Embed Size (px)
Citation preview

Moisture Mapper
Moisture Mapper
Setting up a new job1
Administrative and Operational Details 41.1
Drying Areas 81.2
Adding equipment 121.3
Moisture Map 141.4
Sketch and Labor form 171.5

Moisture Mapper - 3
Setting up a new job

Moisture Mapper - 4
Administrative and Operational Details
This lesson will go over the initial details needed to start a new project
Start a new project
In order to create a new project, we will need to click on the appropriate link. Under the "Projects" tab, there is a link to "Start New Project."
Naming the project
The naming convention for a project is "<last name> <job number>," job number being given to you once the job is set up in SalesForce.
Fill in client information
A red asterisk (*) denotes a required field and must be entered in order to create the project. Fill in client name, address, and as much contact information as possible (phone numbers, fax, email, etc.)
Moisture Mapper - 5
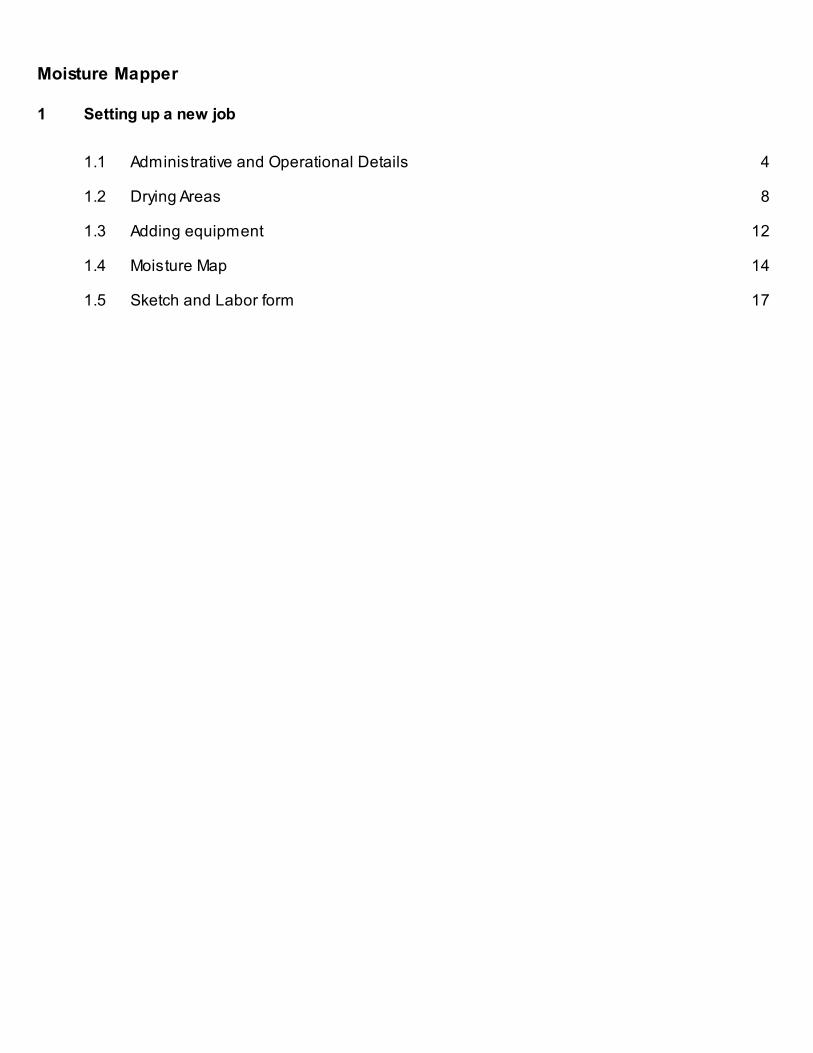
Insurance data
Fill in the insurance information. Even if the customer won't be going through their insurance, still get the insurance company information in case the customer changes their mind. Payment type and deductible amount should be communicated to you.
Building data
These fields are mostly for the insurance companies. The building age needs to be entered, and if the house was built in 1978 or earlier, a lead test needs to be performed.
Create project
Once the appropriate information has been filled out, select "Create Project" to add the project to the job list.

Moisture Mapper - 6
Fill out dates
Once the project is created, the next page is the operational details page. Fill out the fields appropriately. (date of loss, date assigned, etc) If the job is a cash cap, the "rough estimate" and the date the estimate was given needs to be entered.
**NOTE**Do not add the times to any of the fields. It will mess up how long the equipment has been on the job.
Moisture Mapper - 7
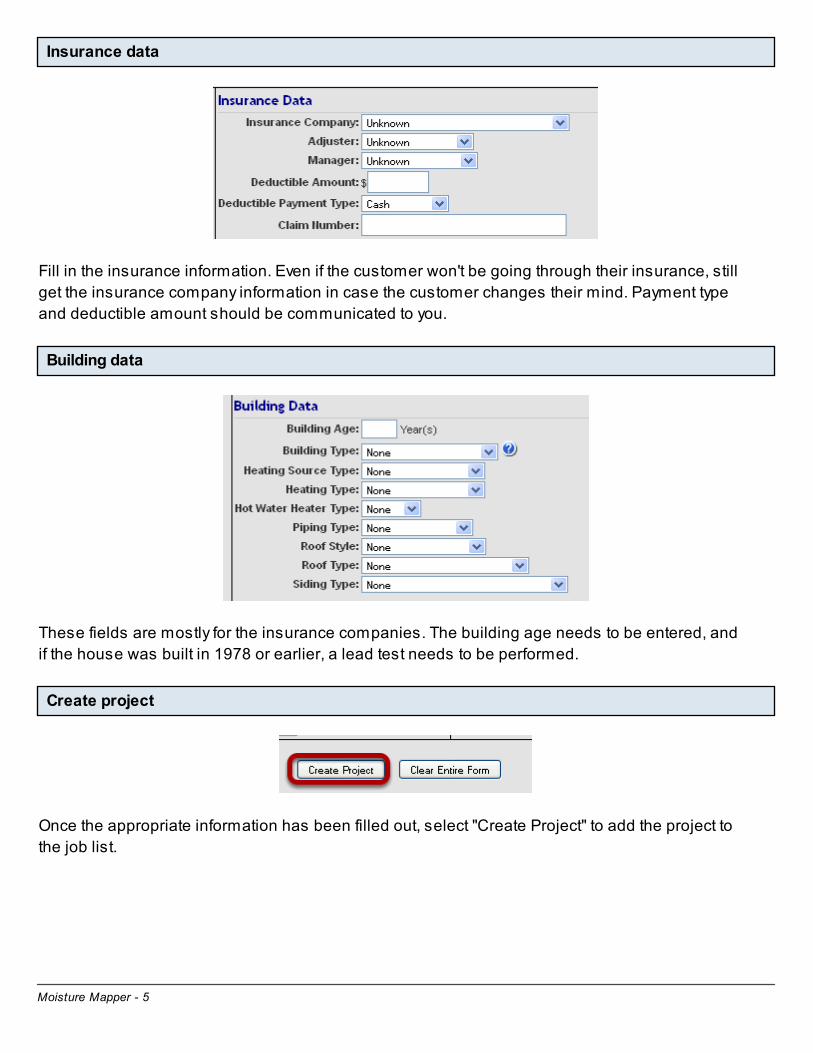
Loss description
The "reported description of loss" field should be filled in with the information provided to you by either the customer or the referrer. Once you arrive at the job and discover the true source (whether it matches with the reported description or not), choose the correct option from the "General Findings" dropdown menu. If it is not listed, choose "other." Put any other pertinent information in the "Detailed Findings" box. Once this is all filled in, click "Done: Go to Drying Areas" at the top or bottom of the gray box.
Moisture Mapper - 8
Drying Areas
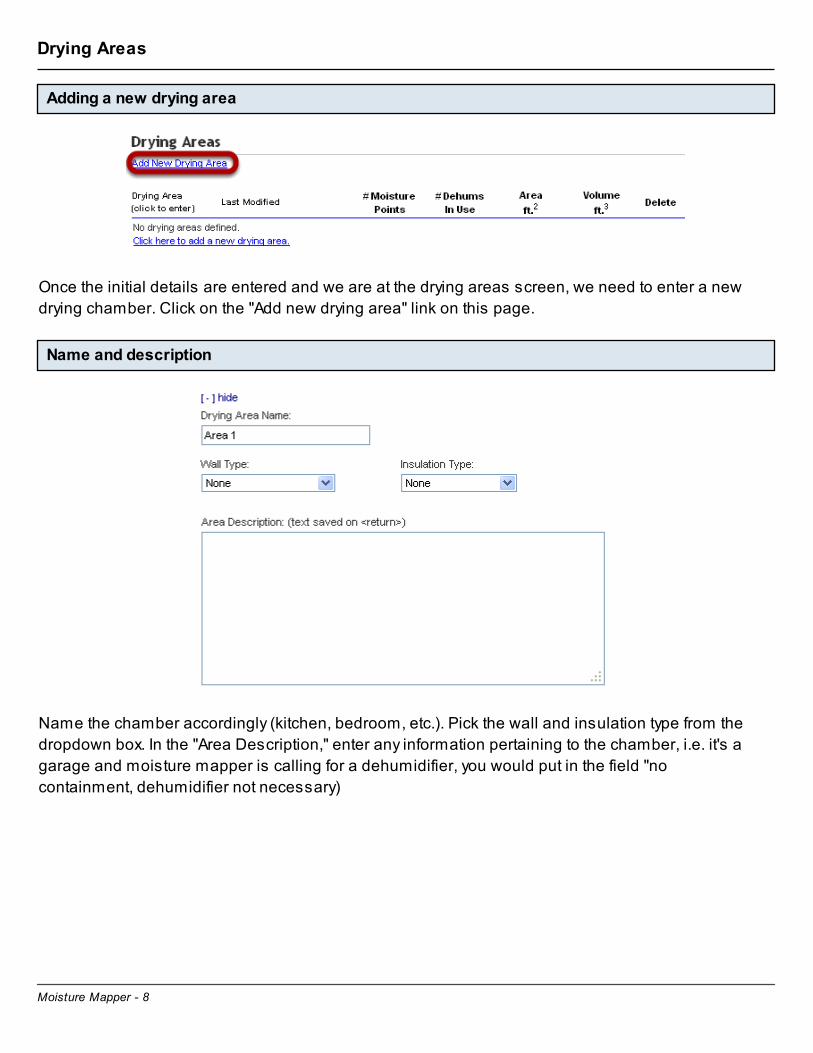
Adding a new drying area
Once the initial details are entered and we are at the drying areas screen, we need to enter a new drying chamber. Click on the "Add new drying area" link on this page.
Name and description
Name the chamber accordingly (kitchen, bedroom, etc.). Pick the wall and insulation type from the dropdown box. In the "Area Description," enter any information pertaining to the chamber, i.e. it's a garage and moisture mapper is calling for a dehumidifier, you would put in the field "no containment, dehumidifier not necessary)
Moisture Mapper - 9
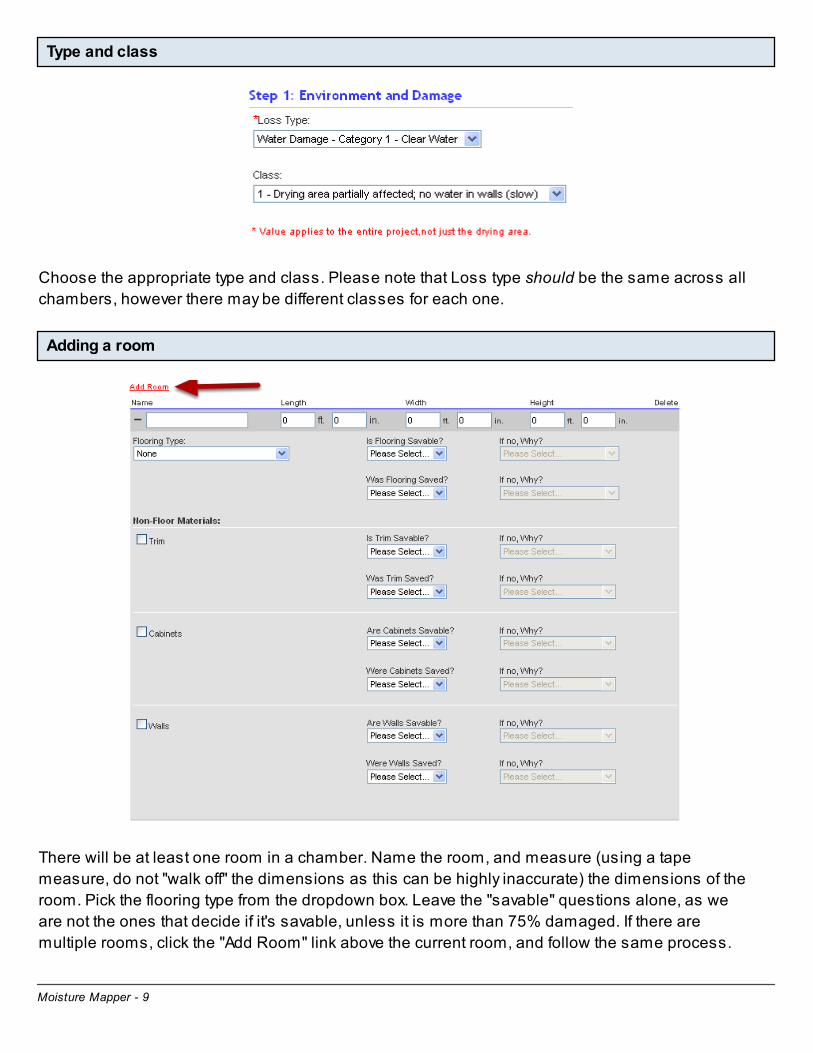
Type and class
Choose the appropriate type and class. Please note that Loss type should be the same across all chambers, however there may be different classes for each one.
Adding a room
There will be at least one room in a chamber. Name the room, and measure (using a tape measure, do not "walk off" the dimensions as this can be highly inaccurate) the dimensions of the room. Pick the flooring type from the dropdown box. Leave the "savable" questions alone, as we are not the ones that decide if it's savable, unless it is more than 75% damaged. If there are multiple rooms, click the "Add Room" link above the current room, and follow the same process.

Moisture Mapper - 10
Percentage area affected
This dropdown list is what Moisture Mapper bases it's S500 recommendations off of. The area affected is across the entire chamber, and not just 1 room. Choose the closest percentage value.
Linear wall affected
This part is a bit tricky. Based off the length and width of the rooms in the chamber and the percentage of area affected, it will calculate an estimate of the linear feet affected by the loss.
**IMPORTANT**This calculation does not take into account any insets, outsets, cabinets, or any other deviation from a "straight wall" room. This needs to be taken into account when this greatly affects the linear feet. In a kitchen this can double or even triple the amount of linear wall affected, thus increasing the amount of equipment necessary.
S-500 recommendations
Once all the information has been entered, Moisture Mapper will provide the appropriate S-500 recommendations based off the measurements you have entered.
Moisture Mapper - 11
**NOTE**When actually setting up the job, the "Air Movers" option will give you a range of the amount of air movers to use. There is literally no reason to use less than the recommended amount, unless there is no room. If you think there should be more or less air movers, please note why in the "Area Description" at the top of the page, or adjust the linear feet that Moisture Mapper uses.
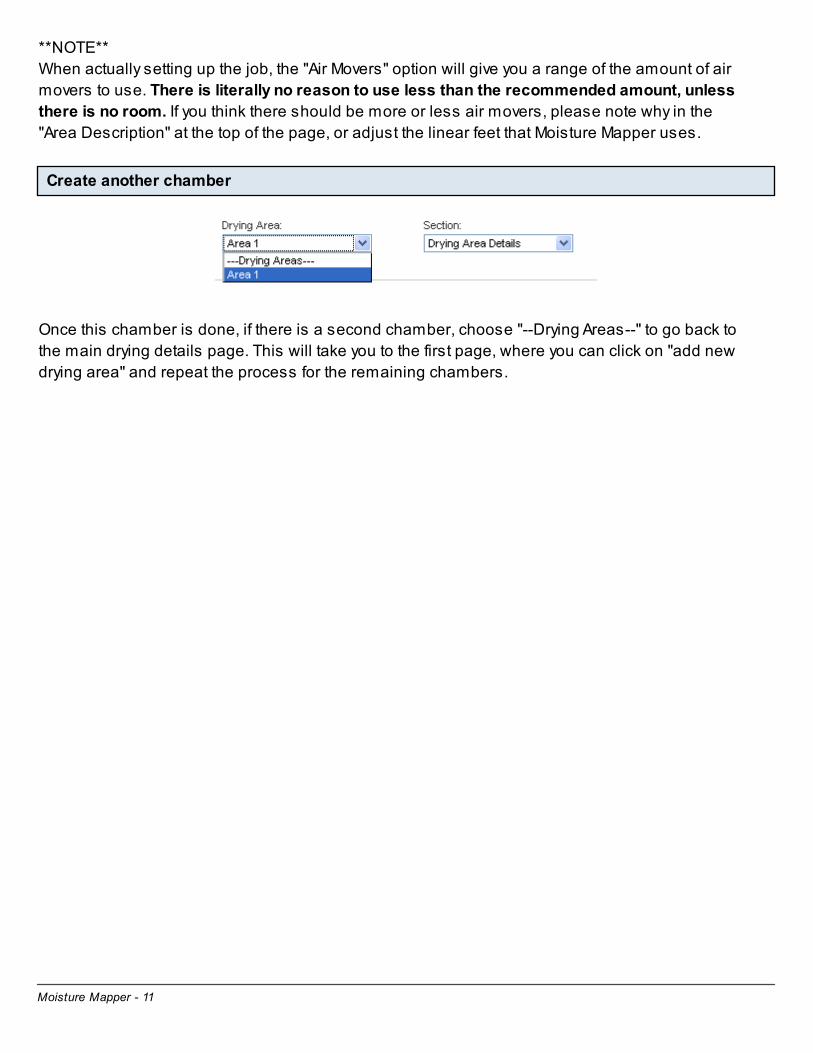
Create another chamber
Once this chamber is done, if there is a second chamber, choose "--Drying Areas--" to go back to the main drying details page. This will take you to the first page, where you can click on "add new drying area" and repeat the process for the remaining chambers.
Moisture Mapper - 12
Adding equipment
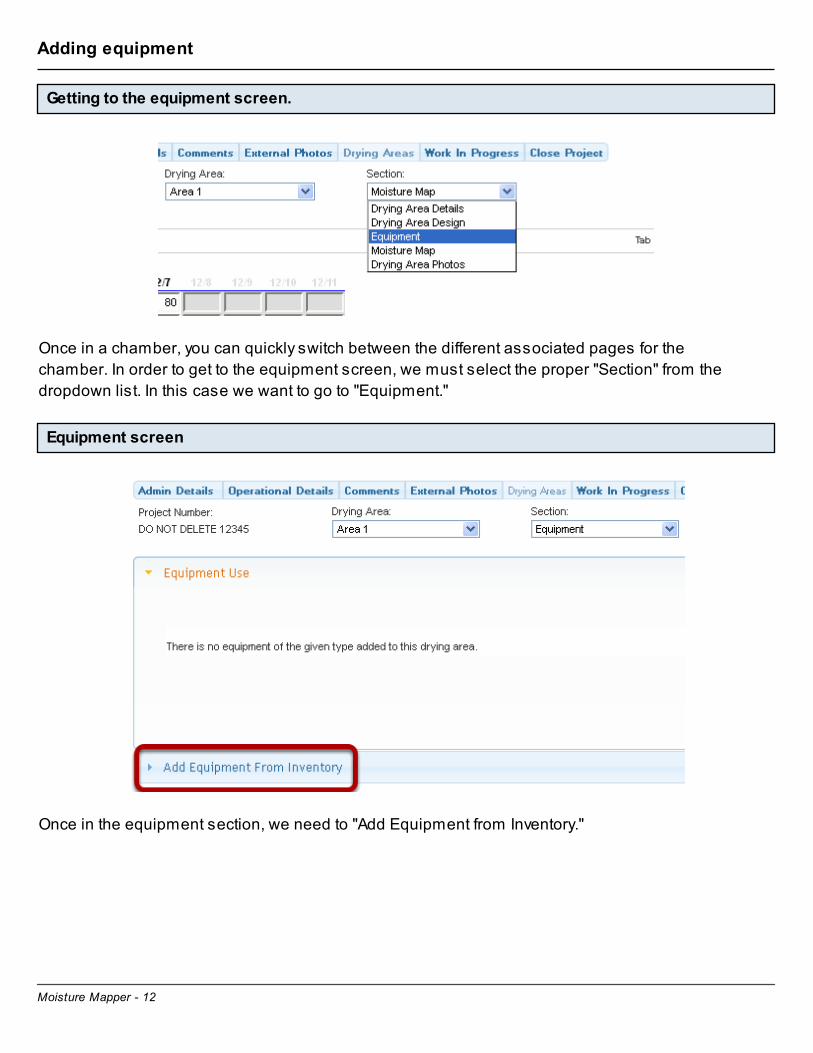
Getting to the equipment screen.
Once in a chamber, you can quickly switch between the different associated pages for the chamber. In order to get to the equipment screen, we must select the proper "Section" from the dropdown list. In this case we want to go to "Equipment."
Equipment screen
Once in the equipment section, we need to "Add Equipment from Inventory."
Moisture Mapper - 13
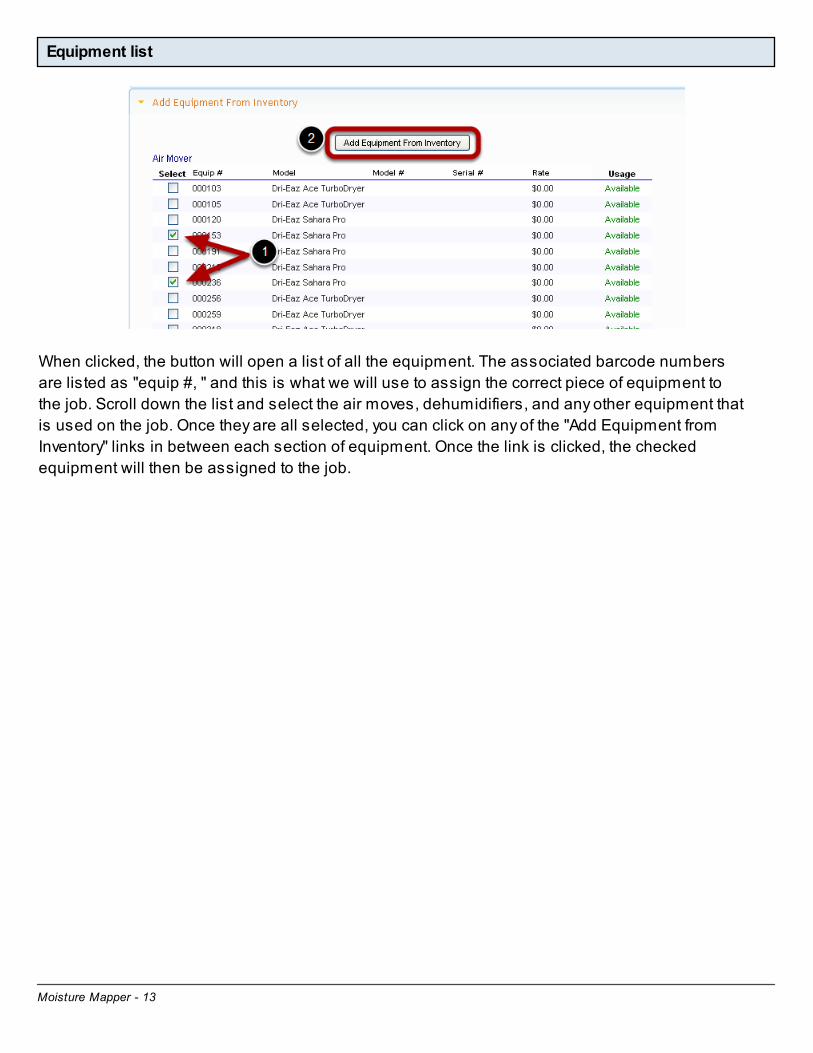
Equipment list
When clicked, the button will open a list of all the equipment. The associated barcode numbers are listed as "equip #, " and this is what we will use to assign the correct piece of equipment to the job. Scroll down the list and select the air moves, dehumidifiers, and any other equipment that is used on the job. Once they are all selected, you can click on any of the "Add Equipment from Inventory" links in between each section of equipment. Once the link is clicked, the checked equipment will then be assigned to the job.
Moisture Mapper - 14
Moisture Map
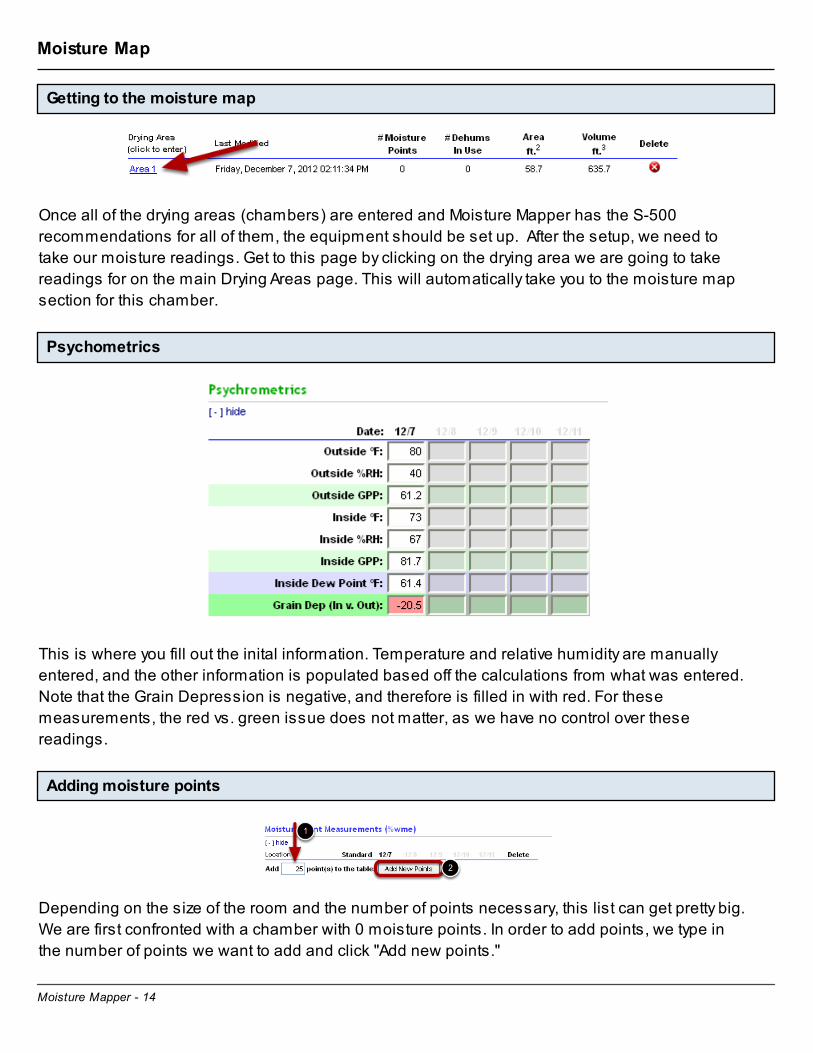
Getting to the moisture map
Once all of the drying areas (chambers) are entered and Moisture Mapper has the S-500 recommendations for all of them, the equipment should be set up. After the setup, we need to take our moisture readings. Get to this page by clicking on the drying area we are going to take readings for on the main Drying Areas page. This will automatically take you to the moisture map section for this chamber.
Psychometrics
This is where you fill out the inital information. Temperature and relative humidity are manually entered, and the other information is populated based off the calculations from what was entered. Note that the Grain Depression is negative, and therefore is filled in with red. For these measurements, the red vs. green issue does not matter, as we have no control over these readings.
Adding moisture points
Depending on the size of the room and the number of points necessary, this list can get pretty big. We are first confronted with a chamber with 0 moisture points. In order to add points, we type in the number of points we want to add and click "Add new points."

Moisture Mapper - 15
Adding moisture readings
Notice that they are automatically assigned numbers. Do not change these numbers. The only time you will change the "location" of the moisture points is if the points are ANYTHING BUT drywall or studs. Carpet, subfloor, everything else should be changed and labeled appropriately, keeping the numbers the same. Drying standards must be taken from a dry part of the same material. If the material is totally wet, the S-500 contains standards based on the type of material, the location, weather, etc.
**NOTE**Initial readings of all 99's IS NOT ACCEPTABLE. These readings are false, and makes it obvious to the adjusters and those who monitor the jobs that you did not take valid readings, which leads to complications between the company and the adjusters. Faking readings is not tolerated.
Moisture Mapper - 16
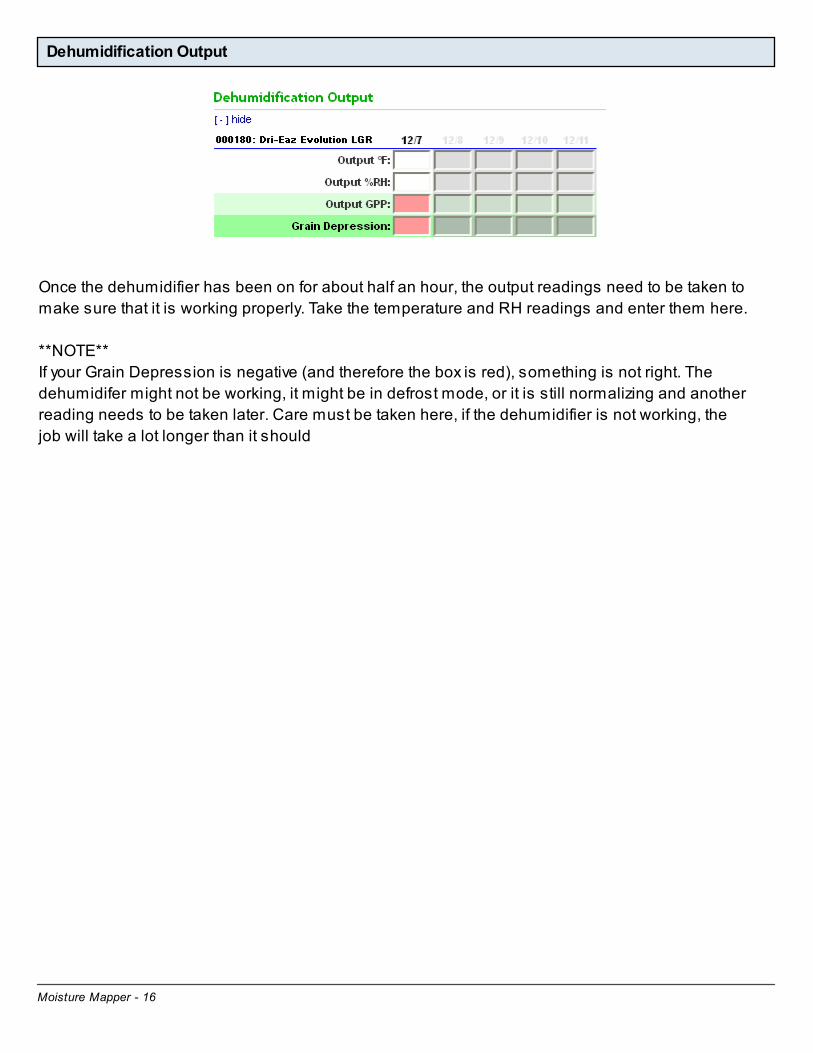
Dehumidification Output
Once the dehumidifier has been on for about half an hour, the output readings need to be taken to make sure that it is working properly. Take the temperature and RH readings and enter them here.
**NOTE**If your Grain Depression is negative (and therefore the box is red), something is not right. The dehumidifer might not be working, it might be in defrost mode, or it is still normalizing and another reading needs to be taken later. Care must be taken here, if the dehumidifier is not working, the job will take a lot longer than it should
Moisture Mapper - 17
Sketch and Labor form
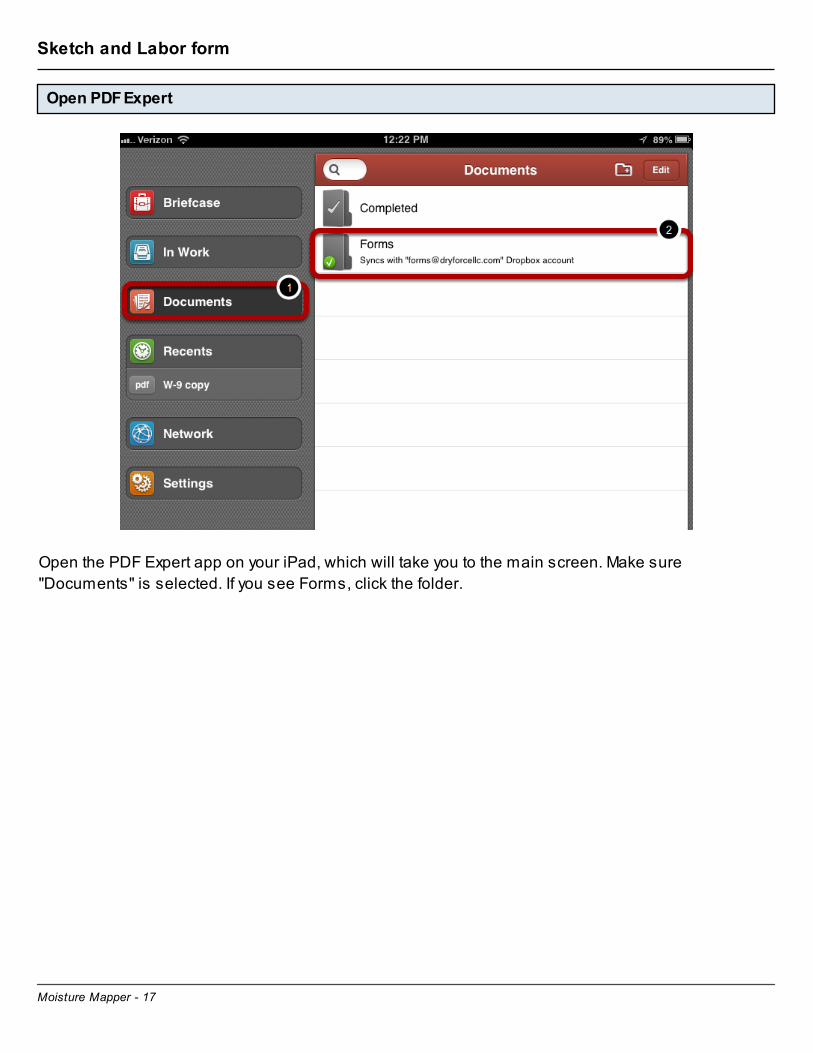
Open PDF Expert
Open the PDF Expert app on your iPad, which will take you to the main screen. Make sure "Documents" is selected. If you see Forms, click the folder.
Moisture Mapper - 18
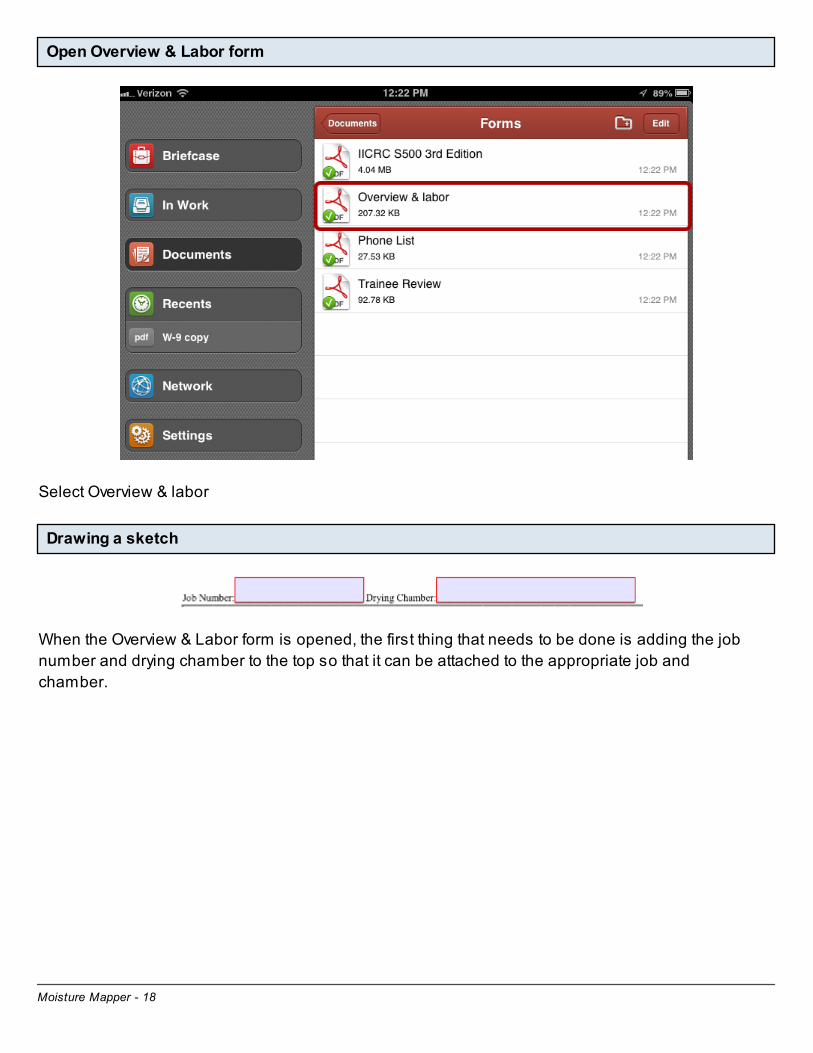
Open Overview & Labor form
Select Overview & labor
Drawing a sketch
When the Overview & Labor form is opened, the first thing that needs to be done is adding the job number and drying chamber to the top so that it can be attached to the appropriate job and chamber.
Moisture Mapper - 19
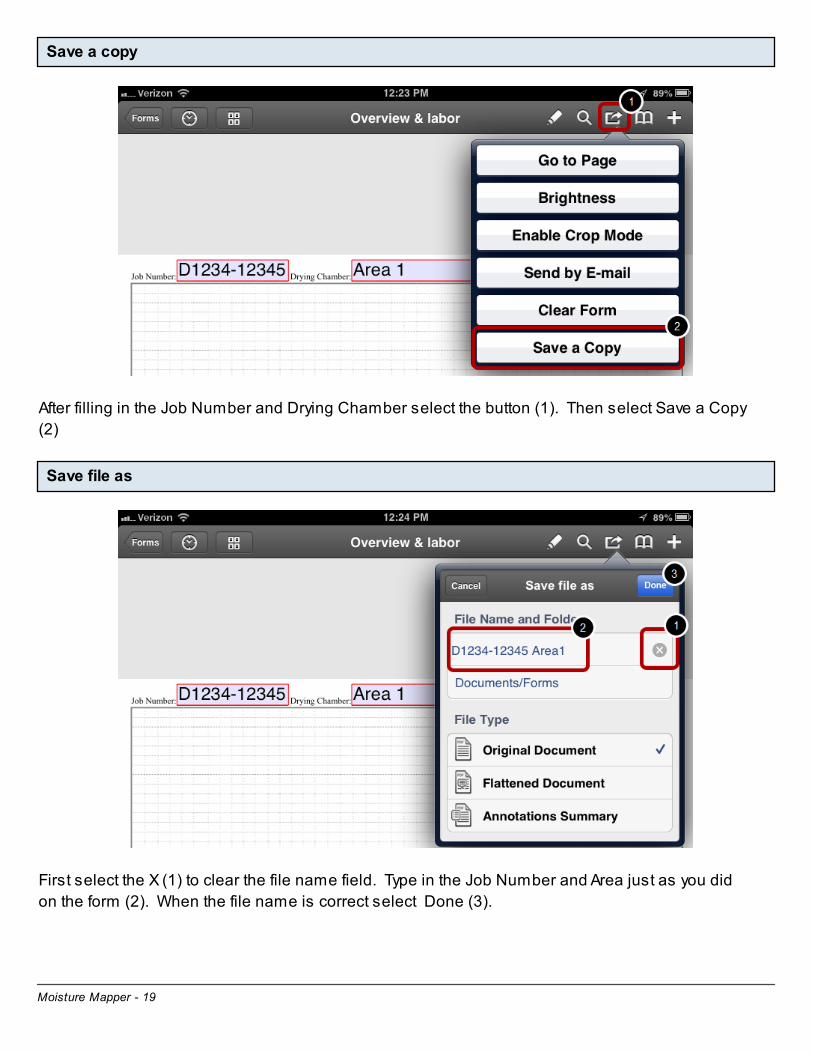
Save a copy
After filling in the Job Number and Drying Chamber select the button (1). Then select Save a Copy (2)
Save file as
First select the X (1) to clear the file name field. Type in the Job Number and Area just as you did on the form (2). When the file name is correct select Done (3).
Moisture Mapper - 20
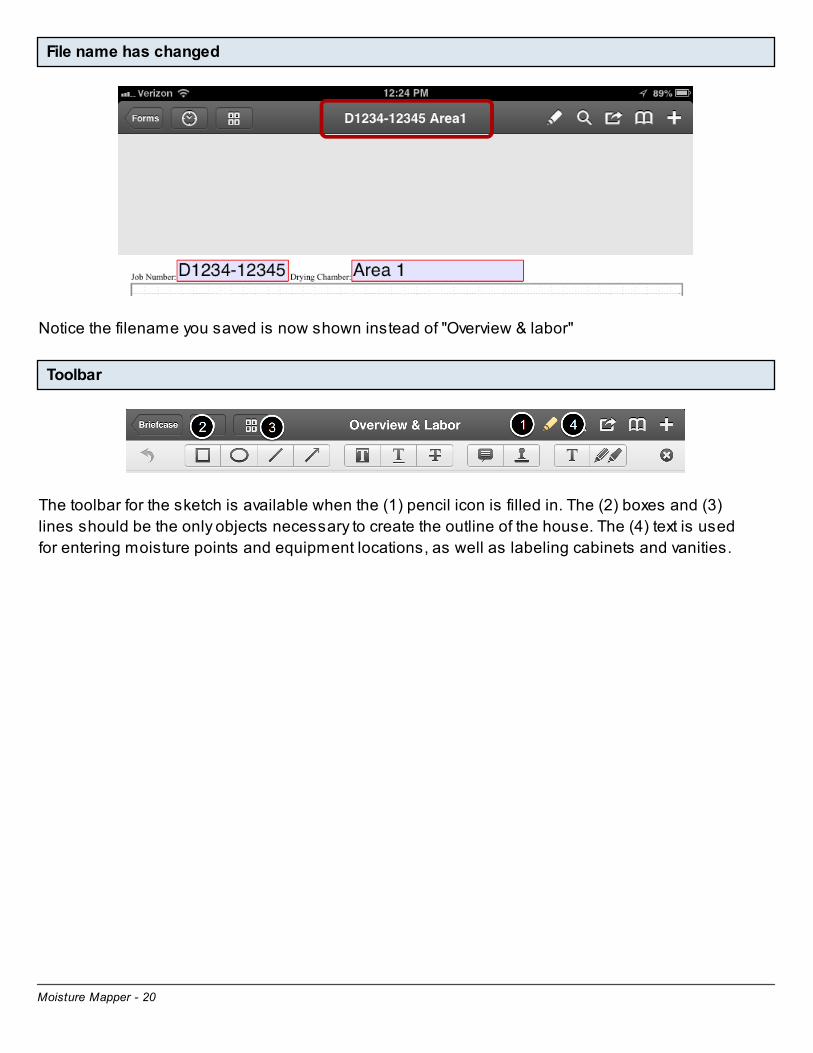
File name has changed
Notice the filename you saved is now shown instead of "Overview & labor"
Toolbar
The toolbar for the sketch is available when the (1) pencil icon is filled in. The (2) boxes and (3) lines should be the only objects necessary to create the outline of the house. The (4) text is used for entering moisture points and equipment locations, as well as labeling cabinets and vanities.
Moisture Mapper - 21
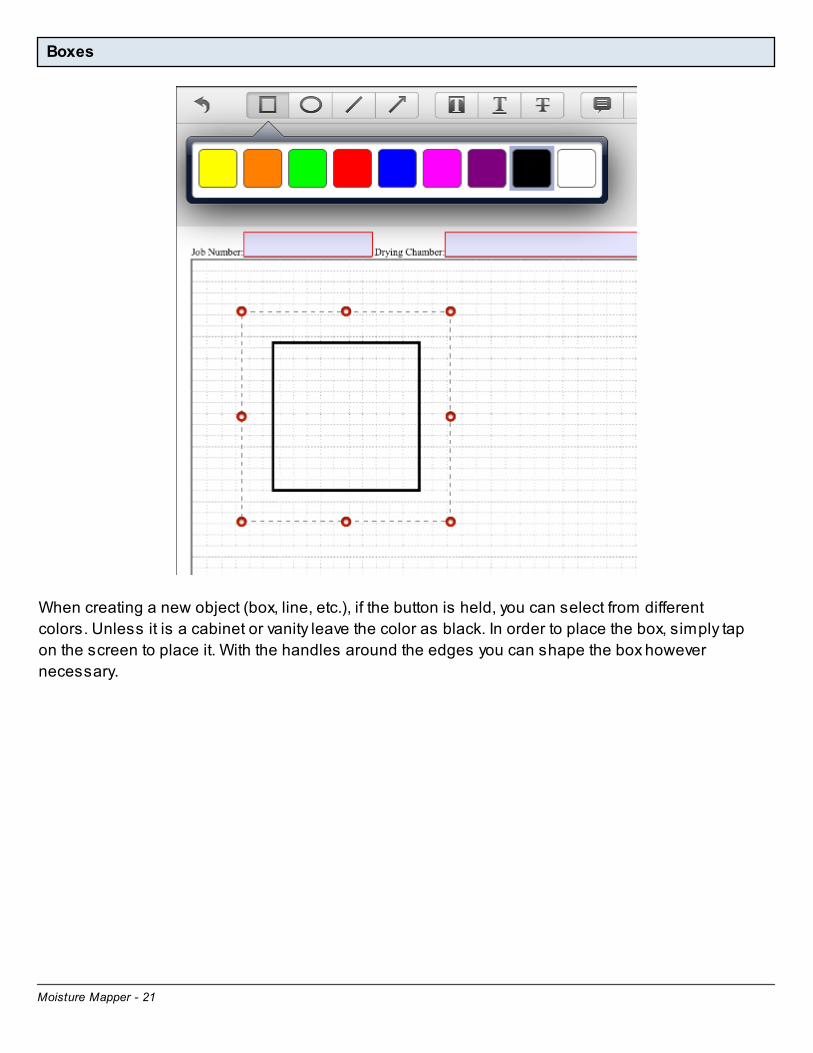
Boxes
When creating a new object (box, line, etc.), if the button is held, you can select from different colors. Unless it is a cabinet or vanity leave the color as black. In order to place the box, simply tap on the screen to place it. With the handles around the edges you can shape the box however necessary.

Moisture Mapper - 22
Adding doors
Next we need to add a door to our room. Select the Line tool and tap on the sketch to place a line. Use the handles on either side of the line to drag and move the line to indicate the location of the door.
Indicate open or closed
If the room is contained, indicate that it is by leaving the door "closed." If it is not able to be contained, change the color of the line to white and place it over the portion of the box near the "door," indicating that there is a door there but it could not be left closed for containment.

Moisture Mapper - 23
Moisture points and equipment location
Click on the "T" in order to enter the (A) air movers, dehumidifiers, etc. and (#)numbers for the corresponding moisture points in Moisture Mapper. There is a legend at the bottom of the page, label the location of each type of equipment on the job. Make sure the lettering is red.
Moisture Mapper - 24
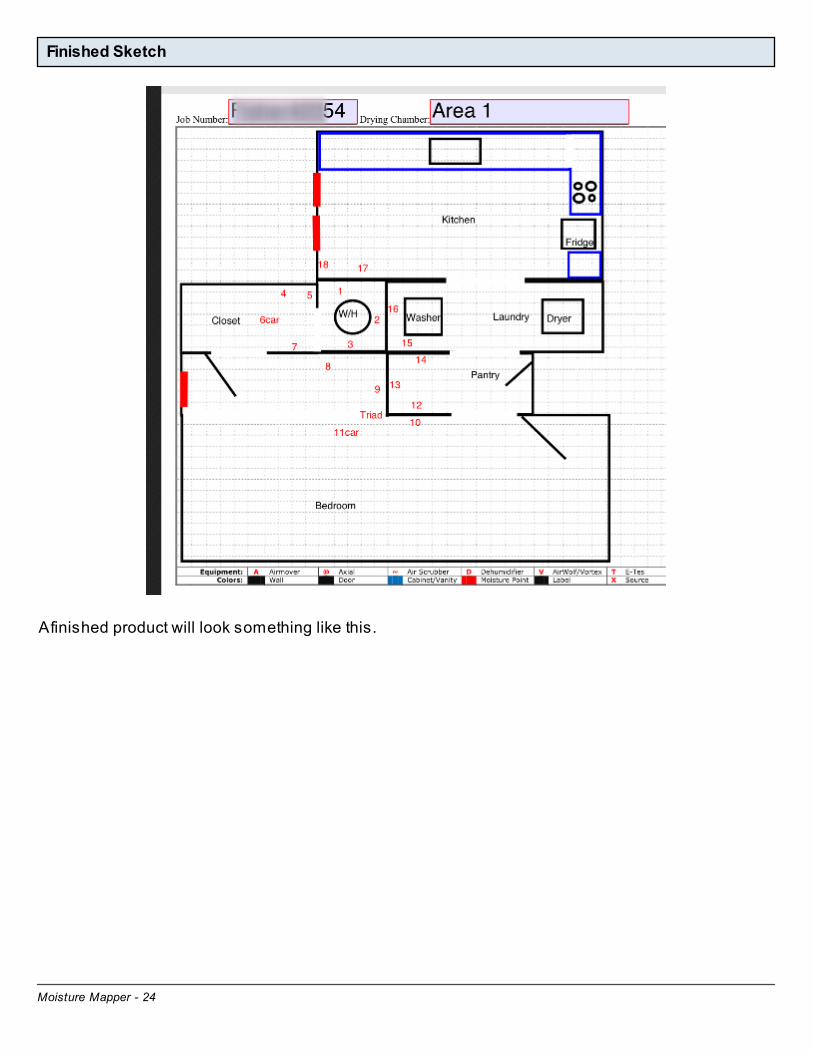
Finished Sketch
A finished product will look something like this.
Moisture Mapper - 25
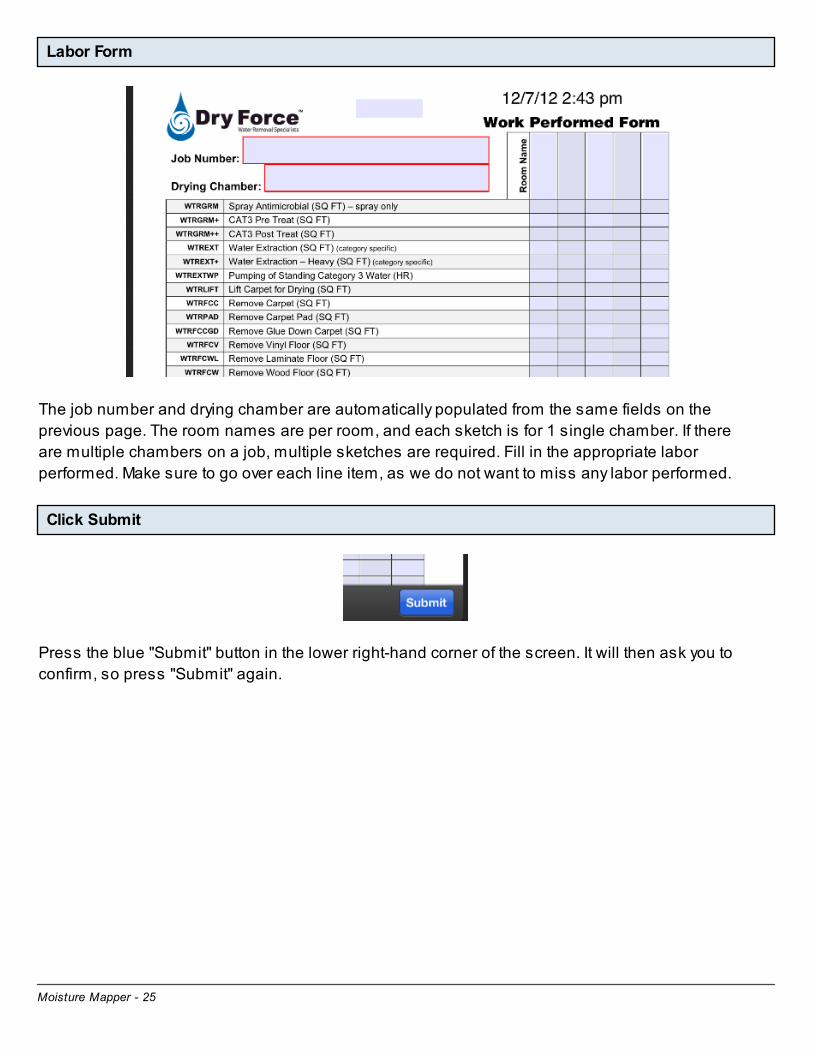
Labor Form
The job number and drying chamber are automatically populated from the same fields on the previous page. The room names are per room, and each sketch is for 1 single chamber. If there are multiple chambers on a job, multiple sketches are required. Fill in the appropriate labor performed. Make sure to go over each line item, as we do not want to miss any labor performed.
Click Submit
Press the blue "Submit" button in the lower right-hand corner of the screen. It will then ask you to confirm, so press "Submit" again.
Moisture Mapper - 26
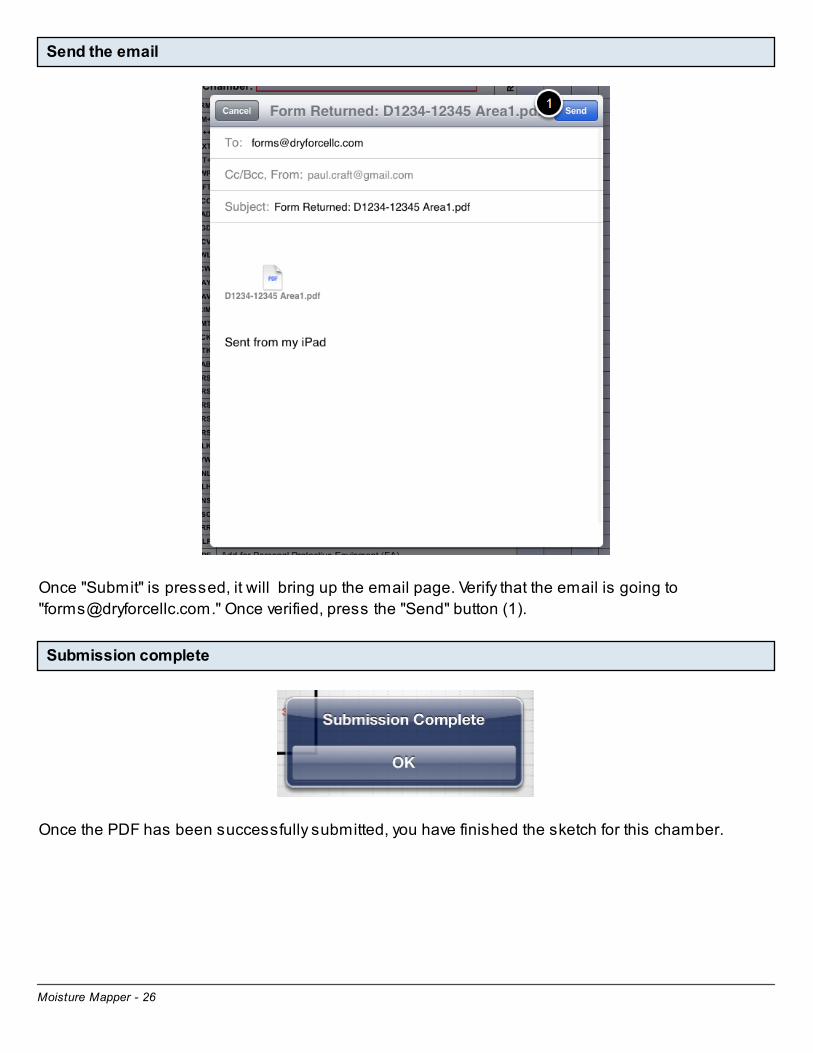
Send the email
Once "Submit" is pressed, it will bring up the email page. Verify that the email is going to "[email protected]." Once verified, press the "Send" button (1).
Submission complete
Once the PDF has been successfully submitted, you have finished the sketch for this chamber.