Embed Size (px)
Citation preview
Module 1: Overview of Buttons, Toolbars, and Commands for the Microsoft PowerPoint Novices
Microsoft PowerPoint XP: Make Your Great Presentations Even Better Page 1 of 9
MICROSOFT POWERPOINT XP: MAKE YOUR GREAT PRESENTATIONS EVEN BETTER
Joyce Maria Boedianto*
OVERVIEW
MODULE 1: OVERVIEW OF BUTTONS, TOOLBARS, AND COMMANDS FOR THE MICROSOFT POWERPOINT NOVICE 1. The benefits of using Microsoft PowerPoint 2. Using Microsoft PowerPoint for the first time:
A Tour of Microsoft PowerPoint Features The Office Assistant Various ways of doing a command/action
MODULE 2: GETTING STARTED WITH MICROSOFT POWERPOINT XP Starting a new presentation Steps in making presentation:
1. Choosing a slide layout and design template 2. Entering contents:
Text, Tables, Charts, Diagrams, ClipArt, Pictures and Animation, Movies and Sounds, and Hyperlinks
3. Adding Slides 4. Viewing presentation 5. Printing a presentation
MODULE 3: SETTING UP AND PRESENTING A SLIDE SHOW
1. Inserting animation 2. Working in slide Sorter View 3. Controlling the slide show presentation 4. Pack-and-Go
MODULE 4: MICROSOFT POWERPOINT XP FOR THE ADVANCED USERS 1. Working with slide master 2. Working with handout and notes master 3. Working with color 4. Working with tables 5. Working with charts 6. Working with diagrams 7. Working with WordArt 8. Working with drawing tools
*These modules were developed, under the supervision of Dr. Jennifer Shapka, and with the help of Danielle M. Law, for the Educational and Counselling Psychology and Special Education department, at the University of British Columbia, as a means of providing technical support.
Module 1: Overview of Buttons, Toolbars, and Commands for the Microsoft PowerPoint Novices
Microsoft PowerPoint XP: Make Your Great Presentations Even Better Page 2 of 9
MODULE 1 OVERVIEW OF BUTTONS, TOOLBARS, AND COMMANDS
FOR THE MICROSOFT POWERPOINT NOVICES
1. THE BENEFITS OF USING MICROSOFT POWERPOINT 1. Flexible, can be edited and updated over and over again 2. Colors, pictures, animations, and sounds help make presentations more
interesting 3. User friendly 4. Slides can be run automatically (do not have to change slides manually) 5. Environmentally friendly since slides do not have to be printed ☺ 6. Presentations can easily be transferred from computer to computer through
small-size diskettes, pen-drives, or via the internet 2. USING MICROSOFT POWERPOINT FOR THE FIRST TIME
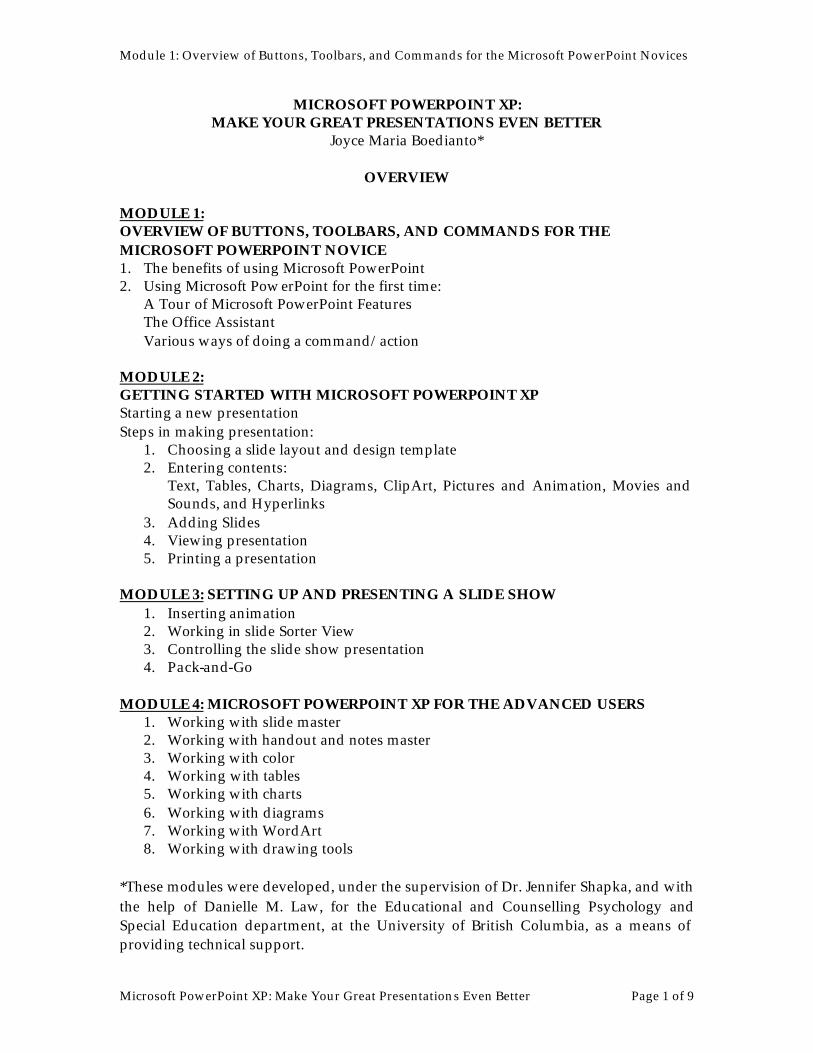
A Tour of Microsoft PowerPoint Features Microsoft PowerPoint features many toolbars and buttons that serve diverse functions. We will need to use these functions or commands in order to make our presentation. Before we start using Microsoft PowerPoint for the first time, it will be helpful to familiarize ourselves with these features. In this section we will describe each function of the menu, toolbars and buttons. However, it is important to note that we might not need to use all these functions. In fact, we might only use several functions repetitively. This module only serves to familiarize readers with the features and the appearance of Microsoft PowerPoint. When we open Microsoft PowerPoint, this is the default view (Picture 1).
Picture 1
Module 1: Overview of Buttons, Toolbars, and Commands for the Microsoft PowerPoint Novices
Microsoft PowerPoint XP: Make Your Great Presentations Even Better Page 3 of 9
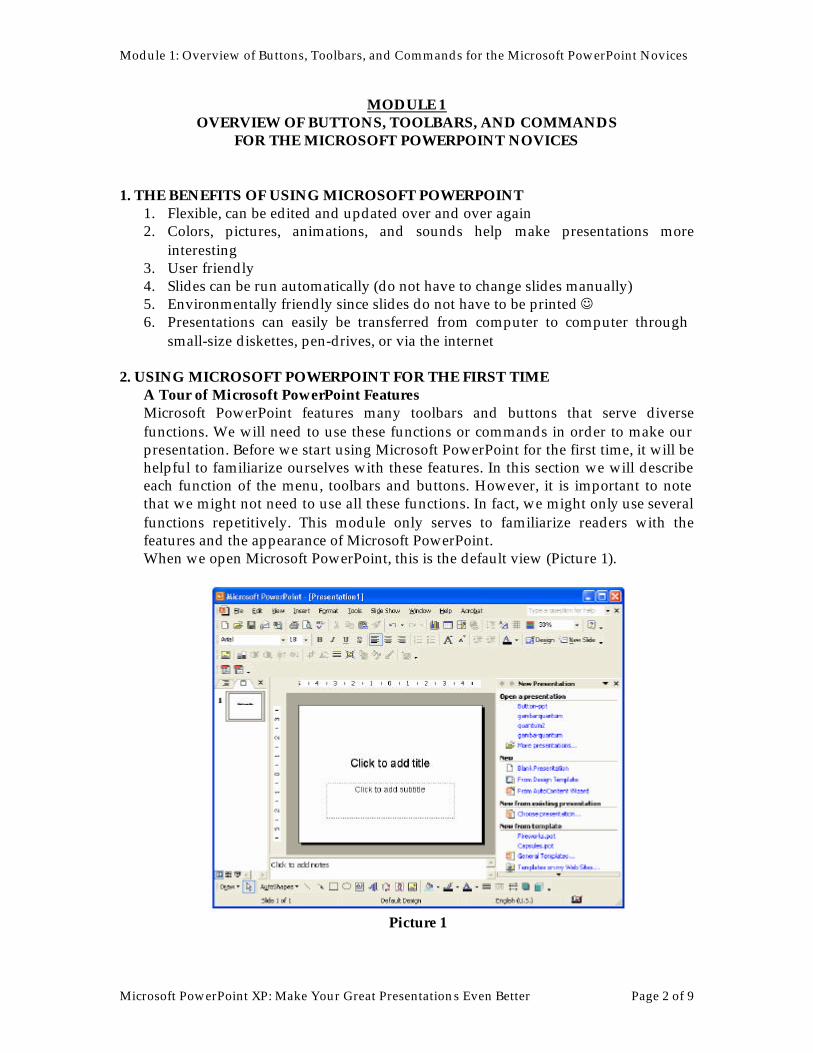
Picture 2: Microsoft PowerPoint Map Above is a Microsoft PowerPoint Map that has been created to help familiarize yourself with the program. Please refer to this map for the following description of this software. The title of the presentation is along the top bar (A4-5). When we open this program, the title ‘Presentation1’ will be given automatically by PowerPoint. This title will be changed after we save our presentation as a different name (usually one that will help us to identify our presentation later).
12 11 10 9 8 7 6 5 4 3 2 1
H H
G
G
F F
E E
D D
C C
B B
A A
12 11 10 9 8 7 6 5 4 3 2 1
Module 1: Overview of Buttons, Toolbars, and Commands for the Microsoft PowerPoint Novices
Microsoft PowerPoint XP: Make Your Great Presentations Even Better Page 4 of 9
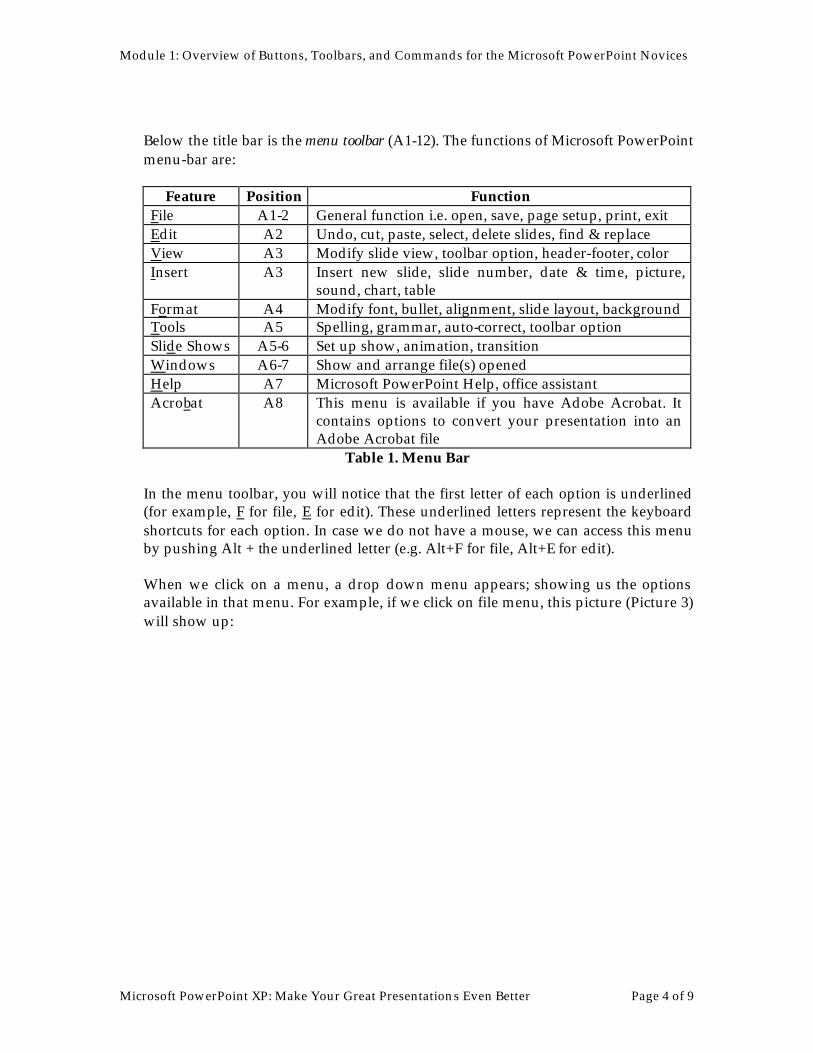
Below the title bar is the menu toolbar (A1-12). The functions of Microsoft PowerPoint menu-bar are:
Feature Position Function File A1-2 General function i.e. open, save, page setup, print, exit Edit A2 Undo, cut, paste, select, delete slides, find & replace View A3 Modify slide view, toolbar option, header-footer, color Insert A3 Insert new slide, slide number, date & time, picture,
sound, chart, table Format A4 Modify font, bullet, alignment, slide layout, background Tools A5 Spelling, grammar, auto-correct, toolbar option Slide Shows A5-6 Set up show, animation, transition Windows A6-7 Show and arrange file(s) opened Help A7 Microsoft PowerPoint Help, office assistant Acrobat A8 This menu is available if you have Adobe Acrobat. It
contains options to convert your presentation into an Adobe Acrobat file
Table 1. Menu Bar
In the menu toolbar, you will notice that the first letter of each option is underlined (for example, F for file, E for edit). These underlined letters represent the keyboard shortcuts for each option. In case we do not have a mouse, we can access this menu by pushing Alt + the underlined letter (e.g. Alt+F for file, Alt+E for edit).
When we click on a menu, a drop down menu appears; showing us the options available in that menu. For example, if we click on file menu, this picture (Picture 3) will show up:
Module 1: Overview of Buttons, Toolbars, and Commands for the Microsoft PowerPoint Novices
Microsoft PowerPoint XP: Make Your Great Presentations Even Better Page 5 of 9
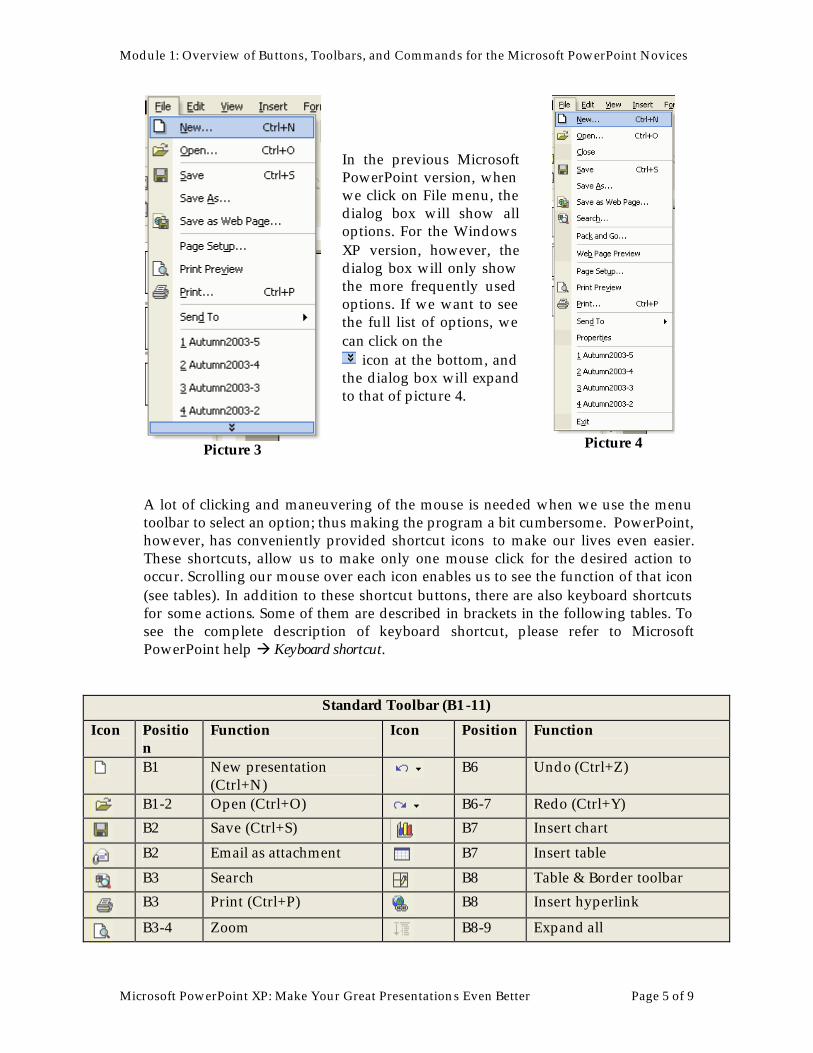
Picture 3
In the previous Microsoft PowerPoint version, when we click on File menu, the dialog box will show all options. For the Windows XP version, however, the dialog box will only show the more frequently used options. If we want to see the full list of options, we can click on the
icon at the bottom, and the dialog box will expand to that of picture 4.
Picture 4
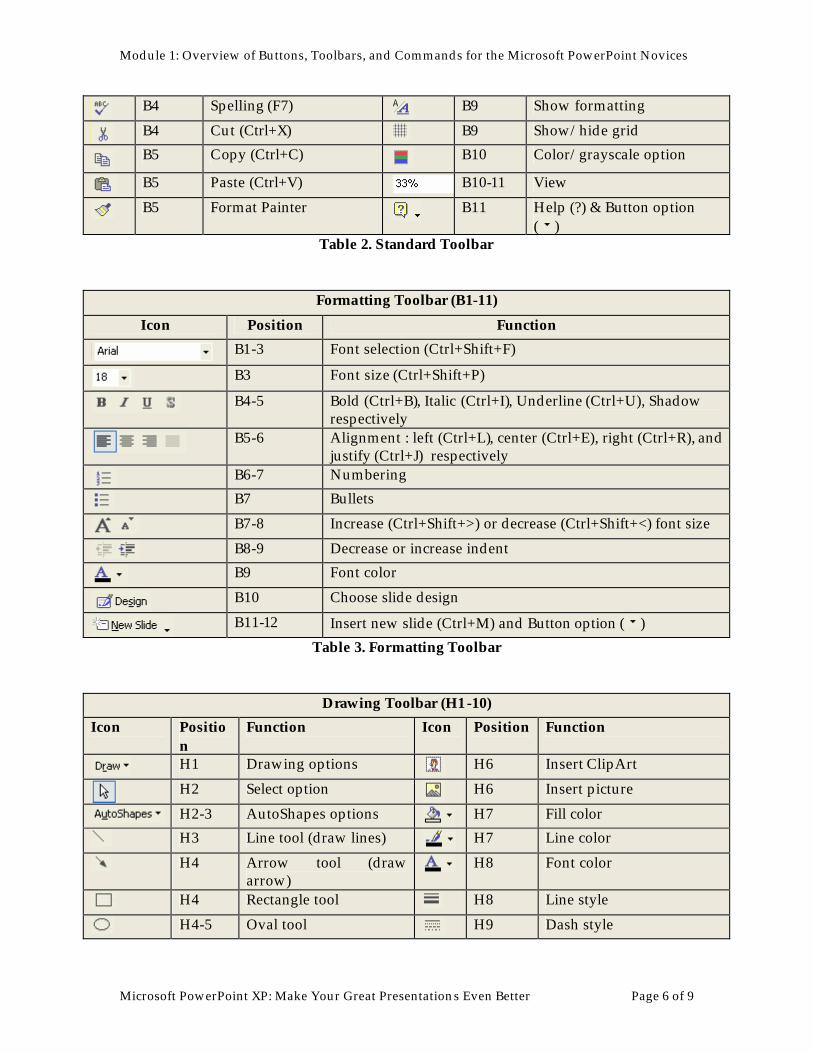
A lot of clicking and maneuvering of the mouse is needed when we use the menu toolbar to select an option; thus making the program a bit cumbersome. PowerPoint, however, has conveniently provided shortcut icons to make our lives even easier. These shortcuts, allow us to make only one mouse click for the desired action to occur. Scrolling our mouse over each icon enables us to see the function of that icon (see tables). In addition to these shortcut buttons, there are also keyboard shortcuts for some actions. Some of them are described in brackets in the following tables. To see the complete description of keyboard shortcut, please refer to Microsoft PowerPoint help à Keyboard shortcut.
Standard Toolbar (B1-11)
Icon Position
Function Icon Position Function
B1 New presentation (Ctrl+N)
B6 Undo (Ctrl+Z)
B1-2 Open (Ctrl+O) B6-7 Redo (Ctrl+Y)
B2 Save (Ctrl+S) B7 Insert chart
B2 Email as attachment B7 Insert table
B3 Search B8 Table & Border toolbar
B3 Print (Ctrl+P) B8 Insert hyperlink
B3-4 Zoom B8-9 Expand all
Module 1: Overview of Buttons, Toolbars, and Commands for the Microsoft PowerPoint Novices
Microsoft PowerPoint XP: Make Your Great Presentations Even Better Page 6 of 9
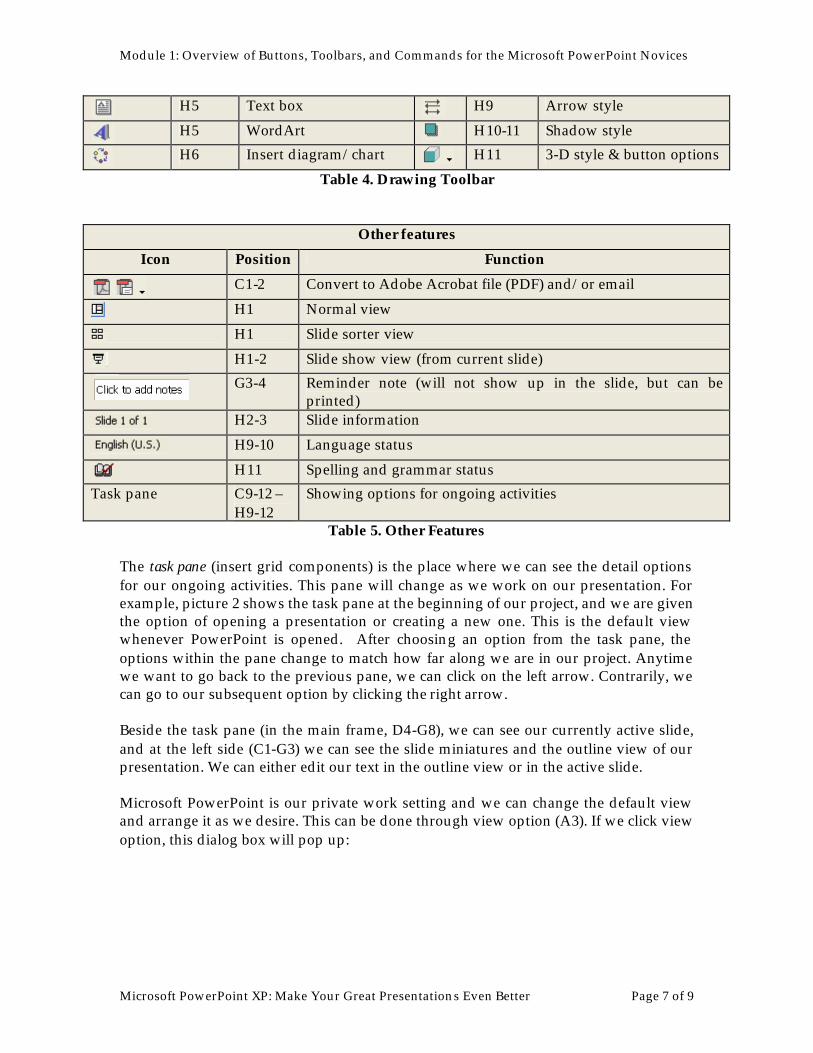
B4 Spelling (F7) B9 Show formatting
B4 Cut (Ctrl+X) B9 Show/hide grid
B5 Copy (Ctrl+C) B10 Color/grayscale option
B5 Paste (Ctrl+V) B10-11 View
B5 Format Painter B11 Help (?) & Button option ( )
Table 2. Standard Toolbar
Formatting Toolbar (B1-11)
Icon Position Function
B1-3 Font selection (Ctrl+Shift+F)
B3 Font size (Ctrl+Shift+P)
B4-5 Bold (Ctrl+B), Italic (Ctrl+I), Underline (Ctrl+U), Shadow respectively
B5-6 Alignment : left (Ctrl+L), center (Ctrl+E), right (Ctrl+R), and
justify (Ctrl+J) respectively
B6-7 Numbering
B7 Bullets
B7-8 Increase (Ctrl+Shift+>) or decrease (Ctrl+Shift+<) font size
B8-9 Decrease or increase indent
B9 Font color
B10 Choose slide design
B11-12 Insert new slide (Ctrl+M) and Button option ( )
Table 3. Formatting Toolbar
Drawing Toolbar (H1-10)
Icon Position
Function Icon Position Function
H1 Drawing options H6 Insert ClipArt
H2 Select option H6 Insert picture
H2-3 AutoShapes options H7 Fill color
H3 Line tool (draw lines) H7 Line color
H4 Arrow tool (draw arrow)
H8 Font color
H4 Rectangle tool H8 Line style
H4-5 Oval tool H9 Dash style
Module 1: Overview of Buttons, Toolbars, and Commands for the Microsoft PowerPoint Novices
Microsoft PowerPoint XP: Make Your Great Presentations Even Better Page 7 of 9
H5 Text box H9 Arrow style
H5 WordArt H10-11 Shadow style
H6 Insert diagram/chart H11 3-D style & button options
Table 4. Drawing Toolbar
Other features
Icon Position Function
C1-2 Convert to Adobe Acrobat file (PDF) and/or email
H1 Normal view
H1 Slide sorter view
H1-2 Slide show view (from current slide)
G3-4 Reminder note (will not show up in the slide, but can be
printed)
H2-3 Slide information
H9-10 Language status
H11 Spelling and grammar status Task pane C9-12 –
H9-12 Showing options for ongoing activities
Table 5. Other Features The task pane (insert grid components) is the place where we can see the detail options for our ongoing activities. This pane will change as we work on our presentation. For example, picture 2 shows the task pane at the beginning of our project, and we are given the option of opening a presentation or creating a new one. This is the default view whenever PowerPoint is opened. After choosing an option from the task pane, the options within the pane change to match how far along we are in our project. Anytime we want to go back to the previous pane, we can click on the left arrow. Contrarily, we can go to our subsequent option by clicking the right arrow. Beside the task pane (in the main frame, D4-G8), we can see our currently active slide, and at the left side (C1-G3) we can see the slide miniatures and the outline view of our presentation. We can either edit our text in the outline view or in the active slide. Microsoft PowerPoint is our private work setting and we can change the default view and arrange it as we desire. This can be done through view option (A3). If we click view option, this dialog box will pop up:
Module 1: Overview of Buttons, Toolbars, and Commands for the Microsoft PowerPoint Novices
Microsoft PowerPoint XP: Make Your Great Presentations Even Better Page 8 of 9
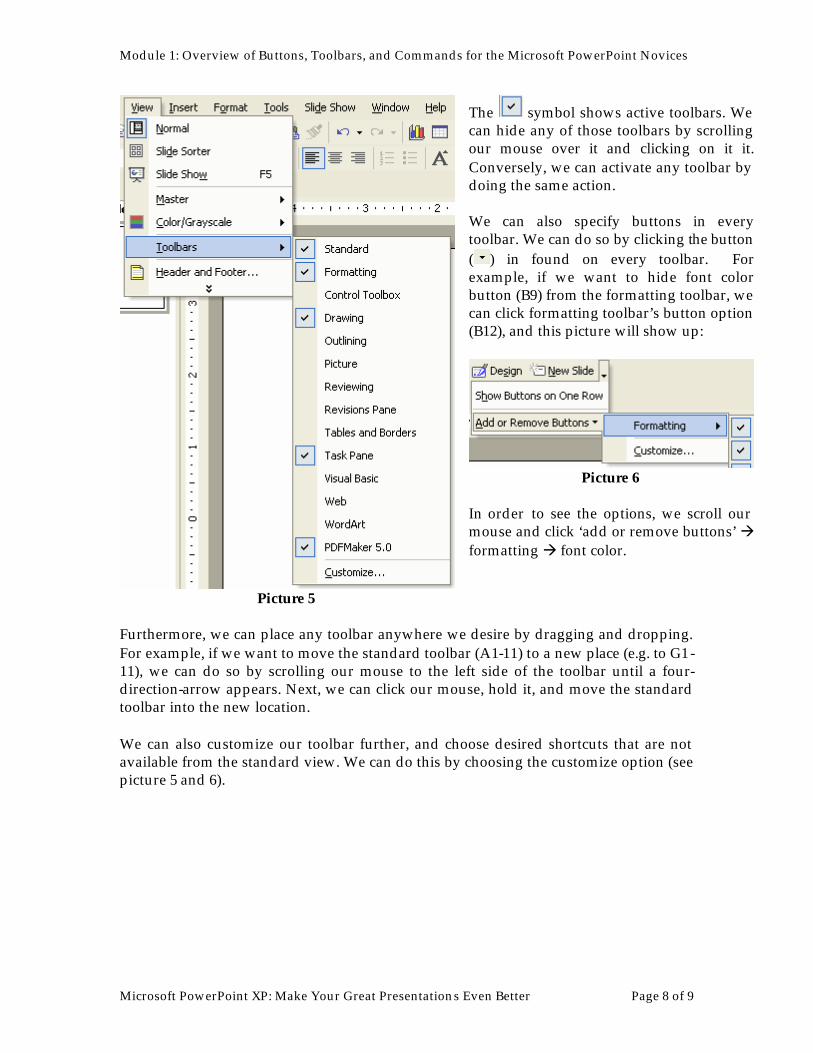
Picture 5
The symbol shows active toolbars. We can hide any of those toolbars by scrolling our mouse over it and clicking on it it. Conversely, we can activate any toolbar by doing the same action. We can also specify buttons in every toolbar. We can do so by clicking the button ( ) in found on every toolbar. For example, if we want to hide font color button (B9) from the formatting toolbar, we can click formatting toolbar’s button option (B12), and this picture will show up:
Picture 6
In order to see the options, we scroll our mouse and click ‘add or remove buttons’ à formatting à font color.
Furthermore, we can place any toolbar anywhere we desire by dragging and dropping. For example, if we want to move the standard toolbar (A1-11) to a new place (e.g. to G1-11), we can do so by scrolling our mouse to the left side of the toolbar until a four-direction-arrow appears. Next, we can click our mouse, hold it, and move the standard toolbar into the new location. We can also customize our toolbar further, and choose desired shortcuts that are not available from the standard view. We can do this by choosing the customize option (see picture 5 and 6).
Module 1: Overview of Buttons, Toolbars, and Commands for the Microsoft PowerPoint Novices
Microsoft PowerPoint XP: Make Your Great Presentations Even Better Page 9 of 9
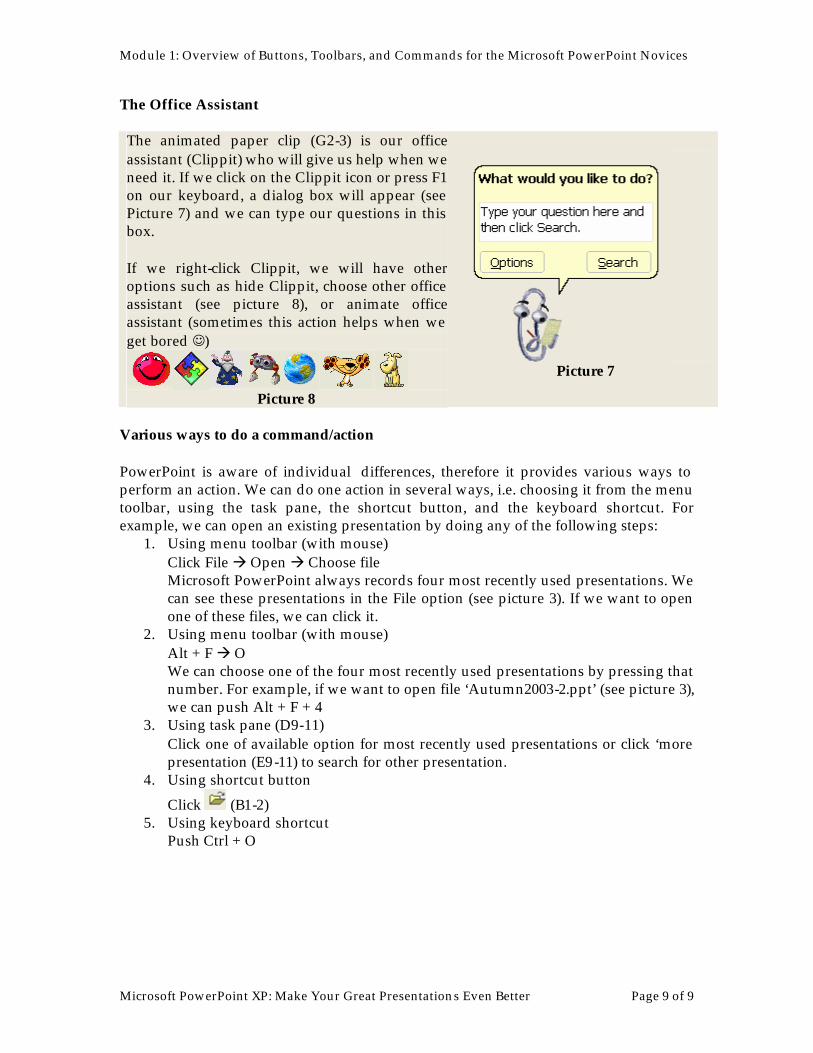
The Office Assistant The animated paper clip (G2-3) is our office assistant (Clippit) who will give us help when we need it. If we click on the Clippit icon or press F1 on our keyboard, a dialog box will appear (see Picture 7) and we can type our questions in this box. If we right-click Clippit, we will have other options such as hide Clippit, choose other office assistant (see picture 8), or animate office assistant (sometimes this action helps when we get bored ☺)
Picture 8
Picture 7
Various ways to do a command/action PowerPoint is aware of individual differences, therefore it provides various ways to perform an action. We can do one action in several ways, i.e. choosing it from the menu toolbar, using the task pane, the shortcut button, and the keyboard shortcut. For example, we can open an existing presentation by doing any of the following steps:
1. Using menu toolbar (with mouse) Click File à Open à Choose file Microsoft PowerPoint always records four most recently used presentations. We can see these presentations in the File option (see picture 3). If we want to open one of these files, we can click it.
2. Using menu toolbar (with mouse) Alt + F à O We can choose one of the four most recently used presentations by pressing that number. For example, if we want to open file ‘Autumn2003-2.ppt’ (see picture 3), we can push Alt + F + 4
3. Using task pane (D9-11) Click one of available option for most recently used presentations or click ‘more presentation (E9-11) to search for other presentation.
4. Using shortcut button
Click (B1-2) 5. Using keyboard shortcut
Push Ctrl + O
Module 2: Getting Started with Microsoft PowerPoint XP
Microsoft PowerPoint XP: Make Your Great Presentations Even Better Page 1 of 15
MICROSOFT POWERPOINT XP: MAKE YOUR GREAT PRESENTATIONS EVEN BETTER
Joyce Maria Boedianto*
OVERVIEW
MODULE 1: OVERVIEW OF BUTTONS, TOOLBARS, AND COMMANDS FOR THE MICROSOFT POWERPOINT NOVICE 1. The benefits of using Microsoft PowerPoint 2. Using Microsoft PowerPoint for the first time:
A Tour of Microsoft PowerPoint Features The Office Assistant Various ways of doing a command/action
MODULE 2: GETTING STARTED WITH MICROSOFT POWERPOINT XP Starting a new presentation Steps in making presentation:
1. Choosing a slide layout and design template 2. Entering contents:
Text, Tables, Charts, Diagrams, ClipArt, Pictures and Animation, Movies and Sounds, and Hyperlinks
3. Adding Slides 4. Viewing presentation 5. Printing a presentation
MODULE 3: SETTING UP AND PRESENTING A SLIDE SHOW
1. Inserting animation 2. Working in slide Sorter View 3. Controlling the slide show presentation 4. Pack-and-Go
MODULE 4: MICROSOFT POWERPOINT XP FOR THE ADVANCED USERS 1. Working with slide master 2. Working with handout and notes master 3. Working with color 4. Working with tables 5. Working with charts 6. Working with diagrams 7. Working with WordArt 8. Working with drawing tools
*These modules were developed, under the supervision of Dr. Jennifer Shapka, and with the help of Danielle M. Law, for the Educational and Counselling Psychology and Special Education department, at the University of British Columbia, as a means of providing technical support.
Module 2: Getting Started with Microsoft PowerPoint XP
Microsoft PowerPoint XP: Make Your Great Presentations Even Better Page 2 of 15
MODULE 2 GETTING STARTED WITH MICROSOFT POWERPOINT XP
Starting a new presentation When we open Microsoft PowerPoint, it will automatically start a new presentation. We can choose the available options in the task pane. Steps in making presentation: Generally, when we make a presentation, our activities involve four repeatable steps, and each will be described below: 1. Choosing slide layout 2. Entering contents (text, picture) 3. Adding slides 4. Viewing presentation 1. Choosing a slide layout and design template We can choose from two options when creating a presentation: make a blank presentation (without backgrounds) or use a design template. Microsoft PowerPoint provides design templates that can be applied to a presentation to give it a professional look. Design templates are thematic and each comes with its own specific images or colors. We can either apply the theme for that template on to each presentation slide or pick and choose which slides we would like to apply the theme to. a. Blank Presentation
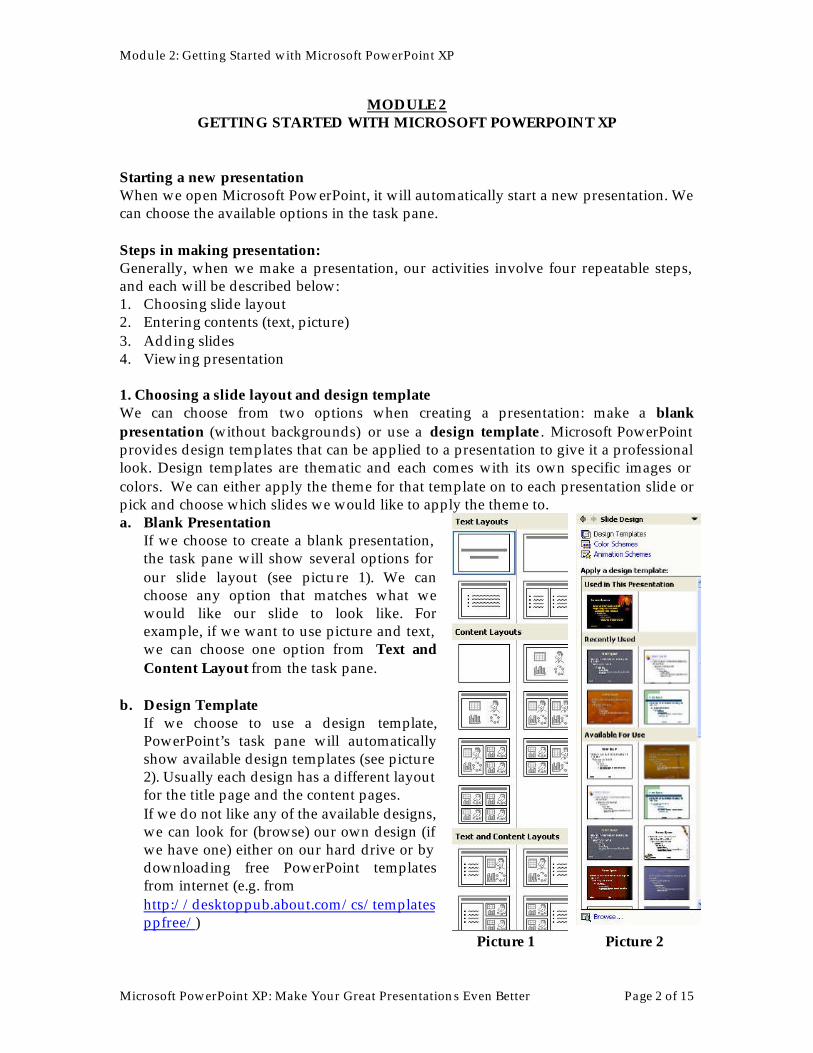
If we choose to create a blank presentation, the task pane will show several options for our slide layout (see picture 1). We can choose any option that matches what we would like our slide to look like. For example, if we want to use picture and text, we can choose one option from Text and Content Layout from the task pane.
b. Design Template If we choose to use a design template, PowerPoint’s task pane will automatically show available design templates (see picture 2). Usually each design has a different layout for the title page and the content pages. If we do not like any of the available designs, we can look for (browse) our own design (if we have one) either on our hard drive or by downloading free PowerPoint templates from internet (e.g. from http://desktoppub.about.com/cs/templatesppfree/)
Picture 1 Picture 2
Module 2: Getting Started with Microsoft PowerPoint XP
Microsoft PowerPoint XP: Make Your Great Presentations Even Better Page 3 of 15
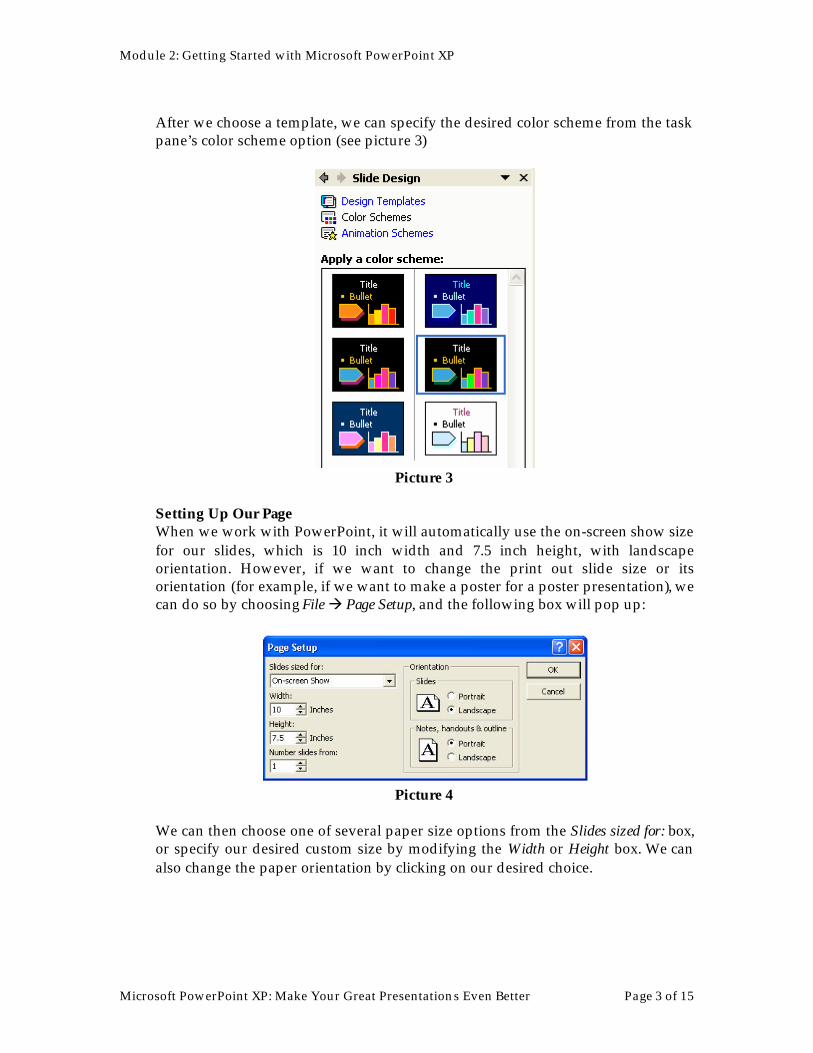
After we choose a template, we can specify the desired color scheme from the task pane’s color scheme option (see picture 3)
Picture 3
Setting Up Our Page When we work with PowerPoint, it will automatically use the on-screen show size for our slides, which is 10 inch width and 7.5 inch height, with landscape orientation. However, if we want to change the print out slide size or its orientation (for example, if we want to make a poster for a poster presentation), we can do so by choosing File à Page Setup, and the following box will pop up:
Picture 4
We can then choose one of several paper size options from the Slides sized for: box, or specify our desired custom size by modifying the Width or Height box. We can also change the paper orientation by clicking on our desired choice.
Module 2: Getting Started with Microsoft PowerPoint XP
Microsoft PowerPoint XP: Make Your Great Presentations Even Better Page 4 of 15
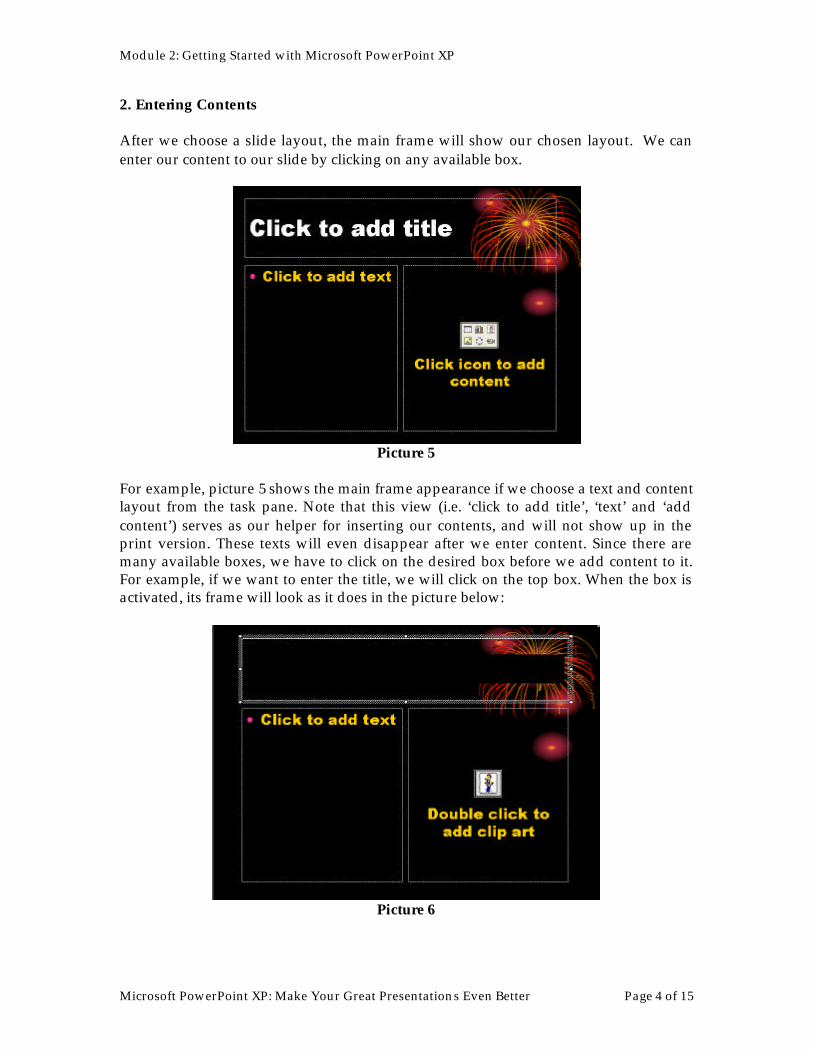
2. Entering Contents After we choose a slide layout, the main frame will show our chosen layout. We can enter our content to our slide by clicking on any available box.
Picture 5
For example, picture 5 shows the main frame appearance if we choose a text and content layout from the task pane. Note that this view (i.e. ‘click to add title’, ‘text’ and ‘add content’) serves as our helper for inserting our contents, and will not show up in the print version. These texts will even disappear after we enter content. Since there are many available boxes, we have to click on the desired box before we add content to it. For example, if we want to enter the title, we will click on the top box. When the box is activated, its frame will look as it does in the picture below:
Picture 6
Module 2: Getting Started with Microsoft PowerPoint XP
Microsoft PowerPoint XP: Make Your Great Presentations Even Better Page 5 of 15
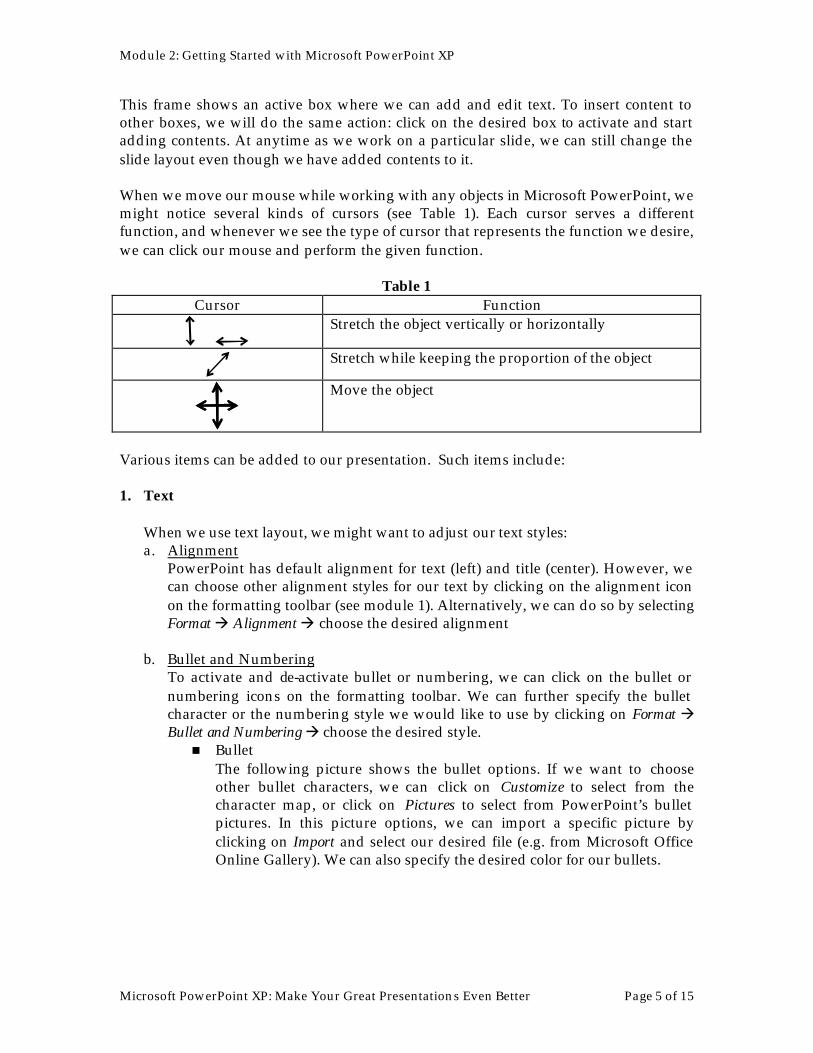
This frame shows an active box where we can add and edit text. To insert content to other boxes, we will do the same action: click on the desired box to activate and start adding contents. At anytime as we work on a particular slide, we can still change the slide layout even though we have added contents to it. When we move our mouse while working with any objects in Microsoft PowerPoint, we might notice several kinds of cursors (see Table 1). Each cursor serves a different function, and whenever we see the type of cursor that represents the function we desire, we can click our mouse and perform the given function.
Table 1 Cursor Function
Stretch the object vertically or horizontally
Stretch while keeping the proportion of the object
Move the object
Various items can be added to our presentation. Such items include: 1. Text
When we use text layout, we might want to adjust our text styles: a. Alignment
PowerPoint has default alignment for text (left) and title (center). However, we can choose other alignment styles for our text by clicking on the alignment icon on the formatting toolbar (see module 1). Alternatively, we can do so by selecting Format à Alignment à choose the desired alignment
b. Bullet and Numbering To activate and de-activate bullet or numbering, we can click on the bullet or numbering icons on the formatting toolbar. We can further specify the bullet character or the numbering style we would like to use by clicking on Format à Bullet and Numbering à choose the desired style. n Bullet
The following picture shows the bullet options. If we want to choose other bullet characters, we can click on Customize to select from the character map, or click on Pictures to select from PowerPoint’s bullet pictures. In this picture options, we can import a specific picture by clicking on Import and select our desired file (e.g. from Microsoft Office Online Gallery). We can also specify the desired color for our bullets.
Module 2: Getting Started with Microsoft PowerPoint XP
Microsoft PowerPoint XP: Make Your Great Presentations Even Better Page 6 of 15
Picture 7
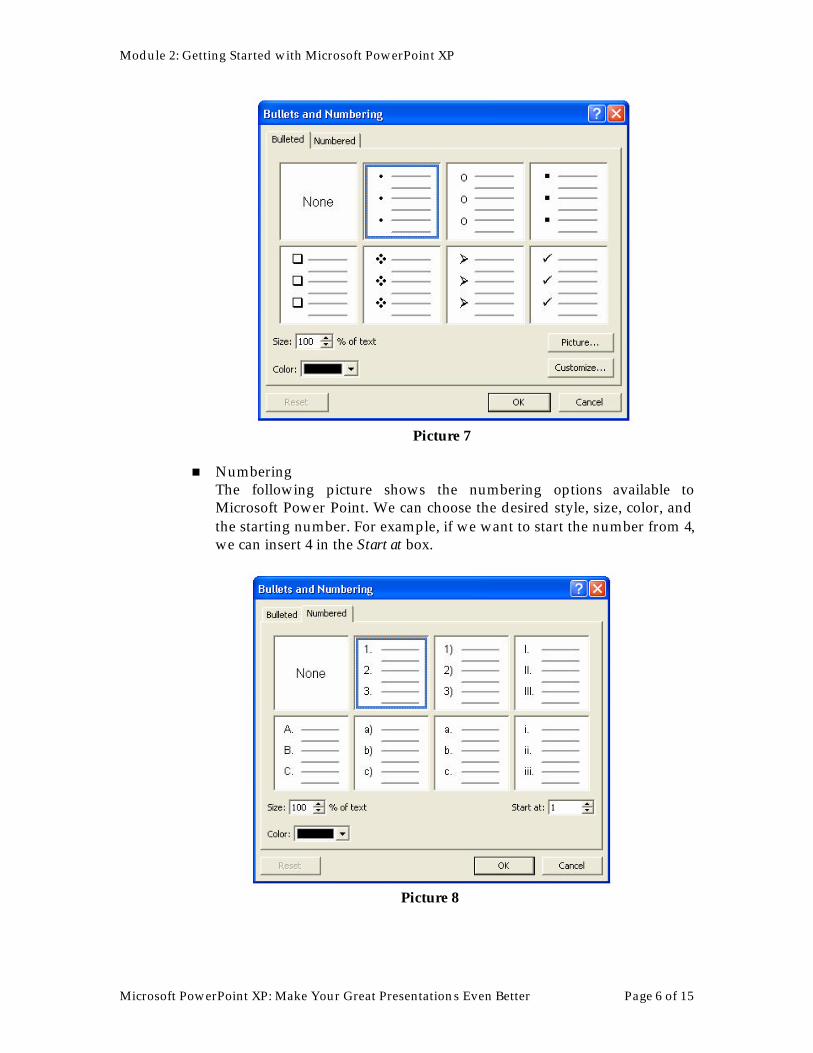
n Numbering
The following picture shows the numbering options available to Microsoft Power Point. We can choose the desired style, size, color, and the starting number. For example, if we want to start the number from 4, we can insert 4 in the Start at box.
Picture 8
Module 2: Getting Started with Microsoft PowerPoint XP
Microsoft PowerPoint XP: Make Your Great Presentations Even Better Page 7 of 15
Note: If we choose bullet and/or numbering style from the layout options, the paragraph style will automatically change to hanging paragraph (see the following picture of a hanging paragraph sample).
Picture 9
The picture below is an example of what the ruler looks like when our paragraph is hanging. The left triangle shows the first line indent, while the right one shows the hanging paragraph indent. We can modify the margin or indent by dragging these triangles to our desired position. Note that the right triangle is on a square. If we drag the square, we can move all the indents simultaneously, including the left and the hanging indent. But if we only want to change the hanging indent, we should click on the triangle instead of the square.
Picture 10
c. Indentation
We can increase and decrease the size of our indentations by clicking on its icon on the formatting toolbar. When we increase or decrease our indentations, PowerPoint will assume that the text we are about to type belongs to a different level or category. Thus, the default style will automatically differentiate every level’s appearance. For example, different font sizes or bullet characters will be indented differently from our main text. Usually, increasing indents will bring about smaller fonts, and decreasing it will result in larger fonts.
d. Change fonts If we want to format the font type and size before we type, we can simply click on the font selection and font size icon. If we want to change the font and the style of the texts we have already entered, we can do one of the following alternatives: n Highlight the desired text and click on the font style icon to change it to
the desired one. Note that the text is surrounded by a frame (see picture 11). This frame tells us that we are in the edit mode for the given box.
Picture 11
n If we want to change the font of the entire text in a specific box, it will be easier if we follow these steps: i. Click the text you wish to change by activating the text box. You will
know the text box has been activated when it looks like picture 12 below. Note that this frame is different from the previous picture. It

Module 2: Getting Started with Microsoft PowerPoint XP
Microsoft PowerPoint XP: Make Your Great Presentations Even Better Page 8 of 15
shows that we are not going to edit the individual part of the box, but change the entire content of the box.
ii. After this frame appears, we can click on the font style icon and iii. Choose the desired font and its size.
Picture 12
All the commands we use in the formatting styles described above will only affect a specific slide or a specific part of the slide we are working on. However, we can also make changes that will affect all the slides in our presentation. We can do so by editing the slide master. Please refer to module 4 for further explanation.
2. Table When we choose to insert a table, a dialog box will pop up where we are given the opportunity to select the number of columns and rows we desire for our table (see picture 13).
Picture 13 If we choose to insert a table by clicking on the table shortcut icon, the picture below (picture 14) will show up. We can choose columns’ and rows’ numbers by highlighting the number of columns and rows we desire. Picture 14 illustrates a 2x3 table.
Picture 14
Module 2: Getting Started with Microsoft PowerPoint XP
Microsoft PowerPoint XP: Make Your Great Presentations Even Better Page 9 of 15
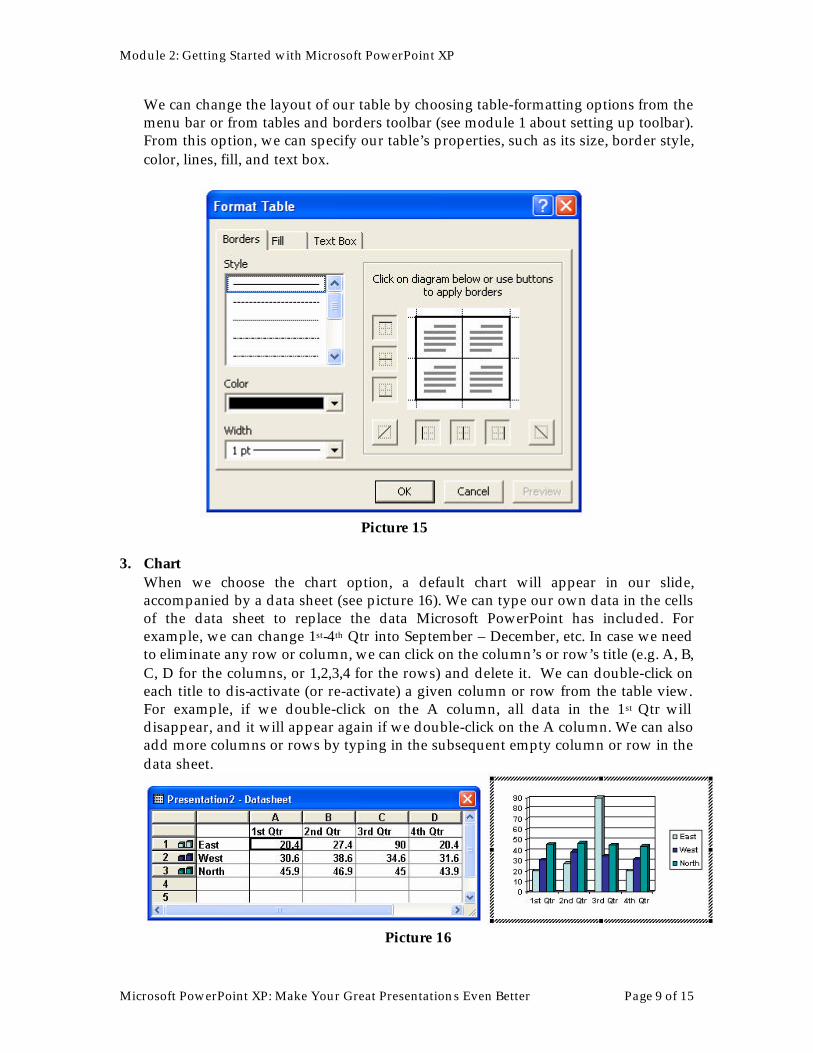
We can change the layout of our table by choosing table-formatting options from the menu bar or from tables and borders toolbar (see module 1 about setting up toolbar). From this option, we can specify our table’s properties, such as its size, border style, color, lines, fill, and text box.
Picture 15
3. Chart
When we choose the chart option, a default chart will appear in our slide, accompanied by a data sheet (see picture 16). We can type our own data in the cells of the data sheet to replace the data Microsoft PowerPoint has included. For example, we can change 1st-4th Qtr into September – December, etc. In case we need to eliminate any row or column, we can click on the column’s or row’s title (e.g. A, B, C, D for the columns, or 1,2,3,4 for the rows) and delete it. We can double-click on each title to dis-activate (or re-activate) a given column or row from the table view. For example, if we double-click on the A column, all data in the 1st Qtr will disappear, and it will appear again if we double-click on the A column. We can also add more columns or rows by typing in the subsequent empty column or row in the data sheet.
Picture 16
Module 2: Getting Started with Microsoft PowerPoint XP
Microsoft PowerPoint XP: Make Your Great Presentations Even Better Page 10 of 15
Additionally, we can edit our chart’s properties (color, fonts, and placement). We will elaborate on this function in the fourth module.
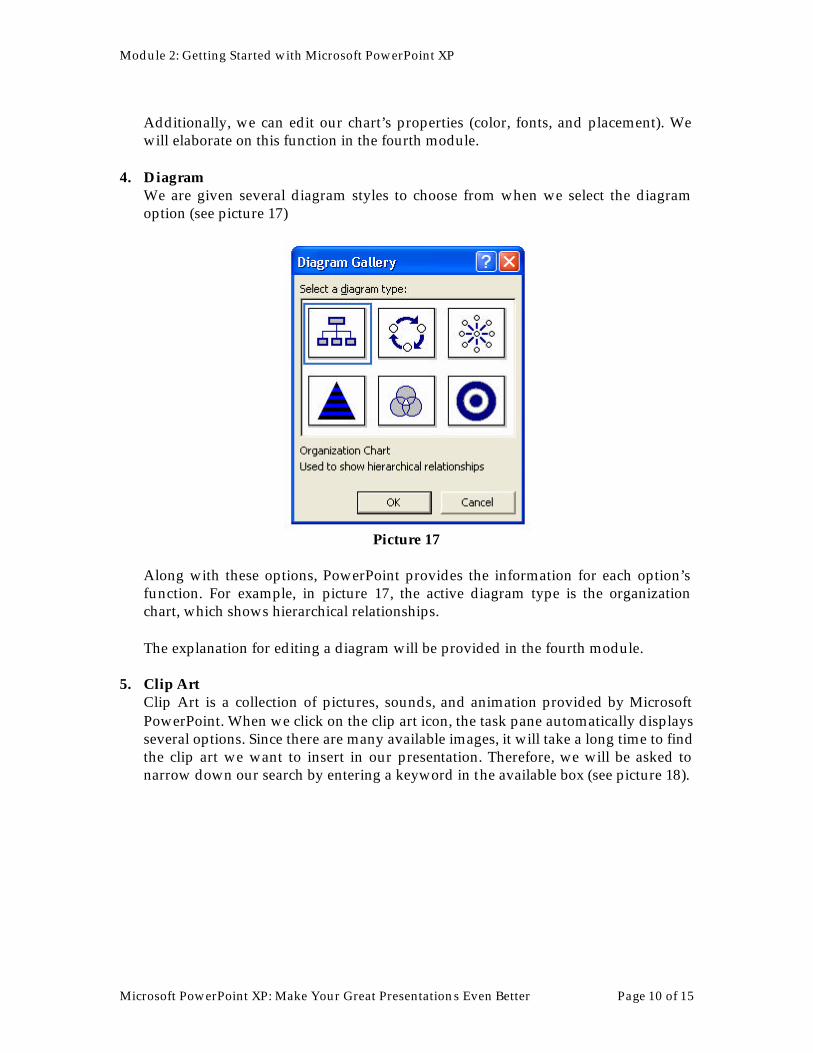
4. Diagram We are given several diagram styles to choose from when we select the diagram option (see picture 17)
Picture 17
Along with these options, PowerPoint provides the information for each option’s function. For example, in picture 17, the active diagram type is the organization chart, which shows hierarchical relationships. The explanation for editing a diagram will be provided in the fourth module.
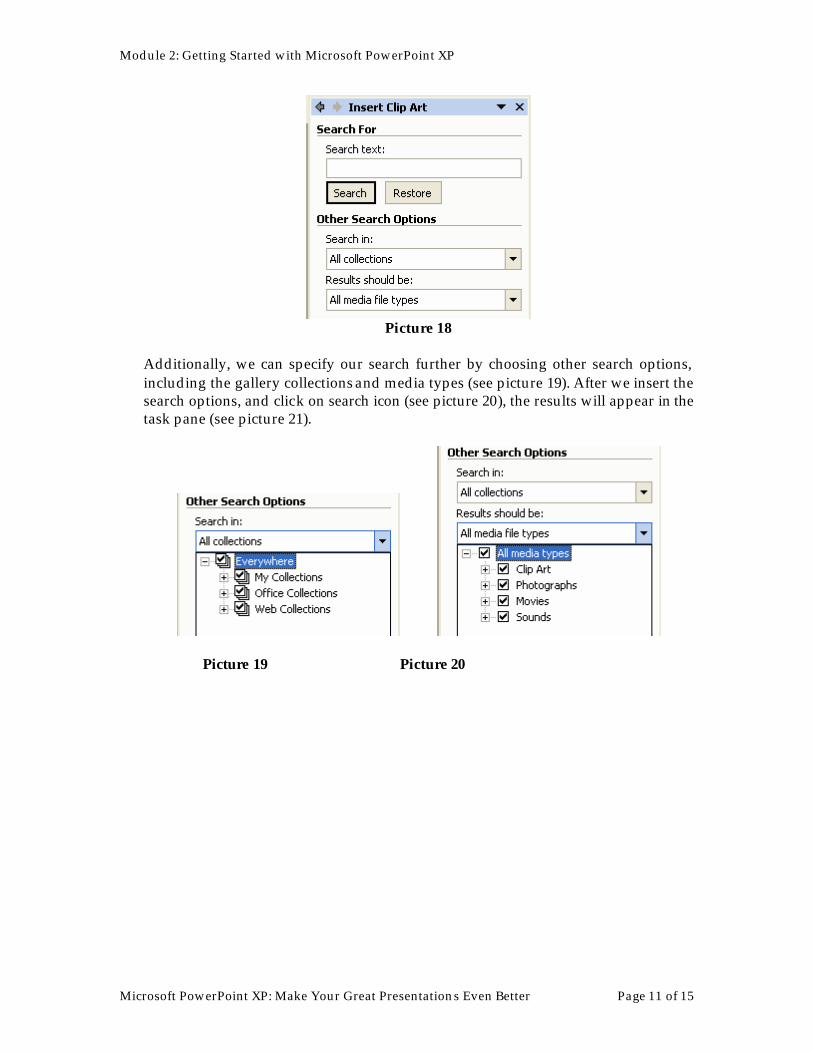
5. Clip Art Clip Art is a collection of pictures, sounds, and animation provided by Microsoft PowerPoint. When we click on the clip art icon, the task pane automatically displays several options. Since there are many available images, it will take a long time to find the clip art we want to insert in our presentation. Therefore, we will be asked to narrow down our search by entering a keyword in the available box (see picture 18).
Module 2: Getting Started with Microsoft PowerPoint XP
Microsoft PowerPoint XP: Make Your Great Presentations Even Better Page 11 of 15
Picture 18
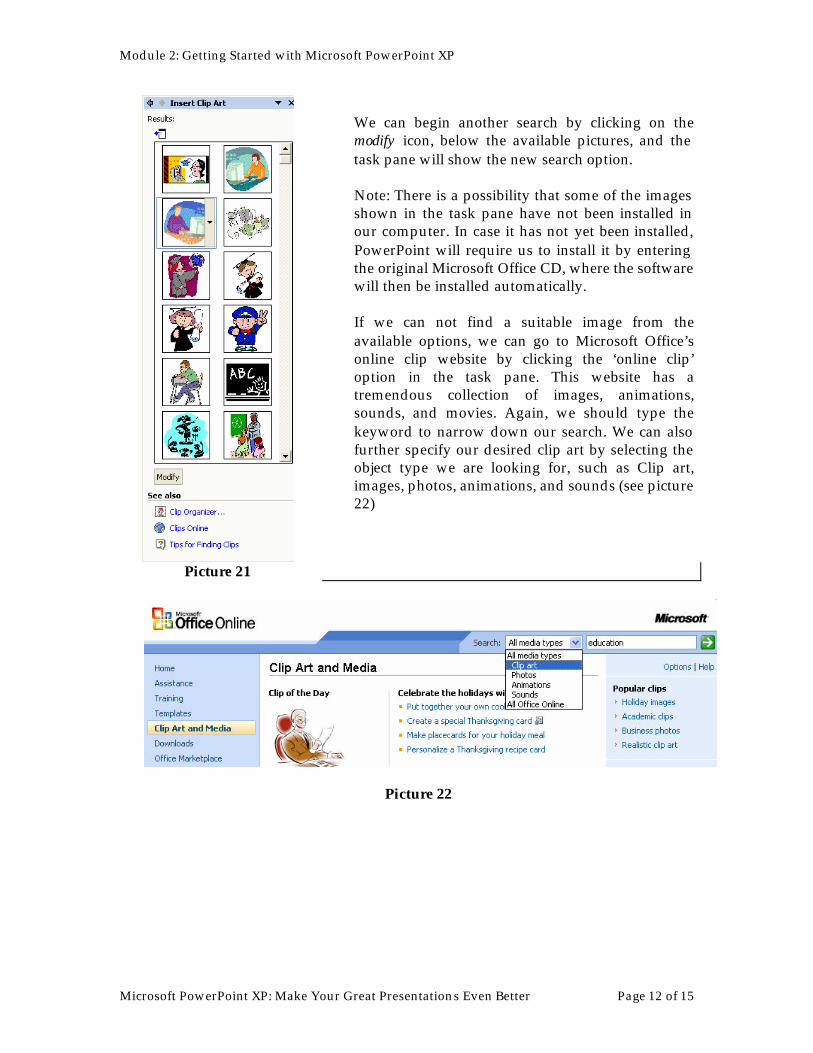
Additionally, we can specify our search further by choosing other search options, including the gallery collections and media types (see picture 19). After we insert the search options, and click on search icon (see picture 20), the results will appear in the task pane (see picture 21).
Picture 19 Picture 20
Module 2: Getting Started with Microsoft PowerPoint XP
Microsoft PowerPoint XP: Make Your Great Presentations Even Better Page 12 of 15
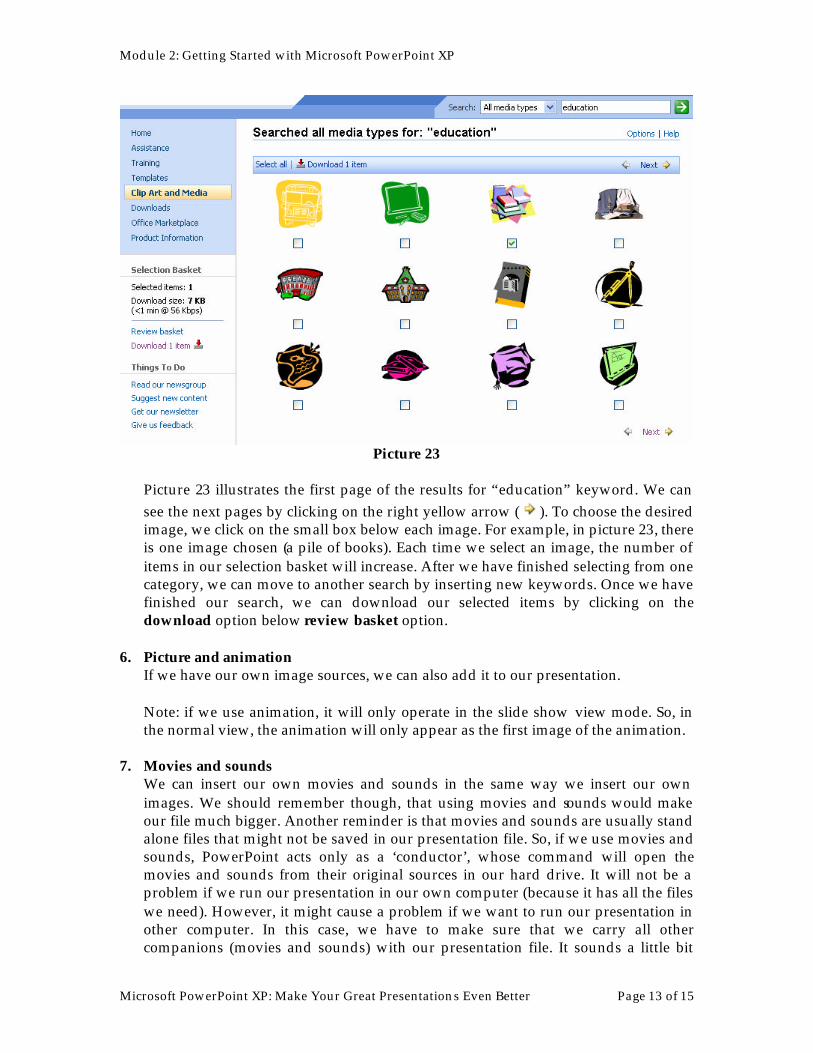
We can begin another search by clicking on the modify icon, below the available pictures, and the task pane will show the new search option. Note: There is a possibility that some of the images shown in the task pane have not been installed in our computer. In case it has not yet been installed, PowerPoint will require us to install it by entering the original Microsoft Office CD, where the software will then be installed automatically. If we can not find a suitable image from the available options, we can go to Microsoft Office’s online clip website by clicking the ‘online clip’ option in the task pane. This website has a tremendous collection of images, animations, sounds, and movies. Again, we should type the keyword to narrow down our search. We can also further specify our desired clip art by selecting the object type we are looking for, such as Clip art, images, photos, animations, and sounds (see picture 22)
Picture 21
Picture 22
Module 2: Getting Started with Microsoft PowerPoint XP
Microsoft PowerPoint XP: Make Your Great Presentations Even Better Page 13 of 15
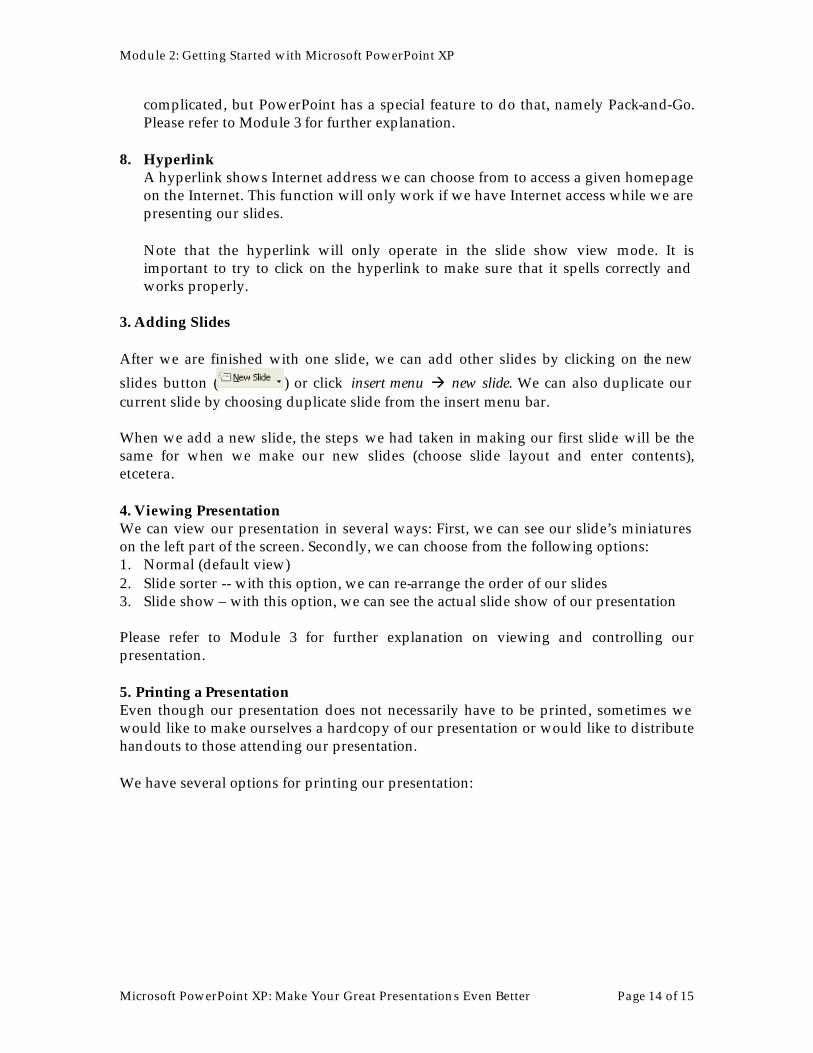
Picture 23
Picture 23 illustrates the first page of the results for “education” keyword. We can see the next pages by clicking on the right yellow arrow ( ). To choose the desired image, we click on the small box below each image. For example, in picture 23, there is one image chosen (a pile of books). Each time we select an image, the number of items in our selection basket will increase. After we have finished selecting from one category, we can move to another search by inserting new keywords. Once we have finished our search, we can download our selected items by clicking on the download option below review basket option.
6. Picture and animation
If we have our own image sources, we can also add it to our presentation. Note: if we use animation, it will only operate in the slide show view mode. So, in the normal view, the animation will only appear as the first image of the animation.
7. Movies and sounds
We can insert our own movies and sounds in the same way we insert our own images. We should remember though, that using movies and sounds would make our file much bigger. Another reminder is that movies and sounds are usually stand alone files that might not be saved in our presentation file. So, if we use movies and sounds, PowerPoint acts only as a ‘conductor’, whose command will open the movies and sounds from their original sources in our hard drive. It will not be a problem if we run our presentation in our own computer (because it has all the files we need). However, it might cause a problem if we want to run our presentation in other computer. In this case, we have to make sure that we carry all other companions (movies and sounds) with our presentation file. It sounds a little bit
Module 2: Getting Started with Microsoft PowerPoint XP
Microsoft PowerPoint XP: Make Your Great Presentations Even Better Page 14 of 15
complicated, but PowerPoint has a special feature to do that, namely Pack-and-Go. Please refer to Module 3 for further explanation.
8. Hyperlink A hyperlink shows Internet address we can choose from to access a given homepage on the Internet. This function will only work if we have Internet access while we are presenting our slides. Note that the hyperlink will only operate in the slide show view mode. It is important to try to click on the hyperlink to make sure that it spells correctly and works properly.
3. Adding Slides After we are finished with one slide, we can add other slides by clicking on the new slides button ( ) or click insert menu à new slide. We can also duplicate our current slide by choosing duplicate slide from the insert menu bar. When we add a new slide, the steps we had taken in making our first slide will be the same for when we make our new slides (choose slide layout and enter contents), etcetera. 4. Viewing Presentation We can view our presentation in several ways: First, we can see our slide’s miniatures on the left part of the screen. Secondly, we can choose from the following options: 1. Normal (default view) 2. Slide sorter -- with this option, we can re-arrange the order of our slides 3. Slide show – with this option, we can see the actual slide show of our presentation Please refer to Module 3 for further explanation on viewing and controlling our presentation. 5. Printing a Presentation Even though our presentation does not necessarily have to be printed, sometimes we would like to make ourselves a hardcopy of our presentation or would like to distribute handouts to those attending our presentation. We have several options for printing our presentation:
Module 2: Getting Started with Microsoft PowerPoint XP
Microsoft PowerPoint XP: Make Your Great Presentations Even Better Page 15 of 15
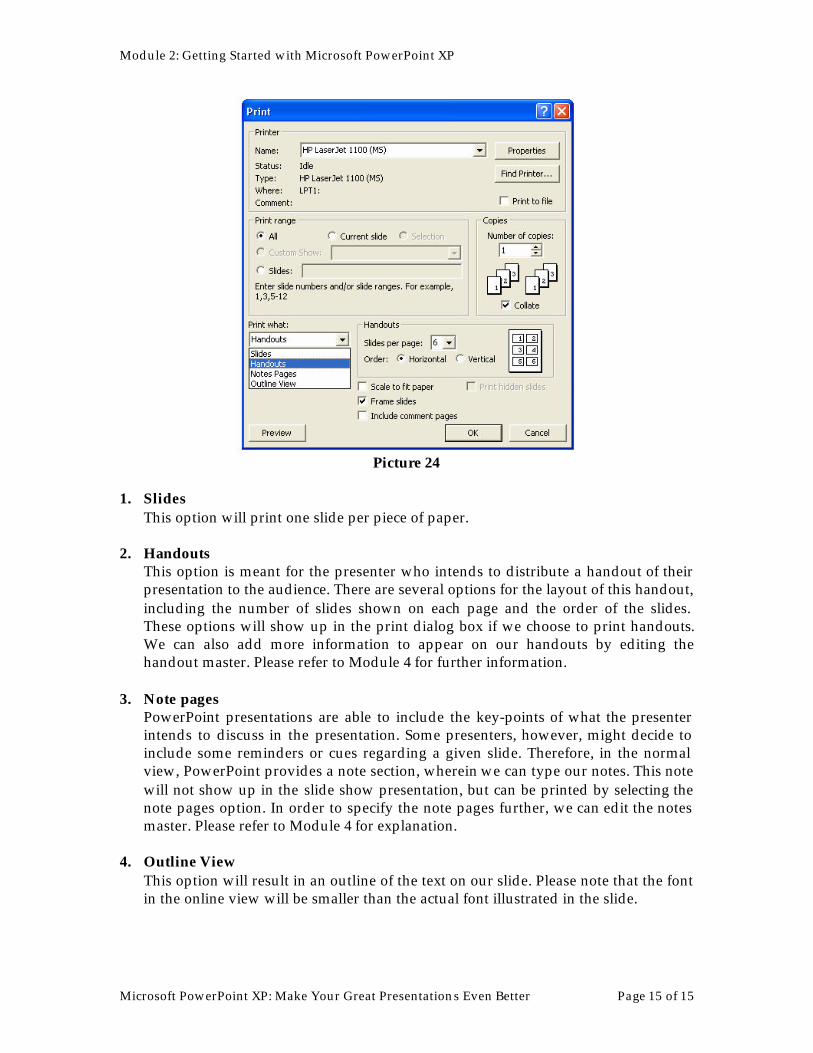
Picture 24
1. Slides
This option will print one slide per piece of paper.
2. Handouts This option is meant for the presenter who intends to distribute a handout of their presentation to the audience. There are several options for the layout of this handout, including the number of slides shown on each page and the order of the slides. These options will show up in the print dialog box if we choose to print handouts. We can also add more information to appear on our handouts by editing the handout master. Please refer to Module 4 for further information.
3. Note pages PowerPoint presentations are able to include the key-points of what the presenter intends to discuss in the presentation. Some presenters, however, might decide to include some reminders or cues regarding a given slide. Therefore, in the normal view, PowerPoint provides a note section, wherein we can type our notes. This note will not show up in the slide show presentation, but can be printed by selecting the note pages option. In order to specify the note pages further, we can edit the notes master. Please refer to Module 4 for explanation.
4. Outline View This option will result in an outline of the text on our slide. Please note that the font in the online view will be smaller than the actual font illustrated in the slide.

Module 3: Setting Up and Presenting Slide Shows
Microsoft PowerPoint XP: Make Your Great Presentations Even Better Page 1 of 7
MICROSOFT POWERPOINT XP: MAKE YOUR GREAT PRESENTATIONS EVEN BETTER
Joyce Maria Boedianto*
OVERVIEW
MODULE 1: OVERVIEW OF BUTTONS, TOOLBARS, AND COMMANDS FOR THE MICROSOFT POWERPOINT NOVICE 1. The benefits of using Microsoft PowerPoint 2. Using Microsoft PowerPoint for the first time:
A Tour of Microsoft PowerPoint Features The Office Assistant Various ways of doing a command/action
MODULE 2: GETTING STARTED WITH MICROSOFT POWERPOINT XP Starting a new presentation Steps in making presentation:
1. Choosing a slide layout and design template 2. Entering contents:
Text, Tables, Charts, Diagrams, ClipArt, Pictures and Animation, Movies and Sounds, and Hyperlinks
3. Adding Slides 4. Viewing presentation 5. Printing a presentation
MODULE 3: SETTING UP AND PRESENTING A SLIDE SHOW
1. Inserting animation 2. Working in slide Sorter View 3. Controlling the slide show presentation 4. Pack-and-Go
MODULE 4: MICROSOFT POWERPOINT XP FOR THE ADVANCED USERS 1. Working with slide master 2. Working with handout and notes master 3. Working with color 4. Working with tables 5. Working with charts 6. Working with diagrams 7. Working with WordArt 8. Working with drawing tools
*These modules were developed, under the supervision of Dr. Jennifer Shapka, and with the help of Danielle M. Law, for the Educational and Counselling Psychology and Special Education department, at the University of British Columbia, as a means of providing technical support.
Module 3: Setting Up and Presenting Slide Shows
Microsoft PowerPoint XP: Make Your Great Presentations Even Better Page 2 of 7
MODULE 3 SETTING UP AND PRESENTING SLIDE SHOWS
1. Inserting Animation
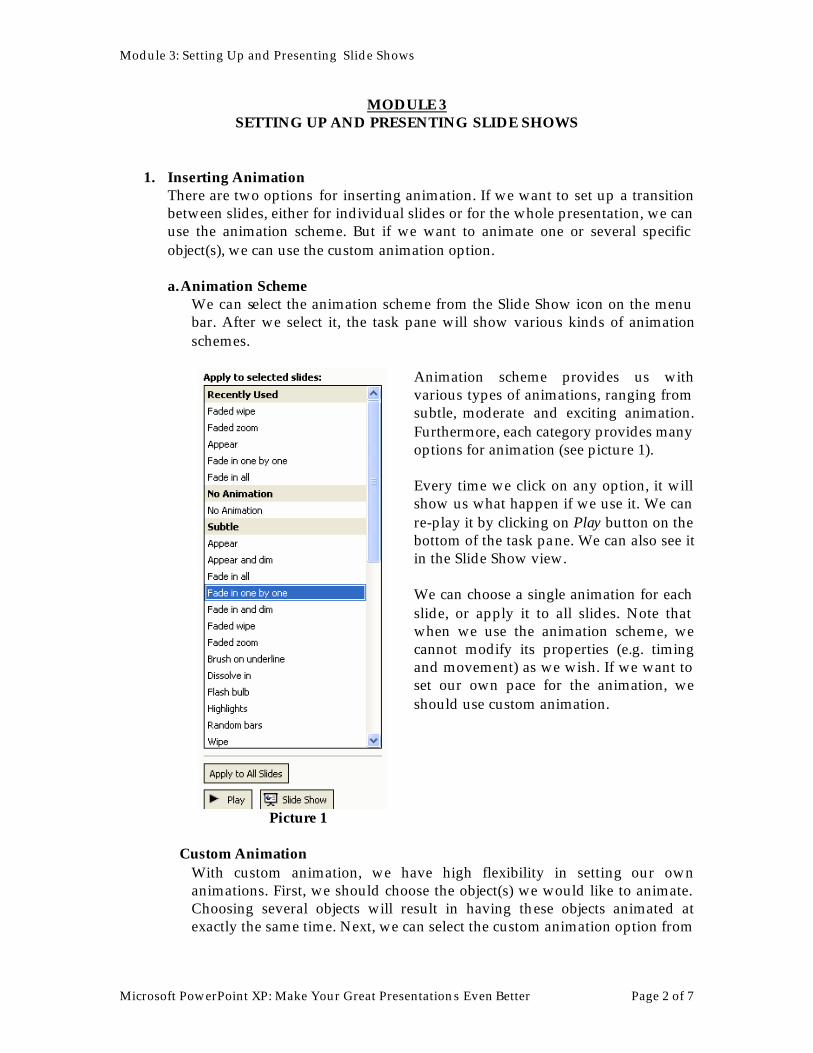
There are two options for inserting animation. If we want to set up a transition between slides, either for individual slides or for the whole presentation, we can use the animation scheme. But if we want to animate one or several specific object(s), we can use the custom animation option. a. Animation Scheme
We can select the animation scheme from the Slide Show icon on the menu bar. After we select it, the task pane will show various kinds of animation schemes.
Picture 1
Animation scheme provides us with various types of animations, ranging from subtle, moderate and exciting animation. Furthermore, each category provides many options for animation (see picture 1). Every time we click on any option, it will show us what happen if we use it. We can re-play it by clicking on Play button on the bottom of the task pane. We can also see it in the Slide Show view. We can choose a single animation for each slide, or apply it to all slides. Note that when we use the animation scheme, we cannot modify its properties (e.g. timing and movement) as we wish. If we want to set our own pace for the animation, we should use custom animation.
Custom Animation
With custom animation, we have high flexibility in setting our own animations. First, we should choose the object(s) we would like to animate. Choosing several objects will result in having these objects animated at exactly the same time. Next, we can select the custom animation option from
Module 3: Setting Up and Presenting Slide Shows
Microsoft PowerPoint XP: Make Your Great Presentations Even Better Page 3 of 7
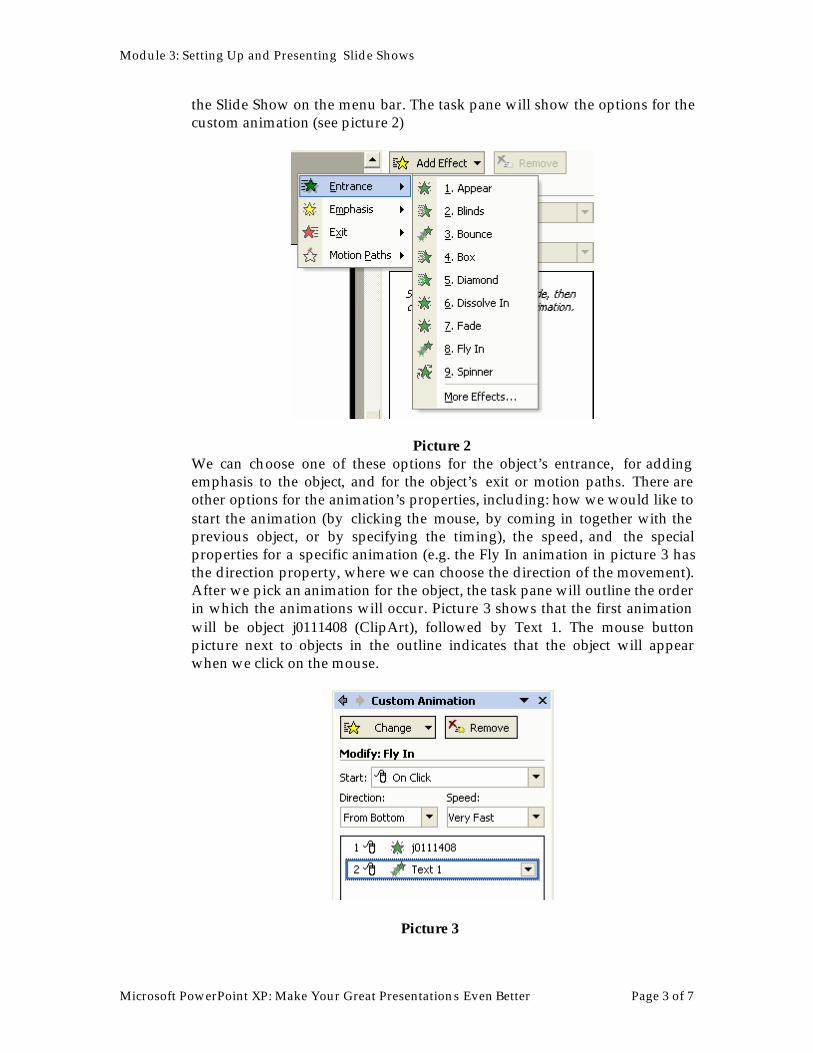
the Slide Show on the menu bar. The task pane will show the options for the custom animation (see picture 2)
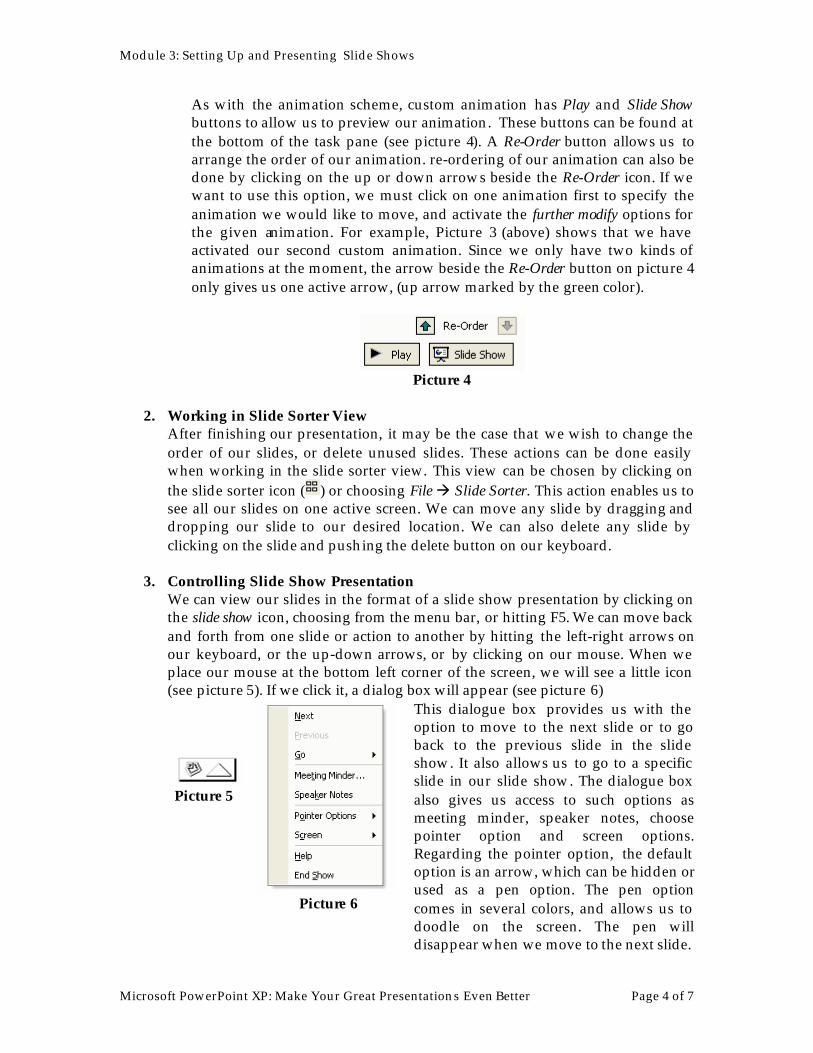
Picture 2 We can choose one of these options for the object’s entrance, for adding emphasis to the object, and for the object’s exit or motion paths. There are other options for the animation’s properties, including: how we would like to start the animation (by clicking the mouse, by coming in together with the previous object, or by specifying the timing), the speed, and the special properties for a specific animation (e.g. the Fly In animation in picture 3 has the direction property, where we can choose the direction of the movement). After we pick an animation for the object, the task pane will outline the order in which the animations will occur. Picture 3 shows that the first animation will be object j0111408 (ClipArt), followed by Text 1. The mouse button picture next to objects in the outline indicates that the object will appear when we click on the mouse.
Picture 3
Module 3: Setting Up and Presenting Slide Shows
Microsoft PowerPoint XP: Make Your Great Presentations Even Better Page 4 of 7
As with the animation scheme, custom animation has Play and Slide Show buttons to allow us to preview our animation. These buttons can be found at the bottom of the task pane (see picture 4). A Re-Order button allows us to arrange the order of our animation. re-ordering of our animation can also be done by clicking on the up or down arrows beside the Re-Order icon. If we want to use this option, we must click on one animation first to specify the animation we would like to move, and activate the further modify options for the given animation. For example, Picture 3 (above) shows that we have activated our second custom animation. Since we only have two kinds of animations at the moment, the arrow beside the Re-Order button on picture 4 only gives us one active arrow, (up arrow marked by the green color).
Picture 4
2. Working in Slide Sorter View
After finishing our presentation, it may be the case that we wish to change the order of our slides, or delete unused slides. These actions can be done easily when working in the slide sorter view. This view can be chosen by clicking on the slide sorter icon ( ) or choosing File à Slide Sorter. This action enables us to see all our slides on one active screen. We can move any slide by dragging and dropping our slide to our desired location. We can also delete any slide by clicking on the slide and pushing the delete button on our keyboard.
3. Controlling Slide Show Presentation We can view our slides in the format of a slide show presentation by clicking on the slide show icon, choosing from the menu bar, or hitting F5. We can move back and forth from one slide or action to another by hitting the left-right arrows on our keyboard, or the up-down arrows, or by clicking on our mouse. When we place our mouse at the bottom left corner of the screen, we will see a little icon (see picture 5). If we click it, a dialog box will appear (see picture 6)
Picture 5
Picture 6
This dialogue box provides us with the option to move to the next slide or to go back to the previous slide in the slide show. It also allows us to go to a specific slide in our slide show. The dialogue box also gives us access to such options as meeting minder, speaker notes, choose pointer option and screen options. Regarding the pointer option, the default option is an arrow, which can be hidden or used as a pen option. The pen option comes in several colors, and allows us to doodle on the screen. The pen will disappear when we move to the next slide.
Module 3: Setting Up and Presenting Slide Shows
Microsoft PowerPoint XP: Make Your Great Presentations Even Better Page 5 of 7
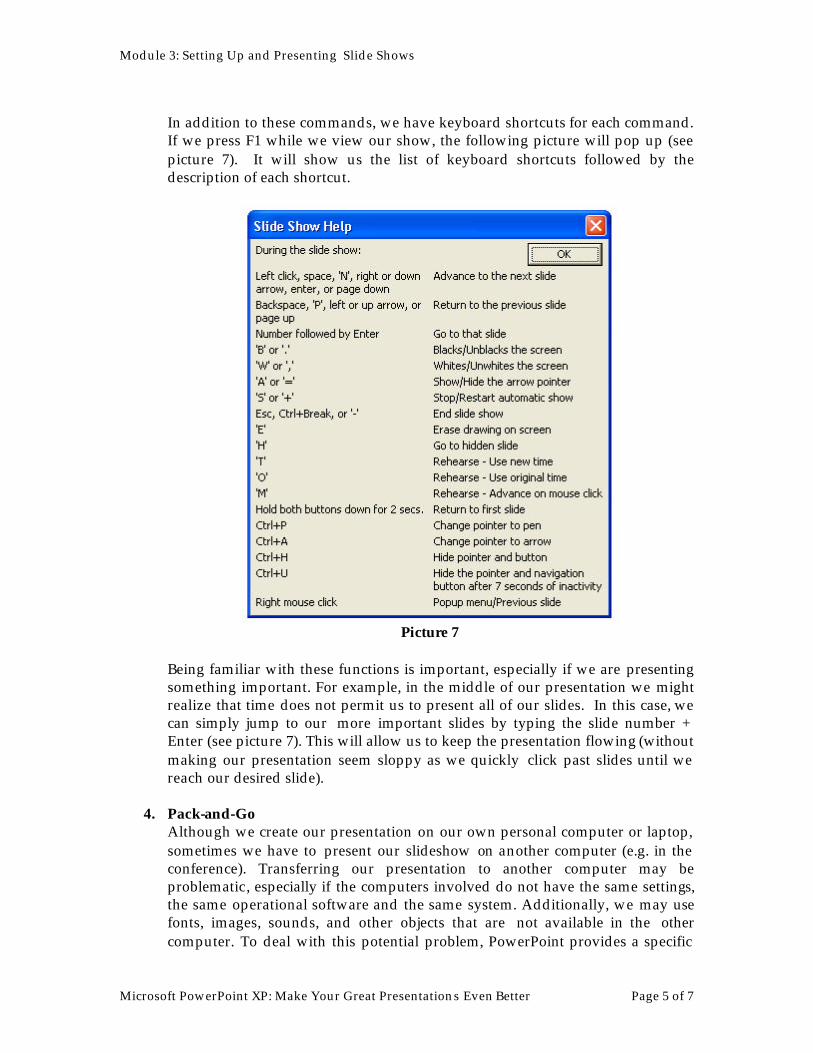
In addition to these commands, we have keyboard shortcuts for each command. If we press F1 while we view our show, the following picture will pop up (see picture 7). It will show us the list of keyboard shortcuts followed by the description of each shortcut.
Picture 7
Being familiar with these functions is important, especially if we are presenting something important. For example, in the middle of our presentation we might realize that time does not permit us to present all of our slides. In this case, we can simply jump to our more important slides by typing the slide number + Enter (see picture 7). This will allow us to keep the presentation flowing (without making our presentation seem sloppy as we quickly click past slides until we reach our desired slide).
4. Pack-and-Go Although we create our presentation on our own personal computer or laptop, sometimes we have to present our slideshow on another computer (e.g. in the conference). Transferring our presentation to another computer may be problematic, especially if the computers involved do not have the same settings, the same operational software and the same system. Additionally, we may use fonts, images, sounds, and other objects that are not available in the other computer. To deal with this potential problem, PowerPoint provides a specific
Module 3: Setting Up and Presenting Slide Shows
Microsoft PowerPoint XP: Make Your Great Presentations Even Better Page 6 of 7
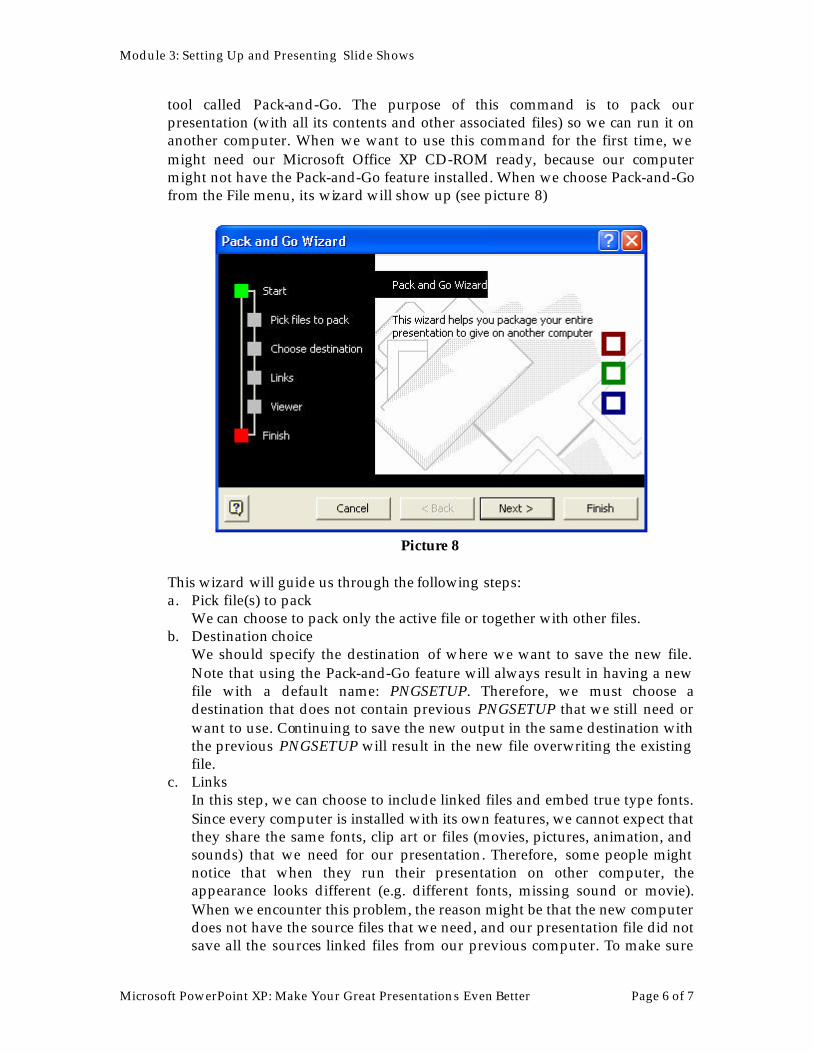
tool called Pack-and-Go. The purpose of this command is to pack our presentation (with all its contents and other associated files) so we can run it on another computer. When we want to use this command for the first time, we might need our Microsoft Office XP CD-ROM ready, because our computer might not have the Pack-and-Go feature installed. When we choose Pack-and-Go from the File menu, its wizard will show up (see picture 8)
Picture 8
This wizard will guide us through the following steps: a. Pick file(s) to pack
We can choose to pack only the active file or together with other files. b. Destination choice
We should specify the destination of where we want to save the new file. Note that using the Pack-and-Go feature will always result in having a new file with a default name: PNGSETUP. Therefore, we must choose a destination that does not contain previous PNGSETUP that we still need or want to use. Continuing to save the new output in the same destination with the previous PNGSETUP will result in the new file overwriting the existing file.
c. Links In this step, we can choose to include linked files and embed true type fonts. Since every computer is installed with its own features, we cannot expect that they share the same fonts, clip art or files (movies, pictures, animation, and sounds) that we need for our presentation. Therefore, some people might notice that when they run their presentation on other computer, the appearance looks different (e.g. different fonts, missing sound or movie). When we encounter this problem, the reason might be that the new computer does not have the source files that we need, and our presentation file did not save all the sources linked files from our previous computer. To make sure
Module 3: Setting Up and Presenting Slide Shows
Microsoft PowerPoint XP: Make Your Great Presentations Even Better Page 7 of 7
our presentation will work well on different computers, we should click on both the linked files and embed true type fonts option.
d. Viewer If we doubt that the computer we will be presenting on has Microsoft PowerPoint installed on it, it is important that we choose this option. This will include viewer software in our file.
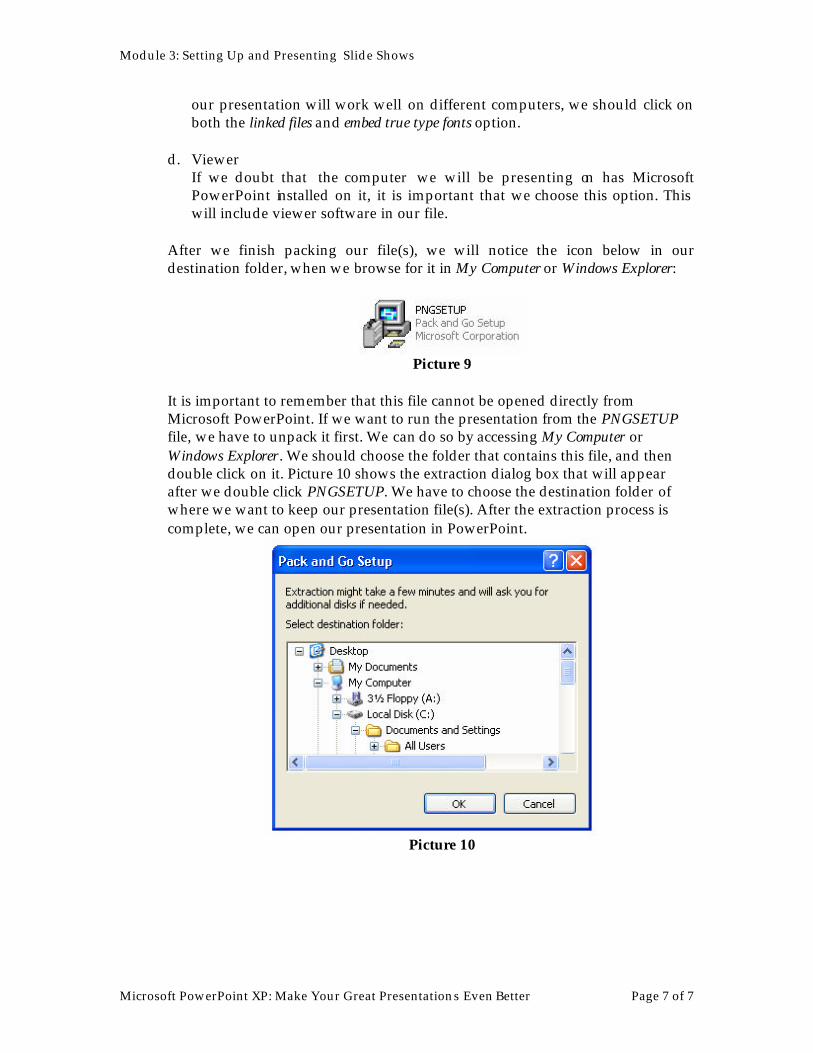
After we finish packing our file(s), we will notice the icon below in our destination folder, when we browse for it in My Computer or Windows Explorer:
Picture 9
It is important to remember that this file cannot be opened directly from Microsoft PowerPoint. If we want to run the presentation from the PNGSETUP file, we have to unpack it first. We can do so by accessing My Computer or Windows Explorer. We should choose the folder that contains this file, and then double click on it. Picture 10 shows the extraction dialog box that will appear after we double click PNGSETUP. We have to choose the destination folder of where we want to keep our presentation file(s). After the extraction process is complete, we can open our presentation in PowerPoint.
Picture 10

Module 4: Microsoft PowerPoint XP for Advanced Users
Microsoft PowerPoint XP: Make Your Great Presentations Even Better Page 1 of 15
MICROSOFT POWERPOINT XP: MAKE YOUR GREAT PRESENTATIONS EVEN BETTER
Joyce Maria Boedianto*
OVERVIEW
MODULE 1: OVERVIEW OF BUTTONS, TOOLBARS, AND COMMANDS FOR THE MICROSOFT POWERPOINT NOVICE 1. The benefits of using Microsoft PowerPoint 2. Using Microsoft PowerPoint for the first time:
A Tour of Microsoft PowerPoint Features The Office Assistant Various ways of doing a command/action
MODULE 2: GETTING STARTED WITH MICROSOFT POWERPOINT XP Starting a new presentation Steps in making presentation:
1. Choosing a slide layout and design template 2. Entering contents:
Text, Tables, Charts, Diagrams, ClipArt, Pictures and Animation, Movies and Sounds, and Hyperlinks
3. Adding Slides 4. Viewing presentation 5. Printing a presentation
MODULE 3: SETTING UP AND PRESENTING A SLIDE SHOW
1. Inserting animation 2. Working in slide Sorter View 3. Controlling the slide show presentation 4. Pack-and-Go
MODULE 4: MICROSOFT POWERPOINT XP FOR THE ADVANCED USERS 1. Working with slide master 2. Working with handout and notes master 3. Working with color 4. Working with tables 5. Working with charts 6. Working with diagrams 7. Working with WordArt 8. Working with drawing tools
*These modules were developed, under the supervision of Dr. Jennifer Shapka, and with the help of Danielle M. Law, for the Educational and Counselling Psychology and Special Education department, at the University of British Columbia, as a means of providing technical support.
Module 4: Microsoft PowerPoint XP for Advanced Users
Microsoft PowerPoint XP: Make Your Great Presentations Even Better Page 2 of 15
MODULE 4 MICROSOFT POWERPOINT XP FOR ADVANCED USERS
1. Working with the Slide Master
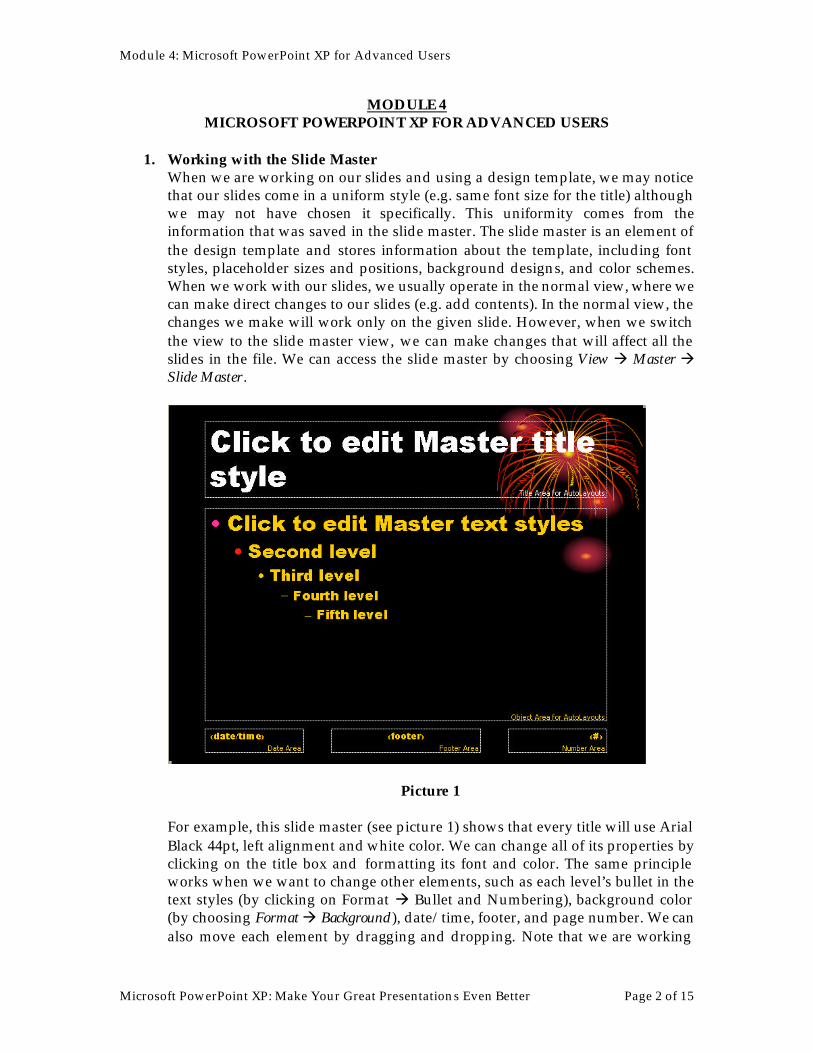
When we are working on our slides and using a design template, we may notice that our slides come in a uniform style (e.g. same font size for the title) although we may not have chosen it specifically. This uniformity comes from the information that was saved in the slide master. The slide master is an element of the design template and stores information about the template, including font styles, placeholder sizes and positions, background designs, and color schemes. When we work with our slides, we usually operate in the normal view, where we can make direct changes to our slides (e.g. add contents). In the normal view, the changes we make will work only on the given slide. However, when we switch the view to the slide master view, we can make changes that will affect all the slides in the file. We can access the slide master by choosing View à Master à Slide Master.
Picture 1 For example, this slide master (see picture 1) shows that every title will use Arial Black 44pt, left alignment and white color. We can change all of its properties by clicking on the title box and formatting its font and color. The same principle works when we want to change other elements, such as each level’s bullet in the text styles (by clicking on Format à Bullet and Numbering), background color (by choosing Format à Background ), date/time, footer, and page number. We can also move each element by dragging and dropping. Note that we are working
Module 4: Microsoft PowerPoint XP for Advanced Users
Microsoft PowerPoint XP: Make Your Great Presentations Even Better Page 3 of 15
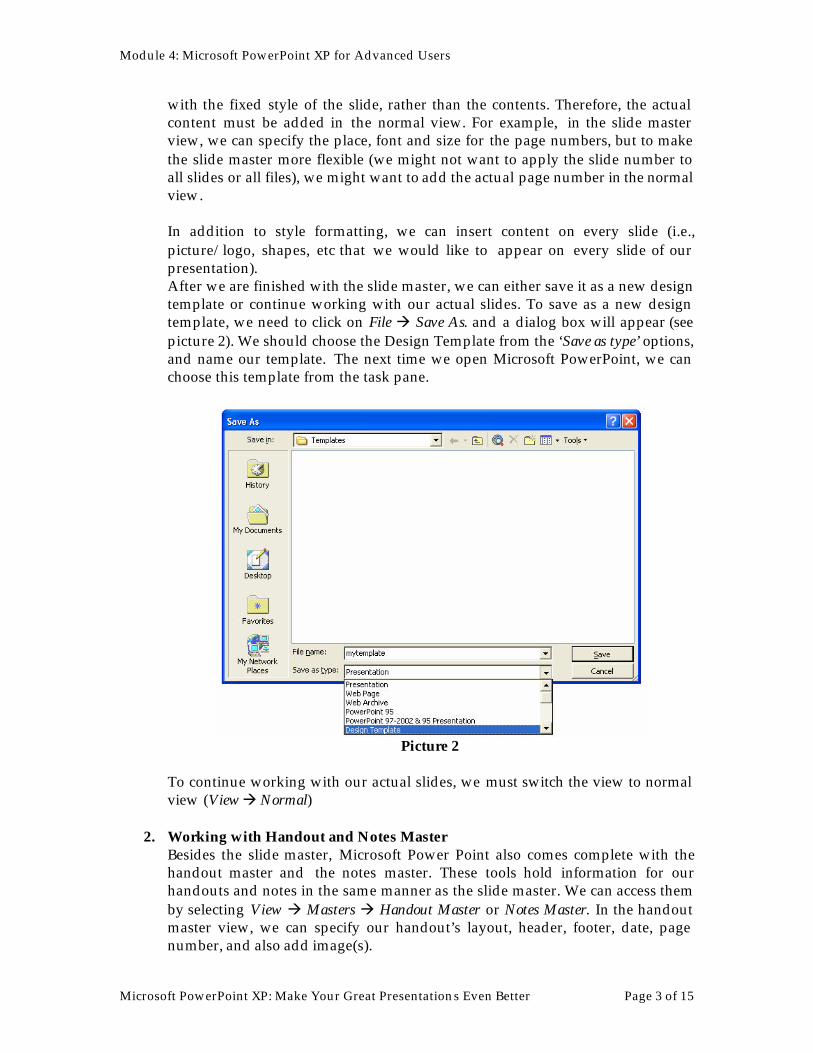
with the fixed style of the slide, rather than the contents. Therefore, the actual content must be added in the normal view. For example, in the slide master view, we can specify the place, font and size for the page numbers, but to make the slide master more flexible (we might not want to apply the slide number to all slides or all files), we might want to add the actual page number in the normal view. In addition to style formatting, we can insert content on every slide (i.e., picture/logo, shapes, etc that we would like to appear on every slide of our presentation). After we are finished with the slide master, we can either save it as a new design template or continue working with our actual slides. To save as a new design template, we need to click on File à Save As. and a dialog box will appear (see picture 2). We should choose the Design Template from the ‘Save as type’ options, and name our template. The next time we open Microsoft PowerPoint, we can choose this template from the task pane.
Picture 2
To continue working with our actual slides, we must switch the view to normal view (View à Normal)
2. Working with Handout and Notes Master Besides the slide master, Microsoft Power Point also comes complete with the handout master and the notes master. These tools hold information for our handouts and notes in the same manner as the slide master. We can access them by selecting View à Masters à Handout Master or Notes Master. In the handout master view, we can specify our handout’s layout, header, footer, date, page number, and also add image(s).
Module 4: Microsoft PowerPoint XP for Advanced Users
Microsoft PowerPoint XP: Make Your Great Presentations Even Better Page 4 of 15
The notes master view looks very similar to the slide master view, except that it contains two parts: the slide master and our notes master. We can click on each box to edit it.
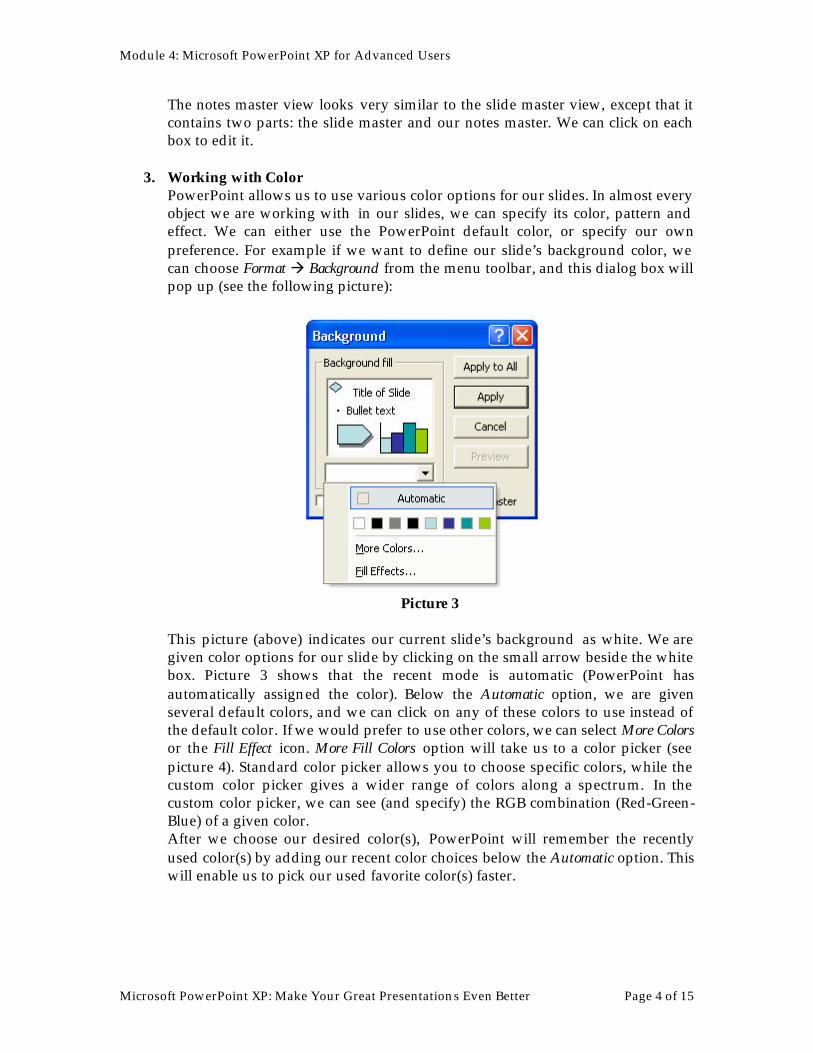
3. Working with Color PowerPoint allows us to use various color options for our slides. In almost every object we are working with in our slides, we can specify its color, pattern and effect. We can either use the PowerPoint default color, or specify our own preference. For example if we want to define our slide’s background color, we can choose Format à Background from the menu toolbar, and this dialog box will pop up (see the following picture):
Picture 3
This picture (above) indicates our current slide’s background as white. We are given color options for our slide by clicking on the small arrow beside the white box. Picture 3 shows that the recent mode is automatic (PowerPoint has automatically assigned the color). Below the Automatic option, we are given several default colors, and we can click on any of these colors to use instead of the default color. If we would prefer to use other colors, we can select More Colors or the Fill Effect icon. More Fill Colors option will take us to a color picker (see picture 4). Standard color picker allows you to choose specific colors, while the custom color picker gives a wider range of colors along a spectrum. In the custom color picker, we can see (and specify) the RGB combination (Red-Green-Blue) of a given color. After we choose our desired color(s), PowerPoint will remember the recently used color(s) by adding our recent color choices below the Automatic option. This will enable us to pick our used favorite color(s) faster.

Module 4: Microsoft PowerPoint XP for Advanced Users
Microsoft PowerPoint XP: Make Your Great Presentations Even Better Page 5 of 15
Picture 4
The Fill Effects option provides us with various types of background color blending, textures, patterns, and pictures (see picture 5).
Picture 5
Besides background color, we can use Fill Color , Line Color and Font Color option in the same manner we choose or specify background color.
4. Working with Tables
Every time we work with a table, the table toolbar automatically appears (see picture 3). This toolbar includes several options:
Module 4: Microsoft PowerPoint XP for Advanced Users
Microsoft PowerPoint XP: Make Your Great Presentations Even Better Page 6 of 15
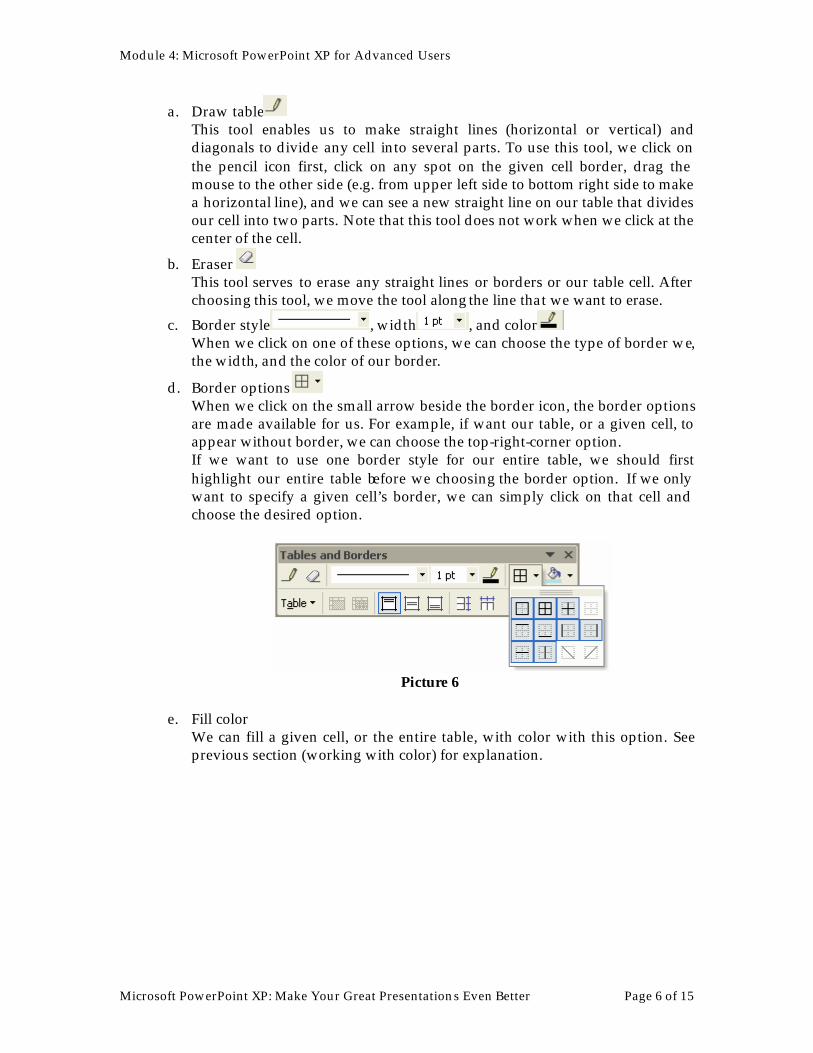
a. Draw table This tool enables us to make straight lines (horizontal or vertical) and diagonals to divide any cell into several parts. To use this tool, we click on the pencil icon first, click on any spot on the given cell border, drag the mouse to the other side (e.g. from upper left side to bottom right side to make a horizontal line), and we can see a new straight line on our table that divides our cell into two parts. Note that this tool does not work when we click at the center of the cell.
b. Eraser This tool serves to erase any straight lines or borders or our table cell. After choosing this tool, we move the tool along the line that we want to erase.
c. Border style , width , and color When we click on one of these options, we can choose the type of border we, the width, and the color of our border.
d. Border options When we click on the small arrow beside the border icon, the border options are made available for us. For example, if want our table, or a given cell, to appear without border, we can choose the top-right-corner option. If we want to use one border style for our entire table, we should first highlight our entire table before we choosing the border option. If we only want to specify a given cell’s border, we can simply click on that cell and choose the desired option.
Picture 6
e. Fill color
We can fill a given cell, or the entire table, with color with this option. See previous section (working with color) for explanation.
Module 4: Microsoft PowerPoint XP for Advanced Users
Microsoft PowerPoint XP: Make Your Great Presentations Even Better Page 7 of 15
Picture 7
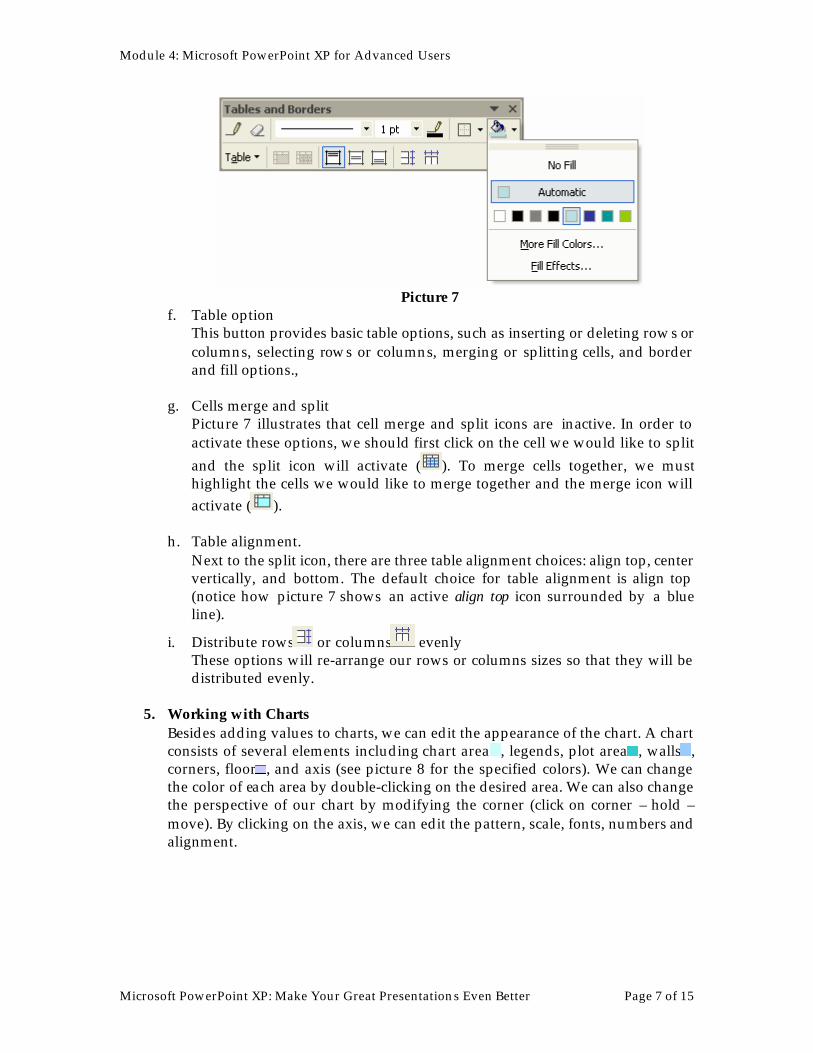
f. Table option This button provides basic table options, such as inserting or deleting rows or columns, selecting rows or columns, merging or splitting cells, and border and fill options.,
g. Cells merge and split Picture 7 illustrates that cell merge and split icons are inactive. In order to activate these options, we should first click on the cell we would like to split and the split icon will activate ( ). To merge cells together, we must highlight the cells we would like to merge together and the merge icon will activate ( ).
h. Table alignment. Next to the split icon, there are three table alignment choices: align top, center vertically, and bottom. The default choice for table alignment is align top (notice how picture 7 shows an active align top icon surrounded by a blue line).
i. Distribute rows or columns evenly These options will re-arrange our rows or columns sizes so that they will be distributed evenly.
5. Working with Charts
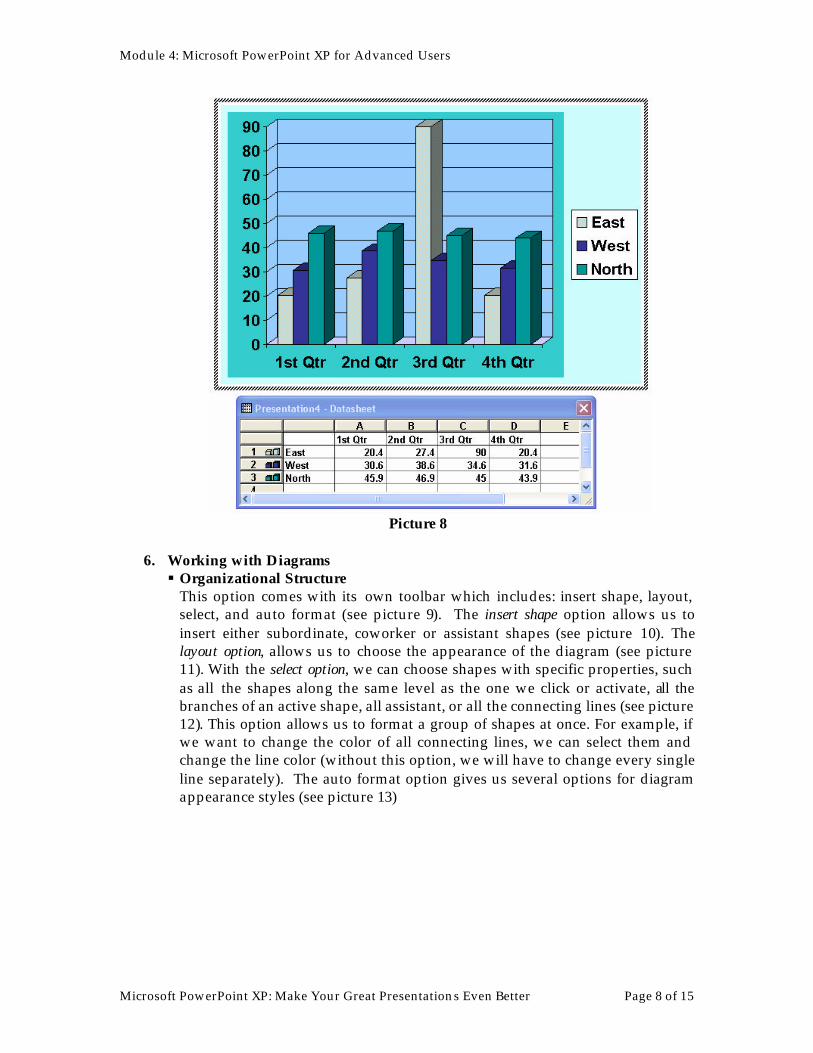
Besides adding values to charts, we can edit the appearance of the chart. A chart consists of several elements including chart area , legends, plot area , walls , corners, floor , and axis (see picture 8 for the specified colors). We can change the color of each area by double-clicking on the desired area. We can also change the perspective of our chart by modifying the corner (click on corner – hold – move). By clicking on the axis, we can edit the pattern, scale, fonts, numbers and alignment.
Module 4: Microsoft PowerPoint XP for Advanced Users
Microsoft PowerPoint XP: Make Your Great Presentations Even Better Page 8 of 15
Picture 8
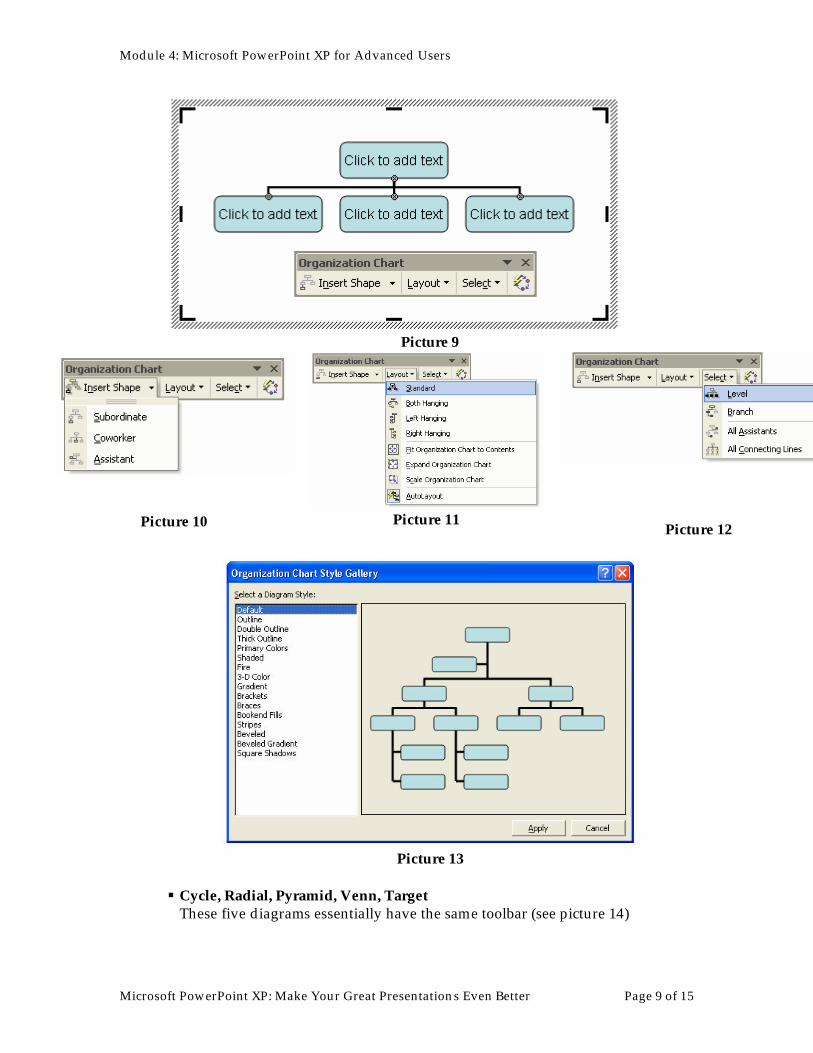
6. Working with Diagrams § Organizational Structure
This option comes with its own toolbar which includes: insert shape, layout, select, and auto format (see picture 9). The insert shape option allows us to insert either subordinate, coworker or assistant shapes (see picture 10). The layout option, allows us to choose the appearance of the diagram (see picture 11). With the select option, we can choose shapes with specific properties, such as all the shapes along the same level as the one we click or activate, all the branches of an active shape, all assistant, or all the connecting lines (see picture 12). This option allows us to format a group of shapes at once. For example, if we want to change the color of all connecting lines, we can select them and change the line color (without this option, we will have to change every single line separately). The auto format option gives us several options for diagram appearance styles (see picture 13)
Module 4: Microsoft PowerPoint XP for Advanced Users
Microsoft PowerPoint XP: Make Your Great Presentations Even Better Page 9 of 15
Picture 9
Picture 10
Picture 11
Picture 12
Picture 13
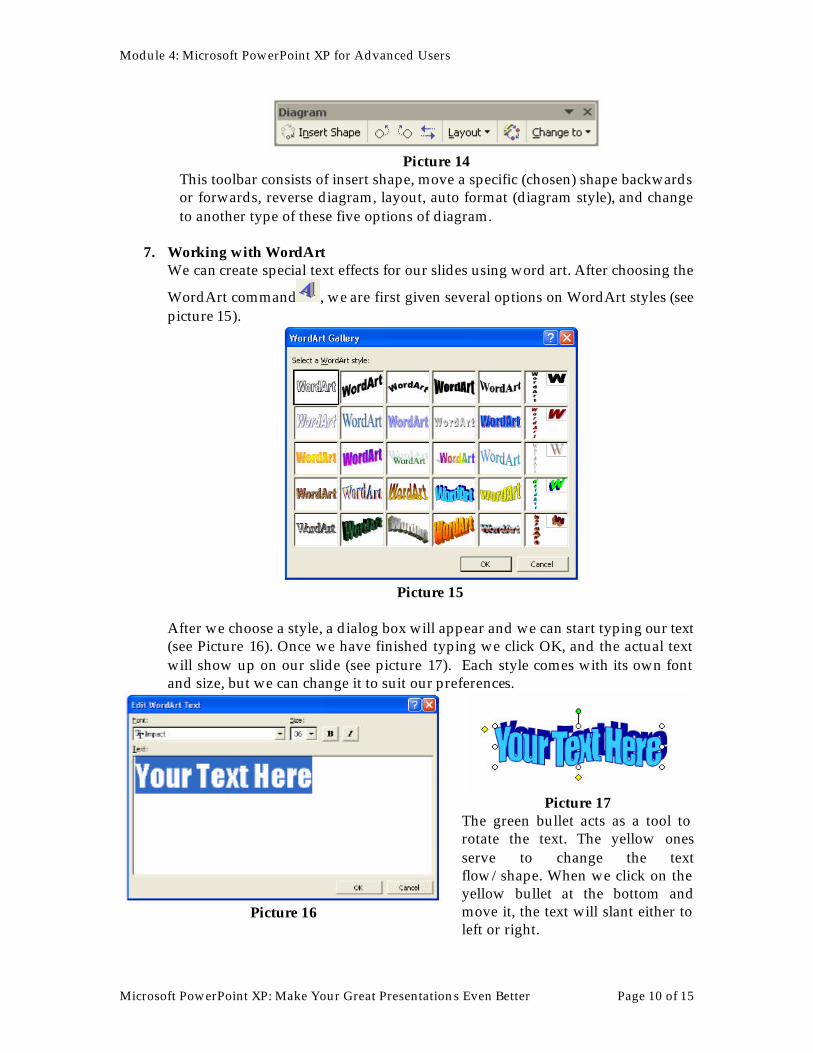
§ Cycle, Radial, Pyramid, Venn, Target
These five diagrams essentially have the same toolbar (see picture 14)
Module 4: Microsoft PowerPoint XP for Advanced Users
Microsoft PowerPoint XP: Make Your Great Presentations Even Better Page 10 of 15
Picture 14
This toolbar consists of insert shape, move a specific (chosen) shape backwards or forwards, reverse diagram, layout, auto format (diagram style), and change to another type of these five options of diagram.
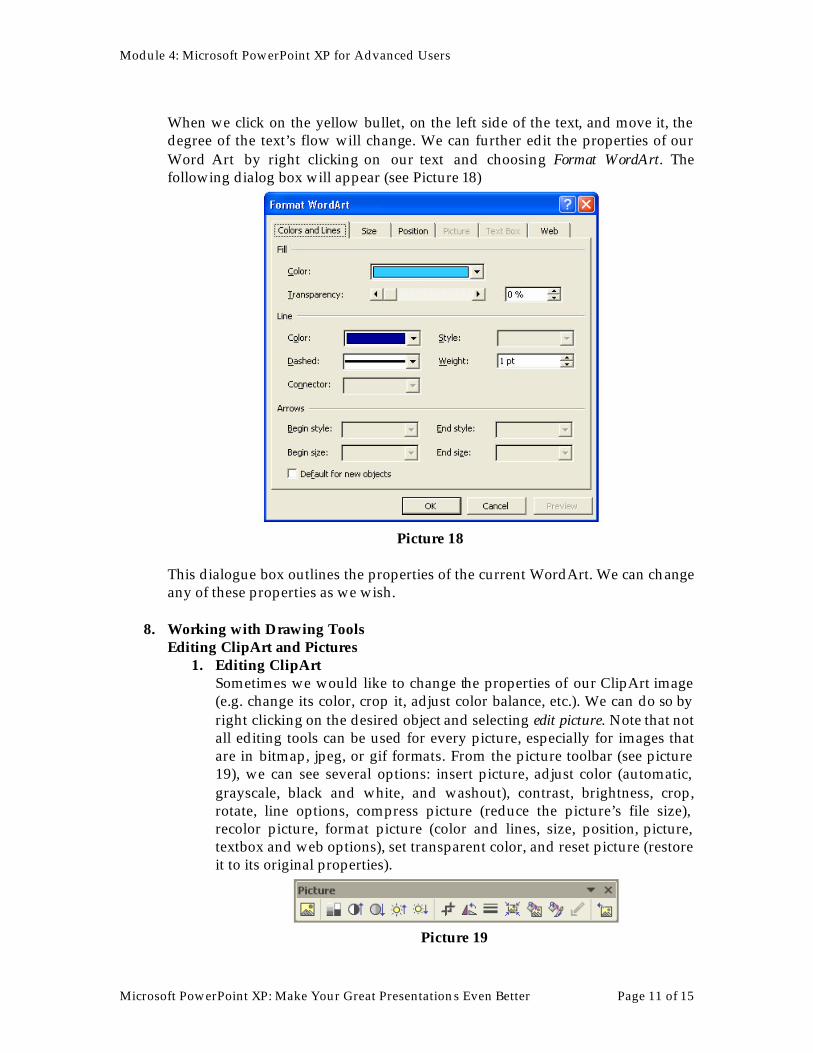
7. Working with WordArt We can create special text effects for our slides using word art. After choosing the
WordArt command , we are first given several options on WordArt styles (see picture 15).
Picture 15
After we choose a style, a dialog box will appear and we can start typing our text (see Picture 16). Once we have finished typing we click OK, and the actual text will show up on our slide (see picture 17). Each style comes with its own font and size, but we can change it to suit our preferences.
Picture 16
Picture 17
The green bullet acts as a tool to rotate the text. The yellow ones serve to change the text flow/shape. When we click on the yellow bullet at the bottom and move it, the text will slant either to left or right.
Module 4: Microsoft PowerPoint XP for Advanced Users
Microsoft PowerPoint XP: Make Your Great Presentations Even Better Page 11 of 15
When we click on the yellow bullet, on the left side of the text, and move it, the degree of the text’s flow will change. We can further edit the properties of our Word Art by right clicking on our text and choosing Format WordArt. The following dialog box will appear (see Picture 18)
Picture 18
This dialogue box outlines the properties of the current WordArt. We can change any of these properties as we wish.
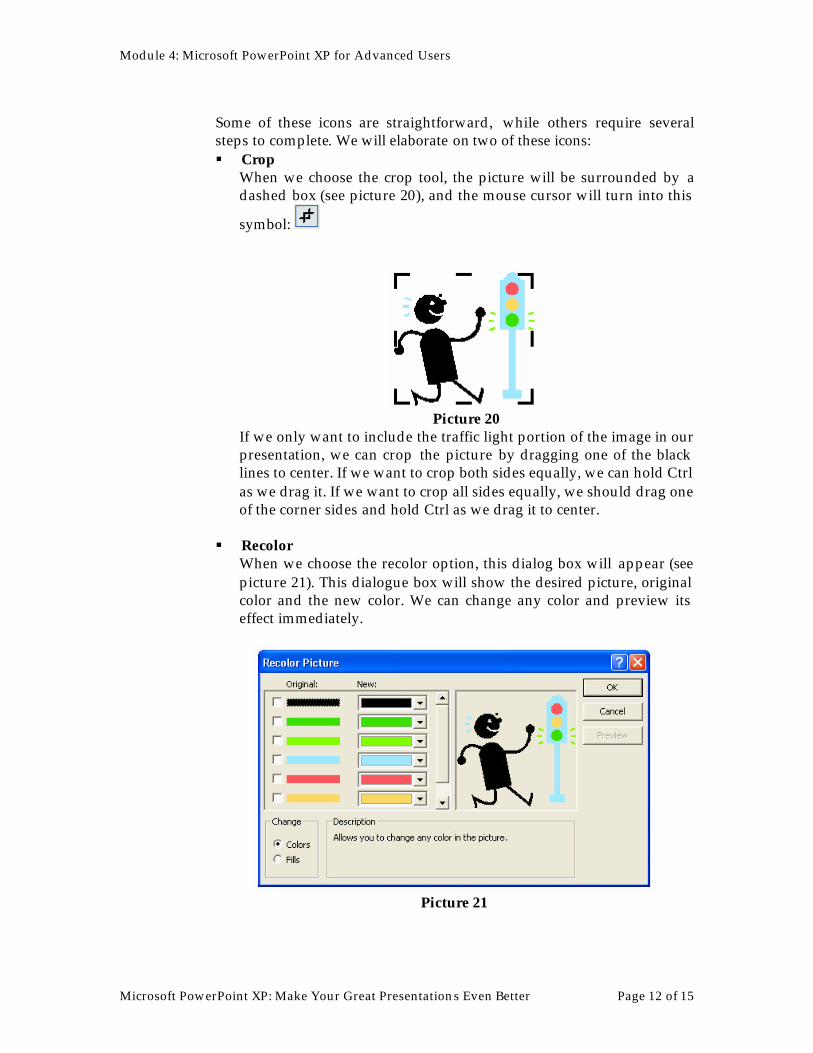
8. Working with Drawing Tools Editing ClipArt and Pictures
1. Editing ClipArt Sometimes we would like to change the properties of our ClipArt image (e.g. change its color, crop it, adjust color balance, etc.). We can do so by right clicking on the desired object and selecting edit picture. Note that not all editing tools can be used for every picture, especially for images that are in bitmap, jpeg, or gif formats. From the picture toolbar (see picture 19), we can see several options: insert picture, adjust color (automatic, grayscale, black and white, and washout), contrast, brightness, crop, rotate, line options, compress picture (reduce the picture’s file size), recolor picture, format picture (color and lines, size, position, picture, textbox and web options), set transparent color, and reset picture (restore it to its original properties).
Picture 19
Module 4: Microsoft PowerPoint XP for Advanced Users
Microsoft PowerPoint XP: Make Your Great Presentations Even Better Page 12 of 15
Some of these icons are straightforward, while others require several steps to complete. We will elaborate on two of these icons: § Crop
When we choose the crop tool, the picture will be surrounded by a dashed box (see picture 20), and the mouse cursor will turn into this
symbol:
Picture 20
If we only want to include the traffic light portion of the image in our presentation, we can crop the picture by dragging one of the black lines to center. If we want to crop both sides equally, we can hold Ctrl as we drag it. If we want to crop all sides equally, we should drag one of the corner sides and hold Ctrl as we drag it to center.
§ Recolor When we choose the recolor option, this dialog box will appear (see picture 21). This dialogue box will show the desired picture, original color and the new color. We can change any color and preview its effect immediately.
Picture 21
Module 4: Microsoft PowerPoint XP for Advanced Users
Microsoft PowerPoint XP: Make Your Great Presentations Even Better Page 13 of 15
2. Drawing tools In addition to the editing tools described above, there are a number of drawing tools to manage, edit, and create new shapes: a. Rotate or flip
We can rotate any object, including images, by clicking on the green button located above the object, and turn our mouse in the desired direction. In case the green button does not show up, we can select Draw à Rotate or Flip à Free rotate. We can also flip our object horizontally or vertically by choosing Draw à Rotate or Flip à choose from the available options.
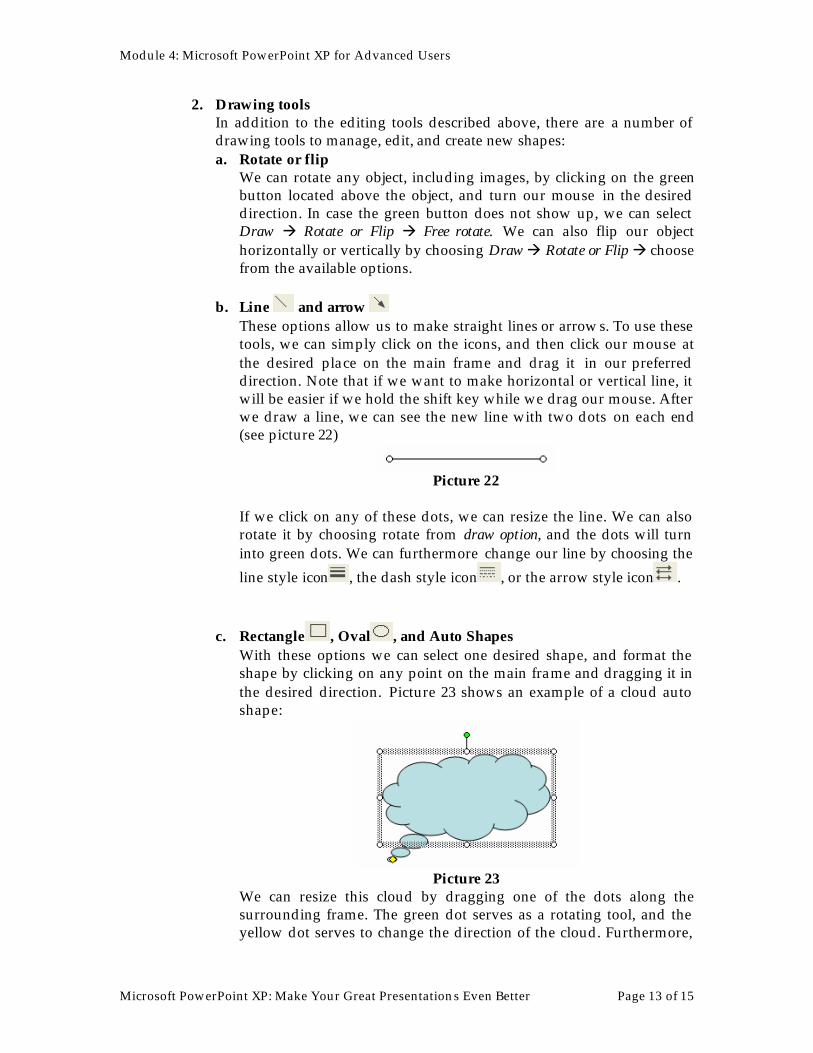
b. Line and arrow These options allow us to make straight lines or arrows. To use these tools, we can simply click on the icons, and then click our mouse at the desired place on the main frame and drag it in our preferred direction. Note that if we want to make horizontal or vertical line, it will be easier if we hold the shift key while we drag our mouse. After we draw a line, we can see the new line with two dots on each end (see picture 22)
Picture 22
If we click on any of these dots, we can resize the line. We can also rotate it by choosing rotate from draw option, and the dots will turn into green dots. We can furthermore change our line by choosing the line style icon , the dash style icon , or the arrow style icon .
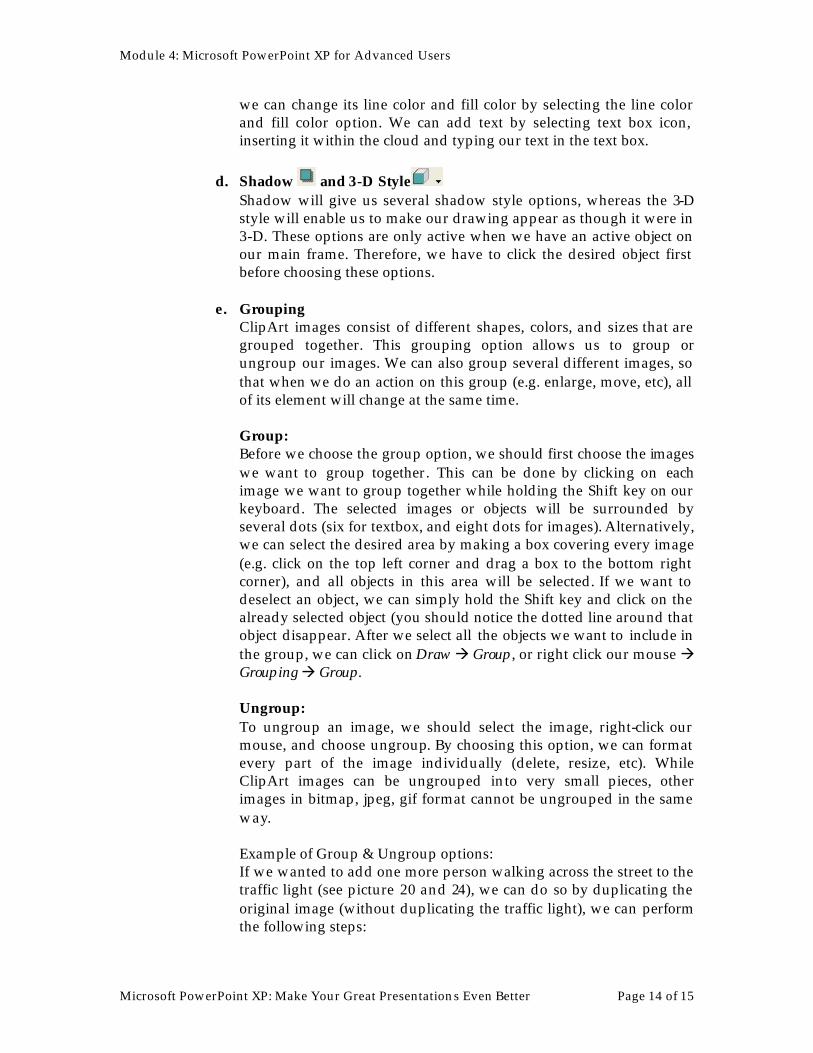
c. Rectangle , Oval , and Auto Shapes With these options we can select one desired shape, and format the shape by clicking on any point on the main frame and dragging it in the desired direction. Picture 23 shows an example of a cloud auto shape:
Picture 23
We can resize this cloud by dragging one of the dots along the surrounding frame. The green dot serves as a rotating tool, and the yellow dot serves to change the direction of the cloud. Furthermore,
Module 4: Microsoft PowerPoint XP for Advanced Users
Microsoft PowerPoint XP: Make Your Great Presentations Even Better Page 14 of 15
we can change its line color and fill color by selecting the line color and fill color option. We can add text by selecting text box icon, inserting it within the cloud and typing our text in the text box.
d. Shadow and 3-D Style Shadow will give us several shadow style options, whereas the 3-D style will enable us to make our drawing appear as though it were in 3-D. These options are only active when we have an active object on our main frame. Therefore, we have to click the desired object first before choosing these options.
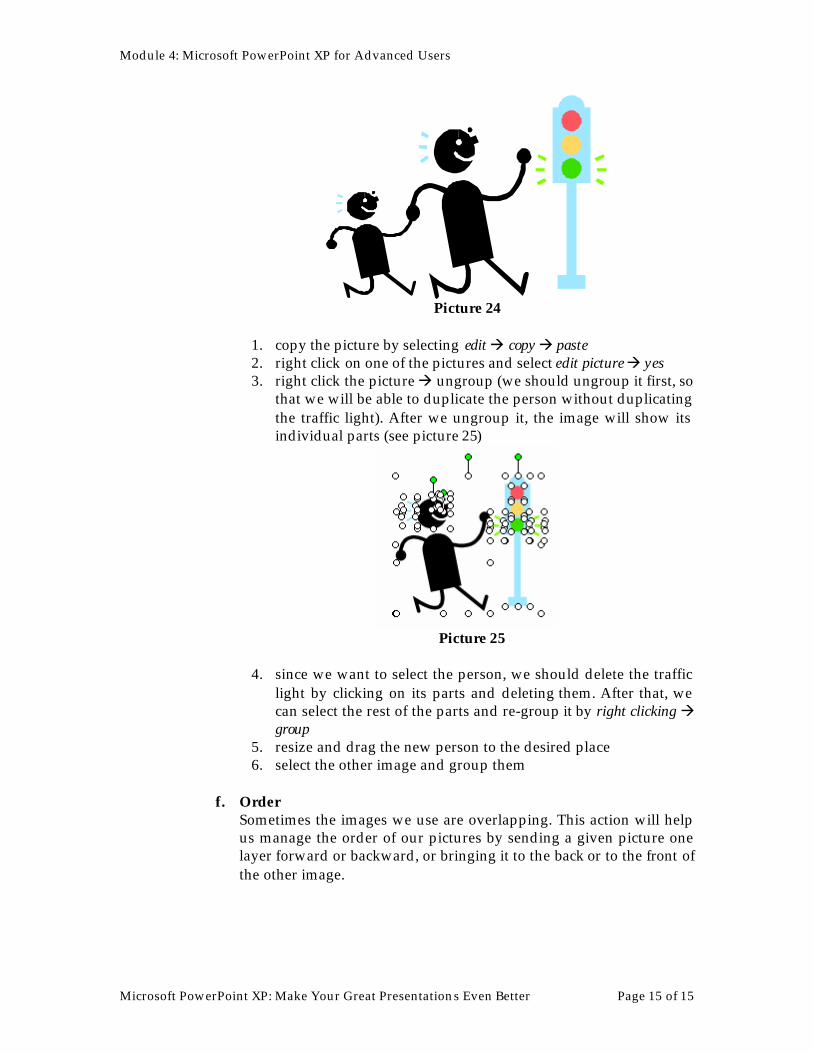
e. Grouping ClipArt images consist of different shapes, colors, and sizes that are grouped together. This grouping option allows us to group or ungroup our images. We can also group several different images, so that when we do an action on this group (e.g. enlarge, move, etc), all of its element will change at the same time. Group: Before we choose the group option, we should first choose the images we want to group together. This can be done by clicking on each image we want to group together while holding the Shift key on our keyboard. The selected images or objects will be surrounded by several dots (six for textbox, and eight dots for images). Alternatively, we can select the desired area by making a box covering every image (e.g. click on the top left corner and drag a box to the bottom right corner), and all objects in this area will be selected. If we want to deselect an object, we can simply hold the Shift key and click on the already selected object (you should notice the dotted line around that object disappear. After we select all the objects we want to include in the group, we can click on Draw à Group , or right click our mouse à Grouping à Group. Ungroup: To ungroup an image, we should select the image, right-click our mouse, and choose ungroup. By choosing this option, we can format every part of the image individually (delete, resize, etc). While ClipArt images can be ungrouped into very small pieces, other images in bitmap, jpeg, gif format cannot be ungrouped in the same way. Example of Group & Ungroup options: If we wanted to add one more person walking across the street to the traffic light (see picture 20 and 24), we can do so by duplicating the original image (without duplicating the traffic light), we can perform the following steps:
Module 4: Microsoft PowerPoint XP for Advanced Users
Microsoft PowerPoint XP: Make Your Great Presentations Even Better Page 15 of 15
Picture 24
1. copy the picture by selecting edit à copy à paste 2. right click on one of the pictures and select edit picture à yes 3. right click the picture à ungroup (we should ungroup it first, so
that we will be able to duplicate the person without duplicating the traffic light). After we ungroup it, the image will show its individual parts (see picture 25)
Picture 25
4. since we want to select the person, we should delete the traffic
light by clicking on its parts and deleting them. After that, we can select the rest of the parts and re-group it by right clicking à group
5. resize and drag the new person to the desired place 6. select the other image and group them
f. Order
Sometimes the images we use are overlapping. This action will help us manage the order of our pictures by sending a given picture one layer forward or backward, or bringing it to the back or to the front of the other image.