Embed Size (px)
Citation preview

OFFICE OF INFORMATION TECHNOLOGY TRAINING & DEVELOPMENT
MSO 101 Outlook 2007 Essentials
User Guide
Microsoft Outlook Exchange
Last Updated:
10/14/2008

2
Table of Contents
Section 1: Starting Out ............................................................................................................................ 5
Getting Started ........................................................................................................................................ 5 What is Exchange?.......................................................................................................................................................... 5 Logging into the Active Directory [Eastern] Domain .................................................................................................... 5 Resetting your Domain/Exchange Password .................................................................................................................. 6 What is Microsoft Office Outlook 2007? ........................................................................................................................ 6 Launching Outlook ......................................................................................................................................................... 6 About the Notification Icon ............................................................................................................................................. 7 Closing Outlook .............................................................................................................................................................. 8
Interacting with Outlook ........................................................................................................................ 8 The Outlook Interface ..................................................................................................................................................... 8 Using the Main Menu ................................................................................................................................................... 10 Using Shortcut (Right-Click) Menus ............................................................................................................................. 12 Keyboard Shortcut ........................................................................................................................................................ 12
Working with Toolbars ........................................................................................................................ 13 Using Toolbars ............................................................................................................................................................. 13 Showing and Hiding Toolbars ...................................................................................................................................... 13 Moving Toolbars and the Menu Bar ............................................................................................................................. 14 Using the Standard Toolbar ......................................................................................................................................... 14 Using the Advanced Toolbar ........................................................................................................................................ 15 Using the Web Toolbar ................................................................................................................................................. 16
Using the Outlook Panes ...................................................................................................................... 17 Using Outlook Today .................................................................................................................................................... 17 Using the Navigation Pane ........................................................................................................................................... 18 Using the Reading Pane ............................................................................................................................................... 22 Using the To-Do Bar..................................................................................................................................................... 23
Getting Help in Outlook ....................................................................................................................... 26 Using the Help Menu .................................................................................................................................................... 26 Opening Help ................................................................................................................................................................ 27 Using the Type a Question Box ..................................................................................................................................... 27
Section 2: Receiving E-Mail ................................................................................................................. 29 Receiving E-Mail ................................................................................................................................... 29
Sending and Receiving E-Mail...................................................................................................................................... 29 Working with E-Mail Messages ........................................................................................................... 29
About Outlook Folders .................................................................................................................................................. 29 Opening Messages ........................................................................................................................................................ 31 Editing Messages .......................................................................................................................................................... 31 Printing Messages ........................................................................................................................................................ 32 Deleting Messages ........................................................................................................................................................ 32
The New Interface, Part 1 .................................................................................................................... 34 About Ribbons ............................................................................................................................................................... 34 About Chunks ................................................................................................................................................................ 35 About Option Buttons.................................................................................................................................................... 35 Minimizing the Ribbon .................................................................................................................................................. 35
The New Interface, Part 2 .................................................................................................................... 36 Using the Quick Access Toolbar ................................................................................................................................... 36 Adding and Removing Buttons ...................................................................................................................................... 36 Moving the Quick Access Toolbar ................................................................................................................................ 37 Using the Options Dialogue to Customize the Toolbar ................................................................................................ 38
Section 3: Sending E-Mail .................................................................................................................... 41

3
Answering Mail ..................................................................................................................................... 41 Replying to Messages.................................................................................................................................................... 41 Forwarding Messages................................................................................................................................................... 43 Opening and Saving Attachments ................................................................................................................................. 45 Using the Attachment Previewer .................................................................................................................................. 47 Composing E-Mail ........................................................................................................................................................ 48 Creating a New Message .............................................................................................................................................. 48 The Message Interface .................................................................................................................................................. 48 Adding Recipients ......................................................................................................................................................... 49 Typing a Subject Line ................................................................................................................................................... 50 Creating Your Message ................................................................................................................................................ 50
Doing More with E-Mail ...................................................................................................................... 51 Creating Custom Signatures ......................................................................................................................................... 51 Adding Attachments ...................................................................................................................................................... 51 Creating Hyperlinks ...................................................................................................................................................... 53 Attaching Outlook Items ............................................................................................................................................... 53
Using the Drafts Folder ........................................................................................................................ 54 Opening the Drafts Folder ............................................................................................................................................ 54 Saving a Message as a Draft ........................................................................................................................................ 55 Opening and Editing a Draft ........................................................................................................................................ 55 Sending a Draft ............................................................................................................................................................. 55 Deleting a Draft ............................................................................................................................................................ 56
Section 4: Information Management (Calendar) ................................................................................. 57
The Calendar ......................................................................................................................................... 57 Opening the Calendar ................................................................................................................................................... 58 Creating a New Appointment ........................................................................................................................................ 58 Editing an Appointment ................................................................................................................................................ 62 Using the Tasks Pane .................................................................................................................................................... 62 Using the Calendar Navigation Pane ........................................................................................................................... 65 Using the Standard Toolbar ......................................................................................................................................... 66 Customizing Calendar Views ........................................................................................................................................ 67
Sharing Your EWU Exchange Calendar ............................................................................................ 68 Sharing your calendar with another person ................................................................................................................. 68 Change Sharing Permissions ........................................................................................................................................ 69 Calendar Permission Levels ......................................................................................................................................... 70 Opening another User’s Calendar ................................................................................................................................ 71 Using Overlay Mode ..................................................................................................................................................... 72
The Contacts Folder ............................................................................................................................. 75 Opening the Contacts Folder ........................................................................................................................................ 75 Creating a New Contact ............................................................................................................................................... 76 Creating a New Distribution List .................................................................................................................................. 77 Editing Contacts and Distribution Lists........................................................................................................................ 79 Using the Contacts Navigation Pane ............................................................................................................................ 81 Using the Standard Toolbar ......................................................................................................................................... 81 Customizing Contacts Views ......................................................................................................................................... 82
The Tasks Folder .................................................................................................................................. 84 Opening the Tasks Folder ............................................................................................................................................. 84 Creating a New Task..................................................................................................................................................... 85 Editing a Task ............................................................................................................................................................... 86 Using the Tasks Navigation Pane ................................................................................................................................. 87 Using the Standard Toolbar ......................................................................................................................................... 88 Customizing Tasks Views .............................................................................................................................................. 89
Section 5: Advanced Organization Tools .............................................................................................. 90
Managing Folders ................................................................................................................................. 90

4
Creating Folders ........................................................................................................................................................... 90 Renaming Folders ......................................................................................................................................................... 92 Moving and Deleting Folders ....................................................................................................................................... 93 Moving Messages to Folders ........................................................................................................................................ 95
Mail Management Tools ....................................................................................................................... 96 Creating a Simple Rule ................................................................................................................................................. 96 Using the Rules and Alerts Wizard ............................................................................................................................... 99
Section 6: Viewing and Printing in Outlook....................................................................................... 109
Using Viewing Tools ........................................................................................................................... 109 Using Arrange By ....................................................................................................................................................... 109 About Groups .............................................................................................................................................................. 111 Using Current View .................................................................................................................................................... 113 About AutoPreview ..................................................................................................................................................... 113
Using Print Preview ............................................................................................................................ 114 Opening Print Preview ............................................................................................................................................... 114 Using the Print Preview Toolbar ................................................................................................................................ 115 Navigating Through Print Preview ............................................................................................................................. 116 Printing from Preview ................................................................................................................................................ 116 Closing Print Preview ................................................................................................................................................. 117
Printing Outlook Items ....................................................................................................................... 117 Choosing Page Setup .................................................................................................................................................. 117 Print Commands ......................................................................................................................................................... 119 Using the Print Dialogue ............................................................................................................................................ 119 Modifying Printer Properties ...................................................................................................................................... 120

5
Section 1: Starting Out
Getting Started
What is Exchange? Microsoft Exchange Server is a messaging and collaborative software product developed by Microsoft. Exchange's major features consist of:
Electronic mail
Calendaring
Contacts
Tasks
Mobile Access to Information
Web-Based Access to Information
Data Storage
Logging into the Active Directory [Eastern] Domain In order for a computer to utilize the resources available on the EWU Active Directory, it must be joined to the domain. When you select Ctrl-Alt-Del, you will be prompted to enter your username and password. Once you do this you will be logged on to the EWU Active Directory Domain and you will be automatically authenticated in Outlook. Your email password and your EWU Active Directory Domain will always remain the same.

6
Resetting your Domain/Exchange Password
Once you are logged onto your computer you can select Ctrl-Alt-Del, and choose Change Password.
What is Microsoft Office Outlook 2007? Outlook 2007 is a versatile e-mail client, as well as a personal information manager (PIM). This means you can create, send, and manage e-mail; manage your address book; keep track of your to-do list; and schedule appointments all in one place. The different components of Outlook are all integrated, meaning you can use your contacts to address an e-mail, track all contact with a particular person, or send your community group tasks. Basic Windows functions, like cutting, copying, and pasting, are also included.
Launching Outlook There are a few ways to start Microsoft Office Outlook 2007. Note that these steps are for users of Windows XP, but other versions of Windows should be similar. First, click the Start button. You may see Outlook pinned to the top of the menu:

7
If so, simply click the icon to start the program. If you don’t see Outlook pinned to the Start menu, click All Programs and click the Microsoft Office folder. Then, click the Microsoft Office Outlook 2007 icon.
About the Notification Icon When you open Outlook, you may see an Outlook icon in the tray next to your clock, like this:

8
Closing Outlook To close Microsoft Office Outlook 2007, click the File menu and click Exit. You can also click the X in the top right-hand corner or use the Alt + F4 shortcut.
Interacting with Outlook
Now that we know how to open and close Outlook, we’re going to look at using some of the elements on the main screen, including menus, shortcut keys, and dialogue boxes.
The Outlook Interface Before we get too far, let’s take a look at the different components of the Outlook interface. Here we’re viewing the Mail folder, just because it’s the first folder that you will see when you open Outlook. The interface will be slightly different for each folder that we look at, but the basic components will remain the same.

9
1. Title Bar On the left hand side, the title bar displays the title of the document you’re working on and the name of the program. To the far right of the title bar, you have buttons to maximize, minimize, restore, or close the window.
2. Menu Bar You can click on any of these items (File, Edit, View, Go, Tools, Actions, or Help) to view a list of commands. (We’ll talk more about using menus in a moment.)
3. Type a Question If you need help, type a question in this box, press Enter, and answers will appear in a new window.
4. Toolbars This is the Standard toolbar. Outlook has three toolbars: Standard, Web, and Advanced. We’ll discuss all of them in the next lesson.
5. Navigation Pane This pane is the easiest way to get around in Outlook. It contains links to various folders so that you can easily view your contacts, mail, calendar appointments, and more. We’ll discuss this pane in

10
Lesson 1.4.
6. Inbox This is where all your new mail will appear. And, no matter what folder you’re in, you will see its items in this central pane (although the pane may be a different size).
7. Preview/Reading Pane View the contents of the selected item here.
8. To-Do Bar This is a new feature in Outlook 2007. It is visible in all folders except the Calendar folder. It summarizes upcoming tasks and appointments.
9. Status Bar Displays item count for the current folder.
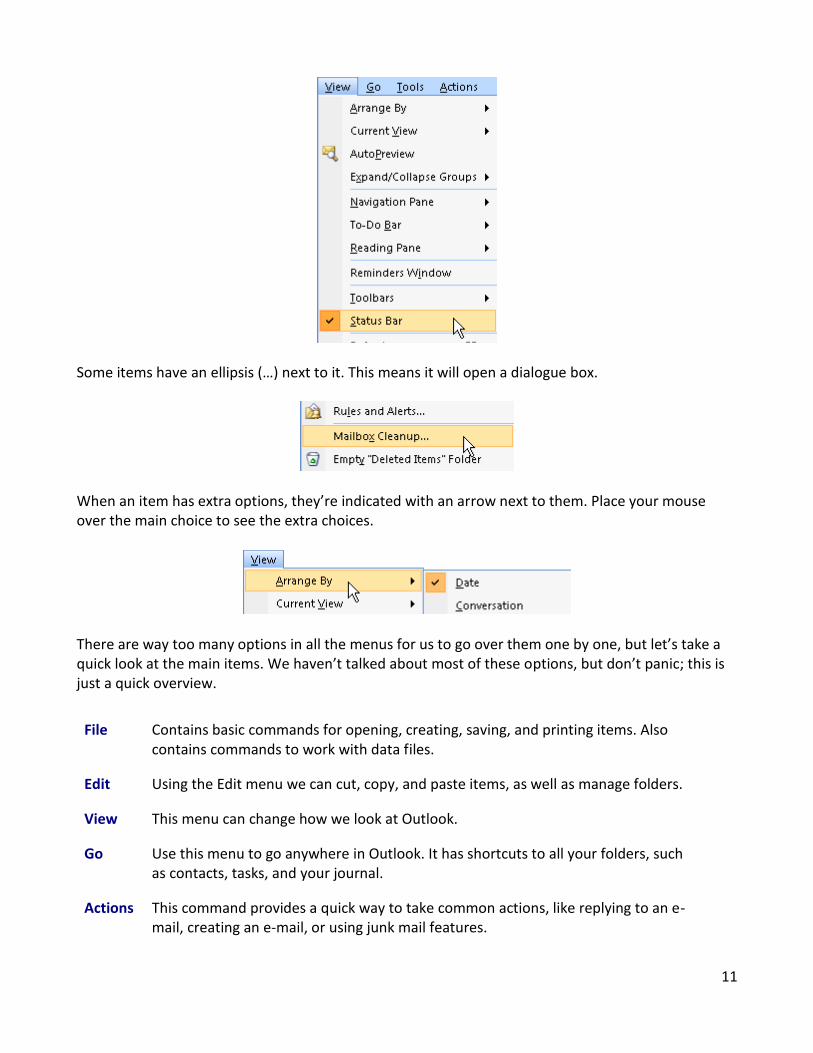
Using the Main Menu Using menus is pretty easy. First, click on the category at the top.
Then, click on the item you want.
There are some different types of items you might see in a menu. The first is action items. These are the easiest; just click on the choice to make it happen. (An example is the New Mail Message command above.) Then there are option items. They are shown with a check when enabled and no check when disabled. Click to turn them on or off.
11
Some items have an ellipsis (…) next to it. This means it will open a dialogue box.
When an item has extra options, they’re indicated with an arrow next to them. Place your mouse over the main choice to see the extra choices.
There are way too many options in all the menus for us to go over them one by one, but let’s take a quick look at the main items. We haven’t talked about most of these options, but don’t panic; this is just a quick overview.
File Contains basic commands for opening, creating, saving, and printing items. Also contains commands to work with data files.
Edit Using the Edit menu we can cut, copy, and paste items, as well as manage folders.
View This menu can change how we look at Outlook.
Go Use this menu to go anywhere in Outlook. It has shortcuts to all your folders, such as contacts, tasks, and your journal.
Actions This command provides a quick way to take common actions, like replying to an e-mail, creating an e-mail, or using junk mail features.
12
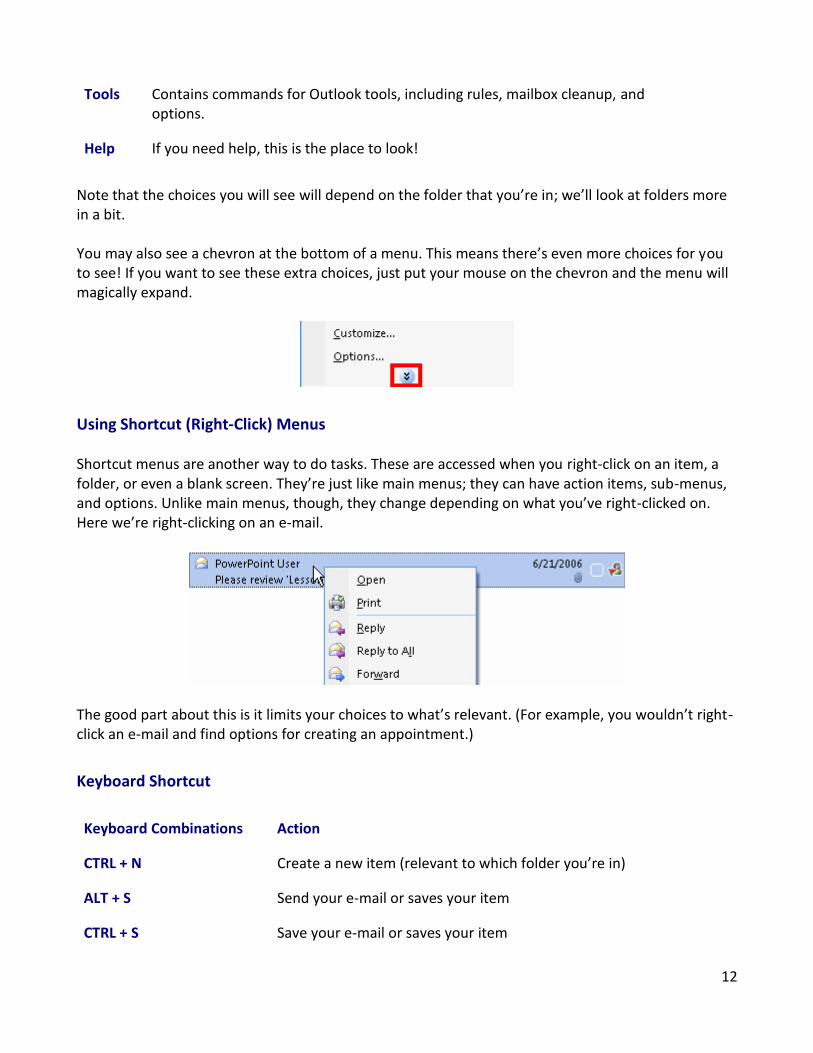
Tools Contains commands for Outlook tools, including rules, mailbox cleanup, and options.
Help If you need help, this is the place to look!
Note that the choices you will see will depend on the folder that you’re in; we’ll look at folders more in a bit. You may also see a chevron at the bottom of a menu. This means there’s even more choices for you to see! If you want to see these extra choices, just put your mouse on the chevron and the menu will magically expand.
Using Shortcut (Right-Click) Menus Shortcut menus are another way to do tasks. These are accessed when you right-click on an item, a folder, or even a blank screen. They’re just like main menus; they can have action items, sub-menus, and options. Unlike main menus, though, they change depending on what you’ve right-clicked on. Here we’re right-clicking on an e-mail.
The good part about this is it limits your choices to what’s relevant. (For example, you wouldn’t right-click an e-mail and find options for creating an appointment.)
Keyboard Shortcut
Keyboard Combinations Action
CTRL + N Create a new item (relevant to which folder you’re in)
ALT + S Send your e-mail or saves your item
CTRL + S Save your e-mail or saves your item
13
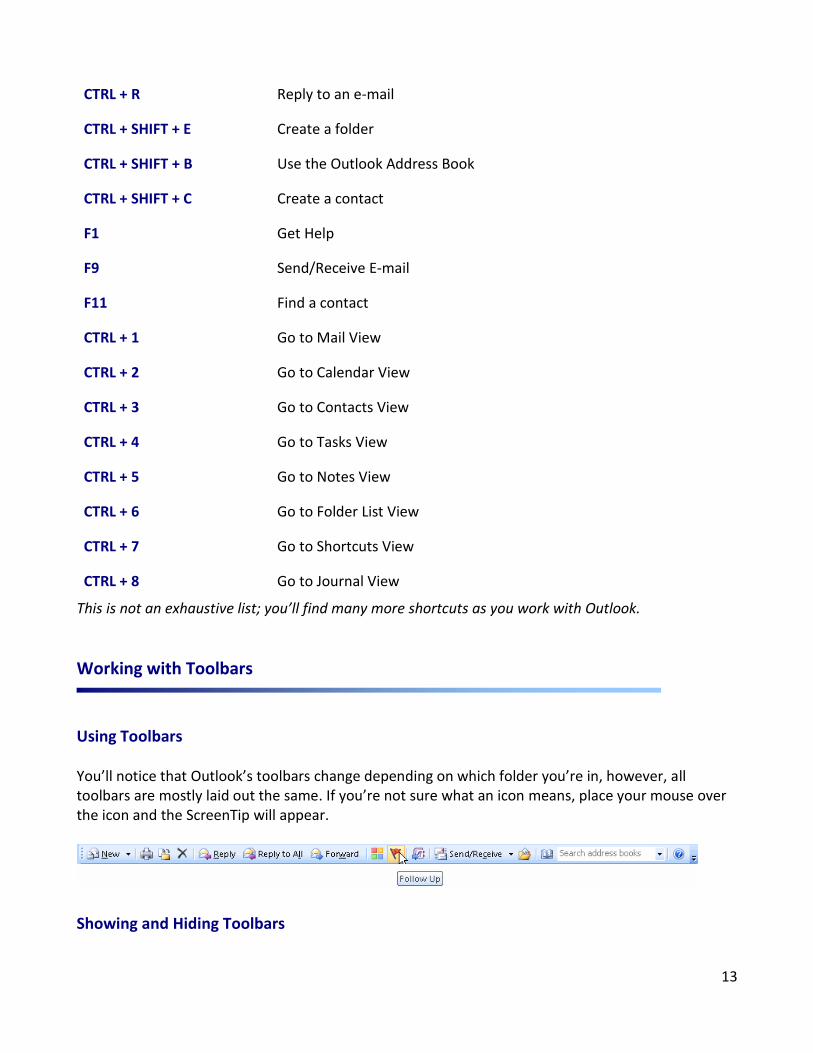
CTRL + R Reply to an e-mail
CTRL + SHIFT + E Create a folder
CTRL + SHIFT + B Use the Outlook Address Book
CTRL + SHIFT + C Create a contact
F1 Get Help
F9 Send/Receive E-mail
F11 Find a contact
CTRL + 1 Go to Mail View
CTRL + 2 Go to Calendar View
CTRL + 3 Go to Contacts View
CTRL + 4 Go to Tasks View
CTRL + 5 Go to Notes View
CTRL + 6 Go to Folder List View
CTRL + 7 Go to Shortcuts View
CTRL + 8 Go to Journal View
This is not an exhaustive list; you’ll find many more shortcuts as you work with Outlook.
Working with Toolbars
Using Toolbars You’ll notice that Outlook’s toolbars change depending on which folder you’re in, however, all toolbars are mostly laid out the same. If you’re not sure what an icon means, place your mouse over the icon and the ScreenTip will appear.
Showing and Hiding Toolbars

14
There are two ways to control what toolbars are on the Outlook screen. The first is to right-click a blank space beside a toolbar. Then, you can check toolbars you want to show and uncheck those that you want to hide. (You will need to re-open the menu after clicking a toolbar.)
You can also access this menu by clicking the View menu and clicking Toolbars.
Moving Toolbars and the Menu Bar To move a toolbar or the menu bar, first place your cursor over the small dots at the bar’s edge.
Then, click, hold, and drag to move it. You can place the toolbar on any side of the screen, or you can leave it floating in the middle.
Using the Standard Toolbar By default, the Standard toolbar is the only one displayed.
As this is the toolbar you will use most often, let’s take a look at its commands when in the mail window.
Creates a new e-mail message. (If you click the arrow next to New, you will have options to create other items as well.)

15
Prints the selected item.
Opens a window allowing you to choose a folder to move the item to.
Deletes the selected item.
Replies to the sender of the message you have selected.
Replies to the sender and all the other recipients of the message you have selected.
Forwards the message you’ve selected.
Categorize the selected item.
Flag the item for follow-up.
Performs a send/receive. (If you click the arrow next to send/receive, more options will appear.)
Brings up the “Create Rule” box.
Launches the Global Address Book (GAL).
Use this window to search through your contacts.
Launches Help.
Using the Advanced Toolbar The Advanced toolbar contains commands for viewing and navigating through items.
Let’s look at its commands when in the mail window. Remember that this is just an overview so that you can find the commands when you need them.
Opens the Outlook Today page.
Goes back one page.
Goes forward one page.
Goes up one folder level.

16
Turns the reading pane on or off.
Shows a print preview for the selected item.
Undoes the last action.
Opens the Rules and Alerts box, a more advanced version of the rules box that opens with the Create Rule button on the Standard toolbar.
Changes how you view the current mail folder. (For example, from all messages to messages received in the last seven days.)
Opens the Group By box, allowing you to group your items.
Opens the Field Chooser to customize the current folder.
Enables or disables auto preview, so you can see the first few lines of the message right in the mail folder.
Using the Web Toolbar This toolbar is used to navigate through Outlook and to search the Web right within Outlook. When you type in a URL in the white box (also known as the address bar), the main screen of Outlook will change to a Web browser.
Let’s look at this toolbar’s commands.
Goes back to the last page you were viewing.
Goes forward one page.
Stops loading the current page.
Refreshes the current page.
Goes to your home page (as set in your Internet browser).
Goes to your search page (also set in your Internet browser).

17
This is an address box, where you can type in a URL and press Enter to go to that Web site.
Using the Outlook Panes
In this section, we’ll look at Outlook Today, the Navigation Pane, the Reading Pane, and the To-Do Bar.
Using Outlook Today Outlook Today is your home page when you’re using Outlook 2007. To display it, click on Personal Folders in the Navigation Pane (it’s at the very top of the list of folders).
Outlook Today will show you not only the date, but also appointments for that day; tasks you have created; and e-mail messages that are in your inbox, drafts, and outbox.
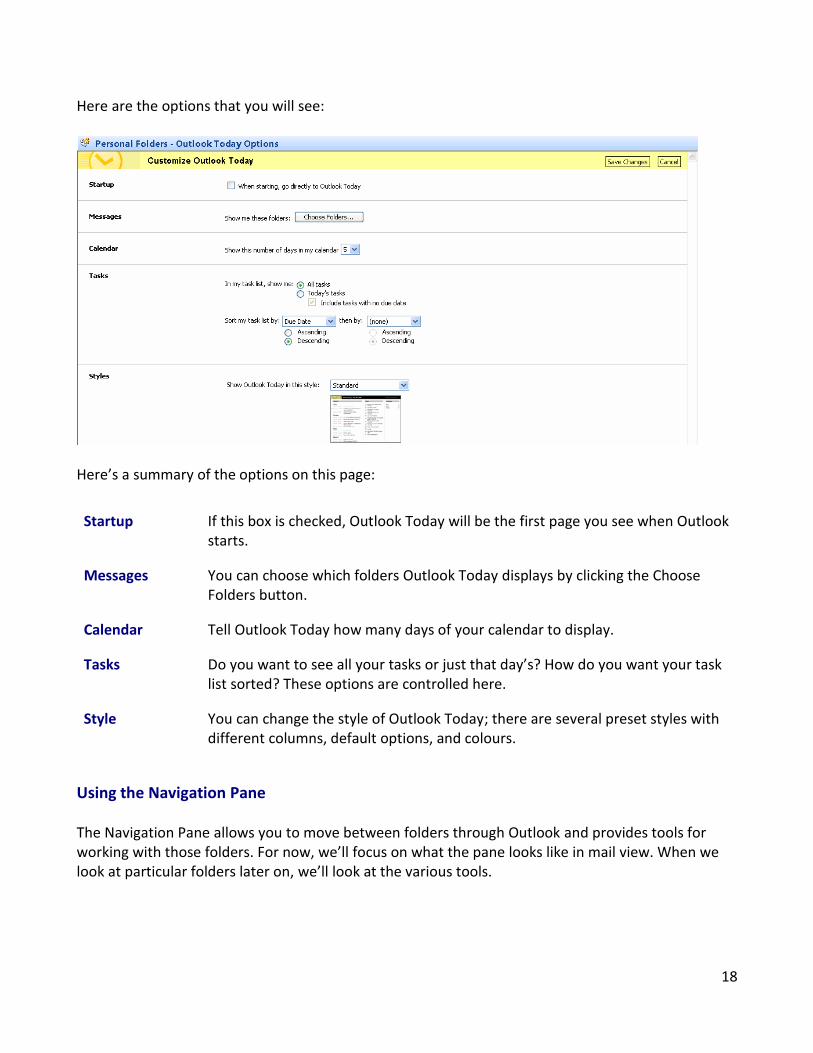
You can click on the Customize Outlook Today, located in the top right hand of the screen, to configure it.
18
Here are the options that you will see:
Here’s a summary of the options on this page:
Startup If this box is checked, Outlook Today will be the first page you see when Outlook starts.
Messages You can choose which folders Outlook Today displays by clicking the Choose Folders button.
Calendar Tell Outlook Today how many days of your calendar to display.
Tasks Do you want to see all your tasks or just that day’s? How do you want your task list sorted? These options are controlled here.
Style You can change the style of Outlook Today; there are several preset styles with different columns, default options, and colours.
Using the Navigation Pane The Navigation Pane allows you to move between folders through Outlook and provides tools for working with those folders. For now, we’ll focus on what the pane looks like in mail view. When we look at particular folders later on, we’ll look at the various tools.

19
There are four parts to this pane. The top part will show your favourite folders and your search folders.
The middle part has buttons for the different mail folders.

20
The next part has buttons for the other folders. You can show more or less of these folders by dragging the separator with the three dots on it up or down. (Additional folders minimize to the buttons at the bottom.)
The bottom part has smaller icons for less commonly used folders and a customization arrow.
By default, when you open Outlook the Mail option will be selected because this is the one most people use. This view lets you see your favourite folders as well as your mail folders. But if you want to see your Calendar all you have to do is click on the Calendar button and the view will change.

21
There are two ways to customize the Navigation Pane. The first way is to click the customization arrow next to the folder icons.
The first two options in this menu are, Show More Buttons and Show Fewer Buttons. These commands do the same thing as dragging the separator between the folder list and the button list.
If you just want to add or remove buttons from the pane, use the Add or Remove buttons menu to check or uncheck buttons. Like toolbar display, checking the button will show it while unchecking it will hide it.

22
You can also click Navigation Pane Options to open a dialogue that will allow you to hide buttons by unchecking them, or to show buttons by checking them. There are also commands to move buttons. (Note that the dialogue also contains a Reset command.)
You can also change the appearance of the Navigation Pane itself by clicking the View menu and clicking Navigation Pane.
As you can see, we have the option to hide the Navigation Pane, show it in the typical fashion, or have it minimized.
Using the Reading Pane The Reading Pane (also known as the Preview Pane) will show you a preview of the currently selected item.

23
You can control the location of the pane using the View menu.
Using the To-Do Bar The to-do bar is a new feature in Outlook 2007. Visible in all folders except the calendar, it provides quick access to upcoming tasks and appointments.

24
The top section shows the current calendar month and upcoming appointments.
The bottom section provides tools for tasks.
You can create a new task just by typing the name in. You can also add a reminder, category, or flag to the task using the icons provided. To customize the appearance of the To-Do Bar, click the View menu.
Under the To-Do Bar menu, you can choose the position and components of the bar. If you click Options, you will see a dialogue that will allow you to set additional options.

25

26
Getting Help in Outlook
There are several different ways to get help in Outlook, and we’ll go through all of them in this section.
Using the Help Menu The Help menu contains all of Outlook’s help resources.
Let’s go through the commands that are in here.
Microsoft Office Outlook Help Opens the main help screen, which we’ll look at in a moment.
Microsoft Office Online Opens http://office.microsoft.com, the Office Web site, in your Internet browser.
Contact Us Opens the support section of the Office Web site in your Internet browser.
Check for Updates Opens the updates section of the Office Web site in your Internet browser.
Disabled Items Lists add-ins that have been stopped from running in Outlook.
Office Diagnostics Runs Office’s self-repair utility.
Activate Product If you did not active Office when you installed it, you can do so with this command.

27
Privacy Options Choose when and how to download and send information to/from Microsoft.
About Microsoft Office Outlook View copyright information.
Opening Help There are three different ways that you can open the Help screen. The first is to click the Help icon on the Standard toolbar.
You can also use the F1 shortcut key, or click the Help menu and click Microsoft Office Outlook Help.
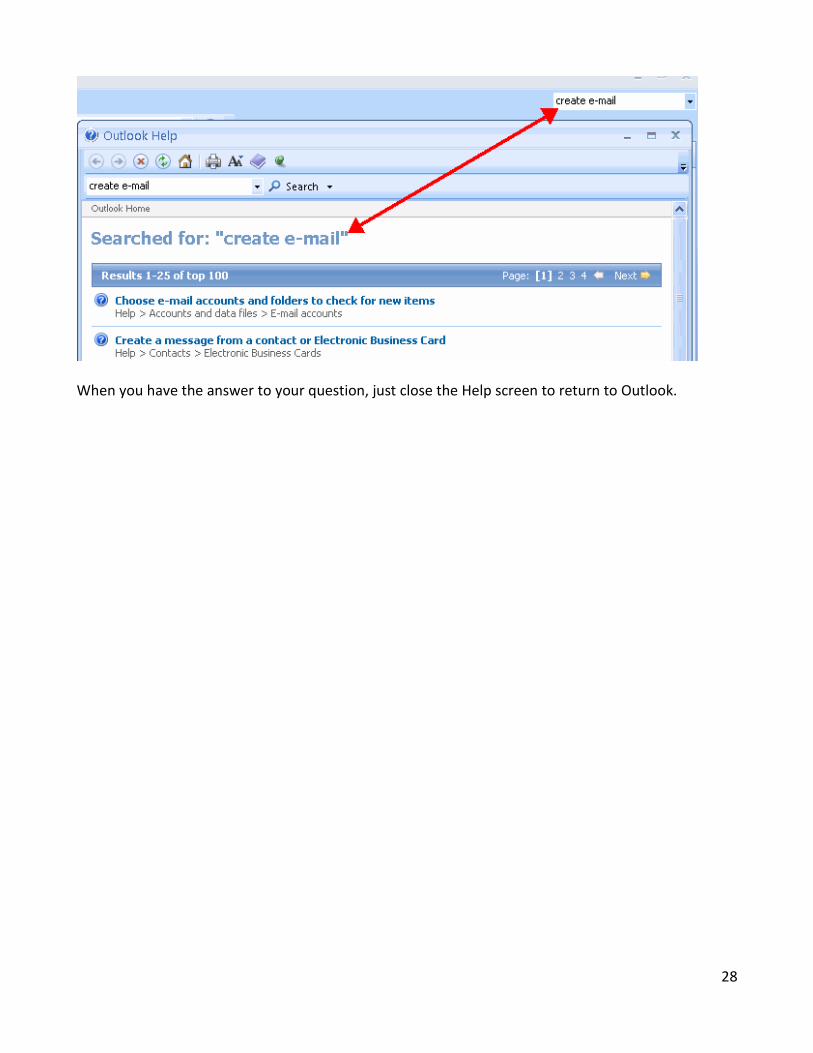
Using the Type a Question Box Another easy way to get help is the Type a Question box in the top right hand corner of the Outlook screen.
Simply type your question here and press Enter. You will see a Help search results screen appear that you can use to locate your answer.
28
When you have the answer to your question, just close the Help screen to return to Outlook.

29
Section 2: Receiving E-Mail
In this section you will learn how to:
Create an e-mail account Modify e-mail account settings Send and receive e-mail Use Outlook folders Open, edit, print, save, and delete e-mail messages Use ribbons, chunks, and option buttons Minimize the ribbon Use, customize, and move the Quick Access toolbar Use the Options dialogue to customize the Quick Access toolbar
Receiving E-Mail
In our last section, we focused on the basics of using Outlook. In this lesson, we’ll start to learn about Outlook’s real power: sending and receiving e-mail.
Sending and Receiving E-Mail Because EWU is running on and Exchange Server, there is no need to send/receive manually. Email is automatically sent and received.
However, you will still see the Send/Receive button on the Standard toolbar.
Working with E-Mail Messages
About Outlook Folders You can see a list of folders in the Navigation Pane.

30
Let’s take a look at each mail folder.
Deleted Items This folder acts like the Recycle Bin in Windows. When you delete an Outlook item, it goes here first. To permanently delete items, click the Tools menu and click Empty Deleted Items Folder.
Drafts Unsent messages can be saved here; we’ll look at this folder in depth in the next section.
Inbox This is where new mail is received.
Junk E-mail E-mail marked as junk will land here.
Outbox Messages you have created and sent are stored here while Outlook connects to the server.
RSS Feeds Live feeds are stored here.
Sent Items After a message is sent, a copy of it is stored here.
Search Folders You can customize these folders to update based on search criteria. We’ll look at these folders in depth in the Intermediate level.
As we learned in Section 1, you can click on any folder to display its contents.

31
Opening Messages To open a message from any folder, just double-click it.
The message will then open in a new window with a wide variety of options.
Editing Messages In the sample above, we opened a message that reminded us to send an accounting report to a colleague. If you like, you can add your own text to a message and save it back to the original folder. First, open the message as described on the previous page. Then, click the Other Actions button and click Edit Message.
Now you can type in the e-mail message.

32
Next, click the X in the top right hand corner to close the message. When you do so, you will be prompted to save the changes to the message.
If you do save your changes, you will see the edited message in its original location.
Printing Messages You can print a message directly from the main Outlook screen. Simply select the message and click the Print icon on the Standard toolbar, click the File menu and click Print, or use the Ctrl + P shortcut.
Deleting Messages

33
To delete a message, first select it in the main Outlook screen. Then, press Delete on your keyboard, right-click the message and click Delete, or click the Edit menu and click Delete.
The message will then be moved to the Deleted Items folder. If you want to retrieve it, click the Deleted Items folder in the Navigation Pane to display its contents. Then, click the deleted message and drag and drop it into the Inbox.
To permanently remove the items in your Deleted Items folder, you can perform the Delete command on individual messages in the folder or you can click the Tools menu and click Empty Deleted Items Folder.

34
The New Interface, Part 1
In our last lesson, we got a glimpse of the 2007-style interface that Outlook uses when creating and editing items. In this lesson, we’ll take a closer look at it.
About Ribbons The ribbon interface used by most of the Office 2007 system changes depending on what kind of object you’re creating. It also ensures you see only the commands that are most applicable to what you’re doing, as the various sets of commands are accessible using the ribbon tabs.
So, if you wanted to insert an item into your mail message, you would click the Insert tab to see those commands.
As well, you will see special ribbons appear when you create certain objects, such as drawings or tables.
We will discuss these ribbons as we encounter them.

35
About Chunks Each ribbon is composed of chunks of commands. For example, the Message ribbon has Clipboard, Basic Text, Names, Include, Options, and Proofing commands.
These separations are useful and can help you quickly and easily find commands.
About Option Buttons Some chunks will have a small button in their bottom right hand corner.
Clicking this button will open a dialogue box with more features related to the chunk. In the example above, clicking the small arrow would open the Font dialogue.
Minimizing the Ribbon If you would like, you can hide the ribbon itself and just leave the ribbon tab.
This way, you can click on the ribbon tab to display commands, but once you click the title bar or the editing window, the ribbon goes back to minimized. To minimize the ribbon, simply click the drop-down arrow next to the Quick Access toolbar and click Minimize the Ribbon.
36
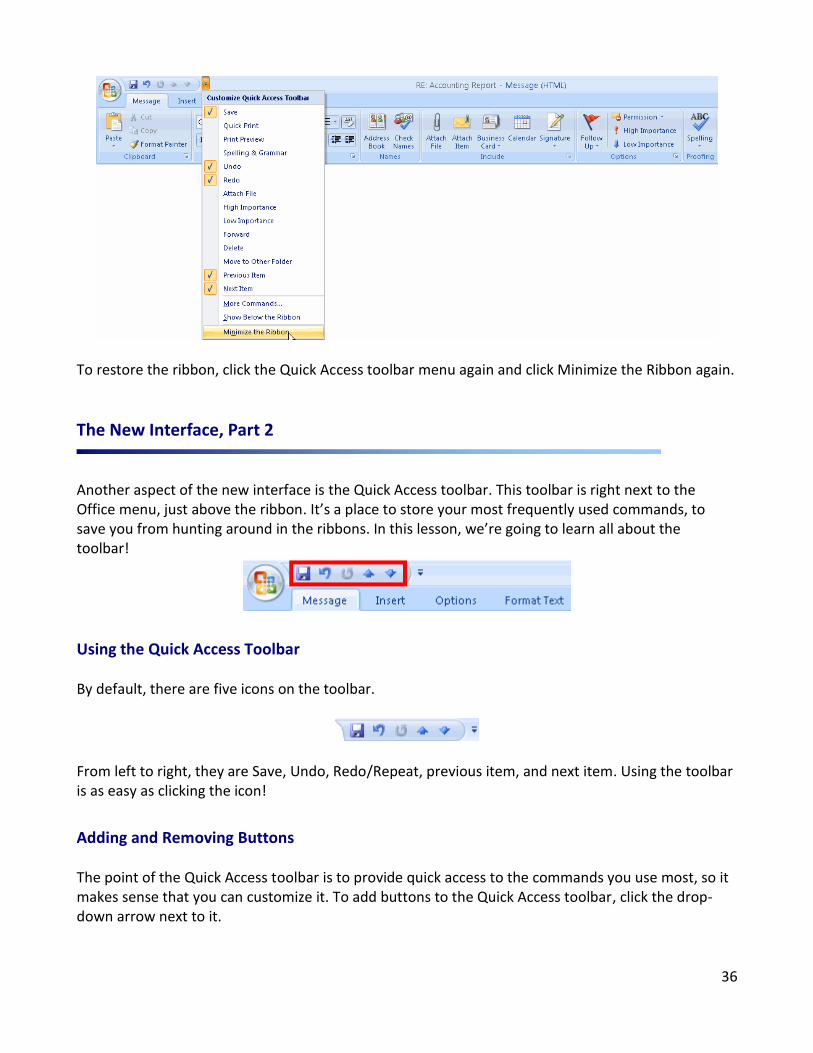
To restore the ribbon, click the Quick Access toolbar menu again and click Minimize the Ribbon again.
The New Interface, Part 2
Another aspect of the new interface is the Quick Access toolbar. This toolbar is right next to the Office menu, just above the ribbon. It’s a place to store your most frequently used commands, to save you from hunting around in the ribbons. In this lesson, we’re going to learn all about the toolbar!
Using the Quick Access Toolbar By default, there are five icons on the toolbar.
From left to right, they are Save, Undo, Redo/Repeat, previous item, and next item. Using the toolbar is as easy as clicking the icon!
Adding and Removing Buttons The point of the Quick Access toolbar is to provide quick access to the commands you use most, so it makes sense that you can customize it. To add buttons to the Quick Access toolbar, click the drop-down arrow next to it.

37
Then, click any commands you want to add to the toolbar. If a command has a check by it, it means it’s active and on the toolbar. To remove a command, simply click it to remove the check.
You can also right-click almost any command and click Add to Quick Access Toolbar.
Moving the Quick Access Toolbar If you like, you can use the drop-down menu to move the Quick Access toolbar below the ribbon:

38
Here’s what it will look like after you move it:
To move the ribbon back to its original place, click the drop-down arrow and click Show Above the Ribbon.
Using the Options Dialogue to Customize the Toolbar

39
You may have noticed that the list of options in the Quick Access toolbar’s drop down menu was pretty limited. For advanced customization options, click the More Commands item.
This will open the Customize tab of the Editor Options dialogue.
There are several things you can do with this dialogue. You can easily add buttons by selecting a category from the list at the top, choosing a command, and clicking Add.
Or, you can remove buttons by selecting them from the list on the right and clicking Remove. You can also use the arrows to change the button’s position in the list.

40
You will also find commands to show the toolbar below the ribbon and to reset the toolbar to its default state.

41
Section 3: Sending E-Mail
In this section you will learn how to:
Reply to messages Forward messages Open and save attachments Use the Attachment Previewer Open a new message Use the new message interface Add recipients to an e-mail message manually and using the Address Book Create a message with a subject line and body Add attachments, Outlook items, and hyperlinks to your message Add a theme to your message Use the Drafts folder Save a message as a draft Open, edit, send, and delete a draft
Answering Mail
In our last section, we learned how to work with messages and how to use the new 2007-style interface. In this section, it’s time to get to the real fun: answering your mail. In this lesson, we’ll learn how to reply to messages, forward messages, open and save attachments, and use the new Attachment Previewer.
Replying to Messages To reply to a message, select it in the main window and click the Reply button on the Standard toolbar. You can also use the Ctrl + R shortcut. (This will reply only to the sender of the message. If you want to include recipients who were copied on the message, use the Reply to All command.)

42
If you have opened the message, you will find the Reply and Reply to All commands on the Respond chunk of the Message ribbon. Of course, the Ctrl + R and Ctrl + Shift + R shortcuts are still valid.
Once you perform either the Reply or Reply to All commands, you will see this window.
At the top, type in the e-mail addresses for the people who will get your message. (The original sender is already entered in the To field, and the original subject line is included with RE: before it, indicating that the message is a reply.) Here’s a quick overview of the three address fields:
To Messages are addressed directly to these recipients.
CC Messages are copied to these recipients.
BCC Messages are copied to these recipients, but their address is not visible to other recipients.
You can then add your text and click Send. (You can also use the Ctrl + Enter shortcut.)

43
Back in the inbox, you will see a purple arrow in the message list indicating that the message has been replied to. You will also see a message in the Reading Pane indicating when you replied.
Forwarding Messages If you want to send the message onto another recipient, use the Forward command on the Standard toolbar.
If you’ve opened the message, you’ll find the Forward command on the Respond section of the Message ribbon.

44
Once you click Forward (or use the Ctrl + F shortcut), you will see a window similar to the Reply window.
Note that all the address fields are blank. The subject line, however, is still the original, with FW: in front of it, indicating that the message has been forwarded. All you have to do is type in your recipient’s address in the To line and your text in the body. When you’re ready, click Send.

45
Back in the inbox, you will see a blue arrow in the message list indicating that the message has been forwarded. You will also see a message in the Reading Pane indicating when you forwarded the message.
Opening and Saving Attachments Often, if someone is sending a long document or a file that can’t be copied and pasted into an e-mail message, they will attach the file itself. You can tell if a file is attached by the paperclip icon in the message list.
If you look at the message in the Reading Pane, you will see that a file is attached.
You can right-click on the file to see options.

46
NOTE: Before you open that attachment, there are some things you should know. Not all attachments are good. A lot of people have gotten viruses by opening e-mail attachments. Here’s what you can do to protect yourself:
Only open attachments from people you trust. Check the file name. If it’s something weird like, “I LOVE YOU!” you probably shouldn’t open
it. Save the file to your hard drive and scan it with your antivirus software. If you’re in doubt, just don’t open it!
Outlook will also protect you by refusing to open certain types of files (like executables, files which are actually small programs). If you’re sure the file is OK, right-click it and click Open to open it in its native application (in this case, PowerPoint).
You can also right-click the file and click Save As to save it to your computer.

47
Using the Attachment Previewer There is a new option for dealing with attachments in Outlook 2007: Preview.
If you click this command, you will be asked to verify your choice. Like regular attachments, you should only preview files that you trust.
If you’re sure you want to preview it, click Preview File. This will show a glimpse of the file in the Reading Pane.

48
Composing E-Mail
In the last lesson, we got a brief look at the message window. In this lesson, we’re going to take a closer look at the tools available to you when creating an e-mail.
Creating a New Message There are a few ways to create a new e-mail message. The easiest is to click the New button on the Standard toolbar while in a mail folder.
You can also click the File menu, choose New, and choose Mail Message. There is also the Ctrl + N shortcut.
With any of these actions, you will see this window.
The Message Interface Let’s take a closer look at the window we see when we create a new mail message.

49
1. Office Menu Click the Office logo to see commands for working with your message, including saving, sending, moving, deleting, and protecting it.
2. Quick Access toolbar Contains icons for frequently used commands. (See Lesson 2.4.)
3. Title Bar Shows the title of your message and the format being used. At the far right, you have buttons to minimize, maximize, and close the window.
4. Ribbons Commands are stored in the various tabs. So, to insert an item, you would click the Insert ribbon and then click the item. (See Lesson 2.3 for more information.)
5. Address fields Type your recipients’ addresses here. You will also find the Send command here.
6. Editing Window This is where you will type your message.
Adding Recipients To choose who to send your message to, simply type the address in the proper field. Here’s a quick overview of the three address fields:
To Messages are addressed directly to these recipients.
CC Messages are copied to these recipients.
BCC Messages are copied to these recipients, but their address is not visible to other recipients.
If you have sent a message to this recipient before, you may see a small menu pop up as you are typing.

50
Simply use the down arrow on your keyboard to choose the correct entry and press Enter to accept it. If the entry is not correct, just keep typing and ignore the menu.
Typing a Subject Line The next item that you will need to fill out is the subject line.
Typically, this will be a five to ten word line explaining what the message is about. Simply type your text in the area shown in the image above.
Creating Your Message To create a basic message, all you have to do is type in the white area.
However, Outlook uses Microsoft Office Word 2007 as its e-mail editor, so there are many more features that you can add to your message. First, let’s look at the Basic Text chunk on the Message ribbon.
Here, you can choose the face, size, color, alignment, and appearance for your font.

51
To add other Word elements, such as pictures, charts, SmartArt, ClipArt, and text boxes, look at the Insert ribbon.
Many of these features are offered with Microsoft Office Word 2007, so for more information on using them, refer to Word help. The last option we’re going to look at is changing the background color of your mail message. To do this, click the Options ribbon, click Page Color, and choose a color.
Watch your message change as you mouse over the various colors! When you find a color you like, click it to apply it. When you’re all done with your message, click Send.
Doing More with E-Mail
In our last lesson, we learned how to create a basic e-mail message. In this lesson, we’ll learn how to use some more advanced features, including attaching files and items, adding hyperlinks, and using themes.
Creating Custom Signatures Coming….
Adding Attachments It’s easy to add an attachment to your message. Just click the Insert ribbon and click Attach File.

52
Then, you will see an Insert Files dialogue. Simply browse to the file, click it to select it, and click Attach. (You can hold the Ctrl key while clicking to attach multiple files.)
You will then see an Attached Files field below the Subject field with your file listed.
You can right-click the file to modify it if necessary. There are a few things to keep in mind when sending attachments:

53
Check the size of your file. If it is too large, some people might not want to receive it, or it might not send at all.
Make sure your file doesn’t have any viruses in it. Title your attachment properly (by changing the file name in Windows) so people won’t think
it’s a virus. Try to send files that can be opened by common programs. If your boss gets your assignment
that can only be opened by Bob’s Super Duper Typing Program, he might not be happy. Outlook will block certain kinds of files that can be harmful, like executable (.exe) files.
Creating Hyperlinks Microsoft Office Outlook 2007 will automatically make the addresses of Web sites a hyperlink. However, you can make any text a hyperlink by selecting it and clicking the Insert ribbon and then the Hyperlink command. (You can also use the Ctrl + K shortcut.)
Attaching Outlook Items We can also attach other Outlook items, such as mail messages, calendar appointments, and tasks, to our mail messages. To do this, click the Insert ribbon in your mail message. Then, click the Attach Item command.
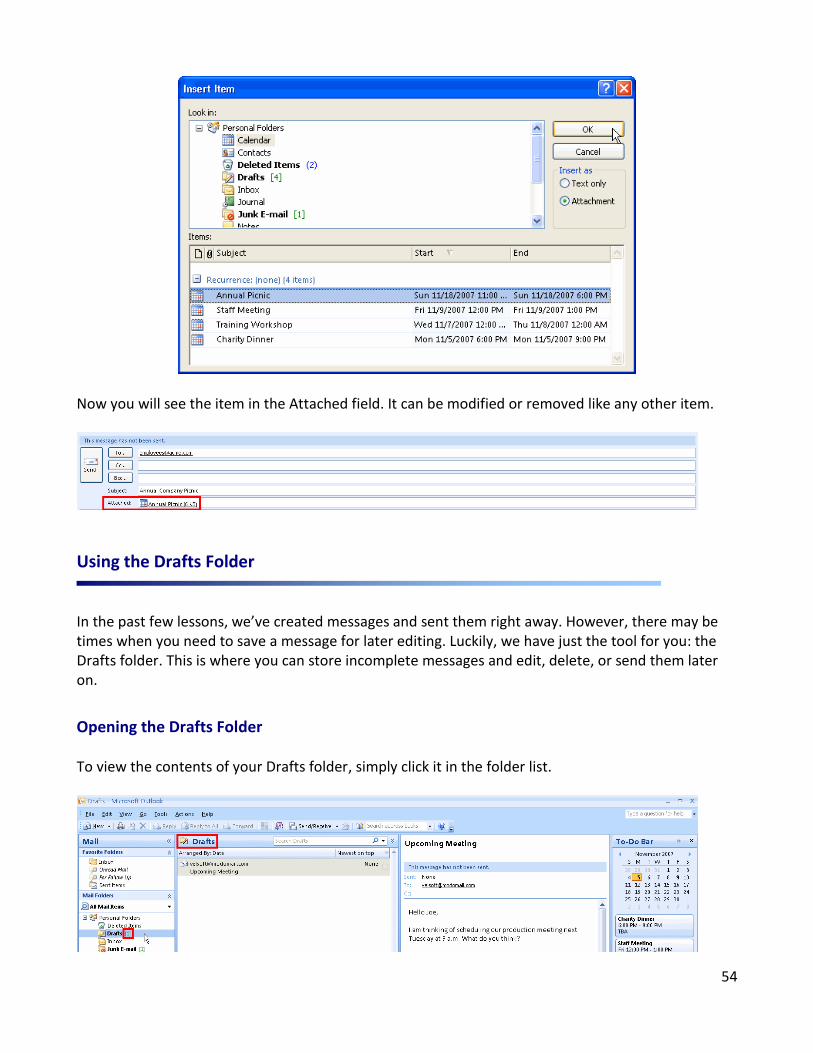
You will then see the Insert item dialogue. From the top, choose the folder that your item is in. Then, click the item that you want to attach and click OK.
54
Now you will see the item in the Attached field. It can be modified or removed like any other item.
Using the Drafts Folder
In the past few lessons, we’ve created messages and sent them right away. However, there may be times when you need to save a message for later editing. Luckily, we have just the tool for you: the Drafts folder. This is where you can store incomplete messages and edit, delete, or send them later on.
Opening the Drafts Folder To view the contents of your Drafts folder, simply click it in the folder list.

55
The number in green next to the folder indicates how many items are in it.
Saving a Message as a Draft By default, Outlook saves messages to the Drafts folder every three minutes. This really comes in handy if your computer blows up while you’re typing a message! If you want to save your message manually, however, you can press Ctrl + S, click the Office menu and click Save, or use the Save command on the Quick Access toolbar.
Opening and Editing a Draft To open a draft message, first open the Drafts folder. Then, double-click the item.
Now you can edit the message as usual and send it. Once you send it, it will be removed from the Drafts folder.
Sending a Draft

56
If you don’t need to edit a draft and you just want to send it, there are two ways to do it. You can open the message and click Send just like we did when editing the message. Or, you can simply drag the message to your Outbox.
Deleting a Draft Deleting a draft is just like deleting any other message. First, click it to select it. Then, press the Delete key on your keyboard, click the Edit menu and click Delete, or right-click the item and click Delete.

57
Section 4: Information Management (Calendar)
In this section you will learn how to:
Open the calendar Create a new appointment Edit an appointment Use the Tasks pane in the calendar Open the Contacts folder Create a new contact and a new distribution list Edit contacts and distribution lists Open the Tasks folder Create a new task Edit tasks Open the Notes folder Create a new note Edit a note Use the Navigation Pane in the various folders Use the Standard toolbar in the various folders Customize your view in all folders
The Calendar
In the previous sections, we’ve learned all about using Outlook’s e-mail features. In this section, we’re going to learn about Outlook’s other information management features. We’ll start off with learning how to use the calendar.

58
Opening the Calendar
To open the calendar, simply click the Calendar button in the Navigation Pane
You can also click the Go menu and click Calendar or use the Ctrl + 2 shortcut.
When the folder opens, you will see a structure much like any mail folder, with the menu bar, toolbar, Navigation Pane, and central window.
Creating a New Appointment There are several ways you can create a new appointment. Like a mail message, you can use the New command on the Standard toolbar.

59
Or, you can click the File menu, choose New, and choose Appointment.
You can also double-click a location in the calendar to place an appointment there.
With any of these actions, you will see the New Appointment window.
Like the New Message window, it uses the ribbon interface. (See Lessons 2.3 and 2.4 for an overview.) Although there are many options here, let’s focus on the basics. First, fill in the subject and location (if you wish) for your meeting.

60
Then, choose the start date and time from the drop-down menus. (This may already be filled in if you double-clicked in the calendar to create your appointment.)
Next, choose the end date and time for your appointment. (You can also check the “All day event box” if you wish. This box is great for events like birthdays.)
Then, type the details of your meeting and click Save and Close.

61
It will now appear in the calendar.
When the time for the appointment comes, Outlook will remind you of it.

62
You can choose to dismiss this reminder or all reminders, open the item, or snooze.
Editing an Appointment To edit an appointment, simply double-click it.
Then, make your changes and click Save and Close.
You can also right-click appointments to see more options.
Using the Tasks Pane

63
At the bottom of the calendar, you will see a pane listing tasks that are due on each day. This replaces the TaskPad feature available in previous versions of Outlook.
By default, tasks are shown on their due date. You can change this by right-clicking it.
To create a task, simply click in the day that you want to create it and type (much like the To-Do Bar).
You can also right-click the task to see more options.

64

65
Using the Calendar Navigation Pane Just like when you’re in a mail folder, the Navigation Pane lets you move around Outlook when you’re in the calendar. However, it also offers some additional options.

66
At the top, you will see calendars for the next several months. The current week is highlighted in orange and existing appointments appear in bold. You can click any date to go to that week or you can use the arrows beside the current month to go back or forward in the calendar.
Then, in the My Calendars section, you will see all your available calendars and links for sharing and searching calendars. (These options will be covered in the Advanced manual.)
Then, at the bottom, you have the navigational buttons that we looked at earlier.
Using the Standard Toolbar The Standard toolbar looks a bit different in the Calendar view.
Let’s take a look at its commands.
Creates a new appointment. (If you click the arrow next to New, you will have options to create other items as well.)
Prints the selected item.
Deletes the selected item.
Categorize the selected item.
Send the selected item to OneNote. (Only available if you have

67
OneNote installed.)
View group schedules associated with your calendar.
Go to the current day in your calendar.
Launches the Outlook address book.
Use this window to search through your contacts.
Launches Help.
Customizing Calendar Views You can change the appearance of your calendar using the view options on the top.
Simply click a tab to change your view. With Week and Month, you will have different options with the radio buttons to the right of the tabs.

68
You can also use the View menu to change your view. You will find options for day, week, work week, and month here. You can also use the Current View menu to change what kind of appointments appear.
Sharing Your EWU Exchange Calendar
To allow another person to access your Exchange calendar, you will need to grant them permission to your calendar.
Sharing your calendar with another person
1. Open Outlook 2007 and click on the Calendar navigation button to switch to the calendar views.
2. If you want to let someone view your calendar only, click the Share My Calendar... link.

69
3. You will be prompted to send an e-mail message telling the person that he or she has access to your calendar. You can also request permission to view a recipient’s Calendar by clicking the check box.
Change Sharing Permissions
If you would like the person to be able to add or edit events on your calendar, you will need to change the Permission Levels. To view and change permission levels, Right click on your calendar and select Change Sharing Permissions.

70
The Calendar Properties Window appears.
To change a person’s permission level, select their Name
Now click the Permission Level drop down to grant that user, the correct level.
Note: Reviewer is the default setting. See Permission Levels for detail about the levels.
Click OK, when you are finished.
Calendar Permission Levels It’s important to understand what level of permission you are granting a user when you share your calendar. You can share your calendar with someone and give that person access to open and view your calendar. You can give another person permission to create meetings on your behalf and to make other changes.
There are several types of sharing; here are the common choices:
Owner Has full ownership of the calendar, this may be useful for those who are owners of resource/room calendars.
Publishing Editor A Publishing Editor has the same capability as Editor but can also create subfolders.

71
Editor An Editor will be able to create and view events on your calendar and will also be able to modify and delete any event on your calendar. You are effectively giving the person full read and write access to your calendar.
Publishing Author
A Publishing Author has the same permission level as Author but can also create subfolders.
Author An Author can create events on your calendar and view your calendar but cannot modify or delete any events that you have placed on your calendar. Only those events created by this person can be modified or deleted.
Non-editing Author
A Non-editing Author can create events on your calendar and view your calendar but cannot modify any events once they have been have placed on your calendar or delete any of your events. Events created by this person can be deleted but
Reviewer A Reviewer will be able to view events on your calendar only. No changes can be done to your calendar. This is the permission level to select if you don't want to grant any write permission to the other person.
Contributor A Contributor can create events on your calendar but can't view your calendar and cannot modify or delete any events that have been placed on the calendar. Events can be dropped on your calendar only.
None By default, if you do not share your calendar other users can only see that you are busy.
Opening another User’s Calendar Sometimes users may choose to send you a calendar as an e-mail attachment.

72
Simply double-click the indicated link to open it. You will then see the additional calendar listed in the Navigation Pane. You can check it to show it or uncheck it to hide it.
The level of detail that you will see in the other user’s calendar will depend on the settings they specified when they sent the file. In the example above, we can only see that Sam is busy at particular times; we can’t see the details of his appointments.
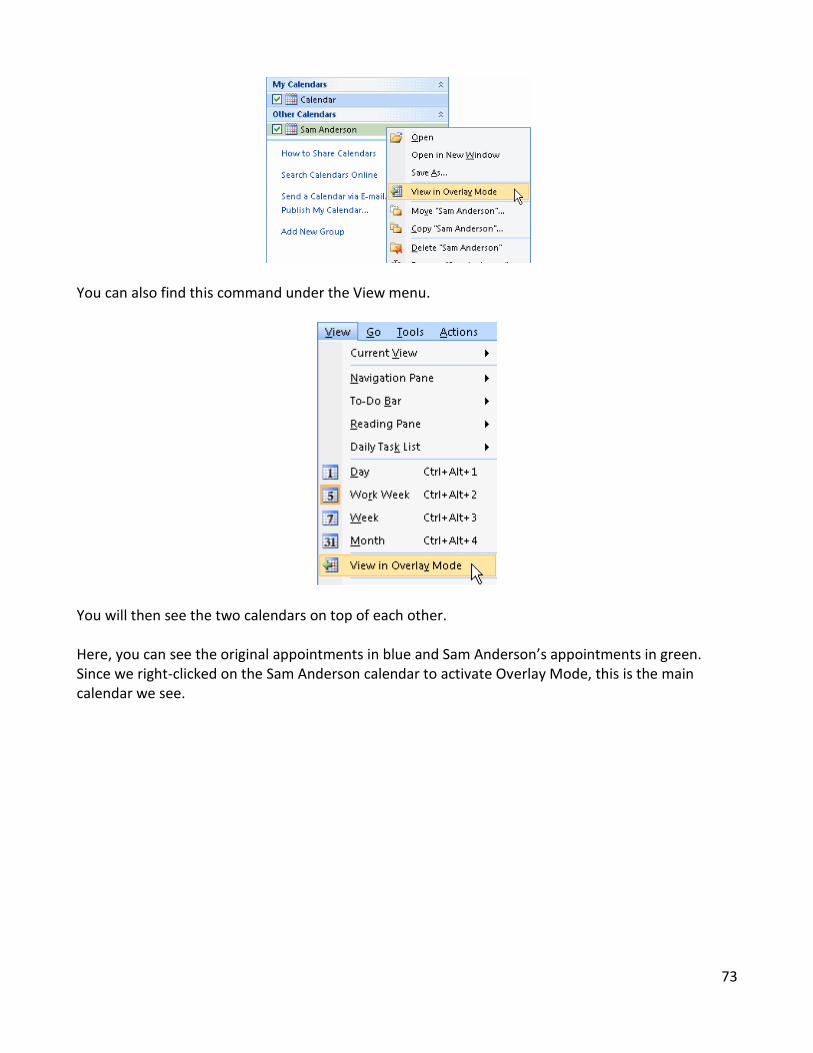
Using Overlay Mode Overlay mode allows you to place calendars on top of each other so that you can easily see conflicts and available time. To switch to this mode, right-click on either calendar and click Switch to Overlay Mode.
73
You can also find this command under the View menu.
You will then see the two calendars on top of each other. Here, you can see the original appointments in blue and Sam Anderson’s appointments in green. Since we right-clicked on the Sam Anderson calendar to activate Overlay Mode, this is the main calendar we see.

74

75
To turn off overlay mode, right-click the calendar again or use the View menu and click View in Side by Side Mode.
The calendars will then be returned to normal view.
The Contacts Folder
Outlook’s contacts folder gives you a place to store vital information about the people you communicate with. You can use the information in this folder to address e-mails, schedule meetings, assign tasks, and much more. In this lesson, we’ll learn how to open and use the Contacts folder; how to create a new contact and distribution list; how to edit contacts and distribution lists; and how to use the Navigation Pane, Standard toolbar, and View menu.
Opening the Contacts Folder To open the Contacts folder, simply click the Contacts button in the Navigation Pane.

76
You can also click the Go menu and click Contacts or use the Ctrl + 3 shortcut.
When the folder opens, you will see a structure much like any mail folder, with the menu bar, toolbar, Navigation Pane, To-Do Bar, and central window.
Creating a New Contact There are several ways you can create a new contact. Like a mail message, you can use the New command on the Standard toolbar.
Or, you can click the File menu, choose New, and choose Contact.

77
You can also double-click a blank spot in the folder.
With any of these actions, you will see a new contact window appear.
You can then fill in the fields in the window. You can also use the commands on the Show chunk of the Contact ribbon to show or hide other fields.
Once your information is filled in, click Save and Close to save your changes and return to the Contacts folder.
Creating a New Distribution List

78
A distribution list is a list that contains many contacts. For example, you could create a distribution list that contains all the members of your soccer team. When you want to send an e-mail to your team, you can send it to the list rather than to each contact. To create a new distribution list, click the File menu, choose New, and click Distribution List.
You can also click the drop-down menu next to the New button on the Standard toolbar and click Distribution List.
You will then see the Distribution List window:
First, type a name for the list. Then, click the Select Members button.

79
Here, you can click the members that you want to add and then click Members.
Once you’ve added the members, click OK to close the dialogue. You will be returned to the Distribution List window where you can click Save and Close to save your changes and close the window.
Editing Contacts and Distribution Lists To edit a contact or distribution list, double click it to open it.

80
You can then edit the contact and click Save and Close once you’ve made your changes.
You can also right-click contacts to see more options.

81
Using the Contacts Navigation Pane You can use the Navigation Pane to help you move through the Contacts folder. At the top, you will see a list of the various contacts folders in Outlook. (By default, there is only one, but you can create more. We’ll cover this topic in our Intermediate manual.)
Next you will see ways of customizing how you view your contacts. We’ll look at these options in detail in a moment.
Then, at the bottom, you have the navigational buttons that we looked at earlier.
Using the Standard Toolbar The Standard toolbar looks a bit different in the Contacts folder.
Let’s take a look at its commands.
Creates a new contact. (If you click the arrow next to New, you will have options to create other items as well.)
Prints the selected item.
Move the contact to a different folder.
Deletes the selected item.
Open a new message to the selected contact.
82
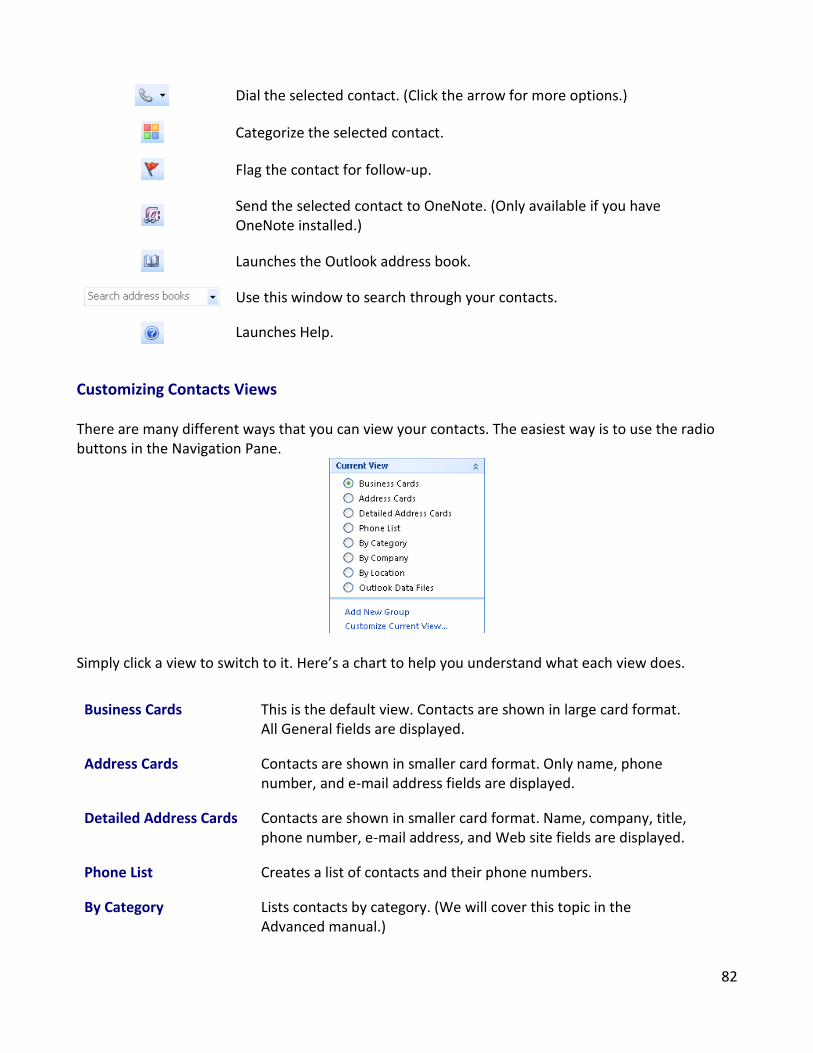
Dial the selected contact. (Click the arrow for more options.)
Categorize the selected contact.
Flag the contact for follow-up.
Send the selected contact to OneNote. (Only available if you have OneNote installed.)
Launches the Outlook address book.
Use this window to search through your contacts.
Launches Help.
Customizing Contacts Views There are many different ways that you can view your contacts. The easiest way is to use the radio buttons in the Navigation Pane.
Simply click a view to switch to it. Here’s a chart to help you understand what each view does.
Business Cards This is the default view. Contacts are shown in large card format. All General fields are displayed.
Address Cards Contacts are shown in smaller card format. Only name, phone number, and e-mail address fields are displayed.
Detailed Address Cards Contacts are shown in smaller card format. Name, company, title, phone number, e-mail address, and Web site fields are displayed.
Phone List Creates a list of contacts and their phone numbers.
By Category Lists contacts by category. (We will cover this topic in the Advanced manual.)

83
By Company Lists contacts by company.
By Location Lists contacts by geographical location.
Outlook Data Files Lists contacts by the file that they are in.
You can also use the Add New Group and Customize Current View links to create a custom view. You can also use the View menu to help you change views. The Arrange By submenu contains a list of ways that you can sort your contacts.
The Current View menu contains the same list of options that we saw in the Navigation Pane.
If you’re in a Cards view, you can use the letter buttons to navigate through your contacts (like a Rolodex). This is particularly useful if you have many contacts.

84
The Tasks Folder
The next folder we’re going to look at is Tasks. This is a great place to manage the things you have to do! We’ll learn how to open and use the Tasks folder; how to create new tasks; how to edit tasks; and how to use the Navigation Pane, Standard toolbar, and View menu while in the Tasks folder.
Opening the Tasks Folder To open the Tasks folder, simply click the Tasks button in the Navigation Pane.
You can also click the Go menu and click Tasks or use the Ctrl + 4 shortcut.

85
When the folder opens, you will see a structure much like any mail folder, with the menu bar, toolbar, Navigation Pane, To-Do Bar, and central window.
Creating a New Task To create a basic task, simply type where indicated in the Tasks window or the To-Do Bar.

86
To open the New Task window, you can click the New button on the Standard toolbar; click the File menu, click New, and choose Task; or press Ctrl + N.
This is much like the New Appointment window. Type a subject, set a start date and a due date, add a reminder if you wish, and add notes. Then, click Save and Close.
Editing a Task Like other Outlook items, you can double-click an item to open it and edit it.

87
Note the Mark Task Complete command and the status area in the task.
These commands will let you keep track of the progress of tasks and keep on top of overdue and upcoming tasks.
Using the Tasks Navigation Pane

88
By now, the Navigation Pane should look familiar to you. At the very top, there is a search bar. In the next section, you can toggle between your to-do list (which shows incomplete tasks) and your tasks list (which shows all tasks). In the middle of the pane, there is a list of views that you can choose from. And at the bottom, we have our standard navigation buttons.
Using the Standard Toolbar There are a few additional commands on the Standard toolbar for the Tasks folder.
Let’s go over each command.
Creates a new task. (If you click the arrow next to New, you will have options to create other items as well.)
Prints the selected item.
Opens a window allowing you to choose a folder to move the item to.
Deletes the selected item.
Mark the selected task as complete.

89
Replies to the sender of the message you have selected.
Replies to the sender and all the other recipients of the message you have selected.
Forwards the message you’ve selected.
Categorize the selected item.
Flag the item for follow-up.
Launches the Outlook address book.
Use this window to search through your contacts.
Launches Help.
Customizing Tasks Views Like the other folders, you can click a view in the Navigation Pane to apply it.
You can also click the View menu and choose Arrange By to see ways to sort your tasks.
90
Section 5: Advanced Organization Tools
Managing Folders
By now, you’re probably quite familiar with creating messages and working with the default folders in Outlook. However, Outlook gives you the ability to create your own folders to manage your mail. In this lesson, we’ll learn about creating, renaming, deleting, and using folders.
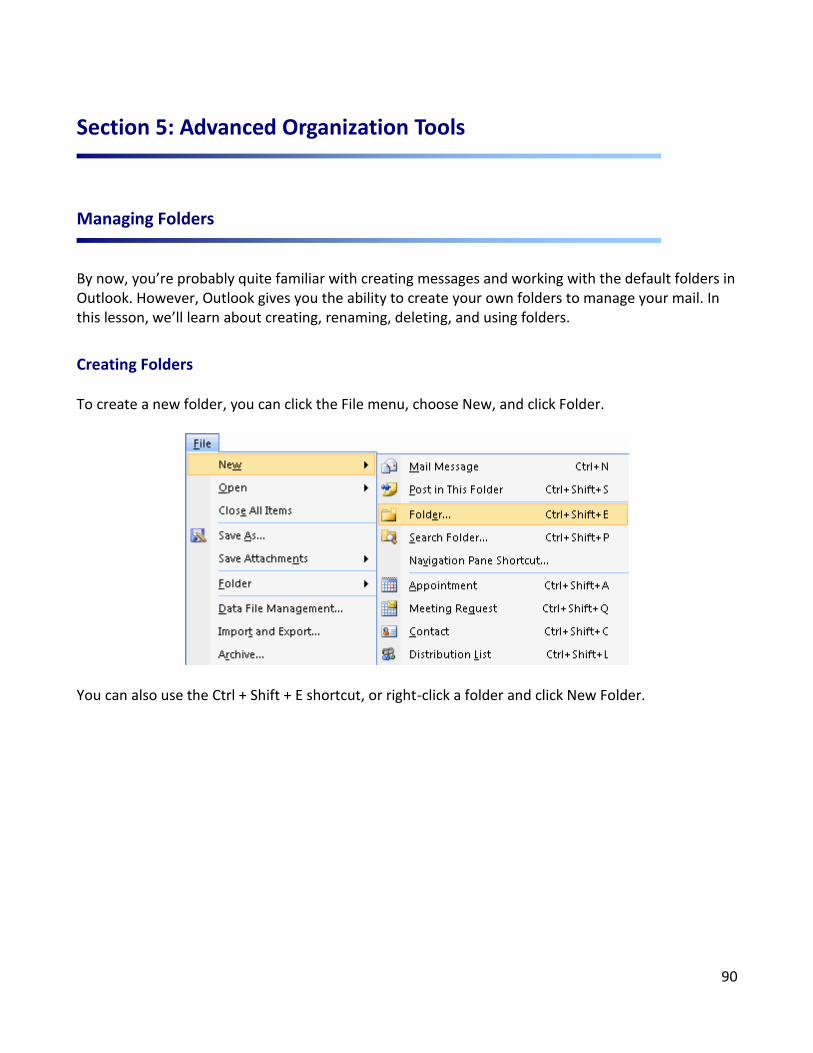
Creating Folders To create a new folder, you can click the File menu, choose New, and click Folder.
You can also use the Ctrl + Shift + E shortcut, or right-click a folder and click New Folder.

91
You will then see this dialogue:
At the top, type a name for your folder. Then, choose what type of items you want it to contain. Then, choose what folder you want to place it underneath. When you’re ready, click OK.

92
Renaming Folders If you later decide to change the name of your folder, simply right-click it and click Rename.
Your cursor will then appear in the folder name. Just type a new name and press Enter.
Note that default folders (such as inbox and junk e-mail) cannot be renamed.

93
Moving and Deleting Folders To change the location of a folder, you can drag and drop it. Here, we are dropping My Folder into the Inbox.
Now, the Inbox will have a plus sign next to it, indicating that it contains subfolders. You can click the plus sign to show the folders, or click the minus sign to hide the folders.

94
You can also right-click a folder to move or delete it.
If you choose the Delete option, the folder will be moved to Deleted Items. If you choose Move or Copy, you will see a dialogue like the following.
Here, you can choose a destination folder and click OK.

95
Moving Messages to Folders Moving messages to your folders is easy! One way is to click the message and drag it to your desired folder.
You can also select the message and click the Move to Folder button on the Standard toolbar. You can then choose a recently used folder in the list, or click the More Folders button to see a complete list of folders.

96
Mail Management Tools
Let’s look at using some of Outlook’s mail management tools that can automate the process, including the Rules and Alerts Wizard and the Organize pane.
Creating a Simple Rule Wouldn’t it be great if every time you got an e-mail from your boss, Outlook moved it to its own folder? Outlook has a feature to do just that; it’s called the Rules and Alerts wizard. You can get to the wizard in one of a few ways:
Click the Create Rule ( ) button on the Standard toolbar Right-click an e-mail and click Create Rule Click the Tools menu and click Rules and Alerts
With either of the first two choices listed above, you will see this dialogue:
This is a simplified version of the Rules and Alerts wizard. It’s a great way to create a quick rule. The first part of the box (“When I get e-mail with all of the selected conditions”) specifies when the rule will act; the second part (“Do the following”) specifies what will happen when the type of e-mail you’ve specified arrives. At least one of the boxes in each section needs to be checked for the OK button at the bottom to light up.

97
Here’s an overview of the first set of boxes:
From This box is automatically filled in with the sender of the e-mail that was selected when you clicked the Create Rule button. It can’t be changed in this window.
Subject contains The white text box is automatically filled in with the subject of the e-mail that was selected when you clicked the Create Rule button. You can edit it just by clicking in the white box, deleting the text that’s there, and typing. (You can, of course, also modify the text that’s typed in there.)
Sent to This message was sent to someone using a distribution list (a predefined group of contacts), so this drop-down list contains both the name of the distribution list and “me only.”
The second set of boxes tells Outlook what actions to take when the conditions in the first set of boxes are met:
Display in the New Item Alert Window With the New Item Alert window, you can open the e-mail by clicking the Open Item button, edit the rule by clicking the Edit Rule button, or just close the window.
Play a selected sound Plays a sound when the e-mail arrives. (Normally Outlook plays a sound anyway when you get new e-mail, but this is a way to have Outlook play a sound for only specific e-mails, or to set a custom sound for certain e-mails.) Click the Browse button to pick a file; you can also click the Play button to hear the sound.
Move the item to folder This is the most commonly used feature. This option will move e-mails that meet the conditions set out in the first box to a folder that you specify. When you check this box, a window will pop up asking you to pick a folder. (You can only specify one folder.)

98
Here is a completed Create Rule box.
This rule will tell Outlook that when an e-mail arrives from Bugs Bunny, and was sent to me only, Outlook should play the tada.wav sound, and move the e-mail to the Deleted Items folder. Once we click OK to this box, Outlook will bring up another box confirming that the rule has been created. You’ll also have an option to run the rule on messages already in the folder, which will help if you’ve created the rule after a lot of e-mail has arrived.
If you click the Advanced Options button in the above figure, you’ll get a totally different screen: step 2 of the Rules and Alerts wizard.

99
Using the Rules and Alerts Wizard Let’s look at the Rules and Alerts wizard from the beginning. To launch it, just click the Tools menu and click Rules and Alerts.
The toolbar at the top of the dialogue gives you options to create a new rule; to change, delete, copy, or move the selected rule; or to run the rule now. The Options button allows you to import, export, or upgrade your rules. If you’re just looking to make a quick change to a rule’s action, the Change Rule button is the best way to do it.

100
All of the options in the menu are pretty self-explanatory: you can rename the rule or add different options. You’ll notice that there are some new options that we didn’t have in the Create Rule dialogue box, like changing the message’s priority. The options that are already in use for the rule are highlighted with an orange icon (for example, Play a Sound and Move to Folder in the sample menu above). You can click those options to remove that action for the rule.

101
The icons you see in the menu are important when we’re looking at part 2 of the Rules and Alerts box.
This section is a list of the rules that are in place and the actions that Outlook will take. The actions are identified by the same icons that we saw in the Change Rule menu. In the list, there’s also a checkbox by the name of each rule. If the box is checked, the rule is on; if the box is unchecked the rule is off. You can click in the checkbox to change this on/off status.

102
Part 3 of the Rules and Alerts screen will give you a detailed explanation of each rule that is set up.
You can click the parts that are underlined in blue to change that action or value. To create a new rule, click the New Rule button in the Rules and Alerts dialogue. The Rules and Alerts wizard will then launch.

103
First, choose to start from a template or a blank rule.

104
Then, click the blue underlined items to choose a specific value.
If you start from a template, the remaining steps in the wizard will be filled out for you. Simply confirm your choices by clicking Next, or click Finish at any point. If you choose to use a blank rule, none of the boxes will be checked when you click Next, so it’s up to you what conditions you pick. It’s the same idea as before: check the conditions in Step 1, and then click the underlined value in Step 2 to specify your information. In this example, we checked “with specific words in the subject” and then clicked “specific words” in Step 2. Now we’ll type the words and click Add.

105
Once you’ve set the options in this window (you can check as many as you want) and filled out the values, you can click Next. (If you forget to click an underlined value in step 2, Outlook will force you to fill out the information before you proceed.) You will then see this window:
This is where you can tell Outlook what to do when the conditions that you specified in the first part of the wizard are met. Once you check an item in Step 1 of this box, you may need to click the underlined value in Step 2 to specify your information. You will also see the conditions that you chose in the previous dialogue listed.

106
Once we click Next, we’ll see our last set of options.
Step 1 in this window is to name your rule; this is the name that will appear in the main Rules and Alerts screen. In Step 2, you can tell Outlook when to run the rule. The first option tells Outlook to run the rule on messages already in the folder you’re in. (You can’t change the folder for this first option; you can just check the box to run the rule, or uncheck the box so the rule isn’t run in that folder.) The next box is checked by default; this will turn your rule on. The third box, “Create this rule on all accounts,” is available only if you have multiple e-mail accounts set up. Step 3 gives you a summary of the conditions, actions, and exceptions for the rule you’ve created. Once you’re done, you can click Finish, and you’ll be back to the main Rules and Alerts screen. Here, you can click Apply and OK to save your changes, or cancel to remove your changes. (Be careful; if you’ve added a rule but you cancel out of the Rules and Alerts box, that rule will be deleted.) In summary, there are three ways to create rules in Outlook:

107
Create Rule box: The easiest way with only the most frequently used options available. Rules and Alerts main screen: A few more options and a nicer interface, but still pretty easy to
use. Rules Wizard: More time-consuming and complicated, but has all options available.

108

109
Section 6: Viewing and Printing in Outlook
In this section you will learn how to:
Use Groups Use AutoPreview Use the Arrange By and Current View menus Use AutoPreview Create and customize menus and toolbars Open Print Preview Use the Print Preview toolbar Navigate through Print Preview Close Print Preview Choose a page setup Print using various commands Use the Print dialogue Modify printer properties
Using Viewing Tools
In the last section, we learned how to create various Outlook items. We also looked a little bit at changing the views in the various folders. In this section, we’ll take a closer look at some of Outlook’s viewing tools. Remember, all of the tools apply to all folders in some form or another.
Using Arrange By Under the View menu, you will find an Arrange By sub-menu.

110
You can click any of the options to group your items by that category. For example, take a look at our Inbox.
Here our items are arranged by the default category (date). If you choose to arrange the items by the sender, the items will be arranged like this:
As a shortcut, you can click the words “Arranged By” at the top of the folder to choose a different arrangement. You can also click the words “<field> on top” to change the sort order.

111
About Groups In the images on the previous page, you can see how items appear in various groups (Microsoft, PowerPoint User, and Susan Harris). You can click the title of a group to select all the messages in it, making moving and deleting items much easier.
You can toggle groups on and off under the Arrange By menu.

112
You will also find commands under the View menu to expand (show all the messages in) or collapse (hide all the messages in) groups.
You can perform the same tasks using the plus and minus signs next to a group.

113
This grouping feature is also available in the Tasks folder and in some views of the Contacts and Calendar folders.
Using Current View As we saw in the last lesson, the Current View submenu under the View menu offers a wide variety of view choices.
Just click the view that you want to apply it.
About AutoPreview The last command in the View menu that we will look at is AutoPreview. (This command is only available in the Mail and Tasks folders.)

114
This feature will show the first few lines of the task or message right in the viewing pane.
Using Print Preview
E-mail was once hailed as a way to greatly reduce paper waste. However, there still may be times when you need a hard copy. Paper copies are also nice for calendars and task lists. In this lesson, we’ll learn how to use Print Preview to make sure your items are ready for printing.
Opening Print Preview Print Preview will give you a good idea of what your Outlook item will look like on paper. To print your item, first select it (if you’re printing tasks, contacts, or mail messages). Then, click the File menu and click Print Preview.

115
You will then see the Print Preview window.
Using the Print Preview Toolbar The Print Preview window features its own toolbar.
Let’s take a look at the commands.
Go to the previous page.
Go to the next page.
View the page at actual size.
View only one page.
View multiple pages.
Opens the Page Setup dialogue.
Opens the Print dialogue.
Close Print Preview.

116
Navigating Through Print Preview There are a number of ways to move through Print Preview. One way is using the toolbar we just looked at. You can click the first two buttons to move back or forwards through the pages.
You can also click and drag the scroll bar just as you would in any other document.
Printing from Preview To print from Print Preview, use the Ctrl + P shortcut or click the Print button on the toolbar.
You will then see the Print dialogue. We’ll cover this dialogue in more detail in the next lesson. For now, just click OK to print.

117
Closing Print Preview To close Print Preview, you can use the X in the top right hand corner of the screen. You can also click the Close command on the Print Preview toolbar.
Printing Outlook Items
Throughout this manual, we’ve learned how to create and edit Outlook items and make sure that they’re ready for printing. In this lesson, we’ll learn how to perform the final touches on items and print them.
Choosing Page Setup Before you print, you can choose how the page will be set up. To see a list of pre-defined styles, click the File menu, choose Page Setup, and click one of the options. (The list will differ depending on what item you have selected.)

118
You will then be able to customize the selected style.
Clicking Define Print Styles will let you make permanent changes to a style.
Once you choose a style and click Edit (as shown above), you will see the same dialogue that we saw when we clicked Page Setup in Print Preview.

119
Print Commands Once your page is set up, you can use one of these commands to print:
File – Print Print icon on the Standard toolbar Ctrl + P
You will also find Print commands in the Page Setup dialogue and in Print Preview.
Using the Print Dialogue When you perform a print command, you will see the Print dialogue.

120
At the top of the dialogue (circled in blue), you can choose a printer and set its properties. In the middle of the dialogue (circled in red), you can choose a print style. Note that you can also open the Define Print Styles and the Page Setup dialogue from here. Opposite the Print Style options you can choose the number of pages and the number of copies to print. Once you’re ready, click OK to print.
Modifying Printer Properties If you want to change the printer you’re using, use the drop-down arrow at the top of the dialogue.
To modify options specific to that printer, click the Properties button. As these settings will vary with each printer, we won’t go into them in detail.

121