Embed Size (px)
Citation preview

Metcal MX-5000
Pow
er. P
reci
sion
. Per
form
ance
.
Soldering, Desoldering and Rework System
User Guide
99 Washington Street Melrose, MA 02176 Phone 781-665-1400Toll Free 1-800-517-8431
Visit us at www.TestEquipmentDepot.com

1
CONTENTS 1. SYSTEM SPECIFICATIONS 2 2. SYSTEM DESIGN AND TECHNOLOGY OVERVIEW
a. SmartHeat® Technology, No Calibration Required 2 b. Systems, Upgrade Kits & Accessories Guide 3
3. POWER SUPPLY OVERVIEW a. Power Supply Features 4 b. Power Supply Mode Overview 5
4. HAND-PIECE OVERVIEW 6 a. Hand-piece Selection Guide 6
5. CARTRIDGE OVERVIEW a. About Metcal Cartridges 7 b. Choosing the Correct Tip Geometry 7 c. Choosing the Correct Temperature Series 8 d. Temperature Series Chart 8
6. TIPSAVER WORKSTAND OVERVIEW a. TipSaver Workstand Features 9 b. Cradle Guide 9 c. TipSaver Workstand Configurations 9 d. Cradle Positioning 9
7. OPERATION a. Initial Setup 10 b. Replacing all Tip Cartridges 10 c. MX-PTZ and TALON Operation 10 d. MX-PTZ Tip Alignment 10 e. User Programmable PowerSave Mode Adjustment 10 f. User Selectable Power Graph 10
8. APPLICATION NOTES a. Extending Tip Life 11 b. Detinned Tips 11
9. BASIC TROUBLESHOOTING GUIDE 11 10. SAFETY 12
Warranty OK International warrants the MX-5000 System against any defects in materials or workmanship for five (5) years from the date of purchase by the original owner. This Warranty excludes normal maintenance and shall not apply to any opened, misused, abused, altered or damaged items. If the product should become defective within the warranty period, OK International will repair or replace it free of charge at its sole option. The repaired or replacement item will be shipped, freight prepaid, to the original purchaser. The warranty period will start from the date of purchase. If the date of purchase cannot be substantiated the date of manufacture will be used as the start of the warranty period.

2
1. SYSTEM SPECIFICATIONS Ambient Operating Temperature 10 - 40°C Maximum Enclosure Temperature 55°C Input Line Voltage 100 - 240 VAC, grounded circuit Input Line Frequency 50/60 Hz Power Consumption 125W Output Power (Max.) 80 Watts max. Per channel at 22°C ambient
temperature Output Frequency 13.56 MHz Power Cord 3-Wire 183cm (18/3”) SJT Dimensions w x d x h 12.1 cm (4.8”) x 13.0cm (5.1”) x 23.5cm (9.3”) Certification / Marking cTUVus, CE Surface Resistivity 105 - 109 Ω/in Tip-to-Ground Potential <2mV Tip-to-Ground Resistance <2 ohms Idle Temperature Stability ± 1.1°C in still air Hand-piece Cable Length L=122cm (48”), burn proof, ESD safe Hand-piece Connector F connector Workstand Dimensions w x d x h 8.6 cm (3.4”) x 19.1 cm (7.5”) x 8.3 cm (3.3”) 2. SYSTEM DESIGN AND TECHNOLOGY OVERVIEW
The MX-5000 Series is a precision, high-power soldering system with dual switchable ports. It is the newest design of the market leading Metcal soldering systems. It adds new ergonomic hand-pieces, a new built in power meter, 80 watts of power and includes SmartHeat® Technology for quick response and precise control.
a. SMARTHEAT® TECHNOLOGY No Calibration Required Each cartridge is equipped with a self-regulating heater which ‘senses’ its own temperature and closely maintains its pre-set idle temperature for the life of the heater-tip; all controlled by OK International’s proprietary SmartHeat® Technology. The tip temperature is determined by the inherent metallurgical properties of the heater; no external adjustment or equipment is required. This eliminates spikes and transients associated with electrically switched elements found in conventional soldering irons. The integrated power indication meter actively monitors power delivered to the tip as it varies in direct response to the thermal load. The power indication meter requires no calibration, because it is monitoring an active feedback loop. Please feel free to contact your OK International representative with any questions. Those companies or individuals requiring periodic verification of system performance may do so in the following ways: • Measure the performance of the system in ‘time required to solder a defined number of loads’, or • Observe start up and idle power with the integrated Power Indication Meter, or • Measure tip idle temperature as it equates to this performance.

3
b. SYSTEMS, UPGRADE KITS & ACCESSORIES GUIDE The MX-5000 Series offers users a choice of systems, upgrade kits and accessories.
Systems Description
MX-
H1-
AV
MX
-H2-
UF
MX
-PTZ
MX
-DS
1
MX-5010 MX-PS5000 Power Supply, Metcal Advanced™ Soldering hand-piece (MX-H1-AV), TipSaver™ workstand (MX-W1AV)
MX-5020 MX-PS5000 Power Supply, UltraFine soldering hand-piece (MX-H2-UF), TipSaver workstand (MX-W1AV)
MX-5050 MX-PS5000 Power Supply, MX-DS1 desoldering hand-piece, workstand (MX-WS5DS)
MX-5041 MX-PS5000 Power Supply, MX-PTZ tweezers hand-piece,
Metcal Advanced Soldering hand-piece (MX-H1-AV), TipSaver workstand (MX-W4PT), TipSaver workstand (MX-
W1AV)
MX-5051 MX-PS5000 Power Supply, MX-DS1 desoldering hand-
piece Metcal Advanced Soldering hand-piece (MX-H1-AV), workstand (MX-WS5DS), workstand (MX-W1AV)
Upgrades MX-UK1 Metcal Advanced Hand-piece & TipSaver workstand MX-UK2 UltraFine hand-piece & TipSaver workstand MX-UK4 Precision Tweezers hand-piece & TipSaver workstand MX-UK5 MX-DS1 hand-piece & TipSaver workstand
Accessories MX-H1GR Grip, Metcal Advanced hand-piece, Ring pattern MX-H1GK Grip, Metcal Advanced hand-piece, Knob pattern MX-H1GS Grip, Metcal Advanced hand-piece, Scallop pattern MX-H2GR Grip, UltraFine hand-piece, Ring pattern MX-H2GK Grip, UltraFine hand-piece, Knob pattern MX-H2GS Grip, UltraFine hand-piece, Scallop pattern
MX-H1-GSR-5 Sleeve, green for Metcal Advanced hand-piece grip, ring pattern, set of 5
MX-H2-GSR-5 Sleeve, green for Metcal UltraFine hand-piece grip, ring pattern, set of 5
MX-CP1 Cartridge removal pad, Metcal Logo AC-BP Brass Pad, package of 10 AC-Y10 Yellow Sponge, package of 10
4
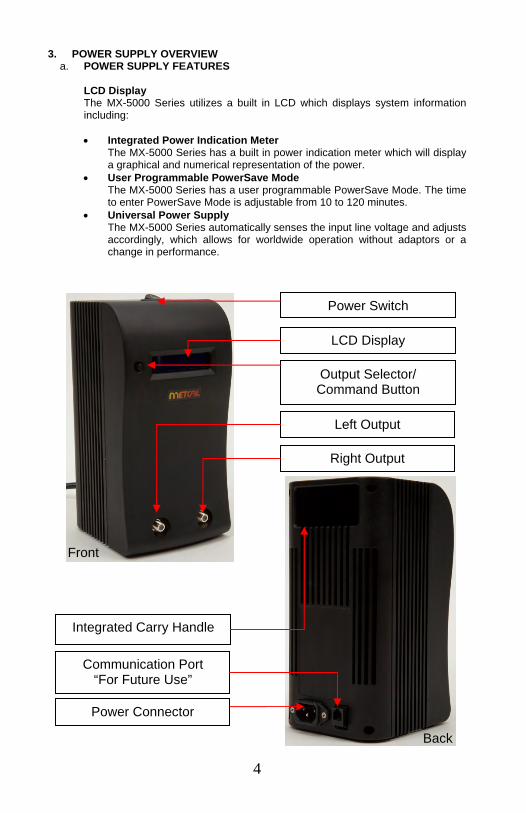
3. POWER SUPPLY OVERVIEW
a. POWER SUPPLY FEATURES
LCD Display The MX-5000 Series utilizes a built in LCD which displays system information including:
• Integrated Power Indication Meter
The MX-5000 Series has a built in power indication meter which will display a graphical and numerical representation of the power.
• User Programmable PowerSave Mode The MX-5000 Series has a user programmable PowerSave Mode. The time to enter PowerSave Mode is adjustable from 10 to 120 minutes.
• Universal Power Supply The MX-5000 Series automatically senses the input line voltage and adjusts accordingly, which allows for worldwide operation without adaptors or a change in performance.
Front
LCD Display
Output Selector/ Command Button
Power Switch
Left Output
Right Output
Integrated Carry Handle
Power Connector
Communication Port “For Future Use”
Back
5
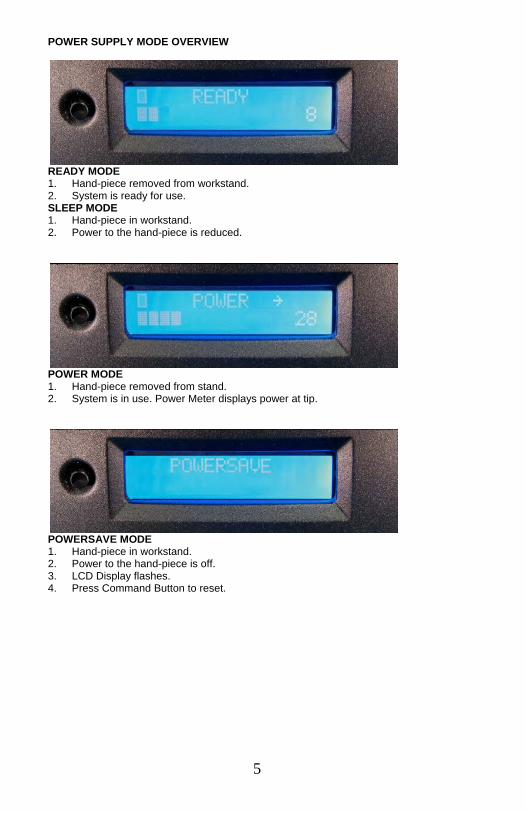
POWER SUPPLY MODE OVERVIEW
READY MODE 1. Hand-piece removed from workstand. 2. System is ready for use. SLEEP MODE 1. Hand-piece in workstand. 2. Power to the hand-piece is reduced.
POWER MODE 1. Hand-piece removed from stand. 2. System is in use. Power Meter displays power at tip.
POWERSAVE MODE 1. Hand-piece in workstand. 2. Power to the hand-piece is off. 3. LCD Display flashes. 4. Press Command Button to reset.

6
4. HAND-PIECE OVERVIEW The MX-5000 Series offers users a choice of hand-pieces to meet the customer’s application needs. Each hand-piece has its own range of cartridges with many choices available for tip geometry and temperature.
a. Hand-piece Selection Guide
NOTE: This is only a small sample of tip styles available for each of the hand-pieces.

7
5. CARTRIDGE OVERVIEW a. About Metcal Cartridges
The soldering and rework cartridges are constructed with a tip, heater, coil, connector and shaft. This assembly is designed for precision and long life provided that the proper tip care procedures are followed. (See Section 8) Selecting a cartridge depends on the following variables
• Need for access • Type of solder • Size and mass of load • Componenet type
The correct choice of cartridge will result in an optimized soldering process. Here are some of the considerations for selecting the soldering or rework cartridge.
b. Choosing the Correct Tip Geometry Metcal cartridges come in a wide variety of tip geometries and temperature ranges (for a complete up to date listing, visit www.testequipmentdepot.com for more information). These tip geometries cover a broad range of tasks from delicate precision work to heavy ground plane soldering.
1. Pick a tip that maximizes contact area between the solder joint and tip.
Maximizing contact area gives the most efficient heat transfer, producing high quality solder joints quickly.
2. Pick a tip that allows good access to the solder joint. Shorter tip lengths allowquicker response. Longer or angled tips may be needed for soldering densely populated boards.
3. Pick the lowest temperature tip cartridge that will accomplish the task. This minimizes the potential for thermal damage. The temperature series is marked on the shaft of the Heater Tip. (See page 8 for more Information)
Too Large Solder/Rework Thru-hole
Desolder Thru-hole
Correct
Correct Too Small Too Large
Too Small
8
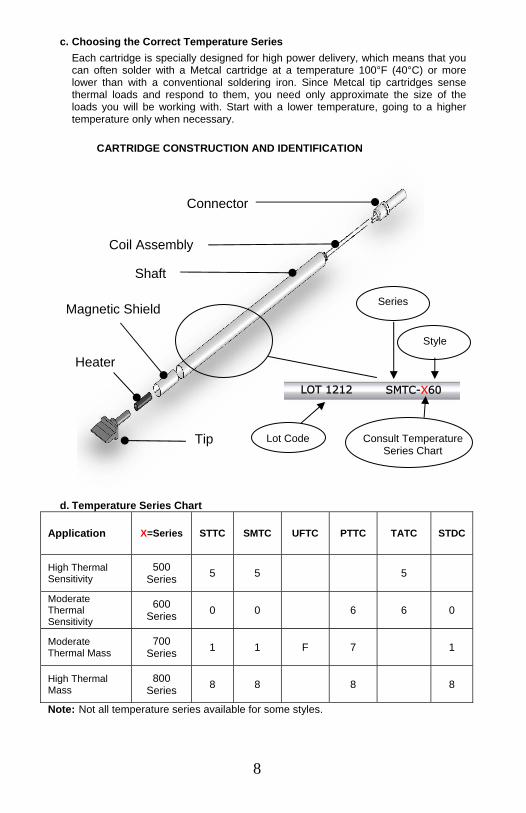
c. Choosing the Correct Temperature Series Each cartridge is specially designed for high power delivery, which means that you can often solder with a Metcal cartridge at a temperature 100°F (40°C) or more lower than with a conventional soldering iron. Since Metcal tip cartridges sense thermal loads and respond to them, you need only approximate the size of the loads you will be working with. Start with a lower temperature, going to a higher temperature only when necessary.
d. Temperature Series Chart
Application X=Series STTC SMTC UFTC PTTC TATC STDC
High Thermal Sensitivity
500 Series 5 5 5
Moderate Thermal Sensitivity
600 Series 0 0 6 6 0
Moderate Thermal Mass
700 Series 1 1 F 7 1
High Thermal Mass
800 Series 8 8 8 8
Note: Not all temperature series available for some styles.
Connector
Coil Assembly
Tip
Shaft
Heater
SMTC-X60 LOT 1212
Consult Temperature Series Chart
Lot Code
Style
Magnetic Shield Series
CARTRIDGE CONSTRUCTION AND IDENTIFICATION

9
6. TIPSAVER WORKSTAND OVERVIEW a. TipSaver Workstand Features
b. Adjustable Angle Cradle Guide* Workstand Cradle Description MX-W1AV MX-W1CR TipSaver cradle, Advanced hand-piece, includes knobs MX-W1AV MX-W1CR TipSaver cradle, UltraFine hand-piece, includes knobs MX-W4PT MX-W4CR TipSaver cradle, MX-PTZ hand-piece, includes knobs MX-W5DS MX-W5CR TipSaver cradle, MX-DS1, includes knobs
c. TipSaver Workstand Configurations
The TipSaver Workstand is designed to accommodate different configurations in a minimal footprint. To change the configuration;
1. Remove the two screws from the underside of the workstand base (MX-WB). 2. Move the Workstand Sponge Holder (MX-WSH) into the desired position. 3. Replace the two screws into the underside of the workstand base.
d. Cradle Positioning
The TipSaver Workstand incorporates an adjustable angle cradle allowing the insertion angle for the hand-piece to be adjusted for the comfort of the operator. To adjust the angle of the cradle;
1. Loosen the knobs counterclockwise. 2. Adjust the cradle to the desired
angle. 3. Tighten the knobs clockwise.
Workstand Sponge Holder (MX-WSH)
Workstand Base (MX-WB)
Adjustable Angle Cradle*
Adjustment Knobs
Coiled Brass Cleaner or Coiled Brass Cleaner with Sponge
10
7. OPERATION a. INITIAL SETUP
1. Connect hand-piece(s) to power unit output connector(s). 2. Insert your selected cartridge into the hand-piece. 3. Push the cartridge all the way until it seats.
• For TATC cartridges, align the flat side of the cartridge shaft with the opening in the handle. Push in the cartridge until it seats. The cartridge is fully seated when the insertion mark is flush with the handle. Do not push past this mark. Repeat for second cartridge.
4. Place hand-piece(s) into associated workstand(s). 5. Add distilled water to workstand sponge (sulfur free) if equipped. 6. Plug the power cord into a grounded wall socket of the rated input line
voltage. 7. To turn the unit “ON”, push the power switch. NOTE: Unit must be
grounded, otherwise it will not work. Unit will not work in an electrical network where an isolation transformer has been used.
8. Select the desired output using the output selector/command button. The active output will display an animated box cursor () to the left or right of the screen, respectively, to indicate the active output.
b. REPLACING ALL TIP CARTRIDGES
1. Make sure the system is turned off. 2. Pull out the cartridge using the Cartridge Removal Pad (MX-CP1). NOTE:
THE TIP CARTRIDGE MAY BE HOT. DO NOT USE METAL TOOLS (PLIERS, ETC) TO REMOVE CARTRIDGES!
3. Push a new cartridge into the handle. 4. Place hand-piece(s) into associated work stand(s). 5. Push the power switch “ON”. The new cartridge will heat up to temperature
quickly.
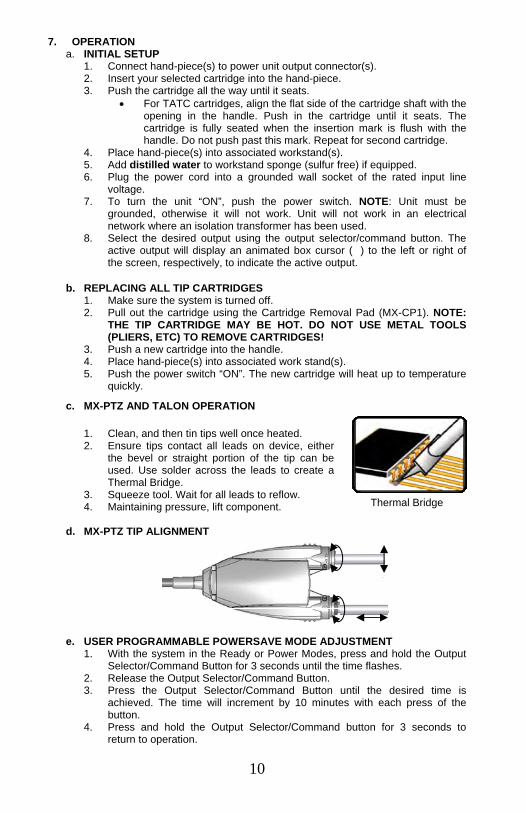
c. MX-PTZ AND TALON OPERATION
1. Clean, and then tin tips well once heated. 2. Ensure tips contact all leads on device, either
the bevel or straight portion of the tip can be used. Use solder across the leads to create a Thermal Bridge.
3. Squeeze tool. Wait for all leads to reflow. 4. Maintaining pressure, lift component.
d. MX-PTZ TIP ALIGNMENT
e. USER PROGRAMMABLE POWERSAVE MODE ADJUSTMENT 1. With the system in the Ready or Power Modes, press and hold the Output
Selector/Command Button for 3 seconds until the time flashes. 2. Release the Output Selector/Command Button. 3. Press the Output Selector/Command Button until the desired time is
achieved. The time will increment by 10 minutes with each press of the button.
4. Press and hold the Output Selector/Command button for 3 seconds to return to operation.
Thermal Bridge

11
f. USER SELECTABLE POWER GRAPH 1. With the system in the Ready or Power Modes, press and hold the Output
Selector/Command Button for 3 seconds until the time flashes 2. Release the Output Selector/Command Button. 3. Press and hold the Output Selector/Command button for 3 seconds. 4. Release the Output Selector/Command Button. 5. Press the Output Selector/Command Button until the desired bar graph is
displayed; Standard or UltraFine. 6. Press and hold the Output Selector/Command button for 3 seconds to
return to operation. 8. APPLICATION NOTES:
a. EXTENDING TIP LIFE 1. Each day, remove, inspect, and clean the cartridge shaft and handle using
denatured alcohol and a clean cloth. Stubborn flux deposits on the shaft (and on the entire SMTC, PTTC & TATC tip) can be removed using a brass brush.
2. After you turn on the system, and each time you return the tip to the holder, apply solder to the tinned surfaces of the tip. The solder protects the tip from oxidation and prolongs the life of the tip.
3. Select the lowest temperature series tip cartridge that will do the job. Lower temperatures decrease tip oxidation and are easier on the components being joined.
4. Use fine point tips only when necessary. The plating on fine precision tips is less durable than the plating on larger tips.
5. Do not use the tip as a prying tool. Bending the tip can cause the plating to crack, shortening tip life.
6. Use the minimum activation flux, appropriate to solder type, as necessary to do the job. Higher activation flux is more corrosive to the tip plating.
7. When making a solder connection, apply fresh solder to the items being joined, not to the hot soldering tip.
8. Switch the system off when not in use. 9. Do not apply pressure to the tip. More pressure does not equal more heat. To
improve heat transfer, use solder to form a thermal bridge between the tip and the solder joint.
10. Clean the tip on a clean, damp sponge or a coiled brass cleaner -- not on a rag or dirty, dry sponge.
b. DETINNED TIPS
If a tip is not wetting with solder then it is detinned. This exposes the plating to oxidation and substantially degrades the heat transfer efficiency of the tip. Detinning is caused by: • Failure to keep the tip covered with fresh solder during idling periods. • High tip temperatures. • Lack of sufficient flux in soldering operations. • Wiping the tip on dirty or dry sponges and rags. (Always use a clean,
damp, industrial grade, sulfur-free sponge or brass sponge) • Impurities in the solder or on the surfaces to be soldered.
NOTE: Detinned tips are preventable with proper daily care!
c. CHOOSING THE CORRECT TIP CARTRIDGE AND GEOMETRY MULTI-LEAD PACKAGES Multi-lead components can be drag soldered using Metcal hoof-tip cartridges. Tin the working face of the tip with solder and gently drag it across the array of leads. SMT REMOVAL First, measure the dimensions of your component, then, use the SMTC charts that are available from www.testequipmentdepot.com to match component and tip dimension.

12
9. BASIC TROUBLESHOOTING GUIDE Problem: LCD displays ‘Open Source’. 1. Ensure cartridge is properly seated. 2. Ensure animated box cursor () is on desired output connector. 3. Tighten hand-piece connector to output connector.
Problem: Solder hand-piece tip cartridge does not heat up. 1. Replace tip cartridge. 2. If problem persists, replace hand-piece with known good hand-piece and insert
new cartridge. 3. If cartridge heats up, replace non-functioning hand-piece.
Problem: Low power operation of the unit. Check input power to the unit. The unit can draw up to 10A of current at 110V. Do not plug into power sources such as power strips that are rated less than 10A. Multiple high current devices plugged into the same electrical circuit can cause low power operation, distribute high current devices among multiple circuits or increase the electrical circuit capacity.
10. Safety
With power applied, the tip temperature can be > 300°C. Failure to observe the following precautions may lead to injury to users or damage the equipment:
• Do not touch any metallic parts of the hand-piece • Do not use near flammable items • Do not use unit for any function other than described in this manual • Use only genuine Metcal replacement parts • Use in a well ventilated area or with fume extraction • Do not use the equipment with wet hands • Connect only to properly grounded outlets to prevent risk of electric shock. • Always place hand-piece back into the work stand to prevent accidental
burning of oneself or surrounding objects. • This appliance is not intended for use by persons (including children) with
reduced physical, sensory or mental capabilities, or lack of experience and knowledge, unless they have been given supervision or instruction concerning use of the appliance by a person responsible for their safety.
• Children should be supervised to ensure that they do not play with the appliance.
Although the systems offer superior EOS (Electrical Overstress) protection, periodic checks of the instrument cord should be incorporated into standard operator maintenance procedures. Waste Electrical and Electronic Equipment Directive - WEEE (2002/96/EC). When this product is no longer required, if it cannot be re-used, we ask our customers not to dispose of it as unsorted municipal waste but to appropriately recycle the product. In Europe, please contact your OK International distributor who can advise the recycling options availableINHALT
WARNING!
Visit us at www.TestEquipmentDepot.com