Embed Size (px)
Citation preview
A N S W E R S W I T H I N T E L L I G E N C E ®
TA L K S W I TC H D O C U M E N TAT I O N
CONFIGURATION GUIDE FOR USINGMEDIATRIX 2102 WITH TALKSWITCHRELEASE 3.24
C T. G W 0 0 5 . 0 0 0 5 0 1
BEFORE YOU BEGIN
• Ensure you have installed the Mediatrix Configuration Tool software on a Windows 2000, NT or XP machine.
• Ensure the TalkSwitch CVA unit that is acting as the SIP Registrar Server is correctly set up.
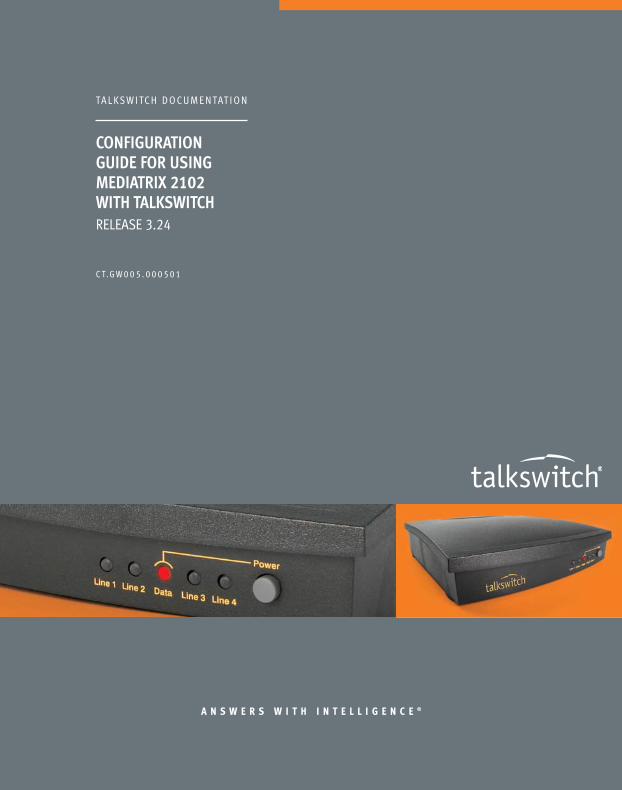
STEP 1 — CONNECTING THE MEDIATRIX 2102 HARDWAREThe Mediatrix 2102 device can be directly plugged into your broadband modem. This will allow the unit to obtain an IP address automatically (via DHCP), and if your Internet connection requires PPPoE authentication (for DSL), the 2102 can be configured to take care of the authentication. The 2102 will also provide Quality of Service (QoS) for your voice traffic.
1. Before you begin, ensure that all of your hardware is powered off, including the router, PC, modem, and Mediatrix 2102.
2. Connect telephones or fax machines into the Phone/Fax connectors of the 2102. Note: Port 1 is the leftmost connector.
3. Connect an Ethernet cable into the ‘Network’ connector on the 2102. Connect the other end to the cable or DSL modem.
4. Connect one Ethernet cable into the ‘Computer’ connector on the 2102. Connect the other end to your PC network card or Router/Firewall WAN/Uplink connector.
5. Connect the power cord to the 2102 and plug it into the wall. Reconnect the rest of your hardware to their power sources as well.
Router/Broadband modem
W W W. TA L K S W I T C H . C O M 1
STEP 2 — RUNNING THE MEDIATRIX CONFIGURATION TOOL SOFTWARE
1. Open the software by double clicking on the Mediatrix Configuration Tool icon on your desktop.
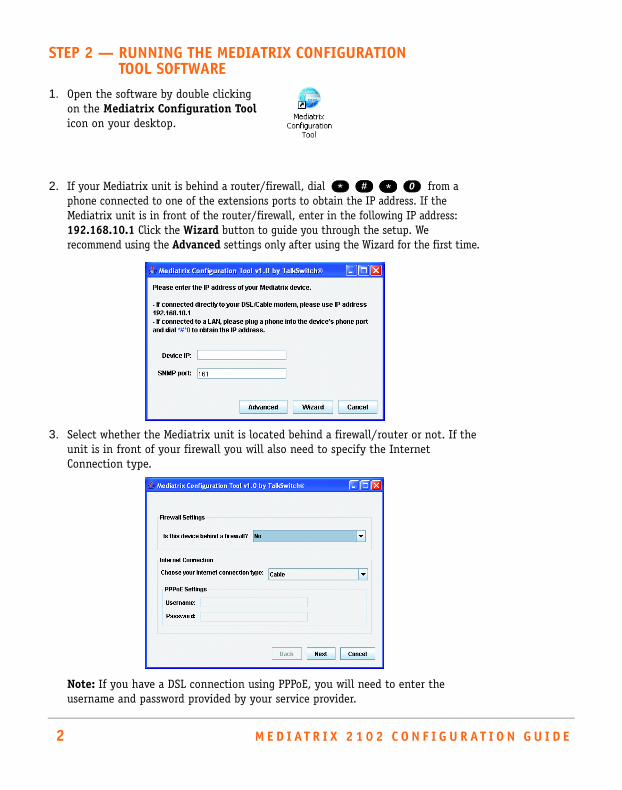
2. If your Mediatrix unit is behind a router/firewall, dial from a phone connected to one of the extensions ports to obtain the IP address. If the Mediatrix unit is in front of the router/firewall, enter in the following IP address: 192.168.10.1 Click the Wizard button to guide you through the setup. We recommend using the Advanced settings only after using the Wizard for the first time.
3. Select whether the Mediatrix unit is located behind a firewall/router or not. If the unit is in front of your firewall you will also need to specify the Internet Connection type.
Note: If you have a DSL connection using PPPoE, you will need to enter the username and password provided by your service provider.
* ## #1* 0
2 M E D I A T R I X 2 1 0 2 C O N F I G U R AT I O N G U I D E
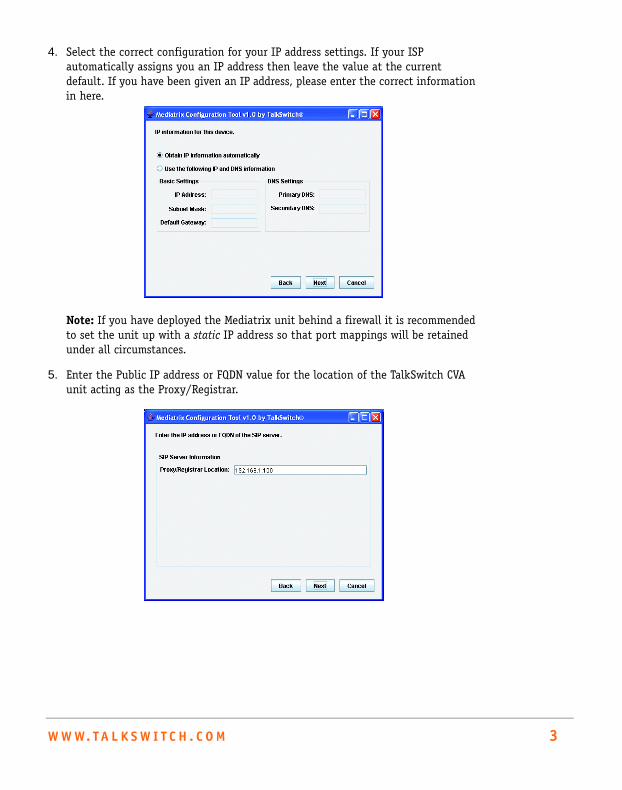
4. Select the correct configuration for your IP address settings. If your ISP automatically assigns you an IP address then leave the value at the current default. If you have been given an IP address, please enter the correct information in here.
Note: If you have deployed the Mediatrix unit behind a firewall it is recommended to set the unit up with a static IP address so that port mappings will be retained under all circumstances.
5. Enter the Public IP address or FQDN value for the location of the TalkSwitch CVA unit acting as the Proxy/Registrar.
W W W. TA L K S W I T C H . C O M 3
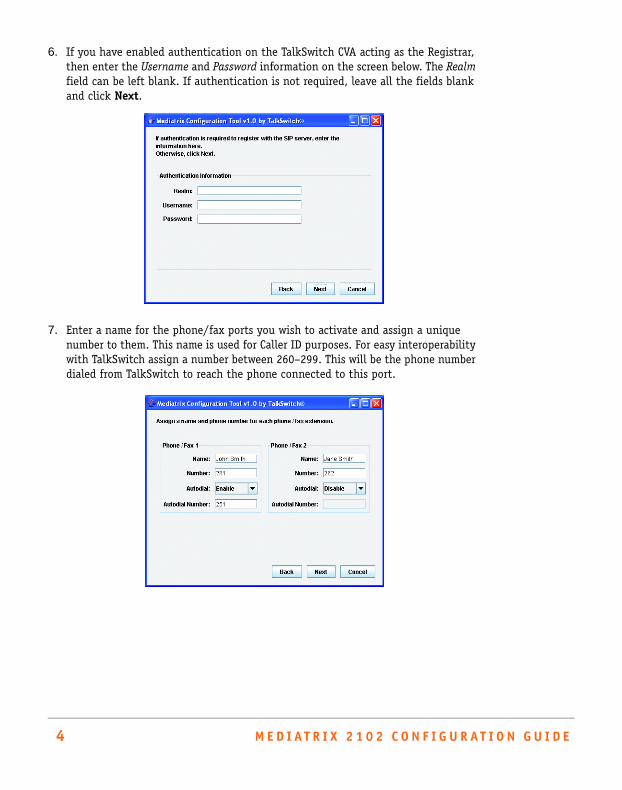
6. If you have enabled authentication on the TalkSwitch CVA acting as the Registrar, then enter the Username and Password information on the screen below. The Realm field can be left blank. If authentication is not required, leave all the fields blank and click Next.
7. Enter a name for the phone/fax ports you wish to activate and assign a unique number to them. This name is used for Caller ID purposes. For easy interoperability with TalkSwitch assign a number between 260–299. This will be the phone number dialed from TalkSwitch to reach the phone connected to this port.
4 M E D I A T R I X 2 1 0 2 C O N F I G U R AT I O N G U I D E
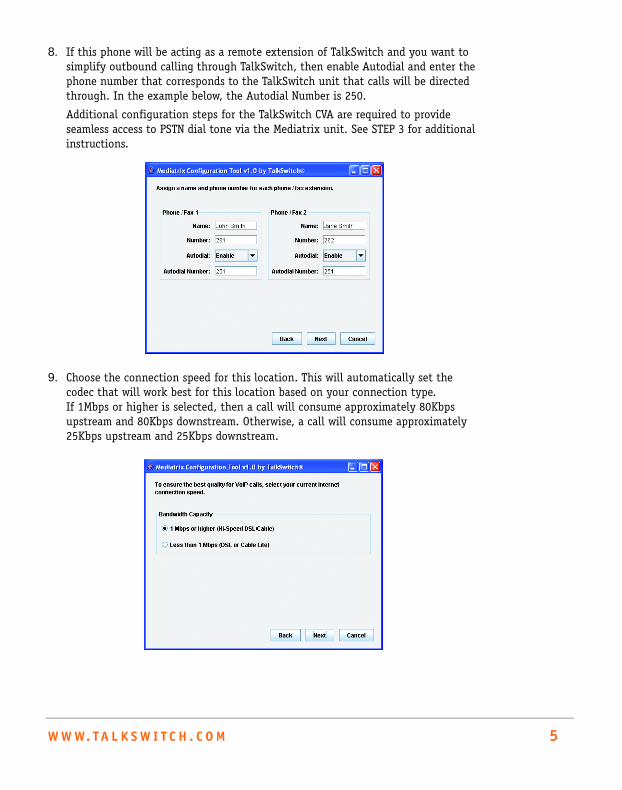
8. If this phone will be acting as a remote extension of TalkSwitch and you want to simplify outbound calling through TalkSwitch, then enable Autodial and enter the phone number that corresponds to the TalkSwitch unit that calls will be directed through. In the example below, the Autodial Number is 250.
Additional configuration steps for the TalkSwitch CVA are required to provide seamless access to PSTN dial tone via the Mediatrix unit. See STEP 3 for additional instructions.
9. Choose the connection speed for this location. This will automatically set the codec that will work best for this location based on your connection type. If 1Mbps or higher is selected, then a call will consume approximately 80Kbps upstream and 80Kbps downstream. Otherwise, a call will consume approximately 25Kbps upstream and 25Kbps downstream.
W W W. TA L K S W I T C H . C O M 5
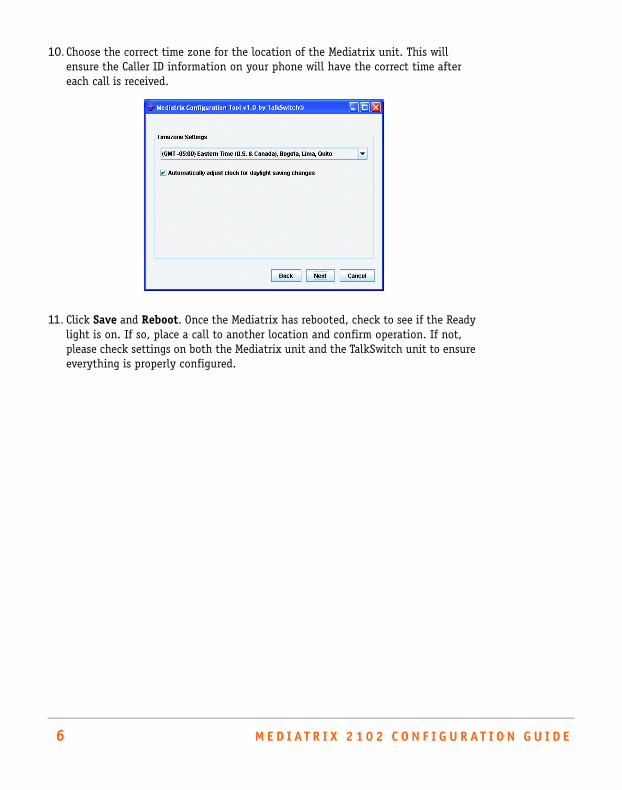
10.Choose the correct time zone for the location of the Mediatrix unit. This will ensure the Caller ID information on your phone will have the correct time after each call is received.
11. Click Save and Reboot. Once the Mediatrix has rebooted, check to see if the Ready light is on. If so, place a call to another location and confirm operation. If not, please check settings on both the Mediatrix unit and the TalkSwitch unit to ensure everything is properly configured.
6 M E D I A T R I X 2 1 0 2 C O N F I G U R AT I O N G U I D E
STEP 3 — CONFIGURING TALKSWITCH FOR SEAMLESS ACCESS TO EXTENSIONS AND EXTERNAL LINES FROM A MEDIATRIX UNIT
The following section covers how to provide a seamless experience to phone users connected to Mediatrix devices registered to a TalkSwitch unit. They will be able to dial 9 or any other permitted hunt groups to access the PSTN (external phone lines connected to TalkSwitch).
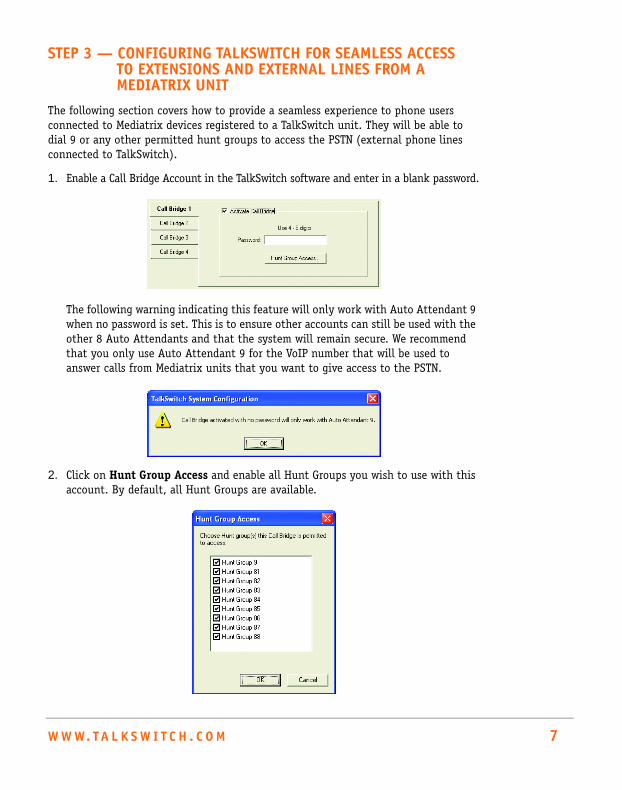
1. Enable a Call Bridge Account in the TalkSwitch software and enter in a blank password.
The following warning indicating this feature will only work with Auto Attendant 9 when no password is set. This is to ensure other accounts can still be used with the other 8 Auto Attendants and that the system will remain secure. We recommend that you only use Auto Attendant 9 for the VoIP number that will be used to answer calls from Mediatrix units that you want to give access to the PSTN.
2. Click on Hunt Group Access and enable all Hunt Groups you wish to use with this account. By default, all Hunt Groups are available.
W W W. TA L K S W I T C H . C O M 7
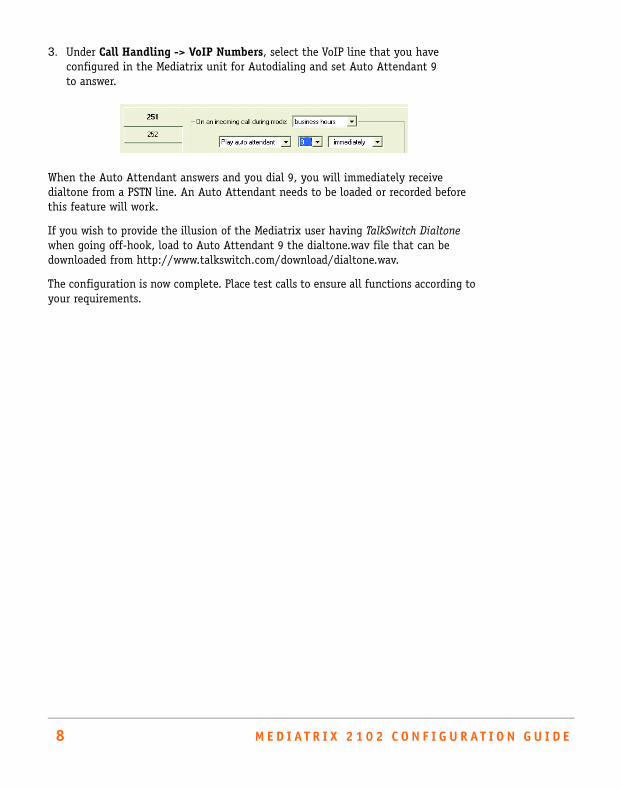
3. Under Call Handling -> VoIP Numbers, select the VoIP line that you have configured in the Mediatrix unit for Autodialing and set Auto Attendant 9 to answer.
When the Auto Attendant answers and you dial 9, you will immediately receive dialtone from a PSTN line. An Auto Attendant needs to be loaded or recorded before this feature will work.
If you wish to provide the illusion of the Mediatrix user having TalkSwitch Dialtone when going off-hook, load to Auto Attendant 9 the dialtone.wav file that can be downloaded from http://www.talkswitch.com/download/dialtone.wav.
The configuration is now complete. Place test calls to ensure all functions according to your requirements.
8 M E D I A T R I X 2 1 0 2 C O N F I G U R AT I O N G U I D E
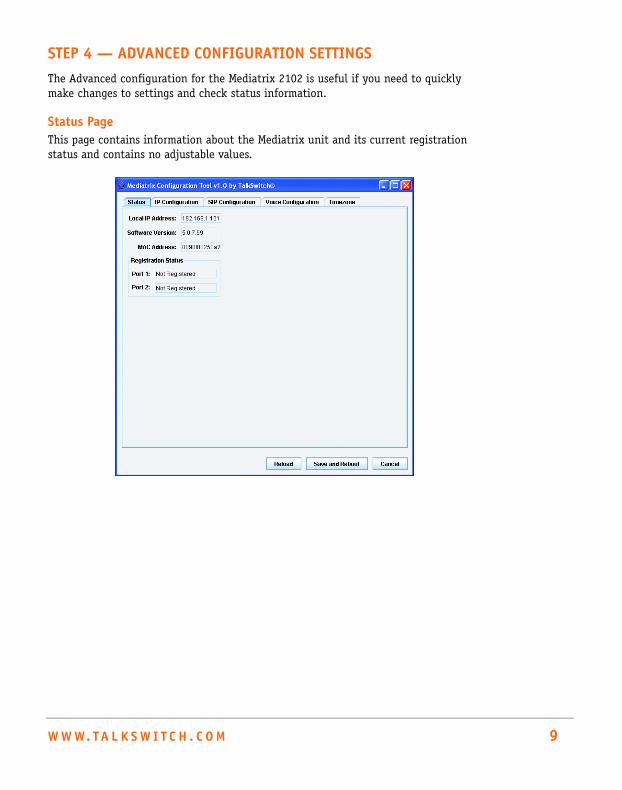
STEP 4 — ADVANCED CONFIGURATION SETTINGSThe Advanced configuration for the Mediatrix 2102 is useful if you need to quickly make changes to settings and check status information.
Status PageThis page contains information about the Mediatrix unit and its current registration status and contains no adjustable values.
W W W. TA L K S W I T C H . C O M 9
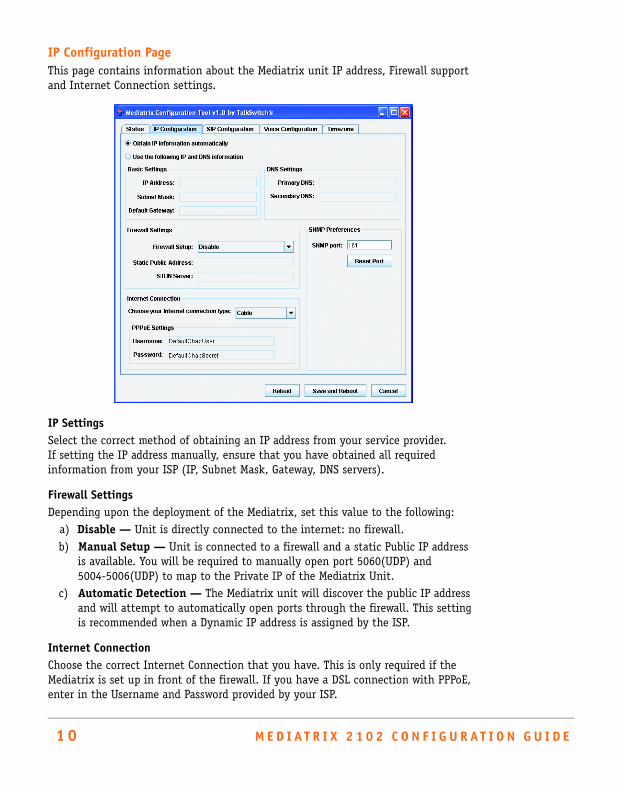
IP Configuration PageThis page contains information about the Mediatrix unit IP address, Firewall support and Internet Connection settings.
IP SettingsSelect the correct method of obtaining an IP address from your service provider. If setting the IP address manually, ensure that you have obtained all required information from your ISP (IP, Subnet Mask, Gateway, DNS servers).
Firewall SettingsDepending upon the deployment of the Mediatrix, set this value to the following:
a) Disable — Unit is directly connected to the internet: no firewall.b) Manual Setup — Unit is connected to a firewall and a static Public IP address
is available. You will be required to manually open port 5060(UDP) and 5004-5006(UDP) to map to the Private IP of the Mediatrix Unit.
c) Automatic Detection — The Mediatrix unit will discover the public IP address and will attempt to automatically open ports through the firewall. This setting is recommended when a Dynamic IP address is assigned by the ISP.
Internet ConnectionChoose the correct Internet Connection that you have. This is only required if the Mediatrix is set up in front of the firewall. If you have a DSL connection with PPPoE, enter in the Username and Password provided by your ISP.
1 0 M E D I A T R I X 2 1 0 2 C O N F I G U R AT I O N G U I D E
SNMP PreferencesThis is the port that you wish to connect to when attempting to configure the unit. The default port is 161. Change this port value if another device in the network is already using that port.
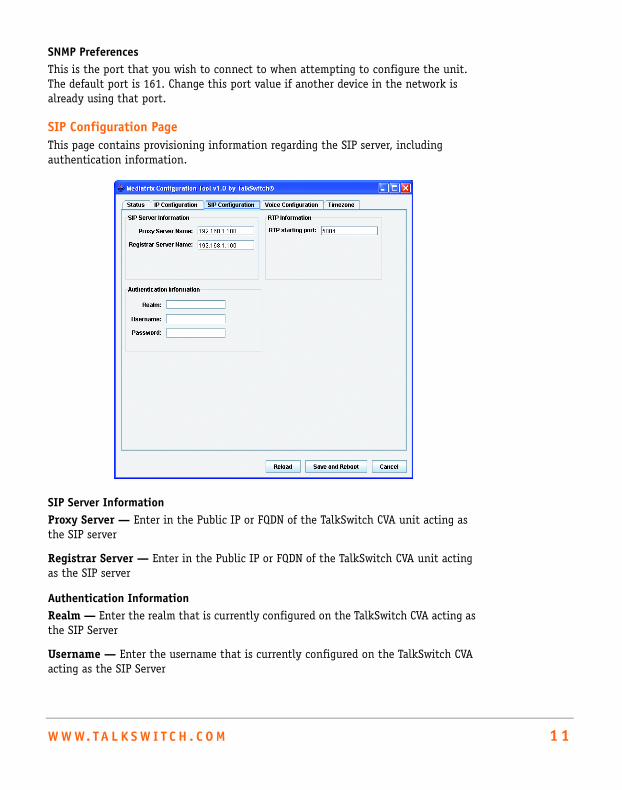
SIP Configuration Page This page contains provisioning information regarding the SIP server, including authentication information.
SIP Server InformationProxy Server — Enter in the Public IP or FQDN of the TalkSwitch CVA unit acting as the SIP server
Registrar Server — Enter in the Public IP or FQDN of the TalkSwitch CVA unit acting as the SIP server
Authentication InformationRealm — Enter the realm that is currently configured on the TalkSwitch CVA acting as the SIP Server
Username — Enter the username that is currently configured on the TalkSwitch CVA acting as the SIP Server
W W W. TA L K S W I T C H . C O M 1 1
Password — Enter the password that is currently configured on the TalkSwitch CVA acting as the SIP Server
RTP InformationRTP Starting Port — For VoIP calls, voice is streamed via a specific port. The default value is 5004. Change this value if it conflicts with another device on your network.
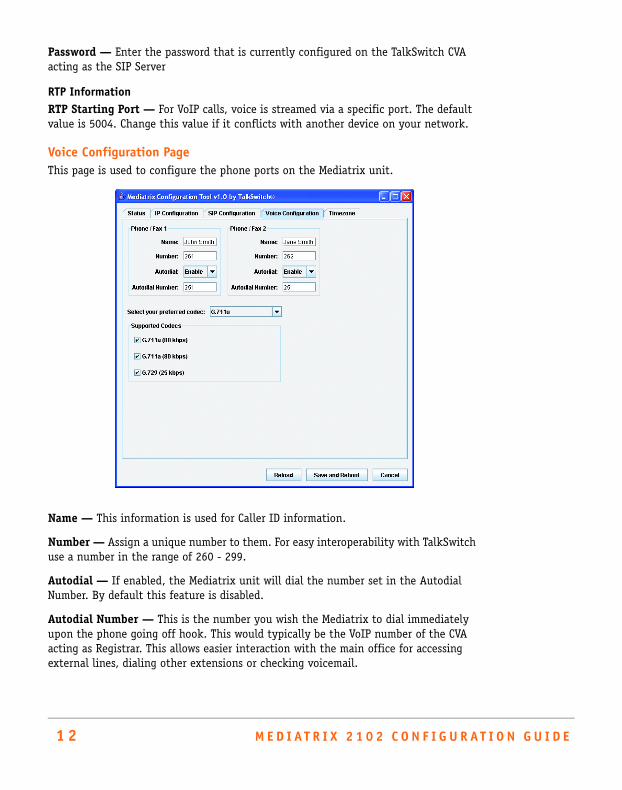
Voice Configuration PageThis page is used to configure the phone ports on the Mediatrix unit.
Name — This information is used for Caller ID information.
Number — Assign a unique number to them. For easy interoperability with TalkSwitch use a number in the range of 260 - 299.
Autodial — If enabled, the Mediatrix unit will dial the number set in the Autodial Number. By default this feature is disabled.
Autodial Number — This is the number you wish the Mediatrix to dial immediately upon the phone going off hook. This would typically be the VoIP number of the CVA acting as Registrar. This allows easier interaction with the main office for accessing external lines, dialing other extensions or checking voicemail.
1 2 M E D I A T R I X 2 1 0 2 C O N F I G U R AT I O N G U I D E
Preferred Codec — This is the Codec you wish to use based upon your Internet connection speed.
A) If you have a DSL/Cable Lite (128K) connection, please choose G.729.
or
B) If you have a 1MB Internet connection please choose G.711u
Supported Codecs — If for example you have a DSL Lite connection and cannot support G.711 and 80Kbps, you may want to disable the G.711 codecs so that they will not get used under any circumstances.
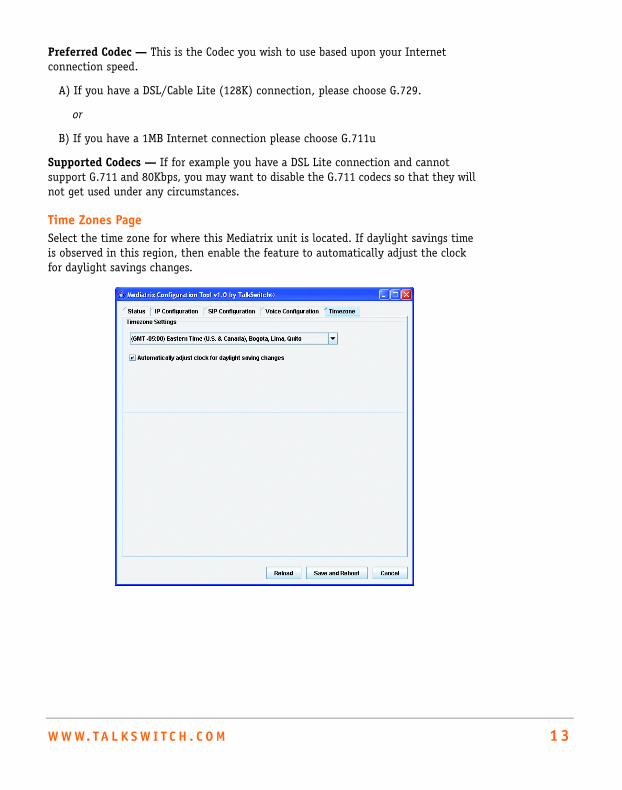
Time Zones PageSelect the time zone for where this Mediatrix unit is located. If daylight savings time is observed in this region, then enable the feature to automatically adjust the clock for daylight savings changes.
W W W. TA L K S W I T C H . C O M 1 3

TalkSwitch. Copyright 2006. All Rights Reserved.
Document number: CT.GW005.000501 (June 2006)
TalkSwitch is a division of Centrepoint Technologies Inc.