Embed Size (px)
Citation preview

MCRP 3-01 B
PistolMarksmanship
US Marine Corps
DISTRIBUTION STATEMENT A: Approved for public release; distribution is unlimited.
PCN 144 000138 00
To Our Readers
Changes: Readers of this publication are encouraged to submit suggestions and changes thatwill improve it. Recommendations may be sent directly to Commanding General, MarineCorps Combat Development Command, Doctrine Division (C 42), 3300 Russell Road, Suite318A, Quantico, VA 22134-502 1 orby fax to 703-784-2917 (DSN 278-2917) or by E-mail [email protected]. Recommendations should include the following information:
Location of changePublication number and titleCurrent page numberParagraph number (if applicable)Line numberFigure or table number (if applicable)
• Nature of changeAdd, deleteProposed new text, preferably double-spaced and typewritten
• Justification and/or source of change
Additional copies: A printed copy of this publication may be obtained from Marine CorpsLogistics Base, Albany, GA 31704-5001, by following the instructions in MCBu1 5600,Marine Corps Doctrinal Publications Status. An electronic copy may be obtained from theDoctrine Division, MCCDC, world wide web home page which is found at the following uni-versal reference locator: http://www.doctrinc.usmc.mil.
Unless otherwise stated, whenever the masculine gender is used, bothmen and women are included..

DEPARTMENT OF THE NAVYHeadquarters United States Marine Corps
Washington, D.C. 20380-1775
25 November 2003
FOREWORD
Marines must have the versatility, flexibility, and skills to deal with any situation at anylevel of intensity across the entire range of military operations. Whenever the situationwarrants the application of deadly force, a Marine must be able to deliver well-aimedshots to eliminate the threat. A Marine who is proficient in pistol marksmanship handlesthis challenge without escalating the level of violence or causing unnecessary collateraldamage. It is not enough to simply provide Marines with the best available firearms; wemust also ensure that their training prepares them to deliver accurate fire against the ene-my under the most adverse conditions without hesitancy, fear, or uncertainty of action. Awell-trained Marine is confident that he can protect himself, accomplish the mission, andprotect his fellow Marines. To be combat ready, a Marine must be skilled in the tactics,techniques, and procedures of pistol marksmanship and diligent in the proper care andmaintenance of the M9, 9-mm service pistol.
Marine Corps Reference Publication (MCRP) 3-0 lB. Pistol Marksmanship, is the MarineCorps' source document for pistol marksmanship and provides the doctrinal basis forMarine Corps pistol marksmanship training. This publication provides all Marines armedwith a pistol with the tactics, techniques, and procedures for range and field firing theM9, 9-mm service pistol.
MCRP 3-01 B supersedes the discussion of pistol marksmanship in Fleet Marine ForceManual (FMFM) 0-8, Basic Marlcs'manship.
Reviewed and approved this date.
BY DIRECTION OF THE COMMANDANT OF THE MARINE CORPS
EDWARDLieutenant General, U.S.
Commanding GMarine Corps Combat DeveIôment Command
Publication Control Number: 144 000138 00Distribution A: Approved for public release; distribution is unlimited,
Corps


Pistol Marksmanship
TABLE OF CONTENTS
iii
Chapter 1. The M9 Service Pistol
Functional CapabilitiesSingle-Action ModeDouble-Action Mode
NomenclatureMajor Components
Slide AssemblySafety Features
Decocking/Safety LeverFiring Pin BlockHalf-Cock Notch
Cycle of OperationFiringUnlockingExtractingEjectingCockingFeedingChamberingLocking
Wearing of the M9 Service Pistol's GearM12 HolsterMl Ammunition PocketMi Shoulder HolsterAssault HolsterConcealed Pistol HolsterLanyardFiring the M9 Service Pistol While Wearing Gloves
Preventive MaintenancePistol DisassemblyDisassembly of the MagazineInspection of the PistolCleaning and Lubricating the PistolPistol Re-assemblyPistol Magazine Re-assembly
Safety/Function CheckUser Serviceability InspectionPistol Maintenance in Adverse Conditions
Extreme ColdHot, Wet Climates
Ammunition
1—1
1—1
1—1
1—1
1—1
1—1
1-3
1-31-31-41-41-41-41-41-41-5
1-5
1-5
1-5
1-61-6
1-61-71-7
1-71-71-101-101—11
1—11
1-121-131-131-141-141-141-151-151-151-15
Hot, Dry Climates 1-16

iV MCRP3-OIB
Heavy Rain and Fording Operations 1 -16
Amphibious Conditions 1-16
Chapter 2. Weapons Handling
Safety RulesWeapons ConditionsDetermining a Weapon's Condition
Checking the Round IndicatorConducting a Chamber Check
Weapons CommandsLoading the PistolMaking the Pistol ReadyFireCease FireUnloading the PistolUnloading and Showing the Pistol ClearEmptying the MagazineFilling the MagazineReloading the Pistol
Dry ReloadCondition I ReloadReloading Considerations
Remedial ActionStoppageMalfunctionRemedial ActionAudible Pop or Reduced Recoil
Weapons CarriesAlertReady
Weapons TransportsFlolster 'I'rrisportAdministrative Transport
Combat MindsetPhysical and Mental PreparationThreat Levels
Transferring the PistolShow Clear TransferCondition Unknown Transfer
Chapter 3. Fundamentals of Pistol Marksmanship
Aiming 31Sight Alignment 3-1
Establishing Sight Alignment 3-1
3-13-2
2-1
2-22-22-22-22-32-42-52-52-62-62-72_?
2-72-82-82ll2-122-132-132-132-132-142-152-15
.2-16
.2-16...2-l6
.2-17
.2-17
.2-18
.2-18
.2-19
.2-192-20
Sight PictureRelationship Between the Eye and the Sights.

Pistol Marksmanship
Trigger ControlSight Alignment and Trigger ControlGrip.Trigger Finger PlacementTypes of Trigger Control
Breath ControlApplication of Marksmanship Fundamentals
Compression of FundamentalsAimingTrigger ControlBreath Control
V
Withdrawing the Pistol From the Holster.
Chapter 4. Pistol Firing Positions and Grip
Pistol Firing PositionMobilityObservation of the EnemyStability
Pistol Firing GripBefore Firing: Stabilize the Sights.During Firing: Allow Trigger Control.After Firing: Manage Recoil
Weaver and Isosceles VariationsStanding Position
Weaver Standing PositionIsosceles Standing Position
Kneeling PositionWeaver Kneeling PositionIsosceles Kneeling Position
Prone PositionWeaver Prone Position.Isosceles Prone Position...Natural Body Alignment
Chapter 5. Use of Cover and Concealment
Cover MaterialsDirtCinder BlocksTrees, Logs, and Telephone PolesSandbags
Considerations for Firing From CoverAdjusting the Firing Position....
4-14-14-14-14-24-24-24-24-34-44-54-54-74-74-84-94-104-104-124-13
5-15-15-15-1
5-15-25-25-25-25-35-55-5
in Field Firing.
3-23-23-23-33-33-33-33-33-43-43-4
Applying the Weaver and Isosceles Variations..Keeping the Body Behind CoverProviding Support for the Position and the PistolChanging PositionsMoving

vi MCRP 3-OIB
Supported Firing PositionsSupported ProneSupported KneelingSupported Standing
Locate and Engage Targets FromPie TechniqueRollout TechniqueCombining the Pie and Rollout Techniques
5-55-65-65-65-75-75-85-8
Chapter 6. Presentation of the M9 Service Pistol
Chapter 7. Pistol Engagement Techniques
Target DetectionMovementSoundImproper Camouflage
Techniques of FireDouble and Single Action FiringSingle Action or Double Action FiringTwo-Shot TechniqueSlow Fire Technique
Re-engagement TechniquesSlow Fire TechniqueTwo-Shot TechniqueOffset Aiming
Multiple TargetsCombat MindsetPrioritizing TargetsEngaging Multiple Targets
Moving TargetsTypes of Moving Targets
6-1
6-1
6-1
6-1
6-26-76-76-76-86-86-86-86-86-8
7-17-17-17-27-27-27-37-37-37-37-47-47-47-47-57-57-67-6
Behind Cover
Sight AlignmentlSight PicturePresentation From the Carries and Holsters
Presentation From the ReadyPresentation From the AlertPresentation From a Holster Transport
Presentation While.Assuming the Kneeling PositionFrom the ReadyFrom the Alert (Arms Straight)From the Alert (Close Quarters, Elbows Bent)From the Holster Transport
Presentation While Assuming the Prone PositionIsosceles ProneWeaver Prone
Search and Assess
7-1
Factors
Leads for Moving Targets 7-7

Methods of EngagementApplying the Fundamentals of Marksmanship..
Chapter 8. One-Handed Techniques
Presentation and ShootingAdjustment of the Standing PositionSearching and Assessing After Firing
ReloadingDry ReloadCondition I Reload
Remedial ActionPresentation From the Holster With the
Method One: Pistol RotationMethod Two: Hand RotationMethod Three: Knee Placement
Transferring the Pistol From One Hand to the Other.
Chapter 9. Advanced Techniques
Shooting on the MoveMoving With the PistolMoving: The Glide TechniqueEngaging Targets: Using the Pistol Sights.Continuing to MoveReloading and Stoppages
Turn and FireEngaging Targets 90 Degrees to the Right andEngaging Targets 180 Degrees to the Rear
Chapter 10. Low Light and Darkness Techniques
Combat MindsetNight Vision Adaptation and Maintenance
Night Vision AdapationNight Vision Maintenance
Target Detection TechniquesOff-Center VisionScanning/Figure Eight Scan
Effects of IlluminationAcquiring Targets at NightSight Alignment/Sight PictureFlashlights
Types of FlashlightsActivation DevicesTypes of LensesTarget DetectionTarget Engagement
8-1
8-1
8-28-28-28-48-58-78-78-88-98-10
9-1
9-1
9-19-19-29-29-29-29-3
10-1
10-1
10-1
10-1
10-1
10-210-210-210-310-310-310-310-310-3
10-410-5
Pistol Marksmanship VII
7-77-8
Weak Hand
Left.


I
CHAPTER 1
THE M9 SERVICE PISTOL
The Marine Corps' uses the M9 service pistol as a Double-Action Modedefensive weapon. It is a semiautomatic, maga-zine-fed, recoil-operated, double-action pistol. The The double-action mode causes the hammer toM9 service pistol's magazine holds 15 rounds and move to the rear as the trigger is being pulled.is chambered with a 9-mm ball (NATO M882 See figure 1-2.
round). The M9 service pistol has a maximumeffective range of 50 meters (54.7 yards).
Note: The procedures in this chapter are writ-ten for right-handed Marines; left-handedMarines reverse instructions as necessary.
Functional Capabilities
When the M9 service pistol's safety lever is Figure 1-2. Double-Action Mode.moved to the firing position, it can be fired ineither a single-action or double-action mode. It is _____________________________________________designed to fire one round each time the trigger is Nomenclaturepulled. When the last round is fired, the slideautomatically locks to the rear. See figure 1-3 on page 1-2.
Single-Action Mode
The single-action mode allows the pistol to be Major Components
fired when the hammer is cocked; single actionrequires the hammer to be cocked to the rear The M9's major components consist of the slidebefore the trigger is pulled. The hammer can be assembly, barrel assembly, and receiver. See fig-manually cocked or mechanically cocked. The ure 1-4 on page 1-3.hammer is mechanically cocked after the firstshot is fired. See figure 1-1. Slide Assembly
The slide assembly houses the firing pin, firingpin block, striker, extractor, and loaded chamberindicator, and it cocks the hammer during recoil.
Extractor
The extractor pulls the brass from the chamberafter the round is fired.
Figure 1-1. Single-Action Mode.

1-2
Firing pin block
MCRP 3-OIB
Right Side View
Left Side View
Figure 1-3. M9 Service Pistol.
DisassernbBy button
Slide assembly Slide stopDisassembly lever
Rear sight
Front sight
Trigger
assembly
Grip
Ltyrd loop

Slide assemblyN
Barrelassembly
IThThn
Receiver
Disassembly Button
The disassembly button permits quick disassem-bly of the pistol.
Slide Stop
The slide stop holds the slide to the rear after thelast round is fired. It can also be manually operat-ed to lock the slide to the rear or release the slide.
Magazine Catch Assembly(Magazine Release Button)
The magazine catch assembly secures the maga-zine in place when loading, and it releases themagazine from the pistol when unloading. Themagazine catch assembly is designed for bothright- and left-handed Marines.
Note: Reversal of the magazine catch assem-bly for left-handed Marines can be per-formed by a qualified armorer.
Loaded Chamber Indicator
When a round is in the chamber, the upper sur-face of the loaded chamber indicator protrudesfrom the right side of the slide. This protrusioncan be felt with the finger, veritying that there isa round in the chamber.
Barrel Assembly
The barrel assembly houses the round for firing,directs the projectile, and locks the barrel in posi-don during firing.
Receiver
The receiver supports the major components, con-trols the functioning of the pistol, and holds themagazine in place. The front and back straps ofthe grip are grooved vertically to ensure that thehand does not slip while firing. The receiver con-sists of the disassembly button, slide stop, andmagazine catch assembly.
The safety features of the M9 service pistolinclude the decocking/safety lever, firing pinblock, and half-cock notch.
DecockinglSafety Lever
The decocking/safety lever, commonly referredto as the safety, permits safe operation of the pis-tol by both right- and left-handed Marines. As thesafety is moved to the safe (down) position, thefiring pin striker moves out of alignment with thefiring pin. This movement prevents the pistolfrom firing as the hammer moves forward.
Note: In the fire (up) position, a red dot is vis-ible, indicating that the pistol is ready to fire.
Firing Pin Block
The firing pin block rests in the firing pin notchand prevents movement of the firing pin until thetrigger is pulled. As the trigger is pulled, the firing
Pistol Marksmanship 1-3
Figure 1-4. Major Components.
Safety Features

1-4 MCRP3-OIB
pin block moves up and out of the firing pinnotch. This movement allows a round to be firedwhen the hammer strikes the firing pin.
Half-Cock Notch
The half-cock notch stops the forward movementof the hammer during a mechanical failure.
Cycle of Operation
Figure 1-6. Unlocking.There are eight steps in the cycle of operation forthe M9 service pistol.
Extracting
FiringAs the slide moves rearward, the extractor with-
Once the safety is off and the trigger is pulled to draws the cartridge case out of the chamber. Seethe rear, the hammer falls on the firing pin, which figure 1-7.
strikes the primer and ignites the round. See fig-ure 1-5.
Figure 1-7. Extracting.
Figure 1-5. FirIng. Ejecting
Unlocking As the face of the slide passes over the ejector,the case strikes the ejector and it is knocked up-
As the slide assembly moves to the rear, the lock- ward and outward through the ejection port. Seeing block rotates out of the notches in the slide. figure 1-8.
See figure 1-6.

a
Pistol Marksmanship 1-5
Cocking
Figure 1-8. Ejecting.
As the slide moves rearward, the hammer ispushed back, allowing the sear to engage thehammer hooks, cock the hammer to the rear, andplace the pistol in the single-action mode. Seefigure 1-9.
Figure 1-9. Cocking
Chambering
FIgure 1-10. Feeding.
As the slide continues forward, it pushes the car-tridge into the chamber. See figure 1-11.
Figure 1-11. Chambering.
Feeding
The slide starts forward, pushed by the recoilspring. The face of the slide makes contact withthe cartridge at the top of the magazine, strippingit from the magazine and pushing it toward thechamber. See figure 1-10.
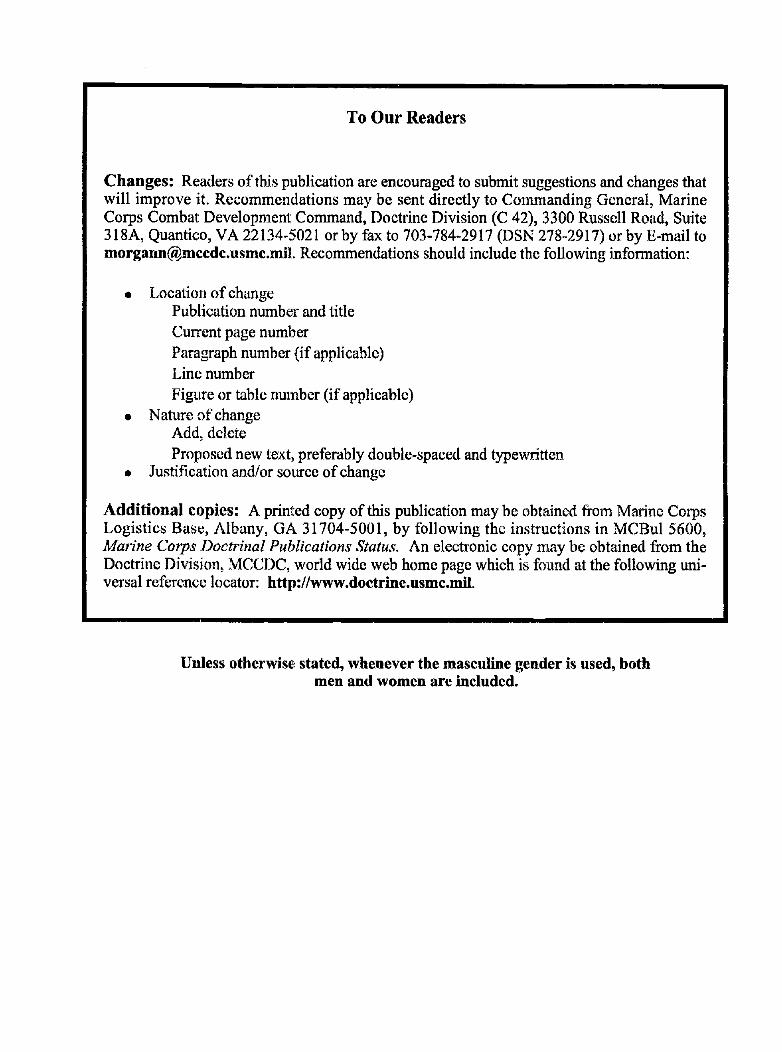
As the slide assembly continues to move forward,the locking block lugs move into the lockingblock recesses on the right and left sides of theslide. See figure 1-12 on page 1-6.
Locking
1-6 MCRP3-OIB
• Wipe off light corrosion as soon as it is discov-ered. Never use ammunition that is heavily cor-roded, dented, or has the projectile pushed in.
• Do not expose ammunition to direct sunlightfor long periods of time.
• Do not oil or grease ammunition. Dust or otherabrasives can collect on greasy ammunitionand may cause damage to the operating parts ofthe pistol. Oiled cartridges also produce exces-sive chamber pressure.
Figure 1-12. Locking.Wearing of the M9 Service Pistol's Gear
Ammunition
The only ammunition authorized for the M9 ser-vice pistol is the NATO M882 9-mm ball. Dum-my ammunition can be used during training (adummy round has a hole drilled in its side andcontains no primer). See figure 1-13.
Live Dummy
Figure 1-13. M9 Service Pistol Ammunition.
Do not open ammunition containers until theammunition is to be used. Ammunition must bemaintained in a high state of readiness. To carefor ammunition—
• Keep ammunition dry and clean. If ammuni-tion gets wet or dirty, wipe it off with a cleandry cloth.
The proper placement of pistol gear helps ensuresafety and aids the Marine in effectively handlingand employing the pistol.
M12 Holster
The M12 holster con-sists of the holster,removable holster flap,and metal retaining clip.To check for properplacement of the holster,allow the right arm tohang freely. The holstershould be slightly infront of the arm to per-mit easy access to thepistol upon presentationfrom the holster. Seefigure 1-14.
Note: In most cases,the holster is issuedwith the holster flapinstalled for a right-handed Marine. Toconvert the holster fora left-handed Marine,remove the metal re-taining clip and installthe clip on the oppo-site side of the holster.
Figure 1-14. The M12• Holster andAmmunition Pocket.

Pistol Marksmanship 1-7
Ml Ammunition Pocket
The ammunition pocket attaches to the cartridgebelt on the side opposite the holster in a positionthat best permits ready access for reloads. Themagazine is stored in the ammunition pocket withthe rounds down and pointed inboard.
M7 Shoulder Holster
The M7 shoulder hol-ster consists of a hol-ster with a thumbsnap closure, shoul-der strap, chest strap,and a belt retainingloop. The holster ispositioned on the leftside of the chest toprovide easy andquick access with theright hand. See fig-ure 1-15. The M7holster comes fullyassembled and hasadjustable straps toaccommodate eachMarine's body size.The holster is avail-able for right-handedMarines only, there-fore, a left-handedMarine has to with-draw the pistol from the holster with the righthand and then transfer the pistol to the left handbefore firing. (See chap. 8 for transferring the pis-tol from one hand to the other.) When the shoul-der holster is worn properly—
• The shoulder strap lays flat across the leftshoulder with the shoulder pad directly on topof the shoulder.
• The chest strap attaches to the D-ring at the topof the holster and runs diagonally across thechest, underneath the right arm, and around theback where it attaches to the end of the shoul-der strap.
• The belt retaining loop is at the bottom of theholster and attaches to the belt to stabilize theholster's position.
• The ammunition pocket attaches to the cheststrap directly underneath the right arm.
Assault Holster
Some Marines (i.e.,Marine security force,direct action platoon,and military police) arerequired to carry theassault holster. Thisholster has a retentionstrap that fastens overthe top of the holster toretain the pistol. Thistype of holster general-ly has a thumb breakon the retention strapthat is disengaged toaccess the pistol. Seefigure 1-16.
Concealed Pistol Holster
Some Marines are required to carry a concealedpistol as part of their official duties. The primaryconsideration for placement of a concealed pistolholster is to ensure the pistol cannot be seen;therefore, the Marine must consider the type ofclothing to be worn. A secondary consideration isto place the holster so the pistol can be presentedeasily. Typically, the best position for a concealedholster is just behind the strong side hip. Thisposition best conceals the pistol while allowing itto be presented quickly. Another placementchoice is in a shoulder holster, placing the pistoljust under the weak side arm. See figures 1-17through 1-20 on pages 1-8 and 1-9.
Figure 1-15. MiShoulder Holster.
Figure 1-16.Assault Holster.

1-8 MCRP3-OIB
Figure 1-17. Wearing of the Concealed Pistol Holster—Utilities.
Figure 118. Wearing of the Concealed Pistol—Sweater.

It
Pistol Marksmanship 19
Figure 1-19. Wearing of the Concealed Pistol Holster—Jacket.
Figure 1-20. Wearing of the Concealed Pistol Holster—Civilian Attire.

Figure 1-21. M9 Service Pistol (With Lanyard).
1-10 MCRP3-OIB
Lanyard
The lanyard aids in pistol retention. It is issued inthree sizes and is adjustable. The lanyard con-sists of a fabric cord, two cylindrical slip rings,and a metal clip that attaches the lanyard to thepistol's lanyard loop. See figure 1-21.
• Ensure that the lanyard is adjusted properly byremoving the pistol from the holster and fullyextending the right arm. The lanyard should betaut. Adjust as necessary.
Note: Re-adjust the lanyard if any equipmentchanges are made (e.g., flak jacket).
Firing the M9 ServicePistol While Wearing Gloves
To don the lanyard—
• Adjust the slip rings so they are positionedflush with the lanyard's base (clip end).
• Place the right arm through the loop and placethe loop over the head, resting on the leftshoulder.
• Attach metal clip to the pistol's lanyard loop.• Place the pistol in the holster.• Use the left hand to hold the bottom slip ring
against the base of the lanyard. Use the righthand to slide the top slip ring upward to posi-tion the loop of the lanyard under the arm. Thelanyard should fit snugly against the body, butnot restrict the Marine's movements.
• Tuck any excess cord behind the holster.
Not all combat engagements occur during idealweather conditions. During cold weather, theMarine may find it necessary to wear gloves toprotect the fingers from frostbite and help preventstiffening of the hands. Gloves may also be wornin mission-oriented protective posture condi-tions. Gloves provide protection to the hands,however, they also may interfere with theMarine's ability to engage targets effectively.The added bulk of the gloves may affect theMarine's ability to manipulate the safety, maga-zine release button, magazine, hammer, and slidestop/release. For example, the Marine may needto exert more pressure to engage the magazinerelease or slide release buttons to compensate forthe thickness of the gloves.
The principles of target engagement (see chap. 7)do not change while wearing gloves, however,the specific ability to manipulate and control thetrigger is greatly affected by the thickness of thegloves around the fingers. Wearing gloves reducethe Marine's ability to feel, which makes it diffi-cult to apply trigger control when firing. TheMarine may find that more pressure than normalmust be applied with the trigger finger just toestablish initial contact with the trigger. Once theMarine can "feel" the trigger through the gloves,then the pressure required to fire a shot can beapplied. This action may increase the chances offiring the pistol prematurely due to excessivepressure on the trigger. Dry firing while wearinggloves allows the Marine to learn how to applytrigger control consistently and determines howmuch pressure is needed to effectively fire a shot.
Pistol Marksmanship
While wearing gloves, the Marine may find it dif-ficult to fire the pistol in the double-action modedue to the position of the trigger and the limitedamount of space between the trigger and the trig-ger guard. Therefore, if the situation permits, theMarine may wish to thumbcock the pistol to firein single-action mode. In single-action mode,there is more space between the trigger guard andthe trigger, making it easier to position the fingeron the trigger. However, the Marine's ability tothumbcock the pistol may also be hindered by thegloves' bulk. Therefore, to thumbcock the pistolwhile wearing gloves, the Marine may performone of the following methods:
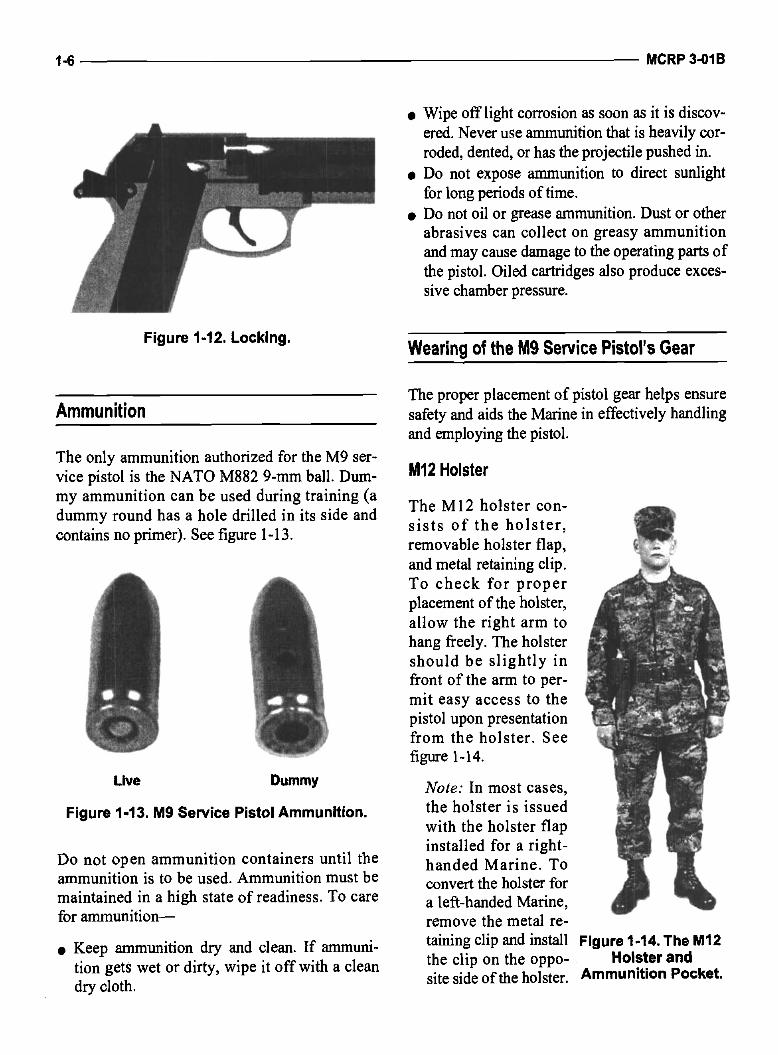
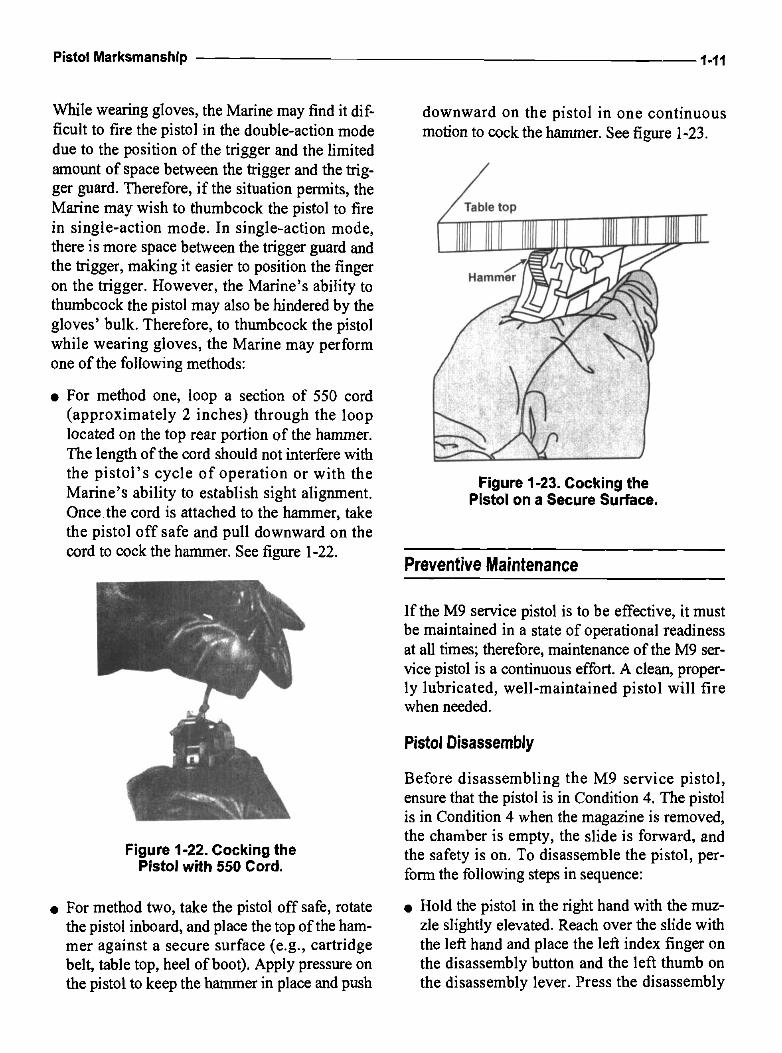
• For method one, loop a section of 550 cord(approximately 2 inches) through the looplocated on the top rear portion of the hammer.The length of the cord should not interfere withthe pistol's cycle of operation or with theMarine's ability to establish sight alignment.Once.the cord is attached to the hammer, takethe pistol off safe and pull downward on thecord to cock the hammer. See figure 1-22.
downward on the pistol in one continuousmotion to cock the hammer. See figure 1-23.
Preventive Maintenance
If the M9 service pistol is to be effective, it mustbe maintained in a state of operational readinessat all times; therefore, maintenance of the M9 ser-vice pistol is a continuous effort. A clean, proper-ly lubricated, well-maintained pistol will firewhen needed.
Pistol Disassembly
Figure 1-22. Cocking thePistol with 550 Cord.
• For method two, take the pistol off safe, rotatethe pistol inboard, and place the top of the ham-mer against a secure surface (e.g., cartridgebelt, table top, heel of boot). Apply pressure onthe pistol to keep the hammer in place and push
Before disassembling the M9 service pistol,ensure that the pistol is in Condition 4. The pistolis in Condition 4 when the magazine is removed,the chamber is empty, the slide is forward, andthe safety is on. To disassemble the pistol, per-form the following steps in sequence:
• Hold the pistol in the right hand with the muz-zle slightly elevated. Reach over the slide withthe left hand and place the left index finger onthe disassembly button and the left thumb onthe disassembly lever. Press the disassembly
Figure 1-23. Cocking thePistol on a Secure Surface.

1-12 MCRP3-OIB
button and hold it in place while rotating thedisassembly lever downward until it stops.
Note: A left-handed Marine places the rightthumb on the disassembly button and theright index finger on the disassembly lever.
• Pull the slide and barrel assembly forward andremove it while wrapping the fingers aroundthe slide to hold the recoil spring and recoilspring guide in place.
• Turn the slide assembly over in the left handuntil the recoil spring and recoil spring guideface up. Place the right thumb on the end of therecoil spring guide next to the locking blockand compress the recoil spring and spring guidewhile lifting and removing them from the slideand barrel assembly. See figure 1-24. Allow therecoil spring to decompress slowly.
• Separate the recoil spring from the recoilspring guide.
• Push in on the locking block plunger with theright index finger while pushing the barrel for-ward slightly. Lift and remove the lockingblock and barrel assembly from the slide.
A Marine is not authorized to disassemble thepistol any further than the preceding steps. Anyfurther disassembly must be performed by ord-nance personnel. See figure 1-25.
Figure 1-25. DisassembledM9 Service Pistol.
Disassembly of the Magazine
To disassembly the magazine, perform the fol-lowing steps:
• Grip the magazine firmly in the left hand withthe floorplate up and the thumb resting againstthe fiat end of the floorplate.
• Release the floorplate by pushing down (with ablunt object; e.g., an ink pen) on the floorplateretainer stud in the center of the floorplate. Atthe same time, slide the floorplate a short dis-tance forward with the thumb.
• Maintain the magazine spring pressure with thethumb and remove the floorplate from themagazine.
• Remove the floorplate retainer and magazinespring and follower from the magazine tube.
See figure 1-26.
Figure 1-24. Removing the RecoilSpring and Recoil Spring Guide.

Pistol Marksmanship 1.13
Cleaning and Lubricating the Pistol
Figure 1-26. Disassembled Magazine.
inspection of the Pistol
Once the pistol has been disassembled, it must bethoroughly inspected to ensure it is in a service-able condition. Pistol inspection is continuous dur-ing the pistol's cleaning and reassembly:
Slide Assembly• Check for free movement of the safety. Ensure
the rear sight is secure.Barrel Assembly• Inspect the bore and chamber for pitting or
obstructions.• Check the locking block plunger for free
movement of the locking block.• Inspect the locking lugs for cracks and burrs.Recoil Spring and Recoil Spring Guide• Check the recoil spring for damage.• Check that it is not bent.• Check the recoil spring guide for straightness
and smoothness.• Check to be sure it is free of cracks and burrs.Receiver Assembly• Check for bends, chips, and cracks.• Check for free movement of the slide stop and
magazine catch assembly.• Check the guide rails for excessive wear, burrs,
cracks, or chips.Magazine Assembly• Check the spring and follower for damage.• Ensure the lips of the magazine are not exces-
sively bent and are free of cracks and burrs.The magazine tube should not be bent or dirty.
Only authorized cleaning materials should be usedto clean and lubricate the pistol. If these items arenot issued with the pistol, they may be obtainedfrom the armory. The following procedures areused to clean and lubricate the pistol—
Slide Assembly• Clean the slide assembly with a cloth. A gen-
eral purpose brush and cleaning lubricant pro-tectant (CLP) can also assist in the removal ofexcess dirt and carbon buildup.
• Ensure the safety, bolt face, slide guides, andextractor are free of dirt and residue.
• Wipe dry with a cloth and apply a light coat ofCLP.
Barrel Assembly• Insert a bore brush with CLP into the chamber
end of the barrel, ensuring that it completelyclears the muzzle before it is pulled backthrough the bore.
Caution
Insert the bore brush through the chamber toprevent damage to the crown of the barrel.
• Repeat several times to loosen carbon deposits.• Dry the barrel by pushing a swab through the
bore.• Repeat until a clean swab can be observed.• Clean the locking block with a general purpose
brush.• Use the barrel brush to apply a light coat of
CLP to the bore and chamber area and lubri-cate the exterior surfaces of the barrel andlocking block.
Recoil Spring and Recoil Spring Guide• Clean the recoil spring and recoil spring guide
using CLP and a general purpose brush or cloth.• Apply a light coat of CLP after wiping the
recoil spring and recoil spring guide clean.Receiver• Wipe the receiver assembly clean with a cloth.• Use a general purpose brush for areas that are
hard to reach, paying special attention to the
1-14 MCRP3-OIB
disassembly lever, trigger, slide stop, hammer,and magazine release button.
• Apply a light coat of CLP.
Caution
Do not allow the hammer to fall with fullforce by pulling the trigger when the slide isremoved. This can damage the receiver andhammer.
Magazine
• Clean the magazine tube and follower withCLP and a general purpose brush.
• Wipe the magazine spring, floorplate retainer,and floorplate clean with a cloth.
• Apply a light coat of CLP.
Pistol Re-assembly
After the M9 service pistol has been cleaned andlubricated, it must be properly re-assembled toensure its serviceability. To re-assemble the M9service pistol—
• Use the left hand to grasp the slide with thebottom facing up and the muzzle pointingtoward the body. Use the right hand to graspthe barrel assembly with the locking block fac-ing up. Use the index finger to push in thelocking block plunger while placing the thumbon the base of the locking block.
• Insert the muzzle of the barrel assembly intothe forward open end of the slide. At the sametime, lower the rear of the barrel assembly byslightly moving the barrel downward. Thelocking block should fall into the notches ofthe slide assembly.
• Slip the recoil spring guide into the recoilspring.
• Insert the end of the recoil spring and recoilspring guide into the slide recoil spring hous-ing. At the same time, compress the recoilspring and lower the spring guide until it isfrilly seated onto the locking block cutaway.
• Use the left hand to grasp the slide and barrelassembly, sights up, and wrap the fingers
around the slide assembly to hold the recoilspring and guide in place. Align the slideassembly guide rails onto the receiver assem-bly guide rails.
• Push the slide rearward while pushing up on theslide stop with the thumb. Lock the slide to therear while maintaining upward pressure on theslide stop. Rotate the disassembly lever upward.Listen for a click, an audible click indicates apositive lock.
Pistol Magazine Re-assembly
To re-assemble the magazine—
• Grip the magazine firmly in the left hand withthe floorplate end up and the counting holesfacing the Marine. Insert the follower into themagazine so the flat end of the follower isagainst the flat end of the magazine.
• Ensure the floorplate retainer is attached to thefirst curve of the bottom coil.
• Hold the spring upright with the right hand andinsert the spring into the magazine tube so thatthe flat end of the floorplate retainer is againstthe flat end of the magazine.
• Push the magazine spring and floorplateretainer down with the right hand and hold it inplace with the thumb of the left hand. Use theright hand to slide the floorplate over the sidewalls of the magazine until fully seated, whichis indicated by an audible click.
SafetyIFunction Check
A safety/function check is performed after reas-sembling the M9 service pistol. Perform the fol-lowing steps to ensure the pistol is operational:
• Ensure there is no ammunition in the chamberof the pistol.
• Ensure that the safety is in the safe position,then depress the slide stop, allowing the slide toreturn fully forward. At the same time, thehammer should fall to the frill forward position.

Pistol Marksmanship 1-15
• Pull and release the trigger. The firing pinblock should move up and down but the ham-mer should not move.
• Place the safety in the fire position.• Pull the trigger to check the double action. The
hammer should cock and fall.• Pull the trigger again and hold it to the rear.
Use the fingers and thumb of the left hand tograsp the serrated sides of the slide just for-ward of the safety. Pull the slide to its rearmostposition and release it while holding the triggerto the rear. Release the trigger, a click shouldbe heard and the hammer should not fall.
• Pull the trigger to check the single action. Thehammer should fall. Place the safety in the safeposition.
If the safety/function check does not indicate anoperational pistol, the Marine takes the pistol toorganizational maintenance or the next autho-rized repair level.
User Serviceability Inspection
• Ensure the magazine falls out freely when themagazine release button is depressed.
• Repeat the preceding four steps with the sec-ond magazine.
• Ensure the slide is locked to the rear beforelubricating the spring guide, the top of the bar-rel just forward of the front sight, and the guiderails of the slide assembly behind the safety.With the muzzle pointed downward, work theslide several times and release.
• Inspect the pistol's external parts visually toensure that there are no cracks or excessivewear.
• Perform a safety/function check of the pistol.
Pistol Maintenance in Adverse Conditions
Combat situations can place Marines in a varietyof adverse conditions. Therefore, the M9 servicepistol must be maintained properly to ensure itscontinued operation.
Extreme Cold
The Marine is responsible for performing a userserviceability inspection on the pistol prior to livefire. The user serviceability inspection ensuresthe pistol is in an acceptable operating condition.This inspection is not intended to replace thedetailed pistol components inspection followingdisassembly or the limited technical inspection orpre-fire inspection conductedby a qualifiedarmorer. To conduct a user serviceability inspec-tion on the pistol, perform the following steps:
• Ensure the magazine release button is on theleft side of the pistol for a right-handed Marine,the right side of the pistol for a left-handedMarine.
• Ensure the magazine seats into the magazinewell when it is inserted and that it cannot bepulled out.
• Ensure the slide stays locked to the rear whenthe slide is pulled rearward with an emptymagazine in the pistol.
In extreme cold conditions, ensure that the fol-lowing maintenance is performed:
• Clean and lubricate the pistol inside at roomtemperature, if possible.
• Apply a light coat of lubricant, arctic weather(LAW) to all functional parts.
• Always keep the pistol dry.• Keep the pistol covered when moving from a
warm to a cold area. This permit gradual cool-ing of the pistol and prevents freezing.
• Ensure that a hot pistol is not placed in snow oron ice.
• Keep snow out of the bore of the barrel. If snowshould enter the bore, use a swab and cleaningrod to clean the bore before firing.
Hot, Wet Climates
Maintenance in hot, wet climates must be per-formed more frequently:
1-16 MCRP3-OIB
• Inspect hidden surfaces for corrosion. If corro-sion is found, clean and lubricate.
• Remove handprints with a clean cloth in orderto prevent corrosion.
• Dry the pistol with a cloth and lubricate it withCLP.
• Check ammunition and magazines frequentlyfor corrosion. Disassemble and clean the maga-zines with CLP and wipe dry with a clean cloth.If necessary, clean ammunition with a dry cloth.
Hot, Dry Climates
In a hot, dry climate, dust and sand can causestoppages and excessive wear on component con-tact surfaces during firing; therefore, keep thepistol covered whenever possible.
Corrosion is less likely to form on metal parts in adry climate. Therefore, lightly lubricate internalworking surfaces with CLP. Do not lubricateexternal parts of the pistol. Wipe excess lubricant
from exposed surfaces. Do not lubricate internalcomponents of the magazine.
Heavy Rain and Fording Operations
The following maintenance procedures are fol-lowed during periods of heavy rains or duringfording operations:
• Always attempt to keep the pistol dry.• Drain any water from the barrel prior to firing.• Dry the bore with a swab and cleaning rod.• Generously lubricate internal and external sur-
faces of the pistol with CLP.
Amphibious Conditions
If the pistol comes into contact with salt water,clean the pistol as soon as possible. If time doesnot permit cleaning in accordance with Techni-cal Manual (TM) 1005 A-i Oil, Operator's Manu-al, Pistol Semiautomatic, 9mm, M9, then washthe pistol with fresh water
CHAPTER 2
WEAPONS HANDLING
Weapons handling is a method of providing con- Note: The procedures in this chapter are writ-sistent and standardized procedures for handling, ten for right-handed Marines; left-handedoperating, and employing the M9 service pistol. Marines should reverse directions as needed.Understanding and applying the principles ofweapons handling are critical to developing safeand consistent weapons skills. Strict adherence to Safety Rulestraining and diligent practice will make weaponshandling instinctive. Mission accomplishment and The following safety rules are the foundation forsurvival during combat depend on a Marine's abil- responsible weapons handling. They must beity to react instinctively and with confidence. observed at all times, both in training and combat.
Safety Rules
Rule 1: Treat every weapon as if it were loaded.This rule is intended to prevent unintentional injury to personnel or damage to propertyfrom handling or transferring possession of a weapon.
Rule 2: Never point a weapon at anything you do not intend to shoot.This rule enforces the importance of muzzle awareness and reinforces positive identifica-tion of the target.
Rule 3: Keep your finger straight and off the trigger until you are ready to fire.This rule is intended to minimize the risk of firing the weapon negligently (when notfiring, the trigger finger is straight along the receiver, outside of the trigger guard). Thisrule also reinforces positive identification of the target.
Rule 4: Keep weapon on safe until you intend to fire.This rule enforces the use of the weapon's own safety feature and reinforces positiveidentification of the target.

2-2 MCRP 3-OIB
Weapons Conditions
The M9 service pistol's level of readiness is de-fined by three specific conditions. The steps in theloading and unloading process take the pistolthrough the specific conditions that indicate thepistol's readiness for live fire. The Marine mustunderstand and know the condition of his pistol atall times.
Condition 1. Magazine inserted, round inchamber, slide forward, and safety on.
Condition 2. Not applicable to the M9 ser-vice pistol.
Condition 3. Magazine inserted, chamber Figure 2-1. Checking the Round Indicator.empty, slide forward, and safety on.
Condition 4. Magazine removed, chamber • Place the trigger guard in the palm of the lefthand. Use the thumb and index finger to graspempty, slide forward, and safety on.the forward end of the slide at the indentationsunder the front sight, behind the muzzle. See
__________________________________________ figure 2-2.
Determining a Weapon's Condition
There are two methods for determining the pis-tol's condition: checking the round indicator onthe right side of the pistol and conducting achamber check.
Checking the Round Indicator
When there is a round in the chamber, the uppersurface of the extractor protrudes from the rightside of the slide. The protrusion can be felt bysliding either the thumb or the index finger of theleft hand over the top of the slide and across theextractor. See figure 2-1.
Conducting a Chamber Check
To conduct a chamber check—
• Point the pistol in a safe direction and grasp the Figure 2-2. Placement of the Left Hand.
pistol grip with the right hand.

Pistol Marksmanship 24
Caution
Ensure the muzzle does not cover the handor fingers.
• Keep thumb in place around the pistol's back-strap and rotate fingers of the right hand overthe top of the slide in front of the rear sight.
• Pull the slide to the rear by pushing forwardwith the right thumb and pulling back on therear sight with the fingers. Use the left hand tosteady the pistol and to assist in pulling theslide to the rear.
• Use the right hand to hold the slide to the rear(just enough to visually inspect the chamber fora round). Physically check for a round byinserting a finger of the right hand into thechamber area. See figure 2-3.
Figure 2-3. Chamber Check.
Note: At night or in low light conditions, theMarine's visibility is reduced; therefore, theMarine will have to rely on the physicalcheck with the finger to determine if a roundis in the chamber.
Caution
Pulling the slide too far to the rear whileinspecting the chamber may cause a doublefeed or the ejection of a round.
• Remove the finger from therelease tension on both hands toto go forward. Ensure that theway forward.
Weapons Commands
Weapons commands direct the Marine toload, unload, and employ the M9 serviceSix commands are used in weapons handling:
chamber andallow the slideslide is all the
safelypistol.
"Load"This command is used to take a weaponfrom Condition 4 to Condition 3.
"Make Ready"This command is used to take a weaponfrom Condition 3 to Condition 1.
"Fire"This command is used to engage targets.
"Cease Fire"This command is used to cease targetengagement.
"Unload"This command is used to take a weaponfrom any condition to Condition 4.
"Unload, Show Clear"This command is used to require a secondindividual to check the weapon to verify thatno ammunition is present before the weaponis put into Condition 4.

Side View
• Cr.I t
2-4 MCRP3-OIB
Loading the Pistol
Perform the following steps to load the pistol(take the pistol from Condition 4 to Condition 3):
• Ensure the pistol is on safe.• Use the right hand to grip the pistol grip
firmly. Ensure that the pistol is pointed in asafe direction, bring the trigger guard to theright of eye level and cant the pistol so themagazine well faces inboard at approximatelya 45-degree angle to the deck. Draw the rightelbow in to facilitate control of the pistol.
• Use the left hand to remove a filled magazinefrom the ammunition pocket. Index the magazine by sliding the index finger along the for-ward edge of the magazine. See figure 2-4.
• Insert the filled magazine into the magazinewell by guiding it with the index finger and,with the fingers extended, pushing it in with theheel of the hand until it is fully seated. Do notrelinquish contact with the magazine until it isfully seated. See figure 2-5.
Front View
Figure 2-5. Seating the Magazine.Figure 2-4. Indexing the Magazine.

[.fr;t
Pistol Marksmanship 2-5
Making the Pistol Ready
Perform the following steps to take the pistolfrom Condition 3 to Condition 1:
• Firmly grip the pistol grip with the right hand.Ensure that the pistol is pointed in a safe direc-tion and the slide is in its forward position.
• Rotate the magazine well outboard to facilitatepulling the slide to the rear. With the fingersand thumb of the left hand, grasp the serratedsides of the slide just forward of the safety. Seefigure 2-6.
Caution
Ensure the muzzle does not cover the handor fingers.
• Pull the slide to its rearmost position by push- Right Side View
ing forward with the right hand while pullingback on the slide with the left hand.
• Release the slide, this strips a round from themagazine and chambers it as the slide movesforward.
• Ensure the pistol remains on safe.• Conduct a chamber check to ensure a round is
in the chamber.
Note: A chamber check may be conducted atany time to check the pistol's condition.
Fire
Perform the following steps to fire the pistol:
• Keep trigger finger straight and use the rightthumb to take the pistol off safe.
• Place the trigger finger on the trigger and applypressure to the trigger until the shot is fired.
Left Side View
Figure 2-6. GraspIng theSlide to Make Ready.

: '
Ift -
2-6 MCRP3-OIB
Cease Fire
Perform the following steps to execute a ceasefire of the pistol:
• Remove the finger from the trigger and place itstraight along the receiver.
• Place the pistol on safe without breaking thegrip of the right hand.
• Assume a carry or transport position.
Unloading the Pistol
Perform the following steps to take the pistolfrom any condition to Condition 4:
• Use the right hand to grip the pistol firmly.Ensure that the pistol is on safe.
• Rotate the pistol so the magazine well is Side Viewpointed inboard and angled down.
Note: The angle of the magazine well must al-low the magazine to fall freely from the wellonce the magazine release button is engaged.
• Depress the magazine release button to removethe magazine from the pistol. Catch the maga-zine with the left hand and retain it.
• Push upward on the slide stop with the rightthumb and maintain pressure. Rotate the weap-on so the chamber is outboard.
Note: A left-handed Marine pushes upwardon the slide stop with the left index finger.
• Reach over the top of the pistol with the lefthand and grasp the slide serrations with thethumb and index finger. The left hand shouldpartially cover the ejection port so it is posi-tioned to catch an ejected round.
• Point the pistol in a safe direction and fullyretract the slide and lock it to the rear. At thesame time, catch the ejected round with the left Front View
hand. See figure 27. Figure 2-7. Catching the Ejected Round.

Pistol Marksmanship 2-7
• Rotate the pistol so the inside of the chambercan be seen. Visually inspect the chamber toensure it is empty.
• Press the slide stop to release the slide andobserve it going forward on an empty chamber.
Unloading and Showing the Pistol Clear
Perform the following steps to take the pistolfrom any condition to Condition 4. See figure 2-8.
• Push upward on the slide stop with the rightthumb and maintain pressure. Rotate the weap-on so the chamber is outboard.
Note: A left-handed Marine pushes upwardon the slide stop with the left index finger.
• Reach over the top of the pistol with the lefthand and grasp the slide serrations with thethumb and index finger. The left hand shouldpartially cover the ejection port so it is posi-tioned to catch an ejected round.
• Point the pistol in a safe direction and fullyrefract slide and lock it to the rear. At the sametime, catch the ejected round with the left hand.
• Rotate the pistol so the inside of the chambercan be seen. Visually inspect the chamber toensure it is empty.
• Bring the pistol to the administrative transportand have another Marine visually inspect thechamber to ensure that—o The chamber is empty, no ammunition is
present, and the magazine is removed.o The pistol is on safe.
• Acknowledge that the pistol is clear.• Press the slide stop to release the
observe it going forward on an empty
Emptying the Magazine
Figure 2-8. Unload, Show Clear.
• Use the right hand to grip the pistolEnsure that the pistol is on safe.
• Rotate the pistol so the magazinepointed inboard and angled down.
Note: The angle of the magazine well must al-low the magazine to fall freely from the wellonce the magazine release button is engaged.
• Depress the magazine release button to removethe magazine from the pistol. Catch the maga-
Once the pistol is unloaded, the pistol magazinecan be emptied of ammunition. To empty themagazine, perform the following steps:
• Hold the magazine upright with the back of themagazine tube against the palm of the hand.
• Push the top round forward with the thumb andcatch it with the other hand as it is removed.
• Repeat until the magazine is empty.
slide andchamber.
firmly.
well is
Filling the Magazine
zine with the left hand and retain it. must be filled with the prescribed number ofPrior to loading the pistol, the pistol magazine
• •' •-t-f..4 - 9'
I-
'a
2-8 MCRP3-O1B
rounds of ammunition. See figure 2-9. To fill themagazine, perform the following steps:
finger may push down on the back of the roundto assist movement. The base of the roundshould be flush with the back of the magazine.
Repeat this procedure until the magazine is filledwith the appropriate number of rounds. Holes onthe back of the magazine allow the visual count-ing of rounds in five-round increments.
Reloading the Pistol
The Marine's ability to reload the pistol quicklyimproves his chance for success on the battlefield.
Dry Reload
Figure 2-9. Filling the Magazine.
• Hold the magazine with the back of the maga-zine against the palm of the hand and the fol-lower up.
• Use the other hand to place a round @rimerend first) on the follower in front of the maga-zine lips.
• Press down on the round and slide the roundcompletely back under the lips. The thumb or
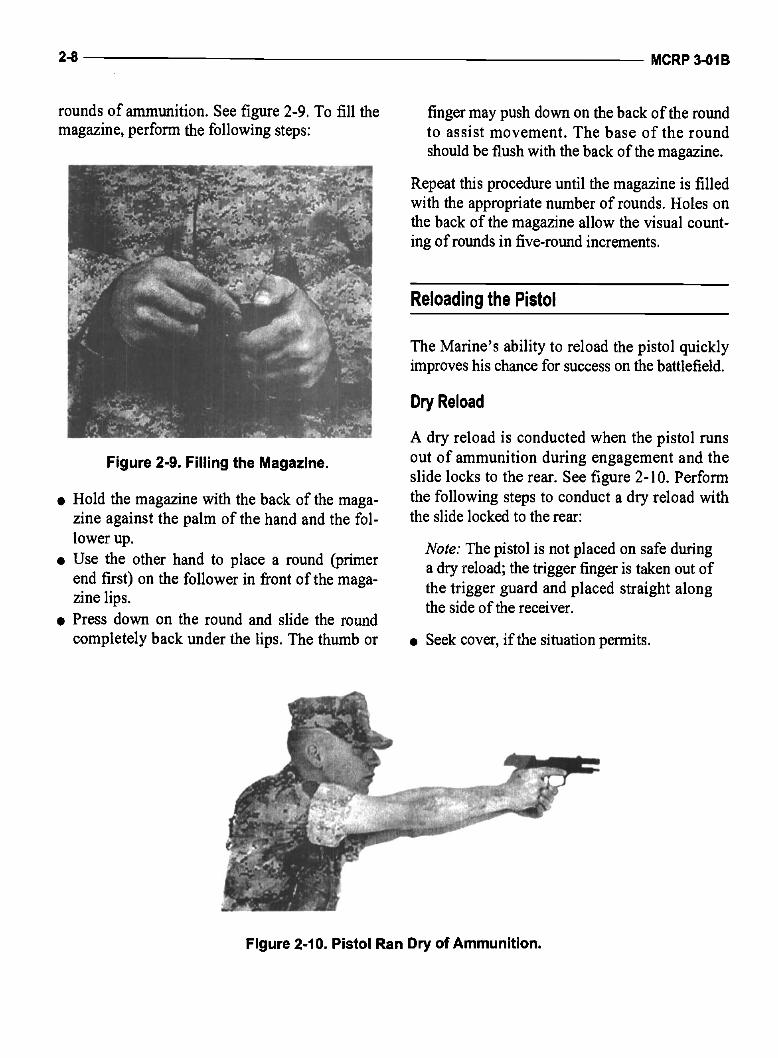
A dry reload is conducted when the pistol runsout of ammunition during engagement and theslide locks to the rear. See figure 2-10. Performthe following steps to conduct a dry reload withthe slide locked to the rear:
Note: The pistol is not placed on safe duringa dry reload; the trigger finger is taken out ofthe trigger guard and placed straight alongthe side of the receiver.
• Seek cover, if the situation permits.
Figure 2-10. Pistol Ran Dry of Ammunition.

Pistol Marksmanship 2-9
• Retain the firing grip with the right hand andpull the pistol in close to the body to facilitatecontrol. Bring the trigger guard to the right ofeye level and cant the pistol so the magazinewell is facing inboard at approximately a 45-degree angle to the deck. See figure 2-11.
Figure 2-12. Release Magazineand Unfasten Ammunition Pocket
Figure 2-11. Bring thePistol Toward the Body.
• Press the magazine release button and let theempty magazine fall to the deck. At the sametime, unfasten the ammunition pocket to with-draw a filled magazine. See figure 2-12.
Note: The primary objective during a dry re-load is to get the pistol back in action asquickly as possible. Following engagement,retrieve the magazine before moving.
• Grasp the magazine by curling the middle fin-ger and thumb of the left hand around the baseof the magazine, with the index fmger straightalong the ammunition pocket. See figure 2-13. Figure 2-13. Grasping the Magazine.

ii
2-10 MCRP3-OIB
• Index the magazine: as the magazine is beingwithdrawn from the pocket, the index fingershould be along the front of the magazine. Seefigure 2-14.
Figure 2-14. Indexing the Magazine.
• Rotate the hand up so the magazine is alignedwith the magazine well.
• Glance quickly at the magazine well, insert themagazine into the magazine well (see fig. 2-15).
Figure 2-15. Glance at the Magazine Well.
• Bring the eyes back on target at the same timeas the heel of the left hand seats the magazine,do not relinquish contact with the magazine.See figure 2-16.
Figure 2-16. Seating the Magazine.
• Roll both hands inward to establish a two-handed grip and press the slide release with theleft thumb to allow the slide to move forward,chambering the first round, and present the pis-tol to the target. See figure 2-17.
Note: A left-handed Marine presses the sliderelease with his trigger finger.

:1?
..v
r&j;4c4
Pistol Marksmanship 2-11
Figure 2-17. Present Pistol Back to TargetFigure 2-18. Facilitating Control of Pistol.
Condition I Reload
In a Condition 1 reload, a partially-filled maga-zinc is removed from the pistol and replaced witha fully filled magazine. A Condition 1 reload isperformed when there is a lull in the action orwhenever deemed necessary by the Marine. Toperform a Condition 1 reload—
• Retain the firing grip with the right hand andpull the pistol in close to the body to facilitatecontrol. Keep the pistol pointed in the directionof the likely threat. See figure 2-18.
• Withdraw a filled magazine from the ammuni-tion pocket with the left hand. Index the maga-zine and bring it up to the left of eye level. Seefigure 2-19.
Figure 2-19. Withdrawing andIndexing a Filled Magazine.
A
tI
fr4
2-12 MCRP 3-OIB
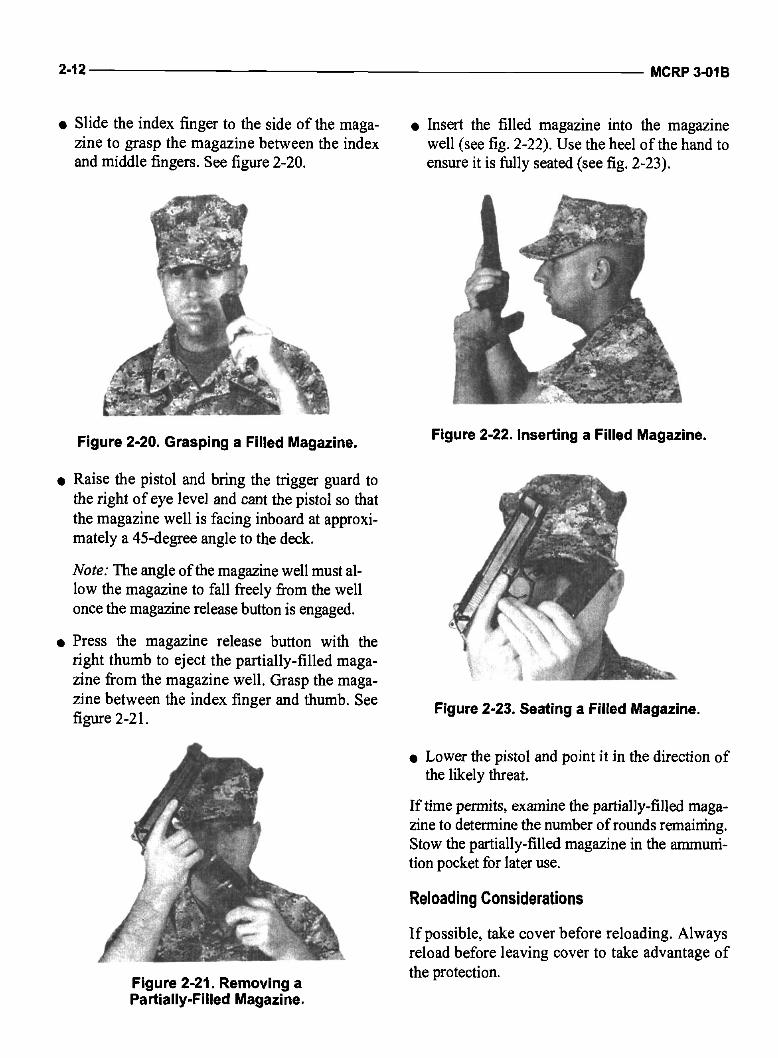
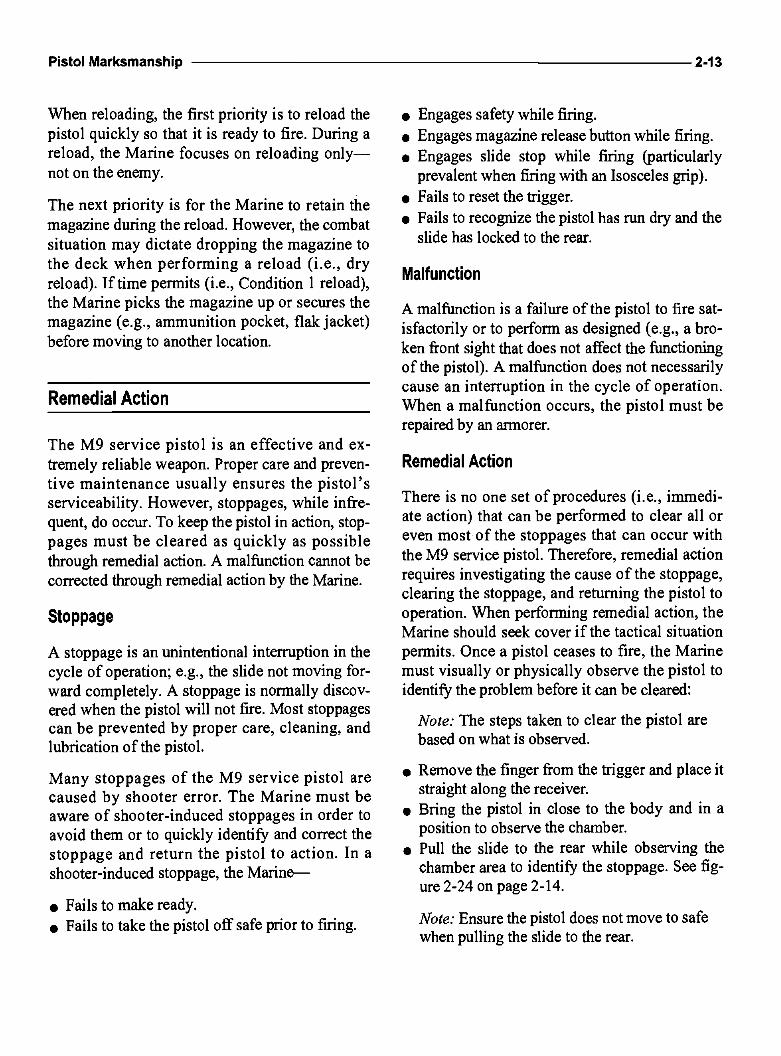
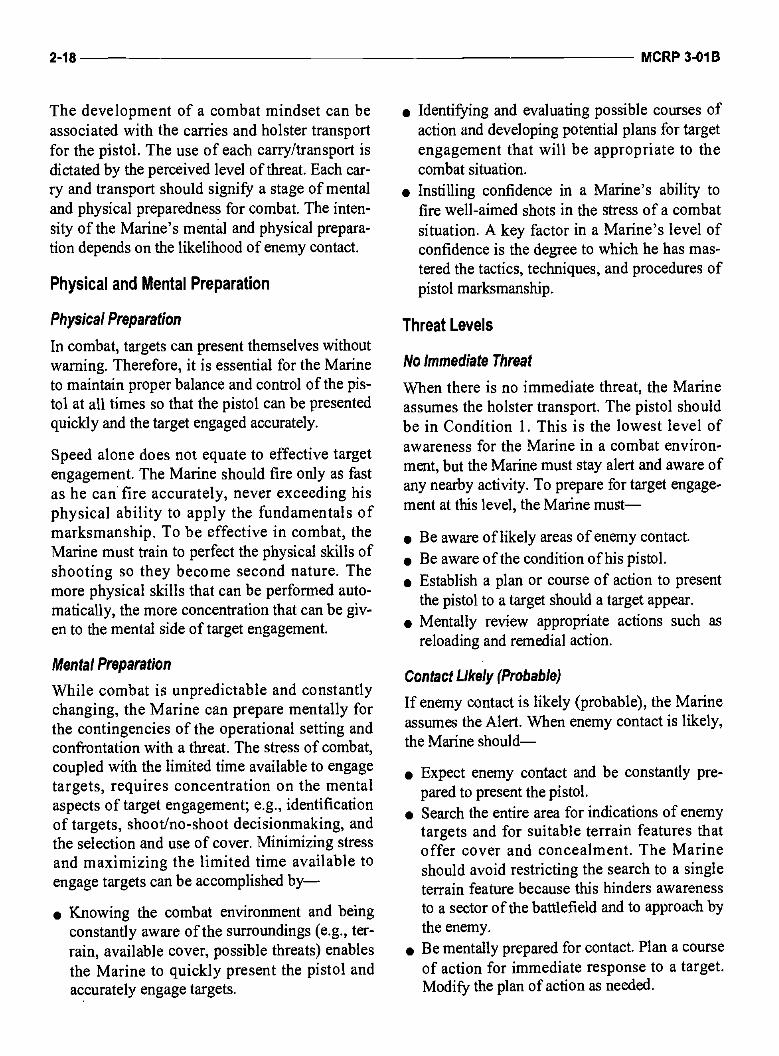
• Slide the index finger to the side of the maga- • Insert the filled magazine into the magazinezine to grasp the magazine between the index well (see fig. 2-22). Use the heel of the hand toand middle fingers. See figure 2-20. ensure it is frilly seated (see fig. 2-23).
Figure 2-20. GraspIng a Filled Magazine. Figure 2-22. Inserting a Filled Magazine.
• Raise the pistol and bring the trigger guard tothe right of eye level and cant the pistol so thatthe magazine well is facing inboard at approxi-mately a 45-degree angle to the deck.
Note: The angle of the magazine well must al-low the magazine to fall freely from the wellonce the magazine release button is engaged.
• Press the magazine release button with theright thumb to eject the partially-filled maga-zine from the magazine well. Grasp the maga-zine between the index fmger and thumb. See Figure 2-23. Seating a Filled Magazine.figure 2-21.
• Lower the pistol and point it in the direction ofthe likely threat.
If time permits, examine the partially-filled maga-zine to determine the number of rounds remaining.Stow the partially-filled magazine in the ammuni-tion pocket for later use.
Reloading Considerations
If possible, take cover before reloading. Alwaysreload before leaving cover to take advantage ofthe protection.
Figure 2-21. Removing aPartially-Filled Magazine.
Pistol Marksmanship 2-13
When reloading, the first priority is to reload thepistol quickly so that it is ready to fire. During areload, the Marine focuses on reloading only—not on the enemy.
The next priority is for the Marine to retain themagazine during the reload. However, the combatsituation may dictate dropping the magazine tothe deck when performing a reload (i.e., dryreload). If time permits (i.e., Condition I reload),the Marine picks the magazine up or secures themagazine (e.g., ammunition pocket, flak jacket)before moving to another location.
Remedial Action
The M9 service pistol is an effective and ex-tremely reliable weapon. Proper care and preven-tive maintenance usually ensures the pistol'sserviceability. However, stoppages, while infre-quent, do occur. To keep the pistol in action, stop-pages must be cleared as quickly as possiblethrough remedial action. A malfunction cannot becorrected through remedial action by the Marine.
Stoppage
A stoppage is an unintentional interruption in thecycle of operation; e.g., the slide not moving for-ward completely. A stoppage is normally discov-ered when the pistol will not fire. Most stoppagescan be prevented by proper care, cleaning, andlubrication of the pistol.
Many stoppages of the M9 service pistol arecaused by shooter error. The Marine must beaware of shooter-induced stoppages in order toavoid them or to quickly identify and correct thestoppage and return the pistol to action. In ashooter-induced stoppage, the Marine—
• Fails to make ready.• Fails to take the pistol off safe prior to firing.
• Engages safety while firing.• Engages magazine release button while firing.• Engages slide stop while firing (particularly
prevalent when firing with an Isosceles grip).• Fails to reset the trigger.• Fails to recognize the pistol has run dry and the
slide has locked to the rear.
Malfunction
A malfunction is a failure of the pistol to fire sat-isfactorily or to perform as designed (e.g., a bro-ken front sight that does not affect the functioningof the pistol). A malfunction does not necessarilycause an interruption in the cycle of operation.When a malfunction occurs, the pistol must berepaired by an armorer.
Remedial Action
There is no one set of procedures (i.e., immedi-ate action) that can be performed to clear all oreven most of the stoppages that can occur withthe M9 service pistol. Therefore, remedial actionrequires investigating the cause of the stoppage,clearing the stoppage, and returning the pistol tooperation. When performing remedial action, theMarine should seek cover if the tactical situationpermits. Once a pistol ceases to fire, the Marinemust visually or physically observe the pistol toidentify the problem before it can be cleared:
Note: The steps taken to clear the pistol arebased on what is observed.
• Remove the finger from the trigger and place itstraight along the receiver.
• Bring the pistol in close to the body and in aposition to observe the chamber.
• Pull the slide to the rear while observing thechamber area to identify the stoppage. See fig-ure 2-24 on page 2-14.
Note: Ensure the pistol does not move to safewhen pulling the slide to the rear.

I
Figure 2-24. Observing Chamber.
• Correct the stoppage:o If there is a round in the magazine but not in
the chamber (see fig. 2-25), the slide is re-leased and a round is observed being cham-bered.
Figure 2-26. Round Not Being Chambered.
• Fire the pistol.
Audible Pop or Reduced Recoil
WARNING
Figure 2-25. Round inMagazine but Not in Chamber.
o If a round being chambered is not observed,the bottom of the magazine is tapped to seatit properly, and the slide is racked to the rear.See figure 2-26.
o If there is no round in the magazine or cham-ber, a reload is conducted. See figure 2-27.
When an audible pop or reduced recoil isexperienced, the Marine DOES NOT performremedial action unless he is in a combat envi-ronment. An audible pop occurs when only aportion of the propellant is ignited. It is nor-mally identifiable by reduced recoil and thepistol will not cycle. Sometimes, it is accom-panied by excessive smoke escaping from thechamber area.
2-14 MCRP 3-OIB
Figure 2-27. No Round inMagazine or Chamber.

Pistol Marksmanship 2-15
Training Environment
If an audible pop or reduced recoil is experiencedduring firing, cease fire immediately. Do notapply remedial action; instead, perform the fol-lowing steps:
• Remove the finger from the trigger and place itstraight along the receiver.Point the pistol down range.
Place the pistol on safe.Raise a hand to receive assistance from avail-able range personnel.
Combat Environment
The tactical situation may dictate correction of anaudible pop or reduced recoil. To clear the pistol,perform the following steps:
• Remove the finger from the trigger and place itstraight along the receiver.
• Seek cover if the tactical situation permits.• Unload the pistol, but leave the slide locked to
the rear.• Insert something into the bore and clear the
obstruction.• Observe the barrel for cracks or bulges.
• Reload the pistol.
and the Ready. The carries permit quick engage-ment when necessary.
Alert
The Alert is used when enemy contact is likely(probable). See figure 2-28. The Marine performsthe following steps to assume the Alert:
Weapons Carries Figure 2-28. Alert.
As the threat level increases, so should theMarine's readiness for engagement. Weaponscarries are designed to place the Marine in a stateof increased readiness as the threat level increas-es. There are two carries with the pistol: the Alert
• Ensure the pistol is on safe.• Grasp the pistol grip firmly with two hands.
The trigger finger is straight and the rightthumb is on the safety and in a position to
•S
S

2-16 MCRP 3-OIB
• Extend the arms down at approximately a 45-degree angle to the body or bend the elbows. Seefigure 2-29.
• The muzzle of the pistol is pointed in the likelydirection of the threat.
Weapons Transports
The M9 service pistol is transported in either theholster transport or the administrative transport.
Ready Holster Transport
The Ready is used when there is no target, butcontact with the enemy is imminent. The Marineperforms the following steps to assume the Ready
(see fig. 2-30):
• Ensure the pistol is on safe.• Grasp the pistol firmly with two hands. The
trigger finger is straight and the right thumb ison the safety and in a position to operate it.
• Extend arms and raise the pistol to just beloweye level so a clear field of view is maintained.
• Point the muzzle of the pistol in the direction ofenemy contact.
The holster transport is the most common methodof carrying the pistol because it can be transport-ed safely in the holster. This transport is usedwhen there is no immediate threat (enemy contactis remote). See figure 2-31. To transport the pis-tol in the holster:
. Point the pistol in a safe direction.
WARNING
Ensure the pistol is pointed in a safe directionat all times and does not cover any part of thebody while holstering.
Figure 2-29. Alert—Close Quarters. Figure 2-30. Ready.

Pistol Marksmanship 2-17
Figure 2-31. Holster Transport.
• Ensure that the safety is on, the slide is for-ward, and the trigger finger is straight.
• Use the right hand to firmly grip the pistol gripand place the pistol in the holster:o Lift the flap of the holster with the left hand.o Look down at the holster, bring the pistol
back to a position above the holster, and ro-tate the muzzle down into the holster.
• Push the pistol snugly into the holster and fas-ten the flap with the right hand.
Figure 2-32. Administrative Transport.
• Ensure the pistol is on safe, the magazine isremoved, the slide is locked to the rear, and thetrigger finger is straight along the receiver.
• Bend the elbow to approximately a 45-degreeangle so the pistol is positioned near shoulderlevel. The wrist should be straight so the pis-tol's muzzle points up.
Combat lYlindset
Administrative Transport
The administrative transport is used to transportthe pistol when the Marine does not have a holster.See figure 2-32. The Marine performs the follow-ing steps to assume the administrative transport:
• Establish a firm grip around the pistol gripwith the right hand.
In a combat environment, the Marine must beconstantly prepared to engage targets. When atarget presents itself, there may be little time toreact. The target must be engaged quickly andaccurately. It is not enough to simply knowmarksmanship techniques, the Marine must beable to react instinctively.
2-18 MCRP3-OIB
The development of a combat mindset can beassociated with the carries and holster transportfor the pistol. The use of each carry/transport isdictated by the perceived level of threat. Each car-ry and transport should signify a stage of mentaland physical preparedness for combat. The inten-sity of the Marine's mental and physical prepara-tion. depends on the likelihood of enemy contact.
Physical and Mental Preparation
Physical Preparation
In combat, targets can present themselves withoutwarning. Therefore, it is essential for the Marineto maintain proper balance and control of the pis-tol at all times so that the pistol can be presentedquickly and the target engaged accurately.
Speed alone does not equate to effective targetengagement. The Marine should fire only as fastas he can fire accurately, never exceeding hisphysical ability to apply the fundamentals ofmarksmanship. To be effective in combat, theMarine must train to perfect the physical skills ofshooting so they become second nature. Themore physical skills that can be performed auto-matically, the more concentration that can be giv-en to the mental side of target engagement.
Mental Preparation
While combat is unpredictable and constantlychanging, the Marine can prepare mentally forthe contingencies of the operational setting andconfrontation with a threat. The stress of combat,coupled with the limited time available to engagetargets, requires concentration on the mentalaspects of target engagement; e.g., identificationof targets, shoot/no-shoot decisionmaking, andthe selection and use of cover. Minimizing stressand maximizing the limited time available toengage targets can be accomplished by—
• Knowing the combat environment and beingconstantly aware of the surroundings (e.g., ter-rain, available cover, possible threats) enablesthe Marine to quickly present the pistol andaccurately engage targets.
• Identifying and evaluating possible courses ofaction and developing potential plans for targetengagement that will be appropriate to thecombat situation.
• Instilling confidence in a Marine's ability tofire well-aimed shots in the stress of a combatsituation. A key factor in a Marine's level ofconfidence is the degree to which he has mas-tered the tactics, techniques, and procedures ofpistol marksmanship.
Threat Levels
No Immediate Threat
When there is no immediate threat, the Marineassumes the holster transport. The pistol shouldbe in Condition 1. This is the lowest level ofawareness for the Marine in a combat environ-ment, but the Marine must stay alert and aware ofany nearby activity. To prepare for target engage-ment at this level, the Marine must—
• Be aware of likely areas of enemy contact.
• Be aware of the condition of his pistol.• Establish a plan or course of action to present
the pistol to a target should a target appear.
• Mentally review appropriate actions such asreloading and remedial action.
Contact Likely (Probable)
If enemy contact is likely (probable), the Marineassumes the Alert. When enemy contact is likely,the Marine should—
• Expect enemy contact and be constantly pre-pared to present the pistol.
• Search the entire area for indications of enemytargets and for suitable terrain features thatoffer cover and concealment. The Marineshould avoid restricting the search to a singleterrain feature because this hinders awarenessto a sector of the battlefield and to approach bythe enemy.
• Be mentally prepared for contact. Plan a courseof action for immediate response to a target.Modify the plan of action as needed.
Pistol Marksmanship 2-19
• Be physically prepared to fire. Maintain properbalance at all times. Avoid self-induced physi-cal fatigue. For example, do not grip the pistolso tightly that fingers, hands, and arms tirefrom carrying the pistol.
Contact Imminent
When contact with an enemy target is imminent,assume the Ready. In this carry, the Marine is atthe highest level of awareness and is constantlysearching for and expecting a target. To fire well-aimed shots upon target detection, the Marinemust be at the peak of his mental preparation, alldistractions must be eliminated, and his focusmust be on firing an accurate shot. In the Ready,the Marine must—
• Keep the pistol oriented in the general direc-tion of observation (eyes, muzzle, target).
• Maintain a clear field of view above the pistolsights until the target is detected.
• Be mentally and physically prepared to engagethe target. The Marine must be ready to:o Identi& the target.o Sweep the safety.o Apply the fundamentals of marksmanship.
• Move only as fast as he is capable of deliveringwell-aimed shots, ensuring that speed of en-gagement does not exceed his physical abilities.
• Search the entire area for indications of enemytargets, lowering the pistol enough to observe aclear field of view of the area.
Show Clear Transfer
To transfer the pistol—
• Grasp the pistol firmly in the rightensuring that the pistol is on safe.
• Remove and retain the magazine.• Lock the slide to the rear and catch
there is a round in the chamber.• Inspect the chamber visually to ensure it is
empty and leave the slide locked to the rear. Totransfer the pistol—o If the receiving Marine is to the right: Cradle
the trigger guard in the palm of the left handand wrap the fingers around the top of thepistol. Release the firing grip.
o If the receiving Marine is to the left: Withthe left hand, grasp the slide of the pistolwith the thumb over the slide and the fingersunderneath. Release the firing grip.
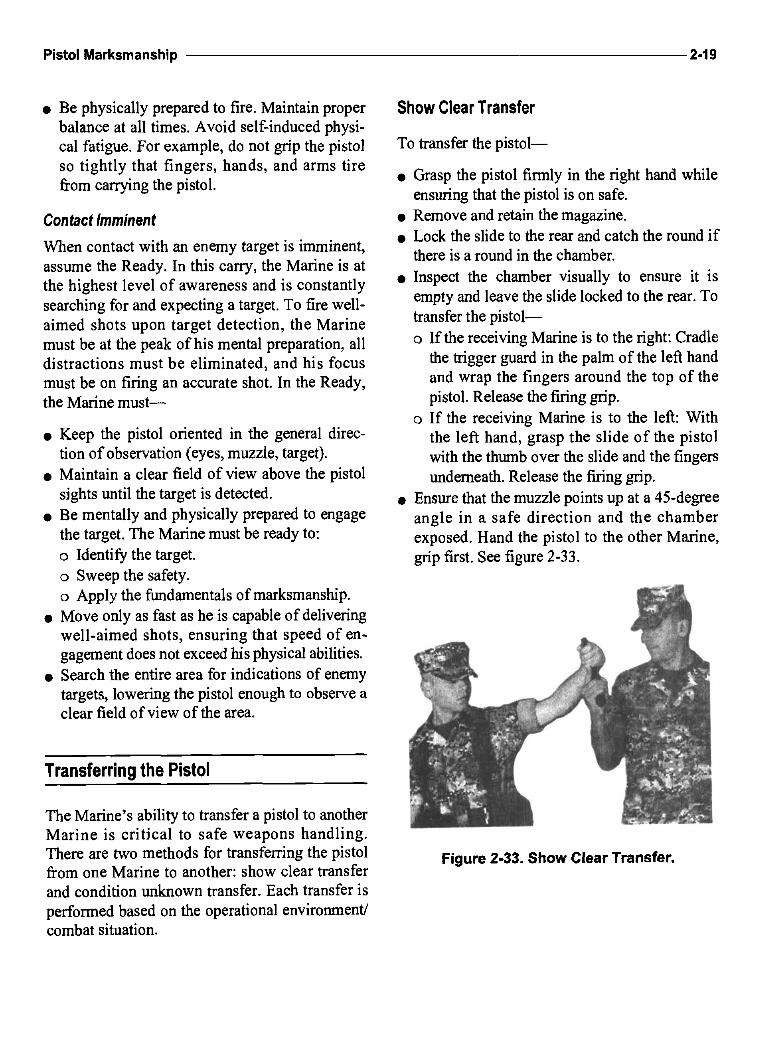
• Ensure that the muzzle points up at a 45-degreeangle in a safe direction and the chamberexposed. Hand the pistol to the other Marine,grip first. See figure 2-33.
Transferring the Pistol
The Marine's ability to transfer a pistol to anotherMarine is critical to safe weapons handling.There are two methods for transferring the pistolfrom one Marine to another: show clear transferand condition unknown transfer. Each transfer isperformed based on the operational environment!combat situation.
Figure 2-33. Show Clear Transfer.
hand while
the round if

tt. :k!4
.1g.
4-
2-20 MCRP3-OIB
Condition Unknown Transfer
To transfer the pistol—
Figure 2-34. Condition UnknownTransfer to the Right.
trigger finger
• The receiving Marin&*-o Grasps the pistol grip with the trigger finger
straight along the receiver.o Inspects the chamber visually to ensure it is
empty.o Ensures the pistol is on safe.
• Grasp the pistol firmly in the right hand whileensuring that the pistol is on safe. To transferthe pistol—o If the receiving Marine is to the right: Cradle
the trigger guard in the palm of the left handand wrap the fingers around the top of the pis-tol. Release the firing grip. See figure 2-34.
o If the receiving Marine is to the left: With theleft hand, grasp the slide of the pistol with thethumb over the slide and the fingers under-neath. Release the firing grip. See figure 2-3 5.
Figure 2-35. Condition UnknownTransfer to the Left.
• Ensure that the muzzle points up at a 45-degreeangle in a safe direction. Hand the pistol to thereceiving Marine, grip first.
• The receiving Marine—o Grasps the pistol grip with the
straight along the receiver.o Ensures the pistol is on safe.o Conducts a chamber check to determine the
condition of the pistol.o Remove the magazine and count the number
of rounds in the magazine by using thecounting holes, if time permits. Re-insert themagazine into the magazine well ensuring itis fUlly seated.
CHAPTER 3
FUNDAMENTALS OF PISTOL MARKSMANSHIP
The fundamentals of pistol marksmanship areaiming, trigger control, and breath control.Understanding and applying the basic pistolmarksmanship fundamentals ensures theMarine's effectiveness in target engagement. Thefundamentals must be continually studied andpracticed because they are the means by whichaccurate shots are placed on target. A Marinewith a solid foundation in the fundamentals ofmarksmanship will be successful in the applica-tion of these fundamentals during combat.
Aiming
Establishing Sight Alignment
The pistol is fired without benefit of bone sup-port; therefore, the pistol is in constant motion.The Marine must understand this, yet continuallystrive to align the sights. To fire accurately, thesights must be aligned when the shot breaks.
Grip
The grip is key to acquiring sight alignment. If thegrip is correct, the front and rear sights shouldalign naturally. Dry fire during presentation of theM9 service pistol aids in obtaining a grip that al-lows sight alignment to be acquired consistently.
Maintaining the correct relationship between thepistol sights is essential for accurate targetengagement. Because of the short distancebetween the pistol sights, a small error in theiralignment causes a considerable error at the target.
Sight Alignment
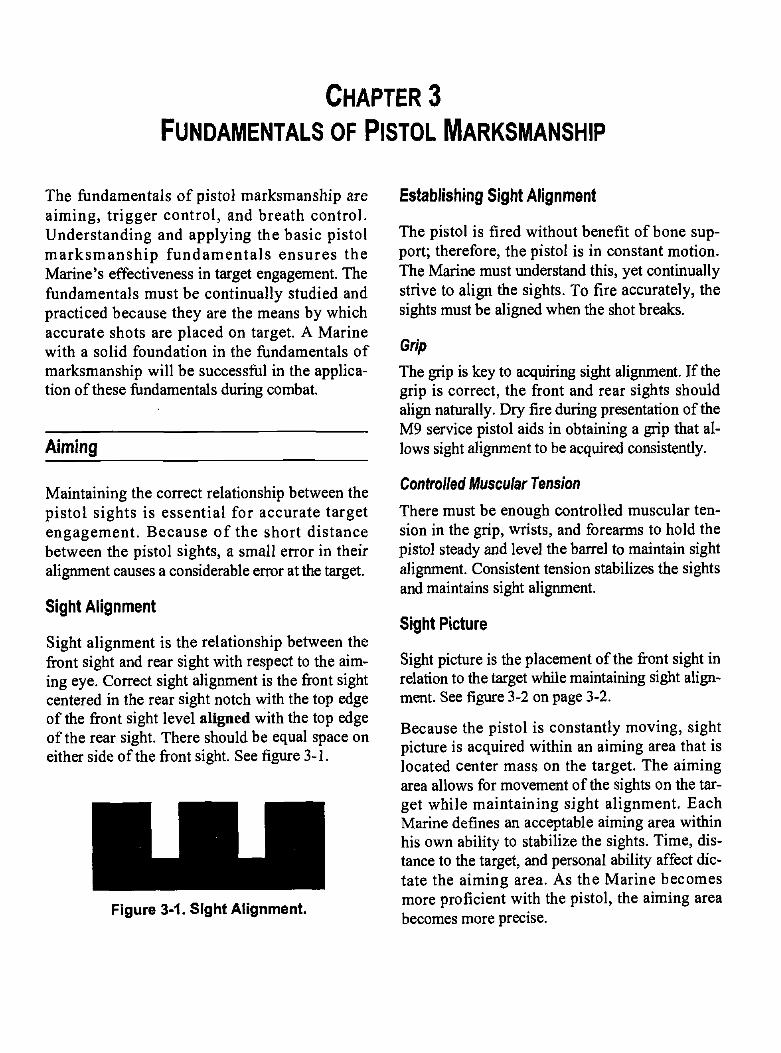
Sight alignment is the relationship between thefront sight and rear sight with respect to the aim-ing eye. Correct sight alignment is the front sightcentered in the rear sight notch with the top edgeof the front sight level aligned with the top edgeof the rear sight. There should be equal space oneither side of the front sight. See figure 3-1.
Figure 3-1. Sight Alignment.
Controlled Muscular Tension
There must be enough controlled muscular ten-sion in the grip, wrists, and forearms to hold thepistol steady and level the barrel to maintain sightalignment. Consistent tension stabilizes the sightsand maintains sight alignment.
Sight Picture
Sight picture is the placement of the front sight inrelation to the target while maintaining sight align-ment. See figure 3-2 on page 3-2.
Because the pistol is constantly moving, sightpicture is acquired within an aiming area that islocated center mass on the target. The aimingarea allows for movement of the sights on the tar-get while maintaining sight alignment. EachMarine defines an acceptable aiming area withinhis own ability to stabilize the sights. Time, dis-tance to the target, and personal ability affect dic-tate the aiming area. As the Marine becomesmore proficient with the pistol, the aiming areabecomes more precise.

A
d
3-2 MCRP 3-OIB
Trigger Control
Trigger control is the Marine's skillful manipula-tion of the trigger that causes the pistol to firewhile maintaining sight alignment and sight pic-ture. Proper trigger control aids in maintainingsight alignment while the shot is fired.
Sight Alignment and Trigger Control
Figure 3-2. Sight Picture.
The aiming area is determined by the Marine'sstability of hold. The proper grip stabilizes thesights so sight alignment can be maintained, butthe sights move continuously within the aimingarea of the target. The Marine understands thepistol's movement and learns to apply triggercontrol as he is obtaining sight alignment/sightpicture within the aiming area so the shot breaksthe moment sight picture is established.
Relationship Between the Eye and the Sights
The human eye can focus clearly on only oneobject at a time. The Marine must focus on thetop edge of the front sight and fire the shot whilemaintaining the relationship between the frontand rear sights within the aiming area. Focusingon the top edge of the front sight rather than thetarget keeps the front sight clear and distinct,which allows the Marine to detect minor varia-tions in sight alignment. Secondary vision allowsthe Marine to see the target (although slightlyblurred) and maintain sight picture within hisaiming area,
Aiming and trigger control are mutually support-ive—one cannot be performed without the other.Sight alignment and trigger control must be per-formed simultaneously to fire an accurate shot.As pressure is applied to the trigger, the sightsmay move, causing them to be misaligned. Tofire accurate shots, the sights must be alignedwhen the shot breaks. Trigger control can actual-ly assist in aligning the sights. With proper trig-ger finger placement and consistent musculartension applied to the grip, the sights can be con-trolled as the trigger is moved to the rear. If thesights move extensively while pressing the trig-ger, this can indicate an improper grip or incon-sistency in the muscular tension being applied tothe grip.
Grip
A firm grip is essential for good trigger control.The grip is established before applying triggercontrol and is maintained throughout the firingprocess. To establish the grip, the hand is placedaround the pistol grip in a location that allows thetrigger finger to move the trigger straight to therear while maintaining sight alignment. Once thegrip is established, it should be firm enough toallow manipulation of the trigger while maintain-ing sight alignment. The pressure applied to thegrip must be equal to or more than the pressurerequired to move the trigger to the rear. If thepressure is not applied correctly, the sights moveas the trigger is pressed to the rear and sightalignment is disturbed.

Pistol Marksmanship 3-3
Trigger Finger Placement
Once the grip is established, the finger is placedon the trigger. Placement of the finger should benatural and allow free movement of the triggerfinger. A natural trigger finger placement allowsthe trigger to be moved straight to the rear whilemaintaining sight alignment. If the finger pressesthe trigger to the side, it can cause an error insight alignment and shot placement.
Each Marine must experiment with finger place-ment in order to determine effective placementon the trigger. Once established, effective triggerfinger placement allows the trigger to be consis-tently moved straight to the rear while maintain-ing sight alignment.
Types of Trigger Control
Uninterrupted Trigger Control
During uninterrupted trigger control, the Marineapplies a steady, unchanging pressure to the trig-ger until the shot is fireà. Uninterrupted triggercontrol is particularly effective at close range,when the target area is lrge, and when stabilityof hold is not critical for frccuraey. To apply unin-terrupted trigger
contro, apply pressure on thetrigger while maintaining focus on the top edgeof the front sight. Contiue pressure on the trig-ger to begin moving the trigger straight to therear while obtaining sight alignment and sightpicture. Move the trigge straight to the rear in asingle, smooth motion with no hesitation.
Interrupted Trigger Control
Interrupted trigger contrél is particularly effectiveat longer ranges, when the target is small, andwhen stability of hold is critical to maintainingsight picture in the aiming area. This method isalso used if the pistol sights move outside theaiming area when applying trigger control. If thesight picture is outside the aiming area, theMarine stops and holds the rearward movementon the trigger until sight picture is re-established.When sight picture is re-established, the rear-
ward movement of the trigger is continued untilthe shot is fired.
Breath Control
Breathing causes movement of the chest, abdo-men, and shoulders, which causes the pistolsights to move vertically while attempting to aimand fire. Therefore, it is necessary to stop breath-ing for a period of time while firing a shot or aseries of shots.
The object of breath control is to stop breathingjust long enough to fire the shot while maintain-ing sight alignment, stabilizing the sights, andestablishing the sight picture. To be consistent,the breath should be held at the same point in thebreathing cycle; i.e., the natural respiratory pause.
Breathing should not be stopped for too longbecause it has adverse visual and physical effects.Holding the breath longer than is comfortableresults in a lack of oxygen that causes vision todeteriorate and then affects the ability to focus onthe sights.
Application of MarksmanshipFundamentals in Field Firing
Compression of the Fundamentals
Pistol engagements typically occur over closedistances and are short in duration. Because animnediate response to the threat is required, theapplication of the fundamentals must be a condi-tioned response that is executable in a com-pressed time. The goal of successful, quick targetengagement is the application of the fundamen-tals of marksmanship while firing the shot themoment weapon presentation is complete.
The time required to move the trigger to the rearwhile acquiring and maintaining sight alignmentand sight picture is unique to each Marine and isbased on his capabilities. Each Marine should
3.4 MCRP3-OIB
know his abilities and fire only as quickly as he iscapable of firing accurately. The Marine must notexceed his shooting skills in an effort to getrounds off quickly.
Aiming
In field firing, the fhndamentals are applied in acompressed time so sight alignment and sight pic-ture are achieved as the shot is fired. Although thetarget must be quickly engaged in combat, sightalignment is still the first priority: strive for a clearfront sight. Distance to the target and the size ofthe target affects sight alignment as follows:
• As the distance to the target increases and thesize of the target decreases, sight alignmentbecomes more critical to target engagement.Accurate sight picture/sight alignment cannotbe compromised for speed.
• Sight alignment is critical to the effectiveengagement of smaller targets such as partiallyexposed targets.
• As the distance to the target decreases, perfectsight alignment is not as critical, but there mustbe a relationship between the sights and theirplacement on the target within the aiming areato ensure accuracy.
Trigger Control
Proper trigger control aids in maintaining sightalignment while the shot is fired. As pressure isapplied to the trigger, the sights may move, caus-ing them to be misaligned. Therefore, the Marineis constantly re-aligning the sights as pressure isapplied to the trigger. Sight alignment and triggercontrol must be performed simultaneously to firean accurate shot.
Breath Control
During combat, the Marine's breathing and heartrate often increase due to physical exertion or thestress of baffle. The key to breath control in fieldfiring is to stop breathing just long enough to firean accurate shot or a series of shots.
CHAPTER 4
PISTOL FIRING POSITIONS AND GRIP
The M9 service pistol is fired from the standing,kneeling, and prone positions. Each firing posi-tion may be adapted to either a Weaver or Isosce-les variation, each possessing a distinct advantagein combat. The Weaver variation stabilizes thepistol sights. The Isosceles variation managesrecoil. The advantages apply whether the Marineis firing in the standing, kneeling, or prone posi-tion. The Marine must select and assume a stablefiring position that provides a solid foundationfor accurate shooting while meeting the demandsof the combat situation
Note: The procedures in this chapter are writ-ten for right-handed Marines; left-handedMarines should reverse directions as needed.
The Pistol Firing Position
vegetation, earth contours, and manmade struc-tures often dictate the firing position. The proneposition normally allows the least exposure, but itusually provides a limited field of view. Kneelingmay provide a wider field of view, but generallyprovides less concealment.
Stability
A solid firing position establishes a stable foun-dation for target engagement and provides accu-rate and consistent shooting. The definition of astable position is one in which the body is posi-tioned so as to resist forces that cause motion(i.e., recoil and movement of the pistol sights).The standing position is the least stable firingposition, while the prone is the most stable firingposition. A consistent, stable position is assumedfor two distinct purposes:
During combat, the Marine selects a firing posi-tion based on mobility, observation of the enemy,and stability.
Mobility
A firing position must provide mobility shouldthe Marine need to move. The standing positionpermits maximum mobility because it is quicklyassumed and easily maneuvered from and it per-mits lateral mobility to engage widely dispersedtargets. The prone position provides limitedmobility because it is the most time-consumingposition to get into and out of and it lacks the lat-eral mobility required to engage dispersed targets.
Observation of the Enemy
A firing position should allow observation of theenemy while minimizing the Marine's exposure.During combat there can be many obstructions toa clear field of view. Terrain features such as
• Minimize the pistol's movement in order tocontrol the sights and to deliver accurate fireon a target.
• Minimize the affects of recoil in order torecover the sights to the same area on the target.
During combat, it may be necessary to engage thesame target more than once to eliminate it. If thefiring position is stable, the pistol's.sights shouldrecover to the same area on the target, allowingrapid re-enactment. Distributing the body'sweight to balance the position also stabilizes thepistol and allows better management of recoil. Apistol firing position is stabilized through con-trolled muscular tension. Because the pistol isfired without benefit of bone support, musculartension is needed in the body to stabilize the posi-tion and the pistol sights. Muscular tension mustfollow these guidelines—
• A consistent amount of muscular tension isneeded to hold the pistol steady so the sightsare aligned with the aiming eye and the target.

4-2 [JJCP 3O1B
• Controlled and consistent tension in the bodyprovides resistance that the Marine uses tomanage recoil and bring the sights back on tar-get quicker. However, too much tension cancause strain or trembling.
• Muscular tension is correct when the Marinecan control the pistol before, during, and afterfiring the shot.
Pistol Firing Grip
A proper grip is one that provides maximum con-trol of the pistol before, during, and after firing. Itstabilizes the pistol sights before firing, allowstrigger control to be applied during firing, andmanages recoil after firing.
Before Firing: Stabilize the Sights
To fire an accurate shot, the sights must be stabi-lized prior to and as the bullet exits the muzzle ofthe pistol. A proper grip controls the alignment ofthe pistol's sights and stabilizes the sights so anaccurate shot may be fired. The following guide-lines apply to the establishment of a proper grip—
• There must be muscular tension in the wristand forearms. Consistent muscular tension inthe wrist, forearms, and grip helps maintainsight alignment by reducing the movement inthe grip that can cause movement in the sights.The grip is correct when it allows the sights tobe naturally aligned to the aiming eye.
• When establishing a two-handed grip, equalpressure must be applied with both hands.Consistent, equal pressure from both hands sta-bilizes the sights and allows them to be alignedand level with respect to the aiming eye.
• The hand grips as high on the back strap as pos-sible, bringing the centerline of the bore as
close as possible to a parallel line with thebones in the forearm.
During Firing: Allow Thgger Control
The Marine's grip provides a foundation for themovement of the trigger finger. The trigger fingerapplies positive pressure on the trigger as anindependent action, completely free of the othermuscles of the gripping hand. The Marine shouldnot apply excessive pressure to the web of thehand touching the pistol's back strap becauseexcessive pressure interferes with the manipula-tion of the trigger by the trigger finger.
After Firing: Manage Recoil
Once a shot is fired, the pistol recoils, disturbingalignment of the sights. A proper grip facilitates aquick recovery from recoil so the sights quicklyreturn to the same area on the target. The Marine'sgrip determines the following during recoil:
• The amount the muzzle climbs during recoildepends on the amount of controlled musculartension in the grip and wrists applied to stabi-lize the pistol and create consistency in resis-tance to recoil, Controlled muscular tensionallows the sights to recover consistently backon target within a minimum amount of time.
• Firm, equal pressure must be applied to thegrip with both hands to ensure that the pistoldoes not slip during recoil. An improper grip orlack of controlled muscular tension causes thepistol to move after the shot is fired, disrupt-ing sight alignment and requiring the Marine tore-establish his grip.
• Locking out the wrist of the firing hand, similarto executing a punch, helps provide resistance torecoil and speed recovery. The elbows should beat a position slightly less than locked out to helpabsorb the recoil and aid in recoil management.

Pistol Marksmanship 4-3
Withdrawing the Pistol From the Holster
The firing grip is not established in the holster,however, a proper firing grip can be assumedquickly if the pistol is withdrawn from the holstercorrectly. The pistol should be withdrawn fromthe holster in one continuous, fluid motion:
• Place the heel of the left hand at the center ofthe torso with the fingers extended toward thetarget. At the same time, unfasten and releasethe D-ring with the right hand. See figure 4-1.
Figure 4-1. WithdrawIng thePistol From the HoIster—Step 1.
Note: The left hand is placed on the torso ina position that allows a two-handed firinggrip to be established in a minimum amountof movement.
• Place the right thumb on the forward edge ofthe lower portion of the holster and the fingers
around the back edge of the holster, keeping thetrigger finger straight. See figure 4-2.
Note: The left hand may assist in holding theholster flap up.
Figure 4-2. Withdrawing thePistol From the Holster—Step 2.
• Slide the hand up the holster until the fingerscome in contact with the pistol grip. At thesame time, keep the thumb above the pistol toguide the holster flap up. See figure 4-3 onpage 4-4.
• Grasp the pistol grip with the fingers and drawthe pistol straight up. Continue withdrawing thepistol while moving the thumb to a position onthe safety. See figure 4-4 on page 4-4.
Note: This hand placement allows a firinggrip to be established once the thumb disen-gages the safety. Any adjustments made tothe firing grip after the safety is disengagedshould be minor.
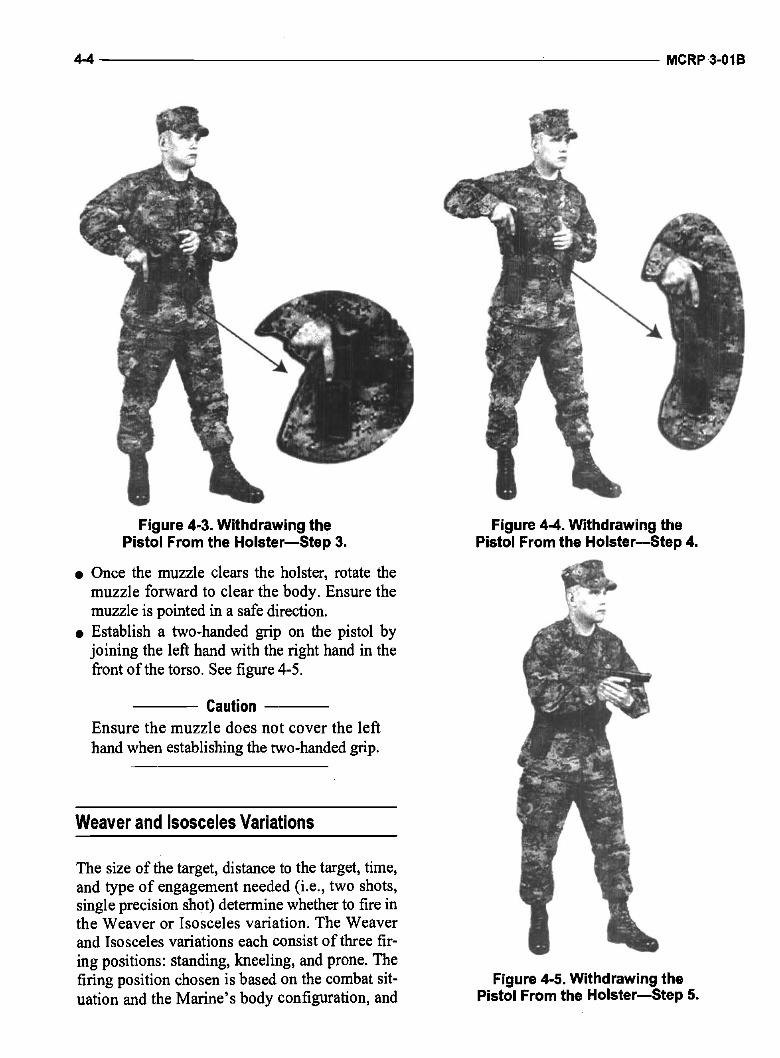
4-4 MCRP3-OIB
Figure 4-3. Withdrawing the Figure 4-4. Withdrawing thePistol From the Holster—Step 3. Pistol From the Holster—Step 4.
• Once the muzzle clears the holster, rotate themuzzle forward to clear the body. Ensure themuzzle is pointed in a safe direction.
• Establish a two-handed grip on the pistol byjoining the left hand with the right hand in thefront of the torso. See figure 4-5.
Caution
Ensure the muzzle does not cover the lefthand when establishing the two-handed grip.
Weaver and Isosceles Variations
The size of the target, distance to the target, time,and type of engagement needed (i.e., two shots,single precision shot) determine whether to fire inthe Weaver or Isosceles variation. The Weaverand Isosceles variations each consist of three fir-ing positions: standing, kneeling, and prone. Thefiring position chosen is based on the combat sit- Figure 4-5. Withdrawing theuation and the Marine's body configuration, and Pistol From the Holster—Step 5.

Pistol Marksmanship 4-5
it must permit balance, control, and stability dur-ing firing. In addition, there is a specific firinggrip that supports each position and the combina-tion of the grip and the body configuration is keyto establishing the variation. See table 4-1 for alist of advantages and disadvantages of both theWeaver and the Isosceles variations.
At longer ranges, the target is smaller, a moreprecise shot is required to eliminate the target,and any small movement moves the sights off thetarget; therefore, the pistol must be steadied.Although the Weaver variation is effective at anydistance, some aspects of the position make itmore effective for long range or precision shotson small or partially exposed targets; i.e., sightalignment and sight picture are easier for stabilityof hold.
The Isosceles variation is effective at any dis-tance, however, some aspects of the positionmake it more effective for close range engage-ments. When confronted with a target, the naturalphysical reaction is to face the target and push outwith the arms. This makes the Isosceles variationadvantageous for quick engagements at closerange. When a target is at close range, it must beengaged quickly before it engages the Marine.
The management of recoil is a bigger factor inclose-range engagements because it is more likelythat multiple shots will be fired to eliminate thetarget and the sights have to recover quickly backon target. However, at close ranges, the target islarger so stability of hold is not as importantbecause it is easier to hold the sights on target andsight picture is not as critical.
Standing Position
The standing position is the most often employedposition during a pistol engagement due to theshort distance of the engagement and the natureof combat. When properly assumed, the standingposition provides a stable base for firing, a clearfield of view, and excellent mobility. The stand-ing position can be adapted to either the Weavervariation or the Isosceles variation.
Weaver Standing Position
The key to successful employment of the Weav-er variation is the body's angle to the target andthe push-pull pressure applied to the grip. Seefigure 4-6.
Table 4-1. Advantages and Disadvantages.
variation Advantages Disadvantages
Weaver Additional balance, control, andstability of hold during firing due toplacement of the arms (left armbent, pistol is in close to the body).
Easier to maintain sight picturebecause the pistols foundation issteady.
Recoil has a greater impact due tothe hand placement on the pistol(some of the pistol grip is exposedand pressure is applied in two dif-ferent directions around the pistol),
Recovery of the sights back on tar-get may take longer since recoil isaffected.
Isosceles Recoil has a lesser impactbecause muscular tension andgrip pressure are evenly distrib-uted around the pistol.
Allows quicker recovery of thesights on target.
Stability of hold is degraded due tothe pistol being further from thebody without support.
Since it is harder to steady the pis-tol, acquiring sight picturebecomes more difficult.

'4,
4-6 MCRP3-OIB
To assume the Weaver standing position—
• Face the target and make ahalf turn to the right, keepingthe pistol oriented toward thetarget. This, orients the bodyat approximately a 40 to 60degree angle oblique to thetarget. The shoulders. areangled to the target, the leftshoulder forward of theright. The feet are aboutshoulder-width apart, the leftfoot forward of the right.
• Grip the pistol grip firmlywith the right hand. Place theright thumb on the safety.
• Keep the shoulders at a 40 to60 degree angle oblique tothe target and raise the rightarm and extend it across thebody toward the target.Ensure that the right shoul-der does not roll forward orturn toward the target.
• Extend the left arm to the tar-get, bending the left elbow tojoin the left and right hands.
The left elbow is inverted and tucked in towardthe body so the left arm supports the pistol.
Note: The angle of the body determines howmuch the elbow bends.
• Establish a two-handed firing grip in theWeaver variation. See figure 4-7.
• Place the palm of the left hand over the front ofthe right hand so the palm covers the curledfingers of the right hand. The trigger guardshould rest in the "V" formed by the left thumband forefinger. The knuckles of the left handare just outboard of the trigger guard. A por-tion of the pistol grip is exposed.
• Rest the trigger finger naturally, straight andoutside of the trigger guard, so the finger canbe moved quickly and easily to the trigger.
• Rest the left thumb against the receiver so thatboth thumbs are on the left side of the pistol.Once the safety is disengaged with the rightthumb, the left thumb is placed over the rightthumb and positive pressure is applied to holdthe right thumb in place.
• Apply rearward pressure with the left hand andforward pressure with the right hand to achievea "push-pull" grip. Isometric tension (push-pull) stabilizes the pistol during firing.
Weapon on Safe
Figure 4-7. Weaver Grip.
Weapon on Fire
Figure 4-6.WeaverStandingPosition.
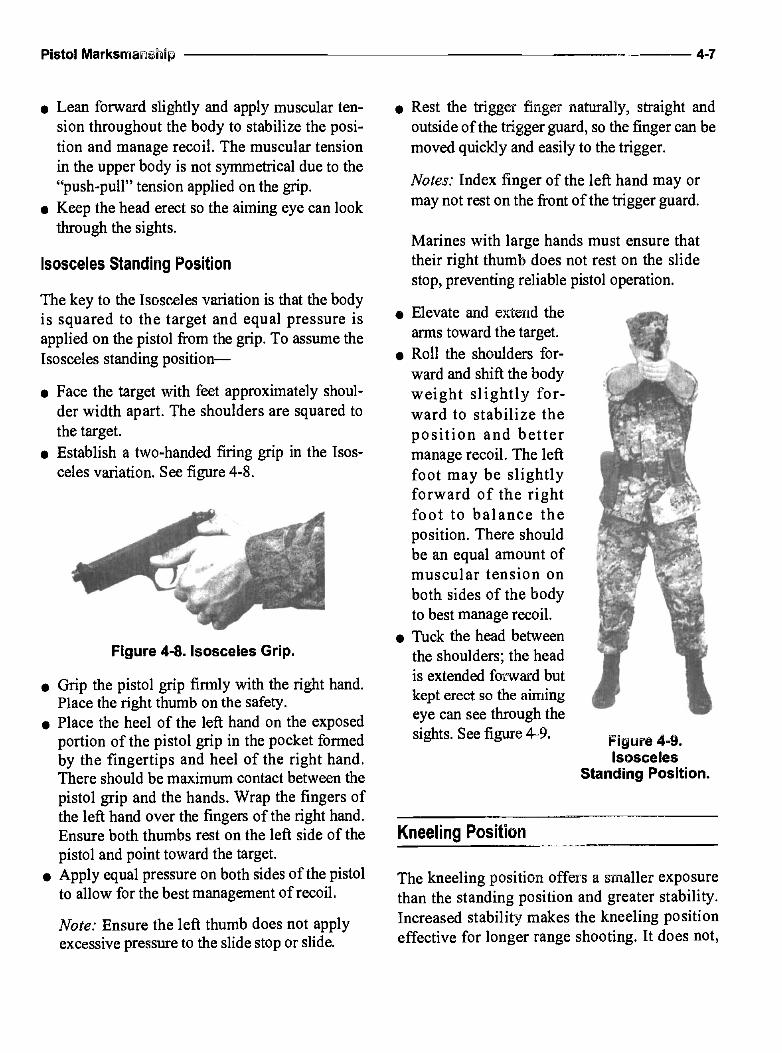
al
Pistol Marksmahip — 4-7
• Lean forward slightly and apply muscular ten-sion throughout the body to stabilize the posi-tion and manage recoil. The muscular tensionin the upper body is not symmetrical due to the"push-pull" tension applied on the grip.
• Keep the head erect so the aiming eye can lookthrough the sights.
Isosceles Standing Position
The key to the Isosceles variation is that the bodyis squared to the target and equal pressure isapplied on the pistol from the grip. To assume theIsosceles standing position—
• Face the target with feet approximately shoul-der width apart. The shoulders are squared tothe target.
• Establish a two..handed firing grip in the Isos-celes variation. See figure 4-8.
Figure 4-8. Isosceles Grip.
• Grip the pistol grip firmly with the right hand.Place the right thumb on the safety.
• Place the heel of the left hand on the exposedportion of the pistol grip in the pocket formedby the fingertips and heel of the right hand.There should be maximum contact between thepistol grip and the hands. Wrap the fingers ofthe left hand over the fingers of the right hand.Ensure both thumbs rest on the left side of thepistol and point toward the target.
• Apply equal pressure on both sides of the pistolto allow for the best management of recoil.
Note: Ensure the left thumb does not applyexcessive pressure to the slide stop or slide.
• Rest the trigger finger naturally, straight andoutside of the trigger guard, so the finger can bemoved quickly and easily to the trigger.
Notes: Index finger of the left hand may ormay not rest on the front of the trigger guard.
Marines with large hands must ensure thattheir right thumb does not rest on the slidestop, preventing reliable pistol operation.
• Elevate and extend thearms toward the target.
• Roll the shoulders for-ward and shift the bodyweight slightly for-ward to stabilize theposition and bettermanage recoil. The leftfoot may be slightlyforward of the rightfoot to balance theposition. There shouldbe an equal amount ofmuscular tension onboth sides of the bodyto best manage recoil.
• Tuck the head betweenthe shoulders; the headis extended forward butkept erect so the aimingeye can see through thesights. See figure 49.
Kneeling Position
The kneeling position offers a smaller exposurethan the standing position and greater stability.Increased stability makes the kneeling positioneffective for longer range shooting. It does not,
Figure 4-9.Isosceles
Standing Position.
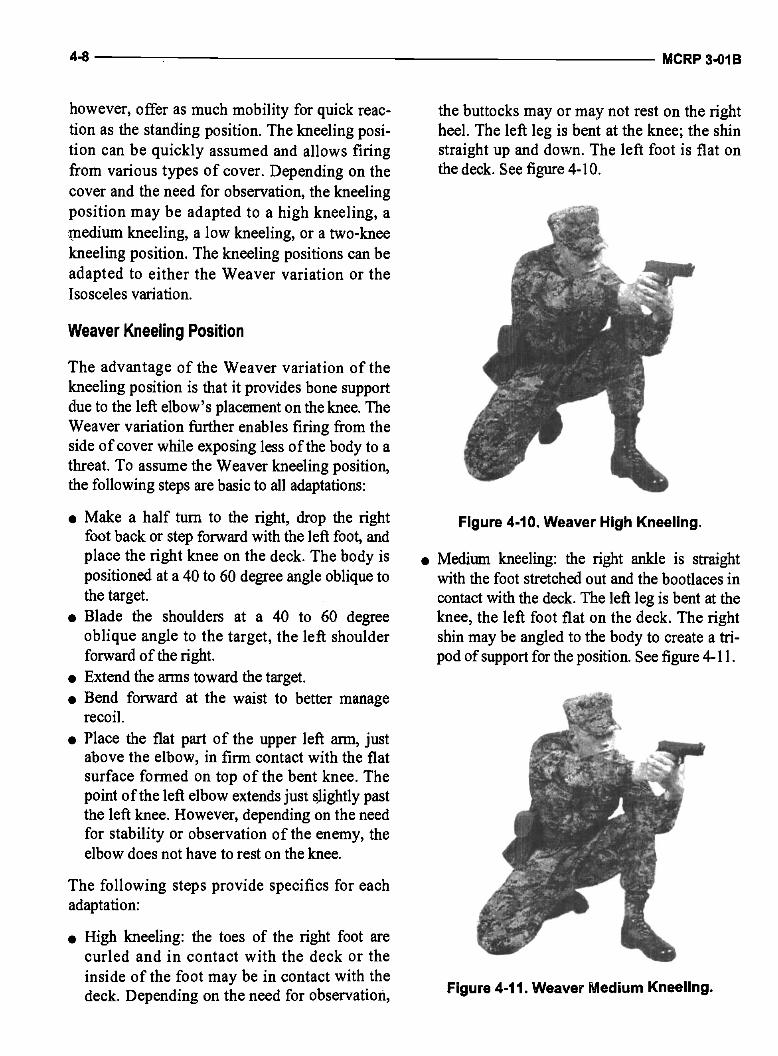
4-8 MCRP3-OIB
however, offer as much mobility for quick reac-tion as the standing position. The kneeling posi-tion can be quickly assumed and allows firingfrom various types of cover. Depending on thecover and the need for observation, the kneelingposition may be adapted to a high kneeling, amedium kneeling, a low kneeling, or a two-kneekneeling position. The kneeling positions can beadapted to either the Weaver variation or theIsosceles variation.
Weaver Kneeling Position
The advantage of the Weaver variation of thekneeling position is that it provides bone supportdue to the left elbow's placement on the knee. TheWeaver variation further enables firing from theside of cover while exposing less of the body to athreat. To assume the Weaver kneeling position,the following steps are basic to all adaptations:
• Make a half turn to the right, drop the rightfoot back or step forward with the left foot, andplace the right knee on the deck. The body ispositioned at a 40 to 60 degree angle oblique tothe target.
• Blade the shoulders at a 40 to 60 degreeoblique angle to the target, the left shoulderforward of the right.
• Extend the arms toward the target.• Bend forward at the waist to better manage
recoil.• Place the flat part of the upper left arm, just
above the elbow, in firm contact with the flatsurface formed on top of the bent knee. Thepoint of the left elbow extends just sjightly pastthe left knee. However, depending on the needfor stability or observation of the enemy, theelbow does not have to rest on the knee.
the buttocks may or may not rest on the rightheel. The left leg is bent at the knee; the shinstraight up and down. The left foot is flat onthe deck. See figure 4-10.
Figure 4-10. Weaver High Kneeling.
• Medium kneeling: the right anide is straightwith the foot stretched out and the bootlaces incontact with the deck. The left leg is bent at theknee, the left foot flat on the deck. The rightshin may be angled to the body to create a tri-pod of support for the position. See figure 4-11.
The following steps provide specifics for eachadaptation:
• High kneeling: the toes of the right foot arecurled and in contact with the deck or theinside of the foot may be in contact with thedeck. Depending on the need for observation, Figure 4-11. Weaver Medium Kneeling.

Pistol Marksmanship 4-9
• Low kneeling: the right ankle is turned so theoutside of the foot is in contact with the deckand the buttocks are in contact with the insideof the foot. The right shin may be angled to thebody to create a tripod of support for the posi-tion. See figure 4-12.
Figure 4-13. Weaver Two-Knee Kneeling.
Figure 4-12. Weaver Low Kneeling.
• Two-knee: drop both knees onto the deck. Thetoes may be curled to get into and out of theposition quickly. Depending on the need forobservation of the enemy, the buttocks may ormay not rest on the heels. See figure 4-13.
isosceles Kneeling Position
The following steps provide specifics for eachadaptation:
• High kneeling: the toes of the right foot arecurled and in contact with the deck or theinside of the foot may be in contact with thedeck. Depending on the need for observation,the buttocks may or may not rest on the rightheel. The left leg is bent at the knee, the shin isstraight up and down. The left foot is flat onthe deck. See figure 4-14.
The advantage of the Isosceles variation is that itenables the Marine to fire over the top of coverwhile exposing less of the body to a threat. Toassume the Isosceles kneeling position, the fol-lowing steps are basic to all adaptations:
• Drop the right foot back or step forward withthe left foot and place the right knee on thedeck.
• Square the shoulders to the target.• Extend the anus toward the target.• Lean forward with the shoulders rolled forward
and the head tucked between the shoulders tobetter manage recoil.
Figure 4-14. Isosceles High Kneeling.
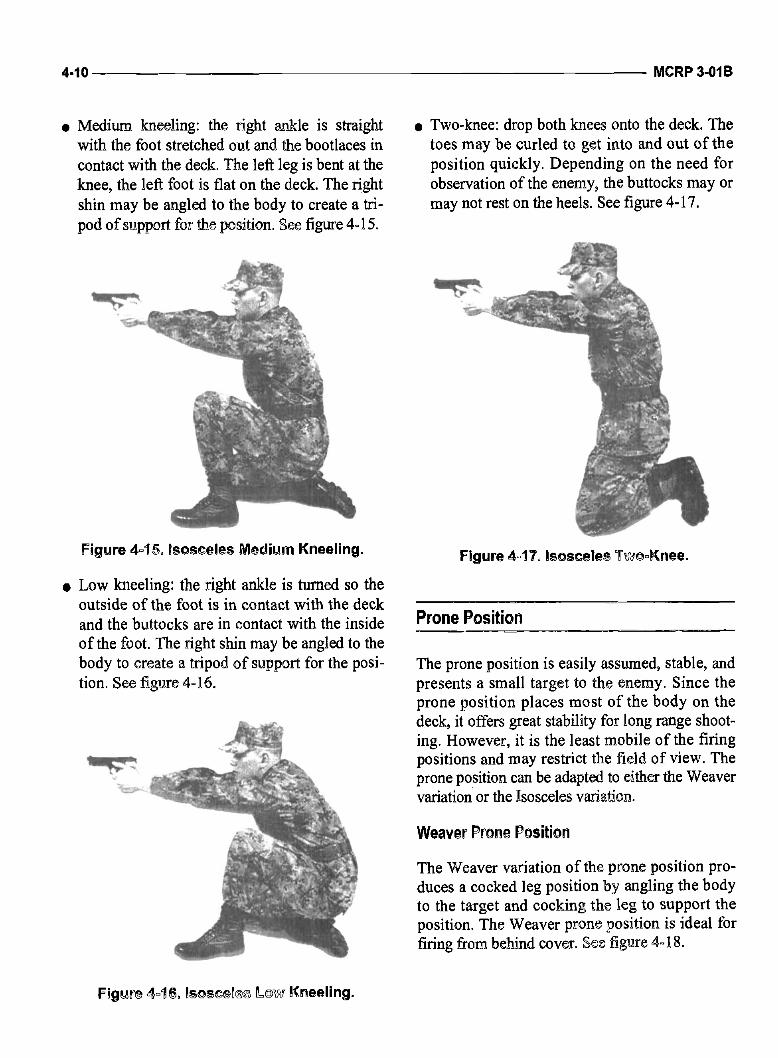
4$
I
L-t
4-10 MCRP3-OIB
• Medium kneeling: the right ankle is straightwith the foot stretched out and the bootlaces incontact with the deck. The left leg is bent at theknee, the left foot is flat on the deck. The rightshin may be angled to the body to create a tri-pod of support for the position. See figure 4-15.
Figure 415, soseeles Medium Kneeling.
• Low kneeling: the right ankle is turned so theoutside of the foot is in contact with the deckand the buttocks are in contact with the insideof the foot. The right shin may be angled to thebody to create a tripod of support for the posi-tion. See figure 416.
flgure L© Kneeling.
• Two-knee: drop both knees onto the deck. Thetoes may be curled to get into and out of theposition quickly. Depending on the need forobservation of the enemy, the buttocks may ormay not rest on the heels. See figure 4-17.
Figure 417. I scelee Thc©Knee.
Prone Position
The prone position is easily assumed, stable, andpresents a small target to the enemy. Since theprone position places most of the body on thedeck, it offers great stability for long range shoot-ing. However, it is the least mobile of the firingpositions and may restrict the field of view. Theprone position can be adapted to either the Weavervariation or the Isosceles variation.
Weaver Prone Position
The Weaver variation of the prone position pro-duces a cocked leg position by angling the bodyto the target and cocking the leg to support theposition. The Weaver prone position is ideal forfiring from behind cover. See figure 4-18.

a
S a
Pistol Marksmanship 4.11
Figure 4-18. Weaver Prone Position.
To assume the Weaver prone position, performthe following steps:
• Face the target and make a half turn to the right(this places the body at a 40 to 60 degreeoblique to the target). Grip the pistol in theright hand, placing the pistol in a position thatfacilitates control of the weapon. Ensure thepistol is pointed in a safe direction and doesnot cover any portion of the body.
• Move the body to the deck by using either thesquat or drop method, keeping the body at a 40to 60 degree oblique to the target.Squat Methodo Squat down and place the left hand on the
deck.o Kick both feet backward and come down on
the right side of the body with the right armextended toward the target.
o Ensure the pistol does not cover the body orthe left hand. See figure 4-19.
Drop Methodo Drop to a kneeling position.o Place the left hand on the deck in front of the
body, push the pistol out toward the target.o Roil the right side of the body onto the deck.o Ensure the pistol does not cover the body or
the left hand. See figure 4-20 on page 4-12.• Bring the left knee up to support the firing
position and to raise the diaphragm off thedeck so as not to interfere with breathing. Theinside of the knee rests on the deck. The kneeis drawn up to provide maximum stability forthe position.
• Establish a two handed-firing, grip on the pistol.
•
Figure 4-19. Squat Method.
• Place the left elbow on the ground for stability.For maximum stability, strive to keep the gripfirmly placed on the deck.
• The head may rest against the right arm so thepistol sights can be aligned. The head may becanted as long as the aiming eye can lookdirectly through the sights. Strive to keep thepistol sights as level as possible while acquir-ing sight alignment.
To make minor increases in elevation, keep theleft hand in place and firmly on the deck andraise the right hand to achieve the desired eleva-tion. However, contact between the right and lefthands must be maintained to stabilize the pistol.See figure 4-21 on page 4-12. (There is a tradeoffbetween obtaining the needed elevation and los-ing stability, so the Marine must strike a balancebetween the two.)

p —p
4-12 MCRP 3OIB
Figure 4-20. Drop Method.
To assume the Isosceles prone position:
• Stand facing the target. Grip the pistol in theright hand, placing the pistol in a position thatfacilitates control of the weapon. Ensure thepistol is pointed in a safe direction and doesnot cover any portion of the body.
• Move the body to the deck by using either thesquat or drop method.Squat Method
o Squat down and place the left hand on thedeck.
o Kick both feet backward and come down onthe right side of the body with the right arm
Figure 4-21. Increasing extended toward the target.Elevation (Minor Adjustments).
o Ensure the pistol does not cover the body orthe left hand. See figure 4-23.
Isosceles Prone Position Drop Methodo Drop to a kneeling position.
The Isosceles variation of the prone position pro-o Place the left hand on the deck in front of theduces a straight leg position. See figure 4-22.
body.
Figure 4-22. Isosceles Prone Position.

N
Pistol Marksmanship 4-13
Figure 4-23. Squat Method.
o Push the pistol out toward the target, and rollthe right side of the body onto the deck.
o Ensure the pistol does not cover the body orthe left hand. See figures 4-24.
• Establish a two-handed firing grip on the pistol.• Spread the legs to a position that provides
maximum stability. The insteps of both feetmay be flat on the deck or the toes may becurled and dug into the deck.
• Keep the pistol sights as level as possible whileacquiring sight alignment. Keep the head in aposition to allow the aiming eye to look directlythrough the sights.
• When wearing a helmet, the head may becanted slightly and rest against the right arm topush the helmet from the eyes so the sights canbe aligned. Likewise, the pistol may be cantedoutboard to allow the aiming eye to lookdirectly through the sights.
To make minor increases in elevation, keep theleft hand in place and firmly on the deck andraise the right hand to achieve the desired eleva-tion. However, contact between the right and lefthands must be maintained to stabilize the pistol.See figure 4-25 on page 4-14. (There is a tradeoffbetween obtaining the needed elevation and los-ing stability, so the Marine must strike a balancebetween the two.)
Natural Body Alignment
The body must be properly aligned to the targetso the sights fall naturally on the target when thepistol is presented. It takes a combination of bodyalignment and consistent muscular tension to
Figure 4-24. Drop Method.
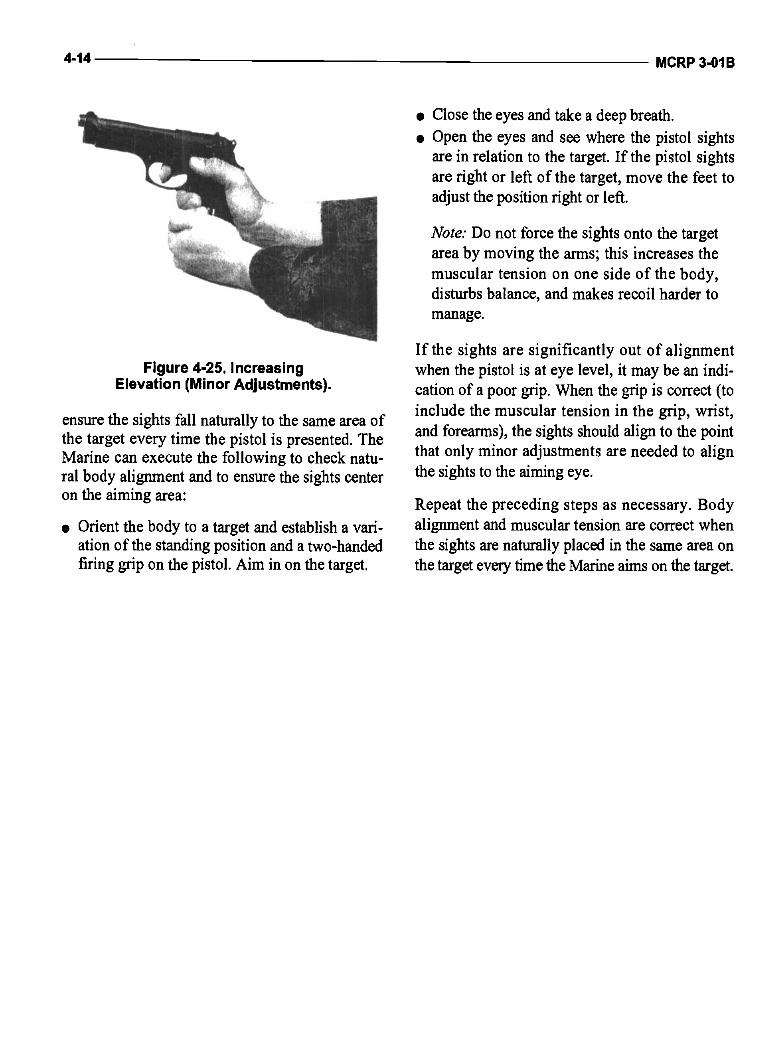
4-14 MCRP 3-OIB
• Close the eyes and take a deep breath.
• Open the eyes and see where the pistol sightsare in relation to the target. If the pistol sightsare right or left of the target, move the feet toadjust the position right or left.
Note: Do not force the sights onto the targetarea by moving the arms; this increases themuscular tension on one side of the body,disturbs balance, and makes recoil harder tomanage.
Figure 4-25. IncreasingElevation (Minor Adjustments).
ensure the sights fall naturally to the same area ofthe target every time the pistol is presented. TheMarine can execute the following to check natu-ral body alignment and to ensure the sights centeron the aiming area:
• Orient the body to a target and establish a vari-ation of the standing position and a two-handedfiring grip on the pistol. Aim in on the target.
If the sights are significantly out of alignmentwhen the pistol is at eye level, it may be an indi-cation of a poor grip. When the grip is correct (toinclude the muscular tension in the grip, wrist,and forearms), the sights should align to the pointthat only minor adjustments are needed to alignthe sights to the aiming eye.
Repeat the preceding steps as necessary. Bodyalignment and muscular tension are correct whenthe sights are naturally placed in the same area onthe target every time the Marine aims on the target.

CHAPTER 5
USE OF COVER AND CONCEALMENT
On the battlefield, a firing position that allowsmaximum observation of the enemy as well ascover and concealment is a necessity. A goodposition provides a solid foundation for the pistol,maximizes the use of cover to provide protectionfrom enemy fire, allows mobility, and providesobservation of the enemy. Where possible, thecover should be used to provide additional sup-port for the position.
When contact with the enemy is made, it isimportant to seek cover as quickly as possible.Cover is anything that provides protection fromenemy fire. Cover should be, at a minimum, thickenough to stop small arms fire and high enoughto protect the Marine when firing from behind it.The effective use of cover enables engagement ofenemy targets while affording protection fromenemy fire. Cover can also be effectively used toconceal the Marine from enemy view whilesearching for targets.
Concealment is anything that hides a Marinefrom enemy view; however, it might not affordprotection. Concealment can be provided bybrush, trees, etc.
Note: The procedures in this chapter are writ-ten for right-handed Marines; left-handedMarines must reverse directions as needed.
protect an individual from small arms fire can beused for cover. Some common types of covermaterial are as follows.
Dirt
The best type of cover is dirt packed to a mini-mum thickness of 18 inches.
Cinder Blocks
Cinder blocks used as foundations for houses orwalls can be used for cover, but they can be pene-trated. They are also brittle and can shatter uponimpact from small arms fire, which can causeinjury by secondary fragmentation.
Trees, Logs, and Telephone Poles
Wood is a relatively dense material; therefore, itoffers good covering protection since bullets havea tendency to fragment as they penetrate. Livetrees have a greater resistance to bullet penetra-tion than dead wood. Wood that has been treatedwith creosote, such as telephone poles and rail-road ties, offers better protection from projectilesthan untreated wood, but it still does not ensureprotection from small arms fire.
Sandbags
Cover Materials
Natural cover (rocks, logs, rubble, etc.) is bestbecause it is hard to detect. But any material(including buildings, structures, etc.) that may
Sandbags can be used for cover. However, theyshould always be packed tightly and tampeddown to increase their density. If loosely filled ormoist, a bullet can more easily penetrate thesandbag. Doubling or overlapping sandbags alsoincreases their protective qualities.

' 3. .Tcira' it
5-2 MCRP3-OIB
Considerations for Firing From Cover
Adjusting the Firing Position
Cover can provide additional support for the firingposition. The firing position is adjusted to ensurestability, mobility, and observation of the enemy.
The Marine chooses a firing position based on hisheight in relation to the height of the cover. Thefiring position must minimize exposure to theenemy but allow observation of the area.
Although the cover provides additional support,the Marine continues to apply the same amountof muscular tension in the grip, wrist, and fore-arms. Muscular tension is still necessary to stabi-lize the pistol sights and manage recovery.
Because the sights are higher than the muzzle ofthe pistol, the Marine must ensure that the muzzleof the pistol clears the cover as he obtains sightalignment/sight picture on the target. The closerthe Marine is to the cover, the easier it is to ensurethe muzzle clears the cover.
Applying the Weaverand Isosceles Variations
The type of cover may dictate which variation ofa firing position will be the most effective. Theposition should provide the Marine with the max-imum amount of stability and control and allowthe Marine to manage recoil effectively in orderto recover on target.
Weaver Variation
The Weaver variation exposes less of the bodyfrom behind cover due to the angle of the body.The Weaver variation may be better suited for fir-ing from behind the right or left side of cover.For example, the Weaver prone is ideal for firingfrom behind a log.
Isosceles Variation
The Isosceles variation is good for firing over thetop of cover (e.g., a window). The Isoscelesprone is ideal for firing from behind narrow cover(e.g., a telephone pole).
Keeping the Body Behind Cover
Avoid inadvertent exposure of any part of thebody. Be especially aware of the top of the head,elbows, knees, or any other body part that mayextend beyond the cover.
Log or Curb
When firing from behind a log or curb, theMarine must present the lowest possible silhou-ette and may use the log or curb for maximumsupport of the position. For maximum protec-tion, muzzle clearance is kept as close as possibleto the top of the log or curb. The Marine may firefrom either the side or the top of the log, depend-ing on cover and concealment (see fig. 5-1). TheMarine fires over the top of a curb when it is usedfor cover.
Figure 5-1. Firing Around a L©q.
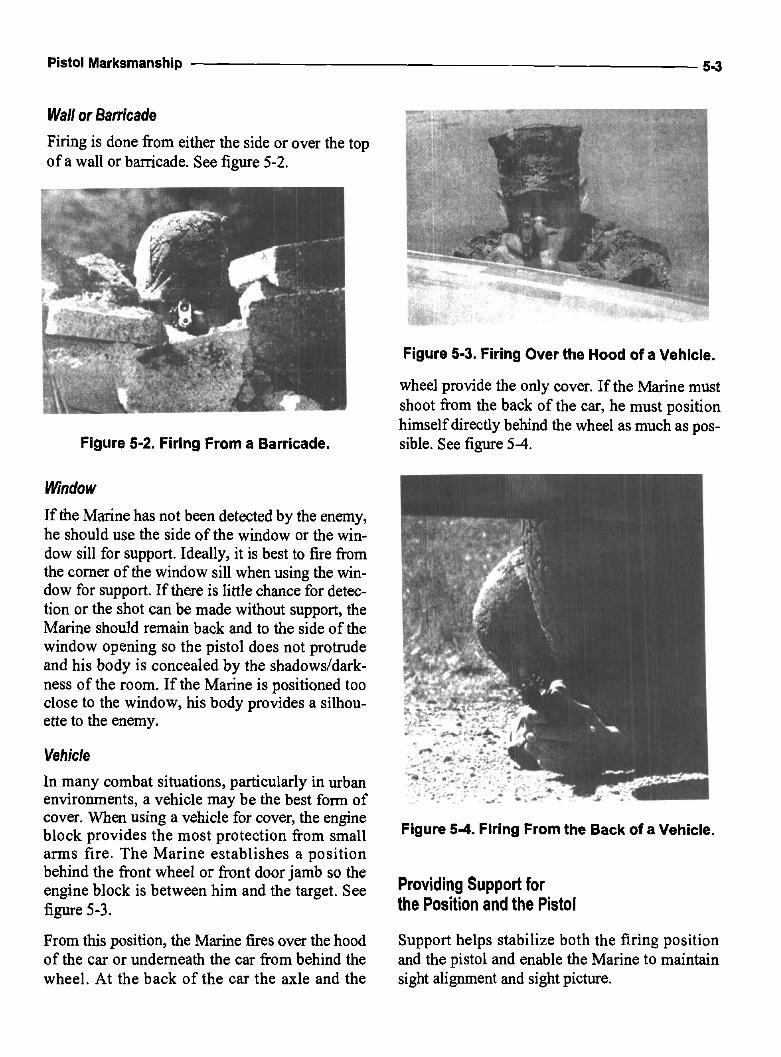
;7
•
!:i':.: r
Pistol Marksmanship 5.3
Wall or Barricade
Firing is done from either the side or over the topof a wall or barricade. See figure 5-2.
Figure 5-3. Firing Over the Hood of a Vehicle.
wheel provide the only cover. If the Marine mustshoot from the back of the car, he must positionhimself directly behind the wheel as much as pos-
FIgure 5-2. Firing From a Barricade. sible. See figure 5-4.
Window
Ifthe Marine has not been detected by the enemy,he should use the side of the window or the win-dow sill for support. Ideally, it is best to fire fromthe corner of the window sill when using the win-dow for support. if there is little chance for detec-tion or the shot can be made without support, theMarine should remain back and to the side of thewindow opening so the pistol does not protrudeand his body is concealed by the shadows/dark-ness of the room. If the Marine is positioned tooclose to the window, his body provides a silhou-ette to the enemy.
Vehicle
In many combat situations, particularly in urbanenvironments, a vehicle may be the best form ofcover. When using a vehicle for cover, the engineblock provides the most protection from small Figure 5-4. Firing From the Back of a Vehicle.
arms fire. The Marine establishes a positionbehind the front wheel or front door jamb so theengine block is between him and the target. See Providing Support for
figure 5-3. the Position and the Pistol
From this position, the Marine fires over the hood Support helps stabilize both the firing positionof the car or underneath the car from behind the and the pistol and enable the Marine to maintainwheel. At the back of the car the axle and the sight alignment and sight picture.

A
5-4 MCRP 3-OIB
The forearms or hands can contact the support tostabilize the pistol. The Marine may rest the pis-tol on or against the support as long as the sup-port does not interfere or affect the pistol's cycleof operation. See figure 5-5.
Figure 5-5. Hand Resting on Support.
When firing over the top of cover, the Marine canestablish a supported position and stabilize theposition by resting the trigger guard or the maga-zine on the cover. The pistol may be pushed upagainst the support so the "V'1 formed by thereceiver and the front of the trigger guard restsfirmly against the support. See figure 5-6.
cover. Avoid placing the slide of the pistol againstthe cover because it can interfere with the pistol'scycle of operation. However, the pistol can becanted and placed against the cover so the triggerguard or the "V" fonned between the receiver andtrigger guard rests against the support. This posi-tion enables the Marine to expose less of himselfto the enemy. See figure 5-7.
Figure 5-7. Hand RestingAgainst Side of Support.
Figure 5-6. Trigger GuardResting Against Support.
When firing around the sides of cover, the Marinecan establish support and stabilize the position byplacing the back of the hand or arm against the
When using a vehicle for cover, the Marine canestablish additional support for the pistol by posi-tioning himself in the car behind the door jamb(frame of door) and placing his hands or pistolagainst the "V" formed by the open door anddoor frame. See figure 5-8.
When shooting from the left side of cover, theMarine still uses his right hand and eye. See fig-ure 5-9. He may have to cant his head and thepistol to the left to establish sight alignment. Forright-handed Marines, shooting from the left sideof cover may expose more of the Marine to theenemy than shooting from the right side.

•
Pistol Marksmanship 5.5
When moving from cover to cover, the Marineselects the next cover location and plans the routeof movement before leaving his present position.This is done by quickly looking from behind cov-er to ensure the area is clear, ensuring the headand eyes are exposed for as short a time as possi-ble. If necessary, the Marine should conduct aCondition 1 reload before moving from cover.Once the Marine is committed to moving, hemust focus on the move until cover is reassumed.
Figure 5-8. Firing From Behindthe Door Jamb of a Vehicle.
Figure 5-9. Firing Fromthe Left Side of Cover.
Changing Positions
If the Marine has been firing from cover and hasto reload or clear a stoppage behind cover heshould attempt to resume firing from a differentposition. The enemy is aware of the Marine'scurrent position and will be ready to engage himonce he re-appears.
Moving
In combat, the Marine must be constantly awareof his surroundings and the available covershould enemy contact occur during movementfrom one position to another.
Supported Firing Positions
During combat, the Marine may not have thetime to assume a perfect firing position. He mustknow instinctively that his position is correctrather than follow a regimented sequence ofmovements to ensure its correctness. With train-ing, the Marine can assume stable firing positionsquickly and instinctively by incorporating the useof cover for support. Support provides founda-tions for the firing position; which, in turn, pro-vides support for the pistol. To maximize thesupport provided by the position, the firing posi-tion should be adjusted to fit or conform to theshape of the cover.
A supported firing position minimizes exposureto the enemy, maximizes the stability of the pistoland protection from fire, and provides observationof the enemy. Any stable support may be used(e.g., logs, sandbags, walls). The surroundingenvironment dictates the support and position.
The size, distance to the target, and time affectthe need for stability and recovery in the selectionof a supported firing position. For example, if thetarget is a great distance from the Marine, he maysacrifice some of his ability to manage recoil inorder to assume a supported firing position thatprovides him the additional stability needed tofire accurately at long range. But, recovery maybe more important for the Marine if he must firemultiple shots on target quickly; therefore, hemay sacrifice some stability in his supported fir-ing position in order to engage a target with mul-tiple shots.

5-6 MCRP3-OIB
Supported Prone
The supported prone position presents the lowestsilhouette and provides maximum protection fromenemy fire. The supported prone position can beassumed behind a tree, a wall, or almost any typeand size of cover. It is flexible and allows firingof the pistol from all sides. To assume the sup-ported prone position and maximize the use ofcover, the position is kept as low as possible toensure no part of the body is exposed to the ene-my. If the cover is narrow, the Marine positionshis body directly behind cover and keeps his legstogether. The Marine's body is in line with thepistol and directly behind the pistol. The Isoscelesprone position presents a smaller target to theenemy and more body mass to absorb recoil. TheWeaver prone position is ideally suited to firefrom around cover (e.g., log) because of the angleof the body, but this position presents a larger tar-get to the enemy. See figure 5-10.
Figure 5-10. Weaver Prone.
Supported Kneeling
If the prone position cannot be used because ofthe height of the support, the Marine may use thesupported kneeling position. The kneeling posi-tion allows firing of the pistol from all sides. Thisposition may be altered to maximize the use ofcover or support by assuming a variation of thekneeling position (high, medium, low, or two-
knee). The kneeling position provides moremobility than the prone position. See figure 5-11.
Caution
The Marine must not indicate to the enemyhis position with his exposed knee. If theMarine changes knees while exposed to theenemy, he has indicated the direction of hisnext shot to the enemy.
Figure 5-11. Supported Kneeling.
Supported Standing
When use of the support is maximized, the sup-ported standing position can be as stable as thesupported kneeling or prone position. The sup-ported standing position provides greater mobili-ty than the other positions and usually providesgreater observation of the enemy. In the standingposition, the Marine must not allow the place-ment of his foot to indicate to the enemy his posi-tion behind cover. See figure 5-12.

Pistol Marksmanship 5-7
Locate and EngageTargets From Behind Cover
To locate targets when behind cover or to ensurethe area is clear before moving, the Marine mustexpose himself to the enemy. There are two tech-niques used to locate and engage targets frombehind cover: the pie and the rollout. These tech-niques minimize the Marine's exposure to ene-my fire while placing him in a position to engagetargets or to move to another location if neces-sary. Both techniques are used in the kneelingand standing positions.
Pie Technique
The Weaver position is the most effective posi-tion when executing the pie technique becausethe position of the Marine's body minimizesexposure to the enemy. See figure 5-13.
Figure 5-12. Supported Standing.
Figure 5-13. Pie Technique.
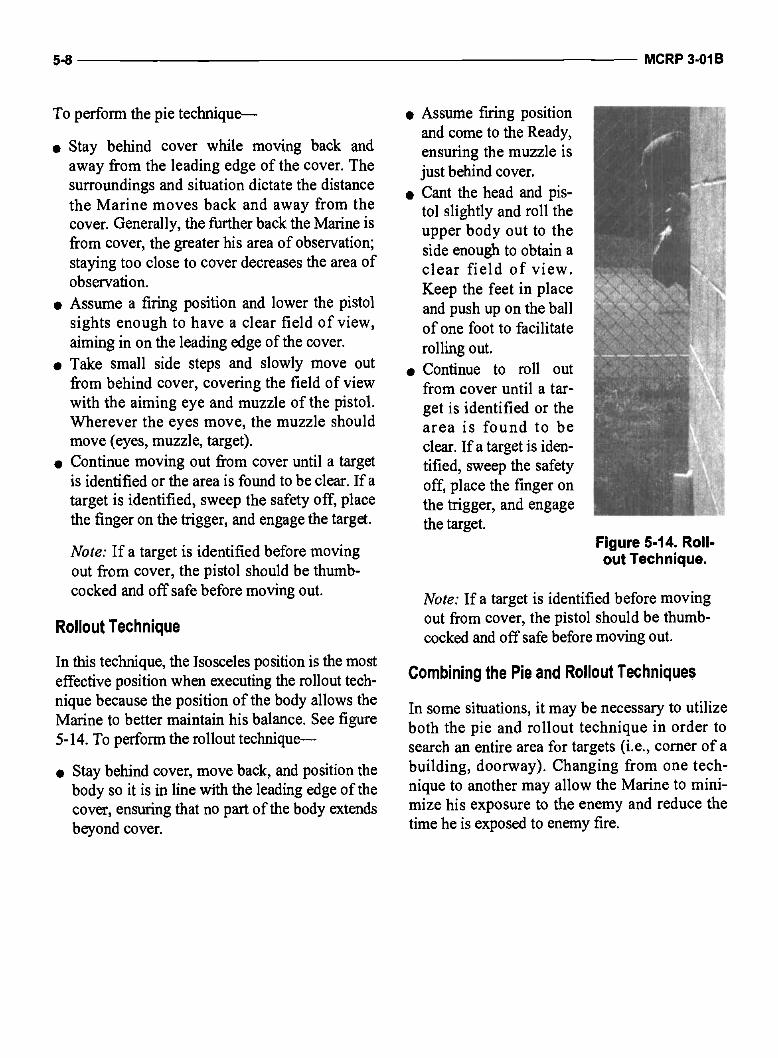
I
54 MCRP3-OIB
To perform the pie technique—
• Stay behind cover while moving back andaway from the leading edge of the cover. Thesurroundings and situation dictate the distancethe Marine moves back and away from thecover. Generally, the further back the Marine isfrom cover, the greater his area of observation;staying too close to cover decreases the area ofobservation.
• Assume a firing position and lower the pistolsights enough to have a clear field of view,aiming in on the leading edge of the cover.
• Take small side steps and slowly move outfrom behind cover, covering the field of viewwith the aiming eye and muzzle of the pistol.\Vherever the eyes move, the muzzle shouldmove (eyes, muzzle, target).
• Continue moving out from cover until a targetis identified or the area is found to be clear. If atarget is identified, sweep the safety off, placethe finger on the trigger, and engage the target.
Note: If a target is identified before movingout from cover, the pistol should be thumb-cocked and off safe before moving out.
Rollout Technique
In this technique, the Isosceles position is the mosteffective position when executing the rollout tech-nique because the position of the body allows theMarine to better maintain his balance. See figure5-14. To perfonn the rollout technique—
• Stay behind cover, move back, and position thebody so it is in line with the leading edge of thecover, ensuring that no part of the body extendsbeyond cover.
• Assume firing positionand come to the Ready,ensuring the muzzle isjust behind cover.
• Cant the head and pis-to! slightly and roll theupper body out to theside enough to obtain aclear field of view.Keep the feet in placeand push up on the ballof one foot to facilitaterolling out.
• Continue to roll outfrom cover unti! a tar-get is identified or thearea is found to beclear. If a target is iden-tified, sweep the safetyoff, place the finger onthe trigger, and engagethe target.
Figure 5-14. Roll-out Technique.
Note: If a target is identified before movingout from cover, the pisto! should be thumb-cocked and off safe before moving out.
Combining the Pie and Rollout Techniques
In some situations, it may be necessary to utilizeboth the pie and rollout technique in order tosearch an entire area for targets (i.e., corner of abui!ding, doorway). Changing from one tech-nique to another may allow the Marine to mini-mize his exposure to the enemy and reduce thetime he is exposed to enemy fire.

CHAPTER 6
PRESENTATION OF THE M9 SERVICE PISTOL
In combat, targets present themselves with little orno warning. The Marine must have the ability toreact quickly and to effectively and efficientlypresent the pistol, whether the pistol is in the hol-ster or at a carry. To successfully engage a combattarget with the M9 service pistol, the Marine mustmaster pistol presentation from the carries andtransport, pistol presentation while assuming a fir-ing position, and search and assess techniques.
Note. The procedures in this chapter are writ-ten for right-handed Marines; left-handedMarines should reverse directions as needed.
Sight Alignment!Sight Picture
Pistol presentation drills and dry fire help theMarine achieve a consistent grip and rapid presen-tation and aid in quickly acquiring sight alignmentand sight picture. The Marine always executes thefollowing steps:
• Identify the target and quickly present the pis-tol to the target while simultaneously sweepingthe safety with the thumb of the right hand.(Disengaging the safety with the right thumbensures the trigger is not pulled before takingthe pistol off safe.)
• Shift the focus from the target to the front sightto obtain sight alignment while presenting thepistol. As the front sight breaks the plane ofvision, acquire the front sight and begin toapply trigger control as sight picture is acquired.
• Apply trigger pressure until the shot is fired.
Presentation From the Carries and Holsters
Presentation From the Ready
To present the pistol from the Ready, the Marineperforms the following steps in sequence. When atarget appears—
• Sweep the safety with the thumb of the righthand, place the trigger finger on the trigger, andraise the arms to bring the pistol to the target.
Note: If the Marine wishes to thumbeock thepistol for a single action shot, the pistol isthumbcocked with the left thumb after thesafety is swept with the right thumb. Thegrip of the left hand may have to be brokento thumbcock the pistol; re-establish the gripafter thumbcocking.
• Acquire sight alignment and sight picturewithin the aiming area and apply trigger pres-sure until the shot is fired.
Presentation From the Alert
To present the pistol from the Alert, the Marineperforms the following steps in sequence. When atarget appears—
• Sweep the safety with the thumb of the righthand, place the trigger finger on the trigger,and bring the pistol to the target:o If the arms are straight, raise the arms to a
45-degree angle with the deck.o If the arms are bent, straighten the arms out
toward the target.

6-2 MCRP 3-OIB
Note: If the Marine wishes to thumbcock thepistol for a single action shot, the pistol isthumbcocked with the left thumb after thesafety is swept with the right thumb. Thegrip of the left hand may have to be brokento thumbcock the pistol; reestab1ish the gripafter thumbcocking.
• Acquire sight alignment and sight picturewithin the aiming area and apply trigger pres-sure until the shot is fired.
Presentation From a Holster Transport
The pistol is presented from the holster in onecontinuous, fluid motion.
MV Holster
pistol while moving the thumb to a position onthe safety.
Note: Hand placement should allow the fir-ing grip to be established once the thumbdisengages the safety. Any adjustmentsmade to the firing grip after the safety hasbeen disengaged should be minor.
• Once the muzzle clears the holster, rotate themuzzle forward while sweeping the safety.
• Establish a two-handed grip on the pistol byjoining the left hand with the right hand infront of the torso. At the same time, start tostraighten the pistol out toward the target. Seefigure 6-1.
To present the pistol from the Ml2 holster trans-port, perform the following steps in sequenceonce the target appears:
• Place the heel of the left hand at the center ofthe torso with the fingers extended toward thetarget. (The placement of the left hand allows atwo-handed grip to be established in a minimumamount of movement.) At the same time, unfas-ten and release the D-ring with the right hand.
• Use the right hand to place the thumb on theforward edge of the holster and the fingersaround the back edge of the holster, keepingthe trigger finger straight.
• Slide the hand up the holster until the fingerscome in contact with the pistol grip. At thesame time, keep the thumb above the pistol toguide the holster flap up.
• Grasp the pistol grip with the fingers and drawthe pistol straight up. Continue withdrawing the
Figure 6-1. Presentation Fromthe M12 Holster—Step 1.
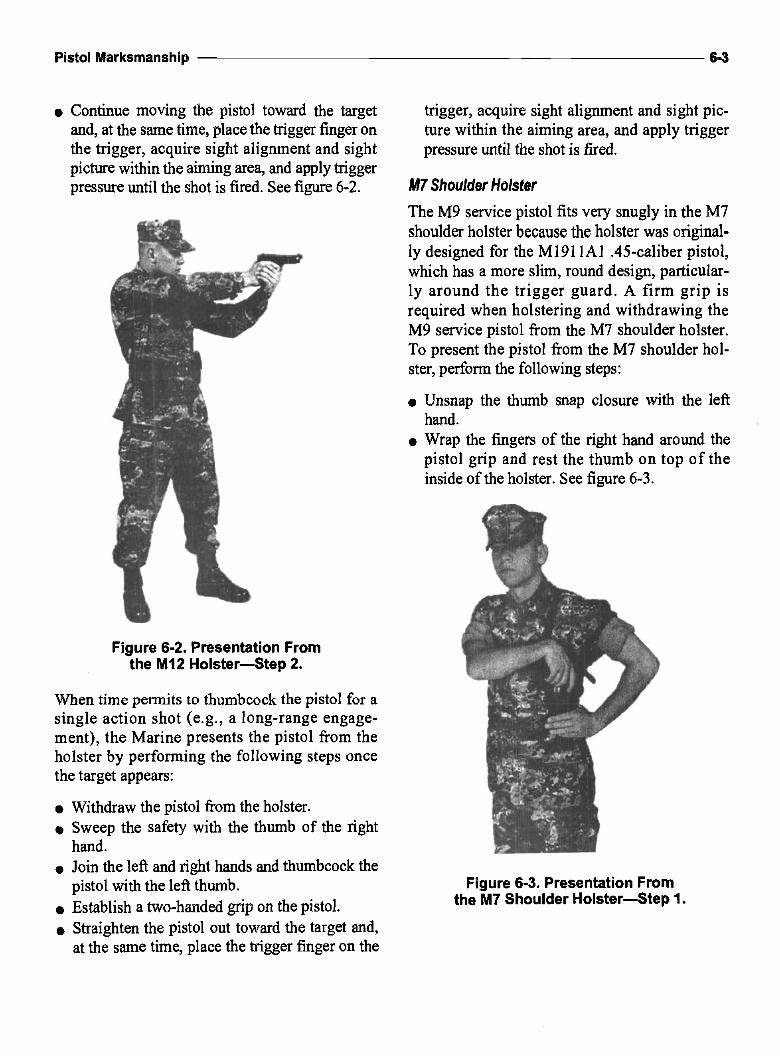
Pistol Marksmanship 64
• Continue moving the pistol toward the target trigger, acquire sight alignment and sight pic-and, at the same time, place the trigger finger on ture within the aiming area, and apply triggerthe trigger, acquire sight alignment and sight pressure until the shot is fired.picture within the aiming area, and apply triggerpressure until the shot is fired. See figure 6-2, Ml Shoulder Holster
The M9 service pistol fits very snugly in the M7shoulder holster because the holster was original-ly designed for the Ml91 1A1 .45-caliber pistol,which has a more slim, round design, particular-ly around the trigger guard. A firm grip isrequired when holstering and withdrawing theM9 service pistol from the M7 shoulder holster.To present the pistol from the M7 shoulder hol-ster, perform the following steps:
• Unsnap the thumb snap closure with the lefthand.
• Wrap the fingers of the right hand around thepistol grip and rest the thumb on top of theinside of the holster. See figure 6-3.
Figure 6-2. Presentation Fromthe M12 Holster—Step 2.
When time permits to thumbcock the pistol for asingle action shot (e.g., a long-range engage-ment), the Marine presents the pistol from theholster by performing the following steps oncethe target appears:
• Withdraw the pistol from the holster.• Sweep the safety with the thumb of the right
hand.• Join the left and right hands and thumbcock the
pistol with the left thumb. Figure 6-3. Presentation From
• Establish a two-handed grip on the pistol. the MT Shoulder Holster—Step 1.
• Straighten the pistol out toward the target and,at the same time, place the trigger finger on the

6-4 MCRP3-OIB
• Grasp the pistol grip firmly and draw the pistolup and away from the holster while rotating thethumb in a position to operate the safety.
• Continue withdrawing the pistol until the muz-zle clears the holster and rotate the muzzle to-ward the target. See figure 6-4.
Figure 6-5. PresentatIon Fromthe Mi Shoulder Holster—Step 3.
Figure 6-4. Presentation Fromthe Mi Shoulder Holster—Step 2.
• Sweep the safety with the thumb of the righthand while starting to punch the pistol outtoward the target.
• Establish a two-handed grip on the pistol byjoining the right hand with the left hand in thecenter of the torso. See figure 6-5.
• Continue punching the pistol out and, at thesame time, place the trigger finger on the trig-ger, establish sight alignment and sight picturewithin the aiming area, and continue triggerpressure until the shot is fired.
Assault Holster
To present the pistol from the assault holster, per-form the following in one, continuous motion:
• Bring the heel of thehand down on thehammer of the pistolso that it disengagesthe thumb break. Seefigure 6-6.
• Sweep the hand for-ward in a small circu-lar motion, slide thehand up the holster,and bring the fingersup under the pistolgrip.
Note: Depending onthe type of retentionstrap, this circularmotion releases theretention strap orpushes the retentionstrap forward and outof the way.
Figure 6-6.Presentation From
the AssaultHolster—Step 1.

Pistol Marksmanship 6-5
• Grasp the pistol grip and draw the pistolstraight up and out of the holster while estab-lishing a firing grip and positioning the thumbon the safety to operate it. See figure 6-7.
tact with the pistol grip. Keep the thumbabove the pistol to ensure the jacket orsweater clears the pistol. See figure 6-9 onpage 6-6.
Figure 6-7. Presentation Fromthe Assault Holster—Step 2.
Concealed Pistol Holster
Depending on the clothing worn by the Marine,there are two methods for accessing the con-cealed pistol holster so that the clothing does notbecome an obstruction while presenting the pis-tol. To present the pistol from the concealed pis-tol holster, the following steps are performed inone, continuous motion when the target appears:
• If the Marine is wearing a short jacketlsweater(waist-level) that is buttoned or zipped—o Move the left hand across the body and grasp
the jacket or sweater just above the holster,at the same time place the right hand on theholster below the jacket or sweater. See fig-ure 6-8 on page 6-6.
o Pull up on the jacket or sweater with the lefthand. At the same time, slide the right handup the holster until the fingers come in con-
Note: Leaning slightly forward at the waistmay assist in clearing the jacket or sweaterfrom the pistol and in removing the pistolfrom the holster.
• If the Marine is wearing a long jacket (belowwaist-level), or a short jacket or sweater that isunfastened—o Place the heel of the left hand at the center of
the torso to hold the left side of the jacketdown with the fingers extended. At the sametime, place the right hand on the right side ofthe jacket, with the thumb underneath theright side of the jacket below the left hand.See figure 6-10 on page 6-7.
o Keep thumb of the right hand against the bodyand throw the jacket back and away from theholster. See figure 6-11 on page 6-7.
Note: Keeping a weighted object (e.g., keys,extra magazine) in the right-hand pocket ofthe jacket assists in throwing the jacket backand away from the holster.
o Place the right hand on the holster and slidethe hand up the holster until the fingers comein contact with the pistol grip.
• Grasp the pistol grip with the fingers and thawthe pistol straight up. Continue withdrawing thepistol while moving the thumb to a position onthe safety.
Note: Hand placement should allow the fir-ing grip to be established once the thumb dis-engages the safety. Any adjustments made tothe firing grip after the safety is disengagedshould be minor.
• Rotate the muzzle forward, once it clears theholster, while sweeping the safety.
• Establish a two-handed grip on the pistol byjoining the left hand with the right hand infront of the torso. At the same time, start topunch the pistol out toward the target.

6-6 MCRP 3-OIB
Figure 6-8. Presentation From the Concealed Pistol Holster—Step 1.
Figure 6-9. Presentation From the Concealed Pistol Holster—Step 2

Pistol Marksmanship 6-7
Figure 6-10. Presentation Fromthe Concealed Pistol Holster
with the Long Jacket—Step 1.
• Continue punching the pistol out and, at thesame time, place the trigger finger on the trig-ger, acquire sight alignment and sight picturewithin the aiming area, and apply trigger pres-sure until the shot is fired.
Presentation WhileAssuming the Kneeling Position
Figure 6-11. Presentation Fromthe Concealed Pistol Holsterwith the Long Jacket—Step 2.
Note: The Weaver variation maintains thebody's position in a 40 to 60 degree obliqueto the target.
At the same time, the Marine sweeps the safetywith the thumb of the right hand, places the trig-ger finger on the trigger, acquires sight align-ment and sight picture within the aiming area,and applies trigger pressure until the shot is fired.
From the Alert (Arms Straight)
In combat, the Marine must be able to quicklyassume the kneeling position while presenting thepistol to the target. This usually takes advantageof cover and provides a more stable base forshooting. The following procedures are based onthe Isosceles and Weaver variations of the stand-ing to the kneeling shooting positions.
From the Ready
The Marine drops to the kneeling position whileraising the arms to bring the pistol up to the target.
The Marine drops to the kneeling position whileraising the arms to bring the pistol up to the target.
Note: The Weaver variation maintains thebody's position in a 40 to 60 degree obliqueto the target.
At the same time, the Marine sweeps the safetywith the thumb of the right hand, places the trig-ger finger on the trigger, acquires sight align-ment and sight picture within the aiming area,and applies trigger pressure until the shot is fired.

6-8 MCRP3-OIB
From the Alert (Close Quarters, Elbows Bent)
The Marine drops to the kneeling position whilepushing the arms out toward the target.
Note: The Weaver variation maintains thebody's position in a 40 to 60 degree obliqueto the target.
At the same time, the Marine sweeps the safetywith the thumb of the right hand, places the trig-ger finger on the trigger, acquires sight align-ment and sight picture within the aiming area,and applies trigger pressure until the shot is fired.
From the Holster Transport
The Marine withdraws the pistol from the holsterwhile dropping to the kneeling position. The pis-tol should be rotated to the target by the time theknee hits the deck. The Marine sweeps the safetywith the thumb of the right hand, establishes atwo-handed firing grip and—
• In the Weaver variation, raises the arms tobring the pistol up toward the target.
• In the Isosceles variation, pushes the pistol outtoward the target.
At the same time, the Marine places the triggerfinger on the trigger, acquires sight alignment andsight picture within the aiming area, and appliestrigger pressure until the shot is fired.
Presentation WhileAssuming the Prone Position
The prone position is generally assumed to takeadvantage of cover or to provide additional sta-bility for shooting. The following procedures areexecuted from the standing holster transports.
Isosceles Prone
The Marine withdraws the pistol from holster. Atthe same time, the Marine eliminates body con-tact with the deck by either the squat method or
the drop method. The pistol is rotated to the tar-get as the left hand is placed on the deck. TheMarine sweeps the safety off.
Note: If the Marine wishes to thumbcock thepistol for a single action shot, it is done oncethe Marine is on the deck.
The Marine establishes a two-handed firing gripwhile spreading the legs a comfortable distanceapart for stability. He places the trigger finger onthe trigger, acquires sight alignment and sightpicture within the aiming area, and applies triggerpressure until the shot is fired.
Weaver Prone
The Marine withdraws the pistol from the holster.At the same time, the Marine eliminates body con-tact with the deck by either the squat method orthe drop method. The Marine maintains the 40 to60 degree oblique to the target. The pistol shouldbe rotated to the target as the left hand is placed onthe deck. The Marine sweeps the safety off.
Note: If the Marine wishes to thumbcock thepistol for a single action shot, it is done oncethe Marine is on the deck.
The Marine brings the left knee up, establishes atwo-handed firing grip, and places the left elbowon the deck for stability. He places the trigger fin-ger on the trigger, acquires sight alignment andsight picture within the aiming area, and appliestrigger pressure until the shot is fired.
Search and Assess
To be successful in combat, the Marine musthave the ability to assess the situation and takeappropriate action following engagement. Oncethe Marine fires one or two rounds to engage atarget, he must quickly assess the situation andthe effectiveness of his engagement. This split-second assessment allows the Marine to deter-mine the best course of action and prevents himfrom expending a number of rounds without
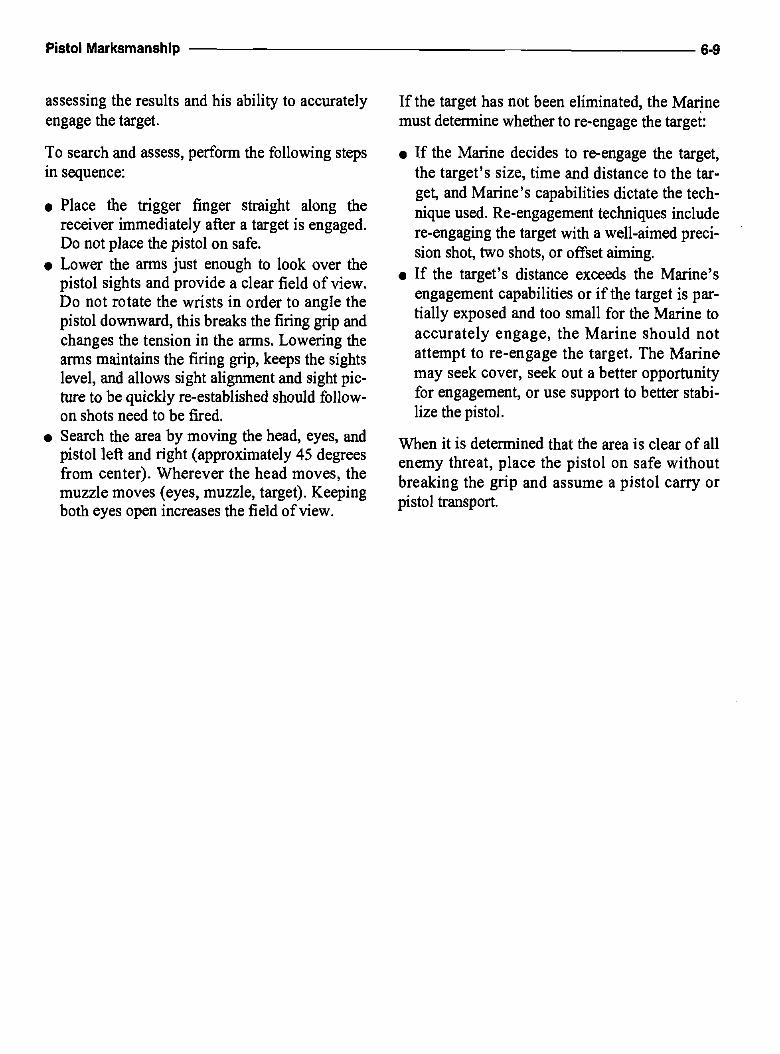
Pistol Marksmanship 6-9
assessing the results and his ability to accuratelyengage the target.
To search and assess, perform the following stepsin sequence:
• Place the trigger finger straight along thereceiver immediately after a target is engaged.Do not place the pistol on safe.
• Lower the arms just enough to look over thepistol sights and provide a clear field of view.Do not rotate the wrists in order to angle thepistol downward, this breaks the firing grip andchanges the tension in the arms. Lowering thearms maintains the firing grip, keeps the sightslevel, and allows sight alignment and sight pic-ture to be quickly re-established should follow-on shots need to be fired.
• Search the area by moving the head, eyes, andpistol left and right (approximately 45 degrees
from center). Wherever the head moves, themuzzle moves (eyes, muzzle, target). Keepingboth eyes open increases the field of view.
If the target has not been eliminated, the Marinemust determine whether to re-engage the target:
• If the Marine decides to re-engage the target,the target's size, time and distance to the tar-get, and Marine's capabilities dictate the tech-nique used. Re-engagement techniques includere-engaging the target with a well-aimed preci-sion shot, two shots, or offset aiming.
• If the target's distance exceeds the Marine'sengagement capabilities or if the target is par-tially exposed and too small for the Marine toaccurately engage, the Marine should notattempt to re-engage the target. The Marinemay seek cover, seek out a better opportunityfor engagement, or use support to better stabi-lize the pistol.
When it is determined that the area is clear of allenemy threat, place the pistol on safe withoutbreaking the grip and assume a pistol carry orpistol transport.


CHAPTER 7
PISTOL ENGAGEMENT TECHNIQUES
The Marine must be able to quickly detect targetsand employ the proper pistol engagement and fir-ing techniques. The Marine must also be able tore-engage a target if the initial engagement is notsuccessfbl.
Note: The procedures in this chapter are writ-ten for right-handed Marines; left-handedMarines should reverse directions as needed.
Improper Camouflage
The improper use of camouflage creates three tar-get indicators: shine, outline, and contrast withthe background. The closeness of a typical pistolengagement somewhat diminishes these effects,but can still affect target detection. The Marine'sability to recognize target indicators aids in thedetection of targets.
Target Detection
Target indicators reveal an enemy's position.Most combat targets are detected by smoke,flash, dust, noise, or movement and are usuallyonly momentarily visible. Target indicators aregrouped into three general areas: movement,sound, and improper camouflage.
Movement
The Marine does not need to look directly at anobject to notice movement, The eye is attracted toany movement, especially sudden movement. Aslowly moving target is harder to detect than onewith quick, jerky movements. Therefore, the abil-ity to locate a moving target depends primarily onthe speed of the object's movement.
Sound
Sound (e.g., movement, rattling equipment, talk-ing) can be used to detect an enemy position.Sound provides only a general location, making itdifficult to pinpoint a target by sound alone.However, sound can alert the Marine to the pres-ence of a target and increases the probability oflocating the target through other indicators.
Shine
Shine is created from reflective objects such asmetal, glass, pools of water, and the skin's natu-ral oils. Shine acts as a beacon in locating a tar-get's position.
Outline
The outline of camouflaged objects such as thebody, head and shoulders, weapons, and gear canbe recognizable.
Contrast With the Background
Objects contrast with a background because ofdifferences in color, surface, and shape. The fol-lowing are examples of objects contrasting withtheir background:
• A target wearing a dark uniform would beclearly visible in an area of snow or sand.
• Symmetrical shapes, such as helmets or riflebarrels, can be detected in a wooded area.
• Fresh soil around a fighting hole contrasts withthe otherwise unbroken ground surface.
While observing an area, the Marine notes any-thing that looks out of place or unusual and studiesit in more detail in order to increase the chances ofspotting a hidden threat.

7-2 MCRP 3418
Techniques of Fire
To successfully engage a combat target with theM9 service pistol, the Marine must employ effec-tive techniques of fire. The Marine's performanceof these skills and the proper application of thefundamentals of marksmanship are critical to suc-cess in a combat situation.
Double and Single Action Firing
When the M9 service pistol is taken off safe, it iscapable of firing in both a double and a singleaction mode.
Double Action Mode
The design of the M9 service pistol causes thefirst shot fired to be a double action shot.
In double action firing, two actions occur as thetrigger is moved to the rear; the hammer movesto the rear, cocking the pistol, and then the ham-mer moves forward, firing the pistol. More pres-sure is required on the trigger to fire a doubleaction shot due to the distance between the trig-ger and hammer and the weight of the trigger. Adouble action shot requires approximately 9 to 16pounds of pressure to move the trigger rearward.
Maintaining sight alignment and sight picture areharder when firing a double action shot. There-fore, the sights will more than likely move outsidethe aiming area when applying trigger pressure.
Single Action Mode
In single action firing, the pistol is alreadycocked because the cycle of operation in the firstdouble action shot leaves the hammer cocked tothe rear. Therefore, the only action taking placeas the trigger is moved to the rear is the hammermoving forward, firing the pistol. A single actionshot requires approximately 4 to 6 pounds ofpressure to move the trigger rearward. Therefore,the application of trigger control is easier whenfiring a single action shot.
To enable the first shot to be fired single action,the pistol's hammer can be manually cocked withthe thumb:
Note: The pistol must be taken off safe be-fore it can be thumbcocked.
• Use the left thumb to pull back on the hammerto cock it. This ensures that the firing grip ofthe right hand does not have to be broken.
• Ensure that the hammer moves all the way tothe rear.
• Ensure the trigger finger remains straight alongthe receiver until the pistol is fully cocked.
• Re-establish the firing grip with both handsonce the pistol is cocked.
Single Action or Double Action Firing Factors
The decision to fire in a single or double actionmode is made rapidly. Ultimately, the decision isbased on the Marine's abilities, but the decisionis also based on time and accuracy. The pistol isfired in the double action mode when trigger con-trol, sight picture, and stability of hold are not ascritical for accuracy (i.e., close range, large tar-gets). The pistol is fired in the single action modewhen the fundamentals are more critical to accu-racy (i.e., long range, small targets).
Time
The Marine sacrifices time to fire a single action,precision shot; but what he sacrifices in time, hegains in accuracy.
For quick engagements at close range, there maynot be time to thumbcock the pistol for a singleaction shot. Therefore, firing the first shot in thedouble action mode is preferred because shots areneeded on target quickly and stability of hold andsight picture are not as critical to accuracy.
When time permits and for targets at longer rang-es, the pistol may be thumbcocked to place it inthe single action mode to reduce the weight of thetrigger and the distance the trigger must travelrearward to fire the first shot.

Pistol Marksmanship 73
Distance and Size of the Target
The smaller the target, the more critical the appli-cation of the fundamentals in order to engage thetarget accurately. To accurately engage a smalltarget (e.g., head shot, long-range target) it is bet-ter to thumbcock the pistol for a single actionshot. Engagement of a smaller target requiresadditional precision because sight alignment andsight picture are more critical to accuracy.
Two-Shot Technique
During combat, the preferred pistol engagementtechnique is to rapidly fire more than one shot ona target to eliminate it as a threat. Two shots firedin rapid succession increase the trauma (i.e.,shock, blood loss) on the target and increase theMarine's chances of quickly eliminating thethreat. Therefore, two shots are most often firedin rapid succession on a target at close range.
After the pistol is fired, the muzzle climbs withthe recoil of the pistol. To fire two shots, theMarine must quickly recover the sights to thesame area on the target while re-acquiring sightalignment and sight picture. The proper recoveryautomatically brings the sights back on target fol-lowing recoil. A quick recovery allows moretime for the Marine to align the sights and applytrigger control to fire the next shot. Recoverybegins immediately after the application of thefundamentals to bring the pistol sights into align-ment with the target in preparation for firing thenext shot.
The amount the muzzle climbs during recoildepends on the amount of controlled musculartension in the grip and wrists used to stabilize thepistol and create consistency in resistance torecoil. Controlled muscular tension allows thepistol sights to recover consistently back on targetwithin a minimum amount of time. The speed ofdelivery of multiple shots depends on how fastthe Marine can re-acquire sight alignment. Sightrecovery is determined by the following:
• The key to proper recovery is a stable firingposition and proper grip.
• If the Marine's firing position is not stable, re-coil forces him out of his firing position, requir-ing him to re-establish his position before hetakes his next shot.
• An improper grip or lack of controlled muscu-lar tension causes the pistol to move in theMarine's hand after the shot is fired, disruptingsight alignment and requiring the Marine to re-establish his grip.
Slow Fire Technique
Sight alignment becomes more critical the small-er the target and the greater the distance to thetarget. In these situations, the Marine does notengage the target with two rapidly fired shotsbecause he has to slow down his application ofthe fundamentals in order to fire a precisionshot(s). To engage small targets (i.e., partiallyexposed) and targets at longer ranges where pre-cision is required, the Marine must employ thefollowing slow fire technique:
• Thumbcock the pistol for a single action shot.• Slow down application of the fundamentals.• Fire one well-aimed, precision shot on target.
Re-engagement Techniques
Once the Marine has quickly assessed the situa-tion and determined that the threat still exists, hemay make the decision to re-engage the target toeliminate it as a threat. Re-engagement tech-niques include engaging the target with a preci-sion shot through slow fire, two shots, or offsetaiming. The time, size, and distance to the targetas well as the Marine's marksmanship abilitiesdictate the technique used to re-engage the target.
Slow Fire Technique
If the Marine has engaged a target and the targetstill poses a threat, the Marine may choose toslow down his application of the fundamentals
7.4 MCRP3-OIB
and fire a slow fire, precision shot. The place-ment of one well-aimed, precision shot on a des-ignated area of the target increases the chances ofeliminating the target as a threat. However, thetime the Marine has to engage the target deter-mines if he can slow down his application of thefundamentals to fire a precision shot. Firing aprecision shot takes time, so the Marine will sac-rifice time for accuracy.
The key to successful shot placement is theMarine's ability to slow down his performanceand focus on the application of the fundamentalsof marksmanship. The Marine must determinewhere to place shot for maximum effectiveness.In order to make this decision, the Marine mustconsider distance and size of the target and time.For targets at close range and within the Marine'smarksmanship abilities, a precision shot is placedin the head to immediately eliminate the target asa threat. Sometimes, even at close ranges, the tar-get may only be partially exposed; therefore, theMarine is presented with a small target and aimshis sights on the portion of the target that isexposed. For targets at long ranges, the target issmaller and requires a precision shot. A preci-sion shot may be placed in the body to add trau-ma to the target and increase the chances ofeliminating the target as a threat.
Two-Shot Technique
If a target is accurately engaged, but does not godown, the Marine may re-ehgage the target withadditional shots. Two additional, rapidly deliv-ered shots increases the trauma and increases theMarine's chances of eliminating the threat.
The size and distance to the target affect howquickly two shots can be delivered on the target.The speed at which two shots are fired alsodepends on the Marine's marksmanship abilitiesand how fast he can re-acquire his front sight.However, the Marine must not compromise accu-racy for speed; the key to successful targetengagement is to fire only as quickly as theMarine can fire effectively.
Offset Aiming
When the Marine assesses the situation and deter-mines his shots are not successful and not strikingthe target in the designated aiming area, he mayemploy offset aiming. Since the pistol's sightscannot be adjusted, offset aiming is applied toadjust the aiming area and to cause rounds tostrike center mass. This technique should only beapplied when the Marine determines that he isapplying the fundamentals of marksmanship cor-rectly. Sight picture will change as the aimingarea is adjusted.
The known strike of the round offset aiming tech-nique requires shifting the point of aim to com-pensate for rounds striking off target center. Toeffectively engage a target using this technique,the Marine must be able to see where the roundsare striking and then aim an equal distance fromthe center of the aiming area opposite theobserved strike of the round. For example, if therounds are striking the target high and left of cen-ter mass, aim an equal and opposite distance lowand right.
Multiple Targets
If engaging more than one target at a time, theMarine adheres to the fundamentals of marksman-ship and employs the techniques of multiple targetengagement. The introduction of multiple targetsin a combat scenario requires additional skills thatmust be learned and practiced if a Marine is to besuccessful. To be effective in combat, the Marinemust be able to detect targets through identifica-tion of target indicators (identified on page 7-1),prioritize the targets, and employ multiple targetengagement techniques.
Combat Mindset
Successful engagement of multiple targetsrequires a somewhat different mindset from singletarget engagement. For example, followingengagement of a single target, the Marine assesses

Pistol Marksmanship 7-5
the situation. During multiple target engage-ments, after the first target is engaged, he mustimmediately engage the next target and continueuntil all targets have been eliminated. Becausesplit-second decisions must be made, the develop-ment of a combat mindset is important to successon the battlefield. A combat mindset allows theMarine to control the pace of the battle rather thanreact to the threat.
Mental preparedness is essential to successfulengagement of multiple targets, and the requiredmindset must be developed until it becomes sec-ond nature to the Marine. When multiple targetsappear, the Marine must prioritize the targets toestablish an engagement sequence. To prioritizetargets and establish an engagement sequence,the Marine must be aware of the surroundings,not focus on one target, and continuously searchthe terrain for additional targets.
Prioritizing Targets
Once multiple targets have been identified, theymust be prioritized in terms of the threat each tar-get presents. While the fundamentals of marks-manship must still be applied, prioritizing targetsand planning the engagement are just as essentialto successful multiple target engagement.
Target priority is based on factors such as prox-imity, threat, and opportunity. It also encompass-es the Marine's proficiency level since a Marineshould not attempt to engage a target beyond hisproficiency level or the pistol's capability (e.g., atarget 100 yards away). The principal method ofprioritizing targets is to determine the level ofthreat for each target so that all targets may beengaged in succession, starting with the mostthreatening and ending with the least threatening.
Prioritizing targets is an ongoing process. As theengagement proceeds, new targets may appear orpreviously identified targets may take cover,delaying their engagement. Therefore, the Marinemust remain constantly alert to changes in targetthreat, proximity, and the opportunity for engage-ment and revise target priorities accordingly.
Engaging Multiple Targets
Once targets have been prioritized, the Marinemust quickly eliminate them. It is crucial tounderstand and practice the physical techniquesfor engaging multiple targets until they becomesecond nature. When these techniques occur asautomatic responses, the Marine maintains anawareness of the complete battlefield and is ableto concentrate on the mental aspects of multipletarget engagement.
Engagement Methods
The fundamentals of marksmanship are critical tothe development of skills to support multiple tar-get engagement. While responsiveness is impor-tant when engaging multiple targets, the Marine'sprimary concem is to place accurate rounds on tar-get. A balance must be struck between placingshots quickly on targets at close range and slowingdown to place precision shots on targets at longrange because all targets pose a threat and must beaccurately engaged. To engage multiple targets—
• Engage every target, move from target to target.• After all of the targets have been initially
engaged, assess the effectiveness of the engage-ments and, if necessary, re-engage targets thatstill pose a threat.
• If all of the targets are eliminated, search thearea for new targets.
Considerations for Field Firing Positions
The selection and use of field firing positions arecritical to engagement of multiple targets. As inany firing situation, if the situation permits, theMarine should make a quick mental review of theterrain to select a firing position that provides sta-bility, mobility, and observation of the enemy.The firing position should also provide flexibilityfor engaging multiple targets. The more dispersedthe multiple targets, the greater the lateral move-ment the position must afford to engage them.
The prone position provides the maximum stabil-ity for firing well-placed shots, but engaging mul-tiple targets from this position may require

7-6 MCRP3-OIB
adjustment in the position from shot to shotdepending on the distance between the targetsand their location. Because the arms are fullyextended on the ground, the prone position can berestrictive, increasing the time it will take torecover the sights onto subsequent targets. If theMarine must make an adjustment in the proneposition to engage multiple targets, he mustensure that he maintains proper arm placement.Improper arm placement may affect his stabilityof hold and his ability to acquire sight picture.The following identifies position adjustments:
• For targets that are not widely dispersed, theMarine adjusts the position of the lower part ofthe body to orient the upper body toward thetarget without disturbing the placement of thearms. This allows the Marine to maintain stabil-ity of hold and quickly recover on subsequenttargets. Moving the legs to the left orients theupper body to the right; moving the legs to theright orients the upper body to the left.
• For targets that are widely dispersed, theMarine may need to adjust his entire position toorient his body in the direction of subsequenttargets. Using the left hand, push the upperbody off the deck just high enough to move thebody in the direction of the target. Extend theright arm toward the target and keep the muzzlepointed in the direction of the target.
The kneeling and standing positions provide anincreased field f view and allow maximum later-al adjustment to engage dispersed targets. Thetype of adjustment the Marine must make in thekneeling or standing position in order to orienthis body in the direction of each target is relatedto the distance between the targets. It is also relat-ed to the Marine's ability to maintain stability ofhold and recover from recoil. Once the first targetis engaged—
• Maintain a proper shooting position, rotate thebody in the direction of the target, keeping thefeet in place. In the standing position, theMarine may bend slightly at the knees while
rotating the body. This allows the Marine todistribute his weight forward to provide addi-tional stability to the position and to better con-trol the effects of recoil.
• Adjust the entire position by either adjustingthe placement of the feet or knee(s) in order toface in the direction of the new target if the tar-gets are some distance apart.
• Ensure that as the eyes move to a new target,the head and pistol muzzle should follow.
Moving Targets
The majority of combat targets will be moving;the enemy will move quickly from cover to cov-er, exposing himself for the shortest time possi-ble. Therefore, a moving target must be engagedbefore it disappears. The Marine must engage amoving target with the same accuracy and preci-sion used to engage a stationary target. Practicein the proper application of leads and the funda-mentals of marksmanship enable the successfulengagement of moving targets.
Types of Moving Targets
Moving Target
This type of target moves in a consistent manner(i.e., walking or running) and is in continuoussight as it moves across the Marine's field ofvision. However, unless the enemy is completelyunaware of the Marine's presence, this type oftarget is not likely to present itself.
Stop and Go Target
This type of target appears and disappears duringits movement due to intermittent cover. It willpresent itself for only a short period of timebefore re-establishing cover. This type of target ismost vulnerable to fire at the beginning and endof its movement because it begins slow and gainsmomentum as it leaves cover and then slows toavoid overrunning the new cover.
Pistol MarksmanshIp 7-7
Leads for Moving Targets
Once the moving target has been identified it mustbe engaged. To engage a moving target, theMarine must aim at a point in front of the target,which is known as a lead. Lead is the distance inadvance of the target that is required to strike thetarget when it is moving. To achieve success,determining the amount of lead to engage a mov-ing target must be as precise as possible. When ashot is fired at a moving target, the target contin-ues to move during the time of the bullet's flight.For this reason, the aim must be in front of the tar-get; otherwise, the shot will fall behind the target.
Factors Affecting Lead
Factors that affect the amount of lead are the tar-get's range, speed, and angle of movement.
Range. There is a time lag from the time a roundis fired until the round strikes at the point of aim.This time of flight could allow a target to moveout of the bullet's path if the round were fireddirectly at the target. Time of flight increases asrange to the target increases. Therefore, the leadmust be increased in proportion to the distance tothe target.
Speed. A greater lead is required to hit a runningman than a walking man because the runningman moves a greater distance during the flight ofthe bullet.
Angle of Movement. The angle of target move-ment also affects the amount of lead required fortarget engagement. The angle of movementacross the Marine's line of sight relative to theflight of the bullet determines the type (amount)of lead.
Types of Leads
Full Lead. The target moves straight across theMarine's line of sight with only one arm and halfthe body visible. This target requires a ftill leadbecause it moves the greatest distance across theMarine's line of sight during the bullet's flight.
Ha If Lead. The target moves obliquely across theMarine's line of sight (at about a 45-degreeangle). One arm and over half of the back orchest are visible. This target requires half of a frilllead because it moves half as far as a target mov-ing directly across the Marine's line of sight dur-ing the bullet's flight.
No Lead. A target moving directly toward oraway from the Marine presents a full view ofboth arms and the entire back or chest. No lead isrequired. This target is engaged in the same man-ner as a stationary target because it is not movingacross the Marine's line of sight.
Point of Aim Technique
To engage a moving target, a Marine establishesa lead using a point of aim offset aiming tech-nique. This technique uses predetermined pointsof aim to sector a man-sized target vertically,halfway between center mass and the leadingedge of the target (both one point of aim and twopoints of aim) (see fig. 7-1 on page 7-8). Thesame units of measure can be applied off the tar-get for holds of additional points of aim. To usethe point of aim technique to establish a lead on aman-sized moving target at various ranges,speeds, and angles of movement, the followingguidelines apply. See figure 7-2 on page 7-9.
• For a target moving at a distance of 15 yardsaway or less, no lead is required.
• For a target walking directly across the Marinesline of sight (full lead) between 16 and 25 yardsaway, hold 1 point of aim in the direction thetarget is moving.
• For a target running directly across the Marine'sline of sight (fbll lead) between 16 and 25 yardsaway, hold 2 points of aim in the direction thetarget is moving.
Methods of Engagement
Moving targets, although difficult, can be engagedby the tracking or ambush method or a combina-tion of the two. See figure 7-2 on page 7-9.

7-8 MCRP3-OIB
Center mass
Figure 7-1. Points of Aim.
Tracking Method
In this method, the Marine "tracks" or follows thetarget with his front sight while maintaining sightalignment and a point of aim on or ahead of(leading) the target until the shot is fired. Sightpicture is the aiming point in relation to the targetwhile maintaining sight alignment (when a lead isestablished in moving target engagement, thesights are not entered on the target). To executethe tracking method—
• Thumbcock the pistol while presenting it to thetarget.
• Track the muzzle of the pistol through the tar-get to the desired point of aim (lead). The pointof aim may be on the target or some point infront of the target depending upon the target'srange, speed, and angle of movement.
• Track and maintain focus on the front sightwhile applying trigger pressure and acquiringsight alignment.
• Continue tracking and applying trigger pres-sure while acquiring sight picture. When sightpicture is established, engage the target whilemaintaining the proper point of aim (lead).
• Follow through so the lead is maintained as thebullet exits the muzzle. Continuing to track alsoenables a second shot to be fired on target.
Ambush Method
The ambush method is generally used to engage astop and go target and when it is difficult to trackthe target with the pistol, such as in the proneposition. With this method, the pistol is aimed at apredetermined engagement point ahead of the tar-get and along its path, allowed to remain station-ary, and fired when the target reaches thepredetermined engagement point. The engage-ment point is based on the required point of aim(lead) to engage the target effectively. When thesights are settled, the target moves into the prede-termined engagement point creating the desiredsight picture. Once sight picture is established, theremaining pressure is applied on the trigger untilthe shot is fired. To execute the ambush method—
• Look for a pattern of exposure.• Thumbcock the pistol while presenting it to a
selected point of aim ahead of the target.• Apply trigger pressure while obtaining sight
alignment in the aiming area.• Continue applying trigger pressure and hold
sight alignment until the target moves into thepredetermined engagement point and thedesired sight picture is established.
• Engage the target once the sight picture isacquired.
• Follow through so the pistol sights are not dis-turbed as the bullet exits the muzzle.
Applying the Fundamentals of Marksmanship
The engagement of moving targets is a perishableskill that must be practiced frequently if it is to bemaintained. The Marine must practice to developthe skill to calculate the point of aim (lead) and
2POA
-us-I
POA
-II
IPOA
_Centermass
2POA

Pistol Marksmanship 7-9
w
Figure 7-2. Moving Target Engagement Methods.
fire the shot while maintaining the proper point ofaim (lead).
To engage moving targets using the trackingmethod, the Marine moves the pistol smoothlyand steadily as the target moves. A stable posi-tion and firm grip are necessary to steady the pis-to! sights while tracking.
When using the tracking method, continue track-ing the target while following through with theshot process so the point of aim (lead) is main-tained as the bullet exits the muzzle. Continuingto track also enables a second shot to be fired ontarget if necessary. Concentration should be oncontinuing to track while applying the fundamen-tals. The fundamentals must be instinctivelyapplied, allowing concentration on tracking thetarget and applying point of aim (lead).
Aiming
Sight alignment remains unchanged for accurateengagement of a moving target. The most corn-
mon error when engaging moving targets is tofocus on the target rather than focusing on thefront sight. Sight picture is the point of aim inrelation to the target while maintaining sightalignment. For both the ambush and trackingmethods, sight picture is changed from the nor-mal center mass picture, based on range, speedsand angle of movement of the target. It takespractice in moving target engagement to quicklyestablish the desired sight picture for a givenpoint of aim (lead).
Breath Control
There is no difference in breath control whenengaging moving targets; the breath is held to firethe shot.
Trigger Control
Trigger control is critical to firing shots whileestablishing and maintaining sight alignment andsight picture. Because the single action mode isthe preferred method of engaging a moving target,
-4 -4 -4 -4 4 —4 -4
Tracking Ambush

7-10 MCRP 3-016
the pistol is thumbcocked before trigger control isapplied. The following guidelines apply:
• Do not use interrupted trigger control whenengaging moving targets because the point ofaim (lead) is lost or has to be adjusted if thetrigger is held in order to re-assume the propersight picture.
• Do not stop tracking as trigger control isapplied. This causes the shot to impact behind
the moving target. Trigger control should beuninterrupted while maintaining the point ofaim so the trigger is pulled in one continuous,smooth motion to the rear.
• Do not interrupt trigger control when the targetis masked from view. This is particularly truein the ambush method for targets that appear tostop and go when moving to and from cover.Trigger control should be uninterrupted.

CHAPTER 8
ONE-HANDED TECHNIQUES
In combat, a situation may arise where the Marinemust engage a target by using only one hand. AMarine fires the pistol one-handed when—
• The Marine's other hand is occupied.• A target presents itself so quickly and at a
close range that the Marine does not have timeto establish a two-handed grip and position.
• One of the Marine's hands is injured.
Note: The procedures in this chapter are writ-ten for right-handed Marines; left-handedMarines should reverse directions as needed.
Presentation and Shooting
Adjustment of the Standing Position
To fire accurately, the Marine must maintain thesame stability and control of the pistol, managerecoil, and recover on target as effectively withone hand as with two. This is accomplished byadjusting the standing position as the pistol ispresented to the target (see fig. 8-1).
The Marine's angle to the target determines whatadjustments are made to the standing position.This adjustment is made while the pistol is beingpresented to the target by moving or sliding thefeet to orient the body to the target. For stabilityand balance, the right foot may be slightly for-ward of the left foot. The further to the right ofthe Marine the target is the farther forward theright foot will be. To adjust the standing positionwhen firing one-handed—
• Increase the muscular tension in the right armand bend the elbow slightly to better managethe pistol.
Note: For some Marines, muscular tension inthe firing arm and the position of the body inrelation to the target causes them to cant thepistol inboard slightly. A slight inboard cantof the pistol and firing arm allows a naturalbend in the elbow and allows a better man-agement of recoil and recovery of the sightsback on target. Any cant should be naturaland not caused by excessive muscular ten-sion. A slight cant does not affect shootingperformance and should not alter the appli-cation of the fundamentals of marksmanship.
• Apply controlled muscular tension throughoutthe body to better manage the effects of recoil.
• Lean forward aggressively, roll the shouldersforward, and tuck the head into the shoulders.
Figure 8-1. One-Handed Presentation.
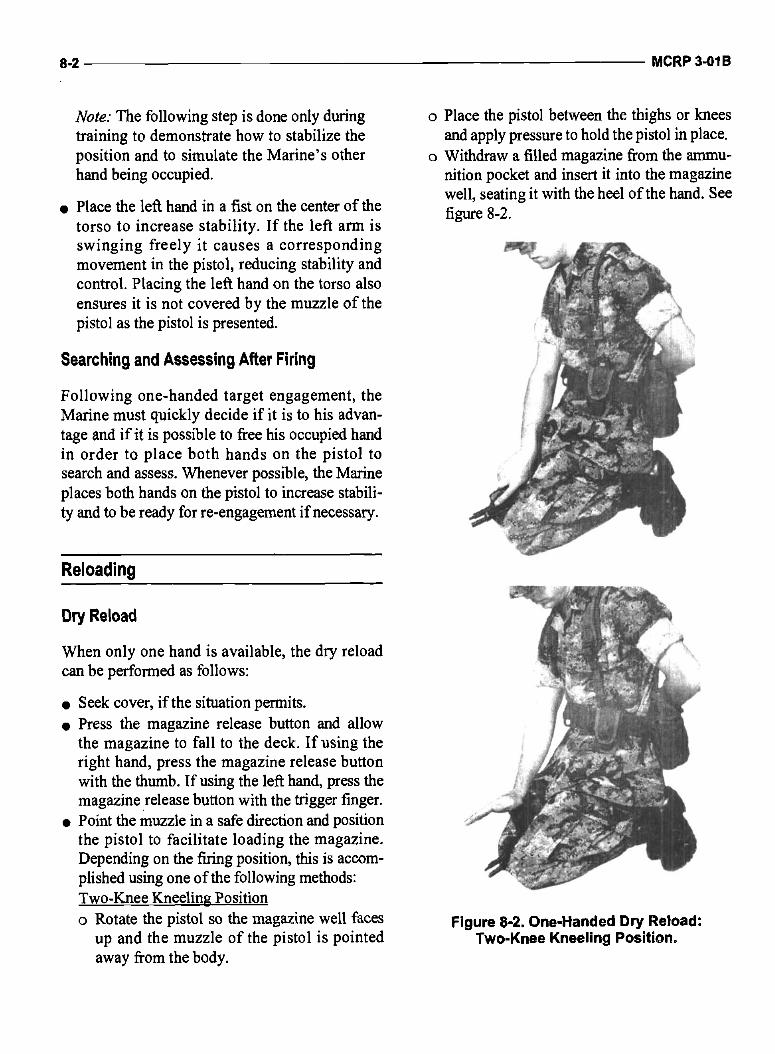
La
8-2 MCRP3-O1S
Note: The following step is done only duringtraining to demonstrate how to stabilize theposition and to simulate the Marine's otherhand being occupied.
• Place the left hand in a fist on the center of thetorso to increase stability. If the left arm isswinging freely it causes a correspondingmovement in the pistol, reducing stability andcontrol. Placing the left hand on the torso alsoensures it is not covered by the muzzle of thepistol as the pistol is presented.
Searching and Assessing After Firing
Following one-handed target engagement, theMarine must quickly decide if it is to his advan-tage and if it is possible to free his occupied handin order to place both hands on the pistol tosearch and assess. Whenever possible, the Marineplaces both hands on the pistol to increase stabili-ty and to be ready for re-engagement if necessary.
o Place the pistol between the thighs or kneesand apply pressure to hold the pistol in place.
o Withdraw a filled magazine from the ammu-nition pocket and insert it into the magazinewell, seating it with the heel of the hand. Seefigure 8-2.
Reloading
Dry Re'oad
When only one hand is available, the dry reloadcan be performed as follows:
• Seek cover, if the situation permits.• Press the magazine release button and allow
the magazine to fall to the deck. If using theright hand, press the magazine release buttonwith the thumb. If using the left hand, press themagazine release button with the trigger finger.
• Point the muzzle in a safe direction and positionthe pistol to facilitate loading the magazine.Depending on the firing position, this is accom-plished using one of the following methods:Two-Knee Kneeling Positiono Rotate the pistol so the magazine well faces
up and the muzzle of the pistol is pointedaway from the body.
Figure 8-2. One-Handed Dry Reload:Two-Knee Kneeling Position.
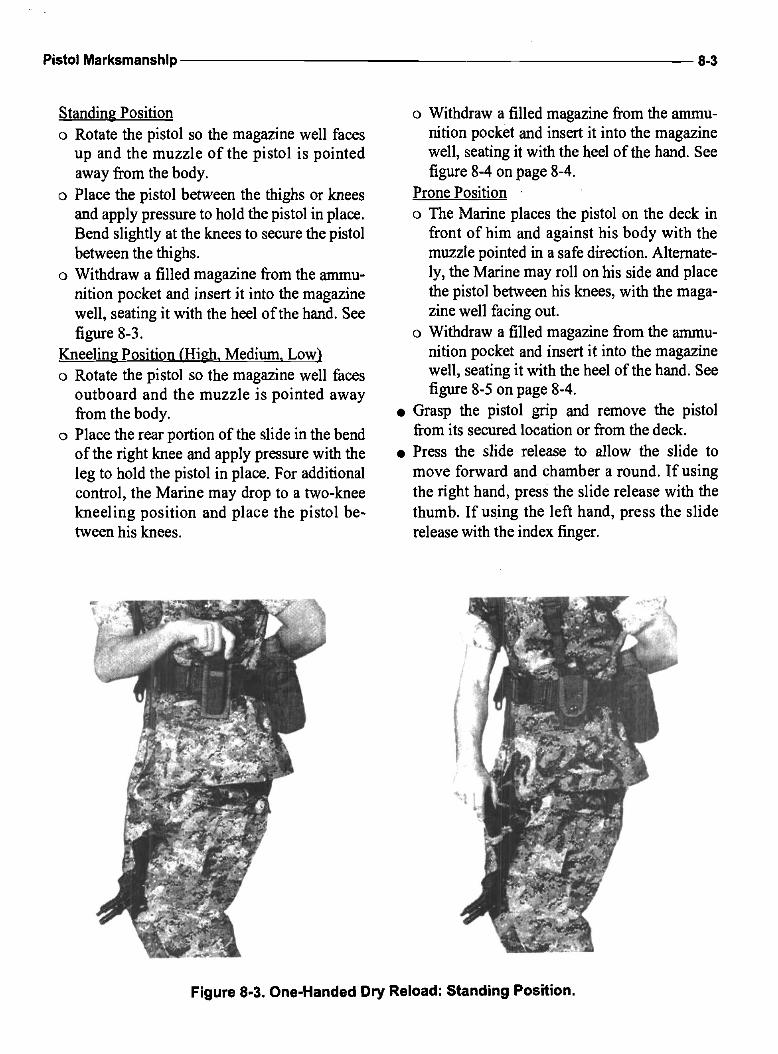
Pistol Marksmanship 8-3
Standing Positiono Rotate the pistol so the magazine well faces
up and the muzzle of the pistol is pointedaway from the body.
o Place the pistol between the thighs or kneesand apply pressure to hold the pistol in place.Bend slightly at the knees to secure the pistolbetween the thighs.
o Withdraw a filled magazine from the ainmu-nition pocket and insert it into the magazinewell, seating it with the heel of the hand. Seefigure 8-3.
Kneeling Position (High. Medium, Low)o Rotate the pistol so the magazine well faces
outboard and the muzzle is pointed awayfrom the body.
o Place the rear portion of the slide in the bendof the right knee and apply pressure with theleg to hold the pistol in place. For additionalcontrol, the Marine may drop to a two-kneekneeling position and place the pistol be-tween his knees.
o Withdraw a filled magazine from the ammu-nition pocket and insert it into the magazinewell, seating it with the heel of the hand. Seefigure 8-4 on page 8-4.
Prone Positiono The Marine places the pistol on the deck in
front of him and against his body with themuzzle pointed in a safe direction. Alternate-ly, the Marine may roll on his side and placethe pistol between his knees, with the maga-zine well facing out.
o Withdraw a filled magazine from the ammu-nition pocket and insert it into the magazinewell, seating it with the heel of the hand. Seefigure 8-5 on page 8-4.
• Grasp the pistol grip and remove the pistolfrom its secured location or from the deck.
• Press the slide release to allow the slide tomove forward and chamber a round. If usingthe right hand, press the slide release with thethumb. If using the left hand, press the sliderelease with the index finger.
Figure 8-3. One-Handed Dry Reload: Standing Position.
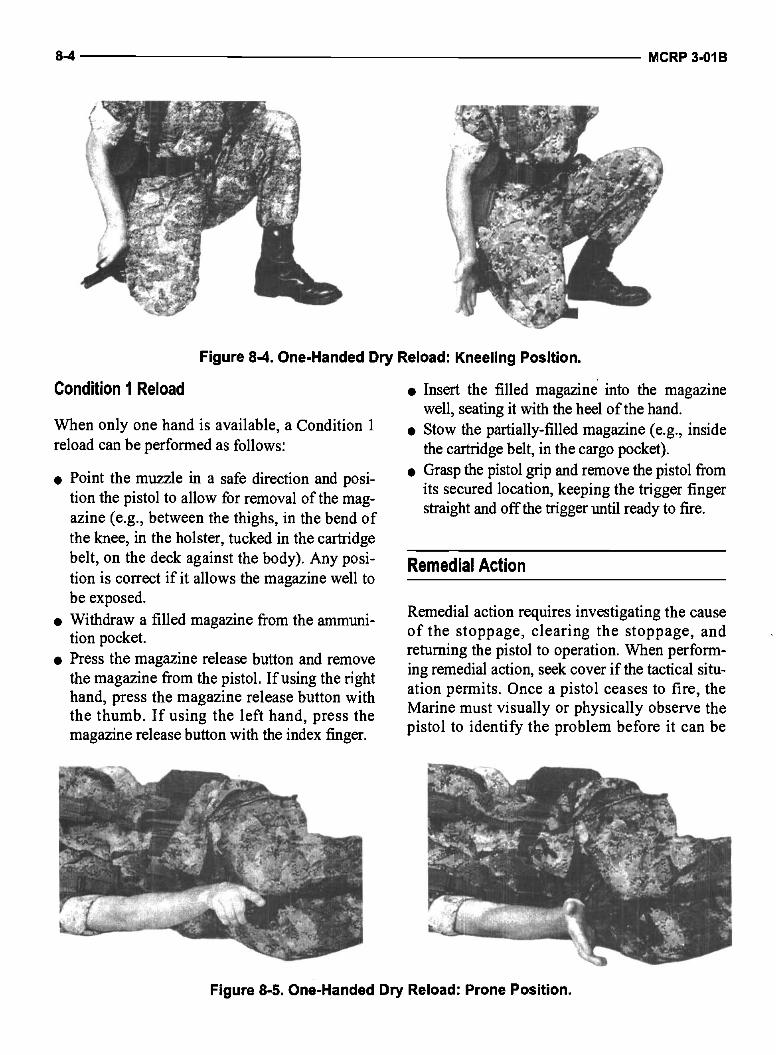
8-4 MCRP3-OIB
Figure 8-4. One-Handed Dry Reload: Kneeling Position.
Condition I Reload
When only one hand is available, a Condition 1reload can be performed as follows:
• Point the muzzle in a safe direction and posi-tion the pistol to allow for removal of the mag-azine (e.g., between the thighs, in the bend ofthe knee, in the holster, tucked in the cartridgebelt, on the deck against the body). Any posi-tion is correct if it allows the magazine well tobe exposed.
• Withdraw a filled magazine from the ammuni-tion pocket.
• Press the magazine release button and removethe magazine from the pistol. If using the righthand, press the magazine release button withthe thumb. If using the left hand, press themagazine release button with the index finger.
• Insert the filled magazine into the magazinewell, seating it with the heel of the hand.
• Stow the partially-filled magazine (e.g., insidethe cartridge belt, in the cargo pocket).
• Grasp the pistol grip and remove the pistol fromits secured location, keeping the trigger fingerstraight and off the trigger until ready to fire.
Remedial Action
Remedial action requires investigating the causeof the stoppage, clearing the stoppage, andreturning the pistol to operation. When perform-ing remedial action, seek cover if the tactical situ-ation permits. Once a pistol ceases to fire, theMarine must visually or physically observe thepistol to identify the problem before it can be
Figure 8-5. One-Handed Dry Reload: Prone Position.

z
I
*4h#-a A
Pistol Marksmanship 8-5
cleared. The steps taken to clear the pistol arebased on what is observed:
• Remove the finger from the trigger and place itstraight along the receiver.
• Lock the slide to the rear. To pull and lock theslide to the rear, push up on the slide stop andmaintain pressure with the right thumb. (Pushup on the slide stop with the left index finger ifremedial action is being performed with theweak hand.)
• Secure the rear sight on the top of the cartridgebelt or any other surface that provides the resis-tance needed to stabilize the pistol. See figure8-6. While applying pressure on the pistol tokeep the rear sight secured, push downward onthe pistol in one continuous motion to lock theslide to the rear.
Note: Ensure the pistol does not move to safewhen locking the slide to the rear.
• Place the pistol in a position to observe thechamber.
• Correct the stoppage.
If there is a round in the magazine but not in thechamber, release the slide and observe a roundbeing chambered. If you do not observe a roundbeing chambered, tap, rack, and bang to performremedial action:
Ian• Keep muzzle pointed in a safe direction and
place trigger finger straight along the receiver.• Strike the bottom of the magazine against a
hard surface to ensure it is seated. In the kneel-ing position, strike the magazine against thethigh (see fig. 8-7 on page 8-6). In the standingposition, bring the right knee up while strikingmagazine against the right thigh (see fig. 8-8on page 8-6). In the prone position, strike the Figure 8-6. One-Handed Remedial Action.magazine against the deck.
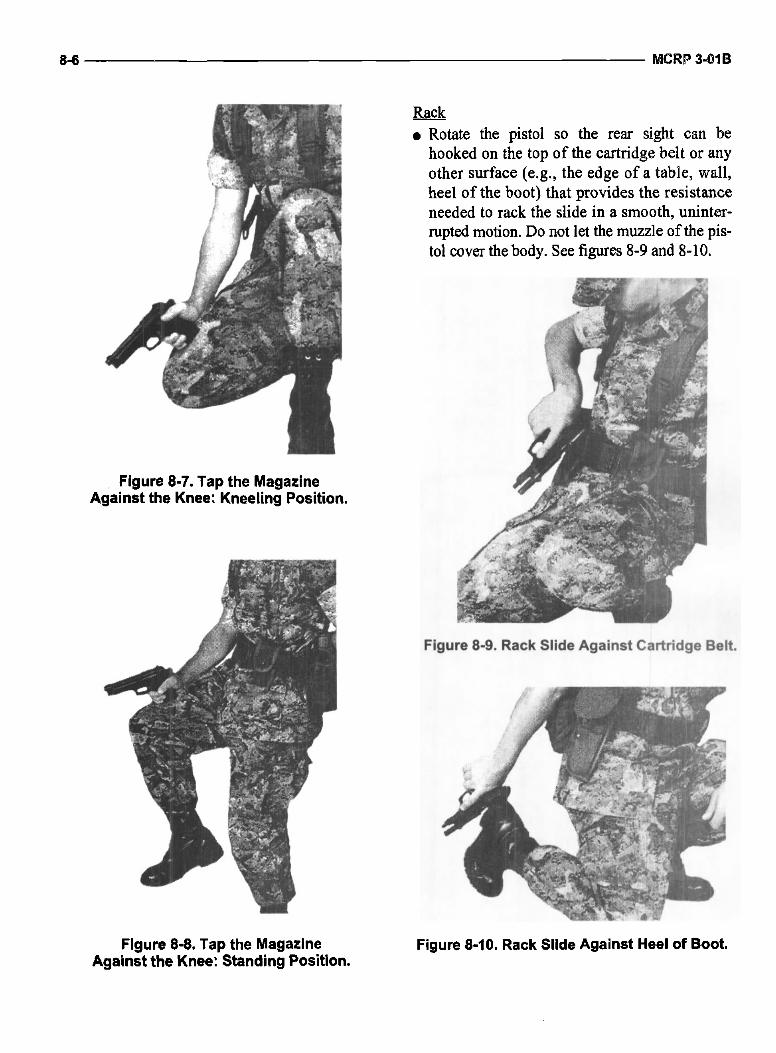
I
IAt
Figure 8-9. Rack Slide Against Cartridge Belt.
8-6 MCRP3-OIB
Rack
• Rotate the pistol so the rear sight can behooked on the top of the cartridge belt or anyother surface (e.g., the edge of a table, wall,heel of the boot) that provides the resistanceneeded to rack the slide in a smooth, uninter-rupted motion. Do not let the muzzle of the pis-tol cover the body. See figures 8-9 and 8-10.
Figure 8-7. Tap the MagazineAgainst the Knee: Kneeling Position.
Figure 8-8. Tap the Magazine Figure 8-10. Rack Slide Against Heel of Boot.Against the Knee: Standing Position.
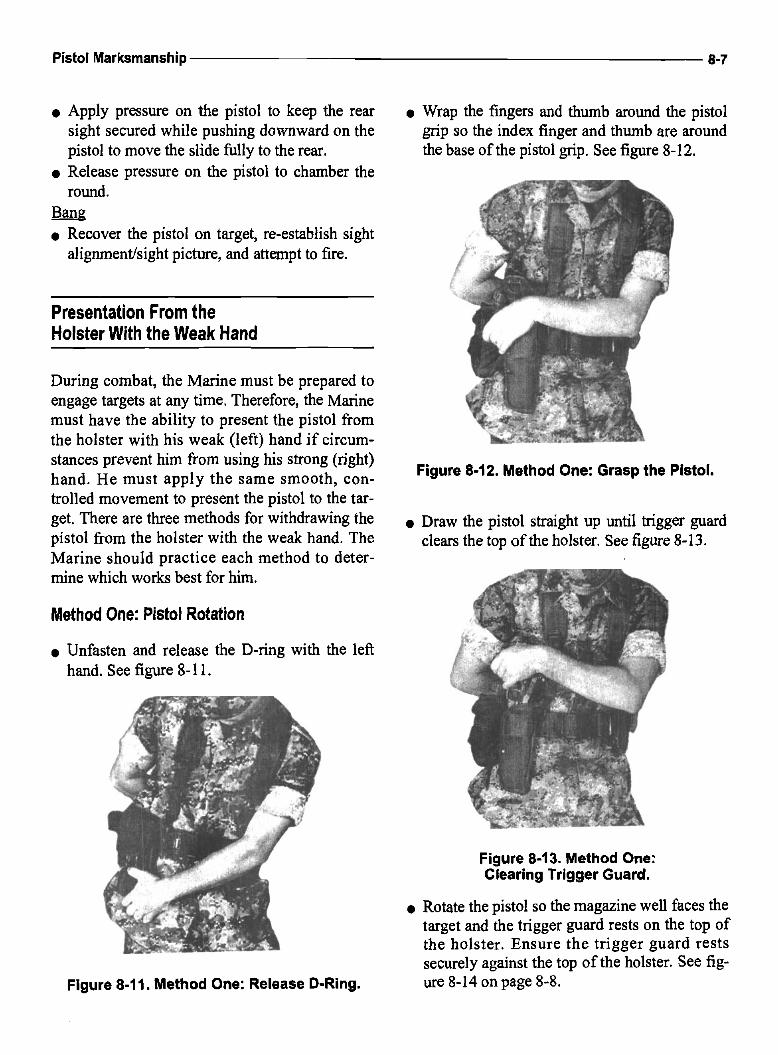
'I e.4 a.'.
Pistol Marksmanship 8-7
• Apply pressure on the pistol to keep the rear • Wrap the fmgers and thumb around the pistolsight secured while pushing downward on the grip so the index finger and thumb are aroundpistol to move the slide fully to the rear, the base of the pistol grip. See figure 8-12.
• Release pressure on the pistol to chamber theround.
Bang• Recover the pistol on target, re-establish sight
alignment/sight picture, and attempt to fire.
Presentation From theHolster With the Weak Hand
During combat, the Marine must be prepared toengage targets at any time. Therefore, the Marinemust have the ability to present the pistol fromthe holster with his weak (left) hand if circum-stances prevent him from using his strong (right)
Figure 8-12. Method One: Grasp the Pistol.hand. He must apply the same smooth, con-trolled movement to present the pistol to the tar-get. There are three methods for withdrawing the , Draw the pistol straight up until trigger guardpistol from the holster with the weak hand. The clears the top of the holster. See figure 8-13.Marine should practice each method to deter-mine which works best for him.
Method One: Pistol Rotation
• Unfasten and release the D-ring with the lefthand. See figure 8-11.
Figure 8-13. Method One:Clearing Trigger Guard.
• Rotate the pistol so the magazine well faces thetarget and the trigger guard rests on the top ofthe holster. Ensure the trigger guard restssecurely against the top of the holster. See fig-
Figure 8-11. Method One: Release D-Rlng. ure 8-14 on page 8-8.
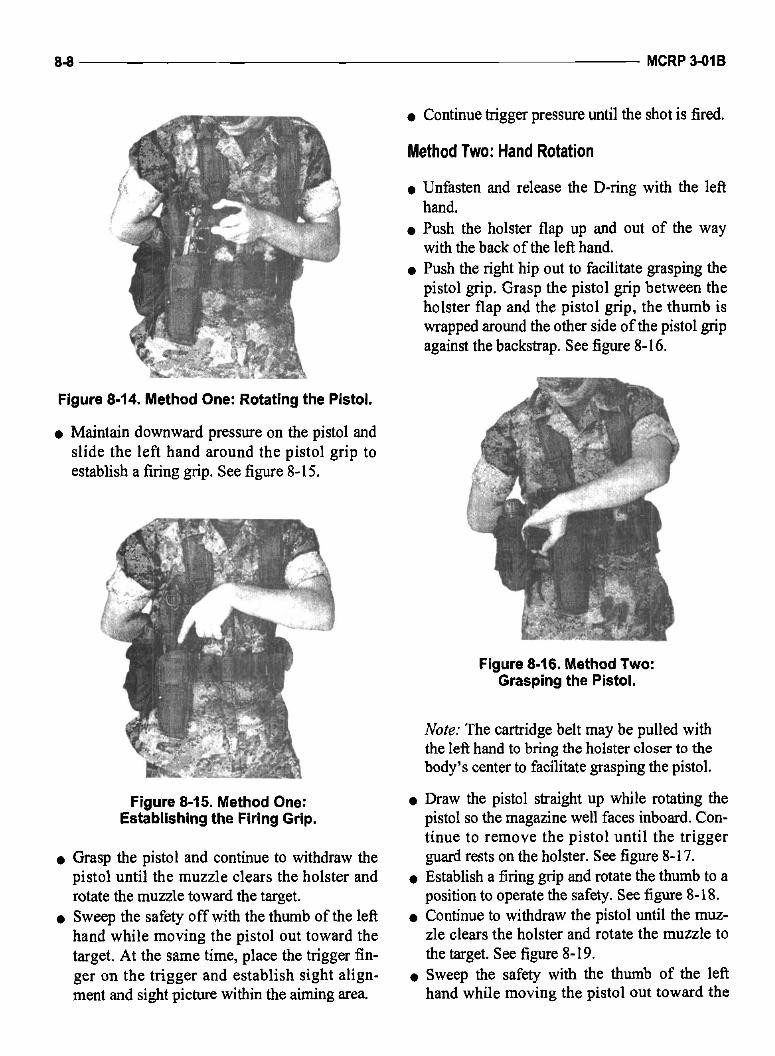
;4p i.
;:2 Jrwr
Figure 8-14. Method One: Rotating the Pistol.
• Maintain downward pressure on the pistol andslide the left hand around the pistol grip toestablish a firing grip. See figure 8-15.
• Continue trigger pressure until the shot is fired.
Method Two: Hand Rotation
• Unfasten and release the D-ring with the lefthand.
• Push the holster flap up and out of the waywith the back of the left hand.
• Push the right hip out to facilitate grasping thepistol grip. Grasp the pistol grip between theholster flap and the pistol grip, the thumb iswrapped around the other side of the pistol gripagainst the backstrap. See figure 8-16.
Figure 8-15. Method One:Establishing the Firing Grip.
• Grasp the pistol and continue to withdraw thepistol until the muzzle clears the holster androtate the muzzle toward the target.
• Sweep the safety off with the thumb of the lefthand while moving the pistol out toward thetarget. At the same time, place the trigger fin-ger on the trigger and establish sight align-ment and sight picture within the aiming area.
Note: The cartridge belt may be pulled withthe left hand to bring the holster closer to thebody's center to facilitate grasping the pistol.
• Draw the pistol straight up while rotating thepistol so the magazine well faces inboard. Con-tinue to remove the pistol until the triggerguard rests on the holster. See figure 8-17.
• Establish a firing grip and rotate the thumb to aposition to operate the safety. See figure 8-18.
• Continue to withdraw the pistol until the muz-zle clears the holster and rotate the muzzle tothe target. See figure 8-19.
• Sweep the safety with the thumb of the lefthand while moving the pistol out toward the
8-8 MCRP3-O1B
Figure 8-16. Method Two:Grasping the Pistol.
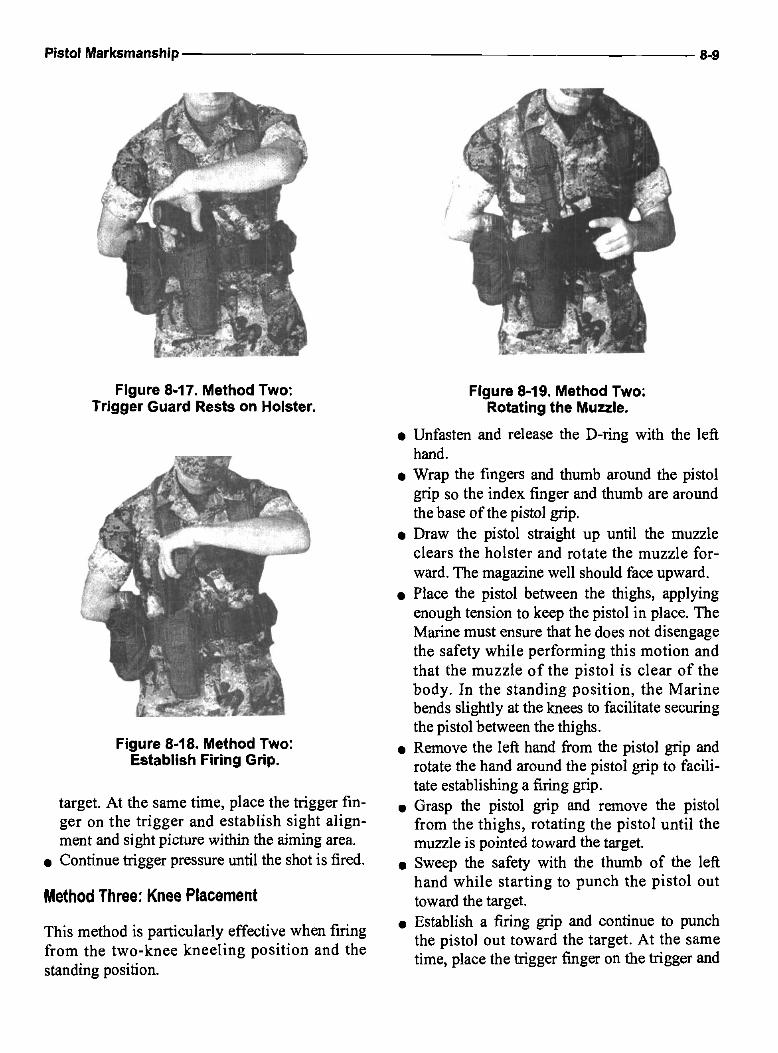
(
A r..
I •
Pistol Marksmanship 8-9
Figure 8-17. Method Two:Trigger Guard Rests on Holster.
Figure 848. Method Two:Establish Firing Grip.
target. At the same time, place the trigger fin-ger on the trigger and establish sight align-ment and sight picture within the aiming area.
• Continue trigger pressure until the shot is fired.
Method Three: Knee Placement
This method is particularly effective when firingfrom the two-knee kneeling position and thestanding position.
Figure 8-19. Method Two:Rotating the Muzzle.
• Unfasten and release the D-ring with the lefthand.
• Wrap the fingers and thumb around the pistolgrip so the index finger and thumb are aroundthe base of the pistol grip.
• Draw the pistol straight up until the muzzleclears the holster and rotate the muzzle for-ward. The magazine well should face upward.
• Place the pistol between the thighs, applyingenough tension to keep the pistol in place. TheMarine must ensure that he does not disengagethe safety while performing this motion andthat the muzzle of the pistol is clear of thebody. In the standing position, the Marinebends slightly at the knees to facilitate securingthe pistol between the thighs.
• Remove the left hand from the pistol grip androtate the hand around the pistol grip to facili-tate establishing a firing grip.
• Grasp the pistol grip and remove the pistolfrom the thighs, rotating the pistol until themuzzle is pointed toward the target.
• Sweep the safety with the thumb of the lefthand while starting to punch the pistol outtoward the target.
• Establish a firing grip and continue to punchthe pistol out toward the target. At the sametime, place the trigger finger on the trigger and

IIN
/\
8.10 MCRP3-OIB
establish sight alignment and sight picturewithin the aiming area.
• Continue trigger pressure until the shot is fifed.
Transferring the PistolFrom One Hand to the Other
Situations may arise in combat where the Marinemust transfer the pistol to the left hand to engagea target because the right hand or arm is injured.To safely transfer the pistol from one hand to theother, perform the following steps:
Note: This procedure is written to transferthe pistol from the right hand to the left hand.
• Point the muzzle in the direction of the targetFigure 8-21. Transferring the Pistol—Step 2.and place the trigger finger straight along the
receiver. See figure 8-20.• Establish a firing grip with the left hand on the
pistol. See figure 8-22.
Figure 8-20. Transferring the Pistol—Step 1.
• Place the web of the left index finger andthumb under the backstrap of the pistol. Seefigure 8-21. Figure 8-22. Transferring the Pistol—Step 3.
• Wrap the fingers of the left hand around thepistol grip while releasing the right hand grip.

CHAPTER 9
ADVANCED TECHNIQUES
Some tactical situations are quite complex aridrequire Marines to apply advanced pistol engage-ment techniques in order to effectively engagethe enemy and survive. The ability of the Mariheto rapidly shoot on the move and to turn and firewill be critical to a successfhl engagement.
Note: The procedures in this chapter are writ-ten for right-handed Marines; left-handedMarines should reverse directions as needed.
Moving: The Glide Technique
To shoot accurately while moving, the Marinecannot run or walk fast. A normal running move-ment produces too much bounce in the Marine'sbody and makes it extremely difficult to use thesights of the pistol or to achieve the needed levelof stability for accurate shooting. Therefore, theproper movement technique is similar to a glideand allows for accurate target engagement:
Shooting on the Move
When moving from one area of cover to another,the Marine may engage a target that presents animmediate threat. In this situation, the Marinerelies on accurate fire to serve as his cover.
Moving With the Pistol
The likelihood of encountering a threat dictateshow the pistol is carried while the Marine is mov-ing. But regardless of the method of carry, thepistol's muzzle is pointed in the same directionthat the head and eyes are looking—the eyes andmuzzle move as one.
When carrying the pistol in the Alert position, thepistol is tucked in close to the body, finger off thetrigger. This position allows the Marine freedomof movement and still allows for a quick presen-tation of the pistol.
If there is a high probability of encountering athreat, the Marine carries the pistol in the Readyposition while moving.
• A lower center of gravity is achieved by keep-ing the knees bent and the upper body erect.
• The bent knees also serve to absorb the shockgenerated by movement.
• The feet are not lifted as high as in a normalwalk or run, allowing obstructions to be kickedout of the way.
• The feet and knees point in the direction oftravel. If there is a need to engage a target off tothe side, the Marine rotates at the waist to movethe upper body in the desired direction. Theupper body shooting position does not change.
The glide is not a technique that can be used for along period of time or for long distances. Rather,the Marine can move in a normal manner until itbecomes necessary to engage a target, he thenslows and assumes the glide.
Engaging Targets: Using the Pistol Sights
When the Marine fires the pistol, he must con-centrate on the pistol's front sight. The adher-ence to the fundamentals of marksmanshipbecomes even more vital when both the Marineand the enemy may be moving.

9-2 MCRP 3-OIB
Continuing to Move
A Marine continues to move no matter what hap-pens. Continuing to move makes it difficult forthe threat to engage the Marine and can be one ofthe Marine's best defensive assets. When mov-ing to cover or to a different position, the Marineshould not stop to engage a target.
Reloading and Stoppages
If a stoppage occurs or a reload is required whilemoving, the Marine's primary consideration is tokeep moving and seek cover. Ideally, reloads andclearing stoppages are performed behind cover.
Turn and Fire
The techniques for turn and fire allow a Marineto engage a target that is not directly in front ofhim. The key to turn and fire is smoothness andquickness of pivoting and presentation of the pis-tol to engage the threat. Turn and fire is based onthe principle that wherever the head goes, thebody follows.
Engaging Targets90 Degrees to the Right and Left
The Marine turns the head toward the threat andidentifies the target. Once the target is identified,the Marine maintains focus on the target for therest of the presentation.
If engaging a target 90 degrees to the right, theMarine turns toward the target by raising the leftfoot while pivoting on the ball of the right foot.The Marine plants the left foot once he is facingthe target squarely. The stance is natural. See fig-ure 9-1. The Marine then engages the target.
Figure 9-1. EngagingTargets 90 Degrees to the Right.

-I
1/I L)*V
. .
4
Pistol Marksmanship 9-3
If engaging a target 90 degrees to the left, theMarine turns toward the target by raising the rightfoot while pivoting on the ball of the left foot.The Marine plants the right foot once he is facingthe target squarely. The stance is natural. See fig-ure 9-2. The Marine then engages the target.
Engaging Targets180 Degrees to the Rear
The Marine turns the head toward the target, look-ing over either the right or left shoulder, and iden-tifies the target. Once the target is identified, theMarine maintains focus on the target for the restof the presentation. See figures 9-3 on page 9-4.
If the Marine pivots to the right to engage the tar-get, pick up the left foot, move it across the rightfoot, while pivoting 180 degrees on the ball of theright foot, plant the left foot, and squarely facethe target in a natural stance. See figure 9-4 onpage 9-4.
If the Marine pivots to the left to engage the tar-get, pick up the right foot, move it across the leftfoot, while pivoting 180 degrees on the ball of theleft foot, plant the left foot, and squarely face thetarget in a natural shooting stance. See figure 9-5on page 9-4.
The Marine then engages the target.
Figure 9-2. EngagIngTargets 90 Degrees to the Left.

MCRP 3-OIB9-4
Right Shoulder Figure 9-4. Engaging Targets180 Degrees to the Rear (Right Shoulder).
Left Shoulder
Figure 9-3. Engaging Figure 9-5. Engaging TargetsTargets 180 Degrees to the Rear. 180 Degrees to the Rear (Left Shoulder).

CHAPTER 10
Low LIGHT AND DARKNESS TECHNIQUES
An effective combat marksman must be preparedto detect and engage targets under a variety ofconditions. Factors such as terrain and opportunityoften dictate that the Marine engage combat tar-gets at night or under low-light conditions.
The fundamentals of marksmanship are employedfor engagement of targets in low light and dark-ness just as they are in daylight. However, theprinciples of night vision and target detectionwhen engaging targets at night must be applied.
this approach is that a Marine is not able to per-form any tasks while acquiring night vision intotal darkness.
The second method is to remain in a darkened areaunder a low intensity red light (similar to the lightin a photographer's darkroom) for about 20 min-utes, followed by about 10 minutes in darknesswithout the red light. This method producesalmost complete night vision &laptation while per-mitting the performance of some tasks during theadjustment period.
Combat Mindset Night Vision Maintenance
In the stress of the combat environment, Marinesmust eliminate any hesitation, fear, or uncertaintyof action and focus on the actions to fire well-aimed shots. This is important during low lightand darkness when attention is more easilydiverted because the sense of vision is reduced.This may create a shock of awareness as theMarine relies more heavily on his other senses.Every noise, movement, and muzzle blast appearsintensified at night. The physical acts of shootingmust become second nature to the Marine, so hisfocus will not be diverted from firing well-aimedshots. This is accomplished through mental pre-paredness and training until shooting actionsbecome instinctive.
Because the eyes take a long time to adjust todarkness, it is important to protect night visiononce it is acquired. To maintain night vision, theMarine avoids looking at any bright light andshields the eyes from parachute flares, spotlights,or headlights. When using a flashlight to read amap or other material—
• Put one hand over the glass to limit the areailluminated and the intensity of the light.
• Keep one eye shut to reduce the amount ofnight vision lost.
• Cover the light with a red filter to help reducethe loss of night vision.
Night Vision Adaptation and Maintenance
Night Vision Adaptation
There are two methods for acquiring night vision.
The first method is to remain in an area of dark-ness for about 30 minutes. This area can beindoors or outdoors. The major disadvantage of
Target Detection Techniques
Once the Marine has acquired night vision, he isprepared to locate targets. Some of the daylightobservation techniques, such as searching for tar-get indicators, also apply at night or in low light.But night observation techniques must allow forthe limitations of night vision and the need toprotect it.

Path ofscan
Areascanned
10-2 MCRP3-01B
Off-Center Vision
Because of the placement of the cones in the cen-ter of the retina and the rods around the edges, theangle at which the Marine observes an object atnight affects how well it is seen. Off-centervision is the technique of keeping the attentionfocused on an object without looking directly atit. To maximize the use of the eye's rods that pro-vide night vision—
• Never look directly at the object being observed.• Look slightly to the left, right, above, or below
the object.
Each Marine must experiment and practice thistechnique to find the best off-center angle. Typi-cally, the best off-center angle is 6 to 10 degreesaway from the object or about a fist's width atarm's length. See figure 10-1.
ScanninglFigure Eight Scan
Scanning is the use of off-center vision toobserve an area or object and involves slowlymoving the eyes in a series of separate move-ments across the objective area. See figure 10-2.To execute a figure eight scan, move the eyes in afigure eight pattern in short, abrupt, irregularmovements over and around the area. Once a tar-get indicator has been detected, focus should beconcentrated in that area, but not directly at it. Itis more effective to scan from a prone position or
Direct vision Oft-Center vision
a position closer to the ground than the objectbeing observed, creating a silhouetted view of theobject. When scanning an area, look and listenfor the same target indicators as in daylight:movement, sound (which seems louder at nightthan during daylight), and improper camouflage.Also, objects in bright moonlight/starlight castshadows just as in sunlight.
Effects of Illumination
Both ambient (natural) light and artificial illumi-nation can affect a Marine's perception of the tar-get's distance and size and his night vision. Thefollowing situations produce less of an effect atthe close ranges that pistol engagements occur, butthey still affect target detection and engagement:
• Light behind or between the Marine and thetarget illuminates the front of the target andmakes it appear closer than it actually is.
• Light beyond the target displays the target insilhouette and makes it appear farther awaythan it actually is.
• The introduction of light requires the eyes tomake a sudden, drastic adjusiment to the amountof light received, causing a temporary blindingeffect that occurs when night vision is inter-mpted abruptly. Ambient light can also have the
Figure 10-1. Off-Center Vision. Figure 10-2. Figure Eight Scan.
Pistol Marksmanship 10-3
same blinding effect; e.g., when a bright moonsuddenly appears from behind clouds.
Acquiring Targets at Night
The Marine must keep both eyes open to getmaximum visual coverage of the target area.Keeping both eyes open also improves depth per-ception and peripheral vision.
Sight Alignment/Sight Picture
Straight/Tubular
The straight/tubular flashlight is the most com-mon. The body of the flashlight is a straightltubu-lar shape with the lens at the head of the flashlight.The on/off mechanism is located along the body orat the base of the flashlight.
L-Shaped
The L-shaped flashlight has a straight/tubularbody, with the head/lens of the flashlight posi-tioned at a 90-degree angle to the body of theflashlight, The on/off mechanism is located alongthe body or at the base of the flashlight.
Sight alignment and sight picture are obtained thesame way in darkness as in daylight. There isnormally enough ambient light to perceiveobjects as far away as 50 meters, especially ifthey are moving. However, when pistol sights areplaced on a dark background, such as a camou-flaged target, the Marine may not be able toacquire and align the sights clearly. Instead, theMarine may have to rely almost entirely on hispresentation, firing position, and grip to get thepistol on target. To check for sight alignment oracquire the sights:
• Move the pistol just off the edge of the targetto an area that provides a good contrast.
• Acquire sight alignment.• Bring the sights back on line with the target
while applying pressure to the trigger so theshot breaks once the sights are on target.
Activation Devices
Depending on the type of flashlight, there areseveral ways that it can be activated.
On/Off Button
On/off buttons are located either along the bodyof the flashlight or at the base. On/off buttons areoperated in a number of ways, depending on theflashlight.
On/Off Switch
On/off switches are mounted on the body of theflashlight. This switch has three settings thatallow the flashlight to be either on, off, or inmanual mode. In the manual mode, the flashlightis turned on by pressing and holding the buttonlocated next to the on/off switch.
Flashlights
A flashlight can be used in low light and darknessto identify and illuminate targets. It is also usedto acquire sight picture.
Types of Flashlights
There are a variety of flashlights used throughoutthe Marine Corps. They come in many differentshapes and sizes; however, they are either straightltubular or L-shaped.
Rotating Head
Rotating the head of the flashlight, either clock-wise or counterclockwise, turns the flashlight on.Continuing this motion allows the width andintensity of the beam to be adjusted.
Types of Lenses
Clear Lenses
Clear lenses are used primarily for target detec-tion and to illuminate the pistol sights. They arethe most commonly used lens.

10-4 I MCRP3-OIB
Colored Lenses
Colored lenses include red, amber, and blue.These lenses are used primarily for map readingand signaling, but can be used to illuminate thçpistol's sights.
Target Detection
When a target is illuminated, the front sight maybecome silhouetted against the target, providingthe sight picture needed to engage the target. Dur-ing target detection, the Marine's focus should betwofold: to scan the area to identify possible tar-gets and to assess the area to formulate a plan forengagement or cover (e.g., identifying the quick-est route to cover, determining the best methodfor engagement based on terrain).
Searches
The Marine executes a hasty search immediatelyupon entering a new area in order to identify athreat that poses immediate danger. To execute ahasty search—
• Quickly scan the area with the flashlight takingnote of obvious points throughout the area thatcould cover or conceal the enemy. Whereverthe eyes move, the flashlight should move.
• Aim the flashlight beam on the ground about 8to 10 feet in front of the Marine's location, thisallows the eyes to follow the beam and quicklyestablishes a reference point for the light. Aim-ing the beam at the outer edge of the searcharea strains the eyes to find the beam anddecreases the field of view.
The Marine executes a detailed search after thehasty search. A detailed search focuses on targetindicators identified during the hasty search. Toconduct the detailed search—
• Focus the most direct or intense portion of theflashlight beam on the target indicators.
• Move the beam of light slowly across the targetindicator from right to left or left to right. Wher-ever the eyes move, the flashlight should move.
Considerations
During night operations, the Marine should use aflashlight whenever possible. A flashlight not onlyhelps the Marine locate targets at night, but thebeam can be aimed directly at the target once it isdetected and temporarily blinds the target. Thisgives the Marine the advantage to react before thetarget does. However, the Marine must considerthe following:
• Anytime a flashlight is on, the location may berevealed to the enemy. The Marine shouldkeep the flashlight pointed out in front of hisbody to help avoid illuminating himself andrevealing his position.
• Light shined directly from in front of theMarine at the target obscures the Marine.
• Light shined from the side of the Marine at thetarget illuminates the Marine.
• Light can bounce off surfaces and reflect backonto larger areas that the light is not focusedon. Therefore, whenever a Marine shines aflashlight onto a surface, some of the light mayreflect back and illuminate the Marine.
• When positioned at the outside corner of aroom, building, or other cover, the Marineshould avoid pointing the flashlight beamdirectly at the corner because the beam reflectsoff the corner and illuminates the Marine. Toprevent this, the head of the flashlight shouldextend just beyond the corner.
• Many flashlights have adjustable beams that aidin target detection. The beam's intensity mustbe adjusted to provide the best illumination ofthe area depending on the distance between theMarine and the area of observation.
• Diffused light from a wide beam creates asofter light and illuminates a greater area, butthe beam does not travel a great distance. Awide beam is best for observing larger areas atclose range.
• Concentrated light from a narrow beam illumi-nates a smaller field of view, but the beamtravels a greater distance. A concentrated beamis effective for observing a specific area or anarea that is further away. Concentrated light

Pistol Marksmanship 10-5
blinds the enemy and prevents him from focus-ing on the Marine or determining his location.
• When searching an area, the Marine can alterthe position where he is holding his flashlightso that the beam is perceived as coming fromvarious locations. For example, the Marine canturn the flashlight on from a standing position,quickly search for targets, turn the flashlightoff, assume a kneeling position, and searchagain. This keeps the enemy from obtaining anexact location of the Marine's position.
• Keep both eyes open to get maximum visualcoverage of the target area. Keeping both eyesopen also improves depth perception andperipheral vision.
Target Engagement
Once a target is detected using a flashlight, theflashlight can be used to acquire sight picture andfacilitate engagement of the target. The funda-mentals of marksmanship are employed forengagement of targets in darkness just as they arein daylight. However, the Marine must apply theprinciples of night vision and target detection andmust be able to employ a flashlight properlywhen engaging targets at night.
Grip
To engage a target accurately while using a flash-light, the flashlight must be held to maintain thepistol's stability, control, and recoil during fir-ing. Normally, the left hand (two-handed grip)provides the pistol's stability and ability to man-age recoil. However, when firing with a flash-light, the left hand holds and operates theflashlight. Therefore, some stability, control, andmanagement of recoil is lost.
Securing the Flashlight
Most flashlights come equipped with a retainingloop located at the base for ease of transportation.To position the cord properly:
• Feed one end of the cord through the retainingloop of the flashlight and tie the ends of thecord together.
• Slip the left hand through the cord loop. Theloop should be just big enough so that, if theflashlight needs to be dropped, it can beretained on the wrist.
• Rotate the flashlight until the cord is twisted tothe desired tension and length necessary to beststabilize the rear end of the flashlight in thehand.
• Grasp the flashlight with the left hand in a posi-tion that allows it to be operated easily.
If the flashlight has a retaining loop, attaching acord to the loop helps support and stabilize theflashlight when the Marine must fire the pistolwith the flashlight in his left hand. The cord alsohelps retain the flashlight.
Acquiring Sight Alignment/Sight Picture
When holding a flashlight on a target, the tenden-cy is to look at the target rather than the sights.Sight alignment is still necessary for effective tar-get engagement. Using a flashlight to illuminate atarget allows the Marine to—
• Acquire sight picture by silhouetting the sightsagainst the target.o The Marine establishes sight picture by fo-
cusing the sights in the soft, diffused lightarea of the target.
o At close ranges, colored lenses produceenough light on the target to silhouette thesights; at long ranges, colored lenses will notprovide enough light off the target to illumi-nate the pistol sights. The Marine must beable to see the target by some other means,(e.g., contrast, moonlight).
• Acquire sight picture by illuminating the sights.o A colored lens can be held directly over the
sights to shine light on the top of the pistol toilluminate the sights. This allows sight align-ment to be established without revealing theMarine to the enemy. This method can alsobe used with a clear lens to make a precisionshot at long ranges but the Marine risks be-ing illuminated by the light.
o A colored lens can be shined from directly be-hind the pistol sights to illuminate them. This

41
4
allows sight alignment to be established, butreveals the Marine's position to the enemy.
Target Engagement Techniques
Two-Handed Grip Technique. This technique istypically used with a straight/tubular flashlight.The pistol and flashlight must be side by side andlevel so the Marine can engage a target withoutmaking adjustments to the pistol or the flash-light. This technique is also effective for firingmultiple shots because the flashlight and pistolrecoil as a unit.
Whenever possible, the flashlight is just in frontof the muzzle of the pistol so that it does not illu-minate the pistol. Placement of the flashlightalongside the pistol may need to be adjusteddepending on the size of the flashlight or thelocation of the on/off mechanism.
This technique is most often used with an Isosce-les position (see fig. 10-3):
• Grasp the flashlight with the left hand, lenspointing down range.
• Wrap the thumb and index finger of the lefthand around the body of the flashlight, thumbresting on the on/off switch to allow easy oper-ation of the on/off switch without disruptingthe grip on the flashlight.
• Extend both aims toward the target and bringthe flashlight alongside the pistol so the fingersof the left and right hands touch.
• Wrap the bottom three fingers of the left handaround the fingers of the right hand, incorpo-rating the flashlight into a two-handed grip.
• Apply isometric pressure against both hands toaid in stabilizing the pistol.
This technique can also be incorporated into aWeaver position; the more the left hand wrapsaround the right, the more the body can be angledand the left elbow bent. Apply push-pull pressureon the grip to stabilize the pistol. See figure 10-4.
Cross-Hand Technique. The cross-hand techniqueis used primarily with a Weaver position and can
Front
Figure 10-3. Two-Handed Grip TechniqueWith Flashlight (Side and Front View).
be used with either a straight/tubular flashlight oran L-shaped flashlight (see fig. 10-5):
• Grasp the flashlight with the left hand, fingerswrapped around the top of the flashlight andthumb wrapped around the bottom.
10-6 MCRP3-OIB
Side

Pistol Marksmanship 10-7
Figure 10-4. Two-Handed Grip TechniqueWith Flashlight (Weaver Position).
• Place the thumb on the on/off button whilemaintaining a firm grip on the flashlight.
• Extend both arms toward the target and bringthe left hand under the pistol so that the backof the left hand is resting firmly against theback of the right hand.
• Apply isometric pressure against both hands toaid in stabilizing the pistol.
• Extended the right ann fully and bend the leftarm at the elbow.
Considerations for the Canyf Transport
When searching an area for targets, the Marinemoves with the pistol at the carry or transportdictated by the threat level.
The Ready. If enemy contact is expected (contactimminent), the Marine carries the pistol at theReady and carries the flashlight in his left handand incorporates it into his firing grip. In theReady, the Marine can search for targets andreadily present the pistol and flashlight to the tar-get for engagement without making adjustments
Figure 10-5. FlashlightCross-Hand Technique.
to either the grip or the flashlight. See figure 10-6on page 10-8.
The Alert. If enemy contact is likely, the Marinecarries the pistol at the Alert and the flashlight inhis left hand and incorporates it into his firinggrip. The Marine must ensure the flashlight is notpointed at the deck because it illuminates theMarine. If necessary, the head of the flashlightmay have to be tilted up to elevate the beam toincrease the field of view. If the flashlight hasbeen tilted, it has to be lowered so it is level withthe pistol muzzle and the light shines directly onthe target in order to establish sight picture. Seefigure 10-7 on page 10-8.
Holster Transport. If there is no immediatethreat, the pistol is holstered and the Marine car-ries the flashlight with his left hand to search fortargets. Should a target present itself, the Marinepresents the pistol from the holster and engagesthe target. Time and distance to the target dictatewhether the Marine incorporates the flashlightand his left hand into the firing grip.

10.8 MCRP3-OIB
Cross-Hand Two-Handed Grip
Figure 10-6. Flashlight Ready Carry (Cross-Hand and Two-Hand Grip).
Two-Handed Grip Cross-Hand
Figure 10-7. Flashlight Alert Carry (Two-Handed Grip and Cross-Hand).
U.$. GOVERNMENT PRINTING OFFICE:2004-302-6571901 20