Embed Size (px)
Citation preview

MCRP 3-01A
Rifle Marksmanship
U.S. Marine Corps
PCN 144 000091 00
To Our Readers
Changes: Readers of this publication are encouraged to submit suggestions and changes thatwill improve it. Recommendations may be sent directly to Commanding General, MarineCorps Combat Development Command, Doctrine Division (C 42), 3300 Russell Road, Suite318A, Quantico, VA 22134-5021 or by fax to 703-784-2917 (DSN 278-2917) or by E-mail [email protected]. Recommendations should include the following information:
l Location of changePublication number and titleCurrent page numberParagraph number (if applicable)Line numberFigure or table number (if applicable)
l Nature of changeAdd, deleteProposed new text, preferably double-spaced and typewritten
l Justification and/or source of change
Additional copies: A printed copy of this publication may be obtained from Marine CorpsLogistics Base, Albany, GA 31704-5001, by following the instructions in MCBul 5600,Marine Corps Doctrinal Publications Status. An electronic copy may be obtained from theDoctrine Division, MCCDC, world wide web home page which is found at the following uni-versal reference locator: http://www.doctrine.usmc.mil.
Unless otherwise stated, whenever the masculine gender is used, both men and women are included.
DEPARTMENT OF THE NAVYHeadquarters United States Marine Corps
Washington, D.C. 20380-1775
29 March 2001
FOREWORD
1. PURPOSE
Marine Corps Reference Publication (MCRP) 3-01A, Rifle Marksmanship, provides techniquesand procedures for Marine Corps rifle marksmanship.
2. SCOPE
Every Marine is first and foremost a rifleman. MCRP 3-01A reflects this ethos and the MarineCorps’ warfighting philosophy. This publication discusses the individual skills required foreffective rifle marksmanship and standardizes the techniques and procedures used throughout theMarine Corps. It constitutes the doctrinal basis for all entry-level and sustainment-level riflemarksmanship training.
3. SUPERSESSION
MCRP 3-01A supersedes the discussion of rifle marksmanship in Fleet Marine Force Manual(FMFM) 0-8, Basic Marksmanship, and FMFM 0-9, Field Firing for the M16A2 Rifle. Thediscussion of pistol marksmanship in FMFM 0-8 remains in effect until it is superseded byMCRP 3-01B, Pistol Marksmanship, which is currently under development.
4. CERTIFICATION
Reviewed and approved this date.
BY DIRECTION OF THE COMMANDANT OF THE MARINE CORPS
B. B. KNUTSON, JR.Lieutenant General, U. S. Marine Corps
Commanding GeneralMarine Corps Combat Development Command
Quantico, Virginia
DISTRIBUTION: 144 000091 00

1-2MCWP 2-12. MAGTF Intelligence Analysis and Production
Table of Contents
Chapter 1. Introduction to Rifle Marksmanship
1001 Role of the Marine Rifleman . . . . . . . . . . . . . . . . . . . . . . . . . . . . . . . . . . . . . 1-1
1002 Conditions Affecting Marksmanship in Combat . . . . . . . . . . . . . . . . . . . . . . 1-1
1003 Combat Mindset . . . . . . . . . . . . . . . . . . . . . . . . . . . . . . . . . . . . . . . . . . . . . . . 1-1Physical Preparation . . . . . . . . . . . . . . . . . . . . . . . . . . . . . . . . . . . . . . . . . 1-2Mental Preparation. . . . . . . . . . . . . . . . . . . . . . . . . . . . . . . . . . . . . . . . . . . 1-2
Chapter 2. Introduction to the M16A2 Service Rifle
2001 Description . . . . . . . . . . . . . . . . . . . . . . . . . . . . . . . . . . . . . . . . . . . . . . . . . . . 2-1
2002 Operational Controls . . . . . . . . . . . . . . . . . . . . . . . . . . . . . . . . . . . . . . . . . . . 2-1Selector Lever . . . . . . . . . . . . . . . . . . . . . . . . . . . . . . . . . . . . . . . . . . . . . . 2-1Magazine Release Button . . . . . . . . . . . . . . . . . . . . . . . . . . . . . . . . . . . . . 2-2Charging Handle . . . . . . . . . . . . . . . . . . . . . . . . . . . . . . . . . . . . . . . . . . . . 2-2Bolt Catch . . . . . . . . . . . . . . . . . . . . . . . . . . . . . . . . . . . . . . . . . . . . . . . . . 2-3
2003 Cycle of Operation . . . . . . . . . . . . . . . . . . . . . . . . . . . . . . . . . . . . . . . . . . . . . 2-3Firing . . . . . . . . . . . . . . . . . . . . . . . . . . . . . . . . . . . . . . . . . . . . . . . . . . . . . 2-3Unlocking . . . . . . . . . . . . . . . . . . . . . . . . . . . . . . . . . . . . . . . . . . . . . . . . . 2-3Extracting. . . . . . . . . . . . . . . . . . . . . . . . . . . . . . . . . . . . . . . . . . . . . . . . . . 2-4Ejecting . . . . . . . . . . . . . . . . . . . . . . . . . . . . . . . . . . . . . . . . . . . . . . . . . . . 2-4Cocking . . . . . . . . . . . . . . . . . . . . . . . . . . . . . . . . . . . . . . . . . . . . . . . . . . . 2-4Feeding . . . . . . . . . . . . . . . . . . . . . . . . . . . . . . . . . . . . . . . . . . . . . . . . . . . 2-5Chambering . . . . . . . . . . . . . . . . . . . . . . . . . . . . . . . . . . . . . . . . . . . . . . . . 2-5Locking . . . . . . . . . . . . . . . . . . . . . . . . . . . . . . . . . . . . . . . . . . . . . . . . . . . 2-5
2004 Ammunition . . . . . . . . . . . . . . . . . . . . . . . . . . . . . . . . . . . . . . . . . . . . . . . . . . 2-5M193 Ball . . . . . . . . . . . . . . . . . . . . . . . . . . . . . . . . . . . . . . . . . . . . . . . . . 2-6M855 Ball . . . . . . . . . . . . . . . . . . . . . . . . . . . . . . . . . . . . . . . . . . . . . . . . . 2-6M196 and M856 Tracer . . . . . . . . . . . . . . . . . . . . . . . . . . . . . . . . . . . . . . . 2-6M199 Dummy . . . . . . . . . . . . . . . . . . . . . . . . . . . . . . . . . . . . . . . . . . . . . . 2-6M200 Blank . . . . . . . . . . . . . . . . . . . . . . . . . . . . . . . . . . . . . . . . . . . . . . . . 2-6
2005 Preventive Maintenance. . . . . . . . . . . . . . . . . . . . . . . . . . . . . . . . . . . . . . . . . 2-6Main Group Disassembly . . . . . . . . . . . . . . . . . . . . . . . . . . . . . . . . . . . . . 2-6Magazine Disassembly . . . . . . . . . . . . . . . . . . . . . . . . . . . . . . . . . . . . . . . 2-7Cleaning. . . . . . . . . . . . . . . . . . . . . . . . . . . . . . . . . . . . . . . . . . . . . . . . . . . 2-8Inspection. . . . . . . . . . . . . . . . . . . . . . . . . . . . . . . . . . . . . . . . . . . . . . . . . . 2-9Lubrication. . . . . . . . . . . . . . . . . . . . . . . . . . . . . . . . . . . . . . . . . . . . . . . . . 2-9Reassembly . . . . . . . . . . . . . . . . . . . . . . . . . . . . . . . . . . . . . . . . . . . . . . . . 2-9
2006 Function Check . . . . . . . . . . . . . . . . . . . . . . . . . . . . . . . . . . . . . . . . . . . . . . 2-10
2007 User Serviceability Inspection . . . . . . . . . . . . . . . . . . . . . . . . . . . . . . . . . . . 2-10
iv ________________________________________________________________________________________________ MCRP 3-01A
2008 Field Maintenance . . . . . . . . . . . . . . . . . . . . . . . . . . . . . . . . . . . . . . . . . . . . 2-11
2009 Cleaning the Rifle in Various Conditions . . . . . . . . . . . . . . . . . . . . . . . . . . 2-11Hot, Wet Tropical . . . . . . . . . . . . . . . . . . . . . . . . . . . . . . . . . . . . . . . . . . 2-11Hot, Dry Desert . . . . . . . . . . . . . . . . . . . . . . . . . . . . . . . . . . . . . . . . . . . . 2-11Arctic or Low Temperature . . . . . . . . . . . . . . . . . . . . . . . . . . . . . . . . . . . 2-11Heavy Rain and Fording . . . . . . . . . . . . . . . . . . . . . . . . . . . . . . . . . . . . . 2-11
Chapter 3. Weapons Handling
3001 Safety Rules . . . . . . . . . . . . . . . . . . . . . . . . . . . . . . . . . . . . . . . . . . . . . . . . . . 3-1
3002 Weapons Condition . . . . . . . . . . . . . . . . . . . . . . . . . . . . . . . . . . . . . . . . . . . . 3-1
3003 Determining a Weapon’s Condition (Chamber Check) . . . . . . . . . . . . . . . . . 3-1
3004 Weapons Commands . . . . . . . . . . . . . . . . . . . . . . . . . . . . . . . . . . . . . . . . . . . 3-2Loading the Rifle . . . . . . . . . . . . . . . . . . . . . . . . . . . . . . . . . . . . . . . . . . . . 3-3Making the Rifle Ready . . . . . . . . . . . . . . . . . . . . . . . . . . . . . . . . . . . . . . . 3-3Fire . . . . . . . . . . . . . . . . . . . . . . . . . . . . . . . . . . . . . . . . . . . . . . . . . . . . . . . 3-3Cease-Fire . . . . . . . . . . . . . . . . . . . . . . . . . . . . . . . . . . . . . . . . . . . . . . . . . 3-3Unloading the Rifle . . . . . . . . . . . . . . . . . . . . . . . . . . . . . . . . . . . . . . . . . . 3-3Unloading and Showing the Rifle Clear . . . . . . . . . . . . . . . . . . . . . . . . . . 3-4
3005 Filling, Stowing, and Withdrawing Magazines . . . . . . . . . . . . . . . . . . . . . . . 3-5Filling the Magazine with Loose Rounds . . . . . . . . . . . . . . . . . . . . . . . . . 3-5Filling the Magazine Using a 10-round
Stripper Clip and Magazine Filler . . . . . . . . . . . . . . . . . . . . . . . . . . . . . 3-5Stowing Magazines . . . . . . . . . . . . . . . . . . . . . . . . . . . . . . . . . . . . . . . . . . 3-5Withdrawing Magazines . . . . . . . . . . . . . . . . . . . . . . . . . . . . . . . . . . . . . . 3-6
3006 Reloading the Rifle. . . . . . . . . . . . . . . . . . . . . . . . . . . . . . . . . . . . . . . . . . . . . 3-6Principles of Reloading . . . . . . . . . . . . . . . . . . . . . . . . . . . . . . . . . . . . . . . 3-6Condition 1 Reload . . . . . . . . . . . . . . . . . . . . . . . . . . . . . . . . . . . . . . . . . . 3-7Dry Reload . . . . . . . . . . . . . . . . . . . . . . . . . . . . . . . . . . . . . . . . . . . . . . . . . 3-7
3007 Remedial Action. . . . . . . . . . . . . . . . . . . . . . . . . . . . . . . . . . . . . . . . . . . . . . . 3-7Observe for Indicators . . . . . . . . . . . . . . . . . . . . . . . . . . . . . . . . . . . . . . . . 3-7Audible Pop or Reduced Recoil . . . . . . . . . . . . . . . . . . . . . . . . . . . . . . . . . 3-8
3008 Weapons Carries. . . . . . . . . . . . . . . . . . . . . . . . . . . . . . . . . . . . . . . . . . . . . . . 3-8Tactical Carry. . . . . . . . . . . . . . . . . . . . . . . . . . . . . . . . . . . . . . . . . . . . . . . 3-8Alert Carry . . . . . . . . . . . . . . . . . . . . . . . . . . . . . . . . . . . . . . . . . . . . . . . . . 3-9Ready Carry . . . . . . . . . . . . . . . . . . . . . . . . . . . . . . . . . . . . . . . . . . . . . . . . 3-9
3009 Weapons Transports . . . . . . . . . . . . . . . . . . . . . . . . . . . . . . . . . . . . . . . . . . . 3-10Strong Side Sling Arms Transport (Muzzle Up) . . . . . . . . . . . . . . . . . . . 3-10
Rifle Marksmanship__________________________________________________________________________________________ v
Weak Side Sling Arms Transport (Muzzle Down) . . . . . . . . . . . . . . . . . 3-10Cross Body Sling Arms Transport. . . . . . . . . . . . . . . . . . . . . . . . . . . . . . 3-10
3010 Transferring the Rifle. . . . . . . . . . . . . . . . . . . . . . . . . . . . . . . . . . . . . . . . . . 3-11Show Clear Transfer . . . . . . . . . . . . . . . . . . . . . . . . . . . . . . . . . . . . . . . . 3-11Condition Unknown Transfer . . . . . . . . . . . . . . . . . . . . . . . . . . . . . . . . . 3-11
3011 Clearing Barrel Procedures . . . . . . . . . . . . . . . . . . . . . . . . . . . . . . . . . . . . . 3-11Purpose of a Clearing Barrel . . . . . . . . . . . . . . . . . . . . . . . . . . . . . . . . . . 3-11Procedures for “Load” . . . . . . . . . . . . . . . . . . . . . . . . . . . . . . . . . . . . . . . 3-12Procedures for “Make Ready” . . . . . . . . . . . . . . . . . . . . . . . . . . . . . . . . . 3-12Procedures for “Unload” . . . . . . . . . . . . . . . . . . . . . . . . . . . . . . . . . . . . . 3-12Procedures for “Unload and Show Clear” . . . . . . . . . . . . . . . . . . . . . . . . 3-12
Chapter 4. Fundamentals of Marksmanship4001 Aiming . . . . . . . . . . . . . . . . . . . . . . . . . . . . . . . . . . . . . . . . . . . . . . . . . . . . . . 4-1
Sight Alignment. . . . . . . . . . . . . . . . . . . . . . . . . . . . . . . . . . . . . . . . . . . . . 4-1Sight Picture. . . . . . . . . . . . . . . . . . . . . . . . . . . . . . . . . . . . . . . . . . . . . . . . 4-1Importance of Correct Sight Alignment . . . . . . . . . . . . . . . . . . . . . . . . . . 4-2Factors Affecting Sight Alignment and Sight Picture . . . . . . . . . . . . . . . . 4-2Acquiring and Maintaining Sight Alignment and Sight Picture . . . . . . . . 4-4Size and Distance to the Target . . . . . . . . . . . . . . . . . . . . . . . . . . . . . . . . . 4-4
4002 Breath Control . . . . . . . . . . . . . . . . . . . . . . . . . . . . . . . . . . . . . . . . . . . . . . . . 4-5Breath Control During Long-range or Precision Fire (Slow Fire) . . . . . . 4-5Breath Control During All Other Combat Situations . . . . . . . . . . . . . . . . 4-5
4003 Trigger Control . . . . . . . . . . . . . . . . . . . . . . . . . . . . . . . . . . . . . . . . . . . . . . . 4-6Grip . . . . . . . . . . . . . . . . . . . . . . . . . . . . . . . . . . . . . . . . . . . . . . . . . . . . . . 4-6Trigger Finger Placement . . . . . . . . . . . . . . . . . . . . . . . . . . . . . . . . . . . . . 4-6Types of Trigger Control . . . . . . . . . . . . . . . . . . . . . . . . . . . . . . . . . . . . . . 4-6Resetting the Trigger . . . . . . . . . . . . . . . . . . . . . . . . . . . . . . . . . . . . . . . . . 4-6
4004 Follow-Through/Recovery. . . . . . . . . . . . . . . . . . . . . . . . . . . . . . . . . . . . . . . 4-7Follow-Through. . . . . . . . . . . . . . . . . . . . . . . . . . . . . . . . . . . . . . . . . . . . . 4-7Recovery . . . . . . . . . . . . . . . . . . . . . . . . . . . . . . . . . . . . . . . . . . . . . . . . . . 4-7
Chapter 5. Rifle Firing Positions
5001 Selecting a Firing Position . . . . . . . . . . . . . . . . . . . . . . . . . . . . . . . . . . . . . . . 5-1Stability . . . . . . . . . . . . . . . . . . . . . . . . . . . . . . . . . . . . . . . . . . . . . . . . . . . 5-1Mobility . . . . . . . . . . . . . . . . . . . . . . . . . . . . . . . . . . . . . . . . . . . . . . . . . . . 5-1Observation of the Enemy . . . . . . . . . . . . . . . . . . . . . . . . . . . . . . . . . . . . . 5-1
5002 Types and Uses of the Rifle Web Sling . . . . . . . . . . . . . . . . . . . . . . . . . . . . . 5-1Hasty Sling. . . . . . . . . . . . . . . . . . . . . . . . . . . . . . . . . . . . . . . . . . . . . . . . . 5-2Loop Sling . . . . . . . . . . . . . . . . . . . . . . . . . . . . . . . . . . . . . . . . . . . . . . . . . 5-3
5003 Factors Common to All Shooting Positions. . . . . . . . . . . . . . . . . . . . . . . . . . 5-4Left Hand . . . . . . . . . . . . . . . . . . . . . . . . . . . . . . . . . . . . . . . . . . . . . . . . . . 5-4Rifle Butt in the Pocket of the Shoulder . . . . . . . . . . . . . . . . . . . . . . . . . . 5-5
vi ________________________________________________________________________________________________ MCRP 3-01A
Grip of the Right Hand. . . . . . . . . . . . . . . . . . . . . . . . . . . . . . . . . . . . . . . . 5-6Right Elbow . . . . . . . . . . . . . . . . . . . . . . . . . . . . . . . . . . . . . . . . . . . . . . . . 5-6Stock Weld. . . . . . . . . . . . . . . . . . . . . . . . . . . . . . . . . . . . . . . . . . . . . . . . . 5-6Breathing . . . . . . . . . . . . . . . . . . . . . . . . . . . . . . . . . . . . . . . . . . . . . . . . . . 5-6Muscular Tension/Relaxation . . . . . . . . . . . . . . . . . . . . . . . . . . . . . . . . . . 5-6
5004 Elements of a Good Shooting Position. . . . . . . . . . . . . . . . . . . . . . . . . . . . . . 5-7Bone Support . . . . . . . . . . . . . . . . . . . . . . . . . . . . . . . . . . . . . . . . . . . . . . . 5-7Muscular Relaxation . . . . . . . . . . . . . . . . . . . . . . . . . . . . . . . . . . . . . . . . . 5-7Natural Point of Aim . . . . . . . . . . . . . . . . . . . . . . . . . . . . . . . . . . . . . . . . . 5-7
5005 Prone Position. . . . . . . . . . . . . . . . . . . . . . . . . . . . . . . . . . . . . . . . . . . . . . . . . 5-8Application. . . . . . . . . . . . . . . . . . . . . . . . . . . . . . . . . . . . . . . . . . . . . . . . . 5-8Assuming the Prone Position . . . . . . . . . . . . . . . . . . . . . . . . . . . . . . . . . . . 5-8Straight Leg Prone Position with the Hasty Sling . . . . . . . . . . . . . . . . . . . 5-9Straight Leg Prone Position with the Loop Sling . . . . . . . . . . . . . . . . . . 5-10Cocked Leg Prone Position with the Hasty Sling . . . . . . . . . . . . . . . . . . 5-11Cocked Leg Prone Position with the Loop Sling . . . . . . . . . . . . . . . . . . . 5-11
5006 Sitting Position . . . . . . . . . . . . . . . . . . . . . . . . . . . . . . . . . . . . . . . . . . . . . . . 5-12Crossed Ankle Sitting Position with the Hasty Sling . . . . . . . . . . . . . . . 5-12Crossed Ankle Sitting Position with the Loop Sling . . . . . . . . . . . . . . . . 5-13Crossed Leg Sitting Position with the Hasty Sling . . . . . . . . . . . . . . . . . 5-13Crossed Leg Sitting Position with the Loop Sling . . . . . . . . . . . . . . . . . . 5-14Open Leg Sitting Position with the Hasty Sling . . . . . . . . . . . . . . . . . . . 5-14Open Leg Sitting Position with the Loop Sling . . . . . . . . . . . . . . . . . . . . 5-15
5007 Kneeling Position . . . . . . . . . . . . . . . . . . . . . . . . . . . . . . . . . . . . . . . . . . . . . 5-15Description . . . . . . . . . . . . . . . . . . . . . . . . . . . . . . . . . . . . . . . . . . . . . . . . 5-15Assuming the Kneeling Position . . . . . . . . . . . . . . . . . . . . . . . . . . . . . . . 5-15High Kneeling Position with the Hasty Sling . . . . . . . . . . . . . . . . . . . . . 5-16High Kneeling Position with the Loop Sling . . . . . . . . . . . . . . . . . . . . . . 5-17Medium Kneeling Position . . . . . . . . . . . . . . . . . . . . . . . . . . . . . . . . . . . 5-17Low Kneeling Position. . . . . . . . . . . . . . . . . . . . . . . . . . . . . . . . . . . . . . . 5-18
5008 Standing Position . . . . . . . . . . . . . . . . . . . . . . . . . . . . . . . . . . . . . . . . . . . . . 5-18Description . . . . . . . . . . . . . . . . . . . . . . . . . . . . . . . . . . . . . . . . . . . . . . . . 5-18Standing Position with the Hasty Sling . . . . . . . . . . . . . . . . . . . . . . . . . . 5-18Standing Position with the Parade Sling . . . . . . . . . . . . . . . . . . . . . . . . . 5-19
Chapter 6. Use of Cover and Concealment
6001 Cover and Concealment . . . . . . . . . . . . . . . . . . . . . . . . . . . . . . . . . . . . . . . . . 6-1Types of Cover. . . . . . . . . . . . . . . . . . . . . . . . . . . . . . . . . . . . . . . . . . . . . . 6-1Common Cover Materials . . . . . . . . . . . . . . . . . . . . . . . . . . . . . . . . . . . . . 6-1Firing From Specific Types of Cover . . . . . . . . . . . . . . . . . . . . . . . . . . . . 6-2
6002 Supported Firing Positions . . . . . . . . . . . . . . . . . . . . . . . . . . . . . . . . . . . . . . . 6-4Considerations Using Cover and Concealment . . . . . . . . . . . . . . . . . . . . . 6-4Seven Factors . . . . . . . . . . . . . . . . . . . . . . . . . . . . . . . . . . . . . . . . . . . . . . . 6-6Types of Supported Positions . . . . . . . . . . . . . . . . . . . . . . . . . . . . . . . . . . 6-8

Rifle Marksmanship________________________________________________________________________________________ vii
6003 Searching for and Engaging Targets From Behind Cover . . . . . . . . . . . . . . 6-10Pie Technique . . . . . . . . . . . . . . . . . . . . . . . . . . . . . . . . . . . . . . . . . . . . . 6-10Rollout Technique . . . . . . . . . . . . . . . . . . . . . . . . . . . . . . . . . . . . . . . . . . 6-10Combining Techniques . . . . . . . . . . . . . . . . . . . . . . . . . . . . . . . . . . . . . . 6-10
6004 Moving Out From Behind Cover . . . . . . . . . . . . . . . . . . . . . . . . . . . . . . . . . 6-11
Chapter 7. Rifle Presentation
7001 Presentation of the Rifle. . . . . . . . . . . . . . . . . . . . . . . . . . . . . . . . . . . . . . . . . 7-1Presenting the Rifle From the Tactical Carry . . . . . . . . . . . . . . . . . . . . . . 7-1Presenting the Rifle From the Alert Carry and From the Ready Carry . . . 7-1Presenting the Rifle From the Strong Side Sling Arms Transport . . . . . . 7-2Presenting the Rifle From the Weak Side Sling Arms Transport . . . . . . . 7-3
7002 Search and Assess . . . . . . . . . . . . . . . . . . . . . . . . . . . . . . . . . . . . . . . . . . . . . 7-4Purpose . . . . . . . . . . . . . . . . . . . . . . . . . . . . . . . . . . . . . . . . . . . . . . . . . . . 7-4Technique . . . . . . . . . . . . . . . . . . . . . . . . . . . . . . . . . . . . . . . . . . . . . . . . . 7-4Searching and Assessing to a Higher Profile. . . . . . . . . . . . . . . . . . . . . . . 7-4
Chapter 8. Effects of Weather
8001 Physical Effects of Wind on the Bullet . . . . . . . . . . . . . . . . . . . . . . . . . . . . . 8-1Physical Effects . . . . . . . . . . . . . . . . . . . . . . . . . . . . . . . . . . . . . . . . . . . . . 8-1Determining Windage Adjustments to Offset Wind Effects . . . . . . . . . . . 8-1
8002 Physical Effects of Temperature andPrecipitation on the Bullet and the Rifle . . . . . . . . . . . . . . . . . . . . . . . . . . . . 8-2
Temperature . . . . . . . . . . . . . . . . . . . . . . . . . . . . . . . . . . . . . . . . . . . . . . . . 8-2Precipitation. . . . . . . . . . . . . . . . . . . . . . . . . . . . . . . . . . . . . . . . . . . . . . . . 8-4
8003 Physical and Psychological Effects of Weather on Marines . . . . . . . . . . . . . 8-4Wind . . . . . . . . . . . . . . . . . . . . . . . . . . . . . . . . . . . . . . . . . . . . . . . . . . . . . 8-4Temperature . . . . . . . . . . . . . . . . . . . . . . . . . . . . . . . . . . . . . . . . . . . . . . . . 8-4Precipitation. . . . . . . . . . . . . . . . . . . . . . . . . . . . . . . . . . . . . . . . . . . . . . . . 8-4Light. . . . . . . . . . . . . . . . . . . . . . . . . . . . . . . . . . . . . . . . . . . . . . . . . . . . . . 8-5
Chapter 9. Zeroing
9001 Elements of Zeroing. . . . . . . . . . . . . . . . . . . . . . . . . . . . . . . . . . . . . . . . . . . . 9-1Line of Sight . . . . . . . . . . . . . . . . . . . . . . . . . . . . . . . . . . . . . . . . . . . . . . . 9-1Aiming Point . . . . . . . . . . . . . . . . . . . . . . . . . . . . . . . . . . . . . . . . . . . . . . . 9-1Centerline of Bore . . . . . . . . . . . . . . . . . . . . . . . . . . . . . . . . . . . . . . . . . . . 9-1Trajectory. . . . . . . . . . . . . . . . . . . . . . . . . . . . . . . . . . . . . . . . . . . . . . . . . . 9-1Range . . . . . . . . . . . . . . . . . . . . . . . . . . . . . . . . . . . . . . . . . . . . . . . . . . . . . 9-2
9002 Types of Zeros . . . . . . . . . . . . . . . . . . . . . . . . . . . . . . . . . . . . . . . . . . . . . . . . 9-2Battlesight Zero (BZO) . . . . . . . . . . . . . . . . . . . . . . . . . . . . . . . . . . . . . . . 9-2Zero . . . . . . . . . . . . . . . . . . . . . . . . . . . . . . . . . . . . . . . . . . . . . . . . . . . . . . 9-2True Zero . . . . . . . . . . . . . . . . . . . . . . . . . . . . . . . . . . . . . . . . . . . . . . . . . . 9-2

viii _______________________________________________________________________________________________ MCRP 3-01A
9003 M16A2 Sighting System . . . . . . . . . . . . . . . . . . . . . . . . . . . . . . . . . . . . . . . . 9-2Front Sight . . . . . . . . . . . . . . . . . . . . . . . . . . . . . . . . . . . . . . . . . . . . . . . . . 9-2Rear Sight. . . . . . . . . . . . . . . . . . . . . . . . . . . . . . . . . . . . . . . . . . . . . . . . . . 9-2
9004 Windage and Elevation Rules . . . . . . . . . . . . . . . . . . . . . . . . . . . . . . . . . . . . 9-3Front Sight Elevation Rule. . . . . . . . . . . . . . . . . . . . . . . . . . . . . . . . . . . . . 9-3Rear Sight Elevation Rule . . . . . . . . . . . . . . . . . . . . . . . . . . . . . . . . . . . . . 9-4Windage Rule. . . . . . . . . . . . . . . . . . . . . . . . . . . . . . . . . . . . . . . . . . . . . . . 9-4
9005 Initial Sight Settings . . . . . . . . . . . . . . . . . . . . . . . . . . . . . . . . . . . . . . . . . . . . 9-4Front Sight Post . . . . . . . . . . . . . . . . . . . . . . . . . . . . . . . . . . . . . . . . . . . . . 9-4Rear Sight Elevation Knob . . . . . . . . . . . . . . . . . . . . . . . . . . . . . . . . . . . . 9-4Windage Knob . . . . . . . . . . . . . . . . . . . . . . . . . . . . . . . . . . . . . . . . . . . . . . 9-4
9006 Zeroing Process . . . . . . . . . . . . . . . . . . . . . . . . . . . . . . . . . . . . . . . . . . . . . . . 9-4
9007 Battlesight Zero . . . . . . . . . . . . . . . . . . . . . . . . . . . . . . . . . . . . . . . . . . . . . . . 9-5
9008 Factors Causing a BZO to be Reconfirmed . . . . . . . . . . . . . . . . . . . . . . . . . . 9-6Maintenance . . . . . . . . . . . . . . . . . . . . . . . . . . . . . . . . . . . . . . . . . . . . . . . . 9-6Temperature . . . . . . . . . . . . . . . . . . . . . . . . . . . . . . . . . . . . . . . . . . . . . . . . 9-6Climate . . . . . . . . . . . . . . . . . . . . . . . . . . . . . . . . . . . . . . . . . . . . . . . . . . . . 9-6Ammunition . . . . . . . . . . . . . . . . . . . . . . . . . . . . . . . . . . . . . . . . . . . . . . . . 9-6Ground Elevation . . . . . . . . . . . . . . . . . . . . . . . . . . . . . . . . . . . . . . . . . . . . 9-6Uniform . . . . . . . . . . . . . . . . . . . . . . . . . . . . . . . . . . . . . . . . . . . . . . . . . . . 9-6
9009 Factors Affecting the Accuracy of a BZO . . . . . . . . . . . . . . . . . . . . . . . . . . . 9-7
Chapter 10. Engagement Techniques
10001 Target Detection . . . . . . . . . . . . . . . . . . . . . . . . . . . . . . . . . . . . . . . . . . . . . . 10-1Target Indicators . . . . . . . . . . . . . . . . . . . . . . . . . . . . . . . . . . . . . . . . . . . 10-1Identifying Target Location . . . . . . . . . . . . . . . . . . . . . . . . . . . . . . . . . . . 10-2Maintaining Observation . . . . . . . . . . . . . . . . . . . . . . . . . . . . . . . . . . . . . 10-3Remembering Target Location . . . . . . . . . . . . . . . . . . . . . . . . . . . . . . . . 10-3
10002 Range Estimation . . . . . . . . . . . . . . . . . . . . . . . . . . . . . . . . . . . . . . . . . . . . . 10-3Range Estimation Methods . . . . . . . . . . . . . . . . . . . . . . . . . . . . . . . . . . . 10-3Factors Affecting Range Estimation . . . . . . . . . . . . . . . . . . . . . . . . . . . . 10-4
10003 Offset Aiming. . . . . . . . . . . . . . . . . . . . . . . . . . . . . . . . . . . . . . . . . . . . . . . . 10-5Point of Aim Technique. . . . . . . . . . . . . . . . . . . . . . . . . . . . . . . . . . . . . . 10-5Known Strike of the Round . . . . . . . . . . . . . . . . . . . . . . . . . . . . . . . . . . . 10-6
10004 Techniques of Fire . . . . . . . . . . . . . . . . . . . . . . . . . . . . . . . . . . . . . . . . . . . . 10-7Two-Shot Technique . . . . . . . . . . . . . . . . . . . . . . . . . . . . . . . . . . . . . . . . 10-7Single Shot Technique . . . . . . . . . . . . . . . . . . . . . . . . . . . . . . . . . . . . . . . 10-7Sustained Rate of Fire . . . . . . . . . . . . . . . . . . . . . . . . . . . . . . . . . . . . . . . 10-7Three-Round Burst Technique. . . . . . . . . . . . . . . . . . . . . . . . . . . . . . . . . 10-7
10005 Engaging Immediate Threat Targets . . . . . . . . . . . . . . . . . . . . . . . . . . . . . . 10-7

Rifle Marksmanship_________________________________________________________________________________________ ix
10006 Engaging Multiple Targets. . . . . . . . . . . . . . . . . . . . . . . . . . . . . . . . . . . . . . 10-7Prioritizing Targets . . . . . . . . . . . . . . . . . . . . . . . . . . . . . . . . . . . . . . . . . 10-8Technique of Engagement . . . . . . . . . . . . . . . . . . . . . . . . . . . . . . . . . . . . 10-8Firing Position . . . . . . . . . . . . . . . . . . . . . . . . . . . . . . . . . . . . . . . . . . . . . 10-8
10007 Engaging Moving Targets . . . . . . . . . . . . . . . . . . . . . . . . . . . . . . . . . . . . . . 10-8Types of Moving Targets. . . . . . . . . . . . . . . . . . . . . . . . . . . . . . . . . . . . . 10-9Leads . . . . . . . . . . . . . . . . . . . . . . . . . . . . . . . . . . . . . . . . . . . . . . . . . . . . 10-9Engagement Methods . . . . . . . . . . . . . . . . . . . . . . . . . . . . . . . . . . . . . . 10-10Marksmanship Fundamentals . . . . . . . . . . . . . . . . . . . . . . . . . . . . . . . . 10-11
10008 Engaging Targets at Unknown Distances . . . . . . . . . . . . . . . . . . . . . . . . . 10-11Hasty Sight Setting . . . . . . . . . . . . . . . . . . . . . . . . . . . . . . . . . . . . . . . . 10-11Point of Aim Technique. . . . . . . . . . . . . . . . . . . . . . . . . . . . . . . . . . . . . 10-12
10009 Engaging Targets During Low Light and Darkness . . . . . . . . . . . . . . . . . 10-12Night Vision. . . . . . . . . . . . . . . . . . . . . . . . . . . . . . . . . . . . . . . . . . . . . . 10-12Searching Methods . . . . . . . . . . . . . . . . . . . . . . . . . . . . . . . . . . . . . . . . 10-12Types of Illumination . . . . . . . . . . . . . . . . . . . . . . . . . . . . . . . . . . . . . . 10-13Effects of Illumination. . . . . . . . . . . . . . . . . . . . . . . . . . . . . . . . . . . . . . 10-14
10010 Engaging Targets while Wearing the Field Protective Mask . . . . . . . . . . 10-14Marksmanship Fundamentals . . . . . . . . . . . . . . . . . . . . . . . . . . . . . . . . 10-14Firing Position . . . . . . . . . . . . . . . . . . . . . . . . . . . . . . . . . . . . . . . . . . . . 10-14
AppendicesA Data Book . . . . . . . . . . . . . . . . . . . . . . . . . . . . . . . . . . . . . . . . . . . . . . . . . . .A-1
Data Book . . . . . . . . . . . . . . . . . . . . . . . . . . . . . . . . . . . . . . . . . . . . . . . . .A-1Recording Data Before Firing . . . . . . . . . . . . . . . . . . . . . . . . . . . . . . . . . .A-1Recording Data During Firing . . . . . . . . . . . . . . . . . . . . . . . . . . . . . . . . . .A-2Recording Data After Firing . . . . . . . . . . . . . . . . . . . . . . . . . . . . . . . . . . .A-5
B Glossary . . . . . . . . . . . . . . . . . . . . . . . . . . . . . . . . . . . . . . . . . . . . . . . . . . . . . B-1

CHAPTER 1. INTRODUCTION TO RIFLE MARKSMANSHIP
All Marines share a common warfighting belief: “Every Marine a rifleman.” Thissimple credo reinforces the belief that all Marines are forged from a commonexperience, share a common set of values, and are trained as members of anexpeditionary force in readiness. As such, there are no “rear area” Marines, and noone is very far from the fighting during expeditionary operations. The Marinerifleman of the next conflict will be as in past conflicts: among the first to confrontthe enemy and the last to hang his weapon in the rack after the conflict is won.
1001. ROLE OF THE MARINE RIFLEMAN
Marine Corps forces are employed across the entirerange of military operations. At one end is war, whichis characterized by large-scale, sustained combat oper-ations. At the other end of the scale are those actionsreferred to as military operations other than war(MOOTW). MOOTW focuses on deterring aggres-sion, resolving conflict, promoting peace, and support-ing civil authorities. These operations can occurbefore, during, and after combat operations. Trainingand preparation for MOOTW should not detract fromthe Corps’ primary mission of training Marines tofight and win in combat. MOOTW normally does notinvolve combat. However, Marines always need to beprepared to protect themselves and respond to chang-ing threats and unexpected situations. Whenever thesituation warrants the application of deadly force, theMarine rifleman must be able to deliver well aimedshots to eliminate the threat. Sometimes the need for awell aimed shot may even be heightened by the pres-ence of noncombatants in close proximity to the target.The proficient rifleman handles this challenge withoutunnecessarily escalating the level of violence or caus-ing unnecessary collateral damage. The Marine rifle-man must have the versatility, flexibility, and skills todeal with a situation at any level of intensity across theentire range of military operations.
To be combat ready, the Marine must be skilled in thetechniques and procedures of rifle marksmanship andtake proper care of his rifle. Even when equipped withthe best rifle in the world, a unit with poorly trained ri-flemen cannot be depended upon to accomplish theirmission. Usually, poorly trained riflemen either fail tofire their weapon or they waste ammunition by firingineffectively. To send Marines into harm’s way with-out thorough training in the use of their individualweapons carries undue risks for every Marine in theunit. On the other hand, well trained riflemen can de-liver accurate fire against the enemy under the most
adverse conditions. A well trained rifleman is not onlyconfident that he can help his unit accomplish it’s mis-sion, he is confident that he can protect his fellowMarines and himself.
1002. CONDITIONS AFFECTING MARKSMANSHIP IN COMBAT
Many factors affect the application of marksmanshipin combat; among them are—
l Most targets are linear in nature and will consist ofa number of men or objects irregularly spaced alongcovered or concealed areas.
l Most targets can be detected by smoke, flash, dust,noise or movement, but will only be visible for abrief moment before taking cover.
l The nature of the target, irregularities of terrain andvegetation will often require a rifleman to use aposition other than prone in order to fire effectivelyon the target.
l The time in which a target can be engaged is oftenfleeting.
1003. COMBAT MINDSET
In a combat environment, the Marine must be con-stantly prepared for possible target engagement. Whena target presents itself in combat, there may be very lit-tle time to take action. A Marine must be able to en-gage the target quickly and accurately. The uniquedemands of combat (i.e., stress, uncertainty) dictatethat the Marine be both physically and mentally pre-pared to engage enemy targets. It will not be enough tosimply know marksmanship techniques and proce-dures. The Marine must develop the mental discipline
1-2 _______________________________________________________________________________________________ MCRP 3-01A
to prepare for enemy contact. In the confusion, noise,and stress of the combat environment, the Marine musthave the ability to eliminate any hesitation, fear or un-certainty of action and to focus on the actions requiredto fire well-aimed shots. This is accomplished throughestablishment of a combat mindset. The key factors inthe development of a combat mindset include bothphysical and mental preparation.
Physical Preparation
In combat, targets can present themselves withoutwarning. Therefore, it is essential for the Marine tomaintain proper balance and control of his weapon atall times so he can quickly assume a firing position,present the weapon, and accurately engage the target.However, speed alone does not equate to effective tar-get engagement. The Marine should fire only as fast ashe can fire accurately, never exceeding his physicalability to apply the fundamentals of marksmanship. Tobe effective in combat, the Marine must train to per-fect the physical skills of shooting so those skills be-come second nature. Mastery of physical skills allowthe Marine to concentrate on the mental aspects of tar-get engagement; e.g., scanning for targets, detection oftargets, selection and use of cover. The more physicalskills that a Marine can perform automatically, themore concentration he can give to the mental side oftarget engagement.
Mental Preparation
While combat is unpredictable and constantly chang-ing, the Marine can prepare himself mentally for con-frontation with the enemy. The stress of battle,
coupled with the often limited time available to en-gage targets, requires concentration on the mental as-pects of target engagement; e.g., scanning for targets,detection of targets, and the selection and use of cover.
Knowledge of the Combat EnvironmentThe Marine must be constantly aware of the sur-roundings to include the terrain, available cover, pos-sible areas of enemy contact, backdrop of the target,etc. This awareness will enable the Marine to selectand assume a firing position and to quickly and accu-rately engage targets.
Plan of ActionIn combat, the situation will dictate the action to betaken. The Marine must understand the situation, iden-tify and evaluate possible courses of action, and thendevelop a plan for target engagement that accomplish-es the mission.
ConfidenceThe Marine must believe in his ability to engage tar-gets accurately in any combat situation. A Marine’slevel of confidence is rooted in the belief that futurechallenges will be overcome—particularly the chal-lenge of firing well aimed shots in a combat environ-ment where the enemy may be returning fire. A keyfactor in a Marine’s level of confidence is the degreeto which he has mastered the techniques and proce-dures of the rifle marksmanship. Mastery of riflemarksmanship can only be obtained by quality instruc-tion. Quality instruction is the foundation for practicalapplication of the marksmanship fundamentals duringrange and field firing.
CHAPTER 2. INTRODUCTION TO THE M16A2 SERVICE RIFLE
Note+The procedures in this manual are writtenfor right-handed Marines; left-handedMarines should reverse instructions asnecessary.
2001. DESCRIPTION
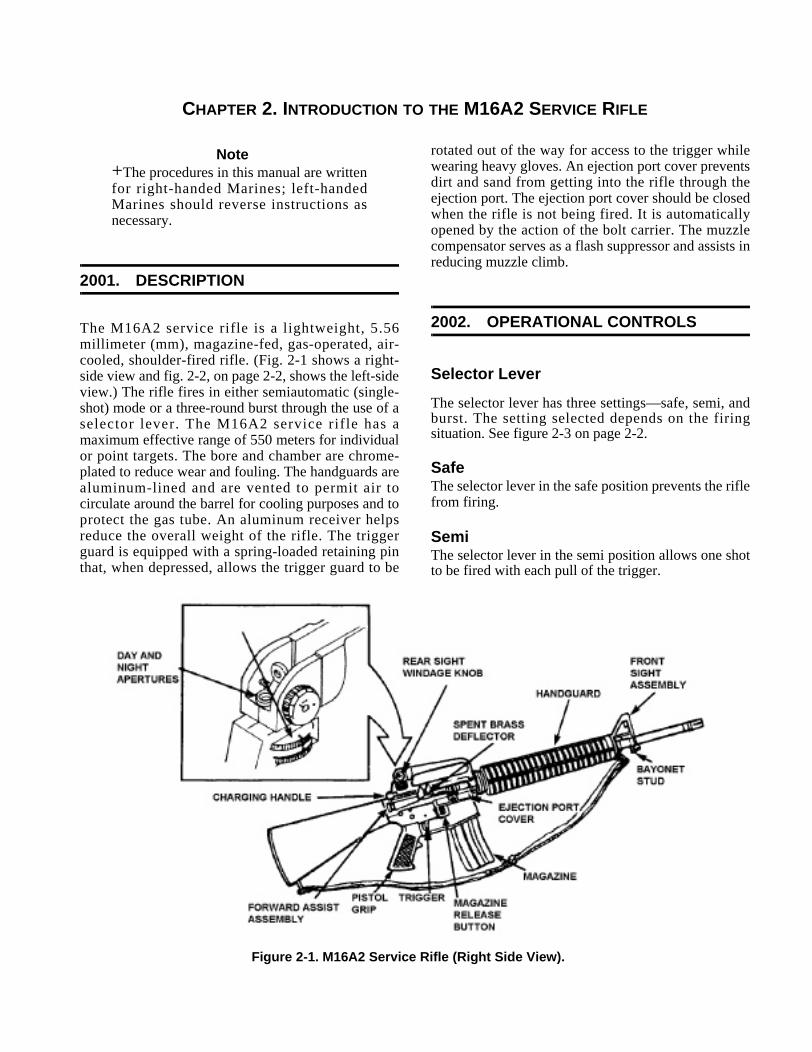
The M16A2 service rifle is a lightweight, 5.56millimeter (mm), magazine-fed, gas-operated, air-cooled, shoulder-fired rifle. (Fig. 2-1 shows a right-side view and fig. 2-2, on page 2-2, shows the left-sideview.) The rifle fires in either semiautomatic (single-shot) mode or a three-round burst through the use of aselector lever. The M16A2 service rifle has amaximum effective range of 550 meters for individualor point targets. The bore and chamber are chrome-plated to reduce wear and fouling. The handguards arealuminum-lined and are vented to permit air tocirculate around the barrel for cooling purposes and toprotect the gas tube. An aluminum receiver helpsreduce the overall weight of the rifle. The triggerguard is equipped with a spring-loaded retaining pinthat, when depressed, allows the trigger guard to be
rotated out of the way for access to the trigger whilewearing heavy gloves. An ejection port cover preventsdirt and sand from getting into the rifle through theejection port. The ejection port cover should be closedwhen the rifle is not being fired. It is automaticallyopened by the action of the bolt carrier. The muzzlecompensator serves as a flash suppressor and assists inreducing muzzle climb.
2002. OPERATIONAL CONTROLS
Selector Lever
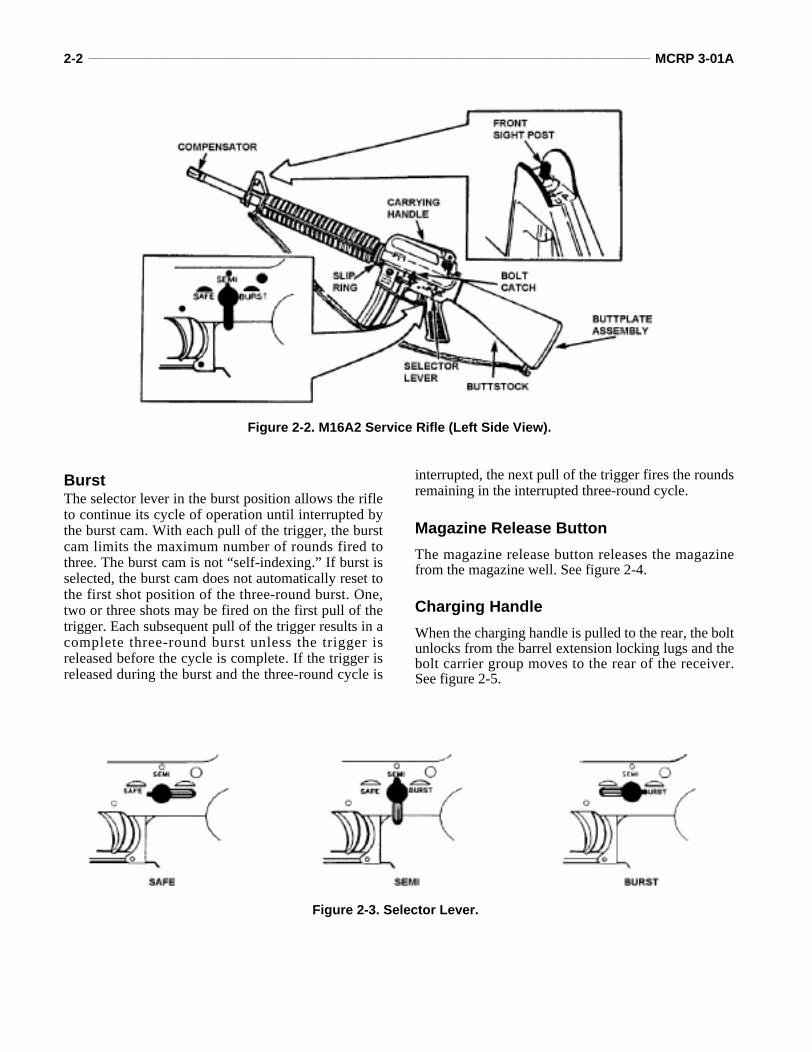
The selector lever has three settings—safe, semi, andburst. The setting selected depends on the firingsituation. See figure 2-3 on page 2-2.
SafeThe selector lever in the safe position prevents the riflefrom firing.
SemiThe selector lever in the semi position allows one shotto be fired with each pull of the trigger.
Figure 2-1. M16A2 Service Rifle (Right Side View).
2-2 _______________________________________________________________________________________________ MCRP 3-01A
BurstThe selector lever in the burst position allows the rifleto continue its cycle of operation until interrupted bythe burst cam. With each pull of the trigger, the burstcam limits the maximum number of rounds fired tothree. The burst cam is not “self-indexing.” If burst isselected, the burst cam does not automatically reset tothe first shot position of the three-round burst. One,two or three shots may be fired on the first pull of thetrigger. Each subsequent pull of the trigger results in acomplete three-round burst unless the trigger isreleased before the cycle is complete. If the trigger isreleased during the burst and the three-round cycle is
interrupted, the next pull of the trigger fires the roundsremaining in the interrupted three-round cycle.
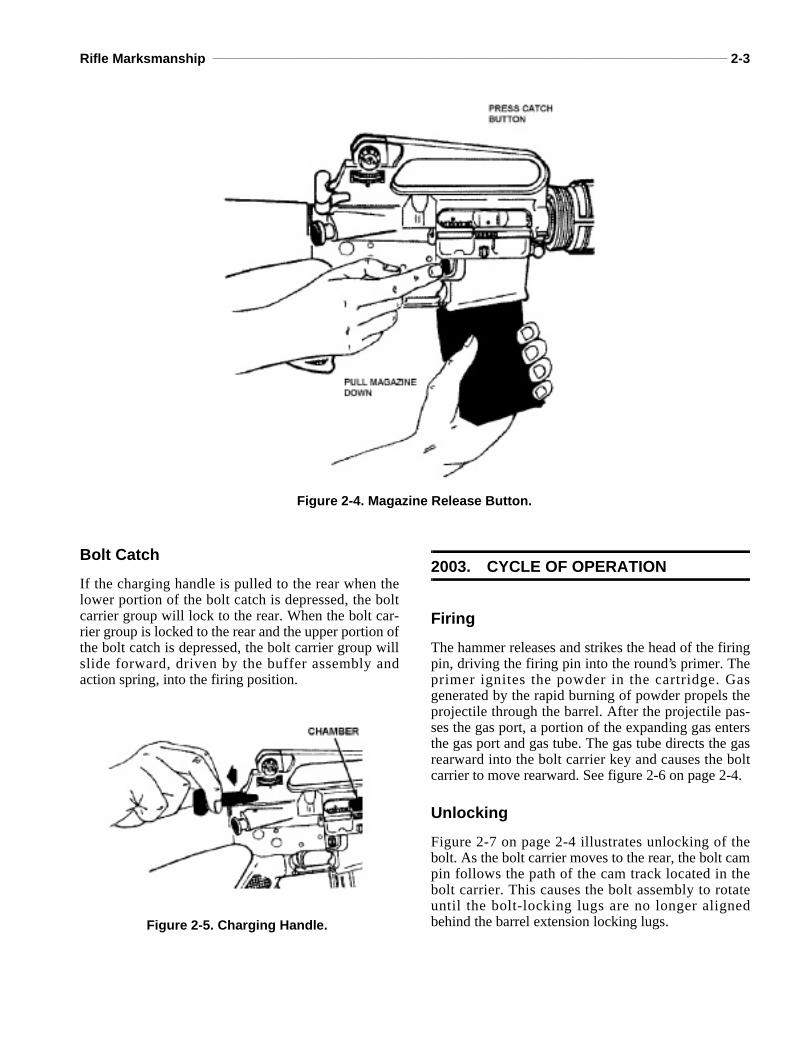
Magazine Release Button
The magazine release button releases the magazinefrom the magazine well. See figure 2-4.
Charging Handle
When the charging handle is pulled to the rear, the boltunlocks from the barrel extension locking lugs and thebolt carrier group moves to the rear of the receiver.See figure 2-5.
Figure 2-2. M16A2 Service Rifle (Left Side View).
Figure 2-3. Selector Lever.
Rifle Marksmanship _______________________________________________________________________________________ 2-3
Bolt Catch
If the charging handle is pulled to the rear when thelower portion of the bolt catch is depressed, the boltcarrier group will lock to the rear. When the bolt car-rier group is locked to the rear and the upper portion ofthe bolt catch is depressed, the bolt carrier group willslide forward, driven by the buffer assembly andaction spring, into the firing position.
2003. CYCLE OF OPERATION
Firing
The hammer releases and strikes the head of the firingpin, driving the firing pin into the round’s primer. Theprimer ignites the powder in the cartridge. Gasgenerated by the rapid burning of powder propels theprojectile through the barrel. After the projectile pas-ses the gas port, a portion of the expanding gas entersthe gas port and gas tube. The gas tube directs the gasrearward into the bolt carrier key and causes the boltcarrier to move rearward. See figure 2-6 on page 2-4.
Unlocking
Figure 2-7 on page 2-4 illustrates unlocking of thebolt. As the bolt carrier moves to the rear, the bolt campin follows the path of the cam track located in thebolt carrier. This causes the bolt assembly to rotateuntil the bolt-locking lugs are no longer alignedbehind the barrel extension locking lugs.
Figure 2-4. Magazine Release Button.
Figure 2-5. Charging Handle.

2-4 _______________________________________________________________________________________________ MCRP 3-01A
Extracting
As the bolt carrier group continues to move to the rear,the extractor claw withdraws the cartridge case fromthe chamber. See figure 2-8.
Ejecting
The ejector, located in the bolt face, is compressedinto the bolt body by the base of the cartridge case.The rearward movement of the bolt carrier group al-lows the nose of the cartridge case to clear the front ofthe ejection port. The cartridge case is thrown out bythe action of the ejector and spring. See figure 2-9.
Cocking
Continuing its rearward travel, the bolt carrier over-rides the hammer, forces it down into the receiver,compresses the hammer spring, and causes thedisconnector to engage the lower hammer hook. Seefigure 2-10.
Figure 2-7. Unlocking.
Figure 2-8. Extracting.
Figure 2-9. Ejecting.
Figure 2-6. Firing.
Figure 2-10. Cocking.
Rifle Marksmanship _______________________________________________________________________________________ 2-5
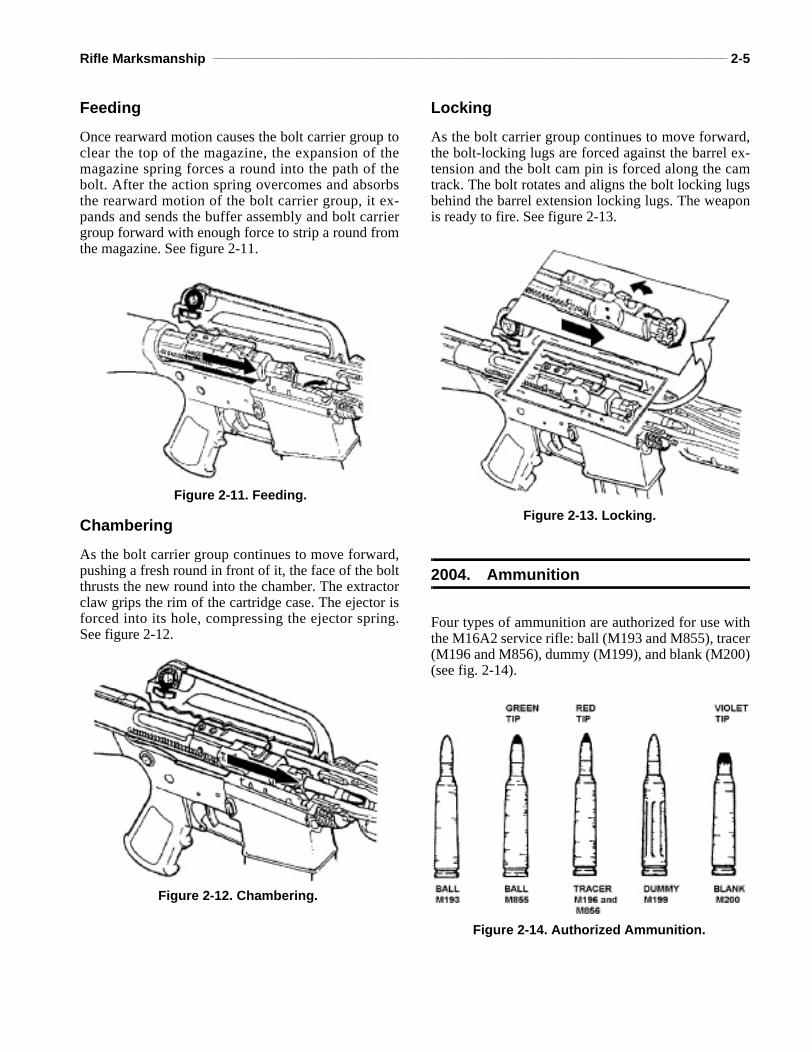
Feeding
Once rearward motion causes the bolt carrier group toclear the top of the magazine, the expansion of themagazine spring forces a round into the path of thebolt. After the action spring overcomes and absorbsthe rearward motion of the bolt carrier group, it ex-pands and sends the buffer assembly and bolt carriergroup forward with enough force to strip a round fromthe magazine. See figure 2-11.
Chambering
As the bolt carrier group continues to move forward,pushing a fresh round in front of it, the face of the boltthrusts the new round into the chamber. The extractorclaw grips the rim of the cartridge case. The ejector isforced into its hole, compressing the ejector spring.See figure 2-12.
Locking
As the bolt carrier group continues to move forward,the bolt-locking lugs are forced against the barrel ex-tension and the bolt cam pin is forced along the camtrack. The bolt rotates and aligns the bolt locking lugsbehind the barrel extension locking lugs. The weaponis ready to fire. See figure 2-13.
2004. Ammunition
Four types of ammunition are authorized for use withthe M16A2 service rifle: ball (M193 and M855), tracer(M196 and M856), dummy (M199), and blank (M200)(see fig. 2-14).
Figure 2-11. Feeding.
Figure 2-12. Chambering.
Figure 2-13. Locking.
Figure 2-14. Authorized Ammunition.
2-6 _______________________________________________________________________________________________ MCRP 3-01A
M193 Ball
This ammunition is a 5.56mm centerfire cartridge witha 55-grain gilded-metal jacket, lead alloy core bullet.The primer and case are waterproofed. The M193 ballammunition has no identifying marks.
M855 Ball
This ammunition is the primary ammunition for theM16A2 rifle. Identified by a green tip, its 5.56mmcenterfire cartridge has better penetration than theM193. It has a 62-grain gilded-metal jacket bullet. Therear two-thirds of the core of the projectile is leadalloy and the front one-third is a solid steel penetrator.The primer and case are waterproofed.
M196 and M856 Tracer
This ammunition has the same basic characteristics asball ammunition. Identified by a bright red tip, itsprimary uses include observation firing, incendiaryeffect, and signaling. Tracer ammunition should beintermixed with ball ammunition in a ratio no greaterthan 1:1. The preferred ratio is one tracer to four balls(1:4) to prevent metal fouling in the bore.
M199 Dummy
This ammunition has six grooves along the side of thecase. It contains no propellants or primer. The primerwell is open to prevent damage to the firing pin. Thedummy cartridge is used during dry fire and othertraining purposes.
M200 Blank
This ammunition has the case mouth closed with aseven-petal rosette crimp. It contains no projectile.Blank ammunition, identified by its violet tip, is usedfor training purposes.
2005. Preventive Maintenance
Normal care and cleaning of the rifle will result inproper functioning of its all parts. Only issue-typecleaning materials maybe used. Improper maintenancecan cause stoppages, reducing combat readiness andeffectiveness.
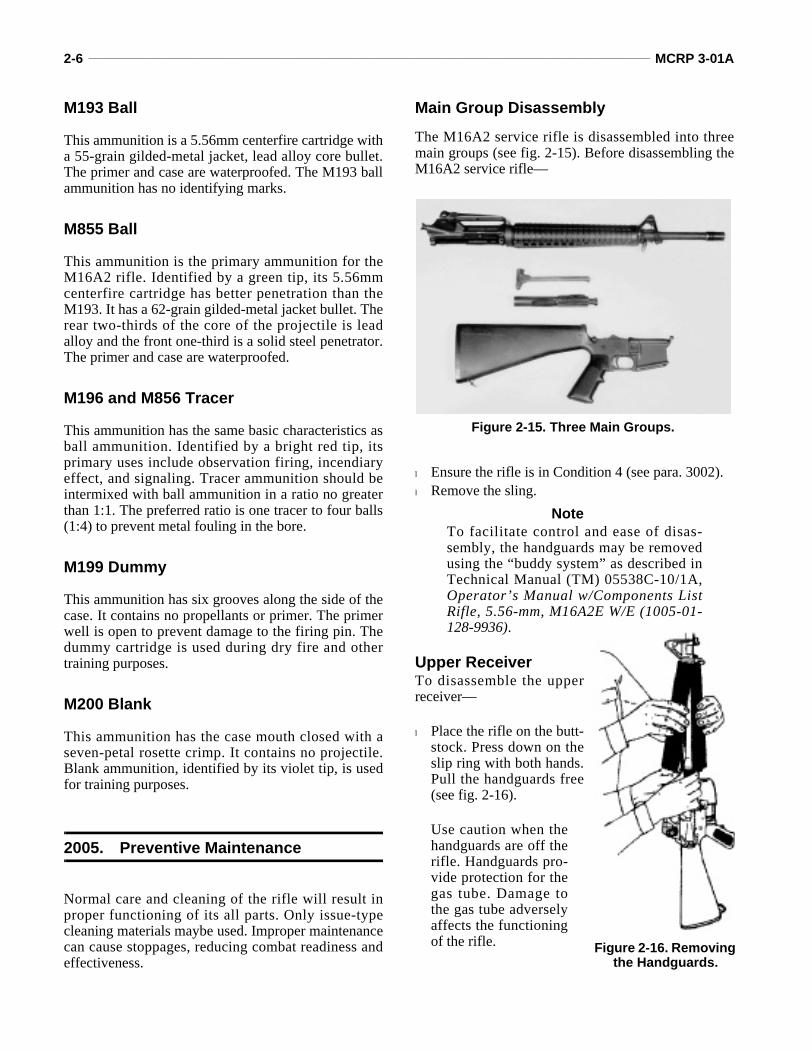
Main Group Disassembly
The M16A2 service rifle is disassembled into threemain groups (see fig. 2-15). Before disassembling theM16A2 service rifle—
l Ensure the rifle is in Condition 4 (see para. 3002).l Remove the sling.
NoteTo facilitate control and ease of disas-sembly, the handguards may be removedusing the “buddy system” as described inTechnical Manual (TM) 05538C-10/1A,Operator’s Manual w/Components ListRifle, 5.56-mm, M16A2E W/E (1005-01-128-9936).
Upper ReceiverTo disassemble the upperreceiver—
l Place the rifle on the butt-stock. Press down on theslip ring with both hands.Pull the handguards free(see fig. 2-16).
Use caution when thehandguards are off therifle. Handguards pro-vide protection for thegas tube. Damage tothe gas tube adverselyaffects the functioningof the rifle.
Figure 2-15. Three Main Groups.
Figure 2-16. Removingthe Handguards.

Rifle Marksmanship _______________________________________________________________________________________ 2-7
l Move the take down pin from the left to the right asfar as it will go to allow the lower receiver to pivotdown from the upper receiver.
l Move the receiver pivot pin from left to right as faras it will go and separate the upper and lowerreceivers.
l Pull back the charging handle and bolt carrier about3 inches and remove the bolt carrier group.
l Remove the charging handle by sliding it back anddown, out of the upper receiver.
No further disassembly is conducted on the upper re-ceiver group.
Bolt CarrierTo disassemble the bolt carrier—
l Remove the firing pin retaining pin.l Push the bolt back into the bolt carrier to the locked
position.l Tap the base of the bolt carrier against the palm of
your hand so the firing pin will drop out.l Rotate the bolt cam pin one-quarter turn and lift the
bolt cam pin out.l Withdraw the bolt assembly from the carrier.l Press on the extractor’s rear and use the firing pin to
push out the extractor-retaining pin. Remove theextractor and spring (the spring is permanentlyattached to the extractor). (See fig. 2-17.)
CAUTIONBe careful not to damage the tip of thefiring pin while pushing out the extractor-retaining pin.
NoteThe extractor assembly has a rubber insertwithin the spring. Do not attempt to re-move it. If the spring comes loose, put thelarge end of the spring in the extractor andseat it. Push in the extractor pin.
Lower ReceiverTo disassemble the lower receiver—
l Press in the buffer and depress the buffer retainer.
NoteIt may be necessary to use the edge of thecharging handle to depress the buffer re-tainer.
l Press the hammer downward and ease the bufferand action spring forward and out of the receiver.
l Separate the parts. See figure 2-18.
No further disassembly of the lower receiver is per-formed.
NoteIn combat situations, the rifle may be par-tially disassembled in any sequence. How-ever, combat situations are the exception,not the rule. Under normal operating cir-cumstances, disassemble the rifle in thesequence just performed. Any further dis-assembly of the rifle is to be performed by aqualified armorer.
Magazine Disassembly
The magazine should be disassembled regularly forcleaning to avoid the possibility of malfunction or
Figure 2-17. Bolt Carrier Disassembled.
Figure 2-18. Lower Receiver Disassembled.
2-8 _______________________________________________________________________________________________ MCRP 3-01A
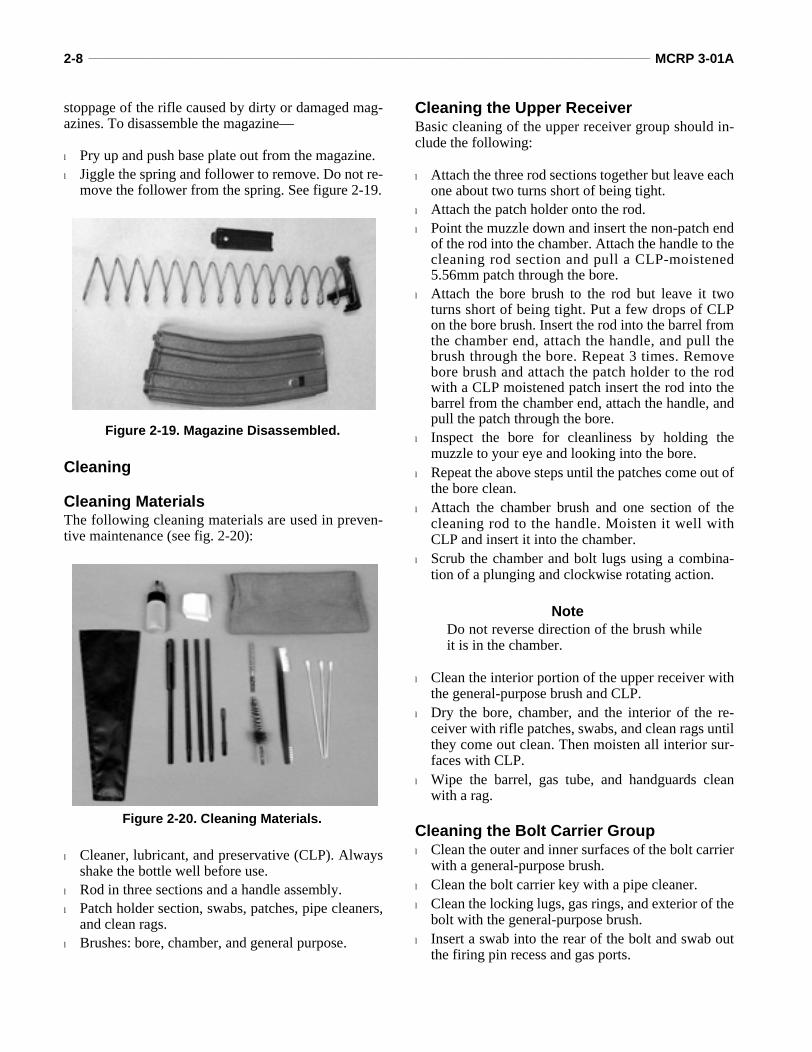
stoppage of the rifle caused by dirty or damaged mag-azines. To disassemble the magazine—
l Pry up and push base plate out from the magazine.l Jiggle the spring and follower to remove. Do not re-
move the follower from the spring. See figure 2-19.
Cleaning
Cleaning MaterialsThe following cleaning materials are used in preven-tive maintenance (see fig. 2-20):
l Cleaner, lubricant, and preservative (CLP). Alwaysshake the bottle well before use.
l Rod in three sections and a handle assembly.l Patch holder section, swabs, patches, pipe cleaners,
and clean rags.l Brushes: bore, chamber, and general purpose.
Cleaning the Upper ReceiverBasic cleaning of the upper receiver group should in-clude the following:
l Attach the three rod sections together but leave eachone about two turns short of being tight.
l Attach the patch holder onto the rod.l Point the muzzle down and insert the non-patch end
of the rod into the chamber. Attach the handle to thecleaning rod section and pull a CLP-moistened5.56mm patch through the bore.
l Attach the bore brush to the rod but leave it twoturns short of being tight. Put a few drops of CLPon the bore brush. Insert the rod into the barrel fromthe chamber end, attach the handle, and pull thebrush through the bore. Repeat 3 times. Removebore brush and attach the patch holder to the rodwith a CLP moistened patch insert the rod into thebarrel from the chamber end, attach the handle, andpull the patch through the bore.
l Inspect the bore for cleanliness by holding themuzzle to your eye and looking into the bore.
l Repeat the above steps until the patches come out ofthe bore clean.
l Attach the chamber brush and one section of thecleaning rod to the handle. Moisten it well withCLP and insert it into the chamber.
l Scrub the chamber and bolt lugs using a combina-tion of a plunging and clockwise rotating action.
NoteDo not reverse direction of the brush whileit is in the chamber.
l Clean the interior portion of the upper receiver withthe general-purpose brush and CLP.
l Dry the bore, chamber, and the interior of the re-ceiver with rifle patches, swabs, and clean rags untilthey come out clean. Then moisten all interior sur-faces with CLP.
l Wipe the barrel, gas tube, and handguards cleanwith a rag.
Cleaning the Bolt Carrier Groupl Clean the outer and inner surfaces of the bolt carrier
with a general-purpose brush.l Clean the bolt carrier key with a pipe cleaner.l Clean the locking lugs, gas rings, and exterior of the
bolt with the general-purpose brush.l Insert a swab into the rear of the bolt and swab out
the firing pin recess and gas ports.
Figure 2-19. Magazine Disassembled.
Figure 2-20. Cleaning Materials.

Rifle Marksmanship _______________________________________________________________________________________ 2-9
l Clean the extractor with the general-purpose brush,ensuring all the carbon is removed from underneaththe extractor lip.
l Clean extractor pin, firing pin, and firing pin retain-ing pin using the general-purpose brush and CLP.
l Clean charging handle assembly with the general-purpose brush and patches.
Cleaning the Lower Receiverl Wipe dirt from the firing mechanism using a
general-purpose brush, clean patch, pipe cleaners,and swabs.
l Clean the outside of the receiver with the general-purpose brush and CLP. Clean the buttplate andrear sling swivel, ensuring drain hole is clear of dirt.
l Wipe the inside of the buffer tube, buffer, and ac-tion spring.
l Wipe the inside of the magazine well with a rag.
l Wipe out the inside of the pistol grip and ensure thatit is clean.
Cleaning the Magazinel Clean the inside of the magazine with the general-
purpose brush and CLP.
l Wipe dry.
l Keep the spring lightly oiled.
Inspection
While cleaning the rifle, and during each succeedingstep in the preventive maintenance process, inspecteach part for cracks and chips and ensure parts are notbent or badly worn. Report any damaged part to thearmorer. Inspection is a critical step to ensure thecombat readiness of your rifle. It is performed nor-mally during rifle cleaning (prior to lubrication), how-ever, it can be performed throughout the preventivemaintenance process.
Lubrication
Lubrication is performed as part of the detailed pro-cedure for preventive maintenance. Lubrication pro-cedures are also performed in preparation for firing.
LubricantIn all but the coldest arctic conditions, CLP is the lu-bricant for the rifle. Remember to remove excess CLPfrom the bore and chamber before firing.
l Lightly lube means that a film of CLP barely visibleto the eye should be applied.
l Generously lube means the CLP should be appliedheavily enough that it can be spread with the finger.
Upper Receiverl Lightly lube the inside of the upper receiver, bore,
chamber, outer surfaces of the barrel, and surfacesunder the handguard.
l Depress the front sight detent and apply two orthree drops of CLP to the front sight detent. Depressseveral times to work lubrication into the spring.
l Lubricate the moving parts and elevation screwshaft of the rear sight.
Bolt Carrier Groupl Generously lube the outside of the cam pin area, the
bolt rings, and outside the bolt body.
l Lightly lube the charging handle and the inner andouter surfaces of the bolt carrier.
Lower Receiverl Lightly lube the inside of the lower receiver exten-
sion.
l Generously lube the moving parts inside the lowerreceiver and their pins.
Reassembly
Reassembling the Riflel Return all cleaning gear into the buttstock of the
rifle and close the buttplate.
l Connect the buffer and action spring and insertthem into the buffer tube/stock.
l Place the extractor and spring back on the bolt.Depress the extractor to align the holes and reinsertthe extractor pin.
l Insert the bolt into the carrier. Do not switch boltsbetween rifles.
l Hold the bolt carrier with the bolt carrier key at 12o’clock. Insert the bolt into the bolt carrier with theextractor at 12 o’clock.
2-10 ______________________________________________________________________________________________ MCRP 3-01A
l Rotate the bolt counterclockwise until the campinhole aligns to the cam pin slot in the bolt carrier.
l Insert the bolt cam pin through the bolt carrier andinto the bolt. Rotate the cam pin 1/4 turn right orleft. Pull the bolt forward until it stops.
l Drop in the firing pin from the rear of the bolt car-rier and seat it.
l Replace the firing pin retaining pin. Ensure the headof the firing pin retaining pin is recessed inside thebolt carrier. The firing pin should not fall out whenthe bolt carrier group is turned upside down.
l Place the charging handle in the upper receiver bylining it up with the grooves in the receiver. Pushthe charging handle partially in.
l With the bolt in the unlocked position, place boltcarrier key into the groove of the charging handle.
l Push the charging handle and bolt carrier group intothe upper receiver until the charging handle locks.
l Join the upper and lower receivers and engage thereceiver pivot pin.
l Ensure the selector lever is on safe before closingthe upper receiver. Close the upper and lower re-ceiver groups. Push in the takedown pin.
l Install the handguards.l Attach the sling.
Reassembling the MagazineTo reassemble the magazine—
l Insert the follower and jiggle the spring to install.l Slide the base under all four tabs until the base
catches. Make sure the printing is on the outside.
2006. Function Check
A function check is performed to ensure the rifle oper-ates properly. To perform a function check:
l Place the weapon in Condition 4 (see para. 3002).l Pull the charging handle to the rear and release. En-
sure the selector lever is on safe and pull the trigger.The hammer should not fall.
l Place the selector lever on semi. Pull the trigger andhold it to the rear. The hammer should fall. Pull thecharging handle to the rear and release. Release thetrigger and pull again. The hammer should fall.
l Pull the charging handle to the rear and release.Place the selector lever on burst. Pull the trigger andhold it to the rear. The hammer should fall. Pull thecharging handle to the rear three times and release.Release the trigger and pull again. The hammershould fall.
l Pull the charging handle to the rear and release.Place the selector lever on safe.
2007. User Serviceability Inspection
Individual Marines must perform user serviceabilityinspections on their weapons before firing them. Thisinspection ensures the weapon is in an acceptable op-erating condition.
l Place rifle in Condition 4 (see para. 3002).l Conduct a function check. l Check the rifle to ensure the following:l Compensator is tight.l Barrel is tight.l Front sight post is straight.l Front sight post is adjustable.l Handguards are serviceable.l Rear sight elevation and windage knobs are adjust-
able and have distinct clicks.l Stock is tight on the lower receiver.l Weapon is properly lubricated for operational con-
ditions.l Barrel is clear of obstructions.l Gas rings are serviceable.l Ensure magazines are serviceable.l Load the rifle with an empty magazine. Ensure that
the magazine can be seated. l Without depressing the bolt catch, pull the charging
handle to the rear. Ensure that the bolt locks to therear.
l Depress the upper portion of the bolt catch andobserve bolt moving forward on an empty chamber.
WARNING WARNING WARNING WARNINGARNING
Ensure the cam pin is installed in the bolt groupor the rifle may explode while firing.
Rifle Marksmanship _____________________________________________________________________________________ 2-11
Ensure the bolt moves completely forward andlocks in the chamber.
l Repeat this procedure with all magazines.
2008. Field Maintenance
Preventive maintenance in the field is performed whendetailed disassembly and cleaning is not practical dueto operational tempo or the level of threat. To performlimited field preventive maintenance—
l Place the rifle in Condition 4 (see paragraph 3002).
l Break the rifle down by removing the rear takedown pin and rotating the upper receiver and barrelforward.
l Remove the bolt carrier group.
l Do not disassemble the bolt carrier group further.
l Clean the bolt carrier group.
l Clean the upper and lower receiver groups (withoutfurther disassembly).
l Clean the bore and chamber.
l Lubricate the rifle.
l Reassemble the rifle and perform a user serviceabil-ity inspection.
2009. Cleaning the Rifle in Various Conditions
The climatic conditions in various locations requirespecial knowledge about cleaning and maintaining therifle. The conditions that will affect the rifle the mostare: hot, wet tropical; hot, dry desert; arctic or lowtemperature; and heavy rain and fording.
Hot, Wet Tropical
l Perform normal maintenance.
l Clean and lubricate your rifle more often. Inspecthidden surfaces for corrosion. Pay particular atten-tion to spring-loaded detentes.
l Use lubricant more liberally.
l Unload and check the inside of the magazine morefrequently. Wipe dry and check for corrosion.
l When practical, keep the rifle covered.
Hot, Dry Desert
Hot dry climates are usually areas that contain blow-ing sand and fine dust. Dust and sand will get into therifle and magazines, causing stoppages. It is impera-tive to pay particular attention to the cleaning andlubrication of the rifle in this type of climate.
Corrosion is less likely to form in these environments,and lubrication will attract more dirt. For this reason,use lubrication more sparingly.
Whenever practical, keep the rifle covered.
Arctic or Low Temperature
l Clean and lubricate the rifle in a warm room, withthe rifle at room temperature, if possible. Lubri-cating oil, arctic weapons (LAW) can be usedbelow a temperature of 0 degrees Fahrenheit andmust be used below -35 degrees Fahrenheit.
l Keep the rifle covered when moving from a warmto a cold environment to allow gradual cooling ofthe rifle. This prevents the condensation of moistureand freezing. Condensation will form on the riflewhen it is moved from outdoors to indoors. Ifpossible, leave the rifle in a protected but cold areaoutdoors. When bringing the rifle inside to a warmplace, it should be disassembled and wiped downseveral times as it warms.
l Always try to keep the rifle dry.
l Unload and perform a function check every 30 min-utes, if possible, to help prevent freezing of func-tional parts.
l Do not lay a warm rifle in snow or ice.
l Keep the inside of the magazine and ammunitionwiped dry. Moisture will freeze and cause stop-pages.
Heavy Rain and Fording
l Keep the rifle dry and covered when practical.
l Keep water out of the barrel if possible. If waterdoes get in, drain and (if possible) dry with a patch.If water is in the barrel, point the muzzle down andbreak the seal by doing a chamber check so thewater will drain. If water is in the stock of theweapon, ensure the drain hole in the stock is clearso the water can run out.
l Perform normal maintenance.
CHAPTER 3. WEAPONS HANDLING
Weapons handling procedures provide a consistent and standardized way for aMarine to handle, operate, and employ the rifle safely and effectively. Properweapons handling procedures ensure the safety of Marines by eliminatingnegligent discharges and reinforcing positive identification of targets beforeengagement. Weapons handling procedures apply at all levels of training andduring combat operations.
Note+The procedures in this manual are writtenfor right-handed Marines; left-handedMarines should reverse instructions asnecessary.
3001. Safety Rules
Safe handling of the rifle is critical. If proper weaponshandling procedures are not used, a Marine risks hissafety and the safety of his fellow Marines. Duringcombat, a Marine must react quickly, safely, and bementally prepared to engage targets. To ensure thatonly the intended target is engaged, a Marine mustapply the following safety rules at all times:
Rule 1—Treat every weapon as if it were loaded.When a Marine takes charge of a rifle in any situation,he must treat the weapon as if it were loaded,determine its condition (see para. 3003), and continueapplying the other safety rules.
Rule 2—Never point a weapon at anything you donot intend to shoot. A Marine must maintain muzzleawareness at all times.
Rule 3—Keep your finger straight and off thetrigger until you are ready to fire. A target must beidentified before taking the weapon off safe andmoving the finger to the trigger.
Rule 4—Keep the weapon on safe until you intendto fire. A target must be identified before taking theweapon off safe. This rule is intended to eliminate thechance of the weapon discharging by accident (e.g.,brush snagging the trigger).
3002. Weapons Conditions
A weapon’s readiness is described by one of fourconditions. The steps in the loading and unloadingprocess take the rifle through four specific conditionsof readiness for live fire.
Condition 1. Safety on, magazine inserted, roundin chamber, bolt forward, ejectionport cover closed.
Condition 2. Not applicable to the M16A2 rifle.
Condition 3. Safety on, magazine inserted, cham-ber empty, bolt forward, ejectionport cover closed.
Condition 4. Safety on, magazine removed, cham-ber empty, bolt forward, ejectionport cover closed.
3003. Determining a Weapon’s Condition (Chamber Check)
A Marine must know the condition of his weapon atall times. When a Marine takes charge of a weapon inany situation, he must determine its condition.Situations include coming across an unmanned rifle incombat, taking charge of any weapon after it has beenunmanned (e.g., out of a rifle rack, stored in a vehicle),or taking charge of another Marine’s weapon. Todetermine the condition of the weapon in any of thesesituations, the Marine should:
l Determine if a magazine is present.
l Ensure the rifle is on safe.
3-2 _______________________________________________________________________________________________ MCRP 3-01A
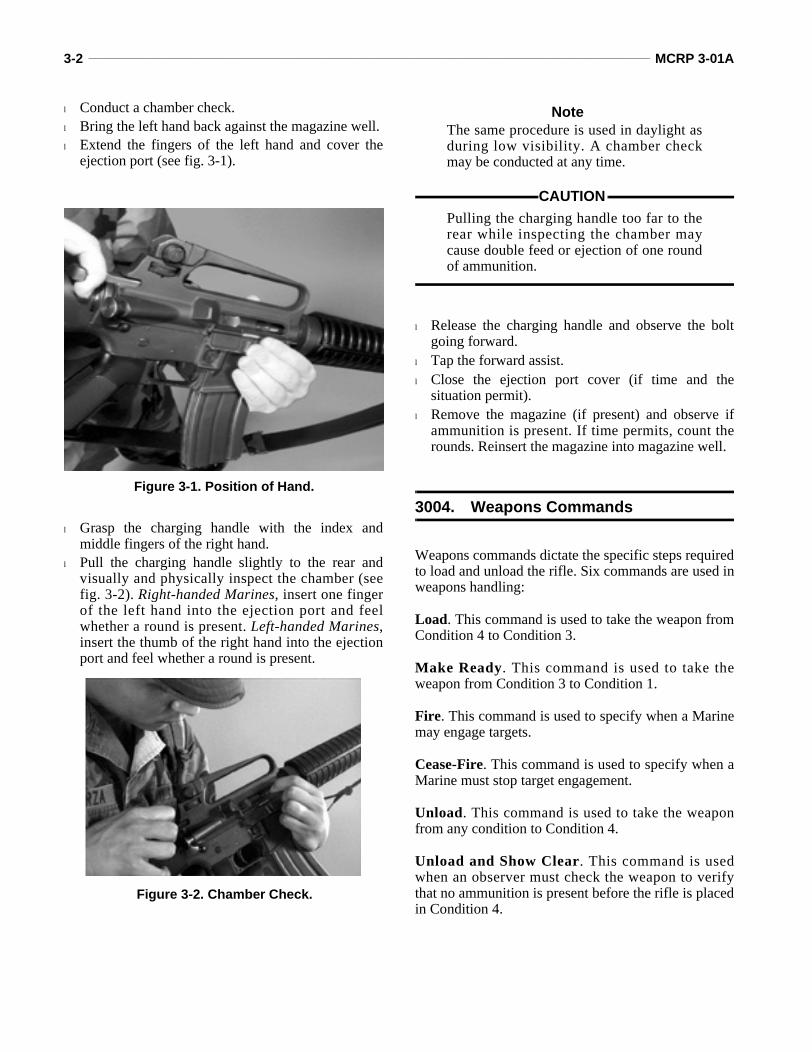
l Conduct a chamber check.l Bring the left hand back against the magazine well.l Extend the fingers of the left hand and cover the
ejection port (see fig. 3-1).
l Grasp the charging handle with the index andmiddle fingers of the right hand.
l Pull the charging handle slightly to the rear andvisually and physically inspect the chamber (seefig. 3-2). Right-handed Marines, insert one fingerof the left hand into the ejection port and feelwhether a round is present. Left-handed Marines,insert the thumb of the right hand into the ejectionport and feel whether a round is present.
NoteThe same procedure is used in daylight asduring low visibility. A chamber checkmay be conducted at any time.
CAUTION
Pulling the charging handle too far to therear while inspecting the chamber maycause double feed or ejection of one roundof ammunition.
l Release the charging handle and observe the boltgoing forward.
l Tap the forward assist.l Close the ejection port cover (if time and the
situation permit).l Remove the magazine (if present) and observe if
ammunition is present. If time permits, count therounds. Reinsert the magazine into magazine well.
3004. Weapons Commands
Weapons commands dictate the specific steps requiredto load and unload the rifle. Six commands are used inweapons handling:
Load. This command is used to take the weapon fromCondition 4 to Condition 3.
Make Ready. This command is used to take theweapon from Condition 3 to Condition 1.
Fire. This command is used to specify when a Marinemay engage targets.
Cease-Fire. This command is used to specify when aMarine must stop target engagement.
Unload. This command is used to take the weaponfrom any condition to Condition 4.
Unload and Show Clear. This command is usedwhen an observer must check the weapon to verifythat no ammunition is present before the rifle is placedin Condition 4.
Figure 3-1. Position of Hand.
Figure 3-2. Chamber Check.
Rifle Marksmanship________________________________________________________________________________________ 3-3
Loading the Rifle
Perform the following steps to load the rifle (take therifle to Condition 3):
l Ensure the rifle is on safe.l Withdraw the magazine from the magazine pouch.l Observe the magazine to ensure it is filled.l Fully insert the magazine in the magazine well.
Without releasing the magazine, tug downward onthe magazine to ensure it is seated.
l Close the ejection port cover.l Fasten the magazine pouch.
Making the Rifle Ready
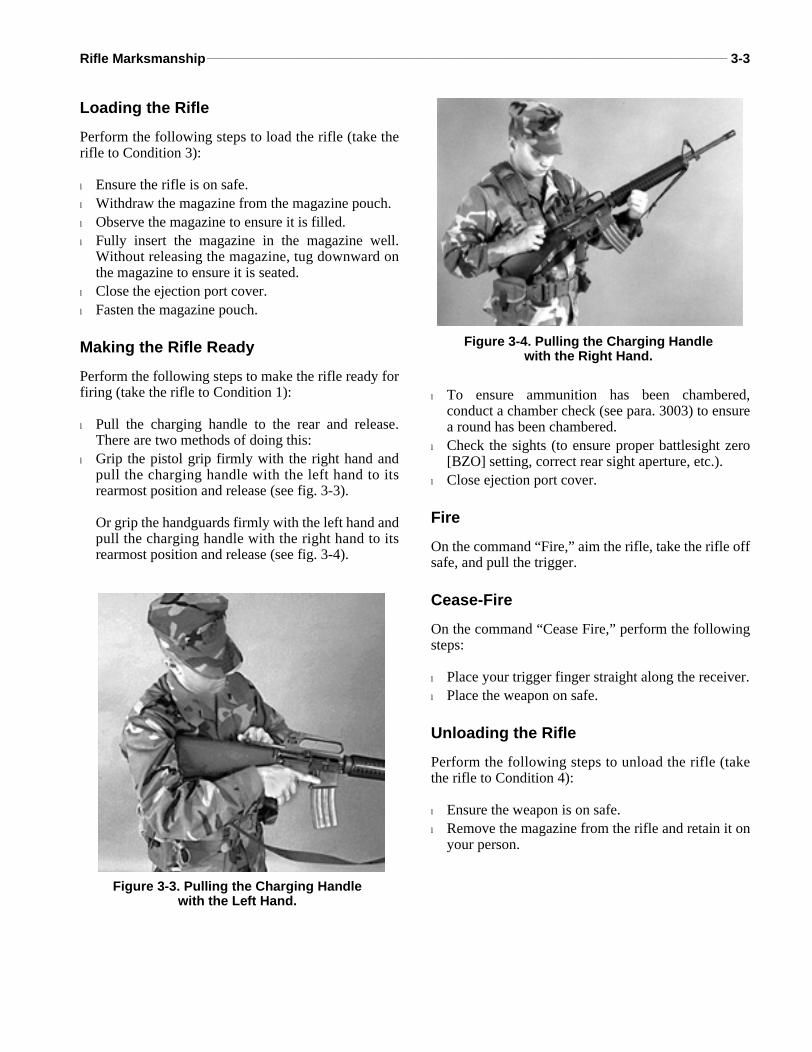
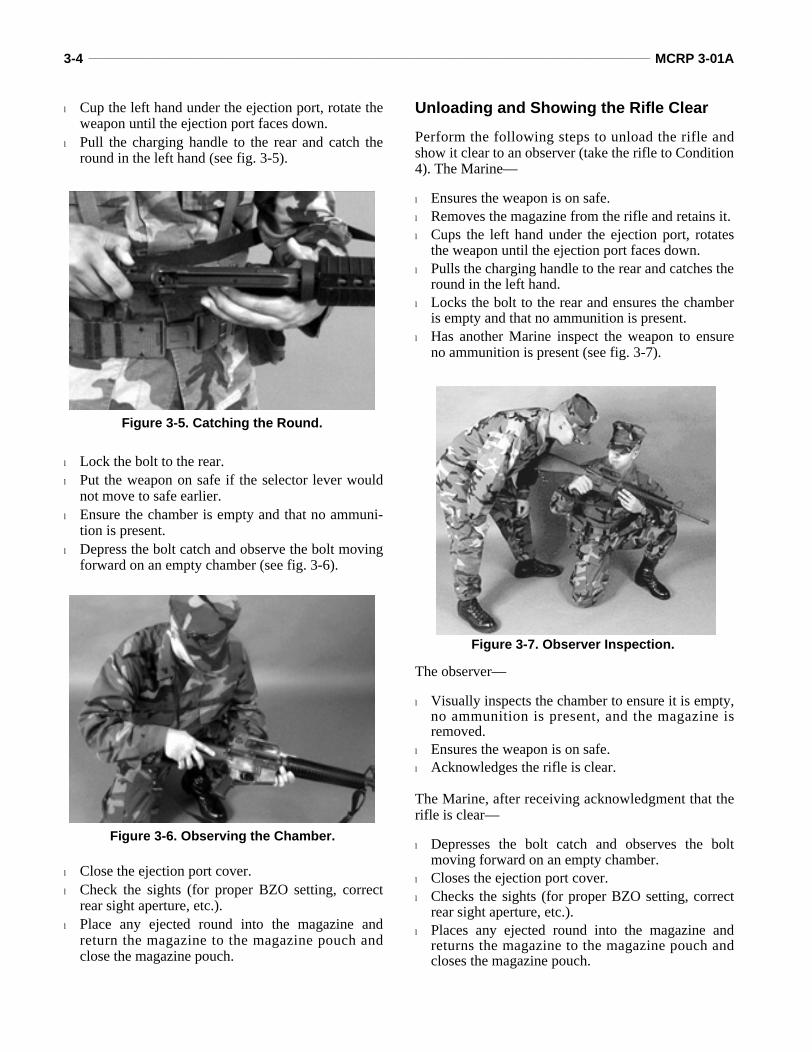
Perform the following steps to make the rifle ready forfiring (take the rifle to Condition 1):
l Pull the charging handle to the rear and release.There are two methods of doing this:
l Grip the pistol grip firmly with the right hand andpull the charging handle with the left hand to itsrearmost position and release (see fig. 3-3).
Or grip the handguards firmly with the left hand andpull the charging handle with the right hand to itsrearmost position and release (see fig. 3-4).
l To ensure ammunition has been chambered,conduct a chamber check (see para. 3003) to ensurea round has been chambered.
l Check the sights (to ensure proper battlesight zero[BZO] setting, correct rear sight aperture, etc.).
l Close ejection port cover.
Fire
On the command “Fire,” aim the rifle, take the rifle offsafe, and pull the trigger.
Cease-Fire
On the command “Cease Fire,” perform the followingsteps:
l Place your trigger finger straight along the receiver.l Place the weapon on safe.
Unloading the Rifle
Perform the following steps to unload the rifle (takethe rifle to Condition 4):
l Ensure the weapon is on safe.l Remove the magazine from the rifle and retain it on
your person.
Figure 3-3. Pulling the Charging Handlewith the Left Hand.
Figure 3-4. Pulling the Charging Handlewith the Right Hand.
3-4 _______________________________________________________________________________________________ MCRP 3-01A
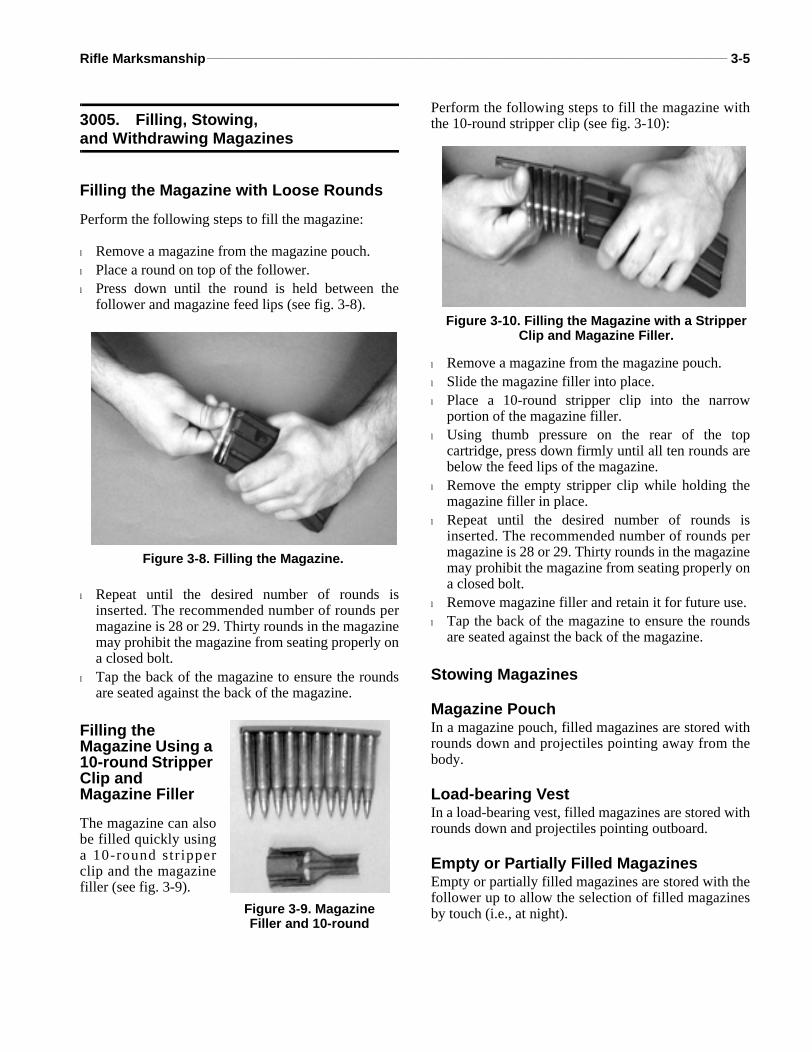
l Cup the left hand under the ejection port, rotate theweapon until the ejection port faces down.
l Pull the charging handle to the rear and catch theround in the left hand (see fig. 3-5).
l Lock the bolt to the rear.l Put the weapon on safe if the selector lever would
not move to safe earlier.l Ensure the chamber is empty and that no ammuni-
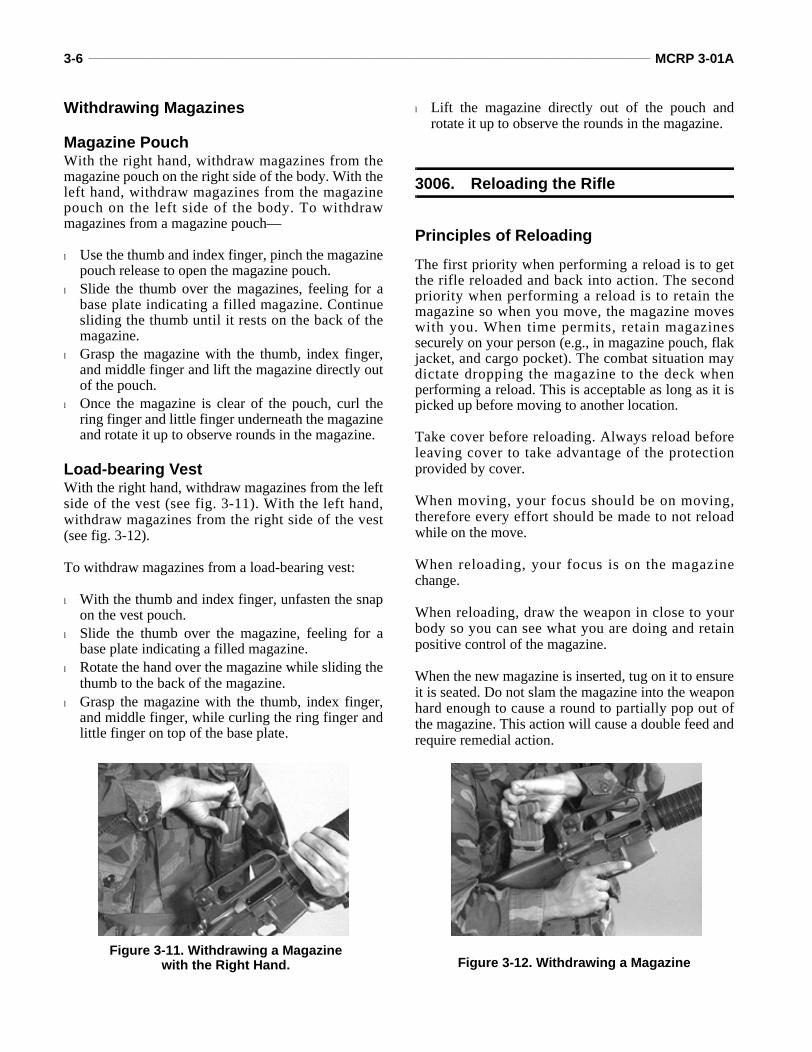
tion is present.l Depress the bolt catch and observe the bolt moving
forward on an empty chamber (see fig. 3-6).
l Close the ejection port cover.l Check the sights (for proper BZO setting, correct
rear sight aperture, etc.).l Place any ejected round into the magazine and
return the magazine to the magazine pouch andclose the magazine pouch.
Unloading and Showing the Rifle Clear
Perform the following steps to unload the rifle andshow it clear to an observer (take the rifle to Condition4). The Marine—
l Ensures the weapon is on safe.l Removes the magazine from the rifle and retains it.l Cups the left hand under the ejection port, rotates
the weapon until the ejection port faces down.l Pulls the charging handle to the rear and catches the
round in the left hand.l Locks the bolt to the rear and ensures the chamber
is empty and that no ammunition is present.l Has another Marine inspect the weapon to ensure
no ammunition is present (see fig. 3-7).
The observer—
l Visually inspects the chamber to ensure it is empty,no ammunition is present, and the magazine isremoved.
l Ensures the weapon is on safe.l Acknowledges the rifle is clear.
The Marine, after receiving acknowledgment that therifle is clear—
l Depresses the bolt catch and observes the boltmoving forward on an empty chamber.
l Closes the ejection port cover.l Checks the sights (for proper BZO setting, correct
rear sight aperture, etc.).l Places any ejected round into the magazine and
returns the magazine to the magazine pouch andcloses the magazine pouch.
Figure 3-5. Catching the Round.
Figure 3-6. Observing the Chamber.
Figure 3-7. Observer Inspection.
Rifle Marksmanship________________________________________________________________________________________ 3-5
3005. Filling, Stowing,and Withdrawing Magazines
Filling the Magazine with Loose Rounds
Perform the following steps to fill the magazine:
l Remove a magazine from the magazine pouch.l Place a round on top of the follower.l Press down until the round is held between the
follower and magazine feed lips (see fig. 3-8).
l Repeat until the desired number of rounds isinserted. The recommended number of rounds permagazine is 28 or 29. Thirty rounds in the magazinemay prohibit the magazine from seating properly ona closed bolt.
l Tap the back of the magazine to ensure the roundsare seated against the back of the magazine.
Filling the Magazine Using a 10-round Stripper Clip and Magazine Filler
The magazine can alsobe filled quickly usinga 10-round stripperclip and the magazinefiller (see fig. 3-9).
Perform the following steps to fill the magazine withthe 10-round stripper clip (see fig. 3-10):
l Remove a magazine from the magazine pouch.l Slide the magazine filler into place.l Place a 10-round stripper clip into the narrow
portion of the magazine filler.l Using thumb pressure on the rear of the top
cartridge, press down firmly until all ten rounds arebelow the feed lips of the magazine.
l Remove the empty stripper clip while holding themagazine filler in place.
l Repeat until the desired number of rounds isinserted. The recommended number of rounds permagazine is 28 or 29. Thirty rounds in the magazinemay prohibit the magazine from seating properly ona closed bolt.
l Remove magazine filler and retain it for future use.l Tap the back of the magazine to ensure the rounds
are seated against the back of the magazine.
Stowing Magazines
Magazine PouchIn a magazine pouch, filled magazines are stored withrounds down and projectiles pointing away from thebody.
Load-bearing VestIn a load-bearing vest, filled magazines are stored withrounds down and projectiles pointing outboard.
Empty or Partially Filled MagazinesEmpty or partially filled magazines are stored with thefollower up to allow the selection of filled magazinesby touch (i.e., at night).
Figure 3-8. Filling the Magazine.
Figure 3-9. MagazineFiller and 10-round
Figure 3-10. Filling the Magazine with a Stripper Clip and Magazine Filler.
3-6 _______________________________________________________________________________________________ MCRP 3-01A
Withdrawing Magazines
Magazine PouchWith the right hand, withdraw magazines from themagazine pouch on the right side of the body. With theleft hand, withdraw magazines from the magazinepouch on the left side of the body. To withdrawmagazines from a magazine pouch—
l Use the thumb and index finger, pinch the magazinepouch release to open the magazine pouch.
l Slide the thumb over the magazines, feeling for abase plate indicating a filled magazine. Continuesliding the thumb until it rests on the back of themagazine.
l Grasp the magazine with the thumb, index finger,and middle finger and lift the magazine directly outof the pouch.
l Once the magazine is clear of the pouch, curl thering finger and little finger underneath the magazineand rotate it up to observe rounds in the magazine.
Load-bearing VestWith the right hand, withdraw magazines from the leftside of the vest (see fig. 3-11). With the left hand,withdraw magazines from the right side of the vest(see fig. 3-12).
To withdraw magazines from a load-bearing vest:
l With the thumb and index finger, unfasten the snapon the vest pouch.
l Slide the thumb over the magazine, feeling for abase plate indicating a filled magazine.
l Rotate the hand over the magazine while sliding thethumb to the back of the magazine.
l Grasp the magazine with the thumb, index finger,and middle finger, while curling the ring finger andlittle finger on top of the base plate.
l Lift the magazine directly out of the pouch androtate it up to observe the rounds in the magazine.
3006. Reloading the Rifle
Principles of Reloading
The first priority when performing a reload is to getthe rifle reloaded and back into action. The secondpriority when performing a reload is to retain themagazine so when you move, the magazine moveswith you. When time permits, retain magazinessecurely on your person (e.g., in magazine pouch, flakjacket, and cargo pocket). The combat situation maydictate dropping the magazine to the deck whenperforming a reload. This is acceptable as long as it ispicked up before moving to another location.
Take cover before reloading. Always reload beforeleaving cover to take advantage of the protectionprovided by cover.
When moving, your focus should be on moving,therefore every effort should be made to not reloadwhile on the move.
When reloading, your focus is on the magazinechange.
When reloading, draw the weapon in close to yourbody so you can see what you are doing and retainpositive control of the magazine.
When the new magazine is inserted, tug on it to ensureit is seated. Do not slam the magazine into the weaponhard enough to cause a round to partially pop out ofthe magazine. This action will cause a double feed andrequire remedial action.
Figure 3-11. Withdrawing a Magazinewith the Right Hand. Figure 3-12. Withdrawing a Magazine
Rifle Marksmanship________________________________________________________________________________________ 3-7
Retain your empty magazines. When there is a lull inthe action, refill those magazines so they will beavailable for future use.
During a lull in the action, replace your magazinewhen you know you are low on ammunition. Thisensures a full magazine of ammunition in the rifleshould action resume. Do not wait until the magazineis completely empty to replace it.
Condition 1 Reload
A condition 1 reload is performed when the weapon isin condition 1 by replacing the magazine before it runsout of ammunition. To perform a condition 1 reload,perform the following steps:
l Withdraw a filled magazine from the magazinepouch. With the same hand, press the magazinebutton and remove the partially filled magazine so itcan be retained in the remaining fingers.
l Fully insert the filled magazine into the magazinewell and tug downward on the magazine to ensure itis properly seated.
l Store the partially filled magazine in the magazinepouch with rounds up and projectiles pointing awayfrom the body.
l Fasten the magazine pouch.
Dry Reload
A dry reload is required when the magazine in theweapon has been emptied and the bolt has locked tothe rear. To perform a dry reload—
l Press the magazine release button.l Remove the empty magazine and retain it on your
person when time permits.l Fully insert a filled magazine into the magazine
well and tug downward on the magazine to ensure itis properly seated.
l Depress the bolt catch to allow the bolt carrier tomove forward and observe the round beingchambered. This places the rifle in Condition 1.
3007. Remedial Action
If the rifle fails to fire, a Marine performs remedialaction. Remedial action is the process of investigating
the cause of the stoppage, clearing the stoppage, andreturning the weapon to operation.
Observe for Indicators
Once the rifle ceases firing, the Marine must visuallyor physically observe the ejection port to identify theproblem before he can clear it. The steps taken to clearthe weapon are based on observation of one of thefollowing three indicators:
Indicator: The bolt is forward or the ejection portcover is closed. See figures 3-13 and 3-14.
To return the weapon to operation—
l Seek cover if the tactical situation permits.l Tap—Tap the bottom of the magazine.l Rack—Pull the charging handle to the rear and
release it.l Bang—Sight in and attempt to fire.
Figure 3-14. Ejection Port Cover Closed.
Figure 3-13. Bolt Forward.

3-8 _______________________________________________________________________________________________ MCRP 3-01A
Indicator: Brass is obstructing chamber area(usually indicating a double feed or failure to eject).See figure 3-15.
To return the weapon to operation—
l Seek cover if the tactical situation permits.l Attempt to remove the magazine.l Attempt to lock the bolt to the rear
If the bolt will not lock to the rear, rotate the rifle sothe ejection port is facing down; hold the charginghandle to the rear as far as it will go and shake the rifleto free the round(s). If the rounds do not shake free,hold the charging handle to the rear and strike the buttof the rifle on the ground or manually clear the round.Conduct a reload. Sight in and attempt to fire.
Indicator: The bolt is locked to the rear. See figure3-16. To clear return the weapon to operation—
NoteAlthough a dry weapon is not considered atrue stoppage or mechanical failure, theMarine must take action to return theweapon to operation.
l Seek cover if the tactical situation permits.l Conduct a dry reload.l Sight in and attempt to fire.
Audible Pop or Reduced Recoil
An audible pop occurs when only a portion of thepropellant is ignited. It is normally identifiable byreduced recoil and is sometimes accompanied byexcessive smoke escaping from the chamber area. Toclear the rifle in a combat environment:
l Place the rifle in Condition 4.l Move take down pin from left to right as far as it
will go to allow the lower receiver to pivot.l Remove the bolt carrier group.l Inspect the bore for an obstruction from the
chamber end.l Insert a cleaning rod into the bore from the muzzle
end and clear the obstruction.l Reassemble the rifle.l Conduct a reload.l Sight in and attempt to fire.
3008. Weapons Carries
Weapons carries provide an effective way to handlethe rifle while remaining alert to enemy engagement.Weapons carries are tied to threat conditions and areassumed in response to a specific threat situation. Theweapons carry assumed prepares the Marine, bothmentally and physically, for target engagement. Thesling provides additional support for the weapon whenfiring; therefore, the hasty sling should be used inconjunction with the carries.
Tactical Carry
A Marine carries the rifle at the tactical carry if noimmediate threat is present. The tactical carry permitscontrol of the rifle while a Marine is moving, yet it stillallows quick engagement of the enemy. A Marineperforms the following steps to assume the tacticalcarry:
l Place left hand on the handguards, right handaround the pistol grip, trigger finger straight alongthe receiver (see fig. 3-17), and right thumb on topof the selector lever (see fig. 3-18).
Figure 3-15. Brass Obstructing the Chamber.
Figure 3-16. Bolt Locked to the Rear.
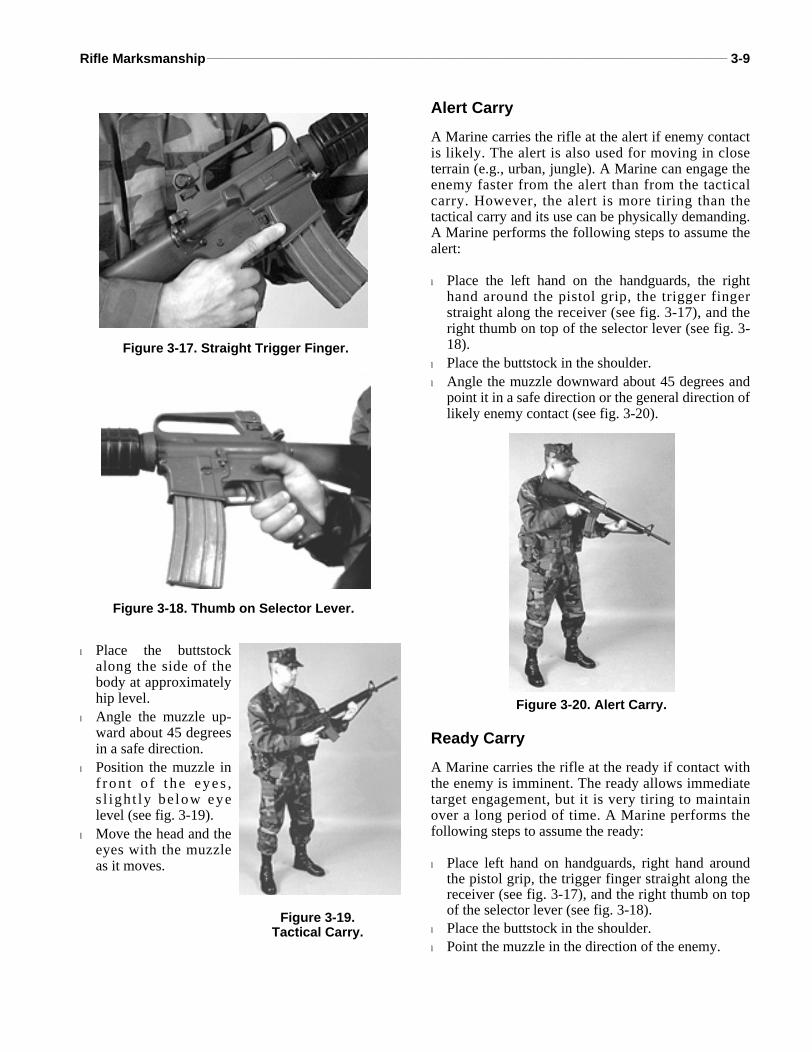
Rifle Marksmanship________________________________________________________________________________________ 3-9
l Place the buttstockalong the side of thebody at approximatelyhip level.
l Angle the muzzle up-ward about 45 degreesin a safe direction.
l Position the muzzle inf ron t o f t he eye s ,s l ight ly be low eyelevel (see fig. 3-19).
l Move the head and theeyes with the muzzleas it moves.
Alert Carry
A Marine carries the rifle at the alert if enemy contactis likely. The alert is also used for moving in closeterrain (e.g., urban, jungle). A Marine can engage theenemy faster from the alert than from the tacticalcarry. However, the alert is more tiring than thetactical carry and its use can be physically demanding.A Marine performs the following steps to assume thealert:
l Place the left hand on the handguards, the righthand around the pistol grip, the trigger fingerstraight along the receiver (see fig. 3-17), and theright thumb on top of the selector lever (see fig. 3-18).
l Place the buttstock in the shoulder.l Angle the muzzle downward about 45 degrees and
point it in a safe direction or the general direction oflikely enemy contact (see fig. 3-20).
Ready Carry
A Marine carries the rifle at the ready if contact withthe enemy is imminent. The ready allows immediatetarget engagement, but it is very tiring to maintainover a long period of time. A Marine performs thefollowing steps to assume the ready:
l Place left hand on handguards, right hand aroundthe pistol grip, the trigger finger straight along thereceiver (see fig. 3-17), and the right thumb on topof the selector lever (see fig. 3-18).
l Place the buttstock in the shoulder.l Point the muzzle in the direction of the enemy.
Figure 3-17. Straight Trigger Finger.
Figure 3-18. Thumb on Selector Lever.
Figure 3-19.Tactical Carry.
Figure 3-20. Alert Carry.
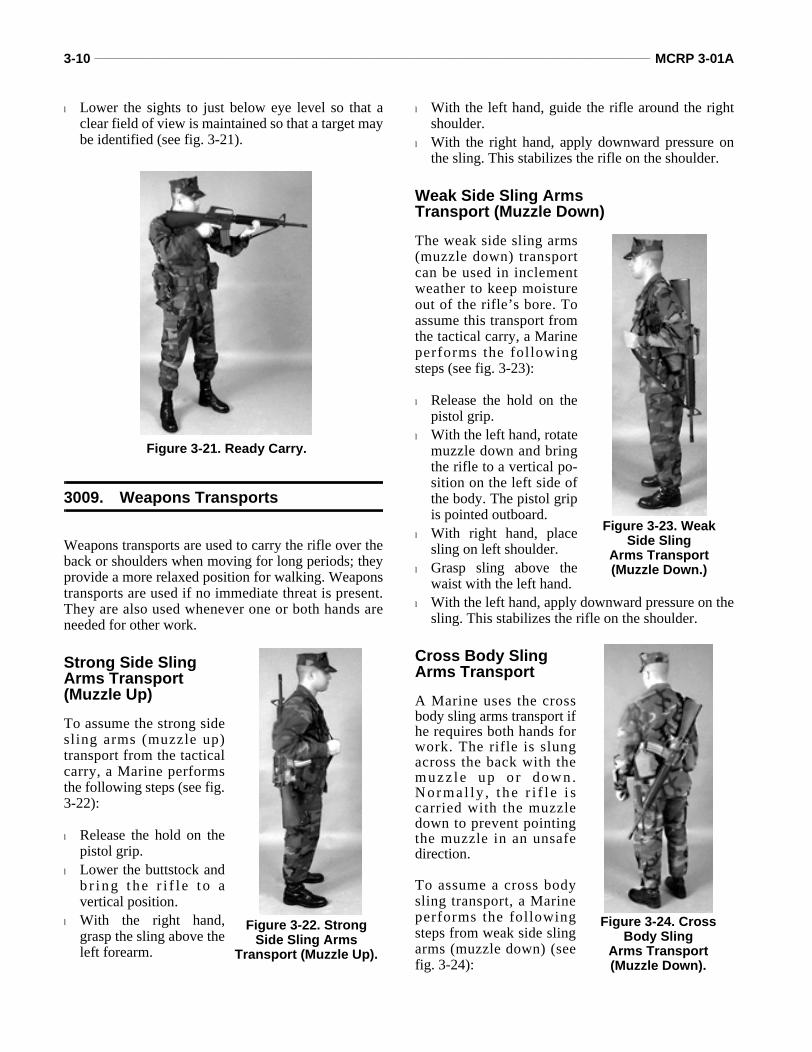
3-10 ______________________________________________________________________________________________ MCRP 3-01A
l Lower the sights to just below eye level so that aclear field of view is maintained so that a target maybe identified (see fig. 3-21).
3009. Weapons Transports
Weapons transports are used to carry the rifle over theback or shoulders when moving for long periods; theyprovide a more relaxed position for walking. Weaponstransports are used if no immediate threat is present.They are also used whenever one or both hands areneeded for other work.
Strong Side Sling Arms Transport (Muzzle Up)
To assume the strong sidesling arms (muzzle up)transport from the tacticalcarry, a Marine performsthe following steps (see fig.3-22):
l Release the hold on thepistol grip.
l Lower the buttstock andb r ing t he r i f l e t o avertical position.
l With the right hand,grasp the sling above theleft forearm.
l With the left hand, guide the rifle around the rightshoulder.
l With the right hand, apply downward pressure onthe sling. This stabilizes the rifle on the shoulder.
Weak Side Sling ArmsTransport (Muzzle Down)
The weak side sling arms(muzzle down) transportcan be used in inclementweather to keep moistureout of the rifle’s bore. Toassume this transport fromthe tactical carry, a Marineperforms the followingsteps (see fig. 3-23):
l Release the hold on thepistol grip.
l With the left hand, rotatemuzzle down and bringthe rifle to a vertical po-sition on the left side ofthe body. The pistol gripis pointed outboard.
l With right hand, placesling on left shoulder.
l Grasp sling above thewaist with the left hand.
l With the left hand, apply downward pressure on thesling. This stabilizes the rifle on the shoulder.
Cross Body Sling Arms Transport
A Marine uses the crossbody sling arms transport ifhe requires both hands forwork. The rifle is slungacross the back with themuz z l e up o r dow n .Norma l ly , t he r i f l e i scarried with the muzzledown to prevent pointingthe muzzle in an unsafedirection.
To assume a cross bodysling transport, a Marineperforms the followingsteps from weak side slingarms (muzzle down) (seefig. 3-24):
Figure 3-21. Ready Carry.
Figure 3-22. Strong Side Sling Arms
Transport (Muzzle Up).
Figure 3-23. Weak Side Sling
Arms Transport(Muzzle Down.)
Figure 3-24. Cross Body Sling
Arms Transport(Muzzle Down).
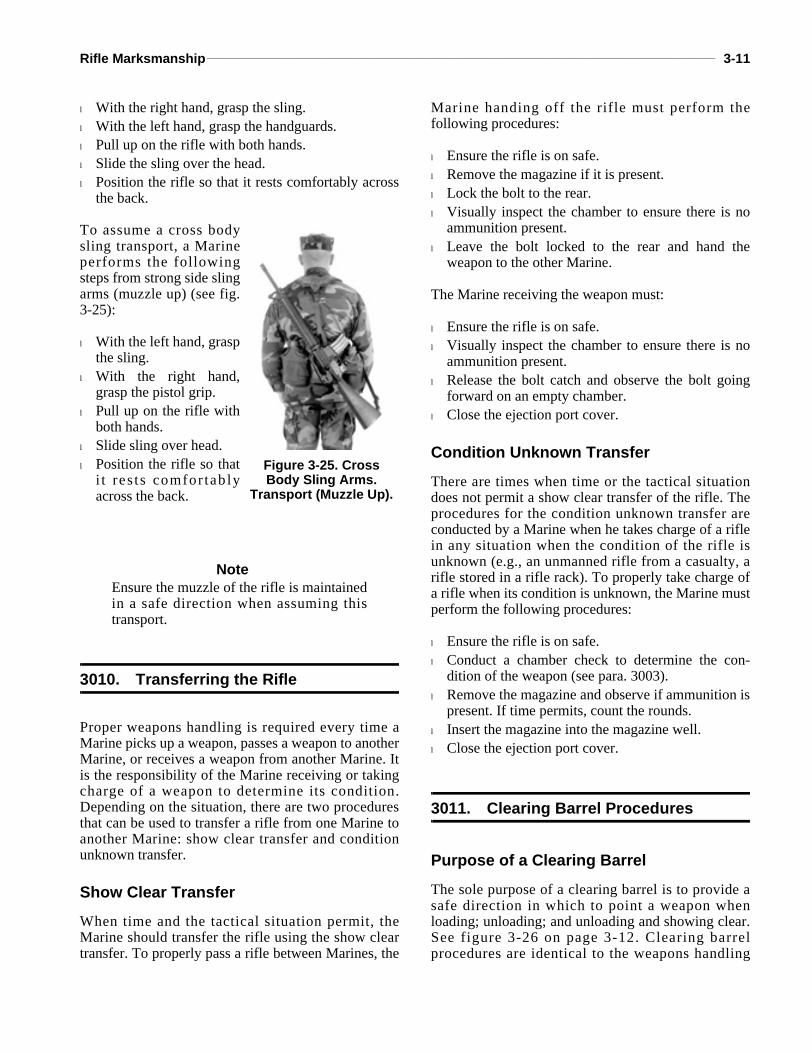
Rifle Marksmanship______________________________________________________________________________________ 3-11
l With the right hand, grasp the sling.l With the left hand, grasp the handguards.l Pull up on the rifle with both hands.l Slide the sling over the head.l Position the rifle so that it rests comfortably across
the back.
To assume a cross bodysling transport, a Marineperforms the followingsteps from strong side slingarms (muzzle up) (see fig.3-25):
l With the left hand, graspthe sling.
l With the right hand,grasp the pistol grip.
l Pull up on the rifle withboth hands.
l Slide sling over head.l Position the rifle so that
i t res ts comfor tab lyacross the back.
NoteEnsure the muzzle of the rifle is maintainedin a safe direction when assuming thistransport.
3010. Transferring the Rifle
Proper weapons handling is required every time aMarine picks up a weapon, passes a weapon to anotherMarine, or receives a weapon from another Marine. Itis the responsibility of the Marine receiving or takingcharge of a weapon to determine its condition.Depending on the situation, there are two proceduresthat can be used to transfer a rifle from one Marine toanother Marine: show clear transfer and conditionunknown transfer.
Show Clear Transfer
When time and the tactical situation permit, theMarine should transfer the rifle using the show cleartransfer. To properly pass a rifle between Marines, the
Marine handing off the rifle must perform thefollowing procedures:
l Ensure the rifle is on safe.l Remove the magazine if it is present.l Lock the bolt to the rear.l Visually inspect the chamber to ensure there is no
ammunition present.l Leave the bolt locked to the rear and hand the
weapon to the other Marine.
The Marine receiving the weapon must:
l Ensure the rifle is on safe.l Visually inspect the chamber to ensure there is no
ammunition present.l Release the bolt catch and observe the bolt going
forward on an empty chamber.l Close the ejection port cover.
Condition Unknown Transfer
There are times when time or the tactical situationdoes not permit a show clear transfer of the rifle. Theprocedures for the condition unknown transfer areconducted by a Marine when he takes charge of a riflein any situation when the condition of the rifle isunknown (e.g., an unmanned rifle from a casualty, arifle stored in a rifle rack). To properly take charge ofa rifle when its condition is unknown, the Marine mustperform the following procedures:
l Ensure the rifle is on safe.l Conduct a chamber check to determine the con-
dition of the weapon (see para. 3003).l Remove the magazine and observe if ammunition is
present. If time permits, count the rounds.l Insert the magazine into the magazine well.l Close the ejection port cover.
3011. Clearing Barrel Procedures
Purpose of a Clearing Barrel
The sole purpose of a clearing barrel is to provide asafe direction in which to point a weapon whenloading; unloading; and unloading and showing clear.See figure 3-26 on page 3-12. Clearing barrelprocedures are identical to the weapons handling
Figure 3-25. Cross Body Sling Arms.
Transport (Muzzle Up).
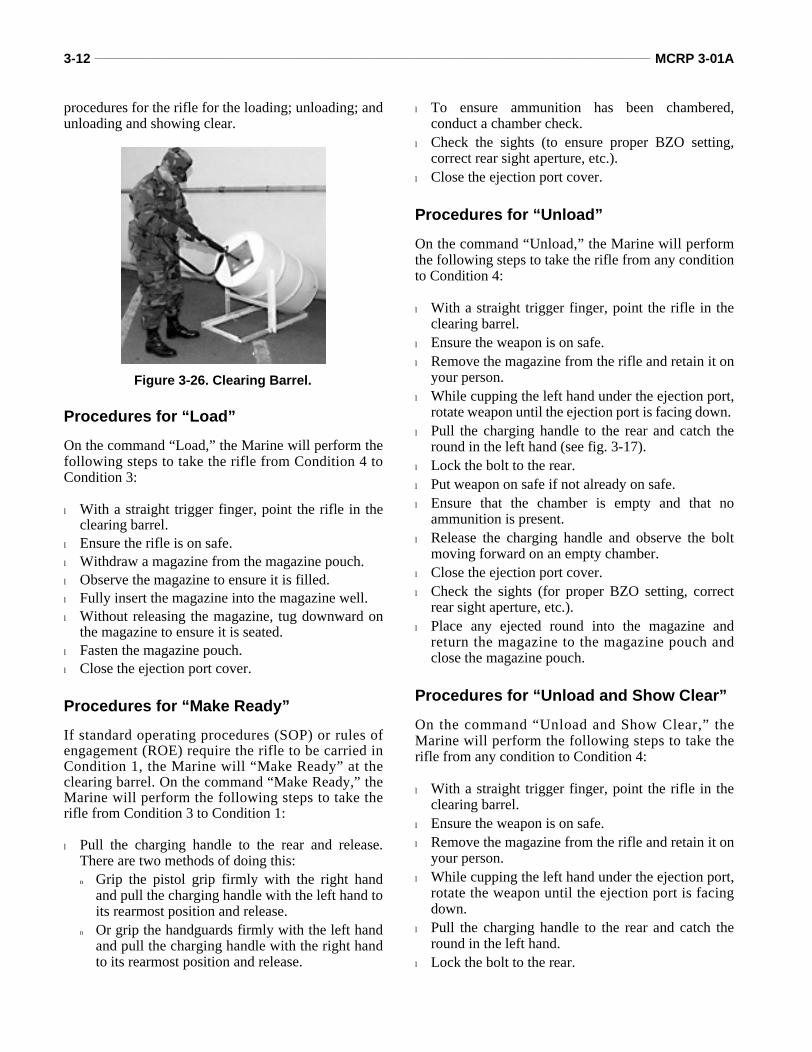
3-12 ______________________________________________________________________________________________ MCRP 3-01A
procedures for the rifle for the loading; unloading; andunloading and showing clear.
Procedures for “Load”
On the command “Load,” the Marine will perform thefollowing steps to take the rifle from Condition 4 toCondition 3:
l With a straight trigger finger, point the rifle in theclearing barrel.
l Ensure the rifle is on safe. l Withdraw a magazine from the magazine pouch.l Observe the magazine to ensure it is filled.l Fully insert the magazine into the magazine well.l Without releasing the magazine, tug downward on
the magazine to ensure it is seated.l Fasten the magazine pouch.l Close the ejection port cover.
Procedures for “Make Ready”
If standard operating procedures (SOP) or rules ofengagement (ROE) require the rifle to be carried inCondition 1, the Marine will “Make Ready” at theclearing barrel. On the command “Make Ready,” theMarine will perform the following steps to take therifle from Condition 3 to Condition 1:
l Pull the charging handle to the rear and release.There are two methods of doing this:n Grip the pistol grip firmly with the right hand
and pull the charging handle with the left hand toits rearmost position and release.
n Or grip the handguards firmly with the left handand pull the charging handle with the right handto its rearmost position and release.
l To ensure ammunition has been chambered,conduct a chamber check.
l Check the sights (to ensure proper BZO setting,correct rear sight aperture, etc.).
l Close the ejection port cover.
Procedures for “Unload”
On the command “Unload,” the Marine will performthe following steps to take the rifle from any conditionto Condition 4:
l With a straight trigger finger, point the rifle in theclearing barrel.
l Ensure the weapon is on safe.l Remove the magazine from the rifle and retain it on
your person.l While cupping the left hand under the ejection port,
rotate weapon until the ejection port is facing down. l Pull the charging handle to the rear and catch the
round in the left hand (see fig. 3-17).l Lock the bolt to the rear.l Put weapon on safe if not already on safe.l Ensure that the chamber is empty and that no
ammunition is present.l Release the charging handle and observe the bolt
moving forward on an empty chamber.l Close the ejection port cover.l Check the sights (for proper BZO setting, correct
rear sight aperture, etc.).l Place any ejected round into the magazine and
return the magazine to the magazine pouch andclose the magazine pouch.
Procedures for “Unload and Show Clear”
On the command “Unload and Show Clear,” theMarine will perform the following steps to take therifle from any condition to Condition 4:
l With a straight trigger finger, point the rifle in theclearing barrel.
l Ensure the weapon is on safe.l Remove the magazine from the rifle and retain it on
your person.l While cupping the left hand under the ejection port,
rotate the weapon until the ejection port is facingdown.
l Pull the charging handle to the rear and catch theround in the left hand.
l Lock the bolt to the rear.
Figure 3-26. Clearing Barrel.
Rifle Marksmanship______________________________________________________________________________________ 3-13
l Ensure the chamber is empty and no ammunition ispresent.
l Have an observer inspect the weapon to ensure noammunition is present. The observer:
n Visually inspects chamber to ensure it is empty,no ammunition is present, and the magazine isremoved.
n Ensures the weapon is on safe.
n Acknowledges the rifle is clear.
l After receiving acknowledgment from the observerthat the rifle is clear, the Marine releases the boltcatch and observes the bolt moving forward on anempty chamber.
l Close the ejection port cover.l Check the sights (for proper BZO setting, correct
rear sight aperture, etc.).l Place any ejected round into the magazine and
return the magazine to the magazine pouch andclose the magazine pouch.
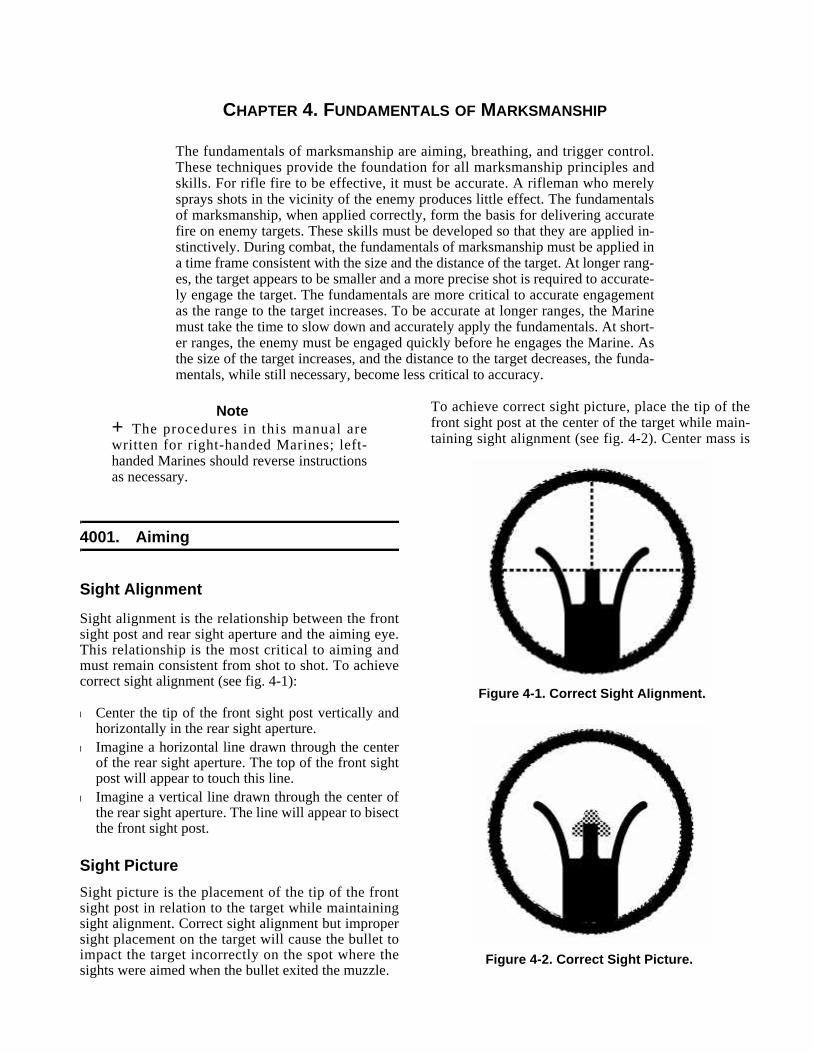
CHAPTER 4. FUNDAMENTALS OF MARKSMANSHIP
The fundamentals of marksmanship are aiming, breathing, and trigger control.These techniques provide the foundation for all marksmanship principles andskills. For rifle fire to be effective, it must be accurate. A rifleman who merelysprays shots in the vicinity of the enemy produces little effect. The fundamentalsof marksmanship, when applied correctly, form the basis for delivering accuratefire on enemy targets. These skills must be developed so that they are applied in-stinctively. During combat, the fundamentals of marksmanship must be applied ina time frame consistent with the size and the distance of the target. At longer rang-es, the target appears to be smaller and a more precise shot is required to accurate-ly engage the target. The fundamentals are more critical to accurate engagementas the range to the target increases. To be accurate at longer ranges, the Marinemust take the time to slow down and accurately apply the fundamentals. At short-er ranges, the enemy must be engaged quickly before he engages the Marine. Asthe size of the target increases, and the distance to the target decreases, the funda-mentals, while still necessary, become less critical to accuracy.
Note+The procedures in this manual arewritten for right-handed Marines; left-handed Marines should reverse instructionsas necessary.
4001. Aiming
Sight Alignment
Sight alignment is the relationship between the frontsight post and rear sight aperture and the aiming eye.This relationship is the most critical to aiming andmust remain consistent from shot to shot. To achievecorrect sight alignment (see fig. 4-1):
l Center the tip of the front sight post vertically andhorizontally in the rear sight aperture.
l Imagine a horizontal line drawn through the centerof the rear sight aperture. The top of the front sightpost will appear to touch this line.
l Imagine a vertical line drawn through the center ofthe rear sight aperture. The line will appear to bisectthe front sight post.
Sight PictureSight picture is the placement of the tip of the frontsight post in relation to the target while maintainingsight alignment. Correct sight alignment but impropersight placement on the target will cause the bullet toimpact the target incorrectly on the spot where thesights were aimed when the bullet exited the muzzle.
To achieve correct sight picture, place the tip of thefront sight post at the center of the target while main-taining sight alignment (see fig. 4-2). Center mass is
Figure 4-1. Correct Sight Alignment.
Figure 4-2. Correct Sight Picture.
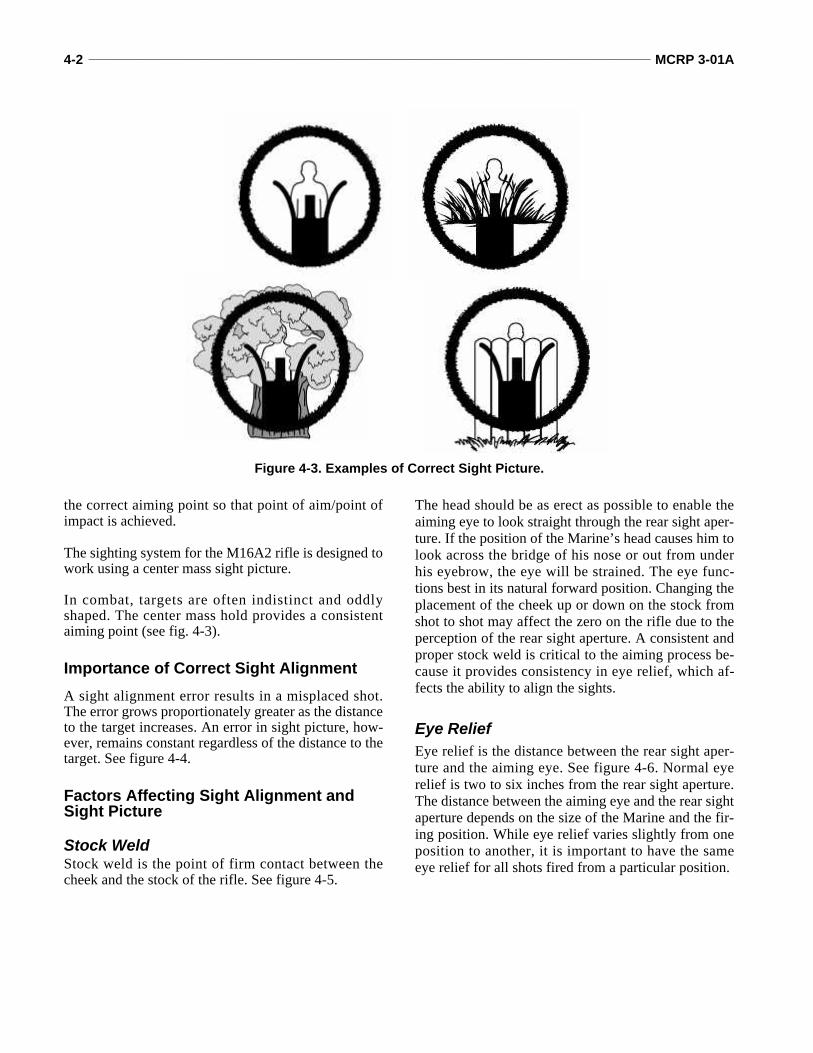
4-2 _______________________________________________________________________________________________ MCRP 3-01A
the correct aiming point so that point of aim/point ofimpact is achieved.
The sighting system for the M16A2 rifle is designed towork using a center mass sight picture.
In combat, targets are often indistinct and oddlyshaped. The center mass hold provides a consistentaiming point (see fig. 4-3).
Importance of Correct Sight AlignmentA sight alignment error results in a misplaced shot.The error grows proportionately greater as the distanceto the target increases. An error in sight picture, how-ever, remains constant regardless of the distance to thetarget. See figure 4-4.
Factors Affecting Sight Alignment and Sight Picture
Stock WeldStock weld is the point of firm contact between thecheek and the stock of the rifle. See figure 4-5.
The head should be as erect as possible to enable theaiming eye to look straight through the rear sight aper-ture. If the position of the Marine’s head causes him tolook across the bridge of his nose or out from underhis eyebrow, the eye will be strained. The eye func-tions best in its natural forward position. Changing theplacement of the cheek up or down on the stock fromshot to shot may affect the zero on the rifle due to theperception of the rear sight aperture. A consistent andproper stock weld is critical to the aiming process be-cause it provides consistency in eye relief, which af-fects the ability to align the sights.
Eye ReliefEye relief is the distance between the rear sight aper-ture and the aiming eye. See figure 4-6. Normal eyerelief is two to six inches from the rear sight aperture.The distance between the aiming eye and the rear sightaperture depends on the size of the Marine and the fir-ing position. While eye relief varies slightly from oneposition to another, it is important to have the sameeye relief for all shots fired from a particular position.
Figure 4-3. Examples of Correct Sight Picture.
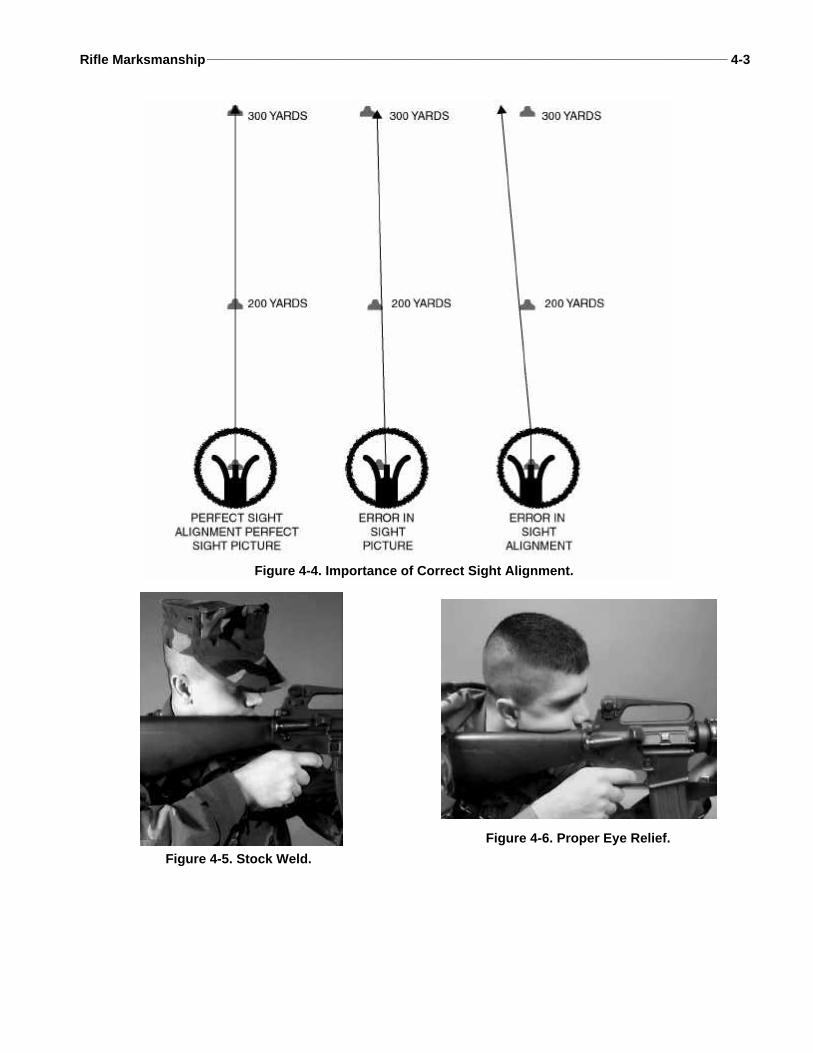
Rifle Marksmanship________________________________________________________________________________________ 4-3
Figure 4-4. Importance of Correct Sight Alignment.
Figure 4-5. Stock Weld.Figure 4-6. Proper Eye Relief.
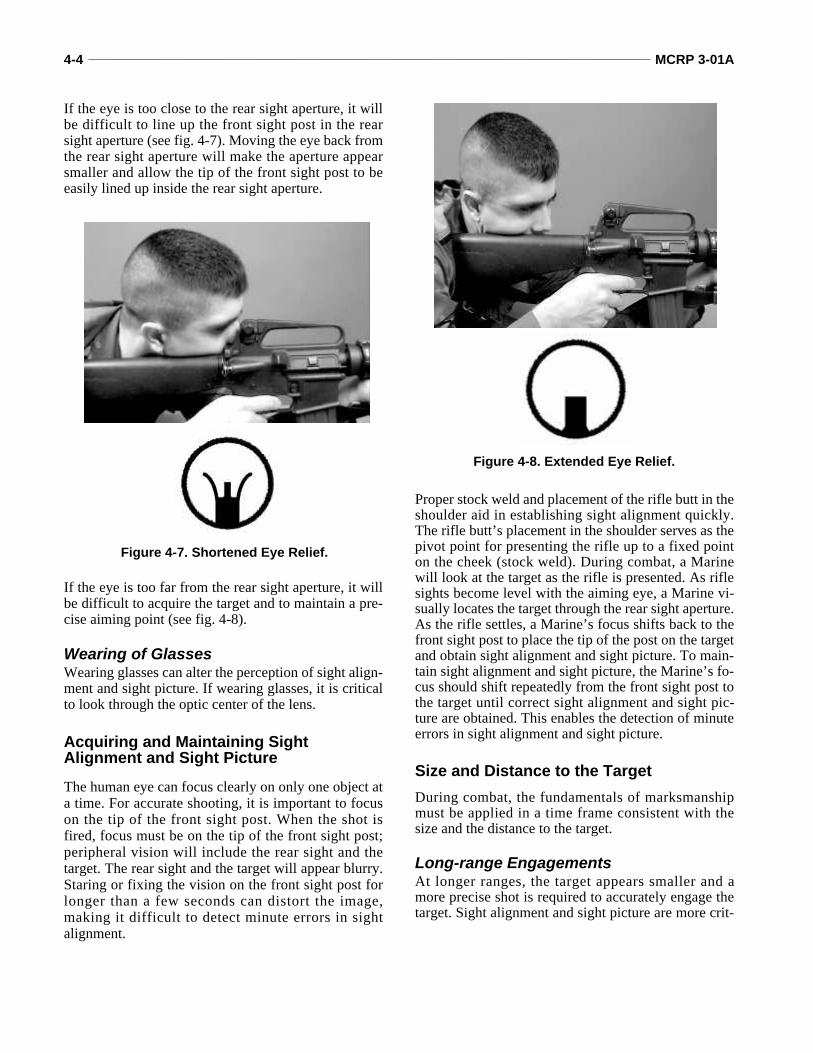
4-4 _______________________________________________________________________________________________ MCRP 3-01A
If the eye is too close to the rear sight aperture, it willbe difficult to line up the front sight post in the rearsight aperture (see fig. 4-7). Moving the eye back fromthe rear sight aperture will make the aperture appearsmaller and allow the tip of the front sight post to beeasily lined up inside the rear sight aperture.
If the eye is too far from the rear sight aperture, it willbe difficult to acquire the target and to maintain a pre-cise aiming point (see fig. 4-8).
Wearing of GlassesWearing glasses can alter the perception of sight align-ment and sight picture. If wearing glasses, it is criticalto look through the optic center of the lens.
Acquiring and Maintaining Sight Alignment and Sight PictureThe human eye can focus clearly on only one object ata time. For accurate shooting, it is important to focuson the tip of the front sight post. When the shot isfired, focus must be on the tip of the front sight post;peripheral vision will include the rear sight and thetarget. The rear sight and the target will appear blurry.Staring or fixing the vision on the front sight post forlonger than a few seconds can distort the image,making it difficult to detect minute errors in sightalignment.
Proper stock weld and placement of the rifle butt in theshoulder aid in establishing sight alignment quickly.The rifle butt’s placement in the shoulder serves as thepivot point for presenting the rifle up to a fixed pointon the cheek (stock weld). During combat, a Marinewill look at the target as the rifle is presented. As riflesights become level with the aiming eye, a Marine vi-sually locates the target through the rear sight aperture.As the rifle settles, a Marine’s focus shifts back to thefront sight post to place the tip of the post on the targetand obtain sight alignment and sight picture. To main-tain sight alignment and sight picture, the Marine’s fo-cus should shift repeatedly from the front sight post tothe target until correct sight alignment and sight pic-ture are obtained. This enables the detection of minuteerrors in sight alignment and sight picture.
Size and Distance to the TargetDuring combat, the fundamentals of marksmanshipmust be applied in a time frame consistent with thesize and the distance to the target.
Long-range EngagementsAt longer ranges, the target appears smaller and amore precise shot is required to accurately engage thetarget. Sight alignment and sight picture are more crit-
Figure 4-7. Shortened Eye Relief.
Figure 4-8. Extended Eye Relief.
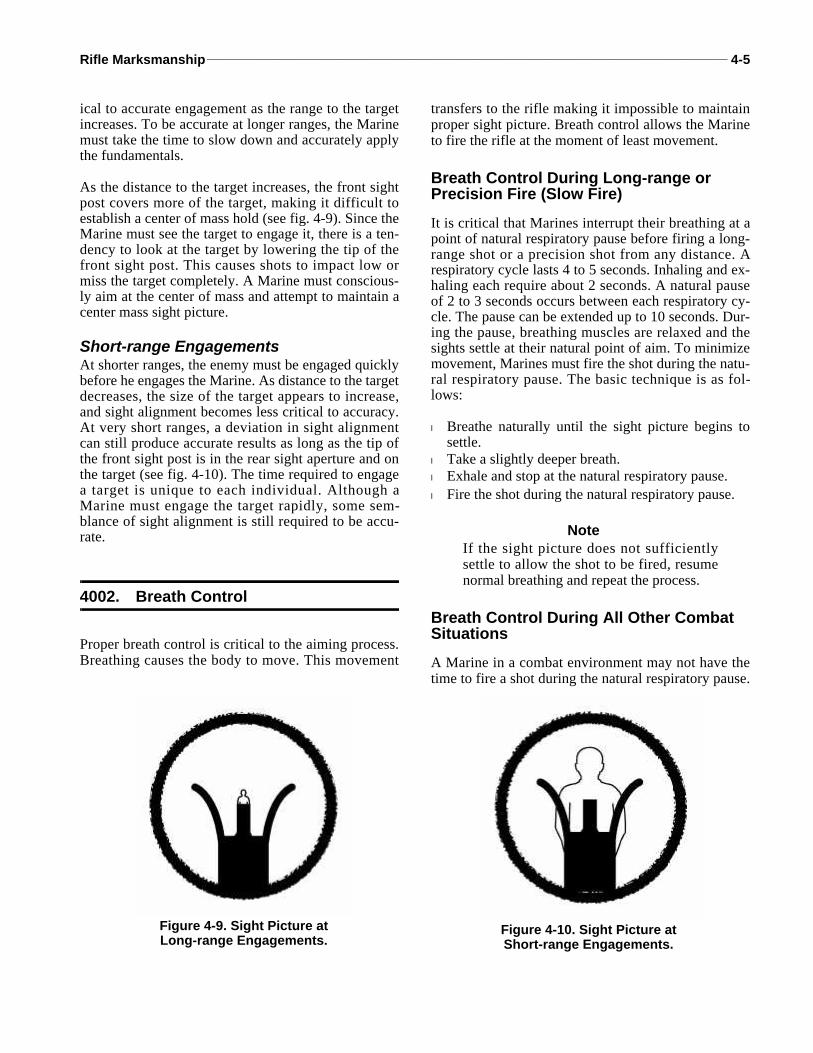
Rifle Marksmanship________________________________________________________________________________________ 4-5
ical to accurate engagement as the range to the targetincreases. To be accurate at longer ranges, the Marinemust take the time to slow down and accurately applythe fundamentals.
As the distance to the target increases, the front sightpost covers more of the target, making it difficult toestablish a center of mass hold (see fig. 4-9). Since theMarine must see the target to engage it, there is a ten-dency to look at the target by lowering the tip of thefront sight post. This causes shots to impact low ormiss the target completely. A Marine must conscious-ly aim at the center of mass and attempt to maintain acenter mass sight picture.
Short-range EngagementsAt shorter ranges, the enemy must be engaged quicklybefore he engages the Marine. As distance to the targetdecreases, the size of the target appears to increase,and sight alignment becomes less critical to accuracy.At very short ranges, a deviation in sight alignmentcan still produce accurate results as long as the tip ofthe front sight post is in the rear sight aperture and onthe target (see fig. 4-10). The time required to engagea target is unique to each individual. Although aMarine must engage the target rapidly, some sem-blance of sight alignment is still required to be accu-rate.
4002. Breath Control
Proper breath control is critical to the aiming process.Breathing causes the body to move. This movement
transfers to the rifle making it impossible to maintainproper sight picture. Breath control allows the Marineto fire the rifle at the moment of least movement.
Breath Control During Long-range or Precision Fire (Slow Fire)It is critical that Marines interrupt their breathing at apoint of natural respiratory pause before firing a long-range shot or a precision shot from any distance. Arespiratory cycle lasts 4 to 5 seconds. Inhaling and ex-haling each require about 2 seconds. A natural pauseof 2 to 3 seconds occurs between each respiratory cy-cle. The pause can be extended up to 10 seconds. Dur-ing the pause, breathing muscles are relaxed and thesights settle at their natural point of aim. To minimizemovement, Marines must fire the shot during the natu-ral respiratory pause. The basic technique is as fol-lows:
l Breathe naturally until the sight picture begins tosettle.
l Take a slightly deeper breath.l Exhale and stop at the natural respiratory pause.l Fire the shot during the natural respiratory pause.
NoteIf the sight picture does not sufficientlysettle to allow the shot to be fired, resumenormal breathing and repeat the process.
Breath Control During All Other Combat SituationsA Marine in a combat environment may not have thetime to fire a shot during the natural respiratory pause.
Figure 4-9. Sight Picture atLong-range Engagements.
Figure 4-10. Sight Picture atShort-range Engagements.
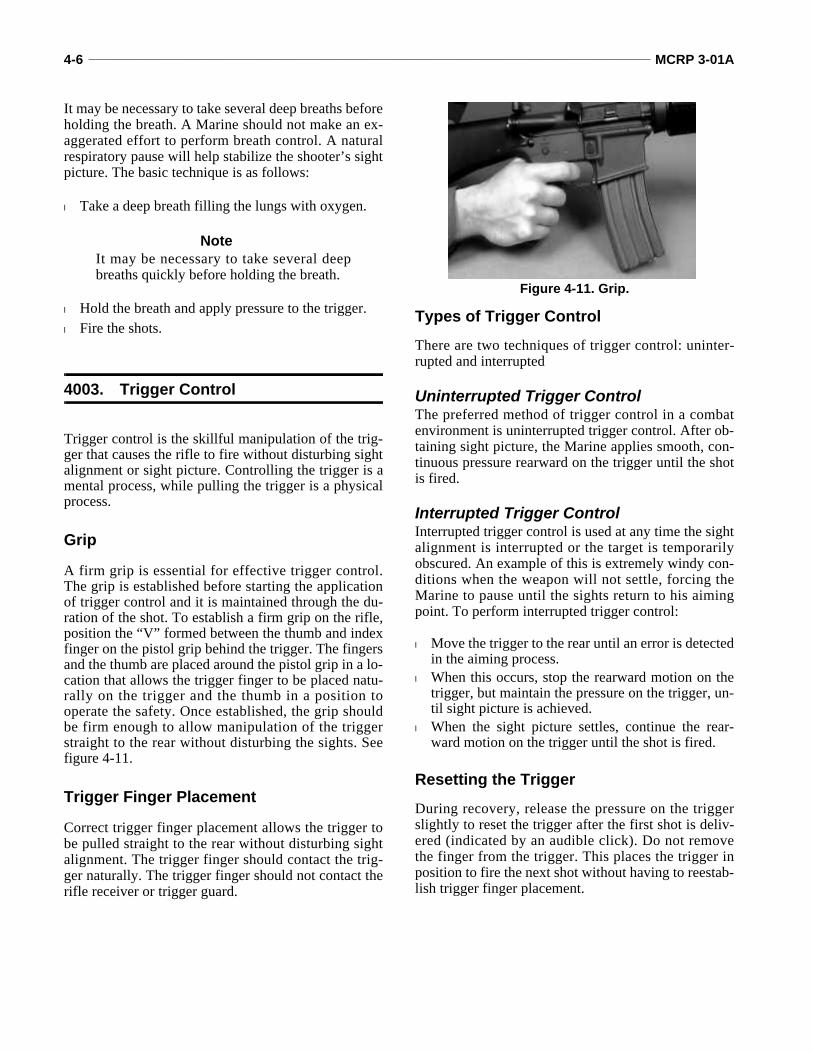
4-6 _______________________________________________________________________________________________ MCRP 3-01A
It may be necessary to take several deep breaths beforeholding the breath. A Marine should not make an ex-aggerated effort to perform breath control. A naturalrespiratory pause will help stabilize the shooter’s sightpicture. The basic technique is as follows:
l Take a deep breath filling the lungs with oxygen.
NoteIt may be necessary to take several deepbreaths quickly before holding the breath.
l Hold the breath and apply pressure to the trigger.l Fire the shots.
4003. Trigger Control
Trigger control is the skillful manipulation of the trig-ger that causes the rifle to fire without disturbing sightalignment or sight picture. Controlling the trigger is amental process, while pulling the trigger is a physicalprocess.
Grip
A firm grip is essential for effective trigger control.The grip is established before starting the applicationof trigger control and it is maintained through the du-ration of the shot. To establish a firm grip on the rifle,position the “V” formed between the thumb and indexfinger on the pistol grip behind the trigger. The fingersand the thumb are placed around the pistol grip in a lo-cation that allows the trigger finger to be placed natu-rally on the trigger and the thumb in a position tooperate the safety. Once established, the grip shouldbe firm enough to allow manipulation of the triggerstraight to the rear without disturbing the sights. Seefigure 4-11.
Trigger Finger Placement
Correct trigger finger placement allows the trigger tobe pulled straight to the rear without disturbing sightalignment. The trigger finger should contact the trig-ger naturally. The trigger finger should not contact therifle receiver or trigger guard.
Types of Trigger ControlThere are two techniques of trigger control: uninter-rupted and interrupted
Uninterrupted Trigger ControlThe preferred method of trigger control in a combatenvironment is uninterrupted trigger control. After ob-taining sight picture, the Marine applies smooth, con-tinuous pressure rearward on the trigger until the shotis fired.
Interrupted Trigger ControlInterrupted trigger control is used at any time the sightalignment is interrupted or the target is temporarilyobscured. An example of this is extremely windy con-ditions when the weapon will not settle, forcing theMarine to pause until the sights return to his aimingpoint. To perform interrupted trigger control:
l Move the trigger to the rear until an error is detectedin the aiming process.
l When this occurs, stop the rearward motion on thetrigger, but maintain the pressure on the trigger, un-til sight picture is achieved.
l When the sight picture settles, continue the rear-ward motion on the trigger until the shot is fired.
Resetting the TriggerDuring recovery, release the pressure on the triggerslightly to reset the trigger after the first shot is deliv-ered (indicated by an audible click). Do not removethe finger from the trigger. This places the trigger inposition to fire the next shot without having to reestab-lish trigger finger placement.
Figure 4-11. Grip.
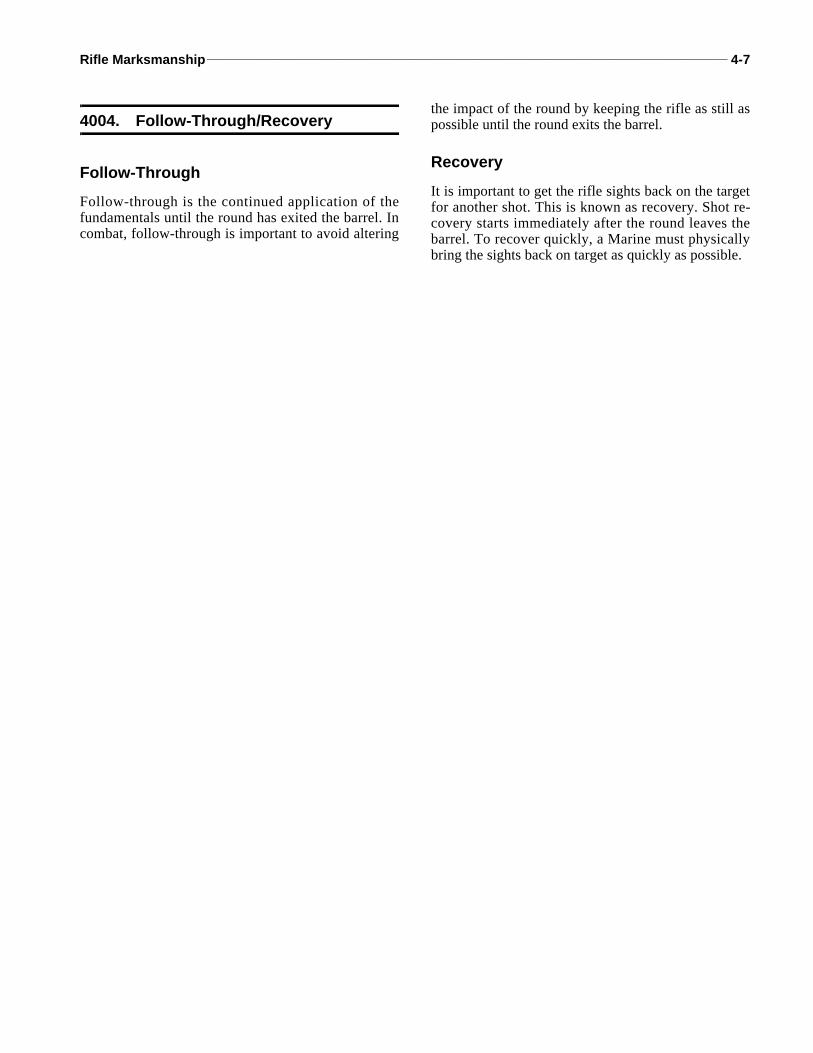
Rifle Marksmanship________________________________________________________________________________________ 4-7
4004. Follow-Through/Recovery
Follow-ThroughFollow-through is the continued application of thefundamentals until the round has exited the barrel. Incombat, follow-through is important to avoid altering
the impact of the round by keeping the rifle as still aspossible until the round exits the barrel.
RecoveryIt is important to get the rifle sights back on the targetfor another shot. This is known as recovery. Shot re-covery starts immediately after the round leaves thebarrel. To recover quickly, a Marine must physicallybring the sights back on target as quickly as possible.
CHAPTER 5. RIFLE FIRING POSITIONS
In a combat environment, a Marine must be prepared to engage the enemy underany circumstance. There are four basic firing positions: prone, sitting, kneeling,and standing. These positions provide a stable foundation for effective shooting.Any firing position must provide stability, mobility, and observation of the ene-my. During training, a Marine learns positions in a step-by-step process, guidedby a series of precise movements until the Marine assumes a correct position. Thepurpose of this is to ensure that the Marine correctly applies all of the factors thatassist him in holding the rifle steady. The Marine will gradually become accus-tomed to the feel of the positions through practice and eventually will be able toknow instinctively whether his position is correct. In combat, it may not be possi-ble to assume a textbook firing position due to terrain, available cover, engage-ment time, dispersion of targets, and other limiting factors. Modifications to thebasic positions may have to be made to adjust to the combat environment. TheMarine must strive to assume a position that offers stability for firing, maximumcover and concealment from the enemy, and maximum observation of the target.
Note+The procedures in this manual are writtenfor right-handed Marines; left-handedMarines should reverse instructions asnecessary.
5001. Selecting a Firing Position
The selection of a firing position (prone, sitting, kneel-ing, standing) is based on terrain, available cover, dis-persion of targets, and other limiting factors. A Marinemust select a position that offers stability, mobility,and observation.
Stability
A firing position must provide a stable platform foraccurate and consistent shooting. If the position is sol-id, the front sight can be held steady and the riflesights should recover after recoil to the same positionon the target. This allows for rapid reengagement ofthe enemy. The prone position provides the most sta-bility for firing, while the standing position providesthe least stability.
Mobility
A firing position must provide a Marine with themobility required to move to new cover or to anotherarea. The standing position permits maximum mobili-ty, and it also allows the most lateral movement forengagement of widely dispersed targets. The prone po-
sition allows the least mobility and allows limited lat-eral movement.
Observation of the Enemy
A firing position must limit a Marine’s exposure to theenemy, yet allow observation of the enemy. Manmadestructures and terrain features (e.g., vegetation, earthcontours) often dictate the shooting position. Thestanding position normally provides the best field ofview, but it usually allows the most exposure to the en-emy. The prone position normally allows the least ex-posure, but it usually provides a limited field of view.
5002. Types and Uses of the Rifle Web Sling
The rifle sling, when adjusted properly, provides max-imum stability for the weapon, and helps hold the frontsight still and reduce the effects of the rifle’s recoil.Once a sling adjustment is found that provides maxi-mum control of the weapon, the same sling adjustmentshould be maintained. Varying the sling tension exten-sively will affect the strike of the bullet, which willmake maintaining a BZO difficult. Using the samesling adjustment will ensure the accuracy of rounds ontarget. There are two basic types of rifle sling adjust-ments: the hasty sling and loop sling.
NoteIn training situations, the parade sling maybe used. See paragraph 5008.

5-2 _______________________________________________________________________________________________ MCRP 3-01A
Hasty Sling
ApplicationThe hasty sling is used in all firing positions. Thehasty sling is advantageous in combat because it canbe acquired quickly and it provides added stability tothe rifle. The same sling setting can be used for all fir-ing positions. If properly adjusted, the hasty sling sup-ports the weight of the weapon, provides stability forthe rifle, and reduces the effects of the rifle’s recoil.When using the hasty sling, controlled muscle tensionis applied to offer resistance against the sling, enablingthe rifle sights to be held steady.
Donning the HastySlingA Marine performs the follow-ing steps to form a hasty sling:
l Hold the rifle vertical withthe barrel pointing upward.
l Unhook the J-hook from thelower sling swivel.
l Loosen the sling keeper.l Adjust the sling until the
J-hook hangs below the ri-fle butt. (The distance willvary based on the individualMarine, but the J-hook willusually hang approximate-ly 3 to 10 inches below therifle butt.) Secure the slingkeeper. See figure 5-1.
l Turn the sling a half turnoutboard to allow the slingto lay flat against the arm.
l Attach the J-hook to thelower sling swivel so theopen end of the J-hook fac-es outboard, away from therifle. See figure 5-2.
l While holding the rifle withthe right hand, place the leftarm through the sling nearthe lower sling swivel. Slidethe arm up through the slingbelow the half twist. Thesling makes contact low on
the arm just below the triceps, above the elbow. Thesling lies flat on the back of the arm.
l With the left hand, grasp the handguard by pinchingit in the “V” formed by the thumb and forefinger.The sling lies flat against the back or side of thewrist or on the arm near the wrist. See figure 5-3.
l Move the left hand as required to level the rifle withthe line of sight. Placement of the forward handcontrols the tension on the sling between the backof the wrist or arm and the upper sling swivel (seefig. 5-4). This hand placement, with a straightlocked wrist, will cause the sling to pull straight un-der the handguards and serves to stabilize the frontsight of the rifle.
l Move the feed end of the sling in or out of the slingkeeper to adjust the hasty sling. Sling tension is in-
Figure 5-1. J-hook Location.
Figure 5-2. J-hook Turned Outboard.
Figure 5-3. Sling Against the Wrist.
Figure 5-4. Position of Forward Hand.
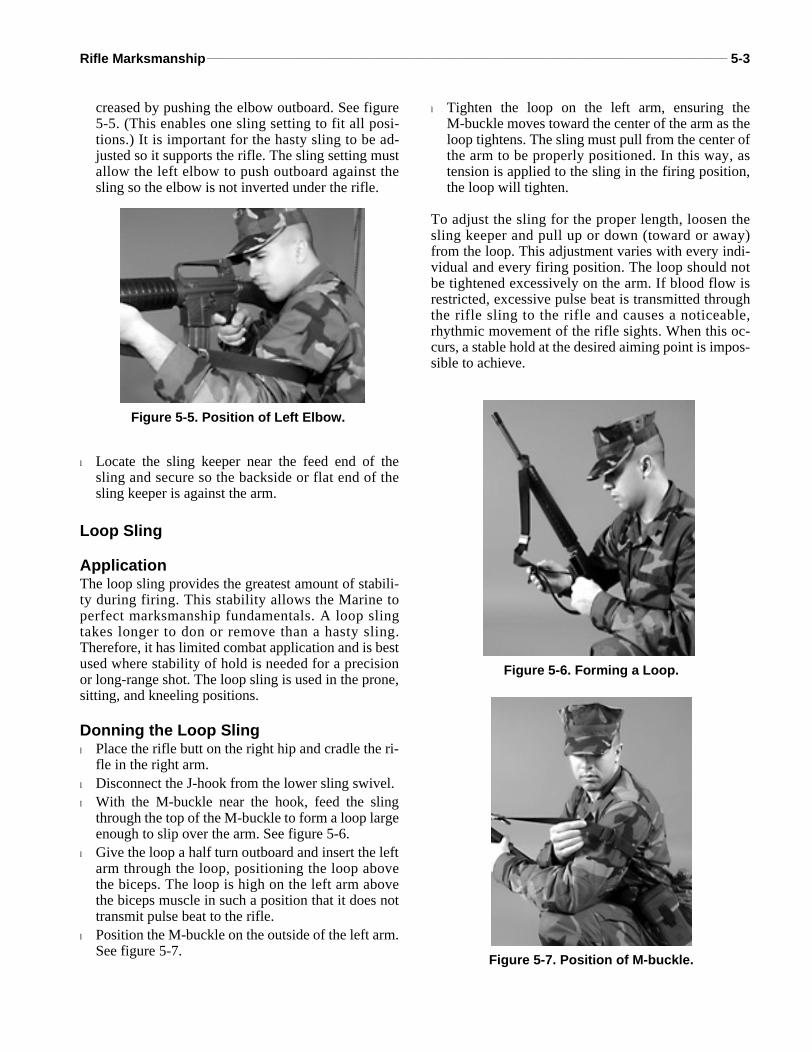
Rifle Marksmanship________________________________________________________________________________________ 5-3
creased by pushing the elbow outboard. See figure5-5. (This enables one sling setting to fit all posi-tions.) It is important for the hasty sling to be ad-justed so it supports the rifle. The sling setting mustallow the left elbow to push outboard against thesling so the elbow is not inverted under the rifle.
l Locate the sling keeper near the feed end of thesling and secure so the backside or flat end of thesling keeper is against the arm.
Loop Sling
ApplicationThe loop sling provides the greatest amount of stabili-ty during firing. This stability allows the Marine toperfect marksmanship fundamentals. A loop slingtakes longer to don or remove than a hasty sling.Therefore, it has limited combat application and is bestused where stability of hold is needed for a precisionor long-range shot. The loop sling is used in the prone,sitting, and kneeling positions.
Donning the Loop Slingl Place the rifle butt on the right hip and cradle the ri-
fle in the right arm.l Disconnect the J-hook from the lower sling swivel.l With the M-buckle near the hook, feed the sling
through the top of the M-buckle to form a loop largeenough to slip over the arm. See figure 5-6.
l Give the loop a half turn outboard and insert the leftarm through the loop, positioning the loop abovethe biceps. The loop is high on the left arm abovethe biceps muscle in such a position that it does nottransmit pulse beat to the rifle.
l Position the M-buckle on the outside of the left arm.See figure 5-7.
l Tighten the loop on the left arm, ensuring theM-buckle moves toward the center of the arm as theloop tightens. The sling must pull from the center ofthe arm to be properly positioned. In this way, astension is applied to the sling in the firing position,the loop will tighten.
To adjust the sling for the proper length, loosen thesling keeper and pull up or down (toward or away)from the loop. This adjustment varies with every indi-vidual and every firing position. The loop should notbe tightened excessively on the arm. If blood flow isrestricted, excessive pulse beat is transmitted throughthe rifle sling to the rifle and causes a noticeable,rhythmic movement of the rifle sights. When this oc-curs, a stable hold at the desired aiming point is impos-sible to achieve.
Figure 5-5. Position of Left Elbow.
Figure 5-6. Forming a Loop.
Figure 5-7. Position of M-buckle.
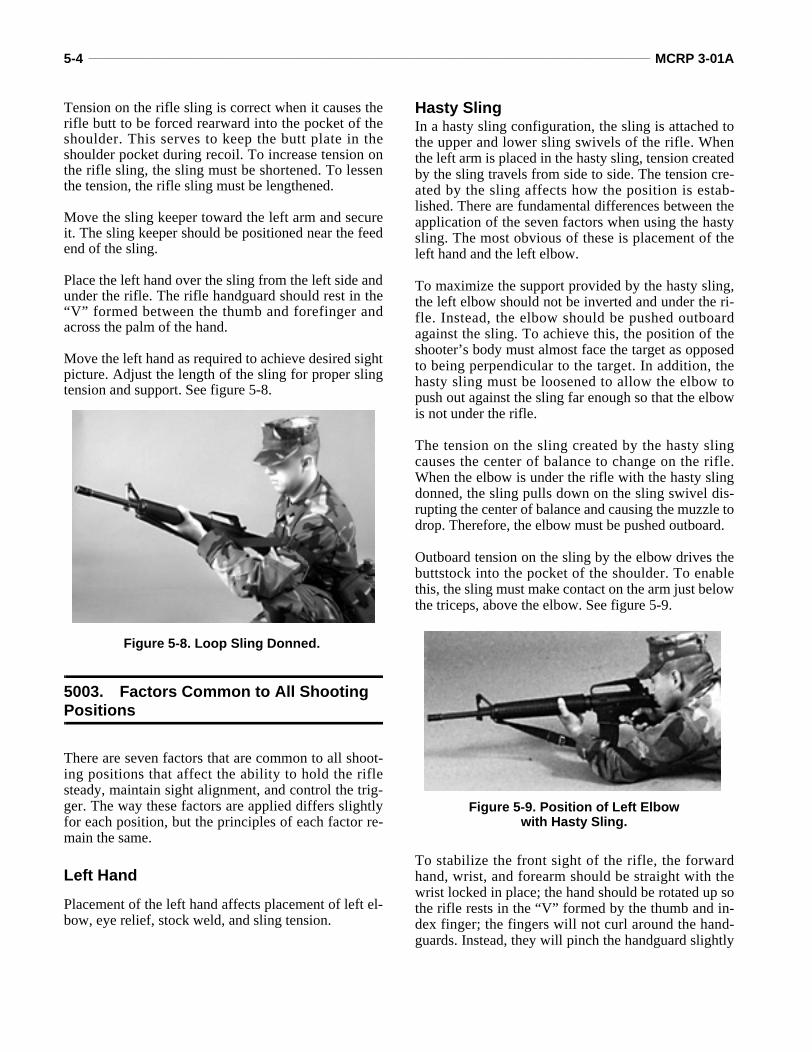
5-4 _______________________________________________________________________________________________ MCRP 3-01A
Tension on the rifle sling is correct when it causes therifle butt to be forced rearward into the pocket of theshoulder. This serves to keep the butt plate in theshoulder pocket during recoil. To increase tension onthe rifle sling, the sling must be shortened. To lessenthe tension, the rifle sling must be lengthened.
Move the sling keeper toward the left arm and secureit. The sling keeper should be positioned near the feedend of the sling.
Place the left hand over the sling from the left side andunder the rifle. The rifle handguard should rest in the“V” formed between the thumb and forefinger andacross the palm of the hand.
Move the left hand as required to achieve desired sightpicture. Adjust the length of the sling for proper slingtension and support. See figure 5-8.
5003. Factors Common to All Shooting Positions
There are seven factors that are common to all shoot-ing positions that affect the ability to hold the riflesteady, maintain sight alignment, and control the trig-ger. The way these factors are applied differs slightlyfor each position, but the principles of each factor re-main the same.
Left Hand
Placement of the left hand affects placement of left el-bow, eye relief, stock weld, and sling tension.
Hasty SlingIn a hasty sling configuration, the sling is attached tothe upper and lower sling swivels of the rifle. Whenthe left arm is placed in the hasty sling, tension createdby the sling travels from side to side. The tension cre-ated by the sling affects how the position is estab-lished. There are fundamental differences between theapplication of the seven factors when using the hastysling. The most obvious of these is placement of theleft hand and the left elbow.
To maximize the support provided by the hasty sling,the left elbow should not be inverted and under the ri-fle. Instead, the elbow should be pushed outboardagainst the sling. To achieve this, the position of theshooter’s body must almost face the target as opposedto being perpendicular to the target. In addition, thehasty sling must be loosened to allow the elbow topush out against the sling far enough so that the elbowis not under the rifle.
The tension on the sling created by the hasty slingcauses the center of balance to change on the rifle.When the elbow is under the rifle with the hasty slingdonned, the sling pulls down on the sling swivel dis-rupting the center of balance and causing the muzzle todrop. Therefore, the elbow must be pushed outboard.
Outboard tension on the sling by the elbow drives thebuttstock into the pocket of the shoulder. To enablethis, the sling must make contact on the arm just belowthe triceps, above the elbow. See figure 5-9.
To stabilize the front sight of the rifle, the forwardhand, wrist, and forearm should be straight with thewrist locked in place; the hand should be rotated up sothe rifle rests in the “V” formed by the thumb and in-dex finger; the fingers will not curl around the hand-guards. Instead, they will pinch the handguard slightly
Figure 5-8. Loop Sling Donned.
Figure 5-9. Position of Left Elbowwith Hasty Sling.
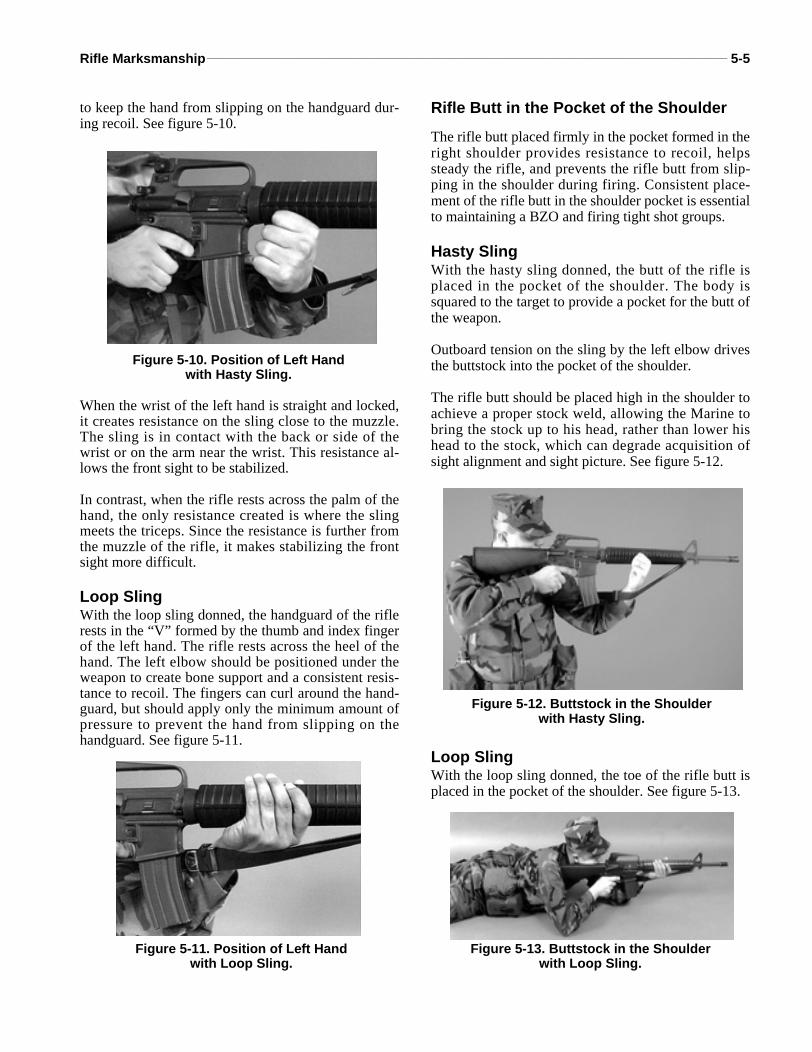
Rifle Marksmanship________________________________________________________________________________________ 5-5
to keep the hand from slipping on the handguard dur-ing recoil. See figure 5-10.
When the wrist of the left hand is straight and locked,it creates resistance on the sling close to the muzzle.The sling is in contact with the back or side of thewrist or on the arm near the wrist. This resistance al-lows the front sight to be stabilized.
In contrast, when the rifle rests across the palm of thehand, the only resistance created is where the slingmeets the triceps. Since the resistance is further fromthe muzzle of the rifle, it makes stabilizing the frontsight more difficult.
Loop SlingWith the loop sling donned, the handguard of the riflerests in the “V” formed by the thumb and index fingerof the left hand. The rifle rests across the heel of thehand. The left elbow should be positioned under theweapon to create bone support and a consistent resis-tance to recoil. The fingers can curl around the hand-guard, but should apply only the minimum amount ofpressure to prevent the hand from slipping on thehandguard. See figure 5-11.
Rifle Butt in the Pocket of the Shoulder
The rifle butt placed firmly in the pocket formed in theright shoulder provides resistance to recoil, helpssteady the rifle, and prevents the rifle butt from slip-ping in the shoulder during firing. Consistent place-ment of the rifle butt in the shoulder pocket is essentialto maintaining a BZO and firing tight shot groups.
Hasty SlingWith the hasty sling donned, the butt of the rifle isplaced in the pocket of the shoulder. The body issquared to the target to provide a pocket for the butt ofthe weapon.
Outboard tension on the sling by the left elbow drivesthe buttstock into the pocket of the shoulder.
The rifle butt should be placed high in the shoulder toachieve a proper stock weld, allowing the Marine tobring the stock up to his head, rather than lower hishead to the stock, which can degrade acquisition ofsight alignment and sight picture. See figure 5-12.
Loop Sling With the loop sling donned, the toe of the rifle butt isplaced in the pocket of the shoulder. See figure 5-13.
Figure 5-10. Position of Left Handwith Hasty Sling.
Figure 5-11. Position of Left Handwith Loop Sling.
Figure 5-12. Buttstock in the Shoulderwith Hasty Sling.
Figure 5-13. Buttstock in the Shoulderwith Loop Sling.
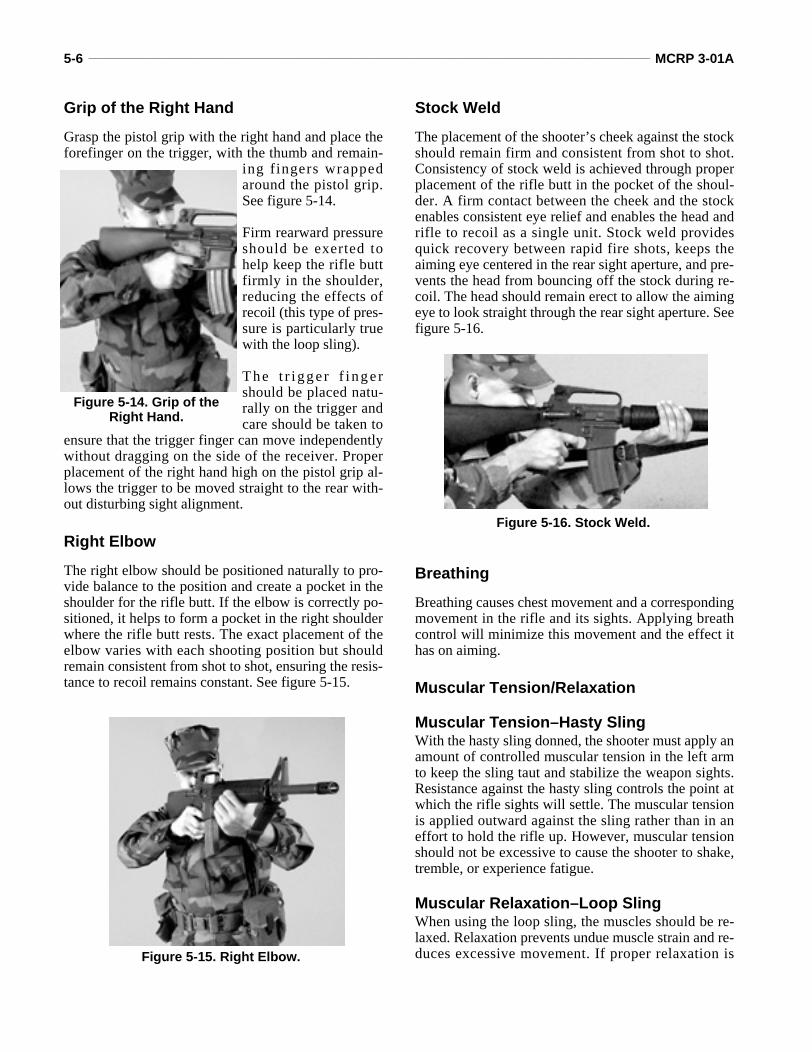
5-6 _______________________________________________________________________________________________ MCRP 3-01A
Grip of the Right Hand
Grasp the pistol grip with the right hand and place theforefinger on the trigger, with the thumb and remain-
ing fingers wrappedaround the pistol grip.See figure 5-14.
Firm rearward pressureshould be exerted tohelp keep the rifle buttfirmly in the shoulder,reducing the effects ofrecoil (this type of pres-sure is particularly truewith the loop sling).
The t r i gg e r f i ng e rshould be placed natu-rally on the trigger andcare should be taken to
ensure that the trigger finger can move independentlywithout dragging on the side of the receiver. Properplacement of the right hand high on the pistol grip al-lows the trigger to be moved straight to the rear with-out disturbing sight alignment.
Right Elbow
The right elbow should be positioned naturally to pro-vide balance to the position and create a pocket in theshoulder for the rifle butt. If the elbow is correctly po-sitioned, it helps to form a pocket in the right shoulderwhere the rifle butt rests. The exact placement of theelbow varies with each shooting position but shouldremain consistent from shot to shot, ensuring the resis-tance to recoil remains constant. See figure 5-15.
Stock Weld
The placement of the shooter’s cheek against the stockshould remain firm and consistent from shot to shot.Consistency of stock weld is achieved through properplacement of the rifle butt in the pocket of the shoul-der. A firm contact between the cheek and the stockenables consistent eye relief and enables the head andrifle to recoil as a single unit. Stock weld providesquick recovery between rapid fire shots, keeps theaiming eye centered in the rear sight aperture, and pre-vents the head from bouncing off the stock during re-coil. The head should remain erect to allow the aimingeye to look straight through the rear sight aperture. Seefigure 5-16.
Breathing
Breathing causes chest movement and a correspondingmovement in the rifle and its sights. Applying breathcontrol will minimize this movement and the effect ithas on aiming.
Muscular Tension/Relaxation
Muscular Tension–Hasty SlingWith the hasty sling donned, the shooter must apply anamount of controlled muscular tension in the left armto keep the sling taut and stabilize the weapon sights.Resistance against the hasty sling controls the point atwhich the rifle sights will settle. The muscular tensionis applied outward against the sling rather than in aneffort to hold the rifle up. However, muscular tensionshould not be excessive to cause the shooter to shake,tremble, or experience fatigue.
Muscular Relaxation–Loop SlingWhen using the loop sling, the muscles should be re-laxed. Relaxation prevents undue muscle strain and re-duces excessive movement. If proper relaxation is
Figure 5-14. Grip of the Right Hand.
Figure 5-15. Right Elbow.
Figure 5-16. Stock Weld.
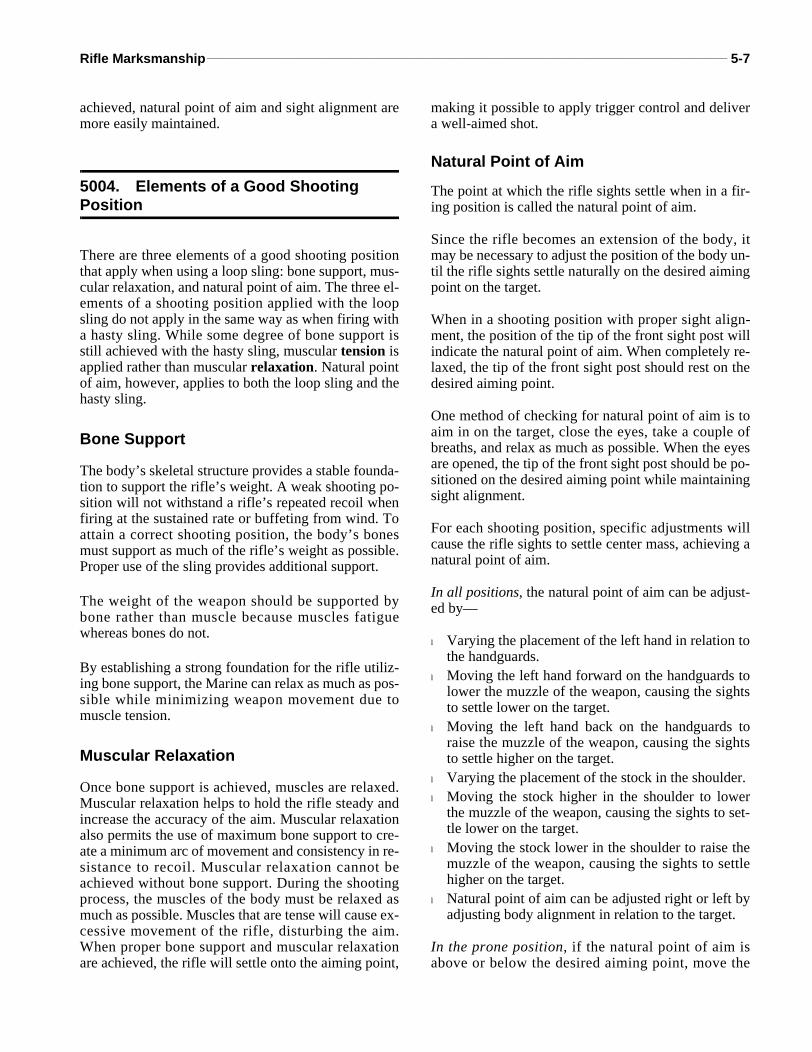
Rifle Marksmanship________________________________________________________________________________________ 5-7
achieved, natural point of aim and sight alignment aremore easily maintained.
5004. Elements of a Good Shooting Position
There are three elements of a good shooting positionthat apply when using a loop sling: bone support, mus-cular relaxation, and natural point of aim. The three el-ements of a shooting position applied with the loopsling do not apply in the same way as when firing witha hasty sling. While some degree of bone support isstill achieved with the hasty sling, muscular tension isapplied rather than muscular relaxation. Natural pointof aim, however, applies to both the loop sling and thehasty sling.
Bone Support
The body’s skeletal structure provides a stable founda-tion to support the rifle’s weight. A weak shooting po-sition will not withstand a rifle’s repeated recoil whenfiring at the sustained rate or buffeting from wind. Toattain a correct shooting position, the body’s bonesmust support as much of the rifle’s weight as possible.Proper use of the sling provides additional support.
The weight of the weapon should be supported bybone rather than muscle because muscles fatiguewhereas bones do not.
By establishing a strong foundation for the rifle utiliz-ing bone support, the Marine can relax as much as pos-sible while minimizing weapon movement due tomuscle tension.
Muscular Relaxation
Once bone support is achieved, muscles are relaxed.Muscular relaxation helps to hold the rifle steady andincrease the accuracy of the aim. Muscular relaxationalso permits the use of maximum bone support to cre-ate a minimum arc of movement and consistency in re-sistance to recoil. Muscular relaxation cannot beachieved without bone support. During the shootingprocess, the muscles of the body must be relaxed asmuch as possible. Muscles that are tense will cause ex-cessive movement of the rifle, disturbing the aim.When proper bone support and muscular relaxationare achieved, the rifle will settle onto the aiming point,
making it possible to apply trigger control and delivera well-aimed shot.
Natural Point of Aim
The point at which the rifle sights settle when in a fir-ing position is called the natural point of aim.
Since the rifle becomes an extension of the body, itmay be necessary to adjust the position of the body un-til the rifle sights settle naturally on the desired aimingpoint on the target.
When in a shooting position with proper sight align-ment, the position of the tip of the front sight post willindicate the natural point of aim. When completely re-laxed, the tip of the front sight post should rest on thedesired aiming point.
One method of checking for natural point of aim is toaim in on the target, close the eyes, take a couple ofbreaths, and relax as much as possible. When the eyesare opened, the tip of the front sight post should be po-sitioned on the desired aiming point while maintainingsight alignment.
For each shooting position, specific adjustments willcause the rifle sights to settle center mass, achieving anatural point of aim.
In all positions, the natural point of aim can be adjust-ed by—
l Varying the placement of the left hand in relation tothe handguards.
l Moving the left hand forward on the handguards tolower the muzzle of the weapon, causing the sightsto settle lower on the target.
l Moving the left hand back on the handguards toraise the muzzle of the weapon, causing the sightsto settle higher on the target.
l Varying the placement of the stock in the shoulder.l Moving the stock higher in the shoulder to lower
the muzzle of the weapon, causing the sights to set-tle lower on the target.
l Moving the stock lower in the shoulder to raise themuzzle of the weapon, causing the sights to settlehigher on the target.
l Natural point of aim can be adjusted right or left byadjusting body alignment in relation to the target.
In the prone position, if the natural point of aim isabove or below the desired aiming point, move the
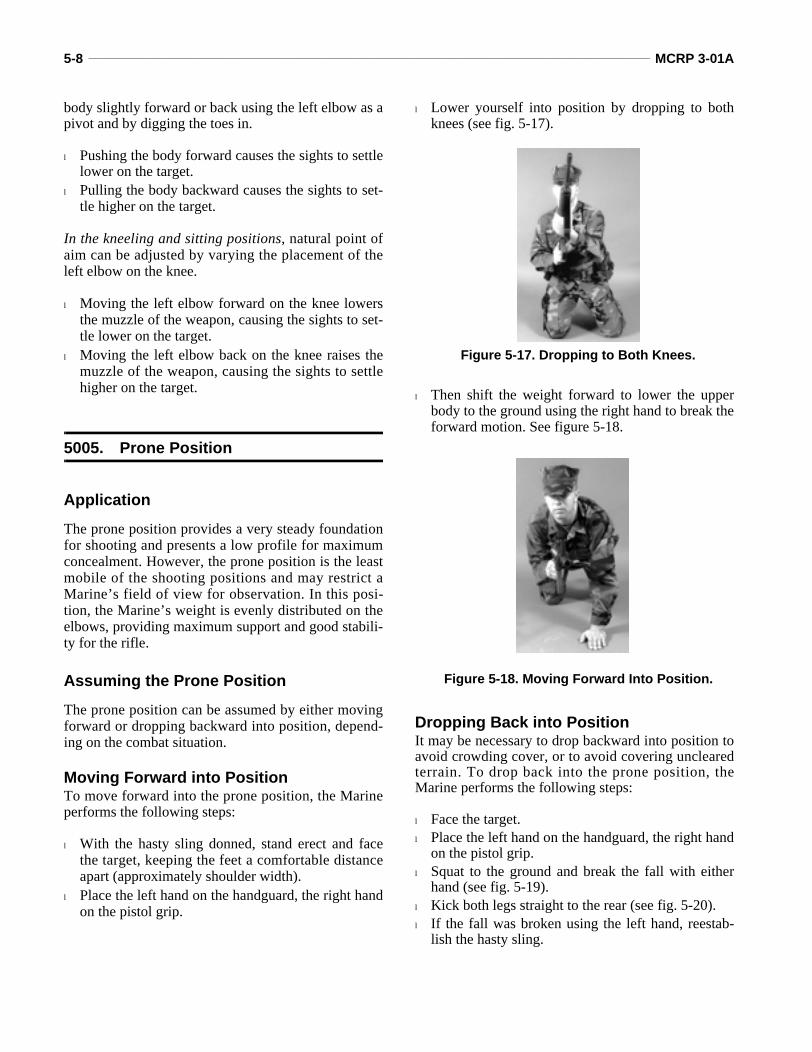
5-8 _______________________________________________________________________________________________ MCRP 3-01A
body slightly forward or back using the left elbow as apivot and by digging the toes in.
l Pushing the body forward causes the sights to settlelower on the target.
l Pulling the body backward causes the sights to set-tle higher on the target.
In the kneeling and sitting positions, natural point ofaim can be adjusted by varying the placement of theleft elbow on the knee.
l Moving the left elbow forward on the knee lowersthe muzzle of the weapon, causing the sights to set-tle lower on the target.
l Moving the left elbow back on the knee raises themuzzle of the weapon, causing the sights to settlehigher on the target.
5005. Prone Position
Application
The prone position provides a very steady foundationfor shooting and presents a low profile for maximumconcealment. However, the prone position is the leastmobile of the shooting positions and may restrict aMarine’s field of view for observation. In this posi-tion, the Marine’s weight is evenly distributed on theelbows, providing maximum support and good stabili-ty for the rifle.
Assuming the Prone Position
The prone position can be assumed by either movingforward or dropping backward into position, depend-ing on the combat situation.
Moving Forward into PositionTo move forward into the prone position, the Marineperforms the following steps:
l With the hasty sling donned, stand erect and facethe target, keeping the feet a comfortable distanceapart (approximately shoulder width).
l Place the left hand on the handguard, the right handon the pistol grip.
l Lower yourself into position by dropping to bothknees (see fig. 5-17).
l Then shift the weight forward to lower the upperbody to the ground using the right hand to break theforward motion. See figure 5-18.
Dropping Back into PositionIt may be necessary to drop backward into position toavoid crowding cover, or to avoid covering unclearedterrain. To drop back into the prone position, theMarine performs the following steps:
l Face the target.l Place the left hand on the handguard, the right hand
on the pistol grip.l Squat to the ground and break the fall with either
hand (see fig. 5-19).l Kick both legs straight to the rear (see fig. 5-20).l If the fall was broken using the left hand, reestab-
lish the hasty sling.
Figure 5-18. Moving Forward Into Position.
Figure 5-17. Dropping to Both Knees.

Rifle Marksmanship________________________________________________________________________________________ 5-9
Straight Leg Prone Position with the Hasty Sling
Apply the seven factors to this position (para. 5003).To assume the straight leg prone position with thehasty sling, either move forward or drop back into po-sition (see figs. 5-21, 5-22, and 5-23):
l Once on the ground, extend your left elbow in frontof you. Stretch your legs out behind you. Spread the
feet a comfortable distance apart with the toespointing outboard and the inner portion of the feetin contact with the ground.
l As much of the body mass should be aligned direct-ly behind the rifle as possible.
l If body alignment is correct, weapon recoil is ab-sorbed by the whole body and not just the shoulder.
l Grasp the pistol grip with the right hand and placethe rifle butt in the right shoulder pocket.
l Lower the head and place the cheek firmly againstthe stock to allow the aiming eye to look throughthe rear sight aperture.
l Rotate the left hand up, pinching the handguard be-tween the thumb and forefinger.
l Slide both elbows outboard on the ground so thereis outboard tension against the sling (moving the el-bows out tightens the sling) and both shoulders arelevel. The elbows should provide a tripod of sup-port with the body.
l Adjust the position of the left hand on the hand-guard to allow the sling to support the weapon andthe front sight to be centered in the rear sight aper-ture. To adjust for elevation:n Move the left hand rearward or forward on the
handguards (moving the hand rearward elevatesthe muzzle).
n Open or close “V” of the left hand for small ad-justments. (closing the “V” elevate the muzzle).
l To adjust for a minor cant in the rifle, rotate thehandguard left or right in the “V” formed by thethumb and forefinger by rotating the pistol grip leftor right.
Figure 5-19. Breaking the Fall.
Figure 5-20. Kicking Back Into Position.
Figure 5-22. Left View. Figure 5-23. Right View.
Figure 5-21. Front View.
Straight Leg Prone Position with the Hasty Sling

5-10 ______________________________________________________________________________________________ MCRP 3-01A
Straight Leg Prone Position with the Loop Sling
Apply the three elements and seven factors to this po-sition (para. 5004). To assume straight leg prone posi-tion with the loop sling, either move forward or dropback into position (see figs. 5-24, 5-25, and 5-26):
l Once on the ground, roll the body to the left side asyou extend and invert the left elbow on the ground.Stretch your legs out behind you. Spread the feet acomfortable distance apart with the toes pointingoutboard and the inner portion of the feet in contactwith the ground.
l As much of the body mass should be aligned direct-ly behind the rifle as possible.
l If body alignment is correct, weapon recoil is ab-sorbed by the whole body and not just the shoulder.
l Grasp the rifle butt with the right hand and place therifle butt into the right shoulder pocket.
l Grasp the pistol grip with the right hand.l Rotate the body to the right while the elbow is low-
ered to the ground so the shoulders are level. Theright hand pulls and holds the rifle in the shoulder.
l Lower the head and place the cheek firmly againstthe stock to allow the aiming eye to look throughthe rear sight aperture.
l Move the left hand to a location under the hand-guard, which provides maximum bone support andstability for the weapon. This may require that youremove the rifle from the shoulder to reposition theleft hand.
Figure 5-25. Left View. Figure 5-26. Right View.
Figure 5-24. Front View.
Straight Leg Prone Position with the Loop Sling
Figure 5-28. Left View. Figure 5-29. Right View.
Figure 5-27. Front View.
Cocked Leg Prone Position with the Hasty Sling
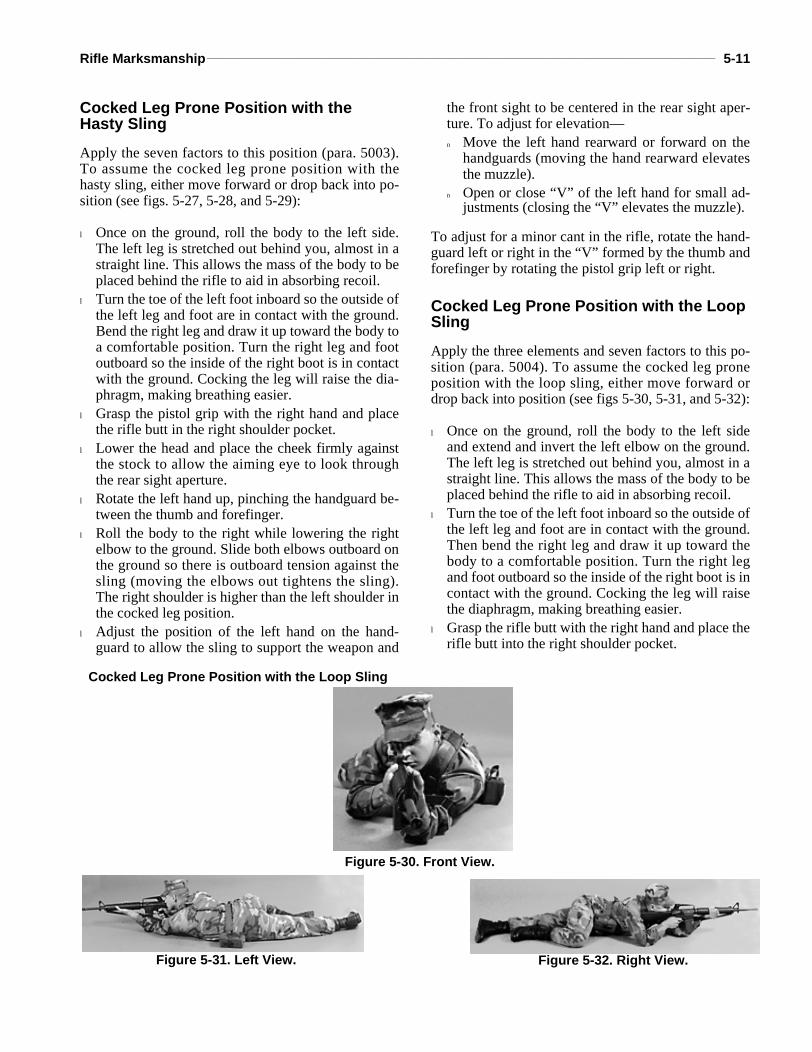
Rifle Marksmanship______________________________________________________________________________________ 5-11
Cocked Leg Prone Position with the Hasty Sling
Apply the seven factors to this position (para. 5003).To assume the cocked leg prone position with thehasty sling, either move forward or drop back into po-sition (see figs. 5-27, 5-28, and 5-29):
l Once on the ground, roll the body to the left side.The left leg is stretched out behind you, almost in astraight line. This allows the mass of the body to beplaced behind the rifle to aid in absorbing recoil.
l Turn the toe of the left foot inboard so the outside ofthe left leg and foot are in contact with the ground.Bend the right leg and draw it up toward the body toa comfortable position. Turn the right leg and footoutboard so the inside of the right boot is in contactwith the ground. Cocking the leg will raise the dia-phragm, making breathing easier.
l Grasp the pistol grip with the right hand and placethe rifle butt in the right shoulder pocket.
l Lower the head and place the cheek firmly againstthe stock to allow the aiming eye to look throughthe rear sight aperture.
l Rotate the left hand up, pinching the handguard be-tween the thumb and forefinger.
l Roll the body to the right while lowering the rightelbow to the ground. Slide both elbows outboard onthe ground so there is outboard tension against thesling (moving the elbows out tightens the sling).The right shoulder is higher than the left shoulder inthe cocked leg position.
l Adjust the position of the left hand on the hand-guard to allow the sling to support the weapon and
the front sight to be centered in the rear sight aper-ture. To adjust for elevation—n Move the left hand rearward or forward on the
handguards (moving the hand rearward elevatesthe muzzle).
n Open or close “V” of the left hand for small ad-justments (closing the “V” elevates the muzzle).
To adjust for a minor cant in the rifle, rotate the hand-guard left or right in the “V” formed by the thumb andforefinger by rotating the pistol grip left or right.
Cocked Leg Prone Position with the Loop Sling
Apply the three elements and seven factors to this po-sition (para. 5004). To assume the cocked leg proneposition with the loop sling, either move forward ordrop back into position (see figs 5-30, 5-31, and 5-32):
l Once on the ground, roll the body to the left sideand extend and invert the left elbow on the ground.The left leg is stretched out behind you, almost in astraight line. This allows the mass of the body to beplaced behind the rifle to aid in absorbing recoil.
l Turn the toe of the left foot inboard so the outside ofthe left leg and foot are in contact with the ground.Then bend the right leg and draw it up toward thebody to a comfortable position. Turn the right legand foot outboard so the inside of the right boot is incontact with the ground. Cocking the leg will raisethe diaphragm, making breathing easier.
l Grasp the rifle butt with the right hand and place therifle butt into the right shoulder pocket.
Figure 5-31. Left View. Figure 5-32. Right View.
Figure 5-30. Front View.
Cocked Leg Prone Position with the Loop Sling
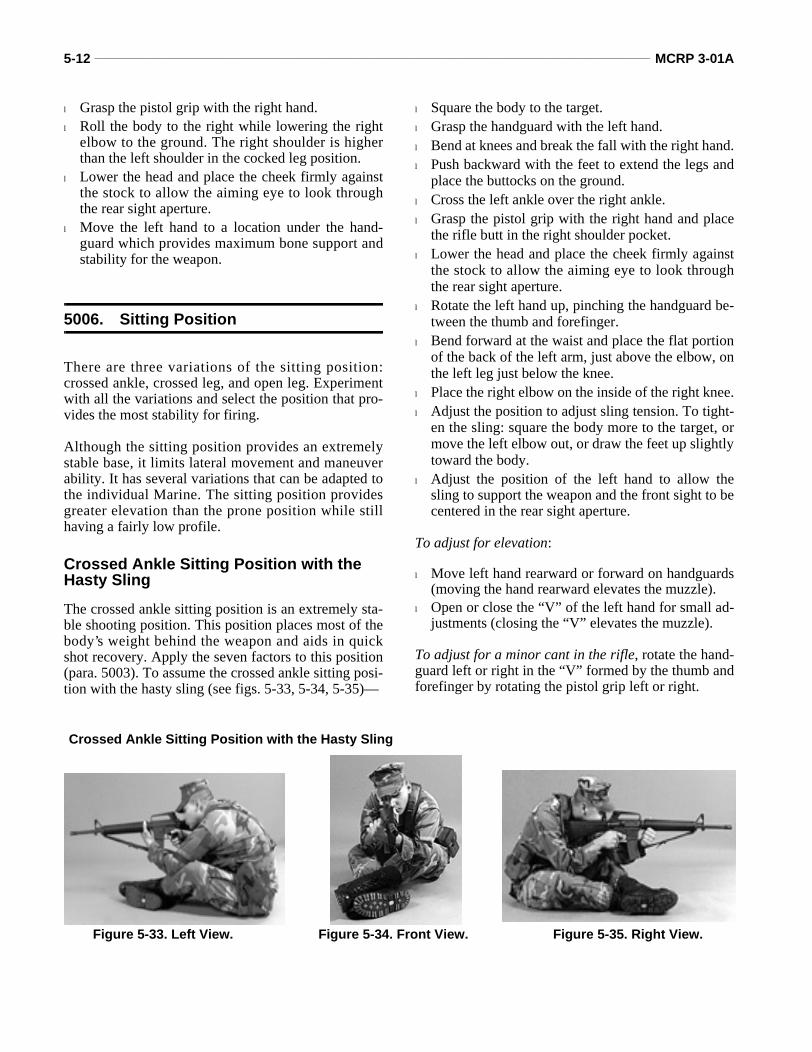
5-12 ______________________________________________________________________________________________ MCRP 3-01A
l Grasp the pistol grip with the right hand.l Roll the body to the right while lowering the right
elbow to the ground. The right shoulder is higherthan the left shoulder in the cocked leg position.
l Lower the head and place the cheek firmly againstthe stock to allow the aiming eye to look throughthe rear sight aperture.
l Move the left hand to a location under the hand-guard which provides maximum bone support andstability for the weapon.
5006. Sitting Position
There are three variations of the sitting position:crossed ankle, crossed leg, and open leg. Experimentwith all the variations and select the position that pro-vides the most stability for firing.
Although the sitting position provides an extremelystable base, it limits lateral movement and maneuverability. It has several variations that can be adapted tothe individual Marine. The sitting position providesgreater elevation than the prone position while stillhaving a fairly low profile.
Crossed Ankle Sitting Position with the Hasty Sling
The crossed ankle sitting position is an extremely sta-ble shooting position. This position places most of thebody’s weight behind the weapon and aids in quickshot recovery. Apply the seven factors to this position(para. 5003). To assume the crossed ankle sitting posi-tion with the hasty sling (see figs. 5-33, 5-34, 5-35)—
l Square the body to the target.l Grasp the handguard with the left hand.l Bend at knees and break the fall with the right hand.l Push backward with the feet to extend the legs and
place the buttocks on the ground.l Cross the left ankle over the right ankle.l Grasp the pistol grip with the right hand and place
the rifle butt in the right shoulder pocket.l Lower the head and place the cheek firmly against
the stock to allow the aiming eye to look throughthe rear sight aperture.
l Rotate the left hand up, pinching the handguard be-tween the thumb and forefinger.
l Bend forward at the waist and place the flat portionof the back of the left arm, just above the elbow, onthe left leg just below the knee.
l Place the right elbow on the inside of the right knee.l Adjust the position to adjust sling tension. To tight-
en the sling: square the body more to the target, ormove the left elbow out, or draw the feet up slightlytoward the body.
l Adjust the position of the left hand to allow thesling to support the weapon and the front sight to becentered in the rear sight aperture.
To adjust for elevation:
l Move left hand rearward or forward on handguards(moving the hand rearward elevates the muzzle).
l Open or close the “V” of the left hand for small ad-justments (closing the “V” elevates the muzzle).
To adjust for a minor cant in the rifle, rotate the hand-guard left or right in the “V” formed by the thumb andforefinger by rotating the pistol grip left or right.
Crossed Ankle Sitting Position with the Hasty Sling
Figure 5-33. Left View. Figure 5-34. Front View. Figure 5-35. Right View.
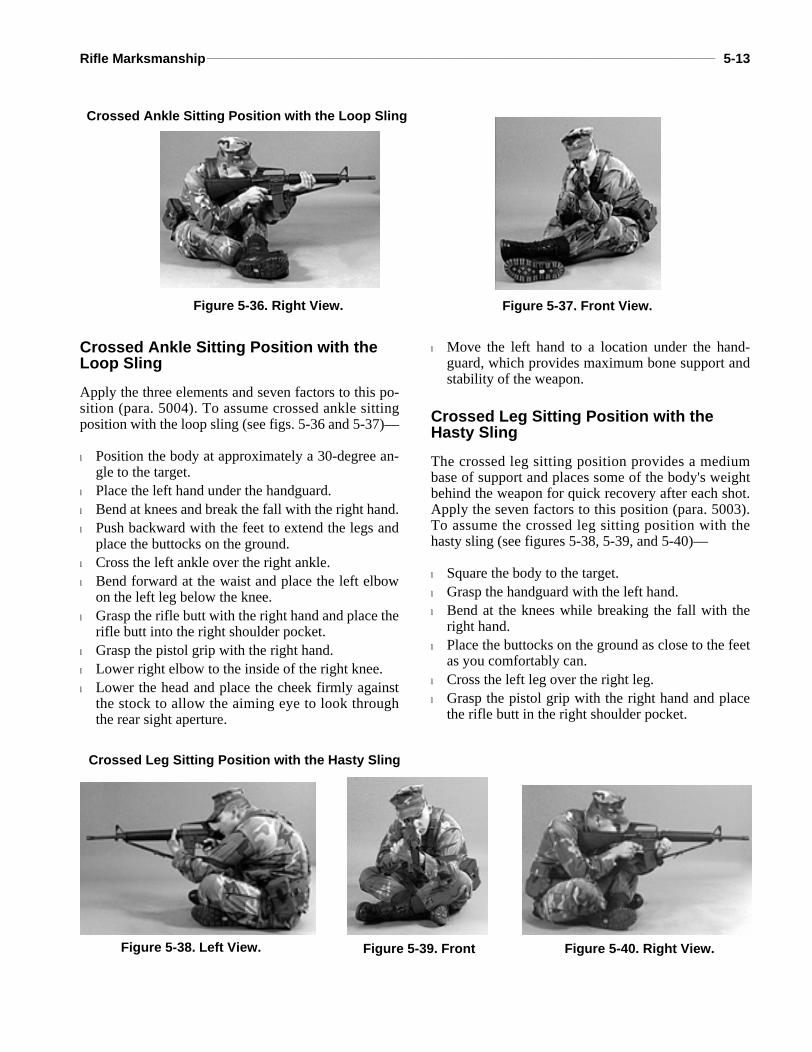
Rifle Marksmanship______________________________________________________________________________________ 5-13
Crossed Ankle Sitting Position with the Loop Sling
Apply the three elements and seven factors to this po-sition (para. 5004). To assume crossed ankle sittingposition with the loop sling (see figs. 5-36 and 5-37)—
l Position the body at approximately a 30-degree an-gle to the target.
l Place the left hand under the handguard.l Bend at knees and break the fall with the right hand.l Push backward with the feet to extend the legs and
place the buttocks on the ground.l Cross the left ankle over the right ankle.l Bend forward at the waist and place the left elbow
on the left leg below the knee.l Grasp the rifle butt with the right hand and place the
rifle butt into the right shoulder pocket. l Grasp the pistol grip with the right hand.l Lower right elbow to the inside of the right knee.l Lower the head and place the cheek firmly against
the stock to allow the aiming eye to look throughthe rear sight aperture.
l Move the left hand to a location under the hand-guard, which provides maximum bone support andstability of the weapon.
Crossed Leg Sitting Position with the Hasty Sling
The crossed leg sitting position provides a mediumbase of support and places some of the body's weightbehind the weapon for quick recovery after each shot.Apply the seven factors to this position (para. 5003).To assume the crossed leg sitting position with thehasty sling (see figures 5-38, 5-39, and 5-40)—
l Square the body to the target.l Grasp the handguard with the left hand.l Bend at the knees while breaking the fall with the
right hand.l Place the buttocks on the ground as close to the feet
as you comfortably can.l Cross the left leg over the right leg.l Grasp the pistol grip with the right hand and place
the rifle butt in the right shoulder pocket.
Figure 5-36. Right View. Figure 5-37. Front View.
Crossed Ankle Sitting Position with the Loop Sling
Figure 5-38. Left View. Figure 5-40. Right View.Figure 5-39. Front
Crossed Leg Sitting Position with the Hasty Sling
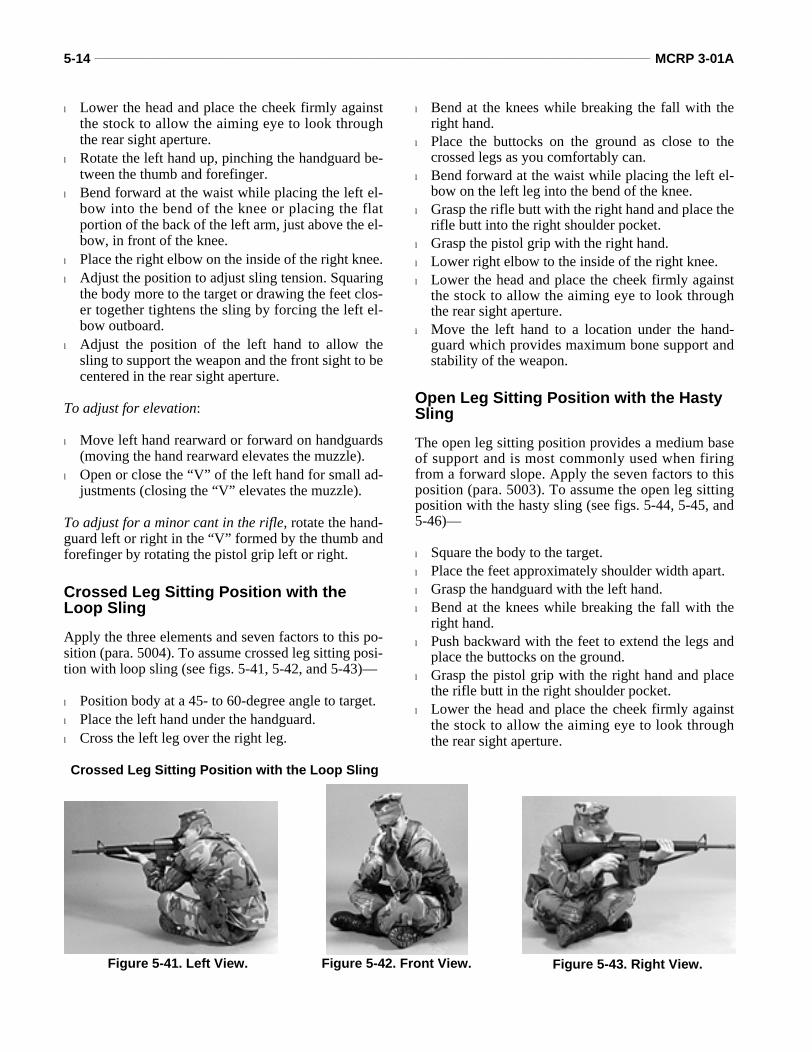
5-14 ______________________________________________________________________________________________ MCRP 3-01A
l Lower the head and place the cheek firmly againstthe stock to allow the aiming eye to look throughthe rear sight aperture.
l Rotate the left hand up, pinching the handguard be-tween the thumb and forefinger.
l Bend forward at the waist while placing the left el-bow into the bend of the knee or placing the flatportion of the back of the left arm, just above the el-bow, in front of the knee.
l Place the right elbow on the inside of the right knee.l Adjust the position to adjust sling tension. Squaring
the body more to the target or drawing the feet clos-er together tightens the sling by forcing the left el-bow outboard.
l Adjust the position of the left hand to allow thesling to support the weapon and the front sight to becentered in the rear sight aperture.
To adjust for elevation:
l Move left hand rearward or forward on handguards(moving the hand rearward elevates the muzzle).
l Open or close the “V” of the left hand for small ad-justments (closing the “V” elevates the muzzle).
To adjust for a minor cant in the rifle, rotate the hand-guard left or right in the “V” formed by the thumb andforefinger by rotating the pistol grip left or right.
Crossed Leg Sitting Position with the Loop Sling
Apply the three elements and seven factors to this po-sition (para. 5004). To assume crossed leg sitting posi-tion with loop sling (see figs. 5-41, 5-42, and 5-43)—
l Position body at a 45- to 60-degree angle to target.l Place the left hand under the handguard.l Cross the left leg over the right leg.
l Bend at the knees while breaking the fall with theright hand.
l Place the buttocks on the ground as close to thecrossed legs as you comfortably can.
l Bend forward at the waist while placing the left el-bow on the left leg into the bend of the knee.
l Grasp the rifle butt with the right hand and place therifle butt into the right shoulder pocket.
l Grasp the pistol grip with the right hand.l Lower right elbow to the inside of the right knee.l Lower the head and place the cheek firmly against
the stock to allow the aiming eye to look throughthe rear sight aperture.
l Move the left hand to a location under the hand-guard which provides maximum bone support andstability of the weapon.
Open Leg Sitting Position with the Hasty Sling
The open leg sitting position provides a medium baseof support and is most commonly used when firingfrom a forward slope. Apply the seven factors to thisposition (para. 5003). To assume the open leg sittingposition with the hasty sling (see figs. 5-44, 5-45, and5-46)—
l Square the body to the target.l Place the feet approximately shoulder width apart.l Grasp the handguard with the left hand.l Bend at the knees while breaking the fall with the
right hand.l Push backward with the feet to extend the legs and
place the buttocks on the ground.l Grasp the pistol grip with the right hand and place
the rifle butt in the right shoulder pocket.l Lower the head and place the cheek firmly against
the stock to allow the aiming eye to look throughthe rear sight aperture.
Figure 5-41. Left View. Figure 5-42. Front View. Figure 5-43. Right View.
Crossed Leg Sitting Position with the Loop Sling
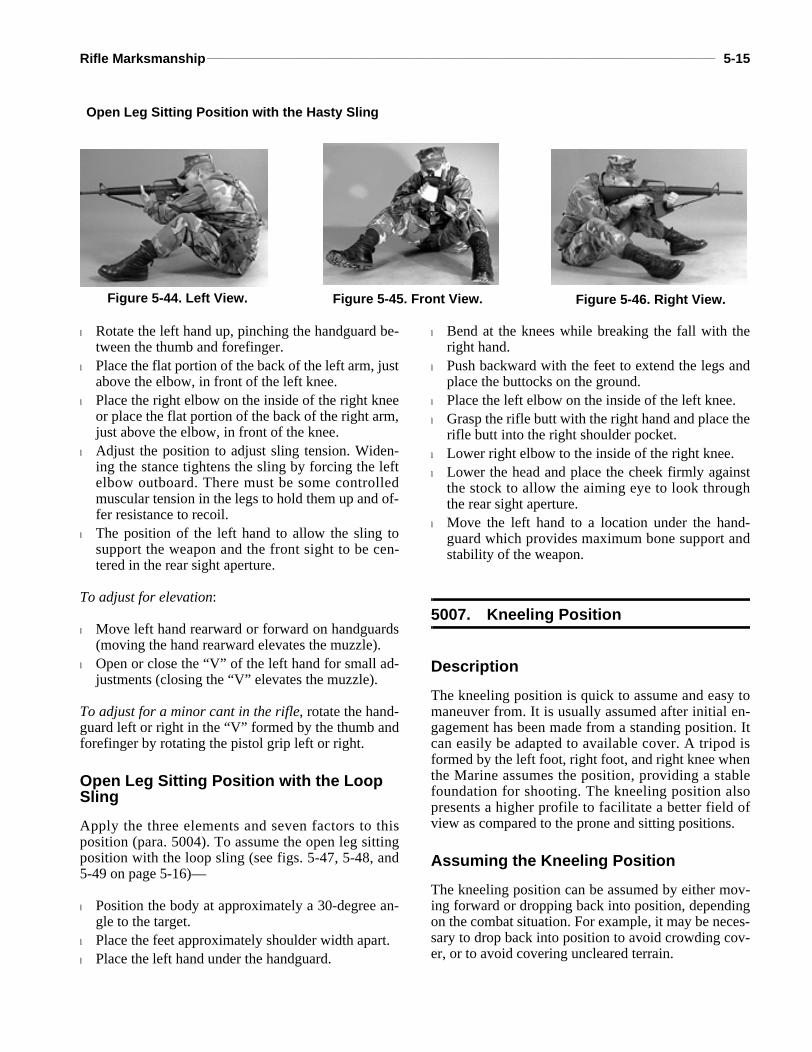
Rifle Marksmanship______________________________________________________________________________________ 5-15
l Rotate the left hand up, pinching the handguard be-tween the thumb and forefinger.
l Place the flat portion of the back of the left arm, justabove the elbow, in front of the left knee.
l Place the right elbow on the inside of the right kneeor place the flat portion of the back of the right arm,just above the elbow, in front of the knee.
l Adjust the position to adjust sling tension. Widen-ing the stance tightens the sling by forcing the leftelbow outboard. There must be some controlledmuscular tension in the legs to hold them up and of-fer resistance to recoil.
l The position of the left hand to allow the sling tosupport the weapon and the front sight to be cen-tered in the rear sight aperture.
To adjust for elevation:
l Move left hand rearward or forward on handguards(moving the hand rearward elevates the muzzle).
l Open or close the “V” of the left hand for small ad-justments (closing the “V” elevates the muzzle).
To adjust for a minor cant in the rifle, rotate the hand-guard left or right in the “V” formed by the thumb andforefinger by rotating the pistol grip left or right.
Open Leg Sitting Position with the Loop Sling
Apply the three elements and seven factors to thisposition (para. 5004). To assume the open leg sittingposition with the loop sling (see figs. 5-47, 5-48, and5-49 on page 5-16)—
l Position the body at approximately a 30-degree an-gle to the target.
l Place the feet approximately shoulder width apart.l Place the left hand under the handguard.
l Bend at the knees while breaking the fall with theright hand.
l Push backward with the feet to extend the legs andplace the buttocks on the ground.
l Place the left elbow on the inside of the left knee.l Grasp the rifle butt with the right hand and place the
rifle butt into the right shoulder pocket.l Lower right elbow to the inside of the right knee.l Lower the head and place the cheek firmly against
the stock to allow the aiming eye to look throughthe rear sight aperture.
l Move the left hand to a location under the hand-guard which provides maximum bone support andstability of the weapon.
5007. Kneeling Position
Description
The kneeling position is quick to assume and easy tomaneuver from. It is usually assumed after initial en-gagement has been made from a standing position. Itcan easily be adapted to available cover. A tripod isformed by the left foot, right foot, and right knee whenthe Marine assumes the position, providing a stablefoundation for shooting. The kneeling position alsopresents a higher profile to facilitate a better field ofview as compared to the prone and sitting positions.
Assuming the Kneeling Position
The kneeling position can be assumed by either mov-ing forward or dropping back into position, dependingon the combat situation. For example, it may be neces-sary to drop back into position to avoid crowding cov-er, or to avoid covering uncleared terrain.
Figure 5-44. Left View. Figure 5-46. Right View.Figure 5-45. Front View.
Open Leg Sitting Position with the Hasty Sling
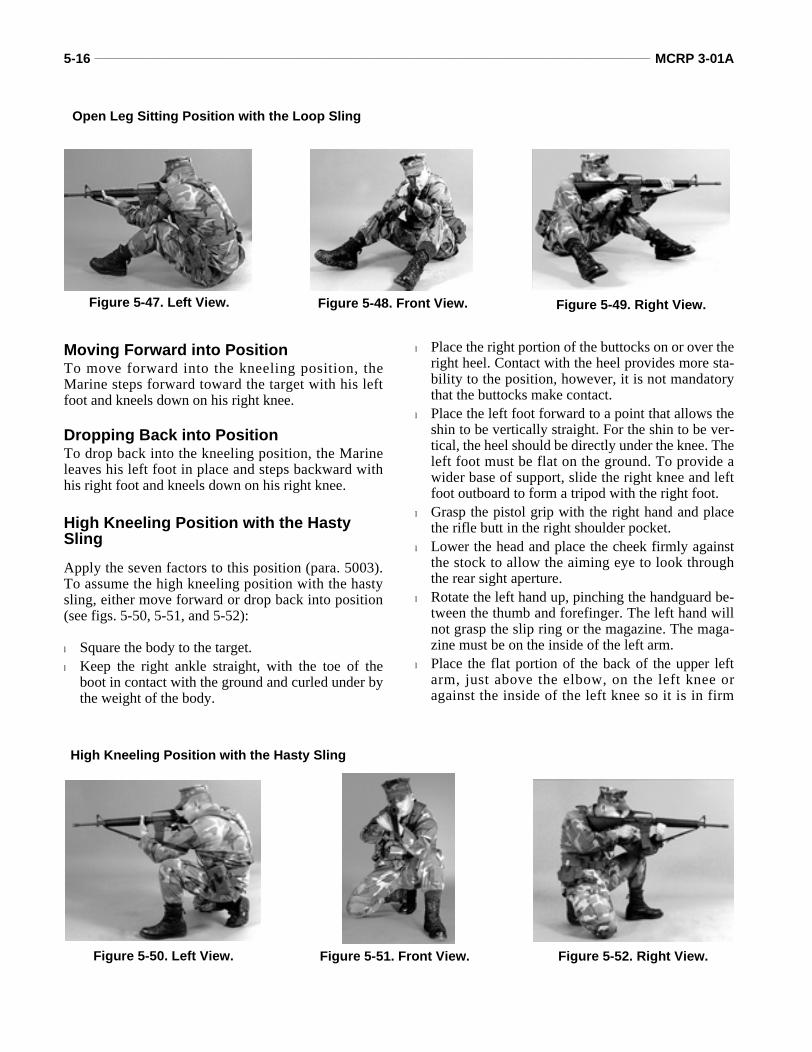
5-16 ______________________________________________________________________________________________ MCRP 3-01A
Moving Forward into PositionTo move forward into the kneeling position, theMarine steps forward toward the target with his leftfoot and kneels down on his right knee.
Dropping Back into PositionTo drop back into the kneeling position, the Marineleaves his left foot in place and steps backward withhis right foot and kneels down on his right knee.
High Kneeling Position with the Hasty Sling
Apply the seven factors to this position (para. 5003).To assume the high kneeling position with the hastysling, either move forward or drop back into position(see figs. 5-50, 5-51, and 5-52):
l Square the body to the target.l Keep the right ankle straight, with the toe of the
boot in contact with the ground and curled under bythe weight of the body.
l Place the right portion of the buttocks on or over theright heel. Contact with the heel provides more sta-bility to the position, however, it is not mandatorythat the buttocks make contact.
l Place the left foot forward to a point that allows theshin to be vertically straight. For the shin to be ver-tical, the heel should be directly under the knee. Theleft foot must be flat on the ground. To provide awider base of support, slide the right knee and leftfoot outboard to form a tripod with the right foot.
l Grasp the pistol grip with the right hand and placethe rifle butt in the right shoulder pocket.
l Lower the head and place the cheek firmly againstthe stock to allow the aiming eye to look throughthe rear sight aperture.
l Rotate the left hand up, pinching the handguard be-tween the thumb and forefinger. The left hand willnot grasp the slip ring or the magazine. The maga-zine must be on the inside of the left arm.
l Place the flat portion of the back of the upper leftarm, just above the elbow, on the left knee oragainst the inside of the left knee so it is in firm
Open Leg Sitting Position with the Loop Sling
Figure 5-47. Left View. Figure 5-48. Front View. Figure 5-49. Right View.
Figure 5-50. Left View. Figure 5-51. Front View. Figure 5-52. Right View.
High Kneeling Position with the Hasty Sling
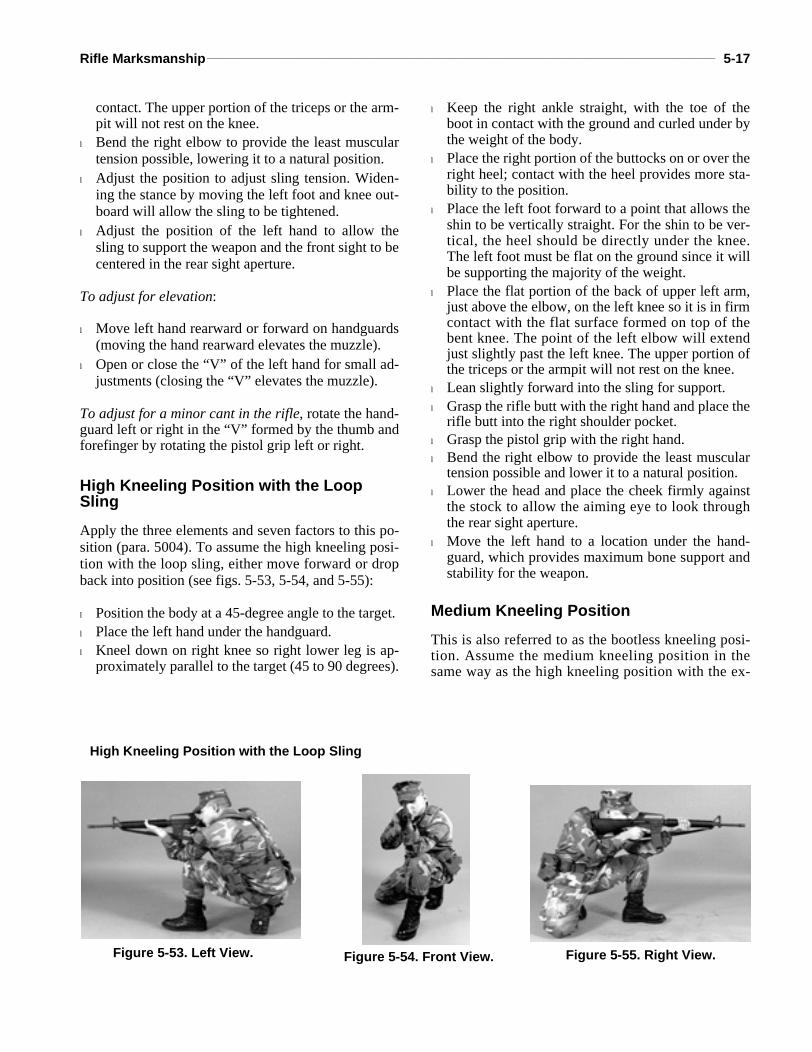
Rifle Marksmanship______________________________________________________________________________________ 5-17
contact. The upper portion of the triceps or the arm-pit will not rest on the knee.
l Bend the right elbow to provide the least musculartension possible, lowering it to a natural position.
l Adjust the position to adjust sling tension. Widen-ing the stance by moving the left foot and knee out-board will allow the sling to be tightened.
l Adjust the position of the left hand to allow thesling to support the weapon and the front sight to becentered in the rear sight aperture.
To adjust for elevation:
l Move left hand rearward or forward on handguards(moving the hand rearward elevates the muzzle).
l Open or close the “V” of the left hand for small ad-justments (closing the “V” elevates the muzzle).
To adjust for a minor cant in the rifle, rotate the hand-guard left or right in the “V” formed by the thumb andforefinger by rotating the pistol grip left or right.
High Kneeling Position with the Loop Sling
Apply the three elements and seven factors to this po-sition (para. 5004). To assume the high kneeling posi-tion with the loop sling, either move forward or dropback into position (see figs. 5-53, 5-54, and 5-55):
l Position the body at a 45-degree angle to the target. l Place the left hand under the handguard.l Kneel down on right knee so right lower leg is ap-
proximately parallel to the target (45 to 90 degrees).
l Keep the right ankle straight, with the toe of theboot in contact with the ground and curled under bythe weight of the body.
l Place the right portion of the buttocks on or over theright heel; contact with the heel provides more sta-bility to the position.
l Place the left foot forward to a point that allows theshin to be vertically straight. For the shin to be ver-tical, the heel should be directly under the knee.The left foot must be flat on the ground since it willbe supporting the majority of the weight.
l Place the flat portion of the back of upper left arm,just above the elbow, on the left knee so it is in firmcontact with the flat surface formed on top of thebent knee. The point of the left elbow will extendjust slightly past the left knee. The upper portion ofthe triceps or the armpit will not rest on the knee.
l Lean slightly forward into the sling for support.l Grasp the rifle butt with the right hand and place the
rifle butt into the right shoulder pocket.l Grasp the pistol grip with the right hand.l Bend the right elbow to provide the least muscular
tension possible and lower it to a natural position.l Lower the head and place the cheek firmly against
the stock to allow the aiming eye to look throughthe rear sight aperture.
l Move the left hand to a location under the hand-guard, which provides maximum bone support andstability for the weapon.
Medium Kneeling Position
This is also referred to as the bootless kneeling posi-tion. Assume the medium kneeling position in thesame way as the high kneeling position with the ex-
Figure 5-53. Left View. Figure 5-54. Front View. Figure 5-55. Right View.
High Kneeling Position with the Loop Sling
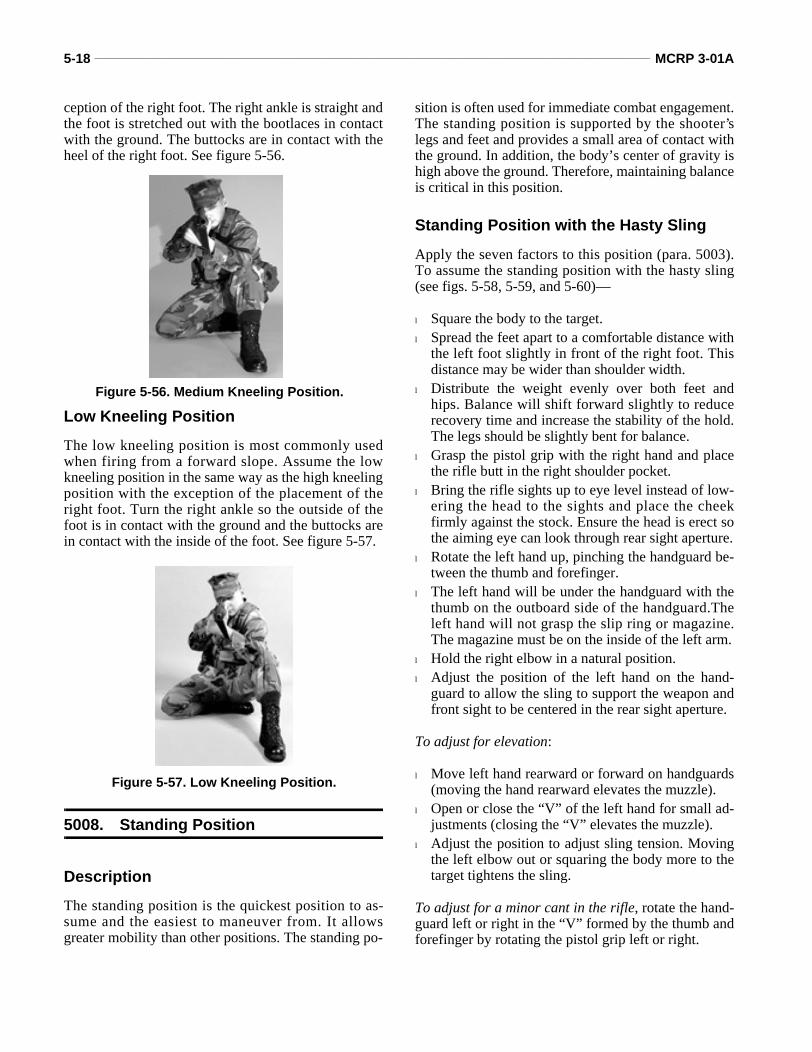
5-18 ______________________________________________________________________________________________ MCRP 3-01A
ception of the right foot. The right ankle is straight andthe foot is stretched out with the bootlaces in contactwith the ground. The buttocks are in contact with theheel of the right foot. See figure 5-56.
Low Kneeling Position
The low kneeling position is most commonly usedwhen firing from a forward slope. Assume the lowkneeling position in the same way as the high kneelingposition with the exception of the placement of theright foot. Turn the right ankle so the outside of thefoot is in contact with the ground and the buttocks arein contact with the inside of the foot. See figure 5-57.
5008. Standing Position
Description
The standing position is the quickest position to as-sume and the easiest to maneuver from. It allowsgreater mobility than other positions. The standing po-
sition is often used for immediate combat engagement.The standing position is supported by the shooter’slegs and feet and provides a small area of contact withthe ground. In addition, the body’s center of gravity ishigh above the ground. Therefore, maintaining balanceis critical in this position.
Standing Position with the Hasty Sling
Apply the seven factors to this position (para. 5003).To assume the standing position with the hasty sling(see figs. 5-58, 5-59, and 5-60)—
l Square the body to the target.l Spread the feet apart to a comfortable distance with
the left foot slightly in front of the right foot. Thisdistance may be wider than shoulder width.
l Distribute the weight evenly over both feet andhips. Balance will shift forward slightly to reducerecovery time and increase the stability of the hold.The legs should be slightly bent for balance.
l Grasp the pistol grip with the right hand and placethe rifle butt in the right shoulder pocket.
l Bring the rifle sights up to eye level instead of low-ering the head to the sights and place the cheekfirmly against the stock. Ensure the head is erect sothe aiming eye can look through rear sight aperture.
l Rotate the left hand up, pinching the handguard be-tween the thumb and forefinger.
l The left hand will be under the handguard with thethumb on the outboard side of the handguard.Theleft hand will not grasp the slip ring or magazine.The magazine must be on the inside of the left arm.
l Hold the right elbow in a natural position.l Adjust the position of the left hand on the hand-
guard to allow the sling to support the weapon andfront sight to be centered in the rear sight aperture.
To adjust for elevation:
l Move left hand rearward or forward on handguards(moving the hand rearward elevates the muzzle).
l Open or close the “V” of the left hand for small ad-justments (closing the “V” elevates the muzzle).
l Adjust the position to adjust sling tension. Movingthe left elbow out or squaring the body more to thetarget tightens the sling.
To adjust for a minor cant in the rifle, rotate the hand-guard left or right in the “V” formed by the thumb andforefinger by rotating the pistol grip left or right.
Figure 5-56. Medium Kneeling Position.
Figure 5-57. Low Kneeling Position.
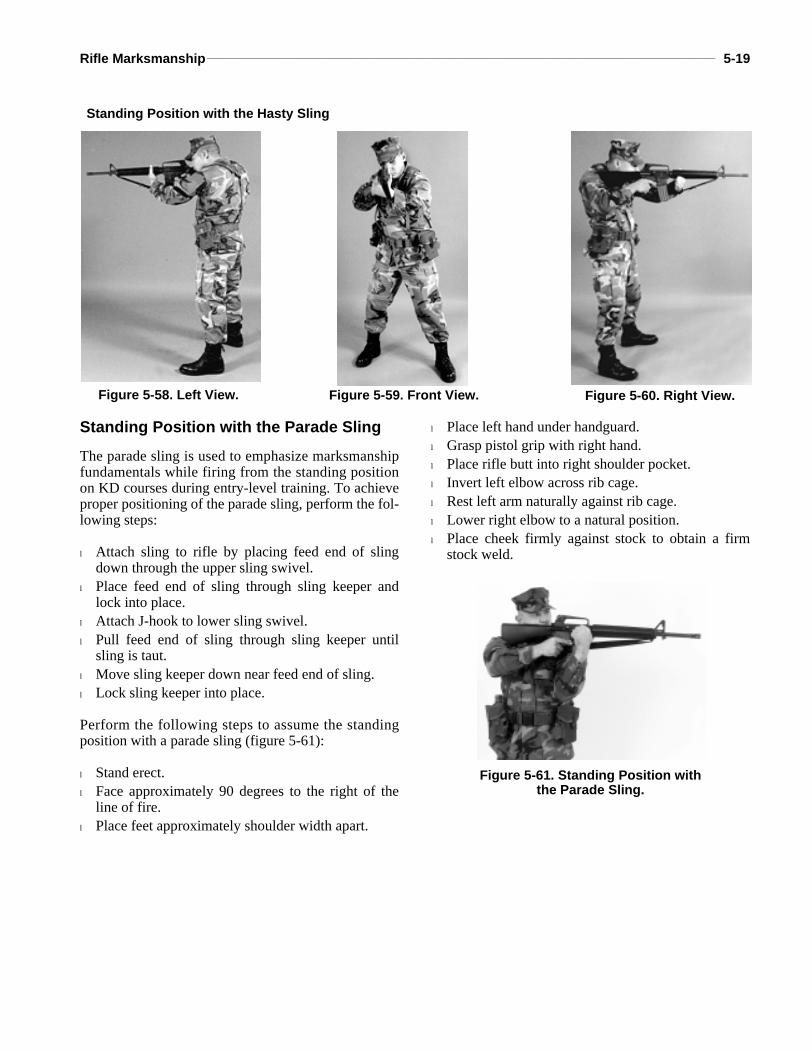
Rifle Marksmanship______________________________________________________________________________________ 5-19
Standing Position with the Parade Sling
The parade sling is used to emphasize marksmanshipfundamentals while firing from the standing positionon KD courses during entry-level training. To achieveproper positioning of the parade sling, perform the fol-lowing steps:
l Attach sling to rifle by placing feed end of slingdown through the upper sling swivel.
l Place feed end of sling through sling keeper andlock into place.
l Attach J-hook to lower sling swivel.l Pull feed end of sling through sling keeper until
sling is taut.l Move sling keeper down near feed end of sling.l Lock sling keeper into place.
Perform the following steps to assume the standingposition with a parade sling (figure 5-61):
l Stand erect.l Face approximately 90 degrees to the right of the
line of fire.l Place feet approximately shoulder width apart.
l Place left hand under handguard.l Grasp pistol grip with right hand.l Place rifle butt into right shoulder pocket.l Invert left elbow across rib cage.l Rest left arm naturally against rib cage.l Lower right elbow to a natural position.l Place cheek firmly against stock to obtain a firm
stock weld.
Figure 5-58. Left View. Figure 5-60. Right View.Figure 5-59. Front View.
Standing Position with the Hasty Sling
Figure 5-61. Standing Position withthe Parade Sling.
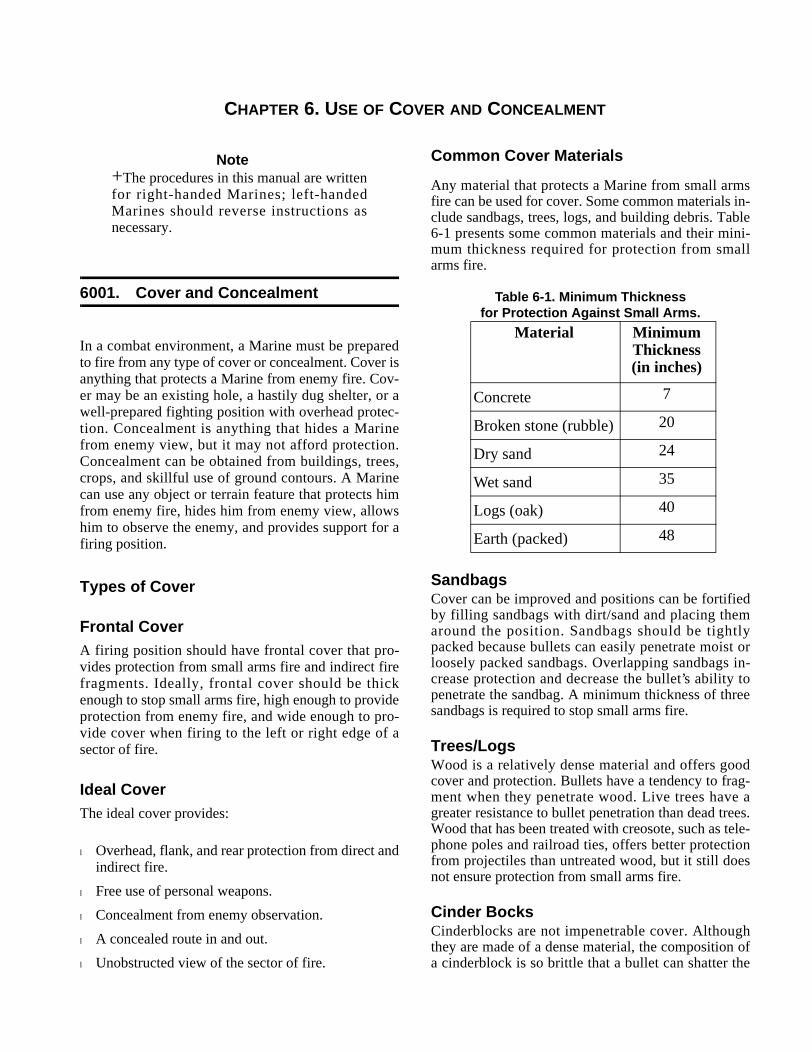
CHAPTER 6. USE OF COVER AND CONCEALMENT
Note+The procedures in this manual are writtenfor right-handed Marines; left-handedMarines should reverse instructions asnecessary.
6001. Cover and Concealment
In a combat environment, a Marine must be preparedto fire from any type of cover or concealment. Cover isanything that protects a Marine from enemy fire. Cov-er may be an existing hole, a hastily dug shelter, or awell-prepared fighting position with overhead protec-tion. Concealment is anything that hides a Marinefrom enemy view, but it may not afford protection.Concealment can be obtained from buildings, trees,crops, and skillful use of ground contours. A Marinecan use any object or terrain feature that protects himfrom enemy fire, hides him from enemy view, allowshim to observe the enemy, and provides support for afiring position.
Types of Cover
Frontal CoverA firing position should have frontal cover that pro-vides protection from small arms fire and indirect firefragments. Ideally, frontal cover should be thickenough to stop small arms fire, high enough to provideprotection from enemy fire, and wide enough to pro-vide cover when firing to the left or right edge of asector of fire.
Ideal CoverThe ideal cover provides:
l Overhead, flank, and rear protection from direct andindirect fire.
l Free use of personal weapons.
l Concealment from enemy observation.
l A concealed route in and out.
l Unobstructed view of the sector of fire.
Common Cover Materials
Any material that protects a Marine from small armsfire can be used for cover. Some common materials in-clude sandbags, trees, logs, and building debris. Table6-1 presents some common materials and their mini-mum thickness required for protection from smallarms fire.
Table 6-1. Minimum Thicknessfor Protection Against Small Arms.
Sandbags Cover can be improved and positions can be fortifiedby filling sandbags with dirt/sand and placing themaround the position. Sandbags should be tightlypacked because bullets can easily penetrate moist orloosely packed sandbags. Overlapping sandbags in-crease protection and decrease the bullet’s ability topenetrate the sandbag. A minimum thickness of threesandbags is required to stop small arms fire.
Trees/LogsWood is a relatively dense material and offers goodcover and protection. Bullets have a tendency to frag-ment when they penetrate wood. Live trees have agreater resistance to bullet penetration than dead trees.Wood that has been treated with creosote, such as tele-phone poles and railroad ties, offers better protectionfrom projectiles than untreated wood, but it still doesnot ensure protection from small arms fire.
Cinder BocksCinderblocks are not impenetrable cover. Althoughthey are made of a dense material, the composition ofa cinderblock is so brittle that a bullet can shatter the
Material Minimum Thickness(in inches)
Concrete 7
Broken stone (rubble) 20
Dry sand 24
Wet sand 35
Logs (oak) 40
Earth (packed) 48
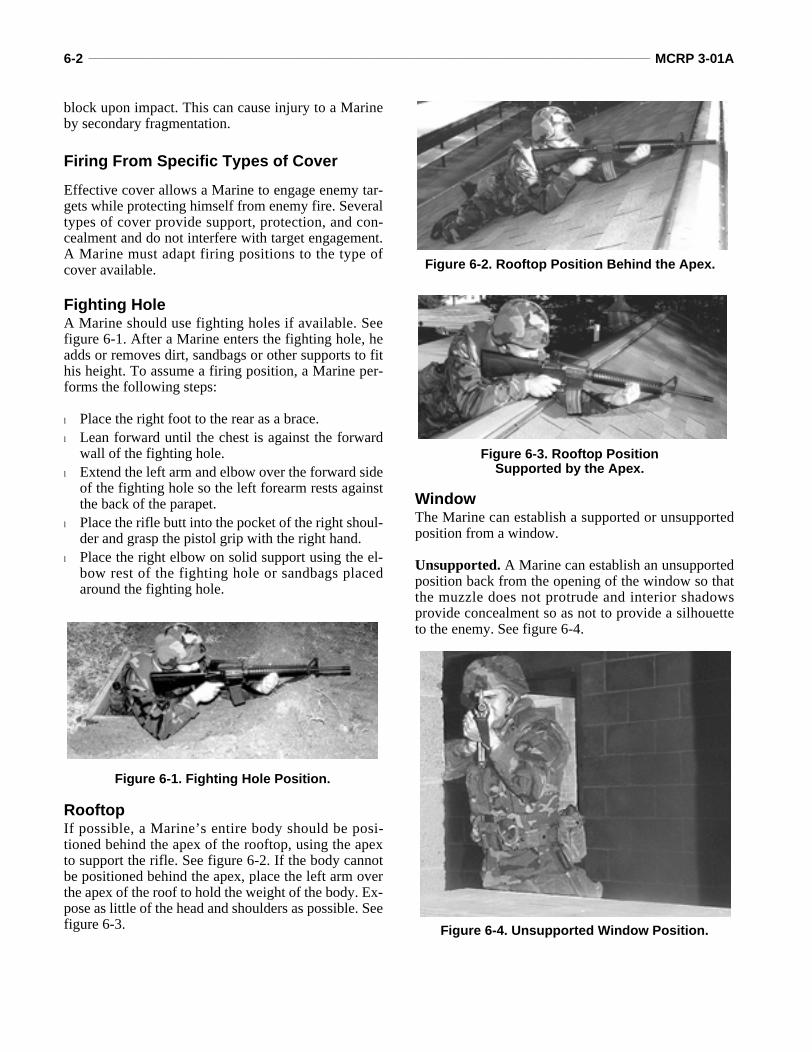
6-2 _______________________________________________________________________________________________ MCRP 3-01A
block upon impact. This can cause injury to a Marineby secondary fragmentation.
Firing From Specific Types of Cover
Effective cover allows a Marine to engage enemy tar-gets while protecting himself from enemy fire. Severaltypes of cover provide support, protection, and con-cealment and do not interfere with target engagement.A Marine must adapt firing positions to the type ofcover available.
Fighting HoleA Marine should use fighting holes if available. Seefigure 6-1. After a Marine enters the fighting hole, headds or removes dirt, sandbags or other supports to fithis height. To assume a firing position, a Marine per-forms the following steps:
l Place the right foot to the rear as a brace.l Lean forward until the chest is against the forward
wall of the fighting hole.l Extend the left arm and elbow over the forward side
of the fighting hole so the left forearm rests againstthe back of the parapet.
l Place the rifle butt into the pocket of the right shoul-der and grasp the pistol grip with the right hand.
l Place the right elbow on solid support using the el-bow rest of the fighting hole or sandbags placedaround the fighting hole.
RooftopIf possible, a Marine’s entire body should be posi-tioned behind the apex of the rooftop, using the apexto support the rifle. See figure 6-2. If the body cannotbe positioned behind the apex, place the left arm overthe apex of the roof to hold the weight of the body. Ex-pose as little of the head and shoulders as possible. Seefigure 6-3.
WindowThe Marine can establish a supported or unsupportedposition from a window.
Unsupported. A Marine can establish an unsupportedposition back from the opening of the window so thatthe muzzle does not protrude and interior shadowsprovide concealment so as not to provide a silhouetteto the enemy. See figure 6-4.
Figure 6-1. Fighting Hole Position.
Figure 6-2. Rooftop Position Behind the Apex.
Figure 6-3. Rooftop PositionSupported by the Apex.
Figure 6-4. Unsupported Window Position.
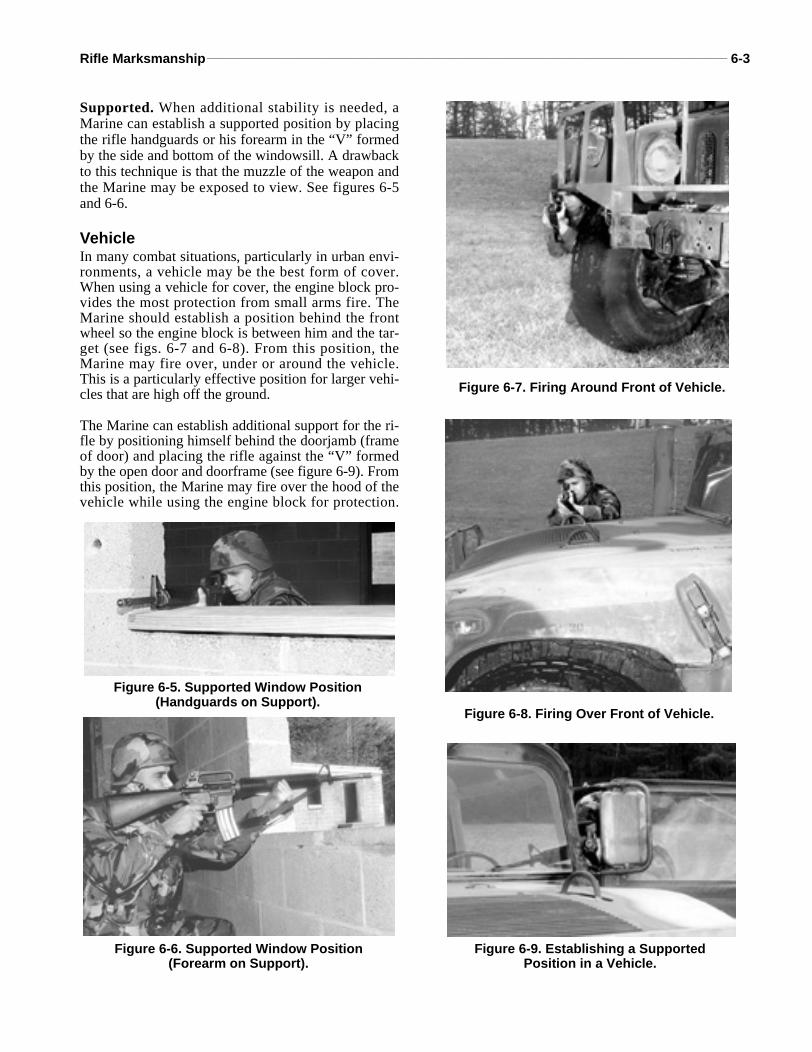
Rifle Marksmanship________________________________________________________________________________________ 6-3
Supported. When additional stability is needed, aMarine can establish a supported position by placingthe rifle handguards or his forearm in the “V” formedby the side and bottom of the windowsill. A drawbackto this technique is that the muzzle of the weapon andthe Marine may be exposed to view. See figures 6-5and 6-6.
VehicleIn many combat situations, particularly in urban envi-ronments, a vehicle may be the best form of cover.When using a vehicle for cover, the engine block pro-vides the most protection from small arms fire. TheMarine should establish a position behind the frontwheel so the engine block is between him and the tar-get (see figs. 6-7 and 6-8). From this position, theMarine may fire over, under or around the vehicle.This is a particularly effective position for larger vehi-cles that are high off the ground.
The Marine can establish additional support for the ri-fle by positioning himself behind the doorjamb (frameof door) and placing the rifle against the “V” formedby the open door and doorframe (see figure 6-9). Fromthis position, the Marine may fire over the hood of thevehicle while using the engine block for protection.
Figure 6-5. Supported Window Position(Handguards on Support).
Figure 6-6. Supported Window Position(Forearm on Support).
Figure 6-7. Firing Around Front of Vehicle.
Figure 6-8. Firing Over Front of Vehicle.
Figure 6-9. Establishing a SupportedPosition in a Vehicle.
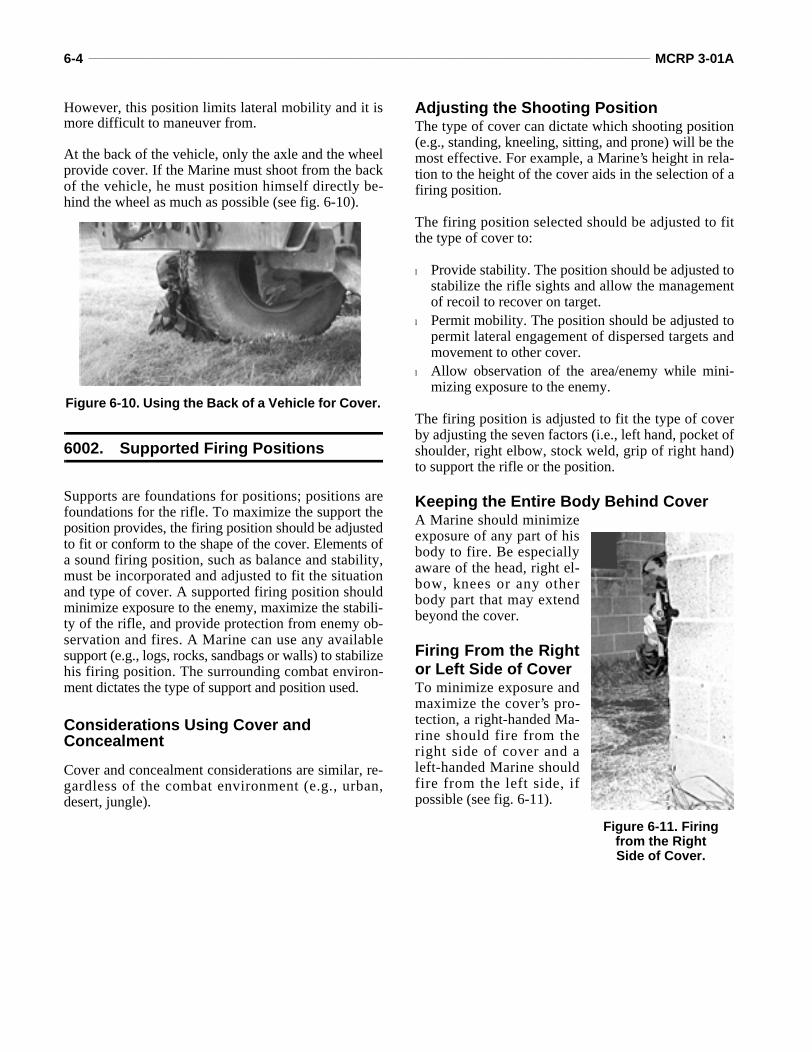
6-4 _______________________________________________________________________________________________ MCRP 3-01A
However, this position limits lateral mobility and it ismore difficult to maneuver from.
At the back of the vehicle, only the axle and the wheelprovide cover. If the Marine must shoot from the backof the vehicle, he must position himself directly be-hind the wheel as much as possible (see fig. 6-10).
6002. Supported Firing Positions
Supports are foundations for positions; positions arefoundations for the rifle. To maximize the support theposition provides, the firing position should be adjustedto fit or conform to the shape of the cover. Elements ofa sound firing position, such as balance and stability,must be incorporated and adjusted to fit the situationand type of cover. A supported firing position shouldminimize exposure to the enemy, maximize the stabili-ty of the rifle, and provide protection from enemy ob-servation and fires. A Marine can use any availablesupport (e.g., logs, rocks, sandbags or walls) to stabilizehis firing position. The surrounding combat environ-ment dictates the type of support and position used.
Considerations Using Cover and Concealment
Cover and concealment considerations are similar, re-gardless of the combat environment (e.g., urban,desert, jungle).
Adjusting the Shooting PositionThe type of cover can dictate which shooting position(e.g., standing, kneeling, sitting, and prone) will be themost effective. For example, a Marine’s height in rela-tion to the height of the cover aids in the selection of afiring position.
The firing position selected should be adjusted to fitthe type of cover to:
l Provide stability. The position should be adjusted tostabilize the rifle sights and allow the managementof recoil to recover on target.
l Permit mobility. The position should be adjusted topermit lateral engagement of dispersed targets andmovement to other cover.
l Allow observation of the area/enemy while mini-mizing exposure to the enemy.
The firing position is adjusted to fit the type of coverby adjusting the seven factors (i.e., left hand, pocket ofshoulder, right elbow, stock weld, grip of right hand)to support the rifle or the position.
Keeping the Entire Body Behind CoverA Marine should minimizeexposure of any part of hisbody to fire. Be especiallyaware of the head, right el-bow, knees or any otherbody part that may extendbeyond the cover.
Firing From the Rightor Left Side of CoverTo minimize exposure andmaximize the cover’s pro-tection, a right-handed Ma-rine should fire from theright side of cover and aleft-handed Marine shouldfire from the left side, ifpossible (see fig. 6-11).
Figure 6-10. Using the Back of a Vehicle for Cover.
Figure 6-11. Firing from the RightSide of Cover.
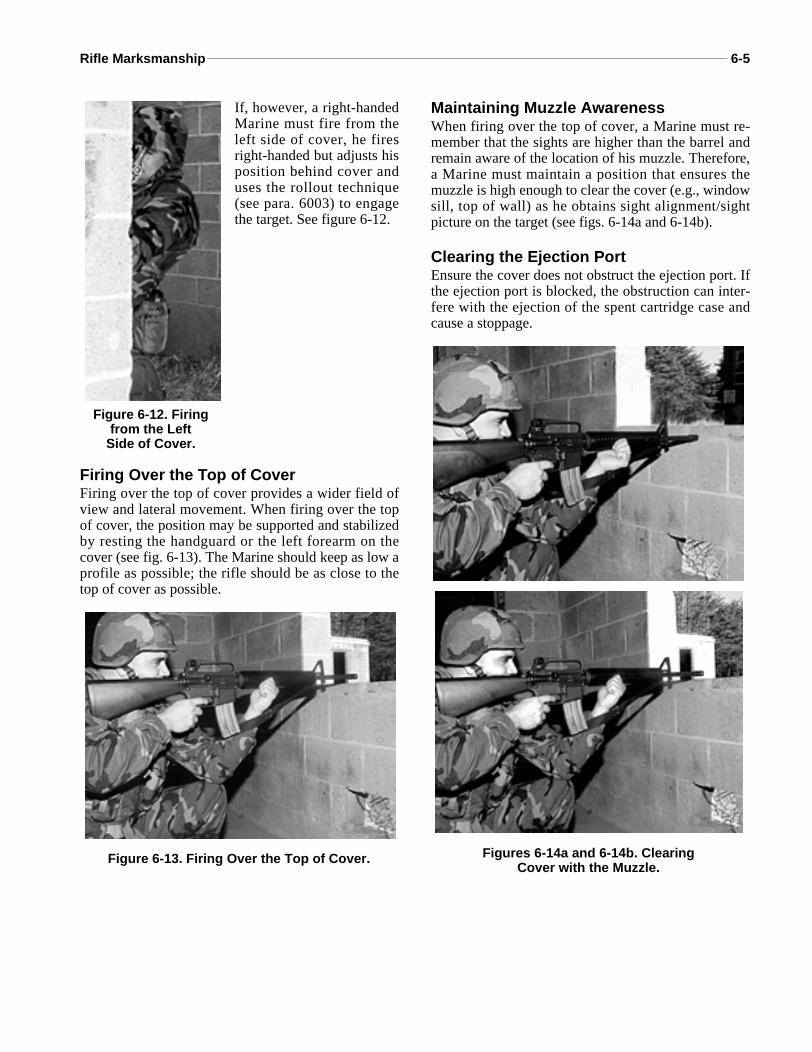
Rifle Marksmanship________________________________________________________________________________________ 6-5
If, however, a right-handedMarine must fire from theleft side of cover, he firesright-handed but adjusts hisposition behind cover anduses the rollout technique(see para. 6003) to engagethe target. See figure 6-12.
Firing Over the Top of CoverFiring over the top of cover provides a wider field ofview and lateral movement. When firing over the topof cover, the position may be supported and stabilizedby resting the handguard or the left forearm on thecover (see fig. 6-13). The Marine should keep as low aprofile as possible; the rifle should be as close to thetop of cover as possible.
Maintaining Muzzle AwarenessWhen firing over the top of cover, a Marine must re-member that the sights are higher than the barrel andremain aware of the location of his muzzle. Therefore,a Marine must maintain a position that ensures themuzzle is high enough to clear the cover (e.g., windowsill, top of wall) as he obtains sight alignment/sightpicture on the target (see figs. 6-14a and 6-14b).
Clearing the Ejection PortEnsure the cover does not obstruct the ejection port. Ifthe ejection port is blocked, the obstruction can inter-fere with the ejection of the spent cartridge case andcause a stoppage.
Figure 6-12. Firing from the Left
Side of Cover.
Figure 6-13. Firing Over the Top of Cover. Figures 6-14a and 6-14b. ClearingCover with the Muzzle.
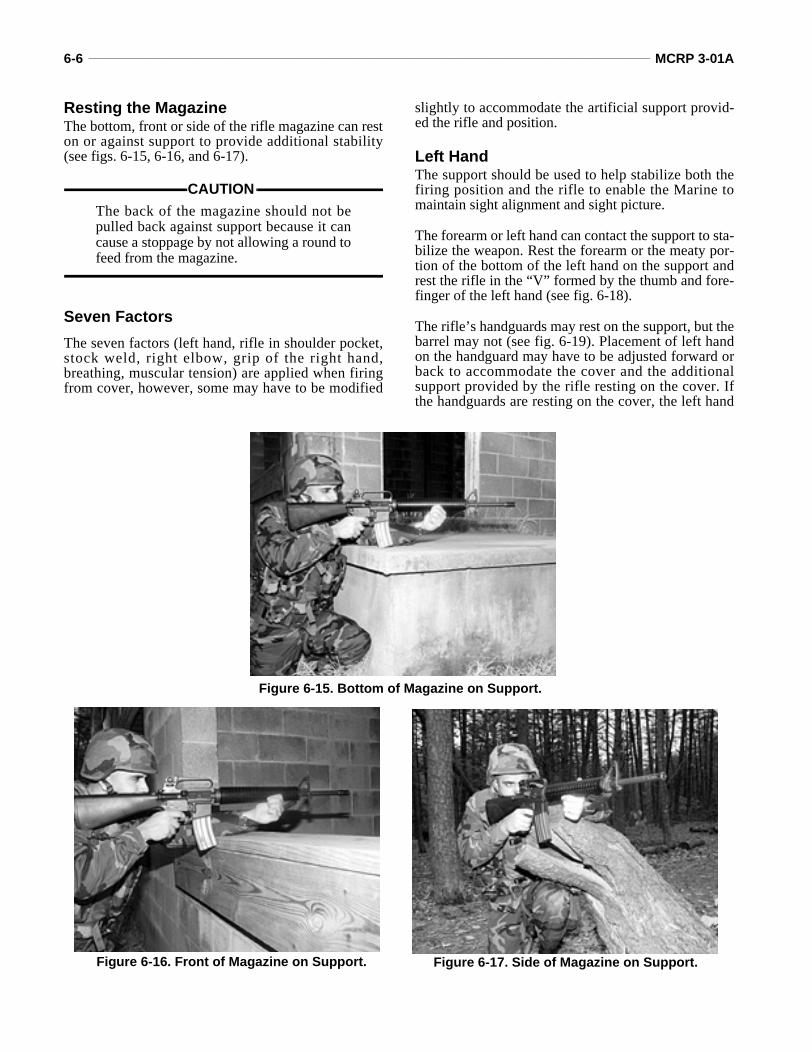
6-6 _______________________________________________________________________________________________ MCRP 3-01A
Resting the MagazineThe bottom, front or side of the rifle magazine can reston or against support to provide additional stability(see figs. 6-15, 6-16, and 6-17).
CAUTION
The back of the magazine should not bepulled back against support because it cancause a stoppage by not allowing a round tofeed from the magazine.
Seven Factors
The seven factors (left hand, rifle in shoulder pocket,stock weld, right elbow, grip of the right hand,breathing, muscular tension) are applied when firingfrom cover, however, some may have to be modified
slightly to accommodate the artificial support provid-ed the rifle and position.
Left HandThe support should be used to help stabilize both thefiring position and the rifle to enable the Marine tomaintain sight alignment and sight picture.
The forearm or left hand can contact the support to sta-bilize the weapon. Rest the forearm or the meaty por-tion of the bottom of the left hand on the support andrest the rifle in the “V” formed by the thumb and fore-finger of the left hand (see fig. 6-18).
The rifle’s handguards may rest on the support, but thebarrel may not (see fig. 6-19). Placement of left handon the handguard may have to be adjusted forward orback to accommodate the cover and the additionalsupport provided by the rifle resting on the cover. Ifthe handguards are resting on the cover, the left hand
Figure 6-16. Front of Magazine on Support. Figure 6-17. Side of Magazine on Support.
Figure 6-15. Bottom of Magazine on Support.
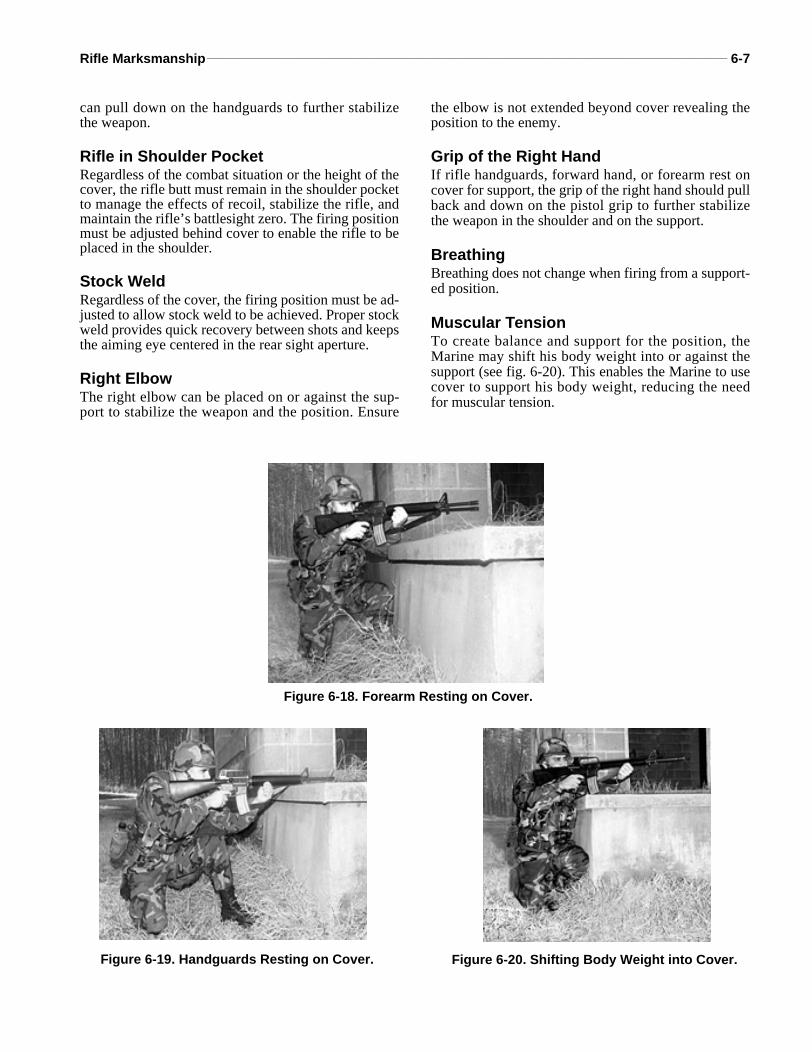
Rifle Marksmanship________________________________________________________________________________________ 6-7
can pull down on the handguards to further stabilizethe weapon.
Rifle in Shoulder PocketRegardless of the combat situation or the height of thecover, the rifle butt must remain in the shoulder pocketto manage the effects of recoil, stabilize the rifle, andmaintain the rifle’s battlesight zero. The firing positionmust be adjusted behind cover to enable the rifle to beplaced in the shoulder.
Stock WeldRegardless of the cover, the firing position must be ad-justed to allow stock weld to be achieved. Proper stockweld provides quick recovery between shots and keepsthe aiming eye centered in the rear sight aperture.
Right ElbowThe right elbow can be placed on or against the sup-port to stabilize the weapon and the position. Ensure
the elbow is not extended beyond cover revealing theposition to the enemy.
Grip of the Right HandIf rifle handguards, forward hand, or forearm rest oncover for support, the grip of the right hand should pullback and down on the pistol grip to further stabilizethe weapon in the shoulder and on the support.
BreathingBreathing does not change when firing from a support-ed position.
Muscular TensionTo create balance and support for the position, theMarine may shift his body weight into or against thesupport (see fig. 6-20). This enables the Marine to usecover to support his body weight, reducing the needfor muscular tension.
Figure 6-18. Forearm Resting on Cover.
Figure 6-19. Handguards Resting on Cover. Figure 6-20. Shifting Body Weight into Cover.
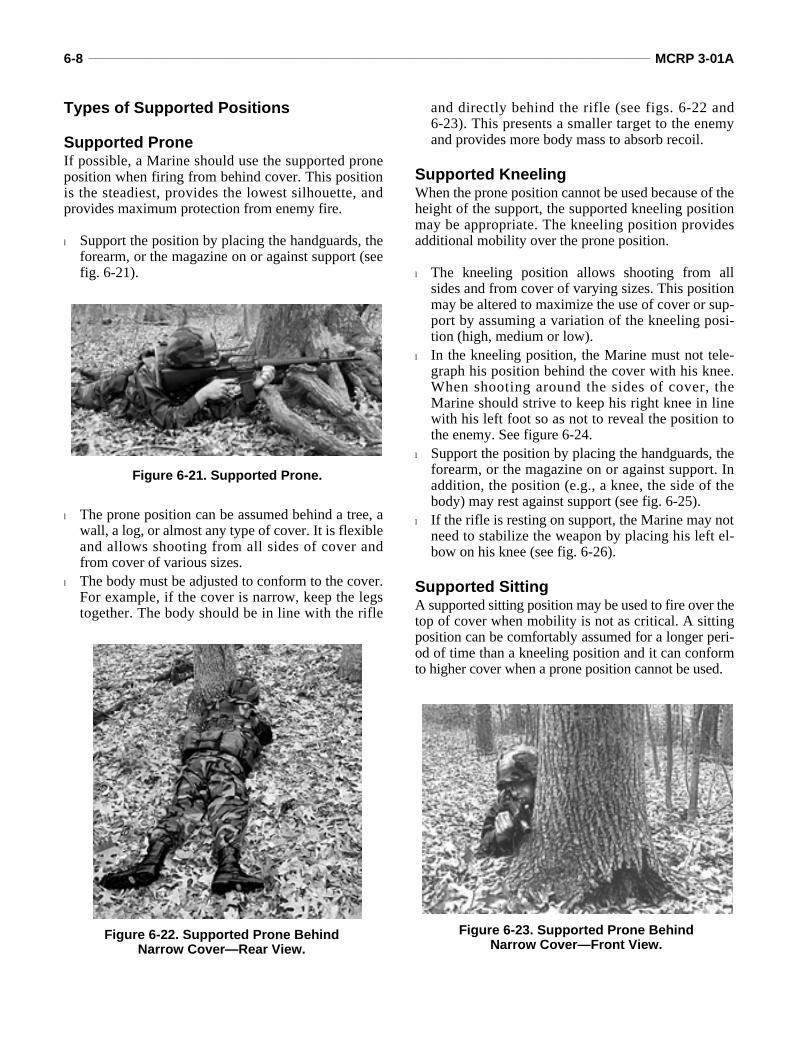
6-8 _______________________________________________________________________________________________ MCRP 3-01A
Types of Supported Positions
Supported ProneIf possible, a Marine should use the supported proneposition when firing from behind cover. This positionis the steadiest, provides the lowest silhouette, andprovides maximum protection from enemy fire.
l Support the position by placing the handguards, theforearm, or the magazine on or against support (seefig. 6-21).
l The prone position can be assumed behind a tree, awall, a log, or almost any type of cover. It is flexibleand allows shooting from all sides of cover andfrom cover of various sizes.
l The body must be adjusted to conform to the cover.For example, if the cover is narrow, keep the legstogether. The body should be in line with the rifle
and directly behind the rifle (see figs. 6-22 and6-23). This presents a smaller target to the enemyand provides more body mass to absorb recoil.
Supported KneelingWhen the prone position cannot be used because of theheight of the support, the supported kneeling positionmay be appropriate. The kneeling position providesadditional mobility over the prone position.
l The kneeling position allows shooting from allsides and from cover of varying sizes. This positionmay be altered to maximize the use of cover or sup-port by assuming a variation of the kneeling posi-tion (high, medium or low).
l In the kneeling position, the Marine must not tele-graph his position behind the cover with his knee.When shooting around the sides of cover, theMarine should strive to keep his right knee in linewith his left foot so as not to reveal the position tothe enemy. See figure 6-24.
l Support the position by placing the handguards, theforearm, or the magazine on or against support. Inaddition, the position (e.g., a knee, the side of thebody) may rest against support (see fig. 6-25).
l If the rifle is resting on support, the Marine may notneed to stabilize the weapon by placing his left el-bow on his knee (see fig. 6-26).
Supported SittingA supported sitting position may be used to fire over thetop of cover when mobility is not as critical. A sittingposition can be comfortably assumed for a longer peri-od of time than a kneeling position and it can conformto higher cover when a prone position cannot be used.
Figure 6-21. Supported Prone.
Figure 6-22. Supported Prone BehindNarrow Cover—Rear View.
Figure 6-23. Supported Prone BehindNarrow Cover—Front View.
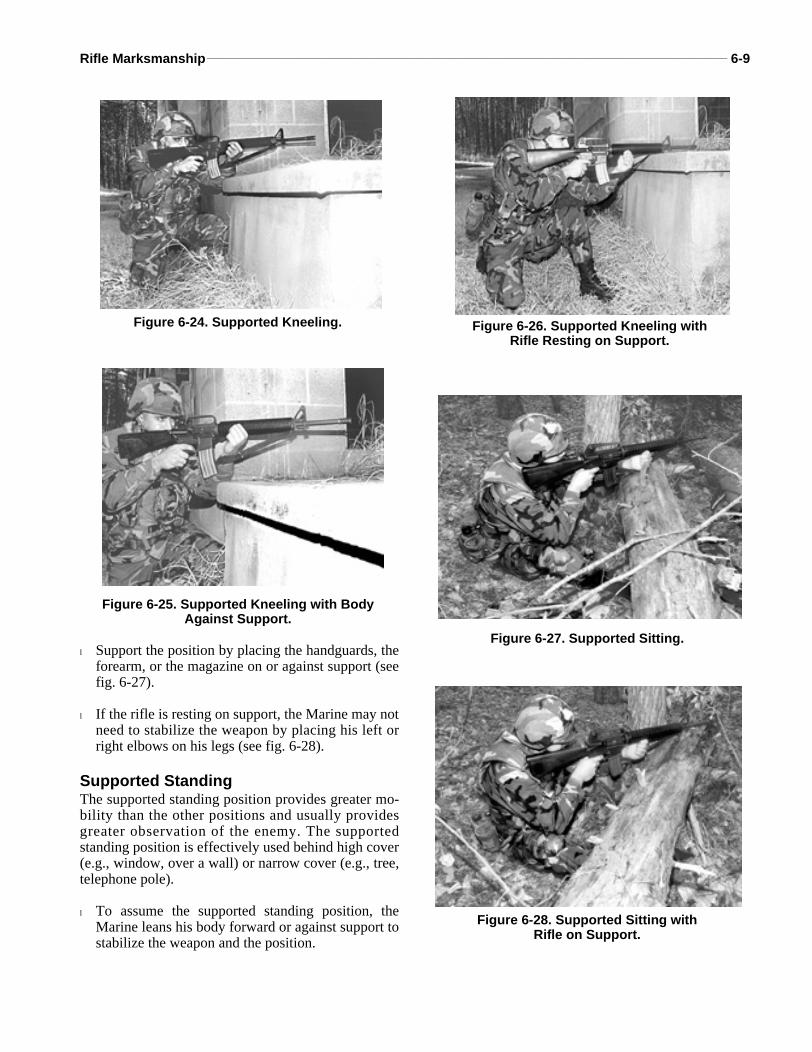
Rifle Marksmanship________________________________________________________________________________________ 6-9
l Support the position by placing the handguards, theforearm, or the magazine on or against support (seefig. 6-27).
l If the rifle is resting on support, the Marine may notneed to stabilize the weapon by placing his left orright elbows on his legs (see fig. 6-28).
Supported StandingThe supported standing position provides greater mo-bility than the other positions and usually providesgreater observation of the enemy. The supportedstanding position is effectively used behind high cover(e.g., window, over a wall) or narrow cover (e.g., tree,telephone pole).
l To assume the supported standing position, theMarine leans his body forward or against support tostabilize the weapon and the position.
Figure 6-25. Supported Kneeling with Body Against Support.
Figure 6-26. Supported Kneeling withRifle Resting on Support.
Figure 6-27. Supported Sitting.
Figure 6-24. Supported Kneeling.
Figure 6-28. Supported Sitting withRifle on Support.
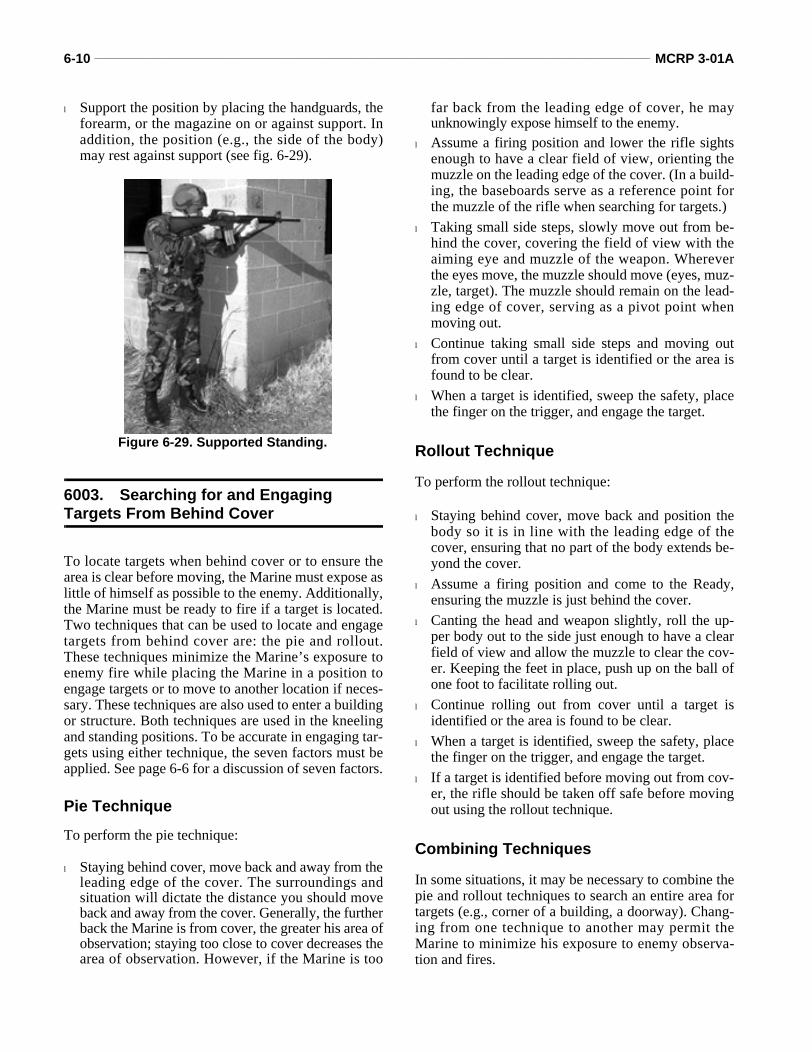
6-10 ______________________________________________________________________________________________ MCRP 3-01A
l Support the position by placing the handguards, theforearm, or the magazine on or against support. Inaddition, the position (e.g., the side of the body)may rest against support (see fig. 6-29).
6003. Searching for and Engaging Targets From Behind Cover
To locate targets when behind cover or to ensure thearea is clear before moving, the Marine must expose aslittle of himself as possible to the enemy. Additionally,the Marine must be ready to fire if a target is located.Two techniques that can be used to locate and engagetargets from behind cover are: the pie and rollout.These techniques minimize the Marine’s exposure toenemy fire while placing the Marine in a position toengage targets or to move to another location if neces-sary. These techniques are also used to enter a buildingor structure. Both techniques are used in the kneelingand standing positions. To be accurate in engaging tar-gets using either technique, the seven factors must beapplied. See page 6-6 for a discussion of seven factors.
Pie Technique
To perform the pie technique:
l Staying behind cover, move back and away from theleading edge of the cover. The surroundings andsituation will dictate the distance you should moveback and away from the cover. Generally, the furtherback the Marine is from cover, the greater his area ofobservation; staying too close to cover decreases thearea of observation. However, if the Marine is too
far back from the leading edge of cover, he mayunknowingly expose himself to the enemy.
l Assume a firing position and lower the rifle sightsenough to have a clear field of view, orienting themuzzle on the leading edge of the cover. (In a build-ing, the baseboards serve as a reference point forthe muzzle of the rifle when searching for targets.)
l Taking small side steps, slowly move out from be-hind the cover, covering the field of view with theaiming eye and muzzle of the weapon. Whereverthe eyes move, the muzzle should move (eyes, muz-zle, target). The muzzle should remain on the lead-ing edge of cover, serving as a pivot point whenmoving out.
l Continue taking small side steps and moving outfrom cover until a target is identified or the area isfound to be clear.
l When a target is identified, sweep the safety, placethe finger on the trigger, and engage the target.
Rollout Technique
To perform the rollout technique:
l Staying behind cover, move back and position thebody so it is in line with the leading edge of thecover, ensuring that no part of the body extends be-yond the cover.
l Assume a firing position and come to the Ready,ensuring the muzzle is just behind the cover.
l Canting the head and weapon slightly, roll the up-per body out to the side just enough to have a clearfield of view and allow the muzzle to clear the cov-er. Keeping the feet in place, push up on the ball ofone foot to facilitate rolling out.
l Continue rolling out from cover until a target isidentified or the area is found to be clear.
l When a target is identified, sweep the safety, placethe finger on the trigger, and engage the target.
l If a target is identified before moving out from cov-er, the rifle should be taken off safe before movingout using the rollout technique.
Combining Techniques
In some situations, it may be necessary to combine thepie and rollout techniques to search an entire area fortargets (e.g., corner of a building, a doorway). Chang-ing from one technique to another may permit theMarine to minimize his exposure to enemy observa-tion and fires.
Figure 6-29. Supported Standing.

Rifle Marksmanship______________________________________________________________________________________ 6-11
6004. Moving Out From Behind Cover
A Marine must be constantly aware of his surround-ings and available cover, should a threat appear. Heshould avoid obvious danger areas and move quicklythrough danger areas that cannot be avoided.
When moving from cover to cover, the Marine shouldselect the next covered location and plan his route be-
fore moving from his present position. This is done byquickly looking from behind cover to ensure the areais clear, ensuring the head and eyes are exposed for asshort a time as possible.
If necessary, the Marine should conduct a Condition 1reload before moving from cover.
Once the Marine is committed to moving, all focusshould be on moving until cover is reassumed.
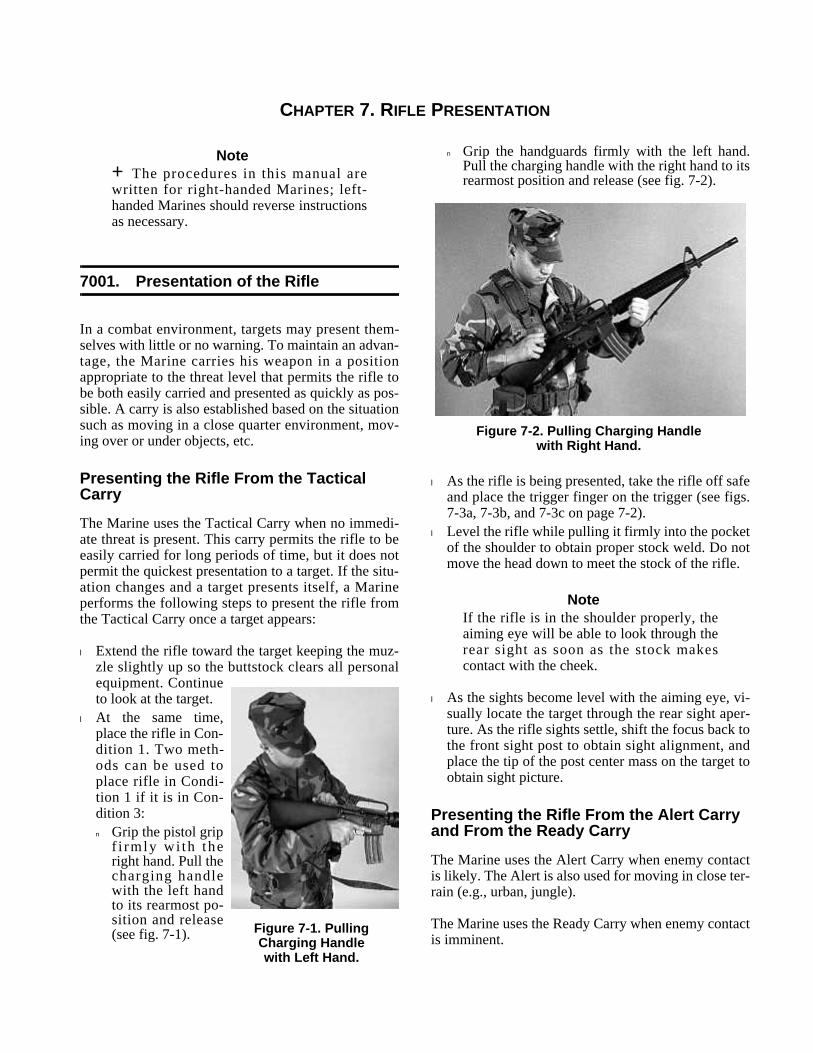
CHAPTER 7. RIFLE PRESENTATION
Note+The procedures in this manual arewritten for right-handed Marines; left-handed Marines should reverse instructionsas necessary.
7001. Presentation of the Rifle
In a combat environment, targets may present them-selves with little or no warning. To maintain an advan-tage, the Marine carries his weapon in a positionappropriate to the threat level that permits the rifle tobe both easily carried and presented as quickly as pos-sible. A carry is also established based on the situationsuch as moving in a close quarter environment, mov-ing over or under objects, etc.
Presenting the Rifle From the Tactical CarryThe Marine uses the Tactical Carry when no immedi-ate threat is present. This carry permits the rifle to beeasily carried for long periods of time, but it does notpermit the quickest presentation to a target. If the situ-ation changes and a target presents itself, a Marineperforms the following steps to present the rifle fromthe Tactical Carry once a target appears:
l Extend the rifle toward the target keeping the muz-zle slightly up so the buttstock clears all personalequipment. Continueto look at the target.
l At the same time,place the rifle in Con-dition 1. Two meth-ods can be used toplace rifle in Condi-tion 1 if it is in Con-dition 3:n Grip the pistol grip
f i rmly wi th theright hand. Pull thecharging handlewith the left handto its rearmost po-sition and release(see fig. 7-1).
n Grip the handguards firmly with the left hand.Pull the charging handle with the right hand to itsrearmost position and release (see fig. 7-2).
l As the rifle is being presented, take the rifle off safeand place the trigger finger on the trigger (see figs.7-3a, 7-3b, and 7-3c on page 7-2).
l Level the rifle while pulling it firmly into the pocketof the shoulder to obtain proper stock weld. Do notmove the head down to meet the stock of the rifle.
NoteIf the rifle is in the shoulder properly, theaiming eye will be able to look through therear sight as soon as the stock makescontact with the cheek.
l As the sights become level with the aiming eye, vi-sually locate the target through the rear sight aper-ture. As the rifle sights settle, shift the focus back tothe front sight post to obtain sight alignment, andplace the tip of the post center mass on the target toobtain sight picture.
Presenting the Rifle From the Alert Carry and From the Ready CarryThe Marine uses the Alert Carry when enemy contactis likely. The Alert is also used for moving in close ter-rain (e.g., urban, jungle).
The Marine uses the Ready Carry when enemy contactis imminent.
Figure 7-1. PullingCharging Handlewith Left Hand.
Figure 7-2. Pulling Charging Handlewith Right Hand.
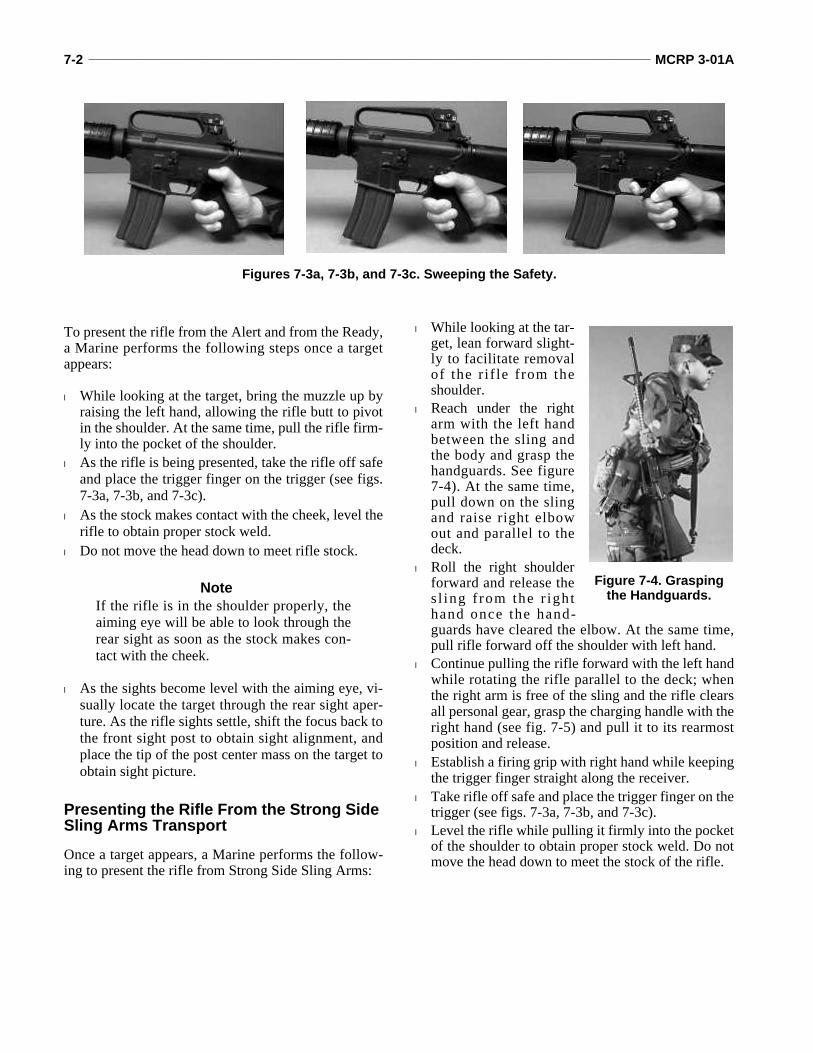
7-2 _______________________________________________________________________________________________ MCRP 3-01A
To present the rifle from the Alert and from the Ready,a Marine performs the following steps once a targetappears:
l While looking at the target, bring the muzzle up byraising the left hand, allowing the rifle butt to pivotin the shoulder. At the same time, pull the rifle firm-ly into the pocket of the shoulder.
l As the rifle is being presented, take the rifle off safeand place the trigger finger on the trigger (see figs.7-3a, 7-3b, and 7-3c).
l As the stock makes contact with the cheek, level therifle to obtain proper stock weld.
l Do not move the head down to meet rifle stock.
NoteIf the rifle is in the shoulder properly, theaiming eye will be able to look through therear sight as soon as the stock makes con-tact with the cheek.
l As the sights become level with the aiming eye, vi-sually locate the target through the rear sight aper-ture. As the rifle sights settle, shift the focus back tothe front sight post to obtain sight alignment, andplace the tip of the post center mass on the target toobtain sight picture.
Presenting the Rifle From the Strong Side Sling Arms Transport
Once a target appears, a Marine performs the follow-ing to present the rifle from Strong Side Sling Arms:
l While looking at the tar-get, lean forward slight-ly to facilitate removalof the r if le from theshoulder.
l Reach under the rightarm with the left handbetween the sling andthe body and grasp thehandguards. See figure7-4). At the same time,pull down on the slingand raise right elbowout and parallel to thedeck.
l Roll the right shoulderforward and release thes l ing f rom the r ighthand once the hand-guards have cleared the elbow. At the same time,pull rifle forward off the shoulder with left hand.
l Continue pulling the rifle forward with the left handwhile rotating the rifle parallel to the deck; whenthe right arm is free of the sling and the rifle clearsall personal gear, grasp the charging handle with theright hand (see fig. 7-5) and pull it to its rearmostposition and release.
l Establish a firing grip with right hand while keepingthe trigger finger straight along the receiver.
l Take rifle off safe and place the trigger finger on thetrigger (see figs. 7-3a, 7-3b, and 7-3c).
l Level the rifle while pulling it firmly into the pocketof the shoulder to obtain proper stock weld. Do notmove the head down to meet the stock of the rifle.
Figures 7-3a, 7-3b, and 7-3c. Sweeping the Safety.
Figure 7-4. Grasping the Handguards.

Rifle Marksmanship________________________________________________________________________________________ 7-3
NoteIf the rifle is in the shoulder properly, theaiming eye will be able to look through therear sight as soon as the stock makescontact with the cheek.
l As the sights become level with the aiming eye, vi-sually locate the target through the rear sight aper-ture. As the rifle sights settle, shift the focus back tothe front sight post to obtain sight alignment, andplace the tip of the post center mass on the target toobtain sight picture.
Presenting the Rifle From the Weak Side Sling Arms TransportThe hasty sling should be maintained while presentingthe rifle from this transport. To present the rifle fromWeak Side Sling Arms, a Marine performs the follow-ing steps once a target appears:
l While looking at the target, lean forward slightly tofacilitate removal of rifle from the shoulder.
l Grasp the sling with the right hand to prevent therifle from falling off the shoulder.
l Grasp handguards with left hand(the index finger points towardthe muzzle). See figure 7-6.
l Rotate the rifle counterclockwisewhile extending the muzzle to-ward the target.
l Continue extending the rifle to-ward the target to ensure the rifleclears all personal gear.
l Grasp the charging handle withthe right hand and pull it to itsrearmost position and release(see fig. 7-7).
l Establish a firing grip with righthand while keeping the triggerfinger straight along the receiver.
l Take the rifle off safe and placethe trigger finger on the trigger (see figures 7-3a, 7-3b, and 7-3c).
l Level the rifle while pulling it firmly into the pocketof the shoulder to obtain proper stock weld. Do notmove the head down to meet the stock of the rifle.
NoteIf the rifle is in the shoulder properly, theaiming eye will be able to look through therear sight as soon as the stock makescontact with the cheek.
Figure 7-5. Clearing Gear and Grasping the Charging Handle.
Figure 7-6. Grasping the Handguards.
Figure 7-7. Clearing Gear and Grasping the Charging Handle.
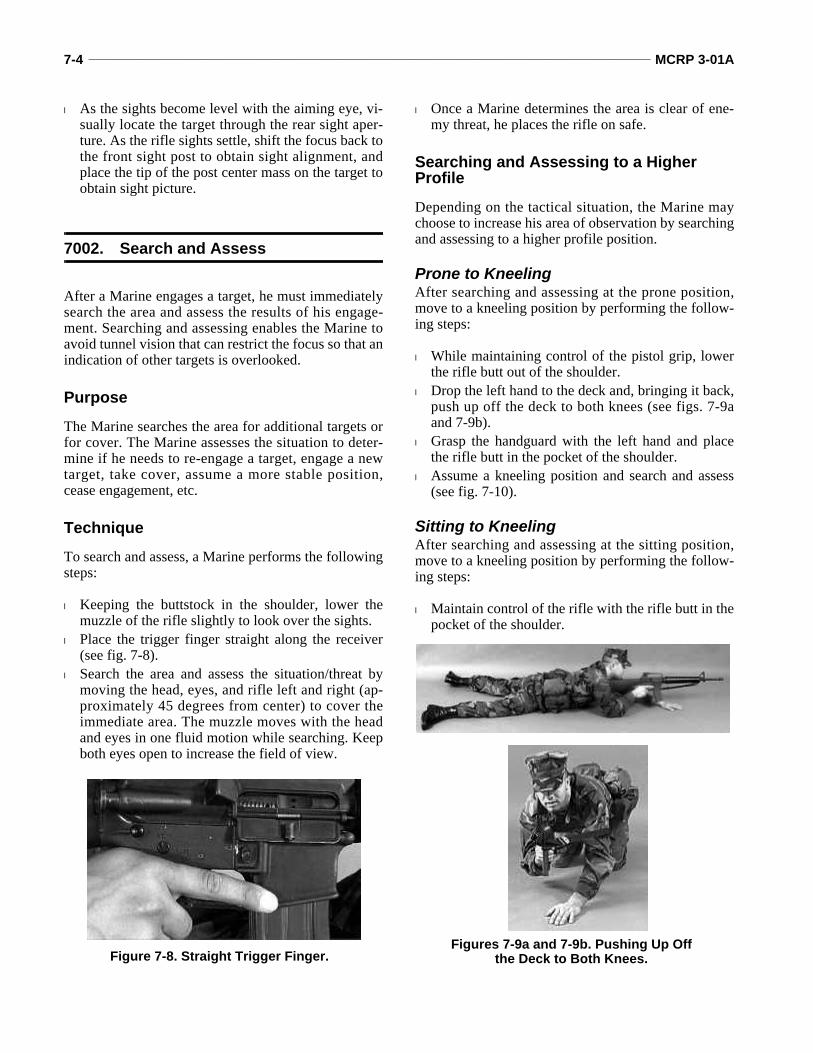
7-4 _______________________________________________________________________________________________ MCRP 3-01A
l As the sights become level with the aiming eye, vi-sually locate the target through the rear sight aper-ture. As the rifle sights settle, shift the focus back tothe front sight post to obtain sight alignment, andplace the tip of the post center mass on the target toobtain sight picture.
7002. Search and Assess
After a Marine engages a target, he must immediatelysearch the area and assess the results of his engage-ment. Searching and assessing enables the Marine toavoid tunnel vision that can restrict the focus so that anindication of other targets is overlooked.
PurposeThe Marine searches the area for additional targets orfor cover. The Marine assesses the situation to deter-mine if he needs to re-engage a target, engage a newtarget, take cover, assume a more stable position,cease engagement, etc.
TechniqueTo search and assess, a Marine performs the followingsteps:
l Keeping the buttstock in the shoulder, lower themuzzle of the rifle slightly to look over the sights.
l Place the trigger finger straight along the receiver(see fig. 7-8).
l Search the area and assess the situation/threat bymoving the head, eyes, and rifle left and right (ap-proximately 45 degrees from center) to cover theimmediate area. The muzzle moves with the headand eyes in one fluid motion while searching. Keepboth eyes open to increase the field of view.
l Once a Marine determines the area is clear of ene-my threat, he places the rifle on safe.
Searching and Assessing to a Higher ProfileDepending on the tactical situation, the Marine maychoose to increase his area of observation by searchingand assessing to a higher profile position.
Prone to KneelingAfter searching and assessing at the prone position,move to a kneeling position by performing the follow-ing steps:
l While maintaining control of the pistol grip, lowerthe rifle butt out of the shoulder.
l Drop the left hand to the deck and, bringing it back,push up off the deck to both knees (see figs. 7-9aand 7-9b).
l Grasp the handguard with the left hand and placethe rifle butt in the pocket of the shoulder.
l Assume a kneeling position and search and assess(see fig. 7-10).
Sitting to KneelingAfter searching and assessing at the sitting position,move to a kneeling position by performing the follow-ing steps:
l Maintain control of the rifle with the rifle butt in thepocket of the shoulder.
Figure 7-8. Straight Trigger Finger.Figures 7-9a and 7-9b. Pushing Up Off
the Deck to Both Knees.

Rifle Marksmanship________________________________________________________________________________________ 7-5
l Uncross the legs to an open leg position.l Tuck the right foot underneath the left thigh, as
close to the buttocks as possible (see fig. 7-11).l Lean forward and to the right and roll on to the right
knee to a kneeling position and search and assess(see fig. 7-12).
NoteIt may be necessary to release the rifle withthe right hand and push off the deck with
the right hand to assist in rolling up to akneeling position.
Kneeling to StandingAfter searching and assessing at the kneeling position,maintain control of the rifle with the rifle butt in thepocket of the shoulder, and stand while continuing tosearch and assess.
Figure 7-12. Rolling Up to a Kneeling Position.Figure 7-11. Tucking the Right Foot.
Figure 7-10. Kneeling Search and Assess.
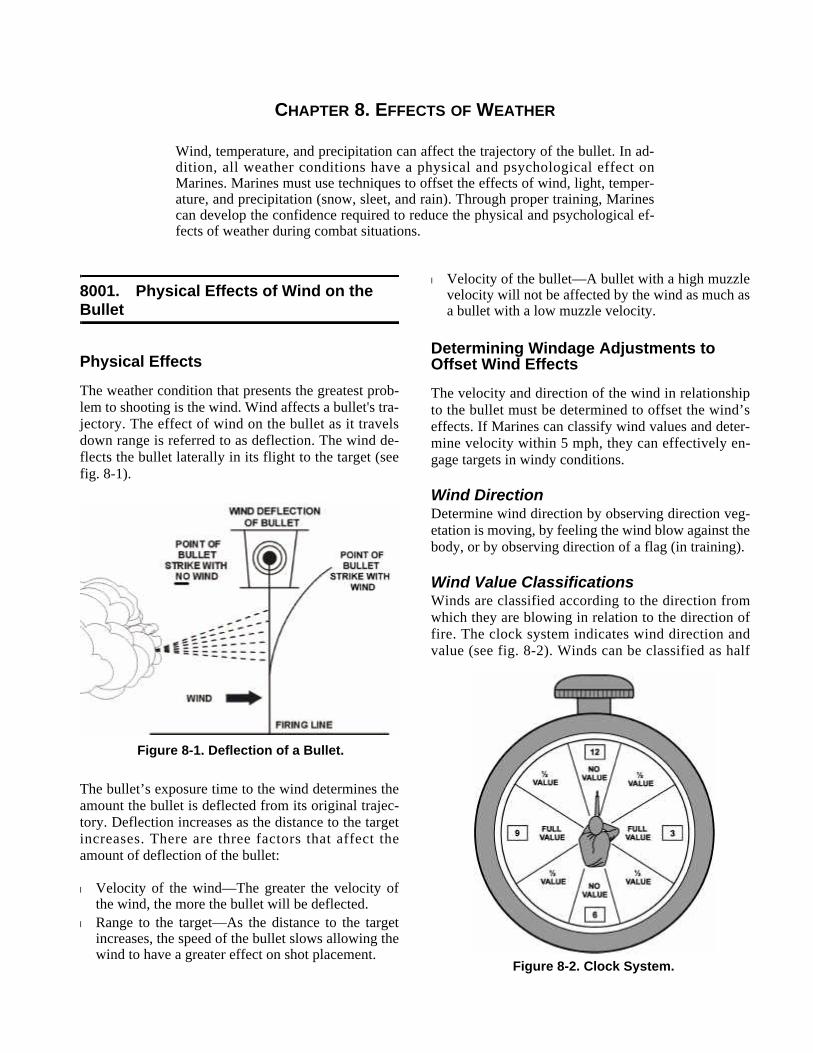
CHAPTER 8. EFFECTS OF WEATHER
Wind, temperature, and precipitation can affect the trajectory of the bullet. In ad-dition, all weather conditions have a physical and psychological effect onMarines. Marines must use techniques to offset the effects of wind, light, temper-ature, and precipitation (snow, sleet, and rain). Through proper training, Marinescan develop the confidence required to reduce the physical and psychological ef-fects of weather during combat situations.
8001. Physical Effects of Wind on the Bullet
Physical EffectsThe weather condition that presents the greatest prob-lem to shooting is the wind. Wind affects a bullet's tra-jectory. The effect of wind on the bullet as it travelsdown range is referred to as deflection. The wind de-flects the bullet laterally in its flight to the target (seefig. 8-1).
The bullet’s exposure time to the wind determines theamount the bullet is deflected from its original trajec-tory. Deflection increases as the distance to the targetincreases. There are three factors that affect theamount of deflection of the bullet:
l Velocity of the wind—The greater the velocity ofthe wind, the more the bullet will be deflected.
l Range to the target—As the distance to the targetincreases, the speed of the bullet slows allowing thewind to have a greater effect on shot placement.
l Velocity of the bullet—A bullet with a high muzzlevelocity will not be affected by the wind as much asa bullet with a low muzzle velocity.
Determining Windage Adjustments to Offset Wind Effects The velocity and direction of the wind in relationshipto the bullet must be determined to offset the wind’seffects. If Marines can classify wind values and deter-mine velocity within 5 mph, they can effectively en-gage targets in windy conditions.
Wind DirectionDetermine wind direction by observing direction veg-etation is moving, by feeling the wind blow against thebody, or by observing direction of a flag (in training).
Wind Value ClassificationsWinds are classified according to the direction fromwhich they are blowing in relation to the direction offire. The clock system indicates wind direction andvalue (see fig. 8-2). Winds can be classified as half
Figure 8-1. Deflection of a Bullet.
Figure 8-2. Clock System.

8-2 _______________________________________________________________________________________________ MCRP 3-01A
value, full value, or no value. The target is always lo-cated at 12 o’clock.
Wind VelocityThere are two methods used to determine wind veloci-ty: observation and flag. The flag method is used as atraining tool on the known distance (KD) range tolearn the observation method. This method teachesMarines to relate the effect a given wind condition hason the natural surroundings in order to develop thebase of knowledge used during the observation meth-od. The observation method is the primary methodused to estimate wind velocity and direction in a tacti-cal situation. The following are guidelines used duringthe observation method:
l Under 3 miles per hour (mph) the wind can hardlybe felt on the face. The presence of a slight windcan be detected by drifting smoke.
l 3 to 5 mph winds can be felt lightly on the face.l 5 to 8 mph winds keep tree leaves in a constant mo-
tion.l 8 to 12 mph winds raise dust and loose paper.l 12 to 15 mph winds cause small trees to sway.l 16 to 25 mph winds cause large trees to sway.
Flag MethodThe flag method is primary method used on the KDrange. To estimate wind velocity in miles per hour:
Estimate the angle created between the flagpole andthe flag in degrees.
l Divide the angle by four to estimate wind velocityin miles per hour. See figure 8-3.
NoteInformation given is based on a dry flag. Awet flag is heavy and gives a false reading.
Windage AdjustmentsAfter identifying wind direction, wind classification,and wind velocity, windage adjustments needed to en-able the bullet to strike the target are estimated in thefollowing ways:
Observation Method. Using the windage chart pro-vided in figure 8-4, match the wind velocity, wind di-rection, and range to the target to the information inthe chart to estimate the correct number of clicks toapply to the windage knob.
Flag Method. Using the windage chart provided infigure 8-5, match the wind velocity, wind direction,and range to the target to the information in the chartto determine the correct number of clicks to apply tothe windage knob.
Once the number of windage clicks is determined, turnthe windage knob causing the rear sight aperture tomove into the direction of the wind. (See chapter 9.)
8002. Physical Effects ofTemperature and Precipitationon the Bullet and the Rifle
Temperature
Extreme changes in temperature cause fluctuation inthe rifle’s chamber pressure. This fluctuation is causedby changes in the propellant’s temperature. In coldweather, as rifle chamber pressure decreases, the bulletexits the muzzle at a lower velocity, and the bullet im-pacts the target below the point of aim. In extremeheat, the rifle’s chamber pressure increases causing thebullet to exit the muzzle at a higher velocity and im-pact the target above the point of aim. Hot air is lessdense than cool air and provides less resistance to thebullet; this allows the bullet to travel faster and experi-ence less deflection from the wind. Cold air is denseand provides the bullet with more resistance; this caus-es the bullet to travel slower and experience greaterdeflection from the wind.
Figure 8-3. Flag Method.
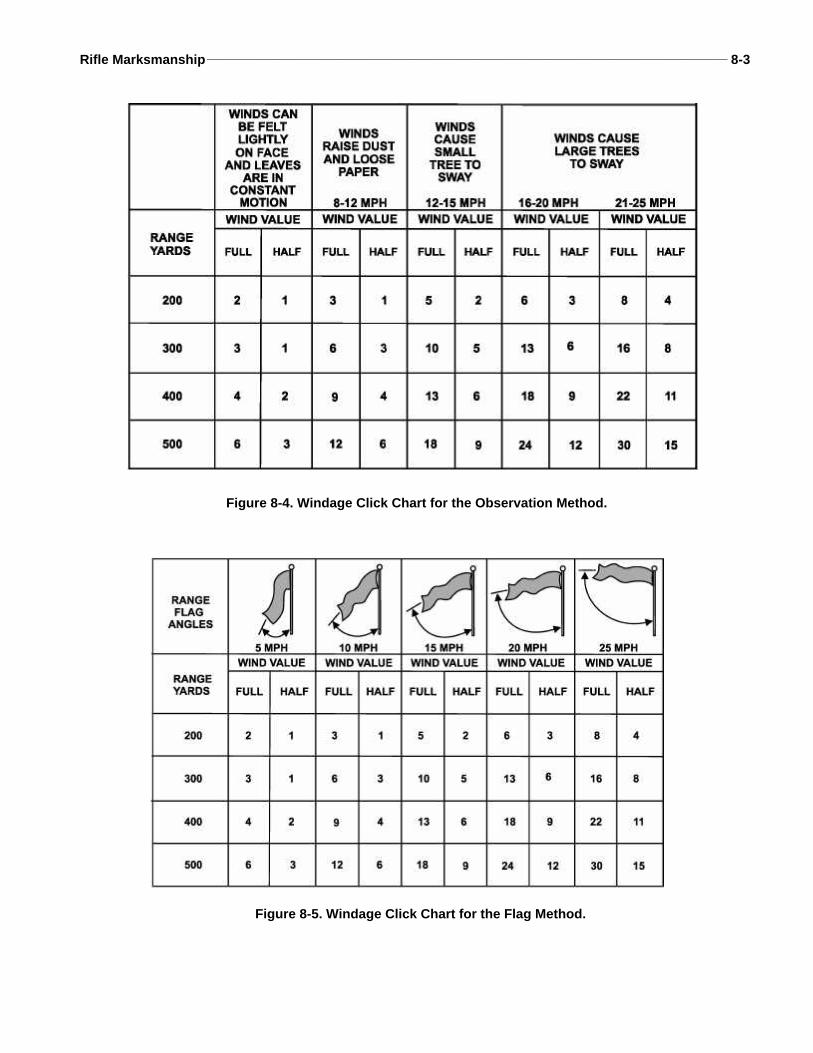
Rifle Marksmanship________________________________________________________________________________________ 8-3
Figure 8-5. Windage Click Chart for the Flag Method.
Figure 8-4. Windage Click Chart for the Observation Method.
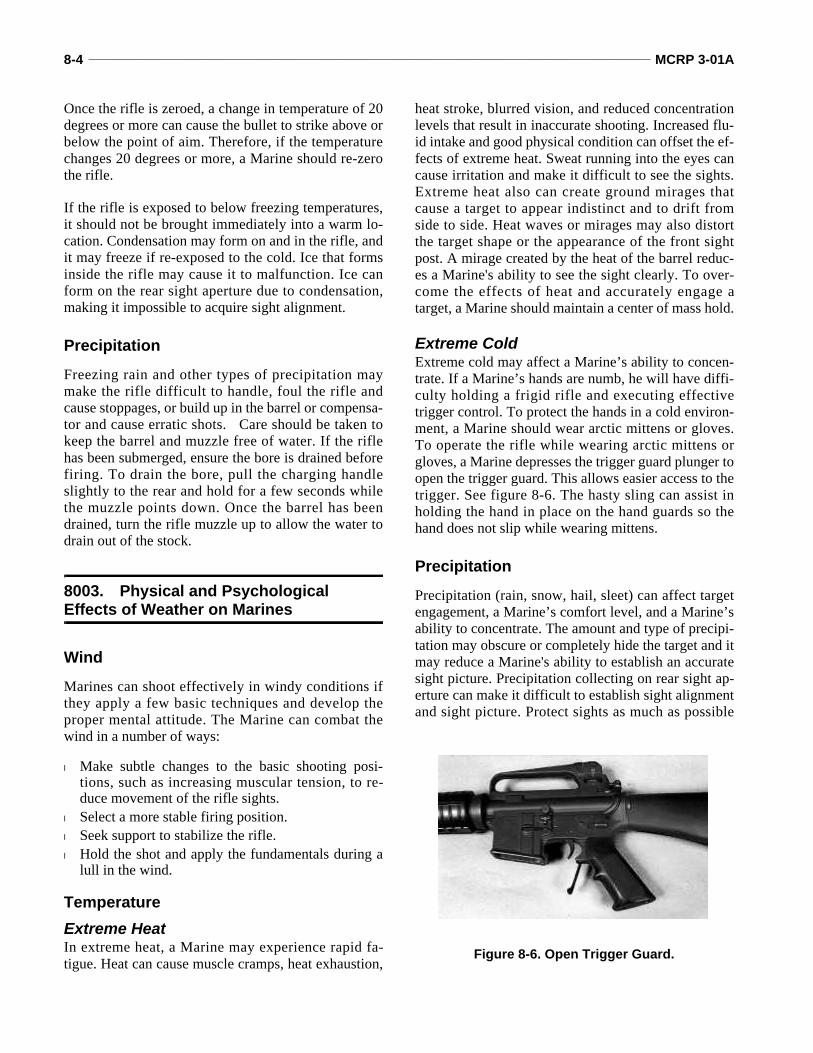
8-4 _______________________________________________________________________________________________ MCRP 3-01A
Once the rifle is zeroed, a change in temperature of 20degrees or more can cause the bullet to strike above orbelow the point of aim. Therefore, if the temperaturechanges 20 degrees or more, a Marine should re-zerothe rifle.
If the rifle is exposed to below freezing temperatures,it should not be brought immediately into a warm lo-cation. Condensation may form on and in the rifle, andit may freeze if re-exposed to the cold. Ice that formsinside the rifle may cause it to malfunction. Ice canform on the rear sight aperture due to condensation,making it impossible to acquire sight alignment.
PrecipitationFreezing rain and other types of precipitation maymake the rifle difficult to handle, foul the rifle andcause stoppages, or build up in the barrel or compensa-tor and cause erratic shots. Care should be taken tokeep the barrel and muzzle free of water. If the riflehas been submerged, ensure the bore is drained beforefiring. To drain the bore, pull the charging handleslightly to the rear and hold for a few seconds whilethe muzzle points down. Once the barrel has beendrained, turn the rifle muzzle up to allow the water todrain out of the stock.
8003. Physical and Psychological Effects of Weather on Marines
Wind
Marines can shoot effectively in windy conditions ifthey apply a few basic techniques and develop theproper mental attitude. The Marine can combat thewind in a number of ways:
l Make subtle changes to the basic shooting posi-tions, such as increasing muscular tension, to re-duce movement of the rifle sights.
l Select a more stable firing position.l Seek support to stabilize the rifle.l Hold the shot and apply the fundamentals during a
lull in the wind.
TemperatureExtreme HeatIn extreme heat, a Marine may experience rapid fa-tigue. Heat can cause muscle cramps, heat exhaustion,
heat stroke, blurred vision, and reduced concentrationlevels that result in inaccurate shooting. Increased flu-id intake and good physical condition can offset the ef-fects of extreme heat. Sweat running into the eyes cancause irritation and make it difficult to see the sights.Extreme heat also can create ground mirages thatcause a target to appear indistinct and to drift fromside to side. Heat waves or mirages may also distortthe target shape or the appearance of the front sightpost. A mirage created by the heat of the barrel reduc-es a Marine's ability to see the sight clearly. To over-come the effects of heat and accurately engage atarget, a Marine should maintain a center of mass hold.
Extreme ColdExtreme cold may affect a Marine’s ability to concen-trate. If a Marine’s hands are numb, he will have diffi-culty holding a frigid rifle and executing effectivetrigger control. To protect the hands in a cold environ-ment, a Marine should wear arctic mittens or gloves.To operate the rifle while wearing arctic mittens orgloves, a Marine depresses the trigger guard plunger toopen the trigger guard. This allows easier access to thetrigger. See figure 8-6. The hasty sling can assist inholding the hand in place on the hand guards so thehand does not slip while wearing mittens.
Precipitation
Precipitation (rain, snow, hail, sleet) can affect targetengagement, a Marine’s comfort level, and a Marine’sability to concentrate. The amount and type of precipi-tation may obscure or completely hide the target and itmay reduce a Marine's ability to establish an accuratesight picture. Precipitation collecting on rear sight ap-erture can make it difficult to establish sight alignmentand sight picture. Protect sights as much as possible
Figure 8-6. Open Trigger Guard.
Rifle Marksmanship________________________________________________________________________________________ 8-5
during periods of precipitation. It is easy to lose con-centration when wet and uncomfortable. Proper dressreduces the effects of precipitation on the Marine.
LightLight conditions can change the appearance of a tar-get. Light affects each Marine differently. Light canaffect range estimation, visual acuity, or the placementof the tip of the front sight on the target. By maintain-ing a center of mass hold, the effects of light can be re-duced.
Bright LightBright light conditions exist under a clear blue skywith no fog or haze present to filter the sunlight.Bright light can make a target appear smaller and far-ther away. As a result, it is easy to overestimate range.Maintaining a center of mass hold, regardless of how
indistinct the target appears, ensures the best chancesfor an effective shot.
OvercastAn overcast condition exists when a solid layer ofclouds blocks the sun. The amount of available lightchanges as the overcast thickens. Overcast conditionscan make a target appear larger and closer. As a result,it is easy to underestimate range. During a light over-cast, the target appears very distinct and the rifle sightsappear very distinct, making it easy to establish sightalignment. As the overcast thickens, it becomes diffi-cult to identify the target from its surroundings.
HazeHazy conditions exist when fog, dust, humidity orsmoke is present. Hazy conditions can make a targetappear indistinct making it difficult to establish sightpicture.
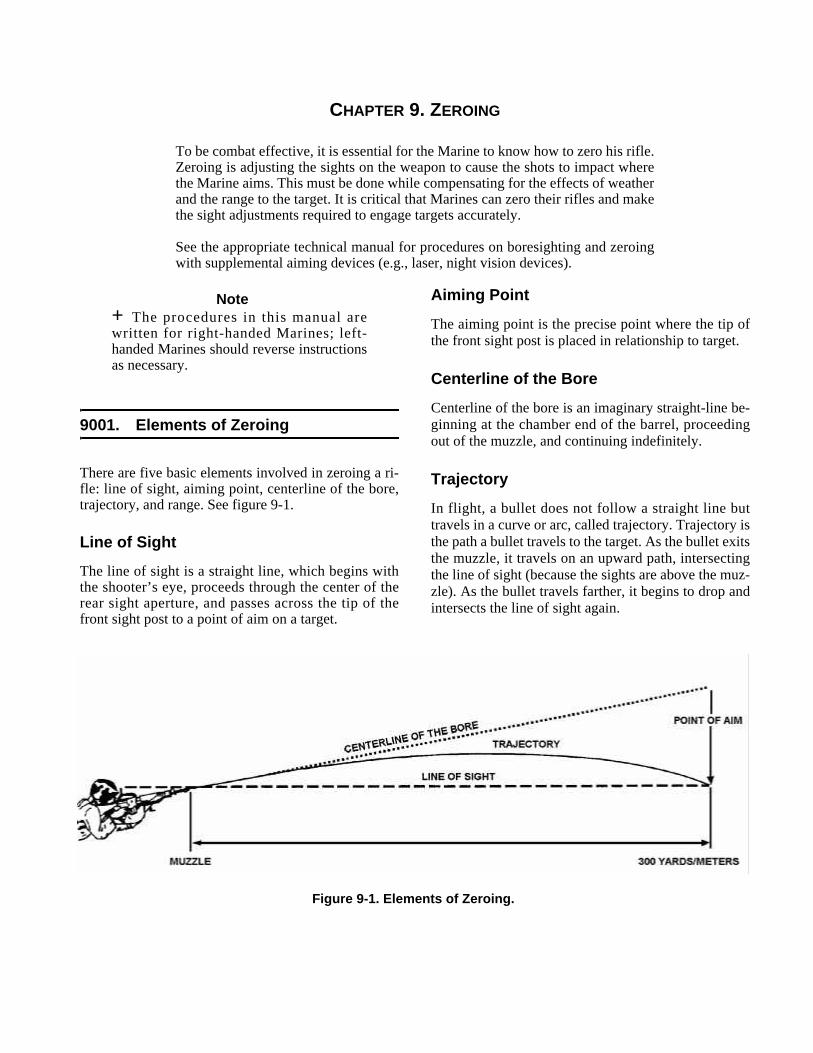
CHAPTER 9. ZEROING
To be combat effective, it is essential for the Marine to know how to zero his rifle.Zeroing is adjusting the sights on the weapon to cause the shots to impact wherethe Marine aims. This must be done while compensating for the effects of weatherand the range to the target. It is critical that Marines can zero their rifles and makethe sight adjustments required to engage targets accurately.
See the appropriate technical manual for procedures on boresighting and zeroingwith supplemental aiming devices (e.g., laser, night vision devices).
Note+The procedures in this manual arewritten for right-handed Marines; left-handed Marines should reverse instructionsas necessary.
9001. Elements of Zeroing
There are five basic elements involved in zeroing a ri-fle: line of sight, aiming point, centerline of the bore,trajectory, and range. See figure 9-1.
Line of SightThe line of sight is a straight line, which begins withthe shooter’s eye, proceeds through the center of therear sight aperture, and passes across the tip of thefront sight post to a point of aim on a target.
Aiming PointThe aiming point is the precise point where the tip ofthe front sight post is placed in relationship to target.
Centerline of the Bore
Centerline of the bore is an imaginary straight-line be-ginning at the chamber end of the barrel, proceedingout of the muzzle, and continuing indefinitely.
Trajectory
In flight, a bullet does not follow a straight line buttravels in a curve or arc, called trajectory. Trajectory isthe path a bullet travels to the target. As the bullet exitsthe muzzle, it travels on an upward path, intersectingthe line of sight (because the sights are above the muz-zle). As the bullet travels farther, it begins to drop andintersects the line of sight again.
Figure 9-1. Elements of Zeroing.
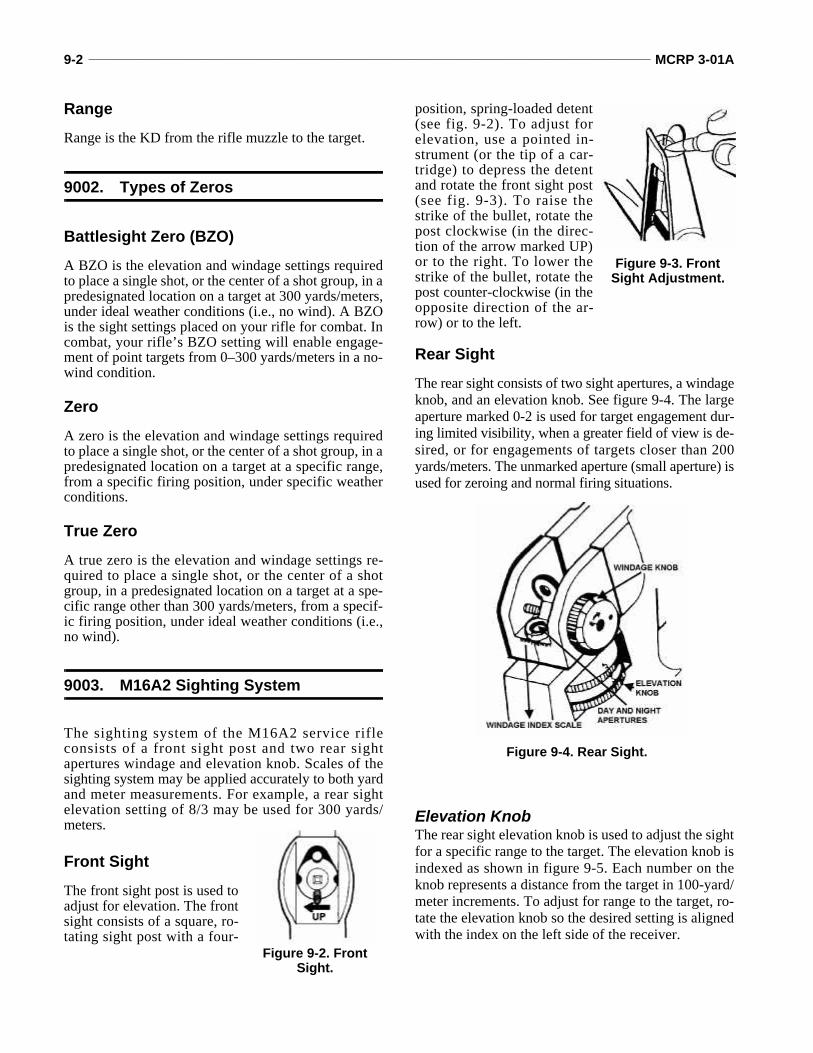
9-2 _______________________________________________________________________________________________ MCRP 3-01A
RangeRange is the KD from the rifle muzzle to the target.
9002. Types of Zeros
Battlesight Zero (BZO)A BZO is the elevation and windage settings requiredto place a single shot, or the center of a shot group, in apredesignated location on a target at 300 yards/meters,under ideal weather conditions (i.e., no wind). A BZOis the sight settings placed on your rifle for combat. Incombat, your rifle’s BZO setting will enable engage-ment of point targets from 0–300 yards/meters in a no-wind condition.
ZeroA zero is the elevation and windage settings requiredto place a single shot, or the center of a shot group, in apredesignated location on a target at a specific range,from a specific firing position, under specific weatherconditions.
True Zero
A true zero is the elevation and windage settings re-quired to place a single shot, or the center of a shotgroup, in a predesignated location on a target at a spe-cific range other than 300 yards/meters, from a specif-ic firing position, under ideal weather conditions (i.e.,no wind).
9003. M16A2 Sighting System
The sighting system of the M16A2 service rifleconsists of a front sight post and two rear sightapertures windage and elevation knob. Scales of thesighting system may be applied accurately to both yardand meter measurements. For example, a rear sightelevation setting of 8/3 may be used for 300 yards/meters.
Front SightThe front sight post is used toadjust for elevation. The frontsight consists of a square, ro-tating sight post with a four-
position, spring-loaded detent(see fig. 9-2). To adjust forelevation, use a pointed in-strument (or the tip of a car-tridge) to depress the detentand rotate the front sight post(see fig. 9-3). To raise thestrike of the bullet, rotate thepost clockwise (in the direc-tion of the arrow marked UP)or to the right. To lower thestrike of the bullet, rotate thepost counter-clockwise (in theopposite direction of the ar-row) or to the left.
Rear SightThe rear sight consists of two sight apertures, a windageknob, and an elevation knob. See figure 9-4. The largeaperture marked 0-2 is used for target engagement dur-ing limited visibility, when a greater field of view is de-sired, or for engagements of targets closer than 200yards/meters. The unmarked aperture (small aperture) isused for zeroing and normal firing situations.
Elevation KnobThe rear sight elevation knob is used to adjust the sightfor a specific range to the target. The elevation knob isindexed as shown in figure 9-5. Each number on theknob represents a distance from the target in 100-yard/meter increments. To adjust for range to the target, ro-tate the elevation knob so the desired setting is alignedwith the index on the left side of the receiver.
Figure 9-2. Front Sight.
Figure 9-3. Front Sight Adjustment.
Figure 9-4. Rear Sight.
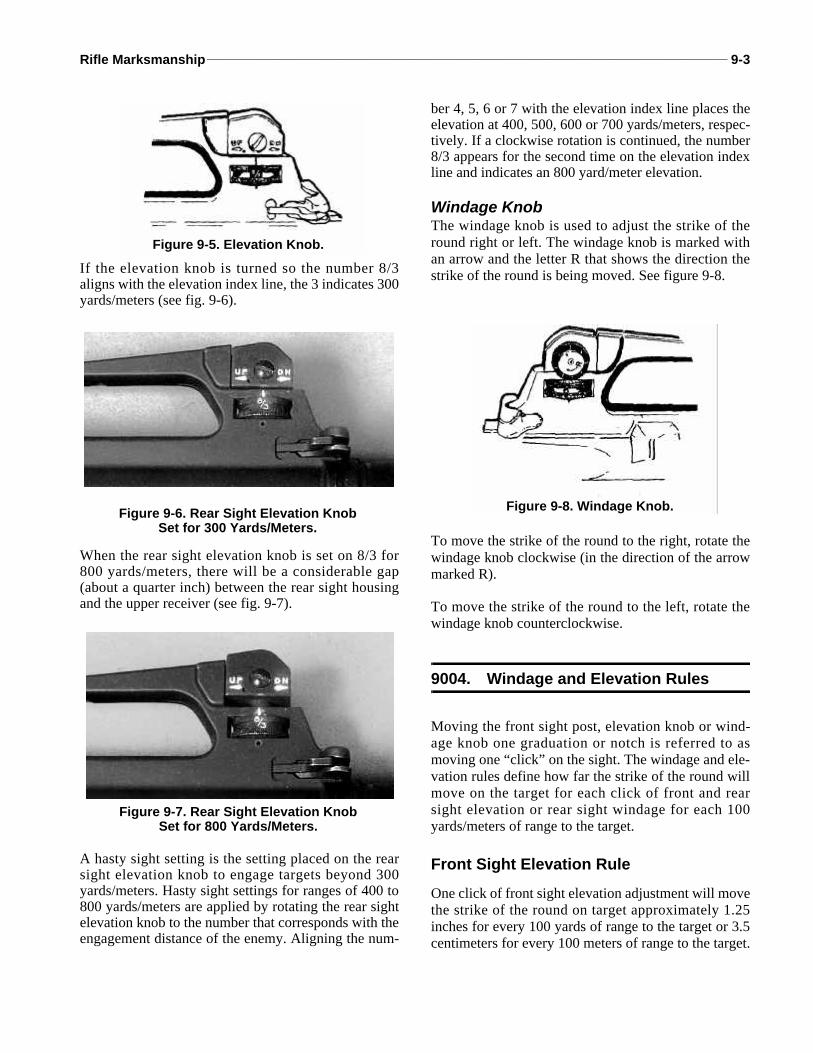
Rifle Marksmanship________________________________________________________________________________________ 9-3
If the elevation knob is turned so the number 8/3aligns with the elevation index line, the 3 indicates 300yards/meters (see fig. 9-6).
When the rear sight elevation knob is set on 8/3 for800 yards/meters, there will be a considerable gap(about a quarter inch) between the rear sight housingand the upper receiver (see fig. 9-7).
A hasty sight setting is the setting placed on the rearsight elevation knob to engage targets beyond 300yards/meters. Hasty sight settings for ranges of 400 to800 yards/meters are applied by rotating the rear sightelevation knob to the number that corresponds with theengagement distance of the enemy. Aligning the num-
ber 4, 5, 6 or 7 with the elevation index line places theelevation at 400, 500, 600 or 700 yards/meters, respec-tively. If a clockwise rotation is continued, the number8/3 appears for the second time on the elevation indexline and indicates an 800 yard/meter elevation.
Windage KnobThe windage knob is used to adjust the strike of theround right or left. The windage knob is marked withan arrow and the letter R that shows the direction thestrike of the round is being moved. See figure 9-8.
To move the strike of the round to the right, rotate thewindage knob clockwise (in the direction of the arrowmarked R).
To move the strike of the round to the left, rotate thewindage knob counterclockwise.
9004. Windage and Elevation Rules
Moving the front sight post, elevation knob or wind-age knob one graduation or notch is referred to asmoving one “click” on the sight. The windage and ele-vation rules define how far the strike of the round willmove on the target for each click of front and rearsight elevation or rear sight windage for each 100yards/meters of range to the target.
Front Sight Elevation RuleOne click of front sight elevation adjustment will movethe strike of the round on target approximately 1.25inches for every 100 yards of range to the target or 3.5centimeters for every 100 meters of range to the target.
Figure 9-5. Elevation Knob.
Figure 9-6. Rear Sight Elevation KnobSet for 300 Yards/Meters.
Figure 9-7. Rear Sight Elevation KnobSet for 800 Yards/Meters.
Figure 9-8. Windage Knob.
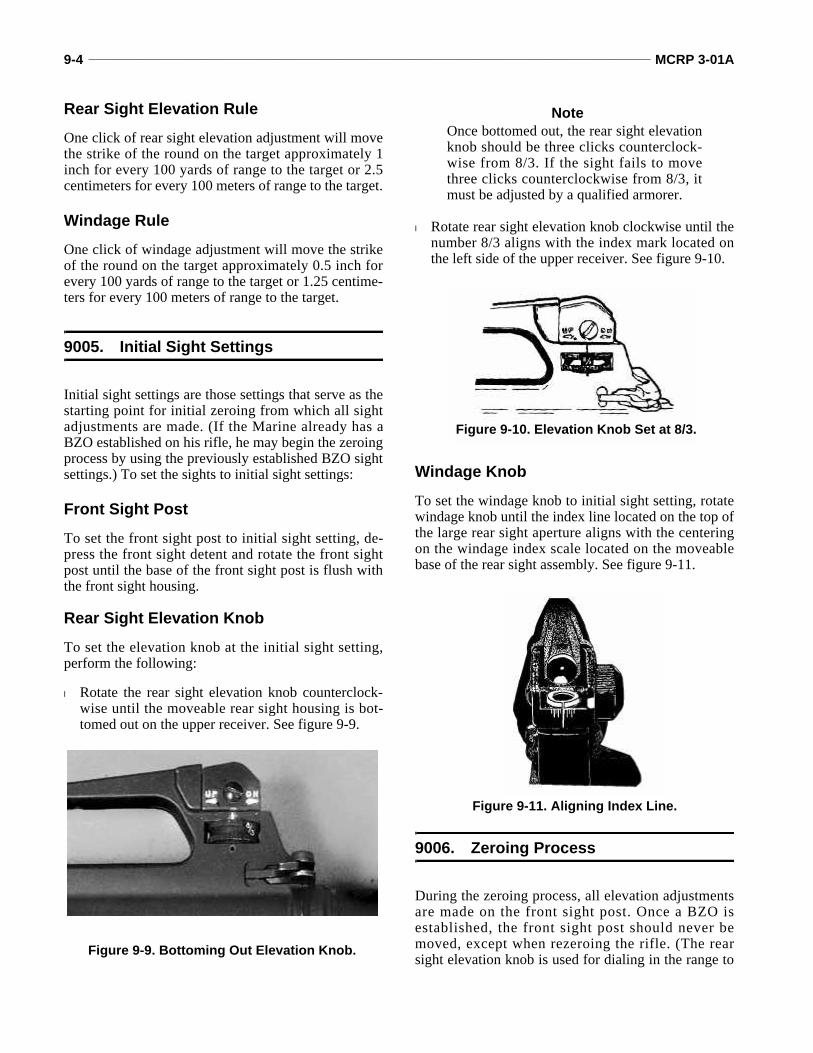
9-4 _______________________________________________________________________________________________ MCRP 3-01A
Rear Sight Elevation RuleOne click of rear sight elevation adjustment will movethe strike of the round on the target approximately 1inch for every 100 yards of range to the target or 2.5centimeters for every 100 meters of range to the target.
Windage RuleOne click of windage adjustment will move the strikeof the round on the target approximately 0.5 inch forevery 100 yards of range to the target or 1.25 centime-ters for every 100 meters of range to the target.
9005. Initial Sight Settings
Initial sight settings are those settings that serve as thestarting point for initial zeroing from which all sightadjustments are made. (If the Marine already has aBZO established on his rifle, he may begin the zeroingprocess by using the previously established BZO sightsettings.) To set the sights to initial sight settings:
Front Sight PostTo set the front sight post to initial sight setting, de-press the front sight detent and rotate the front sightpost until the base of the front sight post is flush withthe front sight housing.
Rear Sight Elevation Knob
To set the elevation knob at the initial sight setting,perform the following:
l Rotate the rear sight elevation knob counterclock-wise until the moveable rear sight housing is bot-tomed out on the upper receiver. See figure 9-9.
NoteOnce bottomed out, the rear sight elevationknob should be three clicks counterclock-wise from 8/3. If the sight fails to movethree clicks counterclockwise from 8/3, itmust be adjusted by a qualified armorer.
l Rotate rear sight elevation knob clockwise until thenumber 8/3 aligns with the index mark located onthe left side of the upper receiver. See figure 9-10.
Windage KnobTo set the windage knob to initial sight setting, rotatewindage knob until the index line located on the top ofthe large rear sight aperture aligns with the centeringon the windage index scale located on the moveablebase of the rear sight assembly. See figure 9-11.
9006. Zeroing Process
During the zeroing process, all elevation adjustmentsare made on the front sight post. Once a BZO isestablished, the front sight post should never bemoved, except when rezeroing the rifle. (The rearsight elevation knob is used for dialing in the range toFigure 9-9. Bottoming Out Elevation Knob.
Figure 9-10. Elevation Knob Set at 8/3.
Figure 9-11. Aligning Index Line.
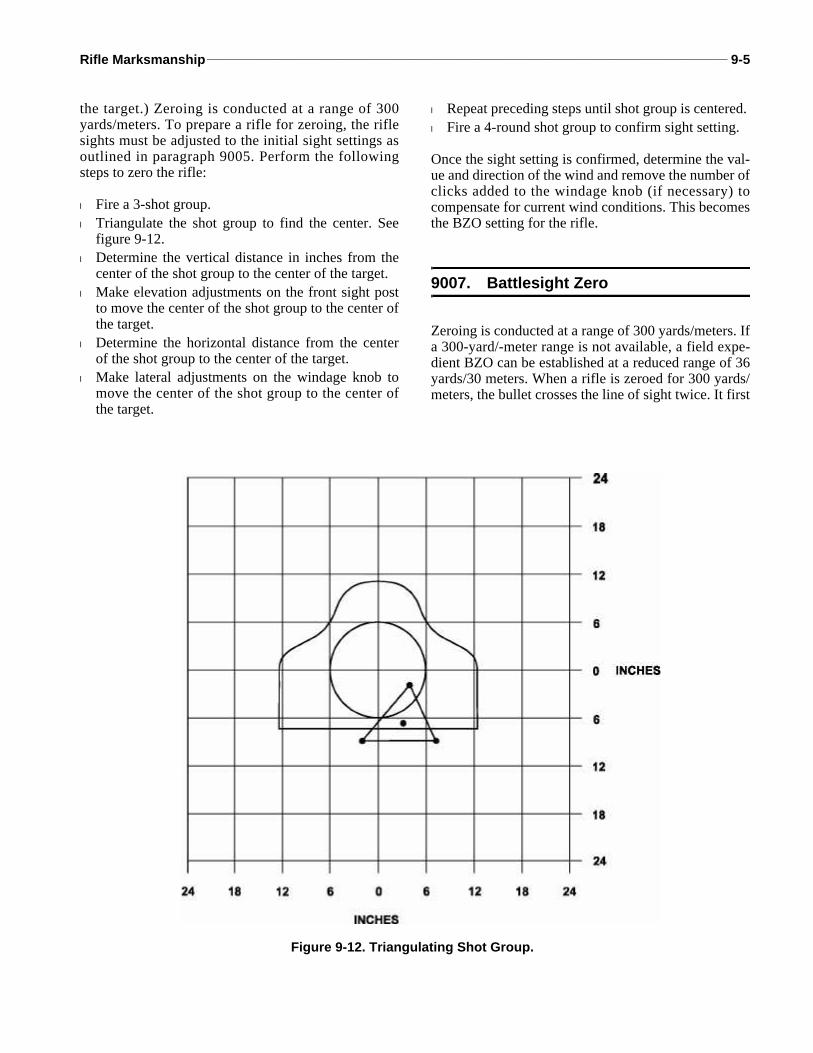
Rifle Marksmanship________________________________________________________________________________________ 9-5
the target.) Zeroing is conducted at a range of 300yards/meters. To prepare a rifle for zeroing, the riflesights must be adjusted to the initial sight settings asoutlined in paragraph 9005. Perform the followingsteps to zero the rifle:
l Fire a 3-shot group.l Triangulate the shot group to find the center. See
figure 9-12.l Determine the vertical distance in inches from the
center of the shot group to the center of the target. l Make elevation adjustments on the front sight post
to move the center of the shot group to the center ofthe target.
l Determine the horizontal distance from the centerof the shot group to the center of the target.
l Make lateral adjustments on the windage knob tomove the center of the shot group to the center ofthe target.
l Repeat preceding steps until shot group is centered. l Fire a 4-round shot group to confirm sight setting.
Once the sight setting is confirmed, determine the val-ue and direction of the wind and remove the number ofclicks added to the windage knob (if necessary) tocompensate for current wind conditions. This becomesthe BZO setting for the rifle.
9007. Battlesight Zero
Zeroing is conducted at a range of 300 yards/meters. Ifa 300-yard/-meter range is not available, a field expe-dient BZO can be established at a reduced range of 36yards/30 meters. When a rifle is zeroed for 300 yards/meters, the bullet crosses the line of sight twice. It first
Figure 9-12. Triangulating Shot Group.
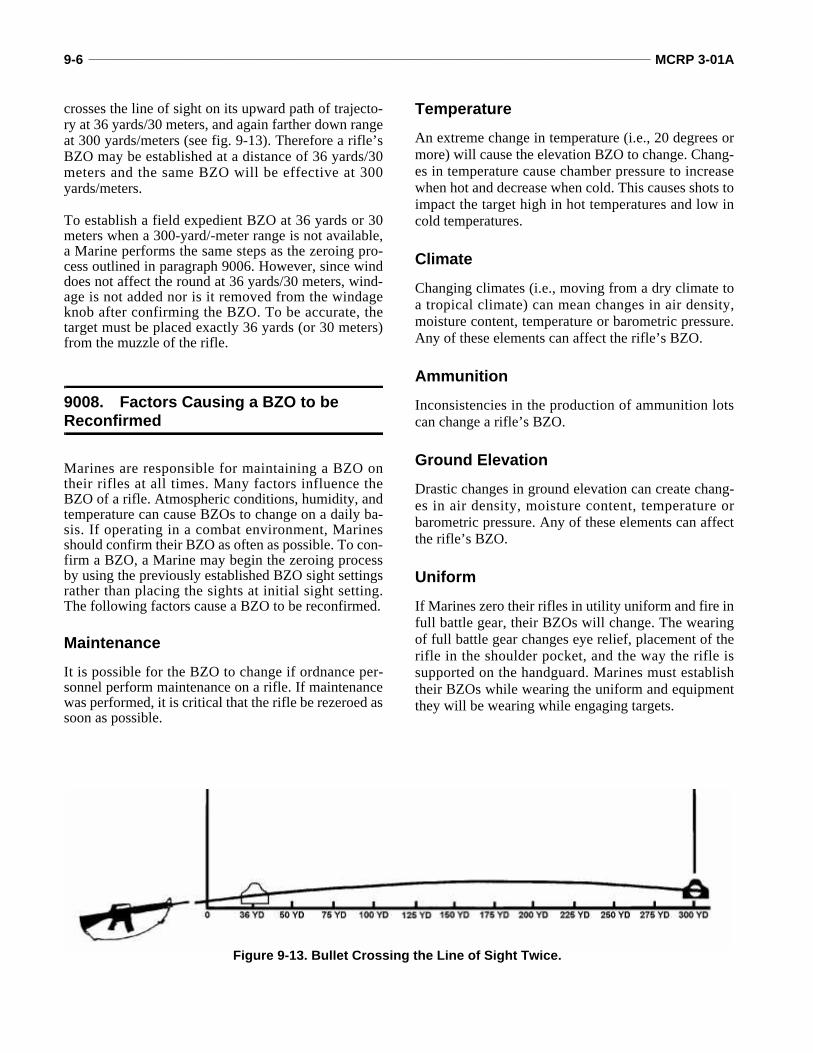
9-6 _______________________________________________________________________________________________ MCRP 3-01A
crosses the line of sight on its upward path of trajecto-ry at 36 yards/30 meters, and again farther down rangeat 300 yards/meters (see fig. 9-13). Therefore a rifle’sBZO may be established at a distance of 36 yards/30meters and the same BZO will be effective at 300yards/meters.
To establish a field expedient BZO at 36 yards or 30meters when a 300-yard/-meter range is not available,a Marine performs the same steps as the zeroing pro-cess outlined in paragraph 9006. However, since winddoes not affect the round at 36 yards/30 meters, wind-age is not added nor is it removed from the windageknob after confirming the BZO. To be accurate, thetarget must be placed exactly 36 yards (or 30 meters)from the muzzle of the rifle.
9008. Factors Causing a BZO to be Reconfirmed
Marines are responsible for maintaining a BZO ontheir rifles at all times. Many factors influence theBZO of a rifle. Atmospheric conditions, humidity, andtemperature can cause BZOs to change on a daily ba-sis. If operating in a combat environment, Marinesshould confirm their BZO as often as possible. To con-firm a BZO, a Marine may begin the zeroing processby using the previously established BZO sight settingsrather than placing the sights at initial sight setting.The following factors cause a BZO to be reconfirmed.
MaintenanceIt is possible for the BZO to change if ordnance per-sonnel perform maintenance on a rifle. If maintenancewas performed, it is critical that the rifle be rezeroed assoon as possible.
TemperatureAn extreme change in temperature (i.e., 20 degrees ormore) will cause the elevation BZO to change. Chang-es in temperature cause chamber pressure to increasewhen hot and decrease when cold. This causes shots toimpact the target high in hot temperatures and low incold temperatures.
ClimateChanging climates (i.e., moving from a dry climate toa tropical climate) can mean changes in air density,moisture content, temperature or barometric pressure.Any of these elements can affect the rifle’s BZO.
AmmunitionInconsistencies in the production of ammunition lotscan change a rifle’s BZO.
Ground ElevationDrastic changes in ground elevation can create chang-es in air density, moisture content, temperature orbarometric pressure. Any of these elements can affectthe rifle’s BZO.
Uniform
If Marines zero their rifles in utility uniform and fire infull battle gear, their BZOs will change. The wearingof full battle gear changes eye relief, placement of therifle in the shoulder pocket, and the way the rifle issupported on the handguard. Marines must establishtheir BZOs while wearing the uniform and equipmentthey will be wearing while engaging targets.
Figure 9-13. Bullet Crossing the Line of Sight Twice.
Rifle Marksmanship________________________________________________________________________________________ 9-7
9009. Factors Affecting the Accuracy of a BZO
Anything the Marine changes from shot to shot affectsthe accuracy of his BZO. It further affects the accuracyof shot placement. The following factors, when ap-plied inconsistently, diminish the accuracy of a BZO:
l Any of the seven factors (left hand, rifle butt in thepocket of the shoulder, grip of the right hand, rightelbow, stock weld, breathing, and muscular relax-ation/tension).
l Stability of hold.l Sling tension.l Trigger control.l Sight picture.
CHAPTER 10. ENGAGEMENT TECHNIQUES
A Marine must maintain the ability to react instinctively in a combat environ-ment—day or night. He must possess a combat mindset that eliminates hesitation,fear, or uncertainty of action. A Marine’s combat mindset allows him to engagethe enemy rapidly and focus on the actions required to fire well-aimed shots. Hemust remember that speed alone does not equate to effective target engagement.He should fire only as fast as he can fire accurately. He should never exceed hisphysical capability to engage a target effectively. To be effective in combat, aMarine must train to perfect the physical skills of target engagement (such as pre-senting the weapon and assuming a shooting position) until they become instinc-tive. A Marine must also employ effective engagement techniques that enableacquisition and engagement of a variety of targets in diverse combat conditions.
10001. Target Detection
To be proficient, a Marine rifleman must be able to de-tect targets, determine the range to targets, and accu-rately engage the targets. There are many variablesaffecting a Marine’s ability to detect and determine therange to combat targets. Enemy targets on the battle-field may be single or multiple, stationary or moving,or completely hidden from view. Success in locatingan enemy target will depend upon the observer’s posi-tion, his skill in searching an area, and his ability torecognize target indicators.
Target Indicators
Most combat targets are detected at close range bysmoke, flash, dust, noise or movement, and are usuallyseen only momentarily. Target indicators are anythingthat reveals an individual’s position to the enemy.These indicators are grouped into three general areas:movement, sound, and improper camouflage.
MovementThe human eye is attracted to movement, especiallysudden movement. The Marine need not be lookingdirectly at an object to notice movement. The degreeof difficulty in locating moving targets depends pri-marily on the speed of movement. A slowly movingtarget will be harder to detect than one with quick,jerky movements.
SoundSound can also be used to detect an enemy position.Sound may be made by movement, rattling equipment,or talking. Sound provides only a general location ofthe enemy, making it difficult to pinpoint a target by
sound alone. However, sound can alert the Marine tothe presence of a target and increase his probability oflocating it through other indicators.
Improper CamouflageThere are three indicators caused by improper camou-flage: shine, outline, and contrast with the background.Most targets on the battlefield are detected due to im-proper camouflage. However, many times an observa-tion post or enemy firing position will blend almostperfectly with the natural background. Only throughextremely careful, detailed searching will these posi-tions be revealed.
Shine. Shine is created from reflective objects such asmetal or glass. It may also come from pools of waterand even the natural oils from the skin. Shine acts as abeacon to the target’s position.
Outline. Most enemy soldiers will camouflage them-selves, their equipment, and their positions. The out-line of objects such as the body, head and shoulders,weapons, and web gear are recognizable even from adistance. The human eye will often pick up a recogniz-able shape and concentrate on it even if the object can-not be identified immediately. The reliability of thisindicator depends upon visibility and the experience ofthe observer.
Contrast With the Background. Indicators in thiscategory include objects that stand out against (con-trast with) a background because of differences in col-or, surface, and shape. For instance, a target wearing adark uniform would be clearly visible in an area ofsnow or sand. Geometric shapes, such as helmets or ri-fle barrels, can be easy to detect in a wooded area.Fresh soil around a fighting hole contrasts with theotherwise unbroken ground surface. While observing

10-2 ______________________________________________________________________________________________ MCRP 3-01A
an area, take note of anything that looks out of place orunusual and study it in more detail. This will greatlyincrease your chances of spotting a hidden enemy.
Identifying Target Location
Observation PositionA good position is one that offers maximum visibilityof the area while affording cover and concealment.The optimal observation position should allow theMarine to scan all the areas of observation and offerenough concealment to prevent his position from be-ing detected.
The Marine should avoid positions that are obvious orstand out, such as a lone tree in a field or a pile ofrocks on a hill. These positions may be ideal points foreasy observation, but they will also make it easier forthe enemy to locate the Marine.
Methods for Searching an AreaIn searching an area, the Marine will be looking fortarget indicators. There are two techniques for search-ing an area: the hasty search and the detailed search.
Hasty Search. When a Marine moves into a new area,he must quickly check for enemy activity that maypose an immediate danger. This search is known as thehasty search and should take about 30 seconds, de-pending on the terrain.
Quickly glance at various points throughout the arearather than sweeping the eyes across the terrain in onecontinuous movement. The Marine should search the
area nearest him first since it poses the greatest poten-tial for danger.
This method of search is effective because it takes ad-vantage of peripheral vision. Peripheral vision enablesthe detection of any movement in a wide area aroundthe object being observed. For this technique to be ef-fective, the eyes must be focused briefly on specificpoints (i.e., areas that may provide cover or conceal-ment for the enemy).
Detailed Search. A detailed search is a systematic ex-amination of a specific target indicator or of the entireobservation area. A detailed search should be conduct-ed immediately on target indicators located during thehasty search. The detailed search should be made fromtop to bottom or side to side, observing the entire ob-ject in exact detail. If multiple indicators were ob-served during the hasty search, the detailed searchshould begin with the indicator that appears to posethe greatest threat.
After a thorough search of target indicators, or if no in-dicators were located during the hasty search, a de-tailed search should be made of the entire observationarea. The 50-meter overlapping strip method is nor-mally used.
Normally, the area nearest the observer offers thegreatest potential danger and should be searched first.Begin the search at one flank, systematically searchingthe terrain at the front in 180-degree arcs, searchingeverything in exacting detail, 50 meters in depth. Seefigure 10-1.
Figure 10-1. Searching the Terrain in Overlapping Strips.
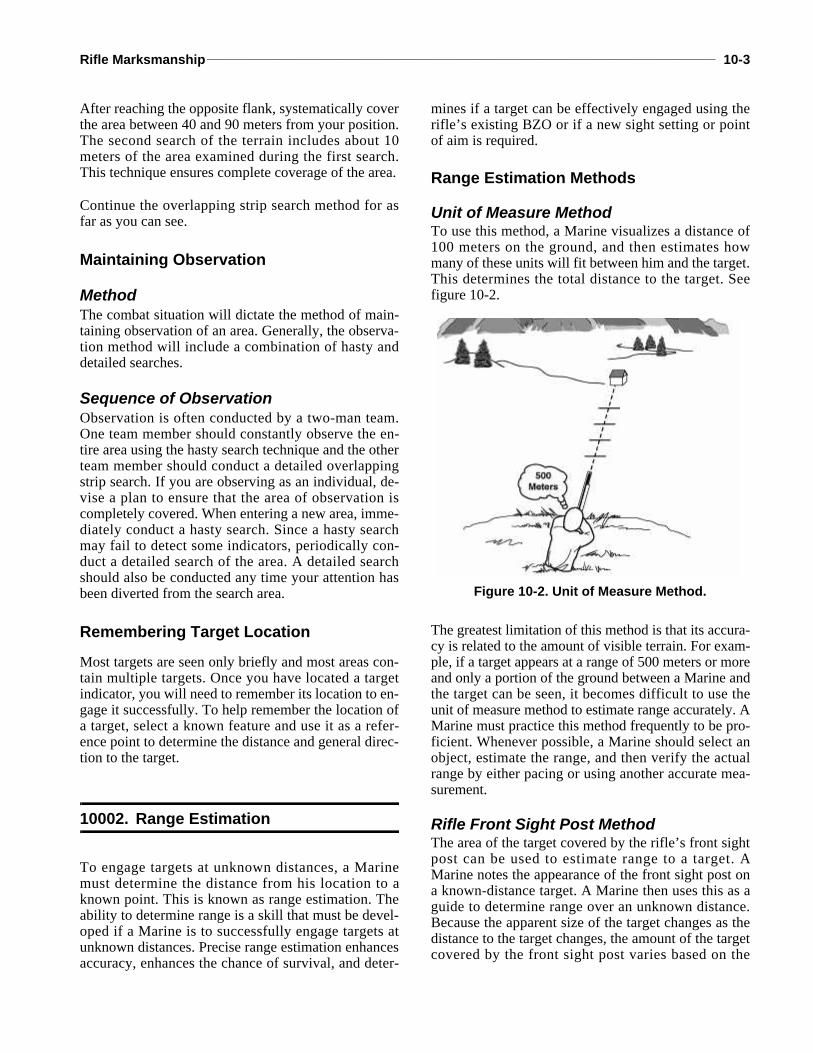
Rifle Marksmanship______________________________________________________________________________________ 10-3
After reaching the opposite flank, systematically coverthe area between 40 and 90 meters from your position.The second search of the terrain includes about 10meters of the area examined during the first search.This technique ensures complete coverage of the area.
Continue the overlapping strip search method for asfar as you can see.
Maintaining Observation
MethodThe combat situation will dictate the method of main-taining observation of an area. Generally, the observa-tion method will include a combination of hasty anddetailed searches.
Sequence of ObservationObservation is often conducted by a two-man team.One team member should constantly observe the en-tire area using the hasty search technique and the otherteam member should conduct a detailed overlappingstrip search. If you are observing as an individual, de-vise a plan to ensure that the area of observation iscompletely covered. When entering a new area, imme-diately conduct a hasty search. Since a hasty searchmay fail to detect some indicators, periodically con-duct a detailed search of the area. A detailed searchshould also be conducted any time your attention hasbeen diverted from the search area.
Remembering Target Location
Most targets are seen only briefly and most areas con-tain multiple targets. Once you have located a targetindicator, you will need to remember its location to en-gage it successfully. To help remember the location ofa target, select a known feature and use it as a refer-ence point to determine the distance and general direc-tion to the target.
10002. Range Estimation
To engage targets at unknown distances, a Marinemust determine the distance from his location to aknown point. This is known as range estimation. Theability to determine range is a skill that must be devel-oped if a Marine is to successfully engage targets atunknown distances. Precise range estimation enhancesaccuracy, enhances the chance of survival, and deter-
mines if a target can be effectively engaged using therifle’s existing BZO or if a new sight setting or pointof aim is required.
Range Estimation Methods
Unit of Measure MethodTo use this method, a Marine visualizes a distance of100 meters on the ground, and then estimates howmany of these units will fit between him and the target.This determines the total distance to the target. Seefigure 10-2.
The greatest limitation of this method is that its accura-cy is related to the amount of visible terrain. For exam-ple, if a target appears at a range of 500 meters or moreand only a portion of the ground between a Marine andthe target can be seen, it becomes difficult to use theunit of measure method to estimate range accurately. AMarine must practice this method frequently to be pro-ficient. Whenever possible, a Marine should select anobject, estimate the range, and then verify the actualrange by either pacing or using another accurate mea-surement.
Rifle Front Sight Post MethodThe area of the target covered by the rifle’s front sightpost can be used to estimate range to a target. AMarine notes the appearance of the front sight post ona known-distance target. A Marine then uses this as aguide to determine range over an unknown distance.Because the apparent size of the target changes as thedistance to the target changes, the amount of the targetcovered by the front sight post varies based on the
Figure 10-2. Unit of Measure Method.

10-4 ______________________________________________________________________________________________ MCRP 3-01A
range. In addition, a Marine’s eye relief and percep-tion of the front sight post affect the amount of the tar-get that is visible. To use this method, a Marine mustapply the following guidelines:
l The front sight post covers the width of a man’schest or body at approximately 300 meters.
l If the target is less than the width of the front sightpost, the target is in excess of 300 meters and the ri-fle’s BZO cannot be used effectively.
l If the target is wider than the front sight post, thetarget is less than 300 meters and can be engagedpoint of aim/point of impact using the rifle’s BZO.
See figure 10-3.
Visible Detail MethodThe amount of detail seen at various ranges can pro-vide a Marine with an estimate of the target’s distance.To use this method, a Marine must be familiar with thesize and various details of personnel and equipment atknown distances. Visibility (such as weather, smokeor darkness) limits the effectiveness of this method. AMarine should observe a man while he is standing,kneeling, and in the prone position at known ranges of100 to 500 meters. He should note the man’s size,characteristics/size of his uniform and equipment, andany other pertinent details. The Marine then uses thisas a guide to determine range over an unknown dis-tance. A Marine also should study the appearance ofother familiar objects such as rifles and vehicles. Touse this method, a Marine applies the following gener-al guidelines:
l At 100 meters, the target is clearly observed in de-tail and facial features are distinguished
l At 200 meters, the target is clearly observed. Thereis a loss of facial detail. The color of the skin andequipment are still identifiable.
l At 300 meters, the target has a clear body outline,face color usually remains accurate, but remainingdetails are blurred.
l At 400 meters, the body outline is clear, but remain-ing detail is blurred.
l At 500 meters, the body shape begins to taper at theends, and the head becomes indistinct from theshoulders.
l At 600 meters, the body appears wedge-shaped andheadless.
Bracketing MethodThis method of range estimation estimates the shortestpossible distance and the greatest possible distance tothe target. For example, a Marine estimates that a tar-get may be as close as 300 meters but it could be as faraway as 500 meters. The estimated distances are aver-aged to determine the estimated range to the target.For example, the average of 300 meters and 500meters is 400 meters.
Halving MethodTo use the halving method, a Marine estimates the dis-tance halfway between him and the target, then dou-bles that distance to get the total distance to the target.A Marine must take care when judging the distance tothe halfway point; any error made in judging the half-way distance is doubled when estimating the total dis-tance.
Combination MethodThe methods previously discussed require optimalconditions with regard to the target, terrain, and visi-bility in order to obtain an accurate range estimation.A Marine should estimate the range using two meth-ods and then compare the estimates, or two Marinescan compare their estimates. The average of the twoestimates should be close to the actual range to target.
Factors Affecting Range Estimation
The following specific factors will affect the accuracyof estimation. A Marine must be aware of these factorsand attempt to compensate for their effects.
Nature of the Targetl An object with a regular outline such as a steel hel-
met, rifle, or vehicle on a clear day will appear to becloser than one with an irregular outline such as acamouflaged object.
Figure 10-3. Front Sight Post Method.
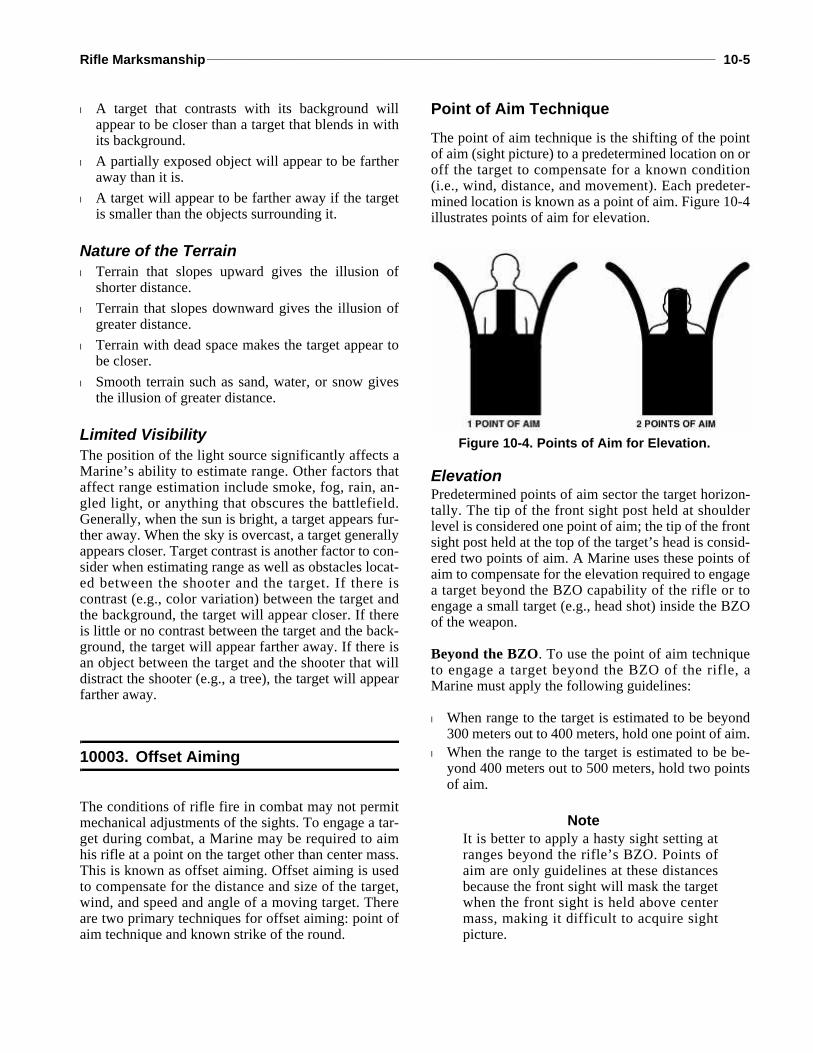
Rifle Marksmanship______________________________________________________________________________________ 10-5
l A target that contrasts with its background willappear to be closer than a target that blends in withits background.
l A partially exposed object will appear to be fartheraway than it is.
l A target will appear to be farther away if the targetis smaller than the objects surrounding it.
Nature of the Terrainl Terrain that slopes upward gives the illusion of
shorter distance.l Terrain that slopes downward gives the illusion of
greater distance.l Terrain with dead space makes the target appear to
be closer.l Smooth terrain such as sand, water, or snow gives
the illusion of greater distance.
Limited VisibilityThe position of the light source significantly affects aMarine’s ability to estimate range. Other factors thataffect range estimation include smoke, fog, rain, an-gled light, or anything that obscures the battlefield.Generally, when the sun is bright, a target appears fur-ther away. When the sky is overcast, a target generallyappears closer. Target contrast is another factor to con-sider when estimating range as well as obstacles locat-ed between the shooter and the target. If there iscontrast (e.g., color variation) between the target andthe background, the target will appear closer. If thereis little or no contrast between the target and the back-ground, the target will appear farther away. If there isan object between the target and the shooter that willdistract the shooter (e.g., a tree), the target will appearfarther away.
10003. Offset Aiming
The conditions of rifle fire in combat may not permitmechanical adjustments of the sights. To engage a tar-get during combat, a Marine may be required to aimhis rifle at a point on the target other than center mass.This is known as offset aiming. Offset aiming is usedto compensate for the distance and size of the target,wind, and speed and angle of a moving target. Thereare two primary techniques for offset aiming: point ofaim technique and known strike of the round.
Point of Aim TechniqueThe point of aim technique is the shifting of the pointof aim (sight picture) to a predetermined location on oroff the target to compensate for a known condition(i.e., wind, distance, and movement). Each predeter-mined location is known as a point of aim. Figure 10-4illustrates points of aim for elevation.
ElevationPredetermined points of aim sector the target horizon-tally. The tip of the front sight post held at shoulderlevel is considered one point of aim; the tip of the frontsight post held at the top of the target’s head is consid-ered two points of aim. A Marine uses these points ofaim to compensate for the elevation required to engagea target beyond the BZO capability of the rifle or toengage a small target (e.g., head shot) inside the BZOof the weapon.
Beyond the BZO. To use the point of aim techniqueto engage a target beyond the BZO of the rifle, aMarine must apply the following guidelines:
l When range to the target is estimated to be beyond300 meters out to 400 meters, hold one point of aim.
l When the range to the target is estimated to be be-yond 400 meters out to 500 meters, hold two pointsof aim.
NoteIt is better to apply a hasty sight setting atranges beyond the rifle’s BZO. Points ofaim are only guidelines at these distancesbecause the front sight will mask the targetwhen the front sight is held above centermass, making it difficult to acquire sightpicture.
Figure 10-4. Points of Aim for Elevation.
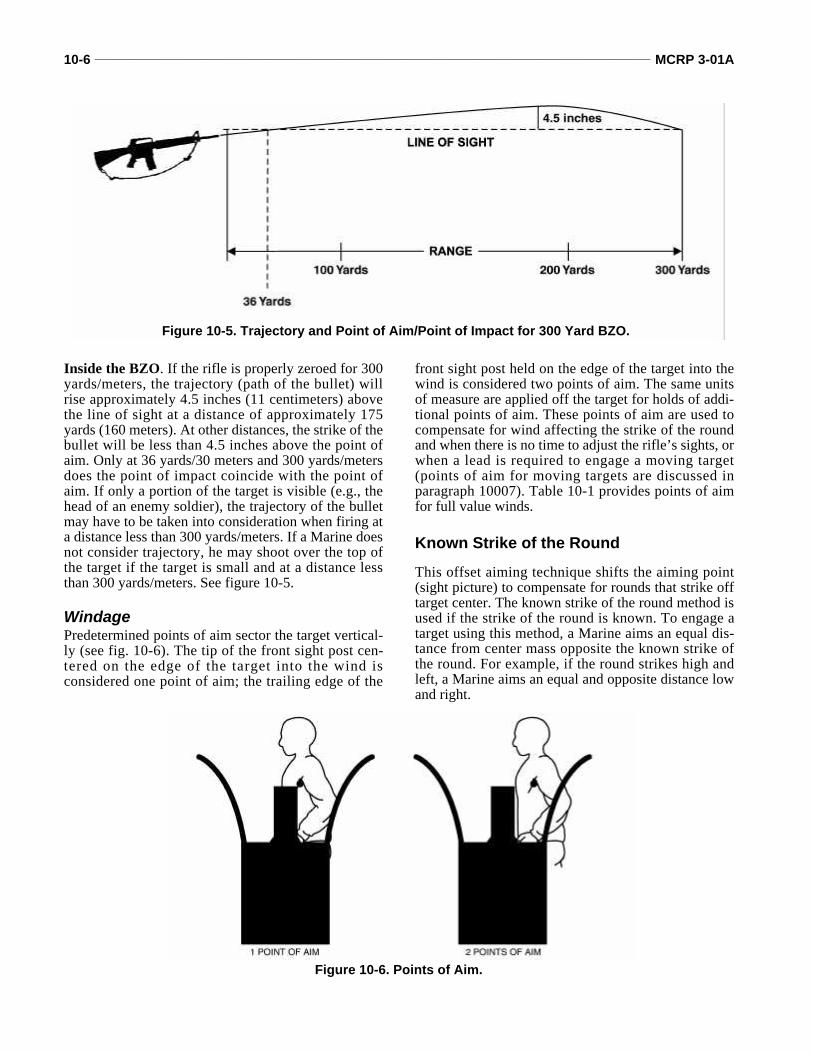
10-6 ______________________________________________________________________________________________ MCRP 3-01A
Inside the BZO. If the rifle is properly zeroed for 300yards/meters, the trajectory (path of the bullet) willrise approximately 4.5 inches (11 centimeters) abovethe line of sight at a distance of approximately 175yards (160 meters). At other distances, the strike of thebullet will be less than 4.5 inches above the point ofaim. Only at 36 yards/30 meters and 300 yards/metersdoes the point of impact coincide with the point ofaim. If only a portion of the target is visible (e.g., thehead of an enemy soldier), the trajectory of the bulletmay have to be taken into consideration when firing ata distance less than 300 yards/meters. If a Marine doesnot consider trajectory, he may shoot over the top ofthe target if the target is small and at a distance lessthan 300 yards/meters. See figure 10-5.
WindagePredetermined points of aim sector the target vertical-ly (see fig. 10-6). The tip of the front sight post cen-tered on the edge of the target into the wind isconsidered one point of aim; the trailing edge of the
front sight post held on the edge of the target into thewind is considered two points of aim. The same unitsof measure are applied off the target for holds of addi-tional points of aim. These points of aim are used tocompensate for wind affecting the strike of the roundand when there is no time to adjust the rifle’s sights, orwhen a lead is required to engage a moving target(points of aim for moving targets are discussed inparagraph 10007). Table 10-1 provides points of aimfor full value winds.
Known Strike of the RoundThis offset aiming technique shifts the aiming point(sight picture) to compensate for rounds that strike offtarget center. The known strike of the round method isused if the strike of the round is known. To engage atarget using this method, a Marine aims an equal dis-tance from center mass opposite the known strike ofthe round. For example, if the round strikes high andleft, a Marine aims an equal and opposite distance lowand right.
Figure 10-5. Trajectory and Point of Aim/Point of Impact for 300 Yard BZO.
Figure 10-6. Points of Aim.
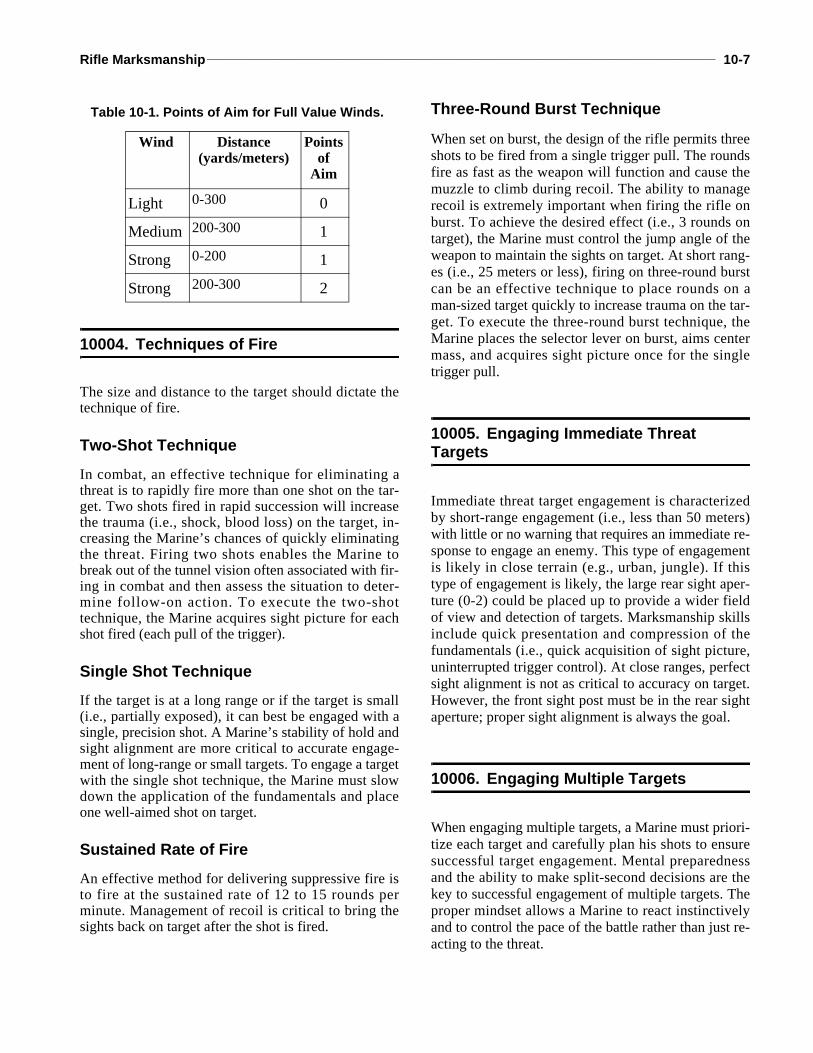
Rifle Marksmanship______________________________________________________________________________________ 10-7
10004. Techniques of Fire
The size and distance to the target should dictate thetechnique of fire.
Two-Shot Technique
In combat, an effective technique for eliminating athreat is to rapidly fire more than one shot on the tar-get. Two shots fired in rapid succession will increasethe trauma (i.e., shock, blood loss) on the target, in-creasing the Marine’s chances of quickly eliminatingthe threat. Firing two shots enables the Marine tobreak out of the tunnel vision often associated with fir-ing in combat and then assess the situation to deter-mine follow-on action. To execute the two-shottechnique, the Marine acquires sight picture for eachshot fired (each pull of the trigger).
Single Shot TechniqueIf the target is at a long range or if the target is small(i.e., partially exposed), it can best be engaged with asingle, precision shot. A Marine’s stability of hold andsight alignment are more critical to accurate engage-ment of long-range or small targets. To engage a targetwith the single shot technique, the Marine must slowdown the application of the fundamentals and placeone well-aimed shot on target.
Sustained Rate of FireAn effective method for delivering suppressive fire isto fire at the sustained rate of 12 to 15 rounds perminute. Management of recoil is critical to bring thesights back on target after the shot is fired.
Three-Round Burst Technique
When set on burst, the design of the rifle permits threeshots to be fired from a single trigger pull. The roundsfire as fast as the weapon will function and cause themuzzle to climb during recoil. The ability to managerecoil is extremely important when firing the rifle onburst. To achieve the desired effect (i.e., 3 rounds ontarget), the Marine must control the jump angle of theweapon to maintain the sights on target. At short rang-es (i.e., 25 meters or less), firing on three-round burstcan be an effective technique to place rounds on aman-sized target quickly to increase trauma on the tar-get. To execute the three-round burst technique, theMarine places the selector lever on burst, aims centermass, and acquires sight picture once for the singletrigger pull.
10005. Engaging Immediate Threat Targets
Immediate threat target engagement is characterizedby short-range engagement (i.e., less than 50 meters)with little or no warning that requires an immediate re-sponse to engage an enemy. This type of engagementis likely in close terrain (e.g., urban, jungle). If thistype of engagement is likely, the large rear sight aper-ture (0-2) could be placed up to provide a wider fieldof view and detection of targets. Marksmanship skillsinclude quick presentation and compression of thefundamentals (i.e., quick acquisition of sight picture,uninterrupted trigger control). At close ranges, perfectsight alignment is not as critical to accuracy on target.However, the front sight post must be in the rear sightaperture; proper sight alignment is always the goal.
10006. Engaging Multiple Targets
When engaging multiple targets, a Marine must priori-tize each target and carefully plan his shots to ensuresuccessful target engagement. Mental preparednessand the ability to make split-second decisions are thekey to successful engagement of multiple targets. Theproper mindset allows a Marine to react instinctivelyand to control the pace of the battle rather than just re-acting to the threat.
Table 10-1. Points of Aim for Full Value Winds.
Wind Distance(yards/meters)
Points of
Aim
Light 0-300 0
Medium 200-300 1
Strong 0-200 1
Strong 200-300 2
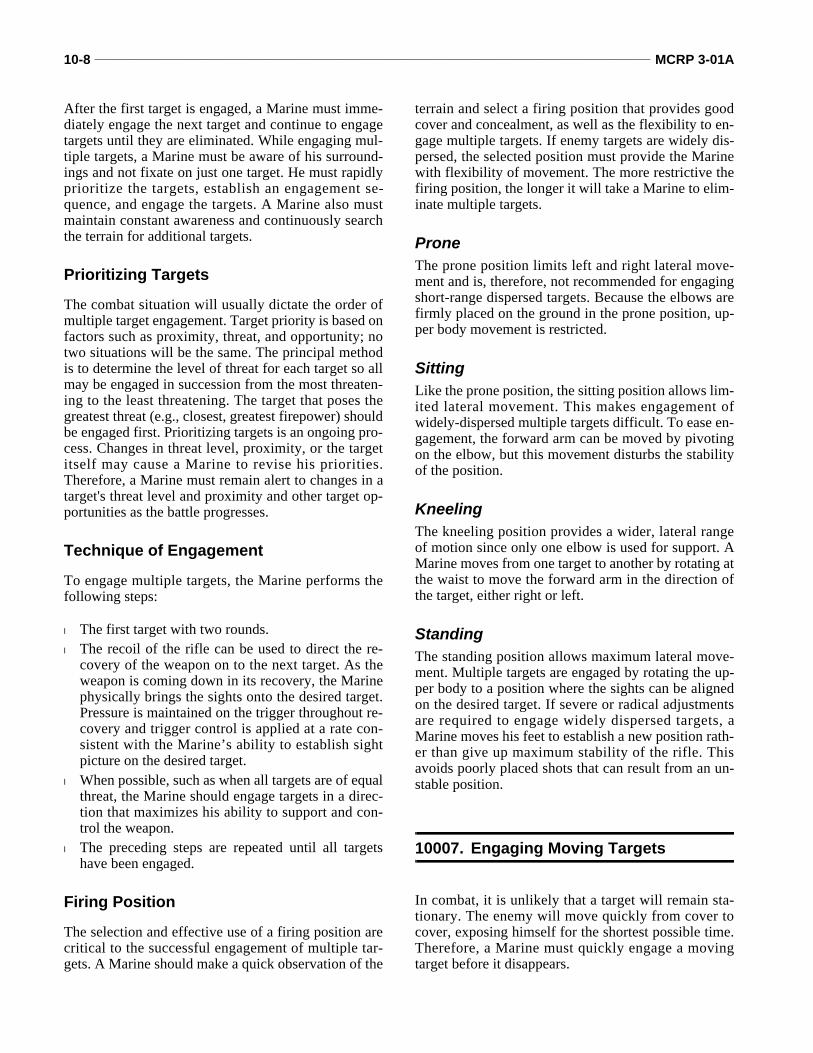
10-8 ______________________________________________________________________________________________ MCRP 3-01A
After the first target is engaged, a Marine must imme-diately engage the next target and continue to engagetargets until they are eliminated. While engaging mul-tiple targets, a Marine must be aware of his surround-ings and not fixate on just one target. He must rapidlyprioritize the targets, establish an engagement se-quence, and engage the targets. A Marine also mustmaintain constant awareness and continuously searchthe terrain for additional targets.
Prioritizing Targets
The combat situation will usually dictate the order ofmultiple target engagement. Target priority is based onfactors such as proximity, threat, and opportunity; notwo situations will be the same. The principal methodis to determine the level of threat for each target so allmay be engaged in succession from the most threaten-ing to the least threatening. The target that poses thegreatest threat (e.g., closest, greatest firepower) shouldbe engaged first. Prioritizing targets is an ongoing pro-cess. Changes in threat level, proximity, or the targetitself may cause a Marine to revise his priorities.Therefore, a Marine must remain alert to changes in atarget's threat level and proximity and other target op-portunities as the battle progresses.
Technique of Engagement
To engage multiple targets, the Marine performs thefollowing steps:
l The first target with two rounds.l The recoil of the rifle can be used to direct the re-
covery of the weapon on to the next target. As theweapon is coming down in its recovery, the Marinephysically brings the sights onto the desired target.Pressure is maintained on the trigger throughout re-covery and trigger control is applied at a rate con-sistent with the Marine’s ability to establish sightpicture on the desired target.
l When possible, such as when all targets are of equalthreat, the Marine should engage targets in a direc-tion that maximizes his ability to support and con-trol the weapon.
l The preceding steps are repeated until all targetshave been engaged.
Firing Position
The selection and effective use of a firing position arecritical to the successful engagement of multiple tar-gets. A Marine should make a quick observation of the
terrain and select a firing position that provides goodcover and concealment, as well as the flexibility to en-gage multiple targets. If enemy targets are widely dis-persed, the selected position must provide the Marinewith flexibility of movement. The more restrictive thefiring position, the longer it will take a Marine to elim-inate multiple targets.
ProneThe prone position limits left and right lateral move-ment and is, therefore, not recommended for engagingshort-range dispersed targets. Because the elbows arefirmly placed on the ground in the prone position, up-per body movement is restricted.
SittingLike the prone position, the sitting position allows lim-ited lateral movement. This makes engagement ofwidely-dispersed multiple targets difficult. To ease en-gagement, the forward arm can be moved by pivotingon the elbow, but this movement disturbs the stabilityof the position.
KneelingThe kneeling position provides a wider, lateral rangeof motion since only one elbow is used for support. AMarine moves from one target to another by rotating atthe waist to move the forward arm in the direction ofthe target, either right or left.
StandingThe standing position allows maximum lateral move-ment. Multiple targets are engaged by rotating the up-per body to a position where the sights can be alignedon the desired target. If severe or radical adjustmentsare required to engage widely dispersed targets, aMarine moves his feet to establish a new position rath-er than give up maximum stability of the rifle. Thisavoids poorly placed shots that can result from an un-stable position.
10007. Engaging Moving Targets
In combat, it is unlikely that a target will remain sta-tionary. The enemy will move quickly from cover tocover, exposing himself for the shortest possible time.Therefore, a Marine must quickly engage a movingtarget before it disappears.
Rifle Marksmanship______________________________________________________________________________________ 10-9
Types of Moving Targets
There are two types of moving targets: steady movingtargets and stop and go targets. Steady moving targetsmove in a consistent manner and remain in a Marine’sfield of vision. A walking or running man is an exam-ple of a steady moving target. A stop and go target ap-pears and disappears during its movement. A stop andgo target will present itself for only a short time beforeit reestablishes cover. An enemy moving from cover tocover is an example of a stop and go target. This targetis most vulnerable to fire at the beginning and end ofits movement to new cover because the target mustgain momentum to exit its existing cover and thenslow down to occupy a new position.
Leads
When a shot is fired at a moving target, the target con-tinues to move during the time the bullet is in flight.Therefore, a Marine must aim in front of the target;otherwise, the shot will fall behind the target. This iscalled leading a target. Lead is the distance in advanceof the target that the rifle sights are placed to accurate-ly engage the target when it is moving.
Amount of Lead RequiredFactors that affect the amount of lead are the target’srange, speed, and angle of movement.
Range. Lead is determined by the rifle’s distance tothe target. When a shot is fired at a moving target, thetarget continues to move during the time the bullet isin flight. This time of flight could allow a target tomove out of the bullet’s path if the round was fired di-rectly at the target. Time of flight increases as range tothe target increases. Therefore, the lead must be in-creased as the distance to the target increases.
Speed. If a man is running, a greater lead is requiredbecause the man will move a greater distance than awalking man will while the bullet is in flight.
Angle of Movement. The angle of movement acrossthe line of sight relative to the flight of the bullet deter-mines the type (amount) of lead.
Three Types of Leads: Full, Half, Nol Full Lead. The target is moving straight across a
Marine's line of sight with only one arm and halfthe body visible. This target requires a full lead be-cause it will move the greatest distance across aMarine’s line of sight during the flight of the bullet.
l Half Lead. The target is moving obliquely across aMarine's line of sight (at a 45-degree angle). Onearm and over half the back or chest are visible. Thistarget requires half of a full lead because it willmove half as far as a target moving directly across aMarine’s line of sight during the flight of the bullet.
l No Lead. The target is moving directly toward oraway from a Marine and presents a full view of botharms and the entire back or chest. No lead is re-quired. A Marine engages this target as if it were astationary target because it is not moving across hisline of sight.
Point of Aim TechniquePredetermined points of aim sector the target vertical-ly. The tip of the front sight post centered on the lead-ing edge of the target is considered one point of aim;the trailing edge of the front sight post held on theleading edge of the target is considered two points ofaim. The same units of measure are applied off the tar-get for holds of additional points of aim. These pointsof aim are used to compensate when a lead is requiredto engage a moving target. The following guidelinesapply if a Marine uses the point of aim technique to es-tablish a lead for a moving target at various ranges andspeeds (see fig. 10-7, on page 10-10). These guidelinesdo not consider wind or other effects of weather. Bodywidth in these examples is considered to be 12 inches(30 centimeters) (side view of the target).
For a slow walking target (approximately 2 to 2.5mph/3.2 to 4 kph) moving directly across the line ofsight (full lead)—
l At a range of 200 meters or less, no lead is required.l At a range of 300 meters, hold one point of aim in
the direction the target is moving.
For a fast walking target (approximately 4 mph/6.4kph) moving directly across the line of sight (fulllead)—
l At a range of 200 meters or less, hold one point ofaim in the direction the target is moving.
l At a range of 300 meters, hold two points of aim inthe direction the target is moving.
For a target running (approximately 6 mph/9.7 kph)directly across the line of sight (full lead)—
l At a range of 100 meters or less, hold one point ofaim in the direction the target is moving.
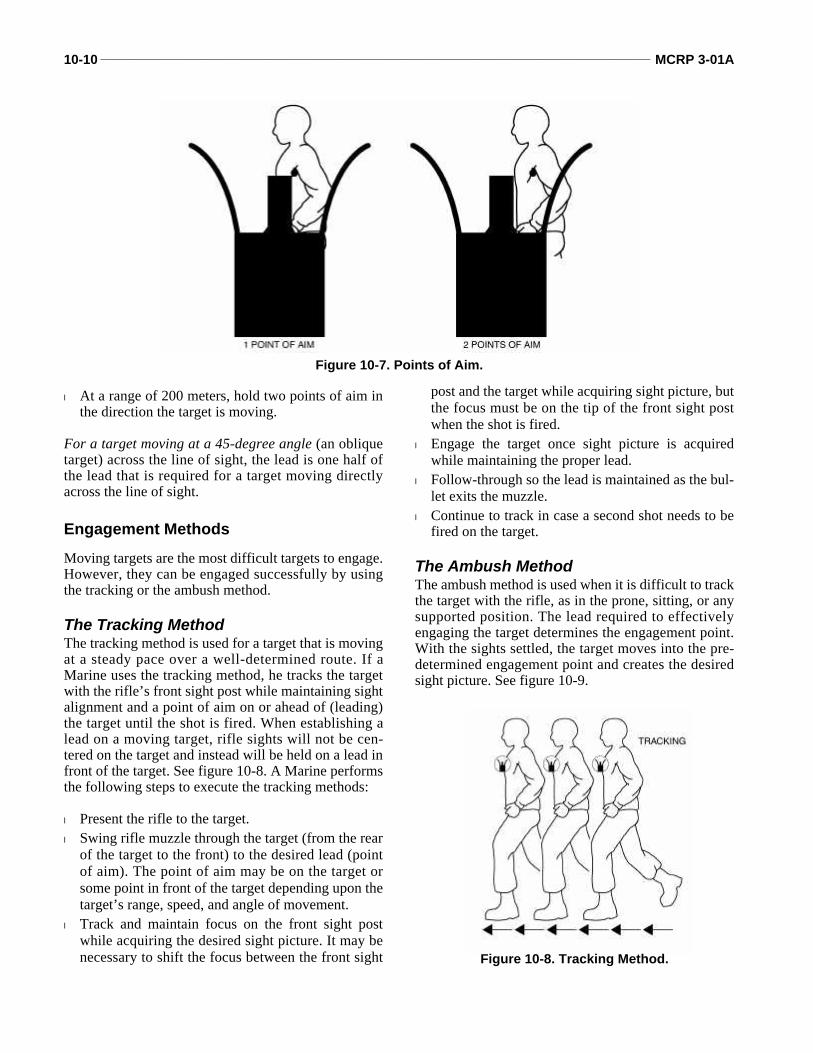
10-10 _____________________________________________________________________________________________ MCRP 3-01A
l At a range of 200 meters, hold two points of aim inthe direction the target is moving.
For a target moving at a 45-degree angle (an obliquetarget) across the line of sight, the lead is one half ofthe lead that is required for a target moving directlyacross the line of sight.
Engagement MethodsMoving targets are the most difficult targets to engage.However, they can be engaged successfully by usingthe tracking or the ambush method.
The Tracking MethodThe tracking method is used for a target that is movingat a steady pace over a well-determined route. If aMarine uses the tracking method, he tracks the targetwith the rifle’s front sight post while maintaining sightalignment and a point of aim on or ahead of (leading)the target until the shot is fired. When establishing alead on a moving target, rifle sights will not be cen-tered on the target and instead will be held on a lead infront of the target. See figure 10-8. A Marine performsthe following steps to execute the tracking methods:
l Present the rifle to the target.l Swing rifle muzzle through the target (from the rear
of the target to the front) to the desired lead (pointof aim). The point of aim may be on the target orsome point in front of the target depending upon thetarget’s range, speed, and angle of movement.
l Track and maintain focus on the front sight postwhile acquiring the desired sight picture. It may benecessary to shift the focus between the front sight
post and the target while acquiring sight picture, butthe focus must be on the tip of the front sight postwhen the shot is fired.
l Engage the target once sight picture is acquiredwhile maintaining the proper lead.
l Follow-through so the lead is maintained as the bul-let exits the muzzle.
l Continue to track in case a second shot needs to befired on the target.
The Ambush MethodThe ambush method is used when it is difficult to trackthe target with the rifle, as in the prone, sitting, or anysupported position. The lead required to effectivelyengaging the target determines the engagement point.With the sights settled, the target moves into the pre-determined engagement point and creates the desiredsight picture. See figure 10-9.
Figure 10-7. Points of Aim.
Figure 10-8. Tracking Method.
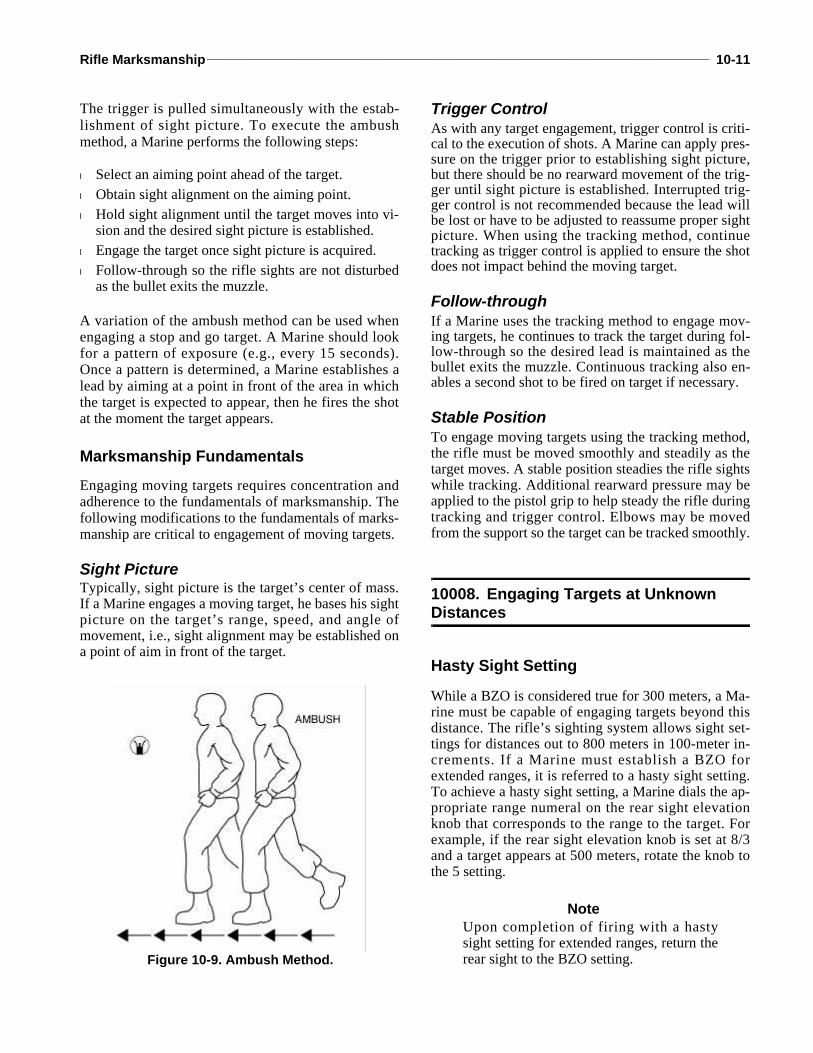
Rifle Marksmanship_____________________________________________________________________________________ 10-11
The trigger is pulled simultaneously with the estab-lishment of sight picture. To execute the ambushmethod, a Marine performs the following steps:
l Select an aiming point ahead of the target.l Obtain sight alignment on the aiming point.l Hold sight alignment until the target moves into vi-
sion and the desired sight picture is established.l Engage the target once sight picture is acquired.l Follow-through so the rifle sights are not disturbed
as the bullet exits the muzzle.
A variation of the ambush method can be used whenengaging a stop and go target. A Marine should lookfor a pattern of exposure (e.g., every 15 seconds).Once a pattern is determined, a Marine establishes alead by aiming at a point in front of the area in whichthe target is expected to appear, then he fires the shotat the moment the target appears.
Marksmanship Fundamentals
Engaging moving targets requires concentration andadherence to the fundamentals of marksmanship. Thefollowing modifications to the fundamentals of marks-manship are critical to engagement of moving targets.
Sight PictureTypically, sight picture is the target’s center of mass.If a Marine engages a moving target, he bases his sightpicture on the target’s range, speed, and angle ofmovement, i.e., sight alignment may be established ona point of aim in front of the target.
Trigger ControlAs with any target engagement, trigger control is criti-cal to the execution of shots. A Marine can apply pres-sure on the trigger prior to establishing sight picture,but there should be no rearward movement of the trig-ger until sight picture is established. Interrupted trig-ger control is not recommended because the lead willbe lost or have to be adjusted to reassume proper sightpicture. When using the tracking method, continuetracking as trigger control is applied to ensure the shotdoes not impact behind the moving target.
Follow-throughIf a Marine uses the tracking method to engage mov-ing targets, he continues to track the target during fol-low-through so the desired lead is maintained as thebullet exits the muzzle. Continuous tracking also en-ables a second shot to be fired on target if necessary.
Stable PositionTo engage moving targets using the tracking method,the rifle must be moved smoothly and steadily as thetarget moves. A stable position steadies the rifle sightswhile tracking. Additional rearward pressure may beapplied to the pistol grip to help steady the rifle duringtracking and trigger control. Elbows may be movedfrom the support so the target can be tracked smoothly.
10008. Engaging Targets at Unknown Distances
Hasty Sight Setting
While a BZO is considered true for 300 meters, a Ma-rine must be capable of engaging targets beyond thisdistance. The rifle’s sighting system allows sight set-tings for distances out to 800 meters in 100-meter in-crements. If a Marine must establish a BZO forextended ranges, it is referred to a hasty sight setting.To achieve a hasty sight setting, a Marine dials the ap-propriate range numeral on the rear sight elevationknob that corresponds to the range to the target. Forexample, if the rear sight elevation knob is set at 8/3and a target appears at 500 meters, rotate the knob tothe 5 setting.
NoteUpon completion of firing with a hastysight setting for extended ranges, return therear sight to the BZO setting.Figure 10-9. Ambush Method.
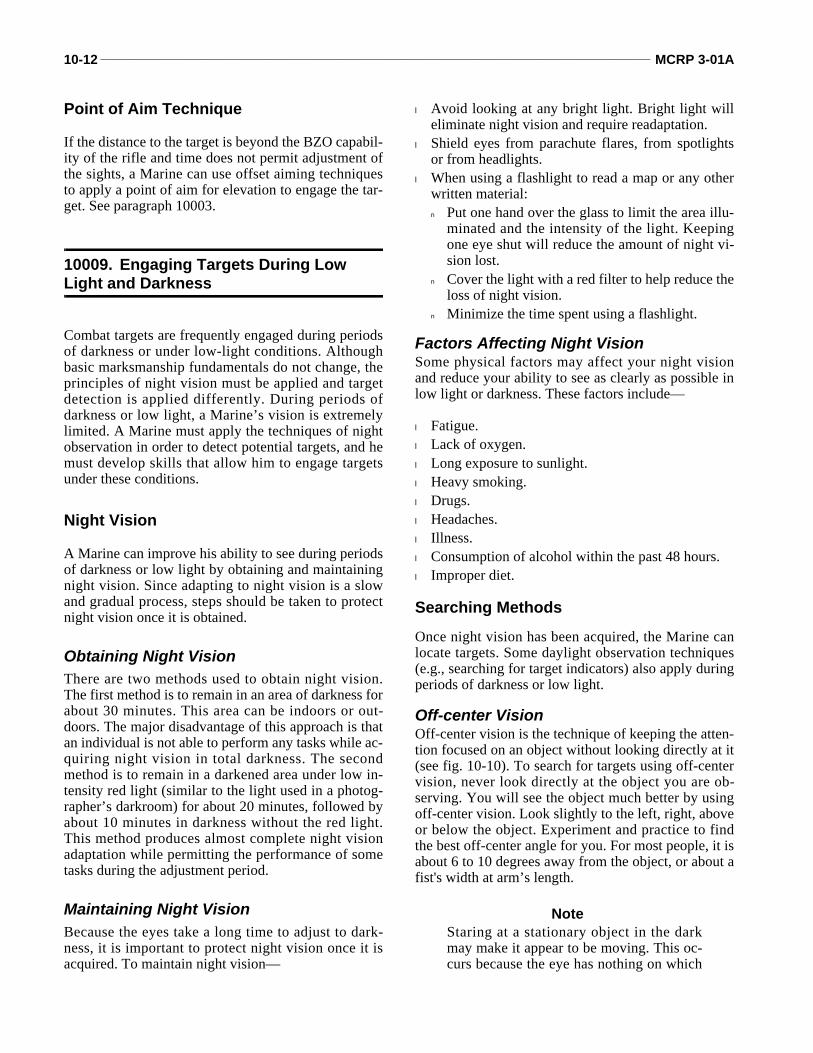
10-12 _____________________________________________________________________________________________ MCRP 3-01A
Point of Aim Technique
If the distance to the target is beyond the BZO capabil-ity of the rifle and time does not permit adjustment ofthe sights, a Marine can use offset aiming techniquesto apply a point of aim for elevation to engage the tar-get. See paragraph 10003.
10009. Engaging Targets During Low Light and Darkness
Combat targets are frequently engaged during periodsof darkness or under low-light conditions. Althoughbasic marksmanship fundamentals do not change, theprinciples of night vision must be applied and targetdetection is applied differently. During periods ofdarkness or low light, a Marine’s vision is extremelylimited. A Marine must apply the techniques of nightobservation in order to detect potential targets, and hemust develop skills that allow him to engage targetsunder these conditions.
Night Vision
A Marine can improve his ability to see during periodsof darkness or low light by obtaining and maintainingnight vision. Since adapting to night vision is a slowand gradual process, steps should be taken to protectnight vision once it is obtained.
Obtaining Night VisionThere are two methods used to obtain night vision.The first method is to remain in an area of darkness forabout 30 minutes. This area can be indoors or out-doors. The major disadvantage of this approach is thatan individual is not able to perform any tasks while ac-quiring night vision in total darkness. The secondmethod is to remain in a darkened area under low in-tensity red light (similar to the light used in a photog-rapher’s darkroom) for about 20 minutes, followed byabout 10 minutes in darkness without the red light.This method produces almost complete night visionadaptation while permitting the performance of sometasks during the adjustment period.
Maintaining Night VisionBecause the eyes take a long time to adjust to dark-ness, it is important to protect night vision once it isacquired. To maintain night vision—
l Avoid looking at any bright light. Bright light willeliminate night vision and require readaptation.
l Shield eyes from parachute flares, from spotlightsor from headlights.
l When using a flashlight to read a map or any otherwritten material:n Put one hand over the glass to limit the area illu-
minated and the intensity of the light. Keepingone eye shut will reduce the amount of night vi-sion lost.
n Cover the light with a red filter to help reduce theloss of night vision.
n Minimize the time spent using a flashlight.
Factors Affecting Night VisionSome physical factors may affect your night visionand reduce your ability to see as clearly as possible inlow light or darkness. These factors include—
l Fatigue.l Lack of oxygen.l Long exposure to sunlight.l Heavy smoking.l Drugs.l Headaches.l Illness.l Consumption of alcohol within the past 48 hours.l Improper diet.
Searching Methods
Once night vision has been acquired, the Marine canlocate targets. Some daylight observation techniques(e.g., searching for target indicators) also apply duringperiods of darkness or low light.
Off-center VisionOff-center vision is the technique of keeping the atten-tion focused on an object without looking directly at it(see fig. 10-10). To search for targets using off-centervision, never look directly at the object you are ob-serving. You will see the object much better by usingoff-center vision. Look slightly to the left, right, aboveor below the object. Experiment and practice to findthe best off-center angle for you. For most people, it isabout 6 to 10 degrees away from the object, or about afist's width at arm’s length.
NoteStaring at a stationary object in the darkmay make it appear to be moving. This oc-curs because the eye has nothing on which

Rifle Marksmanship_____________________________________________________________________________________ 10-13
to reference the exact position of the object.This illusion can be prevented by visuallyaligning the object against something else,such as a finger at arm’s length.
Scanning/Figure Eight ScanScanning is the use of off-center vision to observe anarea or object and involves moving the eyes in a seriesof separate movements across the objective area.
A common method of scanning is to move the eyes ina figure eight pattern (see fig. 10-11). A Marine movesthe eyes in short, abrupt, irregular movements overand around the area. Once a target indicator is detect-ed, focus is concentrated in that area, but not directlyat it. Pause a few seconds at each point of observation
since the eyes cannot focus on a still object while inmotion. Rest the eyes frequently when scanning.
While you are observing, there may be periodic black-outs of night vision due to simple fatigue. This is nor-mal and is not a cause for alarm. Night vision willquickly return after the eyes are moved and blinked afew times.
It is more effective to scan from a prone position or aposition closer to the ground than the object being ob-served. This creates a silhouetted view of the object.
When scanning an area, look and listen for the sametarget indicators as in daylight: movement, sound, andimproper camouflage.
Objects in bright moonlight/starlight cast shadows justas in sunlight.
Sound seems louder at night than during daylight.
Types of IlluminationThere are two types of illumination that assist engage-ment during low light or darkness: ambient light andartificial illumination. Both ambient light and artificialillumination can affect target perception (distance andsize) and night vision capabilities.
l Ambient light is the light produced by naturalmeans (i.e., the sun, moon, and stars). Variationsoccur in ambient light due to the time of day, timeof year, weather conditions, terrain, and vegetation.
l Artificial illumination is the light produced by aprocess other than natural means. Artificial lightcan be used to illuminate an area for target detection
Figure 10-10. Off-center Vision.
Figure 10-11. Figure Eight Scan.

10-14 _____________________________________________________________________________________________ MCRP 3-01A
or to illuminate a specific target to pinpoint its posi-tion. There are two types of artificial illuminationused in combat: air and ground.
Effects of Illumination
In some combat situations, ambient light and artificialillumination may assist a Marine in locating targets.However, this light can affect perception of the targetand disrupt night vision. The introduction of artificiallight requires the eyes to make a sudden, drastic ad-justment to the amount of light received. This cancause a temporary blinding because night vision wasabruptly interrupted. Ambient light also can cause ablinding effect; e.g., a Marine may experience tempo-rary blindness or reduced night vision if a bright moonsuddenly appears from behind the clouds.
l Light behind a Marine or light between the Marineand a target illuminates the front of the target andmakes it appear closer than it is.
l Light beyond the target displays the target in silhou-ette and makes it appear farther away than it is. Ifthe target is silhouetted, it is easier to see and easierto engage.
l Air illumination devices are in constant motion asthey descend to the ground. This movement createschanging shadows on any illuminated target caus-ing a stationary target to appear as if it is moving.
10010. Engaging Targets while Wearing the Field Protective Mask
While engaging targets in a combat environment, aMarine is under considerable stress caused by fear, fa-tigue, and the noise of battle. His stress is further ag-gravated by the fear and uncertainty associated with anuclear, biological, and chemical (NBC) threat. How-ever, a Marine must be able to operate under any bat-tlefield condition, including an NBC environment. If aMarine wears the field protective mask, its bulk andreduced visibility can affect his firing position whichin turn affects the rifle’s zero and his ability to engagethe target. A Marine must make adjustments to his fir-ing position and the application of marksmanship fun-damentals to counter the additional gear worn in anNBC environment. Therefore, a Marine should prac-tice wearing his field protective mask when he is notin a combat environment. This allows him to over-come any restrictions caused by the mask, developconfidence in his ability to execute well-aimed shots
while wearing the mask, and develop a plan of action.This plan should address how the rifle is presented tothe target, how long the mask is worn, and the likeli-hood of enemy contact. If a Marine expects to wear themask for an extended period and enemy contact islikely, he should consider adjusting the rifle sights sothat his first rounds are on target.
Marksmanship Fundamentals
Wearing the field protective mask requires a Marine tomake modifications to his aiming and breath controltechniques.
AimingWearing the field protective mask affects the aimingprocess and the ability to locate targets. The bulk ofthe mask may require an adjustment to stock weld, eyerelief, head position, and placement of the buttstock inthe shoulder.
Breath ControlWearing the field protective mask affects breath con-trol because breathing may be more difficult. Tempo-rary fogging of the lens also may be experienced. Iffogging occurs, a Marine should take a deep breathand fire while holding a full breath of air (inhalingclears the fog).
Firing Position
A good firing position provides balance, control, andstability during firing. The field protective mask’sadded bulk and other restrictions may require a Marineto make changes to his firing position. The adjust-ments are unique to each Marine and based on hisbody size and shape and his ability to adapt to themask. Adjustments should be minor. However, all fir-ing positions will be affected in the following areas:
Stock Weld Changing the placement of the cheek on the stock mayaffect the rifle’s BZO. Therefore, a Marine should ob-tain a BZO for the rifle in full mission-oriented protec-t ive posture gear . S tock weld wi l l not be ascomfortable or feel as solid as it does without the fieldprotective mask. The loss of sensitivity between thecheek and the stock, due to the mask, may cause thecheek to be pressed too firmly against the stock. Press-ing the cheek too firmly against the stock can causethe seal of the field protective mask to break. If thisoccurs, quickly clear the mask and resume a firing po-sition. If the lens of the field protective mask fogs up
Rifle Marksmanship_____________________________________________________________________________________ 10-15
while in a firing position, this indicates that the mask’sseal has been broken. Clear the mask and resume thefiring position.
Eye ReliefThe added bulk of the field protective mask may in-crease eye relief because the head is farther back alongthe stock. If the eye is too far from the rear sight aper-ture it may be difficult to acquire the target and tomaintain sight picture; if the eye is too close, therear sight can hit the mask, possibly breaking a lensor its seal.
Head PositionThe mask’s shape and bulk can make sight alignmentdifficult to achieve. The restrictive vision caused bythe mask may force a Marine to roll or tilt his headover the stock to achieve sight alignment. The Marineshould keep his head as erect as possible while main-taining sight alignment.
Placement of Buttstock in the ShoulderPlacement of the buttstock in the shoulder pocket mayhave to be altered due to the mask’s added bulk. If therifle is canted, a Marine may place the buttstock of therifle just outside the pocket of the shoulder to achievesight alignment. Holding the rifle straight is the pre-ferred method of obtaining sight alignment. However,if sight alignment cannot be achieved in this position, aMarine may alter the hold of the rifle to bring the aim-ing eye in line with the sights. Canting the rifle drasti-cally affects the rifle’s zero. A Marine should cant therifle only as much as is needed to obtain a good stockweld and proper sight alignment. If the rifle is canted,the point of impact may not coincide with the point ofaim. For example, when wearing the mask, a right-handed Marine's point of impact is usually high and tothe left of center mass (for a left-handed Marine, highand to the right of center mass). Therefore a Marinehas to offset aim an equal and opposite distance lowand to the right. See paragraph 10003 for a discussionon offset aiming and the known strike of the roundtechnique.
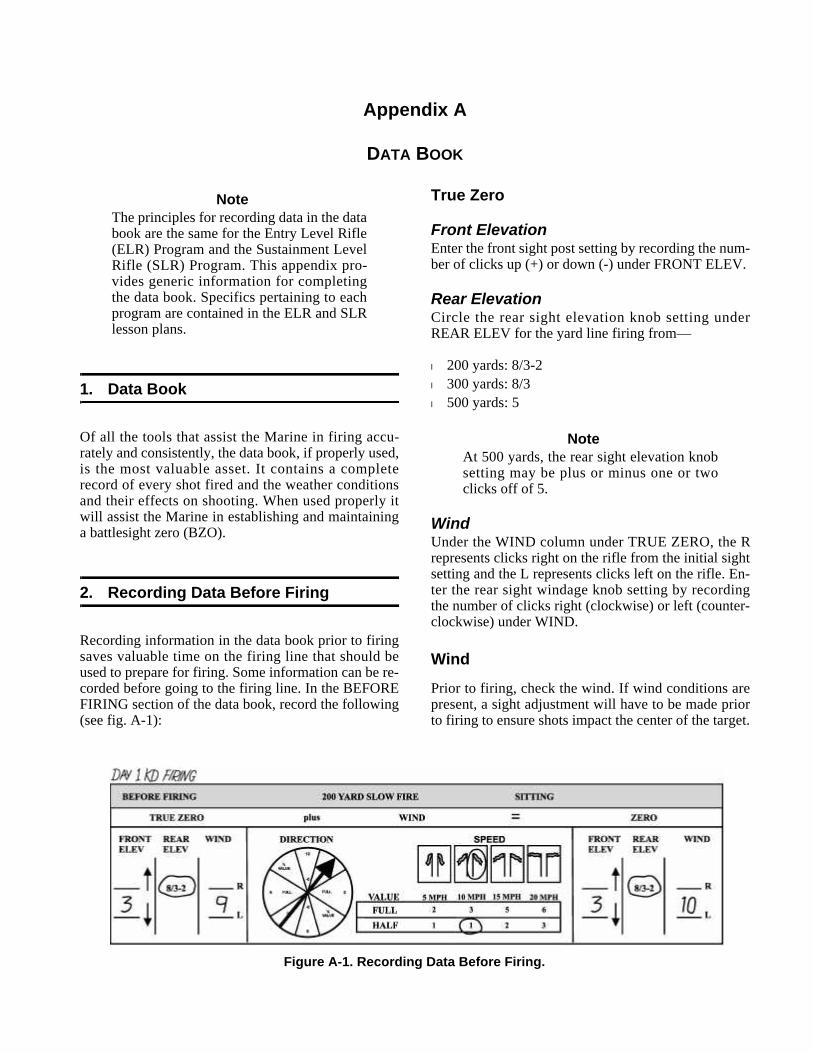
Appendix A
DATA BOOK
NoteThe principles for recording data in the databook are the same for the Entry Level Rifle(ELR) Program and the Sustainment LevelRifle (SLR) Program. This appendix pro-vides generic information for completingthe data book. Specifics pertaining to eachprogram are contained in the ELR and SLRlesson plans.
1. Data Book
Of all the tools that assist the Marine in firing accu-rately and consistently, the data book, if properly used,is the most valuable asset. It contains a completerecord of every shot fired and the weather conditionsand their effects on shooting. When used properly itwill assist the Marine in establishing and maintaininga battlesight zero (BZO).
2. Recording Data Before Firing
Recording information in the data book prior to firingsaves valuable time on the firing line that should beused to prepare for firing. Some information can be re-corded before going to the firing line. In the BEFOREFIRING section of the data book, record the following(see fig. A-1):
True Zero
Front ElevationEnter the front sight post setting by recording the num-ber of clicks up (+) or down (-) under FRONT ELEV.
Rear ElevationCircle the rear sight elevation knob setting underREAR ELEV for the yard line firing from—
l 200 yards: 8/3-2l 300 yards: 8/3l 500 yards: 5
NoteAt 500 yards, the rear sight elevation knobsetting may be plus or minus one or twoclicks off of 5.
WindUnder the WIND column under TRUE ZERO, the Rrepresents clicks right on the rifle from the initial sightsetting and the L represents clicks left on the rifle. En-ter the rear sight windage knob setting by recordingthe number of clicks right (clockwise) or left (counter-clockwise) under WIND.
WindPrior to firing, check the wind. If wind conditions arepresent, a sight adjustment will have to be made priorto firing to ensure shots impact the center of the target.
Figure A-1. Recording Data Before Firing.
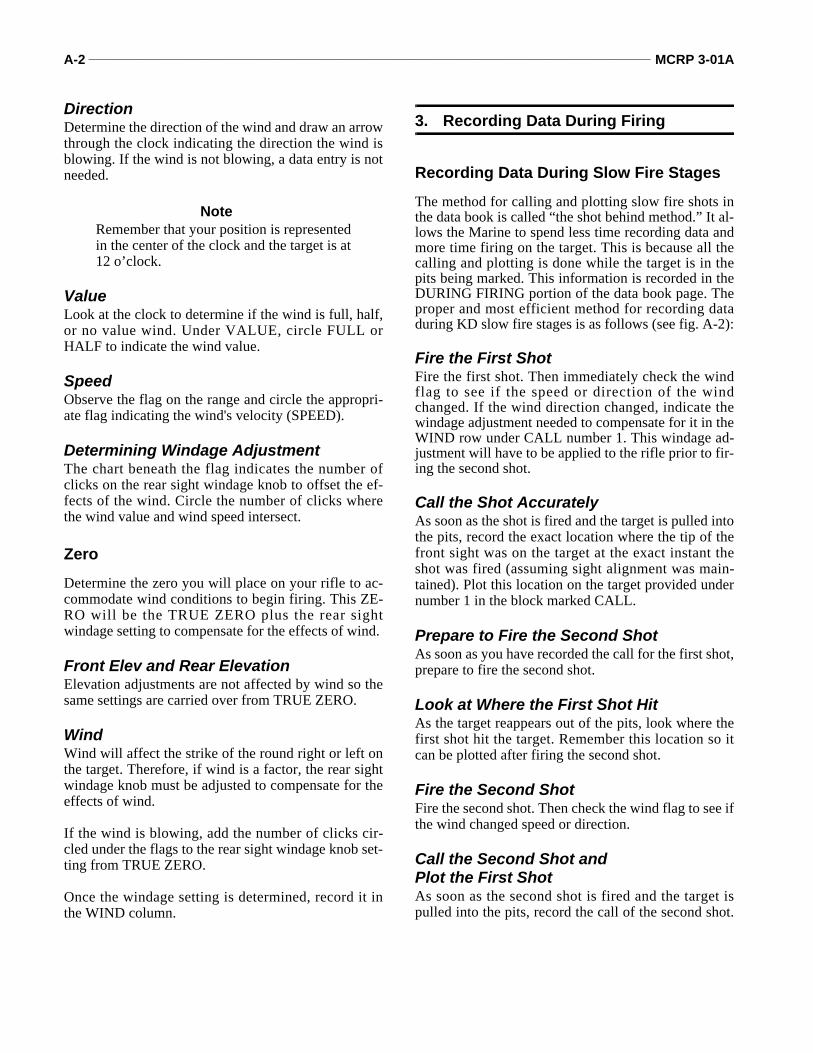
A-2 _______________________________________________________________________________________________ MCRP 3-01A
DirectionDetermine the direction of the wind and draw an arrowthrough the clock indicating the direction the wind isblowing. If the wind is not blowing, a data entry is notneeded.
NoteRemember that your position is representedin the center of the clock and the target is at12 o’clock.
ValueLook at the clock to determine if the wind is full, half,or no value wind. Under VALUE, circle FULL orHALF to indicate the wind value.
SpeedObserve the flag on the range and circle the appropri-ate flag indicating the wind's velocity (SPEED).
Determining Windage AdjustmentThe chart beneath the flag indicates the number ofclicks on the rear sight windage knob to offset the ef-fects of the wind. Circle the number of clicks wherethe wind value and wind speed intersect.
ZeroDetermine the zero you will place on your rifle to ac-commodate wind conditions to begin firing. This ZE-RO will be the TRUE ZERO plus the rear sightwindage setting to compensate for the effects of wind.
Front Elev and Rear ElevationElevation adjustments are not affected by wind so thesame settings are carried over from TRUE ZERO.
WindWind will affect the strike of the round right or left onthe target. Therefore, if wind is a factor, the rear sightwindage knob must be adjusted to compensate for theeffects of wind.
If the wind is blowing, add the number of clicks cir-cled under the flags to the rear sight windage knob set-ting from TRUE ZERO.
Once the windage setting is determined, record it inthe WIND column.
3. Recording Data During Firing
Recording Data During Slow Fire StagesThe method for calling and plotting slow fire shots inthe data book is called “the shot behind method.” It al-lows the Marine to spend less time recording data andmore time firing on the target. This is because all thecalling and plotting is done while the target is in thepits being marked. This information is recorded in theDURING FIRING portion of the data book page. Theproper and most efficient method for recording dataduring KD slow fire stages is as follows (see fig. A-2):
Fire the First ShotFire the first shot. Then immediately check the windflag to see if the speed or direction of the windchanged. If the wind direction changed, indicate thewindage adjustment needed to compensate for it in theWIND row under CALL number 1. This windage ad-justment will have to be applied to the rifle prior to fir-ing the second shot.
Call the Shot AccuratelyAs soon as the shot is fired and the target is pulled intothe pits, record the exact location where the tip of thefront sight was on the target at the exact instant theshot was fired (assuming sight alignment was main-tained). Plot this location on the target provided undernumber 1 in the block marked CALL.
Prepare to Fire the Second ShotAs soon as you have recorded the call for the first shot,prepare to fire the second shot.
Look at Where the First Shot HitAs the target reappears out of the pits, look where thefirst shot hit the target. Remember this location so itcan be plotted after firing the second shot.
Fire the Second ShotFire the second shot. Then check the wind flag to see ifthe wind changed speed or direction.
Call the Second Shot andPlot the First ShotAs soon as the second shot is fired and the target ispulled into the pits, record the call of the second shot.
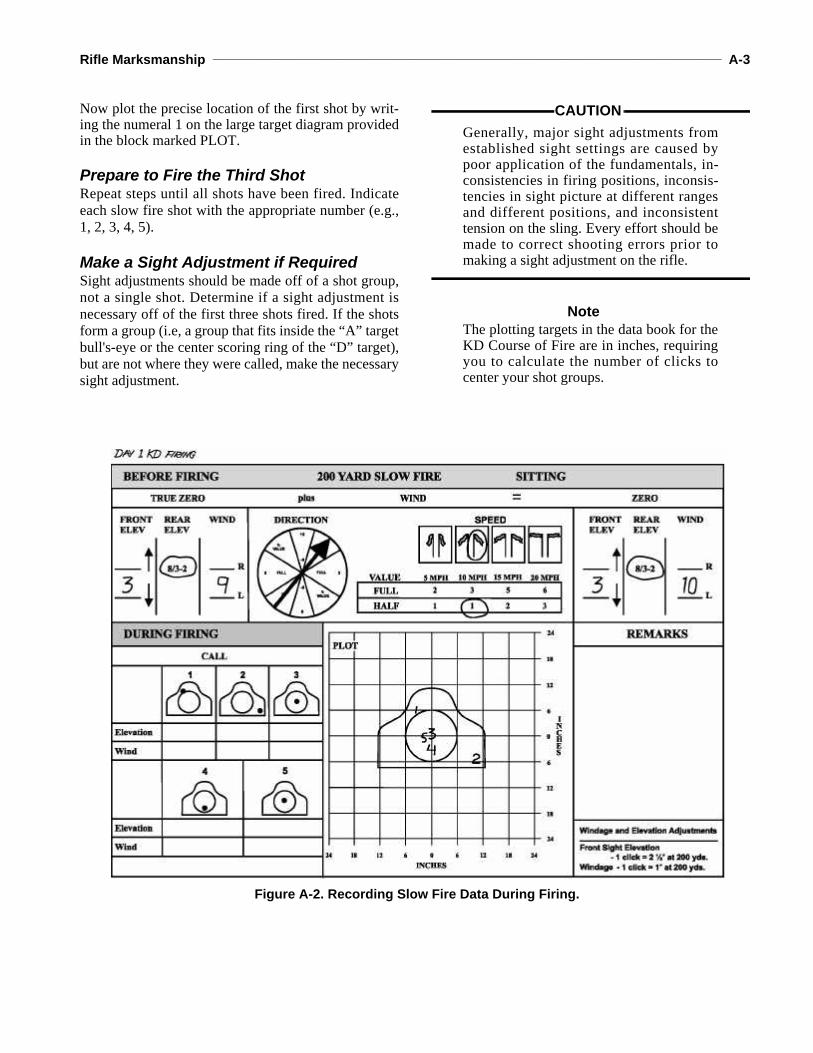
Rifle Marksmanship ______________________________________________________________________________________ A-3
Now plot the precise location of the first shot by writ-ing the numeral 1 on the large target diagram providedin the block marked PLOT.
Prepare to Fire the Third ShotRepeat steps until all shots have been fired. Indicateeach slow fire shot with the appropriate number (e.g.,1, 2, 3, 4, 5).
Make a Sight Adjustment if RequiredSight adjustments should be made off of a shot group,not a single shot. Determine if a sight adjustment isnecessary off of the first three shots fired. If the shotsform a group (i.e, a group that fits inside the “A” targetbull's-eye or the center scoring ring of the “D” target),but are not where they were called, make the necessarysight adjustment.
CAUTIONGenerally, major sight adjustments fromestablished sight settings are caused bypoor application of the fundamentals, in-consistencies in firing positions, inconsis-tencies in sight picture at different rangesand different positions, and inconsistenttension on the sling. Every effort should bemade to correct shooting errors prior tomaking a sight adjustment on the rifle.
NoteThe plotting targets in the data book for theKD Course of Fire are in inches, requiringyou to calculate the number of clicks tocenter your shot groups.
Figure A-2. Recording Slow Fire Data During Firing.
A-4 _______________________________________________________________________________________________ MCRP 3-01A
Elevation. Locate the closest horizontal grid line tothe center of the plotted shot group. Follow the lineacross to the numbered vertical scale to determine thenumber of inches of elevation the shot group is off oftarget center. Calculate the number of clicks on yourfront sight post (for 200 and 300 yards) or rear sightelevation knob (for 500 yards) to bring your shotgroup center.
Windage. Locate the closest vertical grid line to thecenter of the plotted shot group. Follow the line downto the numbered horizontal scale to determine thenumber of inches of windage the shot group is off oftarget center. Calculate the number of clicks on yourrear sight windage knob to bring shot group center.
Recording Data During Rapid Fire StagesIn the DURING FIRING section of the data book,record the following (see fig. A-3):
Mentally Call Shots While FiringWhile firing the rapid fire string, make a mental noteof any shots called out of the group.
Plot the Shot GroupAfter firing the rapid fire string, and when the target ismarked, plot all visible hits with a dot precisely wherethey appear on the large target diagram in the blockmarked PLOT.
Make a Sight Adjustment if RequiredLocate the center of the shot group. If the shots form agroup, make the necessary sight adjustments off of thecenter of the group. If shots do not form a group anddo not just contain a poor shot, do not make a sight ad-justment. Determine the sight adjustment by locatingthe center of the shot group and using the grid lines onthe target in the data book. These grid lines representthe number of inches to bring a shot group center.Looking at the shot group:
Figure A-3. Recording Rapid Fire Data During Firing.

Rifle Marksmanship ______________________________________________________________________________________ A-5
CAUTIONGenerally, major sight adjustments fromestablished sight settings are caused bypoor application of the fundamentals, in-consistencies in firing positions, inconsis-tencies in sight picture at different rangesand different positions, and inconsistenttension on the sling. Every effort should bemade to correct shooting errors prior tomaking a sight adjustment on the rifle.
NoteThe plotting targets in the data book for theKD Course of Fire are in inches, requiringyou to calculate the number of clicks tocenter your shot groups.
Elevation. Locate the closest horizontal grid line tothe center of the plotted shot group. Follow the lineacross to the numbered vertical scale to determine thenumber of inches of elevation the shot group is off oftarget center. Calculate the number of clicks on yourfront sight post to bring your shot group center.
Windage. Locate the closest vertical grid line to thecenter of the plotted shot group. Follow the line downto the numbered horizontal scale to determine thenumber of inches of windage the shot group is off oftarget center. Calculate the number of clicks on yourrear sight windage knob to bring your shot group cen-ter.
RemarksAfter firing a stage, record any data or information thatcan be helpful in improving shooting in the future.Anything done or observed should be recorded. Theseitems will be helpful when analyzing daily shootingperformance. Record this information in the RE-MARKS column. What the Marine fails to record maybe the information he will need to improve.
4. Recording Data After Firing
In the AFTER FIRING section of the data book,record the following (see fig. A-4 on page A-6):
Zero
Upon completion of firing, determine the elevationand windage required to center the shot group (if nec-essary) and record this sight setting in the ZERO blockof the AFTER FIRING section. If no adjustments areneeded to center the shot group, record the sight set-tings currently on the rifle.
Front ElevationUnder the column FRONT ELEV, record the final ele-vation setting made on the front sight post.
Rear ElevationUnder the column REAR ELEV, record the rear sightelevation knob setting for the yard line firing from.
NoteIf firing from 500 yards, record the final el-evation setting made on the rear sight ele-vation knob.
WindUnder the column WIND under ZERO, record finalwindage setting made on the rear sight windage knob.
Wind
Calculate the prevailing wind during the string of fire.
DirectionDetermine the direction of the wind and draw an arrowthrough the clock indicating the direction the wind isblowing.
NoteRemember that your position is representedin the center of the clock and the target is at12 o’clock.
ValueLook at the clock to determine if the wind is full, half,or no value wind. Under VALUE, circle FULL orHALF to indicate the wind value.
SpeedObserve the flag on the range and circle the appropri-ate flag indicating the wind's velocity (SPEED).
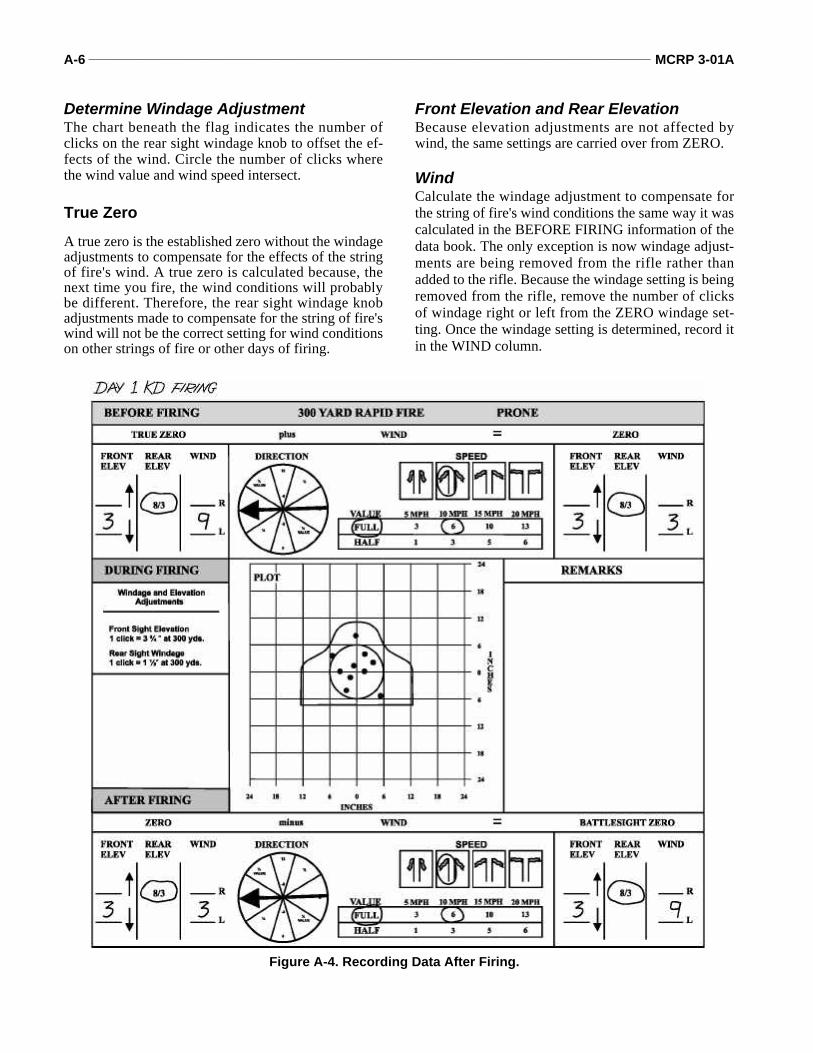
A-6 _______________________________________________________________________________________________ MCRP 3-01A
Determine Windage AdjustmentThe chart beneath the flag indicates the number ofclicks on the rear sight windage knob to offset the ef-fects of the wind. Circle the number of clicks wherethe wind value and wind speed intersect.
True ZeroA true zero is the established zero without the windageadjustments to compensate for the effects of the stringof fire's wind. A true zero is calculated because, thenext time you fire, the wind conditions will probablybe different. Therefore, the rear sight windage knobadjustments made to compensate for the string of fire'swind will not be the correct setting for wind conditionson other strings of fire or other days of firing.
Front Elevation and Rear ElevationBecause elevation adjustments are not affected bywind, the same settings are carried over from ZERO.
WindCalculate the windage adjustment to compensate forthe string of fire's wind conditions the same way it wascalculated in the BEFORE FIRING information of thedata book. The only exception is now windage adjust-ments are being removed from the rifle rather thanadded to the rifle. Because the windage setting is beingremoved from the rifle, remove the number of clicksof windage right or left from the ZERO windage set-ting. Once the windage setting is determined, record itin the WIND column.
Figure A-4. Recording Data After Firing.

APPENDIX B
GLOSSARY
SECTION I. ACRONYMS
BZO. . . . . . . . . . . . . . . . . . . . . . . . . . . . . . . . . . . . . . . . . . . . . . . . . . . . . battlesight zero
CLP . . . . . . . . . . . . . . . . . . . . . . . . . . . . . . . . . . . . . .cleaner, lubricant, and preservative
KD . . . . . . . . . . . . . . . . . . . . . . . . . . . . . . . . . . . . . . . . . . . . . . . . . . . . . . known distance
LAW . . . . . . . . . . . . . . . . . . . . . . . . . . . . . . . . . . . . . . . . .lubricating oil, arctic weapons
NBC. . . . . . . . . . . . . . . . . . . . . . . . . . . . . . . . . . . . . . . nuclear, biological, and chemical
ROE. . . . . . . . . . . . . . . . . . . . . . . . . . . . . . . . . . . . . . . . . . . . . . . . . .rules of engagement
SOP . . . . . . . . . . . . . . . . . . . . . . . . . . . . . . . . . . . . . . . . . .standing operating procedures
TM. . . . . . . . . . . . . . . . . . . . . . . . . . . . . . . . . . . . . . . . . . . . . . . . . . . . . technical manual
B-2 _______________________________________________________________________________________________ MCRP 3-01A
SECTION II. DEFINITIONS
Aaiming point – The aiming point is the precise point where the tip of the front sightpost is placed in relationship to the target.
alibi – Any condition caused by the weapon, ammunition, or range operation that caus-es the shooter not to have an equal opportunity to complete a string of fire as all othershooters on the range.
B
battlesight zero (BZO) – The elevation and windage settings required to engage pointtargets from 0-300 yards/meters under ideal weather conditions (i.e., no wind).
bone support – The body's skeletal structure supporting the rifle's weight.
breath control – Procedure used to fire the rifle at the moment of least movement inthe body and the rifle.
C
canting – An angular deviation of the weapon to the left or right from a vertical posi-tion during firing.
center of mass – A point that is horizontally and vertically centered on the target.
center of mass hold – The placement of the tip of the front sight on the target center ofmass prior to the shot breaking.
centerline of the bore – An imaginary straight line beginning at the chamber end of thebarrel and proceeding out of the muzzle.
chamber check – Procedure used to determine a weapon's condition.
D
double feed – Attempted simultaneous feeding of two or more rounds from the maga-zine.
dry fire – Cocking, aiming, and squeezing the trigger of an unloaded rifle in order topractice the fundamentals of marksmanship.
detailed search – Method for conducting a systematic search of an area for specific tar-get indicators.
E
eye relief – The distance between from the rear sight aperture to the aiming eye.
Rifle Marksmanship ______________________________________________________________________________________ B-3
F
function check – Procedure used to ensure the selector lever operates properly.
flag method – Procedure used to determine wind velocity and direction on a KnownDistance (KD) range.
field expedient battlesight zeroing – Process used to zero the rifle at 36 yards or 30meters when a 300-yard/-meter range is not available.
G
gas operated – A self-loading firearm that utilizes the expanding force of the propel-lant’s gases to operate the action of the weapon.
H
hasty search – Method for quickly searching an area for enemy activity.
hasty sight setting – A zero established for distances out to 800 yards/meters.
I
immediate threat target – A target engaged at a short range (50 meters or less) withlittle or no warning.
initial sight setting – Sight setting placed on a rifle that serves as the starting pointfrom which all sight adjustments are made for the initial zeroing process.
L
limited technical inspection (LTI) – An inspection performed by an armorer on aweapon to determine its operational status (safety and function, not accuracy).
line of sight – An imaginary line extending from the shooter's eye through the rifle'ssights and onto an aiming point on a target.
load – Command/Procedure used to take a weapon from Condition 4 to Condition 3 byinserting a magazine with rounds.
M
magazine – A container that holds ammunition in a position to be chambered.
magazine fed – A mechanical, automatic means of supplying a firearm with ammuni-tion to be chambered.
make ready – Command/Procedure used to take a weapon from Condition 3 to Condi-tion 1 by chambering a round.

B-4 _______________________________________________________________________________________________ MCRP 3-01A
muscular relaxation – The state of tension required to properly control the rifle. Theshooter's muscles are in a relaxed state of control—tightened but not tensed.
N
natural point of aim – The location at which the rifle's sights settle if bone support andmuscular relaxation are achieved.
O
observation method – Procedure used to determine wind velocity and direction in atactical situation.
P
pie technique – A technique used to locate and engage targets from behind cover,while minimizing the Marines exposure to enemy fire.
R
range – 1. A designated place where live fire weapons training is conducted. 2. Thehorizontal distance to which a projectile can be propelled to a specified target. 3. Thehorizontal distance between a weapon and target.
recoil management – The ability to manage or control the recoil of the rifle for a givenshooting position.
rollout – A technique used to locate and engage targets from behind cover, while mini-mizing the Marines exposure to enemy fire.
S
semiautomatic – One full cycle of operation. The firing, extraction, and ejection of thespent cartridge, the cocking of the weapon and chambering of the succeeding round ofammunition after the trigger is pulled.
shooter error — Any action induced by the shooter that causes the weapon to fail tooperate properly or miss the intended target.
sight alignment – The placement of the tip of the front sight post in the center of therear sight aperture.
sight picture — The placement of the tip of the front sight post in the center of the tar-get while maintaining sight alignment.
sling – When properly attached to the rifle, the sling provides maximum stability forthe weapon and helps reduce the effects of the rifle's recoil. Also used for individualweapon transport.
stability of hold – The ability to acquire a stable position and to hold the rifle steady forany given rifle position.
Rifle Marksmanship ______________________________________________________________________________________ B-5
stock weld – The firm, consistent contact of the cheek with the weapon's buttstock.
stoppage – Any condition that causes the rifle to fail to fire.
T
target indicators – Anything that reveals the enemy's position.
trajectory – The path of a projectile through the air and to a target.
triangulation process – Process used to determine the vertical and horizontal sight ad-justments that must be made to center a shot group.
trigger control – The skillful manipulation of the trigger that causes the rifle to firewithout disturbing sight alignment or sight picture.
U
unload – Command/Procedure used to take a weapon from any condition to Condi-tion 4.
unload and show clear – Command/Procedure used to take a weapon from any condi-tion to Condition 4 while requiring a second individual to check the weapon to verifythat no ammunition is present.
user serviceability inspection – Procedure used to ensure a weapon is in an acceptableoperating condition, conducted by the shooter.
V
velocity – Speed at which the projectile travels.
W
weapons carry – Procedure used to effectively handle the rifle while remaining alert topossible threat levels.
weapons condition – Describes a weapon's readiness for live fire.
weapons transport – Procedure used to carry the rifle for long periods of time andwhen one or both hands are needed for other work.
windage and elevation rules – Rules that define how far the strike of the round willmove on the target for each click of front and rear sight elevation or rear sight windagefor each 100 yards/meters of range to the target.
Z
zeroing – The process used to adjust the rifle sights that cause it to shoot to point of aimat a desired range.