Embed Size (px)
Citation preview

.
maxView StorageManager User's GuideCDP-00278-01-A Rev. A
Issue: September 17, 2012

Copyright © PMC-Sierra, Inc. All rights reserved.
The information in this document is proprietary and confidential toPMC-Sierra, Inc. In any event, no part of this document may be reproducedor redistributed in any form without the express written consent ofPMC-Sierra, Inc.
CDP-00278-01-A Rev. A, IssueNumber
None of the information contained in this document constitutes an expressor implied warranty by PMC-Sierra, Inc. as to the sufficiency, fitness orsuitability for a particular purpose of any such information or the fitness, orsuitability for a particular purpose, merchantability, performance, compatibilitywith other parts or systems, of any of the products of PMC-Sierra, Inc., or anyportion thereof, referred to in this document. PMC-Sierra, Inc. expresslydisclaims all representations and warranties of any kind regarding the contentsor use of the information, including, but not limited to, express and impliedwarranties of accuracy, completeness, merchantability, fitness for a particularuse, or non-infringement.
In no event will PMC-Sierra, Inc. be liable for any direct, indirect, special,incidental or consequential damages, including, but not limited to, lost profits,lost business or lost data resulting from any use of or reliance upon theinformation, whether or not PMC-Sierra, Inc. has been advised of thepossibility of such damage.
For a complete list of PMC-Sierra’s trademarks and registered trademarks,visit: http://www.pmc-sierra.com/legal/.
Other product and company names mentioned herein may be the trademarksof their respective owners.
2Proprietary and Confidential to PMC-Sierra, Inc.Document No.: CDP-00278-01-A Rev. A, Issue:
maxView Storage Manager User's Guide

Revision History
Details of ChangeIssue DateIssue
Adaptec Firmware/BIOS/Drivers/Utilities Version 8.0September 17,2012
1.0
3Proprietary and Confidential to PMC-Sierra, Inc.Document No.: CDP-00278-01-A Rev. A, Issue:
maxView Storage Manager User's Guide

ContentsAdaptec by PMC Product Support..............................................................................................................................8Software License Agreement......................................................................................................................................9
1 About this Guide...................................................................................................................................................12What You Need to Know Before You Begin..................................................................................................12Terminology Used in this Guide...................................................................................................................12How to Find More Information....................................................................................................................13
2 Introduction to maxView Storage Manager..........................................................................................................14Getting Started.............................................................................................................................................14About maxView Storage Manager ...............................................................................................................14
About the maxView Storage Manager Agent .................................................................................15About the maxView Storage Manager Web Server.........................................................................15About the maxView Storage Manager CIM Server..........................................................................15
System Requirements..................................................................................................................................16Browser Support..........................................................................................................................................16Typical Storage Space Configurations...........................................................................................................17
A Simple Storage Space...................................................................................................................17An Advanced Storage Space............................................................................................................17Continuing to Grow Your Storage Space..........................................................................................18
3 Installing maxView Storage Manager....................................................................................................................19Before You Begin the Installation.................................................................................................................19Installing on Windows..................................................................................................................................19Installing on Red Hat, Cent OS, SuSE, or Fedora Linux.................................................................................20Installing on Debian or Ubuntu Linux...........................................................................................................21Installing on Solaris......................................................................................................................................21Installing on VMware ESX 4.1.......................................................................................................................22Installing on VMware ESXi 5.0......................................................................................................................23Installing on a VMware Guest OS.................................................................................................................24Running maxView Storage Manager from the DVD.....................................................................................24Uninstalling maxView Storage Manager......................................................................................................25
Uninstalling from Windows.............................................................................................................25Uninstalling from Red Hat, Cent OS, SuSE, or Fedora Linux.............................................................25Uninstalling from Debian or Ubuntu Linux......................................................................................25Uninstalling from Solaris..................................................................................................................25Uninstalling from VMware ESX 4.1..................................................................................................26Uninstalling from VMware ESXi 5.0.................................................................................................26
4 Exploring maxView Storage Manager...................................................................................................................27Starting maxView Storage Manager and Logging In ....................................................................................27Working in maxView Storage Manager........................................................................................................27Overview of the Main Window....................................................................................................................27
The Enterprise View ........................................................................................................................28What do the Enterprise View Icons Mean? ......................................................................29
The Ribbon ......................................................................................................................................30The Storage Dashboard...................................................................................................................30
Checking System Status from the Main Window.........................................................................................31Revealing More Device Information ............................................................................................................32Getting Help.................................................................................................................................................33Logging Out of maxView Storage Manager..................................................................................................33
5 Building Your Storage Space.................................................................................................................................34Overview......................................................................................................................................................34Choosing a Management System.................................................................................................................34
‘Local’ or ‘Remote’?.........................................................................................................................34
4Proprietary and Confidential to PMC-Sierra, Inc.Document No.: CDP-00278-01-A Rev. A, Issue:
maxView Storage Manager User's Guide

Logging in on the Local System .......................................................................................................35Starting maxView Storage Manager on Remote Systems............................................................................35
Starting the Agent Only ..................................................................................................................35Windows.............................................................................................................................36Linux or VMware.................................................................................................................36Solaris..................................................................................................................................36
Logging into Remote Systems from the Local System..................................................................................37Creating Logical Drives.................................................................................................................................38
Express Configuration .....................................................................................................................38Custom Configuration......................................................................................................................40Partitioning and Formatting Your Logical Drives..............................................................................43Creating Logical Drives on Other Systems in Your Storage Space....................................................43
6 Protecting Your Data.............................................................................................................................................44Creating and Managing Hot Spares..............................................................................................................44
Hot Spare Limitations......................................................................................................................44Dedicated Spare or Global Spare?...................................................................................................44Designating a Global Hot Spare.......................................................................................................44Assigning a Dedicated Hot Spare or Pool Hot Spare........................................................................45Deleting a Global Hot Spare ............................................................................................................46Removing or Deleting a Dedicated Hot Spare.................................................................................47
Enabling Copyback.......................................................................................................................................48Enabling Automatic Failover........................................................................................................................49
7 Modifying Your Storage Space..............................................................................................................................51Understanding Logical Drives.......................................................................................................................51Creating and Modifying Logical Drives.........................................................................................................51
Including Different-sized Disk Drives in a Logical Drive...................................................................52Creating a Logical Drive Using Available Segments.........................................................................53Creating a Hybrid RAID Logical Drive ..............................................................................................53
Fine-tuning Logical Drives............................................................................................................................54Renaming a Logical Drive.................................................................................................................54Changing the Read Cache Setting....................................................................................................55Changing the Write Cache Setting...................................................................................................55Changing the Stripe Size .................................................................................................................56Changing the Initialize Method .......................................................................................................56
Optimizing Logical Drive Performance.........................................................................................................56Verifying Logical Drives................................................................................................................................57
Verifying and Fixing a Logical Drive.................................................................................................58Enabling/Disabling Background Consistency Check........................................................................58
Increasing the Capacity of a Logical Drive....................................................................................................59Changing the RAID Level of a Logical Drive..................................................................................................60Erasing a Logical Drive..................................................................................................................................61Deleting a Logical Drive................................................................................................................................61Adding maxCache SSD Caching to Your Storage Space ...............................................................................61
Creating a maxCache Container.......................................................................................................62Setting the maxCache Flush and Fetch Rate ...................................................................................63Verifying and Fixing the maxCache Container.................................................................................63Deleting the maxCache Container...................................................................................................64Changing the maxCache Settings for a Logical Drive.......................................................................64Changing the maxCache Settings for a Controller...........................................................................65
Maintaining an Energy-Efficient Storage Space............................................................................................65Setting Power Management Options for a Logical Drive.................................................................66Setting Power Management Options for a Controller.....................................................................67Disabling Power Management for a Logical Drive...........................................................................68
8 Working with Scheduled Tasks..............................................................................................................................69Scheduling a Task.........................................................................................................................................69Monitoring Tasks .........................................................................................................................................70
What if a Task Misses its Start Time?...............................................................................................71Modifying a Task ..........................................................................................................................................71
5Proprietary and Confidential to PMC-Sierra, Inc.Document No.: CDP-00278-01-A Rev. A, Issue:
maxView Storage Manager User's Guide
Deleting a Task ............................................................................................................................................72
9 Maintaining Physical Devices................................................................................................................................73Viewing Device Properties ..........................................................................................................................73Locating Drives in Your Storage Space..........................................................................................................73
Locating a Disk Drive........................................................................................................................74Locating Physical Disks in a Logical Drive.........................................................................................74Locating SSDs in the maxCache Container.......................................................................................75
Working with Failed or Failing Disk Drives...................................................................................................76Replacing Disk Drives in a Logical Drive...........................................................................................76Setting a Disk Drive to ‘Failed’.........................................................................................................76
Initializing and Erasing Disk Drives...............................................................................................................77Initializing Disk Drives......................................................................................................................77Erasing Disk Drives...........................................................................................................................77
Verifying and Fixing a Disk Drive..................................................................................................................78Changing a Disk Drive's Write Cache Setting................................................................................................78Working with Controllers.............................................................................................................................79
Silencing a Controller Alarm............................................................................................................79Disabling a Controller Alarm............................................................................................................79Rescanning a Controller...................................................................................................................80Setting a Controller's Default Task Priority......................................................................................80Enabling Native Command Queuing on a Controller.......................................................................80
Working with System Alarms.......................................................................................................................81Updating Controller and Disk Drive Firmware.............................................................................................82
Before You Begin..............................................................................................................................82Updating the Controller Firmware ..................................................................................................82Updating the Disk Drive Firmware ..................................................................................................85
10 Monitoring Status and Activity...........................................................................................................................86Monitoring Options......................................................................................................................................86Checking Status from the Main Window .....................................................................................................86
Viewing Activity Status in the Event Log..........................................................................................87What Do the Event Status Icons Mean?..............................................................................87
Viewing Task Status in the Task Log.................................................................................................88Viewing Component Status in the Storage Dashboard....................................................................88
Monitoring Enclosure Status...............................................................................................90Viewing SMART Statistics....................................................................................................90
Viewing Storage Space Usage in Chart View...................................................................................91Notifying Users by Email About Status and Activity ....................................................................................91
Setting Up Email Notifications.........................................................................................................91Sending a Test Message...................................................................................................................94Modifying Recipient Information or Removing a Recipient.............................................................95Modifying Email Server Settings......................................................................................................96Creating an Email Notification Template.........................................................................................96
Broadcasting Alerts About Status and Activity ............................................................................................97Monitoring Advanced Statistics about Activity in Your Storage Space.........................................................97
Setting up Statistics Logging............................................................................................................97Viewing Advanced Statistics............................................................................................................98Resetting the Statistics Counters.....................................................................................................99
Changing an Operating System's Event Log Setting...................................................................................100
11 Managing Your Storage Space..........................................................................................................................101Deploying Servers ......................................................................................................................................101
Creating a Server Template File.....................................................................................................101Duplicating the Server Template....................................................................................................101
Managing Remote Systems........................................................................................................................103Adding Remote Systems with the Wizard......................................................................................103Manually Adding a Remote System...............................................................................................103Removing a Remote System..........................................................................................................104Changing the Auto-Discovery Settings...........................................................................................105
Clearing the Controller Configuration........................................................................................................106
6Proprietary and Confidential to PMC-Sierra, Inc.Document No.: CDP-00278-01-A Rev. A, Issue:
maxView Storage Manager User's Guide
Changing the Agent Base Port Setting........................................................................................................107
12 Solving Problems...............................................................................................................................................108General Troubleshooting Tips....................................................................................................................108Identifying a Failed or Failing Component..................................................................................................108Recovering from a Disk Drive Failure.........................................................................................................109
Failed Disk Drive Protected by a Hot Spare...................................................................................109Failed Disk Drive Not Protected by a Hot Spare.............................................................................109Failure in Multiple Logical Drives Simultaneously.........................................................................109Disk Drive Failure in a RAID 0 Logical Drive...................................................................................110Multiple Disk Drive Failures in the Same Logical Drive .................................................................110
Rebuilding Logical Drives............................................................................................................................111Creating a Support Archive File..................................................................................................................111
Appendix A Selecting the Best RAID Level.............................................................................................................112Comparing RAID Levels..............................................................................................................................113Understanding Drive Segments..................................................................................................................113Non-redundant Logical Drives (RAID 0)......................................................................................................114RAID 1 Logical Drives .................................................................................................................................114RAID 1 Enhanced Logical Drives.................................................................................................................115RAID 10 Logical Drives................................................................................................................................116RAID 5 Logical Drives..................................................................................................................................117RAID 50 Logical Drive.................................................................................................................................118RAID 6 Logical Drives..................................................................................................................................119RAID 60 Logical Drives................................................................................................................................119
Appendix B Icons At-a-Glance................................................................................................................................120
7Proprietary and Confidential to PMC-Sierra, Inc.Document No.: CDP-00278-01-A Rev. A, Issue:
maxView Storage Manager User's Guide
Adaptec by PMC Product SupportIf you have questions about installing or using your Adaptec by PMC product, check this documentfirst—you will find answers to most of your questions. If you need further assistance, use the supportoptions listed below. To expedite your service, have your computer in front of you.
Technical Support Identification (TSID) Number
• Before contacting Technical Support, you need your product unique TSID number. The TSID numberidentifies your product and support status.
• The TSID number is included on a white, bar-coded label, like this example:
• It's recommended that you register your product so that you have easy access to your TSID whencontacting product support.
Note: The phone numbers below are subject to change. Please visit the Supportsection of www.adaptec.com for the most up to date contact information.
North America
• Visit our Web site at www.adaptec.com.• Search the Adaptec Support Knowledgebase (ASK) at ask.adaptec.com for articles, troubleshooting
tips, and frequently asked questions for your product.• For support via e-mail, submit your question at ask.adaptec.com.• To speak with a Technical Support Specialist, call +1 408 934 7274 or +49 89 4366 5544 or +44 845
266 8773.
Europe
• Visit our Web site at www.adaptec-europe.com.• German: Call +49 89 43 66 55 22. For support via e-mail, submit your question at ask-de.adaptec.com.• French: Call +49 89 43 66 55 33. For support via e-mail, submit your question at ask-fr.adaptec.com.• English: Call +49 89 43 66 55 44. For support via e-mail, submit your question at ask.adaptec.com.
Japan
• Visit our Web site at www.adaptec.co.jp.• Call 03-3367-3970 (fax). For support via e-mail, submit your question at ask.adaptec.co.jp
Australia
• Call +61-2-9503-1555.
Russia
• Visit our Web site at www.adaptec.com/ru-ru/.• Call +7 499 918 7200 or +49 89 4366 5555. For support via e-mail, submit your question at
ask-ru.adaptec.com.
8Proprietary and Confidential to PMC-Sierra, Inc.Document No.: CDP-00278-01-A Rev. A, Issue:
maxView Storage Manager User's Guide
Software License AgreementPLEASE READ CAREFULLY: THE USE OF THIS SOFTWARE IS SUBJECT TO THE SOFTWARE LICENSE TERMSOF PMC-SIERRA, INC. AND OTHER LICENSORS WHOSE SOFTWARE MAY BE BUNDLED WITH THIS PRODUCT.BY YOUR USE OF THE SOFTWARE INCLUDED WITH THIS PRODUCT YOU AGREE TO THE LICENSE TERMSREQUIRED BY THE LICENSOR OF THAT SOFTWARE, AS SET FORTH DURING THE INSTALLATION PROCESS.IF YOU DO NOT AGREE TO THE LICENSE TERMS APPLICABLE TO THE SOFTWARE, YOU MAY RETURN THEENTIRE UNUSED PRODUCT FOR A FULL REFUND.In return for acquiring a license to use the PMC-Sierra software, which may include software from thirdparty licensors and patches made available by PMC-Sierra (“Software”), and the related documentation,you agree to the following terms and conditions:
1. License. This Agreement grants you, the Licensee, a license to:
a. Use the Software on a single computer system, which is not intended for use by more than five(5) users; and:
b. Make one copy of the Software in machine readable form solely for back-up purposes, providedyou reproduce PMC-Sierra's copyright proprietary legends. Notwithstanding the foregoing, theSoftware may be used on the home, laptop or other secondary computer of the principal userof the Software, and an additional copy of the Software may be made to support such use. Asused in this license, the Software is “in use” when it is either loaded into RAM or installed on ahard disk or other permanent memory device. The Software may be “in use” on only one computerat any given time. (Different license terms and fees are applicable for networked or multiple userapplications.) As a specific condition of this license, you agree to use the Software in compliancewith all applicable laws, including copyright laws, and that you will not copy, transmit, performor distribute any audio or other content using the Software without obtaining all necessarylicenses or permissions from the owner of the content.
2. Restrictions. You may not distribute copies of the Software to others or electronically transfer theSoftware from one computer to another over a network. You may not post or otherwise makeavailable the Software, or any portion thereof, in any form, on the Internet. You may not use theSoftware in a computer service business, including in time sharing applications. The Software containstrade secrets and, in order to protect them, you may not decompile, reverse engineer, disassemble,or otherwise reduce the Software to a human-perceivable form. YOU MAY NOT MODIFY, ADAPT,TRANSLATE, RENT, LEASE, LOAN, RESELL FOR PROFIT, DISTRIBUTE, NETWORK OR CREATE DERIVATIVEWORKS BASED UPON THE SOFTWARE OR ANY PART THEREOF.
3. Ownership of Software. As Licensee, you own the media upon which the software is recorded orfixed, but PMC-Sierra and its licensors retain title and ownership of the Software recorded on theoriginal media and all subsequent copies of the Software, regardless of the form or media in whichor on which the original and other copies may exist. This license is not a sale of the Software or anycopy.
4. Confidentiality. You agree to maintain the Software in confidence and that you will not disclose theSoftware to any third party without the express written consent of PMC-Sierra. You further agreeto take all reasonable precautions to preclude access of unauthorized persons to the Software.
5. Term. This license is effective until January 1, 2045, unless terminated earlier. You may terminatethe license at any time by destroying the Software (including the related documentation) togetherwith all copies or modifications in any form. PMC-Sierra will have the right to terminate our licenseimmediately if you fail to comply with any term or condition of this Agreement. Upon any termination,including termination by you, you must destroy the Software (including the related documentation),together with all copies or modifications in any form.
6. Special Terms Applicable to Databases. Where a database is included with the Software, youacknowledge that it is licensed only in connection with the use of the Software to perform disccreation, and that the database and all data derived therefrom must be maintained in confidencein accordance with the provisions of Section 4. This license does not grant you any rights to distributeor disclose such database or data.
9Proprietary and Confidential to PMC-Sierra, Inc.Document No.: CDP-00278-01-A Rev. A, Issue:
maxView Storage Manager User's Guide

7. Limited Warranty. PMC-Sierra and its Licensor warrant only that the media upon which the Softwareis furnished will be free from defects in material or workmanship under normal use and service fora period of thirty (30) days from the date of delivery to you. PMC-SIERRA AND ITS LICENSORS DONOT AND CANNOT WARRANT THE PERFORMANCE OR RESULTS YOU MAY OBTAIN BY USING THESOFTWARE OR DOCUMENTATION. THE FOREGOING STATES THE SOLE AND EXCLUSIVE REMEDIESPMC-SIERRA AND ITS LICENSORS WILL PROVIDE FOR BREACH OF WARRANTY. EXCEPT FOR THEFOREGOING LIMITED WARRANTY, PMC-SIERRA AND ITS LICENSORS MAKE NO WARRANTIES,EXPRESSED OR IMPLIED, INCLUDING, BUT NOT LIMITED, AS TO NON-INFRINGEMENT OF THIRD PARTYRIGHTS, MERCHANTABILITY OR FITNESS FOR A PARTICULAR PURPOSE. Some states do not allow theexclusion of implied warranties or limitations on how long an implied warranty may last, so theabove limitations may not apply to you. This warranty gives you specific legal rights and you mayalso have other rights which vary from state to state.
8. The entire liability of PMC-Sierra and its licensors, and your exclusive remedy for a breach of thiswarranty, shall be:
a. The replacement of any media not meeting the above limited warranty which is returned toPMC-Sierra; or:
b. if PMC-Sierra or its distributor is unable to deliver replacement media which is free from defectsin materials or workmanship, you may terminate this Agreement by returning the Software andyour money will be refunded.
9. Limitation of Liability. IN NO EVENT WILL PMC-SIERRA OR ITS LICENSORS BE LIABLE TO YOU FOR ANYINCIDENTAL, CONSEQUENTIAL OR INDIRECT DAMAGES, INCLUDING ANY LOST PROFITS, LOST SAVINGS,OR LOSS OF DATA, EVEN IF PMC-SIERRA OR A LICENSOR HAS BEEN ADVISED OF THE POSSIBILITY OFSUCH DAMAGES, OR FOR ANY CLAIM BY ANY OTHER PARTY. Some states do not allow the exclusionor limitation of special, incidental, or consequential damages, so the above limitation or exclusionmay not apply to you.
10. Export. You acknowledge that the laws and regulations of the United States and other countriesmay restrict the export and re-export of the Software. You agree that you will not export or re-exportthe Software or documentation in any form in violation of applicable United States and foreign law.
11. Government Restricted Rights. The Software is subject to restricted rights as follows. If the Softwareis acquired under the terms of a GSA contract: use, reproduction or disclosure is subject to therestrictions set forth in the applicable ADP Schedule contract. If the Software is acquired under theterms of a DoD or civilian agency contract, use, duplication or disclosure by the Government is subjectto the restrictions of this Agreement in accordance with 48 C.F.R. 12.212 of the Federal AcquisitionRegulations and its successors and 49 C.F.R. 227.7202-1 of the DoD FAR Supplement and its successors.
12. General. You acknowledge that you have read this Agreement, understand it, and that by using theSoftware you agree to be bound by its terms and conditions. You further agree that it is the completeand exclusive statement of the agreement between PMC-Sierra and you, and supersedes any proposalor prior agreement, oral or written, and any other communication between PMC-Sierra and yourelating to the subject matter of this Agreement. No additional or any different terms will beenforceable against PMC-Sierra unless PMC-Sierra gives its express consent, including an expresswaiver of the terms of this Agreement, in writing signed by an officer of PMC-Sierra. You assumefull responsibility for the use of the Software and agree to use the Software legally and responsibly.This Agreement shall be governed by California law, except as to copyright matters, which are coveredby Federal law. This Agreement is deemed entered into at Sunnyvale, California by both parties.Should any provision of this Agreement be declared unenforceable in any jurisdiction, then suchprovision shall be deemed severable from this Agreement and shall not affect the remainder hereof.All rights in the Software not specifically granted in this Agreement are reserved by PMC-Sierra.
Should you have any questions concerning this license, contact:
PMC-Sierra, Inc.Legal Department1380 Bordeaux Drive
10Proprietary and Confidential to PMC-Sierra, Inc.Document No.: CDP-00278-01-A Rev. A, Issue:
maxView Storage Manager User's Guide

Sunnyvale, CA 94089(408) 239-8000
11Proprietary and Confidential to PMC-Sierra, Inc.Document No.: CDP-00278-01-A Rev. A, Issue:
maxView Storage Manager User's Guide
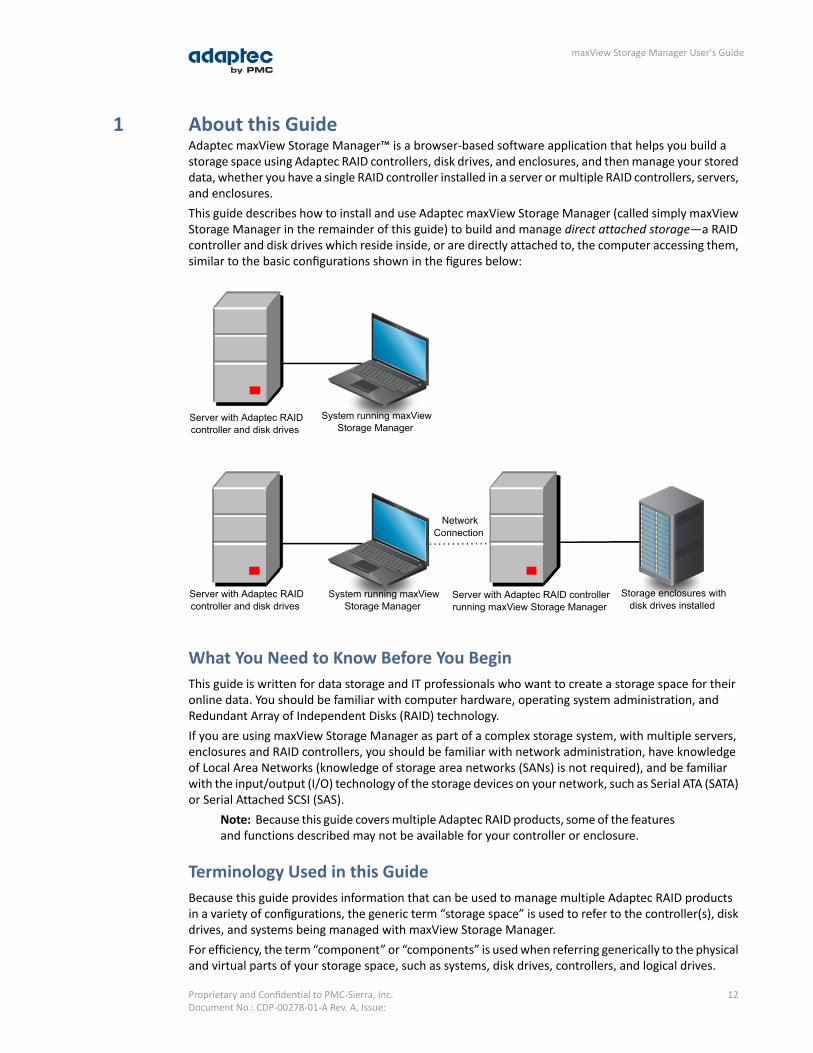
1 About this GuideAdaptec maxView Storage Manager™ is a browser-based software application that helps you build astorage space using Adaptec RAID controllers, disk drives, and enclosures, and then manage your storeddata, whether you have a single RAID controller installed in a server or multiple RAID controllers, servers,and enclosures.This guide describes how to install and use Adaptec maxView Storage Manager (called simply maxViewStorage Manager in the remainder of this guide) to build and manage direct attached storage—a RAIDcontroller and disk drives which reside inside, or are directly attached to, the computer accessing them,similar to the basic configurations shown in the figures below:
Server with Adaptec RAIDcontroller and disk drives
System running maxViewStorage Manager
Server with Adaptec RAIDcontroller and disk drives
System running maxViewStorage Manager
Server with Adaptec RAID controllerrunning maxView Storage Manager
Storage enclosures withdisk drives installed
NetworkConnection
What You Need to Know Before You BeginThis guide is written for data storage and IT professionals who want to create a storage space for theironline data. You should be familiar with computer hardware, operating system administration, andRedundant Array of Independent Disks (RAID) technology.If you are using maxView Storage Manager as part of a complex storage system, with multiple servers,enclosures and RAID controllers, you should be familiar with network administration, have knowledgeof Local Area Networks (knowledge of storage area networks (SANs) is not required), and be familiarwith the input/output (I/O) technology of the storage devices on your network, such as Serial ATA (SATA)or Serial Attached SCSI (SAS).
Note: Because this guide covers multiple Adaptec RAID products, some of the featuresand functions described may not be available for your controller or enclosure.
Terminology Used in this GuideBecause this guide provides information that can be used to manage multiple Adaptec RAID productsin a variety of configurations, the generic term “storage space” is used to refer to the controller(s), diskdrives, and systems being managed with maxView Storage Manager.For efficiency, the term “component” or “components” is used when referring generically to the physicaland virtual parts of your storage space, such as systems, disk drives, controllers, and logical drives.
12Proprietary and Confidential to PMC-Sierra, Inc.Document No.: CDP-00278-01-A Rev. A, Issue:
maxView Storage Manager User's Guide
Many of the terms and concepts referred to in this guide are known to computer users by multiplenames. In this guide, this terminology is used:• Controller (also known as adapter, board, or I/O card)• Disk drive (also known as hard disk, hard drive, or hard disk drive)• Solid State Drive (also known as SSD or non-rotating storage media)• Logical drive (also known as logical device or array)• System (also known as a server, workstation, or computer)• Enclosure (also known as a storage enclosure or disk enclosure)
How to Find More InformationYou can find more information about your Adaptec RAID controller, management software, and utilitiesby referring to these documents, located on the Adaptec Installation DVD:• Readme.txt—Includes product information and known issues.• Adaptec RAID Controllers Installation and User's Guide—Provides complete information on how to
install and configure your Adaptec RAID controller and attach devices.• Adaptec RAID Controllers Command Line Utility User's Guide—Describes how to use ARCCONF, the
Adaptec RAID Controller Configuration command line utility, to perform basic storage managementtasks.
13Proprietary and Confidential to PMC-Sierra, Inc.Document No.: CDP-00278-01-A Rev. A, Issue:
maxView Storage Manager User's Guide
2 Introduction to maxView Storage ManagerThis section introduces the maxView Storage Manager software, explains the concept of a “storagespace,” and provides a checklist of getting-started tasks.
Getting StartedThe first part of this guide provides the information you need to install, start, and begin to use maxViewStorage Manager. Follow these general steps:Step 1: Familiarize yourself with the software components of maxView Storage Manager, review thesystem requirements, and study the configuration examples that illustrate how to build and grow yourstorage space (described in the remainder of this chapter).Step 2: Install maxView Storage Manager on every system that will be part of your storage space (seeInstalling maxView Storage Manager on page 19).Step 3: Start maxView Storage Manager and explore its graphical user interface (see ExploringmaxViewStorage Manager on page 27).Step 4: Build your storage space (see Building Your Storage Space on page 34).
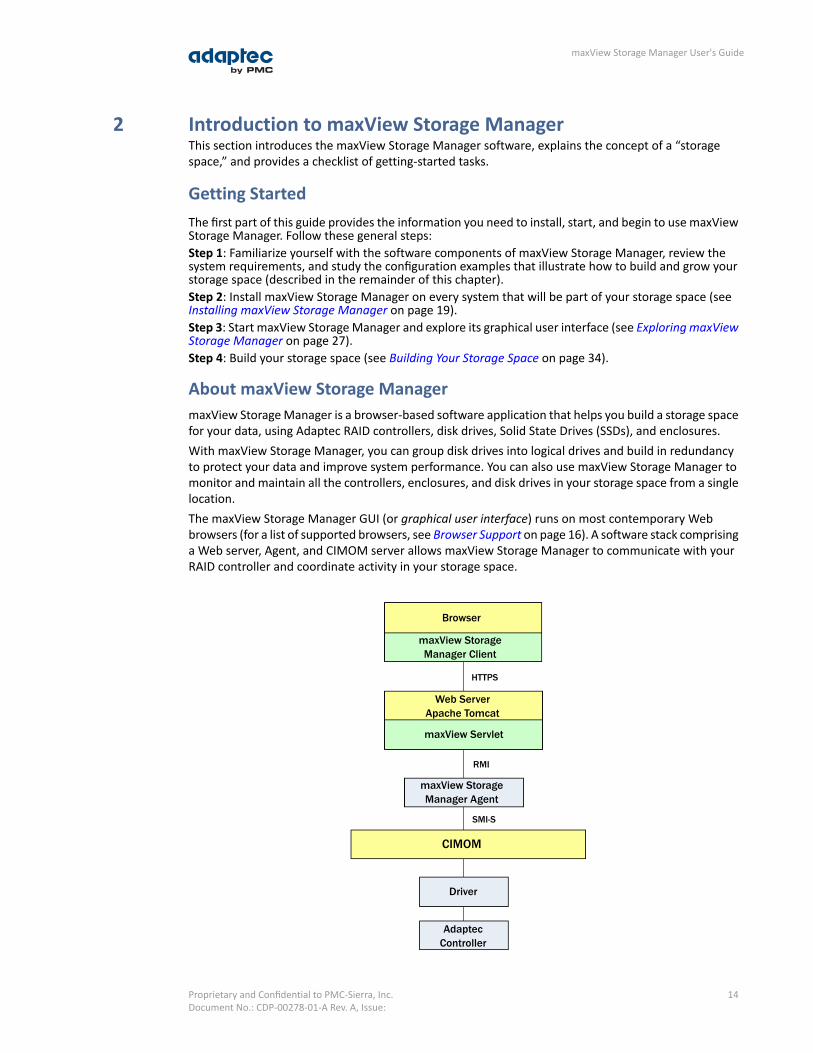
About maxView Storage ManagermaxView Storage Manager is a browser-based software application that helps you build a storage spacefor your data, using Adaptec RAID controllers, disk drives, Solid State Drives (SSDs), and enclosures.With maxView Storage Manager, you can group disk drives into logical drives and build in redundancyto protect your data and improve system performance. You can also use maxView Storage Manager tomonitor and maintain all the controllers, enclosures, and disk drives in your storage space from a singlelocation.The maxView Storage Manager GUI (or graphical user interface) runs on most contemporary Webbrowsers (for a list of supported browsers, see Browser Support on page 16). A software stack comprisinga Web server, Agent, and CIMOM server allows maxView Storage Manager to communicate with yourRAID controller and coordinate activity in your storage space.
Browser
maxView StorageManager Client
Web ServerApache Tomcat
maxView Servlet
CIMOM
Driver
AdaptecController
HTTPS
RMI
SMI-S
maxView StorageManager Agent
14Proprietary and Confidential to PMC-Sierra, Inc.Document No.: CDP-00278-01-A Rev. A, Issue:
maxView Storage Manager User's Guide

About the maxView Storage Manager AgentWhen maxView Storage Manager is installed on a system, the maxView Storage Manager Agent is alsoinstalled automatically. The Agent is designed to run in the background, without user intervention. Itsjob is to monitor system health, manage event notifications, task schedules, and other on-going processeson a system. It sends notices when tasks are completed successfully, and notifies you when errors orfailures occur on that system.If your storage space includes systems that won't be connected to monitors (and therefore won't requirethe graphical user interface), you can choose to run the Agent only on those systems instead of the fullapplication.You can manage and monitor systems running the Agent only by logging into them as remote systems(see Starting maxView Storage Manager on Remote Systems on page 35).
About the maxView Storage Manager Web ServerThe maxView Storage Manager Web Server is an instance of the open-source Apache Tomcat servletcontainer. It runs the maxView Storage Manager Web application, and serves static and dynamic contentto the maxView Storage Manager GUI. The maxView Web Server is installed automatically with maxViewStorage Manager and the maxView Storage Manager Agent.
About the maxView Storage Manager CIM ServerThe maxView Storage Manager CIM Server is an instance of the open-source Pegasus CIM ObjectManager, or CIMOM. In maxView Storage Manager, the CIM Server manages the SMI-S hardwareprovider and notification provider, which monitor the RAID controllers in your system and notify themaxView Storage Manager Agent. The standards-based SMI-S provider enables your Adaptec RAIDcontroller to be managed with any standard CIM client. (For more information, contact your Adaptecsupport representative.) The maxView Storage Manager CIM Server is installed automatically withmaxView Storage Manager and the maxView Storage Manager Agent.
15Proprietary and Confidential to PMC-Sierra, Inc.Document No.: CDP-00278-01-A Rev. A, Issue:
maxView Storage Manager User's Guide

System RequirementsTo install maxView Storage Manager, each system in your storage space must meet these requirements:• PC-compatible computer with Intel Pentium processor, or equivalent• At least 2 GB of RAM• 350 MB of free disk drive space• 256-color video mode• DVD-ROM drive• One of these operating systems:∘ Microsoft® Windows® Server 2012 (32-bit and 64-bit), Windows Server 2008 (32-bit and 64-bit),
Windows Server 2008 R2 (64-bit), Windows SBS 2011, Windows Storage Server 2008 R2, WindowsStorage Server 2011, Windows 7 and Windows 8 (32-bit and 64-bit)
∘ Red Hat® Enterprise Linux 6.2, 5.8 (32-bit and 64-bit)∘ SuSE Linux Enterprise Server 11, 10 (32-bit and 64-bit)∘ Debian Linux 6 (32-bit and 64-bit)∘ Ubuntu Linux 12, 11, 10 (32-bit and 64-bit)∘ Fedora Linux 16, 15, 14 (32-bit and 64-bit)∘ CentOS 6.2, 5.8∘ Solaris 10, Solaris 11 Express∘ VMware ESXi 5.0, VMware ESX 4.1 Classic
For the latest on operating system version support check the readme on your Adaptec Installation DVDor visit the Support area of the Adaptec Web Site at www.adaptec.com
Note: maxView Storage Manager can also be used before an operating system isinstalled. See Running maxView Storage Manager from the DVD on page 24 for moreinformation.
Browser SupportTo run the maxView Storage Manager GUI, each system in your storage space must be running one ofthese Web browsers:• Microsoft® Internet Explorer® 7, 8, 9, or newer• Google® Chrome™ 15.0, or newer• Mozilla Firefox® 8, 9, 10, or newer• Apple® Safari® 4, 5, or newer
16Proprietary and Confidential to PMC-Sierra, Inc.Document No.: CDP-00278-01-A Rev. A, Issue:
maxView Storage Manager User's Guide

Typical Storage Space ConfigurationsThe following examples show typical storage spaces that you can build with maxView Storage Manager.You can grow your storage space as your requirements change by adding more systems, controllers,disk drives, and enclosures, and by adding redundant logical drives for protection against data loss.
A Simple Storage SpaceThis example shows a simple storage space that might be appropriate for a small business. This storagespace includes one RAID controller and three disk drives installed in a server. For data protection, thedisk drives have been used to build a RAID 5 logical drive.
Business andCustomer Data
Server with Adaptec RAIDcontroller and 3 disk drives
System runningmaxView Storage Manager
An Advanced Storage SpaceThis example shows how you can grow your storage space as the requirements of your applicationchange. On the first server, segments from each disk drive have been used to build two RAID 5 logicaldrives. A second server connected to two 12-disk enclosures has been added. The additional storagespace has been used to create two RAID 50 logical drives. The Administrator of this storage space cancreate and modify logical drives and monitor both controllers, disk drives, and enclosures from a singlesystem running the maxView Storage Manager GUI.
RAID 5
RAID 5
Server with Adaptec RAIDcontrollers and disk drives Local system running
maxView Storage Manager
Server with Adaptec RAID controller runningmaxView Storage Manager Agent
Storage enclosure withdisk drives installed
Customer Data
RAID 50
RAID 50
Networkconnection
Business Data
17Proprietary and Confidential to PMC-Sierra, Inc.Document No.: CDP-00278-01-A Rev. A, Issue:
maxView Storage Manager User's Guide
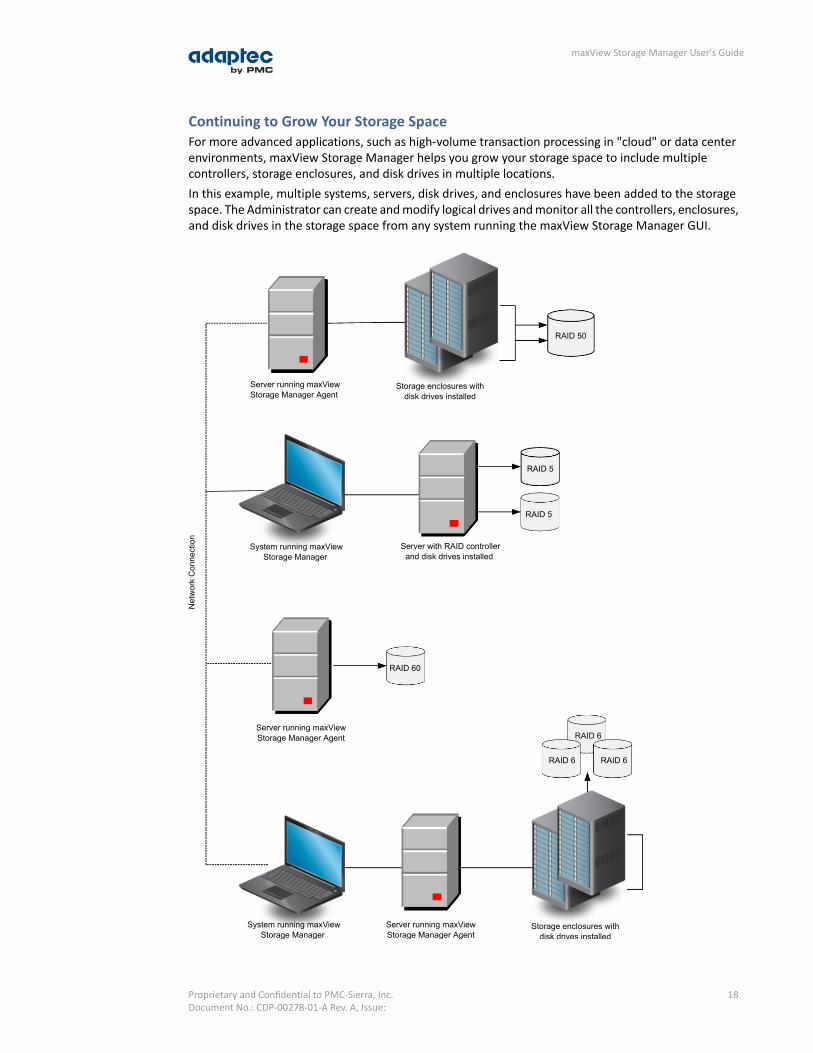
Continuing to Grow Your Storage SpaceFor more advanced applications, such as high-volume transaction processing in "cloud" or data centerenvironments, maxView Storage Manager helps you grow your storage space to include multiplecontrollers, storage enclosures, and disk drives in multiple locations.In this example, multiple systems, servers, disk drives, and enclosures have been added to the storagespace. The Administrator can create and modify logical drives and monitor all the controllers, enclosures,and disk drives in the storage space from any system running the maxView Storage Manager GUI.
Server running maxViewStorage Manager Agent
Storage enclosures withdisk drives installed
RAID 50
System running maxViewStorage Manager
Server with RAID controllerand disk drives installed
RAID 5
RAID 5
Server running maxViewStorage Manager Agent
RAID 60
System running maxViewStorage Manager
Storage enclosures withdisk drives installed
RAID 6
NetworkConnection
Server running maxViewStorage Manager Agent
RAID 6
RAID 6
18Proprietary and Confidential to PMC-Sierra, Inc.Document No.: CDP-00278-01-A Rev. A, Issue:
maxView Storage Manager User's Guide
3 Installing maxView Storage ManagerThis section describes how to install and uninstall maxView Storage Manager on different operatingsystems. It also describes how to run maxView Storage Manager in bootable DVD mode, before theapplication is installed on an operating system.
Before You Begin the InstallationBefore you begin your installation, prepare the following information:• Administrator account user name and password for your operating system.• CIM Server port number. The default port is recommended (5988). If you want to use a different
port, select any one between 65500 and 65535 and it will be assigned as the CIM Server http portfor maxView Storage Manager installation. (The selected port must be free at installation time.) Theinstallation will verify the availability of this port. There is no guarantee that any port number besidesthe default will work in the future as any other application can claim this port. For more informationon the CIM Server, seeAbout the maxView Storage Manager CIM Server on page 15.
• maxView Web Server port number. The default port is recommended (8443). If the default port isnot available, another port number will be automatically assigned. For more information on theWeb Server, see About the maxView Storage Manager Web Server on page 15.
Note: If a previous version of maxView Storage Manager is installed on your system,you must remove it before beginning a new installation. See Uninstalling maxViewStorage Manager on page 25 for details.
Installing on WindowsThis section describes how to install maxView Storage Manager on systems running Windows.
Note: You need administrator or root privileges to install maxView Storage Manager.For details on verifying privileges, refer to your operating system documentation.
1. Insert the Adaptec Installation DVD.The Installation DVD Main Menu opens.
2. Select Install maxView Storage Manager.The Installation wizard opens. If it doesn't open, select Browse the CD/DVD, then click Autorun.
3. Click Next to begin the installation, click I accept..., then click Next.4. Add the following configuration settings:
a) CIM Server Port: 5988.b) Web Server Port: 8443.c) User Name default: Administratord) Operating system password.
19Proprietary and Confidential to PMC-Sierra, Inc.Document No.: CDP-00278-01-A Rev. A, Issue:
maxView Storage Manager User's Guide
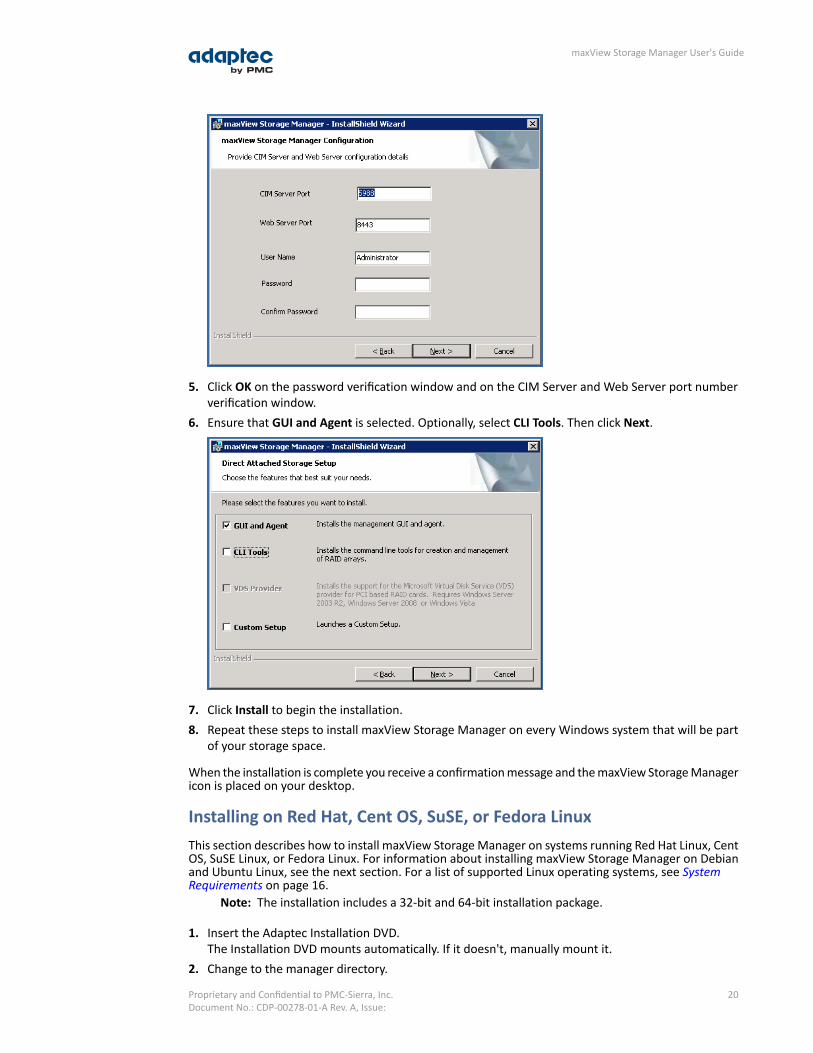
5. Click OK on the password verification window and on the CIM Server and Web Server port numberverification window.
6. Ensure that GUI and Agent is selected. Optionally, select CLI Tools. Then click Next.
7. Click Install to begin the installation.8. Repeat these steps to install maxView Storage Manager on every Windows system that will be part
of your storage space.
When the installation is complete you receive a confirmation message and the maxView Storage Managericon is placed on your desktop.
Installing on Red Hat, Cent OS, SuSE, or Fedora LinuxThis section describes how to install maxView Storage Manager on systems running Red Hat Linux, CentOS, SuSE Linux, or Fedora Linux. For information about installing maxView Storage Manager on Debianand Ubuntu Linux, see the next section. For a list of supported Linux operating systems, see SystemRequirements on page 16.
Note: The installation includes a 32-bit and 64-bit installation package.
1. Insert the Adaptec Installation DVD.The Installation DVD mounts automatically. If it doesn't, manually mount it.
2. Change to the manager directory.
20Proprietary and Confidential to PMC-Sierra, Inc.Document No.: CDP-00278-01-A Rev. A, Issue:
maxView Storage Manager User's Guide
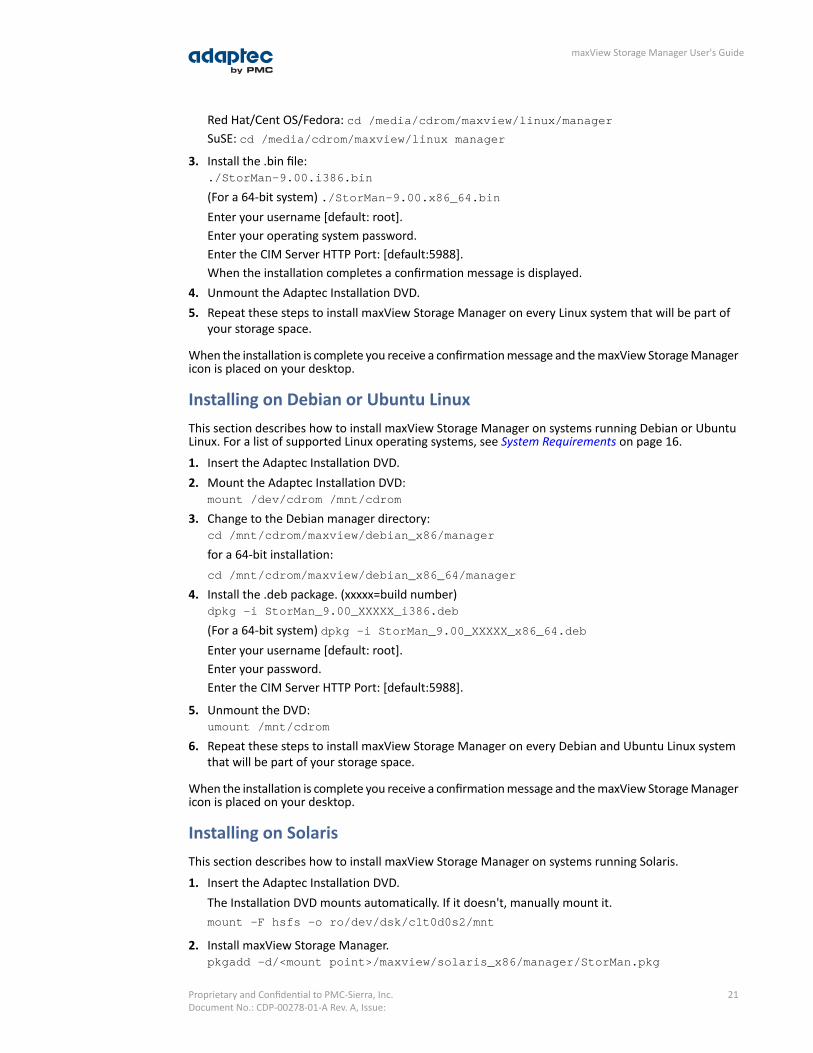
Red Hat/Cent OS/Fedora: cd /media/cdrom/maxview/linux/managerSuSE: cd /media/cdrom/maxview/linux manager
3. Install the .bin file:./StorMan-9.00.i386.bin
(For a 64-bit system) ./StorMan-9.00.x86_64.binEnter your username [default: root].Enter your operating system password.Enter the CIM Server HTTP Port: [default:5988].When the installation completes a confirmation message is displayed.
4. Unmount the Adaptec Installation DVD.5. Repeat these steps to install maxView Storage Manager on every Linux system that will be part of
your storage space.
When the installation is complete you receive a confirmation message and the maxView Storage Managericon is placed on your desktop.
Installing on Debian or Ubuntu LinuxThis section describes how to install maxView Storage Manager on systems running Debian or UbuntuLinux. For a list of supported Linux operating systems, see System Requirements on page 16.
1. Insert the Adaptec Installation DVD.2. Mount the Adaptec Installation DVD:
mount /dev/cdrom /mnt/cdrom
3. Change to the Debian manager directory:cd /mnt/cdrom/maxview/debian_x86/manager
for a 64-bit installation:cd /mnt/cdrom/maxview/debian_x86_64/manager
4. Install the .deb package. (xxxxx=build number)dpkg -i StorMan_9.00_XXXXX_i386.deb
(For a 64-bit system) dpkg -i StorMan_9.00_XXXXX_x86_64.debEnter your username [default: root].Enter your password.Enter the CIM Server HTTP Port: [default:5988].
5. Unmount the DVD:umount /mnt/cdrom
6. Repeat these steps to install maxView Storage Manager on every Debian and Ubuntu Linux systemthat will be part of your storage space.
When the installation is complete you receive a confirmation message and the maxView Storage Managericon is placed on your desktop.
Installing on SolarisThis section describes how to install maxView Storage Manager on systems running Solaris.
1. Insert the Adaptec Installation DVD.The Installation DVD mounts automatically. If it doesn't, manually mount it.mount -F hsfs -o ro/dev/dsk/c1t0d0s2/mnt
2. Install maxView Storage Manager.pkgadd -d/<mount point>/maxview/solaris_x86/manager/StorMan.pkg
21Proprietary and Confidential to PMC-Sierra, Inc.Document No.: CDP-00278-01-A Rev. A, Issue:
maxView Storage Manager User's Guide

At the prompt to continue, select y, then press Enter.Enter your username: [default: root]Enter your password.Enter the CIM Server HTTP Port: [default:5988]
3. Eject or unmount the Adaptec Installation DVD. Refer to your operating system documentation fordetailed instructions.
When the installation is complete you receive a confirmation message and the maxView Storage Managericon is placed on your desktop.
Installing on VMware ESX 4.1Use the following procedure to install the .vib files for a VMware ESX 4.1 system only. The installationcan be done on an ESX 4.1 console or from a remote system running a Telnet/SSH client.
1. Insert the Adaptec Installation DVD.2. Mount the Adaptec Installation DVD.3. Copy the following files to your local ESX 4.1 /tmp directory:
• vmware-esx-provider-arcconf.vib• vmware-esx-provider-arcsmis.vib
The arcconf.vib is for command line communication.The arcsmis.vib is for remote management communication.
4. Stop operations./etc/init.d/./sfcbd-watchdog stop
5. Check for an existing installation of arcconf.esxupdate --vib-view query | grep arcconf
6. Remove the existing installation of arcconf.esxupdate -b < arcconf module name > --maintenancemode remove
When the package is removed, you receive the message "The update completed successfully, butthe system needs to be rebooted for the changes to be effective".
7. Check for an existing installation of arcsmis.esxupdate --vib-view query | grep arcsmis
8. Remove the existing installation of arcsmis.esxupdate -b < arcsmis module name > --maintenancemode remove
When the package is removed, you receive the message "The update completed successfully, butthe system needs to be rebooted for the changes to be effective."
9. Reboot the system.10. Stop operations.
/etc/init.d/./sfcbd-watchdog stop
11. Install the arcconf package.esxupdate -b /tmp/vmware-esx-provider-arcconf.vib --nodeps --nosigcheck
--maintenancemode update
When the package is installed, you receive the message "The update completed successfully, butthe system needs to be rebooted for the changes to be effective."
12. Install the arcsmis package.esxupdate -b /tmp/vmware-esx-provider-arcsmis.vib --nodeps --nosigcheck
--maintenancemode update
When the package is installed, you receive the message "The update completed successfully, butthe system needs to be rebooted for the changes to be effective."
13. Reboot the system.
22Proprietary and Confidential to PMC-Sierra, Inc.Document No.: CDP-00278-01-A Rev. A, Issue:
maxView Storage Manager User's Guide
14. Continue with Installing on a VMware Guest OS on page 24.
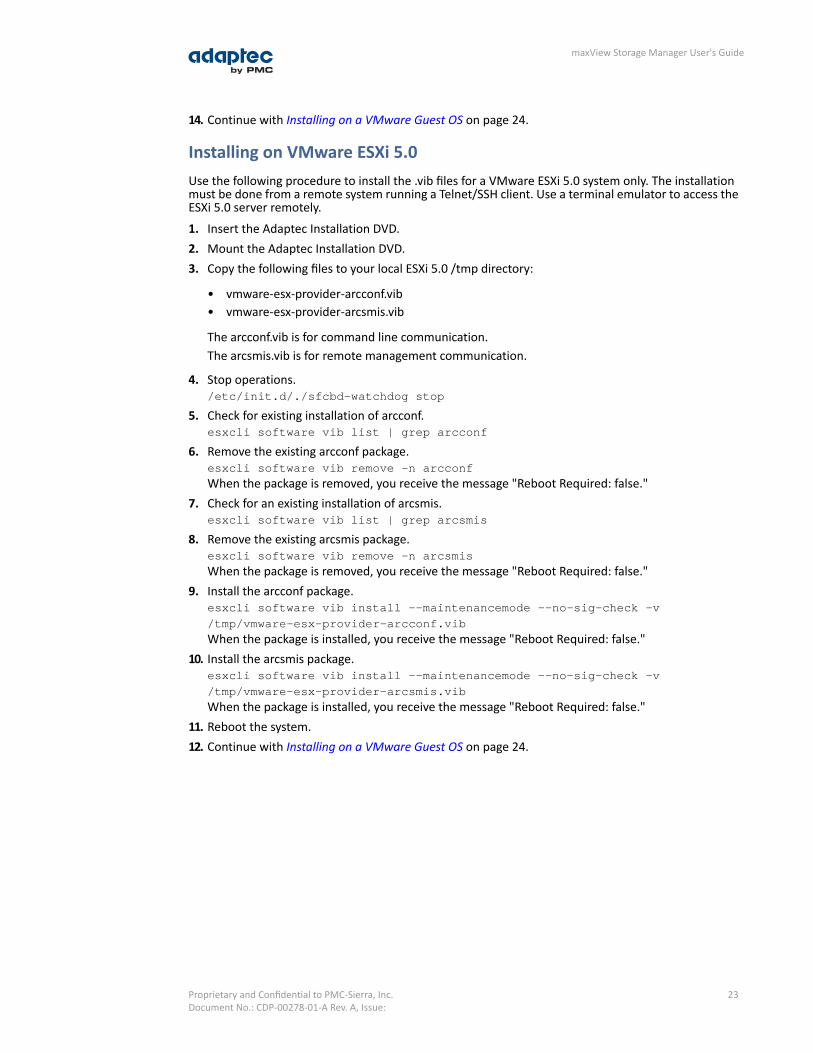
Installing on VMware ESXi 5.0Use the following procedure to install the .vib files for a VMware ESXi 5.0 system only. The installationmust be done from a remote system running a Telnet/SSH client. Use a terminal emulator to access theESXi 5.0 server remotely.
1. Insert the Adaptec Installation DVD.2. Mount the Adaptec Installation DVD.3. Copy the following files to your local ESXi 5.0 /tmp directory:
• vmware-esx-provider-arcconf.vib• vmware-esx-provider-arcsmis.vib
The arcconf.vib is for command line communication.The arcsmis.vib is for remote management communication.
4. Stop operations./etc/init.d/./sfcbd-watchdog stop
5. Check for existing installation of arcconf.esxcli software vib list | grep arcconf
6. Remove the existing arcconf package.esxcli software vib remove -n arcconf
When the package is removed, you receive the message "Reboot Required: false."7. Check for an existing installation of arcsmis.
esxcli software vib list | grep arcsmis
8. Remove the existing arcsmis package.esxcli software vib remove -n arcsmis
When the package is removed, you receive the message "Reboot Required: false."9. Install the arcconf package.
esxcli software vib install --maintenancemode --no-sig-check -v
/tmp/vmware-esx-provider-arcconf.vib
When the package is installed, you receive the message "Reboot Required: false."10. Install the arcsmis package.
esxcli software vib install --maintenancemode --no-sig-check -v
/tmp/vmware-esx-provider-arcsmis.vib
When the package is installed, you receive the message "Reboot Required: false."11. Reboot the system.12. Continue with Installing on a VMware Guest OS on page 24.
23Proprietary and Confidential to PMC-Sierra, Inc.Document No.: CDP-00278-01-A Rev. A, Issue:
maxView Storage Manager User's Guide
Installing on a VMware Guest OSThis section describes how to install maxView Storage Manager on a VMware guest operating system.
1. Insert the Adaptec Installation DVD.2. Go to the ASM-MANAGER-GOS directory for the remote operating system you want to install.3. Type one of the following commands, depending on the operating system:
DescriptionOptions
./StorMan-9.00-19098.esx86_64.binLinux
setup_asm_esx_x64.exeWindows
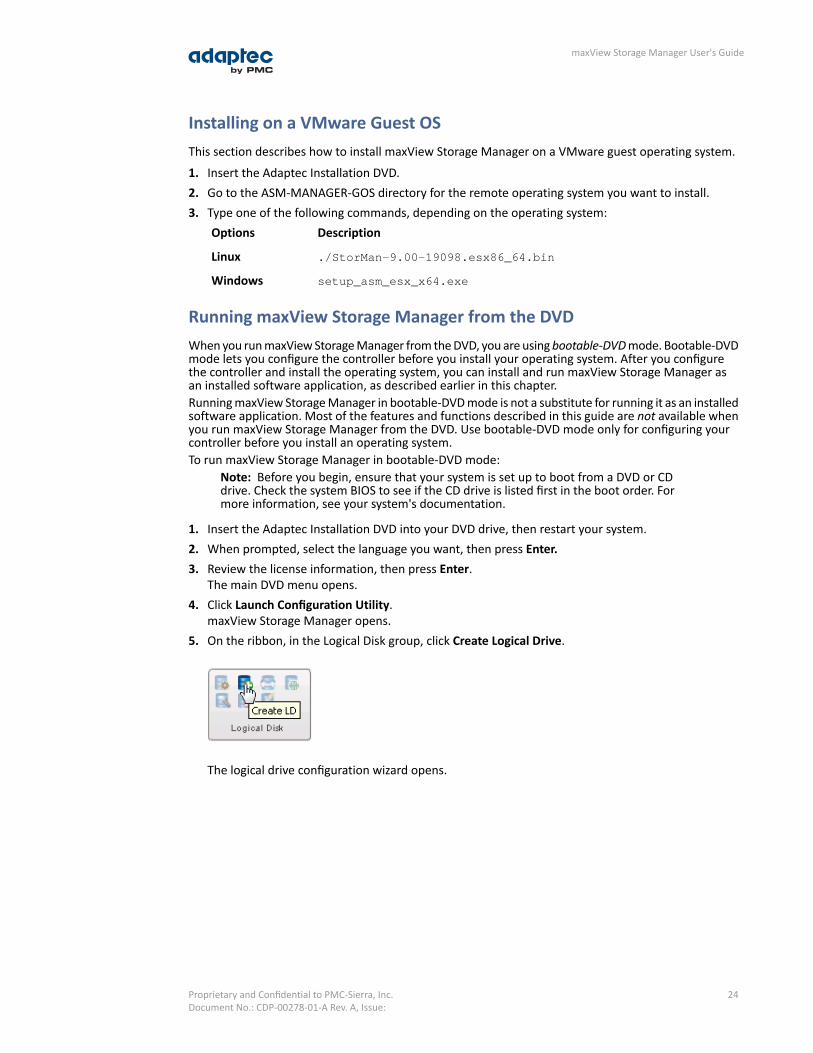
Running maxView Storage Manager from the DVDWhen you run maxView Storage Manager from the DVD, you are usingbootable-DVDmode. Bootable-DVDmode lets you configure the controller before you install your operating system. After you configurethe controller and install the operating system, you can install and run maxView Storage Manager asan installed software application, as described earlier in this chapter.Running maxView Storage Manager in bootable-DVD mode is not a substitute for running it as an installedsoftware application. Most of the features and functions described in this guide are not available whenyou run maxView Storage Manager from the DVD. Use bootable-DVD mode only for configuring yourcontroller before you install an operating system.To run maxView Storage Manager in bootable-DVD mode:
Note: Before you begin, ensure that your system is set up to boot from a DVD or CDdrive. Check the system BIOS to see if the CD drive is listed first in the boot order. Formore information, see your system's documentation.
1. Insert the Adaptec Installation DVD into your DVD drive, then restart your system.2. When prompted, select the language you want, then press Enter.3. Review the license information, then press Enter.
The main DVD menu opens.4. Click Launch Configuration Utility.
maxView Storage Manager opens.5. On the ribbon, in the Logical Disk group, click Create Logical Drive.
The logical drive configuration wizard opens.
24Proprietary and Confidential to PMC-Sierra, Inc.Document No.: CDP-00278-01-A Rev. A, Issue:
maxView Storage Manager User's Guide

6. Continue with Creating Logical Drives on page 38.
Uninstalling maxView Storage ManagerTo uninstall maxView Storage Manager, follow the instructions for your operating system.
Note: If a previous version of maxView Storage Manager is installed on your system,you must remove it before beginning a new installation.
Uninstalling fromWindowsTo uninstall maxView Storage Manager from a Windows system, use the Add or Remove Programs toolin the Control Panel. All maxView Storage Manager components are uninstalled.When the uninstall process is complete, you receive a confirmation message and the maxView icon isremoved from your desktop.
Uninstalling from Red Hat, Cent OS, SuSE, or Fedora LinuxThis section describes how to uninstall maxView Storage Manager from systems running Red Hat, CentOS, SuSE, or Fedora Linux.
Type the command rpm -e StorMan
When the uninstall process is complete, you receive a confirmation message and the maxView icon isremoved from your desktop.
Uninstalling from Debian or Ubuntu LinuxThis section describes how to uninstall maxView Storage Manager from systems running Debian orUbuntu Linux.
Type the command dpkg -r StorMan
When the uninstall process is complete, you receive a confirmation message and the maxView icon isremoved from your desktop.
Uninstalling from SolarisThis section describes how to uninstall maxView Storage Manager from systems running Solaris.
1. Type the command pkgrm StorMan
25Proprietary and Confidential to PMC-Sierra, Inc.Document No.: CDP-00278-01-A Rev. A, Issue:
maxView Storage Manager User's Guide
2. At the prompt to remove the package select y, then press Enter.3. At the confirmation prompt select y, then press Enter.
When the uninstall process is complete, you receive a confirmation message and the maxView icon isremoved from your desktop.
Uninstalling from VMware ESX 4.1Use the following procedure to remove maxView Storage Manager from a VMware ESX 4.1 system.
1. Log in with the user name: root2. List the installed packages:
esxupdate -–vib-view query | grep arcconf
esxupdate –-vib-view query | grep arcsmis
3. Stop operations:/etc/init.d/./sfcbd-watchdog stop
4. Remove the arcconf package:esxcli software vib remove -n arcconf
5. Remove the arcsmis package:esxcli software vib remove -n arcsmis
6. Restart operations:/etc/init.d/./sfcbd-watchdog start
To verify that maxView Storage Manager was uninstalled, repeat step 2. If no results are shown, thesoftware was uninstalled.
Uninstalling from VMware ESXi 5.0Use the following procedure to remove maxView Storage Manager from a VMware ESXi 5.0 system.
1. Log in with the user name: root2. List the installed packages:
esxcli software vib list | grep arcconf
esxcli software vib list | grep arcsmis
3. Stop operations:/etc/init.d/./sfcbd-watchdog stop
4. Remove the arcconf package:esxcli software vib remove -n arcconf
5. Remove the arcsmis package:esxcli software vib remove -n arcsmis
6. Restart operations:/etc/init.d/./sfcbd-watchdog start
To verify that maxView Storage Manager was uninstalled, repeat step 2. If no results are shown, thesoftware was uninstalled.
26Proprietary and Confidential to PMC-Sierra, Inc.Document No.: CDP-00278-01-A Rev. A, Issue:
maxView Storage Manager User's Guide

4 Exploring maxView Storage ManagerThis section describes how to start and log into maxView Storage Manager, and familiarizes you withthe main features of the graphical user interface. It also explains how to get help and log out of maxViewStorage Manager when you are finished working with the application.
Starting maxView Storage Manager and Logging InThe procedure for starting and logging in to maxView Storage Manager is the same for all operatingsystems with a graphical desktop.
Note: You need Administrator or root privileges to run the maxView Storage Managerapplication.
1. On the desktop, double-click the maxView Storage Manager desktop icon.The login window opens in the default browser.
Note: If you do not have an icon for maxView Storage Manager on your desktop,open a browser window, type this URL in the address bar:https://127.0.0.1:8443/maxview/manager/login.xhtml, then press Return.
2. Enter Administrator account username and password from your operating system, then click Login.The maxView Storage Manager main window opens.
Working in maxView Storage ManagerMost options in maxView Storage Manager are available by:• Selecting components in the Enterprise View• Clicking icons on the ribbon, at the top of the main window• Working with information in the Storage Dashboard and Chart View• Checking status in the Event Log and Task LogThe following sections describe how to work with these features in the main window of maxView StorageManager.
Overview of the Main WindowThe main window of maxView Storage Manager has three main panels—left, right, and bottom—plusthe ribbon, at the top of the window.The left panel shows always the Enterprise View. The bottom panel shows the Event Log and Task Log.The right panel shows the Storage Dashboard and Chart View. Different information appears in the rightpanel depending on which component is selected in the Enterprise View.
27Proprietary and Confidential to PMC-Sierra, Inc.Document No.: CDP-00278-01-A Rev. A, Issue:
maxView Storage Manager User's Guide
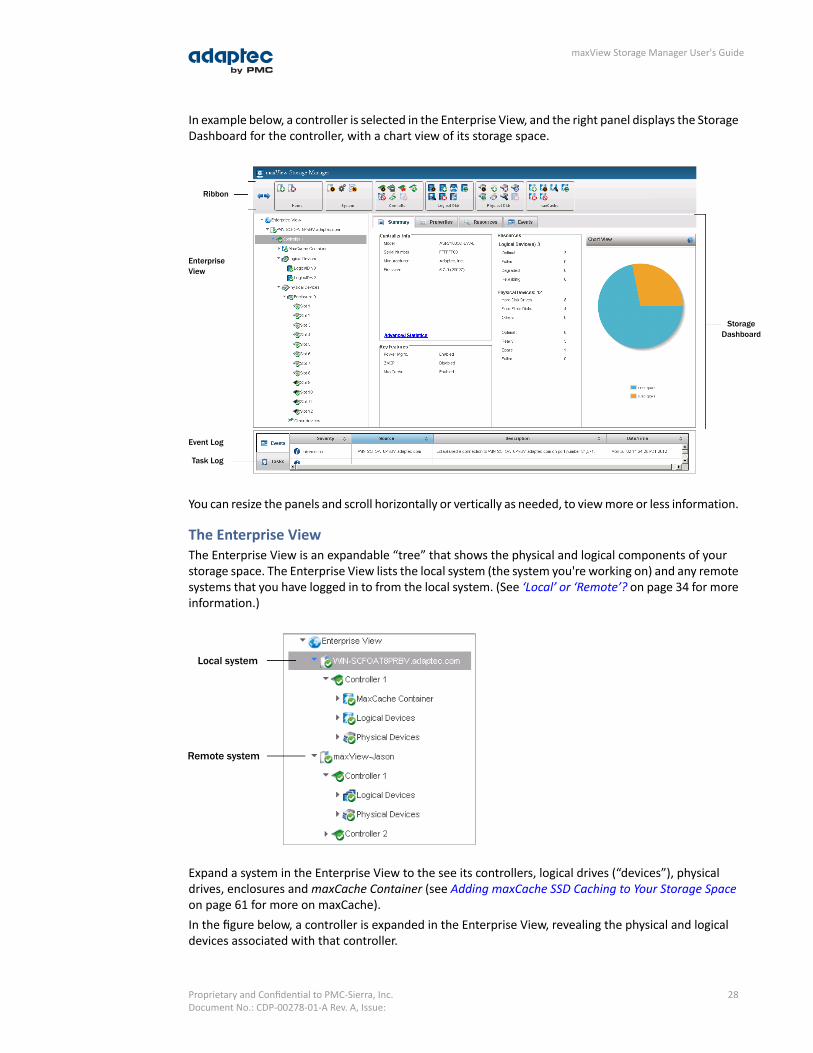
In example below, a controller is selected in the Enterprise View, and the right panel displays the StorageDashboard for the controller, with a chart view of its storage space.
Ribbon
Event Log
Task Log
EnterpriseView
StorageDashboard
You can resize the panels and scroll horizontally or vertically as needed, to view more or less information.
The Enterprise ViewThe Enterprise View is an expandable “tree” that shows the physical and logical components of yourstorage space. The Enterprise View lists the local system (the system you're working on) and any remotesystems that you have logged in to from the local system. (See ‘Local’ or ‘Remote’? on page 34 for moreinformation.)
Local system
Remote system
Expand a system in the Enterprise View to the see its controllers, logical drives (“devices”), physicaldrives, enclosures and maxCache Container (see Adding maxCache SSD Caching to Your Storage Spaceon page 61 for more on maxCache).In the figure below, a controller is expanded in the Enterprise View, revealing the physical and logicaldevices associated with that controller.
28Proprietary and Confidential to PMC-Sierra, Inc.Document No.: CDP-00278-01-A Rev. A, Issue:
maxView Storage Manager User's Guide

By selecting a controllerin the Enterprise View...
...the disk drives or enclosuresand disk drives connected to itand the logical drives created withthose disk drives appear in thePhysical and Logical Devices trees.
You can perform most tasks in maxView Storage Manager by selecting a component in the EnterpriseView, such as a controller or disk drive, then using the related commands on the ribbon, described next.
What do the Enterprise View Icons Mean?
DescriptionIcon
System with controller and directly attached disk drives or enclosures
Controller
Enclosure
Logical device
maxCache Container (healthy)1
Hard drive
Solid State Drive (SSD)
1 A green checkmark in the Enterprise View means that the component is healthy with no problemsor issues. For more information, see Identifying a Failed or Failing Component on page 108.
29Proprietary and Confidential to PMC-Sierra, Inc.Document No.: CDP-00278-01-A Rev. A, Issue:
maxView Storage Manager User's Guide

DescriptionIcon
Connector or other physical device
The RibbonMost tasks in maxView Storage Manager are available from the ribbon, at the top of the main window.The ribbon replaces toolbars and menus in maxView Storage Manager to help you quickly find thecommands you need to complete a task.
The ribbon is organized into groups, with related tasks for Systems, Controllers, Logical Disks, PhysicalDisks, and maxCache; the Home group (on the left) provides commands for working with remote systems(seeManaging Remote Systems on page 103). Options available on the ribbon vary, depending on whichtype of component is selected in the Enterprise View. For instance, if you select a controller in theEnterprise View, the Create Logical Drive option is highlighted in the Logical Disk group, in addition tooptions in the Controller group. If you select a disk drive or SSD in the Enterprise View, options in thePhysical Disk group are highlighted; and so on.For a description of the icons on the ribbon, see Icons At-a-Glance on page 120.
The Storage DashboardWhen you select a component in the Enterprise View, maxView Storage Manager displays detailedinformation about that component on the Storage Dashboard. Occupying the largest portion of themain window in maxView Storage Manager, the Storage Dashboard provides status information, physicaland logical device properties, resources, usage statistics, and reliability indicators for hard drives andSSDs. It also provides a chart view of free and used space in your system.
Tabs provide quick accessto component information
Chart view of freeand used space inyour system
30Proprietary and Confidential to PMC-Sierra, Inc.Document No.: CDP-00278-01-A Rev. A, Issue:
maxView Storage Manager User's Guide
For more information about the types of information provided on the Storage Dashboard for eachcomponent in your storage space, see Viewing Component Status in the Storage Dashboard on page88; also see Revealing More Device Information on page 32.
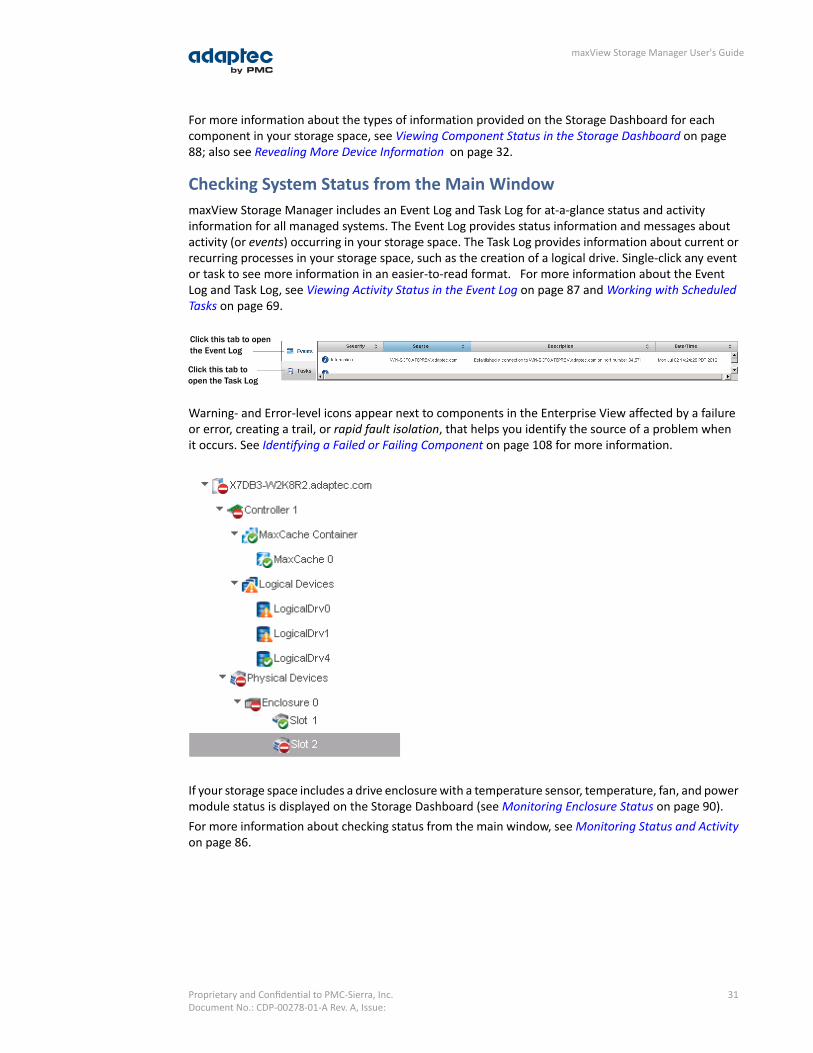
Checking System Status from the Main WindowmaxView Storage Manager includes an Event Log and Task Log for at-a-glance status and activityinformation for all managed systems. The Event Log provides status information and messages aboutactivity (or events) occurring in your storage space. The Task Log provides information about current orrecurring processes in your storage space, such as the creation of a logical drive. Single-click any eventor task to see more information in an easier-to-read format. For more information about the EventLog and Task Log, see Viewing Activity Status in the Event Log on page 87 and Working with ScheduledTasks on page 69.
Click this tab to openthe Event Log
Click this tab toopen the Task Log
Warning- and Error-level icons appear next to components in the Enterprise View affected by a failureor error, creating a trail, or rapid fault isolation, that helps you identify the source of a problem whenit occurs. See Identifying a Failed or Failing Component on page 108 for more information.
If your storage space includes a drive enclosure with a temperature sensor, temperature, fan, and powermodule status is displayed on the Storage Dashboard (see Monitoring Enclosure Status on page 90).For more information about checking status from the main window, see Monitoring Status and Activityon page 86.
31Proprietary and Confidential to PMC-Sierra, Inc.Document No.: CDP-00278-01-A Rev. A, Issue:
maxView Storage Manager User's Guide
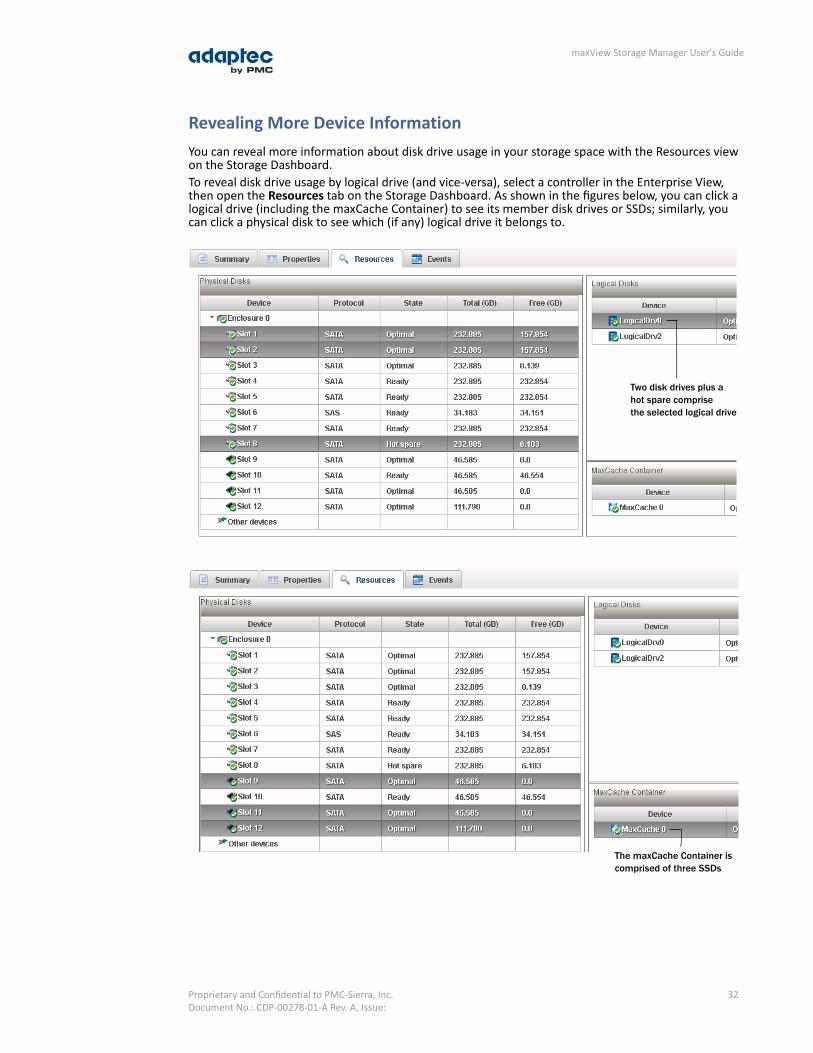
Revealing More Device InformationYou can reveal more information about disk drive usage in your storage space with the Resources viewon the Storage Dashboard.To reveal disk drive usage by logical drive (and vice-versa), select a controller in the Enterprise View,then open the Resources tab on the Storage Dashboard. As shown in the figures below, you can click alogical drive (including the maxCache Container) to see its member disk drives or SSDs; similarly, youcan click a physical disk to see which (if any) logical drive it belongs to.
Two disk drives plus ahot spare comprisethe selected logical drive
The maxCache Container iscomprised of three SSDs
32Proprietary and Confidential to PMC-Sierra, Inc.Document No.: CDP-00278-01-A Rev. A, Issue:
maxView Storage Manager User's Guide

Getting HelpmaxView Storage Manager provides online help that includes conceptual information, glossary definitions,and descriptions of on-screen items and dialog boxes, in addition to step-by-step instructions forcompleting tasks.To open the online help, click the Help button at the upper-right corner of the main window:
Click here to openthe Help window
For help with a dialog box or wizard, click the question-mark icon, in the lower corner of the dialog box,for help with that specific procedure:
Click here for helpwith this procedure
Logging Out of maxView Storage ManagerTo log out of maxView Storage Manager:
1. In the Enterprise View, click on the local system.2. Click the Logout button at the upper-right corner of the main window:
Click here tolog out
You are logged out of maxView Storage Manager and the main window is closed.
33Proprietary and Confidential to PMC-Sierra, Inc.Document No.: CDP-00278-01-A Rev. A, Issue:
maxView Storage Manager User's Guide
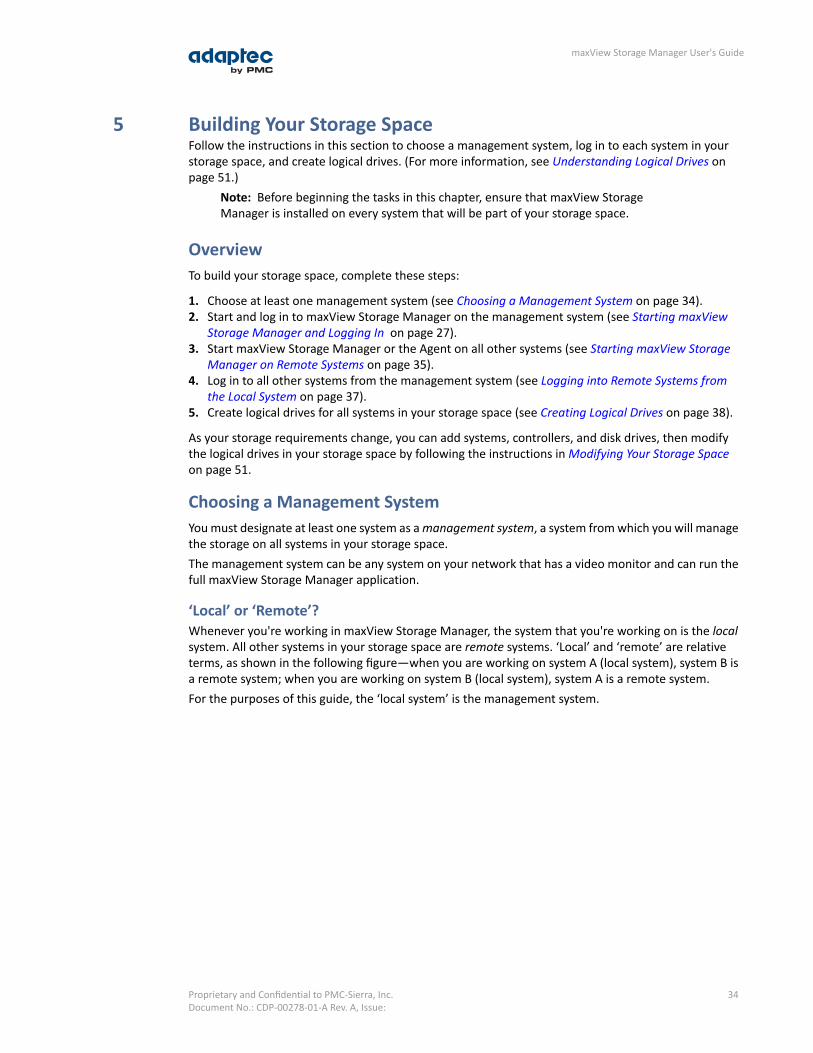
5 Building Your Storage SpaceFollow the instructions in this section to choose a management system, log in to each system in yourstorage space, and create logical drives. (For more information, see Understanding Logical Drives onpage 51.)
Note: Before beginning the tasks in this chapter, ensure that maxView StorageManager is installed on every system that will be part of your storage space.
OverviewTo build your storage space, complete these steps:
1. Choose at least one management system (see Choosing a Management System on page 34).2. Start and log in to maxView Storage Manager on the management system (see Starting maxView
Storage Manager and Logging In on page 27).3. Start maxView Storage Manager or the Agent on all other systems (see Starting maxView Storage
Manager on Remote Systems on page 35).4. Log in to all other systems from the management system (see Logging into Remote Systems from
the Local System on page 37).5. Create logical drives for all systems in your storage space (see Creating Logical Drives on page 38).
As your storage requirements change, you can add systems, controllers, and disk drives, then modifythe logical drives in your storage space by following the instructions in Modifying Your Storage Spaceon page 51.
Choosing a Management SystemYou must designate at least one system as a management system, a system from which you will managethe storage on all systems in your storage space.The management system can be any system on your network that has a video monitor and can run thefull maxView Storage Manager application.
‘Local’ or ‘Remote’?Whenever you're working in maxView Storage Manager, the system that you're working on is the localsystem. All other systems in your storage space are remote systems. ‘Local’ and ‘remote’ are relativeterms, as shown in the following figure—when you are working on system A (local system), system B isa remote system; when you are working on system B (local system), system A is a remote system.For the purposes of this guide, the ‘local system’ is the management system.
34Proprietary and Confidential to PMC-Sierra, Inc.Document No.: CDP-00278-01-A Rev. A, Issue:
maxView Storage Manager User's Guide
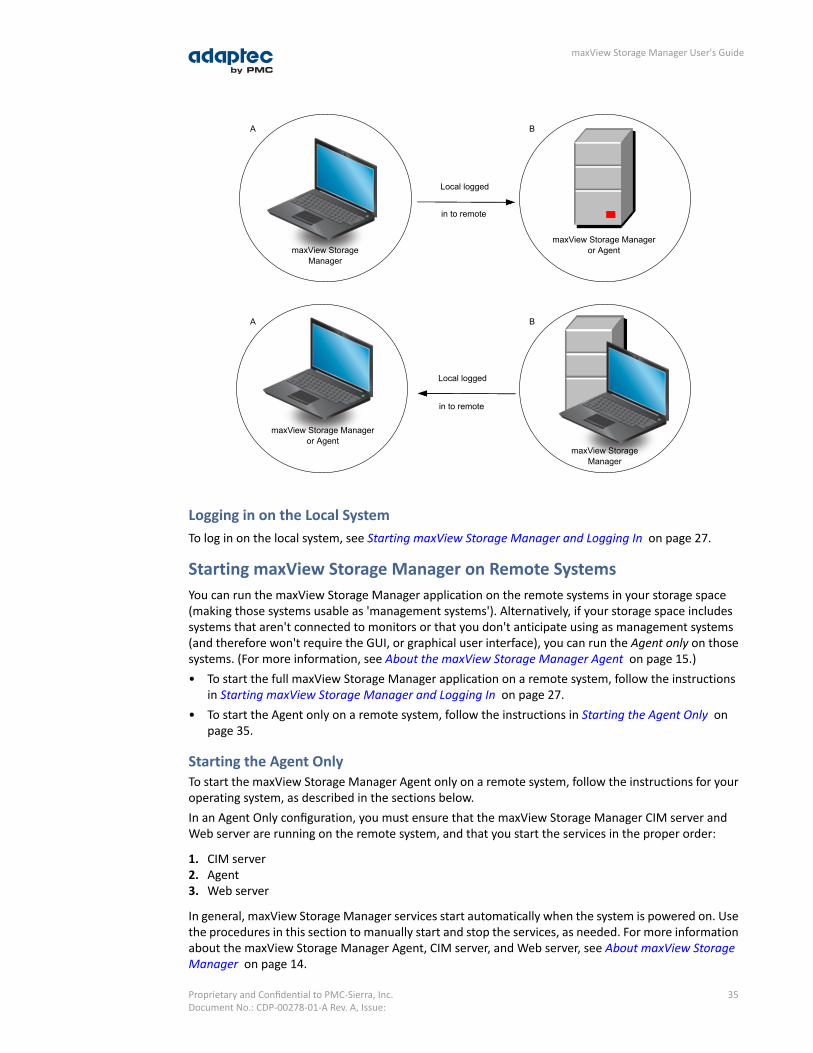
maxView StorageManager
maxView StorageManager
maxView Storage Manageror Agent
maxView Storage Manageror Agent
Local logged
Local logged
in to remote
in to remote
A
A
B
B
Logging in on the Local SystemTo log in on the local system, see Starting maxView Storage Manager and Logging In on page 27.
Starting maxView Storage Manager on Remote SystemsYou can run the maxView Storage Manager application on the remote systems in your storage space(making those systems usable as 'management systems'). Alternatively, if your storage space includessystems that aren't connected to monitors or that you don't anticipate using as management systems(and therefore won't require the GUI, or graphical user interface), you can run the Agent only on thosesystems. (For more information, see About the maxView Storage Manager Agent on page 15.)• To start the full maxView Storage Manager application on a remote system, follow the instructions
in Starting maxView Storage Manager and Logging In on page 27.• To start the Agent only on a remote system, follow the instructions in Starting the Agent Only on
page 35.
Starting the Agent OnlyTo start the maxView Storage Manager Agent only on a remote system, follow the instructions for youroperating system, as described in the sections below.In an Agent Only configuration, you must ensure that the maxView Storage Manager CIM server andWeb server are running on the remote system, and that you start the services in the proper order:
1. CIM server2. Agent3. Web server
In general, maxView Storage Manager services start automatically when the system is powered on. Usethe procedures in this section to manually start and stop the services, as needed. For more informationabout the maxView Storage Manager Agent, CIM server, and Web server, see About maxView StorageManager on page 14.
35Proprietary and Confidential to PMC-Sierra, Inc.Document No.: CDP-00278-01-A Rev. A, Issue:
maxView Storage Manager User's Guide
WindowsOn Windows systems, the Agent and other maxView Storage Manager services start automatically whenthe system is powered on.To verify that the Agent is running:
1. Open the Windows Control Panel.2. Double-click Administrative Tools, then double-click Services.3. In the list of services, check that the maxView Storage Manager Agent is installed and running. Then
verify that the maxView CIM server and maxView Web server are running. If not, you can choose torestart the services. Be sure to observe the proper startup order: CIM server, Agent, Web server.
Linux or VMwareOn Linux systems and VMware Guest OSs, the Agent and other maxView Storage Manager services startautomatically when the system is started. To manually start (or stop) the Agent on Linux, enter thesecommands:
1. Start the CIM server:DescriptionOptions
service stor_cimserver startStart service
service stor_cimserver stopStop service
service stor_cimserver statusCheck statusTo start operations from the VMware console, use these commands:
DescriptionOptions
Sfcbd-watchdog startStart service
Sfcbd-watchdog stopStop service
2. Start the Agent:DescriptionOptions
service stor_agent startStart service
service stor_agent stopStop service
3. Start the Web server:DescriptionOptions
service stor_tomcat startStart service
service stor_tomcat stopStop service
SolarisTo start (or stop) the Agent on Solaris, enter these commands:
1. Start the CIM server:DescriptionOptions
svcadm enable stor_cimserverStart service
svcadm disable stor_cimserverStop service
svcs -l stor_cimserverCheck status
2. Start the Agent:
36Proprietary and Confidential to PMC-Sierra, Inc.Document No.: CDP-00278-01-A Rev. A, Issue:
maxView Storage Manager User's Guide
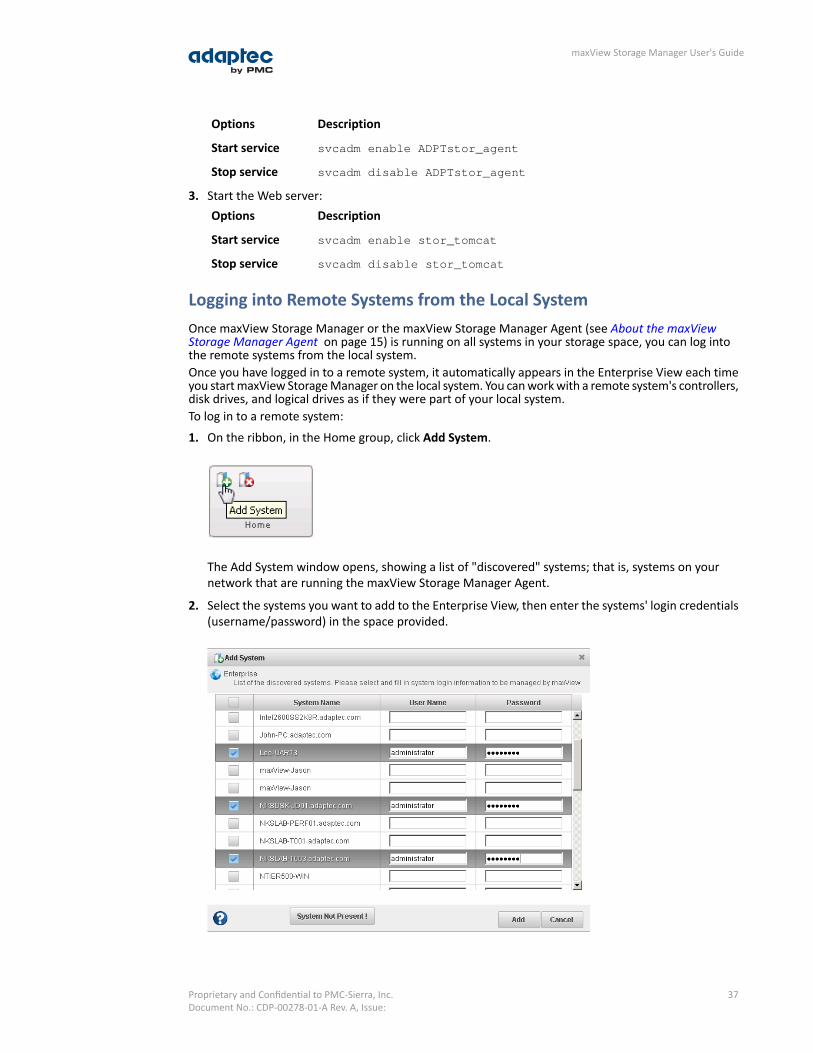
DescriptionOptions
svcadm enable ADPTstor_agentStart service
svcadm disable ADPTstor_agentStop service
3. Start the Web server:DescriptionOptions
svcadm enable stor_tomcatStart service
svcadm disable stor_tomcatStop service
Logging into Remote Systems from the Local SystemOnce maxView Storage Manager or the maxView Storage Manager Agent (see About the maxViewStorage Manager Agent on page 15) is running on all systems in your storage space, you can log intothe remote systems from the local system.Once you have logged in to a remote system, it automatically appears in the Enterprise View each timeyou start maxView Storage Manager on the local system. You can work with a remote system's controllers,disk drives, and logical drives as if they were part of your local system.To log in to a remote system:
1. On the ribbon, in the Home group, click Add System.
The Add System window opens, showing a list of "discovered" systems; that is, systems on yournetwork that are running the maxView Storage Manager Agent.
2. Select the systems you want to add to the Enterprise View, then enter the systems' login credentials(username/password) in the space provided.
37Proprietary and Confidential to PMC-Sierra, Inc.Document No.: CDP-00278-01-A Rev. A, Issue:
maxView Storage Manager User's Guide

Note: You can add a system manually if you don't see the system in the list. Formore information, see Manually Adding a Remote System on page 103.
3. Click Add.maxView Storage Manager connects to the remote system(s) and adds them to the list of managedsystems in the Enterprise View.
For more information about working with remote systems, see Managing Remote Systems on page 103.
Creating Logical DrivesmaxView Storage Manager has a wizard to help you create, or configure, the logical drives in your storagespace. You can choose from two configuration methods, depending on your needs:• Express configuration—Automatically creates logical drives by grouping together same-sized physical
drives, and assigns RAID levels based on the number of physical disk drives in the logical drive.Use the express method when you want to use all available disk drives in the most efficient manner.For instructions, see Express Configuration on page 38.
• Custom configuration—Helps you group disk drives, set RAID levels, determine logical drive size,and configure advanced settings manually.Use the custom method when you want to create specific logical drives with any or all available diskdrives and SSDs (Solid State Drives). For instructions, see Custom Configuration on page 40
Note: We recommend that you do not combine SAS and SATA disk drives within thesame logical drive. maxView Storage Manager displays a warning if you try to createa logical drive using a combination of SAS and SATA disk drives.
Express ConfigurationWhen you use Express configuration, maxView Storage Manager automatically creates logical drives bygrouping together same-sized physical drives, and assigns RAID levels based on the number of physicaldrives in a logical drive:• A logical drive with three or more physical drives is assigned RAID 5.• A logical drive with two physical drives is assigned RAID 1.• A logical drive with only a single physical drive becomes a simple volume, which does not offer
redundancy.To create a logical drive with any other RAID level, you must use the custom method, as described onCustom Configuration on page 40. See Selecting the Best RAID Level on page 112 for more informationabout RAID levels.With Express configuration, maxView Storage Manager uses all available disk drive space to maximizethe capacity of the logical drives.To build your storage space with the Express method:
1. In the Enterprise View, select a system, then select a controller on that system.2. On the ribbon, in the Logical Disk group, click Create Logical Drive.
3. When the wizard opens, ensure that Express Configuration is selected, then click Next.
38Proprietary and Confidential to PMC-Sierra, Inc.Document No.: CDP-00278-01-A Rev. A, Issue:
maxView Storage Manager User's Guide
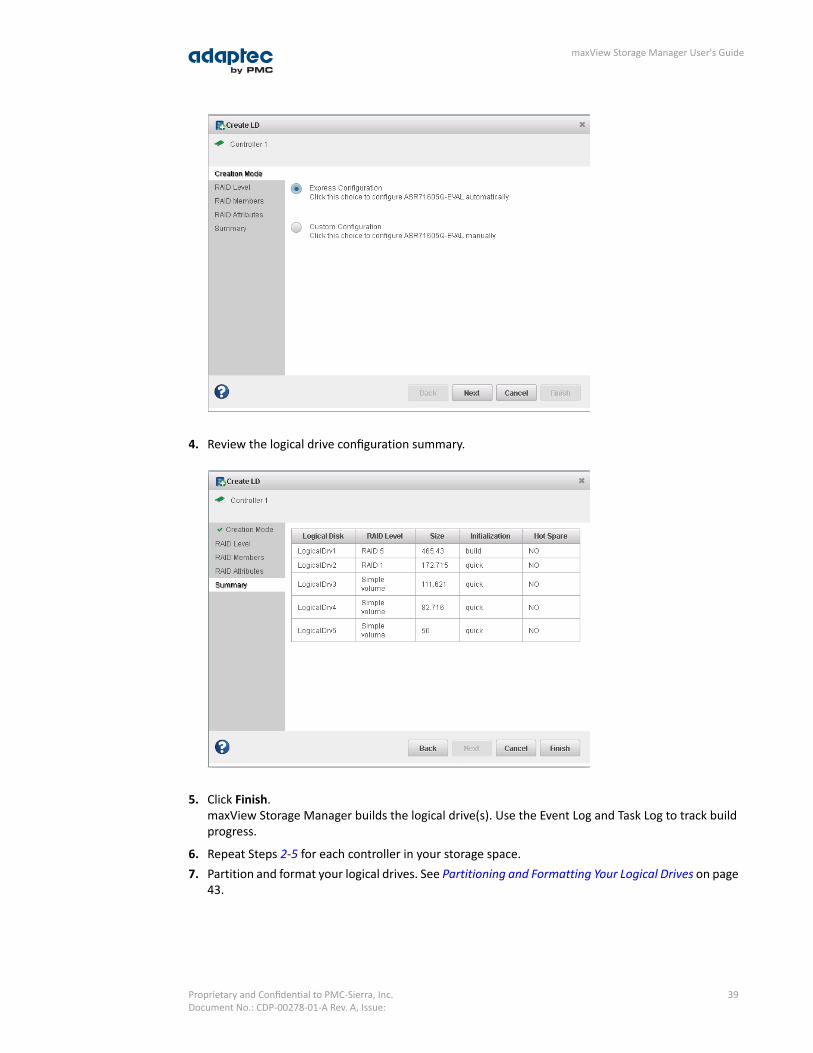
4. Review the logical drive configuration summary.
5. Click Finish.maxView Storage Manager builds the logical drive(s). Use the Event Log and Task Log to track buildprogress.
6. Repeat Steps 2-5 for each controller in your storage space.7. Partition and format your logical drives. See Partitioning and Formatting Your Logical Drives on page
43.
39Proprietary and Confidential to PMC-Sierra, Inc.Document No.: CDP-00278-01-A Rev. A, Issue:
maxView Storage Manager User's Guide
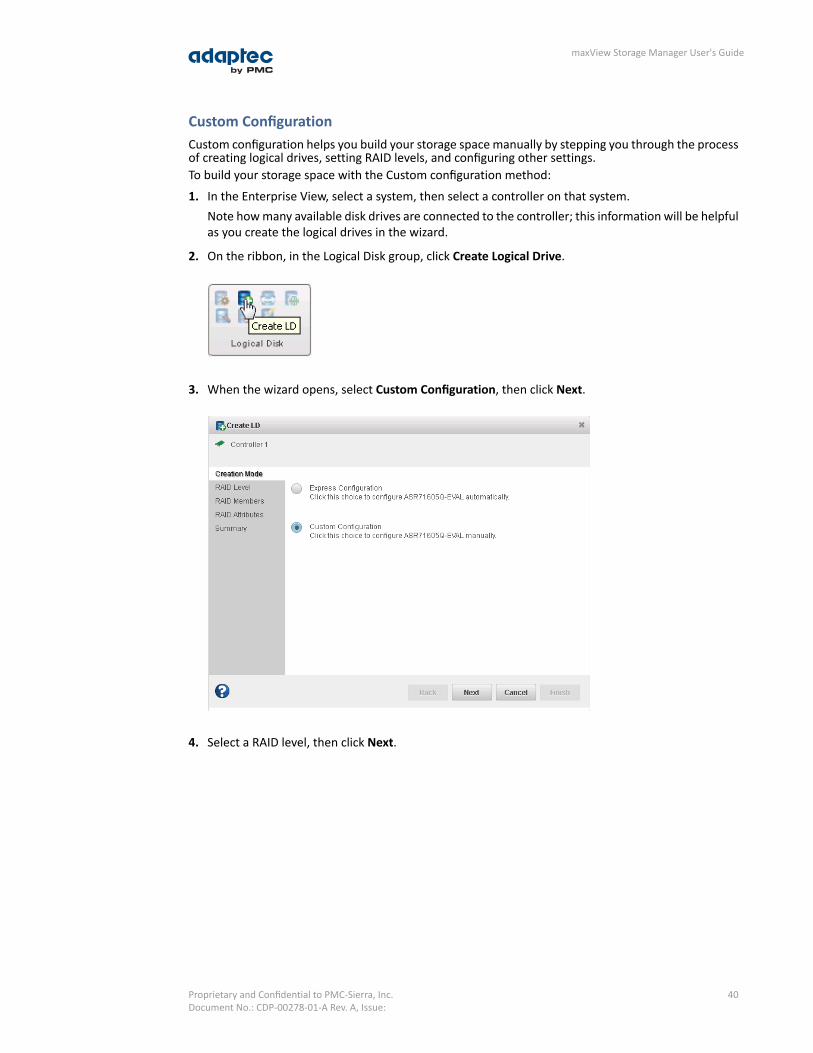
Custom ConfigurationCustom configuration helps you build your storage space manually by stepping you through the processof creating logical drives, setting RAID levels, and configuring other settings.To build your storage space with the Custom configuration method:
1. In the Enterprise View, select a system, then select a controller on that system.Note how many available disk drives are connected to the controller; this information will be helpfulas you create the logical drives in the wizard.
2. On the ribbon, in the Logical Disk group, click Create Logical Drive.
3. When the wizard opens, select Custom Configuration, then click Next.
4. Select a RAID level, then click Next.
40Proprietary and Confidential to PMC-Sierra, Inc.Document No.: CDP-00278-01-A Rev. A, Issue:
maxView Storage Manager User's Guide
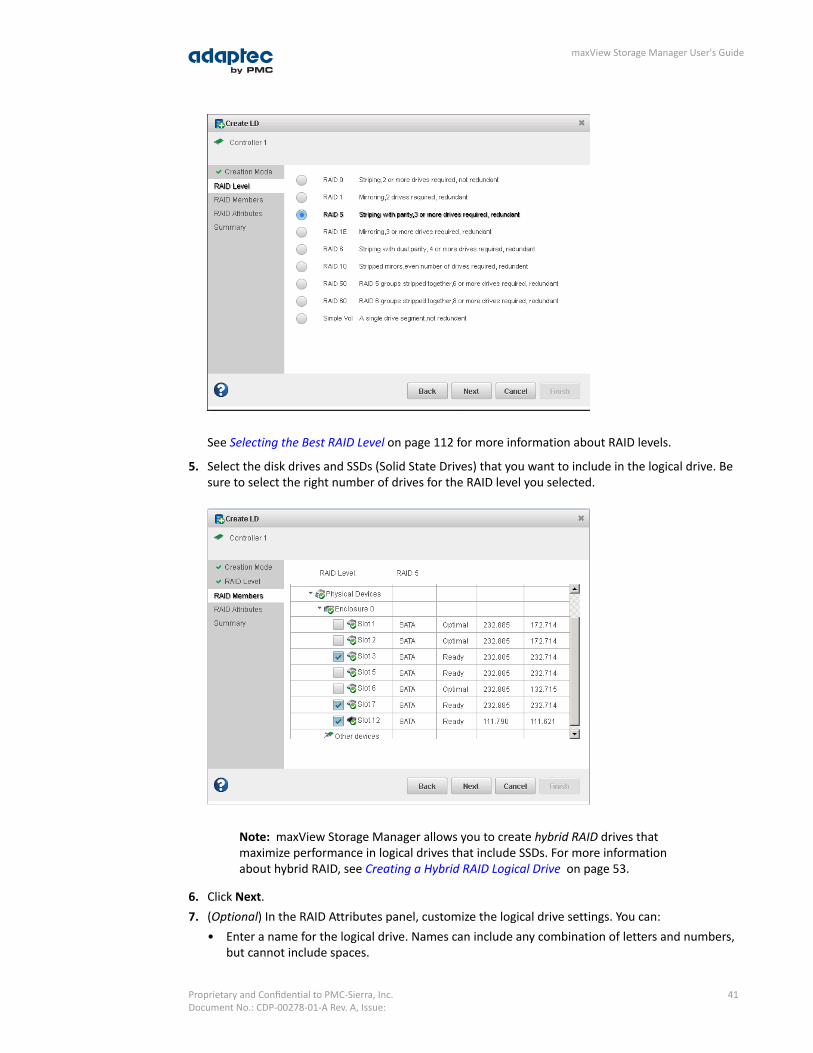
See Selecting the Best RAID Level on page 112 for more information about RAID levels.
5. Select the disk drives and SSDs (Solid State Drives) that you want to include in the logical drive. Besure to select the right number of drives for the RAID level you selected.
Note: maxView Storage Manager allows you to create hybrid RAID drives thatmaximize performance in logical drives that include SSDs. For more informationabout hybrid RAID, see Creating a Hybrid RAID Logical Drive on page 53.
6. Click Next.7. (Optional) In the RAID Attributes panel, customize the logical drive settings. You can:
• Enter a name for the logical drive. Names can include any combination of letters and numbers,but cannot include spaces.
41Proprietary and Confidential to PMC-Sierra, Inc.Document No.: CDP-00278-01-A Rev. A, Issue:
maxView Storage Manager User's Guide
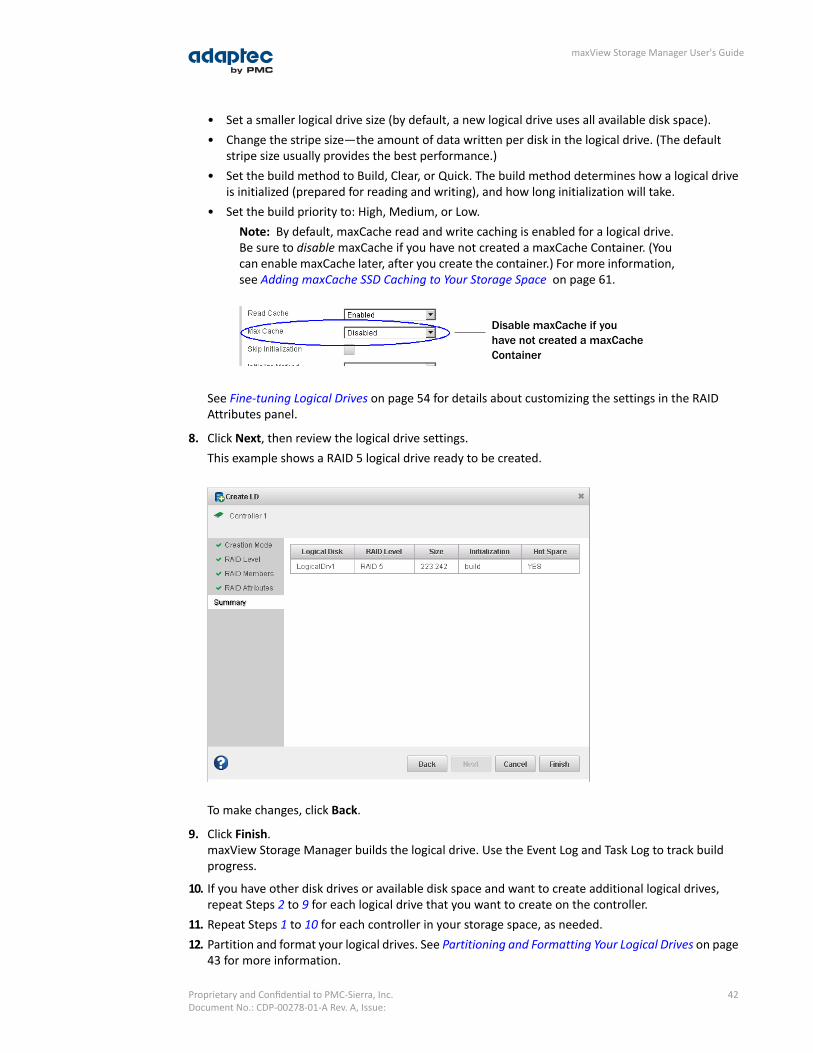
• Set a smaller logical drive size (by default, a new logical drive uses all available disk space).• Change the stripe size—the amount of data written per disk in the logical drive. (The default
stripe size usually provides the best performance.)• Set the build method to Build, Clear, or Quick. The build method determines how a logical drive
is initialized (prepared for reading and writing), and how long initialization will take.• Set the build priority to: High, Medium, or Low.
Note: By default, maxCache read and write caching is enabled for a logical drive.Be sure to disable maxCache if you have not created a maxCache Container. (Youcan enable maxCache later, after you create the container.) For more information,see Adding maxCache SSD Caching to Your Storage Space on page 61.
Disable maxCache if youhave not created a maxCacheContainer
See Fine-tuning Logical Drives on page 54 for details about customizing the settings in the RAIDAttributes panel.
8. Click Next, then review the logical drive settings.This example shows a RAID 5 logical drive ready to be created.
To make changes, click Back.
9. Click Finish.maxView Storage Manager builds the logical drive. Use the Event Log and Task Log to track buildprogress.
10. If you have other disk drives or available disk space and want to create additional logical drives,repeat Steps 2 to 9 for each logical drive that you want to create on the controller.
11. Repeat Steps 1 to 10 for each controller in your storage space, as needed.12. Partition and format your logical drives. See Partitioning and Formatting Your Logical Drives on page
43 for more information.
42Proprietary and Confidential to PMC-Sierra, Inc.Document No.: CDP-00278-01-A Rev. A, Issue:
maxView Storage Manager User's Guide
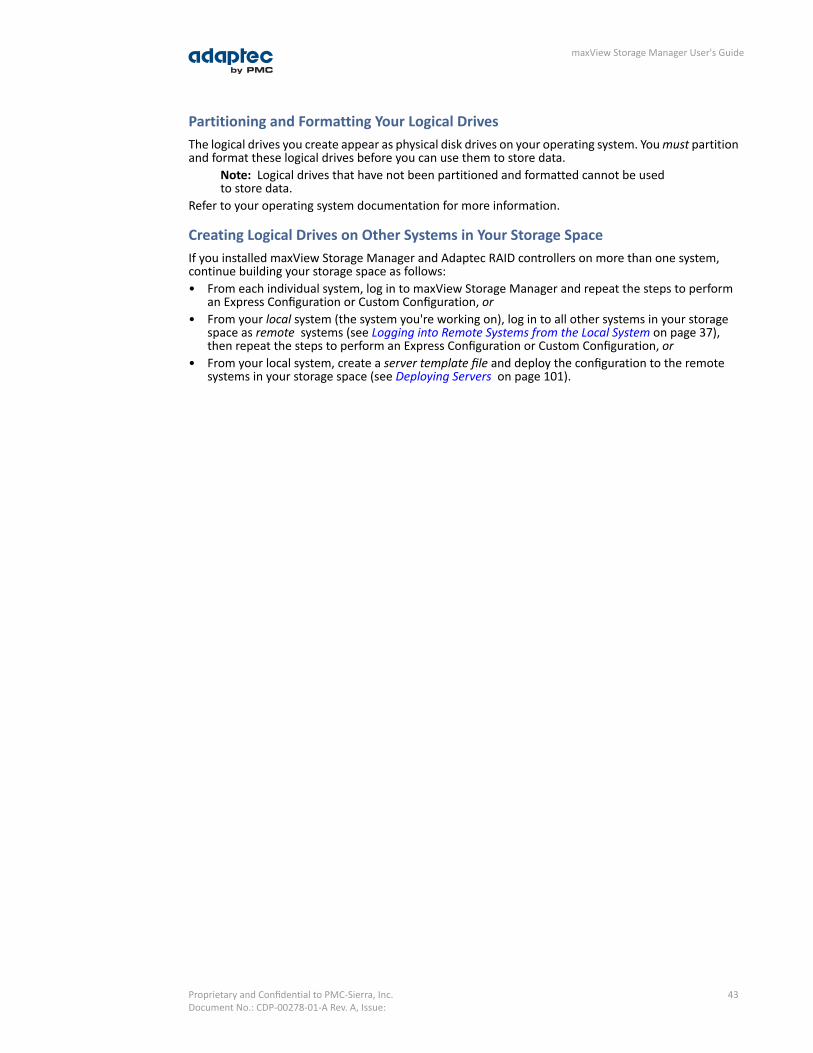
Partitioning and Formatting Your Logical DrivesThe logical drives you create appear as physical disk drives on your operating system. You must partitionand format these logical drives before you can use them to store data.
Note: Logical drives that have not been partitioned and formatted cannot be usedto store data.
Refer to your operating system documentation for more information.
Creating Logical Drives on Other Systems in Your Storage SpaceIf you installed maxView Storage Manager and Adaptec RAID controllers on more than one system,continue building your storage space as follows:• From each individual system, log in to maxView Storage Manager and repeat the steps to perform
an Express Configuration or Custom Configuration, or• From your local system (the system you're working on), log in to all other systems in your storage
space as remote systems (see Logging into Remote Systems from the Local System on page 37),then repeat the steps to perform an Express Configuration or Custom Configuration, or
• From your local system, create a server template file and deploy the configuration to the remotesystems in your storage space (see Deploying Servers on page 101).
43Proprietary and Confidential to PMC-Sierra, Inc.Document No.: CDP-00278-01-A Rev. A, Issue:
maxView Storage Manager User's Guide
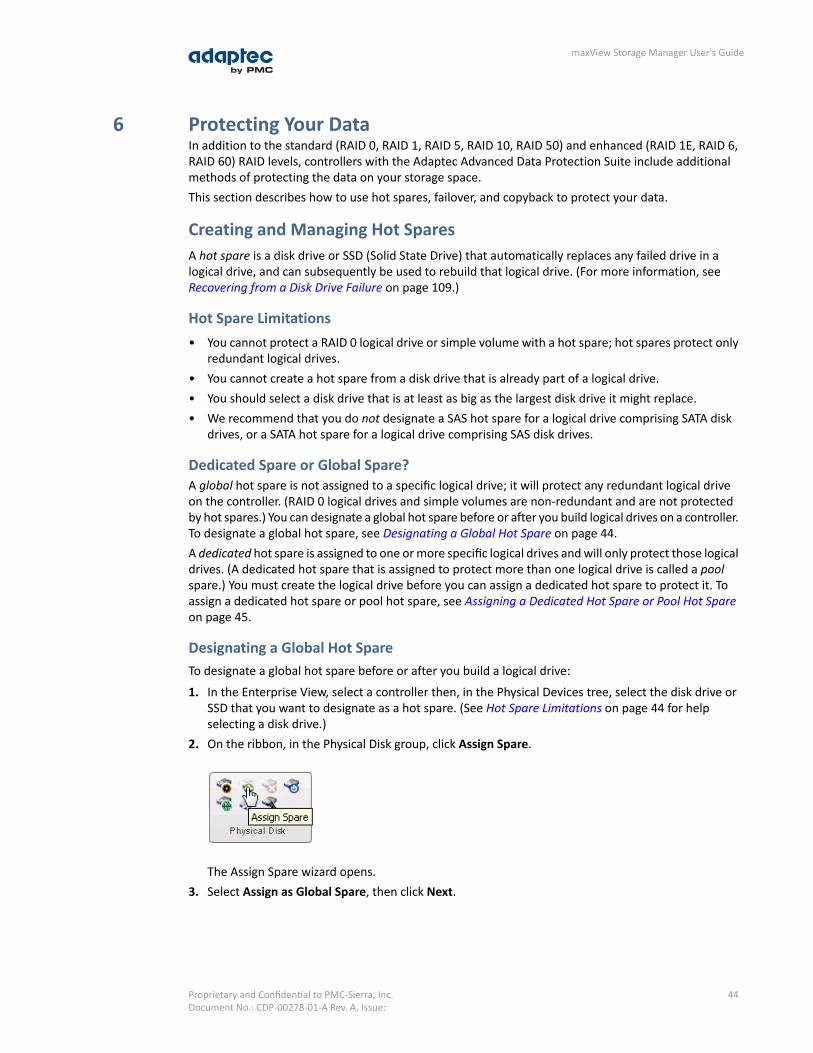
6 Protecting Your DataIn addition to the standard (RAID 0, RAID 1, RAID 5, RAID 10, RAID 50) and enhanced (RAID 1E, RAID 6,RAID 60) RAID levels, controllers with the Adaptec Advanced Data Protection Suite include additionalmethods of protecting the data on your storage space.This section describes how to use hot spares, failover, and copyback to protect your data.
Creating and Managing Hot SparesA hot spare is a disk drive or SSD (Solid State Drive) that automatically replaces any failed drive in alogical drive, and can subsequently be used to rebuild that logical drive. (For more information, seeRecovering from a Disk Drive Failure on page 109.)
Hot Spare Limitations• You cannot protect a RAID 0 logical drive or simple volume with a hot spare; hot spares protect only
redundant logical drives.• You cannot create a hot spare from a disk drive that is already part of a logical drive.• You should select a disk drive that is at least as big as the largest disk drive it might replace.• We recommend that you do not designate a SAS hot spare for a logical drive comprising SATA disk
drives, or a SATA hot spare for a logical drive comprising SAS disk drives.
Dedicated Spare or Global Spare?A global hot spare is not assigned to a specific logical drive; it will protect any redundant logical driveon the controller. (RAID 0 logical drives and simple volumes are non-redundant and are not protectedby hot spares.) You can designate a global hot spare before or after you build logical drives on a controller.To designate a global hot spare, see Designating a Global Hot Spare on page 44.A dedicated hot spare is assigned to one or more specific logical drives and will only protect those logicaldrives. (A dedicated hot spare that is assigned to protect more than one logical drive is called a poolspare.) You must create the logical drive before you can assign a dedicated hot spare to protect it. Toassign a dedicated hot spare or pool hot spare, see Assigning a Dedicated Hot Spare or Pool Hot Spareon page 45.
Designating a Global Hot SpareTo designate a global hot spare before or after you build a logical drive:
1. In the Enterprise View, select a controller then, in the Physical Devices tree, select the disk drive orSSD that you want to designate as a hot spare. (See Hot Spare Limitations on page 44 for helpselecting a disk drive.)
2. On the ribbon, in the Physical Disk group, click Assign Spare.
The Assign Spare wizard opens.3. Select Assign as Global Spare, then click Next.
44Proprietary and Confidential to PMC-Sierra, Inc.Document No.: CDP-00278-01-A Rev. A, Issue:
maxView Storage Manager User's Guide
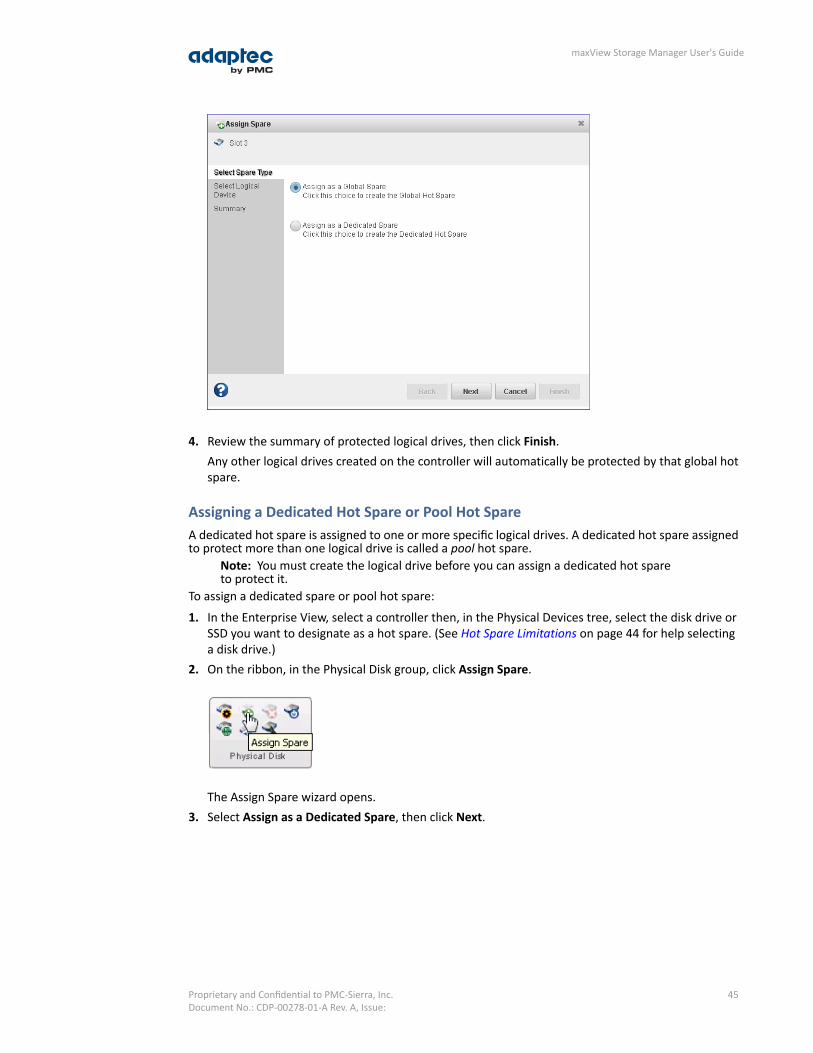
4. Review the summary of protected logical drives, then click Finish.Any other logical drives created on the controller will automatically be protected by that global hotspare.
Assigning a Dedicated Hot Spare or Pool Hot SpareA dedicated hot spare is assigned to one or more specific logical drives. A dedicated hot spare assignedto protect more than one logical drive is called a pool hot spare.
Note: You must create the logical drive before you can assign a dedicated hot spareto protect it.
To assign a dedicated spare or pool hot spare:
1. In the Enterprise View, select a controller then, in the Physical Devices tree, select the disk drive orSSD you want to designate as a hot spare. (See Hot Spare Limitations on page 44 for help selectinga disk drive.)
2. On the ribbon, in the Physical Disk group, click Assign Spare.
The Assign Spare wizard opens.3. Select Assign as a Dedicated Spare, then click Next.
45Proprietary and Confidential to PMC-Sierra, Inc.Document No.: CDP-00278-01-A Rev. A, Issue:
maxView Storage Manager User's Guide

4. Select the logical drive that you want protected by the dedicated spare, then click Next.
5. Review the summary of protected logical drives, then click Finish.6. To use the same dedicated hot spare to protect another logical drive (that is, to create a pool hot
spare), repeat Steps 2-5, selecting a different logical drive in Step 4.
Deleting a Global Hot SpareYou may want to delete a global hot spare to:• Make disk drive space available for another logical drive.• Make a global hot spare into a dedicated hot spare.• Remove the ‘hot spare’ designation from a disk drive that is no longer being used as a hot spare.
(When a hot spare is built into a logical drive after a disk drive failure, it retains its ‘hot spare’
46Proprietary and Confidential to PMC-Sierra, Inc.Document No.: CDP-00278-01-A Rev. A, Issue:
maxView Storage Manager User's Guide
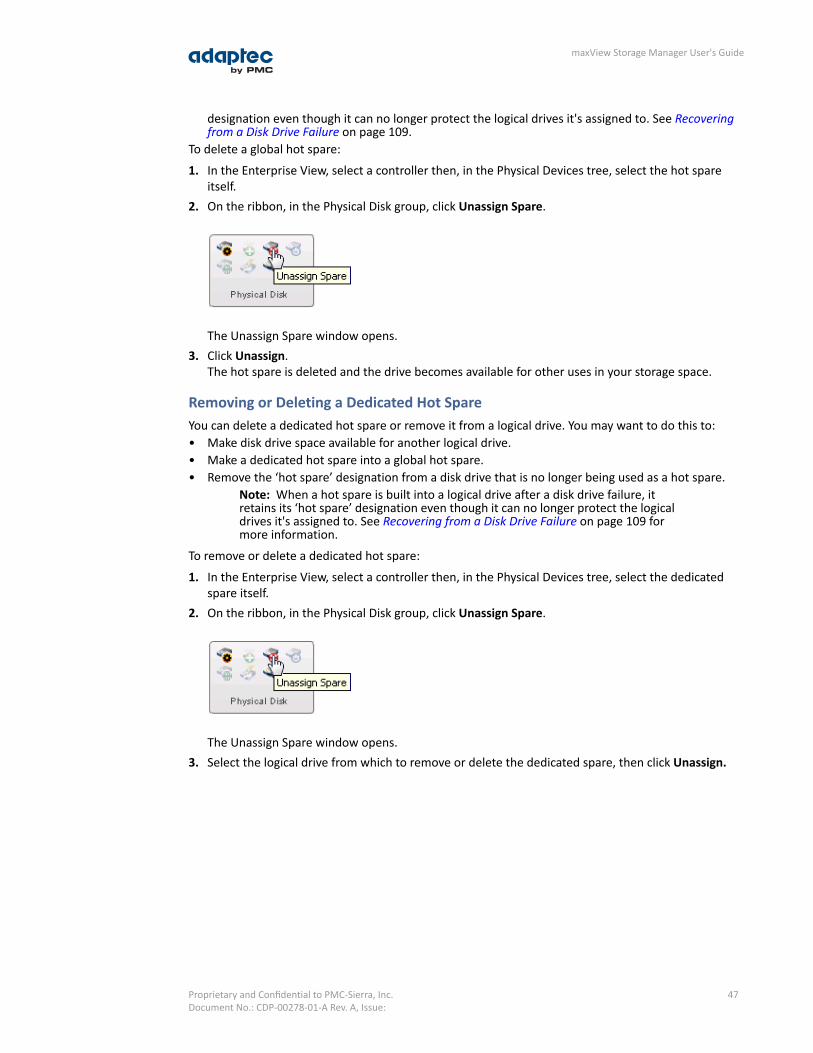
designation even though it can no longer protect the logical drives it's assigned to. See Recoveringfrom a Disk Drive Failure on page 109.
To delete a global hot spare:
1. In the Enterprise View, select a controller then, in the Physical Devices tree, select the hot spareitself.
2. On the ribbon, in the Physical Disk group, click Unassign Spare.
The Unassign Spare window opens.3. Click Unassign.
The hot spare is deleted and the drive becomes available for other uses in your storage space.
Removing or Deleting a Dedicated Hot SpareYou can delete a dedicated hot spare or remove it from a logical drive. You may want to do this to:• Make disk drive space available for another logical drive.• Make a dedicated hot spare into a global hot spare.• Remove the ‘hot spare’ designation from a disk drive that is no longer being used as a hot spare.
Note: When a hot spare is built into a logical drive after a disk drive failure, itretains its ‘hot spare’ designation even though it can no longer protect the logicaldrives it's assigned to. See Recovering from a Disk Drive Failure on page 109 formore information.
To remove or delete a dedicated hot spare:
1. In the Enterprise View, select a controller then, in the Physical Devices tree, select the dedicatedspare itself.
2. On the ribbon, in the Physical Disk group, click Unassign Spare.
The Unassign Spare window opens.3. Select the logical drive from which to remove or delete the dedicated spare, then click Unassign.
47Proprietary and Confidential to PMC-Sierra, Inc.Document No.: CDP-00278-01-A Rev. A, Issue:
maxView Storage Manager User's Guide

If the spare protects only one logical drive, it is deleted and the drive becomes available for otheruses in your storage space. If the spare protects more than one logical drive (a pool spare), it isremoved from the logical drive but continues to protect the other logical drives to which is it assigned.
4. Repeat Step 2 and Step 3 to remove the dedicated spare from other logical drives, as needed.
Enabling CopybackWhen a logical drive is rebuilt using a hot spare (see Failed Disk Drive Protected by a Hot Spare on page109), data from the failed drive is transferred to the hot spare. When copyback is enabled, data is movedback to its original location once the controller detects that the failed drive has been replaced. Oncethe data is copied back, the hot spare becomes available again.To enable or disable copyback:
1. In the Enterprise View, select a controller.2. On the ribbon, in the Controller group, click Set Properties.
The Set Properties window opens.3. Click the Data Protect tab.4. In the Copyback drop-down list, select Enabled or Disabled , then click Apply.
48Proprietary and Confidential to PMC-Sierra, Inc.Document No.: CDP-00278-01-A Rev. A, Issue:
maxView Storage Manager User's Guide

Enabling Automatic FailoverThis function controls the rebuilding of a logical drive when a failed drive is replaced. When failover isenabled, the controller automatically rebuilds a logical drive when a failed disk drive is replaced. Whenfailover is disabled, the logical drive must be rebuilt manually (for more information, see RebuildingLogical Drives on page 111). Failover applies to redundant logical drives only (see Selecting the Best RAIDLevel on page 112).To enable or disable failover:
1. In the Enterprise View, select a controller.2. On the ribbon, in the Controller group, click Set Properties.
The Set Properties window opens.3. Click the Data Protect tab.4. In the Failover drop-down list, select Enabled or Disabled , then click Apply.
49Proprietary and Confidential to PMC-Sierra, Inc.Document No.: CDP-00278-01-A Rev. A, Issue:
maxView Storage Manager User's Guide
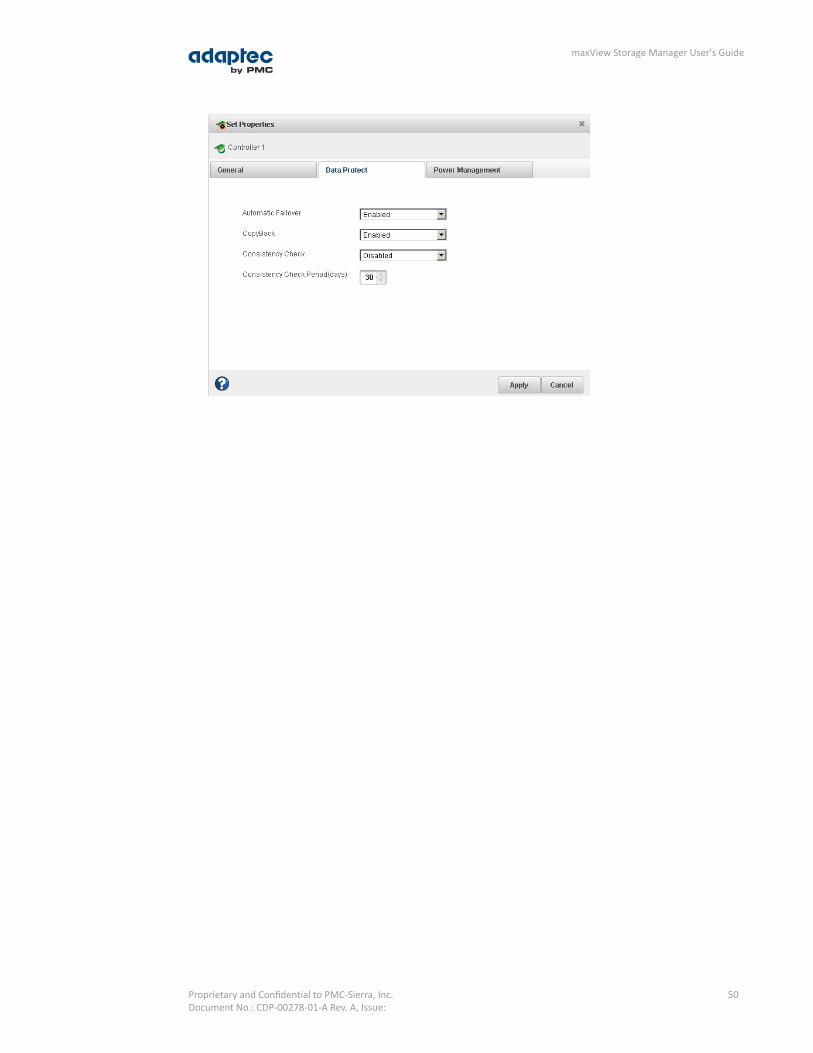
50Proprietary and Confidential to PMC-Sierra, Inc.Document No.: CDP-00278-01-A Rev. A, Issue:
maxView Storage Manager User's Guide

7 Modifying Your Storage SpaceThis section provides additional scenarios for creating and modifying logical drives. It explains how tocreate hybrid RAID drives; optimize logical drive performance; use maxView Storage Manager's powermanagement features; and how to use Adaptec maxCache™ to leverage the performance capabilitiesof the Solid State Drives (SSDs) in your system.
Understanding Logical DrivesA logical drive is a group of physical disk drives that appears to your operating system as a single drivethat can be used for storing data.A logical drive can comprise one or more disk drives or SSDs, and can use part or all of each disk drive'scapacity.You can include the same disk drive in two different logical drives by using just a portion of the spaceon the disk drive in each, as shown in the following figure.
250 MB
250 MB
250 MB
250 MB
250 MB
250 MB 250 MB
250 MB 250 MB
AvailableSpace 250 MB
Three Disk Drives(500 MB Each)
One RAID 5Logical Drive
One RAID 1Logical Drive
Appears to Operating Systemas one 250 MB disk drive
Appears to Operating Systemas one 500 MB disk drive
Disk drive space that has been assigned to a logical drive is called a segment. A segment can include allor just a portion of a disk drive's space. A disk drive with one segment is part of one logical drive, a diskdrive with two segments is part of two logical drives, and so on. When a logical drive is deleted, thesegments that comprised it revert to available space (or free segments).A logical drive can include redundancy, depending on its RAID level. (See Selecting the Best RAID Levelon page 112 for more information.)Once a logical drive has been created, you can change its RAID level or increase its capacity to meetchanging requirements. You can also protect your logical drives by assigning one or more hot spares tothem. (See Creating and Managing Hot Spares on page 44 for more information.)
Creating and Modifying Logical DrivesFor basic instructions for creating logical drives, see Building Your Storage Space on page 34.This section describes three additional scenarios for creating logical drives:• To create a logical drive from different-sized disk drives, see Including Different-sized Disk Drives in
a Logical Drive on page 52.• To create a logical drive using available segments of disk drives, see Creating a Logical Drive Using
Available Segments on page 53.
51Proprietary and Confidential to PMC-Sierra, Inc.Document No.: CDP-00278-01-A Rev. A, Issue:
maxView Storage Manager User's Guide

• To create a hybrid RAID logical drive using a combination of hard disk drives and SSDs, see Creatinga Hybrid RAID Logical Drive on page 53.
Including Different-sized Disk Drives in a Logical DriveYou can combine disk drives of different sizes in the same logical drive. If the logical drive includesredundancy, however, the size of each segment can be no larger than the size of the smallest disk drive.(See Selecting the Best RAID Level on page 112 for more information about redundancy.)
Note: We recommend that you do not combine SAS and SATA disk drives within thesame logical drive. maxView Storage Manager displays a warning if you try to createa logical drive using a combination of SAS and SATA disk drives.
To create a logical drive with disk drives of different sizes, follow the instructions in Custom Configurationon page 40. When the wizard displays the RAID Members panel, select different size drives, as shownin the figure below, then complete the wizard.
When the logical drive is created, check its resources on the Storage Dashboard: it should appear similarto the next figure, where a RAID 5 logical drive includes two disk drives of one size and one of another.
RAID5 with different size disks.No segment is larger than smallestdisk drive (111GB, in this example).
52Proprietary and Confidential to PMC-Sierra, Inc.Document No.: CDP-00278-01-A Rev. A, Issue:
maxView Storage Manager User's Guide

You can include a disk drive's available space in a new logical drive (see Creating a Logical Drive UsingAvailable Segments on page 53), or add it to an existing logical drive (see Increasing the Capacity of aLogical Drive on page 59).
Creating a Logical Drive Using Available SegmentsFree segments on a disk drive can be used to create a new logical drive. (Each segment can be used inonly one logical drive at a time.)To create a logical drive using free segments on disk drives, follow the instructions in CustomConfigurationon page 40. When the wizard displays the RAID Members panel, select the disk drives and/or free diskdrive segments you want to use in the logical drive, then complete the wizard.
Creating a Hybrid RAID Logical DriveYou can combine hard drives and Solid State Drives (SSDs) in a RAID 1 or RAID 10 logical drive to createa hybrid RAID drive. Hybrid RAID leverages the performance benefits of the SSDs in your system bysending read operations to the SSD first; typically, the fastest I/O path.For a hybrid RAID 1, you must select exactly one HDD and one SSD. For a hybrid RAID 10 you must selectan equal number of SSDs and HDDs.You can use any SSD (or available segment) when creating or modifying a hybrid RAID drive.To create a hybrid RAID drive:
1. In the Enterprise View, select a system, then select a controller on that system.Note the number and location of SSDs in your system; for instance, SSD 1 in Slot 1 on Enclosure 1,SSD 2 in Slot 3 on Enclosure 1, and so on. This information will be helpful as you create the hybridRAID drive in the wizard.
2. On the ribbon, in the Logical Disk group, click Create Logical Drive.
3. When the wizard opens, select Custom Configuration, then click Next.4. In the RAID Level panel, select RAID 1 or RAID 10, then click Next.5. Select the hard drives and SSDs that you want to use in the hybrid RAID drive.
53Proprietary and Confidential to PMC-Sierra, Inc.Document No.: CDP-00278-01-A Rev. A, Issue:
maxView Storage Manager User's Guide
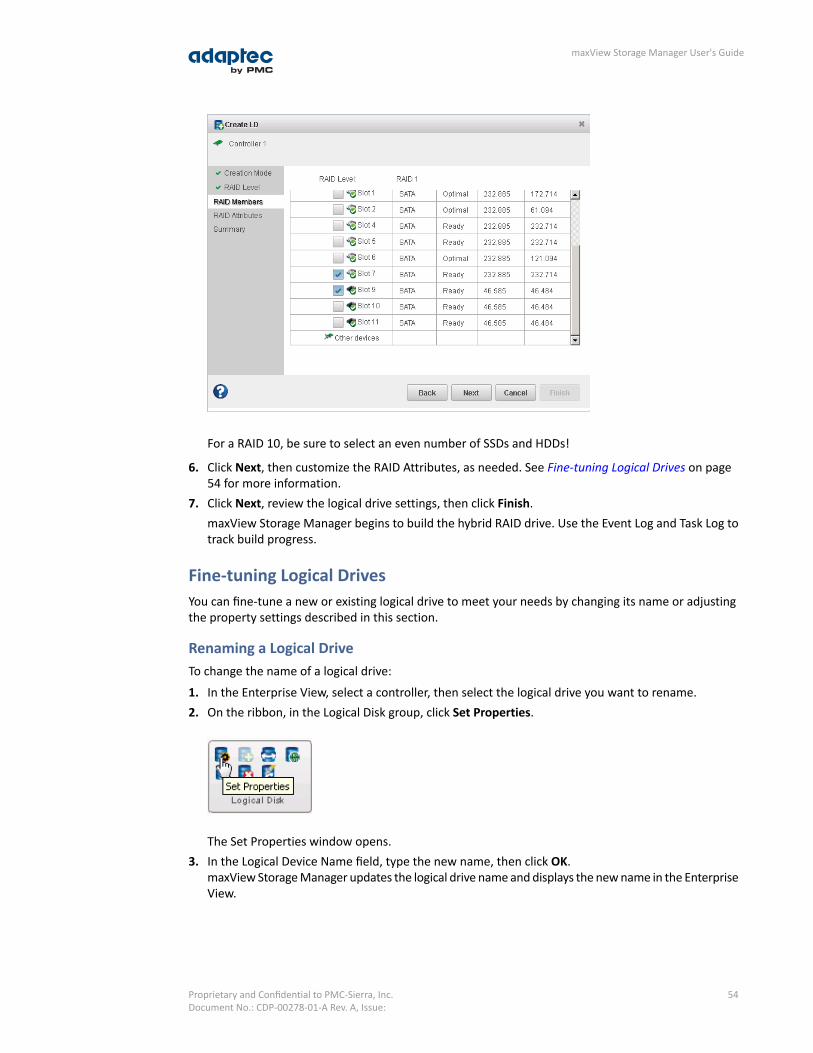
For a RAID 10, be sure to select an even number of SSDs and HDDs!
6. Click Next, then customize the RAID Attributes, as needed. See Fine-tuning Logical Drives on page54 for more information.
7. Click Next, review the logical drive settings, then click Finish.maxView Storage Manager begins to build the hybrid RAID drive. Use the Event Log and Task Log totrack build progress.
Fine-tuning Logical DrivesYou can fine-tune a new or existing logical drive to meet your needs by changing its name or adjustingthe property settings described in this section.
Renaming a Logical DriveTo change the name of a logical drive:
1. In the Enterprise View, select a controller, then select the logical drive you want to rename.2. On the ribbon, in the Logical Disk group, click Set Properties.
The Set Properties window opens.3. In the Logical Device Name field, type the new name, then click OK.
maxView Storage Manager updates the logical drive name and displays the new name in the EnterpriseView.
54Proprietary and Confidential to PMC-Sierra, Inc.Document No.: CDP-00278-01-A Rev. A, Issue:
maxView Storage Manager User's Guide

Changing the Read Cache SettingWhen read caching is enabled, the controller monitors read access to a logical drive and, if it sees apattern, pre-loads the cache with data that seems most likely to be read next, thereby improvingperformance. You can set the Read Cache to:• Enabled—The controller transfers data from the logical drive to its local cache in portions equal to
the stripe size. Use this setting for the best performance when workloads are steady and sequential.Enabled is the default setting.
• Disabled—The controller transfers data from the logical drive to its local cache in portions equal tothe system I/O request size. Use this setting for the best performance when workloads are randomor the system I/O requests are smaller than the stripe size.
Note: For additional performance gains in read-intensive applications, you can alsouse maxCache read caching. For more information, see Changing the maxCacheSettings for a Logical Drive on page 64.
To quickly change the read cache setting:
1. In the Enterprise View, select a controller, then select a logical drive on that controller.2. On the ribbon, in the Logical Disk group, click Set Properties.
The Set Properties window opens.
3. In the Read Cache drop-down list, select Enabled or Disabled, as needed.4. Click OK.
Changing the Write Cache SettingThe write cache setting determines when data is stored on a disk drive and when the controllercommunicates with the operating system. You can set the Write Cache to:• Disabled (write-through)—The controller sends (or writes) the data to a disk drive, then sends
confirmation to the operating system that the data was received. Use this setting when performanceis less important than data protection.
• Enabled (write-back)—The controller sends confirmation to the operating system that the data wasreceived, then writes the data to a disk drive. Use this setting when performance is more importantthan data protection and you aren't using a battery-backup cache or zero-maintenance cacheprotection module. Enabled is the default setting.
• Enabled (write-back) when protected by battery/ZMM—Similar to Enabled (write-back), but usedwhen the controller is protected by a zero-maintenance cache protection module. For moreinformation about zero-maintenance cache protection, see the Adaptec RAID Controller Installationand User's Guide.
Note: (RAID 10, 50, and 60 only) All logical drives comprising a RAID 10/50/60 logicaldevice must have the same write cache setting—either all write-through or allwrite-back.
To quickly change the write cache setting:
1. In the Enterprise View, select a controller, then select a logical drive on that controller.2. On the ribbon, in the Logical Disk group, click Set Properties.
55Proprietary and Confidential to PMC-Sierra, Inc.Document No.: CDP-00278-01-A Rev. A, Issue:
maxView Storage Manager User's Guide

The Set Properties window opens.
3. In the Write Cache drop-down list, selectEnabled,Enabled when protected by battery/ZMM,or Disabled, as needed.
4. Click OK.
Changing the Stripe SizeThe stripe size is the amount of data (in KB) written to one disk drive, before moving to the next diskdrive in the logical device. Stripe size options vary, depending on your controller and RAID level. Forexample, in a RAID 6 or RAID 60 logical drive, the more disk drives included in the logical drive, the fewerstripe size options are available. Normally, the default stripe size provides the best performance.You can change the stripe size of an existing logical drive when you expand or migrate the logical drive.For more information, see Increasing the Capacity of a Logical Drive on page 59 and Changing the RAIDLevel of a Logical Drive on page 60.
Changing the Initialize MethodThe initialize, or build, method determines how a logical drive is prepared for reading and writing andhow long initialization will take.You can choose one of the initialization methods below when you create a new logical drive with theCustom Configuration wizard. (The methods are presented in order of slowest to fastest.) You can changethe initialization method of an existing logical drive only when you expand the logical drive (see Increasingthe Capacity of a Logical Drive on page 59).• Build—(slowest) For RAID 1 logical drives, data is copied from the primary drive to the mirror drive;
for RAID 5 logical drives, parity is computed and written. maxView Storage Manager performs Buildinitializations in the background; you can use the logical drive immediately. Build is the default settingfor most logical drives
• Clear—Every block in the logical drive is overwritten with zeros, removing all existing data. Youcannot use the logical drive until the initialization is complete.
• Quick—(fastest) The logical drive is made available immediately. Quick is the default setting for RAID1, RAID 1EE, and RAID 10 logical drives. It is recommended for use only with new drives.
• Skip Initialization—Reconstructs the logical drive meta-data without modifying or destroying otherdata on the disks. Useful for recovering data when multiple drives fail in the same logical drive. Formore information, see Multiple Disk Drive Failures in the Same Logical Drive on page 110.
Optimizing Logical Drive PerformanceTo ensure optimal performance of the logical drives in your storage space, you can select anapplication-specificperformancemode to improve I/O throughput based on the needs of your application.The following performance modes are supported by maxView Storage Manager.
Best PerformancePerformance CriteriaPerformance Mode
—Automatically adjustscriteria based on controller
Dynamic (default)
usage, RAID level, and diskdrive type
SAS:100% RandomOnline Transaction Process(OLTP)/Database—a system R0 Sequential writes (all request sizes)60%--80% Readthat facilitates and manages R0 File server and Web server20%--40% Writetransaction-oriented
R5 Sequential writes (all request sizes)8Kb Blocksapplications, such as dataentry or retrieval applications. R5 Web server
R6 Web serverR10 Sequential writesR10 Web serverSATA:R0 Sequential reads (all request sizes)
56Proprietary and Confidential to PMC-Sierra, Inc.Document No.: CDP-00278-01-A Rev. A, Issue:
maxView Storage Manager User's Guide
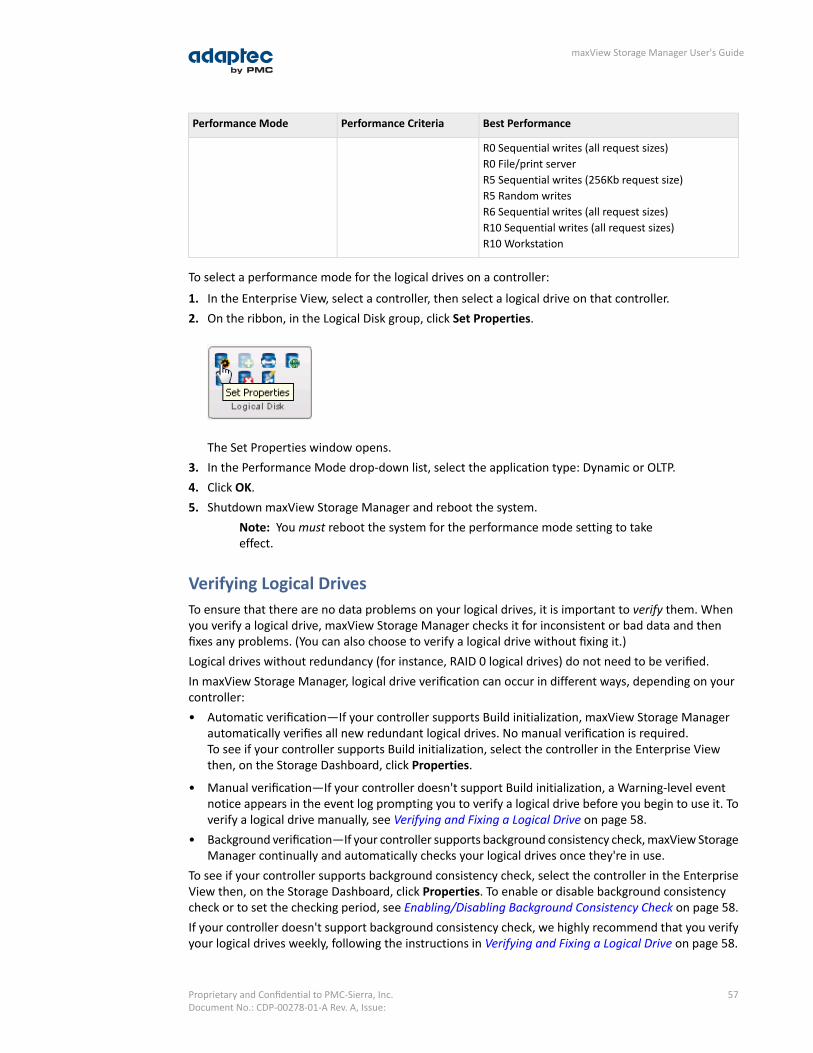
Best PerformancePerformance CriteriaPerformance Mode
R0 Sequential writes (all request sizes)R0 File/print serverR5 Sequential writes (256Kb request size)R5 Random writesR6 Sequential writes (all request sizes)R10 Sequential writes (all request sizes)R10 Workstation
To select a performance mode for the logical drives on a controller:
1. In the Enterprise View, select a controller, then select a logical drive on that controller.2. On the ribbon, in the Logical Disk group, click Set Properties.
The Set Properties window opens.3. In the Performance Mode drop-down list, select the application type: Dynamic or OLTP.4. Click OK.5. Shutdown maxView Storage Manager and reboot the system.
Note: You must reboot the system for the performance mode setting to takeeffect.
Verifying Logical DrivesTo ensure that there are no data problems on your logical drives, it is important to verify them. Whenyou verify a logical drive, maxView Storage Manager checks it for inconsistent or bad data and thenfixes any problems. (You can also choose to verify a logical drive without fixing it.)Logical drives without redundancy (for instance, RAID 0 logical drives) do not need to be verified.In maxView Storage Manager, logical drive verification can occur in different ways, depending on yourcontroller:• Automatic verification—If your controller supports Build initialization, maxView Storage Manager
automatically verifies all new redundant logical drives. No manual verification is required.To see if your controller supports Build initialization, select the controller in the Enterprise Viewthen, on the Storage Dashboard, click Properties.
• Manual verification—If your controller doesn't support Build initialization, a Warning-level eventnotice appears in the event log prompting you to verify a logical drive before you begin to use it. Toverify a logical drive manually, see Verifying and Fixing a Logical Drive on page 58.
• Background verification—If your controller supports background consistency check, maxView StorageManager continually and automatically checks your logical drives once they're in use.
To see if your controller supports background consistency check, select the controller in the EnterpriseView then, on the Storage Dashboard, click Properties. To enable or disable background consistencycheck or to set the checking period, see Enabling/Disabling Background Consistency Check on page 58.If your controller doesn't support background consistency check, we highly recommend that you verifyyour logical drives weekly, following the instructions in Verifying and Fixing a Logical Drive on page 58.
57Proprietary and Confidential to PMC-Sierra, Inc.Document No.: CDP-00278-01-A Rev. A, Issue:
maxView Storage Manager User's Guide
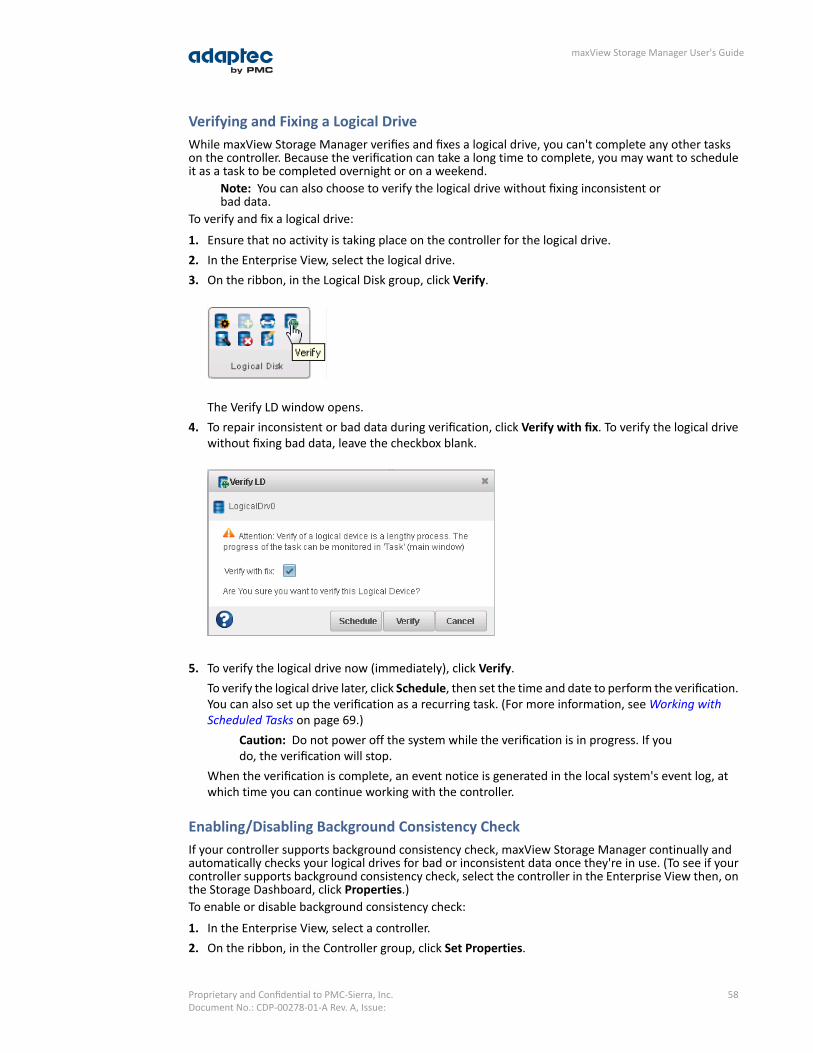
Verifying and Fixing a Logical DriveWhile maxView Storage Manager verifies and fixes a logical drive, you can't complete any other taskson the controller. Because the verification can take a long time to complete, you may want to scheduleit as a task to be completed overnight or on a weekend.
Note: You can also choose to verify the logical drive without fixing inconsistent orbad data.
To verify and fix a logical drive:
1. Ensure that no activity is taking place on the controller for the logical drive.2. In the Enterprise View, select the logical drive.3. On the ribbon, in the Logical Disk group, click Verify.
The Verify LD window opens.4. To repair inconsistent or bad data during verification, click Verify with fix. To verify the logical drive
without fixing bad data, leave the checkbox blank.
5. To verify the logical drive now (immediately), click Verify.To verify the logical drive later, click Schedule, then set the time and date to perform the verification.You can also set up the verification as a recurring task. (For more information, see Working withScheduled Tasks on page 69.)
Caution: Do not power off the system while the verification is in progress. If youdo, the verification will stop.
When the verification is complete, an event notice is generated in the local system's event log, atwhich time you can continue working with the controller.
Enabling/Disabling Background Consistency CheckIf your controller supports background consistency check, maxView Storage Manager continually andautomatically checks your logical drives for bad or inconsistent data once they're in use. (To see if yourcontroller supports background consistency check, select the controller in the Enterprise View then, onthe Storage Dashboard, click Properties.)To enable or disable background consistency check:
1. In the Enterprise View, select a controller.2. On the ribbon, in the Controller group, click Set Properties.
58Proprietary and Confidential to PMC-Sierra, Inc.Document No.: CDP-00278-01-A Rev. A, Issue:
maxView Storage Manager User's Guide
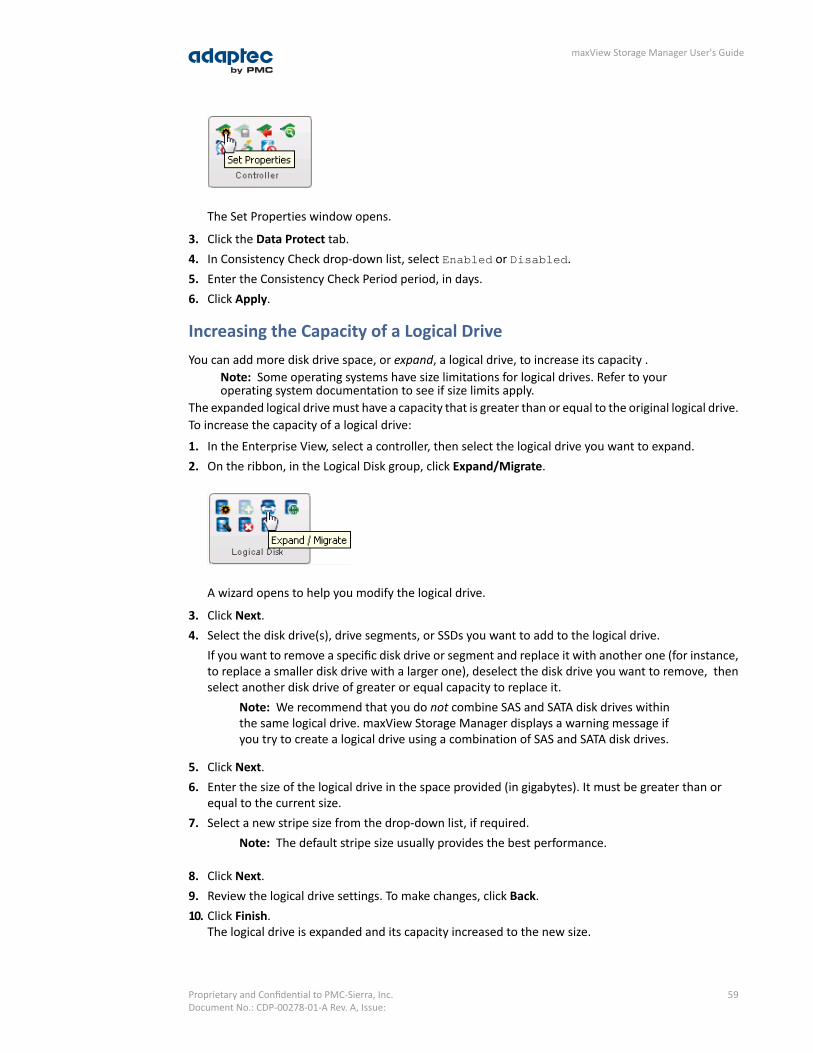
The Set Properties window opens.
3. Click the Data Protect tab.4. In Consistency Check drop-down list, select Enabled or Disabled.5. Enter the Consistency Check Period period, in days.6. Click Apply.
Increasing the Capacity of a Logical DriveYou can add more disk drive space, or expand, a logical drive, to increase its capacity .
Note: Some operating systems have size limitations for logical drives. Refer to youroperating system documentation to see if size limits apply.
The expanded logical drive must have a capacity that is greater than or equal to the original logical drive.To increase the capacity of a logical drive:
1. In the Enterprise View, select a controller, then select the logical drive you want to expand.2. On the ribbon, in the Logical Disk group, click Expand/Migrate.
A wizard opens to help you modify the logical drive.
3. Click Next.4. Select the disk drive(s), drive segments, or SSDs you want to add to the logical drive.
If you want to remove a specific disk drive or segment and replace it with another one (for instance,to replace a smaller disk drive with a larger one), deselect the disk drive you want to remove, thenselect another disk drive of greater or equal capacity to replace it.
Note: We recommend that you do not combine SAS and SATA disk drives withinthe same logical drive. maxView Storage Manager displays a warning message ifyou try to create a logical drive using a combination of SAS and SATA disk drives.
5. Click Next.6. Enter the size of the logical drive in the space provided (in gigabytes). It must be greater than or
equal to the current size.7. Select a new stripe size from the drop-down list, if required.
Note: The default stripe size usually provides the best performance.
8. Click Next.9. Review the logical drive settings. To make changes, click Back.10. Click Finish.
The logical drive is expanded and its capacity increased to the new size.
59Proprietary and Confidential to PMC-Sierra, Inc.Document No.: CDP-00278-01-A Rev. A, Issue:
maxView Storage Manager User's Guide
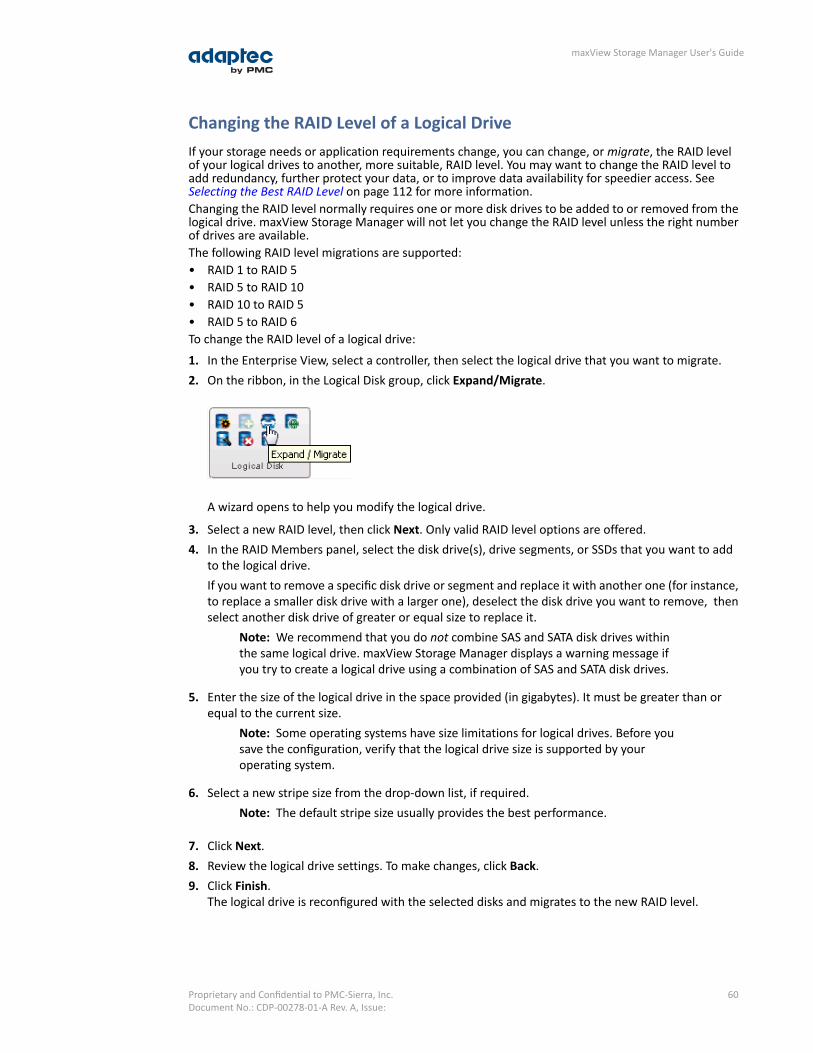
Changing the RAID Level of a Logical DriveIf your storage needs or application requirements change, you can change, or migrate, the RAID levelof your logical drives to another, more suitable, RAID level. You may want to change the RAID level toadd redundancy, further protect your data, or to improve data availability for speedier access. SeeSelecting the Best RAID Level on page 112 for more information.Changing the RAID level normally requires one or more disk drives to be added to or removed from thelogical drive. maxView Storage Manager will not let you change the RAID level unless the right numberof drives are available.The following RAID level migrations are supported:• RAID 1 to RAID 5• RAID 5 to RAID 10• RAID 10 to RAID 5• RAID 5 to RAID 6To change the RAID level of a logical drive:
1. In the Enterprise View, select a controller, then select the logical drive that you want to migrate.2. On the ribbon, in the Logical Disk group, click Expand/Migrate.
A wizard opens to help you modify the logical drive.
3. Select a new RAID level, then click Next. Only valid RAID level options are offered.4. In the RAID Members panel, select the disk drive(s), drive segments, or SSDs that you want to add
to the logical drive.If you want to remove a specific disk drive or segment and replace it with another one (for instance,to replace a smaller disk drive with a larger one), deselect the disk drive you want to remove, thenselect another disk drive of greater or equal size to replace it.
Note: We recommend that you do not combine SAS and SATA disk drives withinthe same logical drive. maxView Storage Manager displays a warning message ifyou try to create a logical drive using a combination of SAS and SATA disk drives.
5. Enter the size of the logical drive in the space provided (in gigabytes). It must be greater than orequal to the current size.
Note: Some operating systems have size limitations for logical drives. Before yousave the configuration, verify that the logical drive size is supported by youroperating system.
6. Select a new stripe size from the drop-down list, if required.Note: The default stripe size usually provides the best performance.
7. Click Next.8. Review the logical drive settings. To make changes, click Back.9. Click Finish.
The logical drive is reconfigured with the selected disks and migrates to the new RAID level.
60Proprietary and Confidential to PMC-Sierra, Inc.Document No.: CDP-00278-01-A Rev. A, Issue:
maxView Storage Manager User's Guide
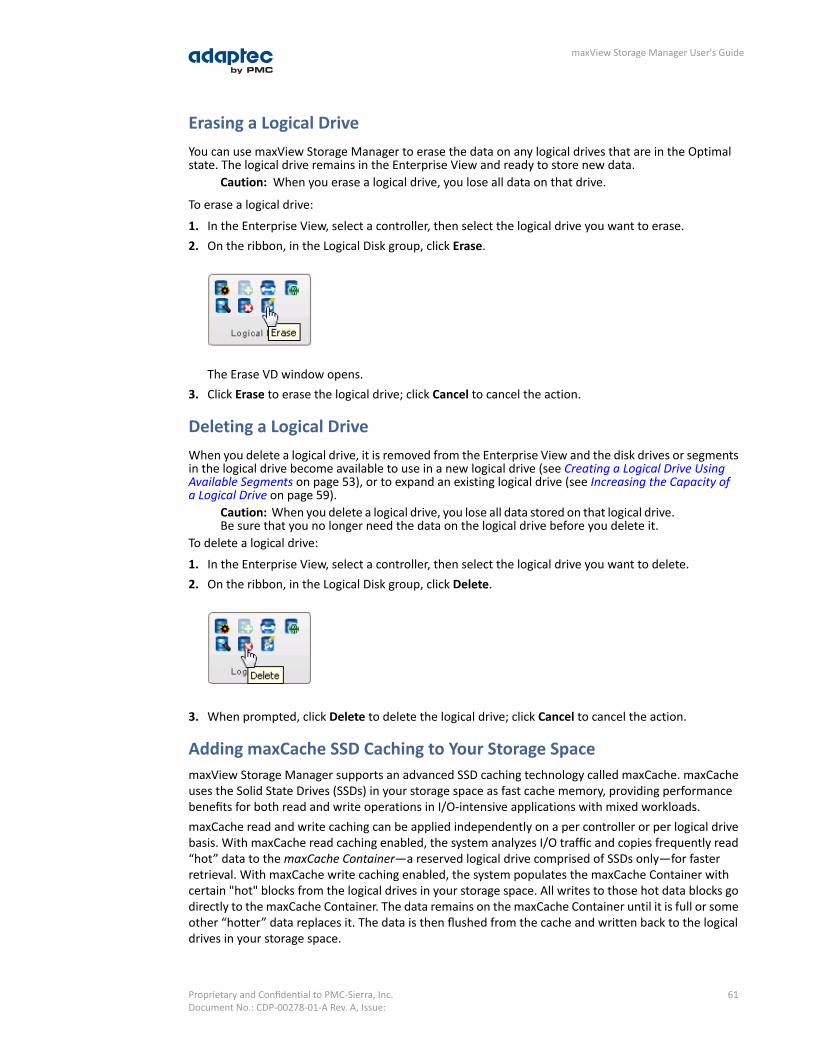
Erasing a Logical DriveYou can use maxView Storage Manager to erase the data on any logical drives that are in the Optimalstate. The logical drive remains in the Enterprise View and ready to store new data.
Caution: When you erase a logical drive, you lose all data on that drive.
To erase a logical drive:
1. In the Enterprise View, select a controller, then select the logical drive you want to erase.2. On the ribbon, in the Logical Disk group, click Erase.
The Erase VD window opens.3. Click Erase to erase the logical drive; click Cancel to cancel the action.
Deleting a Logical DriveWhen you delete a logical drive, it is removed from the Enterprise View and the disk drives or segmentsin the logical drive become available to use in a new logical drive (see Creating a Logical Drive UsingAvailable Segments on page 53), or to expand an existing logical drive (see Increasing the Capacity ofa Logical Drive on page 59).
Caution: When you delete a logical drive, you lose all data stored on that logical drive.Be sure that you no longer need the data on the logical drive before you delete it.
To delete a logical drive:
1. In the Enterprise View, select a controller, then select the logical drive you want to delete.2. On the ribbon, in the Logical Disk group, click Delete.
3. When prompted, click Delete to delete the logical drive; click Cancel to cancel the action.
Adding maxCache SSD Caching to Your Storage SpacemaxView Storage Manager supports an advanced SSD caching technology called maxCache. maxCacheuses the Solid State Drives (SSDs) in your storage space as fast cache memory, providing performancebenefits for both read and write operations in I/O-intensive applications with mixed workloads.maxCache read and write caching can be applied independently on a per controller or per logical drivebasis. With maxCache read caching enabled, the system analyzes I/O traffic and copies frequently read“hot” data to the maxCache Container—a reserved logical drive comprised of SSDs only—for fasterretrieval. With maxCache write caching enabled, the system populates the maxCache Container withcertain "hot" blocks from the logical drives in your storage space. All writes to those hot data blocks godirectly to the maxCache Container. The data remains on the maxCache Container until it is full or someother “hotter” data replaces it. The data is then flushed from the cache and written back to the logicaldrives in your storage space.
61Proprietary and Confidential to PMC-Sierra, Inc.Document No.: CDP-00278-01-A Rev. A, Issue:
maxView Storage Manager User's Guide
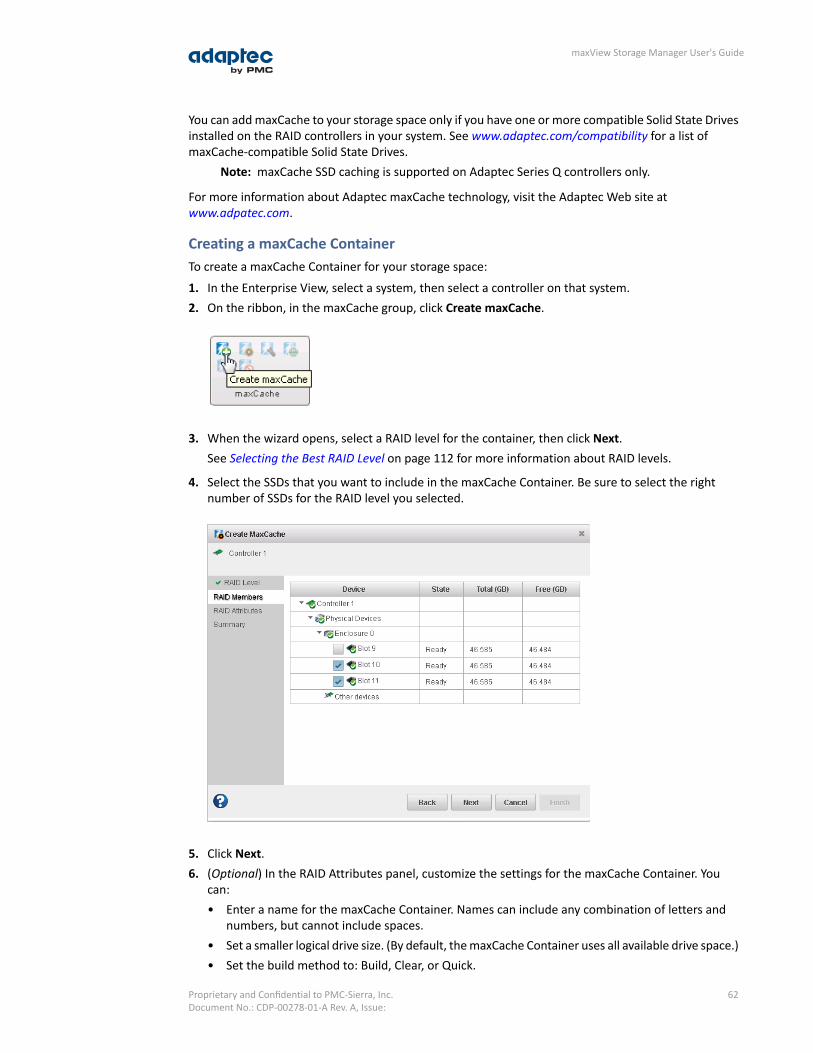
You can add maxCache to your storage space only if you have one or more compatible Solid State Drivesinstalled on the RAID controllers in your system. See www.adaptec.com/compatibility for a list ofmaxCache-compatible Solid State Drives.
Note: maxCache SSD caching is supported on Adaptec Series Q controllers only.
For more information about Adaptec maxCache technology, visit the Adaptec Web site atwww.adpatec.com.
Creating a maxCache ContainerTo create a maxCache Container for your storage space:
1. In the Enterprise View, select a system, then select a controller on that system.2. On the ribbon, in the maxCache group, click Create maxCache.
3. When the wizard opens, select a RAID level for the container, then click Next.See Selecting the Best RAID Level on page 112 for more information about RAID levels.
4. Select the SSDs that you want to include in the maxCache Container. Be sure to select the rightnumber of SSDs for the RAID level you selected.
5. Click Next.6. (Optional) In the RAID Attributes panel, customize the settings for the maxCache Container. You
can:• Enter a name for the maxCache Container. Names can include any combination of letters and
numbers, but cannot include spaces.• Set a smaller logical drive size. (By default, the maxCache Container uses all available drive space.)• Set the build method to: Build, Clear, or Quick.
62Proprietary and Confidential to PMC-Sierra, Inc.Document No.: CDP-00278-01-A Rev. A, Issue:
maxView Storage Manager User's Guide
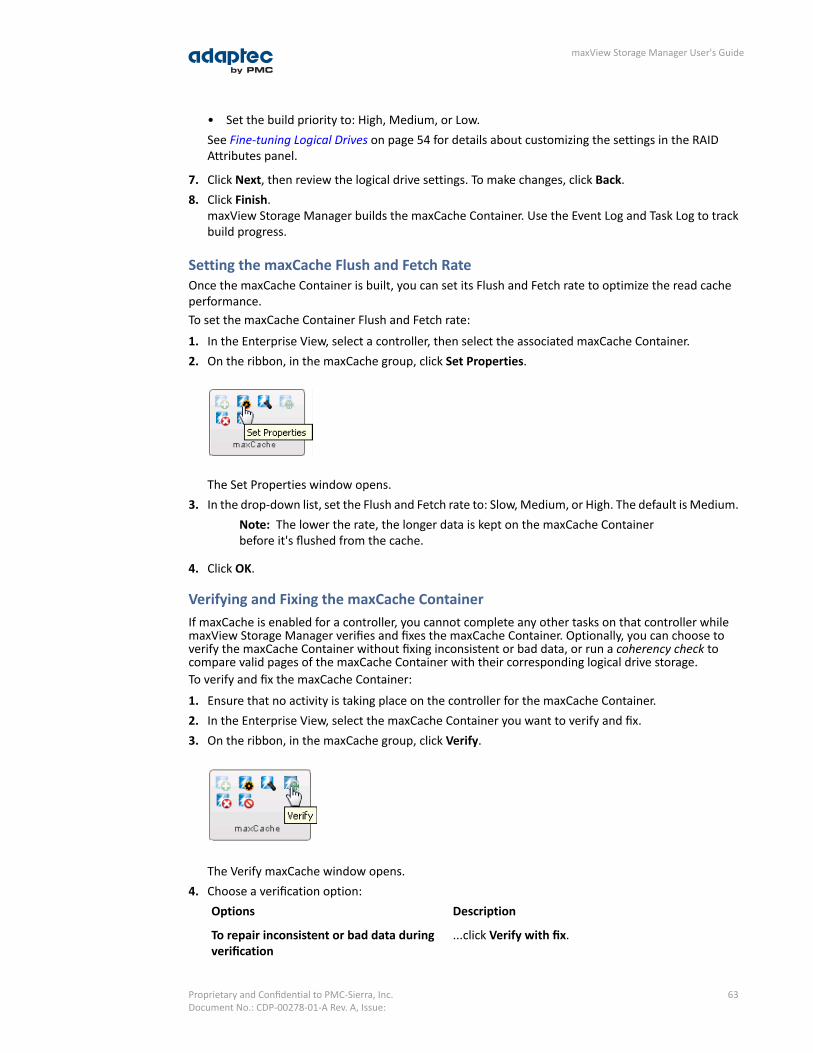
• Set the build priority to: High, Medium, or Low.See Fine-tuning Logical Drives on page 54 for details about customizing the settings in the RAIDAttributes panel.
7. Click Next, then review the logical drive settings. To make changes, click Back.8. Click Finish.
maxView Storage Manager builds the maxCache Container. Use the Event Log and Task Log to trackbuild progress.
Setting the maxCache Flush and Fetch RateOnce the maxCache Container is built, you can set its Flush and Fetch rate to optimize the read cacheperformance.To set the maxCache Container Flush and Fetch rate:
1. In the Enterprise View, select a controller, then select the associated maxCache Container.2. On the ribbon, in the maxCache group, click Set Properties.
The Set Properties window opens.3. In the drop-down list, set the Flush and Fetch rate to: Slow, Medium, or High. The default is Medium.
Note: The lower the rate, the longer data is kept on the maxCache Containerbefore it's flushed from the cache.
4. Click OK.
Verifying and Fixing the maxCache ContainerIf maxCache is enabled for a controller, you cannot complete any other tasks on that controller whilemaxView Storage Manager verifies and fixes the maxCache Container. Optionally, you can choose toverify the maxCache Container without fixing inconsistent or bad data, or run a coherency check tocompare valid pages of the maxCache Container with their corresponding logical drive storage.To verify and fix the maxCache Container:
1. Ensure that no activity is taking place on the controller for the maxCache Container.2. In the Enterprise View, select the maxCache Container you want to verify and fix.3. On the ribbon, in the maxCache group, click Verify.
The Verify maxCache window opens.4. Choose a verification option:
DescriptionOptions
...click Verify with fix.To repair inconsistent or bad data duringverification
63Proprietary and Confidential to PMC-Sierra, Inc.Document No.: CDP-00278-01-A Rev. A, Issue:
maxView Storage Manager User's Guide

DescriptionOptions
...click Verify.To verify the maxCache Container withoutfixing bad data
...click Coherency Check, then select Once or Alwaysfrom the drop-down list.
To perform a coherency check on themaxCache meta-data
5. Click OK.Caution: Do not power off the system while the verification is in progress. If youdo, the verification will stop.
When the verification is complete, an event notice is generated in the system's event log, at whichtime you can continue working with the controller.
Deleting the maxCache ContainerWhen you delete the maxCache Container, the component SSDs become available and can be used tocreate a new logical drive, as hot spares, or to create a new maxCache Container.
Caution: Ensure that no activity is taking place on the controller for the maxCacheContainer; otherwise you may lose data.
To delete the maxCache Container:
1. In the Enterprise View, select a controller, then select the maxCache Container.2. On the ribbon, in the maxCache group, click Delete.
3. When prompted, click Delete to delete the maxCache Container; click Cancel to cancel the action.
Changing the maxCache Settings for a Logical DriveYou can enable or disable maxCache read and write caching for each logical drive in your storage space:
1. In the Enterprise View, select a controller, then select a logical drive on that controller.2. On the ribbon, in the Logical Disk group, click Set Properties.
3. When the Set Properties window opens, click the maxCache tab.
64Proprietary and Confidential to PMC-Sierra, Inc.Document No.: CDP-00278-01-A Rev. A, Issue:
maxView Storage Manager User's Guide

4. In the drop-down lists:• For maxCache Read Cache, select Enabled or Disabled, as needed.• For maxCache Write Cache, select Enabled or Disabled, as needed.
5. Click OK.
Changing the maxCache Settings for a ControllerYou can disable maxCache write caching for all logical drives on a controller. Because write cachingsends in-coming data to the maxCache Container first, before moving it to the logical devices in yourstorage space, you may want to disable write caching to reduce the possibility of data loss in the eventof a power outage, system failure, or dirty shutdown.
Note: To re-enable maxCache write caching in your storage space, you must changethe maxCache settings for each logical drive individually; see Changing the maxCacheSettings for a Logical Drive on page 64.
To disable maxCache write caching for a controller:
1. In the Enterprise View, select a controller, then select the maxCache Container on that controller.2. On the ribbon, in the maxCache group, click Disable Write Cache.
3. Click OK.
Maintaining an Energy-Efficient Storage SpaceYou can use power management in maxView Storage Manager to maintain an energy-efficient storagespace. Power management of your storage space reduces cooling and electricity costs. It increasessystem stability due to lower heat dissipation. And it improves the quality of your work environmentby reducing noise levels in your computer rooms and data centers.
65Proprietary and Confidential to PMC-Sierra, Inc.Document No.: CDP-00278-01-A Rev. A, Issue:
maxView Storage Manager User's Guide
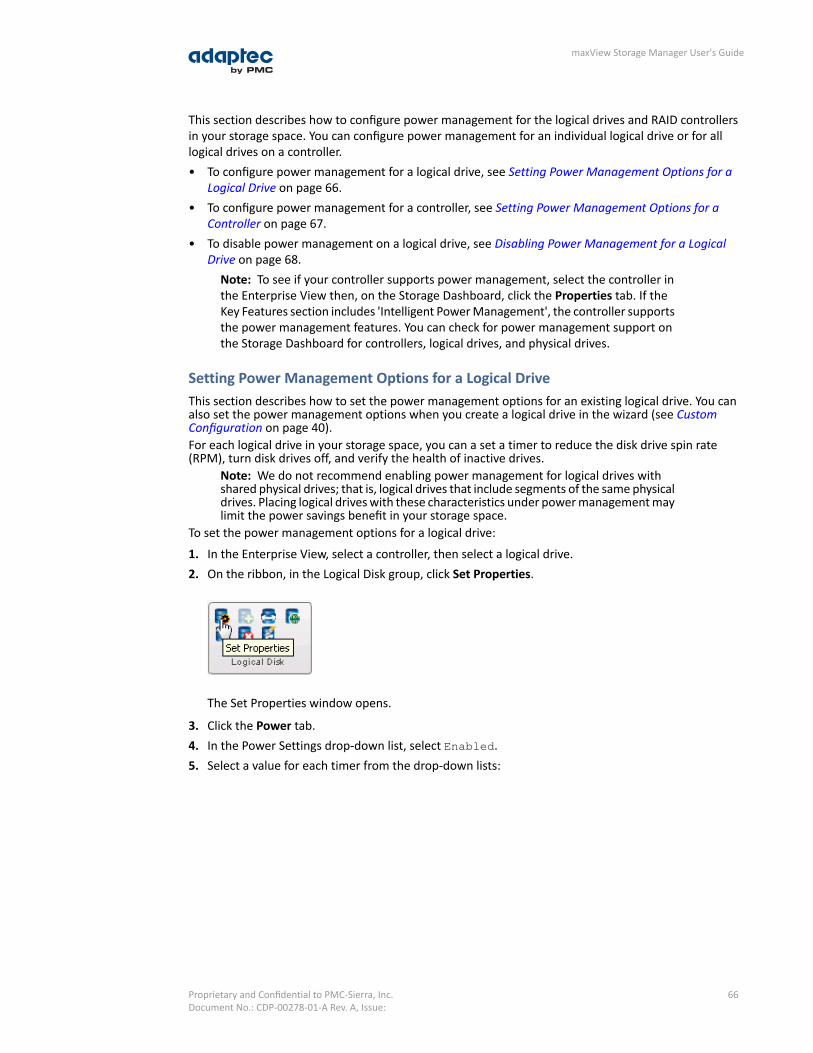
This section describes how to configure power management for the logical drives and RAID controllersin your storage space. You can configure power management for an individual logical drive or for alllogical drives on a controller.• To configure power management for a logical drive, see Setting Power Management Options for a
Logical Drive on page 66.• To configure power management for a controller, see Setting Power Management Options for a
Controller on page 67.• To disable power management on a logical drive, see Disabling Power Management for a Logical
Drive on page 68.Note: To see if your controller supports power management, select the controller inthe Enterprise View then, on the Storage Dashboard, click the Properties tab. If theKey Features section includes 'Intelligent Power Management', the controller supportsthe power management features. You can check for power management support onthe Storage Dashboard for controllers, logical drives, and physical drives.
Setting Power Management Options for a Logical DriveThis section describes how to set the power management options for an existing logical drive. You canalso set the power management options when you create a logical drive in the wizard (see CustomConfiguration on page 40).For each logical drive in your storage space, you can a set a timer to reduce the disk drive spin rate(RPM), turn disk drives off, and verify the health of inactive drives.
Note: We do not recommend enabling power management for logical drives withshared physical drives; that is, logical drives that include segments of the same physicaldrives. Placing logical drives with these characteristics under power management maylimit the power savings benefit in your storage space.
To set the power management options for a logical drive:
1. In the Enterprise View, select a controller, then select a logical drive.2. On the ribbon, in the Logical Disk group, click Set Properties.
The Set Properties window opens.
3. Click the Power tab.4. In the Power Settings drop-down list, select Enabled.5. Select a value for each timer from the drop-down lists:
66Proprietary and Confidential to PMC-Sierra, Inc.Document No.: CDP-00278-01-A Rev. A, Issue:
maxView Storage Manager User's Guide

• Slow Down Drives After—Period of inactivity, from 3 minutes to 3 hours, after which the drives’spin rate is lowered. The default is Never.
Note: For disk drives that do not support slow operation, set this timer toNever.
• Verify Drives After—Period of inactivity, from 1 hour to 24 hours, after which an inactive drive(a drive that's already powered down) is restarted and checked to verify its health. Once thecheck is complete, the drive is powered down and returns to an inactive state. The default isNever.
• Power Off Drives After—Period of inactivity, from 3 minutes to 3 hours, after which the diskdrives are turned off. The default is Never.
6. Click OK.
Setting Power Management Options for a ControllerThe power management options for a controller affect all logical drives on that controller. The mainsetting is the “stay awake” period: the time during which disk drives on the controller always spin attheir peak rate.
Note: The stay awake period is relative to your local system time and time zone. Toset the time zone for power management, you must use the controller BIOS utility.The time zone does not adjust automatically for daylight savings time. To compensate,you must adjust the stay awake period manually, either in the BIOS or with maxViewStorage Manager. For more information, see the Adaptec RAID Controller Installationand User's Guide.
To set the stay awake period for the disk drives on a controller:
1. In the Enterprise View, select a controller.2. On the ribbon, in the Controller group, click Set Properties.
The Set Properties window opens.
67Proprietary and Confidential to PMC-Sierra, Inc.Document No.: CDP-00278-01-A Rev. A, Issue:
maxView Storage Manager User's Guide
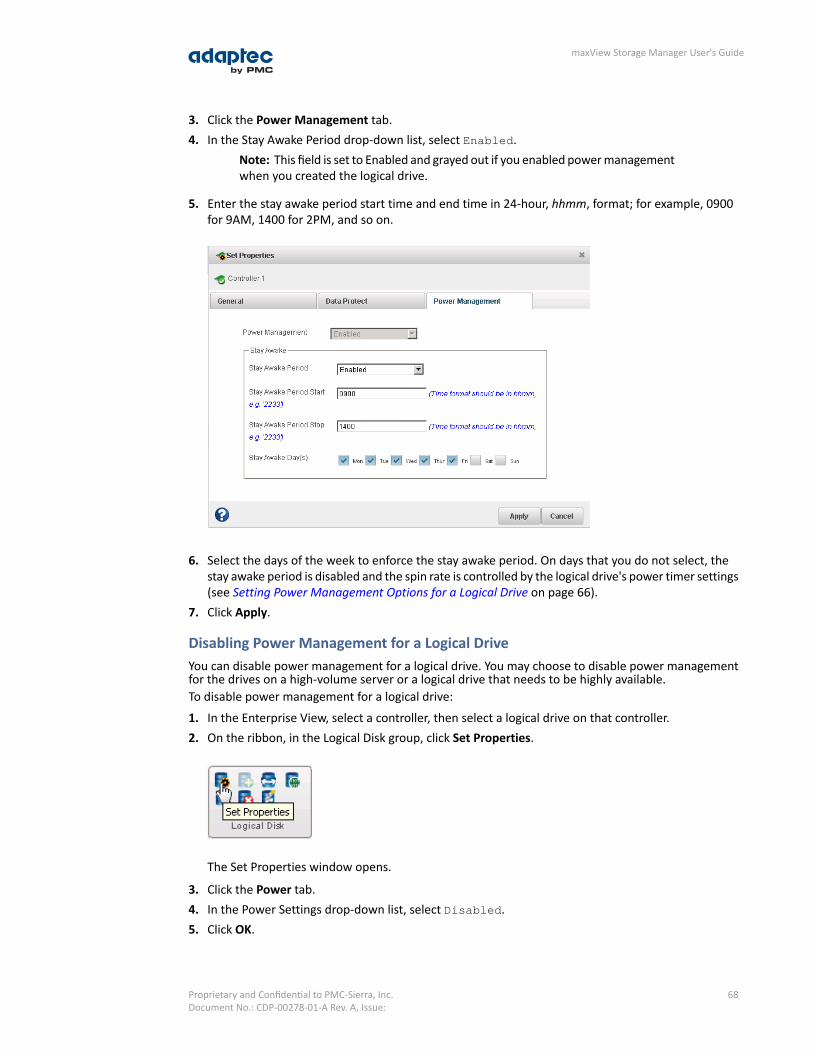
3. Click the Power Management tab.4. In the Stay Awake Period drop-down list, select Enabled.
Note: This field is set to Enabled and grayed out if you enabled power managementwhen you created the logical drive.
5. Enter the stay awake period start time and end time in 24-hour, hhmm, format; for example, 0900for 9AM, 1400 for 2PM, and so on.
6. Select the days of the week to enforce the stay awake period. On days that you do not select, thestay awake period is disabled and the spin rate is controlled by the logical drive's power timer settings(see Setting Power Management Options for a Logical Drive on page 66).
7. Click Apply.
Disabling Power Management for a Logical DriveYou can disable power management for a logical drive. You may choose to disable power managementfor the drives on a high-volume server or a logical drive that needs to be highly available.To disable power management for a logical drive:
1. In the Enterprise View, select a controller, then select a logical drive on that controller.2. On the ribbon, in the Logical Disk group, click Set Properties.
The Set Properties window opens.
3. Click the Power tab.4. In the Power Settings drop-down list, select Disabled.5. Click OK.
68Proprietary and Confidential to PMC-Sierra, Inc.Document No.: CDP-00278-01-A Rev. A, Issue:
maxView Storage Manager User's Guide
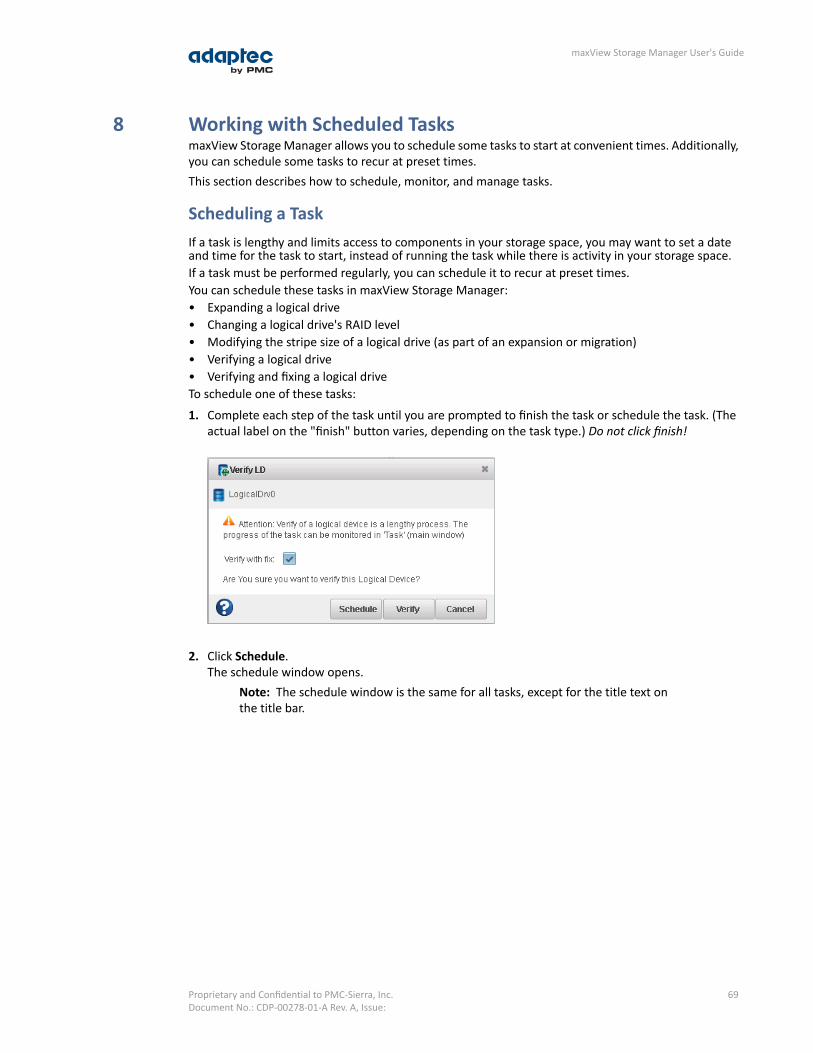
8 Working with Scheduled TasksmaxView Storage Manager allows you to schedule some tasks to start at convenient times. Additionally,you can schedule some tasks to recur at preset times.This section describes how to schedule, monitor, and manage tasks.
Scheduling a TaskIf a task is lengthy and limits access to components in your storage space, you may want to set a dateand time for the task to start, instead of running the task while there is activity in your storage space.If a task must be performed regularly, you can schedule it to recur at preset times.You can schedule these tasks in maxView Storage Manager:• Expanding a logical drive• Changing a logical drive's RAID level• Modifying the stripe size of a logical drive (as part of an expansion or migration)• Verifying a logical drive• Verifying and fixing a logical driveTo schedule one of these tasks:
1. Complete each step of the task until you are prompted to finish the task or schedule the task. (Theactual label on the "finish" button varies, depending on the task type.) Do not click finish!
2. Click Schedule.The schedule window opens.
Note: The schedule window is the same for all tasks, except for the title text onthe title bar.
69Proprietary and Confidential to PMC-Sierra, Inc.Document No.: CDP-00278-01-A Rev. A, Issue:
maxView Storage Manager User's Guide
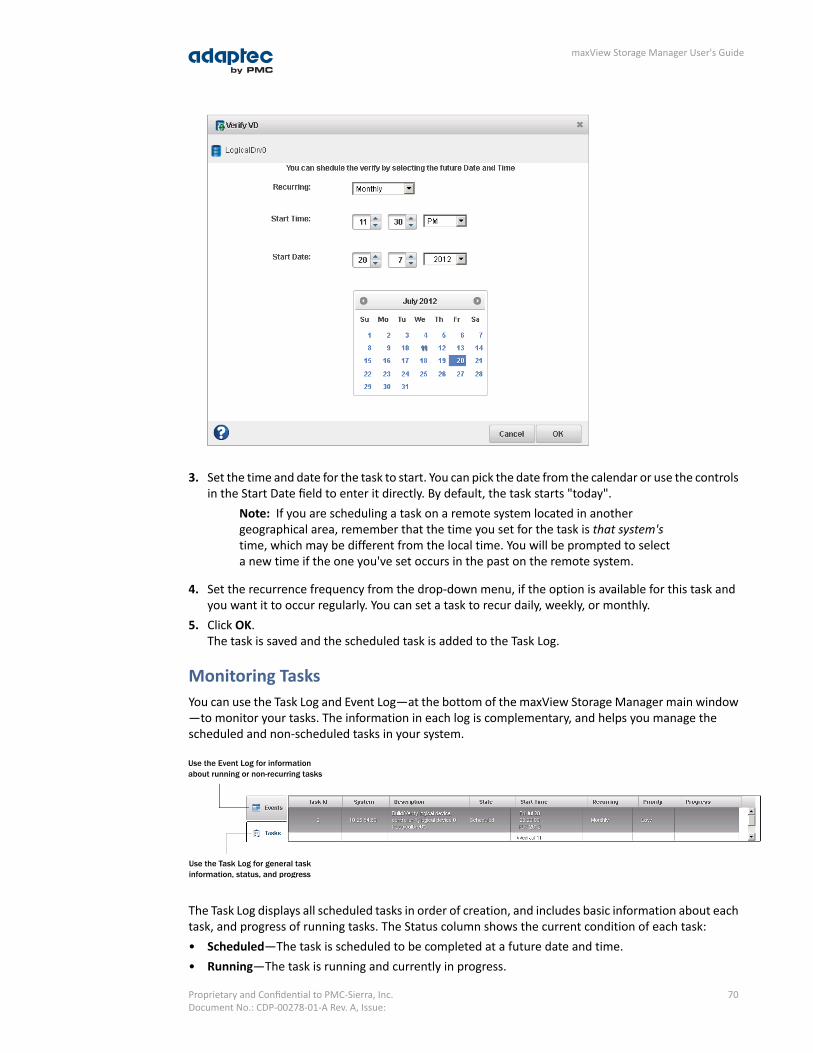
3. Set the time and date for the task to start. You can pick the date from the calendar or use the controlsin the Start Date field to enter it directly. By default, the task starts "today".
Note: If you are scheduling a task on a remote system located in anothergeographical area, remember that the time you set for the task is that system'stime, which may be different from the local time. You will be prompted to selecta new time if the one you've set occurs in the past on the remote system.
4. Set the recurrence frequency from the drop-down menu, if the option is available for this task andyou want it to occur regularly. You can set a task to recur daily, weekly, or monthly.
5. Click OK.The task is saved and the scheduled task is added to the Task Log.
Monitoring TasksYou can use the Task Log and Event Log—at the bottom of the maxView Storage Manager main window—to monitor your tasks. The information in each log is complementary, and helps you manage thescheduled and non-scheduled tasks in your system.
Use the Task Log for general taskinformation, status, and progress
Use the Event Log for informationabout running or non-recurring tasks
The Task Log displays all scheduled tasks in order of creation, and includes basic information about eachtask, and progress of running tasks. The Status column shows the current condition of each task:• Scheduled—The task is scheduled to be completed at a future date and time.• Running—The task is running and currently in progress.
70Proprietary and Confidential to PMC-Sierra, Inc.Document No.: CDP-00278-01-A Rev. A, Issue:
maxView Storage Manager User's Guide
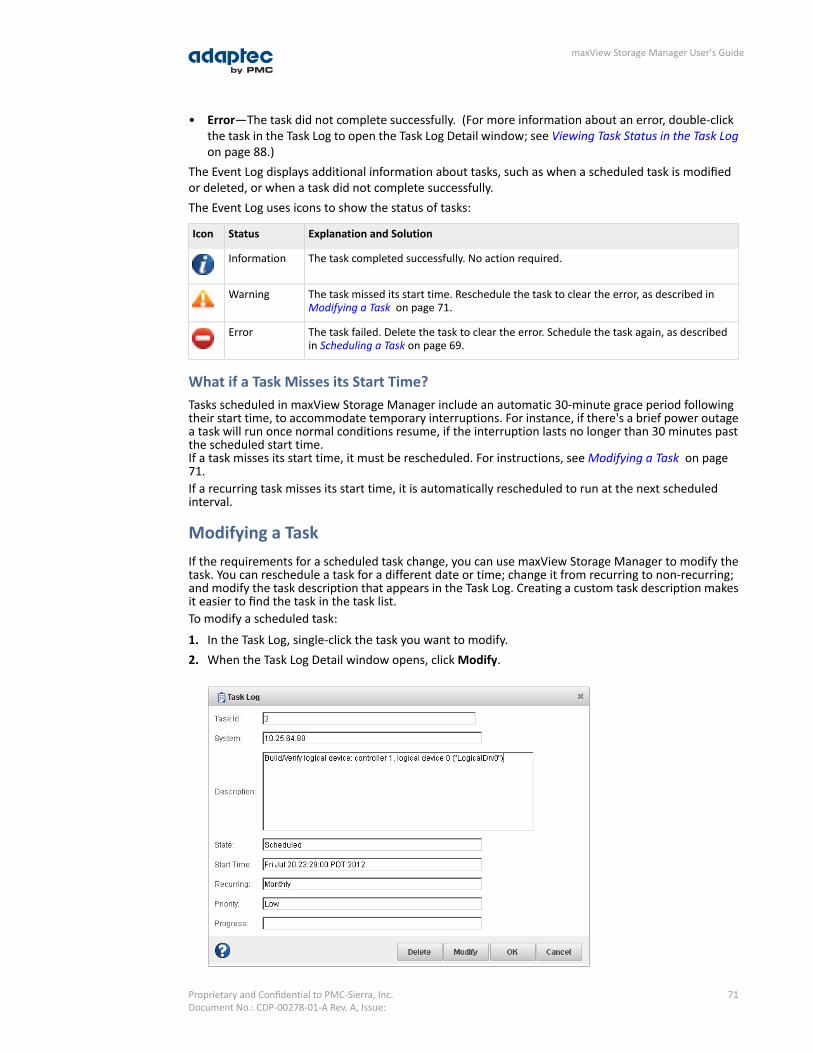
• Error—The task did not complete successfully. (For more information about an error, double-clickthe task in the Task Log to open the Task Log Detail window; see Viewing Task Status in the Task Logon page 88.)
The Event Log displays additional information about tasks, such as when a scheduled task is modifiedor deleted, or when a task did not complete successfully.The Event Log uses icons to show the status of tasks:
Explanation and SolutionStatusIcon
The task completed successfully. No action required.Information
The task missed its start time. Reschedule the task to clear the error, as described inModifying a Task on page 71.
Warning
The task failed. Delete the task to clear the error. Schedule the task again, as describedin Scheduling a Task on page 69.
Error
What if a Task Misses its Start Time?Tasks scheduled in maxView Storage Manager include an automatic 30-minute grace period followingtheir start time, to accommodate temporary interruptions. For instance, if there's a brief power outagea task will run once normal conditions resume, if the interruption lasts no longer than 30 minutes pastthe scheduled start time.If a task misses its start time, it must be rescheduled. For instructions, see Modifying a Task on page71.If a recurring task misses its start time, it is automatically rescheduled to run at the next scheduledinterval.
Modifying a TaskIf the requirements for a scheduled task change, you can use maxView Storage Manager to modify thetask. You can reschedule a task for a different date or time; change it from recurring to non-recurring;and modify the task description that appears in the Task Log. Creating a custom task description makesit easier to find the task in the task list.To modify a scheduled task:
1. In the Task Log, single-click the task you want to modify.2. When the Task Log Detail window opens, click Modify.
71Proprietary and Confidential to PMC-Sierra, Inc.Document No.: CDP-00278-01-A Rev. A, Issue:
maxView Storage Manager User's Guide

3. When the Modify Task window opens, make the required changes, then click OK.The task changes are saved and its entry in the Task Log is updated.
Deleting a TaskIf a scheduled task is no longer needed, you can delete it from the system.To delete a task:
1. In the Task Log, single-click the task you want to delete.2. When the Task Log Detail window opens, click Delete.3. Click Yes to confirm the deletion.
The task is deleted and its entry is removed from the Task Log.
72Proprietary and Confidential to PMC-Sierra, Inc.Document No.: CDP-00278-01-A Rev. A, Issue:
maxView Storage Manager User's Guide
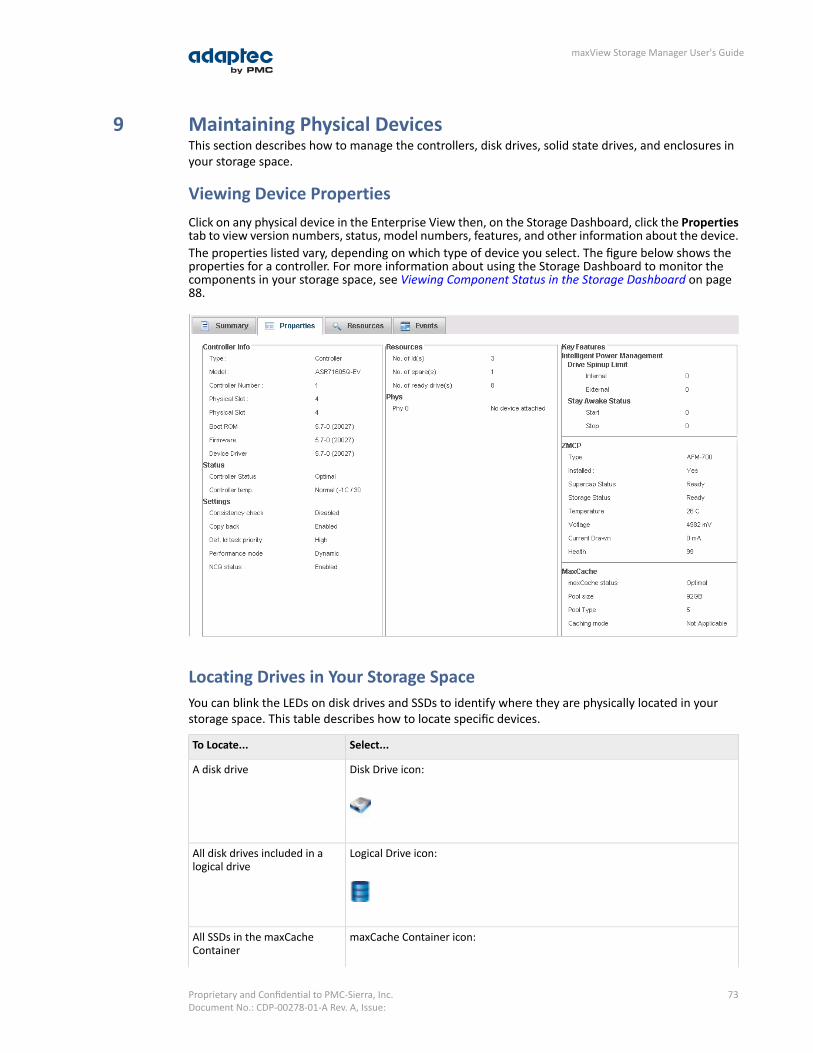
9 Maintaining Physical DevicesThis section describes how to manage the controllers, disk drives, solid state drives, and enclosures inyour storage space.
Viewing Device PropertiesClick on any physical device in the Enterprise View then, on the Storage Dashboard, click the Propertiestab to view version numbers, status, model numbers, features, and other information about the device.The properties listed vary, depending on which type of device you select. The figure below shows theproperties for a controller. For more information about using the Storage Dashboard to monitor thecomponents in your storage space, see Viewing Component Status in the Storage Dashboard on page88.
Locating Drives in Your Storage SpaceYou can blink the LEDs on disk drives and SSDs to identify where they are physically located in yourstorage space. This table describes how to locate specific devices.
Select...To Locate...
Disk Drive icon:A disk drive
Logical Drive icon:All disk drives included in alogical drive
maxCache Container icon:All SSDs in the maxCacheContainer
73Proprietary and Confidential to PMC-Sierra, Inc.Document No.: CDP-00278-01-A Rev. A, Issue:
maxView Storage Manager User's Guide
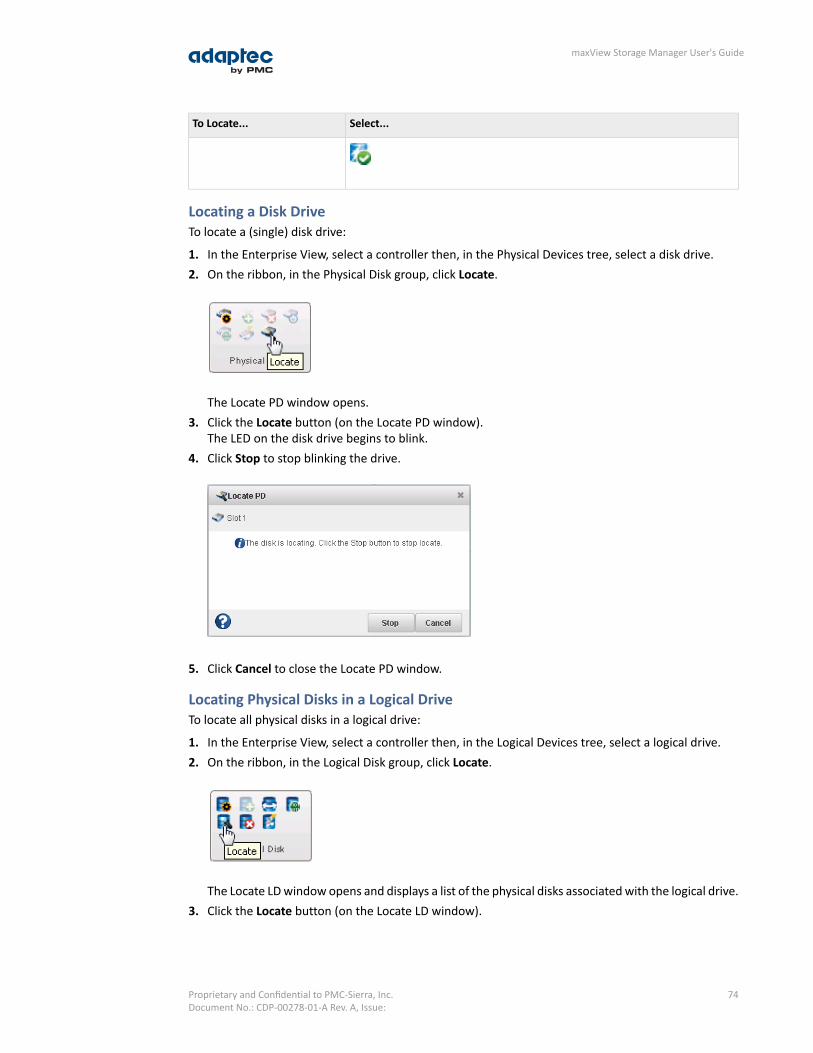
Select...To Locate...
Locating a Disk DriveTo locate a (single) disk drive:
1. In the Enterprise View, select a controller then, in the Physical Devices tree, select a disk drive.2. On the ribbon, in the Physical Disk group, click Locate.
The Locate PD window opens.3. Click the Locate button (on the Locate PD window).
The LED on the disk drive begins to blink.4. Click Stop to stop blinking the drive.
5. Click Cancel to close the Locate PD window.
Locating Physical Disks in a Logical DriveTo locate all physical disks in a logical drive:
1. In the Enterprise View, select a controller then, in the Logical Devices tree, select a logical drive.2. On the ribbon, in the Logical Disk group, click Locate.
The Locate LD window opens and displays a list of the physical disks associated with the logical drive.3. Click the Locate button (on the Locate LD window).
74Proprietary and Confidential to PMC-Sierra, Inc.Document No.: CDP-00278-01-A Rev. A, Issue:
maxView Storage Manager User's Guide
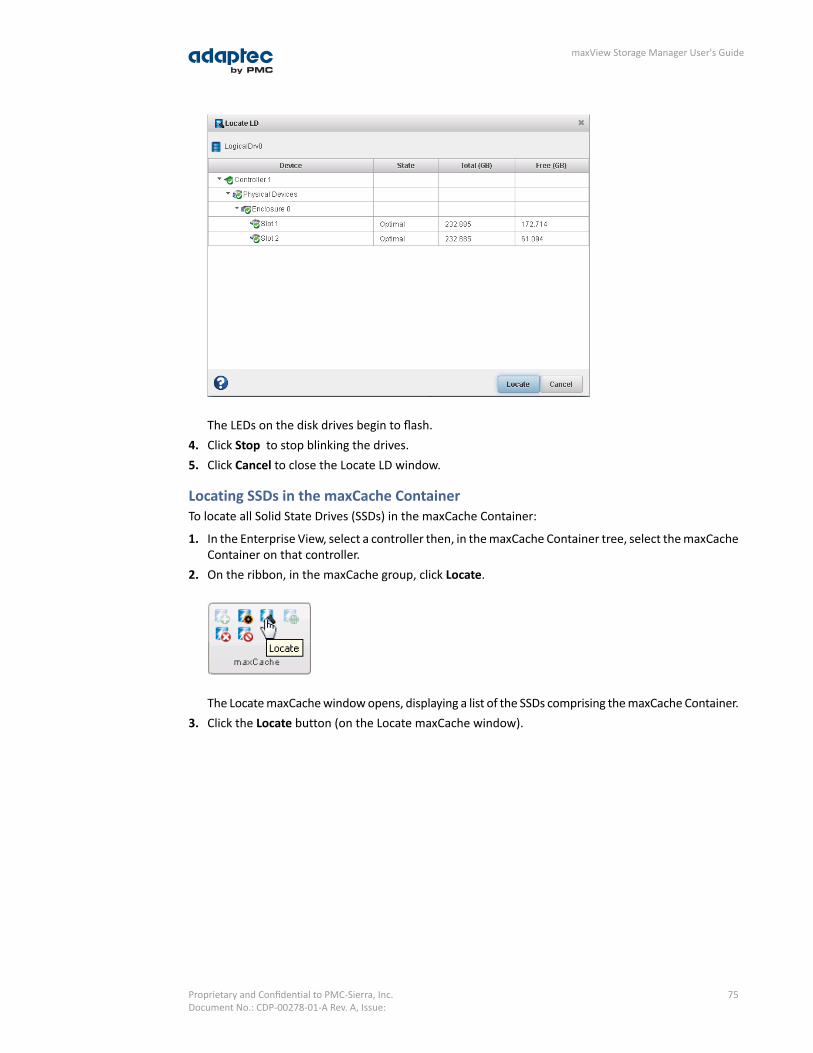
The LEDs on the disk drives begin to flash.4. Click Stop to stop blinking the drives.5. Click Cancel to close the Locate LD window.
Locating SSDs in the maxCache ContainerTo locate all Solid State Drives (SSDs) in the maxCache Container:
1. In the Enterprise View, select a controller then, in the maxCache Container tree, select the maxCacheContainer on that controller.
2. On the ribbon, in the maxCache group, click Locate.
The Locate maxCache window opens, displaying a list of the SSDs comprising the maxCache Container.3. Click the Locate button (on the Locate maxCache window).
75Proprietary and Confidential to PMC-Sierra, Inc.Document No.: CDP-00278-01-A Rev. A, Issue:
maxView Storage Manager User's Guide

The LEDs on the SSDs begin to flash.4. Click Stop to stop blinking the SSDs.5. Click Cancel to close the Locate maxCache window.
Working with Failed or Failing Disk DrivesThis section describes how to use maxView Storage Manager to manage failed or failing disk drives inyour storage space.
Replacing Disk Drives in a Logical DriveYou can replace one or more disk drives in a logical drive. You may want to replace a drive to upgradeto larger disk drives, or to make disk drive size uniform across the logical drive.
Caution: If another disk drive in the logical drive fails during rebuild (see RebuildingLogical Drives on page 111), you may lose data. For help solving disk drive problems,see Recovering from a Disk Drive Failure on page 109.
To replace a disk drive in a logical drive:
1. In the Physical Devices tree in the Enterprise View, find the disk drive you want to replace; note itssize and location (for instance Slot 1 in Enclosure 0).
2. Set the drive state to failed. (See Setting a Disk Drive to ‘Failed’ on page 76.)3. Remove and replace the disk drive with one of equal or greater size.4. Wait for the logical drive to rebuild. (See Rebuilding Logical Drives on page 111.)5. Repeat these steps for each disk drive you want to replace.
Setting a Disk Drive to ‘Failed’Before you can remove a disk drive, you should set it to a failed state to protect your data. You cannotuse maxView Storage Manager to set the drive state to Failed. You must use the Adaptec RAID ControllerConfiguration command line utility (ARCCONF), to change the drive state. First, use the Storage Dashboardto determine the drive's device ID and channel number on the controller (seeViewing Component Statusin the Storage Dashboard on page 88). Then, use the ARCCONF SETSTATE command to change thedrive's state to Failed. See the Adaptec RAID Controllers Command Line Utility User's Guide for detailsabout using ARCCONF.You can set a disk drive to a failed state if:• The disk drive is not part of a logical drive, or• The disk drive is part of a redundant, healthy logical drive
76Proprietary and Confidential to PMC-Sierra, Inc.Document No.: CDP-00278-01-A Rev. A, Issue:
maxView Storage Manager User's Guide
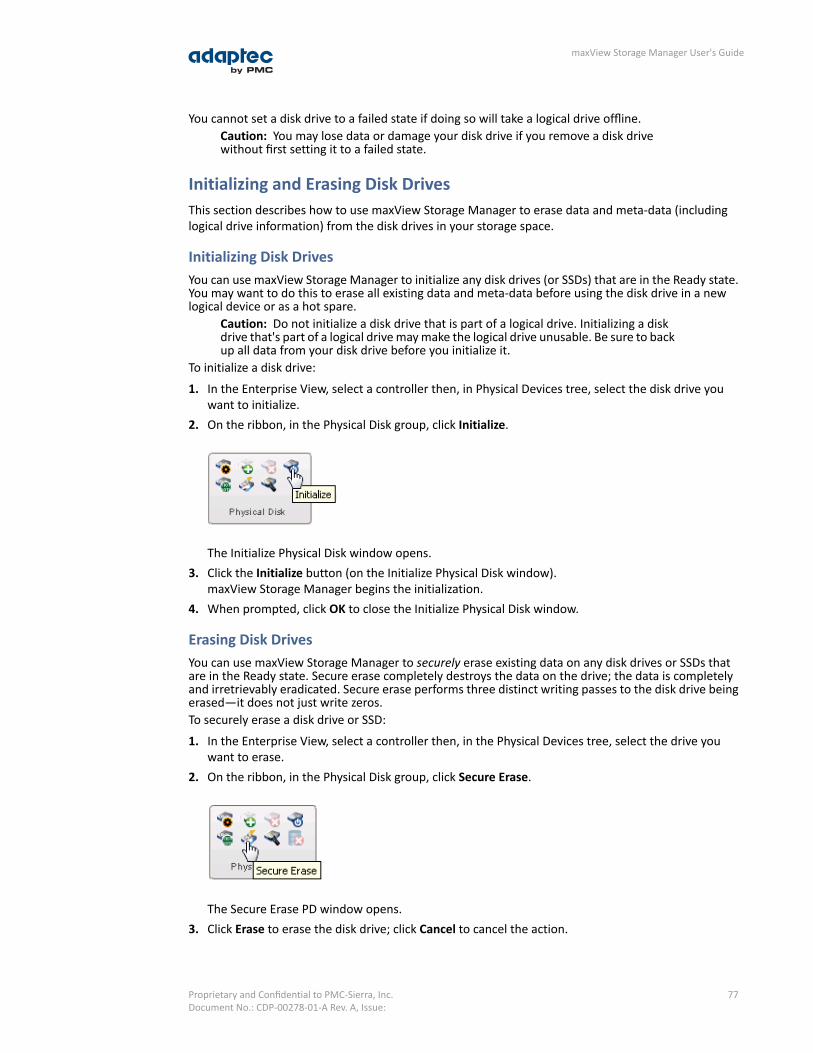
You cannot set a disk drive to a failed state if doing so will take a logical drive offline.Caution: You may lose data or damage your disk drive if you remove a disk drivewithout first setting it to a failed state.
Initializing and Erasing Disk DrivesThis section describes how to use maxView Storage Manager to erase data and meta-data (includinglogical drive information) from the disk drives in your storage space.
Initializing Disk DrivesYou can use maxView Storage Manager to initialize any disk drives (or SSDs) that are in the Ready state.You may want to do this to erase all existing data and meta-data before using the disk drive in a newlogical device or as a hot spare.
Caution: Do not initialize a disk drive that is part of a logical drive. Initializing a diskdrive that's part of a logical drive may make the logical drive unusable. Be sure to backup all data from your disk drive before you initialize it.
To initialize a disk drive:
1. In the Enterprise View, select a controller then, in Physical Devices tree, select the disk drive youwant to initialize.
2. On the ribbon, in the Physical Disk group, click Initialize.
The Initialize Physical Disk window opens.3. Click the Initialize button (on the Initialize Physical Disk window).
maxView Storage Manager begins the initialization.4. When prompted, click OK to close the Initialize Physical Disk window.
Erasing Disk DrivesYou can use maxView Storage Manager to securely erase existing data on any disk drives or SSDs thatare in the Ready state. Secure erase completely destroys the data on the drive; the data is completelyand irretrievably eradicated. Secure erase performs three distinct writing passes to the disk drive beingerased—it does not just write zeros.To securely erase a disk drive or SSD:
1. In the Enterprise View, select a controller then, in the Physical Devices tree, select the drive youwant to erase.
2. On the ribbon, in the Physical Disk group, click Secure Erase.
The Secure Erase PD window opens.3. Click Erase to erase the disk drive; click Cancel to cancel the action.
77Proprietary and Confidential to PMC-Sierra, Inc.Document No.: CDP-00278-01-A Rev. A, Issue:
maxView Storage Manager User's Guide
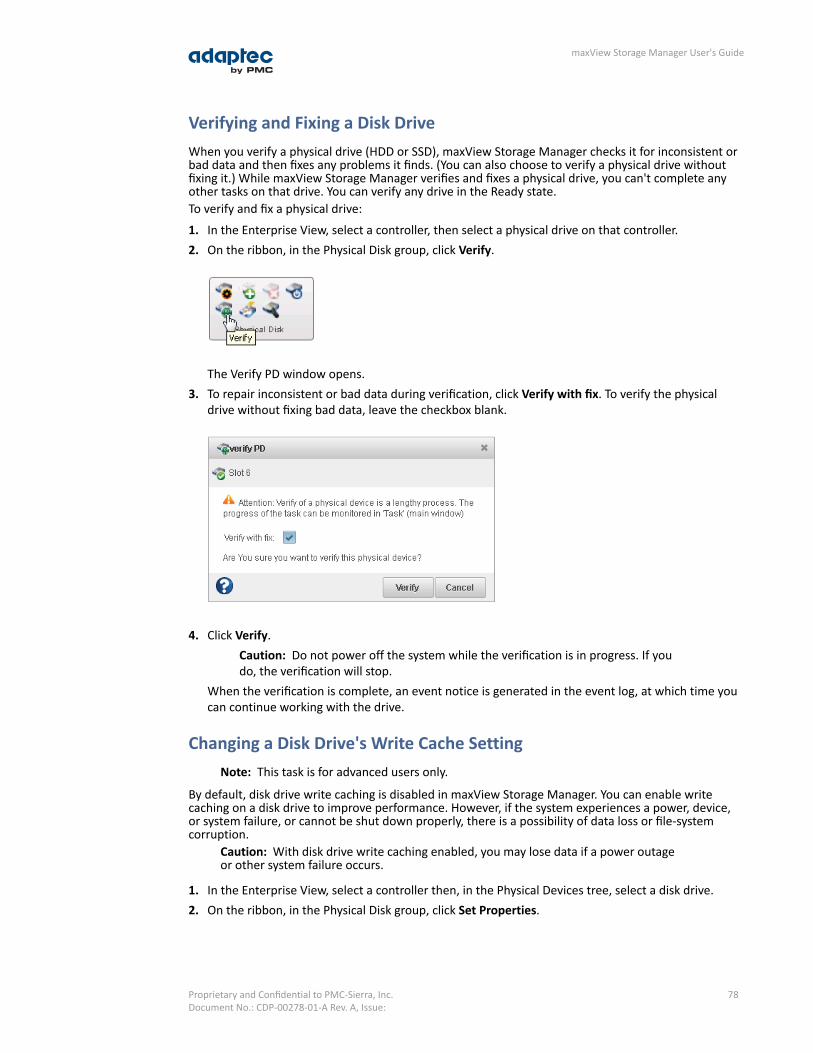
Verifying and Fixing a Disk DriveWhen you verify a physical drive (HDD or SSD), maxView Storage Manager checks it for inconsistent orbad data and then fixes any problems it finds. (You can also choose to verify a physical drive withoutfixing it.) While maxView Storage Manager verifies and fixes a physical drive, you can't complete anyother tasks on that drive. You can verify any drive in the Ready state.To verify and fix a physical drive:
1. In the Enterprise View, select a controller, then select a physical drive on that controller.2. On the ribbon, in the Physical Disk group, click Verify.
The Verify PD window opens.3. To repair inconsistent or bad data during verification, click Verify with fix. To verify the physical
drive without fixing bad data, leave the checkbox blank.
4. Click Verify.Caution: Do not power off the system while the verification is in progress. If youdo, the verification will stop.
When the verification is complete, an event notice is generated in the event log, at which time youcan continue working with the drive.
Changing a Disk Drive's Write Cache SettingNote: This task is for advanced users only.
By default, disk drive write caching is disabled in maxView Storage Manager. You can enable writecaching on a disk drive to improve performance. However, if the system experiences a power, device,or system failure, or cannot be shut down properly, there is a possibility of data loss or file-systemcorruption.
Caution: With disk drive write caching enabled, you may lose data if a power outageor other system failure occurs.
1. In the Enterprise View, select a controller then, in the Physical Devices tree, select a disk drive.2. On the ribbon, in the Physical Disk group, click Set Properties.
78Proprietary and Confidential to PMC-Sierra, Inc.Document No.: CDP-00278-01-A Rev. A, Issue:
maxView Storage Manager User's Guide
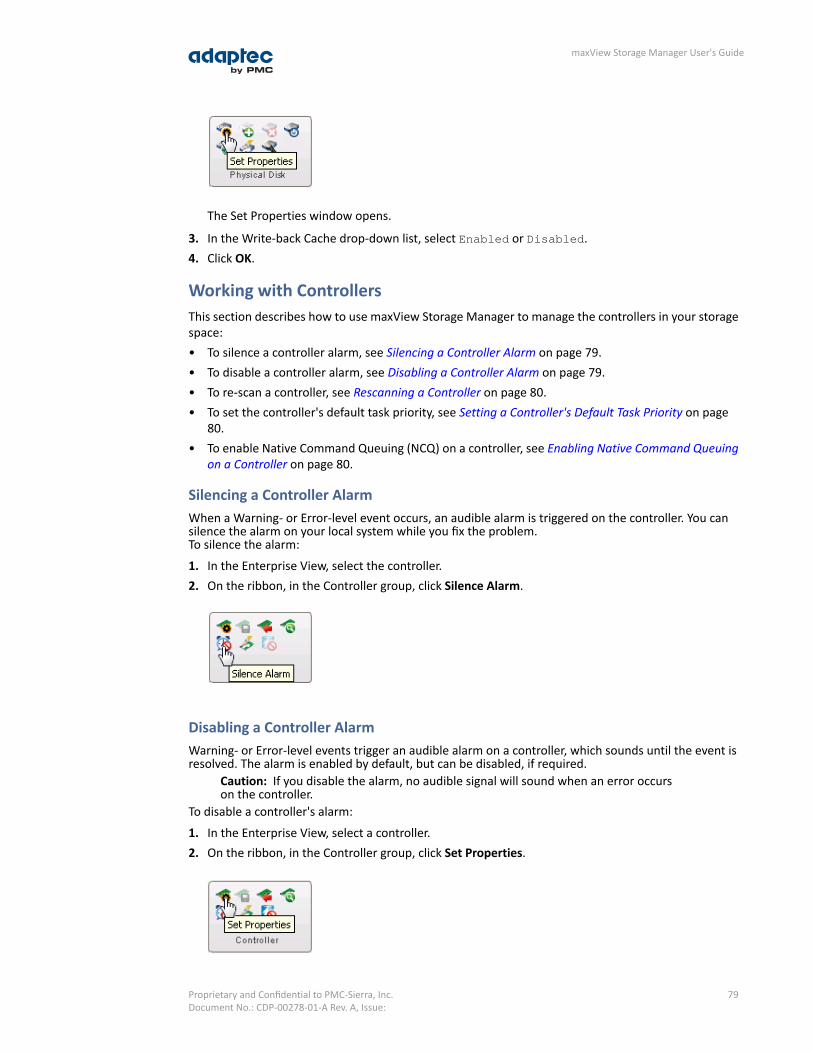
The Set Properties window opens.
3. In the Write-back Cache drop-down list, select Enabled or Disabled.4. Click OK.
Working with ControllersThis section describes how to use maxView Storage Manager to manage the controllers in your storagespace:• To silence a controller alarm, see Silencing a Controller Alarm on page 79.• To disable a controller alarm, see Disabling a Controller Alarm on page 79.• To re-scan a controller, see Rescanning a Controller on page 80.• To set the controller's default task priority, see Setting a Controller's Default Task Priority on page
80.• To enable Native Command Queuing (NCQ) on a controller, see Enabling Native Command Queuing
on a Controller on page 80.
Silencing a Controller AlarmWhen a Warning- or Error-level event occurs, an audible alarm is triggered on the controller. You cansilence the alarm on your local system while you fix the problem.To silence the alarm:
1. In the Enterprise View, select the controller.2. On the ribbon, in the Controller group, click Silence Alarm.
Disabling a Controller AlarmWarning- or Error-level events trigger an audible alarm on a controller, which sounds until the event isresolved. The alarm is enabled by default, but can be disabled, if required.
Caution: If you disable the alarm, no audible signal will sound when an error occurson the controller.
To disable a controller's alarm:
1. In the Enterprise View, select a controller.2. On the ribbon, in the Controller group, click Set Properties.
79Proprietary and Confidential to PMC-Sierra, Inc.Document No.: CDP-00278-01-A Rev. A, Issue:
maxView Storage Manager User's Guide
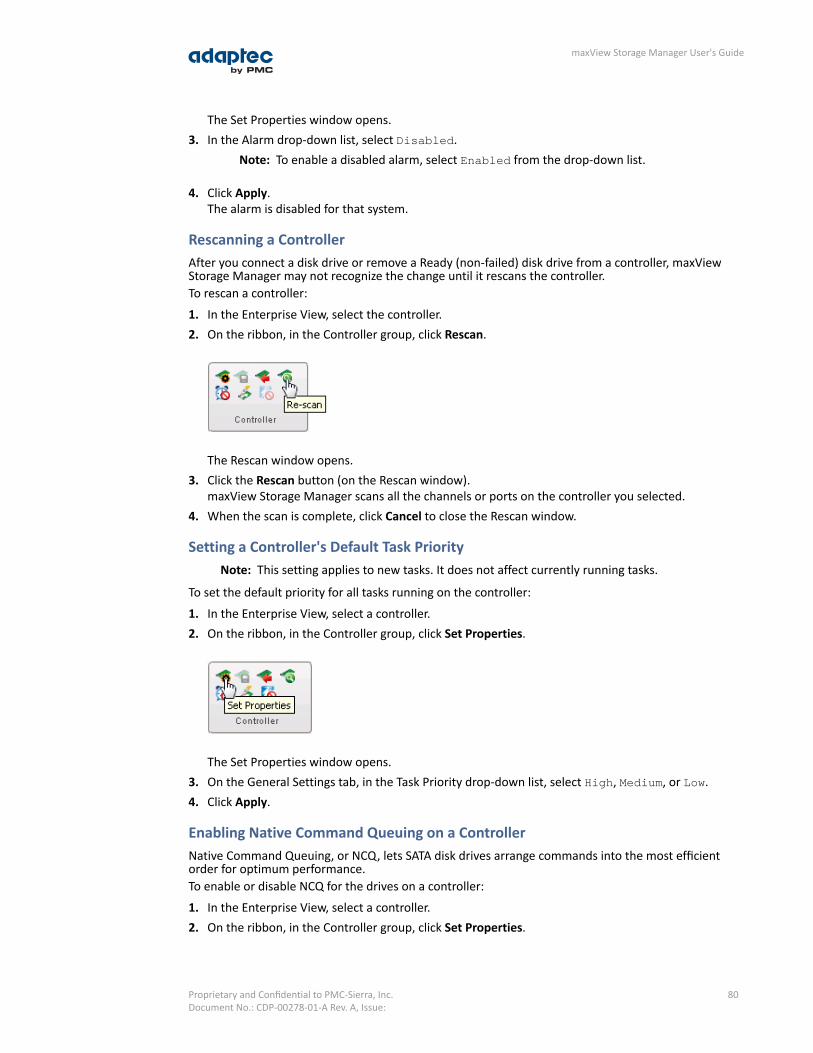
The Set Properties window opens.3. In the Alarm drop-down list, select Disabled.
Note: To enable a disabled alarm, select Enabled from the drop-down list.
4. Click Apply.The alarm is disabled for that system.
Rescanning a ControllerAfter you connect a disk drive or remove a Ready (non-failed) disk drive from a controller, maxViewStorage Manager may not recognize the change until it rescans the controller.To rescan a controller:
1. In the Enterprise View, select the controller.2. On the ribbon, in the Controller group, click Rescan.
The Rescan window opens.3. Click the Rescan button (on the Rescan window).
maxView Storage Manager scans all the channels or ports on the controller you selected.4. When the scan is complete, click Cancel to close the Rescan window.
Setting a Controller's Default Task PriorityNote: This setting applies to new tasks. It does not affect currently running tasks.
To set the default priority for all tasks running on the controller:
1. In the Enterprise View, select a controller.2. On the ribbon, in the Controller group, click Set Properties.
The Set Properties window opens.3. On the General Settings tab, in the Task Priority drop-down list, select High, Medium, or Low.4. Click Apply.
Enabling Native Command Queuing on a ControllerNative Command Queuing, or NCQ, lets SATA disk drives arrange commands into the most efficientorder for optimum performance.To enable or disable NCQ for the drives on a controller:
1. In the Enterprise View, select a controller.2. On the ribbon, in the Controller group, click Set Properties.
80Proprietary and Confidential to PMC-Sierra, Inc.Document No.: CDP-00278-01-A Rev. A, Issue:
maxView Storage Manager User's Guide
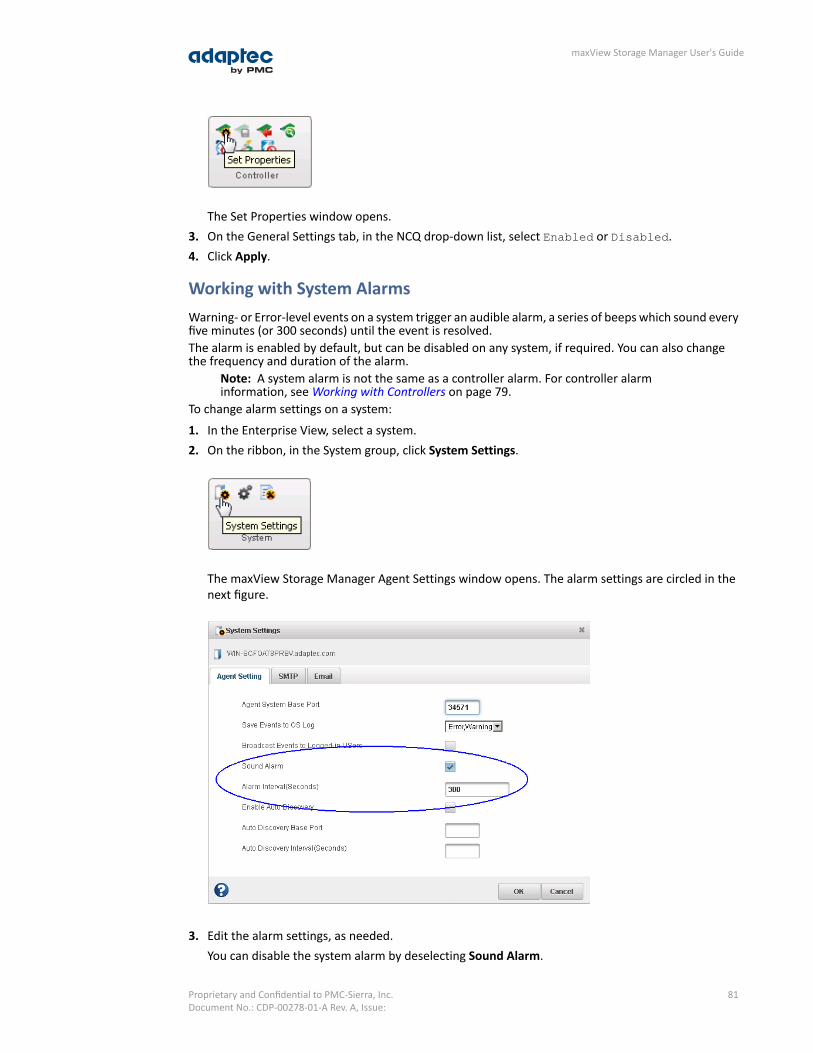
The Set Properties window opens.3. On the General Settings tab, in the NCQ drop-down list, select Enabled or Disabled.4. Click Apply.
Working with System AlarmsWarning- or Error-level events on a system trigger an audible alarm, a series of beeps which sound everyfive minutes (or 300 seconds) until the event is resolved.The alarm is enabled by default, but can be disabled on any system, if required. You can also changethe frequency and duration of the alarm.
Note: A system alarm is not the same as a controller alarm. For controller alarminformation, see Working with Controllers on page 79.
To change alarm settings on a system:
1. In the Enterprise View, select a system.2. On the ribbon, in the System group, click System Settings.
The maxView Storage Manager Agent Settings window opens. The alarm settings are circled in thenext figure.
3. Edit the alarm settings, as needed.You can disable the system alarm by deselecting Sound Alarm.
81Proprietary and Confidential to PMC-Sierra, Inc.Document No.: CDP-00278-01-A Rev. A, Issue:
maxView Storage Manager User's Guide

4. Click OK.The changes take effect immediately.
Updating Controller and Disk Drive FirmwareNote: This task is recommended for advanced users only.
maxView Storage Manager includes a wizard to help you update the firmware on the controllers anddisk drives in your storage space. The wizard updates the firmware for devices of the same type on thelocal or a remote system.For example, if your storage space includes disk drives from two different manufactures, you mustupdate the firmware for each manufacturer's drives separately by running the wizard twice. Additionally,if you have more than one system in your storage space, you must run the wizard for each systemseparately.To update the firmware on the controllers and disk drives in your storage space, review the prerequisitesin Before You Begin on page 82, then follow one of these sets of instructions:• Updating the Controller Firmware on page 82• Updating the Disk Drive Firmware on page 85
Before You BeginBefore you begin, download the latest firmware images from the Adaptec Web site atwww.adaptec.com,or from your vendor's support site on the World Wide Web. Controller images come in sets of one ormore files and have a .ufi file extension. Disk drive image file names vary by manufacturer.
Updating the Controller FirmwareUse the Firmware Update wizard to update the firmware for one or more controllers of the same typeon the local or a remote system.To update the controller firmware:
1. In the Enterprise View, select a system.2. On the ribbon, in the System group, click FW Update.
3. When the wizard opens, select Controller, then click Next.
82Proprietary and Confidential to PMC-Sierra, Inc.Document No.: CDP-00278-01-A Rev. A, Issue:
maxView Storage Manager User's Guide
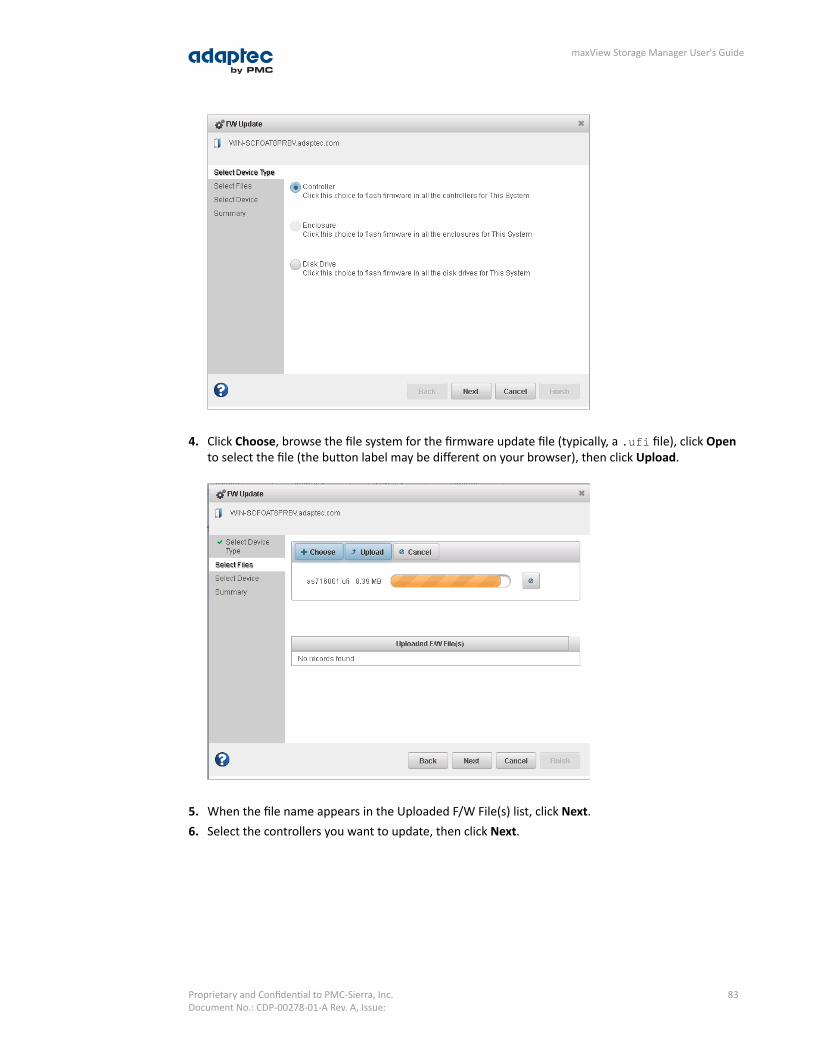
4. Click Choose, browse the file system for the firmware update file (typically, a .ufi file), click Opento select the file (the button label may be different on your browser), then click Upload.
5. When the file name appears in the Uploaded F/W File(s) list, click Next.6. Select the controllers you want to update, then click Next.
83Proprietary and Confidential to PMC-Sierra, Inc.Document No.: CDP-00278-01-A Rev. A, Issue:
maxView Storage Manager User's Guide
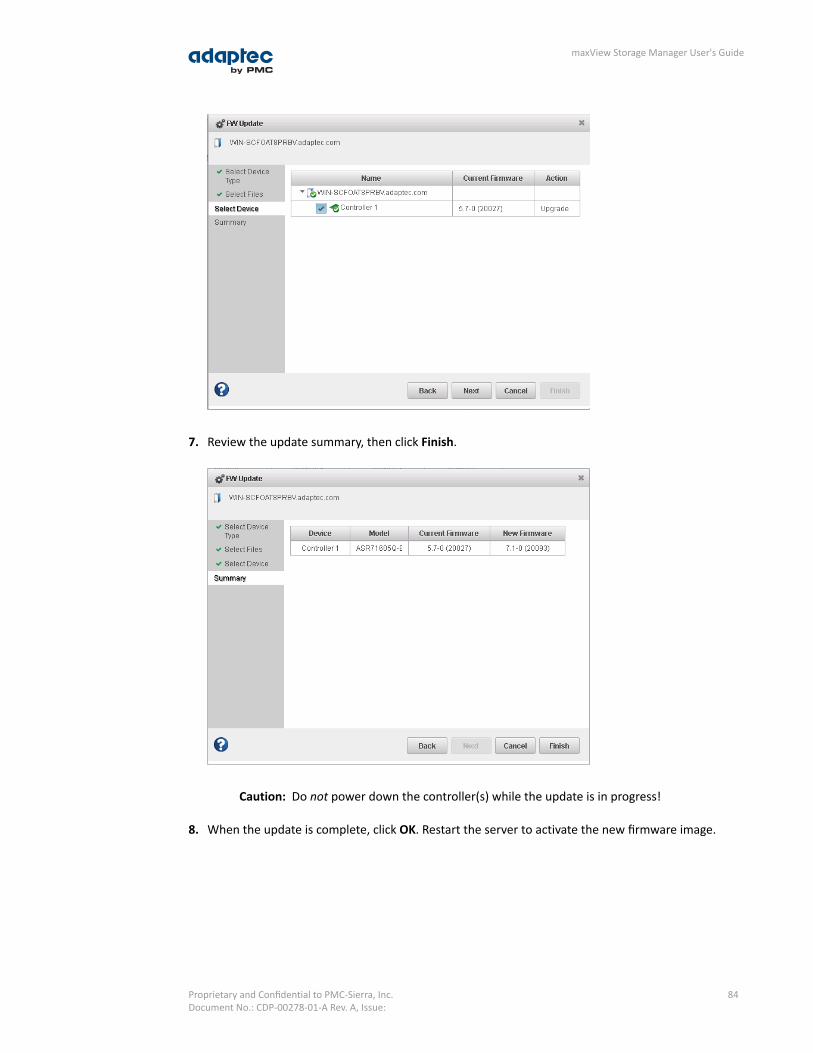
7. Review the update summary, then click Finish.
Caution: Do not power down the controller(s) while the update is in progress!
8. When the update is complete, click OK. Restart the server to activate the new firmware image.
84Proprietary and Confidential to PMC-Sierra, Inc.Document No.: CDP-00278-01-A Rev. A, Issue:
maxView Storage Manager User's Guide

Updating the Disk Drive FirmwareUse the Firmware Update wizard to update the firmware for one or more disk drives of the same typeon the local or a remote system. The procedure is similar to updating the controller firmware (seeUpdating the Controller Firmware on page 82).To update the disk drive firmware:
1. In the Enterprise View, select a system.2. On the ribbon, in the System group, click FW Update.
3. When the wizard opens, select Disk Drive, then click Next.
4. In the Select Files panel, click Choose, browse the file system for the firmware update file, clickOpento select the file (the button label may be different on your browser), then click Upload.
5. When the file name appears in the Uploaded F/W File(s) list, click Next.6. In the Select Devices panel, select the disk drives you want to update, then click Next.7. Review the update summary, then click Finish.
Caution: Do not power down the controller(s) while the update is in progress!
8. When the update is complete, click OK. Restart the server to activate the new firmware image.
85Proprietary and Confidential to PMC-Sierra, Inc.Document No.: CDP-00278-01-A Rev. A, Issue:
maxView Storage Manager User's Guide

10 Monitoring Status and ActivityThis section describes how maxView Storage Manager helps you monitor status and activity in yourstorage space.
Monitoring OptionsmaxView Storage Manager provides many ways to monitor the status of your storage space:• Event Log—The main window of maxView Storage Manager features an event log that provides
at-a-glance status information about activity (or events) occurring in your storage space. All Warning-and Error-level events are also recorded in your operating system's event log.See Viewing Activity Status in the Event Log on page 87 and Changing an Operating System's EventLog Setting on page 100.
• Task Log—The main window also features a task log that provides status information about theprogress of current or recurring tasks in your storage space, such as the creation or verification ofa logical drive.See Viewing Task Status in the Task Log on page 88.
• StorageDashboard—Occupying the largest portion of the main window in maxView Storage Manager,the Storage Dashboard provides complete, at-a-glance, information about the components of yourstorage space, including status information, physical and logical device properties, resources, andreliability indicators for hard drives and SSDs.See Viewing Component Status in the Storage Dashboard on page 88.
• Chart View—Provides a visual representation of free and used space for a system, controller, oryour entire storage space.See Viewing Storage Space Usage in Chart View on page 91.
• Notifications—You can set maxView Storage Manager to email or broadcast status notifications inyour choice of format to help you monitor activities in your storage space, such as:∘ Changes in the status of physical devices, such as disk drive failures.∘ Changes on local or remote systems, such as the expansion of a logical drive or the creation of
a hot spare.∘ Changes in temperature in storage enclosures, or that fans or power supplies within an enclosure
have failed.See pages Notifying Users by Email About Status and Activity on page 91 and Broadcasting AlertsAbout Status and Activity on page 97.
• Advanced Statistics—You can set maxView Storage Manager to log advanced I/O and usage statisticsfor the RAID controllers in your system.See Monitoring Advanced Statistics about Activity in Your Storage Space on page 97.
• Audible Alarm—A series of beeps sounds whenever a serious event occurs on your storage space.See Working with System Alarms on page 81.
Checking Status from the Main WindowYou can view status information and messages about the activity occurring in your storage space bylooking at the event log, status icons, and task log in the main window of maxView Storage Manager.(You can also view all events for a system in its operating system event log; see Changing an OperatingSystem's Event Log Setting on page 100.) Using the Storage Dashboard and Chart View, you can alsomonitor the physical and logical components of your storage space from the main window, includingsummary information and status, physical and logical device properties and resources, and usage andI/O statistics.
86Proprietary and Confidential to PMC-Sierra, Inc.Document No.: CDP-00278-01-A Rev. A, Issue:
maxView Storage Manager User's Guide
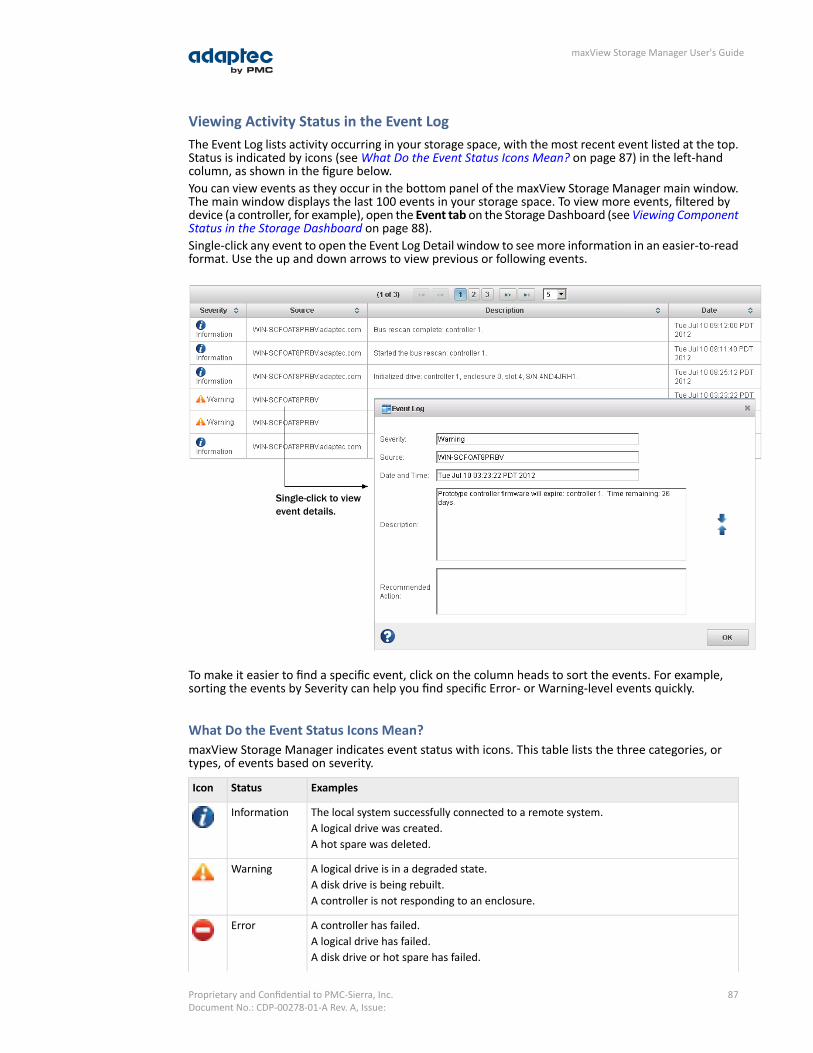
Viewing Activity Status in the Event LogThe Event Log lists activity occurring in your storage space, with the most recent event listed at the top.Status is indicated by icons (see What Do the Event Status Icons Mean? on page 87) in the left-handcolumn, as shown in the figure below.You can view events as they occur in the bottom panel of the maxView Storage Manager main window.The main window displays the last 100 events in your storage space. To view more events, filtered bydevice (a controller, for example), open the Event tab on the Storage Dashboard (seeViewing ComponentStatus in the Storage Dashboard on page 88).Single-click any event to open the Event Log Detail window to see more information in an easier-to-readformat. Use the up and down arrows to view previous or following events.
Single-click to viewevent details.
To make it easier to find a specific event, click on the column heads to sort the events. For example,sorting the events by Severity can help you find specific Error- or Warning-level events quickly.
What Do the Event Status Icons Mean?maxView Storage Manager indicates event status with icons. This table lists the three categories, ortypes, of events based on severity.
ExamplesStatusIcon
The local system successfully connected to a remote system.InformationA logical drive was created.A hot spare was deleted.
A logical drive is in a degraded state.WarningA disk drive is being rebuilt.A controller is not responding to an enclosure.
A controller has failed.ErrorA logical drive has failed.A disk drive or hot spare has failed.
87Proprietary and Confidential to PMC-Sierra, Inc.Document No.: CDP-00278-01-A Rev. A, Issue:
maxView Storage Manager User's Guide
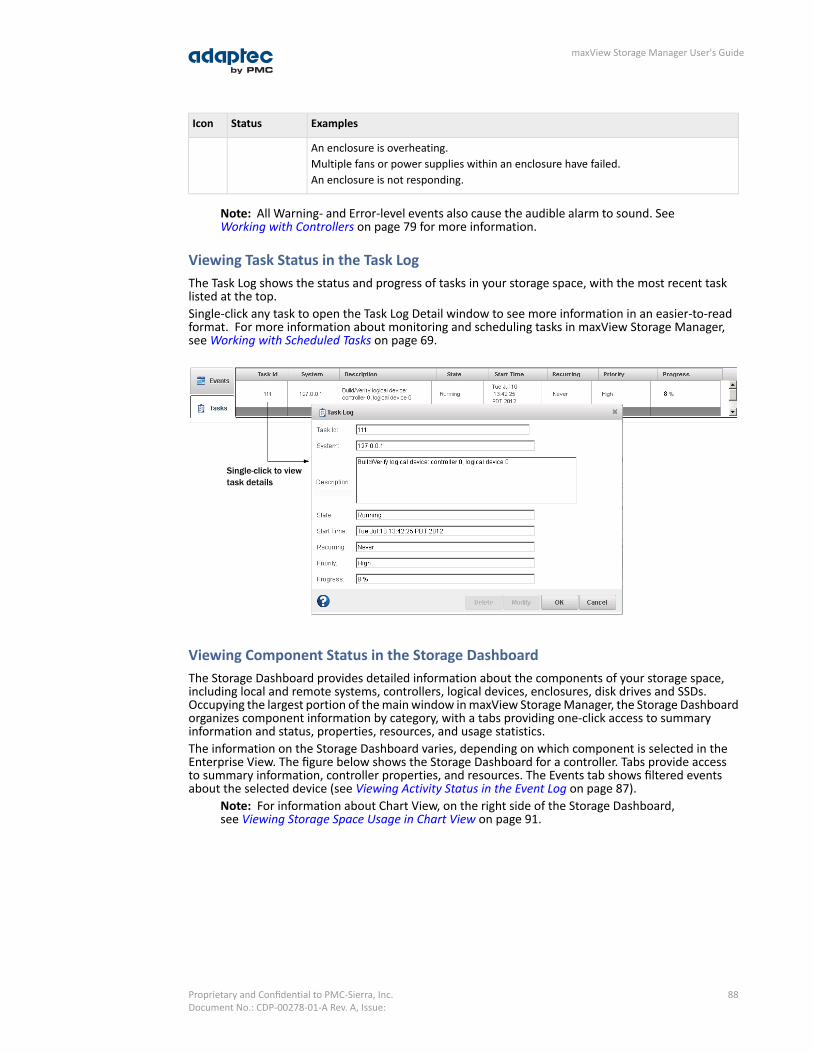
ExamplesStatusIcon
An enclosure is overheating.Multiple fans or power supplies within an enclosure have failed.An enclosure is not responding.
Note: All Warning- and Error-level events also cause the audible alarm to sound. SeeWorking with Controllers on page 79 for more information.
Viewing Task Status in the Task LogThe Task Log shows the status and progress of tasks in your storage space, with the most recent tasklisted at the top.Single-click any task to open the Task Log Detail window to see more information in an easier-to-readformat. For more information about monitoring and scheduling tasks in maxView Storage Manager,see Working with Scheduled Tasks on page 69.
Single-click to viewtask details
Viewing Component Status in the Storage DashboardThe Storage Dashboard provides detailed information about the components of your storage space,including local and remote systems, controllers, logical devices, enclosures, disk drives and SSDs.Occupying the largest portion of the main window in maxView Storage Manager, the Storage Dashboardorganizes component information by category, with a tabs providing one-click access to summaryinformation and status, properties, resources, and usage statistics.The information on the Storage Dashboard varies, depending on which component is selected in theEnterprise View. The figure below shows the Storage Dashboard for a controller. Tabs provide accessto summary information, controller properties, and resources. The Events tab shows filtered eventsabout the selected device (see Viewing Activity Status in the Event Log on page 87).
Note: For information about Chart View, on the right side of the Storage Dashboard,see Viewing Storage Space Usage in Chart View on page 91.
88Proprietary and Confidential to PMC-Sierra, Inc.Document No.: CDP-00278-01-A Rev. A, Issue:
maxView Storage Manager User's Guide
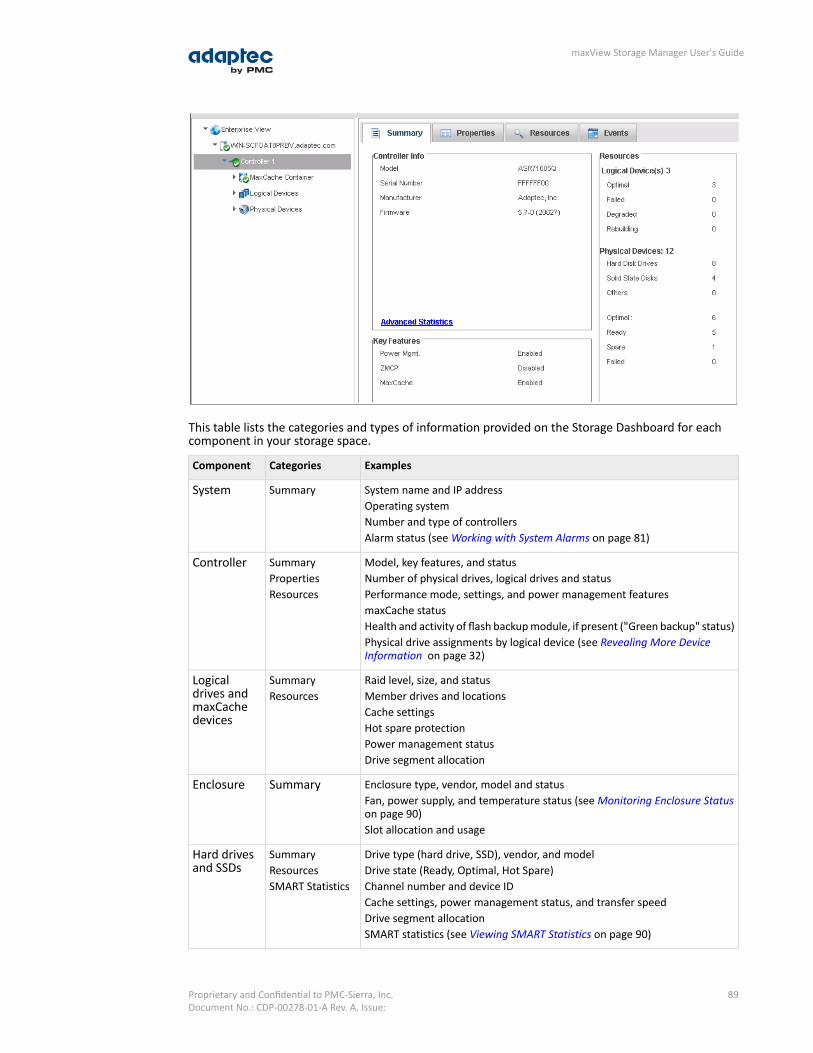
This table lists the categories and types of information provided on the Storage Dashboard for eachcomponent in your storage space.
ExamplesCategoriesComponent
System name and IP addressSummarySystemOperating systemNumber and type of controllersAlarm status (see Working with System Alarms on page 81)
Model, key features, and statusSummaryControllerNumber of physical drives, logical drives and statusPropertiesPerformance mode, settings, and power management featuresResourcesmaxCache statusHealth and activity of flash backup module, if present ("Green backup" status)Physical drive assignments by logical device (see Revealing More DeviceInformation on page 32)
Raid level, size, and statusSummaryLogicaldrives and Member drives and locationsResourcesmaxCachedevices Cache settings
Hot spare protectionPower management statusDrive segment allocation
Enclosure type, vendor, model and statusSummaryEnclosureFan, power supply, and temperature status (see Monitoring Enclosure Statuson page 90)Slot allocation and usage
Drive type (hard drive, SSD), vendor, and modelSummaryHard drivesand SSDs Drive state (Ready, Optimal, Hot Spare)Resources
Channel number and device IDSMART StatisticsCache settings, power management status, and transfer speedDrive segment allocationSMART statistics (see Viewing SMART Statistics on page 90)
89Proprietary and Confidential to PMC-Sierra, Inc.Document No.: CDP-00278-01-A Rev. A, Issue:
maxView Storage Manager User's Guide

Monitoring Enclosure StatusIf your storage space includes an enclosure with an enclosure management device, such as a SCSIAccessed Fault-Tolerant Enclosure (SAF-TE) processor, maxView Storage Manager displays temperature,fan, and power module status on the Storage Dashboard, as shown in the figure below.
Viewing SMART StatisticsYou can use the Storage Dashboard to view various indicators of reliability for the SATA hard drives andSSDs in your storage space. maxView Storage Manager displays SMART statistics for the drives usingSelf-Monitoring, Analysis and Reporting Technology available on most contemporary hard drives andnon-spinning storage devices. You can use this information to verify the health of your hard drives andSSDs and to predict drive failures.To view the SMART statistics for a hard drive or SSD, select the drive in the Enterprise View, then clickthe SMART tab on the Storage Dashboard. For SSDs, the statistics include wear-level and longevityindicators, as shown in next figure. Refer to your drive vendor's data sheet for a description of individualreport items.
SSD wear-level andlongevity indicators
90Proprietary and Confidential to PMC-Sierra, Inc.Document No.: CDP-00278-01-A Rev. A, Issue:
maxView Storage Manager User's Guide
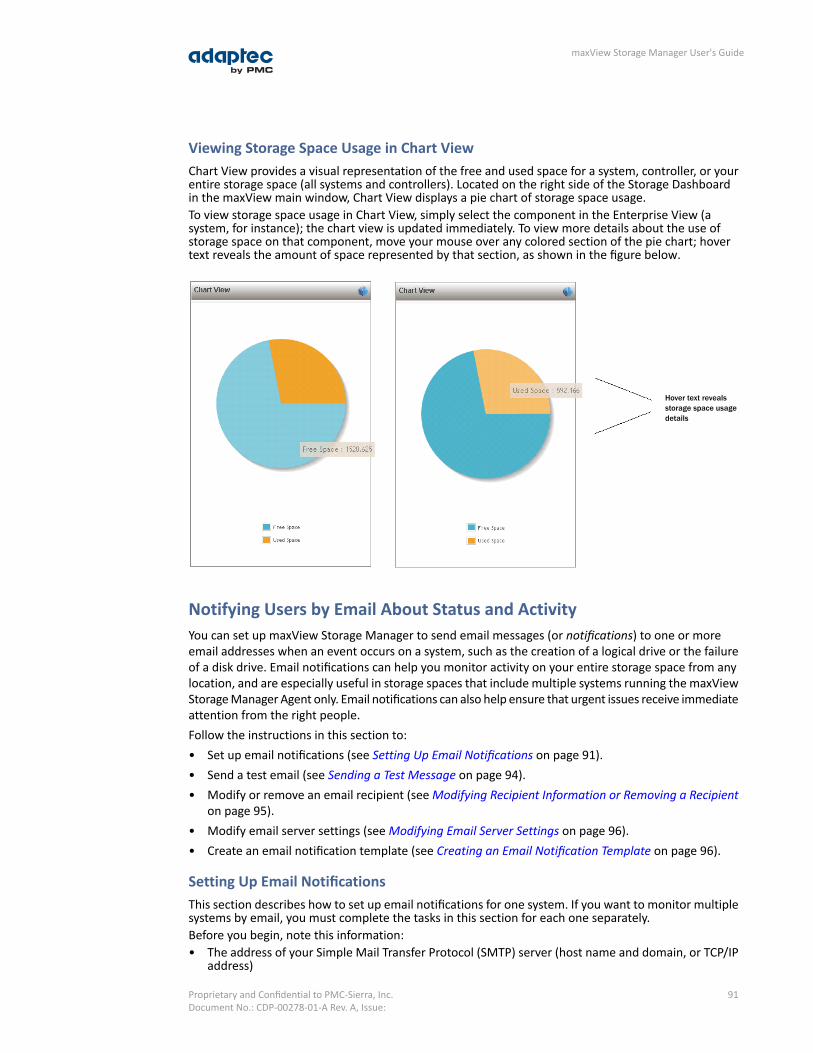
Viewing Storage Space Usage in Chart ViewChart View provides a visual representation of the free and used space for a system, controller, or yourentire storage space (all systems and controllers). Located on the right side of the Storage Dashboardin the maxView main window, Chart View displays a pie chart of storage space usage.To view storage space usage in Chart View, simply select the component in the Enterprise View (asystem, for instance); the chart view is updated immediately. To view more details about the use ofstorage space on that component, move your mouse over any colored section of the pie chart; hovertext reveals the amount of space represented by that section, as shown in the figure below.
Hover text revealsstorage space usagedetails
Notifying Users by Email About Status and ActivityYou can set up maxView Storage Manager to send email messages (or notifications) to one or moreemail addresses when an event occurs on a system, such as the creation of a logical drive or the failureof a disk drive. Email notifications can help you monitor activity on your entire storage space from anylocation, and are especially useful in storage spaces that include multiple systems running the maxViewStorage Manager Agent only. Email notifications can also help ensure that urgent issues receive immediateattention from the right people.Follow the instructions in this section to:• Set up email notifications (see Setting Up Email Notifications on page 91).• Send a test email (see Sending a Test Message on page 94).• Modify or remove an email recipient (see Modifying Recipient Information or Removing a Recipient
on page 95).• Modify email server settings (see Modifying Email Server Settings on page 96).• Create an email notification template (see Creating an Email Notification Template on page 96).
Setting Up Email NotificationsThis section describes how to set up email notifications for one system. If you want to monitor multiplesystems by email, you must complete the tasks in this section for each one separately.Before you begin, note this information:• The address of your Simple Mail Transfer Protocol (SMTP) server (host name and domain, or TCP/IP
address)
91Proprietary and Confidential to PMC-Sierra, Inc.Document No.: CDP-00278-01-A Rev. A, Issue:
maxView Storage Manager User's Guide
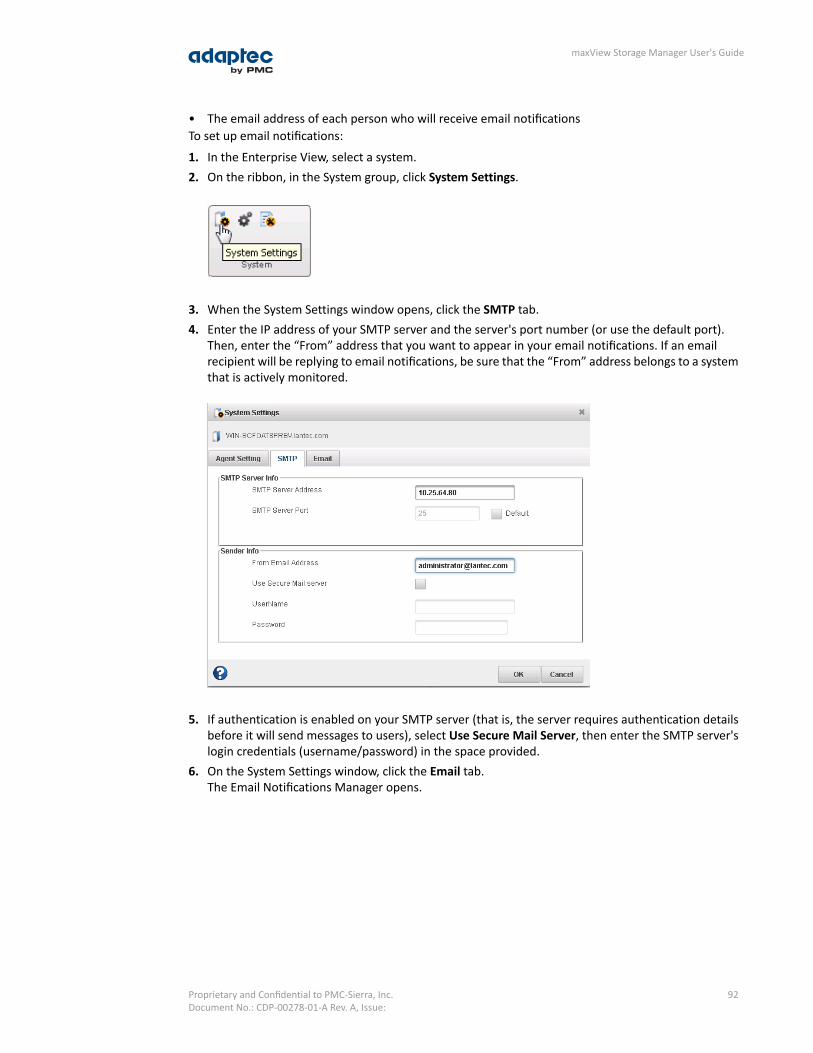
• The email address of each person who will receive email notificationsTo set up email notifications:
1. In the Enterprise View, select a system.2. On the ribbon, in the System group, click System Settings.
3. When the System Settings window opens, click the SMTP tab.4. Enter the IP address of your SMTP server and the server's port number (or use the default port).
Then, enter the “From” address that you want to appear in your email notifications. If an emailrecipient will be replying to email notifications, be sure that the “From” address belongs to a systemthat is actively monitored.
5. If authentication is enabled on your SMTP server (that is, the server requires authentication detailsbefore it will send messages to users), select Use Secure Mail Server, then enter the SMTP server'slogin credentials (username/password) in the space provided.
6. On the System Settings window, click the Email tab.The Email Notifications Manager opens.
92Proprietary and Confidential to PMC-Sierra, Inc.Document No.: CDP-00278-01-A Rev. A, Issue:
maxView Storage Manager User's Guide

7. Click Add Email. When the Add Email window opens, enter the recipient's email address, select thelevel of events that will trigger an email notification for that recipient (Error, Error/Warning,Error/Warning/Informational), then click Add. (For more information about event levels, see WhatDo the Event Status Icons Mean? on page 87.)
Repeat this step to add more email recipients.Each recipient appears in the Email Notifications Manager, as shown below:
93Proprietary and Confidential to PMC-Sierra, Inc.Document No.: CDP-00278-01-A Rev. A, Issue:
maxView Storage Manager User's Guide

8. When you're done adding email recipients, click OK.The email recipients and your SMTP server settings are saved.
9. Repeat the steps in this section for each system you want to monitor with email notifications, thencontinue by sending test messages to all recipients (see Sending a Test Message on page 94).
Sending a Test MessageTo ensure that an email recipient is receiving event notifications, you can send them a test message.To send a test message:
1. In the Enterprise View, select the system you want.2. On the ribbon, in the System group, click System Settings.
3. When the System Settings window opens, click the Email tab.The Email Notifications Manager opens.
4. Select one or more email addresses to send a test message to. To select all addresses, click the checkbox at the top of the list, as shown in the figure below.
94Proprietary and Confidential to PMC-Sierra, Inc.Document No.: CDP-00278-01-A Rev. A, Issue:
maxView Storage Manager User's Guide
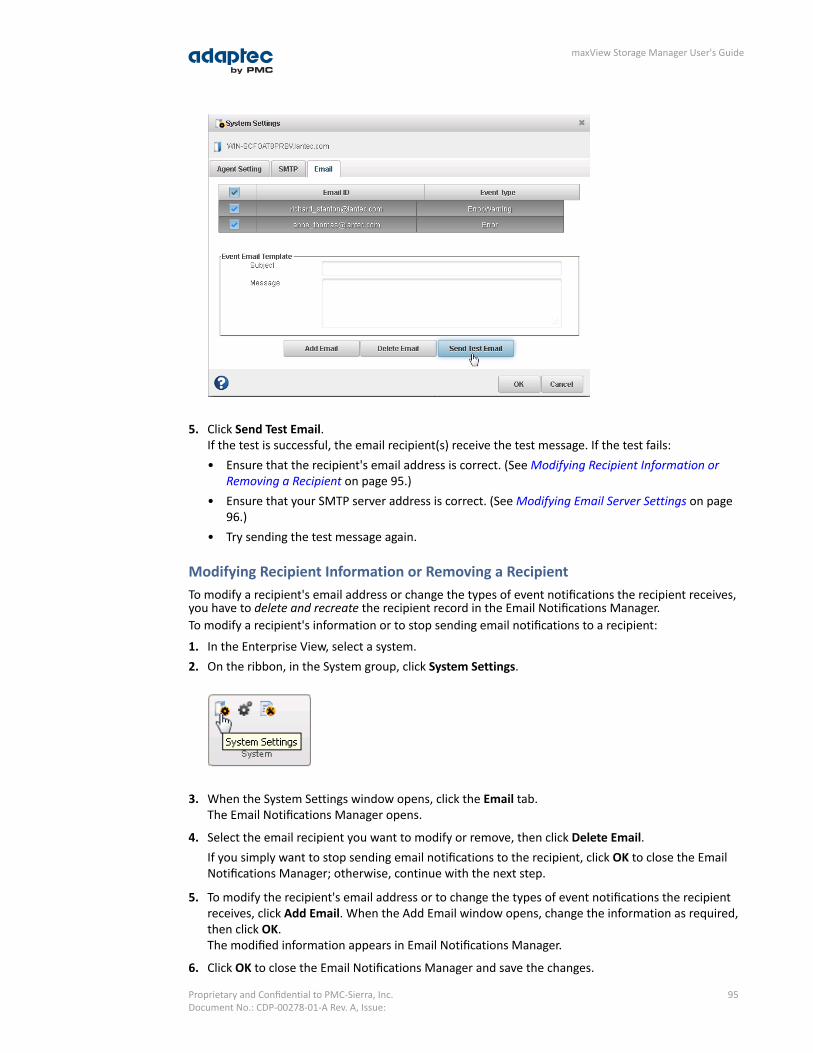
5. Click Send Test Email.If the test is successful, the email recipient(s) receive the test message. If the test fails:• Ensure that the recipient's email address is correct. (See Modifying Recipient Information or
Removing a Recipient on page 95.)• Ensure that your SMTP server address is correct. (See Modifying Email Server Settings on page
96.)• Try sending the test message again.
Modifying Recipient Information or Removing a RecipientTo modify a recipient's email address or change the types of event notifications the recipient receives,you have to delete and recreate the recipient record in the Email Notifications Manager.To modify a recipient's information or to stop sending email notifications to a recipient:
1. In the Enterprise View, select a system.2. On the ribbon, in the System group, click System Settings.
3. When the System Settings window opens, click the Email tab.The Email Notifications Manager opens.
4. Select the email recipient you want to modify or remove, then click Delete Email.If you simply want to stop sending email notifications to the recipient, click OK to close the EmailNotifications Manager; otherwise, continue with the next step.
5. To modify the recipient's email address or to change the types of event notifications the recipientreceives, click Add Email. When the Add Email window opens, change the information as required,then click OK.The modified information appears in Email Notifications Manager.
6. Click OK to close the Email Notifications Manager and save the changes.
95Proprietary and Confidential to PMC-Sierra, Inc.Document No.: CDP-00278-01-A Rev. A, Issue:
maxView Storage Manager User's Guide

Modifying Email Server SettingsYou can modify these email server settings, if required:• Address and port of your SMTP server• ‘From’ address that will appear in email notifications• Secure server login credentialsTo modify email server settings:
1. In the Enterprise View, select a system.2. On the ribbon, in the System group, click System Settings.
3. When the System Settings window opens, click the SMTP tab.4. Edit the SMTP server settings as required, then click OK to save your changes.
Creating an Email Notification TemplateYou can create an email notification template with a custom subject line and notification preamble. Thenotification preamble precedes the system-generated event message (created by maxView StorageManager), which includes (but is not limited to) the following information:• System on which the event occurred• Timestamp• Severity level (Error, Warning, Information)• Event detailsTo create an email notification template:
1. In the Enterprise View, select a system.2. On the ribbon, in the System group, click System Settings.
3. When the System Settings window opens, click the Email tab.The Email Notifications Manager opens.
4. In the Event Email Template section, enter a subject line for the email notification, then enter anotification message.
5. Click OK to save the template.
96Proprietary and Confidential to PMC-Sierra, Inc.Document No.: CDP-00278-01-A Rev. A, Issue:
maxView Storage Manager User's Guide
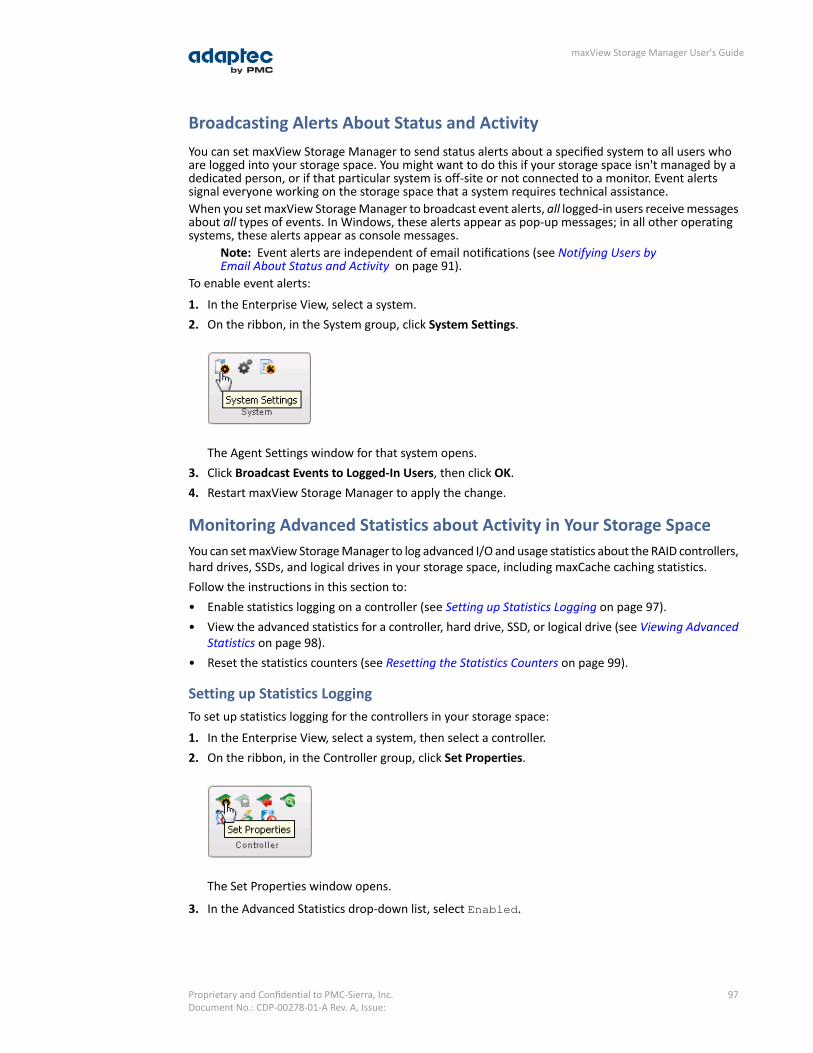
Broadcasting Alerts About Status and ActivityYou can set maxView Storage Manager to send status alerts about a specified system to all users whoare logged into your storage space. You might want to do this if your storage space isn't managed by adedicated person, or if that particular system is off-site or not connected to a monitor. Event alertssignal everyone working on the storage space that a system requires technical assistance.When you set maxView Storage Manager to broadcast event alerts, all logged-in users receive messagesabout all types of events. In Windows, these alerts appear as pop-up messages; in all other operatingsystems, these alerts appear as console messages.
Note: Event alerts are independent of email notifications (see Notifying Users byEmail About Status and Activity on page 91).
To enable event alerts:
1. In the Enterprise View, select a system.2. On the ribbon, in the System group, click System Settings.
The Agent Settings window for that system opens.3. Click Broadcast Events to Logged-In Users, then click OK.4. Restart maxView Storage Manager to apply the change.
Monitoring Advanced Statistics about Activity in Your Storage SpaceYou can set maxView Storage Manager to log advanced I/O and usage statistics about the RAID controllers,hard drives, SSDs, and logical drives in your storage space, including maxCache caching statistics.Follow the instructions in this section to:• Enable statistics logging on a controller (see Setting up Statistics Logging on page 97).• View the advanced statistics for a controller, hard drive, SSD, or logical drive (see Viewing Advanced
Statistics on page 98).• Reset the statistics counters (see Resetting the Statistics Counters on page 99).
Setting up Statistics LoggingTo set up statistics logging for the controllers in your storage space:
1. In the Enterprise View, select a system, then select a controller.2. On the ribbon, in the Controller group, click Set Properties.
The Set Properties window opens.
3. In the Advanced Statistics drop-down list, select Enabled.
97Proprietary and Confidential to PMC-Sierra, Inc.Document No.: CDP-00278-01-A Rev. A, Issue:
maxView Storage Manager User's Guide
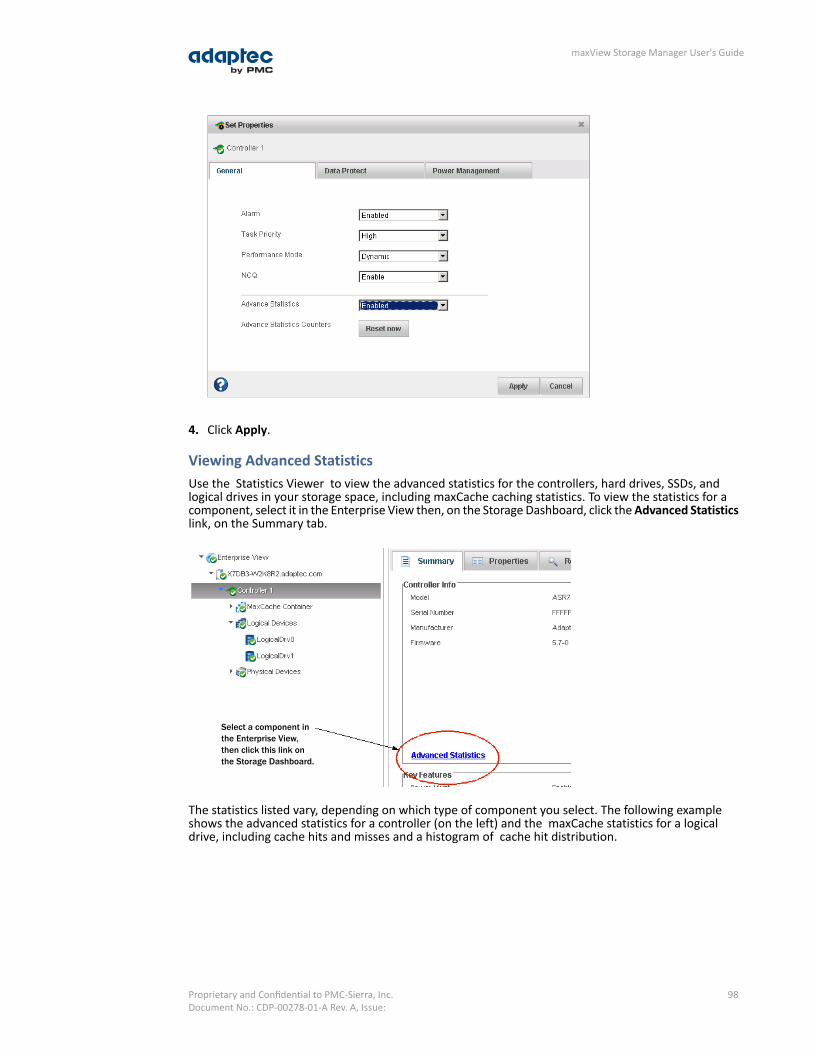
4. Click Apply.
Viewing Advanced StatisticsUse the Statistics Viewer to view the advanced statistics for the controllers, hard drives, SSDs, andlogical drives in your storage space, including maxCache caching statistics. To view the statistics for acomponent, select it in the Enterprise View then, on the Storage Dashboard, click theAdvanced Statisticslink, on the Summary tab.
Select a component inthe Enterprise View,then click this link onthe Storage Dashboard.
The statistics listed vary, depending on which type of component you select. The following exampleshows the advanced statistics for a controller (on the left) and the maxCache statistics for a logicaldrive, including cache hits and misses and a histogram of cache hit distribution.
98Proprietary and Confidential to PMC-Sierra, Inc.Document No.: CDP-00278-01-A Rev. A, Issue:
maxView Storage Manager User's Guide

Controller Statistics
maxCache Statisticsfor a Logical Drive
Resetting the Statistics CountersIn maxView Storage Manager, advanced statistics are cumulative. That is, the statistics continue toaccumulate until you reset the counters for a controller to zero.To reset the statistics counters for a controller:
1. In the Enterprise View, select a system, then select the controller you want to reset.2. On the ribbon, in the Controller group, click Set Properties.
The Set Properties window opens.
3. Click the Reset Now button, then click Apply.
The statistics counters are reset.
99Proprietary and Confidential to PMC-Sierra, Inc.Document No.: CDP-00278-01-A Rev. A, Issue:
maxView Storage Manager User's Guide
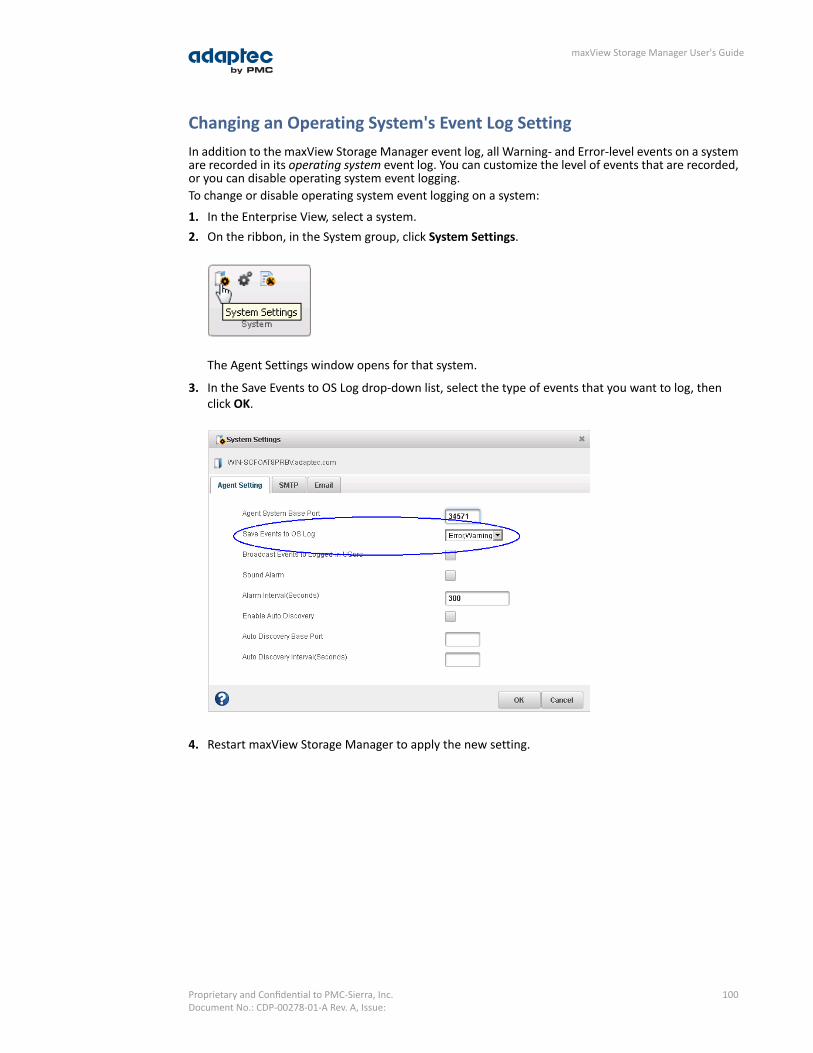
Changing an Operating System's Event Log SettingIn addition to the maxView Storage Manager event log, all Warning- and Error-level events on a systemare recorded in its operating system event log. You can customize the level of events that are recorded,or you can disable operating system event logging.To change or disable operating system event logging on a system:
1. In the Enterprise View, select a system.2. On the ribbon, in the System group, click System Settings.
The Agent Settings window opens for that system.
3. In the Save Events to OS Log drop-down list, select the type of events that you want to log, thenclick OK.
4. Restart maxView Storage Manager to apply the new setting.
100Proprietary and Confidential to PMC-Sierra, Inc.Document No.: CDP-00278-01-A Rev. A, Issue:
maxView Storage Manager User's Guide
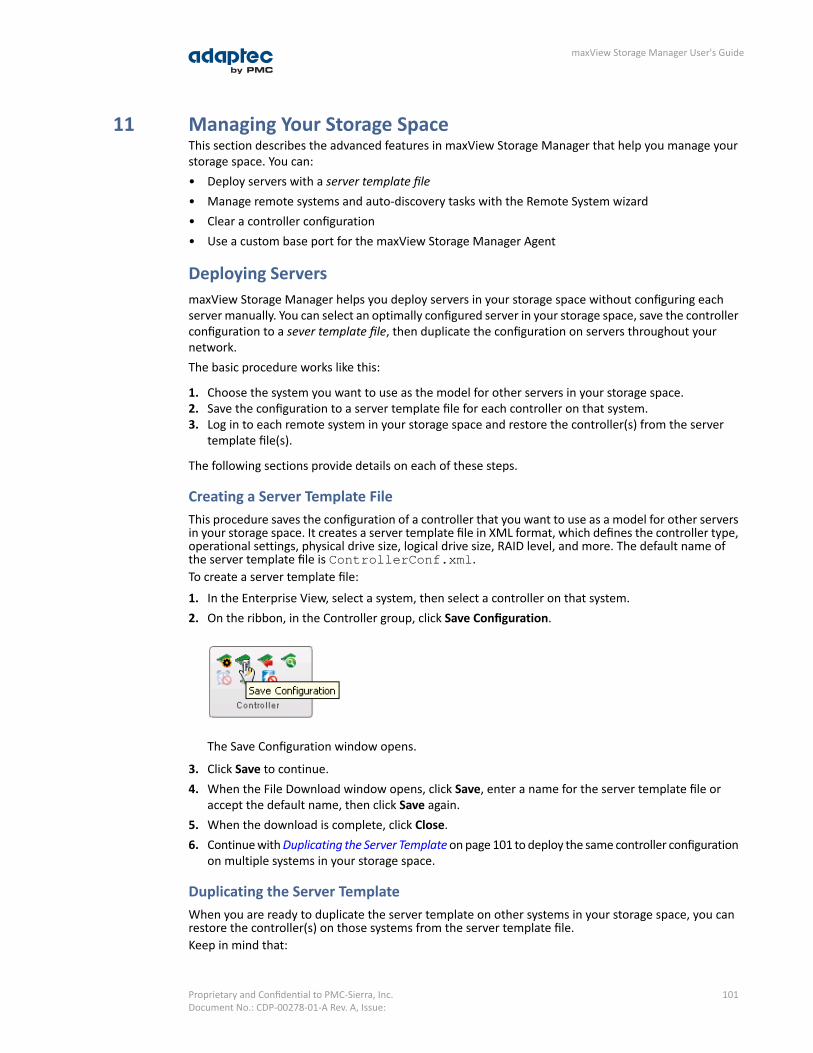
11 Managing Your Storage SpaceThis section describes the advanced features in maxView Storage Manager that help you manage yourstorage space. You can:• Deploy servers with a server template file• Manage remote systems and auto-discovery tasks with the Remote System wizard• Clear a controller configuration• Use a custom base port for the maxView Storage Manager Agent
Deploying ServersmaxView Storage Manager helps you deploy servers in your storage space without configuring eachserver manually. You can select an optimally configured server in your storage space, save the controllerconfiguration to a sever template file, then duplicate the configuration on servers throughout yournetwork.The basic procedure works like this:
1. Choose the system you want to use as the model for other servers in your storage space.2. Save the configuration to a server template file for each controller on that system.3. Log in to each remote system in your storage space and restore the controller(s) from the server
template file(s).
The following sections provide details on each of these steps.
Creating a Server Template FileThis procedure saves the configuration of a controller that you want to use as a model for other serversin your storage space. It creates a server template file in XML format, which defines the controller type,operational settings, physical drive size, logical drive size, RAID level, and more. The default name ofthe server template file is ControllerConf.xml.To create a server template file:
1. In the Enterprise View, select a system, then select a controller on that system.2. On the ribbon, in the Controller group, click Save Configuration.
The Save Configuration window opens.
3. Click Save to continue.4. When the File Download window opens, click Save, enter a name for the server template file or
accept the default name, then click Save again.5. When the download is complete, click Close.6. Continue withDuplicating the Server Templateon page 101 to deploy the same controller configuration
on multiple systems in your storage space.
Duplicating the Server TemplateWhen you are ready to duplicate the server template on other systems in your storage space, you canrestore the controller(s) on those systems from the server template file.Keep in mind that:
101Proprietary and Confidential to PMC-Sierra, Inc.Document No.: CDP-00278-01-A Rev. A, Issue:
maxView Storage Manager User's Guide
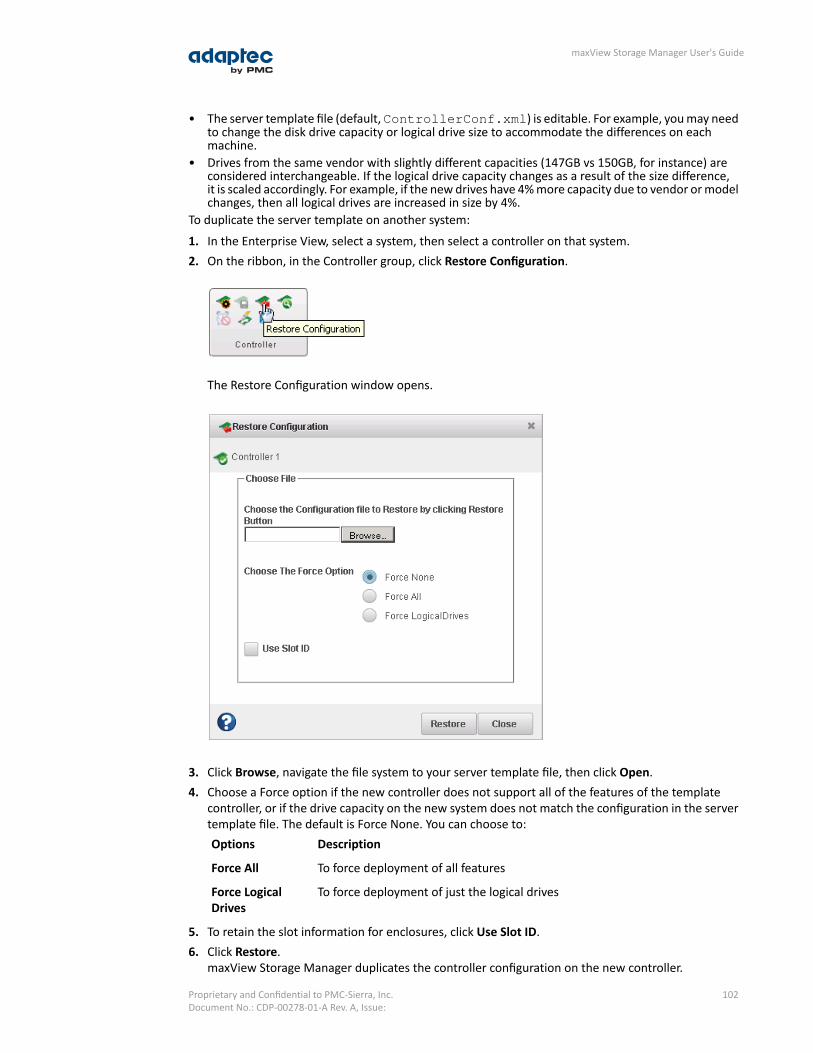
• The server template file (default,ControllerConf.xml) is editable. For example, you may needto change the disk drive capacity or logical drive size to accommodate the differences on eachmachine.
• Drives from the same vendor with slightly different capacities (147GB vs 150GB, for instance) areconsidered interchangeable. If the logical drive capacity changes as a result of the size difference,it is scaled accordingly. For example, if the new drives have 4% more capacity due to vendor or modelchanges, then all logical drives are increased in size by 4%.
To duplicate the server template on another system:
1. In the Enterprise View, select a system, then select a controller on that system.2. On the ribbon, in the Controller group, click Restore Configuration.
The Restore Configuration window opens.
3. Click Browse, navigate the file system to your server template file, then click Open.4. Choose a Force option if the new controller does not support all of the features of the template
controller, or if the drive capacity on the new system does not match the configuration in the servertemplate file. The default is Force None. You can choose to:
DescriptionOptions
To force deployment of all featuresForce All
To force deployment of just the logical drivesForce LogicalDrives
5. To retain the slot information for enclosures, click Use Slot ID.6. Click Restore.
maxView Storage Manager duplicates the controller configuration on the new controller.
102Proprietary and Confidential to PMC-Sierra, Inc.Document No.: CDP-00278-01-A Rev. A, Issue:
maxView Storage Manager User's Guide

7. Repeat these steps for each controller on the server. Choose a different server template file in Step3, as needed.
Managing Remote SystemsmaxView Storage Manager has a wizard to help you manage the remote systems in your storage space.The wizard simplifies the process of connecting to remote systems from the local system and addingthem to the Enterprise View.When you start maxView Storage Manager, an “auto-discovery” task runs in the background, continuouslysearching your network for systems running the maxView Storage Manager Agent. The wizard presentsa list of discovered systems (see figure below). You can select systems to add to the Enterprise Viewwhen you start maxView Storage Manager; add systems manually if they are not discovered automatically;and remove systems that you no longer want to manage.
Adding Remote Systems with the WizardFor basic instructions for adding remote systems with the wizard, see Logging into Remote Systemsfrom the Local System on page 37. Once you add a system in the wizard, it automatically appears in theEnterprise View each time you start maxView Storage Manager. You can work with a remote system'scontrollers, disk drives, and logical drives as if they were part of your local system.
Note: The wizard adds all selected systems to the Enterprise view even if login failson some systems. For those systems, try running the wizard again with different logincredentials.
Manually Adding a Remote SystemYou can add a remote system manually if auto-discovery fails to find the system on your network.To manually add a remote system:
1. On the ribbon, in the Home group, click Add System.
103Proprietary and Confidential to PMC-Sierra, Inc.Document No.: CDP-00278-01-A Rev. A, Issue:
maxView Storage Manager User's Guide

2. When the Add System window opens, click System Not Present.The Add System Manually window opens.
3. Enter the system name and login credentials in the space provided, then click Add.
The window closes and the system appears in the discovered systems list in the Add System window.
4. Select the system, then click Add.maxView Storage Manager connects to the remote system and adds it to the Enterprise View.
Removing a Remote SystemIf you no longer want to manage a remote system, you can remove it from the Enterprise View.
Note: Removing a remote system from the Enterprise View does not take it off-line.
To remove a remote system:
1. On the ribbon, in the Home group, click Delete System.
The Delete System window opens.
2. Select the system(s) you want to remove. To select all systems in the list, click the checkbox at thetop of the window.
104Proprietary and Confidential to PMC-Sierra, Inc.Document No.: CDP-00278-01-A Rev. A, Issue:
maxView Storage Manager User's Guide
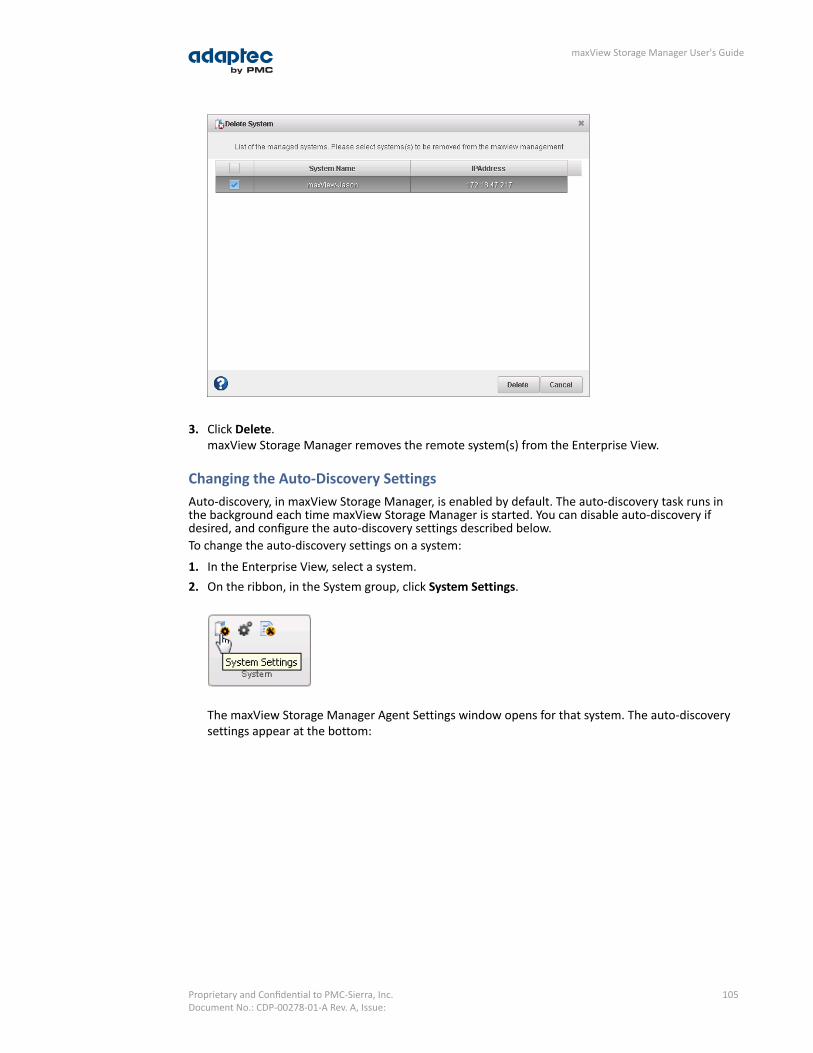
3. Click Delete.maxView Storage Manager removes the remote system(s) from the Enterprise View.
Changing the Auto-Discovery SettingsAuto-discovery, in maxView Storage Manager, is enabled by default. The auto-discovery task runs inthe background each time maxView Storage Manager is started. You can disable auto-discovery ifdesired, and configure the auto-discovery settings described below.To change the auto-discovery settings on a system:
1. In the Enterprise View, select a system.2. On the ribbon, in the System group, click System Settings.
The maxView Storage Manager Agent Settings window opens for that system. The auto-discoverysettings appear at the bottom:
105Proprietary and Confidential to PMC-Sierra, Inc.Document No.: CDP-00278-01-A Rev. A, Issue:
maxView Storage Manager User's Guide

3. To enable/disable auto-discovery, select Enable Auto Discovery. (This option toggles betweenenabled and disabled.)
4. Update the auto-discovery settings, as needed:• In the Auto Discovery Base Port field, enter the port number for the auto-discovery task. You
can use any available port for auto-discovery. The default port is 34570. If you change the port,you must restart the maxView Storage Manager Agent for the change to take effect.
• In the Auto Discovery Interval field, enter the number of seconds between each auto-discoverycheck. This number determines how often maxView Storage Manager checks for changes inremote system resources. The default is 360 seconds.
5. Click OK to save the changes.
Clearing the Controller ConfigurationYou can clear the configuration of a controller, if needed, to accommodate changes in your storagespace. For example, you may want to clear a controller if you upgraded your hardware or if you plan tomove the controller to another machine. Clearing the configuration destroys the controller meta-data,including logical device information, partition information, maxCache information, and so on. Once youclear the controller configuration, your online data is no longer accessible.
Caution: When you clear a controller configuration, you lose all data stored on thatcontroller. Be sure you no longer need the data on the controller before proceeding.
To clear the controller configuration:
1. In the Enterprise View, select a system, then select a controller on that system.2. On the ribbon, in the Controller group, click Clear Configuration.
A message window opens, warning that this operation destroys your data.
106Proprietary and Confidential to PMC-Sierra, Inc.Document No.: CDP-00278-01-A Rev. A, Issue:
maxView Storage Manager User's Guide
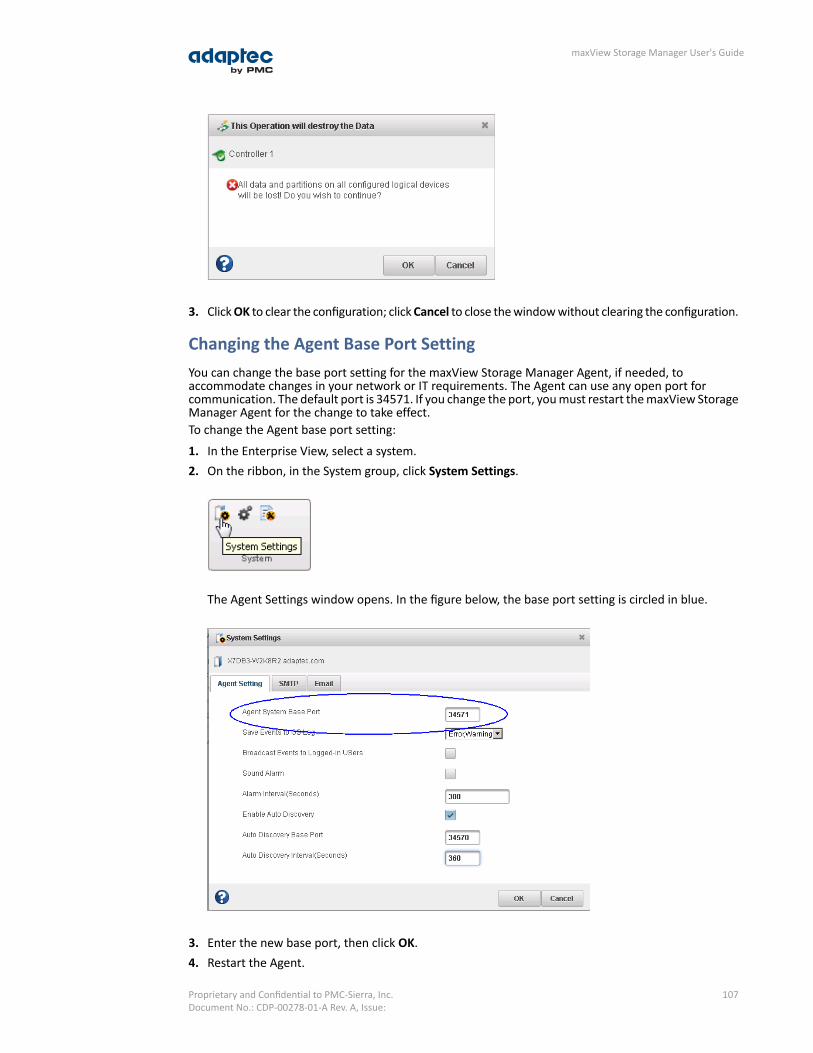
3. ClickOK to clear the configuration; clickCancel to close the window without clearing the configuration.
Changing the Agent Base Port SettingYou can change the base port setting for the maxView Storage Manager Agent, if needed, toaccommodate changes in your network or IT requirements. The Agent can use any open port forcommunication. The default port is 34571. If you change the port, you must restart the maxView StorageManager Agent for the change to take effect.To change the Agent base port setting:
1. In the Enterprise View, select a system.2. On the ribbon, in the System group, click System Settings.
The Agent Settings window opens. In the figure below, the base port setting is circled in blue.
3. Enter the new base port, then click OK.4. Restart the Agent.
107Proprietary and Confidential to PMC-Sierra, Inc.Document No.: CDP-00278-01-A Rev. A, Issue:
maxView Storage Manager User's Guide
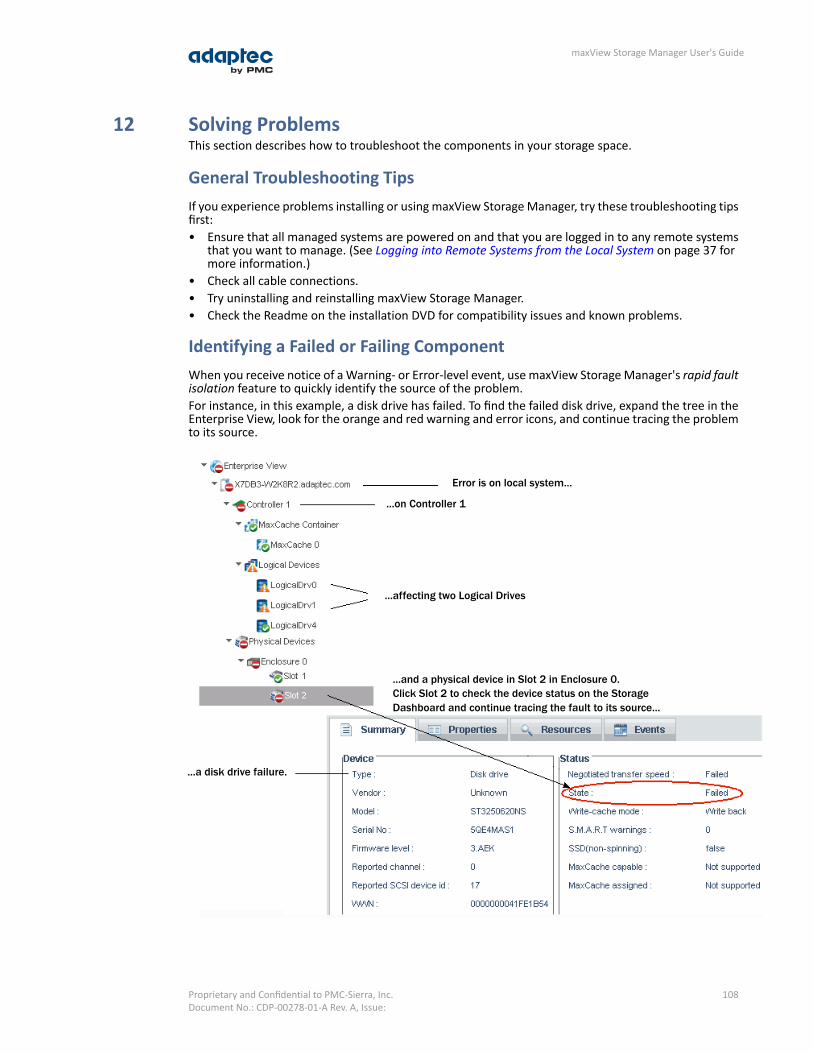
12 Solving ProblemsThis section describes how to troubleshoot the components in your storage space.
General Troubleshooting TipsIf you experience problems installing or using maxView Storage Manager, try these troubleshooting tipsfirst:• Ensure that all managed systems are powered on and that you are logged in to any remote systems
that you want to manage. (See Logging into Remote Systems from the Local System on page 37 formore information.)
• Check all cable connections.• Try uninstalling and reinstalling maxView Storage Manager.• Check the Readme on the installation DVD for compatibility issues and known problems.
Identifying a Failed or Failing ComponentWhen you receive notice of a Warning- or Error-level event, use maxView Storage Manager's rapid faultisolation feature to quickly identify the source of the problem.For instance, in this example, a disk drive has failed. To find the failed disk drive, expand the tree in theEnterprise View, look for the orange and red warning and error icons, and continue tracing the problemto its source.
Error is on local system...
...on Controller 1
...affecting two Logical Drives
...and a physical device in Slot 2 in Enclosure 0.Click Slot 2 to check the device status on the StorageDashboard and continue tracing the fault to its source...
...a disk drive failure.
108Proprietary and Confidential to PMC-Sierra, Inc.Document No.: CDP-00278-01-A Rev. A, Issue:
maxView Storage Manager User's Guide

Recovering from a Disk Drive FailureThis section describes how to recover when a disk drive or SSD fails:• If the logical drive is protected by a hot spare, see Failed Disk Drive Protected by a Hot Spare on page
109.• If the logical drive is not protected by a hot spare, see Failed Disk Drive Not Protected by a Hot Spare
on page 109.• If there is a disk drive failure in more than one logical drive simultaneously, see Failure in Multiple
Logical Drives Simultaneously on page 109.• If it is a RAID 0 logical drive, see Disk Drive Failure in a RAID 0 Logical Drive on page 110.• If multiple disk drives fail within the same logical drive, see Multiple Disk Drive Failures in the Same
Logical Drive on page 110.
Failed Disk Drive Protected by a Hot SpareIf a disk drive in a logical drive fails and that logical drive is protected by a hot spare, the hot spare isautomatically incorporated into the logical drive and takes over for the failed drive.For example, if a disk drive fails in a RAID 5 logical drive, the logical drive is automatically rebuilt, withits data reconstructed using the hot spare in place of the failed drive. You can access the logical drivewhile it's rebuilding.To recover from the failure:
1. Remove and replace the failed disk drive, following the manufacturer's instructions.2. If copyback is not enabled—Remove the ‘hot spare’ designation from the original hot spare (the disk
drive that was built into the logical drive). See Removing or Deleting a Dedicated Hot Spare on page47 for instructions. Then, designate a new hot spare to protect the logical drives on that controller.If copyback is enabled—Data is automatically moved back to its original location once the controllerdetects that the failed drive has been replaced. No action is required. See Enabling Copyback onpage 48 for more information.
Failed Disk Drive Not Protected by a Hot SpareIf a disk drive in a logical drive fails when the logical drive is not protected by a hot spare, remove andreplace the failed disk drive. The controller detects the new disk drive and begins to rebuild it. You canaccess the logical drive while it's rebuilding.For example, when one of the disk drives fails in a RAID 1 logical drive, the logical drive is not automaticallyrebuilt. The failed disk drive must be removed and replaced before the logical drive can be rebuilt.If the controller fails to rebuild the logical drive, check that the cables, disk drives, and controllers areproperly installed and connected. Then, if necessary, follow the instructions in Rebuilding Logical Driveson page 111.
Failure in Multiple Logical Drives SimultaneouslyIf a disk drive fails in more than one logical drive at the same time (one failure per logical drive), andthe logical drives have hot spares protecting them, the controller rebuilds the logical drives with theselimitations:• A hot spare must be of equal or greater size than the failed disk drive it's replacing.• Failed disk drives are replaced with hot spares in the order in which they failed. (The logical drive
that includes the disk drive that failed first is rebuilt first, assuming an appropriate hot spare isavailable—see the previous bullet.)
Note: If the number of disk drive failures exceeds the number of hot spares, see FailedDisk Drive Not Protected by a Hot Spare on page 109.
If copyback is enabled, data is moved back to its original location once the controller detects that thefailed drive has been replaced. See Enabling Copyback on page 48 for more information.
109Proprietary and Confidential to PMC-Sierra, Inc.Document No.: CDP-00278-01-A Rev. A, Issue:
maxView Storage Manager User's Guide
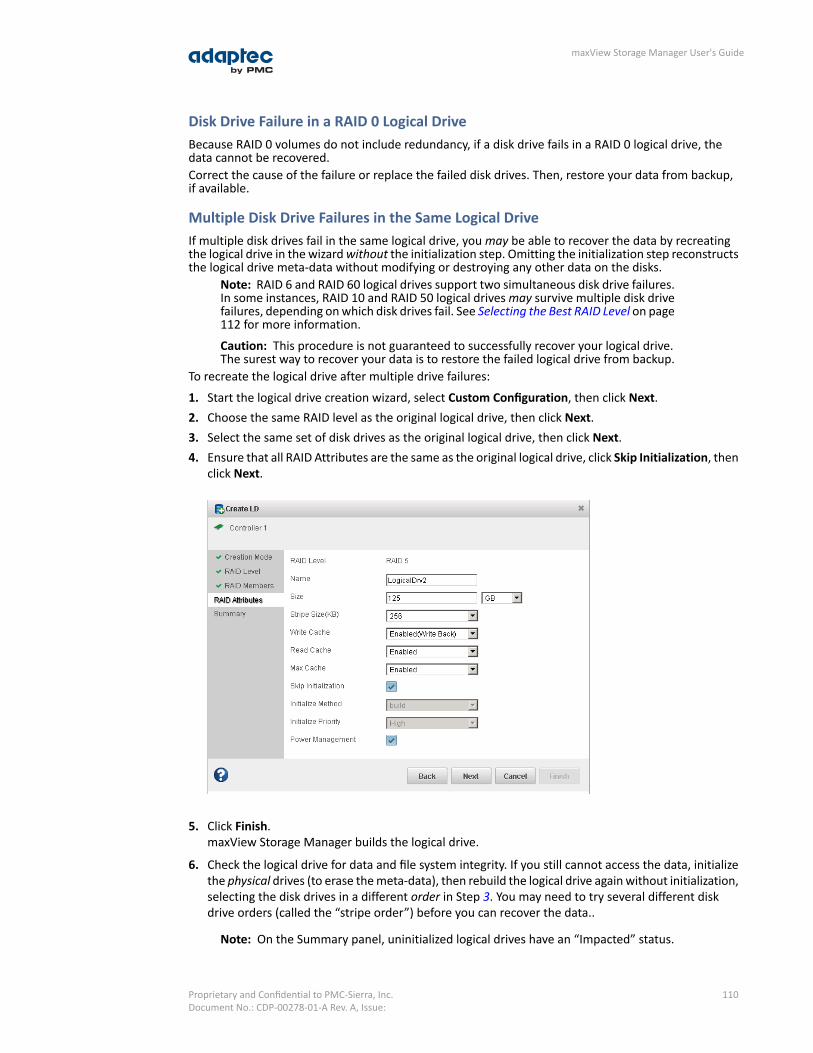
Disk Drive Failure in a RAID 0 Logical DriveBecause RAID 0 volumes do not include redundancy, if a disk drive fails in a RAID 0 logical drive, thedata cannot be recovered.Correct the cause of the failure or replace the failed disk drives. Then, restore your data from backup,if available.
Multiple Disk Drive Failures in the Same Logical DriveIf multiple disk drives fail in the same logical drive, you may be able to recover the data by recreatingthe logical drive in the wizard without the initialization step. Omitting the initialization step reconstructsthe logical drive meta-data without modifying or destroying any other data on the disks.
Note: RAID 6 and RAID 60 logical drives support two simultaneous disk drive failures.In some instances, RAID 10 and RAID 50 logical drives may survive multiple disk drivefailures, depending on which disk drives fail. See Selecting the Best RAID Level on page112 for more information.
Caution: This procedure is not guaranteed to successfully recover your logical drive.The surest way to recover your data is to restore the failed logical drive from backup.
To recreate the logical drive after multiple drive failures:
1. Start the logical drive creation wizard, select Custom Configuration, then click Next.2. Choose the same RAID level as the original logical drive, then click Next.3. Select the same set of disk drives as the original logical drive, then click Next.4. Ensure that all RAID Attributes are the same as the original logical drive, click Skip Initialization, then
click Next.
5. Click Finish.maxView Storage Manager builds the logical drive.
6. Check the logical drive for data and file system integrity. If you still cannot access the data, initializethe physical drives (to erase the meta-data), then rebuild the logical drive again without initialization,selecting the disk drives in a different order in Step 3. You may need to try several different diskdrive orders (called the “stripe order”) before you can recover the data..
Note: On the Summary panel, uninitialized logical drives have an “Impacted” status.
110Proprietary and Confidential to PMC-Sierra, Inc.Document No.: CDP-00278-01-A Rev. A, Issue:
maxView Storage Manager User's Guide
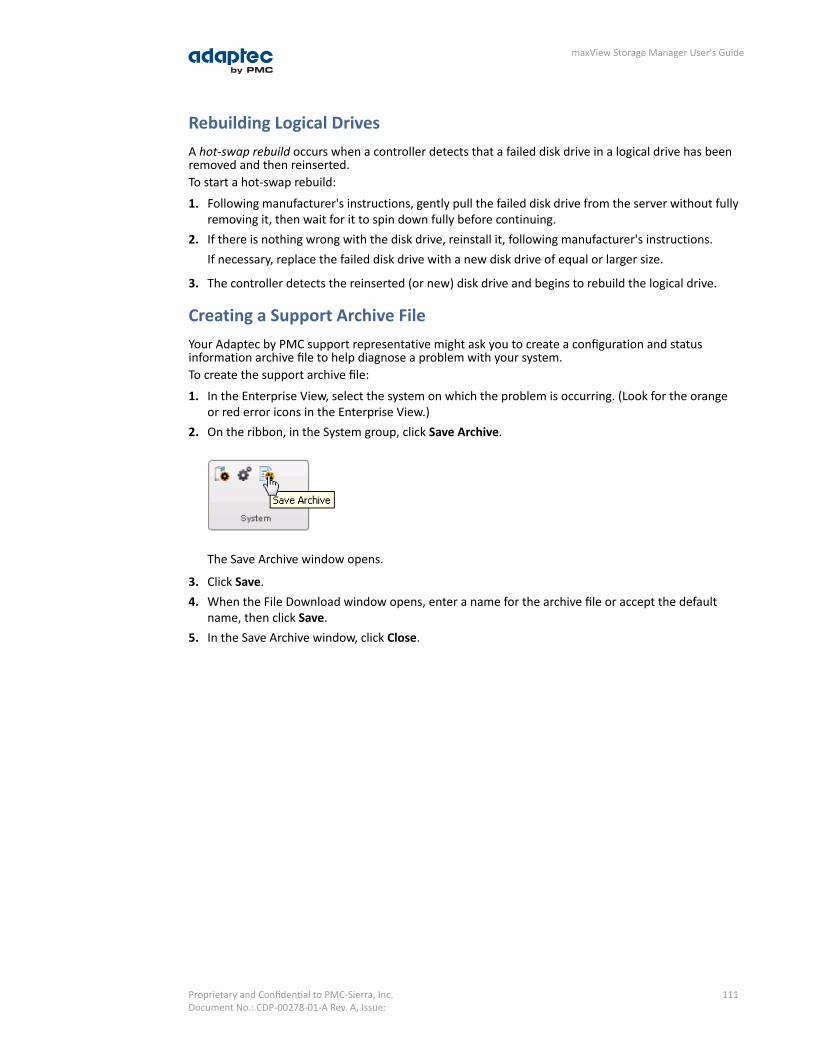
Rebuilding Logical DrivesA hot-swap rebuild occurs when a controller detects that a failed disk drive in a logical drive has beenremoved and then reinserted.To start a hot-swap rebuild:
1. Following manufacturer's instructions, gently pull the failed disk drive from the server without fullyremoving it, then wait for it to spin down fully before continuing.
2. If there is nothing wrong with the disk drive, reinstall it, following manufacturer's instructions.If necessary, replace the failed disk drive with a new disk drive of equal or larger size.
3. The controller detects the reinserted (or new) disk drive and begins to rebuild the logical drive.
Creating a Support Archive FileYour Adaptec by PMC support representative might ask you to create a configuration and statusinformation archive file to help diagnose a problem with your system.To create the support archive file:
1. In the Enterprise View, select the system on which the problem is occurring. (Look for the orangeor red error icons in the Enterprise View.)
2. On the ribbon, in the System group, click Save Archive.
The Save Archive window opens.
3. Click Save.4. When the File Download window opens, enter a name for the archive file or accept the default
name, then click Save.5. In the Save Archive window, click Close.
111Proprietary and Confidential to PMC-Sierra, Inc.Document No.: CDP-00278-01-A Rev. A, Issue:
maxView Storage Manager User's Guide

A Selecting the Best RAID LevelWhen you create logical drives in maxView Storage Manager, you can assign a RAID level to protectyour data.Each RAID level offers a unique combination of performance and redundancy. RAID levels also vary bythe number of disk drives they support.This section provides a comparison of all the RAID levels supported by maxView Storage Manager, andprovides a basic overview of each to help you select the best level of protection for your storage system.
112Proprietary and Confidential to PMC-Sierra, Inc.Document No.: CDP-00278-01-A Rev. A, Issue:
maxView Storage Manager User's Guide

Comparing RAID LevelsUse this table to select the RAID levels that are most appropriate for the logical drives on your storagespace, based on the number of available disk drives and your requirements for performance and reliability.
MinimumDisk Drives
Built-in HotSpare
WritePerformance
ReadPerformance
Disk DriveUsage
RedundancyRAID Level
2No******100%NoRAID 0
2No****50%YesRAID 1
3No****50%YesRAID 1E
4No****50%YesRAID 10
3No****67 – 94%YesRAID 5
6No****67 – 94%YesRAID 50
4No***50 – 88%YesRAID 6
8No***50 – 88%YesRAID 60
Disk drive usage, read performance, and write performance depend on the number of drives in thelogical drive. In general, the more drives, the better the performance.
Understanding Drive SegmentsA drive segment is a disk drive or portion of a disk drive that is used to create a logical drive. A disk drivecan include both RAID segments (segments that are part of a logical drive) and available segments. Eachsegment can be part of only one logical drive at a time. If a disk drive is not part of any logical drive, theentire disk is an available segment.
113Proprietary and Confidential to PMC-Sierra, Inc.Document No.: CDP-00278-01-A Rev. A, Issue:
maxView Storage Manager User's Guide
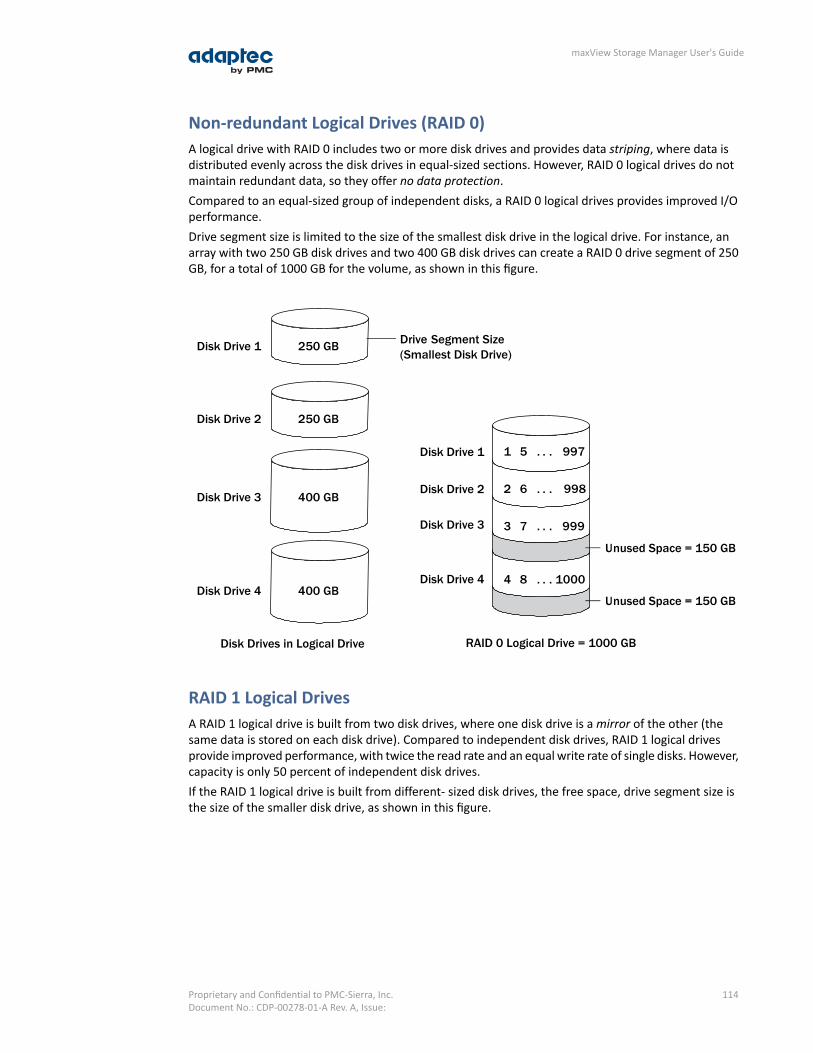
Non-redundant Logical Drives (RAID 0)A logical drive with RAID 0 includes two or more disk drives and provides data striping, where data isdistributed evenly across the disk drives in equal-sized sections. However, RAID 0 logical drives do notmaintain redundant data, so they offer no data protection.Compared to an equal-sized group of independent disks, a RAID 0 logical drives provides improved I/Operformance.Drive segment size is limited to the size of the smallest disk drive in the logical drive. For instance, anarray with two 250 GB disk drives and two 400 GB disk drives can create a RAID 0 drive segment of 250GB, for a total of 1000 GB for the volume, as shown in this figure.
Unused Space = 150 GB
Disk Drive 1
Disk Drive 2
Disk Drive 3
Disk Drive 4
250 GB
250 GB
400 GB
400 GB
Drive Segment Size(Smallest Disk Drive)
Disk Drive 2
Disk Drive 3
Disk Drive 4
Disk Drive 1
Unused Space = 150 GB
Disk Drives in Logical Drive RAID 0 Logical Drive = 1000 GB
9971 5 . . .
9982 6 . . .
9993 7 . . .
10004 8 . . .
RAID 1 Logical DrivesA RAID 1 logical drive is built from two disk drives, where one disk drive is a mirror of the other (thesame data is stored on each disk drive). Compared to independent disk drives, RAID 1 logical drivesprovide improved performance, with twice the read rate and an equal write rate of single disks. However,capacity is only 50 percent of independent disk drives.If the RAID 1 logical drive is built from different- sized disk drives, the free space, drive segment size isthe size of the smaller disk drive, as shown in this figure.
114Proprietary and Confidential to PMC-Sierra, Inc.Document No.: CDP-00278-01-A Rev. A, Issue:
maxView Storage Manager User's Guide

Disk Drive 2
Disk Drive 1
400 GB
Drive Segment Size(Smallest Disk Drive)
Disk Drive 1
Disk Drive 2
Disk Drives in Logical Drive RAID 1 Logical Drive = 250 GB
1 – 250
1 – 250
Unused Space = 150 GB
250 GB
RAID 1 Enhanced Logical DrivesA RAID 1 Enhanced (RAID 1E) logical drive—also known as a striped mirror—is similar to a RAID 1 arrayexcept that data is both mirrored and striped, and more disk drives can be included. A RAID 1E logicaldrive can be built from three or more disk drives.In this example, the large bold numbers represent the striped data, and the smaller, non-bold numbersrepresent the mirrored data stripes.
Disk Drive 2 400 GB
400 GB
400 GBDisk Drive 3
Disk Drive 2
Disk Drive 1
Disk Drive 3
3
1
2
6
4
5
Disk Drives in Logical Drive RAID 1E Logical Drive = 600 GB
Disk Drive 1
115Proprietary and Confidential to PMC-Sierra, Inc.Document No.: CDP-00278-01-A Rev. A, Issue:
maxView Storage Manager User's Guide
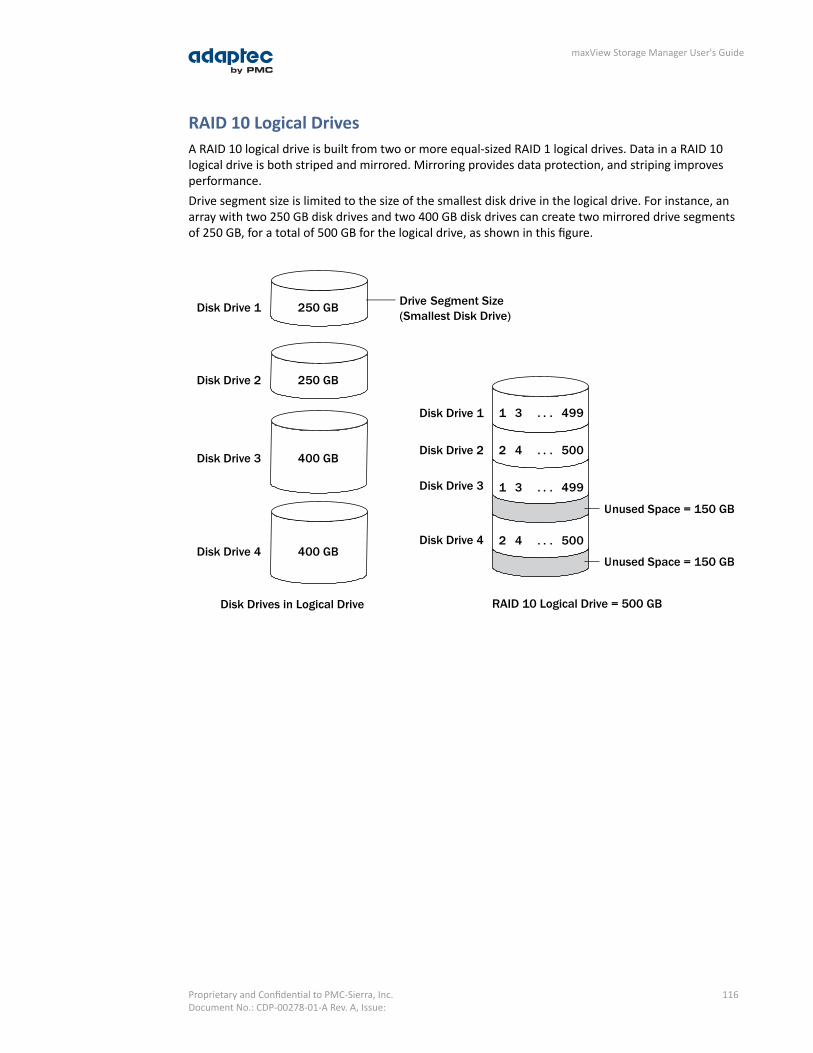
RAID 10 Logical DrivesA RAID 10 logical drive is built from two or more equal-sized RAID 1 logical drives. Data in a RAID 10logical drive is both striped and mirrored. Mirroring provides data protection, and striping improvesperformance.Drive segment size is limited to the size of the smallest disk drive in the logical drive. For instance, anarray with two 250 GB disk drives and two 400 GB disk drives can create two mirrored drive segmentsof 250 GB, for a total of 500 GB for the logical drive, as shown in this figure.
Unused Space = 150 GB
Disk Drive 1
Disk Drive 2
Disk Drive 3
Disk Drive 4
250 GB
250 GB
400 GB
400 GB
Drive Segment Size(Smallest Disk Drive)
Disk Drive 2
Disk Drive 3
Disk Drive 4
Disk Drive 1
Unused Space = 150 GB
Disk Drives in Logical Drive RAID 10 Logical Drive = 500 GB
4991 3 . . .
5002 4 . . .
4991 3 . . .
5002 4 . . .
116Proprietary and Confidential to PMC-Sierra, Inc.Document No.: CDP-00278-01-A Rev. A, Issue:
maxView Storage Manager User's Guide
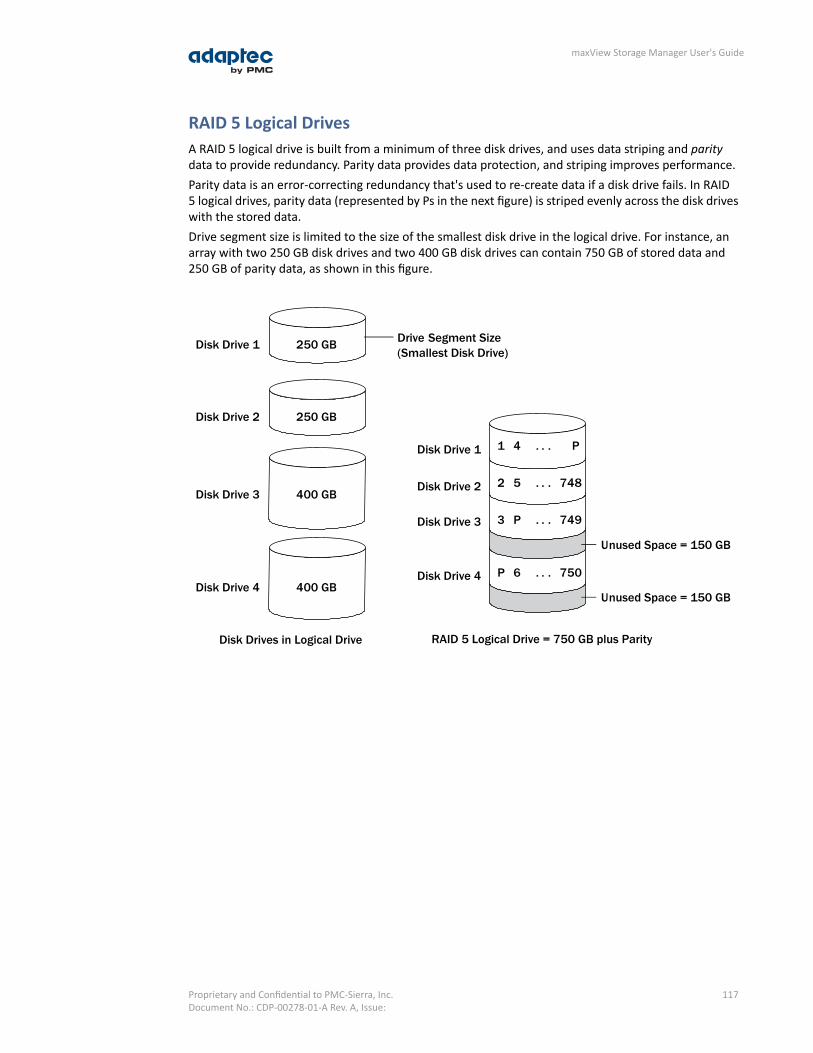
RAID 5 Logical DrivesA RAID 5 logical drive is built from a minimum of three disk drives, and uses data striping and paritydata to provide redundancy. Parity data provides data protection, and striping improves performance.Parity data is an error-correcting redundancy that's used to re-create data if a disk drive fails. In RAID5 logical drives, parity data (represented by Ps in the next figure) is striped evenly across the disk driveswith the stored data.Drive segment size is limited to the size of the smallest disk drive in the logical drive. For instance, anarray with two 250 GB disk drives and two 400 GB disk drives can contain 750 GB of stored data and250 GB of parity data, as shown in this figure.
Unused Space = 150 GB
Disk Drive 1
Disk Drive 2
Disk Drive 3
Disk Drive 4
250 GB
250 GB
400 GB
400 GB
Drive Segment Size(Smallest Disk Drive)
Disk Drive 2
Disk Drive 3
Disk Drive 4
Disk Drive 1
Unused Space = 150 GB
Disk Drives in Logical Drive RAID 5 Logical Drive = 750 GB plus Parity
P1 4 . . .
7482 5 . . .
7493 P . . .
750P 6 . . .
117Proprietary and Confidential to PMC-Sierra, Inc.Document No.: CDP-00278-01-A Rev. A, Issue:
maxView Storage Manager User's Guide
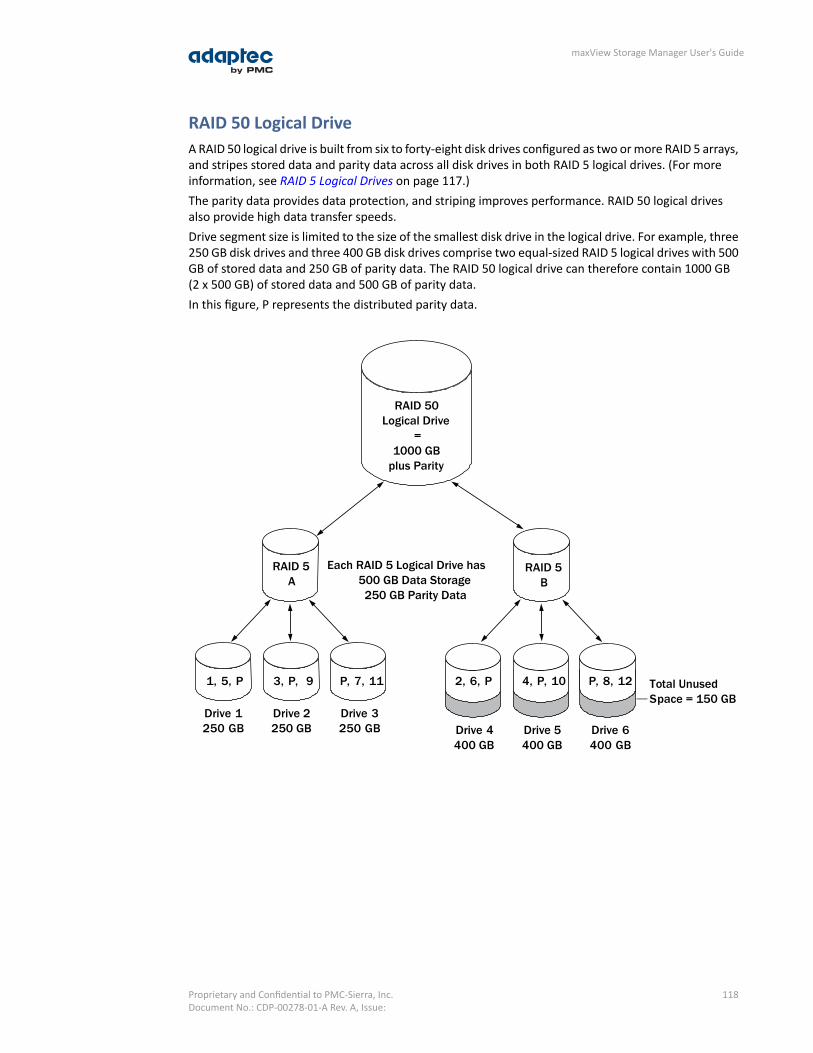
RAID 50 Logical DriveA RAID 50 logical drive is built from six to forty-eight disk drives configured as two or more RAID 5 arrays,and stripes stored data and parity data across all disk drives in both RAID 5 logical drives. (For moreinformation, see RAID 5 Logical Drives on page 117.)The parity data provides data protection, and striping improves performance. RAID 50 logical drivesalso provide high data transfer speeds.Drive segment size is limited to the size of the smallest disk drive in the logical drive. For example, three250 GB disk drives and three 400 GB disk drives comprise two equal-sized RAID 5 logical drives with 500GB of stored data and 250 GB of parity data. The RAID 50 logical drive can therefore contain 1000 GB(2 x 500 GB) of stored data and 500 GB of parity data.In this figure, P represents the distributed parity data.
RAID 5B
RAID 50Logical Drive
=1000 GBplus Parity
RAID 5A
Each RAID 5 Logical Drive has500 GB Data Storage250 GB Parity Data
Drive 1250 GB
Drive 2250 GB
Drive 3250 GB Drive 4
400 GBDrive 5400 GB
Drive 6400 GB
Total UnusedSpace = 150 GB
2, 6, P 4, P, 10 P, 8, 121, 5, P 3, P, 9 P, 7, 11
118Proprietary and Confidential to PMC-Sierra, Inc.Document No.: CDP-00278-01-A Rev. A, Issue:
maxView Storage Manager User's Guide

RAID 6 Logical DrivesA RAID 6 logical drive—also known as dual drive failure protection—is similar to a RAID 5 logical drivebecause it uses data striping and parity data to provide redundancy. However, RAID 6 logical drivesinclude two independent sets of parity data instead of one. Both sets of parity data are striped separatelyacross all disk drives in the logical drive.RAID 6 logical drives provide extra protection for your data because they can recover from twosimultaneous disk drive failures. However, the extra parity calculation slows performance (comparedto RAID 5 logical drives).RAID 6 logical drives must be built from at least four disk drives. Maximum stripe size depends on thenumber of disk drives in the logical drive.
Unused Space = 150 GB
Disk Drive 1
Disk Drive 2
Disk Drive 3
Disk Drive 4
250 GB
250 GB
400 GB
400 GB
Drive Segment Size(Smallest Disk Drive)
Disk Drive 2
Disk Drive 3
Disk Drive 4
Disk Drive 1
Unused Space = 150 GB
Disk Drives in Logical Drive Based on the drive segment sizes used:
(P1 & P2)RAID 6 Logical Drive = 500 GB plus parity
P21 P1 . . .
4492 P2 . . .
P1P1 3 . . .
500P2 4 . . .
RAID 60 Logical DrivesSimilar to a RAID 50 logical drive (see RAID 50 Logical Drive on page 118), a RAID 60 logical drive—alsoknown as dual drive failure protection—is built from eight disk drives configured as two or more RAID6 logical drives, and stripes stored data and two sets of parity data across all disk drives in both RAID 6logical drives.Two sets of parity data provide enhanced data protection, and striping improves performance. RAID 60logical drives also provide high data transfer speeds.
119Proprietary and Confidential to PMC-Sierra, Inc.Document No.: CDP-00278-01-A Rev. A, Issue:
maxView Storage Manager User's Guide

B Icons At-a-GlanceThe following is a complete list of icons used in maxView Storage Manager. It contains the icons on theribbon, in the Enterprise View and on tabs and dialog boxes.See Overview of the Main Window on page 27 for more information.
Ribbon Home Icons
DescriptionIcon
Remote system add
Remote system delete
Ribbon System Icons
DescriptionIcon
System settings
Firmware update
Save archive file
Ribbon Controller Icons
DescriptionIcon
Controller settings
Save configuration
Restore configuration
Controller rescan
Silence alarm
Clear configuration
Ribbon Logical Disk Icons
DescriptionIcon
Logical disk with gear
Logical disk create
Logical disk expand
Logical disk verify
Logical disk locate
120Proprietary and Confidential to PMC-Sierra, Inc.Document No.: CDP-00278-01-A Rev. A, Issue:
maxView Storage Manager User's Guide

DescriptionIcon
Logical disk delete
Logical disk erase
Ribbon Physical Disk Icons
DescriptionIcon
Physical disk set
Assign physical disk as spare
Unassign physical disk as spare
Physical disk initialization
Physical disk verify
Physical disk erase
Physical disk locate
Ribbon MaxCache Icons
DescriptionIcon
maxCache container create
maxCache set properties
maxCache locate
maxCache container verify
maxCache container delete
maxCache container disable
Enterprise View Icons
DescriptionIcon
Enterprise View
Local or remote system
Controller
Enclosure
Logical disk
121Proprietary and Confidential to PMC-Sierra, Inc.Document No.: CDP-00278-01-A Rev. A, Issue:
maxView Storage Manager User's Guide

DescriptionIcon
Logical disks
Physical disk
Hard disk drive
Solid State drive
Physical disks
Enclosure
Connector or other physical device
Enterprise View Status Icons
DescriptionIcon
Enterprise OK
Enterprise error
Enterprise no access
Enterprise warning
Enterprise View System Icons
DescriptionIcon
System OK
System error
System missing
System no access
System warning
Enterprise View Connector Icons
DescriptionIcon
Connector OK
Connector failed
Connector missing
122Proprietary and Confidential to PMC-Sierra, Inc.Document No.: CDP-00278-01-A Rev. A, Issue:
maxView Storage Manager User's Guide
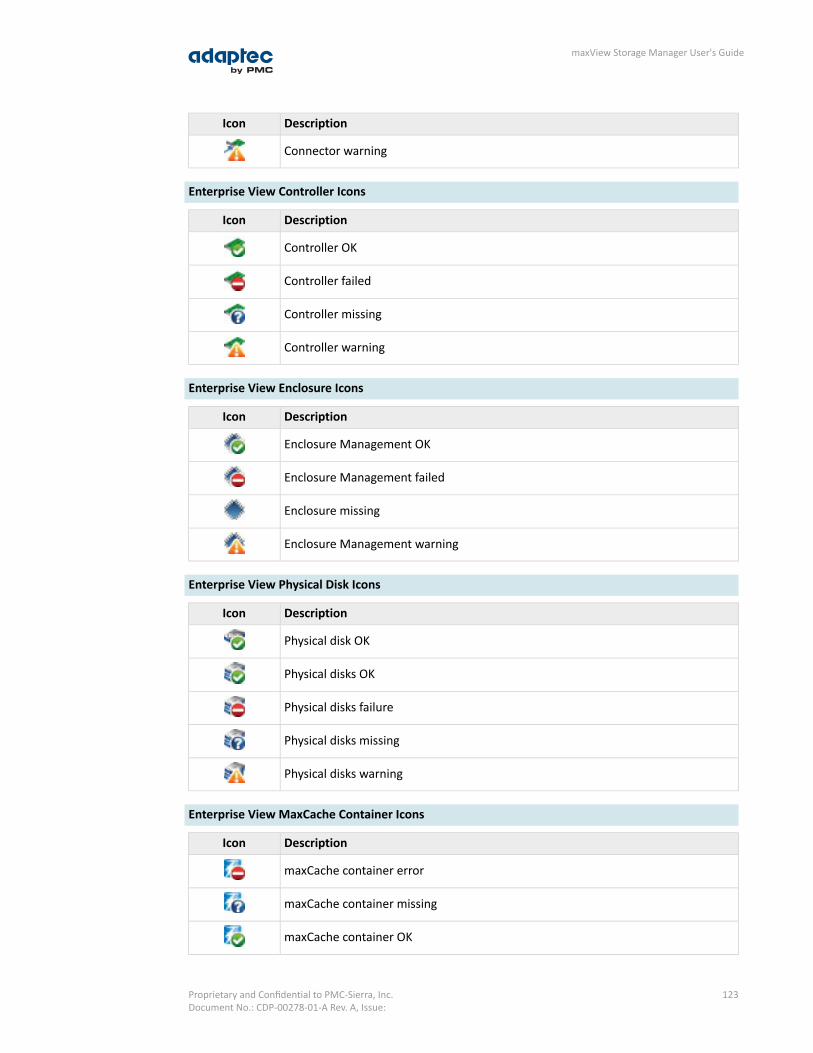
DescriptionIcon
Connector warning
Enterprise View Controller Icons
DescriptionIcon
Controller OK
Controller failed
Controller missing
Controller warning
Enterprise View Enclosure Icons
DescriptionIcon
Enclosure Management OK
Enclosure Management failed
Enclosure missing
Enclosure Management warning
Enterprise View Physical Disk Icons
DescriptionIcon
Physical disk OK
Physical disks OK
Physical disks failure
Physical disks missing
Physical disks warning
Enterprise View MaxCache Container Icons
DescriptionIcon
maxCache container error
maxCache container missing
maxCache container OK
123Proprietary and Confidential to PMC-Sierra, Inc.Document No.: CDP-00278-01-A Rev. A, Issue:
maxView Storage Manager User's Guide
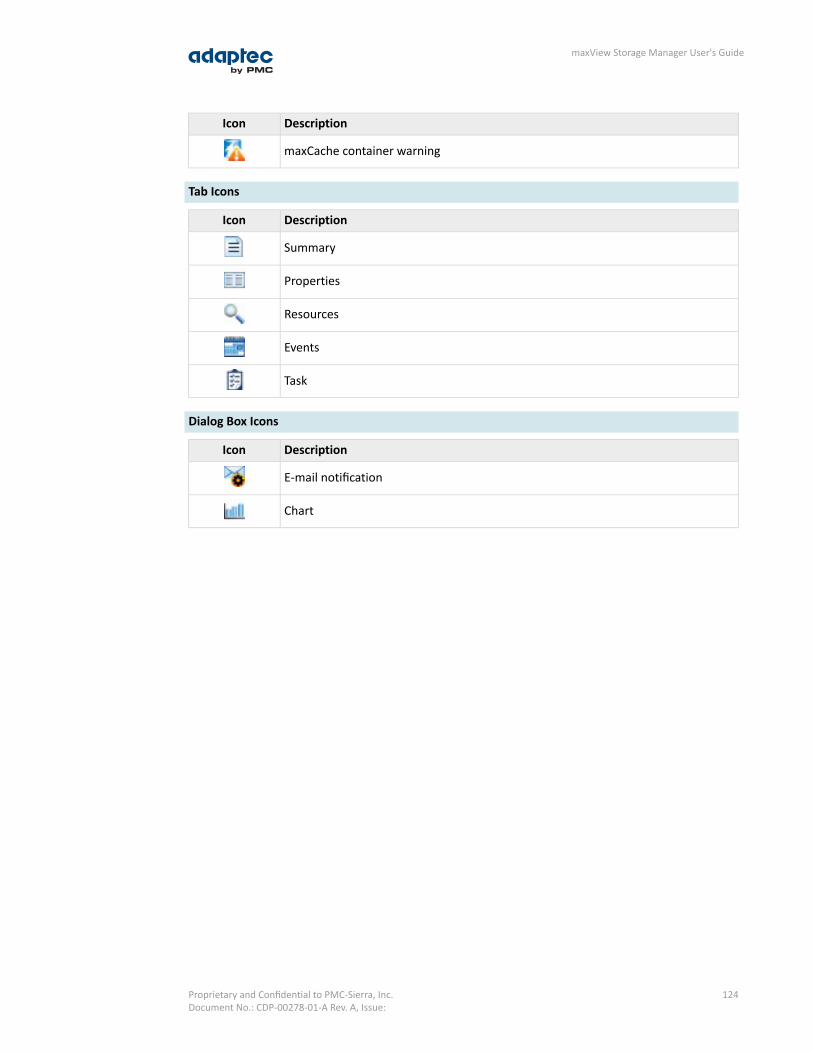
DescriptionIcon
maxCache container warning
Tab Icons
DescriptionIcon
Summary
Properties
Resources
Events
Task
Dialog Box Icons
DescriptionIcon
E-mail notification
Chart
124Proprietary and Confidential to PMC-Sierra, Inc.Document No.: CDP-00278-01-A Rev. A, Issue:
maxView Storage Manager User's Guide

Index
A
activity in storage space 31event log 31task log 31
activity on storage space, See monitoringadapters, See controllersAdd System wizard 103advanced settings 42, 63Agent 15, 35, 36, 37
introduction 15, 35, 37starting 36
Linux 36Solaris 36Windows 36
startup order 35alarm 79
controllers 79disabling 79
disabling 79controller-level 79
systems 79silencing 79
ARCCONF command line utility 13, 76SETSTATE command 76
archive file 111auto-discovery 103automatic verification 57
B
background consistency check 57, 58background verification 57boards, See controllersBootable DVD mode 16, 24broadcasting event alerts 86, 97build method 42, 56, 109, 110
Build 42, 56Clear 42, 56Quick 42, 56Skip Initialization 56, 109, 110
building storage space 14, 34, 38, 40, 51, 52, 53, 62, 66adding maxCache SSD caching 62custom configuration 38, 40, 52, 53, 66express configuration 38
C
cards, See controllersCIM server 15, 19command line utility 13, 76
ARCCONF 13, 76
components 12, 73defined 12viewing properties 73
Configuration Event Detail window 87configuring 38
See also building storage spacecontroller 31, 32, 89, 106
clearing configuration 106controllers 73, 79, 80, 82, 85
disabling alarm 79properties 73rescanning 79, 80updating firmware 82, 85
copyback 48, 109custom configuration 38, 40, 52, 53, 66
D
dedicated hot spares 44, 45, 47, 109creating 44, 45deleting 47, 109removing 47, 109
deleting logical drives 61deleting tasks 72direct attached storage 12
defined 12disk drive 82, 85
updating firmware 82, 85disk drive segments 113disk drives 41, 48, 51, 52, 53, 56, 61, 73, 76, 77, 82,
109, 110conceptual graphic 51different sizes in same logical drive 51, 52failed state 76failure recovery 48, 56, 109, 110
multiple disk drives 56, 109, 110multiple logical drives 109RAID 0 logical drives 109, 110with hot spare 48, 109without hot spare 109
identifying 73initializing 77locating 73properties 73replacing in logical drives 76segments in logical drives 51, 53, 61updating firmware 82within logical drives 41
drives 73identifying 73locating 73
125Proprietary and Confidential to PMC-Sierra, Inc.Document No.: CDP-00278-01-A Rev. A, Issue:
maxView Storage Manager User's Guide

E
email notifications 86, 91, 92, 94, 95, 96, 97"from" address 92changing "from" address 91, 95, 96changing SMTP server 91, 95, 96failed test emails 95modifying recipient information 91, 95recipient addresses 91removing recipients 91, 95setup 91SMTP server settings 92template 91, 96test emails 91, 94
Email Notifications Manager 86, 91, 94, 97opening 91test emails 91, 94
enclosures 31, 73, 89, 90fan status 31, 89, 90identifying 73locating 73monitoring 31, 89, 90power status 31, 89, 90status 31temperature status 31, 89, 90
Enterprise View 28, 29icons 29
Error (task status) 71event alerts 86, 97event log 31, 86event log (operating system) 100events 31
See also monitoringexpanding logical drives 53, 56, 59, 61express configuration 38
RAID levels 38
F
failed disk drives 56, 109, 110multiple disk drives 56, 109, 110multiple logical drives 109RAID 0 logical drives 109, 110without hot spare 109
failover 49firmware 82, 85Firmware Update wizard 82formatting logical drives 39, 42, 43
G
global hot spares 44, 46deleting 46
Green Backup status 89
H
hard disk 13hard disk drive 13
hard drive, See disk drivehelp 33hot spares 44, 45, 47, 51, 109
creating 44creating dedicated 44, 45creating pool spare 44, 45dedicated 44
defined 44deleting 47, 109global 44
defined 44limitations 44, 45removing 47, 109
hybrid RAID 41, 52, 53
I
icons 29, 87, 93Enterprise View 29event status icons 87, 93
identifying components 73initialize method 56initializing disk drives 77, 110
skipping 110
L
Linux 36starting the Agent 36
local systems 34locating drives 73logging in 27, 34, 35logging into remote systems 37logging out 33logical drives 34, 38, 39, 40, 41, 42, 43, 49, 51, 52, 53,
54, 55, 56, 57, 58, 59, 60, 61, 63, 66, 76, 109, 111, 113, 114, 115, 116, 117, 118, 119
advanced settings 42, 63automatic verification 57background consistency check 57background verification 57build method 42, 56building 38
basic 38changing RAID levels 56, 60custom configuration 38, 40, 52, 53, 66defined 51deleting 61different-sized disk drives 51, 52disabling background consistency check 57, 58disk drive segments 51, 53, 61, 113enabling background consistency check 57, 58expanding 53, 56, 59, 61fine-tuning 42, 54, 63formatting 39, 42, 43
126Proprietary and Confidential to PMC-Sierra, Inc.Document No.: CDP-00278-01-A Rev. A, Issue:
maxView Storage Manager User's Guide
logical drives (continued)hybrid RAID 41, 52, 53increasing capacity 53, 56, 59, 61initialize methods 56manual verification 57maximum size 59non-redundant 114options for creating 38partitioning 39, 42, 43RAID 1 114RAID 10 116RAID 1E 115RAID 5 117, 118RAID 50 118, 119RAID 6 119RAID 60 119RAID segments 113read cache 55rebuilding 49, 76, 109, 111remove disk drive or segment 59, 60renaming 54replace disk drive or segment 59, 60replacing disk drives 76selecting disk drives 41selecting RAID levels 40stripe size 56verifying 57verifying and fixing 57, 58write cache setting 55
M
main window 27, 31, 33, 73, 76, 86, 87, 88, 93, 120event details 87event log 86Logout button 33monitoring activity and status 86notification types 86, 87, 93
event log 86event status icons 87, 93
overview 27, 120status icons 87, 93Storage Dashboard 31, 73, 76, 86, 87, 88task details 88
manual verification 57maxCache 28, 42, 61, 98
cache hits and misses 98configuring 28, 42, 61read caching 61write caching 61
maxCache container 62creating 62
maxCache Container 62, 63, 64coherency check 63, 64deleting 64Flush and Fetch rate 63selecting a RAID level 62selecting SSDs 62verifying and fixing 63
maxCache statistics 98maxView Storage Manager 14, 15, 16, 20, 21, 27, 28,
29, 30, 35, 37, 86, 120Agent 15, 35, 37beginning steps 14Enterprise View 28event log 86icons 29introduction 14, 35logging into remote systems 37main window overview 27, 120ribbon 30Ribbon 28system requirements 16, 20, 21
modifying tasks 71monitoring 31, 70, 73, 76, 86, 87, 88, 91, 92, 93, 94,
95, 96, 97device properties 73email notifications 86, 91, 92, 94, 95, 96, 97
"from" address 92changing "from" address 91, 95, 96changing SMTP server 91, 95, 96failed test emails 95modifying recipient information 91, 95recipient addresses 91removing recipients 91, 95setup 91SMTP server settings 92test emails 91, 94
Email Notifications Manager 86, 91, 97event details 87event log 31, 86options 86status icons 87, 93Storage Dashboard 31, 73, 76, 86, 87, 88task details 88task log 31tasks 70
monitoring tasks 70
N
Native Command Queuing 80NCQ 80non-redundant logical drives 114notification types 86, 91, 97
email notifications 86, 91, 97notifications 86, 97
event alerts 86, 97
O
online help 33operating system event log 100operating systems 16
P
partitioning logical drives 39, 42, 43
127Proprietary and Confidential to PMC-Sierra, Inc.Document No.: CDP-00278-01-A Rev. A, Issue:
maxView Storage Manager User's Guide
physical drives 78verifying and fixing 78
pool hot spares 44, 45power management 66, 67, 68
disabling 68stay awake period 67timers 66
Properties tab 73
R
RAID 56, 114, 115, 116, 117, 118, 119non-redundant logical drives 114RAID 0 114RAID 1 114RAID 10 116RAID 1E 115RAID 5 117, 118RAID 50 118, 119RAID 6 56, 119
stripe size 56RAID 60 56, 119
stripe size 56RAID levels 38, 40, 56, 60
changing 56, 60custom configuration 40express configuration 38selecting 40
RAID segments 113read cache 55rebuilding (defined) 109rebuilding logical drives 49, 76, 109, 111recurring tasks 69remote systems 34, 38, 103, 104
adding manually 38, 103removing 104
renaming logical drives 54rescanning controllers 79, 80Resources View 31, 32, 89ribbon 30, 37, 54, 55, 59, 60, 78, 80, 111
Add system 37Change logical device name 54Configure disk drive cache 78Configure read cache 55Expand or change logical device 59, 60overview 30Rescan 80Save support archive 111
Ribbon 28
S
Scheduled (task status) 70scheduling tasks 58, 69, 71
rescheduling 71supported tasks 58
verifying with fix 58tasks you can schedule 69, 71
Secure erase 77
segments 51, 113Selectable performance modes 56Self-Monitoring Analysis and Reporting Technology(SMART) 90Server Template File 43, 101silencing alarm 79
system-level 79Skip Initialization method 110SMART statistics 90SMI-S provider 15, 19SMTP server 91, 95, 96Solaris 36
starting the Agent 36spares, See hot sparesstatistics counters 99
resetting 99statistics logging 97, 98, 99
counters 99enabling 97viewing 98
Statistics Viewer 98status 31
See also monitoringenclosures 31event log 31task log 31
See also monitoringstatus icons 87, 93
main window 87, 93Storage Dashboard 31, 73, 76, 86, 87, 88storage space 12, 17
examples 17stripe size 56
changing 56support archive file 111system requirements 16, 20, 21systems 34, 73
local systems 34properties 73remote systems 34
T
task log 31tasks 69, 70, 71, 72
deleting 72missed start times 71modifying 71monitoring 70recurring 69scheduling 69, 71
temperature status 31, 89, 90terminology 12
U
updating firmware 82, 85
128Proprietary and Confidential to PMC-Sierra, Inc.Document No.: CDP-00278-01-A Rev. A, Issue:
maxView Storage Manager User's Guide

V
verifying and fixing logical drives 57, 58verifying and fixing physical drives 78verifying logical drives 57
automatic verification 57background verification 57manual verification 57
W
Windows 36starting the Agent 36
write cache 55write-back 55write-through 55
129Proprietary and Confidential to PMC-Sierra, Inc.Document No.: CDP-00278-01-A Rev. A, Issue:
maxView Storage Manager User's Guide

PMC-Sierra, Inc.1380 Bordeaux DriveSunnyvale, CA 94089 USA
© Copyright PMC-Sierra, Inc. 2012All rights reserved. Adaptec and the Adaptec by PMC logo are trademarks of PMC-Sierra, Inc.
Part Number: CDP-00278-01-A Rev AJPB 03/11


