Embed Size (px)
Citation preview
1
Marketo Sales Engage for Salesforce: Installation and Success Guide Sales Engage allows enterprise sales teams to increase pipeline, drive consistency and forecast accurately from one platform. With its robust Salesforce integration, sales teams see results in productivity, actionable reporting and accurate data providing full visibility into the sales process. The ‘Sales Engage for Salesforce: Success and Installation Guide’ will walk you through how your sales organization can take advantage of the newest integration updates and best practices using Sales Engage and Salesforce. In this guide you’ll learn: • Recommended best practices for using Sales Engage with Salesforce • Installation and configuration of the Sales Engage package • Improving your team’s productivity with Sales Engage fields and buttons for page layouts & list
views • Keeping Salesforce up to date with automatic activity logging • Taking advantage of the out of the box sales dashboard and reports • Enriching your current reporting with Sales Engage custom fields
Marketo Sales Engage for Salesforce: Installation and Success Guide
2
Table of Contents 1. Connect Sales Engage to Salesforce .............................................................................................................. 3 2. Sales Engage Salesforce Package Installation ............................................................................................... 4 3. Configuring the Sales Engage Salesforce package ........................................................................................ 9
Add Sales Engage fields to Task Page Layouts ...................................................................................... 9 Add Sales Engage Fields to Activity History ......................................................................................... 12 Add Sales Engage buttons to leads and contacts page layouts ........................................................... 13 Add Sales Engage buttons to leads, contacts, opportunities and accounts list views ......................... 14
4. Reports and dashboards ............................................................................................................................... 16
Out of the Box Reports and Dashboard ................................................................................................ 16 Customizations for Reports and Dashboards ....................................................................................... 16 Sales Engage Custom Salesforce Fields ............................................................................................... 19
5. Sales Engage and salesforce account configuration .................................................................................... 25
Sync Opportunities from Salesforce with Sales Engage ....................................................................... 27 Sync Tasks ............................................................................................................................................ 28 Add Sales Engage Outbox .................................................................................................................... 28 Sales Engage Account admin settings .................................................................................................. 29
6. FAQs .............................................................................................................................................................. 32 Appendix A: Salesforce package migration guide ............................................................................................ 44 Appendix B - Apex Classes .............................................................................................................................. 46
Sales EngageUpdateTask ..................................................................................................................... 46 Sales EngageUpdateTaskTest .............................................................................................................. 48
Appendix C - Anonymous Apex to call Batch Job ............................................................................................ 48

Marketo Sales Engage for Salesforce: Installation and Success Guide
3
1. CONNECT SALES ENGAGE TO SALESFORCE Follow these steps to connect your Marketo Sales Engage account to your Salesforce instance: Step 1: Head to https://toutapp.com/next#settings/crm Step 2: Click “Connect” next to the Salesforce option.
Step 3: Next, click the big “Connect to Salesforce” button. You’ll get redirected to Salesforce where you need to Allow Access between your Sales Engage and Salesforce account. Afterwards, you’ll be brought back to the Salesforce settings section in your Sales Engage account.
Step 4: From here, you’ll be presented with a view of your Salesforce/Sales Engage settings.

Marketo Sales Engage for Salesforce: Installation and Success Guide
4
2. SALES ENGAGE SALESFORCE PACKAGE INSTALLATION Estimated Time: 5 Minutes Follow these steps to complete to install the latest update of the Marketo Sales Engage Salesforce package: Step 1: Login to your Marketo Sales Engage account. Click on the gear icon on the top right hand corner and then click on Settings. Navigate to the Salesforce page under the Admin Settings section

Marketo Sales Engage for Salesforce: Installation and Success Guide
5
Step 2: Click “Install Customizations”. Marketo Sales Engage will install custom fields, buttons and reports for you.

Marketo Sales Engage for Salesforce: Installation and Success Guide
6
Sales Engage Tip: We recommend granting access to all users since this only defines access to the Sales Engage buttons, not any of your specific email data.

Marketo Sales Engage for Salesforce: Installation and Success Guide
7
If you choose to Install for Specific Profiles, you can do so in the following screen by selecting the profiles you would like to install the package for
You can still choose to enable for all profiles or disable for all profiles using the toggle

Marketo Sales Engage for Salesforce: Installation and Success Guide
8
Once you click on the Install button, you will see the “Adding Customizations” modal which will show you your progress
Progress bar will be updated as we add customizations for you
Congratulations. You’ve finished updating the Sales Engage Salesforce Package. The next section in the Guide will show you how to build out specific new Sales Engage functionality for your team to leverage in their workflows.
Marketo Sales Engage for Salesforce: Installation and Success Guide
9
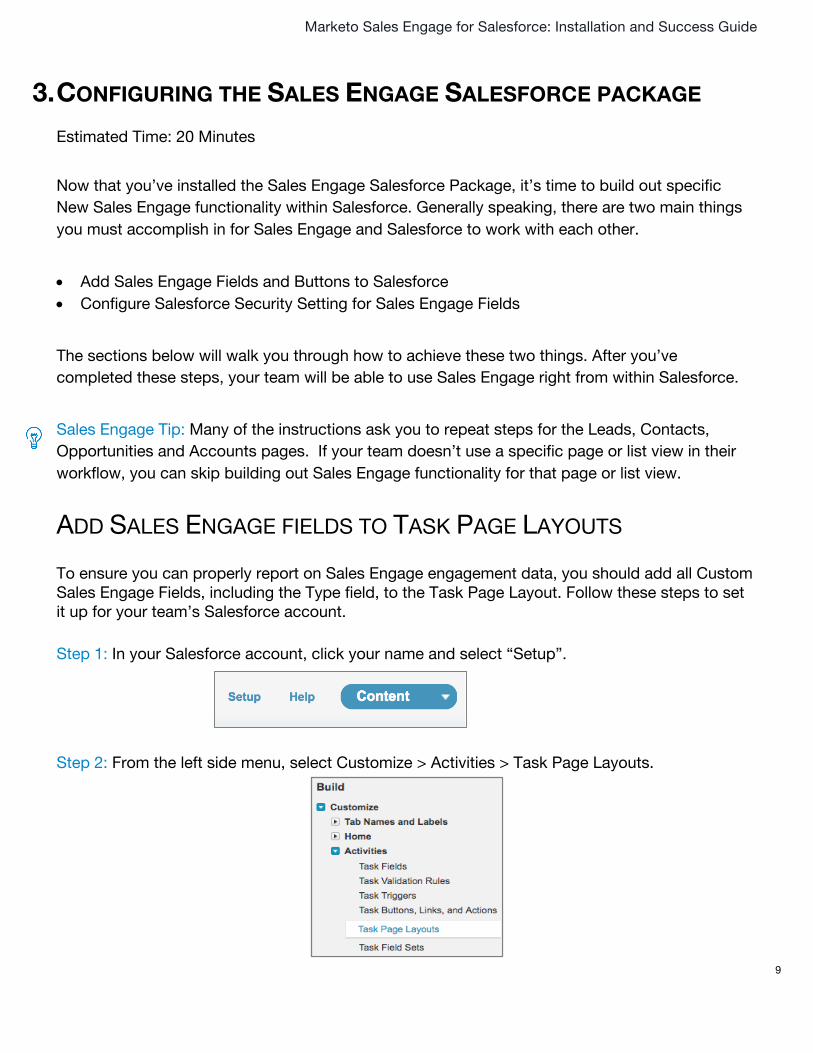
3. CONFIGURING THE SALES ENGAGE SALESFORCE PACKAGE Estimated Time: 20 Minutes Now that you’ve installed the Sales Engage Salesforce Package, it’s time to build out specific New Sales Engage functionality within Salesforce. Generally speaking, there are two main things you must accomplish in for Sales Engage and Salesforce to work with each other. • Add Sales Engage Fields and Buttons to Salesforce • Configure Salesforce Security Setting for Sales Engage Fields The sections below will walk you through how to achieve these two things. After you’ve completed these steps, your team will be able to use Sales Engage right from within Salesforce. Sales Engage Tip: Many of the instructions ask you to repeat steps for the Leads, Contacts, Opportunities and Accounts pages. If your team doesn’t use a specific page or list view in their workflow, you can skip building out Sales Engage functionality for that page or list view.
ADD SALES ENGAGE FIELDS TO TASK PAGE LAYOUTS To ensure you can properly report on Sales Engage engagement data, you should add all Custom Sales Engage Fields, including the Type field, to the Task Page Layout. Follow these steps to set it up for your team’s Salesforce account. Step 1: In your Salesforce account, click your name and select “Setup”.
Step 2: From the left side menu, select Customize > Activities > Task Page Layouts.

Marketo Sales Engage for Salesforce: Installation and Success Guide
10
Step 3: Select the task page layout that you use and click “Edit”. Step 4: Now, create a section to house your Sales Engage Custom Fields. Drag and drop the Section to the area you’d like it to live on for all Task pages.
Step 5: Once the Section Properties window opens, fill out the Section Name (We recommend calling it “Sales Engage Information”) and select 1-Column. Click “OK” when you’re done.
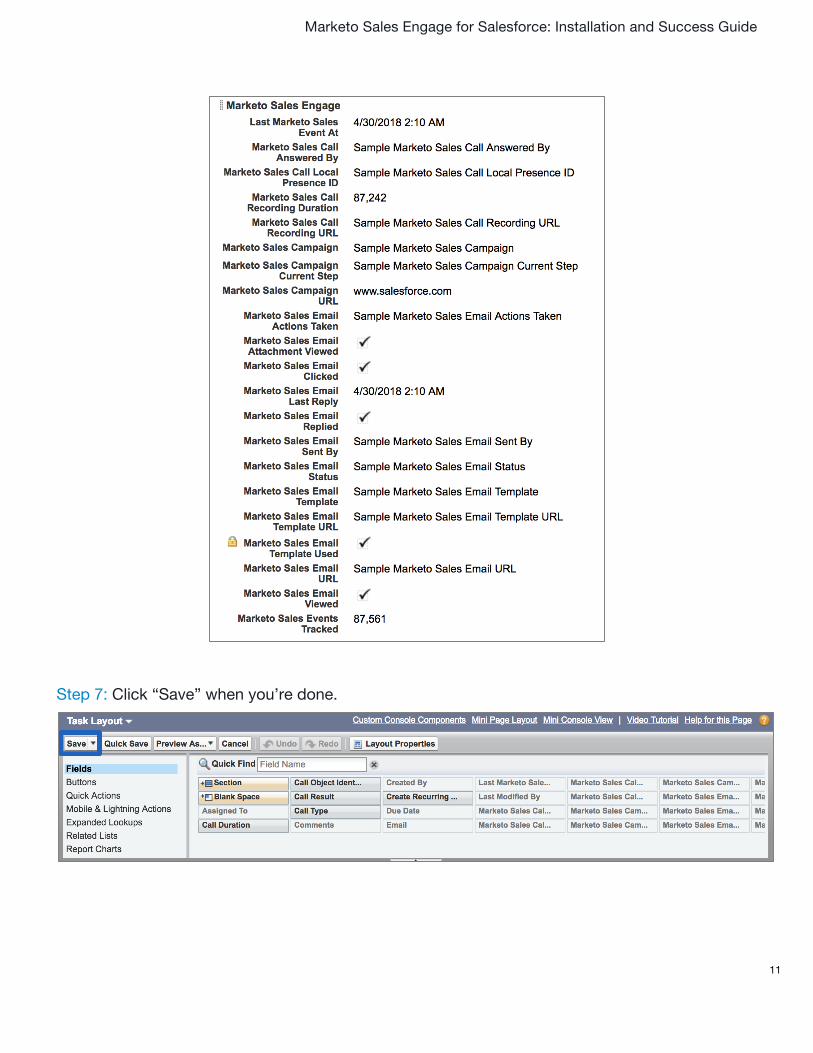
Step 6: Now, drag and drop all the Sales Engage Custom Fields, including Type, into the Sales Engage Information section.
Marketo Sales Engage for Salesforce: Installation and Success Guide
11
Step 7: Click “Save” when you’re done.
Marketo Sales Engage for Salesforce: Installation and Success Guide
12
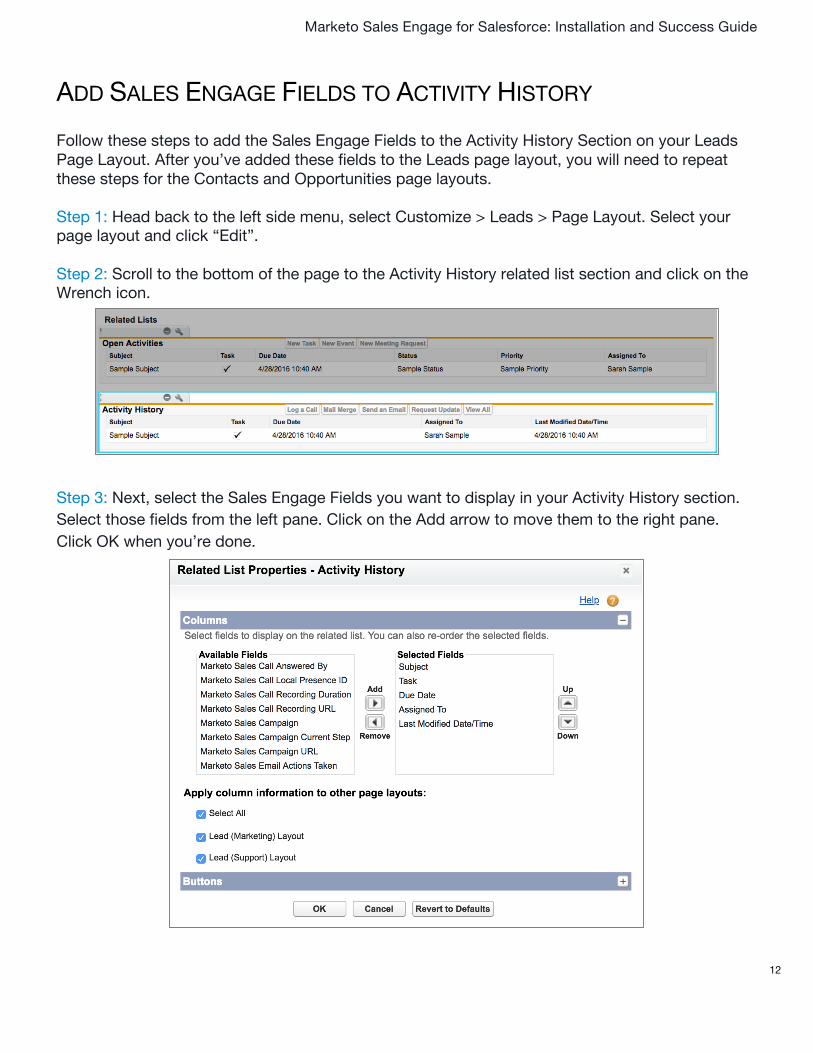
ADD SALES ENGAGE FIELDS TO ACTIVITY HISTORY Follow these steps to add the Sales Engage Fields to the Activity History Section on your Leads Page Layout. After you’ve added these fields to the Leads page layout, you will need to repeat these steps for the Contacts and Opportunities page layouts. Step 1: Head back to the left side menu, select Customize > Leads > Page Layout. Select your page layout and click “Edit”. Step 2: Scroll to the bottom of the page to the Activity History related list section and click on the Wrench icon.
Step 3: Next, select the Sales Engage Fields you want to display in your Activity History section. Select those fields from the left pane. Click on the Add arrow to move them to the right pane. Click OK when you’re done.

Marketo Sales Engage for Salesforce: Installation and Success Guide
13
Sales Engage Tip: Salesforce only allows you to show 10 columns in your Activity History Related List view. Although you can’t show all Sales Engage fields in a single view, you can report on all Sales Engage fields. We recommend including the following Sales Engage fields in Activity History: Type, Sales Engage Clicked, Sales Engage Viewed and Sales Engage Replied. To see a breakdown of all fields, reference pages 19-20. Step 4: Click “Save” when you’re done with Leads page. Step 5: Repeat Steps 1 - 4 for the Contacts and Opportunities Page Layouts.
ADD SALES ENGAGE BUTTONS TO LEADS AND CONTACTS PAGE LAYOUTS Follow these steps to add the Email with Marketo Sales Engage, Call with Marketo Sales Engage Phone and Add to Marketo Sales Engage Campaign buttons to the Leads page layout. After you installed these buttons for your Leads page layout, you will need to repeat these steps for the Contacts page layout. Step 1: Head back to the left side menu, select Customize > Leads > Page Layout. Select your page layout and click “Edit”.
Marketo Sales Engage for Salesforce: Installation and Success Guide
14
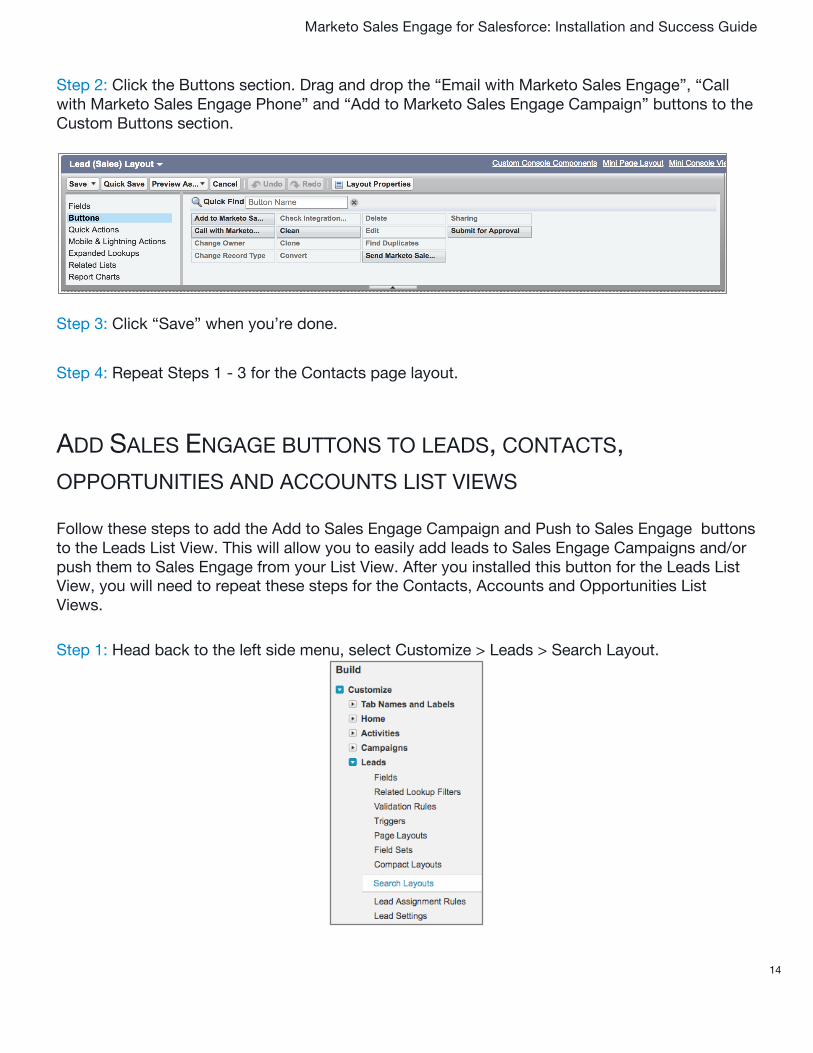
Step 2: Click the Buttons section. Drag and drop the “Email with Marketo Sales Engage”, “Call with Marketo Sales Engage Phone” and “Add to Marketo Sales Engage Campaign” buttons to the Custom Buttons section.
Step 3: Click “Save” when you’re done. Step 4: Repeat Steps 1 - 3 for the Contacts page layout.
ADD SALES ENGAGE BUTTONS TO LEADS, CONTACTS, OPPORTUNITIES AND ACCOUNTS LIST VIEWS Follow these steps to add the Add to Sales Engage Campaign and Push to Sales Engage buttons to the Leads List View. This will allow you to easily add leads to Sales Engage Campaigns and/or push them to Sales Engage from your List View. After you installed this button for the Leads List View, you will need to repeat these steps for the Contacts, Accounts and Opportunities List Views. Step 1: Head back to the left side menu, select Customize > Leads > Search Layout.

Marketo Sales Engage for Salesforce: Installation and Success Guide
15
Step 2: Click Edit next to the Leads List View.
Step 3: Next, select the Add to Sales Engage Campaign options from the left pane. Click on the Add arrow to move it to the right pane. Then select the Push to Sales Engage option and click the Add arrow to move it to the right pane. Click Save when you’re done.
Step 4: Repeat Steps 1 - 3 for the Contacts, Accounts and Opportunities List Views. Congratulations. You’ve finished building out the Sales Engage functionality in your team’s Salesforce account. The next section in the Guide will cover out of the box reporting and dashboards for your team.
Marketo Sales Engage for Salesforce: Installation and Success Guide
16
4. REPORTS AND DASHBOARDS Estimated Time: 20 Minutes (Dashboard and Reports are out of the box. Potential time estimated for any of your own customizations) Based on our research and conversations with Sales leaders, we’ve built out a set of reports and a comprehensive sales dashboard to: 1) Enrich the insights into the organization for management; 2) Enhance the views into prospects and pipeline for Sales Reps; 3) Surface activity levels of each team member to drive productivity.
OUT OF THE BOX REPORTS AND DASHBOARD Once you install the Sales Engage Salesforce Package, you will have access to the pre-built Sales Engage Sales Dashboard. Details include: • 18 Dashboard Components • 19 Sales Engage Sales Reports • Reports are built around standard Salesforce objects, report types and Sales Engage Custom
Fields • The dashboard and reports will populate with data once the team starts using Sales Engage • The default time frame set for all reports is the current Fiscal Quarter
CUSTOMIZATIONS FOR REPORTS AND DASHBOARDS While we’ve designed the dashboard and reports to be easy to use we’ve also built in the option for customization since many sales organization may differ. All Dashboards and Reports can be customized to for your organization, including filtering the source reports for custom fields in your Salesforce instance and/or adjusting the formatting of each dashboard component. You’ll find Sales Engage’s recommended customizations based on our experience on how Sales Engage’s integration with Salesforce can create value and drive meaningful insights for organizations in the chart below.

Marketo Sales Engage for Salesforce: Installation and Success Guide
17
Dashboard Name Dashboard Type Source Report Customization
Pipeline Summary Metric Total Pipeline for Current Quarter and Total Pipeline for Next Quarter
Filter reports by specific opportunity stages or
opportunity types depending on how your company defines
pipeline
Quarter-to-Date Closed Won
Gauge Closed Won Opportunities This Quarter
Shows all Opportunities with “Closed Won”
as the Opportunity Status
Set the breakpoints for the dial in the dashboard editor based
on your company’s targets
Opportunities in the Sales Funnel
Funnel Chart Open Opportunities By Stage
Shows all Opportunities with “Open” as the Opportunity Status and your company’s
Opportunity Stages
Filter the report by specific opportunity stages to show a zoomed in view of your Sales
Funnel
Closed Business Table Closed Business
Shows all Opportunities with “Closed Won” as the Opportunity Status
None
Pipeline by Rep Horizontal Bar Chart Opportunities in the Pipeline
Shows all opportunities with “Open” as the Opportunity Status
To only display a specific team (ie. Pipeline), filter the Report by
“Owner Role” (or another Opportunity Owner field)
Top Opportunities in the Pipeline
Table
Sorted by Amount in descending order
Email Activity & Top Opportunities
Shows all Open Opportunities (Opportunity Stage does not contain “Closed”)
Filter the report by specific opportunity stages or
opportunity types depending on how your company defines
pipeline
AE Activity Level Line Chart
Call and Email Activity - AEs
Shows all Tasks with Activity Type equal to “Email” or “Call”
To only display a specific team (ie. AEs), filter the Report by
“Assigned Role”
Adjust the “Activity Type” filter on the report to pull in
additional activities your team is measured on (I.E. Meeting
Booked)
Activities for Closed Won Opportunities
Table
Sorted by Sum of Amount in descending order
Email Activity With Closed Won Opportunities
Shows all Opportunities with Opportunity
Stage contains “Won”
You can filter by opportunity type.
Most Effective Closers Table
Sorted by Emails Sent in descending order
Email Performance Metrics - AEs To only display a specific team (ie. AEs), filter the Report by
“Assigned Role”

Marketo Sales Engage for Salesforce: Installation and Success Guide
18
Set conditional highlighting breakpoints depending on your
team’s targets
Most Effective SDRS Table
Sorted by Emails Sent in descending order
Email Performance Metrics - SDRs To only display a specific team (ie. AEs), filter the Report by
“Assigned Role”
Set conditional highlighting breakpoints depending on your
team’s targets
Opportunities with the Highest Potential to
Close
Table
Sorted by Sum of Sales Engage Emails Tracked in
descending order
Email Activity With Open Opportunities
Shows all Open Opportunities (Opportunity
Stage does not contain “Closed”) and Tasks with Type equal to “Email”
Filter reports by specific opportunity stages or
opportunity types to get a more granular view
Most Effective Templates to Get a
Reply
Table
Sorted by Average Sales Engage Replied
Template Performance
Shows all Tasks with “Email” as Activity Type
Filter the report by a minimum threshold of number of emails
sent
SDR Team Activity Level
Line Chart Call and Email Activity - SDRs
Shows all Tasks with Activity Type equal to “Email” or “Call”
To only display a specific team (ie. Pipeline), filter the Report by
“Assigned Role”
Adjust the “Activity Type” filter on the report to pull in
additional activities your team is measured on (I.E. Meeting
Booked)
SDR Call Activity Goals
Table
Sorted by Calls Made in descending order
Calls Made
Shows all Tasks with Activity Type equal to “Call” and Includes links to call recordings
To only display a specific team (ie. Pipeline), filter the Report by
“Assigned Role”
Set conditional highlighting breakpoints depending on your
team’s targets
Adoption of Templates by AEs
Table
Sorted by Average Sales Engage Template Used in
descending order
Template Performance - AE”
To only display a specific team (ie. AEs), filter the Report by
“Assigned Role”
Set conditional highlighting breakpoints depending on your
team’s targets
Adoption of Templates by SDRS
Table
Sorted by Average Sales Engage Template Used in
descending order
Template Performance - SDRs”
To only display a specific team (ie. Pipeline), filter the Report by
“Assigned Role”
Set conditional highlighting breakpoints depending on your
Marketo Sales Engage for Salesforce: Installation and Success Guide
19
team’s targets
Opportunities that Should be Moved out
of the Pipeline
Table
Sorted by Average Age in descending order
Stale Opportunities
Shows all Open Opportunities (Opportunity Stage does not contain “Closed”) and Age
greater than 120 days and Activity Type equal to “Email”
Filter for a minimum average age. I.E. Opportunity age is past your company’s average sales
cycle
Most Effective Campaigns to Get a
Reply
Table
Sorted by Average Sales Engage Replied in descending order
Sales Engage Campaign Performance
Shows all Tasks with “Email” as Activity
Type
Filter the report by a minimum threshold of number of emails
sent
You can reference the Salesforce Video and Help Articles below, for guidance on customizing reports and Dashboards within Salesforce.
• Getting Started With Reports and Dashboards • Dashboard Overview • Using the Drag and Drop Report Builder • 5 Ways to Get the Most Out of Your Reports and Dashboards • How to change Visual settings for dashboard chart components • How to Modify a Dashboard Component • How to Change the Data Settings for Dashboard Components
SALES ENGAGE CUSTOM SALESFORCE FIELDS The Sales Engage Salesforce Package offers custom fields for activity, account, contact, leads, and opportunities, which can be used either to enrich the reporting you already have in Salesforce or to build out new reports. You can reference all available Sales Engage Custom Salesforce field in the chart below.
Field Label Field Name Description Field Type Data Type
Marketo Sales Engage Viewed
Sales Engage_Sales Engage_Viewed
Indicates whether an email was viewed Activity Checkbox
Marketo Sales Engage Clicked
Sales Engage_Sales Engage_Clicked
Indicates whether someone clicked on a
link in the email Activity Checkbox
Marketo Sales Engage Events
Tracked
Sales Engage_Sales Engage_Events_Tracked
# of events tracked around this email Activity Number
Marketo Sales Engage Last Event at
Sales Engage_Sales Engage_Event_At
Date and time of last event that was Activity Date and Time

Marketo Sales Engage for Salesforce: Installation and Success Guide
20
detected around this email
Marketo Sales Engage Details
Sales Engage_Sales Engage_Details
A URL linking to detailed tracking for
the email Activity Text
Marketo Sales Engage Template
Sales Engage_Sales Engage_Template
Name of the Email Template used Activity Text
Marketo Sales Engage Template
Used
Sales Engage_Sales Engage_Template_Used
A checkbox indicating if a Sales Engage Email
Template was used. Activity Checkbox
Marketo Sales Engage Template
Details
Sales Engage_Sales Engage_Template_Details
A URL linking to detailed information about the template
Activity Text
Marketo Sales Engage Campaign
Sales Engage_Sales Engage_Campaign
Name of the Sales Engage Campaign that this email is a part of
Activity Text
Marketo Sales Engage Campaign
Used
Sales Engage_Sales Engage_Campaing_Used
A checkbox indicating if a Sales Engage
Campaign was used. Activity Checkbox
Marketo Sales Engage Campaign
Details
Sales Engage_Sales Engage_Campaign_Details
A URL link to details around the Sales
Engage Campaign Activity Text
Marketo Sales Engage Replied
Sales Engage_Sales Engage_Replied
Indicates whether Sales Engage detected
a reply to this email Activity Checkbox
Marketo Sales Engage Replied At
Sales Engage_Sales Engage_Replied_At
Indicates when the reply came in
(DateTime) Activity Date and Time
Marketo Sales Engage Call
Answered By
Sales Engage_Sales Engage_Call_Answered_By
Indicates if the call was answered by a person
or their voicemail Activity Text
Marketo Sales Engage Call Local
Presence ID
Sales Engage_Sales Engage_Call_Local_Presen
ce_ID
Indicated local presence was used to
make the call. Activity Text
Marketo Sales Engage Call Recording
Sales Engage_Sales Engage_Call_Recording
Links to a recording of the call Activity Text
Marketo Sales Engage Call
Recording Duration
Sales Engage_Sales Engage_Call_Recording_D
uration
Indicated how the long the call made was for Activity Number
Marketo Sales Engage Last
Sales Engage_Last_Engagement
Indicates last user engagement with a
Account Contact Data and Time

Marketo Sales Engage for Salesforce: Installation and Success Guide
21
Engagement Sales Engageed email Lead Opportunity
Marketo Sales Engage Last Activity
Sales Engage_Last_Activity
Indicates last outbound activity (ie email) a user Sales
Engageed
Account Contact
Lead Opportunity
Date and Time
Marketo Sales Engage Last Replied
Sales Engage_Last_Replied
Indicates last reply received
Account Contact
Lead Opportunity
Date and Time
Marketo Sales Engage Current
Campaign
Sales Engage_Current_Campai
gn
Indicates current campaign the user is
on.
Account Contact
Lead Opportunity
Text

Marketo Sales Engage for Salesforce: Installation and Success Guide
22
Reports With Sales Engage Custom Fields Using Sales Engage’s custom fields you can create reports such as the priority call report using Sales Engage email engagement data to help reps focus time on the people or opportunities with the most momentum. Salesforce Priority Call Report Step 1: Go to SFDC Report Tab
Step 2: Create a Report with ‘Tasks and Events’

Marketo Sales Engage for Salesforce: Installation and Success Guide
23
Step 3: Set your filters and choose a date range
Step 4: Drag Sales Engage data into your columns by typing Sales Engage into the field search. Once you add Sales Engage data add a column for phone number so you can take action on this report and use it as a call list.

Marketo Sales Engage for Salesforce: Installation and Success Guide
24
Step 5: Run the report and sort by Sales Engage Events Tracked. This will bubble up the people with the most activity on your emails. Make sure you either have a next step planned with these top people or make them a priority that day. There is likely momentum with a high number of engagement activities. Congratulations. You’ve finished setting up the Sales Engage Sales Dashboard and Reports. The admin portion of this guide is now complete. The next section in the Guide will cover the quick Sales Engage and Salesforce steps for user account configuration.
This section of the guide is designed for individual Sales Engage users to connect, configure and learn recommended best practices for syncing their Sales Engage account with their Salesforce account. Every Sales Engage user will want to complete the relevant steps in Section 4 ‘Sales Engage Account Setup’. Sales Engage Account Admins will want to complete ‘Sales Engage Account Admin Settings’.
Marketo Sales Engage for Salesforce: Installation and Success Guide
25
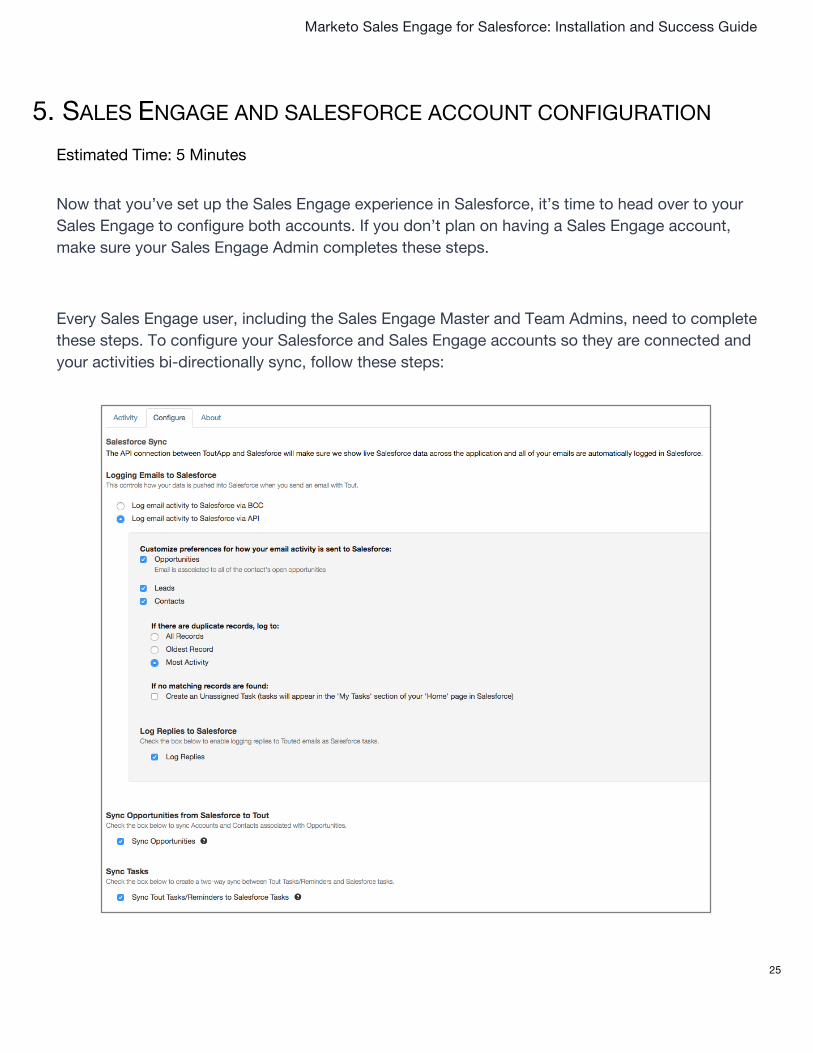
5. SALES ENGAGE AND SALESFORCE ACCOUNT CONFIGURATION Estimated Time: 5 Minutes Now that you’ve set up the Sales Engage experience in Salesforce, it’s time to head over to your Sales Engage to configure both accounts. If you don’t plan on having a Sales Engage account, make sure your Sales Engage Admin completes these steps. Every Sales Engage user, including the Sales Engage Master and Team Admins, need to complete these steps. To configure your Salesforce and Sales Engage accounts so they are connected and your activities bi-directionally sync, follow these steps:

Marketo Sales Engage for Salesforce: Installation and Success Guide
26
Sales Engage Tip: The settings you see defaulted on, are the recommended settings Let’s dive into each setting that users have available to them. Logging Email Activity via API We recommend logging email activity to Salesforce via API. To use Logging Email Activity to Salesforce via API setting, you are required to be on an Enterprise Edition of Salesforce or the Professional Edition of Salesforce (if you purchased the Integration via Web Services API).
There are a number of settings in Sales Engage you can adjust if you log your email activity to Salesforce via API.
1. You have the option to send your email activity to the Opportunities, Leads and Contacts. We recommend sending email activities to Salesforce on for all of these options.
2. If there are duplicate contact or lead records, you can log the activity to All Records, Oldest Record or Most Activity. We recommend selecting Most Activity.
3. If no matching records are found, you can turn on the option to Create an Unassigned Task. This task will appear in the “My Tasks” section of your Home page in Salesforce. This through your reps workflow and decide if this makes sense.
Marketo Sales Engage for Salesforce: Installation and Success Guide
27
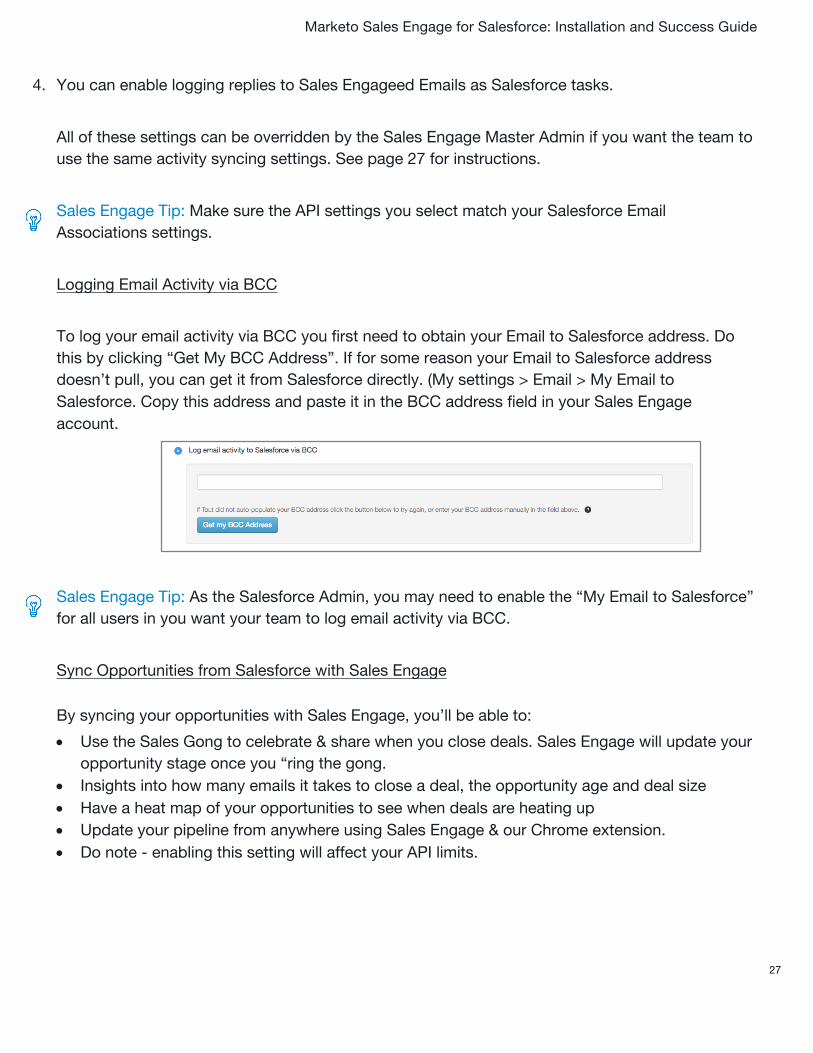
4. You can enable logging replies to Sales Engageed Emails as Salesforce tasks. All of these settings can be overridden by the Sales Engage Master Admin if you want the team to use the same activity syncing settings. See page 27 for instructions. Sales Engage Tip: Make sure the API settings you select match your Salesforce Email Associations settings. Logging Email Activity via BCC To log your email activity via BCC you first need to obtain your Email to Salesforce address. Do this by clicking “Get My BCC Address”. If for some reason your Email to Salesforce address doesn’t pull, you can get it from Salesforce directly. (My settings > Email > My Email to Salesforce. Copy this address and paste it in the BCC address field in your Sales Engage account.
Sales Engage Tip: As the Salesforce Admin, you may need to enable the “My Email to Salesforce” for all users in you want your team to log email activity via BCC. Sync Opportunities from Salesforce with Sales Engage By syncing your opportunities with Sales Engage, you’ll be able to: • Use the Sales Gong to celebrate & share when you close deals. Sales Engage will update your
opportunity stage once you “ring the gong. • Insights into how many emails it takes to close a deal, the opportunity age and deal size • Have a heat map of your opportunities to see when deals are heating up • Update your pipeline from anywhere using Sales Engage & our Chrome extension. • Do note - enabling this setting will affect your API limits.

Marketo Sales Engage for Salesforce: Installation and Success Guide
28
Sync Tasks If you enable this setting, a two way sync will be created between Salesforce and Sales Engage. That means anything created, edited, completed or deleted in Sales Engage will be reflected in Salesforce. Anything created, edited, completed or deleted in Salesforce will be reflected in Sales Engage. These syncs should take about 10 minutes to appear. Do note - enabling this setting will affect your API limits. Once you’re done adjusting your all of your settings, click “Save”. Add Sales Engage Outbox The Sales Engage Outbox allows team members to quickly access all of Sales Engage directly from Salesforce. Through Sales Engage Outbox, a user will be able to create and review email templates, send a Group Email, create a Campaign and manage their daily priorities with Command Center. Follow these steps to add Sales Engage Outbox to your Salesforce account. You will want to make sure all reps have this set up. Step 1: In your Salesforce account, click the + tab on the top of your screen.
Step 2: Then click Customize My Tabs to add a new tab to your default display.
Step 3: On the Customize My Tabs screen, select Sales Engage Outbox option from the left pane. Click on the Add arrow to move it to the right pane. Click Save when you’re done.

Marketo Sales Engage for Salesforce: Installation and Success Guide
29
Sales Engage Tip: If your reps do not see the option to add the Sales Engage Outbox to their Salesforce Tab, it may be related to your Salesforce permissions. If this is the case, we recommend as an Admin you set up your Sales Engage Outbox first so your team members can add their Sales Engage Outbox to their accounts.
SALES ENGAGE ACCOUNT ADMIN SETTINGS Sales Engage Master Admins have the option to configure some of their team’s Salesforce Settings within Sales Engage. Head to https://Sales Engage.com/next#settings/admin and look at the Salesforce Configuration section.
Enable Unsubscribe Syncing with Salesforce With this setting enabled, any Salesforce Lead or Contact that has been blocked unsubscribed by clicking a block unsubscribe link in a Sales Engageed email from any member of your team will automatically be marked as “Email Opt Out” in Salesforce. Additionally, if your team uses the Push to Sales Engage button in Salesforce, any Lead or Contact that is marked as “Email Opt Out” will not be added to the new Sales Engage group after the push. In Salesforce, Field Level Accessibility must be configured to properly allow all users on your team to view and edit the ‘Email Opt Out’ field for Leads and Contacts. If the ‘Email Opt Out’ field is not visible on the Lead and Contact objects, or the users on your team do not have access to it due to their Permission Set, Sales Engage will not be able to properly update this field with new block unsubscribe information.

Marketo Sales Engage for Salesforce: Installation and Success Guide
30
Once the above criteria have been fulfilled, this Sales Engage/Salesforce opt out sync will run once a night, between 8:00pm and 9:00pm PST. You also do not need to have Salesforce Task sync enabled in order for this feature to work properly. Override all Salesforce Sync Settings for Your Team Checking this box means all team members will have the settings you set applied to their Sales Engage accounts. If you log email activity via API you will have more options to sync email activity and log replies to Salesforce.
Don’t forget to click “Save Changes” when you’re done.

Marketo Sales Engage for Salesforce: Installation and Success Guide
31
Congratulations. You’ve fully setup your Sales Engage and Salesforce accounts. The next section in this guide will cover best practices and some frequently asked questions about the installation and setup process.
This final section of the guide is designed for Salesforce Admins learn more about Sales Engage’s integration with Salesforce. If you or your Sales Engage users have questions, be sure to check out the FAQs below.

Marketo Sales Engage for Salesforce: Installation and Success Guide
32
6. FAQS
You’ll find a number of common questions and our recommended best practices below. Logging Activities to Salesforce Q: How are calls logged in Salesforce? A: Any call made from Sales Engage Phone will log to Salesforce Activity history as a task with the “type” of a call. Sales Engage will update the following:
• The subject line reflecting the type of call i.e. “connect” • The type “Call” • The status as “completed” • Your notes (these will appear in the comments section) • A link to the recording will be appended to the Notes field • The call duration
Q: How are tasks logged in Salesforce? A: Tasks are logged to Salesforce via API logging
• Anything created, edited, completed or deleted in Sales Engage will be reflected in Salesforce.
• Anything created, edited, completed or deleted in Salesforce will be reflected in Sales Engage.
• Sync: Tasks created in Sales Engage will update Salesforce about every ~10 minutes. • Sync: Tasks created in Salesforce will update Sales Engage about every ~10 minutes.
Q: How are Sales Engaged emails logged in Salesforce? A: Emails are logged to the Activity History section of a contact record in Salesforce.
• Their type will be logged as “Email” • The subject lines of these emails will be prepended with “email” • You can choose to log these emails via API (recommended) or via BCC

Marketo Sales Engage for Salesforce: Installation and Success Guide
33
Q. How to enable reply logging in your Sales Engage and Salesforce account? A: Log into your Sales Engage account and navigate to your settings page. Click on CRM and then click on Manage in the Salesforce section. Make sure your account is already connected to your salesforce instance
Choose the second option “Log email activity to Salesforce via API”. You can customize which emails you would like to log to Salesforce in this section. And make sure your save your changes.

Marketo Sales Engage for Salesforce: Installation and Success Guide
34
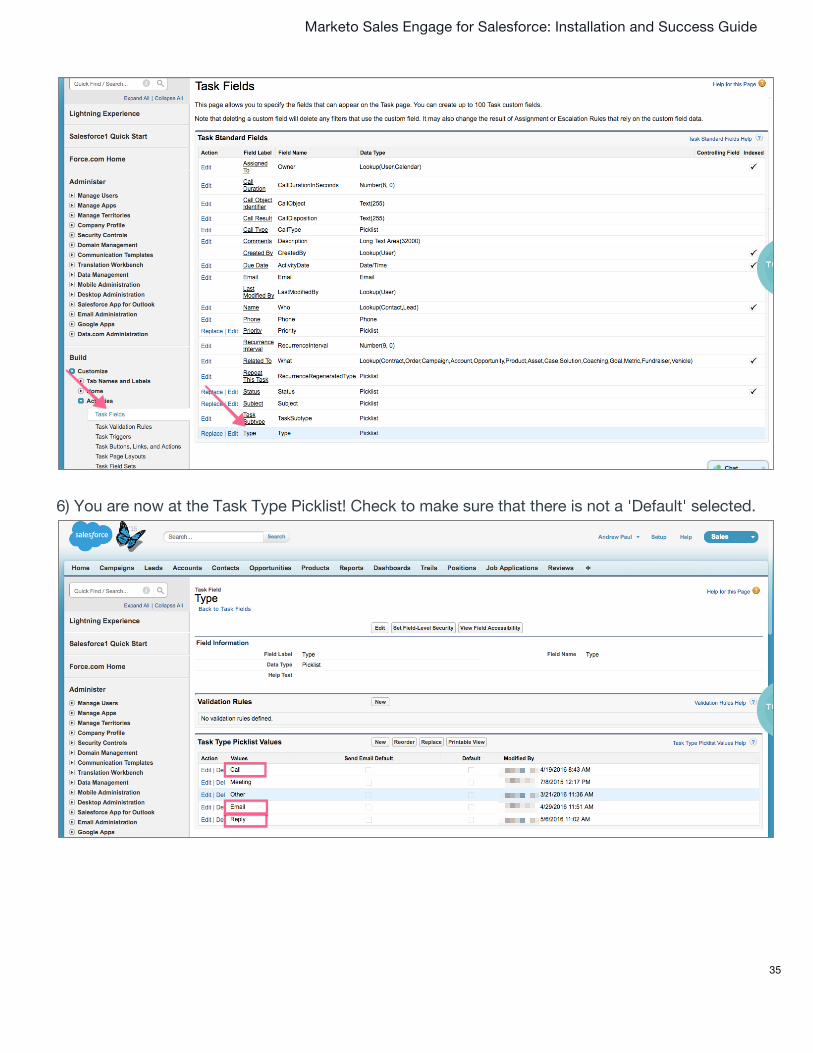
Enabling Reply logging in Salesforce: Requirements • Connection with Salesforce • No Default Type value selected on Task Type picklist • Call, Reply, and Email must all exist under the Task Type picklist (capitalization matters) • No Workflows or Triggers taking action on the value of the Type field Setup First, we will want to check that we have the correct picklist values in place. You will need the help of your Salesforce Admin to make any changes to your picklist. 1) Navigate to Salesforce.com and click on Setup in the top right corner. 2) Click Customize 3) Click Activities 4) Click Task Fields 5) Click Type
Marketo Sales Engage for Salesforce: Installation and Success Guide
35
6) You are now at the Task Type Picklist! Check to make sure that there is not a 'Default' selected.

Marketo Sales Engage for Salesforce: Installation and Success Guide
36
7. Check to make sure that there is a Type value listed for Email, Call, and Reply. Now that this is in place you will begin to see the Type field populate the corresponding value for logged Emails, Calls, and Replies. These values will NOT be populated on Tout reminder tasks. Note: If you do not see 'Reply' as a value you will want to add it by clicking New. 'Reply'is not a standard value in Salesforce. Q. How are replies logged in Salesforce? A: You can enable reply tracking in Sales Engage for replies to log to Salesforce (This is currently available for customers using the Gmail email client) • Then, if you Sales Engage an email and receive a reply a to that email - we will log the reply to
the Activity History section of Salesforce if you have • The body of the reply will get logged to Salesforce • For customers using the Outlook email client of if you choose not to enable reply logging in
Salesforce, Sales Engage will automatically log all Sales Engaged emails to Salesforce. You will have access to replies, as Sales Engage will log any threaded emails to Salesforce.
Q. How do I make sure my team’s email logging settings are consistent? A: As a Master Admin, you have an “Admin Settings” section in your Sales Engage Settings where you can set Salesforce logging rules for your entire subscription. Just choose “Override all Salesforce sync settings for my team” and save your settings.

Marketo Sales Engage for Salesforce: Installation and Success Guide
37
Q. If the email failed to log for a reason that is listed, do I need to do anything before retrying? A: Review error messages and if it doesn’t work reach out to support Q. If an email failed to log, where can I see that? A: If an emailed failed to log, you can check the Salesforce Diagnostics (SFDC activity page). Only check for yourself, admin can’t help with this. API Limits Q. Where can I see my team’s daily API call limit? A: In the “Activity” tab of your Salesforce Settings in Sales Engage, you’ll see how many API calls have been used for the day and how many you have left.

Marketo Sales Engage for Salesforce: Installation and Success Guide
38
General FAQS Q: How do I know which version of the package I’ve installed? A: You can quickly find out which version of the Sales Engage Salesforce is installed within Salesforce. • Go to your name and click “Setup” • Then, in the left-hand side, search for “Apex” • Click on Apex Classes
Q: I Do Not See "My Email to Salesforce" in My Settings? A: If you do not see your My Email to Salesforce under your Settings, it is most likely because your admin has not enabled it. This can happen if your team is new to Salesforce or your team has never used the BCC address that Salesforce provides you with. You will need Admin privileges to set this up so you may need to reach out to a Salesforce Admin. Now let's get started! 1. Click on Setup 2. Click Email Administration 3. Click Email to Salesforce 4. Click Edit 5. Check the box next to Active
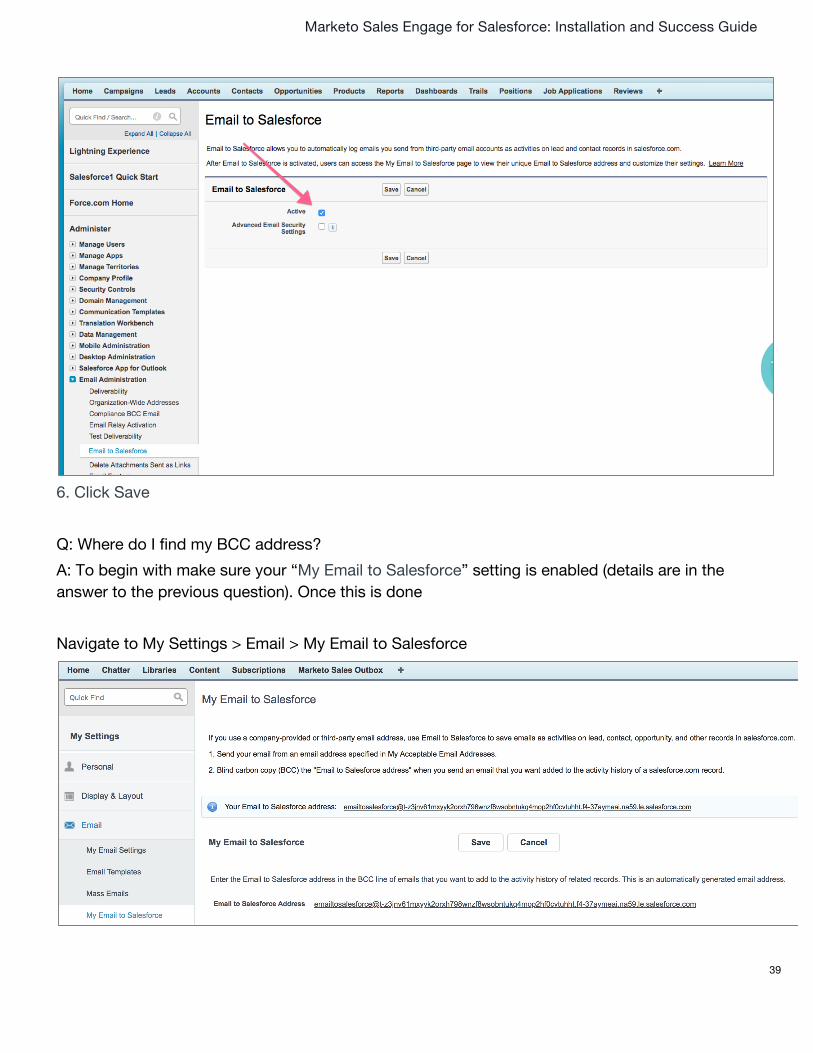
Marketo Sales Engage for Salesforce: Installation and Success Guide
39
6. Click Save Q: Where do I find my BCC address? A: To begin with make sure your “My Email to Salesforce” setting is enabled (details are in the answer to the previous question). Once this is done Navigate to My Settings > Email > My Email to Salesforce

Marketo Sales Engage for Salesforce: Installation and Success Guide
40
Q: What functionality is included with the Salesforce package installation? A: You and your team will have a number of features with the Salesforce package installation. The chart belows breaks down the Sales Engage for Salesforce functionality.
Sales Engage Functionality Description Type
Email with Sales Engage Email Contacts and Leads directly within Salesforce
Detail Page Button
Call with Sales Engage Phone
Call directly from a Contact or Lead’s Salesforce record
Button
Add to Sales Engage Campaign
Add a Contact, Lead, Opportunity or Account to a Sales Engage Campaign
directly from Salesforce Button
Push to Sales Engage Email a group of Contacts, Leads,
Accounts, Opportunities directly from Salesforce
List Button
Sales Engage Custom Fields
Add custom fields to activities and reporting to increase visibility. Custom Fields
Sales Engage Outbox Users can access all Sales Engage functionality directly from Salesforce Tab

Marketo Sales Engage for Salesforce: Installation and Success Guide
41
Q: What functionality is included with the Salesforce and Sales Engage user integration?
Sales Engage Functionality Description
Auto Email Logging Sales Engage will automatically log all emails to Salesforce.
Auto Activity Logging You can configure your settings to auto log all calls, tasks and calendar events.
Dynamic Fields
Any fields you have in Salesforce for Accounts, Leads, Contacts and Opportunities can be used
in Sales Engage templates & campaigns to customize messaging & auto populate.
Recommended Templates
Set up your team’s templates to be auto recommended with any of your salesforce fields
to deliver effective messaging and value to customers based on your historical data.
Update Salesforce from Anywhere Update Salesforce from anywhere using Sales
Engage’s Chrome Extension and in Sales Engage.com
Email from Salesforce Through the Chrome Extension, you can launch
an email or campaign from Salesforce by enabling the Blue Sales Engage envelopes.
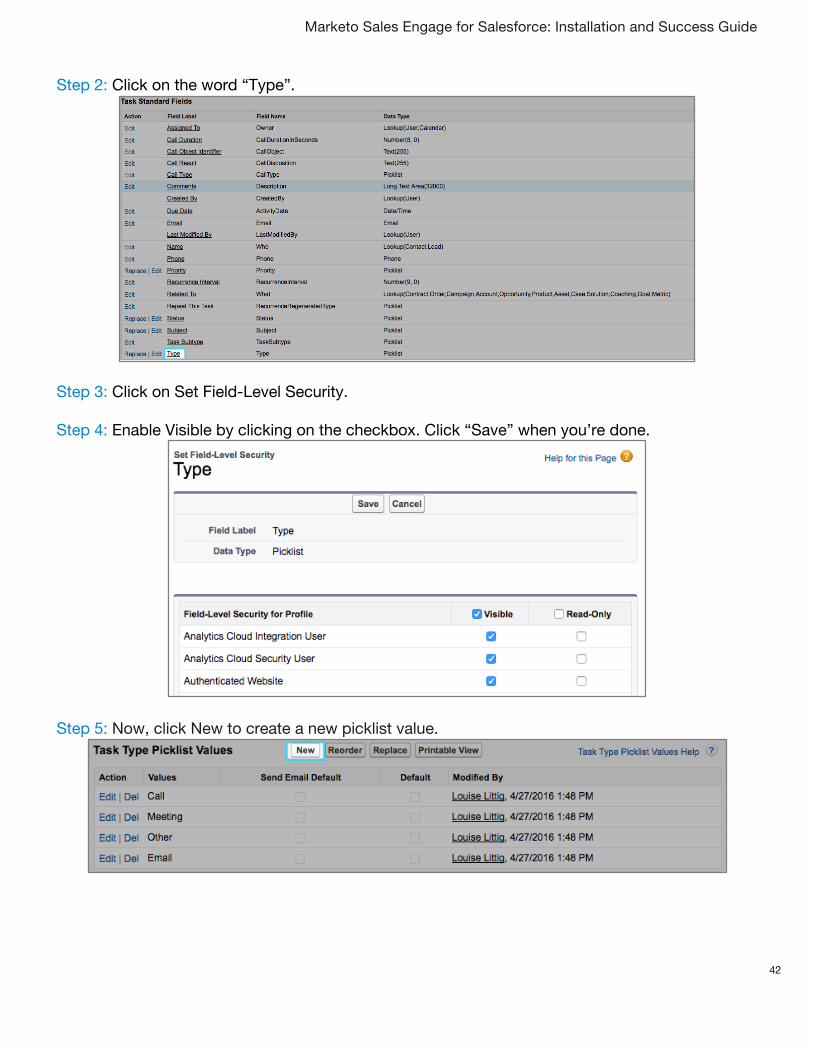
Q: How do I Enable Email Reply Logging for Gmail A: Enable Email Reply Logging to Salesforce to ensure you can get the most out of reporting, follow these steps to set up a new picklist value for Activity Type. Do note - this is only available for Gmail users who have enabled logging email activity via API. Step 1: On the Setup page left side menu, under Build, select Customize > Activities > Task Fields.
Marketo Sales Engage for Salesforce: Installation and Success Guide
42
Step 2: Click on the word “Type”.
Step 3: Click on Set Field-Level Security.
Step 4: Enable Visible by clicking on the checkbox. Click “Save” when you’re done.
Step 5: Now, click New to create a new picklist value.

Marketo Sales Engage for Salesforce: Installation and Success Guide
43
Step 5: Type in “Reply” and click “Save” when you’re done.
Sales Engage Tip: This is case sensitive. Make sure to capitalize the “R” and lowercase the ‘eply’. Now you should see “Reply” appear in the Task Type Picklist Values.
Congratulations. You’ve completed the Sales Engage for Salesforce: Success and Installation Guide. If you are looking for more resources, sales best practices and help, we recommend you check out
• Sales Engage University - https://www1.toutapp.com/university/ • Help Center - https://help.toutapp.com/hc/en-us • Videos - https://www1.toutapp.com/toutorials/ • Blog - https://www1.toutapp.com/blog/
Marketo Sales Engage for Salesforce: Installation and Success Guide
44
APPENDIX A: SALESFORCE PACKAGE MIGRATION GUIDE
Overview This document describes the steps for existing Sales Engage customers to install the updated Sales Engage Salesforce package
Step 1 - Installing the Unmanaged Package
1. Login to your salesforce org as a Salesforce Administrator 2. Paste the following link in your browser window for either Production or Sandbox respectively. If
you have the existing package installed, you will need to deploy the new package in Sandbox in order to do the migration. Production - https://login.salesforce.com/packaging/installPackage.apexp?p0=04t0P000000EgEz Sandbox - https://test.salesforce.com/packaging/installPackage.apexp?p0=04t0P000000EgEz
3. Follow the Installation Steps to Complete the Package Installation If you want only specific profiles to access the Sales Engage custom objects, select the Install for Specific Profiles option and select the appropriate profiles to grant access to.
Step 2 - Migrating the Data from the Task Table Since the Task Table will likely be very large, migrating the data will require the use of the Salesforce’s Bulk API. This requires you to deploy two Apex Classes into the production Salesforce org via a Change Set. Here are the steps to doing this: 1. From Appendix B, Load the following 2 Apex Classes in your Sandbox Org
• Sales EngageUpdateTask • Sales EngageUpdateTaskTest

Marketo Sales Engage for Salesforce: Installation and Success Guide
45
2. In your Sandbox org, go to Developer Console in the top right menu
3. From the Developer Console, hit CTRL-E to bring up the Anonymous Apex window 4. Run the Anonymous Apex code which will invoke the Batch Apex job to migrate the existing
task data from the old Managed Package fields to the new fields • Paste the Apex Code snippet from Appendix B • (Optional) To speed up the batch job, update the date value from the code snippet to • be the date that you initially installed the managed package if it is more recent than • 2/14/2014. • Click the Execute button.
5. Validate that the Batch Job has completed • Under Setup, click on Apex Jobs • Confirm that the job has completed with no failures
6. Create the Change Set in Sandbox consisting of the two Apex Classes and Deploy to Production
7. Repeat steps 2-5 in Production 8. (Optional) Remove the Apex Classes as they are no longer needed
Step 3 - Update Page Layouts 1. Remove Old Fields from Page Layouts 2. Add New fields to Layouts read only on layouts
Step 4 - Update Customizations 1. Update All Customizations in Sales Engage Salesforce to point to Unmanaged Package Fields

Marketo Sales Engage for Salesforce: Installation and Success Guide
46
2. Update all reports, apex classes, triggers, workflows, etc that point to fields in managed package to now reference new fields. To do this, just replace the fields starting with Sales Engage__ with the field names starting with just Sales Engage
Step 5 - Uninstall Managed Package Uninstall the Package
APPENDIX B - APEX CLASSES Sales EngageUpdateTask
global class Sales EngageUpdateTask implements Database.Batchable<sObject> { private Date startDate; private Date endDate; public Sales EngageUpdateTask(Date startDt, Date endDt) { startDate = startDt; endDate = endDt; } global Database.QueryLocator start(Database.BatchableContext BC) { String query = 'SELECT id, Sales Engage__Sales Engage_Actions_Taken__c,'+ 'Sales Engage__Sales Engage_Call_Answered_By__c,'+ 'Sales Engage__Sales Engage_Call_Local_Presence_ID__c,'+ 'Sales Engage__Sales Engage_Call_Recording__c,'+ 'Sales Engage__Sales Engage_Call_Recording_Duration__c,'+ 'Sales Engage__Sales Engage_Campaign__c,'+ 'Sales Engage__Sales Engage_Campaign_Details_Link__c,'+ 'Sales Engage__Sales Engage_Clicked__c,'+ 'Sales Engage__Sales Engage_Details__c,'+ 'Sales Engage__Sales Engage_Events_Tracked__c,'+ 'Sales Engage__Sales Engage_Last_Event_At__c,'+ 'Sales Engage__Sales Engage_Presentation_Viewed__c,'+ 'Sales Engage__Sales Engage_Replied__c,' + 'Sales Engage__Sales Engage_Replied_At__c,'+ 'Sales Engage__Sales Engage_Sent_By__c,'+ 'Sales Engage__Sales Engage_Template__c,'+ 'Sales Engage__Sales Engage_Template_Details__c,'+ 'Sales Engage__Sales Engage_Template_Used__c,'+ 'Sales Engage__Sales Engage_Viewed__c '+ 'from Task '+ 'where ActivityDate >= :startDate AND ActivityDate <= :endDate'; return Database.getQueryLocator(query); } global void execute(Database.BatchableContext BC, List<Task> scope) { for (Task t : scope)

Marketo Sales Engage for Salesforce: Installation and Success Guide
47
{ if (t.Sales Engage__Sales Engage_Actions_Taken__c != null || t.Sales Engage__Sales Engage_Call_Answered_By__c != null || t.Sales Engage__Sales Engage_Call_Local_Presence_ID__c != null || t.Sales Engage__Sales Engage_Call_Recording__c != null || t.Sales Engage__Sales Engage_Call_Recording_Duration__c != null || t.Sales Engage__Sales Engage_Campaign__c != null || t.Sales Engage__Sales Engage_Campaign_Details_Link__c != null || t.Sales Engage__Sales Engage_Clicked__c != null || t.Sales Engage__Sales Engage_Details__c != null || t.Sales Engage__Sales Engage_Events_Tracked__c != null || t.Sales Engage__Sales Engage_Last_Event_At__c != null || t.Sales Engage__Sales Engage_Presentation_Viewed__c != null || t.Sales Engage__Sales Engage_Replied__c != null || t.Sales Engage__Sales Engage_Replied_At__c != null || t.Sales Engage__Sales Engage_Sent_By__c != null || t.Sales Engage__Sales Engage_Template__c != null || t.Sales Engage__Sales Engage_Template_Details__c != null || t.Sales Engage__Sales Engage_Template_Used__c != null || t.Sales Engage__Sales Engage_Viewed__c) { t.Sales Engage_Actions_Taken__c = t.Sales Engage__Sales Engage_Actions_Taken__c; t.Sales Engage_Call_Answered_By__c = t.Sales Engage__Sales Engage_Call_Answered_By__c; t.Sales Engage_Call_Local_Presence_ID__c = t.Sales Engage__Sales Engage_Call_Local_Presence_ID__c; t.Sales Engage_Call_Recording__c = t.Sales Engage__Sales Engage_Call_Recording__c; t.Sales Engage_Call_Recording_Duration__c = t.Sales Engage__Sales Engage_Call_Recording_Duration__c; t.Sales Engage_Campaign__c = t.Sales Engage__Sales Engage_Campaign__c; t.Sales Engage_Campaign_Details_Link__c = t.Sales Engage__Sales Engage_Campaign_Details_Link__c; t.Sales Engage_Clicked__c = t.Sales Engage__Sales Engage_Clicked__c; t.Sales Engage_Details__c = t.Sales Engage__Sales Engage_Details__c; t.Sales Engage_Events_Tracked__c = t.Sales Engage__Sales Engage_Events_Tracked__c; t.Sales Engage_Last_Event_At__c = t.Sales Engage__Sales Engage_Last_Event_At__c; t.Sales Engage_Presentation_Viewed__c = t.Sales Engage__Sales Engage_Presentation_Viewed__c; t.Sales Engage_Replied__c = t.Sales Engage__Sales Engage_Replied__c; t.Sales Engage_Replied_at__C = t.Sales Engage__Sales Engage_Replied_At__c; t.Sales Engage_Sent_By__c = t.Sales Engage__Sales Engage_Sent_By__c; t.Sales Engage_Template__C = t.Sales Engage__Sales Engage_Template__c; t.Sales Engage_Template_details__c = t.Sales Engage__Sales Engage_Template_Details__c; t.Sales Engage_Viewed__c = t.Sales Engage__Sales Engage_Viewed__c; } } // Update with AllOrNone = false so we still process if there are any failures database.update(scope, false); } global void finish(Database.BatchableContext BC) { } }
Marketo Sales Engage for Salesforce: Installation and Success Guide
48
Sales EngageUpdateTaskTest @isTest public class Sales EngageUpdateTaskTest { static testMethod void testSales EngageUpdateTask() { List<Task> tasks = new List<Task>(); for(Integer i=0 ;i <10;i++) { Task t = new Task(); t.ActivityDate = Date.today(); t.Subject = 'Test Task'; tasks.add(t); } insert tasks; Test.startTest(); Sales EngageUpdateTask tut = new Sales EngageUpdateTask(Date.today(), Date.Today()); DataBase.executeBatch(tut); Test.stopTest(); } }
APPENDIX C - ANONYMOUS APEX TO CALL BATCH JOB Date endDate = Date.today(); // date when custom fields were first added to the package. // To speed things up, you can update this date value to be the date that the managed package was initially installed only if it is more recent than 2/14/2014 Date startDate = Date.valueOf('2014-02-14'); // Execute the Batch Apex Sales EngageUpdateTask tut = new Sales EngageUpdateTask (startDate, endDate); database.executeBatch(tut);