Embed Size (px)
Citation preview
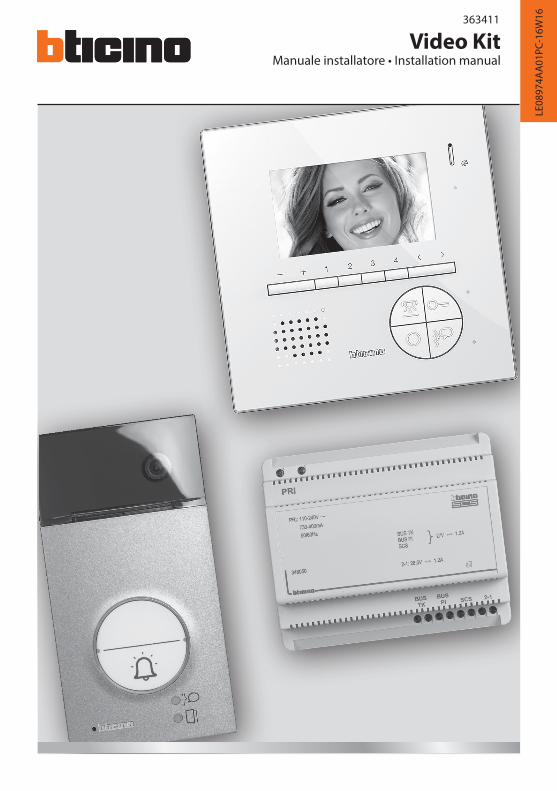
363411
Video KitManuale installatore • Installation manual
LE08
974A
A01
PC-1
6W16
2
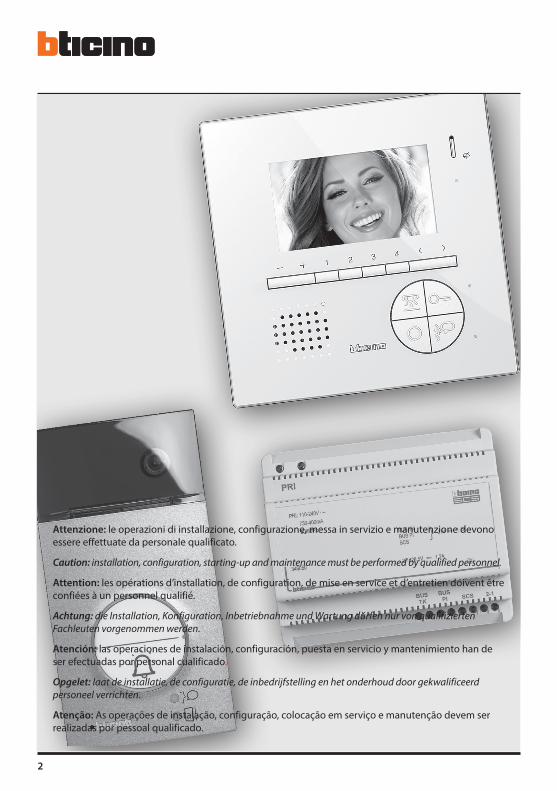
Attenzione: le operazioni di installazione, configurazione, messa in servizio e manutenzione devono essere effettuate da personale qualificato.
Caution: installation, configuration, starting-up and maintenance must be performed by qualified personnel.
Attention: les opérations d’installation, de configuration, de mise en service et d’entretien doivent être confiées à un personnel qualifié.
Achtung: die Installation, Konfiguration, Inbetriebnahme und Wartung dürfen nur von qualifizierten Fachleuten vorgenommen werden.
Atención: las operaciones de instalación, configuración, puesta en servicio y mantenimiento han de ser efectuadas por personal cualificado.
Opgelet: laat de installatie, de configuratie, de inbedrijfstelling en het onderhoud door gekwalificeerd personeel verrichten.
Atenção: As operações de instalação, configuração, colocação em serviço e manutenção devem ser realizadas por pessoal qualificado.

Video Kit
3
• Vecchio impianto a campanelloImpianto esistente con 3 fili e sola chiamata.
• Old system with bellExisting system with 3 wires and just call.
• Ancienne installation a sonnetteInstallation existante à 3 fils et un seul appel.
• Alte klingelanlageVorhandene 3-Leiter Anlage nur mit Ruffunktion.
• Vieja instalación con timbreInstalación existente con 3 hilos y una llamada.
• Oude deurbelinstallatieBestaande 3-aderige installatie met alleen een oproepfunctie.
• Antiga instalação em campaínhaInstalação existente com 3 fios e somente chamada.
230 Vac 12 V
230 Vac
}3 4 6 0 0 0
0322 06
IP30
PRI 230V~ 50 - 60Hz 260mABUS2-1 27V 1,2A
PRI
PS
BUS TK BUS PI
346830
230 Vac 12 V
1– + 2 3 4
1– + 2 3 4
1– + 2 3 4
230 Vac
230 Vac 12 V
230 Vac
}3 4 6 0 0 0
0322 06
IP30
PRI 230V~ 50 - 60Hz 260mABUS2-1 27V 1,2A
PRI
PS
BUS TK BUS PI
346830
230 Vac 12 V
1– + 2 3 4
1– + 2 3 4
1– + 2 3 4
230 Vac
• Nuovo impianto citofonicoImpianto realizzato senza modifiche ai 2 fili esistenti: chiamata, videocitofono e serratura.
• New door entry systemSystem made without modifications to the 2 existing wires; call, video handset and electric door lock.
• Nouvelle installation phoniqueInstallation réalisée sans modifications sur les 2 fils existants: appel, vidéophone, et serrure électrique.
• Neue haustelefonanlageAnlage ohne Änderungen an den vorhandenen 2 Leiter: Ruffunktion, Gegensprechanlage und elektrisches Schloss.
• Nueva instalación interfónicaInstalación realizada sin las modificaciones a los 2 hilos existentes: llamada, videoportero y cerradura eléctrica.
• Nieuwe deurtelefooninstallatieInstallatie aangelegd zonder wijzigingen aan de 2 bestaande aders: oproep, beeldhuistelefoon en elektrisch deurslot.
• Nova instalação do intercomunicadorInstalação realizada sem modificar os 2 fios existentes: chamada, intercomunicador vídeo e fechadura eléctrica.
*
* Acquistabile separatamente* Can be purchased separately* Vendu séparément* Auf Anfrage getrennt erhältlich* A la venta por separado* Apart verkrijgbaar* Adquirível separadamente
4
D
B C
A
1– + 2 3 4
>0,2 mm2
BTicinoL4669
0,35 mm2 0,28 mm2
BTicinoC9881U/5E
AWG24 UTP5
BTicino336904
One PTT278 TP
0,28 mm2
OneSYT+ Digital
TP5/10
OneSYT+ Num TP
5/10
GIGA TWCAT5E
AWG24
One SYT+ Num TP
8/10
CableARB.6060-1
6/10
CableEV6R
6/10
1mm2
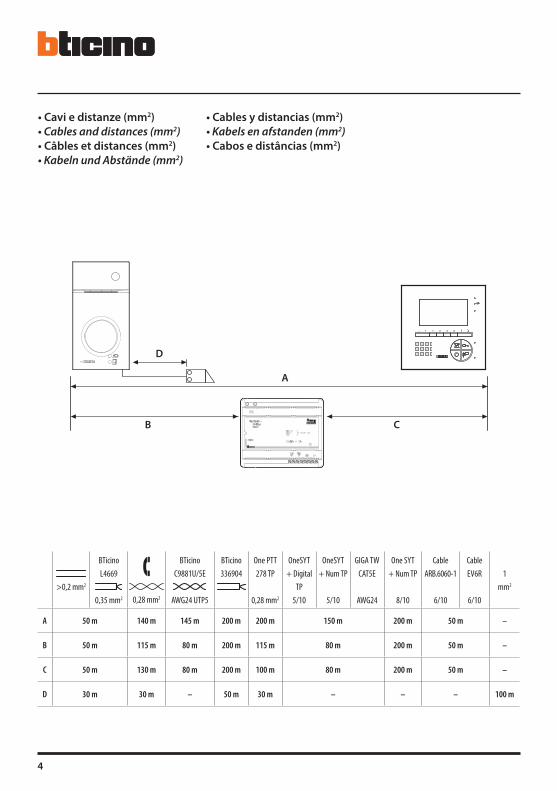
A 50 m 140 m 145 m 200 m 200 m 150 m 200 m 50 m –
B 50 m 115 m 80 m 200 m 115 m 80 m 200 m 50 m –
C 50 m 130 m 80 m 200 m 100 m 80 m 200 m 50 m –
D 30 m 30 m – 50 m 30 m – – – 100 m
• Cavi e distanze (mm2)• Cables and distances (mm2)• Câbles et distances (mm2)• Kabeln und Abstände (mm2)
• Cables y distancias (mm2)• Kabels en afstanden (mm2)• Cabos e distâncias (mm2)

Video Kit
5
• Schema monofamiliare• One-family diagram• Schéma mono-familial• Schema Einfamilienhaus
• Esquema monofamiliar• Schema eensgezins• Esquema monofamiliar
• A Pulsante locale apertura serratura.B Chiamata al piano.S+ S- 18 V; 4 A impulsivi. 250 mA mantenimento (30 Ω max).
• A Door lock release local pushbutton.B Floor call.S+ S- 18 V; 4 A impulsive. 250 mA holding current (30 Ω max).
• A Bouton local ouverture serrure.B Appel à l’étage.S+ S- 18 V; 4 A impulsifs. 250 mA entretien (30 Ω max).
• A Lokale Schlossöffnungstaste.B Etagenruf.S+ S- 18 V; 4 A impulsstrom. 250 mA Haltestrom (30 Ω max).
• A Pulsador local apertura cerradura.B Llamada al piso.S+ S- 18 V; 4 A por impulsos. 250 mA mantenimiento (30 Ω max).
• A Lokale knop opening slot.B Oproep aan verdieping.S+ S- 18 V; 4 A impulsief; 250 mA onderhoud (30 Ω max).
• A Botão local de abertura da fechadura.B Chamada ao piso.S+ S- 18 V; 4 A instantâneos. 250 mA continuos (30 Ω max).
ON
OFF
P= –= –= –= –M
J2J1
N= –= –
BUS
B
1– + 2 3 4
N = –= –
T = –S = –
P = ––=
BUS
PL S+ S-
A
2
1
Bifamiliare • Two-family
Monofamiliare • One-family

6
• Schema bifamiliare 1• Two-family diagram 1• Schéma bi-familiale 1• Schema Zweifamilienhaus 1
• Esquema bifamiliar 1• Schema tweegezins 1• Esquema bifamiliar 1
• A Pulsante locale apertura serratura.B Chiamata al piano.S+ S- 18 V; 4 A impulsivi. 250 mA mantenimento (30 Ω max).
• A Door lock release local pushbutton.B Floor call.S+ S- 18 V; 4 A impulsive. 250 mA holding current (30 Ω max).
• A Bouton local ouverture serrure.B Appel à l’étage.S+ S- 18 V; 4 A impulsifs. 250 mA entretien (30 Ω max).
• A Lokale Schlossöffnungstaste.B Etagenruf.S+ S- 18 V; 4 A impulsstrom. 250 mA Haltestrom (30 Ω max).
• A Pulsador local apertura cerradura.B Llamada al piso.S+ S- 18 V; 4 A por impulsos. 250 mA mantenimiento (30 Ω max).
• A Lokale knop opening slot.B Oproep aan verdieping.S+ S- 18 V; 4 A impulsief; 250 mA onderhoud (30 Ω max).
• A Botão local de abertura da fechadura.B Chamada ao piso.S+ S- 18 V; 4 A instantâneos. 250 mA continuos (30 Ω max).
ON
OFFON
OFF
BUS
B
BUS
B
P= –= –= –= –M
J2J1
N= –= *1
P= –= –= –= –M
J2J1
N= –= –
BUS
PL S+ S-
A
1– + 2 3 4
1– + 2 3 4
N = –= –
T = –S = –
P = ––=
2
1
* • Il secondo posto interno ed il configuratore 3501/1 devono essere acquistati separatemente. • The second internal unit and the 3501/1 configurator must be purchased separately. • Le deuxième poste interne et le configurateur 3501/1 doivent être achetés séparément. • Die zweite Hausstation und der Konfigurator 3501/1 werden getrennt verkauft. • La segunda unidad interior y el configurador 3501/1 se han de comprar por separado. • De tweede binnenpost en de configurator 3501/1 moeten apart worden gekocht. • A segunda unidade interna e o configurador 3501/1 devem ser adquiridos separadamente.
Bifamiliare • Two-family
Monofamiliare • One-family
*
Video Kit
7
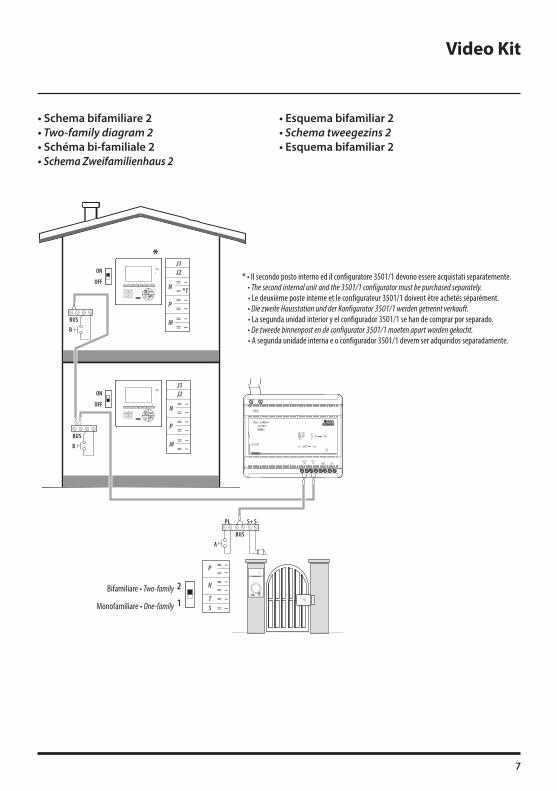
• Schema bifamiliare 2• Two-family diagram 2• Schéma bi-familiale 2• Schema Zweifamilienhaus 2
• Esquema bifamiliar 2• Schema tweegezins 2• Esquema bifamiliar 2
* • Il secondo posto interno ed il configuratore 3501/1 devono essere acquistati separatemente. • The second internal unit and the 3501/1 configurator must be purchased separately. • Le deuxième poste interne et le configurateur 3501/1 doivent être achetés séparément. • Die zweite Hausstation und der Konfigurator 3501/1 werden getrennt verkauft. • La segunda unidad interior y el configurador 3501/1 se han de comprar por separado. • De tweede binnenpost en de configurator 3501/1 moeten apart worden gekocht. • A segunda unidade interna e o configurador 3501/1 devem ser adquiridos separadamente.
BUS
PL S+ S-
A
ON
OFF
ON
OFF
BUS
B
BUS
B
P= –= –= –= –M
J2J1
N= –= *1
P= –= –= –= –M
J2J1
N= –= –
N = –= –
T = –S = –
P = ––=
1– + 2 3 4
1– + 2 3 4
2
1
*
Bifamiliare • Two-family
Monofamiliare • One-family
8
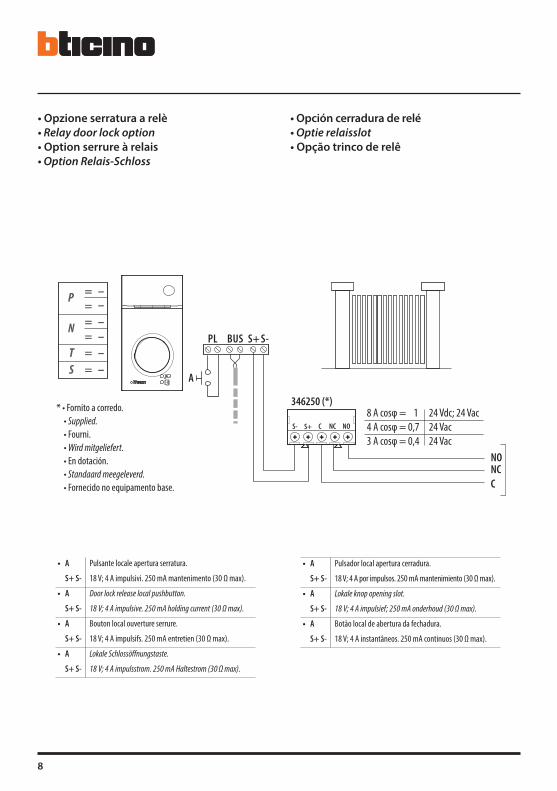
• Opzione serratura a relè• Relay door lock option• Option serrure à relais• Option Relais-Schloss
• Opción cerradura de relé• Optie relaisslot• Opção trinco de relê
BUSPL S+ S-
A
N = –= –
T = –S = –
P = ––=
8 A cosφ = 14 A cosφ = 0,73 A cosφ = 0,4
24 Vdc; 24 Vac24 Vac24 Vac
NONCC
346250 (*)
S- S+ C NC NO
* • Fornito a corredo.• Supplied.• Fourni.• Wird mitgeliefert.• En dotación.• Standaard meegeleverd.• Fornecido no equipamento base.
• A Pulsante locale apertura serratura.
S+ S- 18 V; 4 A impulsivi. 250 mA mantenimento (30 Ω max).
• A Door lock release local pushbutton.
S+ S- 18 V; 4 A impulsive. 250 mA holding current (30 Ω max).
• A Bouton local ouverture serrure.
S+ S- 18 V; 4 A impulsifs. 250 mA entretien (30 Ω max).
• A Lokale Schlossöffnungstaste.
S+ S- 18 V; 4 A impulsstrom. 250 mA Haltestrom (30 Ω max).
• A Pulsador local apertura cerradura.
S+ S- 18 V; 4 A por impulsos. 250 mA mantenimiento (30 Ω max).
• A Lokale knop opening slot.
S+ S- 18 V; 4 A impulsief; 250 mA onderhoud (30 Ω max).
• A Botão local de abertura da fechadura.
S+ S- 18 V; 4 A instantâneos. 250 mA continuos (30 Ω max).
Video Kit
9
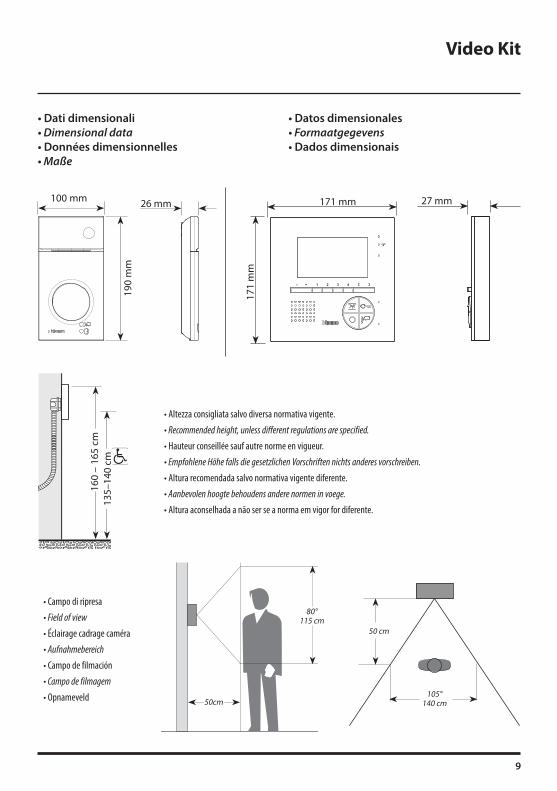
• Altezza consigliata salvo diversa normativa vigente.
• Recommended height, unless different regulations are specified.
• Hauteur conseillée sauf autre norme en vigueur.
• Empfohlene Höhe falls die gesetzlichen Vorschriften nichts anderes vorschreiben.
• Altura recomendada salvo normativa vigente diferente.
• Aanbevolen hoogte behoudens andere normen in voege.
• Altura aconselhada a não ser se a norma em vigor for diferente.
160
– 16
5 cm
135–
140
cm• Dati dimensionali• Dimensional data• Données dimensionnelles• Maße
• Datos dimensionales• Formaatgegevens• Dados dimensionais
171 mm
171
mm
1– + 2 3 4
27 mm100 mm
190
mm
26 mm
• Campo di ripresa
• Field of view
• Éclairage cadrage caméra
• Aufnahmebereich
• Campo de filmación
• Campo de filmagem
• Opnameveld
50 cm
105°140 cm
80°115 cm
50cm
10
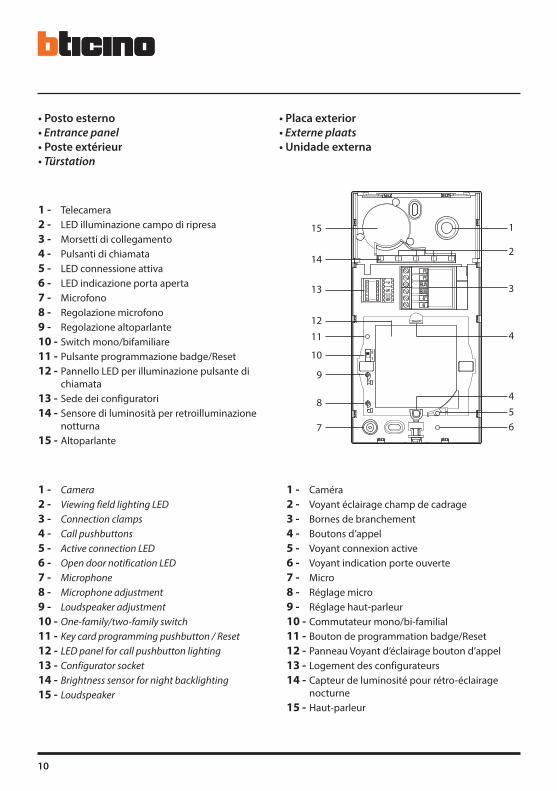
• Posto esterno• Entrance panel• Poste extérieur• Türstation
• Placa exterior• Externe plaats• Unidade externa
1
2
3
4
456
15
14
13
11
12
10
9
8
7
1 - Telecamera2 - LED illuminazione campo di ripresa3 - Morsetti di collegamento4 - Pulsanti di chiamata5 - LED connessione attiva6 - LED indicazione porta aperta7 - Microfono8 - Regolazione microfono9 - Regolazione altoparlante10 - Switch mono/bifamiliare11 - Pulsante programmazione badge/Reset12 - Pannello LED per illuminazione pulsante di
chiamata13 - Sede dei configuratori14 - Sensore di luminosità per retroilluminazione
notturna15 - Altoparlante
1 - Caméra2 - Voyant éclairage champ de cadrage3 - Bornes de branchement4 - Boutons d’appel5 - Voyant connexion active6 - Voyant indication porte ouverte7 - Micro8 - Réglage micro9 - Réglage haut-parleur10 - Commutateur mono/bi-familial11 - Bouton de programmation badge/Reset12 - Panneau Voyant d’éclairage bouton d’appel13 - Logement des configurateurs14 - Capteur de luminosité pour rétro-éclairage
nocturne15 - Haut-parleur
1 - Camera2 - Viewing field lighting LED3 - Connection clamps4 - Call pushbuttons5 - Active connection LED6 - Open door notification LED7 - Microphone8 - Microphone adjustment9 - Loudspeaker adjustment10 - One-family/two-family switch11 - Key card programming pushbutton / Reset12 - LED panel for call pushbutton lighting13 - Configurator socket14 - Brightness sensor for night backlighting15 - Loudspeaker
Video Kit
11
1 - Camera2 - Led verlichting camerabereik3 - Aansluitklemmen4 - Oproepknoppen5 - LED verbinding geactiveerd6 - LED aanduiding deur geopend7 - Microfoon8 - Regeling microfoon9 - Regeling luidspreker10 - Schakelaar een-/tweegezins11 - Knop badgeprogrammering/reset12 - LED paneel voor verlichting oproepknop13 - Plaats van de configuratoren14 - Lichtsensor voor achtergrondverlichting ‘s nachts15 - Luidspreker
1 - Kamera2 - LED Beleuchtung des Aufnahmefelds3 - Anschlussklemmen4 - Ruftasten5 - LED Verbindung aktiv6 - LED Anzeige Tür offen7 - Mikrophon8 - Einstellung des Mikrophons9 - Einstellung des Lautsprechers10 - Switch Ein-/Zweifamilienhaus11 - Programmierungstaste Badge/Reset12 - LED-Tafel zur Beleuchtung der Ruftaste13 - Sitz der Konfiguratoren14 - Helligkeitssensor zur nächtlichen
Rückbeleuchtung15 - Lautsprecher
1 - Câmara de vídeo2 - LED de iluminação do campo de filmagem3 - Bornes de conexão4 - Botões de chamada5 - LED de conexão ativa6 - LED indicação de porta aberta7 - Microfone8 - Regulação do microfone9 - Regulação do altifalante10 - Interruptor mono/bifamiliar11 - Botão de programação do Crachá/Rearme12 - Painel LED para iluminação do botão de
chamada13 - Sede dos configuradores14 - Sensor de luminosidade para retroiluminação
noturna15 - Altifalante
1 - Telecámara2 - LED iluminación campo de grabación3 - Bornes de conexión4 - Pulsadores de llamada5 - LED conexión activada6 - LED indicación puerta abierta7 - Micrófono8 - Regulación del micrófono9 - Regulación del altavoz10 - Switch mono/bifamiliar11 - Pulsador de programación credencial/Reset12 - Panel LED para iluminación pulsador de
llamada13 - Alojamiento de los configuradores14 - Sensor de luminosidad para retroiluminación
nocturna15 - Altavoz
12
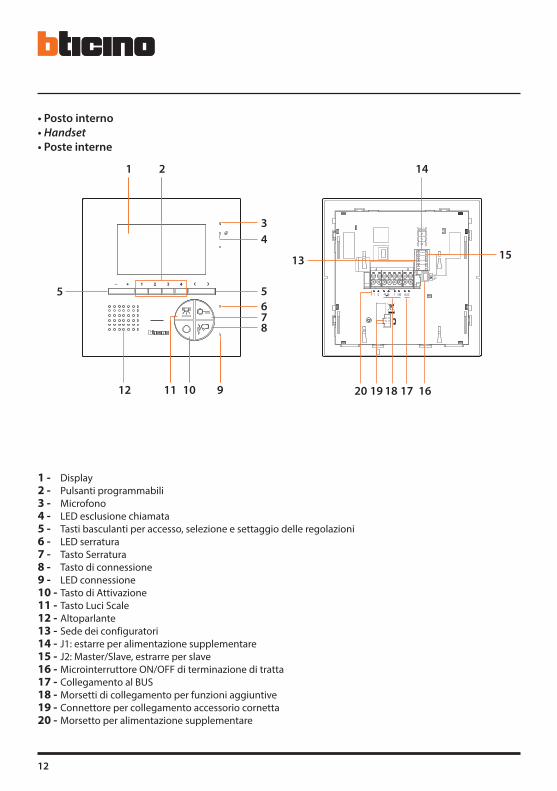
• Posto interno• Handset• Poste interne
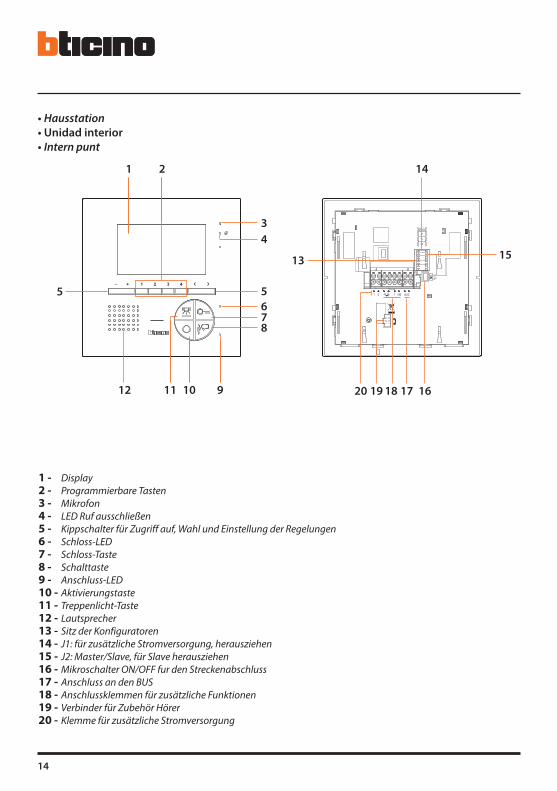
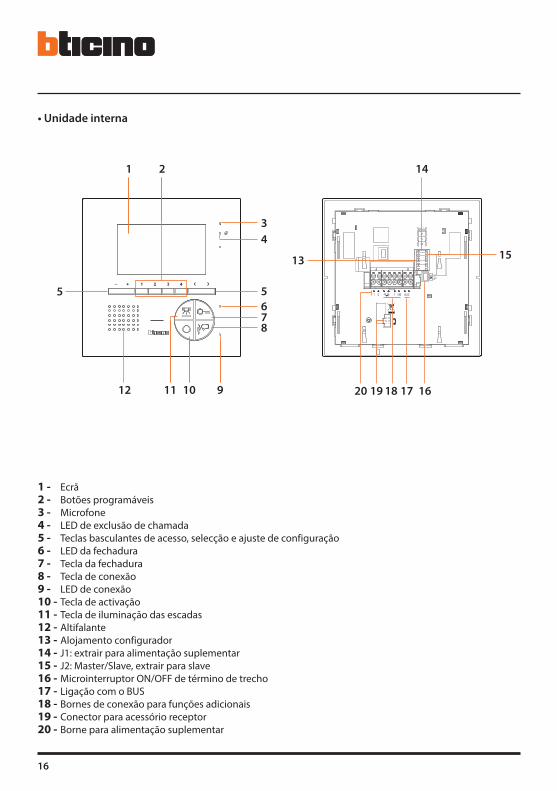
1 - Display2 - Pulsanti programmabili3 - Microfono4 - LED esclusione chiamata5 - Tasti basculanti per accesso, selezione e settaggio delle regolazioni6 - LED serratura7 - Tasto Serratura8 - Tasto di connessione9 - LED connessione10 - Tasto di Attivazione11 - Tasto Luci Scale12 - Altoparlante13 - Sede dei configuratori14 - J1: estarre per alimentazione supplementare15 - J2: Master/Slave, estrarre per slave16 - Microinterruttore ON/OFF di terminazione di tratta17 - Collegamento al BUS18 - Morsetti di collegamento per funzioni aggiuntive19 - Connettore per collegamento accessorio cornetta20 - Morsetto per alimentazione supplementare
1– + 2 3 4
BUS
ONOFF
2 5M1 1
J1J2
P
N
M
34
15
5
2
678
91011
1
12
14
18 17 161920
13
5

Video Kit
13
1 - Display2 - Programmable pushbuttons3 - Microphone4 - Call exclusion LED5 - Rocker switches for access, selection, and adjustment setting6 - Door lock LED7 - Door lock key8 - Connection key9 - Connection LED10 - Activation key11 - Staircase light key12 - Loudspeaker13 - Configurator seat14 - J1: extract for additional power supply15 - J2: Master/Slave, extract for slave 16 - Line termination ON/OFF micro-switch17 - Connection to the BUS18 - Connection terminals for additional functions19 - Accessory handset connector20 - Terminal for additional power supply
1 - Moniteur2 - Touches programmables3 - Micro4 - LED exclusion appel5 - Touches basculantes d’accès, de sélection et de réglage6 - LED serrure7 - Touche Serrure8 - Touche de connexion9 - LED connexion10 - Touches d’activation11 - Touche Lumière Escaliers12 - Haut-parleur13 - Logement configurateurs14 - J1: extraire pour alimentation supplémentaire15 - J2: Master/Slave, extraire pour salve16 - Microinterrupteur ON/OFF de terminaison de ligne17 - Connexion au BUS18 - Bornes de branchement pour fonctions supplémentaires19 - Connecteur pour accessoire combiné20 - Borne d’alimentation supplémentaire
14
1 - Display2 - Programmierbare Tasten3 - Mikrofon4 - LED Ruf ausschließen5 - Kippschalter für Zugriff auf, Wahl und Einstellung der Regelungen6 - Schloss-LED7 - Schloss-Taste8 - Schalttaste9 - Anschluss-LED10 - Aktivierungstaste11 - Treppenlicht-Taste12 - Lautsprecher13 - Sitz der Konfiguratoren14 - J1: für zusätzliche Stromversorgung, herausziehen15 - J2: Master/Slave, für Slave herausziehen16 - Mikroschalter ON/OFF fur den Streckenabschluss17 - Anschluss an den BUS18 - Anschlussklemmen für zusätzliche Funktionen19 - Verbinder für Zubehör Hörer20 - Klemme für zusätzliche Stromversorgung
• Hausstation• Unidad interior• Intern punt
1– + 2 3 4
BUS
ONOFF
2 5M1 1
J1J2
P
N
M
34
15
5
2
678
91011
1
12
14
18 17 161920
13
5
Video Kit
15
1 - Pantalla2 - Pulsadores programables3 - Micrófono4 - LED de exclusión llamada5 - Botones basculantes para acceso, selección y configuración de los ajustes6 - LED cerradura7 - Botón Cerradura8 - Tecla de conexión9 - LED conexión10 - 1Botón de activación11 - Botón luces escaleras12 - Altavoz13 - Alojamiento configuradores14 - J1: extraiga para alimentación adicional15 - J2: Master/Slave, extraiga para slave16 - Microinterruptor ON/OFF terminal de tramo17 - Conexión al BUS18 - Bornes de conexión para funciones adicionales19 - Conector para accesorio auricular20 - Borne para alimentación adicional
1 - Display2 - Programmeerbare drukknoppen3 - Microfoon4 - LED uitsluiting oproep5 - Kanteltoetsen voor toegang, keuze en instelling van de afstellingen6 - LED slot7 - Toets slot8 - Toets aansluiting9 - LED verbinding10 - Activeringstoets11 - Toets trapverlichting12 - Luidspreker13 - Plaats van de configuratiemodules14 - J1: uittrekken voor supplementaire voeding15 - J2: Master/Slave, uittrekken voor slave16 - Microschakelaar ON/OFF van beëindiging traject17 - Verbinding met de BUS18 - Klemmen van verbinding voor bijkomende functies19 - Connector voor accessoire hoorn20 - Klem voor supplementaire voeding
16
1 - Ecrã2 - Botões programáveis3 - Microfone4 - LED de exclusão de chamada5 - Teclas basculantes de acesso, selecção e ajuste de configuração6 - LED da fechadura7 - Tecla da fechadura8 - Tecla de conexão9 - LED de conexão10 - Tecla de activação11 - Tecla de iluminação das escadas12 - Altifalante13 - Alojamento configurador14 - J1: extrair para alimentação suplementar15 - J2: Master/Slave, extrair para slave16 - Microinterruptor ON/OFF de término de trecho17 - Ligação com o BUS18 - Bornes de conexão para funções adicionais19 - Conector para acessório receptor20 - Borne para alimentação suplementar
• Unidade interna
1– + 2 3 4
BUS
ONOFF
2 5M1 1
J1J2
P
N
M
34
15
5
2
678
91011
1
12
14
18 17 161920
13
5
Video Kit
17
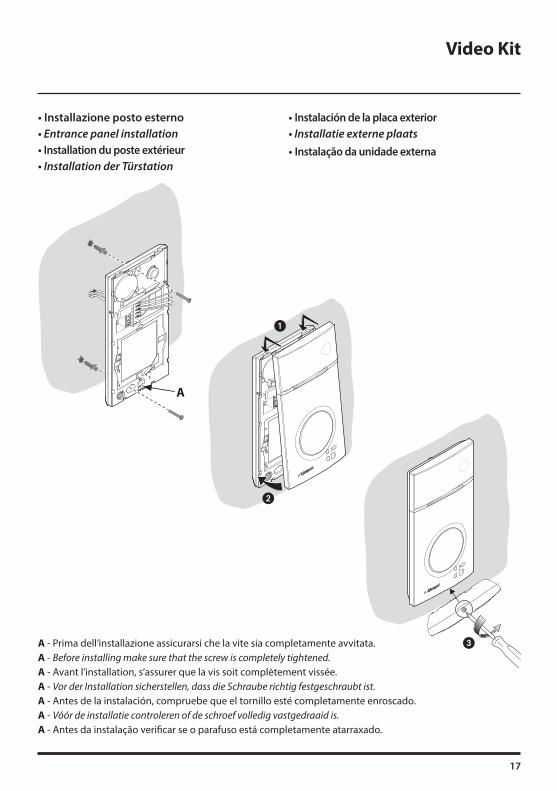
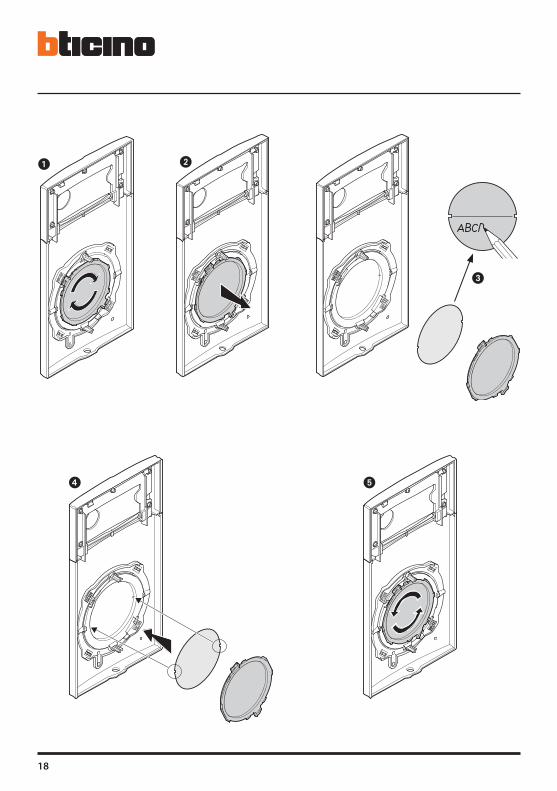
• Installazione posto esterno• Entrance panel installation• Installation du poste extérieur• Installation der Türstation
• Instalación de la placa exterior• Installatie externe plaats• Instalação da unidade externa
A - Prima dell’installazione assicurarsi che la vite sia completamente avvitata.A - Before installing make sure that the screw is completely tightened.A - Avant l’installation, s’assurer que la vis soit complètement vissée.A - Vor der Installation sicherstellen, dass die Schraube richtig festgeschraubt ist.A - Antes de la instalación, compruebe que el tornillo esté completamente enroscado.A - Vóór de installatie controleren of de schroef volledig vastgedraaid is.A - Antes da instalação verificar se o parafuso está completamente atarraxado.
A
2
1
3
18
1 2
3
4 5
Video Kit
19
• La telecamera non deve essere installata di fronte a grandi sorgenti luminose, oppure in luoghi dove il soggetto ripreso rimanga molto in controluce. Le telecamere a colori presentano, in condizioni di scarsa luminosità, una sensibilità inferiore rispetto alle telecamere in bianco/nero. Si consiglia pertanto, in ambienti poco illuminati di prevedere una fonte di illuminazione aggiuntiva.
• The camera must not be installed in front of large light sources, or in places where the subject viewed remains in deep shadow.
In poor lighting conditions colour cameras are less sensitive than black/white cameras. An extra lighting source should be added in poorly lit rooms.
• La télécaméra ne doit pas être installée en face de fortes sources lumineuses, ou bien dans des endroits où le sujet pris reste très à contre-jour. Les télécaméras couleurs présentent, dans des conditions de faible luminosité, une sensibilité inférieure aux télécaméras noir/blanc. Il est donc conseillé, dans des milieux peu éclairés, de prévoir une source de lumière supplémentaire.
• Die Kamera darf nicht vor starken Lichtquellen oder an Orten installiert werden, wo das Subjekt sich im Gegenlicht befindet.
Farbkameras besitzen bei schlechter Beleuchtung eine geringere Empfindlichkeit als Schwarz/Weiß Kameras. Wir empfehlen daher eine zusätzliche Beleuchtungsquelle vorzusehen.
• La telecámara no debe ser instalada delante de fuentes luminosas grande en lugares en donde el individuo filmado se encuentre demasiado en contraluz.
Las telecámaras en colores presentan, en condiciones de escasa luminosidad, una sensibilidad inferior respecto a las telecámaras en blanco/negro. Por lo tanto es aconsejable en ambientes escasamente iluminados prever una fuente de iluminación extra.
• Installeer de camera niet tegenover grote lichtbronnen of op plaatsen waar de opname van het onderwerp door sterk tegenlicht wordt gestoord. Camera’s met zijn bij een zwakke verlichting minder gevoelig dan zwart-wit camera’s. Daarom is het raadzaam om zwak verlichte omgevingen van extra verlichting te voorzien.
• A câmara não deve ser montada diante de fortes fontes de luz, ou então em lugares onde o elemento que deve ser filmado fique muito em contraluz.
As câmaras em cores apresentam, quando há pouca luminosidade, uma sensibilidade inferior em relação às câmaras em branco e preto. Portanto, recomenda-se, quando os ambientes forem pouco iluminados providenciar uma fonte de iluminação adicional.
20
• Se si manifestasse il disturbo del fischio, (effetto Larsen), ridurre prima la potenza del microfono , agen-do con un cacciavite sul potenziometro corrispondente, fino ad un livello accettabile. Qualora il fenomeno persista, agire sul potenziometro dell’altoparlante in modo da eliminare l’inconveniente. Se il volume è troppo basso, aumentare prima il volume dell’altoparlante ed eventualmente anche quello del microfono, tenendo presente che è preferibile una trasmissione chiara e priva di disturbi, che una al limite dell’innesco (Larsen).
• In case of a whistle (Larsen effect), first reduce the microphones power, adjusting the corresponding potentiometers with a screw driver, until an acceptable level is reached. Should the whistle persist, adjust the loudspeakers volume in order to eliminate the trouble. If the volume is too low level then, increase first the potentiometer of the loudspeaker and secondly the one for the microphone, bearing in mind that a clear and noise free reception is preferable than one just before whistling (Larsen).
• Lors de sifflement (effet de Larsen), reduire d’abord la puissance du micro sur le potentiomètre corres-pondant, à l’aide d’un tournevis, jusqu’à l’obtention d’un niveau satisfaisant. Si le sifflement persiste, régler le potentiomètre du hautparleur jusqu’à l’élimination de celui-ci. Si le volume est trop bas, augmenter d’abord la puissance du haut-parleur et éventuellement celle du micro, en considérant qu’une réception claire et sans parasite est préférable à une communication à la limite de l’accrochage (effet de Larsen).
• Beim etwaigen Auftreten eines Pfeiftones (Larsen-Effekt), zuerst die Lautstärke des Mikrophones bis auf einen annehmbaren Wert herabsetzen, indem man das entsprechende Potentiometer mit einem Schraubendreher einstellt. Sollte die Störung weiterhin bestehen, dann das Potentiometer des Lautsprechers bis zur Beseitigung des Pfeiftones einstellen. Ist die Lautstärke nun zu niedrig, dann zuerst die des Lautsprechers und erst danach evtl. auch die des Mikrophones erhohen, wobei ein deutlicher und störungsfreier Empfang einem an der Störungsgrenze liegendem (Larsen-Effekt) vorzuziehen ist.
• Si se manifesta el silbido de acoplamiento, (efecto Larsen), reducir primero la potencia del micrófono , girando con un destornillador el potenciómetro correspondiente, hasta obtener un nivel aceptable. Si el fenómeno persistiera, regular el potenciómetro del altavoz hasta eliminar la interferencia. Si el volumen es demasiado bajo, aumentar primero el volumen del altavoz y eventualmente también el del micrófono, teniendo en cuenta que es preferible una transmissión clara y limpia de interferencias, que una al limite del acoplo (Larsen).
• Als er een fluittoon hoorbaar is (effect van Larsen): verminder eerst het vermogen van de microfoon met behulp van een schroevendraaier zijn stroomregelaar zo te regelen dat de geluidssterkte van het gefluit aanvaardbaar is. Als het verschijnsel niet verdwijnt, dan moet u ook de stroomregelaar van de luidspreker bijstellen. Als de geluidssterkte nu te klein is, verhoog dan eerst de geluidssterkte van de luidspreker en daarna eventueel ook die van de microfoon, en denk er bij het bijstellen aan dat een duidelijk hoorbaar en ongestoord geluid beter is dan een harder geluid op de grens van het Larsen effect.
• Se se manifestar uma interferência no som (efeito de Larsen), começar por diminuir a potência do microfone , rodando o potenciómetro correspondente com uma chave de parafusos, até obter um nível aceitável.
Se o fenómeno persistir, regular o potenciómetro do altifalante de modo a eliminar o problema. Se o volume estiver demasiado baixo, começar por aumentar o volume do altifalante e depois, se necessário, o do microfone, tendo presente que é melhor ter uma transmissão clara e sem interferências, que uma no limiar de início de efeitos Larsen.
Video Kit
21
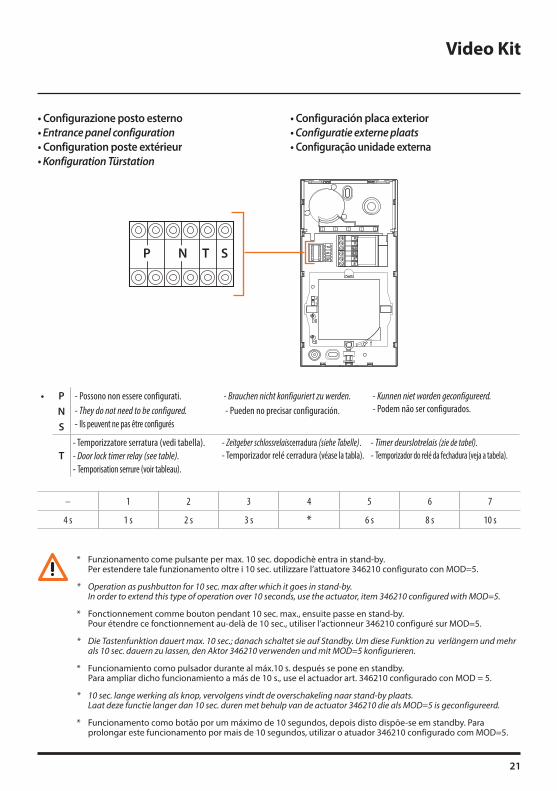
• Configurazione posto esterno • Entrance panel configuration • Configuration poste extérieur • Konfiguration Türstation
• Configuración placa exterior • Configuratie externe plaats• Configuração unidade externa
P T S N
• P - Possono non essere configurati.- They do not need to be configured.- Ils peuvent ne pas être configurés
- Brauchen nicht konfiguriert zu werden. - Pueden no precisar configuración.
- Kunnen niet worden geconfigureerd.- Podem não ser configurados.N
S
T- Temporizzatore serratura (vedi tabella).- Door lock timer relay (see table).- Temporisation serrure (voir tableau).
- Zeitgeber schlossrelaiscerradura (siehe Tabelle).- Temporizador relé cerradura (véase la tabla).
- Timer deurslotrelais (zie de tabel).- Temporizador do relé da fechadura (veja a tabela).
– 1 2 3 4 5 6 7
4 s 1 s 2 s 3 s * 6 s 8 s 10 s
* Funzionamento come pulsante per max. 10 sec. dopodichè entra in stand-by. Per estendere tale funzionamento oltre i 10 sec. utilizzare l’attuatore 346210 configurato con MOD=5.
* Operation as pushbutton for 10 sec. max after which it goes in stand-by. In order to extend this type of operation over 10 seconds, use the actuator, item 346210 configured with MOD=5.
* Fonctionnement comme bouton pendant 10 sec. max., ensuite passe en stand-by. Pour étendre ce fonctionnement au-delà de 10 sec., utiliser l’actionneur 346210 configuré sur MOD=5.
* Die Tastenfunktion dauert max. 10 sec.; danach schaltet sie auf Standby. Um diese Funktion zu verlängern und mehr als 10 sec. dauern zu lassen, den Aktor 346210 verwenden und mit MOD=5 konfigurieren.
* Funcionamiento como pulsador durante al máx.10 s. después se pone en standby. Para ampliar dicho funcionamiento a más de 10 s., use el actuador art. 346210 configurado con MOD = 5.
* 10 sec. lange werking als knop, vervolgens vindt de overschakeling naar stand-by plaats. Laat deze functie langer dan 10 sec. duren met behulp van de actuator 346210 die als MOD=5 is geconfigureerd.
* Funcionamento como botão por um máximo de 10 segundos, depois disto dispõe-se em standby. Para prolongar este funcionamento por mais de 10 segundos, utilizar o atuador 346210 configurado com MOD=5.
22
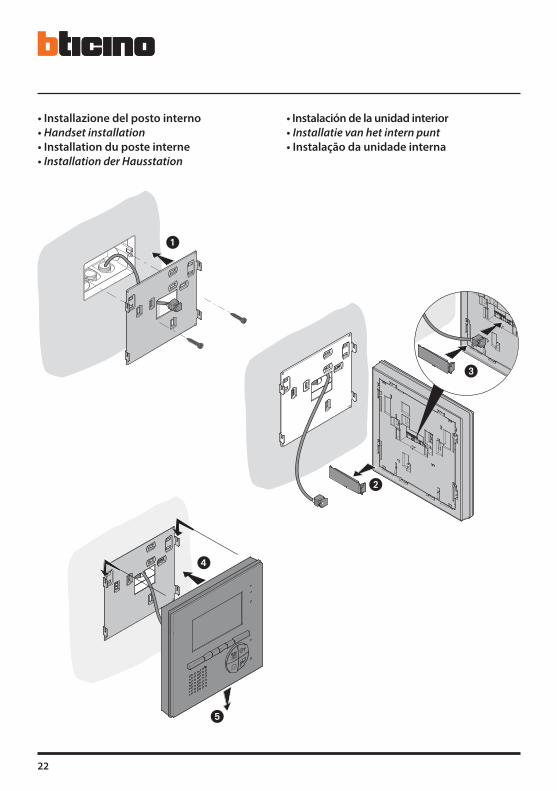
• Installazione del posto interno• Handset installation• Installation du poste interne• Installation der Hausstation
• Instalación de la unidad interior• Installatie van het intern punt• Instalação da unidade interna
1
4
5
2
3
Video Kit
23
• Attenzione: il citofono deve rispettare le seguenti regole installative:- deve essere installato solo in ambienti interni - non deve essere esposto a stillicidio o a spruzzi d’acqua- non ostruire le aperture di ventilazione- deve essere usato unicamente all’interno del Kit in cui è venduto- evitare di fissare la staffa su superfici non piane o irregolari e di effettuare un eccessivo serraggio
delle viti, al fine di evitare deformazioni della staffa che potrebbero compromettere la corretta installazione del dispositivo. Il dispositivo deve scorrere nelle apposite guide della staffa con una leggera pressione e senza sforzo eccessivo.Ogni uso improprio dell’articolo puó comprometterne le caratteristiche di sicurezza.
• Caution: the internal unit must respect the following installation rules:- it must only be installed indoors- it must not be exposed to water drops or splashes- do not block the ventilation openings- only to be used as part of the kit it is sold with.- avoid fastening the bracket on uneven or irregular surfaces and excessive screw tightening, in order to
prevent any bracket distortion that may compromise the correct installation of the device. The device must slide in the appropriate bracket rails with a slight pressure and without straining.An improper use of the item can compromise its safety features.
• Attention: le phone doit respecter les règles d’installation suivantes:- il doit être monté seulement à l’intérieur- il ne doit pas être exposé à des suintements ou à des éclaboussures- ne pas boucher les ouvertures d’aération- il doit être utilisé uniquement à l’intérieur du kit avec lequel il est vendu.- éviter de fixer la bride sur des surfaces non plates ou irrégulières ainsi que d’effectuer un serrage
excessif des vis pour prévenir les déformations de la bride susceptibles de compromettre la bonne installation du dispositif. Le dispositif doit coulisser sur les guides de la bride prévus à cet effet en exerçant une légère pression sans effort excessif.Tout usage impropre de la référence peut compromettre les caractéristiques de sécurité.
• Achtung: die Hausstation muss unter Beachtung folgender Regeln installiert werden:- es darf nur im Inneren installiert werden- es darf nicht Wassertropfen oder-spritzer ausgesetzt werden.- Belüftungsschlitze nicht verstopfen- darf nur zusammen mit dem Set verwendet werden, mit dem es verkauft wird- den Bügel nicht an unebene Flächen befestigen und die Schrauben nicht übermäßig festziehen, um den
Bügel nicht zu verformen und die Installation der Vorrichtung zu beeinträchtigen. Die Vorrichtung muss in den Führungen des Bügels mit einem leichten Druck mühelos gleiten können.Jeder ungeeigneter Gebrauch des Geräts kann seine Sicherheitseigenschaften beeinträchtigen.
24
• Atención: el interfono debe respetar las siguientes normas de instalación:- se debe instalar sólo al cubierto- no debe estar expuesto a goteo o salpicones de agua- no tape las aberturas de ventilación- se debe usarse únicamente en el kit con el que se vende.- evite fijar el soporte en superficies no planas o irregulares y no apriete excesivamente los tornillos
para evitar deformaciones del soporte que podrían comprometer la instalación correcta del dispositivo. El dispositivo ha de deslizarse por las guías correspondientes del soporte con una ligera presión sin esfuerzos excesivos.Cualquier uso impropio del artículo puede comprometer sus características de seguridad.
• Let op: Bij de installatie van de telefoon moet men de volgende voorschriften in acht nemen:- binnenshuis installeren- niet aan waterdruppels en -stralen blootstellen- de ventilatieopeningen niet versperren- mag uitsluitend in de kit waarmee die verkocht is gebruikt worden- de beugel niet bevestigen aan niet-vlakke of onregelmatige oppervlakken, de schroeven niet te veel
aandraaien om de vervorming van de beugel te voorkomen, waardoor de inrichting niet langer correct kan worden geïnstalleerd. Het apparaat moet met een lichte druk over speciale geleider van de beugel kunnen schuiven, zonder dat daar veel kracht voor nodig is.Leder oneigenlijk gebruik kan de veiligheid van het product schaden.
• Atenção: o intercomunicador deve respeitar as seguintes regras para ser instalado:- deve ser instalado somente internamente- não deve ser exposto a estilicídio ou borrifos de água- não deve obstruir as aberturas de ventilação- deve ser usado exclusivamente no âmbito do kit em que o mesmo é vendido- evitar fixar a braçadeira em superfícies não planas ou irregulares, evitado também apertar
excessivamente os parafusos, para impedir deformações do suporte, que poderiam comprometer a correta instalação do dispositivo. O dispositivo deve deslizar nas expressas guias do suporte com uma leve pressão e sem esforço excessivo.Qualquer uso impróprio do artigo pode comprometer as suas características de segurança.
• Tutte le volte che si modifica la configurazione è necessario togliere e ridare l’alimentazione all’impianto, attendendo circa 1 minuto.
• Every time the configuration is altered the system must be switched off and back on again, waiting for about 1 minute.
• Chaque fois que l’on modifie la configuration, il faut retirer, puis redonner l’alimentation à l’installation, après avoir attendu environ 1 minute.
• Jedes Mal, wenn die Konfiguration geändert wird, den Strom abschalten, etwa 1 Minute warten und dann wieder einschalten.
• Cada vez que modifica la configuración, es necesario cortar y volver a dar alimentación a la instalación, después de esperar aproximadamente 1 minuto.
• Na iedere wijziging in de configuratie moet de installatie ongeveer 1 minuut van het elektriciteitsnet worden afgesloten.
• Todas as vezes que se modificar a configuração é necessário ligar e desligar a instalação da energia eléctrica, esperando cerca de 1 minuto.
Video Kit
25
• Configurazione posto interno • Internal unit configuration • Configuration poste interne • Konfiguration einer Hausstation
• Configuración de la unidad interior • Het interne punt configureren• Configuração da unidade interna
J1 J2 N P M
J1 = Estrai se è presente l’alimentazione supplementare (morsetto 1 & 2)J2 = Master/Slave (estrai per slave) NN = Indirizzo del dispositivoPP = Indirizzo del PE di cui apri la Serratura con PI a riposo e a cui indirizzi l’autoaccensioneMM = Modalità di funzionamento I configuratori inseriti nelle sedi M del dispositivo assegnano la modalità di funzionamento ai 4 tasti programmabili (1 - 2 - 3 - 4) secondo le indicazioni riportate di seguito.
J1 = Remove if the additional power supply is present (clamp 1 and 2)J2 = Master/Slave (remove for slave)NN = Device addressPP = Address of the EP of which you can open the Door Lock with Handset idle, and to which you can send the auto- on commandMM = Operating mode The configurators connected to the M socket of the device assign the operating modes to the 4 programmable keys (1 - 2 - 3 - 4) based on the following indications.
J1 = Extraire en présence de l’alimentation supplémentaire (bornes 1 et 2)J2 = Master/Slave (extraire pour Slave)NN = Adresse du dispositifPP = Adresse du PE dont la serrure est ouverte avec PI au repos et auquel est adressé l’auto-allumageMM = Modalité de fonctionnement Les configurateurs placés dans les logements M du dispositif attribuent la modalité de fonctionnement aux 4 touches programmables (1 - 2 - 3 - 4) en fonction des indications figurant ci-après.
J1 = Abziehen, wenn ein zusätzliche Stromversorgung vorhanden ist (Klemme 1&2)J2 = Master/Slave (abziehen für Slave)NN = Adresse der VorrichtungPP = Adresse der TS mit dem zu öffnenden Schloss, mit HS im Ruhestand, der die Selbstschaltung bestimmt istMM = Betriebsmodus Die in den Sitzen M der Vorrichtung eingesetzten Konfiguratoren, teilen den 4 programmierbaren Tasten (1 - 2 - 3 - 4) die Betriebsweise je nach den in der Folge aufgeführten Anweisungen zu.
J1 = Extraiga con presencia de la alimentación adicional (borne 1 & 2)J2 = Master/Slave (extraiga para slave)NN = Dirección del dispositivoPP = Dirección PE de la que abre la Cerradura con UI en reposo y a la que dirige el autoencendidoMM = Modo de funcionamiento Los configuradores, situados en los alojamientos M del dispositivo, asignan el modo de funcionamiento a las 4 teclas programables (1 - 2 - 3 - 4) según las indicaciones indicadas a continuación.
J1 = Uitnemen als een extra voeding aanwezig is (aansluitklem 1 & 2)J2 = Master/Slave (uitnemen voor slave) NN = Adres van het apparaatPP = Adres van buitenpost waar het slot van wordt ontgrendeld met binnenpost in ruststand en waar de automatische inschakeling naar wordt gestuurdMM = Functioneringswijze De configuratoren in de zittingen M van het apparaat kennen de functioneringswijze toe aan de 4 toetsen (1 - 2 - 3 - 4) die volgens de onderstaande aanwijzingen zijn geprogrammeerd.
J1 = Extrai caso esteja presente a alimentação adicional (borne 1 & 2)J2 = Master/Slave (extrai para Slave)NN = Endereço do dispositivoPP = Endereço da UE através da qual você abre a fechadura com a UI em repouso e à qual endereça o autoacendimentoMM = Modo de funcionamento Os configuradores inseridos nos alojamentos M do dispositivo atribuem a modalidade de funcionamento às 4 teclas programáveis (1 - 2 - 3 - 4), de acordo com as indicações referidas abaixo.
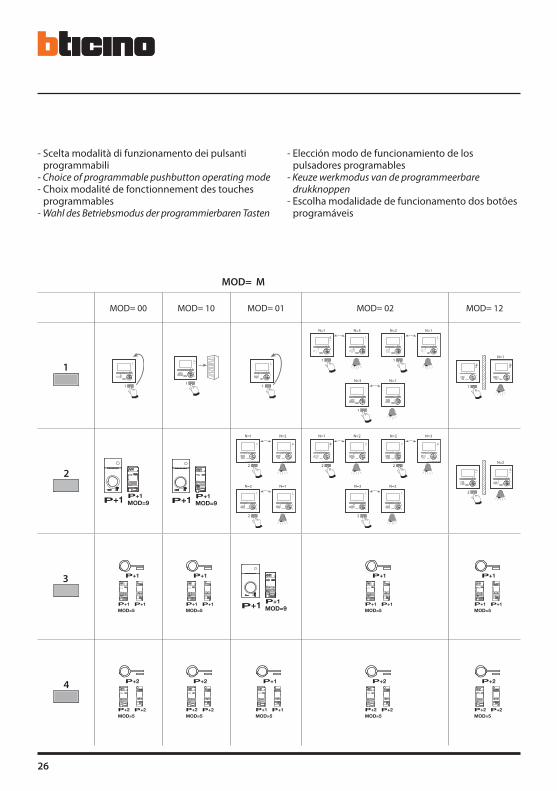
26
- Scelta modalità di funzionamento dei pulsanti programmabili
- Choice of programmable pushbutton operating mode- Choix modalité de fonctionnement des touches
programmables- Wahl des Betriebsmodus der programmierbaren Tasten
- Elección modo de funcionamiento de los pulsadores programables
- Keuze werkmodus van de programmeerbare drukknoppen
- Escolha modalidade de funcionamento dos botões programáveis
MOD= M
MOD= 00 MOD= 10 MOD= 01 MOD= 02 MOD= 12
1 2 3 41–+ 23 4
1
1–+ 23 4
1
1–+ 23 4
1
N=3
N=3 N=1
1–+ 23 4
1
1–+ 23 4
1–+ 23 4
1
N=1
1–+ 23 4
N=1
1–+ 23 4
1
1–+ 23 4
N=2
1–+ 23 4
1
N=1
1–+ 23 4
1 2 3 4
P+1 MOD=9P+1
P+2 MOD=9P+2
P
P+1
MOD=5P+1 P+1
2 3
1 32
346210
1
P+2
MOD=5P+2 P+2
2 3
1 32
346210
1
P+3
MOD=5P+3 P+3
2 3
1 32
346210
1
P+4
MOD=5P+4 P+4
2 3
1 32
346210
1
1–+ 23 4
P+3 MOD=9P+3
1–+ 23 4
2 3
1 32
346210
1
P+1 MOD=9P+1
P+2 MOD=9P+2
P
P+1
MOD=5P+1 P+1
2 3
1 32
346210
1
P+2
MOD=5P+2 P+2
2 3
1 32
346210
1
P+3
MOD=5P+3 P+3
2 3
1 32
346210
1
P+4
MOD=5P+4 P+4
2 3
1 32
346210
1
1–+ 23 4
P+3 MOD=9P+3
1–+ 23 4
2 3
1 32
346210
1
N=2
N=2 N=1
1–+ 23 4
2
1–+ 23 4
1–+ 23 4
2
N=1
1–+ 23 4
N=2
N=3 N=2
1–+ 23 4
2
1–+ 23 4
1–+ 23 4
2
N=1
1–+ 23 4
N=3
1–+ 23 4
2
1–+ 23 4
N=2
1–+ 23 4
2
N=2
1–+ 23 4
1 2 3 4 P+1
MOD=5P+1 P+1
2 3
1 32
346210
1
P+1
MOD=5P+1 P+1
2 3
1 32
346210
1
P+1 MOD=9P+1
P+2 MOD=9P+2
P
P+1
MOD=5P+1 P+1
2 3
1 32
346210
1
P+2
MOD=5P+2 P+2
2 3
1 32
346210
1
P+3
MOD=5P+3 P+3
2 3
1 32
346210
1
P+4
MOD=5P+4 P+4
2 3
1 32
346210
1
1–+ 23 4
P+3 MOD=9P+3
1–+ 23 4
2 3
1 32
346210
1P+1
MOD=5P+1 P+1
2 3
1 32
346210
1
P+1
MOD=5P+1 P+1
2 3
1 32
346210
1
1 2 3 4 P+2
MOD=5P+2 P+2
2 3
1 32
346210
1
P+2
MOD=5P+2 P+2
2 3
1 32
346210
1
P+1
MOD=5P+1 P+1
2 3
1 32
346210
1
P+2
MOD=5P+2 P+2
2 3
1 32
346210
1
P+2
MOD=5P+2 P+2
2 3
1 32
346210
1
Video Kit
27
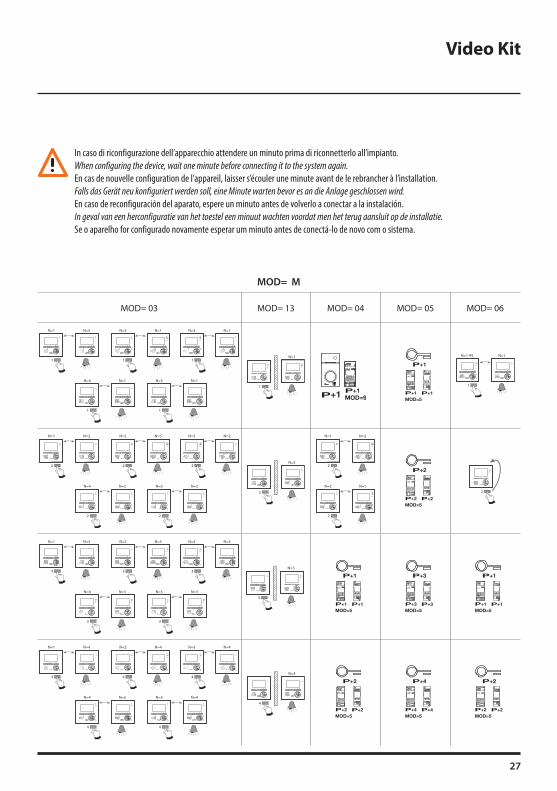
MOD= M
MOD= 03 MOD= 13 MOD= 04 MOD= 05 MOD= 06
N=5
N=4 N=1
1–+ 23 4
1
1–+ 23 4
1–+ 23 4
1
N=1
1–+ 23 4
N=5 N=1
1–+ 23 4
1
1–+ 23 4
N=1
1–+ 23 4
1
1–+ 23 4
N=2 N=1
1–+ 23 4
1
1–+ 23 4
N=3
1–+ 23 4
1
N=1
1–+ 23 4
P+1 MOD=9P+1
P+2 MOD=9P+2
P
P+1
MOD=5P+1 P+1
2 3
1 32
346210
1
P+2
MOD=5P+2 P+2
2 3
1 32
346210
1
P+3
MOD=5P+3 P+3
2 3
1 32
346210
1
P+4
MOD=5P+4 P+4
2 3
1 32
346210
1
1–+ 23 4
P+3 MOD=9P+3
1–+ 23 4
2 3
1 32
346210
1P+1
MOD=5P+1 P+1
2 3
1 32
346210
1
1–+ 23 4
1
N=1
1–+ 23 4
N=1-99
N=2
N=4 N=2
1–+ 23 4
2
1–+ 23 4
1–+ 23 4
2
N=1
1–+ 23 4
N=5 N=2
1–+ 23 4
2
1–+ 23 4
N=5
1–+ 23 4
2
1–+ 23 4
N=2 N=2
1–+ 23 4
2
1–+ 23 4
N=3
1–+ 23 4
2
N=2
1–+ 23 4
N=2
N=2 N=1
1–+ 23 4
2
1–+ 23 4
1–+ 23 4
2
N=1
1–+ 23 4
P+2
MOD=5P+2 P+2
2 3
1 32
346210
1
1–+ 23 4
2
N=3
N=4 N=3
1–+ 23 4
3
1–+ 23 4
1–+ 23 4
3
N=1
1–+ 23 4
N=5 N=3
1–+ 23 4
3
1–+ 23 4
N=3
1–+ 23 4
3
1–+ 23 4
N=2 N=5
1–+ 23 4
3
1–+ 23 4
N=3
1–+ 23 4
3
N=3
1–+ 23 4
P+1
MOD=5P+1 P+1
2 3
1 32
346210
1
P+3
MOD=5P+3 P+3
2 3
1 32
346210
1
P+1
MOD=5P+1 P+1
2 3
1 32
346210
1
N=4
N=4 N=5
1–+ 23 4
4
1–+ 23 4
1–+ 23 4
4
N=1
1–+ 23 4
N=5 N=4
1–+ 23 4
4
1–+ 23 4
N=4
1–+ 23 4
4
1–+ 23 4
N=2 N=4
1–+ 23 4
4
1–+ 23 4
N=3
1–+ 23 4
4
N=4
1–+ 23 4
P+2
MOD=5P+2 P+2
2 3
1 32
346210
1
P+4
MOD=5P+4 P+4
2 3
1 32
346210
1
P+2
MOD=5P+2 P+2
2 3
1 32
346210
1
In caso di riconfigurazione dell’apparecchio attendere un minuto prima di riconnetterlo all’impianto.When configuring the device, wait one minute before connecting it to the system again.En cas de nouvelle configuration de l’appareil, laisser s’écouler une minute avant de le rebrancher à l’installation.Falls das Gerät neu konfiguriert werden soll, eine Minute warten bevor es an die Anlage geschlossen wird.En caso de reconfiguración del aparato, espere un minuto antes de volverlo a conectar a la instalación.In geval van een herconfiguratie van het toestel een minuut wachten voordat men het terug aansluit op de installatie.Se o aparelho for configurado novamente esperar um minuto antes de conectá-lo de novo com o sistema.
28
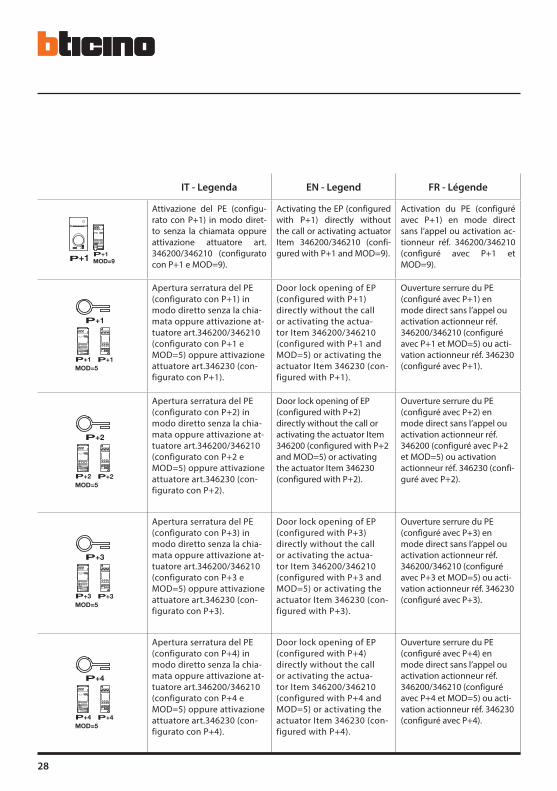
IT - Legenda EN - Legend FR - Légende
P+1 MOD=9P+1
P+2 MOD=9P+2
P
P+1
MOD=5P+1 P+1
2 3
1 32
346210
1
P+2
MOD=5P+2 P+2
2 3
1 32
346210
1
P+3
MOD=5P+3 P+3
2 3
1 32
346210
1
P+4
MOD=5P+4 P+4
2 3
1 32
346210
1
1–+ 23 4
P+3 MOD=9P+3
1–+ 23 4
2 3
1 32
346210
1
Attivazione del PE (configu-rato con P+1) in mo do di ret-to sen za la chia mata op pu re at tivazione at tua to re art. 346200/346210 (con fi gu rato con P+1 e MOD=9).
Activating the EP (configured with P+1) directly without the call or ac ti va ting actuator Item 346200/346210 (con fi-gured with P+1 and MOD=9).
Activation du PE (con fi guré avec P+1) en mode direct sans l’appel ou activation ac-tionneur réf. 346200/346210 (configuré avec P+1 et MOD=9).
P+1 MOD=9P+1
P+2 MOD=9P+2
P
P+1
MOD=5P+1 P+1
2 3
1 32
346210
1
P+2
MOD=5P+2 P+2
2 3
1 32
346210
1
P+3
MOD=5P+3 P+3
2 3
1 32
346210
1
P+4
MOD=5P+4 P+4
2 3
1 32
346210
1
1–+ 23 4
1–+ 23 4
P+3 MOD=9P+3
1–+ 23 4
Apertura serratura del PE (con fi gurato con P+1) in mo do di retto senza la chia-mata op pu re at ti va zione at-tuatore art.346200/346210 (con figurato con P+1 e MOD=5) op pu re at ti va zione attuatore art.346230 (con-figurato con P+1).
Door lock opening of EP (con figured with P+1) directly without the call or activating the actua-tor Item 346200/346210 (con figured with P+1 and MOD=5) or activating the actuator Item 346230 (con-figured with P+1).
Ouverture serrure du PE (con fi gu ré avec P+1) en mode di rect sans l’appel ou ac ti vation ac tion neur réf. 346200/346210 (con fi gu ré avec P+1 et MOD=5) ou ac ti-va tion ac tion neur réf. 346230 (con fi gu ré avec P+1).
P+1 MOD=9P+1
P+2 MOD=9P+2
P
P+1
MOD=5P+1 P+1
2 3
1 32
346210
1
P+2
MOD=5P+2 P+2
2 3
1 32
346210
1
P+3
MOD=5P+3 P+3
2 3
1 32
346210
1
P+4
MOD=5P+4 P+4
2 3
1 32
346210
1
1–+ 23 4
1–+ 23 4
P+3 MOD=9P+3
1–+ 23 4
Apertura serratura del PE (con fi gurato con P+2) in mo do di retto senza la chia-mata op pu re at ti va zione at-tuatore art.346200/346210 (con figurato con P+2 e MOD=5) op pu re at ti va zione attuatore art.346230 (con-figurato con P+2).
Door lock opening of EP (con figured with P+2) directly without the call or activating the actuator Item 346200 (con figured with P+2 and MOD=5) or activating the actuator Item 346230 (configured with P+2).
Ouverture serrure du PE (con fi gu ré avec P+2) en mode di rect sans l’appel ou ac ti vation ac tion neur réf. 346200 (con fi gu ré avec P+2 et MOD=5) ou ac ti va tion ac tion neur réf. 346230 (con fi-gu ré avec P+2).
P+1 MOD=9P+1
P+2 MOD=9P+2
P
P+1
MOD=5P+1 P+1
2 3
1 32
346210
1
P+2
MOD=5P+2 P+2
2 3
1 32
346210
1
P+3
MOD=5P+3 P+3
2 3
1 32
346210
1
P+4
MOD=5P+4 P+4
2 3
1 32
346210
1
1–+ 23 4
1–+ 23 4
P+3 MOD=9P+3
1–+ 23 4
Apertura serratura del PE (con fi gurato con P+3) in mo do di retto senza la chia-mata op pu re at ti va zione at-tuatore art.346200/346210 (con figurato con P+3 e MOD=5) op pu re at ti va zione attuatore art.346230 (con-figurato con P+3).
Door lock opening of EP (con figured with P+3) directly without the call or activating the actua-tor Item 346200/346210 (con figured with P+3 and MOD=5) or activating the actuator Item 346230 (con-figured with P+3).
Ouverture serrure du PE (con fi gu ré avec P+3) en mode di rect sans l’appel ou ac ti vation ac tion neur réf. 346200/346210 (con fi gu ré avec P+3 et MOD=5) ou ac ti-va tion ac tion neur réf. 346230 (con fi gu ré avec P+3).
P+1 MOD=9P+1
P+2 MOD=9P+2
P
P+1
MOD=5P+1 P+1
2 3
1 32
346210
1
P+2
MOD=5P+2 P+2
2 3
1 32
346210
1
P+3
MOD=5P+3 P+3
2 3
1 32
346210
1
P+4
MOD=5P+4 P+4
2 3
1 32
346210
1
1–+ 23 4
1–+ 23 4
P+3 MOD=9P+3
1–+ 23 4
Apertura serratura del PE (con fi gurato con P+4) in mo do di retto senza la chia-mata op pu re at ti va zione at-tuatore art.346200/346210 (con figurato con P+4 e MOD=5) op pu re at ti va zione attuatore art.346230 (con-figurato con P+4).
Door lock opening of EP (con figured with P+4) directly without the call or activating the actua-tor Item 346200/346210 (con figured with P+4 and MOD=5) or activating the actuator Item 346230 (con-figured with P+4).
Ouverture serrure du PE (con fi gu ré avec P+4) en mode di rect sans l’appel ou ac ti vation ac tion neur réf. 346200/346210 (con fi gu ré avec P+4 et MOD=5) ou ac ti-va tion ac tion neur réf. 346230 (con fi gu ré avec P+4).
Video Kit
29
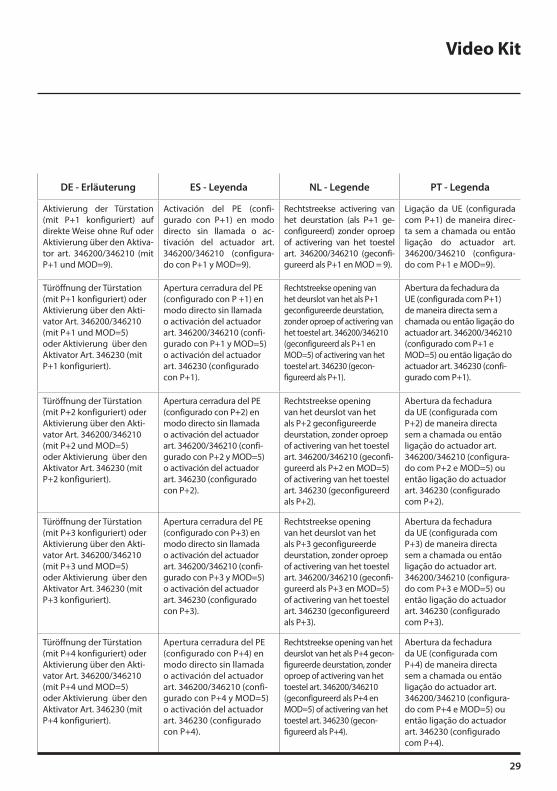
DE - Erläuterung ES - Leyenda NL - Legende PT - Legenda
Aktivierung der Türstation (mit P+1 konfiguriert) auf direkte Weise ohne Ruf oder Aktivierung über den Aktiva-tor art. 346200/346210 (mit P+1 und MOD=9).
Activación del PE (confi-gurado con P+1) en modo directo sin lla ma da o ac-tivación del actuador art. 346200/346210 (configura-do con P+1 y MOD=9).
Rechtstreekse activering van het deur station (als P+1 ge-con fi gu reerd) zonder oproep of ac ti ve ring van het toestel art. 346200/346210 (ge con fi-gureerd als P+1 en MOD = 9).
Ligação da UE (con figurada com P+1) de maneira direc-ta sem a cha ma da ou então ligação do ac tua dor art. 346200/346210 (configura-do com P+1 e MOD=9).
Türöffnung der Türstation (mit P+1 konfiguriert) oder Aktivierung über den Akti-vator Art. 346200/346210 (mit P+1 und MOD=5) oder Aktivierung über den Aktivator Art. 346230 (mit P+1 konfiguriert).
Apertura cerradura del PE (con figurado con P +1) en modo directo sin llamada o activación del actuador art. 346200/346210 (con fi-gurado con P+1 y MOD=5) o ac ti vación del actuador art. 346230 (con fi gu rado con P+1).
Rechtstreekse opening van het deurslot van het als P+1 ge con figureerde deurstation, zonder oproep of activering van het to e stel art. 346200/346210 (ge con fi gu re erd als P+1 en MOD=5) of ac ti ve ring van het toestel art. 346230 (ge con-figureerd als P+1).
Abertura da fechadura da UE (configurada com P+1) de ma nei ra directa sem a chamada ou então ligação do actuador art. 346200/346210 (configurado com P+1 e MOD=5) ou então ligação do actuador art. 346230 (con fi-gu ra do com P+1).
Türöffnung der Türstation (mit P+2 konfiguriert) oder Aktivierung über den Akti-vator Art. 346200/346210 (mit P+2 und MOD=5) oder Aktivierung über den Aktivator Art. 346230 (mit P+2 konfiguriert).
Apertura cerradura del PE (con figurado con P+2) en modo di recto sin llamada o activación del actuador art. 346200/346210 (con fi-gurado con P+2 y MOD=5) o ac ti vación del actuador art. 346230 (con fi gu rado con P+2).
Rechtstreekse opening van het deurslot van het als P+2 ge con figureerde deurstation, zonder oproep of activering van het to e stel art. 346200/346210 (ge con fi-gu re erd als P+2 en MOD=5) of ac ti ve ring van het toestel art. 346230 (ge con figureerd als P+2).
Abertura da fechadura da UE (configurada com P+2) de ma nei ra directa sem a chamada ou então ligação do actuador art. 346200/346210 (configura-do com P+2 e MOD=5) ou então ligação do actuador art. 346230 (con fi gu ra do com P+2).
Türöffnung der Türstation (mit P+3 konfiguriert) oder Aktivierung über den Akti-vator Art. 346200/346210 (mit P+3 und MOD=5) oder Aktivierung über den Aktivator Art. 346230 (mit P+3 konfiguriert).
Apertura cerradura del PE (con figurado con P+3) en modo di recto sin llamada o activación del actuador art. 346200/346210 (con fi-gurado con P+3 y MOD=5) o ac ti vación del actuador art. 346230 (con fi gu rado con P+3).
Rechtstreekse opening van het deurslot van het als P+3 ge con figureerde deurstation, zonder oproep of activering van het to e stel art. 346200/346210 (ge con fi-gu re erd als P+3 en MOD=5) of ac ti ve ring van het toestel art. 346230 (ge con figureerd als P+3).
Abertura da fechadura da UE (configurada com P+3) de ma nei ra directa sem a chamada ou então ligação do actuador art. 346200/346210 (configura-do com P+3 e MOD=5) ou então ligação do actuador art. 346230 (con fi gu ra do com P+3).
Türöffnung der Türstation (mit P+4 konfiguriert) oder Aktivierung über den Akti-vator Art. 346200/346210 (mit P+4 und MOD=5) oder Aktivierung über den Aktivator Art. 346230 (mit P+4 konfiguriert).
Apertura cerradura del PE (con figurado con P+4) en modo di recto sin llamada o activación del actuador art. 346200/346210 (con fi-gurado con P+4 y MOD=5) o ac ti vación del actuador art. 346230 (con fi gu rado con P+4).
Rechtstreekse opening van het deurslot van het als P+4 ge con-figureerde deurstation, zonder oproep of activering van het to e stel art. 346200/346210 (ge con fi gu re erd als P+4 en MOD=5) of ac ti ve ring van het toestel art. 346230 (ge con-figureerd als P+4).
Abertura da fechadura da UE (configurada com P+4) de ma nei ra directa sem a chamada ou então ligação do actuador art. 346200/346210 (configura-do com P+4 e MOD=5) ou então ligação do actuador art. 346230 (con fi gu ra do com P+4).
30
IT - Legenda EN - Legend FR - Légende
1–+ 23 4
1
N=1
1–+ 23 4
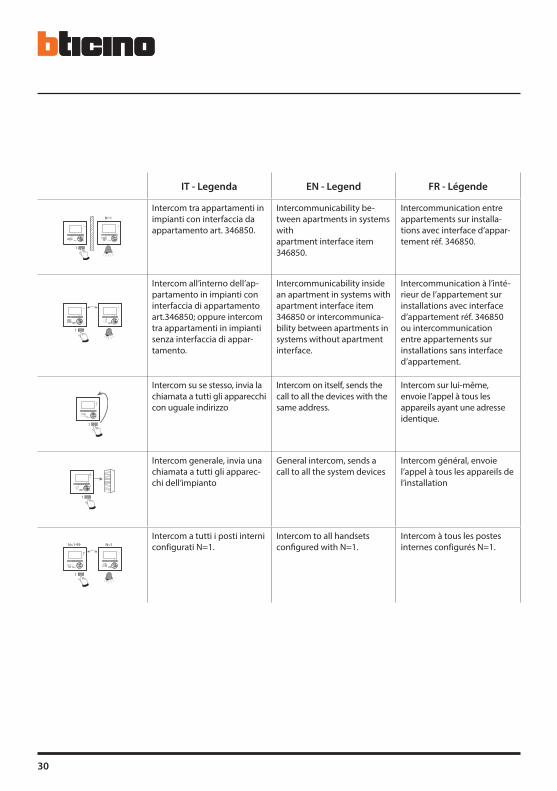
Intercom tra appartamenti in impianti con interfaccia da appartamento art. 346850.
Intercommunicability be-tween apartments in systems with apartment interface item 346850.
Intercommunication entre appartements sur installa-tions avec interface d’appar-tement réf. 346850.
1–+ 23 4
1
1–+ 23 4
Intercom all’interno dell’ap-partamento in impianti con interfaccia di appartamento art.346850; oppure intercom tra appartamenti in impianti senza interfaccia di appar-tamento.
Intercommunicability inside an apartment in systems with apartment interface item 346850 or intercommunica-bility between apartments in systems without apartment interface.
Intercommunication à l’inté-rieur de l’appartement sur installations avec interface d’appartement réf. 346850 ou intercommunication entre appartements sur installations sans interface d’appartement.
1–+ 23 4
1
Intercom su se stesso, invia la chiamata a tutti gli apparecchi con uguale indirizzo
Intercom on itself, sends the call to all the devices with the same address.
Intercom sur lui-même, envoie l’appel à tous les appareils ayant une adresse identique.
1–+ 23 4
1
Intercom generale, invia una chiamata a tutti gli apparec-chi dell’impianto
General intercom, sends a call to all the system devices
Intercom général, envoie l’appel à tous les appareils de l’installation
1–+ 23 4
1
N=1
1–+ 23 4
N=1-99
Intercom a tutti i posti interni configurati N=1.
Intercom to all handsetsconfigured with N=1.
Intercom à tous les postes internes configurés N=1.
Video Kit
31
DE - Erläuterung ES - Leyenda NL - Legende PT - Legenda
Gegenseitige Kommunika-tion zwischen Wohnungen für Anlagen mit Wohnungs-schnittstelle Art. 346850.
Intercomunicación entre apartamentos en instalacio-nes con interfaz de departa-mento Art. 346850.
Intercom tussen apparte-menten in installaties met interface van appartement art. 346850.
Intercom entre apartamen-tos em instalações com interface de apartamento art. 346850.
Gegenseitige Kommunikation innerhalb der Wohnung für Anlagen mit Wohnungs-schnittstelle Art. 346850 oder gegenseitige Kommunikation zwischen Wohnungen für Anlagen ohne Wohnungs-schnittstelle.
Intercomunicación en el apartamento en insta-laciones con interfaz de apartamento Art. 346850 o intercomunicación entre apartamentos en instalaciones sin interfaz de apartamento.
Intercom binnen in het ap-partement in installaties met interface van appartement art. 346850 ofwel intercom tussen appartementen in installaties zonder interface van appartement.
Intercom dentro do aparta-mento em instalações com interface de apartamento art. 346850 ou então inter-com entre apartamentos em instalações sem interface de apartamento.
Intercom mit einseitiger Funk-tion: sendet den Ruf an alle Geräte mit derselben Adresse.
Intercomunicación hacia los aparatos iguales, envía la llamada a todos los aparatos con igual dirección
Intercom op zichzelf, verstuurt de oproep naar alle toestellen met hetzelfde adres
Intercomunicador sobre si mesmo, envia a chamada a todos os aparelhos com endereço igual
Intercom mit allgemeiner Funktion: sendet den Ruf an alle Geräte der Anlage.
Intercomunicación general, envía una llamada a todos los aparatos de la instalación
Algemene Intercom, ver-stuurt een oproep naar alle toestellen van de installatie
Intercomunicador geral, envia uma chamada a todos os aparelhos da instalação
Gegensprechfunktion an allen mit N=1 konfigurierten Hausstationen.
Selección timbre llamada intercom / intercom prede-finido.
Intercom op alle binnen-posten geconfigureerd met N=1.
Intercom a todas as unida-des internas configuradas N=1.
32
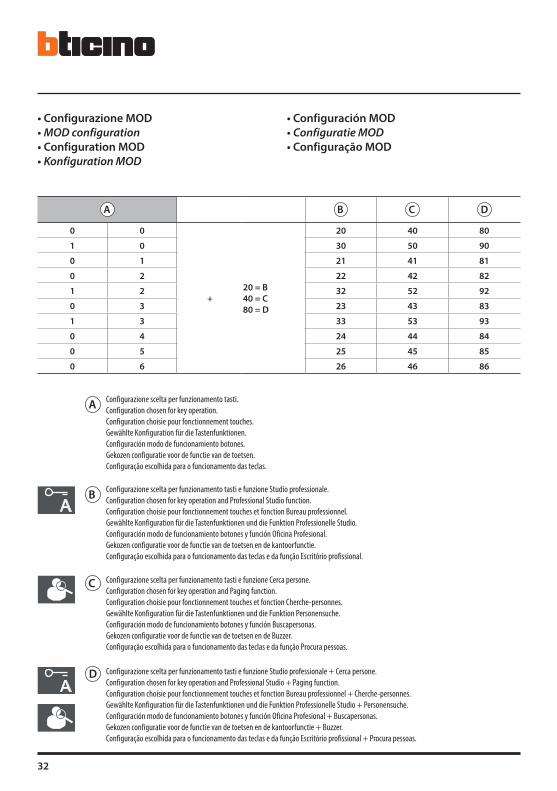
A Configurazione scelta per funzionamento tasti. Configuration chosen for key operation. Configuration choisie pour fonctionnement touches. Gewählte Konfiguration für die Tastenfunktionen. Configuración modo de funcionamiento botones. Gekozen configuratie voor de functie van de toetsen. Configuração escolhida para o funcionamento das teclas.
A B C D
0 0
+20 = B40 = C80 = D
20 40 80
1 0 30 50 90
0 1 21 41 81
0 2 22 42 82
1 2 32 52 92
0 3 23 43 83
1 3 33 53 93
0 4 24 44 84
0 5 25 45 85
0 6 26 46 86
• Configurazione MOD• MOD configuration• Configuration MOD• Konfiguration MOD
• Configuración MOD• Configuratie MOD• Configuração MOD
B Configurazione scelta per funzionamento tasti e funzione Studio professionale. Configuration chosen for key operation and Professional Studio function. Configuration choisie pour fonctionnement touches et fonction Bureau professionnel. Gewählte Konfiguration für die Tastenfunktionen und die Funktion Professionelle Studio. Configuración modo de funcionamiento botones y función Oficina Profesional. Gekozen configuratie voor de functie van de toetsen en de kantoorfunctie. Configuração escolhida para o funcionamento das teclas e da função Escritório profissional.
C Configurazione scelta per funzionamento tasti e funzione Cerca persone. Configuration chosen for key operation and Paging function. Configuration choisie pour fonctionnement touches et fonction Cherche-personnes. Gewählte Konfiguration für die Tastenfunktionen und die Funktion Personensuche. Configuración modo de funcionamiento botones y función Buscapersonas. Gekozen configuratie voor de functie van de toetsen en de Buzzer. Configuração escolhida para o funcionamento das teclas e da função Procura pessoas.
D Configurazione scelta per funzionamento tasti e funzione Studio professionale + Cerca persone. Configuration chosen for key operation and Professional Studio + Paging function. Configuration choisie pour fonctionnement touches et fonction Bureau professionnel + Cherche-personnes. Gewählte Konfiguration für die Tastenfunktionen und die Funktion Professionelle Studio + Personensuche. Configuración modo de funcionamiento botones y función Oficina Profesional + Buscapersonas. Gekozen configuratie voor de functie van de toetsen en de kantoorfunctie + Buzzer. Configuração escolhida para o funcionamento das teclas e da função Escritório profissional + Procura pessoas.
Video Kit
33
• La suoneria di chiamata del citofono è selezionabile tra 16 differenti tipi di melodie.Si possono differenziare le seguenti tipologie di chiamata:Chiamata da posto esterno principale; Chiamata da posto esterno secondario; Chiamata intercom interno; Chiamata intercom esterno; Chiamata al piano.
• The door entry unit call bells can be selected from 16 different types of tune.The following types of call can be differentiated:Call from the main entrance panel; Call from the secondary entrance panel; Intercom internal call; Intercom external call; Call to the floor.
• La sonnerie d’appel du phone peut être sélectionnée parmi 16 différents types de mélodies.On peut différencier les typologies d’appel suivantes:Appel depuis poste externe principal; Appel depuis poste externe secondaire; Appel intercom interne; Appel intercom externe; Appel à l’étage.
• Für das Läutwerk der Rufe des haustelefons stehen 16 verschiedene Melodien zur Verfügung.Die Rufe können folgendermaßen differenziert werden:Ruf von der Haupttürstation; Ruf von der Nebentürstation; Intercom intern Ruf; Intercom extern Ruf; Etagenruf.
• El timbre del llamada del interno fono se puede seleccionar entre 16 melodías diferentes.Es posible diferenciar las siguientes tipologías de llamadas:Llamada desde placa exterior principal; Llamada desde placa exterior secundaria; Llamada intercomunicación interna; Llamada intercomunicación externa; Llamada a la planta.
• De oproepbeltoon van de telefoon biedt de keus uit 16 melodiën.Het is mogelijk om de volgende types oproepen te kenmerken:Oproep van primaire buitenpost; Oproep van secundaire buitenpost; Oproep Interne intercom; Oproep Externe intercom; Oproep op etage.
• Os toques de chamada do intercomunicador podem ser seleccionados em 16 tipos de melodias diferentes.Podem ser diferenciados os seguintes tipos de chamada:Chamada a partir de unidade externa principal; Chamada a partir de unidade externa auxiliar; Chamada Intercom interno; Chamada Intercom externo; Chamada até o andar.
• Selezione suoneria• Bell selection• Sélection sonnerie• Läutwerk wählen
• Selección del timbre• Beltoon kiezen• Selecção toques
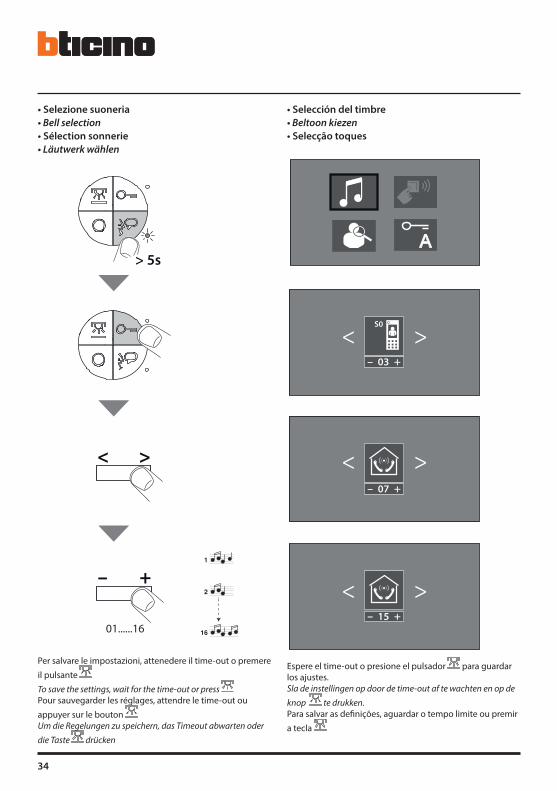
34
Per salvare le impostazioni, attenedere il time-out o premere
il pulsante
To save the settings, wait for the time-out or press Pour sauvegarder les réglages, attendre le time-out ou
appuyer sur le bouton Um die Regelungen zu speichern, das Timeout abwarten oder
die Taste drücken
Espere el time-out o presione el pulsador para guardar los ajustes.Sla de instellingen op door de time-out af te wachten en op de
knop te drukken.Para salvar as definições, aguardar o tempo limite ou premir
a tecla
• Selezione suoneria• Bell selection• Sélection sonnerie• Läutwerk wählen
• Selección del timbre• Beltoon kiezen• Selecção toques
– 03 +
S0
– 15 +
– 07 +
< >
< >
< >
– 03 +
S0
– 15 +
– 07 +
< >
< >
< >
> 5s
– 03 +
S0
– 15 +
– 07 +
< >
< >
< >
< >
– 03 +
S0
– 15 +
– 07 +
< >
< >
< >
– +
01......16
1
2
16
1
2
16
1
2
16
Video Kit
35
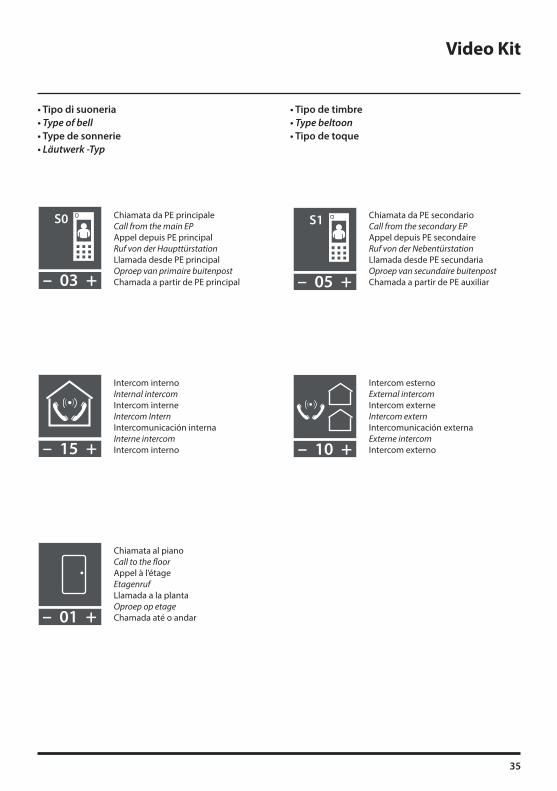
• Tipo di suoneria• Type of bell• Type de sonnerie• Läutwerk -Typ
• Tipo de timbre• Type beltoon• Tipo de toque
– 03 +
S0
– 05 +
S1
– 01 +
– 15 +
– 10 +
Chiamata da PE principaleCall from the main EPAppel depuis PE principalRuf von der HaupttürstationLlamada desde PE principalOproep van primaire buitenpostChamada a partir de PE principal
– 03 +
S0
– 05 +
S1
– 01 +
– 15 +
– 10 +
Intercom internoInternal intercomIntercom interneIntercom InternIntercomunicación internaInterne intercomIntercom interno
– 03 +
S0
– 05 +
S1
– 01 +
– 15 +
– 10 +
Chiamata da PE secondarioCall from the secondary EPAppel depuis PE secondaireRuf von der NebentürstationLlamada desde PE secundariaOproep van secundaire buitenpostChamada a partir de PE auxiliar
– 03 +
S0
– 05 +
S1
– 01 +
– 15 +
– 10 +
Intercom esternoExternal intercomIntercom externeIntercom externIntercomunicación externaExterne intercomIntercom externo
– 03 +
S0
– 05 +
S1
– 01 +
– 15 +
– 10 +
Chiamata al pianoCall to the floorAppel à l’étageEtagenrufLlamada a la plantaOproep op etageChamada até o andar

36
• Modalità Push to Talk• Push to Talk mode• Modalité Push to Talk• Modus Push toTalk
• Función Push to Talk• Push to Talk functie• Função Push to Talk
• Se il posto esterno si trova in un ambiente particolarmente rumoroso è possibile, durante la conversazione, attivare la funzione Push to Talk al fine di ottenere una comunicazione meno disturbata. Durante la conversa-zione è possibile attivare la funzione Push to Talk nel seguente modo.
- Premere il tasto Connessione per almeno 2 secondi per parlare con il posto esterno. Il Led rimane verde.- Rilasciare il tasto per poter ascoltare dal posto esterno. Il Led diventa rosso.- Per terminare la connessione premere brevemente il tasto Connessione. Il Led si spegne.
• If the entrance panel is in a particularly noisy place, during the conversation the Push to Talk function can be activated for a less disturbed call. During the conversation the Push to Talk function can be activated as follows.
- Press the Connection key for at least 2 seconds to talk to the entrance panel. The LED remains green.- Release the key to ear from the entrance panel. The LED becomes red.- To end the connection press the connection key briefly. The LED goes out
• Si le poste externe se trouve dans un environnement particulièrement bruyant, il est possible d’activer durant la conversation la fonction Push to Talk pour obtenir une meilleure communication. Durant la conversation, il est possible d’activer la fonction Push to Talk en procédant comme suit.
- Appuyer sur la touche Connexion pendant au moins 2 secondes pour parler avec le poste externe. Le voyant reste vert.- Relâcher la touche pour pouvoir écouter depuis le poste externe. Le voyant devient rouge.- Pour mettre fin à la connexion, appuyer brièvement sur la touche connexion. Le voyant s’éteint.
• Wenn die Türstation in einem besonders geräuschvollen Bereich installiert ist, kann man während des Gesprächs die Funktion Push to Talk drücken, um diese Geräusche zu überwinden. Während des Gesprächs kann die Funktion Push to Talk folgendermaßen aktiviert werden.
- Die Verbindungstaste mindestens 2 Sekunden lang drücken, um mit der Türstation zu sprechen. Die grüne Meldeleuchte leuchtet immer noch.
- Taste loslassen, um die Türstation hören zu können. Die Meldeleuchte leuchtet rot auf.- Um die Verbindung abzubrechen, die Verbindungstaste kurz drücken. Die Meldeleuchte erlischt
• Si la placa exterior se encuentra en un ambiente con un alto nivel de ruido, durante la conversación es posible activar la función Push to Talk para obtener una comunicación con menor interferencias. Durante la conver-sación es posible activar la función Push to Talk en el modo siguiente.
- Presione la tecla de conexión almenos 2 segundos para conversar con la placa exterior. El led permanece verde.- Suelte la tecla para poder escuchar desde la placa exterior. El led se vuelve rojo.- Para terminar la conexión, presione brevemente la tecla de conexión. El led se apaga.
• Indien het extern punt zich op een bijzonder lawaaierige plaats bevindt, is het mogelijk, tijdens het gesprek, de functie Push to Talk te activeren teneinde een minder gestoorde communicatie te verkrijgen. Tijdens het gesprek is het mogelijk de functie Push to Talk te activeren op de volgende manier.
- De drukknop van Verbinding gedurende minstens 2 seconden indrukken om met het externe punt te communiceren. De led blijft groen.
- De toets loslaten om vanuit het externe punt te kunnen luisteren. De led wordt rood.- Om de verbinding te beëindigen, eventjes de toets. van verbinding indrukken. De led gaat uit.
• Esta função permite difundir uma mensagem vocal, ditada ao microfone do dispositivo, por meio de alti-falantes do sistema de Difusão sonora. A activação realiza-se premindo brevemente a tecla “Conexão” com o dispositivo em espera, o indicador luminoso verde aceso indica que a função está activada. Para cessar a função pressionar novamente a tecla “Conexão”.
- Pressionar a tecla de conexão por pelo menos 2 segundos para falar com a unidade externa. O indicador luminoso continua verde
- Soltar a tecla para poder escutar a unidade externa. O indicador luminoso fica vermelho- Para desligar pressionar ligeiramente a tecla da conexão. O indicador luminoso apaga.
Video Kit
37
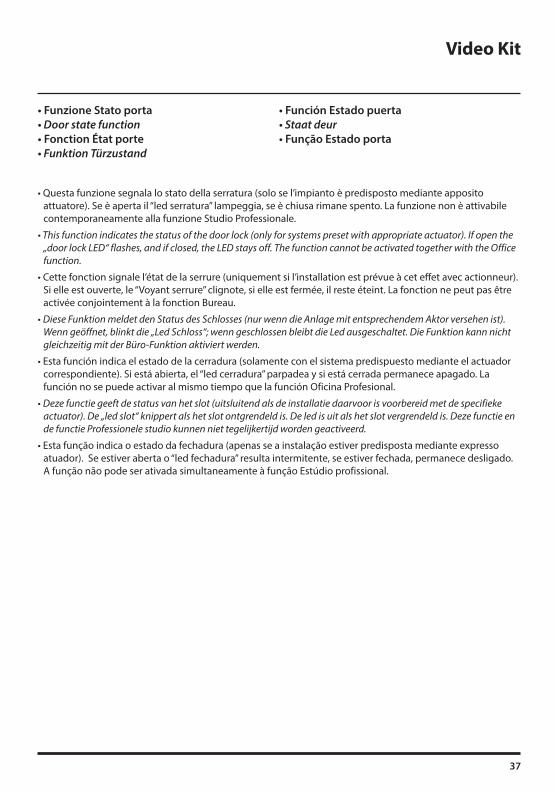
• Questa funzione segnala lo stato della serratura (solo se l’impianto è predisposto mediante apposito attuatore). Se è aperta il “led serratura” lampeggia, se è chiusa rimane spento. La funzione non è attivabile contemporaneamente alla funzione Studio Professionale.
• This function indicates the status of the door lock (only for systems preset with appropriate actuator). If open the „door lock LED“ flashes, and if closed, the LED stays off. The function cannot be activated together with the Office function.
• Cette fonction signale l’état de la serrure (uniquement si l’installation est prévue à cet effet avec actionneur). Si elle est ouverte, le “Voyant serrure” clignote, si elle est fermée, il reste éteint. La fonction ne peut pas être activée conjointement à la fonction Bureau.
• Diese Funktion meldet den Status des Schlosses (nur wenn die Anlage mit entsprechendem Aktor versehen ist). Wenn geöffnet, blinkt die „Led Schloss“; wenn geschlossen bleibt die Led ausgeschaltet. Die Funktion kann nicht gleichzeitig mit der Büro-Funktion aktiviert werden.
• Esta función indica el estado de la cerradura (solamente con el sistema predispuesto mediante el actuador correspondiente). Si está abierta, el “led cerradura” parpadea y si está cerrada permanece apagado. La función no se puede activar al mismo tiempo que la función Oficina Profesional.
• Deze functie geeft de status van het slot (uitsluitend als de installatie daarvoor is voorbereid met de specifieke actuator). De „led slot“ knippert als het slot ontgrendeld is. De led is uit als het slot vergrendeld is. Deze functie en de functie Professionele studio kunnen niet tegelijkertijd worden geactiveerd.
• Esta função indica o estado da fechadura (apenas se a instalação estiver predisposta mediante expresso atuador). Se estiver aberta o “led fechadura” resulta intermitente, se estiver fechada, permanece desligado. A função não pode ser ativada simultaneamente à função Estúdio profissional.
• Funzione Stato porta• Door state function• Fonction État porte• Funktion Türzustand
• Función Estado puerta• Staat deur• Função Estado porta
38
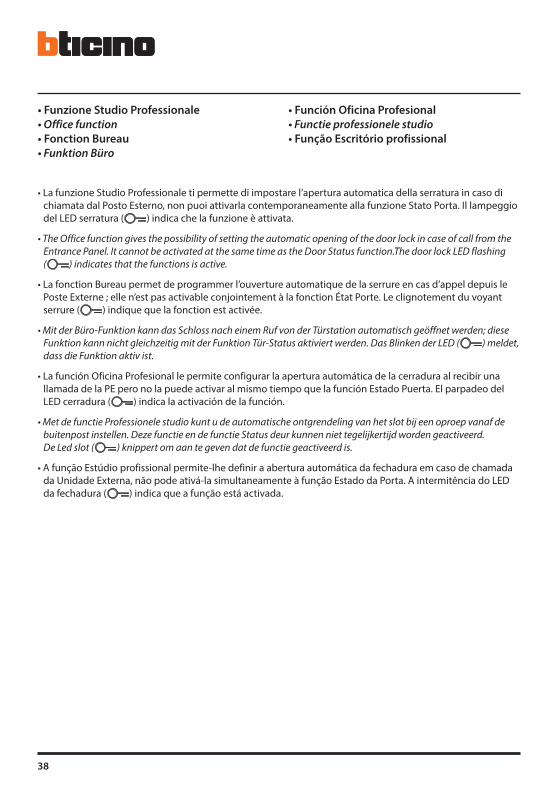
• La funzione Studio Professionale ti permette di impostare l’apertura automatica della serratura in caso di chiamata dal Posto Esterno, non puoi attivarla contemporaneamente alla funzione Stato Porta. Il lampeggio del LED serratura ( ) indica che la funzione è attivata.
• The Office function gives the possibility of setting the automatic opening of the door lock in case of call from the Entrance Panel. It cannot be activated at the same time as the Door Status function.The door lock LED flashing ( ) indicates that the functions is active.
• La fonction Bureau permet de programmer l’ouverture automatique de la serrure en cas d’appel depuis le Poste Externe ; elle n’est pas activable conjointement à la fonction État Porte. Le clignotement du voyant serrure ( ) indique que la fonction est activée.
• Mit der Büro-Funktion kann das Schloss nach einem Ruf von der Türstation automatisch geöffnet werden; diese Funktion kann nicht gleichzeitig mit der Funktion Tür-Status aktiviert werden. Das Blinken der LED ( ) meldet, dass die Funktion aktiv ist.
• La función Oficina Profesional le permite configurar la apertura automática de la cerradura al recibir una llamada de la PE pero no la puede activar al mismo tiempo que la función Estado Puerta. El parpadeo del LED cerradura ( ) indica la activación de la función.
• Met de functie Professionele studio kunt u de automatische ontgrendeling van het slot bij een oproep vanaf de buitenpost instellen. Deze functie en de functie Status deur kunnen niet tegelijkertijd worden geactiveerd. De Led slot ( ) knippert om aan te geven dat de functie geactiveerd is.
• A função Estúdio profissional permite-lhe definir a abertura automática da fechadura em caso de chamada da Unidade Externa, não pode ativá-la simultaneamente à função Estado da Porta. A intermitência do LED da fechadura ( ) indica que a função está activada.
• Funzione Studio Professionale• Office function• Fonction Bureau• Funktion Büro
• Función Oficina Profesional• Functie professionele studio• Função Escritório profissional
Video Kit
39
• Questa funzione permette di diffondere un messaggio vocale, dettato al microfono del dispositivo, tramite gli altoparlanti dell’impianto Diffusione sonora. L’attivazione avviene premendo brevemente il tasto “Connessione” con il dispositivo in stato di riposo, il led verde acceso indica che la funzione è attiva. Per terminare la funzione premere nuovamente il tasto “Connessione”.
• This function plays a voice message, spoken at the device microphone, through the Sound system loudspeakers. It is activated by pressing the “Connection” key with the device in rest state. The ON green LED indicates that the function is active. To end the function press the “Connection” key again.
• Cette fonction permet de diffuser un message vocal dicté au micro du dispositif par l’intermédiaire des haut-parleurs du système de Diffusion sonore. L’activation est obtenue en appuyant brièvement sur la touche “Connexion” quand le dispositif est au repos; allumé, le voyant vert indique que la fonction est active. Pour désactiver la fonction, appuyer à nouveau sur la touche “Connexion”.
• Mit dieser Funktion kann man eine Audiomeldung durch das Mikrophon der Vorrichtung über die Lautsprecher der Schalldiffusionsanlage aussenden. Die Aktivierung erfolgt durch einen kurzen Druck der Taste „Verbindung“ wenn die Vorrichtung auf Ruhestand geschaltet ist. Die grüne eingeschaltete Leuchte meldet dass die Funktion aktiv ist. Um die Funktion auszuschalten, die Taste „Verbindung“ nochmals drücken.
• Esta función permite difundir un mensaje vocal, dictado al micrófono del dispositivo, por medio de los altavoces del sistema de difusión sonora. La activación se realiza pulsando brevemente la tecla “Conexión” con el dispositivo en el estado de reposo; el led verde encendido indica que la función está activada. Para terminar la función, presione de nuevo la tecla “Conexión”.
• Deze functie staat toe een vocale boodschap te verspreiden, gedicteerd aan de microfoon van de inrichting, middels de luidsprekers van de installatie Geluidsdiffusie. De activering geschiedt door te drukken op de toets “Aansluiting” met de inrichting in de ruststand, de brandende groene led wijst erop dat de functie actief is. Om de functie te beëindigen, opnieuw drukken op de toets “Aansluiting”.
• Esta função permite difundir uma mensagem vocal, ditada ao microfone do dispositivo, por meio de altifalantes do sistema de Difusão sonora. A activação realiza-se premindo brevemente a tecla “Conexão” com o dispositivo em espera, o indicador luminoso verde aceso indica que a função está activada. Para cessar a função pressionar novamente a tecla “Conexão”.
• Funzione Cerca persone• Paging function• Fonction cherche-personnes• Funktion Personensuche
• Función buscapersonas• Functie buzzer• Função de procura pessoas
40
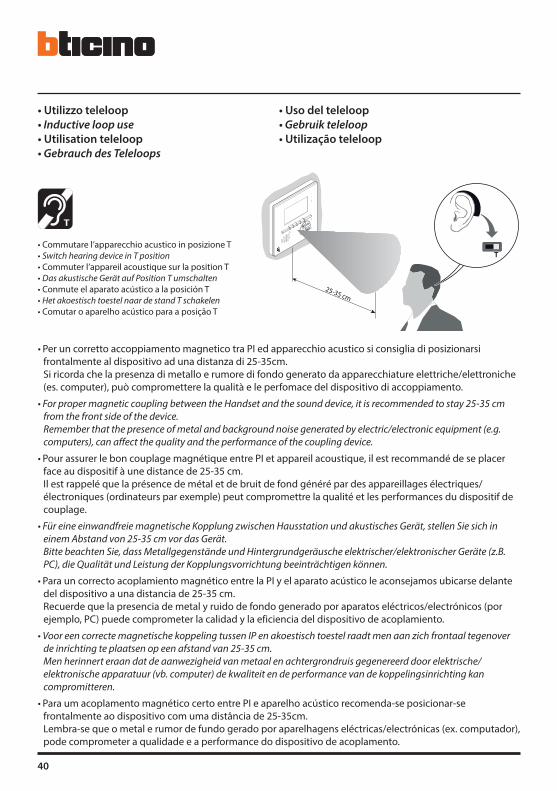
• Per un corretto accoppiamento magnetico tra PI ed apparecchio acustico si consiglia di posizionarsi frontalmente al dispositivo ad una distanza di 25-35cm.
Si ricorda che la presenza di metallo e rumore di fondo generato da apparecchiature elettriche/elettroniche (es. computer), può compromettere la qualità e le perfomace del dispositivo di accoppiamento.
• For proper magnetic coupling between the Handset and the sound device, it is recommended to stay 25-35 cm from the front side of the device.
Remember that the presence of metal and background noise generated by electric/electronic equipment (e.g. computers), can affect the quality and the performance of the coupling device.
• Pour assurer le bon couplage magnétique entre PI et appareil acoustique, il est recommandé de se placer face au dispositif à une distance de 25-35 cm.
Il est rappelé que la présence de métal et de bruit de fond généré par des appareillages électriques/électroniques (ordinateurs par exemple) peut compromettre la qualité et les performances du dispositif de couplage.
• Für eine einwandfreie magnetische Kopplung zwischen Hausstation und akustisches Gerät, stellen Sie sich in einem Abstand von 25-35 cm vor das Gerät.
Bitte beachten Sie, dass Metallgegenstände und Hintergrundgeräusche elektrischer/elektronischer Geräte (z.B. PC), die Qualität und Leistung der Kopplungsvorrichtung beeinträchtigen können.
• Para un correcto acoplamiento magnético entre la PI y el aparato acústico le aconsejamos ubicarse delante del dispositivo a una distancia de 25-35 cm.
Recuerde que la presencia de metal y ruido de fondo generado por aparatos eléctricos/electrónicos (por ejemplo, PC) puede comprometer la calidad y la eficiencia del dispositivo de acoplamiento.
• Voor een correcte magnetische koppeling tussen IP en akoestisch toestel raadt men aan zich frontaal tegenover de inrichting te plaatsen op een afstand van 25-35 cm.
Men herinnert eraan dat de aanwezigheid van metaal en achtergrondruis gegenereerd door elektrische/elektronische apparatuur (vb. computer) de kwaliteit en de performance van de koppelingsinrichting kan compromitteren.
• Para um acoplamento magnético certo entre PI e aparelho acústico recomenda-se posicionar-se frontalmente ao dispositivo com uma distância de 25-35cm.
Lembra-se que o metal e rumor de fundo gerado por aparelhagens eléctricas/electrónicas (ex. computador), pode comprometer a qualidade e a performance do dispositivo de acoplamento.
• Utilizzo teleloop• Inductive loop use• Utilisation teleloop• Gebrauch des Teleloops
• Uso del teleloop• Gebruik teleloop• Utilização teleloop
• Commutare l’apparecchio acustico in posizione T• Switch hearing device in T position• Commuter l’appareil acoustique sur la position T• Das akustische Gerät auf Position T umschalten• Conmute el aparato acústico a la posición T• Het akoestisch toestel naar de stand T schakelen• Comutar o aparelho acústico para a posição T
25-35 cm
40 cm
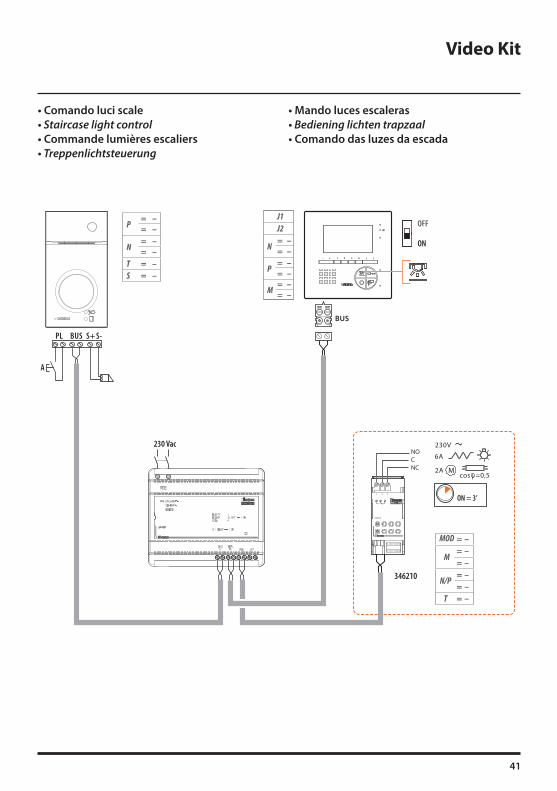
Video Kit
41
• Comando luci scale• Staircase light control• Commande lumières escaliers• Treppenlichtsteuerung
• Mando luces escaleras• Bediening lichten trapzaal• Comando das luzes da escada
ON
OFF
1– + 2 3 4
BUSPL S+ S-
A
ON = 3’
BUS
2 3
1 32
346210
1
CNO
NC
230V
2Acos =0,5
6A
M
230 Vac
MOD = –
M= –= –
N/P= –= –
T = –
346210
P= –= –
N= –= –
T = –S = –
P= –= –
J2J1
N= –= –
M= –= –
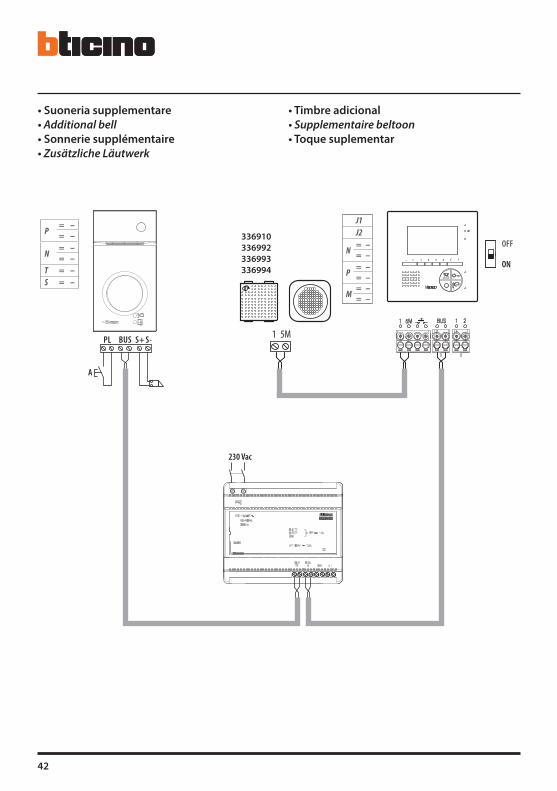
42
• Suoneria supplementare• Additional bell• Sonnerie supplémentaire• Zusätzliche Läutwerk
• Timbre adicional• Supplementaire beltoon• Toque suplementar
1– + 2 3 4
ON
OFF
230 Vac
BUSPL S+ S-
A
1 5M
P= –= –
N= –= –
T = –S = –
P= –= –
J2J1
N= –= –
M= –= –
336910336992336993336994
Video Kit
43
Puoi scaricare i manuali completi dei dispositivi dal sito www.bticino.com
The complete manuals of the devices can be downloaded from the website www.bticino.com
Vous pouvez télécharger le manuel complet des dispositifs sur le site www.bticino.it
Sie können die vollständigen Handbücher von der Website www.bticino.it herunterladen.
Puede bajarse los manuales completos de los dispositivos en la web de www.bticino.it
Puede bajarse los manuales completos de los dispositivos en la web de www.bticino.it
É possível baixar os manuais completos do sítio www.bticino.it
BTicino SpAViale Borri, 23121100 Varese - Italywww.bticino.com
BTicino SpA si riserva il diritto di variare in qualsiasi momento i contenuti illustrati nel presente stampato e di comunicare, in qualsiasi forma e modalità, i cambiamenti apportati.BTicino SpA reserves at any time the right to modify the contents of this booklet and to comunicate in any form and modality, the charges brought to the same.
Timbro installatoreInstaller stamp