Embed Size (px)
Citation preview
MANTRA NVIVO 9 DATA HANDLING EXERCISE
Unit 3: Managing your data at the end of your project
Authors : Dr. Kakia Chatsiou (KC)
Contributors: Dr. Libby Bishop (LB), Louise Corti (LC), Dr. Veerle Van Den Eynden (VV),
Laurence Horton (LH), Robin Rice (RR), Dr. Bethany Morgan-Brett (BMB),
Dr. Kate Orton-Johnson (KOJ)
Publisher : EDINA and Data Library, University of Edinburgh
Project: Research Data MANTRA, www.ed.ac.uk/is/data-library-projects/mantra
Funder: JISC Managing Research Data Programme (2010-11)Version: 00.13-unit3-
00.04
Last updated: 30/08/2011
This work is licensed under the Creative Commons Attribution 2.5 UK: Scotland License. To view a copy of this license, visit http://creativecommons.org/licenses/by/2.5/scotland/
MANTRA-NVIVO-exercise-Unit3.doc
Dr. Kakia Chatsiou Page 2 of 16 MANTRA NVivo 9 Exercise Unit 3: Managing your data at the end of your project
Contents
OVERVIEW – UNIT 3 ................................................................................................................ 2
1 EXPORTING DATA AND DOCUMENTATION FOR ARCHIVING ................................... 3
1.1 EXPORTING YOUR DATA (TEXTUAL, TABULAR, AUDIO, VIDEO OR IMAGE) ............................. 3 3-1. ............................................................................................................................................ 3 3-2. ............................................................................................................................................ 4 3-3. ............................................................................................................................................ 5
1.2 EXPORTING YOUR CODING (EXPORTING NODES AND NODE STRUCTURE) ........................... 7 3-4. ............................................................................................................................................ 7
1.2.1 Exporting classifications (and classification structure) ...................................... 11 3-5. .......................................................................................................................................... 11
1.2.2 Exporting documentation ................................................................................... 12 3-6. .......................................................................................................................................... 12
2 MANAGING BIBLIOGRAPHICAL DATA ........................................................................ 14
3-7. .......................................................................................................................................... 14
SUMMARY .............................................................................................................................. 15
APPENDIX .............................................................................................................................. 16
LIST OF TABLES ...................................................................................................................... 16 LIST OF FIGURES .................................................................................................................... 16
Overview – Unit 3 This unit deals with issues you need to consider at the post analysis stage of your research, when you are ready to export your data and documentation from NVivo 9 for archiving or to make them available to other researchers for reuse. We will present some recommendations on the following issues:
exporting data and documentation for archiving including advice on preservation-friendly formats and exporting contextual information about your data created within the NVivo 9 project file.
managing your bibliographical data and resources created or imported in NVivo 9 and advice on exporting them for use with reference management software.
MANTRA-NVIVO-exercise-Unit3.doc
Dr. Kakia Chatsiou Page 3 of 16 MANTRA NVivo 9 Exercise Unit 3: Managing your data at the end of your project
1 Exporting data and documentation for archiving
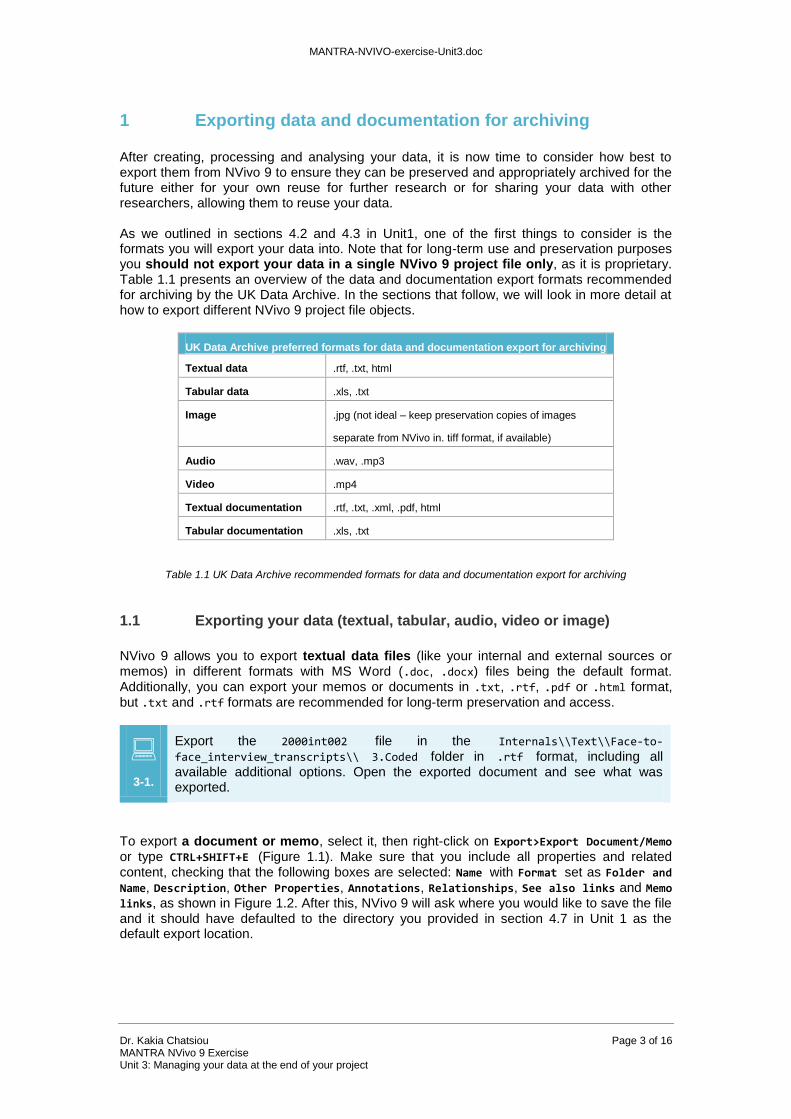
After creating, processing and analysing your data, it is now time to consider how best to export them from NVivo 9 to ensure they can be preserved and appropriately archived for the future either for your own reuse for further research or for sharing your data with other researchers, allowing them to reuse your data. As we outlined in sections 4.2 and 4.3 in Unit1, one of the first things to consider is the formats you will export your data into. Note that for long-term use and preservation purposes you should not export your data in a single NVivo 9 project file only, as it is proprietary. Table 1.1 presents an overview of the data and documentation export formats recommended for archiving by the UK Data Archive. In the sections that follow, we will look in more detail at how to export different NVivo 9 project file objects.
UK Data Archive preferred formats for data and documentation export for archiving
Textual data .rtf, .txt, html
Tabular data .xls, .txt
Image .jpg (not ideal – keep preservation copies of images
separate from NVivo in. tiff format, if available)
Audio .wav, .mp3
Video .mp4
Textual documentation .rtf, .txt, .xml, .pdf, html
Tabular documentation .xls, .txt
Table 1.1 UK Data Archive recommended formats for data and documentation export for archiving
1.1 Exporting your data (textual, tabular, audio, video or image)
NVivo 9 allows you to export textual data files (like your internal and external sources or memos) in different formats with MS Word (.doc, .docx) files being the default format. Additionally, you can export your memos or documents in .txt, .rtf, .pdf or .html format, but .txt and .rtf formats are recommended for long-term preservation and access.
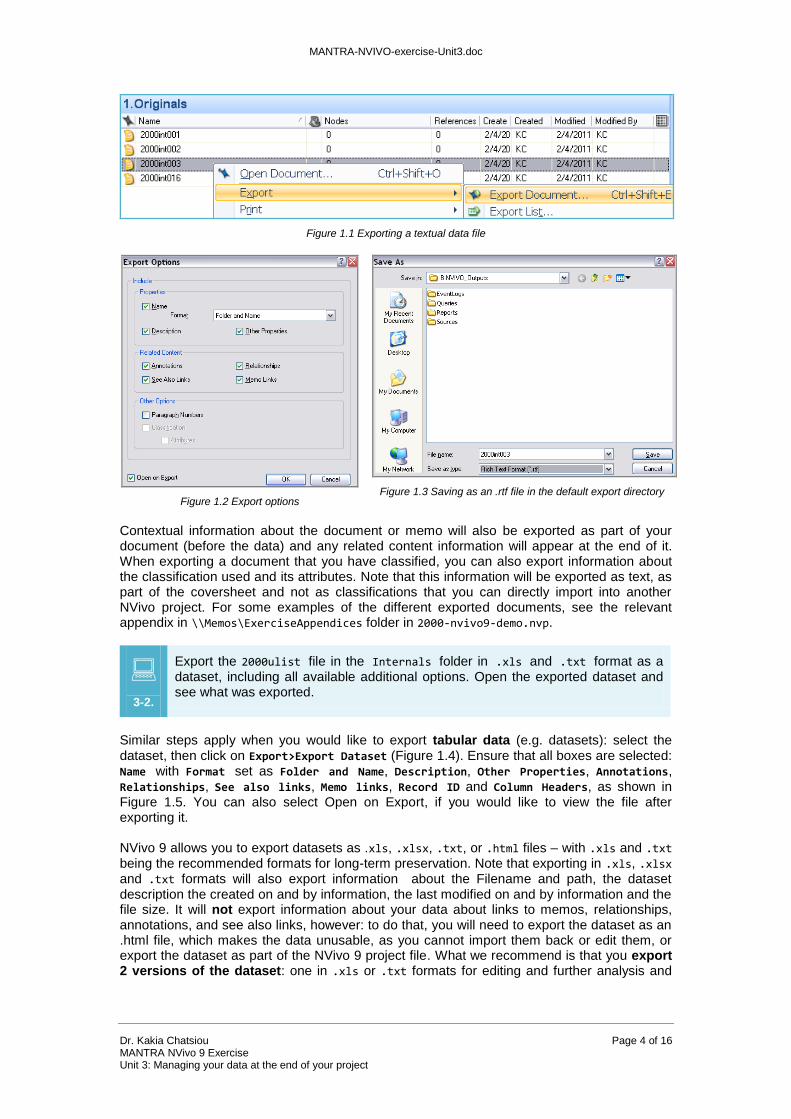
3-1.
Export the 2000int002 file in the Internals\\Text\\Face-to-
face_interview_transcripts\\ 3.Coded folder in .rtf format, including all available additional options. Open the exported document and see what was exported.
To export a document or memo, select it, then right-click on Export>Export Document/Memo or type CTRL+SHIFT+E (Figure 1.1). Make sure that you include all properties and related content, checking that the following boxes are selected: Name with Format set as Folder and Name, Description, Other Properties, Annotations, Relationships, See also links and Memo links, as shown in Figure 1.2. After this, NVivo 9 will ask where you would like to save the file and it should have defaulted to the directory you provided in section 4.7 in Unit 1 as the default export location.
MANTRA-NVIVO-exercise-Unit3.doc
Dr. Kakia Chatsiou Page 4 of 16 MANTRA NVivo 9 Exercise Unit 3: Managing your data at the end of your project
Figure 1.1 Exporting a textual data file
Figure 1.2 Export options
Figure 1.3 Saving as an .rtf file in the default export directory
Contextual information about the document or memo will also be exported as part of your document (before the data) and any related content information will appear at the end of it. When exporting a document that you have classified, you can also export information about the classification used and its attributes. Note that this information will be exported as text, as part of the coversheet and not as classifications that you can directly import into another NVivo project. For some examples of the different exported documents, see the relevant appendix in \\Memos\ExerciseAppendices folder in 2000-nvivo9-demo.nvp.
3-2.
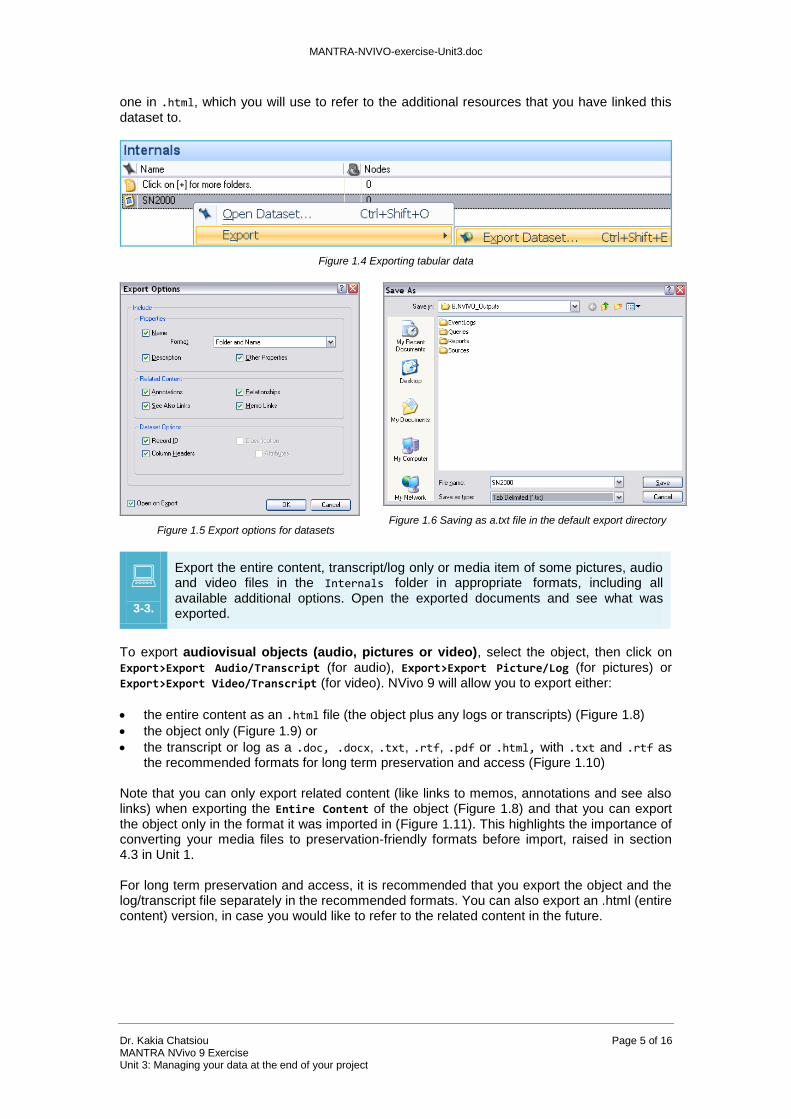
Export the 2000ulist file in the Internals folder in .xls and .txt format as a dataset, including all available additional options. Open the exported dataset and see what was exported.
Similar steps apply when you would like to export tabular data (e.g. datasets): select the dataset, then click on Export>Export Dataset (Figure 1.4). Ensure that all boxes are selected: Name with Format set as Folder and Name, Description, Other Properties, Annotations, Relationships, See also links, Memo links, Record ID and Column Headers, as shown in Figure 1.5. You can also select Open on Export, if you would like to view the file after exporting it. NVivo 9 allows you to export datasets as .xls, .xlsx, .txt, or .html files – with .xls and .txt being the recommended formats for long-term preservation. Note that exporting in .xls, .xlsx and .txt formats will also export information about the Filename and path, the dataset description the created on and by information, the last modified on and by information and the file size. It will not export information about your data about links to memos, relationships, annotations, and see also links, however: to do that, you will need to export the dataset as an .html file, which makes the data unusable, as you cannot import them back or edit them, or export the dataset as part of the NVivo 9 project file. What we recommend is that you export 2 versions of the dataset: one in .xls or .txt formats for editing and further analysis and
MANTRA-NVIVO-exercise-Unit3.doc
Dr. Kakia Chatsiou Page 5 of 16 MANTRA NVivo 9 Exercise Unit 3: Managing your data at the end of your project
one in .html, which you will use to refer to the additional resources that you have linked this dataset to.
Figure 1.4 Exporting tabular data
Figure 1.5 Export options for datasets
Figure 1.6 Saving as a.txt file in the default export directory
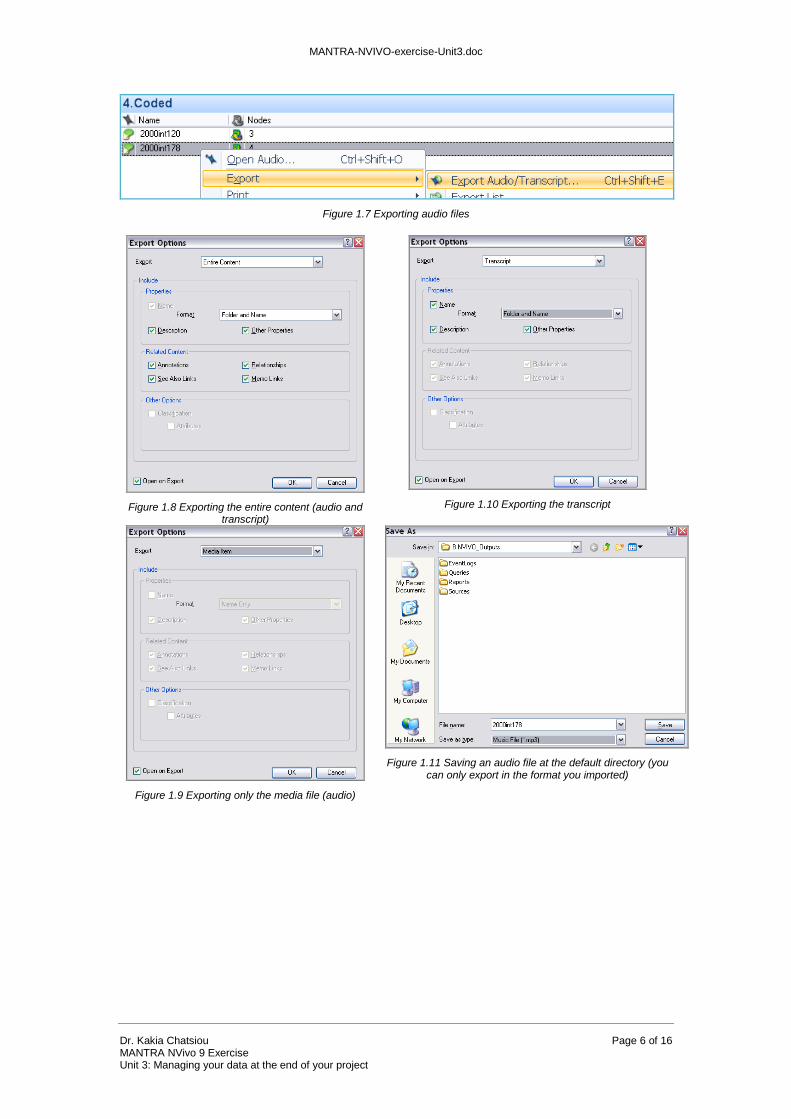
3-3.
Export the entire content, transcript/log only or media item of some pictures, audio and video files in the Internals folder in appropriate formats, including all available additional options. Open the exported documents and see what was exported.
To export audiovisual objects (audio, pictures or video), select the object, then click on Export>Export Audio/Transcript (for audio), Export>Export Picture/Log (for pictures) or Export>Export Video/Transcript (for video). NVivo 9 will allow you to export either:
the entire content as an .html file (the object plus any logs or transcripts) (Figure 1.8)
the object only (Figure 1.9) or
the transcript or log as a .doc, .docx, .txt, .rtf, .pdf or .html, with .txt and .rtf as the recommended formats for long term preservation and access (Figure 1.10)
Note that you can only export related content (like links to memos, annotations and see also links) when exporting the Entire Content of the object (Figure 1.8) and that you can export the object only in the format it was imported in (Figure 1.11). This highlights the importance of converting your media files to preservation-friendly formats before import, raised in section 4.3 in Unit 1. For long term preservation and access, it is recommended that you export the object and the log/transcript file separately in the recommended formats. You can also export an .html (entire content) version, in case you would like to refer to the related content in the future.
MANTRA-NVIVO-exercise-Unit3.doc
Dr. Kakia Chatsiou Page 6 of 16 MANTRA NVivo 9 Exercise Unit 3: Managing your data at the end of your project
Figure 1.7 Exporting audio files
Figure 1.8 Exporting the entire content (audio and transcript)
Figure 1.9 Exporting only the media file (audio)
Figure 1.10 Exporting the transcript
Figure 1.11 Saving an audio file at the default directory (you can only export in the format you imported)
MANTRA-NVIVO-exercise-Unit3.doc
Dr. Kakia Chatsiou Page 7 of 16 MANTRA NVivo 9 Exercise Unit 3: Managing your data at the end of your project
1.2 Exporting your coding (exporting nodes and node structure)
Exporting your coding scheme in appropriate formats will ensure that you or other researchers will have access to your analytic framework. Unfortunately, NVivo 9 does not let you export coded sources as you view them in NVivo 9 (i.e. as a highlighted document), but instead it allows you to export your coding in the following ways: A. a summary view of the node references B. a reference view of the node references C. an html version of the entire content D. a summary of a collection of nodes E. a summary of the node structure
3-4.
Export the following from your NVivo 9 project file:
a) a summary view of the node references
b) a reference view of the node references
c) an html version of the whole content
d) a summary of a collection of nodes
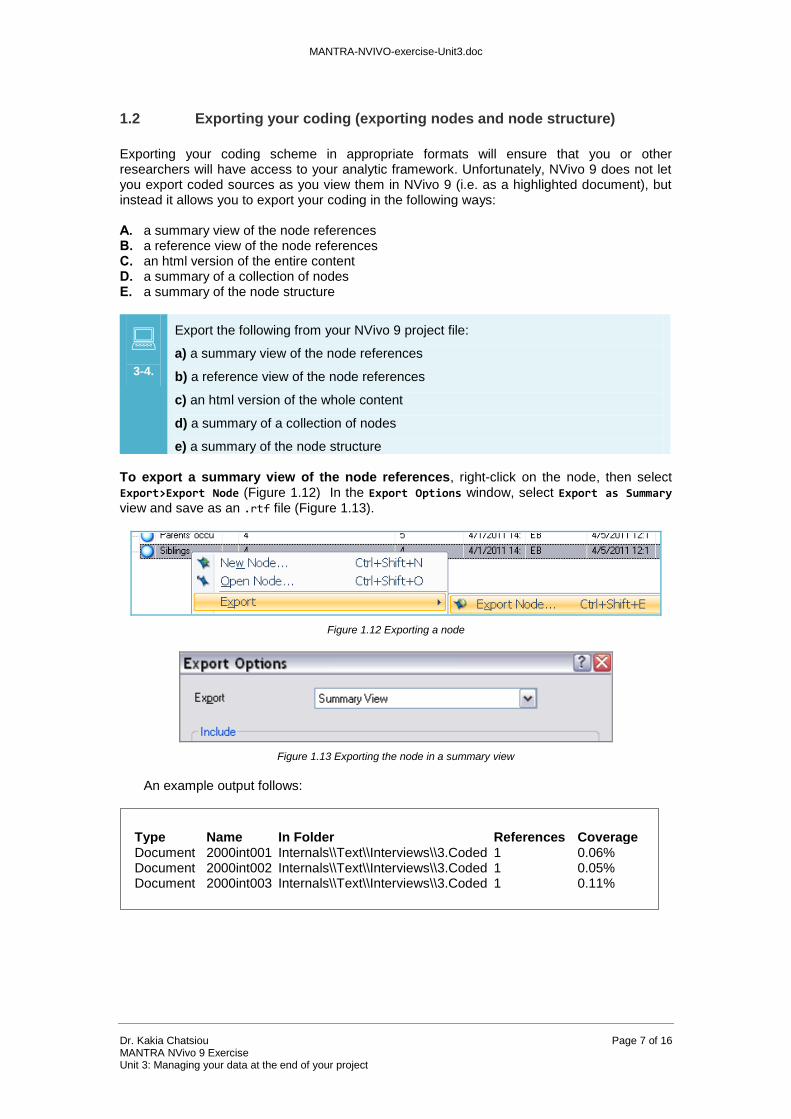
e) a summary of the node structure To export a summary view of the node references, right-click on the node, then select Export>Export Node (Figure 1.12) In the Export Options window, select Export as Summary view and save as an .rtf file (Figure 1.13).
Figure 1.12 Exporting a node
Figure 1.13 Exporting the node in a summary view
An example output follows:
Type Name In Folder References Coverage Document 2000int001 Internals\\Text\\Interviews\\3.Coded 1 0.06% Document 2000int002 Internals\\Text\\Interviews\\3.Coded 1 0.05% Document 2000int003 Internals\\Text\\Interviews\\3.Coded 1 0.11%
MANTRA-NVIVO-exercise-Unit3.doc
Dr. Kakia Chatsiou Page 8 of 16 MANTRA NVivo 9 Exercise Unit 3: Managing your data at the end of your project
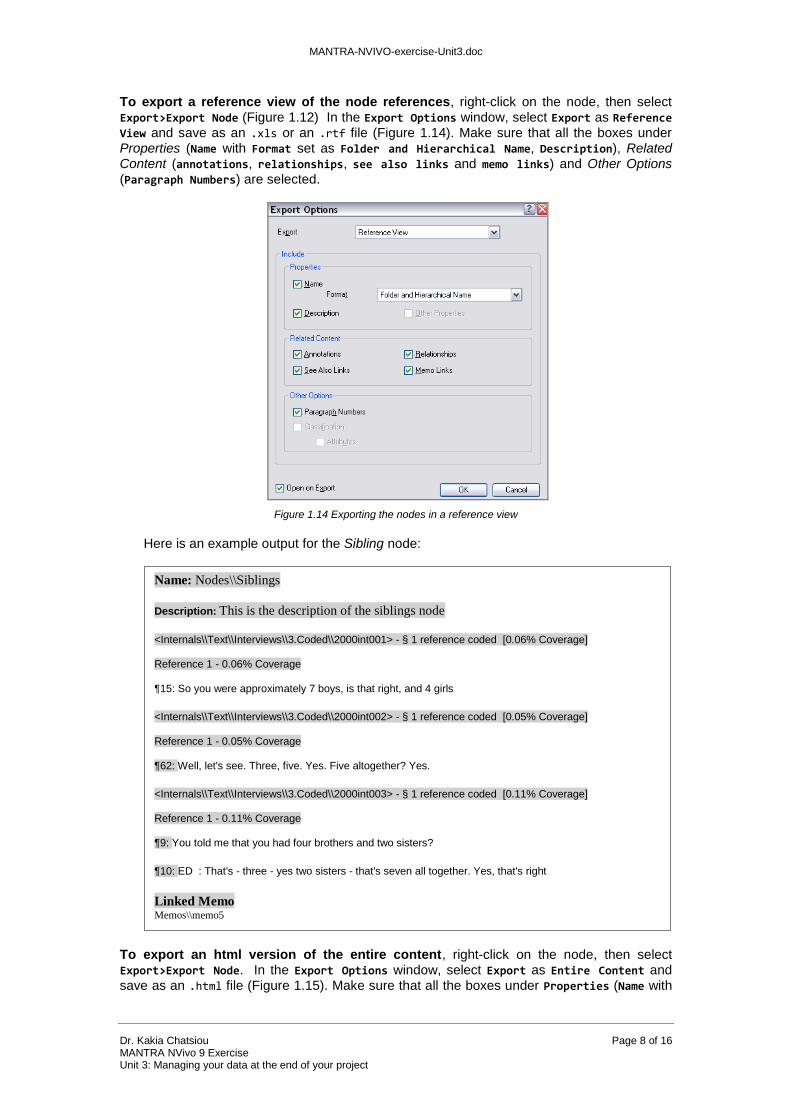
To export a reference view of the node references, right-click on the node, then select Export>Export Node (Figure 1.12) In the Export Options window, select Export as Reference View and save as an .xls or an .rtf file (Figure 1.14). Make sure that all the boxes under Properties (Name with Format set as Folder and Hierarchical Name, Description), Related Content (annotations, relationships, see also links and memo links) and Other Options (Paragraph Numbers) are selected.
Figure 1.14 Exporting the nodes in a reference view
Here is an example output for the Sibling node:
To export an html version of the entire content, right-click on the node, then select Export>Export Node. In the Export Options window, select Export as Entire Content and save as an .html file (Figure 1.15). Make sure that all the boxes under Properties (Name with
Name: Nodes\\Siblings
Description: This is the description of the siblings node
<Internals\\Text\\Interviews\\3.Coded\\2000int001> - § 1 reference coded [0.06% Coverage] Reference 1 - 0.06% Coverage ¶15: So you were approximately 7 boys, is that right, and 4 girls
<Internals\\Text\\Interviews\\3.Coded\\2000int002> - § 1 reference coded [0.05% Coverage] Reference 1 - 0.05% Coverage ¶62: Well, let's see. Three, five. Yes. Five altogether? Yes.
<Internals\\Text\\Interviews\\3.Coded\\2000int003> - § 1 reference coded [0.11% Coverage] Reference 1 - 0.11% Coverage ¶9: You told me that you had four brothers and two sisters?
¶10: ED : That's - three - yes two sisters - that's seven all together. Yes, that's right
Linked Memo Memos\\memo5

MANTRA-NVIVO-exercise-Unit3.doc
Dr. Kakia Chatsiou Page 9 of 16 MANTRA NVivo 9 Exercise Unit 3: Managing your data at the end of your project
Format set as Folder and Hierarchical Name, Description, Other properties), Related content (annotations, relationships, see also links and memo links) and Other Options (Paragraph Numbers, Classification) are selected.
Figure 1.15 Exporting the entire content of the nodes
Here is an example output for the Siblings node (summary and text view):

MANTRA-NVIVO-exercise-Unit3.doc
Dr. Kakia Chatsiou Page 10 of 16 MANTRA NVivo 9 Exercise Unit 3: Managing your data at the end of your project
To export a summary of a collection of nodes, run a Node Summary Extract Report (Folders>Extracts>Node Summary Extract), (Figure 1.16) select the nodes you would like to export the information about, and save as .txt, .xml, or .xls file. If the extract report is successfully generated, NVivo 9 will prompt you with a message.
Figure 1.16 Running a Node Summary Extract Report
To export a summary of the node structure, run a Node Structure Extract Report (Folders>Extracts>Node structure Extract), select the nodes you want to export the information about (Figure 1.17) and save as .txt, .xml, or .xls file.
Figure 1.17 Running a Node Structure Extract Report
MANTRA-NVIVO-exercise-Unit3.doc
Dr. Kakia Chatsiou Page 11 of 16 MANTRA NVivo 9 Exercise Unit 3: Managing your data at the end of your project
1.2.1 Exporting classifications (and classification structure)
You can export source and node classifications as classification sheets that you can then import to another project or use to create a dataset.
3-5.
Export the following:
a) the book source classification as an .xls file
b) all source classifications as a .txt file
c) the interview node classification sheet as an .xls file
d) all node classifications as a .txt file
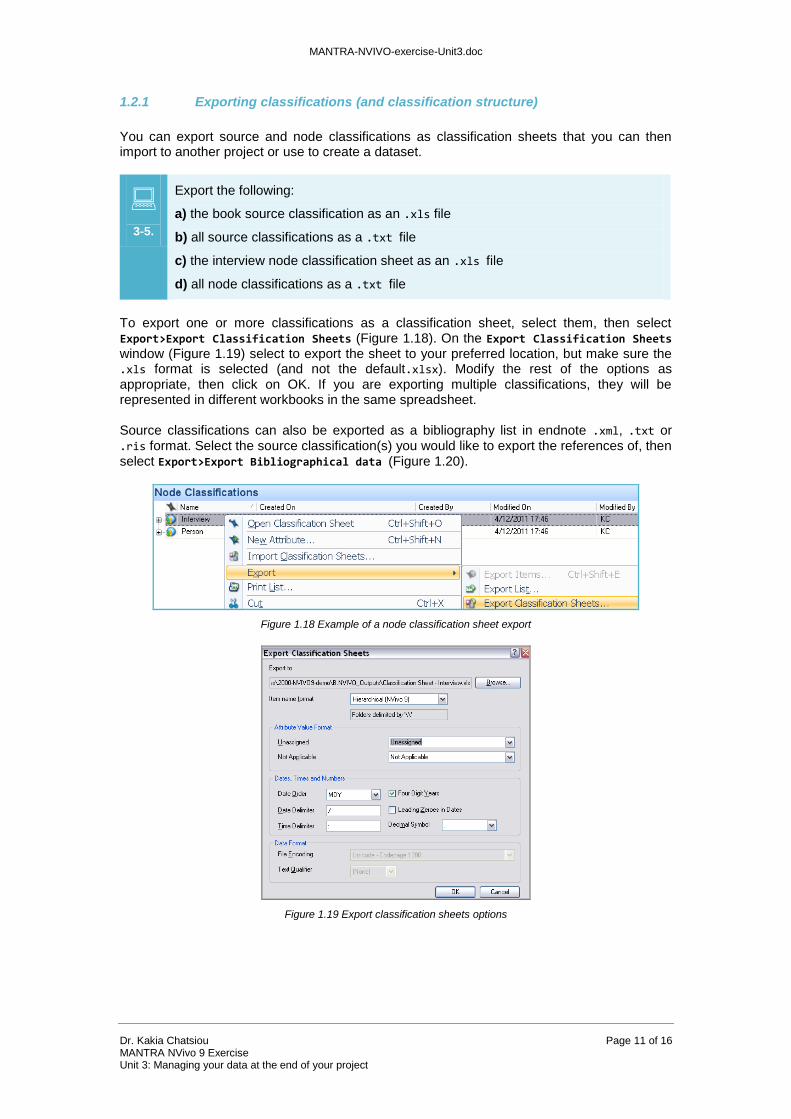
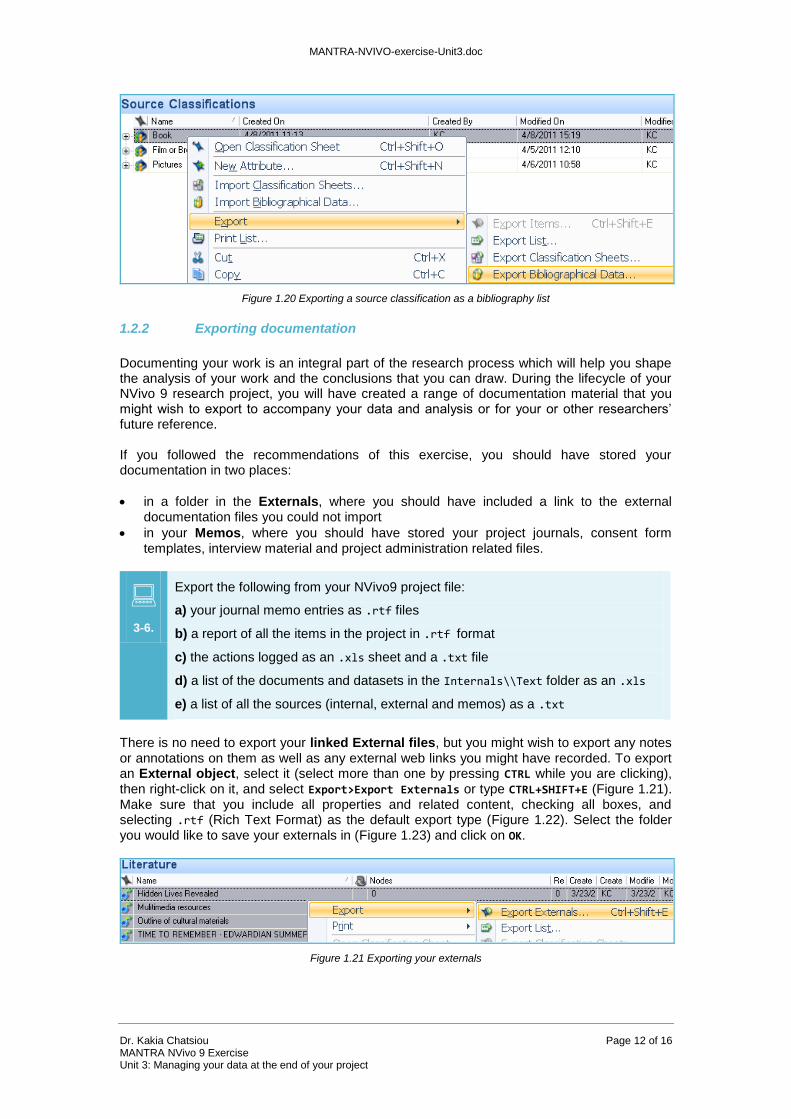
To export one or more classifications as a classification sheet, select them, then select Export>Export Classification Sheets (Figure 1.18). On the Export Classification Sheets window (Figure 1.19) select to export the sheet to your preferred location, but make sure the .xls format is selected (and not the default.xlsx). Modify the rest of the options as appropriate, then click on OK. If you are exporting multiple classifications, they will be represented in different workbooks in the same spreadsheet. Source classifications can also be exported as a bibliography list in endnote .xml, .txt or .ris format. Select the source classification(s) you would like to export the references of, then select Export>Export Bibliographical data (Figure 1.20).
Figure 1.18 Example of a node classification sheet export
Figure 1.19 Export classification sheets options
MANTRA-NVIVO-exercise-Unit3.doc
Dr. Kakia Chatsiou Page 12 of 16 MANTRA NVivo 9 Exercise Unit 3: Managing your data at the end of your project
Figure 1.20 Exporting a source classification as a bibliography list
1.2.2 Exporting documentation
Documenting your work is an integral part of the research process which will help you shape the analysis of your work and the conclusions that you can draw. During the lifecycle of your NVivo 9 research project, you will have created a range of documentation material that you might wish to export to accompany your data and analysis or for your or other researchers’ future reference. If you followed the recommendations of this exercise, you should have stored your documentation in two places:
in a folder in the Externals, where you should have included a link to the external documentation files you could not import
in your Memos, where you should have stored your project journals, consent form templates, interview material and project administration related files.
3-6.
Export the following from your NVivo9 project file:
a) your journal memo entries as .rtf files
b) a report of all the items in the project in .rtf format
c) the actions logged as an .xls sheet and a .txt file
d) a list of the documents and datasets in the Internals\\Text folder as an .xls
e) a list of all the sources (internal, external and memos) as a .txt
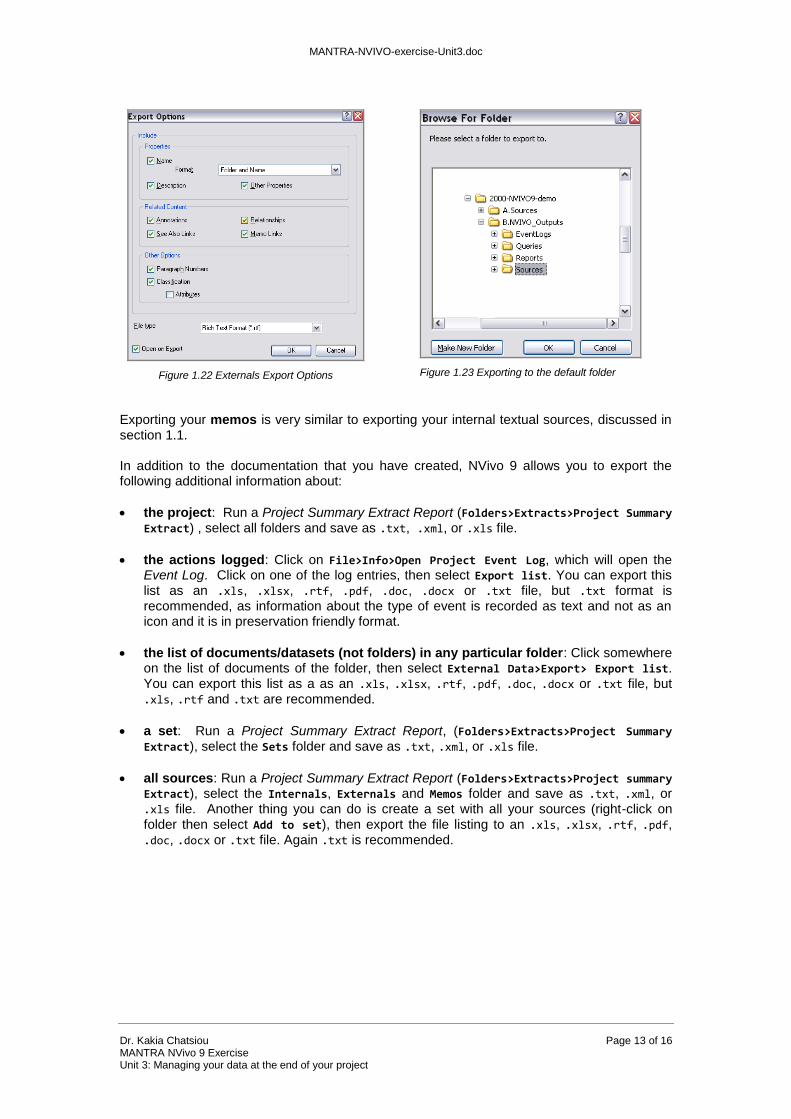
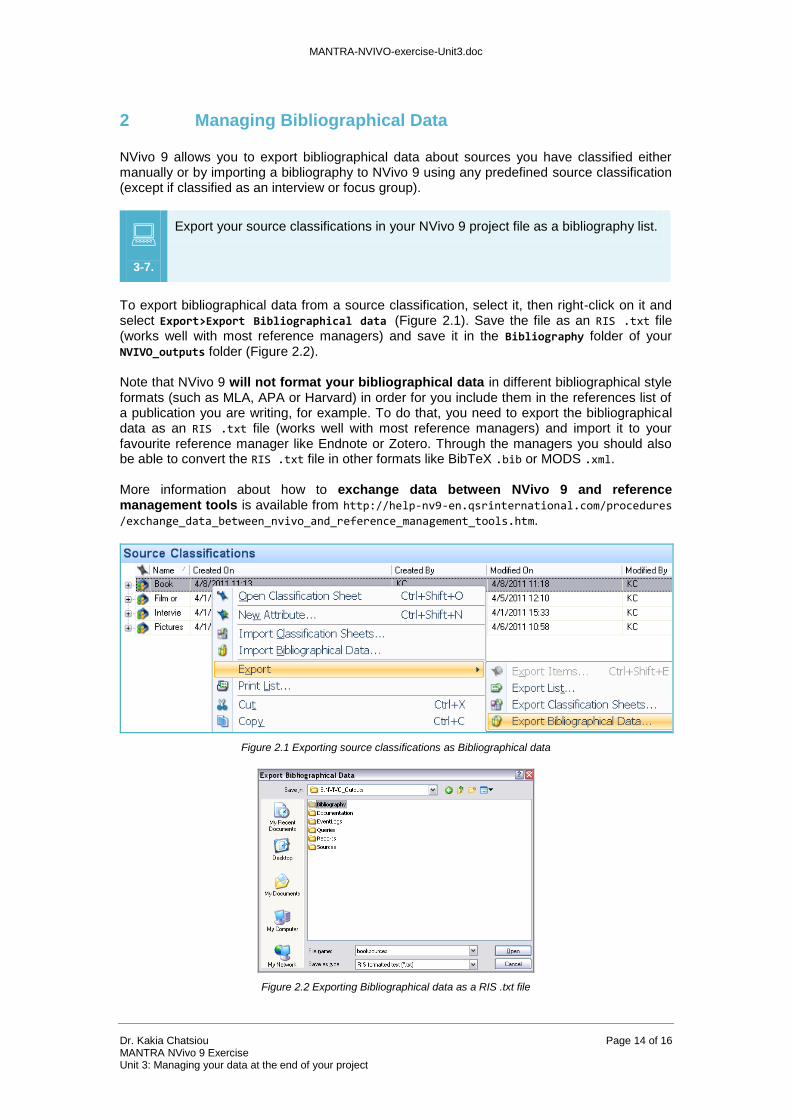
There is no need to export your linked External files, but you might wish to export any notes or annotations on them as well as any external web links you might have recorded. To export an External object, select it (select more than one by pressing CTRL while you are clicking), then right-click on it, and select Export>Export Externals or type CTRL+SHIFT+E (Figure 1.21). Make sure that you include all properties and related content, checking all boxes, and selecting .rtf (Rich Text Format) as the default export type (Figure 1.22). Select the folder you would like to save your externals in (Figure 1.23) and click on OK.
Figure 1.21 Exporting your externals
MANTRA-NVIVO-exercise-Unit3.doc
Dr. Kakia Chatsiou Page 13 of 16 MANTRA NVivo 9 Exercise Unit 3: Managing your data at the end of your project
Figure 1.22 Externals Export Options
Figure 1.23 Exporting to the default folder
Exporting your memos is very similar to exporting your internal textual sources, discussed in section 1.1. In addition to the documentation that you have created, NVivo 9 allows you to export the following additional information about:
the project: Run a Project Summary Extract Report (Folders>Extracts>Project Summary Extract) , select all folders and save as .txt, .xml, or .xls file.
the actions logged: Click on File>Info>Open Project Event Log, which will open the Event Log. Click on one of the log entries, then select Export list. You can export this list as an .xls, .xlsx, .rtf, .pdf, .doc, .docx or .txt file, but .txt format is recommended, as information about the type of event is recorded as text and not as an icon and it is in preservation friendly format.
the list of documents/datasets (not folders) in any particular folder: Click somewhere on the list of documents of the folder, then select External Data>Export> Export list. You can export this list as a as an .xls, .xlsx, .rtf, .pdf, .doc, .docx or .txt file, but .xls, .rtf and .txt are recommended.
a set: Run a Project Summary Extract Report, (Folders>Extracts>Project Summary
Extract), select the Sets folder and save as .txt, .xml, or .xls file.
all sources: Run a Project Summary Extract Report (Folders>Extracts>Project summary Extract), select the Internals, Externals and Memos folder and save as .txt, .xml, or .xls file. Another thing you can do is create a set with all your sources (right-click on folder then select Add to set), then export the file listing to an .xls, .xlsx, .rtf, .pdf, .doc, .docx or .txt file. Again .txt is recommended.
MANTRA-NVIVO-exercise-Unit3.doc
Dr. Kakia Chatsiou Page 14 of 16 MANTRA NVivo 9 Exercise Unit 3: Managing your data at the end of your project
2 Managing Bibliographical Data
NVivo 9 allows you to export bibliographical data about sources you have classified either manually or by importing a bibliography to NVivo 9 using any predefined source classification (except if classified as an interview or focus group).
3-7.
Export your source classifications in your NVivo 9 project file as a bibliography list.
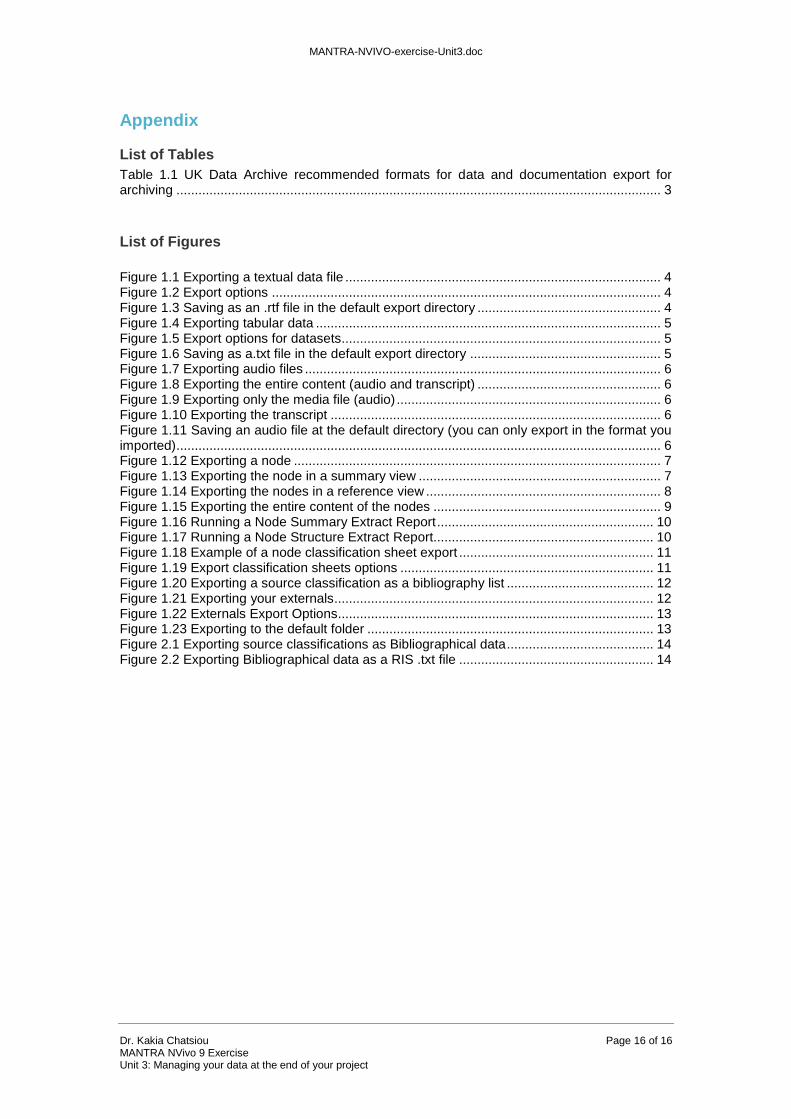
To export bibliographical data from a source classification, select it, then right-click on it and select Export>Export Bibliographical data (Figure 2.1). Save the file as an RIS .txt file (works well with most reference managers) and save it in the Bibliography folder of your NVIVO_outputs folder (Figure 2.2). Note that NVivo 9 will not format your bibliographical data in different bibliographical style formats (such as MLA, APA or Harvard) in order for you include them in the references list of a publication you are writing, for example. To do that, you need to export the bibliographical data as an RIS .txt file (works well with most reference managers) and import it to your favourite reference manager like Endnote or Zotero. Through the managers you should also be able to convert the RIS .txt file in other formats like BibTeX .bib or MODS .xml. More information about how to exchange data between NVivo 9 and reference management tools is available from http://help-nv9-en.qsrinternational.com/procedures /exchange_data_between_nvivo_and_reference_management_tools.htm.
Figure 2.1 Exporting source classifications as Bibliographical data
Figure 2.2 Exporting Bibliographical data as a RIS .txt file

MANTRA-NVIVO-exercise-Unit3.doc
Dr. Kakia Chatsiou Page 15 of 16 MANTRA NVivo 9 Exercise Unit 3: Managing your data at the end of your project
In addition to exporting your bibliographical data, NVivo 9 allows you to do the following:
view a list of all sources and their attribute values that belong in a particular classification. To view all sources that have been classified as books, right-click on the classification name or a source that is a Book, and select Open Classification List. This will open the classification list of the book classification that you can sort or edit.
run a query over sources with particular characteristics e.g. run a text search query on the term “family” across the books published after 1995.
use charts to show the distribution of your sources by attribute value e.g. create a chart of the distribution of your book sources by year.
include bibliographical data when you print or export these sources. To do this, make sure you have selected the classifications and attributes boxes upon export (Figure 1.2, Figure 1.5, Figure 1.8, Figure 1.22)
For more information on citing and referencing, consult your institution’s citing and referencing guide or alternatively have a look at the University of Essex Referencing Guide: http://www.essex.ac.uk/myskills/skills/referencing/default.asp
Summary In this unit we discussed issues that need to be considered at the post analysis stage of your research, when you are ready to export your data and documentation from NVivo 9 for archiving or to make them available to other researchers for reuse. We presented some recommendations on the following issues:
exporting data and documentation for archiving including advice on preservation-friendly formats and exporting contextual information about your data created within the NVivo 9 project file.
managing your bibliographical data and resources created or imported in NVivo 9 and advice on exporting them for use with reference management software.
MANTRA-NVIVO-exercise-Unit3.doc
Dr. Kakia Chatsiou Page 16 of 16 MANTRA NVivo 9 Exercise Unit 3: Managing your data at the end of your project
Appendix
List of Tables
Table 1.1 UK Data Archive recommended formats for data and documentation export for archiving .................................................................................................................................... 3
List of Figures
Figure 1.1 Exporting a textual data file ...................................................................................... 4 Figure 1.2 Export options .......................................................................................................... 4 Figure 1.3 Saving as an .rtf file in the default export directory .................................................. 4 Figure 1.4 Exporting tabular data .............................................................................................. 5 Figure 1.5 Export options for datasets....................................................................................... 5 Figure 1.6 Saving as a.txt file in the default export directory .................................................... 5 Figure 1.7 Exporting audio files ................................................................................................. 6 Figure 1.8 Exporting the entire content (audio and transcript) .................................................. 6 Figure 1.9 Exporting only the media file (audio) ........................................................................ 6 Figure 1.10 Exporting the transcript .......................................................................................... 6 Figure 1.11 Saving an audio file at the default directory (you can only export in the format you imported) .................................................................................................................................... 6 Figure 1.12 Exporting a node .................................................................................................... 7 Figure 1.13 Exporting the node in a summary view .................................................................. 7 Figure 1.14 Exporting the nodes in a reference view ................................................................ 8 Figure 1.15 Exporting the entire content of the nodes .............................................................. 9 Figure 1.16 Running a Node Summary Extract Report ........................................................... 10 Figure 1.17 Running a Node Structure Extract Report............................................................ 10 Figure 1.18 Example of a node classification sheet export ..................................................... 11 Figure 1.19 Export classification sheets options ..................................................................... 11 Figure 1.20 Exporting a source classification as a bibliography list ........................................ 12 Figure 1.21 Exporting your externals....................................................................................... 12 Figure 1.22 Externals Export Options...................................................................................... 13 Figure 1.23 Exporting to the default folder .............................................................................. 13 Figure 2.1 Exporting source classifications as Bibliographical data ........................................ 14 Figure 2.2 Exporting Bibliographical data as a RIS .txt file ..................................................... 14