Embed Size (px)
Citation preview


0
The Community College of Vermont (CCV) uses Moodle for its learning management system.
Course Description:
This document is a brief orientation to the requirements and expectations for taking a course through the Internet. It will cover technical considerations, academic issues and time management concerns. There will be a hands-on overview of the learning management system, Moodle.
Figure 1 Location of your Moodle class in the CCV Portal.
The Anatomy of a Moodle Classroom
Contents
The Anatomy of a Moodle Classroom 0
Moodle Overview 1
Moodle Blocks 2 The Administration Block: 3 Messages & Quickmail: 3 CCV Course Description: 3 CCV Resources: 4 Other Blocks: 4 Accessibility: 4
Weekly Modules 5
Discussion Forums 6
Hyperlinking Text 8
Adding an Image or Graphic 10
Replying to discussion forum posts 13
Assignments 14
Quizzes 15
Help & Assistance 18

1
Moodle Overview
Figure 2 example of a Moodle course.
Overview: Both on-ground and online CCV classes are house in a Moodle course page, allowing you to access course information including grades, assignments and participating in online discussion forums. Course content is located in the middle section of the Moodle page and is organized in either Topic or Weekly Modules. You can view these modules by scrolling down the Moodle page. Week Zero: In Week Zero, located at top of the Moodle page, you will see the course syllabus, class policies, grading criteria, textbook requirements and other pertinent information that you will need to know throughout the semester. The News and Announcements Forum is where the instructor places announcements for the entire class. Check this frequently. If your email address is up-to-date with CCV, you will receive a message when the instructor has posted a new announcement. Weekly Modules: Located below Week Zero in the center column of the Moodle page, you will see weekly modules containing information for the current week. There might be files to download, resources to read, links to direct your browser to or activities such as quizzes and discussion forums which require your participation.

2
Moodle Blocks
Figure 3 a selection of blocks deployed in a Moodle course.
Description: Moodle blocks allow you to check course grades, message or email instructors, navigate the course, check for upcoming deadlines and view additional resources the instructor has provided. Each Moodle course will have a variety of blocks deployed.

3
The Administration Block: The Administration block is available in every Moodle classroom. This block allows you to see important information such as your personal profile and provides access to individual grades. In this block, you can edit your Moodle profile. To do this, click on My Profile Settings and then on Edit Profile. Here you will see a screen asking you for your name, city or town you reside in and a space to upload a profile picture. Your profile setting also allows you to write about academic and personal goals or other information that you might want to share with the class. To view grades entered by your instructor, click on Grades. By doing this, you will see graded assignments, feedback from the instructor and the cumulative grade for the course.
Messages & Quickmail: There are occasions when you need to contact your instructor directly. Likewise, your instructor may send you a message or email. For example, if you have questions about an assignment or reading, please post those in the Moodle discussion forums. Questions such as these benefit the whole class. However, if you have a questions about your grade or past assignments, it will be best to use one of these two blocks to send your instructor a message.
CCV Course Description: This block provides the course description, a syllabus, classroom policies, grading structure and textbook information.

4
CCV Resources: In this block there are quick links to student resources. These resources are also available in the Portal. • Hartness Library: The Hartness Library is CCV’s library where you go to find resources in support of your academic studies. On the library website, you can view an orientation, find books, articles and videos, submit a request for Interlibrary loan or chat live with a librarian. • eTutoring is an online tutoring platform which allows tutors to work with students synchronously and asynchronously, answering questions in real time, or replying to questions and essay submissions. Many instructors require that you submit your paper to eTutoring prior to turning in in for grading. • The CCV Writing Center has been created to provide support and instruction through the writing and research process. You will find models for essays, how to construct a working draft of a research paper and how to properly cite sources for your bibliographies. • Each CCV academic center has a Learning Center where students can get individualized academic assistance I writing, math, computer literacy and with CCV Portal and Hartness library navigation.
Other Blocks: There are many other blocks in Moodle that you will likely encounter in Moodle. If you have questions about these, please ask your instructor.
Accessibility: This block allows you to change the text size, the color of the background and has other features like, text–to-speech.

5
Weekly Modules
Figure 4 anatomy of a weekly module. Please note: not all Moodle course are designed or arranged in this fashion.
Description: Located below Week Zero, you will see weekly/topic modules organized by date (i.e.: October 8 – October 14) or by topic. The weekly modules will inform you on what is to be completed each week. You will encounter activities like quizzes, discussion forums, glossary work and assignment submission in your Moodle classroom.
Every course is going to be designed differently but there are a few consistent elements in all Moodle classes.

6
Discussion Forums
Description: One of the most common activities in Moodle is the Discussion Forum. A discussion forum can be located anywhere throughout your Moodle course. In the example below, notice that discussion forums are indicated by one of the two icons. Conversations in an online course, such as those that take place in a discussion forum, are Asynchronous. Asynchronous communication takes place over a specific time frame verses a requirement of attendance at a specific time. For example: you will meet discussion forums deadlines throughout the week set by the instructor. Not everyone in your online course will be present in Moodle at the very same time as you but every student will meet specified deadlines each week. Discussion Forums have many purposes. Your instructor will prompt you on what you will be doing in each forum such as responding to questions, downloading and uploading documents, submitting an assignment or posting photos or screenshots. You may also be asked to respond to your peers’ submissions. Please make note of the deadlines for submitting assignments. Each Moodle class will have specific deadlines for completion of work each week.
Figure 5 example of different discussion forums.
Figure 6 Sample of an active Discussion Forum with student posts.
Clicking the text next to the Discussion Forum Icon will take you to the forum page. At the top of the discussion forum page, it is important to read the instructor’s notes. If your instructor indicates that you need to create a new topic, click on Add a new discussion topic.

7
Figure 7 (left) new discussion topic with required fields (right) text entered in required fields and a photo attachment was added.
After clicking on Add a new discussion topic, you will be directed to a screen where you can enter your new post. There are two required fields that are marked with an asterisk (*): the Subject and the Message. The Subject line identifies content for your post. In the Message text box, you will pose questions or write responses. Your instructor will specify requirements for the discussion forums. You will notice below the message text box, there may be an option to add an attachment in the discussion forum.
Please be sure to use Microsoft Word or Open Office when working in Discussion Forums. These tool allow you to easily check spelling and grammar. Furthermore these tools, save your work in the event of an unlikely crash of your operating system.

8
Located at the top of the Message field, you will locate the Text Editor. The Text Editor has many icons to assist in entering content. Many of these icons and functions should be familiar to anyone who uses a word processor.
Figure 8 moving your cursor over each icon will tell you the name of each feature.
For more concise documentation on the Text Editor please visit Moodle.org http://docs.moodle.org/26/en/Text_editor
http://docs.moodle.org/26/en/Text_editor_FAQ Hyperlinking Text To hyperlink text to a different website or another section of your Moodle course, first select the text you want to link and then click in the Insert/Edit link button in the Text Editor.
Figure 9 Montpelier has been selected to be hyperlinked before clicking on the Insert/Edit link button.

9
In the pop-up window, paste the complete URL in the Link URL field. In the Target field, select open a new window in the drop down menu. It is important to select open a new window, as this will allow others in the course to read the content of this link without leaving Moodle. Click Insert once you have done this.
You will be directed back to the Text Editor. Your text will now be hyperlinked and indicated in the color, blue.

10
Adding an Image or Graphic Please be aware of the file size of all photos or graphics that you plan to upload. It is suggested that you do not upload anything larger than 700 pixels wide unless instructed to do otherwise. Scaling your photos can be done in a photo editor or online using http://www.shrinkpictures.com/ Anywhere you see Text Editor, you can add an image or graphic. There are two methods: Drag and Drop or the Conventional method using the Attachment field. Method 1: (Drag and Drop): You could drag and drop an image from your computer directly into the field where you type your text or in the Attachment field.
Figure 10 Demonstrating drag and drop of an image to the Message and the Attachment areas of a discussion forum post. The file originated on the
desktop.
Method 2: (Adding an Attachment) This process is very similar to adding an attachment to an email. This method also works if you wanting to upload and Microsoft Word document, a PDF or any other type of document used in your course.

11
Click on Add in the Attachment area of the page.
Figure 11 Click Add in the Attachment field.
Then in the pop-up window, click on Browse, to locate the file on your computer.
Figure 12 browse your computer to locate a file to attach to your post.
Once you have located the file, enter a descriptive piece of text in the Save As field.

12
Then click on Upload this file.
A thumbnail is generated of the photo or other document is attached to your post.
Figure 13 example of a file successfully attached to a discussion form post
All that remains to be done is click on Post to Forum
13
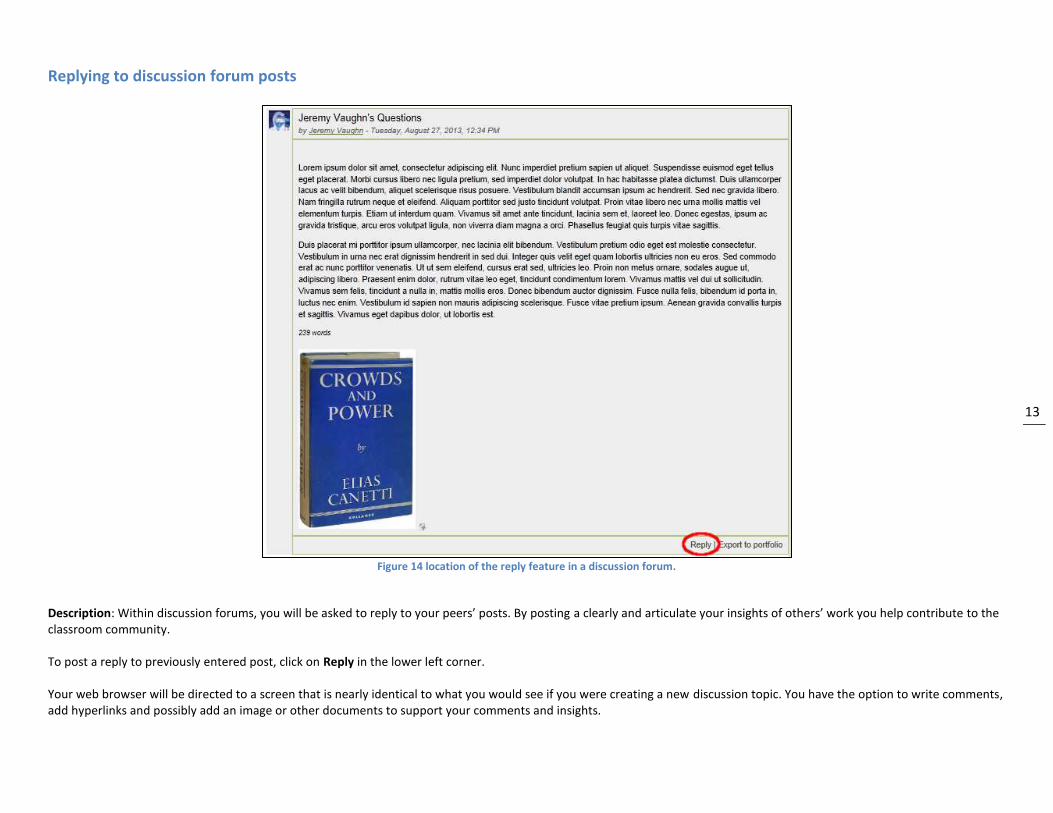
Replying to discussion forum posts
Figure 14 location of the reply feature in a discussion forum.
Description: Within discussion forums, you will be asked to reply to your peers’ posts. By posting a clearly and articulate your insights of others’ work you help contribute to the classroom community. To post a reply to previously entered post, click on Reply in the lower left corner. Your web browser will be directed to a screen that is nearly identical to what you would see if you were creating a new discussion topic. You have the option to write comments, add hyperlinks and possibly add an image or other documents to support your comments and insights.

14
Assignments Description: You can submit digital content files, including word-processed documents, spreadsheets, images, audio and video clips to the Assignment activity. There will be cases when you will be required to enter text. The assignment activity can also be set-up to remind you of “real-world” deadlines.
Figure 15 examples of different assignment activities
Figure 16 example of an assignment activity.
To add your weekly assignments, click on Add submission at the bottom of the assignment prompt. You will be directed to either a text editor where you can write your message and/or a space where you can upload a document.

15
Quizzes Description: You may be required to take quizzes in your Moodle classroom. A quiz may be timed out or not and could consist of multiple choices questions, matching and essays. Depending on how the quiz is set-up, you may have multiple attempts to complete the quiz. Quizzes can be located in the Moodle classroom by the following icon:
In the example quiz below, the grey area displays the description on how to take the quiz. In this case, there are two attempts to take the quiz and each attempt is timed for one hour. Grading of the quiz is done automatically taking into account your highest score.
Figure 17 an example of the introductory page to a quiz.
To start the quiz, click Attempt quiz now. For this quiz and others, you will see a small pop-up window asking you to acknowledge you ready to start the quiz. Manage your time wisely and be prepared. If you are being timed, you will notice a clock counting down the remaining time left for you to complete the quiz.

16
After completing a question or series of questions, click Next.
Figure 18 illustrating the location of how much time is remaining in the quiz and the "nest" button.
Once you have completed all questions, you will need to submit your answers for grading. If this is timed test and you have time remaining, you may go back and check your questions. Click on Submit all and finish to complete the quiz. If you are allowed an additional attempt at completing the quiz, you can either do this immediately after submitting the first attempt or before the due date set by the instructor.

17
You may be able see if you have answered your questions correctly depending on how the instructor has set the quiz up. After you submit your attempt you may be presented with the following screen.
Notice that correct responses are colored green while incorrect answered are red. You may receive feedback for why your response was correct or incorrect. This is helpful if you are taking a quiz that has multiple attempts.

18
Help & Assistance The HelpDesk is located at the top right corner of the Portal or located at https://servicedesk.vsc.edu/ Use your username and password to log-into the Portal and complete a HelpDesk ticket. You will receive an email response from someone in IT shortly. If you forget your username and password, click on the forget username and password link or use http://servicedesk.vsc.edu/sdp.html Moodle Medic: For help using Moodle you can log into the live Moodle Medic chat room. The link to the Moodle Medic is located in the Student Services block in your Portal. Log in using your first and last name to initiate your conversation with the Moodle Medic. You can visit the Moodle Medic chat room by clicking on the following link - https://vscmymeeting.adobeconnect.com/_a818965314/bbdoctor
Figure 19 Screenshot of the Moodle Medic.