Embed Size (px)
Citation preview

If you can make a ring, you can make a bangle!
Mak� g a S� ple B� gle
The fi rst thing you’ll need is a bangle sizing set, I can’t remember where I bought my sets from personally, but Gesswein has a pretty decent looking set for $26 (item number: 820-8056). Just as with rings, you’ll need to fi nd the bangle that fi ts and measure its inside diameter, in our case that’s 55.62. Then measure the thickness or diameter of the wire you’re using to make the bangle, which in our case is 2mm. Then simply use the maths below to calculate the length of wire required.
Calcul� � g t� L� gth of Wire N� ded f� a B� gle
Length of wire needed = (inside diameter + metal thickness) x 3.14
Oh noooooo - t� re’s m� hs!= (55.62 + 2) x 3.14= 57.62 x 3.14= 180.92 (which we’ll round to 180mm)
1

Before we measure the length, I’m going to make sure that one end of the wire is fi led perfectly fl at and perpendicular to the length of the wire. You’ll also want to make sure your wire is perfectly straight too. If we start with wonky wire, we’re going to get a wonky measurement later.
Next, we are just going to use a ruler and a sharpie to mark a line at the exact measurement we need for our bracelet.
Remember, at each stage, we want to be working as accurately as possible. If we butcher just one step, it will have repercussions later down the line.
And now using my 0 saw blade, I’m going to cut just to the waste side of the line I made. Don’t cut on the line or you risk making your bracelet too small.
Then I’ll fi le the edge perfectly fl ush. You can do this by hand or using a miter vice. I’ll show you with a miter vice because I already showed you by hand :). Got a little trick for you later though if it’s still not perfect - but try and get it as close as you can. Make sure you keep checking the length at this stage and don’t over fi le it.
2

There are so many ways to form the bracelet, but I’ll show you the one requiring the least tools - just your hands and a pair of half round and fl at pliers! Now, we don’t need the bracelet to be round at this stage, we just need to bring the ends together for soldering, we can make it perfectly round later. So I’ll simply form the main shape by hand, and then use a pair of half round and fl at pliers to bend the edges inwards so they meet perfectly in all directions. We want our join to look like one single piece of metal, we don’t want one edge of the bracelet to be higher in any direction.
So take a little time here and make sure everything is in perfect alignment. If we don’t get it set up correctly for soldering now, we won’t be able to fi x it later without going through the drama of cutting and re-soldering the bracelet. It might take a little more faffi ng around in the fi rst place, but it saves time in the long run if we get it right the fi rst time. As you can see, the bracelet isn’t remotely round looking, and that is perfectly fi ne right now.
F� m� g t� Bra� l�
Manually push the edges of the bracelet past one another, and then pull them back slightly to allow the join snap together
The join should come together in perfect alignment in every direction. If it’s not, don’t even think about soldering. Capiche!?
3

Wh� � D� ’t W� t!
The edges of the bracelet should not be pointing inwards. The solder join will be weak
and clearly visible
We don’t want the edges of the braclet to be meeting with a step, again the solder join will
be obvious
We don’t need a perfect circle, but we also don’t want a slight point at
the join. This will give a weak and obvious join
G� � g t� Perfe� Solder Jo�
Now I have the edges of my bracelet perfectly aligned and it’s ready for soldering. But What if your fi ling wasn’t quite perfect? That is no drama at all. Here I’ve threaded my bracelet onto one side of my bench peg, basically just as an easy way to hold it so I can gently pull one side and open up the join ever so slightly. Then I have two pin hole sanding disks back to back on a screw mandrel in my fl ex shaft. Place the sanding disks in the small opening and set the fl ex shaft running at a medium speed. Once the fl ex shaft is runnning, slowly allow the bracelet to close so that both sides of the join are sanded at once. This should just take a second or two at most to get the perfect join.
4

Solder� g t� Jo�
Add a little fl ux to the join, as always I’m using my favourite Handy Flux from Lucas Milhauput, and place a tiny amount of solder on the join. I’m using a piece about 1.5mm square that has been rolled as fl at as possible. We can always add a tiny bit more solder if it’s not enough, but using just the right amount makes clean up so much easier later on.
Once the solder is in place, I’ll gently heat around the whole bracelet a couple of times. The reason I do this is becuse by forming the bracelet, we have work hardened it just a little. If I were to go and just heat the area say, an inch either side of the join, yes I could get everything up to temperature and the solder would fl ow, but the tension within the bracelet could cause the join to open slightly. By heating the bracelet gently all the way around fi rst, we are basically annealing the metal evenly, so the tension is removed. This way our join shouldn’t open up when soldering.
Once soldered, wait a few seconds for it to cool slightly, then quench and pop it into the pickle.
5

Once out of the pickle, we have something that resembles a bangle. But maybe one that got ran over by a car. So we are going to make this perfectly round now using a round bracelet mandrel. If you prefer your bangles oval shaped, then you can absolutely use an oval shaped mandrel instead.
I’m using a round bracelet mandrel for this one similar to item #112113 from Rio Grande. Mine isn’t a fancy one as you can see, but it works a treat.
So I’ll pop the bracelet on the mandrel and pull it down as far as I can get it to go.
Just as when making rings, I’m going to tap down on the outside of the bracelet where it isn’t in contact the mandrel As I’m tapping on the bracelet though, I’m still pulling it down the mandrel with my left hand. This is going to take a few passes around the bracelet to make it perfect, especially if you’re using a mallet. You can use a planishing hammer too of course, but that will just reqire slightly more clean up later.
Make sure the bracelet is fully in contact with the mandrel all the way around. But remember every action has a reaction, so this will defi nitely take at least a couple of passes around the bracelet with the mallet.
6

Now we have our bracelet perfectly round, we need to make sure it’s perfectly fl at. So I have it on my steel block, and again wherever it’s not in contact with the block, I’m just going to bash it a bit with my mallet. If you’re using a planishing hammer for this part, make sure you’re hitting the metal straight on so you don’t leave any dings on it from the edge of the hammer. And hopefully this goes without saying, but remember to fl ip the bangle and repeat on the other side.
But, god damn it, every action has a reaction. And so now our bracelet is just slightly out of round again. But it’s not a biggie, back on to the bracelet mandrel it goes, for a gentle tap. Don’t abuse it too much this time, we don’t want to send it wonky in the other direction again. Just gently tap it down until it’s back in contact with the mandrel again.
And there we go, no light is coming through between the bracelet and the mandrel, so we are ready to get things all polished.
7

F� � h� g t� B� gleIn this case there’s very little solder to clean up around the join, so I’m going to jump straight to using my Evefl ex coarse rubber wheel. But if you have a little extra solder around the join, you can give it a quick fi le fi rst with a #2 half round needle fi le.
Because my wire is round, and I want to keep it that way, I’m going to create a rounded channel in my barrel shaped rubber wheel to roughly match the diameter of my wire. You can do this by running the wheel against an old fi le, a diamond plate, or pretty much anything that will cut into the rubber wheel to create a channel. Don’t worry about getting that channel perfectly rounded at this stage, it will round itself out as we use it in a second.
I kept my wire in pretty good condition as I formed the bracelet (I didn’t put any dings on it), so I’m going to use the coarse wheel just to clean up the solder join. I’ll place the little groove in the rubber wheel directly over my join and keeping it moving back and forth. But, if you used a hammer to form the bracelet, you’ll defi iately want to go all the way around the outside edge of the bracelet with the coarse rubber wheel - remembering to keep it moving at all times.
And of course as well as the outside, you’ll want to go around the inside with the coarse rubber wheel too. Again though, if there aren’t any heavy scratches or marks on the bracelet here, you can just clean up the solder join.
When working on the inside or the outside, you’ll probably fi nd that it’s easier to keep working in one particular position, and then rotate the bracelet to work on small sections at a time, rather than trying to hold the bracelet still and move the rubber wheel around the bracelet.
8

Finally you’ll want to make sure you get the sides of the bangle too! Remember if we want a bright and highly polished fi nish all over our bracelet, we have to go through every fi nishing step all over the bracelet too. Again I’m just hitting the solder join here though, but if you have scratches, go all the way around!
Now you can repeat the process with the fi ne (red) rubber wheel and the extra fi ne (light green) rubber wheel. Just as with sandpaper, don’t move onto a fi ner grit until you have removed all the marks created by the previous grit. I can’t say this enough, but our fi nal polish is only as good as our prepolishing stages allow it to be. If we don’t take our time to get this stage perfect, the fi nal polish won’t be perfect either.
Pol� h� g t� B� gleI want to take a look here at using a little more than just Zam polishing compound. Zam is a great one stop compound, and with proper fi nishing you can bring things to a really nice bright fi nish. But what if you want an even brighter fi nish. Well that’s when you can start using a multiple step polishing process.
There are many polishing compounds out there to do this with, and it can be ridiculously confusing as to which compound comes at which stage. Thankfully the brand of polish I prefer makes this a lot easier by using grits rather than arbritary terms and names - but we’ll look at that in a second.
Polishing in stages is like using sandpaper. The more diff erent grits you use, the better the fi nish will be, but we have to balance getting a good fi nish with the time it takes to do this. So for everything but platinum, a two or three step polishing process is usually enough. We’ll keep this simple and use two steps though.
9

The polishing compounds I prefer to use are from Japan and are developed for platinum, but they do work equally well on all metals. These can be purchased from Otto Frei or Gesswein in the US.
I fi nd them relatively clean to work with and not gummy or sticky as some polishing compounds can be. I also love that they are numbered (800 being the coarsest and 8000 the fi nest. The fi nal polish is using platinum blue which is the unmarked pack at the top of the image - but don’t worry, when you take that out of the pack, it’s pretty distinctive! It looks like a smurf.............
In this case we are just going to use the 1500 polishing compound followed by platinum blue for the fi nal polish. If you want to go full on crazy with this polishing marlarkey and add in another step, you can use the 4000 compound in between 1500 and platinum blue.
There are many other polishing compounds available that work in multiple step processes, and you’ll fi nd that every jeweller has their favorites. These are just my personal choice. As with sanding though, when it comes to selecting your own polishing compounds, just try them. At each stage, ask yourself “is this removing the marks created by the previous grit”, if the answer to that is no, then simply use a coarser grit.
I hear a question though - “why not just use them all?” well if you can justify the time it takes to go through every polishing compound and still sell your fi nished piece at a profi t - go for it! But for the most part, this simply isn’t practical (or necessary).
10

Hopefully this goes without saying by now, but make sure to wear a mask and safety glasses when polishing with your fl ex shaft motor. Here I’m using a particularly plump cotton buff (Rio Grande: # 338497) and I’m just touching it to my 1500 compound for a few seconds. I scribed 1500 into the compound myself with a needle burnisher as the compounds aren’t marked, and they all look the same.
Then just as I did with my rubber wheels, I’ll start by polishing the inside of the bangle. I’m keeping the buff moving back and forth at all times, working in a position I fi nd comfortable, and rotating the bracelet little by little to ensure I polish every single spot.
Onto the outside of the bracelet, you may need to add a little more polishing compound at this stage.
And fi nally onto the sides of the bracelet too. Double check at this stage that you have polished the entire surface of the braclet before moving on.
11
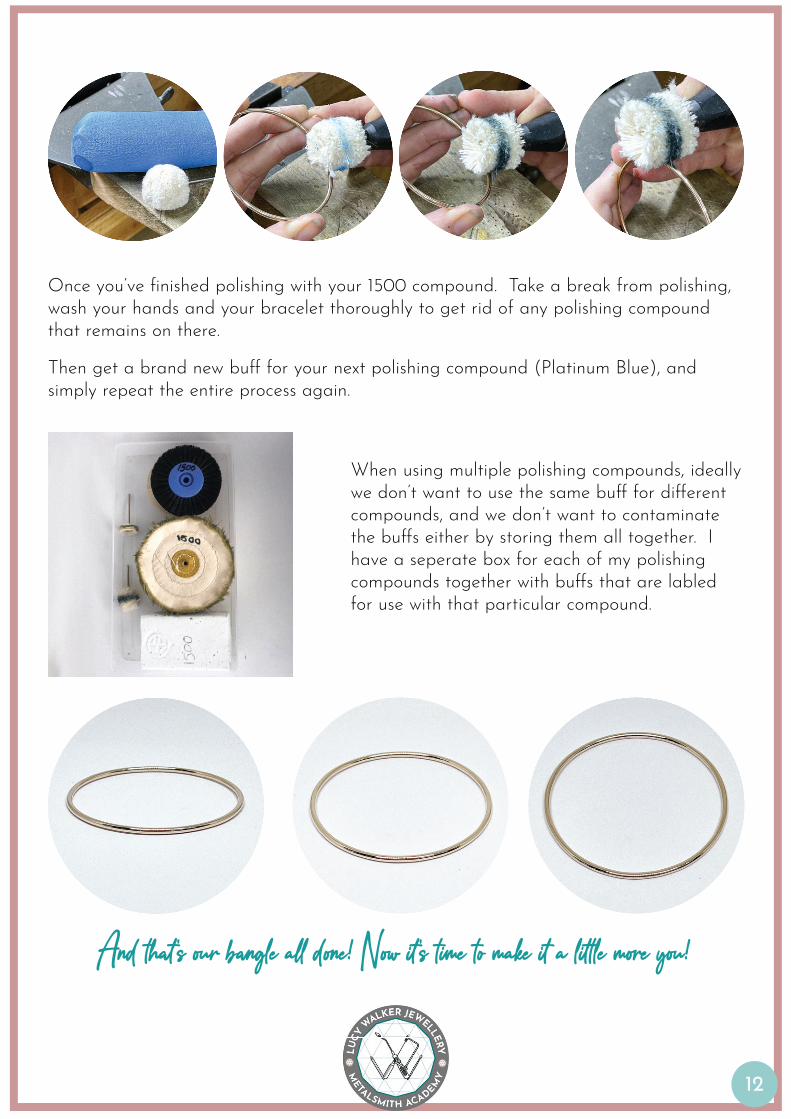
Once you’ve fi nished polishing with your 1500 compound. Take a break from polishing, wash your hands and your bracelet thoroughly to get rid of any polishing compound that remains on there.
Then get a brand new buff for your next polishing compound (Platinum Blue), and simply repeat the entire process again.
When using multiple polishing compounds, ideally we don’t want to use the same buff for diff erent compounds, and we don’t want to contaminate the buff s either by storing them all together. I have a seperate box for each of my polishing compounds together with buff s that are labled for use with that particular compound.
And th� ’s � r b� gle a� d� e! N� ’s t� e to make a l tle m� e y� !
12

T� Tools
Bracelet mandrel
Rio Grande #112113
Half round and fl at pliers
Rio Grande #111180
Stoddard polishing buff
Rio Grande #338497
Dead blow mallet
Rio Grande #112432
Japanese platinum polishing compound in 1500
Otto Frei # 147.390MAIN
Gesswein #215-0049Platinum blue polishing compound
Otto Frei # 147.395
Gesswein #215-1784
Steel block
Rio Grande #112553
Bangle sizing set
Gesswein #820-8056
Pin hole sanding disks
Gesswein #845-1008
Screw mandrel (to use with sanding disks above)
Rio Grande #333122
Digital capliers
Rio Grande #116179
13