Embed Size (px)
Citation preview
INFORMATION TECHNOLOGY
Enterprise Application Systems
Lotus Notes Navigation Guide
Mt. San Antonio College Information Technology
1100 North Grand Avenue • Building 23 Walnut, CA 91789
Help Desk 909.274.4357
Table of Contents
Accessing Lotus Notes .............................................................................. 2
How to Logon to Lotus Notes..................................................................... 2
Lotus Notes Home Page ............................................................................ 3
Reading Mail .............................................................................................. 6
Message handling - Right-click on message ................................... 6
Follow Up Flags .............................................................................. 7
Saving Mail in Folders ..................................................................... 7
Receiving Mail with Attachments ....................................................... 7
Replying to Received Mail ................................................................ 8
Forward Messages ........................................................................... 9
Mail Rules and Quick Rules ............................................................ 9
Searching Emails and Documents .................................................. 9
Setting an Out of Office Message .................................................... 10
Composing Mail ........................................................................................ 11
Sending Mail with Attachments ..................................................... 11
Delivery options ............................................................................ 11
Mail Preferences ...................................................................................... 12
Calendar .................................................................................................. 13
Navigating the Calendar ................................................................. 13
Creating a Calendar Entry .............................................................. 13
Scheduling a Meeting ........................................................................... 14
Meeting Owner Actions................................................................... 17
Calendar Preferences .............................................................................. 18
Access to your mail and calendar .................................................... 19
Access to your schedule ................................................................. 19
Sametime Instant Messaging................................................................... 20
Adding People/Groups ................................................................... 20
Starting a Chat ............................................................................... 21
Using/Getting Help ................................................................................... 22
L O T U S N O T E S 8 . 5
Revised Fall 2015 2
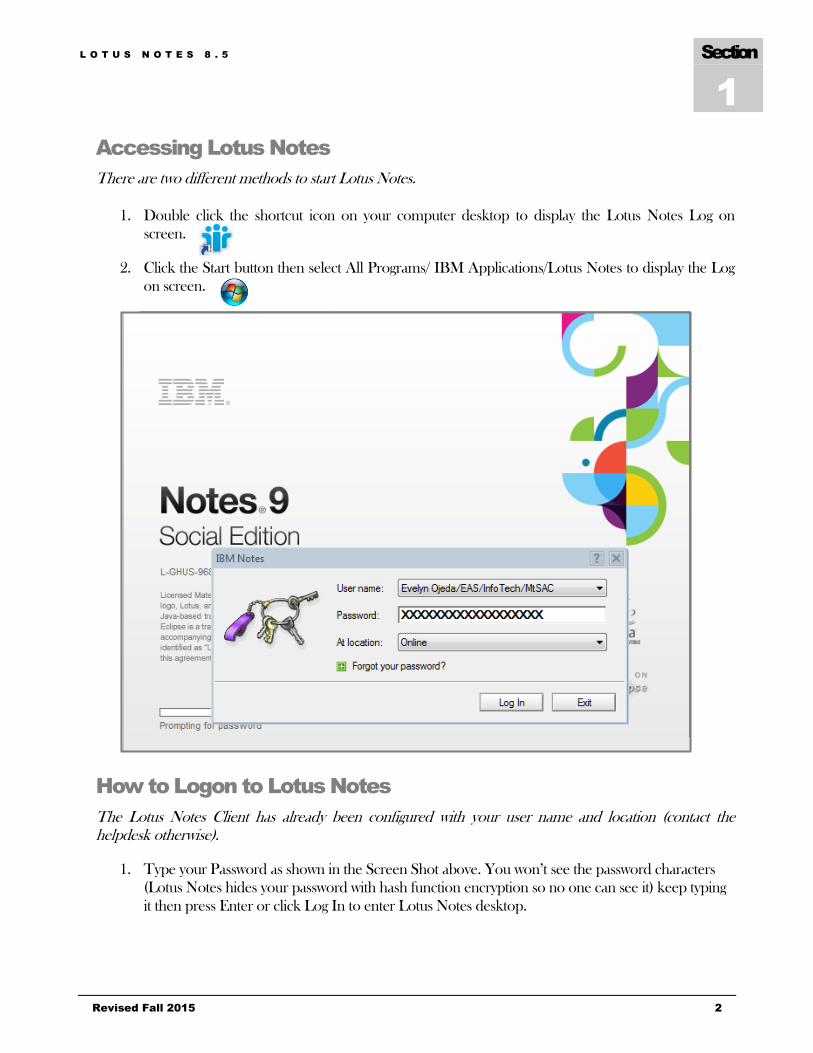
Accessing Lotus Notes
There are two different methods to start Lotus Notes.
1. Double click the shortcut icon on your computer desktop to display the Lotus Notes Log on
screen.
2. Click the Start button then select All Programs/ IBM Applications/Lotus Notes to display the Log
on screen.
How to Logon to Lotus Notes
The Lotus Notes Client has already been configured with your user name and location (contact the helpdesk otherwise).
1. Type your Password as shown in the Screen Shot above. You won’t see the password characters
(Lotus Notes hides your password with hash function encryption so no one can see it) keep typing
it then press Enter or click Log In to enter Lotus Notes desktop.
Section
1
L O T U S N O T E S 8 . 5
Revised Fall 2015 3
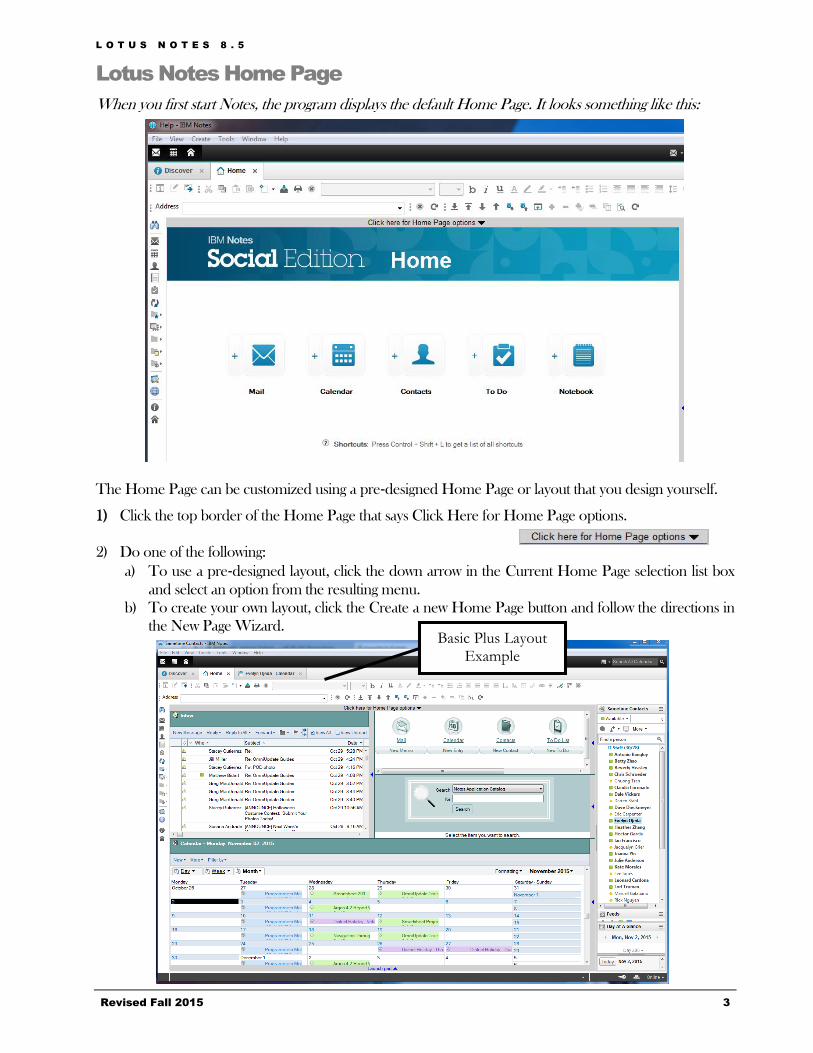
Lotus Notes Home Page
When you first start Notes, the program displays the default Home Page. It looks something like this:
The Home Page can be customized using a pre‐designed Home Page or layout that you design yourself.
1) Click the top border of the Home Page that says Click Here for Home Page options.
2) Do one of the following:
a) To use a pre‐designed layout, click the down arrow in the Current Home Page selection list box
and select an option from the resulting menu.
b) To create your own layout, click the Create a new Home Page button and follow the directions in
the New Page Wizard. Basic Plus Layout
Example
L O T U S N O T E S 8 . 5
Revised Fall 2015 4
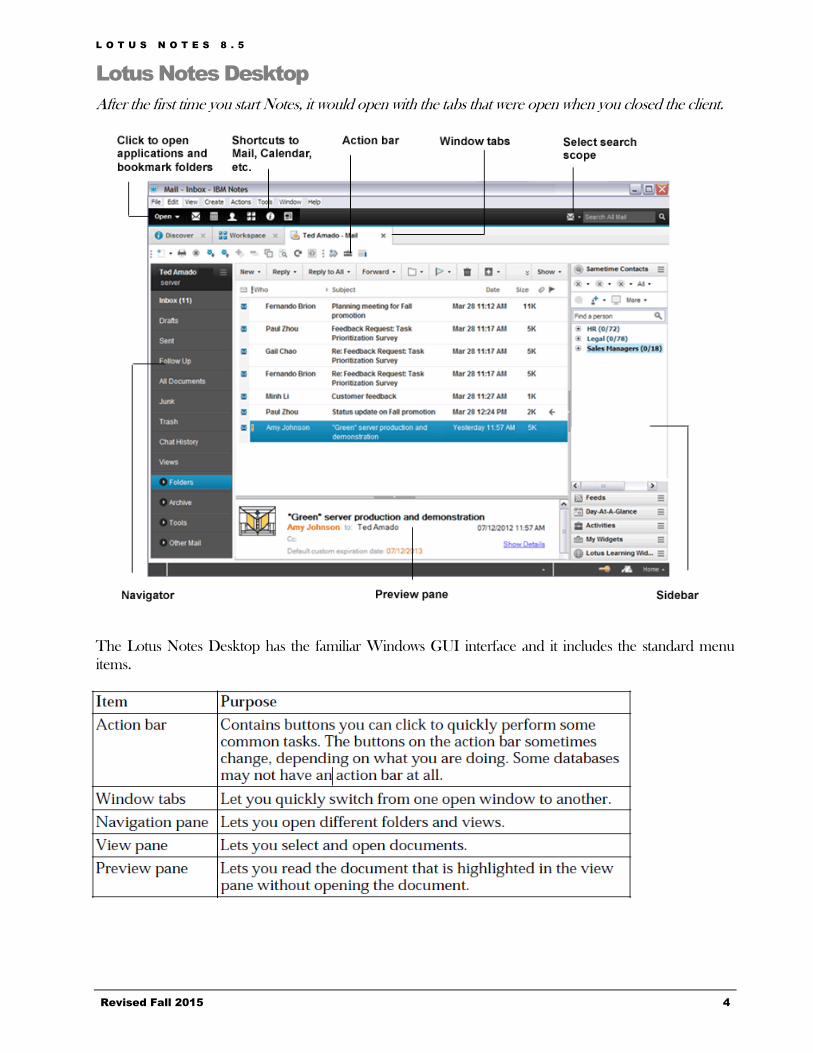
Lotus Notes Desktop
After the first time you start Notes, it would open with the tabs that were open when you closed the client.
The Lotus Notes Desktop has the familiar Windows GUI interface and it includes the standard menu
items.
L O T U S N O T E S 8 . 5
Revised Fall 2015 5
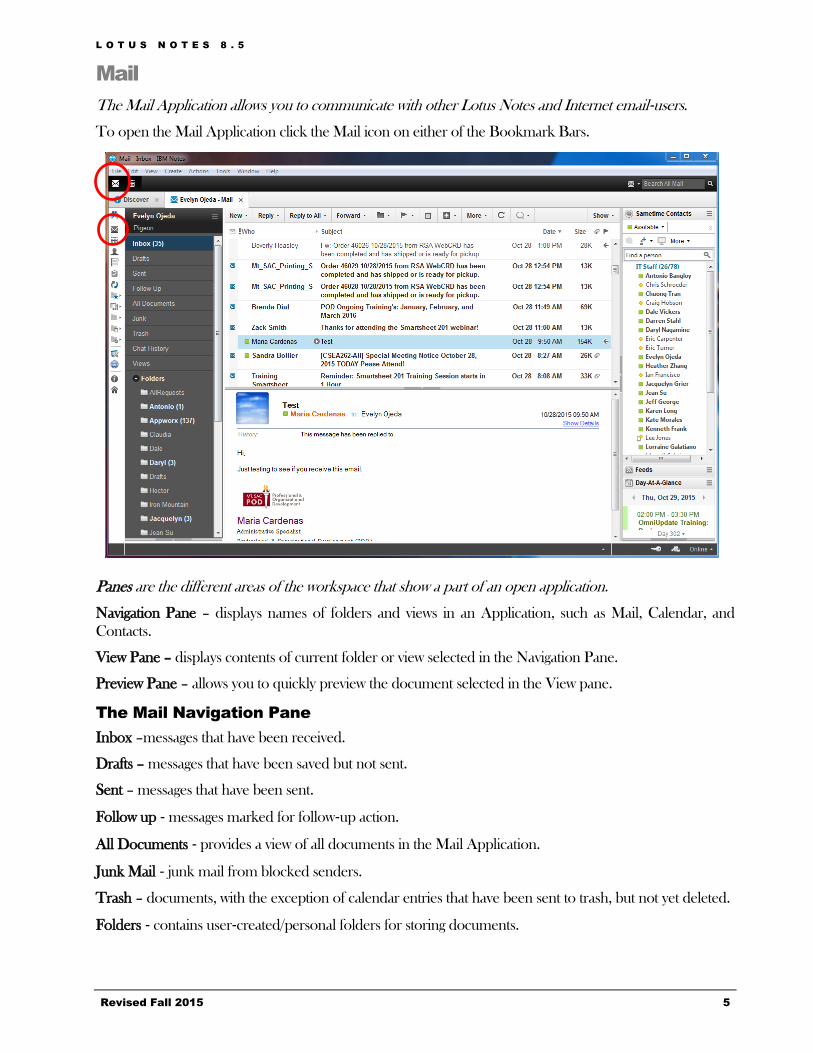
The Mail Application allows you to communicate with other Lotus Notes and Internet email‐users.
To open the Mail Application click the Mail icon on either of the Bookmark Bars.
Panes are the different areas of the workspace that show a part of an open application.
Navigation Pane – displays names of folders and views in an Application, such as Mail, Calendar, and
Contacts.
View Pane – displays contents of current folder or view selected in the Navigation Pane.
Preview Pane – allows you to quickly preview the document selected in the View pane.
The Mail Navigation Pane
Inbox –messages that have been received.
Drafts – messages that have been saved but not sent.
Sent – messages that have been sent.
Follow up ‐ messages marked for follow‐up action.
All Documents ‐ provides a view of all documents in the Mail Application.
Junk Mail ‐ junk mail from blocked senders.
Trash – documents, with the exception of calendar entries that have been sent to trash, but not yet deleted.
Folders ‐ contains user‐created/personal folders for storing documents.
L O T U S N O T E S 8 . 5
Revised Fall 2015 6
Stationary ‐ contains available stationary (message templates) for the Mail Application.
Reading Mail
*Note: To view unread messages only, check the Show/View Unread box at the top of the View Pane. To view all messages, check the View All box at the top of the View Pane.
1. Click the Inbox icon in the Navigation Pane of the Mail Application. A list of messages you have
received will appear in the View Pane.
2. Click once on a message to view it in the Preview Pane or double click a message to open it in a
new tab.
3. To close an open Message, select Close from the File menu, press the Esc key, or click the Close
button on the Window Tab.
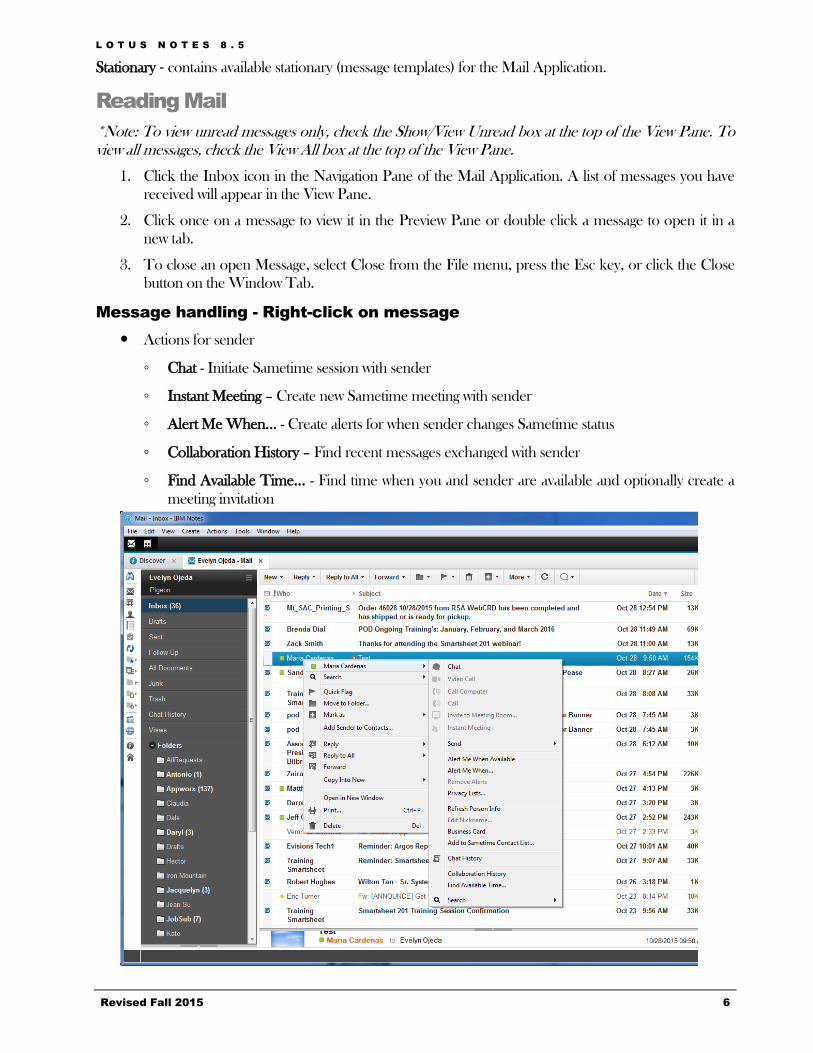
Message handling - Right-click on message
Actions for sender
◦ Chat - Initiate Sametime session with sender
◦ Instant Meeting – Create new Sametime meeting with sender
◦ Alert Me When… - Create alerts for when sender changes Sametime status
◦ Collaboration History – Find recent messages exchanged with sender
◦ Find Available Time… - Find time when you and sender are available and optionally create a
meeting invitation

L O T U S N O T E S 8 . 5
Revised Fall 2015 7
Follow Up Flags
Set a Follow Up flag to be reminded to take action on a message.
From Mail view, select the message you want to
flag then select the Follow Up icon. Select Add or
Edit Flag and from the resulting Menu check
either the High Priority, Normal Priority, or Low
Priority box.
Specify the action in the Enter a Follow Up
Action Box, this can be a brief description for the
action you will take at the time specified for
follow up.
Enter a date and time in the When to Follow Up
box. To set an alarm, check the Set an alarm on
this message box and fill in the appropriate
options.
Click the OK button when you are finished. The
Follow Up icon will appear next to the message
in the mail view and in the header of the message.
Saving Mail in Folders
The recommended way to save and organize messages is to file them in folders (not in Trash, Trash is not a folder and contents will be permanent deleted after 48 hours).
To save a message in a folder, click on the down arrow next to the button and select Move to Folder where
you can choose to Move or Copy to a particular folder and/or just drag and drop it in desire folder.
L O T U S N O T E S 8 . 5
Revised Fall 2015 8
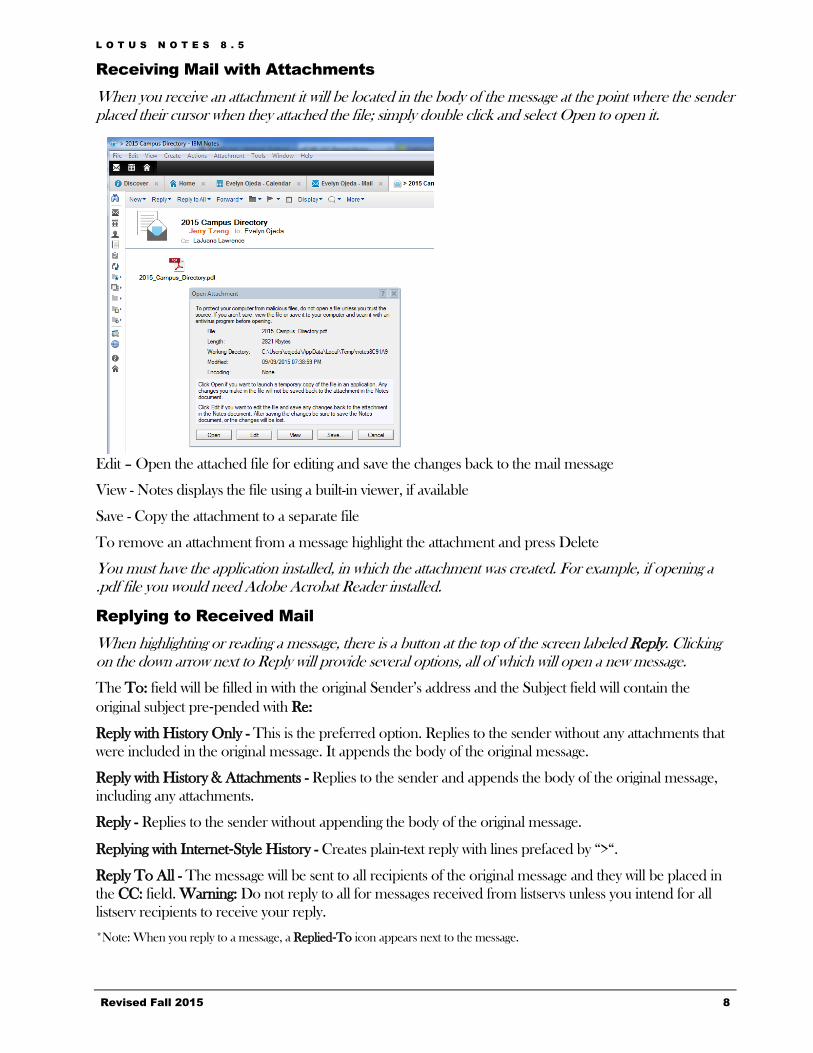
Receiving Mail with Attachments
When you receive an attachment it will be located in the body of the message at the point where the sender placed their cursor when they attached the file; simply double click and select Open to open it.
Edit – Open the attached file for editing and save the changes back to the mail message
View - Notes displays the file using a built-in viewer, if available
Save - Copy the attachment to a separate file
To remove an attachment from a message highlight the attachment and press Delete
You must have the application installed, in which the attachment was created. For example, if opening a .pdf file you would need Adobe Acrobat Reader installed.
Replying to Received Mail
When highlighting or reading a message, there is a button at the top of the screen labeled Reply. Clicking on the down arrow next to Reply will provide several options, all of which will open a new message.
The To: field will be filled in with the original Sender’s address and the Subject field will contain the
original subject pre‐pended with Re:
Reply with History Only - This is the preferred option. Replies to the sender without any attachments that
were included in the original message. It appends the body of the original message.
Reply with History & Attachments - Replies to the sender and appends the body of the original message,
including any attachments.
Reply - Replies to the sender without appending the body of the original message.
Replying with Internet‐Style History - Creates plain-text reply with lines prefaced by “>“.
Reply To All - The message will be sent to all recipients of the original message and they will be placed in
the CC: field. Warning: Do not reply to all for messages received from listservs unless you intend for all
listserv recipients to receive your reply.
*Note: When you reply to a message, a Replied‐To icon appears next to the message.
L O T U S N O T E S 8 . 5
Revised Fall 2015 9
Forward Messages
To forward a received message to another party, click on the button marked Forward, when highlighting or reading the message. Clicking on the down arrow next to Forward will provide several options, all of which will open a new message.
The Subject field will contain the original subject pre‐pended with Fw:. The Forward options are similar to
the Reply options. *Note: When you forward a message, a Forwarded icon appears next to the message.
Mail Rules and Quick Rules
Using Quick Rules is a simple and effective way to organize mail. The following steps will guide you through setting up quick rules.
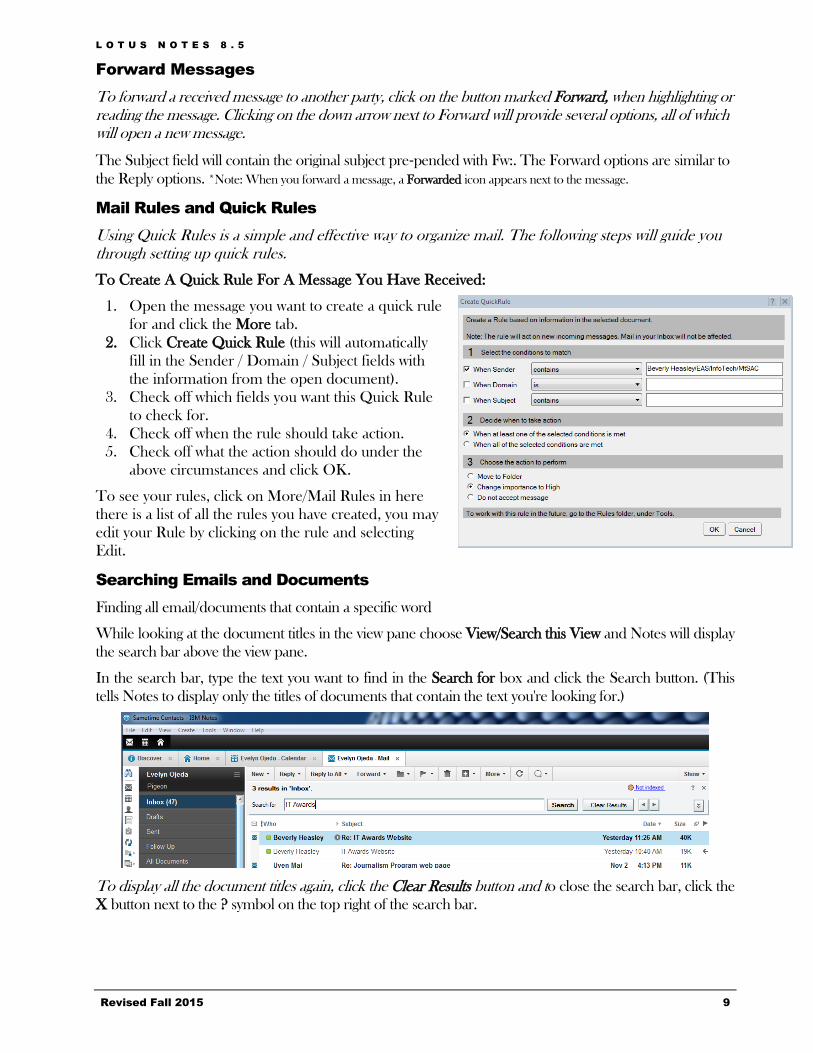
To Create A Quick Rule For A Message You Have Received:
1. Open the message you want to create a quick rule
for and click the More tab.
2. Click Create Quick Rule (this will automatically
fill in the Sender / Domain / Subject fields with
the information from the open document).
3. Check off which fields you want this Quick Rule
to check for.
4. Check off when the rule should take action.
5. Check off what the action should do under the
above circumstances and click OK.
To see your rules, click on More/Mail Rules in here
there is a list of all the rules you have created, you may
edit your Rule by clicking on the rule and selecting
Edit.
Searching Emails and Documents
Finding all email/documents that contain a specific word
While looking at the document titles in the view pane choose View/Search this View and Notes will display
the search bar above the view pane.
In the search bar, type the text you want to find in the Search for box and click the Search button. (This
tells Notes to display only the titles of documents that contain the text you're looking for.)
To display all the document titles again, click the Clear Results button and to close the search bar, click the
X button next to the ? symbol on the top right of the search bar.
L O T U S N O T E S 8 . 5
Revised Fall 2015 10
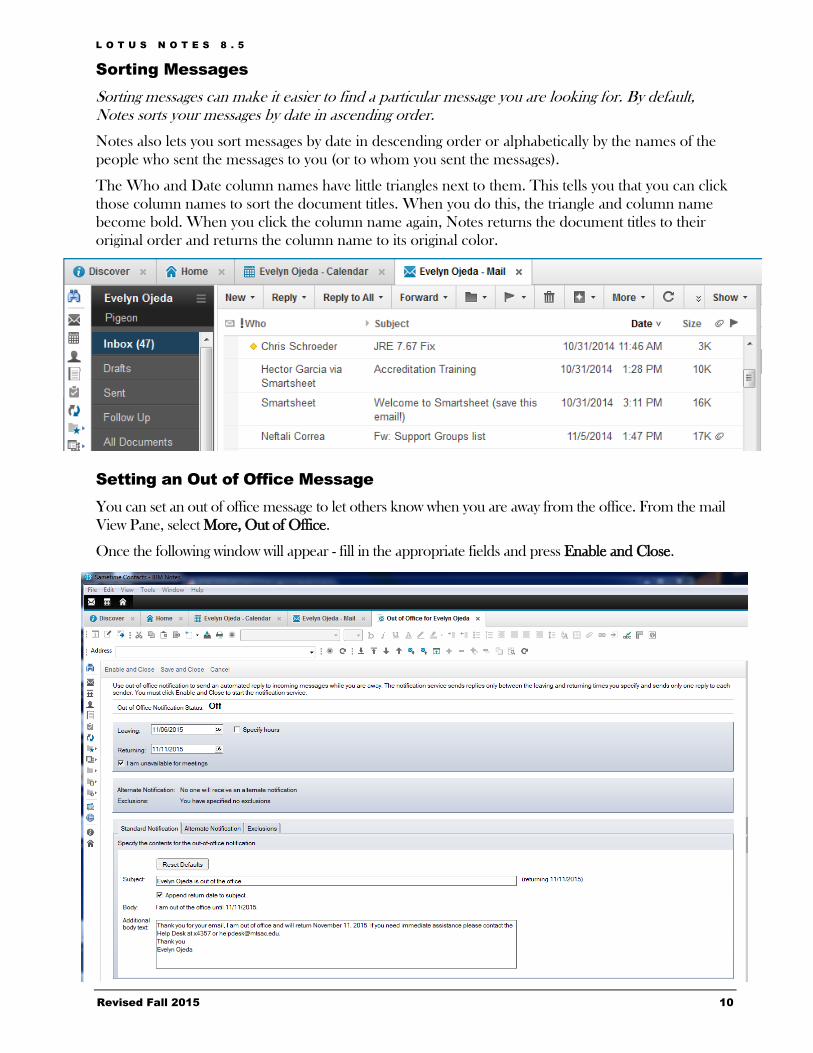
Sorting Messages
Sorting messages can make it easier to find a particular message you are looking for. By default, Notes sorts your messages by date in ascending order.
Notes also lets you sort messages by date in descending order or alphabetically by the names of the
people who sent the messages to you (or to whom you sent the messages).
The Who and Date column names have little triangles next to them. This tells you that you can click
those column names to sort the document titles. When you do this, the triangle and column name
become bold. When you click the column name again, Notes returns the document titles to their
original order and returns the column name to its original color.
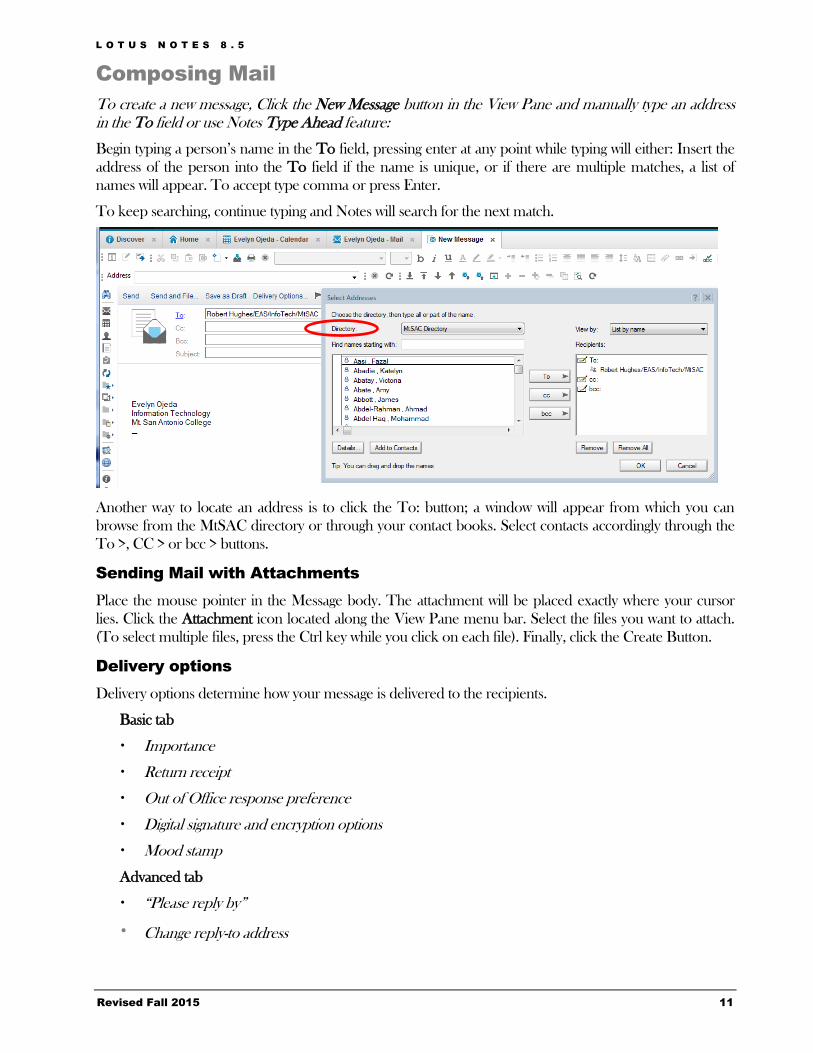
Setting an Out of Office Message
You can set an out of office message to let others know when you are away from the office. From the mail
View Pane, select More, Out of Office.
Once the following window will appear - fill in the appropriate fields and press Enable and Close.
L O T U S N O T E S 8 . 5
Revised Fall 2015 11
Composing Mail
To create a new message, Click the New Message button in the View Pane and manually type an address in the To field or use Notes Type Ahead feature:
Begin typing a person’s name in the To field, pressing enter at any point while typing will either: Insert the
address of the person into the To field if the name is unique, or if there are multiple matches, a list of
names will appear. To accept type comma or press Enter.
To keep searching, continue typing and Notes will search for the next match.
Another way to locate an address is to click the To: button; a window will appear from which you can
browse from the MtSAC directory or through your contact books. Select contacts accordingly through the
To >, CC > or bcc > buttons.
Sending Mail with Attachments
Place the mouse pointer in the Message body. The attachment will be placed exactly where your cursor
lies. Click the Attachment icon located along the View Pane menu bar. Select the files you want to attach.
(To select multiple files, press the Ctrl key while you click on each file). Finally, click the Create Button.
Delivery options
Delivery options determine how your message is delivered to the recipients.
Basic tab
Importance
Return receipt
Out of Office response preference
Digital signature and encryption options
Mood stamp
Advanced tab
“Please reply by”
Change reply-to address
L O T U S N O T E S 8 . 5
Revised Fall 2015 12
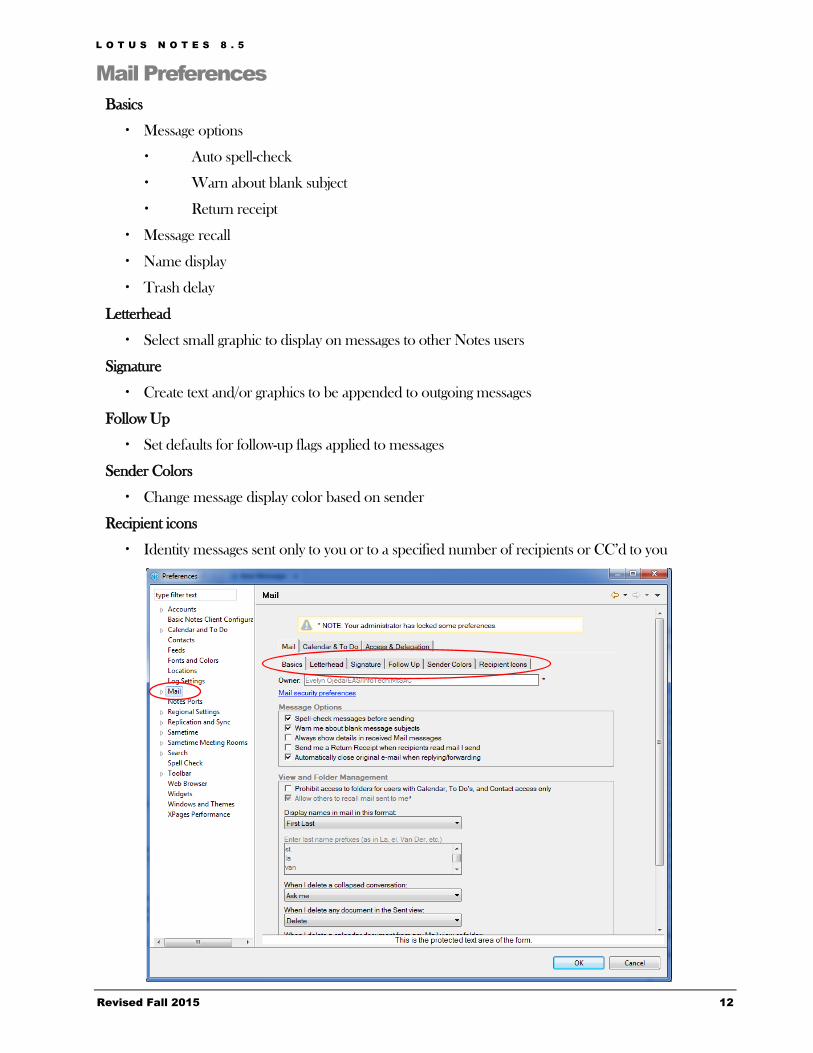
Mail Preferences
Basics
Message options
Auto spell-check
Warn about blank subject
Return receipt
Message recall
Name display
Trash delay
Letterhead
Select small graphic to display on messages to other Notes users
Signature
Create text and/or graphics to be appended to outgoing messages
Follow Up
Set defaults for follow-up flags applied to messages
Sender Colors
Change message display color based on sender
Recipient icons
Identity messages sent only to you or to a specified number of recipients or CC’d to you
L O T U S N O T E S 8 . 5
Revised Fall 2015 13
Calendar
The calendar application allows you to organize appointments, events, meetings, reminders, and anniversaries.
Navigating the Calendar
To open the Calendar, click Open list then select Calendar or click the Calendar icon on the Bookmark
Bar. Use the calendar format tabs at the top of the View Pane to change the number of days the calendar
displays. Click the Back and Forward buttons next to the month in the Navigation Pane to cycle through
the months. Use the slider bars on the right side and bottom of the View Pane to move through the
Calendar. Click on Today at any time to return to the current date.
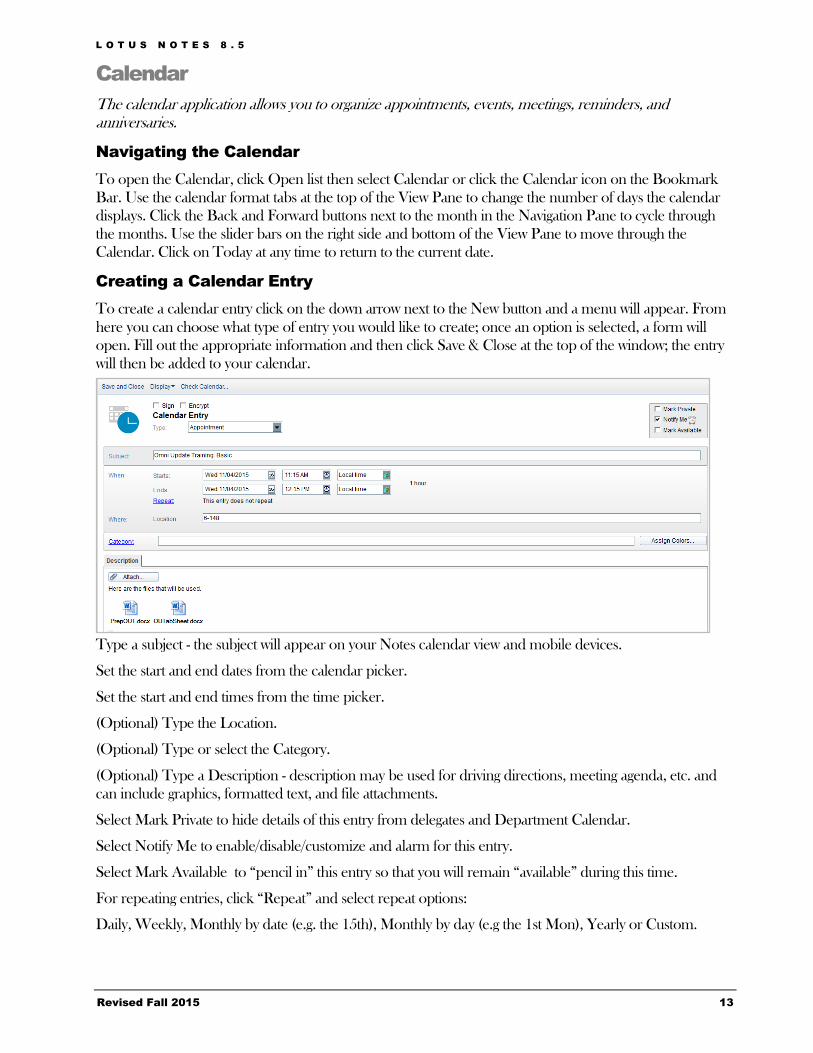
Creating a Calendar Entry
To create a calendar entry click on the down arrow next to the New button and a menu will appear. From
here you can choose what type of entry you would like to create; once an option is selected, a form will
open. Fill out the appropriate information and then click Save & Close at the top of the window; the entry
will then be added to your calendar.
Type a subject - the subject will appear on your Notes calendar view and mobile devices.
Set the start and end dates from the calendar picker.
Set the start and end times from the time picker.
(Optional) Type the Location.
(Optional) Type or select the Category.
(Optional) Type a Description - description may be used for driving directions, meeting agenda, etc. and
can include graphics, formatted text, and file attachments.
Select Mark Private to hide details of this entry from delegates and Department Calendar.
Select Notify Me to enable/disable/customize and alarm for this entry.
Select Mark Available to “pencil in” this entry so that you will remain “available” during this time.
For repeating entries, click “Repeat” and select repeat options:
Daily, Weekly, Monthly by date (e.g. the 15th), Monthly by day (e.g the 1st Mon), Yearly or Custom.
L O T U S N O T E S 8 . 5
Revised Fall 2015 14
Use “Custom” to specify exact dates - specify starting date and ending date or period.
Calendar Entry Types
Appointment – to schedule time on your calendar.
Meeting – schedule time on your calendar and invite others. See Creating and Sending Meeting Invitations.
Anniversary - to add an annual event to your calendar.
Reminder - to remind yourself of something at a particular time.
All Day Event - to schedule an entire day or block of days.
Event Announcement – invite others to an event, no invitee reply options.
Scheduling a Meeting
Invite multiple people, rooms and resources
Invitees receive and respond to invitations via email
Invitee calendar is updated automatically based on response(s)
All invitees are notified if meeting is rescheduled or cancelled
Rooms are scheduled depending on availability and security options
A delegate can create and manage meetings on behalf of a calendar owner
Meeting entries are consolidated on Department Calendars
Create a new calendar entry of type “Meeting” to begin
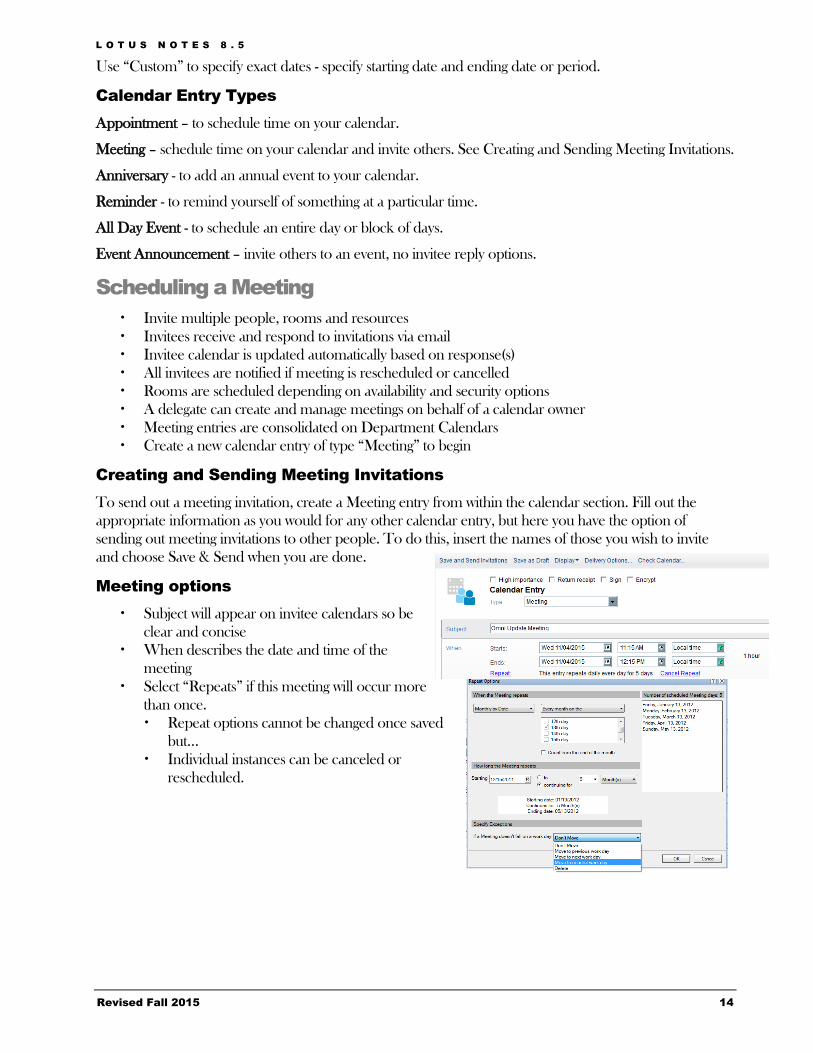
Creating and Sending Meeting Invitations
To send out a meeting invitation, create a Meeting entry from within the calendar section. Fill out the
appropriate information as you would for any other calendar entry, but here you have the option of
sending out meeting invitations to other people. To do this, insert the names of those you wish to invite
and choose Save & Send when you are done.
Meeting options
Subject will appear on invitee calendars so be
clear and concise
When describes the date and time of the
meeting
Select “Repeats” if this meeting will occur more
than once.
Repeat options cannot be changed once saved
but…
Individual instances can be canceled or
rescheduled.
L O T U S N O T E S 8 . 5
Revised Fall 2015 15
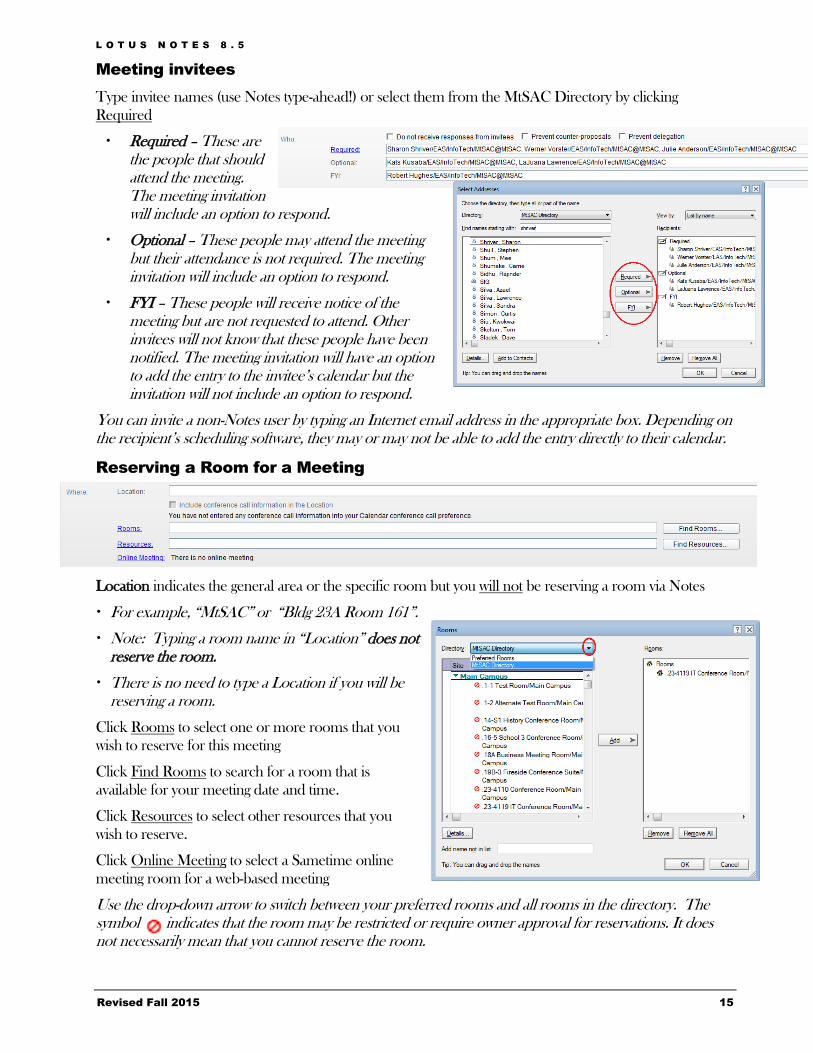
Meeting invitees
Type invitee names (use Notes type-ahead!) or select them from the MtSAC Directory by clicking
Required
Required – These are the people that should attend the meeting. The meeting invitation will include an option to respond.
Optional – These people may attend the meeting
but their attendance is not required. The meeting invitation will include an option to respond.
FYI – These people will receive notice of the meeting but are not requested to attend. Other
invitees will not know that these people have been notified. The meeting invitation will have an option to add the entry to the invitee’s calendar but the invitation will not include an option to respond.
You can invite a non-Notes user by typing an Internet email address in the appropriate box. Depending on the recipient’s scheduling software, they may or may not be able to add the entry directly to their calendar.
Reserving a Room for a Meeting
Location indicates the general area or the specific room but you will not be reserving a room via Notes
For example, “MtSAC” or “Bldg 23A Room 161”.
Note: Typing a room name in “Location” does not reserve the room.
There is no need to type a Location if you will be reserving a room.
Click Rooms to select one or more rooms that you
wish to reserve for this meeting
Click Find Rooms to search for a room that is
available for your meeting date and time.
Click Resources to select other resources that you
wish to reserve.
Click Online Meeting to select a Sametime online
meeting room for a web-based meeting
Use the drop-down arrow to switch between your preferred rooms and all rooms in the directory. The symbol indicates that the room may be restricted or require owner approval for reservations. It does not necessarily mean that you cannot reserve the room.

L O T U S N O T E S 8 . 5
Revised Fall 2015 16
Finding Available Times for a Meeting – Details View
Checks the current schedules of your invitees and any rooms you have requested.
Provides a graphical display of invitee and room availability
The bar is green if all are available, red if there is a conflict for any of the selected people or resources
Schedules for FYI invitees are not checked
Drag the bar to change the time of the meeting
Finding Available Times for a Meeting – Summary View
Suggests times when all or a percentage of invitees and resources are available
L O T U S N O T E S 8 . 5
Revised Fall 2015 17
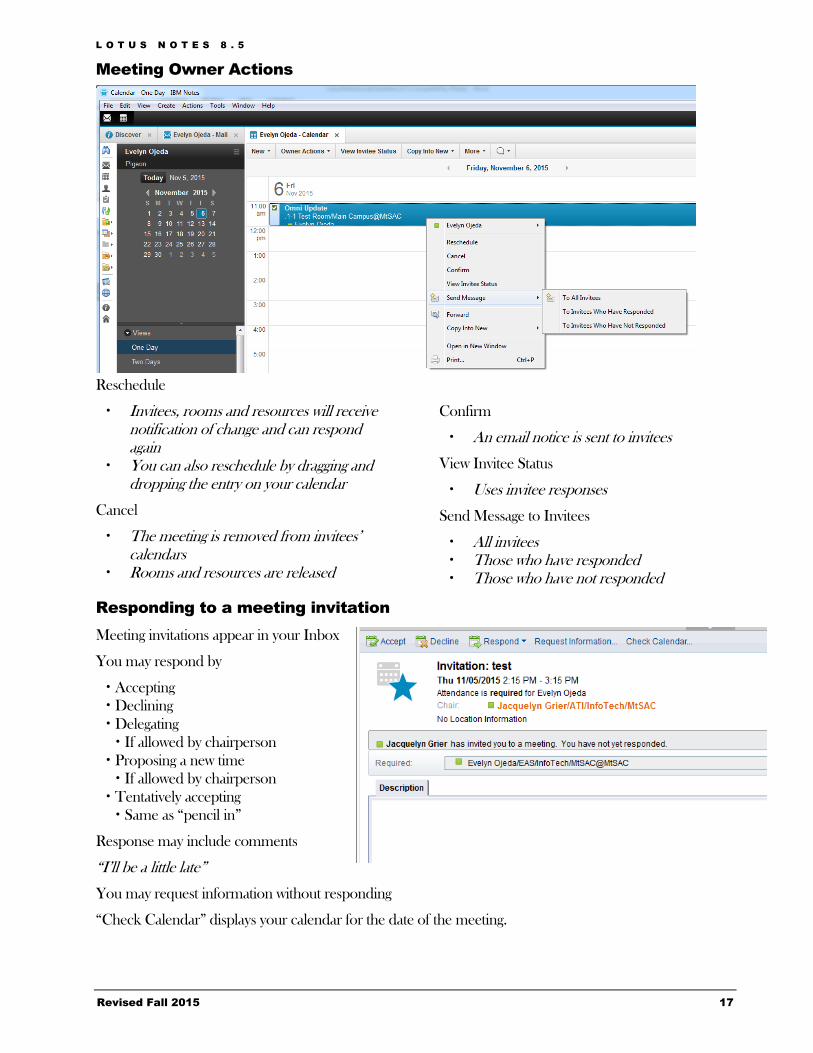
Meeting Owner Actions
Reschedule
Invitees, rooms and resources will receive notification of change and can respond again
You can also reschedule by dragging and dropping the entry on your calendar
Cancel
The meeting is removed from invitees’ calendars
Rooms and resources are released
Confirm
An email notice is sent to invitees
View Invitee Status
Uses invitee responses
Send Message to Invitees
All invitees Those who have responded Those who have not responded
Responding to a meeting invitation
Meeting invitations appear in your Inbox
You may respond by
Accepting
Declining
Delegating
If allowed by chairperson
Proposing a new time
If allowed by chairperson
Tentatively accepting
Same as “pencil in”
Response may include comments
“I’ll be a little late”
You may request information without responding
“Check Calendar” displays your calendar for the date of the meeting.
L O T U S N O T E S 8 . 5
Revised Fall 2015 18
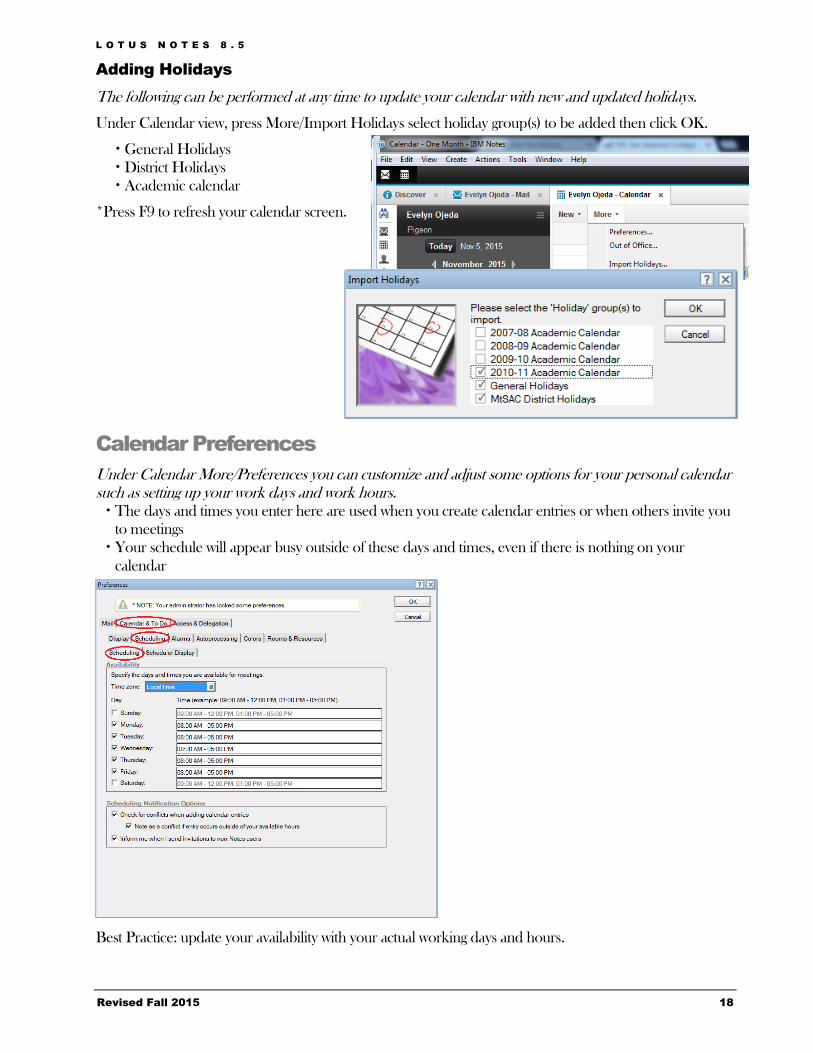
Adding Holidays
The following can be performed at any time to update your calendar with new and updated holidays.
Under Calendar view, press More/Import Holidays select holiday group(s) to be added then click OK.
General Holidays
District Holidays
Academic calendar
*Press F9 to refresh your calendar screen.
Calendar Preferences
Under Calendar More/Preferences you can customize and adjust some options for your personal calendar such as setting up your work days and work hours. The days and times you enter here are used when you create calendar entries or when others invite you
to meetings
Your schedule will appear busy outside of these days and times, even if there is nothing on your
calendar
Best Practice: update your availability with your actual working days and hours.
L O T U S N O T E S 8 . 5
Revised Fall 2015 19
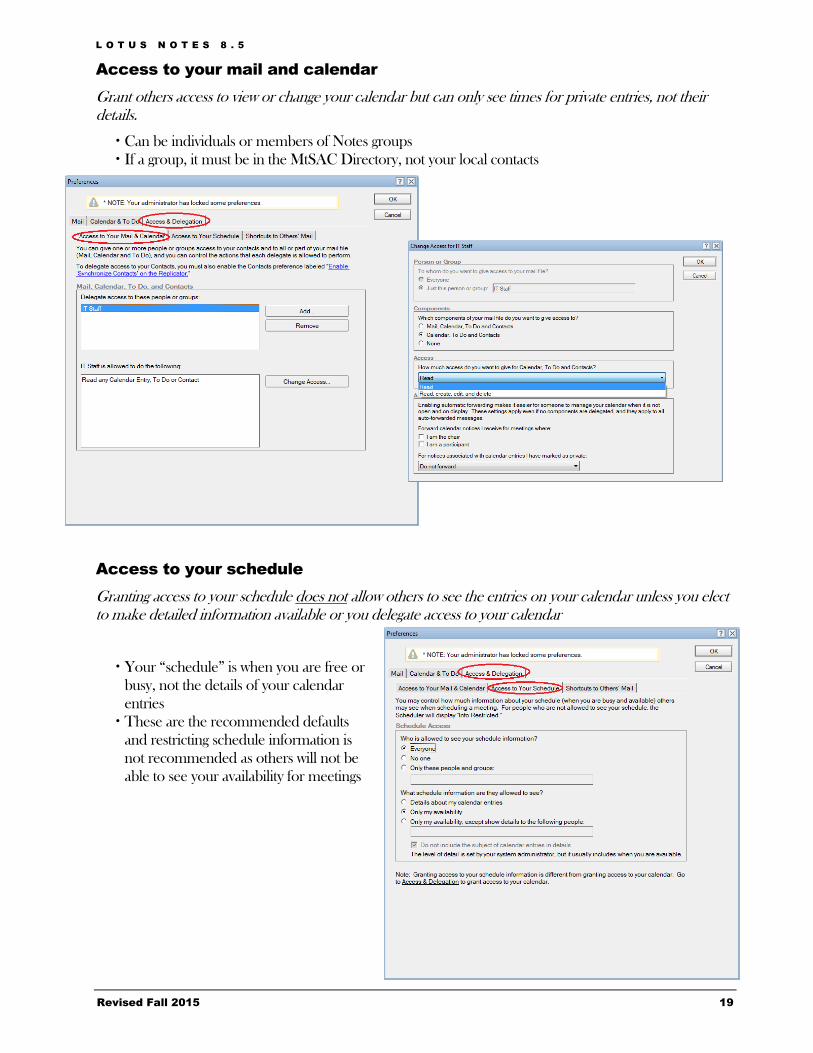
Access to your mail and calendar
Grant others access to view or change your calendar but can only see times for private entries, not their details.
Can be individuals or members of Notes groups
If a group, it must be in the MtSAC Directory, not your local contacts
Access to your schedule
Granting access to your schedule does not allow others to see the entries on your calendar unless you elect to make detailed information available or you delegate access to your calendar
Your “schedule” is when you are free or
busy, not the details of your calendar
entries
These are the recommended defaults
and restricting schedule information is
not recommended as others will not be
able to see your availability for meetings
L O T U S N O T E S 8 . 5
Revised Fall 2015 20
Sametime Instant Messaging
Sametime is a chat program, part of the IBM/Lotus collaboration suite, which enables instant messaging and presence awareness functionality and more.
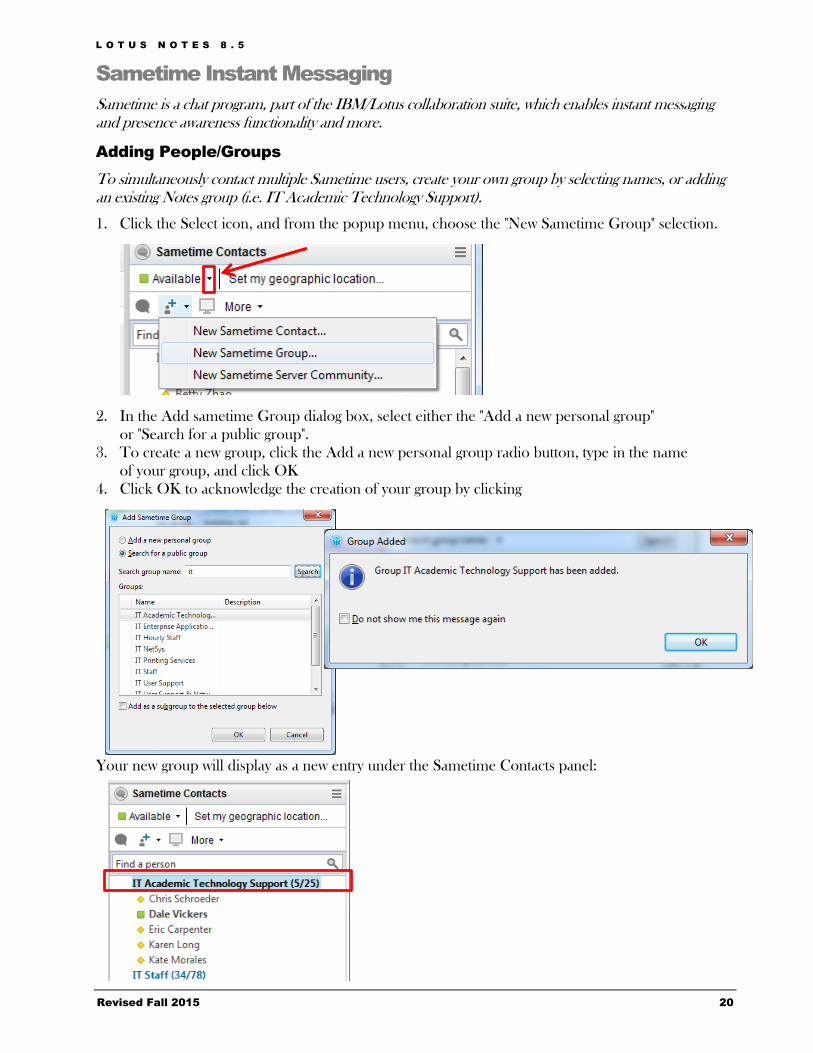
Adding People/Groups
To simultaneously contact multiple Sametime users, create your own group by selecting names, or adding an existing Notes group (i.e. IT Academic Technology Support).
1. Click the Select icon, and from the popup menu, choose the "New Sametime Group" selection.
2. In the Add sametime Group dialog box, select either the "Add a new personal group"
or "Search for a public group".
3. To create a new group, click the Add a new personal group radio button, type in the name
of your group, and click OK
4. Click OK to acknowledge the creation of your group by clicking
Your new group will display as a new entry under the Sametime Contacts panel:
L O T U S N O T E S 8 . 5
Revised Fall 2015 21
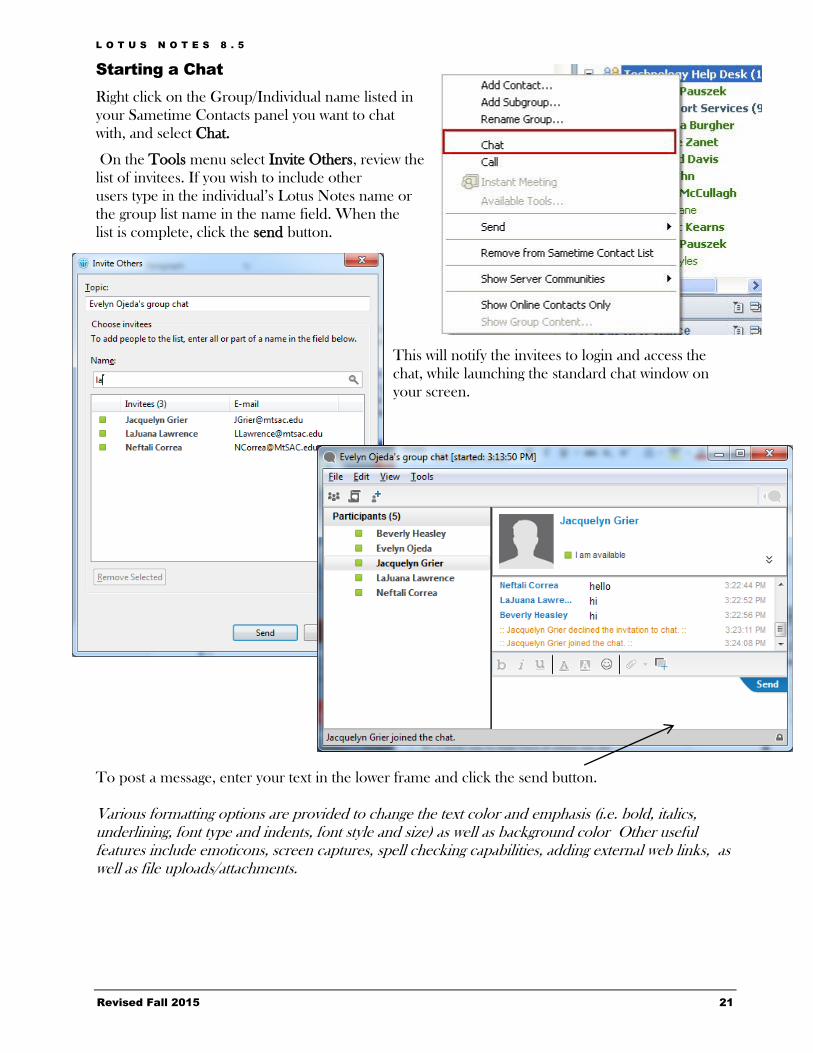
Starting a Chat
Right click on the Group/Individual name listed in
your Sametime Contacts panel you want to chat
with, and select Chat.
On the Tools menu select Invite Others, review the
list of invitees. If you wish to include other
users type in the individual’s Lotus Notes name or
the group list name in the name field. When the
list is complete, click the send button.
This will notify the invitees to login and access the
chat, while launching the standard chat window on
your screen.
To post a message, enter your text in the lower frame and click the send button.
Various formatting options are provided to change the text color and emphasis (i.e. bold, italics, underlining, font type and indents, font style and size) as well as background color Other useful features include emoticons, screen captures, spell checking capabilities, adding external web links, as well as file uploads/attachments.

L O T U S N O T E S 8 . 5
Revised Fall 2015 22
Using/Getting Help
Lotus Notes has several kinds of help that can give you immediate program and online assistance:
Notes Help (F1). Help is context-sensitive and provides excellent step-by-step instructions for most
tasks.
Help Search. Search help based on keywords or topics and get detailed description of the subject
or related subjects.
Learning Resources. Online learning resources including demonstrations, videos, tutorials,
reference cards, and web seminars to help you get started.
Notes Documentation. Technical documentation originally authored by IBM and released with
the product edition.
Online Support Request. help.mtsac.edu self-service portal.
Email. [email protected]
Call us. (909) 274-4357