Embed Size (px)
Citation preview
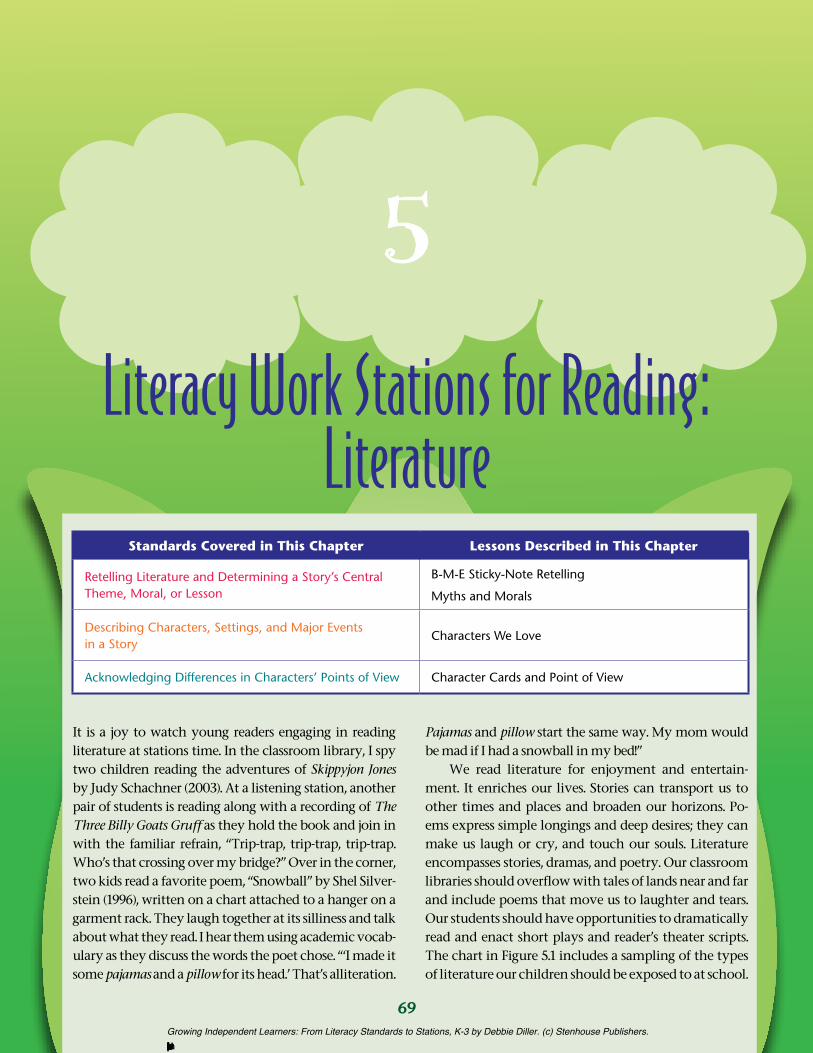
69
Literacy Work Stations for Reading: Literature
5
Standards Covered in This Chapter Lessons Described in This Chapter
Retelling Literature and Determining a Story’s Central Theme, Moral, or Lesson
B-M-E Sticky-Note Retelling
Myths and Morals
Describing Characters, Settings, and Major Events in a Story
Characters We Love
Acknowledging Differences in Characters’ Points of View Character Cards and Point of View
It is a joy to watch young readers engaging in reading literature at stations time. In the classroom library, I spy two children reading the adventures of Skippyjon Jones by Judy Schachner (2003). At a listening station, another pair of students is reading along with a recording of The Three Billy Goats Gruff as they hold the book and join in with the familiar refrain, “Trip-trap, trip-trap, trip-trap. Who’s that crossing over my bridge?” Over in the corner, two kids read a favorite poem, “Snowball” by Shel Silver-stein (1996), written on a chart attached to a hanger on a garment rack. They laugh together at its silliness and talk about what they read. I hear them using academic vocab-ulary as they discuss the words the poet chose. “‘I made it some pajamas and a pillow for its head.’ That’s alliteration.
Pajamas and pillow start the same way. My mom would be mad if I had a snowball in my bed!”
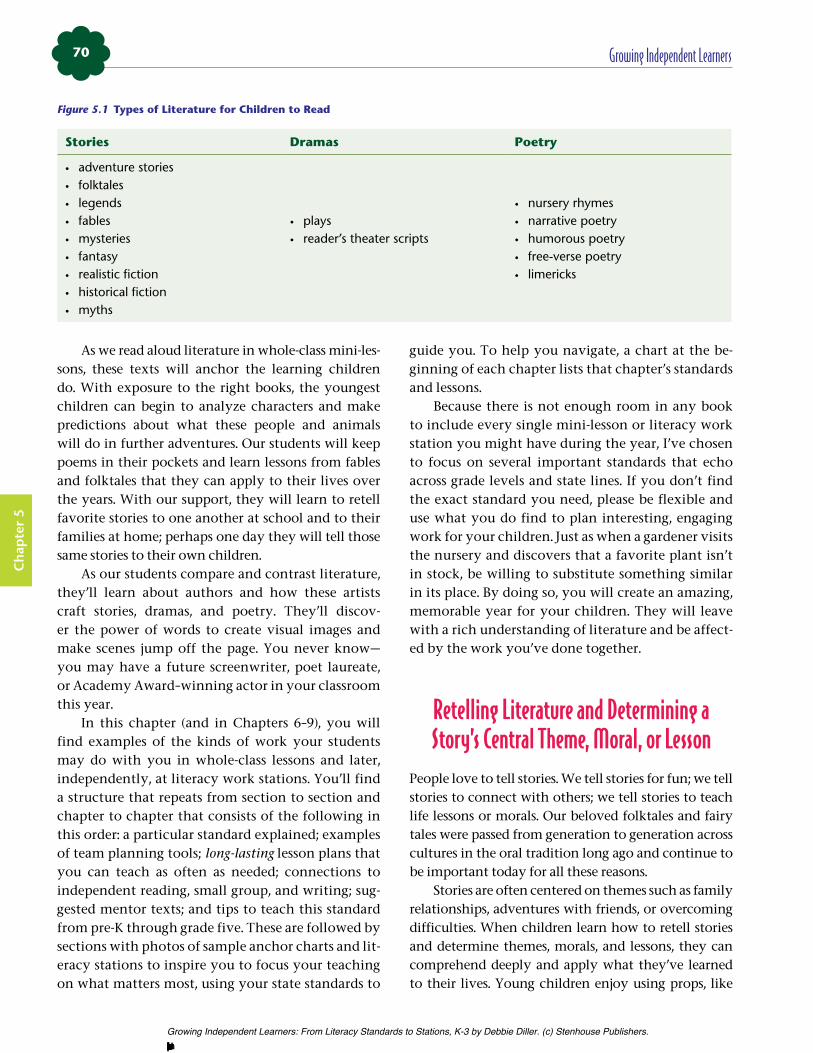
We read literature for enjoyment and entertain-ment. It enriches our lives. Stories can transport us to other times and places and broaden our horizons. Po-ems express simple longings and deep desires; they can make us laugh or cry, and touch our souls. Literature encompasses stories, dramas, and poetry. Our classroom libraries should overflow with tales of lands near and far and include poems that move us to laughter and tears. Our students should have opportunities to dramatically read and enact short plays and reader’s theater scripts. The chart in Figure 5.1 includes a sampling of the types of literature our children should be exposed to at school.
Growing Independent Learners: From Literacy Standards to Stations, K-3 by Debbie Diller. (c) Stenhouse Publishers.No reproduction without written permission from the publisher.
Growing Independent Learners70
Ch
apte
r 5
Figure 5.1 Types of Literature for Children to Read
Stories Dramas Poetry
• adventure stories• folktales• legends• fables• mysteries• fantasy• realistic fiction• historical fiction• myths
• plays• reader’s theater scripts
• nursery rhymes• narrative poetry• humorous poetry• free-verse poetry• limericks
guide you. To help you navigate, a chart at the be-ginning of each chapter lists that chapter’s standards and lessons.
Because there is not enough room in any book to include every single mini-lesson or literacy work station you might have during the year, I’ve chosen to focus on several important standards that echo across grade levels and state lines. If you don’t find the exact standard you need, please be flexible and use what you do find to plan interesting, engaging work for your children. Just as when a gardener visits the nursery and discovers that a favorite plant isn’t in stock, be willing to substitute something similar in its place. By doing so, you will create an amazing, memorable year for your children. They will leave with a rich understanding of literature and be affect-ed by the work you’ve done together.
Retelling Literature and Determining a Story’s Central Theme, Moral, or Lesson
People love to tell stories. We tell stories for fun; we tell stories to connect with others; we tell stories to teach life lessons or morals. Our beloved folktales and fairy tales were passed from generation to generation across cultures in the oral tradition long ago and continue to be important today for all these reasons.
Stories are often centered on themes such as family relationships, adventures with friends, or overcoming difficulties. When children learn how to retell stories and determine themes, morals, and lessons, they can comprehend deeply and apply what they’ve learned to their lives. Young children enjoy using props, like
As we read aloud literature in whole-class mini-les-sons, these texts will anchor the learning children do. With exposure to the right books, the youngest children can begin to analyze characters and make predictions about what these people and animals will do in further adventures. Our students will keep poems in their pockets and learn lessons from fables and folktales that they can apply to their lives over the years. With our support, they will learn to retell favorite stories to one another at school and to their families at home; perhaps one day they will tell those same stories to their own children.
As our students compare and contrast literature, they’ll learn about authors and how these artists craft stories, dramas, and poetry. They’ll discov-er the power of words to create visual images and make scenes jump off the page. You never know—you may have a future screenwriter, poet laureate, or Academy Award–winning actor in your classroom this year.
In this chapter (and in Chapters 6–9), you will find examples of the kinds of work your students may do with you in whole-class lessons and later, independently, at literacy work stations. You’ll find a structure that repeats from section to section and chapter to chapter that consists of the following in this order: a particular standard explained; examples of team planning tools; long-lasting lesson plans that you can teach as often as needed; connections to independent reading, small group, and writing; sug-gested mentor texts; and tips to teach this standard from pre-K through grade five. These are followed by sections with photos of sample anchor charts and lit-eracy stations to inspire you to focus your teaching on what matters most, using your state standards to
Growing Independent Learners: From Literacy Standards to Stations, K-3 by Debbie Diller. (c) Stenhouse Publishers.No reproduction without written permission from the publisher.
Chapter 5: Literacy Work Stations for Reading: Literature 71
Ch
apter 5
retelling pieces and stick puppets, to tell stories they’ve heard or read. They’ll learn about story structure, in-cluding beginning, middle, and end, as they play with
stories. You’ll hear them mimic the voices and lan-guage of literature you’ve shared. Eventually, it will influence the narrative writing they do as well.
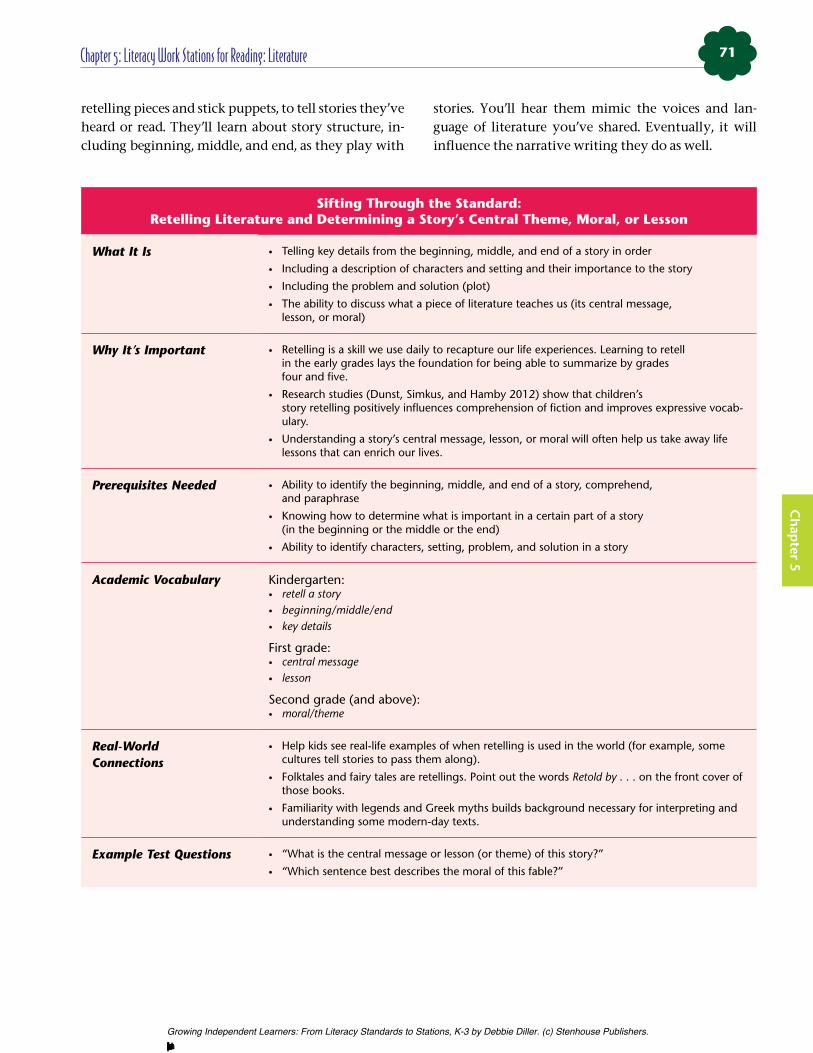
Sifting Through the Standard: retelling Literature and Determining a Story’s Central Theme, moral, or Lesson
What It Is • Telling key details from the beginning, middle, and end of a story in order
• Including a description of characters and setting and their importance to the story
• Including the problem and solution (plot)
• The ability to discuss what a piece of literature teaches us (its central message, lesson, or moral)
Why It’s Important • Retelling is a skill we use daily to recapture our life experiences. Learning to retell in the early grades lays the foundation for being able to summarize by grades four and five.
• Research studies (Dunst, Simkus, and Hamby 2012) show that children’s story retelling positively influences comprehension of fiction and improves expressive vocab-ulary.
• Understanding a story’s central message, lesson, or moral will often help us take away life lessons that can enrich our lives.
Prerequisites Needed • Ability to identify the beginning, middle, and end of a story, comprehend, and paraphrase
• Knowing how to determine what is important in a certain part of a story (in the beginning or the middle or the end)
• Ability to identify characters, setting, problem, and solution in a story
Academic Vocabulary Kindergarten: • retell a story• beginning/middle/end • key details
First grade:• central message• lesson
Second grade (and above):• moral/theme
Real-World Connections
• Help kids see real-life examples of when retelling is used in the world (for example, some cultures tell stories to pass them along).
• Folktales and fairy tales are retellings. Point out the words Retold by . . . on the front cover of those books.
• Familiarity with legends and Greek myths builds background necessary for interpreting and understanding some modern-day texts.
Example Test Questions • “What is the central message or lesson (or theme) of this story?”
• “Which sentence best describes the moral of this fable?”
Growing Independent Learners: From Literacy Standards to Stations, K-3 by Debbie Diller. (c) Stenhouse Publishers.No reproduction without written permission from the publisher.
Growing Independent Learners72
Ch
apte
r 5
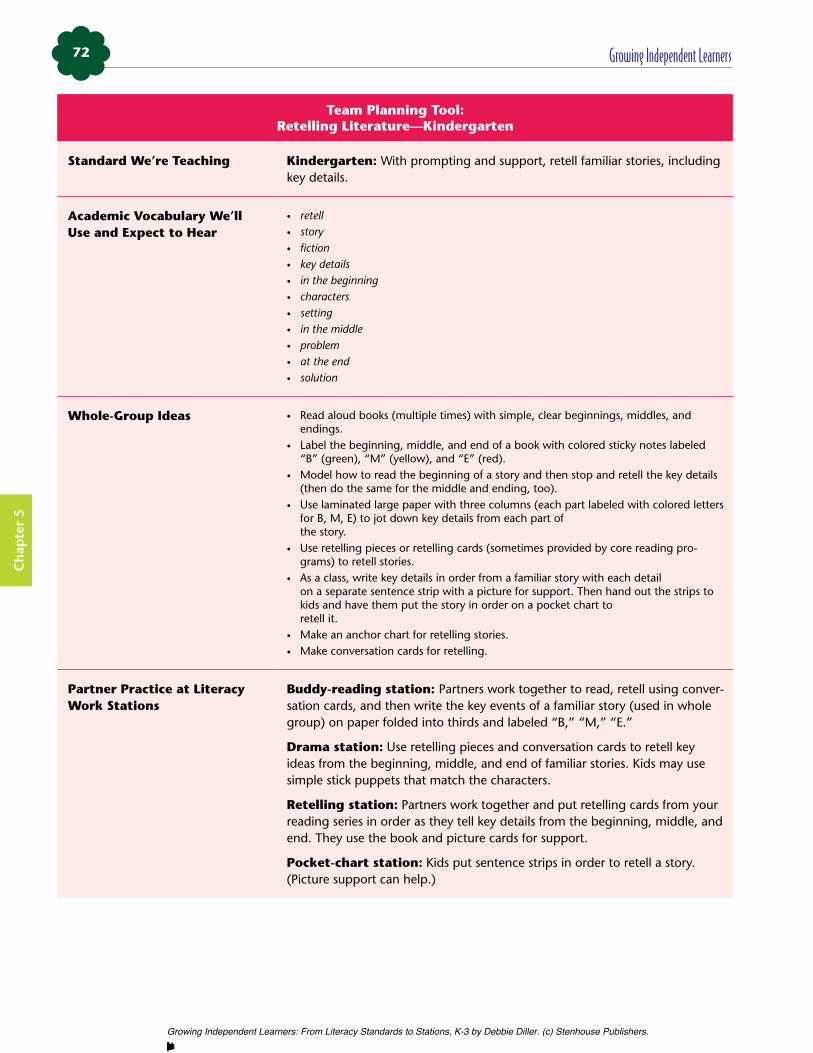
Team Planning Tool: retelling Literature—kindergarten
Standard We’re Teaching kindergarten: With prompting and support, retell familiar stories, including key details.
Academic Vocabulary We’ll Use and Expect to Hear
• retell• story• fiction• key details• in the beginning• characters• setting• in the middle• problem• at the end• solution
Whole-Group Ideas • Read aloud books (multiple times) with simple, clear beginnings, middles, and endings.
• Label the beginning, middle, and end of a book with colored sticky notes labeled “B” (green), “M” (yellow), and “E” (red).
• Model how to read the beginning of a story and then stop and retell the key details (then do the same for the middle and ending, too).
• Use laminated large paper with three columns (each part labeled with colored letters for B, M, E) to jot down key details from each part of the story.
• Use retelling pieces or retelling cards (sometimes provided by core reading pro-grams) to retell stories.
• As a class, write key details in order from a familiar story with each detail on a separate sentence strip with a picture for support. Then hand out the strips to kids and have them put the story in order on a pocket chart to retell it.
• Make an anchor chart for retelling stories.• Make conversation cards for retelling.
Partner Practice at Literacy Work Stations
Buddy-reading station: Partners work together to read, retell using conver-sation cards, and then write the key events of a familiar story (used in whole group) on paper folded into thirds and labeled “B,” “M,” “E.”
Drama station: Use retelling pieces and conversation cards to retell key ideas from the beginning, middle, and end of familiar stories. Kids may use simple stick puppets that match the characters.
retelling station: Partners work together and put retelling cards from your reading series in order as they tell key details from the beginning, middle, and end. They use the book and picture cards for support.
Pocket-chart station: Kids put sentence strips in order to retell a story. (Picture support can help.)
Growing Independent Learners: From Literacy Standards to Stations, K-3 by Debbie Diller. (c) Stenhouse Publishers.No reproduction without written permission from the publisher.

Chapter 5: Literacy Work Stations for Reading: Literature 73
Ch
apter 5
Lessons That Last: Whole-Group mini-Lesson Plan for retelling Literature—kindergarten
B-m-E Sticky-note retelling
focus: retelling a story in order with key details from the beginning, middle, and end
method to maximize Student Engagement: a favorite story kids will love; showing my thinking and jotting it down in pictures on an anchor chart; buddy talk (kids retell a part to someone sitting beside them)
materials: favorite story with a clear beginning, middle, and end (such as The Three Little Pigs, Goldilocks and the Three Bears, or The Little Engine That Could) and a thumbnail book cover to match; green, yellow, and red sticky notes placed in the book to mark the beginning, middle, and end; 12-by-18-inch white construction paper and colored markers for an anchor chart on retelling with three boxes drawn for B, M, and E; die-cut letters, and a glue stick (B in green; M in yellow; E in red) for the anchor chart.
model: how to think about and then jot down key details or what’s most important (in the beginning, middle, and end of a story)
Prompting for Independence: • “If you wanted to tell a friend about what you just read, what would you say? Tell just the key details, the most
important things.”
• “Most stories consist of a beginning, a middle, and an end. Read a part, and then stop and think about what happened.”
• “What were the key details or most important parts in the beginning? In the middle? At the end?”
mini-Lesson Procedure:
1. Choose a short, interesting story that kids will enjoy retelling. Mark the beginning of the book with a green sticky note, the middle with a yellow sticky note, and the end with a red one. Label them “B,” “M,” and “E.” Prepare your anchor chart before the lesson by leaving space for the title and then dividing the chart into thirds. Have the other anchor chart materials at your fingertips for the mini-lesson, since your kids will be helping you to construct it.
2. To begin the mini-lesson, tell students that retelling can help them better understand what they read. Explain that we don’t tell every single thing that happened, because it takes too long. We just tell the key details or most important parts to help us remember what the story was about. On the top of your anchor chart, write, “I can retell ___________________.” Read this with the class and orally fill in the blank with the title of the book you’ll retell.
3. Show students the read-aloud book. They’ll probably notice the colored sticky notes in the book. Explain that a story has a beginning (B), a middle (M), and an end (E) as you point to the sticky notes. Have a student glue the thumbnail picture of the book cover you use for retelling at the top of the chart to help them remember where they learned about retelling.
4. Read aloud the text, one part at a time, pausing to think with students about the key details or what was most important at the end of that section. Also cue them into how you know you’re reading the beginning or moving to the middle or are at the end. For example, read the first page or two and then stop and tell students, “We just read the beginning of the book. In the beginning of a story, the author tells us about the main character or who it’s about, and the setting, the where and when it takes place.” (Point out the B on the sticky note and have a student glue the green B to the anchor chart in the far left column.) “Which details are key or important in the beginning of the story? We should tell about the characters and setting, since this is fiction.” (With student input, draw something to represent the character and setting at the top of the B section of the anchor chart, such as a person and a house and sun.) Think aloud about what the key details are from the beginning. Ask students for their input.
5. Continue this procedure throughout the text, reading the middle next and thinking about the key details or most important parts with the class. Tell the children how you know it’s no longer the beginning of the book: “Now we’re moving into the middle of the book. I can tell because things are starting to change. The train’s engine just broke down. A problem is starting to emerge.” Have a student glue the M to the middle section of the anchor chart. Talk about the problem the characters have in the middle of the story. Again, use a picture suggested by kids to represent a problem. Finally, read the end of the story and retell the key details.
(continued on next page)
Growing Independent Learners: From Literacy Standards to Stations, K-3 by Debbie Diller. (c) Stenhouse Publishers.No reproduction without written permission from the publisher.
Growing Independent Learners74
Ch
apte
r 5
Lessons That Last: Whole-Group mini-Lesson Plan for retelling Literature—kindergarten (continued)
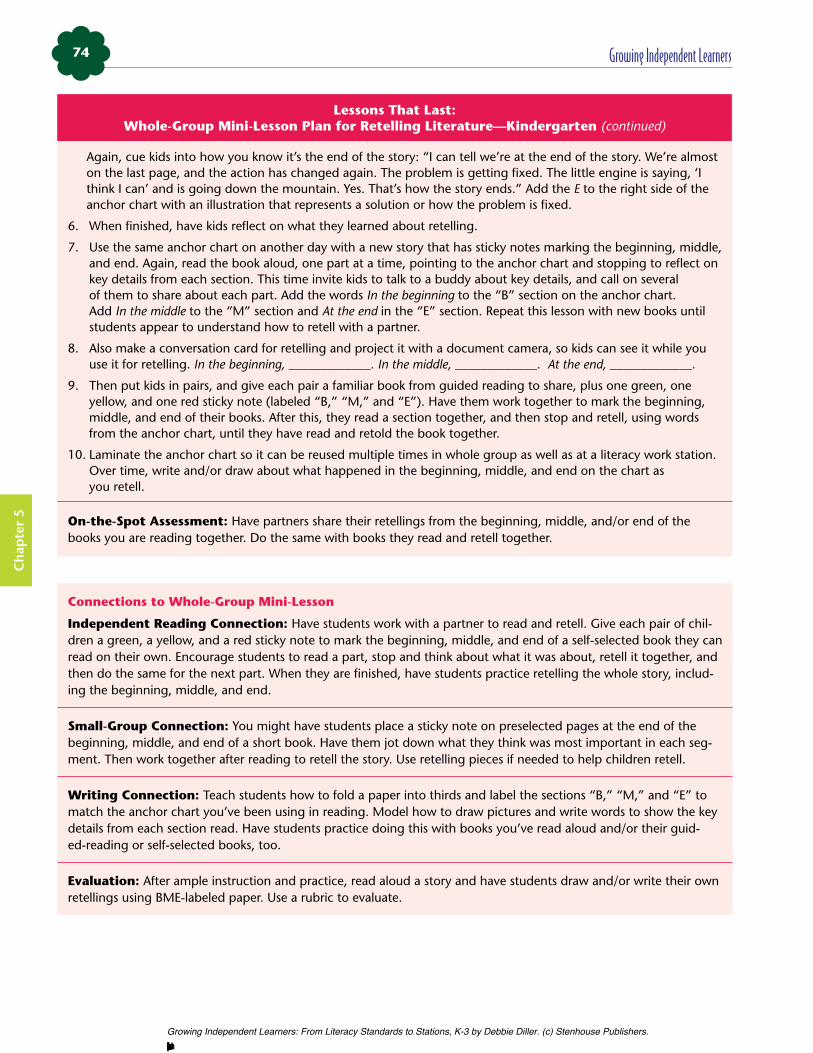
Again, cue kids into how you know it’s the end of the story: “I can tell we’re at the end of the story. We’re almost on the last page, and the action has changed again. The problem is getting fixed. The little engine is saying, ‘I think I can’ and is going down the mountain. Yes. That’s how the story ends.” Add the E to the right side of the anchor chart with an illustration that represents a solution or how the problem is fixed.
6. When finished, have kids reflect on what they learned about retelling.
7. Use the same anchor chart on another day with a new story that has sticky notes marking the beginning, middle, and end. Again, read the book aloud, one part at a time, pointing to the anchor chart and stopping to reflect on key details from each section. This time invite kids to talk to a buddy about key details, and call on several of them to share about each part. Add the words In the beginning to the “B” section on the anchor chart. Add In the middle to the “M” section and At the end in the “E” section. Repeat this lesson with new books until students appear to understand how to retell with a partner.
8. Also make a conversation card for retelling and project it with a document camera, so kids can see it while you use it for retelling. In the beginning, _____________. In the middle, _____________. At the end, _____________.
9. Then put kids in pairs, and give each pair a familiar book from guided reading to share, plus one green, one yellow, and one red sticky note (labeled “B,” “M,” and “E”). Have them work together to mark the beginning, middle, and end of their books. After this, they read a section together, and then stop and retell, using words from the anchor chart, until they have read and retold the book together.
10. Laminate the anchor chart so it can be reused multiple times in whole group as well as at a literacy work station. Over time, write and/or draw about what happened in the beginning, middle, and end on the chart as you retell.
on-the-Spot Assessment: Have partners share their retellings from the beginning, middle, and/or end of the books you are reading together. Do the same with books they read and retell together.
Connections to Whole-Group mini-Lesson
Independent reading Connection: Have students work with a partner to read and retell. Give each pair of chil-dren a green, a yellow, and a red sticky note to mark the beginning, middle, and end of a self-selected book they can read on their own. Encourage students to read a part, stop and think about what it was about, retell it together, and then do the same for the next part. When they are finished, have students practice retelling the whole story, includ-ing the beginning, middle, and end.
Small-Group Connection: You might have students place a sticky note on preselected pages at the end of the beginning, middle, and end of a short book. Have them jot down what they think was most important in each seg-ment. Then work together after reading to retell the story. Use retelling pieces if needed to help children retell.
Writing Connection: Teach students how to fold a paper into thirds and label the sections “B,” “M,” and “E” to match the anchor chart you’ve been using in reading. Model how to draw pictures and write words to show the key details from each section read. Have students practice doing this with books you’ve read aloud and/or their guid-ed-reading or self-selected books, too.
Evaluation: After ample instruction and practice, read aloud a story and have students draw and/or write their own retellings using BME-labeled paper. Use a rubric to evaluate.
Growing Independent Learners: From Literacy Standards to Stations, K-3 by Debbie Diller. (c) Stenhouse Publishers.No reproduction without written permission from the publisher.
Chapter 5: Literacy Work Stations for Reading: Literature 75
Ch
apter 5
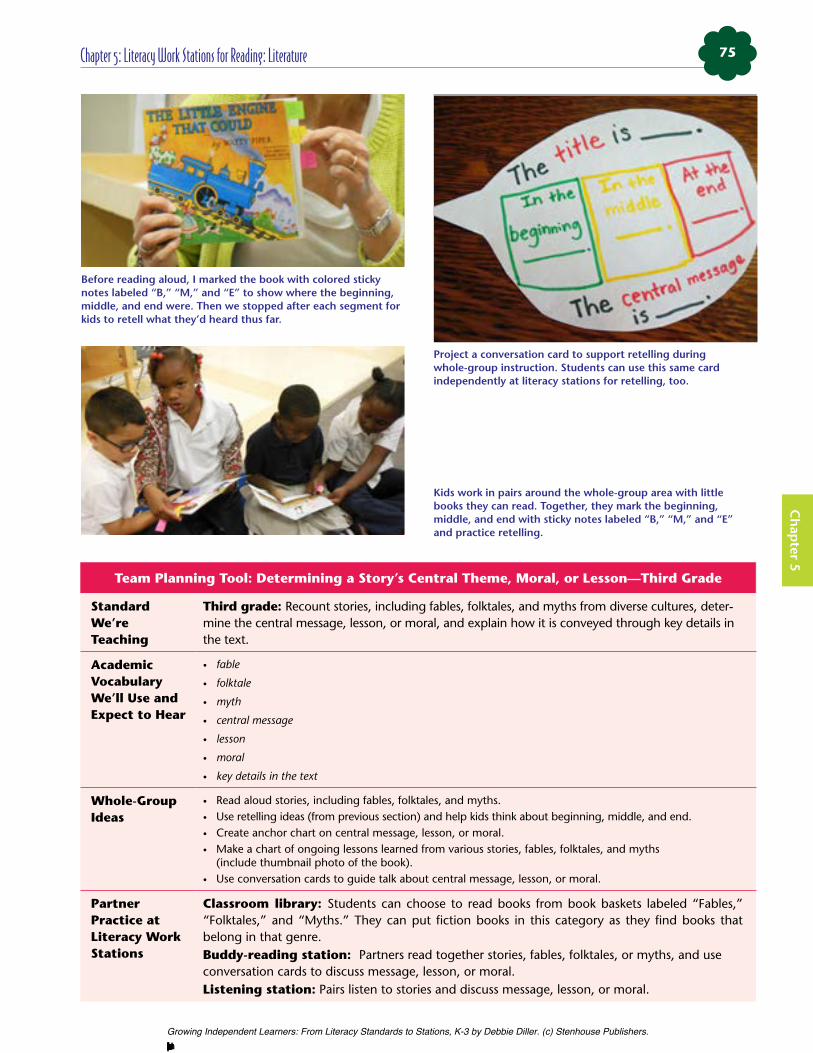
Before reading aloud, I marked the book with colored sticky notes labeled “B,” “M,” and “E” to show where the beginning, middle, and end were. Then we stopped after each segment for kids to retell what they’d heard thus far.
Project a conversation card to support retelling during whole-group instruction. Students can use this same card independently at literacy stations for retelling, too.
Kids work in pairs around the whole-group area with little books they can read. Together, they mark the beginning, middle, and end with sticky notes labeled “B,” “M,” and “E” and practice retelling.
Team Planning Tool: Determining a Story’s Central Theme, moral, or Lesson—Third Grade
Standard We’re Teaching
Third grade: Recount stories, including fables, folktales, and myths from diverse cultures, deter-mine the central message, lesson, or moral, and explain how it is conveyed through key details in the text.
Academic Vocabulary We’ll Use and Expect to Hear
• fable
• folktale
• myth
• central message
• lesson
• moral
• key details in the text
Whole-Group Ideas
• Read aloud stories, including fables, folktales, and myths.• Use retelling ideas (from previous section) and help kids think about beginning, middle, and end.• Create anchor chart on central message, lesson, or moral. • Make a chart of ongoing lessons learned from various stories, fables, folktales, and myths
(include thumbnail photo of the book).• Use conversation cards to guide talk about central message, lesson, or moral.
Partner Practice at Literacy Work Stations
Classroom library: Students can choose to read books from book baskets labeled “Fables,” “Folktales,” and “Myths.” They can put fiction books in this category as they find books that belong in that genre.Buddy-reading station: Partners read together stories, fables, folktales, or myths, and use conversation cards to discuss message, lesson, or moral.Listening station: Pairs listen to stories and discuss message, lesson, or moral.
Growing Independent Learners: From Literacy Standards to Stations, K-3 by Debbie Diller. (c) Stenhouse Publishers.No reproduction without written permission from the publisher.

Growing Independent Learners76
Ch
apte
r 5
Lessons That Last: Whole-Group mini-Lesson Plan for Determining a Story’s Central Theme, moral, or Lesson—Third Grade
myths and morals
focus: recounting a myth, telling the central lesson
(Note: Similar lessons should be taught using fables and folktales, as well as other stories.)
method to maximize Student Engagement: short video on King Midas; turn and talk; conversation cards
materials: video on King Midas; Greek Myths by Deborah Lock; The Chocolate Touch by Patrick Skene Catling; conversation card; anchor chart on morals, lessons, or central theme of stories; chart paper and markers; thumbnail photo of King Midas; glue stick
model: how to read and think about the lesson or moral in a myth
Prompting for Independence:
• “A myth is an ancient, or very old, story that has been told for a very long time to teach a lesson.”
• “Many myths we learn about in school originated, or began, in ancient cultures, such as Greece, Rome, and Egypt.”
• “The moral or lesson learned from this myth is . . .” (You might make a conversation card, too.)
mini-Lesson Procedure:
1. Tell students they will be reading stories called myths that are ancient, or very old, tales told and passed down through generations to teach morals or lessons.
2. Show a brief video clip about King Midas to pique their interest. Tell students to pay attention to the main character and what he does. We will learn the lesson from him. Have kids turn and talk to each other about what they learned about King Midas.
3. After discussing the video and what kids learned about King Midas, read aloud the title “The Foolishness of Midas” from the book Greek Myths. Have kids turn and talk about what they learn from the title.
4. Then read the story aloud. Ask kids to pay attention to Midas being foolish in the book. You might ask them to put their hands on their heads when they hear a part where Midas is foolish. Stop at those points and chart the events. (See the photos on page 69 for a sample chart.)
5. When finished reading, look at the events listed and help students come up with the lesson learned from this story. Use a conversation card that says, “The moral or lesson learned from this story is __________.” Help kids fill in the blank orally with “Be careful what you wish for.” Then add this moral or lesson to an ongoing three-column chart that lists “Themes, Lessons, and Morals Learned from Stories.” Glue a photo of King Midas on the left column with the book title recorded in the middle column and the lesson learned in the third column. Place this chart near the classroom library. Continue to add to the chart throughout your study of themes, morals, and lessons. Invite students to do the same when they are at the classroom library. Ask them to write their ideas on sticky notes affixed to the chart.
6. As a follow-up, you might read aloud The Chocolate Touch by Patrick Skene Catling, a story with connections to King Midas. Again, help students determine the central message, lesson, or moral from this new piece of literature.
on-the-Spot Assessment: Were students able to identify parts in the story where King Midas was foolish? Did they identify the lesson or moral in the myth? Could they connect what they learned to the new book?
Growing Independent Learners: From Literacy Standards to Stations, K-3 by Debbie Diller. (c) Stenhouse Publishers.No reproduction without written permission from the publisher.
Chapter 5: Literacy Work Stations for Reading: Literature 77
Ch
apter 5
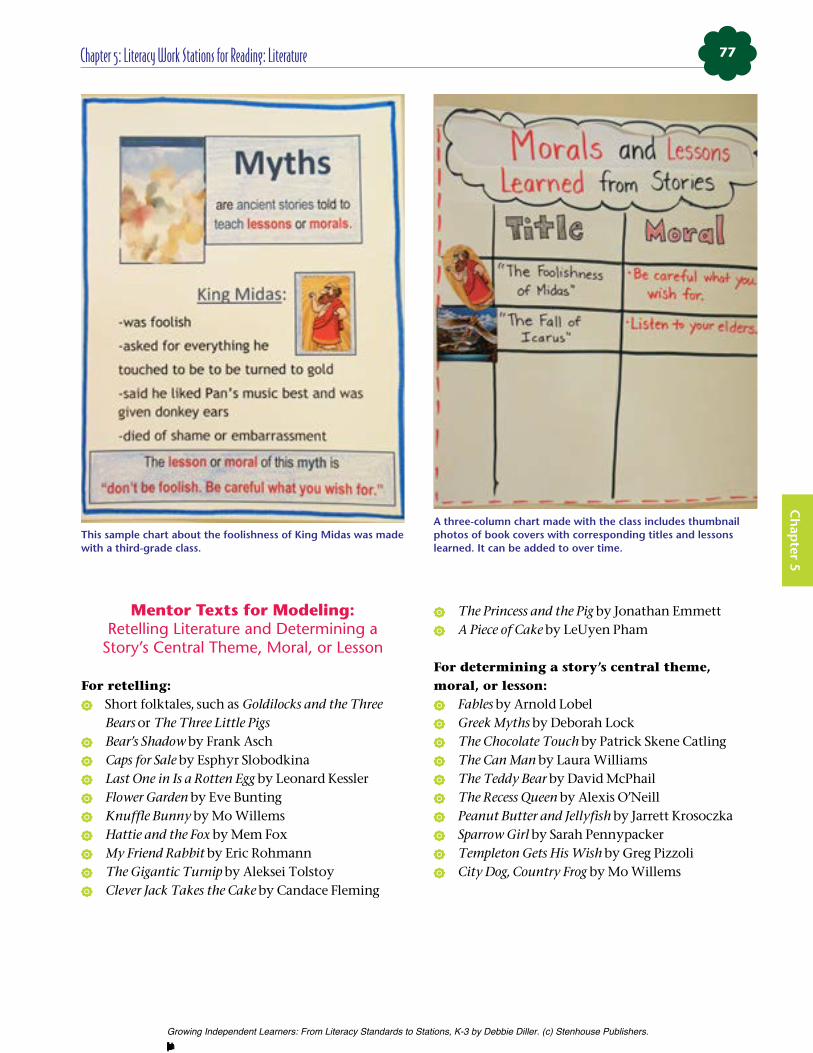
This sample chart about the foolishness of King Midas was made with a third-grade class.
A three-column chart made with the class includes thumbnail photos of book covers with corresponding titles and lessons learned. It can be added to over time.
mentor Texts for modeling: Retelling Literature and Determining a
Story’s Central Theme, Moral, or Lesson
For retelling: Short folktales, such as Goldilocks and the Three
Bears or The Three Little Pigs Bear’s Shadow by Frank Asch Caps for Sale by Esphyr Slobodkina Last One in Is a Rotten Egg by Leonard Kessler Flower Garden by Eve Bunting Knuffle Bunny by Mo Willems Hattie and the Fox by Mem Fox My Friend Rabbit by Eric Rohmann The Gigantic Turnip by Aleksei Tolstoy Clever Jack Takes the Cake by Candace Fleming
The Princess and the Pig by Jonathan Emmett A Piece of Cake by LeUyen Pham
For determining a story’s central theme, moral, or lesson:
Fables by Arnold Lobel Greek Myths by Deborah Lock The Chocolate Touch by Patrick Skene Catling The Can Man by Laura Williams The Teddy Bear by David McPhail The Recess Queen by Alexis O’Neill Peanut Butter and Jellyfish by Jarrett Krosoczka Sparrow Girl by Sarah Pennypacker Templeton Gets His Wish by Greg Pizzoli City Dog, Country Frog by Mo Willems
Growing Independent Learners: From Literacy Standards to Stations, K-3 by Debbie Diller. (c) Stenhouse Publishers.No reproduction without written permission from the publisher.
Growing Independent Learners78
Ch
apte
r 5
Teaching Tips for retelling Literature and Determining a Story’s Central Theme, moral, or Lesson Across the Grades
In Pre-K and Kindergarten • Choose simple stories for retelling with clear beginnings, middles, and endings.• Familiar folktales work well for retelling.• Use retelling pieces and a BME (beginning-middle-end) map. Have kids move the retelling
pieces to the appropriate box as they retell.
In Grades One–Two • Be sure to use fables by second grade (as well as folktales). They will help students find les-sons or morals that may not be as evident in other stories.
• These same folktales can be used for comparing and contrasting, too.
In Grades Three and Up • If students have a good foundation of retelling in K–3, summarizing will be much easier for them by fourth grade. Students will need to recognize summaries on tests. Help them select from multiple choices, telling why some are not the best summary (for example, doesn’t include the most important information; too many details; inaccurate).
• Familiarize older students with Greek myths. Do this only after they can identify morals or lessons from folktales and fables, since myths are more sophisticated.
Sample Anchor Charts for retelling Literature and Determining a Story’s
Central Theme, moral, or Lesson
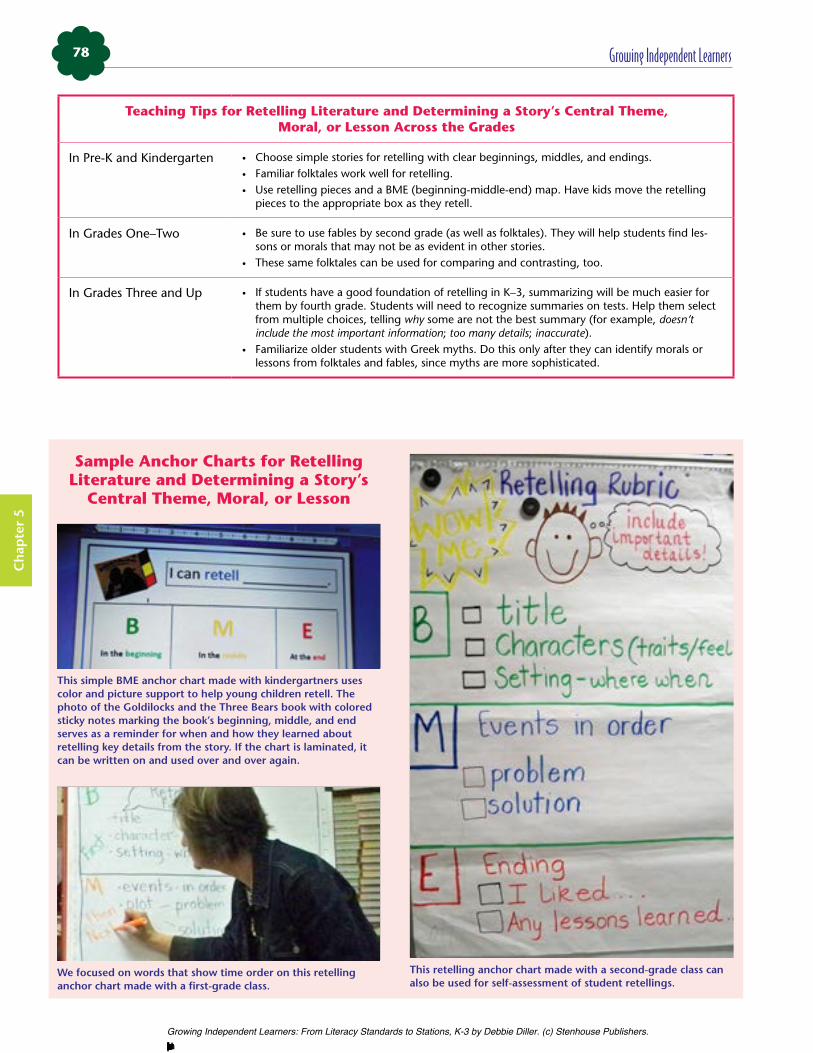
This simple BME anchor chart made with kindergartners uses color and picture support to help young children retell. The photo of the Goldilocks and the Three Bears book with colored sticky notes marking the book’s beginning, middle, and end serves as a reminder for when and how they learned about retelling key details from the story. If the chart is laminated, it can be written on and used over and over again.
We focused on words that show time order on this retelling anchor chart made with a first-grade class.
This retelling anchor chart made with a second-grade class can also be used for self-assessment of student retellings.
Growing Independent Learners: From Literacy Standards to Stations, K-3 by Debbie Diller. (c) Stenhouse Publishers.No reproduction without written permission from the publisher.
Chapter 5: Literacy Work Stations for Reading: Literature 79
Ch
apter 5
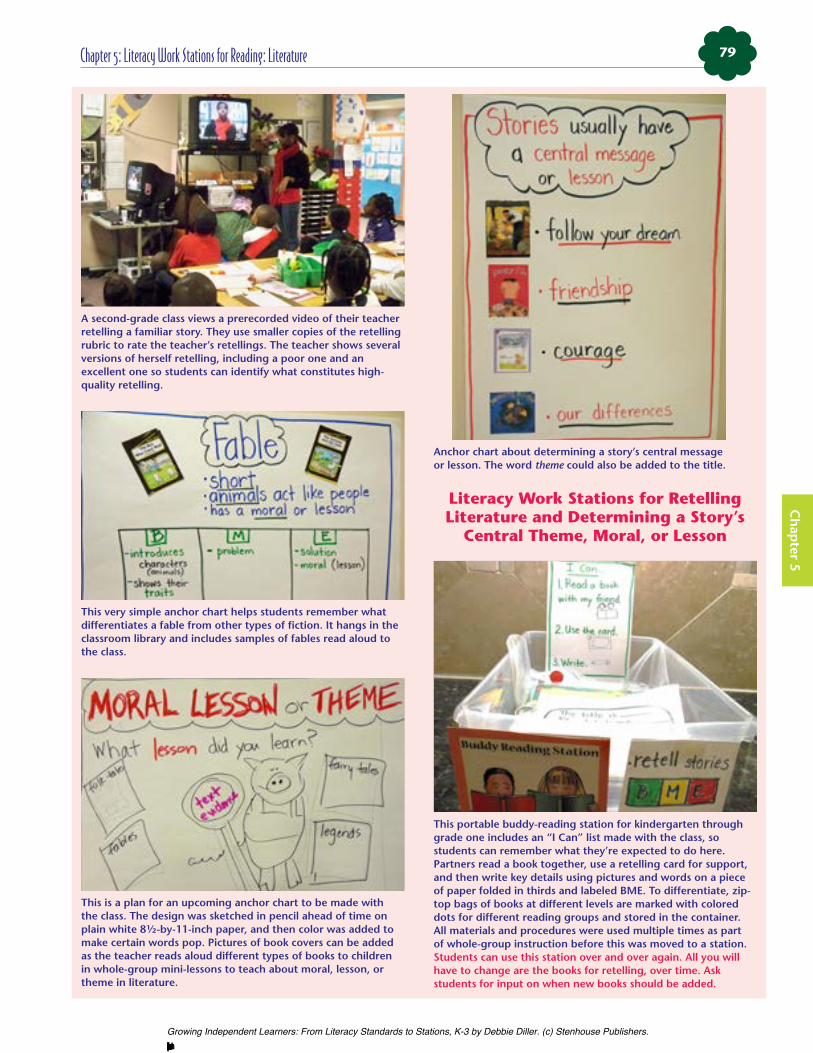
A second-grade class views a prerecorded video of their teacher retelling a familiar story. They use smaller copies of the retelling rubric to rate the teacher’s retellings. The teacher shows several versions of herself retelling, including a poor one and an excellent one so students can identify what constitutes high-quality retelling.
This very simple anchor chart helps students remember what differentiates a fable from other types of fiction. It hangs in the classroom library and includes samples of fables read aloud to the class.
This is a plan for an upcoming anchor chart to be made with the class. The design was sketched in pencil ahead of time on plain white 8½-by-11-inch paper, and then color was added to make certain words pop. Pictures of book covers can be added as the teacher reads aloud different types of books to children in whole-group mini-lessons to teach about moral, lesson, or theme in literature.
Anchor chart about determining a story’s central message or lesson. The word theme could also be added to the title.
Literacy Work Stations for retelling Literature and Determining a Story’s
Central Theme, moral, or Lesson
This portable buddy-reading station for kindergarten through grade one includes an “I Can” list made with the class, so students can remember what they’re expected to do here. Partners read a book together, use a retelling card for support, and then write key details using pictures and words on a piece of paper folded in thirds and labeled BME. To differentiate, zip-top bags of books at different levels are marked with colored dots for different reading groups and stored in the container. All materials and procedures were used multiple times as part of whole-group instruction before this was moved to a station. Students can use this station over and over again. All you will have to change are the books for retelling, over time. Ask students for input on when new books should be added.
Growing Independent Learners: From Literacy Standards to Stations, K-3 by Debbie Diller. (c) Stenhouse Publishers.No reproduction without written permission from the publisher.
Growing Independent Learners80
Ch
apte
r 5
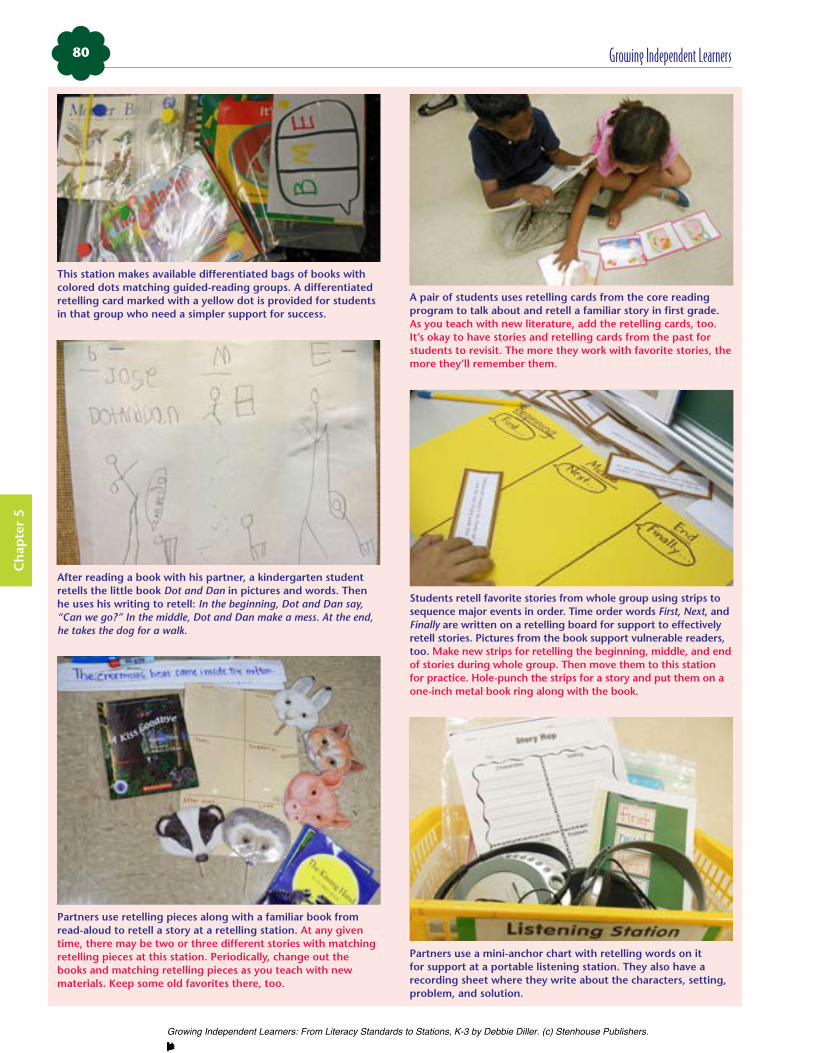
This station makes available differentiated bags of books with colored dots matching guided-reading groups. A differentiated retelling card marked with a yellow dot is provided for students in that group who need a simpler support for success.
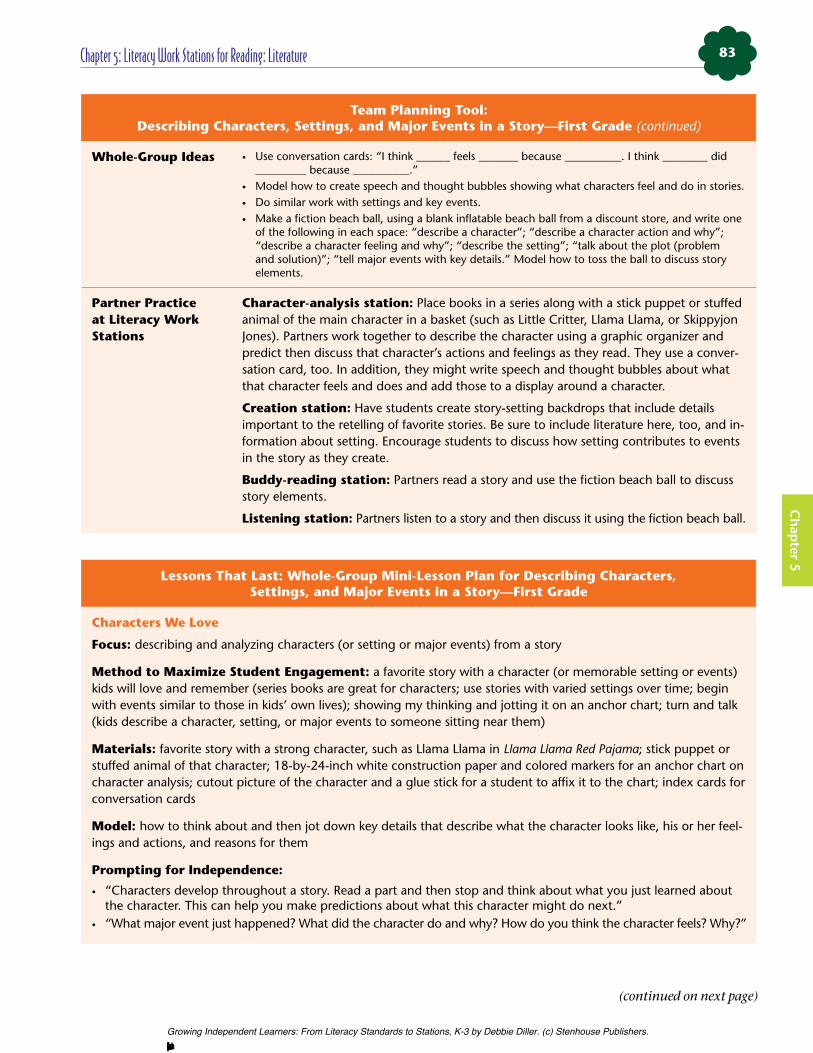
After reading a book with his partner, a kindergarten student retells the little book Dot and Dan in pictures and words. Then he uses his writing to retell: In the beginning, Dot and Dan say, “Can we go?” In the middle, Dot and Dan make a mess. At the end, he takes the dog for a walk.
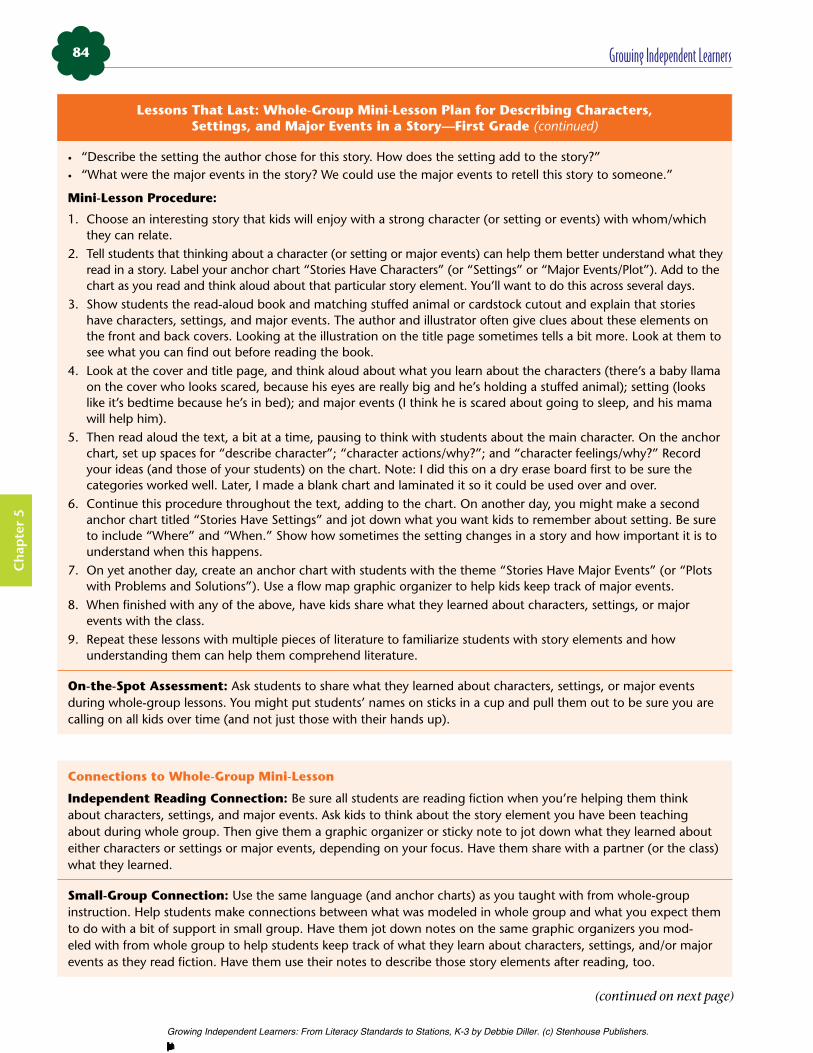
Partners use retelling pieces along with a familiar book from read-aloud to retell a story at a retelling station. At any given time, there may be two or three different stories with matching retelling pieces at this station. Periodically, change out the books and matching retelling pieces as you teach with new materials. Keep some old favorites there, too.
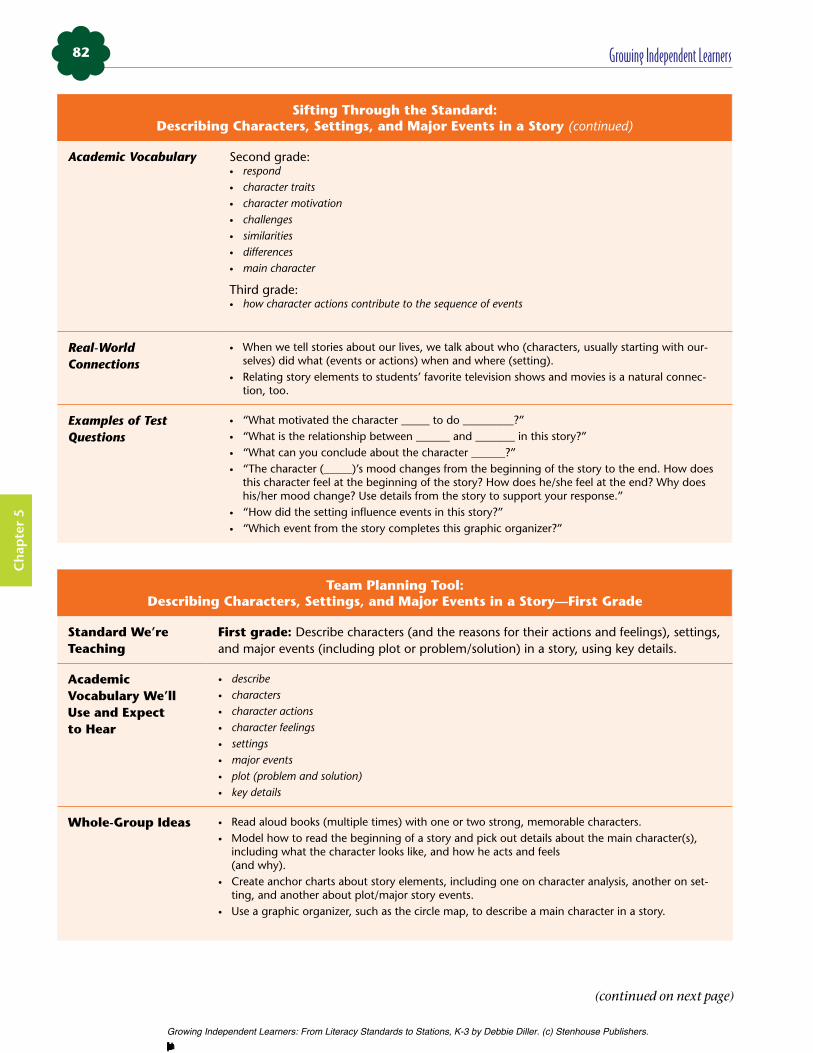
A pair of students uses retelling cards from the core reading program to talk about and retell a familiar story in first grade. As you teach with new literature, add the retelling cards, too. It’s okay to have stories and retelling cards from the past for students to revisit. The more they work with favorite stories, the more they’ll remember them.
Students retell favorite stories from whole group using strips to sequence major events in order. Time order words First, Next, and Finally are written on a retelling board for support to effectively retell stories. Pictures from the book support vulnerable readers, too. Make new strips for retelling the beginning, middle, and end of stories during whole group. Then move them to this station for practice. Hole-punch the strips for a story and put them on a one-inch metal book ring along with the book.
Partners use a mini-anchor chart with retelling words on it for support at a portable listening station. They also have a recording sheet where they write about the characters, setting, problem, and solution.
Growing Independent Learners: From Literacy Standards to Stations, K-3 by Debbie Diller. (c) Stenhouse Publishers.No reproduction without written permission from the publisher.

Chapter 5: Literacy Work Stations for Reading: Literature 81
Ch
apter 5
Describing Characters, Settings, and Major Events in a Story
Stories contain interesting and amusing characters that often entertain and delight us. What young child doesn’t love the antics of Clifford, the Big Red Dog or the heroic endeavors of Captain Underpants? When we read series books, we are able to interact with these favorite characters again and again. And in the process, we get know to them better. When we learn how to think deeply about characters and analyze them, we learn about what it’s like to be human. We connect with characters that remind us of who we are and what we’d like to be (or not be). This, in turn, can lead to
learning about human character or our own qualities.Stories also include settings that can vary from the
forest to the beach or the city during any season and across many time periods. We can travel in time and space through literature and take our students along for the ride! As they learn about setting, our children can deliberately choose to visit a new place or explore a historical or futuristic time.
Stories have plots, major events in which we follow characters into settings where they may encounter ad-venture, difficulty, funny situations, or even mystery. If we understand how stories are structured, we can better comprehend what we are reading and take away the most from this experience.
Sifting Through the Standard: Describing Characters, Settings, and major Events in a Story
What It Is • Being able to identify and describe the characters, settings, and major events using key ideas from the story
• Discussing how a character’s traits, actions, and feelings influence what that character does and why
• Comparing and contrasting characters, settings, and plots in stories by the same author, espe-cially in a series
Why It’s Important • Describing characters, settings, and major events in a story aids reading comprehension of literature.
• Reading research has shown that good readers attend closely to characters and setting when reading literature (Farstrup and Samuels 2011).
• Understanding characters can help a reader make predictions about future events in a story, especially in series books.
• Identifying a story’s setting helps readers put themselves in that story’s time and place to better understand what happens.
• Describing major events in a story creates a “storyboard in the mind”—a visual of the big things that happened.
Prerequisites Needed • Knowing the difference between fiction and nonfiction text• Knowing and expecting story elements (character, setting, plot or problem/solution) in litera-
ture• Understanding how to describe, using details to create a visual image
Academic Vocabulary Kindergarten:• identify• character• character actions• character feelings• setting• major/key event• story
First grade:• describe• key details• plot (problem and solution)
(continued on next page)
Growing Independent Learners: From Literacy Standards to Stations, K-3 by Debbie Diller. (c) Stenhouse Publishers.No reproduction without written permission from the publisher.
Growing Independent Learners82
Ch
apte
r 5
Sifting Through the Standard: Describing Characters, Settings, and major Events in a Story (continued)
Academic Vocabulary Second grade:• respond• character traits• character motivation• challenges• similarities• differences• main character
Third grade:• how character actions contribute to the sequence of events
Real-World Connections
• When we tell stories about our lives, we talk about who (characters, usually starting with our-selves) did what (events or actions) when and where (setting).
• Relating story elements to students’ favorite television shows and movies is a natural connec-tion, too.
Examples of Test Questions
• “What motivated the character _____ to do _________?”• “What is the relationship between ______ and _______ in this story?”• “What can you conclude about the character ______?”• “The character (_____)’s mood changes from the beginning of the story to the end. How does
this character feel at the beginning of the story? How does he/she feel at the end? Why does his/her mood change? Use details from the story to support your response.”
• “How did the setting influence events in this story?”• “Which event from the story completes this graphic organizer?”
Team Planning Tool: Describing Characters, Settings, and major Events in a Story—first Grade
Standard We’re Teaching
first grade: Describe characters (and the reasons for their actions and feelings), settings, and major events (including plot or problem/solution) in a story, using key details.
Academic Vocabulary We’ll Use and Expect to Hear
• describe• characters• character actions• character feelings• settings• major events• plot (problem and solution)• key details
Whole-Group Ideas • Read aloud books (multiple times) with one or two strong, memorable characters.• Model how to read the beginning of a story and pick out details about the main character(s),
including what the character looks like, and how he acts and feels (and why).
• Create anchor charts about story elements, including one on character analysis, another on set-ting, and another about plot/major story events.
• Use a graphic organizer, such as the circle map, to describe a main character in a story.
(continued on next page)
Growing Independent Learners: From Literacy Standards to Stations, K-3 by Debbie Diller. (c) Stenhouse Publishers.No reproduction without written permission from the publisher.
Chapter 5: Literacy Work Stations for Reading: Literature 83
Ch
apter 5
Team Planning Tool: Describing Characters, Settings, and major Events in a Story—first Grade (continued)
Whole-Group Ideas • Use conversation cards: “I think ______ feels _______ because __________. I think ________ did _________ because __________.”
• Model how to create speech and thought bubbles showing what characters feel and do in stories.• Do similar work with settings and key events. • Make a fiction beach ball, using a blank inflatable beach ball from a discount store, and write one
of the following in each space: “describe a character”; “describe a character action and why”; “describe a character feeling and why”; “describe the setting”; “talk about the plot (problem and solution)”; “tell major events with key details.” Model how to toss the ball to discuss story elements.
Partner Practice at Literacy Work Stations
Character-analysis station: Place books in a series along with a stick puppet or stuffed animal of the main character in a basket (such as Little Critter, Llama Llama, or Skippyjon Jones). Partners work together to describe the character using a graphic organizer and predict then discuss that character’s actions and feelings as they read. They use a conver-sation card, too. In addition, they might write speech and thought bubbles about what that character feels and does and add those to a display around a character.
Creation station: Have students create story-setting backdrops that include details important to the retelling of favorite stories. Be sure to include literature here, too, and in-formation about setting. Encourage students to discuss how setting contributes to events in the story as they create.
Buddy-reading station: Partners read a story and use the fiction beach ball to discuss story elements.
Listening station: Partners listen to a story and then discuss it using the fiction beach ball.
Lessons That Last: Whole-Group mini-Lesson Plan for Describing Characters, Settings, and major Events in a Story—first Grade
Characters We Love
focus: describing and analyzing characters (or setting or major events) from a story
method to maximize Student Engagement: a favorite story with a character (or memorable setting or events) kids will love and remember (series books are great for characters; use stories with varied settings over time; begin with events similar to those in kids’ own lives); showing my thinking and jotting it on an anchor chart; turn and talk (kids describe a character, setting, or major events to someone sitting near them)
materials: favorite story with a strong character, such as Llama Llama in Llama Llama Red Pajama; stick puppet or stuffed animal of that character; 18-by-24-inch white construction paper and colored markers for an anchor chart on character analysis; cutout picture of the character and a glue stick for a student to affix it to the chart; index cards for conversation cards
model: how to think about and then jot down key details that describe what the character looks like, his or her feel-ings and actions, and reasons for them
Prompting for Independence:
• “Characters develop throughout a story. Read a part and then stop and think about what you just learned about the character. This can help you make predictions about what this character might do next.”
• “What major event just happened? What did the character do and why? How do you think the character feels? Why?”
(continued on next page)
Growing Independent Learners: From Literacy Standards to Stations, K-3 by Debbie Diller. (c) Stenhouse Publishers.No reproduction without written permission from the publisher.
Growing Independent Learners84
Ch
apte
r 5
Lessons That Last: Whole-Group mini-Lesson Plan for Describing Characters, Settings, and major Events in a Story—first Grade (continued)
• “Describe the setting the author chose for this story. How does the setting add to the story?” • “What were the major events in the story? We could use the major events to retell this story to someone.”
mini-Lesson Procedure:
1. Choose an interesting story that kids will enjoy with a strong character (or setting or events) with whom/which they can relate.
2. Tell students that thinking about a character (or setting or major events) can help them better understand what they read in a story. Label your anchor chart “Stories Have Characters” (or “Settings” or “Major Events/Plot”). Add to the chart as you read and think aloud about that particular story element. You’ll want to do this across several days.
3. Show students the read-aloud book and matching stuffed animal or cardstock cutout and explain that stories have characters, settings, and major events. The author and illustrator often give clues about these elements on the front and back covers. Looking at the illustration on the title page sometimes tells a bit more. Look at them to see what you can find out before reading the book.
4. Look at the cover and title page, and think aloud about what you learn about the characters (there’s a baby llama on the cover who looks scared, because his eyes are really big and he’s holding a stuffed animal); setting (looks like it’s bedtime because he’s in bed); and major events (I think he is scared about going to sleep, and his mama will help him).
5. Then read aloud the text, a bit at a time, pausing to think with students about the main character. On the anchor chart, set up spaces for “describe character”; “character actions/why?”; and “character feelings/why?” Record your ideas (and those of your students) on the chart. Note: I did this on a dry erase board first to be sure the categories worked well. Later, I made a blank chart and laminated it so it could be used over and over.
6. Continue this procedure throughout the text, adding to the chart. On another day, you might make a second anchor chart titled “Stories Have Settings” and jot down what you want kids to remember about setting. Be sure to include “Where” and “When.” Show how sometimes the setting changes in a story and how important it is to understand when this happens.
7. On yet another day, create an anchor chart with students with the theme “Stories Have Major Events” (or “Plots with Problems and Solutions”). Use a flow map graphic organizer to help kids keep track of major events.
8. When finished with any of the above, have kids share what they learned about characters, settings, or major events with the class.
9. Repeat these lessons with multiple pieces of literature to familiarize students with story elements and how understanding them can help them comprehend literature.
on-the-Spot Assessment: Ask students to share what they learned about characters, settings, or major events during whole-group lessons. You might put students’ names on sticks in a cup and pull them out to be sure you are calling on all kids over time (and not just those with their hands up).
Connections to Whole-Group mini-Lesson
Independent reading Connection: Be sure all students are reading fiction when you’re helping them think about characters, settings, and major events. Ask kids to think about the story element you have been teaching about during whole group. Then give them a graphic organizer or sticky note to jot down what they learned about either characters or settings or major events, depending on your focus. Have them share with a partner (or the class) what they learned.
Small-Group Connection: Use the same language (and anchor charts) as you taught with from whole-group instruction. Help students make connections between what was modeled in whole group and what you expect them to do with a bit of support in small group. Have them jot down notes on the same graphic organizers you mod-eled with from whole group to help students keep track of what they learn about characters, settings, and/or major events as they read fiction. Have them use their notes to describe those story elements after reading, too.
(continued on next page)
Growing Independent Learners: From Literacy Standards to Stations, K-3 by Debbie Diller. (c) Stenhouse Publishers.No reproduction without written permission from the publisher.
Chapter 5: Literacy Work Stations for Reading: Literature 85
Ch
apter 5
Connections to Whole-Group mini-Lesson (continued)
Writing Connection: Help students use what they’re learning about characters, settings, and major events to write their own narratives. Begin by having them tell stories and then write them down. They might use graphic organiz-ers like those used in whole group and small group to help them think about their stories before writing them. Also, use read-aloud books from whole group as mentor texts to study how these authors describe characters, settings, and major events. Encourage your children to try this, too.
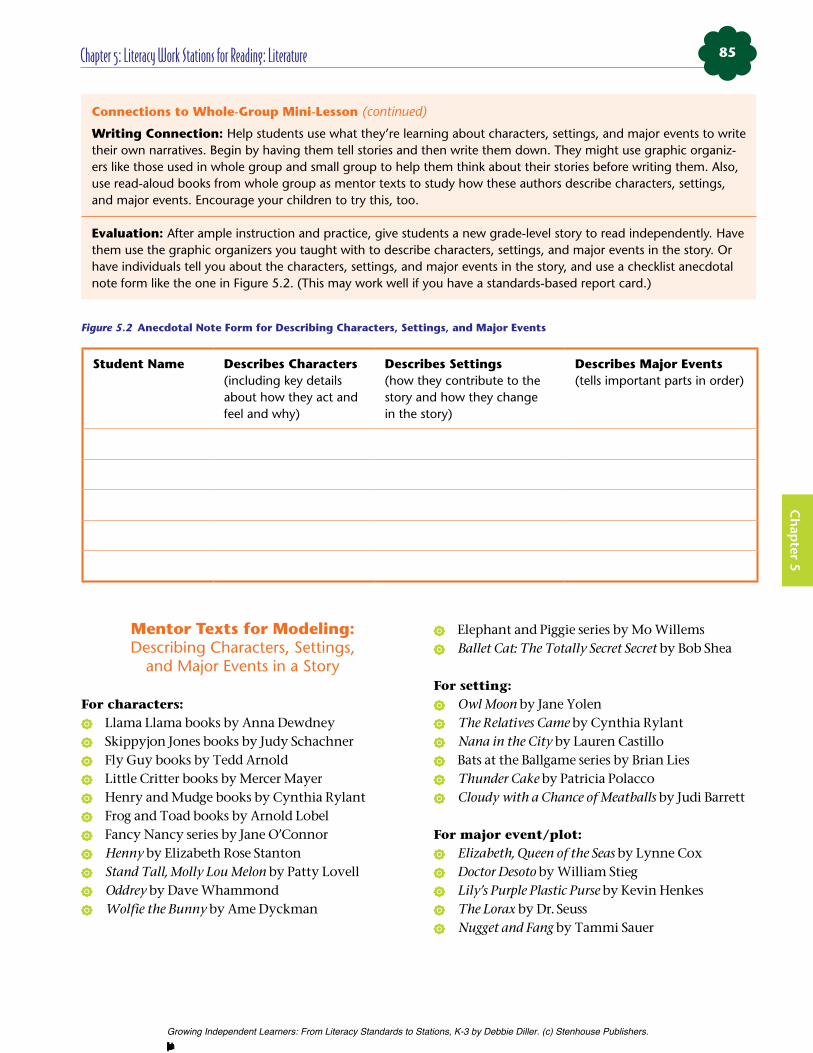
Evaluation: After ample instruction and practice, give students a new grade-level story to read independently. Have them use the graphic organizers you taught with to describe characters, settings, and major events in the story. Or have individuals tell you about the characters, settings, and major events in the story, and use a checklist anecdotal note form like the one in Figure 5.2. (This may work well if you have a standards-based report card.)
Figure 5.2 Anecdotal Note Form for Describing Characters, Settings, and Major Events
Student name Describes Characters (including key details about how they act and feel and why)
Describes Settings (how they contribute to the story and how they change in the story)
Describes major Events (tells important parts in order)
mentor Texts for modeling: Describing Characters, Settings,
and Major Events in a Story
For characters: Llama Llama books by Anna Dewdney Skippyjon Jones books by Judy Schachner Fly Guy books by Tedd Arnold Little Critter books by Mercer Mayer Henry and Mudge books by Cynthia Rylant Frog and Toad books by Arnold Lobel Fancy Nancy series by Jane O’Connor Henny by Elizabeth Rose Stanton Stand Tall, Molly Lou Melon by Patty Lovell Oddrey by Dave Whammond Wolfie the Bunny by Ame Dyckman
Elephant and Piggie series by Mo Willems Ballet Cat: The Totally Secret Secret by Bob Shea
For setting: Owl Moon by Jane Yolen The Relatives Came by Cynthia Rylant Nana in the City by Lauren Castillo Bats at the Ballgame series by Brian Lies Thunder Cake by Patricia Polacco Cloudy with a Chance of Meatballs by Judi Barrett
For major event/plot: Elizabeth, Queen of the Seas by Lynne Cox Doctor Desoto by William Stieg Lily’s Purple Plastic Purse by Kevin Henkes The Lorax by Dr. Seuss Nugget and Fang by Tammi Sauer
Growing Independent Learners: From Literacy Standards to Stations, K-3 by Debbie Diller. (c) Stenhouse Publishers.No reproduction without written permission from the publisher.
Growing Independent Learners86
Ch
apte
r 5
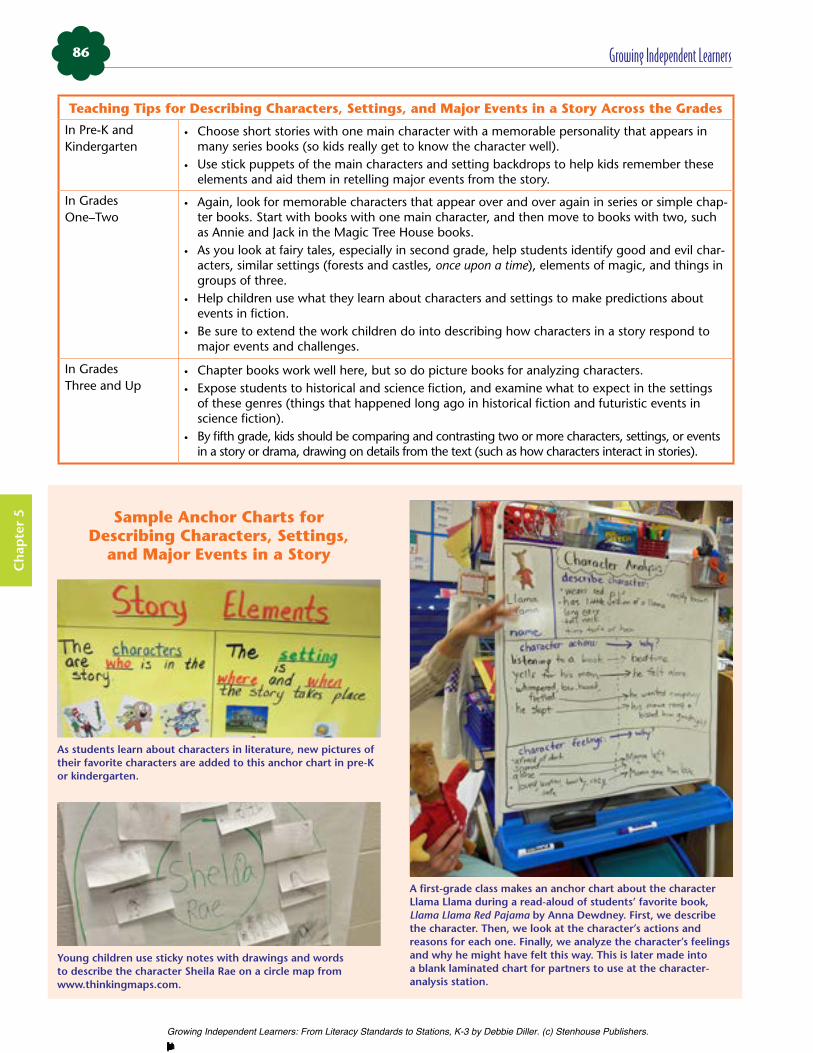
Teaching Tips for Describing Characters, Settings, and major Events in a Story Across the Grades
In Pre-K and Kindergarten
• Choose short stories with one main character with a memorable personality that appears in many series books (so kids really get to know the character well).
• Use stick puppets of the main characters and setting backdrops to help kids remember these elements and aid them in retelling major events from the story.
In Grades One–Two
• Again, look for memorable characters that appear over and over again in series or simple chap-ter books. Start with books with one main character, and then move to books with two, such as Annie and Jack in the Magic Tree House books.
• As you look at fairy tales, especially in second grade, help students identify good and evil char-acters, similar settings (forests and castles, once upon a time), elements of magic, and things in groups of three.
• Help children use what they learn about characters and settings to make predictions about events in fiction.
• Be sure to extend the work children do into describing how characters in a story respond to major events and challenges.
In Grades Three and Up
• Chapter books work well here, but so do picture books for analyzing characters. • Expose students to historical and science fiction, and examine what to expect in the settings
of these genres (things that happened long ago in historical fiction and futuristic events in science fiction).
• By fifth grade, kids should be comparing and contrasting two or more characters, settings, or events in a story or drama, drawing on details from the text (such as how characters interact in stories).
Sample Anchor Charts for Describing Characters, Settings,
and major Events in a Story
As students learn about characters in literature, new pictures of their favorite characters are added to this anchor chart in pre-K or kindergarten.
Young children use sticky notes with drawings and words to describe the character Sheila Rae on a circle map from www.thinkingmaps.com.
A first-grade class makes an anchor chart about the character Llama Llama during a read-aloud of students’ favorite book, Llama Llama Red Pajama by Anna Dewdney. First, we describe the character. Then, we look at the character’s actions and reasons for each one. Finally, we analyze the character’s feelings and why he might have felt this way. This is later made into a blank laminated chart for partners to use at the character-analysis station.
Growing Independent Learners: From Literacy Standards to Stations, K-3 by Debbie Diller. (c) Stenhouse Publishers.No reproduction without written permission from the publisher.
Chapter 5: Literacy Work Stations for Reading: Literature 87
Ch
apter 5
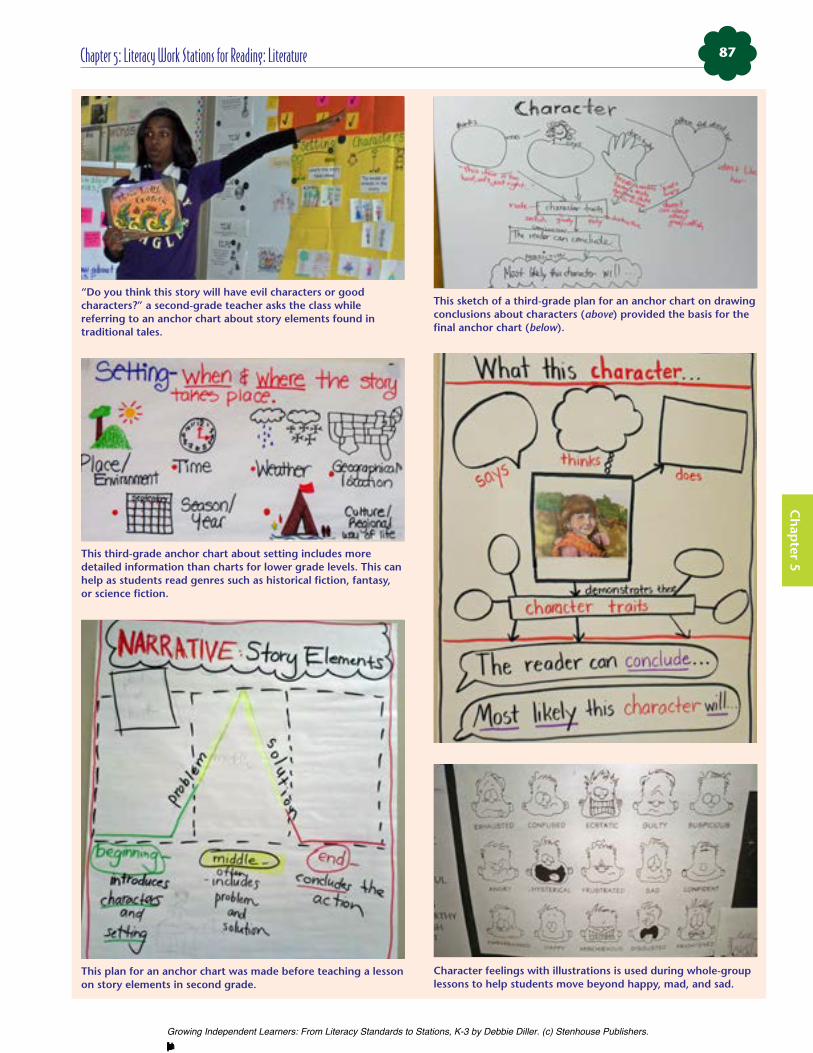
“Do you think this story will have evil characters or good characters?” a second-grade teacher asks the class while referring to an anchor chart about story elements found in traditional tales.
This third-grade anchor chart about setting includes more detailed information than charts for lower grade levels. This can help as students read genres such as historical fiction, fantasy, or science fiction.
This plan for an anchor chart was made before teaching a lesson on story elements in second grade.
This sketch of a third-grade plan for an anchor chart on drawing conclusions about characters (above) provided the basis for the final anchor chart (below).
Character feelings with illustrations is used during whole-group lessons to help students move beyond happy, mad, and sad.
Growing Independent Learners: From Literacy Standards to Stations, K-3 by Debbie Diller. (c) Stenhouse Publishers.No reproduction without written permission from the publisher.

Growing Independent Learners88
Ch
apte
r 5
Literacy Work Stations for Describing Characters, Settings,
and major Events in a Story
In response to listening to a recorded story, this student records what she now knows about its characters, setting, problem, and solution. Writing with a dry erase pen on a laminated graphic organizer attached to a file cabinet makes this fun. Note the “I Can” list posted here. Change the books at this station over time. Kids can record stories for their classmates to listen to, too.
At a creation station, this student makes a poster of story elements to go with a story read in the core program collection taught in whole group. The poster is then displayed in the classroom library, encouraging others to reread the story. Change the books at this station periodically. Instead of making a poster, students might make a bookmark, write a book review, or write a song using story elements.
Students can record what they learned about the characters, setting, or beginning, middle, and end of a story by choosing a graphic organizer in the classroom library. Each organizer is housed in a file folder with a copy of the graphic on the front. Having all materials at students’ fingertips in this station makes it easy for kids to use them and reduces movement around the room that might distract others at work. Finished graphic organizers can be displayed on the bulletin board in this area. Plenty of books keep this station going all year long.
A large, laminated graphic organizer can be used by students to write down their thinking about setting as they listen to a recorded story together at the listening station. Just be sure you’ve taught with this graphic organizer in whole group before moving it to the station for independent practice! Again, simply change books or graphic organizers over time.
Growing Independent Learners: From Literacy Standards to Stations, K-3 by Debbie Diller. (c) Stenhouse Publishers.No reproduction without written permission from the publisher.

Chapter 5: Literacy Work Stations for Reading: Literature 89
Ch
apter 5
Kindergartners record in pictures and words what they learned about the characters and setting of a story at the buddy-reading station.
At a fiction buddy-reading station in first grade, students respond to questions about character, setting, and plot on sticky notes. The books and the question cards change periodically.
Partners read a Llama Llama book and then record their thinking on the character-analysis anchor chart made in whole group. Characters and books change over time.
Supports at the character-analysis station remain there all year.
A pair of students chooses to read and act out a Llama Llama story at the character-analysis station.
Separate baskets hold a character stuffed animal (or a character’s picture on a stick) along with books starring that character to use at the character-analysis station. Introduce new character baskets throughout the year.
Growing Independent Learners: From Literacy Standards to Stations, K-3 by Debbie Diller. (c) Stenhouse Publishers.No reproduction without written permission from the publisher.
Growing Independent Learners90
Ch
apte
r 5
Acknowledging Differences in Characters’ Points of View
A valuable lesson my dad taught me when I was young is that there are always (at least) two sides to a story. Understanding and acknowledging another person’s point of view can help us get along better with each other both at home and in the world. Character edu-cation is sorely needed in many schools today because it is not always taught at home, but it can be tough to find extra time to teach this curriculum. If we focus on acknowledging points of view while reading literature, we can infuse our literacy lessons with character-build-ing principles as well as improve reading comprehen-sion and fluency.
Reading interesting stories with dialogue, capti-vating plays and reader’s theater scripts, and sensory or even silly poems can help children think about points of view and read fluently as they speak in differ-ent voices for different characters. Fairy tales (original and fractured or retold) provide excellent opportuni-ties for examining point of view. Lively discussions may ensue as children consider The Three Little Pigs or Goldilocks and the Three Bears from multiple points of view. Along with these traditional folktales, read aloud
picture books such as Jon Scieszka’s The True Story of the 3 Little Pigs! or Nancy Louwen’s Believe Me, Goldi-locks Rocks: The Story of the Three Bears as Told by Baby Bear. Then ask, “How does the story change when told from the perspective of the wolf versus one of the pigs, or Goldilocks instead of the three bears?” As students become third graders, this can be taken even further, when they are ready to discern their own point of view from that of the characters or narrator. This is sophisti-cated stuff that requires a firm foundation.
Take your time teaching kids to pay attention to points of view. Be sure they are using this academic vo-cabulary. We should not be the only ones in the class-room using these terms. As you read aloud, have young children say (or repeat), “The author is Jan Brett. She is telling the story with the words.” Or “The illustrator is Paul Galdone. That means he did the drawings and an paintings in the book. Sometimes a person is an au-thor and an illustrator.” “Eric Carle wrote the words and drew the pictures.” “Little Red Riding Hood is the main character in this story.” And as you work with older stu-dents, “The narrator is telling the story here. He seems to be standing outside watching the characters. Now the story is being told from the point of view of the wolf. The wolf is hungry and wants to eat the little pigs, but they are working hard to stay away from him.”
Sifting Through the Standard: Acknowledging Differences in Characters’ Points of View
What It Is • Point of view is the perspective from which the story is told: who is telling it at any given point and conveying the opinion or feelings of the characters in the story.
• Point of view is used in stories, essays, and poems to convey characters’ feelings.
Why It’s Important • Knowing who is telling the story affects comprehension. We are given glimpses into characters through points of view.
• Reading fluency (especially reading dialogue) is affected by identifying points of view. As we read and think about who is talking and what that character is like, we can use differ-ent voices and expression to read/talk like the specific characters in literature, including dramas, plays, and poetry.
• As readers mature, it is important that they learn to differentiate between their own points of view and those of characters in a story, play, poem, or essay.
Prerequisites Needed • Understanding the difference between author, illustrator, character, and narrator. These are all people related to stories and can be confusing to young readers.
• Knowing which character a pronoun refers to in the text (for example, Miguel was looking forward to seeing his dad that evening. He thought about the fun they would have together. The narrator is telling this part of the story. He refers to Miguel, not Miguel’s dad.)
• Making personal connections helps us understand and engage with what we’re reading.
(continued on next page)
Growing Independent Learners: From Literacy Standards to Stations, K-3 by Debbie Diller. (c) Stenhouse Publishers.No reproduction without written permission from the publisher.
Chapter 5: Literacy Work Stations for Reading: Literature 91
Ch
apter 5
Sifting Through the Standard: Acknowledging Differences in Characters’ Points of View (continued)
Academic Vocabulary
Kindergarten:• author• illustrator• role in telling the story• play/drama• poem
First grade:• who is telling the story• character• narrator• quotation marks
Second grade:• character’s point of view• dialogue
Third grade:• your point of view• narrator’s point of view• script• cast of characters• first person• third person
Real-World Connections
• Point of view is perspective. It can be helpful in life to be able to consider different per-spectives when making decisions. If we understand someone else’s point of view, it can help us get along better with others.
• Help kids think about point of view when this comes up naturally in the classroom. For example, when two children have a conflict, talk about their points of view to help them understand each other and resolve the problem.
Example Test Questions
• “Which of the following best describes the point of view of [character name]?”• “Which character is telling the story in paragraph ___? How do you know?”• “Is this part of the story told in first or third person? Use text evidence to show
your thinking.”
Team Planning Tool: Acknowledging Differences in Characters’ Point of View—Second Grade
Standard We’re Teaching
Second grade: Acknowledge differences in the point of view, including by speaking in a different voice for each character when reading dialogue aloud.
Academic Vocabulary We’ll Use and Expect to Hear
• narrator is telling the story• the character ______ is telling the story• character’s point of view• dialogue• quotation marks• play
(continued on next page)
Growing Independent Learners: From Literacy Standards to Stations, K-3 by Debbie Diller. (c) Stenhouse Publishers.No reproduction without written permission from the publisher.
Growing Independent Learners92
Ch
apte
r 5
Team Planning Tool: Acknowledging Differences in Characters’ Point of View—Second Grade (continued)
Whole-Group Ideas • Using a projection device, do shared reading of plays, such as 12 Fabulously Funny Fairy Tale Plays by Justin McCory Martin (2002).
• Use character cards so everyone has a part to read.
• Point out the text structure of a play and how to read it.
• Model how to think about who is telling the story each time a new part is read.
• Model how to think about each character’s (or narrator’s) point of view and make your voice sound like that character. Use point-of-view sticks made from a tongue depressor and a thought bubble taped to it labeled “C” or “N” (for Character or Narrator).
• Make an anchor chart for point of view.
• Make conversation cards for point of view. I think _______’s point of view is __________ because _______________.
Partner Practice at Literacy Work Stations
Drama station: A pair of students distribute the character cards to go with a play, so they both have specific parts to read. Then they read the play together, using different voices and the point-of-view conversation cards to discuss the perspective of the different characters and narrator.
Speech-bubble-writing station: Students choose a character from a story, drama, or poem and write what that person is thinking or feeling in a speech bubble in a selected part of the text after reading or listening to that piece of literature.
Writing station: Partners work together to write their own plays, using a simple folk-tale such as The Three Little ______s.
Buddy-reading station: Partners read a story together, using point-of-view sticks. They read a bit and think about who’s telling the story; then they talk about that character’s (or narrator’s) point of view.
Poetry station: Kids read poems written from the point of view of an animal or an inanimate object and identify point of view using conversation cards. Or they can write a poem from a particular point of view. For example, “Pretend you are a [spring flower, kite, cloud, and so on].” As a class, generate topics for this station.
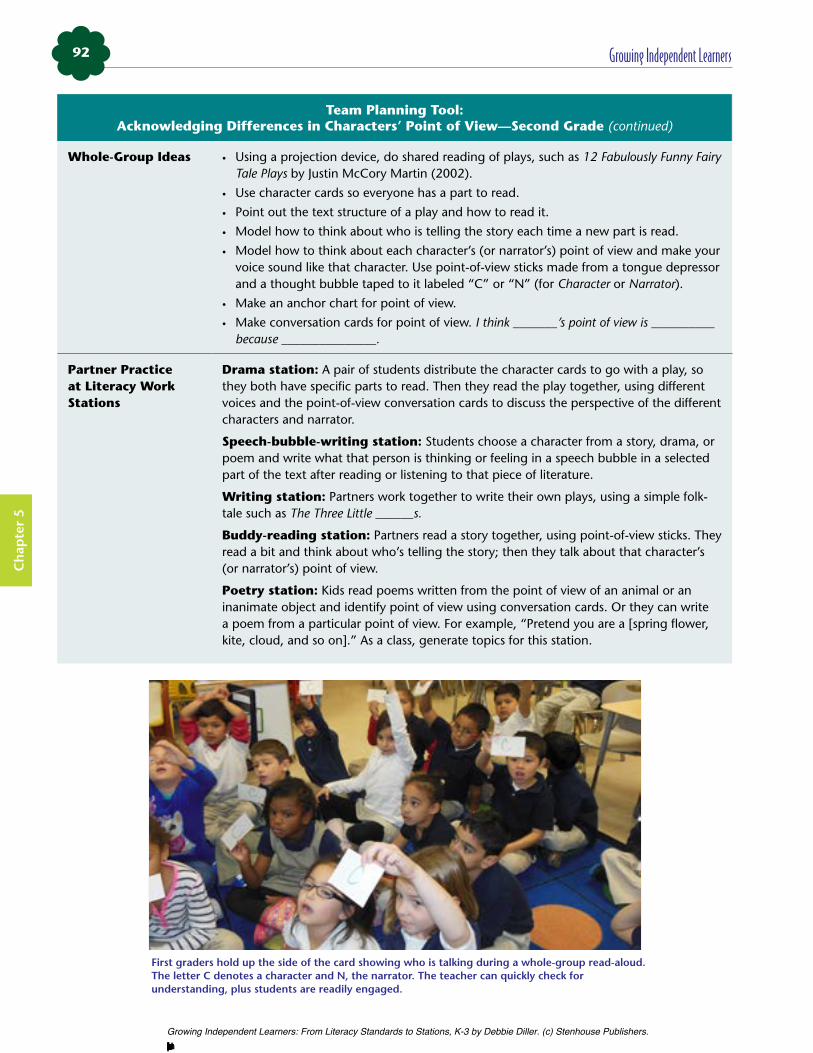
First graders hold up the side of the card showing who is talking during a whole-group read-aloud. The letter C denotes a character and N, the narrator. The teacher can quickly check for understanding, plus students are readily engaged.
Growing Independent Learners: From Literacy Standards to Stations, K-3 by Debbie Diller. (c) Stenhouse Publishers.No reproduction without written permission from the publisher.
Chapter 5: Literacy Work Stations for Reading: Literature 93
Ch
apter 5
Lessons That Last: Whole-Group mini-Lesson Plan for Acknowledging Differences in Characters’ Points of View—Second Grade
Character Cards and Point of View
focus: noting different points of view in characters and speaking in different voices for each when reading dialogue
method to maximize Student Engagement: shared reading of a fun play; using different voices to go with each character; character cards to divide up parts among the class (each character’s name written on a card)
(Note: Teach this mini-lesson multiple times with different pieces of literature, including plays, reader’s theater scripts, stories with dialogue, sections of chapter books, and poems.)
materials: play from 12 Fabulously Funny Fairy Tale Plays by Justin McCory Martin (2002); character cards (index cards, each noting the name of a character from the drama or story); point-of-view anchor chart
model: how to think about who’s talking in the story and how to change your voice according to that character’s point of view
Prompting for Independence:
• “Who is talking now? What is this character’s point of view? How do you know?”
• “How would that character speak to show how he/she is feeling or what he/she is thinking? Make your voice sound like that emotion when reading.”
• “Which character is telling the story? How does that affect the story? How might the story change if a different character told the story?”
mini-Lesson Procedure:
1. Choose a play (or story or poem) that children will enjoy and connect to that has different parts and different points of view and dialogue, such as “The Popsicle Man”—based on “The Gingerbread Man”—from 12 Fabulously Funny Fairy Tale Plays by Justin McCory Martin.
2. Explain that when we read a play (or dialogue), it’s important to think about who’s talking and to identify that character’s point of view. That will help us understand the character and the action in the story as we read. Demonstrate how to use different voices for different characters based on what the author tells us about that character.
3. Refer to your point-of-view anchor chart as you demonstrate thinking about point of view for characters, such as Little Baby (who cries and has a baby voice) and Popsicle Boy (who speaks boldly as he evades those chasing after him).
4. Make the text accessible to all students by using a projection device to display the text of the play on a screen or whiteboard. Then read the names of the characters and distribute the character cards to groups of children, so that all students have a part to read collectively. (If you use this play, there will be Narrator, Little Baby, Popsicle Boy, Jump-Rope Girl, Boy on Bike, and Dog. Write each character’s name on an index card.)
5. Do a shared reading of the play, with each group reading their part together chorally. As each character speaks, ask kids to think for a second about the character and his or her point of view and how he or she would sound.
6. When finished, have kids turn to a buddy and share what they liked about this play. Ask a few students to share with the class. Then have buddies tell each other what they learned about using point of view to read with different voices. Again, have one or two students share with the class.
7. Remind students to think about point of view as they read plays, stories, and poems. They can learn a lot about characters and their feelings as they consider point of view, and they can use the information to use different voices to read dialogue in literature.
on-the-Spot Assessment: Listen to students’ responses. Are they using different voices that reflect the characters and their points of view?
Growing Independent Learners: From Literacy Standards to Stations, K-3 by Debbie Diller. (c) Stenhouse Publishers.No reproduction without written permission from the publisher.

Growing Independent Learners94
Ch
apte
r 5
Connections to Whole-Group mini-Lesson
Independent reading Connection: Find plays (or reader’s theater scripts, or stories with dialogue, or poems, de-pending on what you’ve modeled with) written on the independent reading levels of your class. Put kids in pairs or small groups and teach them how to make their own character cards that represent the parts played in the dramas. Then have them divide the cards between them and read the play. Remind them to think about point of view and use different character voices for each character. When finished, they may switch parts and read again.
Small-Group Connection: Over time, be sure to expose your students to reading plays (as well as other types of literature) in small group, too. Reading a play encourages students to think about point of view and use different voices when reading dialogue, which affects fluency.
Writing Connection: Work as a class to write a play, fracturing a simple folktale they know and love. For example, you might write “The Three Penguins.” Provide a frame for support. See page 89 for ideas on how to do this.
Evaluation: Listen to students read a play or story with dialogue during independent reading time or small group. Use a rubric to evaluate how well the child understands point of view and reading dialogue with expression.
(continued on next page)
mentor Texts for modeling: Acknowledging Differences in
Characters’ Point of View
Plays, such as 25 Science Plays for Emergent Readers by Sheryl Ann Crawford and Nancy I. Sanders or 12 Fabulously Funny Fairy Tale Plays by Justin McCory Martin
Reader’s theater scripts, such as those from Bench-mark Education
Books in a series, such as The World According to Humphrey by Betty G. Birney. (This is a delightful series for third grade.)
Books that tell folktales from different perspec-tives, such as The True Story of the 3 Little Pigs! by Jon Scieszka or Believe Me, Goldilocks Rocks: The Story of the Three Bears as Told by Baby Bear by Nancy Louwen
The Story of Fish and Snail by Deborah Freedman Winter Is for Snow by Robert Neubecker The Day the Crayons Quit by Drew Daywalt Duck! Rabbit! by Amy Krouse Rosenthal Voices in the Park by Anthony Browne Who Is Melvin Bubble? by Nick Bruel City Dog, Country Frog by Mo Willems
Teaching Tips for Acknowledging Differences in Characters’ Point of View Across the Grades
In Pre-k and kindergarten • Be sure to use the words author, illustrator, and character as you read aloud to students. Ask the children to use this academic vocabulary as they talk about books you’re reading to them, too.
• Encourage students to use different voices when acting out stories that have been read aloud. Use retelling pieces or character masks to help them think about who’s talking and how that character acts and feels.
Growing Independent Learners: From Literacy Standards to Stations, K-3 by Debbie Diller. (c) Stenhouse Publishers.No reproduction without written permission from the publisher.
Chapter 5: Literacy Work Stations for Reading: Literature 95
Ch
apter 5
Teaching Tips for Acknowledging Differences in Characters’ Point of View Across the Grades (continued)
In Grades one–Two • Use plays, stories with dialogue, and poetry to teach your class about point of view. Fairy tales are a natural, since they include interesting, familiar characters, and many tales are available as told from different points of view.
• Today, many children love to play video games. You can have them think about who’s telling the story just like they think about who they are when playing a video game. When you’re playing a game, you must think about point of view. If you are the target, you play the game differently from how you play it if you’re the villain.
• Give each child a card with an N (narrator) on one side and a C (character) on the other. As you read aloud, ask them to hold up the card to show who’s talking (narrator or character) and discuss how they knew that and how the point of view changes throughout the piece of literature.
• By second grade, writing fractured fairy tales can be fun for students. See pho-tos of writing stations on page 97 for ideas.
In Grades Three and Up • As students move into chapter books, there is a greater amount of dialogue (and less picture support) in literature. As much as we want students to make connections to the reading, they must learn to discriminate between their own point of view and those of the characters. They might still use the N (narrator) and C (character) cards as in grades one–two, but they also pause at places in literature to point to themselves and tell their point of view.
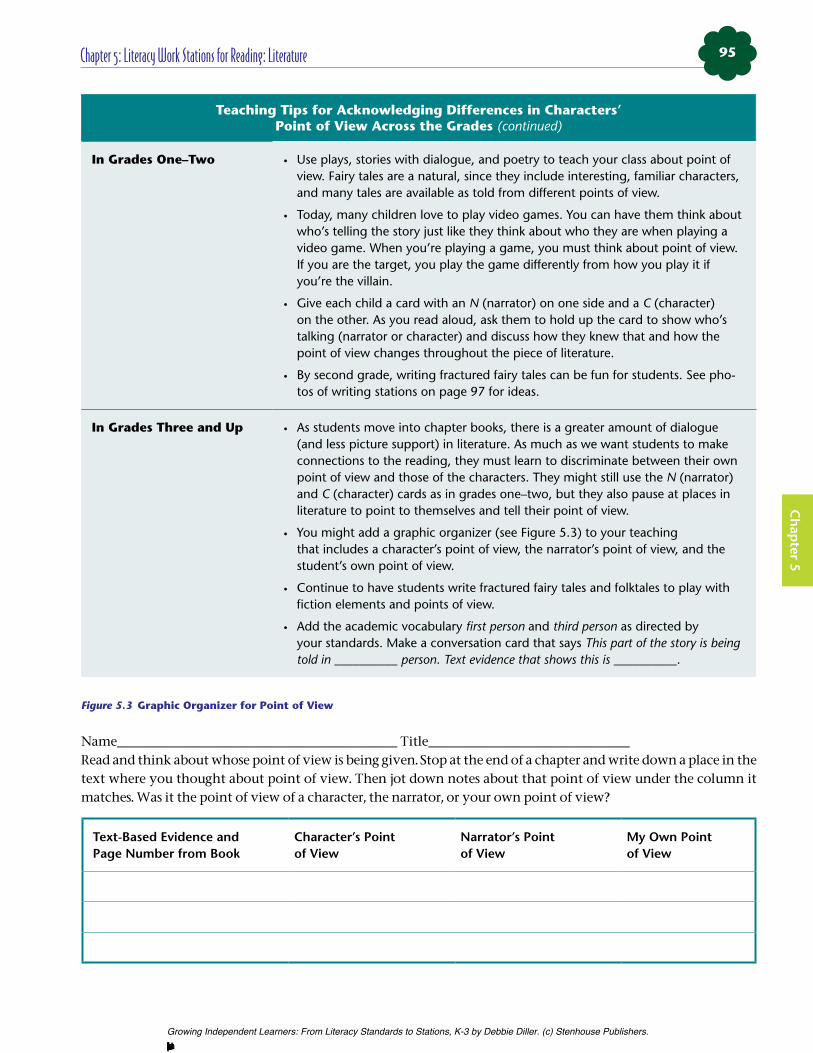
• You might add a graphic organizer (see Figure 5.3) to your teaching that includes a character’s point of view, the narrator’s point of view, and the student’s own point of view.
• Continue to have students write fractured fairy tales and folktales to play with fiction elements and points of view.
• Add the academic vocabulary first person and third person as directed by your standards. Make a conversation card that says This part of the story is being told in __________ person. Text evidence that shows this is __________.
Figure 5.3 Graphic Organizer for Point of View
Name________________________________ Title_______________________Read and think about whose point of view is being given. Stop at the end of a chapter and write down a place in the text where you thought about point of view. Then jot down notes about that point of view under the column it matches. Was it the point of view of a character, the narrator, or your own point of view?
Text-Based Evidence and Page Number from Book
Character’s Point of View
Narrator’s Point of View
My Own Point of View
Growing Independent Learners: From Literacy Standards to Stations, K-3 by Debbie Diller. (c) Stenhouse Publishers.No reproduction without written permission from the publisher.
Growing Independent Learners96
Ch
apte
r 5
Sample Anchor Charts for Acknowledging Differences in Characters’ Points of View
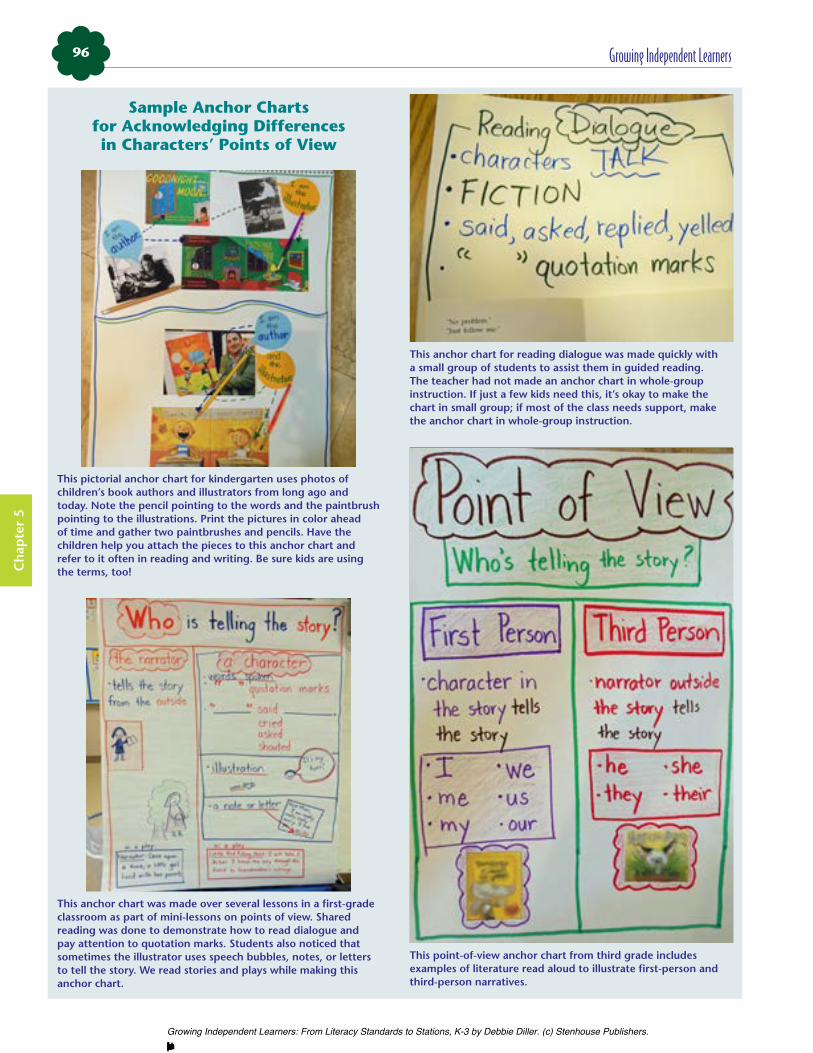
This pictorial anchor chart for kindergarten uses photos of children’s book authors and illustrators from long ago and today. Note the pencil pointing to the words and the paintbrush pointing to the illustrations. Print the pictures in color ahead of time and gather two paintbrushes and pencils. Have the children help you attach the pieces to this anchor chart and refer to it often in reading and writing. Be sure kids are using the terms, too!
This anchor chart was made over several lessons in a first-grade classroom as part of mini-lessons on points of view. Shared reading was done to demonstrate how to read dialogue and pay attention to quotation marks. Students also noticed that sometimes the illustrator uses speech bubbles, notes, or letters to tell the story. We read stories and plays while making this anchor chart.
This anchor chart for reading dialogue was made quickly with a small group of students to assist them in guided reading. The teacher had not made an anchor chart in whole-group instruction. If just a few kids need this, it’s okay to make the chart in small group; if most of the class needs support, make the anchor chart in whole-group instruction.
This point-of-view anchor chart from third grade includes examples of literature read aloud to illustrate first-person and third-person narratives.
Growing Independent Learners: From Literacy Standards to Stations, K-3 by Debbie Diller. (c) Stenhouse Publishers.No reproduction without written permission from the publisher.

Chapter 5: Literacy Work Stations for Reading: Literature 97
Ch
apter 5
Literacy Work Stations for Acknowledging Differences
in Characters’ Points of View
At the drama station, partners use character cards to determine who will read each part and use that character’s voice while acting out the story or play. Change the plays periodically.
Students respond to a piece of literature read or listened to by writing something that a character might say in a speech bubble at the listening station or a writing station. Use paper with blank circles in place of the animals on the recording sheet, so kids can draw characters from any book.
Students write fractured fairy tales based on The Three Little Pigs during writing workshop. They continue this work at a writing station in second and third grade. Various versions of The Three Little Pigs read aloud serve as mentor texts here. Supports (pictured above) have been used during whole-group instruction and are also placed at this station to help students remember story structure. Authors think about the different points of view as they write. Over time, use different folktales to fracture. Keep the story line simple to ensure student success.
Page 1 of a second grader’s fractured fairy tale: “Once upon a time, there lived 3 little penguins and a mama penguin. One day the mama penguin said, ‘Little penguins, you are old enough to go farther through Antarctica.’ Then the little penguins set off to find a new home.”
Page 2 continues . . . “The first little penguin made his house of stone. The second little penguin made his house out of snow. The third little penguin made his house out of eggshells.”
Students store their writing in a folder that they bring to the writing station as they write their fractured fairy tales in the same classroom.
Growing Independent Learners: From Literacy Standards to Stations, K-3 by Debbie Diller. (c) Stenhouse Publishers.No reproduction without written permission from the publisher.
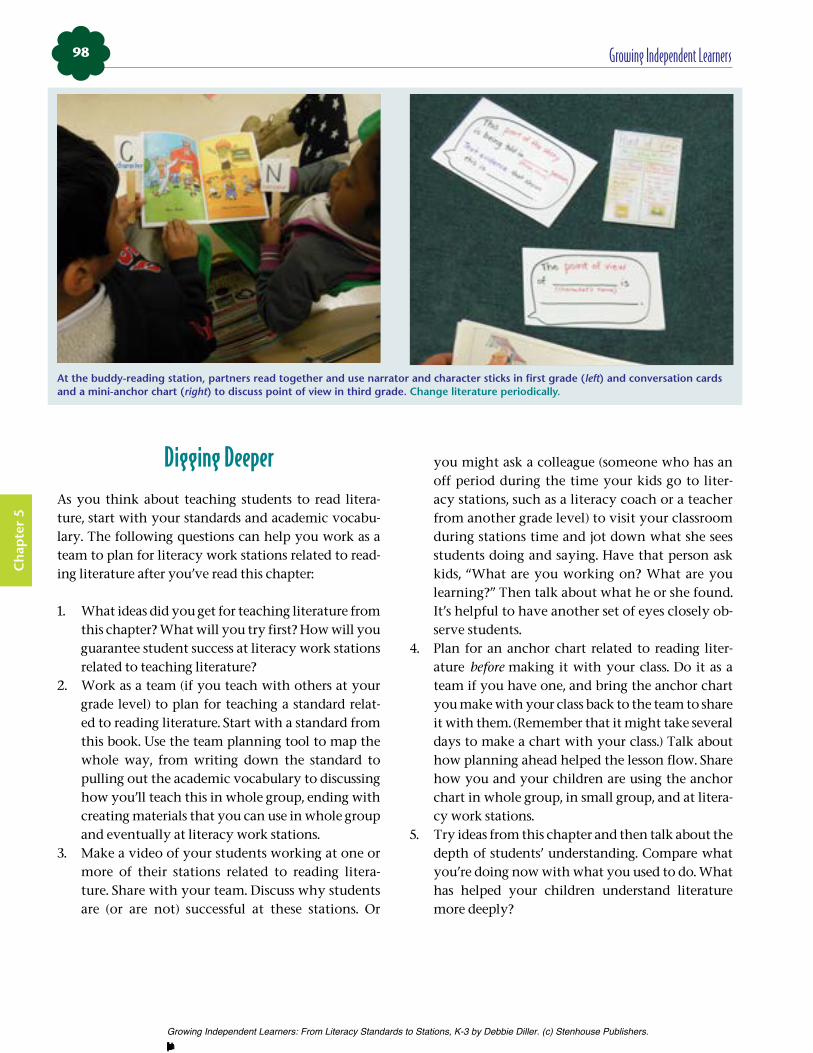
Growing Independent Learners98
Ch
apte
r 5
At the buddy-reading station, partners read together and use narrator and character sticks in first grade (left) and conversation cards and a mini-anchor chart (right) to discuss point of view in third grade. Change literature periodically.
Digging DeeperAs you think about teaching students to read litera-ture, start with your standards and academic vocabu-lary. The following questions can help you work as a team to plan for literacy work stations related to read-ing literature after you’ve read this chapter:
1. What ideas did you get for teaching literature from this chapter? What will you try first? How will you guarantee student success at literacy work stations related to teaching literature?
2. Work as a team (if you teach with others at your grade level) to plan for teaching a standard relat-ed to reading literature. Start with a standard from this book. Use the team planning tool to map the whole way, from writing down the standard to pulling out the academic vocabulary to discussing how you’ll teach this in whole group, ending with creating materials that you can use in whole group and eventually at literacy work stations.
3. Make a video of your students working at one or more of their stations related to reading litera-ture. Share with your team. Discuss why students are (or are not) successful at these stations. Or
you might ask a colleague (someone who has an off period during the time your kids go to liter-acy stations, such as a literacy coach or a teacher from another grade level) to visit your classroom during stations time and jot down what she sees students doing and saying. Have that person ask kids, “What are you working on? What are you learning?” Then talk about what he or she found. It’s helpful to have another set of eyes closely ob-serve students.
4. Plan for an anchor chart related to reading liter-ature before making it with your class. Do it as a team if you have one, and bring the anchor chart you make with your class back to the team to share it with them. (Remember that it might take several days to make a chart with your class.) Talk about how planning ahead helped the lesson flow. Share how you and your children are using the anchor chart in whole group, in small group, and at litera-cy work stations.
5. Try ideas from this chapter and then talk about the depth of students’ understanding. Compare what you’re doing now with what you used to do. What has helped your children understand literature more deeply?
Growing Independent Learners: From Literacy Standards to Stations, K-3 by Debbie Diller. (c) Stenhouse Publishers.No reproduction without written permission from the publisher.