Embed Size (px)
DESCRIPTION
Ubuntu, Linux Mint
Citation preview
VOLUME 3
UNLOCK THE POTENTIAL OF OPEN SOURCE OPERATING SYSTEMS
NEW UBUNTU LINUX MINT ELEMENTARY TAILS
OVER 5 HOURSOF VIDEO TUTORIALS PLUS FREE SOFTWARE PACKAGES


In this new volume of Linux Tips, Tricks, Apps & Hacks, you will find everything you need to bust open your Linux systems and start making them work the way you want
them to. The free and customisable philosophy of open source software means it is perfect for anyone who wants to delve beneath the surface and start tinkering with the way things work. In this book, we’ll get started with 100 ways to master the command
line so you’ll never be daunted by the terminal screen again. You’ll discover how to build your best ever servers, with increased speeds and functionality, and find out all
about this year’s best distros and which free software to use with them. With all of these and many more expert tips, tricks and hacks, plus reviews of some of the best
Linux software available, this is the perfect guide for everyone who wants to enhance their Linux experience.
Welcome to

Imagine Publishing LtdRichmond House33 Richmond Hill
BournemouthDorset BH2 6EZ
+44 (0) 1202 586200Website: www.imagine-publishing.co.uk
Twitter: @Books_ImagineFacebook: www.facebook.com/ImagineBookazines
Publishing Director
Aaron Asadi
Head of Design
Ross Andrews
Production Editor
Alex Hoskins
Senior Art Editor
Greg Whitaker
Designer
David Lewis
Printed byWilliam Gibbons, 26 Planetary Road, Willenhall, West Midlands, WV13 3XT
Distributed in the UK, Eire & the Rest of the World by
Marketforce, Blue Fin Building, 110 Southwark Street, London, SE1 0SUTel 0203 148 3300 www.marketforce.co.uk
Distributed in Australia by Network Services (a division of Bauer Media Group), Level 21 Civic Tower, 66-68 Goulburn Street,
Sydney, New South Wales 2000, Australia Tel +61 2 8667 5288
DisclaimerThe publisher cannot accept responsibility for any unsolicited material lost or damaged in the
post. All text and layout is the copyright of Imagine Publishing Ltd. Nothing in this bookazine may be reproduced in whole or part without the written permission of the publisher. All copyrights are
recognised and used specifically for the purpose of criticism and review. Although the bookazine has endeavoured to ensure all information is correct at time of print, prices and availability may change.
This bookazine is fully independent and not affiliated in any way with the companies mentioned herein.
Linux Tips, Tricks, Apps & Hacks Volume 3 © 2015 Imagine Publishing Ltd
ISBN 978 1785 460 869
bookazine series
Part of the
6 Linux Tips, Tricks, Apps & Hacks
Unlock the potential of open source software
Linux Tips, Tricks, Apps & HacksLinux Tips, Tricks, Apps & Hacks
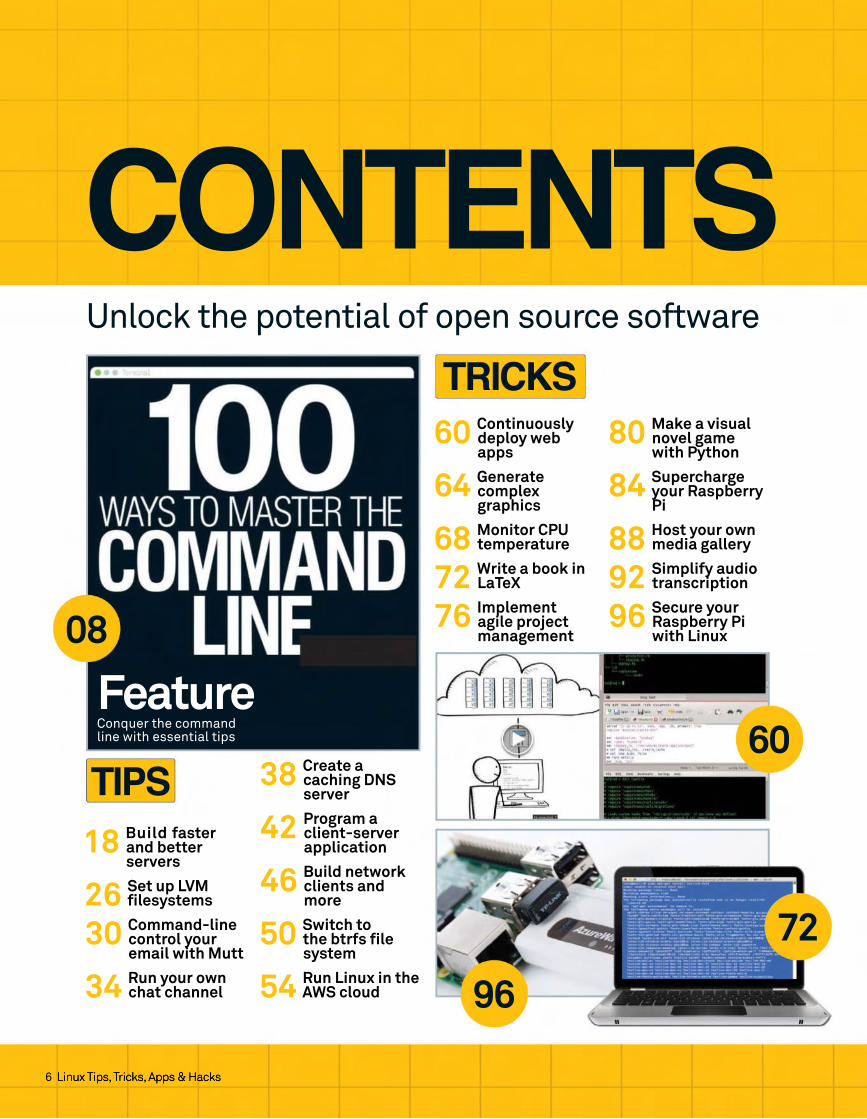
CONTENTS
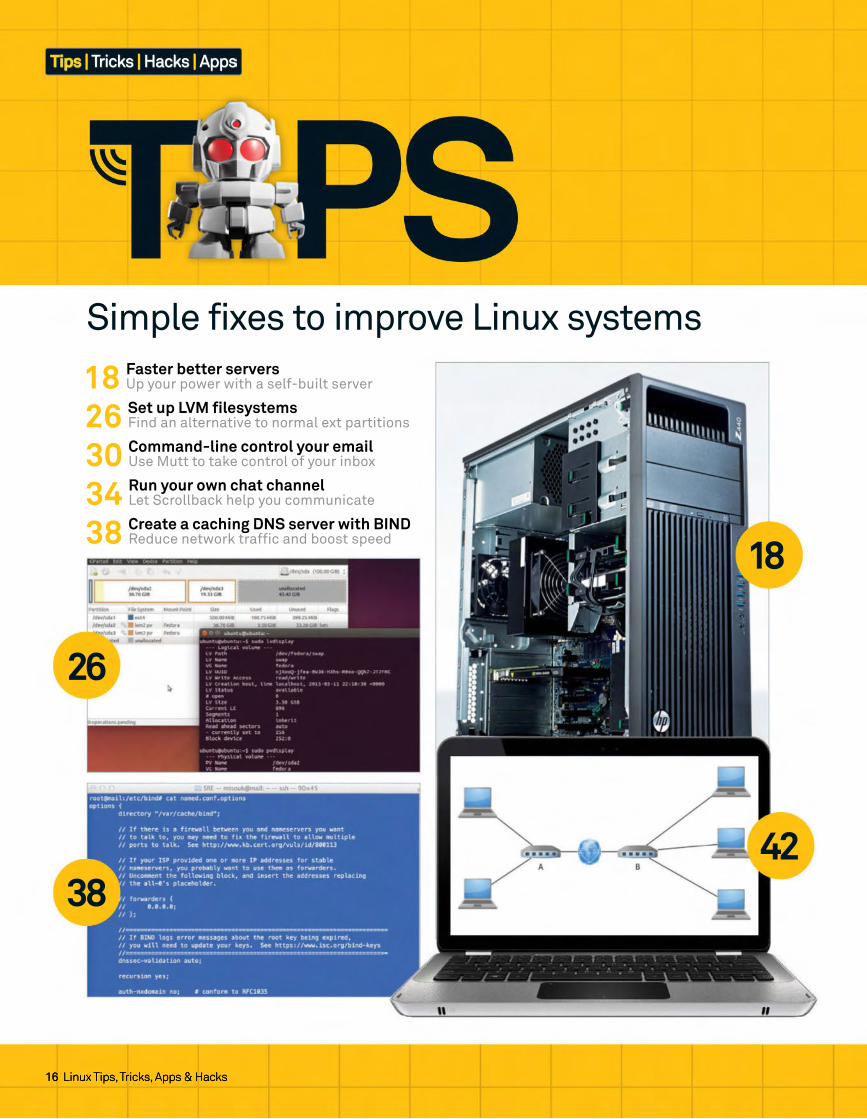
18 Build faster and better servers
26 Set up LVM fi lesystems
30 Command-line control your email with Mutt
34 Run your own chat channel
38 Create a caching DNS server
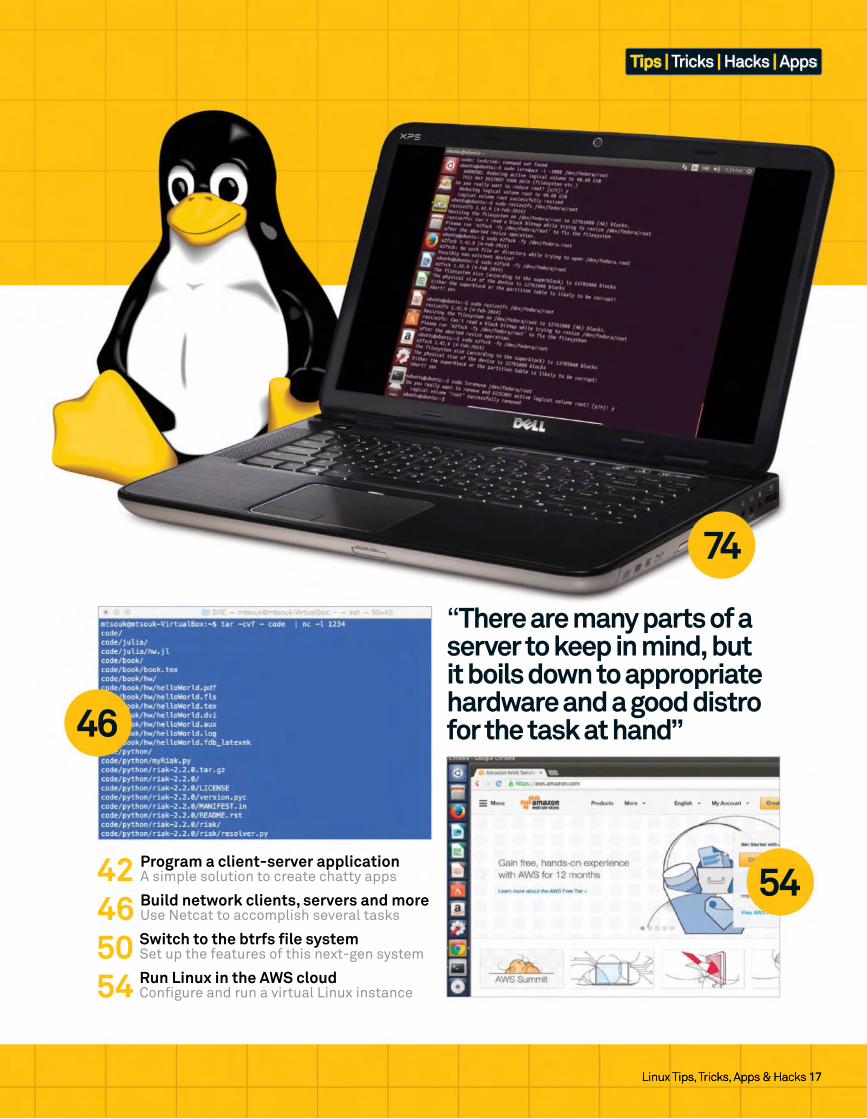
42 Program a client-server application
46 Build network clients and more
50 Switch to the btrfs fi le system
54 Run Linux in the AWS cloud
60 Continuously deploy web apps
64 Generate complex graphics
68 Monitor CPU temperature
72 Write a book in LaTeX
76 Implement agile project management
80 Make a visual novel game with Python
84 Supercharge your Raspberry Pi
88 Host your own media gallery
92 Simplify audio transcription
96 Secure your Raspberry Piwith Linux
TIPS
TRICKS
FeatureConquer the command line with essential tips 60
08
96
72
Linux Tips, Tricks, Apps & Hacks 7Linux Tips, Tricks, Apps & HacksLinux Tips, Tricks, Apps & HacksLinux Tips, Tricks, Apps & Hacks
102 Total Linux security
108 Build your own Qt5-powered desktop
112 Run Android apps in Linux
116 Tether Raspberry Pi to an Android device
118 Spin your own Debian
122 Build a WebKit browser
126 Network penetration testing with Pentoo
130 Build your own DEB and RPM packages
APPS
HACKS
“Find everything you need to bust open your Linux systems and start making them work the way you want them to”
136 Ultimate distro & FOSS guide
146 Tails 1.3
147 Ubuntu 15.04
148 Debian 8.0 Jessie
150 Fedora 22
152 elementary OS 0.3 Freya
154 openSUSE 13.2
156 Linux Mint 17.1
102
112
74

>_Conquer the command line with
these essential terminal tips for controlling Linux
Terminal
WAYS TO MASTER THE
COMMANDTerminal
Long before desktop environments or
graphical interfaces, in the heady days
of the Seventies and Eighties, everything
was done on a command line. Computing
in the Nineties, while generally dominated by
graphical interfaces and mice, wasn’t quite
separated from it and computer users of a certain
age will likely remember at the very least using the
infamous DOS prompt.
Now programming is well advanced and, even in
Linux, you can spend your entire time in the desktop
environment and never even touch the command
line or terminal if you’re using the right distro. Thing
is, you’d be doing yourself a disservice by not learning
how to make the most of the command line as it can
be an extremely powerful tool – especially as a lot of
graphical software will have command line controls
that you can use as well. So put on your best Nineties
outfi t, give yourself a bad nickname and get ready to
look like a movie hacker.
8 Linux Tips, Tricks, Apps & Hacks
100 Terminal tricks

>_Get to grips with the terminal before you take on the advanced toolsNEED TO KNOW
>_001 lsYou can use ls to list the fi les and folders that
are inside the directory you are in.
>_002 cdThe cd command enables you to move
between directories on your system. Like the
following, for example:
$ cd /home/user/
>_003 cpThe copy command, or cp, can be used to
copy fi les from one location to another. To do
this use the command below:
$ cp file /home/user/Desktop/file
>_004 mvSimilar to copy, mv instead moves the fi le to
the new location, deleting the original fi le:
$ mv file /home/user/Desktop/file
>_005 rmThe rm command is for removing or deleting
fi les and directories. You can use it like:
$ rm file
>_006 mkdirYou can create directories with the mkdir
command using something like:
$ mkdir folder
>_007 nanoNano is one of the programs that enables you
to edit text in fi les – it’s vital for working and
editing in the command line. You use it like so:
$ nano file
>_008 TabThe Tab key lets you auto-complete
commands and fi le names. Double-tapping
will list all objects with a similar name. Auto-
completion works for unambiguous fi le and
command names. For example, ‘fi r’ gives you
‘fi refox’ as no other commands begin with
‘fi r’. If you get multiple hits, keep typing to
narrow the selection, then hit Tab again
>_009 UpUp on the keyboard has the very simple task of
enabling you to pull up the last command that
was entered, to run it again or edit it.
>_010 Copy textIf you’re in the terminal, you may want to copy
text output to use somewhere. To do this, you
can use: Ctrl+Alt+C.
>_011 Paste textIf you’ve found a command online or need to
paste some text into nano, you can enter any
text on the clipboard with: Ctrl+Alt+V.
>_012 Open terminalThis trick works in a lot of desktop environments:
a shortcut for opening the terminal can be done
with: Ctrl+Alt+T.
>_013 sudoThis lets you do commands as the super user.
The super user in this case is root and you just
need to add sudo to the start of any command.
>_014 Access rootThe super user, or root, can also be accessed by
logging in as it from the terminal by typing su.
You can enter the root user password and then
run every command as root without having to
use sudo at all.
>_015 Stop processesIf you have run a command and either it’s
paused, taking too long to load, or it’s done its
job and you don’t need to see the rest of it, you
can stop it forcefully by using either Ctrl+C or
Ctrl+Z. Remember, only do this if the process
is not writing any data, as it is not safe in this
instance and you could fi nd yourself in trouble.
>_016 Access root without passwordIf your regular user is in the sudoers list (ie so
that they can use sudo in general to run things
as root), you can access the su account by using
sudo su. This uses your normal user password to
access root terminal functions.
To add a regular user to the sudoers list, you
would need to fi rst log in as the super user by
using su. Then, you would simply run adduser
username sudo (replacing ‘username’). Be
careful who you add to the sudoers list, though!
>_018 Home directory shortcutThe home directory is located at /home/user/
in the absolute fi lesystem, but you can use
the tilde (~) to signify the home directory when
moving between directories or copying, or doing
mostly anything else – like with the following, for
example:
$ cd ~
>_019 Link commands togetherIf you want to do a series of commands one after
the other, like updating and then upgrading
software in Debian, for example, you can use
&& to have a command run right after the one
before. For example:
$ sudo apt-get update && sudo apt-get install libreoffice
>_020 Long terminal inputSometimes when using a list or anything else with
a long terminal output, you might not be able to
read it well. To make it easier to understand, you
can send the output to another command, less,
through the | pipe. It works like so:
$ ls | less
Terminal
>_017 Search for hidden files and directoriesThe ls command can be used in more than
just the basic way of listing all the fi les in a
folder. To begin with, you can use it to list all
the hidden items along with the normal items
by using:
$ ls -a
Linux Tips, Tricks, Apps & Hacks 9
100 Terminal tricks
10 Linux Tips, Tricks, Apps & Hacks
100 Terminal tricks
Terminal
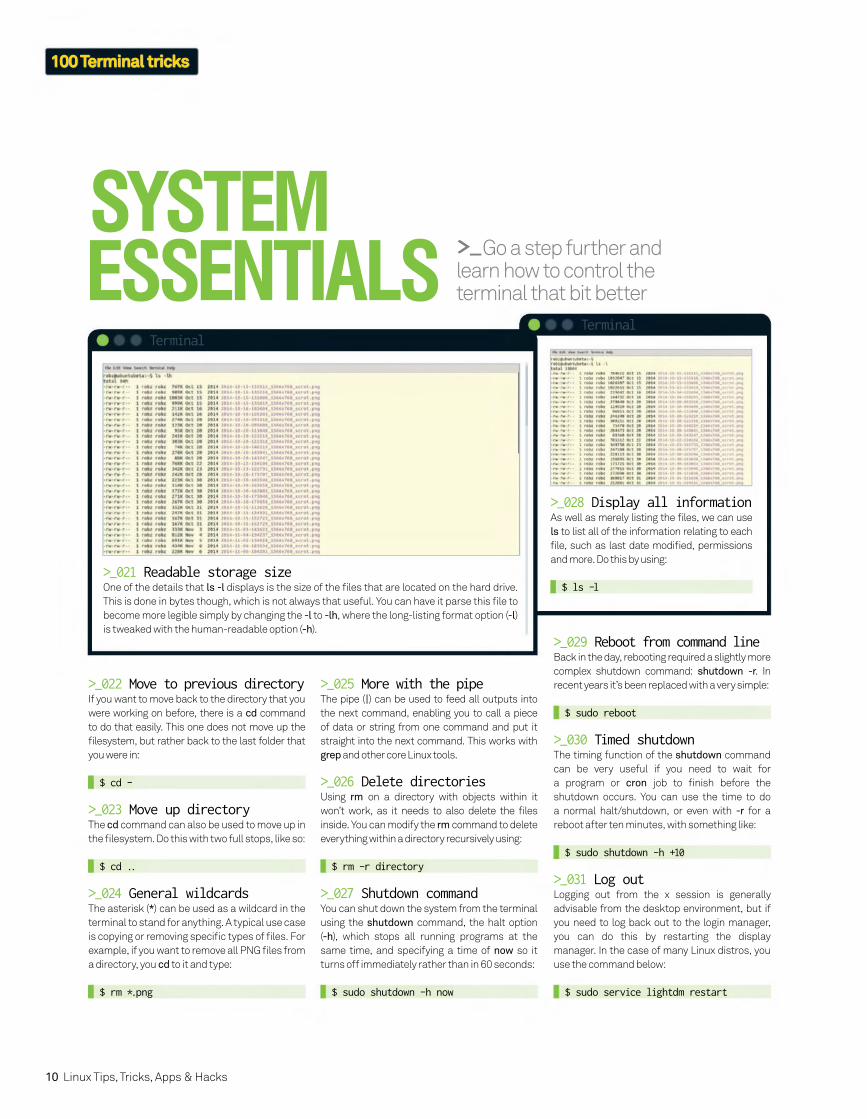
>_028 Display all informationAs well as merely listing the fi les, we can use
ls to list all of the information relating to each
fi le, such as last date modifi ed, permissions
and more. Do this by using:
$ ls -l
>_Go a step further and learn how to control the terminal that bit better
SYSTEM ESSENTIALS
>_021 Readable storage sizeOne of the details that ls -l displays is the size of the fi les that are located on the hard drive.
This is done in bytes though, which is not always that useful. You can have it parse this fi le to
become more legible simply by changing the -l to -lh, where the long-listing format option (-l)
is tweaked with the human-readable option (-h).
Terminal
>_022 Move to previous directoryIf you want to move back to the directory that you
were working on before, there is a cd command
to do that easily. This one does not move up the
fi lesystem, but rather back to the last folder that
you were in:
$ cd -
>_023 Move up directoryThe cd command can also be used to move up in
the fi lesystem. Do this with two full stops, like so:
$ cd ..
>_024 General wildcardsThe asterisk (*) can be used as a wildcard in the
terminal to stand for anything. A typical use case
is copying or removing specifi c types of fi les. For
example, if you want to remove all PNG fi les from
a directory, you cd to it and type:
$ rm *.png
>_025 More with the pipeThe pipe (|) can be used to feed all outputs into
the next command, enabling you to call a piece
of data or string from one command and put it
straight into the next command. This works with
grep and other core Linux tools.
>_026 Delete directoriesUsing rm on a directory with objects within it
won’t work, as it needs to also delete the fi les
inside. You can modify the rm command to delete
everything within a directory recursively using:
$ rm -r directory
>_027 Shutdown commandYou can shut down the system from the terminal
using the shutdown command, the halt option
(-h), which stops all running programs at the
same time, and specifying a time of now so it
turns off immediately rather than in 60 seconds:
$ sudo shutdown -h now
>_029 Reboot from command lineBack in the day, rebooting required a slightly more
complex shutdown command: shutdown -r. In
recent years it’s been replaced with a very simple:
$ sudo reboot
>_030 Timed shutdownThe timing function of the shutdown command
can be very useful if you need to wait for
a program or cron job to fi nish before the
shutdown occurs. You can use the time to do
a normal halt/shutdown, or even with -r for a
reboot after ten minutes, with something like:
$ sudo shutdown -h +10
>_031 Log outLogging out from the x session is generally
advisable from the desktop environment, but if
you need to log back out to the login manager,
you can do this by restarting the display
manager. In the case of many Linux distros, you
use the command below:
$ sudo service lightdm restart

Linux Tips, Tricks, Apps & Hacks 11
100 Terminal tricks
>_Managing your packages and updating your system is a key part of the command lineINSTALLATION
>_032 Debian: update repositoriesDebian-based (and Ubuntu-based) distros use
apt-get as the command line package manager.
One of the quirks of apt-get as a package
manager is that before upgrading or installing
software, it does not check to see if there’s a
newer version in the repositories. Before doing
any installation in Debian, use:
$ sudo apt-get update
>_033 Debian: install softwareUnlike a graphical package manager or software
centre, you can’t quite search for the kind of
packages you want to install, so you need to
know the package name before installing. Once
you do though, try:
$ sudo apt-get install package
>_034 Debian: update softwareYou can upgrade the software in Debian from
the terminal by fi rst performing the repository
update command in Tip 32, followed by the
upgrade command below:
$ sudo apt-get upgrade
>_035 Debian: uninstall softwareAs part of package management, apt-get
enables you to uninstall software as well. This
is simply done by replacing install with remove
in the same command that you would use to
install said package (Tip 33). You can also use
purge instead of remove if you want to delete any
confi g fi les along with it.
>_036 Debian: upgrade distroDebian systems can often update to a ‘newer
version’, especially when it’s rolling or if there’s a
new Ubuntu. Sometimes the prompt won’t show
up, so you can do it in the terminal with:
$ sudo apt-get dist-upgrade
>_037 Debian: multiple packagesA very simple thing you can do while installing on
all platforms is list multiple packages to install
at once with the normal installation command.
So in Debian it would be:
$ sudo apt-get install package1 package2 package3
>_038 Debian: dependenciesCompiling differs between software and they’ll
each have a guide on how to go about it. One
problem you might face is that it will stop until
you can fi nd and install the right dependency.
You can get around this by installing auto-apt
and then using it during confi guration with:
$ sudo auto-apt run ./configure
>_039 Debian: force installSometimes when installing software, apt-get
will refuse to install if specifi c requirements
aren’t met (usually in terms of other packages
needing to be installed for the software to work
properly). You can force the package to install
even without the dependencies using:
$ sudo apt-get download package $ sudo dpkg -i package
>_040 Debian: install binaryIn Tip 39, we used dpkg -i to install the binary
installer package that we downloaded from the
repositories. This same command can be used
to install any downloaded binary, either from the
repos or from a website.
>_041 Debian: manual force install packageIf the advice in Tip 39 is still not working, you can
force install with dpkg. To do this you just need
to add the option --force-all to the installation
command to ignore any problems, like so:
$ sudo dpkg --force-all -i package
>_042 Red Hat: update softwareUnlike apt-get, the yum package manager for
Red Hat/Fedora-based distros does not need
you to specifi cally update the repositories. You
can merely update all the software using:
$ sudo yum update
>_043 Red Hat: install softwareInstalling with yum is very simple, as long as you
know the package name. Yum does have some
search facilities though, if you really need to look
it up, but once you know what package you want,
use the following command:
$ sudo yum install package
>_044 Red Hat: uninstall softwareYum can also be used to uninstall any package
you have on your system, whether you installed
it directly from yum or not. As long as you know
the package name you can uninstall with:
$ sudo yum remove package
>_045 Red Hat: force installThe force install function on Red Hat and
Fedora-based Linux distros requires that you
have a package downloaded and ready to install.
You can download things with yum and then
force the install with:
$ sudo yum install --downloadonly --downloaddir=[directory] package
$ sudo rpm -ivh --force package
>_046 Red Hat: manual installRPM is one of the package installers on Red Hat
distros and can be used to install downloaded
packages. You can either do something like in Tip
45 and download the package from the repos, or
download it from the Internet and install with:
$ sudo rpm -i package
>_047 Red Hat: force manual installationAs in Tip 45, you can use RPM to force install
packages if there’s a dependency issue or
something else wrong with any other packages
that you have downloaded. The same command
should be used as in Tip 45, with the -ivh and
--force options present.
>_048 Fedora: distro upgradeYum has its own distribution upgrade command,
but only in Fedora and they prefer you not to use
it unless you have to. Nonetheless, you can use
the fedora-upgrade package in yum with:
$ sudo yum install fedora-upgrade
“You can force a package to install even without the dependencies”
DEVELOPMENT TIPS >_Some terminal tricks for devs
to help your command line skills become more effi cient
>_054 Stop a system serviceA system service is the kind of background
software that launches at start up. These are
controlled by the system management daemons
like init or systemd, and can be controlled from
the terminal with the service command. First,
you can stop a service using:
$ sudo service name stop
>_055 Start a serviceYou can start system services that have been
stopped by using the same service command
with a different operator. As long as you know the
service name, start it using:
$ sudo service name start
>_056 Restart a system serviceThis one is popular with setting up web servers
that use Apache, for which restarts may be
needed, along with other services that you
customise along the way. Instead of running both
the stop and start commands sequentially, you
can instead restart services by using:
$ sudo service name restart
>_057 Know the IDThe ID that you can get for the software with
top can be used to manipulate it, but a common
reason to know the ID is so that you can end the
process if it’s having trouble stopping itself or
using too many resources. With the ID in hand,
you can kill it with:
$ kill 1234
>_058 Kill multiple IDsSometimes a process can be split up over
multiple IDs (this is usually the case with a
web browser – Google Chrome is a notorious
example), and you need to kill multiple
processes at once. You can either try and quickly
kill all the IDs, or use the common name for the
process and kill it with:
$ killall -v process
>_060 List USB devicesYou may need to know which USB and USB-
related devices are connected to a system,
or fi nd our their proper designation. You’ll
need to install it fi rst, but once you have,
you can use lsusb in the terminal to list all of
the available devices.
>_061 List hard drives and partitionsWhether you need to check the designation
of certain drives for working on them, or you
just need to get a general understanding of the
system’s layout, you can use fdisk to list all the
hard drives. Do this in the terminal with:
$ sudo -l
>_062 Check running softwareSometimes you’ll want to check what’s running
on your system and from the terminal this can
be done simply with top. It lists all the relevant
information you’ll need on your currently running
software, such as CPU and memory usage, along
with the ID so you can control it.
>_Search within fi les using the grep command to save time and fi nd what you need
SEARCHING WITH GREP
>_049 Search a file for a termThe basic use of grep is to search through a file
for a specific term. It will print out every line with
that term in, so it’s best to use it with system
files with readable content in. Use it with:
$ grep hello file
>_050 Check for linesLooking for specifi c lines in a fi le is all well and
good, but when you then start to hunt them
down and you realise the fi le is hundreds
of lines long, you can save yourself a lot of
time by getting grep to also print out the line
number. You can do this with the -n option:
$ grep -n hello file
>_051 Regular expressionsIf you need to make a more advanced search
with grep, you can use regular expressions.
You can replace the search term with ^hello
to look for lines that start with hello, or hello$
for lines ending in hello.
>_052 Wildcards and grepWhen searching for lines, you can use a
wildcard if you need to look for similar
terms. This is done by using a full stop in the
search string – each full stop represents one
wildcard character. Searching for h...o will
return any fi ve-letter string with h at the start
of the string and o at the end. Use it like so:
$ grep ‘\<h...o\>’ file
>_053 More wildcardsYou’ll also be using wildcards to fi nd
something ending or beginning with a
specifi c string but with no fi xed length. You
can do this in grep by using an asterisk (*)
along with the dot. In the above example, we
would have used h.*o instead.
Terminal
>_059 List connectionsThe standard command for listing your
network connections and details in the
terminal is merely ifconfi g – this will list
all of your interfaces and their statuses. If
you just need to list a specifi c one, say for
the wireless interface, you can use:
$ ifconfig wlan0
12 Linux Tips, Tricks, Apps & Hacks
100 Terminal tricks

>_Learn how you can view fi le permissions and get to grips with how they should be properly modifi ed
FILE PERMISSIONS
>_076 List file permissionsYou can check the file permissions of every
item, including hidden files and directories,
in the terminal using ls -la. It will print out the
file permissions as a ten-character string in
the first column of output. The first character
identifies the file type, with d indicating a
directory and - indicating a regular file. We’re
interested in the last nine characters, which are
actually three sets of three and are interpreted
differently. For example:
rwxr-xr-x
R stands for read, w stands for write and x
stands for execute. If they’re present instead of
a -, it means that it is present in that particular
block of permissions. It’s split up over three
blocks: the first three being the user you are
currently using, the second being the group and
the third being for everyone else.
>_077 Change permissionsWith the permissions ascertained, you
can start editing them if you want via the
chmod command. You edit each of the three
permissions set by assigning it a number
that treats the three-bit permissions set as a
binary. So you’d do something like:
$ chmod 777 file
The fi rst number is for the user permissions,
the second is for the group and the third is for
everyone else. The numbers mean:
7: read, write and execute, 111/rwx6: read and write, 110/rw-5: read and execute, 101/r-x4: read only, 100/r--3: write and execute, 011/-wx2: write only, 010/-w-1: execute only, 001/--x0: none, 000/---
>_063 Unpack a ZIP fileIf you’ve downloaded a ZIP fi le and you did it from
the terminal or you’re working from it, you can to
unpack it using the unzip command. Use it like so:
$ unzip file.zip
>_064 Unpack a TAR fileSometimes Linux will have a compressed fi le that
is archived as a .tar.gz, or a tarball. You can use
the terminal to unpack these or similar TAR fi les
using the tar command, although you need the
right options. For the common .gz, it’s:
$ tar -zxvf file.tar.gz
>_065 Copy and write disksComing from UNIX is a powerful image tool called
dd, which we’ve been using a lot recently for
writing Raspberry Pi SD cards. Use it to create
images from discs and hard drives, and for writing
them back. The if is the input fi le or drive and the
of is the output fi le of the same. It works like so:
$ dd if=image.img of=/dev/sda bs=1M
>_066 Create an empty fileSometimes when coding or installing new
software, you need a file to write to. You could
create it manually with nano and then save it, but
the terminal has a command similar to mkdir that
enables you to create an empty file – this is touch:
$ touch file
>_067 Print into the terminalThe terminal uses echo to print details from fi les
into the terminal, much like the C language. If
you’re writing a Bash script and want to see the
output of the current section, you can use echo
to print out the relevant info straight into the
terminal output.
>_068 Check an MD5 hashWhen downloading certain fi les it can help a lot
to check to make sure it’s downloaded properly.
A lot of sites will offer the ability to check the
integrity of the downloaded fi le by comparing a
hash sum based on it. With that MD5 and the fi le
location at hand, you can compare it with:
$ md5sum file
>_069 Run commands to xSometimes you need to do something
concerning the x display, but the only way you
can enter the command line is by switching to an
alternate instance with Ctrl+Alt+F2 or similar. To
send a command to the main x display, preface it
with DISPLAY=“:0” so it knows where to go.
>_070 Create a new SSH keyWhen you need to generate a strong encryption
key, you can always have a go at creating it in
the terminal. You can do this using your email
address as identifi cation by entering the
following into the terminal:
$ ssh-keygen -t rsa -C “[email protected]”
>_071 System detailsSometimes you want to check what you’re
running and you can do this with the simple
uname command, which you can use in the
terminal with the following:
$ uname
>_072 Kernel versionAs part of uname, you also get the kernel version.
Knowing this can be useful for downloading the
right header fi les when compiling modules or
updating certain aspects. You can get purely the
kernel version by adding the -r option:
$ uname -r
>_073 CPU architectureIf you’re on an unknown machine, you might
need to fi nd out what kind of architecture you’re
running. Find out what the processor is with:
$ uname -p
>_074 Everything elseUname enables you to display a lot of data that is
available from the system and you can look at all
of this information by simply using the -a option
with the command:
$ uname -a
>_075 Ubuntu versionWith all the distro updates you do, it can be
tricky to keep track of which version of Ubuntu
you are on. You can check by using:
$ lsb-release -a
Linux Tips, Tricks, Apps & Hacks 13
100 Terminal tricks
“To send a command to the main x display, preface it with DISPLAY=“:0””

>_You can control your tunes while working inside the terminal
MEDIA CONTROLS
>_078 Pause musicSome audio players have command line
controls they can use. Rhythmbox has this
and it’s a cool thing to use when you’re stuck
in the terminal and need to just pause your
music for a moment. You can do this by using:
$ rhythmbox-client --pause
>_079 Skip musicThe command line controls don’t enable
as much as you can get in the interface,
however you can at least skip to the next
track. Try it with the command below:
$ rhythmbox-client --next
>_080 Pause videoYou can use Mplayer to launch video from
the command line to watch. It’s good for
testing a video with different settings
that you can affi x to the video-playing
command. What you can also do is control
the playing video with keys – specifi cally,
you can pause by using the space bar.
>_081 More video controlMplayer gives you a few more controls
while playing in the command line. You can
use Enter to skip to the next item in a list,
and otherwise, you can stop playback by
using Ctrl+C to end the process entirely.
BEST OF THE REST >_All the other commands
that you might want to know for future reference
>_082 Open files in terminalIf you’ve got a fi le you can see in a graphical fi le
manager, instead of opening a terminal and
navigating to and then executing the fi le or script,
you can usually run it directly from the terminal.
To do this you usually just need to right-click and
select a ‘run in terminal’ option.
>_083 Find files in terminalYou can search for specifi c fi les throughout
the fi lesystem by using the fi nd command. You
need to give fi nd a location to search in and a
parameter to search for. For simply searching for
a fi le from root with a specifi c name you can use:
$ find / -name file
>_084 Locate files in terminalSimilar to fi nd is locate, a newer tool that works
slightly differently to fi nd. While fi nd also has
ways to search for fi les by age, size, owner and
so on, locate only really uses the name to locate,
however it can do it so much faster. Use it with:
$ locate file
>_087 Move back through pushdFollowing on from Tip 86, once you want to start
moving back up the stack to the fi rst directory,
you can use popd in the terminal. You can also
check which directories you have stacked up by
using the dirs command as well.
>_088 Process prioritiesCPU priority for processes can be seen as running
from -20 for highest priority or +20 for lowest.
Putting “nice -n X” in front of any command
enables you to change the priority from 0 to
whatever number X is standing in for. Only sudo
or root can elevate the priority of a process, but
anyone can set one down the priority chain.
>_089 Download via the terminalIf you need to download something via the
Internet in the terminal, you’ll want to use the
wget command. It will take any URL you specify
and download it directly into your current
location in the terminal (as long as you have
permission to do so). Use it like:
$ wget http://example.com/file.zip
Terminal
>_085 Current locationIn the terminal you might fi nd yourself a
little lost in the fi lesystem, or want a quick
and easy way to pipe your current location
into something else. You can print out your
current absolute location using pwd.
Terminal
>_086 Move directoriesWhen moving between directories you
might want to be able to quickly return to the
previous one that you were using. Instead
of using cd for moving to the directory, you
can instead use pushd to move and create a
‘stack’ of directories to move between.
14 Linux Tips, Tricks, Apps & Hacks
100 Terminal tricks

>_Easter eggs, gags and other attempts by patterless software engineers to be funny
TERMINAL JOKES
>_099 What’s in a dateYou can actually write date into the terminal
and it will print out the actual date according
to its own internal clock for you, which is very
useful. What you can also do is use ddate to
create a ‘discordian date’ that prints out an
almost dystopian date system.
>_100 Crystal terminalOur last tip is fortune. Call it to get a hint at
what your day might involve. Hopefully it’s
something inspirational to get you started.
Remember though, it’s just a random output
from a string of code. Enjoy!
>_097 What does the cow sayA Debian trick as part of apt-get, moo is an
easter egg wherein you type apt-get moo and
a cow asks you if you have mooed today. If you
have, in fact, not mooed today then you should
immediately fi nd a quiet room and let out a
single, loud moo to appease the terminal cow.
>_098 Let it snowThis one uses a Bash script to simulate snow
in the terminal. We have added the fi le you will
need to use to FileSilo.co.uk, so download it,
cd to the location of the fi le and then run it. It’s
completely pointless, especially in the middle of
summer, but it can be relaxing.
>_096 Do the locomotionThe story behind this is that apparently after finding a lot of people misspelling the list
command ‘ls’ as ‘sl’, this joke program was made to particularly hammer home that they were
indeed not using the correct command. It plays the animation of a steam locomotive; sl.
Terminal
>_090 Change image formatsInstead of loading up an image editor like GIMP,
you can actually change images in the terminal
using the convert command. You can very
simply use it to change the fi letype or even
change the size. Do it with:
$ convert image.jpg image.png
>_091 Alter image settingsAs well as convert there’s also mogrify, which is
part of the same software package. You can use it
scale, rotate and do more to an image more easily
than with some of the convert commands. To
resize you can use something like:
$ mogrify -resize 640x480! image.png
>_092 Send message to displaysThis is an old school prank that can actually have
good uses when done right. Xmessage enables
you to send a message prompt to an x display on
the same system, as long as you know the display
you want to send it to. Try:
$ DISPLAY=:0 xmessage -center “Hello World!”
>_093 Rename files with cpThis is an extension of the way you can use
cp – cp will copy a fi le and name it to whatever
you want, so you can either copy it to another
directory and give it a different name, or you can
just copy it into the same folder with a different
name and delete the original. This also works for
renaming with mv.
>_094 Manual screenshotsThis is something we have to do during Raspberry
Pi tutorials, but it works everywhere else. For
GNOME-based desktops you can do it in the
terminal by calling gnome-screenshot, in XFCE
it’s xfce-screenshooter, in LXDE it’s scrot and
so on. This will immediately take a screenshot of
what you can see.
>_095 Delayed screenshotsWith the functions above, you can add delay to
set up a screenshot. This is useful if you want
to show the contents of a drop-down menu, for
example. Screenshot tools allow you to delay by
adding the -d option and number of seconds, eg:
$ scrot -d 5
Linux Tips, Tricks, Apps & Hacks 15
100 Terminal tricks
16 Linux Tips, Tricks, Apps & Hacks
Simple fixes to improve Linux systems
18 Faster better serversUp your power with a self-built server
26 Set up LVM fi lesystemsFind an alternative to normal ext partitions
30 Command-line control your emailUse Mutt to take control of your inbox
34 Run your own chat channelLet Scrollback help you communicate
38 Create a caching DNS server with BINDReduce network traffi c and boost speed
38
26
18
Linux Tips, Tricks, Apps & Hacks16 Linux Tips, Tricks, Apps & Hacks
Tips | Tricks | Hacks | Apps
42
Linux Tips, Tricks, Apps & Hacks 17
54
46
Linux Tips, Tricks, Apps & Hacks 17Linux Tips, Tricks, Apps & Hacks
42 Program a client-server applicationA simple solution to create chatty apps
46 Build network clients, servers and moreUse Netcat to accomplish several tasks
50 Switch to the btrfs fi le systemSet up the features of this next-gen system
54 Run Linux in the AWS cloudConfi gure and run a virtual Linux instance
Tips | Tricks | Hacks | Apps
74
“There are many parts of a server to keep in mind, but it boils down to appropriate hardware and a good distro for the task at hand”

hile big business and big data may be utilising mainframes more of
late, the concept of servers is not going away any time soon. Servers
are an integral part of any system, however
large your IT infrastructure is. Whether it’s inside
the data centre or tucked away in your (well-
ventilated!) cupboard at home, there are still a
lot of uses for servers in 2015.
For the offi ce you may want to save a bit of
money and create something perfect for your
needs that you know exactly how to maintain.
For home you may just want to enhance your
setup and make the entire network more
effi cient. For both it’s a great way to separate
certain aspects of your network to control it in a
more effi cient way.
There are many components of a server that
you need to keep in mind, but it boils down to
an appropriate hardware selection and a good
distro for the task at hand. In this tutorial, we
are going to concentrate on fi le and web servers,
two base server systems that can be expanded
and modifi ed in multiple ways to best fi t the
situation you are in.
As we’re teaching you how to build a better
web server, we will fi rst take a quick detour
to tell you what you should know if you want
to upgrade your current server so that it can
compete with the new tech.
UP YOUR COMPUTING POWER
WITH AN UPGRADED OR
BRAND NEW SERVER THAT
YOU CAN BUILD YOURSELF
18 Linux Tips, Tricks, Apps & Hacks
Tips | Tricks | Hacks | Apps

If you have a server, an upgrade may be all it needs to run betterYou may already have a server, in which case instead of actually building a better server from scratch, you may want to just upgrade your server to be more efficiently than it was before. There are several ways of doing
this depending on how you want to improve your server, and most of them
require a hardware upgrade. If you decide to go down the hardware upgrade
route, refer overleaf to see the kind of hardware that we recommend and
learn some quick tips on how to install it if you’re new to system building.
The easiest upgrade is storage space, especially for file servers. For Linux
systems you can quite simply just add an extra hard drive into the case, as long
as you have room in terms of spare SATA cables and power. Once installed,
reboot your system and you can start adding the hard drive under /etc/fstab
so that it automatically mounts to a specific location – in this case, the location
on the filesystem which needs a bit more storage. Otherwise, you can create
a clone of the system using Clonezilla (clonezilla.org) and then restore it to a
larger hard drive with almost no change in the way it works.
For other system hardware, you need to ask yourself which section is
slow and perhaps needs upgrading. If it’s a little slow for certain operations
and computational tasks, your fi rst port of call should be upgrading the
CPU. Depending on how forward-thinking you were when building or buying
the original system, the motherboard may support newer processors than
the one inside it. Find out the socket information and start a search for a
new CPU. While you’ll need enough RAM to support the CPU and whatever
the server is being used for, you’ll always need more for one handling web
services than fi le serving. You can easily replace these kind of parts without
having to reinstall Linux.
If you’re doing heavy computational tasks and can use hardware
acceleration for it, look at getting a new video card to support it – although
not many servers will even require one, let alone a good one.
If you’ve reached the limit of your current motherboard, it’s time to gut the
system and get a new mobo, CPU, RAM and GPU if you need it – backing up
important fi les and settings is a good idea before you attempt this as Linux
may not be able to work with completely new hardware without a reinstall.
Otherwise, if you need a software upgrade then refer to whatever guide is
relevant to you in this feature on how to install and setup a new distro.
Above RAM is much more important in a server than a desktop PC, as you need to serve several people
UPGRADING TO A BETTER SERVER
Linux Tips, Tricks, Apps & Hacks 19
Tips | Tricks | Hacks | Apps
The hardware in a server is a very important consideration for building your system. Servers
handle different requests to a normal desktop
machine, often handling several people’s
requests at once. This means that the resource
priorities have changed and these can even be
different between various types of servers.
Software counts as well, of course, but
without a decent hardware base, it will be tricky
to have the server work as intended. Scalability
and peak loads need to be considered as a
future-proofi ng method, so always try and
make sure that you have a bit more power than
you need. With all that said, let’s start looking at
the individual components.
There are six main components you need to
put thought into, and the four most important
ones are the motherboard, the processor, RAM
and power supply – the core components on any
computer. As we mentioned, you need to think
differently about what you need components-
wise because resource usage is different.
A minor concern for some will be a graphics
card of some kind, whether it’s so you can
directly interface with the system or do
computational work that benefi ts from multiple
different cores instead. You’ll also need a good
storage solution for your server build.
MotherboardMotherboards for servers come in various
styles. A lot of server boards will have two ports
to connect a CPU to, which is good for servers
used for small businesses or if you expect to get
a lot of requests on a regular basis. These are
more expensive than single-CPU systems, but
the benefi ts in the long run for a big offi ce server
are more than worth it.
For home use, a single slot for a processor will
do you fi ne for most cases, the main exception
What kind of hardware will you require to build a better server?being a web server where you plan to have a lot
of regular connections made to it. In this case,
you want to keep an eye out for motherboards
with plenty of storage and connection slots to
make it as fl exible and scalable as possible.
CPUThe most important thing for a server CPU is
the number of cores – that’s why dual-slots
can be quite useful. More cores allows for more
threads, essential if you plan to run VMs off
a fi le server or several sites at the same time.
Clock speed is not as important, but you should
at least get one that is not ridiculously slow and
comes with a decent cache.
With Intel’s Hyper Threading, each core can
work harder by creating multiple threads in
each core. Conversely, AMD processors will
offer more cores for a lower price, especially if
you’re on a budget.
RAMA larger amount of RAM is more important on
servers than it is on a desktop PC, enabling
you to run more operations at once. Speed and
latency is not so important, so gaming RAM
with tweaked timings will not grant you a better
system – in fact, it may be slightly worse since
they don’t have ECC. ECC fi xes single-byte errors
that make up the most common forms of data
corruption in the RAM.
While ECC RAM can be important, it’s more
important in web servers and generally much
more necessary in business and enterprise
servers. On every level though, a larger amount
of RAM is good.
PSUWhile it’s best practice to never skimp on
a power supply, it’s near essential when it
comes to server power. While you may need
1,000+ watts for your ridiculous 4K gaming rig
(electricity bills be damned), you can be a little
more reserved in the peak power for a home
server, depending on its intended use. Look
for power supplies with an ‘80 Plus’ rating, as
these ones have been through some level of
certifi cation to ensure that they have a degree
of effi ciency – this is a good idea for servers that
are on all the time as they will save on electricity
bills in the long run. Titanium and Platinum are
the highest ratings, meaning they’re at least
90 per cent effi cient (95 per cent effi cient for
server power supplies).
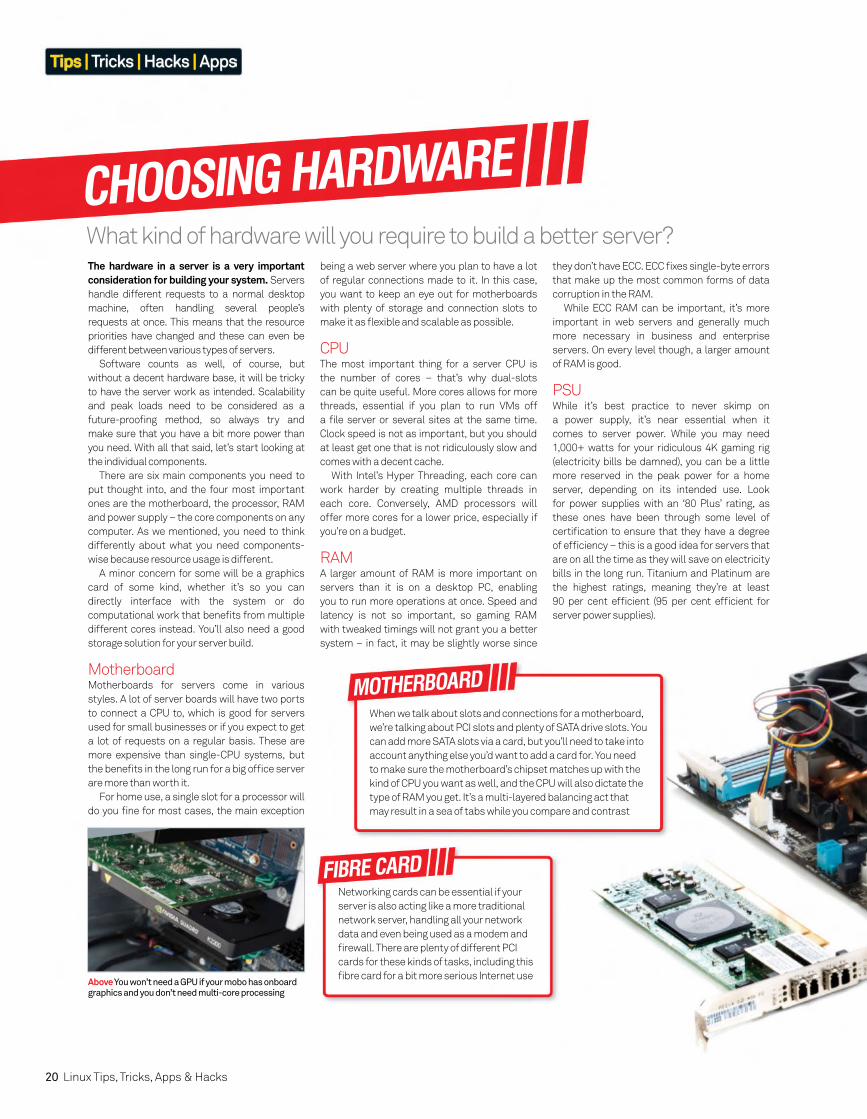
Above You won’t need a GPU if your mobo has onboard graphics and you don’t need multi-core processing
When we talk about slots and connections for a motherboard,
we’re talking about PCI slots and plenty of SATA drive slots. You
can add more SATA slots via a card, but you’ll need to take into
account anything else you’d want to add a card for. You need
to make sure the motherboard’s chipset matches up with the
kind of CPU you want as well, and the CPU will also dictate the
type of RAM you get. It’s a multi-layered balancing act that
may result in a sea of tabs while you compare and contrast
MOTHERBOARD
Networking cards can be essential if your
server is also acting like a more traditional
network server, handling all your network
data and even being used as a modem and
fi rewall. There are plenty of different PCI
cards for these kinds of tasks, including this
fi bre card for a bit more serious Internet use
FIBRE CARD
20 Linux Tips, Tricks, Apps & Hacks
Tips | Tricks | Hacks | Apps
CHOOSING HARDWARE

StorageDepending on your storage requirements, there
are multiple solutions that you can use. At the
very least we recommend you split up your
storage with an SSD for the operating system
and associated settings fi les, and use standard
hard drives for storing everything else. This way,
when the general fi les are not being accessed,
the operating system can still run while drawing
much less power.
Otherwise, your actual mass storage can
be confi gured in multiple ways. You can have
straight drives connected with JBOD for
minimal complexity. Or you can start looking
down the RAID route – mirroring in case of
drive failure, striping to more effi ciently use the
space of two hard drives, or even going
as far as RAID 5 and 6, which increases
complexity but enables you to create
one large, consistent storage space with
redundancy failures. The more complex
you go though, the more diffi cult it can be
to maintain and the more catastrophic a
major failure can be.
You don’t need RAM
with heatsinks for server PCs, really
– it’s usually reserved for gaming
RAM with tweaked timings. If you
are concerned with the heat of
your system and have a little more
budget to spend, get RAM with
some kind of heat dissipater
RAM
For server cases,
you need to think of where you’re
using your server. At home, a silent
case can be great, with padding
to keep the noise down while it
runs all the time. In the offi ce,
and assuming it will be taxed a
bit more, you’ll need to take into
consideration proper cooling. Size
is also a factor, as you need to fi t
your parts in
CASE
When picking a
PSU you need to keep in mind a
few things, such as what kind of
connectors you need. This can
depend on your motherboard, the
amount of hard drives you’re using,
any extras like case fans and case
I/O panels. If you want a better idea
of what kind of wattage you will
need, you can use this tool to fi gure
it out: bit.ly/1pjcjns
PSU
Linux Tips, Tricks, Apps & Hacks 21
Tips | Tricks | Hacks | Apps
They’re more rarely needed
these days, but it can
sometimes be handy to have
an optical drive for transferring
data or to have ISOs installed
to. If you’re using your server to
serve fi les and media, you can
create redirects to be able to
play DVD or Blu-ray movies, or
even rip ones that don’t come
with any DRM at all
DVD DRIVE
File servers are very useful for both home and business environments. For home, it’s a good
way to have a more low-power, dedicated solution
to storing your media and backing up your
systems, without needing to specifi cally turn on
your desktop machine to get the fi les – a desktop
machine that may use more power idling than a
dedicated fi le server.
For enterprise, it can not only be useful for
backups, but also provides for off-machine
networked storage for individual users that
can be accessed from within and outside the
network. So, let’s set a server up.
For a simple server type such as this, we’re
going to go ahead and use Ubuntu Server to
set up the system. This means that if you have
any experience with Linux, it should be easy
to maintain and install more software on if
you need to.
If you’re doing the initial setup for a home
server then installing it with a monitor attached
will be much easier. Burn the ISO to an
installable medium or boot it over the network if
you have the facilities set up, then hit return on
‘Install Ubuntu Server’ to continue.
InstallationThe installation for the server edition is different
from the usual graphical installer of Ubuntu
– it’s a command line one, albeit with fairly
straightforward options. After setting up your
location, language and keyboard settings, it
will try and detect your hardware for you. Give
your server a name, set up your username
and password, and then continue with the
installation as directed.
Store and serve fi les around your network or further
Like the graphical Ubuntu, the server edition
comes with options to automatically set up the
partitions – by default, using the whole disc
will create an install partition and a swap. If
you want it to use a specifi c set of partitions,
we recommend sorting them out with GParted
before trying to install, and then assigning the
partitions manually yourself.
During installation you’ll get some extra
questions about whether you need a proxy
or not; set that up as you wish and then it will
ask about other services to install. As we’re
using this as a fi le server, make sure OpenSSH
is installed so you can dial in from another
machine on the network and ensure that a
Samba server is installed, to make sharing
fi les and such over the network easier and
compatible with any Windows machines.
Finally, it will prompt you to install GRUB.
Assuming this is a dedicated fi le server, you can
let it overwrite the master boot record. Once
that’s done you will restart the system, so make
sure you remove the live boot medium. After it
loads up, you will be dumped into the command
line to log in – as this is a server distro, there is
no desktop environment.
First stepsNow you’re into Ubuntu, we’ll fi rst get set up to
SSH into the machine. For something like a home
server it’s best to set a static IP, and we can do
that in /etc/network/interfaces. Open it up with:
$ sudo nano /etc/network/interfaces
… and change the primary network interface to
be something like:
auto eth0 iface eth0 inet static address [Desired IP] netmask 255.255.255.0 gateway [Router address]
If you are using a wireless connection, make sure
you switch it to wlan0 and then add in details for
the SSID and password.
With the IP you’ve set, or using ifconfi g to fi nd
out what the IP has been automatically set as,
you can now SSH into your machine using the
username and password that you set up. From a
machine on the same network, type:
$ ssh [username]@[IP address of server]
Entering the password will grant you access to
the same command line interface.
Shared foldersNow we can create a shared folder that the rest
of the network can see and modify. First, let’s
create the folder that we want to use and put it in
the normal home directory, with a usual:
$ mkdir ~/networkshareAbove You’ll need to configure Samba in order to get shared folders working
BUILD A FILE SERVER
22 Linux Tips, Tricks, Apps & Hacks
Tips | Tricks | Hacks | Apps
It’s best if you don’t use any spaces, to make the
sharing simpler. Once done, you’ll need to create
a password for Samba. Do this by entering:
$ sudo smbpasswd -a [username]
It will ask you to enter and then confi rm the
password. Once that’s done, and with the folder
created, we can add it to the Samba server.
Access the confi g fi le using:
$ sudo nano /etc/samba/smb.conf
Go to the very end of the fi le and add something
like the following to get the shared folder
recognised by Samba:
[NetworkShare] path = /home/[username]/networkshare available = yes valid users = [username] read only = no browseable = yes public = yes writable = yes
Save the fi le and exit, then restart Samba:
$ sudo service smbd restart
And fi nish by testing the setup with testparm to
ensure everything runs okay.
File servers can be useful for other things as well
VPNDialling in externally from a remote location to VPN into your server can have
added benefi ts. Accessing your fi les remotely is one thing, but also being
able to use a more unrestricted Internet service (yours) can be handy if you’re
stuck in a hotel or other location with strict browsing regulations.
Setting it up is not too diffi cult and requires the server to be connected to
the Internet wherever it stays. The more users you allow to VPN from it, the
more resources you’ll require (including RAM and processing power).
Torrent serverWith all the storage and possibly a connection to the Internet, you can set up
the fi le server to also be a torrent server. This will enable you to give back to
the community by seeding the latest distro torrents, as well as making sure
you have the latest version of certain distros for you to install and test with.
Just adding a torrent service will let you do this, and a good one for
command lines is rTorrent. Not only can you view a useful command line
interface with it, but you can also set a folder that it reads for new torrents.
Above left For a flexible, scalable server, consider trying MAAS: maas.ubuntu.com/docs1.5
Above right Ubuntu Server makes it easy to grab the software you need during installation
EXTRA FILE SERVER USES
Linux Tips, Tricks, Apps & Hacks 23
Tips | Tricks | Hacks | Apps
Your own web server can be a useful addition to any system. If you don’t have massive loads to
worry about you can install it to your own custom-
built server, or if you have a lot of scalable server
space then you can build it on there with a very
similar software setup.
We are going to use Ubuntu Server again for
this, so follow our advice on the previous pages
on how to get it set up and get to a point where
we can start adding Apache services. Feasibly,
you could have the server be both a fi le and web
server in this way.
Host your web services on a dedicated server that you control
01Install ApacheOnce you’ve got your server set up and
can SSH in, it’s time to install the Apache web
server . Do that using the following:
$ sudo apt-get install apache2
It will automatically set the domain address to
the following: 127.0.0.1
02Test serverIf you have to install a GUI onto your
server, you can test out that Apache is working
by going to a browser in it and navigating to
127.0.0.1. Otherwise, from an external system,
navigate to the IP address of your system in
your browser and it should show the Apache
confi rmation page on-screen.
04Confi gure FTPWe can access the confi guration fi le
for FTP by using nano to open /etc/vsftpd.conf
(sudo nano /etc/vsftpd.conf). From here we
can confi gure it to match our uses, but fi rst it
is necessary that we increase the security just
slightly before using it properly as an FTP server,
just to be on the safe side.
03Install FTPWith a web server you can now use it
to host a website or to access storage from the
server remotely over the Internet. We can set up
the latter using FTP, or in our case the secure
VSFTP. Install it to the system using:
$ sudo apt-get install vsftpd
05Secure your FTPThe main change to make the FTP
secure is to turn off anonymous users. In the
confi g fi le, look for the line with ‘anonymous_
enable’. We want to change this to NO if it’s not
already there, just to make sure that there is a
bit more security for the FTP server and that all
of your content is kept private.
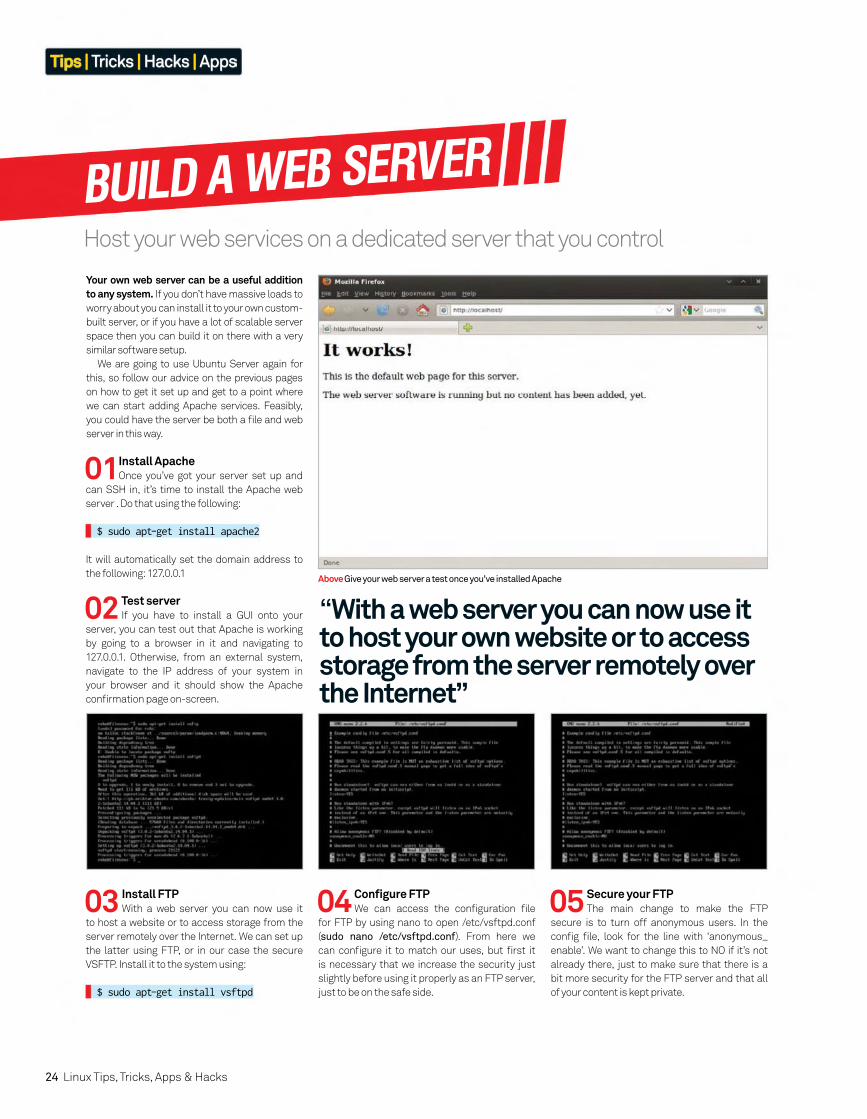
Above Give your web server a test once you’ve installed Apache
BUILD A WEB SERVER
24 Linux Tips, Tricks, Apps & Hacks
Tips | Tricks | Hacks | Apps
“With a web server you can now use it to host your own website or to access storage from the server remotely over the Internet”
Tailor your web server to suit all of your individual needs
Mail serverPart of the benefi ts of this being a web server is that it enables you to
also add your own mail server to it, or even host your own webmail client
as well. Having Apache confi gured is the fi rst step to this, and it is quite
straightforward to then set up a mail server on top of that.
As for a webmail client, we recommend using RainLoop, which looks nice
and modern and also lets you add other webmail services to it, along with
your own webmail server.
Nginx serverInstead of using Apache for the server, you can also look into and try out
Nginx. Nginx handles processes slightly differently than Apache and can
result in a lighter load on your web server. It’s available in the repos of most
distros, much like Apache is, so it can be installed in mostly the same way.
For a more complete guide to setting up an Nginx server, you can always
refer back to one of our tutorials from Mihalis – it’s inside issue 144, if you
have it to hand, and on our website: bit.ly/1AYKkx8.
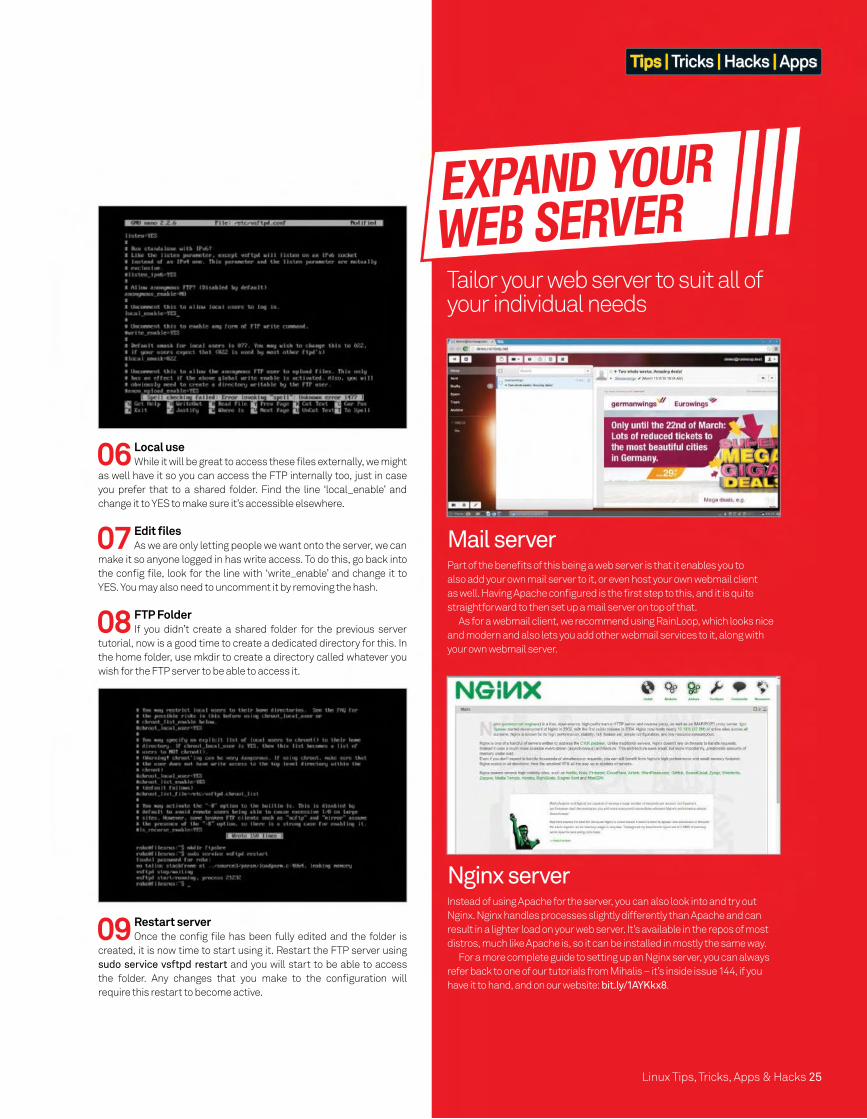
06Local useWhile it will be great to access these fi les externally, we might
as well have it so you can access the FTP internally too, just in case
you prefer that to a shared folder. Find the line ‘local_enable’ and
change it to YES to make sure it’s accessible elsewhere.
08FTP FolderIf you didn’t create a shared folder for the previous server
tutorial, now is a good time to create a dedicated directory for this. In
the home folder, use mkdir to create a directory called whatever you
wish for the FTP server to be able to access it.
07Edit fi lesAs we are only letting people we want onto the server, we can
make it so anyone logged in has write access. To do this, go back into
the confi g fi le, look for the line with ‘write_enable’ and change it to
YES. You may also need to uncomment it by removing the hash.
09Restart serverOnce the confi g fi le has been fully edited and the folder is
created, it is now time to start using it. Restart the FTP server using
sudo service vsftpd restart and you will start to be able to access
the folder. Any changes that you make to the confi guration will
require this restart to become active.
EXPAND YOUR WEB SERVER
Linux Tips, Tricks, Apps & Hacks 25
Tips | Tricks | Hacks | Apps
26 Linux Tips, Tricks, Apps & Hacks
Tips | Tricks | Hacks | Apps
Quite a different fi lesystem to your normal ext partitions, but LVM might just be the way for you to go
Set up LVM filesystems
You’d be forgiven for not knowing what LVM stands for, but it’s a useful thing to know. Logical volume management, as it’s properly
designated, acts as a sort of container to
manage your data – the benefi t of this is that
you can start adding and extending space
while the LVM is still online and working.
This is great for server farms because you
can swap out and add storage very quickly,
and on your desktop its particularly good for
managing the size of different partitions if
you weren’t sure how they should have been
during installation.
In this tutorial, we’ll look at how you can
create an LVM fi lesystem and then how you
can go about maintaining and modifying it.
We will also look into how some distros install
using LVM.
Add more hard drives and partitions
to the LVM to keep expanding the
space forever by allocating it smartly
Create, name and modify logical
volumes and volume groups that
contain all your data
Understand the limitations of
graphical partitioning when
dealing with LVM fi lesystems
ResourcesLVM 2 tools sourceware.org/lvm2
gparted gparted.org
Linux Tips, Tricks, Apps & Hacks 27
Tips | Tricks | Hacks | Apps
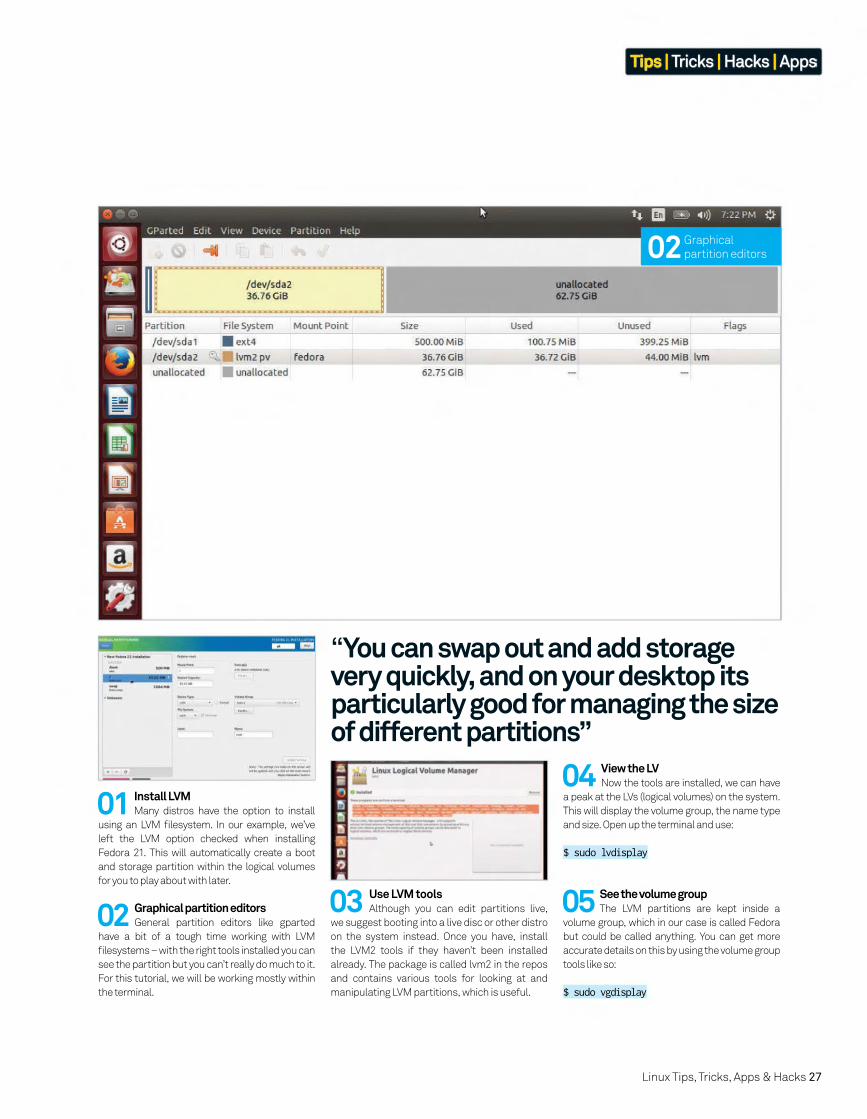
01 Install LVMMany distros have the option to install
using an LVM fi lesystem. In our example, we’ve
left the LVM option checked when installing
Fedora 21. This will automatically create a boot
and storage partition within the logical volumes
for you to play about with later.
04 View the LVNow the tools are installed, we can have
a peak at the LVs (logical volumes) on the system.
This will display the volume group, the name type
and size. Open up the terminal and use:
$ sudo lvdisplay
02 Graphical partition editorsGeneral partition editors like gparted
have a bit of a tough time working with LVM
fi lesystems – with the right tools installed you can
see the partition but you can’t really do much to it.
For this tutorial, we will be working mostly within
the terminal.
05 See the volume groupThe LVM partitions are kept inside a
volume group, which in our case is called Fedora
but could be called anything. You can get more
accurate details on this by using the volume group
tools like so:
$ sudo vgdisplay
03 Use LVM toolsAlthough you can edit partitions live,
we suggest booting into a live disc or other distro
on the system instead. Once you have, install
the LVM2 tools if they haven’t been installed
already. The package is called lvm2 in the repos
and contains various tools for looking at and
manipulating LVM partitions, which is useful.
“You can swap out and add storage very quickly, and on your desktop its particularly good for managing the size of different partitions”
02 Graphical
partition editors
28 Linux Tips, Tricks, Apps & Hacks
Tips | Tricks | Hacks | Apps
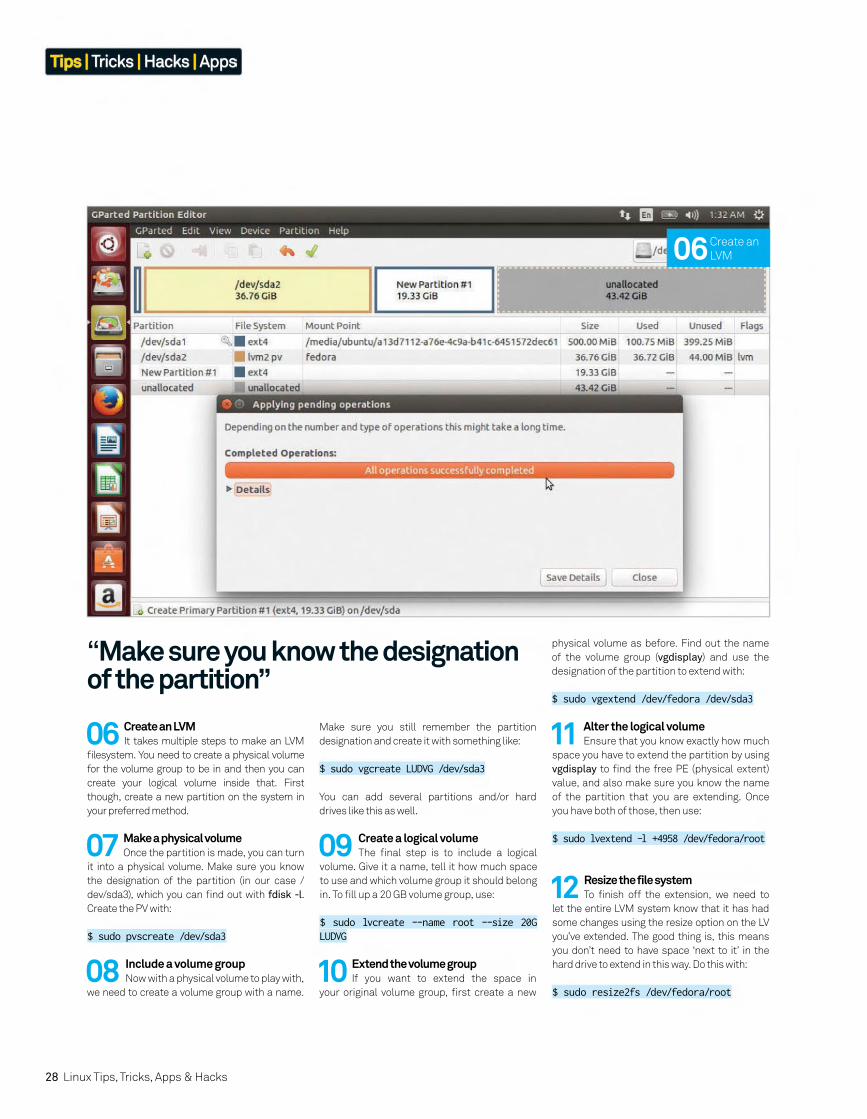
10 Extend the volume groupIf you want to extend the space in
your original volume group, fi rst create a new
11 Alter the logical volumeEnsure that you know exactly how much
space you have to extend the partition by using
vgdisplay to fi nd the free PE (physical extent)
value, and also make sure you know the name
of the partition that you are extending. Once
you have both of those, then use:
$ sudo lvextend -l +4958 /dev/fedora/root
12 Resize the file systemTo fi nish off the extension, we need to
let the entire LVM system know that it has had
some changes using the resize option on the LV
you’ve extended. The good thing is, this means
you don’t need to have space ‘next to it’ in the
hard drive to extend in this way. Do this with:
$ sudo resize2fs /dev/fedora/root
09 Create a logical volumeThe fi nal step is to include a logical
volume. Give it a name, tell it how much space
to use and which volume group it should belong
in. To fi ll up a 20 GB volume group, use:
$ sudo lvcreate --name root --size 20G LUDVG
06 Create an LVMIt takes multiple steps to make an LVM
fi lesystem. You need to create a physical volume
for the volume group to be in and then you can
create your logical volume inside that. First
though, create a new partition on the system in
your preferred method.
07 Make a physical volumeOnce the partition is made, you can turn
it into a physical volume. Make sure you know
the designation of the partition (in our case /
dev/sda3), which you can fi nd out with fdisk -l.
Create the PV with:
$ sudo pvscreate /dev/sda3
08 Include a volume groupNow with a physical volume to play with,
we need to create a volume group with a name.
“Make sure you know the designation of the partition”
Make sure you still remember the partition
designation and create it with something like:
$ sudo vgcreate LUDVG /dev/sda3
You can add several partitions and/or hard
drives like this as well.
physical volume as before. Find out the name
of the volume group (vgdisplay) and use the
designation of the partition to extend with:
$ sudo vgextend /dev/fedora /dev/sda3
06 Create an
LVM
Linux Tips, Tricks, Apps & Hacks 29
Tips | Tricks | Hacks | Apps
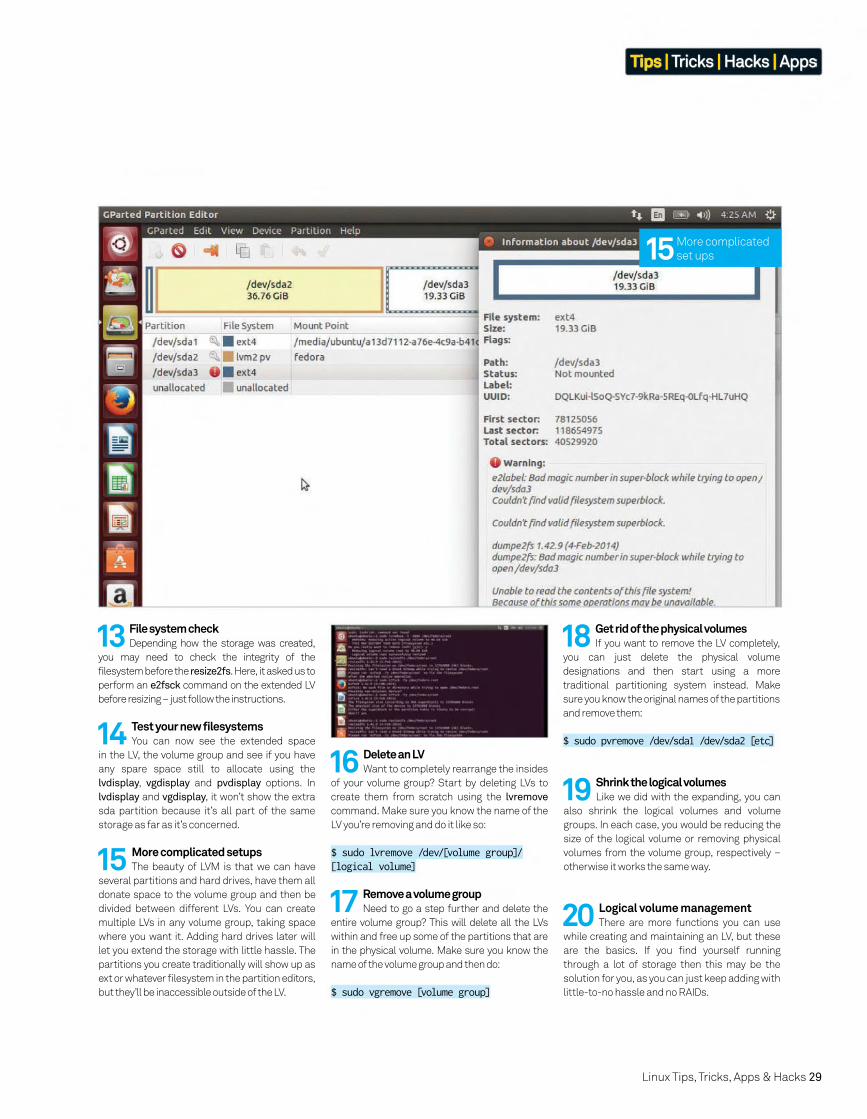
13 File system checkDepending how the storage was created,
you may need to check the integrity of the
filesystem before the resize2fs. Here, it asked us to
perform an e2fsck command on the extended LV
before resizing – just follow the instructions.
14 Test your new filesystemsYou can now see the extended space
in the LV, the volume group and see if you have
any spare space still to allocate using the
lvdisplay, vgdisplay and pvdisplay options. In
lvdisplay and vgdisplay, it won’t show the extra
sda partition because it’s all part of the same
storage as far as it’s concerned.
16 Delete an LVWant to completely rearrange the insides
of your volume group? Start by deleting LVs to
create them from scratch using the lvremove
command. Make sure you know the name of the
LV you’re removing and do it like so:
$ sudo lvremove /dev/[volume group]/[logical volume]
18 Get rid of the physical volumesIf you want to remove the LV completely,
you can just delete the physical volume
designations and then start using a more
traditional partitioning system instead. Make
sure you know the original names of the partitions
and remove them:
$ sudo pvremove /dev/sda1 /dev/sda2 [etc]
19 Shrink the logical volumesLike we did with the expanding, you can
also shrink the logical volumes and volume
groups. In each case, you would be reducing the
size of the logical volume or removing physical
volumes from the volume group, respectively –
otherwise it works the same way.
20 Logical volume managementThere are more functions you can use
while creating and maintaining an LV, but these
are the basics. If you fi nd yourself running
through a lot of storage then this may be the
solution for you, as you can just keep adding with
little-to-no hassle and no RAIDs.
15 More complicated setupsThe beauty of LVM is that we can have
several partitions and hard drives, have them all
donate space to the volume group and then be
divided between different LVs. You can create
multiple LVs in any volume group, taking space
where you want it. Adding hard drives later will
let you extend the storage with little hassle. The
partitions you create traditionally will show up as
ext or whatever fi lesystem in the partition editors,
but they’ll be inaccessible outside of the LV.
17 Remove a volume groupNeed to go a step further and delete the
entire volume group? This will delete all the LVs
within and free up some of the partitions that are
in the physical volume. Make sure you know the
name of the volume group and then do:
$ sudo vgremove [volume group]
15 More complicated
set ups
30 Linux Tips, Tricks, Apps & Hacks
Tips | Tricks | Hacks | Apps
Email is one of the biggest time users, but Mutt offers the tools to sort and process your inbox
Take command-line control of your email with Mutt
A few years ago, social media started to take up more of our time and you may have felt that email was diminishing in importance. However, we still spend hours each week wading
through emails, and have to sign up for all sorts of commercial
mailings just to complete the obligatory registration on many
new websites and services.
The other big change has been a near wholesale move to
webmail – a contracting out by mail users of running both the
personal mail server and the client (and associated backups) to
Google, Yahoo! and Microsoft, worryingly at the cost of control
and privacy.
Webmail is convenient in the sense that we no longer have
to think about looking after our emails, but despite some lovely
interfaces, it remains at best a clunky and slow way of managing
a busy email life. Mutt offers you the chance to take back control
of your email and really speed up your workflow. We’ll show you
how to do this with one of the major webmail services.
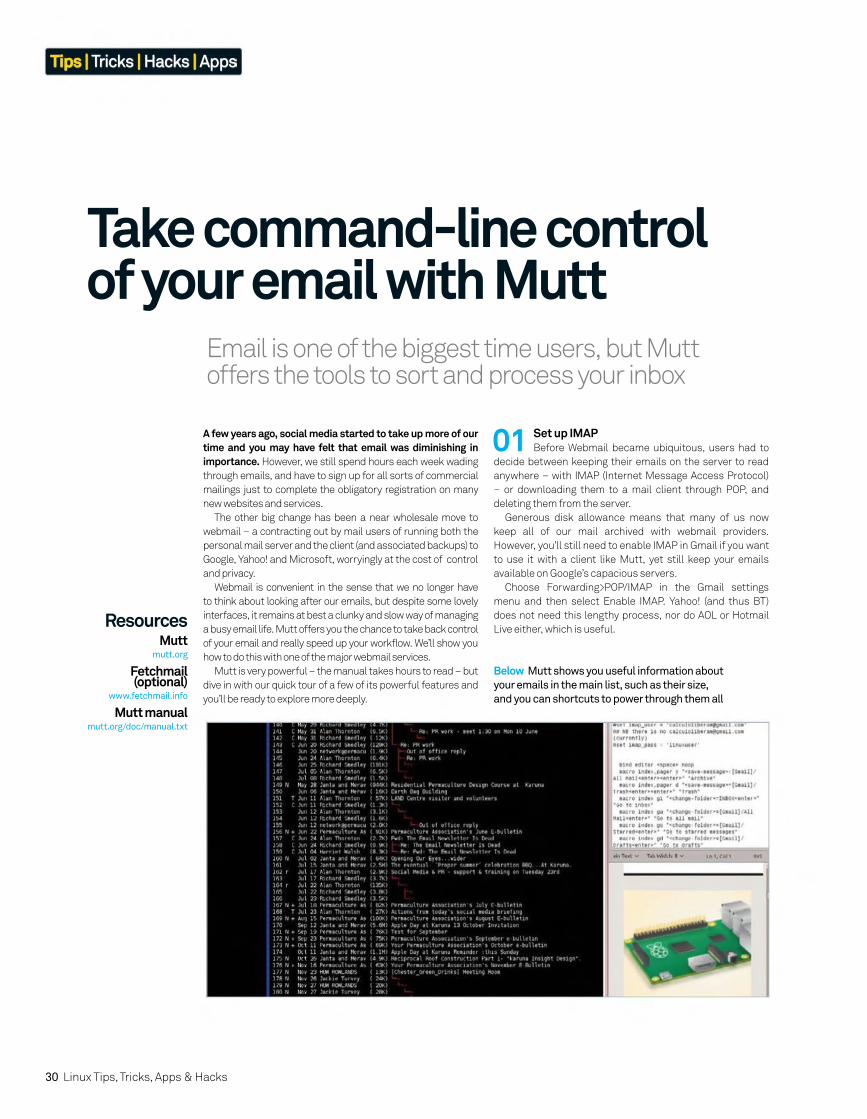
Mutt is very powerful – the manual takes hours to read – but
dive in with our quick tour of a few of its powerful features and
you’ll be ready to explore more deeply.
Below Mutt shows you useful information about
your emails in the main list, such as their size,
and you can shortcuts to power through them all
01 Set up IMAPBefore Webmail became ubiquitous, users had to
decide between keeping their emails on the server to read
anywhere – with IMAP (Internet Message Access Protocol)
– or downloading them to a mail client through POP, and
deleting them from the server.
Generous disk allowance means that many of us now
keep all of our mail archived with webmail providers.
However, you’ll still need to enable IMAP in Gmail if you want
to use it with a client like Mutt, yet still keep your emails
available on Google’s capacious servers.
Choose Forwarding>POP/IMAP in the Gmail settings
menu and then select Enable IMAP. Yahoo! (and thus BT)
does not need this lengthy process, nor do AOL or Hotmail
Live either, which is useful.Resources
Muttmutt.org
Fetchmail (optional)
www.fetchmail.info
Mutt manual mutt.org/doc/manual.txt
Linux Tips, Tricks, Apps & Hacks 31
Tips | Tricks | Hacks | Apps
gpg -r [email protected] -e pwd shred ./pwd rm ./pwd
… with ~/.mutt/pwd containing:
set my_pwd=“your_password”
Now replace .muttrc’s password line with:
source “gpg -d ~/.mutt/passwords.gpg |” set imap_pass = $my_pwd
02 Confi g fi leTo get up and running quickly, having already installed
Mutt from your package manager, open ~/.muttrc in your
favourite text editor and fi ll in the basics:
set from = ‘[email protected]’ set realname = ‘You’ set imap_user = ‘[email protected]’ set imap_pass = ‘your-secret-password’ set folder = ‘imaps://imap.gmail.com:993’ set spoolfile = ‘+INBOX’ set smtp_url = ‘smtp://[email protected]:587/’ set smtp_pass = ‘your-secret-password’
Other providers need similar settings, for example:
smtp://[email protected]@smtp.live.com:587/
Above Mutt has a
threaded mode that
adds functions for
long conversations
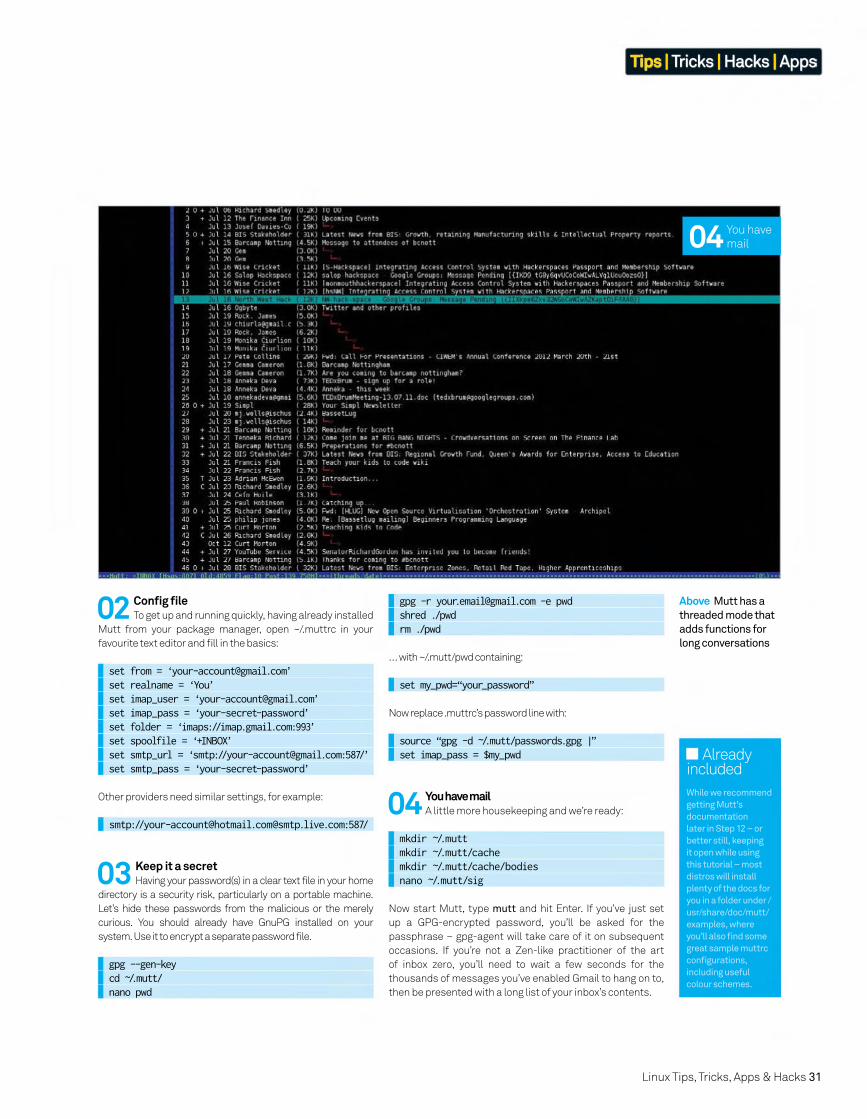
04 You have
04 You have mailA little more housekeeping and we’re ready:
mkdir ~/.mutt mkdir ~/.mutt/cache mkdir ~/.mutt/cache/bodies nano ~/.mutt/sig
Now start Mutt, type mutt and hit Enter. If you’ve just set
up a GPG-encrypted password, you’ll be asked for the
passphrase – gpg-agent will take care of it on subsequent
occasions. If you’re not a Zen-like practitioner of the art
of inbox zero, you’ll need to wait a few seconds for the
thousands of messages you’ve enabled Gmail to hang on to,
then be presented with a long list of your inbox’s contents.
03 Keep it a secretHaving your password(s) in a clear text file in your home
directory is a security risk, particularly on a portable machine.
Let’s hide these passwords from the malicious or the merely
curious. You should already have GnuPG installed on your
system. Use it to encrypt a separate password file.
gpg --gen-key cd ~/.mutt/ nano pwd
Already included
While we recommend
getting Mutt’s
documentation
later in Step 12 – or
better still, keeping
it open while using
this tutorial – most
distros will install
plenty of the docs for
you in a folder under /
usr/share/doc/mutt/
examples, where
you’ll also fi nd some
great sample muttrc
confi gurations,
including useful
colour schemes.
32 Linux Tips, Tricks, Apps & Hacks
Tips | Tricks | Hacks | Apps
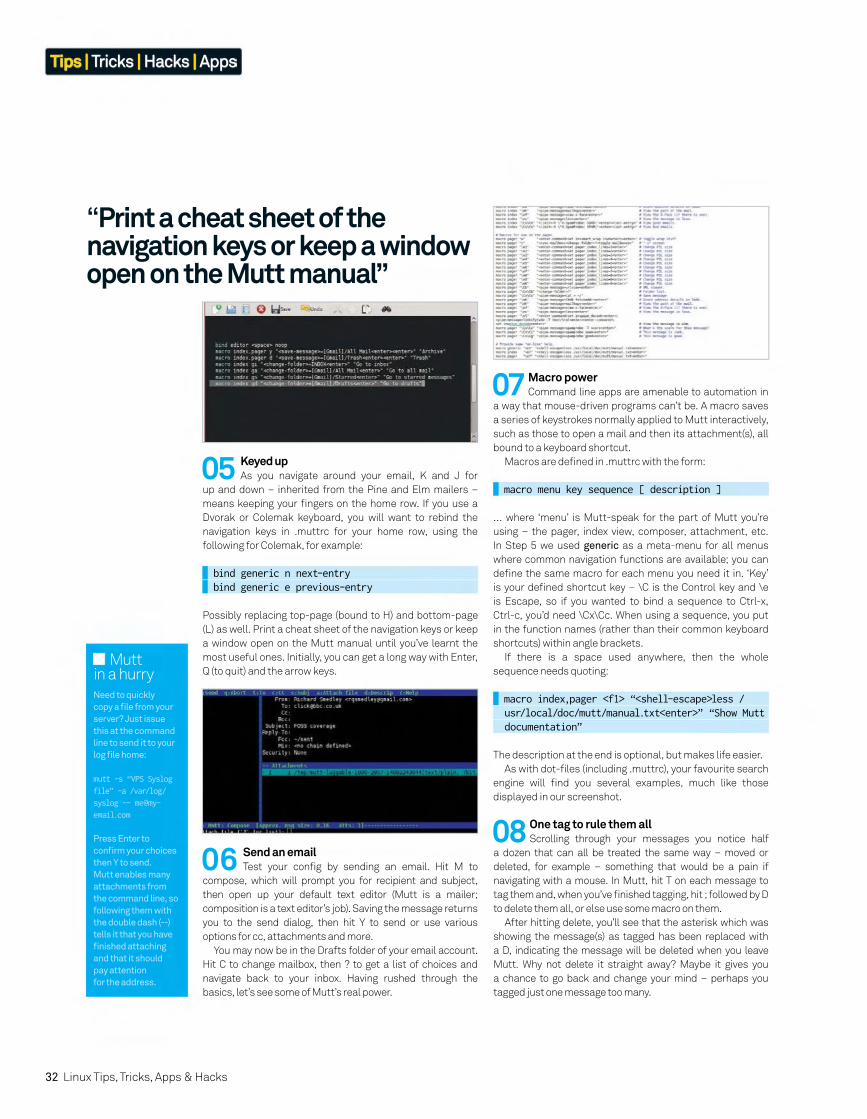
08 One tag to rule them allScrolling through your messages you notice half
a dozen that can all be treated the same way – moved or
deleted, for example – something that would be a pain if
navigating with a mouse. In Mutt, hit T on each message to
tag them and, when you’ve fi nished tagging, hit ; followed by D
to delete them all, or else use some macro on them.
After hitting delete, you’ll see that the asterisk which was
showing the message(s) as tagged has been replaced with
a D, indicating the message will be deleted when you leave
Mutt. Why not delete it straight away? Maybe it gives you
a chance to go back and change your mind – perhaps you
tagged just one message too many.
05 Keyed upAs you navigate around your email, K and J for
up and down – inherited from the Pine and Elm mailers –
means keeping your fi ngers on the home row. If you use a
Dvorak or Colemak keyboard, you will want to rebind the
navigation keys in .muttrc for your home row, using the
following for Colemak, for example:
bind generic n next-entry bind generic e previous-entry
Possibly replacing top-page (bound to H) and bottom-page
(L) as well. Print a cheat sheet of the navigation keys or keep
a window open on the Mutt manual until you’ve learnt the
most useful ones. Initially, you can get a long way with Enter,
Q (to quit) and the arrow keys.
06 Send an emailTest your confi g by sending an email. Hit M to
compose, which will prompt you for recipient and subject,
then open up your default text editor (Mutt is a mailer;
composition is a text editor’s job). Saving the message returns
you to the send dialog, then hit Y to send or use various
options for cc, attachments and more.
You may now be in the Drafts folder of your email account.
Hit C to change mailbox, then ? to get a list of choices and
navigate back to your inbox. Having rushed through the
basics, let’s see some of Mutt’s real power.
07 Macro powerCommand line apps are amenable to automation in
a way that mouse-driven programs can’t be. A macro saves
a series of keystrokes normally applied to Mutt interactively,
such as those to open a mail and then its attachment(s), all
bound to a keyboard shortcut.
Macros are defi ned in .muttrc with the form:
macro menu key sequence [ description ]
… where ‘menu’ is Mutt-speak for the part of Mutt you’re
using – the pager, index view, composer, attachment, etc.
In Step 5 we used generic as a meta-menu for all menus
where common navigation functions are available; you can
defi ne the same macro for each menu you need it in. ‘Key’
is your defi ned shortcut key – \C is the Control key and \e
is Escape, so if you wanted to bind a sequence to Ctrl-x,
Ctrl-c, you’d need \Cx\Cc. When using a sequence, you put
in the function names (rather than their common keyboard
shortcuts) within angle brackets.
If there is a space used anywhere, then the whole
sequence needs quoting:
macro index,pager <f1> “<shell-escape>less / usr/local/doc/mutt/manual.txt<enter>” “Show Mutt documentation”
The description at the end is optional, but makes life easier.
As with dot-fi les (including .muttrc), your favourite search
engine will fi nd you several examples, much like those
displayed in our screenshot.
Mutt in a hurry
Need to quickly
copy a fi le from your
server? Just issue
this at the command
line to send it to your
log fi le home:
mutt -s “VPS Syslog
file” -a /var/log/
syslog -- me@my-
email.com
Press Enter to
confi rm your choices
then Y to send.
Mutt enables many
attachments from
the command line, so
following them with
the double dash (--)
tells it that you have
fi nished attaching
and that it should
pay attention
for the address.
“Print a cheat sheet of the navigation keys or keep a window open on the Mutt manual”
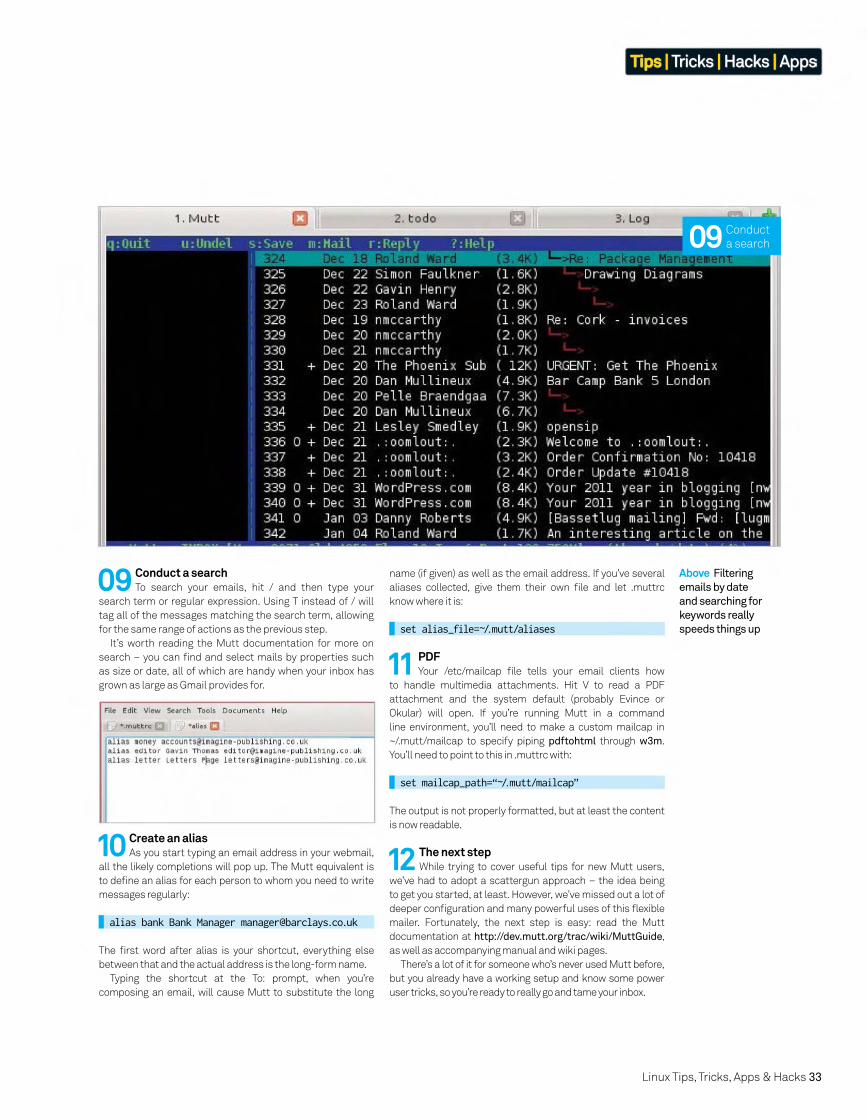
Linux Tips, Tricks, Apps & Hacks 33
Tips | Tricks | Hacks | Apps
10 Create an aliasAs you start typing an email address in your webmail,
all the likely completions will pop up. The Mutt equivalent is
to defi ne an alias for each person to whom you need to write
messages regularly:
alias bank Bank Manager [email protected]
The fi rst word after alias is your shortcut, everything else
between that and the actual address is the long-form name.
Typing the shortcut at the To: prompt, when you’re
composing an email, will cause Mutt to substitute the long
11 PDFYour /etc/mailcap fi le tells your email clients how
to handle multimedia attachments. Hit V to read a PDF
attachment and the system default (probably Evince or
Okular) will open. If you’re running Mutt in a command
line environment, you’ll need to make a custom mailcap in
~/.mutt/mailcap to specify piping pdftohtml through w3m.
You’ll need to point to this in .muttrc with:
set mailcap_path=“~/.mutt/mailcap”
The output is not properly formatted, but at least the content
is now readable.
12 The next stepWhile trying to cover useful tips for new Mutt users,
we’ve had to adopt a scattergun approach – the idea being
to get you started, at least. However, we’ve missed out a lot of
deeper confi guration and many powerful uses of this fl exible
mailer. Fortunately, the next step is easy: read the Mutt
documentation at http://dev.mutt.org/trac/wiki/MuttGuide,
as well as accompanying manual and wiki pages.
There’s a lot of it for someone who’s never used Mutt before,
but you already have a working setup and know some power
user tricks, so you’re ready to really go and tame your inbox.
09 Conduct a searchTo search your emails, hit / and then type your
search term or regular expression. Using T instead of / will
tag all of the messages matching the search term, allowing
for the same range of actions as the previous step.
It’s worth reading the Mutt documentation for more on
search – you can fi nd and select mails by properties such
as size or date, all of which are handy when your inbox has
grown as large as Gmail provides for.
Above Filtering
emails by date
and searching for
keywords really
speeds things up
name (if given) as well as the email address. If you’ve several
aliases collected, give them their own fi le and let .muttrc
know where it is:
set alias_file=~/.mutt/aliases
09 Conduct
a search
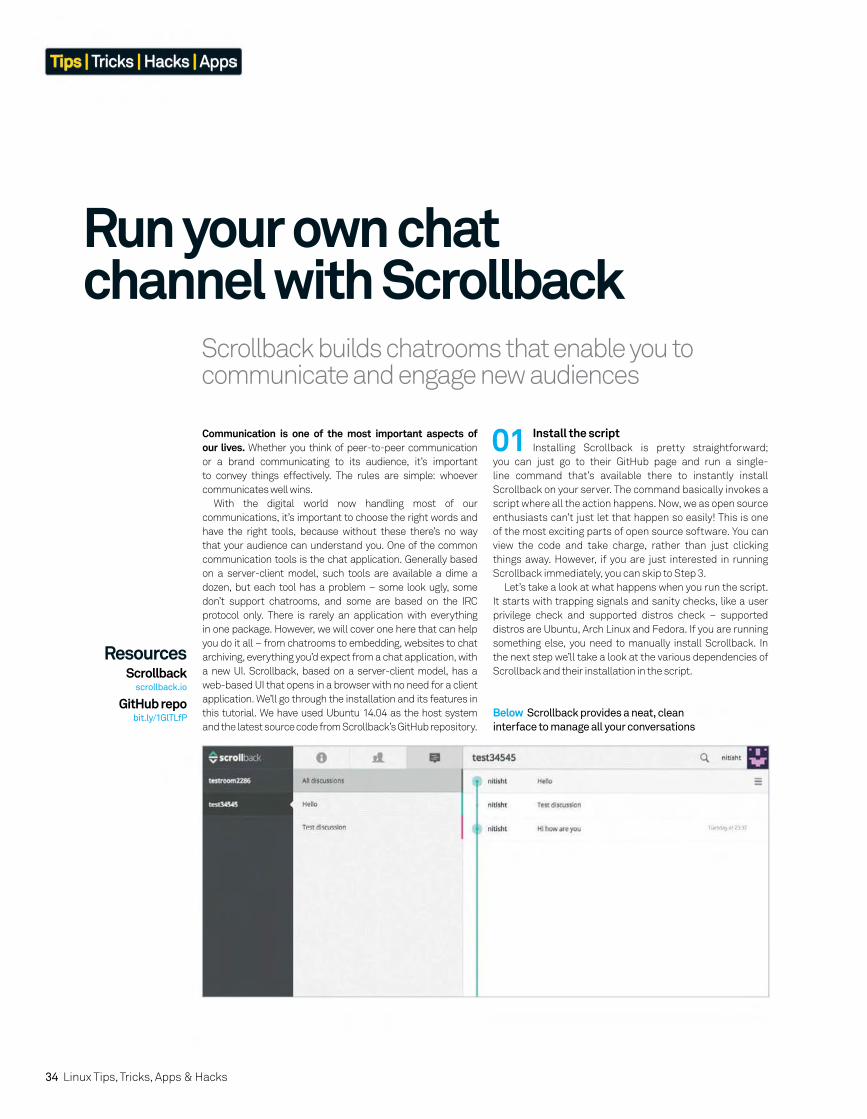
34 Linux Tips, Tricks, Apps & Hacks
Tips | Tricks | Hacks | Apps
Scrollback builds chatrooms that enable you to communicate and engage new audiences
Run your own chat channel with Scrollback
Communication is one of the most important aspects of our lives. Whether you think of peer-to-peer communication
or a brand communicating to its audience, it’s important
to convey things effectively. The rules are simple: whoever
communicates well wins.
With the digital world now handling most of our
communications, it’s important to choose the right words and
have the right tools, because without these there’s no way
that your audience can understand you. One of the common
communication tools is the chat application. Generally based
on a server-client model, such tools are available a dime a
dozen, but each tool has a problem – some look ugly, some
don’t support chatrooms, and some are based on the IRC
protocol only. There is rarely an application with everything
in one package. However, we will cover one here that can help
you do it all – from chatrooms to embedding, websites to chat
archiving, everything you’d expect from a chat application, with
a new UI. Scrollback, based on a server-client model, has a
web-based UI that opens in a browser with no need for a client
application. We’ll go through the installation and its features in
this tutorial. We have used Ubuntu 14.04 as the host system
and the latest source code from Scrollback’s GitHub repository.
Below Scrollback provides a neat, clean
interface to manage all your conversations
01 Install the scriptInstalling Scrollback is pretty straightforward;
you can just go to their GitHub page and run a single-
line command that’s available there to instantly install
Scrollback on your server. The command basically invokes a
script where all the action happens. Now, we as open source
enthusiasts can’t just let that happen so easily! This is one
of the most exciting parts of open source software. You can
view the code and take charge, rather than just clicking
things away. However, if you are just interested in running
Scrollback immediately, you can skip to Step 3.
Let’s take a look at what happens when you run the script.
It starts with trapping signals and sanity checks, like a user
privilege check and supported distros check – supported
distros are Ubuntu, Arch Linux and Fedora. If you are running
something else, you need to manually install Scrollback. In
the next step we’ll take a look at the various dependencies of
Scrollback and their installation in the script.
ResourcesScrollback
scrollback.io
GitHub repobit.ly/1GlTLfP
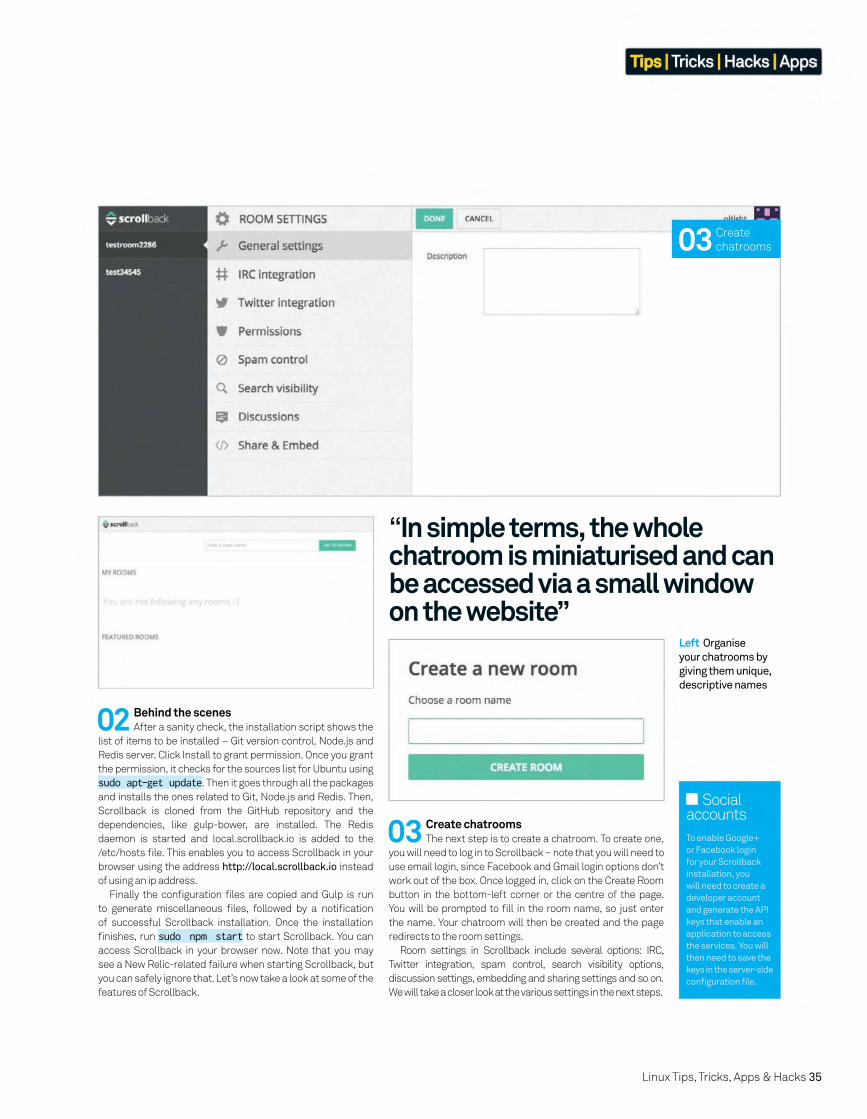
Linux Tips, Tricks, Apps & Hacks 35
Tips | Tricks | Hacks | Apps
03 Create chatroomsThe next step is to create a chatroom. To create one,
you will need to log in to Scrollback – note that you will need to
use email login, since Facebook and Gmail login options don’t
work out of the box. Once logged in, click on the Create Room
button in the bottom-left corner or the centre of the page.
You will be prompted to fi ll in the room name, so just enter
the name. Your chatroom will then be created and the page
redirects to the room settings.
Room settings in Scrollback include several options: IRC,
Twitter integration, spam control, search visibility options,
discussion settings, embedding and sharing settings and so on.
We will take a closer look at the various settings in the next steps.
02 Behind the scenesAfter a sanity check, the installation script shows the
list of items to be installed – Git version control, Node.js and
Redis server. Click Install to grant permission. Once you grant
the permission, it checks for the sources list for Ubuntu using
sudo apt-get update. Then it goes through all the packages
and installs the ones related to Git, Node.js and Redis. Then,
Scrollback is cloned from the GitHub repository and the
dependencies, like gulp-bower, are installed. The Redis
daemon is started and local.scrollback.io is added to the
/etc/hosts fi le. This enables you to access Scrollback in your
browser using the address http://local.scrollback.io instead
of using an ip address.
Finally the confi guration fi les are copied and Gulp is run
to generate miscellaneous fi les, followed by a notifi cation
of successful Scrollback installation. Once the installation
fi nishes, run sudo npm start to start Scrollback. You can
access Scrollback in your browser now. Note that you may
see a New Relic-related failure when starting Scrollback, but
you can safely ignore that. Let’s now take a look at some of the
features of Scrollback.
Left Organise
your chatrooms by
giving them unique,
descriptive names
Social accounts
To enable Google+
or Facebook login
for your Scrollback
installation, you
will need to create a
developer account
and generate the API
keys that enable an
application to access
the services. You will
then need to save the
keys in the server-side
confi guration fi le.
03 Create
chatrooms
“In simple terms, the whole chatroom is miniaturised and can be accessed via a small window on the website”
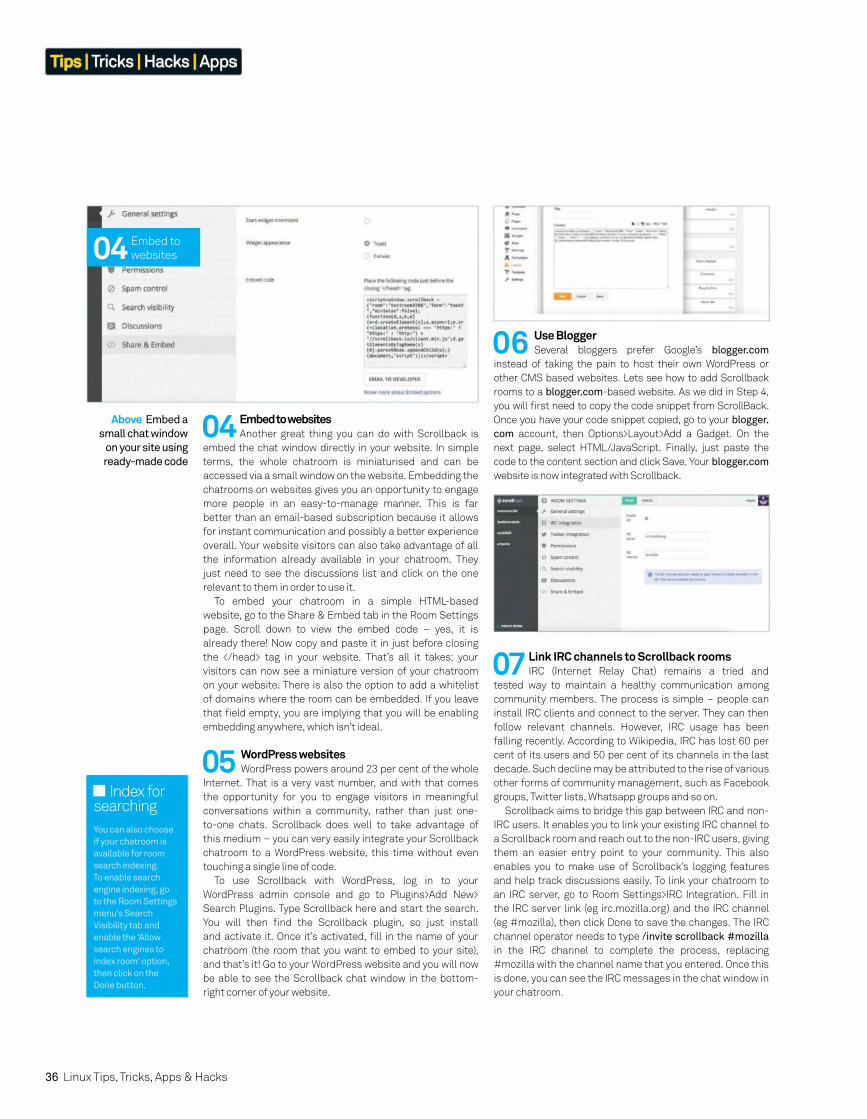
36 Linux Tips, Tricks, Apps & Hacks
Tips | Tricks | Hacks | Apps
Above Embed a
small chat window
on your site using
ready-made code
Index for searching
You can also choose
if your chatroom is
available for room
search indexing.
To enable search
engine indexing, go
to the Room Settings
menu’s Search
Visibility tab and
enable the ‘Allow
search engines to
index room’ option,
then click on the
Done button.
05 WordPress websitesWordPress powers around 23 per cent of the whole
Internet. That is a very vast number, and with that comes
the opportunity for you to engage visitors in meaningful
conversations within a community, rather than just one-
to-one chats. Scrollback does well to take advantage of
this medium – you can very easily integrate your Scrollback
chatroom to a WordPress website, this time without even
touching a single line of code.
To use Scrollback with WordPress, log in to your
WordPress admin console and go to Plugins>Add New>
Search Plugins. Type Scrollback here and start the search.
You will then fi nd the Scrollback plugin, so just install
and activate it. Once it’s activated, fi ll in the name of your
chatroom (the room that you want to embed to your site),
and that’s it! Go to your WordPress website and you will now
be able to see the Scrollback chat window in the bottom-
right corner of your website.
06 Use BloggerSeveral bloggers prefer Google’s blogger.com
instead of taking the pain to host their own WordPress or
other CMS based websites. Lets see how to add Scrollback
rooms to a blogger.com-based website. As we did in Step 4,
you will fi rst need to copy the code snippet from ScrollBack.
Once you have your code snippet copied, go to your blogger.
com account, then Options>Layout>Add a Gadget. On the
next page, select HTML/JavaScript. Finally, just paste the
code to the content section and click Save. Your blogger.com
website is now integrated with Scrollback.
07 Link IRC channels to Scrollback roomsIRC (Internet Relay Chat) remains a tried and
tested way to maintain a healthy communication among
community members. The process is simple – people can
install IRC clients and connect to the server. They can then
follow relevant channels. However, IRC usage has been
falling recently. According to Wikipedia, IRC has lost 60 per
cent of its users and 50 per cent of its channels in the last
decade. Such decline may be attributed to the rise of various
other forms of community management, such as Facebook
groups, Twitter lists, Whatsapp groups and so on.
Scrollback aims to bridge this gap between IRC and non-
IRC users. It enables you to link your existing IRC channel to
a Scrollback room and reach out to the non-IRC users, giving
them an easier entry point to your community. This also
enables you to make use of Scrollback’s logging features
and help track discussions easily. To link your chatroom to
an IRC server, go to Room Settings>IRC Integration. Fill in
the IRC server link (eg irc.mozilla.org) and the IRC channel
(eg #mozilla), then click Done to save the changes. The IRC
channel operator needs to type /invite scrollback #mozilla
in the IRC channel to complete the process, replacing
#mozilla with the channel name that you entered. Once this
is done, you can see the IRC messages in the chat window in
your chatroom.
04 Embed to websitesAnother great thing you can do with Scrollback is
embed the chat window directly in your website. In simple
terms, the whole chatroom is miniaturised and can be
accessed via a small window on the website. Embedding the
chatrooms on websites gives you an opportunity to engage
more people in an easy-to-manage manner. This is far
better than an email-based subscription because it allows
for instant communication and possibly a better experience
overall. Your website visitors can also take advantage of all
the information already available in your chatroom. They
just need to see the discussions list and click on the one
relevant to them in order to use it.
To embed your chatroom in a simple HTML-based
website, go to the Share & Embed tab in the Room Settings
page. Scroll down to view the embed code – yes, it is
already there! Now copy and paste it in just before closing
the </head> tag in your website. That’s all it takes; your
visitors can now see a miniature version of your chatroom
on your website. There is also the option to add a whitelist
of domains where the room can be embedded. If you leave
that fi eld empty, you are implying that you will be enabling
embedding anywhere, which isn’t ideal.
04 Embed to
websites
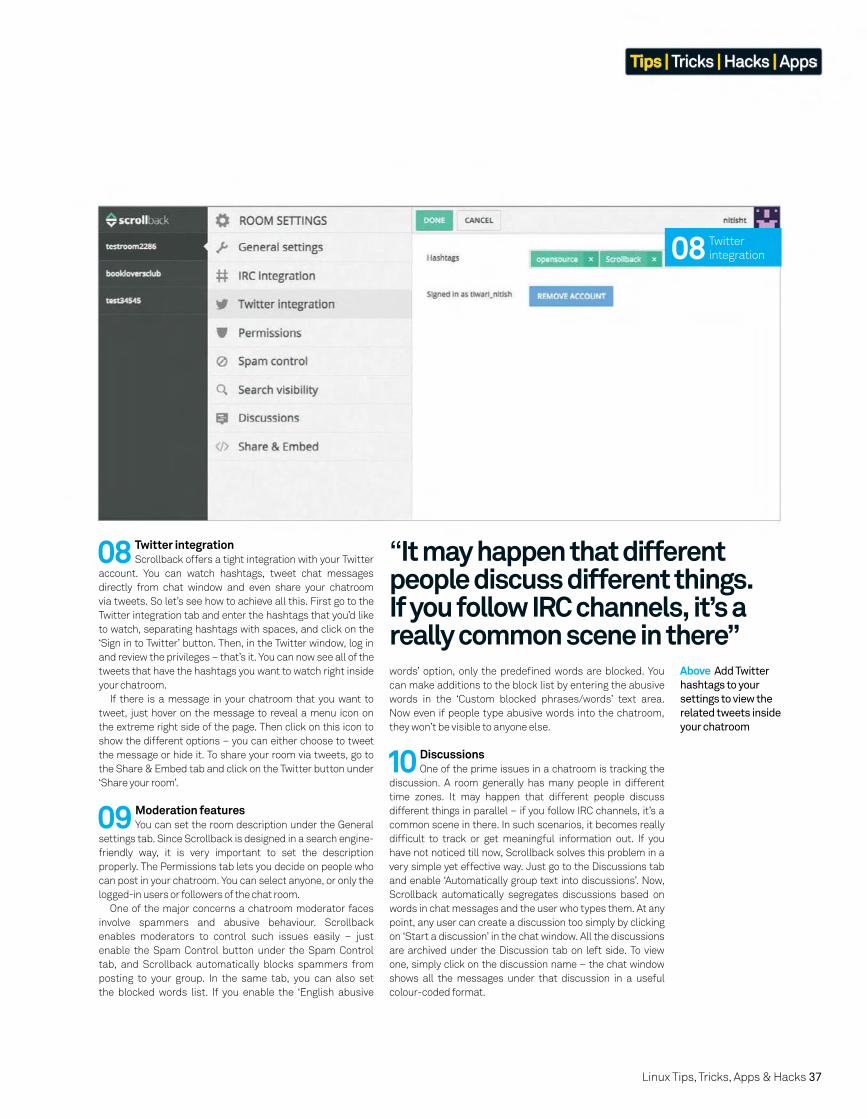
Linux Tips, Tricks, Apps & Hacks 37
Tips | Tricks | Hacks | Apps
10 DiscussionsOne of the prime issues in a chatroom is tracking the
discussion. A room generally has many people in different
time zones. It may happen that different people discuss
different things in parallel – if you follow IRC channels, it’s a
common scene in there. In such scenarios, it becomes really
diffi cult to track or get meaningful information out. If you
have not noticed till now, Scrollback solves this problem in a
very simple yet effective way. Just go to the Discussions tab
and enable ‘Automatically group text into discussions’. Now,
Scrollback automatically segregates discussions based on
words in chat messages and the user who types them. At any
point, any user can create a discussion too simply by clicking
on ‘Start a discussion’ in the chat window. All the discussions
are archived under the Discussion tab on left side. To view
one, simply click on the discussion name – the chat window
shows all the messages under that discussion in a useful
colour-coded format.
08 Twitter integrationScrollback offers a tight integration with your Twitter
account. You can watch hashtags, tweet chat messages
directly from chat window and even share your chatroom
via tweets. So let’s see how to achieve all this. First go to the
Twitter integration tab and enter the hashtags that you’d like
to watch, separating hashtags with spaces, and click on the
‘Sign in to Twitter’ button. Then, in the Twitter window, log in
and review the privileges – that’s it. You can now see all of the
tweets that have the hashtags you want to watch right inside
your chatroom.
If there is a message in your chatroom that you want to
tweet, just hover on the message to reveal a menu icon on
the extreme right side of the page. Then click on this icon to
show the different options – you can either choose to tweet
the message or hide it. To share your room via tweets, go to
the Share & Embed tab and click on the Twitter button under
‘Share your room’.
09 Moderation featuresYou can set the room description under the General
settings tab. Since Scrollback is designed in a search engine-
friendly way, it is very important to set the description
properly. The Permissions tab lets you decide on people who
can post in your chatroom. You can select anyone, or only the
logged-in users or followers of the chat room.
One of the major concerns a chatroom moderator faces
involve spammers and abusive behaviour. Scrollback
enables moderators to control such issues easily – just
enable the Spam Control button under the Spam Control
tab, and Scrollback automatically blocks spammers from
posting to your group. In the same tab, you can also set
the blocked words list. If you enable the ‘English abusive
08 Twitter
integration
Above Add Twitter
hashtags to your
settings to view the
related tweets inside
your chatroom
words’ option, only the predefi ned words are blocked. You
can make additions to the block list by entering the abusive
words in the ‘Custom blocked phrases/words’ text area.
Now even if people type abusive words into the chatroom,
they won’t be visible to anyone else.
“It may happen that different people discuss different things. If you follow IRC channels, it’s a really common scene in there”
38 Linux Tips, Tricks, Apps & Hacks
Tips | Tricks | Hacks | Apps
Reduce your network traffi c and serve DNS requests faster by running your very own caching DNS server
Create a caching DNS server for query requests using BIND
DNS (Domain Name System) is what converts a human readable string to an IP address (and vice versa) – when it does not work properly, you cannot browse the Internet or get your email. Machines called DNS servers,
or simply name servers, support the Domain
Name System. These machines are nothing
extraordinary except the fact that they run
special server software to support DNS. A
network device must have at least one properly
confi gured DNS server in order to operate
normally, but for added redundancy you should
use more name servers to ensure that the
network device is operational regardless of
any problems. A name server should always
be stated with its IP address. A DNS zone is a
part of a domain name that its administration
has been delegated. So, the .co.uk domain
has many zones. It is very reasonable that the
.co.uk domain administrator delegates the
administration of all subdomains because
otherwise it would have to administer all the
.co.uk subdomains, which, as you can imagine,
are numerous.
ResourcesBIND home page www.isc.org/software/bind
RFC 1034, Domain Names tools.ietf.org/html/rfc1034
RFC 5936, AXFR tools.ietf.org/html/rfc5936
Above Check out bit.ly/1tr9kbv for documention on BIND

Linux Tips, Tricks, Apps & Hacks 39
Tips | Tricks | Hacks | Apps
01 Install BINDBIND stands for Berkeley Internet
Name Domain and is an implementation of the
DNS protocols. On a Debian 7 system you can
install the latest version of BIND by running the
following command:
# apt-get install bind9
To fi nd your version of BIND, execute the
following command:
# named -vBIND 9.8.4-rpz2+rl005.12-P1
04 The dig utilityThe dig utility can show you the same
DNS related information as host, however, dig’s
output is more populated by default. In order to
fi nd the DNS servers of the co.uk domain with
the help of dig, you could do this by executing the
following command:
$ dig co.uk. nsTrying to perform a AXFR query with dig fails:$ dig @localhost co.uk. axfr
; <<>> DiG 9.8.4-rpz2+rl005.12-P1 <<>> @localhost co.uk. axfr; (2 servers found);; global options: +cmd; Transfer failed.
AXFR is a mechanism for replicating DNS data
across DNS servers, but it can also be used
for evil purposes. The DNS Administrator is
responsible for allowing the access to the AXFR
protocol to specifi c machines and restricting it
to the rest of the world.
02 What is Cache DNS server?A caching-only DNS server does not
contain information about a domain; it just
contains information based on the results of the
DNS queries it has already performed. The main
reason that DNS caching works well is because
DNS data does not change frequently.
05 The /etc/resolv.conf fileThe quickest way to see your DNS
confi guration is by looking at the /etc/resolv.conf
fi le, where you can see the IP address for each
DNS server used; each entry starts with the
nameserver keyword. There is no point in using
anything but an IP address for a DNS server.
Usually, the administrator deals with this fi le
when setting up a Linux machine; otherwise it
is populated when your Linux machine gets its
network confi guration using DHCP.
03 The host utilityHost produces a clean output and that is
the main reason for liking it – it can easily be used
inside shell scripts. Its last parameter, which is
optional, is the name of the DNS server to ask. If
not given, it uses the /etc/resolv.conf fi le to fi nd a
DNS server to ask.
Used with the -t mx parameters, host shows
the mail servers for a domain or a subdomain:
# host -t mx linuxuser.co.uklinuxuser.co.uk mail is handled by 10 mail.imagine-publishing.co.uk.linuxuser.co.uk mail is handled by 20 mail2.imagine-publishing.co.uk.
The numbers that you see after the “handled
by” are the preference values that indicate the
mail exchanger’s priority. A preference value by
itself is not important, what is important is its
relationship to the other values.
Mail servers should attempt to deliver to the
mail exchangers with the lowest values fi rst. If
the delivery fails for some reason, then the mail
exchanger with the next highest value will be
tried. If two or more mail exchangers have the
same preference value, it is up to the mail server
to decide which one to choose. The primary DNS
server is responsible for defi ning the email server
for a domain or a subdomain.
Used with the -t ns parameters, host shows
the DNS Servers for a domain.
03 The host
utility

40 Linux Tips, Tricks, Apps & Hacks
Tips | Tricks | Hacks | Apps
11 Manage the caching DNS serverYou already know how to start the DNS
server. The following command stops it:
# /etc/init.d/bind9 stop
And then this command restarts it:
# /etc/init.d/bind9 restart[....] Stopping domain name service...: bind9waiting for pid 24713 to die. ok [ ok ] Starting domain name service...: bind9.
09 The /etc/bind/db.root fi leThe db.root fi le holds the information
on root name servers, denoted by a single dot,
needed to initialise the cache of internet domain
name servers. You can manually generate it by
running the following command:
$ dig @a.root-servers.net . NS > db.root
10 The configuration file The default BIND confi guration is almost
ready to support a caching DNS server. You will
only need to explicitly turn recursion on and then
it will all be done. This action can be completed
by adding a line inside ‘named.conf.options’ that
contains the ‘recursion yes;’ text.
The next step then is to run the BIND server
process as follows:
# /etc/init.d/bind9 start
You will also need to add an access control list to
reduce traffi c and increase security, and you will
learn about access control lists a little later on
in Step 14. The DNS service will usually listen to
port number 53, as you can clearly see from the
following output:
# telnet localhost 53Trying ::1...Connected to localhost.
06 The rndc utilityThe rndc executable is the name
server control utility. It controls the operation of
the name server and it communicates with the
named process using a TCP connection. The
rndc utility has a confi guration fi le called rndc.
conf that has structure and syntax similar to
named.conf. You can type man rndc-confgen
and man rndc.conf for more information.
07 Other types of DNS serversThere are three more types of DNS
servers: primary, secondary and forwarding.
Each domain should have at least one primary
and one secondary DNS server.
A primary DNS server (or Master) defi nes
one or more zone fi les for which this DNS
is authoritative. A zone has been assigned to a
DNS server using an NS Resource Record.
A secondary DNS server (or Slave) mainly acts
as the backup of the primary DNS server in case it
goes down for some reason.
A forwarding DNS server is almost identical to
a caching server from the perspective of a client.
Its difference is that it does not perform recursive
queries itself; it just forwards them to another
DNS server, gets the response back and then
caches the results.
It is not possible to fi nd out from a query result
whether it was answered from a zone master or
from a slave.
08 The /etc/bind directoryAll confi guration fi les related to BIND
are located inside the /etc/bind directory. You
will need root access to make changes to it and
you will have to restart the named process for
the changes to take effect.
BIND keeps some other fi les inside /var/
cache/bind:
# ls -l /var/cache/bind/total 24-rw-r--r-- 1 bind bind 698 Oct 15 09:46 managed-keys.bind-rw-r--r-- 1 bind bind 512 Oct 15 09:46 managed-keys.bind.jnl-rw-r--r-- 1 bind bind 9446 Oct 15 11:17 named_dump.db-rw-r--r-- 1 bind bind 1103 Oct 14 10:58 named.stats
10 The confi guration fi le
for the caching server
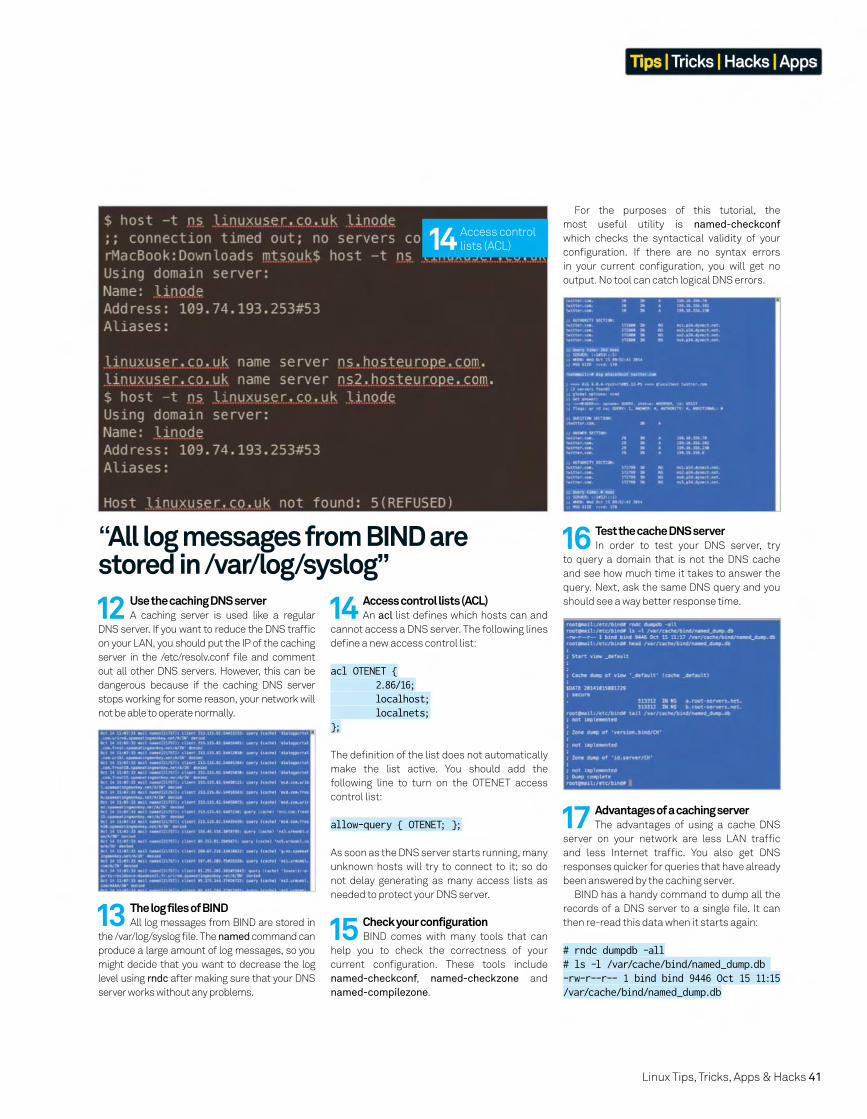
Linux Tips, Tricks, Apps & Hacks 41
Tips | Tricks | Hacks | Apps
12 Use the caching DNS serverA caching server is used like a regular
DNS server. If you want to reduce the DNS traffi c
on your LAN, you should put the IP of the caching
server in the /etc/resolv.conf fi le and comment
out all other DNS servers. However, this can be
dangerous because if the caching DNS server
stops working for some reason, your network will
not be able to operate normally.
13 The log files of BINDAll log messages from BIND are stored in
the /var/log/syslog fi le. The named command can
produce a large amount of log messages, so you
might decide that you want to decrease the log
level using rndc after making sure that your DNS
server works without any problems.
14 Access control lists (ACL)An acl list defi nes which hosts can and
cannot access a DNS server. The following lines
defi ne a new access control list:
acl OTENET { 2.86/16; localhost; localnets;};
The defi nition of the list does not automatically
make the list active. You should add the
following line to turn on the OTENET access
control list:
allow-query { OTENET; };
As soon as the DNS server starts running, many
unknown hosts will try to connect to it; so do
not delay generating as many access lists as
needed to protect your DNS server.
15 Check your configurationBIND comes with many tools that can
help you to check the correctness of your
current confi guration. These tools include
named-checkconf, named-checkzone and
named-compilezone.
16 Test the cache DNS serverIn order to test your DNS server, try
to query a domain that is not the DNS cache
and see how much time it takes to answer the
query. Next, ask the same DNS query and you
should see a way better response time.
17 Advantages of a caching serverThe advantages of using a cache DNS
server on your network are less LAN traffi c
and less Internet traffi c. You also get DNS
responses quicker for queries that have already
been answered by the caching server.
BIND has a handy command to dump all the
records of a DNS server to a single fi le. It can
then re-read this data when it starts again:
# rndc dumpdb -all# ls -l /var/cache/bind/named_dump.db -rw-r--r-- 1 bind bind 9446 Oct 15 11:15 /var/cache/bind/named_dump.db
For the purposes of this tutorial, the
most useful utility is named-checkconf
which checks the syntactical validity of your
confi guration. If there are no syntax errors
in your current confi guration, you will get no
output. No tool can catch logical DNS errors.
“All log messages from BIND are stored in /var/log/syslog”
14 Access control
lists (ACL)
42 Linux Tips, Tricks, Apps & Hacks
Tips | Tricks | Hacks | Apps
Each operating system provides its own set of networking APIs, but Qt gives a solution to simplify creating chatty applications
Program a client-server application
Modern computer networks are composed of multiple protocols. Creating well-formed
packets by hand is almost impossible – the
protocol stack and its underlying network
hardware affect the format.
Engineers working on Unix solved this problem
by introducing an abstraction layer – so-called
sockets acting as endpoints between two
local or remote applications. Developers use
the standardised interface in order to provide
commands to the socket, which are then
translated to the network.
When dealing with sockets, a basic
understanding of networking is benefi cial. For
now, it shall suffi ce to defi ne that messages
can be transmitted by two high-level protocols.
TCP – short for Transmission Control Protocol
– provides confi rmation when data has been
delivered successfully. This is accomplished by
a relatively complex sequence of packets which
add overhead to the communication process.
However, some applications don’t require this.
For them, UDP provides a sleeker communication
protocol that forgoes delivery confi rmation. On
a network, computers are identifi ed by their IP
address. Individual services are then identifi ed by
their port numbers – consider them apartment
door numbers inside a high-rise building.
Developers working on communication
software tend to face a chicken-egg situation
– if no server has been written, the client can’t
connect. On the other hand, the lack of a client
means that the server can’t be tested.
In practical projects you should start out by
creating a rough mock-up of the messages that
the client and server will exchange. You don’t
need to get this 100 per cent right on the fi rst try;
most protocols change as they get implemented.
Our fi nger exercise-level applications don’t
require this level of sophistication. It will
suffi ce to begin by creating a command line
project called ImagineTCPServer. Qt Creator
does not add the networking module to newly
created applications. This can easily be
remedied by opening its .pro fi le and adjusting
the QT directive so that network gets included
at compile time:
QT += network
With that, it is time to create the server object.
Its declaration can be placed inside the main()
function responsible for program bring-up:
myServer=new QTcpServer();if(myServer->listen(QHostAddress::Any,1025)==false){ qDebug() << “Server error” << myServer->serverError(); return 0;}else{ qDebug() << “Server up” << myServer->serverAddress() << “ ” << myServer->serverPort();}
In classic Berkeley socket programming, server
and client logic are handled by instances of the
socket class. Qt provides a dedicated server
that contains helper methods for connectivity
management. After start-up, we invoke the
listen() method in order to make our QTcpServer
wait for incoming connections.
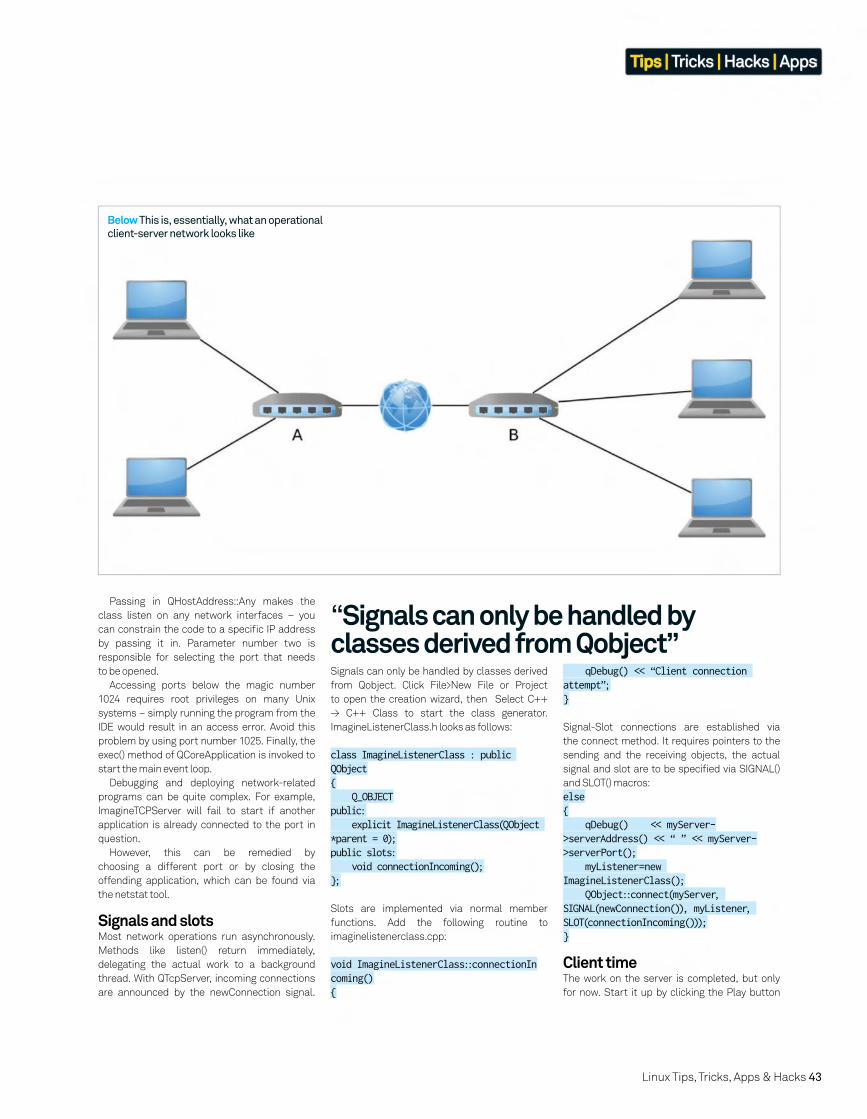
Linux Tips, Tricks, Apps & Hacks 43
Tips | Tricks | Hacks | Apps
Passing in QHostAddress::Any makes the
class listen on any network interfaces – you
can constrain the code to a specifi c IP address
by passing it in. Parameter number two is
responsible for selecting the port that needs
to be opened.
Accessing ports below the magic number
1024 requires root privileges on many Unix
systems – simply running the program from the
IDE would result in an access error. Avoid this
problem by using port number 1025. Finally, the
exec() method of QCoreApplication is invoked to
start the main event loop.
Debugging and deploying network-related
programs can be quite complex. For example,
ImagineTCPServer will fail to start if another
application is already connected to the port in
question.
However, this can be remedied by
choosing a different port or by closing the
offending application, which can be found via
the netstat tool.
Signals and slotsMost network operations run asynchronously.
Methods like listen() return immediately,
delegating the actual work to a background
thread. With QTcpServer, incoming connections
are announced by the newConnection signal.
Signals can only be handled by classes derived
from Qobject. Click File>New File or Project
to open the creation wizard, then Select C++
≥ C++ Class to start the class generator.
ImagineListenerClass.h looks as follows:
class ImagineListenerClass : public QObject{ Q_OBJECTpublic: explicit ImagineListenerClass(QObject *parent = 0);public slots: void connectionIncoming();};
Slots are implemented via normal member
functions. Add the following routine to
imaginelistenerclass.cpp:
void ImagineListenerClass::connectionIncoming(){
qDebug() << “Client connection attempt”;}
Signal-Slot connections are established via
the connect method. It requires pointers to the
sending and the receiving objects, the actual
signal and slot are to be specifi ed via SIGNAL()
and SLOT() macros:
else{ qDebug() << myServer->serverAddress() << “ ” << myServer->serverPort(); myListener=new ImagineListenerClass(); QObject::connect(myServer, SIGNAL(newConnection()), myListener, SLOT(connectionIncoming()));}
Client timeThe work on the server is completed, but only
for now. Start it up by clicking the Play button
Below This is, essentially, what an operational
client-server network looks like
“Signals can only be handled by classes derived from Qobject”
44 Linux Tips, Tricks, Apps & Hacks
Tips | Tricks | Hacks | Apps
“At first, using TCP/IP to connect the processes sounds like overkill, but many programs are implemented in this fashion”
Connecting to servers requires the use of a
QTcpSocket. Its most basic implementation is
made up of but two lines:
QTcpSocket *mySocket;int main(int argc, char *argv[]){ QCoreApplication a(argc, argv); mySocket=new QTcpSocket(); mySocket->connectToHost(QHostAddress::LocalHost, 1025); return a.exec();}
ConnectToHost() is another asynchronous
method which takes two parameters. The fi rst
one designates the IP to use, while the second
specifi es the port. Successful connections
will be indicated by the emission of a signal
which we will handle in the next step. For now,
a running instance of ImagineTCPServer will
display a connection attempted message when
our client is started.
At the fi rst glance, using TCP/IP to connect
two processes on the same machine sounds
like overkill. However, many programs are
implemented in this fashion – handling inter-
process communication via sockets provides a
safe and simple way to de-couple components
from one another.
Streams of dataReal network applications exchange data, which
is accomplished by using the data streams
embedded into the socket instances. First,
modify the constructor of ImagineListenerClass
to provide the myServer instance to the method
responsible for handling the newConnection
signal. Then adjust its body as per Fig. 01.
QTcpServer can happily handle multiple
pending connections at the same time.
NextPendingConnection returns a socket
representing the connection to the selected
client. We’ll wire its disconnected signal to the
deleteLater slot to ensure unneeded sockets will
be eliminated automatically. In the next step a
byte array is populated and sent to the client.
Qt’s underlying DataStream class gets
improved as the framework evolves. Specifying
a data format ensures that binaries built with
later versions of Qt can interpret the data
provided in the socket. Many applications use
Qt 4.0’s format. If your program is limited to Qt 5
and above due to other dependencies, you can
also defi ne this version as baseline.
The next step involves modifi cations
to the client. Insert a class similar to the
ImagineListener to handle the signals emitted
from the socket class. Our application has to
deal with three events – we need to notify the
user of successful and failed connections and
must receive data sent from the server.
Status messages are handled by emitting the
corresponding statements to the console via
qDebug() (see Fig 02).
Receiving data is more complex. Our simple
protocol doesn’t inform the client in advance
about how much data is to be transmitted. Due
to that, we simply read whatever amount of data
has been received:
void ImagineReceiver::dataReady(){ QDataStream in(mySocket); in.setVersion(QDataStream::Qt_4_0); QString thatsIt; in >> thatsIt;
qDebug() << thatsIt;}
Each of the slots must be connected to
the socket. This should be done before the
connectToHost method is invoked. On some
operating systems the connected signal is
emitted before connectToHost returns (Fig. 03).
Run the program in its current state to display
the greeting message from the server – it will
show up in the client’s window. ErrorOccurred
will be invoked to inform our program that the
server terminated its connection.
Further interactionOur server currently kicks out clients after
providing them with a friendly greeting message.
A polite server would stick around and wait for
a response. Even though we could keep the
sockets in our current example, this would lead
to issues once more than one client is connected
– we connect all signals to one slot which makes
keeping the different connections apart diffi cult.
A thread is a convenient solution for this
problem. Threads are subroutines that run in
parallel to the main application code – spawning
threads permits your code to do multiple things
at the same time. Adding a thread is as easy as
adding a new class whose header looks like this:
class ImagineThread:public QThread{ Q_OBJECTpublic: ImagineThread(QTcpSocket* _aSocket); void run();public: QTcpSocket* mySocket;};
The actual payload can be found in the
run() method which will be executed in the
background after the thread was spawned:
void ImagineThread::run(){ exec(); //Start event loop}void ImagineThread::dataReady(){ QDataStream in(mySocket); in.setVersion(QDataStream::Qt_4_0); QString thatsIt; in >> thatsIt; qDebug() << thatsIt; exit();}ImagineThread’s sole role involves staying until
a signal is emitted. We accomplish that by
invoking the exec() method which creates an
event loop. It keeps idling until exit is called from
the dataReady handler.
Our server must be modifi ed in order to
start the thread when a new client connects
(Fig. 04).A classic beginner’s mistake involves
inside Qt Creator and then make sure that you
keep your console window open. You can now
check its functionality by opening a terminal
window and entering netstat -tlnp, and the
ImagineTCPServer will show up. Open a second
session of Qt Creator in order to develop the
client. Create another Qt Console Application
named ImagineTCPClient and modify its .pro fi le
to enable networking as outlined above.
Linux Tips, Tricks, Apps & Hacks 45
Tips | Tricks | Hacks | Apps
“Multithreaded programs can behave oddly”
calling the run() method of a thread directly.
Background execution can be accomplished
only when start() is called – it invokes the
thread-spawning logic and then proceeds to
executing the payload.
Finally, change the client so that it sends
some data to its master:
void ImagineReceiver::dataReady(){ . . . QDataStream out(&block, QIODevice::WriteOnly); out.setVersion(QDataStream::Qt_4_0); out << Qstring(“Hello, server!"); mySocket->write(block);}
Multithreaded programs can show all kinds
of odd behaviour due to a situation called race
condition. If two routines access a shared
element at the same time, havoc is guaranteed.
Qt provides a variety of methods, such as
mutexes, which can mitigate such problems.
Advanced considerationsIn the beginnings of the internet, every computer
had its own public IP address. Nowadays many,
if not most, systems fi nd themselves behind
layers of routers providing network address
translation and/or fi rewall services.
The image on page 43 shows a network made
up of two local networks connected to one
another via the Internet.
If a networked application on system A
wants to connect to system B, router B must be
confi gured to expose the port in question. This
can usually be accomplished in the backend of
the router – since every manufacturer provides
a slightly different user interface, it’s best to
refer to your router’s (online) manual.
ConclusionWell-versed developers can implement the most
complex of protocols. Fortunately, Qt provides
ready-made classes that implement commonly-
used protocols such as HTTP. Next time, we will
use one of these to create a small RSS reader.
void ImagineListenerClass::connectionIncoming(){ QTcpSocket *clientConnection = myServer->nextPendingConnection(); connect(clientConnection, SIGNAL(disconnected()), clientConnection, SLOT(deleteLater())); QByteArray block; QDataStream out(&block, QIODevice::WriteOnly); out.setVersion(QDataStream::Qt_4_0); out << QString(“Hello, client!”); clientConnection->write(block); clientConnection->disconnectFromHost();}
Fig 01
int main(int argc, char *argv[]){ QCoreApplication a(argc, argv); mySocket=new QTcpSocket(); ImagineReceiver *myListener=new ImagineReceiver(mySocket); mySocket->connect(mySocket, SIGNAL(connected()),myListener,SLOT(amConnected())); mySocket->connect(mySocket, SIGNAL(readyRead()),myListener,SLOT(dataReady())); mySocket->connect(mySocket, SIGNAL(error(QAbstractSocket::SocketError)), myListener,SLOT(errorOccurred(QAbstractSocket::SocketError))); mySocket->connectToHost(QHostAddress::LocalHost, 1025); return a.exec();}
Fig 03
void ImagineReceiver::amConnected(){ qDebug() << “Connection successful”;}void ImagineReceiver::errorOccurred(QAbstractSocket::SocketError anError){ qDebug() << “Error: ” << anError;}
Fig 02
void ImagineListenerClass::connectionIncoming(){ QTcpSocket *clientConnection = myServer->nextPendingConnection(); connect(clientConnection, SIGNAL(disconnected()), clientConnection, SLOT(deleteLater())); clientConnection->setParent(0); ImagineThread* myThread=new ImagineThread(clientConnection); connect(clientConnection,SIGNAL(readyRead()), myThread,SLOT(dataReady())); myThread->start(); QByteArray block; QDataStream out(&block, QIODevice::WriteOnly); out.setVersion(QDataStream::Qt_4_0); out << QString(“Hello, client!”); clientConnection->write(block);}
Fig 04
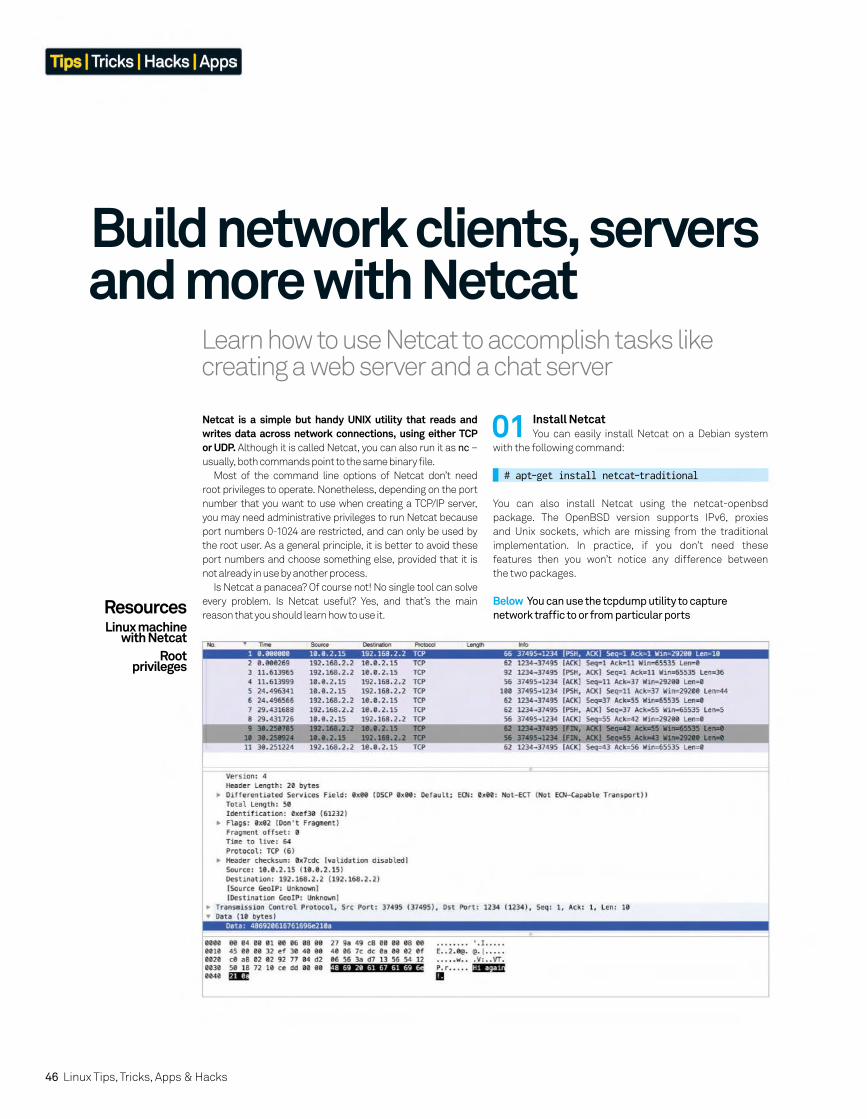
46 Linux Tips, Tricks, Apps & Hacks
Tips | Tricks | Hacks | Apps
Learn how to use Netcat to accomplish tasks like creating a web server and a chat server
Build network clients, servers and more with Netcat
Netcat is a simple but handy UNIX utility that reads and writes data across network connections, using either TCP or UDP. Although it is called Netcat, you can also run it as nc –
usually, both commands point to the same binary fi le.
Most of the command line options of Netcat don’t need
root privileges to operate. Nonetheless, depending on the port
number that you want to use when creating a TCP/IP server,
you may need administrative privileges to run Netcat because
port numbers 0-1024 are restricted, and can only be used by
the root user. As a general principle, it is better to avoid these
port numbers and choose something else, provided that it is
not already in use by another process.
Is Netcat a panacea? Of course not! No single tool can solve
every problem. Is Netcat useful? Yes, and that’s the main
reason that you should learn how to use it.
Below You can use the tcpdump utility to capture
network traffi c to or from particular ports
01 Install NetcatYou can easily install Netcat on a Debian system
with the following command:
# apt-get install netcat-traditional
You can also install Netcat using the netcat-openbsd
package. The OpenBSD version supports IPv6, proxies
and Unix sockets, which are missing from the traditional
implementation. In practice, if you don’t need these
features then you won’t notice any difference between
the two packages.
ResourcesLinux machine
with NetcatRoot
privileges

Linux Tips, Tricks, Apps & Hacks 47
Tips | Tricks | Hacks | Apps
03 Netcat as a clientThe most common Netcat usage is acting as a client
for a server process. This is mostly used for troubleshooting
network servers because you can see the raw data of the
full interaction. The following command will interact with
an SMTP server:
$ nc linode 25
As you can guess, you can give either the host name or the IP
address of the remote host.
02 Basic Netcat usageThe general form of a Netcat command looks
like the following:
$ netcat [options] host port
The default Netcat behaviour is similar to a simulated
network interaction that uses the telnet command, which
means that the network connection is not secure (ie
unencrypted) and that the default protocol is TCP.
If you want, you can also specify a range of ports using
the minus character between the two port numbers that
indicate the range.
Above You can see
details on the Netcat
package right at the
top of this output
01 Install
Netcat
04 Use files for input and outputAccording to Unix philosophy, the input to a program
can be read from a fi le and the output can be captured into
a fi le. The input is defi ned as <fi lename and the output as
>fi lename. You can also use Unix pipes to get your input from
the output of other processes.
05 Netcat as a serverNot only you can use Netcat as a client, you can also
use it for creating a server! The next command makes Netcat
listen to port number 1234 for incoming TCP connections:
$ netcat -l 1234
The job is done by the -l option because it tells Netcat to listen
for incoming connections. The port number is also provided in
the command line.
06 The UDP protocolBy default, all Netcat interactions work with the
TCP protocol. However, it’s also possible to use the UDP
protocol that is specifi ed with the use of the -u option. This
is particularly valuable because Telnet can only test TCP
services. The following command tries to test a DNS server
that uses UDP:
$ netcat -vv -u 8.8.8.8 53
You can create a UDP server if you combine the -l option with
the -u option.
07 Use Netcat for port scanningNetcat can be used for port scanning as a naive
version of Nmap. The next command scans the 192.168.2.1
IP address using a range of port numbers from 20 to 40:
$ netcat -z -v -n 192.168.2.1 20-40
The -z option tells Netcat to send zero data. In other words,
Netcat closes the connection as soon as it opens it, without
any actual data exchange taking place. The -n option tells
Netcat to disable DNS lookup for the given IP address.
Finding the problem
As you already know,
there are many
tools that can be
used for network
troubleshooting,
including netstat,
traceroute, wget,
ping, lost, nmap,
telnet, etc. If you
cannot fi nd and
solve the problem
you are experiencing
using this software,
you should always
have in mind that
an erroneous
network device can
sometimes cause
strange networking
problems, so you
might need to start
looking at your
hardware instead.
“Default Netcat behaviour is similar to a simulated network interaction”
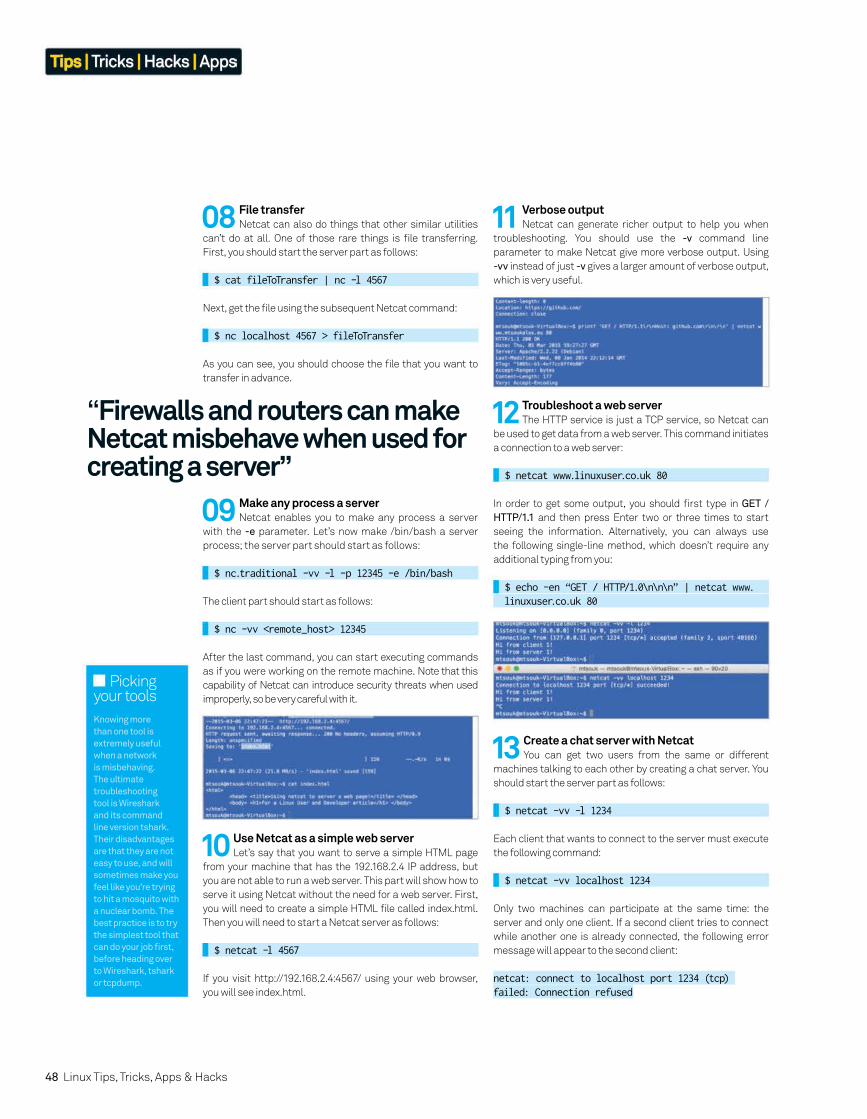
48 Linux Tips, Tricks, Apps & Hacks
Tips | Tricks | Hacks | Apps
08 File transferNetcat can also do things that other similar utilities
can’t do at all. One of those rare things is fi le transferring.
First, you should start the server part as follows:
$ cat fileToTransfer | nc -l 4567
Next, get the fi le using the subsequent Netcat command:
$ nc localhost 4567 > fileToTransfer
As you can see, you should choose the fi le that you want to
transfer in advance.
09 Make any process a serverNetcat enables you to make any process a server
with the -e parameter. Let’s now make /bin/bash a server
process; the server part should start as follows:
$ nc.traditional -vv -l -p 12345 -e /bin/bash
The client part should start as follows:
$ nc -vv <remote_host> 12345
After the last command, you can start executing commands
as if you were working on the remote machine. Note that this
capability of Netcat can introduce security threats when used
improperly, so be very careful with it.
10 Use Netcat as a simple web serverLet’s say that you want to serve a simple HTML page
from your machine that has the 192.168.2.4 IP address, but
you are not able to run a web server. This part will show how to
serve it using Netcat without the need for a web server. First,
you will need to create a simple HTML fi le called index.html.
Then you will need to start a Netcat server as follows:
$ netcat -l 4567
If you visit http://192.168.2.4:4567/ using your web browser,
you will see index.html.
11 Verbose outputNetcat can generate richer output to help you when
troubleshooting. You should use the -v command line
parameter to make Netcat give more verbose output. Using
-vv instead of just -v gives a larger amount of verbose output,
which is very useful.
13 Create a chat server with NetcatYou can get two users from the same or different
machines talking to each other by creating a chat server. You
should start the server part as follows:
$ netcat -vv -l 1234
Each client that wants to connect to the server must execute
the following command:
$ netcat -vv localhost 1234
Only two machines can participate at the same time: the
server and only one client. If a second client tries to connect
while another one is already connected, the following error
message will appear to the second client:
netcat: connect to localhost port 1234 (tcp) failed: Connection refused
12 Troubleshoot a web serverThe HTTP service is just a TCP service, so Netcat can
be used to get data from a web server. This command initiates
a connection to a web server:
$ netcat www.linuxuser.co.uk 80
In order to get some output, you should fi rst type in GET /
HTTP/1.1 and then press Enter two or three times to start
seeing the information. Alternatively, you can always use
the following single-line method, which doesn’t require any
additional typing from you:
$ echo -en “GET / HTTP/1.0\n\n\n” | netcat www. linuxuser.co.uk 80
Picking your tools
Knowing more
than one tool is
extremely useful
when a network
is misbehaving.
The ultimate
troubleshooting
tool is Wireshark
and its command
line version tshark.
Their disadvantages
are that they are not
easy to use, and will
sometimes make you
feel like you’re trying
to hit a mosquito with
a nuclear bomb. The
best practice is to try
the simplest tool that
can do your job fi rst,
before heading over
to Wireshark, tshark
or tcpdump.
“Firewalls and routers can make Netcat misbehave when used for creating a server”

Linux Tips, Tricks, Apps & Hacks 49
Tips | Tricks | Hacks | Apps
14 Test network speed using NetcatThis is a relatively tricky use of Netcat, but it is very
handy when you don’t have any other tool to test the network
speed between two machines. For this to work you'll have to
use the netcat-traditional package.
Now, on the server machine you will need to execute
the following command:
$ time nc -D -vv -n -l 2222 >/dev/null
On the client machine, execute the next command and press
Ctrl+C after about 15 seconds to make it stop:
$ time yes | nc.traditional -vv -n 192.168.2.4 2222 >/dev/null
Using the bc utility, you can fi nd out that the network speed is
about 1,108,087 bytes per second, which is absolutely perfect
for a 10MB wireless network.
15 Transfer entire directories using NetcatYou have already learned how to transfer single fi les
using Netcat. Now, you are going to learn how to transfer
whole directories using Netcat and the help of the tar
command. The server part is the following:
$ tar -cvf - directory | nc -l 1234
The client part should be as follows:
$ nc localhost 1234 | tar -xvf -
16 Encrypt a Netcat connection using CryptcatTransferring data in plain text isn’t secure and may
cause problems. If you need encryption, use Cryptcat,
a lightweight version of Netcat that includes Twofi sh
encryption. On an Ubuntu system, install as follows:
$ sudo apt-get install cryptcat
Now, you are ready to start using Cryptcat. The server part
looks like this:
$ cryptcat -k passphrase -l -p 12345
The client part should run the following command:
$ cryptcat -k passphrase localhost 12345
17 Firewall and router issuesFirewalls and routers can make Netcat misbehave
when used for creating a server with the -l parameter.
Diffi culty lies in the fact that a router or a fi rewall may
not enable hairpin connections. The router or the fi rewall
would not make the connection when both the source and
destination are behind the NAT. As a result, the machine won’t
listen to the specifi ed port, using an arbitrary port instead.
18 Capture network data using tcpfl owIf lots is happening and you can’t fi nd out where the
actual problem is, ask Tcpfl ow, Tcpdump and Wireshark
for help. Tcpfl ow is a command line tool to help you inspect
network data. The following command displays network data
from or to port number 1234:
$ sudo tcpflow -i any -c -J port 1234
If you cannot solve your problems with tcpfl ow, capture your
data with tcpdump and process it with Wireshark.
Above You don’t
need Dropbox to
transfer folders over
your network
15 Transfer entire directories
using Netcat
If you give a wrong password after the -k parameters, the
connection will automatically terminate. If you want to make
sure that your data is actually encrypted, you can use a tool
such as Wireshark or Tcpdump to sniff it and see the results.
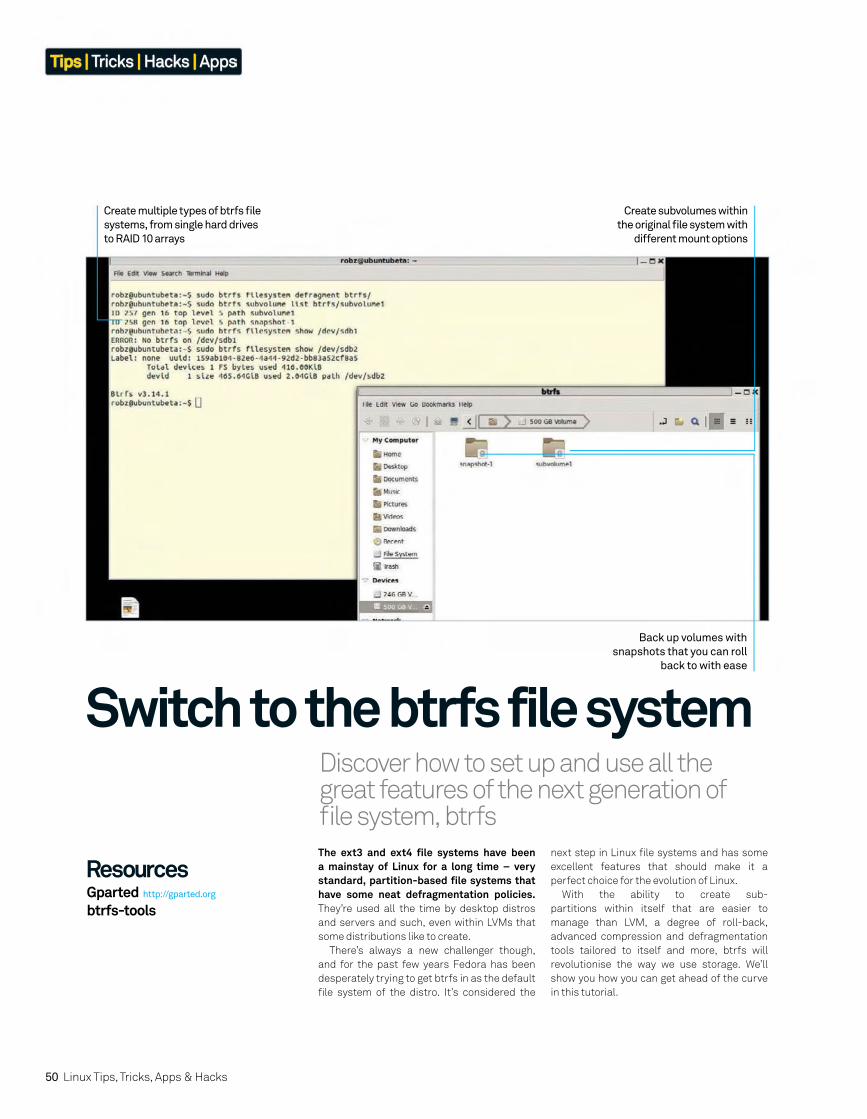
50 Linux Tips, Tricks, Apps & Hacks
Tips | Tricks | Hacks | Apps
Discover how to set up and use all the great features of the next generation of fi le system, btrfs
Switch to the btrfs file system
The ext3 and ext4 fi le systems have been a mainstay of Linux for a long time – very standard, partition-based fi le systems that have some neat defragmentation policies. They’re used all the time by desktop distros
and servers and such, even within LVMs that
some distributions like to create.
There’s always a new challenger though,
and for the past few years Fedora has been
desperately trying to get btrfs in as the default
fi le system of the distro. It’s considered the
next step in Linux fi le systems and has some
excellent features that should make it a
perfect choice for the evolution of Linux.
With the ability to create sub-
partitions within itself that are easier to
manage than LVM, a degree of roll-back,
advanced compression and defragmentation
tools tailored to itself and more, btrfs will
revolutionise the way we use storage. We’ll
show you how you can get ahead of the curve
in this tutorial.
Create subvolumes within
the original fi le system with
different mount options
Back up volumes with
snapshots that you can roll
back to with ease
Create multiple types of btrfs fi le
systems, from single hard drives
to RAID 10 arrays
ResourcesGparted http://gparted.org
btrfs-tools
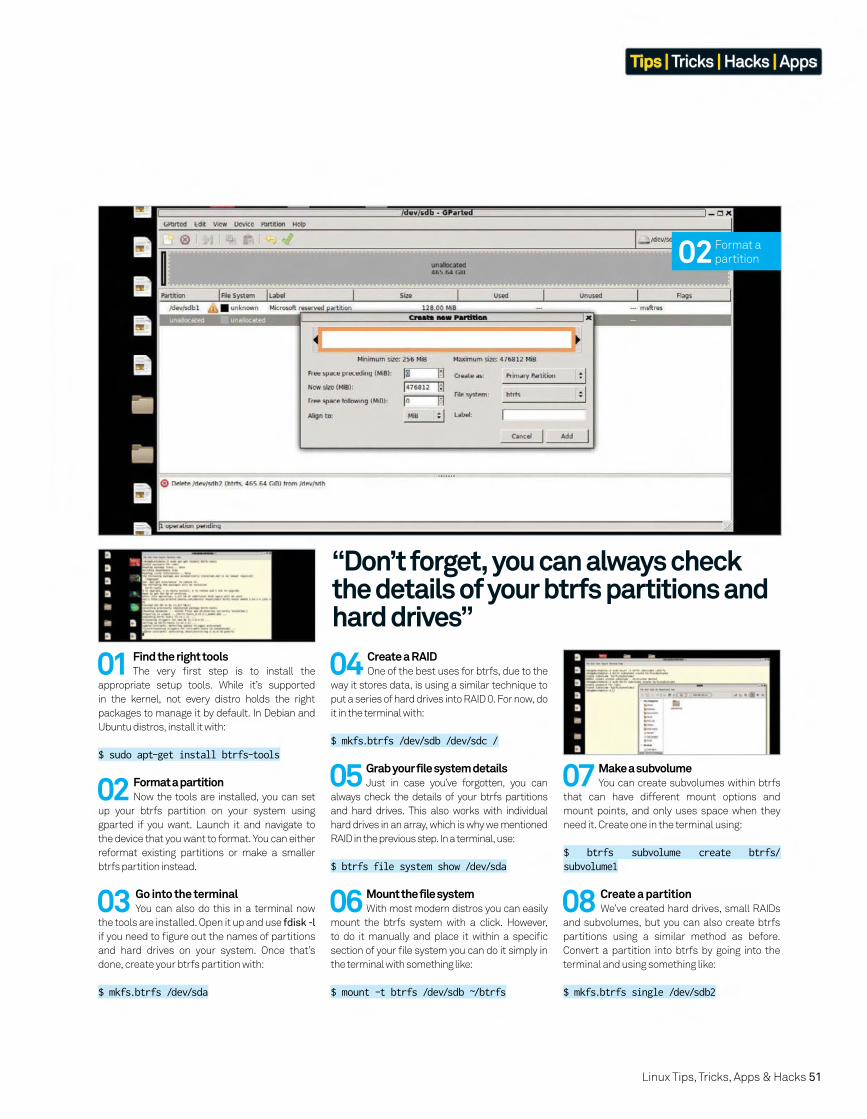
Linux Tips, Tricks, Apps & Hacks 51
Tips | Tricks | Hacks | Apps
01 Find the right toolsThe very fi rst step is to install the
appropriate setup tools. While it’s supported
in the kernel, not every distro holds the right
packages to manage it by default. In Debian and
Ubuntu distros, install it with:
$ sudo apt-get install btrfs-tools
04 Create a RAIDOne of the best uses for btrfs, due to the
way it stores data, is using a similar technique to
put a series of hard drives into RAID 0. For now, do
it in the terminal with:
$ mkfs.btrfs /dev/sdb /dev/sdc /
02 Format a partitionNow the tools are installed, you can set
up your btrfs partition on your system using
gparted if you want. Launch it and navigate to
the device that you want to format. You can either
reformat existing partitions or make a smaller
btrfs partition instead.
05 Grab your file system detailsJust in case you’ve forgotten, you can
always check the details of your btrfs partitions
and hard drives. This also works with individual
hard drives in an array, which is why we mentioned
RAID in the previous step. In a terminal, use:
$ btrfs file system show /dev/sda
06 Mount the file systemWith most modern distros you can easily
mount the btrfs system with a click. However,
to do it manually and place it within a specifi c
section of your fi le system you can do it simply in
the terminal with something like:
$ mount -t btrfs /dev/sdb ~/btrfs
07 Make a subvolumeYou can create subvolumes within btrfs
that can have different mount options and
mount points, and only uses space when they
need it. Create one in the terminal using:
$ btrfs subvolume create btrfs/subvolume1
03 Go into the terminalYou can also do this in a terminal now
the tools are installed. Open it up and use fdisk -l
if you need to fi gure out the names of partitions
and hard drives on your system. Once that’s
done, create your btrfs partition with:
$ mkfs.btrfs /dev/sda
08 Create a partitionWe’ve created hard drives, small RAIDs
and subvolumes, but you can also create btrfs
partitions using a similar method as before.
Convert a partition into btrfs by going into the
terminal and using something like:
$ mkfs.btrfs single /dev/sdb2
“Don’t forget, you can always check the details of your btrfs partitions and hard drives”
02 Format a
partition
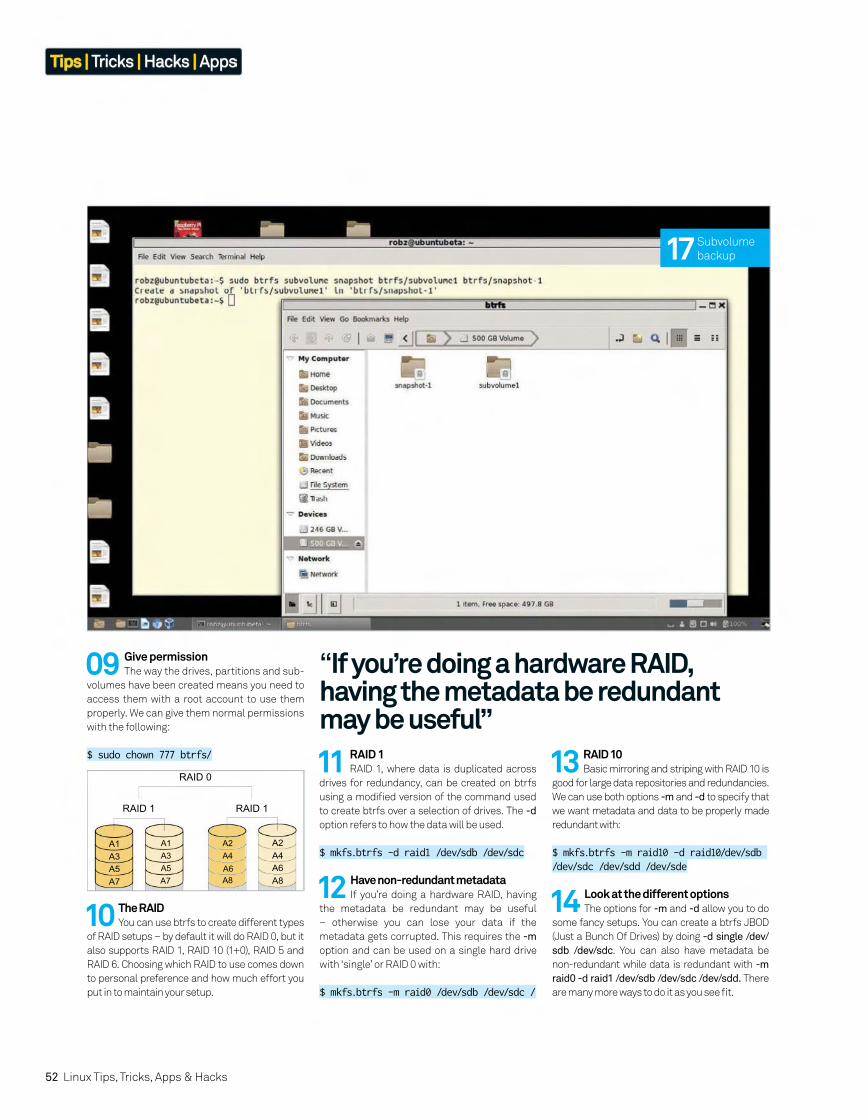
52 Linux Tips, Tricks, Apps & Hacks
Tips | Tricks | Hacks | Apps
“If you’re doing a hardware RAID, having the metadata be redundant may be useful”
10 The RAIDYou can use btrfs to create different types
of RAID setups – by default it will do RAID 0, but it
also supports RAID 1, RAID 10 (1+0), RAID 5 and
RAID 6. Choosing which RAID to use comes down
to personal preference and how much effort you
put in to maintain your setup.
11 RAID 1RAID 1, where data is duplicated across
drives for redundancy, can be created on btrfs
using a modifi ed version of the command used
to create btrfs over a selection of drives. The -d
option refers to how the data will be used.
$ mkfs.btrfs -d raid1 /dev/sdb /dev/sdc
12 Have non-redundant metadataIf you’re doing a hardware RAID, having
the metadata be redundant may be useful
– otherwise you can lose your data if the
metadata gets corrupted. This requires the -m
option and can be used on a single hard drive
with ‘single’ or RAID 0 with:
$ mkfs.btrfs -m raid0 /dev/sdb /dev/sdc /
13 RAID 10Basic mirroring and striping with RAID 10 is
good for large data repositories and redundancies.
We can use both options -m and -d to specify that
we want metadata and data to be properly made
redundant with:
$ mkfs.btrfs -m raid10 -d raid10/dev/sdb /dev/sdc /dev/sdd /dev/sde
14 Look at the different optionsThe options for -m and -d allow you to do
some fancy setups. You can create a btrfs JBOD
(Just a Bunch Of Drives) by doing -d single /dev/
sdb /dev/sdc. You can also have metadata be
non-redundant while data is redundant with -m
raid0 -d raid1 /dev/sdb /dev/sdc /dev/sdd. There
are many more ways to do it as you see fi t.
09 Give permissionThe way the drives, partitions and sub-
volumes have been created means you need to
access them with a root account to use them
properly. We can give them normal permissions
with the following:
$ sudo chown 777 btrfs/
A7A5A3A1
A8A6A4A2
RAID 1 RAID 1
RAID 0
A1A3A5A7
A2A4A6A8
17 Subvolume
backup
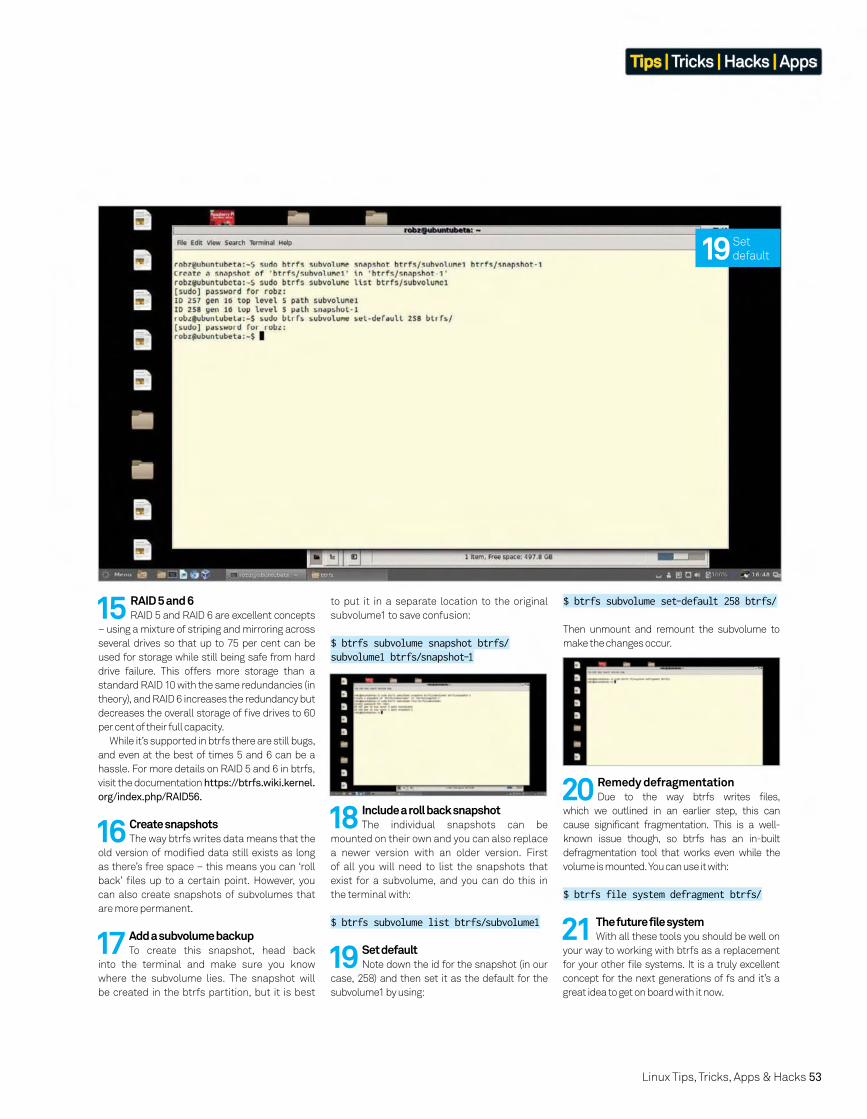
Linux Tips, Tricks, Apps & Hacks 53
Tips | Tricks | Hacks | Apps
16 Create snapshotsThe way btrfs writes data means that the
old version of modifi ed data still exists as long
as there’s free space – this means you can ‘roll
back’ fi les up to a certain point. However, you
can also create snapshots of subvolumes that
are more permanent.
18 Include a roll back snapshotThe individual snapshots can be
mounted on their own and you can also replace
a newer version with an older version. First
of all you will need to list the snapshots that
exist for a subvolume, and you can do this in
the terminal with:
$ btrfs subvolume list btrfs/subvolume1
19 Set defaultNote down the id for the snapshot (in our
case, 258) and then set it as the default for the
subvolume1 by using:
21 The future file systemWith all these tools you should be well on
your way to working with btrfs as a replacement
for your other fi le systems. It is a truly excellent
concept for the next generations of fs and it’s a
great idea to get on board with it now.
20 Remedy defragmentationDue to the way btrfs writes files,
which we outlined in an earlier step, this can
cause significant fragmentation. This is a well-
known issue though, so btrfs has an in-built
defragmentation tool that works even while the
volume is mounted. You can use it with:
$ btrfs file system defragment btrfs/
15 RAID 5 and 6RAID 5 and RAID 6 are excellent concepts
– using a mixture of striping and mirroring across
several drives so that up to 75 per cent can be
used for storage while still being safe from hard
drive failure. This offers more storage than a
standard RAID 10 with the same redundancies (in
theory), and RAID 6 increases the redundancy but
decreases the overall storage of fi ve drives to 60
per cent of their full capacity.
While it’s supported in btrfs there are still bugs,
and even at the best of times 5 and 6 can be a
hassle. For more details on RAID 5 and 6 in btrfs,
visit the documentation https://btrfs.wiki.kernel.
org/index.php/RAID56.
17 Add a subvolume backupTo create this snapshot, head back
into the terminal and make sure you know
where the subvolume lies. The snapshot will
be created in the btrfs partition, but it is best
to put it in a separate location to the original
subvolume1 to save confusion:
$ btrfs subvolume snapshot btrfs/subvolume1 btrfs/snapshot-1
$ btrfs subvolume set-default 258 btrfs/
Then unmount and remount the subvolume to
make the changes occur.
19 Set
default
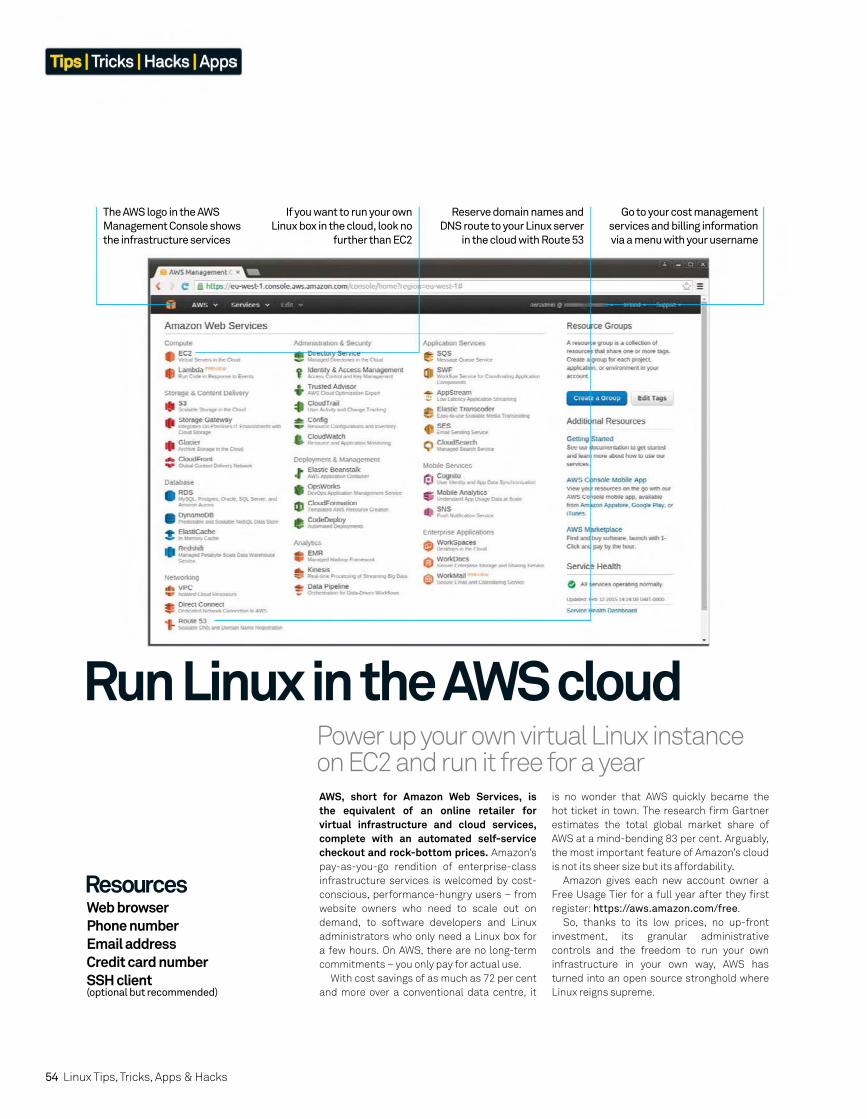
54 Linux Tips, Tricks, Apps & Hacks
Tips | Tricks | Hacks | Apps
Power up your own virtual Linux instance on EC2 and run it free for a year
Run Linux in the AWS cloud
AWS, short for Amazon Web Services, is the equivalent of an online retailer for virtual infrastructure and cloud services, complete with an automated self-service checkout and rock-bottom prices. Amazon’s
pay-as-you-go rendition of enterprise-class
infrastructure services is welcomed by cost-
conscious, performance-hungry users – from
website owners who need to scale out on
demand, to software developers and Linux
administrators who only need a Linux box for
a few hours. On AWS, there are no long-term
commitments – you only pay for actual use.
With cost savings of as much as 72 per cent
and more over a conventional data centre, it
is no wonder that AWS quickly became the
hot ticket in town. The research fi rm Gartner
estimates the total global market share of
AWS at a mind-bending 83 per cent. Arguably,
the most important feature of Amazon’s cloud
is not its sheer size but its affordability.
Amazon gives each new account owner a
Free Usage Tier for a full year after they fi rst
register: https://aws.amazon.com/free.
So, thanks to its low prices, no up-front
investment, its granular administrative
controls and the freedom to run your own
infrastructure in your own way, AWS has
turned into an open source stronghold where
Linux reigns supreme.
Go to your cost management
services and billing information
via a menu with your username
Reserve domain names and
DNS route to your Linux server
in the cloud with Route 53
If you want to run your own
Linux box in the cloud, look no
further than EC2
The AWS logo in the AWS
Management Console shows
the infrastructure services
ResourcesWeb browserPhone numberEmail addressCredit card numberSSH client (optional but recommended)
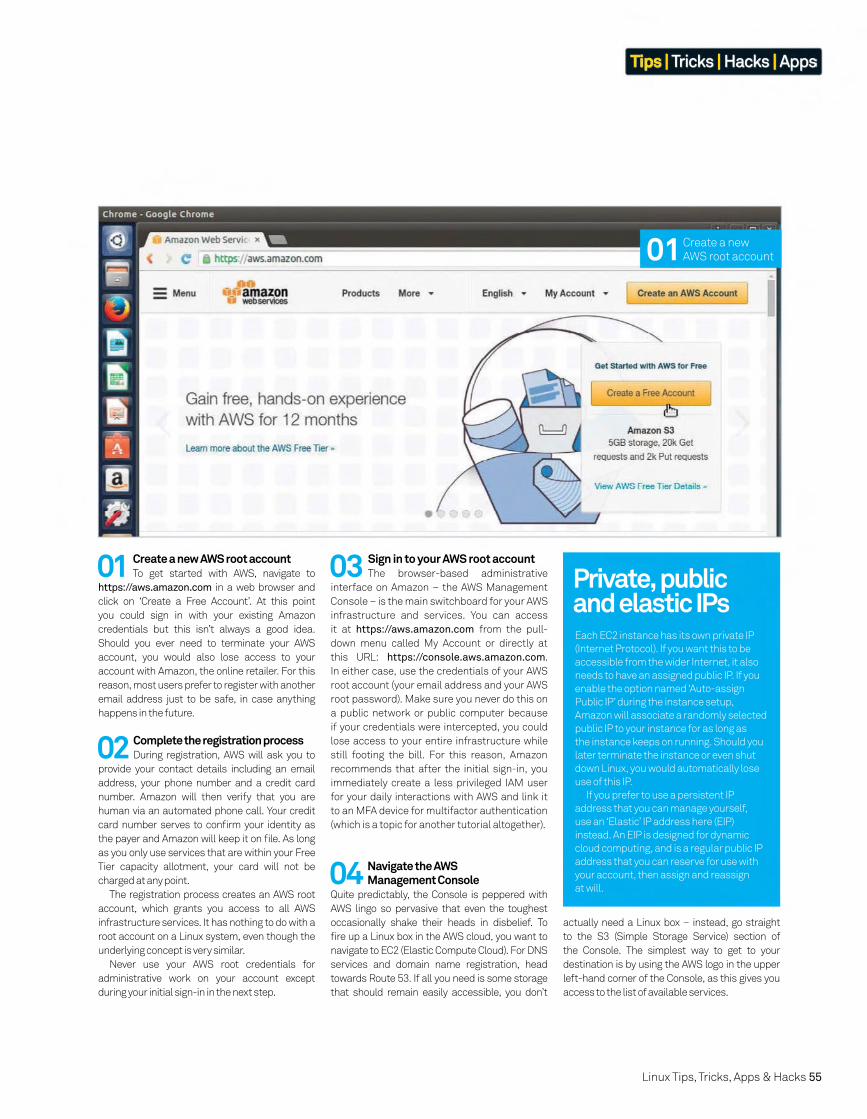
Linux Tips, Tricks, Apps & Hacks 55
Tips | Tricks | Hacks | Apps
01 Create a new AWS root accountTo get started with AWS, navigate to
https://aws.amazon.com in a web browser and
click on ‘Create a Free Account’. At this point
you could sign in with your existing Amazon
credentials but this isn’t always a good idea.
Should you ever need to terminate your AWS
account, you would also lose access to your
account with Amazon, the online retailer. For this
reason, most users prefer to register with another
email address just to be safe, in case anything
happens in the future.
actually need a Linux box – instead, go straight
to the S3 (Simple Storage Service) section of
the Console. The simplest way to get to your
destination is by using the AWS logo in the upper
left-hand corner of the Console, as this gives you
access to the list of available services.
03 Sign in to your AWS root accountThe browser-based administrative
interface on Amazon – the AWS Management
Console – is the main switchboard for your AWS
infrastructure and services. You can access
it at https://aws.amazon.com from the pull-
down menu called My Account or directly at
this URL: https://console.aws.amazon.com.
In either case, use the credentials of your AWS
root account (your email address and your AWS
root password). Make sure you never do this on
a public network or public computer because
if your credentials were intercepted, you could
lose access to your entire infrastructure while
still footing the bill. For this reason, Amazon
recommends that after the initial sign-in, you
immediately create a less privileged IAM user
for your daily interactions with AWS and link it
to an MFA device for multifactor authentication
(which is a topic for another tutorial altogether).
02 Complete the registration processDuring registration, AWS will ask you to
provide your contact details including an email
address, your phone number and a credit card
number. Amazon will then verify that you are
human via an automated phone call. Your credit
card number serves to confi rm your identity as
the payer and Amazon will keep it on fi le. As long
as you only use services that are within your Free
Tier capacity allotment, your card will not be
charged at any point.
The registration process creates an AWS root
account, which grants you access to all AWS
infrastructure services. It has nothing to do with a
root account on a Linux system, even though the
underlying concept is very similar.
Never use your AWS root credentials for
administrative work on your account except
during your initial sign-in in the next step.
Each EC2 instance has its own private IP
(Internet Protocol). If you want this to be
accessible from the wider Internet, it also
needs to have an assigned public IP. If you
enable the option named ‘Auto-assign
Public IP’ during the instance setup,
Amazon will associate a randomly selected
public IP to your instance for as long as
the instance keeps on running. Should you
later terminate the instance or even shut
down Linux, you would automatically lose
use of this IP.
If you prefer to use a persistent IP
address that you can manage yourself,
use an ‘Elastic’ IP address here (EIP)
instead. An EIP is designed for dynamic
cloud computing, and is a regular public IP
address that you can reserve for use with
your account, then assign and reassign
at will.
Private, public and elastic IPs
04 Navigate the AWS Management Console
Quite predictably, the Console is peppered with
AWS lingo so pervasive that even the toughest
occasionally shake their heads in disbelief. To
fi re up a Linux box in the AWS cloud, you want to
navigate to EC2 (Elastic Compute Cloud). For DNS
services and domain name registration, head
towards Route 53. If all you need is some storage
that should remain easily accessible, you don’t
01 Create a new
AWS root account

56 Linux Tips, Tricks, Apps & Hacks
Tips | Tricks | Hacks | Apps
10 Attach storageIf you need additional volumes, you can
create and attach them now. Free Tier covers
up to 30GB of General Purpose (SSD) storage
giving you a maximum baseline performance
of slightly under 100 IOPS (see ‘EBS Volumes’
boxout for more information).
Now click on ‘Next: Tag Instance’.
11 Tag your Linux InstanceTags on AWS are key value pairs that store
information that can help you to organise your
AWS resources. Using tags is purely optional.
Don’t sweat it – you can always edit tags later if
you need to. If nothing comes to mind, click on
Next>Confi gure Security Groups.
09 Confi gure instance detailsOn the next screen, you can select how
many instances to start, whether you want
them to be persistent (leave the Purchasing
option check box deactivated), if they should
have their own privileges to access your AWS
services (IAM role>None), and confi gure
05 Choose your AWS regionSome AWS services, particularly EC2,
require you to select an AWS region. A region
is a set of interconnected data centres, called
AWS zones, with a common tax jurisdiction and
identical pricing. You can utilise services in any
of the nine AWS regions, not just your default
one, and combine them to suit you. Typically, you
would pick the most cost-effective one or combine
several regions that are closest to the location of
your end users to minimise latency. It’s important
to remember that your EC2 dashboard shows
infrastructure that you are paying for only in the
region currently selected. This is a common trick
of AWS: watching resource consumption in the
dashboard of a wrong region, so beware.
06 Launch a new EC2 instanceNavigate to the EC2 section of the AWS
Management Console. This part of the interface
grants you access to a variety of infrastructure
services which enable you to build and run your
own Linux box in the AWS cloud, a so-called EC2
instance of Linux.
Each EC2 instance represents a host that
runs in a virtualised environment in isolation
from other virtual machines, which makes it very
cost-effective and reasonably safe. In order to
start your own Linux server in the cloud, click
on Launch Instance in the EC2 Dashboard. You
can also click on the link Instance in the left-
hand navigation pane of the AWS Management
Console and then on the button Launch Instance.
08 Choose an instance typeThe instance type defi nes the
performance characteristics of your Linux box in
terms of its clock speed, available RAM, internal
storage and network capabilities. The only
instance type that qualifi es for the free usage
tier is t2.micro.
Make your choice and then click ‘Next:
Confi gure Instance Details’.
EBS volumes are slower than instance
storage but offer data persistence – you
can attach and detach them even while
your Linux instance is running.
EBS volumes come in two different
fl avours: as magnetic hard drives or
‘fl ashy’ SSDs. Amazon offers SSDs in one
performance category – General Purpose
or Provisioned IOPS, which deliver bursts of
I/O depending on the size of the drive and
other users’ activities within the shared
storage pool.
SSDs with provisioned IOPS will perform
at the specifi ed I/O level, but they can
certainly be pricey. General Purpose SSDs
are more likely the way to go for the wallet-
conscious. If you’re budgeting and only
need infrequent access, Magnetic is an
adequate compromise.
EBS Volumes
networking. It is best to launch an EC2 instance
in a virtual private cloud (VPC), which is a fancy
way of saying that Amazon will isolate it from
other users’ instances by means of smart
routing. Older AWS accounts may also offer an
option labelled ‘EC2-Classic’, which does not
have this protection, so if you see it, don’t use it.
In the menu ‘Auto-assign Public IP’, select
‘Use subnet setting (Disable)’. Set the IAM role
to None and shutdown behaviour to Stop.
If you enable ‘Termination protection’, AWS
won’t let you destroy the instance using the
Terminate command in the Console until you
remove this protection.
Leave the other options unchanged and click
on ‘Next: Add Storage’.
07 Select a Linux-based AMI The storage confi guration of an
instance is described using a machine
defi nition called an AMI (Amazon Machine
Image). An AMI specifi es, among other things,
the contents of the boot volume. Select an AMI
based on a Linux distribution of your choice
from the list in section Quick Start (not a
database instance, an Amazon RDS instance
doesn’t grant you superuser access at the OS
level). Instances labelled ‘Free tier eligible’ do
not incur any costs so long as you remain within
the time allotment of up to 720 hours per month
throughout the fi rst 12 months after your
account is fi rst registered.
08 Choose an
instance type
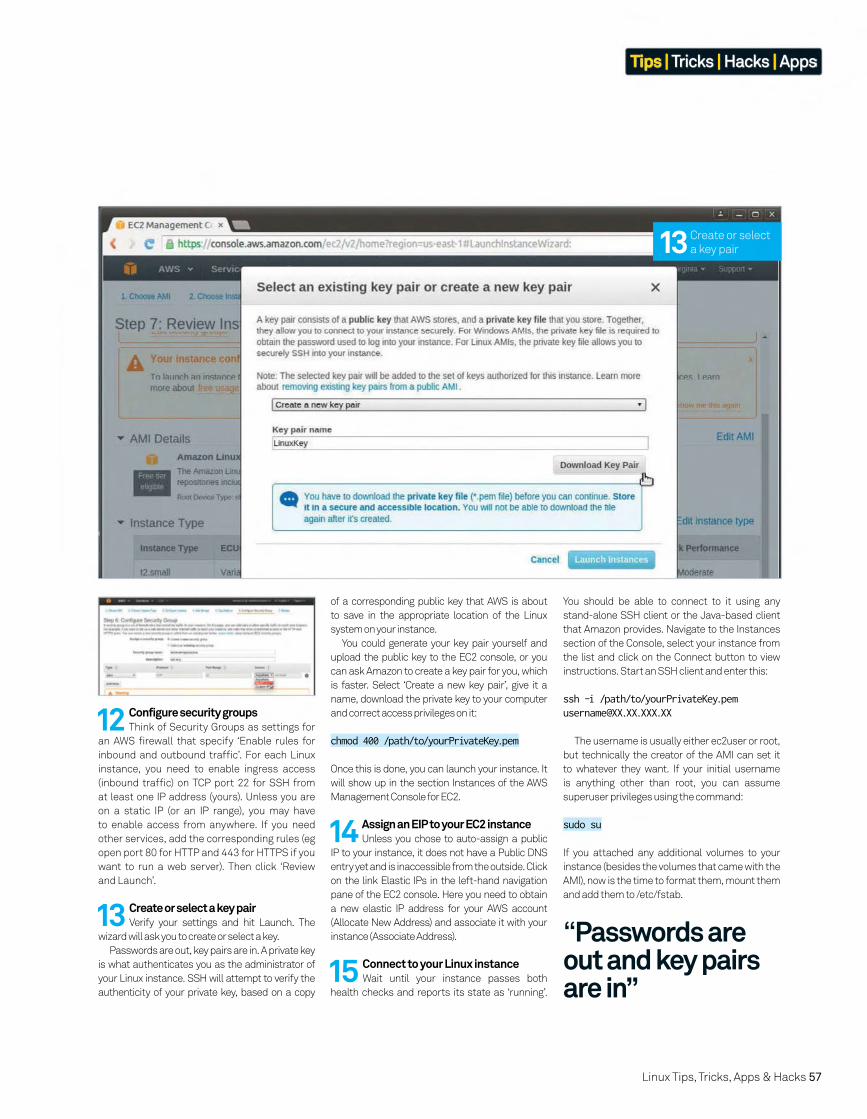
Linux Tips, Tricks, Apps & Hacks 57
Tips | Tricks | Hacks | Apps
12 Configure security groupsThink of Security Groups as settings for
an AWS fi rewall that specify ‘Enable rules for
inbound and outbound traffi c’. For each Linux
instance, you need to enable ingress access
(inbound traffi c) on TCP port 22 for SSH from
at least one IP address (yours). Unless you are
on a static IP (or an IP range), you may have
to enable access from anywhere. If you need
other services, add the corresponding rules (eg
open port 80 for HTTP and 443 for HTTPS if you
want to run a web server). Then click ‘Review
and Launch’.
13 Create or select a key pairVerify your settings and hit Launch. The
wizard will ask you to create or select a key.
Passwords are out, key pairs are in. A private key
is what authenticates you as the administrator of
your Linux instance. SSH will attempt to verify the
authenticity of your private key, based on a copy
14 Assign an EIP to your EC2 instanceUnless you chose to auto-assign a public
IP to your instance, it does not have a Public DNS
entry yet and is inaccessible from the outside. Click
on the link Elastic IPs in the left-hand navigation
pane of the EC2 console. Here you need to obtain
a new elastic IP address for your AWS account
(Allocate New Address) and associate it with your
instance (Associate Address).
15 Connect to your Linux instanceWait until your instance passes both
health checks and reports its state as ‘running’.
of a corresponding public key that AWS is about
to save in the appropriate location of the Linux
system on your instance.
You could generate your key pair yourself and
upload the public key to the EC2 console, or you
can ask Amazon to create a key pair for you, which
is faster. Select ‘Create a new key pair’, give it a
name, download the private key to your computer
and correct access privileges on it:
chmod 400 /path/to/yourPrivateKey.pem
Once this is done, you can launch your instance. It
will show up in the section Instances of the AWS
Management Console for EC2.
13 Create or select
a key pair
You should be able to connect to it using any
stand-alone SSH client or the Java-based client
that Amazon provides. Navigate to the Instances
section of the Console, select your instance from
the list and click on the Connect button to view
instructions. Start an SSH client and enter this:
ssh -i /path/to/yourPrivateKey.pem [email protected]
The username is usually either ec2user or root,
but technically the creator of the AMI can set it
to whatever they want. If your initial username
is anything other than root, you can assume
superuser privileges using the command:
sudo su
If you attached any additional volumes to your
instance (besides the volumes that came with the
AMI), now is the time to format them, mount them
and add them to /etc/fstab.
“Passwords are out and key pairs are in”
58 Linux Tips, Tricks, Apps & Hacks
Put Linux to work with expert tricks
60 Continuously deploy web appsTransition to deployment with Capistrano
64 Generate complex graphics in ggplot2Create impressive plots with R and ggplot2
68 Monitor CPU temperature with DizmoTurn Raspberry Pi into an Internet of Things
72 Write a book in LaTeXTypeset, beautify and customise a full book
76 Agile project management with TaigaImplement an organised project
64
72
Linux Tips, Tricks, Apps & Hacks58 Linux Tips, Tricks, Apps & Hacks
TR CKS
76
Tips | Tricks | Hacks | Apps
60
88

Linux Tips, Tricks, Apps & Hacks 59
“It’s a relief to learn that several tools, tricks and methods can be applied to keep your device and data away from prying eyes”
92
Linux Tips, Tricks, Apps & Hacks 59Linux Tips, Tricks, Apps & Hacks
92 Simplify interviewing and transcriptionUse Audacity and VLC to make life easier
96 Secure your Raspberry PiProtect your data with these tips
80 Make a visual novel game with PythonCreate and play a book-videogame hybrid
84 Supercharge your Raspberry PiEnhance the performance of your Pi
88 Host a media gallery with MediaGoblinShare videos, photos, audio and more
80
Tips | Tricks | Hacks | Apps

60 Linux Tips, Tricks, Apps & Hacks
Tips | Tricks | Hacks | Apps
Move your web apps’ development versions painlessly from staging and testing to deployment on databases and web servers
Continuously deploy web apps with Capistrano
Capistrano automates deploying web apps to your servers, taking care of tiresome tasks like running a series of remote commands on any box on which you have SSH access. Capistrano’s main recipe is deploy, containing
tasks such as rollback, which consists of groups
of commands. Servers are given roles: app –
application servers, web – web servers, and
db – database servers. Within this (expandable)
framework, it’s easy to adjust Capistrano’s
confi guration fi les for your particular app and
collection of servers. Basic set up is simple
enough, but Capistrano 3 is a fl exible framework
and you will need to go a long way beyond this
simple introduction if you want to begin to get
the full use of it.
We will need a recent Ruby, Git (plus a GitHub
account) and a Rails project you’re working on.
Also rbenv makes working with Rails easier,
and capistrano-rbenv makes sure Capistrano
uses the correct rbenv version of Ruby for
deployment. It doesn’t matter whether you run
Passenger, Unicorn or Puma as your app server,
but note that there are Capistrano plugins to
help with extra tasks on all of them. Search
rubygems.org for the full choice.
No matter where you deploy your app, Capistrano makes it
easy to deploy Rails (and other platforms) to *nix servers
Changes like adding a QA stage after production, with qa.rb,
are both possible and easy with its modular structure
Built from Ruby, and originally for Rails, Capistrano 3 is a
great fi t for deploying other web platforms
Capistrano’s fl exibility and power can mean a lot of
confi g, but it’s relatively straightforward
ResourcesRuby >= 1.9 (RBENV makes it easier)git www.git-scm.com
Capistrano 3 www.capistranorb.com
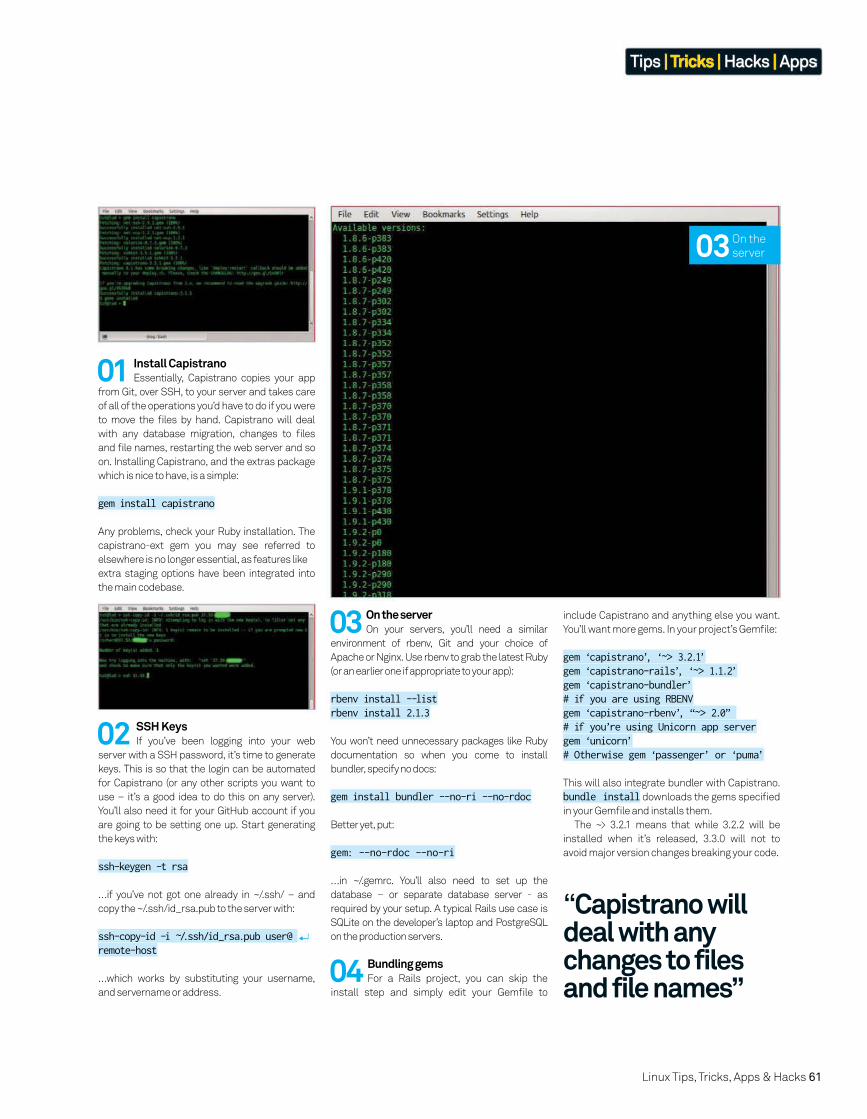
Linux Tips, Tricks, Apps & Hacks 61
Tips | Tricks | Hacks | Apps
01 Install CapistranoEssentially, Capistrano copies your app
from Git, over SSH, to your server and takes care
of all of the operations you’d have to do if you were
to move the fi les by hand. Capistrano will deal
with any database migration, changes to fi les
and fi le names, restarting the web server and so
on. Installing Capistrano, and the extras package
which is nice to have, is a simple:
gem install capistrano
Any problems, check your Ruby installation. The
capistrano-ext gem you may see referred to
elsewhere is no longer essential, as features like
extra staging options have been integrated into
the main codebase.
02 SSH KeysIf you’ve been logging into your web
server with a SSH password, it’s time to generate
keys. This is so that the login can be automated
for Capistrano (or any other scripts you want to
use – it’s a good idea to do this on any server).
You’ll also need it for your GitHub account if you
are going to be setting one up. Start generating
the keys with:
ssh-keygen -t rsa
…if you’ve not got one already in ~/.ssh/ – and
copy the ~/.ssh/id_rsa.pub to the server with:
ssh-copy-id -i ~/.ssh/id_rsa.pub user@ remote-host
…which works by substituting your username,
and servername or address.
03 On the server On your servers, you’ll need a similar
environment of rbenv, Git and your choice of
Apache or Nginx. Use rbenv to grab the latest Ruby
(or an earlier one if appropriate to your app):
rbenv install --listrbenv install 2.1.3
You won’t need unnecessary packages like Ruby
documentation so when you come to install
bundler, specify no docs:
gem install bundler --no-ri --no-rdoc
Better yet, put:
gem: --no-rdoc --no-ri
…in ~/.gemrc. You’ll also need to set up the
database – or separate database server - as
required by your setup. A typical Rails use case is
SQLite on the developer’s laptop and PostgreSQL
on the production servers.
04 Bundling gemsFor a Rails project, you can skip the
install step and simply edit your Gemfi le to
include Capistrano and anything else you want.
You’ll want more gems. In your project’s Gemfi le:
gem ‘capistrano’, ‘~> 3.2.1’gem ‘capistrano-rails’, ‘~> 1.1.2’gem ‘capistrano-bundler’# if you are using RBENVgem ‘capistrano-rbenv’, “~> 2.0” # if you’re using Unicorn app servergem ‘unicorn’# Otherwise gem ‘passenger’ or ‘puma’
This will also integrate bundler with Capistrano.
bundle install downloads the gems specifi ed
in your Gemfi le and installs them.
The ~> 3.2.1 means that while 3.2.2 will be
installed when it’s released, 3.3.0 will not to
avoid major version changes breaking your code.
“Capistrano will deal with any changes to files and file names”
03 On the
server
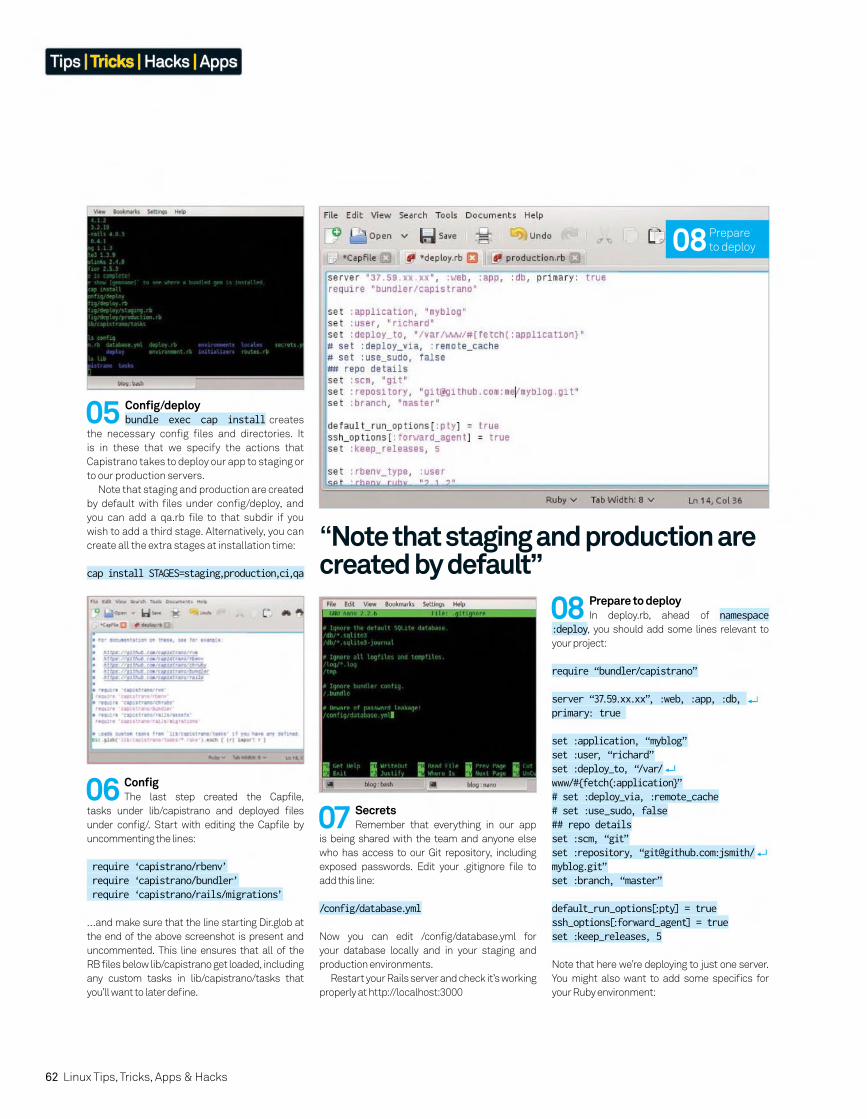
62 Linux Tips, Tricks, Apps & Hacks
Tips | Tricks | Hacks | Apps
07 SecretsRemember that everything in our app
is being shared with the team and anyone else
who has access to our Git repository, including
exposed passwords. Edit your .gitignore fi le to
add this line:
/config/database.yml
Now you can edit /confi g/database.yml for
your database locally and in your staging and
production environments.
Restart your Rails server and check it’s working
properly at http://localhost:3000
05 Confi g/deploy bundle exec cap install creates
the necessary confi g fi les and directories. It
is in these that we specify the actions that
Capistrano takes to deploy our app to staging or
to our production servers.
Note that staging and production are created
by default with fi les under confi g/deploy, and
you can add a qa.rb fi le to that subdir if you
wish to add a third stage. Alternatively, you can
create all the extra stages at installation time:
cap install STAGES=staging,production,ci,qa
06 Confi gThe last step created the Capfi le,
tasks under lib/capistrano and deployed fi les
under confi g/. Start with editing the Capfi le by
uncommenting the lines:
require ‘capistrano/rbenv’ require ‘capistrano/bundler’ require ‘capistrano/rails/migrations’
…and make sure that the line starting Dir.glob at
the end of the above screenshot is present and
uncommented. This line ensures that all of the
RB fi les below lib/capistrano get loaded, including
any custom tasks in lib/capistrano/tasks that
you’ll want to later defi ne.
08 Prepare to deployIn deploy.rb, ahead of namespace
:deploy, you should add some lines relevant to
your project:
require “bundler/capistrano”
server “37.59.xx.xx”, :web, :app, :db, primary: true
set :application, “myblog”set :user, “richard”set :deploy_to, “/var/www/#{fetch(:application}”# set :deploy_via, :remote_cache# set :use_sudo, false## repo detailsset :scm, “git”set :repository, “[email protected]:jsmith/myblog.git”set :branch, “master”
default_run_options[:pty] = truessh_options[:forward_agent] = trueset :keep_releases, 5
Note that here we’re deploying to just one server.
You might also want to add some specifi cs for
your Ruby environment:
“Note that staging and production are created by default”
08 Prepare
to deploy

Linux Tips, Tricks, Apps & Hacks 63
Tips | Tricks | Hacks | Apps
10 DeployNow for deployment. Our confi g wound
up the spring; to set the clockwork in motion we:
cap production deploy
For that to work fi rst time, you’ll have had to have
done a bit of work on the confi g – beyond what
we’ve specifi cally outlined in the case of many
setups. Capistrano is designed to expand and
stretch to cover all sorts of circumstances, and
your app and server setup won’t be exactly the
same as anyone else’s. Although, that said, if you
deploy to a large cloud provider then they may
have Capistrano example confi gs you can copy.
Capistrano’s modularity and fl exibility means
there’s a lot to explore to get it doing what you
need. It is essentially a utility for running tasks,
in parallel, across remote servers…
11 Parallel linesWith the simple on/in/do syntax of the
Rake-derived DSL, fl exible splitting of tasks
across servers is easy. For example, to run
something on every server at once:
on :all, in: :parallel do # parallel task here end
Getting your servers to start a task in sequence,
perhaps to avoid hitting a shared database,
involves defi ning :sequence and then:
on :all, in: :sequence, wait: 15 do # sequential code here end
For a rolling restart of a large cluster, you can
group servers together to go in parallel:
on :all, in: :groups, limit: 3, wait: 5 do # Your rolling restart... end
You can see the parallel execution of code for
different groups of servers in the Capistrano
developers’ example over at bit.ly/1FuodCh
(look under ‘Parallelism’), which was developed
specifically to replace the previous version’s more
hacky parallel do |session|.
12 Off the RailsThere’s plenty of documentation
available out there to go beyond the simple
introductions we give here. The Capistrano
website (http://capistranorb.com) should
be your fi rst port of call, but you’ll fi nd docs
elsewhere for integrating Capistrano with
everything from Jenkins to AngularJS –
just double check to make sure that you’re
reading something that has been updated
for Capistrano 3. Integrating Capistrano’s
scripts for continuous deployment into a larger
environment of a continuous integration server
like Jenkins is easy enough – a job in Jenkins, as
an example, has cap deploy as its build step (and
your Git repository as its URL).
Away from Rails, gems do exist that can ease
deployment for most web platforms, from
Sinatra to Django. For Drupal (with Drush and
the CapDrupal gem) you can automate taking
the site offl ine, backing up the database, cloning
your new code and pointing the site root there,
updating the database, and putting the site back
online as well as all of the advantages of cap
deploy:rollback.
SSHkitThe Capistrano 3 development process gave
birth to the SSHkit library developed by Lee
Hambley – who did much of the great work of
making Capistrano 3 such an improvement
over an already pretty useful piece of code.
SSHKit is a lower level toolkit that
Capistrano uses for everything such as
logging, formatting, connection management
and pooling, parallelism, and batch execution.
You too can use it for running commands in a
structured way on one or more servers.
Within Capistrano, you’ll fi nd SSHkit called
upon most of the time you use on(). To use it
yourself, start with some of the examples on
the GitHub page and adapt for your site.
Here SSHkit will build a path from the
nested directories:
on hosts do within “/var” do puts capture(:pwd) within :log do puts capture(:pwd) end endend
Behind the scenes File.join() is taking care of
the slashes for you to build the paths and it
should return:
/var//var/log
09 Test and prepareSetting tests will halt the deployment
should tests fail:
# tests under lib/capistrano/tasks/run_tests.capset :tests, []
Now edit the set :server_name and server lines
in confi g/deploy/production.rb to your server’s
domain name.
We’re about ready to deploy now. You could
add a task deploy:setup_confi g to install the
server software, and that would be desirable with
a multiserver setup – but we’re keeping things
simple in this introduction, hence the earlier
manual set up of the server.
set :rbenv_type, :system # or :userset :rbenv_ruby, “2.1.2”set :rbenv_prefix, “RBENV_ROOT=#{fetch(:rbenv_path)} RBENV_VERSION=#{fetch(:rbenv_ruby)} #{fetch(:rbenv_path)}/bin/rbenv exec”set :rbenv_map_bins, %w{rake gem bundle ruby rails}
Above The numerous usage examples on
SSHkit’s GitHub page hint at its potential
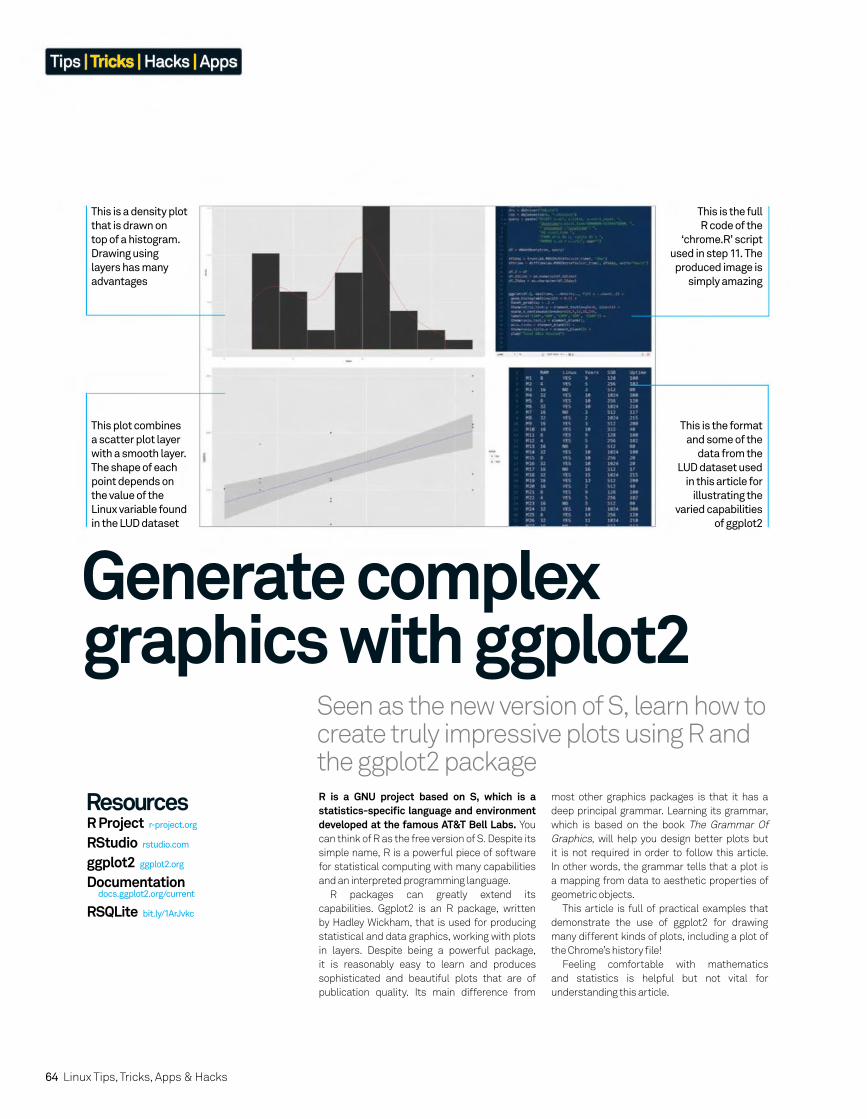
64 Linux Tips, Tricks, Apps & Hacks
Tips | Tricks | Hacks | Apps
Seen as the new version of S, learn how to create truly impressive plots using R and the ggplot2 package
Generate complex graphics with ggplot2
most other graphics packages is that it has a
deep principal grammar. Learning its grammar,
which is based on the book The Grammar Of
Graphics, will help you design better plots but
it is not required in order to follow this article.
In other words, the grammar tells that a plot is
a mapping from data to aesthetic properties of
geometric objects.
This article is full of practical examples that
demonstrate the use of ggplot2 for drawing
many different kinds of plots, including a plot of
the Chrome’s history fi le!
Feeling comfortable with mathematics
and statistics is helpful but not vital for
understanding this article.
ResourcesR Project r-project.org
RStudio rstudio.com
ggplot2 ggplot2.org
Documentation docs.ggplot2.org/current
RSQLite bit.ly/1ArJvkc
R is a GNU project based on S, which is a statistics-specifi c language and environment developed at the famous AT&T Bell Labs. You
can think of R as the free version of S. Despite its
simple name, R is a powerful piece of software
for statistical computing with many capabilities
and an interpreted programming language.
R packages can greatly extend its
capabilities. Ggplot2 is an R package, written
by Hadley Wickham, that is used for producing
statistical and data graphics, working with plots
in layers. Despite being a powerful package,
it is reasonably easy to learn and produces
sophisticated and beautiful plots that are of
publication quality. Its main difference from
This is a density plot
that is drawn on
top of a histogram.
Drawing using
layers has many
advantages
This is the full
R code of the
‘chrome.R’ script
used in step 11. The
produced image is
simply amazing
This is the format
and some of the
data from the
LUD dataset used
in this article for
illustrating the
varied capabilities
of ggplot2
This plot combines
a scatter plot layer
with a smooth layer.
The shape of each
point depends on
the value of the
Linux variable found
in the LUD dataset

Linux Tips, Tricks, Apps & Hacks 65
Tips | Tricks | Hacks | Apps
“Experiment with your data and the various types of plots that R and ggplot can generate”
01 Install ggplot2First run R. The ggplot2 R package isn’t
installed by default, so check if you already
have it installed by running:
> require(ggplot2)Loading required package: ggplot2
If it’s not installed, download and select:
> install.packages(“ggplot2”)
If you execute the library() function without
arguments, you’ll get a list of installed packages.
To get a detailed output, run the installed.
packages() command without any arguments.
02 About R and data visualisationR is a command line application, which
is fi ne for plain text output but not for graphical
output. RStudio is a more preferable graphical
wrapper for R.
When visualising data, remember that not
every plot suits every data set. This knowledge
comes from experience, and experience
comes from experimentation, so don’t forget to
experiment with your data and the various types
of plots that R and ggplot2 can generate.
03 Use quickplot() The ggplot2 package offers two
main functions: quickplot() and ggplot(). The
quickplot() function, qplot(), is similar to the
plot() R function and is good for simple plots.
The quickplot() function hides what happens,
whereas ggplot() is harder to use but fl exible.
The following commands draw a plot using
columns V2 and V3 from the data variable:
> str(data)‘data.frame’: 16180 obs. of 3 variables: $ V1: num 0 0 0 0 0 0 0.98 1 1.06 1 ... $ V2: num 0.01 0.01 0.01 0.01 0.03 0.01 0.58 0.85 1.01 1.01 ... $ V3: num 0.05 0.05 0.05 0.05 0.05 0.05 0.27 0.48 0.65 0.75 ...> quickplot(data$V2, data$V2)
The following version adds colour to the output:
> quickplot(data$V2, data$V3, color=data$V1)
04 Work with ggpairs() The ggpairs() command fi nds relations
between variables and then calculates the
coeffi cient of correlation value. The coeffi cient
of correlation is linked to the statistical
05 Generate bar plotsNow use a sample dataset for
plotting. The LUD dataset, available from
FileSilo, is stored in a plain text fi le, named
Lud.data. The titles of the columns are named
to refer to their values. You can load the
dataset into R using the following command:
> LUD <- read.table(“lud.data”, header=TRUE)
The bar plot is very simple. The following
command generates it:
> ggplot(LUD, aes(x=RAM, y=SSD)) + geom_bar(stat=“identity”)
If you type ggplot(LUD, aes(x=RAM, y=SSD))
without specifying a plot, the command will
show the ‘Error: No layers in plot’ message.
To change the colour of the bars, try the
following variation:
> ggplot(LUD, aes(x=RAM, y=SSD, fill=Uptime)) + geom_bar(stat=“identity”)
correlation, a technique that shows whether or
not two variables are related. As the coeffi cient
of correlation approaches zero there is less
of a relationship (no correlation), whereas
the closer the coeffi cient is to -1 or +1, the
stronger the correlation (positive or negative)
is. A positive correlation shows that if one
variable gets bigger then the other does as
well. Conversely, a negative correlation denotes
that if one variable gets bigger then the other
becomes smaller.
The presented plot was produced using the
following commands:
> data <-read.table(“uptime.data”, header=TRUE)> require(ggplot2)> require(GGally)> require(CCA)> ggpairs(data)
03 Use
quickplot()

66 Linux Tips, Tricks, Apps & Hacks
Tips | Tricks | Hacks | Apps
09 Add smooth layersAnother type of layer is the smooth
layer. It doesn’t display raw data, but rather a
statistical transformation of the data.
The (method=“lm”) parameter generates a
linear regression line instead of a LOESS (local
polynomial regression fi tting) curve, which is
the default for samples with less than 1000
observations. For bigger samples, the default
method is called GAM (generalised additive
model). The produced plot was generated with
the following commands:
> q <- ggplot(LUD, aes(x=RAM, y=SSD))> q + geom_point() + geom_smooth()> q + geom_point() + geom_smooth(method=‘lm’)
08 Create histogramsGenerate histograms using the geom_
histogram() function, similar to the geom_bar()
function, and change the number of bars using
the binwidth argument. Plot a simple histogram
using the following command:
> ggplot(LUD, aes(Years)) + geom_histogram(binwidth=1, color=‘gray’)
Use geom_density() function for a density plot:
> ggplot(LUD, aes(Years)) + geom_density(binwidth=1)
The following command draws a histogram and
a density plot on the same plot:
> ggplot(LUD) + geom_histogram(aes(Years, ..density..), binwidth=2, color=‘white’) + geom_density(aes(Years, ..density..), binwidth=2, color=‘red’)
If you put the geom_density() command fi rst,
the histogram will be on top of the density
plot and therefore the density plot will not be
completely visible.
07 More about titles and labelsYou can add or change the appearance,
size, font and colour of all the titles and labels.
The following command makes the title blue and
its size larger using the theme() function:
> ggplot(LUD, aes(x=RAM, y=SSD, fill=Uptime)) + geom_bar(stat=“identity”) + labs(title=“This is a Title”) + xlab(“X Label”) + ylab(“Y Label”) + theme(plot.title = element_text(size = rel(2), colour = “blue”))
To change the attributes of the X and Y axes, use
the axis.line function:
> ggplot(LUD, aes(x=RAM, y=SSD, fill=Uptime)) + geom_bar(stat=“identity”) + labs(title=“This is a Title”) + xlab(“X Label”) + ylab(“Y Label”) + theme(plot.title = element_text(size = rel(2), colour = “blue”), axis.line = element_line(size = 3, colour = “red”, linetype = “dotted”))
06 Add titles and labelsSooner or later, it’s likely that you will
want to add a title and labels to the output.
Adding a main title is simple – you just need
to make use of the labs() function in order to
do so. The previously plotted bar plot can thus
be modifi ed with inclusion of the the following
command at the end:
> ggplot(LUD, aes(x=RAM, y=SSD, fill=Uptime)) + geom_bar(stat=“identity”) + labs(title=“This is a Title”)
Adding X and Y labels can be done by entering
the following:
> ggplot(LUD, aes(x=RAM, y=SSD, fill=Uptime)) + geom_bar(stat=“identity”) + labs(title=“This is a Title”) + xlab(“X Label”) + ylab(“Y Label”)
11 Visualising Chrome’s
history fi le

Linux Tips, Tricks, Apps & Hacks 67
Tips | Tricks | Hacks | Apps
11 Visualising Chrome’s history fi leThe history fi le of Chrome (simply called
History) stores its history of visited websites
in SQLite3 database format. Therefore, you
can use the RSQLite R package to read it. The
‘chrome.R’ script generates an impressive
10 Work with shapes and facetsThe following plot draws points using
different shapes depending on the value of the
non-continuous Linux variable:
> ggplot(LUD, aes(x=RAM, y=Uptime)) + geom_point(aes(shape = Linux))
A facet allows you to split up your data by one
or more variables and then plot the subsets
of data together. Using facets is also a great
way of generating conditional plots. Try the
following point plot, which will generate two
plots depending on the two different values of
the Linux variable:
> ggplot(LUD, aes(x=RAM, y=Uptime)) + geom_point() + facet_grid(Linux ~ .)
The facet_grid() function works fi ne when using
continuous variables.
12 Use box plotsA box plot can give you information
regarding the shape, the variability and the
median of a data set, quickly and effi ciently.
The presented box plot was generated using the
following R command:
> ggplot(LUD, aes(Linux, Uptime)) + geom_point() + geom_boxplot(colour = “red”) + labs(title=“A Box Plot”)
Based on the two discrete values of the
Linux variable, the output is divided into two
subsets. For each subset, a separate box plot is
produced individually.
14 Final thoughtsBefore we wrap up this tutorial, here are
some things to keep in mind. The more you use
ggplot2 and the better you know your data, the
better the output you’ll achieve. Just make sure
that you don’t forget that ggplot2 works using
layers! Also, to take full advantage of plotting
you’ll have to plot the right metrics, and fi nding
the right metrics is not always as simple as it
might seem.
13 Create R ScriptsIt is very useful to learn how to create
R scripts in order to use ggplot2 inside bigger
scripts that can run as cron jobs. A sample script
fi le, named ‘ggplot.R’ shows you how:
$ chmod 755 ggplot.R $ ./ggplot.R $ lltotal 160-rwxr-xr-x@ 1 mtsouk staff 234 Nov 14 22:41 ggplot.R-rw-r--r-- 1 mtsouk staff 73820 Nov 14 22:43 ggplot.png$ file ggplot.pngggplot.png: PNG image data, 1280 x 800, 8-bit/color RGBA, non-interlaced
output using RSQLite and ggplot2 with many
layers. It can be executed as follows:
$ ./chrome.RLoading required package: methodsLoading required package: DBI$ ls -l Rplots.pdf-rw-r--r--@ 1 mtsouk staff 5089 Nov 27 09:42 Rplots.pdf
The produced result is automatically stored in a
fi le called ‘Rplots.pdf’ fi le.
12 Box
plots
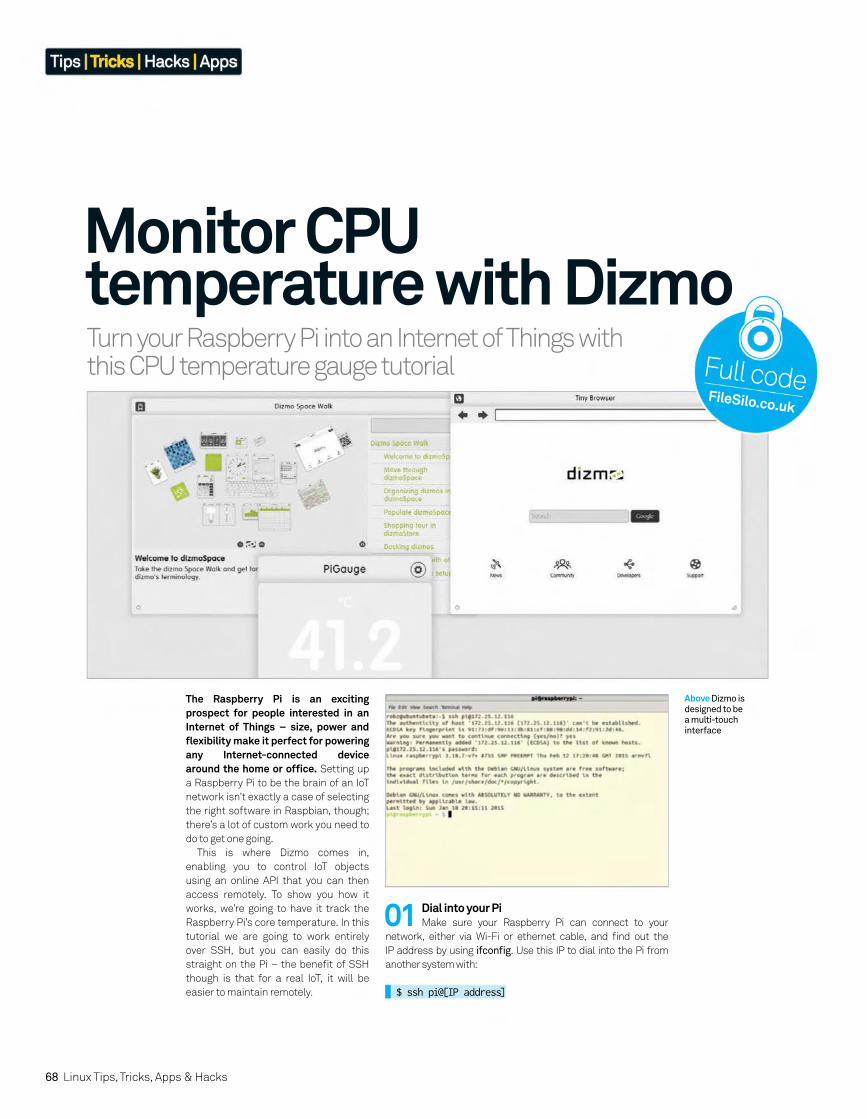
68 Linux Tips, Tricks, Apps & Hacks
Tips | Tricks | Hacks | Apps
Turn your Raspberry Pi into an Internet of Things with this CPU temperature gauge tutorial
Monitor CPU temperature with Dizmo
The Raspberry Pi is an exciting prospect for people interested in an Internet of Things – size, power and fl exibility make it perfect for powering any Internet-connected device around the home or offi ce. Setting up
a Raspberry Pi to be the brain of an IoT
network isn’t exactly a case of selecting
the right software in Raspbian, though;
there’s a lot of custom work you need to
do to get one going.
This is where Dizmo comes in,
enabling you to control IoT objects
using an online API that you can then
access remotely. To show you how it
works, we’re going to have it track the
Raspberry Pi’s core temperature. In this
tutorial we are going to work entirely
over SSH, but you can easily do this
straight on the Pi – the benefi t of SSH
though is that for a real IoT, it will be
easier to maintain remotely.
01 Dial into your PiMake sure your Raspberry Pi can connect to your
network, either via Wi-Fi or ethernet cable, and fi nd out the
IP address by using ifconfi g. Use this IP to dial into the Pi from
another system with:
$ ssh pi@[IP address]
Above Dizmo is designed to be a multi-touch interface
Full codeFileSilo.co.uk

Linux Tips, Tricks, Apps & Hacks 69
Tips | Tricks | Hacks | Apps
02 Install dizmoSpaceIf you haven’t already, head to www.dizmo.com, grab
dizmoSpace and install it to the system you plan for it to work
with. All you need to do is download the zip and unpack it, then
click the Dizmo icon or run it from the terminal.
05 Add frameworkUse node -v to check if it’s installed correctly – it should
spit out a version number for you. Once that’s done, install
express.js, which will be our web application framework:
$ sudo npm install -g express $ sudo npm install -g express-generator
06 Install frameworkWe’ll create the folder www in var and create a symlink
for everything to run. Do this by moving to var, creating www and
making the symlink with:
$ cd /var $ sudo mkdir www $ cd www $ sudo ln -s /usr/local/lib/node_modules/ /node_modules
03 Launch issues?If Dizmo is complaining about libraries when you try
to run it, you’ll need to install some extra software. Open the
terminal on the PC you’re working from and install the extra
software with the following:
$ sudo apt-get install libavahi-compat-libdnssd-dev $ sudo apt-get install libavahi-client-dev
04 Download node.jsNow, we need to grab the latest version of node.js for the
Raspberry Pi. Back in the SSH connection to your Raspberry Pi,
use the following:
$ sudo wget http://node-arm.herokuapp.com/ node_latest_armhf.deb $ sudo dpkg -i node_latest_armhf.deb
Left Builds are available for various distros on the Download page, and you can also check the pricing plans
“A Dizmo widget is a HTML file, packaging resources together to create an interface or graphic. Our HTML file uses jQuery”
70 Linux Tips, Tricks, Apps & Hacks
Tips | Tricks | Hacks | Apps
07 Package fi leFirst, create the fi le package.json with sudo nano
package.json, then enter:
{“name”: “ServeSysinfo”,“version”: “0.0.1”,“dependencies”: {“express”: “4.x”}}
08 App nodeNow, create a fi le called app.js and enter the following:
var express = require(‘express’);var app = express();app.use(express.static(__dirname + ‘/public’));app.listen(3000, function(){console.log(‘listening on *.3000’);});
09 Start node.jsYou can now start the node server by typing in:
$ node app.js
It will say it’s listening on *.3000. Start up a new terminal, ssh in,
and create the folder /public with mkdir /public to save all of the
CPU data in.
10 CPU informationWe are going to use the vcgencmd command to get the
CPU information from the Raspberry Pi. We will write a script that
will do this and then write the info to sysinfo.json. Download the
fi le grabsysinfo.sh from FileSilo and put it in /usr/local/bin.
11 Make a cronjobWe will make it so that the temperature is updated every
ten minutes. You can make it update much faster if you want, but
have a play around with that. Open up cron with sudo crontab -e and add this at the end:
*/10 * * * * /usr/local/bin/grabsysinfo.sh
Above As it’s multi-touch, Dizmo is perfect for interactive table displays in meetings
Internet of ThingsIt’s not a very descriptive term, but the Internet of Things can be almost anything. Any item that is or can be connected to the internet or networks, such as modern automated lights, can be connected up to Dizmo and the Raspberry Pi.
Dizmo space walk Enjoy some pre-installed projects to see exactly what Dizmo can do
PiGauge Create a custom app to monitor the temperature of your Raspberry Pi, and then go even further
Browser Create an entire custom display using a variety of information that can connect to and through the Pi
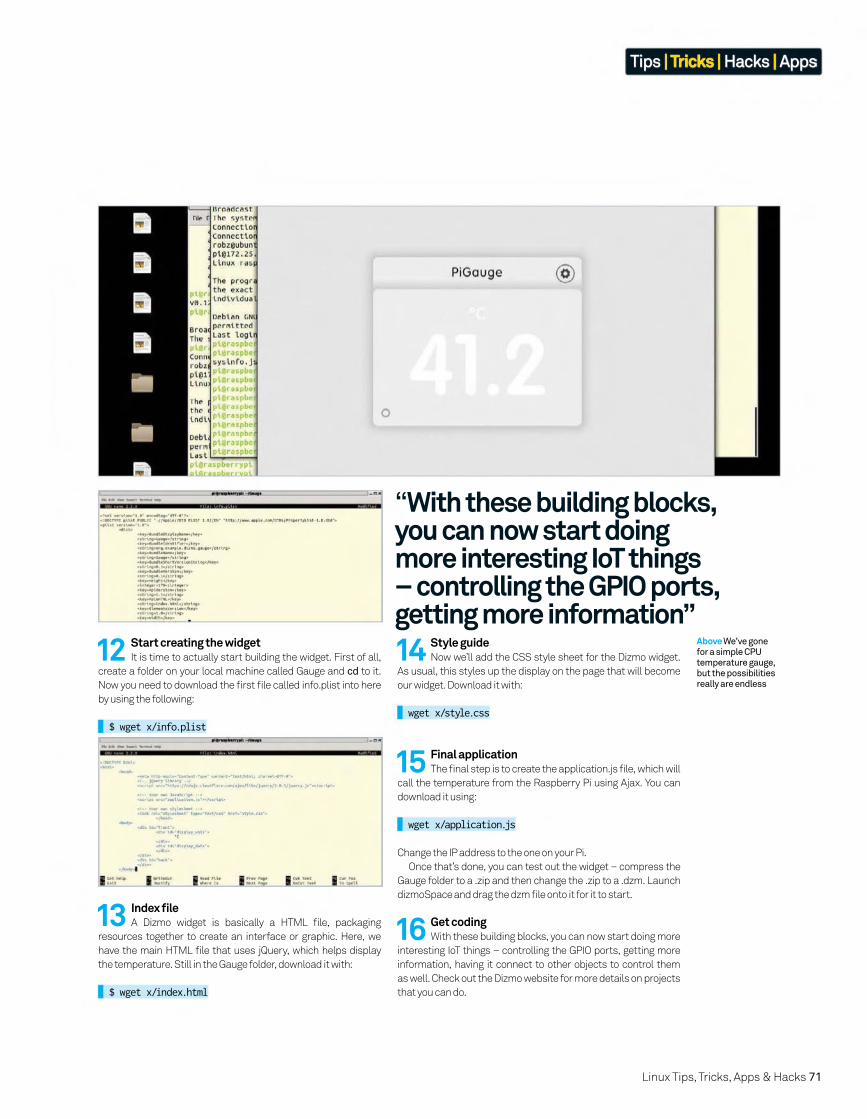
Linux Tips, Tricks, Apps & Hacks 71
Tips | Tricks | Hacks | Apps
12 Start creating the widgetIt is time to actually start building the widget. First of all,
create a folder on your local machine called Gauge and cd to it.
Now you need to download the fi rst fi le called info.plist into here
by using the following:
$ wget x/info.plist
13 Index fi leA Dizmo widget is basically a HTML fi le, packaging
resources together to create an interface or graphic. Here, we
have the main HTML fi le that uses jQuery, which helps display
the temperature. Still in the Gauge folder, download it with:
$ wget x/index.html
14 Style guideNow we’ll add the CSS style sheet for the Dizmo widget.
As usual, this styles up the display on the page that will become
our widget. Download it with:
wget x/style.css
15 Final applicationThe fi nal step is to create the application.js fi le, which will
call the temperature from the Raspberry Pi using Ajax. You can
download it using:
wget x/application.js
Change the IP address to the one on your Pi.
Once that’s done, you can test out the widget – compress the
Gauge folder to a .zip and then change the .zip to a .dzm. Launch
dizmoSpace and drag the dzm fi le onto it for it to start.
16 Get codingWith these building blocks, you can now start doing more
interesting IoT things – controlling the GPIO ports, getting more
information, having it connect to other objects to control them
as well. Check out the Dizmo website for more details on projects
that you can do.
Above We’ve gone for a simple CPU temperature gauge, but the possibilities really are endless
“With these building blocks, you can now start doing more interesting IoT things – controlling the GPIO ports, getting more information”
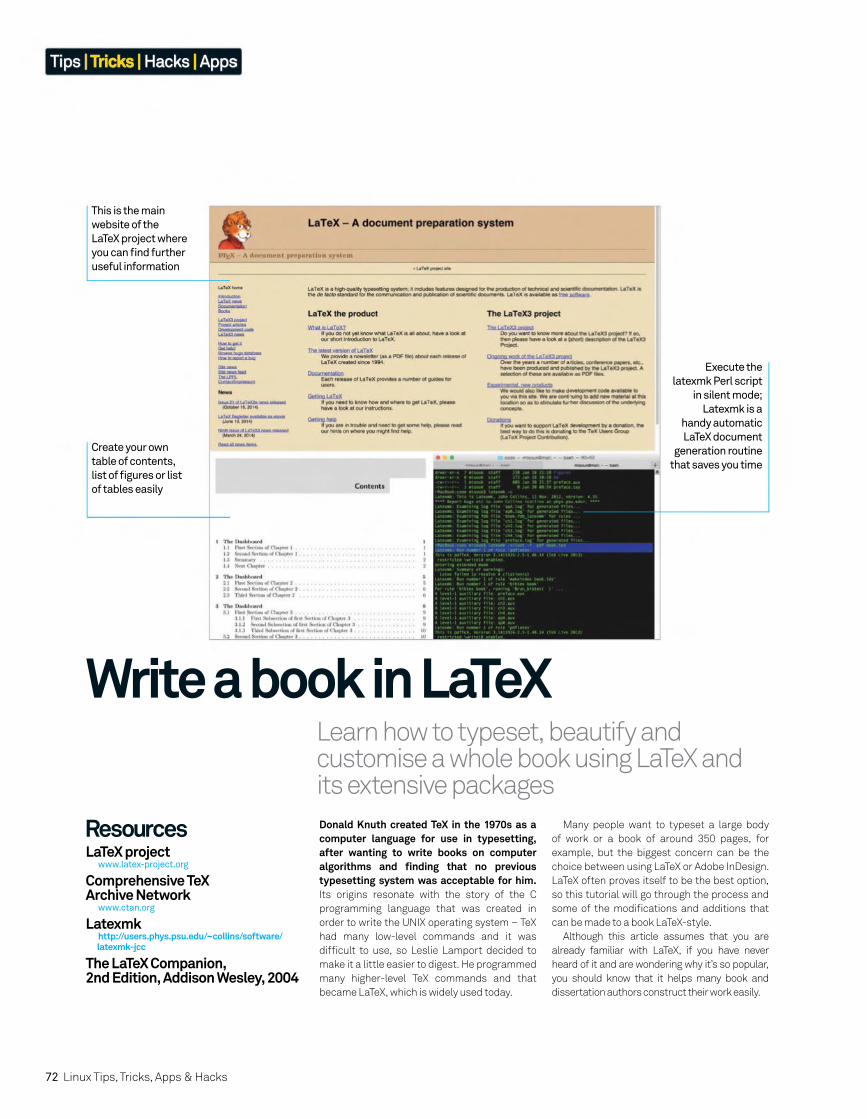
72 Linux Tips, Tricks, Apps & Hacks
Tips | Tricks | Hacks | Apps
Learn how to typeset, beautify and customise a whole book using LaTeX and its extensive packages
Write a book in LaTeX
Donald Knuth created TeX in the 1970s as a computer language for use in typesetting, after wanting to write books on computer algorithms and fi nding that no previous typesetting system was acceptable for him. Its origins resonate with the story of the C
programming language that was created in
order to write the UNIX operating system – TeX
had many low-level commands and it was
diffi cult to use, so Leslie Lamport decided to
make it a little easier to digest. He programmed
many higher-level TeX commands and that
became LaTeX, which is widely used today.
Many people want to typeset a large body
of work or a book of around 350 pages, for
example, but the biggest concern can be the
choice between using LaTeX or Adobe InDesign.
LaTeX often proves itself to be the best option,
so this tutorial will go through the process and
some of the modifi cations and additions that
can be made to a book LaTeX-style.
Although this article assumes that you are
already familiar with LaTeX, if you have never
heard of it and are wondering why it’s so popular,
you should know that it helps many book and
dissertation authors construct their work easily.
ResourcesLaTeX project www.latex-project.org
Comprehensive TeX Archive Network www.ctan.org
Latexmk http://users.phys.psu.edu/~collins/software/
latexmk-jcc
The LaTeX Companion,2nd Edition, Addison Wesley, 2004
Execute the
latexmk Perl script
in silent mode;
Latexmk is a
handy automatic
LaTeX document
generation routine
that saves you time
This is the main
website of the
LaTeX project where
you can fi nd further
useful information
Create your own
table of contents,
list of fi gures or list
of tables easily
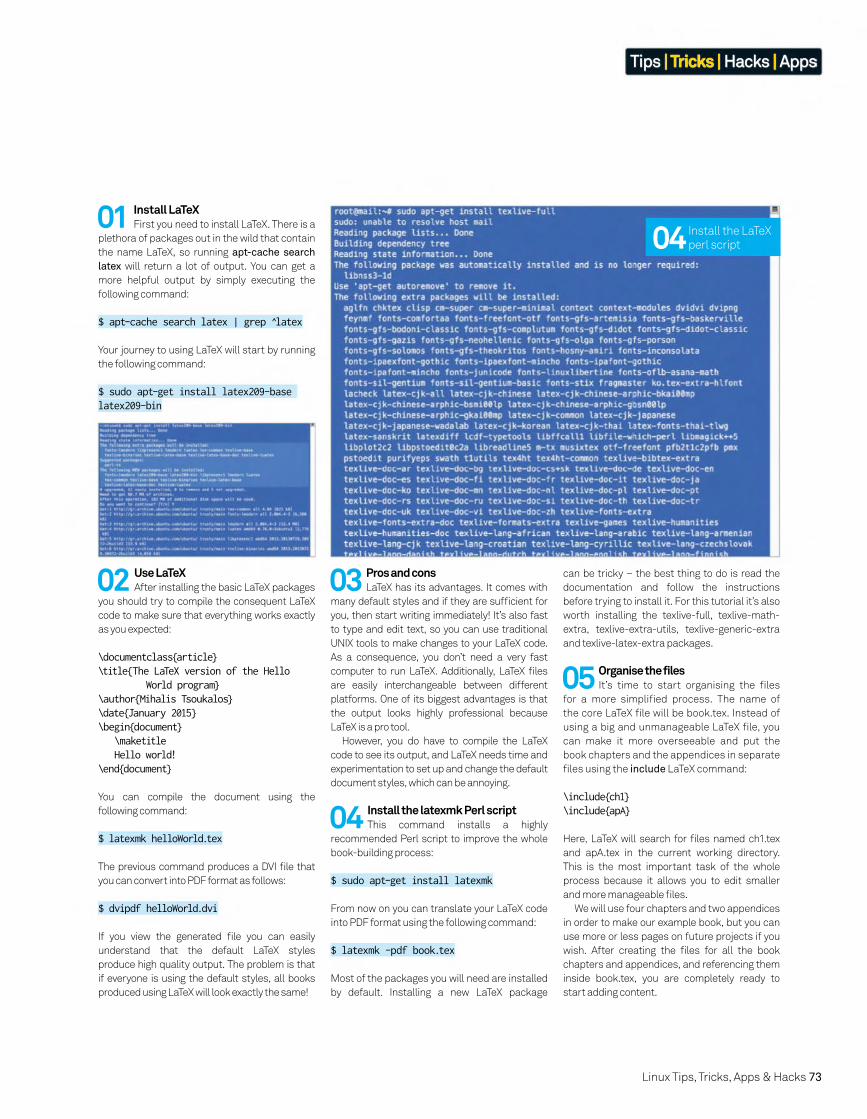
Linux Tips, Tricks, Apps & Hacks 73
Tips | Tricks | Hacks | Apps
01 Install LaTeXFirst you need to install LaTeX. There is a
plethora of packages out in the wild that contain
the name LaTeX, so running apt-cache search
latex will return a lot of output. You can get a
more helpful output by simply executing the
following command:
$ apt-cache search latex | grep l̂atex
Your journey to using LaTeX will start by running
the following command:
$ sudo apt-get install latex209-base latex209-bin
04 Install the latexmk Perl scriptThis command installs a highly
recommended Perl script to improve the whole
book-building process:
$ sudo apt-get install latexmk
From now on you can translate your LaTeX code
into PDF format using the following command:
$ latexmk -pdf book.tex
Most of the packages you will need are installed
by default. Installing a new LaTeX package
02 Use LaTeXAfter installing the basic LaTeX packages
you should try to compile the consequent LaTeX
code to make sure that everything works exactly
as you expected:
\documentclass{article}\title{The LaTeX version of the Hello World program}\author{Mihalis Tsoukalos}\date{January 2015}\begin{document} \maketitle Hello world!\end{document}
You can compile the document using the
following command:
$ latexmk helloWorld.tex
The previous command produces a DVI fi le that
you can convert into PDF format as follows:
$ dvipdf helloWorld.dvi
If you view the generated fi le you can easily
understand that the default LaTeX styles
produce high quality output. The problem is that
if everyone is using the default styles, all books
produced using LaTeX will look exactly the same!
05 Organise the filesIt’s time to start organising the fi les
for a more simplifi ed process. The name of
the core LaTeX fi le will be book.tex. Instead of
using a big and unmanageable LaTeX fi le, you
can make it more overseeable and put the
book chapters and the appendices in separate
fi les using the include LaTeX command:
\include{ch1}\include{apA}
Here, LaTeX will search for fi les named ch1.tex
and apA.tex in the current working directory.
This is the most important task of the whole
process because it allows you to edit smaller
and more manageable fi les.
We will use four chapters and two appendices
in order to make our example book, but you can
use more or less pages on future projects if you
wish. After creating the fi les for all the book
chapters and appendices, and referencing them
inside book.tex, you are completely ready to
start adding content.
03 Pros and consLaTeX has its advantages. It comes with
many default styles and if they are suffi cient for
you, then start writing immediately! It’s also fast
to type and edit text, so you can use traditional
UNIX tools to make changes to your LaTeX code.
As a consequence, you don’t need a very fast
computer to run LaTeX. Additionally, LaTeX fi les
are easily interchangeable between different
platforms. One of its biggest advantages is that
the output looks highly professional because
LaTeX is a pro tool.
However, you do have to compile the LaTeX
code to see its output, and LaTeX needs time and
experimentation to set up and change the default
document styles, which can be annoying.
can be tricky – the best thing to do is read the
documentation and follow the instructions
before trying to install it. For this tutorial it’s also
worth installing the texlive-full, texlive-math-
extra, texlive-extra-utils, texlive-generic-extra
and texlive-latex-extra packages.
04 Install the LaTeX
perl script

74 Linux Tips, Tricks, Apps & Hacks
Tips | Tricks | Hacks | Apps
You can now use the MyCode style inside LaTeX
using the following command:
\begin{MyCode}[fontsize=\relsize{-1}]#include <stdio.h>int main (int argc, const char * argv[]){ printf(“Hello, World!\n”); return 0;}\end{MyCode}
If you change the \relsize value from -1 to +1, the
code size is going to get bigger.
07 Sort contentYou can LaTex to sort and organise
content more easily. LaTeX generates pages with
table of contents, list of fi gures and list of tables.
You can create your own table of contents (TOC)
using this command:
\tableofcontents
If you only want to include entries for chapters
and sections, include the next command before
the previous command in Step 6:
\setcounter{tocdepth}{1}
In order to include the list of fi gures you might
have in your book you can do so by inserting the
following command:
\listoffigures
If you have tables in your book, you can generate
the list of tables as follows:
\listoftables
08 Mini table of contentsIf your book chapters are on the
large side you may need to add a mini table of
contents at the beginning of each chapter. There
is a LaTeX package called minitoc that does the
job. The next LaTeX code adds support for the
mini TOC functionality:
\usepackage{minitoc}\setcounter{minitocdepth}{1}
The previous commands should be combined
with the \dominitoc command that must be used
once to turn on the mini TOC functionality. Finally,
type \minitoc at the beginning of each chapter to
actually add the mini table of contents.
06 Create a bibliographyLaTeX offers BibTex for dealing with
bibliographic references. All BibTeX entries will
be located in a fi le called booklist.bib. Each
BibTeX entry has the following format:
@book{Kernighan84, author = {Brian W. Kernighan and Robert Pike}, title = {The UNIX Programming Environment}, year = {1984}, isbn = {013937681X}, publisher = {Prentice Hall Professional Technical Reference},}
The following LaTeX commands are used for
beautifying and inserting the bibliography
into this project:
\bibliographystyle{alpha}\addcontentsline{toc}{chapter}{Bibliography}\bibliography{booklist}
You can add a reference to the Kernighan84
book in your LaTeX code as follows:
\cite{Kernighan84}
09 Format codeThe book is going to contain multiple
blocks of code to showcase certain techniques,
therefore the code must be well formatted. Using
the following LaTeX code you can defi ne a new
style called MyCode for formatting code:
\usepackage{relsize, color, fancyvrb}\CustomVerbatimEnvironment{MyCode}{Verbatim} {numbers=left,frame=lines,framerule=1pt,rulecolor=\color{blue},framesep=4mm}
Creating a style saves you time. Additionally, if you
want to make a global change to the output format
of code in your book, all you have to do is go to its
definition, make the changes and recompile the
book. Also, if you want to create a new style similar
to an existing one, you can copy and paste the
existing style definition code, choose a different
name and make the modifications you want.
10 Include a header and footerThe following LaTeX code changes the
header and the footer of each book page. Right
pages (RO) have a different rule to left pages
(LE). It’s also worth noting that the fi rst page of
each chapter (CO) has another rule that puts the
page number at the footer of it without adding
any header information.
\renewcommand\headrule{{% \color[gray]{0.5} \hrule height 1pt width\headwidth \vspace{-4pt}}}
\fancyhead[RO]{% {\bfseries\S\ \thesection\ \textbar\ \ LARGE\thepage\normalsize\ \textbar}}
\fancyhead[LE]{% {\bfseries\textbar\ \LARGE\thepage\ normalsize\ \textbar\ \S\ \ thesection\ \textbar\ \leftmark}}
\fancypagestyle{plain}{% \fancyhf{} \fancyfoot[CO]{% {\bfseries\LARGE\thepage} } \renewcommand{\headrulewidth}{0pt}%}

Linux Tips, Tricks, Apps & Hacks 75
Tips | Tricks | Hacks | Apps
12 Generate an indexThe following command helps you create
a book index:
\usepackage{makeidx}
The next LaTeX command puts the index
information into the generated fi le:
\printindex
This code adds the word Knuth to the index:
\index{Knuth}11 Format figuresYou can easily alter the existing format
of a picture caption by using the following
LaTeX commands:
\usepackage{caption}\DeclareCaptionLabelSeparator{par}{\par}\DeclareCaptionFormat{dashedlabel}{\ textbf{---} #1 \textbf{---}#2#3}\captionsetup{format=dashedlabel,margin=1 cm,singlelinecheck=true, font=small,labe lfont={sc,bf,},textfont=it,justification=ce nterlast,labelsep=par}
Now you will be able to add a specifi c fi gure in
your book as follows:
\begin{figure}[tb] \centering \fbox{\scalebox{0.45}{\ includegraphics{figures/ch1/f0101. jpg}}} \caption{Adding a figure} \label{ch10:fig1}\end{figure}
13 Add tablesThis code produces an elegant table to
blend in with the rest of the book:
\begin{table}[t]\centering\setlength\extrarowheight{2.5pt}\setlength\extrarowheight{2.5pt}\begin{tabular}{cccc}\hline \addlinespace\textbf{Name} & \textbf{Size in Kbytes} & \textbf{\# of files} & \textbf{\# of keys in Info.plist} \\ \addlinespace \hlineamazonsearch.wdgt & 144 & 8 & 13 \\Tags - HTML.wdgt & 88 & 17 & 11 \\Temperature Monitor.wdgt & 416 & 50 & 10 \\Wikipedia.wdgt & 696 & 125 & 12 \\ \addlinespace \hline\end{tabular}\caption{Statistical Information.}\label{ch3:stats}\end{table}%
14 Some other useful infoProducing a more fancy and
professional chapter heading can be done
easily using the fncychar package:
\usepackage[Bjornstrup]{fncychap}
15 Work with the NOTE styleBefore talking about the NOTE style you
should fi rst download the picins.sty fi le and put
it where your LaTeX fi les are:
$ wget http://tug.ctan.org/tex-archive/macros/latex209/contrib/picins/picins.sty
The NOTE style was defi ned as follows:
\usepackage{picins}\usepackage{amsthm}\newcommand\NOTE{\linethickness{1mm}\parpic(14mm,5mm)[sl]{NOTE}\noindent}
You can now add a note as follows:
\NOTE A small note doesn’t look very elegant
The only drawback of the style is that it
needs to have at least two lines of text to look
pleasant on the page.
16 How it workedOur example book was built step-by-
step: a minimal book.tex fi le was generated
fi rst, then chapter and appendix fi les without
any data were added to the project.
At this point it was time for us to write
the book by adding text, images, tables,
bibliography and index entries, while
experimenting with the look of the existing
LaTeX styles, making changes to them, adding
new ones and correcting errors.
This is defi nitely the safest procedure to
follow when writing your own book while using
LaTeX – LaTeX was able to process all the fi les,
as well as the index and the bibliography,
without any diffi culties. So go on and make your
own creation!
You should fi rst insert the following code for the
modifi cations to work:
\usepackage{fancyhdr}\pagestyle{fancy}\fancyhf{}\renewcommand{\chaptermark}[1]{\markboth{#1}{}}
The last command is for resetting the existing
defi nition of the header and the footer.
12 Generate
an index
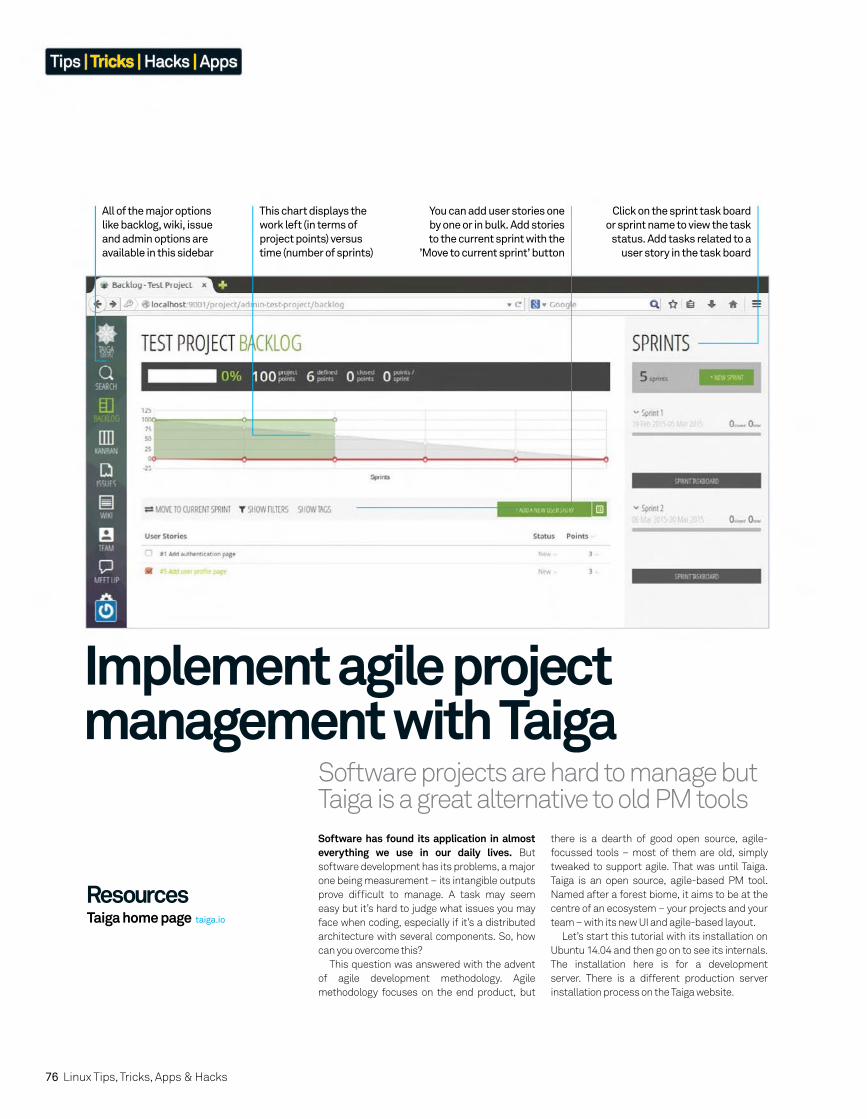
76 Linux Tips, Tricks, Apps & Hacks
Tips | Tricks | Hacks | Apps
Software projects are hard to manage but Taiga is a great alternative to old PM tools
Implement agile project management with Taiga
Software has found its application in almost everything we use in our daily lives. But
software development has its problems, a major
one being measurement – its intangible outputs
prove diffi cult to manage. A task may seem
easy but it’s hard to judge what issues you may
face when coding, especially if it’s a distributed
architecture with several components. So, how
can you overcome this?
This question was answered with the advent
of agile development methodology. Agile
methodology focuses on the end product, but
there is a dearth of good open source, agile-
focussed tools – most of them are old, simply
tweaked to support agile. That was until Taiga.
Taiga is an open source, agile-based PM tool.
Named after a forest biome, it aims to be at the
centre of an ecosystem – your projects and your
team – with its new UI and agile-based layout.
Let’s start this tutorial with its installation on
Ubuntu 14.04 and then go on to see its internals.
The installation here is for a development
server. There is a different production server
installation process on the Taiga website.
Click on the sprint task board
or sprint name to view the task
status. Add tasks related to a
user story in the task board
You can add user stories one
by one or in bulk. Add stories
to the current sprint with the
’Move to current sprint’ button
All of the major options
like backlog, wiki, issue
and admin options are
available in this sidebar
This chart displays the
work left (in terms of
project points) versus
time (number of sprints)
ResourcesTaiga home page taiga.io
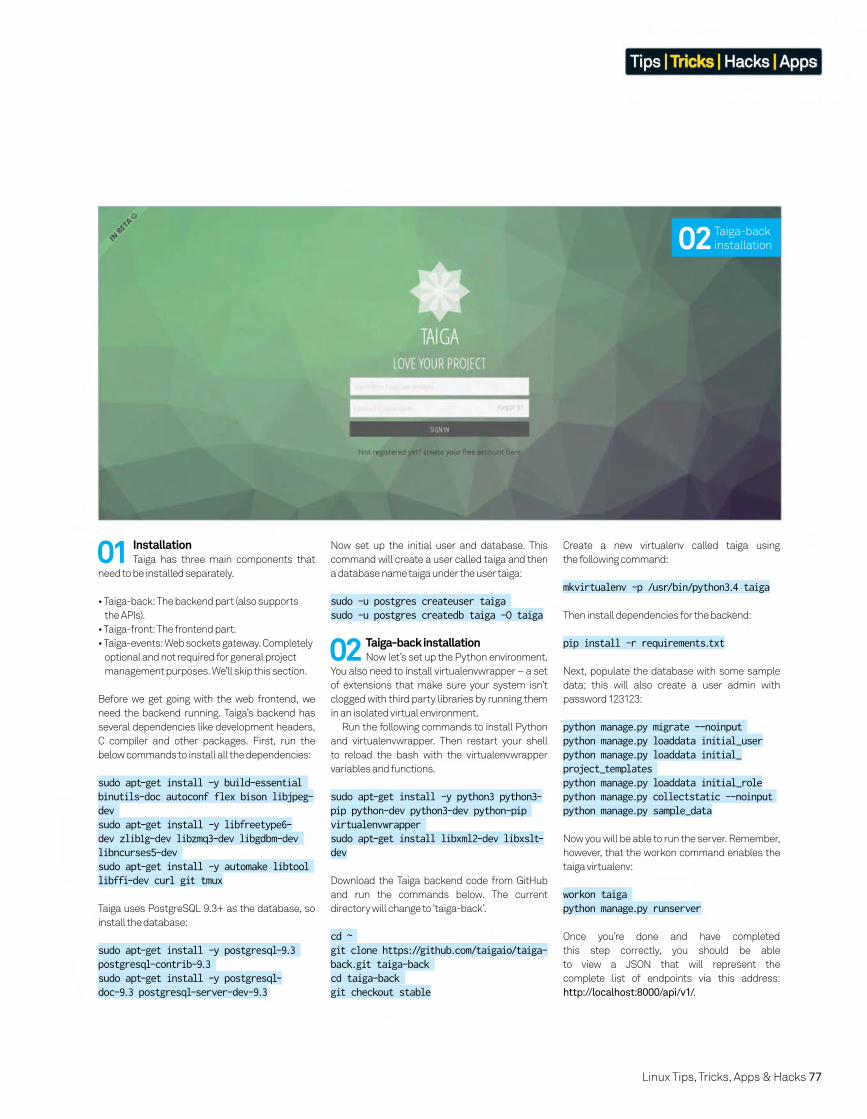
Linux Tips, Tricks, Apps & Hacks 77
Tips | Tricks | Hacks | Apps
01 InstallationTaiga has three main components that
need to be installed separately.
• Taiga-back: The backend part (also supports
the APIs).
• Taiga-front: The frontend part.
• Taiga-events: Web sockets gateway. Completely
optional and not required for general project
management purposes. We’ll skip this section.
Before we get going with the web frontend, we
need the backend running. Taiga’s backend has
several dependencies like development headers,
C compiler and other packages. First, run the
below commands to install all the dependencies:
sudo apt-get install -y build-essential binutils-doc autoconf flex bison libjpeg-dev sudo apt-get install -y libfreetype6-dev zlib1g-dev libzmq3-dev libgdbm-dev libncurses5-dev sudo apt-get install -y automake libtool libffi-dev curl git tmux
Taiga uses PostgreSQL 9.3+ as the database, so
install the database:
sudo apt-get install -y postgresql-9.3 postgresql-contrib-9.3 sudo apt-get install -y postgresql-doc-9.3 postgresql-server-dev-9.3
02 Taiga-back installation Now let’s set up the Python environment.
You also need to install virtualenvwrapper – a set
of extensions that make sure your system isn’t
clogged with third party libraries by running them
in an isolated virtual environment.
Run the following commands to install Python
and virtualenvwrapper. Then restart your shell
to reload the bash with the virtualenvwrapper
variables and functions.
sudo apt-get install -y python3 python3-pip python-dev python3-dev python-pip virtualenvwrapper sudo apt-get install libxml2-dev libxslt-dev
Download the Taiga backend code from GitHub
and run the commands below. The current
directory will change to ’taiga-back’.
cd ~ git clone https://github.com/taigaio/taiga-back.git taiga-back cd taiga-back git checkout stable
Now set up the initial user and database. This
command will create a user called taiga and then
a database name taiga under the user taiga:
sudo -u postgres createuser taiga sudo -u postgres createdb taiga -O taiga
Create a new virtualenv called taiga using
the following command:
mkvirtualenv -p /usr/bin/python3.4 taiga
Then install dependencies for the backend:
pip install -r requirements.txt
Next, populate the database with some sample
data; this will also create a user admin with
password 123123:
python manage.py migrate --noinput python manage.py loaddata initial_userpython manage.py loaddata initial_project_templates python manage.py loaddata initial_rolepython manage.py collectstatic --noinput python manage.py sample_data
Now you will be able to run the server. Remember,
however, that the workon command enables the
taiga virtualenv:
workon taiga python manage.py runserver
Once you’re done and have completed
this step correctly, you should be able
to view a JSON that will represent the
complete list of endpoints via this address:
http://localhost:8000/api/v1/.
02 Taiga-back
installation
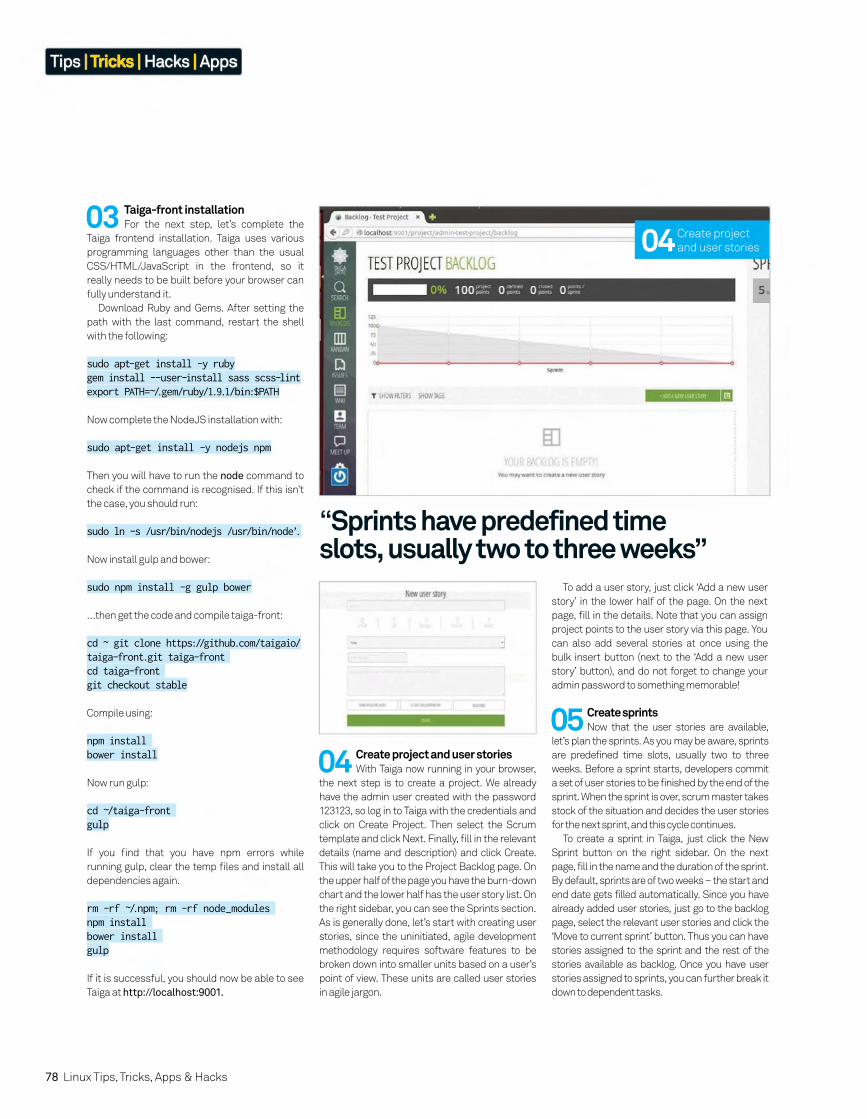
78 Linux Tips, Tricks, Apps & Hacks
Tips | Tricks | Hacks | Apps
04 Create project and user storiesWith Taiga now running in your browser,
the next step is to create a project. We already
have the admin user created with the password
123123, so log in to Taiga with the credentials and
click on Create Project. Then select the Scrum
template and click Next. Finally, fi ll in the relevant
details (name and description) and click Create.
This will take you to the Project Backlog page. On
the upper half of the page you have the burn-down
chart and the lower half has the user story list. On
the right sidebar, you can see the Sprints section.
As is generally done, let’s start with creating user
stories, since the uninitiated, agile development
methodology requires software features to be
broken down into smaller units based on a user’s
point of view. These units are called user stories
in agile jargon.
05 Create sprintsNow that the user stories are available,
let’s plan the sprints. As you may be aware, sprints
are predefined time slots, usually two to three
weeks. Before a sprint starts, developers commit
a set of user stories to be finished by the end of the
sprint. When the sprint is over, scrum master takes
stock of the situation and decides the user stories
for the next sprint, and this cycle continues.
To create a sprint in Taiga, just click the New
Sprint button on the right sidebar. On the next
page, fill in the name and the duration of the sprint.
By default, sprints are of two weeks – the start and
end date gets filled automatically. Since you have
already added user stories, just go to the backlog
page, select the relevant user stories and click the
‘Move to current sprint’ button. Thus you can have
stories assigned to the sprint and the rest of the
stories available as backlog. Once you have user
stories assigned to sprints, you can further break it
down to dependent tasks.
03 Taiga-front installationFor the next step, let’s complete the
Taiga frontend installation. Taiga uses various
programming languages other than the usual
CSS/HTML/JavaScript in the frontend, so it
really needs to be built before your browser can
fully understand it.
Download Ruby and Gems. After setting the
path with the last command, restart the shell
with the following:
sudo apt-get install -y rubygem install --user-install sass scss-lintexport PATH=~/.gem/ruby/1.9.1/bin:$PATH
Now complete the NodeJS installation with:
sudo apt-get install -y nodejs npm
Then you will have to run the node command to
check if the command is recognised. If this isn’t
the case, you should run:
sudo ln -s /usr/bin/nodejs /usr/bin/node’.
Now install gulp and bower:
sudo npm install -g gulp bower
…then get the code and compile taiga-front:
cd ~ git clone https://github.com/taigaio/taiga-front.git taiga-front cd taiga-front git checkout stable
Compile using:
npm install bower install
Now run gulp:
cd ~/taiga-front gulp
If you fi nd that you have npm errors while
running gulp, clear the temp fi les and install all
dependencies again.
rm -rf ~/.npm; rm -rf node_modules npm install bower install gulp
If it is successful, you should now be able to see
Taiga at http://localhost:9001.
To add a user story, just click ‘Add a new user
story’ in the lower half of the page. On the next
page, fi ll in the details. Note that you can assign
project points to the user story via this page. You
can also add several stories at once using the
bulk insert button (next to the ‘Add a new user
story’ button), and do not forget to change your
admin password to something memorable!
04 Create project
and user stories
“Sprints have predefined time slots, usually two to three weeks”
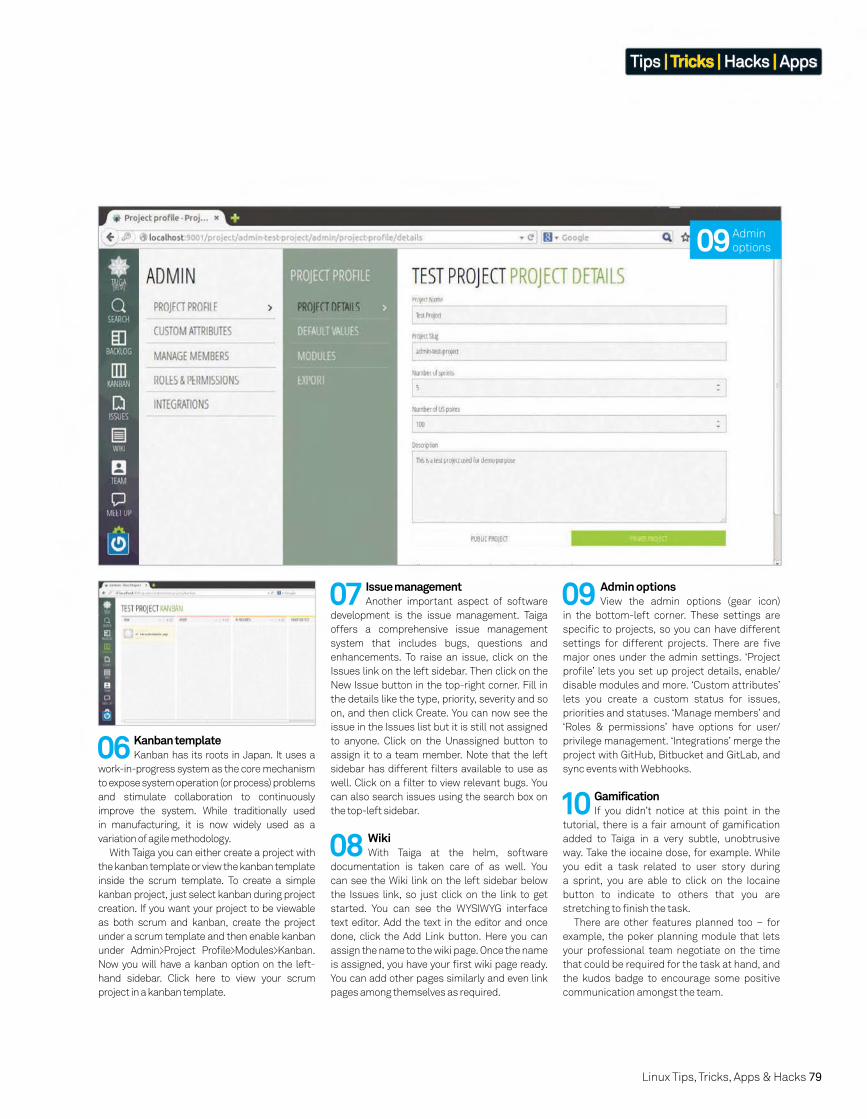
Linux Tips, Tricks, Apps & Hacks 79
Tips | Tricks | Hacks | Apps
10 GamificationIf you didn’t notice at this point in the
tutorial, there is a fair amount of gamifi cation
added to Taiga in a very subtle, unobtrusive
way. Take the iocaine dose, for example. While
you edit a task related to user story during
a sprint, you are able to click on the Iocaine
button to indicate to others that you are
stretching to fi nish the task.
There are other features planned too – for
example, the poker planning module that lets
your professional team negotiate on the time
that could be required for the task at hand, and
the kudos badge to encourage some positive
communication amongst the team.
09 Admin optionsView the admin options (gear icon)
in the bottom-left corner. These settings are
specifi c to projects, so you can have different
settings for different projects. There are fi ve
major ones under the admin settings. ‘Project
profi le’ lets you set up project details, enable/
disable modules and more. ‘Custom attributes’
lets you create a custom status for issues,
priorities and statuses. ‘Manage members’ and
‘Roles & permissions’ have options for user/
privilege management. ‘Integrations’ merge the
project with GitHub, Bitbucket and GitLab, and
sync events with Webhooks.
08 WikiWith Taiga at the helm, software
documentation is taken care of as well. You
can see the Wiki link on the left sidebar below
the Issues link, so just click on the link to get
started. You can see the WYSIWYG interface
text editor. Add the text in the editor and once
done, click the Add Link button. Here you can
assign the name to the wiki page. Once the name
is assigned, you have your fi rst wiki page ready.
You can add other pages similarly and even link
pages among themselves as required.
06 Kanban templateKanban has its roots in Japan. It uses a
work-in-progress system as the core mechanism
to expose system operation (or process) problems
and stimulate collaboration to continuously
improve the system. While traditionally used
in manufacturing, it is now widely used as a
variation of agile methodology.
With Taiga you can either create a project with
the kanban template or view the kanban template
inside the scrum template. To create a simple
kanban project, just select kanban during project
creation. If you want your project to be viewable
as both scrum and kanban, create the project
under a scrum template and then enable kanban
under Admin>Project Profi le>Modules>Kanban.
Now you will have a kanban option on the left-
hand sidebar. Click here to view your scrum
project in a kanban template.
07 Issue managementAnother important aspect of software
development is the issue management. Taiga
offers a comprehensive issue management
system that includes bugs, questions and
enhancements. To raise an issue, click on the
Issues link on the left sidebar. Then click on the
New Issue button in the top-right corner. Fill in
the details like the type, priority, severity and so
on, and then click Create. You can now see the
issue in the Issues list but it is still not assigned
to anyone. Click on the Unassigned button to
assign it to a team member. Note that the left
sidebar has different fi lters available to use as
well. Click on a fi lter to view relevant bugs. You
can also search issues using the search box on
the top-left sidebar.
09 Admin
options
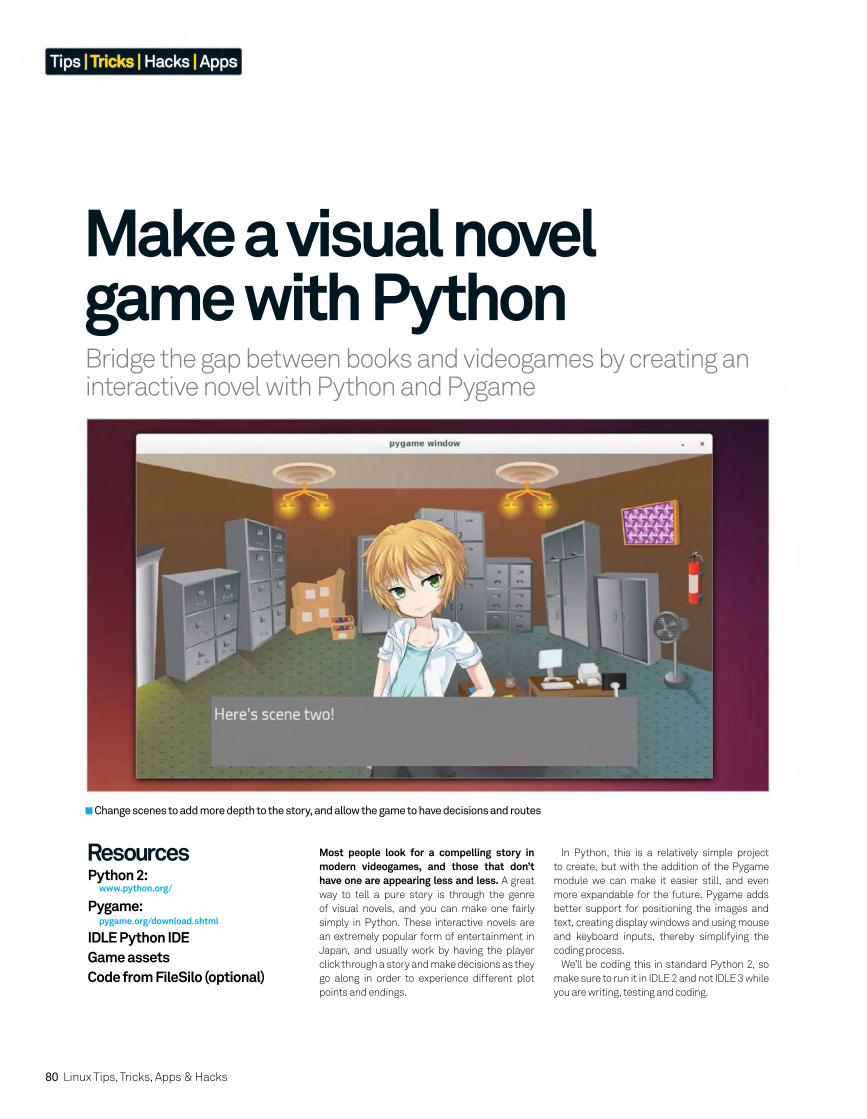
80 Linux Tips, Tricks, Apps & Hacks
Tips | Tricks | Hacks | Apps
Bridge the gap between books and videogames by creating an interactive novel with Python and Pygame
ResourcesPython 2:
www.python.org/
Pygame: pygame.org/download.shtml
IDLE Python IDEGame assetsCode from FileSilo (optional)
Make a visual novel game with Python
Most people look for a compelling story in modern videogames, and those that don’t have one are appearing less and less. A great
way to tell a pure story is through the genre
of visual novels, and you can make one fairly
simply in Python. These interactive novels are
an extremely popular form of entertainment in
Japan, and usually work by having the player
click through a story and make decisions as they
go along in order to experience different plot
points and endings.
Change scenes to add more depth to the story, and allow the game to have decisions and routes
In Python, this is a relatively simple project
to create, but with the addition of the Pygame
module we can make it easier still, and even
more expandable for the future. Pygame adds
better support for positioning the images and
text, creating display windows and using mouse
and keyboard inputs, thereby simplifying the
coding process.
We’ll be coding this in standard Python 2, so
make sure to run it in IDLE 2 and not IDLE 3 while
you are writing, testing and coding.
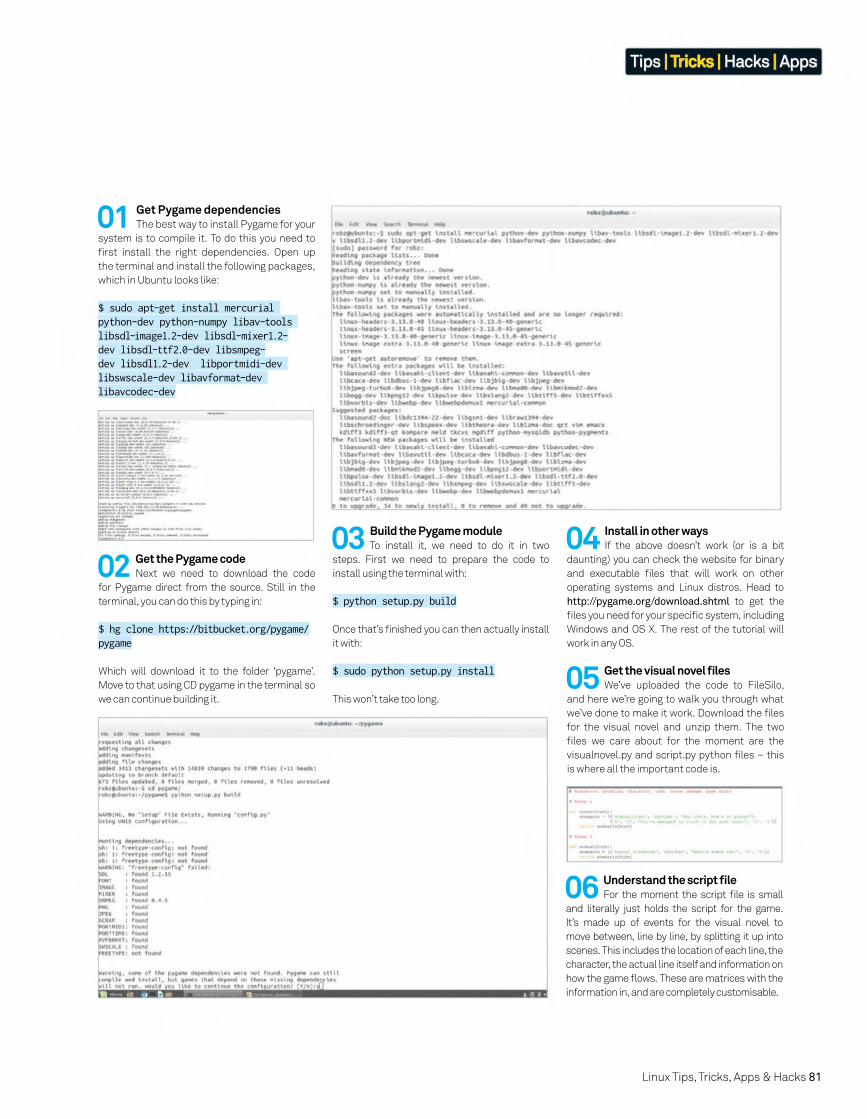
Linux Tips, Tricks, Apps & Hacks 81
Tips | Tricks | Hacks | Apps
02 Get the Pygame codeNext we need to download the code
for Pygame direct from the source. Still in the
terminal, you can do this by typing in:
$ hg clone https://bitbucket.org/pygame/pygame
Which will download it to the folder ‘pygame’.
Move to that using CD pygame in the terminal so
we can continue building it.
03 Build the Pygame moduleTo install it, we need to do it in two
steps. First we need to prepare the code to
install using the terminal with:
$ python setup.py build
Once that’s fi nished you can then actually install
it with:
$ sudo python setup.py install
This won’t take too long.
04 Install in other waysIf the above doesn’t work (or is a bit
daunting) you can check the website for binary
and executable fi les that will work on other
operating systems and Linux distros. Head to
http://pygame.org/download.shtml to get the
fi les you need for your specifi c system, including
Windows and OS X. The rest of the tutorial will
work in any OS.
01 Get Pygame dependenciesThe best way to install Pygame for your
system is to compile it. To do this you need to
fi rst install the right dependencies. Open up
the terminal and install the following packages,
which in Ubuntu looks like:
$ sudo apt-get install mercurial python-dev python-numpy libav-tools libsdl-image1.2-dev libsdl-mixer1.2-dev libsdl-ttf2.0-dev libsmpeg-dev libsdl1.2-dev libportmidi-dev libswscale-dev libavformat-dev libavcodec-dev
05 Get the visual novel fi lesWe’ve uploaded the code to FileSilo,
and here we’re going to walk you through what
we’ve done to make it work. Download the fi les
for the visual novel and unzip them. The two
fi les we care about for the moment are the
visualnovel.py and script.py python fi les – this
is where all the important code is.
06 Understand the script fi leFor the moment the script fi le is small
and literally just holds the script for the game.
It’s made up of events for the visual novel to
move between, line by line, by splitting it up into
scenes. This includes the location of each line, the
character, the actual line itself and information on
how the game fl ows. These are matrices with the
information in, and are completely customisable.
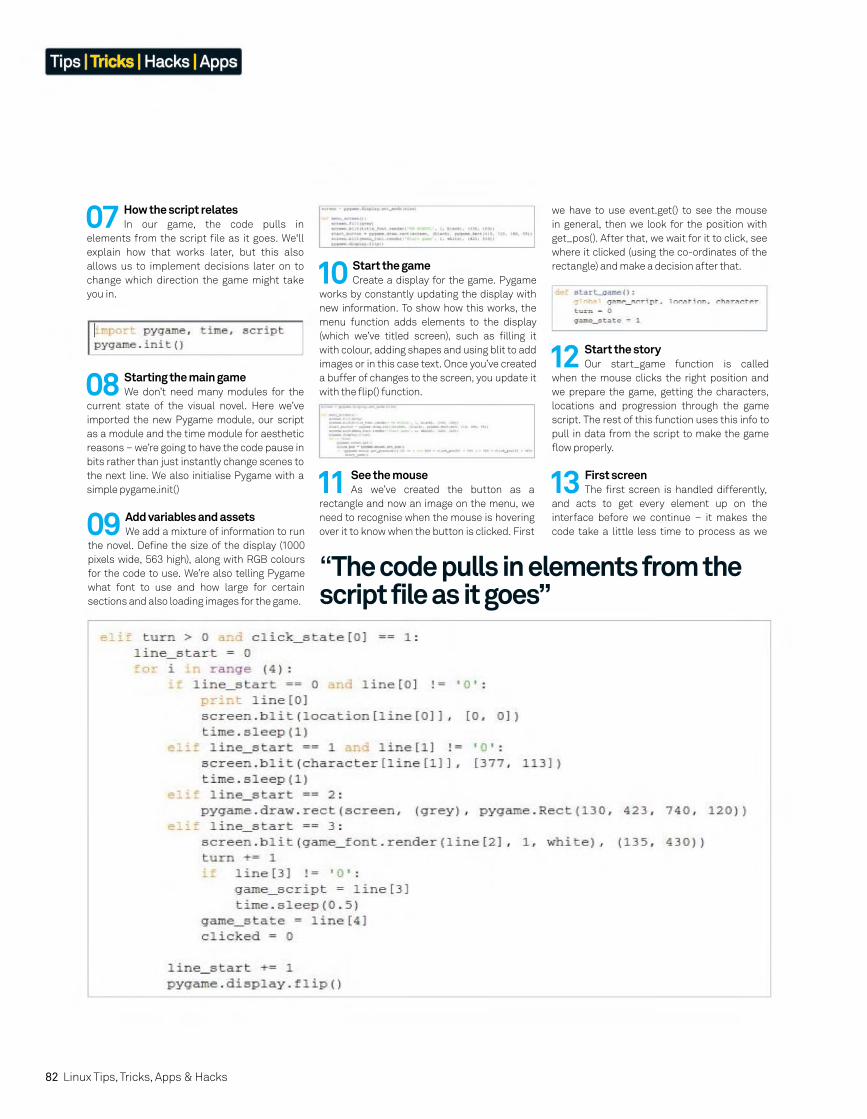
82 Linux Tips, Tricks, Apps & Hacks
Tips | Tricks | Hacks | Apps
09 Add variables and assetsWe add a mixture of information to run
the novel. Defi ne the size of the display (1000
pixels wide, 563 high), along with RGB colours
for the code to use. We’re also telling Pygame
what font to use and how large for certain
sections and also loading images for the game.
10 Start the gameCreate a display for the game. Pygame
works by constantly updating the display with
new information. To show how this works, the
menu function adds elements to the display
(which we’ve titled screen), such as fi lling it
with colour, adding shapes and using blit to add
images or in this case text. Once you’ve created
a buffer of changes to the screen, you update it
with the fl ip() function.
12 Start the storyOur start_game function is called
when the mouse clicks the right position and
we prepare the game, getting the characters,
locations and progression through the game
script. The rest of this function uses this info to
pull in data from the script to make the game
fl ow properly.
07 How the script relatesIn our game, the code pulls in
elements from the script fi le as it goes. We'll
explain how that works later, but this also
allows us to implement decisions later on to
change which direction the game might take
you in.
08 Starting the main gameWe don’t need many modules for the
current state of the visual novel. Here we’ve
imported the new Pygame module, our script
as a module and the time module for aesthetic
reasons – we’re going to have the code pause in
bits rather than just instantly change scenes to
the next line. We also initialise Pygame with a
simple pygame.init() 13 First screenThe fi rst screen is handled differently,
and acts to get every element up on the
interface before we continue – it makes the
code take a little less time to process as we
11 See the mouseAs we’ve created the button as a
rectangle and now an image on the menu, we
need to recognise when the mouse is hovering
over it to know when the button is clicked. First
we have to use event.get() to see the mouse
in general, then we look for the position with
get_pos(). After that, we wait for it to click, see
where it clicked (using the co-ordinates of the
rectangle) and make a decision after that.
“The code pulls in elements from the script file as it goes”

Linux Tips, Tricks, Apps & Hacks 83
Tips | Tricks | Hacks | Apps
15 The starting functionWe fi nish our code bit with a simple
function that starts off the entire game. This is
just to encapsulate the entire code and allows us
to add different ways of turning it off in the future.
IDLE when running the fi le will load everything
up and then run the game() function at the end
– this is similar to how you can add a __main__
function at the end which will start the code in the
command line.
feel even more interactive. This would not
require the addition of very much more code
than the if statements, and it would also be a
good opportunity for you to look into adding in
some graphical buttons to click and use the
collide function.
17 Move the assetsCurrently the code has the script-
specifi c assets stored in the main visualnovel
fi le. These can be moved over to the script,
which will allow you to make the visualnovel
fi le signifi cantly more modular. This means
that you can then have multiple scripts with
different assets that will load at startup. With
the basic game done, enjoy playing!
14 Add variables and assetsSimilarly to the way that our original
startup code works, our next if statement and
iteration checks to see what is different on the
next line, and if it moves to a different scene
function. It will also change anything that is
different without fi lling up the buffer more
than needed. Where we’ve made no change is
labelled with a 0 in the scripts.
16 Expand your codeThe code written is very expandable,
allowing you to add decisions that are logged
to take you to different scenes (or ‘routes’, in
visual novel terminology) and make your game
begin. The getattr allows us to use the string/
integer associated with our place in the story
and call upon the relevant scene function from
the script fi le. We then use an if statement
with an iterative function to successively add
screen element to give the illusion that it’s
building up the fi rst screen. We fi nish it by
advancing the progression value.
“The code here is very expandable, allowing you to add decisions that take you to different scenes”

84 Linux Tips, Tricks, Apps & Hacks
Tips | Tricks | Hacks | Apps
Get the most out of your Raspberry Pi with these performance-enhancing tips and tricks
Supercharge your Raspberry Pi
Your Raspberry Pi is plugged in. Raspbian is installed on the SD card and you are right in the middle of setting up a wireless print server or building a robot to collect your mail from your doormat.
But are you truly getting the most from your little
computer? Do the components you’re using maximise the
potential of your Raspberry Pi or are they holding it back?
Perhaps you haven’t explored the full set of options in
Raspbian, or you’re running the entire OS from SD card,
something that can reduce SD card lifespan.
Various tools and techniques can be employed to
improve performance, from choosing the right hardware
to overclocking the CPU. You might even maximise storage
space on the Raspberry Pi’s SD card or all but replace it with a
secondary device to help improve speed.
Use these tips and tricks to reconfi gure your Raspberry Pi
setup and optimise software and hardware to ensure you get
the best performance for your projects.
01 Use better storage hardwareYour choice of storage media can have an impact on your
Raspberry Pi’s performance, regardless of the operating system.
A low capacity SD card with poor error correction, is going to be
slower than a larger card with greater resilience, so you need to
fi nd the right balance for your project and shop wisely.
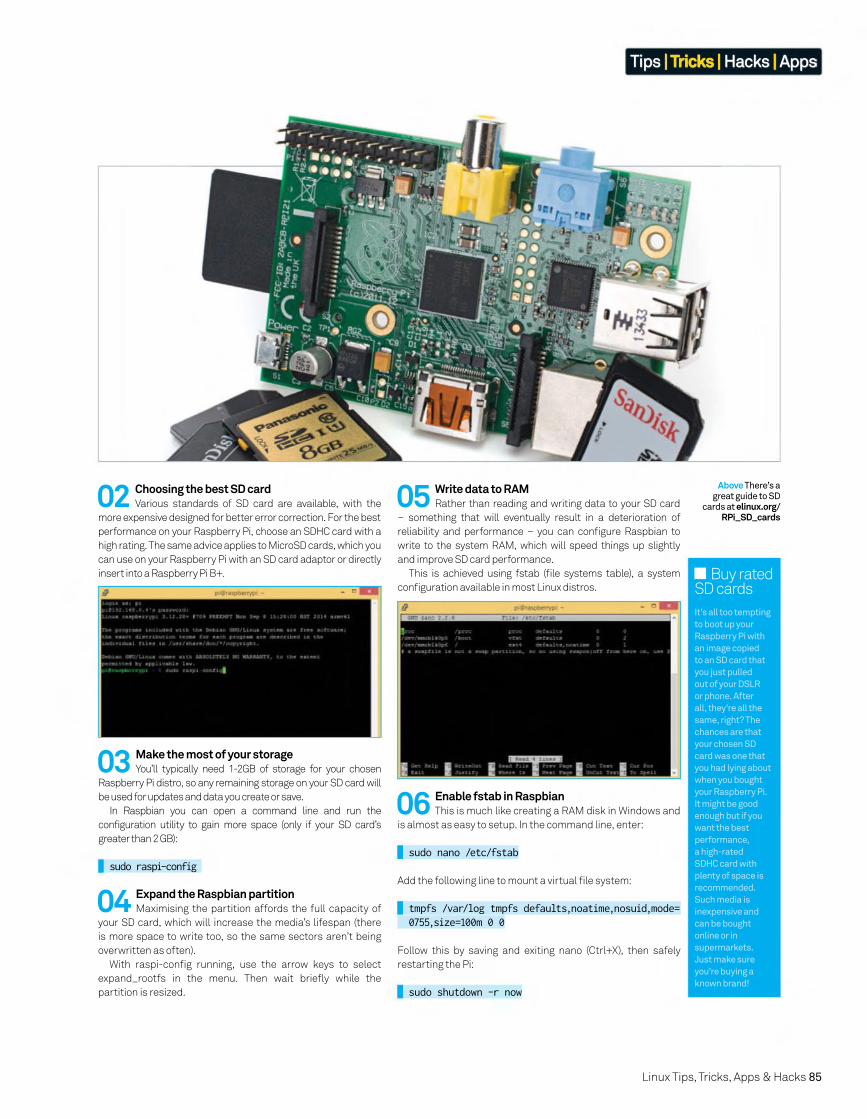
Linux Tips, Tricks, Apps & Hacks 85
Tips | Tricks | Hacks | Apps
04 Expand the Raspbian partitionMaximising the partition affords the full capacity of
your SD card, which will increase the media’s lifespan (there
is more space to write too, so the same sectors aren’t being
overwritten as often).
With raspi-confi g running, use the arrow keys to select
expand_rootfs in the menu. Then wait briefl y while the
partition is resized.
03 Make the most of your storage You’ll typically need 1-2GB of storage for your chosen
Raspberry Pi distro, so any remaining storage on your SD card will
be used for updates and data you create or save.
In Raspbian you can open a command line and run the
configuration utility to gain more space (only if your SD card’s
greater than 2 GB):
sudo raspi-config
02 Choosing the best SD cardVarious standards of SD card are available, with the
more expensive designed for better error correction. For the best
performance on your Raspberry Pi, choose an SDHC card with a
high rating. The same advice applies to MicroSD cards, which you
can use on your Raspberry Pi with an SD card adaptor or directly
insert into a Raspberry Pi B+.
Above There’s a great guide to SD
cards at elinux.org/RPi_SD_cards
05 Write data to RAMRather than reading and writing data to your SD card
– something that will eventually result in a deterioration of
reliability and performance – you can confi gure Raspbian to
write to the system RAM, which will speed things up slightly
and improve SD card performance.
This is achieved using fstab (fi le systems table), a system
confi guration available in most Linux distros.
06 Enable fstab in RaspbianThis is much like creating a RAM disk in Windows and
is almost as easy to setup. In the command line, enter:
sudo nano /etc/fstab
Add the following line to mount a virtual fi le system:
tmpfs /var/log tmpfs defaults,noatime,nosuid,mode= 0755,size=100m 0 0
Follow this by saving and exiting nano (Ctrl+X), then safely
restarting the Pi:
sudo shutdown -r now
Buy rated SD cards
It’s all too tempting
to boot up your
Raspberry Pi with
an image copied
to an SD card that
you just pulled
out of your DSLR
or phone. After
all, they’re all the
same, right? The
chances are that
your chosen SD
card was one that
you had lying about
when you bought
your Raspberry Pi.
It might be good
enough but if you
want the best
performance,
a high-rated
SDHC card with
plenty of space is
recommended.
Such media is
inexpensive and
can be bought
online or in
supermarkets.
Just make sure
you’re buying a
known brand!
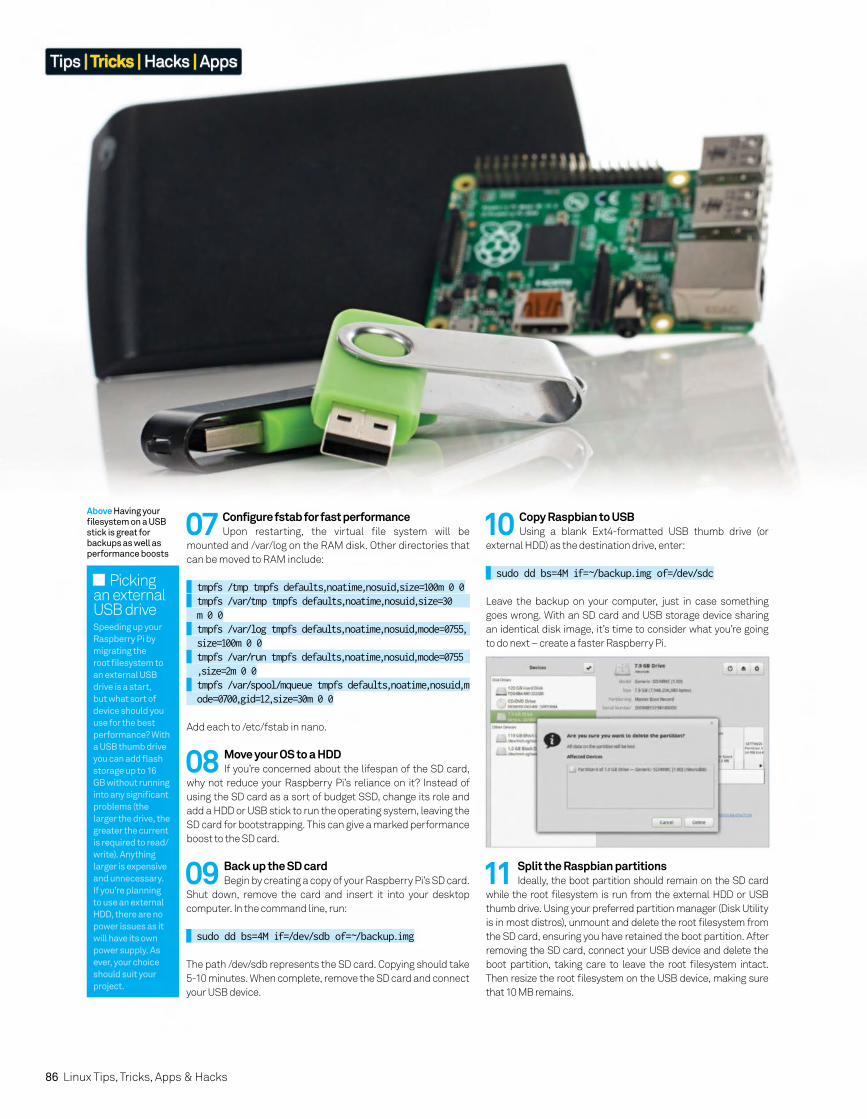
08 Move your OS to a HDD If you’re concerned about the lifespan of the SD card,
why not reduce your Raspberry Pi’s reliance on it? Instead of
using the SD card as a sort of budget SSD, change its role and
add a HDD or USB stick to run the operating system, leaving the
SD card for bootstrapping. This can give a marked performance
boost to the SD card.
09 Back up the SD card Begin by creating a copy of your Raspberry Pi’s SD card.
Shut down, remove the card and insert it into your desktop
computer. In the command line, run:
sudo dd bs=4M if=/dev/sdb of=~/backup.img
The path /dev/sdb represents the SD card. Copying should take
5-10 minutes. When complete, remove the SD card and connect
your USB device.
10 Copy Raspbian to USB Using a blank Ext4-formatted USB thumb drive (or
external HDD) as the destination drive, enter:
sudo dd bs=4M if=~/backup.img of=/dev/sdc
Leave the backup on your computer, just in case something
goes wrong. With an SD card and USB storage device sharing
an identical disk image, it’s time to consider what you’re going
to do next – create a faster Raspberry Pi.
11 Split the Raspbian partitions Ideally, the boot partition should remain on the SD card
while the root fi lesystem is run from the external HDD or USB
thumb drive. Using your preferred partition manager (Disk Utility
is in most distros), unmount and delete the root fi lesystem from
the SD card, ensuring you have retained the boot partition. After
removing the SD card, connect your USB device and delete the
boot partition, taking care to leave the root fi lesystem intact.
Then resize the root fi lesystem on the USB device, making sure
that 10 MB remains.
Above Having your fi lesystem on a USB stick is great for backups as well as performance boosts
07 Configure fstab for fast performanceUpon restarting, the virtual fi le system will be
mounted and /var/log on the RAM disk. Other directories that
can be moved to RAM include:
tmpfs /tmp tmpfs defaults,noatime,nosuid,size=100m 0 0 tmpfs /var/tmp tmpfs defaults,noatime,nosuid,size=30 m 0 0 tmpfs /var/log tmpfs defaults,noatime,nosuid,mode=0755, size=100m 0 0 tmpfs /var/run tmpfs defaults,noatime,nosuid,mode=0755 ,size=2m 0 0 tmpfs /var/spool/mqueue tmpfs defaults,noatime,nosuid,m ode=0700,gid=12,size=30m 0 0
Add each to /etc/fstab in nano.
86 Linux Tips, Tricks, Apps & Hacks
Tips | Tricks | Hacks | Apps
Picking an external USB driveSpeeding up your
Raspberry Pi by
migrating the
root fi lesystem to
an external USB
drive is a start,
but what sort of
device should you
use for the best
performance? With
a USB thumb drive
you can add fl ash
storage up to 16
GB without running
into any signifi cant
problems (the
larger the drive, the
greater the current
is required to read/
write). Anything
larger is expensive
and unnecessary.
If you’re planning
to use an external
HDD, there are no
power issues as it
will have its own
power supply. As
ever, your choice
should suit your
project.
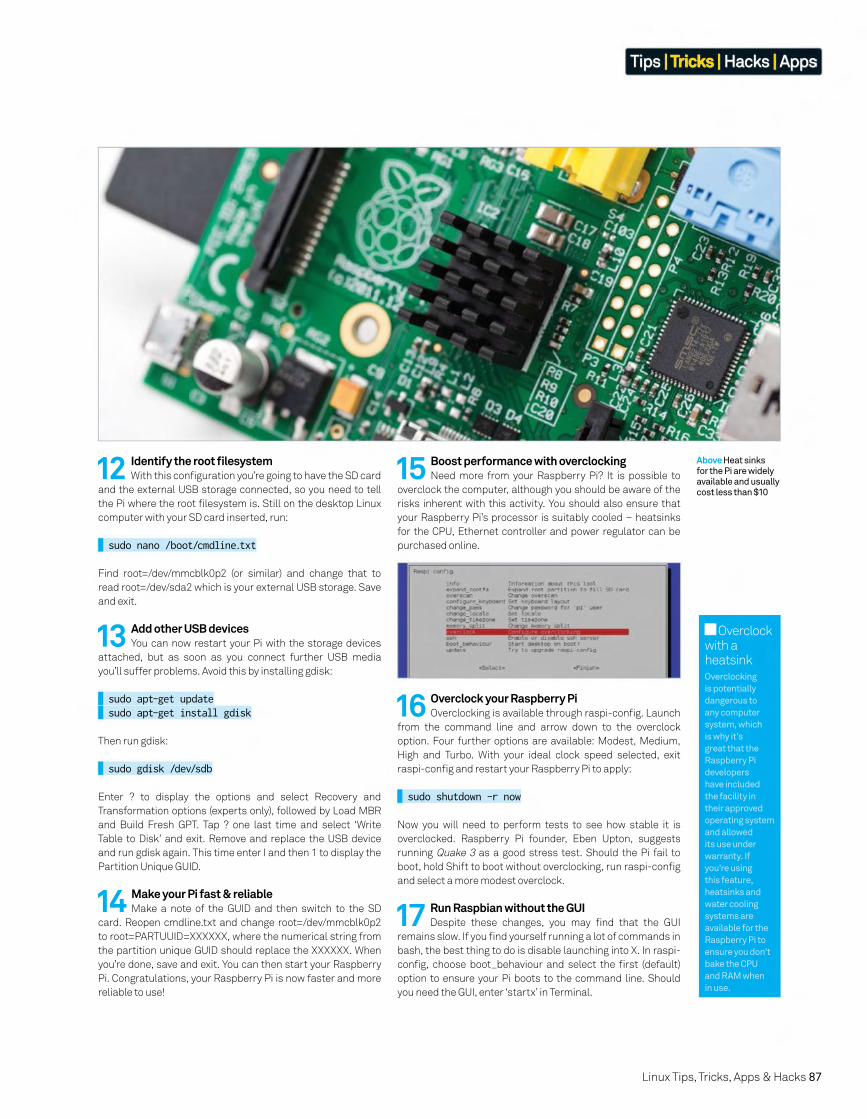
12 Identify the root fi lesystemWith this confi guration you’re going to have the SD card
and the external USB storage connected, so you need to tell
the Pi where the root fi lesystem is. Still on the desktop Linux
computer with your SD card inserted, run:
sudo nano /boot/cmdline.txt
Find root=/dev/mmcblk0p2 (or similar) and change that to
read root=/dev/sda2 which is your external USB storage. Save
and exit.
13 Add other USB devicesYou can now restart your Pi with the storage devices
attached, but as soon as you connect further USB media
you’ll suffer problems. Avoid this by installing gdisk:
sudo apt-get update sudo apt-get install gdisk
Then run gdisk:
sudo gdisk /dev/sdb
Enter ? to display the options and select Recovery and
Transformation options (experts only), followed by Load MBR
and Build Fresh GPT. Tap ? one last time and select ‘Write
Table to Disk’ and exit. Remove and replace the USB device
and run gdisk again. This time enter I and then 1 to display the
Partition Unique GUID.
14 Make your Pi fast & reliableMake a note of the GUID and then switch to the SD
card. Reopen cmdline.txt and change root=/dev/mmcblk0p2
to root=PARTUUID=XXXXXX, where the numerical string from
the partition unique GUID should replace the XXXXXX. When
you’re done, save and exit. You can then start your Raspberry
Pi. Congratulations, your Raspberry Pi is now faster and more
reliable to use!
15 Boost performance with overclockingNeed more from your Raspberry Pi? It is possible to
overclock the computer, although you should be aware of the
risks inherent with this activity. You should also ensure that
your Raspberry Pi’s processor is suitably cooled – heatsinks
for the CPU, Ethernet controller and power regulator can be
purchased online.
16 Overclock your Raspberry Pi Overclocking is available through raspi-confi g. Launch
from the command line and arrow down to the overclock
option. Four further options are available: Modest, Medium,
High and Turbo. With your ideal clock speed selected, exit
raspi-confi g and restart your Raspberry Pi to apply:
sudo shutdown -r now
Now you will need to perform tests to see how stable it is
overclocked. Raspberry Pi founder, Eben Upton, suggests
running Quake 3 as a good stress test. Should the Pi fail to
boot, hold Shift to boot without overclocking, run raspi-confi g
and select a more modest overclock.
17 Run Raspbian without the GUIDespite these changes, you may fi nd that the GUI
remains slow. If you fi nd yourself running a lot of commands in
bash, the best thing to do is disable launching into X. In raspi-
confi g, choose boot_behaviour and select the fi rst (default)
option to ensure your Pi boots to the command line. Should
you need the GUI, enter ‘startx’ in Terminal.
Above Heat sinks for the Pi are widely available and usually cost less than $10
Linux Tips, Tricks, Apps & Hacks 87
Tips | Tricks | Hacks | Apps
Overclock with a heatsinkOverclocking
is potentially
dangerous to
any computer
system, which
is why it’s
great that the
Raspberry Pi
developers
have included
the facility in
their approved
operating system
and allowed
its use under
warranty. If
you’re using
this feature,
heatsinks and
water cooling
systems are
available for the
Raspberry Pi to
ensure you don’t
bake the CPU
and RAM when
in use.

88 Linux Tips, Tricks, Apps & Hacks
Tips | Tricks | Hacks | Apps
MediaGoblin provides a way to share videos, photos or audio recordings with your loved ones, without worrying about privacy
Host your own mediagallery with MediaGoblin
YouTube is not only a website anymore, it’s become a phenomenon. Millions of hours are
spent – or wasted – daily in watching videos of
cats, dogs and humans doing strange things.
With the predictive playlist appearing just after
you fi nish a video, it is sometimes very diffi cult
to close the window and you go on and on,
watching one video after the other. But YouTube
is a dangerous place for personal videos and
other media that you don’t want strangers to
access. Though it has an option to make your
videos private, you don’t really know how private
it is. So we need to fi nd a solution that has the
perfect match of convenience and privacy.
This is where MediaGoblin comes in. This
open source tool can help you organise, host
and stream media from your own PC without
having to worry about privacy. If you are a power
user, you can also have it run on a web server
and let other people add their media. There are
a range of other useful features available too,
like tags and collections to name just two.
In this tutorial, we will begin with the steps
to install MediaGoblin on Ubuntu and
then proceed to get it working and see it in
action. We have used Ubuntu 14.04 as the host
system and MediaGoblin’s clone from their
Gitorious repo.
Here, you can add new fi les or create a collection of media fi les.
Files can be assigned to collections at any point of time
Update account settings here and track media fi les using the
Media processing panel, which shows details about uploads
All creative commons licences are available here to assign
under an available media fi le
This section lets you upload a media fi le and update the
relevant information regarding that fi le
ResourcesMediaGoblin home page mediagoblin.org
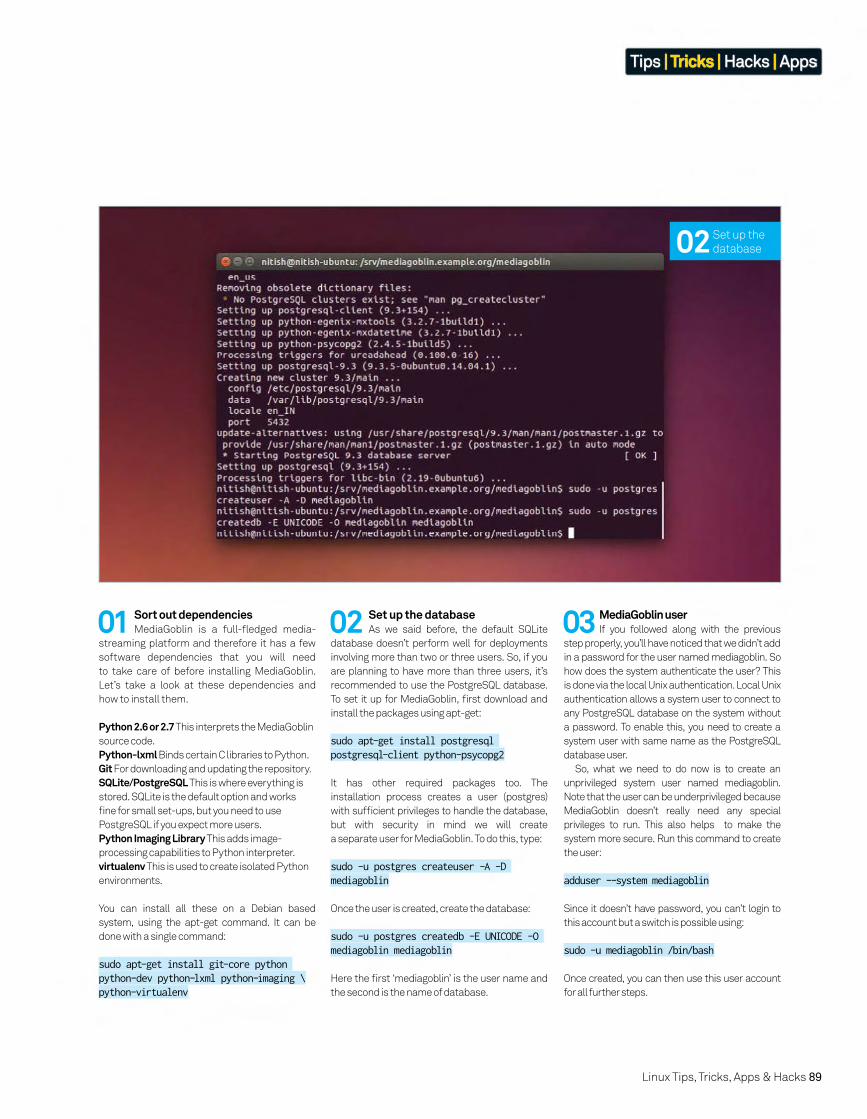
Linux Tips, Tricks, Apps & Hacks 89
Tips | Tricks | Hacks | Apps
01 Sort out dependenciesMediaGoblin is a full-fl edged media-
streaming platform and therefore it has a few
software dependencies that you will need
to take care of before installing MediaGoblin.
Let’s take a look at these dependencies and
how to install them.
Python 2.6 or 2.7 This interprets the MediaGoblin
source code.
Python-lxml Binds certain C libraries to Python.
Git For downloading and updating the repository.
SQLite/PostgreSQL This is where everything is
stored. SQLite is the default option and works
fi ne for small set-ups, but you need to use
PostgreSQL if you expect more users.
Python Imaging Library This adds image-
processing capabilities to Python interpreter.
virtualenv This is used to create isolated Python
environments.
You can install all these on a Debian based
system, using the apt-get command. It can be
done with a single command:
sudo apt-get install git-core python python-dev python-lxml python-imaging \python-virtualenv
02 Set up the databaseAs we said before, the default SQLite
database doesn’t perform well for deployments
involving more than two or three users. So, if you
are planning to have more than three users, it’s
recommended to use the PostgreSQL database.
To set it up for MediaGoblin, fi rst download and
install the packages using apt-get:
sudo apt-get install postgresql postgresql-client python-psycopg2
It has other required packages too. The
installation process creates a user (postgres)
with suffi cient privileges to handle the database,
but with security in mind we will create
a separate user for MediaGoblin. To do this, type:
sudo -u postgres createuser -A -D mediagoblin
Once the user is created, create the database:
sudo -u postgres createdb -E UNICODE -O mediagoblin mediagoblin
Here the fi rst ‘mediagoblin’ is the user name and
the second is the name of database.
03 MediaGoblin user If you followed along with the previous
step properly, you’ll have noticed that we didn’t add
in a password for the user named mediagoblin. So
how does the system authenticate the user? This
is done via the local Unix authentication. Local Unix
authentication allows a system user to connect to
any PostgreSQL database on the system without
a password. To enable this, you need to create a
system user with same name as the PostgreSQL
database user.
So, what we need to do now is to create an
unprivileged system user named mediagoblin.
Note that the user can be underprivileged because
MediaGoblin doesn’t really need any special
privileges to run. This also helps to make the
system more secure. Run this command to create
the user:
adduser --system mediagoblin
Since it doesn’t have password, you can’t login to
this account but a switch is possible using:
sudo -u mediagoblin /bin/bash
Once created, you can then use this user account
for all further steps.
02 Set up the
database
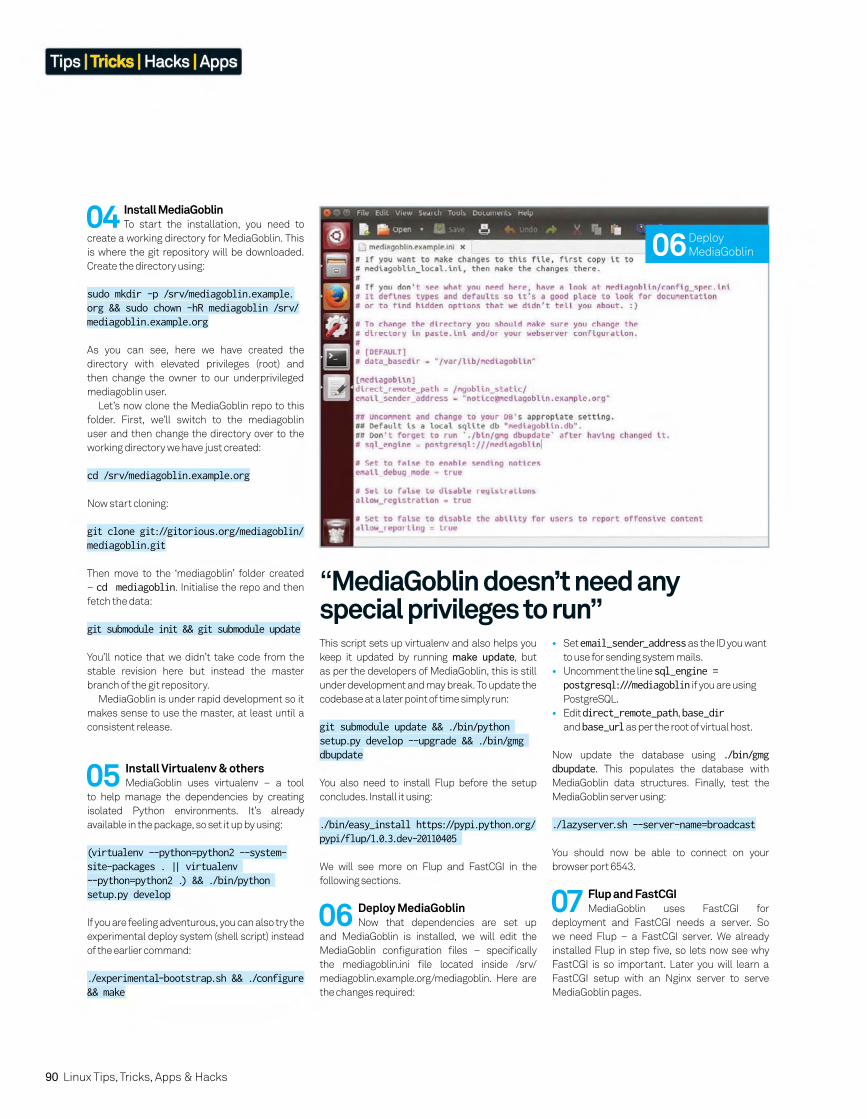
90 Linux Tips, Tricks, Apps & Hacks
Tips | Tricks | Hacks | Apps
“MediaGoblin doesn’t need any special privileges to run”
04 Install MediaGoblinTo start the installation, you need to
create a working directory for MediaGoblin. This
is where the git repository will be downloaded.
Create the directory using:
sudo mkdir -p /srv/mediagoblin.example.org && sudo chown -hR mediagoblin /srv/mediagoblin.example.org
As you can see, here we have created the
directory with elevated privileges (root) and
then change the owner to our underprivileged
mediagoblin user.
Let’s now clone the MediaGoblin repo to this
folder. First, we’ll switch to the mediagoblin
user and then change the directory over to the
working directory we have just created:
cd /srv/mediagoblin.example.org
Now start cloning:
git clone git://gitorious.org/mediagoblin/mediagoblin.git
Then move to the ‘mediagoblin’ folder created
– cd mediagoblin. Initialise the repo and then
fetch the data:
git submodule init && git submodule update
You’ll notice that we didn’t take code from the
stable revision here but instead the master
branch of the git repository.
MediaGoblin is under rapid development so it
makes sense to use the master, at least until a
consistent release.
This script sets up virtualenv and also helps you
keep it updated by running make update, but
as per the developers of MediaGoblin, this is still
under development and may break. To update the
codebase at a later point of time simply run:
git submodule update && ./bin/python setup.py develop --upgrade && ./bin/gmg dbupdate
You also need to install Flup before the setup
concludes. Install it using:
./bin/easy_install https://pypi.python.org/pypi/flup/1.0.3.dev-20110405
We will see more on Flup and FastCGI in the
following sections.
• Set email_sender_address as the ID you want
to use for sending system mails.
• Uncomment the line sql_engine = postgresql:///mediagoblin if you are using
PostgreSQL.
• Edit direct_remote_path, base_dir
and base_url as per the root of virtual host.
Now update the database using ./bin/gmg dbupdate. This populates the database with
MediaGoblin data structures. Finally, test the
MediaGoblin server using:
./lazyserver.sh --server-name=broadcast
You should now be able to connect on your
browser port 6543.
05 Install Virtualenv & othersMediaGoblin uses virtualenv – a tool
to help manage the dependencies by creating
isolated Python environments. It’s already
available in the package, so set it up by using:
(virtualenv --python=python2 --system-site-packages . || virtualenv --python=python2 .) && ./bin/python setup.py develop
If you are feeling adventurous, you can also try the
experimental deploy system (shell script) instead
of the earlier command:
./experimental-bootstrap.sh && ./configure && make
06 Deploy MediaGoblinNow that dependencies are set up
and MediaGoblin is installed, we will edit the
MediaGoblin confi guration fi les – specifi cally
the mediagoblin.ini fi le located inside /srv/
mediagoblin.example.org/mediagoblin. Here are
the changes required:
07 Flup and FastCGI MediaGoblin uses FastCGI for
deployment and FastCGI needs a server. So
we need Flup – a FastCGI server. We already
installed Flup in step fi ve, so lets now see why
FastCGI is so important. Later you will learn a
FastCGI setup with an Nginx server to serve
MediaGoblin pages.
06 Deploy
MediaGoblin
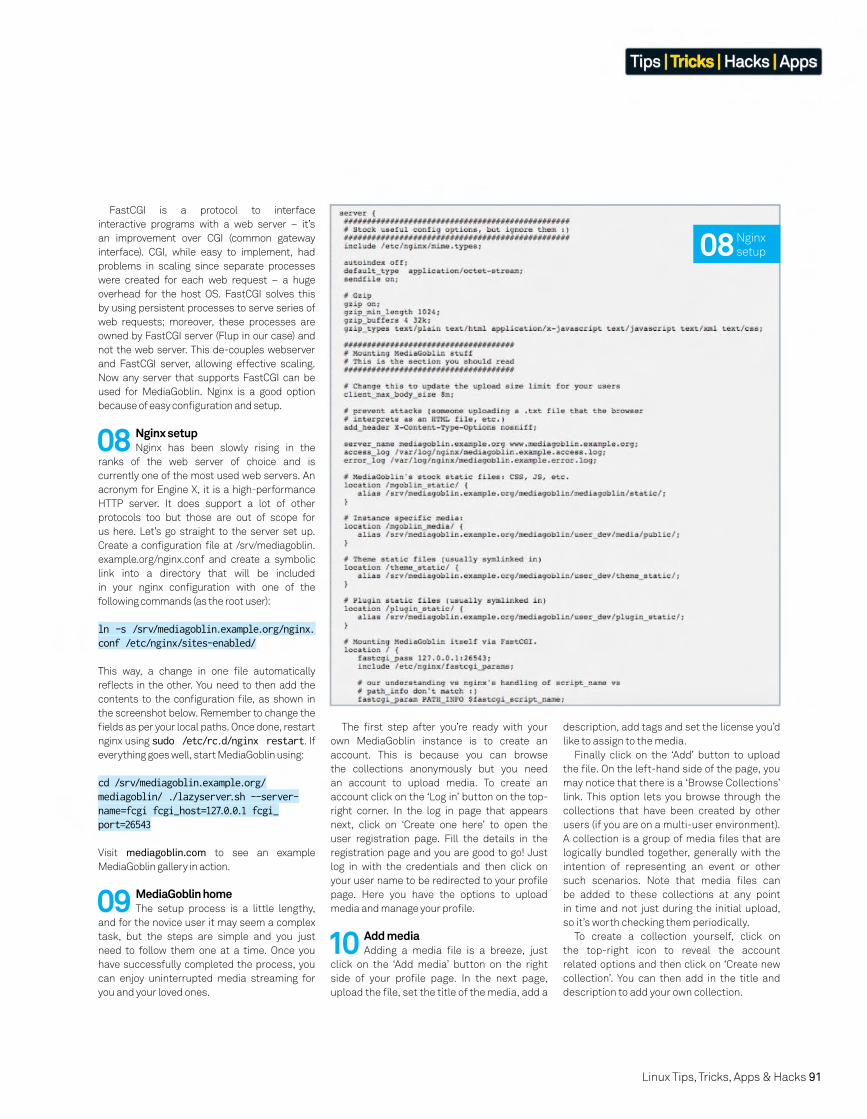
Linux Tips, Tricks, Apps & Hacks 91
Tips | Tricks | Hacks | Apps
description, add tags and set the license you’d
like to assign to the media.
Finally click on the ‘Add’ button to upload
the fi le. On the left-hand side of the page, you
may notice that there is a ‘Browse Collections’
link. This option lets you browse through the
collections that have been created by other
users (if you are on a multi-user environment).
A collection is a group of media fi les that are
logically bundled together, generally with the
intention of representing an event or other
such scenarios. Note that media fi les can
be added to these collections at any point
in time and not just during the initial upload,
so it’s worth checking them periodically.
To create a collection yourself, click on
the top-right icon to reveal the account
related options and then click on ‘Create new
collection’. You can then add in the title and
description to add your own collection.
FastCGI is a protocol to interface
interactive programs with a web server – it’s
an improvement over CGI (common gateway
interface). CGI, while easy to implement, had
problems in scaling since separate processes
were created for each web request – a huge
overhead for the host OS. FastCGI solves this
by using persistent processes to serve series of
web requests; moreover, these processes are
owned by FastCGI server (Flup in our case) and
not the web server. This de-couples webserver
and FastCGI server, allowing effective scaling.
Now any server that supports FastCGI can be
used for MediaGoblin. Nginx is a good option
because of easy confi guration and setup.
08 Nginx setupNginx has been slowly rising in the
ranks of the web server of choice and is
currently one of the most used web servers. An
acronym for Engine X, it is a high-performance
HTTP server. It does support a lot of other
protocols too but those are out of scope for
us here. Let’s go straight to the server set up.
Create a confi guration fi le at /srv/mediagoblin.
example.org/nginx.conf and create a symbolic
link into a directory that will be included
in your nginx confi guration with one of the
following commands (as the root user):
ln -s /srv/mediagoblin.example.org/nginx.conf /etc/nginx/sites-enabled/
This way, a change in one fi le automatically
refl ects in the other. You need to then add the
contents to the confi guration fi le, as shown in
the screenshot below. Remember to change the
fi elds as per your local paths. Once done, restart
nginx using sudo /etc/rc.d/nginx restart. If
everything goes well, start MediaGoblin using:
cd /srv/mediagoblin.example.org/mediagoblin/ ./lazyserver.sh --server-name=fcgi fcgi_host=127.0.0.1 fcgi_port=26543
Visit mediagoblin.com to see an example
MediaGoblin gallery in action.
The fi rst step after you’re ready with your
own MediaGoblin instance is to create an
account. This is because you can browse
the collections anonymously but you need
an account to upload media. To create an
account click on the ‘Log in’ button on the top-
right corner. In the log in page that appears
next, click on ‘Create one here’ to open the
user registration page. Fill the details in the
registration page and you are good to go! Just
log in with the credentials and then click on
your user name to be redirected to your profi le
page. Here you have the options to upload
media and manage your profi le.09 MediaGoblin homeThe setup process is a little lengthy,
and for the novice user it may seem a complex
task, but the steps are simple and you just
need to follow them one at a time. Once you
have successfully completed the process, you
can enjoy uninterrupted media streaming for
you and your loved ones.
10 Add mediaAdding a media fi le is a breeze, just
click on the ‘Add media’ button on the right
side of your profi le page. In the next page,
upload the fi le, set the title of the media, add a
08 Nginx
setup
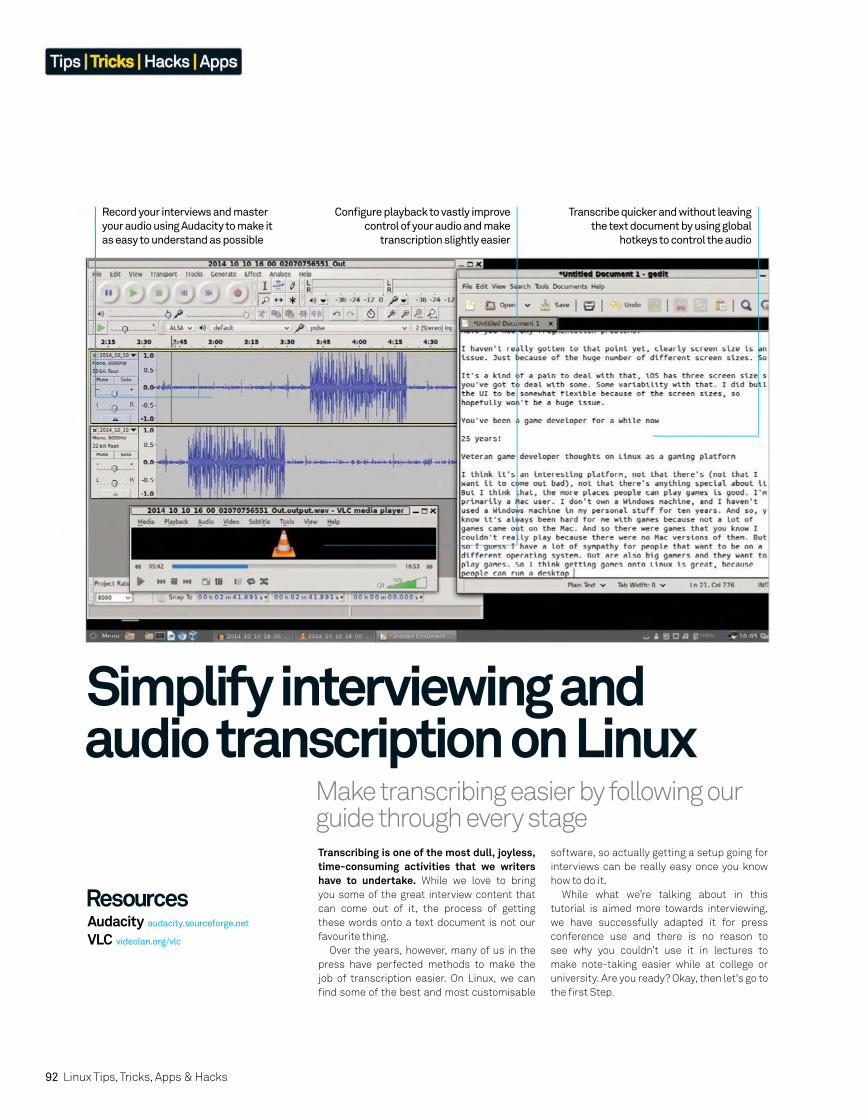
92 Linux Tips, Tricks, Apps & Hacks
Tips | Tricks | Hacks | Apps
Make transcribing easier by following our guide through every stage
Simplify interviewing and audio transcription on Linux
Transcribing is one of the most dull, joyless, time-consuming activities that we writers have to undertake. While we love to bring
you some of the great interview content that
can come out of it, the process of getting
these words onto a text document is not our
favourite thing.
Over the years, however, many of us in the
press have perfected methods to make the
job of transcription easier. On Linux, we can
fi nd some of the best and most customisable
software, so actually getting a setup going for
interviews can be really easy once you know
how to do it.
While what we’re talking about in this
tutorial is aimed more towards interviewing,
we have successfully adapted it for press
conference use and there is no reason to
see why you couldn’t use it in lectures to
make note-taking easier while at college or
university. Are you ready? Okay, then let's go to
the fi rst Step.
Transcribe quicker and without leaving
the text document by using global
hotkeys to control the audio
Confi gure playback to vastly improve
control of your audio and make
transcription slightly easier
Record your interviews and master
your audio using Audacity to make it
as easy to understand as possible
ResourcesAudacity audacity.sourceforge.net
VLC videolan.org/vlc
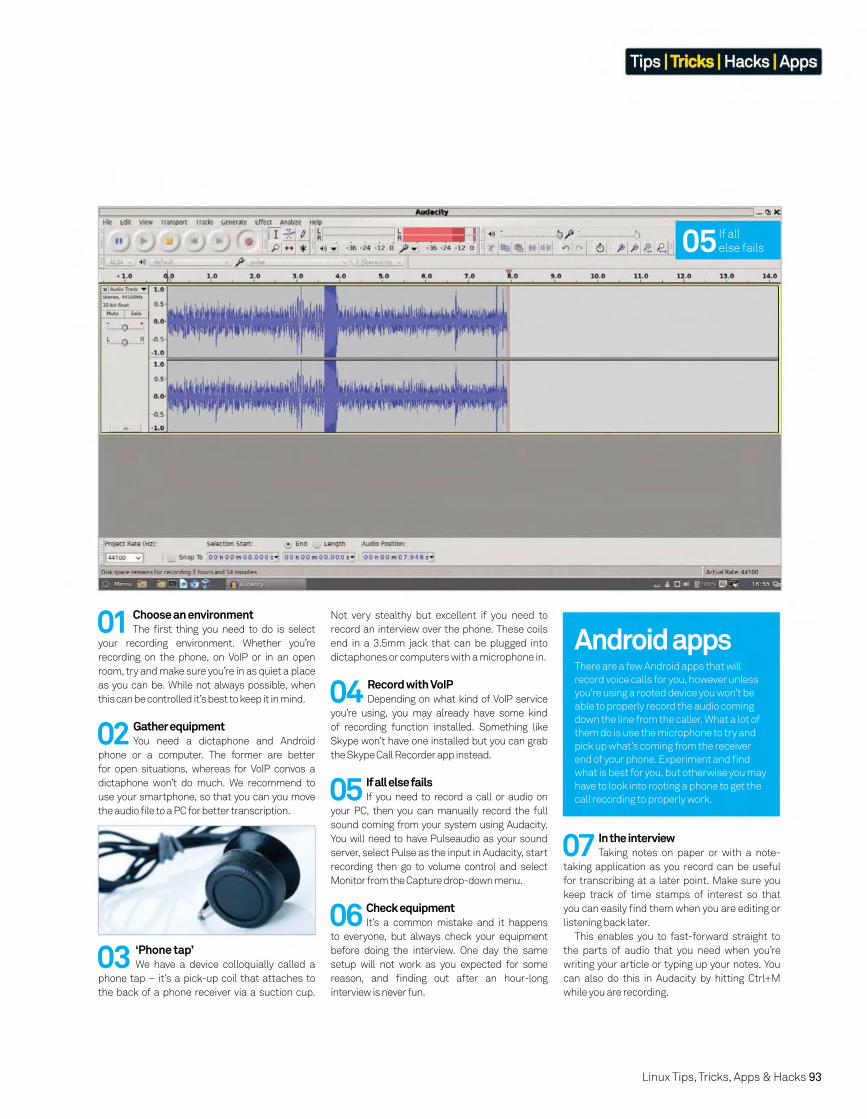
Linux Tips, Tricks, Apps & Hacks 93
Tips | Tricks | Hacks | Apps
05 If all
else fails
01 Choose an environmentThe fi rst thing you need to do is select
your recording environment. Whether you’re
recording on the phone, on VoIP or in an open
room, try and make sure you’re in as quiet a place
as you can be. While not always possible, when
this can be controlled it’s best to keep it in mind. 04 Record with VoIPDepending on what kind of VoIP service
you’re using, you may already have some kind
of recording function installed. Something like
Skype won’t have one installed but you can grab
the Skype Call Recorder app instead.
02 Gather equipmentYou need a dictaphone and Android
phone or a computer. The former are better
for open situations, whereas for VoIP convos a
dictaphone won’t do much. We recommend to
use your smartphone, so that you can you move
the audio fi le to a PC for better transcription.
05 If all else failsIf you need to record a call or audio on
your PC, then you can manually record the full
sound coming from your system using Audacity.
You will need to have Pulseaudio as your sound
server, select Pulse as the input in Audacity, start
recording then go to volume control and select
Monitor from the Capture drop-down menu.
06 Check equipmentIt’s a common mistake and it happens
to everyone, but always check your equipment
before doing the interview. One day the same
setup will not work as you expected for some
reason, and fi nding out after an hour-long
interview is never fun.
07 In the interviewTaking notes on paper or with a note-
taking application as you record can be useful
for transcribing at a later point. Make sure you
keep track of time stamps of interest so that
you can easily fi nd them when you are editing or
listening back later.
This enables you to fast-forward straight to
the parts of audio that you need when you’re
writing your article or typing up your notes. You
can also do this in Audacity by hitting Ctrl+M
while you are recording.
03 ‘Phone tap’We have a device colloquially called a
phone tap – it’s a pick-up coil that attaches to
the back of a phone receiver via a suction cup.
Not very stealthy but excellent if you need to
record an interview over the phone. These coils
end in a 3.5mm jack that can be plugged into
dictaphones or computers with a microphone in.There are a few Android apps that will
record voice calls for you, however unless
you’re using a rooted device you won’t be
able to properly record the audio coming
down the line from the caller. What a lot of
them do is use the microphone to try and
pick up what’s coming from the receiver
end of your phone. Experiment and fi nd
what is best for you, but otherwise you may
have to look into rooting a phone to get the
call recording to properly work.
Android apps

94 Linux Tips, Tricks, Apps & Hacks
Tips | Tricks | Hacks | Apps
10 Create a noise profileBefore lopping off a quiet spot, you can
use this to create a noise profi le for the locale
you’re in. This can remove any background
noise and make the interviewee slightly clearer.
To select the quiet spot, go to Effect then Noise
Removal and hit ‘Get Noise Profi le’.
11 Remove noiseOnce the profi le has been set, you can
start to experiment with removing it from the
track. Deselect the profi le area and give it a
quick try for the whole track and the default
settings by going back to Noise Removal and
hitting OK. You can select areas to remove
noise from and change the settings to refi ne the
removal if it helps.
12 Amplify and normaliseYou can look at trying to get a more
consistent volume by amplifying different
parts of the audio – especially if one side is
consistently and noticeably more quiet than
the other. Amplify can be found in the Effects
menu. You may also have one side being far too
loud – for this you can use Normalise to bring
the volume down.
13 Mix downSome recorders will put interviewer and
interviewee on different sides of a stereo track.
This can be extremely annoying if you need to leave
one side of your earphones out, or if you’re just
trying to pick up words. On the track itself there’s
a drop-down menu where you can ‘Split Stereo
Track’ and then turn each one into mono.
09 Clean up the audioBefore we start transcribing, we can
do a few things to make the process slightly
easier for ourselves. Import the audio into
Audacity and, for now, trim the length and any
breaks that you might have, so that you can
gain a better understanding of how much there
is to transcribe.
08 Transfer to PCIf you have recorded your interview on
an external device, now it’s time to move it to
your PC. While dictaphones and some apps will
have features that let you rewind and slow down
playback – we can do it far better by having it
unifi ed on one system.
10 Create a noise
profi le
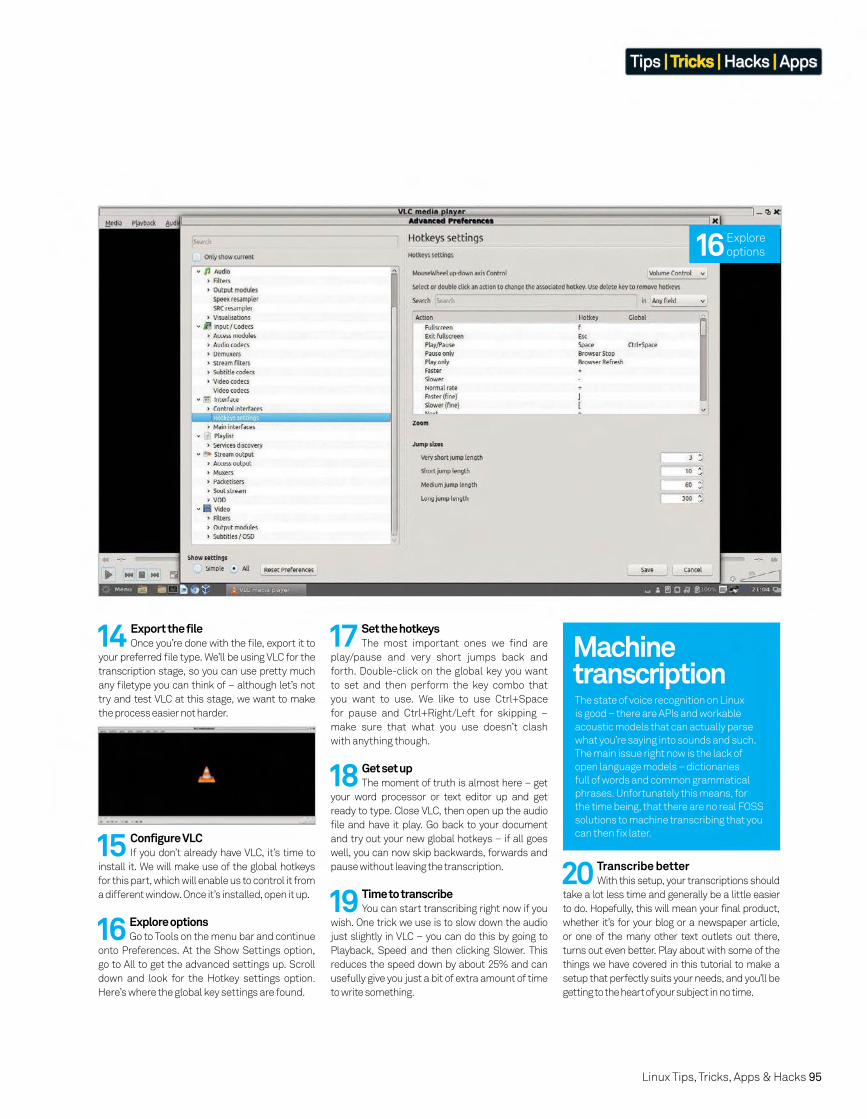
Linux Tips, Tricks, Apps & Hacks 95
Tips | Tricks | Hacks | Apps
14 Export the fileOnce you’re done with the fi le, export it to
your preferred fi le type. We’ll be using VLC for the
transcription stage, so you can use pretty much
any fi letype you can think of – although let’s not
try and test VLC at this stage, we want to make
the process easier not harder.
16 Explore optionsGo to Tools on the menu bar and continue
onto Preferences. At the Show Settings option,
go to All to get the advanced settings up. Scroll
down and look for the Hotkey settings option.
Here’s where the global key settings are found.
18 Get set upThe moment of truth is almost here – get
your word processor or text editor up and get
ready to type. Close VLC, then open up the audio
fi le and have it play. Go back to your document
and try out your new global hotkeys – if all goes
well, you can now skip backwards, forwards and
pause without leaving the transcription.
19 Time to transcribeYou can start transcribing right now if you
wish. One trick we use is to slow down the audio
just slightly in VLC – you can do this by going to
Playback, Speed and then clicking Slower. This
reduces the speed down by about 25% and can
usefully give you just a bit of extra amount of time
to write something.
20 Transcribe betterWith this setup, your transcriptions should
take a lot less time and generally be a little easier
to do. Hopefully, this will mean your final product,
whether it’s for your blog or a newspaper article,
or one of the many other text outlets out there,
turns out even better. Play about with some of the
things we have covered in this tutorial to make a
setup that perfectly suits your needs, and you’ll be
getting to the heart of your subject in no time.
15 Configure VLCIf you don’t already have VLC, it’s time to
install it. We will make use of the global hotkeys
for this part, which will enable us to control it from
a different window. Once it’s installed, open it up.
17 Set the hotkeysThe most important ones we fi nd are
play/pause and very short jumps back and
forth. Double-click on the global key you want
to set and then perform the key combo that
you want to use. We like to use Ctrl+Space
for pause and Ctrl+Right/Left for skipping –
make sure that what you use doesn’t clash
with anything though.
The state of voice recognition on Linux
is good – there are APIs and workable
acoustic models that can actually parse
what you’re saying into sounds and such.
The main issue right now is the lack of
open language models – dictionaries
full of words and common grammatical
phrases. Unfortunately this means, for
the time being, that there are no real FOSS
solutions to machine transcribing that you
can then fi x later.
Machine transcription
16 Explore
options
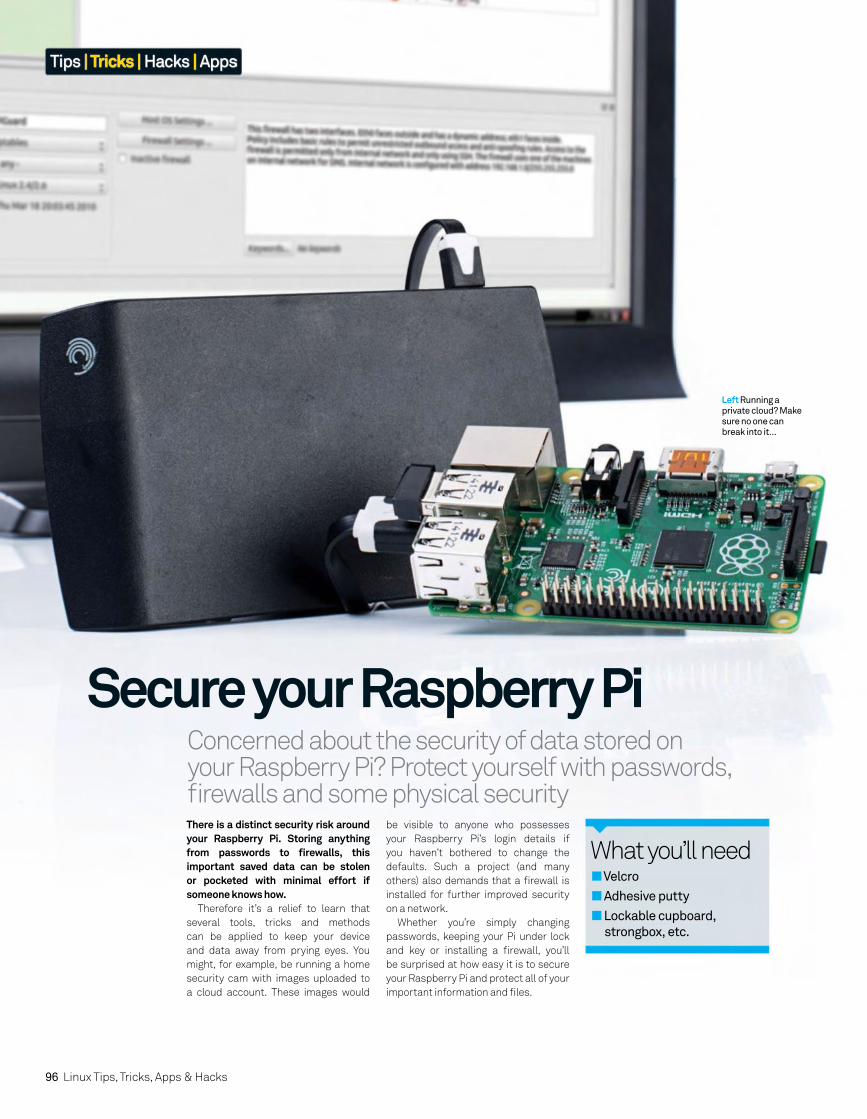
Concerned about the security of data stored on your Raspberry Pi? Protect yourself with passwords, fi rewalls and some physical security
Secure your Raspberry Pi
There is a distinct security risk around your Raspberry Pi. Storing anything from passwords to fi rewalls, this important saved data can be stolen or pocketed with minimal effort if someone knows how.
Therefore it’s a relief to learn that
several tools, tricks and methods
can be applied to keep your device
and data away from prying eyes. You
might, for example, be running a home
security cam with images uploaded to
a cloud account. These images would
What you’ll need Velcro
Adhesive putty
Lockable cupboard,
strongbox, etc.
Left Running a private cloud? Make sure no one can break into it…
be visible to anyone who possesses
your Raspberry Pi’s login details if
you haven’t bothered to change the
defaults. Such a project (and many
others) also demands that a fi rewall is
installed for further improved security
on a network.
Whether you’re simply changing
passwords, keeping your Pi under lock
and key or installing a fi rewall, you’ll
be surprised at how easy it is to secure
your Raspberry Pi and protect all of your
important information and fi les.
96 Linux Tips, Tricks, Apps & Hacks
Tips | Tricks | Hacks | Apps

01 Stop using the default passwordEveryone who uses a Raspberry Pi knows that the
default Raspbian credentials are ‘pi’ and ‘raspberry’. Naturally,
this means that anyone can sign into your computer if you
haven’t changed these defaults – something you’ll need to do as
a matter of urgency. After signing in, open the terminal and set a
new password with:
passwd04 Give the new account a password
With the new account set up, the next step is to set a
password. As you’re not signed into the account at this stage,
you won’t be using the passwd command. Instead, enter:
sudo passwd usernameWith the new account ready to use, you should be ready to
remove the default pi account from Raspbian altogether.
03 Create a new user account To completely baffle anyone attempting to gain access
using default credentials, take the most secure option and create
a new user account. In the command line, enter:
sudo useradd -m username -G sudoThe –m switch creates a new home directory, while the second
sudo adds the new account to the superuser group.
02 Change password with raspi-confi gIf you’re setting up a new installation of Raspbian,
changing the password is one of the fi rst things that you should
do. With a new install, the fi rst boot will automatically run the
raspi-confi g screen.
Here, use the arrow keys to fi nd the second option, change
User Password and then follow the on-screen prompts to set
yourself a new passcode.
05 Delete the default Raspbian accountYou no longer need the default user account, pi. Sign
out and login to your new account, and confi rm it is correctly
set up by opening:
sudo visudo…and adding…
username ALL=(ALL) NOPASSWD: ALL …to the fi nal line. Save and exit with Ctrl+X. Now that’s done,
simply delete the old account with:
sudo deluser piThen remove the home directory:
sudo deluser -remove-home pi
06 Recover a lost passwordIf you’ve somehow forgotten your Raspberry Pi user
account password or suspect that someone has changed it,
what can you do?
With a desktop computer and SD card reader, there is a way
that you can recover your password. Begin by inserting the
Pi’s SD card into your PC’s card reader.
Linux Tips, Tricks, Apps & Hacks 97
Tips | Tricks | Hacks | Apps
“With just a desktop computer and SD card reader, there is a way that you can recover your password”
Use a proximity sensorIf you’re genuinely
concerned about
your Raspberry
Pi’s physical
security, you
may consider
employing
some additional
hardware to make
it less of
a target.
Your best option
here is probably a
proximity sensor
confi gured
to detect an
unauthorised
presence. When
coupled with
a buzzer, this
can detect the
presence of an
intruder and
alert you. It’s
even possible to
confi gure such
an alert as an
email message if
you’re likely to be
elsewhere, and it
makes for a great
side project.
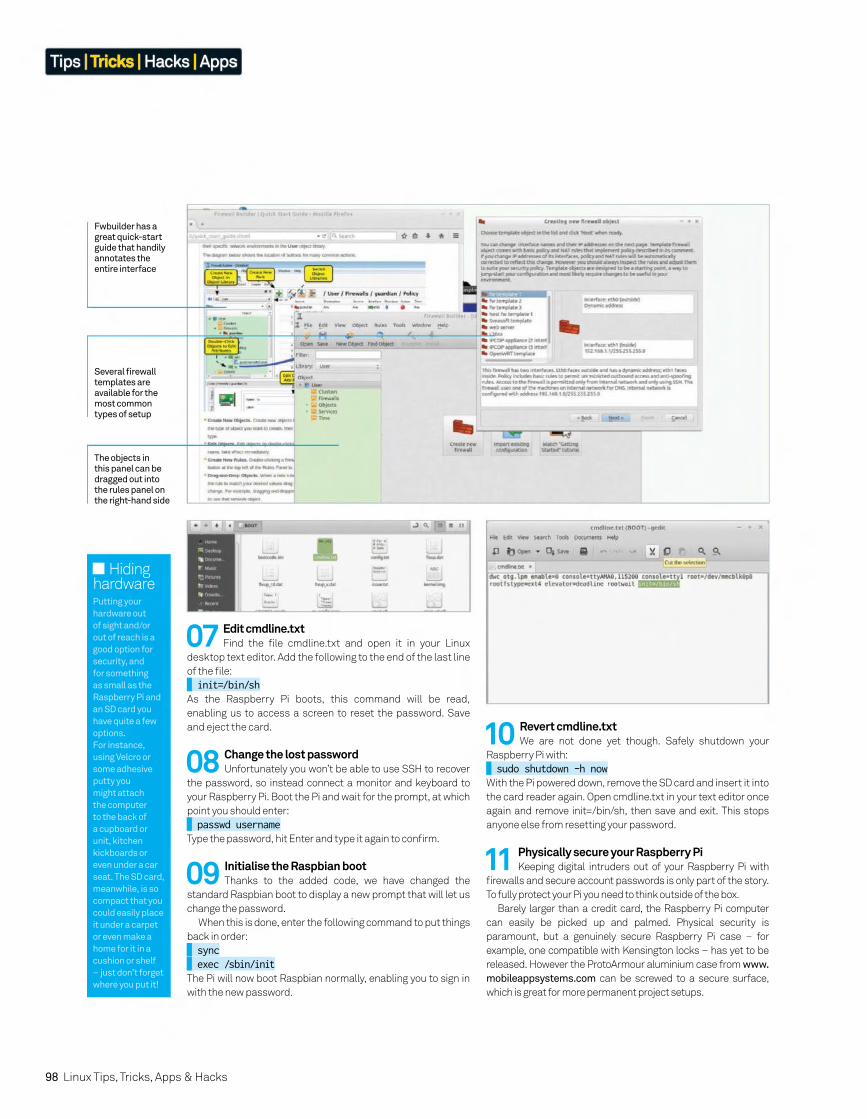
08 Change the lost password Unfortunately you won’t be able to use SSH to recover
the password, so instead connect a monitor and keyboard to
your Raspberry Pi. Boot the Pi and wait for the prompt, at which
point you should enter:
passwd usernameType the password, hit Enter and type it again to confi rm.
09 Initialise the Raspbian boot Thanks to the added code, we have changed the
standard Raspbian boot to display a new prompt that will let us
change the password.
When this is done, enter the following command to put things
back in order:
sync exec /sbin/initThe Pi will now boot Raspbian normally, enabling you to sign in
with the new password.
10 Revert cmdline.txt We are not done yet though. Safely shutdown your
Raspberry Pi with:
sudo shutdown -h nowWith the Pi powered down, remove the SD card and insert it into
the card reader again. Open cmdline.txt in your text editor once
again and remove init=/bin/sh, then save and exit. This stops
anyone else from resetting your password.
11 Physically secure your Raspberry Pi Keeping digital intruders out of your Raspberry Pi with
fi rewalls and secure account passwords is only part of the story.
To fully protect your Pi you need to think outside of the box.
Barely larger than a credit card, the Raspberry Pi computer
can easily be picked up and palmed. Physical security is
paramount, but a genuinely secure Raspberry Pi case – for
example, one compatible with Kensington locks – has yet to be
released. However the ProtoArmour aluminium case from www.
mobileappsystems.com can be screwed to a secure surface,
which is great for more permanent project setups.
07 Edit cmdline.txtFind the fi le cmdline.txt and open it in your Linux
desktop text editor. Add the following to the end of the last line
of the fi le:
init=/bin/shAs the Raspberry Pi boots, this command will be read,
enabling us to access a screen to reset the password. Save
and eject the card.
Fwbuilder has a great quick-start guide that handily annotates the entire interface
The objects in this panel can be dragged out into the rules panel on the right-hand side
Several fi rewall templates are available for the most common types of setup
98 Linux Tips, Tricks, Apps & Hacks
Tips | Tricks | Hacks | Apps
Hiding hardwarePutting your
hardware out
of sight and/or
out of reach is a
good option for
security, and
for something
as small as the
Raspberry Pi and
an SD card you
have quite a few
options.
For instance,
using Velcro or
some adhesive
putty you
might attach
the computer
to the back of
a cupboard or
unit, kitchen
kickboards or
even under a car
seat. The SD card,
meanwhile, is so
compact that you
could easily place
it under a carpet
or even make a
home for it in a
cushion or shelf
– just don’t forget
where you put it!
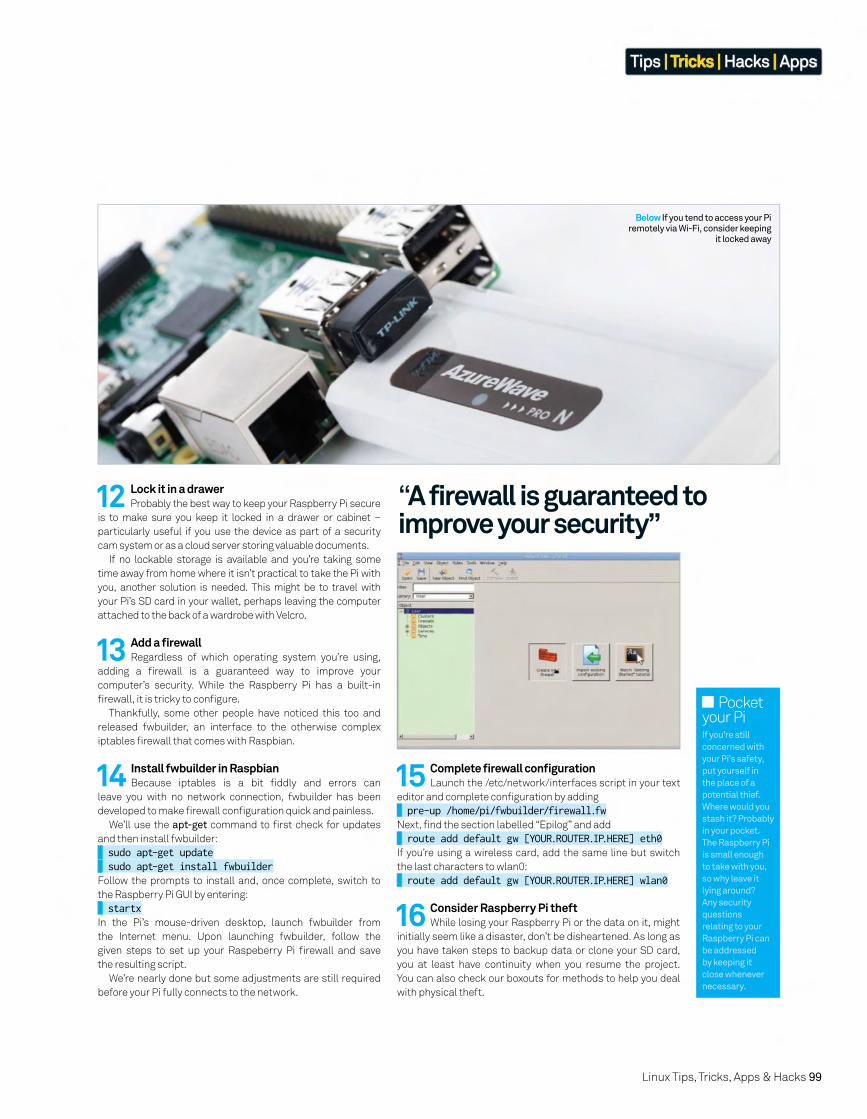
12 Lock it in a drawer Probably the best way to keep your Raspberry Pi secure
is to make sure you keep it locked in a drawer or cabinet –
particularly useful if you use the device as part of a security
cam system or as a cloud server storing valuable documents.
If no lockable storage is available and you’re taking some
time away from home where it isn’t practical to take the Pi with
you, another solution is needed. This might be to travel with
your Pi’s SD card in your wallet, perhaps leaving the computer
attached to the back of a wardrobe with Velcro.
13 Add a fi rewallRegardless of which operating system you’re using,
adding a fi rewall is a guaranteed way to improve your
computer’s security. While the Raspberry Pi has a built-in
fi rewall, it is tricky to confi gure.
Thankfully, some other people have noticed this too and
released fwbuilder, an interface to the otherwise complex
iptables fi rewall that comes with Raspbian.
14 Install fwbuilder in RaspbianBecause iptables is a bit fi ddly and errors can
leave you with no network connection, fwbuilder has been
developed to make fi rewall confi guration quick and painless.
We’ll use the apt-get command to fi rst check for updates
and then install fwbuilder:
sudo apt-get update sudo apt-get install fwbuilderFollow the prompts to install and, once complete, switch to
the Raspberry Pi GUI by entering:
startxIn the Pi’s mouse-driven desktop, launch fwbuilder from
the Internet menu. Upon launching fwbuilder, follow the
given steps to set up your Raspeberry Pi fi rewall and save
the resulting script.
We’re nearly done but some adjustments are still required
before your Pi fully connects to the network.
15 Complete fi rewall confi gurationLaunch the /etc/network/interfaces script in your text
editor and complete confi guration by adding
pre-up /home/pi/fwbuilder/firewall.fwNext, fi nd the section labelled “Epilog” and add
route add default gw [YOUR.ROUTER.IP.HERE] eth0If you’re using a wireless card, add the same line but switch
the last characters to wlan0:
route add default gw [YOUR.ROUTER.IP.HERE] wlan0
16 Consider Raspberry Pi theft While losing your Raspberry Pi or the data on it, might
initially seem like a disaster, don’t be disheartened. As long as
you have taken steps to backup data or clone your SD card,
you at least have continuity when you resume the project.
You can also check our boxouts for methods to help you deal
with physical theft.
Below If you tend to access your Pi remotely via Wi-Fi, consider keeping
it locked away
Linux Tips, Tricks, Apps & Hacks 99
Tips | Tricks | Hacks | Apps
“A firewall is guaranteed to improve your security”
Pocket your PiIf you’re still
concerned with
your Pi’s safety,
put yourself in
the place of a
potential thief.
Where would you
stash it? Probably
in your pocket.
The Raspberry Pi
is small enough
to take with you,
so why leave it
lying around?
Any security
questions
relating to your
Raspberry Pi can
be addressed
by keeping it
close whenever
necessary.
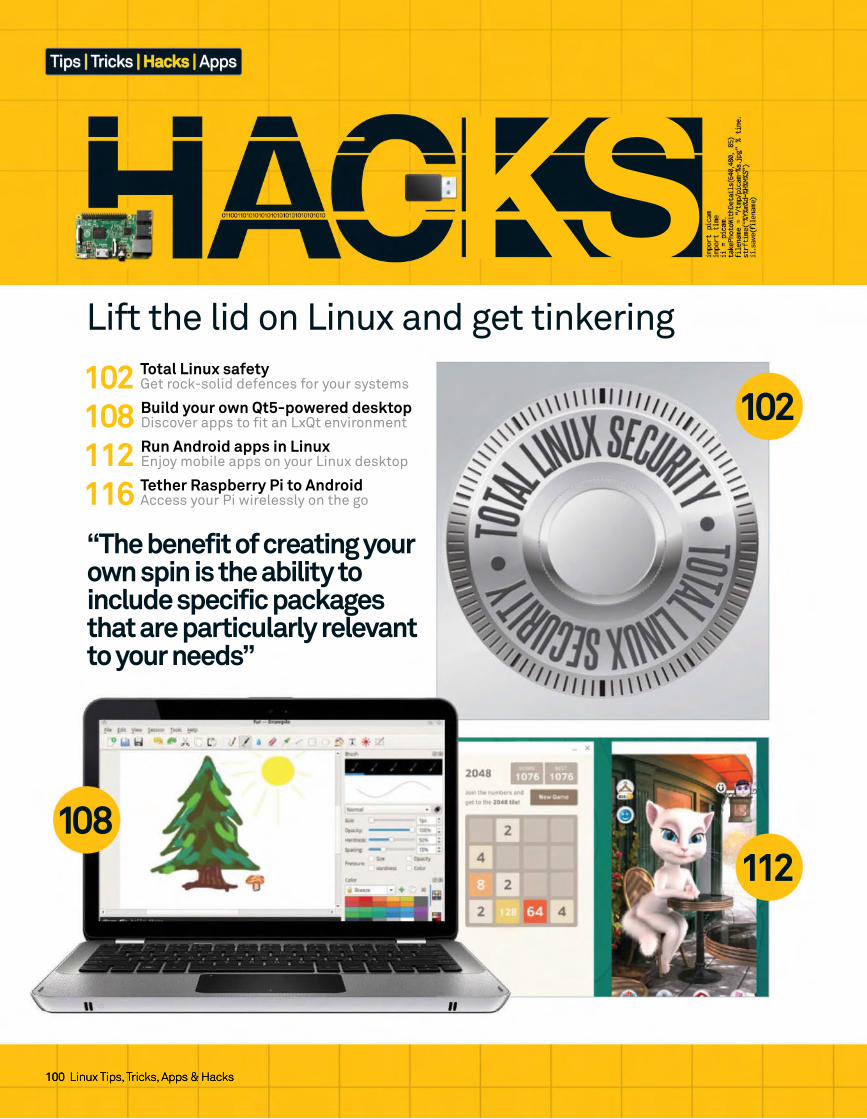
100 Linux Tips, Tricks, Apps & Hacks
KSLift the lid on Linux and get tinkering
102 Total Linux safetyGet rock-solid defences for your systems
108 Build your own Qt5-powered desktopDiscover apps to fi t an LxQt environment
112 Run Android apps in LinuxEnjoy mobile apps on your Linux desktop
116 Tether Raspberry Pi to AndroidAccess your Pi wirelessly on the go
“The benefit of creating your own spin is the ability to include specific packages that are particularly relevant to your needs”
Tips | Tricks | Hacks | Apps
Linux Tips, Tricks, Apps & Hacks100 Linux Tips, Tricks, Apps & Hacks
102
112108

Linux Tips, Tricks, Apps & Hacks 101
Tips | Tricks | Hacks | Apps
Linux Tips, Tricks, Apps & Hacks 101Linux Tips, Tricks, Apps & Hacks
118 Spin your own DebianMake a customised Debian system
122 Build a WebKit browserLearn how to get WebKit built and running
126 Network penetration testingA Gentoo-based utility to fi nd weak spots
130 Build your own DEB & RPM packagesDeliver Linux software like a pro
118
126
116

102 Linux Tips, Tricks, Apps & Hacks
Tips | Tricks | Hacks | Apps
Get rock-solid defences on your systems and
networks with this guide to Linux safety
Linux has a well-deserved reputation for being incredibly secure in comparison to operating systems like Windows and OS X. However, that said, you can’t simply
rest on your laurels and assume
that your computer is impervious
to attack – especially in the wake
of security scare stories over the
course of the last few months such
as Heartbleed, Shellshock and the
Turla malware, as well as the ever-
present threat of more direct system
and account intrusions.
This month we’re going to tackle
security on a number of fronts. First
up we’ll go through good password
practice with a fi ne-tooth comb,
picking out everything that you
need to know and showing you how
to create super-safe passwords.
We’ll then take a look at client-side
security by running through the
optimal settings for your machine
and suggesting ways for you to
ensure everything important is
protected. Networks are next –
we’ll explain how to build fi rewalls
and properly set up and control
your ports, then go through the
principles of penetration testing.
Finally, we’ll return to online matters
with a look at securing your various
accounts, including using two-factor
authentication, and then locking
down any information that could
potentially be used to hack your
accounts. Let’s get started.
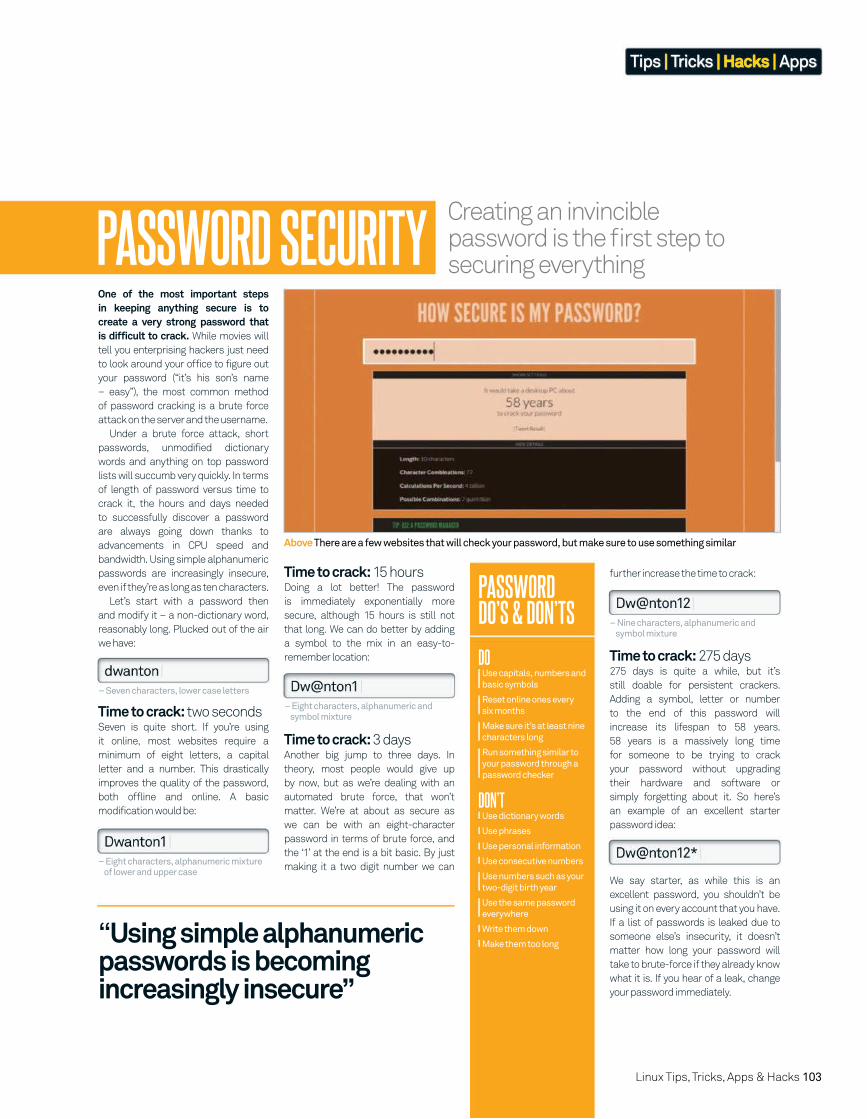
Linux Tips, Tricks, Apps & Hacks 103
Tips | Tricks | Hacks | Apps
Creating an invincible password is the fi rst step to securing everythingPASSWORD SECURITY
One of the most important steps in keeping anything secure is to create a very strong password that is difficult to crack. While movies will
tell you enterprising hackers just need
to look around your office to figure out
your password (“it’s his son’s name
– easy”), the most common method
of password cracking is a brute force
attack on the server and the username.
Under a brute force attack, short
passwords, unmodified dictionary
words and anything on top password
lists will succumb very quickly. In terms
of length of password versus time to
crack it, the hours and days needed
to successfully discover a password
are always going down thanks to
advancements in CPU speed and
bandwidth. Using simple alphanumeric
passwords are increasingly insecure,
even if they’re as long as ten characters.
Let’s start with a password then
and modify it – a non-dictionary word,
reasonably long. Plucked out of the air
we have:
Time to crack: two secondsSeven is quite short. If you’re using
it online, most websites require a
minimum of eight letters, a capital
letter and a number. This drastically
improves the quality of the password,
both offline and online. A basic
modification would be:
Time to crack: 15 hoursDoing a lot better! The password
is immediately exponentially more
secure, although 15 hours is still not
that long. We can do better by adding
a symbol to the mix in an easy-to-
remember location:
Time to crack: 3 daysAnother big jump to three days. In
theory, most people would give up
by now, but as we’re dealing with an
automated brute force, that won’t
matter. We’re at about as secure as
we can be with an eight-character
password in terms of brute force, and
the ‘1’ at the end is a bit basic. By just
making it a two digit number we can
further increase the time to crack:
Time to crack: 275 days275 days is quite a while, but it’s
still doable for persistent crackers.
Adding a symbol, letter or number
to the end of this password will
increase its lifespan to 58 years.
58 years is a massively long time
for someone to be trying to crack
your password without upgrading
their hardware and software or
simply forgetting about it. So here’s
an example of an excellent starter
password idea:
We say starter, as while this is an
excellent password, you shouldn’t be
using it on every account that you have.
If a list of passwords is leaked due to
someone else’s insecurity, it doesn’t
matter how long your password will
take to brute-force if they already know
what it is. If you hear of a leak, change
your password immediately.
PASSWORD DO’S & DON’TS
DOUse capitals, numbers and
basic symbols
Reset online ones every
six months
Make sure it’s at least nine
characters long
Run something similar to
your password through a
password checker
DON’TUse dictionary words
Use phrases
Use personal information
Use consecutive numbers
Use numbers such as your
two-digit birth year
Use the same password
everywhere
Write them down
Make them too long
Above There are a few websites that will check your password, but make sure to use something similar
– Seven characters, lower case letters
– Eight characters, alphanumeric mixture of lower and upper case
– Eight characters, alphanumeric and symbol mixture
– Nine characters, alphanumeric and symbol mixture
“Using simple alphanumeric passwords is becoming increasingly insecure”

104 Linux Tips, Tricks, Apps & Hacks
Tips | Tricks | Hacks | Apps
Now we have a basic password, it’s time to start implementing it online. Security experts say you should use a
different password for every account.
Services like LastPass can offer a
convenient way of doing this with
truly unique passwords per account,
but you might not be comfortable
with them. Human beings can only
remember so many passwords; as
you most defi nitely should not be
making a note of these passwords,
what we suggest is to modify the
password based on what website
you’re using it on.
For example, let’s take Amazon. It
has your credit card details so securing
the account is extremely important.
After the ‘Dw@n’ of the ‘dwanton’
base we have three characters to play
with, so we could change them for our
Amazon password. Here’s our working:
Take the middle three letters of the
site’s name (as Amazon is six letters
long we will choose ‘maz’), and reverse
the letters to ‘zam’. Now insert it into
our password:
This still has the high level of security,
but will be different from, say, eBay
(Dw@nabe12*) or Github (Dw@
nhti12*), without being immediately
obvious to whatever cracking program
would then try and use that password
on other websites and accounts. A
smart enough human might crack the
code, but this is only an example of how
you can modify your password while
still making it memorable to yourself.
Security and PrivacyLast issue we touched upon how to
keep your details as private as possible.
As well as brute force attacks,
crackers can perform confidence
and social manipulation tricks with
phone support to deceive you, using
any information they can gather from
social accounts. Some of the privacy-
TWO-FACTOR AUTHENTICATIONOne of the best security
features of recent years is
two-factor authentication.
Google, Apple, Tumblr and
many other services and
websites with sensitive
information now include
two-factor authentication
to increase security.
Usually, a mobile number
is securely supplied to
the company, which then
sends you a message
including a special,
one-use code to work
in-conjunction with any
system you’re trying to
log into the account with.
Other companies will send
it via email or allow you to
use a special app similar
to banking keypads.
Turning this on may be
slightly inconvenient to
some, but the peace of
mind and added security
is well worth it.
orientated recommendations can
help keep angles of attack secret from
malicious people.
Go through your social media
accounts – Twitter and Facebook
mainly – and look at your privacy
settings. Make sure nothing sensitive
is set to private, and even think of
removing items that you don’t need on
your profile, such as phone numbers
on Facebook or location on Twitter.
Most importantly, keep your main
email address completely secret: never
share it on Twitter unless via a DM to
someone you trust and don’t keep
it in your profile. For work email, use
a different address and link as few
accounts as possible to this email.
Lastly, while an extreme step, you
can always look at not using your real
name on your more public social media
accounts. Facebook won’t truly allow it
for personal accounts, but everywhere
else you can it’s a good idea to use a
pseudonym if you want to be as secure
and private as possible.
Above LastPass won our password managers group test a couple of issues back
Below Controlling your visibility on platforms like Facebook is crucial to security
Effectively use your passwords online and employ other security measures ONLINE SECURITY
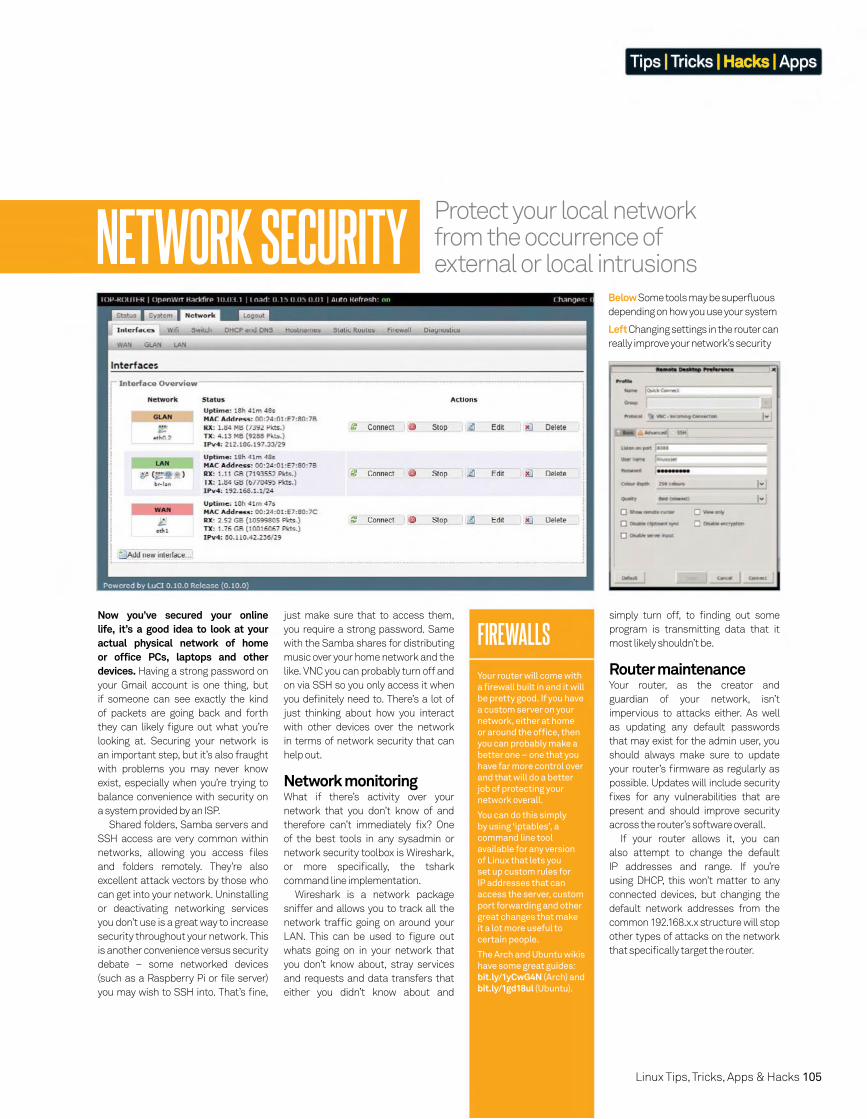
Linux Tips, Tricks, Apps & Hacks 105
Tips | Tricks | Hacks | Apps
Now you’ve secured your online life, it’s a good idea to look at your actual physical network of home or office PCs, laptops and other devices. Having a strong password on
your Gmail account is one thing, but
if someone can see exactly the kind
of packets are going back and forth
they can likely fi gure out what you’re
looking at. Securing your network is
an important step, but it’s also fraught
with problems you may never know
exist, especially when you’re trying to
balance convenience with security on
a system provided by an ISP.
Shared folders, Samba servers and
SSH access are very common within
networks, allowing you access fi les
and folders remotely. They’re also
excellent attack vectors by those who
can get into your network. Uninstalling
or deactivating networking services
you don’t use is a great way to increase
security throughout your network. This
is another convenience versus security
debate – some networked devices
(such as a Raspberry Pi or fi le server)
you may wish to SSH into. That’s fi ne,
FIREWALLSYour router will come with
a fi rewall built in and it will
be pretty good. If you have
a custom server on your
network, either at home
or around the offi ce, then
you can probably make a
better one – one that you
have far more control over
and that will do a better
job of protecting your
network overall.
You can do this simply
by using ‘iptables’, a
command line tool
available for any version
of Linux that lets you
set up custom rules for
IP addresses that can
access the server, custom
port forwarding and other
great changes that make
it a lot more useful to
certain people.
The Arch and Ubuntu wikis
have some great guides:
bit.ly/1yCwG4N (Arch) and
bit.ly/1gd18ul (Ubuntu).
Below Some tools may be superfluous
depending on how you use your system
Left Changing settings in the router can
really improve your network’s security
Protect your local network from the occurrence of external or local intrusionsNETWORK SECURITY
just make sure that to access them,
you require a strong password. Same
with the Samba shares for distributing
music over your home network and the
like. VNC you can probably turn off and
on via SSH so you only access it when
you defi nitely need to. There’s a lot of
just thinking about how you interact
with other devices over the network
in terms of network security that can
help out.
Network monitoringWhat if there’s activity over your
network that you don’t know of and
therefore can’t immediately fi x? One
of the best tools in any sysadmin or
network security toolbox is Wireshark,
or more specifi cally, the tshark
command line implementation.
Wireshark is a network package
sniffer and allows you to track all the
network traffi c going on around your
LAN. This can be used to fi gure out
whats going on in your network that
you don’t know about, stray services
and requests and data transfers that
either you didn’t know about and
simply turn off, to fi nding out some
program is transmitting data that it
most likely shouldn’t be.
Router maintenanceYour router, as the creator and
guardian of your network, isn’t
impervious to attacks either. As well
as updating any default passwords
that may exist for the admin user, you
should always make sure to update
your router’s fi rmware as regularly as
possible. Updates will include security
fi xes for any vulnerabilities that are
present and should improve security
across the router’s software overall.
If your router allows it, you can
also attempt to change the default
IP addresses and range. If you’re
using DHCP, this won’t matter to any
connected devices, but changing the
default network addresses from the
common 192.168.x.x structure will stop
other types of attacks on the network
that specifi cally target the router.
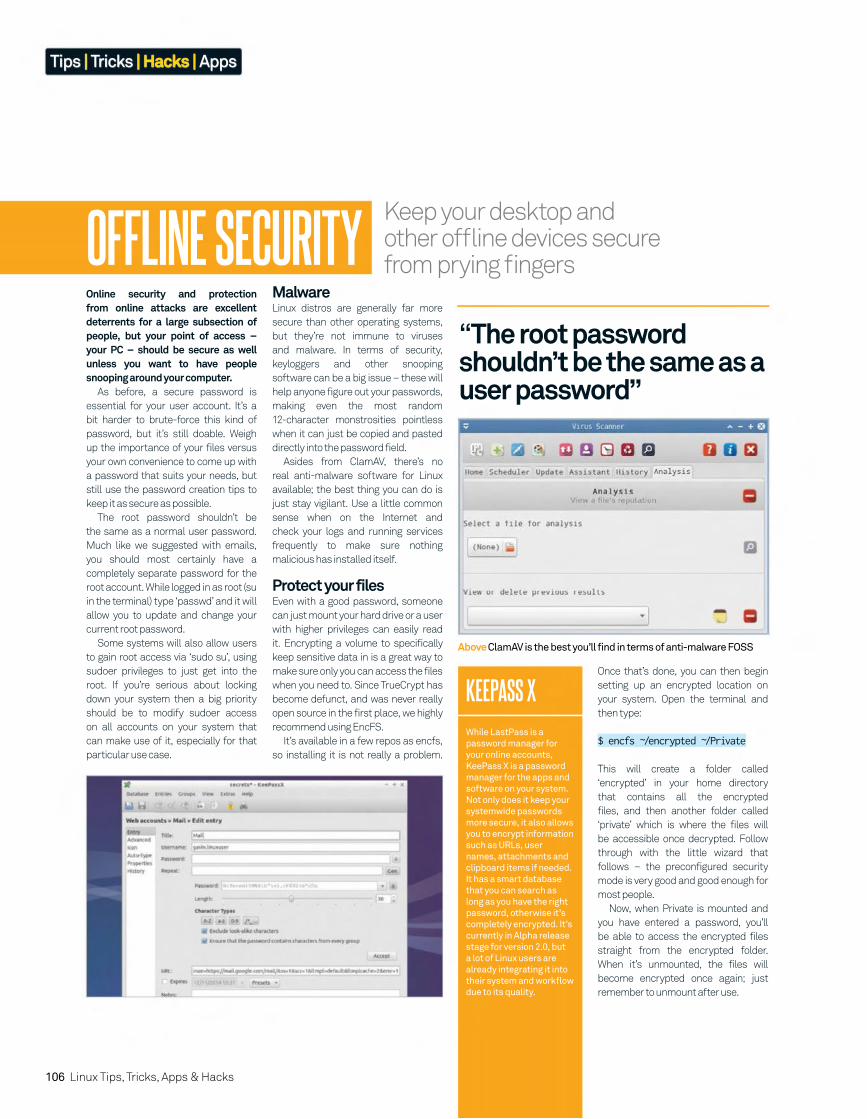
106 Linux Tips, Tricks, Apps & Hacks
Tips | Tricks | Hacks | Apps
Online security and protection from online attacks are excellent deterrents for a large subsection of people, but your point of access – your PC – should be secure as well unless you want to have people snooping around your computer.
As before, a secure password is
essential for your user account. It’s a
bit harder to brute-force this kind of
password, but it’s still doable. Weigh
up the importance of your files versus
your own convenience to come up with
a password that suits your needs, but
still use the password creation tips to
keep it as secure as possible.
The root password shouldn’t be
the same as a normal user password.
Much like we suggested with emails,
you should most certainly have a
completely separate password for the
root account. While logged in as root (su
in the terminal) type ‘passwd’ and it will
allow you to update and change your
current root password.
Some systems will also allow users
to gain root access via ‘sudo su’, using
sudoer privileges to just get into the
root. If you’re serious about locking
down your system then a big priority
should be to modify sudoer access
on all accounts on your system that
can make use of it, especially for that
particular use case.
MalwareLinux distros are generally far more
secure than other operating systems,
but they’re not immune to viruses
and malware. In terms of security,
keyloggers and other snooping
software can be a big issue – these will
help anyone figure out your passwords,
making even the most random
12-character monstrosities pointless
when it can just be copied and pasted
directly into the password field.
Asides from ClamAV, there’s no
real anti-malware software for Linux
available; the best thing you can do is
just stay vigilant. Use a little common
sense when on the Internet and
check your logs and running services
frequently to make sure nothing
malicious has installed itself.
Protect your filesEven with a good password, someone
can just mount your hard drive or a user
with higher privileges can easily read
it. Encrypting a volume to specifically
keep sensitive data in is a great way to
make sure only you can access the files
when you need to. Since TrueCrypt has
become defunct, and was never really
open source in the first place, we highly
recommend using EncFS.
It’s available in a few repos as encfs,
so installing it is not really a problem.
Keep your desktop and other offl ine devices secure from prying fi ngersOFFLINE SECURITY
KEEPASS XWhile LastPass is a
password manager for
your online accounts,
KeePass X is a password
manager for the apps and
software on your system.
Not only does it keep your
systemwide passwords
more secure, it also allows
you to encrypt information
such as URLs, user
names, attachments and
clipboard items if needed.
It has a smart database
that you can search as
long as you have the right
password, otherwise it’s
completely encrypted. It’s
currently in Alpha release
stage for version 2.0, but
a lot of Linux users are
already integrating it into
their system and workfl ow
due to its quality.
Once that’s done, you can then begin
setting up an encrypted location on
your system. Open the terminal and
then type:
$ encfs ~/encrypted ~/Private
This will create a folder called
‘encrypted’ in your home directory
that contains all the encrypted
files, and then another folder called
‘private’ which is where the files will
be accessible once decrypted. Follow
through with the little wizard that
follows – the preconfigured security
mode is very good and good enough for
most people.
Now, when Private is mounted and
you have entered a password, you’ll
be able to access the encrypted files
straight from the encrypted folder.
When it’s unmounted, the files will
become encrypted once again; just
remember to unmount after use.
Above ClamAV is the best you’ll find in terms of anti-malware FOSS
“The root password shouldn’t be the same as a user password”

Linux Tips, Tricks, Apps & Hacks 107
Tips | Tricks | Hacks | Apps
Privacy Fix privacyfix.com
As we mentioned earlier in the article, defending against a brute force
attack is only one method in keeping everything secure. Hackers and
crackers may also try social manipulation via telephone or email to get your
information from banks and account support teams. You can minimise this
risk significantly by keep more of your information private.
Privacy Fix from AVG helps you monitor your different social accounts
to figure out exactly what people can see and how easily they can see it. It
allows you to plug holes in your accounts and tighten up your privacy and
security in general.
The applications work across multiple platforms, so you can keep control
of these concerns on the go via mobile if something needs to be changed
immediately. It covers Twitter, Facebook, Google+, LinkedIn and many other
account types.
Linux Security linuxsecurity.com
Linux Security is a news aggregate
for anything related to security
in Linux. Not only does it cover
vulnerabilities, bugs in security
software and other desktop and
server security concerns, it also
covers web security and think
pieces that will keep you informed on the latest security stories.
Keeping up with relevant issues in the security world can keep you ahead
of the game and enable you to lock down anything before a threat becomes
viable. It’s not absolutely necessary for everyone, but even those slightly
interested in keeping secure would do well to keep up with some of the
current trends.
There are also some other resources on the site, such as a security
glossary for some of the more obscure terms and general security tips that
anyone can use.
Random.org random.org/passwords
Coming up with a password or
password base can be difficult.
While we have the example in this
issue, we implore you not to use it.
However, if you’re having trouble
coming up with your own base, or
want a completely random and
secure password for your email accounts, there are lots of websites that
will enable you to securely and anonymously generate passwords that you
could then slightly modify and use yourself.
Random.org is such a website, where you can create a list of passwords
of varying character length that are all very secure. Nothing is stored on
their servers and all passwords are sent securely via SSL. The random
algorithm uses ambient noise to create the password, which makes it
slightly more difficult to decrypt using high-level cryptographic techniques.
Keep up to date on security concerns and learn more ways to keep your accounts safeSECURITY RESOURCES
Above PrivacyFix rounds up your online accounts into a single dashboard
Above Linux Security is a news aggregate for anything related to Linux
Above Random.org comes up with highly secure passwords
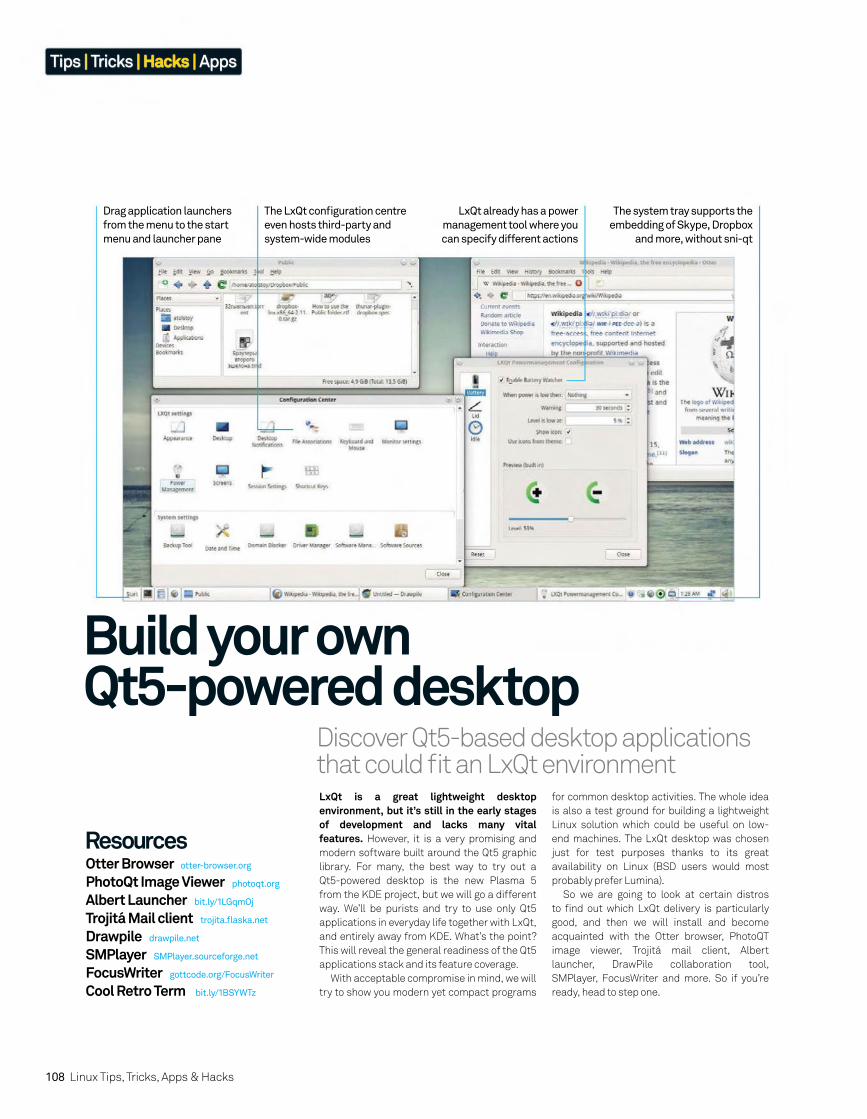
108 Linux Tips, Tricks, Apps & Hacks
Discover Qt5-based desktop applications that could fi t an LxQt environment
Build your own Qt5-powered desktop
LxQt is a great lightweight desktop environment, but it’s still in the early stages of development and lacks many vital features. However, it is a very promising and
modern software built around the Qt5 graphic
library. For many, the best way to try out a
Qt5-powered desktop is the new Plasma 5
from the KDE project, but we will go a different
way. We’ll be purists and try to use only Qt5
applications in everyday life together with LxQt,
and entirely away from KDE. What’s the point?
This will reveal the general readiness of the Qt5
applications stack and its feature coverage.
With acceptable compromise in mind, we will
try to show you modern yet compact programs
for common desktop activities. The whole idea
is also a test ground for building a lightweight
Linux solution which could be useful on low-
end machines. The LxQt desktop was chosen
just for test purposes thanks to its great
availability on Linux (BSD users would most
probably prefer Lumina).
So we are going to look at certain distros
to fi nd out which LxQt delivery is particularly
good, and then we will install and become
acquainted with the Otter browser, PhotoQT
image viewer, Trojitá mail client, Albert
launcher, DrawPile collaboration tool,
SMPlayer, FocusWriter and more. So if you’re
ready, head to step one.
The system tray supports the
embedding of Skype, Dropbox
and more, without sni-qt
LxQt already has a power
management tool where you
can specify different actions
Drag application launchers
from the menu to the start
menu and launcher pane
The LxQt confi guration centre
even hosts third-party and
system-wide modules
ResourcesOtter Browser otter-browser.org
PhotoQt Image Viewer photoqt.org
Albert Launcher bit.ly/1LGqmOj
Trojitá Mail client trojita.fl aska.net
Drawpile drawpile.net
SMPlayer SMPlayer.sourceforge.net
FocusWriter gottcode.org/FocusWriter
Cool Retro Term bit.ly/1BSYWTz
Tips | Tricks | Hacks | Apps
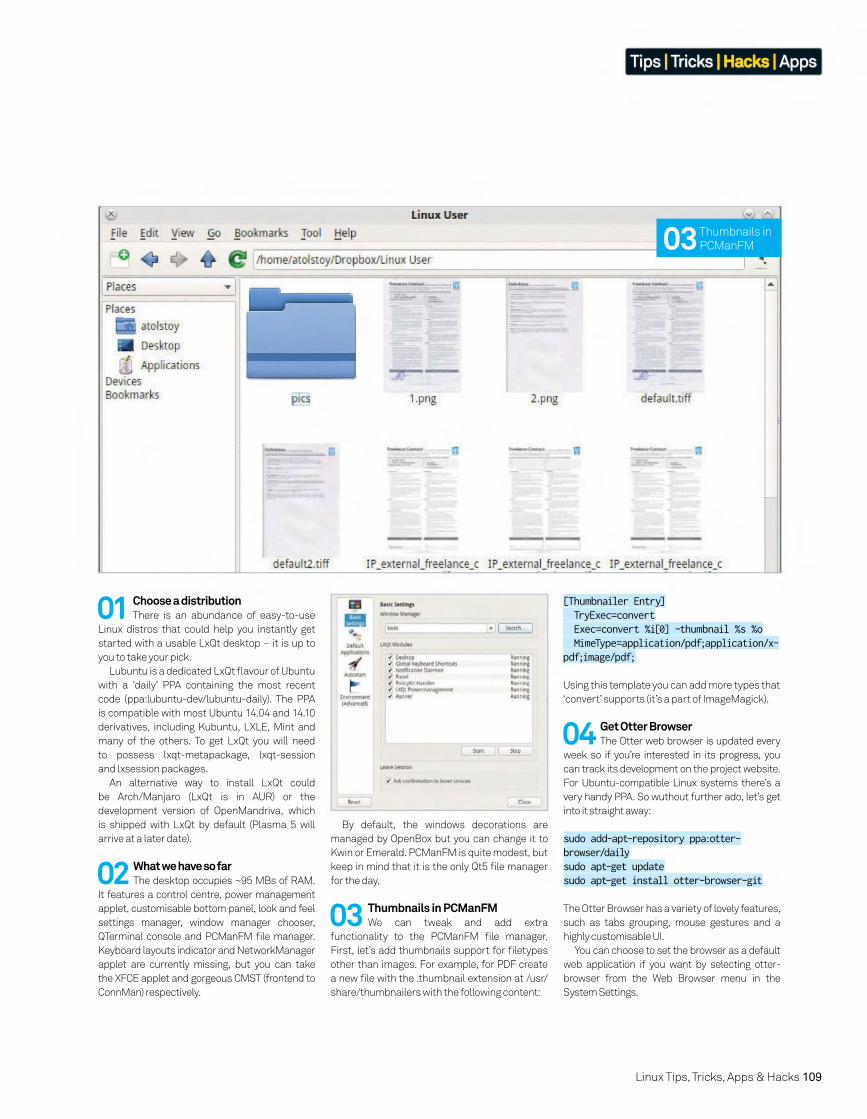
04 Get Otter BrowserThe Otter web browser is updated every
week so if you’re interested in its progress, you
can track its development on the project website.
For Ubuntu-compatible Linux systems there’s a
very handy PPA. So wuthout further ado, let’s get
into it straight away:
sudo add-apt-repository ppa:otter-browser/dailysudo apt-get updatesudo apt-get install otter-browser-git
The Otter Browser has a variety of lovely features,
such as tabs grouping, mouse gestures and a
highly customisable UI.
You can choose to set the browser as a default
web application if you want by selecting otter-
browser from the Web Browser menu in the
System Settings.
Linux Tips, Tricks, Apps & Hacks 109
03 Thumbnails in
PCManFM
01 Choose a distributionThere is an abundance of easy-to-use
Linux distros that could help you instantly get
started with a usable LxQt desktop – it is up to
you to take your pick.
Lubuntu is a dedicated LxQt fl avour of Ubuntu
with a ‘daily’ PPA containing the most recent
code (ppa:lubuntu-dev/lubuntu-daily). The PPA
is compatible with most Ubuntu 14.04 and 14.10
derivatives, including Kubuntu, LXLE, Mint and
many of the others. To get LxQt you will need
to possess lxqt-metapackage, lxqt-session
and lxsession packages.
An alternative way to install LxQt could
be Arch/Manjaro (LxQt is in AUR) or the
development version of OpenMandriva, which
is shipped with LxQt by default (Plasma 5 will
arrive at a later date).
02 What we have so farThe desktop occupies ~95 MBs of RAM.
It features a control centre, power management
applet, customisable bottom panel, look and feel
settings manager, window manager chooser,
QTerminal console and PCManFM fi le manager.
Keyboard layouts indicator and NetworkManager
applet are currently missing, but you can take
the XFCE applet and gorgeous CMST (frontend to
ConnMan) respectively.
03 Thumbnails in PCManFM We can tweak and add extra
functionality to the PCManFM fi le manager.
First, let’s add thumbnails support for fi letypes
other than images. For example, for PDF create
a new fi le with the .thumbnail extension at /usr/
share/thumbnailers with the following content:
By default, the windows decorations are
managed by OpenBox but you can change it to
Kwin or Emerald. PCManFM is quite modest, but
keep in mind that it is the only Qt5 fi le manager
for the day.
[Thumbnailer Entry] TryExec=convert Exec=convert %i[0] -thumbnail %s %o MimeType=application/pdf;application/x-pdf;image/pdf;
Using this template you can add more types that
‘convert’ supports (it’s a part of ImageMagick).
Tips | Tricks | Hacks | Apps
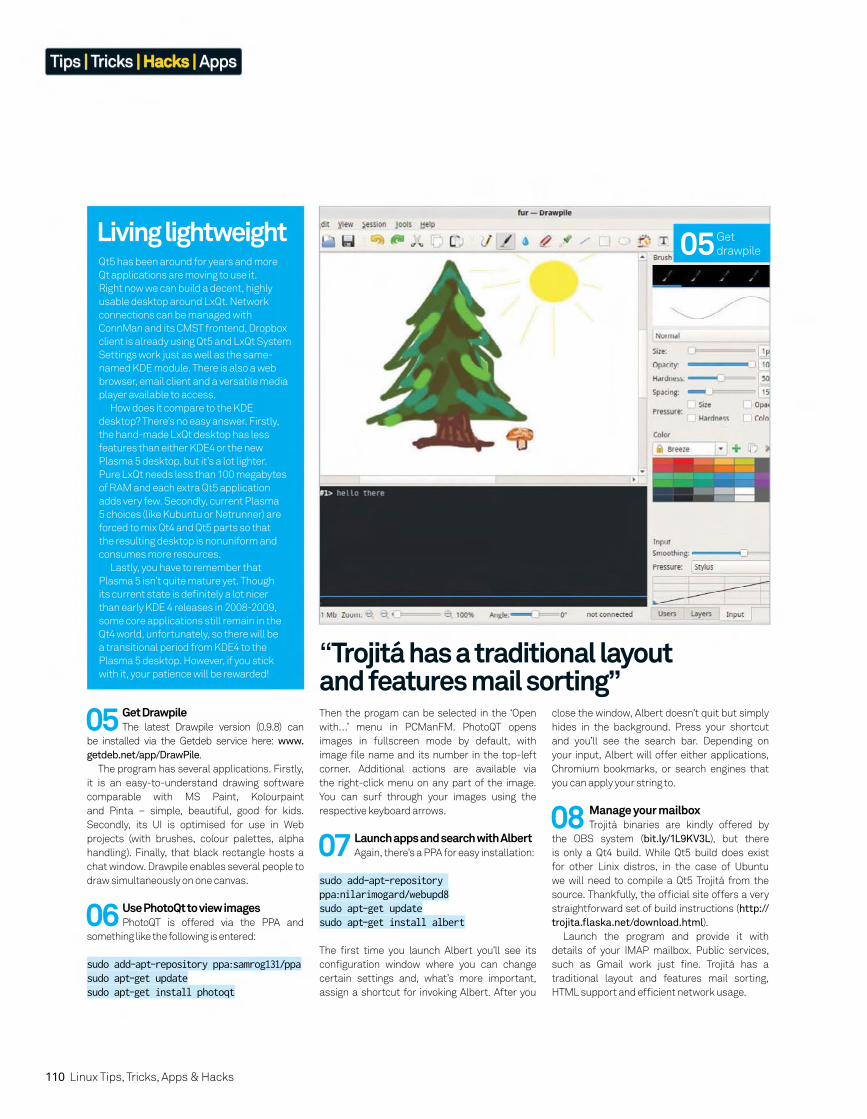
110 Linux Tips, Tricks, Apps & Hacks
08 Manage your mailboxTrojitá binaries are kindly offered by
the OBS system (bit.ly/1L9KV3L), but there
is only a Qt4 build. While Qt5 build does exist
for other Linix distros, in the case of Ubuntu
we will need to compile a Qt5 Trojitá from the
source. Thankfully, the offi cial site offers a very
straightforward set of build instructions (http://
trojita.fl aska.net/download.html).
Launch the program and provide it with
details of your IMAP mailbox. Public services,
such as Gmail work just fi ne. Trojitá has a
traditional layout and features mail sorting,
HTML support and effi cient network usage.
07 Launch apps and search with AlbertAgain, there’s a PPA for easy installation:
sudo add-apt-repository ppa:nilarimogard/webupd8sudo apt-get updatesudo apt-get install albert
The fi rst time you launch Albert you’ll see its
confi guration window where you can change
certain settings and, what’s more important,
assign a shortcut for invoking Albert. After you
05 Get DrawpileThe latest Drawpile version (0.9.8) can
be installed via the Getdeb service here: www.
getdeb.net/app/DrawPile.
The program has several applications. Firstly,
it is an easy-to-understand drawing software
comparable with MS Paint, Kolourpaint
and Pinta – simple, beautiful, good for kids.
Secondly, its UI is optimised for use in Web
projects (with brushes, colour palettes, alpha
handling). Finally, that black rectangle hosts a
chat window. Drawpile enables several people to
draw simultaneously on one canvas.
06 Use PhotoQt to view imagesPhotoQT is offered via the PPA and
something like the following is entered:
sudo add-apt-repository ppa:samrog131/ppasudo apt-get updatesudo apt-get install photoqt
close the window, Albert doesn’t quit but simply
hides in the background. Press your shortcut
and you’ll see the search bar. Depending on
your input, Albert will offer either applications,
Chromium bookmarks, or search engines that
you can apply your string to.
Qt5 has been around for years and more
Qt applications are moving to use it.
Right now we can build a decent, highly
usable desktop around LxQt. Network
connections can be managed with
ConnMan and its CMST frontend, Dropbox
client is already using Qt5 and LxQt System
Settings work just as well as the same-
named KDE module. There is also a web
browser, email client and a versatile media
player available to access.
How does it compare to the KDE
desktop? There’s no easy answer. Firstly,
the hand-made LxQt desktop has less
features than either KDE4 or the new
Plasma 5 desktop, but it’s a lot lighter.
Pure LxQt needs less than 100 megabytes
of RAM and each extra Qt5 application
adds very few. Secondly, current Plasma
5 choices (like Kubuntu or Netrunner) are
forced to mix Qt4 and Qt5 parts so that
the resulting desktop is nonuniform and
consumes more resources.
Lastly, you have to remember that
Plasma 5 isn’t quite mature yet. Though
its current state is defi nitely a lot nicer
than early KDE 4 releases in 2008-2009,
some core applications still remain in the
Qt4 world, unfortunately, so there will be
a transitional period from KDE4 to the
Plasma 5 desktop. However, if you stick
with it, your patience will be rewarded!
Living lightweight
Then the progam can be selected in the ‘Open
with…’ menu in PCManFM. PhotoQT opens
images in fullscreen mode by default, with
image fi le name and its number in the top-left
corner. Additional actions are available via
the right-click menu on any part of the image.
You can surf through your images using the
respective keyboard arrows.
“Trojitá has a traditional layout and features mail sorting”
05 Get
drawpile
Tips | Tricks | Hacks | Apps
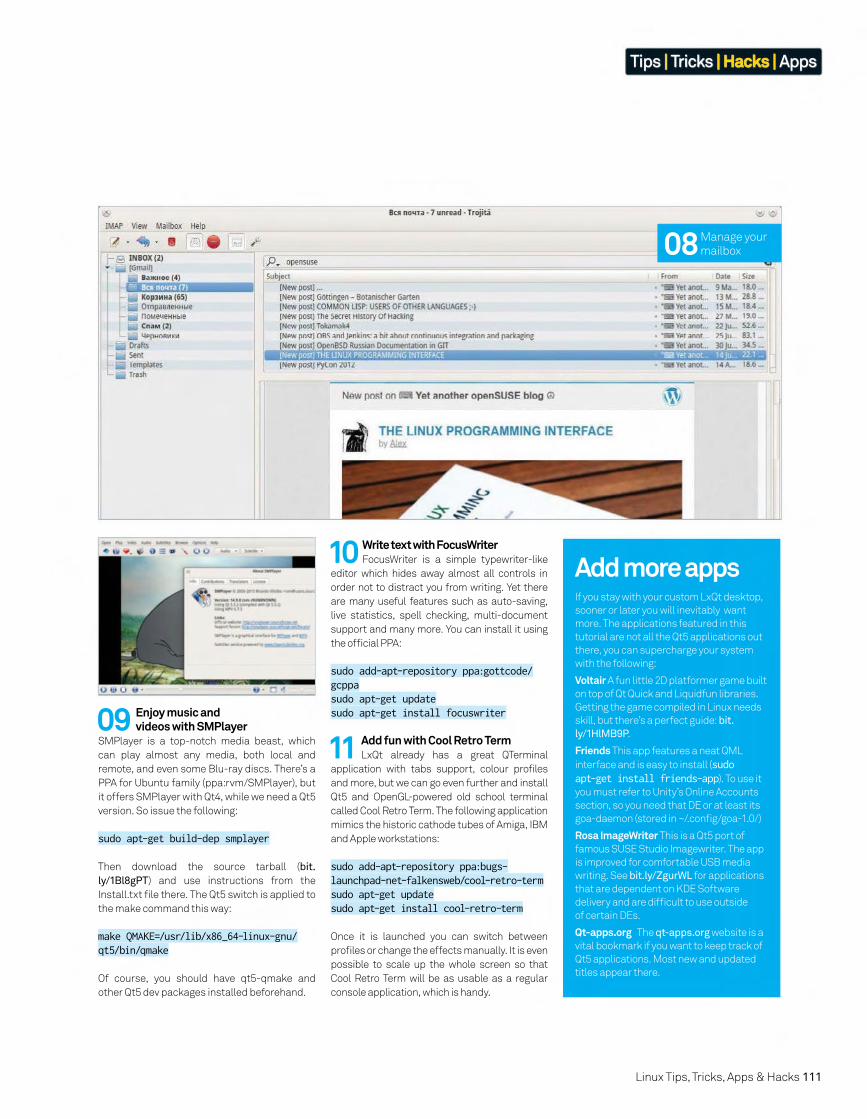
Linux Tips, Tricks, Apps & Hacks 111
10 Write text with FocusWriterFocusWriter is a simple typewriter-like
editor which hides away almost all controls in
order not to distract you from writing. Yet there
are many useful features such as auto-saving,
live statistics, spell checking, multi-document
support and many more. You can install it using
the offi cial PPA:
sudo add-apt-repository ppa:gottcode/gcppasudo apt-get updatesudo apt-get install focuswriter
11 Add fun with Cool Retro TermLxQt already has a great QTerminal
application with tabs support, colour profi les
and more, but we can go even further and install
Qt5 and OpenGL-powered old school terminal
called Cool Retro Term. The following application
mimics the historic cathode tubes of Amiga, IBM
and Apple workstations:
sudo add-apt-repository ppa:bugs-launchpad-net-falkensweb/cool-retro-termsudo apt-get updatesudo apt-get install cool-retro-term
Once it is launched you can switch between
profi les or change the effects manually. It is even
possible to scale up the whole screen so that
Cool Retro Term will be as usable as a regular
console application, which is handy.
09 Enjoy music and videos with SMPlayer
SMPlayer is a top-notch media beast, which
can play almost any media, both local and
remote, and even some Blu-ray discs. There’s a
PPA for Ubuntu family (ppa:rvm/SMPlayer), but
it offers SMPlayer with Qt4, while we need a Qt5
version. So issue the following:
sudo apt-get build-dep smplayer
Then download the source tarball (bit.
ly/1Bl8gPT) and use instructions from the
Install.txt fi le there. The Qt5 switch is applied to
the make command this way:
make QMAKE=/usr/lib/x86_64-linux-gnu/qt5/bin/qmake
Of course, you should have qt5-qmake and
other Qt5 dev packages installed beforehand.
If you stay with your custom LxQt desktop,
sooner or later you will inevitably want
more. The applications featured in this
tutorial are not all the Qt5 applications out
there, you can supercharge your system
with the following:
Voltair A fun little 2D platformer game built
on top of Qt Quick and Liquidfun libraries.
Getting the game compiled in Linux needs
skill, but there’s a perfect guide: bit.
ly/1HlMB9P.
Friends This app features a neat QML
interface and is easy to install (sudo apt-get install friends-app). To use it
you must refer to Unity’s Online Accounts
section, so you need that DE or at least its
goa-daemon (stored in ~/.confi g/goa-1.0/)
Rosa ImageWriter This is a Qt5 port of
famous SUSE Studio Imagewriter. The app
is improved for comfortable USB media
writing. See bit.ly/ZgurWL for applications
that are dependent on KDE Software
delivery and are diffi cult to use outside
of certain DEs.
Qt-apps.org The qt-apps.org website is a
vital bookmark if you want to keep track of
Qt5 applications. Most new and updated
titles appear there.
Add more apps
08 Manage your
mailbox
Tips | Tricks | Hacks | Apps
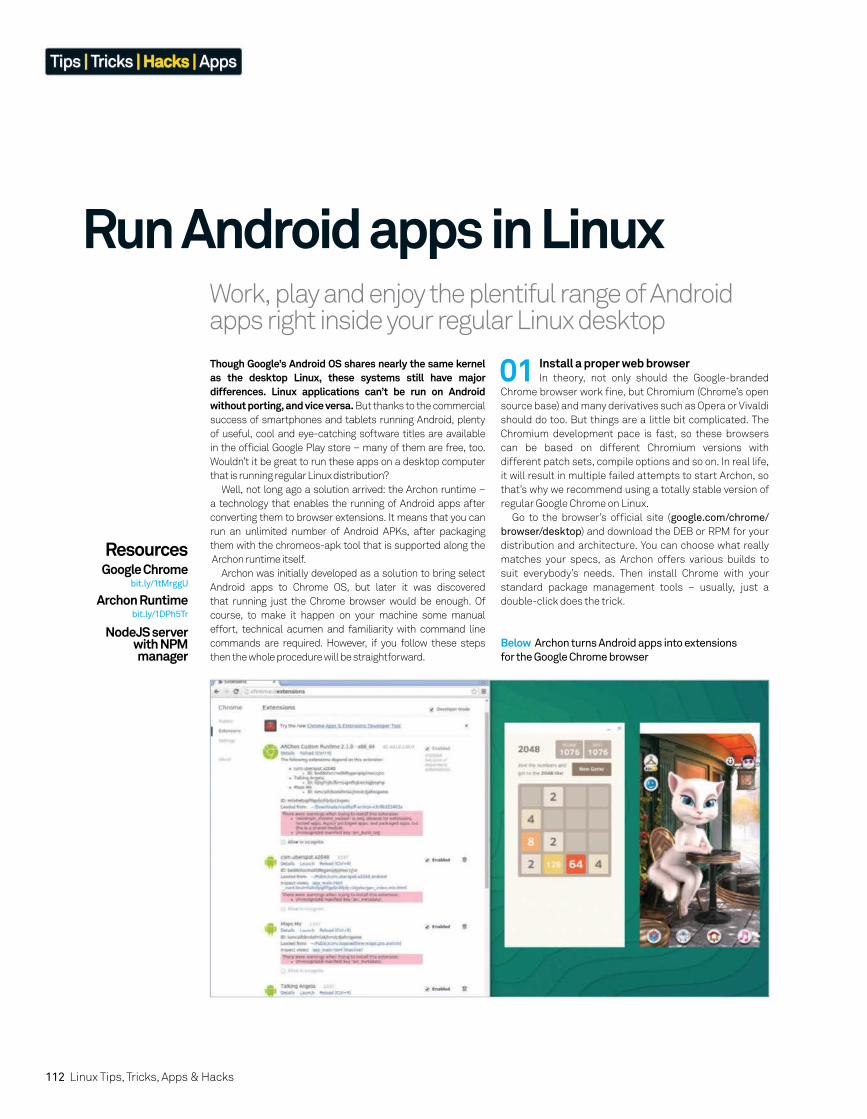
112 Linux Tips, Tricks, Apps & Hacks
Work, play and enjoy the plentiful range of Android apps right inside your regular Linux desktop
Run Android apps in Linux
Though Google’s Android OS shares nearly the same kernel as the desktop Linux, these systems still have major differences. Linux applications can’t be run on Android without porting, and vice versa. But thanks to the commercial
success of smartphones and tablets running Android, plenty
of useful, cool and eye-catching software titles are available
in the offi cial Google Play store – many of them are free, too.
Wouldn’t it be great to run these apps on a desktop computer
that is running regular Linux distribution?
Well, not long ago a solution arrived: the Archon runtime –
a technology that enables the running of Android apps after
converting them to browser extensions. It means that you can
run an unlimited number of Android APKs, after packaging
them with the chromeos-apk tool that is supported along the
Archon runtime itself.
Archon was initially developed as a solution to bring select
Android apps to Chrome OS, but later it was discovered
that running just the Chrome browser would be enough. Of
course, to make it happen on your machine some manual
effort, technical acumen and familiarity with command line
commands are required. However, if you follow these steps
then the whole procedure will be straightforward.
Below Archon turns Android apps into extensions
for the Google Chrome browser
01 Install a proper web browserIn theory, not only should the Google-branded
Chrome browser work fi ne, but Chromium (Chrome’s open
source base) and many derivatives such as Opera or Vivaldi
should do too. But things are a little bit complicated. The
Chromium development pace is fast, so these browsers
can be based on different Chromium versions with
different patch sets, compile options and so on. In real life,
it will result in multiple failed attempts to start Archon, so
that’s why we recommend using a totally stable version of
regular Google Chrome on Linux.
Go to the browser’s offi cial site (google.com/chrome/
browser/desktop) and download the DEB or RPM for your
distribution and architecture. You can choose what really
matches your specs, as Archon offers various builds to
suit everybody’s needs. Then install Chrome with your
standard package management tools – usually, just a
double-click does the trick.
ResourcesGoogle Chrome
bit.ly/1tMrggU
Archon Runtimebit.ly/1DPh5Tr
NodeJS server with NPM manager
Tips | Tricks | Hacks | Apps
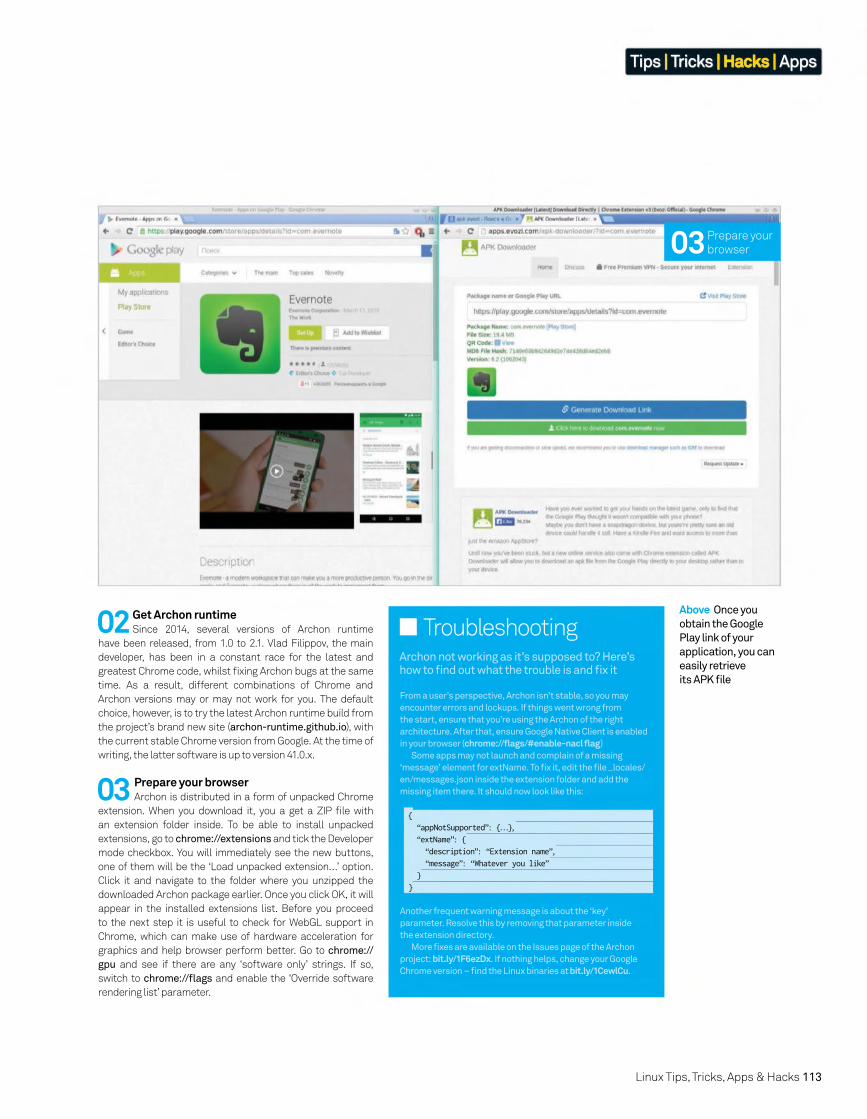
Linux Tips, Tricks, Apps & Hacks 113
03 Prepare your browserArchon is distributed in a form of unpacked Chrome
extension. When you download it, you a get a ZIP fi le with
an extension folder inside. To be able to install unpacked
extensions, go to chrome://extensions and tick the Developer
mode checkbox. You will immediately see the new buttons,
one of them will be the ‘Load unpacked extension…’ option.
Click it and navigate to the folder where you unzipped the
downloaded Archon package earlier. Once you click OK, it will
appear in the installed extensions list. Before you proceed
to the next step it is useful to check for WebGL support in
Chrome, which can make use of hardware acceleration for
graphics and help browser perform better. Go to chrome://
gpu and see if there are any ‘software only’ strings. If so,
switch to chrome://fl ags and enable the ‘Override software
rendering list’ parameter.
02 Get Archon runtimeSince 2014, several versions of Archon runtime
have been released, from 1.0 to 2.1. Vlad Filippov, the main
developer, has been in a constant race for the latest and
greatest Chrome code, whilst fi xing Archon bugs at the same
time. As a result, different combinations of Chrome and
Archon versions may or may not work for you. The default
choice, however, is to try the latest Archon runtime build from
the project’s brand new site (archon-runtime.github.io), with
the current stable Chrome version from Google. At the time of
writing, the latter software is up to version 41.0.x.
Above Once you
obtain the Google
Play link of your
application, you can
easily retrieve
its APK fi le
03 Prepare your
browser
From a user’s perspective, Archon isn't stable, so you may
encounter errors and lockups. If things went wrong from
the start, ensure that you’re using the Archon of the right
architecture. After that, ensure Google Native Client is enabled
in your browser (chrome://flags/#enable-nacl flag)
Some apps may not launch and complain of a missing
‘message’ element for extName. To fi x it, edit the fi le _locales/
en/messages.json inside the extension folder and add the
missing item there. It should now look like this:
{
“appNotSupported”: {...},
“extName”: {
“description”: “Extension name”,
“message”: “Whatever you like”
}
}
Another frequent warning message is about the ‘key’
parameter. Resolve this by removing that parameter inside
the extension directory.
More fi xes are available on the Issues page of the Archon
project: bit.ly/1F6ezDx. If nothing helps, change your Google
Chrome version – fi nd the Linux binaries at bit.ly/1CewlCu.
TroubleshootingArchon not working as it’s supposed to? Here’s how to fi nd out what the trouble is and fi x it
Tips | Tricks | Hacks | Apps
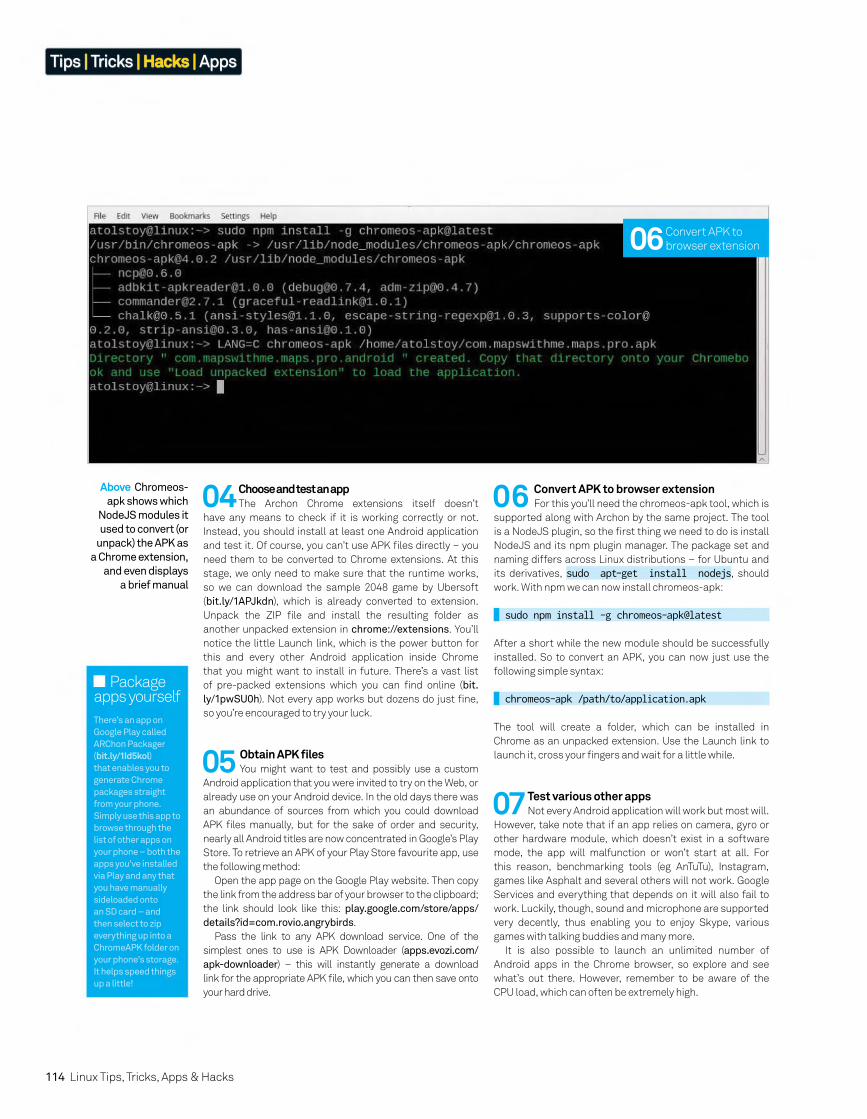
114 Linux Tips, Tricks, Apps & Hacks
06 Convert APK to
browser extension
Above Chromeos-
apk shows which
NodeJS modules it
used to convert (or
unpack) the APK as
a Chrome extension,
and even displays
a brief manual
Package apps yourself
There’s an app on
Google Play called
ARChon Packager
(bit.ly/1Id5kol) that enables you to
generate Chrome
packages straight
from your phone.
Simply use this app to
browse through the
list of other apps on
your phone – both the
apps you’ve installed
via Play and any that
you have manually
sideloaded onto
an SD card – and
then select to zip
everything up into a
ChromeAPK folder on
your phone’s storage.
It helps speed things
up a little!
04 Choose and test an appThe Archon Chrome extensions itself doesn’t
have any means to check if it is working correctly or not.
Instead, you should install at least one Android application
and test it. Of course, you can’t use APK fi les directly – you
need them to be converted to Chrome extensions. At this
stage, we only need to make sure that the runtime works,
so we can download the sample 2048 game by Ubersoft
(bit.ly/1APJkdn), which is already converted to extension.
Unpack the ZIP fi le and install the resulting folder as
another unpacked extension in chrome://extensions. You’ll
notice the little Launch link, which is the power button for
this and every other Android application inside Chrome
that you might want to install in future. There’s a vast list
of pre-packed extensions which you can fi nd online (bit.
ly/1pwSU0h). Not every app works but dozens do just fi ne,
so you’re encouraged to try your luck.
05 Obtain APK fi lesYou might want to test and possibly use a custom
Android application that you were invited to try on the Web, or
already use on your Android device. In the old days there was
an abundance of sources from which you could download
APK fi les manually, but for the sake of order and security,
nearly all Android titles are now concentrated in Google’s Play
Store. To retrieve an APK of your Play Store favourite app, use
the following method:
Open the app page on the Google Play website. Then copy
the link from the address bar of your browser to the clipboard;
the link should look like this: play.google.com/store/apps/
details?id=com.rovio.angrybirds.
Pass the link to any APK download service. One of the
simplest ones to use is APK Downloader (apps.evozi.com/
apk-downloader) – this will instantly generate a download
link for the appropriate APK fi le, which you can then save onto
your hard drive.
06 Convert APK to browser extensionFor this you’ll need the chromeos-apk tool, which is
supported along with Archon by the same project. The tool
is a NodeJS plugin, so the fi rst thing we need to do is install
NodeJS and its npm plugin manager. The package set and
naming differs across Linux distributions – for Ubuntu and
its derivatives, sudo apt-get install nodejs, should
work. With npm we can now install chromeos-apk:
sudo npm install -g chromeos-apk@latest
After a short while the new module should be successfully
installed. So to convert an APK, you can now just use the
following simple syntax:
chromeos-apk /path/to/application.apk
The tool will create a folder, which can be installed in
Chrome as an unpacked extension. Use the Launch link to
launch it, cross your fi ngers and wait for a little while.
07 Test various other appsNot every Android application will work but most will.
However, take note that if an app relies on camera, gyro or
other hardware module, which doesn’t exist in a software
mode, the app will malfunction or won’t start at all. For
this reason, benchmarking tools (eg AnTuTu), Instagram,
games like Asphalt and several others will not work. Google
Services and everything that depends on it will also fail to
work. Luckily, though, sound and microphone are supported
very decently, thus enabling you to enjoy Skype, various
games with talking buddies and many more.
It is also possible to launch an unlimited number of
Android apps in the Chrome browser, so explore and see
what’s out there. However, remember to be aware of the
CPU load, which can often be extremely high.
Tips | Tricks | Hacks | Apps
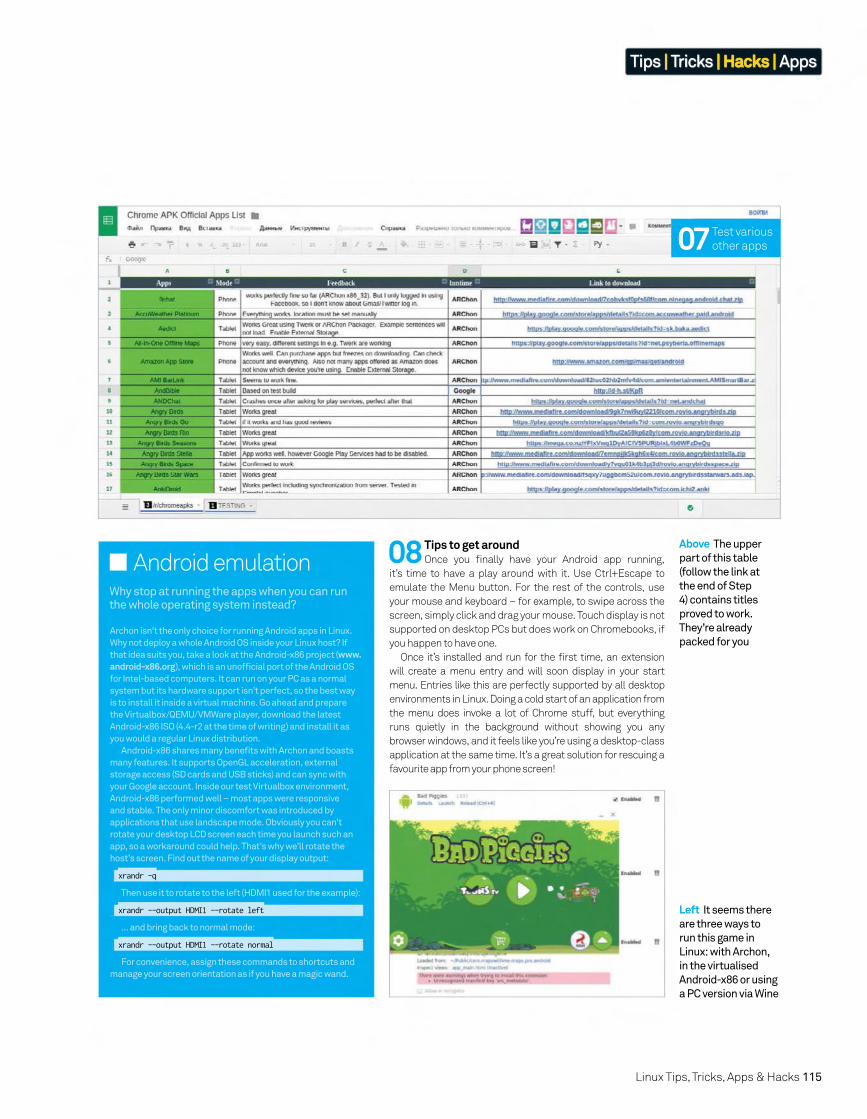
Linux Tips, Tricks, Apps & Hacks 115
08 Tips to get aroundOnce you fi nally have your Android app running,
it’s time to have a play around with it. Use Ctrl+Escape to
emulate the Menu button. For the rest of the controls, use
your mouse and keyboard – for example, to swipe across the
screen, simply click and drag your mouse. Touch display is not
supported on desktop PCs but does work on Chromebooks, if
you happen to have one.
Once it’s installed and run for the fi rst time, an extension
will create a menu entry and will soon display in your start
menu. Entries like this are perfectly supported by all desktop
environments in Linux. Doing a cold start of an application from
the menu does invoke a lot of Chrome stuff, but everything
runs quietly in the background without showing you any
browser windows, and it feels like you’re using a desktop-class
application at the same time. It’s a great solution for rescuing a
favourite app from your phone screen!
07 Test various
other apps
Above The upper
part of this table
(follow the link at
the end of Step
4) contains titles
proved to work.
They’re already
packed for you
Left It seems there
are three ways to
run this game in
Linux: with Archon,
in the virtualised
Android-x86 or using
a PC version via Wine
Archon isn’t the only choice for running Android apps in Linux.
Why not deploy a whole Android OS inside your Linux host? If
that idea suits you, take a look at the Android-x86 project (www.android-x86.org), which is an unoffi cial port of the Android OS
for Intel-based computers. It can run on your PC as a normal
system but its hardware support isn’t perfect, so the best way
is to install it inside a virtual machine. Go ahead and prepare
the Virtualbox/QEMU/VMWare player, download the latest
Android-x86 ISO (4.4-r2 at the time of writing) and install it as
you would a regular Linux distribution.
Android-x86 shares many benefi ts with Archon and boasts
many features. It supports OpenGL acceleration, external
storage access (SD cards and USB sticks) and can sync with
your Google account. Inside our test Virtualbox environment,
Android-x86 performed well – most apps were responsive
and stable. The only minor discomfort was introduced by
applications that use landscape mode. Obviously you can’t
rotate your desktop LCD screen each time you launch such an
app, so a workaround could help. That’s why we’ll rotate the
host’s screen. Find out the name of your display output:
xrandr -q
Then use it to rotate to the left (HDMI1 used for the example):
xrandr --output HDMI1 --rotate left
… and bring back to normal mode:
xrandr --output HDMI1 --rotate normal
For convenience, assign these commands to shortcuts and
manage your screen orientation as if you have a magic wand.
Android emulationWhy stop at running the apps when you can run the whole operating system instead?
Tips | Tricks | Hacks | Apps
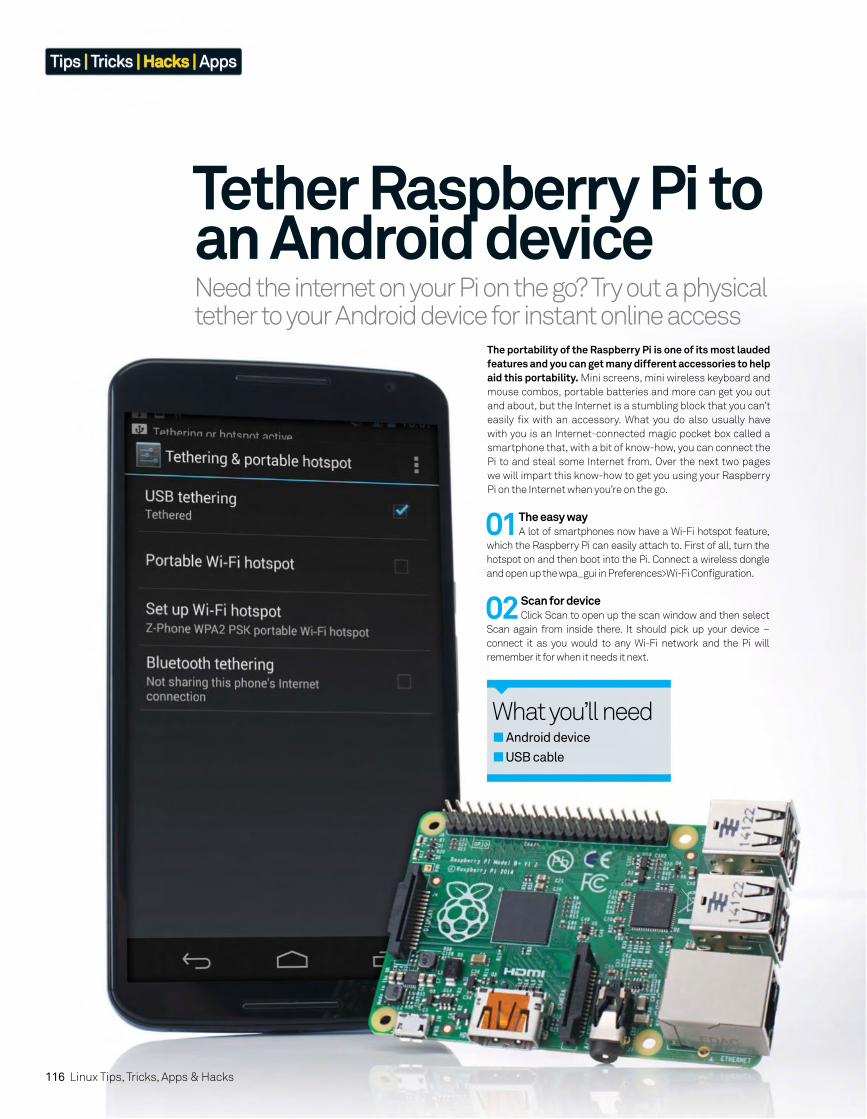
Need the internet on your Pi on the go? Try out a physical tether to your Android device for instant online access
Tether Raspberry Pi to an Android device
The portability of the Raspberry Pi is one of its most lauded features and you can get many different accessories to help aid this portability. Mini screens, mini wireless keyboard and
mouse combos, portable batteries and more can get you out
and about, but the Internet is a stumbling block that you can’t
easily fi x with an accessory. What you do also usually have
with you is an Internet-connected magic pocket box called a
smartphone that, with a bit of know-how, you can connect the
Pi to and steal some Internet from. Over the next two pages
we will impart this know-how to get you using your Raspberry
Pi on the Internet when you’re on the go.
01 The easy wayA lot of smartphones now have a Wi-Fi hotspot feature,
which the Raspberry Pi can easily attach to. First of all, turn the
hotspot on and then boot into the Pi. Connect a wireless dongle
and open up the wpa_gui in Preferences>Wi-Fi Confi guration.
02 Scan for deviceClick Scan to open up the scan window and then select
Scan again from inside there. It should pick up your device –
connect it as you would to any Wi-Fi network and the Pi will
remember it for when it needs it next.
What you’ll need Android device
USB cable
116 Linux Tips, Tricks, Apps & Hacks
Tips | Tricks | Hacks | Apps

03 Set up tetherFirst connect your phone to your Raspberry Pi via a USB
cable – depending on the amount of power your Pi has, it might
have trouble charging your phone but it will still let you tether. In
the tethering menu you can now activate USB tethering.
04 Check connectionYour Android device will create an interface known
as eth0 on the Raspberry Pi. You can check to make sure this
is happening, and that it will let you tether, by opening up a
terminal and typing the following:
$ ifconfig
05 Quick connectYou can connect from the terminal right now to
access the Internet. You should be able to do this by typing the
following into the terminal:
$ sudo dhclient usb0
This will automatically grab any available IP address that your
phone will give to it.
06 Test connection There’s a few ways to test your connection. We’d usually
stay in the terminal and ping www.google.com, which you can
do, or you can click on the browser and see if it loads the page.
07 Save the settingsOnce you reboot your Pi, it won’t remember to
automatically connect to the phone’s tether. However, we can
add an entry to its confi g so that it will try and do this in the
future. From the terminal use:
$ sudo nano /etc/network/interfaces
08 Interface settingsHere you’ll fi nd all the current network settings – yours
might look different from ours depending on if you have added
any fi xed wireless settings or passthroughs. Using the same
syntax as the eth0 line, add:
iface usb0 inet dhcp
09 Tether on the goAfter a save and reboot, your Pi should now
automatically connect to your phone, whether it’s via Wi-Fi
hotspot or a physical connection. It may draw a little more
charge than usual while tethering, so be sure to keep an eye on
your battery level.
Above It’s usually easy to fi gure out which device is your phone – set it right next to the Pi and it will be the one with the best signal!
Linux Tips, Tricks, Apps & Hacks 117
Tips | Tricks | Hacks | Apps
Mobile dataUsing your Pi
on your mobile
phone will eat up
data much faster
than browsing
on your phone
normally is. We
suggest not doing
a full software,
distribution or
fi rmware update
if you don’t
want to spend
a fortune on
data. You can
also set limits
on the amount
of data used on
your phone to
save yourself any
problems, and a
physical tether
will allow you to
connect via the
phone’s Wi-Fi if
that’s an option.
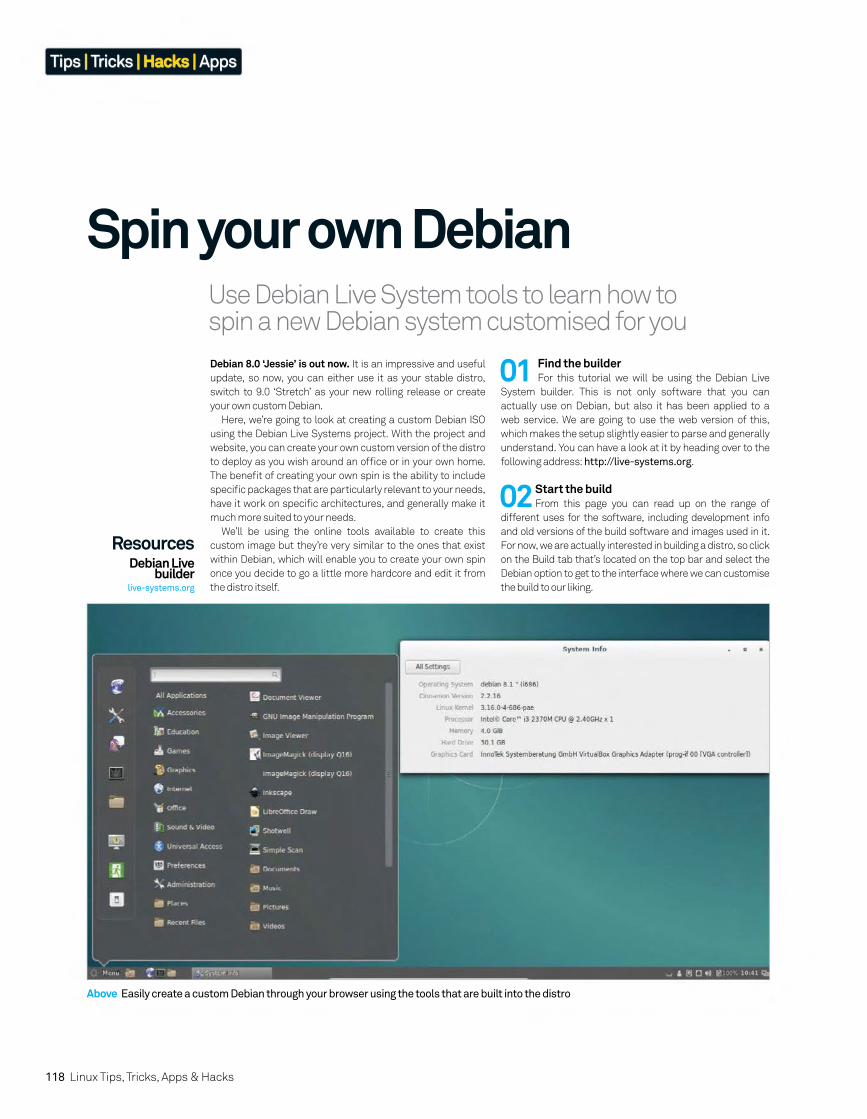
118 Linux Tips, Tricks, Apps & Hacks
Tips | Tricks | Hacks | Apps
Use Debian Live System tools to learn how to spin a new Debian system customised for you
Spin your own Debian
Debian 8.0 ‘Jessie’ is out now. It is an impressive and useful
update, so now, you can either use it as your stable distro,
switch to 9.0 ‘Stretch’ as your new rolling release or create
your own custom Debian.
Here, we’re going to look at creating a custom Debian ISO
using the Debian Live Systems project. With the project and
website, you can create your own custom version of the distro
to deploy as you wish around an offi ce or in your own home.
The benefi t of creating your own spin is the ability to include
specifi c packages that are particularly relevant to your needs,
have it work on specifi c architectures, and generally make it
much more suited to your needs.
We’ll be using the online tools available to create this
custom image but they’re very similar to the ones that exist
within Debian, which will enable you to create your own spin
once you decide to go a little more hardcore and edit it from
the distro itself.
Above Easily create a custom Debian through your browser using the tools that are built into the distro
01 Find the builderFor this tutorial we will be using the Debian Live
System builder. This is not only software that you can
actually use on Debian, but also it has been applied to a
web service. We are going to use the web version of this,
which makes the setup slightly easier to parse and generally
understand. You can have a look at it by heading over to the
following address: http://live-systems.org.
02 Start the buildFrom this page you can read up on the range of
different uses for the software, including development info
and old versions of the build software and images used in it.
For now, we are actually interested in building a distro, so click
on the Build tab that’s located on the top bar and select the
Debian option to get to the interface where we can customise
the build to our liking.
ResourcesDebian Live
builderlive-systems.org
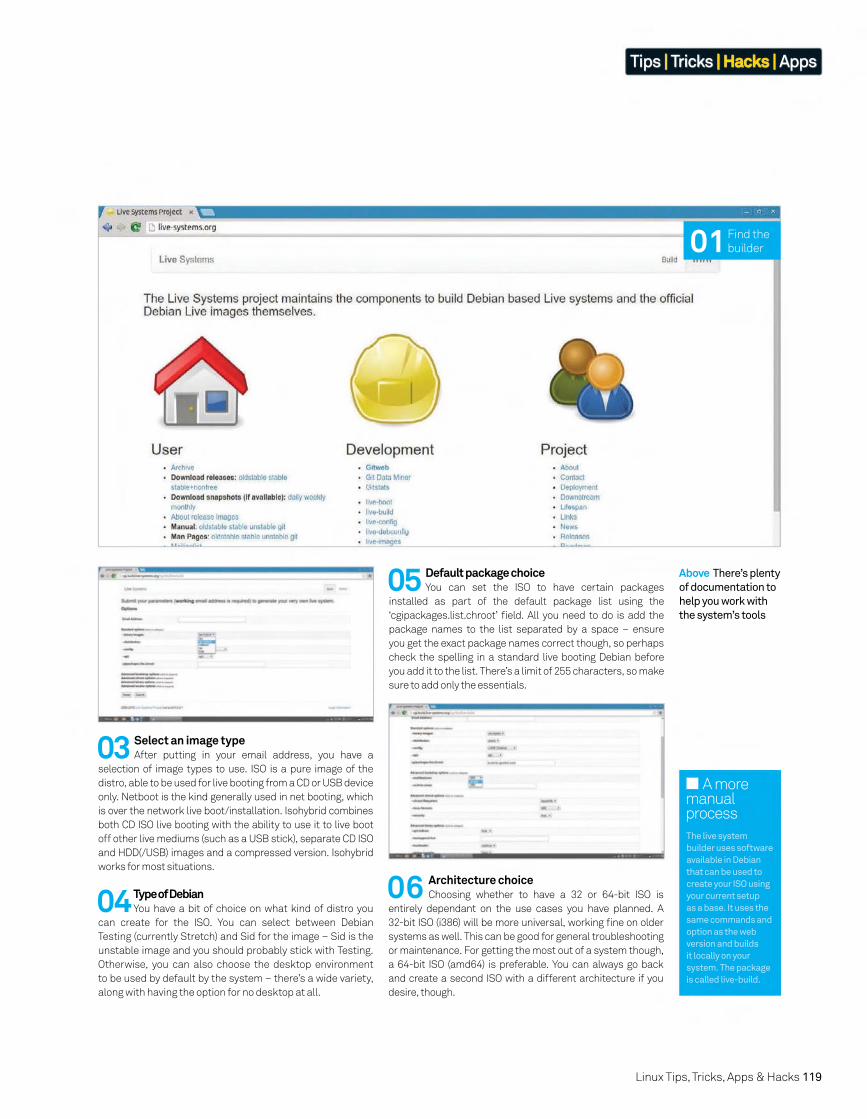
Linux Tips, Tricks, Apps & Hacks 119
Tips | Tricks | Hacks | Apps
03 Select an image typeAfter putting in your email address, you have a
selection of image types to use. ISO is a pure image of the
distro, able to be used for live booting from a CD or USB device
only. Netboot is the kind generally used in net booting, which
is over the network live boot/installation. Isohybrid combines
both CD ISO live booting with the ability to use it to live boot
off other live mediums (such as a USB stick), separate CD ISO
and HDD(/USB) images and a compressed version. Isohybrid
works for most situations.
Above There’s plenty
of documentation to
help you work with
the system’s tools
01 Find the
builder
04 Type of DebianYou have a bit of choice on what kind of distro you
can create for the ISO. You can select between Debian
Testing (currently Stretch) and Sid for the image – Sid is the
unstable image and you should probably stick with Testing.
Otherwise, you can also choose the desktop environment
to be used by default by the system – there’s a wide variety,
along with having the option for no desktop at all.
05 Default package choiceYou can set the ISO to have certain packages
installed as part of the default package list using the
‘cgipackages.list.chroot’ fi eld. All you need to do is add the
package names to the list separated by a space – ensure
you get the exact package names correct though, so perhaps
check the spelling in a standard live booting Debian before
you add it to the list. There’s a limit of 255 characters, so make
sure to add only the essentials.
A more manual process
The live system
builder uses software
available in Debian
that can be used to
create your ISO using
your current setup
as a base. It uses the
same commands and
option as the web
version and builds
it locally on your
system. The package
is called live-build.
06 Architecture choiceChoosing whether to have a 32 or 64-bit ISO is
entirely dependant on the use cases you have planned. A
32-bit ISO (i386) will be more universal, working fi ne on older
systems as well. This can be good for general troubleshooting
or maintenance. For getting the most out of a system though,
a 64-bit ISO (amd64) is preferable. You can always go back
and create a second ISO with a different architecture if you
desire, though.
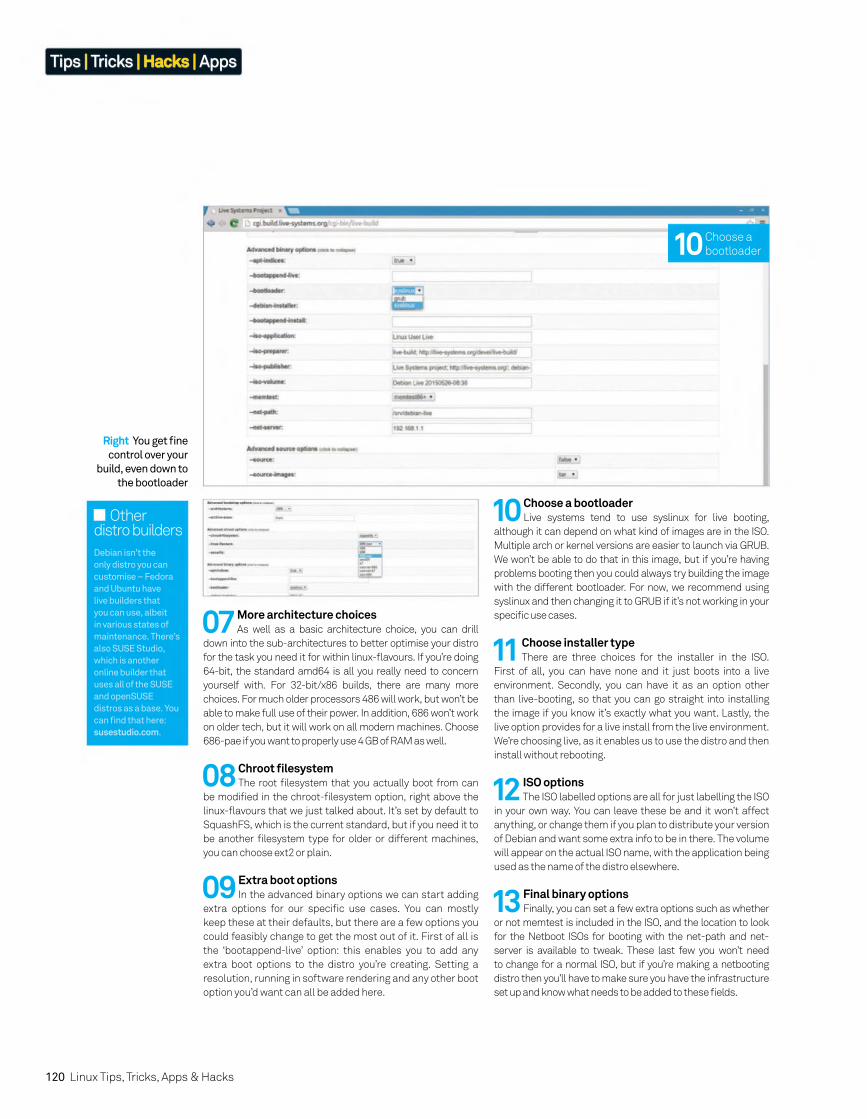
120 Linux Tips, Tricks, Apps & Hacks
Tips | Tricks | Hacks | Apps
10 Choose a bootloaderLive systems tend to use syslinux for live booting,
although it can depend on what kind of images are in the ISO.
Multiple arch or kernel versions are easier to launch via GRUB.
We won’t be able to do that in this image, but if you’re having
problems booting then you could always try building the image
with the different bootloader. For now, we recommend using
syslinux and then changing it to GRUB if it’s not working in your
specifi c use cases.
11 Choose installer typeThere are three choices for the installer in the ISO.
First of all, you can have none and it just boots into a live
environment. Secondly, you can have it as an option other
than live-booting, so that you can go straight into installing
the image if you know it’s exactly what you want. Lastly, the
live option provides for a live install from the live environment.
We’re choosing live, as it enables us to use the distro and then
install without rebooting.
13 Final binary optionsFinally, you can set a few extra options such as whether
or not memtest is included in the ISO, and the location to look
for the Netboot ISOs for booting with the net-path and net-
server is available to tweak. These last few you won’t need
to change for a normal ISO, but if you’re making a netbooting
distro then you’ll have to make sure you have the infrastructure
set up and know what needs to be added to these fi elds.
12 ISO optionsThe ISO labelled options are all for just labelling the ISO
in your own way. You can leave these be and it won’t affect
anything, or change them if you plan to distribute your version
of Debian and want some extra info to be in there. The volume
will appear on the actual ISO name, with the application being
used as the name of the distro elsewhere.
Right You get fi ne
control over your
build, even down to
the bootloader
10 Choose a
bootloader
Other distro builders
Debian isn’t the
only distro you can
customise – Fedora
and Ubuntu have
live builders that
you can use, albeit
in various states of
maintenance. There’s
also SUSE Studio,
which is another
online builder that
uses all of the SUSE
and openSUSE
distros as a base. You
can fi nd that here:
susestudio.com.
07 More architecture choicesAs well as a basic architecture choice, you can drill
down into the sub-architectures to better optimise your distro
for the task you need it for within linux-fl avours. If you’re doing
64-bit, the standard amd64 is all you really need to concern
yourself with. For 32-bit/x86 builds, there are many more
choices. For much older processors 486 will work, but won’t be
able to make full use of their power. In addition, 686 won’t work
on older tech, but it will work on all modern machines. Choose
686-pae if you want to properly use 4 GB of RAM as well.
08 Chroot fi lesystemThe root fi lesystem that you actually boot from can
be modifi ed in the chroot-fi lesystem option, right above the
linux-fl avours that we just talked about. It’s set by default to
SquashFS, which is the current standard, but if you need it to
be another fi lesystem type for older or different machines,
you can choose ext2 or plain.
09 Extra boot optionsIn the advanced binary options we can start adding
extra options for our specifi c use cases. You can mostly
keep these at their defaults, but there are a few options you
could feasibly change to get the most out of it. First of all is
the ‘bootappend-live’ option: this enables you to add any
extra boot options to the distro you’re creating. Setting a
resolution, running in software rendering and any other boot
option you’d want can all be added here.
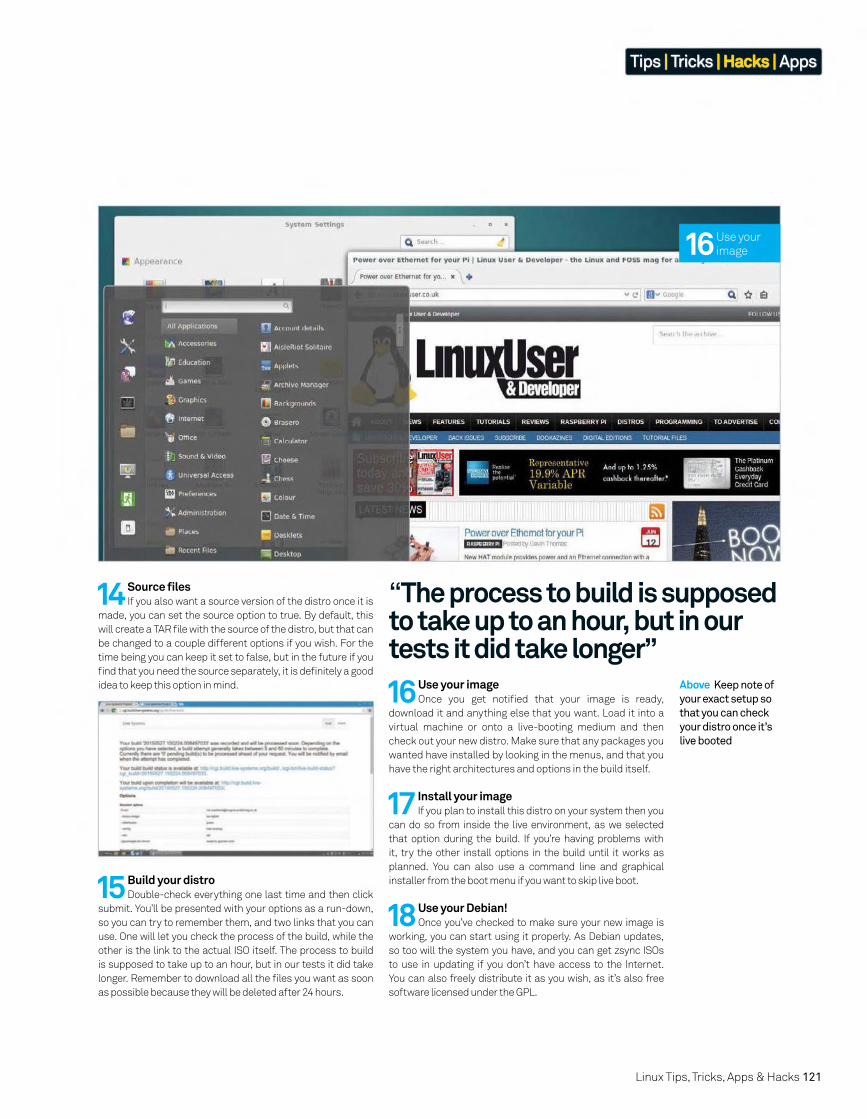
Linux Tips, Tricks, Apps & Hacks 121
Tips | Tricks | Hacks | Apps
“The process to build is supposed to take up to an hour, but in our tests it did take longer”
14 Source fi lesIf you also want a source version of the distro once it is
made, you can set the source option to true. By default, this
will create a TAR fi le with the source of the distro, but that can
be changed to a couple different options if you wish. For the
time being you can keep it set to false, but in the future if you
fi nd that you need the source separately, it is defi nitely a good
idea to keep this option in mind.
15 Build your distroDouble-check everything one last time and then click
submit. You’ll be presented with your options as a run-down,
so you can try to remember them, and two links that you can
use. One will let you check the process of the build, while the
other is the link to the actual ISO itself. The process to build
is supposed to take up to an hour, but in our tests it did take
longer. Remember to download all the fi les you want as soon
as possible because they will be deleted after 24 hours.
16 Use your imageOnce you get notifi ed that your image is ready,
download it and anything else that you want. Load it into a
virtual machine or onto a live-booting medium and then
check out your new distro. Make sure that any packages you
wanted have installed by looking in the menus, and that you
have the right architectures and options in the build itself.
17 Install your imageIf you plan to install this distro on your system then you
can do so from inside the live environment, as we selected
that option during the build. If you’re having problems with
it, try the other install options in the build until it works as
planned. You can also use a command line and graphical
installer from the boot menu if you want to skip live boot.
18 Use your Debian!Once you’ve checked to make sure your new image is
working, you can start using it properly. As Debian updates,
so too will the system you have, and you can get zsync ISOs
to use in updating if you don’t have access to the Internet.
You can also freely distribute it as you wish, as it’s also free
software licensed under the GPL.
Above Keep note of
your exact setup so
that you can check
your distro once it’s
live booted
16 Use your
image
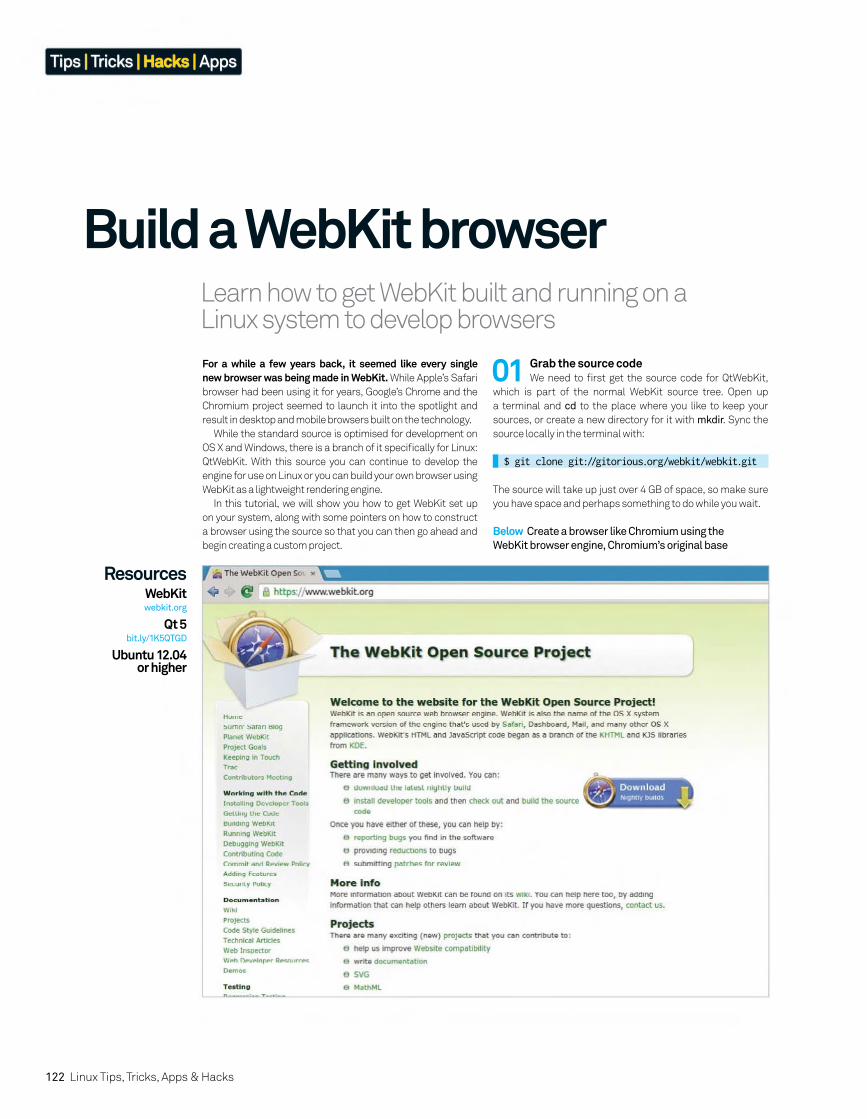
122 Linux Tips, Tricks, Apps & Hacks
Tips | Tricks | Hacks | Apps
Learn how to get WebKit built and running on a Linux system to develop browsers
Build a WebKit browser
For a while a few years back, it seemed like every single new browser was being made in WebKit. While Apple’s Safari
browser had been using it for years, Google’s Chrome and the
Chromium project seemed to launch it into the spotlight and
result in desktop and mobile browsers built on the technology.
While the standard source is optimised for development on
OS X and Windows, there is a branch of it specifi cally for Linux:
QtWebKit. With this source you can continue to develop the
engine for use on Linux or you can build your own browser using
WebKit as a lightweight rendering engine.
In this tutorial, we will show you how to get WebKit set up
on your system, along with some pointers on how to construct
a browser using the source so that you can then go ahead and
begin creating a custom project.
Below Create a browser like Chromium using the
WebKit browser engine, Chromium’s original base
01 Grab the source codeWe need to fi rst get the source code for QtWebKit,
which is part of the normal WebKit source tree. Open up
a terminal and cd to the place where you like to keep your
sources, or create a new directory for it with mkdir. Sync the
source locally in the terminal with:
$ git clone git://gitorious.org/webkit/webkit.git
The source will take up just over 4 GB of space, so make sure
you have space and perhaps something to do while you wait.
ResourcesWebKitwebkit.org
Qt 5bit.ly/1K5QTGD
Ubuntu 12.04 or higher
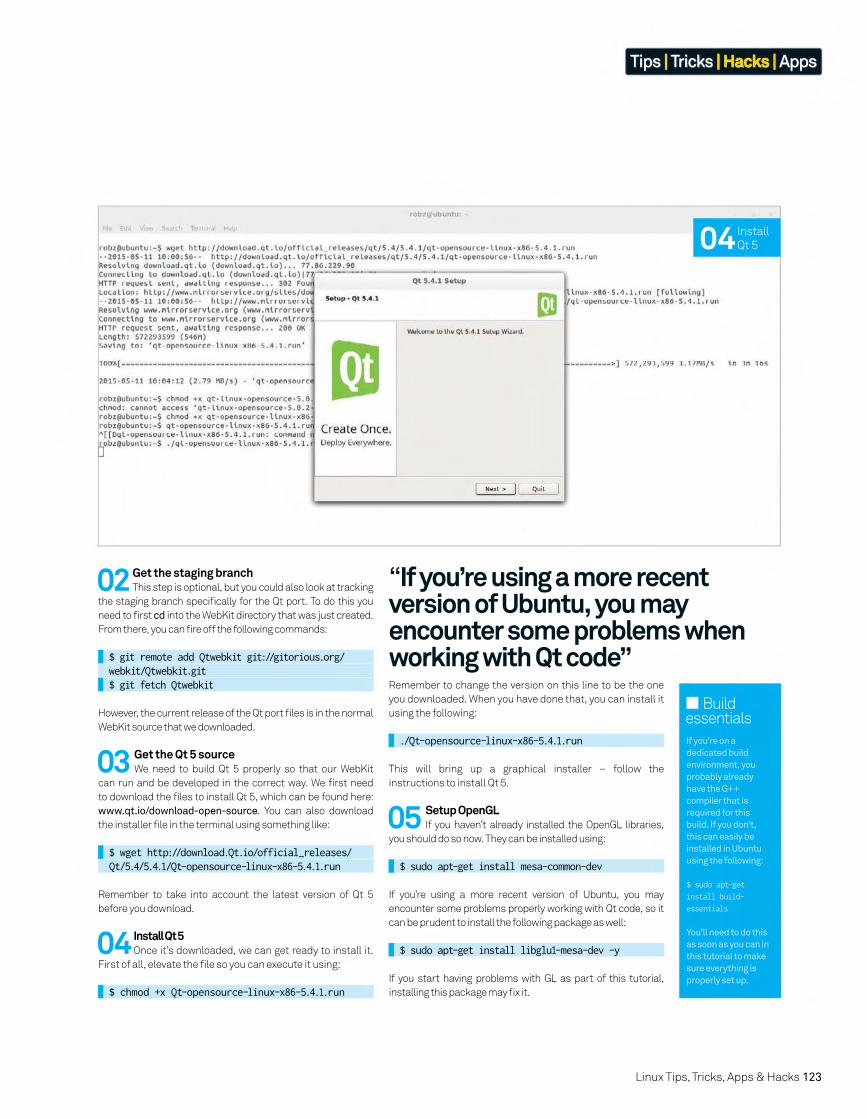
Linux Tips, Tricks, Apps & Hacks 123
Tips | Tricks | Hacks | Apps
03 Get the Qt 5 sourceWe need to build Qt 5 properly so that our WebKit
can run and be developed in the correct way. We fi rst need
to download the fi les to install Qt 5, which can be found here:
www.qt.io/download-open-source. You can also download
the installer fi le in the terminal using something like:
$ wget http://download.Qt.io/official_releases/ Qt/5.4/5.4.1/Qt-opensource-linux-x86-5.4.1.run
Remember to take into account the latest version of Qt 5
before you download.
02 Get the staging branchThis step is optional, but you could also look at tracking
the staging branch specifi cally for the Qt port. To do this you
need to fi rst cd into the WebKit directory that was just created.
From there, you can fi re off the following commands:
$ git remote add Qtwebkit git://gitorious.org/ webkit/Qtwebkit.git $ git fetch Qtwebkit
However, the current release of the Qt port fi les is in the normal
WebKit source that we downloaded.
04 Install
Qt 5
04 Install Qt 5Once it’s downloaded, we can get ready to install it.
First of all, elevate the fi le so you can execute it using:
$ chmod +x Qt-opensource-linux-x86-5.4.1.run
05 Setup OpenGLIf you haven’t already installed the OpenGL libraries,
you should do so now. They can be installed using:
$ sudo apt-get install mesa-common-dev
If you’re using a more recent version of Ubuntu, you may
encounter some problems properly working with Qt code, so it
can be prudent to install the following package as well:
$ sudo apt-get install libglu1-mesa-dev -y
If you start having problems with GL as part of this tutorial,
installing this package may fi x it.
Build essentials
If you’re on a
dedicated build
environment, you
probably already
have the G++
compiler that is
required for this
build. If you don’t,
this can easily be
installed in Ubuntu
using the following:
$ sudo apt-get
install build-
essentials
You’ll need to do this
as soon as you can in
this tutorial to make
sure everything is
properly set up.
Remember to change the version on this line to be the one
you downloaded. When you have done that, you can install it
using the following:
./Qt-opensource-linux-x86-5.4.1.run
This will bring up a graphical installer – follow the
instructions to install Qt 5.
“If you’re using a more recent version of Ubuntu, you may encounter some problems when working with Qt code”

124 Linux Tips, Tricks, Apps & Hacks
Tips | Tricks | Hacks | Apps
10 WebKit use explainedThere are some basic principles to the way WebKit
handles data to render. This is handled via the WebCore
engine and is made up of specifi c systems: the Document
Object Model (DOM) tree, the render tree and the style tree.
These three parts help to render each webpage effi ciently and
therefore we will break them down and discuss them in more
detail over the next few steps.
11 How the DOM tree worksEach webpage is parsed into this DOM tree of nodes,
all referred to be the base class of Node.h. Of these nodes,
there are three that are relevant for actually rendering
data: Document.h/HTMLDocument.h, which is the root
of the tree; all of the tags from the HTML or XML are kept in
Elements.h, and can be queried whenever you need them;
fi nally, Text.h contains all the raw text that goes between
the elements – in other words, the content on the page that
is actually readable.
14 Destroy the render treeThis is related to creating render trees by calling the
opposite command, detaching DOM nodes from the renderer:
void detach()
This destroys the render tree when a tab or window is closed,
and ends the need to see the info present in the DOM tree.
13 Create the render treeRenderers are created when a DOM node is attached
to a renderer. The information in the node will determine what
kind of renderer to use, including not creating it if certain
conditions are met. It’s a top-down recursive operation –
all descendants have renderer nodes created after their
parents. You can call the attach method with:
void attach()
… on the DOM nodes to begin the rendering process and get it
fully underway.
12 Structure of the render treeThe rendering nodes of the render tree mostly
correspond to the nodes in the DOM tree, albeit with a few
extra objects and nodes that don’t exist in DOM. These are
kept in RenderObject.h. The RenderObject for a DOM node
can be obtained using:
RenderObject* renderer() const
… which can be more usefully used as:
RenderObject* firstChild() const; RenderObject* lastChild() const; RenderObject* previousSibling() const; RenderObject* nextSibling() const;
Qt Creator
While we’re building
this in a command
line environment, you
can also build it in the
graphical Qt Creator
software. It takes a
bit more to get it to
run in there, though
– you’ll have to edit
bits of the source and
use a custom build
command for it to
actually start. You
can look into how to
do this here:
bit.ly/1IvzbM5.
07 Get any extra dependenciesDepending on your development environment,
we may need to add extra dependencies to make sure
everything will run and compile correctly. Ensure that the
following packages are installed just to be certain that the
compiling goes smoothly.
$ sudo apt-get install bison gperf flex libsqlite0-dev libicu-dev libxslt-dev ruby
There may be other packages you need and you can install
them as you go, but these seemed to be the common absent
packages in our tests.
08 Start to build WebKitFinally, we can begin to actually build the QtWebKit
source. Go to the directory that you’ve downloaded the
WebKit source to and build it using:
$ webkit/Tools/Scripts/build-webkit -Qt
This will take a while, depending on your system. If there are
any other errors or missing dependencies, it will stop and you
may have to hunt down the libraries that it needs.
09 Launch a test of WebKitOnce everything is compiled (and it will take a while
depending on your system), you can run this very basic
version of WebKit using the following:
$ Tools/Scripts/run-launcher -Qt
This is the QtTestBrowser, which is a very quick
implementation of WebKit as a browser. You can look
through the fi les to get an idea of how it uses WebKit.
06 Set the Qt pathsBefore we can continue building WebKit, we need to
set the correct paths for the Qt development software. We
fi rst need to set QTDIR to the location of the Qt installation.
Do this by exporting the path with:
$ export QTDIR=[Install directory]
Then make sure that the Qt 5 qmake is the fi rst in the PATH.
Use the following to do this:
$ export PATH=$QTDIR/bin:$PATH
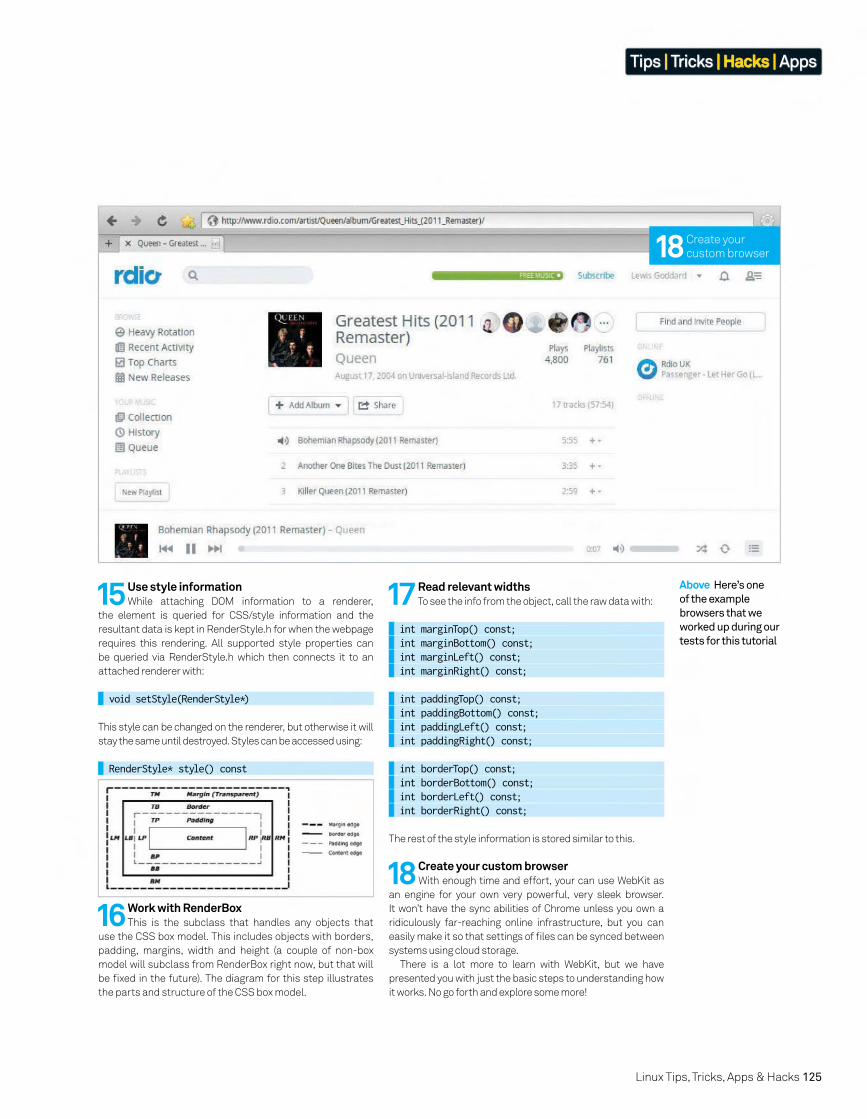
Linux Tips, Tricks, Apps & Hacks 125
Tips | Tricks | Hacks | Apps
15 Use style informationWhile attaching DOM information to a renderer,
the element is queried for CSS/style information and the
resultant data is kept in RenderStyle.h for when the webpage
requires this rendering. All supported style properties can
be queried via RenderStyle.h which then connects it to an
attached renderer with:
void setStyle(RenderStyle*)
This style can be changed on the renderer, but otherwise it will
stay the same until destroyed. Styles can be accessed using:
RenderStyle* style() const
16 Work with RenderBoxThis is the subclass that handles any objects that
use the CSS box model. This includes objects with borders,
padding, margins, width and height (a couple of non-box
model will subclass from RenderBox right now, but that will
be fi xed in the future). The diagram for this step illustrates
the parts and structure of the CSS box model.
17 Read relevant widthsTo see the info from the object, call the raw data with:
int marginTop() const; int marginBottom() const; int marginLeft() const; int marginRight() const;
int paddingTop() const; int paddingBottom() const; int paddingLeft() const; int paddingRight() const;
int borderTop() const; int borderBottom() const; int borderLeft() const; int borderRight() const;
The rest of the style information is stored similar to this.
18 Create your custom browserWith enough time and effort, your can use WebKit as
an engine for your own very powerful, very sleek browser.
It won’t have the sync abilities of Chrome unless you own a
ridiculously far-reaching online infrastructure, but you can
easily make it so that settings of fi les can be synced between
systems using cloud storage.
There is a lot more to learn with WebKit, but we have
presented you with just the basic steps to understanding how
it works. No go forth and explore some more!
Above Here’s one
of the example
browsers that we
worked up during our
tests for this tutorial
18 Create your
custom browser

126 Linux Tips, Tricks, Apps & Hacks
Tips | Tricks | Hacks | Apps
The Gentoo-based utility distro can fi nd vulnerabilities in your network
Network penetration testing with Pentoo
Safety is a big preoccupation for all computer users, not just those on Linux systems. It’s
important to know how to shield yourself and
your systems from attacks, and now we’re going
to look at the problem from a slightly different
angle: how someone would attempt to attack
your system.
White hat or ethical hacking is an important
step in any security process, and we’re going
to take a quick look at probing your own local
network to try and fi gure out any problems you
might have. There are a few different tools and
distros that can aid you in this, but today we are
going to focus on Pentoo.
Pentoo is less known than Kali or Backtrack
Linux, but it’s by no means a poorer product.
Built on Gentoo, it can be used perfectly well
live and can be installed for a more permanent
testing rig. While it has a full suite of pentesting
software, we’ll be concentrating on some of
the network testing apps for the purpose of
exposing any vulnerabilities in your network.
Wireshark can keep track of the
traffi c in your system so you can fi nd
out if there are any problems
Use aircrack-ng to fi gure out
just how secure your wireless
network really is
There are a range of excellent
pentesting apps that are all
installed by default
ResourcesPentoo www.pentoo.ch
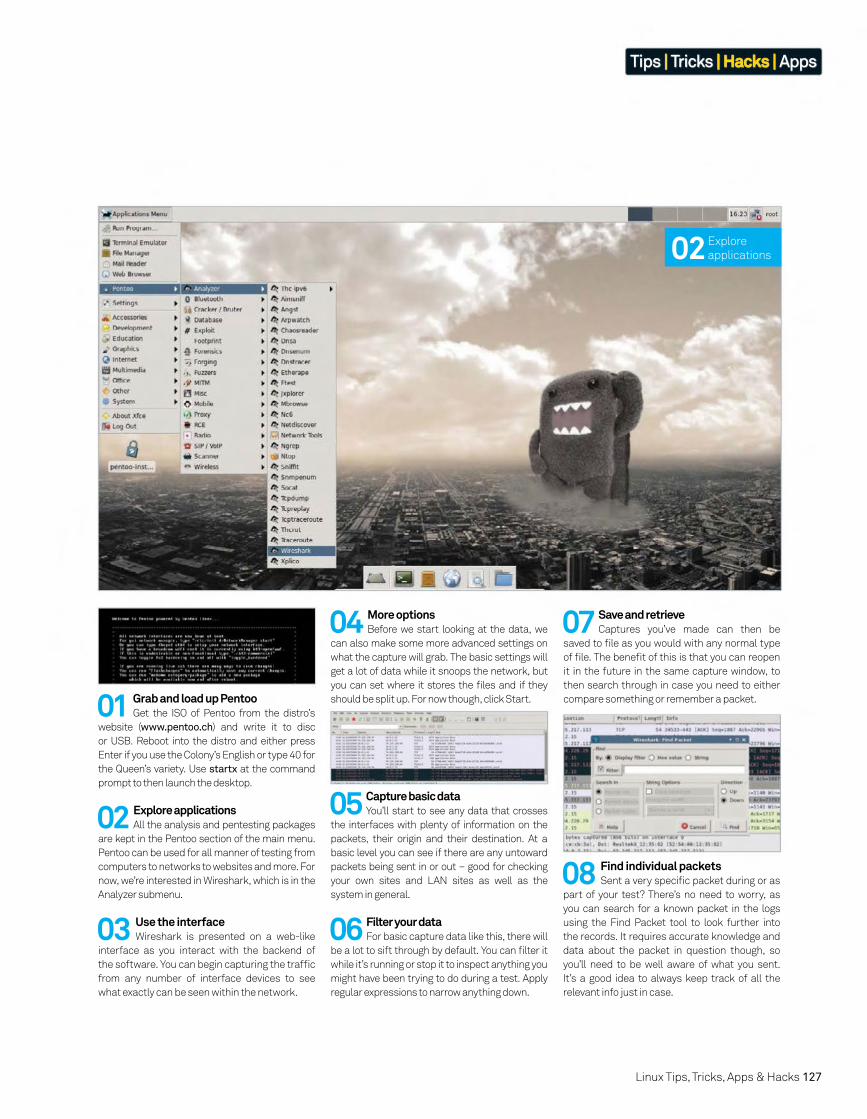
Linux Tips, Tricks, Apps & Hacks 127
Tips | Tricks | Hacks | Apps
01 Grab and load up PentooGet the ISO of Pentoo from the distro’s
website (www.pentoo.ch) and write it to disc
or USB. Reboot into the distro and either press
Enter if you use the Colony’s English or type 40 for
the Queen’s variety. Use startx at the command
prompt to then launch the desktop.
04 More optionsBefore we start looking at the data, we
can also make some more advanced settings on
what the capture will grab. The basic settings will
get a lot of data while it snoops the network, but
you can set where it stores the fi les and if they
should be split up. For now though, click Start.
02 Explore applicationsAll the analysis and pentesting packages
are kept in the Pentoo section of the main menu.
Pentoo can be used for all manner of testing from
computers to networks to websites and more. For
now, we’re interested in Wireshark, which is in the
Analyzer submenu.
05 Capture basic dataYou’ll start to see any data that crosses
the interfaces with plenty of information on the
packets, their origin and their destination. At a
basic level you can see if there are any untoward
packets being sent in or out – good for checking
your own sites and LAN sites as well as the
system in general.
06 Filter your dataFor basic capture data like this, there will
be a lot to sift through by default. You can fi lter it
while it’s running or stop it to inspect anything you
might have been trying to do during a test. Apply
regular expressions to narrow anything down.
07 Save and retrieveCaptures you’ve made can then be
saved to fi le as you would with any normal type
of fi le. The benefi t of this is that you can reopen
it in the future in the same capture window, to
then search through in case you need to either
compare something or remember a packet.
03 Use the interfaceWireshark is presented on a web-like
interface as you interact with the backend of
the software. You can begin capturing the traffi c
from any number of interface devices to see
what exactly can be seen within the network.
08 Find individual packetsSent a very specifi c packet during or as
part of your test? There’s no need to worry, as
you can search for a known packet in the logs
using the Find Packet tool to look further into
the records. It requires accurate knowledge and
data about the packet in question though, so
you’ll need to be well aware of what you sent.
It’s a good idea to always keep track of all the
relevant info just in case.
02 Explore
applications
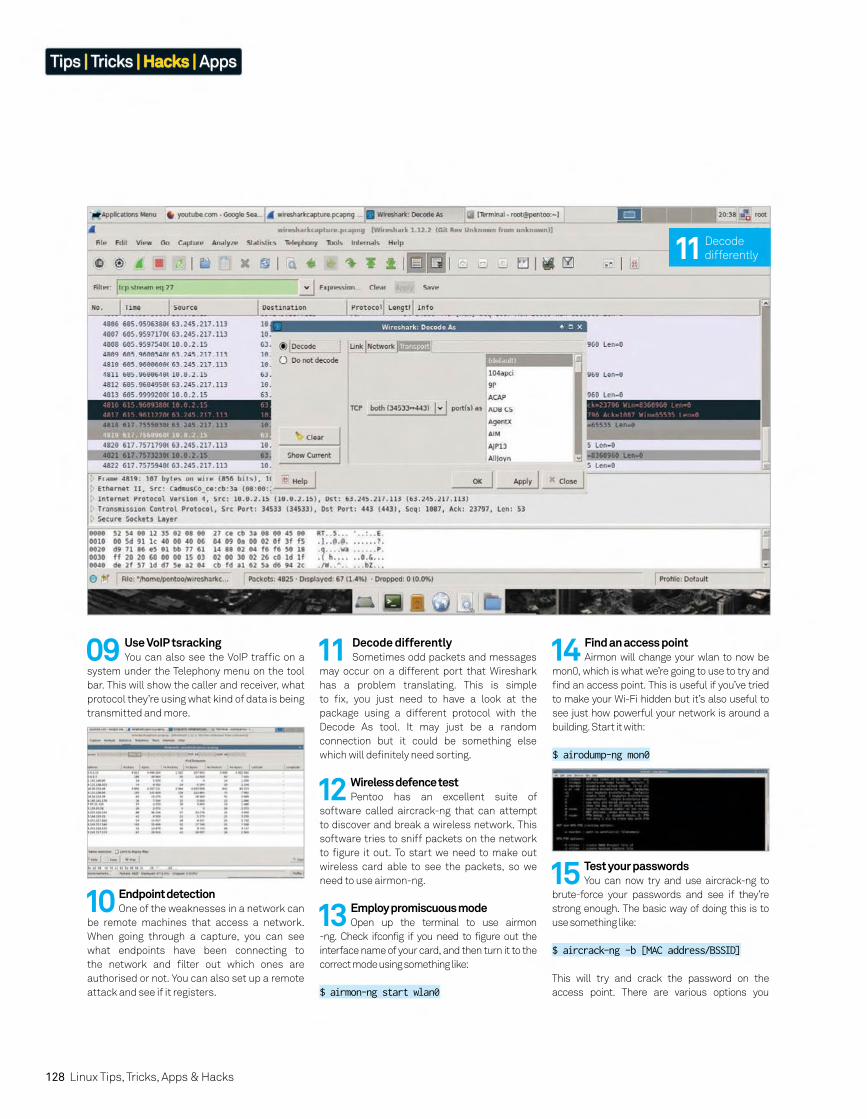
128 Linux Tips, Tricks, Apps & Hacks
Tips | Tricks | Hacks | Apps
10 Endpoint detectionOne of the weaknesses in a network can
be remote machines that access a network.
When going through a capture, you can see
what endpoints have been connecting to
the network and fi lter out which ones are
authorised or not. You can also set up a remote
attack and see if it registers.
11 Decode differentlySometimes odd packets and messages
may occur on a different port that Wireshark
has a problem translating. This is simple
to fi x, you just need to have a look at the
package using a different protocol with the
Decode As tool. It may just be a random
connection but it could be something else
which will defi nitely need sorting.
12 Wireless defence testPentoo has an excellent suite of
software called aircrack-ng that can attempt
to discover and break a wireless network. This
software tries to sniff packets on the network
to fi gure it out. To start we need to make out
wireless card able to see the packets, so we
need to use airmon-ng.
13 Employ promiscuous modeOpen up the terminal to use airmon
-ng. Check ifconfig if you need to figure out the
interface name of your card, and then turn it to the
correct mode using something like:
$ airmon-ng start wlan0
14 Find an access pointAirmon will change your wlan to now be
mon0, which is what we’re going to use to try and
fi nd an access point. This is useful if you’ve tried
to make your Wi-Fi hidden but it’s also useful to
see just how powerful your network is around a
building. Start it with:
$ airodump-ng mon0
15 Test your passwordsYou can now try and use aircrack-ng to
brute-force your passwords and see if they’re
strong enough. The basic way of doing this is to
use something like:
$ aircrack-ng -b [MAC address/BSSID]
This will try and crack the password on the
access point. There are various options you
09 Use VoIP tsrackingYou can also see the VoIP traffi c on a
system under the Telephony menu on the tool
bar. This will show the caller and receiver, what
protocol they’re using what kind of data is being
transmitted and more.
11 Decode
differently
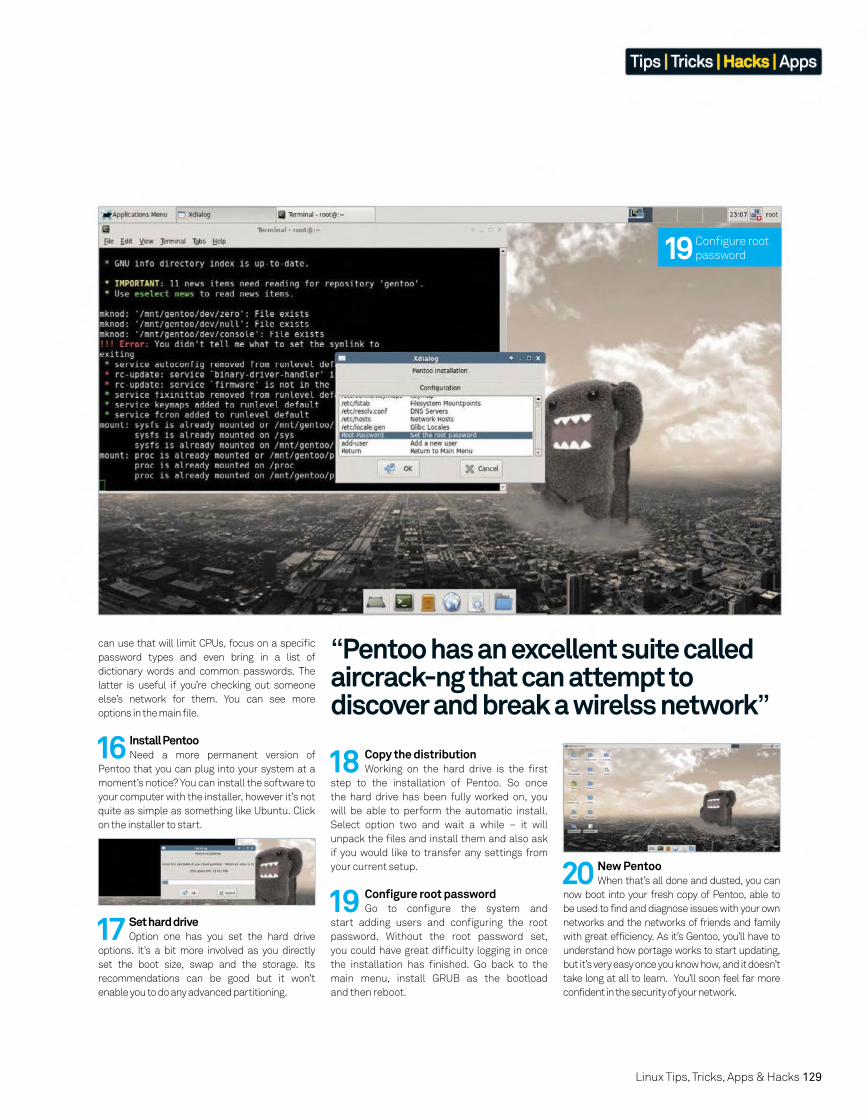
Linux Tips, Tricks, Apps & Hacks 129
Tips | Tricks | Hacks | Apps
16 Install PentooNeed a more permanent version of
Pentoo that you can plug into your system at a
moment’s notice? You can install the software to
your computer with the installer, however it’s not
quite as simple as something like Ubuntu. Click
on the installer to start.
18 Copy the distributionWorking on the hard drive is the fi rst
step to the installation of Pentoo. So once
the hard drive has been fully worked on, you
will be able to perform the automatic install.
Select option two and wait a while – it will
unpack the fi les and install them and also ask
if you would like to transfer any settings from
your current setup.
19 Confi gure root passwordGo to confi gure the system and
start adding users and confi guring the root
password. Without the root password set,
you could have great diffi culty logging in once
the installation has fi nished. Go back to the
main menu, install GRUB as the bootload
and then reboot.
20 New PentooWhen that’s all done and dusted, you can
now boot into your fresh copy of Pentoo, able to
be used to find and diagnose issues with your own
networks and the networks of friends and family
with great efficiency. As it’s Gentoo, you’ll have to
understand how portage works to start updating,
but it’s very easy once you know how, and it doesn’t
take long at all to learn. You’ll soon feel far more
confident in the security of your network.
17 Set hard driveOption one has you set the hard drive
options. It’s a bit more involved as you directly
set the boot size, swap and the storage. Its
recommendations can be good but it won’t
enable you to do any advanced partitioning.
can use that will limit CPUs, focus on a specifi c
password types and even bring in a list of
dictionary words and common passwords. The
latter is useful if you’re checking out someone
else’s network for them. You can see more
options in the main fi le.
“Pentoo has an excellent suite called aircrack-ng that can attempt to discover and break a wirelss network”
19 Confi gure root
password
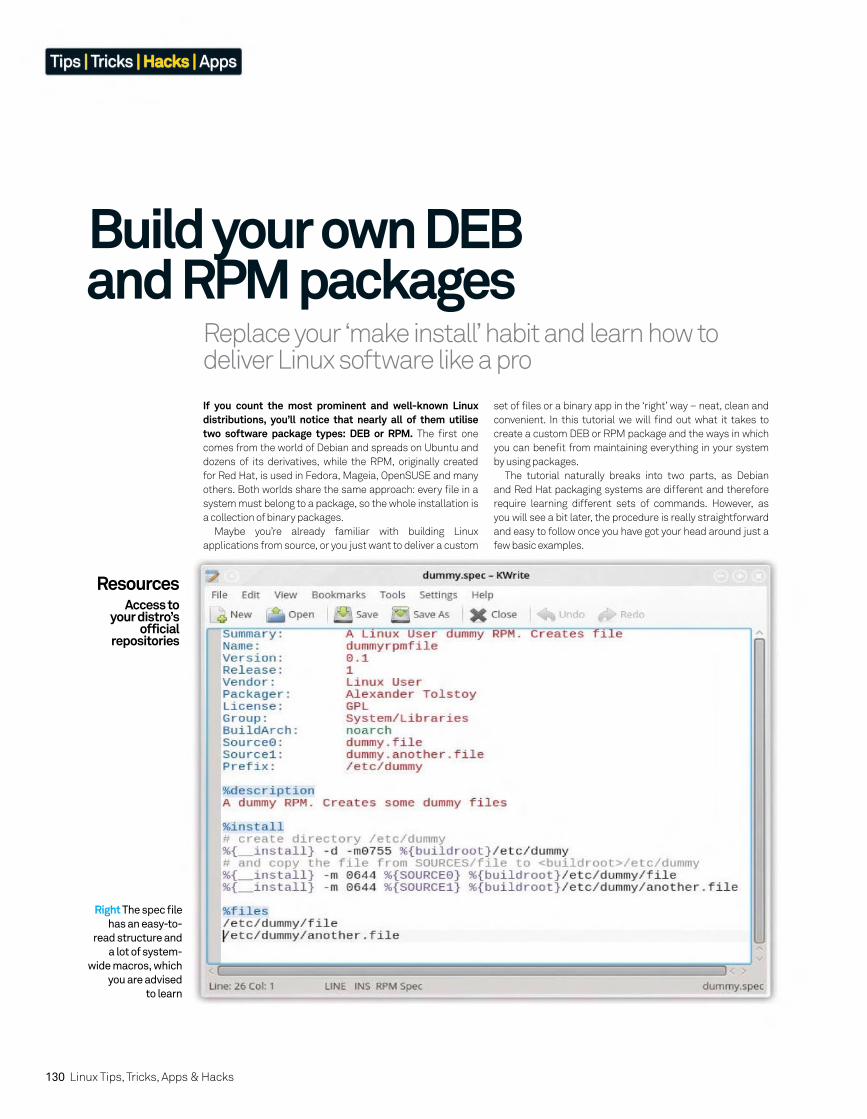
130 Linux Tips, Tricks, Apps & Hacks
Tips | Tricks | Hacks | Apps
Replace your ‘make install’ habit and learn how to deliver Linux software like a pro
Build your own DEB and RPM packages
If you count the most prominent and well-known Linux distributions, you’ll notice that nearly all of them utilise two software package types: DEB or RPM. The fi rst one
comes from the world of Debian and spreads on Ubuntu and
dozens of its derivatives, while the RPM, originally created
for Red Hat, is used in Fedora, Mageia, OpenSUSE and many
others. Both worlds share the same approach: every fi le in a
system must belong to a package, so the whole installation is
a collection of binary packages.
Maybe you’re already familiar with building Linux
applications from source, or you just want to deliver a custom
ResourcesAccess to
your distro’s official
repositories
set of fi les or a binary app in the ‘right’ way – neat, clean and
convenient. In this tutorial we will fi nd out what it takes to
create a custom DEB or RPM package and the ways in which
you can benefi t from maintaining everything in your system
by using packages.
The tutorial naturally breaks into two parts, as Debian
and Red Hat packaging systems are different and therefore
require learning different sets of commands. However, as
you will see a bit later, the procedure is really straightforward
and easy to follow once you have got your head around just a
few basic examples.
Right The spec fi le
has an easy-to-
read structure and
a lot of system-
wide macros, which
you are advised
to learn
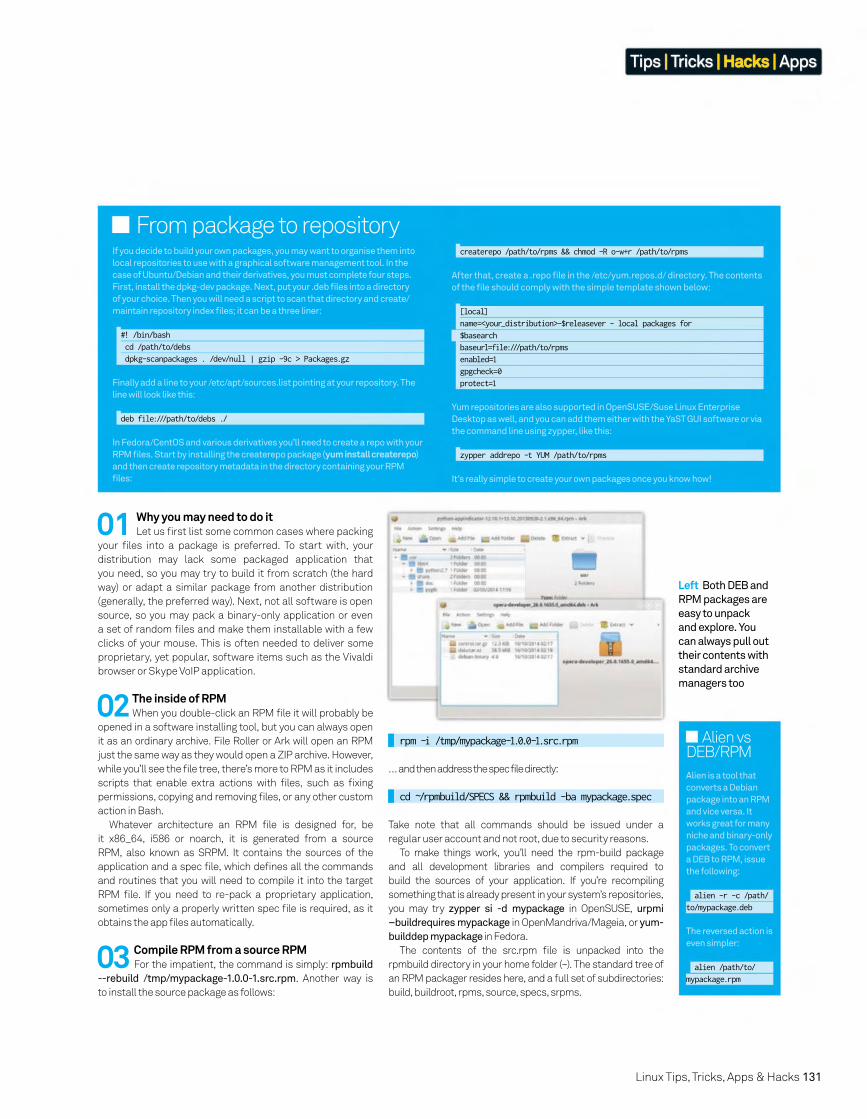
Linux Tips, Tricks, Apps & Hacks 131
Tips | Tricks | Hacks | Apps
01 Why you may need to do itLet us fi rst list some common cases where packing
your fi les into a package is preferred. To start with, your
distribution may lack some packaged application that
you need, so you may try to build it from scratch (the hard
way) or adapt a similar package from another distribution
(generally, the preferred way). Next, not all software is open
source, so you may pack a binary-only application or even
a set of random fi les and make them installable with a few
clicks of your mouse. This is often needed to deliver some
proprietary, yet popular, software items such as the Vivaldi
browser or Skype VoIP application.
rpm -i /tmp/mypackage-1.0.0-1.src.rpm
… and then address the spec file directly:
cd ~/rpmbuild/SPECS && rpmbuild -ba mypackage.spec
Take note that all commands should be issued under a
regular user account and not root, due to security reasons.
To make things work, you’ll need the rpm-build package
and all development libraries and compilers required to
build the sources of your application. If you’re recompiling
something that is already present in your system’s repositories,
you may try zypper si -d mypackage in OpenSUSE, urpmi
–buildrequires mypackage in OpenMandriva/Mageia, or yum-
builddep mypackage in Fedora.
The contents of the src.rpm fi le is unpacked into the
rpmbuild directory in your home folder (~). The standard tree of
an RPM packager resides here, and a full set of subdirectories:
build, buildroot, rpms, source, specs, srpms.
02 The inside of RPMWhen you double-click an RPM fi le it will probably be
opened in a software installing tool, but you can always open
it as an ordinary archive. File Roller or Ark will open an RPM
just the same way as they would open a ZIP archive. However,
while you’ll see the fi le tree, there’s more to RPM as it includes
scripts that enable extra actions with fi les, such as fi xing
permissions, copying and removing fi les, or any other custom
action in Bash.
Whatever architecture an RPM fi le is designed for, be
it x86_64, i586 or noarch, it is generated from a source
RPM, also known as SRPM. It contains the sources of the
application and a spec fi le, which defi nes all the commands
and routines that you will need to compile it into the target
RPM fi le. If you need to re-pack a proprietary application,
sometimes only a properly written spec fi le is required, as it
obtains the app fi les automatically.
If you decide to build your own packages, you may want to organise them into
local repositories to use with a graphical software management tool. In the
case of Ubuntu/Debian and their derivatives, you must complete four steps.
First, install the dpkg-dev package. Next, put your .deb fi les into a directory
of your choice. Then you will need a script to scan that directory and create/
maintain repository index fi les; it can be a three liner:
#! /bin/bash
cd /path/to/debs
dpkg-scanpackages . /dev/null | gzip -9c > Packages.gz
Finally add a line to your /etc/apt/sources.list pointing at your repository. The
line will look like this:
deb file:///path/to/debs ./
In Fedora/CentOS and various derivatives you’ll need to create a repo with your
RPM fi les. Start by installing the createrepo package (yum install createrepo)
and then create repository metadata in the directory containing your RPM
fi les:
createrepo /path/to/rpms && chmod -R o-w+r /path/to/rpms
After that, create a .repo fi le in the /etc/yum.repos.d/ directory. The contents
of the fi le should comply with the simple template shown below:
[local]
name=<your_distribution>-$releasever - local packages for
$basearch
baseurl=file:///path/to/rpms
enabled=1
gpgcheck=0
protect=1
Yum repositories are also supported in OpenSUSE/Suse Linux Enterprise
Desktop as well, and you can add them either with the YaST GUI software or via
the command line using zypper, like this:
zypper addrepo -t YUM /path/to/rpms
It’s really simple to create your own packages once you know how!
From package to repository
03 Compile RPM from a source RPMFor the impatient, the command is simply: rpmbuild
--rebuild /tmp/mypackage-1.0.0-1.src.rpm. Another way is
to install the source package as follows:
Left Both DEB and
RPM packages are
easy to unpack
and explore. You
can always pull out
their contents with
standard archive
managers too
Alien vs DEB/RPM
Alien is a tool that
converts a Debian
package into an RPM
and vice versa. It
works great for many
niche and binary-only
packages. To convert
a DEB to RPM, issue
the following:
alien -r -c /path/
to/mypackage.deb
The reversed action is
even simpler:
alien /path/to/
mypackage.rpm
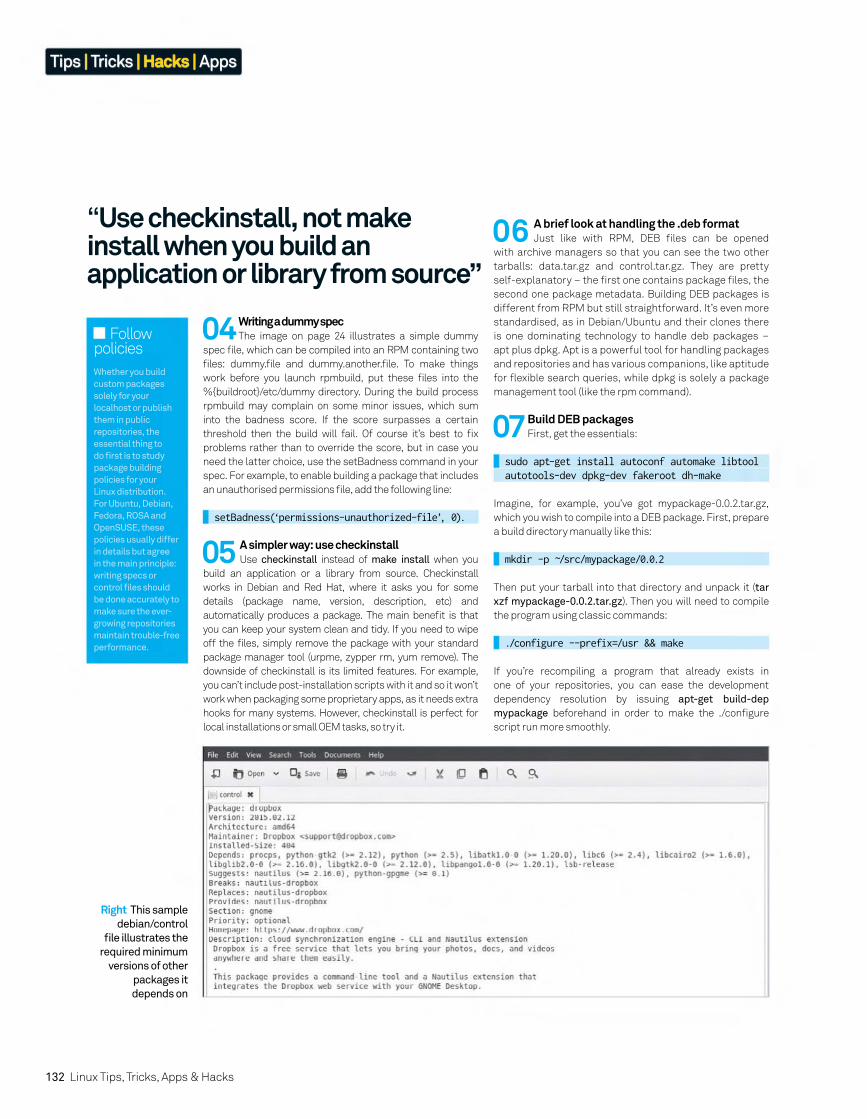
132 Linux Tips, Tricks, Apps & Hacks
Tips | Tricks | Hacks | Apps
“Use checkinstall, not make install when you build an application or library from source”
Right This sample
debian/control
fi le illustrates the
required minimum
versions of other
packages it
depends on
Follow policies
Whether you build
custom packages
solely for your
localhost or publish
them in public
repositories, the
essential thing to
do fi rst is to study
package building
policies for your
Linux distribution.
For Ubuntu, Debian,
Fedora, ROSA and
OpenSUSE, these
policies usually differ
in details but agree
in the main principle:
writing specs or
control fi les should
be done accurately to
make sure the ever-
growing repositories
maintain trouble-free
performance.
04 Writing a dummy specThe image on page 24 illustrates a simple dummy
spec fi le, which can be compiled into an RPM containing two
fi les: dummy.fi le and dummy.another.fi le. To make things
work before you launch rpmbuild, put these fi les into the
%{buildroot}/etc/dummy directory. During the build process
rpmbuild may complain on some minor issues, which sum
into the badness score. If the score surpasses a certain
threshold then the build will fail. Of course it’s best to fi x
problems rather than to override the score, but in case you
need the latter choice, use the setBadness command in your
spec. For example, to enable building a package that includes
an unauthorised permissions fi le, add the following line:
setBadness(‘permissions-unauthorized-file’, 0).
05 A simpler way: use checkinstallUse checkinstall instead of make install when you
build an application or a library from source. Checkinstall
works in Debian and Red Hat, where it asks you for some
details (package name, version, description, etc) and
automatically produces a package. The main benefi t is that
you can keep your system clean and tidy. If you need to wipe
off the fi les, simply remove the package with your standard
package manager tool (urpme, zypper rm, yum remove). The
downside of checkinstall is its limited features. For example,
you can’t include post-installation scripts with it and so it won’t
work when packaging some proprietary apps, as it needs extra
hooks for many systems. However, checkinstall is perfect for
local installations or small OEM tasks, so try it.
06 A brief look at handling the .deb formatJust like with RPM, DEB fi les can be opened
with archive managers so that you can see the two other
tarballs: data.tar.gz and control.tar.gz. They are pretty
self-explanatory – the fi rst one contains package fi les, the
second one package metadata. Building DEB packages is
different from RPM but still straightforward. It’s even more
standardised, as in Debian/Ubuntu and their clones there
is one dominating technology to handle deb packages –
apt plus dpkg. Apt is a powerful tool for handling packages
and repositories and has various companions, like aptitude
for fl exible search queries, while dpkg is solely a package
management tool (like the rpm command).
07 Build DEB packagesFirst, get the essentials:
sudo apt-get install autoconf automake libtool autotools-dev dpkg-dev fakeroot dh-make
Imagine, for example, you’ve got mypackage-0.0.2.tar.gz,
which you wish to compile into a DEB package. First, prepare
a build directory manually like this:
mkdir -p ~/src/mypackage/0.0.2
Then put your tarball into that directory and unpack it (tar
xzf mypackage-0.0.2.tar.gz). Then you will need to compile
the program using classic commands:
./configure --prefix=/usr && make
If you’re recompiling a program that already exists in
one of your repositories, you can ease the development
dependency resolution by issuing apt-get build-dep
mypackage beforehand in order to make the ./confi gure
script run more smoothly.
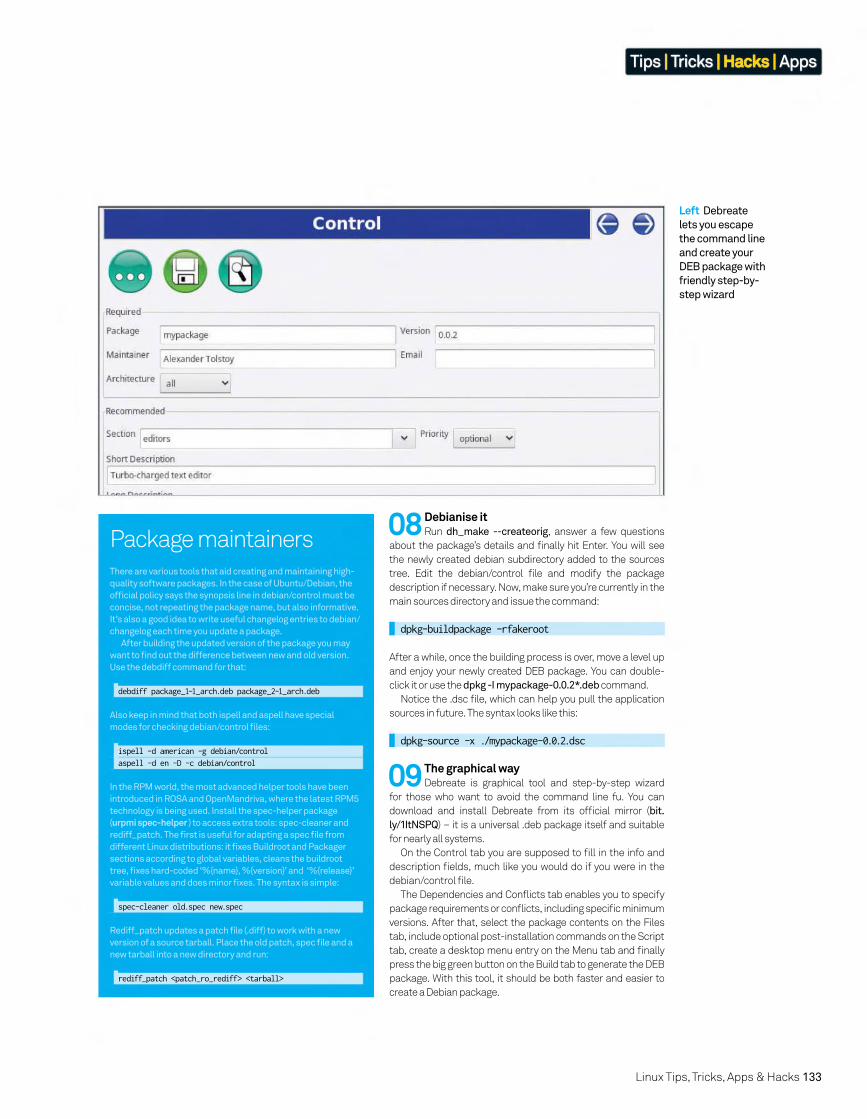
Linux Tips, Tricks, Apps & Hacks 133
Tips | Tricks | Hacks | Apps
09 The graphical way Debreate is graphical tool and step-by-step wizard
for those who want to avoid the command line fu. You can
download and install Debreate from its offi cial mirror (bit.
ly/1ItNSPQ) – it is a universal .deb package itself and suitable
for nearly all systems.
On the Control tab you are supposed to fi ll in the info and
description fi elds, much like you would do if you were in the
debian/control fi le.
The Dependencies and Confl icts tab enables you to specify
package requirements or confl icts, including specifi c minimum
versions. After that, select the package contents on the Files
tab, include optional post-installation commands on the Script
tab, create a desktop menu entry on the Menu tab and fi nally
press the big green button on the Build tab to generate the DEB
package. With this tool, it should be both faster and easier to
create a Debian package.
Left Debreate
lets you escape
the command line
and create your
DEB package with
friendly step-by-
step wizard
There are various tools that aid creating and maintaining high-
quality software packages. In the case of Ubuntu/Debian, the
offi cial policy says the synopsis line in debian/control must be
concise, not repeating the package name, but also informative.
It’s also a good idea to write useful changelog entries to debian/
changelog each time you update a package.
After building the updated version of the package you may
want to fi nd out the difference between new and old version.
Use the debdiff command for that:
debdiff package_1-1_arch.deb package_2-1_arch.deb
Also keep in mind that both ispell and aspell have special
modes for checking debian/control fi les:
ispell -d american -g debian/control
aspell -d en -D -c debian/control
In the RPM world, the most advanced helper tools have been
introduced in ROSA and OpenMandriva, where the latest RPM5
technology is being used. Install the spec-helper package
(urpmi spec-helper ) to access extra tools: spec-cleaner and
rediff_patch. The fi rst is useful for adapting a spec fi le from
different Linux distributions: it fi xes Buildroot and Packager
sections according to global variables, cleans the buildroot
tree, fi xes hard-coded ‘%{name}, %{version}’ and ‘%{release}’
variable values and does minor fi xes. The syntax is simple:
spec-cleaner old.spec new.spec
Rediff_patch updates a patch fi le (.diff) to work with a new
version of a source tarball. Place the old patch, spec fi le and a
new tarball into a new directory and run:
rediff_patch <patch_ro_rediff> <tarball>
Package maintainers08 Debianise it
Run dh_make --createorig, answer a few questions
about the package’s details and fi nally hit Enter. You will see
the newly created debian subdirectory added to the sources
tree. Edit the debian/control fi le and modify the package
description if necessary. Now, make sure you’re currently in the
main sources directory and issue the command:
dpkg-buildpackage -rfakeroot
After a while, once the building process is over, move a level up
and enjoy your newly created DEB package. You can double-
click it or use the dpkg -I mypackage-0.0.2*.deb command.
Notice the .dsc fi le, which can help you pull the application
sources in future. The syntax looks like this:
dpkg-source -x ./mypackage-0.0.2.dsc
134 Linux Tips, Tricks, Apps & Hacks
Choose the best software for your system
136 Ultimate distro & FOSS guideThe best free software for all uses
146 Tails 1.3The Tails team tightens security for 1.3
147 Ubuntu 15.04 Final BetaUbuntu makes the switch to systemd
148 Debian 8.0 JessieThe new LTS release for Debian
“An everyday distro is quite broad: the kind of operating system you can use for anything and everything and is easy to use”
146
Linux Tips, Tricks, Apps & Hacks134 Linux Tips, Tricks, Apps & Hacks
Tips | Tricks | Hacks | Apps
136
148

Linux Tips, Tricks, Apps & Hacks 135Linux Tips, Tricks, Apps & Hacks 135Linux Tips, Tricks, Apps & Hacks
156
Tips | Tricks | Hacks | Apps
150
150 Fedora 22How did Fedora build on 21’s foundations?
152 elementary OS 0.3 FreyaAn update with over 1,1000 improvements
154 openSUSE 13.2The next step for all Linux users
156 Linux Mint 17.1Mint’s fi rst truly independent desktop
154152

Discover the best free
software in every category and
see which ones you should be using
136 Linux Tips, Tricks, Apps & Hacks
Tips | Tricks | Hacks | Apps

An everyday distro is quite a broad thing; in this context we mean the kind of operating system you can use for just about anything and everything without really specialising in one specific area.
Something that’s easy to use and its supplied tools aid
your use of it.
This is exactly the point where elementaryOS comes
in. Aiming to be easy to use for people of all skill levels,
elementaryOS is a beautifully designed distro that
has had a lot of care put into it. Using an Ubuntu LTS
as a base and cribbing from a lot of existing design
decisions, elementaryOS is hardly a completely
original Linux distribution.
What makes elementaryOS unique is its use of
these design aspects and design decisions, putting
together a wholly new desktop and distro experience
that you can’t fi nd anywhere else without some
serious customisations on the user’s part. It’s the
best of every world for people who prefer using a fully-
feature graphical desktop, and it works extremely well
on new and modern systems.
The wording on the website is inclusive and friendly
to newcomers as well – not once is there mention of
Linux or distribution, instead using wording familiar
to everyone and rightfully referring to elementaryOS
as a whole as an operating system. This kind of
friendliness and familiarity is translated to the
desktop, from a simple dock bar that grants access to
important programs from the moment you start using
it to an applications menu reminiscent of modern
smartphone design.
The stable Ubuntu base also grants access to an
unprecedented level of packages and other desktop
types if you want something a little different to
elementary’s offering. It’s a great fi rst distro for people
who want to make the switch to Linux as well.
Elementary OS
Is this the year of Linux? Or is it the year we stop claiming that? Either way, there are already plenty of choices for your day-to-day
Linux MintAnother fi rm favourite as
an everyday distro, Linux
Mint would have taken this
category by storm once
upon a time due to excellent design
over two fantastic desktops on top of
an excellent distro.
UbuntuUbuntu is probably the
most popular distro in
the world, or at least the
most well-known, which
means a lot of software supports it and
not other distros. You can customise it
anyway you want off of its core base.
MageiaMageia is a very user-
friendly spin on the
Mandriva family with
some excellent apps for
controlling just about every aspect
of the distro along with other smart
design choices. It’s been brought back
into Mandriva but is still great.
LibreOfficeThe offi ce suite
that has far
superseded
its originator,
LibreOffi ce can handle
all your word processing,
spreadsheeting and
presentation needs extremely
well with a selection of
excellent software.
FirefoxOnce again
the king of the
browsers, with
half a billion users
around the world, Firefox has
privacy and customisability
in mind with its design. Due to
some excellent cross-platform
tools, you can use it wherever
you want.
ThunderbirdThe email
counterpart
to Firefox has
remained a very
strong email client on any
operating system for a long
time. With a great range of add-
ons and extensions, you can
have it work exactly as you’d
want it to.
CinnamonThe desktop environment
originally made for Linux
Mint, Cinnamon uses a more
traditional desktop layout
and a lot of common sense
design choices and workfl ow
methods that make the most
of modern tech and traditional
ideas. It’s an improvement on
many default desktops.
ShotwellExcellent photo
management
software used
by a lot of distros
by default, it even has some
basic support for RAWs. You
can perform batch operations
to tweak colours and lighting,
or just organise photos into
specifi c tags.
Elements like the dock and
window styling will look familiar
The simple, searchable applications menu
takes design cues from mobile operating systems
99999999////11110000
77777777////11110000777777777777
66666666////11110000
888888888////11110000
1111111100000000////11110000
99999999////11110000
99999999////11110000
77777777////11110000777777777777
Linux Tips, Tricks, Apps & Hacks 137
Tips | Tricks | Hacks | Apps

You can define lightweight in a number of ways these days. While the graphical software part of a distro itself can be the one that is most resource intensive, the core kernel and behind-the-scenes
packages can also take power away from CPU cycles. While Lubuntu and other normal Linux distros
running LXDE don’t do much to the core of their
operation, merely running the desktop itself can be a
huge relief on some systems.
That’s why we’re awarding Lubuntu this prestigious
prize. While we’re not the biggest fans of Unity, the
distribution underneath the desktop environment is
an incredibly solid and relatively easy-to-use system
that a good desktop environment can really make
the most of. LXDE is not only extremely light – it uses
78 MB of RAM compared to XFCEs 89 MB – it’s also
(very importantly) as fully-featured as most modern
desktops. Add this to Ubuntu’s impressive software
and packages and you’ve got a lightweight distro that
doesn’t sacrifi ce any usability and still has access to all
your favourite software.
As for lightweight software, Lubuntu comes with
quite a different selection of default apps compared to
its vanilla counterpart. A smattering of the basics such
as Firefox, Pidgin and Abiword are all you’re presented
with. It’s enough to get you started and thanks to
access to the full Ubuntu repos you can then start
building up your system with some of the excellent and
lightweight apps that Linux is known for.
It’s defi nitely not the lightest distro around but
it’s certainly the best distro that comes under the
lightweight banner.
Lubuntu
A lighter Linux distro can help you get the most out of an older or underpowered system by using relatively fewer resources
wattOSA very lightweight
and speedy operating
system that aims to
do two things: boot to
desktop very fast and also save you
electricity, either plugged in or on
the battery. It does both of these
exceedingly well.
Puppy LinuxPuppy Linux lets you teach
an old dog new tricks – it’s
specifi cally designed
for older systems and is
extremely resource friendly. It can live
in a very small amount of RAM yet still
includes a very functional system.
PorteusA very fast live distro that
takes up only 300 MB of
space, and is optimised
to run from live media as
well. You can add modules for extra
software if needed, making it a very
customisable distro.
AudaciousVery lightweight
and very fast,
Audacious is the
defi nitely the
best audio player for those on
a resource budget. It hooks
into notifi cation centres
of most major desktops as
well, allowing you to control
it better.
MidoriMidori teeters
on the edge of
being just a bit
too lightweight
to be as useful as some of
its peers, but it managed
to maintain a number of
excellent features to make
browsing the Internet with it
acceptable in 2015.
CMPlayerA lightweight
video player that
still has a fairly
decent interface
and no need for mucking
around in the command
line, it will play all the media
you need as long as you
have the right codecs and
backends installed.
GeanyA text editor with
IDE features
that is popular
among those
with a few small projects on
the go. It’s easy enough to
switch between the two types,
meaning you can use it for your
day-to-day text editing before
going full developer.
EnlightenmentA window manager
or full desktop
environment,
Enlightenment
is an incredible fl exible and
lightweight framework loved
by hardcore users. It’s rarely
used as a default desktop, but
give it a go if you’re on the hunt
for something different.
While minimal, the LXDE
desktop styling is very smart
Lubuntu has an excellent Software Centre to
make package downloads easier
888888888////111100000
77777777////11110000777777777777
999999999////111100000
66666666////11110000
11111111000000000////111100000
1111111100000000////11110000
99999999////11110000
99999999////111100000
138 Linux Tips, Tricks, Apps & Hacks
Tips | Tricks | Hacks | Apps

When it comes to media and other forms of entertainment consumption via computers, one of the most recognisable names in existence is XBMC. Very likely
because of its quite redundant legacy
naming, it’s unfortunately dropping the well-known
branding in favour of new name Kodi. What’s this all
got to do with entertainment distros though?
Well the devs behind Kodi also make the excellent
OpenELEC, a Linux distro optimised for a number of
different hardware types to offer the best possible
Kodi experience.
Not only does it work on specialist hardware
such as the Raspberry Pi, Apple TV and some other
hardware ideal as HTPCs, but you can also get
generic PC builds for x86 and x64 systems.OpenELEC
takes up only a tiny amount of your fi le system while
still offering a full version of Kodi. This means you can
use any remaining storage to keep media local, such as
your party playlist, if that’s your kind of thing, however
you can still stream your media from any other
computer set up to share it. Setting up these shared
folders in Kodi is a quick and simple exercise, and it
even scrapes together information on the fi les to make
navigation easier.
There are also plenty of add-ons available that allow
you to stream media for many online video sources,
as well as recently-added native Live TV viewing and
recording – the latter being a better use for your hard
drive space.
For both TV and PC, this is an excellent way to
consume media in almost any situation, with plenty of
codecs and online features.
OpenELEC
Here are your best distros for making custom systems to play all your media, either on a TV or just for better navigation while at your desk
GeeXboxA direct alternative to
OpenELEC that gives you
a little more choice for
how you set up a HTPC. It
hasn’t had any new development for
about a year now, but that’s nothing to
worry about as it’s still excellent.
UbuntuWhen it comes to being
an entertainment distro,
Ubuntu’s strength is its
supreme list of packages.
You can set up XBMC/Kodi, Plex, Myth
or just plain video and music players on
Ubuntu of any type.
AVLinuxNot for playing back
your media per se, AV
Linux is an excellent
way for you to actually
create audio and video yourself,
thanks to a custom kernel and great
package selection on a live CD or live
USB stick.
KodiPreviously
XBMC, Kodi
Entertainment
Center is the
premier media PC software
around. It’s the software
behind OpenELEC and it can
be used for simple music and
video playback, or streaming
services and recording live TV.
VLCAn extremely
powerful yet small
piece of software
that can not only
play just about any form of
media, but also send, receive
and record network streams.
It’s very customisable and easy
to use even if you don’t want to
stream your desktop.
ClementineThe most fully-
featured audio
player around, with
incredible library
and playlist management and
an excellent interface to boot.
It also has a smart playlist
that will build itself on the fl y,
however it doesn’t run well on
older systems.
NuvolaOne of the
problems we
have found with
browser-based
streaming is that we cannot
control playback with media
keys or hotkeys. Nuvola allows
you to keep all your streaming
audio in one place and, more
importantly, control it.
GIMPThe powerful
image manipulator
that is probably
the best open
source has to offer, GIMP can
even challenge Photoshop
thanks to its array of excellent
features and tools – it even has
a more straightforward naming
convention in places.
OpenELEC claims to set up
your media box in 15 minutes There are some customisations you can make,
as well as add-ons to install
1111111100000000////11110000
88888888////11110000
44444444////111100000
88888888////11110000
333333333////11110000
1111111100000000////11110000
999999999////11110000
1111111100000000////11110000
Linux Tips, Tricks, Apps & Hacks 139
Tips | Tricks | Hacks | Apps

Arch has never been a distribution to pander to the common denominator. While its contemporaries add user-
friendly wizards and hand-holding
installation packages, Arch dumps the
newcomer to a console session and
leaves them adrift with little more than a Wiki page for
company. For beginners, simply getting Arch installed
can seem like a major achievement – but beginners are
most certainly not Arch’s target market.
Once it’s installed, Arch reveals its true potential.
It allows the more technical user to install only
the packages required for day-to-day work for
guaranteed zero bloat, with all the benefi ts to
performance, stability and your ability to concentrate
that this implies. Tweaking your Arch install can
become obsessive, but once it’s set up to your liking
you can expect a smooth ride.
Arch is certainly not a distribution for beginners, but
those with Linux experience will find plenty to like about
it. It has an active community, albeit one which can be
unwelcoming to beginners, boasts a great package
selection for even some of the more esoteric tools in a
developer’s arsenal, and promises to provide an easily-
customised environment tailored specifically to your
individual needs.
A rolling-release development methodology means
that while installation may be painful it’s a one-off
experience, and users are guaranteed to be working on
the latest available tools and resources. There’s a good
reason Arch and its derivatives are popular among
Linux kernel developers as well as those who write
software for other platforms.
Finally, Arch has an ace up its sleeve for those
targeting Arch itself with their creations: the Arch Build
System. Designed specifi cally for Linux developers,
the ABS offers the ability to create, customise and
distribute packages into Arch which are built directly
from source. Based heavily on the BSD ports system,
ABS offers automation for tasks other distributions
require developers to perform by hand.
Arch Linux
With Linux proving a popular platform for development work, which is the best of the bunch for getting your code on?
CrunchBangA Debian derivative,
CrunchBang uses the
lightweight Openbox
window manager to be
as distraction-free as possible and
offers a good balance between the
performance and fl exibility of Arch and
the shallow learning curve of Ubuntu.
GentooLike Arch, Gentoo features
a BSD ports-like package
management system
dubbed Portage, and a
release system ensuring users install
the latest packages compiled from
source with per-distro optimisations.
UbuntuOften derided for
Canonical’s treatment
of the wider open-
source community,
Ubuntu nevertheless promises wide
compatibility backed by the option of
commercial support contracts.
You can install just the tools
you need for zero bloat
222222222////11110000
55555555////11110000
1111111100000000////11110000
66666666////11110000
888888888////11110000
99999999////11110000
22222222////11110000
99999999////11110000
EclipseIt might lack
compatibility with
the GNU General
Public Licence, but
the Eclipse Public Licensed
Eclipse IDE is a powerful tool.
Based on IBM’s Visual Age,
it supports most common
programming languages you’ll
be working with.
VirtualBoxWhile the
GPL-licensed
VirtualBox OSE
build only provides
virtualised USB 1.1 support, its
other features make it a great
way to run alternative operating
systems on top of userspace
Linux; ideal for testing your
code on other platforms.
GitBorn of a copyright
confusion that
surrounded
BitKeeper, Git is
the distributed revision control
system of choice for kernel
developers. It allows for easy
collaborative working with
plenty of ways to track bugs
added in later code revisions.
Vim/EMACSDid you really think we were
going to get involved in this
debate? A good text editor
is the programmer’s best
tool, but we’re staying on the
fence with this one. Whether
you’re an acolyte of Stallman
and Steele or a proselyte for
Moolenaar, use whichever of
these works for you.
GNU DebuggerThe standard
debugger for
GNU/Linux, GDB’s
capabilities
extend beyond the obvious
with support for programming
languages ranging from Free
Pascal and Ada through to
Objective-C and Java. We
recommend giving it a try.
140 Linux Tips, Tricks, Apps & Hacks
Tips | Tricks | Hacks | Apps
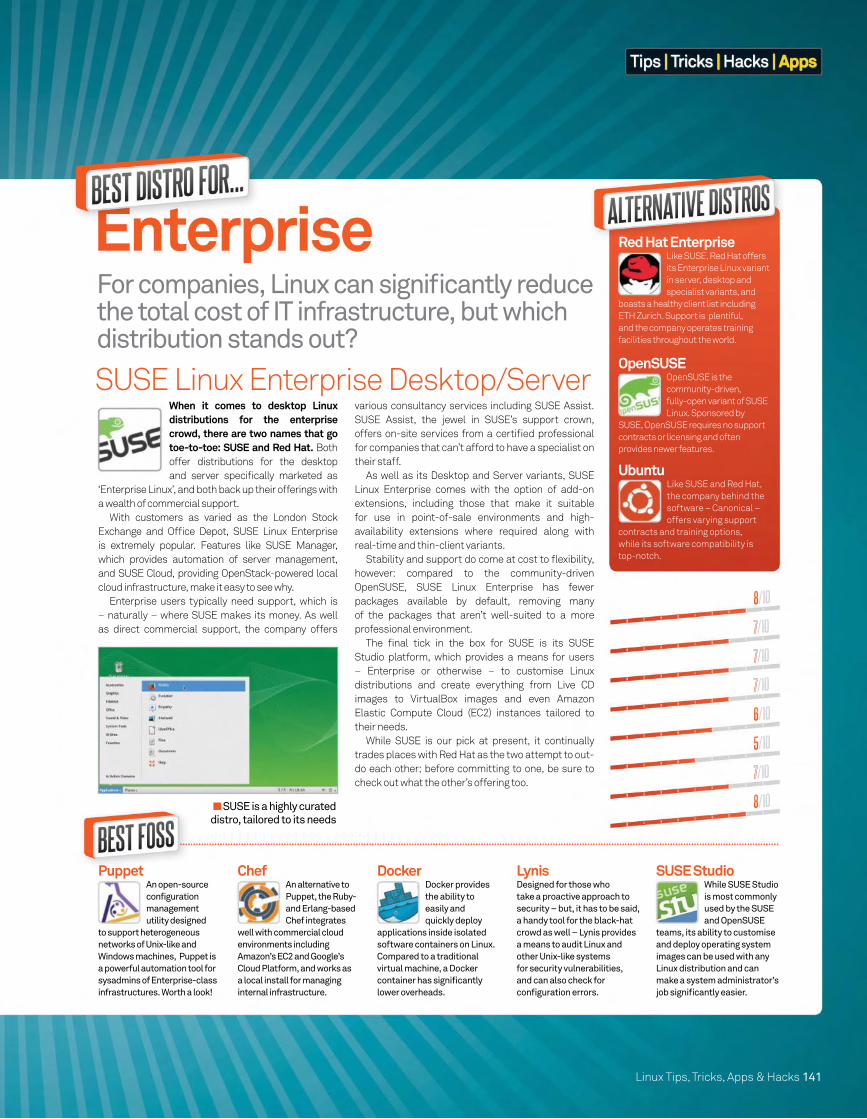
When it comes to desktop Linux distributions for the enterprise crowd, there are two names that go toe-to-toe: SUSE and Red Hat. Both
offer distributions for the desktop
and server specifi cally marketed as
‘Enterprise Linux’, and both back up their offerings with
a wealth of commercial support.
With customers as varied as the London Stock
Exchange and Offi ce Depot, SUSE Linux Enterprise
is extremely popular. Features like SUSE Manager,
which provides automation of server management,
and SUSE Cloud, providing OpenStack-powered local
cloud infrastructure, make it easy to see why.
Enterprise users typically need support, which is
– naturally – where SUSE makes its money. As well
as direct commercial support, the company offers
various consultancy services including SUSE Assist.
SUSE Assist, the jewel in SUSE’s support crown,
offers on-site services from a certifi ed professional
for companies that can’t afford to have a specialist on
their staff.
As well as its Desktop and Server variants, SUSE
Linux Enterprise comes with the option of add-on
extensions, including those that make it suitable
for use in point-of-sale environments and high-
availability extensions where required along with
real-time and thin-client variants.
Stability and support do come at cost to fl exibility,
however: compared to the community-driven
OpenSUSE, SUSE Linux Enterprise has fewer
packages available by default, removing many
of the packages that aren’t well-suited to a more
professional environment.
The fi nal tick in the box for SUSE is its SUSE
Studio platform, which provides a means for users
– Enterprise or otherwise – to customise Linux
distributions and create everything from Live CD
images to VirtualBox images and even Amazon
Elastic Compute Cloud (EC2) instances tailored to
their needs.
While SUSE is our pick at present, it continually
trades places with Red Hat as the two attempt to out-
do each other; before committing to one, be sure to
check out what the other’s offering too.
SUSE Linux Enterprise Desktop/Server
For companies, Linux can signifi cantly reduce the total cost of IT infrastructure, but which distribution stands out?
Red Hat EnterpriseLike SUSE, Red Hat offers
its Enterprise Linux variant
in server, desktop and
specialist variants, and
boasts a healthy client list including
ETH Zurich. Support is plentiful,
and the company operates training
facilities throughout the world.
OpenSUSEOpenSUSE is the
community-driven,
fully-open variant of SUSE
Linux. Sponsored by
SUSE, OpenSUSE requires no support
contracts or licensing and often
provides newer features.
UbuntuLike SUSE and Red Hat,
the company behind the
software – Canonical –
offers varying support
contracts and training options,
while its software compatibility is
top-notch.
PuppetAn open-source
configuration
management
utility designed
to support heterogeneous
networks of Unix-like and
Windows machines, Puppet is
a powerful automation tool for
sysadmins of Enterprise-class
infrastructures. Worth a look!
ChefAn alternative to
Puppet, the Ruby-
and Erlang-based
Chef integrates
well with commercial cloud
environments including
Amazon’s EC2 and Google’s
Cloud Platform, and works as
a local install for managing
internal infrastructure.
DockerDocker provides
the ability to
easily and
quickly deploy
applications inside isolated
software containers on Linux.
Compared to a traditional
virtual machine, a Docker
container has signifi cantly
lower overheads.
LynisDesigned for those who
take a proactive approach to
security – but, it has to be said,
a handy tool for the black-hat
crowd as well – Lynis provides
a means to audit Linux and
other Unix-like systems
for security vulnerabilities,
and can also check for
confi guration errors.
SUSE StudioWhile SUSE Studio
is most commonly
used by the SUSE
and OpenSUSE
teams, its ability to customise
and deploy operating system
images can be used with any
Linux distribution and can
make a system administrator’s
job signifi cantly easier.
SUSE is a highly curated
distro, tailored to its needs
888888888////11110000
77777777////11110000777777777777
77777777////11110000777777777777
77777777////11110000777777777777
666666666////11110000
55555555////11110000
77777777////11110000777777777777
88888888////11110000
Linux Tips, Tricks, Apps & Hacks 141
Tips | Tricks | Hacks | Apps

For years, BackTrack Linux was the king of Linux distributions for those doing security audits and penetration testing. In 2013,
however, the project was forked into
Kali Linux. Created and maintained
by Mati Aharoni and Devon Kearns of Offensive
Security, Kali is a ground-up rewrite of BackTrack
and a worthy successor to it.
Based on Debian, rather than the Ubuntu origins
of its predecessor, Kali includes pre-installed
copies of the most popular security utilities,
including network sniffer and analyser Wireshark,
port-scanning tool nmap, password cracker
John the Ripper and even the Aircrack-ng suite
for penetration testing of wireless networks. Its
repositories have plenty more choices available, in
addition to more sedate applications and utilities.
Where Kali differentiates itself from the
competition is in compatibility: as well as 32-bit
and 64-bit x86 hosts, the team behind it have
worked hard to bring Kali to the more popular
ARM-based platforms out there. Builds are already
available for devices as diverse as the Raspberry
Pi and Samsung Chromebook, with more builds
arriving on a regular basis. Considering the very
low cost of some of these devices, Kali’s support
helps lower the barrier to entry considerably
over distributions which require more expensive
hardware to run.
Perhaps the most impressive compatibility
feature, however, is a Kali sub-project dubbed
NetHunter. Currently available exclusively for
Google’s Nexus Android smartphones and
tablets, Kali NetHunter provides various wireless
penetration testing tools usable directly from the
device – a great tool for discreet testing without
having to lug an all-too-obvious laptop around.
Combined with options to install to a hard drive
as well as run from memory and an attractive
desktop which lends itself well to every-day use,
Kali is the obvious choice for anyone with an
interest in network security – despite its reputation
as a script-kiddie’s play-thing, it’s actually pretty
tight on the security front.
Kali Linux
While the mainstream media worries its readers over black-hats, security-focused distributions are a vital tool for the good guys
BackBox LinuxFor those who don’t need
ARM support, the x86-
only BackBox is a great
alternative. Based on
Ubuntu and featuring the lightweight
Xfce window manager, BackBox is
powerful yet attractive and comes with
a selection of pre-installed utilities.
WifislaxFor penetration testing of
both wired and wireless
networks, the Slackware-
based Wifi slax is brilliant
thanks to integration of many unoffi cial
hardware drivers and fi rmwares not
normally part of the mainline kernel.
REMnuxREMnux specialises in
reverse-engineering
of malicious software.
Tools are provided for
memory investigation and analysis of
various executable formats as well as
documents and even web content.
LynisCreated by Michael Boelen,
the author of Rootkit Hunter
(rkhunter), Lynis is a fully open
security audit tool. As well
as checking for vulnerabilities,
Lynis has the ability to fi nd
misconfi gurations with
reports that can prove to
be extremely useful when
hardening a system.
nmapA tool so famous
it ended up with
screen time in The
Matrix Reloaded,
Fyodor Vaskovich’s (real name
Gordon Lyon) nmap should
have a place on every system.
Its rapid network mapping is
incredibly fl exible and can be
individually tailored.
OpenVASThe Open
Vulnerability
Assessment
System (OpenVAS)
started life as a fork of Nessus
under the name GNessUs.
Now, it’s one of the leading
vulnerability scanning and
management tools – and it’s
entirely free and open-source.
WiresharkWhile Wireshark
– formerly
Ethereal – has
its competitors
in the packet-sniffi ng arena,
its friendly user interface and
powerful analysis and fi ltering
tools are second to none.
Wireshark is useful for general
network diagnosis as well.
MetasploitThis framework
is invaluable
for penetration
testers. When
a scan has revealed a
vulnerability, Metasploit
can attempt to exploit said
vulnerability; proving or
disproving its existence quickly
and easily.
Kali has everything you need
for full security testing
666666666////11110000
77777777////11110000777777777777
55555555////11110000
55555555////11110000
999999999////11110000
99999999////11110000
66666666////11110000
99999999////11110000
142 Linux Tips, Tricks, Apps & Hacks
Tips | Tricks | Hacks | Apps

Privacy can be extremely important on the Internet, and it’s only going to become more of a concern as time goes on. With more ways to
leave your trace on the Internet,
and more companies wanting your
details to sell you ads, it can be tricky to remain truly
anonymous. This can be essential for some people –
whistleblowers, victims of stalking and people writing
unpopular opinions on Twitter. It can also be handy for
just buying a secret gift for your other half to avoid the
inevitable targeted ads popping up that an incognito
mode won’t stop.
Tails can help you with all of this, and makes it
fairly easy to do in the process. It manages this
through many careful layers of security and privacy
considerations – fi rstly, the entire system runs
in RAM and does not use any disk-bound swap
partition. The RAM is then completely written over
when Tails is shut down, leaving no trace of what you
were doing or using.
All of its networking is run through Tor, so your IP is
masked behind at least a dozen encrypted servers.
Failing that, the default is the Tor browser, which
also has the same software, meaning that whatever
you’re looking for, it won’t get traced back to you. You
can also use secure chat clients to keep your location
safe, there’s PGP email support built-in so you can
send private mail and there’s also just a full suite of
normal programs like LibreOffi ce and GIMP, so you
can use the distro in any other way.
You can install Tails, but it’s designed to be live
booted and that will guarantee maximum privacy at
the same time. Give it a go today to fi nd out just how
easy it is to remain anonymous.
Tails
Stay private and keep your information safe with these Linux distros specially built to put your mind at ease when working online
iprediaOSAn alternative to Tails that
relies more on the I2P
network than Tor, yet still
provides an environment
where you can stay completely
anonymous. It’s also live, so you can
test it out before committing to it.
WhonixA very different private
distro, anonymously
connecting you online via
an anonymous terminal
and anonymous server, giving two
levels of security to maximise privacy
and stop any incoming attacks.
LiberteA Gentoo-based
Tails alternative
that’s not had much
development recently
but is still extremely private and
very secure. It uses Tor and other
software to keep the user safe from
prying eyes.
TorIn the movie
Sneakers, an
intrepid group of
Bay Area hackers
bounce their signal off multiple
servers and satellites to avoid
detection. Tor is essentially
this, sending your requests
through several secure and
encrypted servers.
Tor browserBuilt using
Firefox and Tor,
using the Tor
browser is an
easy way to stay completely
anonymous online without the
need for booting into a private
distro. It’s so good its used by
default in Tails to make sure
you stay private.
ClawsMailThis is a PGP
encryption
for your email
clients, including
Thunderbird, that lets you send
messages in confi dence. It
also works on its own, just in
case you want to leave even
less trace of its existence on
your system.
KeePassXManage your
passwords with
KeePassX, the
cross-platform
password manager. It allows
you to store a lot of data in a
highly encrypted database that
can only be accessed via your
password – once it’s accessed,
you can even search it.
Florence Virtual Keyboard
A virtual keyboard
that avoids
any keylogging
programs to
make your computer just that
little more secure. It can also
be used if your keyboard is
missing and broken, and is
extensible and customisable.
Run Tails from a disc or memory
stick to get the best use
All traces of user activity are removed as part of
the shutdown process
888888888////11110000
77777777////11110000777777777777
666666666////11110000
1111111100000000////11110000
666666666////11110000
1111111100000000////11110000
444444444////11110000
77777777////11110000777777777777
Linux Tips, Tricks, Apps & Hacks 143
Tips | Tricks | Hacks | Apps

Named for the speedy Gentoo penguin, Gentoo and Arch have long been rivals. Both offer a true rolling-
release development methodology,
meaning that the latest updates
are brought to the entire user base
simultaneously – ensuring that no installation is ever
out of date, and that installation need only occur once
– and both feature a BSD-inspired ports-like software
distribution platform.
For the Linux purist, the hands-off approach of Arch
is likely to appeal, but for the average user Gentoo is
a gentler introduction to the world of rolling releases.
First released back in 2002, the distribution has a
considerable fan base who appreciate the team’s still-
rare approach to development and software releases.
The other main advantage to running Gentoo is that
its software is compiled from source directly on the
user’s system via the Portage manager. This means no
waiting for package maintainers to build and upload
a package for your platform, and that the software
which gets installed can be optimised for your specific
processor architecture – enabling performance boosts
where generic compilation would drain power from the
system. The trade-off, of course, is that compiling from
source typically takes longer than simply installing pre-
compiled binaries from a package archive.
Like Arch, Gentoo’s installation process has been
tricky – although plenty of community help is available
in documentation, IRC channels and mailing lists – but
the relatively recent release of a Live USB variant makes
it far easier to try. While its popularity has waned in
recent years, Gentoo remains a great choice for anyone
who wants a highly customisable system, and while it
can be tricky to install it’s a process that – in theory –
should only ever have to happen once.
Gentoo
For those who don’t like to be beholden to formal release schedules, rolling-release distributions promise to never get out of date
SabayonA Gentoo variant,
Sabayon retains the
rolling-release ethos but
is a lot more welcoming.
Designed to work out-the-box,
Sabayon loses a little in fl exibility
compared to its upstream parent but
is still a powerful distribution.
ArchArch can be unwelcoming
to newcomers; fi rst boot
drops the user at a console
session and installation is
a process of following the instructions
on the wiki. Once installed, though, it’s
lean, fast and extremely fl exible.
AptosidAptosid offers a familiar
environment and rolling-
release development.
Taking Debian’s unstable
branch as its parent, Aptosid includes a
custom kernel and retains compatibility
with Debian’s Free Software guidelines.
GIMPThe open-
source answer
to PhotoShop,
the GNU Image
Manipulation Program has
recently introduced a single-
window mode to combat
criticisms of its unfriendly
userface, bringing its power to
a new audience.
AudacitySupporting
multi-track mixing
and with more
fi lters and utilities
than you could imagine using,
Audacity helps prove that Linux
is no slouch when it comes to
creative work and that it can
hold its head up there with the
proprietary platforms.
FirefoxAlthough under
fi re for perceived
bloat – ironic,
considering the
project was founded to deal
with perceived bloat in the
Netscape browser – the
Firefox browser, now on
version 34, remains a popular
choice among users.
LibreOfficeCreated following
Sun Microsystems’
acquisition of
OpenOffi ce.org,
The Document Foundation’s
LibreOffi ce is now the default
in many distributions, offering
features and compatibility
to please even the biggest
Microsoft Offi ce fan.
VLCThe strength of
VLC lies in its
fl exibility. As well
as the ability to
play almost any audio or video
format, it supports streaming
over the network and the
ability to record from various
sources – including capturing a
live view of your desktop.
Installation is slower but gives
you better-optimised apps
Support forums and an IRC channel are linked
right from the desktop
77777777////11110000777777777777
66666666////11110000
11111111000000000////11110000
88888888////11110000
99999999////11110000
1111111100000000////11110000
44444444////11110000
999999999////11110000
144 Linux Tips, Tricks, Apps & Hacks
Tips | Tricks | Hacks | Apps
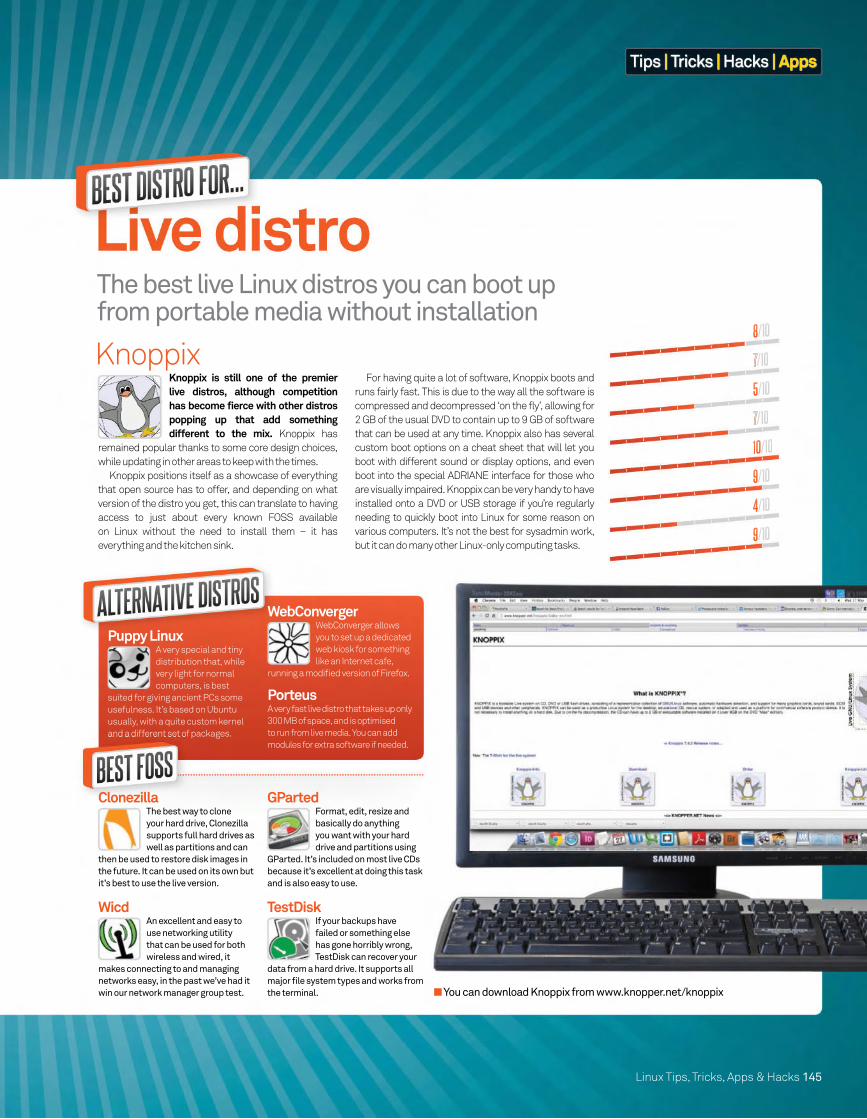
Knoppix is still one of the premier live distros, although competition has become fierce with other distros popping up that add something different to the mix. Knoppix has
remained popular thanks to some core design choices,
while updating in other areas to keep with the times.
Knoppix positions itself as a showcase of everything
that open source has to offer, and depending on what
version of the distro you get, this can translate to having
access to just about every known FOSS available
on Linux without the need to install them – it has
everything and the kitchen sink.
For having quite a lot of software, Knoppix boots and
runs fairly fast. This is due to the way all the software is
compressed and decompressed ‘on the fly’, allowing for
2 GB of the usual DVD to contain up to 9 GB of software
that can be used at any time. Knoppix also has several
custom boot options on a cheat sheet that will let you
boot with different sound or display options, and even
boot into the special ADRIANE interface for those who
are visually impaired. Knoppix can be very handy to have
installed onto a DVD or USB storage if you’re regularly
needing to quickly boot into Linux for some reason on
various computers. It’s not the best for sysadmin work,
but it can do many other Linux-only computing tasks.
Knoppix
The best live Linux distros you can boot up from portable media without installation
WicdAn excellent and easy to
use networking utility
that can be used for both
wireless and wired, it
makes connecting to and managing
networks easy, in the past we’ve had it
win our network manager group test.
ClonezillaThe best way to clone
your hard drive, Clonezilla
supports full hard drives as
well as partitions and can
then be used to restore disk images in
the future. It can be used on its own but
it’s best to use the live version.
TestDiskIf your backups have
failed or something else
has gone horribly wrong,
TestDisk can recover your
data from a hard drive. It supports all
major fi le system types and works from
the terminal.
GPartedFormat, edit, resize and
basically do anything
you want with your hard
drive and partitions using
GParted. It’s included on most live CDs
because it’s excellent at doing this task
and is also easy to use.
Puppy LinuxA very special and tiny
distribution that, while
very light for normal
computers, is best
suited for giving ancient PCs some
usefulness. It’s based on Ubuntu
usually, with a quite custom kernel
and a different set of packages.
WebConvergerWebConverger allows
you to set up a dedicated
web kiosk for something
like an Internet cafe,
running a modifi ed version of Firefox.
PorteusA very fast live distro that takes up only
300 MB of space, and is optimised
to run from live media. You can add
modules for extra software if needed.
You can download Knoppix from www.knopper.net/knoppix
88888888////11110000
77777777////11110000777777777777
55555555////11110000
77777777////11110000777777777777
1111111100000000////11110000
99999999////11110000
44444444////11110000
99999999////11110000
Linux Tips, Tricks, Apps & Hacks 145
Tips | Tricks | Hacks | Apps
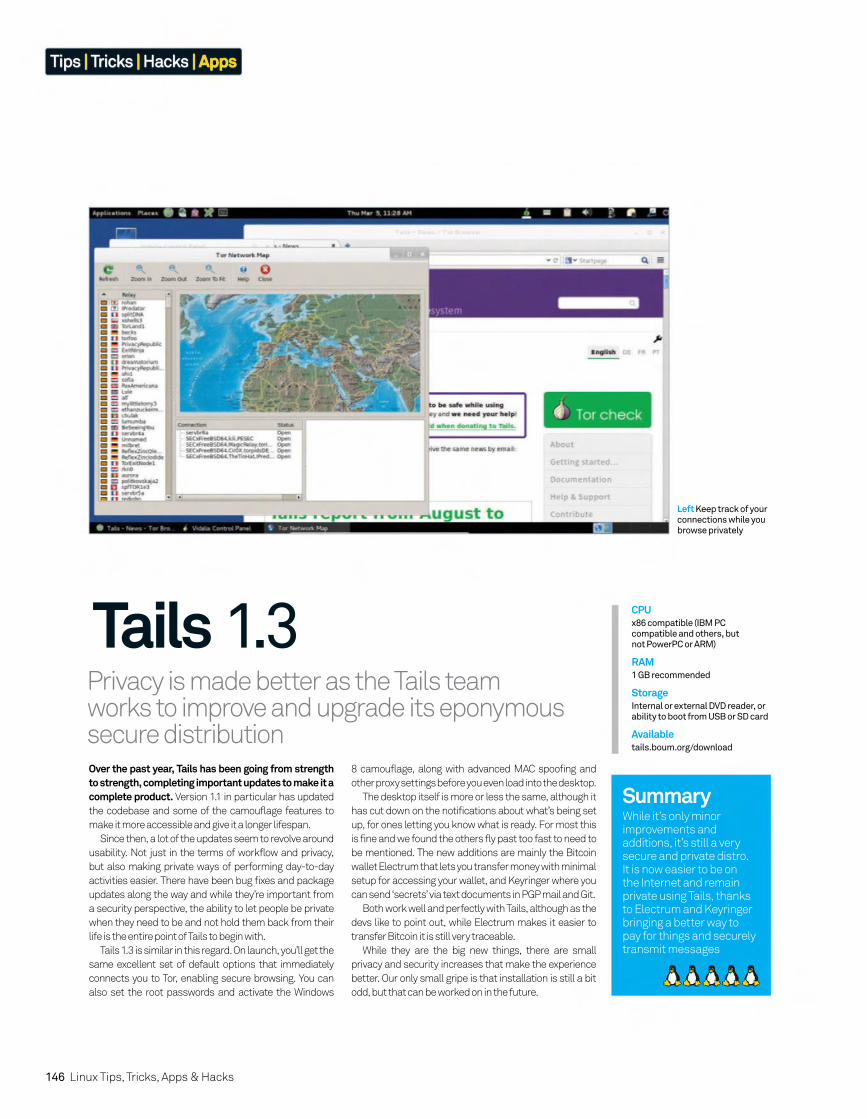
146 Linux Tips, Tricks, Apps & Hacks
Tips | Tricks | Hacks | Apps
Over the past year, Tails has been going from strength to strength, completing important updates to make it a complete product. Version 1.1 in particular has updated
the codebase and some of the camouflage features to
make it more accessible and give it a longer lifespan.
Since then, a lot of the updates seem to revolve around
usability. Not just in the terms of workflow and privacy,
but also making private ways of performing day-to-day
activities easier. There have been bug fixes and package
updates along the way and while they’re important from
a security perspective, the ability to let people be private
when they need to be and not hold them back from their
life is the entire point of Tails to begin with.
Tails 1.3 is similar in this regard. On launch, you’ll get the
same excellent set of default options that immediately
connects you to Tor, enabling secure browsing. You can
also set the root passwords and activate the Windows
Privacy is made better as the Tails team works to improve and upgrade its eponymous secure distribution
CPUx86 compatible (IBM PC compatible and others, but not PowerPC or ARM)
RAM1 GB recommended
StorageInternal or external DVD reader, or ability to boot from USB or SD card
Availabletails.boum.org/download
SummaryWhile it’s only minor improvements and additions, it’s still a very secure and private distro. It is now easier to be on the Internet and remain private using Tails, thanks to Electrum and Keyringer bringing a better way to pay for things and securely transmit messages
Tails 1.3
8 camouflage, along with advanced MAC spoofing and
other proxy settings before you even load into the desktop.
The desktop itself is more or less the same, although it
has cut down on the notifications about what’s being set
up, for ones letting you know what is ready. For most this
is fine and we found the others fly past too fast to need to
be mentioned. The new additions are mainly the Bitcoin
wallet Electrum that lets you transfer money with minimal
setup for accessing your wallet, and Keyringer where you
can send ‘secrets’ via text documents in PGP mail and Git.
Both work well and perfectly with Tails, although as the
devs like to point out, while Electrum makes it easier to
transfer Bitcoin it is still very traceable.
While they are the big new things, there are small
privacy and security increases that make the experience
better. Our only small gripe is that installation is still a bit
odd, but that can be worked on in the future.
Left Keep track of your connections while you browse privately
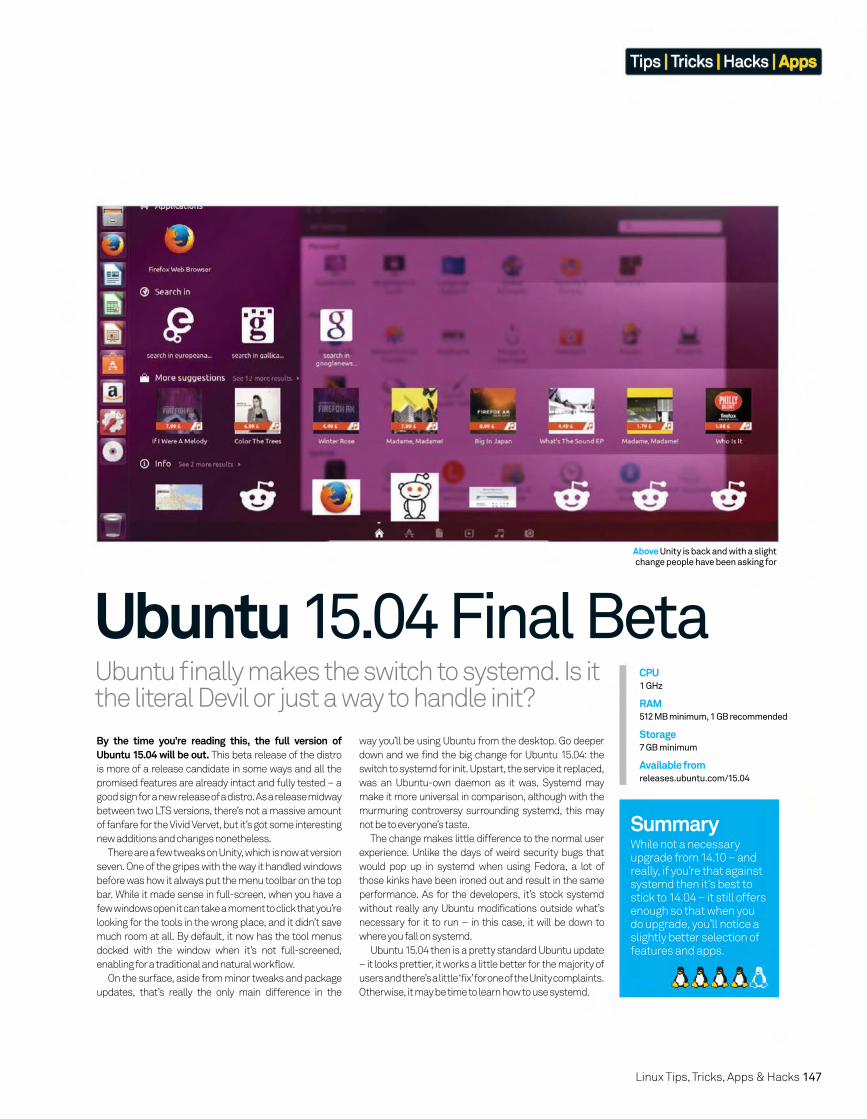
Linux Tips, Tricks, Apps & Hacks 147
Tips | Tricks | Hacks | Apps
Ubuntu fi nally makes the switch to systemd. Is it the literal Devil or just a way to handle init?
By the time you’re reading this, the full version of Ubuntu 15.04 will be out. This beta release of the distro
is more of a release candidate in some ways and all the
promised features are already intact and fully tested – a
good sign for a new release of a distro. As a release midway
between two LTS versions, there’s not a massive amount
of fanfare for the Vivid Vervet, but it’s got some interesting
new additions and changes nonetheless.
There are a few tweaks on Unity, which is now at version
seven. One of the gripes with the way it handled windows
before was how it always put the menu toolbar on the top
bar. While it made sense in full-screen, when you have a
few windows open it can take a moment to click that you’re
looking for the tools in the wrong place, and it didn’t save
much room at all. By default, it now has the tool menus
docked with the window when it’s not full-screened,
enabling for a traditional and natural workflow.
On the surface, aside from minor tweaks and package
updates, that’s really the only main difference in the
way you’ll be using Ubuntu from the desktop. Go deeper
down and we find the big change for Ubuntu 15.04: the
switch to systemd for init. Upstart, the service it replaced,
was an Ubuntu-own daemon as it was. Systemd may
make it more universal in comparison, although with the
murmuring controversy surrounding systemd, this may
not be to everyone’s taste.
The change makes little difference to the normal user
experience. Unlike the days of weird security bugs that
would pop up in systemd when using Fedora, a lot of
those kinks have been ironed out and result in the same
performance. As for the developers, it’s stock systemd
without really any Ubuntu modifications outside what’s
necessary for it to run – in this case, it will be down to
where you fall on systemd.
Ubuntu 15.04 then is a pretty standard Ubuntu update
– it looks prettier, it works a little better for the majority of
users and there’s a little ‘fix’ for one of the Unity complaints.
Otherwise, it may be time to learn how to use systemd.
Ubuntu 15.04 Final Beta
SummaryWhile not a necessary upgrade from 14.10 – and really, if you’re that against systemd then it’s best to stick to 14.04 – it still offers enough so that when you do upgrade, you’ll notice a slightly better selection of features and apps.
Above Unity is back and with a slight change people have been asking for
CPU1 GHz
RAM512 MB minimum, 1 GB recommended
Storage7 GB minimum
Available fromreleases.ubuntu.com/15.04
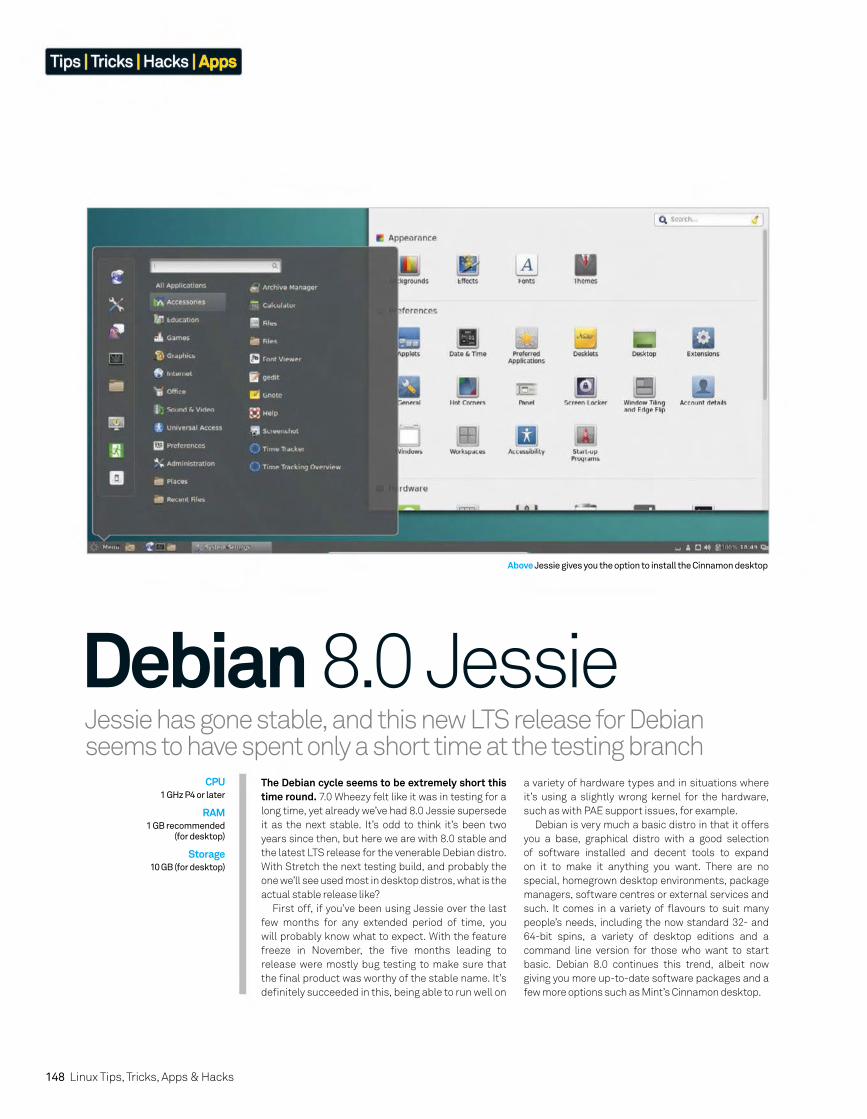
148 Linux Tips, Tricks, Apps & Hacks
Tips | Tricks | Hacks | Apps
Jessie has gone stable, and this new LTS release for Debian seems to have spent only a short time at the testing branch
The Debian cycle seems to be extremely short this time round. 7.0 Wheezy felt like it was in testing for a
long time, yet already we’ve had 8.0 Jessie supersede
it as the next stable. It’s odd to think it’s been two
years since then, but here we are with 8.0 stable and
the latest LTS release for the venerable Debian distro.
With Stretch the next testing build, and probably the
one we’ll see used most in desktop distros, what is the
actual stable release like?
First off, if you’ve been using Jessie over the last
few months for any extended period of time, you
will probably know what to expect. With the feature
freeze in November, the fi ve months leading to
release were mostly bug testing to make sure that
the fi nal product was worthy of the stable name. It’s
defi nitely succeeded in this, being able to run well on
CPU1 GHz P4 or later
RAM1 GB recommended
(for desktop)
Storage10 GB (for desktop)
a variety of hardware types and in situations where
it’s using a slightly wrong kernel for the hardware,
such as with PAE support issues, for example.
Debian is very much a basic distro in that it offers
you a base, graphical distro with a good selection
of software installed and decent tools to expand
on it to make it anything you want. There are no
special, homegrown desktop environments, package
managers, software centres or external services and
such. It comes in a variety of fl avours to suit many
people’s needs, including the now standard 32- and
64-bit spins, a variety of desktop editions and a
command line version for those who want to start
basic. Debian 8.0 continues this trend, albeit now
giving you more up-to-date software packages and a
few more options such as Mint’s Cinnamon desktop.
Debian 8.0 Jessie
Above Jessie gives you the option to install the Cinnamon desktop
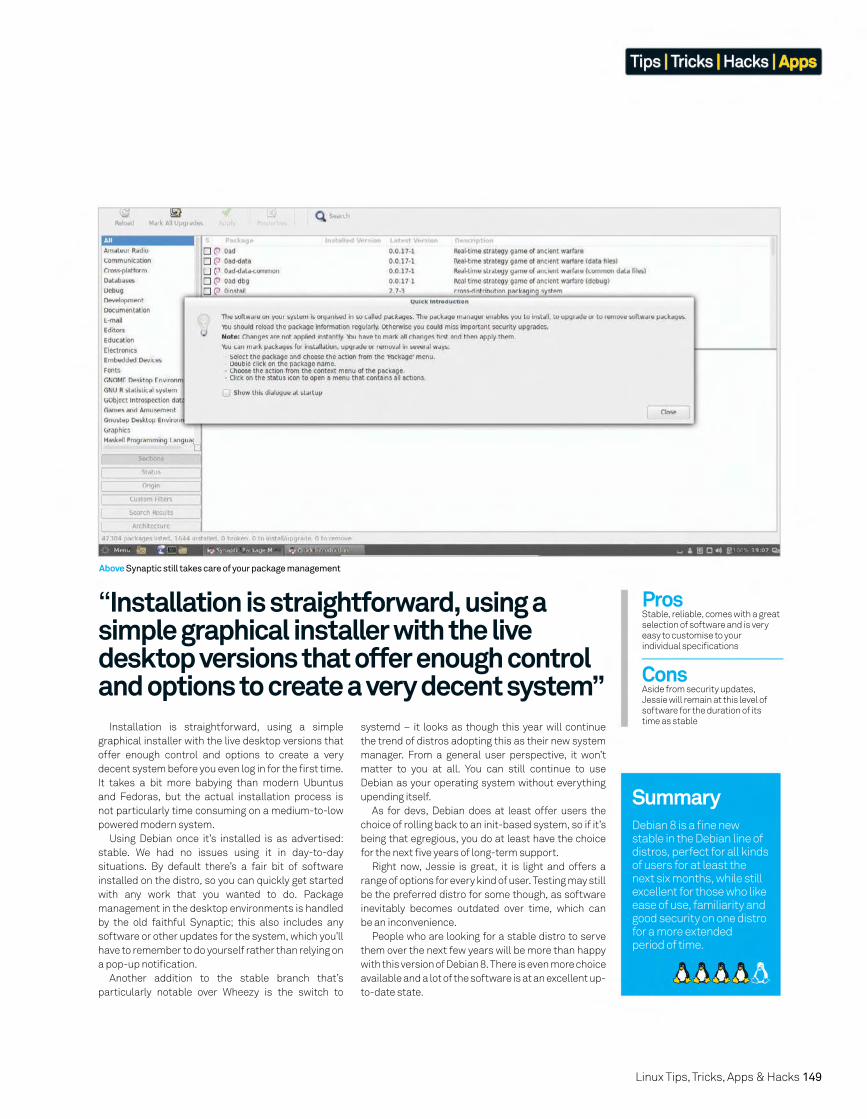
Linux Tips, Tricks, Apps & Hacks 149
Tips | Tricks | Hacks | Apps
systemd – it looks as though this year will continue
the trend of distros adopting this as their new system
manager. From a general user perspective, it won’t
matter to you at all. You can still continue to use
Debian as your operating system without everything
upending itself.
As for devs, Debian does at least offer users the
choice of rolling back to an init-based system, so if it’s
being that egregious, you do at least have the choice
for the next fi ve years of long-term support.
Right now, Jessie is great, it is light and offers a
range of options for every kind of user. Testing may still
be the preferred distro for some though, as software
inevitably becomes outdated over time, which can
be an inconvenience.
People who are looking for a stable distro to serve
them over the next few years will be more than happy
with this version of Debian 8. There is even more choice
available and a lot of the software is at an excellent up-
to-date state.
Installation is straightforward, using a simple
graphical installer with the live desktop versions that
offer enough control and options to create a very
decent system before you even log in for the fi rst time.
It takes a bit more babying than modern Ubuntus
and Fedoras, but the actual installation process is
not particularly time consuming on a medium-to-low
powered modern system.
Using Debian once it’s installed is as advertised:
stable. We had no issues using it in day-to-day
situations. By default there’s a fair bit of software
installed on the distro, so you can quickly get started
with any work that you wanted to do. Package
management in the desktop environments is handled
by the old faithful Synaptic; this also includes any
software or other updates for the system, which you’ll
have to remember to do yourself rather than relying on
a pop-up notifi cation.
Another addition to the stable branch that’s
particularly notable over Wheezy is the switch to
SummaryDebian 8 is a fi ne new stable in the Debian line of distros, perfect for all kinds of users for at least the next six months, while still excellent for those who like ease of use, familiarity and good security on one distro for a more extended period of time.
ProsStable, reliable, comes with a great selection of software and is very easy to customise to your individual specifi cations
ConsAside from security updates, Jessie will remain at this level of software for the duration of its time as stable
Above Synaptic still takes care of your package management
“Installation is straightforward, using a simple graphical installer with the live desktop versions that offer enough control and options to create a very decent system”
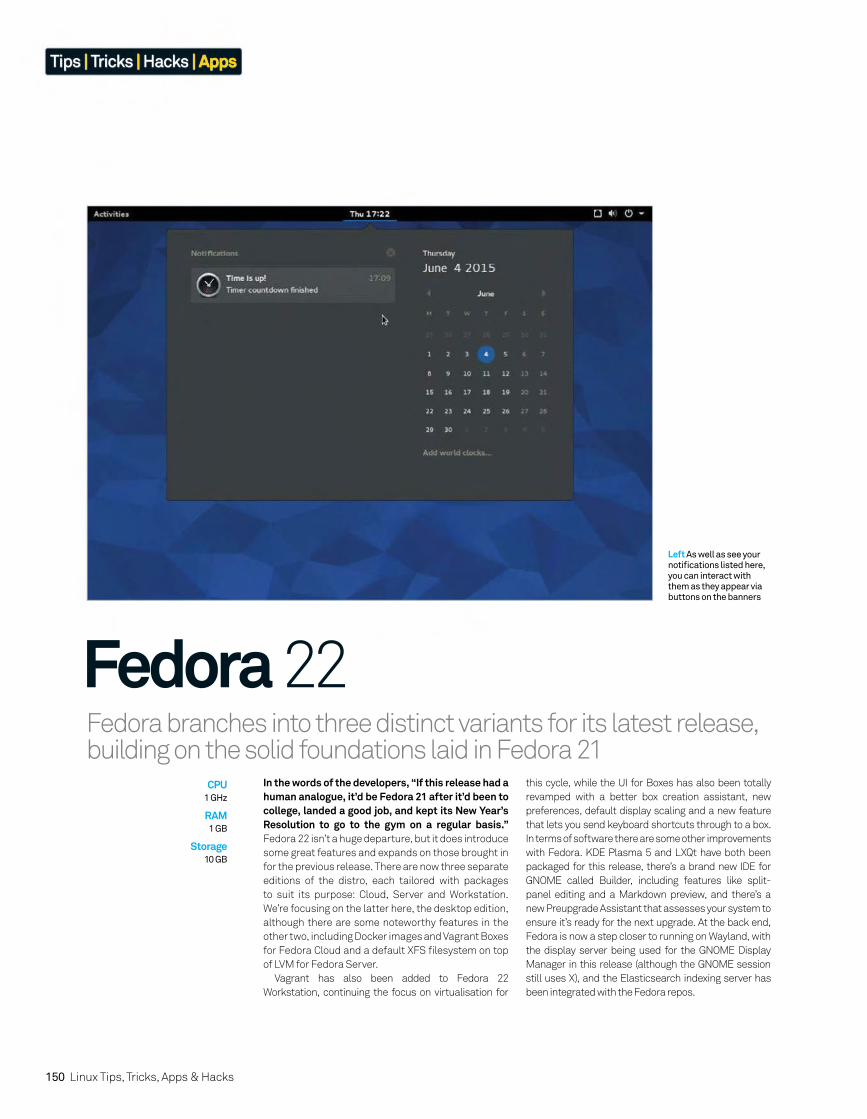
150 Linux Tips, Tricks, Apps & Hacks
Tips | Tricks | Hacks | Apps
Fedora branches into three distinct variants for its latest release, building on the solid foundations laid in Fedora 21
In the words of the developers, “If this release had a human analogue, it’d be Fedora 21 after it’d been to college, landed a good job, and kept its New Year’s Resolution to go to the gym on a regular basis.” Fedora 22 isn’t a huge departure, but it does introduce
some great features and expands on those brought in
for the previous release. There are now three separate
editions of the distro, each tailored with packages
to suit its purpose: Cloud, Server and Workstation.
We’re focusing on the latter here, the desktop edition,
although there are some noteworthy features in the
other two, including Docker images and Vagrant Boxes
for Fedora Cloud and a default XFS fi lesystem on top
of LVM for Fedora Server.
Vagrant has also been added to Fedora 22
Workstation, continuing the focus on virtualisation for
this cycle, while the UI for Boxes has also been totally
revamped with a better box creation assistant, new
preferences, default display scaling and a new feature
that lets you send keyboard shortcuts through to a box.
In terms of software there are some other improvements
with Fedora. KDE Plasma 5 and LXQt have both been
packaged for this release, there’s a brand new IDE for
GNOME called Builder, including features like split-
panel editing and a Markdown preview, and there’s a
new Preupgrade Assistant that assesses your system to
ensure it’s ready for the next upgrade. At the back end,
Fedora is now a step closer to running on Wayland, with
the display server being used for the GNOME Display
Manager in this release (although the GNOME session
still uses X), and the Elasticsearch indexing server has
been integrated with the Fedora repos.
Left As well as see your notifi cations listed here, you can interact with them as they appear via buttons on the banners
CPU1 GHz
RAM1 GB
Storage10 GB
Fedora 22
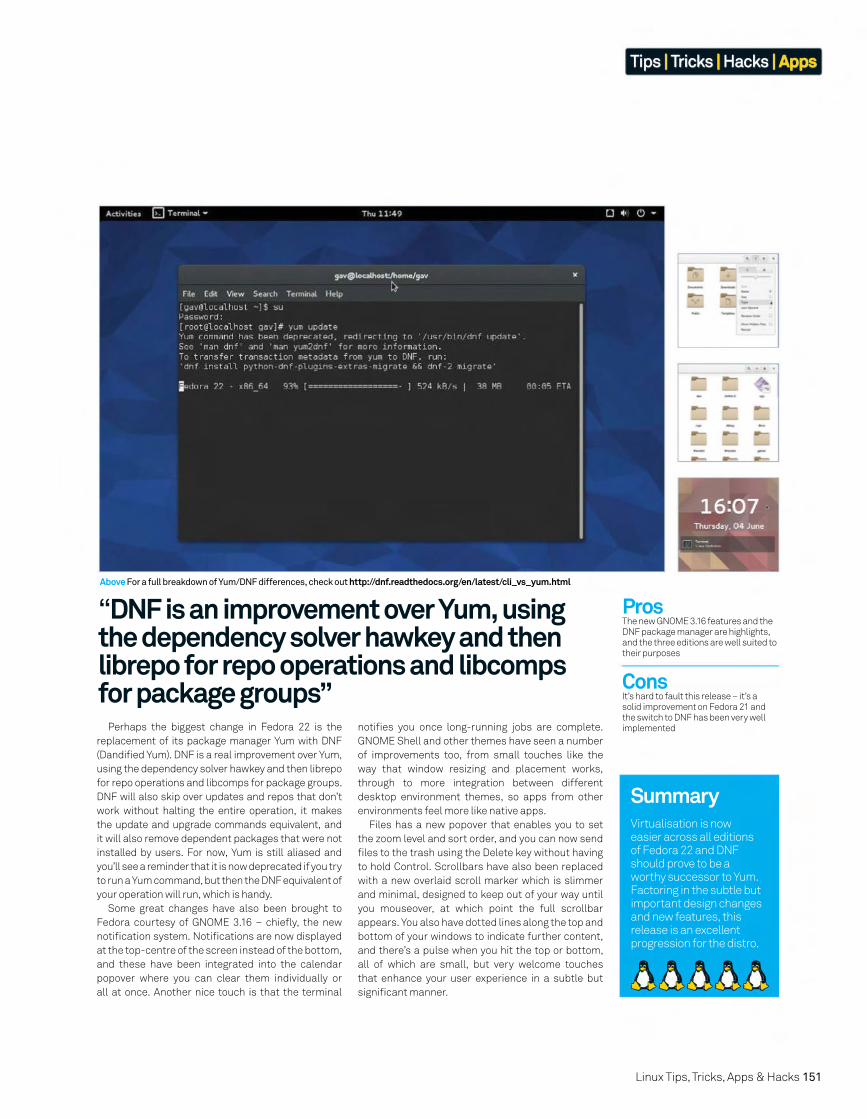
Linux Tips, Tricks, Apps & Hacks 151
Tips | Tricks | Hacks | Apps
notifi es you once long-running jobs are complete.
GNOME Shell and other themes have seen a number
of improvements too, from small touches like the
way that window resizing and placement works,
through to more integration between different
desktop environment themes, so apps from other
environments feel more like native apps.
Files has a new popover that enables you to set
the zoom level and sort order, and you can now send
fi les to the trash using the Delete key without having
to hold Control. Scrollbars have also been replaced
with a new overlaid scroll marker which is slimmer
and minimal, designed to keep out of your way until
you mouseover, at which point the full scrollbar
appears. You also have dotted lines along the top and
bottom of your windows to indicate further content,
and there’s a pulse when you hit the top or bottom,
all of which are small, but very welcome touches
that enhance your user experience in a subtle but
signifi cant manner.
Perhaps the biggest change in Fedora 22 is the
replacement of its package manager Yum with DNF
(Dandifi ed Yum). DNF is a real improvement over Yum,
using the dependency solver hawkey and then librepo
for repo operations and libcomps for package groups.
DNF will also skip over updates and repos that don’t
work without halting the entire operation, it makes
the update and upgrade commands equivalent, and
it will also remove dependent packages that were not
installed by users. For now, Yum is still aliased and
you’ll see a reminder that it is now deprecated if you try
to run a Yum command, but then the DNF equivalent of
your operation will run, which is handy.
Some great changes have also been brought to
Fedora courtesy of GNOME 3.16 – chiefl y, the new
notifi cation system. Notifi cations are now displayed
at the top-centre of the screen instead of the bottom,
and these have been integrated into the calendar
popover where you can clear them individually or
all at once. Another nice touch is that the terminal
SummaryVirtualisation is now easier across all editions of Fedora 22 and DNF should prove to be a worthy successor to Yum. Factoring in the subtle but important design changes and new features, this release is an excellent progression for the distro.
ProsThe new GNOME 3.16 features and the DNF package manager are highlights, and the three editions are well suited to their purposes
ConsIt’s hard to fault this release – it’s a solid improvement on Fedora 21 and the switch to DNF has been very well implemented
Above For a full breakdown of Yum/DNF differences, check out http://dnf.readthedocs.org/en/latest/cli_vs_yum.html
“DNF is an improvement over Yum, using the dependency solver hawkey and then librepo for repo operations and libcomps for package groups”
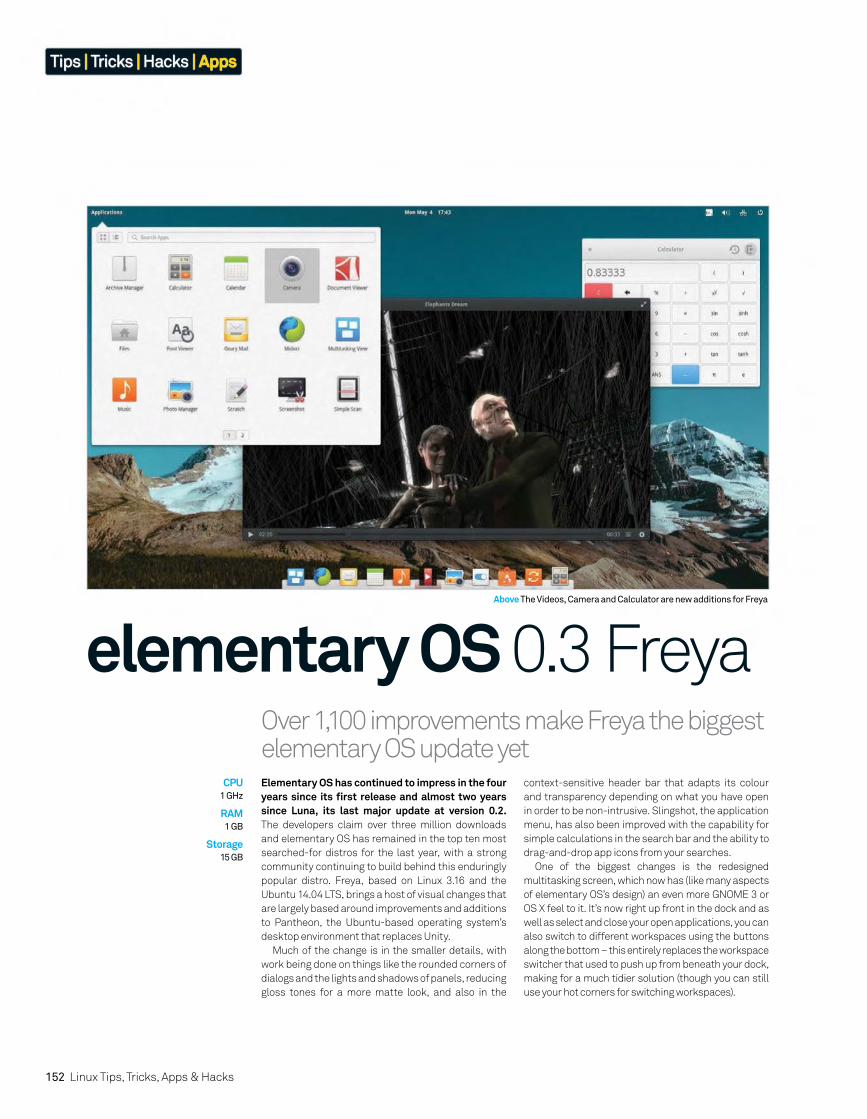
152 Linux Tips, Tricks, Apps & Hacks
Tips | Tricks | Hacks | Apps
Over 1,100 improvements make Freya the biggest elementary OS update yetElementary OS has continued to impress in the four years since its fi rst release and almost two years since Luna, its last major update at version 0.2. The developers claim over three million downloads
and elementary OS has remained in the top ten most
searched-for distros for the last year, with a strong
community continuing to build behind this enduringly
popular distro. Freya, based on Linux 3.16 and the
Ubuntu 14.04 LTS, brings a host of visual changes that
are largely based around improvements and additions
to Pantheon, the Ubuntu-based operating system’s
desktop environment that replaces Unity.
Much of the change is in the smaller details, with
work being done on things like the rounded corners of
dialogs and the lights and shadows of panels, reducing
gloss tones for a more matte look, and also in the
context-sensitive header bar that adapts its colour
and transparency depending on what you have open
in order to be non-intrusive. Slingshot, the application
menu, has also been improved with the capability for
simple calculations in the search bar and the ability to
drag-and-drop app icons from your searches.
One of the biggest changes is the redesigned
multitasking screen, which now has (like many aspects
of elementary OS’s design) an even more GNOME 3 or
OS X feel to it. It’s now right up front in the dock and as
well as select and close your open applications, you can
also switch to different workspaces using the buttons
along the bottom – this entirely replaces the workspace
switcher that used to push up from beneath your dock,
making for a much tidier solution (though you can still
use your hot corners for switching workspaces).
elementary OS 0.3 FreyaAbove The Videos, Camera and Calculator are new additions for Freya
CPU1 GHz
RAM1 GB
Storage15 GB

Linux Tips, Tricks, Apps & Hacks 153
Tips | Tricks | Hacks | Apps
Look in the System Settings and there are a few
fi nal changes of note, including redesigns of the date
and time, user accounts, applications and displays
menus, again to simplify and visually improve the
options. The privacy settings page now has a toggle at
the top for a privacy mode, which you can enable if you
want to stop elementary OS itself from tracking your
usage data, and there’s another new toggle switch
for a built-in fi rewall which supports custom rules for
enabling and denying traffi c.
Altogether, these minor and major additions to
the operating system make for an incredibly strong
release that defi nitely adds to elementary OS’s
reputation for clean, elegant simplicity in its user
experience while also modernising its design and
updating the software selection. It’s as fast and
lightweight as it has ever been, making it suitable
for old machines, and Freya is a pleasure to use and
tinker with no matter which operating system you are
used to working with.
Along with a new unifi ed lock and login screen that
has a great clock widget, there’s also an updated
notifi cations system that comes with a ‘do not disturb’
mode. The notifi cations are interactive and they’ll also
show you alerts from things like terminal processes
that are running in the background. Regarding the
terminal itself, this now has labels for the tabs along
the top that each show the last command that you’ve
run and natural copying and pasting (ie Ctrl+C) now
works in the terminal too.
Another big change from Luna is the redesigned
Photos app. Forked from Shotwell earlier this year,
which is helpfully written in the Vala language also
used to write Pantheon, Pantheon Photos is now
being run by the elementary team and has been given
the same attention-to-detail treatment as the other
Pantheon programs to make it as intuitive as possible.
Joining Photos in Freya’s line-up of core software is a
new Videos application, as well as a new Calculator
and a Camera application for webcams.
SummaryFreya’s host of updates brings improvements across the board, from new core apps to a fi rewall and simplifi ed workspace switching, making the new release a clear progression on an already brilliant distro that has a lot to offer to Linux newcomers.
ProsDesign and menu improvements throughout Pantheon, new and overhauled software, notifi cations, fi rewall and privacy mode
ConsMay be just a bit too limiting for users accustomed to greater choice and customisation options in their distro
Above Photos has been redesigned since being forked from Shotwell
“The developers claim over three million downloads and elementary OS has remained in the top ten most searched-for distros for the last year, with a strong community building behind it”
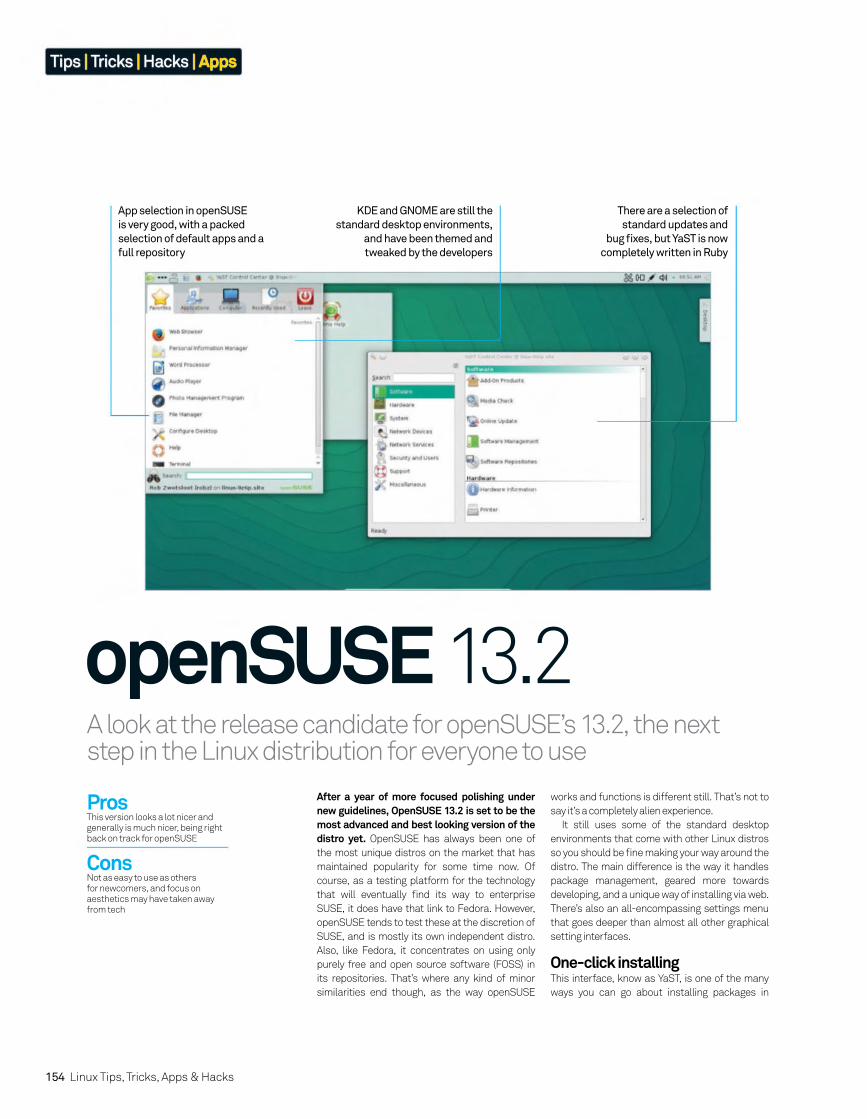
154 Linux Tips, Tricks, Apps & Hacks
Tips | Tricks | Hacks | Apps
After a year of more focused polishing under new guidelines, OpenSUSE 13.2 is set to be the most advanced and best looking version of the distro yet. OpenSUSE has always been one of
the most unique distros on the market that has
maintained popularity for some time now. Of
course, as a testing platform for the technology
that will eventually fi nd its way to enterprise
SUSE, it does have that link to Fedora. However,
openSUSE tends to test these at the discretion of
SUSE, and is mostly its own independent distro.
Also, like Fedora, it concentrates on using only
purely free and open source software (FOSS) in
its repositories. That’s where any kind of minor
similarities end though, as the way openSUSE
A look at the release candidate for openSUSE’s 13.2, the next step in the Linux distribution for everyone to use
works and functions is different still. That’s not to
say it’s a completely alien experience.
It still uses some of the standard desktop
environments that come with other Linux distros
so you should be fi ne making your way around the
distro. The main difference is the way it handles
package management, geared more towards
developing, and a unique way of installing via web.
There’s also an all-encompassing settings menu
that goes deeper than almost all other graphical
setting interfaces.
One-click installingThis interface, know as YaST, is one of the many
ways you can go about installing packages in
openSUSE 13.2
App selection in openSUSE
is very good, with a packed
selection of default apps and a
full repository
KDE and GNOME are still the
standard desktop environments,
and have been themed and
tweaked by the developers
There are a selection of
standard updates and
bug fi xes, but YaST is now
completely written in Ruby
ProsThis version looks a lot nicer and generally is much nicer, being right back on track for openSUSE
ConsNot as easy to use as others for newcomers, and focus on aesthetics may have taken away from tech
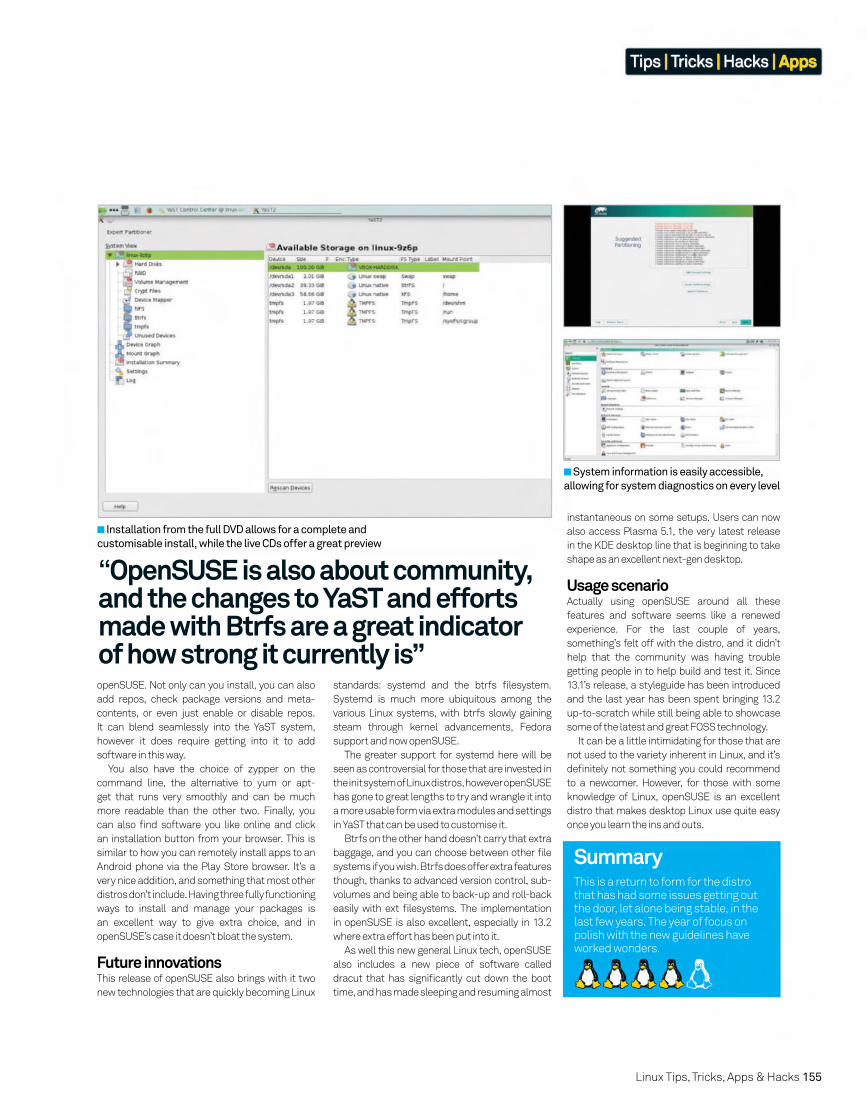
Linux Tips, Tricks, Apps & Hacks 155
Tips | Tricks | Hacks | Apps
Installation from the full DVD allows for a complete and
customisable install, while the live CDs offer a great preview
System information is easily accessible,
allowing for system diagnostics on every level
“OpenSUSE is also about community, and the changes to YaST and efforts made with Btrfs are a great indicator of how strong it currently is” openSUSE. Not only can you install, you can also
add repos, check package versions and meta-
contents, or even just enable or disable repos.
It can blend seamlessly into the YaST system,
however it does require getting into it to add
software in this way.
You also have the choice of zypper on the
command line, the alternative to yum or apt-
get that runs very smoothly and can be much
more readable than the other two. Finally, you
can also fi nd software you like online and click
an installation button from your browser. This is
similar to how you can remotely install apps to an
Android phone via the Play Store browser. It’s a
very nice addition, and something that most other
distros don’t include. Having three fully functioning
ways to install and manage your packages is
an excellent way to give extra choice, and in
openSUSE’s case it doesn’t bloat the system.
Future innovationsThis release of openSUSE also brings with it two
new technologies that are quickly becoming Linux
standards: systemd and the btrfs fi lesystem.
Systemd is much more ubiquitous among the
various Linux systems, with btrfs slowly gaining
steam through kernel advancements, Fedora
support and now openSUSE.
The greater support for systemd here will be
seen as controversial for those that are invested in
the init system of Linux distros, however openSUSE
has gone to great lengths to try and wrangle it into
a more usable form via extra modules and settings
in YaST that can be used to customise it.
Btrfs on the other hand doesn’t carry that extra
baggage, and you can choose between other fi le
systems if you wish. Btrfs does offer extra features
though, thanks to advanced version control, sub-
volumes and being able to back-up and roll-back
easily with ext fi lesystems. The implementation
in openSUSE is also excellent, especially in 13.2
where extra effort has been put into it.
As well this new general Linux tech, openSUSE
also includes a new piece of software called
dracut that has signifi cantly cut down the boot
time, and has made sleeping and resuming almost
instantaneous on some setups. Users can now
also access Plasma 5.1, the very latest release
in the KDE desktop line that is beginning to take
shape as an excellent next-gen desktop.
Usage scenarioActually using openSUSE around all these
features and software seems like a renewed
experience. For the last couple of years,
something’s felt off with the distro, and it didn’t
help that the community was having trouble
getting people in to help build and test it. Since
13.1’s release, a styleguide has been introduced
and the last year has been spent bringing 13.2
up-to-scratch while still being able to showcase
some of the latest and great FOSS technology.
It can be a little intimidating for those that are
not used to the variety inherent in Linux, and it’s
defi nitely not something you could recommend
to a newcomer. However, for those with some
knowledge of Linux, openSUSE is an excellent
distro that makes desktop Linux use quite easy
once you learn the ins and outs.
SummaryThis is a return to form for the distro that has had some issues getting out the door, let alone being stable, in the last few years. The year of focus on polish with the new guidelines have worked wonders.
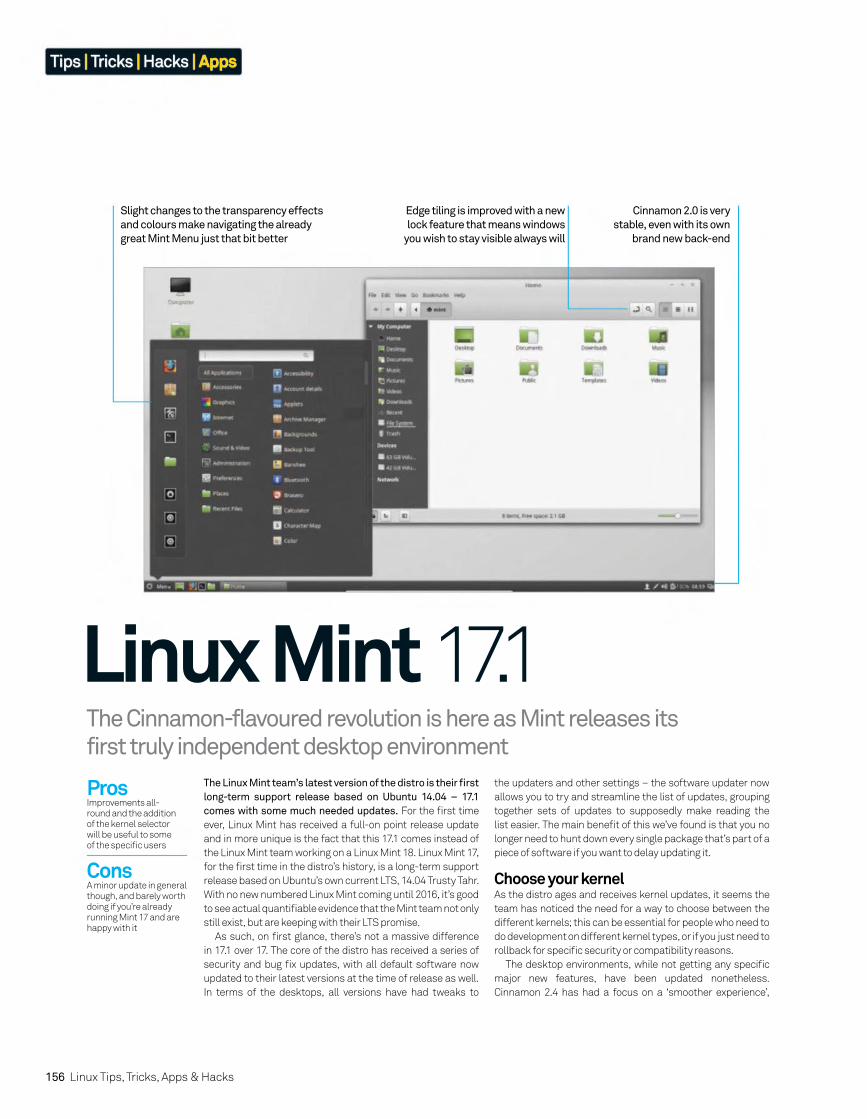
156 Linux Tips, Tricks, Apps & Hacks
Tips | Tricks | Hacks | Apps
The Linux Mint team’s latest version of the distro is their fi rst
long-term support release based on Ubuntu 14.04 – 17.1
comes with some much needed updates. For the fi rst time
ever, Linux Mint has received a full-on point release update
and in more unique is the fact that this 17.1 comes instead of
the Linux Mint team working on a Linux Mint 18. Linux Mint 17,
for the fi rst time in the distro’s history, is a long-term support
release based on Ubuntu’s own current LTS, 14.04 Trusty Tahr.
With no new numbered Linux Mint coming until 2016, it’s good
to see actual quantifi able evidence that the Mint team not only
still exist, but are keeping with their LTS promise.
As such, on fi rst glance, there’s not a massive difference
in 17.1 over 17. The core of the distro has received a series of
security and bug fi x updates, with all default software now
updated to their latest versions at the time of release as well.
In terms of the desktops, all versions have had tweaks to
The Cinnamon-flavoured revolution is here as Mint releases its
first truly independent desktop environment
the updaters and other settings – the software updater now
allows you to try and streamline the list of updates, grouping
together sets of updates to supposedly make reading the
list easier. The main benefi t of this we’ve found is that you no
longer need to hunt down every single package that’s part of a
piece of software if you want to delay updating it.
Choose your kernelAs the distro ages and receives kernel updates, it seems the
team has noticed the need for a way to choose between the
different kernels; this can be essential for people who need to
do development on different kernel types, or if you just need to
rollback for specifi c security or compatibility reasons.
The desktop environments, while not getting any specifi c
major new features, have been updated nonetheless.
Cinnamon 2.4 has had a focus on a ‘smoother experience’,
Linux Mint 17.1
Slight changes to the transparency effects
and colours make navigating the already
great Mint Menu just that bit better
Cinnamon 2.0 is very
stable, even with its own
brand new back-end
Edge tiling is improved with a new
lock feature that means windows
you wish to stay visible always will
ProsImprovements all-round and the addition of the kernel selector will be useful to some of the specifi c users
ConsA minor update in general though, and barely worth doing if you’re already running Mint 17 and are happy with it
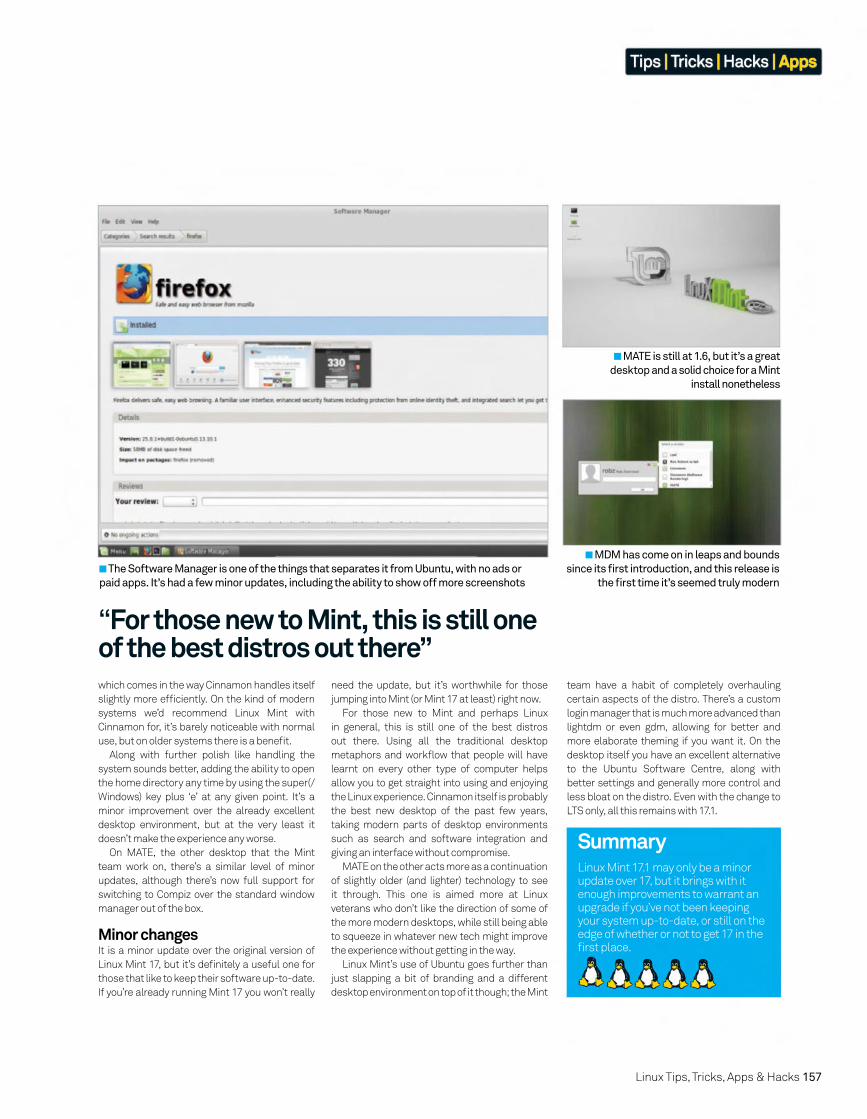
Linux Tips, Tricks, Apps & Hacks 157
Tips | Tricks | Hacks | Apps
“For those new to Mint, this is still one of the best distros out there”
team have a habit of completely overhauling
certain aspects of the distro. There’s a custom
login manager that is much more advanced than
lightdm or even gdm, allowing for better and
more elaborate theming if you want it. On the
desktop itself you have an excellent alternative
to the Ubuntu Software Centre, along with
better settings and generally more control and
less bloat on the distro. Even with the change to
LTS only, all this remains with 17.1.
which comes in the way Cinnamon handles itself
slightly more effi ciently. On the kind of modern
systems we’d recommend Linux Mint with
Cinnamon for, it’s barely noticeable with normal
use, but on older systems there is a benefi t.
Along with further polish like handling the
system sounds better, adding the ability to open
the home directory any time by using the super(/
Windows) key plus ‘e’ at any given point. It’s a
minor improvement over the already excellent
desktop environment, but at the very least it
doesn’t make the experience any worse.
On MATE, the other desktop that the Mint
team work on, there’s a similar level of minor
updates, although there’s now full support for
switching to Compiz over the standard window
manager out of the box.
Minor changesIt is a minor update over the original version of
Linux Mint 17, but it’s defi nitely a useful one for
those that like to keep their software up-to-date.
If you’re already running Mint 17 you won’t really
need the update, but it’s worthwhile for those
jumping into Mint (or Mint 17 at least) right now.
For those new to Mint and perhaps Linux
in general, this is still one of the best distros
out there. Using all the traditional desktop
metaphors and workfl ow that people will have
learnt on every other type of computer helps
allow you to get straight into using and enjoying
the Linux experience. Cinnamon itself is probably
the best new desktop of the past few years,
taking modern parts of desktop environments
such as search and software integration and
giving an interface without compromise.
MATE on the other acts more as a continuation
of slightly older (and lighter) technology to see
it through. This one is aimed more at Linux
veterans who don’t like the direction of some of
the more modern desktops, while still being able
to squeeze in whatever new tech might improve
the experience without getting in the way.
Linux Mint’s use of Ubuntu goes further than
just slapping a bit of branding and a different
desktop environment on top of it though; the Mint
The Software Manager is one of the things that separates it from Ubuntu, with no ads or
paid apps. It’s had a few minor updates, including the ability to show off more screenshots
MATE is still at 1.6, but it’s a great
desktop and a solid choice for a Mint
install nonetheless
MDM has come on in leaps and bounds
since its fi rst introduction, and this release is
the fi rst time it’s seemed truly modern
SummaryLinux Mint 17.1 may only be a minor update over 17, but it brings with it enough improvements to warrant an upgrade if you’ve not been keeping your system up-to-date, or still on the edge of whether or not to get 17 in the fi rst place.

Try 3 issues for just
£5** This off er entitles new UK direct debit subscribers to receive their fi rst three issues for £5. After these issues, subscribers will then pay £25.15 every six issues. Subscribers can cancel this subscription at any time. New subscriptions will start from the next available issue. Off er code ZGGZIN must be quoted to receive this special subscriptions price. Direct debit guarantee available on request.
** This is an US subscription off er. The USA issue rate is based on an annual subscription price of £65 for 13 issues which is equivalent to $102 at the time of writing compared with the newsstand price of $16.99 for 13 issues being $220.87. Your subscription will start from the next available issue.
Special
trial o
ffer
Exclusive offer for new
Enjoyed this book?

For amazing offers please visit www.imaginesubs.co.uk/lud Quote code ZGGZIN
Try 3 issues for £5 in the UK* or just $7.85 per issue in the USA** (saving 54% off the newsstand price)
Dedicated to all things LinuxWritten for youLinux User & Developer is the only magazine dedicated to advanced users, developers & IT professionals
In-depth guides & featuresWritten by grass-roots developers and industry experts
Free assets every issueFour of the hottest distros feature every month – log in to FileSilo, download and test them all!
About the
mag
Or telephone UK 0844 249 0282+ overseas +44 (0) 1795 418 661
subscribers to…
+ Calls will cost 7p per minute plus your telephone company’s access charge

YOUR FREE RESOURCESLog in to filesilo.co.uk/bks-714/ and download your tutorial resources NOW!
YOUR BONUS RESOURCESON FILESILO WE’VE PROVIDED FREE, EXCLUSIVE CONTENT FOR LINUX TIPS, TRICKS, APPS & HACKS VOLUME 3 READERS, INCLUDING…
• 25 software packages to help your make the most of your Linux system, including HomeBank personal finance manager, Tomahawk music player and many more
• 18 video tutorials adding up to over five hours of expert advice, covering Python coding, Raspberry Pi projects, system admin fixes and more
• All of the tutorial files you’ll need to complete the steps in this book, including assets for your visual novel game.
All the files you need to complete the tutorials
PACKED WITH FREE PREMIUM CONTENT
Go to: http://www.filesilo.co.uk/bks-714/
EVERYTHING YOU NEED
TO FOLLOW THETUTORIALS AND
PROJECTS IN THIS BOOK
MASTER PYTHON AND MORE WITH YOUR FREE FILES
160 Linux Tips, Tricks, Apps & Hacks
Download free software
5+ hours of video tutorials
FILESILO – THE HOME OF PRO RESOURCESA rapidly growing library Updated continually with cool resourcesLets you keep your downloads organisedBrowse and access your content from anywhereNo more torn disc pages to ruin your magazines
No more broken discsPrint subscribers get all the contentDigital magazine owners get all the content too!Each issue’s content is free with your magazineSecure online access to your free resources
Discover your free online assets
The most popular downloads are shown in the carousel here, so check out what your fellow readers are enjoying.
Whether it’s Python tutorials or software resources, categories make it easy to identify the content you’re looking for.
Find out more about our online stores, and useful FAQs, such as our cookie and privacy policies and contact details.
If you’re looking for a particular type of content, like software or video tutorials, use the filters here to refine your search.
Can’t find the resource you’re looking for in these filters? Click on More Types to specify what kind of resource you want.
See key details for each resource including number of views and downloads, and the community rating.
Discover our fantastic sister magazines and the wealth of content and information that they provide.
The first time you use FileSilo, you’ll need to register. After that, you can use your email address and password to log in.
This is the new FileSilo site that replaces your disc. You’ll find it by visiting the link on the following page.
Linux Tips, Tricks, Apps & Hacks 161
HOW TO USEEVERYTHING YOU NEED TO KNOW ABOUT ACCESSING YOUR NEW DIGITAL REPOSITORY
Having trouble with any of the techniques in this issue’s tutorials? Don’t know how to make the best use of your free resources? Want to have your work critiqued by those in the know? Then why not visit the Bookazines or Linux User & Developer Facebook page for all your questions, concerns and qualms. There is a friendly community of experts to help you out, as well as regular posts and updates from the bookazine team. Like us today and start chatting!
facebook.com/ImagineBookazinesfacebook.com/LinuxUserUK
NEED HELP WITHTHE TUTORIALS?
To access FileSilo, please visit http://www.filesilo.co.uk/bks-714/
01 Follow the on-screen instructions to create
an account with our secure FileSilo system, or log in and unlock the issue by answering a simple question
about the edition you’ve just read. You can access the content for free with each edition released.
02Once you have logged in, you are free to
explore the wealth of content made available for free on FileSilo, from great video tutorials and online guides to superb downloadable resources. And the more bookazines you purchase, the more your instantly accessible collection of digital content will grow.
03 You can access FileSilo on any
desktop, tablet or smartphone device using any popular browser (such as Safari, Firefox or Google Chrome). However, we recommend that you use a desktop to download content, as you may not be able to download files to your phone or tablet.
04 If you have any problems with
accessing content on FileSilo, or with the registration process, take a look at the FAQs online or email [email protected].
162 Linux Tips, Tricks, Apps & Hacks

TERMINAL TIPSLEARN TO CONQUER THE
COMMAND LINE AND GAIN MORE CONTROL OVER YOUR SYSTEM
DISTRO GUIDEDISCOVER THE BEST FREE
SOFTWARE TO HELP YOU TAKE LINUX TO THE NEXT LEVEL
BUILD A SERVERTAKE THE NEXT STEP AND UP YOUR COMPUTING POWER BY
UPGRADING YOUR SERVER
STAY SECUREFIND OUT HOW TO DEFEND YOUR
NETWORK AND SYSTEM, AND KEEP YOUR DATA SAFE
www.imaginebookshop.co.uk
Everything you need to get the most from Linux
Run Linux in the cloud
Generate complex graphics
Supercharge your Pi
Transform your network
UBUNTU LINUX MINT ELEMENTARY TAILS
Top hints and tips to guide you through the best open source software and operating systems
Guides for RasPi, Debian &
more