Embed Size (px)
Citation preview

Thank you for purchasing an Olympus Digital Voice Recorder. Please read these instructions for information about using the product correctly and safely. Keep the instructions handy for future reference. To ensure successful recordings, we recommend that you test the record function and volume before use.
Register your product on www.olympus-consumer.com/register and get additional benefits from Olympus!
EN
LINEAR PCM RECORDERLS-20M
Linear PCM Recorder
DETAILEDINSTRUCTIONS

EN
Introduction• The contents of this document may be changed in the future without advanced notice. Contact our
Customer Support Center for the latest information relating to product names and model numbers.• The illustration of the screen and the recorder shown in this manual may differ from the actual product.
The utmost care has been taken to ensure the integrity of this document but if you find a questionable item, error or omission, please contact our Customer Support Center.
• Any liability for passive damages or damage of any kind occurred due to data loss incurred by a defect of the product, repair performed by the third party other than Olympus or an Olympus authorized service station, or any other reason is excluded.
Trademarks and registered trademarks
• IBM and PC/AT are the trademarks or registered trademarks of International Business Machines Corporation.• Microsoft, Windows and Windows Media are registered trademarks of Microsoft Corporation.• Macintosh, Mac OS and Quick Time are the trademarks of Apple Inc.• SD and SDHC are the trademarks of SD Card Association.• HDMI, the HDMI Logo and High-Definition Multimedia Interface are trademarks or registered trademarks of
HDMI Licensing LLC.• MPEG Layer-3 audio coding technology licensed from Fraunhofer IIS and Thomson.• This product is licensed under the AVC patent portfolio license for the personal and noncommercial use of
a consumer to. • Encode video in compliance with the AVC standard (AVC VIDEO) and/or. • Decode AVC video that was encoded by a consumer engaged in a personal and noncommercial activity and/or was
obtained from a video provider licensed to provide AVC video. No license is granted or shall be implied for any other use. Additional information may be obtained from MPEG LA, L.L.C. see
http://www.mpegla.com• Recording or shooting a concert, performance, or any other event without the permission of the copyright
holder is prohibited by law.
Other product and brand names mentioned herein may be the trademarks or registered trademarks of their respective owners.

EN
1
2
3
4
5
6
INDEX
Table of contents P.4
Safety precautions P.5
Getting started P.10
About recording/shooting P.34
About playback P.48
Menu setting P.63
Using the recorder on your PC P.88
Other information P.96

EN
IntroductionINDEX..............................................................................3Table.of.contents.............................................................4Safety.precautions..........................................................5
1 Getting startedMain.features................................................................10Checking.the.contents.of.the.box...................................11Identification.of.parts...................................................12
Display (LCD panel) ................................................................ 13Power.supply.................................................................17
Inserting the battery ............................................................. 17Charging by connecting to a computer via USB .................... 19Connect to the USB-AC adapter to charge............................. 20Turning on/off the power ...................................................... 23
HOLD.............................................................................24Setting.time.and.date.[Time.&.Date]..............................25
Changing the time and date .................................................. 26Inserting.and.ejecting.an.SD.card..................................27
Inserting an SD card .............................................................. 27Ejecting an SD card ................................................................ 27
Notes.on.the.folders......................................................29About the folders for voice recordings .................................. 29About the folders for movie shootings ................................. 30About the folder for music playback ..................................... 31
Selecting.the.folders.and.files.......................................32Switching.between.voice.and.movie.mode....................33
2 About recording/shootingBefore.recording.A.......................................................34
Turn the microphone toward the original sound source ...... 34Recording.A..................................................................35
Recommended settings by recording condition .................. 39Recording from external microphone or other devices ........ 40
Before.shooting.movies.n...........................................42Point the lens toward the subject..... .................................... 42
Shooting.movies.n.....................................................43
3 About playbackPlayback.A....................................................................48Setting.an.index.mark.A...............................................52Playing.movies.n........................................................53
To play back movies on a TV .................................................. 56How.to.begin.segment.repeat.playback.A.n...............57Erasing.A.n................................................................58
Erasing files ........................................................................... 58Erasing all files in a folder ..................................................... 59Partially erasing a file ........................................................... 61
4 Menu settingMenu.setting.method....................................................63
C.Rec.Menu...................................................................... 65J.Recording.Settings .................................................... 68#.Play.Menu .................................................................... 71!.File.Menu ..................................................................... 72D.LCD/Sound.Menu ........................................................ 73E.Device.Menu ................................................................ 74Voice sync recording [V-Sync. Rec] A ................................... 76Rearranging files [Replace] A n ....................................... 78Moving/Copying files [File Move/Copy] A n .................... 79Dividing files [File Divide] A n.......................................... 81Fn Setting [Fn. setting] A n.............................................. 83Changing the USB class [USB Settings] A n ..................... 84Formatting the recorder [Format] A n ............................. 86
5 Using the recorder on your PCOperating.environment.................................................88Connecting.to.your.PC....................................................90
Disconnecting from your PC .................................................. 91Transfer.the.voice.files.to.your.PC..................................92Using.Quick.Time...........................................................93Using.as.PC.camera........................................................95
6 Other informationAlarm.message.list........................................................96Troubleshooting............................................................98Accessories.(optional).................................................. 101Specifications............................................................. 102Technical.assistance.and.support................................. 107
Table of contents

EN
Before using your new recorder, read this manual carefully to ensure that you know how to operate it safely and correctly. Keep this manual in an easily accessible location for future reference.• The warning symbols indicate important
safety related information. To protect yourself and others from personal injury or damage to property, it is essential that you always read the warnings and information provided.
Safety precautions
f DangerIf the product is used without observing the information given under this symbol, serious injury or death may result.
f WarningIf the product is used without observing the information given under this symbol, injury or death may result.
f CautionIf the product is used without observing the information given under this symbol, minor personal injury, damage to the equipment, or loss of valuable data may result.
Caution for usage environment• To protect the high-precision technology
contained in this product, never leave the recorder in the places listed below, no matter if in use or storage:• Places where temperatures and/or humidity
are high or go through extreme changes. Direct sunlight, beaches, locked cars, or near other heat sources (stove, radiator, etc.) or humidifiers.
• In sandy or dusty environments.• Near flammable items or explosives.• In wet places, such as bathrooms or in the
rain. When using products with weatherproof designs, read their manuals as well.
• In places prone to strong vibrations.• Never drop the recorder or subject it to
severe shocks or vibrations.• The recorder may malfunction if it is
used in a location where it is subject to a magnetic/ electromagnetic field, radio waves, or high voltage, such as near a TV set, microwave, video game, loud speakers, large monitor unit, TV/radio tower, or transmission towers. In such cases, turn the recorder off and on again before further operation.
• Avoid recording or playing back near cellular phones or other wireless equipment, as they may cause interference and noise. If you experience noise, move to another place, or move the recorder further away from such equipment.
• Do not use organic solvents such as alcohol and lacquer thinner to clean the unit.
• When attaching this recorder to a tripod, be sure to rotate only the screw of the tripod in the tripod socket of this recorder. Never rotate the recorder.

EN
Warning regarding data loss:• Recorded content in memory may be
destroyed or erased by operating mistakes, unit malfunction, or during repair work. It is recommended to back up and save important content to other media such as a computer hard disk.
• Any liability for passive damages or damage of any kind occurred due to data loss incurred by a defect of the product, repair performed by the third party other than Olympus or an Olympus authorized service station, or any other reasons is excluded from the Olympus’s liability.
Handling the recorder
f Warning:• Do not use the recorder near flammable
or explosive gases.• Keep young children and infants away
from the recorder. Always use and store the recorder out of the reach
of young children and infants to prevent the following dangerous situations which could cause serious injury:1 Becoming entangled in the recorder strap,
causing strangulation.2 Accidentally swallowing the battery, cards or
other small parts.3 Accidentally being injured by the moving
parts of the recorder.• Do not use or store the recorder in
dusty or humid places.• Do not disassemble, repair or modify
the unit yourself.• Use SD/SDHC memory cards only.
Never use other types of cards. If you accidentally insert another type of
card into the recorder, contact an authorized distributor or service center. Do not try to remove the card by force.
• Do not operate the unit while operating a vehicle (such as a bicycle, motorcycle, or car).
f Caution:• Stop using the recorder immediately if
you notice any unusual odors, noise, or smoke around it.
Never remove the batteries with bare hands, which may cause a fire or burn your hands.
• Be careful with the strap. Be careful with the strap when you carry the
recorder. It could easily catch on stray objects and cause serious damage.
• Do not leave the recorder in places where it may be subject to extremely high temperatures.
Doing so may cause parts to deteriorate and, in some circumstances, cause the recorder to catch fire. Do not use the charger or AC adapter if it is covered (such as a blanket). This could cause overheating, resulting in fire.
• Handle the recorder with care to avoid getting a low-temperature burn.• When the recorder contains metal parts,
overheating can result in a low-temperature burn. Pay attention to the following:
• When used for a long period, the recorder will get hot. If you hold on to the recorder in this state, a low-temperature burn may be caused.
• In places subject to extremely cold temperatures, the temperature of the recorder’s body may be lower than the environmental temperature. If possible, wear gloves when handling the recorder in cold temperatures.
Safety precautions

EN
Battery handling precautionsFollow these important guidelines to prevent batteries from leaking, overheating, burning, exploding, or causing electrical shocks or burns.
f Danger:• The recorder uses a lithium ion battery
specified by Olympus. Charge the battery with the specified AC adapter or charger. Do not use any other AC adapters or chargers.
• Batteries should never be exposed to flame, heated, short-circuited or disassembled.
• Never heat or incinerate batteries.• Take precautions when carrying or
storing batteries to prevent them from coming into contact with any metal objects such as jewelry, pins, fasteners, etc.
• Never store batteries where they will be exposed to direct sunlight, or subjected to high temperatures in a hot vehicle, near a heat source, etc.
• To prevent causing battery leaks or damaging their terminals, carefully follow all instructions regarding the use of batteries. Never attempt to disassemble a battery or modify it in any way, solder, etc.
• Do not connect the battery directly to a power outlet or a cigarette lighter of an automobile.
• If a battery fluid gets into your eyes, flush your eyes immediately with clear, cold running water and seek medical attention immediately.
f Warning:• Keep batteries dry at all times.• If rechargeable batteries have not been
recharged within the specified time, stop charging them and do not use them.
• Do not use a battery if it is cracked or broken.
• Never subject batteries to strong shocks or continuous vibration.
• If a battery leaks, becomes discolored or deformed, or becomes abnormal in any other way during operation, stop using the recorder.
• If a battery leaks fluid onto your clothing or skin, remove the clothing and flush the affected area with clean, running cold water immediately. If the fluid burns your skin, seek medical attention immediately.
• Keep battery out of the reach of children.
• If you notice anything unusual when using this product such as abnormal noise, heat, smoke, or a burning odor:1 remove the battery immediately while being
careful not to burn yourself, and;2 call your dealer or local Olympus
representative for service.
f Caution:• Please recycle batteries to help save
our planet’s resources. When you throw away dead batteries, be sure to cover their terminals and always observe local laws and regulations.
• Always charge a rechargeable battery when using it for the first time, or if it has not been used for a long period.
Safety precautions

EN
• Rechargeable battery have limited lifetime. When the operating time becomes shorter even if the rechargeable battery is fully charged under the specified condition, replace it with a new one.
• The battery may become hot during prolonged use. To avoid minor burns, do not remove it immediately after using the recorder.
AC.adapter
f Danger:• Be sure to use the AC adapter with the
proper voltage (AC 100 - 240 V). Using it with other voltage levels may cause fire, explosion, overheating, electric shock or injury.
• For safety, be sure to unplug the AC adapter from the outlet before performing maintenance or cleaning. Also, never plug in or disconnect the power plug with a wet hand. This may cause electric shock or injury.
f Warning:• Do not attempt to disassemble, repair
or modify the AC adapter in any way.• Keep foreign objects including water,
metal, or flammable substances from getting inside the product.
• Do not moisten the AC adapter or touch it with a wet hand.
• Do not use the AC adapter in the vicinity of flammable gas (including gasoline, benzine and lacquer thinner).
In case• ... the internal parts of the AC adapter are
exposed because it has been dropped or otherwise damaged:
• ... the AC adapter is dropped in water, or if water, metal flammable substances or other foreign objects get inside it:
• ... you notice anything unusual when using the AC adapter such as abnormal noise, heat, smoke, or a burning odor:1 do not touch any of the exposed parts;2 immediately disconnect the power supply
plug from the power outlet, and;3 call your dealer or local Olympus representative
for servicing. Continued use of the AC adapter under these circumstances could result in electric shock, fire or injury.
f Caution:• Do not use the AC adapter if the power
plug is damaged or the plug is not completely connected to the outlet. This may cause fire, overheating, electric shock, short circuit or damage.
• Unplug the AC adapter from AC outlet when not using. If this precaution is not followed, fire, overheating or electric shock may occur.
• Make sure to hold the plug when removing the power plug from the outlet. Do not bend the cord excessively or put a heavy object on it. This may cause fire, overheating, electric shock or damage.
• If something appears to be wrong with the AC adapter, unplug the AC adapter from the outlet and consult your nearest service center. Using the AC adapter may cause fire, overheating, electric shock or injury.
Safety precautions

EN
Safety precautions
• Do not use or keep the AC adapter in very hot places, such as in direct sunlight, in a closed car on a sunny day, near a heater, on an electric carpet, etc. Do not use the AC adapter if something is covering it (such as a blanket). This may cause fire, explosion, leakage or overheating.
LCD.monitor• The LCD used for the monitor is made
with high-precision technology. However, black spots or bright spots of light may appear constantly on the LCD Monitor. Due to its characteristics or the angle at which you are viewing the monitor, the spot may not be uniform in color and brightness. This is not a malfunction.
10
1
EN
Main featuress Shoots full high definition videos at the
high resolution of 1920 x 1080 pixels. You can change the shooting resolution according to your usage ( P.68).
s Adopts the MPEG-4 AVC and H.264 formats for video recording. This also allows you to enjoy high-resolution images on a PC or a large-screen TV.
s Allows you to upload movie files to video sites, to easily share them with the world through the Internet. Supports the 640x480 (30fps/ mp3) video format suitable for uploading video files ( P.68).
s Incorporates a digital zoom function. This allows you to clearly capture subjects that are far away from you ( P.45).
s Utilizes a high sensitivity, low noise stereo microphone capable of faithfully capturing the original sound.
Fixing the stereo microphones at a 45° angle enables recording with a natural and expansive stereo feel.
s The recording format, without compressing the original sound recording, "Linear PCM format, " and capable of efficient record "MP3 format" support. Scene can be recorded in a wide range of high quality ( P.65).
Capable of realistically recording various different sound sources. High resolution recording at a high sampling frequency and bit count equivalent or superior to that of a music CD (Sampling frequency 44.1 kHz, Bit count 16bit) is possible. Capable of recording natural sound for various purposes, including recording the practicing of a musical instrument.
s You can playback WAV and MP3 format files transferred from a computer in addition to files recorded by the device itself.
This allows you to use this recorder as a music player.
s Using the visualizer, 5 types of video patterns can be displayed on the LCD while playing back voice files recorded with the recorder ( P.71).
s Supports high capacity recording media. Capable of recording onto commercially available SD cards ( P.27).
s Equipped with a variety of features that support audio recording.
With this recorder you can customize a variety of recording functions such as the recording level and microphone sensitivity to suit the recording conditions and personal preferences ( P.65 ~ P.66).
s Equipped with a variety of features to improve video shooting. When using this recorder as a camera, you can customize a variety of shooting functions according to the scene ( P. 68 ~ P.70).
s Allows you to move or copy files within the folders of an SD card ( P. 79).
s You can divide files ( P.81), or delete part of a file ( P.61) recorded in PCM format in this recorder.
s Index mark features allow you to quickly find desired locations ( P.52).
s Supports USB 2.0. Hi-Speed, which enables high-speed data transmission as an external memory device for your computer.
s It has a USB charging function ( P.19).s It has a 2.0 inch QVGA color LCD panel.s Allows you to connect the recorder to a PC
and to use it as a PC camera ( P.95).
Getting started
Main features

11
1
EN
LOCK
Checking the contents of the boxChecking the contents of the box
The following items are included with the recorder.If anything is missing or damaged, contact the dealer from whom you purchased the recorder.
Voice Recorder
Lithium ion battery (LI-42B)
• Warranty card• Contents may vary depending on purchase
location.• Warranty differs depending on purchase
location. Warranty card may not be included.
USB-AC adapter (F-3AC)
USB cable
Instructions
Note
• Be sure to use the included dedicated USB cable and AC adapter. If any other company’s cable is used, it may lead to malfunction of the recorder. Also, never use this dedicated cable with any other company’s products.
SD card

1
1
EN
o
i
r
u=
6
5
4
q
3
1
0!
@
^%$
#
*78
9&
(
)
-
w
e
p
ty
2
Identification of parts
1 Built-in stereo microphone(R)2 Built-in stereo microphone(L)3 PEAK/LED indicator light (LED)4 Lens5 Main LCD (LCD panel)6 Sub LCD (LCD panel)7 + button8 OK button9 REC (s) (Record) button Recording/Shooting indicator light
(LED)0 9 button! LIST button@ MENU button# A-B REPEAT button$ – button% Fn button^ ERASE button& 0 button
* STOP (4) button( Card cover) Mode switch (A/n)- Strap hole= MIC (Microphone) jack
(MIC/LINE-IN)q EAR (Earphone) jackw POWER/HOLD switche REMOTE jack
Connect the receiver for the exclusive remote control set RS30W (optional). This enables operation of the start and stop recording/shooting functions through the remote control.
r Connector covert HDMI micro connectory USB connectoru Battery cover lock buttoni Battery covero Tripod socketp Built-in speaker
Identification of parts

1
1
EN
1
2
3
1
2
4
1
56
2 3
Identification of parts
Display (LCD panel)
1 Root folder indicator2 Folder name
File list display
1 Current folder name2 File name3 Guide indicator
4 A mode [Recorder] mode display:
File display
1 Battery indicator2Current file number/
Total number of recorded files in the folder
3 Remaining recording time/ File length
4Recorder status indicator[K]: Record indicator [≠]: Pause indicator [L]: Stop indicator [•]: Play indicator [ß]: Forwarding indicator [™]: Rewinding indicator
5Level meter6Elapsed recording time/
Elapsed playback time
Folder list display
Identification of parts

1
1
EN
1
2
3
3
1
2
4
1
56
2 3
1 Current folder name2 Folder name/File name3 Guide indicator
List display 2
1 Current folder name2 File name3 Guide indicator
4 A mode [Music] mode display:
File display
1 Battery indicator2Current file number/
Total number of recorded files in the folder
3 File length4Recorder status indicator
[L]: Stop indicator [•]: Play indicator [ß]: Forwarding indicator [™]: Rewinding indicator
5Level meter6Elapsed playback time
List display 1
When there are files and folders in the folder
When there are only files in the folder
Identification of parts
Identification of parts

1
1
EN
1
2
1
2
3
1
2
6
3
7
8
4 5
1 Root folder indicator2 Folder name
File list display
1 Current folder name2 File name3 Guide indicator
4 n mode [Movie] mode display:
File display
1 Shooting mode indicator2 Icon display3 Battery indicator4Current file number/
Total number of recorded files in the folder
5 Remaining shooting time/ File length
6Recorder status indicator[K]: Shooting indicator [≠]: Pause indicator [L]: Stop indicator [•]: Play indicator [ß]: Forwarding indicator [™]: Rewinding indicator
7 Level meter8Elapsed shooting time/
Elapsed playback time
Folder list display
Identification of partsIdentification of parts

1
1
EN
^1
4
23
5 678 90!@ #
$
%
4 Icon display:
1 Shooting mode (s) (n)2 Recording Level (i)3 Zoom (h)/ Volume (g)4Microphone Sensitivity (q)(r)5 Low Cut Filter (c)6Limiter ([)7 Voice Sync (Z)8Equalizer (]) (^) (_) (‘)9Playback Mode (Y) (X) (W)0Self timer (j)(k)!White balance ()(;)(<)(:)(=)(|)@Metering (u)(v)#Exposure compensation (y)$Image stabilization (I)%Fn button Function (H)^Reverse Angle Recording (o)
About the two LCD displays
The recorder has two displays, the main LCD and the sub LCD, utilized differently depending on mode and function.
A mode
n mode
During shooting or playback:• During shooting or playback, both
the main LCD and sub LCD are on. However, when the [Main LCD Display] setting of [Recording Settings] is set to [Off], both the LCDs are off during shooting. ( P.68).
When operation is stopped:• When operation is stopped, both the
main LCD and sub LCD are on.Menu settings:
• When you switch to the menu settings, both the main LCD and sub LCD are on.
During recording or playback:• During recording or playback, the
main LCD is off and only the sub LCD is on.
When operation is stopped:• When operation is stopped, both the
main LCD and sub LCD are on.Menu settings:
• When you switch to the menu settings, both the main LCD and sub LCD are on.
Identification of parts
Identification of parts

1
1
EN
Power supply
Inserting the batteryThis recorder uses a lithium ion battery specified by Olympus (LI-42B). Do not use any other type of battery.
1 Slide the battery cover lock button in the direction indicated by the arrow.
With the back label of the battery facing up, line up the terminals of the recorder and battery. Insert the battery by sliding in direction A while pushing down in direction B.• Be careful of the direction of the battery
when inserting it.
Close the battery cover by pressing in direction A and sliding in direction B.
4 Completely close the battery cover by sliding its lock button in the direction indicated by the arrow.
• Verify that the battery lock cover button is locked.
The supplied rechargeable battery is not fully charged. Before using the unit the first time or after long periods of disuse, it is recommended that you charge it until full ( P.19).
Power supply

1
1
EN
Notes
• Be sure to turn off the power of the recorder before replacing the battery. Unloading the battery while the recorder is in use may cause a malfunction such as corrupting the file, etc. If you take out the battery while operating, you will lose your currently recorded file because the file header will not be able to close.
• If it takes longer than 15 minutes to replace the dead battery or if you take the battery in and out repeatedly at short intervals, you may have to reset the time when you have loaded fresh battery.
• Remove the battery if you are not going to use the recorder for an extended period of time.
• When replacing rechargeable battery, be sure to use lithium ion battery (LI-42B) specified by Olympus. The use of other manufacturers' products can damage the recorder and should be avoided.
• Lithium ion battery is self discharging. After unpacking this product, charge the supplied lithium ion battery before using the recorder for the first time.
Power supply
Power supply

1
1
EN
Power supply
Charging by connecting to a computer via USBYou can charge the battery by connecting to a PC's USB port. When charging, be sure to correctly place the rechargeable battery (supplied) into the recorder ( P.17).
Connect the USB cable to the USB port of the PC.
1 Boot the PC.
While the recorder is during stop mode or turned off, connect the USB cable to the connecting terminal on the bottom of the recorder.
The charging process will start.
. Charging is completed when [Battery Full] is displayed.Charging time: approximately 2 hours ** It shows the approximate time when
charging the rechargeable battery fully from no remaining power at the room temperature. The charging time will be changed depending on the remaining amount and the state of battery.
Before connecting the USB cable, exit HOLD mode ( P.24).
Power supply
Battery indicator
• When [æ] appears on the sub LCD, charging the battery as soon as possible. When the battery is too weak, [s] and [Battery Low] will appear on the display and the recorder will shut down.
• While charging, the battery indicator constantly changes and does not show the actual amount of power remaining.
The battery indicator on the sub LCD changes as the battery lose power.

0
1
EN
Connect to the USB-AC adapter to chargeIt can be charged by connecting to the USB-AC adapter (F-3AC).
1 Plug the recorder’s USB cable into the AC adapter.
• Before connecting the AC adapter, switch the USB connection setting to [AC Adapter] ( P.84).
• Before connecting the USB cable, exit HOLD mode ( P.24).
Connect the AC cable to the AC adapter, and then to an AC outlet.
To the USB-AC adapter’s (F-3AC) USB connector
Power supply
To the AC outlet
While the recorder is during stop mode or turned off, connect the USB cable to the connecting terminal on the bottom of the recorder.
To the USB connector
Press the `OK button to start charging.
• While [Press OK to start charging] is flashing, press the `OK button.
Charging is completed when [Battery Full] is displayed.
Power supply

1
1
EN
Notes
• Charging is not possible during recording, shooting or playback.
• When playing a voice/music file, the recorder may be reset due to the reduction of the voltage output of the battery depending on the volume level even if [º] is displayed in the battery indicator. In this case, lower the volume of the recorder.
• Do not put in or take out the battery or AC adapter when the recorder power is on or when this recorder is connected to another device. It may cause problems with the values and functions set in the recorder.
• The charger can be used within the range of AC 100 V to AC 240 V (50/60 Hz). When using the charger abroad, you may need a plug adapter to convert the plug to the shape of the AC wall outlet. For details, ask at your local electrical shop or travel agent.
• Do not use travel voltage converters as they could damage your charger.
• The recorder cannot be charged when the PC is not turned on. It may not also be charged when the PC is in standby, hibernate, or sleep mode.
• Do not charge the recorder with the USB hub connected.
• You cannot charge when [ø]*1 or [√]*2 blinks. Charge the battery at a temperature in the range of 5°C to 35°C (41°F to 95°F).*1 [ø]: When the surrounding temperature
is low.*2 [√]: When the surrounding temperature
is high.• When using time becomes notably short even
after the battery is fully charged, replace them with new ones.
• Be sure to push the USB connector all the way in. Otherwise, the recorder may not operate properly.
• Selecting [PC Camera] in the USB connection settings will prevent the recorder to charge via USB. Select [Storage class] in the USB connection settings if you would like to charge ( P.84).
• In case you would like to charge using the [PC Camera] setting, select [Optional] in the USB connection settings, then connect the USB cable to the recorder. Select [AC Adapter] at the [USB Connect] display to start charging ( P.84).
Cautions concerning the rechargeable battery
Read the following descriptions carefully when you use the lithium ion battery (LI-42B).
Discharging:The rechargeable battery self-discharge while this is not in use. Be sure to charge them regularly before use.
Operating temperature:The rechargeable battery is chemical products. The rechargeable battery efficiency may fluctuate even when operating within the recommended temperature range. This is an inherent nature of such products.
Recommended temperature range:When operating appliance: 0°C - 42°C/ 32°F - 107.6°FCharging: 5°C - 35°C/ 41°F - 95°FStorage for a long period: –20°C - 30°C/ –4°F - 86°FUsing the rechargeable battery outside the above temperature range may result in declining efficiency and shorter battery life. In order to prevent battery leakage or rust, remove the rechargeable battery from the products when you will not be using them for a long time, and store them separately.
Power supplyPow
er supply

1
EN
Notes
• This recorder is designed to fully charge battery regardless of their energy level. However, for best results when charging newly purchased rechargeable battery that have not been used for a long time (more than one month), it is recommended to fully charge the battery then discharge repeatedly for 2 to 3 times.
• When disposing rechargeable battery, always observe the local laws and regulations. Contact your local recycling center for proper disposal methods.
• If lithium ion battery is not fully discharged, protect against short-circuiting (e.g. by taping the contacts) before disposing.
For customers in Germany:Olympus has a contract with the GRS (Joint Battery Disposal Association) in Germany to ensure environmentally friendly disposal.
Power supply
Power supply

1
EN
Turning on/off the powerWhen the recorder is not being used, turn the power off to reduce battery consumption to a minimum. Even if the power is turned off, existing data, mode settings, and clock settings will be maintained.
Turning on the power
While the recorder is turned off, slide the POWER/HOLD switch to the direction of the arrow.
• The display shuts off, and the power will be turned off.
• The resume function remembers the stop position before the power is turned off.
Auto Power Off mode
Turning off the power
Slide the POWER/HOLD switch to the direction of the arrow, and hold it for 0.5 seconds or longer.
If the recorder is stopped/not used for over 10 minutes (default) while the power is turned on, the power will be turned off ( P.74).• To exit Auto Power Off mode , turn on the
power again.
• The display will turn on, and the power will be turned on.
Power supplyPow
er supply

1
EN
If you set the recorder to HOLD mode, the running conditions will be preserved, and all buttons will be disabled. This feature is useful when the recorder has to be carried in a bag or pocket. This mode can also prevent you from accidentally stopping recording or shooting.
Set the recorder to HOLD mode
Slide the POWER/HOLD switch to the [HOLD] position.
• After [Hold] appears on the sub LCD, the recorder is set to HOLD mode.
Notes
• If you press any button in HOLD mode, the clock display lights for 2 seconds, but it will not operate the recorder.
• If HOLD is applied during operation of the recorder, operation is disabled and the operation state is preserved (if playback has ended or recording or shooting has ended due to the remaining memory being used up, the recorder will enter the stopped state).
• The recorder can be effectively operated via the exclusive remote control set RS30W (optional), even when it is in HOLD mode.
HOLD
Exit HOLD mode
Slide the POWER/HOLD switch to the A position.
HOLD

1
EN
• Follow the same steps by pressing the 9 or 0 button to select the next item, and pressing the + or − button to set.
• You can select between 12 and 24 hour display by pressing the LIST button while setting the hour and minute.
Example: 10:38 P.M10:38 PM (Initial setting) 22:38
• You can select the order of the “Month”, “Day” and “Year” by pressing the LIST button while setting them.
Example: March 24, 20113M 24D 2011Y (Initial setting)
24D 3M 2011Y
2011Y 3M 24D
Setting the time and date beforehand enables easier file management.The recorder stores the time information automatically with the recording.
When you use the recorder for the first time after purchasing it, or when the battery have been inserted without the device having been used in a long time, the [Set Time & Date] will appear. When the “Hour” is flashing, conduct the setup from Step 1.
1 Press the 9 or 0 button to select the item to set.• Select the item from the “Hour”, “Minute”,
“Year”, “Month” and “Day” with a flashing point.
Press the + or − button to set.
Setting time and date [Time & Date]
+− button9 0 button`OK button
Press the `OK button to complete the setting.
• The clock will start from the set date and time. Press the `OK button according to the time signal.
Setting time and date

1
EN
Note
• If you press the ` OK button during the setup operation, the recorder will save the items that were set to that point.
1 While the recorder is during stop mode, press the MENU button.• The menu will appear on the display
( P.63).
Changing the time and date
While the recorder is during stop mode, press and hold the STOP (4) button to display the Time and Date, Remaining Memory and File Format. If the current time and date is not correct, set it using the procedure below.
+ − button`OK button
MENU button
Press the + or − button to select [Device Menu] tab.• You can change the menu display by moving
the settings tab cursor.
Press the `OK button to move the cursor to the item to set.• [Device Menu] will appear on the display.
Press the + or − button to select [Time & Date].
Press the `OK button.• [Time & Date] will appear on the display.• The “Hour” will flash on the display,
indicating the start of the Time and Date setup process.
The following steps are the same as Step 1 through Step 3 of “Setting time and date [Time & Date]” ( P.25).
Press the MENU button to close the menu screen.
Setting time and date [Time & Date]
Setting time and date

1
EN
LOCK
Inserting and ejecting an SD card
The “SD” indicated in the instruction manual refers to both SD and SDHC. You can use any commercially available SD card with the recorder.
Face the SD card in the correct way and insert into the card slot as shown in the diagram.• Insert the SD card keeping it straight.
• Inserting the SD card in the wrong way or at an angle could damage the contact area or cause the SD card to jam.
• If the SD card is not inserted all the way, data may not be written to the SD card.
Close the card cover securely.
Note
• In some cases SD cards which have been formatted (initialized) by another device, such as a computer, may not be recognized. Be sure to format SD cards with this recorder before using them ( P.86).
Inserting and ejecting an SD card
Ejecting an SD card
1 While the recorder is during stop mode, open the card cover.
Inserting an SD card
1 While the recorder is during stop mode, open the card cover.

1
EN
LOCK
Push the SD card inward to unlock it, and let it eject partially.
• The SD card is visibly out of the slot and can be removed safely.
Close the card cover securely.
Notes
• Releasing your finger quickly after pushing the SD card inward may cause it to eject forcefully out of the slot.
• Depending on the SD card maker or type, some SD cards may not be recognized properly due to incompatibility issues with the recorder.
• Be sure to read the instruction manual supplied with the SD card before using it.
• In the case when the SD card cannot be recognized, remove the SD card then put it in again to see if this recorder recognizes the SD card.
• The processing performance reduces in an SD card when you repeat writing and deleting. In this case, format the SD card ( P.86).
• There is no guarantee that all SD cards work with the recorder.
About the SD Card
When the SD card is write protected, there will be a display reading [SD card is locked]. Before inserting the card, turn off the write protection function.
If the write protection switch is facing the [LOCK] direction, recording and other functions cannot be carried out.
LOCK
See the Olympus support homepage for a list of SD cards verified for this recorder in accordance with the Olympus standards.http://olympus-europa.com/Although verified SD card makers are shown on the Olympus homepage, Olympus doesn’t guarantee compatibility in all cases.Also, according to changes in card specifications, support may become no longer available.
Inserting and ejecting an SD card
Inserting and ejecting an SD card
1
EN
001
002
001
003
999
Folder A
Folder B
Folder C
Folder D
Folder E
Root
Notes on the foldersNotes on the folders
Note
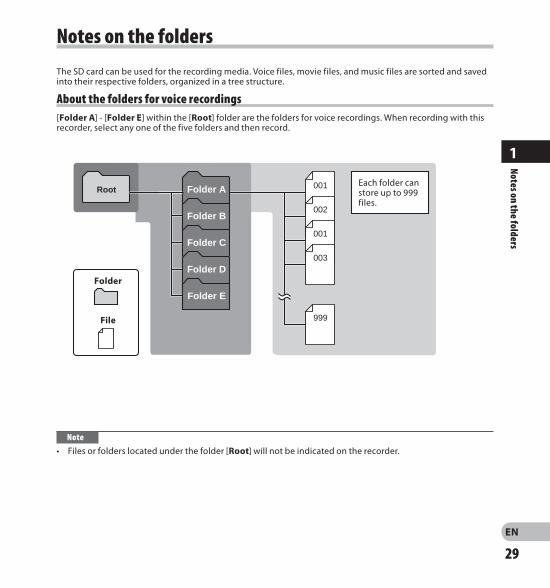
• Files or folders located under the folder [Root] will not be indicated on the recorder.
Folder
File
Each folder can store up to 999 files.
The SD card can be used for the recording media. Voice files, movie files, and music files are sorted and saved into their respective folders, organized in a tree structure.
About the folders for voice recordings[Folder A] - [Folder E] within the [Root] folder are the folders for voice recordings. When recording with this recorder, select any one of the five folders and then record.

0
1
EN
Root Movie100
Movie101
Movie102
Folder A
999OLYMPFolder A
001
002
003
9999
Edit
Movie999
DCIM
Folder File
About the folders for movie shootingsMovie files recorded with the LS-20M are stored into folders created under the [DCIM] folder using the recording date.
Each folder can store up to 9999 files.
First layer Second layer
When you divide a file, a new number is assigned to it and it is saved into the [Edit] folder.
Notes on the folders
Notes on the folders

1
1
EN
001
002
003
004
005
999
Root Artist 01
Artist 02
Artist 03
Album 01
Album 02
Album 03
Music
Folder File
Notes on the folders
About the folder for music playbackWhen transferring music files to the device using Windows Media Player, a folder is automatically created within the music playback folder which has a layered structure as shown in the diagram below. Music files that are in the same folder can be rearranged in preferential order and replayed ( P.78).
First layer
Each folder can store up to 999 files.
Second layer Third layer
Up to 128 folders can be created under the [Music] folder, including [Music].
Notes on the folders

1
EN
Please change folders only when the recorder's operation is stopped. For information on the layeredstructure of the folders, see the section entitled “Notes on the folders” ( P.29 ~ P.31).
Selecting the folders and files
A mode [Operation of the folders for music playbacks]
File list display
n mode [Operation of the folders for movie shootings]
Folder list display
Folder list display
(First layer)
Folder list display
(Second layer)
File list displayFolder list display
A mode [Operation of the folders for voice recordings]
Moving through the levels
Return: LIST buttonEach time you press this it returns up one level. The 0 button can also serve as the LIST button on a list display.
Proceed: `OK buttonEach time you press this it opens the folder or file selected in the list display and proceeds down one level.• The 9 button can also serve as the `OK
button on a list display.
+ or – buttonSelect the folder or file.
List display:The folders and files recorded in this recorder are displayed.
Selecting the folders and files
File list displayFolder list display

1
EN
Switching betw
een voice and movie m
ode
The recorder has two modes: voice recorder and movie recorder. Select the mode according to the purpose of use.
Switching between voice and movie mode
1 Slide the mode switch to A or n.
Note
• If you change the position of the mode switch while the recorder is operating, the recorder will continue the operation but will change the mode automatically once the operation has stopped.
About the functions of each mode
When the switch is at the A position:
You can record voice and save the data to the [Folder A] through [Folder E] folders for voice recording, and play the voice files you recorded with the recorder. Music files transferred to the [Music] folder of the recorder can also be played ( P.29, P.31).
When the switch is at the n position:
You can shoot movies and save the data to the [DCIM] folder dedicated to movie files, and play the movie files you shot ( P.30).
About the icons used in this manual
AIndicates an operation or setting that is possible when the mode switch is at the voice mode position.
nIndicates an operation or setting that is possible when the mode switch is at the movie mode position.
A nIndicates an operation or setting that is possible when the mode switch is at either voice mode or movie mode position.
The mode switch does not work while the recorder is performing operations such as recording, shooting, and playback. Stop the recorder or turn off the power and then change the mode.

2
EN
About recording/shooting
Before recording AGetting Ready
Changing modes:Slide the mode switch on the recorder to A ( P.33).
Select the recording format:Recording can be performed through thelinear PCM format, as well as the MP3 formats ( P.65).
Turn the microphone toward the original sound sourceTurn the built-in stereo microphone in the direction that you would like to record. Placing the built-in stereo microphone over the display is the proper position for performing stereo recording. If it is below the display when recording then proper stereo recording cannot be performed because the position of the original sound will be recorded in reverse phase.
When recording with the built-in microphone:Turn the microphone in the direction of the source to be recorded.
Original sound source
MIC SENSE HIGH
MIC SENSE LOW
L R
Key map
On mounting:Accurate adjustments of the microphone’s angle and the like can be made when the device is affixed to a commercially available tripod used for cameras.
About the built-in stereo microphone:The extension of the microphone sensitivity can be adjusted by changing the [Mic Sense] setting to [High] or [Low] ( P.65).
Before recording A

2
EN
Recording A
a
c
b
Recording A
1 Select the recording folder ( P.32).
• The recording/shooting indicator light will flash and [≠] will appear on the sub LCD.
• The main LCD turns off.a Remaining recording timeb File numberc Level meter (changes according to the
recording level and recording function settings)
• The voice sync level can be set when voice sync recording is on ( P.76).
• [Rec Mode] cannot be changed in the recording standby mode or while recording. Configure this while the recorder is stopped ( P.65).
• This recorder is designed to be able to record cleanly and evenly, even in recording conditions such as when the volume of the source sound changes significantly. However, even higher sound quality recordings can be achieved by adjusting the recording level manually ( P.65).
Press the 9 or 0 button to adjust the recording level.
Before starting recording, select a folder among [Folder A] to [Folder E]. These five folders can be selectively used to distinguish the kind of recording; for example, Folder [Folder A] might be used to store private information, while Folder [Folder B] might be dedicated to holding business information.
Press the REC (s) button to prepare recording.
• The level can be adjusted from [01] to [12]. The higher the number, the higher the level and the larger the indicator position on the level meter.
• If too big sound is input, the noise may occur even if [Rec Level] is set to [Auto] or [Limiter ON] ( P.65). Also, in certain cases the PEAK/LED indicator light, which notifies large input, may not light. To ensure successful recordings, we recommend that you test the record function and volume before use.
• When [Rec Level] is set to [Auto] the recording level will be adjusted automatically. Set [Rec Level] to [Manual] when using the recording level adjustment function and the limiter function ( P.65).
STOP (4) button
REC (s) button
9 0 button

2
EN
e
Press the REC (s) button to start recording.
• The recording/shooting indicator light grows and [K] will appear on the sub LCD.
d Elapsed recording time
Press the STOP (4) button to stop recording.
• [L] will appear on the sub LCD.e File length
Notes
• To ensure that you do not lose the beginning of the recording, confirm that the recording is activated by checking the recording/shooting indicator or the mode indicator in the sub LCD.
• When remaining recording time is less than 60 seconds, the PEAK/LED indicator light starts flashing. When the recording time is decreasing to 30 or 10 seconds, the light flashes faster.
• [Folder Full] will appear when the recording cannot be made any further. Select other folder or delete any unnecessary files before recording ( P.58).
• [Memory Full] will appear when there is no free space. Delete any unnecessary files before recording any further ( P.58).
• If the REC (s) button is pressed when a function other than the record function is specified, [Cannot record in this folder] is displayed. Select a folder from [Folder A] through [Folder E] and start recording again.
• Depending on the sound recording mode and the status of record media, the data transfer to the media cannot be done in time during recording and the skipped sound may be recorded. In this case, [Data Write Error] will appear during recording or when the recording is finished. After transferring the data to the PC, format the record media.
Recording A
d
Actually producing the sound you would like to record:
• When a loud sound is produced the level meter will swing all the way over to the right while recording and the PEAK/LED indicator light will turn on. When this happens the sound will be recorded in a distorted manner since the recording level is too high.
• When a loud noise is produced, adjust the recording level so that the level meter does not exceed [6dB].
When the level meter is maxed out (the recorded sounds will be distorted).
Example of conditions where the recording level has been lowered and the excess input has been adjusted.
Recording A

2
EN
Recording A
About recordings in linear PCM format exceeding GB:The recording will continue even if the volume of a single file exceeds 2 GB in the linear PCM format recording.• The file is saved every 2 GB in separate files.
It will be treated as multiple files when playing back.
• When the recording exceeds 2 GB, the number of files in the folder may exceed 999 files. The 1000th file and later will not be recognized by the recorder, so check by connecting the recorder to a PC.
• It is possible to record a maximum of 24 hours continuously.
File names will be automatically created for files recorded by this recorder.
1 User ID: The user ID name that has been set on the
Digital Voice Recorder.
2 File number: A file number is consecutively assigned.
3 Extension: These are the file name extensions for the
recording format when recording with this device.• Linear PCM format .WAV• MP3 format .MP3
LS20 0001 .WAV
1 2 3
Recording A
• We recommend formatting the record media in the recorder before recording ( P.86).
• Pressing once the recording button of the optional exclusive remote control RS30W ( P.101) will make the recording start immediately.
Pause
While the recorder is during recording mode, press the REC (s) button.
• [≠] will appear on the sub LCD.• The recorder will time out after 60 minutes
when left in [Rec Pause].
Resume Recording:
Press the REC (s) button again.• Recording will resume at the point of
interruption.

2
EN
Recording A
Listening while audio is recorded (REC Monitor)
If you start recording after inserting the earphone into the EAR jack on the recorder, you can hear the sound being recorded. The recording monitor volume can be adjusted by pressing the + or − button.Connect the earphone to the EAR jack on the recorder.• After recording has started, you can hear the
sound being recorded through the earphone.
Notes
• Recording level cannot be controlled using the volume button.
• To avoid irritation to the ear, insert the earphone after turning down the volume level.
• Do not place earphones near a microphone as this may cause feedback.
• When the external speaker is connected while recording, there is a risk that audio feedback will occur. It is recommended that you use earphones for the recording monitor, or turn [Rec Monitor] to [Off] while recording ( P.67).
To EAR jack
Settings relating to Recording
[Mic Sense] ( P.65) Sets the recording sensitivity.
[Rec Mode] ( P.65)
Sets the recording rate for each recording format.
[Rec Level] ( P.65)
You can configure whether to adjust the recording level automatically or to adjust it manually.
[Low Cut Filter] ( P.66)
This function can reduce noise from air conditioners, projectors and other similar noises.
[Self Timer] ( P.66) Sets the self-timer function.
[Rec Monitor] ( P.67)
Select whether or not to output the recording monitor sound from the EAR jack.
[Plug-inPower] ( P.67)
Select whether or not to use the plug-in power function according to the external microphone connected to the MIC jack.
[Input Jack] ( P.67)
Select whether to connect an external device to the MIC jack to use it as a LINE IN jack for recording, or to connect an external microphone for recording.
[V-Sync. Rec] ( P.76)
Sets the start level for voice sync recording.
Recording A

2
EN
Recording A
Recording settings
Recording condition
Indoor musical
performance
Band performance in a practice
studio
Performance in a vast hall,
etc.
Outdoor environment
sounds like wild birds singing,
railroad noises, etc.
Conferences with large crowds in
vast meeting venues
Conferences with a few
people indoors
Recording level* ( P.65)
When the [Rec Level] is set to [Manual] you can adjust the recording level.Adjust while looking at the level meter.
[Mic Sense] ( P.65) [Low] [High]
[Low Cut Filter] ( P.66)
[Off] or [100Hz] [300Hz]
[Rec Mode] ( P.65) The recording level can be adjusted to suit the volume of the original sound
[Rec Level]* ( P.65)
You can configure whether to adjust the recording level automatically or to adjust it manually.When [Rec Level] is set to [Manual] you can configure the limiter function.
[Rec Monitor] ( P.67)
Select whether or not to output the recording monitor sound from the EAR jack.
[Plug-inPower] ( P.67)
Select whether or not to use the plug-in power function according to the external microphone connected to the MIC jack.
* When [Rec Level] is set to [Auto] the recording level will be adjusted automatically. When this happens, the recording level adjustment function and limiter function will not work ( P.65).
Recommended settings by recording conditionThe recorder is initially set to [PCM 44.1kHz] mode so that you can make high quality stereo recordings immediately after purchasing it. The various functions relating to recording can be configured in detail to suit the recording conditions. The following table shows the recommended settings for some example recording conditions. Configure the functions to suit the actual recording conditions.
Recording A

2
0
EN
Before you connect an external microphone to the MIC jack, change the [Input Jack] setting to [Microphone] ( P.67).
Recording from external microphone or other devicesThe external microphone and other devices can be connected and the sound can be recorded. Connect as follows according to a device to be used.• Do not plug and unplug devices into the
recorder’s jack while it is recording.
Applicable external microphones (optional) ( P.101)2-channel microphone (omni-directional): ME30W These are highly sensitive omni-directional
microphones supported by plug-in power which are well-suited to recording musical performances.
Compact Gun Microphone (unidirectional): ME31 The directional microphones useful for
recordings such as outdoor recording of wild birds singing.
Compact zoom microphone (unidirectional): ME32 The microphone is integrated with a tripod,
making it suitable to place on a table and record conferences or lecture from a distance.
Highly sensitive noise-cancellation monaural microphone (unidirectional): ME52W This microphone is used to record sound at a
distance while minimizing surrounding noise.
Tie clip microphone (omni-directional): ME15 Small concealing microphone with a tie-clip.
Telephone pickup: TP7 Earphone type microphone can be plugged
into your ear while phoning. The voice or conversation over the phone can be clearly recorded.
To MIC jack
Recording with external microphone:Connect an external microphone to the MIC jack of the recorder.
Notes
• The built-in microphone will become inoperable when an external microphone is plugged into the recorder’s MIC jack.
• Microphones supported by plug-in power can also be used. When the plug-in power function is set to [On] power will be supplied by the recorder to the microphone ( P.67).
• Turn the plug-in power function to [Off] when an external microphone not supported by plug-in power is connected, as there is the risk that noise may be generated while recording ( P.67).
Recording A
Recording A

2
1
EN
Note
• If you are unable to produce a clear recording with this recorder even after adjusting the recording level ( P.65), this could potentially be because the output level for the connected devices is too high or too low. When external devices are connected, perform a test recording and then adjust the output level for the external devices.
Note
• When you adjust the sound quality settings related to playback on the recorder, the audio output signal sent out from the EAR jack will change as well ( P.71).
Recording the sound of this recorder with other devices:• The sound of this recorder can be recorded
using another device. In order to do so, connect the recorder’s EAR jack to the other device’s audio input terminal (MIC jack) using the connecting cord KA334 (optional) for dubbing.
• When connecting to another device with no LINE IN jack but only a MIC IN, use the connecting cord KA333 (optional) equipped with a resistance attenuator for dubbing.
To EAR jackTo audio input terminal of other devices
Recording the sound of other devices with this recorder:The sound can be recorded when connecting to the audio output terminal (earphone jack) of the other device and the MIC jack of the recorder with the connecting cord KA333 (optional) for dubbing.
Before you connect an external microphone to the MIC jack, change the [Input Jack] setting to [Line] ( P.67).
To audio output terminal of other devices
To MIC jack
Recording ARecording A

2
EN
Before shooting movies nGetting Ready
Changing modes:Slide the mode switch on the recorder to n ( P.33).
Point the lens toward the subjectPoint the lens toward the subject you want to shoot. You can verify the images you are shooting using the main LCD. While shooting, high-quality sound can be recorded using thee built-in stereo microphone.
On mounting:Accurate adjustments of the microphone’s angle and the like can be made when the device is affixed to a commercially available tripod used for cameras.
Subject
Select the image quality:Set the movie resolution and recording format according to the content you want to shoot and its length ( P.68).
Before shooting movies n

2
EN
b
d
c
a
f
e
Shooting movies n
Press the REC (s) button to start shooting.
Shooting movies n
• The recording/shooting indicator light grows and [K] will appear on the sub LCD.
• Sound will also be recorded.f Shooting mode (Shooting state)
1 Press the REC (s) button to prepare shooting.
Press the 9 or 0 button to adjust the recording level of sound ( P.35).STOP (4) button
REC (s) button
• The recording/shooting indicator light will flash and [≠] will appear on the sub LCD.
• [Image Quality] cannot be changed in the shooting standby mode or while shooting. Configure this while the recorder is stopped ( P.68).
a Shooting mode (Shooting paused state)b Remaining shooting timec File numberd Level meter (changes according to the
recording level and recording function settings)
9 0 button
e Recording level guide indicator

2
EN
g
Notes
• To ensure that you do not lose the beginning of the recording, confirm that the shooting is activated by checking the recording/shooting indicator or the mode indicator in the sub LCD.
• When remaining recording time is less than 60 seconds, the PEAK/LED indicator light starts flashing. When the recording time is decreasing to 30 or 10 seconds, the light flashes faster.
• [Folder Full] will appear when the recording cannot be made any further. Select other folder or delete any unnecessary files before recording ( P.58).
• [Memory Full] will appear when there is no free space. Delete any unnecessary files before recording any further ( P.58).
• Depending on the image quality and the status of the recording media, data may not be able to be transferred in time to the recording media while shooting. This may result in sound skipping. In such a case, [Data Write Error] will appear during shooting or when shooting finishes. After transferring the data to a PC, format the recording media.
About shooting that exceeds GB:If the size of a single file exceeds 4 GB, shooting will stop.
Shooting movies n
Shooting movies n
Press the STOP (4) button to stop shooting.
• [L] will appear on the sub LCD.g File length
• We recommend formatting the record media in the recorder before shooting ( P.86).
• Pressing once the recording button of the optional exclusive remote control RS30W ( P.101) will make the shooting start immediately.

2
EN
a a
Adjusting the volume
1 Press the `OK button during shooting to change the function of the + and − buttons.
a Volume control indicator
Press the + or − button to adjust the volume.• The volume can be adjusted within a range
from [00] to [30].
Shooting movies n
Using the zoom
1 Press the `OK button during shooting to change the function of the + and − buttons.
a Zoom indicator
Press the + or − button during shooting to adjust the shooting range.
[+]: Switches to telephoto screen. [−]: Switches to wide angle screen.
• When you start using the zoom, the zoom bar is displayed on the main LCD.
Shooting movies n
Zoom bar
2
EN
L
L
R
R
Shooting movies n
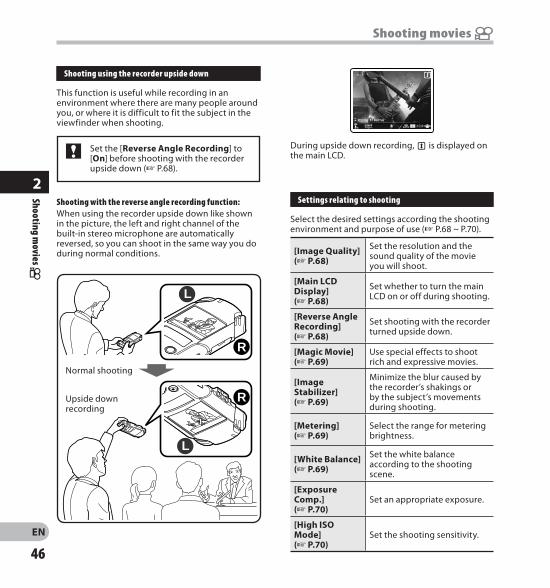
Settings relating to shooting
Select the desired settings according the shooting environment and purpose of use ( P.68 ~ P.70).
[Image Quality] ( P.68)
Set the resolution and the sound quality of the movie you will shoot.
[Main LCD Display] ( P.68)
Set whether to turn the main LCD on or off during shooting.
[Reverse Angle Recording] ( P.68)
Set shooting with the recorder turned upside down.
[Magic Movie] ( P.69)
Use special effects to shoot rich and expressive movies.
[Image Stabilizer] ( P.69)
Minimize the blur caused by the recorder’s shakings or by the subject’s movements during shooting.
[Metering] ( P.69)
Select the range for metering brightness.
[White Balance] ( P.69)
Set the white balance according to the shooting scene.
[Exposure Comp.] ( P.70)
Set an appropriate exposure.
[High ISO Mode] ( P.70)
Set the shooting sensitivity.
Shooting movies n
Shooting using the recorder upside down
This function is useful while recording in an environment where there are many people around you, or where it is difficult to fit the subject in the viewfinder when shooting.
Set the [Reverse Angle Recording] to [On] before shooting with the recorder upside down ( P.68).
Shooting with the reverse angle recording function:When using the recorder upside down like shown in the picture, the left and right channel of the built-in stereo microphone are automatically reversed, so you can shoot in the same way you do during normal conditions.
Normal shooting
Upside down recording
During upside down recording, o is displayed on the main LCD.
2
EN
Shooting’s recorded sound settings
Configure the settings of the sound recorded during shooting ( P.65 ~ P.67). It is convenient to use these settings in combination with [Recording Settings].
[Mic Sense] ( P.65) Sets the recording sensitivity.
[Rec Level] ( P.65)
You can configure whether to adjust the recording level automatically or to adjust it manually.
[Low Cut Filter] ( P.66)
This function can reduce noise from air conditioners, projectors and other similar noises.
[Self Timer] ( P.66) Sets the self-timer function.
[Rec Monitor] ( P.67)
Select whether or not to output the recording monitor sound from the EAR jack.
[Plug-inPower] ( P.67)
Select whether or not to use the plug-in power function according to the external microphone connected to the MIC jack.
[Input Jack] ( P.67)
Select whether to connect an external device to the MIC jack to use it as a LINE IN jack for recording, or to connect an external microphone for recording.
Recording from external microphone
You can connect an external microphone to record sound. Do not plug or unplug a device into/from the recorder’s jack during shooting. For details on how to connect an external microphone and the external microphones that can be used with the recorder, see P.40.
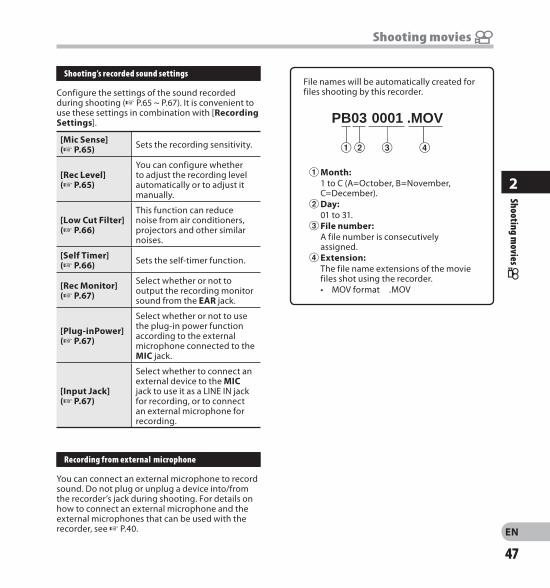
File names will be automatically created for files shooting by this recorder.
1 Month: 1 to C (A=October, B=November,
C=December).2 Day: 01 to 31.3 File number: A file number is consecutively
assigned.4 Extension: The file name extensions of the movie
files shot using the recorder.• MOV format .MOV
PB03 0001 .MOV
1 3 42
Shooting movies n Shooting m
ovies n

3
EN
Playback A
Press the `OK button to start playback.
About playback
1 Select the file to be played back from the folder which contains it ( P.32).
• [•] will appear on the sub LCD.• When playback starts, the main LCD turns
off.a File lengthb File numberc Level meterd Elapsed playback time
The recorder can play WAV and MP3 format files. To playback a file recorded with other machines, you need to transfer (copy) it from a computer.
+ − button`OK button
STOP (4) button
Press the + or − button to adjust to a comfortable listening volume.• The volume can be adjusted within a range
from [00] to [30].
a
c
b
d
Press the STOP (4) button at any point you want to stop playback.
• [L] will appear on the sub LCD.• This will stop the file being played back
midway. When the resume function is activated the stopped location will be registered, even if the power is turned off. The next time the power is turned on, playback may be resumed from the registered stopped location.
Playback A

3
EN
Playback A
Settings relating to playback
[Play Mode] ( P.71)
You can select the playback mode that fits your preference.
[Equalizer] ( P.71)
If you change the equalizer setting, you can enjoy the music with your favorite sound quality.
[Visualizer] ( P.71)
You can enjoy watching images during the playback of voice files.
Playback through earphone
An earphone can be connected to the EAR jack of the recorder for listening.• When the earphone is used, the recorder
speaker will be switched-off.
Notes
• To avoid irritation to the ear, insert the earphone after turning down the volume level.
• When you listen with the earphone during playback, do not raise the volume too much. It may cause hearing impairment and decrease in hearing ability.
To EAR jack
While the recorder is during stop mode in the file display, press and hold the 9 button.• [ß] will appear on the sub LCD.• If you release the 9 button, it will stop. Press
the `OK button to start playback from where it was stopped.
While the recorder is during playback mode, press and hold the 9 button.• When you release the 9 button the recorder
will resume normal playback.• If there is an index mark in the middle of the file,
the recorder will stop at that location ( P.52).• The recorder stops when it reaches the end of
the file. Continue pressing the 9 button to proceed with the cue from the beginning of the next file.
Forwarding
Playback A
Note
• When the [Visualizer] setting in the [Play Menu] is set to [On], the set visualizer effect is displayed on the main LCD during the playback of voice files ( P.71).

0
3
EN
Rewinding
While the recorder is during stop mode in the file display, press and hold the 0 button.• [™] will appear on the sub LCD.• If you release the 0 button, it will stop. Press
the `OK button to start playback from where it was stopped.
While the recorder is during playback mode, press and hold the 0 button.• When you release the 0 button the recorder
will resume normal playback.• If there is an index mark in the middle of the file,
the recorder will stop at that location ( P.52).• The recorder stops when it reaches the
beginning of the file. Continue pressing the 0 button to proceed with the review from the end of the previous file.
Locating the beginning of a file
While the recorder is during playback mode, press the 9 button.• The recorder skips to the beginning of the next
file.While the recorder is during playback mode, press the 0 button.• The recorder skips to the beginning of the
current file.While the recorder is during playback mode, press the 0 button twice.• The recorder skips to the beginning of the
previous file.
Note
• When you skip to the beginning of the file during playback, the recorder will stop at the position of the index mark. The index mark will be skipped when you perform the operation in stop mode ( P.52).
Playback A
Playback A

1
3
EN
About music file
In cases where the recorder is unable to playback music files that have been transferred to it, check to make sure that the sampling rate and bit rate are in the range where playback is possible. Combinations of sampling rates and bit rates for music files which the recorder can playback are given below.
File format Sampling frequency Bit rate
WAV format 44.1 kHz, 48 kHz, 88.2 kHz, 96 kHz
16 bit or 24 bit
MP3 format
MPEG1 Layer3:32 kHz, 44.1 kHz, 48 kHzMPEG2 Layer3:16 kHz, 22.05 kHz, 24 kHz
From 8 kbps up to 320 kbps
• Variable bit rate MP3 files (in which conversion bit rates can vary) may not be played back properly.
• For WAV files, this recorder can only play back those in the linear PCM format. WAV files other than these cannot be played back.
• Even if the format of the file is compatible for playback on this recorder, the recorder does not support every encoder.
Playback APlayback A

3
EN
• To add index marks, the index function must be registered to the Fn button ( P.74).
Setting an index mark
If index marks is placed, you can quickly find a location you want to listen to in fast forward and fast rewind and when cuing a file. Index marks can be added only during PCM recording with this recorder or to PCM files recorded using this recorder.
1 Press the Fn button at the position you want to add an index mark.• A number appears on the sub LCD and an
index mark will be placed.
• Even after an index mark is placed, recording, shooting or playback will continue so you can place index marks in other locations in a similar manner.
Setting an index mark A
Clearing an index mark
1 Select a file in which index marks you wish to erase are contained.
Press the 9 or 0 button to select the index mark to erase.
While the index number is displayed for approximately 2 seconds on the sub LCD, press the ERASE button.• The index mark is erased.
• Index numbers after the erased index number will be automatically decreased by 1.
Notes
• During recording or playback, the main LCD is off.
• Up to 16 index marks can be set in a file. If you try to place more than 16 index marks, the [Index Full] message will appear for index marks.
• Index marks cannot be set or erased in a locked file ( P.72).
• An index mark cannot be added to a movie file shot with the recorder or a file in MP3 format.
Setting an index mark A

3
EN
Playing movies n
Playing movies n
Press the `OK button to start playback.
1 Select the movie file to play ( P.32).
• [•] will appear on the sub LCD.a File lengthb File numberc Level meterd Elapsed playback time
You can play movie files shot with the recorder. The recorder can also be connected to a TV so that you can enjoy high definition movies on a large screen.
+ − button`OK button
STOP (4) button Press the + or − button to adjust to a
comfortable listening volume.• The volume can be adjusted within a range
from [00] to [30].
Press the STOP (4) button at any point you want to stop playback.• [L] will appear on the sub LCD.
Note
• Movies shot with a device other than the recorder or movie files imported from a PC may not play correctly.
a
c
b
d

3
EN
While the recorder is during stop mode in the file display, press and hold the 9 button.• [ß] will appear on the sub LCD.• If you release the 9 button, it will stop. Press
the `OK button to start playback from where it was stopped.
While the recorder is during playback mode, press and hold the 9 button.• When you release the 9 button the recorder
will resume normal playback.• The recorder stops when it reaches the end of
the file. Continue pressing the 9 button to proceed with the cue from the beginning of the next file.
Forwarding Rewinding
While the recorder is during stop mode in the file display, press and hold the 0 button.• [™] will appear on the sub LCD.• If you release the 0 button, it will stop. Press
the `OK button to start playback from where it was stopped.
While the recorder is during playback mode, press and hold the 0 button.• When you release the 0 button the recorder
will resume normal playback.• The recorder stops when it reaches the
beginning of the file. Continue pressing the 0 button to proceed with the review from the end of the previous file.
Playing movies n
Playing movies n
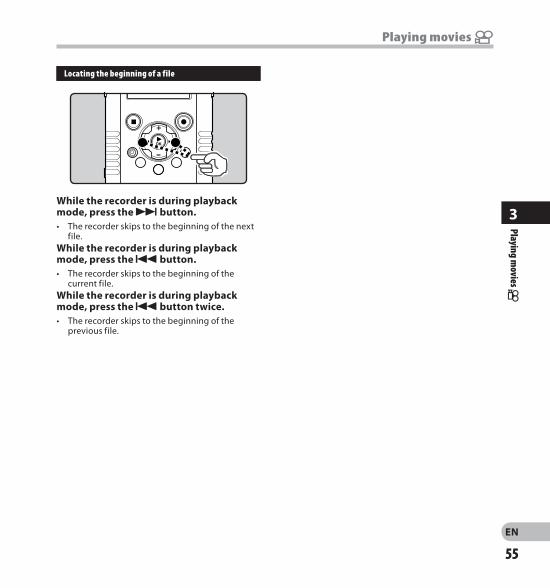
3
EN
Playing movies n
Locating the beginning of a file
While the recorder is during playback mode, press the 9 button.• The recorder skips to the beginning of the next
file.While the recorder is during playback mode, press the 0 button.• The recorder skips to the beginning of the
current file.While the recorder is during playback mode, press the 0 button twice.• The recorder skips to the beginning of the
previous file.
Playing movies n

3
EN
To play back movies on a TVYou can use any commercially available HDMI mini cable (Type D) to connect the recorder to a high definition compatible TV.
Turn off the power of the recorder and TV before connecting them.
Connecting with HDMI mini cable
1 Connect the HDMI mini cable to the HDMI connector on the TV.
Connect the HDMI mini cable to the HDMI connector on the recorder.
Turn on the TV and switch [Input] to [HDMI].
Turn on the recorder.
Select the video file to play ( P.32).
Press the `OK button to start playback.
Notes
• The TV video signal system varies depending on the countries and regions. Change the output signal setting in the [HDMI] setting of the recorder to match the signal of the TV ( P.74).
• For details on changing the input setting of the TV, refer to the TV’s instruction manual.
• Use an HDMI cable that matches the HDMI micro connector on the recorder and the HDMI connector on the TV.
• Depending on the TV’s settings, the displayed images and information may become cropped.
• It is not possible to record sound and shoot movies while the recorder is connected via HDMI cable.
• Do not connect the recorder to another HDMI output device. Doing so may result in a malfunction.
• When the recorder is connected to the computer by the USB cable, do not connect the HDMI cable to the recorder.
• The main LCD does not turn on while the recorder is connected via HDMI cable.
• When connecting the recorder to a TV that supports the sampling rate outputs of 96kHz and 88.2kHz, the sound will be output only from the TV speaker, and not from the recorder's speaker or the headphones.
• When connecting the recorder to a TV that does not support the sampling rate outputs of 96kHz and 88.2kHz, the sound will be output only from the recorder's speaker or the headphones, and not from the TV speaker.
HDMI micro connector
HDMI cable
Playing movies n
Playing movies n

3
EN
1 Select a file that has a segment you would like to play back repeatedly, and start playback.
This function enables repeated playback of part of the file being played.
Press the A-B REPEAT button at the point you want to start segment repeat playback.• [w] will flash on the sub LCD.
Note
• If an index mark is placed or cleared during segment repeat playback, segment repeat playback will be canceled and it will return to normal playback mode ( P.52).
Canceling the segment repeat playback function
A-B REPEAT button
• Fast forwarding and rewinding can be conducted when [w] is flashing in the same manner as during normal playback, and you can quickly proceed as far as the end position ( P.49).
• When it reaches the end of the file while [w] is flashing, point [x] becomes the end of the file, and repeat playback will start.
Press the A-B REPEAT button again at the position where you want to end segment repeat playback.• The recorder continuously plays back the
segment until the segment repeat playback is canceled.
Pressing any of the following buttons will release the segment repeat playback.a Press the `OK or STOP (4) button
Pressing the `OK or STOP (4) button will release segment repeat playback, and stop playback.
b Press the 9 buttonPressing the 9 button will release segment repeat playback, and make the recorder to skip to the beginning of the next file.
c Press the 0 buttonPressing the 0 button will release segment repeat playback, and make the recorder to skip to the beginning of the current file.
d Press the A-B REPEAT buttonPressing the A-B REPEAT button will release segment repeat playback, and it will return to normal playback mode.
How to begin segment repeat playback A nHow
to begin segment repeat playback A
n

3
EN
Erasing A nErasing filesA selected file can be erased from a folder.
1 Select the file you want to erase ( P.32).
Press the + or − button to select [File Erase].
While the recorder is during stop mode in the file list display, press the ERASE button.
+ − button`OK button
ERASE button
Press the `OK button.
• If an action is not selected within 8 seconds, the recorder will return to stop mode.
Press the + button to select [Start].
Erasing A n

3
EN
Erasing A n
Press the `OK button.
• The display changes to [Erase!] and erasing will start.
• [Erase Done] is displayed when the file is erased. File numbers will be reassigned automatically.
Erasing all files in a folderAll files in a folder can be erased simultaneously.
1 Select the folder you want to erase ( P.32).
+ − button`OK button
ERASE button
While the recorder is during stop mode in the folder list display, press the ERASE button.
• If an action is not selected within 8 seconds, the recorder will return to stop mode.
Erasing A n

0
3
EN
Press the + or − button to select [Erase in Folder].
Press the `OK button.
Press the + button to select [Start].
Press the `OK button.
• The display changes to [Erase!] and erasing will start.
• [Erase Done] is displayed when the folder is erased.
Erasing A n
Erasing A n

1
3
EN
Erasing A n
Partially erasing a fileAn unwanted part of a file can be erased.
1 Play the file you want to partially erase.• Forward a file to the position that shall be
erased. If the file is long, use the 9 button to move to the position you want to delete.
ERASE button
It is recommended to make a copy of the original file before partially erasing it ( P.79, P.92).
In the starting position of the partial erase, press the ERASE button.
In the position you want to end partial erase, press the ERASE button again.
• [Start point] and [End point] on the sub LCD flash alternatively.
• The display will switch to [Partial erasing !] and start the partial erase. The deletion is completed when [Partial erase completed.] is displayed.
• Playback will stop at the end location of the partial erase.
• If you do not press the ERASE button within 8 seconds, the partial erase operation will be canceled and the recorder will return to playback mode.
• [Erase start] will flash on the sub LCD.• While [Erase start] is flashing, playback
continues and you can rewind or fast-forward as usual to locate the erase end position quickly. If the end of the file is reached while this indication is flashing, that position will become the erase end position.
Press the ERASE button.
Erasing A n

3
EN
Erasing A n
Notes
• You cannot recover a file once it has been erased. Please check carefully before erasing.
• The file creation date will not change even if the file is partially erased.
• When you partially erase a movie file, the selected start position and end position may be offset by up to approximately 1 second.
• The locked files and files set as read-only cannot be erased ( P.72).
• If there is a file that cannot be recognized by the recorder, the file and the folder which contains that file will not be erased. Please connect the recorder to your PC to erase.
• It may take over 10 seconds to complete processing. Never perform operations such as the following while processing, as they may damage the data.1 Disconnect the AC Adapter while processing.2 Remove the battery while processing.3 Remove the SD card while processing.
In addition, carefully check the remaining battery level in order to ensure that the battery will not run out while processing.
Erasing A n

4
EN
Menu setting m
ethod
Menu setting method
1 While the recorder is during stop mode, press the MENU button.
Menu setting
• The menu will appear on the display.
Press the `OK button to move the cursor to the item to set.
Press the + or − button to move to the item you want to set.
Press the `OK or 9 button.• Moves to the setting of the selected item.
Items in menus are categorized by tabs, so select a tab first and move to a desired item to quickly set it. You can set each menu item as follows.
+ − button`OK button
MENU button
Press the + or − button to move to the tab that contains the item you want to set.• You can change the menu display by moving
the settings tab cursor. Press the + or − button to change the
setting.

4
EN
Press the `OK button to complete the setting.• You will be informed that the settings have
been established via the screen.
• Pressing the 0 button without pressing the `OK button will cancel the settings and return you to the previous screen.
Press the MENU button to close the menu screen.
Note
• The recorder will stop if you leave it idle for 3 minutes during a menu setup operation, when a selected item is not applied.
Menu setting method
Menu setting m
ethod

4
EN
Menu setting m
ethod
CRec Menu
Mic Sense A n
Microphone sensitivity is adjustable to meet recording needs.[High]:
This is a highly sensitive mode which can record surrounding noises.
[Low]: This is the standard level of microphone sensitivity. Select this mode for cases where the volume of the source sound is high, such as a band performance.
Note
• When you would like to clearly record a speaker’s voice, set [Mic Sense] to [Low] and hold recorder’s built-in stereo microphone close to the speaker’s mouth (5-10 cm) when recording.
Rec Level A n
You can set the device to automatically or manually adjust the recording level.
1 Select [Manual] or [Auto].[Manual]:
Recording is performed by manually adjusting the recording level.
[Auto]: Recording is performed by automatically adjusting the recording level. This is useful for when you will be recording right away.
• If you select [Manual], proceed to the operation of step 2.
Select limiter function.[Limiter ON]:
This function will adjust the input level when sudden high volume is encountered. This will prevent sound distortion.
[Limiter OFF]: Disables this function.
Adjust the recording level: 1 Press the 9 or 0 button while
the recorder is recording, shooting or paused to adjust the recording level.
Menu setting method
Rec Mode A
The recorder supports the Linear PCM recording format, which allows sound to be recorded with a quality equivalent to CD or higher, and the MP3 format, which allows files to be saved with a high compression ratio. This means you can choose to give priority to either sound quality or recording time.
1 Select the recording format.[PCM]:
This is an uncompressed audio format which is used for music CDs and the like.
[MP3]: MPEG is the international standard established by a working group of the ISO (International Organization for Standardization).
Select the recording rate.When [PCM] is selected:
[96 kHz/24 bit] to [44.1 kHz/16 bit]When [MP3] is selected:
[320 kbps] to [128 kbps]
Notes
• When the recording format is set to the MP3 formats, the sampling rate will be encoded and processed at 44.1 kHz.
• When a high recording rate setting is used the file capacity will increase. Make sure that the amount of memory remaining is sufficient before recording.
• When the recorder is in movie mode, the [Rec Mode] setting will not be affected. To set the recording mode, set the [Image Quality] setting in [Recording Settings] while in movie mode ( P.68).

4
EN
Low Cut Filter A n
The recorder has a Low Cut Filter function to minimize low-frequency sounds and record voices more clearly. This function can reduce noise from air conditioners, projectors and other similar noises.[Off]:
Disables this function.[100Hz]:
This setting will reduce the noise generated from air conditioners or projectors. It is effective for indoor recording.
[300Hz]: Use this setting when sufficient effects cannot be obtained with the [100 Hz] setting.
Note
• When the [Input Jack] setting is set to [Line], the Low Cut Filter function is disabled ( P.67).
Self Timer A n
The self-timer function allows a certain amount of time to elapse after you fully press the REC (s) button and then starts recording or shooting. Set this function according to the purpose of recording or shooting.[Off]:
Disables this function.[beep 5sec]:
A beep tone sounds for 5 seconds and the PEAK/LED indicator light flashes from 3 seconds before recording or shooting starts.
[beep 12sec]: A beep tone sounds for 12 seconds and the PEAK/LED indicator light flashes from 3 seconds before recording or shooting starts.
[metalic5sec]: A rhythm count tone sounds for 5 seconds and the PEAK/LED indicator light flashes from 3 seconds before recording or shooting starts.
[metalic12sec]: A rhythm count tone sounds for 12 seconds and the PEAK/LED indicator light flashes from 3 seconds before recording or shooting starts.
Notes
• To cancel the self-timer after it starts press the STOP (4) button.
• Self-timer shooting is automatically canceled after one shot.
• When the [LED] setting is set to [Off], the LED does not flash during self-timer operation. After the time set for the self-timer elapses, recording or shooting starts automatically ( P.73).
• When the [Beep] setting is set to [Off], beep does not sound during self-timer operation. After the time set for the self-timer elapses, recording or shooting starts automatically ( P.73).
Notes
• The recording level will be automatically adjusted when the recording level is set to [Auto]. Set the recording level to [Manual] to use the recording level adjustment feature.
• When the unit is set to [Auto], the limiter function will be disabled. When a loud sound is produced the level meter will swing all the way over to the right while recording and the PEAK/LED indicator light will turn on. When this happens the sound will be recorded in a distorted manner since the recording level is too high. If sound distortions do not disappear even after the recording level has been adjusted, change the setting for microphone sensitivity ( P.65) and adjust the recording level again.
• If too big sound is input, the noise may occur even if [Rec Level] is set to [Auto] or [Limiter ON].
• The level can be adjusted from [01] to [12]. The higher the number, the higher the level and the larger the indicator position on the level meter.
Menu setting method
Menu setting m
ethod

4
EN
Rec Monitor A n
Select whether or not to output audio while recording from the earphone jack.[On]:
Enables the recording monitor function. Sound will be output from the EAR jack.
[Off]: Disables this function. Sound will not be output from the EAR jack.
Note
• When the external speaker is connected while recording, there is a risk that audio feedback will occur. It is recommended that you use earphones for the recording monitor, or turn [Rec Monitor] to [Off] while recording.
Plug-inPower A n
External microphones which are supported by plug in power can also be used. Whether or not to supply power to external microphones can be configured. [On]:
When the plug-in power function is activated, power will be supplied to the connected external microphone. Select this when external microphones supported by plug-in power are connected ( P.40).
[Off]: Disables this function. Select this when external microphones not supported by plug-in power are connected.
Notes
• When the [Input Jack] setting is set to [Line], the plug in power function is disabled.
• Turn the plug-in power function to [Off] when an external microphone not supported by plug-in power is connected, as there is the risk that noise may be generated while recording.
• Phantom power cannot be supplied, even when the plug in power function is set to [On].
Input Jack A n
Select whether to use the recorder’s MIC jack to connect an external microphone or as a LINE IN jack to connect an external device.[Microphone]:
Set this when connecting an external microphone.
[Line]: Set this when connecting an external device to use the jack as a LINE IN.
Note
• When the [Input Jack] setting is set to [Line], the Low Cut Filter function is disabled ( P.66).
V-Sync. Rec A
See “Voice sync recording [V-Sync. Rec] A” ( P.76).
Menu setting m
ethodMenu setting method

4
EN
JRecording Settings
Image Quality n
You can set the image quality (resolution) of the movie you will shoot. Select an image mode according to the purpose of use. Concurrently with the image quality, you can also set the movie’s sound quality.
1 Select the image quality.[1920 ×1080 30fps] [1280 × 720 30fps] [640 × 480 30fps]:• Setting the resolution to higher values
(number of pixels) allows more detailed shootings, but will result in larger files. Set the image quality according to the purpose of use.
Select the recording rate.When [1920 x 1080 30fps] is selected:
[PCM 96 kHz/24 bit] to [PCM 44.1 kHz/16 bit]When [1280 x 720 30fps] is selected:
[PCM 96 kHz/24 bit] to [PCM 44.1 kHz/16 bit]When [640 x 480 30fps] is selected:
[MP3 320 kbps] to [MP3 128 kbps]
Notes
• When a high recording rate setting is used the file capacity will increase. Make sure that the amount of memory remaining is sufficient before recording.
• It is recommended to set the resolution to [640×480 30fps] and MP3 format when uploading to video sites.
• During movie mode (n), the sound is recorded at the recording rate set in [Image Quality]. The setting configured in [Rec Mode] under [Rec Menu] will not be reversed ( P.65).
Main LCD Display n
Set whether to turn on the main LCD during shooting depending on the location and environment of use. The battery life will increase if the LCD is off during shooting.[On]:
The main LCD is turned on also during shooting.[Off]:
The main LCD is turned off during shooting.
Note
• When shooting with the LCD off, use a tripod or shoot with the recorder placed on a stable and flat surface.
Reverse Angle Recording n
Set upside down recording to shoot using the recorder upside down ( P.46).[On]:
Enables the upside down recording function.[Off]:
Disables this function.
Note
• The setting returns automatically to [Off] after the shooting finishes. To continue shooting using the upside down recording function, configure the setting again.
Menu setting method
Menu setting m
ethod

4
EN
Magic Movie n
4 types of filters allow you to easily apply various effects when shooting movies, enabling you to capture dynamic scenes and special moments in your own distinctive way.
[On]: Enables the magic movie function. You can select the magic movie type.
• Select the desired magic movie type from [Rock], [Pop], [Pinhole], and [Sketch].
• If you select [Rock], effects from [1] to [3] can be applied.
[Off]: Disables this function.
Notes
• In case the magic movie is set to [On], only the movie file with special effects will be recorded. The original version of the movie will not be recorded.
• Special effects cannot be applied or removed afterwords.
• If you want to shoot a movie normally without applying special effects, verify that the [Magic Movie] setting is set to [Off] before shooting.
Image Stabilizer n
You can reduce the amount of recorder shake that can occur when shooting in low light situations or shooting with high magnification.[On]:
The image stabilizer is activated.[Off]:
The image stabilizer is deactivated. This is recommended for shooting when the recorder is fixed in place on a tripod or other stable surface.
Note
• Images may not be stabilized if recorder shake is too severe.
Metering n
The recorder is equipped with multi-zone metering and spot metering. Set the proper metering according to the scene to be shot.[Multi-zone Metering]:
Shoots to obtain a balanced brightness over the entire screen (Meters the brightness at the center and surrounding areas of the screen separately).
[Spot Metering]: Shoots the subject at the center during backlighting (Meters the brightness at the center of the screen).
Note
• When set to [Multi-zone Metering], the center may appear dark when shooting against strong backlighting.
White Balance n
For more natural coloring, choose a white balance option suited to the scene.[] Auto:
The recorder automatically adjusts the white balance according to the shooting scene.
[;] Sunny: For shooting outdoors under a clear sky.
[<] Cloudy: For shooting outdoors under a cloudy sky.
[:] Fluorescent: For shooting under daylight fluorescent lighting (household lighting, etc.).
[=] Incandescent: For shooting under incandescent lighting (office, etc.).
[|] Quick Operation: You can set the optimum white balance for the shooting conditions by pointing the recorder at a white object like a sheet of white paper.
Menu setting m
ethodMenu setting method

0
4
EN
Exposure Comp. n
The standard brightness (appropriate exposure) set by the recorder based on the shooting mode can be adjusted brighter or darker to obtain a desired shot.
Press the + or – button to adjust the exposure.
• You can adjust the exposure from [-2.0] to [+2.0], incrementing it by 1/3 steps.
Note
• The value you set remains stored into the recorder even if you turn the power off. Check the setting before you start shooting.
High ISO Mode n
Set the shooting sensitivity.[Normal]:
The recorder automatically adjusts the sensitivity according to the shooting scene.
[High ISO]: The recorder uses a higher sensitivity compared to [Normal] to minimize blur caused by a moving subject or by recorder shake.
Note
• If you set the sensitivity to [High ISO], the amount of image noise may increase depending on the shooting environment.
When [Quick Operation] is selected:1 Point the lens at a white sheet of paper.
• Place the sheet of paper so that it fills the screen, and avoid creating shadows.
2 Press the `OK button.• The white balance is set.
Note
• The registered white balance is stored into the recorder. It will not be deleted even if you turn the power off.
Menu setting method
Menu setting m
ethod

1
4
EN
#Play Menu
Play Mode A n
You can select the playback mode that fits your preference.
Select the desired playback mode:[File]:
Stop after playing back the current file.[File Repeat]:
Play the current file repeatedly.[Folder]:
Play files continuously in the current folder until the last file and stop.
[Folder Repeat]: Play all files in the current folder continuously.
[All]: Play all files in the selected memory continuously and stop.
[All Repeat]: Play all files in the selected memory continuously and repeatedly.
Notes
• In [File] mode, when the recorder comes to the end of the last file in the folder, [End] flashes for two seconds on the sub LCD and the recorder stops at the start of the last file.
• In [Folder] mode, when the recorder comes to the end of the last file in the folder, [End] flashes for two seconds on the sub LCD and the recorder stops at the start of the first file in the folder.
• In [All] mode, after playing the last file in the folder, the recorder will start playing from the first file in the next folder. When it comes to the end of the last file in the recorder, [End] flashes for two seconds on the sub LCD and the recorder stops at the start of the first file in the recorder.
Equalizer A n
If you change the equalizer setting, you can enjoy the music with your favorite sound quality.
1 Select the desired equalizer characteristics.[Off]:
Disables the equalizer function.[Rock] [Pop] [Jazz]:
Enables the equalizer function.[User]:
Select [User] to save your own custom equalizer settings. If [User] is selected, proceed to Step 2.
Select the frequency band.[60 Hz] [250 Hz] [1 kHz] [4 kHz] [12 kHz]: Select the frequency bandwidth setting.
Select the equalizer level.• You can select the equalizer level from [–6]
to [+6] in 1dB increments.• The higher the decibel value, the louder the
sound.• To change the settings again, press the 9
or 0 button and repeat the procedure from step 2.
Visualizer A
5 types of video (visualizer) can be displayed on the screen along with the playback of files. This allows you to enjoy sound and video together.[Off]:
Disables this function.[Equalizer] [Run!] [Pink Line] [Mysterious Tree] [Rainy Blue]: Select the desired visualizer type.
Note
• The visualizer is enabled during file playback in voice mode (A).
Menu setting m
ethodMenu setting method

4
EN
!File Menu
File Lock A n
Locking a file keeps important data from being accidentally erased. Locked files are not erased when you select to erase all files from a folder ( P.59).[On]:
Locks the file and prevents it from being erased.[Off]:
Unlocks the file and allows it to be erased.
Replace A n
See “Rearranging files [Replace] A n” ( P.78).
File Move/Copy A n
See “Moving/Copying files [File Move/Copy] A n” ( P.79).
File Divide A n
See “Dividing files [File Divide] A n” ( P.81).
Property A n
File and folder information can be confirmed from the menu screen.When a file is selected:[Name] [Date] [Size] [File Length] and [File Format] will appear on the display.When a folder is selected:[Name] and [Date] will appear on the display.
Note
• Select a file for which you would like to confirm information in advance before operating the menu.
Menu setting method
Menu setting m
ethod

4
EN
DLCD/Sound Menu
Main LCD A n
Main LCD contrast can be adjusted in 5 levels.• You can adjust the main LCD contrast level from
[1] to [5].
Sub LCD A n
You can set the backlighting time interval and adjust the contrast of the sub LCD.
1 Select [Contrast] or[Backlight]. Select the setting.
When [Contrast] is selected: You can adjust the sub LCD contrast level
from [01] to [12].When [Backlight] is selected:[Off]:
Disables this function.[5 seconds] [10 seconds] [30 seconds] [60 seconds] [Always ON]: Enables the Backlight function.
LED A n
You can set it so the PEAK/LED indicator light and recording/shooting indicator light does not turn on.[On]: LED light will be set.[Off]: LED light will be canceled.
Note
• When the [LED] setting is set to [Off], the LED of the [Self Timer] function does not light.
Beep A n
The recorder beeps to alert you to button operations or warn you of errors. System sounds may be turned off.[On]:
Enables the Beep function.[Off]:
Disables this function.
Note
• When the [Beep] setting is set to [Off], the beep of the [Self Timer] function does not sound.
Language(Lang) A n
You can select the display language for this recorder.[English] [Français] [Deutsch] [Italiano] [Español] [Русский]:• The selectable languages differ depending on
the region.
Menu setting m
ethodMenu setting method

4
EN
EDevice Menu
Auto Power Off A n
Forgetting to turn the power off can be prevented. If the recorder remains in stop mode for over 10 minutes (Initial setting) while the power is turned on, the power will be turned off.[5min.] [10min.] [30min.] [1hour]: Set the length of time before the power will be
turned off.[Off]:
Disables this function.• If any button is pressed, the elapsed time count
before the power turns off will start over again.
Time & Date A n
See “Setting time and date [Time & Date] A n” ( P.25).
Fn setting A n
See “Fn Setting [Fn. setting] A n” ( P.83).
USB Settings A n
See “Changing the USB class [USB Settings] A n” ( P.84).
HDMI A n
Set this when connecting the recorder to a TV to play movie files.[480p/576p] [720p] [1080i]:• For details on connecting the recorder to a TV,
see P.56.
Notes
• When set to [1080i], 1080i format takes priority for HDMI output. However, if this setting does not match the input setting of the TV, the signal format is changed first to [720p] and then to [480p/576p]. For details on changing the input setting of the TV, refer to the TV’s instruction manual.
• When the recorder is connected to the computer by the USB cable, do not connect the HDMI cable to the recorder.
• The main LCD will be off when an HDMI cable is connected to the recorder.
Reset Settings A n
This returns the functions back to their initial settings (factory default).[Start]:
Returns the settings to their initial values.[Cancel]:
Takes you back to [Device Menu].• After resetting the settings, the time settings,
file numbers and folder name will be preserved, will not return to their initial settings.
Menu settings after resetting (initial settings):
Rec Menu:[Mic Sense] [High][Rec Mode] [PCM] [44.1kHz/16bit][Rec Level] [Manual][Low Cut Filter] [Off][Self Timer] [Off][Rec Monitor] [On][Plug-inPower] [On][Input Jack] [Microphone][V-Sync. Rec] [Off]
Menu setting method
Menu setting m
ethod

4
EN
Recording Settings:[Image Quality] [640×480 30fps] [MP3 320kbps][Main LCD Display] [On][Reverse Angle Recording] [Off][Magic Movie ] [Off][Image Stabilizer] [On][Metering] [Multi-zone Metering][White Balance] [] (Auto)[Exposure Comp.] [±0.0EV][High ISO Mode] [Normal]
Play Menu:[Play Mode] [File][Equalizer] [Off][Visualizer] [Off]
LCD/Sound Menu:[Main LCD] [3][Sub LCD] [Contrast] [Level 06] [Backlight] [10Seconds][LED] [On][Beep] [On][Language(Lang)] [English]
Device Menu:[Auto Power Off] [10min.][Fn. setting] [Off][USB Settings] [USB Connect] [PC] [USB Class] [Storage class][HDMI] [1080i]
Format A n
See “Formatting the recorder [Format] A n” ( P.86).
Memory Info. A n
The recordable capacity remaining and overall capacity of the recording media can be seen from the menu.• The recorder will use some capacity of the
memory to keep the management file. For SD card, the remaining capacity will be shown less than the total capacity of the card due to characteristic of the SD card, but this is not a malfunction.
System Info. A n
You can check the recorder’s information on the menu screen. [Model] (Model Name), [Version] (System version) and [Serial No.] (Serial Number) appear on the display.
Menu setting m
ethodMenu setting method
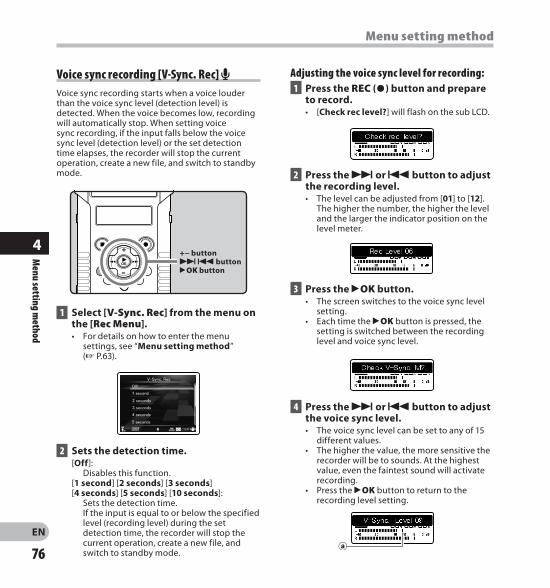
4
ENa
Voice sync recording [V-Sync. Rec] AVoice sync recording starts when a voice louder than the voice sync level (detection level) is detected. When the voice becomes low, recording will automatically stop. When setting voice sync recording, if the input falls below the voice sync level (detection level) or the set detection time elapses, the recorder will stop the current operation, create a new file, and switch to standby mode.
1 Select [V-Sync. Rec] from the menu on the [Rec Menu].• For details on how to enter the menu
settings, see “Menu setting method” ( P.63).
+− button9 0 button`OK button
Sets the detection time. [Off]:
Disables this function.[1 second] [2 seconds] [3 seconds] [4 seconds] [5 seconds] [10 seconds]: Sets the detection time.
If the input is equal to or below the specified level (recording level) during the set detection time, the recorder will stop the current operation, create a new file, and switch to standby mode.
Adjusting the voice sync level for recording: 1 Press the REC (s) button and prepare
to record.• [Check rec level?] will flash on the sub LCD.
Press the 9 or 0 button to adjust the recording level.• The level can be adjusted from [01] to [12].
The higher the number, the higher the level and the larger the indicator position on the level meter.
Press the `OK button.• The screen switches to the voice sync level
setting.• Each time the `OK button is pressed, the
setting is switched between the recording level and voice sync level.
Press the 9 or 0 button to adjust the voice sync level.• The voice sync level can be set to any of 15
different values.• The higher the value, the more sensitive the
recorder will be to sounds. At the highest value, even the faintest sound will activate recording.
• Press the `OK button to return to the recording level setting.
Menu setting method
Menu setting m
ethod

4
EN
a Voice sync level (moves to the right/left according to the set level)
Press the REC (s) button again.
• The recorder will go into standby. [Standby] will flash on the sub LCD and the recording/shooting indicator light will flash.
• When the input is at or above the voice sync level, recording will start automatically.
Voice sync recording stops automatically.• If sound at a volume below the voice sync
level continues for the specified time, voice sync recording will end automatically, and the recorder will return to the standby mode of Step 5. Every time the recorder enters standby mode, the file will be closed and recording will continue in a different file.
• To stop the recorder during voice sync recording, press the STOP (4) button.
Menu setting m
ethodMenu setting method

4
EN
Press the `OK button to complete the setting.• If there are more files to move, repeat Steps
3 through 6.• Pressing the 0 button without pressing
the `OK button will cancel the settings and return you to the previous screen.
Press the MENU button to close the menu screen.
Press the + or − button to select the location to move it to.
Rearranging files [Replace] A nYou can move a file in a folder to change the order of playback. First select the folder (file) for which you want to change the playback order.
1 Select the folder for which you would like to rearrange the file order ( P.32).
Select [Replace] from the menu on the [File Menu].• For details on how to enter the menu
settings, see “Menu setting method” ( P.63).
Press the + or − button to select the file you want to move.
Press the `OK button.• The cursor will flash to confirm that the file
can be moved.
+ − button`OK button
MENU button
Menu setting method
Menu setting m
ethod

4
EN
[Move]: Move a file in the SD card to another folder in
the SD card.[Copy]: Copy a file in the SD card to another folder
within the SD card.
Moving/Copying files [File Move/Copy] A nFiles saved in the SD card can be moved or copied within the memory. Files can also be moved or copied between memory.
1 In the file list display, press the + or − button to select the file you want to move or copy ( P.32).
Select [File Move/Copy] from the menu on the [File Menu].• For details on how to enter the menu
settings, see “Menu setting method” ( P.63).
Press the + or − button to select the position to move or copy the file to.
+ − button `OK button
MENU button
Press the `OK button. Press the + or − button to select the
folder you want to move or copy the file to.
Press the `OK button.
• File move or file copy will start if [Moving!] or [Copying!] appears on the sub LCD. During the process, the progress status will be shown in percentage. The process is completed when [File move completed] or [File copy completed] is displayed.
Menu setting m
ethodMenu setting method
0
4
EN
Notes
• The recorder cannot copy when the memory capacity is not sufficient.
• The recorder cannot move or copy when the number of files exceeds 999.
• Do not remove the battery during moving or copying. This may damage the data.
• A file cannot be moved or copied to the same folder.
• When the operation is canceled during moving or copying, only the file that is being moved or copied is effective, all other files will not be moved or copied.
• Files which are locked will remain so even after they are moved or copied ( P.72).
• Files cannot be moved or copied directly under the [Root] folder.
• In movie mode (n), files can be moved or copied to the [Movie ***] and [Edit] folders directly under the [DCIM] folder.
• In voice mode (A), files can be moved or copied to the [Folder A] through [Folder E] and [Music] folders.
Menu setting method
Menu setting m
ethod

1
4
EN
+ − button`OK button
MENU button
Dividing files [File Divide] A nFiles with large capacities and long recording times can be divided so that they are easier to manage and edit.
It is recommended to make a copy of the original file before dividing a file ( P.79, P.92).
1 Stop playback at the divide position.• While the recorder is during playback mode,
press and hold the 9 or 0 button to fast-forward or rewind.
• It is useful to set index marks on marking in advance at the divide position ( P.52).
Select [File Divide] from the menu on the [File Menu].• For details on how to enter the menu
settings, see “Menu setting method” ( P.63).
Press the + button to select [Start].
Press the MENU button to complete the setting.
Press the `OK button.• [Dividing!] will appear and file dividing will
start.• File dividing is completed when [File divide
completed] appears.
Menu setting m
ethodMenu setting method

4
EN
Notes
• The recorder cannot divide files when the number of files in the folder exceeds 999.
• Locked files cannot be divided ( P.72).• When you divide a movie file, the dividing
position may be offset by up to approximately 1 second.
• After splitting the voice file, the front part of the file will be renamed as [File name_1.MP3] and the latter part of the file will be named as [File name_2.MP3].
• After a file is divided, a new file number is assigned to each of the movie files, and then the files are saved to the [Edit] folder under the [DCIM] folder. The original file is deleted automatically.
• If a file has an extremely short recording time, it may not be divided even if it is a PCM file.
• Do not remove the battery and SD card while dividing a file. This may damage the data.
Menu setting method
Menu setting m
ethod
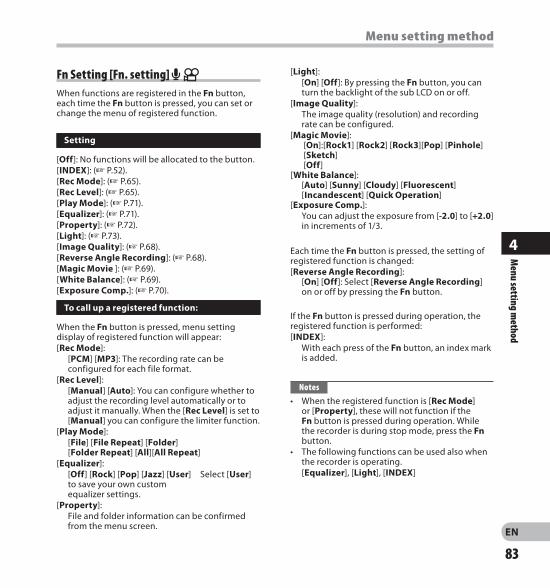
4
EN
Fn Setting [Fn. setting] A nWhen functions are registered in the Fn button, each time the Fn button is pressed, you can set or change the menu of registered function.
Setting
[Off]: No functions will be allocated to the button.[INDEX]: ( P.52).[Rec Mode]: ( P.65).[Rec Level]: ( P.65).[Play Mode]: ( P.71).[Equalizer]: ( P.71).[Property]: ( P.72).[Light]: ( P.73).[Image Quality]: ( P.68).[Reverse Angle Recording]: ( P.68).[Magic Movie ]: ( P.69).[White Balance]: ( P.69).[Exposure Comp.]: ( P.70).
To call up a registered function:
When the Fn button is pressed, menu setting display of registered function will appear:[Rec Mode]: [PCM] [MP3]: The recording rate can be
configured for each file format.[Rec Level]: [Manual] [Auto]: You can configure whether to
adjust the recording level automatically or to adjust it manually. When the [Rec Level] is set to [Manual] you can configure the limiter function.
[Play Mode]: [File] [File Repeat] [Folder]
[Folder Repeat] [All][All Repeat][Equalizer]: [Off] [Rock] [Pop] [Jazz] [User] Select [User]
to save your own custom equalizer settings.
[Property]: File and folder information can be confirmed
from the menu screen.
[Light]: [On] [Off]: By pressing the Fn button, you can
turn the backlight of the sub LCD on or off.[Image Quality]: The image quality (resolution) and recording
rate can be configured.[Magic Movie]: [On]:[Rock1] [Rock2] [Rock3][Pop] [Pinhole]
[Sketch] [Off]
[White Balance]: [Auto] [Sunny] [Cloudy] [Fluorescent]
[Incandescent] [Quick Operation][Exposure Comp.]: You can adjust the exposure from [-2.0] to [+2.0]
in increments of 1/3.
Each time the Fn button is pressed, the setting of registered function is changed:[Reverse Angle Recording]:
[On] [Off]: Select [Reverse Angle Recording] on or off by pressing the Fn button.
If the Fn button is pressed during operation, the registered function is performed:[INDEX]: With each press of the Fn button, an index mark
is added.
Notes
• When the registered function is [Rec Mode] or [Property], these will not function if the Fn button is pressed during operation. While the recorder is during stop mode, press the Fn button.
• The following functions can be used also when the recorder is operating.
[Equalizer], [Light], [INDEX]
Menu setting m
ethodMenu setting method

4
EN
Changing the USB class [USB Settings] A nBesides setting to [PC] (Connect to PC to transfer files) or [AC Adapter] (Connect to AC adapter to recharge the battery), you can switch the USB class according to your usage. The [PC Camera] setting is also included for when you want to use the recorder as a PC camera ( P.95).
[USB Connect]: Setting for connecting to the PC.
[USB Class]: Setting for USB class. Press the ` OK button.
• If you select [USB Class], proceed to the operation of Step 6.
1 Select [USB Settings] from the menu on the [Device Menu].• For details on how to enter the menu
settings, see “Menu setting method” ( P.63).
Press the + or − button to select [USB Connect] or [USB Class].
+ − button`OK button
MENU button
When [USB Connect] is selected:
Press the + or − button to change the setting.
[PC]: Setting for when the recorder is connected to the PC and used as a storage device or composite device. Connected as storage or composite.
[AC Adapter]: Setting for when the recorder is connected to the PC for charging or to the AC Adapter (F-3AC).
[Optional]: Setting to confirm the connection method each time a USB connection is made.
Press the ` OK button to complete the setting.• If you select [USB Connect], proceed to the
operation of Step 8.
Menu setting method
Menu setting m
ethod

4
EN
When [USB Class] is selected:
Press the + or − button to change the setting.
[Storage class]: Recognized as an external memory device from the PC.
[PC Camera]: Recognized as a PC camera from the PC.
Press the ` OK button to complete the setting.
Press the MENU button to close the menu screen.
Notes
• When you first connect the recorder to your PC as an external storage device, the driver for the recorder will be automatically installed in your PC.
• The PC cannot recognize when the recorder is connected to the PC when setting for the [USB Connect] is set to [AC Adapter].
• When the recorder is not recognized by the PC as an external storage device, change the [USB Class] setting to [Storage class].
• When [PC Camera] is set, the recorder is not recognized as an external removable device by the PC.
Menu setting m
ethodMenu setting method

4
EN
Formatting the recorder [Format] A n
1 Select [Format] from the menu on the [Device Menu].• For details on how to enter the menu
settings, see “Menu setting method” ( P.63).
Press the + button to select [Start].
Press the `OK button.• After [Data will be cleared] message is on
for two seconds, [Start] and [Cancel] will turn on.
If you format the recorder, all files will be removed and all function settings will return to defaults except date and time settings. Transfer any important files to a computer before formatting the recorder.
+ − button`OK button
• [Format Done] appears when formatting ends.
Press the + button again to select [Start].
Press the `OK button.• Formatting begins and [Format !] flashes on
the main LCD.
Menu setting method
Menu setting m
ethod

4
EN
Notes
• Never format the recorder from a PC.• When the recorder is formatted, all the saved
data, including locked files and read-only files, are erased.
• After formatting, recorded voice file names may start from [0001].
• For returning the settings for the functions to their initial settings, use [Reset Settings] ( P.74).
• It may take over 10 seconds to complete processing. Never perform operations such as the following while processing, as they may damage the data.1 Disconnect the AC Adapter while processing.2 Removing the battery while processing.3 Remove the SD card while processing.
In addition, carefully check the remaining battery level in order to ensure that the battery will not run out while processing.
• Formatting on the recorder will be Quick Format. If you format the SD card, information of file management is refreshed and the data inside the SD card is not deleted completely. When handing over and disposing the SD card, be careful about the data leakage from the SD card. We recommend the SD card to be destroyed when you dispose the SD card.
Menu setting m
ethodMenu setting method
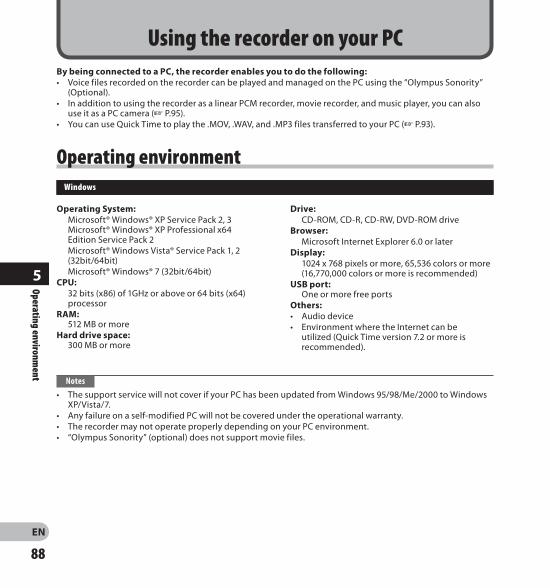
5
EN
Using the recorder on your PC
Operating environment
By being connected to a PC, the recorder enables you to do the following:• Voice files recorded on the recorder can be played and managed on the PC using the “Olympus Sonority”
(Optional).• In addition to using the recorder as a linear PCM recorder, movie recorder, and music player, you can also
use it as a PC camera ( P.95).• You can use Quick Time to play the .MOV, .WAV, and .MP3 files transferred to your PC ( P.93).
Windows
Notes
• The support service will not cover if your PC has been updated from Windows 95/98/Me/2000 to Windows XP/Vista/7.
• Any failure on a self-modified PC will not be covered under the operational warranty.• The recorder may not operate properly depending on your PC environment.• “Olympus Sonority” (optional) does not support movie files.
Operating System: Microsoft® Windows® XP Service Pack 2, 3
Microsoft® Windows® XP Professional x64 Edition Service Pack 2
Microsoft® Windows Vista® Service Pack 1, 2 (32bit/64bit)
Microsoft® Windows® 7 (32bit/64bit)CPU: 32 bits (x86) of 1GHz or above or 64 bits (x64)
processorRAM:
512 MB or moreHard drive space:
300 MB or more
Drive: CD-ROM, CD-R, CD-RW, DVD-ROM driveBrowser: Microsoft Internet Explorer 6.0 or laterDisplay: 1024 x 768 pixels or more, 65,536 colors or more
(16,770,000 colors or more is recommended)USB port:
One or more free portsOthers:• Audio device• Environment where the Internet can be
utilized (Quick Time version 7.2 or more is recommended).
Operating environment

5
EN
Operating environment
Macintosh
Operating System: Mac OS X 10.4.11 - 10.6CPU: PowerPC® G5 or Intel Multicore Processor 1.5
GHz or aboveRAM:
512 MB or moreHard drive space:
300 MB or moreDrive: CD-ROM, CD-R, CD-RW, DVD-ROM driveBrowser: Macintosh Safari 2.0 or later
Display: 1024 x 768 pixels or more, 32,000 colors or more
(16,770,000 colors or more is recommended)USB port: One or more free portsOthers:• Audio device• Environment where the Internet can be
utilized (Quick Time version 7.2 or more is recommended).
Precautions on using the recorder connected to a PC
• When you are downloading a file from the recorder or uploading a file to the recorder, do not remove the USB cable even if the screen is indicating you can. Data is still being transferred while the PEAK/LED indicator light is blinking. When removing the USB cable, be sure to follow the description in P.91. If the USB cable is removed before the drive is stopped, data may not be successfully transferred.
• On a PC, do not format the drive of the recorder. Initialization is not successfully achieved on a PC. For initialization, follow the instructions in the [Format] display of the recorder ( P.86).
• Folder (directory) names displayed by file management tools such as Explorer in Microsoft Windows and Finder in Macintosh are different from the folder names that can be set with the recorder or the “Olympus Sonority”.
• If folders or files stored on the recorder are moved or renamed by using a file management tool in Windows or Macintosh, the order of files may be changed or files may become unrecognizable.
• Data can be written or uploaded to the recorder even though the attribute of the recorder drive is shown as Read-only by the operating system of the PC.
• As the noise may cause adverse effects on electronics devices nearby the recorder, unplug the external microphone and earphone when you connect the recorder to a PC.
Operating environment

0
5
EN
Connecting to your PC
1 Boot the PC. Connect the USB cable to the USB port
of the PC.
While the recorder is during stop mode or turned off, connect the USB cable to the connecting terminal on the bottom of the recorder.
• [Remote (Storage)] is displayed on the recorder if the USB cable is connected.
• When the recorder is using the USB connection setting, it will not be connected to the PC when [AC Adapter] is selected. Select [PC] in the USB connection setting ( P.84).
Windows:When you connect the recorder to Windows and open [My Computer], it will be recognized by the drive name of the product name. Inserting an SD card will allow you to use it as [Removable Disk].Macintosh:When you connect the recorder to Mac OS, it will be recognized by the drive name of the product name on the desktop. If an SD card is inserted, [LS20M] will be displayed.
Notes
• Before connecting the USB cable, exit HOLD mode.
• Refer to the user’s manual for your PC regarding the USB port on your PC.
• Be sure to push the cable connector all the way in. Otherwise, the recorder may not operate properly.
• When connecting the recorder through an USB hub the operation may become unstable. In such cases, refrain from using a USB hub.
• Be sure to use the included dedicated USB cable. If any other company’s cable is used, it may lead to malfunction of the recorder. Also, never use this dedicated cable with any other company’s products.
Connecting to your PC

1
5
EN
Connecting to your PC
Windows
1 Click [ ] on the task bar located at the lower-right corner of the screen. Click [Safely remove USB Mass Storage Device].
Disconnecting from your PC
• The drive letter will differ depending on the PC being used.
• When the window indicating that it is safe to remove hardware window appears, close the window.
Confirm that the recorder PEAK/LED indicator light is gone before disconnecting the USB cable.
Macintosh
1 Drag and drop the drive icon for this recorder displayed on the desktop to the Recycle Bin icon.
Note
• NEVER disconnect the USB cable while the PEAK/LED indicator light is flashing. If you do, the data will be destroyed.
Confirm that the recorder PEAK/LED indicator light is gone before disconnecting the USB cable.
Connecting to your PC

5
EN
Folder A
Folder B
Folder C
Folder D
Music
Recorder
Windows
Removable Disk
Macintosh
LS20M
Folder E
DCIM
Transfer the voice files to your PC
The 5 voice folders of this recorder are named as [Folder A], [Folder B], [Folder C], [Folder D] and [Folder E], and the recorded voice files are saved in these folders. Furthermore, the movie shooting folder is named as [DCIM]. Copy a folder to any folder on your PC.
Windows
1 Connect the recorder to your PC ( P.90).
Open the Explorer window.• When you connect the recorder to Windows
and open [My Computer], it will be recognized by the drive name of the product name. Inserting an SD card will allow you to use it as [Removable Disk].
Open the product name folder. Copy the data. Disconnect the recorder from the PC
( P.91).
4 Drive names and folder names when a PC is connected:
SD card
Notes
• While transmitting data, [Busy] is displayed, and the PEAK/LED indicator light flashes. NEVER disconnect the USB cable while the PEAK/LED indicator light is flashing. If you do, the data will be destroyed.
• In a Windows standard environment, 24-bit wav-format files cannot be played. Use “Quick Time” or “Olympus Sonority” (Optional) for playback of such files.
• “Olympus Sonority” (Optional) allows you to perform operations such as editing voice files, but it does not support movie files.
Drive name Folder name
Macintosh
1 Connect the recorder to your PC ( P.90).• When you connect the recorder to
Mac OS, it will be recognized by the drive name of the product name on the desktop. If an SD card is inserted, [LS20M] will be displayed.
Double-click the product name icon on the desktop.
Copy the data. Disconnect the recorder from the PC
( P.91).
Transfer the voice files to your PC

5
EN
Using Quick Time
Using Quick Time
You can transfer the voice files you record and movie files you shoot with the recorder to a PC, and then use Quick Time to play them.
Play the voice file
1 Connect the recorder to your PC ( P.90).
Open the “Quick Time”.• The control screen of Quick Time Player is
visualized. Select [Open File] from the [File] menu.
• The [Open A File] dialog box appears. At the dialog screen, set the [File
location], [File type], and [File name] for the file you want to play.• When selecting a voice file recorded with
the recorder, set [File type] to [Audio Files].• Select a file, and then click [Open].
Play the voice file.• Click the button in the controls of Quick
Time Player to start playback.

5
EN
Play the movie file
1 Connect the recorder to your PC ( P.90).
Open the “Quick Time”.• The control screen of Quick Time Player
appears. Select [Open File] from the [File]
menu.• The [Open A File] dialog box appears.
At the dialog screen, set the [File location], [File type], and [File name] for the file you want to play.• When selecting a movie file shot with the
recorder, set [File type] into [Movies].• Select a file, and then click [Open].
Play the movie file.• Click the button in the controls of Quick
Time Player to start playback.
Using Quick Time
Using Quick Time
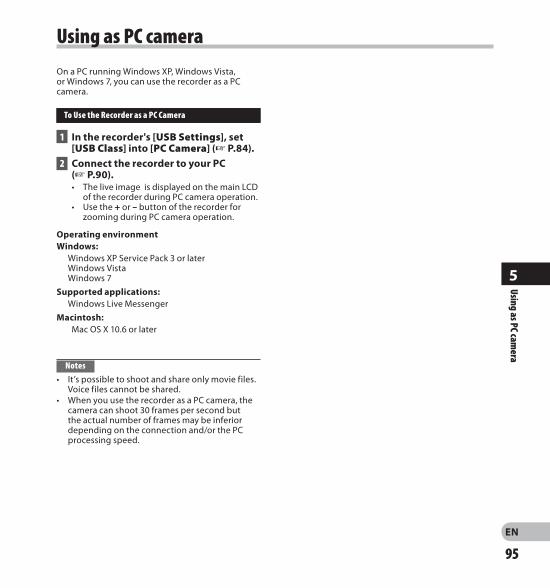
5
EN
Using as PC camera
Using as PC camera
On a PC running Windows XP, Windows Vista, or Windows 7, you can use the recorder as a PC camera.
To Use the Recorder as a PC Camera
1 In the recorder's [USB Settings], set [USB Class] into [PC Camera] ( P.84).
Connect the recorder to your PC ( P.90).• The live image is displayed on the main LCD
of the recorder during PC camera operation.• Use the + or – button of the recorder for
zooming during PC camera operation.
Operating environmentWindows: Windows XP Service Pack 3 or later Windows Vista Windows 7Supported applications: Windows Live MessengerMacintosh:
Mac OS X 10.6 or later
Notes
• It’s possible to shoot and share only movie files. Voice files cannot be shared.
• When you use the recorder as a PC camera, the camera can shoot 30 frames per second but the actual number of frames may be inferior depending on the connection and/or the PC processing speed.

6
EN
Other information
Message Meaning Explanation Action
[Battery Low] Low battery power. Battery power is getting low.
Charge the battery ( P.19, P.20). If you run out of battery soon after the charge, the battery life has ended. Replace with new battery.
[File Protected] Erase-locked. Tried to delete a locked file. Unlock the file ( P.72).
[Cannot record in this folder]
Not an audio-recordingfolder.
Recording has beenattempted with a [Music] or [DCIM] folder.
Select a folder from among [Folder A] to [Folder E] and try recording again ( P.32).
[Index Full] Index full. The file is full of index marks (maximum of 16 marks).
Erase index marks that are no longer required ( P.52).
[Folder Full] Folder full. The folder is full of files (maximum of 999 files).
Erase unnecessary files ( P.58).
[Card Error] Error in the memory. SD card is not recognized correctly.
Remove the SD card, and put it again ( P.27).
[Licence Mismatch] Illegally copied file. The music files copied illegally. Erase the file ( P.58).
[Memory Full] Zero remaining memory. No remaining memory. Erase unnecessary files ( P.58).
[No File] No file. No files were found in the folder. Select another folder ( P.32).
[Format Error] Formatting error.There was an error while formatting the recorder’s memory.
Reformat the memory ( P.86).
[Can’t make the system file. Connect to PC and delete unnecessary file]
The management file cannot be created.
The file for management cannot be created due to a shortage of capacity for remaining memory.
Connect the recorder to a computer and delete any unnecessary files.
[Cannot play this file] File which cannot be played. Incompatible format.Please confirm the file that can be played on this recorder ( P.48).
[Please Select The File] Unselected File File is not selected. Please select a file then carry out the operation ( P.32).
[Same folder. Can't be moved(copied).]
File cannot be moved (copied).
Attempting to move (copy) into the same folder. Please select another folder.
Alarm message list
Alarm m
essage list

6
EN
Alarm m
essage list
Message Meaning Explanation Action
[Some files can't be moved(copied).]
File cannot be moved (copied).
A file with the same file name exists in the destination folder for a move (copy) operation.
Please select another file.
[This file can’t be divided.] File which cannot be split.
Attempting to split a file other than PCM files recorded in this recorder.
Please select another file.
[Cooling circuit. Please Wait]
Recording and shooting are not possible.
Recording and shooting are not possible because the circuit temperature has risen.
Please wait until the circuit temperature has become lower.
[Sound rec. stopped] Recording is not possible.Recording was stopped because the circuit temperature has risen.
Please wait until the circuit temperature has become lower.
[Movie rec. stopped] Shooting is not possible.Shooting was stopped because the circuit temperature has risen.
Please wait until the circuit temperature has become lower.
Alarm message list

6
EN
Troubleshooting
Symptom Probable cause Action
Nothing appears on the display
The battery is not loaded properly. Check the direction of the battery ( P.17).
Battery power is getting low. Charge the battery ( P.19, P.20).
The power is off. Turn the power on ( P.23).
Won’t start
Battery power is getting low. Charge the battery ( P.19, P.20).
The power is off. Turn the power on ( P.23).
The recorder is in HOLD mode. Release the recorder from HOLD ( P.24).
Unable to recordLow remaining memory. Erase unnecessary files ( P.58).
The maximum number of files has been reached.
Change to any other folder ( P.32).
Unable to shooting
Low remaining memory. Erase unnecessary files ( P.58).
The maximum number of files has been reached. Erase unnecessary files ( P.58).
Attempting to shoot a movie in voice mode (A).
Slide the mode switch on the recorder to movie mode (n) ( P.33).
No sound picked up by thebuilt-in microphone
An external microphone or external device is connected.
Detach all external microphones andexternal devices connected to the MIC jack ( P.40).
Unable to record through an external microphone
An external microphone supported by plug-in power is connected but [Plug-in Power] is set to [Off].
Set [Plug-inPower] to [On] when an external microphone supported by plug-in power is connected ( P.67).
[Input Jack] is set to [Line]. Set [Input Jack] to [Microphone] ( P.67).
No playback sound heard The earphone is connected. Unplug the earphones to use the internal
speaker.
The volume level is set to [00]. Adjust the volume level ( P.48).
Shooting stopped midway The size of a single file exceeded 4 GB. It is not possible to shoot exceeding 4 GB for a single file.
Troubleshooting

6
EN
Troubleshooting
Symptom Probable cause Action
Recording level too low
The recording level has not been adjusted. Adjust the recording level and then try recording once more ( P.35, P.65).
The microphone sensitivity is too low. Set [Mic Sense] to [High] ( P.65).
This could potentially be because the output level for the connected external devices are too low.
Adjust the output level for the connected devices.
Recording level too high
The recording level has not been adjusted. Adjust the recording level and then try recording once more ( P.35, P.65).
This could potentially be because the recording level and output level for connected external devices are too high.
If you cannot record clearly even after adjusting the recording level, then adjust the output level for the connected devices ( P.35, P.65).
Cannot find the recorded Voice File Wrong folder. Switch to the correct folder
( P.32).
Noise heard during playback
The recorder was shaken during recording. ———
The recorder was placed near a cell phone or fluorescent lamp while recording or during playback.
Move the recorder.
The settings of the connected external microphone do not correspond to those of the recorder.
When a microphone not supported by the plug-in power function is connected, turn the [Plug-inPower] setting to [Off] ( P.67).
Unable to hear any sound from the earphone through the recording monitor
[Rec Monitor] is set to [Off]. Set [Rec Monitor] to [On] ( P.67).
Unable to erase the fileThe file is locked. Unlock the file ( P.72).
The file is read-only. Unlock the file or cancel the read-only setting of the file on the PC.
Noise is audible through the recording monitor Acoustic feedback is occurring.
When the built-in speaker amps and the like are connected there is a risk that audio feedback will occur while recording. It is recommended that you use earphones for the recording monitor, or turn the [Rec Monitor] to [Off] while recording ( P.67).
Perform adjustments, such as further distancing the earphones from the microphones, not pointing the microphones at the earphones, or lowering the volume of the recording monitor.
Troubleshooting

100
6
EN
Symptom Probable cause Action
Unable to set index marks
The maximum number of marks has been reached. Erase unnecessary marks ( P.52).
The file is locked. Unlock the file ( P.72).
The file is read-only. Unlock the file or cancel the read-only setting of the file on the PC.
The file is MP3 format. An index cannot be set for files in MP3 format.
Cannot recharge Contains battery other than thespecified battery.
Please insert the chargeable batteryprovided.
The recorder has become hotThe back of the recorder could become hot when shooting movies. This is not a malfunction.
If the recorder becomes abnormally hot, please contact the Olympus Customer Support Center.
Troubleshooting
Troubleshooting

101
5
EN
Accessories (optional)Accessories (optional)
s 2-channel microphone (omni-directional): ME30WTwo ME30 monaural microphones come in a set with a miniature tripod and a connection adapter. These are highly sensitive omni-directional microphones supported by plug-in power which are well-suited to recording musical performances.
s Compact Gun Microphone (unidirectional): ME31The directional microphones useful for recordings such as outdoor recording of wild birds singing. The metal body provides a sturdiness to the high rigidity.
s Compact zoom microphone (unidirectional): ME32The microphone is integrated with a tripod, making it suitable for when you wish to record from a distance, such as from your table at a meeting or conference.
s Highly sensitive noise-cancellation monaural microphone (unidirectional): ME52WThis microphone is used to record sound at a distance while minimizing surrounding noise.
s Tie clip microphone (omni-directional): ME15Small concealing microphone with a tie-clip.
s Telephone pickup: TP7Earphone type microphone can be plugged into your ear while phoning. The voice or conversation over the phone can be clearly recorded.
s Lithium ion battery: LI-42BThis lithium ion rechargeable battery is manufactured by Olympus. It is best paired with the LI-41C battery charger.
s Connecting cord: KA333Connecting cord which has stereo mini-plugs (ø3.5) with resistance at both ends. Use to connect from the earphone jack output of the recorder to the microphone input jack when recording. Converting plug adapters (PA331/PA231) which convert to the monaural mini plug (ø3.5) or monaural mini plug (ø2.5) are also enclosed.
s Exclusive remote control set: RS30WWhen the receiver is plugged into the REMOTE jack the recorder’s recording, shooting and stop functions can be operated through the remote control. The receiving position can be adjusted, thereby allowing you to operate the recorder from various different angles.
s High speed HDMI cable: CB-HD1This cable is for connecting the recorder to an high-definition TV via an HDMI connection. The connector type for the recorder side is an HDMI micro connector (Type D).
Accessories exclusive to the Olympus voice recorder can be purchased directly from Online Shop on our company’s website. Sales of accessories are different according to the country.

10
6
EN
Specifications
General points
4 Recording format:Voice: Linear PCM (Pulse Code Modulation) MP3 (MPEG-1 Audio Layer3)Movie: MOV (MPEG-4AVC/H.264)
4 Recording medium:SD card: 1 GB to 32 GB
4 No. of effective pixels:2,930,000 pixels (16:9)2,190,000 pixels (4:3)
4 Image pickup device:1/4" 5-megapixel CMOS sensor
4 Lens:Focal length f4.1mm.16:9 at 49mm4:3 at 59mm
4 Shooting range:30 cm to ∞
4 Movie resolution:HD1080p 30fps, HD720p 30fps, HD480p 30fps
4 Photometric system:Digital ESP metering, spot metering system.
4 Shutter speed:1/30 to 1/4000 sec.
4 Digital Zoom: Max. 4x4 Monitor: 2.0 color LCD display4 Input level:
Mic Sense [High]: — 59 dBvMic Sense [Low]: — 39 dBvLINE-IN : — 6 dBv
4 Sampling frequency:Linear PCM format
[96 kHz/24 bit] 96 kHz
[88.2 kHz/24 bit] 88.2 kHz
[48 kHz/24 bit] 48 kHz
[44.1 kHz/16 bit] 44.1 kHz
MP3 format
[320 kbps 44.1 kHz] 44.1 kHz
[256 kbps 44.1 kHz] 44.1 kHz
[128 kbps 44.1 kHz] 44.1 kHz
4 Maximum headphone output:â 150 mV (according to EN 50332-2)
4 Speaker:Built-in ø 16 mm round dynamic speaker
4 MIC jack:Input Jack [Microphone]:ø 3.5 mm mini-jack, impedance 2.2 kΩInput Jack [Line]:ø 3.5 mm mini-jack, impedance 39 kΩ
4 EAR jack:ø 3.5 mm mini-jack, impedance 16 Ω or more
4 ConnectorUSB connector/HDMI micro connector (type D)
4 Maximum working output:270 mW (8 Ω speaker)
4 Input power requirement:Battery: Lithium ion battery (LI-42B)External power supply: AC adapter (F-3AC) 5 V
4 External dimensions:135 mm × 63 mm × 18.1 mm (without protrusions)
4 Weight:154 g (including battery and SD card)
4 Operating temperature:0°C - 42°C/ 32°F - 107.6°F
Frequency response:
4 During recording mode (Microphone jack):Linear PCM format
[96 kHz/24 bit] 20 Hz to 44 kHz
[88.2 kHz/24 bit] 20 Hz to 42 kHz
[48 kHz/24 bit] 20 Hz to 23 kHz
[44.1 kHz/16 bit] 20 Hz to 21 kHz
Specifications

10
6
EN
Specifications
MP3 format
[320 kbps 44.1 kHz] 50 Hz to 20 kHz
[256 kbps 44.1 kHz] 50 Hz to 20 kHz
[128 kbps 44.1 kHz] 50 Hz to 17 kHz
Specifications
Guide to battery life
The following values are strictly references.4 Lithium ion battery:
Voice mode Built-in stereo microphone (During recording mode)
Built-in speakers (During playback mode) Earphone Playback
Linear PCM format
[96 kHz/24 bit] 3h. 45min. 4h. 15min. 4h. 25min.
[88.2 kHz/24 bit] 3h. 45min. 4h. 15min. 4h. 25min.
[48 kHz/16 bit] 3h. 45min. 4h. 15min. 4h. 25min.
[44.1 kHz/16 bit] 3h. 45min. 4h. 15min. 4h. 25min.
MP3 format
[320 kbps 44.1 kHz] 4h. 4h. 30min. 4h. 35min.
[256 kbps 44.1 kHz] 4h. 4h. 30min. 4h. 35min.
[128 kbps 44.1 kHz] 4h. 4h. 30min. 4h. 35min.
Movie mode Built-in stereo microphone (During shooting mode)
Built-in speakers (During playback mode) Earphone Playback
1920×1080 30fps(Linear PCM format)
[96 kHz/24 bit] 1h. 5min. 2h. 2h.
[88.2 kHz/24 bit] 1h. 5min. 2h. 2h.
[48 kHz/16 bit] 1h. 5min. 2h. 2h.
[44.1 kHz/16 bit] 1h. 5min. 2h. 2h.
1280×720 30fps(Linear PCM format)
[96 kHz/24 bit] 1h. 10min. 2h. 15min. 2h. 15min.
[88.2 kHz/24 bit] 1h. 10min. 2h. 15min. 2h. 15min.
[48 kHz/16 bit] 1h. 10min. 2h. 15min. 2h. 15min.
[44.1 kHz/16 bit] 1h. 10min. 2h. 15min. 2h. 15min.
690×480 30fps(MP3 format)
[320 kbps 44.1 kHz] 1h. 20min. 2h. 25min. 2h. 25min.
[256 kbps 44.1 kHz] 1h. 20min. 2h. 25min. 2h. 25min.
[128 kbps 44.1 kHz] 1h. 20min. 2h. 25min. 2h. 25min.
4 During recording mode (Built-in microphone):60 Hz to 20 kHz (However, when recording in the MP3 format, the upper limit value of the frequency response depends on each recording mode)
4 During playback mode:20 Hz to 20 kHz

10
6
EN
Note
• Battery life is measured by Olympus. It varies greatly according to the type of batteries used and the conditions of use.
Guide to recording times
The following values are strictly references.4 Linear PCM format:
Recording mode
SD card1 GB 2 GB 4 GB 8 GB 16 GB 32 GB
[96 kHz/24 bit] 25min. 55min. 1h. 50min. 3h. 45min. 7h. 25min. 15h. 20min.
[88.2 kHz/24 bit] 30min. 1h. 2h. 4h. 8h. 5min. 16h. 40min.
[48 kHz/16 bit] 1h. 20min. 2h. 45min. 5h. 30min. 11h. 20min. 22h. 20min. 45h. 55min.
[44.1 kHz/16 bit] 1h. 30min. 3h. 6h. 12h. 20min. 24h. 15min. 49h. 55min.
4 MP3 format:Recording
modeSD card
1 GB 2 GB 4 GB 8 GB 16 GB 32 GB
[320 kbps 44.1 kHz] 6h. 45min. 12h. 45min. 26h. 53h. 30min. 105h 216h.
[256 kbps 44.1 kHz] 8h. 30min. 16h. 32h. 67h. 131h. 270h.
[128 kbps 44.1 kHz] 17h. 31h. 62h. 30min. 134h. 263h. 540h.
Notes
• Available recording time may be shorter if many short recordings are made (The displayed available recording time and recorded time are approximate indications).
• Variations in the available recording time will arise as there may be differences in the available memory depending on the SD card.
Guide to shooting times
The following values are strictly references.4 1920×1080 30fps:
Shooting mode
SD card1 GB 2 GB 4 GB 8 GB 16 GB 32 GB
[96 kHz/24 bit] 7min. 15min. 30min. 1h. 2h. 4h.
[88.2 kHz/24 bit] 7min. 15min. 30min. 1h. 2h. 4h.
[48 kHz/16 bit] 9min. 17min. 35min. 1h. 10min. 2h. 20min. 5h.
[44.1 kHz/16 bit] 9min. 17min. 35min. 1h. 10min. 2h. 20min. 5h.
Specifications
Specifications

10
6
EN
Specifications
4 1280×720 30fps:Shooting
modeSD card
1 GB 2 GB 4 GB 8 GB 16 GB 32 GB
[96 kHz/24 bit] 10min. 20min. 45min. 1h. 30min. 3h. 6h.
[88.2 kHz/24 bit] 10min. 20min. 45min. 1h. 30min. 3h. 6h.
[48 kHz/16 bit] 15min. 30min. 1h. 2h. 4h. 8h.
[44.1 kHz/16 bit] 15min. 30min. 1h. 2h. 4h. 8h.
4 640×480 30fps:Shooting
modeSD card
1 GB 2 GB 4 GB 8 GB 16 GB 32 GB
[320 kbps 44.1 kHz] 30min. 1h. 2h. 4h. 30min. 9h. 30min. 19h.
[256 kbps 44.1 kHz] 30min. 1h. 2h. 4h. 30min. 9h. 30min. 19h.
[128 kbps 44.1 kHz] 35min. 1h. 15min. 2h. 30min. 5h. 10h. 20h.
Notes
• Available shooting time may be shorter if many short shootings are made (The displayed available shooting time and recorded time are approximate indications).
• Variations in the available shooting time will arise as there may be differences in the available memory depending on the SD card.
Maximum recording time per file
• The maximum size of a single file is limited to approx. 4 GB for MP3 format, and approx. 2 GB for PCM format.
• Regardless of the memory remaining amount, the longest sound recording time per file is restricted to the following value.
Linear PCM format
[96 kHz 24 bit] approx. 55 min.
[88.2 kHz 24 bit] approx. 1 h.
[48 kHz 16 bit] approx. 2 h. 45 min.
[44.1 kHz 16 bit] approx. 3 h.
MP3 format
[320 kbps 44.1 kHz] approx. 26 h.
[256 kbps 44.1 kHz] approx. 32 h.
[128 kbps 44.1 kHz] approx. 62 h. 30min.
Specifications

10
6
EN
Specifications and design are subject to change without notice.
Maximum shooting time per file
• The maximum size of a single movie file is limited to approx. 4 GB.• Regardless of the memory remaining amount, the longest sound recording time per file is restricted to the
following value.
1920×1080 30fps:
[96 kHz 24 bit] approx. 30 min.
[88.2 kHz 24 bit] approx. 30 min.
[48 kHz 16 bit] approx. 35 min.
[44.1 kHz 16 bit] approx. 35 min.
1280×720 30fps:
[96 kHz 24 bit] approx. 45 min.
[88.2 kHz 24 bit] approx. 45 min.
[48 kHz 16 bit] approx. 1 h.
[44.1 kHz 16 bit] approx. 1 h.
640×480 30fps:
[320 kbps 44.1 kHz] approx. 2 h.
[256 kbps 44.1 kHz] approx. 2 h.
[128 kbps 44.1 kHz] approx. 2 h.
Specifications
Specifications

10
6
EN
Technical assistance and support
The following are contact information for technical support for Olympus recorders and software only.s Technical Hotline Number in the U.S. and Canada
1-888-553-4448s User Support E-mail address in the U.S. and Canada
[email protected] Technical Hotline Number in Europe
Toll free number: 00800 67 10 83 00available for Austria, Belgium, Denmark, Finland, France, Germany, Italy, Luxemburg, Netherlands, Norway, Portugal, Spain, Sweden, Switzerland, United KingdomCharged numbers for the Rest of Europe + 49 180 567 1083 + 49 40 23773 4899
s User Support E-mail address in [email protected]
Technical assistance and support
“CE” mark indicates that this product complies with the European requirements for safety, health,environment and customer protection.
For customers in Europe
This symbol [crossed-out wheeled bin WEEE Annex IV] indicates separate collection of waste electrical and electronic equipment in the EU countries. Please do not throw the equipment into the domestic refuse. Please use the return and collection systems available in your country for the disposal of this product.Applicable Product : LS-20M, AC adapter
This symbol [crossed-out wheeled bin Directive 2006/66/EC Annex II] indicates separate collection of waste batteries in the EU countries. Please do not throw the batteries into the domestic refuse. Please use the return and collection systems available in your country for the disposal of the waste batteries.

EN-BD3355-01AP1104
OLYMPUS IMAGING CORP.Shinjuku Monolith, 3-1 Nishi-Shinjuku 2-chome, Shinjuku-ku,
Tokyo 163-0914, Japan. Tel. +81 (0)3-3340-2111http://www.olympus.com
OLYMPUS IMAGING AMERICA INC.3500 Corporate Parkway, P.O. Box 610, Center Valley,
PA 18034-0610, U.S.A. Tel. 1-888-553-4448http://www.olympusamerica.com
OLYMPUS EUROPA HOLDING GMBH(Premises/Goods delivery) Wendenstrasse 14-18, 20097 Hamburg, Germany.
Tel. +49 (0)40-237730(Letters) Postfach 10 49 08. 20034 Hamburg, Germany.
http://www.olympus-europa.com
OLYMPUS IMAGING AUSTRALIA PTY LTD.82 Waterloo Rd, North Ryde NSW 2113, Australia
TEL: (61) 2-9886-3999http://www.olympus.com.au