Embed Size (px)
Citation preview
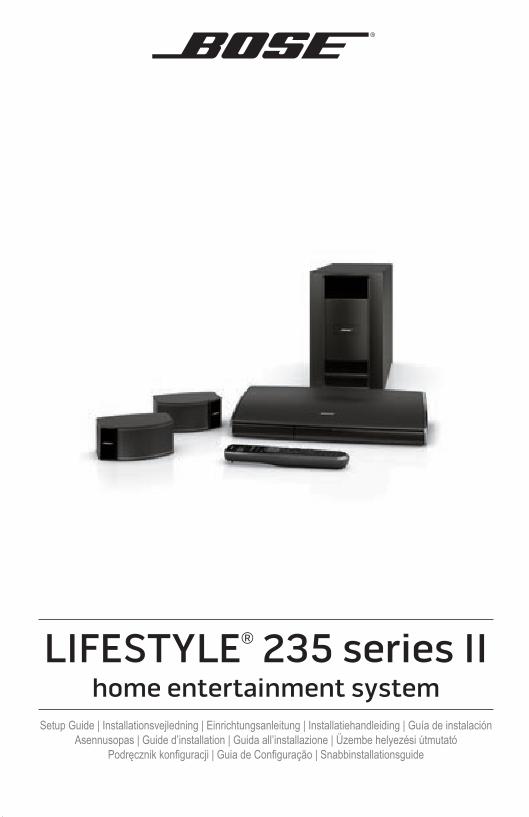
LIFESTYLE® 235 series IIhome entertainment system
Setup Guide | Installationsvejledning | Einrichtungsanleitung | Installatiehandleiding | Guía de instalación Asennusopas | Guide d’installation | Guida all’installazione | Üzembe helyezési útmutató
Podręcznik konfiguracji | Guia de Configuração | Snabbinstallationsguide
Safety Information
2 - English
Please read this guidePlease take the time to follow the instructions in this owner’s guide carefully. It will help you set up and operate your system properly and enjoy its advanced features. Please save this guide for future reference.All Bose® products must be used in accordance with local, state, federal, and industry regulations.
The lightning flash with arrowhead symbol within an equilateral triangle alerts the user to the presence of uninsulated, dangerous voltage within the system enclosure that may be of sufficient magnitude to constitute a risk of electric shock.The exclamation point within an equilateral triangle, as marked on the system, is intended to alert the user to the presence of important operating and maintenance instructions in this owner’s guide.
WARNING: Contains small parts which may be a choking hazard. Not suitable for children under age 3.
WARNINGS:• To reduce the risk of fire or electrical shock, do not expose the product to rain or moisture.• Do not expose this apparatus to dripping or splashing, and do not place objects filled with liquids, such
as vases, on or near the apparatus. As with any electronic products, use care not to spill liquids into any part of the system. Liquids can cause a failure and/or a fire hazard.
• To prevent electric shock, match the wide blade of the line cord plug to the wide slot of the AC (mains) receptacle. Insert fully.
• Do not place any naked flame sources, such as lighted candles, on or near the apparatus.
CAUTIONS:• Make no modifications to the system or accessories. Unauthorized alterations may compromise safety,
regulatory compliance, and system performance.• Long-term exposure to loud music may cause hearing damage. It is best to avoid extreme volume when
using headphones, especially for extended periods.
The terms HDMI and the HDMI Logo are trademarks or registered trademarks of HDMI Licensing LLC in the United States and other countries.©2013 Bose Corporation. No part of this work may be reproduced, modified, distributed, or otherwise used without written permission.
Safety Information
English - 3
NOTES:• The product label is located on the bottom or the back of the product.• Where the mains plug or appliance coupler is used as the disconnect device, such disconnect device shall remain
readily operable.• The product must be used indoors. It is neither designed nor tested for use outdoors, in recreation vehicles, or on
boats.• This product is intended to be used only with the power supply provided.• The speaker wire and interconnect cables included with the system are not approved for in-wall installation.
Please check your local building codes for the correct type of wire and cable required for in-wall installation.
Please dispose of used batteries properly, following any local regulations. Do not incinerate.
Bose® Corporation hereby declares that this product is in compliance with the essential requirements and other relevant provisions of Directive 1999/5/EC and all other applicable EU directive require-ments. The complete declaration of conformity can be found at: www.Bose.com/compliance.
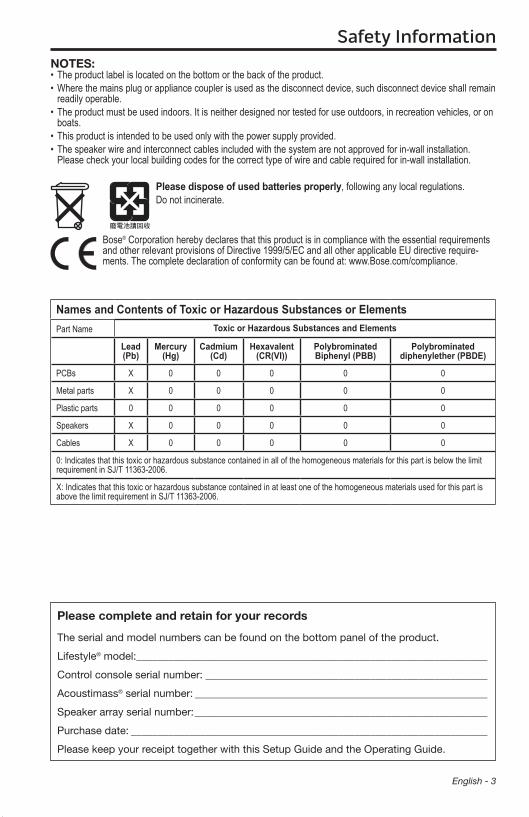
Names and Contents of Toxic or Hazardous Substances or ElementsPart Name Toxic or Hazardous Substances and Elements
Lead (Pb)
Mercury (Hg)
Cadmium (Cd)
Hexavalent (CR(VI))
Polybrominated Biphenyl (PBB)
Polybrominated diphenylether (PBDE)
PCBs X 0 0 0 0 0
Metal parts X 0 0 0 0 0
Plastic parts 0 0 0 0 0 0
Speakers X 0 0 0 0 0
Cables X 0 0 0 0 0
0: Indicates that this toxic or hazardous substance contained in all of the homogeneous materials for this part is below the limit requirement in SJ/T 11363-2006.
X: Indicates that this toxic or hazardous substance contained in at least one of the homogeneous materials used for this part is above the limit requirement in SJ/T 11363-2006.
Please complete and retain for your records
The serial and model numbers can be found on the bottom panel of the product.
Lifestyle® model: __________________________________________________________________
Control console serial number: _____________________________________________________
Acoustimass® serial number: _______________________________________________________
Speaker array serial number: _______________________________________________________
Purchase date: ___________________________________________________________________
Please keep your receipt together with this Setup Guide and the Operating Guide.
Safety Information
4 - English
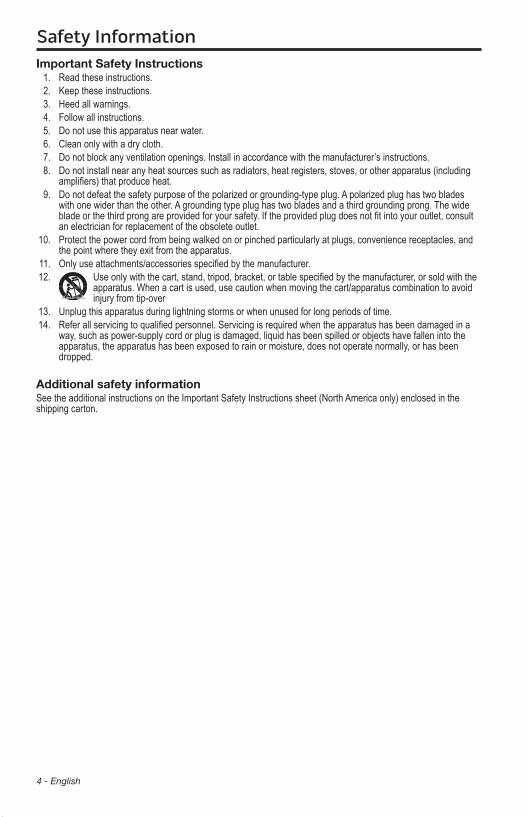
Important Safety Instructions1. Read these instructions.2. Keep these instructions.3. Heed all warnings.4. Follow all instructions.5. Do not use this apparatus near water.6. Clean only with a dry cloth.7. Do not block any ventilation openings. Install in accordance with the manufacturer’s instructions.8. Do not install near any heat sources such as radiators, heat registers, stoves, or other apparatus (including
amplifiers) that produce heat.9. Do not defeat the safety purpose of the polarized or grounding-type plug. A polarized plug has two blades
with one wider than the other. A grounding type plug has two blades and a third grounding prong. The wide blade or the third prong are provided for your safety. If the provided plug does not fit into your outlet, consult an electrician for replacement of the obsolete outlet.
10. Protect the power cord from being walked on or pinched particularly at plugs, convenience receptacles, and the point where they exit from the apparatus.
11. Only use attachments/accessories specified by the manufacturer.12. Use only with the cart, stand, tripod, bracket, or table specified by the manufacturer, or sold with the
apparatus. When a cart is used, use caution when moving the cart/apparatus combination to avoid injury from tip-over
13. Unplug this apparatus during lightning storms or when unused for long periods of time.14. Refer all servicing to qualified personnel. Servicing is required when the apparatus has been damaged in a
way, such as power-supply cord or plug is damaged, liquid has been spilled or objects have fallen into the apparatus, the apparatus has been exposed to rain or moisture, does not operate normally, or has been dropped.
Additional safety informationSee the additional instructions on the Important Safety Instructions sheet (North America only) enclosed in the shipping carton.
English - 5
ContentWelcomeThank you ........................................................................................................... 5Unpacking ........................................................................................................... 5
System SetupControl console box ........................................................................................... 6Acoustimass® module box ............................................................................... 9Speaker box ........................................................................................................ 11Interactive box ................................................................................................... 14Other Box 4 items .............................................................................................. 16Applying rubber feet ......................................................................................... 17If you have setup problems ............................................................................. 17Contacting customer service .......................................................................... 17

6 - English
Welcome
Thank you Thank you for choosing a Bose® LIFESTYLE® 235 Series II home entertainment system for your home. This guide provides step-by-step instructions for setting up your new system. There are two phases to the setup process:
Physical setup phase: Placing the system components and connecting them together.
Interactive setup phase: Completing your setup following the interactive steps on your TV screen provided by the UNIFY® intelligent integration system.
UnpackingThe parts of your new system are packaged in four numbered boxes plus a small box containing the appropriate power cords:
• 11 Control console box
• 2 Acoustimass® module box
• 3 Speaker box
• 4 Interactive box
• Power cord box (used with boxes 1 and 2)
Starting with Box 1, unpack each box and set up its contents before unpacking the next one.
Be sure to save all of the packing materials. These provide the safest means for any necessary shipping or transporting.
If any part appears damaged, do not attempt to use it. Notify Bose or your authorized Bose dealer immediately. For Bose contact information, refer to the address sheet included in Box 4.

English - 7
System Setup
11 Control console boxWhat you need from box 1:
What you need from the power cord box:
A. Place the control console on a flat, stable surface near your TV.
Control console
Note: Until your system is completely installed, it may be helpful to keep the control console positioned for easy access to its rear connection panel.
From box 1:
Control console Power supply Audio input cable HDMI® cable
From the power cord box:
Power cord

System Setup
8 - English
B. Plug one end of the HDMI® cable into an HDMI INPUT connector on your TV.
If an HDMI cable is already connected to an HDMI input on your TV, you can use this one. Just disconnect the other end.
C. Plug the other end of the HDMI cable you are using into the connector labeled HDMI OUT Video to TV on the control console.
HDMI OUT Video to TV
System Setup
English - 9
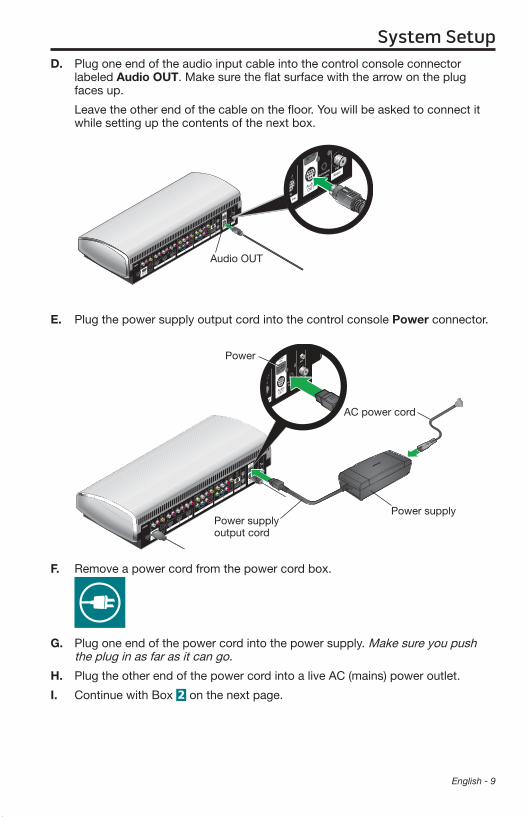
D. Plug one end of the audio input cable into the control console connector labeled Audio OUT. Make sure the flat surface with the arrow on the plug faces up.
Leave the other end of the cable on the floor. You will be asked to connect it while setting up the contents of the next box.
Audio OUT
E. Plug the power supply output cord into the control console Power connector.
Power
AC power cord
Power supply output cord
Power supply
F. Remove a power cord from the power cord box.
G. Plug one end of the power cord into the power supply. Make sure you push the plug in as far as it can go.
H. Plug the other end of the power cord into a live AC (mains) power outlet.
I. Continue with Box 2 on the next page.
System Setup
10 - English
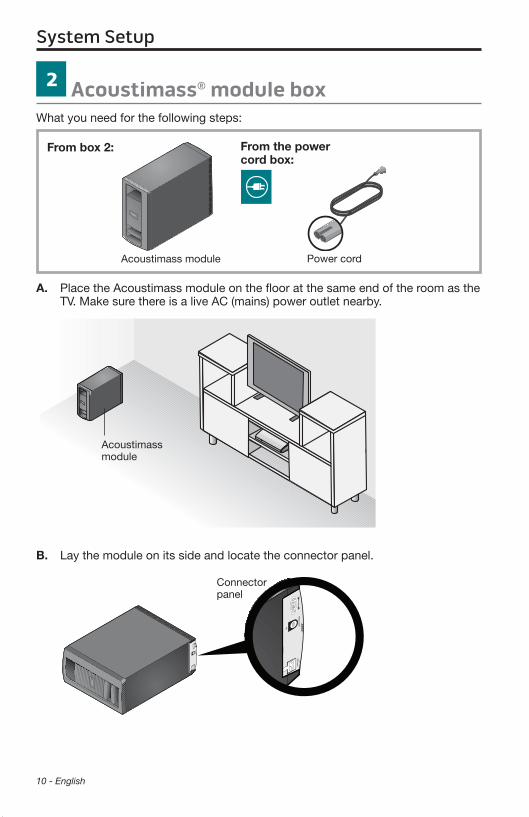
2 Acoustimass® module boxWhat you need for the following steps:
A. Place the Acoustimass module on the floor at the same end of the room as the TV. Make sure there is a live AC (mains) power outlet nearby.
B. Lay the module on its side and locate the connector panel.
Connector panel
From the power cord box:
Power cordAcoustimass module
From box 2:
Acoustimass module
System Setup
English - 11
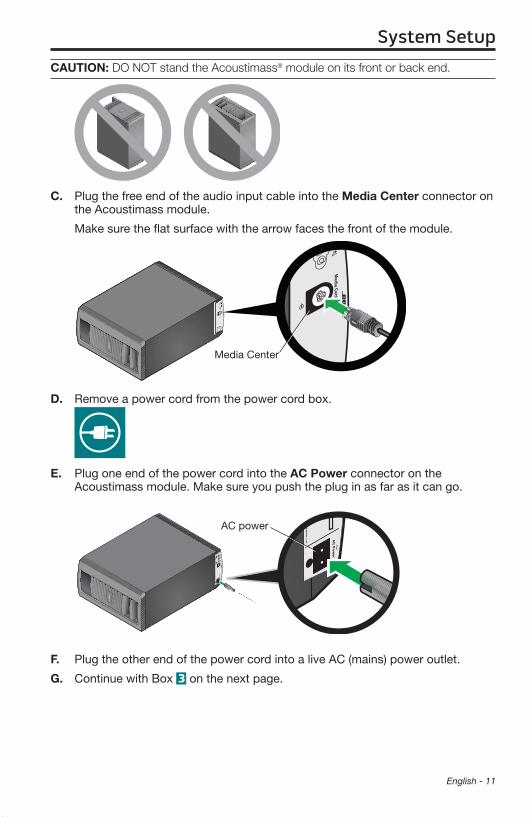
CAUTION: DO NOT stand the Acoustimass® module on its front or back end.
C. Plug the free end of the audio input cable into the Media Center connector on the Acoustimass module.
Make sure the flat surface with the arrow faces the front of the module.
Media Center
D. Remove a power cord from the power cord box.
E. Plug one end of the power cord into the AC Power connector on the Acoustimass module. Make sure you push the plug in as far as it can go.
AC power
F. Plug the other end of the power cord into a live AC (mains) power outlet.
G. Continue with Box 3 on the next page.
System Setup
12 - English
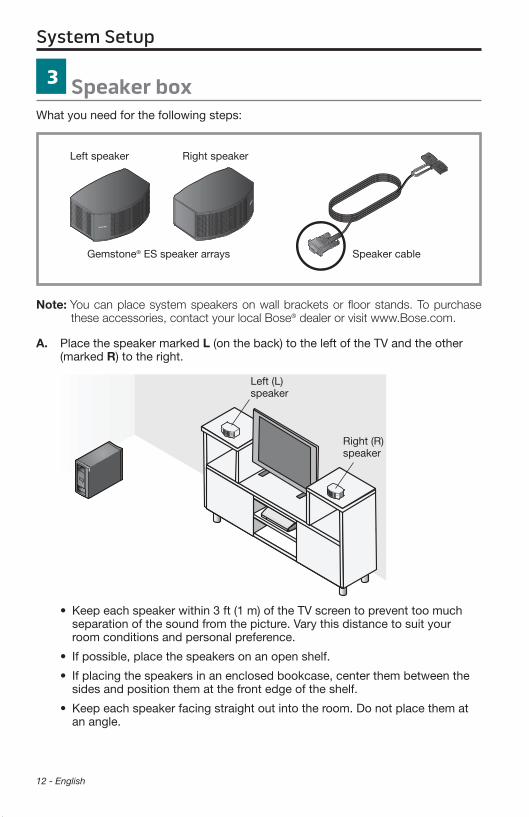
3 Speaker boxWhat you need for the following steps:
Gemstone® ES speaker arrays
Left speaker Right speaker
Speaker cable
Note: You can place system speakers on wall brackets or floor stands. To purchase these accessories, contact your local Bose® dealer or visit www.Bose.com.
A. Place the speaker marked L (on the back) to the left of the TV and the other (marked R) to the right.
Left (L) speaker
Right (R) speaker
• Keep each speaker within 3 ft (1 m) of the TV screen to prevent too much separation of the sound from the picture. Vary this distance to suit your room conditions and personal preference.
• If possible, place the speakers on an open shelf.
• If placing the speakers in an enclosed bookcase, center them between the sides and position them at the front edge of the shelf.
• Keep each speaker facing straight out into the room. Do not place them at an angle.
System Setup
English - 13
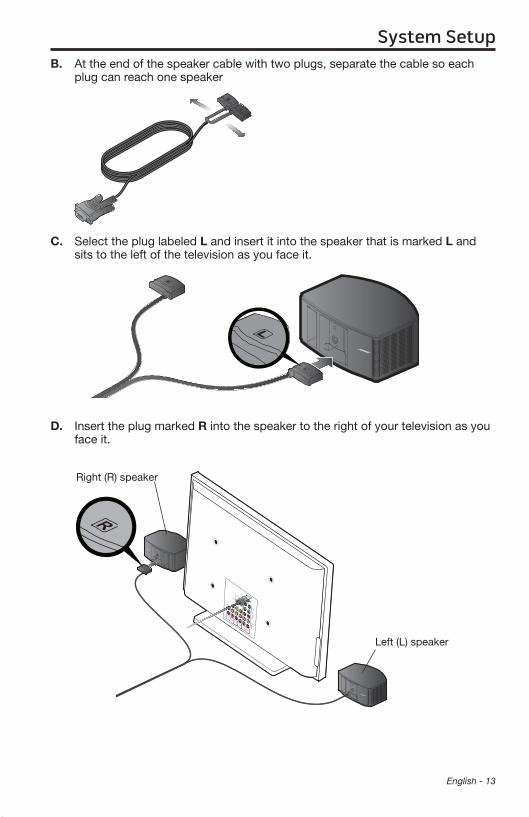
B. At the end of the speaker cable with two plugs, separate the cable so each plug can reach one speaker
C. Select the plug labeled L and insert it into the speaker that is marked L and sits to the left of the television as you face it.
D. Insert the plug marked R into the speaker to the right of your television as you face it.
Right (R) speaker
Left (L) speaker
System Setup
14 - English
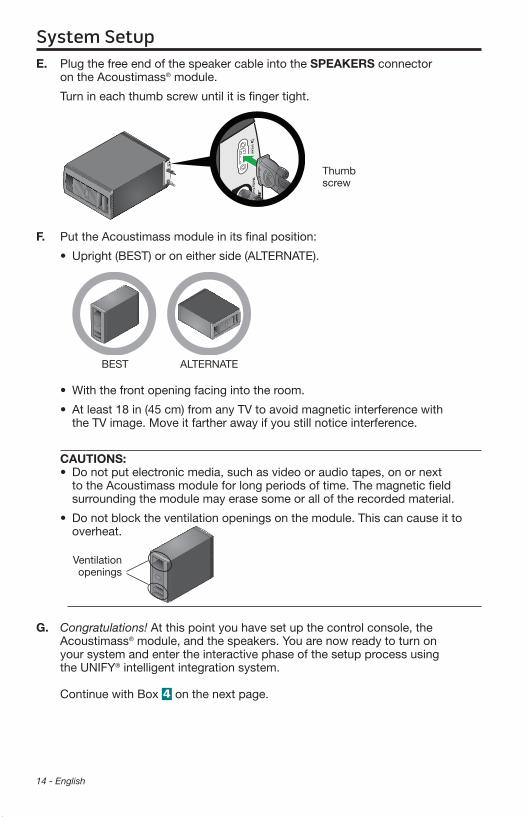
E. Plug the free end of the speaker cable into the SPEAKERS connector on the Acoustimass® module.
Turn in each thumb screw until it is finger tight.
Thumb screw
F. Put the Acoustimass module in its final position:
• Upright (BEST) or on either side (ALTERNATE).
BEST ALTERNATE
• With the front opening facing into the room.
• At least 18 in (45 cm) from any TV to avoid magnetic interference with the TV image. Move it farther away if you still notice interference.
CAUTIONS:• Do not put electronic media, such as video or audio tapes, on or next
to the Acoustimass module for long periods of time. The magnetic field surrounding the module may erase some or all of the recorded material.
• Do not block the ventilation openings on the module. This can cause it to overheat.
Ventilation openings
G. Congratulations! At this point you have set up the control console, the Acoustimass® module, and the speakers. You are now ready to turn on your system and enter the interactive phase of the setup process using the UNIFY® intelligent integration system. Continue with Box 4 on the next page.

System Setup
English - 15
4 Interactive boxWhat you need for the following steps:
Remote control with batteries ADAPTiQ® audio calibration headset
IMPORTANT!
Before you start, make sure your speakers and Acoustimass® module are in their final positions.
Do not connect any devices to the control console at this time. The instructions provided on your TV will tell you when to do this.
A. Slide the battery compartment cover off the back of the remote control.
Battery compartment cover
AA (IEC LR6) batteries (4)
B. Install four AA (IEC LR6) batteries, matching the polarity markings (+ and –) to the markings inside the battery compartment.
C. Slide the battery cover back into place.
System Setup
16 - English
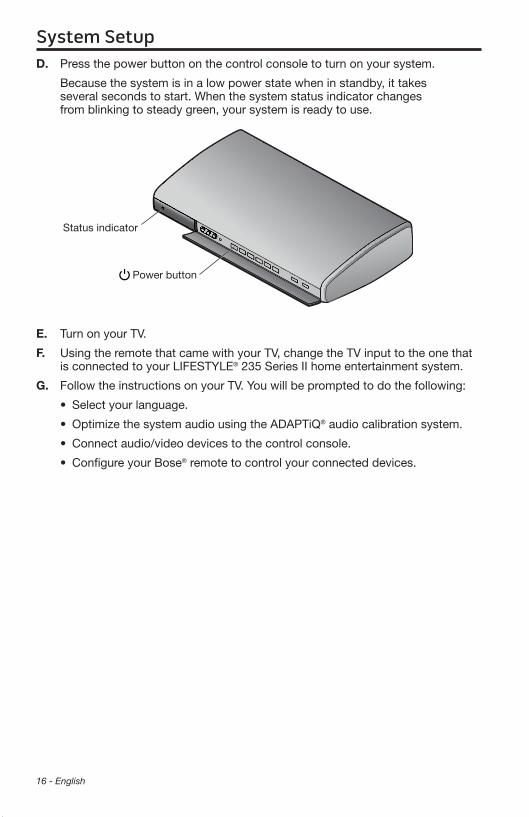
D. Press the power button on the control console to turn on your system.
Because the system is in a low power state when in standby, it takes several seconds to start. When the system status indicator changes from blinking to steady green, your system is ready to use.
Status indicator
Power button
E. Turn on your TV.
F. Using the remote that came with your TV, change the TV input to the one that is connected to your LIFESTYLE® 235 Series II home entertainment system.
G. Follow the instructions on your TV. You will be prompted to do the following:
• Select your language.
• Optimize the system audio using the ADAPTiQ® audio calibration system.
• Connect audio/video devices to the control console.
• Configure your Bose® remote to control your connected devices.
System Setup
English - 17
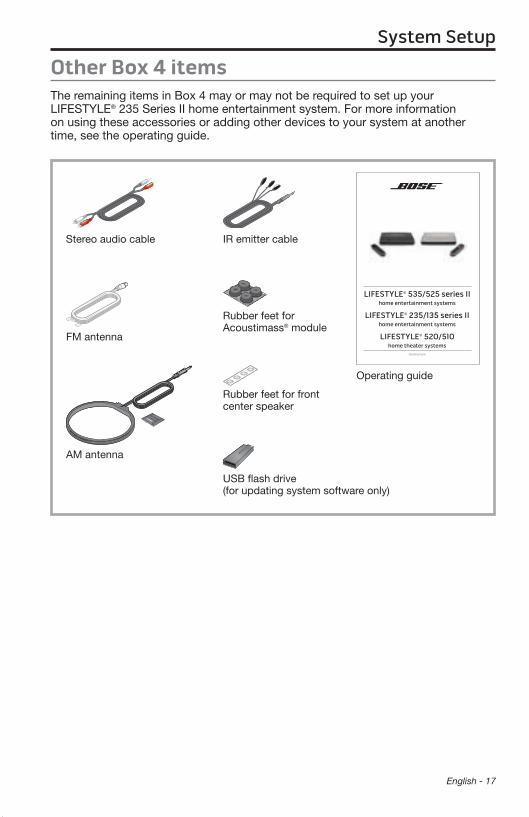
Other Box 4 itemsThe remaining items in Box 4 may or may not be required to set up your LIFESTYLE® 235 Series II home entertainment system. For more information on using these accessories or adding other devices to your system at another time, see the operating guide.
Operating guide
USB flash drive (for updating system software only)
Stereo audio cable IR emitter cable
AM antenna
FM antenna
Rubber feet for Acoustimass® module
Rubber feet for front center speaker
LIFESTYLE® 535/525 series IIhome entertainment systems
LIFESTYLE® 235/135 series IIhome entertainment systems
LIFESTYLE® 520/510home theater systems
Operating Guide
System Setup
18 - English
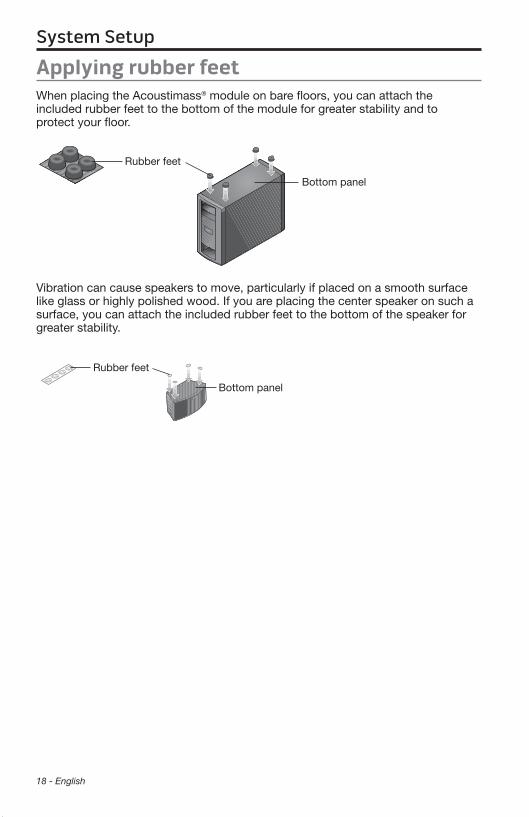
Applying rubber feetWhen placing the Acoustimass® module on bare floors, you can attach the included rubber feet to the bottom of the module for greater stability and to protect your floor.
Bottom panel
Rubber feet
Vibration can cause speakers to move, particularly if placed on a smooth surface like glass or highly polished wood. If you are placing the center speaker on such a surface, you can attach the included rubber feet to the bottom of the speaker for greater stability.
Bottom panel
Rubber feet

System Setup
English - 19
If you have setup problemsIf you experience any difficulties during the setup process, such as an unrecog-nized device remote or a connection error, you can reactivate the interactive setup mode at any time and correct or change part of your system setup. See “Using the Setup Mode” in your system operating guide.
For help in trying to resolve any problems, see the troubleshooting table in your system operating guide.
Contacting customer serviceFor additional help in solving problems, contact Bose® Customer Service. See the address sheet included in Box 4.

©2013 Bose Corporation, The Mountain, Framingham, MA 01701-9168 USA AM372613_00 Rev. 00