Embed Size (px)
Citation preview

Occupational First Aid Level 3 Training Guide


Occupational First Aid Level 3: Table of Contents
Page 1 of 3
0. Overview 1. Introduction to the Course 2. How to Use this Guide 3. About the Course 4. Course Content 5. Instructional Methods 6. Assessing Learner Progress
1. Introduction 1.1 Set Up the Classroom 1.2 Welcome Students to the Course 1.3 Explain How the Course Works 1.4 Explain Student Involvement 1.5 Review the Course Agenda
2. Scene Assessment 2.1 The Priority Action Approach 2.2 Hazard Management 2.3 Scene Assessment
3. Primary Survey and Transport Decision 3.1 Manually Stabilizing Head and Neck 3.2 Primary Survey 3.3 Modified NEXUS Rule 3.4 Transport Decision 3.5 Rapid Transport Criteria
4. Secondary Survey 4.1 Glasgow Coma Score 4.2 Secondary Survey 4.3 Ongoing Assessment and After the Call
5. Positioning the Patient 5.1 Determining Safest Position 5.2 Standing and Sitting to Supine 5.3 Prone to Supine 5.4 Supine to 3/4 Prone 5.5 Fore and Aft Lift
6. Patient Packaging 6.1 Hard Collar 6.2 Spine Board 6.3 Scoop-Style Stretcher 6.4 Patient Care During Transport

Occupational First Aid Level 3: Table of Contents
Page 2 of 3
7. Basic Skills7.1 Jaw Thrust 7.2 Oral Airway 7.3 Suctioning 7.4 Pocket Mask 7.5 Oxygen Administration Methods 7.6 Administering Oxygen 7.7 Bag-Valve Mask 7.8 CPR / AED
8. Being an Occupational First Aid Attendant8.1 Role of Attendant
9. Airway and Breathing Unresponsive Patient9.1 Signs of Airway Obstruction 9.2 Partial Airway Obstruction (Fluids) 9.3 Complete Airway Obstruction 9.4 Signs of Respiratory Emergencies 9.5 Respiratory Distress 9.6 Respiratory Arrest
10. Airway and Breathing Conscious Patient10.1 Partial Airway Obstruction 10.2 Complete Airway Obstruction 10.3 Respiratory Distress No Ventilation 10.4 Respiratory Distress Ventilation
11. Cardiac Emergencies11.1 Circulatory System 11.2 Angina 11.3 Heart Attack 11.4 Cardiac Arrest
12. Shock12.1 Signs of Shock 12.2 Hypovolemic Shock 12.3 Life-Threatening Allergic Reaction
13. Bleeding13.1 Signs of Bleeding 13.2 Using a Tourniquet 13.3 Massive Bleeding Conscious 13.4 Amputation 13.5 Massive Bleeding Unresponsive

Occupational First Aid Level 3: Table of Contents
Page 3 of 3
14. Medical Emergencies 14.1 Medication 14.2 Critical Incident Stress 14.3 Diabetic Emergencies 14.4 Poison Management
15. Minor Injuries 15.1 First Aid Record 15.2 Minor Wounds 15.3 Applying a Spica Ankle Wrap 15.4 Minor Sprains 15.5 Minor Fractures 15.6 Minor Dislocations 15.7 Activity-Related Soft-Tissue Disorders 15.8 Minor Ear, Nose and Eye Injuries 15.9 Assessing Burns 15.10 Minor Burns 15.11 Ongoing Management
16. Occupational First Aid Safety 16.1 General Safety Practices
17. Major Ear, Nose and Eye Injuries 17.1 Musculoskeletal System 17.2 Major Sprains, Dislocations and Fractures 17.3 Major Ear Injuries 17.4 Major Nose Injuries 17.5 Major Eye Injuries 17.6 Major Burns
18. Exposure to Heat and Cold 18.1 Signs of Heat and Cold Injuries 18.2 Heat Stroke 18.3 Hypothermia 18.4 Frostbite
19. Effective Communication 19.1 Your Communication Role 19.2 Communication Strategies
20. Head and Nervous System 20.1 Spinal Injuries 20.2 Altered Level of Consciousness 20.3 Seizure 20.4 Stroke
21. Multiple Patients 21.1 START System


1. Introduction
1.1 Welcome to the Course
1.2 How the Course Works
1.3 Your Commitment to Learning
1.4 Course Agenda
1.5 Certification of Occupational First Aid Attendants
Introduction Module 1

Occupational First Aid Level 3 Training Guide
1-2 Module 1: Introduction
Theory You Can Help Save Lives
As an OFA attendant, you provide an essential and important service in the workplace. You alleviate suffering. Sometimes your skills may help save lives. Also, by providing effective injury care, you can help shorten the time it takes workers to heal, allowing them to resume normal activities sooner.
To be effective in your role, you need training in a wide range of patient care, from minor injuries to serious traumas involving airway, breathing, and circulatory emergencies. That's what this course is all about.
But before we go any further, let's take a look at the affect a well-trained OFA attendant can have on the people in their workplace.
Class-Based Discussion 1. As his trailer was being loaded, a logging truck driver walked around the trailer to
remove loose tree limbs. It was dark and he was in a poorly lit area. He was pulling off a limb, when a 5.18 m (17 ft) fir dislodged from the load and struck him in the chest. When the OFA attendant arrived, the driver was unconscious, he was not breathing, and he did not have a pulse. The OFA attendant gave the driver CPR. The driver began to breathe and his pulse returned.
What might have happened if the OFA attendant did not give the driver CPR?
If you were the truck driver, would you want the OFA attendant to be well trained in CPR?
2. A worker was cutting lumber on a radial saw when she caught her index finger in the blade. The tip of her finger was cut off. When the OFA attendant arrived, she was lying supine and red blood was spurting out of the wound. The OFA attendant got help from a nearby worker. Together they stopped the bleeding by applying direct pressure. They cleaned and dressed the amputated fingertip. They put the amputated fingertip in a bag with ice and labelled the bag. At the hospital, the doctors were able to reattach the fingertip. The worker has retained full use of her finger.
How did the actions of the OFA attendant affect the life of the worker after her injury?
What might have happened if an OFA attendant wasn't there?
1.1: Welcome to the Course

Occupational First Aid Level 3 Training Guide
Module 1: Introduction 1-3
3. A middle-aged worker had been unloading boxes from a truck when he began to feel nauseous and asked for an OFA attendant. The worker was short of breath, had a weak pulse, and was experiencing chest pain. The OFA attendant recognized the signs and symptoms of a heart attack, called an ambulance and gave the worker two 80 mg chewable tablets of ASA. After medical care, the worker made a full recovery.
What might have happened if the OFA attendant had not recognized the signs of a possible heart attack?

Occupational First Aid Level 3 Training Guide
1-4 Module 1: Introduction
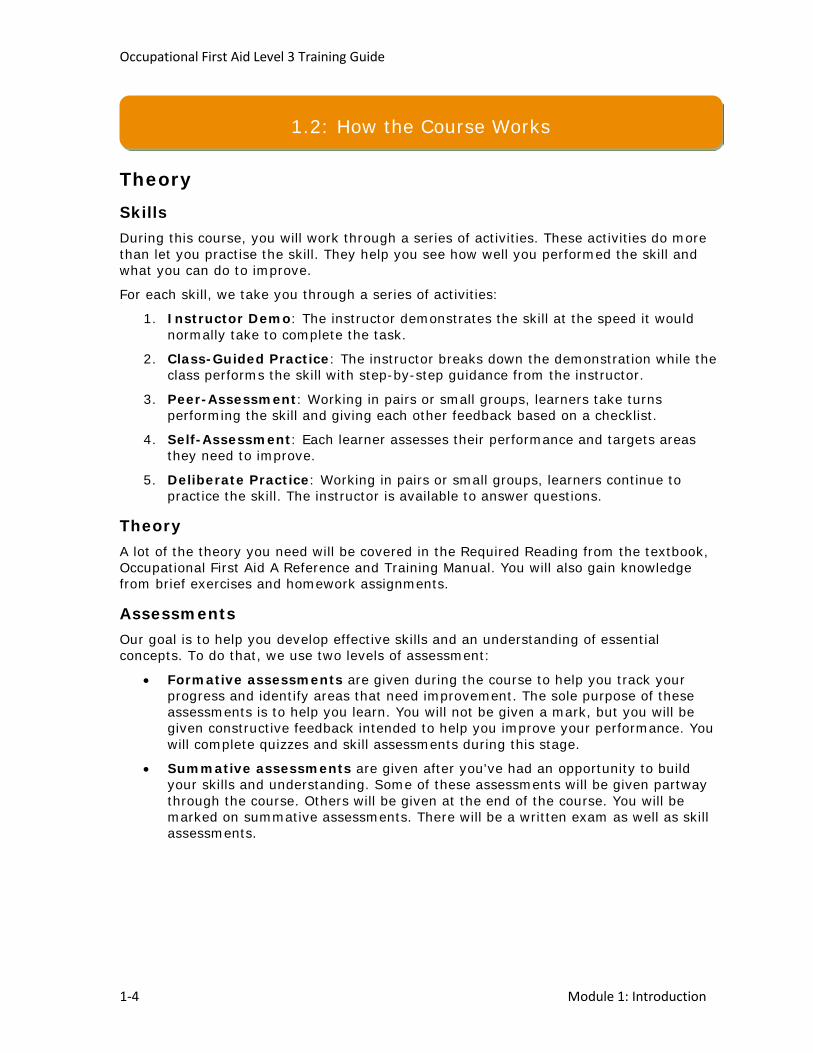
Theory Skills During this course, you will work through a series of activities. These activities do more than let you practise the skill. They help you see how well you performed the skill and what you can do to improve.
For each skill, we take you through a series of activities:
1. Instructor Demo: The instructor demonstrates the skill at the speed it would normally take to complete the task.
2. Class-Guided Practice: The instructor breaks down the demonstration while the class performs the skill with step-by-step guidance from the instructor.
3. Peer-Assessment: Working in pairs or small groups, learners take turns performing the skill and giving each other feedback based on a checklist.
4. Self-Assessment: Each learner assesses their performance and targets areas they need to improve.
5. Deliberate Practice: Working in pairs or small groups, learners continue to practice the skill. The instructor is available to answer questions.
Theory A lot of the theory you need will be covered in the Required Reading from the textbook, Occupational First Aid A Reference and Training Manual. You will also gain knowledge from brief exercises and homework assignments.
Assessments Our goal is to help you develop effective skills and an understanding of essential concepts. To do that, we use two levels of assessment:
• Formative assessments are given during the course to help you track your progress and identify areas that need improvement. The sole purpose of these assessments is to help you learn. You will not be given a mark, but you will be given constructive feedback intended to help you improve your performance. You will complete quizzes and skill assessments during this stage.
• Summative assessments are given after you've had an opportunity to build your skills and understanding. Some of these assessments will be given partway through the course. Others will be given at the end of the course. You will be marked on summative assessments. There will be a written exam as well as skill assessments.
1.2: How the Course Works

Occupational First Aid Level 3 Training Guide
Module 1: Introduction 1-5
The Learning Environment In this learning environment, you are free to ask questions and learn from mistakes. You can monitor your progress at every stage. Before the final assessment, you will have several opportunities to work on areas that need improvement. When you return to your job, you will have the tools to continue practising, monitoring your performance, and improving your skills.
Warm-Up Activity
Before continuing with the class, the instructor gives the learners an opportunity to introduce themselves and share what they hope to learn.

Occupational First Aid Level 3 Training Guide
1-6 Module 1: Introduction
Theory Your Commitment This is a hands-on course. For most of the course, you will be actively practising skills. To be successful, you need to be committed to your learning. This involves being on time, participating fully in class activities, completing required reading beforehand, and doing 1 to 3 hours of homework each night.
Being an OFA attendant is a potentially life-saving role. It takes effort to acquire the necessary knowledge and skills.
Keys to Success To be successful in this course, you need to:
• Complete the Required Reading for each day in advance.
• Participate fully in Class-Guided Practices and other activities.
• Give one another useful feedback during Peer-Assessments.
• Honestly evaluate your competence during Self-Assessments and make a genuine commitment to further developing your skills.
• Use Deliberate Practice and Formative Assessments to develop your skills and address areas of weakness.
• Complete a Homework Assignment every night.
Safety and Personal Protection This course is physically demanding. You will have to kneel for long periods of time, move other learners who are pretending to be patients, and perform various manual tasks. Knee pads and closed toe footwear are recommended.
If you have physical concerns that could limit your participation in an activity, talk to your instructor. We will try to make accommodations.
As an OFA attendant, you should wear waterproof gloves whenever there is a possibility of direct contact with blood and other bodily fluids. We are going to practice that now.
1.3: Your Commitment to Learning

Occupational First Aid Level 3 Training Guide
Module 1: Introduction 1-7
Skills Practice Goal
Safely remove gloves.
Steps
1. With both of your hands gloved:
a. Grasp the outside of a glove at the top of the wrist.
b. As you peel off the glove, turn it inside out and pull it away from yourself.
c. Hold the removed glove in your gloved hand.
2. With your ungloved hand:
a. Grasp the second glove at the top of the wrist.
b. As you peel off the glove, turn it inside out and pull it away from yourself. Leave the first glove inside the second glove.
3. Immediately dispose of both gloves in a waterproof garbage bag.
4. Wash your hands thoroughly with soap and water.

Occupational First Aid Level 3 Training Guide
1-8 Module 1: Introduction
DAY 1
1 Introduction 2 Scene Assessment 3 Primary Survey & Transport
Decision 4 Secondary Survey 5 Patient Positioning Deliberate Practice Homework Assignment
DAY 6
Deliberate Practice 14 Medical Emergencies 15 Minor Injuries Deliberate Practice Homework Assignment
DAY 2
6 Patient Packaging Deliberate Practice 7 Basic Skills Deliberate Practice Formative Skills Assessment Quiz 1 Homework Assignment
DAY 7
Quiz 3 16 Occupational First Aid
Safety 17 Major Injuries Deliberate Practice 18 Exposure to Heat and Cold Homework Assignment
DAY 3
8 Being an OFA 9 Airway & Breathing
Unresponsive Patient 10 Airway & Breathing
Conscious Patient Formative Skills Assessment Homework Assignment
DAY 8
19 Effective Communication 20 Head & Nervous System 21 Multiple Patients Deliberate Practice Quiz 4
DAY 4 11 Cardiac Emergencies 12 Shock Deliberate Practice Homework Assignment
DAY 9
Formative Skills Assessment
Written Test
DAY 5
Quiz 2 Deliberate Practice 13 Bleeding Summative Skills
Assessment Homework Assignment
DAY 10 Summative Skills Assessment
1.4: Course Agenda

Occupational First Aid Level 3 Training Guide
Module 1: Introduction 1-9
1. Training and examination
To qualify for an OFA 1 certificate or a certificate endorsement a candidate must successfully complete the training course as taught and evaluated by a person authorized by WorkSafeBC. The OFA 1 and the Transportation Endorsement courses are each 7 hours in length, excluding breaks.
To qualify for an initial OFA 2 or OFA 3 certificate, a candidate must successfully complete an OFA 2 or OFA 3 training course, and achieve a grade of at least 70% on each of the written, oral, and practical portions of the examination conducted by a person authorized by WorkSafeBC. The length of the OFA 2 course is 35 hours and the length of the OFA 3 course is 70 hours, excluding breaks.
Candidates that fail to complete a full course of instruction when required to must, without undue delay and at the discretion of the training agency, complete all missed components of the course prior to being eligible for an examination. Eligible candidates that fail any part of the written, oral, or practical examination must redo the failed portion of the examination again in its entirety (written, oral, and/or practical).
Failure of the written, oral, or practical examination may be remediated at the discretion of an approved training agency. Candidates will be required to repeat the failed segment of the examination in its entirety (written, oral, and/or practical). Passing grades obtained in various segments of the first examination may be carried forward to the second examination.
Candidates may attempt a second examination no sooner than 24 hours after the first failed examination. Candidates that choose not to attempt a second examination within 6 months of the first examination, will be required to repeat the entire course of instruction prior to being eligible for another examination. Should the second examination also result in failure, the candidate must undergo a full course of instruction prior to being eligible for another examination.
Persons may challenge the OFA 2 or OFA 3 examination provided they possess a current/valid advanced first aid certificate and a current/valid CPR/AED certificate (a current first aid or pre-hospital emergency care course consisting of approximately 70 hours and a CPR/AED certificate issued not more than 6 months prior to the examination). Candidates are advised that, depending on the nature of the course, there may be equipment, protocol, and procedure (e.g. patient record) differences that impact examination results.
2. Duration of certificates
OFA certificates and certificate endorsements are valid for three years from the date of completion of a training course and/or examination.
• Extensions of the duration of certificates are not permitted.
3. Renewal of certificates
Except as stated below, to renew a certificate or certificate endorsement, a candidate must meet the same training and examination requirements as for initial certificates.
A candidate for renewal of an OFA 2 or OFA 3 certificate may challenge the examination without retaking the initial certification course provided the candidate possesses a valid
1.5: Certification of Occupational First Aid (OFA) Attendants

Occupational First Aid Level 3 Training Guide
1-10 Module 1: Introduction
(unexpired) OFA 2 or OFA 3 certificate and a CPR/AED certificate that was issued not more than 6 months prior to the examination date. An OFA 2 or OFA 3 examination leading to a certification decision consists of the final 14 hours of the OFA 2 or OFA 3 course. Another option for OFA 3 attendants is to take a 35-hour refresher course.
4. Terms and Conditions of Certification
The attendant must
a) follow the principles of first aid treatment as outlined in WorkSafeBC’s Occupational First Aid training programs that are provided to the attendant when he or she participates in the training program,
b) comply with the Occupational Health and Safety Regulation (OHSR), and the other responsibilities of attendants in this training program, and
c) comply with any other terms and conditions provided to the attendant by the training agency when granted certification, or provided to the attendant by WorkSafeBC at any other time.
5. Inappropriate conduct
Prevention Policy Item D12-195-1 states:
A first aid certificate issued to a first aid attendant may be suspended, cancelled or have conditions placed upon its use where the first aid attendant engages in inappropriate conduct, including:
• smoking while assessing or treating an injured or ill worker and/or while handling oxygen therapy equipment, or permitting others to do so;
• failure to use the assessment and injury treatment techniques outlined in first aid training courses unless conditions precluded them;
• conduct that poses an unreasonable threat to the safety and well- being of other workers or the public;
• removing themselves from being able to see or hear any summons for first aid at a workplace;
• abandonment of an injured worker after beginning assessment or treatment;
• refusal to treat an injured worker when acting as the designated attendant; or
• treating or transporting an injured worker while impaired or under the influence of drugs or alcohol.
6. Failure to Comply with Requirements
If WorkSafeBC has reasonable grounds for believing that a person who holds a first aid certificate has breached a term or condition of the certificate or has otherwise contravened a provision of the Workers Compensation Act or the OHSR, WorkSafeBC may, under section 195 of the Workers Compensation Act,
a) cancel or suspend the certificate, or
b) place a condition on the use of that certificate that WorkSafeBC considers is necessary in the circumstances.
WorkSafeBC will consider the nature of the violation, the circumstances surrounding the incident, and the past history of the attendant in determining the action to be taken. In order of severity, the possible actions that may be taken are:

Occupational First Aid Level 3 Training Guide
Module 1: Introduction 1-11
(a) a warning is issued,
(b) a condition is placed on the use of the certificate,
(c) the certificate is suspended for a period that ends before the normal expiry of the certificate, or
(d) the certificate is cancelled.
In addition to or instead of these actions, WorkSafeBC may direct that applications of the attendant to renew the existing certificate or obtain a different certificate be subject to a condition or be denied for a period of time.
7. Reviews and Appeals
An order to cancel or suspend a certificate may be appealed. Section 96.2(1)(c) of the Workers Compensation Act provides that a person may request a review officer to review “a Board order, a refusal to make a Board order, a variation of a Board order or a cancellation of a Board order respecting an occupational health or safety matter under Part 3.”
An attendant may, within 90 calendar days of the order issue date, in writing, request the Review Division of the WCB to conduct a review of the order.
A final decision made by a review officer in a review under section 96.2, pertaining to an order made under section 195 to cancel or suspend a certificate, may be appealed to the Workers’ Compensation Appeal Tribunal.
An attendant may, within 30 calendar days of the final decision of the Review Division, in writing, request the Workers’ Compensation Appeal Tribunal to conduct a review.

2. Scene Assessment
2.1 The Priority Action Approach
2.2 Hazard Management
2.3 Scene Assessment
Scene Assessment Module 2

Occupational First Aid Level 3 Training Guide
2-2 Module 2: Scene Assessment
Learning Outcomes 1. Describe the four stages of the Priority Action Approach and the purpose of each.
Required Reading Occupational First Aid: A Reference and Training Manual, 2018 edition
Chapter 3: Initial Evaluation of the Trauma Patient, pages 17 – 21
Theory Why It's Important The Priority Action Approach helps ensure that you:
• Recognize a seriously injured worker quickly.
• Perform life-saving first aid interventions quickly.
• Activate transportation and Emergency Management System resources.
• Get patients in need of medical care to the hospital without delay.
It's a step-by-step approach that helps you make a thorough yet rapid assessment and determine what needs to be done to care for the patient.
How thoroughly each step is conducted depends on the circumstances. For example, if the patient is not responsive, not breathing normally and does not have a carotid pulse; you will move through the primary survey rapidly and begin CPR and AED immediately.
The Four Stages The Priority Action Approach includes four stages:
1. Scene Assessment
2. Primary Survey with Critical Interventions
3. Transport Decision
4. Secondary Survey
This lesson provides an overview of the stages. Later lessons will cover each stage in detail.
Lesson 2.1: The Priority Action Approach

Occupational First Aid Level 3 Training Guide
Module 2: Scene Assessment 2-3
Scene Assessment The scene assessment helps ensure that the site is safe for you and the patient. As you approach:
• Assess the scene for hazards.
• Determine the mechanism of injury.
• Count the number of patients.
Primary Survey with Critical Interventions
The primary survey is a rapid patient assessment to determine if there are any immediately life-threatening injuries or conditions, and to provide critical interventions. In most cases, it shouldn’t take more than 2 min.
Transport Decision There are three options for transport:
• Rapid Transport Category (RTC): The patient is transported as quickly as possible for medical aid. The patient may be transported by ambulance, helicopter or an employer’s Emergency Transport Vehicle (ETV).
• Medical Aid: The patient requires medical aid, but does not need to be transported as quickly. The patient may be transported by a company vehicle, taxi, ETV or ambulance.
• Return to Work: After assessment and treatment, the patient can return to work.
Secondary Survey
The secondary survey is similar to the primary survey, except it's more detailed and takes longer. A secondary survey is a thorough assessment of the patient. The purpose is to determine the full extent of the developing injury or illness, and to identify any other injuries or illnesses that may not have been discovered during the primary survey. A secondary survey should not take longer than 10 min.
For a patient in the RTC, the secondary survey is done while waiting for equipment and transportation or en route to the hospital if the first aid attendant must transport the patient. Otherwise, it is conducted at the scene.
Summary 1. What is the purpose of the scene assessment?
2. What is the purpose of the primary survey?
3. What is the purpose of the secondary survey?

Occupational First Aid Level 3 Training Guide
2-4 Module 2: Scene Assessment
Learning Outcomes 1. Describe what a hazard is.
2. Explain the difference between a hazard and a risk.
3. Describe the basic principles of hazard identification, risk assessment and hazard control.
4. Describe the hazards and risks an OFA attendant may encounter.
5. Describe exposure control plans and why they are important.
6. Describe the personal protective equipment used by an OFA attendant.
Required Reading Government of Canada, Canadian Centre for Occupational Health and Safety: Hazard and Risk (www.ccohs.ca/oshanswers/hsprograms/hazard_risk.html)
Theory
Definitions A hazard is any source of potential damage, harm or adverse health effects on something or someone.
A risk is the probability that a person will be harmed or experience adverse health effects when exposed to a hazard. It takes into consideration both the likelihood that something might happen and the severity of the possible harm. The risk can be immediate (acute) as with exposed electrical wires or long-term (chronic) as with asbestos.
Hazard Management Hazards management includes three steps:
1. Identify the hazard.
2. Assess the risk.
3. Control the hazard.
Lesson 2.2: Hazard Management

Occupational First Aid Level 3 Training Guide
Module 2: Scene Assessment 2-5
Identifying the Hazard The hazards you encounter may be:
• Environmental such as extreme weather and climate
• Biological such as blood, body fluids and infectious disease
• Physical such as heights, fire, electricity and machinery
• Chemical such as dust, fumes and gases
Assessing the Risk Factors that influence the likelihood or degree of risk include:
• How much a person is exposed to the hazard (such as several times a day or once a year)
• How the person is exposed (such as inhaling or skin contact)
• The possible severity of the affect (ranging from minor affects like skin irritation to major affects like skin cancer or immediately fatal)
Controlling the Hazard Hazards are controlled according the following hierarchy:
1. Elimination: Remove the hazard.
2. Substitution: Replace the source of the hazard with something less hazardous.
3. Engineering Controls: Add equipment that prevents workers from being exposed to the hazard.
4. Administrative Controls: Follow safe work procedures such as exposure control plans, which tell workers what to do if they are exposed to an infectious material.
5. Personal Protective Equipment: Wear gloves, goggles and other protective equipment.
If necessary, more than one type of control may be used, but the highest level of control possible is the best. Whenever possible, eliminate the hazard.
Personal Protective Equipment (PPE) If there is any risk of exposure to blood or body fluids, you must wear PPE such as rubber gloves. Remember to change your gloves between patients to avoid cross contamination.
If there is a potential for spraying body fluids, you must wear safety glasses or face shields. Arterial bleeding, child birth and vomiting are examples.
If there is a potential for splatter from blood or body fluids, or there is a suspected respiratory infection, you must wear PPE. If wearing a respirator is required as part of your PPE, you will need to be fit tested before you start your duties and once a year after that.
You may also be required to wear other personal protective equipment, depending on the circumstances, such as high-visibility vests and respirators for silica dust.

Occupational First Aid Level 3 Training Guide
2-6 Module 2: Scene Assessment
Summary 1. Why is it important to for you to be aware of hazards?
2. What are the five types of hazard controls?
3. What personal protective equipment must you wear every time you are caring for a patient?

Occupational First Aid Level 3 Training Guide
Module 2: Scene Assessment 2-7
Learning Outcomes 1. Assess the scene for hazards.
2. Discover what happened and how many people are ill or injured.
Required Reading Occupational First Aid: A Reference and Training Manual, 2018 edition
Chapter 3: Initial Evaluation of the Trauma Patient page 21 – 22
Theory As you approach the patient:
1. Assess the hazards.
Are there hazards to you, your helpers or the patient? Can the hazard be removed or controlled? Does the patient need to be moved? Are emergency personnel, specialized equipment or specially trained personnel required?
2. Determine the mechanism of the injury.
What happened? When? How much force was applied? To which part of the body and in what direction?
3. Determine how many people are injured or ill.
Are there more people who are injured or ill?
Lesson 2.3: Scene Assessment

Occupational First Aid Level 3 Training Guide
2-8 Module 2: Scene Assessment
Pair and Share Scenario Exercise Instructions Take turns being the injured person and the OFA attendant.
1. The injured person reads the scenario out loud.
2. The OFA attendant identifies the hazards, mechanism of injury, and number of people injured.
3. Using the Answer Key, the injured person tells the OFA attendant what happened.
Scenarios 1. Two workers were thrown off the forks of a forklift when the boom hit the ceiling.
2. An orchard worker hit the overhead powerlines with an irrigation pipe.
3. A ranch hand got his arm caught in the gears of the mill.
4. A glazier has been burned.
5. A carpenter fell from the first floor.
6. A firefighter could not evacuate an area fast enough when the wind changed direction and was overcome by smoke.

Occupational First Aid Level 3 Training Guide
Module 2: Scene Assessment 2-9
Answer Key
1 Hazards The area has been blocked off to prevent further traffic. The forklift has been stabilized. No other environmental, biological, physical, or chemical hazards.
Mechanism of Injury (What happened?)
Workers were riding on the forks approx. 3.5 m (11 ft) in the air when the boom hit the ceiling. The forklift was travelling at 15 kph. It happened 3 min ago.
People Injured 2
2 Hazards The irrigation pipe is now on the ground. There is no longer an electrical hazard. No other environmental, biological, physical, or chemical hazards.
Mechanism of Injury (What happened?)
An orchard worker was electrocuted. She was carrying a metal irrigation pipe and it touched an overhead power line. She’s not moving. It happened 3 min ago.
People Injured 1
3 Hazards The mill has been shut down. No other environmental, biological, physical, or chemical hazards.
Mechanism of Injury (What happened?)
A ranch hand was adjusting the motor with the transmission engaged. The sleeve of his jacket got snagged in the chain drive and it pulled his arm into the gears. It just happened.
People Injured 1
4 Hazards Co-workers soaked her with water to put out the fire. Fire has been controlled. No other environmental, biological, physical, or chemical hazards.
Mechanism of Injury (What happened?)
She was cleaning the glass with chemicals and her arm caught fire. She has burns on her hand, arms and face. She seems to be in a lot of pain. It happened 2 min ago.
People Injured 1

Occupational First Aid Level 3 Training Guide
2-10 Module 2: Scene Assessment
5 Hazards The area has been blocked off to prevent further traffic. No other environmental, biological, physical, or chemical hazards.
Mechanism of Injury (What happened?)
A carpenter was working on an unguarded sundeck and fell 3.5 m (11 ft). He hit his head when he landed. He’s hurt. It happened 1 min ago.
People Injured 1
6 Hazards The wind is blowing away from the injured worker. She is away from the active fire. Other firefighters are not at risk. No other environmental, biological, physical, or chemical hazards.
Mechanism of Injury (What happened?)
Three firefighters were exposed to smoke. They were laying out fire hose on a steep hill when the wind blew across the fire break, setting the adjacent gully on fire. The area where the firefighters were working filled with smoke. It happened 5 min ago.
People Injured 1
Summary 1. What is the goal of scene assessment?
2. What types of things should you consider when looking for hazards?
3. What questions should you ask to identify the mechanism of injury?

3. Primary Survey and Transport Decision
3.1 Manually Stabilizing Head and Neck
3.2 Primary Survey
3.3 Modified NEXUS Rule
3.4 Transport Decision
3.5 Rapid Transport Criteria
Primary Survey and Transport Decision
Module 3

Occupational First Aid Level 3 Training Guide
3-2 Module 3: Primary Survey and Transport Decision
Learning Outcomes 1. Manually stabilize the head and neck if there is a possible spinal injury.
Required Reading Occupational First Aid: A Reference and Training Manual, 2018 edition
Chapter 18: Spinal Injury Management pages 146 – 148
Skill Practice Goal Realign the head of a patient with a possible spinal injury into the anatomical and neutral position to prevent further damage. This is also referred to as c-spine control. Scenario A traffic control person was struck by an oncoming vehicle travelling at about 50 km/hr through a construction zone. When you arrive, she is lying supine on the ground. You conduct a scene assessment. Based on the mechanism of injury, you determine that spinal motion restriction is required. Steps 1. Tell the patient that you’re there to help them and to lie still while you kneel at the
top of patient's head.
2. Tell the patient what you're going to do before you do it. Ask them to tell you if they experience any pain or resistance.
3. Brace your elbows on the ground if possible. Firmly place your hands on either side of the patient's head, over their ears.
Don't completely cover the patient's ears.
4. While communicating the procedure, gently realign the chin to midline, and move the head into the neutral position.
Anatomical position = Eyes forward + Chin in midline Neutral position = Gaze perpendicular to body axis
5. If patient's trunk is twisted, ask someone to help you. Maintain the head and neck in the neutral position while the helper grasps the patient’s waist and gently slides or pulls the trunk into the anatomical position.
If there is no one available to help, you will not be able to complete this step. Continue to manually stabilize the head and neck until the patient is packaged for transport or the need for spinal motion restriction is ruled out.
Lesson 3.1: Manually Stabilizing Head and Neck

Occupational First Aid Level 3 Training Guide
Module 3: Primary Survey and Transport Decision 3-3
6. If possible, train a helper to manually stabilize the patient's head and neck before you continue the primary survey:
"Hands over mine, fingers and thumbs where mine are, elbows braced. Don’t move while I reposition myself. Let me know if you have to move so I can help."
Summary 1. What is the purpose of manually stabilizing the head and neck?
2. What should you do if the patient experiences pain while you are realigning the head and neck?

Occupational First Aid Level 3 Training Guide
3-4 Module 3: Primary Survey and Transport Decision
Learning Outcomes 1. Assess a patient's level of consciousness using the AVPU system.
2. Assess a patient's airway.
3. Assess a patient's breathing.
4. Assess a patient's circulation.
Required Reading Occupational First Aid: A Reference and Training Manual, 2018 edition
Chapter 3: Initial Evaluation of the Trauma Patient, pages 22 – 28
Theory
Purpose of Primary Survey The purpose of the primary survey is to quickly identify life-threatening conditions. It’s a rapid examination of the patient to discover any immediate life-threats.
How thoroughly each step is done depends on whether the attendant has identified any life threats. The primary survey should not take more than 2 minutes, but may have to be interrupted to begin active resuscitation.
Airway, Breathing and Circulation The primary survey is based on the ABCs:
• Airway assessment: Quickly identify whether the patient’s airway is open and clear. Use spinal motion restriction if the mechanism of injury suggests spinal trauma.
• Breathing assessment: Quickly identify whether the patient is breathing, and if they are, how effectively.
• Circulation assessment: Quickly identify whether the patient has a pulse, signs of life-threatening shock, and any massive bleeding and/or deformities.
Critical Interventions Critical interventions are performed as soon as a life threat is discovered during any step of the ABCs. The primary survey and some interventions can often be conducted with the patient in the position found. But in some cases, the patient has to be repositioned. For example, an unresponsive patient who does not appear to be breathing normally will have to be placed supine for the assessment.
Lesson 3.2: Primary Survey

Occupational First Aid Level 3 Training Guide
Module 3: Primary Survey and Transport Decision 3-5
Modified Primary Survey The attendant can modify the primary survey in some cases. For example, some patients who walk into the first aid room may be assessed visually as they approach. If the patient is alert, talking and breathing normally, and has normal skin colour; you can see that the airway is clear, breathing is effective, and the patient has a pulse.
Skill Practice Goal
Rapid assessment to: • Determine whether spinal motion restriction is required • Discover immediately life-threatening conditions • Identify critical interventions required
Scenario
A worker fell 2 m (6.5 ft) from a stepladder. He was lying supine when you arrived, complaining about pain in his right knee.
Steps
1. Complete a scene assessment. Based on the mechanism of injury, spinal motion restriction is required.
2. Manually stabilize head and neck if required. Chin to midline then neutral If resistance, stop
3. Assess the patient's level of consciousness. Approach patient from front, identify yourself and ask what happened. Alert: Patient is aware of surrounding. Verbal: Patient responds when spoken to. Pain: Patient doesn't respond to questions, but responds to painful stimulus. Unresponsive: Patient doesn't respond to any stimuli.
He's alert and verbal.
4. Activate the workplace emergency response procedures.
If patient is unable or unwilling to walk, ask someone to call an ambulance or have an Emergency Transport Vehicle prepared. If calling an ambulance, say there's a responsive adult who has fallen and has knee pain, and report back.
Patient can't walk.

Occupational First Aid Level 3 Training Guide
3-6 Module 3: Primary Survey and Transport Decision
5. Assess the patient's airway. Can patient speak clearly? If not, look, listen and feel.
He speaks clearly. The airway is clear.
6. Assess the patient's breathing. Look, listen and feel. Rate (slow, normal, fast) Rhythm and Quality (effective, even, deep, shallow, distressed, laboured, gasping) Chest wall movement (both sides should expand equally)
Breathing appears normal and effective. Patient can speak in full sentences. No cyanosis (blue lips and face) noted. Chest wall movement is equal on both sides.
7. Assess the patient's circulation. Pulse: Take radial pulse. Use fingers, not thumb. Both wrists if needed. If no radial pulse found, check carotid for 5 to 10 sec (30 sec if hypothermic). Signs of Shock: Cool, pale, clammy skin Rapid Body Survey: Bleeding and fractures. Support the injured leg. Cover the patient with a blanket.
Radial pulse is normal. No signs of shock. No blood visible. No injury other than knee pain. Minor Fractures to be covered in Lesson 15.4.
8. Determine if critical interventions are required. The patient appears to be stable.
9. Transport decision. Is medical aid needed?
The patient can't walk and can't return to work.
10. Apply the Modified NEXUS Rule. To be covered in Lesson 3.3.
11. Secondary Survey To be covered in Lesson 4.2.
Summary 1. How do you assess the patient's airway?
2. How do you assess the patient's breathing?
3. How do you assess the patient's circulation?

Occupational First Aid Level 3 Training Guide
Module 3: Primary Survey and Transport Decision 3-7
Learning Outcomes 1. Apply the Modified NEXUS Rule to decide whether ongoing spinal motion
restriction is required.
Required Reading Occupational First Aid: A Reference and Training Manual, 2018 edition
Chapter 3: Initial Evaluation of the Trauma Patient, page 40
Theory Previously, OFA attendants applied c-spine control and immobilized an injured patient using a hard cervical collar and a long spine board based solely on the mechanism of injury. In the case of a Rapid Transport Category patient, once they were packaged, we did not rule out the need for full immobilization. Now, for all conscious trauma patients, we can apply the Modified NEXUS Rule at the end of the Primary Survey to determine the need for ongoing spinal motion restriction. The NEXUS Rule is based on studies completed by the National Emergency X-Radiography Utilization Study.
Class-Based Scenario Exercise Instructions Refer to the Modified NEXUS Flow Chart in your textbook, or the handout or poster given to you by the instructor. For each scenario, identify whether the patient requires ongoing spinal motion restriction.
Scenarios 1. A driver wearing a seat belt was in a front-end collision at approximately
40 kph. Her airbags deployed on impact. When you arrive, she's sitting on the roadside, fully alert with no signs of intoxication. She complains of pain in her left shoulder and the side of her left flank. No other injuries are noted. She does not have mid-line cervical pain. She answers questions appropriately. She says she doesn't have any numbness or tingling in her extremities, or any pre-existing neck or back conditions. She is 48 years old.
2. A man fell 6 m (20 ft) off a roof, landing head-first and striking his head against a concrete block on impact. When you arrive, he's supine. You talk to him and his eyes open (V on AVPU), but he appears confused. He has a hematoma on top of his head. All four of his limbs are moving spontaneously. He's hesitant to answer questions, but denies having any numbness or tingling, or pre-existing neck or back conditions. He seems unsure of his answers. He's 36 years old.
Lesson 3.3: Modified NEXUS Rule

Occupational First Aid Level 3 Training Guide
3-8 Module 3: Primary Survey and Transport Decision
3. During a stunt on a movie set, a competitive motorcycle rider misjudged the position of an obstacle and was thrown over the handlebars. She was travelling at approximately 50 kph. When you arrive, her helmet has been removed and she is supine. She's fully alert and complains of a headache and neck pain. The pain is present when you examine the cervical vertebrae by touch. She has no other injuries and denies any numbness or tingling, or pre-existing neck or back conditions. She is 21 years old.
4. When trying to access a light fixture, an electrician fell 4 m (12 ft) off a ladder to a concrete floor. When you arrive, he's lying supine, surrounded by co-workers. He's fully alert, and says he felt a snap and a sudden sharp pain in his left leg when he hit the ground. He's obviously in extreme pain. He has tears in his eyes and keeps talking about how bad the pain in his leg is. His left femur is deformed. No other injuries are noted. He doesn’t answer your questions about numbness, tingling and pre-existing spinal conditions. He's in his early twenties.
5. A landscaper slipped and tumbled down a 15 m (50 ft) steep embankment (not a free fall). When you arrive, she's lying supine. She's fully alert and there is no evidence of intoxication. When asked where it hurts, she jokes that it “hurts all over” and then points to her right flank. She has road rash wherever her skin is exposed. She winces and describes point tenderness pain when you examine her right flank. She says it also hurts to move her left ankle, but she can move it when asked. No numbness or tingling is noted. She denies having any pre-existing spinal conditions. She's 26 years old and is otherwise healthy.
6. A tree faller got into an argument with a co-worker after hours. He was stabbed once in the right-anterior chest with a kitchen knife. Witnesses say the patient crumpled to the ground after the stabbing. The assailant has been restrained and is no longer a threat. When you arrive, the patient is seated with his hand over his right-anterior chest. He has mild shortness of breath, but is fully alert and does not appear intoxicated. He speaks in full sentences and his skin colour is normal. There's a small entrance wound on his right-anterior chest and no exit wound. There is no significant bleeding. He denies having any numbness or tingling, and says he has mild osteoporosis in his back. He's 44 years old.
7. A construction worker was standing on makeshift scaffolding when it collapsed. When you arrive, the scaffolding has been removed from the patient. He's lying supine, surrounded by coworkers. He's fully alert, and complains of chest and abdominal pain. There is no evidence of intoxication. He has bruising and discolouration on his right-anterior chest, bruising on the upper-right quadrant, and a 10 cm (4 inch) laceration on his right thigh with moderate bleeding that is being controlled through direct pressure. His skin is pale, cool and clammy, and he appears anxious. He denies having any numbness or tingling, or pre-existing spinal conditions. He's 22 years old.

Occupational First Aid Level 3 Training Guide
Module 3: Primary Survey and Transport Decision 3-9
ANSWERS

Occupational First Aid Level 3 Training Guide
3-10 Module 3: Primary Survey and Transport Decision
Skill Practice Goal Rapid assessment to: • Determine whether ongoing spinal motion restriction is required (apply Modified
NEXUS Rule) • Discover immediately life-threatening conditions • Identify critical interventions required Scenario A worker fell 2 m (6.5 ft) from a stepladder. He was lying supine when you arrived, complaining about pain in his right knee. Steps 1. Complete a scene assessment. Based on the mechanism of
injury, spinal motion restriction is required.
2. Manually stabilize head and neck if required. Chin to midline then neutral If resistance, stop
3. Assess the patient's level of consciousness. Approach patient from front, identify yourself and ask what happened. Alert: Patient is aware of surroundings. Verbal: Patient responds when spoken to. Pain: Patient doesn't respond to questions, but responds to painful stimulus. Unresponsive: Patient doesn't respond to any stimuli.
He's alert and verbal.
4. Activate the workplace emergency response procedures.
If patient is unable to, or is unwilling to walk, ask someone to call an ambulance or have an Emergency Transport Vehicle prepared. If calling an ambulance, say there's a responsive adult who has fallen and has knee pain, and report back.
Patient can't walk.
5. Assess the patient's airway. Can patient speak clearly? If not, look, listen and feel.
He speaks clearly. The airway is clear.

Occupational First Aid Level 3 Training Guide
Module 3: Primary Survey and Transport Decision 3-11
6. Assess the patient's breathing. Look, listen and feel. Rate (slow, normal, fast) Rhythm and Quality (effective, even, deep, shallow, distressed, laboured, gasping) Chest wall movement (both sides should expand equally)
Breathing appears normal and effective. Patient can speak in full sentences. No cyanosis (blue lips and face) noted. Chest wall movement is equal on both sides.
7. Assess the patient's circulation. Pulse: Take radial pulse. Use fingers, not thumb. Both wrists if needed. If no radial pulse found, check carotid for 5 to 10 sec (30 sec if hypothermic). Signs of Shock: Cool, pale, clammy skin Rapid Body Survey: Bleeding and fractures. Support the injured leg. Cover the patient with a blanket.
Radial pulse is normal. No signs of shock. No blood visible. No injury other than knee pain. Minor Fractures to be covered in Lesson 15.4.
8. Determine if critical interventions are required. The patient appears to be stable.
9. Transport decision. Is medical aid needed?
The patient can't walk and can't return to work.
10. Decide whether to maintain spinal motion restriction:
Is patient reliable?
Patient's age, what happened, pre-existing back or spine problems?
Any distracting injuries?
He is alert. No signs of intoxication.
Mid 30’s. Reports that he fell of the ladder and is otherwise healthy.
No distracting injuries.
11. Palpate the cervical spine region. The patient does not complain of midline cervical tenderness.
12. Ask about concerning physical findings: Pain along midline spine or pelvis? Able to feel and move arms and legs without pain or unusual sensations? Any numbness or tingling?
Patient has no pain along the spine or pelvis, can move his arms and legs, and does not have any neurological deficits.
A hard collar is not required.
13. Release c-spine control and put padding under patient's head for comfort
14. Complete secondary survey. To be covered in Lesson 4.2.

Occupational First Aid Level 3 Training Guide
3-12 Module 3: Primary Survey and Transport Decision
Summary 1. What are the three main questions you should ask when applying the Modified
NEXUS Rule? 2. What should you do if you're unsure whether spinal motion restriction is
required? 3. How do you determine if a patient is reliable? 4. How do you determine whether a patient has any concerning physical findings? 5. How do you determine if there are any other concerning considerations?

Occupational First Aid Level 3 Training Guide
Module 3: Primary Survey and Transport Decision 3-13
Learning Outcomes 1. Describe the three options involved in the transport decision.
Required Reading Occupational First Aid: A Reference and Training Manual, 2018 edition
Chapter 50: Transportation, pages 347 – 348
Theory Overview Whether the workplace designated first aid attendant is called to the first aid room or to the scene of an accident, the transport decision is usually made in the first few minutes. Often this decision is confirmed after the primary survey and the severity of the injury or illness has been assessed. But the decision can be changed at any time.
Ask three questions:
• Should the patient be transported?
• If so, when should the patient be transported?
• How should the patient be transported?
Transportation Options There are three options:
• Rapid Transport Category (RTC): The patient is transported for medical aid as quickly as possible. The patient is unstable.
• Medical Aid: The patient requires medical aid, but does not need to be transported rapidly. The patient is stable.
• Return to Work: After assessment and treatment, the patient is able to return to work. The patient is stable and can resume normal or modified work activities.
Every worksite is required to have emergency response procedures. These are often referred to as the workplace ERP (or WERP). These procedures explain how patients who are not able to return to work should be transported. When deciding whether a patient should be transported by ambulance, helicopter, ETV or another means; refer to these written workplace emergency response procedures.
Lesson 3.4: Transport Decision

Occupational First Aid Level 3 Training Guide
3-14 Module 3: Primary Survey and Transport Decision
Rapid Transport Category
Use the Rapid Transport Criteria in your textbook to determine whether a patient requires rapid transport.
If an ambulance is required, call the BC Emergency Health Services (EHS). Give them as full a description of the event and the patient's condition as possible. If you discover new information that you think is important after your first call to BC EHS, call them again with an update.
You will practice applying the Rapid Transport Criteria in the next lesson.
Medical Aid The decision about whether to refer a patient for medical aid is based on the severity of the illness or injury. A patient who needs medical aid, but is stable and able to walk, does not always need to be transported by ambulance or ETV. Ambulatory patients can often be transported for medical aid by a company vehicle or taxi.
Return to Work Minor injuries, such as cuts and scrapes and musculoskeletal injuries (MSI), can often be managed at the workplace. MSIs result from work activities that include risk factors such as repetitive activity, awkward or static posture, twisting, bending, pushing or pulling.
The following signs and symptoms indicate that the patient with an MSI may be managed at the workplace:
• The onset of symptoms is gradual.
• The patient is able to walk and does not have any weakness, numbness or tingling in the extremities.
• The patient can conduct a range of motion without experiencing a significant increase in pain.
Summary 1. How do you decide if a patient requires rapid transport?
2. How do you decide if a patient requires medical aid?

Occupational First Aid Level 3 Training Guide
Module 3: Primary Survey and Transport Decision 3-15
Learning Outcomes 1. Apply the Rapid Transport Criteria.
Required Reading Occupational First Aid: A Reference and Training Manual, 2018 edition
Chapter 3: Initial Evaluation of the Trauma Patient, pages 29 – 30
Class-Based Scenario Exercise Instructions Refer to the Rapid Transport Criteria in your textbook or learning aids posted in the classroom. For each scenario, identify whether the patient's condition meets the Rapid Transport Criteria.
Scenarios 1. A worker was struck in the face by a board from an edger and he fell to the
ground. He is supine, his eyes are closed, his skin is pale, and there is blood around his nose and mouth. He doesn't respond when you talk to him.
2. A worker who fell 2.5 m (8 ft.) off a step ladder walks into the first aid room, holding his wrist. He says that he may have broken his wrist. His face colour is normal. His hand is a normal colour and warm.
3. An orchard worker has been electrocuted. She is supine with her eyes closed and her skin colour is cyanotic. Burns are visible on both of her hands.
4. A worker walks into the first aid room, holding her index finger. She says she hit her finger with a hammer. Her skin colour is normal and she's not anxious. Blood has collected under her fingernail, but she can move her finger without a significant increase in pain.
5. A conveyor operator's arm was amputated just above the elbow. The worker did not fall. The worker is speaking in a clear voice, sitting against the wall, clutching the stump. There is major arterial bleeding and the worker appears pale.
6. When a fire started in his office, a shipper was overcome by smoke. After being helped from the office, he stands outside, coughing vigorously.
7. A worker was struck in the chest by a metal rod as it was propelled from a motor. She is supine and the rod protrudes from the right side of her chest.
Lesson 3.5: Rapid Transport Criteria

Occupational First Aid Level 3 Training Guide
3-16 Module 3: Primary Survey and Transport Decision
ANSWERS
Summary 1. What are the three main categories of the Rapid Transport Criteria?
2. Why should you memorize the Rapid Transport Criteria?

4. Secondary Survey
4.1 Glasgow Coma Score
4.2 Secondary Survey
4.3 Ongoing Assessment and After the Call
Secondary Survey Module 4

Occupational First Aid Level 3 Training Guide
4-2 Module 4: Secondary Survey
Learning Outcomes 1. Assess a patient's level of consciousness using the GCS.
Required Reading Occupational First Aid: A Reference and Training Manual, 2018 edition
Chapter 3: Initial Evaluation of the Trauma Patient, pages 34 – 35
Pair and Share Instructions Use the GCS to assess the level of consciousness of the patient.
Scenarios 1. The worker has a burn on his face and eyes. A bandage has been applied over his
eyes. He answers your questions, can squeeze your finger when asked, and is fully oriented.
2. The worker suffered a blunt trauma to the lumbar spinal area. She is able to describe the accident in full and answers all your questions appropriately. Her eyes are open and they follow you as you move. She says, "I can't feel my legs." She is able to grip your fingers, but is unable to move her legs or identify which toe is being squeezed.
3. The worker was struck in the head by a plank. As you approach, you see that her eyes are open and hear her moaning. When you call out, she asks, "Where am I? What happened? Why does my head hurt so much?" She is able to grip your fingers when asked.
4. The worker was in an excavator that rolled over. His eyes flickered open several times during the primary survey. When you say, "Look at me. Can you open your eyes?", his eyes do not open. When you apply a pain stimulus to his right index finger; his eyes flicker, he moans, and he tries to pull the finger out of your grasp.
5. The worker fell from a ladder. Whenever you ask her a question, her eyes open briefly and then she tells you to go away. She will not grip your hand when asked. But when you apply a painful stimulus, she reaches over, pushes you away and says "go away" again.
Lesson 4.1: Glasgow Coma Score

Occupational First Aid Level 3 Training Guide
Module 4: Secondary Survey 4-3
Glasgow Coma Scale Stimulate patient to highest response in order to assess the following:
Eye-Opening Response 4 spontaneous 3 to voice 2 to pain 1 none
Verbal Response: 5 normal 4 confused but coherent 3 simple, inappropriate words 2 incomprehensible speech 1 no speech
Motor Response: 6 obeys commands 5 localizes to pain (identifies source) 4 withdraws from pain (reflex) 3 flexion (decerebrate) 2 extension (decorticate) 1 none
Total
Answers
Summary 1. What does the Glasgow Coma Score measure?
2. What three nervous system functions are used to measure the GCS?
3. If the patient doesn't respond to verbal stimulus, what should you do?

Occupational First Aid Level 3 Training Guide
4-4 Module 4: Secondary Survey
Learning Outcomes 1. Take the patient's vital signs.
2. Obtain a medical history of the patient.
3. Assess the patient's level of consciousness using the GCS.
4. Complete a head-to-toe assessment.
Required Reading Occupational First Aid: A Reference and Training Manual, 2018 edition
Chapter 3: Initial Evaluation of the Trauma Patient, pages 32 – 44
Theory Purpose of Secondary Survey The fourth stage in the priority action approach is the secondary survey.
The secondary survey is similar to the primary survey except this assessment is more detailed and takes longer. The purpose is to determine the full extent of the developing injury or illness, and to identify any other injuries or illnesses that may not have been discovered during the primary survey.
For a patient in the Rapid Transport Category (RTC), this is done while waiting for equipment and transportation, or en route to the hospital. Otherwise, it is conducted at the scene. The secondary survey should not take longer than 10 min.
What It Includes The secondary survey includes the following areas of assessment:
• Vital signs
• History taking
• Head-to-toe examination
The order in which these areas are assessed depends on the patient’s condition and whether they are able to respond. In some cases, it makes more sense to assess the history before the vitals. The attendant will have to consider the mechanism of injury, the anatomy of the injury and the physical findings in the primary survey to decide.
Lesson 4.2: Secondary Survey

Occupational First Aid Level 3 Training Guide
Module 4: Secondary Survey 4-5
Vital Signs The patient's vital signs help you identify life-threatening conditions that develop while the patient is in your care. Always record the time the vital signs were taken so that changes in the patient's condition can be evaluated.
Vital signs must be reassessed:
• Every 10 min for RTC or if the patient will be transported by BC EHS.
• Every 30 min for non-RTC patients.
Vital signs include an assessment of the patient’s:
• Level of consciousness using the GCS: Is the patient fully conscious?
• Respiration rate, rhythm and volume: Is the patient breathing normally?
• Oxygen saturation of the patient’s blood, referred to as SpO2
• Pulse rate and character: Does the pulse feel normal?
• Pupil size and reaction to light: Are the pupils equal in size and do they react normally to light?
• Skin temperature, colour and whether it is moist or dry: Is the skin normal in appearance and temperature?
History Taking History taking is a verbal assessment of what the patient feels and the patient’s past medical history. Some of this information may have been discovered during the primary survey or when taking vital signs. Obtaining a history of the injury is very important and findings must be recorded.
The four components of history taking are:
• Chief complaint: The mnemonic PPQRRST can be used to investigate pain
• Allergies: Drugs/medications, chemicals, foods, pollens, animal fur or dust
• Medications: Name of drug, dose, frequency, purpose and compliance
• Past medical history: Anything related to current problem or illness history including any recent hospitalizations
Head-to-Toe Examination The head-to-toe examination is a physical examination to assess:
• All injuries: Cuts, discolouration, deformity and swelling
• Limb circulation: Compare pulses, colour and temperature
• Neurological function of the limbs: Numbness, tingling or weakness

Occupational First Aid Level 3 Training Guide
4-6 Module 4: Secondary Survey
Skill Practice Goal Complete a secondary assessment. This is a thorough assessment of the patient to determine the full extent of the developing injury or illness, and identify any other injuries or illnesses. Scenario A worker fell 2 m (6.5 ft) from a stepladder. He was lying supine when you arrived, complaining about pain in his right knee. You've completed the scene assessment and activated the Workplace Emergency Response Procedure. The primary survey is complete and you’ve applied the Modified NEXUS Rule, but the patient is unwilling to move his knee because it hurts much more when moved. You've decided to call for an ambulance or the workplace ETV. While waiting, you do a complete secondary survey. Steps 1. Record the patient’s name, date, time, and all
findings.
2. Assess breathing rate, rhythm and quality. Rate: Count chest wall movements (in and out is 1 breath). Multiply 15-sec interval by 4. Normal is 12/min to 20/min. Quality: Effective, even, deep, shallow, distressed, laboured, gasping Chest wall movement (both sides should expand and relax equally).
His breathing rate 12/min. Effective and even. Both sides expand equally.
3. Assess the radial pulse. Rate: Normal pulse is 60/min to 80/min. Quality: Regular, strong, irregular, easy to feel, weak
His radial pulse is 65/min. Regular and strong
4. Take pulse oximeter reading. <95% = Administer oxygen
His oxygen level (Sp02) is 100%.

Occupational First Aid Level 3 Training Guide
Module 4: Secondary Survey 4-7
5. Assess level of consciousness using GCS. Eye-Opening Response:
4 spontaneous 3 to voice 2 to pain 1 none
Verbal Response: 5 normal 4 confused but coherent 3 simple, inappropriate words 2 incomprehensible speech 1 no speech
Motor Response: 6 obeys commands 5 localizes to pain (identifies source) 4 withdraws from pain (reflex) 3 flexion 2 extension 1 none
Total
His GCS score is 4 + 5 + 6 = 15
6. Shine light into each eye and note pupil reaction. Dilated, unequal and/or poorly reactive = Possible brain injury
His pupil size is normal. Both eyes react equally.
7. Assess skin colour, temperature and condition. Pale = Blood loss and possible shock Blue = Cyanosis (low oxygen), possible cardiorespiratory emergency Cold, sweating = Possible shock
His skin is normal, dry and warm. No signs of shock
8. Record patient's medical history. Where does it hurt? What happened? Are you under the care of a physician? Medical alert devices? Assess pain
P = Position P = Provoke Q = Quality R = Radiation R = Relief S = Severity (1 to 10) T = Timing
Associated Problems: breathing, pain, numbness, weakness, tingling, dizziness, blurred vision, nausea, need to void Allergies Medications: name, dose, frequency, purpose, compliance Past medical history related to current problem
Right knee hurts. Fell off stepladder. Not under care of physician. No medical alerts. Pain is in knee. Sharp pain. Hurts when moved. Holding knee still relieves the pain. Knee pain is 3 in severity when kept from moving; 7 if moved. Started after fall. No associated problems. No allergies. No medications. No relevant past medical history.

Occupational First Aid Level 3 Training Guide
4-8 Module 4: Secondary Survey
9. Examine head. Wounds, lacerations, swelling, deformities? Nose and oral cavity Eyes Ear canals Motor function: Ask patient to smile and whether they’ve still got all the teeth they came to work with.
No injuries found
10. Examine neck. Swelling, deformities, open wounds, hoarseness, stridor? Ask patient to swallow. Any pain?
No injuries found
11. Examine chest. Bruising, wounds, tenderness? Observe deep breaths.
No injuries found
12. Examine abdomen. Tenderness = Possible internal injury Never push down on the iliac crests. This can increase internal damage.
No injuries found
13. Examine back. Bleeding, tenderness, deformity, wounds? If any wounds are discovered on the back, you may have to roll the patient to assess the injury.
No injuries found
14. Examine the legs and feet. a. Expose the injury site and examine knee area.
Cover any open injuries with a dressing. b. Remove socks and shoes to examine the lower
legs and feet. Circulation: Numbness or tingling? Assess the pedal pulses on top of foot or inside foot behind ankle. Motor Function: Flex ankles against pressure. Wiggle toes. Lift one leg at a time. Sensory Function: Touch toes and ask what it feels like. General: Lacerations, swelling, deformity, symmetry? Distal circulation is fine. Apply ice to injured knee.
Circulation normal Pulse normal Motor function normal Sensory function normal Discolouration, deformity, point tenderness and swelling in knee of right leg (possible fractured patella) Patient can move his ankle, but will not lift the injured leg because it causes a significant increase in knee pain.

Occupational First Aid Level 3 Training Guide
Module 4: Secondary Survey 4-9
15. Examine arms and hands. General: Lacerations, swelling, deformity, symmetry? Circulation: Numbness or tingling? Squeeze fingertip. If fracture or deep laceration, take radial pulse on affected side. Motor Function: Hand grip. Raise arms, one at a time. Sensory Function: Touch fingers and ask what it feels like.
All normal
Summary 1. How important is it to follow a consistent order when doing the head-to-toe
assessment?
2. What should the medical history include?

Occupational First Aid Level 3 Training Guide
4-10 Module 4: Secondary Survey
Learning Outcomes 1. Identify the appropriate interval for reassessing the patient.
Required Reading Occupational First Aid: A Reference and Training Manual, 2018 edition
Chapter 3: Initial Evaluation of the Trauma Patient, page 27
Theory
Airway, Breathing and Circulation The airway, breathing and circulation (ABCs) assessments as explained in the primary survey are repeated:
• Every 5 min on a RTC patient or an urban patient requiring transport by BC EHS
• Every 10 min on a non-RTC patient
If critical interventions were required, check the ongoing effectiveness.
Vital Signs After completing the secondary survey, the vital signs should be reassessed:
• Every 10 min for RTC patients or an urban patient requiring transport by BC EHS
• Every 30 min for non-RTC patients
Head-to-Toe Assessment In most cases, the head-to-toe assessment should be repeated every 30 min during transport. If RTC, more frequent assessments may be needed.
Check dressings and bandages and splints. Also check the neurological and circulatory status of injured limbs. Look for changes in head, chest or abdominal injuries. Don't just focus on injured areas. Look for evidence of new injuries.
After the Call After you have finished with the patient:
• Make sure that the First Aid Record is complete.
• Clean and disinfect the area.
• Safely dispose of sharps and contaminated supplies.
Lesson 4.3: Ongoing Assessment and After the Call

Occupational First Aid Level 3 Training Guide
Module 4: Secondary Survey 4-11
Critical Incident Stress As an OFA attendant, you may be called upon to provide emergency care to co-workers and friends. After an incident involving serious injury or death, people sometimes experience critical incident stress. Be aware of early signs of critical incident stress and reach out for help if you need it. Early signs range from nausea, headaches and dizziness, to difficulty concentrating, anxiety, depression and difficulty being alone. Critical incident stress will be covered in more detail in Lesson 14.2.
The Critical Incident Response (CIR) Program excerpt on the next page was retrieved from www.worksafebc.com/en/claims/report-workplace-injury-illness/critical-incident-response
Summary 1. How often should the ABCs be reassessed?
2. How often should the vital signs be taken?
3. How often should a head-to-toe assessment be repeated?
4. What should you do after the call?

Occupational First Aid Level 3 Training Guide
4-12 Module 4: Secondary Survey

5. Positioning the Patient
5.1 Determining Safest Position
5.2 Standing and Sitting to Supine
5.3 Prone to Supine
5.4 Supine to 3/4 Prone
5.5 Fore and Aft Lift
Patient Positioning Module 5

Occupational First Aid Level 3 Training Guide
5-2 Module 5: Patient Positioning
Learning Outcomes 1. Determine the safest patient position.
Required Reading Occupational First Aid: A Reference and Training Manual, 2018 edition
Chapter 17: Spinal Injuries, pages 143 – 145
Theory Deciding Whether to Move a Patient To determine whether the patient needs to be moved, ask yourself:
• Can I assess the patient in the position found?
• If the patient is alert or responsive to voice, can critical interventions be provided in the position found?
If the answer to either question is No, move the patient to the supine position.
Spinal Motion Restriction If the mechanism of injury suggests spinal injury, manually stabilize the head and neck. Try not to move the patient's head and neck. If the patient must be moved, stabilize the spine and move the patient's body as a unit. This is best accomplished with help.
Review the need for maintaining ongoing spinal motion restriction later based on the findings of the primary and secondary survey, and the Modified NEXUS Rule. If ever you're not sure, err on the side of caution and apply spinal motion restriction.
Summary 1. How do you decide whether to move a patient?
2. What should you do if you're unsure whether spinal motion restriction is required?
Lesson 5.1: Determining Safest Position

Occupational First Aid Level 3 Training Guide
Module 5: Patient Positioning 5-3
Learning Outcomes 1. Guide a patient from a standing or sitting position to the supine position with
spinal motion restriction.
Required Reading Occupational First Aid: A Reference and Training Manual, 2018 edition
Chapter 18: Spinal Injury Management, pages 150 – 151
Skill Practice Goal Guide a patient from standing or sitting to supine with spinal motion restriction. Scenario A driver slipped on ice when getting out of his truck in the shipping bay. His head struck the floor on impact. When you arrive, he's standing, leaning on the truck, and holding his head. You can see that the driver is unsteady on his feet. He’s in pain and has a large lump on his head. You’re concerned that he may collapse and you would prefer having him supine with c-spine control while you continue the assessment. You can see he is not fully alert. He has an open airway, is breathing normally and his skin looks normal. You know he has a head injury. Steps 1. Approach the patient from the front. Tell the patient to continue looking straight
ahead.
2. If the patient is standing, ask the patient to keep their head and neck as still as possible while they sit down. Ask the patient to move slowly and carefully to a sitting position. They may need support while they’re doing this.
3. Once seated, ask the patient to continue keeping their head and neck as still as possible. Move to the patient’s side.
4. Instruct a helper to kneel beside the patient on the opposite side of you to help support the patient's weight as the patient lies back.
5. Instruct the patient to lie back. Explain that you and the helper will support them as they do so.
6. While assisting the patient into the supine position, gently help the patient maintain their head in position. Move your hands so that the patient will not be lying on your hands once supine.
7. Once the patient is supine, move around to the c-spine position at the top of the patient’s head and carefully realign the patient if possible. Maintain manual stabilization until the patient is packaged for transport or the need for spinal motion restriction is ruled out.
Lesson 5.2: Standing and Sitting to Supine

Occupational First Aid Level 3 Training Guide
5-4 Module 5: Patient Positioning
8. If possible, train the helper to manually stabilize the patient's head and neck. "Hands over mine, fingers and thumbs where mine are, elbows braced. Don’t move while I reposition myself. Let me know if you have to move so I can help." If there is no help available to maintain manual stabilization of the patient’s head and neck, you may have to improvise using readily available materials to maintain head support until help arrives. You should also ask the patient not to move their head and neck while you move around them.
Summary 1. What is the first step in guiding a patient with a possible spinal injury from
standing to the supine position?
2. What are the key principles to keep in mind when moving a patient with a possible spinal injury?

Occupational First Aid Level 3 Training Guide
Module 5: Patient Positioning 5-5
Learning Outcomes 1. Maintaining c-spine, roll a patient from the prone position into the supine position
with help.
Required Reading Occupational First Aid: A Reference and Training Manual, 2018 edition
Chapter 18: Spinal Injury Management, pages 148 –150
Skill Practice (10 min) Goal Move a patient from prone to supine with spinal motion restriction. Scenario A brick layer was building a wall when a large piece of lumber fell from above and struck her in the head and chest. She fell to the ground and is lying prone on the ground when you arrive. You complete a scene assessment and can see she is responsive. Her airway is clear, but she's not breathing normally. You decide that she may need help with her breathing, but you can't help her in the position found. With a helper, you move her into the supine position. Step 1. Kneel at the top of the patient's head.
2. Grasp the patient's trapezius muscle on the side of their head closest to the ground.
3. Assess airway: a. Place your other hand on the patient's head and face so your hands are
opposite one another. b. Use your fingers to support the head. c. Lean forward and assess the patient's airway.
4. Firmly control the patient's head and neck with your forearm and hand. Support your arms on your flexed knees or the ground if possible.
5. While you continue to support the patient's head and neck, tell a helper to: a. Firmly grasp the patient's shoulder, and waist or belt.
If other helpers are available, have them support the patient's legs and/or injured areas. Do not turn the patient's head and neck during the roll.
b. Pull the patient towards them when you give the go ahead. c. Roll the patient as a unit to the lateral position.
6. Tell helper to use the hand they had on the patient's hip or waist to: a. Grasp the patient's cheekbones. b. Brace their forearm and elbow against the patient's chest at their midline.
Lesson 5.3: Prone to Supine

Occupational First Aid Level 3 Training Guide
5-6 Module 5: Patient Positioning
7. Tell helper to use the other hand that was on the patient’s shoulder to: a. Grasp the patient's lower skull. b. Brace their forearm against the patient's back at the patient’s midline.
8. After the helper has manually stabilized the head and neck, the attendant should: a. Release the patient's head. b. Check the patient’s airway for debris and air movement. c. Perform a finger sweep and/or suction if necessary. d. Change your hand position so that you can reposition the patient supine.
9. If the patient must remain lateral, maintain manual stabilization. Otherwise, continue with these next steps.
10. Complete the roll to supine: a. Grasp the trapezius muscle on the downward side of the patient's head. b. Place your other hand over the patient's ear with your elbows supported.
11. Tell a helper to: a. Put their hands back on the patient's shoulder and waist and hold, while you
support the patient's head and neck.
12. Coordinate the roll from lateral to supine so you and your helper are moving the patient at the same rate.
This enables you to maintain the original position of the head and neck when completing the roll to supine. You should finish the roll with your thumbs in the up position.
13. Realign the patient’s head and neck: a. Tell the patient what you are going to do. Ask them to tell you if there is any
pain, or if they begin to experience any numbness or tingling during the move.
b. If no pain, neurological deficits or resistance is detected; realign the patient's head to the anatomical and neutral position. With an unresponsive patient, after realignment of the head, you would do a jaw thrust and check for air movement and a carotid pulse.
14. If possible, train a helper to take over manually stabilizing the head and neck. "Hands over mine, fingers and thumbs where mine are, elbows braced. Don’t move while I reposition myself. Let me know if you have to move so I can help."
Summary 1. What are the key principles to keep in mind when moving a patient with a
possible spinal injury?

Occupational First Aid Level 3 Training Guide
Module 5: Patient Positioning 5-7
Learning Outcomes 1. Roll a patient from supine to 3/4 prone.
Required Reading Occupational First Aid: A Reference and Training Manual, 2018 edition
Chapter 18: Spinal Injury Management, page 150
Skill Practice Goal Maintain an unresponsive patient’s airway by placing them 3/4 prone. Scenario An unresponsive patient with fluid in the airway needs to be placed in the lateral or 3/4 prone position. This will help keep the airway open and allow fluid to drain. Steps 1. Kneel beside the supine patient's abdomen.
2. Place the patient’s arm that is closest to you straight out (at 90 degrees).
3. Place the patient’s other arm on their chest.
4. Using your hand closest to their head, support the patient’s head and neck during the roll.
5. Using your hand closest to the patient’s feet, reach across the patient and grasp the patient's clothing just below the waist.
6. In one smooth movement, roll the patient against your thighs.
7. Place the patient’s hand that was on their chest, under their head to prevent their face from making direct contact with the ground. Or you can use a folded blanket to support their head.
8. Position the patient's leg to prevent the patient from rolling fully prone.
9. Ensure the patient’s head and neck are positioned to ensure an open airway and to allow fluid to drain away by gravity. An oral airway may be needed to keep the mouth open. To be covered in Lesson 10.2.
10. Reassess the airway, breathing and circulation.
Lesson 5.4: Supine to 3/4 Prone

Occupational First Aid Level 3 Training Guide
5-8 Module 5: Patient Positioning
Summary 1. What type of patient should be maintained 3/4 prone?
2. What is the purpose of using the 3/4 prone position?
3. What device may be needed to facilitate drainage from the airway?
4. How can you prevent a patient in the 3/4 prone position from rolling fully prone?

Occupational First Aid Level 3 Training Guide
Module 5: Patient Positioning 5-9
Learning Outcomes 1. Move a non-trauma patient from a sitting position into a basket stretcher for
transport.
Required Reading Occupational First Aid: A Reference and Training Manual, 2018 edition
Chapter 48: Lifts, Carries, and Stretchers, page 334
Skill Practice Goal Move a non-trauma patient from a sitting position into a basket stretcher for transport in a position of comfort. Scenario A worker with an illness that prevents them from moving unassisted needs to be moved into a basket stretcher or onto the floor for assessment and intervention. Steps 1. Tell the patient that you’re there to help them and to remain still while you move
to their back to support them.
2. Brace yourself at the patient's back.
3. Reach under their axilla with each of your forearms.
4. Grasp the patient’s opposite wrist with each hand. Your right hand grasps the patient’s left wrist and vice versa.
5. Tell a helper to: a. Scoop under the patient’s legs with their forearm at the patient’s knees. b. Reach over the patient’s legs with their other arm and lock their hands
together at the patient’s knees.
6. Ensure everyone uses proper lifting technique. Feet apart, back straight and eyes forward. Lift with legs.
7. Gently lift and move the patient as a unit to the basket or floor.
Summary 1. What type of patient can be moved using a fore and aft lift?
Lesson 5.5: Fore and Aft Lift

Occupational First Aid Level 3 Training Guide
5-10
Day 1 Homework Being an Occupational First Aid Attendant 1/2 During the evening, read pages 3 – 4 in the textbook. Bring notes on the following to the next class:
1. What is occupational first aid (OFA)?
2. Describe your role and responsibilities as an OFA attendant.
3. Describe the scope of your role as an OFA attendant.
4. Describe the legislation that protects OFA attendants.
5. What does it mean to have a patient's actual or implied consent?
NOTES

Occupational First Aid Level 3 Training Guide
Module 5: Patient Positioning 5-11
NOTES


6. Patient Packaging
6.1 Hard Collar
6.2 Spine Board
6.3 Scoop-Style Stretcher
6.4 Patient Care During Transport
Patient Packaging Module 6

Occupational First Aid Level 3 Training Guide
6-2 Module 6: Patient Packaging
Learning Outcomes 1. Apply a hard collar on a patient.
Required Reading Occupational First Aid: A Reference and Training Manual, 2018 edition
Chapter 18: Spinal Injury Management, pages 153 – 155
Theory
Spinal Motion Restriction We take spinal motion restriction based on the mechanism of injury. We maintain spinal motion restriction and package the patient based on physical and clinical findings. If there is any doubt about whether spinal motion restriction should be maintained, apply a hard collar and package accordingly.
If the mechanism of injury suggests spinal injury and applying the Modified NEXUS Rule is not appropriate, manually stabilize the head and neck until a hard collar can be applied and the patient is packaged.
Purpose of Hard Collar A hard collar helps to stabilize the patient’s neck (C-spine). If needed, a hard collar should be applied at the end of the primary survey for patients in the Rapid Transport Category (RTC). A hard collar must be applied whenever the attendant cannot rule out the need for ongoing c-spine control.
Hard collars come in a variety of sizes and are available commercially. Follow the general guidelines included on page 153 of the Occupational First Aid: A Reference and Training Manual when selecting a particular brand for use at the worksite.
The head and neck of the patient must be in the anatomical and neutral position prior to selecting the right hard collar size.
Lesson 6.1: Hard Collar

Occupational First Aid Level 3 Training Guide
Module 6: Patient Packaging 6-3
Skill Practice Goal Apply a hard collar at the end of the primary survey for an RTC patient. Steps 1. Tell the patient what you're going to do. Ask the patient to tell you if they
experience any resistance or pain.
2. Align head and neck: a. Support the head and neck in position found. Tell patient you will be realigning
to neutral and anatomical position. b. Manually stabilize head and neck. c. If possible, train a helper to take over manual stabilization.
"Hands over mine, fingers and thumbs where mine are, elbows braced. Don’t move while I reposition myself. Let me know if you have to move so I can help."
3. Select the right collar size: a. Ensure the patient’s shoulders are relaxed before measuring (not shrugging). b. Quickly examine the neck and shoulder area for swelling or wounds. Applying a
hard collar may not be appropriate. c. Using your fingers, measure the key dimension: the distance between the top
of the patient's trapezius and the bottom of the patient's chin. d. Select a hard collar with a neck size that matches this measurement.
Proper sizing of the hard collar is essential. Too short a collar does not provide enough support and may compromise the patient's airway. Too tall a collar may hyperextend the neck.
4. Prepare the collar: a. Assemble the chin piece if required. b. Pre-form the collar by flexing it inward at the hooked Velcro attachment.
5. Put the collar on: a. Slide the back portion of the collar with the looped/fuzzy part of the Velcro
strap behind the patient's neck. b. Position the front of the collar underneath the patient's chin by scooping the
collar chin piece upward under the chin. c. Ensure the patient’s chin is in the centre of the collar’s chin piece and the
patient’s chin covers the central fastener (if there is one).
6. Attach the collar: a. Tell the patient that you are going to secure the collar and it shouldn’t hurt.
Ask them to tell you if it does. b. Hold the collar in place and gently tighten the collar. c. Secure the Velcro strap to the hooked Velcro part on the collar. d. Consider adding tape if the Velcro is not attached securely.

Occupational First Aid Level 3 Training Guide
6-4 Module 6: Patient Packaging
7. Check the fit: a. Check that the chin piece supports the patient's chin and is in line with the
midline of the patient's body. b. Check for facial flushing. If the patient's face is flushed after the collar is
secured but it was not before securing the collar, the hard collar may be too tight. Adjust as needed.
Summary 1. What happens if the hard collar is too short?
2. What happens if the hard collar is too long?
3. What should you do if you observe facial flushing after applying a hard collar?

Occupational First Aid Level 3 Training Guide
Module 6: Patient Packaging 6-5
Learning Outcomes 1. Position and secure a patient on a spine board.
Required Reading Occupational First Aid: A Reference and Training Manual, 2018 edition
Chapter 18: Spinal Injury Management, pages 155 – 158
Theory The Purpose of the Spine Board The purpose of a spine board is to prevent further injury. It may be used for transferring a patient with a possible spinal injury to a transport stretcher. It may also be needed if a scoop stretcher is not available or not practicable to extract a patient from the position found.
Although the risk of secondary injury to the spine during packaging and transport is very rare, it does occur. The consequences may be devastating. Supporting the cervical spine in a comfortable manner is important.
At the same time, it is also important to carefully assess the need for using a spine board before securing the patient. In some cases, the risks of immobilizing may outweigh the benefits. For example, securing a patient on a spine board can adversely affect airway and breathing management. That is why we use the Modified NEXUS Rule.
Modified NEXUS Rule The Modified NEXUS Rule helps you to assess whether a trauma patient requires ongoing spinal motion restriction.
It consists of two stages:
• When assessing the scene, you consider the mechanism of injury. If there is a possibility of spinal injury, apply spinal motion restriction.
• As you complete the primary survey, go through the questions included in the Modified NEXUS Rule. If the answer to ANY of the questions is No, continue spinal motion restriction. But if the answer to ALL of the questions is Yes, you can stop applying spinal motion restriction.
Lesson 6.2: Spine Board

Occupational First Aid Level 3 Training Guide
6-6 Module 6: Patient Packaging
The Modified NEXUS Rule includes the following: Is the patient reliable?
1. Is the patient fully alert? 2. Is the patient showing any signs of intoxication? 3. Does the patient have any distracting injuries?
Are there any concerning physical findings? 4. Midline cervical discomfort? 5. New onset focal neurological deficits?
Are there any other concerning considerations? 6. Is the patient over the age of 65? 7. Does the patient have any pre-existing spinal conditions? 8. Is this a multi-system trauma?
If the answer is YES to ALL of the above, spinal motion restriction is not required. If you are in doubt, err on the side of caution and apply spinal motion restriction.
Skill Practice Goal Position and secure a patient on a spine board. Steps 1. Align head and neck:
a. Support the head and neck in position found. Tell patient you will be realigning to neutral and anatomical position.
b. Manually stabilize the head and neck. c. If possible, train a helper to take over manual stabilization.
"Hands over mine, fingers and thumbs where mine are, elbows braced. Don’t move while I reposition myself. Let me know if you have to move so I can help."
2. Measure and apply a hard collar if injuries permit.
3. Before using a spine board, it may be necessary to place a rolled blanket between the patient's legs and secure the legs together.
4. Position the padded spine board close to one side of the patient.
5. Adjust the straps as needed. Skip securing holes for tall patients. Share securing holes for shorter patients.
6. Take over manually stabilizing the patient's head and neck.
7. With one helper holding the right leg and another helper at the side of the patient, roll the patient to the lateral position.

Occupational First Aid Level 3 Training Guide
Module 6: Patient Packaging 6-7
8. Tell a helper to: a. Examine the patient's back for obvious wounds and deformities.
If serious wounds are discovered, the attendant must assess and dress the wounds if necessary before rolling the patient supine.
b. Empty the patient's pockets. c. Brush off debris. d. Dress open wounds found on the back if necessary.
9. Tell a helper to: a. Pull the spine board close to the patient. b. Slide blankets used for padding partway off the spine board (towards the
patient). c. Move the spine board up against the patient's back. d. Remove any wrinkles in the blankets.
10. With helpers: a. Roll the patient supine on the spine board. Coordinate the helpers and have
them push/slide the patient as a unit into the centre of the spine board.
11. Maintain spinal motion restriction.
12. Secure the patient by applying the straps: • Ask the patient to tell you if they experience any pain. • Always secure the head last. • Do not cinch the straps too tight. • Depending on the size of the patient, you may need to adjust the strap
positions. Skip securing holes for tall patients. Share securing holes for shorter patients.
13. Before lifting the patient, check that all of the straps are secure. The hooked side of the straps should be attached to the looped side of the straps. If a strap needs retightening, tighten the opposite side. This helps ensure the patient remains level and does not get pulled to the side.
14. Apply blankets.
15. Reassess ABCs.
Summary 1. When is a spine board used and why?
2. How do you decide whether to use a spine board?

Occupational First Aid Level 3 Training Guide
6-8 Module 6: Patient Packaging
Learning Outcomes 1. Position and secure a patient on a scoop-style stretcher.
Required Reading Occupational First Aid: A Reference and Training Manual, 2018 edition
Chapter 48: Lifts, Carries and Stretchers, page 337
Theory Purpose and Use of Scoop-Style Stretcher A scoop-style stretcher is an excellent device for lifting patients from the ground or spine board to another kind of stretcher or carrying device. This type of stretcher is used by many ambulance, fire rescue and professional first aid services because it's lightweight, adjusts easily, and can be separated into two halves.
A scoop stretcher should be used whenever a spine board is not needed to extract the patient. The scoop eliminates the need for a log roll and can be applied with minimal patient movement. In addition, the curved shape of the scoop stretcher makes it a more appropriate device to use even if a full package is required because it puts less pressure on the patient’s spine.
For patients who meet the criteria for modified spinal motion restriction, the attendant can use a variety of means to restrict patient movements to maximize patient comfort while ensuring effective support for the head and neck.
Lesson 6.3: Scoop-Style Stretcher

Occupational First Aid Level 3 Training Guide
Module 6: Patient Packaging 6-9
Skill Practice Goal Position and secure a patient on a scoop-style stretcher with full spinal motion restriction precautions. Steps 1. Assess the patient's weight to determine how many helpers are needed.
<90 kg (200 lb) = 2 helpers, 90 to 114 kg (200 to 250 lb) = 4 helpers
2. Before using a scoop-style stretcher, it may be necessary to place a rolled blanket between the patient's legs and secure the legs together.
3. Size the stretcher: a. Place the stretcher beside the patient. b. Adjust the stretcher as needed to make it slightly longer than the patient.
4. Disassemble the stretcher: a. Press the locking mechanism to release the locking pins. b. Insert the locking pins into the closest holes. c. Place your foot between the stretcher and the patient. d. Press the lever that disengages the couplings on either end of the stretcher. e. Pull the stretcher halves apart.
If the coupling mechanism sticks, use your foot to prevent the patient from getting hit by the stretcher.
5. Reassemble the stretcher: a. Move half of the disassembled stretcher around the patient. b. Place each half of the stretcher under the patient. c. Lock the end of the stretcher that supports the uninjured part of the patient.
Then lock the other end. d. Re-check that the locking mechanisms are locked. e. Secure the patient to the scoop using the stretcher straps f. Ensure that the receiving stretcher is nearby and prepared.
Always go around the patient. Do not move the stretcher part over the patient.
6. Lift and move the patient: a. Squat at one end of the stretcher. Ask a helper to squat at the other end and
additional helpers to squat at each side. b. Tell everyone to place their feet shoulder-width apart with their weight evenly
distributed. c. Grasp the frame firmly. d. Co-ordinate the lift. Remind everyone to keep their backs straight and use their
leg muscles.

Occupational First Aid Level 3 Training Guide
6-10 Module 6: Patient Packaging
Summary 1. Where should you position your foot when disassembling the stretcher?
2. How should the stretcher halves be moved when preparing to apply it to a patient?
3. What techniques should you always follow when lifting?

Occupational First Aid Level 3 Training Guide
Module 6: Patient Packaging 6-11
Learning Outcomes 1. Identify appropriate strategies for patient care during transport.
Required Reading Occupational First Aid: A Reference and Training Manual, 2018 edition
Chapter 50: Transportation, pages 348 – 360
Theory
Prior to Transport Before the patient is transported:
• Check that the patient is positioned appropriately. Avoid motion sickness by positioning the patient with their head toward the direction of travel. Ensure spinal motion restriction has been used if needed.
• Maximize patient comfort. For example, if a spine board must be used, make sure it's well padded. Remove bunched up clothing, belts, and objects from the patient's pockets. If necessary, pre-heat the vehicle.
• Immobilize extremity injuries. Check all splints, bandages and stretcher-securing straps before transport.
• Check that first aid supplies are available and in good working order for the trip.
• Bring along the patient's medication and personal belongings if possible. Tell them where their belongings are stowed for safekeeping.
During Transport While en route:
• Assess the patient's ABC’s and vital signs at appropriate intervals.
• Reassure the patient. Explain where they're going even if the patient has a decreased level of consciousness.
• Direct the driver as needed.
Lesson 6.4: Patient Care During Transport

Occupational First Aid Level 3 Training Guide
6-12 Module 6: Patient Packaging
Securing the Patient • Maintain stabilization of the head and neck during the procedure if necessary.
• The basket should have adequate padding under the patient, but additional padding may be necessary.
• Place rolled blankets or other suitable padding down the sides of the patient if necessary. This padding will control lateral motion and maintain alignment.
• Depending on the stretcher straps, they may not need to be removed or unbuckled prior to breaking the scoop stretcher apart on either end.
• Break apart the scoop at either end of the stretcher and gently slide the two halves out from under the patient. This step may not be possible with some larger patients.
• Secure the patient in such a way that the stretcher may be lifted and moved without significant patient movement.
• If the patient's head and neck must be secured, do that last.
• All strapping should allow rapid access to the patient.
• If patient packaging causes pain, reconsider whether there is another way to support the injury.
Summary 1. What should you check before transporting the patient?
2. What should you check en route?
3. What should you do if packaging causes the patient pain?

7. Basic Skills
7.1 Jaw Thrust
7.2 Oral Airway
7.3 Suctioning
7.4 Pocket Mask
7.5 Oxygen Administration Methods
7.6 Administering Oxygen
7.7 Bag-Valve Mask
7.8 CPR / AED
Basic Skills Module 7

Occupational First Aid Level 3 Training Guide
7-2 Module 7: Basic Skills
Learning Outcomes 1. Perform a jaw thrust.
Required Reading Occupational First Aid: A Reference and Training Manual, 2018 edition
Chapter 5: Airway Management, page 52
Theory Purpose and Use of Jaw Thrust The jaw thrust is the preferred method of opening the airway of all patients who require spinal motion restriction. It holds the unresponsive patient's tongue forward and helps keep their airway clear.
Skill Practice Goal Open the airway of an unresponsive patient with a jaw thrust. Use a mannequin. Steps 1. Manually stabilize the head and neck, and perform a jaw thrust from that position:
a. Put your thumbs on the patient's cheekbones. b. Put your fingers under the bony structure of the patient's jaw. c. Hold the patient's head in position. d. Lift the patient's jaw with your fingers. e. Look, listen and feel for air movement.
2. Ask a helper to take over manual stabilization of the head and neck, and the jaw thrust. Tell the helper:
a. Put your elbows down, and your fingers and thumbs where mine are. Hold steady.
b. Change hands one at a time. c. Do not extend the patient's neck while maintaining the jaw thrust.
3. Reassess the airway.
Summary 1. What is the purpose of a jaw thrust?
2. What is the preferred method of opening the airway of all patients that require spinal motion restriction?
Lesson 7.1: Jaw Thrust

Occupational First Aid Level 3 Training Guide
Module 7: Basic Skills 7-3
Learning Outcomes 1. Measure and insert an oral airway.
2. Describe when an oral airway is needed.
Required Reading Occupational First Aid: A Reference and Training Manual, 2018 edition
Chapter 5: Airway Management, pages 53 – 54
Theory Oral Airway (OPA) The oral airway is a semi-circular hollow plastic device that holds the unresponsive patient's tongue forward and helps keep the airway clear. Try to insert an oral airway in all patients who are unresponsive to verbal stimuli. Do not try to insert an oral airway if there are large pieces of vomitus, broken teeth or blood clots. This may worsen the obstruction. When inserting the oral airway, do not use excessive force. It should not cause any pain. Remove the oral airway if resistance is felt or the patient gags or tries to spit out the oral airway.
Skill Practice Goal Maintain the airway of an unresponsive patient with an oral airway. Steps 1. Measure the oral airway:
Match the distance from the corner of the mouth to the angle of the jaw with the curved part of the OPA.
2. Insert the oral airway. a. With the curved part of the oral airway against the tongue, slide the oral
airway along the roof of the mouth. Describe what you would do, but don't insert an oral airway. Simulate the actions to the side.
b. When the oral airway is almost completely inserted, rotate it 180 degrees. Alternatively, you can open the mouth with a tongue depressor and push the tongue out of the way. Then under direct vision, insert the oral airway directly into position. The patient accepts the oral airway and is still breathing normally.
3. Reassess airway.
Lesson 7.2: Oral Airway

Occupational First Aid Level 3 Training Guide
7-4 Module 7: Basic Skills
Summary 1. Why should you not insert an oral airway if there are large pieces of vomitus,
broken teeth or blood clots?
2. What should you do if resistance is felt, or the patient gags or tries to spit out the oral airway?

Occupational First Aid Level 3 Training Guide
Module 7: Basic Skills 7-5
Learning Outcomes 1. Apply suction to clear a patient's airway.
Required Reading Occupational First Aid: A Reference and Training Manual, 2018 edition
Chapter 5: Airway Management, pages 55 – 56
Theory Use of Suctioning Conscious patients are usually able to clear the oral cavity on their own by spitting or coughing up the material. The patient with a decreased level of consciousness often cannot do this.
It is the responsibility of the OFA attendant to try to keep the airway clear. Positioning the patient to allow drainage helps. Patients with profuse bleeding of the mouth or nose, or who are actively vomiting, should be managed in the lateral or 3/4 prone (drainage) position.
But more often than not, the material is too thick and tenacious to drain away by gravity alone. Although the drainage position and finger sweep are helpful, they are not always effective. The best method is to use a portable suction device.
Skill Practice Goal Clear the airway of an unresponsive patient with a suction device.
Steps
1. Set up the suction: a. Put on eye protection. b. Attach a clean suction tip and tubing to the machine. c. Turn the device on and test it.
2. Ensure the patient is in the lateral or 3/4 prone position.
3. Suction the airway: a. Insert the suction into the mouth only as far as you can see to the side of the
patient’s lower cheek. b. If the suction unit has a venting hole, do not cover it until the suction has been
inserted. c. Suction gently. d. Limit suctioning to 20 seconds at a time. e. Repeat as necessary.
Lesson 7.3: Suctioning

Occupational First Aid Level 3 Training Guide
7-6 Module 7: Basic Skills
Summary 1. What position should patients with profuse bleeding of the mouth or nose, or who
are actively vomiting be put into?
2. What is the time limit for suctioning?

Occupational First Aid Level 3 Training Guide
Module 7: Basic Skills 7-7
Learning Outcomes 1. Perform assisted ventilation using a pocket mask.
Required Reading Occupational First Aid: A Reference and Training Manual, 2018 edition
Chapter 5: Airway Management, pages 58 – 59
Theory When to Assist Ventilation Using a pocket mask is the preferred way to assist ventilation. With a conscious patient, you should assist ventilation if the patient:
• Has rapid, shallow breaths
• Is only able to speak one or two words between gasps
• Has blue lips and face
With an unresponsive patient who is not breathing normally but still has a carotid pulse, you should assist ventilation.
Skill Practice Goal Assist ventilation in a patient who is not breathing effectively. Scenario A worker has fallen. You are working nearby and hear a call for help. As you approach, she is supine. You call out her name, but her eyes only open briefly and she moans. You notice a lump on her forehead. You activate the ERP and ask for the first aid gear. You apply c-spine. She is breathing quietly and has a pulse. You hand over c-spine to a helper and continue the primary survey. When you discover she is cyanotic and breathing too slowly, you decide to assist her breathing. Steps 1. Tell the patient that you're going to place a mask on her face. Help her stay calm.
Remind her to keep breathing and to try to not fight the mask. You tell the helper to watch what you are doing.
2. Using two hands and the jaw thrust position, place the mask over the mannequin's nose and mouth. Hold the mask with your fingers under the jaw and your thumbs on the mask.
Lesson 7.4: Pocket Mask

Occupational First Aid Level 3 Training Guide
7-8 Module 7: Basic Skills
3. Once every 5 seconds, give the mannequin a breath using the pocket mask. Time the ventilations with the patient's inhalations if possible, for a combined total of 12 breaths per min. If the patient's abdomen starts to distend, ensure the airway is open by adjusting the jaw thrust or slightly extending the neck. If the abdomen is still distending, ventilate with less force.
4. If possible, train a helper to take over ventilation by giving slow, clear directions. Tell the helper, “this is a pocket mask.”: a. Show the helper how to hold the mask and to watch you. b. Give 1 breath every 5 seconds, continue showing the helper. c. Ask them to take over assisted ventilations. d. Assess the effectiveness of the helper's ventilations before continuing the
primary survey.
Summary 1. How should you hold the pocket mask against the patient's face?
2. What should you do if the patient's abdomen starts to distend?
3. How should you time the breaths?

Occupational First Aid Level 3 Training Guide
Module 7: Basic Skills 7-9
Learning Outcomes 1. Describe when oxygen administration is needed.
2. Identify the best method for administering oxygen to the patient.
3. Describe pulse oximetry.
4. Describe the types of oxygen delivery systems.
5. Describe safe handling of oxygen delivery systems.
Required Reading Occupational First Aid: A Reference and Training Manual, 2018 edition
Chapter 7: Oxygen Therapy and Equipment, pages 81 – 86
Theory Indications Whenever a patient's ABCs are not normal, administer oxygen. For example, you should administer oxygen in the following situations:
• Respiratory and/or cardiac arrest
• Hypoxic patients in the Rapid Transport Category
• Acute or chronic shortness of breath
• Shock
• Cardiovascular or respiratory illness
• Inadequate respiration (such as due to drug overdose)
• Decreased level of consciousness
• Pregnant patients
• All medical air evacuation patients
• All patients with decompression illness
• Potential carbon monoxide and/or toxic-smoke inhalation
• Patients with no history of COPD, with blood oxygen saturations that are below normal levels (less than 95%)
Lesson 7.5: Oxygen Administration Methods

Occupational First Aid Level 3 Training Guide
7-10 Module 7: Basic Skills
Methods Four methods are used to administer oxygen:
• Nasal Cannula: Oxygen passes through a tube to openings in prongs that are inserted into each of the patient's nostrils. This method gives the patient the greatest freedom to move around and talk while receiving oxygen. It may be appropriate for a patient who is vomiting. Provide oxygen at 24% to 44%. Do not exceed 5 Lpm.
• Face Mask: The face mask connects to a tube that connects to a regulator and oxygen cylinder. The face mask is used when moderate oxygen concentrations are required, and with patients who have nasal irritation. It can be uncomfortable and makes it harder to communicate with the patient. Provide oxygen at 40% to 60% at 6 to 10 Lpm.
• Partial Rebreathing Mask: This method combines a face mask with a reservoir bag. Exhaled air enters a reservoir bag, where it's enriched with oxygen. Pure oxygen is added to the enriched mixture and given to the patient. This method is used when increased oxygen concentrations are required. Provide oxygen at 40% to 60% at 6 to 10 Lpm. Adjust the flow rate to ensure that the reservoir does not collapse.
• Non-Rebreathing Mask: This mask is similar to the partial rebreathing mask, except it doesn't allow the patient to rebreathe exhaled air. This method is used to deliver high concentrations of oxygen to a spontaneously breathing patient. Provide oxygen at up to 90% at 10 to 15 Lpm.
Pulse Oximetry The pulse oximeter is a small battery-operated electronic device that can be used to confirm the blood oxygen saturation of a patient. This helps you to decide whether to adjust oxygen flow.
Place the pulse oximeter on a clean finger or a toe that has good circulation. The pulse oximeter should not be used on a patient with hypothermia, smoke inhalation or carbon monoxide poisoning.

Occupational First Aid Level 3 Training Guide
Module 7: Basic Skills 7-11
Safe Handling Practices Always follow these safe handling practices:
• Never use oil or grease on any device that will be attached to an oxygen cylinder.
• Do not allow smoking or open flames around oxygen equipment.
• Keep oxygen cylinders well secured.
• Store cylinders in a cool, well ventilated room away from corrosives.
• When opening the cylinder, stand so that the cylinder valve is between you and the regulator.
• Ensure that the valve seat insert and gasket are in good condition before you assemble the equipment.
• Never attempt to tighten the cylinder valve or any part of the valve. If the cylinder valve is leaking, place it well away from hazards and notify the oxygen supplier immediately.
• Oxygen cylinders are not to be refilled by unauthorized personnel. Always return empty cylinders to qualified plants for refilling.
• Oxygen cylinders should only be refilled with oxygen and should have a hydrostatic test every 5 or 10 years, depending on manufacturer's specification.
Changing Oxygen Cylinders Oxygen cylinders come in various sizes. OFAs typically use a D (14.5 cu ft), E (26 cu ft) or K (249 cu ft) size.
Full cylinders usually have between 2000 and 2200 PSI. The cylinders should be changed when the PSI drops below 200. Refer to the Oxygen Cylinder Duration table in your textbook.
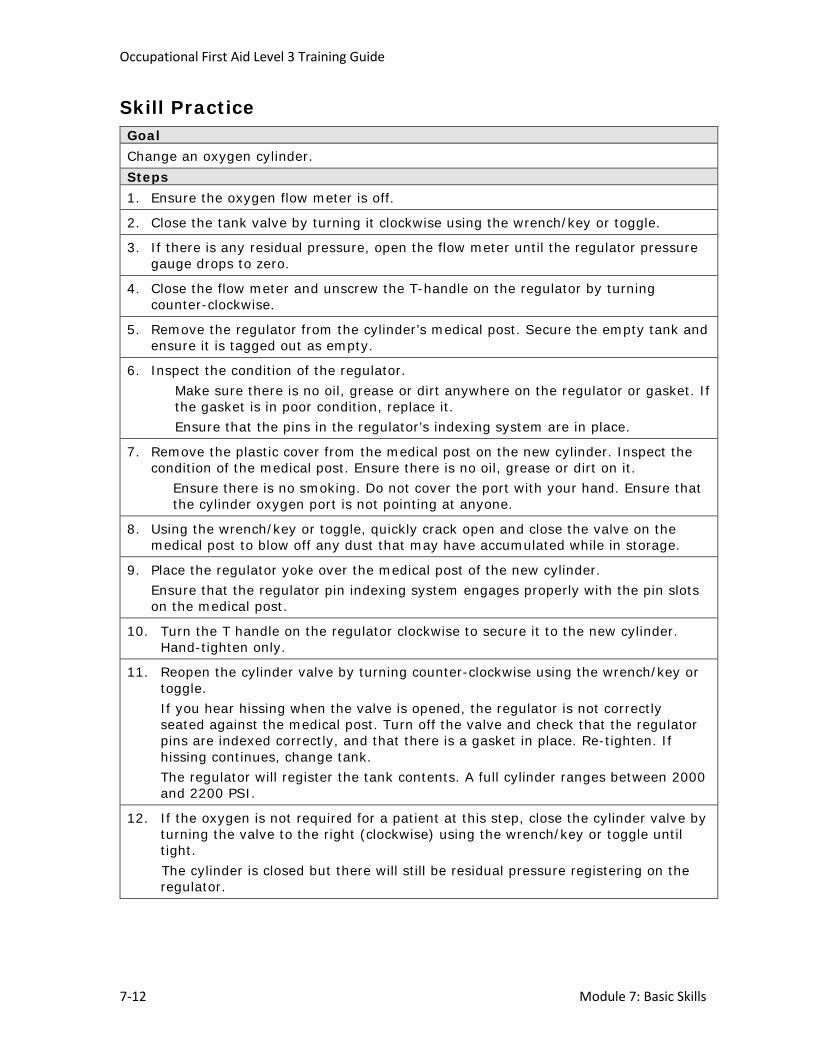
Occupational First Aid Level 3 Training Guide
7-12 Module 7: Basic Skills
Skill Practice Goal Change an oxygen cylinder. Steps 1. Ensure the oxygen flow meter is off.
2. Close the tank valve by turning it clockwise using the wrench/key or toggle.
3. If there is any residual pressure, open the flow meter until the regulator pressure gauge drops to zero.
4. Close the flow meter and unscrew the T-handle on the regulator by turning counter-clockwise.
5. Remove the regulator from the cylinder’s medical post. Secure the empty tank and ensure it is tagged out as empty.
6. Inspect the condition of the regulator. Make sure there is no oil, grease or dirt anywhere on the regulator or gasket. If the gasket is in poor condition, replace it. Ensure that the pins in the regulator’s indexing system are in place.
7. Remove the plastic cover from the medical post on the new cylinder. Inspect the condition of the medical post. Ensure there is no oil, grease or dirt on it.
Ensure there is no smoking. Do not cover the port with your hand. Ensure that the cylinder oxygen port is not pointing at anyone.
8. Using the wrench/key or toggle, quickly crack open and close the valve on the medical post to blow off any dust that may have accumulated while in storage.
9. Place the regulator yoke over the medical post of the new cylinder. Ensure that the regulator pin indexing system engages properly with the pin slots on the medical post.
10. Turn the T handle on the regulator clockwise to secure it to the new cylinder. Hand-tighten only.
11. Reopen the cylinder valve by turning counter-clockwise using the wrench/key or toggle. If you hear hissing when the valve is opened, the regulator is not correctly seated against the medical post. Turn off the valve and check that the regulator pins are indexed correctly, and that there is a gasket in place. Re-tighten. If hissing continues, change tank. The regulator will register the tank contents. A full cylinder ranges between 2000 and 2200 PSI.
12. If the oxygen is not required for a patient at this step, close the cylinder valve by turning the valve to the right (clockwise) using the wrench/key or toggle until tight. The cylinder is closed but there will still be residual pressure registering on the regulator.

Occupational First Aid Level 3 Training Guide
Module 7: Basic Skills 7-13
13. To release the residual pressure, turn on the flow meter until the pressure registered on regulator drops to zero, then turn the flow meter back to zero.
14. Ensure new cylinder is secured appropriately in the oxygen kit.
Summary 1. Which method should you use to deliver high concentrations of oxygen to a
spontaneously breathing patient?
2. What are the advantages and disadvantages of the nasal cannula and the face mask?
3. When should a partial rebreathing mask be used?
4. What does a pulse oximeter do?
5. How should oxygen cylinders be stored?
6. When should an oxygen cylinder be changed?

Occupational First Aid Level 3 Training Guide
7-14 Module 7: Basic Skills
Learning Outcomes 1. Administer oxygen to a patient.
2. Demonstrate safe handling of oxygen delivery systems.
Required Reading Occupational First Aid: A Reference and Training Manual, 2018 edition
Chapter 7: Oxygen Therapy and Equipment: pages 78 – 86
Skill Practice Goal Administer oxygen to a patient. Scenario You’ve completed the primary survey, called for the emergency transport vehicle (ETV), and have taken a set of vitals. The vitals indicate that this patient is very sick. You decide to perform a critical intervention; the patient needs oxygen. Steps 1. Inspect the cylinder, regulator, regulator inlet, cylinder outlet and internal
surfaces.
2. Ensure the cylinder is in a secure position and the regulator is in the off position. Tubing should be attached. Show the learners the PSI gauge and flow gauge.
3. Open cylinder valve counter-clockwise by 1/4 to 1/2 a turn.
4. Open regulator flow valve clockwise until flow gauge reaches desired rate (litres per min).
5. Flow oxygen for a few seconds to clear out possible contaminants like dust before placing the nasal cannula or mask on the patient.
6. When finished, close cylinder valve by turning it to the right (clockwise). The regulator pressure will bleed to 0. Do not overtighten valves.
7. Turn the regulator flow meter back to 0 by turning it counter-clockwise.
Summary 1. Why is it important to inspect the equipment before using it?
2. How can you adjust the flow rate?
3. What direction do you turn the regulator valve to turn it to 0?
Lesson 7.6: Administering Oxygen

Occupational First Aid Level 3 Training Guide
Module 7: Basic Skills 7-15
Learning Outcomes 1. Perform assisted ventilation using a bag-valve mask.
Required Reading Occupational First Aid: A Reference and Training Manual, 2018 edition
Chapter 5: Airway Management: pages 60 – 61
Theory The bag-valve mask is generally only used once en route or while waiting for transport after the patient has been fully packaged and the secondary survey has been completed. This method requires considerable expertise, training and practice to use effectively. This fact is often not recognized by first aid personnel. To ensure the patient’s airway is managed correctly and to establish a good seal between the mask and the patients face, the bag-valve mask should only be used when there are two attendants trained in its use.
Skill Practice Goal Assist ventilation in a patient who is not breathing effectively. Scenario You've completed the primary survey, provided critical interventions for a patient who is not breathing effectively, and packaged the patient. You're trained in how to use a bag-valve mask and have someone to help who is also trained. En route to the hospital, you use a bag-valve mask to help the patient breathe. Steps 1. Attach oxygen to the bag-valve mask at 15 Lpm.
If oxygen is not available or the flow is insufficient to keep the reservoir inflated, remove the reservoir.
2. Place the apex of the mask over the bridge of the mannequin's nose and the base below the lower lip against the chin.
3. Hold the mask snugly against the mannequin's face with your thumbs along either side of the mask and your fingers under the angle of the patient’s jaw (similar to the jaw thrust).
4. Tell a helper to compress the bag while you hold the mask. Ventilate the mannequin once every 5 sec. Time the ventilations with the patient's breathing if possible. The two most common reasons for inadequate ventilation with this device are failure to maintain a proper jaw position and an ineffective seal. If ventilation is not effective, use a pocket mask.
Lesson 7.7: Bag-Valve Mask

Occupational First Aid Level 3 Training Guide
7-16 Module 7: Basic Skills
Summary 1. What are the two most common reasons for ineffective ventilation with a bag-
valve mask?
2. What should you do if the assisted ventilation with a bag-valve mask is not effective?

Occupational First Aid Level 3 Training Guide
Module 7: Basic Skills 7-17
Learning Outcomes 1. Describe when CPR is needed.
2. Provide CPR to an adult.
3. Describe the signs and symptoms of cardiac arrest.
4. Describe what defibrillation is.
5. Describe the importance of workplace policy and procedures for AED use.
6. Explain how to inspect AED equipment.
7. Apply and use an AED on an adult.
Required Reading Occupational First Aid: A Reference and Training Manual, 2018 edition
Chapter 13: Cardiopulmonary Resuscitation (CPR): pages 113 – 115
Theory When CPR Is Needed CPR is provided whenever a patient:
• Is unresponsive,
• Is not breathing normally or not breathing at all, and
• Has no pulse or you are not sure if there is a carotid pulse
All patients who are in cardiac arrest should receive resuscitation unless exceptional circumstances apply. A hypothermic patient in cardiac arrest must be packaged and transported immediately while CPR is being administered. All other cardiac arrest patients are managed at the scene and would not be packaged until a pulse is restored.
If cardiac arrest occurs once the patient is en route, the ETV should pull over when it’s safe to pull off the road and CPR must be administered at the roadside. Ensure Emergency Health Services (EHS) is updated and is aware of your new location.
Chest compressions used to administer CPR are also used to help clear an unresponsive patient’s airway. This will be covered in a later lesson.
Lesson 7.8: CPR / AED

Occupational First Aid Level 3 Training Guide
7-18 Module 7: Basic Skills
Do NOT start CPR in the following circumstances:
1. There is clear evidence a death has occurred (for example, there is decapitation, transection or decomposition).
2. The adult patient was completely submerged in water for more than 60 min.
3. If there are multiple patients and no other attendants, patients with vital signs who are found in life-threatening condition take precedence over those in cardiac arrest.
4. You were notified previously that the patient has a do-not-resuscitate order.
Advanced Care Directive and Do Not Resuscitate Orders People think about and write down the health care treatment they would like to be given in the event that they become incapable of deciding for themselves. The documents used to record these choices are called an Advanced Care Directive and a Do Not Resuscitate Order.
As part of this process, a person may ask that they not be given CPR if they become unresponsive. People who have a No CPR Medical Order are encouraged to wear a medical bracelet that indicates their wishes.
Cardiac Arrest Sudden cardiac arrest is an abrupt, unexpected loss of heart pump function. A patient who is unresponsive, not breathing normally or at all, and has no pulse is assumed to be in cardiac arrest.
Electrical Activity in the Heart The heart contains an electrical system that sends out impulses that tell it when to contract to pump blood. The leader of this electrical system is the sinoatrial (SA) node. The SA node is the heart's pacemaker and is part of the autonomic nervous system.
Defibrillation With defibrillation, you use an AED to send a shock through the heart. This shock stops all electrical activity and allows the SA node to regain its role in providing effective electrical impulses.
Ventricular fibrillation (VF) and ventricular tachycardia (VT) are abnormal heart rhythms that need to be defibrillated immediately. For all patients in cardiac arrest, the AED should be used immediately if available.

Occupational First Aid Level 3 Training Guide
Module 7: Basic Skills 7-19
Inspecting an AED Inspection requirements vary depending on the manufacturer. Check the manufacturer's instructions that came with your AED unit.
With a typical inspection, you would:
1. Check that all of the components are in the kit including the AED, an extra battery, 2 sets of pads, at least one disposable razor (two or more is preferable), a cloth or towel, and a user manual.
2. Check that the pads and batteries are within their expiration dates. If the manufacturer recommends it, put the AED through a self-check to make sure it's working properly.
3. If any faults are discovered, contact your AED supplier immediately.
Skill Practice Goal Provide CPR and use an AED on an adult patient. CPR requires at least 5 cycles of 30:2 Scenario A worker was found slumped over in a chair and was carefully positioned on the floor by co-workers. When you arrive, you activate the workplace emergency response procedures, rule out the need for spinal motion restriction, and establish that he is unresponsive to voice and pain. You see only occasional gasps. He is not breathing normally. You ask a helper to retrieve an AED. Steps 1. Assess the patient's airway and breathing:
a. Open the airway with a head-tilt/chin-lift. b. Look, listen and feel for air movement for 5 sec. The patient takes only occasional gasps. Airway looks clear.
2. Assess the patient's circulation: a. Maintain an open airway and feel for a carotid pulse for the next 5 sec.
After 10 sec of assessing airway, breathing and a pulse; you can't feel a carotid pulse. This patient is in cardiac arrest.
b. Ensure EHS is updated and ask if the AED has arrived. The AED has not arrived.

Occupational First Aid Level 3 Training Guide
7-20 Module 7: Basic Skills
3. Perform 30 chest compressions: a. Ensure patient is on hard surface and expose chest. b. Kneel beside the patient with your knees apart. c. Place the heel of your hands on the centre of the patient's chest. d. Interlock your fingers and straighten your arms until your elbows lock. Ensure
your shoulders, arms and hands are directly over the centre of the patient's chest.
e. Press straight down. Push hard; push fast. Compress at least 5 cm (2 inches) at a rate of at least 100/min. Allow chest to recoil.
4. After 30 compressions, if the patient remains unresponsive: a. Open the airway. b. Using a pocket mask, ventilate the patient with 2 breaths.
5. Repeat Step 3 and 4 until: • Spontaneous circulation and breathing is restored. • Another trained attendant takes over. • Patient is transferred to EHS. • You are too tired to continue. • 30 min pass without even a temporary return of normal breathing (patient is
not hypothermic). If a helper is available, you can switch roles every 2 min or 5 cycles of 30:2.
6. With CPR in progress, prepare the patient and attach AED: a. Bare the chest if not already bare. b. Turn on AED and follow voice prompts. c. Shave hair, remove med patches and make sure the chest is dry. d. Apply pads at least 1 inch from any implanted devices.
7. Analyze the heart rhythm: a. When the pads are attached, tell the 1st Attendant, "Stop compressions and
don't touch the patient." b. Make sure no one is touching the patient and look around to make sure
everyone is standing clear. c. Follow AED voice prompts or press the Analyze button.
8. Deliver a shock: a. Say, "I'm clear. Everyone is clear. Do not touch the patient." b. If prompted to do so, press the Shock button.
9. If patient remains unresponsive after the shock or you get a “No Shock” prompt: a. Continue administering CPR for 2 min or 5 cycles of 30:2. b. Reanalyze the heart rhythm. c. Measure and insert an oral airway if available. d. Apply oxygen to the pocket mask if available.
10. Tell the attendant administering CPR when you’re ready to take over CPR. Switch roles every 2 min.

Occupational First Aid Level 3 Training Guide
Module 7: Basic Skills 7-21
Summary 1. When is CPR needed?
2. To what depth should chest compressions be given?
3. At what rate should chest compressions be given?
4. What should happen to the patient's chest in between chest compressions?
5. What is sudden cardiac arrest?
6. What happens when you use an AED?

Occupational First Aid Level 3 Training Guide
7-22
Day 2 Homework Being an Occupational First Aid Attendant 2/2 During the evening, read pages 3 – 4 in the textbook. Bring notes on the following to the next class:
1. As an OFA attendant, what is your role in the occupational health and safety
management system for your workplace?
2. Describe the legislation that sets out the basic principles of occupational health
and safety.
3. What first aid policies and procedures are required by legislation?
NOTES

Occupational First Aid Level 3 Training Guide
Module 7: Basic Skills 7-23
NOTES


8. Being an Occupational First Aid Attendant
8.1 Role of Attendant
Being an Occupational First Aid Attendant
Module 8

Occupational First Aid Level 3 Training Guide
8-2 Module 8: Being an Occupational First Aid Attendant
Learning Outcomes 1. Describe what OFA is.
2. Describe the role and responsibilities of an OFA attendant.
3. Describe the scope of the role played by an OFA attendant.
4. Describe the legislation that protects OFA attendants.
5. Explain what it means to have a patient's actual or implied consent.
Required Reading Occupational First Aid: A Reference and Training Manual, 2018 edition
Chapter 1: Introduction to Occupational First Aid, pages 3 – 4
Pair and Share 1. What is occupational first aid (OFA)?
2. Describe your role and responsibilities as an OFA attendant.
3. Describe the scope of your role as an OFA attendant.
4. Describe the legislation that protects OFA attendants.
5. What does it mean to have a patient's actual or implied consent?
Lesson 8.1: Role of Attendant
Occupational First Aid Level 3 Training Guide
Module 8: Being an Occupational First Aid Attendant 8-3
Answers
Summary 1. What are your key responsibilities as an OFA attendant?
2. What is the scope of your role as an OFA attendant?
3. Why is patient consent important?


9. Airway and Breathing Unresponsive Patient
9.1 Signs of Airway Obstruction
9.2 Partial Airway Obstruction (Fluids)
9.3 Complete Airway Obstruction
9.4 Signs of Respiratory Emergencies
9.5 Respiratory Distress
9.6 Respiratory Arrest
Airway and Breathing Unresponsive Patient
Module 9

Occupational First Aid Level 3 Training Guide
9-2 Module 9: Airway and Breathing Unresponsive Patient
Learning Outcomes 1. Describe the signs and symptoms of airway obstruction.
2. Describe the precautions when performing airway manoeuvres.
Required Reading Occupational First Aid: A Reference and Training Manual, 2018 edition
Chapter 5: Airway Management, pages 50 – 51
Theory Breathing Air is moved into the lungs and expired through the air passages. The upper air passages consist of the nose and mouth. The back of the throat (pharynx) divides, at its lower portion, to become the windpipe (trachea) in front and the food pipe (esophagus) in back. A small flap of tissue called the epiglottis closes when we swallow and protects the windpipe (trachea) opening. The trachea extends to the center of the chest and is supported by rings of cartilage. The air passages branch off and become smaller and smaller, the smallest of which are called alveoli and this is where the gas exchange takes place in the lungs.
Signs of Airway Obstruction As you approach, ask what happened. If the patient is unable to speak clearly, you should suspect airway obstruction. Look and listen for signs of airway obstruction.
Signs of partial obstruction include: • Noisy, congested, or gurgling breathing • Hoarseness • High-pitched noise on inspiration or expiration (stridor) • Blue lips and face (cyanosis)
Signs of complete obstruction include: • Being unable to speak or cough, if conscious • Blue lips and face (cyanosis) • No movement of air in or out of the mouth • Chest wall doesn't rise with ventilation
Lesson 9.1: Signs of Airway Obstruction

Occupational First Aid Level 3 Training Guide
Module 9: Airway and Breathing Unresponsive Patient 9-3
Causes of Airway Obstruction Airway obstruction may be caused by:
• Blockage by the tongue (common cause with unresponsive supine patients)
• Blockage by foreign bodies such as broken teeth, food, fluid or other objects (snow or dirt)
• Blockage by vomitus or blood
• Swelling from throat injury
Precautions The airway clearing manoeuvre you should use depends on whether there is a possible spinal injury and whether the patient is responsive.
Refer to the Priority Action Approach and Critical Interventions flow chart in your textbook. Review decisions related to airway manoeuvres.
Indications of a Clear Airway With a conscious patient, a clear airway is indicated by:
• Clear speech (even if the patient is confused)
• Effortless and quiet breathing
With an unresponsive patient, a clear airway is indicated by:
• The flow of air in and out of the mouth and nose
• The chest and abdomen rising on inspiration
• Quiet and effortless breathing
Summary 1. What are the signs of a partial airway obstruction?
2. What are the signs of a complete airway obstruction?

Occupational First Aid Level 3 Training Guide
9-4 Module 9: Airway and Breathing Unresponsive Patient
Learning Outcomes 1. Manage an unresponsive patient with a partial airway obstruction due to fluids.
Required Reading Occupational First Aid: A Reference and Training Manual, 2018 edition
Chapter 5: Airway Management, page 58
Skill Practice Goal Clear and maintain the airway of an unresponsive patient with a partial airway obstruction due to fluids. Scenario A worker was struck in the face by the moving hook of an overhead warehouse crane. She was knocked to the ground. When you arrive, she is lying supine not moving with blood on her face. Steps 1. Conduct a scene assessment. The crane hook is secure and the
crane has been deactivated. There are no hazards. One person injured. Based on mechanism of injury, spinal motion restriction is required.
2. Assess the patient's level of consciousness. Approach the patient from the front, identify yourself, and attempt to communicate. Do not attempt painful stimulus due to urgent need to manage the airway.
Patient doesn't respond to verbal stimulus. There is blood in and around the patient's mouth. You hear gurgling.
3. Activate the workplace emergency response procedure:
Ask someone to call an ambulance or have an ETV prepared. If calling an ambulance, tell them there is an unconscious adult with facial trauma.
Lesson 9.2: Partial Airway Obstruction (Fluids)

Occupational First Aid Level 3 Training Guide
Module 9: Airway and Breathing Unresponsive Patient 9-5
4. Manually stabilize head and neck.
5. Manage the airway: a. Assess the airway. b. Ask for help if available. c. Roll the patient into the lateral position,
while you maintain stabilization of the head and neck.
d. If possible, train a helper to take over manually stabilizing head and neck in the lateral position. Tell helper to: "Grasp the back of the patient’s head with your hand that’s on the patient’s hip. Use your forearm to prevent the patient from moving away from you. Then, with the hand that’s on the patient’s shoulder, cup your hand under the patient’s cheek, and brace your elbows against patient’s chest and hold in this position."
e. With the patient’s head, neck and upper body supported in the lateral position by the helper, finger sweep the mouth and reassess the airway while lateral.
Patient is gurgling. There is fluid in the airway. Finger sweep does not fully clear the airway.
6. If previous methods don't clear the airway, apply suction: a. Put on wraparound safety glasses, goggles
or a face shield, and a suction barrier device if available.
b. Attach a clean suction tip and tubing to the battery-operated machine or use the manual suction device in the kit.
c. Suction for no more than 20 sec. Suction only as far back in the throat as you can see. Be gentle. Aggressive suctioning may stimulate retching or vomiting, or cause injury. The suction tip may clog. If it does, dip it into a small container of water or saline solution, or replace the suction tip with a new one.
Airway clears after suctioning.

Occupational First Aid Level 3 Training Guide
9-6 Module 9: Airway and Breathing Unresponsive Patient
7. If airway continues to drain fluids: a. Ask your helper to maintain the patient in
the lateral position and place something (like a rolled/folded blanket) under the patient’s head to maintain position. Complete the primary survey in this position.
b. Suction as needed.
8. Reassess airway: a. Take over manual stabilization of head and
neck. b. Ask helper to put their hands back on the
patient’s shoulder and hip and prepare to reposition supine.
c. Reposition patient supine. d. Apply jaw thrust. e. Reassess airway. f. If possible, get helper to take over manual
stabilization of the head and jaw thrust.
Patient breathes quietly.
9. Measure and insert oral airway. The patient accepts oral airway. Airway is still clear.
10. Assess breathing rate, rhythm, quality and chest wall movement.
Patient continues to breathe normally.
11. Assess the circulation: • Radial pulse • Signs of shock (cool, pale, clammy skin) • Rapid body survey (bleeding, fractures)
Radial pulse present. No signs of shock. No injuries beyond facial trauma.
12. Apply high-flow oxygen.
13. Apply a blanket for warmth.
14. Transport decision: Rapid Transport Category (RTC).
15. Apply the Modified NEXUS Rule. Since the patient is unresponsive, spinal motion restriction should be maintained.
16. Apply a hard collar. Describe this and the remaining steps; there is no need to demonstrate.
17. Position and secure patient on a spine board or scoop stretcher.
18. Lift patient onto basket stretcher.

Occupational First Aid Level 3 Training Guide
Module 9: Airway and Breathing Unresponsive Patient 9-7
19. Complete a Secondary Survey while waiting for transport or en route to hospital.
20. Complete a First Aid Record
Summary 1. How can you tell if an unresponsive patient has a partial airway obstruction due
to fluids?
2. How can you clear the airway of an unresponsive patient with a partial airway obstruction due to fluids?

Occupational First Aid Level 3 Training Guide
9-8 Module 9: Airway and Breathing Unresponsive Patient
Learning Outcomes 1. Manage an unresponsive patient with a complete airway obstruction.
2. Open a patient's airway using a head-tilt/chin-lift.
Required Reading Occupational First Aid: A Reference and Training Manual, 2018 edition
Chapter 5: Airway Management, page 57 – 58
Skill Practice Goal Clear and maintain the airway of an unresponsive patient with a complete airway obstruction. Scenario A worker is found unconscious in a chair. As you approach, co-workers gently lay the worker supine. Use a mannequin for Steps 1 through 11, but practice positioning the patient prone using learners. Steps 1. Conduct a scene assessment. No hazards. One injured.
Based on mechanism of injury, spinal motion restriction not required.
2. Assess the patient's level of consciousness. a. Approach the patient from the front,
identify yourself, and attempt to communicate.
b. Apply a painful stimulus by squeezing the nail bed on the patient's hand or another appropriate means.
Patient does not respond to verbal stimulus. Patient does not respond to pain. Based on AVPU, he is unresponsive.
3. Activate workplace emergency response procedure:
Ask someone to call an ambulance or have an ETV prepared. If calling an ambulance, tell them there is an unconscious adult who was found in a chair.
Lesson 9.3: Complete Airway Obstruction

Occupational First Aid Level 3 Training Guide
Module 9: Airway and Breathing Unresponsive Patient 9-9
4. Assess ABCs: a. Perform a head-tilt/chin-lift. b. Look, listen and feel for air movement for
5 sec. c. Assess carotid pulse for 5 sec.
Patient is not breathing.
Pulse is present.
5. Ventilate the patient: a. Attempt to ventilate the patient using a
pocket mask. b. Check head-tilt/chin-lift and attempt to
ventilate again.
No chest rise on first vent.
No chest rise on second vent. There is a complete airway obstruction.
6. Clear airway: a. Perform 30 chest compressions. b. Look in mouth and remove any object
seen. c. Attempt to ventilate the patient using a
pocket mask. d. Repeat steps until able to ventilate.
A candy is seen and removed after the second set of compressions. Two breaths go in and the patient starts to breathe again.
7. Assess carotid pulse for 5 sec. Pulse is present.
8. Measure and insert oral airway. The patient accepts the oral airway and is breathing normally.
9. Reassess breathing rate, rhythm, quality and chest wall movement.
You can hear and feel regular, quiet breathing. The chest rises and falls.
10. Assess circulation: • Radial pulse • Signs of shock (cool, pale, clammy skin) • Rapid body survey (bleeding, fractures)
Radial pulse is present Normal, warm, dry skin. No cyanosis. No injuries.
11. Apply high-flow oxygen. Nothing found in the mouth until the second set of chest compressions.
12. Apply a blanket for warmth.

Occupational First Aid Level 3 Training Guide
9-10 Module 9: Airway and Breathing Unresponsive Patient
13. Place the patient 3/4 prone: a. Kneel beside the patient's abdomen. b. Reach across the patient and grasp the
patient's clothing just below the waist. c. In one smooth movement, roll the
patient against your thighs. d. Position the patient's leg to prevent the
patient from rolling fully prone. All unconscious patients who do not require spinal motion restriction and are not actively being resuscitated should be placed 3/4 prone.
14. Transport decision: RTC.
15. Reassess ABCs every 5 min. Describe this and the remaining steps; there is no need to demonstrate.
16. Complete a Secondary Survey while waiting for transport or en route to hospital.
17. Complete a First Aid Record.
Summary 1. How can you tell if an unconscious patient has a complete airway obstruction?
2. What should you do to remove the obstruction?
3. What should you do to maintain the airway?
4. How can you prevent a patient in the 3/4 prone position from rolling?

Occupational First Aid Level 3 Training Guide
Module 9: Airway and Breathing Unresponsive Patient 9-11
Learning Outcomes 1. Describe the major parts of the respiratory system and how they work.
2. Describe the signs and symptoms of respiratory distress and chest injury.
Required Reading Occupational First Aid: A Reference and Training Manual, 2018 edition
Chapter 4: Anatomy and Function of Airway and Respiratory System, pages 62 – 77
Theory
Respiratory System The major components of the respiratory system are:
• Airway: nose, mouth, pharynx, trachea and bronchi
• Lungs: bronchioles, alveoli and pleura
• Thorax: muscles and bones involved in breathing
Breathing During inhalation, the respiration muscles contract, pulling down the diaphragm and lifting the ribs. This enlarges the thoracic cavity. When the thoracic cavity enlarges, pressure decreases, causing a negative pressure within the chest. This causes lung tissue to expand and, provided the airway is clear, air rushes in to fill the air sacs.
During exhalation, the respiration muscles relax, which decreases the size of the thoracic cavity. As the pressure in the chest increases, air is pushed out through the trachea.
Three processes are essential for the transfer of oxygen:
• Ventilation is the process by which air moves in and out of the lungs.
• Diffusion is the spontaneous movement of gases between the gas in the alveoli and the blood in the capillaries in the lungs.
• Perfusion is the process by which the cardiovascular system pumps blood throughout the lungs.
Lesson 9.4: Signs of Respiratory Emergencies

Occupational First Aid Level 3 Training Guide
9-12 Module 9: Airway and Breathing Unresponsive Patient
Respiratory Distress General signs and symptoms of respiratory distress include:
• Shortness of breath (dyspnea)
• Gasping
• Blue lips, fingernails or earlobes (cyanosis)
• A history of chest trauma
• Pain at the injury site
• Pain when taking a deep breath
Chest Injury Signs and symptoms of chest injury include:
• Pain at the injury site
• Pain that's aggravated by breathing
• Shortness of breath or difficulty breathing
• Failure of one or both sides of the chest to expand normally
• Coughing up blood
• Rapid and weak pulse
• Cool or moist skin
• Blue lips, fingernails or earlobes (cyanosis)
• Air under skin tissues (subcutaneous emphysema)
• Anxiety and fear
COPD Chronic obstructive pulmonary diseases (COPD) are long-standing obstructive airway diseases. They affect more than one-fifth of all North American adults. The most common forms of COPD are emphysema and chronic bronchitis.
Chest Injuries A closed pneumothorax is caused by a blunt injury, such as rib fractures, that punctures the lung. The chest wall is intact, but the lung tissue is torn, permitting air to enter the pleural space.
An open pneumothorax is caused by a penetrating chest wound, such as a metal rod puncturing the chest. With this type of injury, air passes back and forth through the wound on inspiration and expiration. Because this occasionally creates a sucking sound, this type of wound is called a sucking chest wound.

Occupational First Aid Level 3 Training Guide
Module 9: Airway and Breathing Unresponsive Patient 9-13
Asthma Asthma is a disease characterized by attacks during which the airways narrow and breathing becomes difficult. The factors that cause an acute asthmatic attack depend on the person. An attack may be caused by an allergic reaction, respiratory infection, cold air, medication, emotional stress, exercise or other irritants.
Suspected Opioid Overdose Morphine, heroin, methadone, oxycodone and fentanyl are all opioid drugs. Taking too much of any opioid drug can make breathing slow down or stop. Naloxone reverses this, restoring normal breathing and consciousness.
Summary 1. What are the major components of the respiratory system?
2. Explain what happens during the two phases of breathing?
3. What are the signs and symptoms of a chest injury?

Occupational First Aid Level 3 Training Guide
9-14 Module 9: Airway and Breathing Unresponsive Patient
Learning Outcomes 1. Manage an unresponsive patient with respiratory distress.
Required Reading Occupational First Aid: A Reference and Training Manual, 2018 edition
Chapter 6: Respiratory Emergencies, pages 62 – 77
Skill Practice Goal Manage an unresponsive patient with respiratory distress who is still breathing. Scenario A co-worker at a work camp is found unresponsive by housekeeping staff. She is on the couch in her room and there is drug paraphernalia on the coffee table. Steps 1. Conduct a scene assessment. There are no hazards. One person
injured. Based on the mechanism of injury, spinal motion restriction is not needed.
2. Assess level of consciousness. Approach the patient from the front, identify yourself, and attempt to communicate. Apply a painful stimulus by squeezing the nail bed on the patient's hand.
Patient doesn't respond to verbal or painful stimulus. Based on AVPU, she is unresponsive. She is obviously cyanotic (blue) around her lips and ear lobes.
3. Activate workplace emergency response procedure.
Ask someone to call an ambulance or have an ETV prepared. If calling an ambulance, tell them there is an unconscious adult who was found on a couch.
4. Carefully reposition the patient onto the floor.
Lesson 9.5: Respiratory Distress Unresponsive

Occupational First Aid Level 3 Training Guide
Module 9: Airway and Breathing Unresponsive Patient 9-15
5. Assess airway, breathing and pulse: a. Apply a head-tilt/chin-lift. b. Look, listen and feel for air movement for
5 sec. c. With one hand, carefully slide your
fingers to the carotid pulse and assess for 5 sec.
d. Attempt to ventilate the patient.
Airway is clear. Breathing is extremely slow and shallow. Chest barely rises. Skin is blue (cyanosis). Carotid pulse is present. Chest rises easily upon ventilation.
6. Assist ventilation: a. Every 5 sec, give the patient 1 breath
with a pocket mask. Time the ventilations with her inhalations if possible, for a combined total of 12 breaths per min.
b. If possible, train a helper to take over. Give clear directions. "Hold the mask with your fingers under the jaw and your thumbs on the mask." Ensure helper keeps mask seal tight and uses a sufficient volume of breath.
7. Measure and insert an oral airway. She accepts the oral airway.
8. Apply high-flow oxygen to the pocket mask. Tell the helper to continue venting.
9. Assess circulation: • Radial pulse present • Signs of shock (cool, pale, clammy skin) • Rapid body survey (bleeding, fractures)
Cold, dry, blue skin (cyanosis) Track marks on patient's left elbow area
10. Other critical interventions: a. Administer naloxone if available.
Giving naloxone can prevent death or brain damage from lack of oxygen during an opioid overdose.
b. Patient is being actively resuscitated, so should remain supine.
c. Apply a blanket for warmth.
A Naloxone kit is not available at the camp.
11. Transport decision: RTC
12. Package the patient for transport. Describe this and the remaining steps; there is no need to demonstrate.
13. Complete a Secondary Survey while waiting for transport or en route to hospital.

Occupational First Aid Level 3 Training Guide
9-16 Module 9: Airway and Breathing Unresponsive Patient
14. Reassess the patient's ABCs every 5 min.
15. Complete a First Aid Record.
Summary 1. If there is no need for spinal motion restriction, what manoeuvre should you use
to open the airway?
2. Why should you administer naloxone to a patient with a suspected opioid overdose?

Occupational First Aid Level 3 Training Guide
Module 9: Airway and Breathing Unresponsive Patient 9-17
Learning Outcomes 1. Manage an unresponsive patient in respiratory arrest.
Required Reading Occupational First Aid: A Reference and Training Manual, 2018 edition
Chapter 6: Respiratory Emergencies, pages 62 – 77
Skill Practice Goal Manage an unresponsive patient who has stopped breathing. Scenario While repairing a light fixture, a worker contacted a live electrical line and fell 4 m (13 ft) from his ladder to the concrete floor. When you arrive, he is lying supine. Steps 1. Conduct a scene assessment. There are no hazards. The scene
has been secured. One person injured. Based on the mechanism of injury, spinal motion restriction is needed.
2. Assess level of consciousness. Approach the patient from the front, identify yourself, and attempt to communicate. Apply a painful stimulus by squeezing the nail bed on the patient's hand.
The patient does not respond to verbal stimulus. The patient does not respond to pain stimulus. Based on AVPU, he is unresponsive.
3. Activate workplace emergency response procedure.
Ask someone to call an ambulance or have an ETV prepared. If calling an ambulance, tell them there is an unconscious adult patient who has been electrocuted.
4. Manually stabilize the head and neck.
5. Apply a jaw thrust.
Lesson 9.6: Respiratory Arrest

Occupational First Aid Level 3 Training Guide
9-18 Module 9: Airway and Breathing Unresponsive Patient
6. Assess airway, breathing and pulse: a. Look, listen and feel for air movement
for 5 sec. b. With one hand, carefully slide your
fingers to the carotid pulse and assess for 5 sec.
c. Hand over manual stabilization of head and neck with jaw thrust to a helper if available.
d. Attempt to ventilate the patient twice to determine if the airway is clear.
There is no breathing. The carotid pulse is present. Helper can maintain the manual stabilization of head and neck with jaw thrust. Chest rises easily both times. Airway is clear.
7. Assist ventilation: a. Every 5 sec, give the patient 1 breath
with a pocket mask. Time the ventilations with the patient's inhalations if possible, for a combined total of 12 breaths per min.
b. If possible, train a helper to take over. Give clear directions. "Hold the mask with your fingers under the jaw and your thumbs on the mask." Ensure helper keeps mask seal tight and uses a sufficient volume of breath.
8. Measure and insert an oral airway. Patient accepts oral airway.
9. Apply high-flow oxygen using the pocket mask.
10. Assess circulation: • Radial pulse • Signs of shock (cool, pale, clammy
skin) • Rapid body survey (bleeding,
fractures)
Radial pulse present Cold, dry, blue skin (cyanosis) No injuries found
11. Other critical interventions: a. Keep patient supine. b. Apply a blanket for warmth.
12. Transport decision: RTC
13. Apply the Modified NEXUS Rule. Since the patient is unresponsive, spinal motion restriction should be maintained.
14. Apply a hard collar. Describe this and the remaining steps; there is no need to demonstrate.
15. Attach and secure patient to spine board or scoop stretcher.

Occupational First Aid Level 3 Training Guide
Module 9: Airway and Breathing Unresponsive Patient 9-19
16. Lift the patient onto basket stretcher.
17. Complete a Secondary Survey while waiting for transport or en route to hospital.
18. Reassess patient's ABCs every 5 min.
19. Complete a First Aid Record.
Summary 1. How do you determine whether an unresponsive patient with respiratory arrest
should be given assisted ventilations?
2. How should you time the assisted ventilations?


10. Airway and Breathing Conscious Patient
10.1 Partial Airway Obstruction
10.2 Complete Airway Obstruction
10.3 Respiratory Distress No Ventilation
10.4 Respiratory Distress Ventilation
Airway and Breathing Conscious Patient
Module 10

Occupational First Aid Level 3 Training Guide
10-2 Module 10: Airway and Breathing Conscious Patient
Learning Outcomes 1. Manage a conscious patient with a partial airway obstruction.
Required Reading Occupational First Aid: A Reference and Training Manual, 2018 edition
Chapter 5: Airway Management, page 56
Skill Practice Goal Clear and maintain the airway of a conscious patient with a partial airway obstruction. Scenario A worker stood up and began to cough forcefully immediately after taking a bite of food. Steps 1. Conduct a scene assessment. No hazards. One person injured.
Based on mechanism of injury, spinal motion restriction not required
2. Assess the patient's level of consciousness.
Approach the patient from the front, identify yourself, and attempt to communicate.
The patient's eyes are open and he's coughing forcefully. Based on AVPU, he's alert.
3. Activate workplace emergency response procedure:
Ask someone to call an ambulance or have an ETV prepared. If calling an ambulance, tell them there is a responsive adult with a partial airway obstruction.
4. Assess airway. The patient is talking, coughing forcefully, and saying, "I'm choking. Help me."
5. Encourage coughing and position the patient to maximize his efforts to cough.
He continues to cough effectively. If he didn't, you would perform back blows and abdominal thrusts to clear the obstruction.
6. Assess breathing rate, rhythm, quality and chest movement.
He inhales adequately before each cough and is able to speak in short 3 to 4 word sentences between coughs. Both sides of the chest are rising equally.
Lesson 10.1: Partial Airway Obstruction

Occupational First Aid Level 3 Training Guide
Module 10: Airway and Breathing Conscious Patient 10-3
7. Assess circulation: • Radial pulse • Signs of shock (cool, pale, clammy
skin) • Modified rapid body survey
(bleeding, fractures)
Pulse is present. Skin colour is warm and the face is flushed red. There are no injuries.
8. Apply high-flow oxygen. The patient has a partial airway obstruction that is not relieving. He is showing signs of respiratory distress and becoming more agitated.
9. Apply a blanket for warmth.
10. Transport decision: Rapid Transport Category (RTC).
11. Complete a Secondary Survey while waiting for transport or en route to hospital. Describe this and the remaining steps; there is no need to demonstrate.
Watch for signs of a complete airway obstruction.
12. Reassess ABCs every 5 min and vitals every 10 min.
13. Complete a First Aid Record.
Summary 1. How can you tell if a conscious patient has a partial airway obstruction?
2. What position should the patient be placed in?
3. What critical interventions should you provide?

Occupational First Aid Level 3 Training Guide
10-4 Module 10: Airway and Breathing Conscious Patient
Learning Outcomes 1. Manage a conscious patient with a complete airway obstruction.
2. Perform back blows and abdominal thrusts.
Required Reading Occupational First Aid: A Reference and Training Manual, 2018 edition
Chapter 5: Airway Management, pages 56 – 57
Skill Practice Goal Clear and maintain the airway of a conscious patient with a complete airway obstruction. Scenario While eating a doughnut during a tailgate safety meeting, a worker starts to choke and stands up, clutching his throat with a look of panic in his eyes. Steps 1. Conduct a scene assessment. No hazards. One injured.
Based on mechanism of injury, spinal motion restriction not required.
2. Assess the level of consciousness: Approach the patient from the front, identify yourself, and attempt to communicate.
Eyes are open, but he is unable to speak. Based on AVPU, he is alert.
3. Activate workplace emergency response procedure:
Ask someone to call an ambulance or have an ETV prepared. If calling an ambulance, tell them there is a responsive adult with a complete airway obstruction.
4. Assess the airway. Ask, "Are you choking?" Patient's eyes follow you, but he's unable to speak. He nods confirming that he’s choking. This is a complete airway obstruction.
Lesson 10.2: Complete Airway Obstruction

Occupational First Aid Level 3 Training Guide
Module 10: Airway and Breathing Conscious Patient 10-5
5. Perform back blows: a. Tell the patient what you will be doing. b. Place your arm across the patient's upper
body as support and brace yourself. c. Give up to 5 forceful back blows.
Back blows, abdominal thrusts or chest thrusts are only used on a conscious patient with a suspected foreign-body obstruction of the upper airway.
6. If back blows don't dislodge the object, and the patient is not too large to manage or obviously pregnant, perform abdominal thrusts: a. Stand behind the patient and place one of
your legs between their legs and brace yourself, locate the top of the patient’s hips with your forearms and wrap both of your arms around the patient's waist. If you can't get your arms around the patient, use chest thrusts.
b. Make a fist with one hand and hold your fist with your thumb against the patient's abdomen in the midline just above the navel.
c. With your other hand, grasp your fist and press it into the patient's abdomen with a quick, forceful thrust directed inward and upward.
d. Give up to 5 abdominal thrusts.
The patient is not too large to manage or obviously pregnant.
7. Repeat back blows and abdominal thrusts until the object clears, the patient starts to cough, or the patient becomes unresponsive.
The airway clears, the patient gasps and starts coughing forcefully.
8. Position the patient for comfort and assess the breathing rhythm and quality.
Patient is coughing and taking deep breaths. Both sides of the chest are rising equally. Breathing is effective
9. Assess circulation: • Radial pulse • Signs of shock (cool, pale, clammy skin) • Modified rapid body survey (bleeding,
fractures)
Radial pulse is present. Skin is normal, warm and dry. Patient is complaining of abdominal pain where you performed abdominal thrusts.
10. Apply high-flow oxygen.
11. Apply a blanket for warmth.
12. Transport decision: Medical Aid.

Occupational First Aid Level 3 Training Guide
10-6 Module 10: Airway and Breathing Conscious Patient
13. Complete a Secondary Survey while waiting for transport or en route to hospital. Describe this and the remaining steps; there is no need to demonstrate.
14. Reassess ABCs every 5 minutes and vitals every 10 minutes
15. Complete a First Aid Record.
Summary 1. How can you tell when a conscious patient has a complete airway obstruction?
2. When should back blows and abdominal thrusts be used?
3. What should you do if you can't get your arms around the patient's waist?
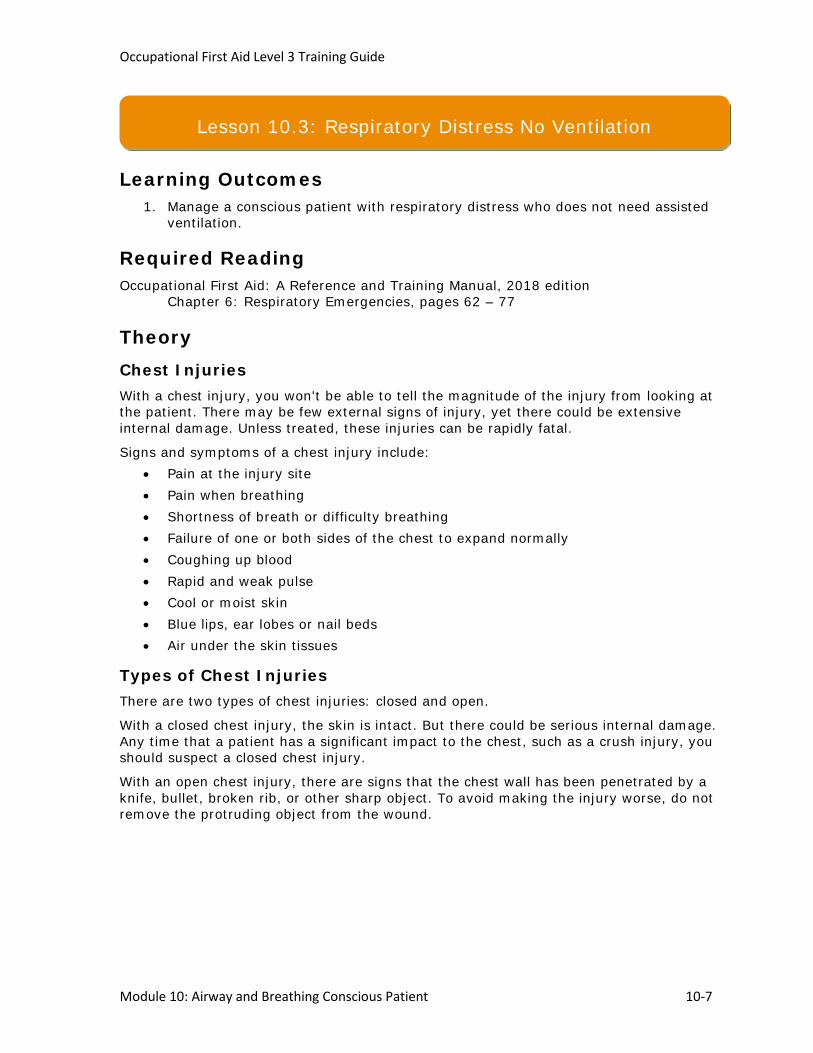
Occupational First Aid Level 3 Training Guide
Module 10: Airway and Breathing Conscious Patient 10-7
Learning Outcomes 1. Manage a conscious patient with respiratory distress who does not need assisted
ventilation.
Required Reading Occupational First Aid: A Reference and Training Manual, 2018 edition
Chapter 6: Respiratory Emergencies, pages 62 – 77
Theory Chest Injuries With a chest injury, you won't be able to tell the magnitude of the injury from looking at the patient. There may be few external signs of injury, yet there could be extensive internal damage. Unless treated, these injuries can be rapidly fatal.
Signs and symptoms of a chest injury include: • Pain at the injury site • Pain when breathing • Shortness of breath or difficulty breathing • Failure of one or both sides of the chest to expand normally • Coughing up blood • Rapid and weak pulse • Cool or moist skin • Blue lips, ear lobes or nail beds • Air under the skin tissues
Types of Chest Injuries There are two types of chest injuries: closed and open.
With a closed chest injury, the skin is intact. But there could be serious internal damage. Any time that a patient has a significant impact to the chest, such as a crush injury, you should suspect a closed chest injury.
With an open chest injury, there are signs that the chest wall has been penetrated by a knife, bullet, broken rib, or other sharp object. To avoid making the injury worse, do not remove the protruding object from the wound.
Lesson 10.3: Respiratory Distress No Ventilation

Occupational First Aid Level 3 Training Guide
10-8 Module 10: Airway and Breathing Conscious Patient
Assisting Ventilation You should assist ventilation in all patients who are not breathing effectively. They may be panicking because they feel like they can’t breathe.
Assist ventilation if:
• The patient's breathing is too rapid, too slow or too shallow.
• The patient has blue lips, ear lobes or nail beds.
• The patient can only speak one or two words without gasping.
Skill Practice Goal Manage a conscious patient with respiratory distress who does not require ventilation. Scenario A firefighter who had been fighting a forest fire returns to the bush camp to recover. He's having trouble breathing and coughing a lot. Steps 1. Conduct a scene assessment. There are no hazards. One person
injured. Based on the mechanism of injury, spinal motion restriction is not needed.
2. Assess level of consciousness. Approach the patient from the front, identify yourself, and attempt to communicate.
Patient's eyes are open. Based on AVPU, he is alert.
3. Activate workplace emergency response procedure.
Ask someone to call an ambulance or have an ETV prepared. If calling an ambulance, tell them there is a responsive adult with respiratory distress due to smoke inhalation.
4. Assess airway. He's coughing and short of breath, but able to talk. Airway is clear.
5. Assess breathing: a. Position patient for ease of breathing. b. Assess breathing rate, rhythm, quality
and chest movement.
He's coughing and short of breath, but able to speak in 4 to 5 word sentences between coughs.
6. Apply high-flow oxygen by a non-rebreathing mask.
Smoke inhalation

Occupational First Aid Level 3 Training Guide
Module 10: Airway and Breathing Conscious Patient 10-9
7. Assess circulation: • Radial pulse • Signs of shock
(cool, pale, clammy skin) • Modified rapid body survey
(bleeding, fractures)
Pulse is present. No signs of shock. Patient has small amounts of black soot on his face, including around his mouth and nostrils.
8. Other critical interventions: a. Keep patient in an upright position of
comfort to facilitate easier breathing. b. Apply a blanket for warmth.
9. Transport decision: RTC.
10. Complete a Secondary Survey while waiting for transport or en route to hospital. Describe this and the remaining steps; there is no need to demonstrate.
11. Reassess ABCs every 5 min and vitals every 10 min.
12. Complete a First Aid Record.
Summary 1. How can you determine whether a conscious patient in respiratory distress should
be given assisted ventilation?
2. All patients in respiratory distress should be given oxygen, what flow and delivery device should be used?

Occupational First Aid Level 3 Training Guide
10-10 Module 10: Airway and Breathing Conscious Patient
Learning Outcomes 1. Manage a conscious patient with respiratory distress who requires assisted
ventilation.
Required Reading Occupational First Aid: A Reference and Training Manual, 2018 edition
Chapter 6: Respiratory Emergencies, pages 62 – 77
Theory You should assist ventilation in all patients who have a carotid pulse but are not breathing effectively. Their breathing may be too fast/rapid, too slow or too shallow. They may have blue lips, ear lobes and nail beds. If conscious, they may only be able to speak one or two words without gasping. They may be panicking because they feel like they can’t breathe.
Skill Practice Goal Manage a conscious patient with respiratory distress who requires ventilation (open pneumothorax). Scenario A worker was not wearing fall restraint and fell 4.5 m (15 ft) from the building she was working on. She fell onto a pile of debris. When you arrive, she is sitting, struggling to breathe and holding her chest. Steps 1. Conduct a scene assessment. There are no hazards. One person
injured. Based on the mechanism of injury, spinal motion restriction is required.
2. Assess level of consciousness. Approach the patient from the front, identify yourself, and attempt to communicate.
Patient's eyes are open and she responds with clear speech. Based on AVPU, she is alert.
3. Activate workplace emergency response procedure.
Ask someone to call an ambulance or have an ETV prepared. If calling an ambulance, tell them there is a responsive adult who has taken a significant fall and is showing signs of respiratory distress.
Lesson 10.4: Respiratory Distress Ventilation

Occupational First Aid Level 3 Training Guide
Module 10: Airway and Breathing Conscious Patient 10-11
4. Manually stabilize head and neck.
5. Ask a helper to a. Help you lay the patient supine while
manually stabilizing the head and neck.
Tell the patient what you're going to do. She's able to talk.
6. Assess the airway. Her airway is clear.
7. Assess breathing rate, rhythm, quality and chest wall movement. Tell the patient that you are going to place a mask on their face and help them breath, try not to fight it.
Her breathing is laboured with shallow, rapid, gasping breaths. She's only able to speak one or two words before gasping for breath. She is very weak.
8. Provide assisted ventilation: a. Every 5 sec, give the patient 1 breath
using a pocket mask. Time the ventilations with her inhalations if possible, for a combined total of 12 breaths per minute.
b. Train a helper to take over the ventilations. Give clear directions. "Hold the mask with your fingers under the jaw and your thumbs on the mask." The breath should be 1 sec in duration. Ensure helper keeps mask seal tight and uses a sufficient volume of breath.
9. Apply high-flow oxygen using the pocket mask.
10. Assess circulation: • Radial pulse • Signs of shock (cool, pale, clammy skin) • Expose and examine the chest • Rapid body survey (bleeding, fractures)
Pulse is present. Skin is cool, pale and clammy. There are lacerations and instability on the right lateral chest wall. There is an open wound on the right anterior chest wall.
11. Other critical interventions: a. Leave patient supine. b. Apply a blanket for warmth. c. Cover the wound with gauze to control
any bleeding, but do not seal the open wound.
12. Transport decision: RTC. Describe the remaining steps; there is no need to demonstrate.

Occupational First Aid Level 3 Training Guide
10-12 Module 10: Airway and Breathing Conscious Patient
13. Apply Modified NEXUS Rule:
a. Is patient reliable?
b. Patient's age, what happened, pre-existing back or spine problems?
c. Any distracting injuries? d. Palpate c-spine region. e. Concerning physical findings:
• Midline spine or cervical pain • Feel/move arms and legs without
pain/unusual sensations • Numbness or tingling
14. Apply a hard collar.
15. Attach and secure patient to spine board or scoop stretcher.
16. Lift the patient onto basket stretcher.
17. Complete a Secondary Survey while waiting for transport or en route to hospital.
18. Reassess ABCs every 5 min and vitals every 10 min.f
19. Complete a First Aid Record.
Summary 1. How should you train a helper to assist ventilation?
2. What should you make sure the helper does when assisting ventilation?
3. Should you bandage an open chest wound on a patient in respiratory distress?

Occupational First Aid Level 3 Training Guide
10-13
Day 3 Homework Types of Shock During the evening, read pages 94 – 99 in the textbook. Bring notes on the following to the next class:
1. What are the five types of shock?
2. What are the signs and symptoms of hypovolemic and cardiogenic shock?
3. What are the signs and symptoms of anaphylactic shock?
4. What are the signs and symptoms of neurogenic shock?
5. What are the signs and symptoms of septic shock?
NOTES

Occupational First Aid Level 3 Training Guide
10-14
NOTES

11. Cardiac Emergencies
11.1 Circulatory System
11.2 Angina
11.3 Heart Attack
11.4 Cardiac Arrest
Cardiac Emergencies Module 11

Occupational First Aid Level 3 Training Guide
11-2 Module 11: Cardiac Emergencies
Learning Outcomes 1. Describe the major parts of the circulatory system and how they work.
2. Describe the potential impact of arteriosclerosis on cardiovascular health.
3. Describe strategies for managing a patient with congestive heart failure.
Required Reading Occupational First Aid: A Reference and Training Manual, 2018 edition
Chapter 8: Anatomy and Function of the Circulatory System, pages 89 – 93
Theory The Two Systems The circulatory system is made up of two separate systems:
• Pulmonary circulation which provides circulation through the lungs
• Systemic circulation which provides circulation through the rest of the body
Pulmonary Circulation Pulmonary arteries are the blood vessels from the right side of the heart. They branch and re-branch, finally forming the pulmonary capillaries. These capillaries form an extensive network over the surface of each alveolus in the lung tissue.
Oxygen from the alveoli is absorbed by the blood, and carbon dioxide from the blood is released to the alveoli. The oxygenated blood from the lungs returns to the heart and enters the left atrium. It then passes into the left ventricle and is pumped into the systemic circulation system again.
Systemic Circulation The systemic circulation system includes:
• Arteries which carry blood away from the heart to the organs and other parts of the body
• Veins which return blood from the capillary system to the heart
• Capillaries which allow exchanges of oxygen, water and other nutrients between blood and body cells. This is also how carbon dioxide and other waste products pass from tissue cells into the blood to be carried away.
Lesson 11.1: Circulatory System

Occupational First Aid Level 3 Training Guide
Module 11: Cardiac Emergencies 11-3
Heart The heart is a hollow muscular organ, slightly bigger than a fist. It is located between the lungs to the left of the midline of the body.
The heart is really a double pump. The right atrium of the heart receives the venous blood returning from body tissues. It delivers this venous blood to the right ventricle, which pumps the blood into the capillary network of the lungs. At this point, oxygen passes into the blood and carbon dioxide passes from the blood into the alveoli.
This blood, which is now rich in oxygen, flows from the lungs into the left atrium of the heart. The left atrium delivers this oxygenated blood to the left ventricle where it is pumped to all parts of the body.
The pumping action of the different chambers of the heart is initiated by the heart's intrinsic pacemaker, which is the sinoatrial node.
Arteriosclerosis Atherosclerosis is the buildup of fatty deposits in the inner walls of an artery. These deposits, known as plaque, are made up of fats such as cholesterol. As these deposits build, the artery is narrowed and the flow of arterial blood is restricted.
Over time, calcium can be deposited at the site, causing the area to harden and the vessel to lose its elasticity. This affects blood flow and increases blood pressure. Blood clots may form and break off, causing heart attacks.
Congestive Heart Failure With congestive heart failure, the lungs become swollen with blood and the patient has trouble breathing. All patients with congestive heart failure are in the Rapid Transport Category (RTC).
Key strategies for helping a patient with congestive heart failure include:
• Keep the patient calm.
• Provide oxygen quickly.
• Suction the airway.
• Assist ventilation if needed.
Summary 1. How does the pulmonary circulation system work?
2. What does the systemic circulation system include?
3. How does the heart work?
4. What is atherosclerosis?
5. What are the key strategies for helping a patient with congestive heart failure?

Occupational First Aid Level 3 Training Guide
11-4 Module 11: Cardiac Emergencies
Learning Outcomes 1. Manage a patient who is having an angina attack.
Required Reading Occupational First Aid: A Reference and Training Manual, 2018 edition
Chapter 12: Non-Traumatic Cardiac Emergencies, pages 108 – 109
Theory Signs and Symptoms of Angina With angina, the classic symptom is chest pain. There is a reduction of oxygen supply to the heart muscle due to narrowing of the heart's arteries. The lack of oxygen may cause pain that is similar to the pain of a heart attack, which is referred to as angina pectoris.
The pain may occur suddenly or build gradually. The pain is usually preceded by physical activity and is located beneath the sternum in the anterior chest. The pain may radiate across the anterior chest. It may also be felt in the arms, neck or jaw, or through the back.
Signs and symptoms of angina are:
• Pain (usually eases with rest and nitroglycerin; lasts less than 15 min)
• Nausea
• Apprehension or uneasiness
• Pallor
• Shortness of breath
Lesson 11.2: Angina

Occupational First Aid Level 3 Training Guide
Module 11: Cardiac Emergencies 11-5
Skill Practice Goal Manage a patient who is having an angina attack. Scenario A weigh scale operator began experiencing chest pain. His coworkers asked you to come to the area and help him. When you arrive, he is sitting on a box, leaning against a stack of pallets. He says he was helping to ship an order when his angina started to flare up. Steps 1. Conduct a scene assessment. There are no hazards. One
patient. Since there is no trauma, spinal motion restriction is not required.
2. Assess level of consciousness. Approach the patient from the front, identify yourself, and attempt to communicate.
Based on AVPU, patient is alert.
3. Place the patient in a comfortable position, preferably supine.
Patient prefers to stay where he is.
4. Assess airway. Patient speaks clearly. Airway is clear.
5. Assess breathing rate, rhythm, quality and chest wall movement.
Breathing is shallow, but it is effective.
6. Assess circulation: • Radial pulse • Signs of shock (cool, pale, clammy skin) • Rapid body survey (bleeding, fractures)
Radial pulse is present. Skin is cool, pale and dry. No pain anywhere else.
7. Administer high-flow oxygen.
8. Because there is no history of trauma, assess the pain using PPQRRST.
Position, Provoke, Quality, Radiation, Relief, Severity, Timing
Substernal, heavy lifting, feels tired and short of breath. No radiation of pain. Rest helps. Pain was 5/10 at first, but is getting better (2/10 now). Started about 5 mins ago.
9. Help with medication: a. Ask if patient has taken any medications. If
the patient took an erectile dysfunction medication within the last 24 to 48 hours, he cannot take nitroglycerin.
b. Check expiry date of nitroglycerin. c. Help the patient take his nitroglycerin.
Patient hasn't taken any meds today. Angina meds are in the patient’s coat pocket in the weigh scale shack. About 5 min after taking medication, the patient begins to feel better.

Occupational First Aid Level 3 Training Guide
11-6 Module 11: Cardiac Emergencies
10. Transport decision: Not enough information to decide if medical aid needed.
Not in RTC at this time.
11. Complete a Secondary Survey. Monitor patient for a while before allowing him to return to work
Patient is feeling better with rest and medication
12. Reassess ABCs every 5 minutes and vitals every 10 minutes
Second set of vitals shows improvement
13. Complete a First Aid Record. Since patient’s vitals are stable, patient can return to less physical work.
Summary 1. What should you ask the patient before helping them take their nitroglycerin?
2. How can you decide whether the angina patient can return to work?

Occupational First Aid Level 3 Training Guide
Module 11: Cardiac Emergencies 11-7
Learning Outcomes 1. Manage a patient who is having a heart attack.
Required Reading Occupational First Aid: A Reference and Training Manual, 2018 edition
Chapter 12: Non-Traumatic Cardiac Emergencies, pages 109 – 110
Theory Signs and Symptoms of a Heart Attack If part of the heart is deprived of oxygen for long enough, the heart muscle cells in that area will die. This is called a heart attack.
The pain may occur suddenly or build gradually. The pain is usually located beneath the sternum in the anterior chest and may radiate across the anterior chest. It may also be felt in the back, arms, neck or jaw. It may be described as choking, squeezing, vice-like, burning or intense indigestion. Patients who are having a heart attack often experience a feeling of pressure.
A heart attack usually lasts longer than 30 min and is constant. It is not affected by coughing, movement, deep breaths, oxygen, angina medication or rest.
Signs and symptoms of a heart attack are:
• Chest pain
• Apprehension and denial
• Marked weakness, especially in the arms
• Shortness of breath or difficulty breathing
• Sweating
• Pallor
• Nausea or vomiting and the desire to defecate
• A weak and rapid pulse
Lesson 11.3: Heart Attack

Occupational First Aid Level 3 Training Guide
11-8 Module 11: Cardiac Emergencies
Skill Practice Goal Manage a patient who is having a heart attack. Scenario A worker walks into the first aid room and sits down. She tells you that she has pain in her chest that started when she was shovelling snow. She looks pale and sweaty, and says she is very tired. Steps 1. Conduct a scene assessment. There are no hazards. One patient.
Spinal motion restriction is not required.
2. Assess level of consciousness. Approach the patient from the front, identify yourself, and attempt to communicate.
Patient is very anxious, but able to speak clearly. Based on AVPU, she is alert.
3. Position the patient in the position of most comfort, preferably supine if willing.
She prefers to sit and lean back in a chair or the cot.
4. Assess the airway. Patient is speaking clearly. Airway is clear.
5. Assess the breathing rate, rhythm and quality.
Breathing is shallow, but effective.
6. Assess circulation: • Radial pulse • Signs of shock (cool, pale, clammy
skin) • Modified rapid body survey (bleeding,
fractures)
Radial pulse is present. Skin is cool, pale and clammy. No pain anywhere else.
7. Administer high-flow oxygen.
8. Determine if patient is on medication. She is on medication for high blood pressure. No previous history of chest pain
9. Because there is no history of trauma, assess the pain using PPQRRST.
Position, Provoke, Quality, Radiation, Relief, Severity, Timing
Pain is behind the breastbone. Feels vice-like and radiates down left arm. Severity is 7 out of 10. Gets worse when she's working. Pain has lasted 40 minutes with no relief.
10. Activate workplace emergency response procedure:
Ask someone to call an ambulance or have an ETV prepared.
Tell the dispatcher there’s a responsive woman with chest pain that started 40+ mins ago.

Occupational First Aid Level 3 Training Guide
Module 11: Cardiac Emergencies 11-9
11. Critical intervention: a. Check that patient isn't allergic to
ASA, having a heart attack because of a stroke, having an asthmatic attack, or under 19 years of age.
b. If NO to all of the above, offer the patient two 80 mg chewable tablets of ASA or one regular strength 325 ASA tablet to chew.
It must be ASA, not acetaminophen or ibuprofen.
No allergies to ASA Not having a heart attack because of a stroke Not having an asthmatic attack Over 19
12. Transport decision: RTC.
13. Help the patient move into the basket stretcher or do a fore and aft lift. If you use a fore and aft lift, ask the patient to remain still.
14. Package patient in a position of comfort with minimal securing. Describe this and the remaining steps; there is no need to demonstrate.
15. Continue with secondary survey en route or while waiting for the ETV or ambulance.
16. Reassess ABCs every 5 min and vitals every 10 min.
17. Complete a First Aid Record.
Summary 1. Where is the pain associated with a heart attack and what does it feel like?
2. What should you offer to a patient who is having a heart attack?
3. Are possible heart attacks in the Rapid Transport Category?

Occupational First Aid Level 3 Training Guide
11-10 Module 11: Cardiac Emergencies
Learning Outcomes 1. Manage a patient who is in cardiac arrest.
Required Reading Occupational First Aid: A Reference and Training Manual, 2018 edition
Chapter 13: Cardiopulmonary Resuscitation (CPR), pages 113 – 115
Skill Practice Goal Manage a patient who is in cardiac arrest. Scenario A worker was found slumped over a table in the store room and was carefully laid supine on the floor by co-workers. Steps 1. Conduct a scene assessment.
No hazards. One worker injured. Spinal motion restriction is not required.
2. Assess level of consciousness. Approach the patient from the front, identify yourself, and attempt to communicate.
Patient does not respond to verbal stimuli.
3. Activate workplace emergency response procedure:
Ask someone to call an ambulance or have an ETV prepared. If calling ambulance, tell them there is an unresponsive adult and to report back.
Patient requires urgent medical help.
4. Assess airway, breathing and circulation: a. Perform a head-tilt/chin-lift. b. Look, listen and feel for air movement for 5
sec. c. With one hand, carefully slide your fingers to
the carotid pulse and assess for 5 sec.
Patient is not breathing normally. There is no pulse.
Lesson 11.4: Cardiac Arrest

Occupational First Aid Level 3 Training Guide
Module 11: Cardiac Emergencies 11-11
5. Perform 30 chest compressions: a. If an AED is available at the scene, apply it now
(see Step 9). Or send a helper to bring the AED.
b. As you perform chest compressions, train a helper to take over if possible.
c. Ensure patient is on hard surface and expose chest.
d. Place your hands on the centre of the chest. e. Interlock your fingers and straighten your arms
until your elbows lock. f. Press straight down.
Push hard; push fast. Compress at least 5 cm (2 inches) at a rate of at least 100/min. Allow chest to recoil.
g. If available, have helper take over compressions. Switch roles every 2 min or 5 cycles of 30:2.
AED is not at the scene. You have a helper that has had CPR training in the past.
6. Measure and insert an oral airway.
7. Apply high-flow oxygen to pocket mask.
8. If the patient remains unresponsive: a. Perform a head-tilt/chin-lift. b. Using a pocket mask, ventilate the patient with
2 breaths. About 1 sec per breath, just enough to make the chest rise.
9. When AED arrives, prepare patient and attach AED.: a. Bare the chest if not already done. b. Turn on AED and follow voice prompts. c. Shave hair, remove patches and make sure the
chest is dry. d. Apply pads at least 1 inch from implanted
devices.
Chest is dry. No chest hair, medication patches or medical devices
10. Analyze the heart rhythm: a. Follow voice prompts or press the Analyze
button. b. Tells the helper to, "Stop compressions and
don't touch the patient." c. Make sure no one is touching the patient and
everyone is standing clear.

Occupational First Aid Level 3 Training Guide
11-12 Module 11: Cardiac Emergencies
11. Deliver a shock: a. Say, "I'm clear. Everyone is clear. Do not
touch the patient." b. If prompted to do so, press the Shock button.
12. Continue CPR/AED until: • Spontaneous circulation and breathing is
restored. • Patient is transferred to EHS. • You are too tired to continue. • 30 min passes without even a temporary
return of normal breathing or pulse.
13. Confirm Transport decision: RTC
14. Complete a Secondary Survey while waiting for transport or en route to hospital. Describe this and the remaining steps; there is no need to demonstrate.
15. Reassess ABCs every 5 mins and vitals every 10 mins.
16. Complete a First Aid Record.
Summary 1. How can you determine whether a patient is in cardiac arrest?
2. How long should you continue CPR/AED?

12. Shock
12.1 Signs of Shock
12.2 Hypovolemic Shock
12.3 Life-Threatening Allergic Reaction
Shock Module 12

Occupational First Aid Level 3 Training Guide
12-2 Module 12: Shock
Learning Outcomes 1. Describe what shock is.
2. List the types of shock.
3. Describe the signs and symptoms of shock.
Required Reading Occupational First Aid: A Reference and Training Manual, 2018 edition
Chapter 9: Shock, pages 94 – 99
Theory
Definition of Shock A patient who is in shock has inadequate perfusion of their cells. This results in a lack of oxygen and ineffective waste removal at the cell level. Wastes begin to accumulate and cells begin to die. The body tries to compensate by increasing breathing and pulse rates. The blood vessels constrict in parts of the body, for example the skin and digestive tract. Blood is moved away from non-vital organs so more blood is available to the vital organs such as the brain and heart.
Causes of Shock There are three main causes of shock:
• Low blood volume due to bleeding or fluid loss
• Excessively dilated blood vessels due to spinal injury or a severe allergic reaction called anaphylaxis
• Heart damage due to a heart attack or direct trauma to the chest
Class Discussion 1. As an OFA attendant, what are the five main types of shock you may encounter?
What is the cause of each type?
Lesson 12.1: Signs of Shock

Occupational First Aid Level 3 Training Guide
Module 12: Shock 12-3
Answers

Occupational First Aid Level 3 Training Guide
12-4 Module 12: Shock
Group Share 1. What are the signs and symptoms of hypovolemic and cardiogenic shock?
2. What are the signs and symptoms of anaphylactic shock?
3. What are the signs and symptoms of neurogenic shock?
4. What are the signs and symptoms of septic shock?
Answers

Occupational First Aid Level 3 Training Guide
Module 12: Shock 12-5
Class-Based Scenario Exercise Instructions Identify the type of shock and its symptoms in each of the following scenarios.
Scenarios 1. While performing her regular duties, a shop supervisor developed chest pain.
When you approach her, you notice that she is pale and sweaty. She appears anxious.
2. A piece of sheet metal fell off a forklift and struck a worker in the chest. The worker was thrown to the ground and is bleeding severely. As you approach, you notice that he is pale and sweaty. His pulse is rapid and he has agonal breathing.
3. A worker was riding his ATV between worksites when it started to rain. The ATV skidded out of control throwing the driver onto the road. He's having difficulty breathing and you can't find his radial pulses. Plus, he says that he can't feel his legs.
4. A tree planter was at the crew truck preparing for work when a bee stung her arm. The area around the sting is red and swollen. She has tingling around her mouth and is having difficulty breathing.
Answers

Occupational First Aid Level 3 Training Guide
12-6 Module 12: Shock
Summary 1. What are the main causes of shock?
2. Why are the signs and symptoms of hypovolemic shock?
3. What are the signs and symptoms of anaphylactic shock?
4. What are the signs and symptoms of neurogenic shock?

Occupational First Aid Level 3 Training Guide
Module 12: Shock 12-7
Learning Outcomes 1. Manage a patient who is in hypovolemic shock.
Required Reading Occupational First Aid: A Reference and Training Manual, 2018 edition
Chapter 9: Shock, pages 96 – 98
Skill Practice Goal Manage a patient who is in hypovolemic shock. Scenario A piece of lumber fell off a conveyor and struck a worker in the lower-right ribs. The worker was knocked 4 m (13 ft) to the ground. When you arrive, she is lying supine. Steps 1. Conduct a scene assessment. No hazards. One worker injured.
Based on mechanism of injury, spinal motion restriction is required.
2. Assess the level of consciousness: Approach the patient from the front, identify yourself, and attempt to communicate.
Her eyes are open, she appears anxious, and she responds with clear speech. Based on AVPU, she is alert.
3. Activate workplace emergency response procedure:
Ask someone to call an ambulance or have an ETV prepared. If calling an ambulance, say there is a responsive adult who has taken a significant fall.
4. Manually stabilize the head and neck. If available, train a helper to take over manual stabilization. "Hands over mine, fingers and thumbs where mine are, elbows braced. Don’t move while I reposition myself. Let me know if you have to move so I can help."
5. Assess the airway. Patient is talking normally. Airway is clear.
Lesson 12.2: Hypovolemic Shock

Occupational First Aid Level 3 Training Guide
12-8 Module 12: Shock
6. Assess the breathing rate, rhythm, quality and chest wall movement.
Breathing is slightly rapid and shallow, but patient can speak in full sentences. Both sides of chest expand evenly. Not cyanotic (blue).
7. Assess circulation: • Radial pulse • Signs of shock (cool, pale, clammy skin) • Expose and examine the chest • Rapid body survey (bleeding, fractures)
Radial pulse is weak and rapid. Skin is cool, pale and clammy. Patient is in shock. There is redness and bruising in the lower-right rib area. Possible internal bleeding of liver. No external bleeding.
8. Apply high-flow oxygen.
9. Transport decision: Rapid Transport Category
10. Other critical interventions: a. Leave patient supine and keep still. b. Provide a blanket for warmth.
11. Apply Modified NEXUS Rule:
a. Is patient reliable?
b. Patient's age, what happened, pre-existing back or spine problems?
c. Any distracting injuries? d. Palpate c-spine region. e. Concerning physical findings:
• Midline spine or cervical pain • Feel/move arms and legs without
pain/unusual sensations • Numbness or tingling
Patient is reliable. She is 35. Does not have pre-exiting problems or distracting injuries. No spinal abnormalities. No pain, unusual sensations, numbness or tingling. Spinal motion restriction is NOT required.
12. Package patient in position of comfort.
13. Complete a Secondary Survey while waiting for transport or en route to hospital. Describe this and the remaining steps; there is no need to demonstrate.
14. Reassess ABCs every 5 min.
15. Complete a First Aid Record.

Occupational First Aid Level 3 Training Guide
Module 12: Shock 12-9
Summary 1. How can you tell if a patient is in hypovolemic shock?
2. What critical interventions can be provided for a patient in hypovolemic shock?
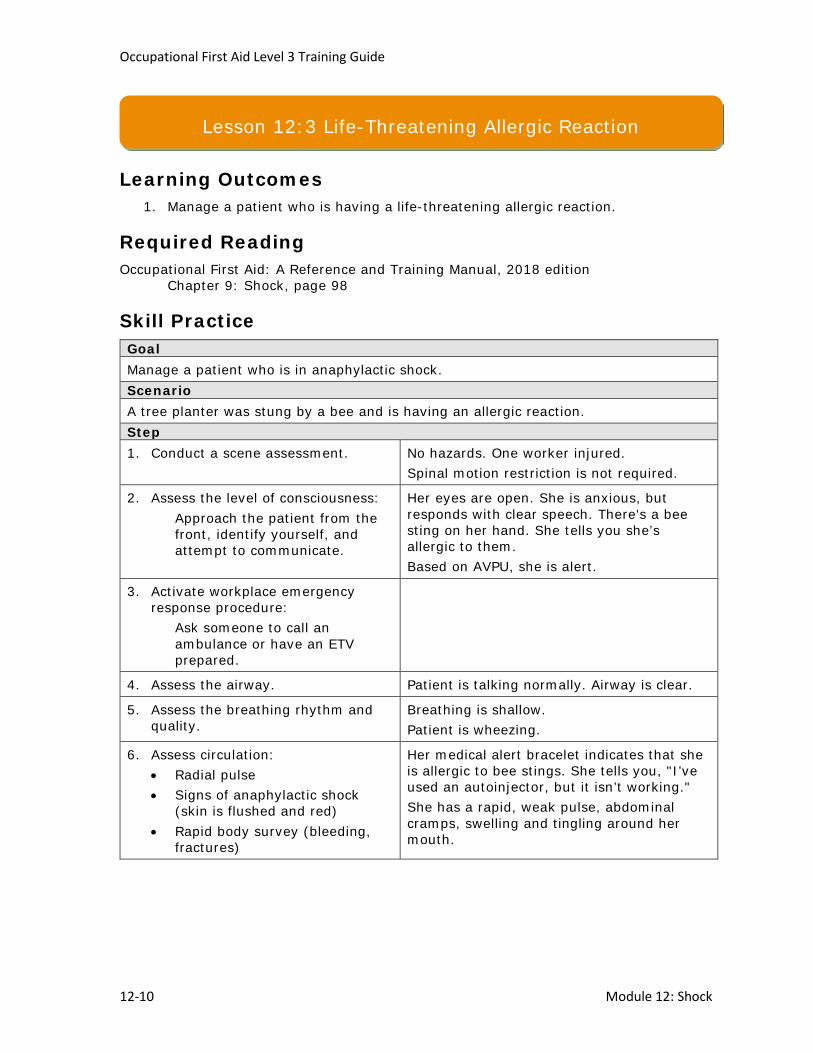
Occupational First Aid Level 3 Training Guide
12-10 Module 12: Shock
Learning Outcomes 1. Manage a patient who is having a life-threatening allergic reaction.
Required Reading Occupational First Aid: A Reference and Training Manual, 2018 edition
Chapter 9: Shock, page 98
Skill Practice Goal Manage a patient who is in anaphylactic shock. Scenario A tree planter was stung by a bee and is having an allergic reaction. Step 1. Conduct a scene assessment. No hazards. One worker injured.
Spinal motion restriction is not required.
2. Assess the level of consciousness: Approach the patient from the front, identify yourself, and attempt to communicate.
Her eyes are open. She is anxious, but responds with clear speech. There's a bee sting on her hand. She tells you she’s allergic to them. Based on AVPU, she is alert.
3. Activate workplace emergency response procedure:
Ask someone to call an ambulance or have an ETV prepared.
4. Assess the airway. Patient is talking normally. Airway is clear.
5. Assess the breathing rhythm and quality.
Breathing is shallow. Patient is wheezing.
6. Assess circulation: • Radial pulse • Signs of anaphylactic shock
(skin is flushed and red) • Rapid body survey (bleeding,
fractures)
Her medical alert bracelet indicates that she is allergic to bee stings. She tells you, "I’ve used an autoinjector, but it isn’t working." She has a rapid, weak pulse, abdominal cramps, swelling and tingling around her mouth.
Lesson 12:3 Life-Threatening Allergic Reaction

Occupational First Aid Level 3 Training Guide
Module 12: Shock 12-11
7. Treat severe allergic reaction: a. Ask a helper to retrieve the
auto-injector from the kit. b. Check the expiration date of the
auto-injector. c. Help patient use the epinephrine
auto-injector.
The work truck first aid kit has another Epinephrine auto-injector in it.
8. Apply high-flow oxygen.
9. Provide a blanket for warmth.
10. Transport decision: RTC.
11. Assist patient to ETV or package in position of comfort.
12. Complete a Secondary Survey while waiting for transport or en route to hospital.
13. Reassess ABCs every 5 min and vitals every 10 min.
14. Complete a First Aid Record.
Summary 1. How can you tell if a patient is in anaphylactic shock?
2. What critical interventions can be provided for a patient in anaphylactic shock?

Occupational First Aid Level 3 Training Guide
12-12
Day 4 Homework Obstetrical and Nervous System During the evening, read pages 119 – 122, 188 – 189 and 363 – 365 in the textbook. Bring notes on the following to the next class:
1. What are the signs and symptoms of a pregnancy or childbirth emergency?
2. How can you help a woman who is pregnant or having a childbirth emergency?
3. What are the major parts of the nervous system and how do they work?
NOTES

Occupational First Aid Level 3 Training Guide
12-13
NOTES


13. Bleeding
13.1 Signs of Bleeding
13.2 Using a Tourniquet
13.3 Massive Bleeding Conscious
13.4 Amputation
13.5 Massive Bleeding Unresponsive
Bleeding Module 13

Occupational First Aid Level 3 Training Guide
13-2 Module 13: Bleeding
Learning Outcomes 1. Describe the signs and symptoms of external bleeding.
2. Describe the signs and symptoms of internal bleeding.
Required Reading Occupational First Aid: A Reference and Training Manual, 2018 edition
Chapter 10: Bleeding and its Management, pages 100 – 101
Theory External Bleeding The signs and symptoms of external bleeding depend on which vessel is mostly involved:
• Arterial bleeding: The blood spurts or pulses out, and is usually bright red.
• Venous bleeding: The blood comes in a steady flow and is usually darker than arterial blood.
• Capillary bleeding: There is a continuous, steady ooze.
External bleeding can usually be controlled by applying direct pressure on the wound. Although this may cause pain, it is necessary to control the bleeding. If bleeding is not controlled by direct pressure, a tourniquet should be applied proximal to the wound site.
Internal Bleeding Signs of symptoms of internal bleeding include:
• Cool, pale and clammy skin
• A weak and rapid pulse
• Shortness of breath and agonal breathing
• Faintness and dizziness
• Thirst, anxiety and restlessness
• Nausea and vomiting
Summary 1. What are the signs and symptoms of external bleeding?
2. What are the signs and symptoms of internal bleeding?
Lesson 13.1: Signs of Bleeding

Occupational First Aid Level 3 Training Guide
Module 13: Bleeding 13-3
Learning Outcomes 1. Apply a tourniquet if needed.
Required Reading Occupational First Aid: A Reference and Training Manual, 2018 edition
Chapter 29: Soft-Tissue Injuries, pages 102 – 103
Theory
Purpose and Use of Tourniquets A tourniquet is a constricting or compressing bandage used to control severe bleeding from an extremity and can be used to control hemorrhage in the following circumstances:
• Direct pressure fails to control bleeding
• Another life-threatening priority demands your attention
• You're unable to access the injury (such as when an arm or leg is trapped in machinery or equipment, and you can't get to the bleeding site to apply direct pressure)
The best type of tourniquet to use is a commercial tourniquet designed for tactical applications such as a Combat Application Tourniquet. This type of tourniquet has been studied and recommended for use in a first aid setting.
Skill Practice Goal Apply a tourniquet. Steps 1. Unfasten the tourniquet and secure the strap into the buckle.
2. Place the tourniquet around your arm (or thigh) and tighten by pulling on the strap.
3. Twist the windlass until the bleeding stops. Do not actually tighten.
4. Anchor the windlass and record the time it was applied.
Summary 1. When should a tourniquet be used to control bleeding?
Lesson 13.2: Using a Tourniquet

Occupational First Aid Level 3 Training Guide
13-4 Module 13: Bleeding
Learning Outcomes 1. Manage a conscious patient with massive bleeding.
2. Apply pressure to help control external bleeding.
3. Dress and bandage the injury as needed.
4. Apply a tourniquet if needed.
Required Reading Occupational First Aid: A Reference and Training Manual, 2018 edition
Chapter 10: Bleeding and its Management, pages 102 – 104
Skill Practice Goal Manage a conscious patient with massive external bleeding. Scenario A worker was struck in the left leg by a chainsaw that kicked back. When you arrive, the chainsaw has been turned off and the patient is lying supine on the ground. Steps 1. Conduct a scene assessment. No hazards.
One person injured. Left thigh is bleeding. Pool of blood underneath the leg. Patient confirms that he did not fall or hit his head. Spinal motion restriction is not required.
2. On approach, give helpers gloves. Helpers put on gloves.
3. Assess the level of consciousness: Approach the patient from the front, identify yourself, and attempt to communicate.
Patient's eyes are open, but he is extremely anxious. He responds with clear speech. Based on AVPU, he is alert.
4. Activate workplace emergency response procedure:
Ask someone to call an ambulance or have an ETV prepared. If calling an ambulance, tell them there is a responsive adult who has severe bleeding from a cut on the leg.
Lesson 13.3: Massive Bleeding Conscious

Occupational First Aid Level 3 Training Guide
Module 13: Bleeding 13-5
5. Assess the airway, breathing and circulation on approach.
Patient is speaking in full sentences. Airway is clear. Breathing is unlabored. Both sides of chest expand evenly. Patient is conscious so heart must be beating.
6. Apply direct pressure: a. Open first aid kit, find scissors and expose
the site of bleeding. b. Using absorbent dressings, apply direct
pin-point pressure directly on wound site and maintain pressure.
c. Ask helper to take over maintaining direct pressure on the wound with an absorbent dressing.
Moderate flow of dark blood (venous) Bleeding is not controlled by direct pressure Tourniquet is needed
7. Apply a tourniquet: a. Apply a windlass-style tourniquet several
inches proximal to the wound site. b. Secure the tourniquet strap firmly around
the limb. c. Tighten the windlass until the bleeding
stops. d. Anchor the windlass. e. Attach a tag to the tourniquet that
indicates when it was applied.
Bleeding stops with correct application of the tourniquet.
8. Assess circulation: • Radial pulse • Signs of shock (cool, pale, clammy skin) • Rapid body survey (bleeding, fractures)
Pulse is present. Skin is pale, cool and dry. No other injuries
9. Apply high-flow oxygen.
10. Other critical interventions: a. Apply more dressings over the ones
already applied and one or more fracture straps over all of the dressings on the wound. Do not cover the tourniquet.
b. The patient should remain supine. c. Apply a blanket for warmth.
11. Transport decision: Rapid Transport Category (RTC).
12. Complete a Secondary Survey while waiting for transport or en route to hospital. Describe this and the remaining steps; there is no need to demonstrate.

Occupational First Aid Level 3 Training Guide
13-6 Module 13: Bleeding
13. Reassess ABCs every 5 min and vitals every 10 min.
14. Complete a First Aid Record.
Summary 1. When should direct pressure be applied to a massive bleed?
2. If the source of massive bleeding is obvious, do you need to do a rapid body survey?

Occupational First Aid Level 3 Training Guide
Module 13: Bleeding 13-7
Learning Outcomes 1. Manage a patient with an amputation.
2. Apply a tourniquet if needed.
3. Prepare the amputated part for transport.
Required Reading Occupational First Aid: A Reference and Training Manual, 2018 edition
Chapter 29: Soft-Tissue Injuries, pages 221 – 223
Skill Practice Goal Manage a patient with an amputation. Scenario A worker was cutting lumber on a radial saw when he caught his hand in the blade. The hand was fully amputated at the wrist. When you arrive, he is on his knees clutching the stump. Steps 1. Conduct a scene assessment. No hazards. One person injured.
A significant amount of blood has soaked into the patient's sleeve and is pooling on the ground. Based on mechanism of injury, spinal motion restriction is not required.
2. Activate workplace emergency response procedure: Ask someone to call an ambulance or have an ETV prepared. If calling an ambulance, tell them there is a responsive adult who has amputated his hand. Put on gloves and glasses.
3. Assess the level of consciousness: Approach the patient from the front, identify yourself, and attempt to communicate.
Patient's eyes are open. He is extremely anxious, but responds with clear speech. He confirms that he did not fall. Based on AVPU, he is alert.
4. Assess the airway, breathing and circulation on approach.
Patient is able to call out for help; airway is clear. Patient is breathing normally. Patient is conscious so heart must be beating.
Lesson 13.4: Amputation

Occupational First Aid Level 3 Training Guide
13-8 Module 13: Bleeding
5. Control bleeding: a. Apply direct pressure over the
wound and position patient supine.
b. Cut away sleeve to expose the site of the bleeding.
c. Keep the patient's upper arm in contact with the ground. Do not fully elevate the arm.
d. Apply additional dressings if needed.
e. Apply more direct pressure if needed.
The bandage soaks through rapidly and continues to bleed. Apply additional dressings over the initial dressing and apply more pressure. Bright red blood is spurting out of the wound. This is arterial bleeding
6. Ask a helper to don PPE and take over direct pressure.
Helper applies direct pressure with gloved hands.
7. Apply a tourniquet: a. Apply a commercially prepared
tourniquet several inches proximal to the wrist.
b. Secure the tourniquet strap firmly around the limb.
c. Tighten the windlass until the bleeding stops.
d. Anchor the windlass. e. Attach a tag to the tourniquet
that indicates when it was applied.
Bleeding stops with correct application of the tourniquet.
8. Assess circulation: • Radial pulse on uninjured arm • Signs of shock (cool, pale,
clammy skin) • Rapid body survey
The radial pulse is weak and rapid. Skin is cold, pale and dry. No other injuries are found.
9. Apply high-flow oxygen.
10. Other critical interventions: a. Bandage the bleed using a large
gauze pad and ABD dressing. b. Secure the dressings with a
crepe roller bandage. c. The patient should remain
supine. d. Apply a blanket for warmth.
Do not cover the tourniquet with the bandages.

Occupational First Aid Level 3 Training Guide
Module 13: Bleeding 13-9
11. Prepare the amputated part for transport: a. As carefully as possible, clean
off any gross foreign matter. b. Dress the part in sterile, moist
gauze. c. Place the dressed part in a
waterproof bag with seal. d. Place the bag inside another
filled with ice. e. Label the bag with the date and
time of the amputation. f. Transport the part with the
patient.
12. Transport decision: RTC.
13. Complete a Secondary Survey while waiting for transport or en route to hospital.
14. Reassess ABCs every 5 min and vitals every 10 min.
15. Complete a First Aid Record.
Summary 1. What should you do if the dressing becomes soaked in blood?
2. How should you clean an amputated part?
3. How should you store an amputated part?

Occupational First Aid Level 3 Training Guide
13-10 Module 13: Bleeding
Learning Outcomes 1. Manage an unresponsive patient with massive bleeding.
2. Apply pressure to help control external bleeding.
3. Dress and bandage the injury as needed.
4. Apply a tourniquet if needed.
Required Reading Occupational First Aid: A Reference and Training Manual, 2018 edition
Chapter 10: Bleeding and its Management, pages 102 – 104
Skill Practice Goal Manage an unresponsive patient with massive external bleeding. Scenario A traffic control person was struck by an oncoming vehicle travelling at about 50 km/hr through a construction zone. When you arrive, the traffic control person is lying supine on the ground. Steps 1. Conduct a scene assessment. No hazards. Traffic has been
stopped. One person injured. Right thigh is bleeding. Pool of blood underneath the leg. Based on mechanism of injury, spinal motion restriction is required.
2. On approach, give helpers gloves and the first aid kit. Ask them to apply pressure on wound.
The helper must be trained in at least OFA 1. If a trained helper is not available, do a basic assessment of the ABCs and proceed to controlling the bleed as quickly as possible.
3. Assess the level of consciousness: a. Approach the patient from the front,
identify yourself, and attempt to communicate.
b. Apply a painful stimulus by squeezing the nail bed on the patient's hand or another appropriate stimulus.
Patient doesn't respond to verbal or pain stimulus. Based on AVPU, she is unresponsive.
Lesson 13.5: Massive Bleeding Unresponsive

Occupational First Aid Level 3 Training Guide
Module 13: Bleeding 13-11
4. Activate workplace emergency response procedure:
Ask someone to call an ambulance or have an ETV prepared. If calling an ambulance, tell them there is an unresponsive adult who has been struck by a car at 50 km/hr.
5. Manually stabilize the head and neck.
6. Assess airway, breathing and circulation: a. Apply a jaw thrust. b. Look, listen and feel for air movement for 5
sec. c. Check carotid pulse for 5 sec. d. If possible, train a helper to take over
manual stabilization. "Hands over mine, fingers and thumbs where mine are, elbows braced. Don’t move while I reposition myself. Let me know if you have to move so I can help."
You hear and feel regular, quiet breathing. The chest rises and falls normally. The carotid pulse is present.
7. Measure and insert an oral airway. Patient accepts the oral airway and is still breathing normally.
8. Apply direct pressure: a. Open first aid kit, find scissors and expose
the site of bleeding. Helper will have to move their hands.
b. Using absorbent dressings, reapply direct pin-point pressure directly on wound site and maintain pressure.
c. Ask helper to take over maintaining direct pressure on the wound with an absorbent dressing.
Moderate flow of dark blood (venous) Bleeding is controlled by direct pressure Tourniquet not needed
9. Assess circulation: • Radial pulse • Signs of shock (cool, pale, clammy skin) • Rapid body survey (bleeding, fractures)
Pulse is present. Skin is normal, warm and dry. Patient has a large contusion on the side of the head in addition to the leg injury discovered earlier.
10. Apply high-flow oxygen.
11. Other critical interventions: a. Apply more dressings over the ones
already applied and one or more fracture straps over all of the dressings on the right thigh.
b. The patient should remain supine. c. Apply a blanket for warmth.
Bleeding is controlled with direct pressure and one or more bandages provided the dressings are completely covered and the bandage(s) tight.

Occupational First Aid Level 3 Training Guide
13-12 Module 13: Bleeding
12. Transport decision: Rapid Transport Category (RTC).
13. Apply the Modified NEXUS Rule. Since the patient is unresponsive, spinal motion restriction should be maintained.
14. Apply a hard collar.
15. Attach and secure patient to spine board or scoop stretcher.
16. Lift the patient onto basket stretcher.
17. Complete a Secondary Survey while waiting for transport or en route to hospital. Describe this and the remaining steps; there is no need to demonstrate.
18. Reassess ABCs every 5 min and vitals every 10 min.
19. Complete a First Aid Record.
Summary 1. What should you do if the dressing becomes soaked in blood?

Occupational First Aid Level 3 Training Guide
13-13
Day 5 Homework Medication and Mental Health During the evening, read pages 199 and 325 in the textbook. Bring notes on the following to the next class:
1. What should you do before giving non-prescription medication to a patient?
2. What are your responsibilities when helping a patient with a prescription
medication?
3. What are the most common types of mental health emergencies?
4. What can you do to help a person experiencing a mental health emergency?
NOTES

Occupational First Aid Level 3 Training Guide
13-14
NOTES

14. Medical Emergencies
14.1 Medication
14.2 Critical Incident Stress
14.3 Diabetic Emergencies
14.4 Poison Management
Medical Emergencies Module 14

Occupational First Aid Level 3 Training Guide
14-2 Module 14: Medical Emergencies
Learning Outcomes 1. Describe what you must do before giving non-prescription medications to a
patient.
2. Describe your responsibilities when helping a patient with prescription medication.
Required Reading Occupational First Aid: A Reference and Training Manual, 2018 edition
Chapter 26: First Aid Room Procedures, page 199
Group Discussion 1. What should you do before giving non-prescription medication to a patient?
2. What are your responsibilities when helping a patient with a prescription medication?
Answers
Lesson 14.1: Medication

Occupational First Aid Level 3 Training Guide
Module 14: Medical Emergencies 14-3
Summary 1. What must you know before giving non-prescription medication to a patient?
2. What must you know before giving prescription medication to a patient?

Occupational First Aid Level 3 Training Guide
14-4 Module 14: Medical Emergencies
Learning Outcomes 1. Describe the signs and symptoms of critical incident stress.
2. Describe strategies for managing critical incident stress.
Required Reading Occupational First Aid: A Reference and Training Manual, 2018 edition
Chapter 46: Critical Incident Stress, page 325
Theory Physical Effects The physical effects of critical incident stress include:
• Nausea, weight loss and diarrhea • Dizziness, shakiness and a weak feeling in the legs, and sweating • Pounding heart, hyperventilation and a feeling of fatigue • Headaches, general aches and pains, and chest pains
Cognitive Effects The cognitive effects of critical incident stress include:
• Difficulty concentrating, absent-mindedness • Confusion and difficulty making decisions • Difficulty performing tasks
Emotional Effects The emotional effects of critical incident stress include:
• Feelings anxious, jumpy and irritable • Feeling guilt, anger, fear and grief • Feeling depressed, having mood swings, nightmares and flashbacks • Feeling lost, helpless and abandoned
Behavioural Effects The behavioural effects of critical incident stress include:
• Increased use of drugs and/or alcohol • Difficulty going certain places, or withdrawal from family, friends and colleagues • Difficulty being alone
Lesson 14.2: Critical Incident Stress
Occupational First Aid Level 3 Training Guide
Module 14: Medical Emergencies 14-5
Class-Based Discussion 1. What are some strategies for self-care that can help you manage critical incident
stress?
2. What other resources are helpful?
Answers
Summary 1. What are the possible physical effects of critical incident stress?
2. What are the possible behavioural effects of critical incident stress?
3. How will you take care of yourself?

Occupational First Aid Level 3 Training Guide
14-6 Module 14: Medical Emergencies
Learning Outcomes 1. Describe what diabetes is.
2. Describe the signs and symptoms of a diabetic emergency.
3. Manage a patient who is having a diabetic emergency.
Required Reading Occupational First Aid: A Reference and Training Manual, 2018 edition
Chapter 45: Diabetes, pages 319 – 321
Theory Types of Diabetes With patients who have diabetes, the body's ability to regulate blood glucose is impaired.
There are two types:
• Type 1 diabetes is caused by a total lack of insulin production. Patients who have this type of diabetes must take insulin to control their disease.
• Type II diabetes is caused by insufficient insulin production (insulin resistance). Many patients with this type of diabetes can control it by diet alone; others need oral medication.
Hypoglycemia (Low Blood Sugar) Early signs of hypoglycemia include:
• Hunger
• Pale and clammy skin
• Dizziness, trembling and weakness
• Confusion, restlessness and irrational behaviour
As the condition progresses, these signs may also appear:
• Slurred speech
• Seizures
Lesson 14.3: Diabetic Emergencies

Occupational First Aid Level 3 Training Guide
Module 14: Medical Emergencies 14-7
Hyperglycemia (High Blood Sugar) Early signs of hyperglycemia include:
• Thirst
• Excessive urination
• Loss of appetite
• Weakness and dizziness
As the condition progresses, these signs may also appear:
• Nausea and vomiting
• Deep, rapid breathing
• Dry mouth
• A fruity sweet odour to the breath
• Weak, rapid pulse
• Warm, dry skin
• Decreased level of consciousness
Skill Practice Goal Manage a patient who is having a diabetic emergency. Scenario A site manager who is known to have diabetes suddenly feels faint and starts to collapse. A co-worker standing nearby catches him and gently lowers him to a supine position on the floor. When you arrive, the site manager's eyes are closed and his skin is pale. Steps 1. Conduct a scene assessment. No hazards. One injured.
Co-workers saw him collapse. He did not hit his head or neck. Spinal motion restriction not required.
2. Assess the patient's level of consciousness. a. Approach the patient from the front,
identify yourself, and attempt to communicate.
b. Apply a painful stimulus by squeezing the nail bed on the patient's hand or another appropriate stimulus.
No response to verbal or pain stimulus. Patient is unresponsive.

Occupational First Aid Level 3 Training Guide
14-8 Module 14: Medical Emergencies
3. Activate workplace emergency response procedure:
Ask someone to call an ambulance or have an ETV prepared. If calling an ambulance, tell them there is an unresponsive adult who is a known diabetic.
4. Assess airway, breathing and pulse: a. Perform a head-tilt/chin-lift. b. Look, listen and feel for the movement
of air for 5 sec. c. Check for carotid pulse for 5 sec. d. If possible, get a helper to maintain the
head-tilt/chin lift. e. Ensure suction device is ready. f. Reassess that patient is still breathing
quietly and effectively.
Airway is clear. You hear and feel regular, quiet breathing. You see the patient's chest rise and fall normally. The carotid pulse is present. The patient accepts the oral airway and is still breathing normally.
5. Assess circulation: • Radial pulse • Signs of shock (cool, pale, clammy
skin) • Rapid body survey (bleeding, fractures)
Radial pulse is present. His skin is pale. No other injuries are found.
6. Apply high-flow oxygen.
7. Place the patient in the 3/4 prone position.
8. Apply a blanket for warmth.
9. Place sugar or glucose in the pocket of the cheek that’s closest to the ground. Monitor the airway closely.
10. Transport decision: Rapid Transport Category (RTC).
Package and transport 3/4 prone
11. Complete a Secondary Survey while waiting for transport or en route to hospital.
12. Reassess ABCs every 5 mins and vitals every 10 mins.
13. Complete a First Aid Record.

Occupational First Aid Level 3 Training Guide
Module 14: Medical Emergencies 14-9
Summary 1. What are the two types of diabetes?
2. What are the signs and symptoms of hypoglycemia?
3. What are the signs and symptoms of hyperglycemia?
4. What critical intervention should you provide to patient having a diabetic emergency?
5. What made this patient RTC?

Occupational First Aid Level 3 Training Guide
14-10 Module 14: Medical Emergencies
Learning Outcomes 1. Describe the ways poison can enter the body.
2. Describe strategies for managing a patient who has been poisoned.
Required Reading Occupational First Aid: A Reference and Training Manual, 2018 edition
Chapter 42: Poisons, pages 301 – 306
Theory Inhaled Poisons Inhaled poisons can cause damage in three main ways:
• Reduction of the oxygen-carrying capacity of the blood, such as with carbon monoxide poisoning
• Direct irritation of the lung tissues, such as with chlorine gas poisoning
• A direct toxic effect on cells, such as with hydrogen sulphide poisoning
Ingested Poisons Ingested poisons affect the body by destroying the tissues of the digestive tract, or by being absorbed into the body and causing adverse health affects. Accidental poisoning by ingestion is usually caused by drugs, chemicals and bacterial toxins.
Skin-Contact Poisons Some substances cause skin destruction or irritation on contact, such as will happen with a chemical burn. Other substances like pesticides may cause adverse health effects when in contact with the skin, eyes or mucous membranes.
Lesson 14.4: Poison Management

Occupational First Aid Level 3 Training Guide
Module 14: Medical Emergencies 14-11
Class-Based Scenario Exercise How would you manage the patient in each of the following scenarios?
1. A mechanic has been complaining of a headache, dizziness and nausea. When you take him out of the shop, he begins to feel better. A co-worker checks the air quality in the shop and discovers there's a carbon monoxide leak.
2. A worker at a pulp and paper plant begins to experience eye and nose irritation. She tears up excessively and can't stop coughing. There is a pain in her throat. A pungent and disagreeable odour has come into the room.
3. A mill worker says he feels weak and has trouble breathing. He is pale, sweaty and confused. His breath smells like bitter almonds.
4. A roofer is walking by a landscaper and is accidentally sprayed with pesticide. His skin begins to burn.
5. A worker at a glass etching plant accidentally splashes his ankle with hydrofluoric acid. He immediately experiences excruciating pain from the chemical burn.
Answers

Occupational First Aid Level 3 Training Guide
14-12 Module 14: Medical Emergencies
Answers
Summary 1. How should you manage a patient who has been exposed to chlorine gas?
2. What is the first thing you should do when responding to a worker who has been exposed to a hazardous gas?
3. How should you treat a chemical burn?
4. What is Hydroxocobalamin?

15. Minor Injuries
15.1 First Aid Record
15.2 Minor Wounds
15.3 Applying a Spica Ankle Wrap
15.4 Minor Sprains
15.5 Minor Fractures
15.6 Minor Dislocations
15.7 Activity-Related Soft-Tissue Disorders
15.8 Minor Ear, Nose and Eye Injuries
15.9 Assessing Burns
15.10 Minor Burns
15.11 Ongoing Management
Minor Injuries Module 15

Occupational First Aid Level 3 Training Guide
Module 15: Minor Injuries 15-2
Learning Outcomes 1. Explain the purpose of the First Aid Record and when it should be completed.
2. Complete a First Aid Record.
Required Reading Occupational First Aid: A Reference and Training Manual, 2018 edition
Chapter 26: First Aid Room Procedures, pages 199 – 200
Theory Purpose of the First Aid Record You must complete a First Aid Record for every patient you see. This includes the initial visit as well as any follow-up visits.
The First Aid Record:
• Gives the attendant a history of how the injury occurred
• Helps ensure that proper follow-up is provided
• Provides evidence of work relatedness for compensation claims
• Identifies trends so action can be taken by the employer
• Identifies work areas, and procedures or practices that may be causing injuries or illnesses
First Aid Records are confidential. Ensure they are stored securely. First Aid Records must be retained by the employer for a minimum of 3 years.
Only people who need to see the First Aid Records should be allowed access, such as:
• The worker
• The worker's direct supervisor
• Personnel who manage health and safety, compensation claims or return-to-work programs at the workplace
• A WorkSafeBC prevention officer
For some reviewers, first aid records may need to be redacted to protect the identity of the worker. For example, the joint health and safety committee may review first aid records as part of the regular committee meetings. Their interest would primarily be the mechanism of injury (what happened) and the specifics of where the worker was injured. The committee does not need the name or other identifiable information about the worker in order to do committee work.
Lesson 15.1: First Aid Record

Occupational First Aid Level 3 Training Guide
15-3 Module 15: Minor Injuries
Exercise Complete a First Aid Record based on this scenario:
On April 1, 2018 at 2:35 PM, Anna Prentice came into the first aid room to report an injury. She reached into a motor on power unit 16 to tighten the exhaust manifold. As she pulled her arm out, she cut her arm on a sharp piece of metal.
Chester Fields was working with Anna Prentice when it happened and is available as a witness.
Her ABCs are normal. She has a 2 cm (1 inch) laceration just through the skin on the upper-inside of her left forearm. There is minimal bleeding and pain, and no swelling. The wound appears clean. Circulation and nerve function are normal.
Supporting her arm on a large sterile dressing, you cover the wound with sterile gauze. You examine the arm from shoulder to fingertips and find no unusual symptoms or other injuries. With the wound covered, you cleanse around the wound with wound-cleansing towelettes. Then you walk over to the sink and remove the gauze to clean inside the wound with running tap water or sterile saline. Because this wound gapes slightly, you apply skin closures to close the wound. You dress the wound with four layers of sterile gauze and an absorbent dressing, which you bandage with a roller bandage.
Before Anna returns to work, you advise her to get a Tetanus booster within the next 36 hours and discuss the minor wound handout sheet on taking care of the wound. You tell her to keep the dressing clean and dry, and return immediately if the dressing gets wet or dirty, or starts to come off. You also tell her to return to first aid at the start of the next shift for reassessment.
Summary 1. Why is it important to complete the First Aid Record accurately?
2. What could happen if you don't complete the First Aid Record accurately?

Occupational First Aid Level 3 Training Guide
Module 15: Minor Injuries 15-4
Learning Outcomes 1. Assess a minor wound.
2. Clean, dress and bandage a minor wound.
3. Provide follow-up care for a minor wound.
Required Reading Occupational First Aid: A Reference and Training Manual, 2018 edition
Chapter 25: The Priority Action Approach to the Walk-In Patient, pages 193 –195 Chapter 29: Soft-Tissue Injuries, pages 213 – 221
Theory Medical Aid The following soft tissue injuries must be referred for medical aid:
• Wounds longer than 3 cm (1 inch) through the full skin thickness
• Wounds to hands in areas of joints or tendons
• Wounds that require stitches
• Wounds that are very dirty, including human or animal bites
• Wounds with embedded materials
• Wounds that have any sign of infection
Signs of Infection Signs of a wound becoming infected include:
• Pain and local tenderness around the wound
• Heat and redness around the affected area
• Redness around the area
• Pus beneath the skin or draining from the wound
• Swelling of the infected part or lymph nodes
• Red streaks extending from the area
Tetanus Prevention All minor wounds must be thoroughly cleaned. If medical attention is necessary but will be delayed beyond 36 hours, it is even more essential that the wound be properly cleaned and dressed. For major wounds with gross contamination, once hemorrhage has been controlled, there may be justification for some wound cleansing. Patient’s with a wound should receive a tetanus booster as soon as possible, preferably within 36 hours.
Lesson 15.2: Minor Wounds

Occupational First Aid Level 3 Training Guide
15-5 Module 15: Minor Injuries
Skill Practice Goal Assess and treat a minor wound. Scenario A worker comes into the first aid room with a cut on her arm. While working on a motor, she was cut on the arm by a piece of metal. Steps 1. Conduct a scene assessment. No hazards. One injured.
Spinal motion restriction not required.
2. Modified primary survey: a. Look at patient to assess the airway. b. Assess breathing rate, rhythm and quality. c. Assess circulation.
Look for signs of shock (cool, pale, clammy skin). Do a verbal rapid body survey. Ask, “did you hurt yourself anywhere else”?
Patient is talking clearly. Airway is clear. Breathing is normal. Skin colour is normal. When asked, patient says, "Only my arm hurts."
3. Position: a. Position the patient based on the findings of
the modified primary survey. If the patient is reacting to the injury (pale, anxious), position supine. If patient 's colour is normal, not showing anxiety, position sitting.
b. Support arm and cover the injury with a sterile dressing/gauze pad.
Patient can remain sitting.
4. Wash your hands and put on gloves.
5. Look at injury to make initial transport decision:
Return to work after treatment
Laceration is only 2 cm (3/4 inch) and does not require stitches. Minimal bleeding. No swelling. Laceration appears clean.
6. Modified secondary survey: a. Question patient about medical history. b. Ask if tetanus is up-to-date. c. Thoroughly examine injured area. d. Take pulse distal to injury. e. Assess nerve function.
Patient has no allergies and is not on any medications. Tetanus was updated within the last 5 years. No discolouration, swelling, deformity, or excessive pain No underlying damage Pulse is normal. Neurological function is normal.

Occupational First Aid Level 3 Training Guide
Module 15: Minor Injuries 15-6
7. Injury care: a. Keep the wound covered with sterile gauze
while you cleanse the surrounding skin with mild antibacterial soap or warm water.
b. Flush inside of wound with warm running water.
c. If patient is returning to work, use skin closures to hold wound closed.
d. Apply a dressing large enough to cover the entire wound site.
e. Wrap it with a bandage large enough to cover the entire dressing.
8. Complete a First Aid Record.
9. Tell patient how to care for the wound and provide an at home care sheet:
• Keep dressings clean and dry. • Watch for signs of infection. • Make sure tetanus is up-to-date. • Return for reassessment.
Summary 1. What parts of the secondary survey need to be completed for a patient that is
otherwise healthy but has a minor wound that does not require medical treatment?
2. How do you cleanse a minor wound?
3. How do you dress a minor wound?
4. How do you decide whether the patient needs medical aid?

Occupational First Aid Level 3 Training Guide
15-7 Module 15: Minor Injuries
Learning Outcomes 1. Apply a Spica ankle wrap.
Required Reading Occupational First Aid: A Reference and Training Manual, 2018 edition
Chapter 33: Sprains, Dislocations and Fractures, pages 211 – 213
Skill Practice Goal Apply a Spica ankle wrap. Steps 1. Anchor the bandage at the metatarsal arch.
2. Wrap the bandage across the top of the foot, around the heal and back to the start. A criss-cross pattern forms at the top of the foot.
3. Continue wrapping in the same pattern, overlapping the bandage by about 1/2 of its width, moving up the foot and toward the calf.
Summary 1. What is the purpose of a Spica ankle wrap?
Lesson 15.3: Applying a Spica Ankle Wrap

Occupational First Aid Level 3 Training Guide
Module 15: Minor Injuries 15-8
Learning Outcomes 1. Manage a patient with a minor sprain.
Required Reading Occupational First Aid: A Reference and Training Manual, 2018 edition
Chapter 33: Sprains, Dislocations and Fractures, pages 242 – 243
Theory Medical Aid A patient with a suspected sprain who has any of the following should be referred for medical aid:
• A sudden deceleration injury, such as with a fall from height
• Pain, numbness, tingling, or weakness in an extremity distal to the injury
• Sudden onset of very severe pain
• Difficulty walking
Skill Practice Goal Assess and treat a minor sprain. Scenario A worker limps into the first aid room, complaining about pain in her ankle. While walking down the stairs, she twisted her ankle. She says she did not fall down the stairs. Steps 1. Conduct a scene assessment. No hazards. One injured.
Spinal motion restriction not required.
2. Modified primary survey: a. Look at patient to assess the
airway. b. Assess breathing rate, rhythm and
quality. c. Assess circulation.
Look for signs of shock (cool, pale, clammy skin). Do a verbal rapid body survey. Did you hurt yourself anywhere else?
Patient is talking clearly. Airway is clear. Breathing is normal. Skin colour is normal. When asked, patient says, "Only my ankle hurts."
Lesson 15.4: Minor Sprains

Occupational First Aid Level 3 Training Guide
15-9 Module 15: Minor Injuries
3. Position: a. Position the patient based on the
findings of the modified primary survey. If the patient is reacting to the injury (pale, anxious), position supine. If patient 's colour is normal, not showing anxiety, position sitting.
b. Support the injury.
Position patient and support the injured limb.
4. Wash your hands and put on gloves.
5. Ask patient to remove both of their shoes and socks.
You’ll need to compare both feet and ankles.
6. Look at injury to make initial transport decision: • No obvious deformity • Minimal swelling • Patient was bearing weight when
they came into the first aid area
Return to work after treatment
7. Modified secondary survey: a. Question patient about medical
history. b. Assess the pain using PPQRRST. c. Thoroughly examine injured area. d. Take pulse distal to injury. e. Assess sensory and nerve function. f. Compare both ankles and feet. g. Conduct a range of motion check.
Patient has no allergies and is not on any medications. She does not have serious pain. Symptoms started after initial incident, but pain increased gradually. She is ambulatory. No obvious deformity or bleeding. She has slight pain when you touch her lateral ankle. No obvious swelling when compared to uninjured side. Circulation and nerve functions are normal. Pain slightly increases when foot is inverted during range of motion check.

Occupational First Aid Level 3 Training Guide
Module 15: Minor Injuries 15-10
8. Injury care: a. Elevate injured leg. b. Apply ice pack for 20 min with a
protective barrier. c. Reassess ankle. d. Using a crepe roller bandage, apply
a Spica to support injured area. e. Wrap from toes to calf. f. Check circulation after wrap. Pulse, skin (colour, temperature,
condition of toes g. Have patient bear weight on the
foot.
No swelling or increased pain after ice. No obvious impaired circulation after wrap.
Patient is able to walk. Nothing to indicate the need for medical aid.
9. Tell patient how to care for injury and provide at home care sheet: • Elevate, ice, remove bandage at
night. • Carry on activities within the
limitations of pain. Complete rest extends recovery time.
• Return for reassessment and re-wrapping.
10. Complete a First Aid Record.
Summary 1. How should you treat a sprain?
2. What should you tell the patient about caring for the sprain?
3. How do you decide whether the patient needs medical aid?

Occupational First Aid Level 3 Training Guide
15-11 Module 15: Minor Injuries
Learning Outcomes 1. Manage a patient with a minor fracture.
Required Reading Occupational First Aid: A Reference and Training Manual, 2018 edition
Chapter 33: Sprains, Dislocations and Fractures, pages 244 –245
Theory Medical Aid A patient with a suspected fracture who has any of the following should be referred for medical aid:
• A sudden deceleration injury, such as with a motor vehicle crash, direct blow to the body, or a fall from a height
• Pain, numbness, tingling, or weakness in an extremity distal to the injury
• Bowel or bladder symptoms
• Sudden onset of very severe pain
• Difficulty walking
Lesson 15.5: Minor Fractures

Occupational First Aid Level 3 Training Guide
Module 15: Minor Injuries 15-12
Skill Practice Goal Assess and treat a minor fracture. Scenario A worker walks into the first aid room, supporting his right forearm. He was struck on the forearm by a drive shaft while working on a vehicle. He says he did not fall or hit his head. Steps 1. Conduct a scene assessment. No hazards. One injured.
Spinal motion restriction not required.
2. Modified primary survey: a. Look at patient as they approach. Note
their posture, movement and level of anxiety.
b. Ask patient what happened. Observe how they talk to assess the airway.
c. Assess breathing rhythm and quality. d. Assess circulation.
Look for signs of shock (cool, pale, clammy skin). Do a verbal rapid body survey. Did you hurt yourself anywhere else?
Patient is alert. Patient is cradling their forearm, but otherwise walking and talking normally. Patient is talking clearly. Airway is clear. Breathing is normal. Skin colour is normal. Patient is in some pain. Patient does not hurt anywhere else.
3. Position: a. Position the patient based on the findings
of the modified primary survey. If the patient is reacting to the injury (pale, anxious), position supine. If patient's colour is normal, not showing anxiety, position sitting.
b. Support the injury.
4. Wash your hands and put on gloves.
5. Look at injury to make initial transport decision:
Medical aid
There is swelling, redness, bruising, pain and angulation at the mid-third section of his forearm.
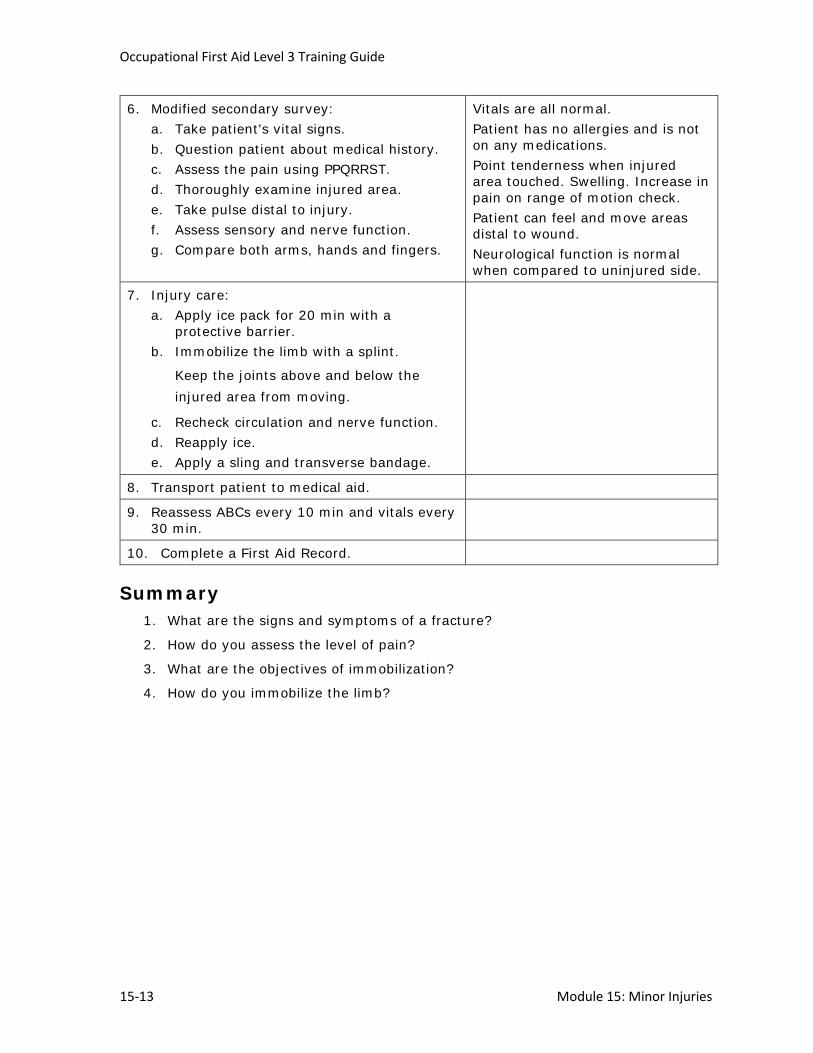
Occupational First Aid Level 3 Training Guide
15-13 Module 15: Minor Injuries
6. Modified secondary survey: a. Take patient's vital signs. b. Question patient about medical history. c. Assess the pain using PPQRRST. d. Thoroughly examine injured area. e. Take pulse distal to injury. f. Assess sensory and nerve function. g. Compare both arms, hands and fingers.
Vitals are all normal. Patient has no allergies and is not on any medications. Point tenderness when injured area touched. Swelling. Increase in pain on range of motion check. Patient can feel and move areas distal to wound. Neurological function is normal when compared to uninjured side.
7. Injury care: a. Apply ice pack for 20 min with a
protective barrier. b. Immobilize the limb with a splint.
Keep the joints above and below the injured area from moving.
c. Recheck circulation and nerve function. d. Reapply ice. e. Apply a sling and transverse bandage.
8. Transport patient to medical aid.
9. Reassess ABCs every 10 min and vitals every 30 min.
10. Complete a First Aid Record.
Summary 1. What are the signs and symptoms of a fracture?
2. How do you assess the level of pain?
3. What are the objectives of immobilization?
4. How do you immobilize the limb?

Occupational First Aid Level 3 Training Guide
Module 15: Minor Injuries 15-14
Learning Outcomes 1. Manage a patient with a minor dislocation.
Required Reading Occupational First Aid: A Reference and Training Manual, 2018 edition
Chapter 33: Sprains, Dislocations and Fractures, page 243 – 244
Theory Medical Aid The patient with a suspected dislocation who has any of the following should be referred for medical aid:
• A sudden deceleration injury, such as with a motor vehicle crash or a fall from a height
• Pain, numbness, tingling, or weakness in an extremity distal to the injury
• Bowel or bladder symptoms
• Sudden onset of very severe pain
• Difficulty walking
Assessment and Treatment Patients with a minor dislocation are assessed the same way as those who have a minor fracture.
However, injuries like a minor shoulder dislocation are treated as follows:
1. Apply ice pack for 20 min with a protective barrier.
2. Apply a large arm sling.
3. Place a pad under the patient's elbow to fill the gaps between body and position of arm.
4. Apply a wide transverse bandage around the elbow and torso. Tie it on the uninjured side.
5. Recheck circulation and nerve function.
6. Reapply ice.
Summary 1. What are the signs and symptoms of a dislocation?
2. How should you treat a dislocation?
Lesson 15.6: Minor Dislocations

Occupational First Aid Level 3 Training Guide
15-15 Module 15: Minor Injuries
Learning Outcomes 1. Describe how you would manage a patient with an activity-related soft-tissue
disorder (ASTD).
Required Reading Occupational First Aid: A Reference and Training Manual, 2018 edition
Chapter 31: Activity-Related Soft-Tissue Disorders, pages 228 – 232
Class-Based Discussion Manage the patient described in the following scenario. Refer to Chapter 31 in your textbook as needed.
A man comes into the first aid room, complaining of a sore wrist. He has been painting guard rails for several days. Painting is not his usual job. His wrist was sore after work yesterday. Although it felt better in the morning, it's getting sore again today. He experiences some pain when he flexes and extends his wrist. There is no swelling, but there is some tenderness along the tendon sheath that increases when extending and flexing. Circulation and nerve functions are normal.
Answers
Lesson 15.7: Activity-Related Soft-Tissue Disorders

Occupational First Aid Level 3 Training Guide
Module 15: Minor Injuries 15-16
Summary 1. What are the signs and symptoms of ASTD?
2. What can you do to treat an ASTD?

Occupational First Aid Level 3 Training Guide
15-17 Module 15: Minor Injuries
Learning Outcomes 1. Manage a patient with a minor eye, nose or ear injury.
Required Reading Occupational First Aid: A Reference and Training Manual, 2018 edition
Chapter 19: Facial Injuries and Their Management, pages 161 – 163 Chapter 20: Eye Injuries, pages 164 – 172 Chapter 22: Ear Injuries, pages 174 – 175
Theory Minor Nose Injuries To treat a minor nose bleed, ask the patient to lean forward and pinch the nose for 15 to 20 min. Then ice the nose for 10 min, stop for 5 min, and repeat until the bleeding stops.
Minor Ear Injuries The most common minor ear injury is an infection of the middle ear. The main symptoms are ear pain and hearing impairment at the time of an upper respiratory infection.
A patient with an ear injury may appear very ill. In addition to ear pain, they may have dizziness, nausea and vomiting.
Inner ear trouble may be a sign of a more serious condition, such as meningitis. Refer the patient to a physician.
Minor Eye Injuries The most common minor eye injury is a foreign body in the eye. Most foreign bodies in the eye are superficial and can be removed without any complications.
Lesson 15.8: Minor Ear, Nose and Eye Injuries

Occupational First Aid Level 3 Training Guide
Module 15: Minor Injuries 15-18
Skill Practice Goal Assess and treat a minor eye injury. Scenario A worker walks into the first aid room and tells you she has dust in her eye. She was sweeping the loading dock when some dust entered her eye. Steps 1. Conduct a scene assessment. No hazards. One injured.
Spinal motion restriction not required.
2. Modified primary survey: a. Look at patient to assess the airway. b. Assess breathing rate, rhythm and quality. c. Assess circulation:
• Signs of shock (cool, pale, clammy skin) • Do a verbal rapid body survey. Did you
hurt yourself anywhere else?
Patient is talking clearly. Airway is clear. Breathing is normal. Skin colour is normal. No other injuries
3. Position: a. Position the patient based on the findings of
the modified primary survey. If the patient is reacting to the injury (pale, anxious), position supine. If patient 's colour is normal, not showing anxiety, position sitting.
b. Give patient gauze to cover the eye.
4. Wash your hands and put on gloves.
5. Look at injury to make initial transport decision: Return to work after treatment
6. Modified secondary survey: a. Question patient about medical history. b. Thoroughly examine injured area.
She has no allergies, is not on any medications. There are no vision problems. You can see a fleck of dust.

Occupational First Aid Level 3 Training Guide
15-19 Module 15: Minor Injuries
7. Injury care: a. If the patient is wearing a contact lens, ask
them to remove it. b. Clean the area around the eye. Make sure
there is no debris or cosmetics on the eye lashes.
c. Tell the patient to rinse the eye a couple of times.
d. Have patient pull upper lashes down over lower lashes.
e. Examine the eye more closely. f. Remove the dust with a moistened swab. g. Reassess vision by comparing uninjured eye
to injured.
When you pull back the eyelid, you see a speck of dust. After you remove the dust, the patient feels relief. Patient reports no blurry vision
8. Complete a First Aid Record.
Summary 1. How should you treat a patient with dust in their eye?
2. Do you need to complete a First Aid Record for a simple treatment like getting the worker to flush their own eye?

Occupational First Aid Level 3 Training Guide
Module 15: Minor Injuries 15-20
Learning Outcomes 1. Describe the types of burns.
2. Describe the difference between first-degree, partial-thickness and full-thickness burns.
3. Describe the signs and symptoms of burn injuries.
Required Reading Occupational First Aid: A Reference and Training Manual, 2018 edition
Chapter 38: Burns, pages 277 – 279
Theory
First-Degree Burns First-degree burns affect only the outer layer of skin. The skin is red and the patient experiences mild pain, such as with a mild sunburn or a minor scald. This type of burn usually heals in about a week.
Partial-Thickness Burns A partial-thickness burn affects the outer layer of skin and part of the second layer of skin.
Signs and symptoms include:
• Blisters
• Reddening of the skin
• Pain
• Fluid loss
A patient with a significant partial-thickness burn to less than 10% of the body surface should be referred for medical aid. If the burn is worse than that, the patient requires rapid transport.
Full-Thickness Burns A full-thickness burn involves damage to the layers of skin and underlying structures. Muscles, bones and deeper structures may be damaged.
Signs and symptoms include:
• Charred, dry or pale skin
• Fluid loss
Lesson 15.9: Assessing Burns

Occupational First Aid Level 3 Training Guide
15-21 Module 15: Minor Injuries
A patient with a full-thickness burn to less than 2% of the body surface should be referred for medical aid. If the burn is worse than that, the patient requires rapid transport.
Rule of Nines A partial-thickness burn may not have blisters when you first encounter the patient. In order to determine the extent of the burns, you need to consider more than the signs and symptoms.
The fastest and easiest way to estimate the extent of burns is to estimate the percentage of the body that has been burned. This is done using the Rule of Nines:
• Each upper extremity counts 9%.
• The head and neck together count 9%.
• Each lower extremity counts 18%.
• The anterior and posterior surfaces of the trunk each count 18%.
• The perineum and genitalia together count 1%.
• An area the size of the patient’s hand can be assumed to be 1%.
Mechanism of Injury Another important consideration is the mechanism of injury. A worker involved with a sudden flash or scalding liquid, is likely to have first-degree, partial-thickness burns, or both. If the worker's clothing caught fire, there may be full-thickness burns. If the worker was burned in an enclosed space, there may be respiratory burns or smoke inhalation. If there was an explosion, there may be other associated injuries. The attendant should try to cool burns as soon as possible during the primary survey.
Rapid Transport Category The following burns are in the Rapid Transport Category:
• Any burn with associated smoke inhalation injury
• Partial-thickness burns to more than 10% of the body surface
• Full-thickness burns to more than 2% of the body surface
• Significant burns involving the face
• Burns encircling a limb
• Major burns to the hands, feet or genitalia
• All electrical burns
• All chemical burns
Summary 1. What are the signs and symptoms of a first-degree burn?
2. What are the signs and symptoms of a partial-thickness burn?
3. What are the signs and symptoms of a full-thickness burn?
4. Which burns are in the Rapid Transport Category?

Occupational First Aid Level 3 Training Guide
Module 15: Minor Injuries 15-22
Learning Outcomes 1. Manage a patient with a minor burn.
Required Reading Occupational First Aid: A Reference and Training Manual, 2018 edition
Chapter 38: Burns, pages 280 – 283
Skill Practice Goal Assess and treat a minor burn. Scenario A worker comes into the first aid room with a burn on his arm. He tells you that he burned his arm while repairing a motor. Steps 1. Conduct a scene assessment. No hazards. One injured.
Spinal motion restriction not required.
2. Modified primary survey: a. Look at patient as they approach. Note their
posture, movement and level of anxiety. b. Ask patient what happened. Observe how
they talk to assess the airway. c. Assess circulation:
• Signs of shock (cool, pale, clammy skin) • Do a verbal rapid body survey. Did you
hurt yourself anywhere else?
Patient is talking clearly. Airway is clear. Breathing is normal. Skin colour is normal. No other injuries
3. Cool the burn as soon as possible.
4. Position the patient based on the findings of the modified primary survey.
If the patient is reacting to the injury (pale, anxious), position supine. If patient 's colour is normal, not showing anxiety, position sitting.
5. While cooling, look at injury to make initial transport decision:
Return to work after treatment
6. Wash your hands and put on gloves.
Lesson 15.10: Minor Burns

Occupational First Aid Level 3 Training Guide
15-23 Module 15: Minor Injuries
7. Modified secondary survey: a. Question patient about medical history. b. Thoroughly examine injured area. c. Take pulse distal to injury. d. Assess sensory and nerve function.
He has no allergies, is not on any medications. There is a first-degree and partial-thickness burn to the arm. Circulation and nerve functions are normal.
8. Injury care: a. Cover the area with moist sterile gauze. b. Cover the gauze with drainage dressing. c. Lightly secure the dressings with a roller
bandage.
9. Complete a First Aid Record.
10. Tell patient how to care for injury: • Keep bandage clean and dry. • Report back immediately to first aid if
bandage gets wet or dirty, or starts to come off.
• Come back next day for reassessment. • Give patient a handout on care for burns.
Summary 1. How should you treat a first-degree burn?
2. How long do first-degree burns take to heal?

Occupational First Aid Level 3 Training Guide
Module 15: Minor Injuries 15-24
Learning Outcomes 1. Describe the ongoing management of an injured worker who remains at the
workplace.
Required Reading Covered earlier
Theory Return to Work Program In cases involving more serious injuries and illnesses, the worker may need to take time off for treatment and therapy. This is managed through a return to work program. This program provides a systematic, progressive, individualized, and time-limited process for helping injured workers get back into their normal routine at home and at the workplace as quickly and safely as possible.
The first aid program and return to work program focus on:
• Compliance with regulation
• First aid best practice that meets or surpasses set guidelines
• Early intervention to prevent further damage
• Stay-at-work options that allow workers to remain at work on modified duties while they heal
Summary 1. What is a return to work program?
2. How does a return to work program help workers and the organization as a whole?
Lesson 15.11: Ongoing Management

Occupational First Aid Level 3 Training Guide
15-25
Day 6 Homework Occupational First Aid Safety During the evening, read pages 196 – 199, 211 – 221 and 311 –313 in the textbook. Bring notes on the following to the next class:
1. What are the legislation requirements for first aid kits and equipment used by
OFA attendants?
2. How can you keep first aid equipment clean and disinfected?
3. What should you do to clean and disinfect the work environment after you've
provided first aid?
4. How should you dispose of sharps and contaminated supplies?
5. How are diseases and infections passed from one person to another?
6. How can you prevent the spread of infection?
7. Where can you find first aid information for hazardous products used in the
workplace?
NOTES

Occupational First Aid Level 3 Training Guide
15-26
NOTES
16. Occupational First Aid Safety
16.1 General Safety Practices
Occupational First Aid Safety Module 16

Occupational First Aid Level 3 Training Guide
16-2 Module 16: Occupational First Aid Safety
Learning Outcomes 1. Describe the legislation requirements for first aid kits and equipment used by OFA
attendants.
2. Describe strategies for keeping first aid equipment clean and disinfected.
3. Describe how to safely dispose of sharps and contaminated supplies.
4. Describe how diseases and infections are passed from one person to another.
5. Describe strategies for preventing the spread of infection.
6. Describe the first aid information included in Safety Data Sheets.
Required Reading Occupational First Aid: A Reference and Training Manual, 2018 edition
Chapter 26: First Aid Room Techniques and Procedures, pages 196 – 199 Chapter 29: Soft-Tissue Injuries, pages 211 – 221
Chapter 44: Communicable Diseases, pages 311 – 313
Pair and Share 1. What are the legislation requirements for first aid kits and equipment used by
OFA attendants?
2. How can you keep first aid equipment clean and disinfected?
3. What should you do to clean and disinfect the work environment after you've provided first aid?
4. How should you dispose of sharps and contaminated supplies?
5. How can you prevent the spread of infection?
6. Where can you find first aid information for hazardous products used in the workplace?
Lesson 16.1 General Safety Practices

Occupational First Aid Level 3 Training Guide
Module 16: Occupational First Aid Safety 16-3
Answers
Summary 1. When should you wash your hands?
2. How should you clean and disinfect instruments?
3. How often should the first aid room be cleaned and disinfected?
4. What is a Safety Data Sheet?


17. Major Ear, Nose and Eye Injuries
17.1 Musculoskeletal System
17.2 Major Sprains, Dislocations and Fractures
17.3 Major Ear Injuries
17.4 Major Nose Injuries
17.5 Major Eye Injuries
17.6 Major Burns
Major Injuries Module 17

Occupational First Aid III Instructor Guide
17-2 Module 17: Major Injuries
Learning Outcomes 1. Describe the major parts of the musculoskeletal system and how they work.
2. Describe the principles of splinting.
Required Reading Occupational First Aid: A Reference and Training Manual, 2018 edition
Chapter 27: Anatomy and Function of the Skin and Soft Tissues, pages 201 – 205 Chapter 32: Anatomy and Function of the Skeletal System, pages 235 – 241 Chapter 34: Immobilization, pages 246 – 249
Theory The Musculoskeletal System The skeleton is the bony framework of the body. It gives the body shape, strength and rigidity. It also protects the organs and acts as a movable framework so that muscular contractions can move the body.
Bones are connected by joints. Ball and socket joints, such as the hip and shoulder, are the most mobile. Hinge joints, such as the knee and elbow, permit free movement in a single plane.
Muscles and their tendons pass around and across joints. A tendon is a band of strong, white, fibrous tissue that connects a muscle to a bone. When a muscle contracts, it pulls on the tendon, which moves the bone. Tendons are so tough they are seldom torn. Ligaments are fibrous tissue bands that connect one bone to another at a joint.
Most skeletal muscles exist in groups or pairs, which have equal but opposite functions. Voluntary contraction of one group of muscles is accompanied by an automatic relaxation of the opposing group.
Limb Injuries In order to assess and correctly treat a limb injury, you will need to be able to tell the difference between a joint injury and a mid-third injury.
To do this, you will use the rule of thirds. According to this rule, long bones are divided into thirds. An upper or lower third injury is a joint injury. Joint injuries can affect the circulation and nerve function in a limb. A middle-third injury is a limb injury.
A dislocation is a displacement of one or more bone ends at a joint. A fracture is a break in a bone.
Soft-Tissue Injuries Soft-tissue damage includes damage to skin, muscles, ligaments, tendons, blood vessels or nerves.
Lesson 17.1: Musculoskeletal System

Occupational First Aid Level 3 Instructor Guide
Module 17: Major Injuries 17-3
Principles of Splinting When splinting a sprain, dislocation or fracture:
• Steady and support the injured limb at all times.
• Dress and bandage open wounds before splinting.
• Fully expose the entire limb to be immobilized.
• Check circulation and nerve function before and after immobilization, and every 30 minutes thereafter.
• Apply cold if circulation is not impaired.
• Secure the splint from the stable part of the limb to the unstable part of the limb.
• Pad the entire splint wherever it rests against the limb.
• Avoid splinting over the wound and deformities if possible.
• Do not use an encircling bandage under a splint.
• Do not trap bandage knots or attachments under the splint.
• Elevate the limb after it has been immobilized if circulation is not impaired and it does not cause any increase in pain.
Summary 1. What is the purpose of splinting an injury?
2. What should you do if the limb is cold and pulseless with obvious angulation?

Occupational First Aid III Instructor Guide
17-4 Module 17: Major Injuries
Learning Outcomes 1. Manage a patient with a major sprain, dislocation or fracture.
Required Reading Occupational First Aid: A Reference and Training Manual, 2018 edition
Chapter 35: Management of Upper Limb Injuries, pages 250 – 256 Chapter 36: Management of Lower Limb Injuries, 258 – 266
Theory Causes Sprains, dislocations and fractures may be caused by:
• An angular force, such as when a person falls on their outstretched hand
• A direct blow
• A compression force, such as when a person falls from a height and lands on their feet
• A crush, such as when an object lands on a person
Signs and Symptoms The signs and symptoms of a major sprain, dislocation or fracture are:
• Severe pain
• Obvious gross deformity and irregularity
• A complete or near-complete inability to move the injured limb
• A complete or near-complete inability to put weight on the injured limb
• Swelling and point tenderness
• A grating sound or feeling (fracture only)
Assessing Nerve Damage The following may indicate nerve damage:
• The patient has numbness and tingling in the extremities
• The patient is unable to move the limb
• The patient is unable to identify which toe you touch on the injured limb
Lesson 17.2: Major Sprains, Dislocations and Fractures

Occupational First Aid Level 3 Instructor Guide
Module 17: Major Injuries 17-5
Manipulating Limb with Physician Supervision If the limb is cold and pulseless with obvious angulation, it may be necessary to manipulate the limb in an attempt to restore some circulation. Only do this if advised to do so by a qualified medical advisor.
Contact a physician for instructions if both of the following conditions exist:
• The limb is cold and pulseless with a joint injury or obvious angulation.
• There will be more than 1 hour between the time of the injury and the patient's arrival at hospital.
Medical Aid A patient with a suspected sprain, dislocation or fracture who has any of the following should be referred for medical aid:
• A sudden deceleration injury, such as with a motor vehicle crash or a fall from height
• Pain, numbness, tingling, or weakness in an extremity distal to the injury
• Sudden onset of very severe pain
• Significant swelling
• Bowel or bladder symptoms
• Difficulty walking
Rapid Transport Category A patient with a severe crush injury, two or more proximal long-bone fractures, or a pelvic fracture is in the Rapid Transport Category (RTC).
Skill Practice Goal Manage a patient with a major sprain, dislocation or fracture. Scenario A faller was struck on the right leg by a falling branch. When you arrive, he is in the lateral position with his right side down. He is holding onto his right thigh. Steps 1. Conduct a scene assessment. No hazards. One injured.
Based on the mechanism of injury, spinal motion restriction is required.
2. Assess the level of consciousness. Approach the patient from the front, identify yourself, and attempt to communicate.
Based on AVPU, he is alert. He is yelling about extreme pain in his right thigh.
3. Activate the workplace emergency response procedure.
4. Manually stabilize head and neck.
5. Support the injured leg.

Occupational First Aid III Instructor Guide
17-6 Module 17: Major Injuries
6. Assess the airway. Patient is talking clearly. Airway is clear.
7. Assess breathing rate, rhythm, quality and chest wall movement.
Breathing is regular and effective.
8. Assess circulation: • Pulse distal to injury • Signs of shock (cool, pale, clammy
skin) • Rapid body survey (bleeding,
fractures)
Radial pulse present. Skin is normal, warm and dry. Small amount of blood soaked through pant leg. Baseball sized deformity is felt right mid-thigh region. No pain anywhere else.
9. Apply Modified NEXUS Rule:
a. Is patient reliable?
b. Patient's age, what happened, pre-existing back or spine problems?
c. Any distracting injuries? d. Palpate c-spine region. e. Concerning physical findings:
• Midline spine or cervical pain • Feel/move arms and legs without
pain/unusual sensations • Numbness or tingling
f. If in doubt, apply a hard collar with full spinal motion restriction.
Not intoxicated. Mid 40s, alert and able to answer all questions, no pre-existing spinal problems or distracting injuries. No mid-line spine or cervical pain. No Neurological deficits.
10. Transport decision: Medical Aid Ask for an ETV and inform BC EHS.
11. Secondary survey: a. Vitals - As found on patient b. Record the patient's medical history. c. Assess the pain using PPQRSST. d. Thoroughly examine the injured area.
Compare the injured limb with the uninjured limb.
e. Assess sensory and nerve function.
Compound mid 1/3 femur fracture with minimal bleeding, slight deformity mid thigh. Sensory and nerve function normal.
12. Provide injury care: a. Immobilize the leg using materials
that will meet the objectives of immobilization of the limb.
b. Apply ice pack for 20 min with a protective barrier.
c. Recheck circulation and nerve function.

Occupational First Aid Level 3 Instructor Guide
Module 17: Major Injuries 17-7
13. Package for transport: Modified spinal motion restriction
Motion restriction of the pelvis will help meet the principles of immobilization for this injury.
14. Monitor ABCs.
15. Complete First Aid Record.
Summary 1. How can you tell if an injury is limb-threatening?
2. What injury care should you provide for a major sprain, dislocation or fracture?

Occupational First Aid III Instructor Guide
17-8 Module 17: Major Injuries
Learning Outcomes 1. Describe the signs and symptoms of major ear injuries.
2. Manage a patient with a major ear injury.
Required Reading Occupational First Aid: A Reference and Training Manual, 2018 edition
Chapter 22: Ear Injuries, pages 174 – 175
Skill Practice Goal Manage a patient with a major ear injury. Scenario An electrician walks into the first aid room and tells you he cut his ear. He said he was working on a ceiling fan without locking out the switch when someone turned the fan and the fan blade hit him in the ear. Steps 1. Conduct a scene assessment. No hazards. One injured.
Spinal motion restriction not required. Patient can be assessed and treated sitting in chair.
2. Assess the level of consciousness. Approach the patient from the front, identify yourself, and attempt to communicate.
Based on AVPU, he is alert. He says that a fan blade cut his ear.
3. Assess airway. He is talking clearly. Airway is clear.
4. Assess breathing rate, rhythm and quality. Breathing is normal.
5. Assess circulation: • Radial pulse • Signs of shock (cool, pale, clammy skin) • Rapid body survey (bleeding, fractures)
Radial pulse is present. Skin colour is normal. There’s a 3.8 cm (1.5 inch) jagged laceration to his outer ear (pinna). No other injuries.
6. Apply pressure to ear with gauze. Bleeding is controlled with gauze and pressure
Lesson 17.3: Major Ear Injuries

Occupational First Aid Level 3 Instructor Guide
Module 17: Major Injuries 17-9
7. Transport decision: Medical Aid. The ear will need sutures (stiches).
8. Secondary survey: a. Assess patient's vital signs. b. Record patient's medical history
(tetanus). b. Thoroughly examine injured area. c. Assess sensory function, nerve function
and hearing.
Tetanus immunization history unknown. 3.8 cm (1.5 inch) jagged laceration on outer area (pinna) of ear. Hearing in the injured ear is not affected.
9. Provide injury care: a. Cleanse surrounding area. b. Cover both sides of outer ear with a
sterile dressing. c. Wrap with roller gauze around the ear
and head and secure with tape.
Skin closures should not be applied to this injury as patient will be referred for sutures.
10. Complete a First Aid Record.
Summary 1. Should you apply wound closures to an ear injury that will require sutures
(stiches)?

Occupational First Aid III Instructor Guide
17-10 Module 17: Major Injuries
Learning Outcomes 1. Describe the signs and symptoms of major nose injuries.
2. Manage a patient with a major nose injury.
Required Reading Occupational First Aid: A Reference and Training Manual, 2018 edition
Chapter 19: Facial Injuries and their Management, pages 161 – 163
Theory Nose Injuries The signs and symptoms of nose injuries are obvious. They include pain and bleeding. But that does not mean that a nose injury can't become a medical emergency.
By themselves, a nosebleed and a nasal fracture are not medical emergencies. Yet if they are the result of blunt trauma, there may be a brain and/or spinal injury. Also, due to the bleeding, there is the possibility of airway obstruction.
Summary 1. How can you tell if a patient with a nose injury has an airway obstruction due to
fluids?
2. How can you clear the airway of a patient with an airway obstruction due to a nose injury that is bleeding?
Lesson 17.4: Major Nose Injuries

Occupational First Aid Level 3 Instructor Guide
Module 17: Major Injuries 17-11
Learning Outcomes 1. Describe the signs and symptoms of major eye injuries.
2. Manage a patient with a major eye injury.
Required Reading Occupational First Aid: A Reference and Training Manual, 2018 edition
Chapter 20: Eye Injuries, pages 164 – 172
Theory Eye Injuries Eye injuries are common in the workplace. They can result from a variety of workplace activities including:
• Working with or near chemicals, laser and UV light
• Flying particles from bursts of compressed air or other compressed gases
• Windblown debris
The main types of eye injuries are:
• Direct blows from sharp or blunt objects (lacerations, contusions, extruded eyeball)
• Burns (chemical, thermal, radiation)
• Foreign bodies (penetrating, superficial)
Lesson 17.5: Major Eye Injuries

Occupational First Aid III Instructor Guide
17-12 Module 17: Major Injuries
Skill Practice Goal Manage a patient with a major eye injury. Scenario During a tree trimming procedure, a worker slipped from a ladder, fell face-first into a tree, and then dropped 2 m (6.5 ft) to the ground. When you arrive, she is lying supine on the ground. There is a small twig protruding from her eye. Steps 1. Conduct a scene assessment. No hazards. One injured.
Based on the mechanism of injury, spinal motion restriction is required.
2. Assess level of consciousness. Approach the patient from the front, identify yourself, and attempt to communicate. Ask patient to close both eyes if she can and to keep her hands away from her injured eye.
Patient responds with clear speech, but is very anxious. She complains about pain in her eye.
3. Manual stabilize the patient's head and neck. If available train a helper to take over manual stabilization: "Hands over mine, fingers and thumbs where mine are, elbows braced. Don’t move while I reposition myself. Let me know if you have to move so I can help."
4. Assess the airway. Patient talks clearly. Airway is clear.
5. Assess the breathing rate, rhythm and quality. Breathing is shallow, but effective.
6. Assess circulation: • Radial pulse • Signs of shock (cool, pale, clammy skin) • Rapid body survey (bleeding, fractures)
Radial pulse is present, but rapid and weak. Skin is cool and pale. No major bleeding or other gross deformity.
7. Apply high-flow oxygen.
8. Provide injury care: a. Tell the patient what you're doing. b. Ask a helper to put on gloves. If it’s a large
object, ask the helper to support the twig to ensure no movement occurs.
c. Cover both eyes with sterile dressings. Use bulky dressing or supportive bandages to maintain the position of the twig.

Occupational First Aid Level 3 Instructor Guide
Module 17: Major Injuries 17-13
9. Transport decision: RTC. Describe the remaining steps; there is no need to demonstrate.
10. Apply Modified NEXUS Rule:
a. Is patient reliable?
b. Patient's age, what happened, pre-existing back or spine problems?
c. Any distracting injuries? d. Palpate c-spine region. e. Concerning physical findings:
• Midline spine or cervical pain • Feel/move arms and legs without
pain/unusual sensations • Numbness or tingling
11. Position and secure patient on spine board or scoop stretcher.
12. Lift patient onto basket stretcher.
13. Complete a secondary survey en route.
14. Complete a First Aid Record.
Summary 1. How should you treat a patient with a penetrating eye injury?

Occupational First Aid III Instructor Guide
17-14 Module 17: Major Injuries
Learning Outcomes 1. Manage a patient with a major burn.
Required Reading Occupational First Aid: A Reference and Training Manual, 2018 edition
Chapter 38: Burns, pages 279 – 280
Skill Practice Goal Manage a patient with a major burn to both hands. Scenario A painter was working at height applying labels to the plant flow piping near the top of a 4-metre step ladder when he lost his footing. As he reached out to prevent himself from falling, he grabbed an active steam pipe with both hands. When you arrive, he is at the industrial sink cooling his burned hands. Steps 1. Conduct a scene assessment.
Confirm mechanism. There are no hazards. One person injured. Based on the mechanism of injury, spinal motion restriction is not needed. He did not fall.
2. Assess level of consciousness. Approach the patient from the front, identify yourself, and attempt to communicate.
Patient's eyes are open. He is anxious. Based on AVPU, he is alert.
3. Initiate or continue flushing his hands with cool water.
4. Activate workplace emergency response procedure.
Ask someone to call an ambulance or have an ETV prepared. If calling an ambulance, tell them there is a responsive adult with a serious burn on his hands.
Major burns to the hands, feet or genitalia are in the RTC.
5. Assess airway. He's able to talk. Airway is clear.
6. Assess breathing rate, rhythm, quality and chest wall movement.
He's able to speak in full sentences.
Lesson 17.6: Major Burns

Occupational First Aid Level 3 Instructor Guide
Module 17: Major Injuries 17-15
7. Assess circulation: • Radial pulse • Signs of shock (cool, pale, clammy
skin) • Rapid body survey (bleeding,
fractures)
Pulse is present. No signs of shock Major full thickness burns to the palms and fingers of both hands. No other injuries
8. Critical interventions: a. Continue cooling and remove any
rings, watches or jewelry. b. Cover the area with moist sterile
gauze. c. Lightly secure the dressing with a
roller bandage. d. Keep hands elevated if possible.
9. Transport decision: RTC. Describe the remaining steps; there is no need to demonstrate.
10. Monitor the ABCs.
11. Package patient in position of comfort for transport.
12. Continue cooling and conduct Secondary Survey while waiting for transport or en route.
13. Complete a First Aid Record.
Summary 1. What is the first thing you should do for a patient with a major thermal burn?
2. What critical interventions should you provide for a patient with a major thermal or chemical burn?


18. Exposure to Heat and Cold
18.1 Signs of Heat and Cold Injuries
18.2 Heat Stroke
18.3 Hypothermia
18.4 Frost Bite
Exposure to Heat and Cold Module 18

Occupational First Aid Level 3 Training Guide
18-2 Module 18: Exposure to Heat and Cold
Learning Outcomes 1. Describe the signs and symptoms of heat exhaustion, heat stroke, frostbite and
hypothermia.
Required Reading Occupational First Aid: A Reference and Training Manual, 2018 edition
Chapter 37: Exposure to Heat and Cold, pages 269 – 274
Theory Heat Exhaustion The signs and symptoms of heat exhaustion include:
• Shallow respiration
• Increased respiratory rate
• Weak and rapid pulse
• Cool, pale and clammy skin
• Sweating
• Weakness, fatigue or dizziness
• Headache and nausea
• Fainting
• Muscle cramps
The presence of sweating is an important finding because it is often the only way to differentiate heat exhaustion from the life-threatening emergency of heat stroke.
Lesson 18.1: Signs of Heat and Cold Injuries

Occupational First Aid Level 3 Training Guide
Module 18: Exposure to Heat and Cold 18-3
Heat Stroke The signs and symptoms of heat stroke include:
• Hot, dry, flushed skin
• Absence of sweating
• Agitation and confusion
• Decreased level of consciousness
• Headache
• Nausea and vomiting
• Seizures
• Increased respiratory rate
• Irregular pulse
• Shock
• Cardiac arrest
All patients with heat stroke are in the Rapid Transport Category.
Frostbite The signs and symptoms of frostbite include:
• Pain and redness in the affected area
• Pale skin, tingling and numbness as the frostbite worsens
• White or blue and white skin
• Skin feels frozen solid to the touch
Patients with frostbite alone are not in the Rapid Transport Category but will need medical attention.
Hypothermia The signs and symptoms of hypothermia include:
• Mild: shivering, body temperature 33 to 35°C
• Moderate: confusion, decreased level of consciousness, slowed heart rate, slowed breathing, body temperature 29 to 32°C
• Severe: slowed respiratory rate, slowed heart rate, dilated and poorly reactive pupils, unresponsive, frothy sputum, body temperature below 28°C, cardiac arrest, coma
Patients with mild hypothermia are not in the Rapid Transport Category. Patients with moderate to severe hypothermia are.

Occupational First Aid Level 3 Training Guide
18-4 Module 18: Exposure to Heat and Cold
Hypothermic Patients in Cardiac Arrest Hypothermic patients in cardiac arrest should receive CPR. If an AED is available, apply the pads, and if prompted, deliver 1 shock only. A hypothermic patient in cardiac arrest is in the Rapid Transport Category and should be transported without delay. CPR should be administered en route to the hospital if possible. This is the only time that a patient in cardiac arrest should be transported prior to the restoration of normal breathing and pulse.
Summary 1. How do the symptoms of heat exhaustion differ from the symptoms of heat
stroke?
2. What are the signs and symptoms of frostbite?
3. What is the difference between moderate and severe hypothermia?
4. Which heat and cold injuries are in the RTC?
5. Why is moderate hypothermia in the RTC?

Occupational First Aid Level 3 Training Guide
Module 18: Exposure to Heat and Cold 18-5
Learning Outcomes 1. Manage a patient experiencing heat stroke.
Required Reading Occupational First Aid: A Reference and Training Manual, 2018 edition
Chapter 37: Exposure to Heat and Cold, page 271
Skill Practice Goal Manage a patient experiencing heat stroke. Scenario A construction worker who is part of a crew that is building a residential high-rise tower walks into the first aid office. It's a hot day and he's been outside all morning. He's agitated and tells you that he has a really bad headache. Steps 1. Conduct a scene assessment. You send a helper to check on the
rest of the crew. None of them have been affected by the heat, but the helper reminds the crew to take breaks and drink water. Patient looks very sunburned. He tells you that he feels sick. Spinal motion restriction is not required.
2. Assess the patient's level of consciousness. Approach the patient from the front, identify yourself, and attempt to communicate.
Patient responds with clear speech, but he's agitated and confused. Based on AVPU, he is alert.
3. Activate workplace emergency response procedure.
4. Position patient supine on cot with head elevated.
5. Assess airway. He's speaking clearly. Airway is clear.
6. Assess breathing rate, rhythm, quality and chest wall movement.
Breathing is normal.
Lesson 18.2: Heat Stroke

Occupational First Aid Level 3 Training Guide
18-6 Module 18: Exposure to Heat and Cold
7. Assess circulation: • Radial pulse • Signs of shock (cool, pale, clammy
skin) • Rapid body survey (bleeding, fractures)
Radial pulse is present, but irregular. His skin is hot, dry and flushed. Headache and nausea. No other injuries
8. Critical interventions: a. If still in direct sunlight, move patient
to coolest spot available. b. Get a biohazard bucket ready. c. Remove all outer clothing. d. Sponge/soak patient with cool water
and use a fan. e. Give patient fluids to drink.
Juice, non-caffeinated soft drinks, or a sports drink is best. If that's not available, mix 1 teaspoon of salt in 1 pint of water.
Position of comfort. Patient does not feel like they will vomit.
9. Transport decision: RTC. Describe the remaining steps; there is no need to demonstrate.
10. Package patient in position of comfort.
11. Conduct secondary survey while waiting for transport or en route. If possible, monitor and record core temperature.
12. Complete a First Aid Record.
Summary 1. When you have a patient with heat stroke, what should you do as part of the
scene assessment?
2. What critical interventions should you provide for a patient who is having a heat stroke?

Occupational First Aid Level 3 Training Guide
Module 18: Exposure to Heat and Cold 18-7
Learning Outcomes 1. Manage a patient experiencing hypothermia.
Required Reading Occupational First Aid: A Reference and Training Manual, 2018 edition
Chapter 37: Exposure to Heat and Cold, pages 273 – 276
Skill Practice Goal Manage a patient with moderate to severe hypothermia. Scenario A worker has been outdoors for several hours in the cold. His coworkers notice that he is acting confused and sluggish. They tell you that he decided to just lie down right where he was because he was very tired. When you arrive, he is lying supine and coworkers tell you that he just won’t get up. Steps 1. Conduct a scene. Ask a helper to check on other
workers and caution them about the dangers of hypothermia. Spinal motion restriction not required. Patient can be assessed in position found.
2. Assess the patient's level of consciousness. a. Approach the patient from the front,
identify yourself, and attempt to communicate.
b. Apply a painful stimulus by squeezing the nail bed on the patient's hand or another appropriate means.
No response to your voice. Patient does not respond to verbal or pain stimulus. Based on AVPU, he is unresponsive.
3. Activate workplace emergency response procedure.
Ask someone to call an ambulance or have an ETV prepared. If calling ambulance, tell them there is an unresponsive adult and to report back.
Lesson 18.3: Hypothermia

Occupational First Aid Level 3 Training Guide
18-8 Module 18: Exposure to Heat and Cold
4. Assess airway, breathing and circulation: a. Perform a head-tilt/chin-lift. b. Look, listen and feel for air movement for
5 sec. c. With one hand, carefully slide your fingers
to the carotid pulse and assess for up to 30 sec.
Patient is not breathing. There is no pulse.
5. Perform 30 chest compressions: a. Send a helper to bring the AED. b. Ensure patient is on hard surface and
expose chest. c. Place your hands on the chest between
the nipples. d. Interlock your fingers and straighten your
arms until your elbows lock. e. Press straight down.
Push hard; push fast. Compress at least 5 cm (2 inches) at a rate of at least 100/min. Allow chest to recoil.
f. As you perform chest compressions, train a helper to take over if possible.
6. If the patient remains unresponsive: a. Perform a head-tilt/chin-lift. b. Using a pocket mask, ventilate the patient
with 2 breaths. If a helper is available, you can switch roles every 2 min or 5 cycles of 30:2.
7. Measure and insert an oral airway.
8. Administer high-flow oxygen using the pocket mask.
9. Prepare patient and attach the AED: a. Bare the chest. b. Shave hair, remove patches and make
sure the chest is dry. c. Turn on AED and follow voice prompts. d. Apply pads at least 1 inch from implanted
devices.
Chest is dry. No chest hair, medication patches or medical devices.
10. Analyze the heart rhythm: a. Follow voice prompts or press the
Analyze button. b. Tell helper to, stop compressions and
don't touch the patient." c. Make sure no one is touching the patient
and everyone is standing clear.

Occupational First Aid Level 3 Training Guide
Module 18: Exposure to Heat and Cold 18-9
11. Deliver a shock: a. Say, "I'm clear. Everyone is clear. Do
not touch the patient." b. If prompted to do so, press the Shock
button.
Spontaneous circulation and breathing are restored.
12. Other critical interventions: a. Move patient to warm environment as
soon as possible. Handle the patient gently. Use a stretcher. Do not suppress shivering. It helps the patient generate heat.
b. Apply high-flow oxygen using a non-rebreathing mask.
c. Remove all wet clothes, cover patient with blankets, and turn up the heat if possible.
d. Do not give the patient anything by mouth.
13. Transport decision: RTC. Describe the remaining steps; there is no need to demonstrate.
14. Package patient for transport.
15. Monitor the patient's ABCs.
16. Complete secondary survey while waiting for transport or en route. Reassess patient frequently. Record core temperature if possible.
17. Complete a First Aid Record.
Summary 1. For how long should you assess the carotid pulse if the patient is hypothermic?
2. Besides CPR and AED if the patient is in cardiac arrest, what else can you do to help a patient with moderate to severe hypothermia?

Occupational First Aid Level 3 Training Guide
18-10 Module 18: Exposure to Heat and Cold
Learning Outcomes 1. Manage a patient with frostbite.
Required Reading Occupational First Aid: A Reference and Training Manual, 2018 edition
Chapter 37: Exposure to Heat and Cold, pages 272 – 273
Skill Practice Goal Manage a patient with frostbite. Scenario A worker has been outdoors for several hours in the wind chill. She walks into your office. She's worried that she might have frost bite on her right ear. At first, it stung. Now, it's numb. Steps 1. Conduct a scene assessment. Send a helper to check on other
workers and caution them about the possibility of frost bite. Spinal motion restriction not required. Patient can be assessed sitting in a chair.
2. Assess the patient's level of consciousness. Approach the patient from the front, identify yourself, and attempt to communicate.
Patient responds with clear speech. Based on AVPU, she's alert.
3. Assess airway. She's speaking clearly. Airway is clear.
4. Assess breathing rate, rhythm, quality and chest wall movement.
Breathing is normal.
5. Assess circulation: • Radial pulse • Signs of shock (cool, pale, clammy skin) • Rapid body survey (bleeding, fractures)
Radial pulse is present. Ear is pale. It is also tingling and numb. No other injuries
6. Transport decision: Medical Aid.
Lesson 18.4: Frostbite

Occupational First Aid Level 3 Training Guide
Module 18: Exposure to Heat and Cold 18-11
7. Secondary survey: a. Take medical history. b. Take patient's vitals. c. Thoroughly examine the injured area. d. Assess sensory and nerve function.
As the ear rewarms, she experiences pain. Reassure her that the pain is normal and a good sign indicating that the affected part will recover.
8. Injury care: a. Lightly dress the ear with sterile dressing. b. Wrap in roller gauze.
Explain that swelling and blisters may form a few hours after rewarming.
9. Complete a First Aid Record.
Summary 1. When you have a patient with frostbite, what should you do as part of the scene
assessment?
2. What critical interventions should you provide for a patient who has frostbite?

Occupational First Aid Level 3 Training Guide
18-12
Day 7 Homework Effective Communication During the evening, read pages page 19 – 20 in the textbook. Bring notes on the following to the next class:
1. When should you first notify EHS? When should you give EHS updates?
2. What information should you give to EHS when you transfer responsibility?
NOTES

19. Effective Communication
19.1 Your Communication Role
19.2 Communication Strategies
Effective Communication Module 19
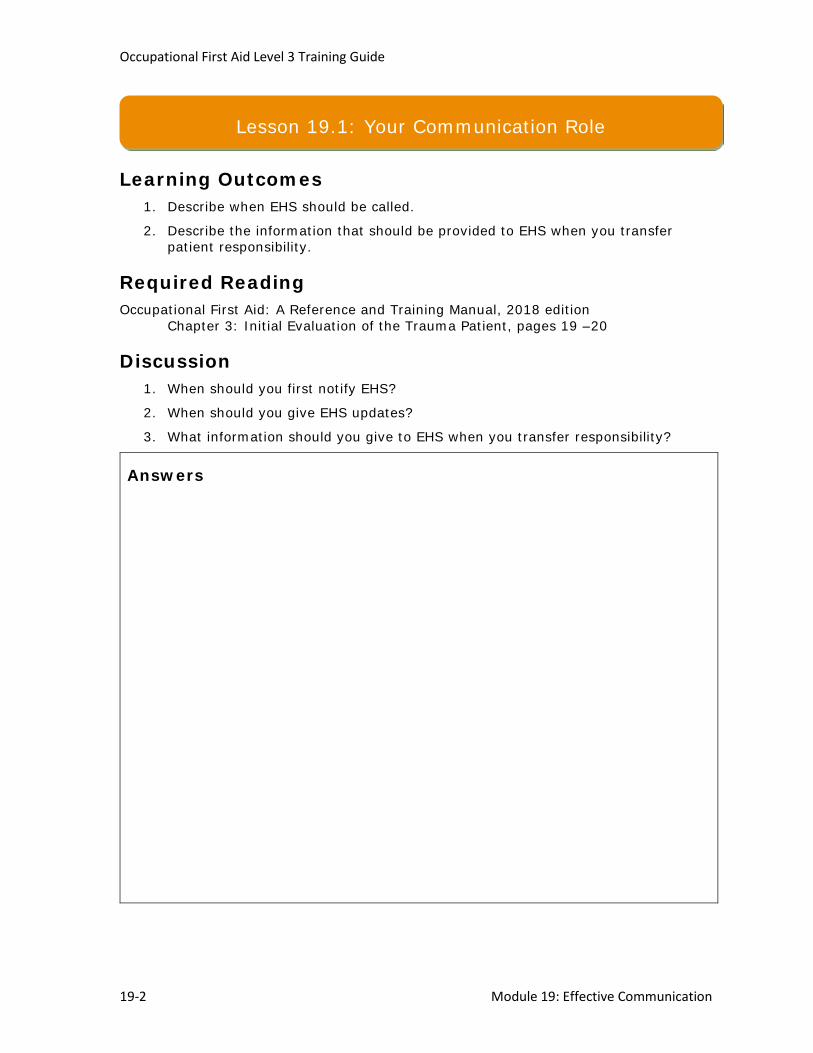
Occupational First Aid Level 3 Training Guide
19-2 Module 19: Effective Communication
Learning Outcomes 1. Describe when EHS should be called.
2. Describe the information that should be provided to EHS when you transfer patient responsibility.
Required Reading Occupational First Aid: A Reference and Training Manual, 2018 edition
Chapter 3: Initial Evaluation of the Trauma Patient, pages 19 –20
Discussion 1. When should you first notify EHS?
2. When should you give EHS updates?
3. What information should you give to EHS when you transfer responsibility?
Answers
Lesson 19.1: Your Communication Role

Occupational First Aid Level 3 Training Guide
Module 19: Effective Communication 19-3
Pair-Based Scenario Exercise Instructions Take turns practising what you should say when you hand over the patient to the next level of care.
Scenarios 1. While performing his regular duties, 40-year-old Jack Spencer developed chest pain.
When you arrive, he is standing beside the photocopier. He is alert, but showing signs of shock. He's on medication for high blood pressure, but has no previous history of chest pain. The severity of his chest pain is 7 out of 10. The pain has not lessened in the last 40 min. He's not allergic to anything, having a heart attack because of stroke, having an asthmatic attack, or under 19 years of age. You offered him two 80 mg chewable tablets of ASA which he took approximately 35 min ago.
His vitals are as follows: LOC: 4/5/6=15 Breathing: 28, short of breath but effective Pulse: 100, irregular SpO2 94% Skin: cool, pale and clammy Pupils: 4 mm, equal & reactive
2. You are called to a meeting room where a worker has been complaining of chest pain. About 10 min ago, 53-year-old Jill Kramer appeared to be faint and had to be helped to the floor. She is unresponsive, not breathing normally and does not have a carotid pulse. She has no medication patches or medical alert devices. You've been administering CPR/AED for 5 min. The AED advised no shock during CPR. Spontaneous circulation and breathing has not been restored.
3. 19-year-old Jim Brady is an agriculture equipment salesman. He was visiting an orchard to promote his goods when he was stung by a bee. He's alert, but anxious when he tells you what happened and that he's allergic to bee stings. His airway is clear, his breathing is shallow and his radial pulse is weak. You help him use his epinephrine auto-injector about 4 min before the next level of care arrives. By the time that the next level of care arrives, it's been 10 min since he was stung.
His vitals are as follows: LOC: 4/5/6=15 Breathing: 28, shortness of breath, effective Pulse: 60, weak SpO2 94% Skin: cool, pale and clammy Pupils: 4 mm, equal & reactive

Occupational First Aid Level 3 Training Guide
19-4 Module 19: Effective Communication
4. 32-year-old Sandra Carr is a sawmill worker. She was struck in the face by a log as it broke free from a jam. When you arrive, she's unresponsive. Co-workers tell you what happened. Based on mechanism of injury, spinal motion restriction is required. There is blood in and around her mouth and gurgling. Suctioning clears the airway and she accepts an oral airway. You give her high-flow oxygen.
Her vitals are as follows: LOC: 2/2/4=8 Breathing: 20 assisted Pulse: 88 regular SpO2 98% Skin: pale, cool and dry Pupils: 3 mm, equal & reactive
5. 42-year-old Cam Spinner is experiencing respiratory distress. He was carried out of an area due to a gas leak. He's unresponsive to voice but withdraws from pain stimulus. You assist ventilation with a pocket mask and give him high-flow oxygen. He accepts an oral airway.
His vitals are as follows: LOC: 1/2/4=7 Breathing: 20 assisted Pulse: 104 regular SpO2 92% Pupils: 5 mm, equal & slow to react Skin: pale, cool and clammy
6. A box of machine parts hit 23-year-old Margaret Newman on the head. Co-workers helped her to the floor. Based on her mechanism of injury, spinal motion restriction is required. She's unresponsive and in respiratory arrest. Her carotid pulse is present and the airway is clear. Her skin is cold, dry and blue. You ventilate with a pocket mask, insert an oral airway, and give her high-flow oxygen. The next level of care arrives before you have time to take her vitals.
7. At a health and safety meeting, 47-year-old Matt Houston started to choke on his snack. He remained alert while you cleared the airway using back blows and abdominal thrusts. You gave him high-flow oxygen. There is no relevant medical history, medications or allergies.
His vitals are as follows: LOC: 4/5/6=15 Breathing: 24 regular effective Pulse: 96 regular SpO2 98% Pupils: 3 mm, equal & reactive Skin: normal, warm and dry

Occupational First Aid Level 3 Training Guide
Module 19: Effective Communication 19-5
8. Jim Blair is 23 years old. He was thrown out of his forklift when he accidentally drove the left wheels into a ditch and the forklift tipped over. He has massive bleeding on his left thigh. He has been conscious since the accident. Based on the mechanism of injury, spinal motion restriction is required. You apply direct pressure, but it doesn't control the bleeding. You apply a tourniquet at 2:35 PM and that stops the bleeding. You give him high-flow oxygen.
His vital signs are as follows: LOC: 4/5/6=15 Breathing: 28 shallow effective Pulse: 112 weak and regular SpO2: 98% Pupils: 3 mm, equal & reactive Skin: pale, cool and dry
9. 56-year-old Trish Rutford is known to have diabetes. She was taking stock in the warehouse when she felt faint. A co-worker helped her to the floor. You give her high-flow oxygen and glucose.
Her vital signs are as follows: LOC: 3/4/5=11 Breathing: 20 shallow effective Pulse: 104 regular SpO2 98% Pupils: 4 mm, equal & reactive Skin: pale, cool and clammy
10. 26-year-old Jock Harmony was working on a high-rise when a piece of lumber fell from above and struck him in the face. He is unresponsive to voice. His nose was bleeding profusely but has been controlled. The accident happened about 20 min ago. Spinal motion restriction was applied. Suctioning clears the airway. You insert an oral airway and give him high-flow oxygen.
His vitals are as follows: LOC: 1/2/4=7 Breathing: 20 regular effective Pulse: 88 regular SpO2 98% Pupils: 5 mm, equal & reactive Skin: normal, warm and dry
11. 46-year-old Martin Summerfield was completing inventory in the warehouse when he began to have a seizure. He slid to the floor without hitting his head or neck. When you arrived, the seizure had stopped, but he was unresponsive. He rejected an oral airway and shows no signs of shock. The next level of care arrives before you take vital signs.
12. 58-year-old Stella Wingfield was at her desk when she began to behave strangely. Her face drooped and her speech became garbled. She said she was dizzy, then became unconscious and slid to the floor without hitting her head or neck. She seems to hear you, but is confused. She shows signs of a stroke. You applied suction to clear her airway and gave her low-flow oxygen using a nasal cannula. The next level of care arrives before you take vital signs.

Occupational First Aid Level 3 Training Guide
19-6 Module 19: Effective Communication
Answers

Occupational First Aid Level 3 Training Guide
Module 19: Effective Communication 19-7
Answers
Summary 1. When should you call EHS?
2. What should you tell EHS?

Occupational First Aid Level 3 Training Guide
19-8 Module 19: Effective Communication
Learning Outcomes 1. Describe strategies for effective communication with patients and other
workers.
2. Describe barriers to effective communication with patients and other workers.
Required Reading Occupational First Aid: A Reference and Training Manual, 2018 edition
Chapter 3: Initial Evaluation of the Trauma Patient, pages 19 –20
Lecture
Effective Communication Strategies When talking to patients and other workers:
• Be calm and reassuring.
• Tell them you're prepared and have practised for this type of situation.
• Use the patient's name and make eye contact.
• Explain what you're going to do and reassure the patient even if the patient is confused or comatose.
• Listen attentively and paraphrase what you've heard.
• Tell the truth or you may destroy the patient's trust in you.
• Use appropriate body language such as a pat on the shoulder.
• Avoid being coldly detached, angry or irritated with a patient.
Lesson 19.2: Communication Strategies

Occupational First Aid Level 3 Training Guide
Module 19: Effective Communication 19-9
Class Discussion Barrier to Effective Communication What are possible solutions to the following communication barriers?
1. The patient speaks a different language than you or has hearing challenges.
2. In the heat of the moment, you could miss something important the patient says.
3. The scene of the accident is next to a noisy work area.
4. The patient seems to be confused by your question.
Answers
Summary 1. How can you reassure a patient who is feeling anxious?
2. What is just as important as talking?
3. What should you do if the patient does not speak your language?


20. Head and Nervous System
20.1 Spinal Injuries
20.2 Altered Level of Consciousness
20.3 Seizure
20.4 Stroke
Head and Nervous System Module 20

Occupational First Aid Level 3 Training Guide
20-2 Module 20: Head and Nervous System
Learning Outcomes 1. Describe the signs and symptoms of a spinal injury.
2. Manage a patient with a possible spinal injury.
Required Reading Occupational First Aid: A Reference and Training Manual, 2018 edition
Chapter 17: Spinal Injuries, pages 138 – 145 Chapter 18: Spinal Injury Management, 146 – 158
Theory
Mechanism of Injury You should assume that the patient has a spinal injury if any of the following mechanisms of injury occurred:
• Motor vehicle crash
• Fall from a height
• Direct blow to the spine
• Severe electrical shock
• Facial and head injury
• NEXUS application reveals spinal precautions are necessary
Signs and Symptoms of Spinal Injury The signs and symptoms of a spinal injury include:
• Pain, tenderness or stiffness in the affected area
• Numbness, tingling or weakness in one or more extremity
• Any noticeable deformity of the spine
• Swelling
• Difficulty breathing if the spinal cord was injured
Difference Between Spinal Cord and Bony Spine Injuries The spinal cord is the delicate tissue inside the spinal column. If the signs and symptoms of spinal injury include neurological deficits, the spinal cord has been injured.
The bony spine is part of the skeleton. If the signs and symptoms do not include neurological deficits, it is a bony spine injury.
Lesson 20.1: Spinal Injuries

Occupational First Aid Level 3 Training Guide
Module 20: Head and Nervous System 20-3
Skill Practice Goal Manage a patient with a spinal injury. Scenario A worker was struck and knocked to the ground with roof trusses. The worker is lying supine on the ground, complaining about hip pain and supporting both sides of his pelvis. You are 2 hrs from a hospital. Steps 1. Use all appropriate personal protective equipment
for the site.
2. Conduct a scene assessment. The trusses have been moved. One injured. Based on mechanism of injury, spinal motion restriction is required.
3. Activate Workplace Emergency Response Procedures.
Due to the mechanism of injury, ask someone to bring the ETV right away and call BC EHS.
4. Assess the patient's level of consciousness: Approach the patient from the front, identify yourself, and attempt to communicate.
Patient responds with clear speech. Based on AVPU, patient is alert.
5. Manually stabilize patient's head and neck.
6. Assess airway. He's speaking clearly. Airway is clear.
7. If possible, train a helper to take over manually stabilizing the head and neck.
"Hands over mine, fingers and thumbs where mine are, elbows braced. Don’t move while I reposition myself. Let me know if you have to move so I can help."
8. Assess breathing rate, rhythm, and quality. Breathing is normal.
9. Assess circulation • Radial pulse • Signs of shock (pale, cool, clammy) • Rapid body survey
Radial pulse is present No signs of shock. Pain on both sides of the pelvis.
10. Tell a helper to apply and maintain support to the sides of the pelvis. Caution the helper to not apply support to the top of the pelvis.
11. Apply a pelvic binder and tie the patient's legs together.

Occupational First Aid Level 3 Training Guide
20-4 Module 20: Head and Nervous System
12. Administer high-flow oxygen.
13. Apply a blanket for warmth.
14. Transportation decision: RTC. Pelvic injury is RTC
15. Apply Modified NEXUS Rule:
a. Is patient reliable?
b. Patient's age, what happened, pre-existing back or spine problems?
c. Any distracting injuries? d. Palpate c-spine region. e. Concerning physical findings:
• Midline spine or cervical pain • Feel/move arms and legs without
pain/unusual sensations • Numbness or tingling
Alert, not intoxicated. Under 65 and able to answer all questions. Pelvic pain is not distracting from answering questions. No midline cervical pain or neurological deficits reported. Spinal motion restriction not required.
16. Lift patient onto basket stretcher.
17. Complete secondary survey while waiting for transport or en route.
18. Check ABCs every 5 min and vital signs every 10 min.
19. Complete a First Aid Record
Summary 1. What are the signs and symptoms of a possible spinal injury?
2. How can you tell the difference between a spinal cord and a bony spine injury?
3. What is the main thing to remember when assessing and treating a patient with a possible spinal injury?
4. How should you package a patient who has a possible spinal injury?

Occupational First Aid Level 3 Training Guide
Module 20: Head and Nervous System 20-5
Learning Outcomes 1. Describe strategies for managing a patient with an altered level of consciousness.
Required Reading Occupational First Aid: A Reference and Training Manual, 2018 edition
Chapter 15: The Patient with an Altered Level of Consciousness, pages 123 – 125
Group-Based Scenario Exercise Instructions Identify the possible cause of the altered level of consciousness and come up with strategies for managing the patient. Refer to Chapter 15 in your textbooks.
Scenarios 1. A building maintenance worker is found lying on some cartons of paper products
in the stockroom. There is a strong odour of alcohol in the immediate area.
2. An office worker is slurring her words and seems unsteady on her feet. Her skin is pale and she is confused. There is no smell of alcohol or signs of drug use.
3. A worker who came to you a few days ago with a minor wound is feeling faint.
4. A carpenter fell 5 m (3 ft) from a scaffold, striking her head on a stack of lumber. She is lying on her side with her eyes closed and she's not moving. When you assess her level of consciousness, she does not respond to verbal or pain stimulus.
Answers
Lesson 20.2: Altered Level of Consciousness

Occupational First Aid Level 3 Training Guide
20-6 Module 20: Head and Nervous System
Answers
Summary 1. If you know a patient is intoxicated, do you need to look for other causes of the
altered level of consciousness?
2. What is the transport decision for all patients with an altered level of consciousness?

Occupational First Aid Level 3 Training Guide
Module 20: Head and Nervous System 20-7
Learning Outcomes 1. Describe what a seizure is.
2. Describe the types of seizures.
3. Describe the signs and symptoms of a seizure.
4. Manage a patient who is having a seizure.
Required Reading Occupational First Aid: A Reference and Training Manual, 2018 edition
Chapter 16: Injuries to the Head and Brain, pages 134 – 137
Theory What a Seizure Is A seizure is a sudden surge of electrical activity in the brain. As an OFA attendant, you may encounter tonic-clonic seizures or simple partial seizures. The primary objective of first aid treatment for a patient who is having any kind of seizure if to maintain a clear airway.
Tonic-Clonic Seizures With tonic-clonic (grand mal) seizures, the patient convulses, loses consciousness and drops to the ground. All of their muscles contract and their body becomes rigid. Their extremities begin to jerk rapidly, their jaw tightens and their teeth clench. The patient appears to be in danger of respiratory arrest. Loss of bladder control is common. The convulsion is followed by a period of decreased consciousness, which typically lasts 10 to 30 min. During this period, the patient gradually improves.
Simple Partial Seizures With a simple partial seizure, only the part of the brain that controls motor activity is affected. Typically, only one part of the body begins to twitch or shake. A simple partial seizure may progress into a tonic-clonic seizure.
Lesson 20.3: Seizure

Occupational First Aid Level 3 Training Guide
20-8 Module 20: Head and Nervous System
Skill Practice Goal Manage a patient who is having a seizure. Scenario A worker was at his desk when he began to have a seizure. He slid out of his chair and landed on the floor without hitting his head or neck. When you arrive, the seizure has stopped and he is lying on his side with a pool of saliva around his head. Steps 1. Conduct a scene assessment. No hazards. One injured.
Spinal motion restriction not required.
2. Place the patient supine.
3. Assess the patient's level of consciousness. a. Approach the patient from the front,
identify yourself, and attempt to communicate.
b. Apply a painful stimulus by squeezing the nail bed on the patient's hand or another appropriate means.
Patient does not respond to verbal stimuli. Patient does not respond to pain either. Based on AVPU, he is unresponsive.
4. Activate workplace emergency response procedure:
Ask someone to call an ambulance or have an ETV prepared. If calling an ambulance, tell them there is an unconscious adult who has had a seizure.
5. Assess airway and breathing and pulse: a. Perform a head-tilt/chin-lift. b. Look, listen and feel for the movement
of air for 5 sec. c. Slide your fingers to the carotid pulse
for 5 sec. d. If possible, get a helper to maintain the
head-tilt/chin-lift.
You hear and feel regular, quiet breathing. You see the patient's chest rise and fall. A carotid pulse is present.
6. Measure and insert an oral airway. Assess to ensure that the patient is still breathing quietly and effectively.
The patient accepts the oral airway and is still breathing normally.
7. Assess circulation: • Signs of shock (cool, pale, clammy
skin) • Rapid body survey (bleeding, fractures)
His skin is normal, warm and dry. No other injuries are found.
8. Apply high-flow oxygen.
9. Place the patient in the 3/4 prone position.

Occupational First Aid Level 3 Training Guide
Module 20: Head and Nervous System 20-9
10. Apply a blanket for warmth.
11. Transport decision: RTC.
12. Package and load the patient in the 3/4 prone position.
The OPA may be left partially in place to keep the mouth open.
13. Complete Secondary Survey while waiting for transport or en route.
14. Check ABCs every 5 min and vital signs every 10 min.
15. Complete a First Aid Record.
Summary 1. What are the signs and symptoms of a seizure?
2. What critical interventions should be given to a patient who had a seizure?
3. What is the transport decision for patients who have had a seizure?

Occupational First Aid Level 3 Training Guide
20-10 Module 20: Head and Nervous System
Learning Outcomes 1. Describe what a stroke is.
2. Describe the types of strokes.
3. Describe the signs and symptoms of a stroke.
4. Manage a patient who is having a stroke.
Required Reading Occupational First Aid: A Reference and Training Manual, 2018 edition
Chapter 16: Injuries to the Head and Brain, pages 132 – 134
Theory Types of Stroke A stroke is a cerebrovascular accident in which a cerebral artery becomes blocked or ruptures.
There are two main types of strokes:
• Ischemic strokes caused by blockage or narrowing of a cerebral artery
• Hemorrhagic strokes caused by rupture of a cerebral artery
Signs and Symptoms of a Stroke Signs and symptoms of a stroke include:
• Weakness in one or more limb
• Numbness in one side of the body
• Severe headache
• Nausea
• Amnesia
• Visual difficulty
• Decreased level of consciousness and confusion
• Trouble speaking
• Dizziness
• Seizures
• Sudden clumsiness
• Difficulty swallowing
Lesson 20.4: Stroke

Occupational First Aid Level 3 Training Guide
Module 20: Head and Nervous System 20-11
A quick screen for stroke is to use the FAST mnemonic:
• Face: Look for facial droop or asymmetry.
• Arms: Ask the patient to hold both arms out straight in front of them with their palms up. Then ask the patient to close their eyes for 10 seconds. If one of their arms drop, it may be a sign of stroke.
• Speech: Is the patient speaking normally? Are they oriented in time and place? Can they understand you? Can you understand them?
• Time: If you think the patient may have had a stroke, get them to the hospital as fast as possible.
Skill Practice Goal Manage a patient who is having a stroke. Scenario During a meeting, a worker began to behave strangely. Her face drooped and her speech became garbled. She seemed confused and said she felt dizzy. Then she became unconscious and slid to the floor without hitting her head or neck. When you arrive, she is lying supine. Steps 1. Conduct a scene assessment. No hazards. One person injured.
Spinal motion restriction not required.
2. Assess the patient's level of consciousness. Approach the patient from the front, identify yourself, and attempt to communicate.
Patient seems to hear you talking, but is confused. She responds in garbled speech.
3. Activate workplace emergency response procedure:
Ask someone to call an ambulance or have an ETV prepared. If calling an ambulance, tell them there is a conscious adult who may be having a stroke.
4. Open the airway: a. Perform a head-tilt/chin-lift. b. Look, listen and feel for air movement
for 5 sec. c. Place 3/4 prone to facilitate drainage
Breathing is noisy/gurgley. Airway drains effectively in 3/4 prone position.

Occupational First Aid Level 3 Training Guide
20-12 Module 20: Head and Nervous System
5. Assess breathing: a. Check breathing in 3/4 prone position
After placing 3/4 prone, you hear and feel regular, quiet breathing. You see and feel the patient's chest rise and fall regularly.
6. Assess circulation: • Radial pulse • Signs of shock (cool, pale, clammy
skin) • Rapid body survey (bleeding, fractures)
Radial pulse is present. Skin warm and dry. No injuries or medical alert devices found during RBS.
7. Other critical interventions: a. Apply low-flow oxygen using a nasal
cannula. b. Apply a blanket for warmth.
8. Transport decision: Rapid Transport Category
Package 3/4 prone to allow airway to drain
9. Complete a secondary survey while waiting for transport or en route.
10. Complete a First Aid Record.
Summary 1. What are the signs and symptoms of a stroke?
2. What is a quick way to screen for stroke?
3. What critical interventions should you give to a patient who is having a stroke?

21. Multiple Patients
21.1 START System
Multiple Patients Module 21

Occupational First Aid Level 3 Training Guide
21-2 Module 21: Multiple Patients
Learning Outcomes 1. Describe the START system for triage and management of multiple injured or ill
workers.
Required Reading Occupational First Aid: A Reference and Training Manual, 2018 edition
Chapter 49: Multiple Casualties, Disaster and Triage, pages 342 – 346
Lecture
Triage The first rule of triage is to do the greatest good for the greatest number. Sorting and prioritizing injuries and allocating limited resources requires skill, judgment and experience. The OFA attendant must initiate a triage process, but responsibility for triage should be handed over to a more experienced person as soon as possible.
The following rules of triage apply:
1. Only immediately life-threatening conditions are identified and treated in the initial triage round.
2. Salvage of life takes precedence over salvage of limbs.
Sorting START stands for Simple Triage and Rapid Treatment. Tag the patients using the following colour codes:
• Green: minor injury, walking wounded
• Yellow: delay, can wait
• Red: immediate
• Black: expectant or deceased
You need to sort the patients as quickly as possible. Ask anyone who can hear you and walk, to come forward. Tag these people as green and get them to wait nearby. Some of these people may be able to help you assess and provide life-saving interventions to the other patients.
Lesson 21.1: START System

Occupational First Aid Level 3 Training Guide
Module 21: Multiple Patients 21-3
Assessment Using the primary survey and Rapid Transport Criteria, move rapidly from one patient to another, identifying those who require immediate treatment and prioritizing patients for transport to hospital. Pause only to treat life-threatening conditions.
Use the following acronym when assessing triage patients:
R = Respiratory
P = Perfusion
M = Mental Status
Class-Based Scenario Exercise Using the START system, triage the following group of patients. Refer to the START Triage flowchart in your textbook.
1. 90% partial-thickness burns, lying on floor, respiratory rate >30, radial pulse absent, unconscious
2. Sudden onset of chest pain with shortness of breath, able to walk, breathing spontaneously, respiratory rate <30, no radial pulse
3. Abrasion on face, able to walk, respiratory rate <30, radial pulse present, obeys commands
4. Female six months pregnant, broken left-lower leg, not able to walk, respiratory rate <30, radial pulse present, obeys commands
5. Unresponsive, not breathing, positioning airway does not restore breathing
6. Blood in right eye, walking, breathing spontaneously, respiratory rate <30, radial pulse present, obeys commands
Answers

Occupational First Aid Level 3 Training Guide
21-4 Module 21: Multiple Patients
Answers
Summary 1. What are the four categories used to triage patients?
2. What sort of critical interventions would you provide during triage?

Occupational First Aid Level 3: Index
Page 1 of 3
Activity-Related Soft-Tissue Disorders ..................... 15.7 Administering Oxygen ............................................. 7.6 Altered Level of Consciousness .............................. 20.2 Amputation .......................................................... 13.4 Anaphylactic Shock ............................................... 12.3 Angina ................................................................. 11.2 Bag-Valve Mask ...................................................... 7.7 Bleeding, Massive Conscious................................... 13.3 Bleeding, Massive Unresponsive .............................. 13.5 Bleeding, Signs Of ................................................. 13.1 Burns, Assessing ................................................... 15.9 Burns, Major ........................................................ 17.6 Burns, Minor ....................................................... 15.10 Cardiac Arrest ...................................................... 11.4 Circulatory System ................................................ 11.1 Communication ..................................................... 19.1 Complete Airway Obstruction Conscious ................... 10.2 Complete Airway Obstruction Unresponsive ................ 9.3 CPR / AED .............................................................. 7.8 Critical Incident Stress ........................................... 14.2 Diabetic Emergencies ............................................ 14.3 Dislocations, Major ................................................ 17.2 Dislocations, Minor ................................................ 15.6 Ear Injuries, Major ................................................ 17.3 Ear Injuries, Minor ................................................ 15.8 Eye Injuries, Major ................................................ 17.5 Eye Injuries, Minor ................................................ 15.8 First Aid Record .................................................... 15.1 Fore and Aft Lift ...................................................... 5.5 Fractures, Major ................................................... 17.2 Fractures, Minor .................................................... 15.5 Frost Bite ............................................................. 18.4 General Safety Practices ........................................ 16.1 Glasgow Coma Score ............................................... 4.1 Hard Collar ............................................................. 6.1 Hazard Management................................................ 2.2 Heart Attack ......................................................... 11.3 Heat and Cold Injuries, Signs ................................. 18.1 Heat Stroke .......................................................... 18.2

Occupational First Aid Level 3: Index
Page 2 of 3
Hypothermia ........................................................ 18.3 Hypovolemic Shock ............................................... 12.2 Jaw Thrust ............................................................. 7.1 Life-Threatening Allergic Reaction ........................... 12.3 Manually Stabilizing Head and Neck ........................... 3.1 Medication ........................................................... 14.1 Modified NEXUS Rule ............................................... 3.3 Musculoskeletal System ......................................... 17.1 Nose Injuries, Major .............................................. 17.4 Nose Injuries, Minor .............................................. 15.8 Occupational First Aid Safety .................................. 16.1 Ongoing Assessment and After the Call ...................... 4.3 Ongoing Management, Minor Injuries .................... 15.11 Oral Airway ............................................................ 7.2 Oxygen Administration Methods ................................ 7.5 Partial Airway Obstruction (Fluids) Unresponsive ......... 9.2 Partial Airway Obstruction Conscious ....................... 10.1 Patient Care During Transport .................................. 6.4 Pocket Mask ........................................................... 7.4 Poison Management .............................................. 14.4 Prescriptions ........................................................ 14.1 Primary Survey ....................................................... 3.2 Priority Action Approach ........................................... 2.1 Prone to Supine ...................................................... 5.3 Rapid Transport Criteria ........................................... 3.5 Respiratory Arrest Unresponsive ............................... 9.6 Respiratory Distress No Ventilation Conscious ........... 10.3 Respiratory Distress Unresponsive ............................ 9.5 Respiratory Distress Ventilation Conscious ............... 10.4 Role of Attendant .................................................... 8.1 Safest Position ........................................................ 5.1 Scene Assessment .................................................. 2.3 Scoop-Style Stretcher .............................................. 6.3 Secondary Survey ................................................... 4.2 Seizure ................................................................ 20.3 Shock .................................................................. 12.2 Shock, Signs Of .................................................... 12.1 Signs of Airway Obstruction ..................................... 9.1 Signs of Respiratory Emergencies Unresponsive .......... 9.4

Occupational First Aid Level 3: Index
Page 3 of 3
Spica Ankle Wrap .................................................. 15.3 Spinal Injuries ...................................................... 20.1 Spine Board ........................................................... 6.2 Sprains, Major ...................................................... 17.2 Sprains, Minor ...................................................... 15.3 Standing and Sitting to Supine ................................. 5.2 START System ...................................................... 21.1 Stroke ................................................................. 20.4 Suctioning .............................................................. 7.3 Supine to 3/4 Prone ................................................ 5.4 Tourniquet ........................................................... 13.2 Transport Decision .................................................. 3.4 Triage .................................................................. 21.1 Wounds, Minor ..................................................... 15.2

© 1999, 2003, 2006, 2010, 2012, 2018 The Workers’ Compensation Board of B.C. (dba WorkSafeBC). All rights reserved. This publication is protected bycopyright. No part of this publication may be copied or reproduced in anymanner without prior written permission of WorkSafeBC.
APRIL 2018