Embed Size (px)
Citation preview
LESSON ASSIGNMENT
LESSON 2 Positioning the Patient. TEXT ASSIGNMENT Paragraph 2-1 through 2-10. LESSON OBJECTIVES When you have completed this you should be able to: 2-1. Identify the benefits of positioning the patient. 2-2. Identify and define body mechanics, body posture, and the common body rest positions. 2-3. Identify methods of positioning the patient, to include orienting the patient, modification of bed rest positions, and body alignment in bed. 2-4. Identify methods of moving and lifting while avoiding back strain. 2-5. Identify techniques in moving bed patients. 2-6. Identify range-of-motion. 2-7. Identify the stages involved in lifting a patient from floor to bed level. 2-8. Identify the common position support devices and methods in which they are applied. 2-9. Identify the bed cradle, its use, and function. 2-10. Identify the methods by which the patient is properly placed on the footboard. 2-11. Identify the proper procedure for placing a patient on his side. 2-12. Identify the range-of-motion exercises for the neck. 2-13. Identify methods of preventing bed or pressure sores; areas of susceptibility, stages of development, preventive measures, and treatment.
MD0556 2-1
2-14. Identify the range-of-motion exercises for the hip. SUGGESTION Work the lesson exercises at the end of this lesson before beginning the next lesson. These exercises will help you accomplish the lesson objectives.
MD0556 2-2
LESSON 2
POSITIONING THE PATIENT 2-1. OVERVIEW Physical comfort is very important to a human being. This is especially applicable to a bed patient. Both the patient and nursing service personnel need physical comfort as they respectively recuperate or perform nursing care. Since enlisted nursing personnel come in contact with the patient more than other medical personnel, they should employ procedures which will ensure the comfort, safety, and well being of the patient. In addition, they should consider their own physical comfort. Only those techniques which reduce or prevent undue strain on the muscles should be used when lifting or moving patients. The benefits of proper body mechanics and good posture include the efficient use of muscles, promotion of normal body functions, avoidance of strain and fatigue, and prevention of deformity. 2-2. BODY POSTURE AND BODY MECHANICS Through the knowledge of the correct application of their own muscles, medical nursing personnel can instruct patients on how to use theirs. The combination of good posture and body mechanics benefits both medical personnel and the patients. a. Posture. Posture is body alignment. It refers to the relative positions of the body when lying down, standing, sitting, or any other activity. Posture determines the stress and the strain on muscles and the distribution of weight. It affects the pressure on many of the organs of the body. Posture also affects such important functions of the body as circulation, respiration, and digestion as well as actions of the joints. To attain good posture, which requires the least strain to maintain, the following respective positions should be practiced. (1) In a standing position, the back should be straight; feet firmly on the ground, about 4 to 6 inches apart to give an adequate base of support, with the toes pointing straight ahead or slightly toed out; head and rib cage held high; chin, abdomen, and buttocks pulled in; and knees slightly bent (figure 2-1). (2) In a sitting position, the back should be straight, with the weight resting equally on the buttocks and under surface of the thigh, but not on the base of the spine (figure 2-2).
MD0556 2-3
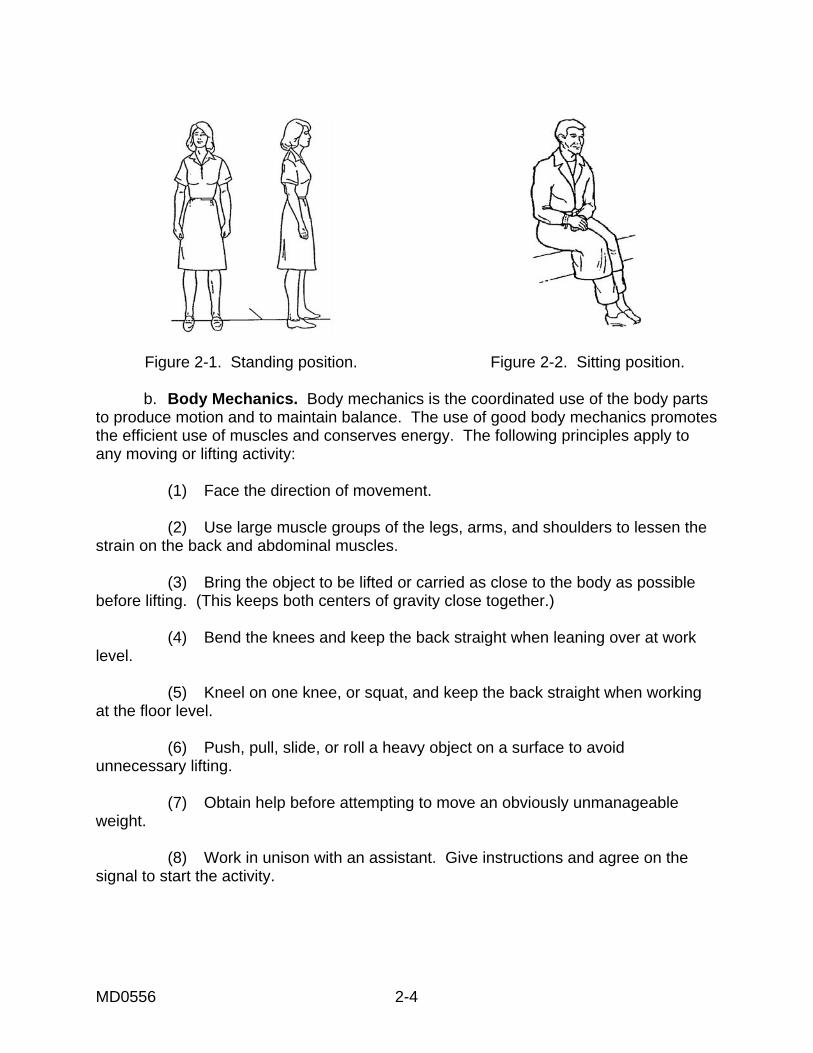
Figure 2-1. Standing position. Figure 2-2. Sitting position. b. Body Mechanics. Body mechanics is the coordinated use of the body parts to produce motion and to maintain balance. The use of good body mechanics promotes the efficient use of muscles and conserves energy. The following principles apply to any moving or lifting activity: (1) Face the direction of movement. (2) Use large muscle groups of the legs, arms, and shoulders to lessen the strain on the back and abdominal muscles. (3) Bring the object to be lifted or carried as close to the body as possible before lifting. (This keeps both centers of gravity close together.) (4) Bend the knees and keep the back straight when leaning over at work level. (5) Kneel on one knee, or squat, and keep the back straight when working at the floor level. (6) Push, pull, slide, or roll a heavy object on a surface to avoid unnecessary lifting. (7) Obtain help before attempting to move an obviously unmanageable weight. (8) Work in unison with an assistant. Give instructions and agree on the signal to start the activity.
MD0556 2-4
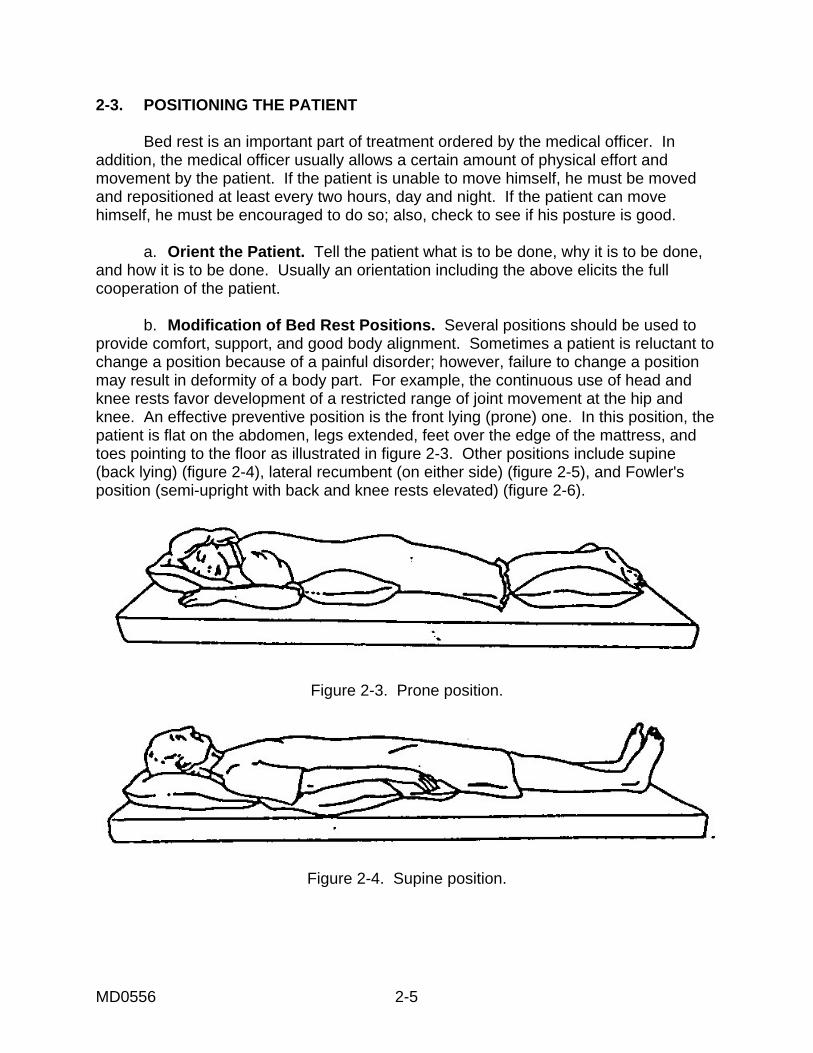
2-3. POSITIONING THE PATIENT Bed rest is an important part of treatment ordered by the medical officer. In addition, the medical officer usually allows a certain amount of physical effort and movement by the patient. If the patient is unable to move himself, he must be moved and repositioned at least every two hours, day and night. If the patient can move himself, he must be encouraged to do so; also, check to see if his posture is good. a. Orient the Patient. Tell the patient what is to be done, why it is to be done, and how it is to be done. Usually an orientation including the above elicits the full cooperation of the patient. b. Modification of Bed Rest Positions. Several positions should be used to provide comfort, support, and good body alignment. Sometimes a patient is reluctant to change a position because of a painful disorder; however, failure to change a position may result in deformity of a body part. For example, the continuous use of head and knee rests favor development of a restricted range of joint movement at the hip and knee. An effective preventive position is the front lying (prone) one. In this position, the patient is flat on the abdomen, legs extended, feet over the edge of the mattress, and toes pointing to the floor as illustrated in figure 2-3. Other positions include supine (back lying) (figure 2-4), lateral recumbent (on either side) (figure 2-5), and Fowler's position (semi-upright with back and knee rests elevated) (figure 2-6).
Figure 2-3. Prone position.
Figure 2-4. Supine position.
MD0556 2-5
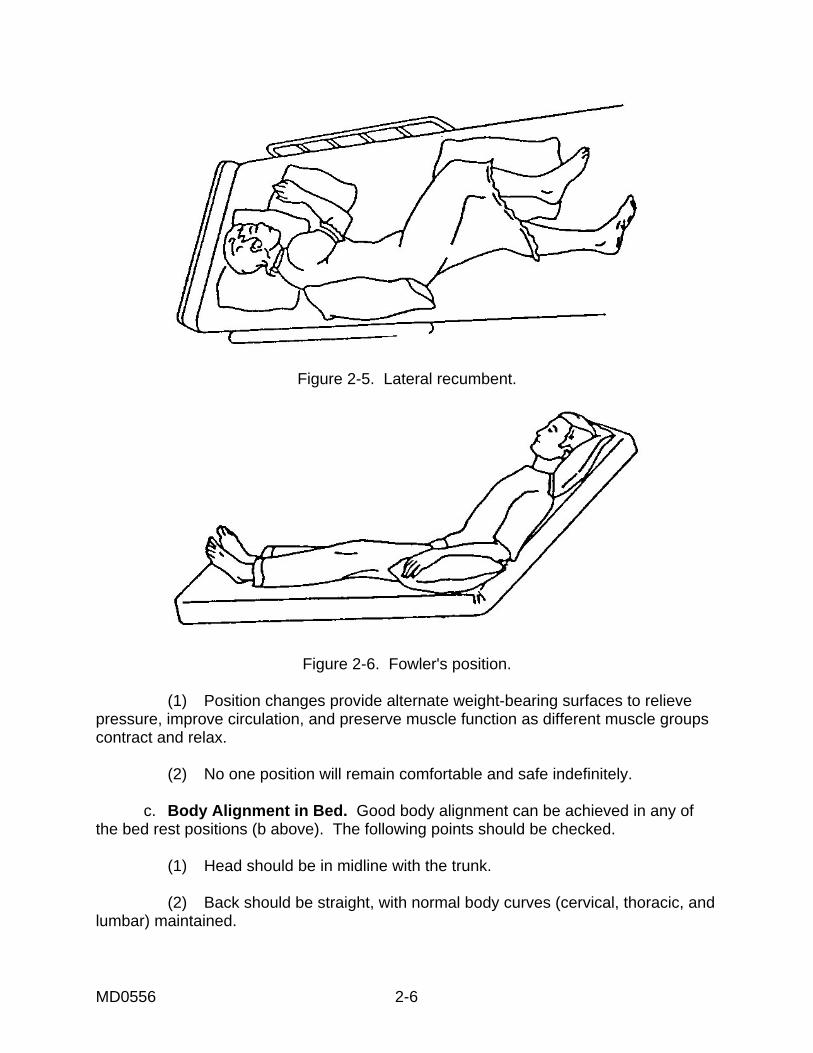
Figure 2-5. Lateral recumbent.
Figure 2-6. Fowler's position. (1) Position changes provide alternate weight-bearing surfaces to relieve pressure, improve circulation, and preserve muscle function as different muscle groups contract and relax. (2) No one position will remain comfortable and safe indefinitely. c. Body Alignment in Bed. Good body alignment can be achieved in any of the bed rest positions (b above). The following points should be checked. (1) Head should be in midline with the trunk. (2) Back should be straight, with normal body curves (cervical, thoracic, and lumbar) maintained.
MD0556 2-6

(3) Ribs should be elevated to prevent constriction of the chest. (4) Arms and legs should be in a position of function (the position for maximum usefulness of the joints, feet, and hands). (a) Position of function of legs and feet. This position favors standing upright and walking. In general, if the toes point to the ceiling when in a back-lying position and point to the floor when in a front-lying position, the feet, legs, and hips are in good alignment. (b) Position of function of arms and hands. This position favors raising the arms and grasping things with the fingers. The hand should not droop at the wrist, be clenched in a fist, or be flat. The position of function for the hand is dorsiflexion (at a slight upward angle) at the wrist, with the fingers and thumb in position to write with a pencil. 2-4. MOVING AND LIFTING ACTIVITIES Body mechanics enable medical personnel to perform moving and lifting activities while avoiding back strain. Primarily, the concern is for moving patients while standing at a hospital bed; however, the methods discussed can apply also to lifting or moving objects of similar weight. a. Prepare the Patient and Your Body for Lifting Movement. Before starting to lift a patient, always explain the procedure to him. In addition, prepare your body for the lifting movement as follows: (1) Stand with your feet apart, one foot advanced (figure 2-7A) facing the side of the bed. (2) Lower your body to the working level by flexing your knees and at the same time keeping your back straight (figure 2-7B). (3) Lean forward and slide your hands and arms under the patient, keeping the elbows close to your body and the back straight. At the same time, tense contract the abdominal and gluteal muscles in anticipation of moving the patient (figure 2-7C). b. Mechanics of Body Movements. The following procedures relate to the mechanics of your body as you move the patient in the various directions. (1) To move the patient toward you, let the arm holding the patient slide on the surface toward you while shifting your weight backward from front to rear foot (figure 2-7D).
MD0556 2-7

Figure 2-7. Body positions for moving and lifting.
(2) To move the patient away from you, let the arm holding the patient slide on the surface away from you while you shift your weight forward from rear to front foot. (3) To lift the patient, first move the patient toward you. This keeps the centers of gravity close together. Keeping elbows close to your body, straighten your knees to equalize the weight on both feet. Support the weight of the patient against the chest as you shift your weight backward. (4) To lower the patient to the bed surface, flex the knees to lower your body to working level. 2-5. TECHNIQUES IN MOVING BED PATIENTS a. Preparation Before Moving Patients. The principles of body mechanics should be employed when assisting or moving the patient. Important points that should be resolved before the procedures start include the following: (1) Check the medical officer's orders and the nursing care plan card in order to determine any restriction of the patient's movement and to know what the patient should be encouraged to do. Explain to the patient, how he can assist in the procedure. (2) Obtain the equipment and the assistance necessary before moving patient. (3) Ensure that the bed wheels are locked; and start with the bed level (unless contraindicated). b. Moving a Patient Up in the Bed. There is a tendency for the mattress and the patient to slip down when the head of the bed has been elevated. Lower the head rail to a level position and move the mattress up before repositioning the patient, as free space at the foot of the bed is needed to adjust the bedding.
MD0556 2-8
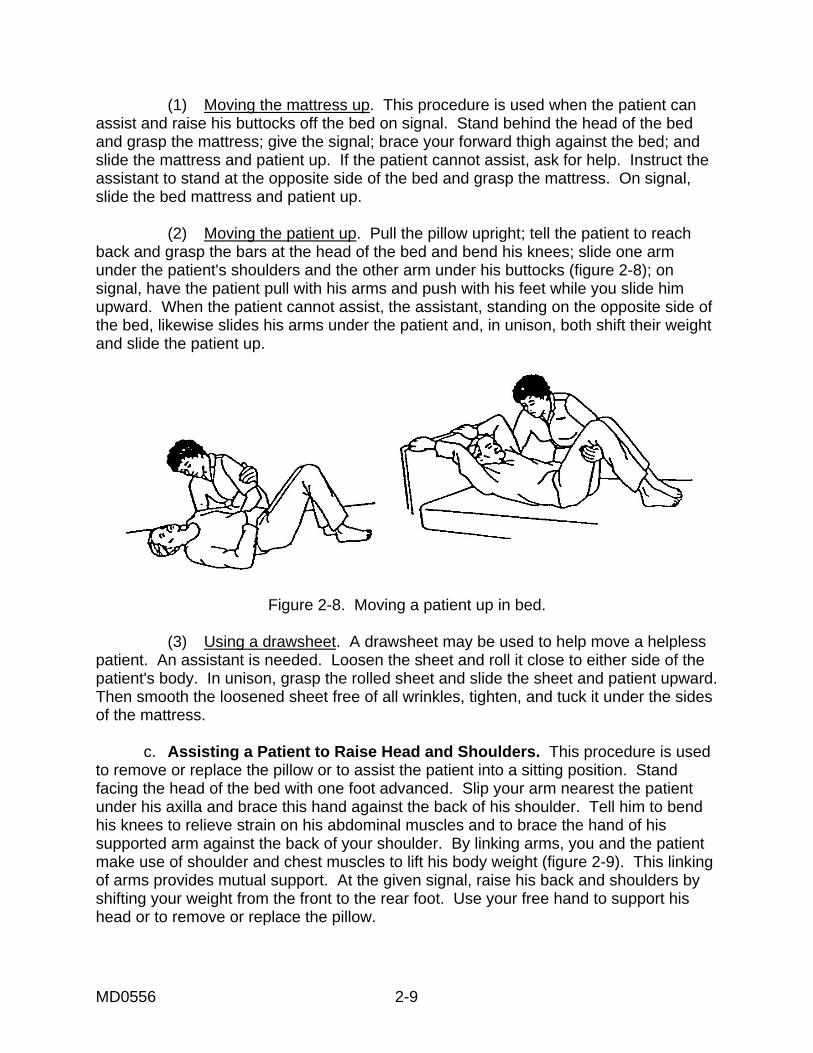
(1) Moving the mattress up. This procedure is used when the patient can assist and raise his buttocks off the bed on signal. Stand behind the head of the bed and grasp the mattress; give the signal; brace your forward thigh against the bed; and slide the mattress and patient up. If the patient cannot assist, ask for help. Instruct the assistant to stand at the opposite side of the bed and grasp the mattress. On signal, slide the bed mattress and patient up. (2) Moving the patient up. Pull the pillow upright; tell the patient to reach back and grasp the bars at the head of the bed and bend his knees; slide one arm under the patient's shoulders and the other arm under his buttocks (figure 2-8); on signal, have the patient pull with his arms and push with his feet while you slide him upward. When the patient cannot assist, the assistant, standing on the opposite side of the bed, likewise slides his arms under the patient and, in unison, both shift their weight and slide the patient up.
Figure 2-8. Moving a patient up in bed. (3) Using a drawsheet. A drawsheet may be used to help move a helpless patient. An assistant is needed. Loosen the sheet and roll it close to either side of the patient's body. In unison, grasp the rolled sheet and slide the sheet and patient upward. Then smooth the loosened sheet free of all wrinkles, tighten, and tuck it under the sides of the mattress. c. Assisting a Patient to Raise Head and Shoulders. This procedure is used to remove or replace the pillow or to assist the patient into a sitting position. Stand facing the head of the bed with one foot advanced. Slip your arm nearest the patient under his axilla and brace this hand against the back of his shoulder. Tell him to bend his knees to relieve strain on his abdominal muscles and to brace the hand of his supported arm against the back of your shoulder. By linking arms, you and the patient make use of shoulder and chest muscles to lift his body weight (figure 2-9). This linking of arms provides mutual support. At the given signal, raise his back and shoulders by shifting your weight from the front to the rear foot. Use your free hand to support his head or to remove or replace the pillow.
MD0556 2-9

Figure 2-9. Raising head and shoulders.
d. Moving a Patient to the Side of The Bed. A patient is easier to move or lift when he is close to the side of the bed since the medical worker can be closer to the patient's center of gravity. Consequently, other procedures require less strain. When working alone move the upper and lower parts of the body separately. To move his upper body, slide one arm under his head and shoulders and one arm under his back; then slide his upper body toward you. To move his lower body, slide one arm under his hips and one under his thighs, and then slide his lower body toward you. Realign his shoulders, hips, and legs. e. Turning a Patient on His Side. When working alone, always turn the patient toward you. Stand on the side of the bed toward which the patient is to be turned. Flex his knees toward you. Place one hand on his far shoulder and the other on his far hip. Bracing your body against the side of the bed, gently roll the patient toward you. Now go to the opposite side of the bed. Slide your arms under the patient's hips and draw his hips toward you, toward the center of the bed. Flex his upper leg forward on his extended lower leg to prevent him from rolling backward. Check his shoulder alignment. His lower arm should be in front of his chest or extended along his back, but not caught under his body (figure 2-10). Return to the original side of the bed. Arrange the pillow to support his head. Use two additional pillows to support his upper arm and upper leg and to maintain shoulder and hip alignment.
MD0556 2-10

Figure 2-10. Turning a patient on his side. 2-6. RANGE OF MOTION a. Range of motion is a group of exercises performed to proper preserve movement of a joint. Types of motion are depicted below. b. Parts of the body that can be exercised by the respective range-of-motions are depicted in the following: (figures 2-11 through 2-22).
Figure 2-11. Range-of-motion exercises for the neck.
MD0556 2-11
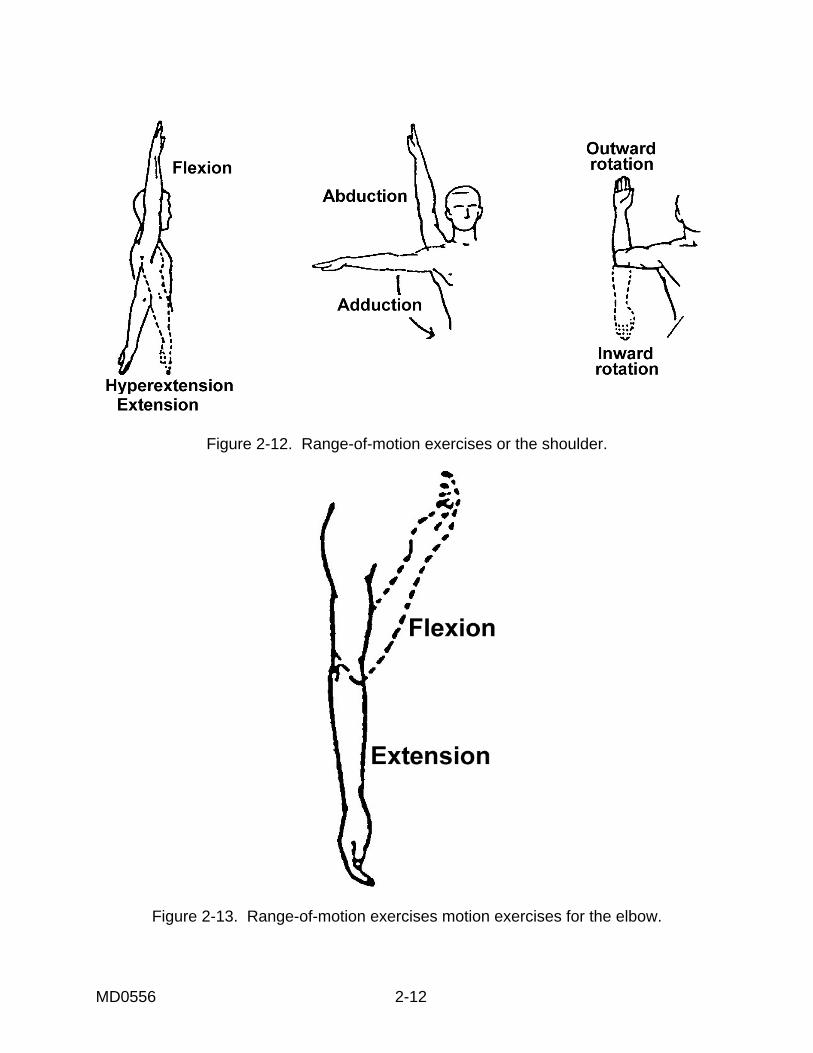
Figure 2-12. Range-of-motion exercises or the shoulder.
Figure 2-13. Range-of-motion exercises motion exercises for the elbow.
MD0556 2-12

. Figure 2-14. Range-of-motion exercises motion exercises for the forearm.
Figure 2-15. Range-of-motion exercises for the wrist.
MD0556 2-13
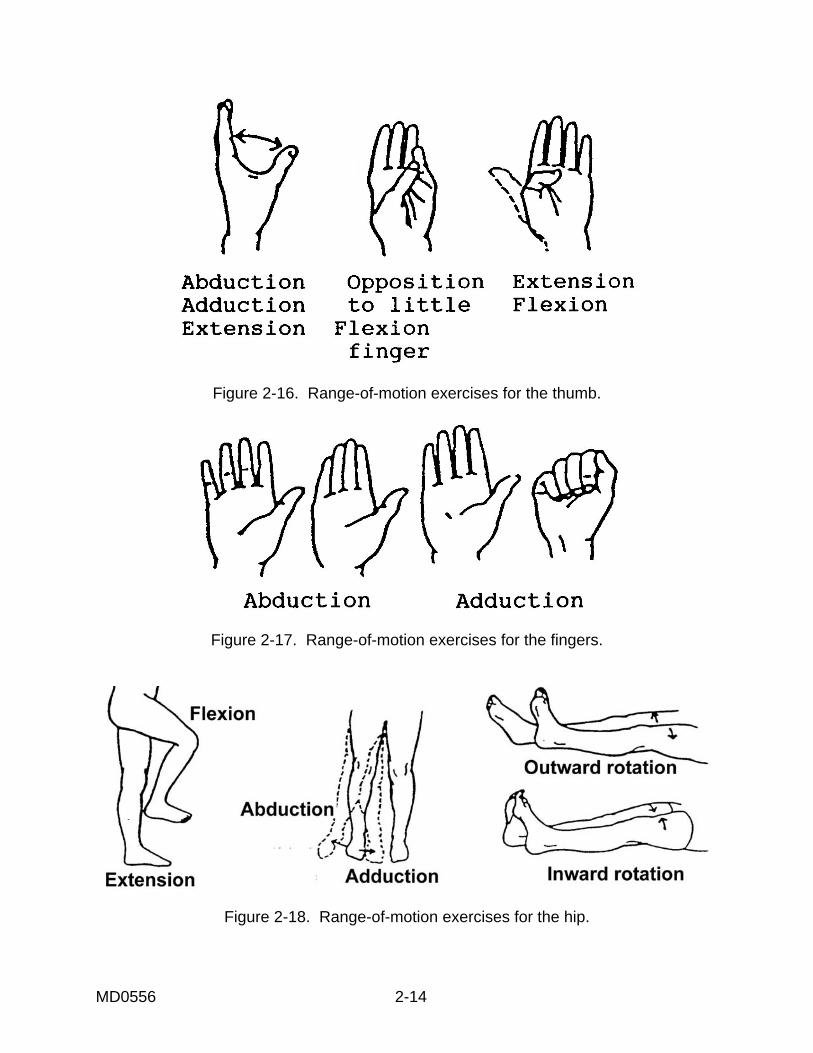
Figure 2-16. Range-of-motion exercises for the thumb.
Figure 2-17. Range-of-motion exercises for the fingers.
Figure 2-18. Range-of-motion exercises for the hip.
MD0556 2-14
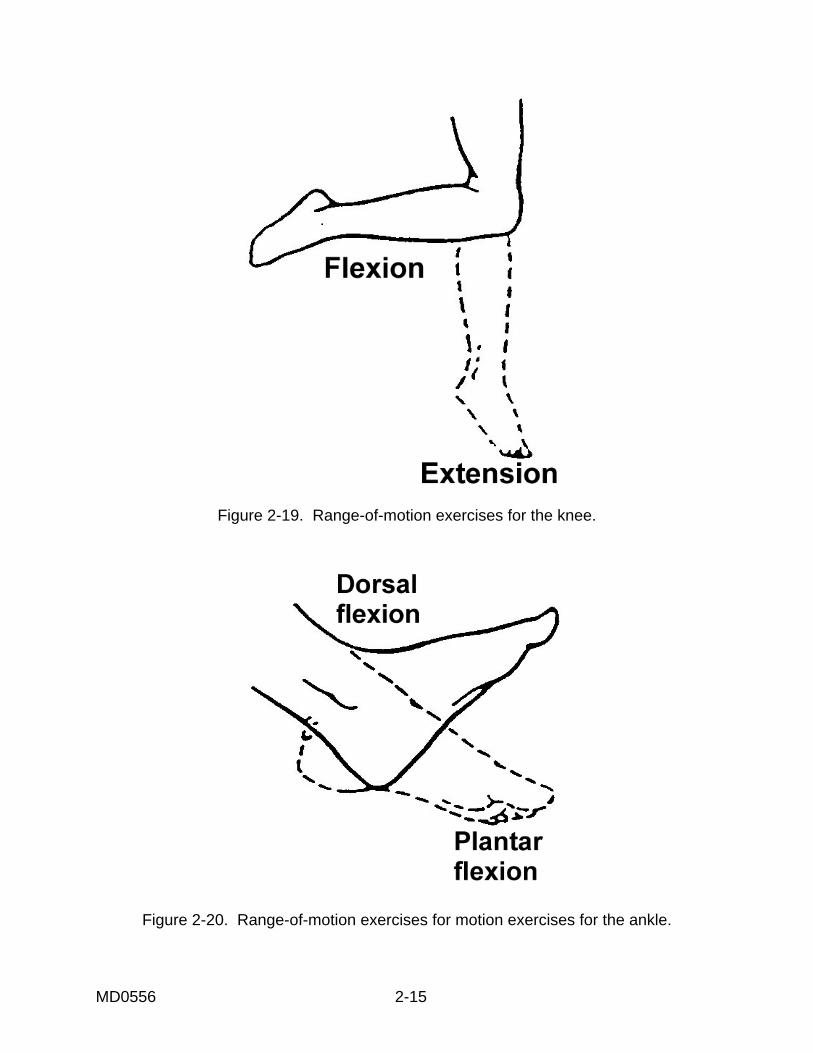
Figure 2-19. Range-of-motion exercises for the knee.
Figure 2-20. Range-of-motion exercises for motion exercises for the ankle.
MD0556 2-15

Figure 2-21. Range-of-motion exercises for the foot
Figure 2-22. Range-of-motion exercises for the toes. 2-7. ARMS CARRY LIFT FROM FLOOR TO BED LEVEL Situations may arise which require a patient to be lifted from the floor to a bed or wheeled litter. For this procedure, perhaps two bearers should be sufficient to lift a lightweight patient but three or more bearers are necessary to lift a heavy patient. The signals or commands should be given by the bearer lifting the patient's head and shoulders. The following procedures are appropriate. a. Place the bed or stretcher to receive a patient lifted from the floor at the far side of the patient and parallel to him. Lock the wheels of the bed or stretcher. All bearers kneel on the knee nearest the patient's feet. Each bearer slides his arms under the patient at a space interval, which allows the bearer's elbows to be held close to his body, while supporting the patient's shoulders, back, hips, and thighs (figure 2-23A).
MD0556 2-16
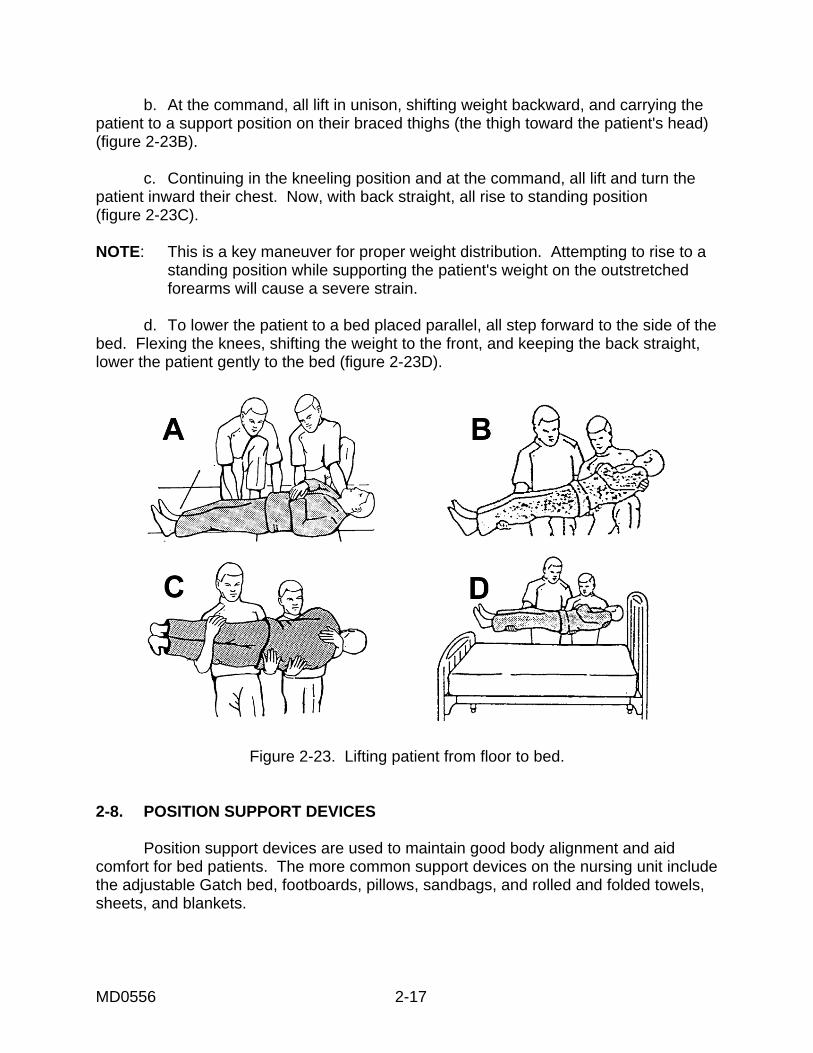
b. At the command, all lift in unison, shifting weight backward, and carrying the patient to a support position on their braced thighs (the thigh toward the patient's head) (figure 2-23B). c. Continuing in the kneeling position and at the command, all lift and turn the patient inward their chest. Now, with back straight, all rise to standing position (figure 2-23C). NOTE: This is a key maneuver for proper weight distribution. Attempting to rise to a standing position while supporting the patient's weight on the outstretched forearms will cause a severe strain. d. To lower the patient to a bed placed parallel, all step forward to the side of the bed. Flexing the knees, shifting the weight to the front, and keeping the back straight, lower the patient gently to the bed (figure 2-23D).
Figure 2-23. Lifting patient from floor to bed. 2-8. POSITION SUPPORT DEVICES Position support devices are used to maintain good body alignment and aid comfort for bed patients. The more common support devices on the nursing unit include the adjustable Gatch bed, footboards, pillows, sandbags, and rolled and folded towels, sheets, and blankets.
MD0556 2-17
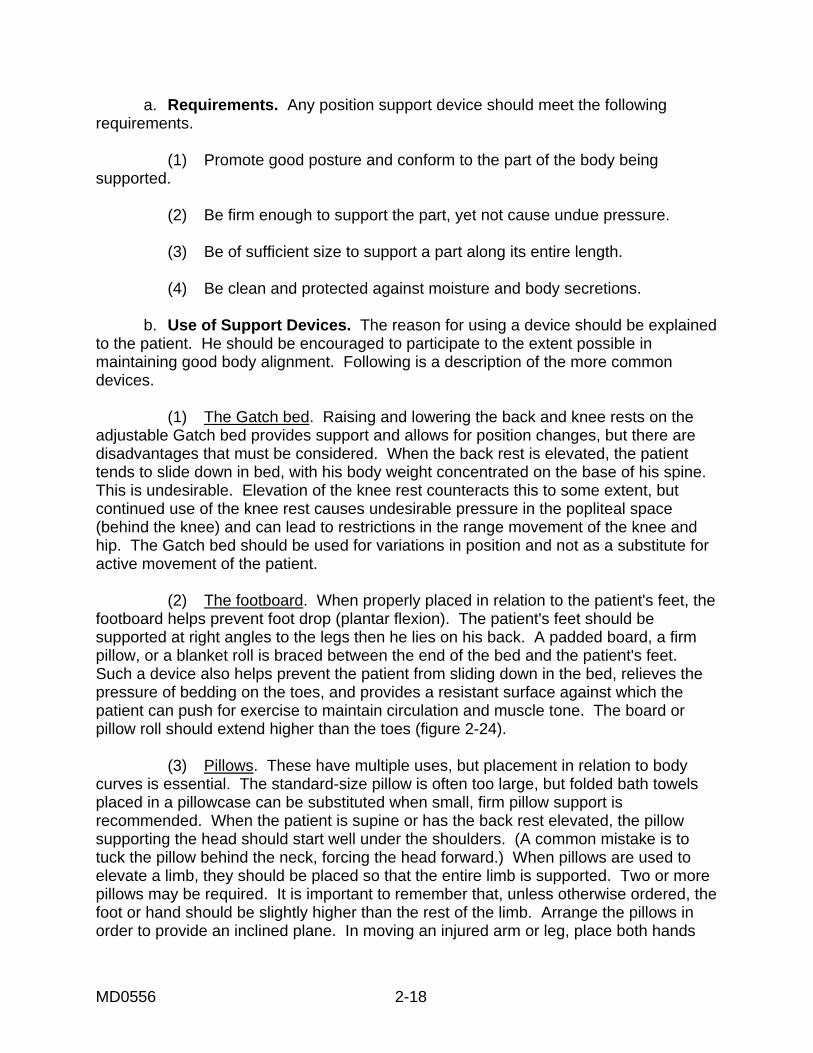
a. Requirements. Any position support device should meet the following requirements. (1) Promote good posture and conform to the part of the body being supported. (2) Be firm enough to support the part, yet not cause undue pressure. (3) Be of sufficient size to support a part along its entire length. (4) Be clean and protected against moisture and body secretions. b. Use of Support Devices. The reason for using a device should be explained to the patient. He should be encouraged to participate to the extent possible in maintaining good body alignment. Following is a description of the more common devices. (1) The Gatch bed. Raising and lowering the back and knee rests on the adjustable Gatch bed provides support and allows for position changes, but there are disadvantages that must be considered. When the back rest is elevated, the patient tends to slide down in bed, with his body weight concentrated on the base of his spine. This is undesirable. Elevation of the knee rest counteracts this to some extent, but continued use of the knee rest causes undesirable pressure in the popliteal space (behind the knee) and can lead to restrictions in the range movement of the knee and hip. The Gatch bed should be used for variations in position and not as a substitute for active movement of the patient. (2) The footboard. When properly placed in relation to the patient's feet, the footboard helps prevent foot drop (plantar flexion). The patient's feet should be supported at right angles to the legs then he lies on his back. A padded board, a firm pillow, or a blanket roll is braced between the end of the bed and the patient's feet. Such a device also helps prevent the patient from sliding down in the bed, relieves the pressure of bedding on the toes, and provides a resistant surface against which the patient can push for exercise to maintain circulation and muscle tone. The board or pillow roll should extend higher than the toes (figure 2-24). (3) Pillows. These have multiple uses, but placement in relation to body curves is essential. The standard-size pillow is often too large, but folded bath towels placed in a pillowcase can be substituted when small, firm pillow support is recommended. When the patient is supine or has the back rest elevated, the pillow supporting the head should start well under the shoulders. (A common mistake is to tuck the pillow behind the neck, forcing the head forward.) When pillows are used to elevate a limb, they should be placed so that the entire limb is supported. Two or more pillows may be required. It is important to remember that, unless otherwise ordered, the foot or hand should be slightly higher than the rest of the limb. Arrange the pillows in order to provide an inclined plane. In moving an injured arm or leg, place both hands
MD0556 2-18
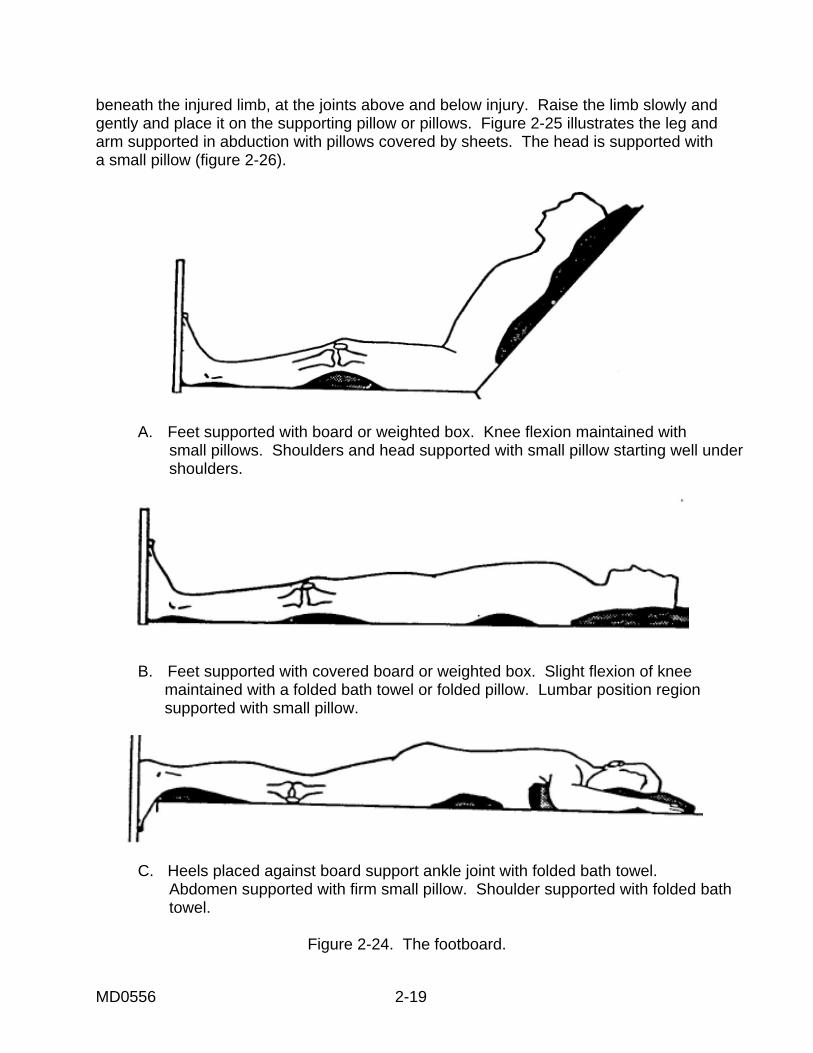
beneath the injured limb, at the joints above and below injury. Raise the limb slowly and gently and place it on the supporting pillow or pillows. Figure 2-25 illustrates the leg and arm supported in abduction with pillows covered by sheets. The head is supported with a small pillow (figure 2-26).
A. Feet supported with board or weighted box. Knee flexion maintained with
small pillows. Shoulders and head supported with small pillow starting well under shoulders.
B. Feet supported with covered board or weighted box. Slight flexion of knee
maintained with a folded bath towel or folded pillow. Lumbar position region supported with small pillow.
C. Heels placed against board support ankle joint with folded bath towel.
Abdomen supported with firm small pillow. Shoulder supported with folded bath towel.
Figure 2-24. The footboard.
MD0556 2-19
Figure 2-25. Positioning an injured leg.
Figure 2-26. Leg and arm supported in abduction. 2-9. BED CRADLE A bed cradle is used to keep the weight of bed coverings off the body part to be protected. Moreover, the dimensions of the bed cradle enable the limbs to be elevated on pillows when necessary. When using the bed cradle, bed making is modified for protection and comfort of the patient and to maintain a neat appearance. The following equipment and procedures are appropriate when a bed cradle is to be used. a. Equipment. The equipment required when using a bed cradle follows: (1) Bed cradle, standard model or field (collapsible). (2) Roller bandage. (3) Usual allowance of bed linen, plus one additional sheet and blanket. b. Procedure. The bed foundation is completed as for the patient occupied bed. Proceed as follows: (1) Place the cradle in position over the patient, with no part in contact with a body part. Secure the cradle in place with bandage loops tied to the bedframe. (2) Place the top covers to provide adequate covering for the shoulders, then drag these ends over the head-end of the cradle.
MD0556 2-20
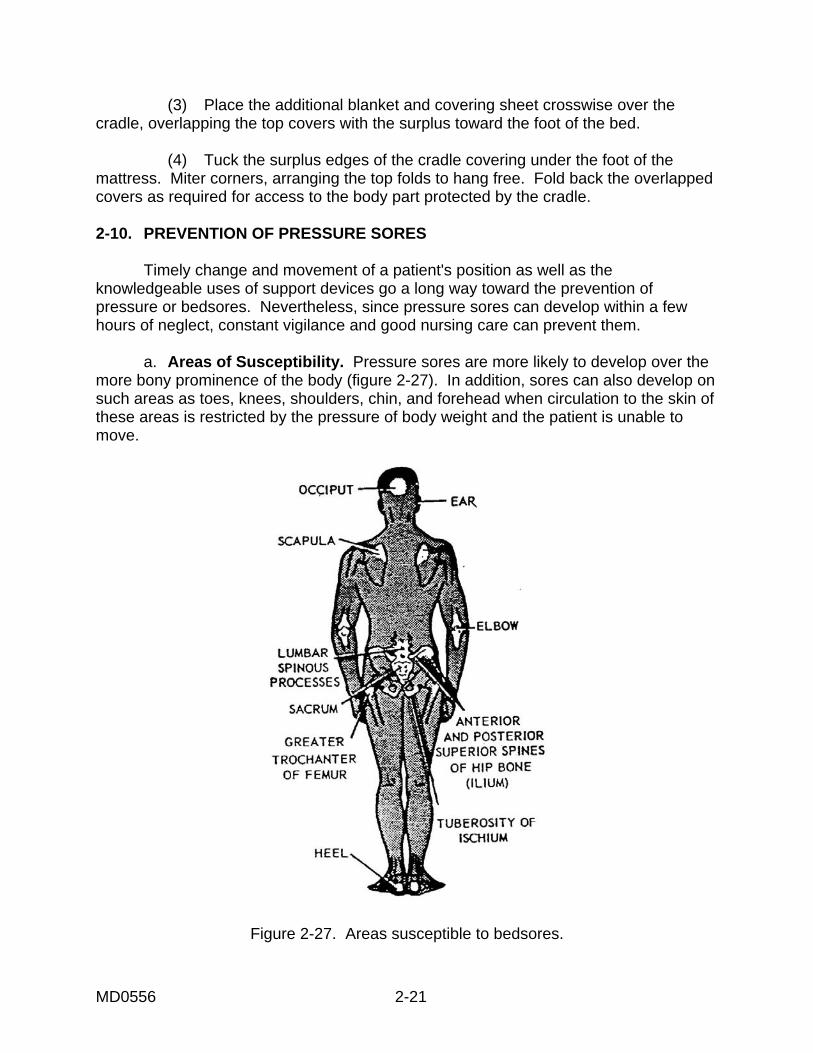
(3) Place the additional blanket and covering sheet crosswise over the cradle, overlapping the top covers with the surplus toward the foot of the bed. (4) Tuck the surplus edges of the cradle covering under the foot of the mattress. Miter corners, arranging the top folds to hang free. Fold back the overlapped covers as required for access to the body part protected by the cradle. 2-10. PREVENTION OF PRESSURE SORES Timely change and movement of a patient's position as well as the knowledgeable uses of support devices go a long way toward the prevention of pressure or bedsores. Nevertheless, since pressure sores can develop within a few hours of neglect, constant vigilance and good nursing care can prevent them. a. Areas of Susceptibility. Pressure sores are more likely to develop over the more bony prominence of the body (figure 2-27). In addition, sores can also develop on such areas as toes, knees, shoulders, chin, and forehead when circulation to the skin of these areas is restricted by the pressure of body weight and the patient is unable to move.
Figure 2-27. Areas susceptible to bedsores.
MD0556 2-21
b. Stages of Development. Pressure sores develop in three recognized stages. (1) The first stage reveals redness of the skin in the area. (2) In the second stage, a bluish or mottled (blotches of different shades) discoloration of the skin occurs. (3) In the third stage, there is a break in the skin that can develop rapidly into a decubitus ulceration (a destruction of underlying tissue). c. Preventive Nursing Measures. Pressure sores can complicate recovery of the patient for weeks and even months. Therefore, nursing personnel must be alert and perform the following preventive measures. (1) Change the patient's position at least every 2 hours, or more frequently if necessary. Remember that there are four body surfaces on which to turn the patient to relieve pressure on any one area. (2) Inspect all skin areas of all bed patients daily during the bath procedure and at evening care. Massage skin areas over bony prominence to stimulate circulation. Report any suspicious (reddened) area immediately to the nurse in charge, and relieve pressure by changing position. Report any complaint of numbness or tingling under a cast or splint. (3) Keep the patient's skin clean and dry. Wash areas soiled by body excretions immediately with soap and water, rinse well, and dry thoroughly. (4) Keep bed linen clean, dry, free of wrinkles, and free of crumbs and any other foreign matter. (5) Use pillows and all positioning and comfort devices properly. Rubber rings, cotton doughnuts, and similar articles often cause new circumscribed pressure areas; hence, they should not be used. d. Treatment of Pressure Sores. The best treatment is prevention by proper nursing care. The medical officer's orders must be followed for application of any medication. Aseptic technique must be used on any broken skin areas.
Continue with Exercises
MD0556 2-22

EXERCISES, LESSON 2 INSTRUCTIONS: Answer the following exercises by marking the lettered response that best answers the question or best completes the statement. After you have completed all of the exercise, turn to "Solutions to Exercises" at the end of the lesson and check your answers. 1. Posture is: a. Standing. b. Body alignment. c. Walking. d. Sitting erect. 2. In the standing position, the back should be straight; feet firmly on the ground, about ______________ inches apart. a. 4 to 6. b. 6 to 8. c. 8 to 10. d. 10 to 12. 3. Posture in the sitting position, the back should be straight, with the weight resting equally on the thigh and the: a. Buttocks. b. Spine. c. Knees. d. Legs.
MD0556 2-23
4. Which of the following is not a principle that applies to lifting an object? a. Push, pull, slide, or roll a heavy object on a surface to avoid unnecessary lifting. b. Kneel on both knees, or squat, and keep the back straight when working at the floor level. c. Obtain help before attempting to move an obviously unmanageable weight. d. Work in unison with an assistant. Give instructions and agree on the signal to start the activity. 5. The bed rest position where the patient is flat on the abdomen, legs extended, feet over the edge of the mattress, and toes pointed to the floor is the: a. Fowler position. b. Lateral position. c. Supine position. d. Prone position. 6. The patient lying flat on his back is in the: a. Prone position. b. Supine position. c. Lateral position. d. Fowler's position. 7. A person lying on either side is in the _________________ position. a. Fowler's. b. Lateral recumbent. c. Supine. d. Prone.
MD0556 2-24
8. The ________________ position will remain comfortable and safe indefinitely. a. Sitting. b. Fowler's. c. Lateral. d. None of the above. 9. Which one is correct to achieve good body alignment in bed? a. Head should be in midline with the trunk. b. Back should be straight, with normal body curves maintained. c. Ribs elevated to prevent constriction of chest. d. All of the above. 10. Body mechanics enable medical personnel to perform moving and lifting: a. While avoiding back strain. b. In order to pick up more weight. c. To prevent dropping supplies. d. While standing far away from an object. 11. Mechanics of body movements suggest that to move a patient toward you, let the arms holding the patient slide on the surface toward you while: a. Shifting your weight forward from rear to front foot. b. Shifting you weight backward from front to rear foot. c. Shifting your weight equally on each foot. d. None of the above.
MD0556 2-25
12. To move a patient away from you, let the arm holding the patient slide on the surface away from you while: a. You shift your weight forward from rear to front foot. b. You shift your weight equally on each foot. c. You shift your weight backward from front to rear foot. d. None of the above. 13. Which one of the following is not one of the principles that apply to moving or lifting activity? a. Face the direction of movement. b. Use large muscle groups of legs, arms, and shoulder. c. Push, pull, slide, or roll a heavy object. d. Allow the patient to roll to your side as this will reduce back strain. 14. When moving the mattress up, you should: a. Stand in front of the bed and grasp the mattress. b. Stand behind the head of the bed and grasp the mattress. c. Brace your hip against the bed while pulling. d. Stand on either side of the bed and pull the mattress up. 15. To turn a patient on his side, when you are working alone, always: a. Turn the patient toward you. b. Turn the patient away from you. c. Turn the patient toward the center of the bed. d. Turn the patient toward the outer edge of the bed.
MD0556 2-26
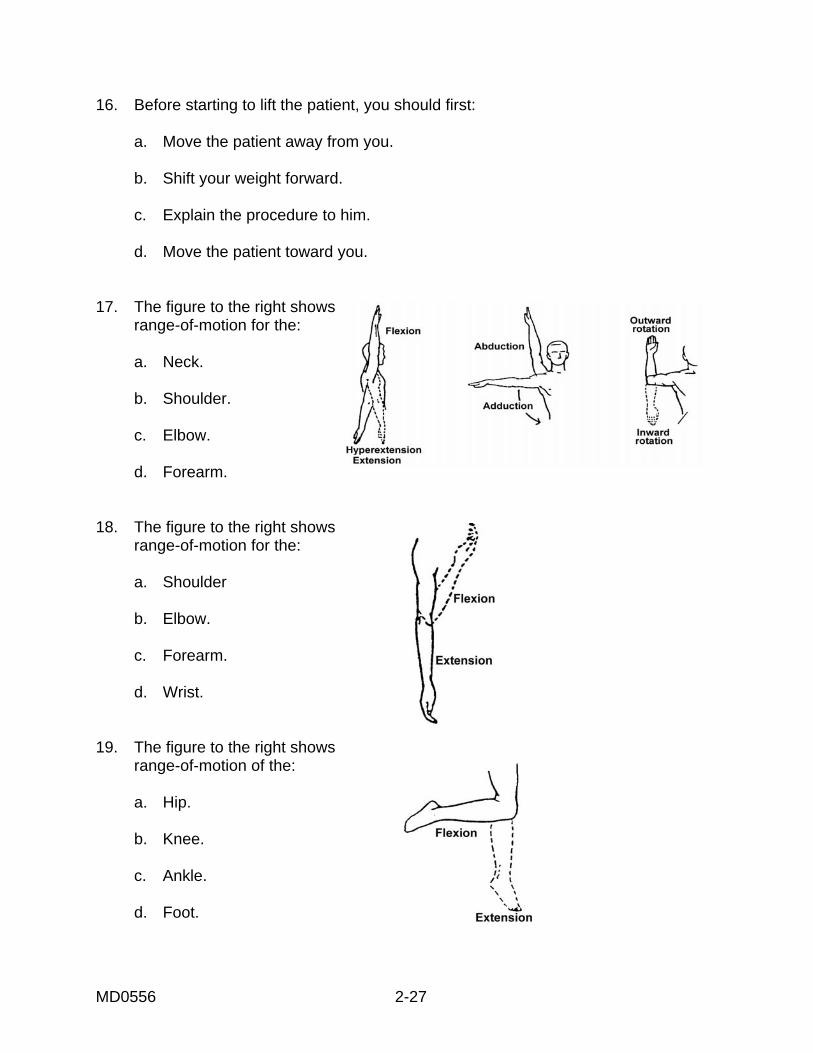
16. Before starting to lift the patient, you should first: a. Move the patient away from you. b. Shift your weight forward. c. Explain the procedure to him. d. Move the patient toward you. 17. The figure to the right shows range-of-motion for the: a. Neck. b. Shoulder. c. Elbow. d. Forearm. 18. The figure to the right shows range-of-motion for the: a. Shoulder b. Elbow. c. Forearm. d. Wrist. 19. The figure to the right shows range-of-motion of the: a. Hip. b. Knee. c. Ankle. d. Foot.
MD0556 2-27
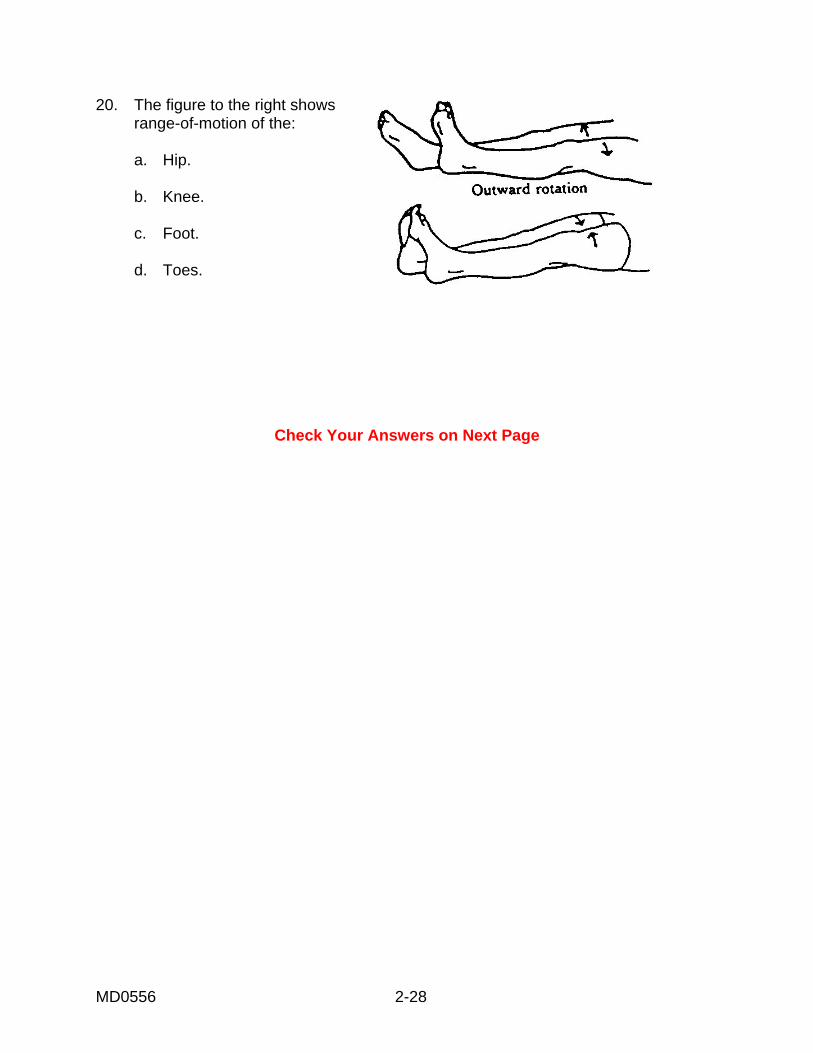
20. The figure to the right shows range-of-motion of the: a. Hip. b. Knee. c. Foot. d. Toes.
Check Your Answers on Next Page
MD0556 2-28

SOLUTIONS TO EXERCISES, LESSON 2 1. b (para 2-2a) 2. a (para 2-2a(1)) 3. a (para 2-2a(2)) 4. b (para 2-2b) 5. d (para 2-3b) 6. b (para 2-3b) 7. b (para 2-3b) 8. d (para 2-3b(2)) 9. d (para 2-3c) 10. a (para 2-4) 11. a (para 2-4b(1)) 12. a (para 2-4b(2)) 13. d (para 2-2b) 14. b (para 2-5b (1) 15. a (para 2-5e) 16. c (para 2-4a) 17. b (figure 2-12) 18. b (figure 2-13) 19. b (figure 2-19) 20. a (figure 2-18)
End of Lesson 2
MD0556 2-29