Embed Size (px)
Citation preview
Politecnico di Milano, January 2016Chrono::Engine tutorial
A.Tasora, R.Serban
Chrono::Engine tutorial
Alessandro Tasora
Dipartimento di Ingegneria IndustrialeUniversità di Parma, Italy
http://dynamics.eng.unipr.it/tasora
Politecnico di Milano, January 2016Chrono::Engine tutorial
A.Tasora, R.Serban
Introduction
2
Politecnico di Milano, January 2016Chrono::Engine tutorial
A.Tasora, R.Serban
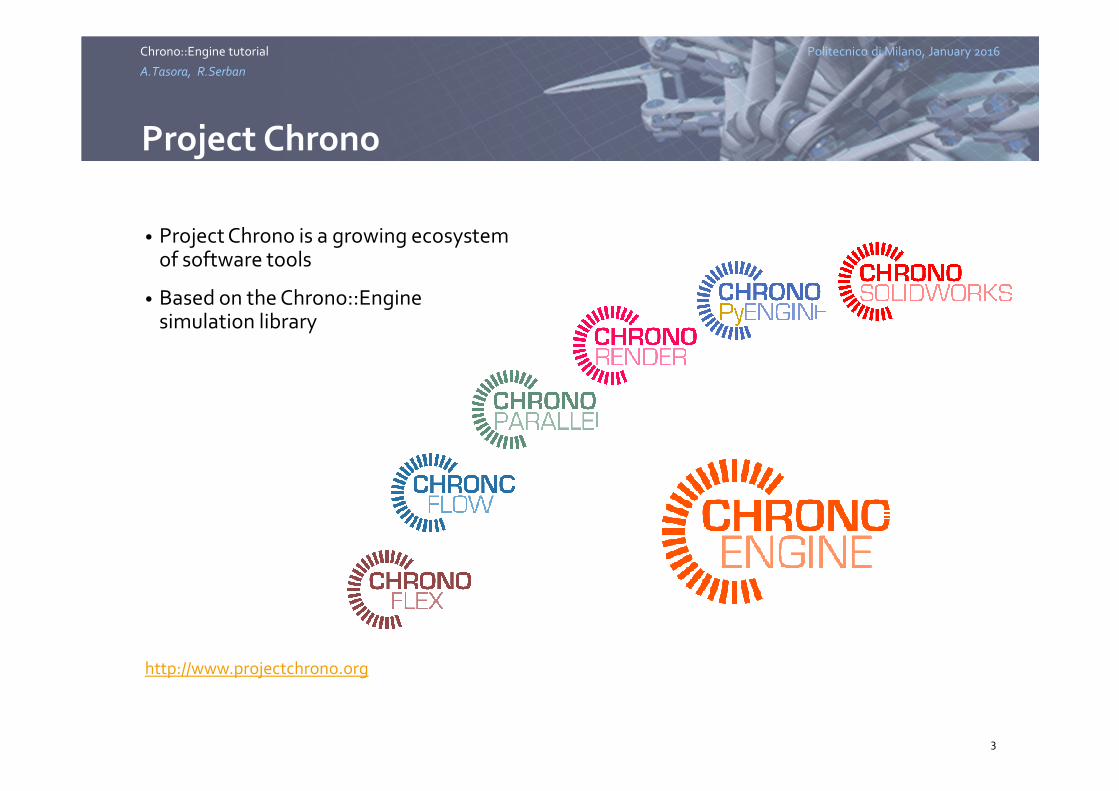
Project Chrono
• Project Chrono is a growing ecosystem of software tools
• Based on the Chrono::Engine simulation library
http://www.projectchrono.org
3
Politecnico di Milano, January 2016Chrono::Engine tutorial
A.Tasora, R.Serban
What is Chrono::Engine?
• Middleware: can be embedded in third parties software
• Open source with BSD license
• Library developed in C++
• Cross-platform: compiles on GNU GCC, MSVC, etc.
4
A software library for multi-body
mechanical simulations
Politecnico di Milano, January 2016Chrono::Engine tutorial
A.Tasora, R.Serban
What is Chrono::Engine?
• Modular: based on optional linking of units
• Expandable via C++ class inheritance
• Efficient, fast, robust algorithms
• Real-time performance when possible
5
A software library for multi-body
mechanical simulations
Politecnico di Milano, January 2016Chrono::Engine tutorial
A.Tasora, R.Serban
What is Chrono::Engine?
• Large scale problems with millions of parts
• Support of parallel computing via GPU, MPI, HPC
• DVI formulation for non-mooth dynamics
• State-of-the-art collision-detection
6
A software library for multi-body
mechanical simulations
Politecnico di Milano, January 2016Chrono::Engine tutorial
A.Tasora, R.Serban
Chrono::Engine modeling features
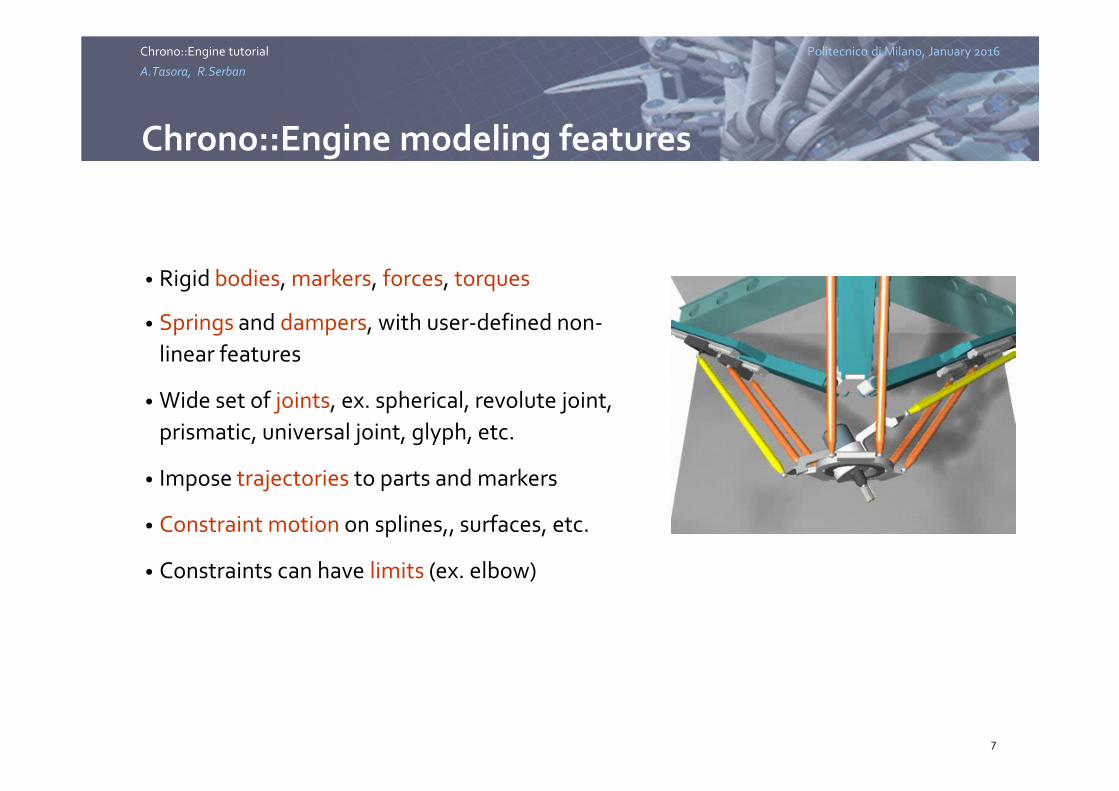
• Rigid bodies, markers, forces, torques
• Springs and dampers, with user-defined non-
linear features
• Wide set of joints, ex. spherical, revolute joint,
prismatic, universal joint, glyph, etc.
• Impose trajectories to parts and markers
• Constraint motion on splines,, surfaces, etc.
• Constraints can have limits (ex. elbow)
7
Politecnico di Milano, January 2016Chrono::Engine tutorial
A.Tasora, R.Serban
Chrono::Engine modeling features
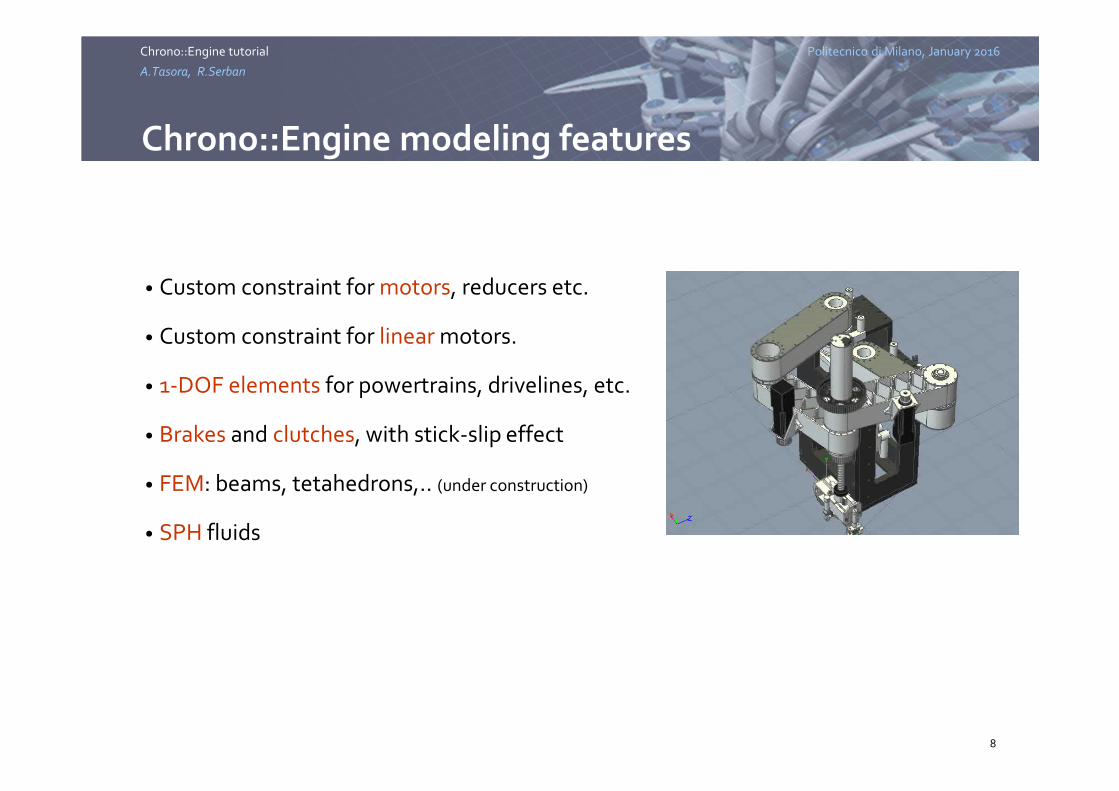
• Custom constraint for motors, reducers etc.
• Custom constraint for linear motors.
• 1-DOF elements for powertrains, drivelines, etc.
• Brakes and clutches, with stick-slip effect
• FEM: beams, tetahedrons,.. (under construction)
• SPH fluids
8
Politecnico di Milano, January 2016Chrono::Engine tutorial
A.Tasora, R.Serban
Chrono::Engine modeling features
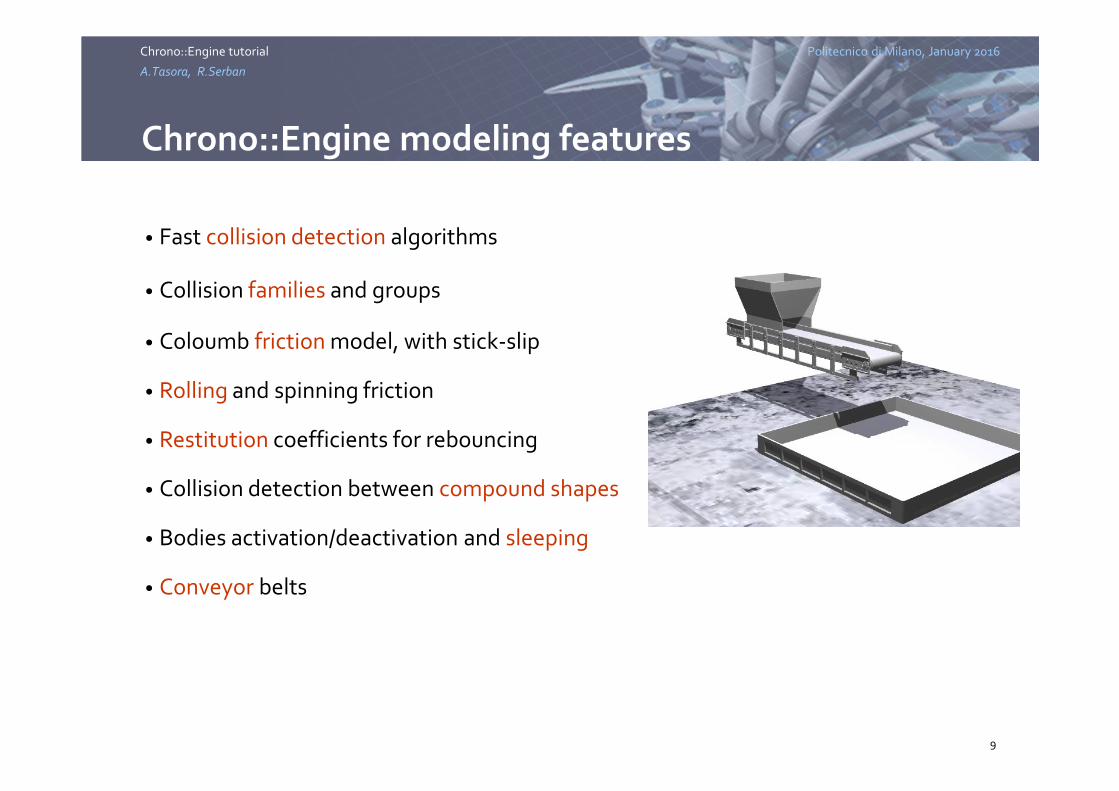
• Fast collision detection algorithms
• Collision families and groups
• Coloumb friction model, with stick-slip
• Rolling and spinning friction
• Restitution coefficients for rebouncing
• Collision detection between compound shapes
• Bodies activation/deactivation and sleeping
• Conveyor belts
9
Politecnico di Milano, January 2016Chrono::Engine tutorial
A.Tasora, R.Serban
Chrono::Engine architecture
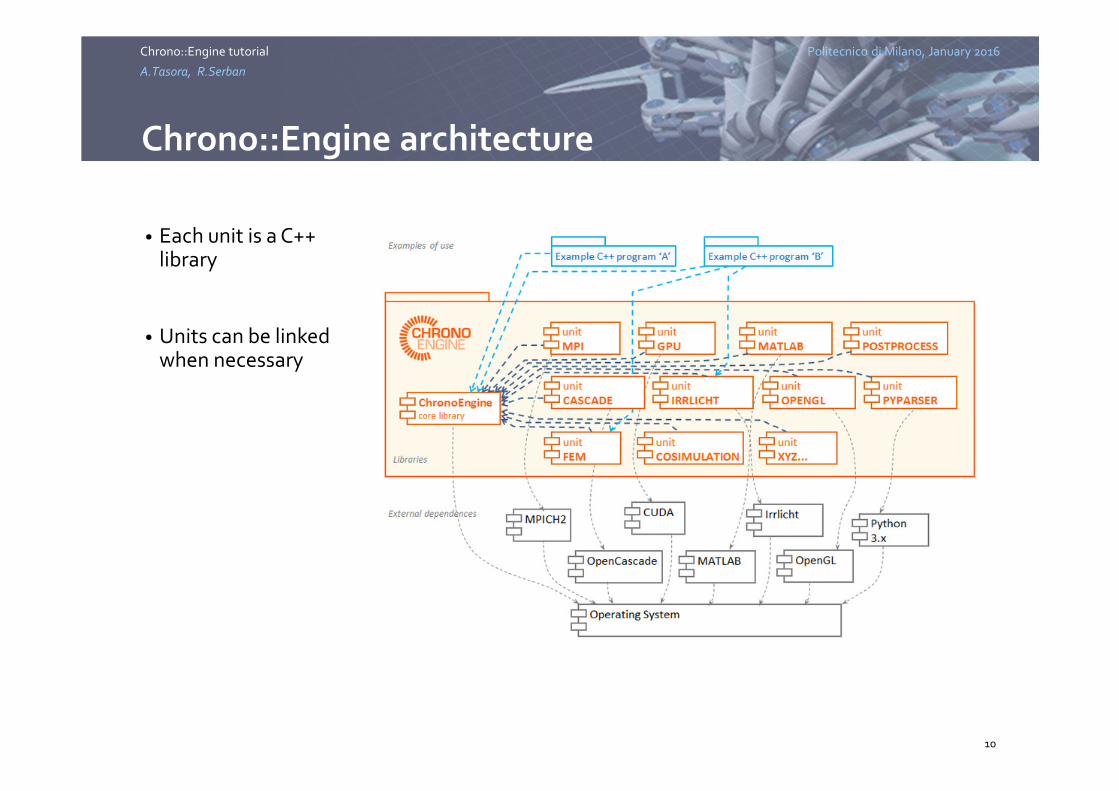
• Each unit is a C++library
• Units can be linkedwhen necessary
10
Politecnico di Milano, January 2016Chrono::Engine tutorial
A.Tasora, R.Serban
Chrono software, documentation,and support
11

Politecnico di Milano, January 2016Chrono::Engine tutorial
A.Tasora, R.Serban
Web, Wiki and User Mailing List
Chrono webpage http://projectchrono.org
• The site provides thorough documentation, including
• Installation instructions
• Tutorials and examples
• API documentation (via Doxygen)
• Scientific papers on Chrono::Engine
• Manual (under development): http://chronoengine.info/mediawiki/index.php/ChronoEngine:Manual
• Additionally, a mailing list and forum have been set up using Google Groups for questions and support
12
Politecnico di Milano, January 2016Chrono::Engine tutorial
A.Tasora, R.Serban
Source code
Chrono C++ source on GIThub: https://github.com/projectchrono/chrono.git
• Source code of Project Chrono is hosted on GitHub, a Git repository web-based hosting service• Offers distributed revision control and source code management
• Provides a web-based graphical interface, as well as desktop/mobile integration
13
Politecnico di Milano, January 2016Chrono::Engine tutorial
A.Tasora, R.Serban
Documentation: C++ API
Chrono C++ API documentation: http://api.chrono.projectchrono.org/
• The C++ classes and functions of the Application Program Interface (API) of Project Chrono are documented via Doxygen, a tool for writing software reference documentation
• Documentation is written within the code and automatically published to a webpage
• Provides an easy way to keep the documentation up to date and can cross reference documentation and code
14

Politecnico di Milano, January 2016Chrono::Engine tutorial
A.Tasora, R.Serban
Chrono demos – basic features
• demo_mathTutorial on using Chrono mathematical objects and functions (vector math, matrices, linear algebra, etc.)
• demo_coordsTutorial on how to perform 3D coordinate manipulation (rotation and translations of points, frames, etc.)
• demo_streamTutorial on files, streams, serialization, etc.
• demo_sharedptrTutorial on using smart and shared pointers.
15
Politecnico di Milano, January 2016Chrono::Engine tutorial
A.Tasora, R.Serban
Chrono demos – basic features
• demo_buildsystemTutorial on the basic approach to building and simulating mechanical systems (creating a physical system, adding/removing bodies, creating joints, performing a simulation)
• demo_powertrainTutorial on the basic approach to using 1-DOF items (rotating shafts)
• demo_chfunctionsTutorial on using ChFunction to create and use y=f(x) objects
• demo_postprocessTutorial on UNIT_POSTPROCESS – creating animations with PovRay
16
Politecnico di Milano, January 2016Chrono::Engine tutorial
A.Tasora, R.Serban
Chrono demos with the Irrlicht 3D interface
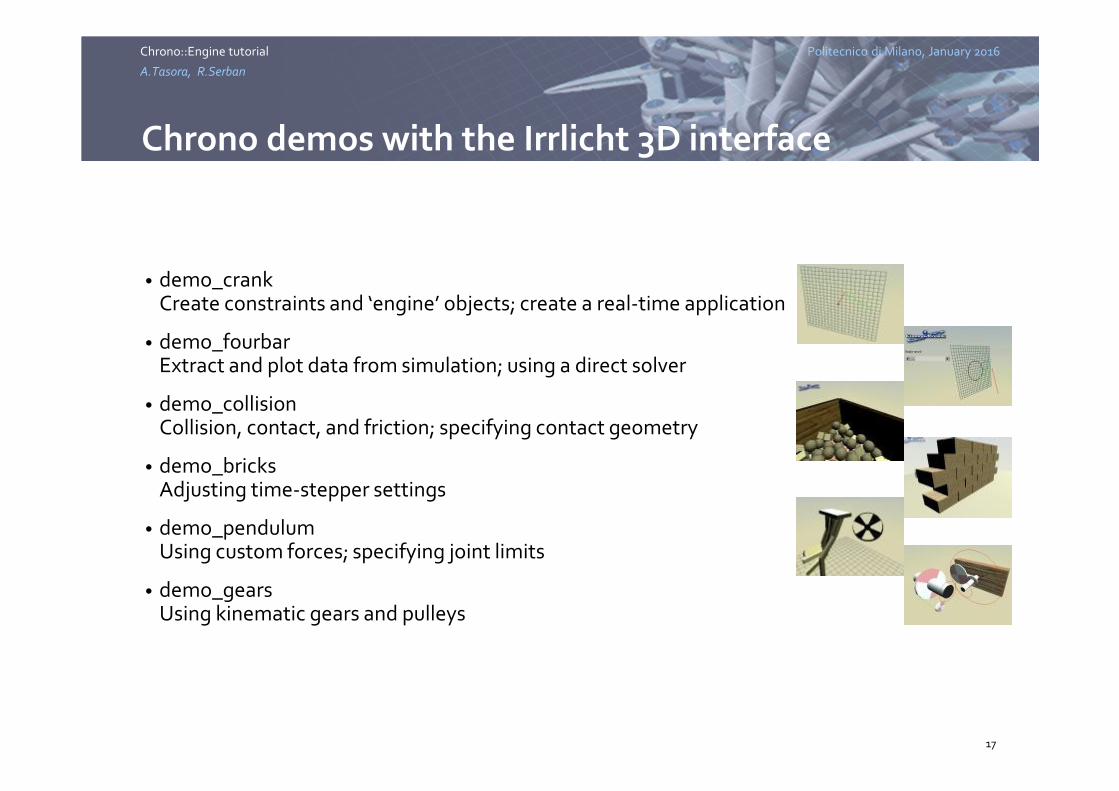
• demo_crankCreate constraints and ‘engine’ objects; create a real-time application
• demo_fourbarExtract and plot data from simulation; using a direct solver
• demo_collisionCollision, contact, and friction; specifying contact geometry
• demo_bricksAdjusting time-stepper settings
• demo_pendulumUsing custom forces; specifying joint limits
• demo_gearsUsing kinematic gears and pulleys
17
Politecnico di Milano, January 2016Chrono::Engine tutorial
A.Tasora, R.Serban
Chrono demos with the Irrlicht 3D interface
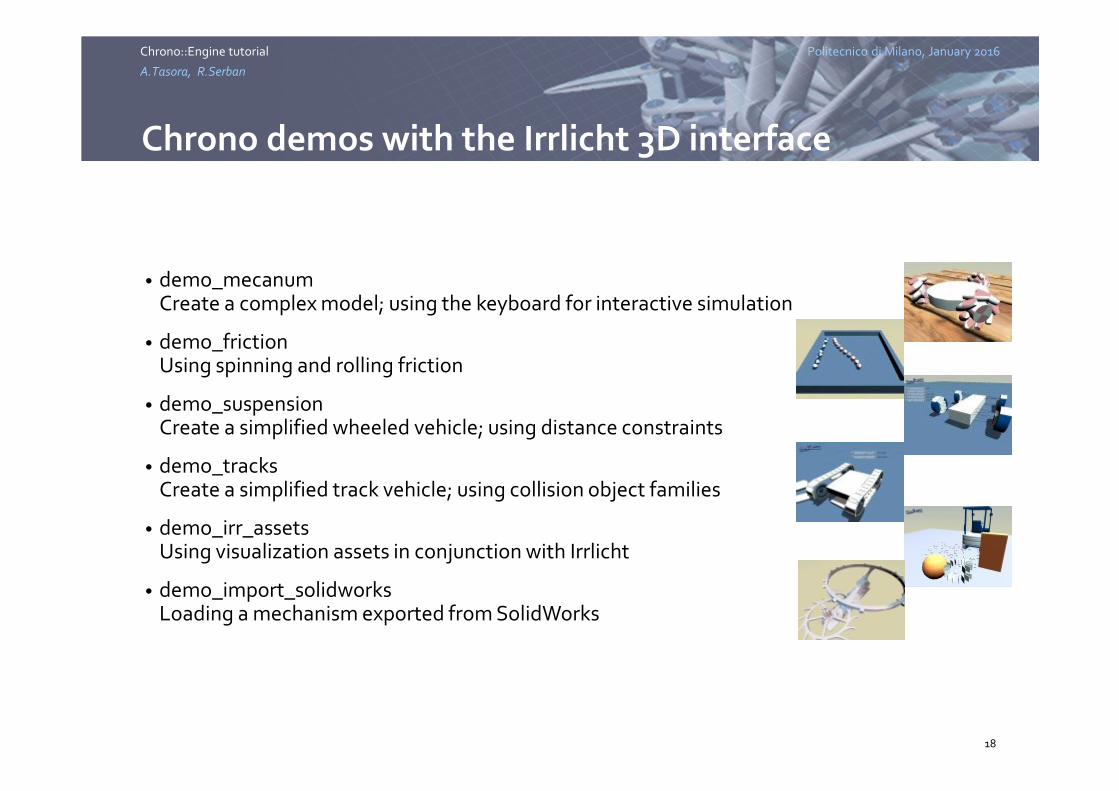
• demo_mecanumCreate a complex model; using the keyboard for interactive simulation
• demo_frictionUsing spinning and rolling friction
• demo_suspensionCreate a simplified wheeled vehicle; using distance constraints
• demo_tracksCreate a simplified track vehicle; using collision object families
• demo_irr_assetsUsing visualization assets in conjunction with Irrlicht
• demo_import_solidworksLoading a mechanism exported from SolidWorks
18
Politecnico di Milano, January 2016Chrono::Engine tutorial
A.Tasora, R.Serban
Chrono demos with the Irrlicht 3D interface
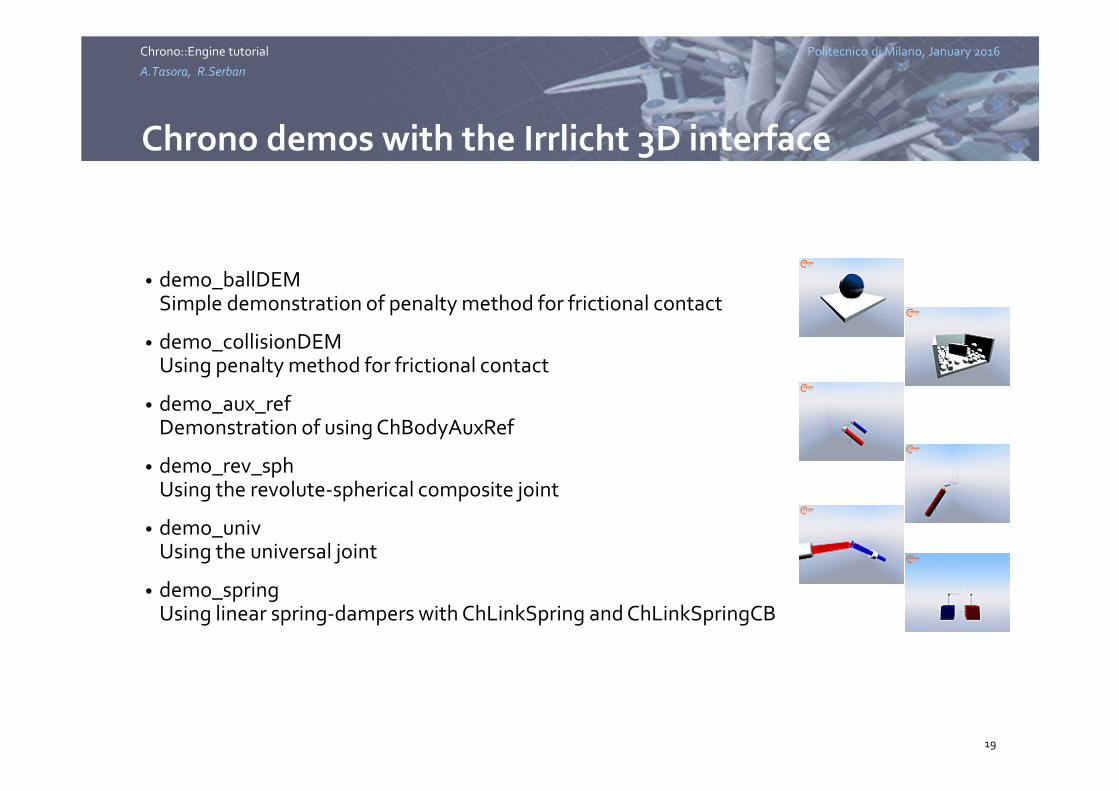
• demo_ballDEMSimple demonstration of penalty method for frictional contact
• demo_collisionDEMUsing penalty method for frictional contact
• demo_aux_refDemonstration of using ChBodyAuxRef
• demo_rev_sphUsing the revolute-spherical composite joint
• demo_univUsing the universal joint
• demo_springUsing linear spring-dampers with ChLinkSpring and ChLinkSpringCB
19

Politecnico di Milano, January 2016Chrono::Engine tutorial
A.Tasora, R.Serban
Chrono build toolchain
20
Politecnico di Milano, January 2016Chrono::Engine tutorial
A.Tasora, R.Serban
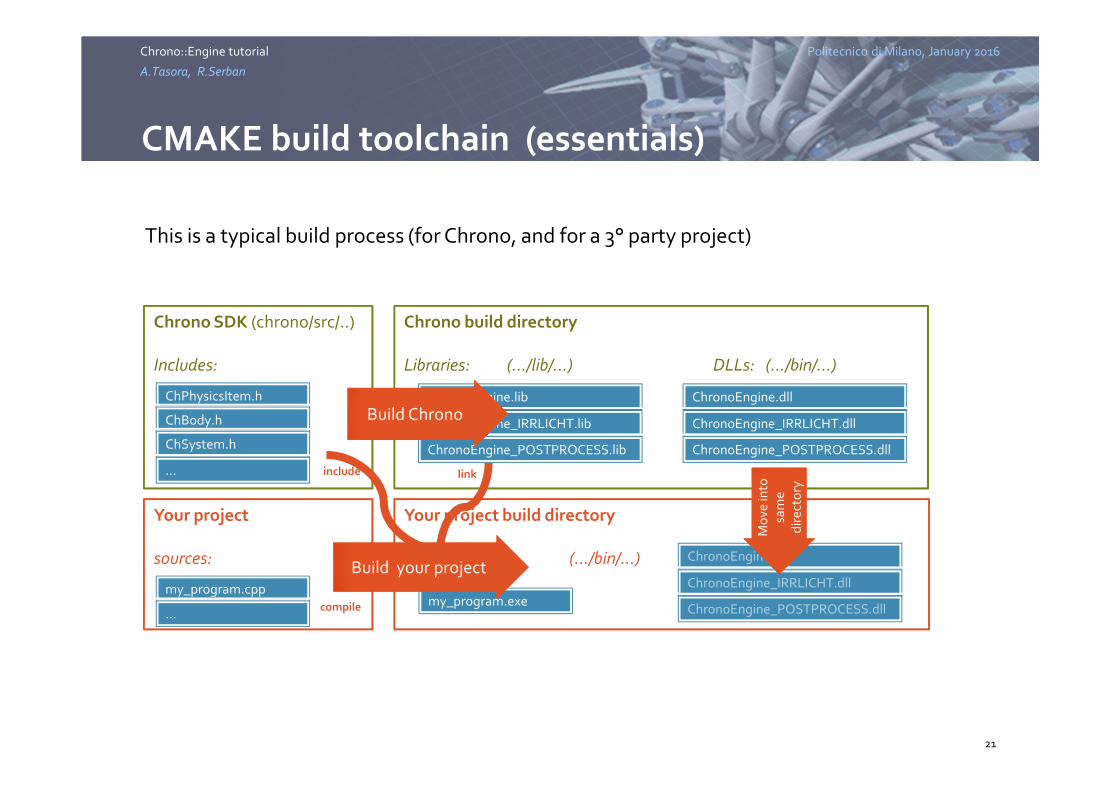
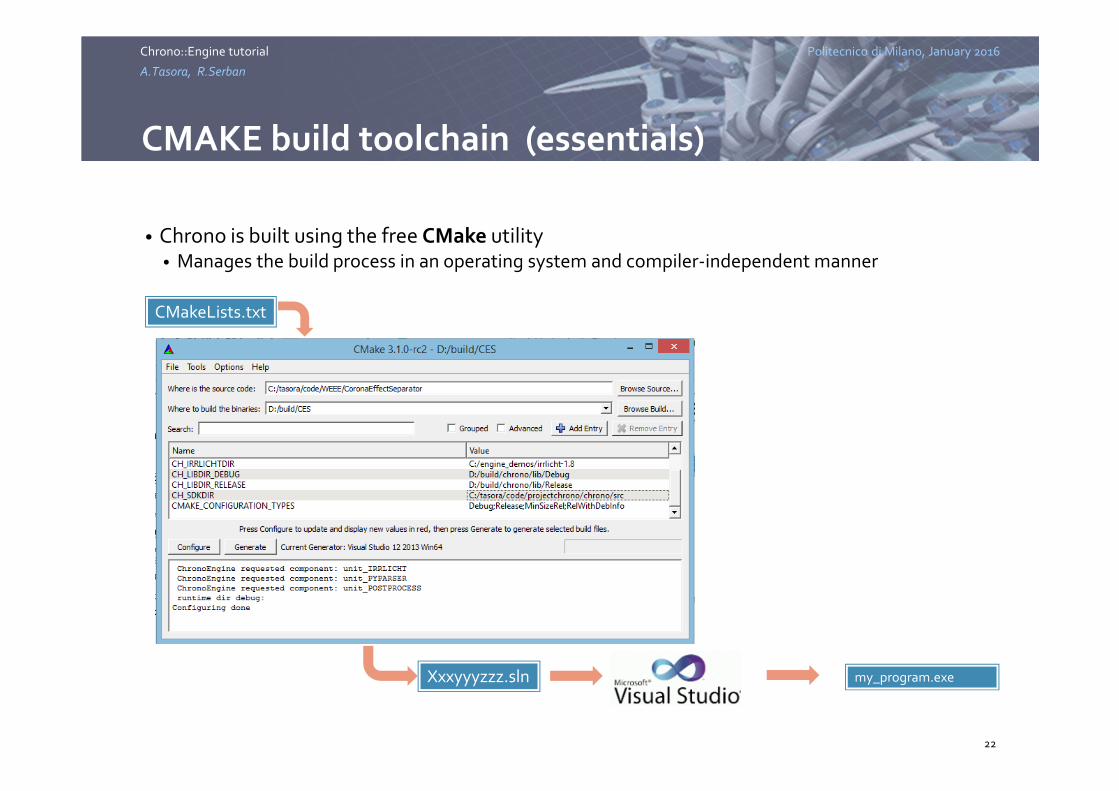
This is a typical build process (for Chrono, and for a 3° party project)
CMAKE build toolchain (essentials)
21
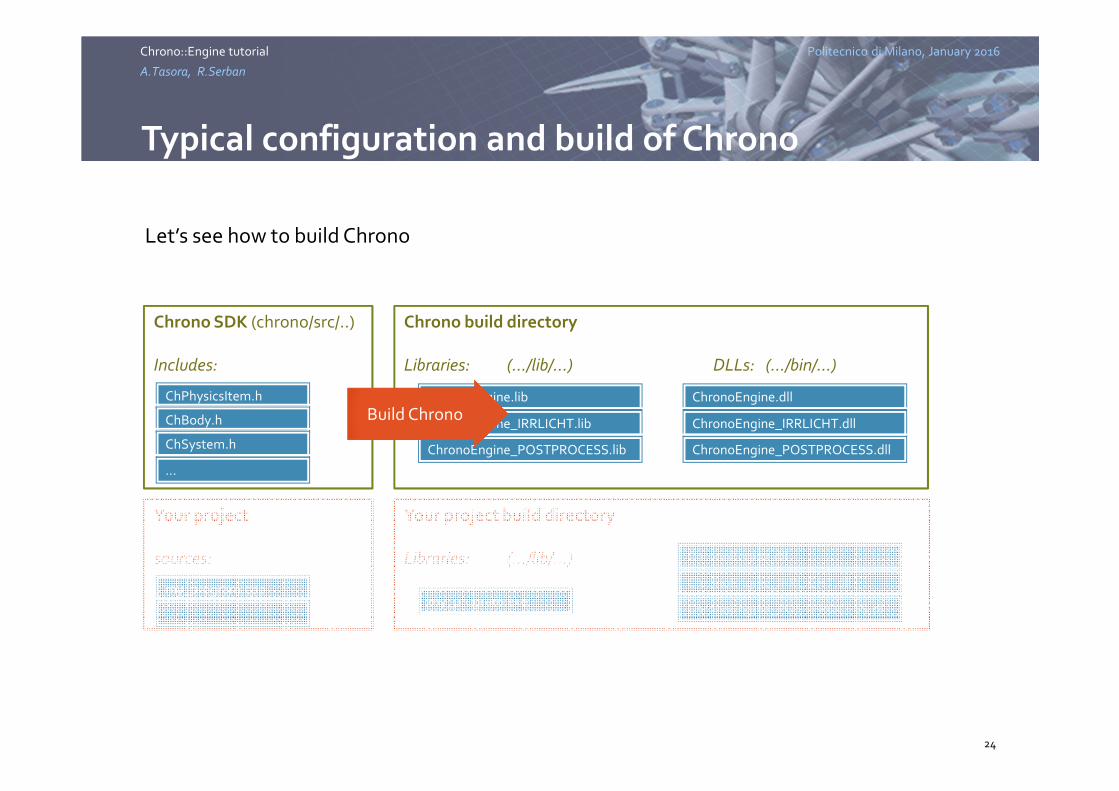
ChPhysicsItem.h
ChBody.h
ChSystem.h
…
Chrono build directory
Libraries: (…/lib/…) DLLs: (…/bin/…)
ChronoEngine.lib
ChronoEngine_IRRLICHT.lib
ChronoEngine_POSTPROCESS.lib
ChronoEngine.dll
ChronoEngine_IRRLICHT.dll
ChronoEngine_POSTPROCESS.dll
Chrono SDK (chrono/src/..)
Includes:
my_program.cpp
…
Your project
sources:
Your project build directory
Librarie s: (…/bin/…)
my_program.exe
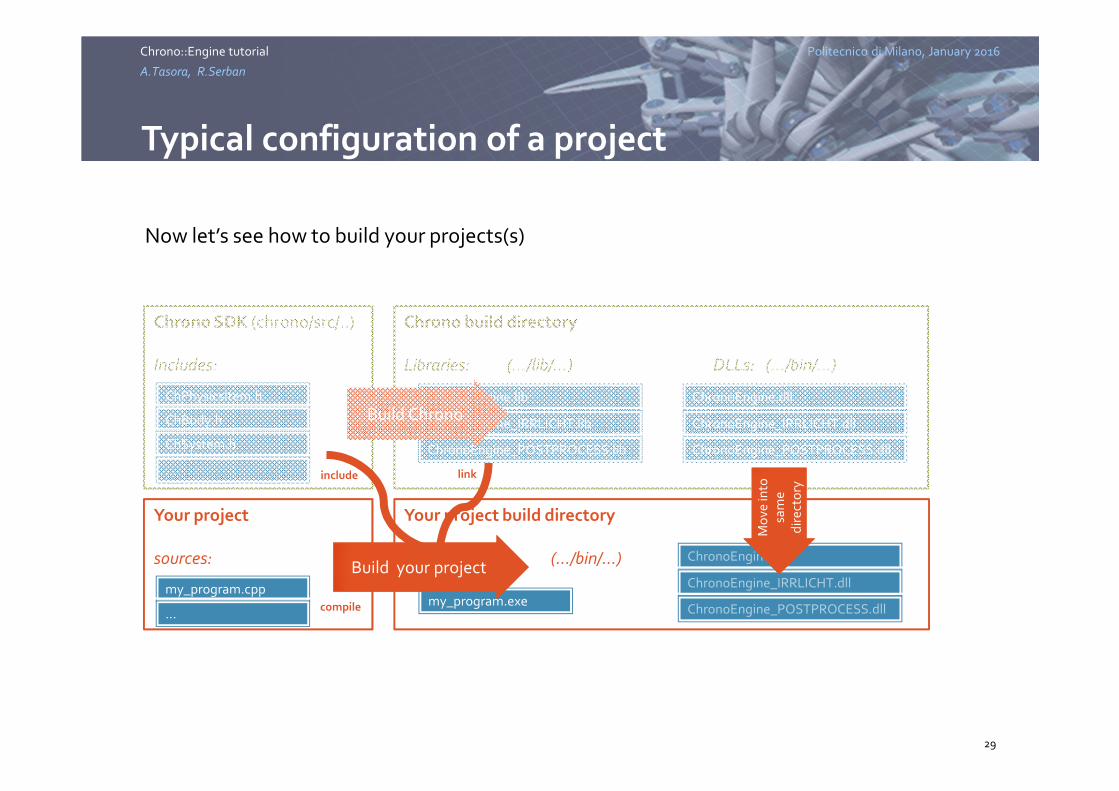
Build Chrono
Build your project
include
compile
link
ChronoEngine.dll
ChronoEngine_IRRLICHT.dll
ChronoEngine_POSTPROCESS.dll
Mo
vein
tosa
me
dir
ect
ory
Politecnico di Milano, January 2016Chrono::Engine tutorial
A.Tasora, R.Serban
CMAKE build toolchain (essentials)
22
Xxxyyyzzz.sln
CMakeLists.txt
my_program.exe
• Chrono is built using the free CMake utility• Manages the build process in an operating system and compiler-independent manner
Politecnico di Milano, January 2016Chrono::Engine tutorial
A.Tasora, R.Serban
CMAKE build toolchain (dependencies)
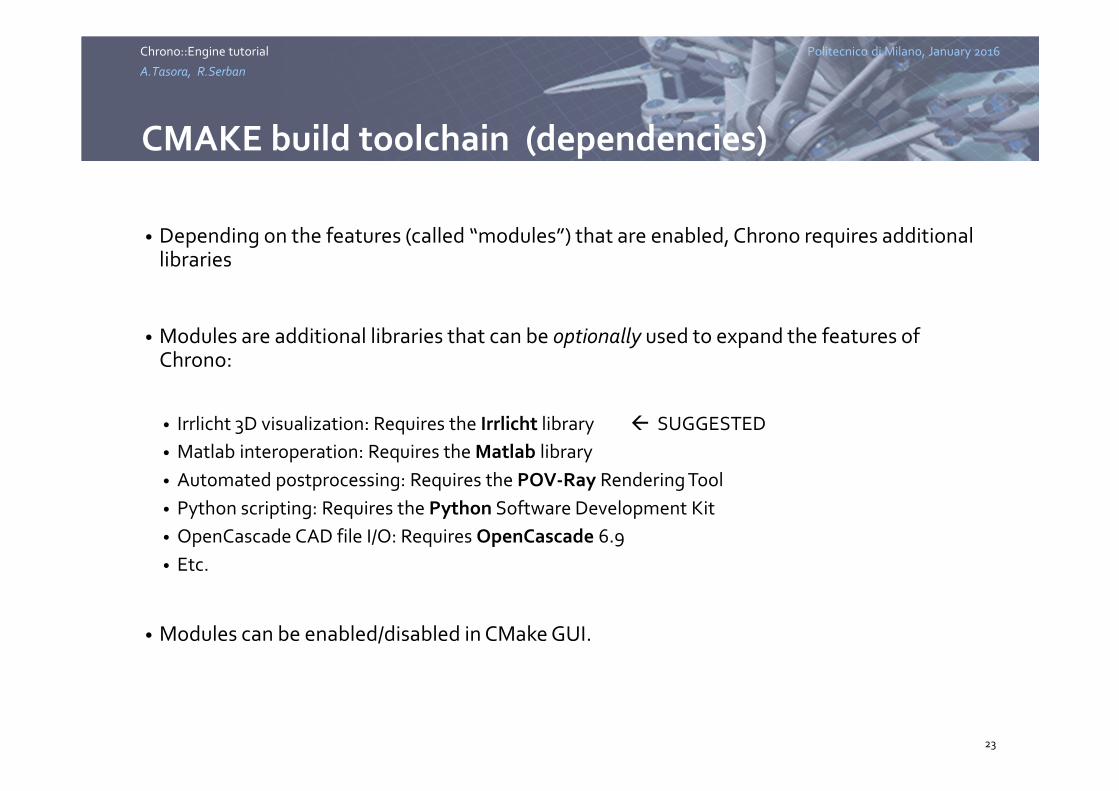
• Depending on the features (called “modules”) that are enabled, Chrono requires additional libraries
• Modules are additional libraries that can be optionally used to expand the features of Chrono:
• Irrlicht 3D visualization: Requires the Irrlicht library � SUGGESTED
• Matlab interoperation: Requires the Matlab library
• Automated postprocessing: Requires the POV-Ray Rendering Tool
• Python scripting: Requires the Python Software Development Kit
• OpenCascade CAD file I/O: Requires OpenCascade 6.9
• Etc.
• Modules can be enabled/disabled in CMake GUI.
23
Politecnico di Milano, January 2016Chrono::Engine tutorial
A.Tasora, R.Serban
Let’s see how to build Chrono
Typical configuration and build of Chrono
24
ChPhysicsItem.h
ChBody.h
ChSystem.h
…
Chrono build directory
Libraries: (…/lib/…) DLLs: (…/bin/…)
ChronoEngine.lib
ChronoEngine_IRRLICHT.lib
ChronoEngine_POSTPROCESS.lib
ChronoEngine.dll
ChronoEngine_IRRLICHT.dll
ChronoEngine_POSTPROCESS.dll
Chrono SDK (chrono/src/..)
Includes:
my_program.cpp
…
Your project
sources:
Your project build directory
Libraries: (…/lib/…)
my_program.exe
Build Chrono
ChronoEngine.dll
ChronoEngine_IRRLICHT.dll
ChronoEngine_POSTPROCESS.dll
Politecnico di Milano, January 2016Chrono::Engine tutorial
A.Tasora, R.Serban
Typical configuration and build of Chrono
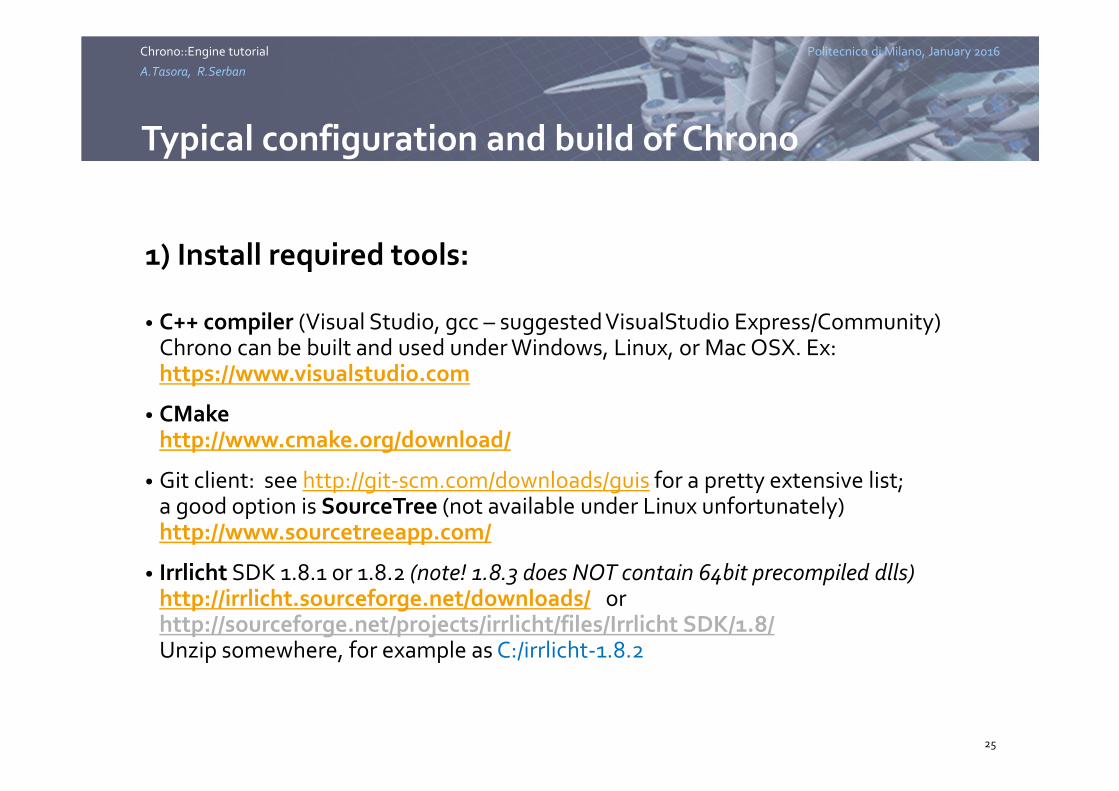
1) Install required tools:
• C++ compiler (Visual Studio, gcc – suggested VisualStudio Express/Community)Chrono can be built and used under Windows, Linux, or Mac OSX. Ex:https://www.visualstudio.com
• CMakehttp://www.cmake.org/download/
• Git client: see http://git-scm.com/downloads/guis for a pretty extensive list;a good option is SourceTree (not available under Linux unfortunately)http://www.sourcetreeapp.com/
• Irrlicht SDK 1.8.1 or 1.8.2 (note! 1.8.3 does NOT contain 64bit precompiled dlls)http://irrlicht.sourceforge.net/downloads/ orhttp://sourceforge.net/projects/irrlicht/files/Irrlicht SDK/1.8/Unzip somewhere, for example as C:/irrlicht-1.8.2
25
Politecnico di Milano, January 2016Chrono::Engine tutorial
A.Tasora, R.Serban
Typical configuration and build of Chrono
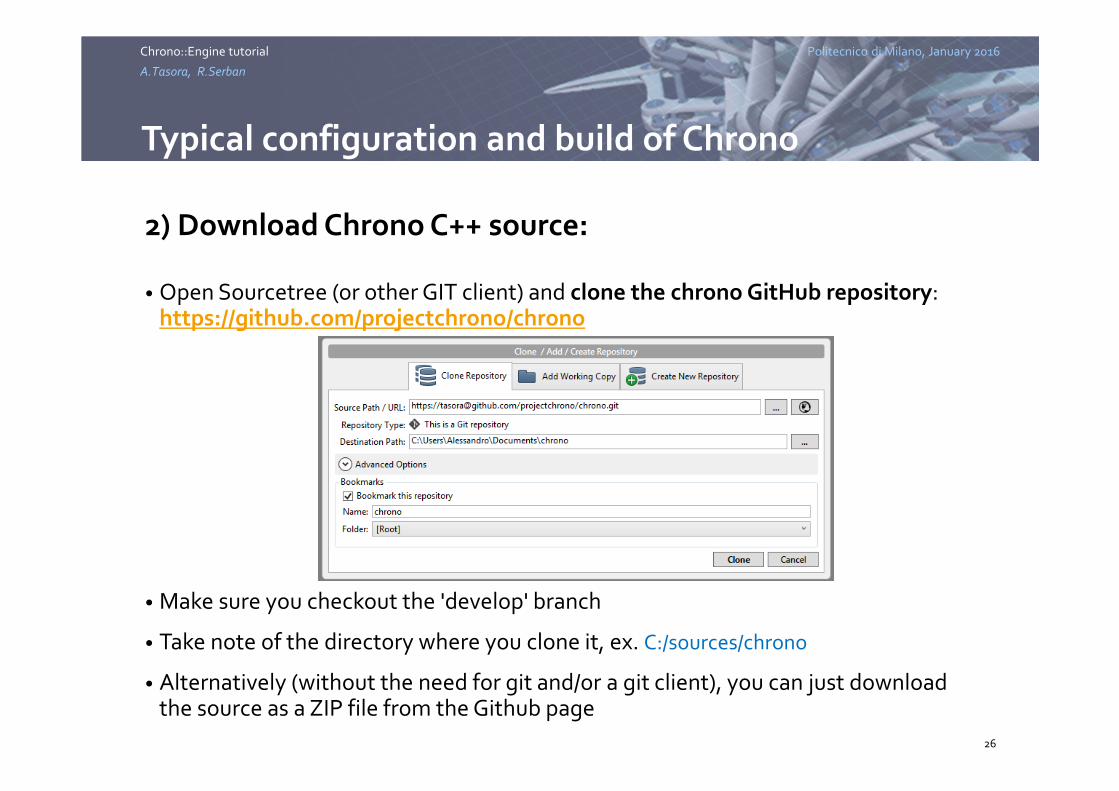
2) Download Chrono C++ source:
• Open Sourcetree (or other GIT client) and clone the chrono GitHub repository: https://github.com/projectchrono/chrono
• Make sure you checkout the 'develop' branch
• Take note of the directory where you clone it, ex. C:/sources/chrono
• Alternatively (without the need for git and/or a git client), you can just download the source as a ZIP file from the Github page
26
Politecnico di Milano, January 2016Chrono::Engine tutorial
A.Tasora, R.Serban
Typical configuration and build of Chrono
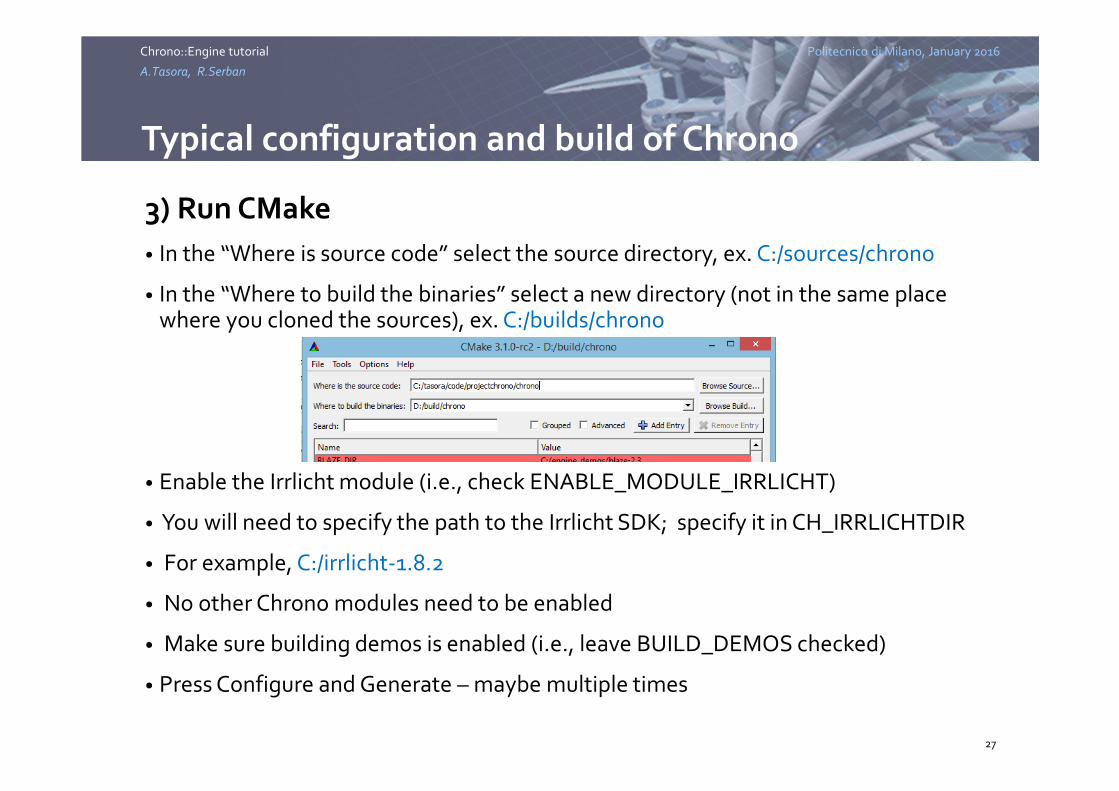
3) Run CMake
• In the “Where is source code” select the source directory, ex. C:/sources/chrono
• In the “Where to build the binaries” select a new directory (not in the same place where you cloned the sources), ex. C:/builds/chrono
• Enable the Irrlicht module (i.e., check ENABLE_MODULE_IRRLICHT)
• You will need to specify the path to the Irrlicht SDK; specify it in CH_IRRLICHTDIR
• For example, C:/irrlicht-1.8.2
• No other Chrono modules need to be enabled
• Make sure building demos is enabled (i.e., leave BUILD_DEMOS checked)
• Press Configure and Generate – maybe multiple times
27
Politecnico di Milano, January 2016Chrono::Engine tutorial
A.Tasora, R.Serban
Typical configuration and build of Chrono
4) Build Chrono using VisualStudio (or other IDEs)
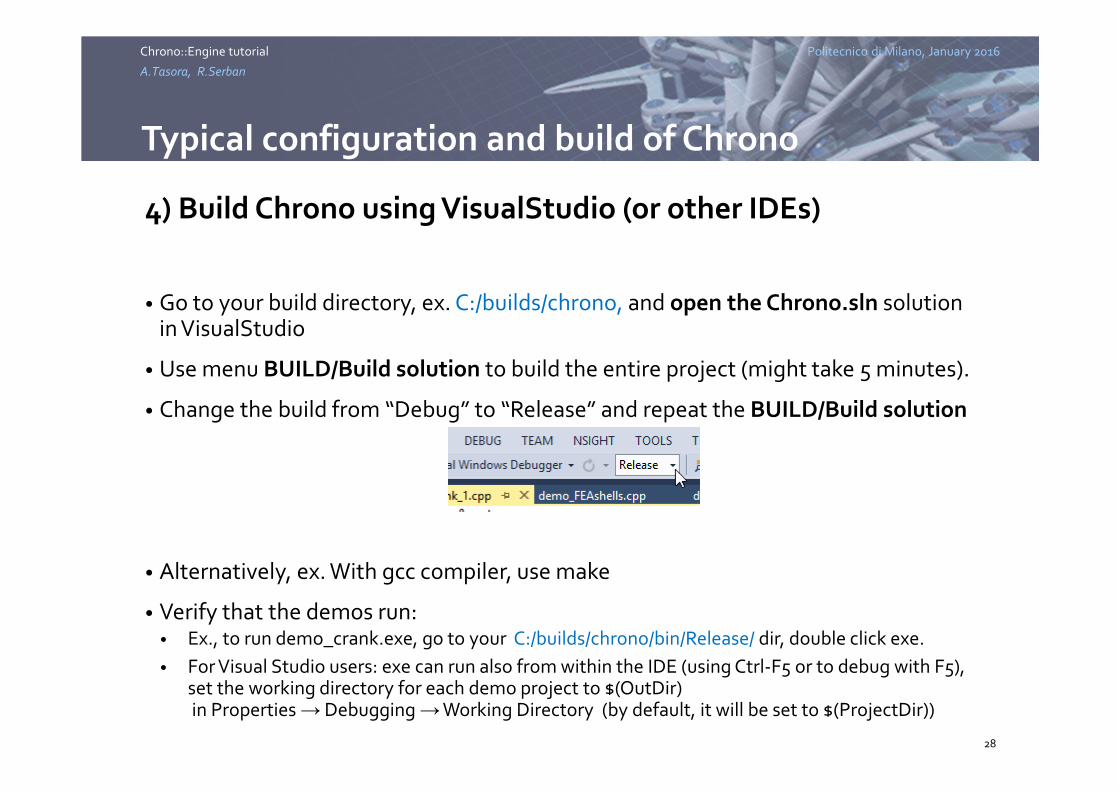
• Go to your build directory, ex. C:/builds/chrono, and open the Chrono.sln solution in VisualStudio
• Use menu BUILD/Build solution to build the entire project (might take 5 minutes).
• Change the build from “Debug” to “Release” and repeat the BUILD/Build solution
• Alternatively, ex. With gcc compiler, use make
• Verify that the demos run:• Ex., to run demo_crank.exe, go to your C:/builds/chrono/bin/Release/ dir, double click exe.
• For Visual Studio users: exe can run also from within the IDE (using Ctrl-F5 or to debug with F5), set the working directory for each demo project to $(OutDir)in Properties →Debugging →Working Directory (by default, it will be set to $(ProjectDir))
28
Politecnico di Milano, January 2016Chrono::Engine tutorial
A.Tasora, R.Serban
Now let’s see how to build your projects(s)
Typical configuration of a project
29
ChPhysicsItem.h
ChBody.h
ChSystem.h
…
Chrono build directory
Libraries: (…/lib/…) DLLs: (…/bin/…)
ChronoEngine.lib
ChronoEngine_IRRLICHT.lib
ChronoEngine_POSTPROCESS.lib
ChronoEngine.dll
ChronoEngine_IRRLICHT.dll
ChronoEngine_POSTPROCESS.dll
Chrono SDK (chrono/src/..)
Includes:
my_program.cpp
…
Your project
sources:
Your project build directory
Libraries: (…/bin/…)
my_program.exe
Build Chrono
ChronoEngine.dll
ChronoEngine_IRRLICHT.dll
ChronoEngine_POSTPROCESS.dll
Build your project
include
compile
link
Mo
vein
tosa
me
dir
ect
ory
Politecnico di Milano, January 2016Chrono::Engine tutorial
A.Tasora, R.Serban
Typical configuration of a project
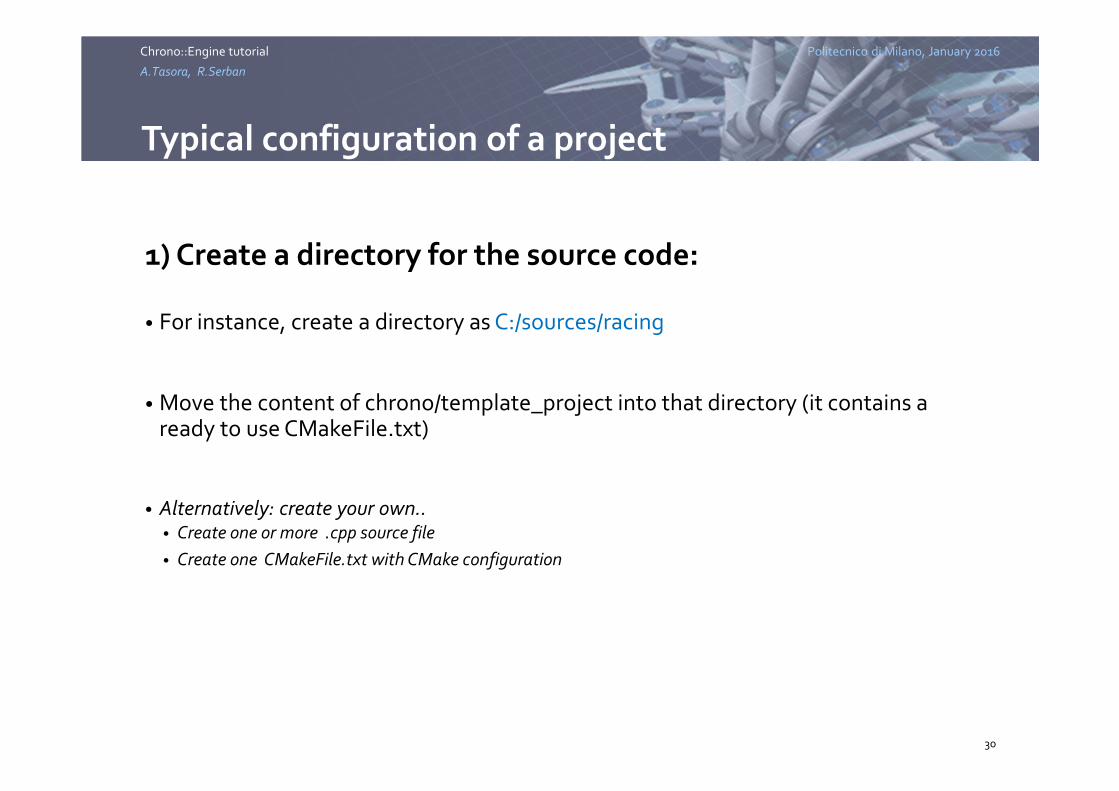
1) Create a directory for the source code:
• For instance, create a directory as C:/sources/racing
• Move the content of chrono/template_project into that directory (it contains a ready to use CMakeFile.txt)
• Alternatively: create your own..• Create one or more .cpp source file
• Create one CMakeFile.txt with CMake configuration
30
Politecnico di Milano, January 2016Chrono::Engine tutorial
A.Tasora, R.Serban
Typical configuration of a project
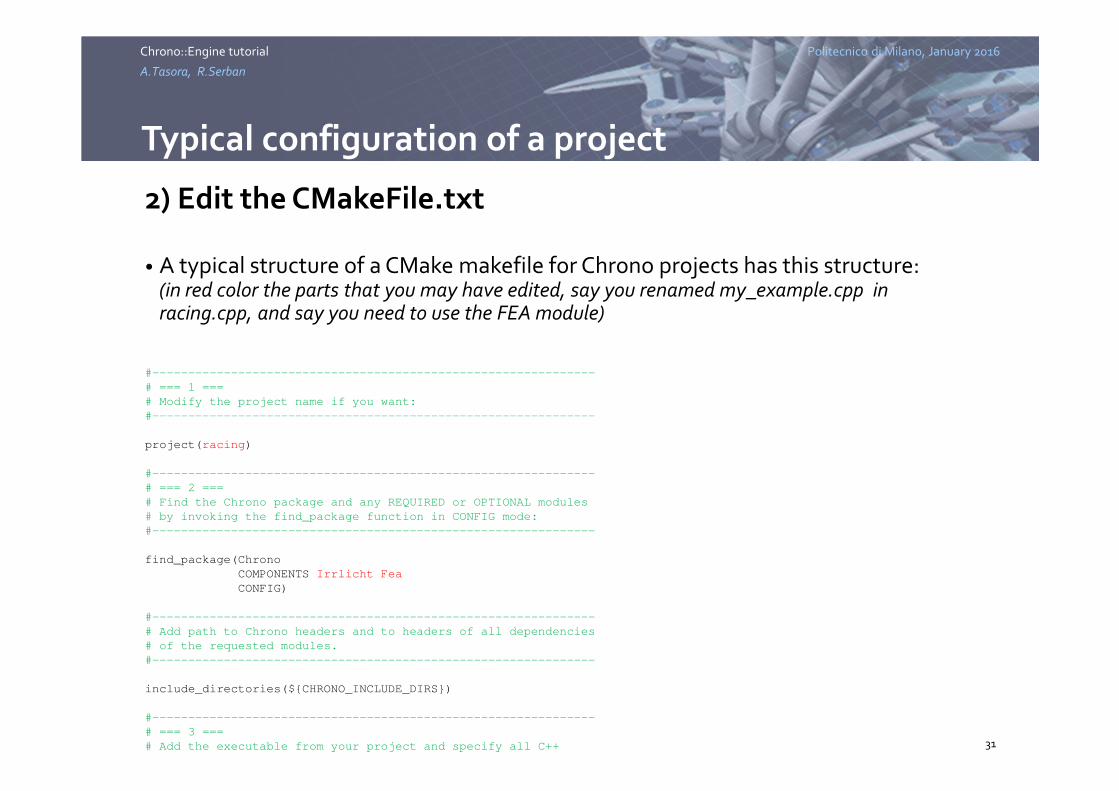
2) Edit the CMakeFile.txt
• A typical structure of a CMake makefile for Chrono projects has this structure:(in red color the parts that you may have edited, say you renamed my_example.cpp in racing.cpp, and say you need to use the FEA module)
#--------------------------------------------------------------
# === 1 ===
# Modify the project name if you want:
#--------------------------------------------------------------
project(racing)
#--------------------------------------------------------------
# === 2 ===
# Find the Chrono package and any REQUIRED or OPTIONAL modules
# by invoking the find_package function in CONFIG mode:
#--------------------------------------------------------------
find_package(Chrono
COMPONENTS Irrlicht Fea
CONFIG)
#--------------------------------------------------------------
# Add path to Chrono headers and to headers of all dependencies
# of the requested modules.
#--------------------------------------------------------------
include_directories(${CHRONO_INCLUDE_DIRS})
#--------------------------------------------------------------
# === 3 ===
# Add the executable from your project and specify all C++
# files in your project.
31
Politecnico di Milano, January 2016Chrono::Engine tutorial
A.Tasora, R.Serban
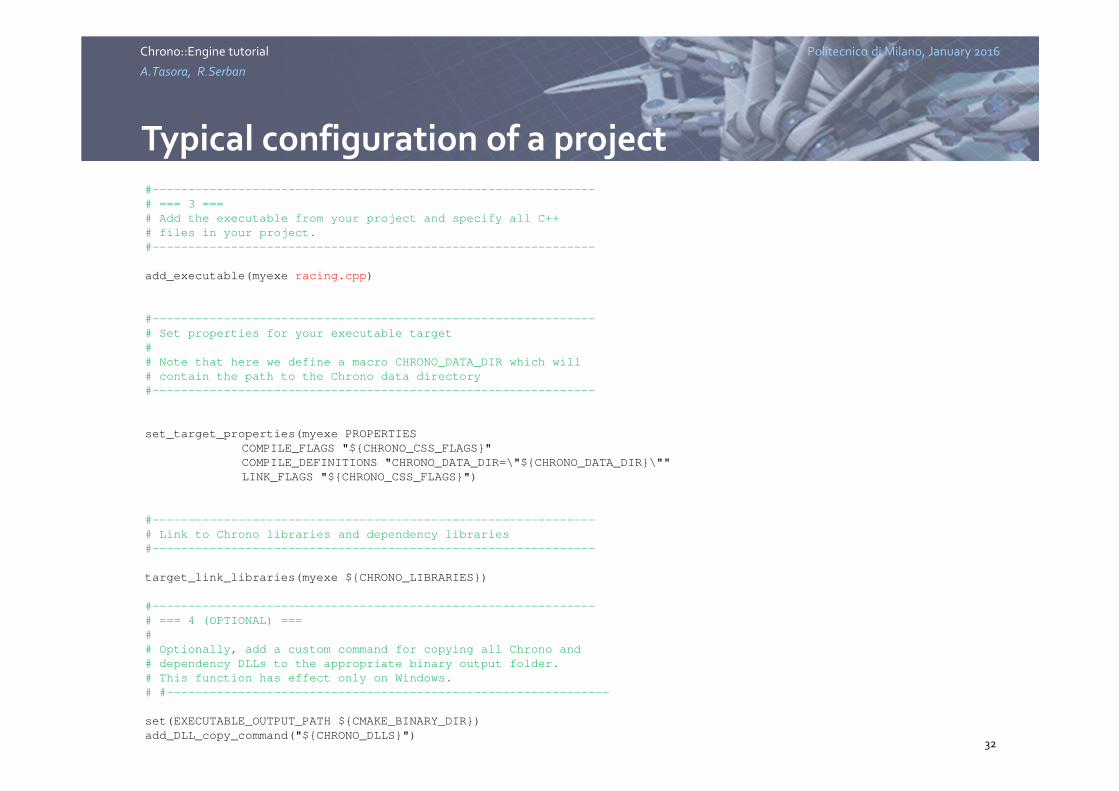
Typical configuration of a project#--------------------------------------------------------------
# === 3 ===
# Add the executable from your project and specify all C++
# files in your project.
#--------------------------------------------------------------
add_executable(myexe racing.cpp)
#--------------------------------------------------------------
# Set properties for your executable target
#
# Note that here we define a macro CHRONO_DATA_DIR which will
# contain the path to the Chrono data directory
#--------------------------------------------------------------
set_target_properties(myexe PROPERTIES
COMPILE_FLAGS "${CHRONO_CSS_FLAGS}"
COMPILE_DEFINITIONS "CHRONO_DATA_DIR=\"${CHRONO_DATA_DIR}\""
LINK_FLAGS "${CHRONO_CSS_FLAGS}")
#--------------------------------------------------------------
# Link to Chrono libraries and dependency libraries
#--------------------------------------------------------------
target_link_libraries(myexe ${CHRONO_LIBRARIES})
#--------------------------------------------------------------
# === 4 (OPTIONAL) ===
#
# Optionally, add a custom command for copying all Chrono and
# dependency DLLs to the appropriate binary output folder.
# This function has effect only on Windows.
# #--------------------------------------------------------------
set(EXECUTABLE_OUTPUT_PATH ${CMAKE_BINARY_DIR})
add_DLL_copy_command("${CHRONO_DLLS}")32
Politecnico di Milano, January 2016Chrono::Engine tutorial
A.Tasora, R.Serban
Typical configuration of a project
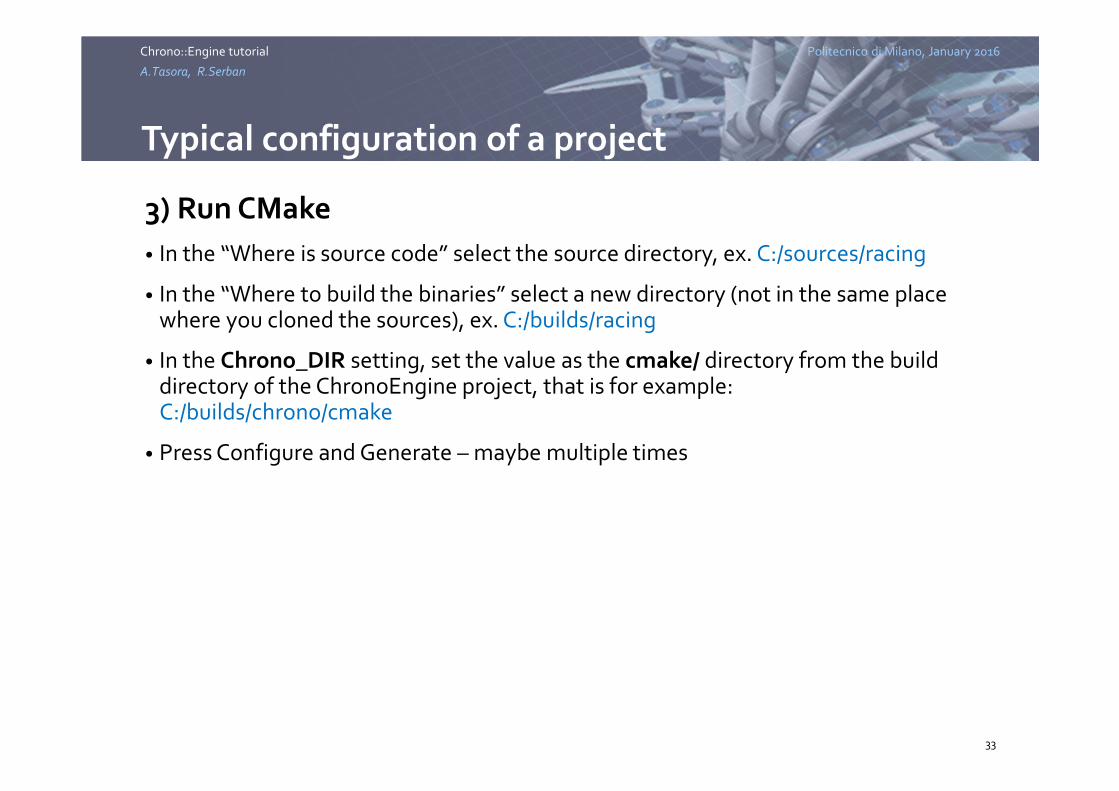
3) Run CMake
• In the “Where is source code” select the source directory, ex. C:/sources/racing
• In the “Where to build the binaries” select a new directory (not in the same place where you cloned the sources), ex. C:/builds/racing
• In the Chrono_DIR setting, set the value as the cmake/ directory from the build directory of the ChronoEngine project, that is for example:C:/builds/chrono/cmake
• Press Configure and Generate – maybe multiple times
33
Politecnico di Milano, January 2016Chrono::Engine tutorial
A.Tasora, R.Serban
Typical configuration and build of Chrono
4) Build your project using VisualStudio (or other IDEs)
• Go to your build directory, ex. C:/builds/racing, and open the racing.sln solution in VisualStudio
• Use menu BUILD/Build solution to build your project (in release or debug mode, as you prefer)
• To run racing.exe, go to your C:/builds/chrono/bin/Release/ dir, double click the exe.• For Visual Studio users: exe can run also from within the IDE (using Ctrl-F5 or to debug with F5),
set the working directory for each demo project to $(OutDir)in Properties →Debugging →Working Directory (by default, it will be set to $(ProjectDir))
NOTE:
• The .exe needs all dlls (ChronoEngine.dll, Irrlicht.dll,etc.) in its directory. When you do BUILD/Rebuild solution, VisualStudio will copy them automatically for you, but only for release mode. For the debug mode, you have to copy by hand.
34
Politecnico di Milano, January 2016Chrono::Engine tutorial
A.Tasora, R.Serban
Chrono API basics
35
Politecnico di Milano, January 2016Chrono::Engine tutorial
A.Tasora, R.Serban
Coding with shared pointers
• Most «complex» objects in C::E are managed via shared pointers
• Shared pointers frees you from the need of delete()
• ChSharedPtr<> is for objects inherited from ChShared
• ChSmartPtr<> is for whatever object
• Syntax:
ChSharedPointer<MyClass> my_body(new MyClass);
36
Politecnico di Milano, January 2016Chrono::Engine tutorial
A.Tasora, R.Serban
Coding with shared pointers
• Example:
ChSharedPointer<ChBody> my_body(new ChBody);
my_body->SetMass(100);
. . .
instead of typical:
ChBody* my_body = new ChBody;
my_body->SetMass(100);
. . .
delete my_body;
37
Politecnico di Milano, January 2016Chrono::Engine tutorial
A.Tasora, R.Serban
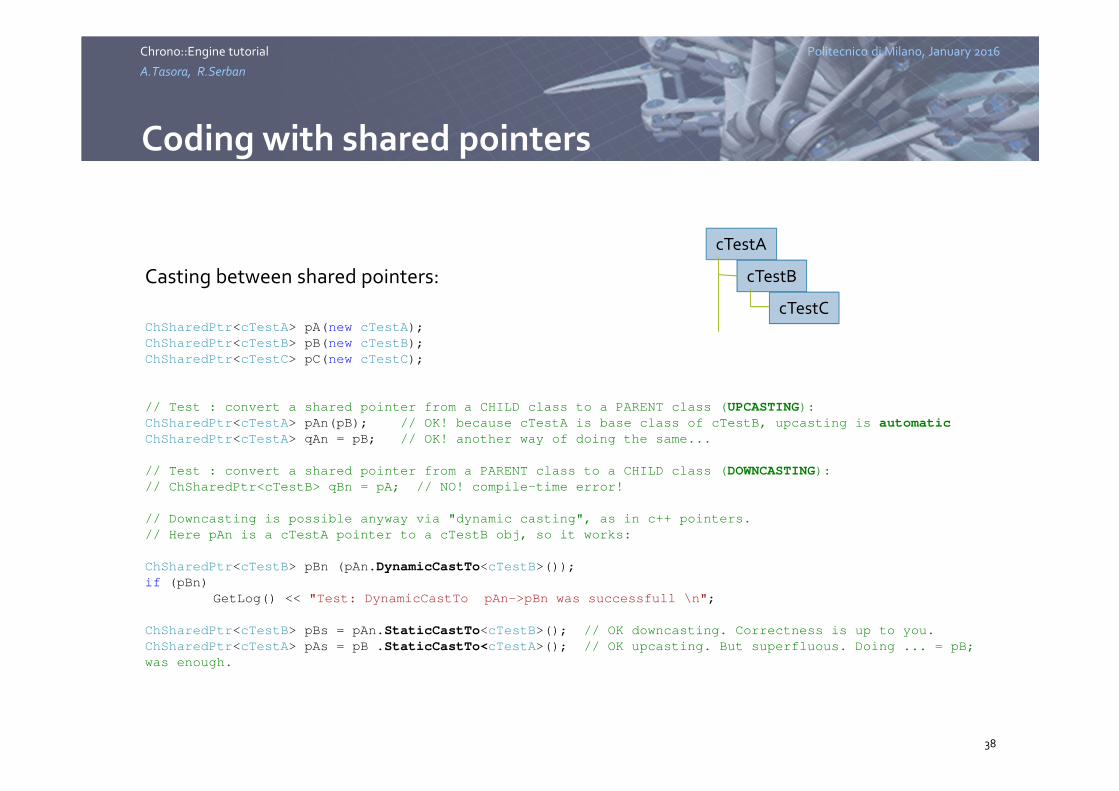
Coding with shared pointers
Casting between shared pointers:
ChSharedPtr<cTestA> pA(new cTestA);
ChSharedPtr<cTestB> pB(new cTestB);
ChSharedPtr<cTestC> pC(new cTestC);
// Test : convert a shared pointer from a CHILD class to a PARENT class (UPCASTING):
ChSharedPtr<cTestA> pAn(pB); // OK! because cTestA is base class of cTestB, upcasting is automatic
ChSharedPtr<cTestA> qAn = pB; // OK! another way of doing the same...
// Test : convert a shared pointer from a PARENT class to a CHILD class (DOWNCASTING):
// ChSharedPtr<cTestB> qBn = pA; // NO! compile-time error!
// Downcasting is possible anyway via "dynamic casting", as in c++ pointers.
// Here pAn is a cTestA pointer to a cTestB obj, so it works:
ChSharedPtr<cTestB> pBn (pAn.DynamicCastTo<cTestB>());
if (pBn)
GetLog() << "Test: DynamicCastTo pAn->pBn was successfull \n";
ChSharedPtr<cTestB> pBs = pAn.StaticCastTo<cTestB>(); // OK downcasting. Correctness is up to you.
ChSharedPtr<cTestA> pAs = pB .StaticCastTo<cTestA>(); // OK upcasting. But superfluous. Doing ... = pB;
was enough.
38
cTestA
cTestB
cTestC
Politecnico di Milano, January 2016Chrono::Engine tutorial
A.Tasora, R.Serban
Coordinate transformations
ChVector<>
ChVector<double> mvect1(2,3,4); /// create a vector with given x,y,z ‘double’ components
ChVector<float> mvect2(4,1,2); /// create a vector with given x,y,z ‘float’ components
ChVector<> mvect3(); /// create a 0,0,0, vector. The <> defaults to ‘double’
ChVector<> mvect4(mvect1 + mvect2); /// create a vector by copying another (a result from +)
mvect3 = mvect1 + mvect2; /// vector operators: +, -
mvect3 += mvect1; /// in-place operators
mvect3 = mvect2 * 0.003; /// vector product by scalar
mvect3.Normalize(); /// many member functions…
mvect3 = mvect1 % mvect2; /// Operator for cross product: A%B means vector cross-product AxB
double val = mvect1 ^ mvect2; /// Operator for inner product (scalar product)
39
Politecnico di Milano, January 2016Chrono::Engine tutorial
A.Tasora, R.Serban
Coordinate transformations
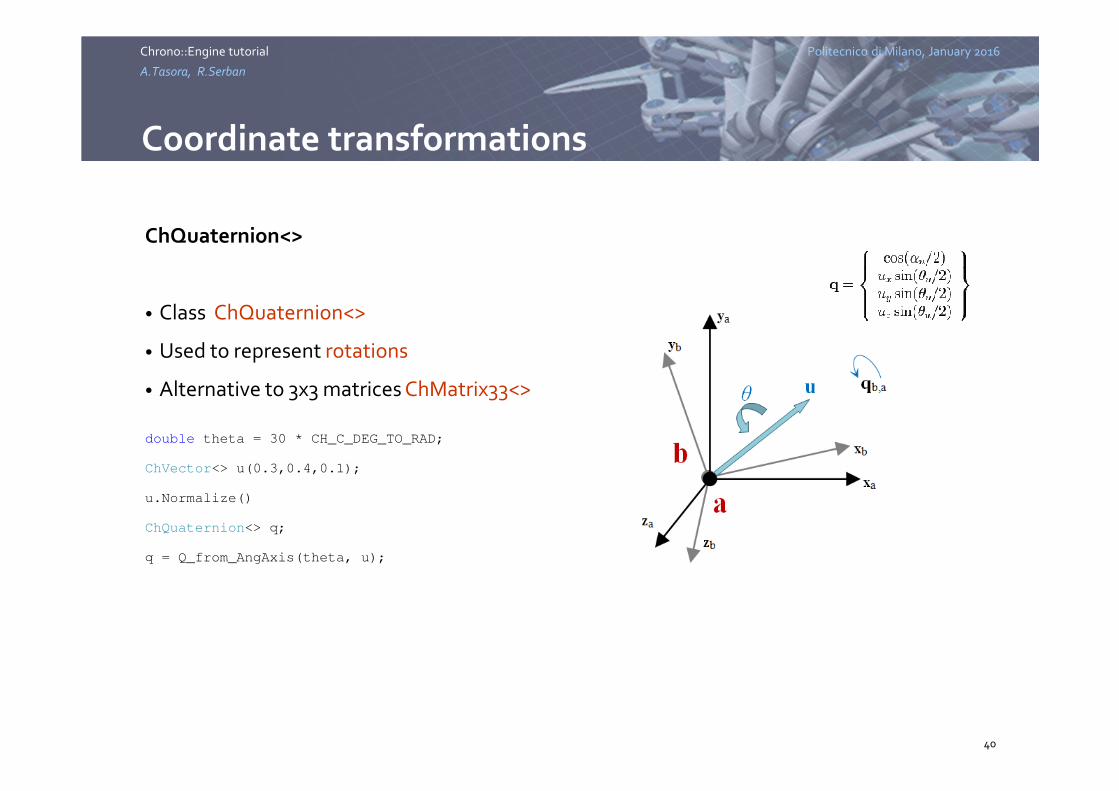
ChQuaternion<>
• Class ChQuaternion<>
• Used to represent rotations
• Alternative to 3x3 matrices ChMatrix33<>
double theta = 30 * CH_C_DEG_TO_RAD;
ChVector<> u(0.3,0.4,0.1);
u.Normalize()
ChQuaternion<> q;
q = Q_from_AngAxis(theta, u);
40
Politecnico di Milano, January 2016Chrono::Engine tutorial
A.Tasora, R.Serban
Coordinate transformations
ChQuaternion<>
mvect2 = vtraslA + qrotA.Rotate(mvect1); /// use Rotate() to rotate a vector
/// quaternion product via operator *
qa = qb * qc; /// concatenate two rotations, first qc, followed by qb
qa.Rotate(mvect1);
qa = qc >> qb; /// concatenate two rotations, first qc, followed by qb (same as
before!)
qa.Rotate(mvect1);
41
Politecnico di Milano, January 2016Chrono::Engine tutorial
A.Tasora, R.Serban
Coordinate transformations
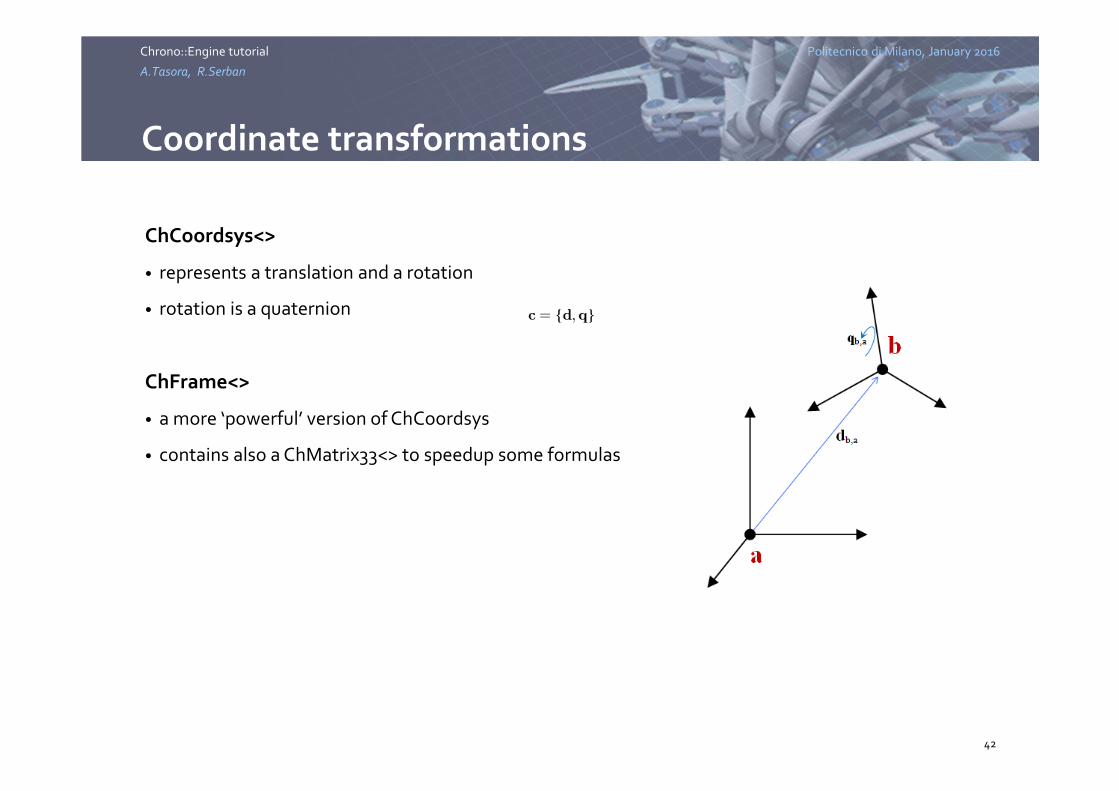
ChCoordsys<>
• represents a translation and a rotation
• rotation is a quaternion
ChFrame<>
• a more ‘powerful’ version of ChCoordsys
• contains also a ChMatrix33<> to speedup some formulas
42
Politecnico di Milano, January 2016Chrono::Engine tutorial
A.Tasora, R.Serban
Coordinate transformations
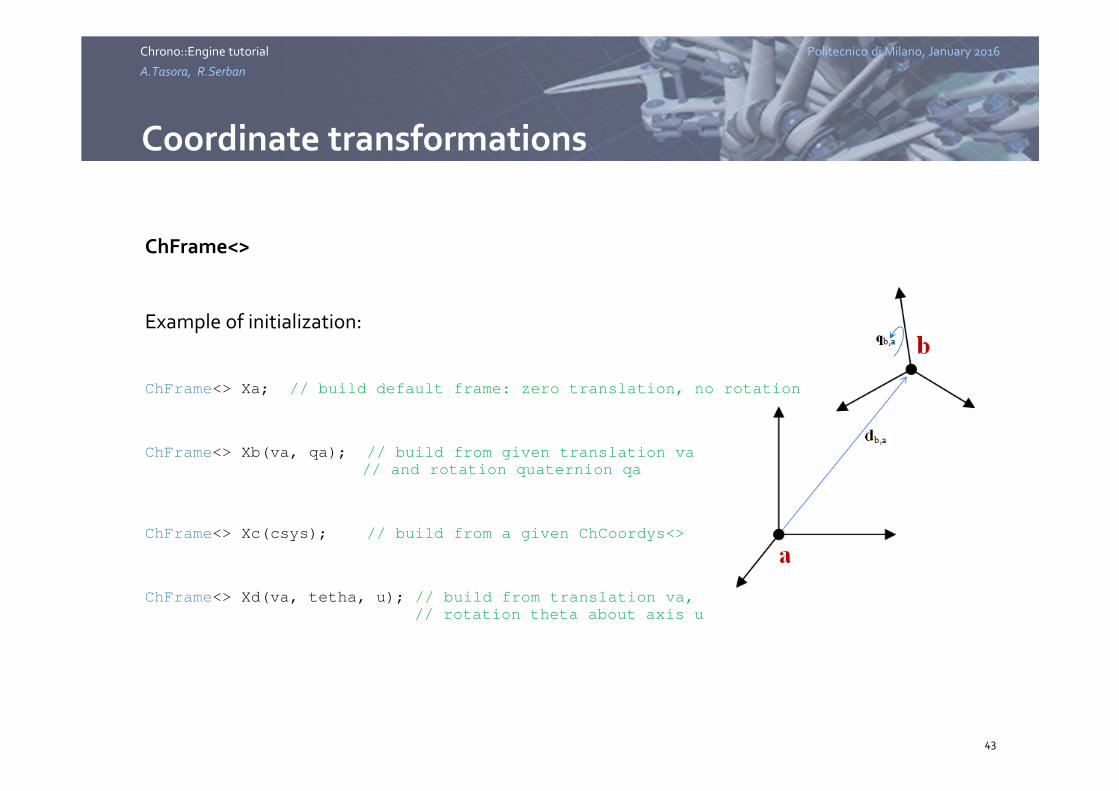
ChFrame<>
Example of initialization:
ChFrame<> Xa; // build default frame: zero translation, no rotation
ChFrame<> Xb(va, qa); // build from given translation va
// and rotation quaternion qa
ChFrame<> Xc(csys); // build from a given ChCoordys<>
ChFrame<> Xd(va, tetha, u); // build from translation va,
// rotation theta about axis u
43

Politecnico di Milano, January 2016Chrono::Engine tutorial
A.Tasora, R.Serban
Coordinate transformations
ChFrame<>
• ChFrame<> can transform points in space
• Two alternative specular options for syntax:
• * operator: RIGHT-TO-LEFT transformation
• >> operator: LEFT-TO-RIGHT transformation
ChVector<> d_Paa, d_Pbb;
ChFrame<> X_ba;
...
d_Paa = X_ba * d_Pbb; // otherwise…
d_Paa = d_Pbb >> X_ba;
44
Politecnico di Milano, January 2016Chrono::Engine tutorial
A.Tasora, R.Serban
Coordinate transformations
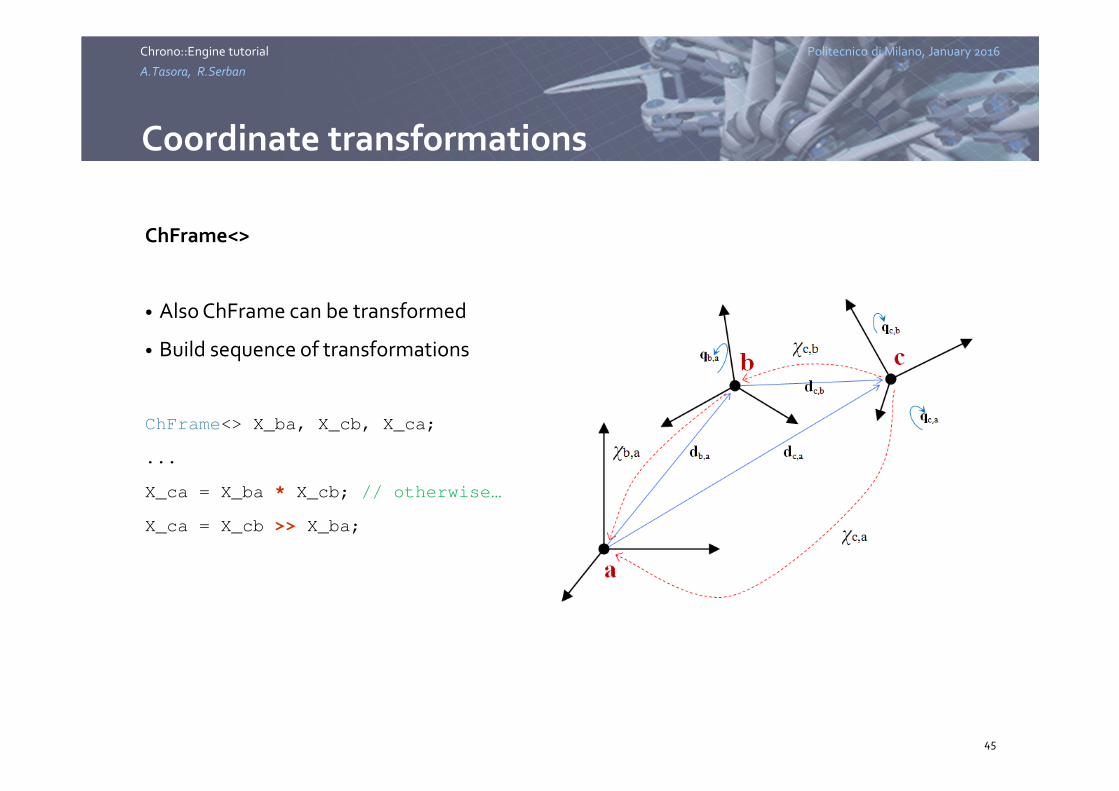
ChFrame<>
• Also ChFrame can be transformed
• Build sequence of transformations
ChFrame<> X_ba, X_cb, X_ca;
...
X_ca = X_ba * X_cb; // otherwise…
X_ca = X_cb >> X_ba;
45
Politecnico di Milano, January 2016Chrono::Engine tutorial
A.Tasora, R.Serban
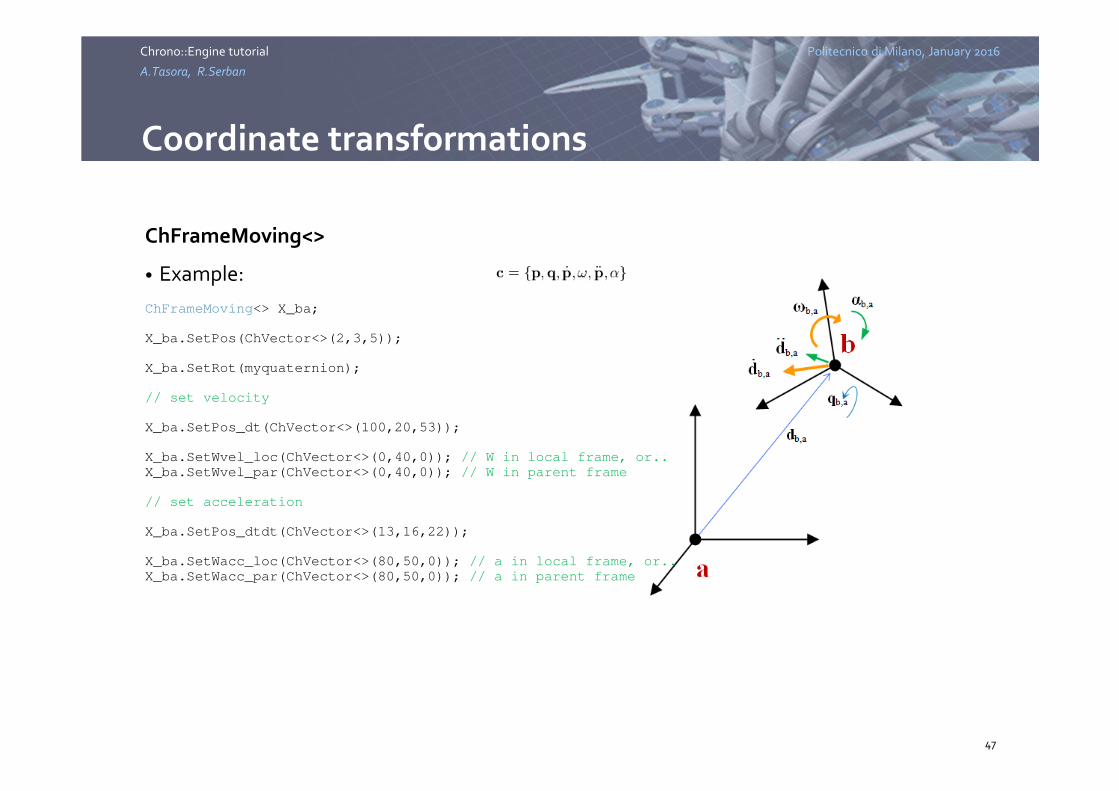
Coordinate transformations
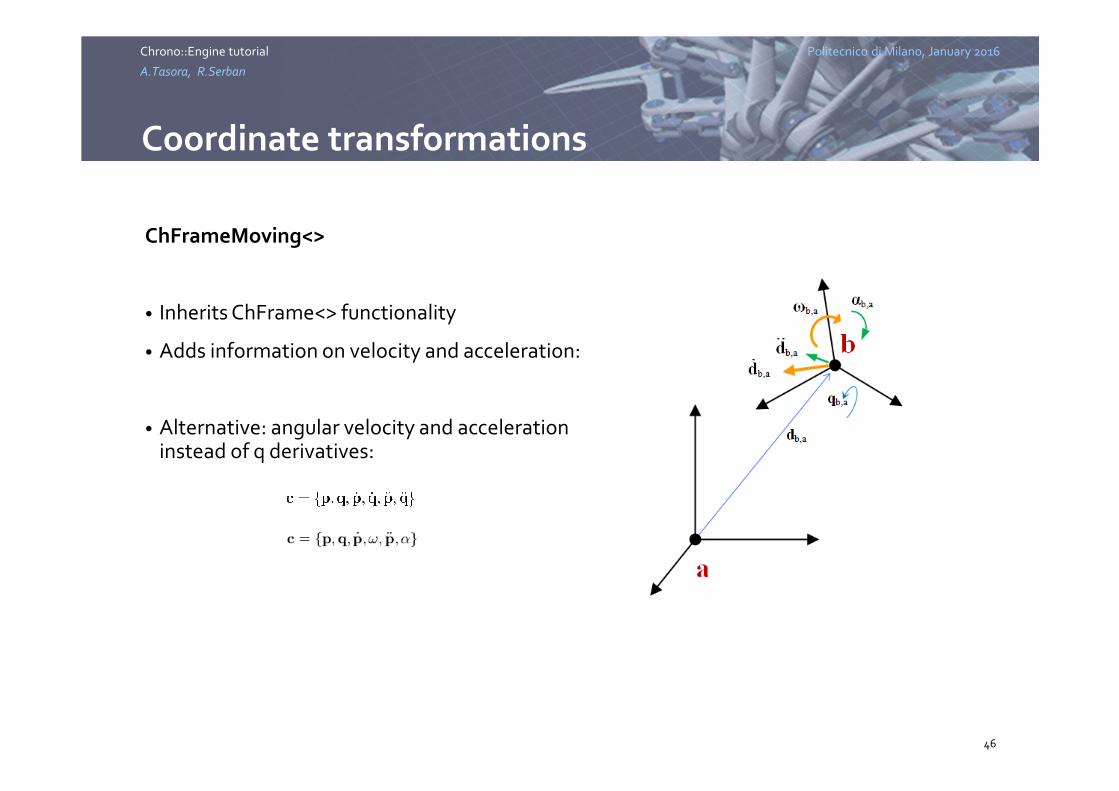
ChFrameMoving<>
• Inherits ChFrame<> functionality
• Adds information on velocity and acceleration:
• Alternative: angular velocity and accelerationinstead of q derivatives:
46
Politecnico di Milano, January 2016Chrono::Engine tutorial
A.Tasora, R.Serban
Coordinate transformations
ChFrameMoving<>
• Example:
ChFrameMoving<> X_ba;
X_ba.SetPos(ChVector<>(2,3,5));
X_ba.SetRot(myquaternion);
// set velocity
X_ba.SetPos_dt(ChVector<>(100,20,53));
X_ba.SetWvel_loc(ChVector<>(0,40,0)); // W in local frame, or..
X_ba.SetWvel_par(ChVector<>(0,40,0)); // W in parent frame
// set acceleration
X_ba.SetPos_dtdt(ChVector<>(13,16,22));
X_ba.SetWacc_loc(ChVector<>(80,50,0)); // a in local frame, or..
X_ba.SetWacc_par(ChVector<>(80,50,0)); // a in parent frame
47
Politecnico di Milano, January 2016Chrono::Engine tutorial
A.Tasora, R.Serban
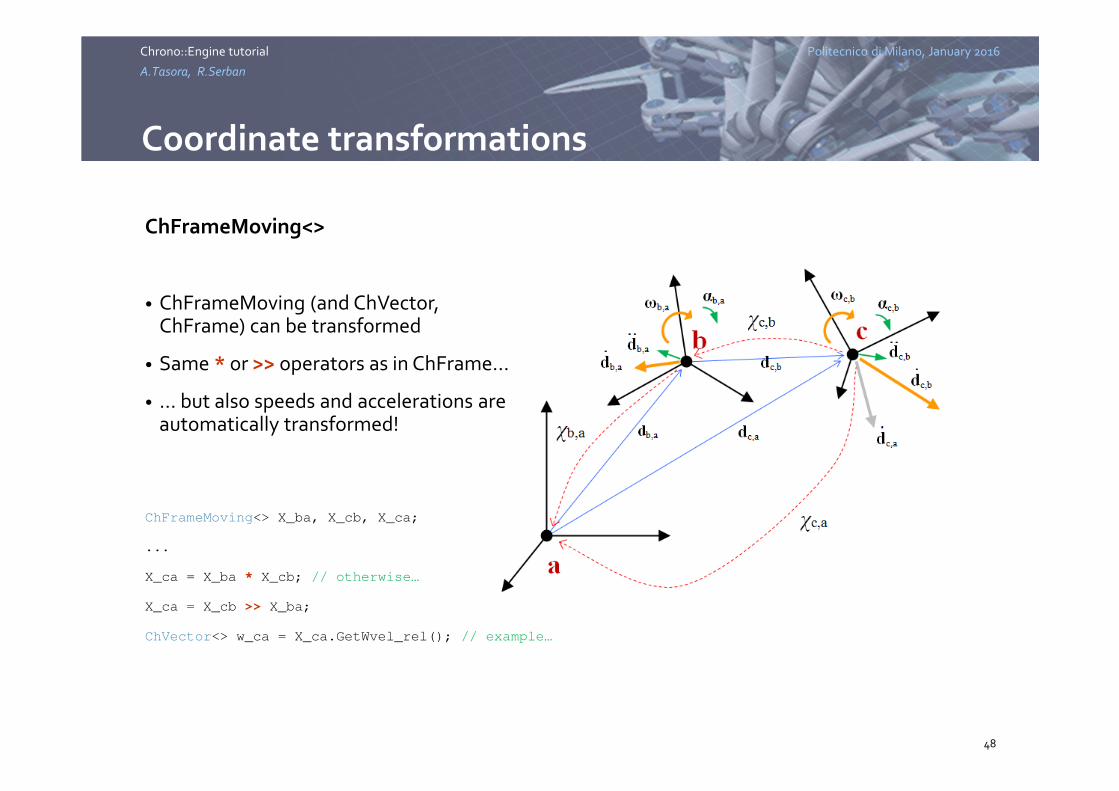
Coordinate transformations
ChFrameMoving<>
• ChFrameMoving (and ChVector, ChFrame) can be transformed
• Same * or >> operators as in ChFrame…
• … but also speeds and accelerations are automatically transformed!
ChFrameMoving<> X_ba, X_cb, X_ca;
...
X_ca = X_ba * X_cb; // otherwise…
X_ca = X_cb >> X_ba;
ChVector<> w_ca = X_ca.GetWvel_rel(); // example…
48
Politecnico di Milano, January 2016Chrono::Engine tutorial
A.Tasora, R.Serban
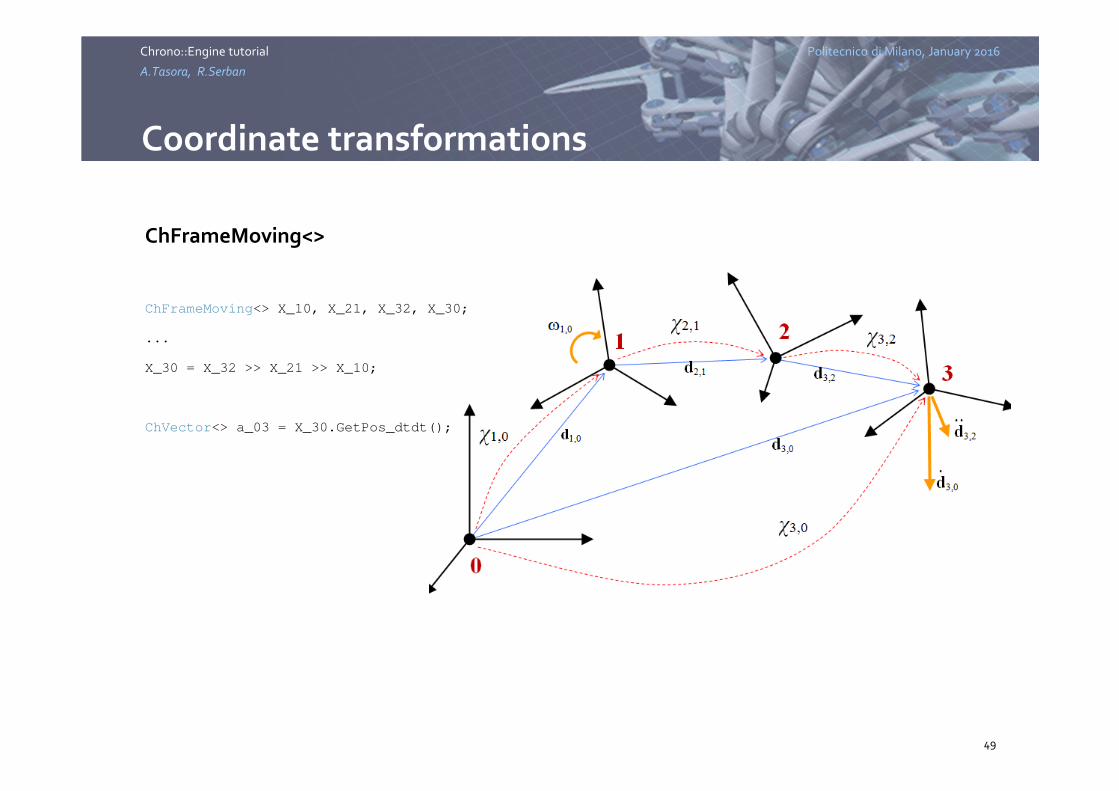
Coordinate transformations
ChFrameMoving<>
ChFrameMoving<> X_10, X_21, X_32, X_30;
...
X_30 = X_32 >> X_21 >> X_10;
ChVector<> a_03 = X_30.GetPos_dtdt();
49
Politecnico di Milano, January 2016Chrono::Engine tutorial
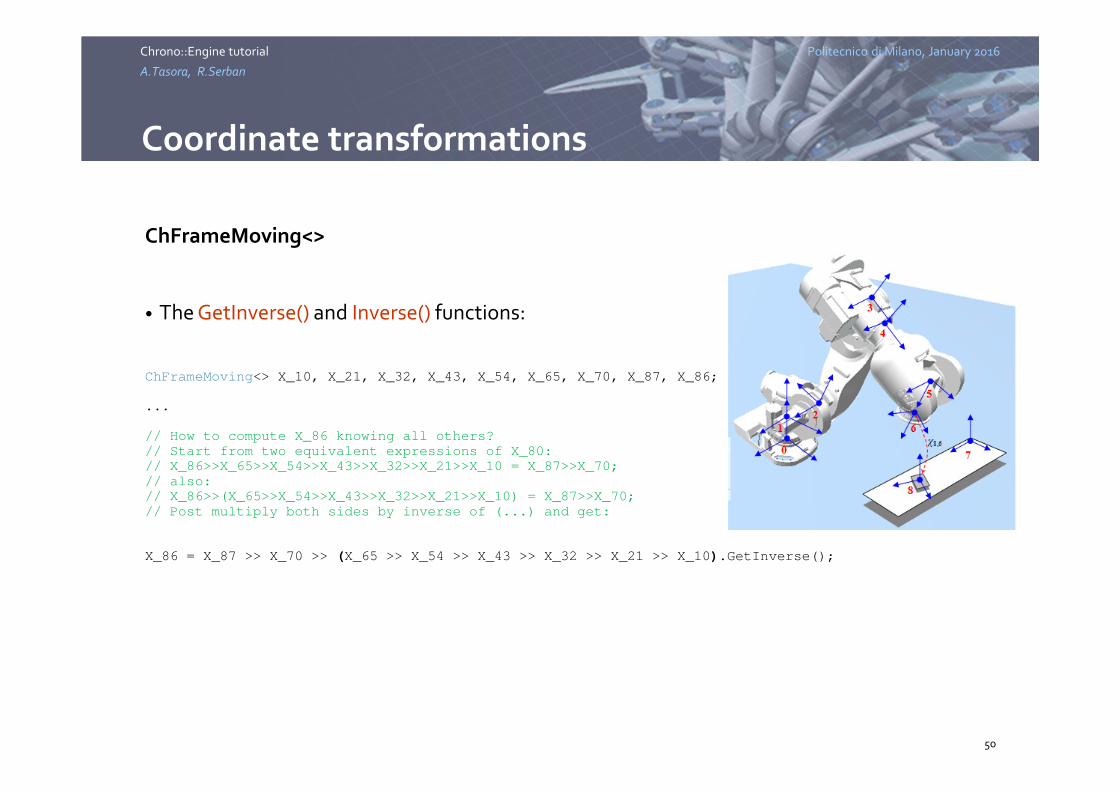
A.Tasora, R.Serban
Coordinate transformations
ChFrameMoving<>
• The GetInverse() and Inverse() functions:
ChFrameMoving<> X_10, X_21, X_32, X_43, X_54, X_65, X_70, X_87, X_86;
...
// How to compute X_86 knowing all others?
// Start from two equivalent expressions of X_80:
// X_86>>X_65>>X_54>>X_43>>X_32>>X_21>>X_10 = X_87>>X_70;
// also:
// X_86>>(X_65>>X_54>>X_43>>X_32>>X_21>>X_10) = X_87>>X_70;
// Post multiply both sides by inverse of (...) and get:
X_86 = X_87 >> X_70 >> (X_65 >> X_54 >> X_43 >> X_32 >> X_21 >> X_10).GetInverse();
50
Politecnico di Milano, January 2016Chrono::Engine tutorial
A.Tasora, R.Serban
Rigid bodies
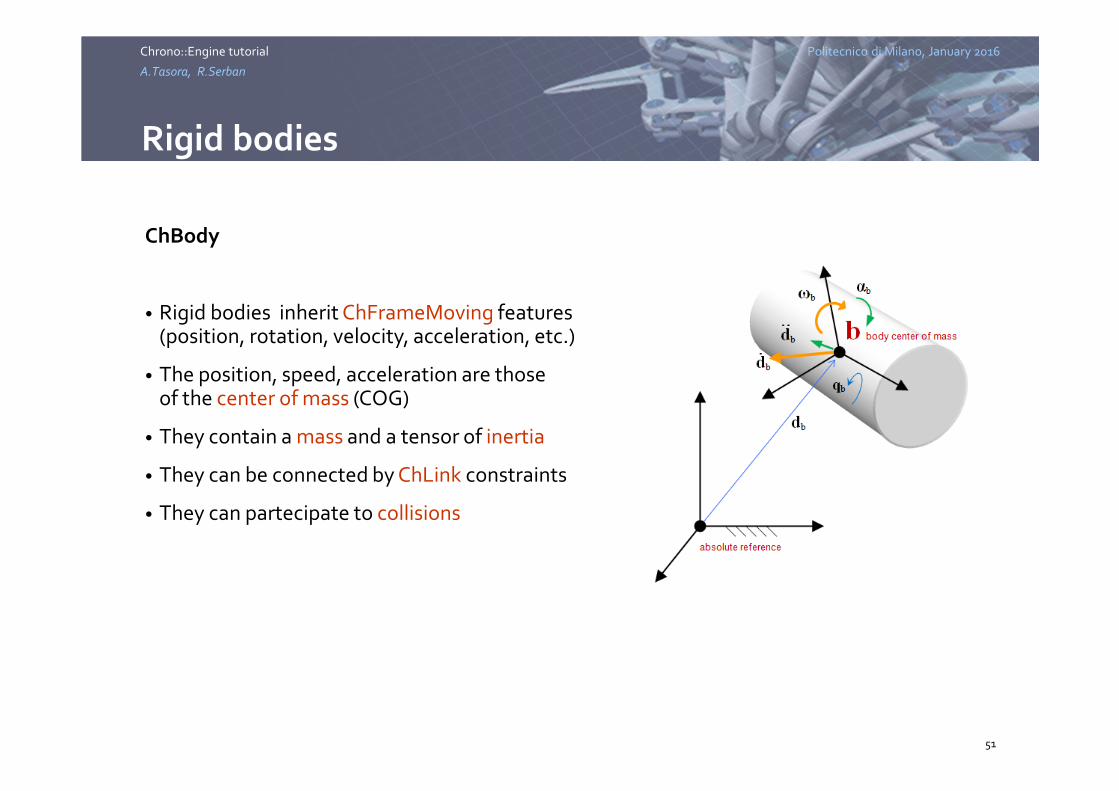
ChBody
• Rigid bodies inherit ChFrameMoving features(position, rotation, velocity, acceleration, etc.)
• The position, speed, acceleration are thoseof the center of mass (COG)
• They contain a mass and a tensor of inertia
• They can be connected by ChLink constraints
• They can partecipate to collisions
51

Politecnico di Milano, January 2016Chrono::Engine tutorial
A.Tasora, R.Serban
Rigid bodies
ChBody
Important steps for each rigid body:
1. Create the ChBody and set position/mass properties
2. Add the body to a ChSystem
3. Optional: add collision shapes
4. Optional: add visualization assets
52

Politecnico di Milano, January 2016Chrono::Engine tutorial
A.Tasora, R.Serban
Rigid bodies
ChBody
// Create a body – use shared pointer!
ChSharedPtr<ChBody> body_b(new ChBody);
// Set initial position & speed of the COG of body,
// using the same syntax used for ChFrameMoving
body_b->SetPos( ChVector<>(0.2,0.4,2) );
body_b->SetPos_dt( ChVector<>(0.1,0,0) );
// Set mass and inertia tensor
body_b->SetMass(10);
body_b->SetInertiaXX( ChVector<>(4,4,4) );
// If body is fixed to ground, use this:
body_b->SetBodyFixed(true);
// Finally do not forget this
my_system.Add(body_b);
53
Politecnico di Milano, January 2016Chrono::Engine tutorial
A.Tasora, R.Serban
Rigid bodies
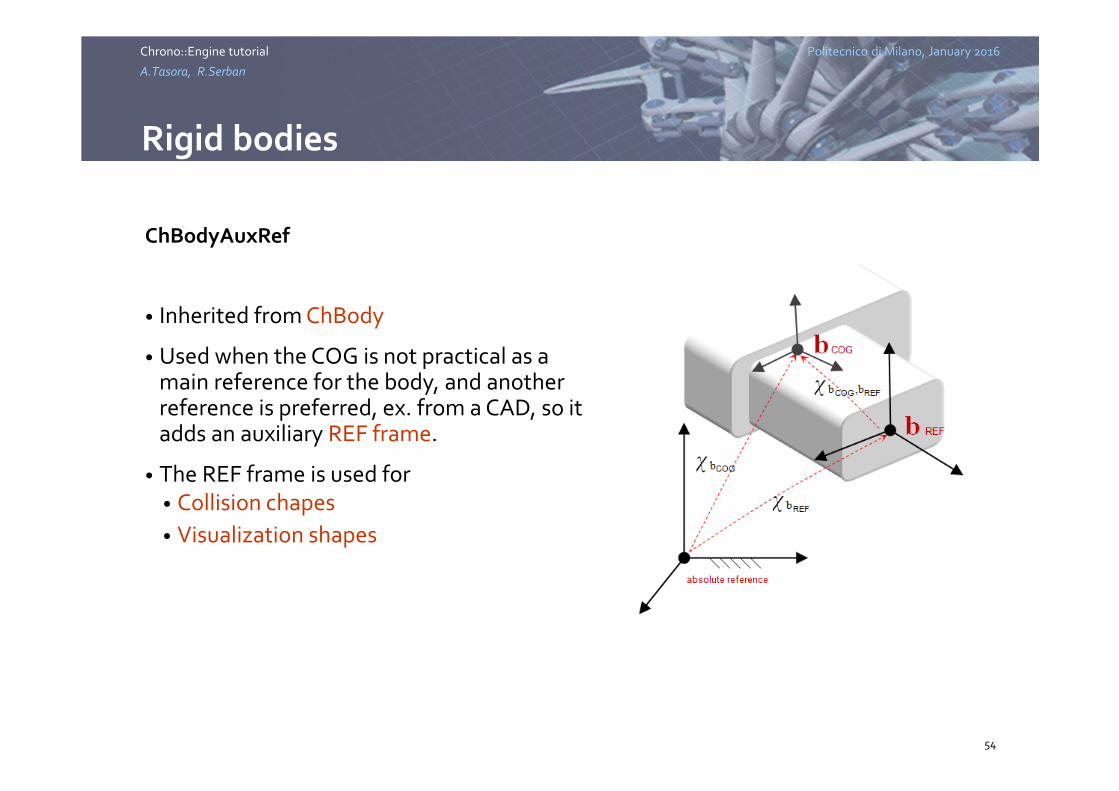
ChBodyAuxRef
• Inherited from ChBody
• Used when the COG is not practical as amain reference for the body, and anotherreference is preferred, ex. from a CAD, so itadds an auxiliary REF frame.
• The REF frame is used for• Collision chapes
• Visualization shapes
54
Politecnico di Milano, January 2016Chrono::Engine tutorial
A.Tasora, R.Serban
Rigid bodies
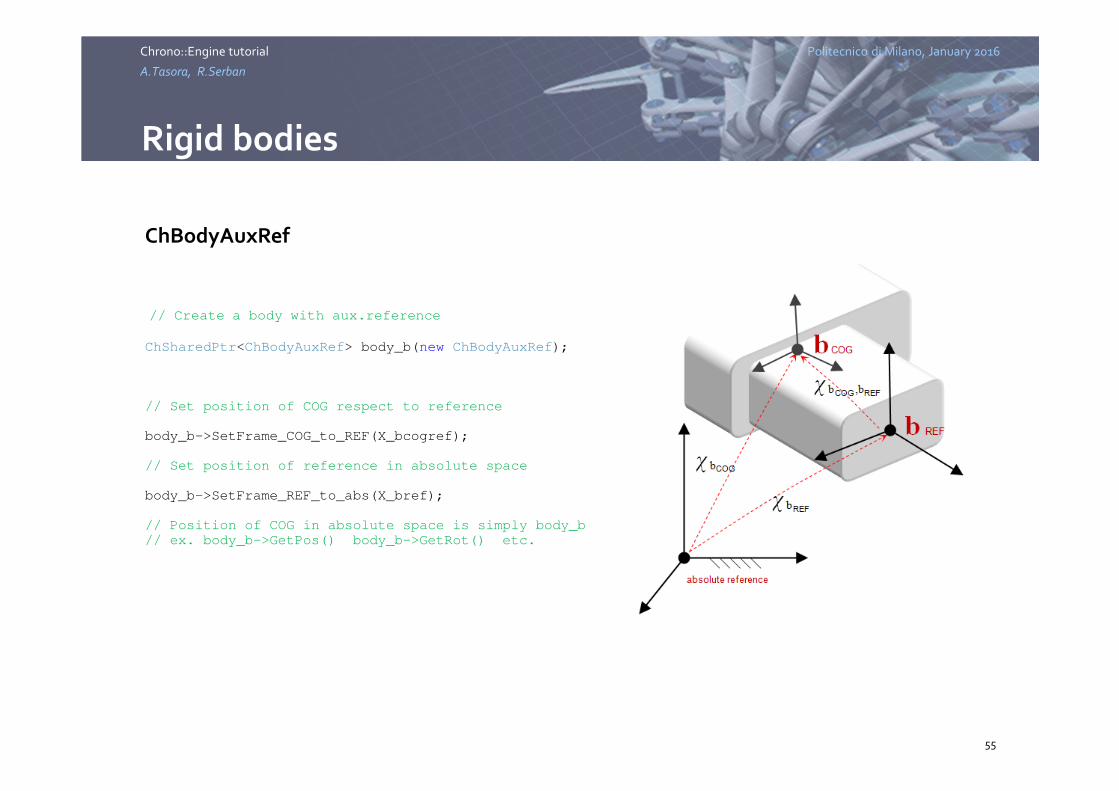
ChBodyAuxRef
// Create a body with aux.reference
ChSharedPtr<ChBodyAuxRef> body_b(new ChBodyAuxRef);
// Set position of COG respect to reference
body_b->SetFrame_COG_to_REF(X_bcogref);
// Set position of reference in absolute space
body_b->SetFrame_REF_to_abs(X_bref);
// Position of COG in absolute space is simply body_b
// ex. body_b->GetPos() body_b->GetRot() etc.
55
Politecnico di Milano, January 2016Chrono::Engine tutorial
A.Tasora, R.Serban
Markers
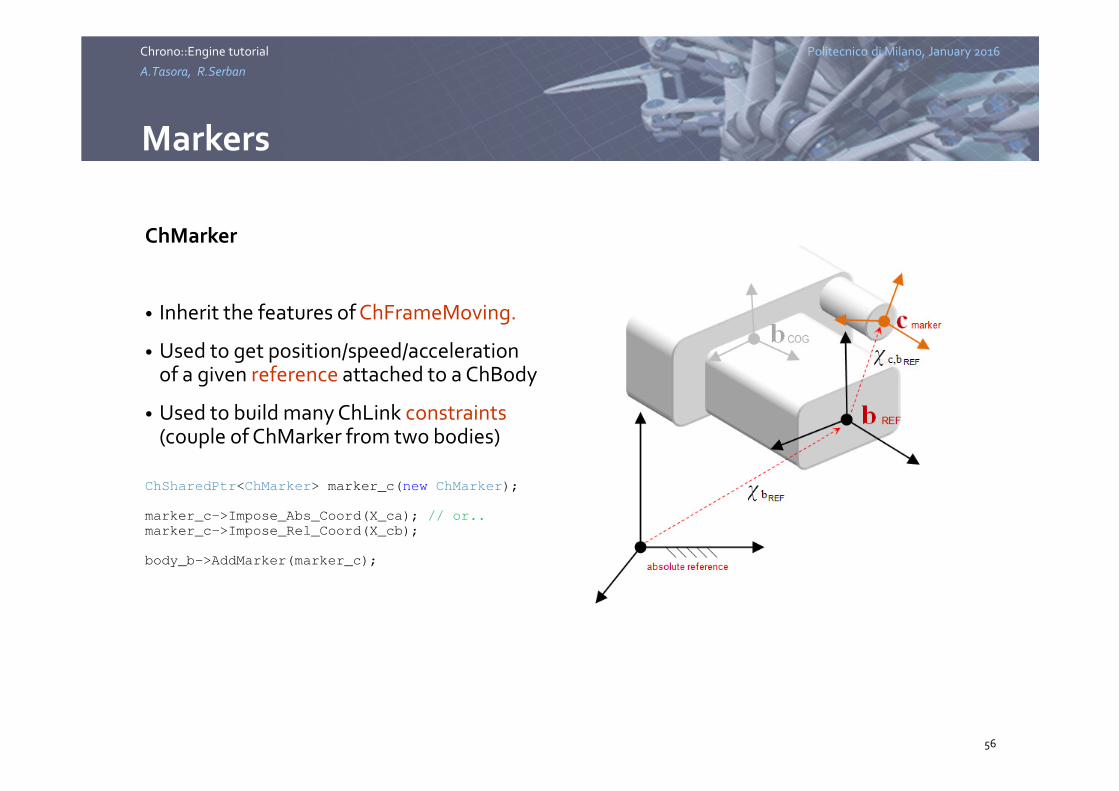
ChMarker
• Inherit the features of ChFrameMoving.
• Used to get position/speed/accelerationof a given reference attached to a ChBody
• Used to build many ChLink constraints(couple of ChMarker from two bodies)
ChSharedPtr<ChMarker> marker_c(new ChMarker);
marker_c->Impose_Abs_Coord(X_ca); // or..
marker_c->Impose_Rel_Coord(X_cb);
body_b->AddMarker(marker_c);
56

Politecnico di Milano, January 2016Chrono::Engine tutorial
A.Tasora, R.Serban
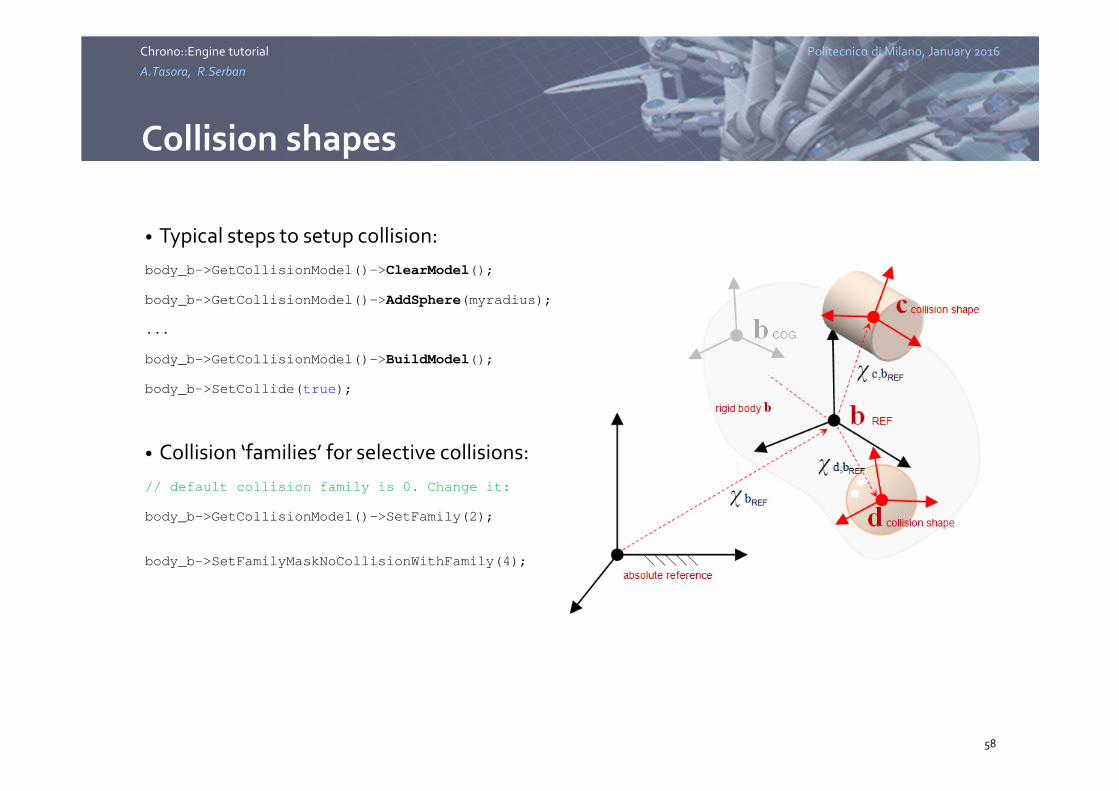
Collision shapes
• Collision shapes are defined respectto the REF frame of the body
• Spheres, boxes, cylinders, convex hulls,ellipsoids, compounds,…
• Concave shapes: decompose in compoundsof convex shapes
• Hint: for simple ready-to-use bodies that already contain collision shapes, use
ChBodyEasySphere,ChBodyEasyBox, etc.
57
Politecnico di Milano, January 2016Chrono::Engine tutorial
A.Tasora, R.Serban
Collision shapes
• Typical steps to setup collision:
body_b->GetCollisionModel()->ClearModel();
body_b->GetCollisionModel()->AddSphere(myradius);
...
body_b->GetCollisionModel()->BuildModel();
body_b->SetCollide(true);
• Collision ‘families’ for selective collisions:
// default collision family is 0. Change it:
body_b->GetCollisionModel()->SetFamily(2);
body_b->SetFamilyMaskNoCollisionWithFamily(4);
58
Politecnico di Milano, January 2016Chrono::Engine tutorial
A.Tasora, R.Serban
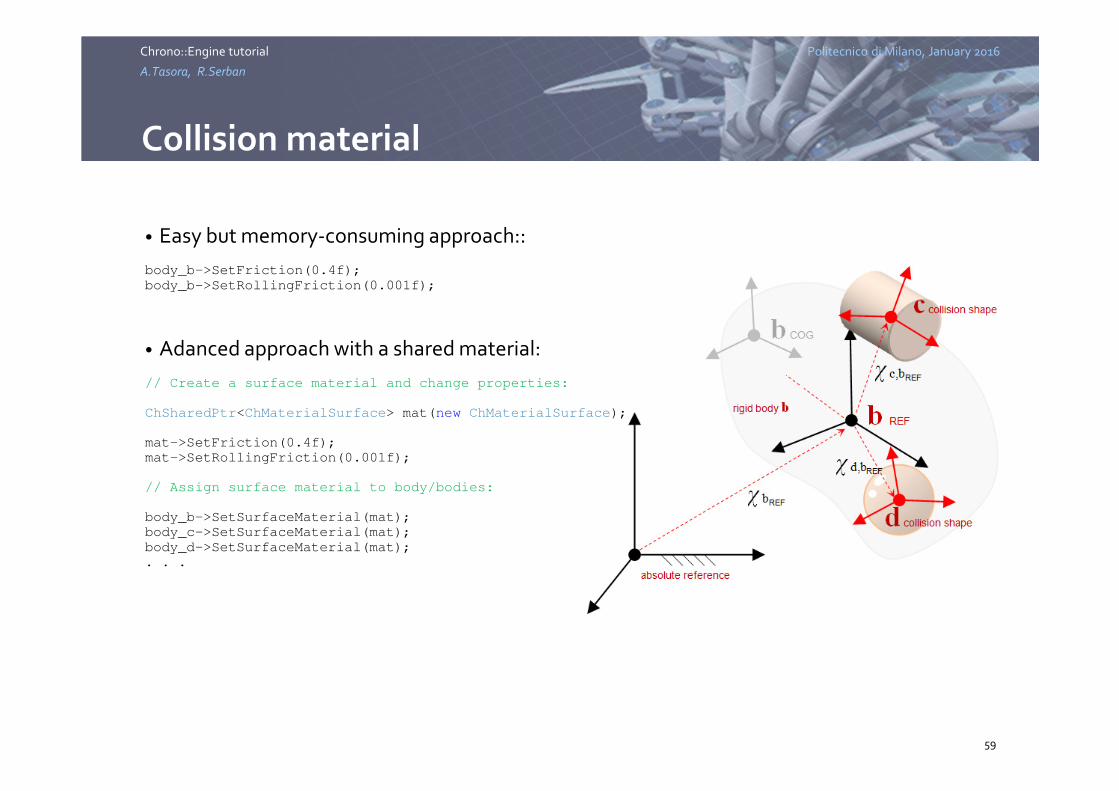
Collision material
• Easy but memory-consuming approach::
body_b->SetFriction(0.4f);
body_b->SetRollingFriction(0.001f);
• Adanced approach with a shared material:
// Create a surface material and change properties:
ChSharedPtr<ChMaterialSurface> mat(new ChMaterialSurface);
mat->SetFriction(0.4f);
mat->SetRollingFriction(0.001f);
// Assign surface material to body/bodies:
body_b->SetSurfaceMaterial(mat);
body_c->SetSurfaceMaterial(mat);
body_d->SetSurfaceMaterial(mat);
. . .
59
Politecnico di Milano, January 2016Chrono::Engine tutorial
A.Tasora, R.Serban
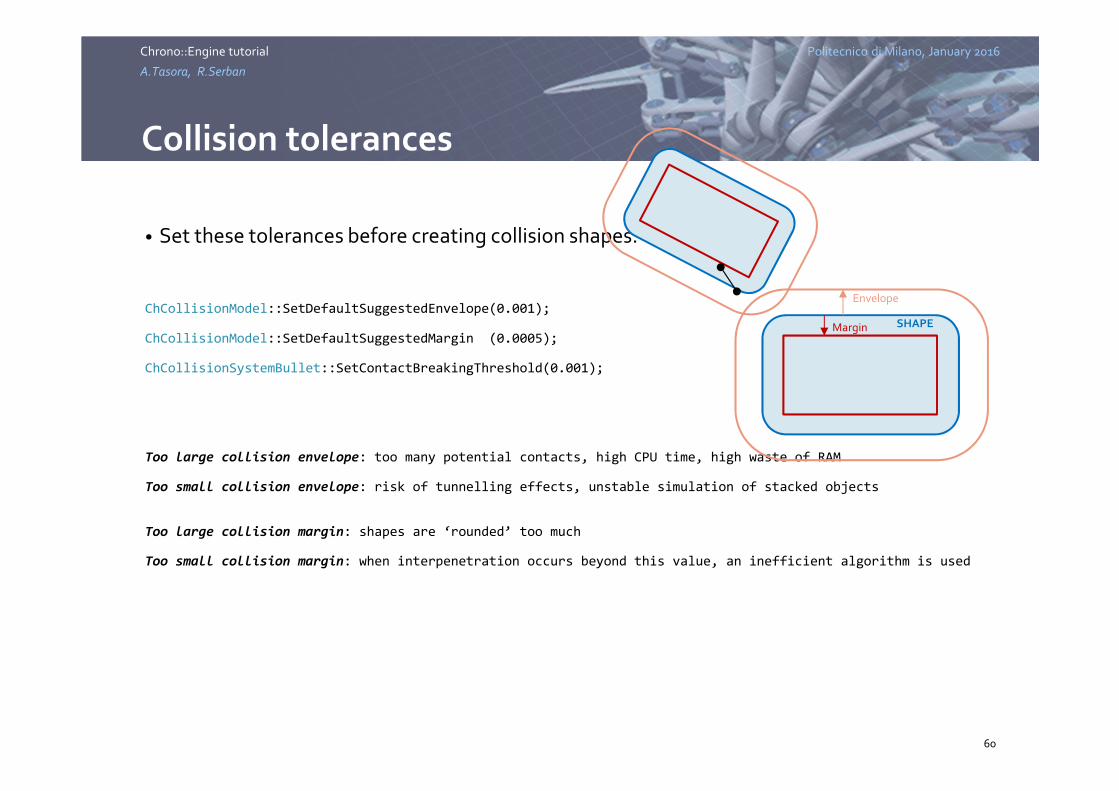
• Set these tolerances before creating collision shapes:
ChCollisionModel::SetDefaultSuggestedEnvelope(0.001);
ChCollisionModel::SetDefaultSuggestedMargin (0.0005);
ChCollisionSystemBullet::SetContactBreakingThreshold(0.001);
Too large collision envelope: too many potential contacts, high CPU time, high waste of RAM
Too small collision envelope: risk of tunnelling effects, unstable simulation of stacked objects
Too large collision margin: shapes are ‘rounded’ too much
Too small collision margin: when interpenetration occurs beyond this value, an inefficient algorithm is used
Collision tolerances
60
Envelope
Margin SHAPE
Politecnico di Milano, January 2016Chrono::Engine tutorial
A.Tasora, R.Serban
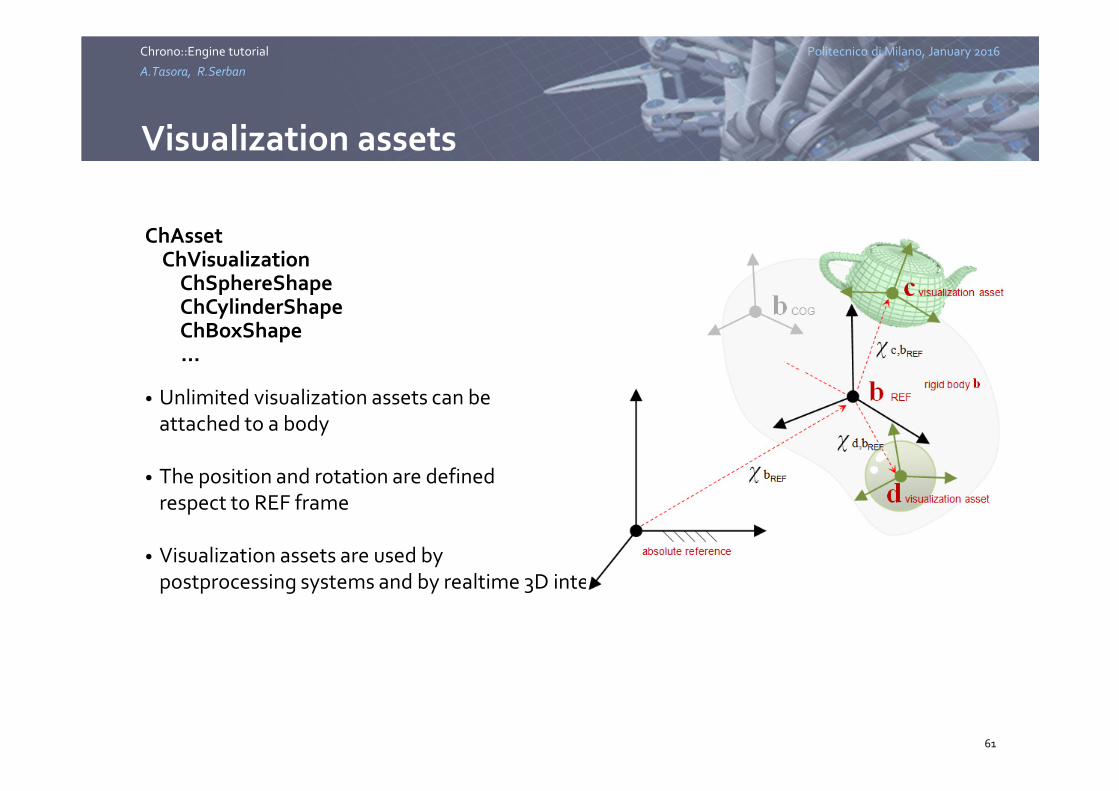
Visualization assets
ChAssetChVisualization
ChSphereShapeChCylinderShapeChBoxShape…
• Unlimited visualization assets can beattached to a body
• The position and rotation are definedrespect to REF frame
• Visualization assets are used by postprocessing systems and by realtime 3D interfaces
61

Politecnico di Milano, January 2016Chrono::Engine tutorial
A.Tasora, R.Serban
Visualization assets
• Example: add a box
ChSharedPtr<ChBoxShape> mbox (new ChBoxShape);
mbox->GetBoxGeometry().Pos = ChVector<>(0,-1,0);
mbox->GetBoxGeometry().Size = ChVector<>(10,0.5,10);
body_b->AddAsset(mbox);
• Example: add a texture
ChSharedPtr<ChTexture> mtexture(new ChTexture);
mtexture->SetTextureFilename(GetChronoDataFile("bluwhite.png"));
body_b->AddAsset(mtexture);
62
Politecnico di Milano, January 2016Chrono::Engine tutorial
A.Tasora, R.Serban
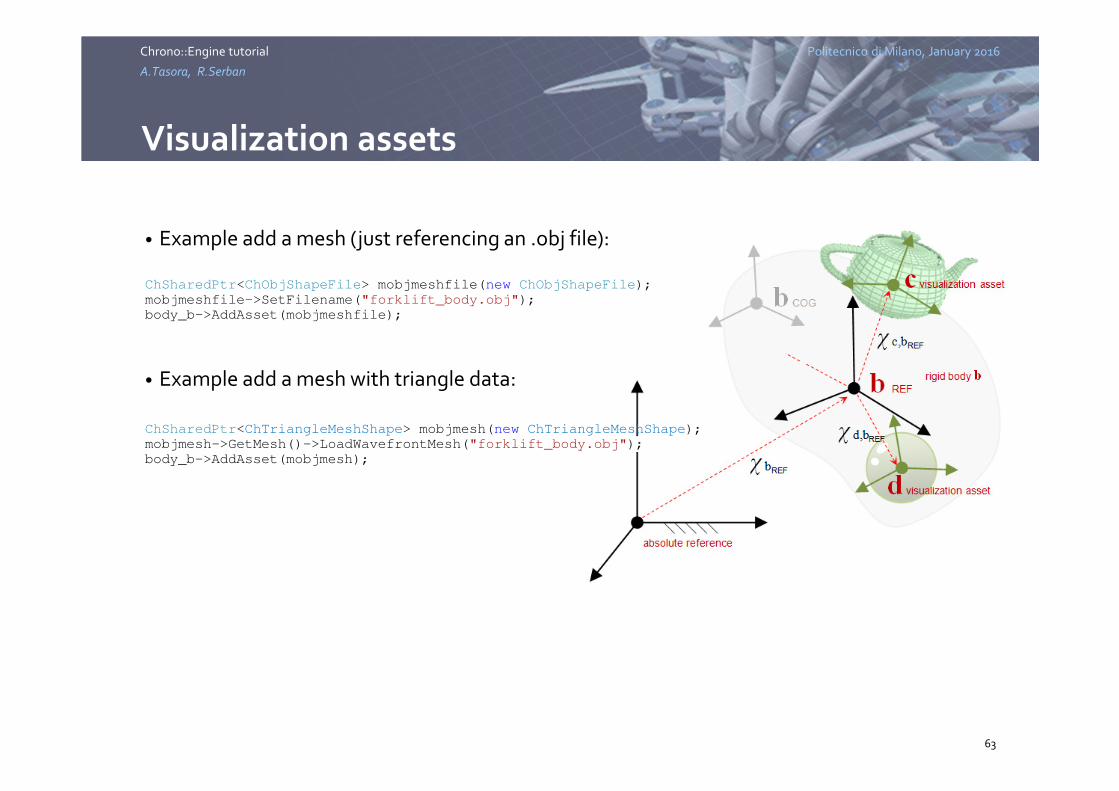
Visualization assets
• Example add a mesh (just referencing an .obj file):
ChSharedPtr<ChObjShapeFile> mobjmeshfile(new ChObjShapeFile);
mobjmeshfile->SetFilename("forklift_body.obj");
body_b->AddAsset(mobjmeshfile);
• Example add a mesh with triangle data:
ChSharedPtr<ChTriangleMeshShape> mobjmesh(new ChTriangleMeshShape);
mobjmesh->GetMesh()->LoadWavefrontMesh("forklift_body.obj");
body_b->AddAsset(mobjmesh);
63
Politecnico di Milano, January 2016Chrono::Engine tutorial
A.Tasora, R.Serban
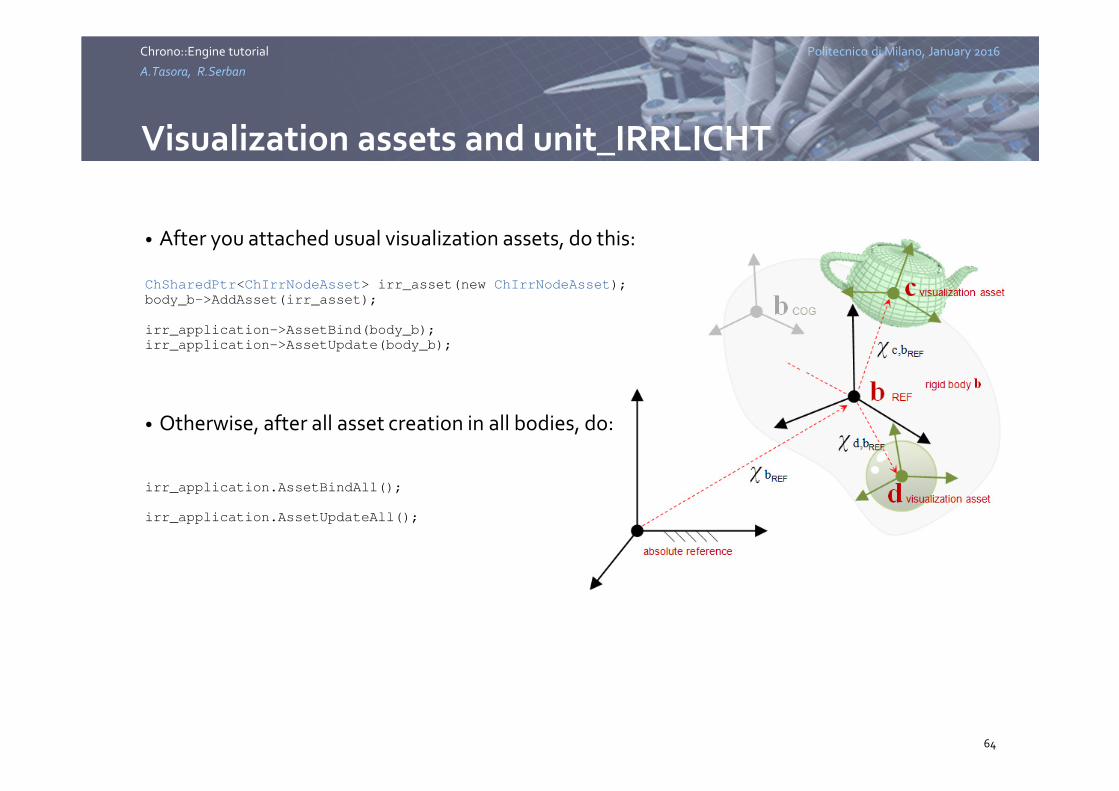
Visualization assets and unit_IRRLICHT
• After you attached usual visualization assets, do this:
ChSharedPtr<ChIrrNodeAsset> irr_asset(new ChIrrNodeAsset);
body_b->AddAsset(irr_asset);
irr_application->AssetBind(body_b);
irr_application->AssetUpdate(body_b);
• Otherwise, after all asset creation in all bodies, do:
irr_application.AssetBindAll();
irr_application.AssetUpdateAll();
64

Politecnico di Milano, January 2016Chrono::Engine tutorial
A.Tasora, R.Serban
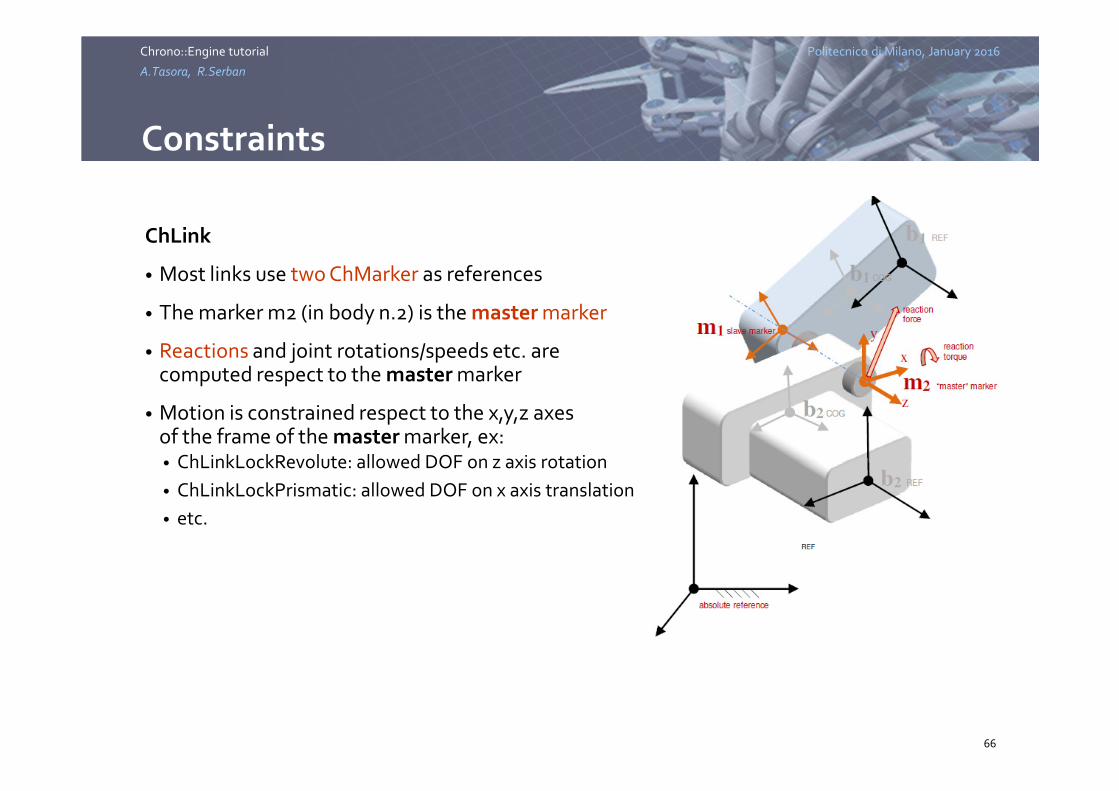
Constraints
ChLink
• Links are used to connect two ChBody
• There are many sub-classes of ChLink:• ChLinkLockSpherical
• ChLinkLockRevolute
• ChLinkLockLock
• ChLinkLockPrismatic
• ChLinkGears
• ChLinkDistance
• …
(see API documentation)
65
Politecnico di Milano, January 2016Chrono::Engine tutorial
A.Tasora, R.Serban
Constraints
ChLink
• Most links use two ChMarker as references
• The marker m2 (in body n.2) is the master marker
• Reactions and joint rotations/speeds etc. arecomputed respect to the master marker
• Motion is constrained respect to the x,y,z axesof the frame of the master marker, ex:• ChLinkLockRevolute: allowed DOF on z axis rotation
• ChLinkLockPrismatic: allowed DOF on x axis translation
• etc.
66

Politecnico di Milano, January 2016Chrono::Engine tutorial
A.Tasora, R.Serban
Constraints
ChLink
Important steps for each ChLink:
1. Create the link from the desired ChLinkXxxyyy class
2. Use mylink->Initialize(…) to connect two bodies
3. Add the link to a ChSystem
4. Optional: set link properties
67
Politecnico di Milano, January 2016Chrono::Engine tutorial
A.Tasora, R.Serban
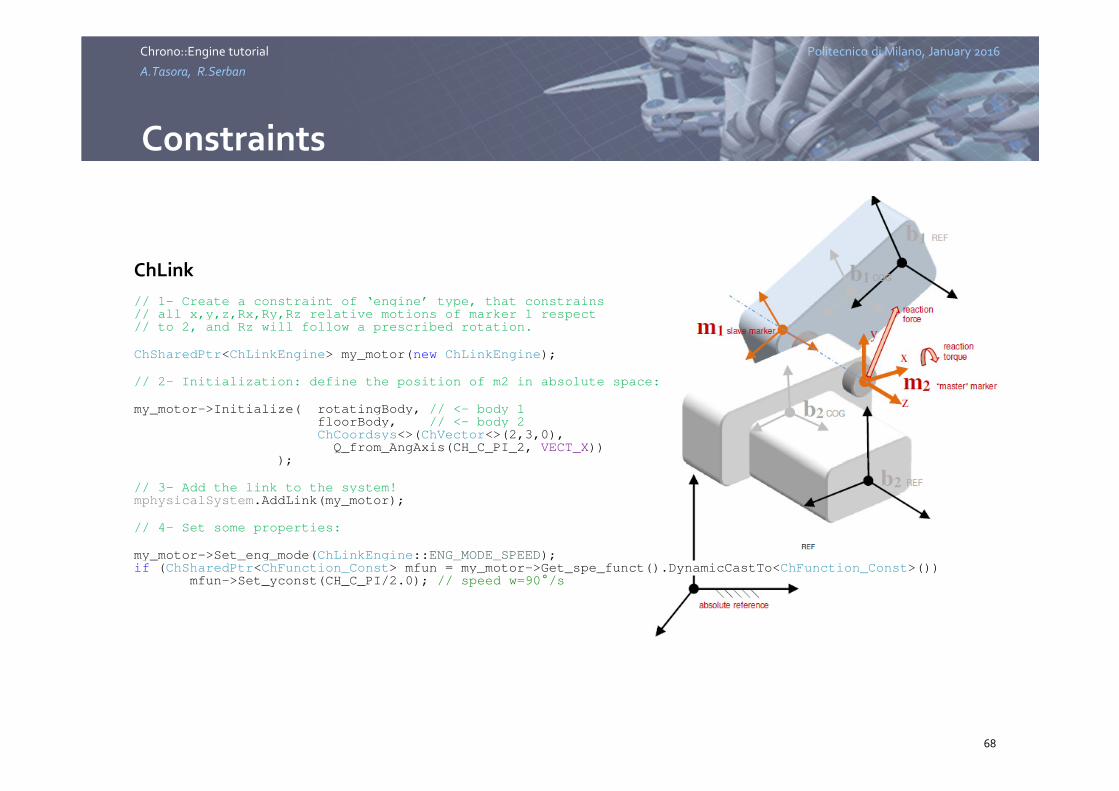
Constraints
ChLink
// 1- Create a constraint of ‘engine’ type, that constrains// all x,y,z,Rx,Ry,Rz relative motions of marker 1 respect// to 2, and Rz will follow a prescribed rotation.
ChSharedPtr<ChLinkEngine> my_motor(new ChLinkEngine);
// 2- Initialization: define the position of m2 in absolute space:
my_motor->Initialize( rotatingBody, // <- body 1floorBody, // <- body 2ChCoordsys<>(ChVector<>(2,3,0),
Q_from_AngAxis(CH_C_PI_2, VECT_X)) );
// 3- Add the link to the system!mphysicalSystem.AddLink(my_motor);
// 4- Set some properties:
my_motor->Set_eng_mode(ChLinkEngine::ENG_MODE_SPEED);if (ChSharedPtr<ChFunction_Const> mfun = my_motor->Get_spe_funct().DynamicCastTo<ChFunction_Const>())
mfun->Set_yconst(CH_C_PI/2.0); // speed w=90°/s
68
Politecnico di Milano, January 2016Chrono::Engine tutorial
A.Tasora, R.Serban
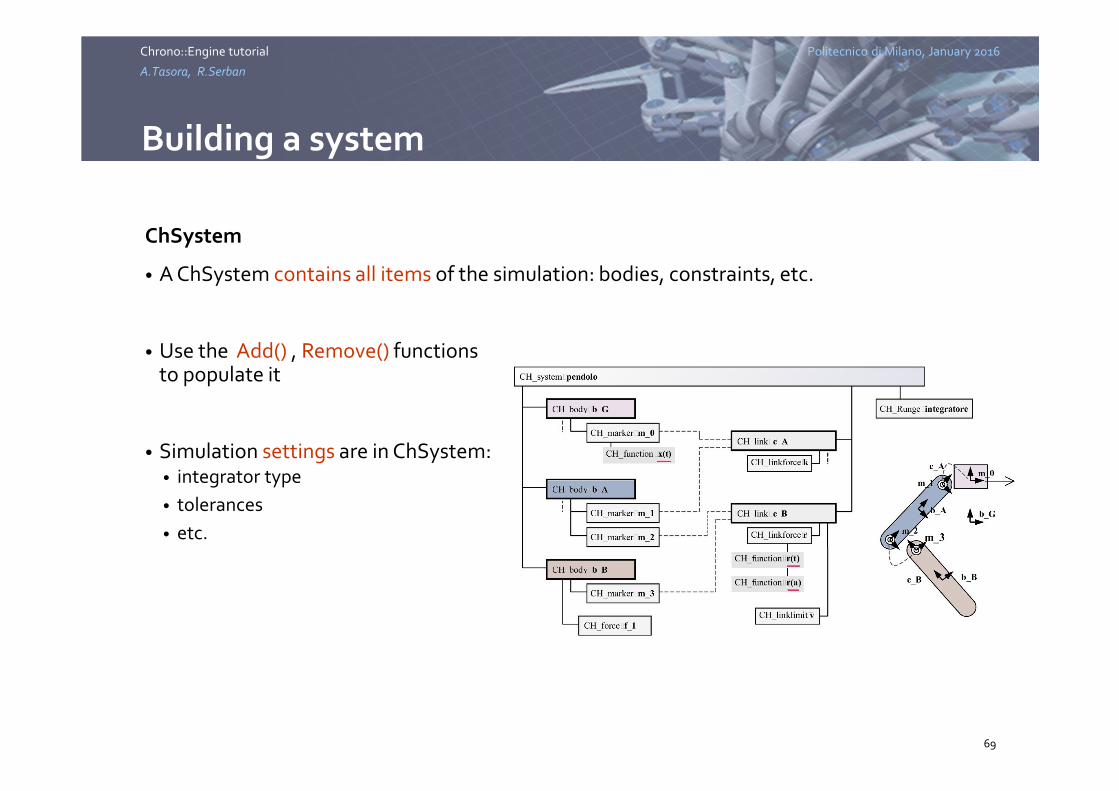
Building a system
ChSystem
• A ChSystem contains all items of the simulation: bodies, constraints, etc.
• Use the Add() , Remove() functionsto populate it
• Simulation settings are in ChSystem:• integrator type
• tolerances
• etc.
69
Politecnico di Milano, January 2016Chrono::Engine tutorial
A.Tasora, R.Serban
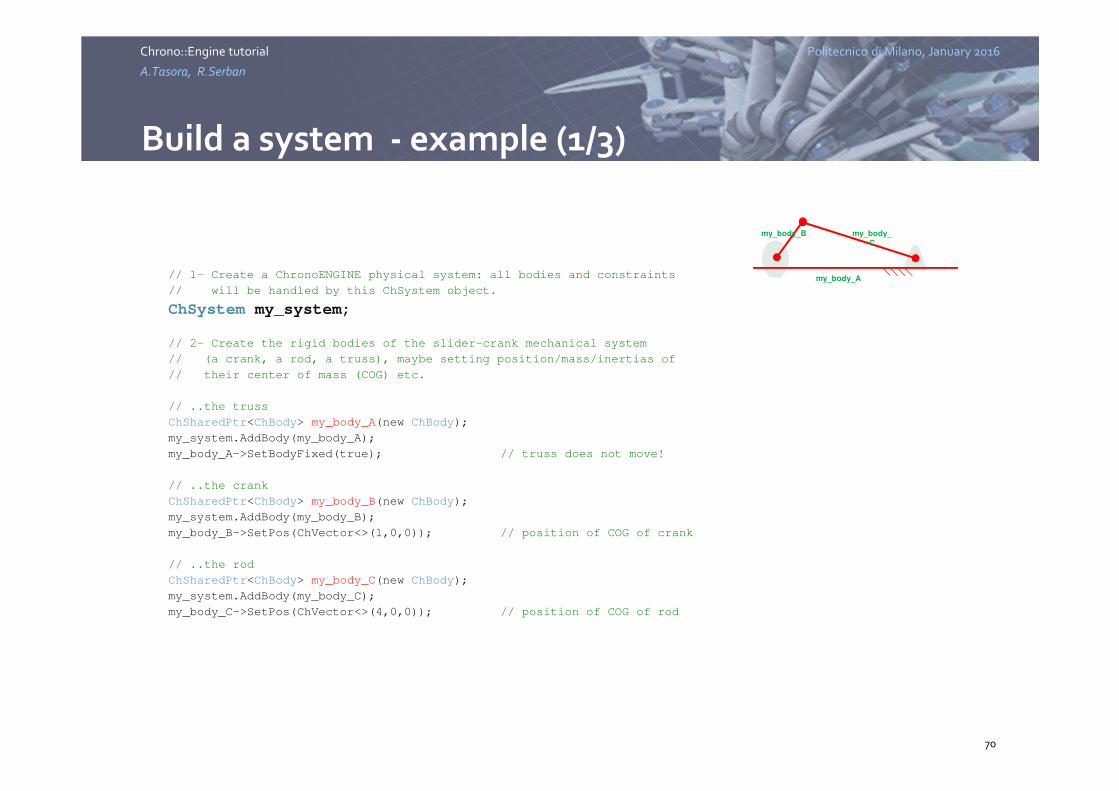
Build a system - example (1/3)
// 1- Create a ChronoENGINE physical system: all bodies and constraints
// will be handled by this ChSystem object.
ChSystem my_system;
// 2- Create the rigid bodies of the slider-crank mechanical system
// (a crank, a rod, a truss), maybe setting position/mass/inertias of
// their center of mass (COG) etc.
// ..the truss
ChSharedPtr<ChBody> my_body_A(new ChBody);
my_system.AddBody(my_body_A);
my_body_A->SetBodyFixed(true); // truss does not move!
// ..the crank
ChSharedPtr<ChBody> my_body_B(new ChBody);
my_system.AddBody(my_body_B);
my_body_B->SetPos(ChVector<>(1,0,0)); // position of COG of crank
// ..the rod
ChSharedPtr<ChBody> my_body_C(new ChBody);
my_system.AddBody(my_body_C);
my_body_C->SetPos(ChVector<>(4,0,0)); // position of COG of rod
70
my_body_A
my_body_B my_body_
C
Politecnico di Milano, January 2016Chrono::Engine tutorial
A.Tasora, R.Serban
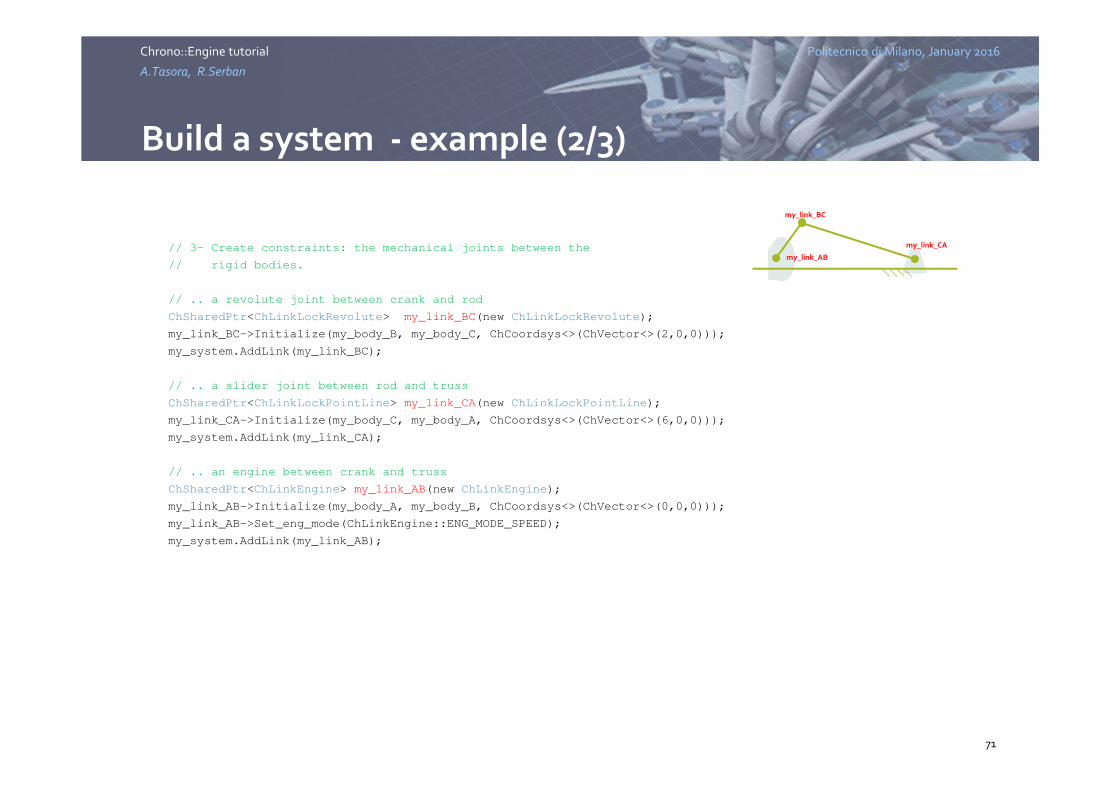
Build a system - example (2/3)
// 3- Create constraints: the mechanical joints between the
// rigid bodies.
// .. a revolute joint between crank and rod
ChSharedPtr<ChLinkLockRevolute> my_link_BC(new ChLinkLockRevolute);
my_link_BC->Initialize(my_body_B, my_body_C, ChCoordsys<>(ChVector<>(2,0,0)));
my_system.AddLink(my_link_BC);
// .. a slider joint between rod and truss
ChSharedPtr<ChLinkLockPointLine> my_link_CA(new ChLinkLockPointLine);
my_link_CA->Initialize(my_body_C, my_body_A, ChCoordsys<>(ChVector<>(6,0,0)));
my_system.AddLink(my_link_CA);
// .. an engine between crank and truss
ChSharedPtr<ChLinkEngine> my_link_AB(new ChLinkEngine);
my_link_AB->Initialize(my_body_A, my_body_B, ChCoordsys<>(ChVector<>(0,0,0)));
my_link_AB->Set_eng_mode(ChLinkEngine::ENG_MODE_SPEED);
my_system.AddLink(my_link_AB);
71
my_link_BC
my_link_AB
my_link_CA
Politecnico di Milano, January 2016Chrono::Engine tutorial
A.Tasora, R.Serban
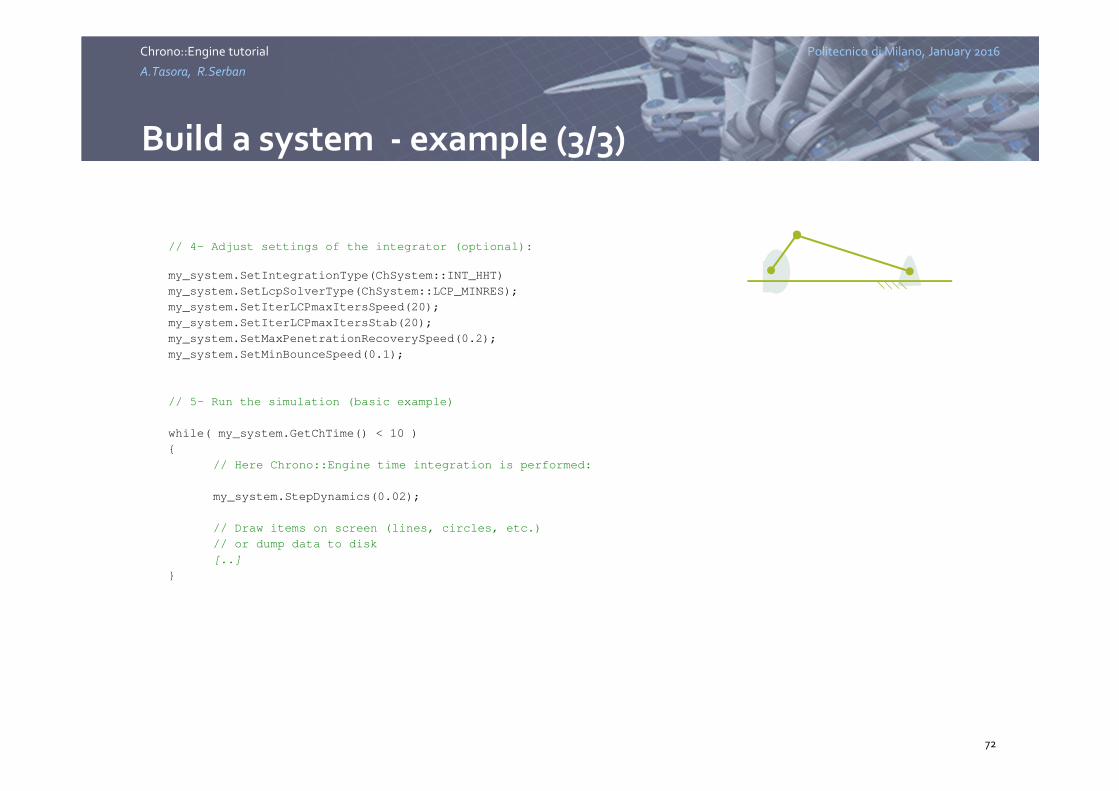
Build a system - example (3/3)
// 4- Adjust settings of the integrator (optional):
my_system.SetIntegrationType(ChSystem::INT_HHT)
my_system.SetLcpSolverType(ChSystem::LCP_MINRES);
my_system.SetIterLCPmaxItersSpeed(20);
my_system.SetIterLCPmaxItersStab(20);
my_system.SetMaxPenetrationRecoverySpeed(0.2);
my_system.SetMinBounceSpeed(0.1);
// 5- Run the simulation (basic example)
while( my_system.GetChTime() < 10 )
{
// Here Chrono::Engine time integration is performed:
my_system.StepDynamics(0.02);
// Draw items on screen (lines, circles, etc.)
// or dump data to disk
[..]
}
72
Politecnico di Milano, January 2016Chrono::Engine tutorial
A.Tasora, R.Serban
Main system parameters
my_system.SetLcpSolverType(ChSystem::LCP_ITERATIVE_SOR);
LCP_ITERATIVE_SOR for maximum speed in real-time applications, low precision, convergence might stallLCP_ITERATIVE_APGC slower but better convergence, works also in DVILCP_ITERATIVE_MINRES for precise solution, but only ODE/DAE, no DVI for the moment(etc.)
my_system.SetIterLCPmaxItersSpeed(20);
Most LCP solvers have an upper limit on number of iterations. The higher, the more precise, but slower.
my_system.SetMaxPenetrationRecoverySpeed(0.2);
Objects that interpenetrate (ex for numerical errors, incoherent initial conditions, etc.) do not ‘escape’ one from the other faster than thisthreshold. The higher, the faster and more precisely are recovered the contact constraints errors (if any), but the risk is that objects ‘pop’ out, and stackingsmight become unstable and noisy.The lower, the more likely the risk that objects ‘sink’ one into the other when the integrator precision is low (ex small number of iterations).
my_system.SetMinBounceSpeed(0.1);
When objects collide, if their incoming speed is lower than this threshold, a zero restitution coefficient is assumed. This helps to achieve more stable simulations of stacked objects. The higher, the more likely is to get stable simulations, but the less realistic the physics of the collision.
73
Politecnico di Milano, January 2016Chrono::Engine tutorial
A.Tasora, R.Serban
Chrono C++ API: tutorial
74

Politecnico di Milano, January 2016Chrono::Engine tutorial
A.Tasora, R.Serban
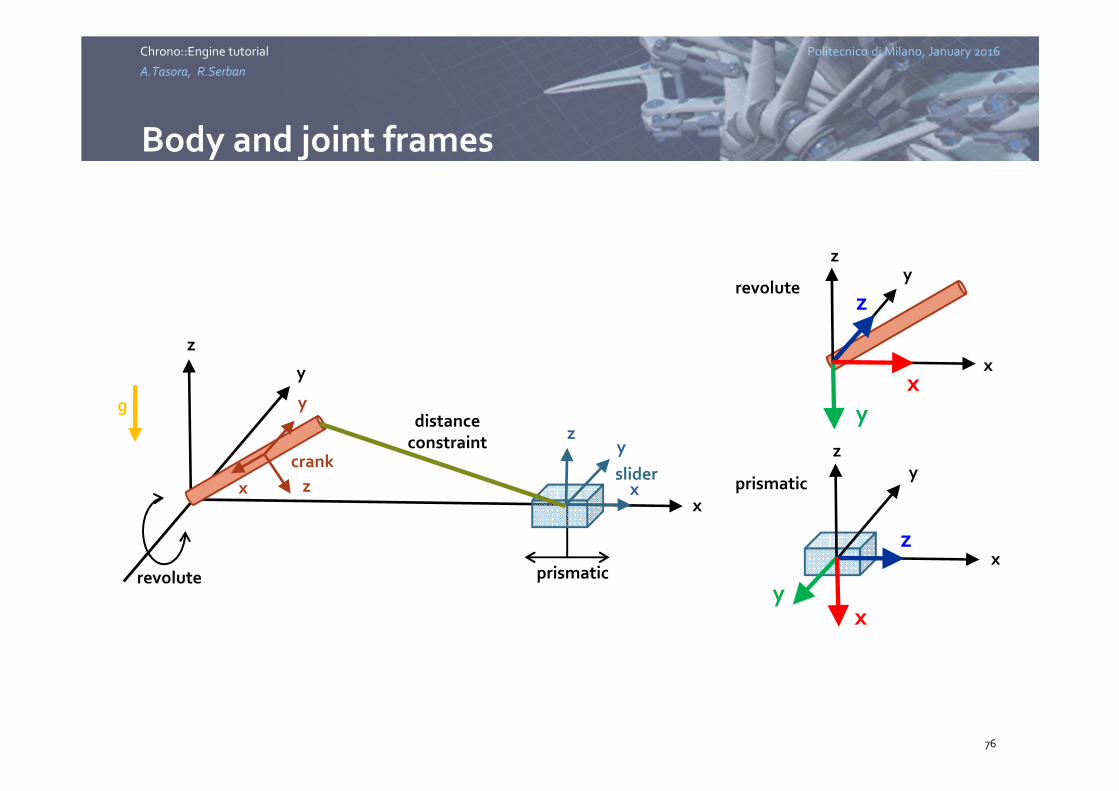
Base model: 2-body slider-crank mechanism
• Crank and slider bodies
• Revolute and prismatic joints
• Distance constraint
• Moving under gravity only
75
z
x
Politecnico di Milano, January 2016Chrono::Engine tutorial
A.Tasora, R.Serban
Body and joint frames
76
x
y
z
x
y
z x
yz
crankslider
revolute prismatic
distanceconstraint
revolute
prismatic
z
z
x
x
y
y
x
x
y
y
z
z
g
Politecnico di Milano, January 2016Chrono::Engine tutorial
A.Tasora, R.Serban
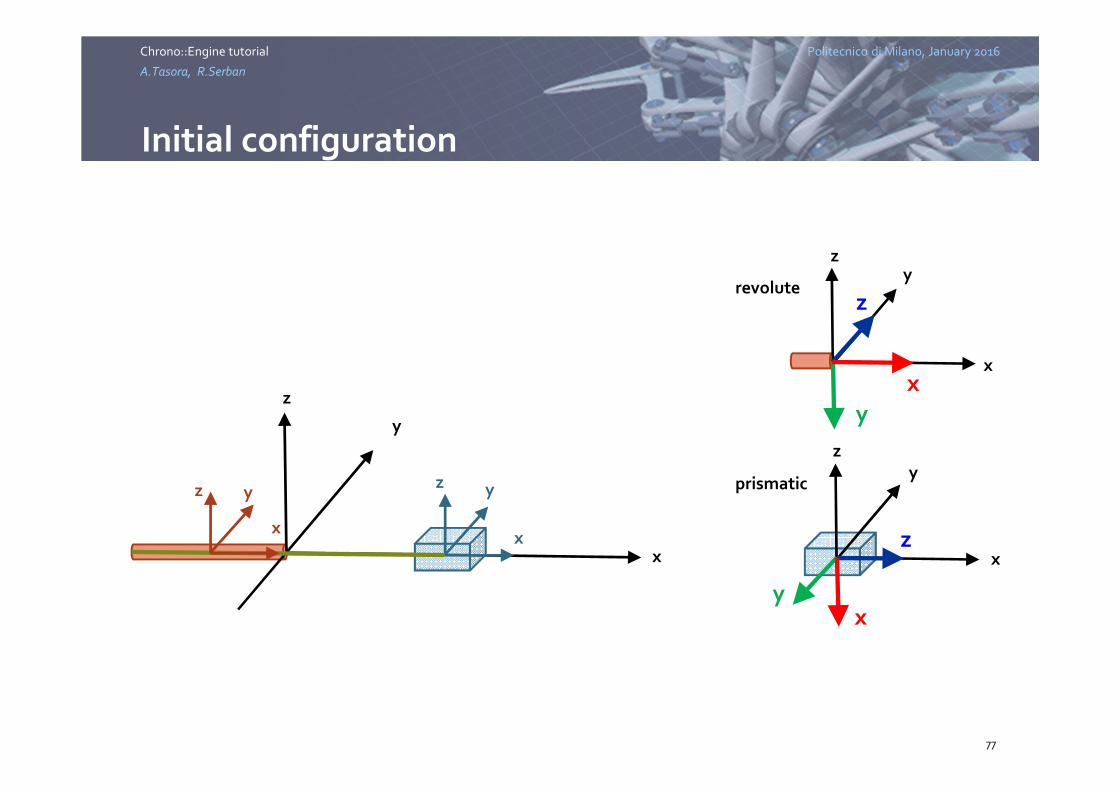
Initial configuration
77
x
y
z
x
yz
x
yz
revolute
prismatic
z
z
x
x
y
y
x
x
y
y
z
z
Politecnico di Milano, January 2016Chrono::Engine tutorial
A.Tasora, R.Serban
Defining a body
78
• Specify mass properties
• Specify initial conditions (relative to global frame)• Position and orientation
• Linear velocity and angular velocity
// Crank
ChSharedPtr<ChBody> crank(new ChBody);
system.AddBody(crank);
crank->SetIdentifier(1);
crank->SetName("crank");
crank->SetMass(1.0);
crank->SetInertiaXX(ChVector<>(0.005, 0.1, 0.1));
crank->SetPos(ChVector<>(-1, 0, 0));
crank->SetRot(ChQuaternion<>(1, 0, 0, 0));
Politecnico di Milano, January 2016Chrono::Engine tutorial
A.Tasora, R.Serban
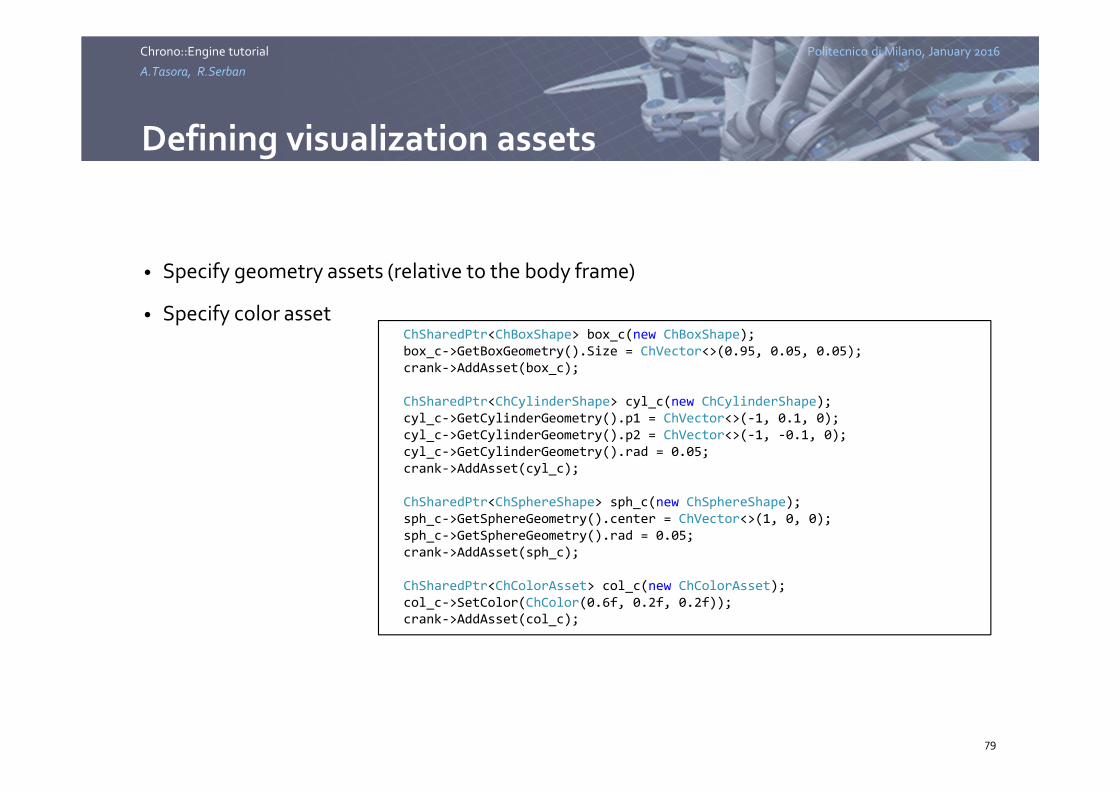
Defining visualization assets
79
• Specify geometry assets (relative to the body frame)
• Specify color assetChSharedPtr<ChBoxShape> box_c(new ChBoxShape);
box_c->GetBoxGeometry().Size = ChVector<>(0.95, 0.05, 0.05);
crank->AddAsset(box_c);
ChSharedPtr<ChCylinderShape> cyl_c(new ChCylinderShape);
cyl_c->GetCylinderGeometry().p1 = ChVector<>(-1, 0.1, 0);
cyl_c->GetCylinderGeometry().p2 = ChVector<>(-1, -0.1, 0);
cyl_c->GetCylinderGeometry().rad = 0.05;
crank->AddAsset(cyl_c);
ChSharedPtr<ChSphereShape> sph_c(new ChSphereShape);
sph_c->GetSphereGeometry().center = ChVector<>(1, 0, 0);
sph_c->GetSphereGeometry().rad = 0.05;
crank->AddAsset(sph_c);
ChSharedPtr<ChColorAsset> col_c(new ChColorAsset);
col_c->SetColor(ChColor(0.6f, 0.2f, 0.2f));
crank->AddAsset(col_c);
Politecnico di Milano, January 2016Chrono::Engine tutorial
A.Tasora, R.Serban
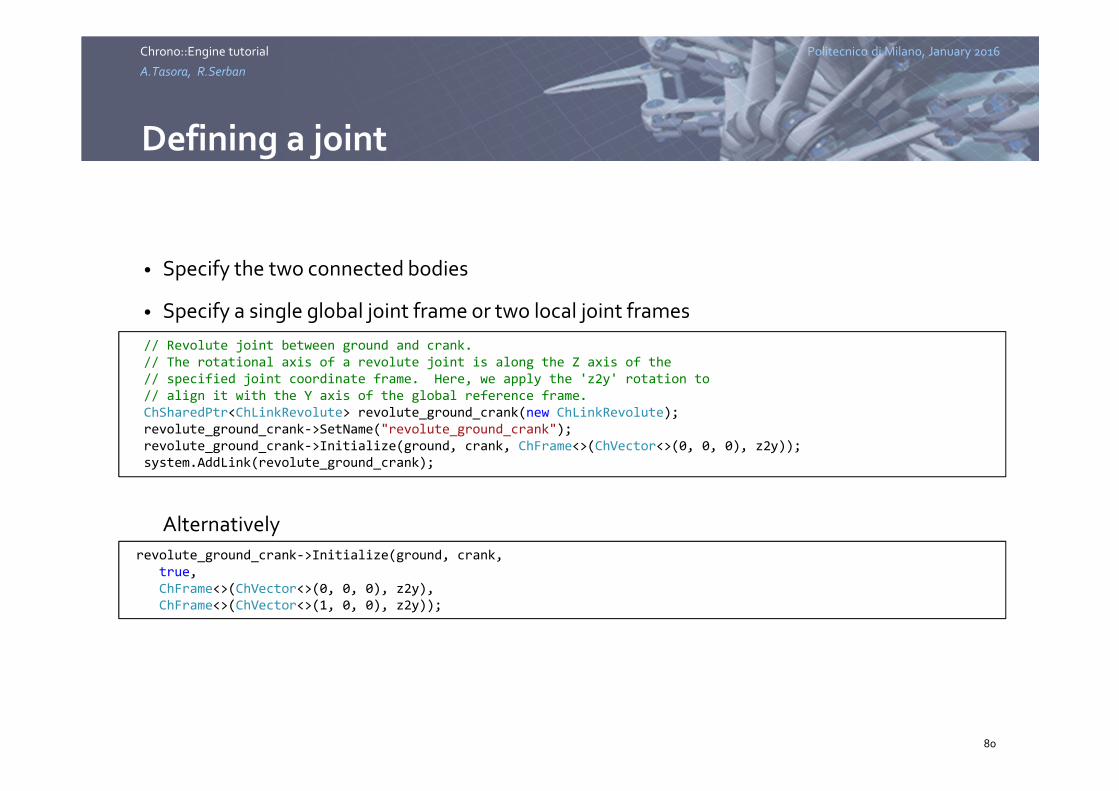
• Specify the two connected bodies
• Specify a single global joint frame or two local joint frames
Alternatively
Defining a joint
80
// Revolute joint between ground and crank.
// The rotational axis of a revolute joint is along the Z axis of the
// specified joint coordinate frame. Here, we apply the 'z2y' rotation to
// align it with the Y axis of the global reference frame.
ChSharedPtr<ChLinkRevolute> revolute_ground_crank(new ChLinkRevolute);
revolute_ground_crank->SetName("revolute_ground_crank");
revolute_ground_crank->Initialize(ground, crank, ChFrame<>(ChVector<>(0, 0, 0), z2y));
system.AddLink(revolute_ground_crank);
revolute_ground_crank->Initialize(ground, crank,
true,
ChFrame<>(ChVector<>(0, 0, 0), z2y),
ChFrame<>(ChVector<>(1, 0, 0), z2y));
Politecnico di Milano, January 2016Chrono::Engine tutorial
A.Tasora, R.Serban
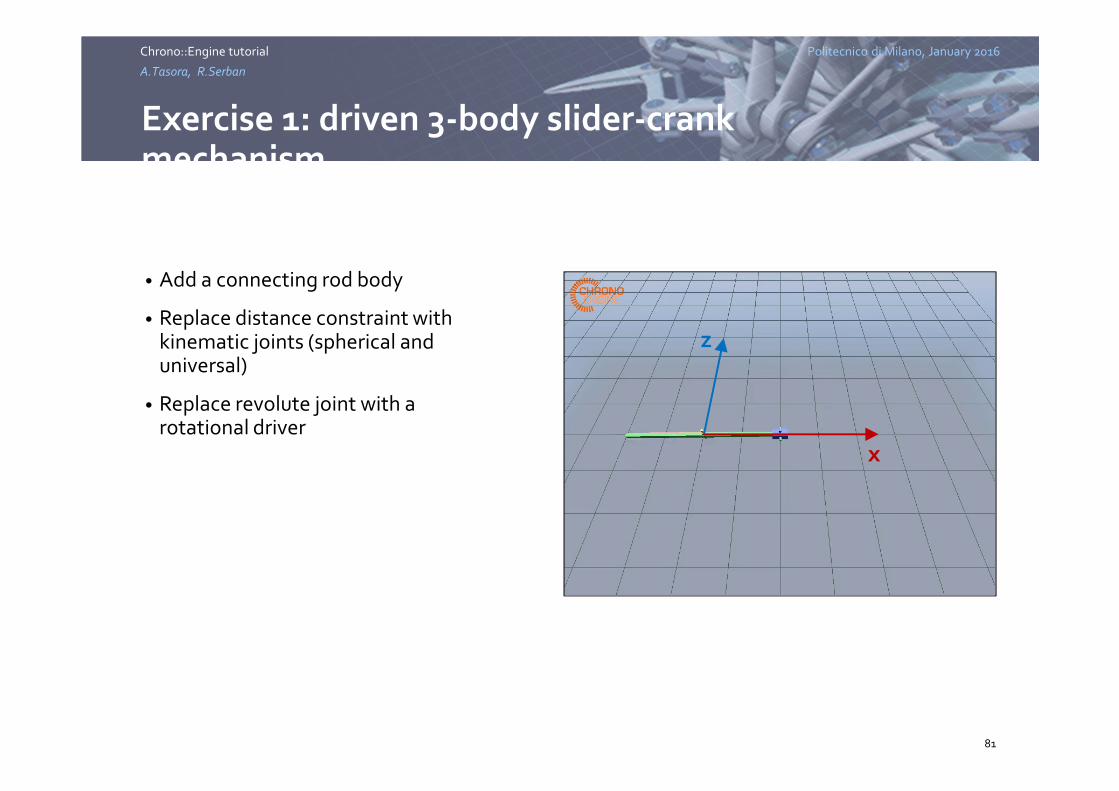
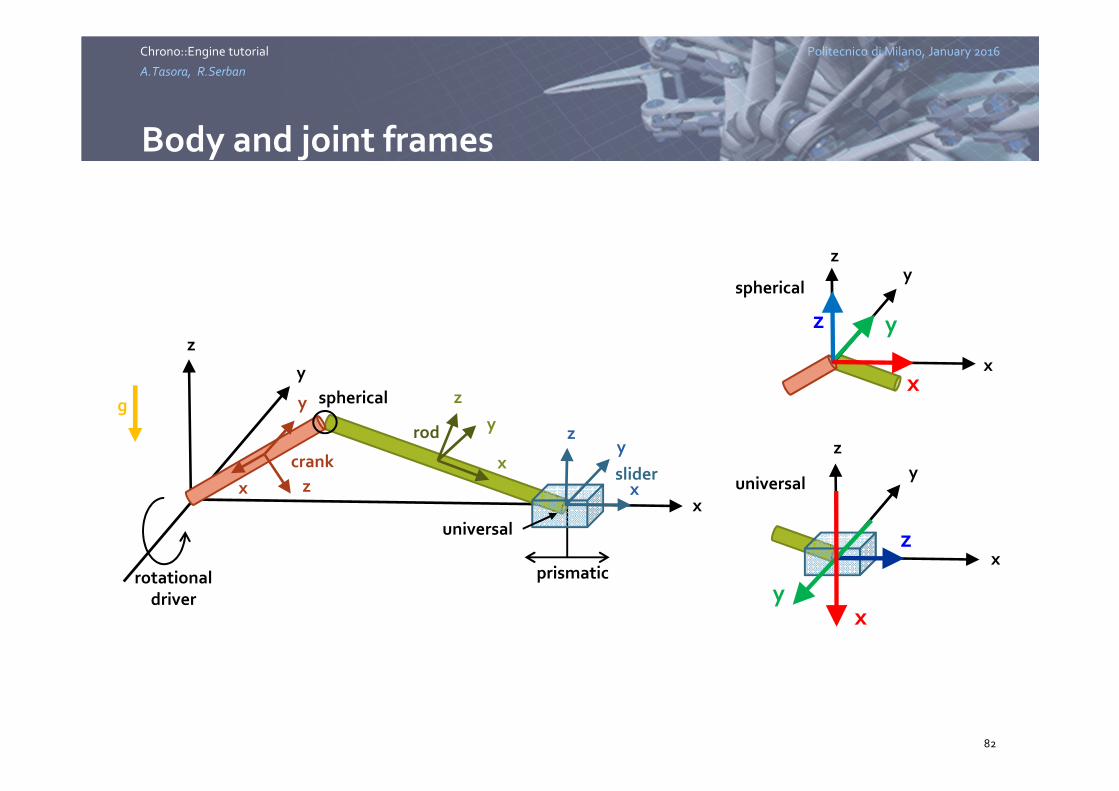
Exercise 1: driven 3-body slider-crank mechanism
• Add a connecting rod body
• Replace distance constraint with kinematic joints (spherical and universal)
• Replace revolute joint with a rotational driver
81
z
x
Politecnico di Milano, January 2016Chrono::Engine tutorial
A.Tasora, R.Serban
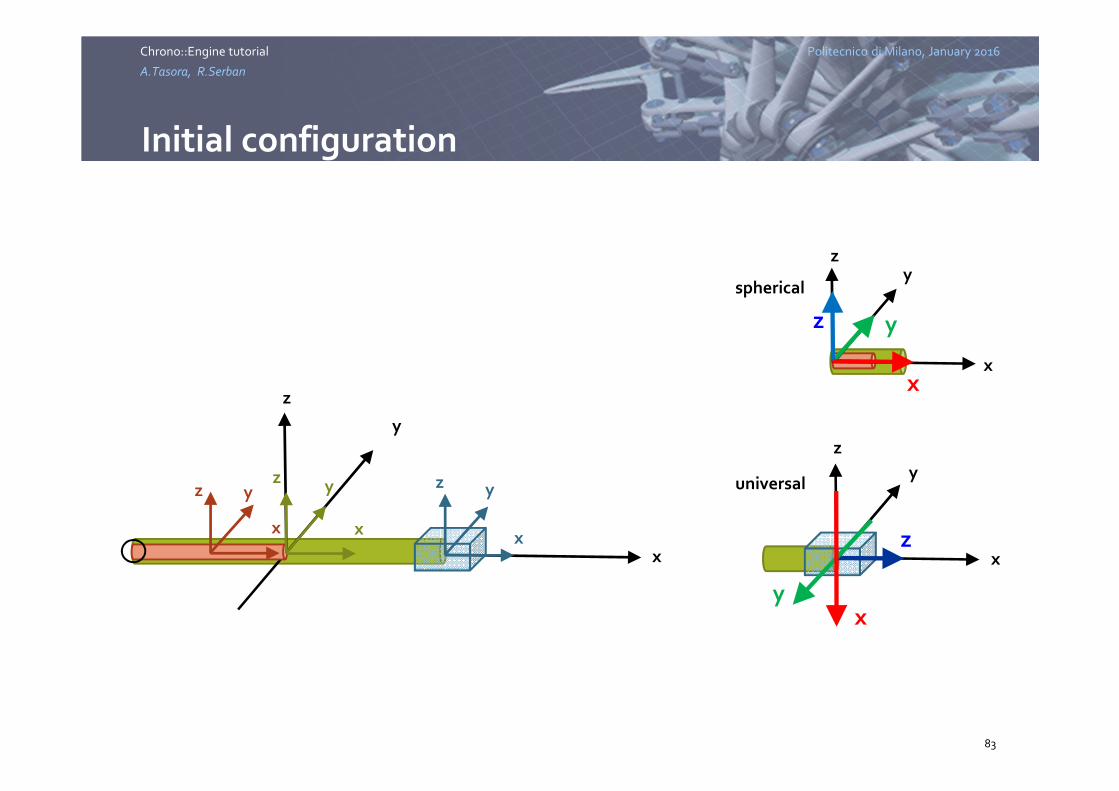
Body and joint frames
82
x
y
z
x
y
z
x
y
z
x
yz
crank
rod
slider
rotationaldriver
spherical
prismatic
universal
spherical
z
x
y
x
yz
universal
z
xy
x
y
z
g
Politecnico di Milano, January 2016Chrono::Engine tutorial
A.Tasora, R.Serban
Initial configuration
83
x
y
z
x
yz
x
yz
x
yz universal
z
xy
x
y
z
spherical
z
x
y
x
yz
Politecnico di Milano, January 2016Chrono::Engine tutorial
A.Tasora, R.Serban
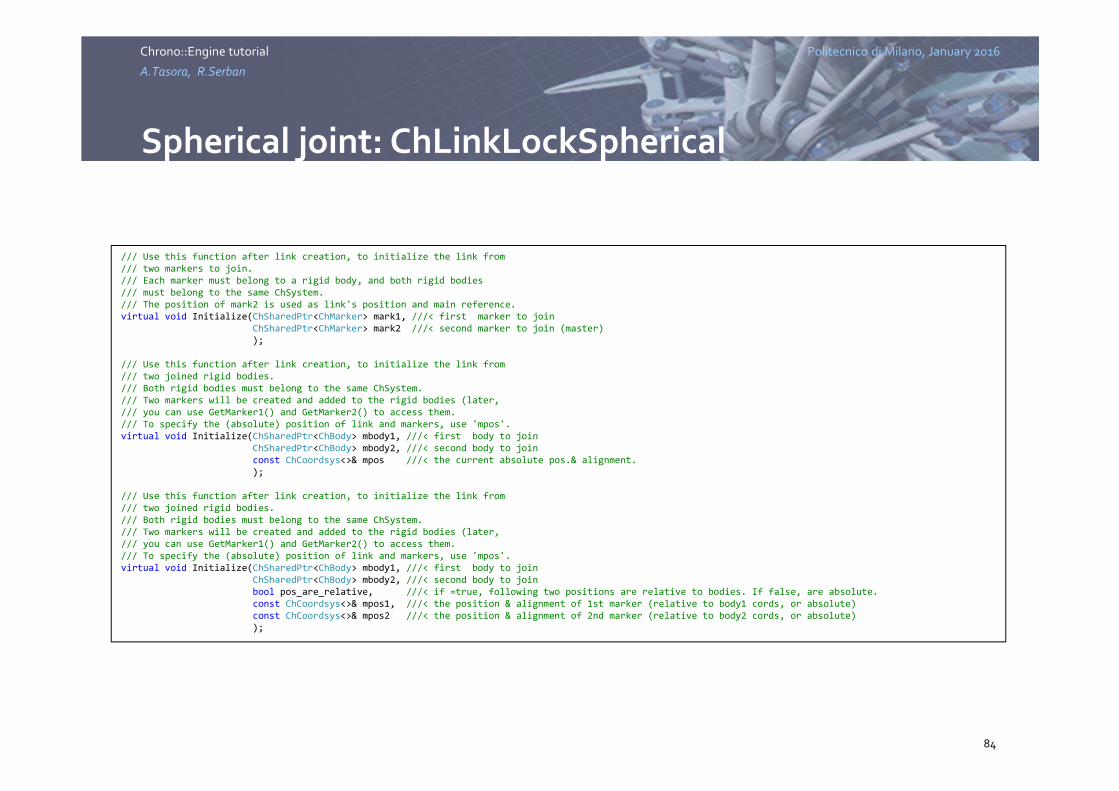
Spherical joint: ChLinkLockSpherical
84
/// Use this function after link creation, to initialize the link from
/// two markers to join.
/// Each marker must belong to a rigid body, and both rigid bodies
/// must belong to the same ChSystem.
/// The position of mark2 is used as link's position and main reference.
virtual void Initialize(ChSharedPtr<ChMarker> mark1, ///< first marker to join
ChSharedPtr<ChMarker> mark2 ///< second marker to join (master)
);
/// Use this function after link creation, to initialize the link from
/// two joined rigid bodies.
/// Both rigid bodies must belong to the same ChSystem.
/// Two markers will be created and added to the rigid bodies (later,
/// you can use GetMarker1() and GetMarker2() to access them.
/// To specify the (absolute) position of link and markers, use 'mpos'.
virtual void Initialize(ChSharedPtr<ChBody> mbody1, ///< first body to join
ChSharedPtr<ChBody> mbody2, ///< second body to join
const ChCoordsys<>& mpos ///< the current absolute pos.& alignment.
);
/// Use this function after link creation, to initialize the link from
/// two joined rigid bodies.
/// Both rigid bodies must belong to the same ChSystem.
/// Two markers will be created and added to the rigid bodies (later,
/// you can use GetMarker1() and GetMarker2() to access them.
/// To specify the (absolute) position of link and markers, use 'mpos'.
virtual void Initialize(ChSharedPtr<ChBody> mbody1, ///< first body to join
ChSharedPtr<ChBody> mbody2, ///< second body to join
bool pos_are_relative, ///< if =true, following two positions are relative to bodies. If false, are absolute.
const ChCoordsys<>& mpos1, ///< the position & alignment of 1st marker (relative to body1 cords, or absolute)
const ChCoordsys<>& mpos2 ///< the position & alignment of 2nd marker (relative to body2 cords, or absolute)
);
Politecnico di Milano, January 2016Chrono::Engine tutorial
A.Tasora, R.Serban
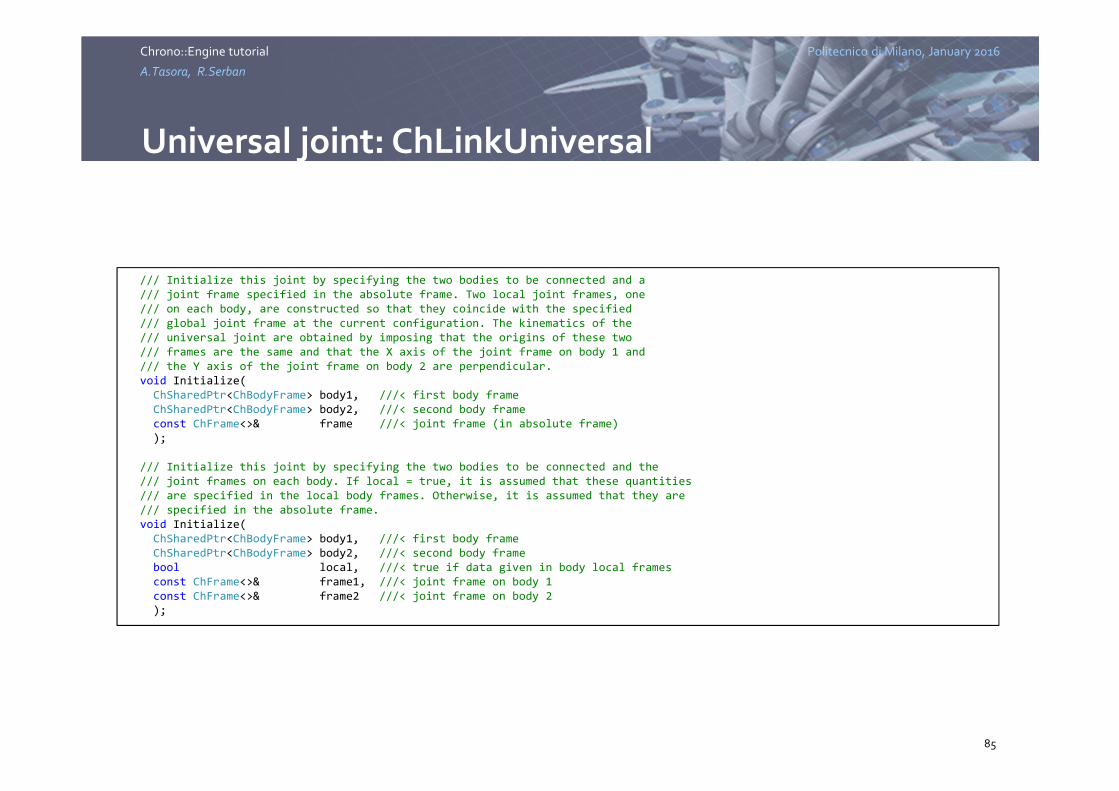
Universal joint: ChLinkUniversal
85
/// Initialize this joint by specifying the two bodies to be connected and a
/// joint frame specified in the absolute frame. Two local joint frames, one
/// on each body, are constructed so that they coincide with the specified
/// global joint frame at the current configuration. The kinematics of the
/// universal joint are obtained by imposing that the origins of these two
/// frames are the same and that the X axis of the joint frame on body 1 and
/// the Y axis of the joint frame on body 2 are perpendicular.
void Initialize(
ChSharedPtr<ChBodyFrame> body1, ///< first body frame
ChSharedPtr<ChBodyFrame> body2, ///< second body frame
const ChFrame<>& frame ///< joint frame (in absolute frame)
);
/// Initialize this joint by specifying the two bodies to be connected and the
/// joint frames on each body. If local = true, it is assumed that these quantities
/// are specified in the local body frames. Otherwise, it is assumed that they are
/// specified in the absolute frame.
void Initialize(
ChSharedPtr<ChBodyFrame> body1, ///< first body frame
ChSharedPtr<ChBodyFrame> body2, ///< second body frame
bool local, ///< true if data given in body local frames
const ChFrame<>& frame1, ///< joint frame on body 1
const ChFrame<>& frame2 ///< joint frame on body 2
);

Politecnico di Milano, January 2016Chrono::Engine tutorial
A.Tasora, R.Serban
Rotational driver: ChLinkEngine
86
void Set_eng_mode(int mset);
enum eCh_eng_mode {
ENG_MODE_ROTATION = 0,
ENG_MODE_SPEED,
ENG_MODE_TORQUE,
ENG_MODE_KEY_ROTATION,
ENG_MODE_KEY_POLAR,
ENG_MODE_TO_POWERTRAIN_SHAFT
};
void Set_rot_funct(ChSharedPtr<ChFunction> mf) { rot_funct = mf; }
void Set_spe_funct(ChSharedPtr<ChFunction> mf) { spe_funct = mf; }
void Set_tor_funct(ChSharedPtr<ChFunction> mf) { tor_funct = mf; }
Politecnico di Milano, January 2016Chrono::Engine tutorial
A.Tasora, R.Serban
ChFunction
87
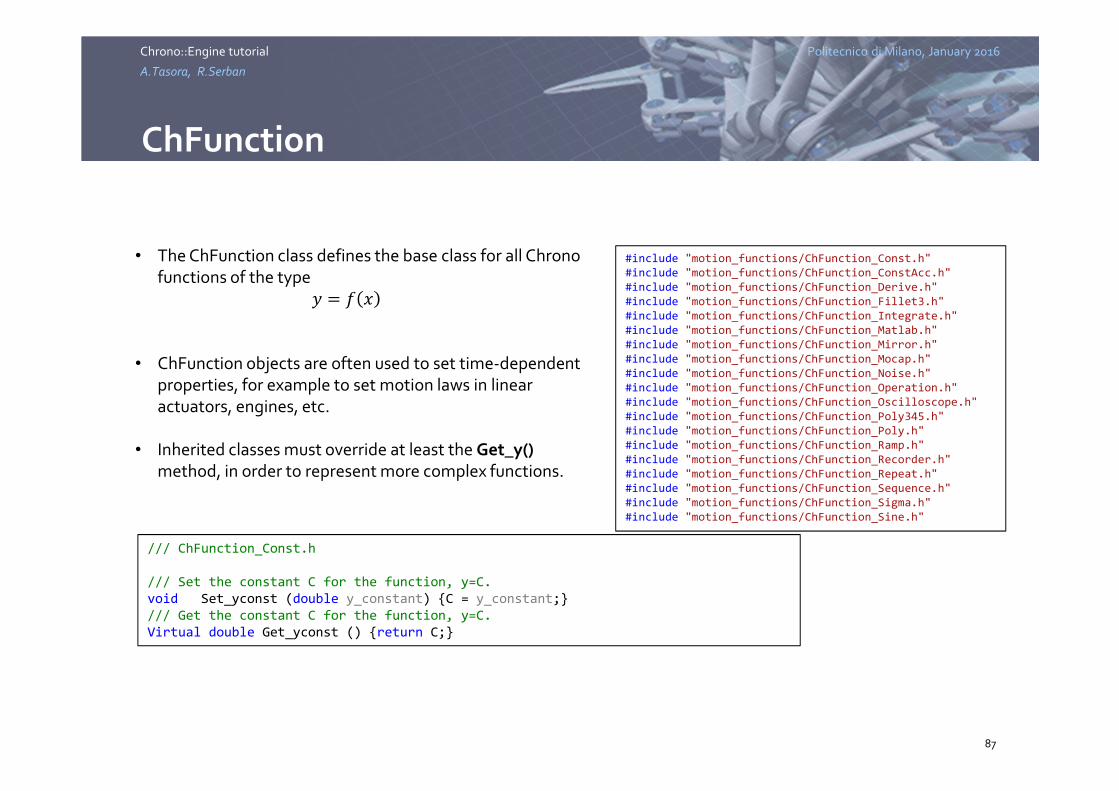
• The ChFunction class defines the base class for all Chrono functions of the type
� � � �
• ChFunction objects are often used to set time-dependent properties, for example to set motion laws in linear actuators, engines, etc.
• Inherited classes must override at least the Get_y() method, in order to represent more complex functions.
#include "motion_functions/ChFunction_Const.h"
#include "motion_functions/ChFunction_ConstAcc.h"
#include "motion_functions/ChFunction_Derive.h"
#include "motion_functions/ChFunction_Fillet3.h"
#include "motion_functions/ChFunction_Integrate.h"
#include "motion_functions/ChFunction_Matlab.h"
#include "motion_functions/ChFunction_Mirror.h"
#include "motion_functions/ChFunction_Mocap.h"
#include "motion_functions/ChFunction_Noise.h"
#include "motion_functions/ChFunction_Operation.h"
#include "motion_functions/ChFunction_Oscilloscope.h"
#include "motion_functions/ChFunction_Poly345.h"
#include "motion_functions/ChFunction_Poly.h"
#include "motion_functions/ChFunction_Ramp.h"
#include "motion_functions/ChFunction_Recorder.h"
#include "motion_functions/ChFunction_Repeat.h"
#include "motion_functions/ChFunction_Sequence.h"
#include "motion_functions/ChFunction_Sigma.h"
#include "motion_functions/ChFunction_Sine.h"
/// ChFunction_Const.h
/// Set the constant C for the function, y=C.
void Set_yconst (double y_constant) {C = y_constant;}
/// Get the constant C for the function, y=C.
Virtual double Get_yconst () {return C;}
Politecnico di Milano, January 2016Chrono::Engine tutorial
A.Tasora, R.Serban
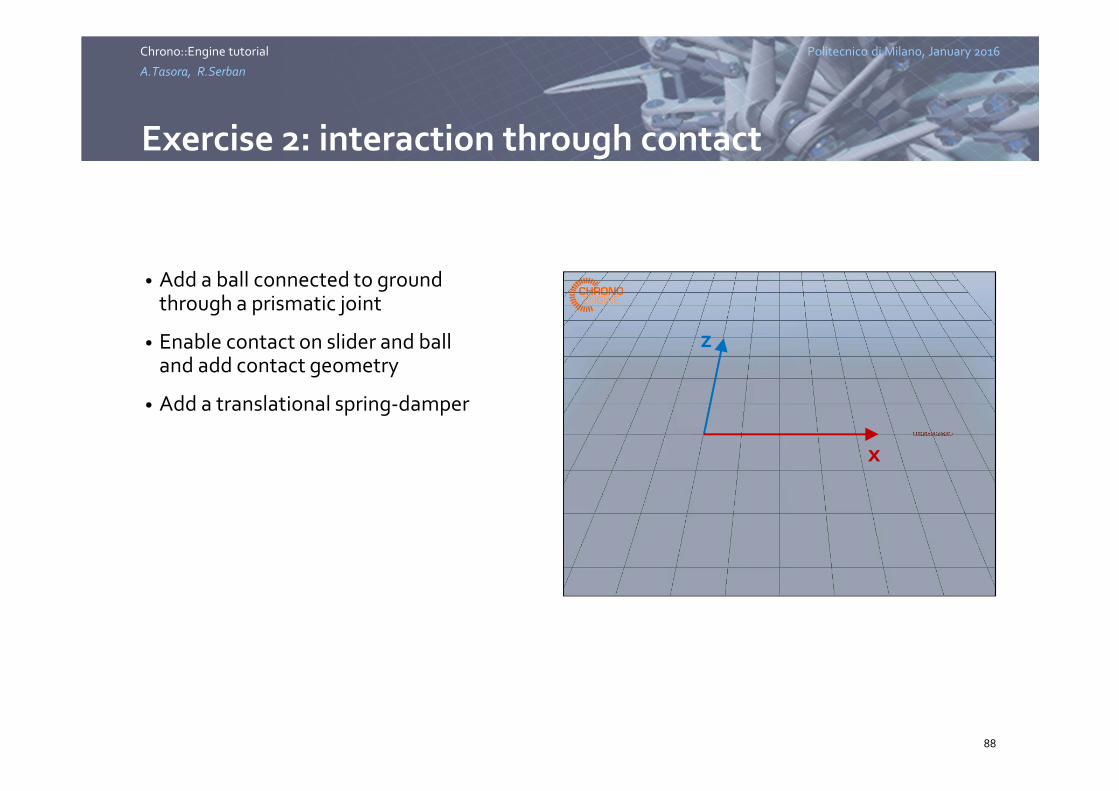
Exercise 2: interaction through contact
• Add a ball connected to ground through a prismatic joint
• Enable contact on slider and ball and add contact geometry
• Add a translational spring-damper
88
z
x

Politecnico di Milano, January 2016Chrono::Engine tutorial
A.Tasora, R.Serban
Specifying contact geometry
89
/// Acess the collision model for the collision engine.
/// To get a non-null pointer, remember to SetCollide(true), before.
collision::ChCollisionModel* GetCollisionModel() {return collision_model;}
/// Enable/disable the collision for this rigid body.
void SetCollide(bool mcoll);
/// Deletes all inserted geometries.
/// Call this function BEFORE adding the geometric description.
virtual int ClearModel() = 0;
/// Builds the BV hierarchy.
/// Call this function AFTER adding the geometric description.
virtual int BuildModel() = 0;
/// Add a sphere shape to this model, for collision purposes
virtual bool AddSphere (double radius, ///< the radius of the sphere
const ChVector<>& pos = ChVector<>() ///< the position of the sphere in model coordinates
) = 0;
/// Add a box shape to this model, for collision purposes
virtual bool AddBox (double hx, ///< the halfsize on x axis
double hy, ///< the halfsize on y axis
double hz, ///< the halfsize on z axis
const ChVector<>& pos = ChVector<>(), ///< the position of the box COG
const ChMatrix33<>& rot = ChMatrix33<>(1) ///< the rotation of the box
) = 0;
ChBodyfunctions
ChCollisionModelfunctions
Politecnico di Milano, January 2016Chrono::Engine tutorial
A.Tasora, R.Serban
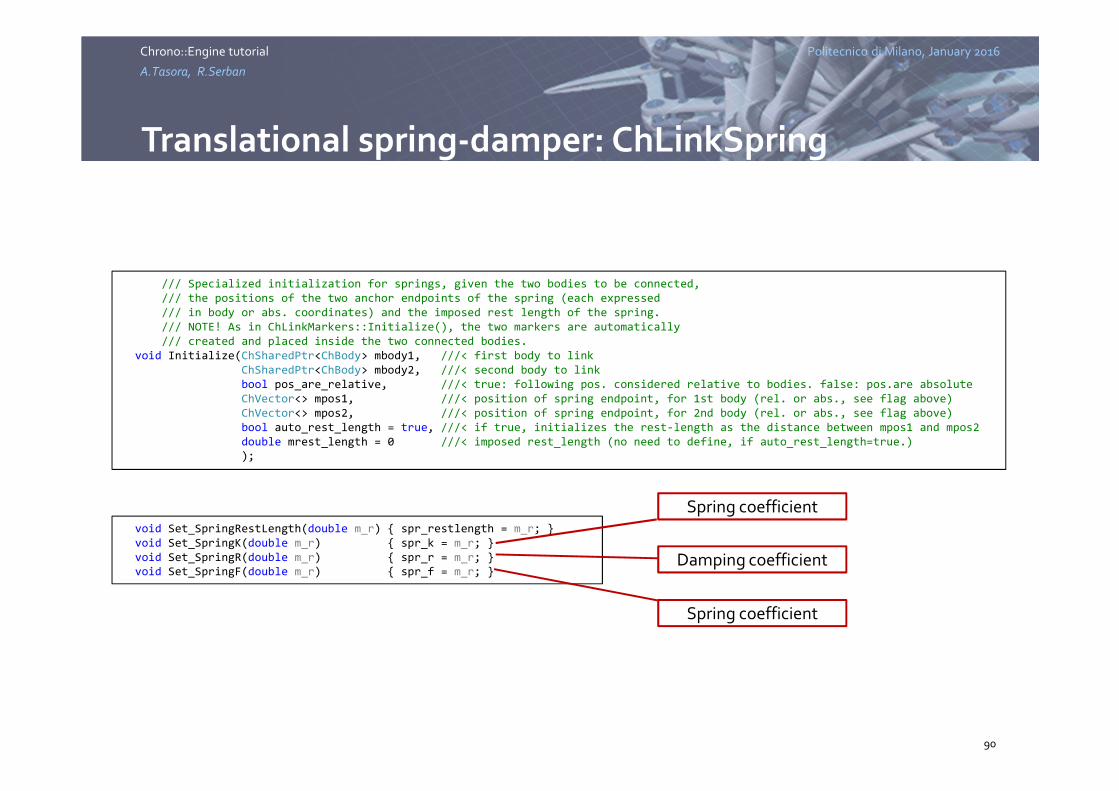
Translational spring-damper: ChLinkSpring
90
/// Specialized initialization for springs, given the two bodies to be connected,
/// the positions of the two anchor endpoints of the spring (each expressed
/// in body or abs. coordinates) and the imposed rest length of the spring.
/// NOTE! As in ChLinkMarkers::Initialize(), the two markers are automatically
/// created and placed inside the two connected bodies.
void Initialize(ChSharedPtr<ChBody> mbody1, ///< first body to link
ChSharedPtr<ChBody> mbody2, ///< second body to link
bool pos_are_relative, ///< true: following pos. considered relative to bodies. false: pos.are absolute
ChVector<> mpos1, ///< position of spring endpoint, for 1st body (rel. or abs., see flag above)
ChVector<> mpos2, ///< position of spring endpoint, for 2nd body (rel. or abs., see flag above)
bool auto_rest_length = true, ///< if true, initializes the rest-length as the distance between mpos1 and mpos2
double mrest_length = 0 ///< imposed rest_length (no need to define, if auto_rest_length=true.)
);
void Set_SpringRestLength(double m_r) { spr_restlength = m_r; }
void Set_SpringK(double m_r) { spr_k = m_r; }
void Set_SpringR(double m_r) { spr_r = m_r; }
void Set_SpringF(double m_r) { spr_f = m_r; }
Spring coefficient
Spring coefficient
Damping coefficient
Politecnico di Milano, January 2016Chrono::Engine tutorial
A.Tasora, R.Serban
Thank you for the attention
91