Embed Size (px)
Citation preview
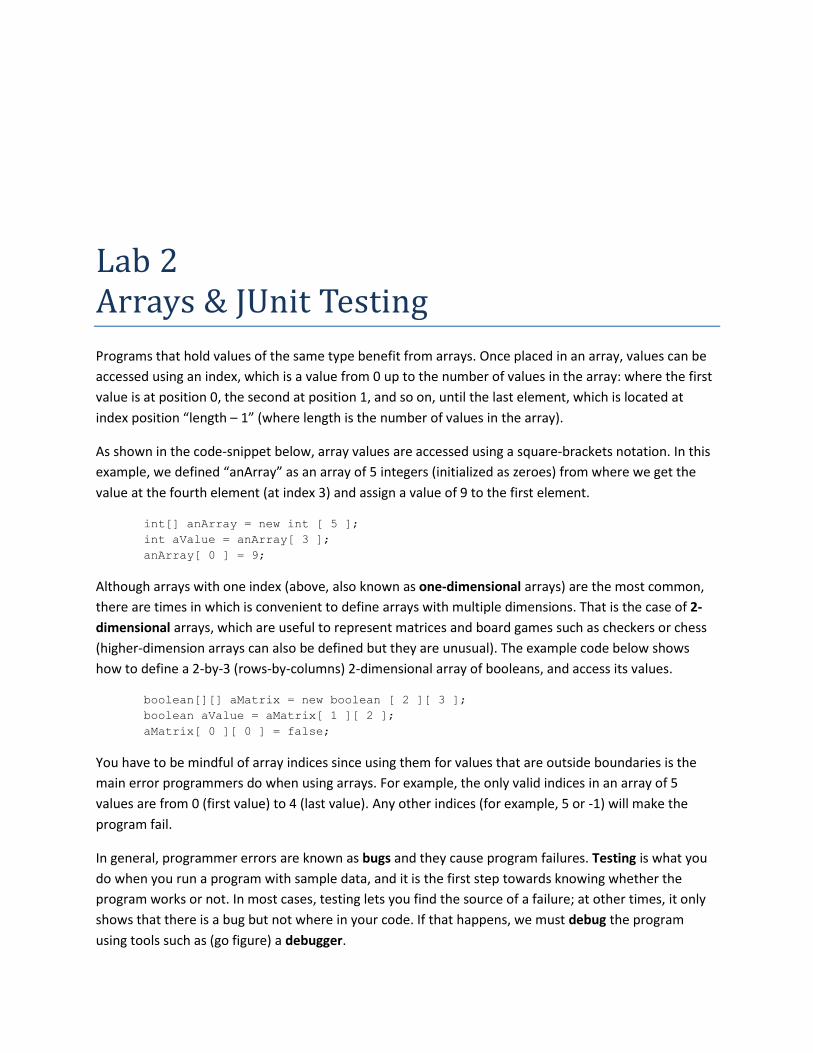
Lab 2 Arrays & JUnit Testing
Programs that hold values of the same type benefit from arrays. Once placed in an array, values can be
accessed using an index, which is a value from 0 up to the number of values in the array: where the first
value is at position 0, the second at position 1, and so on, until the last element, which is located at
index position “length – 1” (where length is the number of values in the array).
As shown in the code-snippet below, array values are accessed using a square-brackets notation. In this
example, we defined “anArray” as an array of 5 integers (initialized as zeroes) from where we get the
value at the fourth element (at index 3) and assign a value of 9 to the first element.
int[] anArray = new int [ 5 ];
int aValue = anArray[ 3 ];
anArray[ 0 ] = 9;
Although arrays with one index (above, also known as one-dimensional arrays) are the most common,
there are times in which is convenient to define arrays with multiple dimensions. That is the case of 2-
dimensional arrays, which are useful to represent matrices and board games such as checkers or chess
(higher-dimension arrays can also be defined but they are unusual). The example code below shows
how to define a 2-by-3 (rows-by-columns) 2-dimensional array of booleans, and access its values.
boolean[][] aMatrix = new boolean [ 2 ][ 3 ];
boolean aValue = aMatrix[ 1 ][ 2 ];
aMatrix[ 0 ][ 0 ] = false;
You have to be mindful of array indices since using them for values that are outside boundaries is the
main error programmers do when using arrays. For example, the only valid indices in an array of 5
values are from 0 (first value) to 4 (last value). Any other indices (for example, 5 or -1) will make the
program fail.
In general, programmer errors are known as bugs and they cause program failures. Testing is what you
do when you run a program with sample data, and it is the first step towards knowing whether the
program works or not. In most cases, testing lets you find the source of a failure; at other times, it only
shows that there is a bug but not where in your code. If that happens, we must debug the program
using tools such as (go figure) a debugger.
This lab has exercises with both 1- and 2-dimensional arrays. In addition, we will write methods, and
practice testing them using JUnit and Eclipse’s debugger. Be aware that this lab may require you to look
for information from different sources, such as your text book, the Java API, or Google.
1. One-Dimensional Arrays In this section we will practice writing methods that use integer arrays of one dimension.
Exercise 1
Create a new Eclipse project named Lab02 with a Lab02One class in it.
In this class you will write methods to make a string with the values in a 1-dimensional array of integers,
and to calculate the sum, and average of the values in the array. The names of the methods you will
create are listed below. You need to use these exact definitions (later it will become clear why):
public static String arrayToString( int[] anArray )
public static int arraySum( int[] anArray )
public static double arrayAverage( int[] anArray )
Follow the steps below to implement these methods:
1. Write the implementation of the method arrayToString.
This method receives an array of integers and returns a string with all values in the array enclosed in
square brackets and separated by a comma and a blank space. For example, the method returns the
string “[4, 2]” when receiving an array with values {4,2}. Note that the method returns a string
rather than printing a string to the screen.
2. Write the implementation of the method arraySum.
This method receives an array of integers and returns an integer with the sum of the array’s values
(or 0 if the array is empty).
3. Write the implementation of the method arrayAverage.
This method receives an array of integer and returns a double value with the average of the values
in the array (or 0 if the array is empty).
Lastly, write a main method with the code shown below.
int arrayInt[] = new int[]{80,100,80,92,95,87,82,76,45,76,80,70};
System.out.println("array : " + arrayToString( arrayInt ));
System.out.println("sum : " + arraySum( arrayInt ));
System.out.println("average: " + arrayAverage( arrayInt ));
Arrays.sort( arrayInt );
System.out.println("sorted : " + arrayToString( arrayInt ));
This code does the following:
a. It initializes an array with the values 80, 100, 80, 92, 95, 87, 82, 76, 45, 76, 80, 70. As shown,
to initialize an array with a list of known values, you just write the values within curly braces.
b. It prints the string returned from “arrayToString”. As explained earlier, the string should
have all values enclosed in square brackets and separated by a comma and a blank space.
array : [80, 100, 80, 92, 95, 87, 82, 76, 45, 76, 80, 70]
c. It prints the results of calculating the sum and average of the values in the array.
sum : 963
average: 80.25
d. Finally, it sorts and prints the values in the array. Rather than doing the sorting ourselves,
we can use a sort method implemented in the Arrays class, which is located in the java.util
package (you can learn more about the sort method by looking it up in the Java API) Note
that sort is static: it means that it can be used just by calling it using its class name, i.e.,
Arrays.sort (you will need to import the Arrays class first).
sorted : [45, 70, 76, 76, 80, 80, 80, 82, 87, 92, 95, 100]
Get your instructor’s signature when the above code compiles and runs.
Exercise 1 - Get Instructor’s Signature
2. Debugging & JUnit Testing Programming is an iterative & incremental process in which we write code, compile it and test it. If we
get the results we want then we write new code (the incremental part); if not, we fix the code we have.
Either way, we code, compile and test over and over (the iterative part) until our program is finished.
As we progress writing code, we perform different tests to know that the program works fine. At times
our new code breaks code that worked before, which you may not notice unless you run all tests again.
Can you imagine how time consuming programming would be if we have to repeat all past tests plus any
new tests each time we change our programs?
Fortunately, programmers have thought about this and created testing frameworks, one of which is
JUnit. With JUnit we can automatically run all prior tests at once to see that we haven’t added any errors
to existing code.
Using JUnit
To see how JUnit works, download the classes Lab02Debug and Lab02DebugTest from the class web
site, and import them into your project. The test file Lab02DebugTest should show errors because JUnit
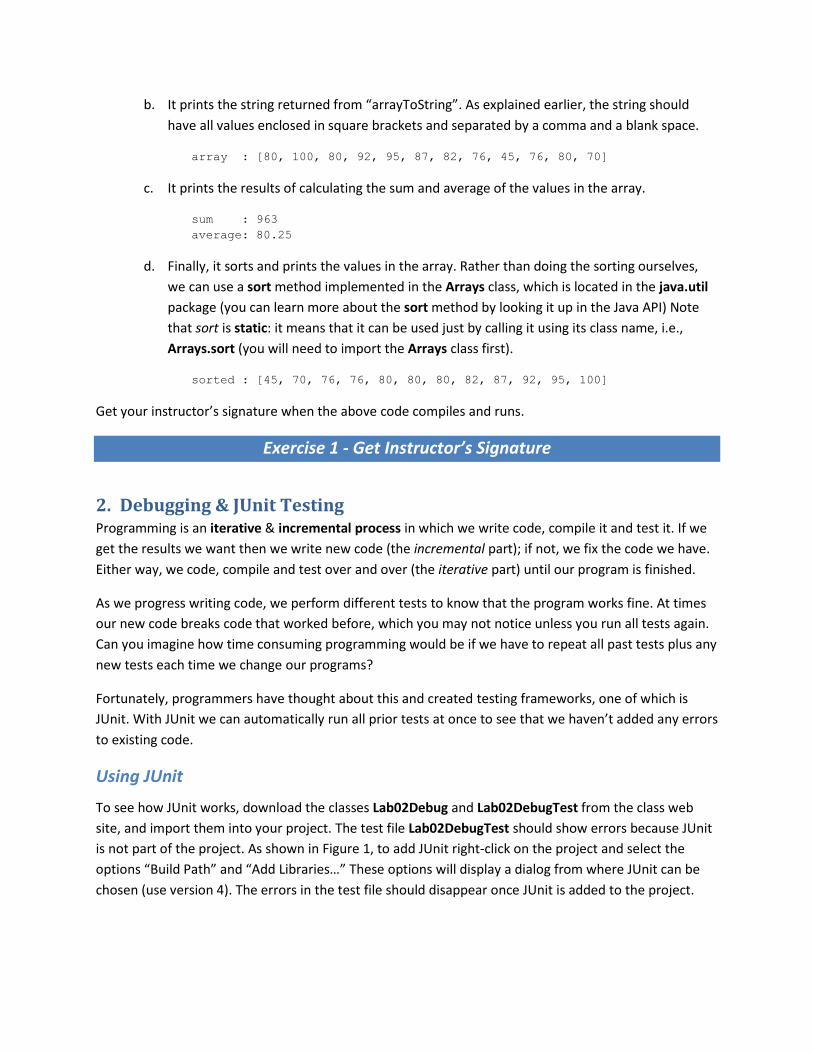
is not part of the project. As shown in Figure 1, to add JUnit right-click on the project and select the
options “Build Path” and “Add Libraries…” These options will display a dialog from where JUnit can be
chosen (use version 4). The errors in the test file should disappear once JUnit is added to the project.
Understanding the “Lab02DebugTest” Class
Open the class Lab02Debug in the editor. This class implements one method named findMaximum. As
implied, this method is supposed to find out the maximum integer in an array given as a parameter.
Open the class Lab02DebugTest in the editor. This class is a JUnit class that has methods to test the
method findMaximum. The purpose of each test method is to “assert” (or confirm) that findMaximum
returns an expected value given a certain input.
Test methods are usually named “testXXXXX”, where XXXXX is a description of the test. For example, the
first test is called testFindMaximumWhenHighestIsFirst and it tests that findMaximum can find the
highest value when this number is the first element in the array. This method defines an example array
(named array), a variable with the expected result (named expected), and a variable that captures the
result from calling the findMaximum method (named actual). The last statement in the method calls a
JUnit method called assertEquals that checks whether expected and actual have the same value: the
test passes if they do; it fails otherwise.
There are other “assert” methods that we will see in the future, such as assertTrue and assertFalse,
which verify that their parameters are either true or false, respectively.
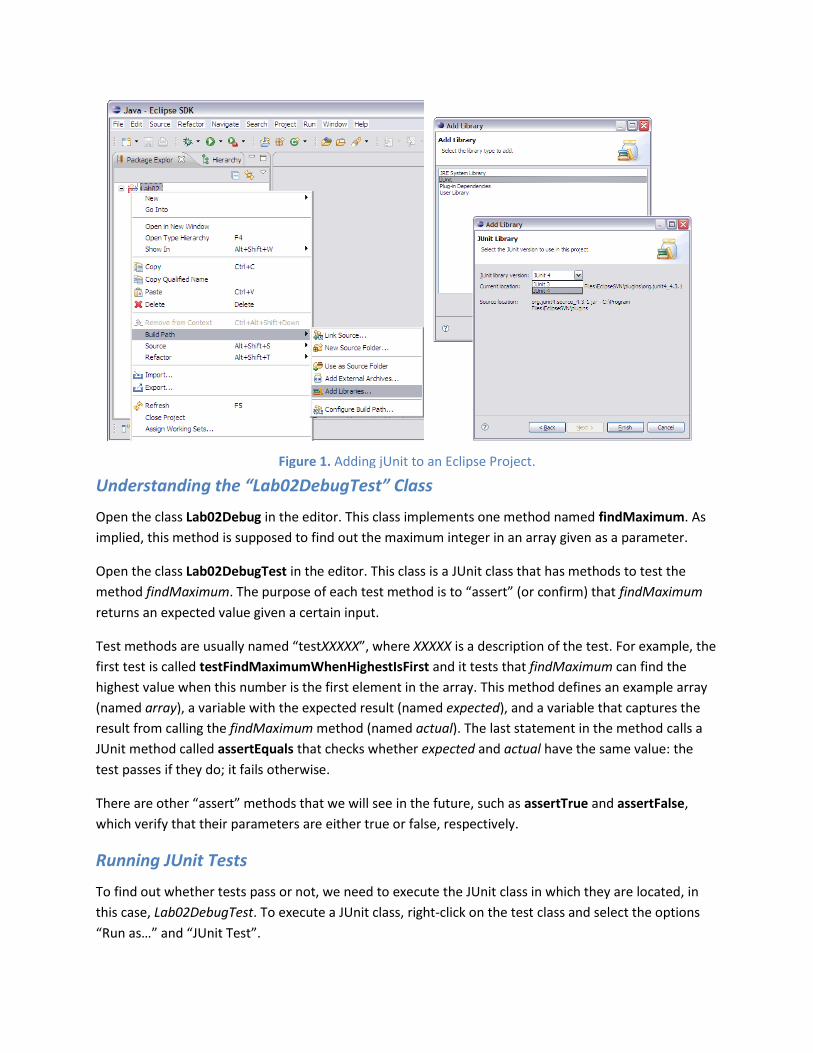
Running JUnit Tests
To find out whether tests pass or not, we need to execute the JUnit class in which they are located, in
this case, Lab02DebugTest. To execute a JUnit class, right-click on the test class and select the options
“Run as…” and “JUnit Test”.
Figure 1. Adding jUnit to an Eclipse Project.
These options execute the test class and will display a JUnit view showing whether its test methods
passed (with a green check mark) or failed (with either a blue cross if result were incorrect, or a red
cross if an exception happened).
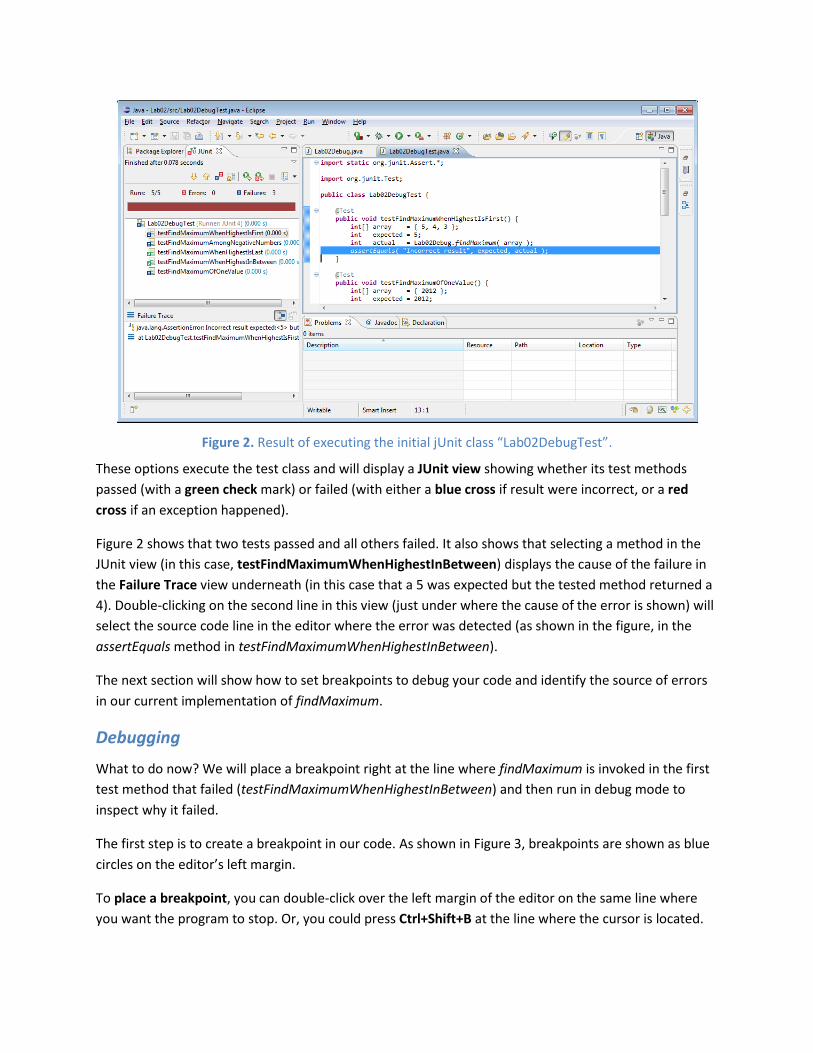
Figure 2 shows that two tests passed and all others failed. It also shows that selecting a method in the
JUnit view (in this case, testFindMaximumWhenHighestInBetween) displays the cause of the failure in
the Failure Trace view underneath (in this case that a 5 was expected but the tested method returned a
4). Double-clicking on the second line in this view (just under where the cause of the error is shown) will
select the source code line in the editor where the error was detected (as shown in the figure, in the
assertEquals method in testFindMaximumWhenHighestInBetween).
The next section will show how to set breakpoints to debug your code and identify the source of errors
in our current implementation of findMaximum.
Debugging
What to do now? We will place a breakpoint right at the line where findMaximum is invoked in the first
test method that failed (testFindMaximumWhenHighestInBetween) and then run in debug mode to
inspect why it failed.
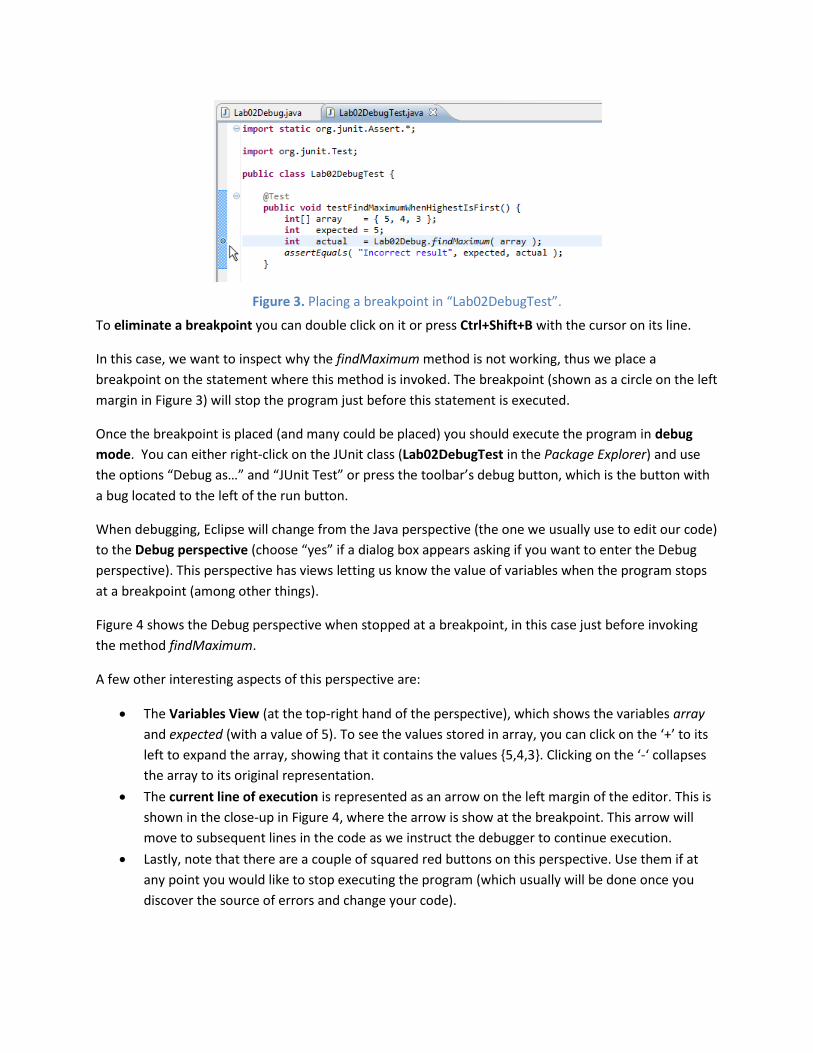
The first step is to create a breakpoint in our code. As shown in Figure 3, breakpoints are shown as blue
circles on the editor’s left margin.
To place a breakpoint, you can double-click over the left margin of the editor on the same line where
you want the program to stop. Or, you could press Ctrl+Shift+B at the line where the cursor is located.
Figure 2. Result of executing the initial jUnit class “Lab02DebugTest”.
To eliminate a breakpoint you can double click on it or press Ctrl+Shift+B with the cursor on its line.
In this case, we want to inspect why the findMaximum method is not working, thus we place a
breakpoint on the statement where this method is invoked. The breakpoint (shown as a circle on the left
margin in Figure 3) will stop the program just before this statement is executed.
Once the breakpoint is placed (and many could be placed) you should execute the program in debug
mode. You can either right-click on the JUnit class (Lab02DebugTest in the Package Explorer) and use
the options “Debug as…” and “JUnit Test” or press the toolbar’s debug button, which is the button with
a bug located to the left of the run button.
When debugging, Eclipse will change from the Java perspective (the one we usually use to edit our code)
to the Debug perspective (choose “yes” if a dialog box appears asking if you want to enter the Debug
perspective). This perspective has views letting us know the value of variables when the program stops
at a breakpoint (among other things).
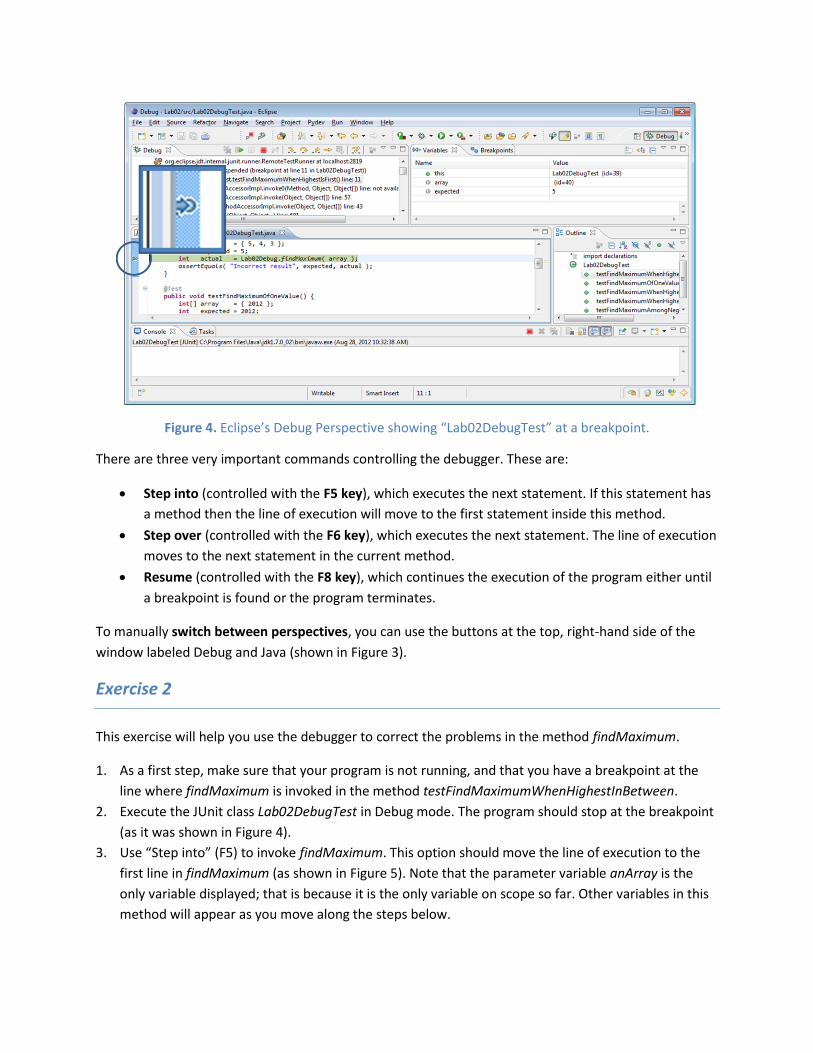
Figure 4 shows the Debug perspective when stopped at a breakpoint, in this case just before invoking
the method findMaximum.
A few other interesting aspects of this perspective are:
The Variables View (at the top-right hand of the perspective), which shows the variables array
and expected (with a value of 5). To see the values stored in array, you can click on the ‘+’ to its
left to expand the array, showing that it contains the values {5,4,3}. Clicking on the ‘-‘ collapses
the array to its original representation.
The current line of execution is represented as an arrow on the left margin of the editor. This is
shown in the close-up in Figure 4, where the arrow is show at the breakpoint. This arrow will
move to subsequent lines in the code as we instruct the debugger to continue execution.
Lastly, note that there are a couple of squared red buttons on this perspective. Use them if at
any point you would like to stop executing the program (which usually will be done once you
discover the source of errors and change your code).
Figure 3. Placing a breakpoint in “Lab02DebugTest”.
There are three very important commands controlling the debugger. These are:
Step into (controlled with the F5 key), which executes the next statement. If this statement has
a method then the line of execution will move to the first statement inside this method.
Step over (controlled with the F6 key), which executes the next statement. The line of execution
moves to the next statement in the current method.
Resume (controlled with the F8 key), which continues the execution of the program either until
a breakpoint is found or the program terminates.
To manually switch between perspectives, you can use the buttons at the top, right-hand side of the
window labeled Debug and Java (shown in Figure 3).
Exercise 2
This exercise will help you use the debugger to correct the problems in the method findMaximum.
1. As a first step, make sure that your program is not running, and that you have a breakpoint at the
line where findMaximum is invoked in the method testFindMaximumWhenHighestInBetween.
2. Execute the JUnit class Lab02DebugTest in Debug mode. The program should stop at the breakpoint
(as it was shown in Figure 4).
3. Use “Step into” (F5) to invoke findMaximum. This option should move the line of execution to the
first line in findMaximum (as shown in Figure 5). Note that the parameter variable anArray is the
only variable displayed; that is because it is the only variable on scope so far. Other variables in this
method will appear as you move along the steps below.
Figure 4. Eclipse’s Debug Perspective showing “Lab02DebugTest” at a breakpoint.
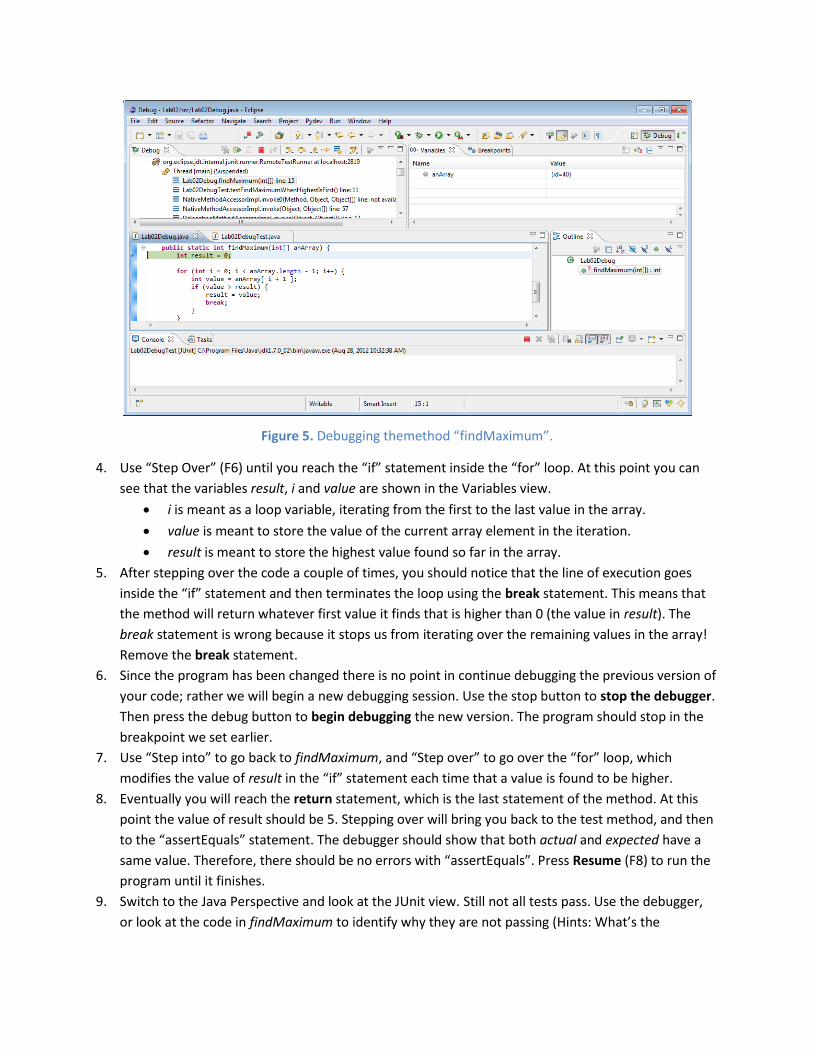
4. Use “Step Over” (F6) until you reach the “if” statement inside the “for” loop. At this point you can
see that the variables result, i and value are shown in the Variables view.
i is meant as a loop variable, iterating from the first to the last value in the array.
value is meant to store the value of the current array element in the iteration.
result is meant to store the highest value found so far in the array.
5. After stepping over the code a couple of times, you should notice that the line of execution goes
inside the “if” statement and then terminates the loop using the break statement. This means that
the method will return whatever first value it finds that is higher than 0 (the value in result). The
break statement is wrong because it stops us from iterating over the remaining values in the array!
Remove the break statement.
6. Since the program has been changed there is no point in continue debugging the previous version of
your code; rather we will begin a new debugging session. Use the stop button to stop the debugger.
Then press the debug button to begin debugging the new version. The program should stop in the
breakpoint we set earlier.
7. Use “Step into” to go back to findMaximum, and “Step over” to go over the “for” loop, which
modifies the value of result in the “if” statement each time that a value is found to be higher.
8. Eventually you will reach the return statement, which is the last statement of the method. At this
point the value of result should be 5. Stepping over will bring you back to the test method, and then
to the “assertEquals” statement. The debugger should show that both actual and expected have a
same value. Therefore, there should be no errors with “assertEquals”. Press Resume (F8) to run the
program until it finishes.
9. Switch to the Java Perspective and look at the JUnit view. Still not all tests pass. Use the debugger,
or look at the code in findMaximum to identify why they are not passing (Hints: What’s the
Figure 5. Debugging themethod “findMaximum”.
minimum integer value possible? Are all array elements examined?). In any event, be aware that the
JUnit test class must not be changed!
Get your instructor’s signature when all tests pass.
Exercise 2 - Get Instructor’s Signature
3. JUnit Testing Lab02 In this section, we will use JUnit to test the results of the methods you wrote in Section 1.
Exercise 3
1. Download from the class website the JUnit file Lab02OneTest.java.
2. Import this JUnit file into the project. Correct any compile errors if there are any – if there are, they
should be due to misspellings in the methods you wrote in the Lab02One class; if that is the case,
change your method names to match those in the JUnit file.
3. Run the Lab02OneTest as a JUnit test case. Debug if necessary.
Your grade in this exercise will depend on the number of JUnit tests passed (and in accordance with your
instructor’s class policies). Be aware that answers MUST NOT be hard-coded. This means that making
your methods explicitly return results known to pass the given JUnit test cases is not allowed.
Exercise 3 - Get Instructor’s Signature
4. Two-Dimensional Arrays In this last section, you will write methods handling 2-dimensional arrays.
Exercise 4
Create a class Lab02Matrix that implements the methods below.
public static void switchRows( int[][] anArray )
public static void switchColumns( char[][] anArray )
Follow the steps below to implement them:
1. Write the implementation of the method switchRows.
This method receives a 2-dimensional array of integers and switches the values in opposing rows.
For example, given a 2-dimensional array (shown left, below), the method should swap its row
values (shown right, below) where the values on the 1st row (index 0) are switched with the values
on the 5th row (index 4), and the values on the 2nd row (index 1) are switched with those on the 4th
(index 3). Since this example shows an array with odd-numbered rows, the 3rd row (index 2) did not
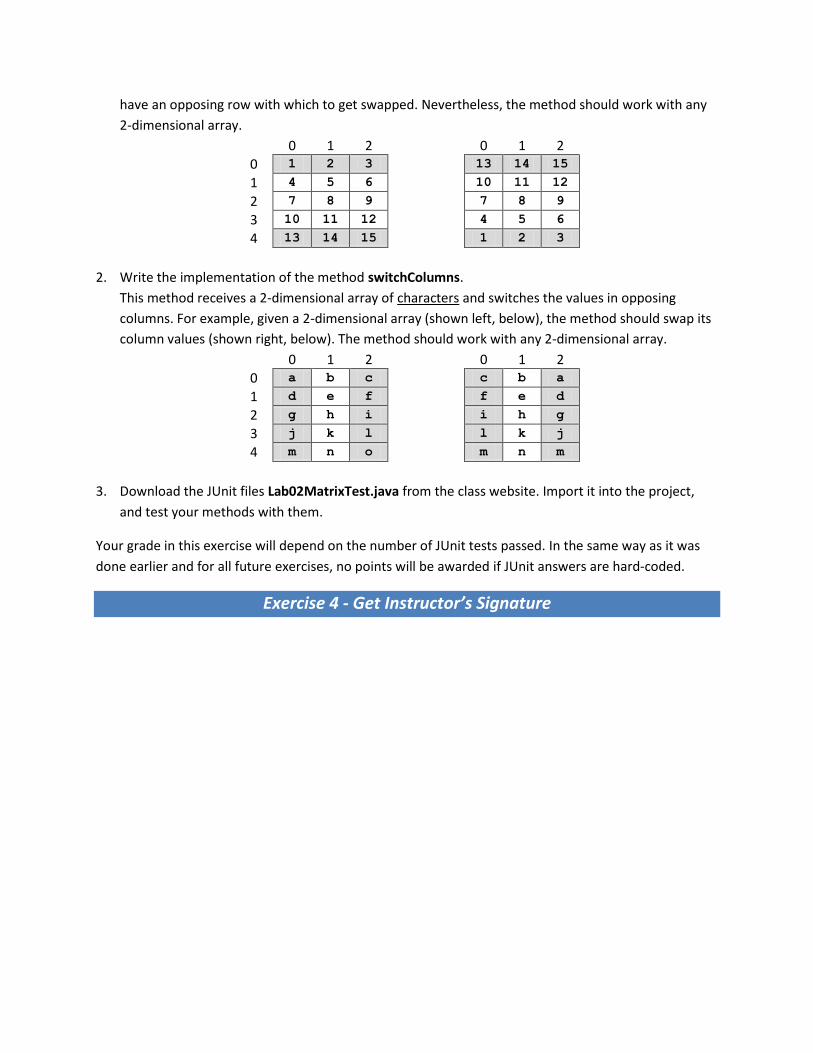
have an opposing row with which to get swapped. Nevertheless, the method should work with any
2-dimensional array.
0 1 2 0 1 2
0 1 2 3 13 14 15
1 4 5 6 10 11 12
2 7 8 9 7 8 9
3 10 11 12 4 5 6
4 13 14 15 1 2 3
2. Write the implementation of the method switchColumns.
This method receives a 2-dimensional array of characters and switches the values in opposing
columns. For example, given a 2-dimensional array (shown left, below), the method should swap its
column values (shown right, below). The method should work with any 2-dimensional array.
0 1 2 0 1 2
0 a b c c b a
1 d e f f e d
2 g h i i h g
3 j k l l k j
4 m n o m n m
3. Download the JUnit files Lab02MatrixTest.java from the class website. Import it into the project,
and test your methods with them.
Your grade in this exercise will depend on the number of JUnit tests passed. In the same way as it was
done earlier and for all future exercises, no points will be awarded if JUnit answers are hard-coded.
Exercise 4 - Get Instructor’s Signature
Lab 2 Instructor’s Signature Page
Student’s Name: ___________________________________________ Student ID _________________
Exercise 1: ___________________________ Comments:
Exercise 2: ___________________________ Comments:
Exercise 3: ___________________________ JUnit tests passed: ____________
Exercise 4: ___________________________ JUnit tests passed: ____________