Embed Size (px)
Citation preview


Qubix International Limited – Hyperion HFM Bootcamp Page 2
31st January 2013
Author: Saravanan Singaravadivelan
Qubix International Limited
Highclere House 5 High Street, Knaphill
Surrey, GU21 2PG Tel: +44 (0) 1483 480222

Qubix International Limited – Hyperion HFM Bootcamp Page 3
CONTENTS
8 REPORTING .............................................................................................................. 4
8.1 SECTION OBJECTIVES ...................................................................................................................... 4 8.2 SMART VIEW ................................................................................................................................ 4 8.2.1 Smart View Install .............................................................................................................. 4 8.2.2 Managing Connections ...................................................................................................... 7 8.2.3 Creating reports using Functions ..................................................................................... 10 8.2.4 Creating reports using Ad‐Hoc ......................................................................................... 27 8.2.5 Data Forms in Smartview ................................................................................................. 44
8.3 FINANCIAL REPORTING STUDIO ....................................................................................................... 46 8.3.1 Creating reports using FR Studio ...................................................................................... 46
8.4 WORKSPACE REPORTING AND ANALYSIS ........................................................................................... 79 8.4.1 Navigate Workspace Reporting ....................................................................................... 79 8.4.2 Exporting and importing reports ..................................................................................... 87 8.4.3 Creating Books ................................................................................................................. 90 8.4.4 Creating Batches .............................................................................................................. 98

Qubix International Limited – Hyperion HFM Bootcamp Page 4
8 REPORTING
8.1 SECTION OBJECTIVES
The focus of this Chapter is to review two of the reporting tools for end users. Smart View for
Microsoft Office and Financial Reporting Studio, which is a tool used for the production of quality
type of reports.
At the end of this section, you will be able to:
Create reports using Smart View Functions
Create Ad Hoc analysis
Use Data Forms using Smart View
Create reports using Financial Reporting Studio
Manage / running reports using Workspace
Create Books of reports
8.2 SMART VIEW
8.2.1 SMART VIEW INSTALL
1. To be able to use Smart View for Office, the Add‐In needs to be installed on the Hyperion server or on the user machine. First make sure it hasn’t been installed already, this should appear on the Excel / Word / PowerPoint menu bar.
2. If it’s not installed, logon to Workspace.

Qubix International Limited – Hyperion HFM Bootcamp Page 5
3. Click Tools > Install > Smart View.
4. Click on Run or you can Save it to a folder and then run it from there.
5. Click on Next.

Qubix International Limited – Hyperion HFM Bootcamp Page 6
6. Select a destination folder for the install and click on Next.
7. Click on Next to start the install.

Qubix International Limited – Hyperion HFM Bootcamp Page 7
8. The install will take a minute.
9. Click on Finish. Open Microsoft Excel, you should now be able to see a new item for Smart View on the menu bar.
8.2.2 MANAGING CONNECTIONS
10. We now have to connect to the application required. You can connect to any application on HFM, Planning or Essbase. For our exercise the application is QBCCONSOL. Open Excel, click on Smart View from the menu bar. This will display a tool bar.

Qubix International Limited – Hyperion HFM Bootcamp Page 8
11. Click on the Options icon and select Advanced tab.
12. Make sure the URL is set correctly. It has to have the name of the server in there. Example above is just for reference only, do not copy this one into your URL.
13. Click on the Open icon. This will open a window on the right hand side of the screen.
14. You can setup shared or private connections. Let’s create a shared one by clicking on Shared Connections.

Qubix International Limited – Hyperion HFM Bootcamp Page 9
15. Connect using the admin credentials.
16. Click on the Select Server to proceed box and select Oracle Hyperion Financial Management, Fusion Edition.
17. This will display the registered cluster demodrive. Expand it and select QBCCONSOL application. This will display some options at the bottom of the window.
18. Select Add to Private connections. This will add QBCCONSOL connection to the private ones menu.

Qubix International Limited – Hyperion HFM Bootcamp Page 10
19. Give it a name and description and click on OK.
20. Click on the Home button and select Private Connections this time.
21. Click on the Select Server or enter… box and select Financial Management….This will now display the connection we just created.
8.2.3 CREATING REPORTS USING FUNCTIONS
22. On this exercise we are creating a new report in Excel which we want to use to retrieve data from QBCCONSOL application for entity ENTITY_EUR1, Actual, 2011, Jan for P&L accounts.
23. On Excel, connect to QBCCONSOL as show on previous exercise. Using a blank sheet we now need to place all the dimensions / members which we will need to create the formula to retrieve the data. On column A we list all the HFM dimensions, with the order we saw on the PoV for grids/forms.

Qubix International Limited – Hyperion HFM Bootcamp Page 11
24. On column B we list the member (for each dimension) that we need for this report. Select cell B2 and type the member (if you know the label) or right click on QBCCONSOL from the right pane.
25. Select Member Selection.

Qubix International Limited – Hyperion HFM Bootcamp Page 12
26. Select Scenario from the drop down option.
27. Tick ACTUAL and move it to the right box. Click on OK when done. This will add ACTUAL on the cell selected B2.
Qubix International Limited – Hyperion HFM Bootcamp Page 13
28. Repeat previous steps (or type them in) to add the members as displayed below.
29. We now want to design the report so that we have Account dimension going down the rows and we want Scenario and Period on the columns, so that we can compare Actual against Forecast etc. We can move the dimension/member accordingly as displayed below.
30. Select now cell B14, where account PL6001 is, and click on button from the toolbar. Select Account from the drop down option. Now you

Qubix International Limited – Hyperion HFM Bootcamp Page 14
can select as many accounts as you want by ticking them one by one or using some filters/options.
31. Tick RETAINEDPL account, click on the button next to the Add button.
32. Select [Descendants].
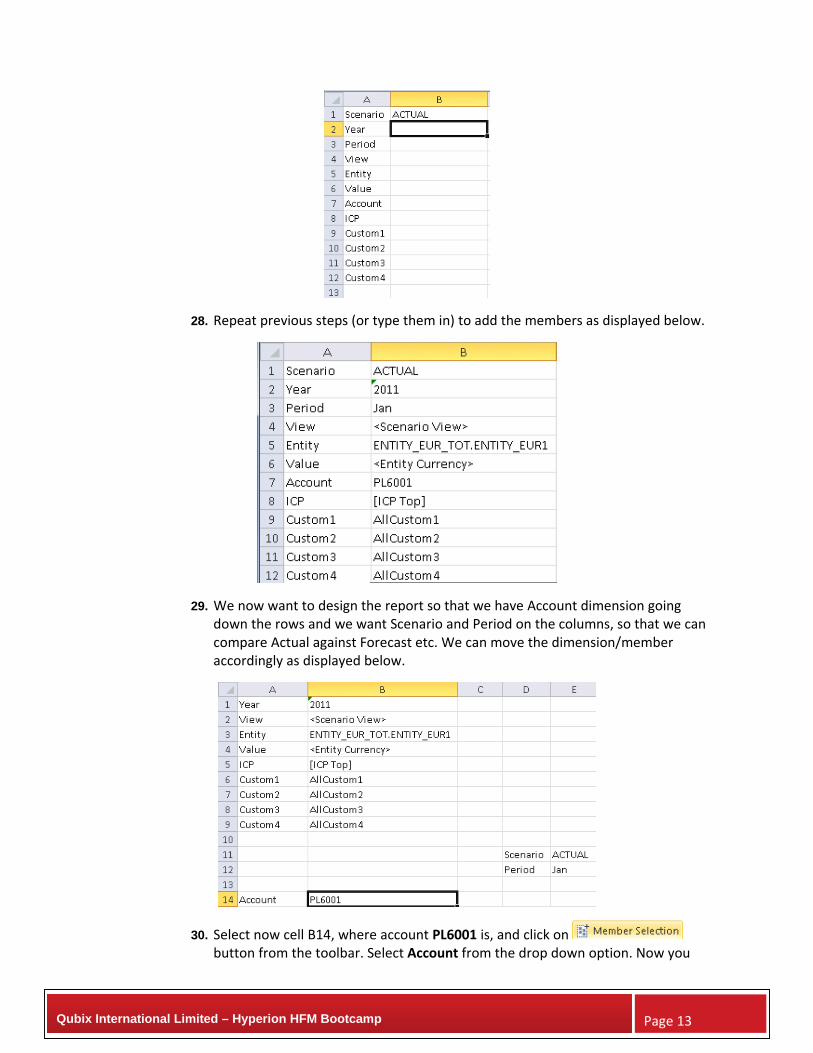
33. Click on OK. This will add all accounts under RETAINEDPL onto the sheet.
Qubix International Limited – Hyperion HFM Bootcamp Page 15
34. We now have all the accounts we require. Let’s add the comparison scenarios and periods on the column, as per below.
35. We are now adding a function that will allow us to automatically retrieve the account description from HFM, by just using the Account dimension. Select cell C14, select Smart View menu from the menu bar.
36. Click on button on the toolbar and select Build Function.

Qubix International Limited – Hyperion HFM Bootcamp Page 16
37. This is the Build Function wizard that allows you to create all the functions you need for HFM. Make sure the connection selected at the top is QBCCONSOL. Select HSDescription from the list of functions.
38. Select Account from the Dimension drop down, add $B14 (cell where the account is) on the Member box and select Cell Reference from the Member Type box.

Qubix International Limited – Hyperion HFM Bootcamp Page 17
39. Click on Add to Function button. This will add the formula in the bottom box.
40. Click on Validate Syntax and if correct click on OK.

Qubix International Limited – Hyperion HFM Bootcamp Page 18
41. The formula has now been placed on cell C14 and it says it requires a refresh. To do that click on the Refresh button from the toolbar and select Refresh.
42. The cell will now display the description associated to the account in column B. Copy the formula in cell C14 and paste it down on all other rows. Then click on Refresh again.

Qubix International Limited – Hyperion HFM Bootcamp Page 19
43. We are now going to use another function HSGetValue which will allow us to retrieve data from HFM onto the sheet. Instead of using the Build Function wizard, this time we will manually write the formula and we will start using the formula we just created and work from there. Copy the C14 cell formula and paste onto cell E14.
44. We now need to modify the formula on the formula bar to become HSGetValue and with the correct intersection of dimension/member.
45. Start with modifying the formula to HSGetValue.
46. Let’s now add each dimension/member concatenation one by one, starting from Scenario. As you can see with the Account, the formula concatenate Account dimension with the content of cell B14. In a similar way we need to concatenate Scenario dimension with the content of cell E11. Copy the Account concatenation and paste just before.
47. Update it now for the Scenario dimension.
48. Add now the Year dimension as concatenation of Year dimension with the content of cell B1.

Qubix International Limited – Hyperion HFM Bootcamp Page 20
49. Add now the Period dimension as concatenation of Period dimension with the content of cell E12.
50. Add now the View dimension as concatenation of View dimension with the content of cell B2.
51. Add now the Entity dimension as concatenation of Entity dimension with the content of cell B3.
52. Add now the Value dimension as concatenation of Value dimension with the content of cell B4.
53. Add now the ICP dimension as concatenation of ICP dimension with the content of cell B5.
54. The Account concatenation is already there, so we don’t need to change anything on this. Add now the Custom1 dimension as concatenation of Custom1 dimension with the content of cell B6.
55. Add now the Custom2 dimension as concatenation of Custom2 dimension with the content of cell B7.
56. Add now the Custom3 dimension as concatenation of Custom3 dimension with the content of cell B8.
57. Add now the Custom4 dimension as concatenation of Custom4 dimension with the content of cell B9.
58. The full formula should be as below.
=HsGetValue("QBCCONSOL","Scenario#"&E$11&"","Year#"&$B$1&"","Period#"&E$12&"","View#"&$B$2&"","Entity#"&$B$3&"","Value#"&$B$4&"","ICP#"&$B$5&"","Account#"&$B14&"","Cu
stom1#"&$B$6&"","Custom2#"&$B$7&"","Custom3#"&$B$8&"","Custom4#"&$B$9&"")

Qubix International Limited – Hyperion HFM Bootcamp Page 21
59. Press on the Enter button on the keyboard. Click on the Refresh button.
60. Data is retrieved from HFM. If you select cell E14 and press the F2 button of the keyboard, you will be able to see the cell reference linkage. Press Esc.
61. Copy the formula on cell E14 and paste on column F and G and down to rows 77. Click on Refresh after.

Qubix International Limited – Hyperion HFM Bootcamp Page 22
62. You will see now data appearing for the other cell. On some cell you can see a #Missing symbol. To get rid of it, click on the Option button from the toolbar and select Data Options tab.
63. Select #NumericZero on the #NoData/Missing Label option.

Qubix International Limited – Hyperion HFM Bootcamp Page 23
64. Click on OK. Click on Refresh button again.
65. #Missing symbol has now disappeared.
66. Save the file as Smart View – FB Exercise 1.xls under D:\1HFMBootcamp\Smartview\ folder.
67. With the following exercise instead we want to upload data onto HFM using Smart View. The function to be used is HSSetValue, which is very similar to HSGetValue but it includes the number (amount or quantity) or cell reference to be loaded onto the system. Open the file Smart View – FB Exercise 2 Start.xls under D:\1HFMBootcamp\Smartview\ folder. We are going to use this file to upload some P&L data for the month of February. The file contains two sheets, the first one to include the data to be loaded, the second will be used to upload the data onto QBCCONSOL application. Select the first sheet.
68. Enter some data as shown below.

Qubix International Limited – Hyperion HFM Bootcamp Page 24
69. Move to the second sheet. We now need to modify the PoV to make sure the intersection we are uploading the data is a valid input member’s intersection.
70. As you can see from the sheet, some of the members selected are top members. You will never be able to upload data at this level. Let’s select the correct members ICP, Custom1‐4, as per below.

Qubix International Limited – Hyperion HFM Bootcamp Page 25
71. We now need to modify the formula on cell E14 (HSGetValue) to become an upload formula. Select E14 and look at the formula bar.
72. First thing modify HSGetValue to HSSetValue.
73. Next thing we need to add is the reference to the cell we want to upload data from, which is on the first sheet ‘Input Sheet’. This reference needs to be added at the beginning of the formula, just after the open bracket (.
74. Press Enter on the keyboard. If the formula is correct is should show the number on the sheet.
75. The data has not been loaded yet. To do that select Smart View menu and click on Submit Data.
76. Logon to Workspace now and open up PL_ACT_INP_FORM_F form and select Feb period.

Qubix International Limited – Hyperion HFM Bootcamp Page 26
77. The form should show the number we have just loaded.
78. You can now copy formula in cell E14 for all other rows except for the total accounts row, as data cannot be loaded into totals.
79. Click on Submit and check the data again on the form on Workspace, after
clicking on the Refresh button.

Qubix International Limited – Hyperion HFM Bootcamp Page 27
80. Save the file as Smart View – FB Exercise 2 Final.xls under D:\1HFMBootcamp\Smartview\ folder.
8.2.4 CREATING REPORTS USING AD‐HOC
81. On this exercise we are replicating the two reports we created on exercise 9.2.3 but using Ad‐Hoc this time. First report will be used to retrieve data from QBCCONSOL application for entity ENTITY_EUR1, Actual, 2011, Jan for P&L accounts, second report will be used to upload data onto QBCCONSOL application for entity ENTITY_EUR1, Actual, 2011, Feb for P&L accounts.
82. Open Excel and on a new blank sheet connect to QBCCONSOL as show on previous exercises. Once connected, right click on QBCCONSOL connection.
83. Select Ad hoc analysis. This will open a new item HFM Ad Hoc on the menu bar and it will also open a new toolbar underneath. All these all the commands needed to run an Ad Hoc analysis.

Qubix International Limited – Hyperion HFM Bootcamp Page 28
84. A default analysis will also be open on the sheet and there is a separate box containing the Point of View (POV).
85. The default analysis that gets’ open most of the time contains Account dimension on the rows and Period dimension on the column. All dimensions can be moved/placed onto the sheet or on the POV, the important thing is that a dimension can only appear once, so if it’s on the sheet, it cannot appear on the POV as well. We now need to place the correct members on the sheet or on the POV. Remember from the previous exercises, we need to place the Account on the rows and Scenario and Period on the columns. To place a member on the sheet, select a cell for example B1 and write the member label if you know it (i.e. Jan) or select the cell and click on Member Selection button from the toolbar.

Qubix International Limited – Hyperion HFM Bootcamp Page 29
86. Select Period, if not selected already) from the drop down menu at the top. If you need to change what’s in the cell already, select the member from the right hand
pane and click on the Remove button to remove it. Then tick the period required Jan, and move it onto the right pane.
87. Click on OK when done. Member Jan will now be place onto the sheet on cell B1.
88. Select now cell A2 and click on Member Selection button from the toolbar.

Qubix International Limited – Hyperion HFM Bootcamp Page 30
89. Select Account (if not selected already) from the drop down menu at the top. If you need to change what’s in the cell already, select the member from the right
hand pane and click on the Remove button to remove it. Then you need to tick the account required (RETAINEDPL) and move it onto the right pane. Click on OK when done.
90. Member RETAINEDPL will now be place onto the sheet on cell A2. Click now on the Refresh button from the POV box to refresh/validate the query.

Qubix International Limited – Hyperion HFM Bootcamp Page 31
91. We now need to place the Scenario dimension on the sheet as well, on the columns. To do that you can insert a new row just above row 1.
92. Select cell B1 and click on Member Selection.

Qubix International Limited – Hyperion HFM Bootcamp Page 32
93. Select Scenario (if not selected already) from the drop down menu at the top. If you need to change what’s in the cell already, select the member from the right
hand pane and click on the Remove button to remove it. Then you need to tick the scenario required (ACTUAL) and move it onto the right pane. Click on OK when done.
94. Member ACTUAL will now be place onto the sheet on cell B1. Click now on the Refresh button from the POV box to refresh/validate the query.

Qubix International Limited – Hyperion HFM Bootcamp Page 33
95. If your POV is same as above, you should be able to get some data retrieved already. We now need to select the members from the POV. To do that, select the first drop down.
96. Select … from the list. This will open the Member Selection window.
Qubix International Limited – Hyperion HFM Bootcamp Page 34
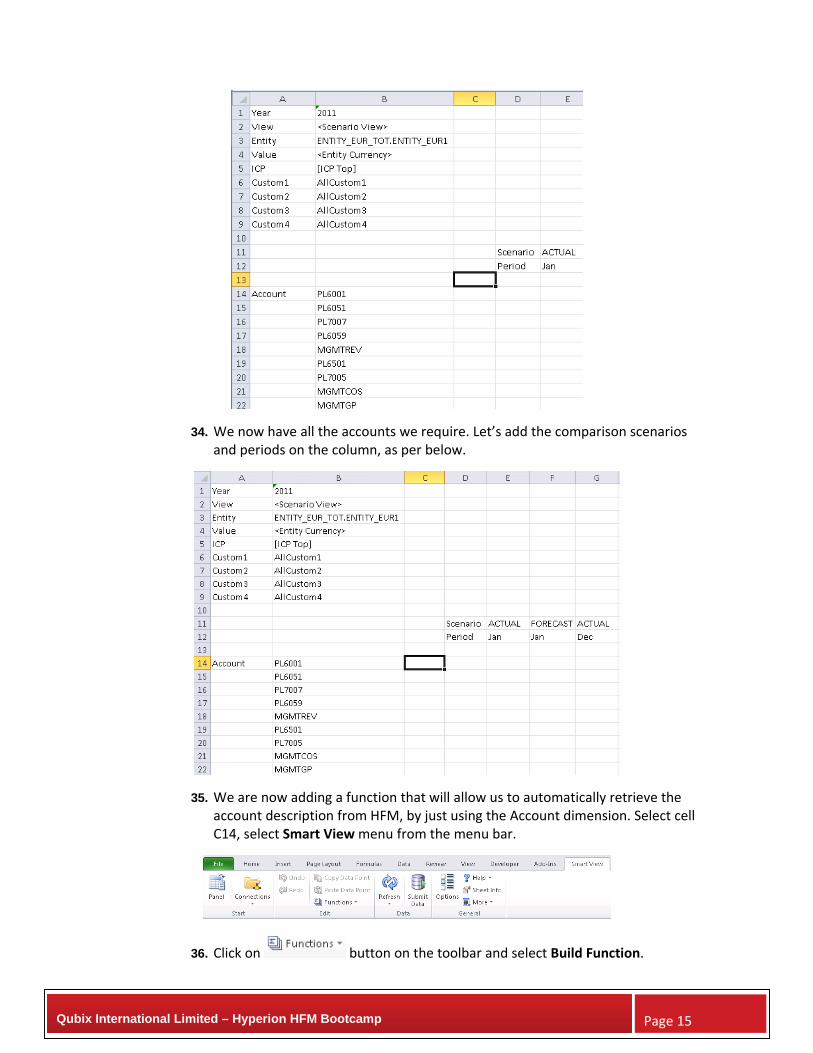
97. Add 2011 for Year dimension, then click on the dimension drop down at the top and select View.
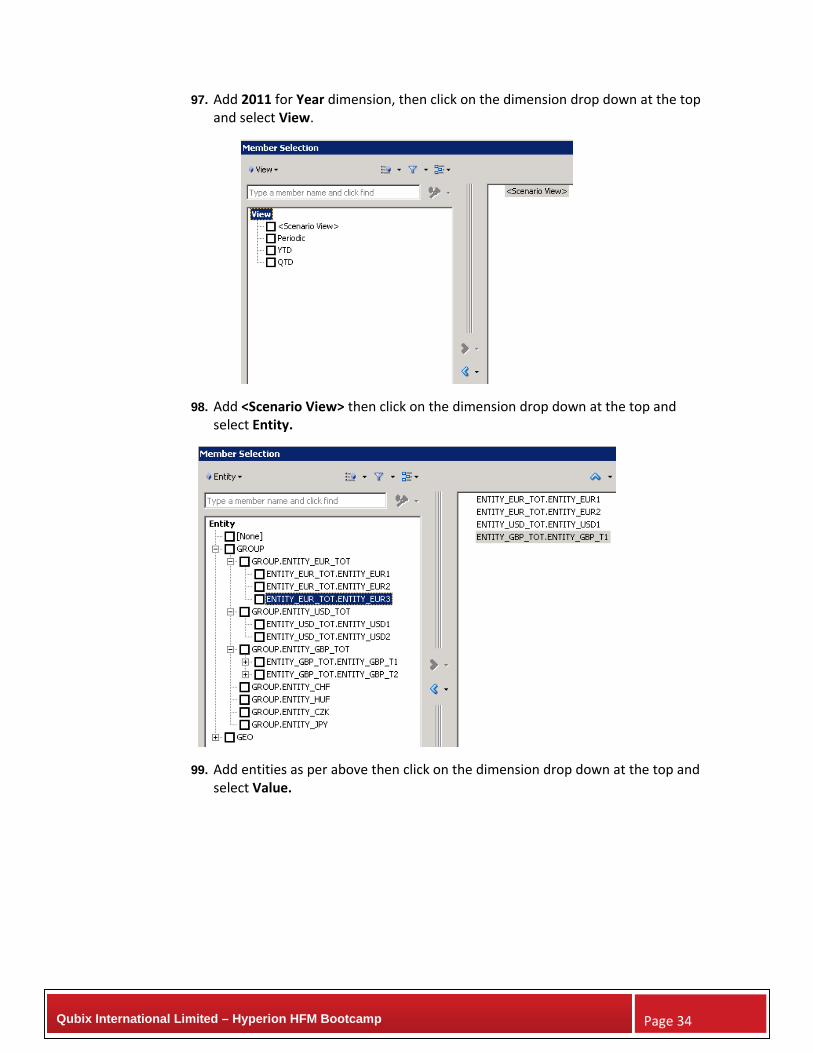
98. Add <Scenario View> then click on the dimension drop down at the top and select Entity.
99. Add entities as per above then click on the dimension drop down at the top and select Value.

Qubix International Limited – Hyperion HFM Bootcamp Page 35
100. Add <Entity Currency> then click on the dimension drop down at the top and select ICP.
101. Add [ICP Top] then click on the dimension drop down at the top and select Custom1.
102. Add AllCustom1 then click on the dimension drop down at the top and select Custom2.

Qubix International Limited – Hyperion HFM Bootcamp Page 36
103. Add AllCustom2 then click on the dimension drop down at the top and select Custom3.
104. Add AllCustom3 then click on the dimension drop down at the top and select Custom4.
105. Add AllCustom4. Click on OK when done.
106. POV should look like the above. If you expand the Entity drop down, you should be able to see the 4 entities selection.

Qubix International Limited – Hyperion HFM Bootcamp Page 37
107. This allows you to select an entity then refresh to see the data or you could select a different entity and display the data for that entity. The same logic can be applied to any other dimension. My advice is to keep on the POV those dimension that needs to change, any other dimension can be hardcoded onto the sheet, mostly on columns. Click on Refresh.
108. You can now copy the content of cells B1 and B2 and paste onto cells C1/C2. and D1/D2.
109. Modify content of the pasted cells as per below.
110. Click on Refresh.

Qubix International Limited – Hyperion HFM Bootcamp Page 38
111. If you sheet is displaying #Missing, we need to change the Options. Select Smart View menu, click on Options button from toolbar select Data Options tab.
112. Select #NumericZero on the #NoData/Missing Label option.
113. Click on OK. Click on Refresh button again.
114. #Missing should have now disappeared. Re‐open the Options window and let’s set some useful settings. Select Member Options tab.

Qubix International Limited – Hyperion HFM Bootcamp Page 39
115. Select options as above and select Formatting tab.
116. Select Use Excel Formatting and click on OK.
117. Click on Refresh.
118. The query now displays label and description of the members, as selected in the Options. Select cell A3 and double click on it or click on Zoom In button on the toolbar.

Qubix International Limited – Hyperion HFM Bootcamp Page 40
119. The accounts have been expanded down to every single account, as selected on the Options. If you want to re‐group the accounts, select RETANEDPL at the bottom and click on Zoom Out button.
120. Save the file as Smart View – Ad Hoc Exercise 1.xls under D:\1HFMBootcamp\Smartview\ folder.
121. With the following exercise instead we want to upload data onto HFM using Ad Hoc. Open the file Smart View – Ad Hoc Exercise 2 Start.xls under D:\1HFMBootcamp\Smartview\ folder. We are going to use this file to upload some P&L data for the month of March. The file contains two sheets, the first one to include the data to be loaded, the second will be used to upload the data onto QBCCONSOL application. Select the first sheet.
122. Enter some data as shown below.

Qubix International Limited – Hyperion HFM Bootcamp Page 41
123. Move to the second sheet. We now need to modify the PoV to make sure the intersection we are uploading the data is a valid input member’s intersection.
124. Select cell B2 and modify the member to Mar. Click on Refresh.
125. Select the first member on the POV and click on the … from the list.

Qubix International Limited – Hyperion HFM Bootcamp Page 42
126. Add 2011 (Year), <Scenario View> (View)), same entities as per previous exercise, <Entity Currency> (Value), [ICP None] (ICP), [None] (Custom1), [None] (Custom2), [None] (Custom3), TBUpload (Custom4). Click on OK. POV should look like the below one.
127. Click on Refresh.

Qubix International Limited – Hyperion HFM Bootcamp Page 43
128. Copy now the amounts from Input Sheet and paste them onto the Upload Sheet. Don’t copy the total, as these won’t be uploaded.
129. When done, click on Submit Data from the toolbar.
130. Data has been submitted onto QBCCONSOL. To check that, click on Refresh and it should return the data you wanted to submit, or logon to Workspace and open PL_ACT_INP_FORM_F. Change the period to Mar and it will show you the data just uploaded from Excel.

Qubix International Limited – Hyperion HFM Bootcamp Page 44
131. Save the file as Smart View – Ad Hoc Exercise 2 Final.xls under D:\1HFMBootcamp\Smartview\ folder and close the file.
8.2.5 DATA FORMS IN SMARTVIEW
132. Data Forms, created on Workspace, can also be opened and used in Excel. Smart View. On Excel, open a blank new sheet and connect to QBCCONSOL application and expand it.
133. Expand Root > ACT Forms. This will display the forms we created on exercise 8.2.
134. Double click on PL_ACT_INP_FORM_F.

Qubix International Limited – Hyperion HFM Bootcamp Page 45
135. Change the Options so that is not showing #Missing.
136. Using this form, you have access to the POV, you can Refresh data or enter data on the form and submit it onto HFM using the commands on the toolbar. You should not try to change the layout of the file nor removing rows/columns, as the form is defined on the Web and that’s where you should be changing them.
137. For more detail and explanation on Smart View, please refer to the sv_user.pdf guide saved under D:\1HFMBootCamp\11.1.2.2 Guides\ folder.

Qubix International Limited – Hyperion HFM Bootcamp Page 46
8.3 FINANCIAL REPORTING STUDIO
8.3.1 CREATING REPORTS USING FR STUDIO
138. On this exercise we are creating a new report using FR Studio, which we want to use to retrieve data from QBCCONSOL application for entity ENTITY_EUR1, Actual, 2011, Jan to Mar, for P&L accounts.
139. Click on Start > Programs > Oracle EPM System > Reporting and Analysis and open Financial Reporting Studio. Logon as admin.
140. Select File > Explore to open the report repository.
141. Select on File New Folder. Name the folder Actual Reports and press the Enter key on the keyboard.

Qubix International Limited – Hyperion HFM Bootcamp Page 47
142. Click on the New Report button from the toolbar, or select File > New > Report.
143. The window contains a menu/toolbar at the top, the report area with header, main body and footer, and the properties pane on the right hand side. Let’s start creating the report. First we need to insert a grid, select Insert > Grid and draw the grid onto the main body of the report.

Qubix International Limited – Hyperion HFM Bootcamp Page 48
144. The report is requiring a connection to an application. Our QBCCONSOL application won’t be on the list, as we haven’t added this connection yet. This needs to be done only once. Click on New Database Connection.
145. Enter a name for the connection – QBCCONSOL, type of connection – Financial Management, server – QUBIXEPMV1 and username admin with its password.
146. Click on the Search button next to the Application box. If the server name has been entered correctly, you should get a list of HFM application.
147. Select QBCCONSOL and click on OK.

Qubix International Limited – Hyperion HFM Bootcamp Page 49
148. Click on OK.
149. Enter admin username and password and click on OK.

Qubix International Limited – Hyperion HFM Bootcamp Page 50
150. We now need to define the layout of out report. We want to have Account
on rows and Period on columns. Click on Account dimension icon from the Point of View box and drag and drop it into the Rows box.
151. Click on Period dimension icon from the Point of View box and drag and drop it into the Columns box.

Qubix International Limited – Hyperion HFM Bootcamp Page 51
152. The dimensions we wanted to set up are done. You can always add more dimensions to rows and columns after if required. Click on OK.
153. The grid has now been added to the report and it contains the two dimensions we just set on the Dimension Layout section. There is a user Point of View at the top and the properties pane on the left. User Point of View contains the dimension/members that can be change by the user.
154. We now need to set the dimensions that are not going to be changed by the user and are fixed on the grid. Select the Grid by clicking on the upper left corner and right click on it. You will have the following menu appearing.

Qubix International Limited – Hyperion HFM Bootcamp Page 52
155. Select Grid Point of View.
156. This has now displayed the Grid Point of View just above the grid. Click on any of the member. This will open a window to be used for the member selection. The process is similar to what we have done previously in Excel. On the Scenario tab select ACTUAL. This will hardcode the report to ACTUAL scenario and no other scenario can be selected by the user.
157. On the Year tab select User Point of View for Year. This will allow the user to select the year from the User Point of View bar.
158. On the View tab select Periodic. This will hardcode the report to Periodic view and no other view can be selected by the user.

Qubix International Limited – Hyperion HFM Bootcamp Page 53
159. On the Entity tab select User Point of View for Entity. This will allow the user to select the entity from the User Point of View bar.
160. On the Value tab select <Entity Currency>. This will hardcode the report to <Entity Currency> value and no other value member can be selected by the user.
161. On the ICP tab select [ICP Top]. This will hardcode the report to [ICP Top] and no other ICP member can be selected by the user.
162. On the Custom1 tab select AllCustom1. This will hardcode the report to AllCustom1 member and no other Custom1 member can be selected by the user.

Qubix International Limited – Hyperion HFM Bootcamp Page 54
163. On the Custom2 tab select AllCustom2. This will hardcode the report to AllCustom2 member and no other Custom2 member can be selected by the user.
164. On the Custom3 tab select AllCustom3. This will hardcode the report to AllCustom3 member and no other Custom3 member can be selected by the user.
165. On the Custom4 tab select AllCustom4. This will hardcode the report to AllCustom4 member and no other Custom4 member can be selected by the user.
166. Click on OK.

Qubix International Limited – Hyperion HFM Bootcamp Page 55
167. This has now change the User Point of View, reducing it to two selectable dimensions, Year and Entity. Let’s now set the dimensions on the columns and on the rows. Double click on the first cell on column A or select it and click on the
Period button from the toolbar.
168. Remove what’s on the right pane and add Jan into it instead. Click on OK when done.
169. Click on the button on the toolbar to centre the period on the cell.
170. Double click on the first cell on row 1 or select it and click on the Account
button from the toolbar.

Qubix International Limited – Hyperion HFM Bootcamp Page 56
171. Remove what’s on the right pane and add PL6001, PL6051, PL7007 and PL6059 into it instead. Click on OK when done.
172. We need to increase the width of the first column (without a letter). To do that, select the column. Tis will display the properties of the column on the right pane.
173. Change the width to 180 and click back on any cell of the report.
Qubix International Limited – Hyperion HFM Bootcamp Page 57
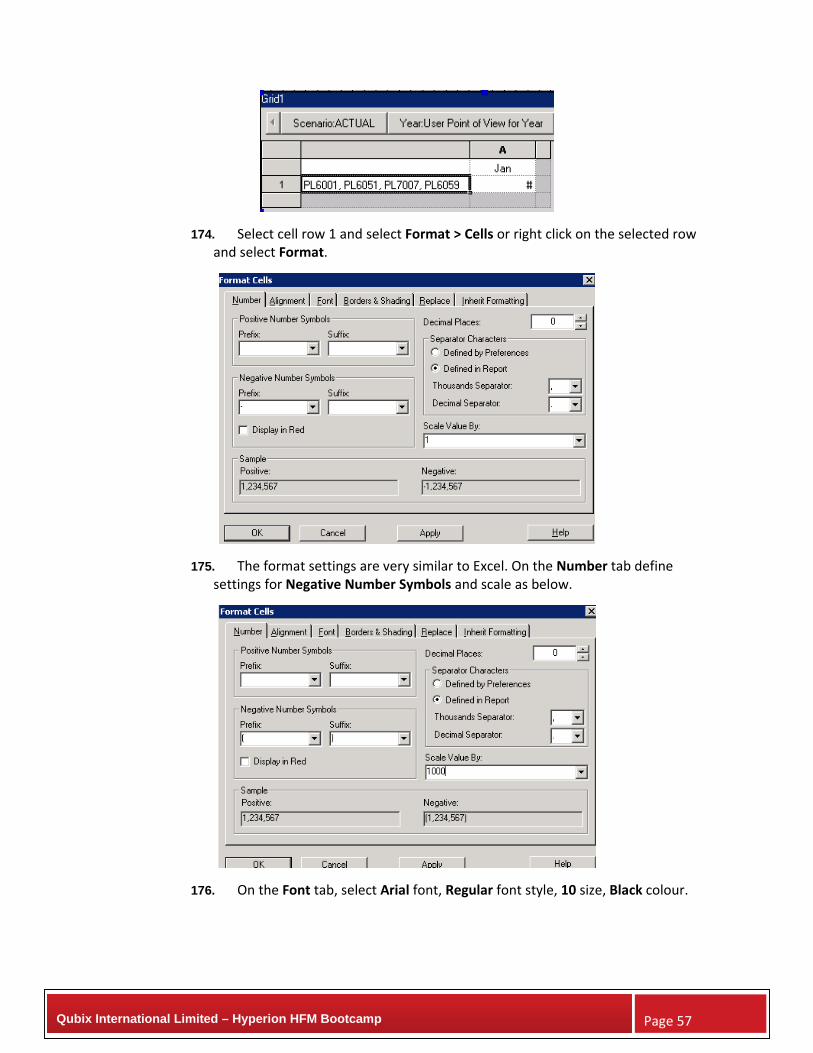
174. Select cell row 1 and select Format > Cells or right click on the selected row and select Format.
175. The format settings are very similar to Excel. On the Number tab define settings for Negative Number Symbols and scale as below.
176. On the Font tab, select Arial font, Regular font style, 10 size, Black colour.

Qubix International Limited – Hyperion HFM Bootcamp Page 58
177. Click on Apply and then OK.
178. Select row 1 now and paste it below it.
179. Double click on first cell of row 2 to open the Select Member window.
180. Remove what’s on the right pane and add MGMTREV into it instead. Click on OK when done.

Qubix International Limited – Hyperion HFM Bootcamp Page 59
181. Select cell row 2 and select Format > Cells or right click on the selected row and select Format.
182. The format settings are very similar to Excel. On the Number tab define settings for Negative Number Symbols and scale as below.
183. On the Font tab, select Arial font, Bold font style, 10 size, Black colour.

Qubix International Limited – Hyperion HFM Bootcamp Page 60
184. Click on Apply and then OK.
185. Accounts on row 1 can be set dynamically instead of being selected one by one. To do that, double click the cell where the accounts.
186. Remove what’s on the right pane and select the Functions tab.

Qubix International Limited – Hyperion HFM Bootcamp Page 61
187. Select Descendants and move it to the right pane.
188. Click on the Value box of the first row and type MGMTREV or click on the Search button to find the account.
189. Click on OK.

Qubix International Limited – Hyperion HFM Bootcamp Page 62
190. Click on OK.
191. Select the Grid by clicking on the upper left corner and right click on it. You will have the following menu appearing.
192. Un‐select Grid Point of View to hide the bar.
193. Open the User Point of View for Year and Entity and select 2011 and ENTITY_EUR_TOT.ENTITY_EUR1.

Qubix International Limited – Hyperion HFM Bootcamp Page 63
194. Click on Print Preview button on the toolbar to preview the report.
195. Report start showing some numbers but it has got very little formatting. Click on Close to return to the report.
196. Select the first cell on row 1 and set the Headings onto Description on the right pane.

Qubix International Limited – Hyperion HFM Bootcamp Page 64
197. Repeat previous step for first cell on row 2 as well.
198. Click on Print Preview button to see the change on the report.
199. Report is now displaying descriptions on rows, instead of labels. Click on Close.
200. Click on cell where Jan is click on the Bold button on the toolbar.
201. Copy column A and paste it to the right of the column. This will insert column B and paste the content from column A.

Qubix International Limited – Hyperion HFM Bootcamp Page 65
202. Modify first cell on column B to read Feb. With the same approach, create column C and insert Mar into it.
203. We now need to insert a fourth column that will sum up column A to C data. To do that, right click on the last column to the right (the one with no letter on it) and right click on it, select Insert Column.
204. Select Formula.
205. Select first top cell on column D, select Custom Heading from the Properties pane and write Q1 within the box.

Qubix International Limited – Hyperion HFM Bootcamp Page 66
206. Select column D and
207. Click on the function drop down from the toolbar.

Qubix International Limited – Hyperion HFM Bootcamp Page 67
208. Select Sum(). This will add the function on the empty box next to the button.
209. Modify the formula to read Sum([A] , [C]).
210. Click on cell D1 now and make sure on the right pane the Calculation Order is set onto Use the column formula.
211. Repeat this for cell D2. Click on the Print Preview button to check result of the changes just made.
212. To remove the #ZERO message from the report, click on Close. Click on the top left cell to select the entire grid.

Qubix International Limited – Hyperion HFM Bootcamp Page 68
213. On the right pane there will be a Grid Properties box with different settings to be chosen.
214. Select Suppression from the top box.

Qubix International Limited – Hyperion HFM Bootcamp Page 69
215. Modify the Text Options at the bottom to use the options below.
216. Click back on the grid and re‐run the print preview.
217. The #ZERO message has now been replaced by ‐.

Qubix International Limited – Hyperion HFM Bootcamp Page 70
218. To complete the report we can now add a header and footer to the report. Click on Insert > Text and draw a text box within the Header section of the report.
219. On the right hand side, you can see the Text Properties pane. Select the positioning options as below.
220. Click inside the new text box and select Format > Font.

Qubix International Limited – Hyperion HFM Bootcamp Page 71
221. Set the font settings as above and click on OK. Click back into the text box and add some text.
222. You can also add dynamic functions to retrieve Entity member description from the POV. To do that, click inside the text box and click on Insert Function from the left pane.
223. Select Member Description and move it into the right box.

Qubix International Limited – Hyperion HFM Bootcamp Page 72
224. Update GridName to Grid1, remove the Row/Col/Page as we don’t need it, and update DimName with Entity.
225. Click on OK. This will be added onto the text box.
226. Run Print Preview.
227. As you can see from the report, the margins are not set. To do that, go back to the report page and select File > Page Setup.

Qubix International Limited – Hyperion HFM Bootcamp Page 73
228. On the Page tab, set the options as above.
229. On the Margins tab, set the options as above Click on OK.
230. Run Print Preview.
Qubix International Limited – Hyperion HFM Bootcamp Page 74
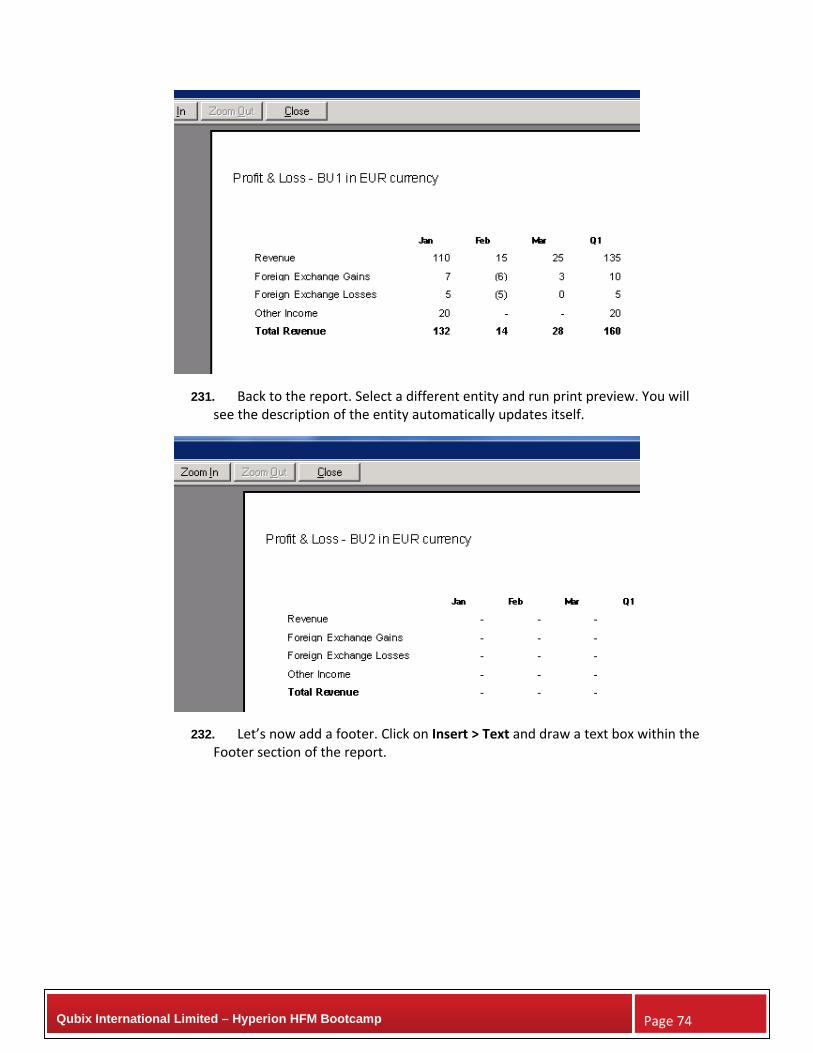
231. Back to the report. Select a different entity and run print preview. You will see the description of the entity automatically updates itself.
232. Let’s now add a footer. Click on Insert > Text and draw a text box within the Footer section of the report.

Qubix International Limited – Hyperion HFM Bootcamp Page 75
233. On the right hand side, you can see the Text Properties pane. Select the positioning options as below.
234. Click inside the new text box and select Format > Font.
235. Set the font settings as above and click on OK. Click back into the text box and add some text.

Qubix International Limited – Hyperion HFM Bootcamp Page 76
236. Click back into the text box and click on Insert Function from the left pane.
237. Select Page and move it into the right box.
238. Click on OK. This will be added onto the text box.
239. Highlight the text inside the box and click on the button.
240. Click on Print Preview to check the change.

Qubix International Limited – Hyperion HFM Bootcamp Page 77
241. Click on File > Save As.

Qubix International Limited – Hyperion HFM Bootcamp Page 78
242. Save the file as ACT PL REP under Actual Reports folder.
243. Once saved, close the report and return to the Explore area.
244. Click on Actual Reports. The new report should now appear on the repository, on the right side frame.
245. For more detail and explanation on FR Studio, please refer to the fr_user.pdf guide saved under D:\1HFMBootCamp\11.1.2.2 Guides\ folder.

Qubix International Limited – Hyperion HFM Bootcamp Page 79
8.4 WORKSPACE REPORTING AND ANALYSIS
8.4.1 NAVIGATE WORKSPACE REPORTING
246. Logon to Workspace and click on File > Preferences.
247. Select Financial Reporting menu from the left pane.
248. Set properties as above and click on OK.

Qubix International Limited – Hyperion HFM Bootcamp Page 80
249. Click on the Explore button on the toolbar.
250. This area is the correspondent Web version of the repository we used on FR Studio. Expand Actual Reports. You will find the report we created earlier on FR Studio.
251. Double click on ACT PL REP to open the report.
252. Click on Select to define the Year and Entity members you want to use. Use the ones shown below.

Qubix International Limited – Hyperion HFM Bootcamp Page 81
253. Click on OK to run the report. The report will be open in PDF.
254. You can then Save/Print the PDF report by using the Adobe commands.
255. If you wanted to see the report on a HTML format, click on the Open in HTML
button from the Workspace toolbar.

Qubix International Limited – Hyperion HFM Bootcamp Page 82
256. As you can see the report has been open on a different tab . You can always toggle between tabs or close the ones you no longer require.
257. Browse back to Explore tab.
258. Right click on Actual Reports and select Edit Permissions.

Qubix International Limited – Hyperion HFM Bootcamp Page 83
259. Here you can define who will have access to the reports and what type of access. Select the Groups tab on the left hand side and click on Update List at the bottom of the box.

Qubix International Limited – Hyperion HFM Bootcamp Page 84
260. Unfortunately the Groups we had setup on Shared Services during exercise 5.2.2 are not appearing. This is due to some roles not been provisioned yet on those groups. Let’s do that quickly. Click on Cancel on the window above.
261. Select Navigate > Administer > Shared Services Console expand User Directories > Native Directory > Groups node and click on Search button.
262. Right click on HFMUsers group and select Provision.
263. Expand Reporting & Analysis > Reporting & Analysis.
264. You can now select the role(s) that are appropriate for the user, moving them over to the pane on the right.

Qubix International Limited – Hyperion HFM Bootcamp Page 85
265. When done, click on Save.
266. Click on OK.
267. Back to Explore on Workspace. Right click on Actual Reports and select Edit Permissions.

Qubix International Limited – Hyperion HFM Bootcamp Page 86
268. Select the Groups tab on the left hand side and click on Update List at the bottom of the box.
269. HFMUsers group now appears on the list. Select it and move it to the right pane.
270. Click on the Access drop down.

Qubix International Limited – Hyperion HFM Bootcamp Page 87
271. Select View and click on OK. You can also apply these settings to all reports under these folders by selecting Apply Permissions to Children option. It is suggested to do this once you have created all your reports under this folder, as you can apply the security once for all.
8.4.2 EXPORTING AND IMPORTING REPORTS
272. Reports can be extracted and loaded from/to Workspace, i.e. for backup purposes, individually or by extracting the folder that contains all of them.
273. To export a report, on Explore, select the folder Actual Reports and select File > Export.
274. Select ACT PL REP and click on OK.
275. Click on Save and save the file as ACT_PL_REP.des under D:\1HFMBootcamp\Reports\ folder. File has now been exported and saved locally.
276. To import a report, on Explore, select the folder Actual Reports and select File > Import > Financial Reporting Document.

Qubix International Limited – Hyperion HFM Bootcamp Page 88
277. Click on Browse and select ACT_PL_REP_2.des from D:\1HFMBootcamp\Reports\ folder.
278. Click on Import.
279. The report has now been imported.
280. When you have more than one report in a folder, when exporting it’s better to export the folder, rather than individual reports. To do that, select the folder Actual Reports and select File > Export.

Qubix International Limited – Hyperion HFM Bootcamp Page 89
281. Click on the button to go up one level.
282. Select Actual Reports folder and click on OK.

Qubix International Limited – Hyperion HFM Bootcamp Page 90
283. Click on Save and save the file as Actual Reports.zip under D:\1HFMBootcamp\Reports\ folder. You can then open the file and it should contain the 2 reports we have defined so far.
8.4.3 CREATING BOOKS
284. Books are collection of reports. To create a book, on Explore, select File > New > Document.
285. Select Collect Reports into a Book and click on Next at the bottom of the screen.
286. Double click on Actual Reports folder to access it.

Qubix International Limited – Hyperion HFM Bootcamp Page 91
287. Select ACT_PL_REP_2 and move it to the right pane. Click on Finish when done.
288. Leave the Point of View as is and right click on Entity.
289. Select Member Selection.
Qubix International Limited – Hyperion HFM Bootcamp Page 92
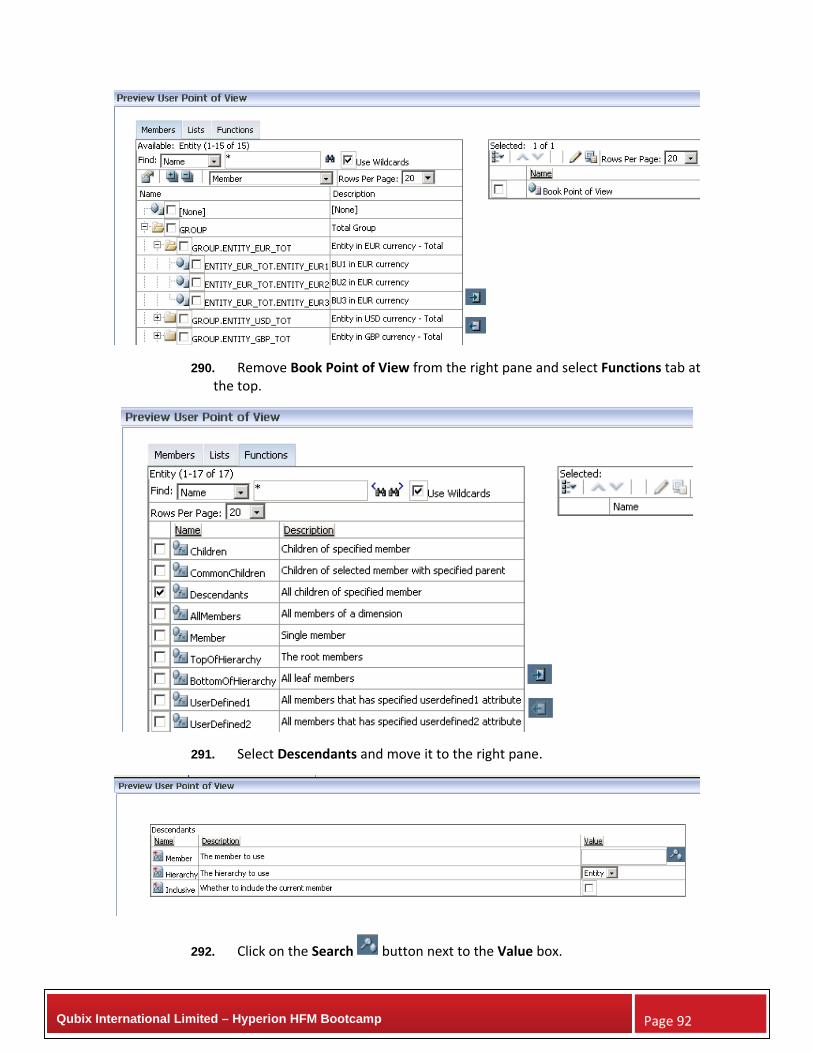
290. Remove Book Point of View from the right pane and select Functions tab at the top.
291. Select Descendants and move it to the right pane.
292. Click on the Search button next to the Value box.

Qubix International Limited – Hyperion HFM Bootcamp Page 93
293. Select GROUP.ENTITY_EUR_TOT and click on OK.
294. Tick the Inclusive option and click on OK.
295. Click on OK.

Qubix International Limited – Hyperion HFM Bootcamp Page 94
296. The Entity dimension has disappeared from the PoV bar, as this has been set within the report. Let’s now add another report to the book. On the right pane, Add Document box, expand Actual Reports.
297. Select ACT_PL_REP and drag & drop it onto the main area of the book.
298. Modify the Entity for this report to include Descendants of GROUP.ENTITY_USD_TOT.

Qubix International Limited – Hyperion HFM Bootcamp Page 95
299. To save the book, click on File > Save As.
300. Double click on Actual Reports to access the folder. Save the book there as ACT_PL_BOOK. Close the book.
301. To edit the book, browse to Actual Reports and right click on the new book created.
302. Select Open In > Editor.

Qubix International Limited – Hyperion HFM Bootcamp Page 96
303. To run the book, browse to Actual Reports and right click on the new book created and select Open In > Complete Book in PDF.
304. Select 2011 and Jan and click on OK.
305. This list displays the reports that have been run and their PoV. If you scroll down you can find the report been run for various different entities.

Qubix International Limited – Hyperion HFM Bootcamp Page 97
306. You can print or save the document using the Adobe commands.
307. To change the settings of the book, access the book first and by right‐clicking the book and select Open In, then Editor to open the Book Editor.
308. From the right‐sided pane drop‐down list, select Book Setup.

Qubix International Limited – Hyperion HFM Bootcamp Page 98
309. Set the options as per above, save the book and close. You can then run the book again to see the changes.
8.4.4 CREATING BATCHES
310. Batches are used to automate report and book execution. Batches allow you to schedule reports and specify the output format. To create a batch, select File > New > Document.
311. Select Batch Reports for Scheduling and click on Next.

Qubix International Limited – Hyperion HFM Bootcamp Page 99
312. Double click on Actual Reports. Select type Financial Reporting Book at the bottom and add ACT_PL_BOOK into the right pane.
313. Click on Finish. The Batch Editor appears and shows the book that we added in the previous step.
314. Select the Edit > Add Item(s) menu option, if you want to add another report or book. Can also choose to delete an item from the Batch, or change the member selections for a book.
315. Once all books, reports, and snapshots have been added, save the batch by selecting File > Save As from the menu option.
Qubix International Limited – Hyperion HFM Bootcamp Page 100
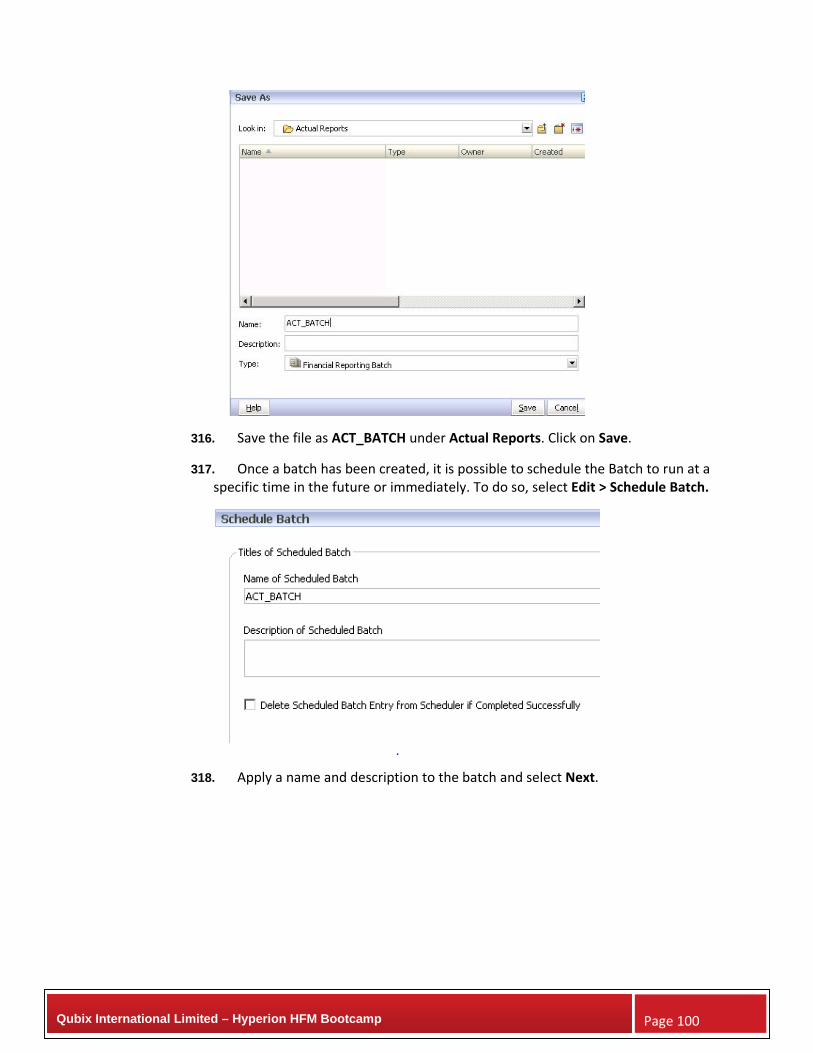
316. Save the file as ACT_BATCH under Actual Reports. Click on Save.
317. Once a batch has been created, it is possible to schedule the Batch to run at a specific time in the future or immediately. To do so, select Edit > Schedule Batch.
318. Apply a name and description to the batch and select Next.

Qubix International Limited – Hyperion HFM Bootcamp Page 101
319. Navigate to a batch that has been saved, highlight it and click on Next.
320. Enter credentials and click on OK.

Qubix International Limited – Hyperion HFM Bootcamp Page 102
321. The Start Time dialog box appears. It is possible and often the case to just run it “… Now” or to schedule the Batch to run at the different times.
322. Note that the section shown above specifies the members from each dimension for the reports.
323. The section above allows you run the batch for multiple periods. Set the options as above and click on Next.

Qubix International Limited – Hyperion HFM Bootcamp Page 103
324. The Destinations allow you to specify the Batch output. When executing reports through batches, designers have various options available. Leave the option as are and click on Next.
Qubix International Limited – Hyperion HFM Bootcamp Page 104
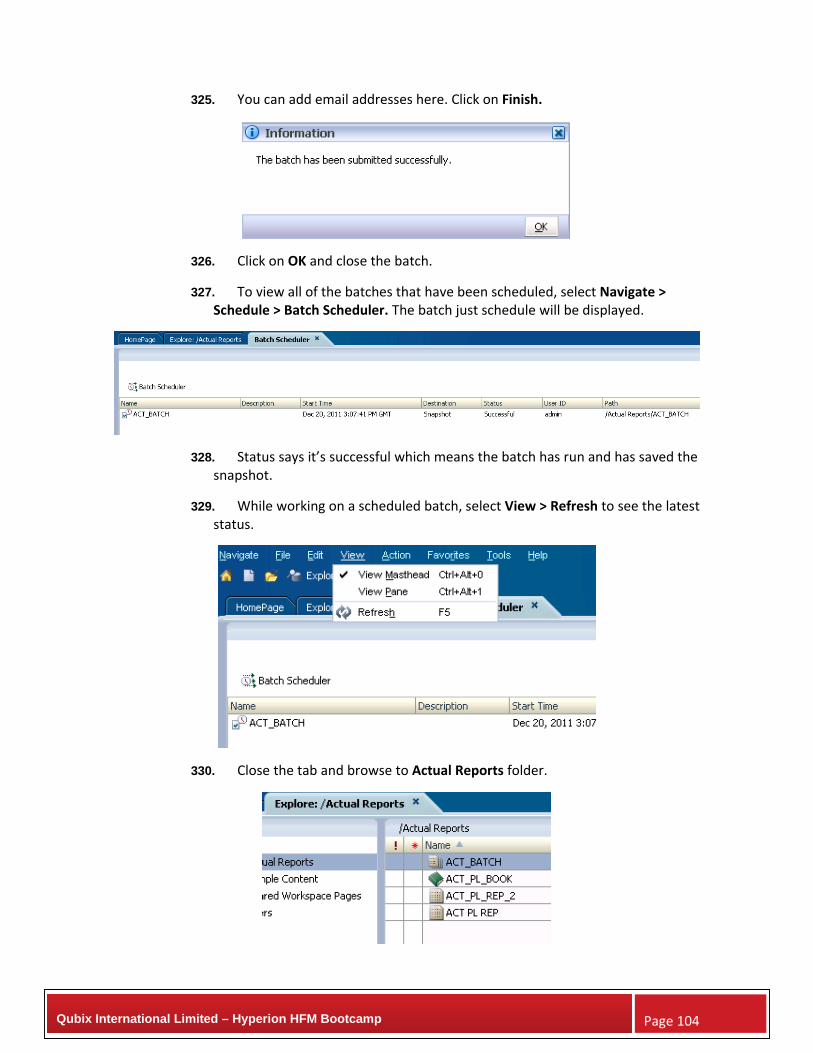
325. You can add email addresses here. Click on Finish.
326. Click on OK and close the batch.
327. To view all of the batches that have been scheduled, select Navigate > Schedule > Batch Scheduler. The batch just schedule will be displayed.
328. Status says it’s successful which means the batch has run and has saved the snapshot.
329. While working on a scheduled batch, select View > Refresh to see the latest status.
330. Close the tab and browse to Actual Reports folder.
Qubix International Limited – Hyperion HFM Bootcamp Page 105
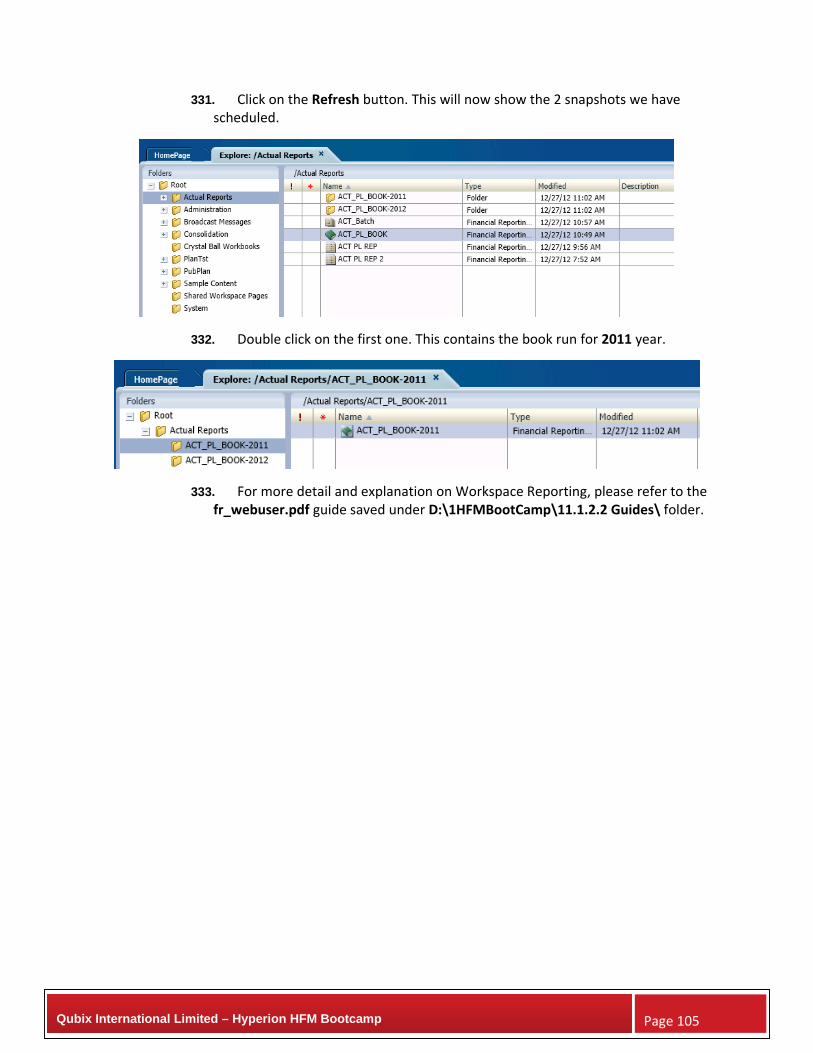
331. Click on the Refresh button. This will now show the 2 snapshots we have scheduled.
332. Double click on the first one. This contains the book run for 2011 year.
333. For more detail and explanation on Workspace Reporting, please refer to the fr_webuser.pdf guide saved under D:\1HFMBootCamp\11.1.2.2 Guides\ folder.