Embed Size (px)
Citation preview

JA2500 Junos Space Appliance Quick
Start
November 2018Revision 06
This document describes how to install the Juniper Networks JA2500 Junos Space
Appliance.
Contents JA2500 Appliance Quick Start Description . . . . . . . . . . . . . . . . . . . . . . . . . . . . . . . . 3
Step 1: Prepare the Site for JA2500 Appliance Installation . . . . . . . . . . . . . . . . . . . 5
Rack Requirements . . . . . . . . . . . . . . . . . . . . . . . . . . . . . . . . . . . . . . . . . . . . . . . 5
Tools Required to Install the Appliance in a Rack . . . . . . . . . . . . . . . . . . . . . . . 6
Step 2: Install the JA2500 Appliance . . . . . . . . . . . . . . . . . . . . . . . . . . . . . . . . . . . . 6
Unpack the JA2500 Appliance . . . . . . . . . . . . . . . . . . . . . . . . . . . . . . . . . . . . . . 6
Mount the JA2500 Appliance . . . . . . . . . . . . . . . . . . . . . . . . . . . . . . . . . . . . . . . 7
Front-and-Rear Mounting the JA2500 Appliance Flush to a Rack . . . . . . 7
Front-and-Rear Mounting the JA2500 Appliance Recessed in a
Rack . . . . . . . . . . . . . . . . . . . . . . . . . . . . . . . . . . . . . . . . . . . . . . . . . . . 8
Midmounting the JA2500 Appliance in a Two-Post Rack . . . . . . . . . . . . . 9
Step 3: Connect Power to the JA2500 Appliance . . . . . . . . . . . . . . . . . . . . . . . . . . 10
Connecting AC Power to the JA2500 Appliance . . . . . . . . . . . . . . . . . . . . . . . 10
Connecting DC Power to the JA2500 Appliance . . . . . . . . . . . . . . . . . . . . . . . 12
Step 4: Connect External Devices and Cables . . . . . . . . . . . . . . . . . . . . . . . . . . . . . 14
Connecting the JA2500 Appliance to a Management Console . . . . . . . . . . . . 14
Connecting the JA2500 Appliance to the Network . . . . . . . . . . . . . . . . . . . . . 15
Step 5: Boot the JA2500 Appliance . . . . . . . . . . . . . . . . . . . . . . . . . . . . . . . . . . . . . 15
Step 6: Configure the JA2500 Appliance . . . . . . . . . . . . . . . . . . . . . . . . . . . . . . . . . 17
Step 7 (Optional): Configuring the eth1 Interface . . . . . . . . . . . . . . . . . . . . . . . . . . 25
Safety Warnings . . . . . . . . . . . . . . . . . . . . . . . . . . . . . . . . . . . . . . . . . . . . . . . . . . . . 26
Compliance Statements for EMC Requirements for JA2500 . . . . . . . . . . . . . . . . . 27
Canada . . . . . . . . . . . . . . . . . . . . . . . . . . . . . . . . . . . . . . . . . . . . . . . . . . . . . . . 27
European Community . . . . . . . . . . . . . . . . . . . . . . . . . . . . . . . . . . . . . . . . . . . . 27
Japan . . . . . . . . . . . . . . . . . . . . . . . . . . . . . . . . . . . . . . . . . . . . . . . . . . . . . . . . . 27
United States . . . . . . . . . . . . . . . . . . . . . . . . . . . . . . . . . . . . . . . . . . . . . . . . . . 28
Requesting Technical Support . . . . . . . . . . . . . . . . . . . . . . . . . . . . . . . . . . . . . . . . 28
Self-Help Online Tools and Resources . . . . . . . . . . . . . . . . . . . . . . . . . . . . . . 28
Opening a Case with JTAC . . . . . . . . . . . . . . . . . . . . . . . . . . . . . . . . . . . . . . . . 29
1Copyright © 2018, Juniper Networks, Inc.

Revision History . . . . . . . . . . . . . . . . . . . . . . . . . . . . . . . . . . . . . . . . . . . . . . . . . . . . 29
Copyright © 2018, Juniper Networks, Inc.2
JA2500 Junos Space Appliance Quick Start

JA2500 Appliance Quick Start Description
This Quick Start contains information you need to install and configure the JA2500
appliance quickly. For complete installation instructions, see the JA2500 Junos Space
Appliance Hardware Guide at
http://www.juniper.net/techpubs/en_US/release-independent/junos-space/index.html.
WARNING: ThisQuickStart containsasummaryofsafetywarnings in “SafetyWarnings” on page 26. For a complete list of warnings for this appliance,including translations, see the JA2500JunosSpaceApplianceHardwareGuide.
The JA2500 appliance has a 2-U, rack-mountable chassis with dimensions of 17.81 in. x
17.31 in. x 3.5 in. (45.2 cm x 44 cm x 8.89 cm). The appliance shipswith a single AC power
supply module; an additional power supply module can be installed in the power supply
slot in the rear panel of the appliance. In addition, the JA2500 appliance can also be
powered on by using one or two DC power supply modules.
Theappliancehassix 1-TBharddrives inaRAID 10configuration.Twoexternallyaccessible
cooling fans provide the required airflow and cooling for the appliance.
Figure 1 on page 3 shows the front panel of the JA2500 appliance and Figure 2 on page 4
shows the rear panel.
Figure 1: Front Panel of the JA2500 Appliance
5—1— Console portHard drive
6—2— Hardware Fault LEDIOC expansion slot (currently notsupported)
7—3— Hard Disk Activity LEDNetwork (Ethernet) ports
8—4— Power LEDUSB port
3Copyright © 2018, Juniper Networks, Inc.
JA2500 Appliance Quick Start Description

Figure 2: Rear Panel of the JA2500 Appliance
3—1— Redundant power supply module slotCooling fans
4—2— Power supply modulePower switch
Copyright © 2018, Juniper Networks, Inc.4
JA2500 Junos Space Appliance Quick Start

Step 1: Prepare the Site for JA2500 Appliance Installation
• Rack Requirements on page 5
• Tools Required to Install the Appliance in a Rack on page 6
Rack Requirements
• You can install the JA2500 appliance in a two-post or four-post rack. The rack size
requirements are as follows:
• A 19-in. (48.3-cm) rack as defined in Cabinets, Racks, Panels, and Associated
Equipment (documentnumberEIA-310-D)publishedby theElectronicComponents
Industry Association (http://www.ecianow.org)
• A 600-mm rack as defined in the four-part Equipment Engineering (EE); European
telecommunicationsstandard for equipmentpractice (documentnumbersETS300
119-1 through 119-4) published by the European Telecommunications Standards
Institute (http://www.etsi.org)
The horizontal spacing between the rails in a rack that complies with this standard
is wider than the appliance’s mounting brackets, which measure 19 in. (48.3 cm)
from outer edge to outer edge. Use approved wing devices to narrow the opening
between the rails as required
• The rack rails must be spacedwide enough to accommodate the external dimensions
of the JA2500 appliance chassis. The shipping dimensions of a JA2500 appliance are
17.81 in. x 17.31 in. x 3.5 in. (45.2 cm x 44 cm x 8.89 cm).
• The outer edges of the mounting brackets extend the width of the chassis to 19 in.
(48.3 cm).
• The front of the chassis extends approximately 0.5 in. (1.27 cm) beyond themounting
ears.
• The holes within each rack set are spaced at 2-U [3.5 in (8.9 cm)]. Therefore, the
appliance can bemounted in a rack that provides holes or hole patterns spaced at 2-U
[3.5 in (8.9 cm)] increments, or in a rack that provides holes or hole patterns spaced
at 1-U [1.75 in. (4.5 cm)] increments as long as there is 2x1-U space available in the
rack.
• Themounting brackets and front-mount flanges used to attach the chassis to a rack
are designed to fasten to holes spaced at rack distances of 2-U [3.5 in (8.9 cm)]
increments, or in a rack that provides holes or hole patterns spaced at 1-U [1.75 in.
(4.5 cm)] increments as long as there is 2x1-U space available in the rack.
• Themounting holes in the mounting brackets provided with the device are spaced
1.25 in. (3.2 cm) apart (top and bottommounting holes).
• Always secure the rack in which you are installing the appliance to the structure of the
building. If your geographical area is subject to earthquakes, bolt the rack to the floor.
For maximum stability, also secure the rack to ceiling brackets.
5Copyright © 2018, Juniper Networks, Inc.
Step 1: Prepare the Site for JA2500 Appliance Installation

• For the cooling system to function properly, the airflow around the chassis must be
unrestricted. Allow sufficient clearance between the front and back of the chassis and
adjacentequipment. Ensure that there isadequatecirculation in the installation location.
• The rackmustbe strongenough to support theweightof the fully configuredappliance,
up to 31.2 lb (14.15 kg).
• The appliance should bemounted at the bottom of the rack if it is the only unit in the
rack.
• Install the appliance only in restricted areas, such as dedicated equipment rooms and
equipmentclosets, inaccordancewithArticles 110–16, 110–17, and 110–18of theNational
Electrical Code, ANSI/NFPA 70.
Tools Required to Install the Appliance in a Rack
• Phillips (+) screwdriver, number 2
• Phillips (+) screwdriver, number 3
• (Optional) Tie wrap
Step 2: Install the JA2500 Appliance
• Unpack the JA2500 Appliance on page 6
• Mount the JA2500 Appliance on page 7
Unpack the JA2500 Appliance
The JA2500 Appliance is shipped in a cardboard carton along with the items listed in
Table 1 on page 7.
CAUTION: The JA2500appliance ismaximally protected inside the shippingcarton. Do not unpack it until you are ready to begin installation.
WARNING: The shipping dimensions of a JA2500 appliance are 17.81 in x17.31 in x 3.5 in (45.2 cm x 44 cm x 8.89 cm), and the appliance shippingweight is 28.05 lb (12.72 kg).Use the correct lifting techniquewhenyoumovethe appliance. (Refer toChassis LiftingGuidelines for Junos SpaceAppliancesin the JA2500 Junos Space Appliance Hardware Guide for more details.)
To unpack the appliance, do the following:
1. Move the shipping carton to a staging area as close to the installation site as possible,
ensuring that you have enough room to remove the system components.
2. Position the carton so that the arrows are pointing up.
Copyright © 2018, Juniper Networks, Inc.6
JA2500 Junos Space Appliance Quick Start

3. Open the top flaps on the shipping carton.
4. Pull out the packing material holding the appliance in place.
5. Read theGeneral SafetyGuidelines andWarnings in the JA2500 JunosSpaceAppliance
Hardware Guide carefully.
6. Remove the appliance from the shipping carton.
7. Verify the appliance chassis components received against the packing list.
Table 1 on page 7 lists the items provided with the appliance.
8. Save the shipping carton and packing materials in case you need to move or ship the
appliance later.
Table 1: Items in the JA2500 Appliance Shipping Carton
QuantityComponent
1Junos Space JA2500 appliance chassis
1Power cable
2Mounting kits
1RJ–45 to DB–9F cable with adapter, 7 ft console cable
27-ft, blue, Category 5e cable
1Safety Information Reference for Hardware Platforms
Mount the JA2500 Appliance
You canmount the JA2500 appliance in one of the following configurations:
• Front-and-Rear Mounting the JA2500 Appliance Flush to a Rack on page 7
• Front-and-Rear Mounting the JA2500 Appliance Recessed in a Rack on page 8
• Midmounting the JA2500 Appliance in a Two-Post Rack on page 9
Front-and-Rear Mounting the JA2500 Appliance Flush to a Rack
Tomount the JA2500 appliance front and rear flush to a rack, do the following:
1. Insert four rack-mount screws on each side of the appliance to secure the front of the
chassis to the equipment rack.
2. Slide the rear-mount rail brackets into the backs of the front rails on either side of the
chassis and alignwith your rear equipment rack posts, as shown in Figure 3 on page 8.
7Copyright © 2018, Juniper Networks, Inc.
Mount the JA2500 Appliance

3. Secure the rear-mount rail brackets to your equipment rack with two rack-mount
screws each.
4. Insert locking screws on the sides of the rear-mount brackets to secure the front and
rear mounting brackets in place.
Figure 3: Front-and-Rear Mounting Flush to a Rack
5. Verify that themounting screws on one side of the rack are alignedwith themounting
screws on the opposite side and that the appliance is level.
Front-and-Rear Mounting the JA2500 Appliance Recessed in a Rack
The recessed position allows network and console cables to be routed through the sides
of the equipment rack and through the holes of the recessed front rails on either side of
the unit. This enables easy cable routing on the racks with limited cable management.
Tomount the JA2500 appliance front and rear recessed in a rack, do the following:
1. Remove the rear screws on each side of the appliance’s front rails and the two small
screws toward the front of the chassis.
2. Loosen the side-rail screws of the chassis and slide the front rails of the system
backward, as far as they will move.
3. Tighten the side-rail screws.
4. Insert the two small screws in the recessed holes on the front rails and tighten.
5. Slide the rear-mount rail brackets into the backs of the front rails on either side of the
chassis and align with your rear equipment rack posts. Secure the rear-mount rail
brackets to your equipment rack with two rack mount screws each, as shown in
Figure 4 on page 9.
Copyright © 2018, Juniper Networks, Inc.8
JA2500 Junos Space Appliance Quick Start

Figure 4: Front-and-Rear Mounting Recessed in a Rack
6. Insert locking screws on the sides of the rear-mount brackets to secure the front and
rear mounting brackets in place.
7. Verify that themounting screws on one side of the rack are alignedwith themounting
screws on the opposite side and that the appliance is level.
Midmounting the JA2500 Appliance in a Two-Post Rack
This option allows the appliance to bemounted so that there is even clearance on the
front and rear of the rack.
Tomount the appliance in a two-post rack, do the following:
1. Remove the two front-mount rails from either side of the chassis.
2. Insert onemidmount bracket to the center on either side of the chassis.
3. Attach the chassis to the equipment rack and insert theother twomidmount brackets
oneither sideof theappliance to secure the chassis to thebacksof thepost, as shown
in Figure 5 on page 10.
9Copyright © 2018, Juniper Networks, Inc.
Midmounting the JA2500 Appliance in a Two-Post Rack

Figure 5: Midmoounting in a Two-Post Rack
4. Verify that themounting screws on one side of the rack are alignedwith themounting
screws on the opposite side and that the appliance is level.
Step 3: Connect Power to the JA2500 Appliance
(Optional) Before you connect power to the Junos Space Appliance, attach an
electrostatic discharge (ESD) grounding strap to your bare wrist and connect the strap
to an external ESD point.
• Connecting AC Power to the JA2500 Appliance on page 10
• Connecting DC Power to the JA2500 Appliance on page 12
Connecting AC Power to the JA2500 Appliance
Before you begin connecting AC power to a JA2500 Appliance:
• Ensure that you have grounded the appliance.
CAUTION: Grounding for Junos Space Appliances is provided through thepowersupplyground.Ensure thatyouconnect theACpowersupplymodulein the appliance into a grounded AC power outlet by using an AC powercord (with the grounding pin) appropriate for your geographical location.(See the AC Power Cord Specifications for Junos Space Appliances in theJA2500 Junos Space Appliance Hardware Guide).
NOTE: If you have installed an additional power supply module, then eachpowersupplymodulemustbeconnected toadedicatedpowersourceoutlet.
Copyright © 2018, Juniper Networks, Inc.10
JA2500 Junos Space Appliance Quick Start

To connect AC power to the JA2500 Appliance, do the following:
1. Ensure that the power supply module is fully inserted into the chassis.
2. Squeeze the two sides of the power cord retainer clip and insert the L-shaped ends
of the wire clip into the holes in the bracket on each side of the AC power cord inlet
on the faceplate of the AC power supply module, as shown in Figure 6 on page 11.
Figure 6: Connecting an AC Power Supply
3. Locate the power cord or cords shipped with the appliance; the cords have plugs
appropriate for your geographical location.
WARNING: Ensure that thepowercorddoesnotblockaccess toappliancecomponents or drape where people can trip on it.
4. Insert the coupler end of the power cord into the AC power cord inlet on the faceplate
of the AC power supply.
5. Push the cord into the slot in the adjustment nut of the power cord retainer. Turn the
nut until it is tight against the base of the coupler and the slot in the nut is turned 90°
from the top of the appliance, as shown inFigure 6 on page 11.
6. If the AC power source outlet has a power switch, set it to the OFF position.
7. Insert the power cord plug into an AC power source outlet.
8. If the AC power source outlet has a power switch, set it to the ON position.
The JA2500 Appliance powers on when you supply power to the power supply module.
When the power supply module is correctly installed and functioning normally, the LED
on the power supply module displays green when the power supply module is powering
the appliance, and amber when the power supply module is in standbymode (not
powering the appliance).
11Copyright © 2018, Juniper Networks, Inc.
Connecting AC Power to the JA2500 Appliance

Connecting DC Power to the JA2500 Appliance
Before connecting the JA2500 Appliance to a DC power source, do the following:
• Ensure that you have read the guidelines in the DC Power Electrical Safety Guidelines
topic in the JA2500 Junos Space Appliance Hardware Guide.
• Ensure that you have taken the necessary precautions to prevent ESD damage.
• Ensure that you have grounded the appliance by connecting the DC power supply
grounding cable to earth ground.
CAUTION: Before you connect power to the Junos Space Appliance, inorder tomeet the safety requirements and ensure proper operation, get alicensedelectrician toattachacable lug to thegroundingandpowercablesthat you supply. A cable with an incorrectly attached lug can damage theappliance (for example, by causing a short circuit).
• Ensure that you have the following parts and tools available:
• DC power source cables (12-14 AWG) with ends of the wire stripped ~12mm and
twisted
• Phillips (+) screwdriver, number 1
You connect DC source power to the appliance by attaching power cables from external
DC power sources to the terminal studs on the DC power supply module faceplates.
WARNING: DC-poweredJunosSpaceAppliancesare intendedfor installationonly in restricted access locations.
WARNING: Before you perform the following procedure, ensure that poweris removed from the DC circuit. To ensure that all power is off, locate thecircuit breaker on the panel board that services the DC circuit, switch thecircuit breaker to the OFF position, and tape the switch handle of the circuitbreaker in the OFF position.
To connect the DC source power to the JA2500 appliance, do the following:
1. Ensure that the power supply module is fully inserted in the chassis.
2. Ensure that the input circuit breaker is open so that the voltage across the DC power
source cable leads is 0 V and that the cable leads will not become active when you
connect the DC power.
3. Remove the clear plastic cover protecting the terminal on the faceplate.
Copyright © 2018, Juniper Networks, Inc.12
JA2500 Junos Space Appliance Quick Start

4. Remove the screws on the terminals by using the screwdriver. Save the screws.
5. Connect the stripped and twisted wires to wire clamps under the DC terminal screws
as shown in Figure 7 on page 13.
Figure 7: Connecting a DC Power Supply
6. Use the terminal screws to secure the power source cables to the power feed on the
appliance by attaching the twisted wires that are attached to the cables to the
appropriate terminals.
7. Remove the screwon thegrounding terminal by using the screwdriver. Save the screw.
The grounding terminal is located to the right and above the terminals, as shown in
Figure 8 on page 13.
Figure 8: DC Power Supply Grounding
g000
234
8. Connect the grounding lug to the earthing terminal using the screw, as shown in
Figure 8 on page 13.
13Copyright © 2018, Juniper Networks, Inc.
Connecting DC Power to the JA2500 Appliance

9. Attach the plastic safety cover.
10. Close the input circuit breaker.
The JA2500 Appliance powers on when you supply power to the power supply module.
If the power supply module is correctly installed and functioning normally, the LED on
the power supplymodule displays greenwhen the power supplymodule is powering the
appliance, and amber when the power supplymodule is in standbymode (not powering
the appliance).
Step 4: Connect External Devices and Cables
• Connecting the JA2500 Appliance to a Management Console on page 14
• Connecting the JA2500 Appliance to the Network on page 15
Connecting the JA2500 Appliance to aManagement Console
Every JA2500 appliance has a console port with an RJ-45 connector that you can use to
connect theappliance to themanagementconsoleor toaconsole server. AnRJ-45cable,
as shown in Figure 9 on page 14, and an RJ-45 to DB-9 serial port adapter are supplied
with the appliance.
Figure 9: Ethernet Cable Connector
To connect the appliance to amanagement console, do the following:
1. Connect the RJ-45 to DB-9 serial port adapter to the serial port of the management
device (laptop or PC) that you will use to access the Junos Space CLI.
NOTE: If your laptop or PC does not have a DB-9male connector pin andyou want to connect your laptop or PC directly to the appliance, use acombination of the RJ-45 to DB-9 female adapter supplied with theappliance and a USB to DB-9male adapter. Youmust provide the USBto DB-9male adapter.
2. Connect one end of the Ethernet cable into the console port (labeled CONSOLE) on
the front panel of the appliance.
3. Connect theother endof theEthernet cable into theRJ-45 toDB-9serial port adapter.
Copyright © 2018, Juniper Networks, Inc.14
JA2500 Junos Space Appliance Quick Start

Connecting the JA2500 Appliance to the Network
Though the JA2500 appliance has four Ethernet interfaces, only three, labeled 0 (eth0),
1 (eth1), and 3 (eth3), can be used; the other Ethernet interface, labeled 2, is reserved for
future use. The eth0 Ethernet interfacemust bemandatorily connected to a network for
managing the Junos SpaceWeb client and devices. Connecting the eth1 interface to the
network containing the Junos Space nodes and the eth3 interface to the device
management network is optional.
For information about the Ethernet Interfaces in JA2500 appliance, see Junos Space
Ethernet Interfaces Overview.
To connect the appliance to a network, do the following:
1. Plug one end of the Ethernet cable into the port labeled 0.
2. Plug the other end of the Ethernet cable into the network.
NOTE: If you choose to connect the JA2500 appliance to both Ethernetinterfaces, then you should plug the other end of the Ethernet cable intothe network that contains theWeb UI clients and the other Junos Spacenodes in the fabric.
3. (Optional) If you are using eth1 Ethernet interface, take an Ethernet cable, plug one
end of the Ethernet cable into the port labeled 1, and the other end into the network
that contains the Junos Space nodes in the fabric.
4. (Optional) If you are using eth3 Ethernet interface, take an Ethernet cable, plug one
end of the Ethernet cable into the port labeled 3, and the other end into the network
that contains the devices being managed by Junos Space.
Step 5: Boot the JA2500 Appliance
Before you begin booting the Junos Space Appliance, ensure that you have configured a
console terminal or terminal emulation utility to use the following serial connection
parameters:
• Baud rate: 9600 bits per second
• Data: 8 bits
• Flow control: None
• Parity: None
• Stop bits: 1
15Copyright © 2018, Juniper Networks, Inc.
Connecting the JA2500 Appliance to the Network

NOTE: If you have turned on power to the power supply module, then theJA2500 appliance starts booting automatically.
To boot the JA2500 appliance, do the following:
1. Power on themanagement device (PCor laptop) that is connected to the appliance’s
console port.
2. (Optional) Power on the JunosSpaceAppliance by toggling the power switch located
at the rear panel of the appliance.
The appliance is shipped with a version of the Junos Space Network Management
Platform software installed. When the appliance is powered on, the serial console
displays diagnostic information before booting. When booting is complete, the serial
console displays the login prompt. You are now ready to configure the appliance.
Copyright © 2018, Juniper Networks, Inc.16
JA2500 Junos Space Appliance Quick Start

Step 6: Configure the JA2500 Appliance
You can configure a JA2500 Appliance as a Junos Space node or as a specialized node
used for fault monitoring and performancemonitoring (FMPM).
Before you begin, ensure that you have the relevant information (depending on whether
you are configuring a Junos Space node or an FMPM node) shown in Table 2 on page 17
available:
Table 2: Information Required for Junos Space Appliance Configuration
Required for Configuring FMPMNode?
Required for Configuring JunosSpace Node?Description
YesYesIPaddress and subnetmaskor prefix of the eth0interface
YesYesIP address of the default gateway
YesYesIP address of the name server
Yes, only if you are configuring theeth1 interface
Yes, only if you are configuring theeth1 interface
IPaddressand subnetmaskof theeth1 interface
NOTE: FromJunosSpaceNetworkManagementPlatform Release 14.1R1 onward, you canconfigure the eth1 Ethernet interface as anadministrative interface.
Yes, only if the IP address of the eth1interface is not in the same subnetas the VIP address
Yes, only if the IP address for the eth1interface is not in the same subnetas the VIP address
IP address of the default gateway for the eth1interface
NoYes, only if you are configuring theeth3 interface
IP address and subnetmask or prefix of the eth3interface
NoYes, only if you are configuring theeth3 interface
IP address of the default gateway for the eth3interface
Yes
NOTE: This is theVIP address of theFMPM nodes and is used forcommunications between JunosSpace nodes and FMPMnodes. ThisVIP address must be different fromthe VIP address used to access theWeb GUI.
Yes
NOTE: The VIP address is used toaccess the Junos Space NetworkManagement Platform GUI throughaWeb browser.
Virtual IP (VIP) address
NOTE: The VIP address must be in the samesubnet as the IP address assigned to the eth0interface.
YesYesNTP server settings with which the Junos SpaceAppliance synchronizes its time.
17Copyright © 2018, Juniper Networks, Inc.
Step 6: Configure the JA2500 Appliance

NOTE: From Junos Space Network Management Platform Release 14.1R2onward, you can configure Junos Space Ethernet interfaces with only IPv4addresses, or both IPv4 and IPv6 addresses.
To configure a Junos Space Appliance as a Junos Space node or an FMPM node, do the
following:
1. At theserial console loginprompt, type thedefault username(admin)andpressEnter.
2. Type the default password (abc123) and press Enter.
You are prompted to change your password.
3. To change the default password, do the following:
a. Type the default password and press Enter.
b. Type your new password and press Enter.
c. Retype your new password and press Enter.
If thepasswordhasbeenchangedsuccessfully, themessagepasswd:allauthentication
tokens updated successfully is displayed.
NOTE: All passwords are case-sensitive.
4. Type the new password to log in to the appliance and press Enter.
5. You can configure the appliance as a Junos Space node or as an FMPM node.
• To configure the appliance as a Junos Space node, do the following:
a. TypeS to proceedwith the configuration of the appliance as a JunosSpacenode
with full Junos Space Network Management Platform functionality. Every Junos
Space installation requires at least one Junos Space node.
b. Configure the Ethernet interface eth0.
NOTE: If youareconfiguring theapplianceaspartofacluster (fabric),then all nodes in that fabric must be in the same subnet.
• To configure the IPv4 address for the eth0 interface:
Copyright © 2018, Juniper Networks, Inc.18
JA2500 Junos Space Appliance Quick Start

i. Type 1 and press Enter.
ii. Type the IPv4 address for eth0 interface in dotted-decimal notation and
press Enter.
iii. Type the subnet mask for the IPv4 address and press Enter.
iv. Type the IPv4 address of the default gateway in dotted-decimal notation
and press Enter.
• (Optional) To configure both IPv4 and IPv6 address for the eth0 interface:
i. Type 2.
ii. Type the IPv4 address for eth0 interface in dotted-decimal notation and
press Enter.
iii. Type the subnet mask for the IPv4 address and press Enter.
iv. Type the IPv4 address of the default gateway in dotted-decimal notation
and press Enter.
v. Type the IPv6 address and prefix for the eth0 interface and press Enter.
vi. Type the IPv6 address of the default gateway for the eth0 interface and
press Enter.
c. Type the IPv4 address of the name server for the eth0 interface and press Enter.
d. Type the IPv6 address of the name server for the eth0 interface and press Enter.
e. Specify whether you want to configure a separate interface for device
management or not:
• Type Y if you want to use a different Ethernet interface (eth3) to manage
devices.
NOTE: On a Junos Space fabric with two or more Junos Spacenodes, if you configure the eth3 interface as the devicemanagement interface on one Junos Space node, then youmustalso configure the eth3 interface as the devicemanagementinterface on all the other Junos Space nodes in that fabric.
19Copyright © 2018, Juniper Networks, Inc.
Step 6: Configure the JA2500 Appliance

• To configure the IPv4 address of the eth3 interface:
i. Type 1.
ii. Type the IPv4 address for eth3 interface in dotted-decimal notation and
press Enter.
iii. Type thenewsubnetmaskof the IPv4address indotted-decimalnotation
and press Enter.
iv. Type the IPv4 address of the default gateway for the eth3 Ethernet
interface in dotted-decimal notation and press Enter.
v. Type the IPv4address of thenameserver for the eth3 interfaceandpress
Enter.
• To configure the IPv6 address of the eth3 interface:
i. Type 2.
ii. Type the IPv6 address with prefix for the eth3 interface and press Enter.
iii. Type the IPv6 address of the default gateway for the eth3 interface and
press Enter.
iv. Type the IPv6addressof thenameserver for the eth3 interfaceandpress
Enter.
• To configure both IPv4 and IPv6 addresses:
i. Type 3.
ii. Type the IPv4 address for the eth3 interface in dotted-decimal notation
and press Enter.
iii. Type a subnetmask for the IPv4 address in dotted-decimal notation and
press Enter.
iv. Type the IPv4 address of the default gateway for the eth3 interface in
dotted-decimal notation and press Enter.
v. Type the IPv6 address and prefix for the eth3 interface and press Enter.
Copyright © 2018, Juniper Networks, Inc.20
JA2500 Junos Space Appliance Quick Start
NOTE: Youmustprovidean IPv6address for thenameserverif you configure an IPv6 address for the eth3 interface.
vi. Type the IPv6 address of the default gateway for the eth3 interface and
press Enter.
vii. Type the IPv4address of thenameserver for the eth3 interfaceandpress
Enter.
viii.Type the IPv6addressof thenameserver for the eth3 interfaceandpress
Enter.
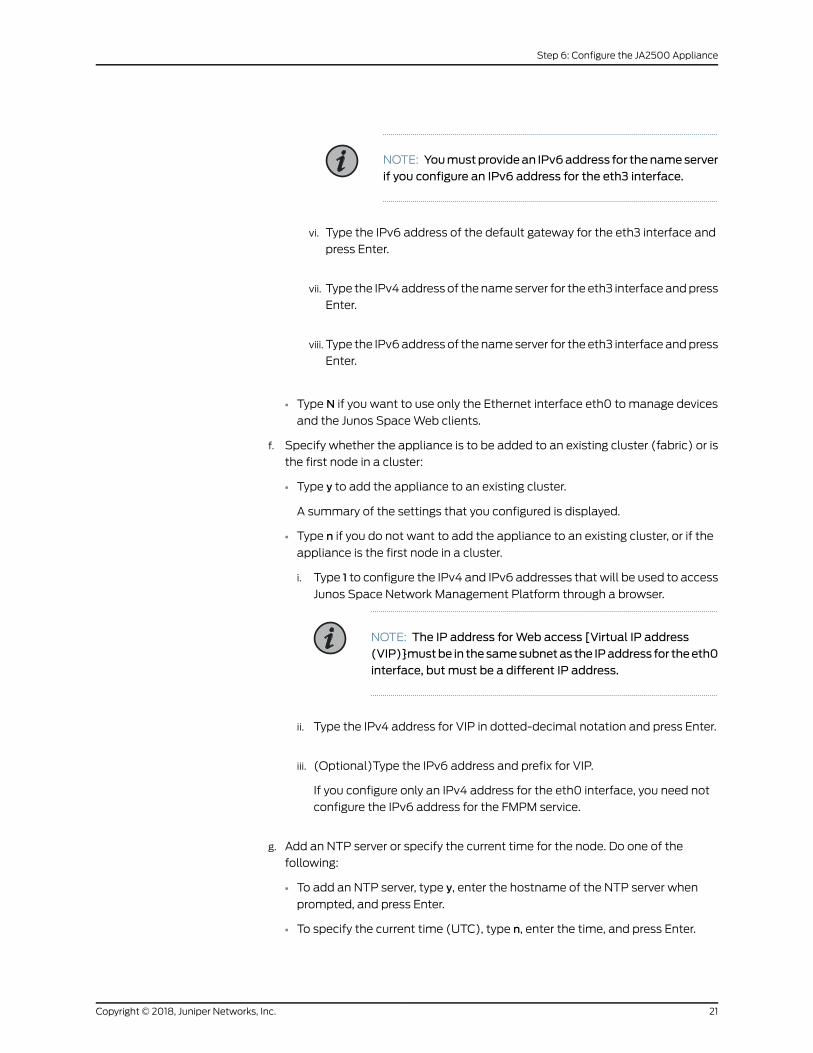
• Type N if you want to use only the Ethernet interface eth0 tomanage devices
and the Junos SpaceWeb clients.
f. Specify whether the appliance is to be added to an existing cluster (fabric) or is
the first node in a cluster:
• Type y to add the appliance to an existing cluster.
A summary of the settings that you configured is displayed.
• Type n if you do not want to add the appliance to an existing cluster, or if the
appliance is the first node in a cluster.
i. Type 1 to configure the IPv4 and IPv6 addresses that will be used to access
Junos Space Network Management Platform through a browser.
NOTE: The IP address forWeb access [Virtual IP address(VIP)}mustbe in thesamesubnetas the IPaddress for theeth0interface, but must be a different IP address.
ii. Type the IPv4 address for VIP in dotted-decimal notation and press Enter.
iii. (Optional)Type the IPv6 address and prefix for VIP.
If you configure only an IPv4 address for the eth0 interface, you need not
configure the IPv6 address for the FMPM service.
g. Add an NTP server or specify the current time for the node. Do one of the
following:
• To add an NTP server, type y, enter the hostname of the NTP server when
prompted, and press Enter.
• To specify the current time (UTC), type n, enter the time, and press Enter.
21Copyright © 2018, Juniper Networks, Inc.
Step 6: Configure the JA2500 Appliance

h. Type a name for the node and press Enter.
When you access Junos Space Network Management Platform using theWeb
GUI, the appliance is displayed with the configured name.
i. If you are configuring the appliance as a standalone node or as the first node of
the cluster (fabric), type apassword for accessing the appliance inmaintenance
mode and press Enter.
NOTE:• You can choose a password that is at least eight characters longand contains characters from at least three of the following fourcharacter classes: uppercase letters, lowercase letters, numbers(0 through 9), and special characters. Ab(3)def, o0*wwrty, and9Rtsgukj are some examples of valid password for maintenancemode.
• When you configure the other nodes in a cluster (fabric), you arenot prompted to enter amaintenance-mode password. Themaintenance-modepassword thatyouspecifywhenyouconfigurethe first node of the cluster is applicable to all other nodes in thatcluster (fabric); in other words, the entire cluster of nodes has thesamemaintenance-mode password.
j. Retype the password for accessing the appliance in maintenancemode and
press Enter.
If the password has been changed successfully, a confirmation message is
displayed along with a summary of the settings that you configured for the
appliance.
A sample of the settings summary is as follows:
Settings Summary:
> IPv4 Change: eth0 is 192.0.2.50 / 255.255.0.0> Default IPv4 Gateway = 192.0.2.150 on eth0> IPV6 Change: eth0 is 2001:db8:0:1:192:0:2:50 / 64> Default IPv6 Gateway = 2001:db8:0:1:192:0:2:150 on eth0> IPv4 DNS add: 192.0.2.10> DNS add: 2001:db8:0:1:192:0:2:10> IPv4 Change: eth3 is 192.0.2.55 / 255.255.0.0> Default IPv4 Gateway = 192.0.2.155 on eth0> IPV6 Change: eth3 is 2001:db8:20:1:192:0:2:55 / 64> Default IPv6 Gateway = 2001:db8:20:1:192:0:2:155 on eth3> IPv4 DNS add: 192.0.2.12> DNS add: 2001:db8:20:1:192:0:2:12> Create as first node or standalone> Web IPv4 address 192.0.2.60> Web IPv6 address is 2001:db8:0:1:192:0:2:60/64> NTP add: device1.example.com
Copyright © 2018, Juniper Networks, Inc.22
JA2500 Junos Space Appliance Quick Start

> Node display name is "node1"> Password for Junos Space maintenance mode is set.
A> Apply settingsC> Change settingsQ> Quit and set up laterR> Redraw Menu
Choice [ACQR]:
• Toconfigure theapplianceasaprimaryor standaloneFMPMnode, do the following:
NOTE: You can also configure an appliance as a secondary or backupFMPMnode.Fordetails, refer to theConfiguringa JunosSpaceApplianceas a Backup or Secondary FMPMNode for High Availability topic in theJA2500 Junos Space Appliance Hardware Guide.
a. Type F to proceed with the configuration of the appliance as an FMPM node.
b. Configure the Ethernet interface eth0.
NOTE: If youareconfiguring theapplianceaspartofacluster (fabric),then all nodes in that fabric must be in the same subnet.
• To configure the IPv4 address for the eth0 interface:
i. Type 1.
ii. Type the IPv4 address for eth0 interface in dotted-decimal notation and
press Enter.
iii. Type the subnet mask for the IPv4 address and press Enter.
iv. Type the IPv4 address of the default gateway in dotted-decimal notation
and press Enter.
• (Optional) To configure both IPv4 and IPv6 address for the eth0 interface:
i. Type 2.
ii. Type the IPv4 address for eth0 interface in dotted-decimal notation and
press Enter.
iii. Type the subnet mask for the IPv4 address and press Enter.
23Copyright © 2018, Juniper Networks, Inc.
Step 6: Configure the JA2500 Appliance

iv. Type the IPv4 address of the default gateway in dotted-decimal notation
and press Enter.
v. Type the IPv6 address and prefix for the eth0 interface and press Enter.
vi. Type the IPv6 address of the default gateway for the eth0 interface and
press Enter.
c. Type P to configure the node as a standalone or primary FMPM node.
d. Type 1 to configure the IPv4 and IPv6 addresses for the FMPM service.
e. Type the IPv4 address for the FMPM service and press Enter.
f. (Optional) Type the IPv6 address for the FMPM service and press Enter.
If youconfigureonlyan IPv4address for theeth0 interface, youneednotconfigure
the IPv6 address for the FMPM service.
g. Youmust add an NTP server or specify the current time for the node. Do one of
the following:
• To add an NTP server, type y, enter the hostname of the NTP server when
prompted, and press Enter.
• To specify the current time (UTC), type n, enter the time, and press Enter.
A summary of the settings that you configured is displayed.
6. Review the settings that you configured.
7. You can change the settings, quit without applying the settings, or apply the settings.
Do one of the following:
• To apply the settings, type A. The settings that you configured are applied and a
series of messages is displayed on the console, and then the Junos Space Settings
Menu is displayed.
• To change the settings, type C, and follow the prompts on the CLI.
• To quit the configuration without applying the settings, typeQ.
CAUTION: If you quit the configuration without applying the settings,then all the settings are discarded.
8. (Optional) If you have applied the settings, then typeQ to quit.
You are taken to the console login prompt.
Copyright © 2018, Juniper Networks, Inc.24
JA2500 Junos Space Appliance Quick Start

The configuration of the appliance as a Junos Space node or an FMPM node is now
complete. If you configured the appliance as a Junos Space node, you can access the
node by typing the address configured for theWeb GUI in a browser.
NOTE: AfteryouconfigureanFMPMnode,youmustadd it to theJunosSpacefabric using the Junos Space Network Management Platform. For moreinformation, see the Adding a Node to an Existing Junos Space Fabric topic inthe Junos Space Network Management PlatformWorkspaces Feature Guide.
Step 7 (Optional): Configuring the eth1 Interface
You use the eth1 interface as the administrative interface for the Junos Space or FMPM
node. When the Junos Space or FMPM node reboots after the basic configuration,
configure the eth1 interface.
NOTE:
• From Junos Space NetworkManagement PlatformRelease 14.1R1 onward,youcanconfigure theeth1Ethernet interfaceasanadministrative interface.
• The eth1 interfacemust be configured separately for each node in amultinode fabric.
• If youconfigure theeth1 interface, SSH isdisabledon theeth0and theeth3interfaces. You can then access the CLI of the Junos Space appliance onlythrough the eth1 interface.
To configure the eth1 interface:
1. On the Junos Space Settings Menu, type 6 to access the shell.
You are prompted to enter your password.
2. Type your password and press Enter.
The shell prompt appears.
3. At the shell prompt, type jmp_config and press Enter.
You are prompted to enter the IP address of the eth1 interface.
4. Type the IP address of the eth1 interface in dotted decimal notation and press Enter.
The IPaddresscanbe in the samesubnetas thevirtual IP (VIP)addressor inadifferent
subnet. If the IPaddress is not in thesamesubnetas theVIPaddress, youareprompted
to enter the subnet mask and then the default gateway for the eth1 interface.
25Copyright © 2018, Juniper Networks, Inc.
Step 7 (Optional): Configuring the eth1 Interface

5. (Optional) Type the subnet mask for the eth1 interface in dotted decimal notation
and press Enter.
6. (Optional) Type the default gateway in dotted decimal notation and press Enter.
The eth1 interface is configured.
7. To verify that the eth1 address is configured, run the ifconfig eth1 command and check
that the IP address displayed for eth1 is the same as the one that you configured.
You can now access the Junos Space or FMPM node through the eth1 interface to
perform administrative tasks.
To troubleshoot issues in configuring the eth1 interface, refer to the
/var/log/changeEth1.log file.
SafetyWarnings
This is a summary of the safetywarnings. For a complete list ofwarnings, see the JA2500
Junos Space Appliance Hardware Guide.
WARNING: Failure to observe these safety warnings can result in seriousphysical injury.
• Permit only trained and qualified personnel to install or replace the JA2500 appliance.
• Perform only the procedures described in this quick start and the JA2500 Junos Space
ApplianceHardwareGuide.Other servicesmustbeperformedonlybyauthorizedservice
personnel.
• Before installing the appliance, read the planning instructions in the JA2500 Junos
SpaceApplianceHardwareGuide tomakesure that thesitemeetspower, environmental,
and clearance requirements for the appliance.
• Before connecting the appliance to a power source, read the installation instructions
in the JA2500 Junos Space Appliance Hardware Guide.
• Installing a JA2500 appliance requires one person to lift the appliance and a second
person to install the mounting screws.
• If the rack has stabilizing devices, install them in the rack beforemounting or servicing
the appliance in the rack.
• Before installing or after removing an electrical component, always place it
component-side up on an antistatic mat placed on a flat, stable surface or in an
antistatic bag.
• Donotwork on the appliance or connect or disconnect cables during electrical storms.
Beforeworkingonequipment that is connected topower lines, remove jewelry, including
rings, necklaces, and watches. Metal objects heat up when connected to power and
ground and can cause serious burns or becomewelded to the terminals.
Copyright © 2018, Juniper Networks, Inc.26
JA2500 Junos Space Appliance Quick Start

• Whenyou install theappliance,alwaysmake thegroundconnection firstanddisconnect
it last.
• Wire the DC power supply using the appropriate lugs. Always connect the ground wire
first and disconnect it last.
• AC-powereddevicesare shippedwitha three-wireelectrical cordwithagrounding-type
plug that fits only a grounding-typepower outlet. Donot circumvent this safety feature.
Equipment grounding must comply with local and national electrical codes.
• AC power cable warning (Japan):
WARNING: The attached power cable is only for this product. Do not usethe cable for another product.
Compliance Statements for EMC Requirements for JA2500
This topic describes theelectromagnetic compatibility (EMC) requirements for the Junos
Space JA2500 appliance:
• Canada on page 27
• European Community on page 27
• Japan on page 27
• United States on page 28
Canada
This Class A digital apparatus complies with Canadian ICES-003.
Cet appareil numérique de la classe A est conforme à la norme NMB-003 du Canada.
European Community
This is a Class A device. In a domestic environment this device might cause radio
interference, in which case the user needs to take adequate measures.
Japan
The preceding translates as follows:
27Copyright © 2018, Juniper Networks, Inc.
Compliance Statements for EMC Requirements for JA2500

This is a Class A device. In a domestic environment this device might cause radio
interference, in which case the user needs to take adequate measures.
VCCI-A
United States
The device has been tested and found to comply with the limits for a Class A digital
device, pursuant to Part 15 of the FCC Rules. These limits are designed to provide
reasonable protection against harmful interference when the equipment is operated in
a commercial environment. This equipment generates, uses, and can radiate radio
frequencyenergyand, if not installedandused inaccordancewith the instructionmanual,
might cause harmful interference to radio communications. Operation of this equipment
in a residential area is likely to cause harmful interference, in which case users need to
correct the interference at their own expense.
Requesting Technical Support
Technical product support is available through the JuniperNetworksTechnicalAssistance
Center (JTAC). If you are a customer with an active J-Care or Partner Support Service
support contract, or are covered under warranty, and need postsales technical support,
you can access our tools and resources online or open a case with JTAC.
• JTAC policies—For a complete understanding of our JTAC procedures and policies,
review the JTAC User Guide located at
https://www.juniper.net/us/en/local/pdf/resource-guides/7100059-en.pdf.
• Product warranties—For product warranty information, visit
https://www.juniper.net/support/warranty/.
• JTAC Hours of Operation —The JTAC centers have resources available 24 hours a day,
7 days a week, 365 days a year.
Self-Help Online Tools and Resources
For quick and easy problem resolution, Juniper Networks has designed an online
self-service portal called the Customer Support Center (CSC) that provides youwith the
following features:
• Find CSC offerings: https://www.juniper.net/customers/support/
• Find product documentation: https://www.juniper.net/documentation/
• Find solutions and answer questions using our Knowledge Base: https://kb.juniper.net/
• Download the latest versions of software and review release notes:
https://www.juniper.net/customers/csc/software/
• Search technical bulletins for relevant hardware and software notifications:
https://kb.juniper.net/InfoCenter/
• Join and participate in the Juniper Networks Community Forum:
https://www.juniper.net/company/communities/
• Open a case online in the CSC Case Management tool: https://www.juniper.net/cm/
Copyright © 2018, Juniper Networks, Inc.28
JA2500 Junos Space Appliance Quick Start

Toverify serviceentitlementbyproduct serial number, useourSerialNumberEntitlement
(SNE) Tool: https://entitlementsearch.juniper.net/entitlementsearch/
Opening a Casewith JTAC
You can open a case with JTAC on theWeb or by telephone.
• Use the Case Management tool in the CSC at https://www.juniper.net/cm/.
• Call 1-888-314-JTAC (1-888-314-5822 toll-free in the USA, Canada, and Mexico).
For international or direct-dial options in countries without toll-free numbers, visit us at
https://www.juniper.net/support/requesting-support.html
Revision History
March 2014—Initial release
January 2015—Revision 2
August 2015—Revision 3
June 2016—Revision 4
June 2016—Revision 5
September 2018—Revision 6
Copyright © 2018 Juniper Networks, Inc. All rights reserved.
Juniper Networks, the Juniper Networks logo, Juniper, and Junos are registered trademarks of Juniper Networks, Inc. and/or its affiliates inthe United States and other countries. All other trademarks may be property of their respective owners.
Juniper Networks assumes no responsibility for any inaccuracies in this document. Juniper Networks reserves the right to change, modify,transfer, or otherwise revise this publication without notice.
29Copyright © 2018, Juniper Networks, Inc.
Requesting Technical Support