Embed Size (px)
DESCRIPTION
ip sec
Citation preview
IPSec Network Security
DescriptionIPSec is a framework of open standards developed by the Internet Engineering Task Force (IETF).
IPSec provides security for transmission of sensitive information over unprotected networks such as the Internet. IPSec acts at the network layer, protecting and authenticating IP packets between participating IPSec devices (“peers”), such as Cisco routers.
IPSec provides the following network security services. These services are optional. In general, local security policy will dictate the use of one or more of these services:
• Data Confidentiality—The IPSec sender can encrypt packets before transmitting them across a network.
• Data Integrity—The IPSec receiver can authenticate packets sent by the IPSec sender to ensure that the data has not been altered during transmission.
• Data Origin Authentication—The IPSec receiver can authenticate the source of the IPSec packets sent. This service is dependent upon the data integrity service.
• Anti-Replay—The IPSec receiver can detect and reject replayed packets.
Note The term data authentication is generally used to mean data integrity and data origin authentication. Within this document it also includes anti-replay services, unless otherwise specified.
With IPSec, data can be transmitted across a public network without fear of observation, modification, or spoofing. This enables applications such as virtual private networks (VPNs), including intranets, extranets, and remote user access.
IPSec services are similar to those provided by Cisco Encryption Technology (CET), a proprietary security solution introduced in Cisco IOS Software Release 11.2. (The IPSec standard was not yet available at Release 11.2.) However, IPSec provides a more robust security solution and is standards-based. IPSec also provides data authentication and anti-replay services in addition to data confidentiality services, while CET provides only data confidentiality services.
BenefitsIPSec shares the same benefits as Cisco Encryption Technology: both technologies protect sensitive data that travels across unprotected networks, and, like Cisco Encryption Technology, IPSec security services are provided at the network layer, so you do not have to configure individual workstations,
IPSec Network Security 1
Description
PCs, or applications. This benefit can provide a great cost savings. Instead of providing the security services you do not need to deploy and coordinate security on a per-application, per-computer basis, you can simply change the network infrastructure to provide the needed security services.
IPSec also provides the following additional benefits not present in Cisco Encryption Technology:
• Because IPSec is standards-based, Cisco devices will be able to interoperate with other IPSec-compliant networking devices to provide the IPSec security services. IPSec-compliant devices could include both Cisco devices and non-Cisco devices such as PCs, servers, and other computing systems.
Cisco and its partners, including Microsoft, are planning to offer IPSec across a wide range of platforms, including Cisco IOS software, the Cisco PIX Firewall, Windows 95, and Windows NT. Cisco is working closely with the IETF to ensure that IPSec is quickly standardized.
• A mobile user will be able to establish a secure connection back to his office. For example, the user can establish an IPSec “tunnel” with a corporate firewall—requesting authentication services—in order to gain access to the corporate network; all of the traffic between the user and the firewall will then be authenticated. The user can then establish an additional IPSec tunnel—requesting data privacy services—with an internal router or end system.
• IPSec provides support for the Internet Key Exchange (IKE) protocol and for digital certificates. IKE provides negotiation services and key derivation services for IPSec. Digital certificates allow devices to be automatically authenticated to each other without the manual key exchanges required by Cisco Encryption Technology. For more information, see the “Internet Key Exchange Security Protocol” feature documentation.
This support allows IPSec solutions to scale better than Cisco Encryption Technology solutions, making IPSec preferable in many cases for use with medium-sized, large-sized, and growing networks, where secure connections between many devices is required.
These and other differences between IPSec and Cisco Encryption Technology are described in the following sections.
Comparison of IPSec to Cisco Encryption TechnologyShould you implement Cisco Encryption Technology (CET) or IPSec network security in your network? The answer depends on your requirements.
If you require only Cisco router-to-Cisco router encryption, then you could run Cisco Encryption Technology, which is a more mature, higher-speed solution.
If you require a standards-based solution that provides multivendor interoperability or remote client connections, then you should implement IPSec. Also, if you want to implement data authentication with or without privacy (encryption), then IPSec is the right choice.
If you want, you can configure both Cisco Encryption Technology and IPSec simultaneously in your network, even simultaneously on the same device. A Cisco device can simultaneously have Cisco Encryption Technology secure sessions and IPSec secure sessions, with multiple peers.
Table 1 compares Cisco Encryption Technology to IPSec.
Table 1 Cisco Encryption Technology vs. IPSec
Feature Cisco Encryption Technology IPSec
Availability Cisco IOS Release 11.2 and later Cisco IOS Release 11.3(3)T and later
Standards Pre-IETF standards IETF standard
2 Release 11.3(3)T
Supported Standards
Supported StandardsCisco implements the following standards with this feature:
• IPSec—IP Security Protocol. IPSec is a framework of open standards that provides data confidentiality, data integrity, and data authentication between participating peers. IPSec provides these security services at the IP layer; it uses IKE to handle negotiation of protocols and algorithms based on local policy, and to generate the encryption and authentication keys to be used by IPSec. IPSec can be used to protect one or more data flows between a pair of hosts, between a pair of security gateways, or between a security gateway and a host.
IPSec is documented in a series of Internet Drafts, all available at http://www.ietf.org/html.charters/ipsec-charter.html (as of the first publication of this document). The overall IPSec implementation is per the latest version of the “Security Architecture for the Internet Protocol” Internet Draft (draft-ietf-arch-sec-xx.txt). An earlier version of IPSec is
Interoperability Cisco router to Cisco router All IPSec compliant implementations
Remote Access Solution No Client encryption will be available
Device Authentication Manual between each peer at installation
IKE uses digital certificates as a type of “digital ID card” (when Certification Authority support is configured); also supports manually-configured authentication shared secrets and manually-configured public keys
Certificate Support No X509.V3 support; will support public key infrastructure standard when the standard is completed
Protected Traffic Selected IP traffic is encrypted, based on extended access lists you define
Selected IP traffic is encrypted and/or authenticated, based on extended access lists; additionally, different traffic can be protected with different keys or different algorithms
Hardware Support Encryption Service Adapter (ESA) for the Cisco 7200/7500
Support planned for later
Packet Expansion None Tunnel mode adds a new IP and IPSec header to the packet; transport mode adds a new IPSec header
Scope of Encryption IP and ULP headers remain in the clear
In tunnel mode, both the IP and ULP headers are encrypted; in transport mode, IP headers remain in the clear but ULP headers are encrypted. (In tunnel mode, the inner IP header is also encrypted.)
Data authentication with or without encryption
Encryption only Can configure data authentication and encryption to both occur, or can use AH header to provide data authentication without encryption
Internet Key Exchange (IKE) support
No Yes
Redundant topologies Concurrent redundant Cisco Encryption Technology peers not supported
Concurrent redundant IPSec peers supported
Table 1 Cisco Encryption Technology vs. IPSec (Continued)
Feature Cisco Encryption Technology IPSec
IPSec Network Security 3
Description
described in RFCs 1825 through 1829. While Internet Drafts supersede these RFCs, Cisco IOS IPSec implements RFC 1828 (IP Authentication using Keyed MD5) and RFC 1829 (ESP DES-CBC Transform) for backwards compatibility.
• Internet Key Exchange (IKE)—A hybrid protocol which implements Oakley and SKEME key exchanges inside the ISAKMP framework. While IKE can be used with other protocols, its initial implementation is with the IPSec protocol. IKE provides authentication of the IPSec peers, negotiates IPSec security associations, and establishes IPSec keys.
For more information on IKE, see the “Internet Key Exchange Security Protocol” feature documentation.
The component technologies implemented for IPSec include:
• DES—The Data Encryption Standard (DES) is used to encrypt packet data. Cisco IOS implements the mandatory 56-bit DES-CBC with Explicit IV. Cipher Block Chaining (CBC) requires an initialization vector (IV) to start encryption. The IV is explicitly given in the IPSec packet. For backwards compatibility, Cisco IOS IPSec also implements the RFC 1829 version of ESP DES-CBC.
• MD5 (HMAC variant)—MD5 (Message Digest 5) is a hash algorithm. HMAC is a keyed hash variant used to authenticate data.
• SHA (HMAC variant)—SHA (Secure Hash Algorithm) is a hash algorithm. HMAC is a keyed hash variant used to authenticate data.
IPSec as implemented in Cisco IOS software supports the following additional standards:
• AH—Authentication Header. A security protocol which provides data authentication and optional anti-replay services. AH is embedded in the data to be protected (a full IP datagram).
Both the older RFC 1828 AH and the updated AH protocol are implemented. The updated AH protocol is per the latest version of the “IP Authentication Header” Internet Draft (draft-ietf-ipsec-auth-header-xx.txt).
RFC 1828 specifies the Keyed MD5 authentication algorithm; it does not provide anti-replay services. The updated AH protocol allows for the use of various authentication algorithms; Cisco IOS has implemented the mandatory MD5 and SHA (HMAC variants) authentication algorithms. The updated AH protocol provides anti-replay services.
• ESP—Encapsulating Security Payload. A security protocol which provides data privacy services and optional data authentication, and anti-replay services. ESP encapsulates the data to be protected.
Both the older RFC 1829 ESP and the updated ESP protocol are implemented. The updated ESP protocol is per the latest version of the “IP Encapsulating Security Payload” Internet Draft (draft-ietf-ipsec-esp-v2-xx.txt).
RFC 1829 specifies DES-CBC as the encryption algorithm; it does not provide data authentication or anti-replay services. The updated ESP protocol allows for the use of various cipher algorithms and (optionally) various authentication algorithms. Cisco IOS implements the mandatory 56-bit DES-CBC with Explicit IV as the encryption algorithm, and MD5 or SHA (HMAC variants) as the authentication algorithms. The updated ESP protocol provides anti-replay services.
4 Release 11.3(3)T
List of Terms
List of Termsanti-replay—A security service where the receiver can reject old or duplicate packets in order to protect itself against replay attacks. IPSec provides this optional service by use of a sequence number combined with the use of data authentication. Cisco IOS IPSec provides this service whenever it provides the data authentication service, except in the following cases:
• RFC 1828 does not provide support for this service.
• The service is not available for manually established security associations (that is, security associations established by configuration and not by IKE).
data authentication—Includes two concepts:
• Data integrity (verify that data has not been altered).
• Data origin authentication (verify that the data was actually sent by the claimed sender).
Data authentication can refer either to integrity alone or to both of these concepts (although data origin authentication is dependent upon data integrity).
data confidentiality—A security service where the protected data cannot be observed.
data flow—A grouping of traffic, identified by a combination of source address/mask, destination address/mask, IP next protocol field, and source and destination ports, where the protocol and port fields can have the values of any. In effect, all traffic matching a specific combination of these values is logically grouped together into a data flow. A data flow can represent a single TCP connection between two hosts, or it can represent all of the traffic between two subnets. IPSec protection is applied to data flows.
peer—In the context of this document, a peer refers to a router or other device that participates in IPSec.
perfect forward secrecy (PFS)—A cryptographic characteristic associated with a derived shared secret value. With PFS, if one key is compromised, previous and subsequent keys are not compromised, because subsequent keys are not derived from previous keys.
security association—An IPSec security association (SA) is a description of how two or more entities will use security services in the context of a particular security protocol (AH or ESP) to communicate securely on behalf of a particular data flow. It includes such things as the transform and the shared secret keys to be used for protecting the traffic.
The IPSec security association is established either by IKE or by manual user configuration. Security associations are unidirectional and are unique per security protocol. So when security associations are established for IPSec, the security associations (for each protocol) for both directions are established at the same time.
When using IKE to establish the security associations for the data flow, the security associations are established when needed and expire after a period of time (or volume of traffic). If the security associations are manually established, they are established as soon as the necessary configuration is completed and do not expire.
Security parameter index (SPI)—This is a number which, together with an IP address and security protocol, uniquely identifies a particular security association. When using IKE to establish the security associations, the SPI for each security association is a pseudo-randomly derived number. Without IKE, the SPI is manually specified for each security association.
transform—A transform lists a security protocol (AH or ESP) with its corresponding algorithms. For example, one transform is the AH protocol with the HMAC-MD5 authentication algorithm; another transform is the ESP protocol with the 56-bit DES encryption algorithm and the HMAC-SHA authentication algorithm.
IPSec Network Security 5
Description
tunnel—In the context of this document, a secure communication path between two peers, such as two routers. It does not refer to using IPSec in tunnel mode.
IPSec Interoperability with Other Cisco IOS Software FeaturesYou can use Cisco Encryption Technology and IPSec together; the two encryption technologies can coexist in your network. Each router may support concurrent encryption links using either IPSec or Cisco encryption technology. A single interface can even support the use of IPSec or CET for protecting different data flows.
Supported Hardware, Switching Paths, and EncapsulationIPSec has certain restrictions for hardware, switching paths, and encapsulation methods as follows.
Supported HardwareIPSec is not supported on VIP2 interfaces (VIP2-40 or above) or the Encryption Service Adapter (ESA) card. There is currently no hardware accelerator for IPSec.
Supported Switching PathsIPSec works with both process switching and fast switching. IPSec does not work with optimum or flow switching.
Supported EncapsulationIPSec works with the following serial encapsulations: High-Level Data-Links Control (HDLC), Point-to-Point Protocol (PPP), and Frame Relay.
IPSec also works with the GRE and IPinIP Layer 3 tunneling protocols; however, multipoint tunnels are not supported. Other Layer 3 tunneling protocols (DLSw, SRB, etc.) are currently not supported for use with IPSec.
Since the IPSec Working Group has not yet addressed the issue of group key distribution, IPSec currently cannot be used to protect group traffic (such as broadcast or multicast traffic).
IPSec Performance ImpactsIPSec packet processing is slower than Cisco Encryption Technology packet processing for these reasons:
• IPSec offers per-packet data authentication, an additional task not performed with Cisco Encryption Technology.
• IPSec introduces packet expansion, which is more likely to require fragmentation/reassembly of IPSec packets.
6 Release 11.3(3)T
Restrictions
RestrictionsAt this time, IPSec can be applied to unicast IP datagrams only. Because the IPSec Working Group has not yet addressed the issue of group key distribution, IPSec does not currently work with multicasts or broadcast IP datagrams.
If you use Network Address Translation (NAT), you should configure static NAT translations so that IPSec will work properly. In general, NAT translation should occur before the router performs IPSec encapsulation; in other words, IPSec should be working with global addresses.
Overview of How IPSec WorksIn simple terms, IPSec provides secure tunnels between two peers, such as two routers. You define which packets are considered sensitive and should be sent through these secure tunnels, and you define the parameters which should be used to protect these sensitive packets, by specifying characteristics of these tunnels. Then, when the IPSec peer sees such a sensitive packet, it sets up the appropriate secure tunnel and sends the packet through the tunnel to the remote peer.
Note The use of the term tunnel in this document does not refer to using IPSec in tunnel mode.
More accurately, these tunnels are sets of security associations that are established between two IPSec peers. The security associations define which protocols and algorithms should be applied to sensitive packets, and also specify the keying material to be used by the two peers. Security associations are unidirectional and are established per security protocol (AH or ESP).
With IPSec you define what traffic should be protected between two IPSec peers by configuring access lists and applying these access lists to interfaces by way of crypto map sets. Therefore, traffic may be selected based on source and destination address, and optionally Layer 4 protocol, and port. (Similar to CET, the access lists used for IPSec are used only to determine which traffic should be protected by IPSec, not which traffic should be blocked or permitted through the interface. Separate access lists define blocking and permitting at the interface.
A crypto map set can contain multiple entries, each with a different access list. The crypto map entries are searched in order—the router attempts to match the packet to the access list specified in that entry.
When a packet matches a permit entry in a particular access list, and the corresponding crypto map entry is tagged as cisco, then CET is triggered, and connections are established if necessary.
If the crypto map entry is tagged as ipsec-isakmp, IPSec is triggered. If no security association exists that IPSec can use to protect this traffic to the peer, IPSec uses IKE to negotiate with the remote peer to set up the necessary IPSec security associations on behalf of the data flow. The negotiation uses information specified in the crypto map entry as well as the data flow information from the specific access list entry. (The behavior is different for dynamic crypto map entries. Refer to the section “Creating Dynamic Crypto Maps (Requires IKE).”)
If the crypto map entry is tagged as ipsec-manual, IPSec is triggered. If no security association exists that IPSec can use to protect this traffic to the peer, the traffic is dropped. (In this case, the security associations are installed via the configuration, without the intervention of IKE. If the security associations did not exist, IPSec did not have all of the necessary pieces configured.)
Similar to CET, the router will discard packets if no connection or security association exists.
Once established, the set of security associations (outbound, to the peer) is then applied to the triggering packet as well as to subsequent applicable packets as those packets exit the router. “Applicable” packets are packets that match the same access list criteria that the original packet
IPSec Network Security 7
Platforms
matched. For example, all applicable packets could be encrypted before being forwarded to the remote peer. The corresponding inbound security associations are used when processing the incoming traffic from that peer.
If IKE is used to establish the security associations, the security associations will have lifetimes so that they will periodically expire and require renegotiation. (This provides an additional level of security.)
Multiple IPSec tunnels can exist between two peers to secure different data streams, and each tunnel uses a separate set of security associations. For example, some data streams might be just authenticated while other data streams are both encrypted and authenticated.
Access lists associated with IPSec crypto map entries also represent which traffic the router requires to be protected by IPSec. Inbound traffic is also processed against the crypto map entries—if a packet matches a permit entry in a particular access list associated with an IPSec crypto map entry, that packet is dropped because it was not sent as an IPSec-protected packet.
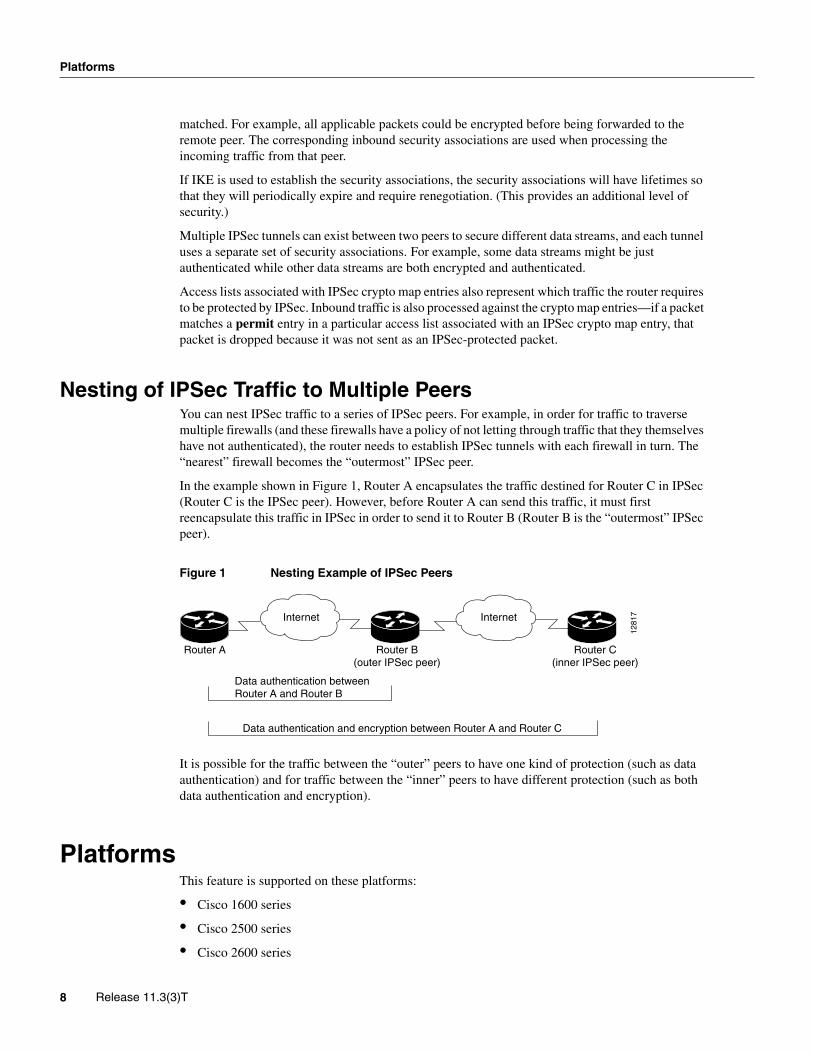
Nesting of IPSec Traffic to Multiple PeersYou can nest IPSec traffic to a series of IPSec peers. For example, in order for traffic to traverse multiple firewalls (and these firewalls have a policy of not letting through traffic that they themselves have not authenticated), the router needs to establish IPSec tunnels with each firewall in turn. The “nearest” firewall becomes the “outermost” IPSec peer.
In the example shown in Figure 1, Router A encapsulates the traffic destined for Router C in IPSec (Router C is the IPSec peer). However, before Router A can send this traffic, it must first reencapsulate this traffic in IPSec in order to send it to Router B (Router B is the “outermost” IPSec peer).
Figure 1 Nesting Example of IPSec Peers
It is possible for the traffic between the “outer” peers to have one kind of protection (such as data authentication) and for traffic between the “inner” peers to have different protection (such as both data authentication and encryption).
PlatformsThis feature is supported on these platforms:
• Cisco 1600 series
• Cisco 2500 series
• Cisco 2600 series
1281
7Internet Internet
Router A
Data authentication betweenRouter A and Router B
Router B(outer IPSec peer)
Router C(inner IPSec peer)
Data authentication and encryption between Router A and Router C
8 Release 11.3(3)T
Ensure Access Lists Are Compatible with IPSec
• Cisco 3600 series
• Cisco 4000 series (Cisco 4000, 4000-M, 4500, 4500-M, 4700, 4700-M)
• Cisco 7200 series
• Cisco 7500 series
• Cisco AS5300
PrerequisitesYou need to configure IKE as described in the “Internet Key Exchange Security Protocol” feature documentation.
Even if you decide to not use IKE, you still need to disable it as described in the “Internet Key Exchange Security Protocol” document.
Configuration TasksAfter you have completed IKE configuration, configure IPSec by completing the following tasks at each participating IPSec peer:
• Ensure Access Lists Are Compatible with IPSec
• Set Global Lifetimes for IPSec Security Associations
• Create Crypto Access Lists
• Define Transform Sets
• Create Crypto Map Entries
• Apply Crypto Map Sets to Interfaces
• Monitor and Maintain IPSec
Ensure Access Lists Are Compatible with IPSecIKE uses UDP port 500. The IPSec ESP and AH protocols use protocol numbers 50 and 51. Ensure that your access lists are configured so that protocol 50, 51, and UDP port 500 traffic is not blocked at interfaces used by IPSec. In some cases you might need to add a statement to your access lists to explicitly permit this traffic.
Set Global Lifetimes for IPSec Security AssociationsYou can change the global lifetime values which are used when negotiating new IPSec security associations. (These global lifetime values can be overridden for a particular crypto map entry).
These lifetimes only apply to security associations established via IKE. Manually established security associations do not expire.
There are two lifetimes: a “timed” lifetime and a “traffic-volume” lifetime. A security association expires after the first of these lifetimes is reached. The default lifetimes are 3600 seconds (one hour) and 4,608,000 kilobytes (10 Mbytes per second for one hour).
IPSec Network Security 9
Configuration Tasks
If you change a global lifetime, the new lifetime value will not be applied to currently existing security associations, but will be used in the negotiation of subsequently established security associations. If you wish to use the new values immediately, you can clear all or part of the security association database. Refer to the clear crypto sa command for more details.
IPSec security associations use one or more shared secret keys. These keys and their security associations time out together.
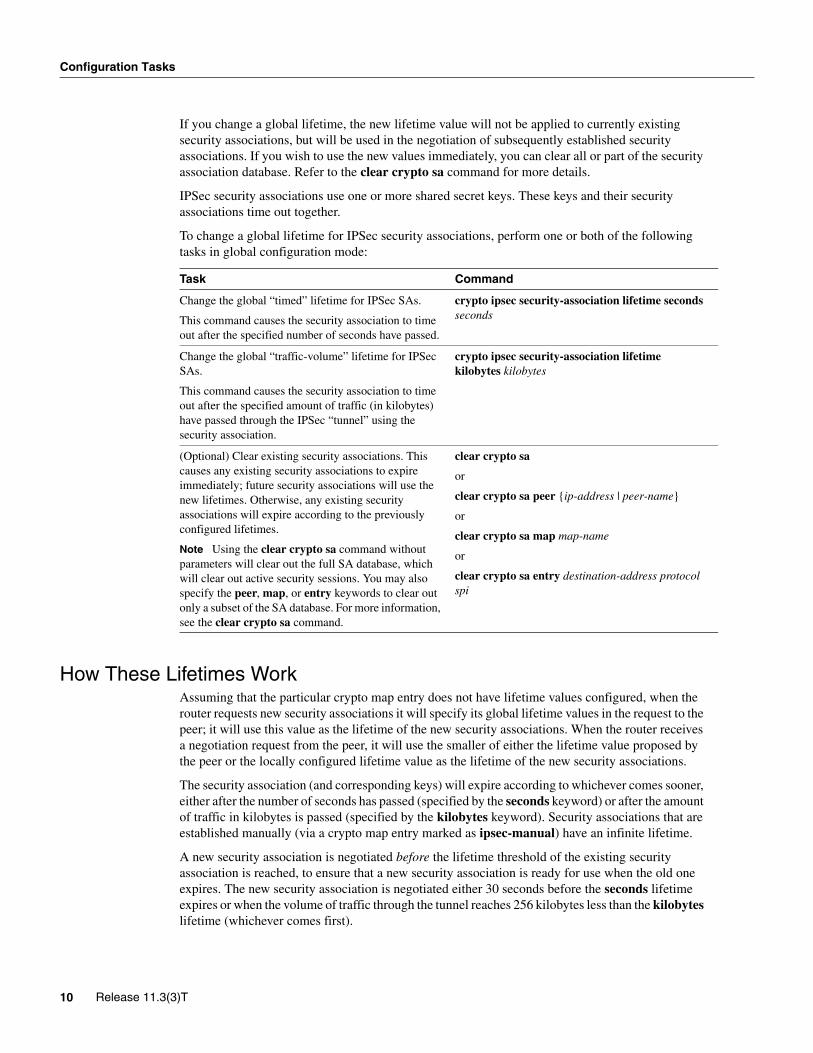
To change a global lifetime for IPSec security associations, perform one or both of the following tasks in global configuration mode:
How These Lifetimes WorkAssuming that the particular crypto map entry does not have lifetime values configured, when the router requests new security associations it will specify its global lifetime values in the request to the peer; it will use this value as the lifetime of the new security associations. When the router receives a negotiation request from the peer, it will use the smaller of either the lifetime value proposed by the peer or the locally configured lifetime value as the lifetime of the new security associations.
The security association (and corresponding keys) will expire according to whichever comes sooner, either after the number of seconds has passed (specified by the seconds keyword) or after the amount of traffic in kilobytes is passed (specified by the kilobytes keyword). Security associations that are established manually (via a crypto map entry marked as ipsec-manual) have an infinite lifetime.
A new security association is negotiated before the lifetime threshold of the existing security association is reached, to ensure that a new security association is ready for use when the old one expires. The new security association is negotiated either 30 seconds before the seconds lifetime expires or when the volume of traffic through the tunnel reaches 256 kilobytes less than the kilobytes lifetime (whichever comes first).
Task Command
Change the global “timed” lifetime for IPSec SAs.
This command causes the security association to time out after the specified number of seconds have passed.
crypto ipsec security-association lifetime seconds seconds
Change the global “traffic-volume” lifetime for IPSec SAs.
This command causes the security association to time out after the specified amount of traffic (in kilobytes) have passed through the IPSec “tunnel” using the security association.
crypto ipsec security-association lifetime kilobytes kilobytes
(Optional) Clear existing security associations. This causes any existing security associations to expire immediately; future security associations will use the new lifetimes. Otherwise, any existing security associations will expire according to the previously configured lifetimes.
Note Using the clear crypto sa command without parameters will clear out the full SA database, which will clear out active security sessions. You may also specify the peer, map, or entry keywords to clear out only a subset of the SA database. For more information, see the clear crypto sa command.
clear crypto sa
or
clear crypto sa peer {ip-address | peer-name}
or
clear crypto sa map map-name
or
clear crypto sa entry destination-address protocol spi
10 Release 11.3(3)T
Create Crypto Access Lists
If no traffic has passed through the tunnel during the entire life of the security association, a new security association is not negotiated when the lifetime expires. Instead, a new security association will be negotiated only when IPSec sees another packet that should be protected.
Create Crypto Access ListsCrypto access lists are used to define which IP traffic will be protected by crypto and which traffic will not be protected by crypto. (These access lists are not the same as regular access lists, which determine what traffic to forward or block at an interface.) For example, access lists can created to protect all IP traffic between Subnet A and Subnet Y or Telnet traffic between Host A and Host B.
The access lists themselves aren’t specific to IPSec—they are no different from what is used for CET. It is the crypto map entry referencing the specific access list that defines whether IPSec or CET processing is applied to the traffic matching a permit in the access list.
Crypto access lists associated with IPSec crypto map entries have four primary functions:
• Select outbound traffic to be protected by IPSec (permit = protect).
• Indicate the data flow to be protected by the new security associations (specified by a single permit entry) when initiating negotiations for IPSec security associations.
• Process inbound traffic in order to filter out and discard traffic that should have been protected by IPSec.
• Determine whether or not to accept requests for IPSec security associations on behalf of the requested data flows when processing negotiation from the IPSec peer. (Negotiation is only done for ipsec-isakmp crypto map entries.) In order to be accepted, if the peer initiates the IPSec negotiation, it must specify a data flow that is “permitted” by a crypto access list associated with an ipsec-isakmp crypto map entry.
If you want certain traffic to receive one combination of IPSec protection (for example, authentication only) and other traffic to receive a different combination of IPSec protection (for example, both authentication and encryption), you need to create two different crypto access lists to define the two different types of traffic. These different access lists are then used in different crypto map entries which specify different IPSec policies.
Later, you will associate the crypto access lists to particular interfaces when you configure and apply crypto map sets to the interfaces (following instructions in the sections “Create Crypto Map Entries” and “Apply Crypto Map Sets to Interfaces”).
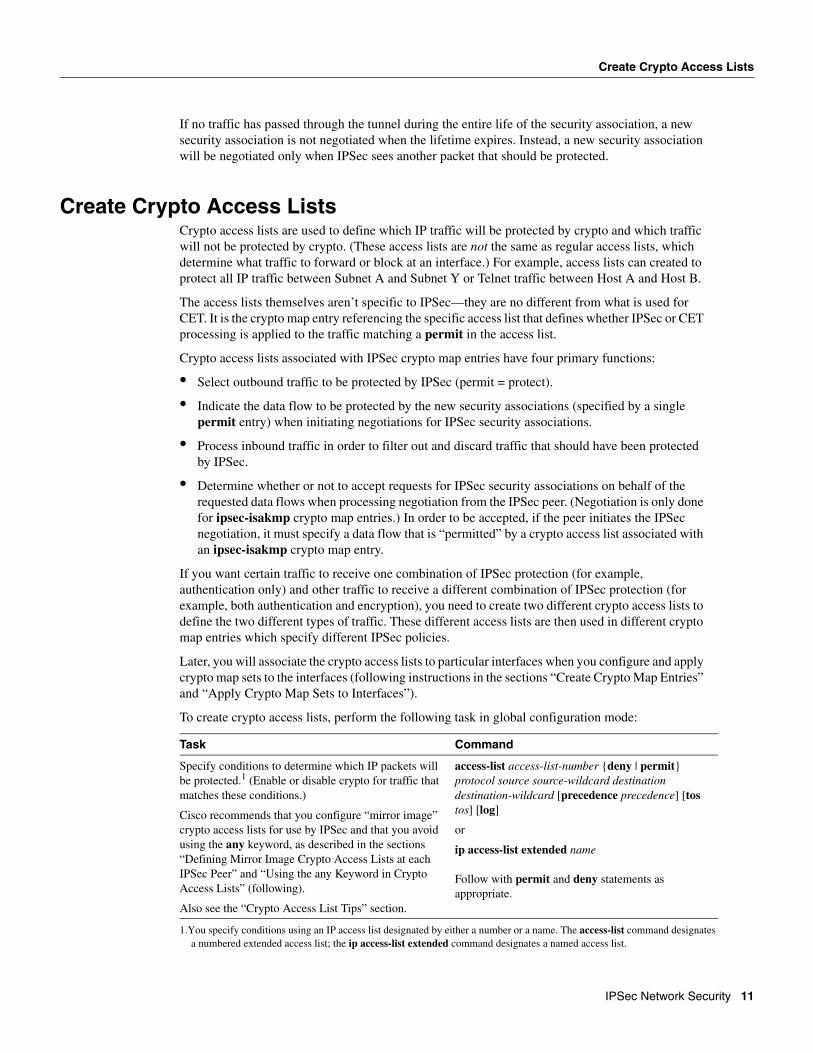
To create crypto access lists, perform the following task in global configuration mode:
Task Command
Specify conditions to determine which IP packets will be protected.1 (Enable or disable crypto for traffic that matches these conditions.)
Cisco recommends that you configure “mirror image” crypto access lists for use by IPSec and that you avoid using the any keyword, as described in the sections “Defining Mirror Image Crypto Access Lists at each IPSec Peer” and “Using the any Keyword in Crypto Access Lists” (following).
Also see the “Crypto Access List Tips” section.
1.You specify conditions using an IP access list designated by either a number or a name. The access-list command designates a numbered extended access list; the ip access-list extended command designates a named access list.
access-list access-list-number {deny | permit} protocol source source-wildcard destination destination-wildcard [precedence precedence] [tos tos] [log]
or
ip access-list extended name
Follow with permit and deny statements as appropriate.
IPSec Network Security 11
Configuration Tasks
Crypto Access List TipsUsing the permit keyword causes all IP traffic that matches the specified conditions to be protected by crypto, using the policy described by the corresponding crypto map entry. Using the deny keyword prevents traffic from being protected by crypto in the context of that particular crypto map entry. (In other words, it doesn’t allow the policy as specified in this crypto map entry to be applied to this traffic.) If this traffic is denied in all of the crypto map entries for that interface, then the traffic is not protected by crypto (either CET or IPSec).
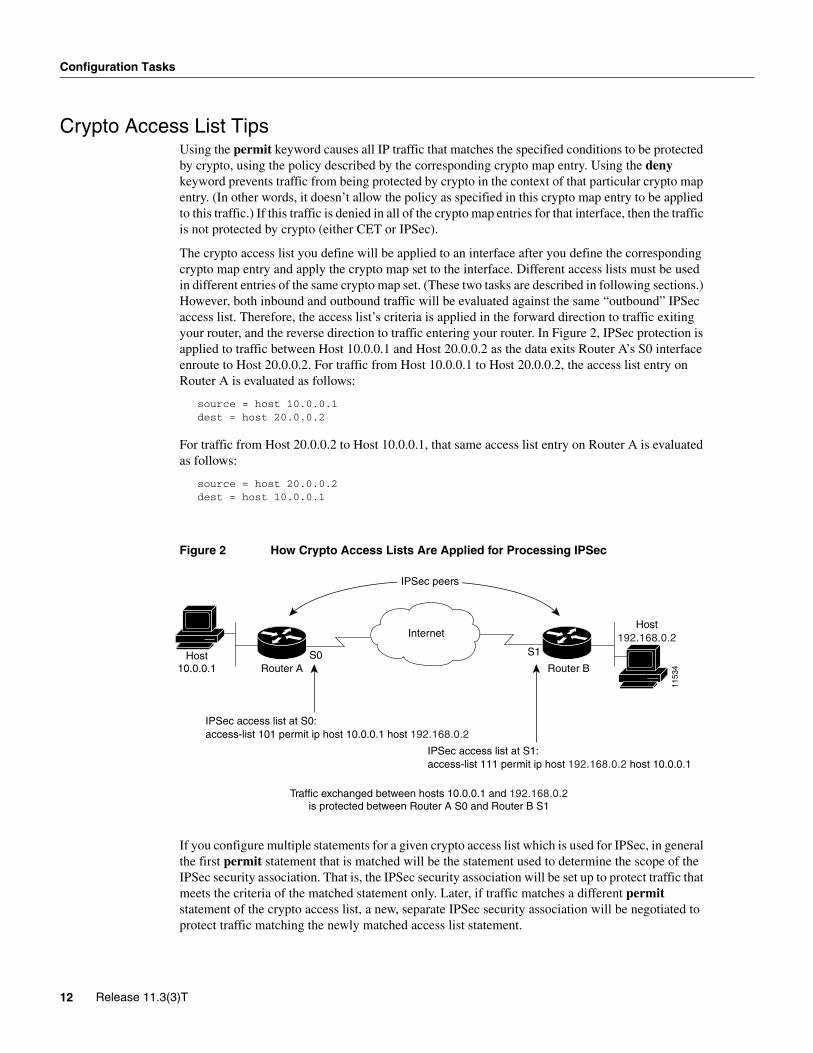
The crypto access list you define will be applied to an interface after you define the corresponding crypto map entry and apply the crypto map set to the interface. Different access lists must be used in different entries of the same crypto map set. (These two tasks are described in following sections.) However, both inbound and outbound traffic will be evaluated against the same “outbound” IPSec access list. Therefore, the access list’s criteria is applied in the forward direction to traffic exiting your router, and the reverse direction to traffic entering your router. In Figure 2, IPSec protection is applied to traffic between Host 10.0.0.1 and Host 20.0.0.2 as the data exits Router A’s S0 interface enroute to Host 20.0.0.2. For traffic from Host 10.0.0.1 to Host 20.0.0.2, the access list entry on Router A is evaluated as follows:
source = host 10.0.0.1dest = host 20.0.0.2
For traffic from Host 20.0.0.2 to Host 10.0.0.1, that same access list entry on Router A is evaluated as follows:
source = host 20.0.0.2dest = host 10.0.0.1
Figure 2 How Crypto Access Lists Are Applied for Processing IPSec
If you configure multiple statements for a given crypto access list which is used for IPSec, in general the first permit statement that is matched will be the statement used to determine the scope of the IPSec security association. That is, the IPSec security association will be set up to protect traffic that meets the criteria of the matched statement only. Later, if traffic matches a different permit statement of the crypto access list, a new, separate IPSec security association will be negotiated to protect traffic matching the newly matched access list statement.
IPSec peers
1153
4
Internet
S0 S1
Router A Router BHost
10.0.0.1
Host192.168.0.2
IPSec access list at S0:access-list 101 permit ip host 10.0.0.1 host 192.168.0.2
IPSec access list at S1:access-list 111 permit ip host 192.168.0.2 host 10.0.0.1
Traffic exchanged between hosts 10.0.0.1 and 192.168.0.2is protected between Router A S0 and Router B S1
12 Release 11.3(3)T
Defining Mirror Image Crypto Access Lists at each IPSec Peer
Note Access lists for crypto map entries tagged as ipsec-manual are restricted to a single permit entry and subsequent entries are ignored. In other words, the security associations established by that particular crypto map entry are only for a single data flow. To be able to support multiple manually established security associations for different kinds of traffic, define multiple crypto access lists, and then apply each one to a separate ipsec-manual crypto map entry. Each access list should include one permit statement defining what traffic to protect.
Any unprotected inbound traffic that matches a permit entry in the crypto access list for a crypto map entry flagged as IPSec will be dropped, since this traffic was expected to be protected by IPSec.
Note If you view your router’s access lists by using a command such as show ip access-lists, all extended IP access lists will be shown in the command output. This includes extended IP access lists that are used for traffic filtering purposes as well as those that are used for crypto. The show command output does not differentiate between the different uses of the extended access lists.
See the Cisco IOS Release 11.3 Security Command Reference for complete details about the extended IP access list commands used to create IPSec access lists.
Defining Mirror Image Crypto Access Lists at each IPSec PeerCisco recommends that for every crypto access list specified for a static crypto map entry, you define at the local peer you define a “mirror image” crypto access list at the remote peer, so that traffic that has IPSec protection applied locally can be processed correctly at the remote peer. (The crypto map entries themselves must also support common transforms and must refer to the other system as a peer.)
Figure 3 shows some sample scenarios when you have mirror image access lists and when you do not have mirror image access lists.
IPSec Network Security 13

Configuration Tasks
Figure 3 Mirror Image vs. Non-Mirror Image Crypto Access Lists (for IPSec)
As Figure 3 indicates, IPSec Security Associations (SAs) can be established as expected whenever the two peers’ crypto access lists are mirror images of each other. However, an IPSec SA can be established only some of the time when the access lists are not mirror images of each other. This can happen in the case where an entry in one peer’s access list is a subset of an entry in the other peer’s access list, such as shown in Cases 3 and 4 of Figure 3. IPSec SA establishment is critical to IPSec—without SAs, IPSec does not work, causing any packets matching the crypto access list criteria to be silently dropped instead of being forwarded with IPSec security.
In Figure 3, an SA cannot be established in Case 4. This is because SAs are always requested according to the crypto access lists at the initiating packet’s end. In Case 4, Router B requests that all traffic between Subnet X and Subnet Y be protected, but this is a superset of the specific flows permitted by the crypto access list at Router A so the request is therefore not permitted. Case 3 works because Router A’s request is a subset of the specific flows permitted by the crypto access list at Router B.
Because of the complexities introduced when crypto access lists are not configured as mirror images at peer IPSec devices, Cisco strongly encourages you to use mirror image crypto access lists.
Using the any Keyword in Crypto Access ListsWhen you create crypto access lists, using the any keyword could cause problems. Cisco discourages the use of the any keyword to specify source or destination addresses.
1153
5
Internet
S0 S1Router M Router N
Host A
Host D
Host C
Host B
IPSec access list at S0: IPSec access list at S1: 1st packet
Aor B
BA
Result
Aor B
BA
A B
B A
or A C
or C D
and so on
Case 1permitsHost A Host B
permitsHost B Host A
SAs established fortraffic A B (good)
permitsHost A Host B
permitsSubnet X Subnet Y
permitsSubnet Y Subnet X
permitsSubnet Y Subnet X
Case 2
Case 3
Case 4
SAs established fortraffic A B (good)SAs cannot be established and packets from Host B to Host A are dropped (bad)
SAs established fortraffic X Y (good)
Mirror imageaccess lists atRouter M S0and Router N S1
Subnet X
Subnet Y
14 Release 11.3(3)T
Define Transform Sets
The any keyword in a permit statement is discouraged when you have multicast traffic flowing through the IPSec interface; the any keyword can cause multicast traffic to fail. (This is true for both CET and IPSEC.)
The permit any any statement is strongly discouraged, as this will cause all outbound traffic to be protected (and all protected traffic sent to the peer specified in the corresponding crypto map entry) and will require protection for all inbound traffic. Then, all inbound packets that lack IPSec protection will be silently dropped, including packets for routing protocols, NTP, echo, echo response, etc. The difference here between CET and IPSec is that CET would attempt to decrypt and then forward the (now garbage) data, while IPSec would simply drop any packets that did not have IPSec protection.
You need to be sure you define which packets to protect. If you must use the any keyword in a permit statement, you must preface that statement with a series of deny statements to filter out any traffic (that would otherwise fall within that permit statement) that you don’t want to be protected.
Define Transform SetsA transform set represents a certain combination of security protocols and algorithms. During the IPSec security association negotiation, the peers agree to use a particular transform set for protecting a particular data flow.
You can specify multiple transform sets, and then specify one or more of these transform sets in a crypto map entry. The transform set defined in the crypto map entry would be used in the IPSec security association negotiation to protect the data flows specified by that crypto map entry’s access list.
During IPSec security association negotiations with IKE the peers search for a transform set that is the same at both peers. When such a transform set is found, it is selected and will be applied to the protected traffic as part of both peers’ IPSec security associations.
With manually established security associations, there is no negotiation with the peer, so both sides must specify the same transform set.
If you change a transform set definition, the change is only applied to crypto map entries that reference the transform set. The change will not be applied to existing security associations, but will be used in subsequent negotiations to establish new security associations. If you want the new settings to take effect sooner, you can clear all or part of the security association database by using the clear crypto sa command.
To define a transform set, perform the following tasks starting in global configuration mode:
Task Command
Define a transform set.
There are complex rules defining which entries you can use for the transform arguments. These rules are explained in the command description for the crypto ipsec transform-set command.
This command puts you into the crypto transform configuration mode.
crypto ipsec transform-set transform-set-name transform1 [transform2 [transform3]]
(Optional) If you specified the esp-rfc1829 transform in the transform set, you can change the initialization vector size to be used with the esp-rfc1829 transform.
initialization-vector size [4 | 8]
IPSec Network Security 15
Configuration Tasks
Create Crypto Map EntriesTo create crypto map entries, follow the guidelines and tasks described in these sections:
• About Crypto Maps
• How Many Crypto Maps Should You Create?
• Creating Crypto Map Entries for Establishing Manual Security Associations
• Creating Crypto Map Entries that Use IKE to Establish Security Associations
• Creating Dynamic Crypto Maps (Requires IKE)
About Crypto MapsCrypto maps, used with Cisco Encryption Technology (released in Cisco IOS Release 11.2), are now expanded to also specify IPSec policy.
Crypto map entries created for IPSec pull together the various parts used to set up IPSec security associations, including:
• Which traffic should be protected by IPSec (per a crypto access list)
• The granularity of the flow to be protected by a set of security associations
• Where IPSec-protected traffic should be sent (who the remote IPSec peer is)
• The local address to be used for the IPSec traffic (See the “Apply Crypto Map Sets to Interfaces” section for more details.)
• What IPSec security should be applied to this traffic (selecting from a list of one or more transform sets)
• Whether security associations are manually established or are established via IKE
• Other parameters that might be necessary to define an IPSec security association
(Optional) Change the mode associated with the transform set. The mode setting is only applicable to traffic whose source and destination addresses are the IPSec peer addresses; it is ignored for all other traffic. (All other traffic is in tunnel mode only.)
mode [tunnel | transport]
Exit the crypto transform configuration mode. exit
This step clears existing IPSec security associations so that any changes to a transform set will take effect on subsequently established security associations. (Manually established SAs are reestablished immediately.)
Note Using the clear crypto sa command without parameters will clear out the full SA database, which will clear out active security sessions. You may also specify the peer, map, or entry keywords to clear out only a subset of the SA database. For more information, see the clear crypto sa command.
clear crypto sa
or
clear crypto sa peer {ip-address | peer-name}
or
clear crypto sa map map-name
or
clear crypto sa entry destination-address protocol spi
Task Command
16 Release 11.3(3)T
How Many Crypto Maps Should You Create?
Crypto map entries with the same crypto map name (but different map sequence numbers) are grouped into a crypto map set. Later, you will apply these crypto map sets to interfaces; then, all IP traffic passing through the interface is evaluated against the applied crypto map set. If a static crypto map entry sees outbound IP traffic that should be protected and the crypto map specifies the use of IKE, a security association is negotiated with the remote peer according to the parameters included in the crypto map entry; otherwise, if the crypto map entry specifies the use of manual security associations, a security association should have already been established via configuration. (If a dynamic crypto map entry sees outbound traffic that should be protected and no security association exists, the packet is dropped.)
The policy described in the crypto map entries is used during the negotiation of security associations. If the local router initiates the negotiation, it will use the policy specified in the static crypto map entries to create the offer to be sent to the specified IPSec peer. If the IPSec peer initiates the negotiation, the local router will check the policy from the static crypto map entries, as well as any referenced dynamic crypto map entries to decide whether to accept or reject the peer’s request (offer).
For IPSec to succeed between two IPSec peers, both peers’ crypto map entries must contain compatible configuration statements.
When two peers try to establish a security association, they must each have at least one crypto map entry that is compatible with one of the other peer’s crypto map entries. For two crypto map entries to be compatible, they must at least meet the following criteria:
• The crypto map entries must contain compatible crypto access lists (for example, mirror image access lists). In the case where the responding peer is using dynamic crypto maps, the entries in the local crypto access list must be “permitted” by the peer’s crypto access list.
• The crypto map entries must each identify the other peer (unless the responding peer is using dynamic crypto maps).
• The crypto map entries must have at least one transform set in common.
If you are not sure how to configure each crypto map parameter to guarantee compatibility with other peers, you might consider configuring dynamic crypto maps as described in the section “Creating Dynamic Crypto Maps (Requires IKE).” Dynamic crypto maps are useful when the establishment of the IPSec tunnels is initiated by the IPSec peer (such as in the case of an IPSec router fronting a server). They are not useful if the establishment of the IPSec tunnels is locally initiated, because the dynamic crypto maps are policy templates, not complete statements of policy. (Although the access lists in any referenced dynamic crypto map entry are used for crypto packet filtering.)
You can define multiple remote peers using crypto maps to allow for load sharing. If one peer fails, there will still be a protected path. The peer that packets are actually sent to is determined by the last peer that the router heard from (received either traffic or a negotiation request from) for a given data flow. If the attempt fails with the first peer, IKE tries the next peer on the crypto map list.
How Many Crypto Maps Should You Create?You can create a crypto map set (containing at least one crypto map entry) for each interface that will be sending/receiving IPSec-protected traffic. Multiple interfaces can share the same crypto map set if you want to apply the same policy to multiple interfaces.
You can create multiple crypto map entries for a given interface if you assign the same map-name to all the crypto map entries. Crypto map entries with different map-numbers but the same map-name are considered to be part of a single set, and you can apply only one crypto map set to a single interface. The crypto map set can include a combination of CET, IPSec/IKE, and IPSec/manual entries.
IPSec Network Security 17
Configuration Tasks
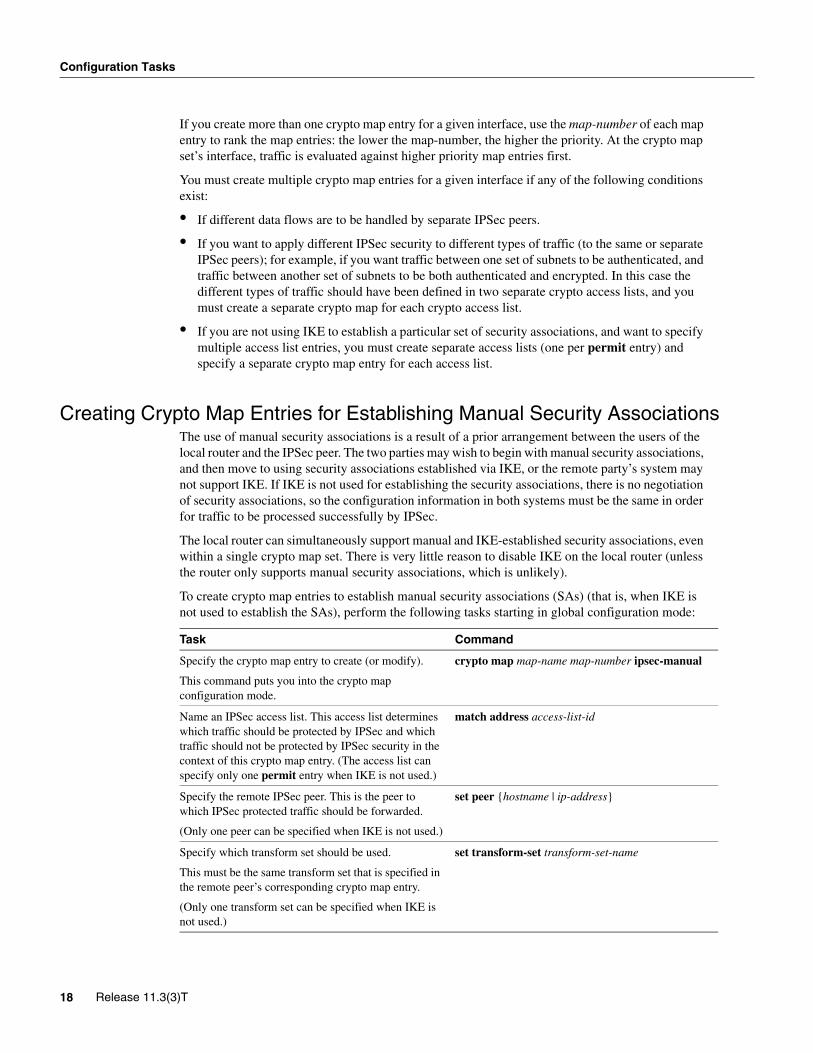
If you create more than one crypto map entry for a given interface, use the map-number of each map entry to rank the map entries: the lower the map-number, the higher the priority. At the crypto map set’s interface, traffic is evaluated against higher priority map entries first.
You must create multiple crypto map entries for a given interface if any of the following conditions exist:
• If different data flows are to be handled by separate IPSec peers.
• If you want to apply different IPSec security to different types of traffic (to the same or separate IPSec peers); for example, if you want traffic between one set of subnets to be authenticated, and traffic between another set of subnets to be both authenticated and encrypted. In this case the different types of traffic should have been defined in two separate crypto access lists, and you must create a separate crypto map for each crypto access list.
• If you are not using IKE to establish a particular set of security associations, and want to specify multiple access list entries, you must create separate access lists (one per permit entry) and specify a separate crypto map entry for each access list.
Creating Crypto Map Entries for Establishing Manual Security AssociationsThe use of manual security associations is a result of a prior arrangement between the users of the local router and the IPSec peer. The two parties may wish to begin with manual security associations, and then move to using security associations established via IKE, or the remote party’s system may not support IKE. If IKE is not used for establishing the security associations, there is no negotiation of security associations, so the configuration information in both systems must be the same in order for traffic to be processed successfully by IPSec.
The local router can simultaneously support manual and IKE-established security associations, even within a single crypto map set. There is very little reason to disable IKE on the local router (unless the router only supports manual security associations, which is unlikely).
To create crypto map entries to establish manual security associations (SAs) (that is, when IKE is not used to establish the SAs), perform the following tasks starting in global configuration mode:
Task Command
Specify the crypto map entry to create (or modify).
This command puts you into the crypto map configuration mode.
crypto map map-name map-number ipsec-manual
Name an IPSec access list. This access list determines which traffic should be protected by IPSec and which traffic should not be protected by IPSec security in the context of this crypto map entry. (The access list can specify only one permit entry when IKE is not used.)
match address access-list-id
Specify the remote IPSec peer. This is the peer to which IPSec protected traffic should be forwarded.
(Only one peer can be specified when IKE is not used.)
set peer {hostname | ip-address}
Specify which transform set should be used.
This must be the same transform set that is specified in the remote peer’s corresponding crypto map entry.
(Only one transform set can be specified when IKE is not used.)
set transform-set transform-set-name
18 Release 11.3(3)T

Creating Crypto Map Entries that Use IKE to Establish Security Associations
Repeat these steps to create additional crypto map entries as required.
Creating Crypto Map Entries that Use IKE to Establish Security AssociationsWhen IKE is used to establish security associations, the IPSec peers can negotiate the settings they will use for the new security associations. This means that you can specify lists (such as lists of acceptable transforms) within the crypto map entry.
Create crypto map entries that will use IKE to establish the security associations by performing the following tasks starting in global configuration mode:
If the specified transform set includes the AH protocol, set the AH Security Parameter Indexes (SPIs) and keys to apply to inbound and outbound protected traffic.
(This manually specifies the AH security association to be used with protected traffic.)
set session-key inbound ah spi hex-key-data
and
set session-key outbound ah spi hex-key-data
If the specified transform set includes the ESP protocol, set the ESP Security Parameter Indexes (SPIs) and keys to apply to inbound and outbound protected traffic. If the transform set includes an ESP cipher algorithm, specify the cipher keys. If the transform set includes an ESP authenticator algorithm, specify the authenticator keys.
(This manually specifies the ESP security association to be used with protected traffic.)
set session-key inbound esp spi cipher hex-key-data [authenticator hex-key-data]
and
set session-key outbound esp spi cipher hex-key-data [authenticator hex-key-data]
Exit crypto-map configuration mode and return to global configuration mode.
exit
Task Command
Name the crypto map entry to create (or modify).
This command puts you into the crypto map configuration mode.
crypto map map-name map-number ipsec-isakmp
Name an extended access list. This access list determines which traffic should be protected by IPSec and which traffic should not be protected by IPSec security in the context of this crypto map entry.
match address access-list-id
Specify a remote IPSec peer. This is the peer to which IPSec protected traffic can be forwarded.
Repeat for multiple remote peers.
set peer {hostname | ip-address}
Specify which transform sets are allowed for this crypto map entry. List multiple transform sets in order of priority (highest priority first).
set transform-set transform-set-name1 [transform-set-name2...transform-set-name6]
(Optional) If you want the security associations for this crypto map entry to be negotiated using different IPSec security association lifetimes than the global lifetimes, specify a security association lifetime for the crypto map entry.
set security-association lifetime seconds seconds
and/or
set security-association lifetime kilobytes kilobytes
Task Command
IPSec Network Security 19
Configuration Tasks
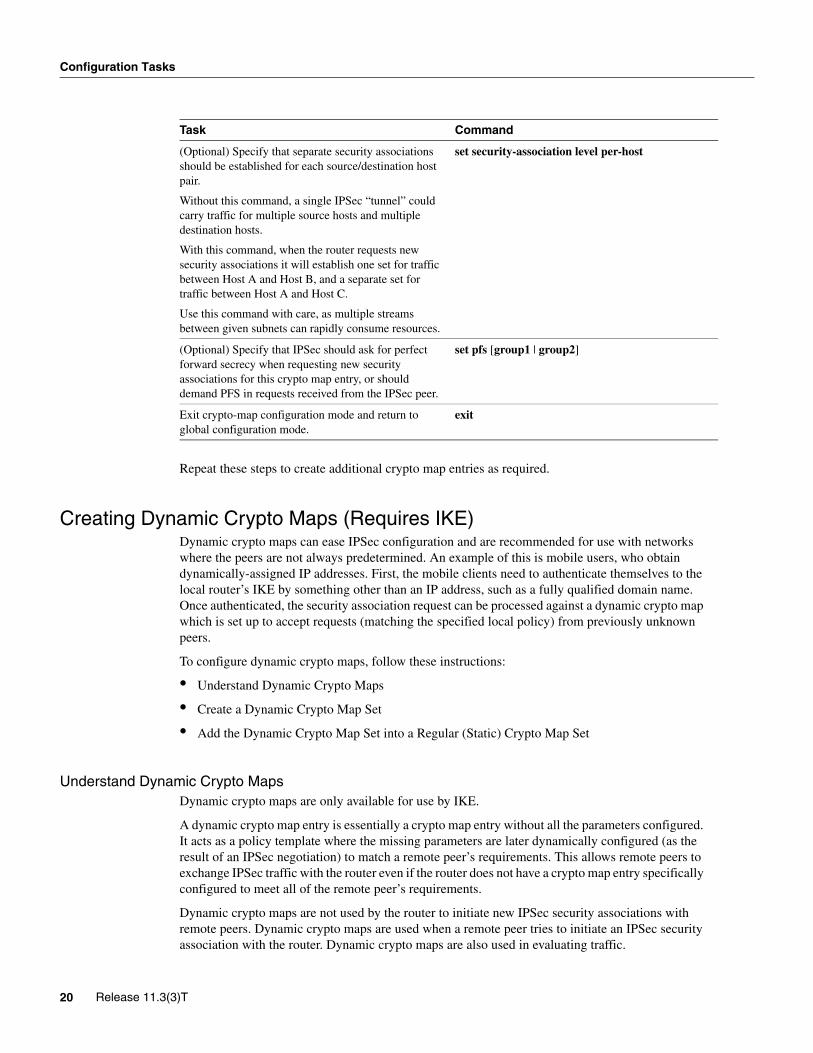
Repeat these steps to create additional crypto map entries as required.
Creating Dynamic Crypto Maps (Requires IKE)Dynamic crypto maps can ease IPSec configuration and are recommended for use with networks where the peers are not always predetermined. An example of this is mobile users, who obtain dynamically-assigned IP addresses. First, the mobile clients need to authenticate themselves to the local router’s IKE by something other than an IP address, such as a fully qualified domain name. Once authenticated, the security association request can be processed against a dynamic crypto map which is set up to accept requests (matching the specified local policy) from previously unknown peers.
To configure dynamic crypto maps, follow these instructions:
• Understand Dynamic Crypto Maps
• Create a Dynamic Crypto Map Set
• Add the Dynamic Crypto Map Set into a Regular (Static) Crypto Map Set
Understand Dynamic Crypto MapsDynamic crypto maps are only available for use by IKE.
A dynamic crypto map entry is essentially a crypto map entry without all the parameters configured. It acts as a policy template where the missing parameters are later dynamically configured (as the result of an IPSec negotiation) to match a remote peer’s requirements. This allows remote peers to exchange IPSec traffic with the router even if the router does not have a crypto map entry specifically configured to meet all of the remote peer’s requirements.
Dynamic crypto maps are not used by the router to initiate new IPSec security associations with remote peers. Dynamic crypto maps are used when a remote peer tries to initiate an IPSec security association with the router. Dynamic crypto maps are also used in evaluating traffic.
(Optional) Specify that separate security associations should be established for each source/destination host pair.
Without this command, a single IPSec “tunnel” could carry traffic for multiple source hosts and multiple destination hosts.
With this command, when the router requests new security associations it will establish one set for traffic between Host A and Host B, and a separate set for traffic between Host A and Host C.
Use this command with care, as multiple streams between given subnets can rapidly consume resources.
set security-association level per-host
(Optional) Specify that IPSec should ask for perfect forward secrecy when requesting new security associations for this crypto map entry, or should demand PFS in requests received from the IPSec peer.
set pfs [group1 | group2]
Exit crypto-map configuration mode and return to global configuration mode.
exit
Task Command
20 Release 11.3(3)T
Creating Dynamic Crypto Maps (Requires IKE)
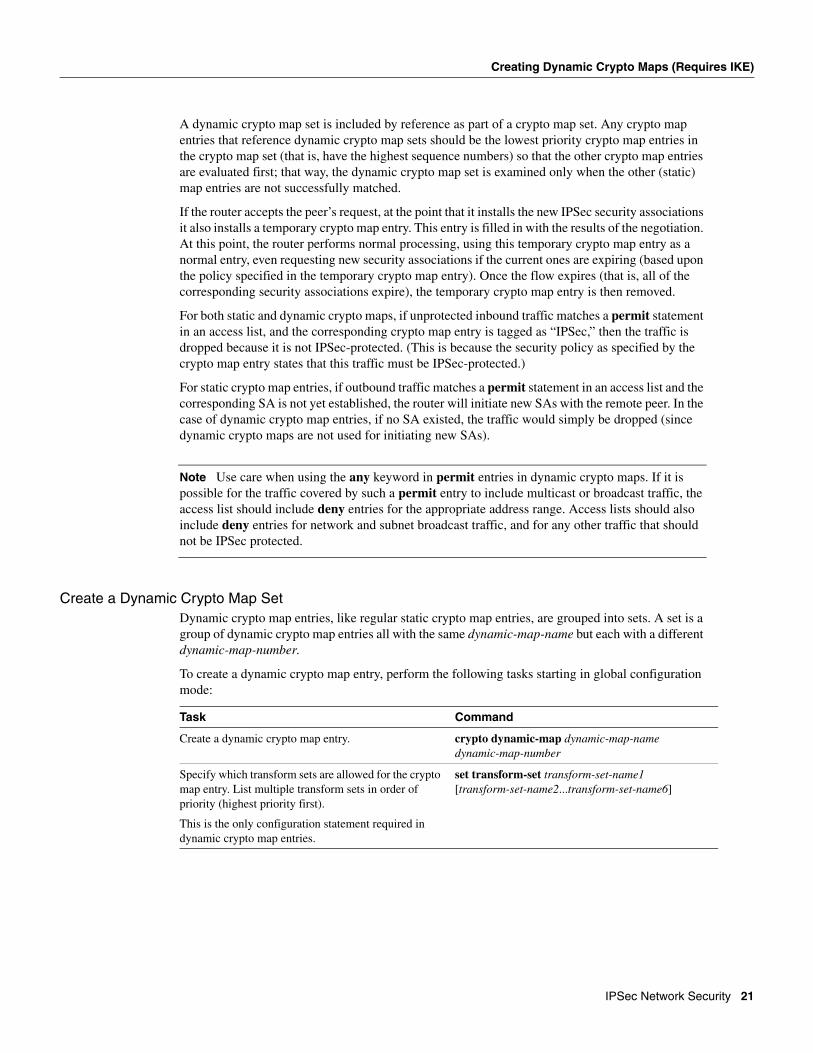
A dynamic crypto map set is included by reference as part of a crypto map set. Any crypto map entries that reference dynamic crypto map sets should be the lowest priority crypto map entries in the crypto map set (that is, have the highest sequence numbers) so that the other crypto map entries are evaluated first; that way, the dynamic crypto map set is examined only when the other (static) map entries are not successfully matched.
If the router accepts the peer’s request, at the point that it installs the new IPSec security associations it also installs a temporary crypto map entry. This entry is filled in with the results of the negotiation. At this point, the router performs normal processing, using this temporary crypto map entry as a normal entry, even requesting new security associations if the current ones are expiring (based upon the policy specified in the temporary crypto map entry). Once the flow expires (that is, all of the corresponding security associations expire), the temporary crypto map entry is then removed.
For both static and dynamic crypto maps, if unprotected inbound traffic matches a permit statement in an access list, and the corresponding crypto map entry is tagged as “IPSec,” then the traffic is dropped because it is not IPSec-protected. (This is because the security policy as specified by the crypto map entry states that this traffic must be IPSec-protected.)
For static crypto map entries, if outbound traffic matches a permit statement in an access list and the corresponding SA is not yet established, the router will initiate new SAs with the remote peer. In the case of dynamic crypto map entries, if no SA existed, the traffic would simply be dropped (since dynamic crypto maps are not used for initiating new SAs).
Note Use care when using the any keyword in permit entries in dynamic crypto maps. If it is possible for the traffic covered by such a permit entry to include multicast or broadcast traffic, the access list should include deny entries for the appropriate address range. Access lists should also include deny entries for network and subnet broadcast traffic, and for any other traffic that should not be IPSec protected.
Create a Dynamic Crypto Map SetDynamic crypto map entries, like regular static crypto map entries, are grouped into sets. A set is a group of dynamic crypto map entries all with the same dynamic-map-name but each with a different dynamic-map-number.
To create a dynamic crypto map entry, perform the following tasks starting in global configuration mode:
Task Command
Create a dynamic crypto map entry. crypto dynamic-map dynamic-map-name dynamic-map-number
Specify which transform sets are allowed for the crypto map entry. List multiple transform sets in order of priority (highest priority first).
This is the only configuration statement required in dynamic crypto map entries.
set transform-set transform-set-name1 [transform-set-name2...transform-set-name6]
IPSec Network Security 21
Configuration Tasks
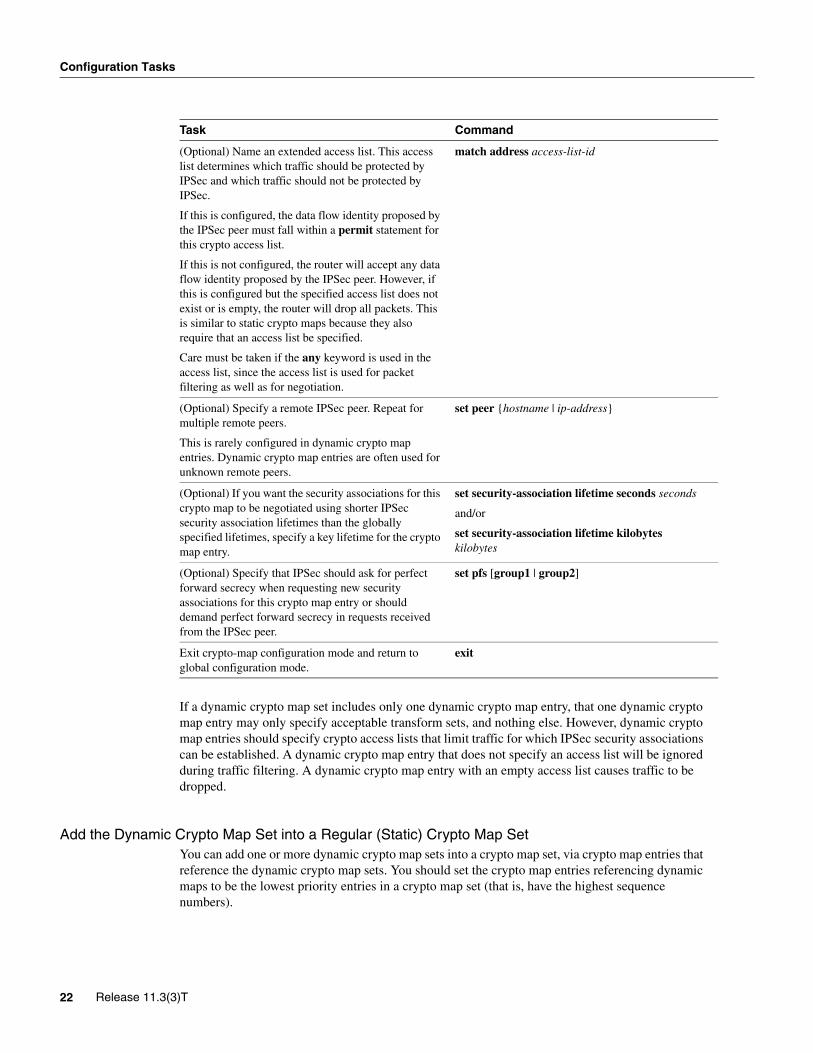
If a dynamic crypto map set includes only one dynamic crypto map entry, that one dynamic crypto map entry may only specify acceptable transform sets, and nothing else. However, dynamic crypto map entries should specify crypto access lists that limit traffic for which IPSec security associations can be established. A dynamic crypto map entry that does not specify an access list will be ignored during traffic filtering. A dynamic crypto map entry with an empty access list causes traffic to be dropped.
Add the Dynamic Crypto Map Set into a Regular (Static) Crypto Map SetYou can add one or more dynamic crypto map sets into a crypto map set, via crypto map entries that reference the dynamic crypto map sets. You should set the crypto map entries referencing dynamic maps to be the lowest priority entries in a crypto map set (that is, have the highest sequence numbers).
(Optional) Name an extended access list. This access list determines which traffic should be protected by IPSec and which traffic should not be protected by IPSec.
If this is configured, the data flow identity proposed by the IPSec peer must fall within a permit statement for this crypto access list.
If this is not configured, the router will accept any data flow identity proposed by the IPSec peer. However, if this is configured but the specified access list does not exist or is empty, the router will drop all packets. This is similar to static crypto maps because they also require that an access list be specified.
Care must be taken if the any keyword is used in the access list, since the access list is used for packet filtering as well as for negotiation.
match address access-list-id
(Optional) Specify a remote IPSec peer. Repeat for multiple remote peers.
This is rarely configured in dynamic crypto map entries. Dynamic crypto map entries are often used for unknown remote peers.
set peer {hostname | ip-address}
(Optional) If you want the security associations for this crypto map to be negotiated using shorter IPSec security association lifetimes than the globally specified lifetimes, specify a key lifetime for the crypto map entry.
set security-association lifetime seconds seconds
and/or
set security-association lifetime kilobytes kilobytes
(Optional) Specify that IPSec should ask for perfect forward secrecy when requesting new security associations for this crypto map entry or should demand perfect forward secrecy in requests received from the IPSec peer.
set pfs [group1 | group2]
Exit crypto-map configuration mode and return to global configuration mode.
exit
Task Command
22 Release 11.3(3)T
Apply Crypto Map Sets to Interfaces
To add a dynamic crypto map set into a crypto map set, perform the following task in global configuration mode:
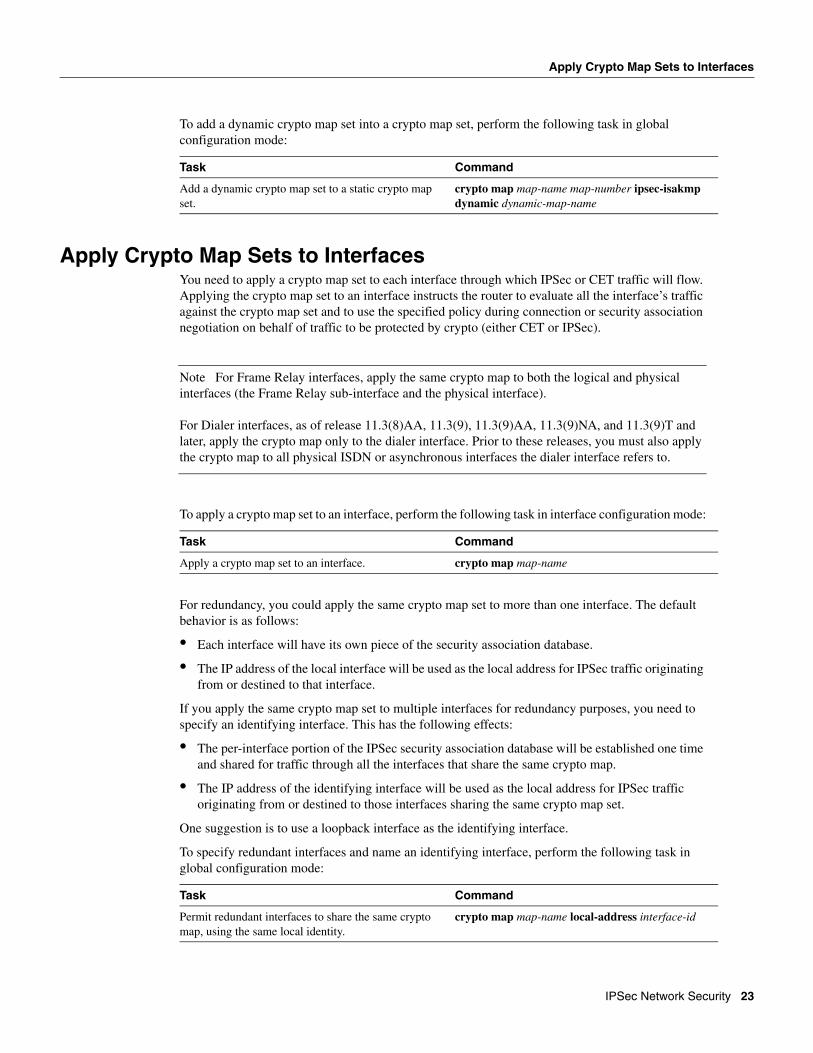
Apply Crypto Map Sets to InterfacesYou need to apply a crypto map set to each interface through which IPSec or CET traffic will flow. Applying the crypto map set to an interface instructs the router to evaluate all the interface’s traffic against the crypto map set and to use the specified policy during connection or security association negotiation on behalf of traffic to be protected by crypto (either CET or IPSec).
Note For Frame Relay interfaces, apply the same crypto map to both the logical and physical interfaces (the Frame Relay sub-interface and the physical interface).
For Dialer interfaces, as of release 11.3(8)AA, 11.3(9), 11.3(9)AA, 11.3(9)NA, and 11.3(9)T and later, apply the crypto map only to the dialer interface. Prior to these releases, you must also apply the crypto map to all physical ISDN or asynchronous interfaces the dialer interface refers to.
To apply a crypto map set to an interface, perform the following task in interface configuration mode:
For redundancy, you could apply the same crypto map set to more than one interface. The default behavior is as follows:
• Each interface will have its own piece of the security association database.
• The IP address of the local interface will be used as the local address for IPSec traffic originating from or destined to that interface.
If you apply the same crypto map set to multiple interfaces for redundancy purposes, you need to specify an identifying interface. This has the following effects:
• The per-interface portion of the IPSec security association database will be established one time and shared for traffic through all the interfaces that share the same crypto map.
• The IP address of the identifying interface will be used as the local address for IPSec traffic originating from or destined to those interfaces sharing the same crypto map set.
One suggestion is to use a loopback interface as the identifying interface.
To specify redundant interfaces and name an identifying interface, perform the following task in global configuration mode:
Task Command
Add a dynamic crypto map set to a static crypto map set.
crypto map map-name map-number ipsec-isakmp dynamic dynamic-map-name
Task Command
Apply a crypto map set to an interface. crypto map map-name
Task Command
Permit redundant interfaces to share the same crypto map, using the same local identity.
crypto map map-name local-address interface-id
IPSec Network Security 23
Configuration Examples
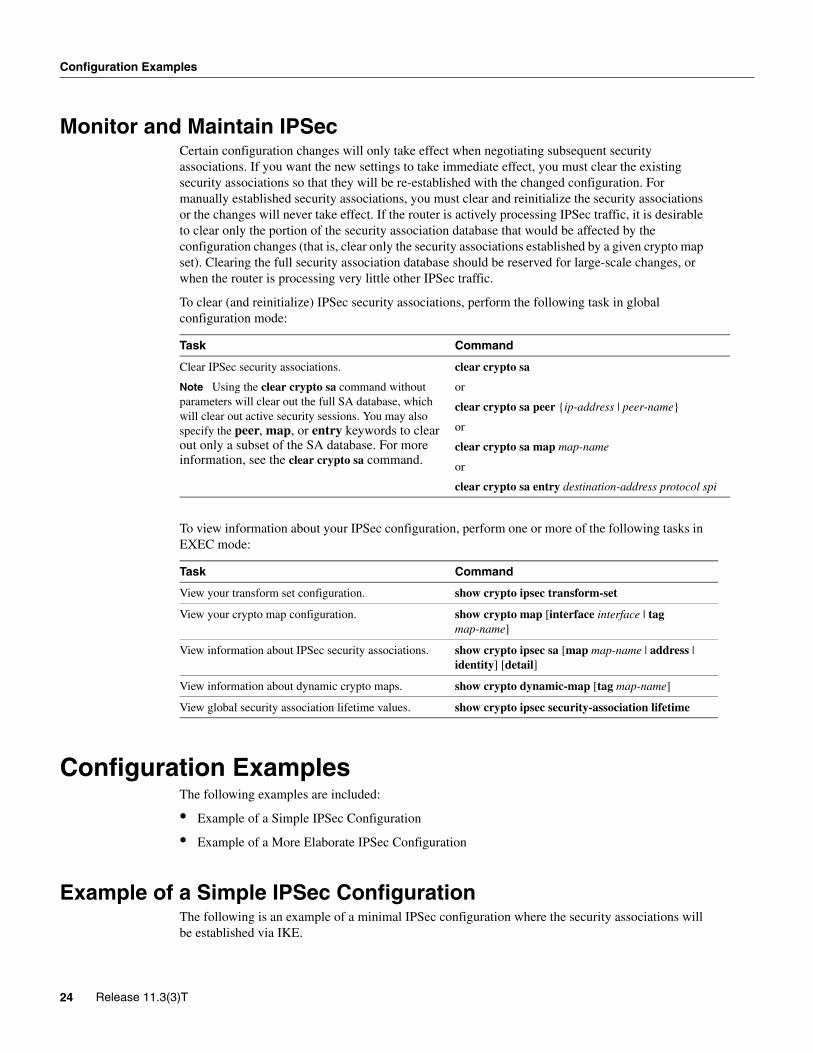
Monitor and Maintain IPSecCertain configuration changes will only take effect when negotiating subsequent security associations. If you want the new settings to take immediate effect, you must clear the existing security associations so that they will be re-established with the changed configuration. For manually established security associations, you must clear and reinitialize the security associations or the changes will never take effect. If the router is actively processing IPSec traffic, it is desirable to clear only the portion of the security association database that would be affected by the configuration changes (that is, clear only the security associations established by a given crypto map set). Clearing the full security association database should be reserved for large-scale changes, or when the router is processing very little other IPSec traffic.
To clear (and reinitialize) IPSec security associations, perform the following task in global configuration mode:
To view information about your IPSec configuration, perform one or more of the following tasks in EXEC mode:
Configuration ExamplesThe following examples are included:
• Example of a Simple IPSec Configuration
• Example of a More Elaborate IPSec Configuration
Example of a Simple IPSec ConfigurationThe following is an example of a minimal IPSec configuration where the security associations will be established via IKE.
Task Command
Clear IPSec security associations.
Note Using the clear crypto sa command without parameters will clear out the full SA database, which will clear out active security sessions. You may also specify the peer, map, or entry keywords to clear out only a subset of the SA database. For more information, see the clear crypto sa command.
clear crypto sa
or
clear crypto sa peer {ip-address | peer-name}
or
clear crypto sa map map-name
or
clear crypto sa entry destination-address protocol spi
Task Command
View your transform set configuration. show crypto ipsec transform-set
View your crypto map configuration. show crypto map [interface interface | tag map-name]
View information about IPSec security associations. show crypto ipsec sa [map map-name | address | identity] [detail]
View information about dynamic crypto maps. show crypto dynamic-map [tag map-name]
View global security association lifetime values. show crypto ipsec security-association lifetime
24 Release 11.3(3)T
Example of a More Elaborate IPSec Configuration
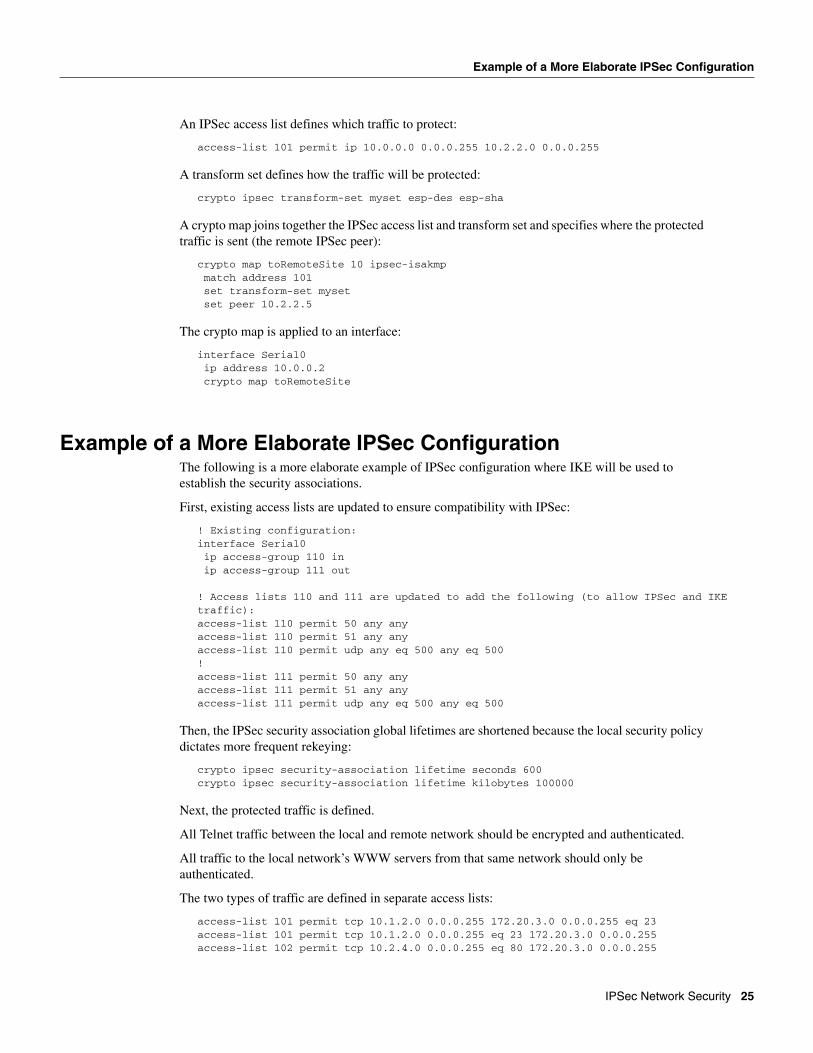
An IPSec access list defines which traffic to protect:
access-list 101 permit ip 10.0.0.0 0.0.0.255 10.2.2.0 0.0.0.255
A transform set defines how the traffic will be protected:
crypto ipsec transform-set myset esp-des esp-sha
A crypto map joins together the IPSec access list and transform set and specifies where the protected traffic is sent (the remote IPSec peer):
crypto map toRemoteSite 10 ipsec-isakmpmatch address 101set transform-set mysetset peer 10.2.2.5
The crypto map is applied to an interface:
interface Serial0ip address 10.0.0.2crypto map toRemoteSite
Example of a More Elaborate IPSec ConfigurationThe following is a more elaborate example of IPSec configuration where IKE will be used to establish the security associations.
First, existing access lists are updated to ensure compatibility with IPSec:
! Existing configuration:interface Serial0ip access-group 110 inip access-group 111 out
! Access lists 110 and 111 are updated to add the following (to allow IPSec and IKE traffic):access-list 110 permit 50 any anyaccess-list 110 permit 51 any anyaccess-list 110 permit udp any eq 500 any eq 500!access-list 111 permit 50 any anyaccess-list 111 permit 51 any anyaccess-list 111 permit udp any eq 500 any eq 500
Then, the IPSec security association global lifetimes are shortened because the local security policy dictates more frequent rekeying:
crypto ipsec security-association lifetime seconds 600crypto ipsec security-association lifetime kilobytes 100000
Next, the protected traffic is defined.
All Telnet traffic between the local and remote network should be encrypted and authenticated.
All traffic to the local network’s WWW servers from that same network should only be authenticated.
The two types of traffic are defined in separate access lists:
access-list 101 permit tcp 10.1.2.0 0.0.0.255 172.20.3.0 0.0.0.255 eq 23access-list 101 permit tcp 10.1.2.0 0.0.0.255 eq 23 172.20.3.0 0.0.0.255access-list 102 permit tcp 10.2.4.0 0.0.0.255 eq 80 172.20.3.0 0.0.0.255
IPSec Network Security 25
Configuration Examples
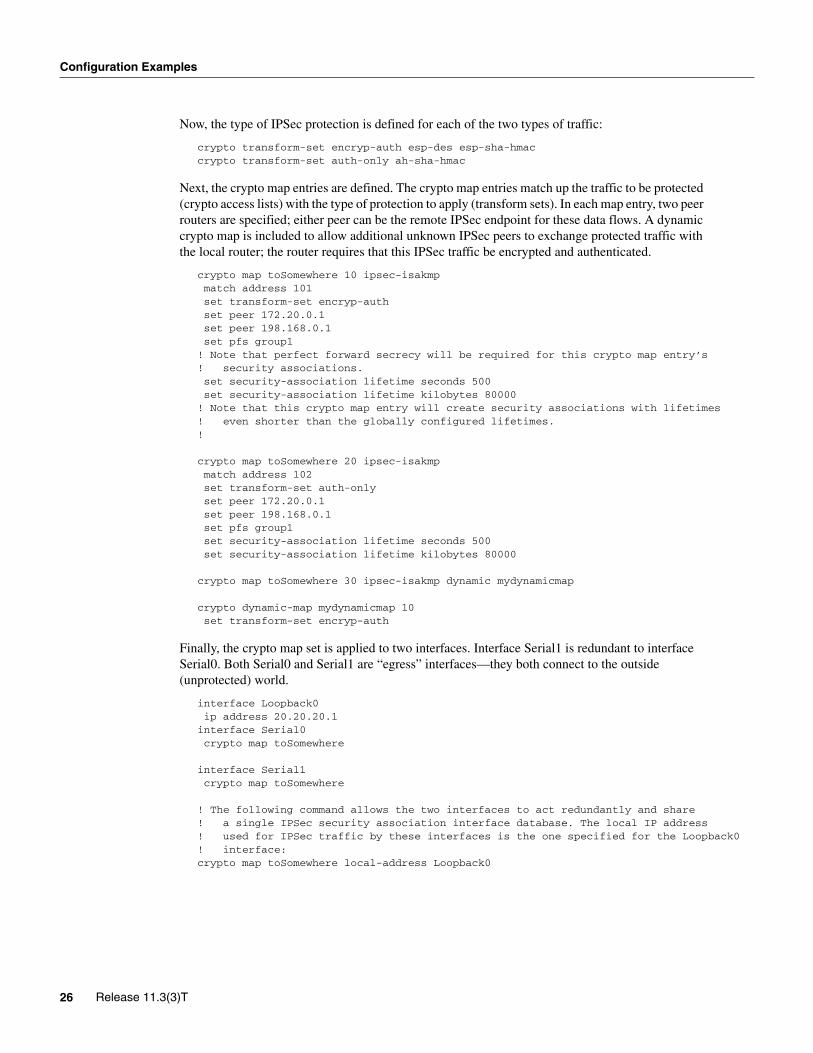
Now, the type of IPSec protection is defined for each of the two types of traffic:
crypto transform-set encryp-auth esp-des esp-sha-hmaccrypto transform-set auth-only ah-sha-hmac
Next, the crypto map entries are defined. The crypto map entries match up the traffic to be protected (crypto access lists) with the type of protection to apply (transform sets). In each map entry, two peer routers are specified; either peer can be the remote IPSec endpoint for these data flows. A dynamic crypto map is included to allow additional unknown IPSec peers to exchange protected traffic with the local router; the router requires that this IPSec traffic be encrypted and authenticated.
crypto map toSomewhere 10 ipsec-isakmpmatch address 101set transform-set encryp-authset peer 172.20.0.1set peer 198.168.0.1set pfs group1
! Note that perfect forward secrecy will be required for this crypto map entry’s! security associations.set security-association lifetime seconds 500set security-association lifetime kilobytes 80000
! Note that this crypto map entry will create security associations with lifetimes! even shorter than the globally configured lifetimes.!
crypto map toSomewhere 20 ipsec-isakmpmatch address 102set transform-set auth-onlyset peer 172.20.0.1set peer 198.168.0.1set pfs group1set security-association lifetime seconds 500set security-association lifetime kilobytes 80000
crypto map toSomewhere 30 ipsec-isakmp dynamic mydynamicmap
crypto dynamic-map mydynamicmap 10set transform-set encryp-auth
Finally, the crypto map set is applied to two interfaces. Interface Serial1 is redundant to interface Serial0. Both Serial0 and Serial1 are “egress” interfaces—they both connect to the outside (unprotected) world.
interface Loopback0ip address 20.20.20.1
interface Serial0crypto map toSomewhere
interface Serial1crypto map toSomewhere
! The following command allows the two interfaces to act redundantly and share! a single IPSec security association interface database. The local IP address ! used for IPSec traffic by these interfaces is the one specified for the Loopback0! interface:crypto map toSomewhere local-address Loopback0
26 Release 11.3(3)T
Example of a More Elaborate IPSec Configuration
Command ReferenceThis section documents new or modified commands. All other commands used with this feature are documented in the Cisco IOS Release 11.3 command references.
For debug commands, see the “Debug Commands” section later in this document.
• clear crypto sa
• crypto dynamic-map
• crypto ipsec security-association lifetime
• crypto ipsec transform-set
• crypto map (global configuration)
• crypto map (interface configuration)
• crypto map local-address
• initialization-vector size
• match address
• mode
• set peer
• set pfs
• set security-association level per-host
• set security-association lifetime
• set session-key
• set transform-set
• show crypto ipsec sa
• show crypto ipsec security-association lifetime
• show crypto ipsec transform-set
• show crypto dynamic-map
• show crypto map
IPSec Network Security 27
Command Reference
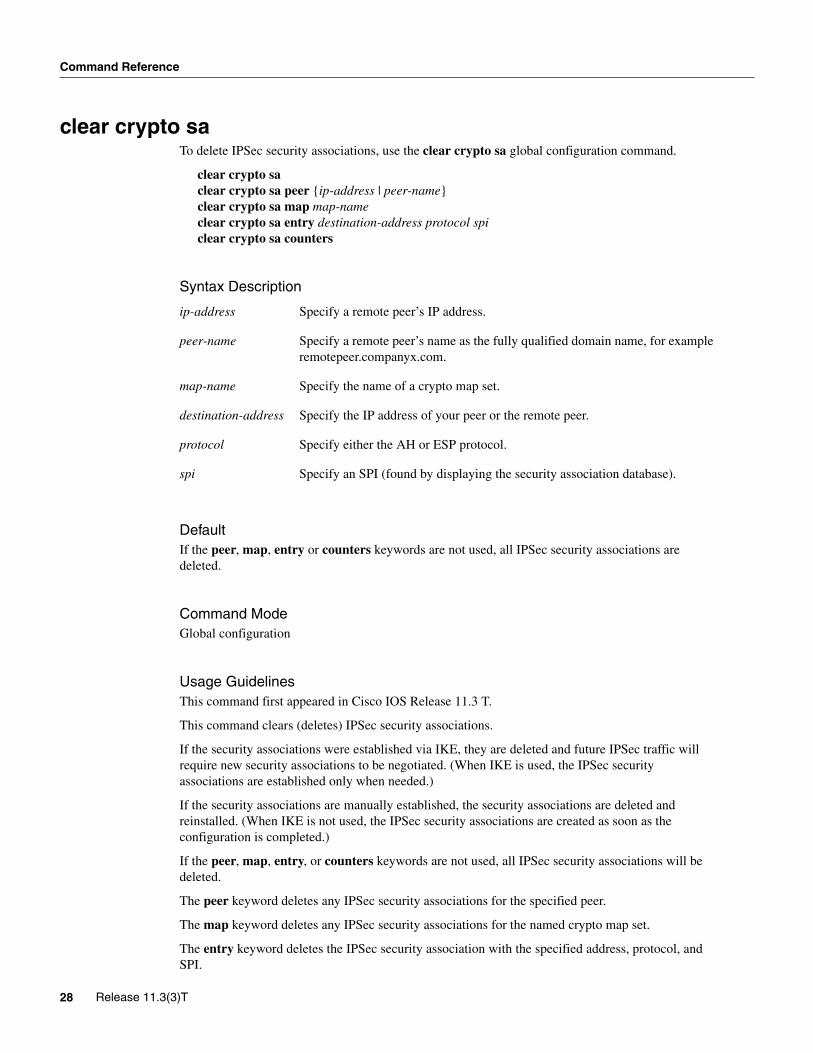
clear crypto saTo delete IPSec security associations, use the clear crypto sa global configuration command.
clear crypto saclear crypto sa peer {ip-address | peer-name}clear crypto sa map map-nameclear crypto sa entry destination-address protocol spiclear crypto sa counters
Syntax Description
DefaultIf the peer, map, entry or counters keywords are not used, all IPSec security associations are deleted.
Command ModeGlobal configuration
Usage GuidelinesThis command first appeared in Cisco IOS Release 11.3 T.
This command clears (deletes) IPSec security associations.
If the security associations were established via IKE, they are deleted and future IPSec traffic will require new security associations to be negotiated. (When IKE is used, the IPSec security associations are established only when needed.)
If the security associations are manually established, the security associations are deleted and reinstalled. (When IKE is not used, the IPSec security associations are created as soon as the configuration is completed.)
If the peer, map, entry, or counters keywords are not used, all IPSec security associations will be deleted.
The peer keyword deletes any IPSec security associations for the specified peer.
The map keyword deletes any IPSec security associations for the named crypto map set.
The entry keyword deletes the IPSec security association with the specified address, protocol, and SPI.
ip-address Specify a remote peer’s IP address.
peer-name Specify a remote peer’s name as the fully qualified domain name, for example remotepeer.companyx.com.
map-name Specify the name of a crypto map set.
destination-address Specify the IP address of your peer or the remote peer.
protocol Specify either the AH or ESP protocol.
spi Specify an SPI (found by displaying the security association database).
28 Release 11.3(3)T
clear crypto sa
If any of the above commands cause a particular security association to be deleted, all the “sibling” security associations—that were established during the same IKE negotiation—are deleted as well.
The counters keyword simply clears the traffic counters maintained for each security association; it does not clear the security associations themselves.
If you make configuration changes that affect security associations, these changes will not apply to existing security associations but to negotiations for subsequent security associations. You can use the clear crypto sa command to restart all security associations so they will use the most current configuration settings. In the case of manually established security associations, if you make changes that affect security associations you must use the clear crypto sa command before the changes take effect.
If the router is processing active IPSec traffic, it is suggested that you only clear the portion of the security association database that is affected by the changes, to avoid causing active IPSec traffic to temporarily fail.
Note that this command only clears IPSec security associations; to clear IKE state, use the clear crypto isakmp command.
ExamplesThe following example clears (and reinitializes if appropriate) all IPSec security associations at the router:
clear crypto sa
The following example clears (and reinitializes if appropriate) the inbound and outbound IPSec security associations established along with the security association established for address 10.0.0.1 using the AH protocol with the SPI of 256:
clear crypto sa entry 10.0.0.1 AH 256
Related Commandsclear crypto isakmp
IPSec Network Security 29
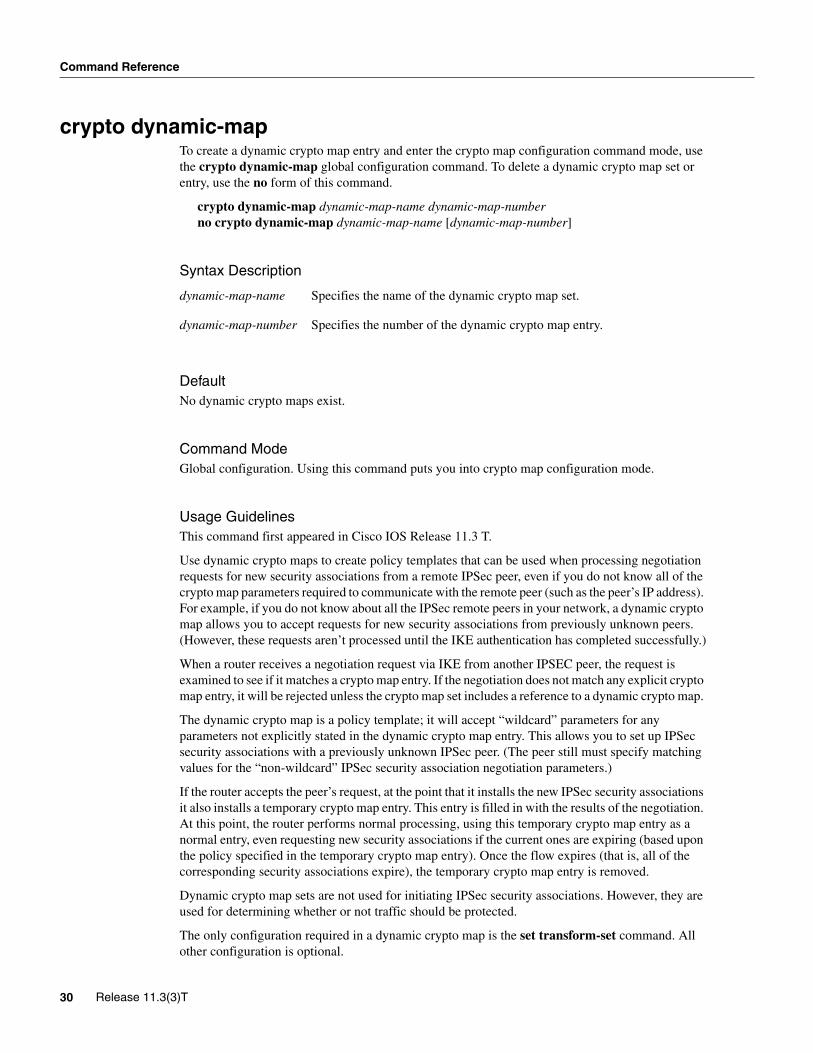
Command Reference
crypto dynamic-mapTo create a dynamic crypto map entry and enter the crypto map configuration command mode, use the crypto dynamic-map global configuration command. To delete a dynamic crypto map set or entry, use the no form of this command.
crypto dynamic-map dynamic-map-name dynamic-map-numberno crypto dynamic-map dynamic-map-name [dynamic-map-number]
Syntax Description
DefaultNo dynamic crypto maps exist.
Command ModeGlobal configuration. Using this command puts you into crypto map configuration mode.
Usage GuidelinesThis command first appeared in Cisco IOS Release 11.3 T.
Use dynamic crypto maps to create policy templates that can be used when processing negotiation requests for new security associations from a remote IPSec peer, even if you do not know all of the crypto map parameters required to communicate with the remote peer (such as the peer’s IP address). For example, if you do not know about all the IPSec remote peers in your network, a dynamic crypto map allows you to accept requests for new security associations from previously unknown peers. (However, these requests aren’t processed until the IKE authentication has completed successfully.)
When a router receives a negotiation request via IKE from another IPSEC peer, the request is examined to see if it matches a crypto map entry. If the negotiation does not match any explicit crypto map entry, it will be rejected unless the crypto map set includes a reference to a dynamic crypto map.
The dynamic crypto map is a policy template; it will accept “wildcard” parameters for any parameters not explicitly stated in the dynamic crypto map entry. This allows you to set up IPSec security associations with a previously unknown IPSec peer. (The peer still must specify matching values for the “non-wildcard” IPSec security association negotiation parameters.)
If the router accepts the peer’s request, at the point that it installs the new IPSec security associations it also installs a temporary crypto map entry. This entry is filled in with the results of the negotiation. At this point, the router performs normal processing, using this temporary crypto map entry as a normal entry, even requesting new security associations if the current ones are expiring (based upon the policy specified in the temporary crypto map entry). Once the flow expires (that is, all of the corresponding security associations expire), the temporary crypto map entry is removed.
Dynamic crypto map sets are not used for initiating IPSec security associations. However, they are used for determining whether or not traffic should be protected.
The only configuration required in a dynamic crypto map is the set transform-set command. All other configuration is optional.
dynamic-map-name Specifies the name of the dynamic crypto map set.
dynamic-map-number Specifies the number of the dynamic crypto map entry.
30 Release 11.3(3)T
crypto dynamic-map
Dynamic crypto map entries, like regular static crypto map entries, are grouped into sets. After you define a dynamic crypto map set (which commonly contains only one map entry) using this command, you include the dynamic crypto map set in an entry of the “parent” crypto map set using the crypto map (global configuration) command. The parent crypto map set is then applied to an interface.
You should make crypto map entries referencing dynamic maps the lowest priority map entries, so that negotiations for security associations will try to match the static crypto map entries first. Only after the negotiation request does not match any of the static map entries do you want it to be evaluated against the dynamic map.
To make a dynamic crypto map the lowest priority map entry, give the map entry referencing the dynamic crypto map the highest map-number of all the map entries in a crypto map set.
For both static and dynamic crypto maps, if unprotected inbound traffic matches a permit statement in an access list, and the corresponding crypto map entry is tagged as “IPSec,” then the traffic is dropped because it is not IPSec-protected. (This is because the security policy as specified by the crypto map entry states that this traffic must be IPSec-protected.)
For static crypto map entries, if outbound traffic matches a permit statement in an access list and the corresponding SA is not yet established, the router will initiate new SAs with the remote peer. In the case of dynamic crypto map entries, if no SA existed, the traffic would simply be dropped (since dynamic crypto maps are not used for initiating new SAs).
Note Use care when using the any keyword in permit entries in dynamic crypto maps. If it is possible for the traffic covered by such a permit entry to include multicast or broadcast traffic, the access list should include deny entries for the appropriate address range. Access lists should also include deny entries for network and subnet broadcast traffic, and for any other traffic that should not be IPSec protected.
ExampleThe following example configures an IPSec crypto map set.
Crypto map entry “mymap 30” references the dynamic crypto map set “mydynamicmap,” which can be used to process inbound security association negotiation requests that do not match “mymap” entries 10 or 20. In this case, if the peer specifies a transform set that matches one of the transform sets specified in “mydynamicmap,” for a flow “permitted” by the access list 103, IPSec will accept the request and set up security associations with the remote peer without previously knowing about the remote peer. If accepted, the resulting security associations (and temporary crypto map entry) are established according to the settings specified by the remote peer.
The access list associated with “mydynamicmap 10” is also used as a filter. Inbound packets that match a permit statement in this list are dropped for not being IPSec protected. (The same is true for access lists associated with static crypto maps entries.) Outbound packets that match a permit statement without an existing corresponding IPSec SA are also dropped.
IPSec Network Security 31
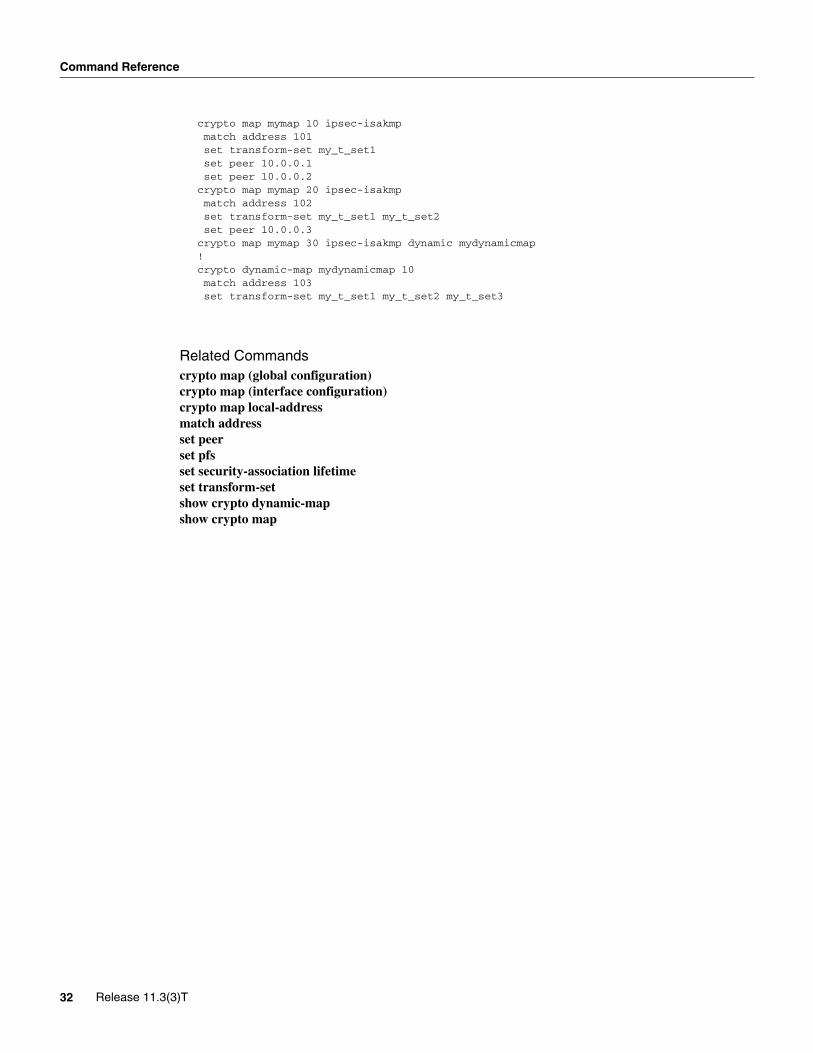
Command Reference
crypto map mymap 10 ipsec-isakmpmatch address 101set transform-set my_t_set1set peer 10.0.0.1set peer 10.0.0.2
crypto map mymap 20 ipsec-isakmpmatch address 102set transform-set my_t_set1 my_t_set2set peer 10.0.0.3
crypto map mymap 30 ipsec-isakmp dynamic mydynamicmap!crypto dynamic-map mydynamicmap 10match address 103set transform-set my_t_set1 my_t_set2 my_t_set3
Related Commandscrypto map (global configuration)crypto map (interface configuration)crypto map local-addressmatch addressset peerset pfsset security-association lifetimeset transform-setshow crypto dynamic-mapshow crypto map
32 Release 11.3(3)T
crypto ipsec security-association lifetime
crypto ipsec security-association lifetimeTo change global lifetime values used when negotiating IPSec security associations, use the crypto ipsec security-association lifetime global configuration command. To reset a lifetime to the default value, use the no form of the command.
crypto ipsec security-association lifetime {seconds seconds | kilobytes kilobytes}no crypto ipsec security-association lifetime {seconds | kilobytes}
Syntax Description
Default3600 seconds (one hour) and 4,608,000 kilobytes (10 Mbytes per second for one hour)
Command ModeGlobal configuration
Usage GuidelinesThis command first appeared in Cisco IOS Release 11.3 T.
IPSec security associations use shared secret keys. These keys and their security associations time out together.
Assuming that the particular crypto map entry does not have lifetime values configured, when the router requests new security associations during security association negotiation, it will specify its global lifetime value in the request to the peer; it will use this value as the lifetime of the new security associations. When the router receives a negotiation request from the peer, it will use the smaller of the lifetime value proposed by the peer or the locally configured lifetime value as the lifetime of the new security associations.
There are two lifetimes: a “timed” lifetime and a “traffic-volume” lifetime. The security association expires after the first of these lifetimes is reached.
If you change a global lifetime, the change is only applied when the crypto map entry does not have a lifetime value specified. The change will not be applied to existing security associations, but will be used in subsequent negotiations to establish new security associations. If you want the new settings to take effect sooner, you can clear all or part of the security association database by using the clear crypto sa command. Refer to the clear crypto sa command for more detail.
To change the global timed lifetime, use the crypto ipsec security-association lifetime seconds form of the command. The timed lifetime causes the security association to time out after the specified number of seconds have passed.
seconds seconds Specifies the number of seconds a security association will live before expiring. The default is 3600 seconds (one hour).
kilobytes kilobytes Specifies the volume of traffic (in kilobytes) that can pass between IPSec peers using a given security association before that security association expires. The default is 4,608,000 kilobytes.
IPSec Network Security 33
Command Reference
To change the global traffic-volume lifetime, use the crypto ipsec security-association lifetime kilobytes form of the command. The traffic-volume lifetime causes the security association to time out after the specified amount of traffic (in kilobytes) has been protected by the security associations’ key.
Shorter lifetimes can make it harder to mount a successful key recovery attack, since the attacker has less data encrypted under the same key to work with. However, shorter lifetimes require more CPU processing time for establishing new security associations.
The lifetime values are ignored for manually established security associations (security associations installed using an ipsec-manual crypto map entry).
How These Lifetimes WorkThe security association (and corresponding keys) will expire according to whichever comes sooner, either after the number of seconds has passed (specified by the seconds keyword) or after the amount of traffic in kilobytes has passed (specified by the kilobytes keyword).
A new security association is negotiated before the lifetime threshold of the existing security association is reached, to ensure that a new security association is ready for use when the old one expires. The new security association is negotiated either 30 seconds before the seconds lifetime expires or when the volume of traffic through the tunnel reaches 256 kbytes less than the kilobytes lifetime (whichever comes first).
If no traffic has passed through the tunnel during the entire life of the security association, a new security association is not negotiated when the lifetime expires. Instead, a new security association will be negotiated only when IPSec sees another packet that should be protected.
ExampleThis example shortens both lifetimes, because the administrator feels there is a higher risk that the keys could be compromised. The timed lifetime is shortened to 2700 seconds (45 minutes), and the traffic-volume lifetime is shortened to 2,304,000 kilobytes (10 Mbytes per second for one half hour).
crypto ipsec security-association lifetime seconds 2700crypto ipsec security-association lifetime kilobytes 2304000
Related Commandsset security-association lifetimeshow crypto ipsec security-association lifetime
34 Release 11.3(3)T
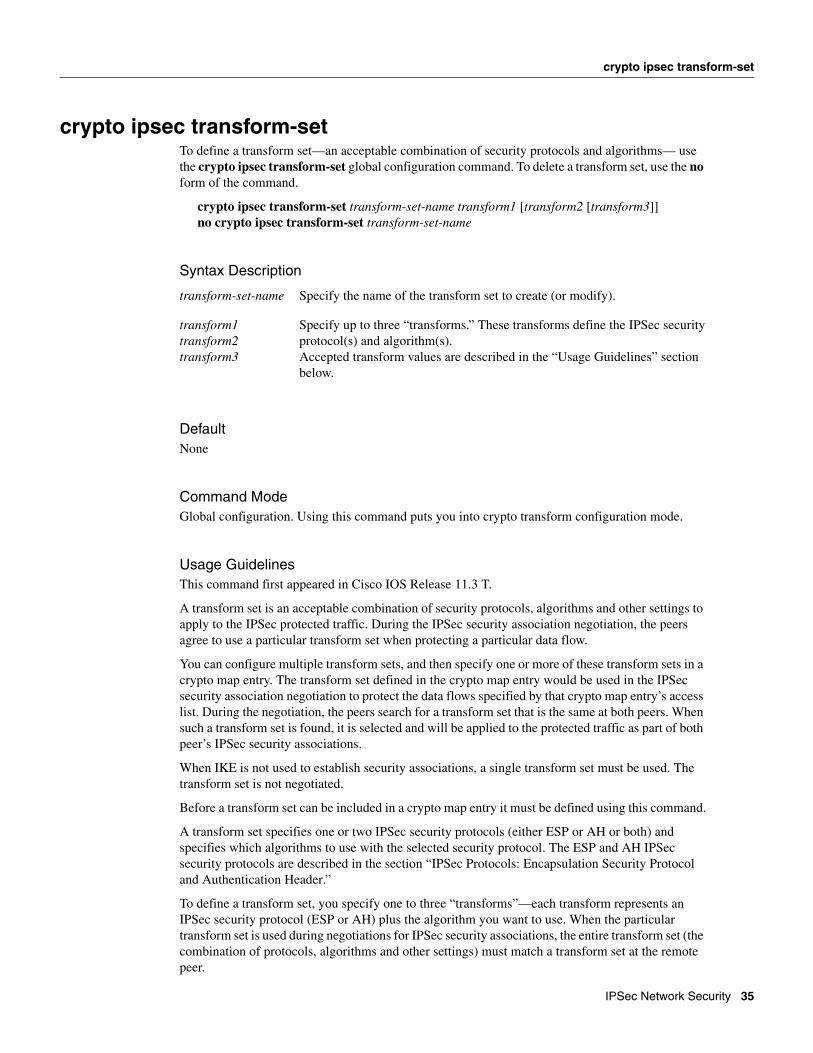
crypto ipsec transform-set
crypto ipsec transform-setTo define a transform set—an acceptable combination of security protocols and algorithms— use the crypto ipsec transform-set global configuration command. To delete a transform set, use the no form of the command.
crypto ipsec transform-set transform-set-name transform1 [transform2 [transform3]]no crypto ipsec transform-set transform-set-name
Syntax Description
DefaultNone
Command ModeGlobal configuration. Using this command puts you into crypto transform configuration mode.
Usage GuidelinesThis command first appeared in Cisco IOS Release 11.3 T.
A transform set is an acceptable combination of security protocols, algorithms and other settings to apply to the IPSec protected traffic. During the IPSec security association negotiation, the peers agree to use a particular transform set when protecting a particular data flow.
You can configure multiple transform sets, and then specify one or more of these transform sets in a crypto map entry. The transform set defined in the crypto map entry would be used in the IPSec security association negotiation to protect the data flows specified by that crypto map entry’s access list. During the negotiation, the peers search for a transform set that is the same at both peers. When such a transform set is found, it is selected and will be applied to the protected traffic as part of both peer’s IPSec security associations.
When IKE is not used to establish security associations, a single transform set must be used. The transform set is not negotiated.
Before a transform set can be included in a crypto map entry it must be defined using this command.
A transform set specifies one or two IPSec security protocols (either ESP or AH or both) and specifies which algorithms to use with the selected security protocol. The ESP and AH IPSec security protocols are described in the section “IPSec Protocols: Encapsulation Security Protocol and Authentication Header.”
To define a transform set, you specify one to three “transforms”—each transform represents an IPSec security protocol (ESP or AH) plus the algorithm you want to use. When the particular transform set is used during negotiations for IPSec security associations, the entire transform set (the combination of protocols, algorithms and other settings) must match a transform set at the remote peer.
transform-set-name Specify the name of the transform set to create (or modify).
transform1transform2transform3
Specify up to three “transforms.” These transforms define the IPSec security protocol(s) and algorithm(s).Accepted transform values are described in the “Usage Guidelines” section below.
IPSec Network Security 35
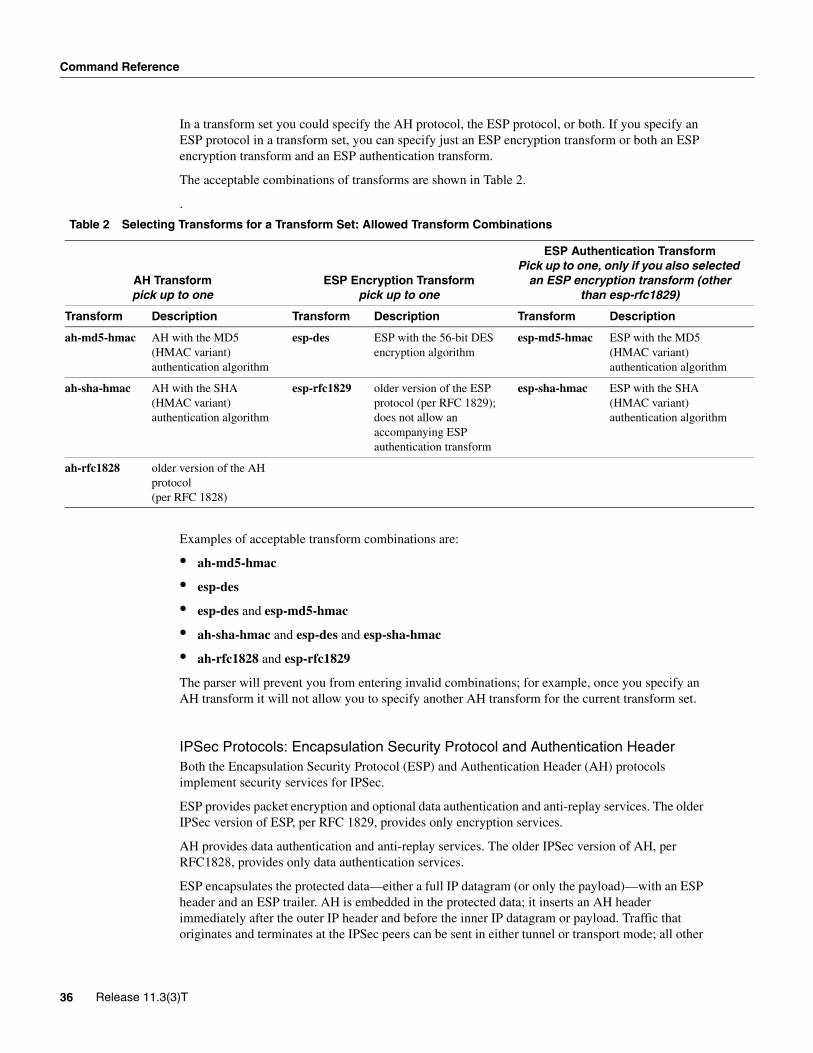
Command Reference
In a transform set you could specify the AH protocol, the ESP protocol, or both. If you specify an ESP protocol in a transform set, you can specify just an ESP encryption transform or both an ESP encryption transform and an ESP authentication transform.
The acceptable combinations of transforms are shown in Table 2.
.
Examples of acceptable transform combinations are:
• ah-md5-hmac
• esp-des
• esp-des and esp-md5-hmac
• ah-sha-hmac and esp-des and esp-sha-hmac
• ah-rfc1828 and esp-rfc1829
The parser will prevent you from entering invalid combinations; for example, once you specify an AH transform it will not allow you to specify another AH transform for the current transform set.
IPSec Protocols: Encapsulation Security Protocol and Authentication HeaderBoth the Encapsulation Security Protocol (ESP) and Authentication Header (AH) protocols implement security services for IPSec.
ESP provides packet encryption and optional data authentication and anti-replay services. The older IPSec version of ESP, per RFC 1829, provides only encryption services.
AH provides data authentication and anti-replay services. The older IPSec version of AH, per RFC1828, provides only data authentication services.
ESP encapsulates the protected data—either a full IP datagram (or only the payload)—with an ESP header and an ESP trailer. AH is embedded in the protected data; it inserts an AH header immediately after the outer IP header and before the inner IP datagram or payload. Traffic that originates and terminates at the IPSec peers can be sent in either tunnel or transport mode; all other
Table 2 Selecting Transforms for a Transform Set: Allowed Transform Combinations
AH Transform pick up to one
ESP Encryption Transform pick up to one
ESP Authentication TransformPick up to one, only if you also selected
an ESP encryption transform (other than esp-rfc1829)
Transform Description Transform Description Transform Description
ah-md5-hmac AH with the MD5 (HMAC variant) authentication algorithm
esp-des ESP with the 56-bit DES encryption algorithm
esp-md5-hmac ESP with the MD5 (HMAC variant) authentication algorithm
ah-sha-hmac AH with the SHA (HMAC variant) authentication algorithm
esp-rfc1829 older version of the ESP protocol (per RFC 1829); does not allow an accompanying ESP authentication transform
esp-sha-hmac ESP with the SHA (HMAC variant) authentication algorithm
ah-rfc1828 older version of the AH protocol(per RFC 1828)
36 Release 11.3(3)T

crypto ipsec transform-set
traffic is sent in tunnel mode. Tunnel mode encapsulates and protects a full IP datagram, while transport mode encapsulates/protects the payload of an IP datagram. For more information about modes, see the mode command description.
Selecting Appropriate TransformsIf the router will be establishing IPSec secure tunnels with a device that supports only the older IPSec transforms (ah-rfc1828 and esp-rfc1829) then you must specify these older transforms. Because RFC 1829 ESP does not provide authentication, you should probably always include the ah-rfc1828 transform in a transform set that has esp-rfc1829. For interoperability with a peer that supports only the older IPSec transforms, recommended transform combinations are as follows:
• ah-rfc1828
• ah-rfc1828 and esp-rfc1829
If the peer supports the newer IPSec transforms, your choices are more complex. The following tips may help you select transforms that are appropriate for your situation:
• If you want to provide data confidentiality, include an ESP encryption transform.
• If you want to ensure data authentication for the outer IP header as well as the data, include an AH transform. (Some consider the benefits of outer IP header data integrity to be debatable.)
• If you use an ESP encryption transform, also consider including an ESP authentication transform or an AH transform to provide authentication services for the transform set.
• If you want data authentication (either using ESP or AH) you can choose from the MD5 or SHA (HMAC keyed hash variants) authentication algorithms. The SHA algorithm is generally considered stronger than MD5, but is slower.
• Note that some transforms might not be supported by the IPSec peer.
Suggested transform combinations:
• esp-des and esp-sha-hmac
• ah-sha-hmac and esp-des and esp-sha-hmac
The Crypto Transform Configuration ModeAfter you issue the crypto ipsec transform-set command, you are put into the crypto transform configuration mode. While in this mode you can change the initialization vector length for the esp-rfc1829 transform, or you can change the mode to tunnel or transport. (These are optional changes.) After you have made either of these changes, type exit to return to global configuration mode. For more information about these optional changes, see the initialization-vector size and mode command descriptions.)
Changing Existing TransformsIf one or more transforms are specified in the crypto ipsec transform-set command for an existing transform set, the specified transforms will replace the existing transforms for that transform set.
If you change a transform set definition, the change is only applied to crypto map entries that reference the transform set. The change will not be applied to existing security associations, but will be used in subsequent negotiations to establish new security associations. If you want the new settings to take effect sooner, you can clear all or part of the security association database by using the clear crypto sa command.
IPSec Network Security 37
Command Reference
ExampleThis example defines two transform sets. The first transform set will be used with an IPSec peer that supports the newer ESP and AH protocols. The second transform set will be used with an IPSec peer that only supports the older transforms.
crypto ipsec transform-set newer esp-des esp-sha-hmaccrypto ipsec transform-set older ah-rfc-1828 esp-rfc1829
Related Commandsinitialization-vector sizemodeset transform-setshow crypto ipsec transform-set
38 Release 11.3(3)T
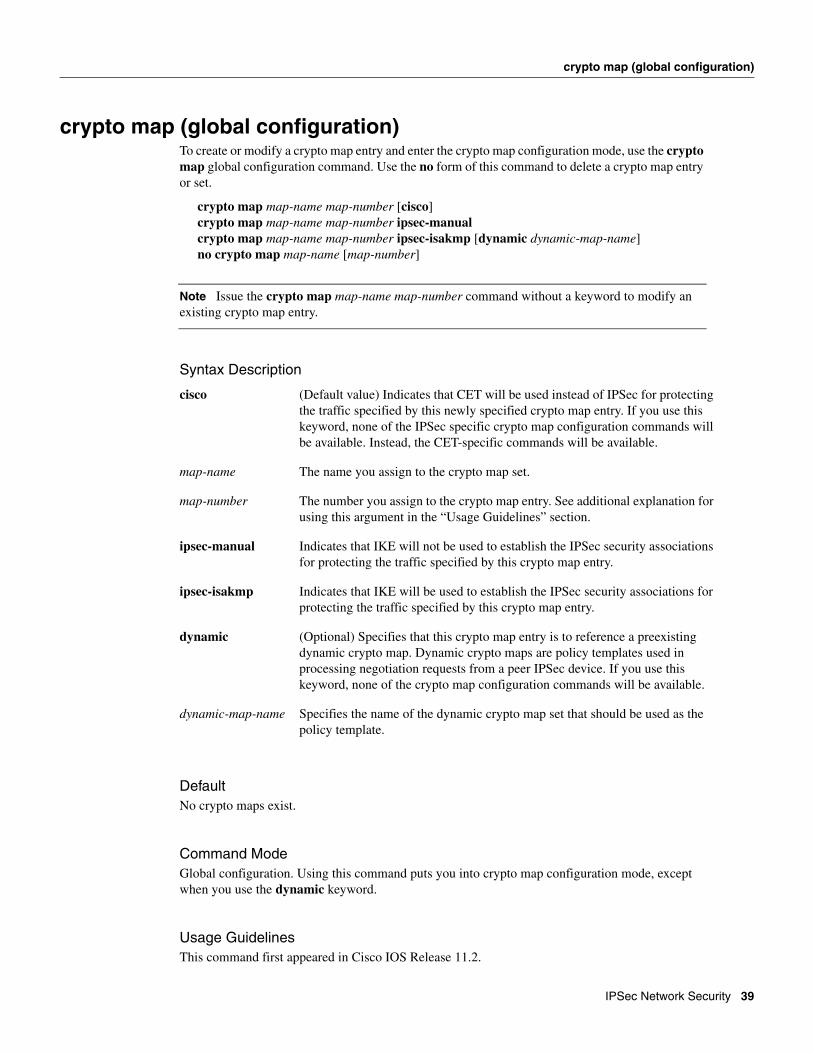
crypto map (global configuration)
crypto map (global configuration)To create or modify a crypto map entry and enter the crypto map configuration mode, use the crypto map global configuration command. Use the no form of this command to delete a crypto map entry or set.
crypto map map-name map-number [cisco]crypto map map-name map-number ipsec-manualcrypto map map-name map-number ipsec-isakmp [dynamic dynamic-map-name]no crypto map map-name [map-number]
Note Issue the crypto map map-name map-number command without a keyword to modify an existing crypto map entry.
Syntax Description
DefaultNo crypto maps exist.
Command ModeGlobal configuration. Using this command puts you into crypto map configuration mode, except when you use the dynamic keyword.
Usage GuidelinesThis command first appeared in Cisco IOS Release 11.2.
cisco (Default value) Indicates that CET will be used instead of IPSec for protecting the traffic specified by this newly specified crypto map entry. If you use this keyword, none of the IPSec specific crypto map configuration commands will be available. Instead, the CET-specific commands will be available.
map-name The name you assign to the crypto map set.
map-number The number you assign to the crypto map entry. See additional explanation for using this argument in the “Usage Guidelines” section.
ipsec-manual Indicates that IKE will not be used to establish the IPSec security associations for protecting the traffic specified by this crypto map entry.
ipsec-isakmp Indicates that IKE will be used to establish the IPSec security associations for protecting the traffic specified by this crypto map entry.
dynamic (Optional) Specifies that this crypto map entry is to reference a preexisting dynamic crypto map. Dynamic crypto maps are policy templates used in processing negotiation requests from a peer IPSec device. If you use this keyword, none of the crypto map configuration commands will be available.
dynamic-map-name Specifies the name of the dynamic crypto map set that should be used as the policy template.
IPSec Network Security 39
Command Reference
Use this command to create a new crypto map entry or to modify an existing crypto map entry.
Once a crypto map entry has been created, you cannot change the parameters specified at the global configuration level, since these parameters determine which of the configuration commands are valid at the crypto map level. For example, once a map entry has been created as ipsec-isakmp, you cannot change it to ipsec-manual or cisco; you must delete and reenter the map entry.
After you define crypto map entries, you can assign the crypto map set to interfaces using the crypto map (interface configuration) command.
What Crypto Maps Are ForCrypto maps provide two functions: filtering/classifying of traffic to be protected, and defining the policy to be applied to that traffic. The first use affects the flow of traffic on an interface; the second affects the negotiation performed (via IKE) on behalf of that traffic.
IPSec crypto maps link together definitions of the following:
• What traffic should be protected
• Which IPSec peer(s) the protected traffic can be forwarded to—these are the peers with which a security association can be established
• Which transform sets are acceptable for use with the protected traffic
• How keys and security associations should be used/managed (or what the keys are, if IKE is not used)
Multiple Crypto Maps Entries with the Same map-name Form a Crypto Map SetA crypto map set is a collection of crypto map entries each with a different map-number but the same map-name. Therefore, for a given interface, you could have certain traffic forwarded to one IPSec peer with specified security applied to that traffic, and other traffic forwarded to the same or a different IPSec peer with different IPSec security applied. To accomplish this you would create two crypto maps, each with the same map-name, but each with a different map-number. A crypto map set can include a combination of CET and IPSec crypto map entries.
The map-number ArgumentThe number you assign to the map-number argument should not be arbitrary. This number is used to rank multiple crypto map entries within a crypto map set. Within a crypto map set, a crypto map entry with a lower map-number is evaluated before a map entry with a higher map-number; that is, the map entry with the lower number has a higher priority.
For example, imagine there is a crypto map set that contains three crypto map entries: mymap 10, mymap 20, and mymap 30. The crypto map set named mymap is applied to interface Serial 0. When traffic passes through the Serial 0 interface, the traffic is evaluated first for mymap 10. If the traffic matches a permit entry in the extended access list in mymap 10, the traffic will be processed according to the information defined in mymap 10 (including establishing IPSec security associations or CET connections when necessary). If the traffic does not match the mymap 10 access list, the traffic will be evaluated for mymap 20, and then mymap 30, until the traffic matches a permit entry in a map entry. (If the traffic does not match a permit entry in any crypto map entry, it will be forwarded without any IPSec (or CET) security.)
40 Release 11.3(3)T
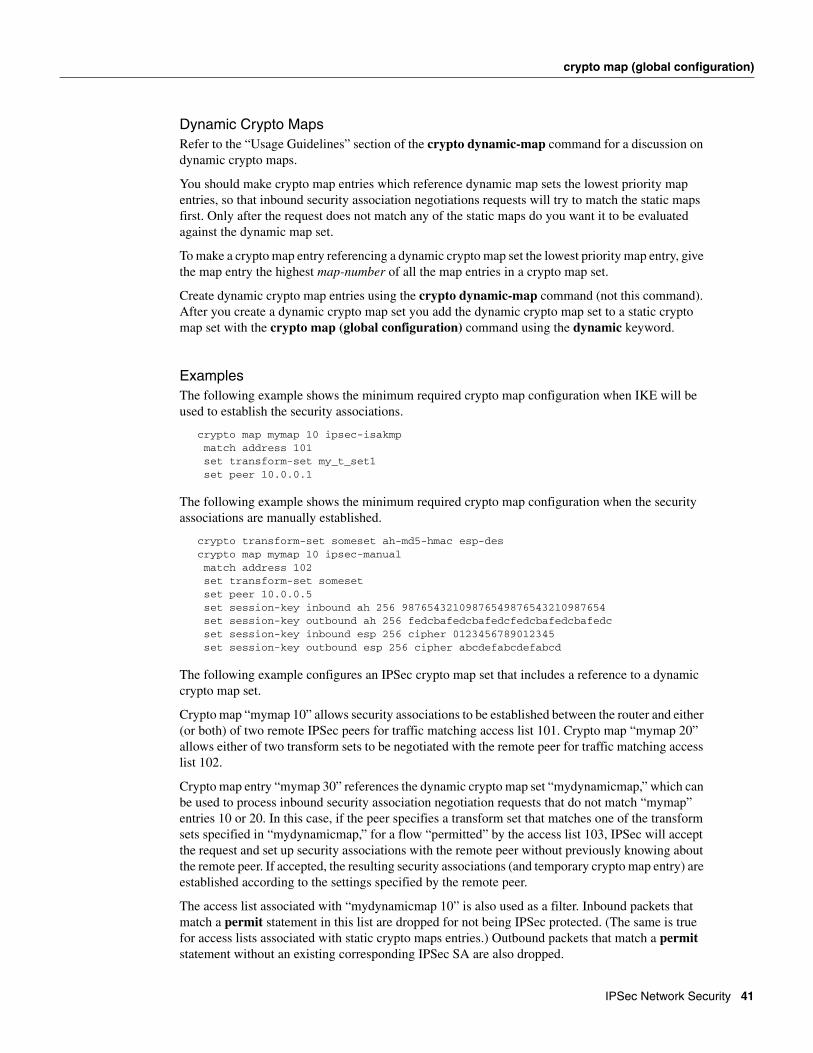
crypto map (global configuration)
Dynamic Crypto MapsRefer to the “Usage Guidelines” section of the crypto dynamic-map command for a discussion on dynamic crypto maps.
You should make crypto map entries which reference dynamic map sets the lowest priority map entries, so that inbound security association negotiations requests will try to match the static maps first. Only after the request does not match any of the static maps do you want it to be evaluated against the dynamic map set.
To make a crypto map entry referencing a dynamic crypto map set the lowest priority map entry, give the map entry the highest map-number of all the map entries in a crypto map set.
Create dynamic crypto map entries using the crypto dynamic-map command (not this command). After you create a dynamic crypto map set you add the dynamic crypto map set to a static crypto map set with the crypto map (global configuration) command using the dynamic keyword.
ExamplesThe following example shows the minimum required crypto map configuration when IKE will be used to establish the security associations.
crypto map mymap 10 ipsec-isakmpmatch address 101set transform-set my_t_set1set peer 10.0.0.1
The following example shows the minimum required crypto map configuration when the security associations are manually established.
crypto transform-set someset ah-md5-hmac esp-descrypto map mymap 10 ipsec-manualmatch address 102set transform-set somesetset peer 10.0.0.5set session-key inbound ah 256 98765432109876549876543210987654set session-key outbound ah 256 fedcbafedcbafedcfedcbafedcbafedcset session-key inbound esp 256 cipher 0123456789012345set session-key outbound esp 256 cipher abcdefabcdefabcd
The following example configures an IPSec crypto map set that includes a reference to a dynamic crypto map set.
Crypto map “mymap 10” allows security associations to be established between the router and either (or both) of two remote IPSec peers for traffic matching access list 101. Crypto map “mymap 20” allows either of two transform sets to be negotiated with the remote peer for traffic matching access list 102.
Crypto map entry “mymap 30” references the dynamic crypto map set “mydynamicmap,” which can be used to process inbound security association negotiation requests that do not match “mymap” entries 10 or 20. In this case, if the peer specifies a transform set that matches one of the transform sets specified in “mydynamicmap,” for a flow “permitted” by the access list 103, IPSec will accept the request and set up security associations with the remote peer without previously knowing about the remote peer. If accepted, the resulting security associations (and temporary crypto map entry) are established according to the settings specified by the remote peer.
The access list associated with “mydynamicmap 10” is also used as a filter. Inbound packets that match a permit statement in this list are dropped for not being IPSec protected. (The same is true for access lists associated with static crypto maps entries.) Outbound packets that match a permit statement without an existing corresponding IPSec SA are also dropped.
IPSec Network Security 41
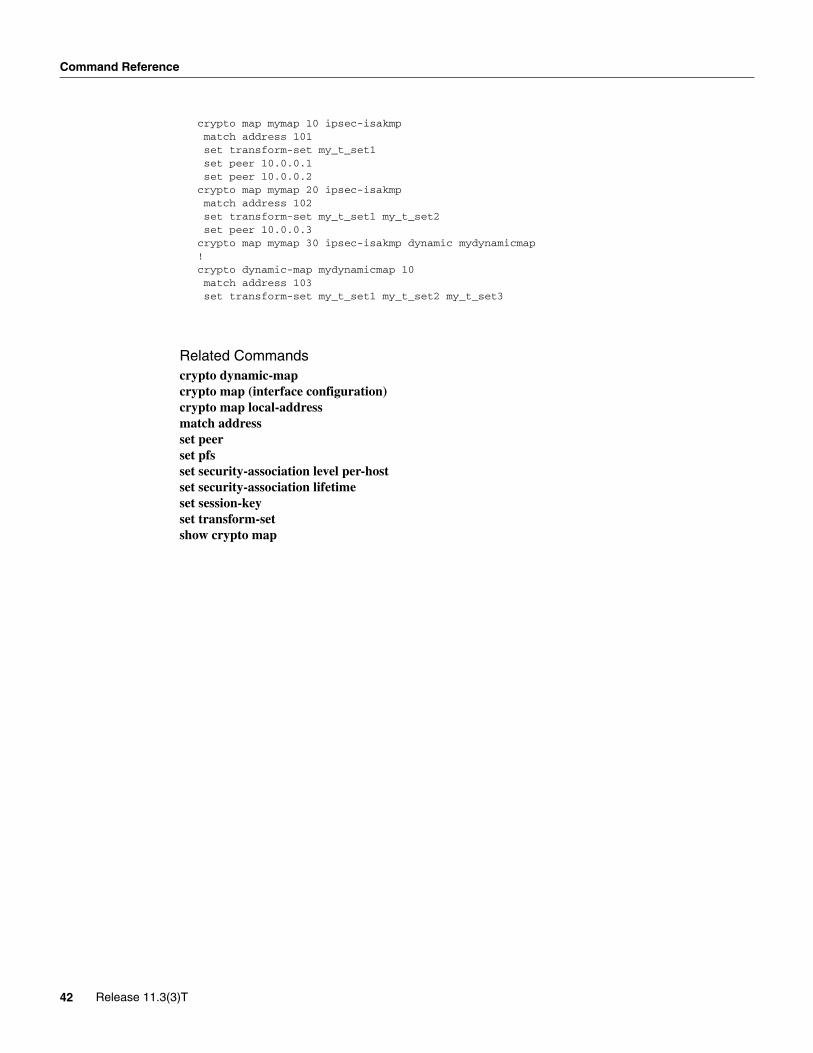
Command Reference
crypto map mymap 10 ipsec-isakmpmatch address 101set transform-set my_t_set1set peer 10.0.0.1set peer 10.0.0.2
crypto map mymap 20 ipsec-isakmpmatch address 102set transform-set my_t_set1 my_t_set2set peer 10.0.0.3
crypto map mymap 30 ipsec-isakmp dynamic mydynamicmap!crypto dynamic-map mydynamicmap 10match address 103set transform-set my_t_set1 my_t_set2 my_t_set3
Related Commandscrypto dynamic-mapcrypto map (interface configuration)crypto map local-addressmatch addressset peerset pfsset security-association level per-hostset security-association lifetimeset session-keyset transform-setshow crypto map
42 Release 11.3(3)T
crypto map (interface configuration)
crypto map (interface configuration)To apply a previously defined crypto map set to an interface, use the crypto map interface configuration command. Use the no form of the command to remove the crypto map set from the interface.
crypto map map-nameno crypto map [map-name]
Syntax Description
DefaultNo crypto maps are assigned to interfaces.
Command ModeInterface configuration
Usage GuidelinesThis command first appeared in Cisco IOS Release 11.2.
Use this command to assign a crypto map set to an interface. You must assign a crypto map set to an interface before that interface can provide IPSec services. Only one crypto map set can be assigned to an interface. If there are multiple crypto map entries with the same map-name but each with a different map-number, they are considered to be part of the same set and will all be applied to the interface. The crypto map entry with the lowest map-number is considered the highest priority and will be evaluated first. A single crypto map set can contain a combination of cisco, ipsec-isakmp, and ipsec-manual crypto map entries.
Note For Frame Relay interfaces, apply the same crypto map to both the logical and physical interfaces (the Frame Relay sub-interace and the physical interface).
For Dialer interfaces, as of release 11.3(8)AA, 11.3(9), 11.3(9)AA, 11.3(9)NA, and 11.3(9)T and later, apply the crypto map only to the dialer interface. Prior to these releases, you must also apply the crypto map to all physical ISDN or async interfaces the dialer interface refers to.
ExampleThe following example assigns crypto map set “mymap” to the S0 interface. When traffic passes through S0 the traffic will be evaluated against all the crypto map entries in the “mymap” set. Lower numbered crypto map entries will be evaluated before higher numbered crypto map entries. When outbound traffic matches an access list in one of the “mymap” crypto map entries, a security association (if IPsec) or CET connection (if CET) will be established per that crypto map entry’s configuration (if no security association or connection already exists).
map-name The name which identifies the crypto map set. This is the name assigned when the crypto map was created.
When the no form of the command is used, this argument is optional. Any value supplied for the argument is ignored.
IPSec Network Security 43
Command Reference
interface S0crypto map mymap
Related Commandscrypto map (global configuration)crypto map local-addressshow crypto map
44 Release 11.3(3)T
crypto map local-address
crypto map local-addressTo specify and name an identifying interface to be used by the crypto map for IPSec traffic, use the crypto map local-address global configuration command. Use the no form of the command to remove this command from the configuration.
crypto map map-name local-address interface-idno crypto map map-name local-address
Syntax Description
DefaultNone.
Command ModeGlobal configuration
Usage GuidelinesThis command first appeared in Cisco IOS Release 11.3 T.
If you apply the same crypto map to two interfaces and do not use this command, two separate security associations (with different local IP addresses) could be established to the same peer for similar traffic. If you are using the second interface as redundant to the first interface, it could be preferable to have a single security association (with a single local IP address) created for traffic sharing the two interfaces. Having a single security association decreases the overhead and makes administration simpler.
This command allows your peer to establish a single security association (and use a single local IP address) that is shared by the two redundant interfaces.
If applying the same crypto map set to more than one interface, the default behavior is:
• Each interface will have its own security association database.
• The IP address of the local interface will be used as the local address for IPSec traffic originating from/destined to that interface.
However, if you use a local-address for that crypto map set, it has multiple effects:
• Only one IPSec security association database will be established and shared for traffic through both interfaces.
• The IP address of the specified interface will be used as the local address for IPSec (and IKE) traffic originating from/ destined to that interface.
map-name The name which identifies the crypto map set. This is the name assigned when the crypto map was created.
interface-id Specify the identifying interface that should be used by the router to identify itself to remote peers.
If IKE is enabled and you are using a certification authority (CA) to obtain certificates, this should be the interface with the address specified in the CA certificates.
IPSec Network Security 45
Command Reference
One suggestion is to use a loopback interface as the referenced local address interface, because the loopback interface never goes down.
ExampleThe following example assigns crypto map set “mymap” to the S0 interface and to the S1 interface. When traffic passes through either S0 or S1 the traffic will be evaluated against the all the crypto maps in the “mymap” set. When traffic through either interface matches an access list in one of the “mymap” crypto maps, a security association will be established. This same security association will then apply to both S0 and S1 traffic that matches the originally matched IPSec access list. The local address that IPSec will use on both interfaces will be the IP address of interface loopback0.
interface S0crypto map mymap
interface S1crypto map mymap
crypto map mymap local-address loopback0
Related Commandscrypto map (interface configuration)
46 Release 11.3(3)T
initialization-vector size
initialization-vector sizeTo change the length of the initialization vector for the esp-rfc1829 transform, use the initialization-vector size crypto transform configuration command. To reset the initialization vector length to the default value, use the no form of the command.
initialization-vector size [4 | 8]no initialization-vector size
Syntax Description
Default8 bytes
Command ModeCrypto transform configuration
Usage GuidelinesThis command first appeared in Cisco IOS Release 11.3 T.
Use this command to change the initialization vector (IV) length for the esp-rfc1829 transform.
During negotiation, the IV length must match the IV length in the remote peer's transform set. Otherwise, the transform sets will not be considered a match.
After you define a transform set, you are put into the crypto transform configuration mode. While in this mode you can change the esp-rfc1829 initialization vector length to either 4 bytes or 8 bytes. This change only applies to the transform set just defined. (This command is only available when the transform set includes the esp-rfc1829 transform.)
If you do not change the IV length when you first define the transform set, but later decide you want to change the IV length for the transform set, you must re-enter the transform set (specifying the transform name without the transform list), and then change the IV length.
If you use this command to change the IV length, the change will only affect the negotiation of subsequent IPSec security associations via crypto map entries that specify this transform set. If you want to use the new settings sooner, you can clear all or part of the security association database. Refer to the clear crypto sa command for more details.
ExampleThis example defines a transform set and changes the IV length to 4 bytes:
MyPeerRouter(config)# crypto ipsec transform-set older ah-rfc-1828 esp-rfc1829MyPeerRouter(cfg-crypto-trans)# initialization-vector size 4MyPeerRouter(cfg-crypto-trans)# exitMyPeerRouter(config)#
4 | 8 (Optional) Specifies the length of the initialization vector: either 4 bytes or 8 bytes long. If neither 4 nor 8 is specified, the default length of 8 is assigned.
IPSec Network Security 47

Command Reference
Related Commandscrypto ipsec transform-setmode
48 Release 11.3(3)T
match address
match addressTo specify an extended access list for a crypto map entry, use the match address crypto map configuration command. Use the no form of this command to remove the extended access list from a crypto map entry. (These extended access lists are also known as crypto access lists in this document.)
match address access-list-idno match address [access-list-id]
Syntax Description
DefaultNo access lists are matched to the crypto map entry.
Command ModeCrypto map configuration
Usage GuidelinesThis command first appeared in Cisco IOS Release 11.2.
This command is required for all static crypto map entries. If you are defining a dynamic crypto map entry (with the crypto dynamic-map command), this command is not required but is strongly recommended.
Use this command to assign an extended access list to a crypto map entry. You also need to define this access list using the access-list or ip access-list extended commands.
The extended access list you specify with this command will be used by IPSec (or CET, depending on the setting of the crypto map entry) to determine which traffic should be protected by crypto and which traffic does not need crypto protection. (Traffic that is permitted by the access list will be protected. Traffic that is denied by the access list will not be protected in the context of the corresponding crypto map entry.)
Note that the crypto access list is not used to determine whether to permit or deny traffic through the interface. An access list applied directly to the interface makes that determination.
The crypto access list specified by this command is used when evaluating both inbound and outbound traffic. Outbound traffic is evaluated against the crypto access lists specified by the interface’s crypto map entries to determine if it should be protected by crypto and if so (if traffic matches a permit entry) which crypto policy applies. (If necessary, in the case of static IPSec crypto maps, new security associations are established using the data flow identity as specified in the permit entry; in the case of CET, new connections are established; in the case of dynamic crypto map entries, if no SA exists, the packet is dropped.) After passing the regular access lists at the interface, inbound traffic is evaluated against the crypto access lists specified by the entries of the interface’s crypto map set to determine if it should be protected by crypto and, if so, which crypto policy applies. (In the case of IPSec, unprotected traffic is discarded because it should have been protected by IPSec; in the case of CET, the traffic is decrypted even though it was never encrypted.)
access-list-id Identifies the extended access list by its name or number. This value should match the access-list-number or name argument of the extended access list.
IPSec Network Security 49
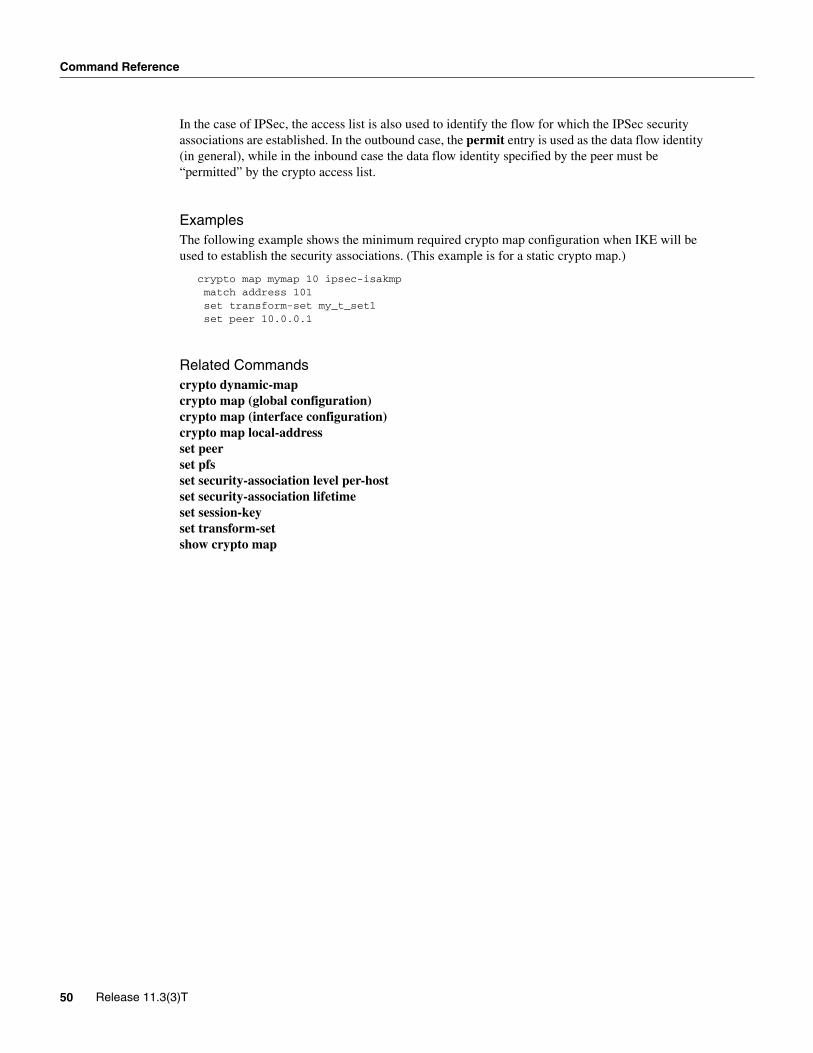
Command Reference
In the case of IPSec, the access list is also used to identify the flow for which the IPSec security associations are established. In the outbound case, the permit entry is used as the data flow identity (in general), while in the inbound case the data flow identity specified by the peer must be “permitted” by the crypto access list.
ExamplesThe following example shows the minimum required crypto map configuration when IKE will be used to establish the security associations. (This example is for a static crypto map.)
crypto map mymap 10 ipsec-isakmpmatch address 101set transform-set my_t_set1set peer 10.0.0.1
Related Commandscrypto dynamic-mapcrypto map (global configuration)crypto map (interface configuration)crypto map local-addressset peerset pfsset security-association level per-hostset security-association lifetimeset session-keyset transform-setshow crypto map
50 Release 11.3(3)T
mode
modeTo change the mode for a transform set, use the mode crypto transform configuration command. To reset the mode to the default value of tunnel mode, use the no form of the command.
mode [tunnel | transport]no mode
Syntax Description
DefaultTunnel mode
Command ModeCrypto transform configuration
Usage GuidelinesThis command first appeared in Cisco IOS Release 11.3 T.
Use this command to change the mode specified for the transform. This setting is only used when the traffic to be protected has the same IP addresses as the IPSec peers (this traffic can be encapsulated either in tunnel or transport mode). This setting is ignored for all other traffic (all other traffic is encapsulated in tunnel mode).
If the traffic to be protected has the same IP address as the IPSec peers and transport mode is specified, during negotiation the router will request transport mode but will accept either transport or tunnel mode. If tunnel mode is specified, the router will request tunnel mode and will accept only tunnel mode.
After you define a transform set, you are put into the crypto transform configuration mode. While in this mode you can change the mode to either tunnel or transport. This change applies only to the transform set just defined.
If you do not change the mode when you first define the transform set, but later decide you want to change the mode for the transform set, you must re-enter the transform set (specifying the transform name and all its transforms) and then change the mode.
If you use this command to change the mode, the change will only affect the negotiation of subsequent IPSec security associations via crypto map entries which specify this transform set. (If you want the new settings to take effect sooner, you can clear all or part of the security association database. Refer to the clear crypto sa command for more details.
Tunnel ModeWith tunnel mode, the entire original IP packet is protected (encrypted, authenticated, or both) and is encapsulated by the IPSec headers and trailers (an ESP header and trailer, an AH header, or both). Then a new IP header is prefixed to the packet, specifying the IPSec endpoints as the source and destination.
tunnel | transport (Optional) Specifies the mode for a transform set: either tunnel or transport mode. If neither tunnel nor transport is specified, the default (tunnel mode) is assigned.
IPSec Network Security 51
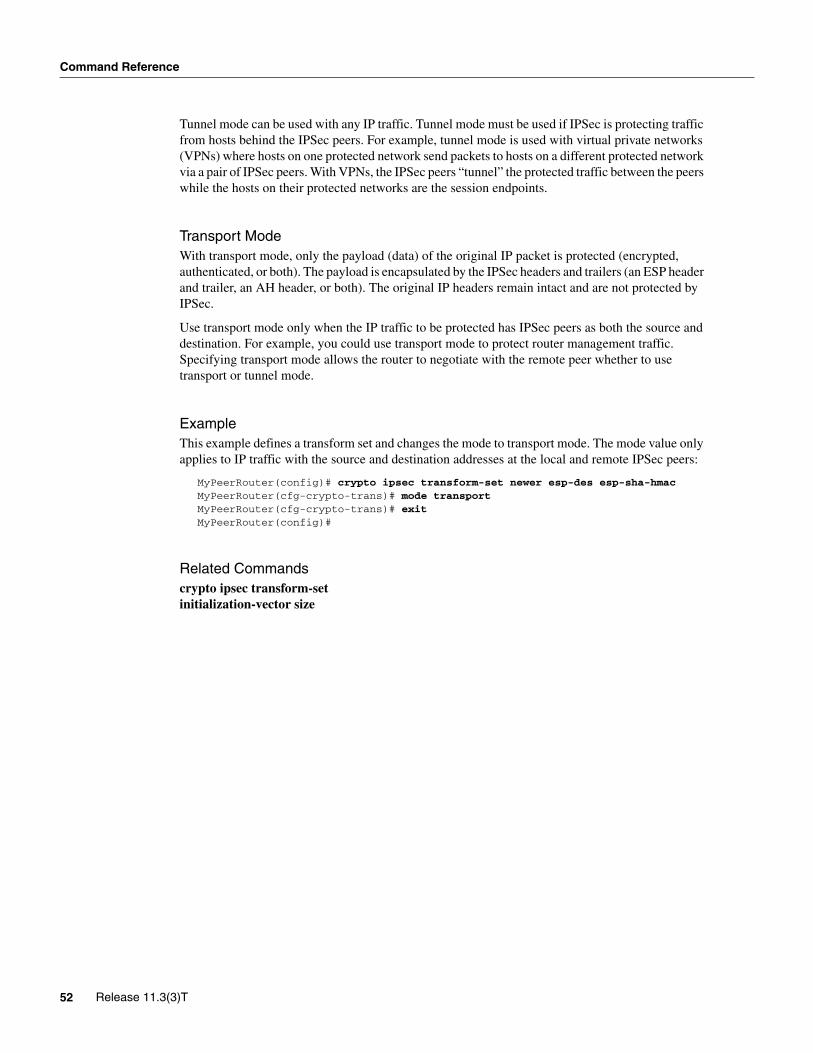
Command Reference
Tunnel mode can be used with any IP traffic. Tunnel mode must be used if IPSec is protecting traffic from hosts behind the IPSec peers. For example, tunnel mode is used with virtual private networks (VPNs) where hosts on one protected network send packets to hosts on a different protected network via a pair of IPSec peers. With VPNs, the IPSec peers “tunnel” the protected traffic between the peers while the hosts on their protected networks are the session endpoints.
Transport ModeWith transport mode, only the payload (data) of the original IP packet is protected (encrypted, authenticated, or both). The payload is encapsulated by the IPSec headers and trailers (an ESP header and trailer, an AH header, or both). The original IP headers remain intact and are not protected by IPSec.
Use transport mode only when the IP traffic to be protected has IPSec peers as both the source and destination. For example, you could use transport mode to protect router management traffic. Specifying transport mode allows the router to negotiate with the remote peer whether to use transport or tunnel mode.
ExampleThis example defines a transform set and changes the mode to transport mode. The mode value only applies to IP traffic with the source and destination addresses at the local and remote IPSec peers:
MyPeerRouter(config)# crypto ipsec transform-set newer esp-des esp-sha-hmacMyPeerRouter(cfg-crypto-trans)# mode transportMyPeerRouter(cfg-crypto-trans)# exitMyPeerRouter(config)#
Related Commandscrypto ipsec transform-setinitialization-vector size
52 Release 11.3(3)T
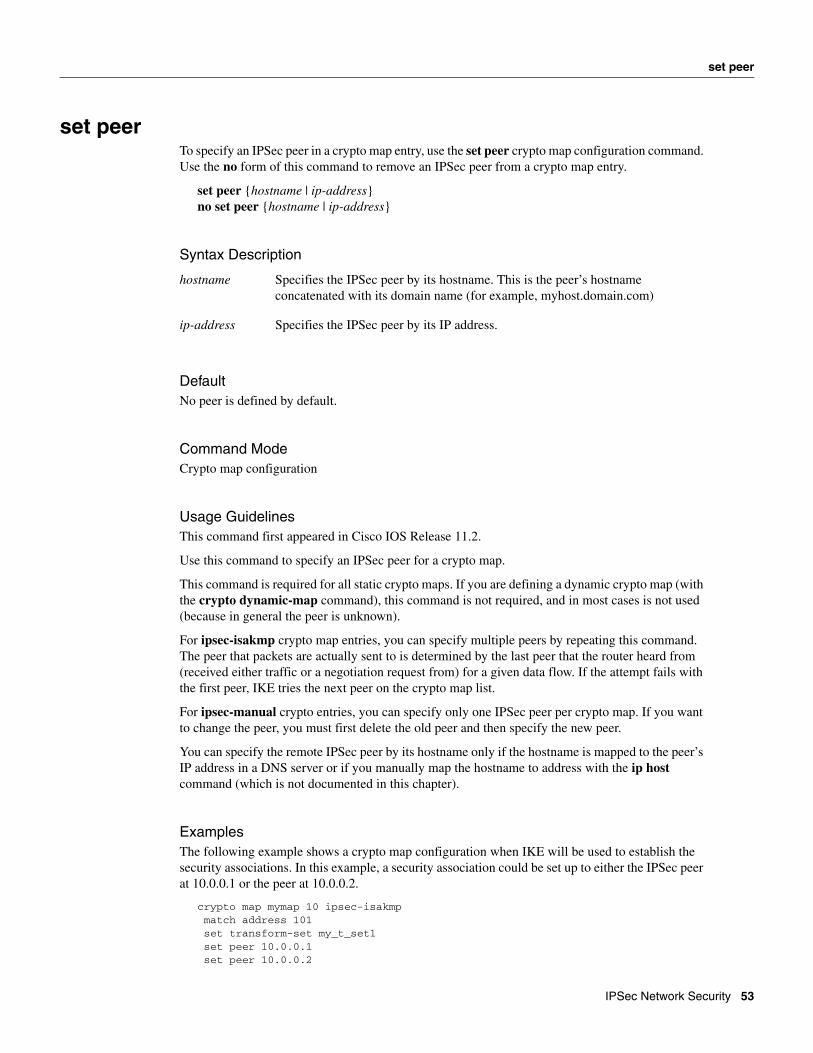
set peer
set peerTo specify an IPSec peer in a crypto map entry, use the set peer crypto map configuration command. Use the no form of this command to remove an IPSec peer from a crypto map entry.
set peer {hostname | ip-address}no set peer {hostname | ip-address}
Syntax Description
DefaultNo peer is defined by default.
Command ModeCrypto map configuration
Usage GuidelinesThis command first appeared in Cisco IOS Release 11.2.
Use this command to specify an IPSec peer for a crypto map.
This command is required for all static crypto maps. If you are defining a dynamic crypto map (with the crypto dynamic-map command), this command is not required, and in most cases is not used (because in general the peer is unknown).
For ipsec-isakmp crypto map entries, you can specify multiple peers by repeating this command. The peer that packets are actually sent to is determined by the last peer that the router heard from (received either traffic or a negotiation request from) for a given data flow. If the attempt fails with the first peer, IKE tries the next peer on the crypto map list.
For ipsec-manual crypto entries, you can specify only one IPSec peer per crypto map. If you want to change the peer, you must first delete the old peer and then specify the new peer.
You can specify the remote IPSec peer by its hostname only if the hostname is mapped to the peer’s IP address in a DNS server or if you manually map the hostname to address with the ip host command (which is not documented in this chapter).
ExamplesThe following example shows a crypto map configuration when IKE will be used to establish the security associations. In this example, a security association could be set up to either the IPSec peer at 10.0.0.1 or the peer at 10.0.0.2.
crypto map mymap 10 ipsec-isakmpmatch address 101set transform-set my_t_set1set peer 10.0.0.1set peer 10.0.0.2
hostname Specifies the IPSec peer by its hostname. This is the peer’s hostname concatenated with its domain name (for example, myhost.domain.com)
ip-address Specifies the IPSec peer by its IP address.
IPSec Network Security 53
Command Reference
Related Commandscrypto dynamic-mapcrypto map (global configuration)crypto map (interface configuration)crypto map local-addressmatch addressset pfsset security-association level per-hostset security-association lifetimeset session-keyset transform-setshow crypto map
54 Release 11.3(3)T
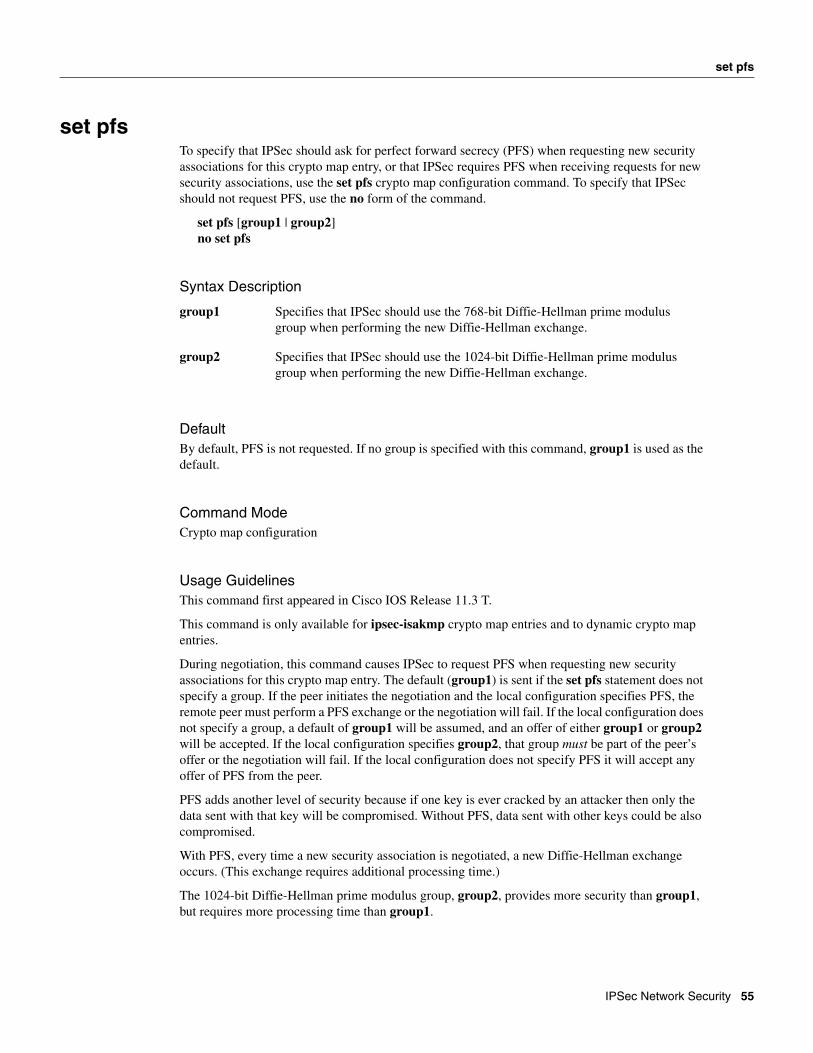
set pfs
set pfsTo specify that IPSec should ask for perfect forward secrecy (PFS) when requesting new security associations for this crypto map entry, or that IPSec requires PFS when receiving requests for new security associations, use the set pfs crypto map configuration command. To specify that IPSec should not request PFS, use the no form of the command.
set pfs [group1 | group2]no set pfs
Syntax Description
DefaultBy default, PFS is not requested. If no group is specified with this command, group1 is used as the default.
Command ModeCrypto map configuration
Usage GuidelinesThis command first appeared in Cisco IOS Release 11.3 T.
This command is only available for ipsec-isakmp crypto map entries and to dynamic crypto map entries.
During negotiation, this command causes IPSec to request PFS when requesting new security associations for this crypto map entry. The default (group1) is sent if the set pfs statement does not specify a group. If the peer initiates the negotiation and the local configuration specifies PFS, the remote peer must perform a PFS exchange or the negotiation will fail. If the local configuration does not specify a group, a default of group1 will be assumed, and an offer of either group1 or group2 will be accepted. If the local configuration specifies group2, that group must be part of the peer’s offer or the negotiation will fail. If the local configuration does not specify PFS it will accept any offer of PFS from the peer.
PFS adds another level of security because if one key is ever cracked by an attacker then only the data sent with that key will be compromised. Without PFS, data sent with other keys could be also compromised.
With PFS, every time a new security association is negotiated, a new Diffie-Hellman exchange occurs. (This exchange requires additional processing time.)
The 1024-bit Diffie-Hellman prime modulus group, group2, provides more security than group1, but requires more processing time than group1.
group1 Specifies that IPSec should use the 768-bit Diffie-Hellman prime modulus group when performing the new Diffie-Hellman exchange.
group2 Specifies that IPSec should use the 1024-bit Diffie-Hellman prime modulus group when performing the new Diffie-Hellman exchange.
IPSec Network Security 55
Command Reference
ExampleThis example specifies that PFS should be used whenever a new security association is negotiated for the crypto map “mymap 10.”
crypto map mymap 10 ipsec-isakmpset pfs group2
Related Commandscrypto dynamic-mapcrypto map (global configuration)crypto map (interface configuration)crypto map local-addressmatch addressset peerset security-association level per-hostset security-association lifetimeset transform-setshow crypto map
56 Release 11.3(3)T
set security-association level per-host
set security-association level per-hostTo specify that separate IPSec security associations should be requested for each source/destination host pair, use the set security-association level per-host crypto map configuration command. To specify that one security association should be requested for each crypto map access list permit entry, use the no form of this command.
set security-association level per-hostno set security-association level per-host
Syntax DescriptionThis command has no arguments or keywords.
DefaultFor a given crypto map, all traffic between two IPSec peers matching a single crypto map access list permit entry will share the same security association.
Command ModeCrypto map configuration
Usage GuidelinesThis command first appeared in Cisco IOS Release 11.3 T.
This command is only available for ipsec-isakmp crypto map entries and is not supported for dynamic crypto map entries.
When you use this command to specify that a separate security association should be used for each source/destination host pair.
Normally, within a given crypto map, IPSec will attempt to request security associations at the granularity specified by the access list entry. For example, if the access list entry specifies permit ip between Subnet A and Subnet B, IPSec will attempt to request security associations between Subnet A and Subnet B (for any IP protocol), and unless finer-grained security associations are established (by a peer request) all IPSec-protected traffic between these two subnets would use the same security association.
With this command you can change this “normal” behavior, and cause IPSec to request separate security associations for each source/destination host pair. In this case, each host pairing (where one host was in Subnet A and the other host was in Subnet B) would cause IPSec to request a separate security association.
With this command, one security association would be requested to protect traffic between Host A and Host B, and a different security association would be requested to protect traffic between Host A and Host C.
The access list entry can specify local and remote subnets, or it can specify a host-and-subnet combination. If the access list entry specified protocols and ports, these values are applied when establishing the unique security associations.
Use this command with care, as multiple streams between given subnets can rapidly consume system resources.
IPSec Network Security 57
Command Reference
ExampleWith an access list entry of permit ip 1.1.1.0 0.0.0.255 2.2.2.0 0.0.0.255 and a per-host level:
• A packet from 1.1.1.1 to 2.2.2.1 will initiate a security association request which would look like it originated via permit ip host 1.1.1.1 host 2.2.2.1.
• A packet from 1.1.1.1 to 2.2.2.2 will initiate a security association request which would look like it originated via permit ip host 1.1.1.1 host 2.2.2.2.
• A packet from 1.1.1.2 to 2.2.2.1 will initiate a security association request which would look like it originated via permit ip host 1.1.1.2 host 2.2.2.1.
Without the per-host level, any of the above packets will initiate a single security association request originated via permit ip 1.1.1.0 0.0.0.255 2.2.2.0 0.0.0.255.
Related Commandscrypto dynamic-mapcrypto map (global configuration)crypto map (interface configuration)crypto map local-addressmatch addressset peerset pfsset security-association lifetimeset transform-setshow crypto map
58 Release 11.3(3)T
set security-association lifetime
set security-association lifetimeTo override (for a particular crypto map entry) the global lifetime value, which is used when negotiating IPSec security associations, use the set security-association lifetime crypto map configuration command. To reset a crypto map entry’s lifetime value to the global value, use the no form of the command.
set security-association lifetime {seconds seconds | kilobytes kilobytes}no set security-association lifetime {seconds | kilobytes}
Syntax Description
DefaultThe crypto map’s security associations are negotiated according to the global lifetimes.
Command ModeCrypto map configuration
Usage GuidelinesThis command first appeared in Cisco IOS Release 11.3 T.
This command is only available for ipsec-isakmp crypto map entries and for dynamic crypto map entries.
IPSec security associations use shared secret keys. These keys and their security associations time out together.
Assuming that the particular crypto map entry has lifetime values configured, when the router requests new security associations during security association negotiation, it will specify its crypto map lifetime value in the request to the peer; it will use this value as the lifetime of the new security associations. When the router receives a negotiation request from the peer, it will use the smaller of the lifetime value proposed by the peer or the locally configured lifetime value as the lifetime of the new security associations.
There are two lifetimes: a “timed” lifetime and a “traffic-volume” lifetime. The session keys/security association expires after the first of these lifetimes is reached.
If you change a lifetime, the change will not be applied to existing security associations, but will be used in subsequent negotiations to establish security associations for data flows supported by this crypto map entry. If you want the new settings to take effect sooner, you can clear all or part of the security association database by using the clear crypto sa command. Refer to the clear crypto sa command for more detail.
To change the timed lifetime, use the set security-association lifetime seconds form of the command. The timed lifetime causes the keys and security association to time out after the specified number of seconds have passed.
seconds seconds Specifies the number of seconds a security association will live before expiring.
kilobytes kilobytes Specifies the volume of traffic (in kilobytes) that can pass between IPSec peers using a given security association before that security association expires.
IPSec Network Security 59
Command Reference
To change the traffic-volume lifetime, use the set security-association lifetime kilobytes form of the command. The traffic-volume lifetime causes the key and security association to time out after the specified amount of traffic (in kilobytes) has been protected by the security association’s key.
Shorter lifetimes can make it harder to mount a successful key recovery attack, since the attacker has less data encrypted under the same key to work with. However, shorter lifetimes require more CPU processing time.
The lifetime values are ignored for manually established security associations (security associations installed via an ipsec-manual crypto map entry).
How These Lifetimes WorkAssuming that the particular crypto map entry does not have lifetime values configured, when the router requests new security associations it will specify its global lifetime values in the request to the peer; it will use this value as the lifetime of the new security associations. When the router receives a negotiation request from the peer, it will use the smaller of either the lifetime value proposed by the peer or the locally configured lifetime value as the lifetime of the new security associations.
The security association (and corresponding keys) will expire according to whichever comes sooner, either after the seconds timeout or after the kilobytes amount of traffic is passed.
A new security association is negotiated before the lifetime threshold of the existing security association is reached, to ensure that a new security association is ready for use when the old one expires. The new security association is negotiated either 30 seconds before the seconds lifetime expires or when the volume of traffic through the tunnel reaches 256 kbytes less than the kilobytes lifetime (whichever comes first).
If no traffic has passed through the tunnel during the entire life of the security association, a new security association is not negotiated when the lifetime expires. Instead, a new security association will be negotiated only when IPSec sees another packet that should be protected.
ExampleThis example shortens the timed lifetime for a particular crypto map entry, perhaps because the administrator feels there is a higher risk that the keys could be compromised for security associations belonging to that crypto map entry. The traffic-volume lifetime is not changed because there is not a high volume of traffic anticipated for these security associations. The timed lifetime is shortened to 2700 seconds (45 minutes).
crypto map mymap 10 ipsec-isakmpset security-association lifetime seconds 2700
Related Commandscrypto dynamic-mapcrypto ipsec security-association lifetimecrypto map (global configuration)crypto map (interface configuration)crypto map local-addressmatch addressset peerset pfs
60 Release 11.3(3)T

set security-association lifetime
set security-association level per-hostset transform-setshow crypto map
IPSec Network Security 61
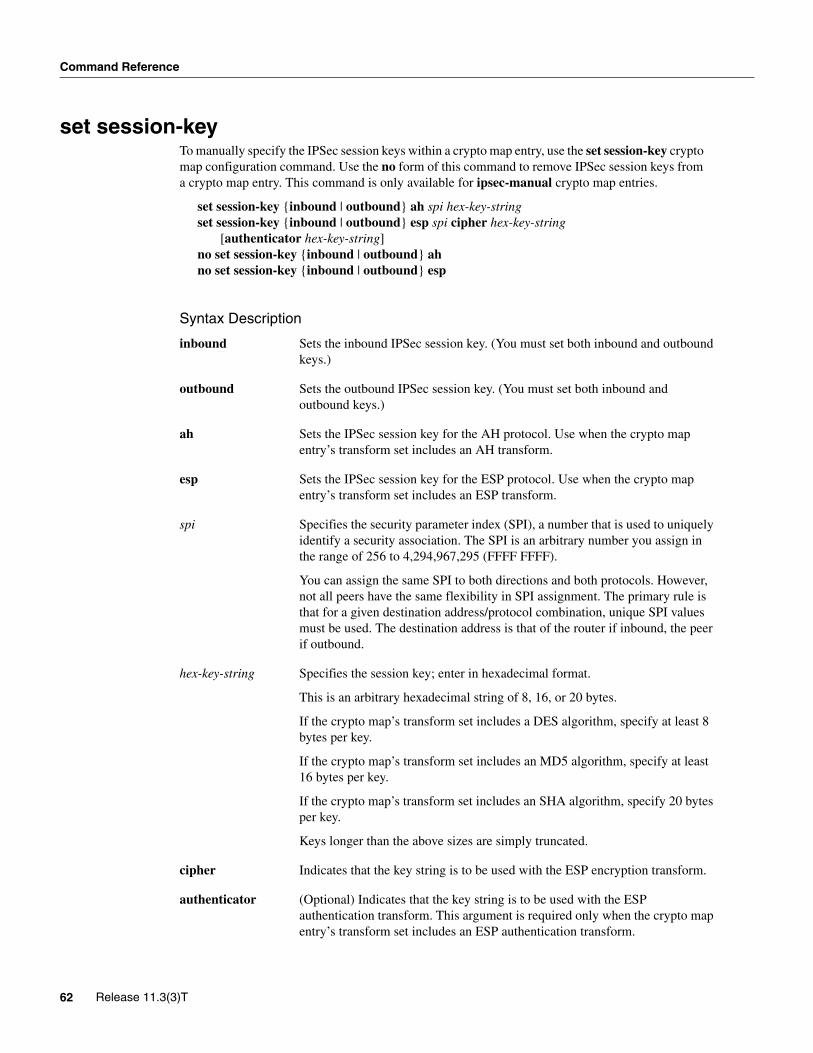
Command Reference
set session-keyTo manually specify the IPSec session keys within a crypto map entry, use the set session-key crypto map configuration command. Use the no form of this command to remove IPSec session keys from a crypto map entry. This command is only available for ipsec-manual crypto map entries.
set session-key {inbound | outbound} ah spi hex-key-stringset session-key {inbound | outbound} esp spi cipher hex-key-string
[authenticator hex-key-string]no set session-key {inbound | outbound} ahno set session-key {inbound | outbound} esp
Syntax Description
inbound Sets the inbound IPSec session key. (You must set both inbound and outbound keys.)
outbound Sets the outbound IPSec session key. (You must set both inbound and outbound keys.)
ah Sets the IPSec session key for the AH protocol. Use when the crypto map entry’s transform set includes an AH transform.
esp Sets the IPSec session key for the ESP protocol. Use when the crypto map entry’s transform set includes an ESP transform.
spi Specifies the security parameter index (SPI), a number that is used to uniquely identify a security association. The SPI is an arbitrary number you assign in the range of 256 to 4,294,967,295 (FFFF FFFF).
You can assign the same SPI to both directions and both protocols. However, not all peers have the same flexibility in SPI assignment. The primary rule is that for a given destination address/protocol combination, unique SPI values must be used. The destination address is that of the router if inbound, the peer if outbound.
hex-key-string Specifies the session key; enter in hexadecimal format.
This is an arbitrary hexadecimal string of 8, 16, or 20 bytes.
If the crypto map’s transform set includes a DES algorithm, specify at least 8 bytes per key.
If the crypto map’s transform set includes an MD5 algorithm, specify at least 16 bytes per key.
If the crypto map’s transform set includes an SHA algorithm, specify 20 bytes per key.
Keys longer than the above sizes are simply truncated.
cipher Indicates that the key string is to be used with the ESP encryption transform.
authenticator (Optional) Indicates that the key string is to be used with the ESP authentication transform. This argument is required only when the crypto map entry’s transform set includes an ESP authentication transform.
62 Release 11.3(3)T

set session-key
DefaultNo session keys are defined by default.
Command ModeCrypto map configuration
Usage GuidelinesThis command first appeared in Cisco IOS Release 11.3 T.
Use this command to define IPSec keys for security associations via ipsec-manual crypto map entries. (In the case of ipsec-isakmp crypto map entries, the security associations with their corresponding keys are automatically established via the IKE negotiation.)
If the crypto map’s transform set includes an AH protocol, you must define IPSec keys for AH for both inbound traffic and for outbound traffic. If the crypto map’s transform set includes an ESP encryption protocol, you must define IPSec keys for ESP encryption for both inbound traffic and for outbound traffic. If your transform set includes an ESP authentication protocol, you must define IPSec keys for ESP authentication for inbound traffic and for outbound traffic.
When you define multiple IPSec session keys within a single crypto map, you can assign the same security parameter index (SPI) number to all the keys. The SPI is used to identify the security association used with the crypto map. However, not all peers have the same flexibility in SPI assignment. You should coordinate SPI assignment with your peer’s operator, making certain that the same SPI is not used more than once for the same destination address/protocol combination.
Security associations established via this command do not expire (unlike security associations established via IKE).
Session keys at one peer must match the session keys at the remote peer.
If you change a session key, the security association using the key will be deleted and reinitialized.
ExamplesThe following example shows a crypto map entry for manually established security associations. The transform set “t_set” includes only an AH protocol.
crypto ipsec transform-set t_set ah-sha-hmac
crypto map mymap 20 ipsec-manualmatch address 102set transform-set t_setset peer 10.0.0.21set session-key inbound ah 300 1111111111111111111111111111111111111111set session-key outbound ah 300 2222222222222222222222222222222222222222
IPSec Network Security 63
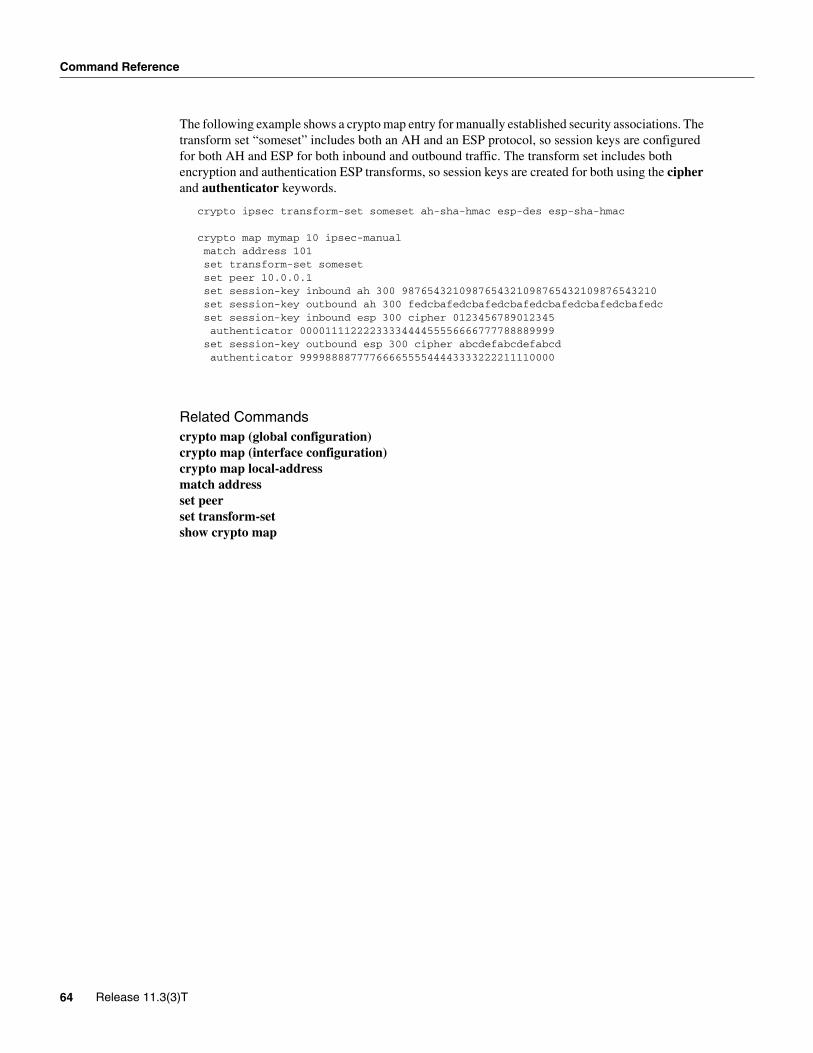
Command Reference
The following example shows a crypto map entry for manually established security associations. The transform set “someset” includes both an AH and an ESP protocol, so session keys are configured for both AH and ESP for both inbound and outbound traffic. The transform set includes both encryption and authentication ESP transforms, so session keys are created for both using the cipher and authenticator keywords.
crypto ipsec transform-set someset ah-sha-hmac esp-des esp-sha-hmac
crypto map mymap 10 ipsec-manualmatch address 101set transform-set somesetset peer 10.0.0.1set session-key inbound ah 300 9876543210987654321098765432109876543210set session-key outbound ah 300 fedcbafedcbafedcbafedcbafedcbafedcbafedcset session-key inbound esp 300 cipher 0123456789012345authenticator 0000111122223333444455556666777788889999
set session-key outbound esp 300 cipher abcdefabcdefabcdauthenticator 9999888877776666555544443333222211110000
Related Commandscrypto map (global configuration)crypto map (interface configuration)crypto map local-addressmatch addressset peerset transform-setshow crypto map
64 Release 11.3(3)T
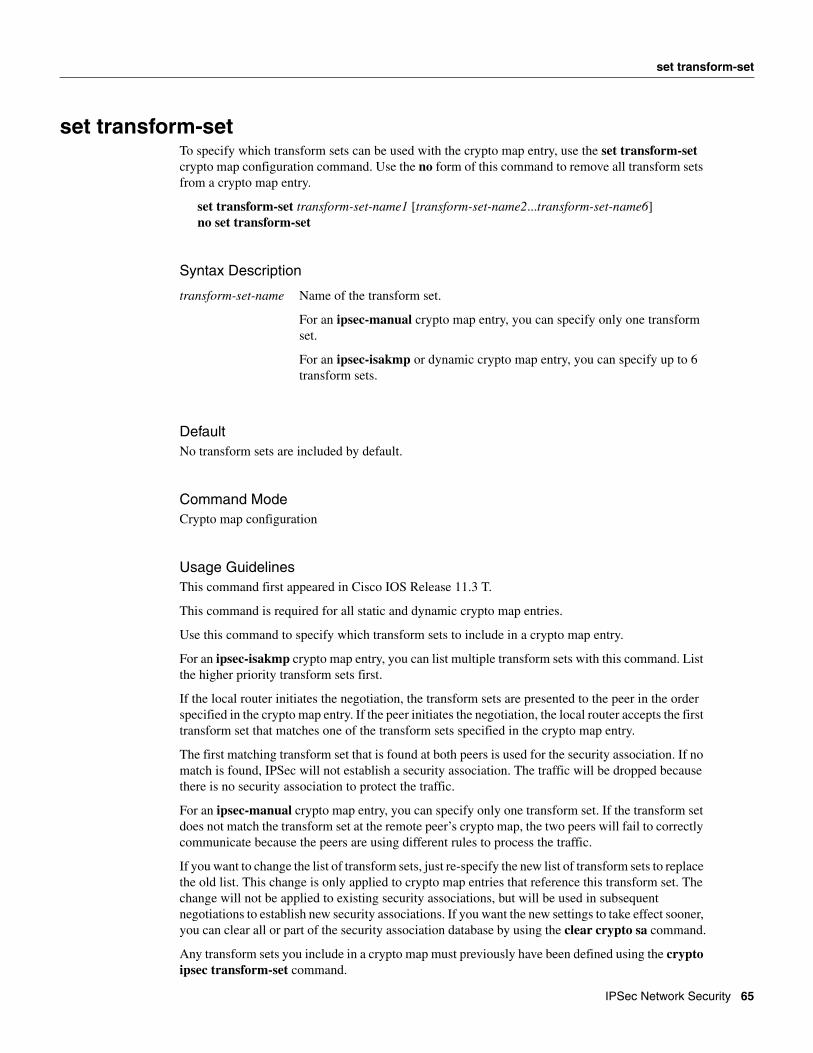
set transform-set
set transform-setTo specify which transform sets can be used with the crypto map entry, use the set transform-set crypto map configuration command. Use the no form of this command to remove all transform sets from a crypto map entry.
set transform-set transform-set-name1 [transform-set-name2...transform-set-name6]no set transform-set
Syntax Description
DefaultNo transform sets are included by default.
Command ModeCrypto map configuration
Usage GuidelinesThis command first appeared in Cisco IOS Release 11.3 T.
This command is required for all static and dynamic crypto map entries.
Use this command to specify which transform sets to include in a crypto map entry.
For an ipsec-isakmp crypto map entry, you can list multiple transform sets with this command. List the higher priority transform sets first.
If the local router initiates the negotiation, the transform sets are presented to the peer in the order specified in the crypto map entry. If the peer initiates the negotiation, the local router accepts the first transform set that matches one of the transform sets specified in the crypto map entry.
The first matching transform set that is found at both peers is used for the security association. If no match is found, IPSec will not establish a security association. The traffic will be dropped because there is no security association to protect the traffic.
For an ipsec-manual crypto map entry, you can specify only one transform set. If the transform set does not match the transform set at the remote peer’s crypto map, the two peers will fail to correctly communicate because the peers are using different rules to process the traffic.
If you want to change the list of transform sets, just re-specify the new list of transform sets to replace the old list. This change is only applied to crypto map entries that reference this transform set. The change will not be applied to existing security associations, but will be used in subsequent negotiations to establish new security associations. If you want the new settings to take effect sooner, you can clear all or part of the security association database by using the clear crypto sa command.
Any transform sets you include in a crypto map must previously have been defined using the crypto ipsec transform-set command.
transform-set-name Name of the transform set.
For an ipsec-manual crypto map entry, you can specify only one transform set.
For an ipsec-isakmp or dynamic crypto map entry, you can specify up to 6 transform sets.
IPSec Network Security 65
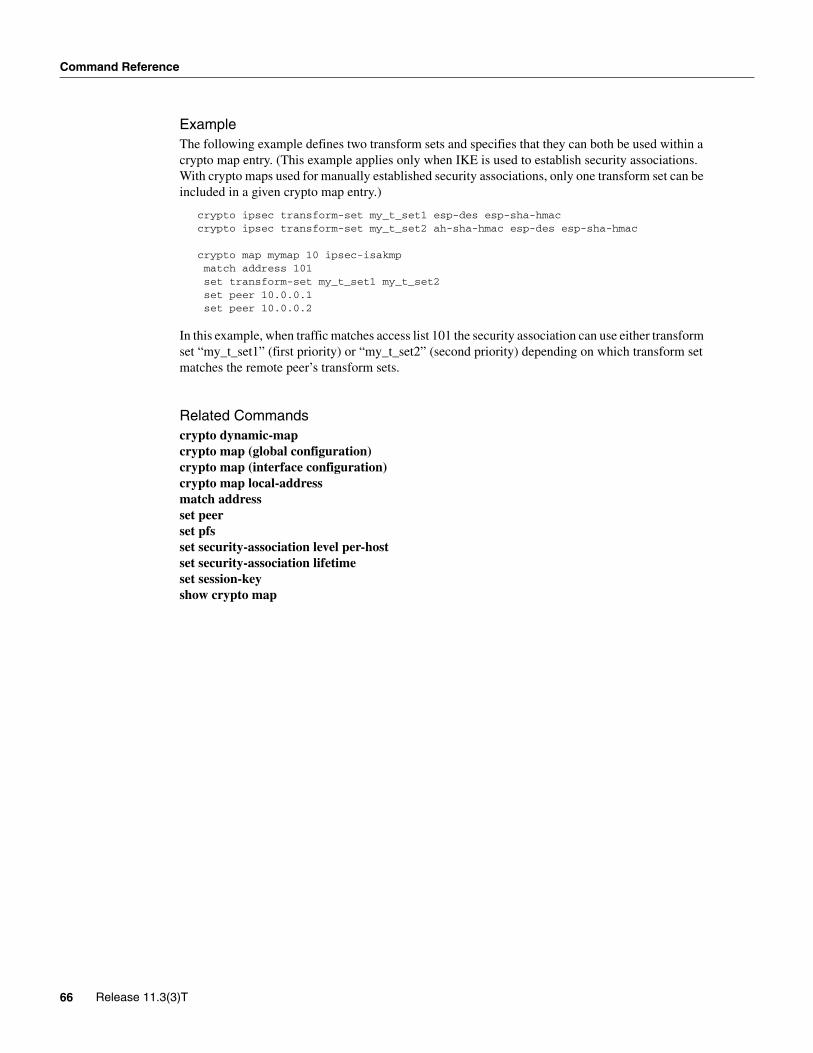
Command Reference
ExampleThe following example defines two transform sets and specifies that they can both be used within a crypto map entry. (This example applies only when IKE is used to establish security associations. With crypto maps used for manually established security associations, only one transform set can be included in a given crypto map entry.)
crypto ipsec transform-set my_t_set1 esp-des esp-sha-hmaccrypto ipsec transform-set my_t_set2 ah-sha-hmac esp-des esp-sha-hmac
crypto map mymap 10 ipsec-isakmpmatch address 101set transform-set my_t_set1 my_t_set2set peer 10.0.0.1set peer 10.0.0.2
In this example, when traffic matches access list 101 the security association can use either transform set “my_t_set1” (first priority) or “my_t_set2” (second priority) depending on which transform set matches the remote peer’s transform sets.
Related Commandscrypto dynamic-mapcrypto map (global configuration)crypto map (interface configuration)crypto map local-addressmatch addressset peerset pfsset security-association level per-hostset security-association lifetimeset session-keyshow crypto map
66 Release 11.3(3)T
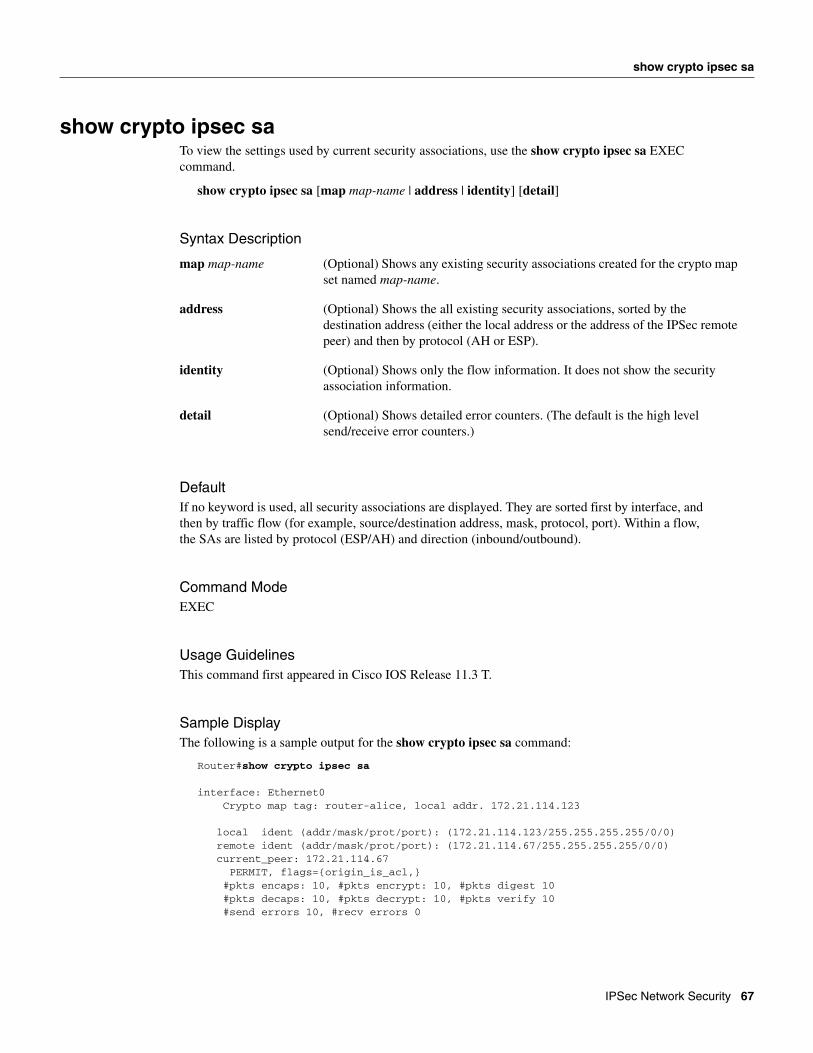
show crypto ipsec sa
show crypto ipsec saTo view the settings used by current security associations, use the show crypto ipsec sa EXEC command.
show crypto ipsec sa [map map-name | address | identity] [detail]
Syntax Description
DefaultIf no keyword is used, all security associations are displayed. They are sorted first by interface, and then by traffic flow (for example, source/destination address, mask, protocol, port). Within a flow, the SAs are listed by protocol (ESP/AH) and direction (inbound/outbound).
Command ModeEXEC
Usage GuidelinesThis command first appeared in Cisco IOS Release 11.3 T.
Sample DisplayThe following is a sample output for the show crypto ipsec sa command:
Router#show crypto ipsec sa interface: Ethernet0 Crypto map tag: router-alice, local addr. 172.21.114.123 local ident (addr/mask/prot/port): (172.21.114.123/255.255.255.255/0/0) remote ident (addr/mask/prot/port): (172.21.114.67/255.255.255.255/0/0) current_peer: 172.21.114.67 PERMIT, flags={origin_is_acl,} #pkts encaps: 10, #pkts encrypt: 10, #pkts digest 10 #pkts decaps: 10, #pkts decrypt: 10, #pkts verify 10 #send errors 10, #recv errors 0
map map-name (Optional) Shows any existing security associations created for the crypto map set named map-name.
address (Optional) Shows the all existing security associations, sorted by the destination address (either the local address or the address of the IPSec remote peer) and then by protocol (AH or ESP).
identity (Optional) Shows only the flow information. It does not show the security association information.
detail (Optional) Shows detailed error counters. (The default is the high level send/receive error counters.)
IPSec Network Security 67
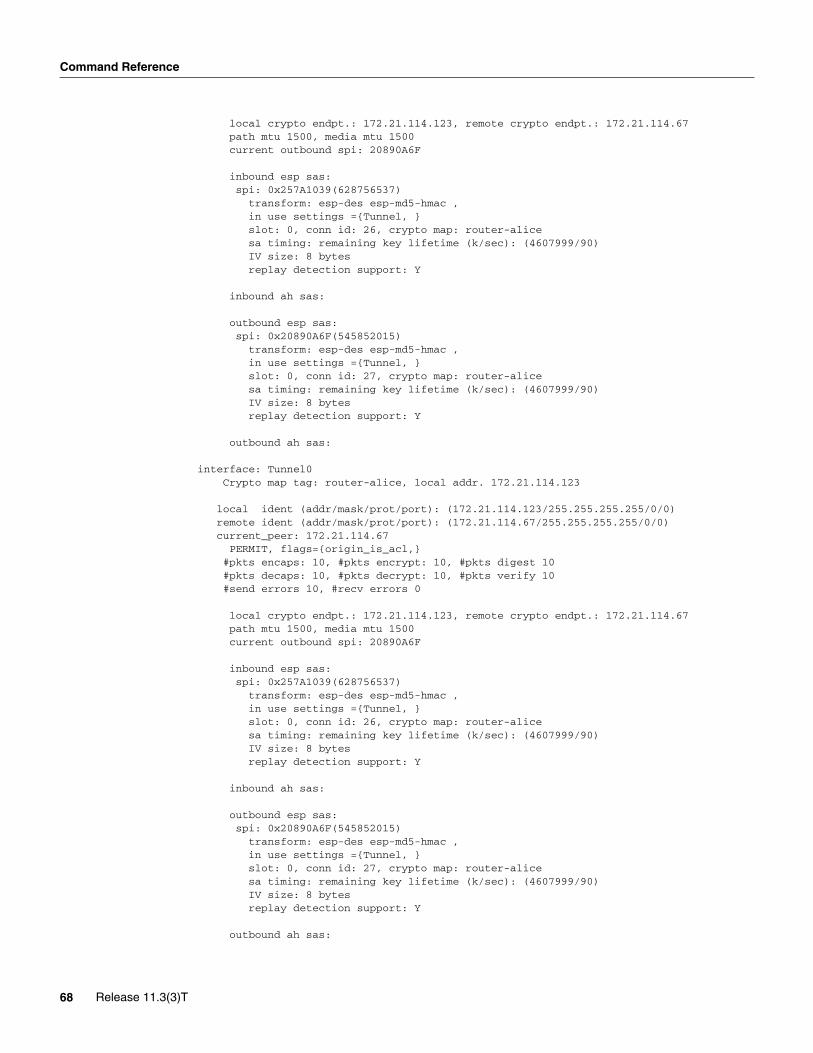
Command Reference
local crypto endpt.: 172.21.114.123, remote crypto endpt.: 172.21.114.67 path mtu 1500, media mtu 1500 current outbound spi: 20890A6F inbound esp sas: spi: 0x257A1039(628756537) transform: esp-des esp-md5-hmac , in use settings ={Tunnel, } slot: 0, conn id: 26, crypto map: router-alice sa timing: remaining key lifetime (k/sec): (4607999/90) IV size: 8 bytes replay detection support: Y
inbound ah sas:
outbound esp sas: spi: 0x20890A6F(545852015) transform: esp-des esp-md5-hmac , in use settings ={Tunnel, } slot: 0, conn id: 27, crypto map: router-alice sa timing: remaining key lifetime (k/sec): (4607999/90) IV size: 8 bytes replay detection support: Y
outbound ah sas:
interface: Tunnel0 Crypto map tag: router-alice, local addr. 172.21.114.123 local ident (addr/mask/prot/port): (172.21.114.123/255.255.255.255/0/0) remote ident (addr/mask/prot/port): (172.21.114.67/255.255.255.255/0/0) current_peer: 172.21.114.67 PERMIT, flags={origin_is_acl,} #pkts encaps: 10, #pkts encrypt: 10, #pkts digest 10 #pkts decaps: 10, #pkts decrypt: 10, #pkts verify 10 #send errors 10, #recv errors 0 local crypto endpt.: 172.21.114.123, remote crypto endpt.: 172.21.114.67 path mtu 1500, media mtu 1500 current outbound spi: 20890A6F inbound esp sas: spi: 0x257A1039(628756537) transform: esp-des esp-md5-hmac , in use settings ={Tunnel, } slot: 0, conn id: 26, crypto map: router-alice sa timing: remaining key lifetime (k/sec): (4607999/90) IV size: 8 bytes replay detection support: Y
inbound ah sas:
outbound esp sas: spi: 0x20890A6F(545852015) transform: esp-des esp-md5-hmac , in use settings ={Tunnel, } slot: 0, conn id: 27, crypto map: router-alice sa timing: remaining key lifetime (k/sec): (4607999/90) IV size: 8 bytes replay detection support: Y
outbound ah sas:
68 Release 11.3(3)T
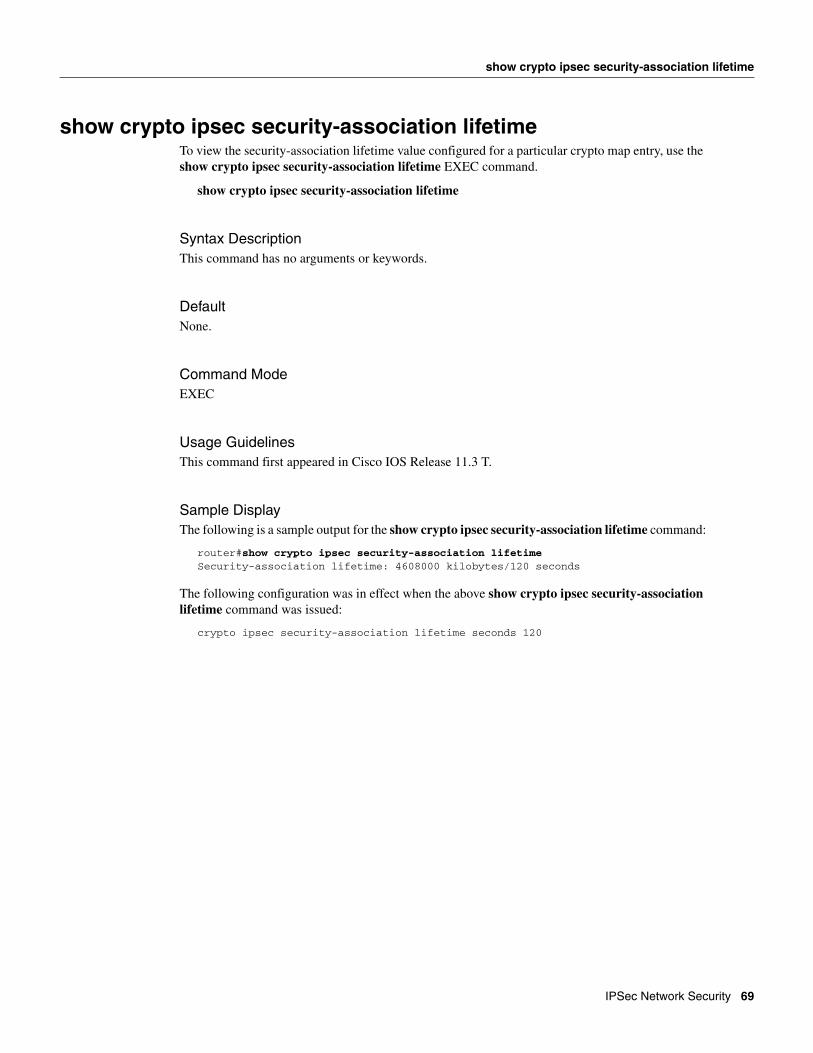
show crypto ipsec security-association lifetime
show crypto ipsec security-association lifetimeTo view the security-association lifetime value configured for a particular crypto map entry, use the show crypto ipsec security-association lifetime EXEC command.
show crypto ipsec security-association lifetime
Syntax DescriptionThis command has no arguments or keywords.
DefaultNone.
Command ModeEXEC
Usage GuidelinesThis command first appeared in Cisco IOS Release 11.3 T.
Sample DisplayThe following is a sample output for the show crypto ipsec security-association lifetime command:
router#show crypto ipsec security-association lifetimeSecurity-association lifetime: 4608000 kilobytes/120 seconds
The following configuration was in effect when the above show crypto ipsec security-association lifetime command was issued:
crypto ipsec security-association lifetime seconds 120
IPSec Network Security 69
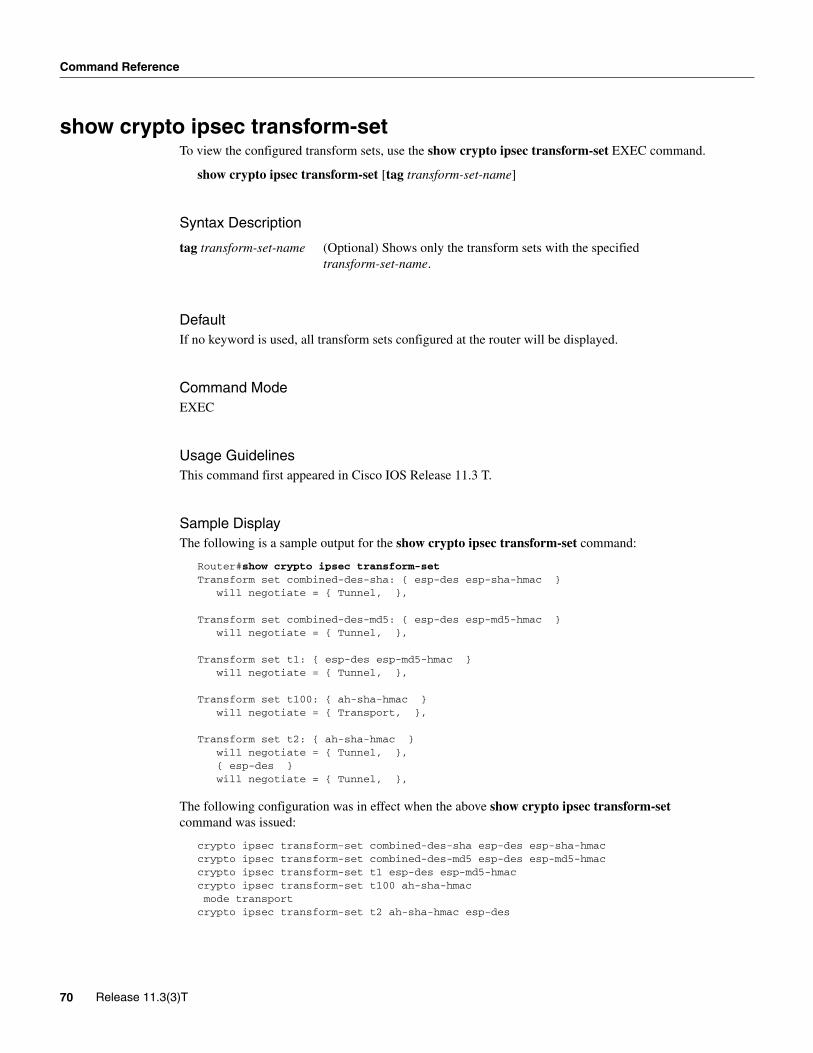
Command Reference
show crypto ipsec transform-setTo view the configured transform sets, use the show crypto ipsec transform-set EXEC command.
show crypto ipsec transform-set [tag transform-set-name]
Syntax Description
DefaultIf no keyword is used, all transform sets configured at the router will be displayed.
Command ModeEXEC
Usage GuidelinesThis command first appeared in Cisco IOS Release 11.3 T.
Sample DisplayThe following is a sample output for the show crypto ipsec transform-set command:
Router#show crypto ipsec transform-set Transform set combined-des-sha: { esp-des esp-sha-hmac } will negotiate = { Tunnel, }, Transform set combined-des-md5: { esp-des esp-md5-hmac } will negotiate = { Tunnel, }, Transform set t1: { esp-des esp-md5-hmac } will negotiate = { Tunnel, }, Transform set t100: { ah-sha-hmac } will negotiate = { Transport, }, Transform set t2: { ah-sha-hmac } will negotiate = { Tunnel, }, { esp-des } will negotiate = { Tunnel, },
The following configuration was in effect when the above show crypto ipsec transform-set command was issued:
crypto ipsec transform-set combined-des-sha esp-des esp-sha-hmac crypto ipsec transform-set combined-des-md5 esp-des esp-md5-hmac crypto ipsec transform-set t1 esp-des esp-md5-hmac crypto ipsec transform-set t100 ah-sha-hmac mode transport
crypto ipsec transform-set t2 ah-sha-hmac esp-des
tag transform-set-name (Optional) Shows only the transform sets with the specified transform-set-name.
70 Release 11.3(3)T
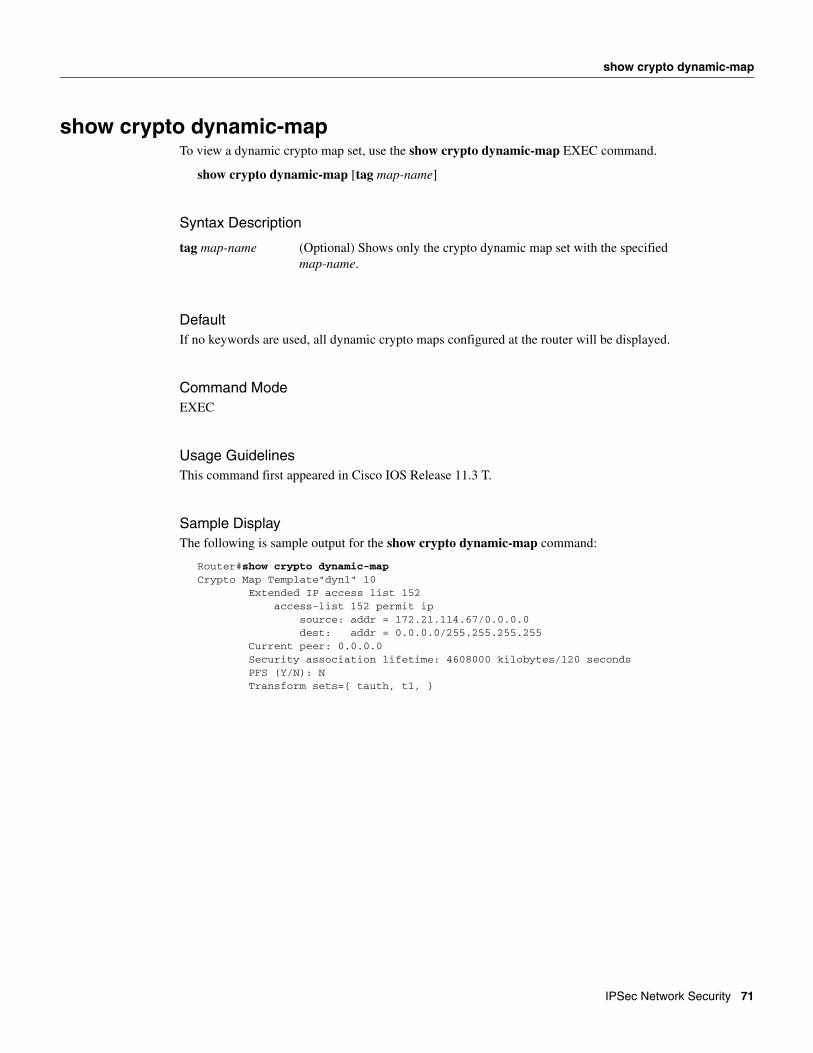
show crypto dynamic-map
show crypto dynamic-mapTo view a dynamic crypto map set, use the show crypto dynamic-map EXEC command.
show crypto dynamic-map [tag map-name]
Syntax Description
DefaultIf no keywords are used, all dynamic crypto maps configured at the router will be displayed.
Command ModeEXEC
Usage GuidelinesThis command first appeared in Cisco IOS Release 11.3 T.
Sample DisplayThe following is sample output for the show crypto dynamic-map command:
Router#show crypto dynamic-mapCrypto Map Template"dyn1" 10 Extended IP access list 152 access-list 152 permit ip source: addr = 172.21.114.67/0.0.0.0 dest: addr = 0.0.0.0/255.255.255.255 Current peer: 0.0.0.0 Security association lifetime: 4608000 kilobytes/120 seconds PFS (Y/N): N Transform sets={ tauth, t1, }
tag map-name (Optional) Shows only the crypto dynamic map set with the specified map-name.
IPSec Network Security 71

Command Reference
The following partial configuration was in effect when the above show crypto dynamic-map command was issued:
crypto ipsec security-association lifetime seconds 120! crypto ipsec transform-set t1 esp-des esp-md5-hmac crypto ipsec transform-set tauth ah-sha-hmac !crypto dynamic-map dyn1 10 set transform-set tauth t1 match address 152crypto map to-router local-address Ethernet0crypto map to-router 10 ipsec-isakmp set peer 172.21.114.123 set transform-set tauth t1 match address 150crypto map to-router 20 ipsec-isakmp dynamic dyn1!access-list 150 permit ip host 172.21.114.67 host 172.21.114.123access-list 150 permit ip host 15.15.15.1 host 172.21.114.123access-list 150 permit ip host 15.15.15.1 host 8.8.8.1access-list 152 permit ip host 172.21.114.67 any
72 Release 11.3(3)T
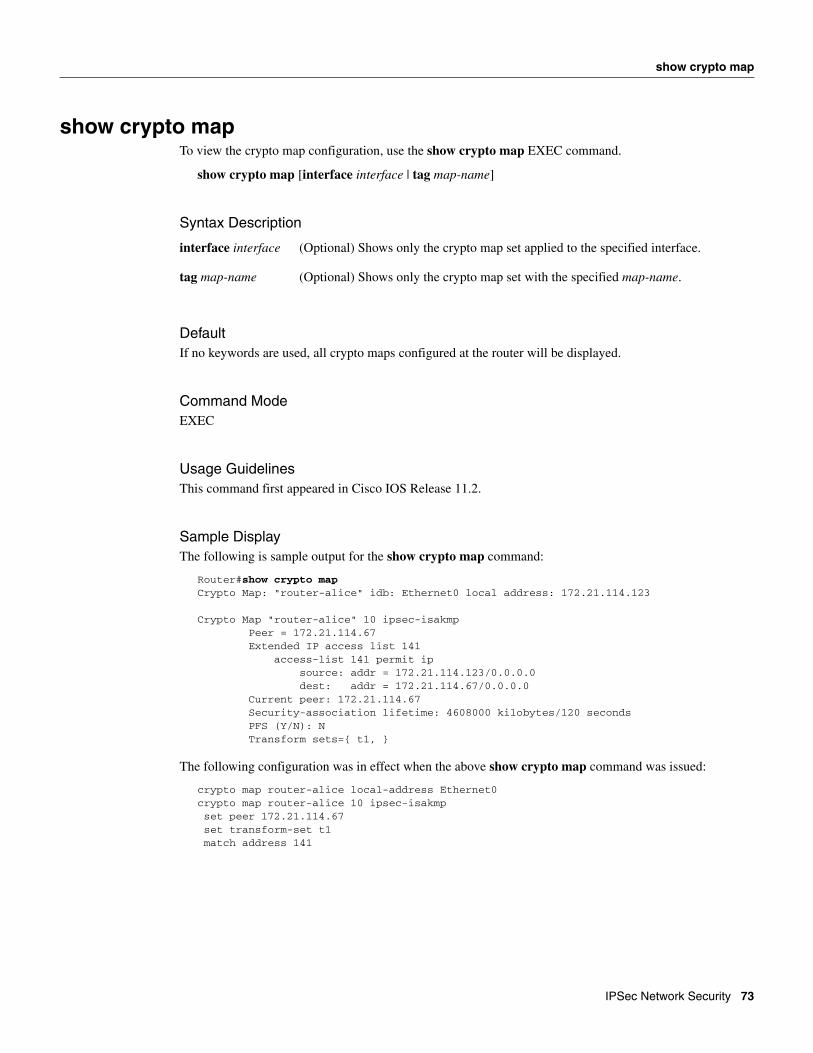
show crypto map
show crypto mapTo view the crypto map configuration, use the show crypto map EXEC command.
show crypto map [interface interface | tag map-name]
Syntax Description
DefaultIf no keywords are used, all crypto maps configured at the router will be displayed.
Command ModeEXEC
Usage GuidelinesThis command first appeared in Cisco IOS Release 11.2.
Sample DisplayThe following is sample output for the show crypto map command:
Router#show crypto mapCrypto Map: "router-alice" idb: Ethernet0 local address: 172.21.114.123 Crypto Map "router-alice" 10 ipsec-isakmp Peer = 172.21.114.67 Extended IP access list 141 access-list 141 permit ip source: addr = 172.21.114.123/0.0.0.0 dest: addr = 172.21.114.67/0.0.0.0 Current peer: 172.21.114.67 Security-association lifetime: 4608000 kilobytes/120 seconds PFS (Y/N): N Transform sets={ t1, }
The following configuration was in effect when the above show crypto map command was issued:
crypto map router-alice local-address Ethernet0crypto map router-alice 10 ipsec-isakmp set peer 172.21.114.67 set transform-set t1 match address 141
interface interface (Optional) Shows only the crypto map set applied to the specified interface.
tag map-name (Optional) Shows only the crypto map set with the specified map-name.
IPSec Network Security 73
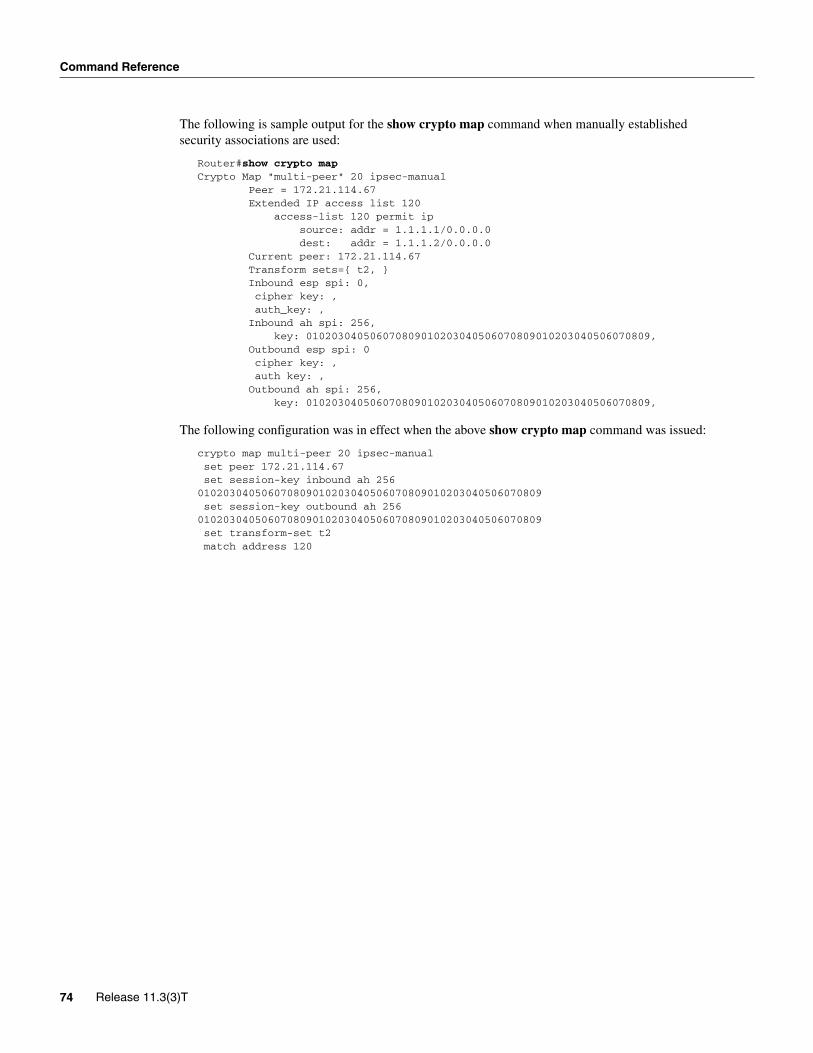
Command Reference
The following is sample output for the show crypto map command when manually established security associations are used:
Router#show crypto mapCrypto Map "multi-peer" 20 ipsec-manual Peer = 172.21.114.67 Extended IP access list 120 access-list 120 permit ip source: addr = 1.1.1.1/0.0.0.0 dest: addr = 1.1.1.2/0.0.0.0 Current peer: 172.21.114.67 Transform sets={ t2, } Inbound esp spi: 0, cipher key: , auth_key: , Inbound ah spi: 256, key: 010203040506070809010203040506070809010203040506070809, Outbound esp spi: 0 cipher key: , auth key: , Outbound ah spi: 256, key: 010203040506070809010203040506070809010203040506070809,
The following configuration was in effect when the above show crypto map command was issued:
crypto map multi-peer 20 ipsec-manual set peer 172.21.114.67 set session-key inbound ah 256010203040506070809010203040506070809010203040506070809 set session-key outbound ah 256010203040506070809010203040506070809010203040506070809 set transform-set t2 match address 120
74 Release 11.3(3)T
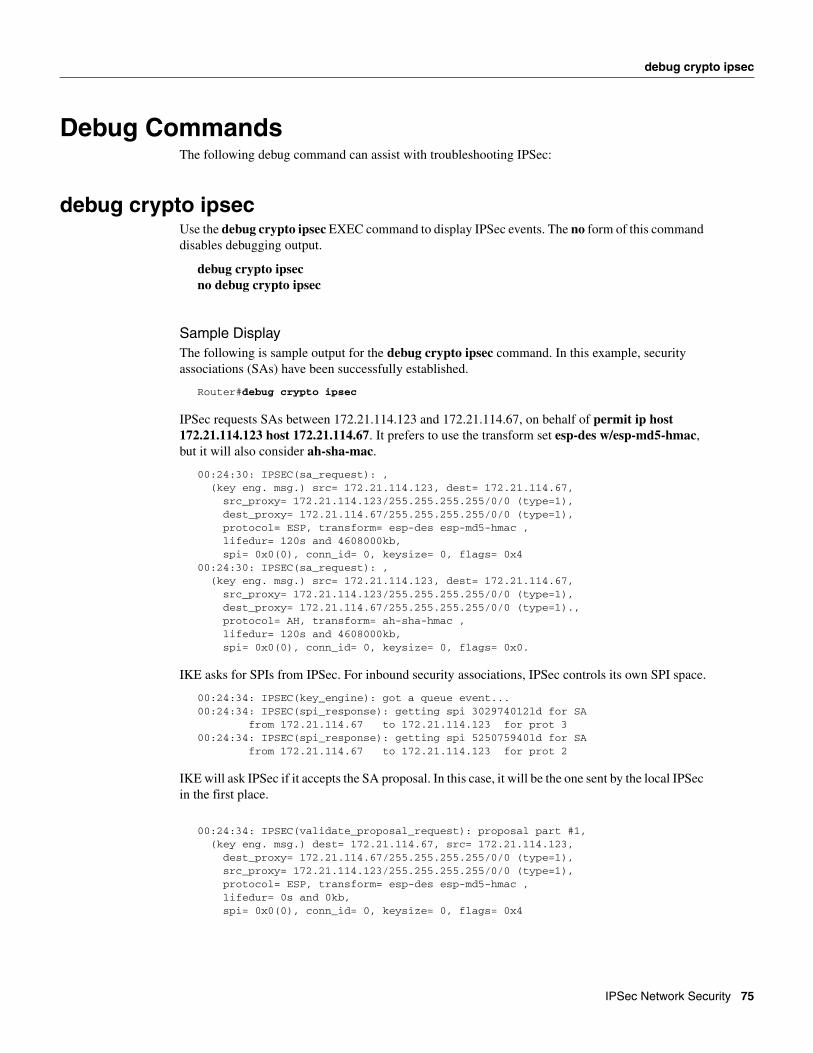
debug crypto ipsec
Debug CommandsThe following debug command can assist with troubleshooting IPSec:
debug crypto ipsecUse the debug crypto ipsec EXEC command to display IPSec events. The no form of this command disables debugging output.
debug crypto ipsecno debug crypto ipsec
Sample DisplayThe following is sample output for the debug crypto ipsec command. In this example, security associations (SAs) have been successfully established.
Router#debug crypto ipsec
IPSec requests SAs between 172.21.114.123 and 172.21.114.67, on behalf of permit ip host 172.21.114.123 host 172.21.114.67. It prefers to use the transform set esp-des w/esp-md5-hmac, but it will also consider ah-sha-mac.
00:24:30: IPSEC(sa_request): , (key eng. msg.) src= 172.21.114.123, dest= 172.21.114.67, src_proxy= 172.21.114.123/255.255.255.255/0/0 (type=1), dest_proxy= 172.21.114.67/255.255.255.255/0/0 (type=1), protocol= ESP, transform= esp-des esp-md5-hmac , lifedur= 120s and 4608000kb, spi= 0x0(0), conn_id= 0, keysize= 0, flags= 0x400:24:30: IPSEC(sa_request): , (key eng. msg.) src= 172.21.114.123, dest= 172.21.114.67, src_proxy= 172.21.114.123/255.255.255.255/0/0 (type=1), dest_proxy= 172.21.114.67/255.255.255.255/0/0 (type=1)., protocol= AH, transform= ah-sha-hmac , lifedur= 120s and 4608000kb, spi= 0x0(0), conn_id= 0, keysize= 0, flags= 0x0.
IKE asks for SPIs from IPSec. For inbound security associations, IPSec controls its own SPI space.
00:24:34: IPSEC(key_engine): got a queue event...00:24:34: IPSEC(spi_response): getting spi 302974012ld for SA from 172.21.114.67 to 172.21.114.123 for prot 300:24:34: IPSEC(spi_response): getting spi 525075940ld for SA from 172.21.114.67 to 172.21.114.123 for prot 2
IKE will ask IPSec if it accepts the SA proposal. In this case, it will be the one sent by the local IPSec in the first place.
00:24:34: IPSEC(validate_proposal_request): proposal part #1, (key eng. msg.) dest= 172.21.114.67, src= 172.21.114.123, dest_proxy= 172.21.114.67/255.255.255.255/0/0 (type=1), src_proxy= 172.21.114.123/255.255.255.255/0/0 (type=1), protocol= ESP, transform= esp-des esp-md5-hmac , lifedur= 0s and 0kb, spi= 0x0(0), conn_id= 0, keysize= 0, flags= 0x4
IPSec Network Security 75
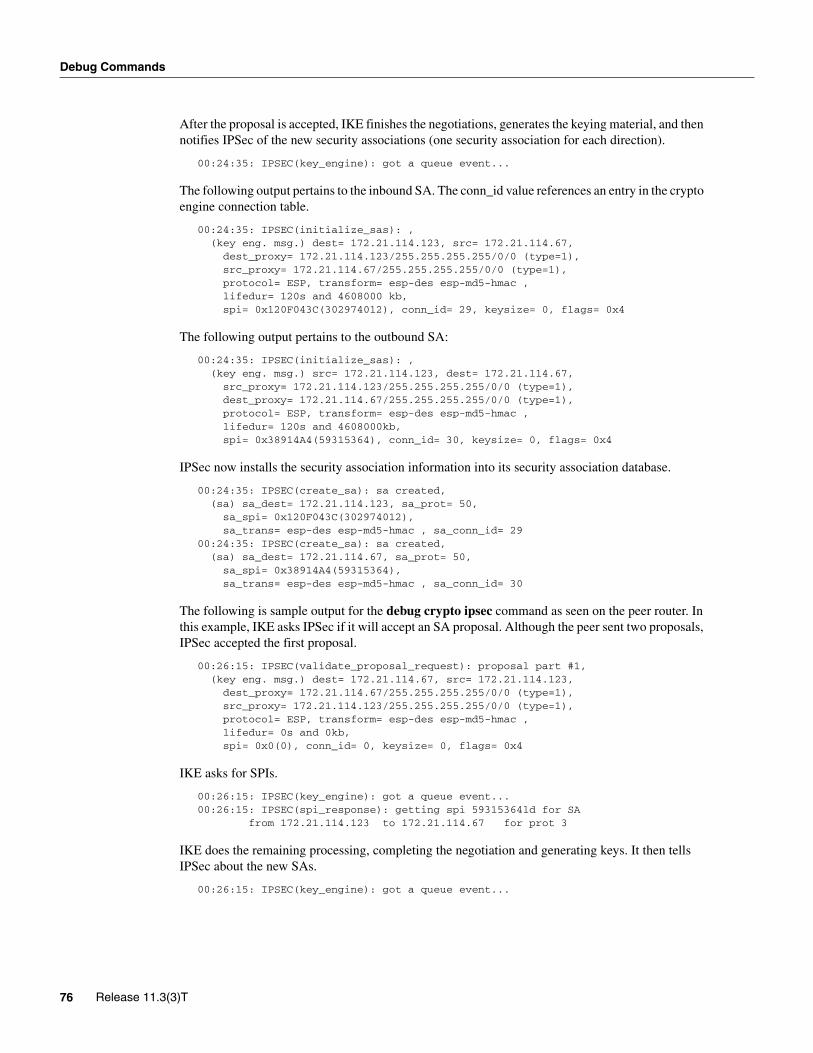
Debug Commands
After the proposal is accepted, IKE finishes the negotiations, generates the keying material, and then notifies IPSec of the new security associations (one security association for each direction).
00:24:35: IPSEC(key_engine): got a queue event...
The following output pertains to the inbound SA. The conn_id value references an entry in the crypto engine connection table.
00:24:35: IPSEC(initialize_sas): , (key eng. msg.) dest= 172.21.114.123, src= 172.21.114.67, dest_proxy= 172.21.114.123/255.255.255.255/0/0 (type=1), src_proxy= 172.21.114.67/255.255.255.255/0/0 (type=1), protocol= ESP, transform= esp-des esp-md5-hmac , lifedur= 120s and 4608000 kb, spi= 0x120F043C(302974012), conn_id= 29, keysize= 0, flags= 0x4
The following output pertains to the outbound SA:
00:24:35: IPSEC(initialize_sas): , (key eng. msg.) src= 172.21.114.123, dest= 172.21.114.67, src_proxy= 172.21.114.123/255.255.255.255/0/0 (type=1), dest_proxy= 172.21.114.67/255.255.255.255/0/0 (type=1), protocol= ESP, transform= esp-des esp-md5-hmac , lifedur= 120s and 4608000kb, spi= 0x38914A4(59315364), conn_id= 30, keysize= 0, flags= 0x4
IPSec now installs the security association information into its security association database.
00:24:35: IPSEC(create_sa): sa created, (sa) sa_dest= 172.21.114.123, sa_prot= 50, sa_spi= 0x120F043C(302974012), sa_trans= esp-des esp-md5-hmac , sa_conn_id= 2900:24:35: IPSEC(create_sa): sa created, (sa) sa_dest= 172.21.114.67, sa_prot= 50, sa_spi= 0x38914A4(59315364), sa_trans= esp-des esp-md5-hmac , sa_conn_id= 30
The following is sample output for the debug crypto ipsec command as seen on the peer router. In this example, IKE asks IPSec if it will accept an SA proposal. Although the peer sent two proposals, IPSec accepted the first proposal.
00:26:15: IPSEC(validate_proposal_request): proposal part #1, (key eng. msg.) dest= 172.21.114.67, src= 172.21.114.123, dest_proxy= 172.21.114.67/255.255.255.255/0/0 (type=1), src_proxy= 172.21.114.123/255.255.255.255/0/0 (type=1), protocol= ESP, transform= esp-des esp-md5-hmac , lifedur= 0s and 0kb, spi= 0x0(0), conn_id= 0, keysize= 0, flags= 0x4
IKE asks for SPIs.
00:26:15: IPSEC(key_engine): got a queue event...00:26:15: IPSEC(spi_response): getting spi 59315364ld for SA from 172.21.114.123 to 172.21.114.67 for prot 3
IKE does the remaining processing, completing the negotiation and generating keys. It then tells IPSec about the new SAs.
00:26:15: IPSEC(key_engine): got a queue event...
76 Release 11.3(3)T
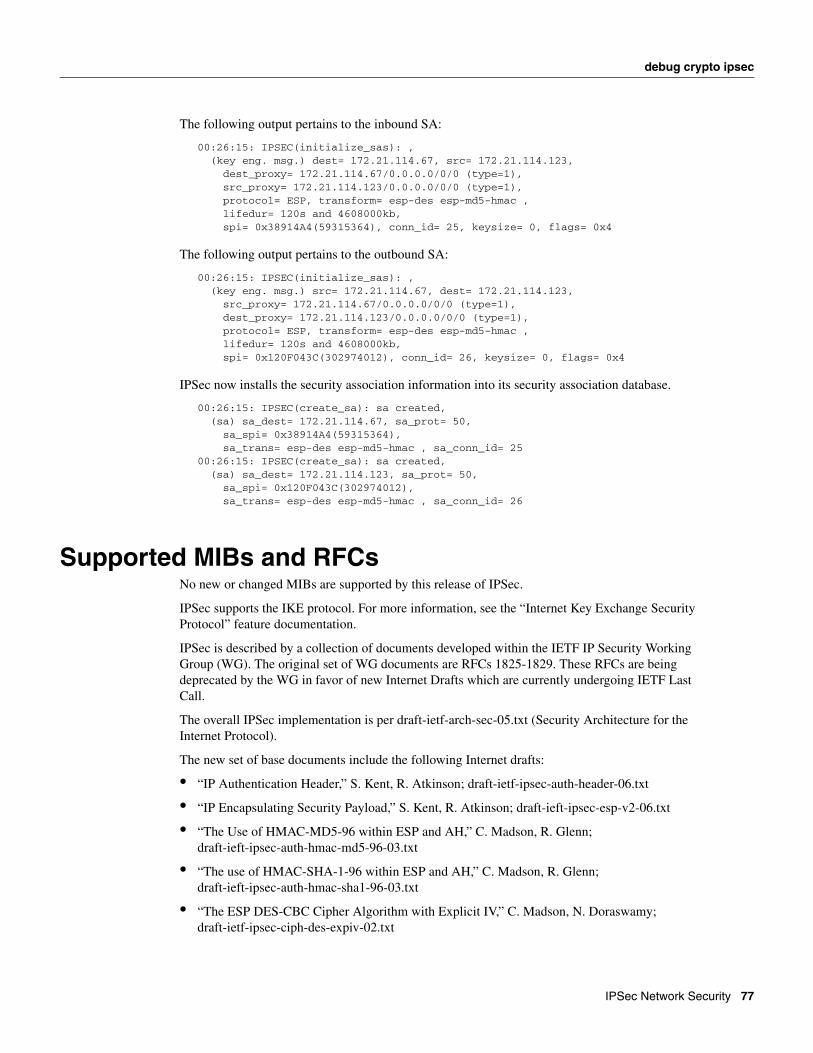
debug crypto ipsec
The following output pertains to the inbound SA:
00:26:15: IPSEC(initialize_sas): , (key eng. msg.) dest= 172.21.114.67, src= 172.21.114.123, dest_proxy= 172.21.114.67/0.0.0.0/0/0 (type=1), src_proxy= 172.21.114.123/0.0.0.0/0/0 (type=1), protocol= ESP, transform= esp-des esp-md5-hmac , lifedur= 120s and 4608000kb, spi= 0x38914A4(59315364), conn_id= 25, keysize= 0, flags= 0x4
The following output pertains to the outbound SA:
00:26:15: IPSEC(initialize_sas): , (key eng. msg.) src= 172.21.114.67, dest= 172.21.114.123, src_proxy= 172.21.114.67/0.0.0.0/0/0 (type=1), dest_proxy= 172.21.114.123/0.0.0.0/0/0 (type=1), protocol= ESP, transform= esp-des esp-md5-hmac , lifedur= 120s and 4608000kb, spi= 0x120F043C(302974012), conn_id= 26, keysize= 0, flags= 0x4
IPSec now installs the security association information into its security association database.
00:26:15: IPSEC(create_sa): sa created, (sa) sa_dest= 172.21.114.67, sa_prot= 50, sa_spi= 0x38914A4(59315364), sa_trans= esp-des esp-md5-hmac , sa_conn_id= 2500:26:15: IPSEC(create_sa): sa created, (sa) sa_dest= 172.21.114.123, sa_prot= 50, sa_spi= 0x120F043C(302974012), sa_trans= esp-des esp-md5-hmac , sa_conn_id= 26
Supported MIBs and RFCsNo new or changed MIBs are supported by this release of IPSec.
IPSec supports the IKE protocol. For more information, see the “Internet Key Exchange Security Protocol” feature documentation.
IPSec is described by a collection of documents developed within the IETF IP Security Working Group (WG). The original set of WG documents are RFCs 1825-1829. These RFCs are being deprecated by the WG in favor of new Internet Drafts which are currently undergoing IETF Last Call.
The overall IPSec implementation is per draft-ietf-arch-sec-05.txt (Security Architecture for the Internet Protocol).
The new set of base documents include the following Internet drafts:
• “IP Authentication Header,” S. Kent, R. Atkinson; draft-ietf-ipsec-auth-header-06.txt
• “IP Encapsulating Security Payload,” S. Kent, R. Atkinson; draft-ieft-ipsec-esp-v2-06.txt
• “The Use of HMAC-MD5-96 within ESP and AH,” C. Madson, R. Glenn; draft-ieft-ipsec-auth-hmac-md5-96-03.txt
• “The use of HMAC-SHA-1-96 within ESP and AH,” C. Madson, R. Glenn; draft-ieft-ipsec-auth-hmac-sha1-96-03.txt
• “The ESP DES-CBC Cipher Algorithm with Explicit IV,” C. Madson, N. Doraswamy; draft-ietf-ipsec-ciph-des-expiv-02.txt
IPSec Network Security 77

Supported MIBs and RFCs
78 Release 11.3(3)T