Embed Size (px)
Citation preview
Intel Core Processors
Intel Core i3, Core i5, and Core i7 CPUs have been around for over a year now, but some buyers still get stumped whenever they attempt to build their own systems and are forced to choose among the three. With the more recent Sandy Bridge architecture now on store shelves, we expect the latest wave of buyers to ask the same kind of questions.
Core i3, Core i5, Core i7 — the difference in a nutshellIf you want a plain and simple answer, then generally speaking, Core i7s are better than Core i5s, which are in turn better than Core i3s. Nope, Core i7 does not have seven cores nor does Core i3 have three cores. The numbers are simply indicative of their relative processing powers.
Their relative levels of processing power are also signified by their Intel Processor Star Ratings, which are based on a collection of criteria involving their number of cores, clockspeed (in GHz), size of cache, as well as some new Intel technologies like Turbo Boost and Hyper-Threading.
Core i3s are rated with three stars, i5s have four stars, and i7s have five. If you’re wondering why the ratings start with three, well they actually don’t. The entry-level Intel CPUs — Celeron and Pentium — get one and two stars respectively.
Number of coresThe more cores there are, the more tasks (known as threads) can be served at the same time. The lowest number of cores can be found in Core i3 CPUs, i.e., which have only two cores. Currently, all Core i3s are dual-core processors.
Currently all Core i5 processors, except for the i5-661, are quad cores in Australia. The Core i5-661 is only a dual-core processor with a clockspeed of 3.33 GHz. Remember that all Core i3s are also dual cores. Furthermore, the i3-560 is also 3.33GHz, yet a lot cheaper. Sounds like it might be a better buy than the i5. What gives?
At this point, I’d like to grab the opportunity to illustrate how a number of factors affect the overall processing power of a CPU and determine whether it should be considered an i3, an i5, or an i7.
Even if the i5-661 normally runs at the same clockspeed as Core i3-560, and even if they all have the same number of cores, the i5-661 benefits from a technology known as Turbo Boost.
Intel Turbo BoostThe Intel Turbo Boost Technology allows a processor to dynamically increase its clockspeed whenever the need arises. The maximum amount that Turbo Boost can raise clockspeed at any given time is dependent on the number of active cores, the estimated current consumption, the estimated power consumption, and the processor temperature.
For the Core i5-661, its maximum allowable processor frequency is 3.6 GHz. Because none of the Core i3 CPUs have Turbo Boost, the i5-661 can outrun them when it needs to. Because all Core i5 processors are equipped with the latest version of this technology — Turbo Boost 2.0 — all of them can outrun any Core i3.
Cache sizeWhenever the CPU finds that it keeps on using the same data over and over, it stores that data in its cache. Cache is just like RAM, only faster — because it’s built into the CPU itself. Both RAM and cache serve as holding areas for frequently used data. Without them, the CPU would have to keep on reading from the hard disk drive, which would take a lot more time.
Basically, RAM minimises interaction with the hard disk, while cache minimises interaction with the RAM. Obviously, with a larger cache, more data can be accessed quickly. All Core i3 processors have 3MB of cache. All Core i5s, except again for the 661 (only 4MB), have 6MB of cache. Finally, all Core i7 CPUs have 8MB of cache. This is clearly one reason why an i7 outperforms an i5 — and why an i5 outperforms an i3.
Hyper-ThreadingStrictly speaking, only one thread can be served by one core at a time. So if a CPU is a dual core, then supposedly only two threads can be served simultaneously. However, Intel has introduced a technology called Hyper-Threading. This enables a single core to serve multiple threads.
For instance, a Core i3, which is only a dual core, can actually serve two threads per core. In other words, a total of four threads can run simultaneously. Thus, even if Core i5 processors are quad cores, since they don’t support Hyper-Threading (again, except the i5-661) the number of threads they can serve at the same time is just about equal to those of their Core i3 counterparts.
This is one of the many reasons why Core i7 processors are the creme de la creme. Not only are they quad cores, they also support Hyper-Threading. Thus, a total of eight threads can run on them at the same time. Combine that with 8MB of cache and Intel Turbo Boost Technology, which all of them have, and you’ll see what sets the Core i7 apart from its siblings.
The upshot is that if you do a lot of things at the same time on your PC, then it might be worth forking out a bit more for an i5 or i7. However, if you use your PC to check emails, do some banking, read the news, and download a bit of music, you might be equally served by the cheaper i3.
At DCA Computers, we regularly hear across the sales counter, “I don’t mind paying for a computer that will last, which CPU should I buy?” The sales tech invariably responds “Well that depends on what you use your computer for.” If it’s the scenario described above, we pretty much tell our customers to save their money and buy an i3 or AMD dual core.
Another factor in this deliberation is that more and more programs are being released with multithread capability. That is they can use more than one CPU thread to execute a single command. So things happen more quickly. Some photo editors and video editing programs are multi-threaded, for example. However, the Internet browser you use to access Netbank or your email client is not, and is unlikely to be in the foreseeable future.
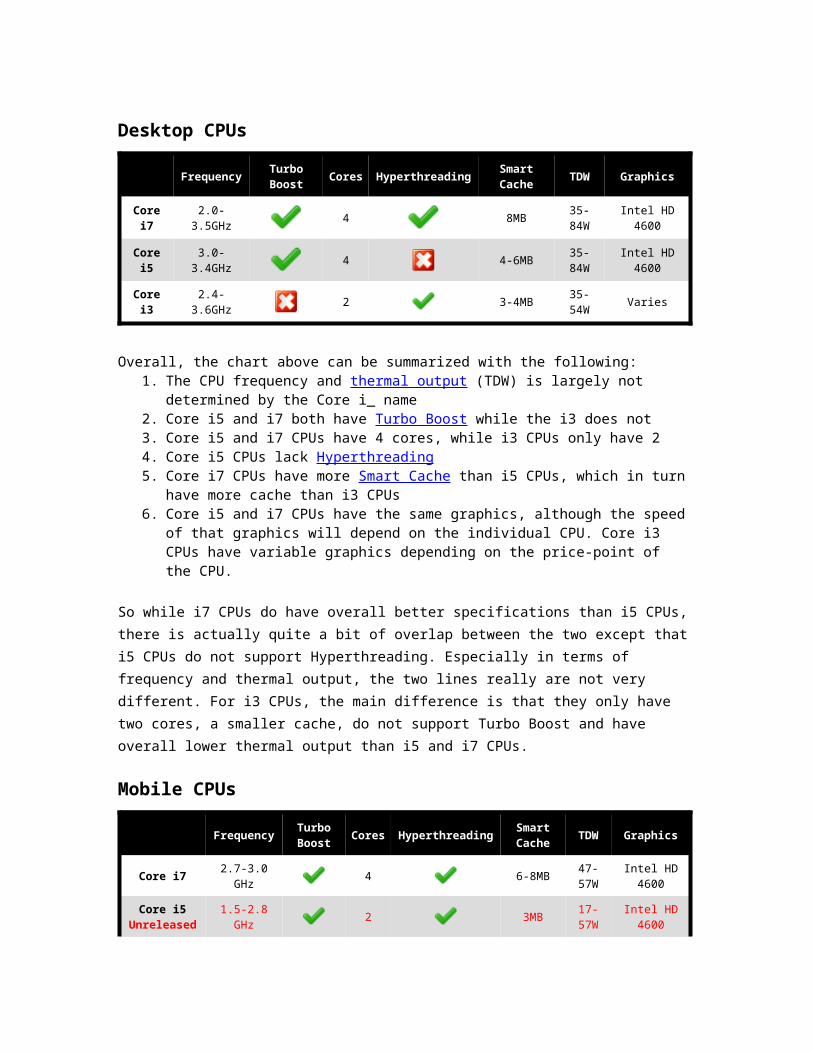
Desktop CPUs
Frequency
Turbo Boost
Cores
Hyperthreading
Smart Cache TDW Graphics
Core i7 2.0-3.5GHz 4 8MB 35-
84WIntel HD
4600
Core i5 3.0-3.4GHz 4 4-6MB 35-
84WIntel HD
4600
Core i3 2.4-3.6GHz 2 3-4MB 35-
54W Varies
Overall, the chart above can be summarized with the following:1. The CPU frequency and thermal output (TDW) is largely not determined
by the Core i_ name2. Core i5 and i7 both have Turbo Boost while the i3 does not3. Core i5 and i7 CPUs have 4 cores, while i3 CPUs only have 24. Core i5 CPUs lack Hyperthreading5. Core i7 CPUs have more Smart Cache than i5 CPUs, which in turn have
more cache than i3 CPUs6. Core i5 and i7 CPUs have the same graphics, although the speed of that
graphics will depend on the individual CPU. Core i3 CPUs have variable graphics depending on the price-point of the CPU.
So while i7 CPUs do have overall better specifications than i5 CPUs, there is actually quite a bit of overlap between the two except that i5 CPUs do not support Hyperthreading. Especially in terms of frequency and thermal output, the two lines really are not very different. For i3 CPUs, the main difference is that they only have two cores, a smaller cache, do not support Turbo Boost and have overall lower thermal output than i5 and i7 CPUs.
Mobile CPUs
Frequency Turbo Boost
Cores
Hyperthreading
Smart Cache TDW Graphics
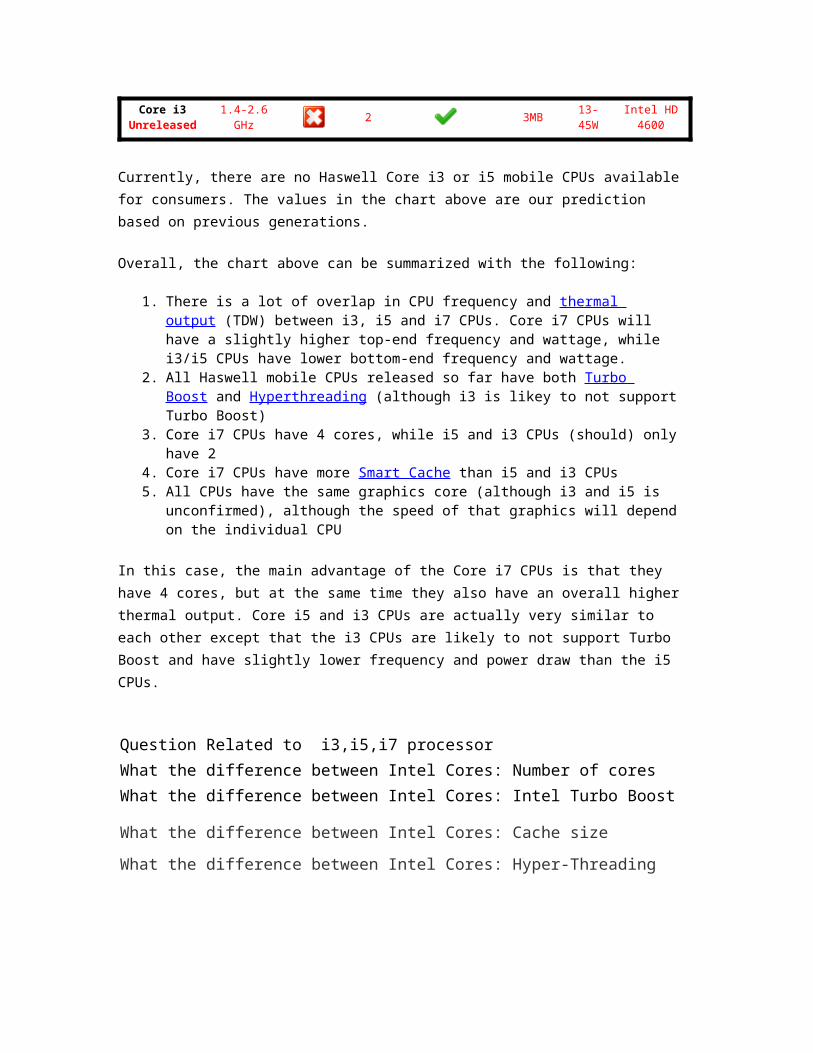
Core i7 2.7-3.0 GHz 4 6-8MB 47-57W
Intel HD 4600
Core i5Unreleased 1.5-2.8 GHz 2 3MB 17-
57WIntel HD
4600Core i3
Unreleased 1.4-2.6 GHz 2 3MB 13-45W
Intel HD 4600
Currently, there are no Haswell Core i3 or i5 mobile CPUs available for
consumers. The values in the chart above are our prediction based on previous generations.
Overall, the chart above can be summarized with the following:
1. There is a lot of overlap in CPU frequency and thermal output (TDW) between i3, i5 and i7 CPUs. Core i7 CPUs will have a slightly higher top-end frequency and wattage, while i3/i5 CPUs have lower bottom-end frequency and wattage.
2. All Haswell mobile CPUs released so far have both Turbo Boost and Hyperthreading (although i3 is likey to not support Turbo Boost)
3. Core i7 CPUs have 4 cores, while i5 and i3 CPUs (should) only have 24. Core i7 CPUs have more Smart Cache than i5 and i3 CPUs5. All CPUs have the same graphics core (although i3 and i5 is unconfirmed),
although the speed of that graphics will depend on the individual CPU
In this case, the main advantage of the Core i7 CPUs is that they have 4 cores, but at the same time they also have an overall higher thermal output. Core i5 and i3 CPUs are actually very similar to each other except that the i3 CPUs are likely to not support Turbo Boost and have slightly lower frequency and power draw than the i5 CPUs.
Question Related to i3,i5,i7 processorWhat the difference between Intel Cores: Number of coresWhat the difference between Intel Cores: Intel Turbo BoostWhat the difference between Intel Cores: Cache sizeWhat the difference between Intel Cores: Hyper-Threading
Difference between Core i3, Core i5 and Core i7 Intel will stop selling Core 2 Duo and Core 2 Quad in 2010. Core is the new range of Intel processors.
Core i3: * Entry level processor. * 2-4 Cores * 4 Threads * Hyper-Threading (efficient use of processor resources) * 3-4 MB Catche * 32 nm Silicon (less heat and energy)
Core i5: * Mid range processor. * 2-4 Cores * 4 Threads * Turbo Mode (turn off core if not used) * Hyper-Threading (efficient use of processor resources) * 3-8 MB Catche * 32-45 nm Silicon (less heat and energy)
Core i7: * High end processor. * 4 Cores * 8 Threads * Turbo Mode (turn off core if not used) * Hyper-Threading (efficient use of processor resources) * 4-8 MB Catche * 32-45 nm Silicon (less heat and energy)
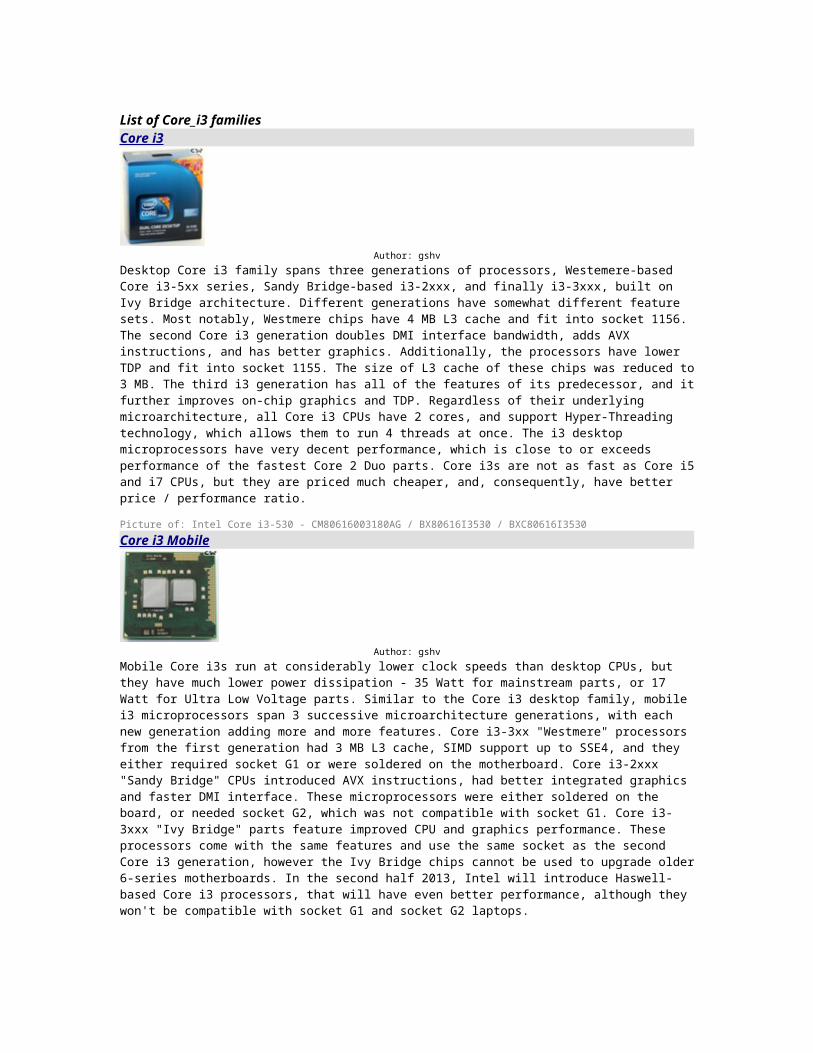
List of Core_i3 familiesCore i3
Author: gshvDesktop Core i3 family spans three generations of processors, Westemere-based Core i3-5xx series, Sandy Bridge-based i3-2xxx, and finally i3-3xxx, built on Ivy Bridge architecture. Different generations have somewhat different feature sets. Most notably, Westmere chips have 4 MB L3 cache and fit into socket 1156. The second Core i3 generation doubles DMI interface bandwidth, adds AVX instructions, and has better graphics. Additionally, the processors have lower TDP and fit into socket 1155. The size of L3 cache of these chips was reduced to 3 MB. The third i3 generation has all of the features of its predecessor, and it further improves on-chip graphics and TDP. Regardless of their underlying microarchitecture, all Core i3 CPUs have 2 cores, and support Hyper-Threading technology, which allows them to run 4 threads at once. The i3 desktop microprocessors have very decent performance, which is close to or exceeds performance of the fastest Core 2 Duo parts. Core i3s are not as fast as Core i5 and i7 CPUs, but they are priced much cheaper, and, consequently, have better price / performance ratio.
Picture of: Intel Core i3-530 - CM80616003180AG / BX80616I3530 / BXC80616I3530Core i3 Mobile
Author: gshvMobile Core i3s run at considerably lower clock speeds than desktop CPUs, but they have much lower power dissipation - 35 Watt for mainstream parts, or 17 Watt for Ultra Low Voltage parts. Similar to the Core i3 desktop family, mobile i3 microprocessors span 3 successive microarchitecture generations, with each new generation adding more and more features. Core i3-3xx "Westmere" processors from the first generation had 3 MB L3 cache, SIMD support up to SSE4, and they either required socket G1 or were soldered on the motherboard. Core i3-2xxx "Sandy Bridge" CPUs introduced AVX instructions, had better integrated graphics and faster DMI interface. These microprocessors were either soldered on the board, or needed socket G2, which was not compatible with socket G1. Core i3-3xxx "Ivy Bridge" parts feature improved CPU and graphics performance. These processors come with the same features and use the same socket as the second Core i3 generation, however the Ivy Bridge chips cannot be used to upgrade older 6-series motherboards. In the second half 2013, Intel will introduce Haswell-based Core i3 processors, that will have even better performance, although they won't be compatible with socket G1 and socket G2 laptops.
Intel Core i3-3220 Processor is a new low cost i3 sires processor from Intel. The Intel Core i3-
3220 Processor integrated with 2 cores and 3MB Internal cache. The processor has 4 threads
which will virtually work like 4 cores. This 64bit processor is coming with Intel HD Graphics 2500.
Below we given the advanced technologies added in this processor.
1. Intel Hyper-Threading Technology
2. Intel 64
3. Intel Virtualization Technology (VT-x)
4. Intel My WiFi Technology
5. Intel Anti-Theft Technology
6. Idle States
7. Enhanced Intel SpeedStep Technology
8. Thermal Monitoring Technologies
9. Intel VT-x with Extended Page Tables (EPT)
10. Execute Disable Bit
Intel Core i3-3220 Processor Features
No of Cores:2
3.3 GHz Clock speed
3 MB Intel Smart Cache
64-bit Instruction Set
22 nm core technology
55 W Max Thermal Design Power (TDP)
Supported memory size: 32GB
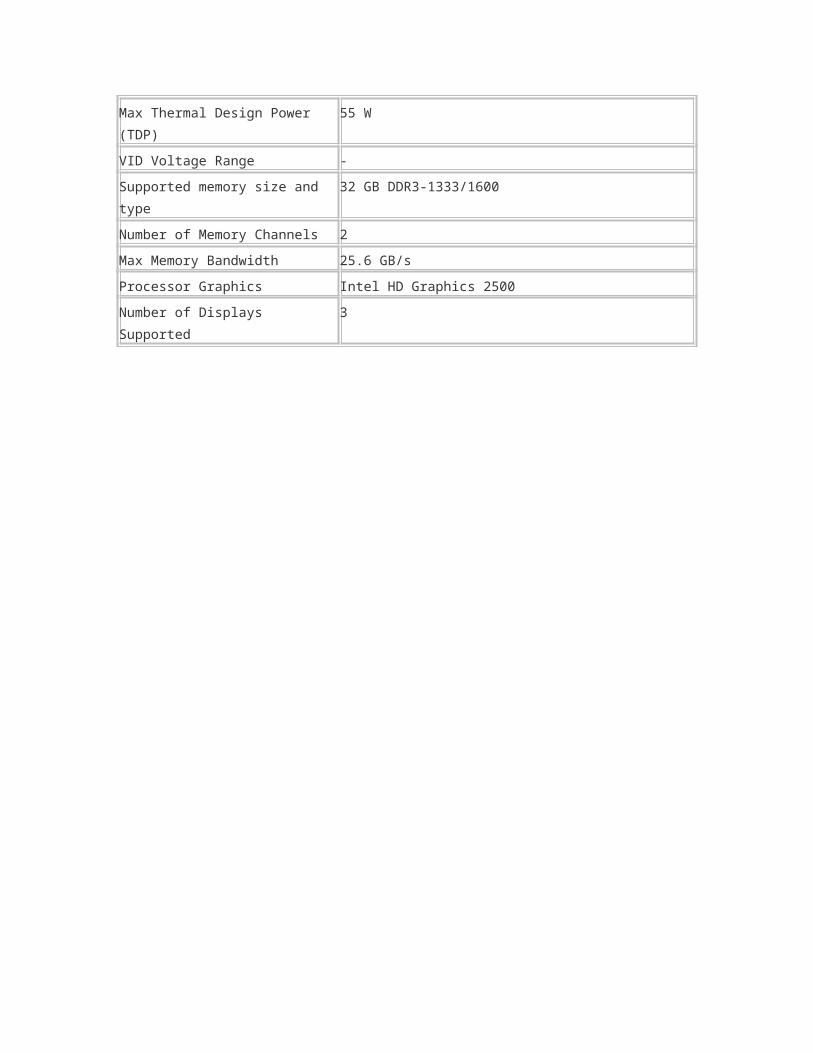
Intel Core i3-3220 Processor SpecificationsProcessor Intel i3-3220
Supported Socket FCLGA1155
No of Cores 2
Number of Threads 4
Clock Speed 3.3 GHz
Intel Smart Cache 3 MB
DMI 5 GT/s
Instruction Set 64-bit
Instruction Set Extensions SSE4.1/4.2, AVX
Core technology (Lithography) 22 nm
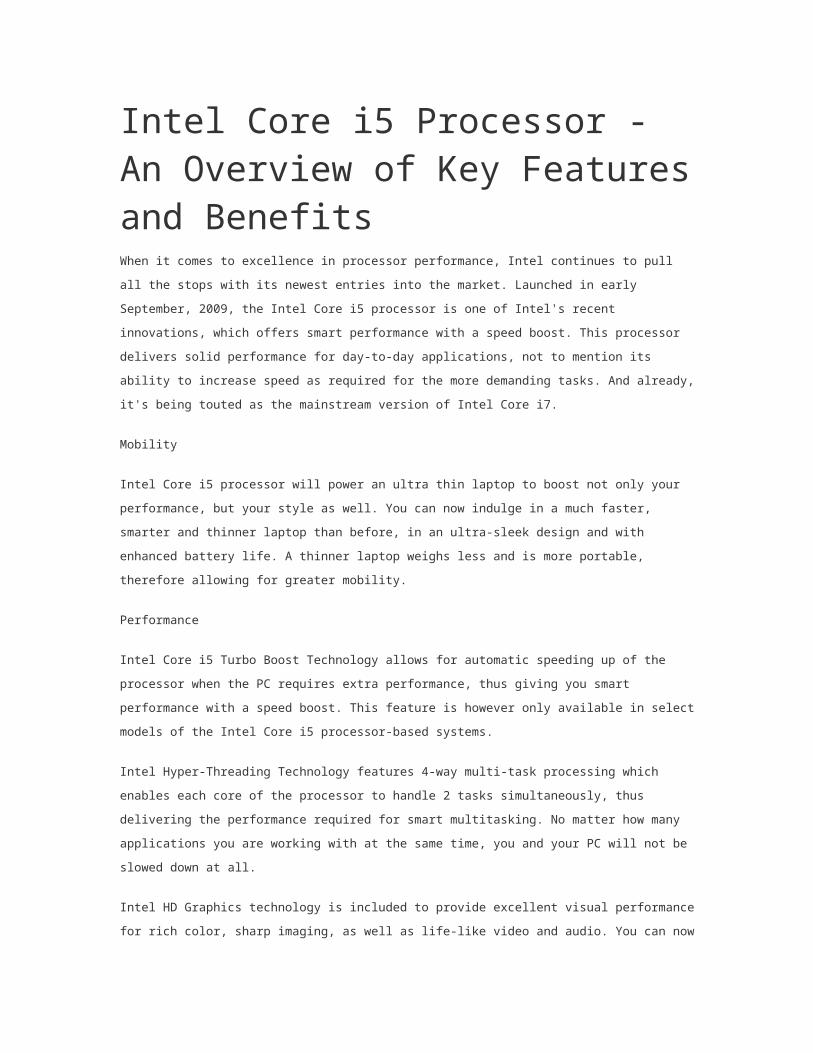
Max Thermal Design Power (TDP) 55 W
VID Voltage Range -
Supported memory size and type 32 GB DDR3-1333/1600
Number of Memory Channels 2
Max Memory Bandwidth 25.6 GB/s
Processor Graphics Intel HD Graphics 2500
Number of Displays Supported 3
Intel Core i5 Processor - An Overview of Key Features and BenefitsWhen it comes to excellence in processor performance, Intel continues to pull all the stops with its newest
entries into the market. Launched in early September, 2009, the Intel Core i5 processor is one of Intel's
recent innovations, which offers smart performance with a speed boost. This processor delivers solid
performance for day-to-day applications, not to mention its ability to increase speed as required for the more
demanding tasks. And already, it's being touted as the mainstream version of Intel Core i7.
Mobility
Intel Core i5 processor will power an ultra thin laptop to boost not only your performance, but your style as
well. You can now indulge in a much faster, smarter and thinner laptop than before, in an ultra-sleek design
and with enhanced battery life. A thinner laptop weighs less and is more portable, therefore allowing for
greater mobility.
Performance
Intel Core i5 Turbo Boost Technology allows for automatic speeding up of the processor when the PC
requires extra performance, thus giving you smart performance with a speed boost. This feature is however
only available in select models of the Intel Core i5 processor-based systems.
Intel Hyper-Threading Technology features 4-way multi-task processing which enables each core of the
processor to handle 2 tasks simultaneously, thus delivering the performance required for smart multitasking.
No matter how many applications you are working with at the same time, you and your PC will not be slowed
down at all.
Intel HD Graphics technology is included to provide excellent visual performance for rich color, sharp
imaging, as well as life-like video and audio. You can now enjoy your movies and internet videos in high-
definition, get full Microsoft Windows 7 support, as well as play popular game titles. You can do all this
without the need for an extra add-in video card as this is all built-in.
Laptops powered by Intel Core i5 processor and featuring 4g WiMAX wireless technology can deliver great
smart performance from internet speed which is four times faster than 3G.
Compatibility
Intel Core i5 processors are used to power ultra thin laptops such as the Sony VAIO Series, HP dv4, Dell
Inspiron 15R, Toshiba Satellite L500, HP Pavilion dv4i Series, CyberPower Xplorer X5, Sager NP7652,
ASUS N61JV, CyberPower Xplorer X5 and the Lenovo ThinkPad T Series.
Security
Intel Core i5 is optimized for a number of security-related technologies including MacAfee security, WinZip
file compression, the Bit Locker in 64-bit Windows 7, as well as PGP security. This will come as a relief for
laptop owners, seeing as an estimated 12,000 laptops get stolen each week from airports alone.
Some more Features
• Intel Core i5-700 and i5-600 processor series with Intel Turbo Boost Technology;
• 4 processing threads;
• Up to 8 MB of Intel Smart Cache;
• Intel HD Graphics on Intel Core i5-600 processor series; and,
• 2 channels of DDR3 1333 MHz memory.
Intel has long been recognized as the leading name in cutting-edge performance processors, and the Intel
Core i5 very well lives up to this reputation.
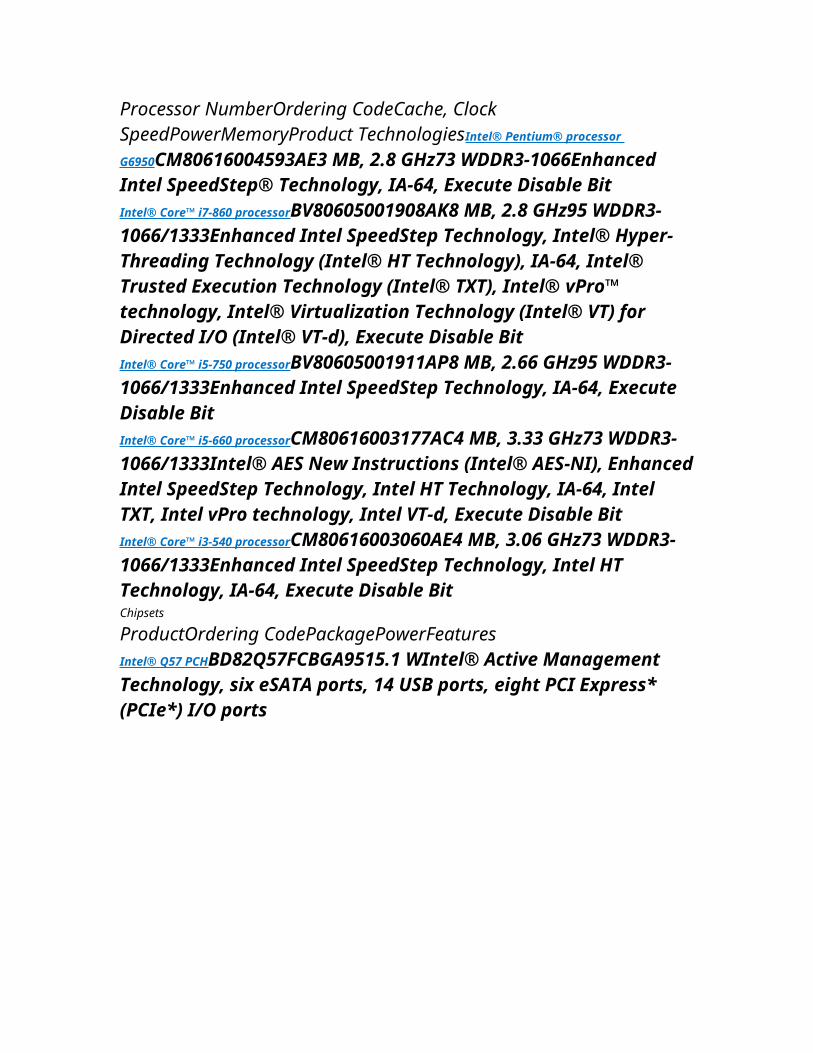
Processor NumberOrdering CodeCache, Clock SpeedPowerMemoryProduct TechnologiesIntel® Pentium® processor G6950CM80616004593AE3 MB, 2.8 GHz73 WDDR3-1066Enhanced Intel SpeedStep® Technology, IA-64, Execute Disable BitIntel® Core™ i7-860 processorBV80605001908AK8 MB, 2.8 GHz95 WDDR3-1066/1333Enhanced Intel SpeedStep Technology, Intel® Hyper-Threading Technology (Intel® HT Technology), IA-64, Intel® Trusted Execution Technology (Intel® TXT), Intel® vPro™ technology, Intel® Virtualization Technology (Intel® VT) for Directed I/O (Intel® VT-d), Execute Disable BitIntel® Core™ i5-750 processorBV80605001911AP8 MB, 2.66 GHz95 WDDR3-1066/1333Enhanced Intel SpeedStep Technology, IA-64, Execute Disable BitIntel® Core™ i5-660 processorCM80616003177AC4 MB, 3.33 GHz73 WDDR3-1066/1333Intel® AES New Instructions (Intel® AES-NI), Enhanced Intel SpeedStep Technology, Intel HT Technology, IA-64, Intel TXT, Intel vPro technology, Intel VT-d, Execute Disable BitIntel® Core™ i3-540 processorCM80616003060AE4 MB, 3.06 GHz73 WDDR3-1066/1333Enhanced Intel SpeedStep Technology, Intel HT Technology, IA-64, Execute Disable BitChipsets
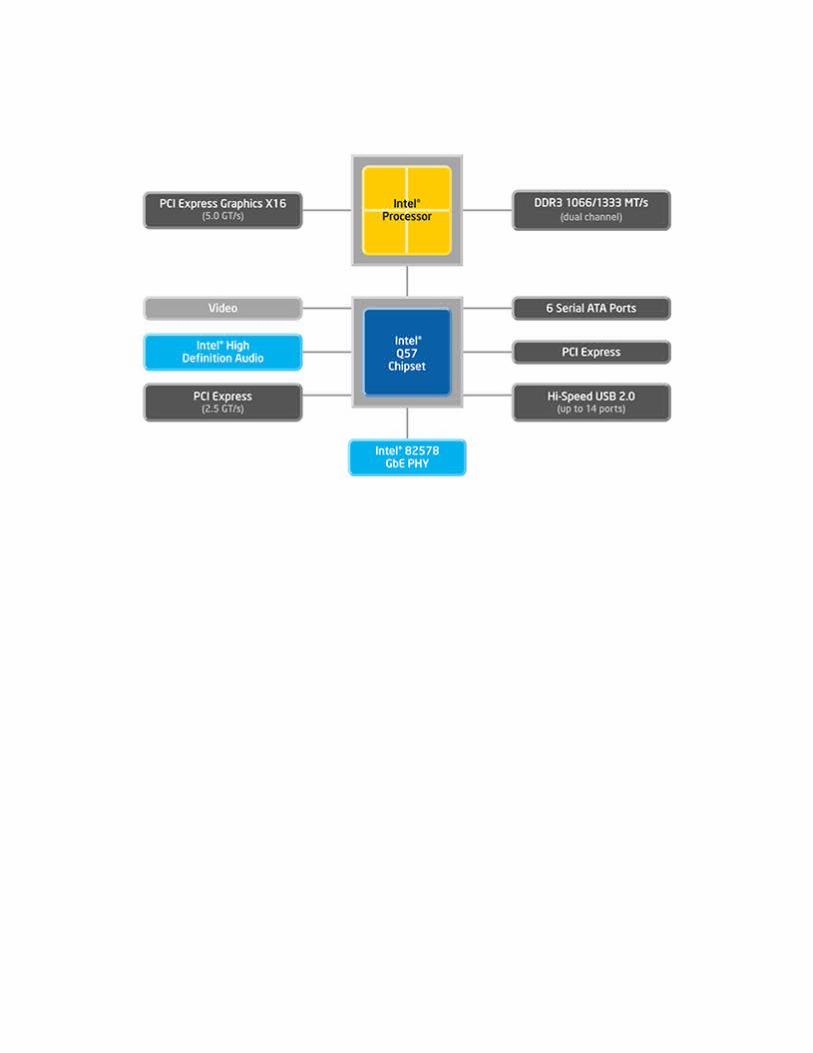
ProductOrdering CodePackagePowerFeaturesIntel® Q57 PCHBD82Q57FCBGA9515.1 WIntel® Active Management Technology, six eSATA ports, 14 USB ports, eight PCI Express* (PCIe*) I/O ports

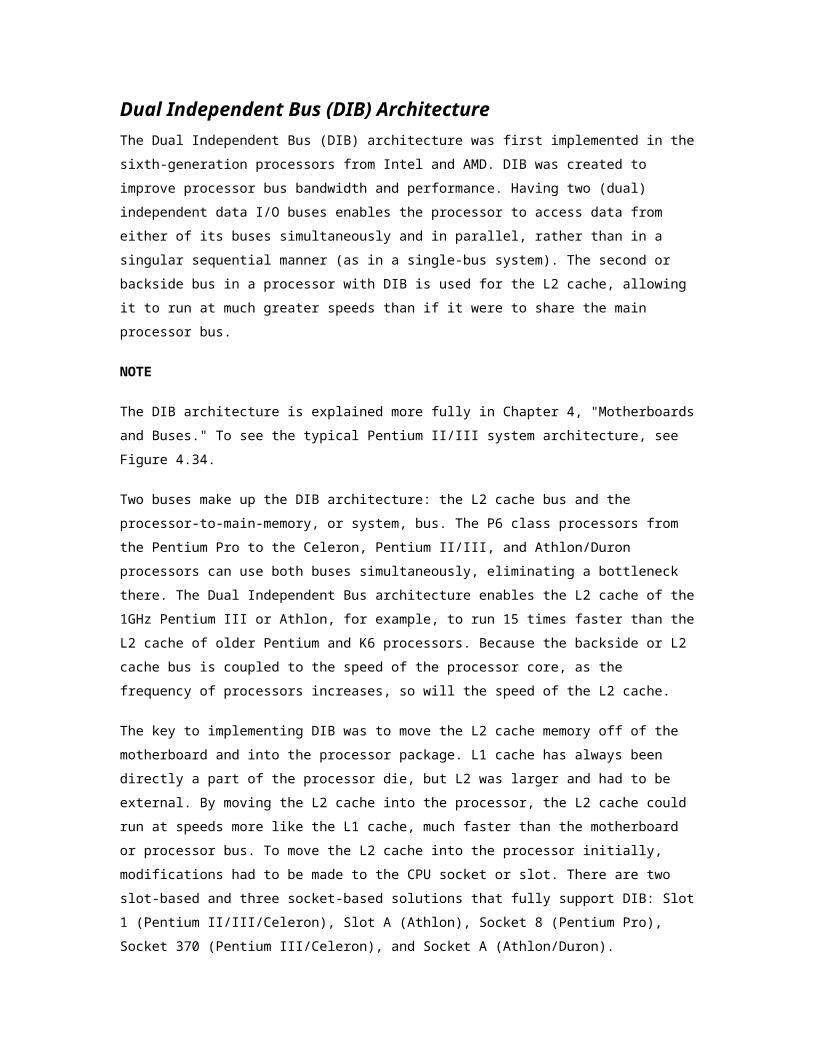
Dual Independent Bus (DIB) ArchitectureThe Dual Independent Bus (DIB) architecture was first implemented in the sixth-generation
processors from Intel and AMD. DIB was created to improve processor bus bandwidth and
performance. Having two (dual) independent data I/O buses enables the processor to access
data from either of its buses simultaneously and in parallel, rather than in a singular sequential
manner (as in a single-bus system). The second or backside bus in a processor with DIB is used
for the L2 cache, allowing it to run at much greater speeds than if it were to share the main
processor bus.
NOTE
The DIB architecture is explained more fully in Chapter 4, "Motherboards and Buses." To see the
typical Pentium II/III system architecture, see Figure 4.34.
Two buses make up the DIB architecture: the L2 cache bus and the processor-to-main-memory,
or system, bus. The P6 class processors from the Pentium Pro to the Celeron, Pentium II/III, and
Athlon/Duron processors can use both buses simultaneously, eliminating a bottleneck there. The
Dual Independent Bus architecture enables the L2 cache of the 1GHz Pentium III or Athlon, for
example, to run 15 times faster than the L2 cache of older Pentium and K6 processors. Because
the backside or L2 cache bus is coupled to the speed of the processor core, as the frequency of
processors increases, so will the speed of the L2 cache.
The key to implementing DIB was to move the L2 cache memory off of the motherboard and into
the processor package. L1 cache has always been directly a part of the processor die, but L2 was
larger and had to be external. By moving the L2 cache into the processor, the L2 cache could run
at speeds more like the L1 cache, much faster than the motherboard or processor bus. To move
the L2 cache into the processor initially, modifications had to be made to the CPU socket or slot.
There are two slot-based and three socket-based solutions that fully support DIB: Slot 1 (Pentium
II/III/Celeron), Slot A (Athlon), Socket 8 (Pentium Pro), Socket 370 (Pentium III/Celeron), and
Socket A (Athlon/Duron).
DIB also allows the system bus to perform multiple simultaneous transactions (instead of singular
sequential transactions), accelerating the flow of information within the system and boosting
performance. Overall DIB architecture offers up to three times the bandwidth performance over a
single-bus architecture processor.
Hyper-threading is where your processor pretends to have 2 physical processor cores, yet only has 1 and some extra junk.
The point of hyperthreading is that many times when you are executing code in the processor, there are parts of the processor that is idle. By including an extra set of CPU registers, the processor can act like it has two cores and thus use all parts of the processor in parallel. When the 2 cores both need to use one component of the processor, then one core ends up waiting of course. This is why it can not replace dual-core and such processors.
Hyper-Threading is a technology used by some Intel microprocessor s that allows a single microprocessor to act like two separate processors to the operating system and theapplication program s that use it. It is a feature of Intel's IA-32 processor architecture.
With Hyper-Threading, a microprocessor's "core" processor can execute two (rather than one) concurrent streams (or thread s) of instructions sent by the operating system. Having two streams of execution units to work on allows more work to be done by the processor during each clock cycle . To the operating system, the Hyper-Threading microprocessor appears to be two separate processors. Because most of today's operating systems (such as Windows and Linux) are capable of dividing their work load among multiple processors (this is called symmetric multiprocessing or SMP ), the operating system simply acts as though the Hyper-Threading processor is a pool of two processors.
Intel notes that existing code will run correctly on a processor with Hyper-Threading but "some relatively simple code modifications are recommended to get the optimum benefit."
What Is a Core?Each CPU “core” is actually a separate central processing unit, which is the part of the CPU that actually does the work. For example, a dual-core chip may look like a single CPU chip, but it actually has two physical central processing units on the chip.
Additional central processing units allow a computer to do multiple things at once. If you’ve ever used a single-core CPU and made the upgrade to a dual-core CPU, you should have noticed a significant difference in how responsive your computer is.

For example, let’s say you’re extracting an archive file and browsing the web at the same time. If you had a single-core CPU in your computer, web browsing wouldn’t be very responsive. The single core would have to split its time between web browsing and file-extraction tasks. If you had a dual-core CPU with two cores, one core would work on extracting the file while the other core did your web-browsing work. Web browsing would be much faster and more responsive.Whether you’re doing multiple things at once or not, your computer is often doing system tasks in the background and you can benefit from additional cores to keep the operating system responsive. Applications can also be written to take advantage of multiple cores. For example, Google Chrome renders each website with a separate process. This allows Google Chrome to use different CPUs for different websites rather than using a single CPU for all browser-related tasks.
Clock Speed vs. CoresCPUs have a clock speed – think of it as how fast the CPU does work. (That’s actually an imperfect analogy as the truth is a lot more complicated, but it will have to do for now.)
For example, Intel’s Core i5-3330 processor has a clock speed of 3 GHz and is a quad-core processor, which means it has four cores. All four cores in this Intel i5 processor are each running at 3 GHz.
Doubling The Cores Doesn’t Double The SpeedMany computer programs are single-threaded, which means that their work can’t be divided across multiple CPUs. They must each run on a single CPU. This means that doubling the cores won’t double their performance.
If you have a single-threaded application running on a 3 GHz quad-core CPU, that application will run at 3 GHz — not 12 GHz. It will use one core and the other three cores will sit idle, waiting for other tasks to perform.
Writing properly multithreaded applications that can scale across several CPUs at once is actually a difficult problem in computer science. It’s becoming a more crucial problem, as the future looks to be computers with more and more cores instead of fewer cores at faster and faster speeds.
Some applications can take advantage of multiple cores. Google Chrome’s multi-process architecture allows it to perform actions across several different cores at once. Some computer games can divide their calculations across multiple separate cores at once.
However, most of the applications you use are likely single-threaded. A quad-core CPU won’t run Microsoft Office twice as fast as a dual-core CPU. If all you do is run Microsoft Office, the performance might be extremely similar.
More cores help if you’re looking to do more at once or if you have a multithreaded application that can take advantage of them. For example, if you’re running severalvirtual machines while encoding video, extracting files, and doing other CPU-demanding things on your computer, an octo-core CPU may be able to keep up while even a quad-core CPU may stumble under such load.
Dual Core, Quad Core & MorePhrases like “dual core,” “quad core,” and “octo core” all just refer to the number of cores a CPU has:
o Dual Core: Two cores.o Quad Core: Four cores.
o Hexa Core: Six cores.o Octo Core: Eight cores.o Deca Core: Ten cores.
Dual Core, Quad Core & MorePhrases like “dual core,” “quad core,” and “octo core” all just refer to the number of cores a CPU has:
o Dual Core: Two cores.o Quad Core: Four cores.o Hexa Core: Six cores.o Octo Core: Eight cores.o Deca Core: Ten cores.
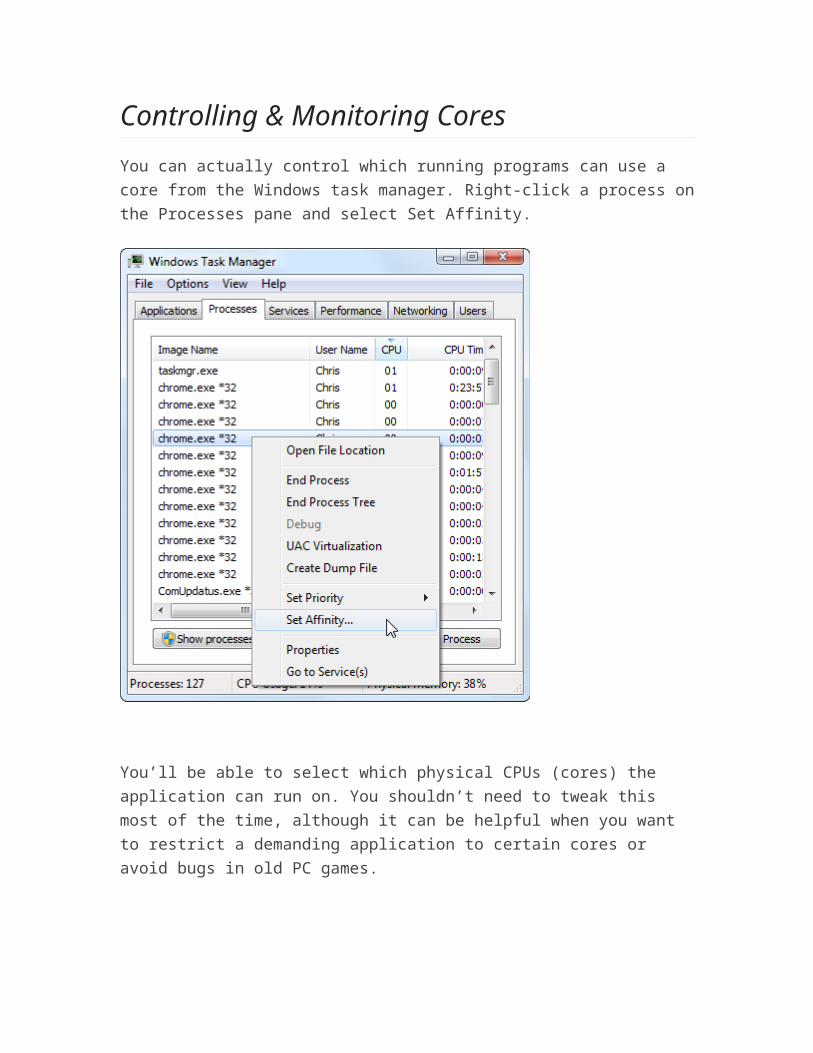
Controlling & Monitoring CoresYou can actually control which running programs can use a core from the Windows task manager. Right-click a process on the Processes pane and select Set Affinity.
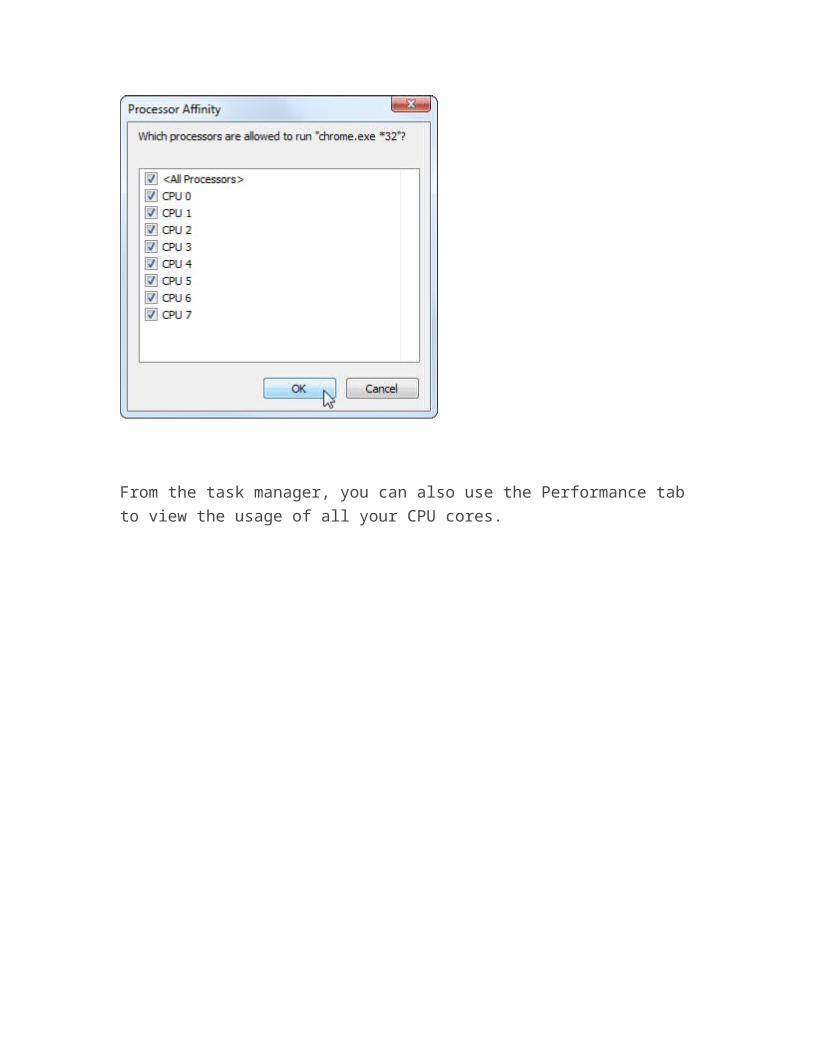
You’ll be able to select which physical CPUs (cores) the application can run on. You shouldn’t need to tweak this most of the time, although it can be helpful when you want to restrict a demanding application to certain cores or avoid bugs in old PC games.
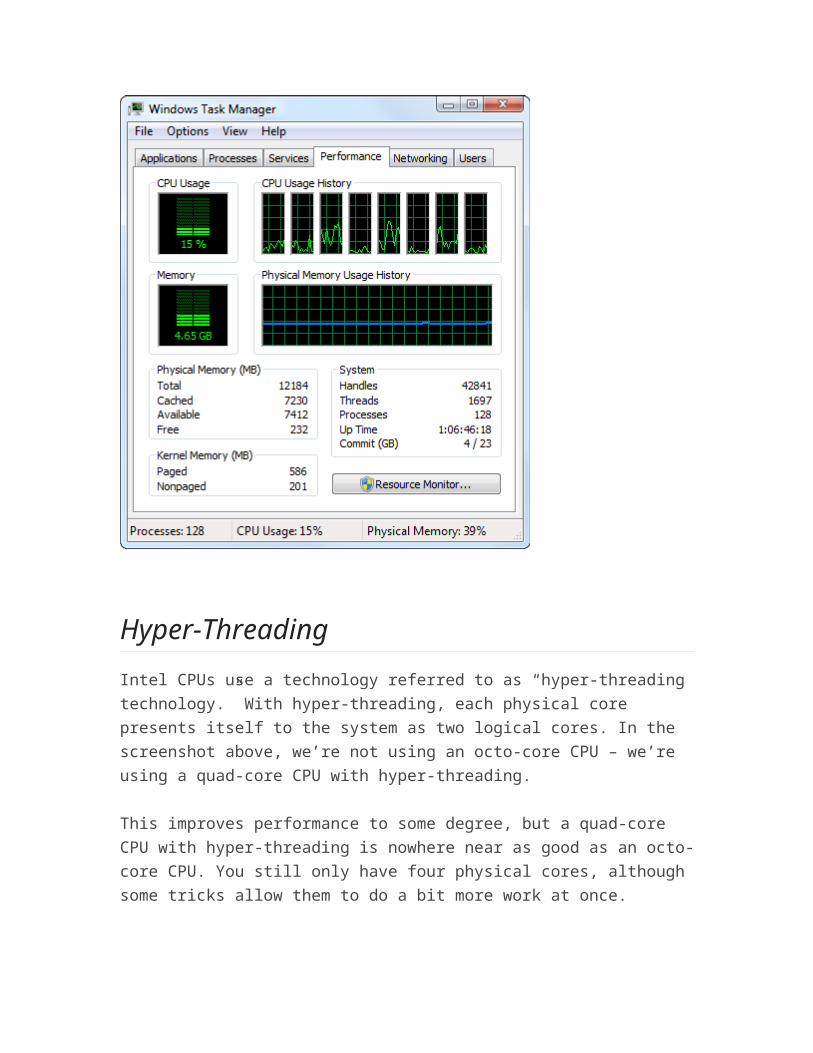
From the task manager, you can also use the Performance tab to view the usage of all your CPU cores.
Hyper-ThreadingIntel CPUs use a technology referred to as “hyper-threading technology.” With hyper-threading, each physical core presents itself to the system as two logical cores. In the screenshot above, we’re not using an octo-core CPU – we’re using a quad-core CPU with hyper-threading.
This improves performance to some degree, but a quad-core CPU with hyper-threading is nowhere near as good as an octo-core CPU. You still only have four physical cores, although some tricks allow them to do a bit more work at once.
Dual Core
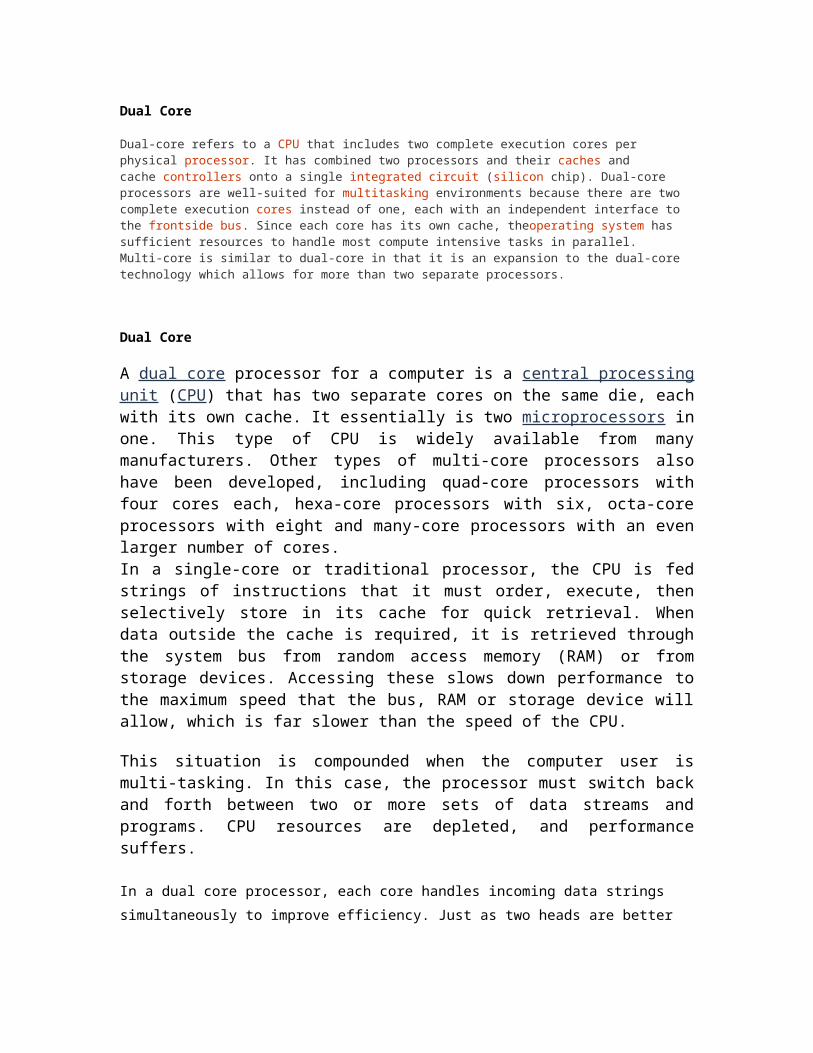
Dual-core refers to a CPU that includes two complete execution cores per physical processor. It has combined two processors and their caches and cache controllers onto a single integrated circuit (silicon chip). Dual-core processors are well-suited for multitasking environments because there are two complete execution cores instead of one, each with an independent interface to the frontside bus. Since each core has its own cache, theoperating system has sufficient resources to handle most compute intensive tasks in parallel.Multi-core is similar to dual-core in that it is an expansion to the dual-core technology which allows for more than two separate processors.
Dual Core
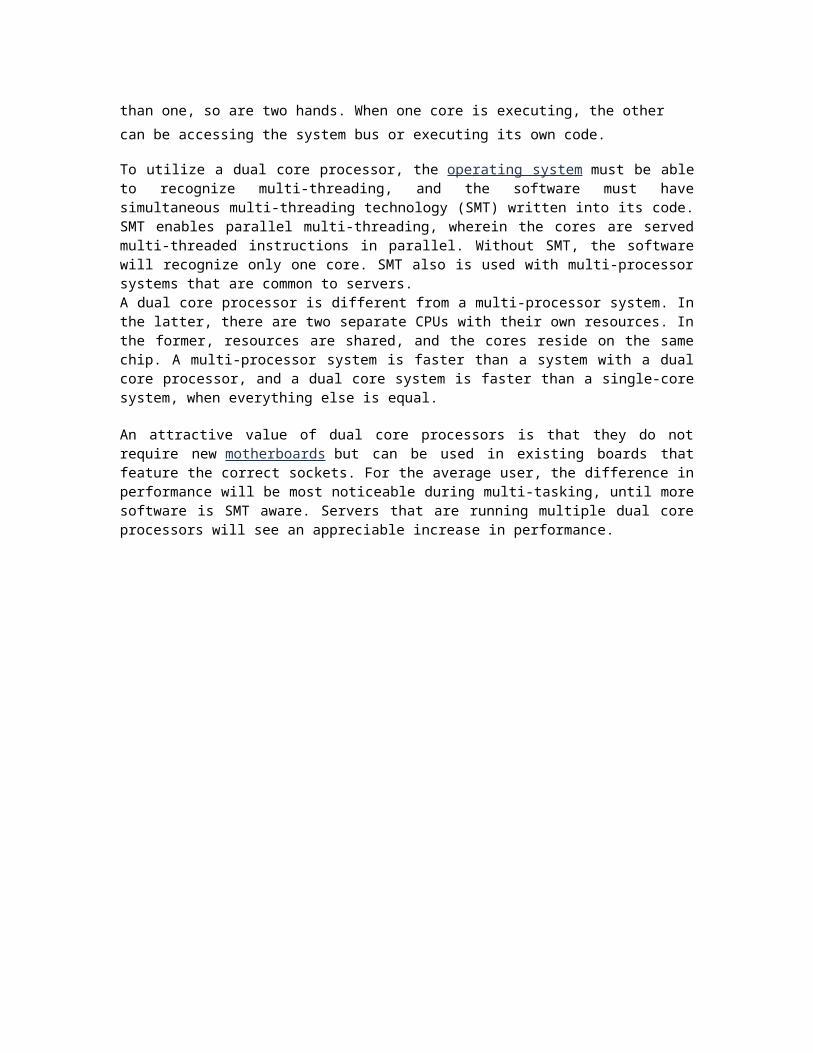
A dual core processor for a computer is a central processing unit (CPU) that has two separate cores on the same die, each with its own cache. It essentially is two microprocessors in one. This type of CPU is widely available from many manufacturers. Other types of multi-core processors also have been developed, including quad-core processors with four cores each, hexa-core processors with six, octa-core processors with eight and many-core processors with an even larger number of cores.In a single-core or traditional processor, the CPU is fed strings of instructions that it must order, execute, then selectively store in its cache for quick retrieval. When data outside the cache is required, it is retrieved through the system bus from random access memory (RAM) or from storage devices. Accessing these slows down performance to the maximum speed that the bus, RAM or storage device will allow, which is far slower than the speed of the CPU.
This situation is compounded when the computer user is multi-tasking. In this case, the processor must switch back and forth between two or more sets of data streams and programs. CPU resources are depleted, and performance suffers.
In a dual core processor, each core handles incoming data strings simultaneously to improve
efficiency. Just as two heads are better than one, so are two hands. When one core is
executing, the other can be accessing the system bus or executing its own code.
To utilize a dual core processor, the operating system must be able to recognize multi-threading, and the software must have simultaneous multi-threading technology (SMT) written into its code. SMT enables parallel multi-threading, wherein the cores are served multi-threaded instructions in parallel. Without SMT, the software will recognize only one core. SMT also is used with multi-processor systems that are common to servers.A dual core processor is different from a multi-processor system. In the latter, there are two separate CPUs with their own resources. In the former, resources are shared, and the cores reside on the same chip. A multi-processor system is faster than a system with a dual core processor, and a dual core system is faster than a single-core system, when everything else is equal.
An attractive value of dual core processors is that they do not require new motherboards but can be used in existing boards that feature the correct sockets. For the average user, the difference in performance will be most noticeable during multi-tasking, until more software is SMT aware. Servers that are running multiple dual core processors will see an appreciable increase in performance.
MultiCore Processor
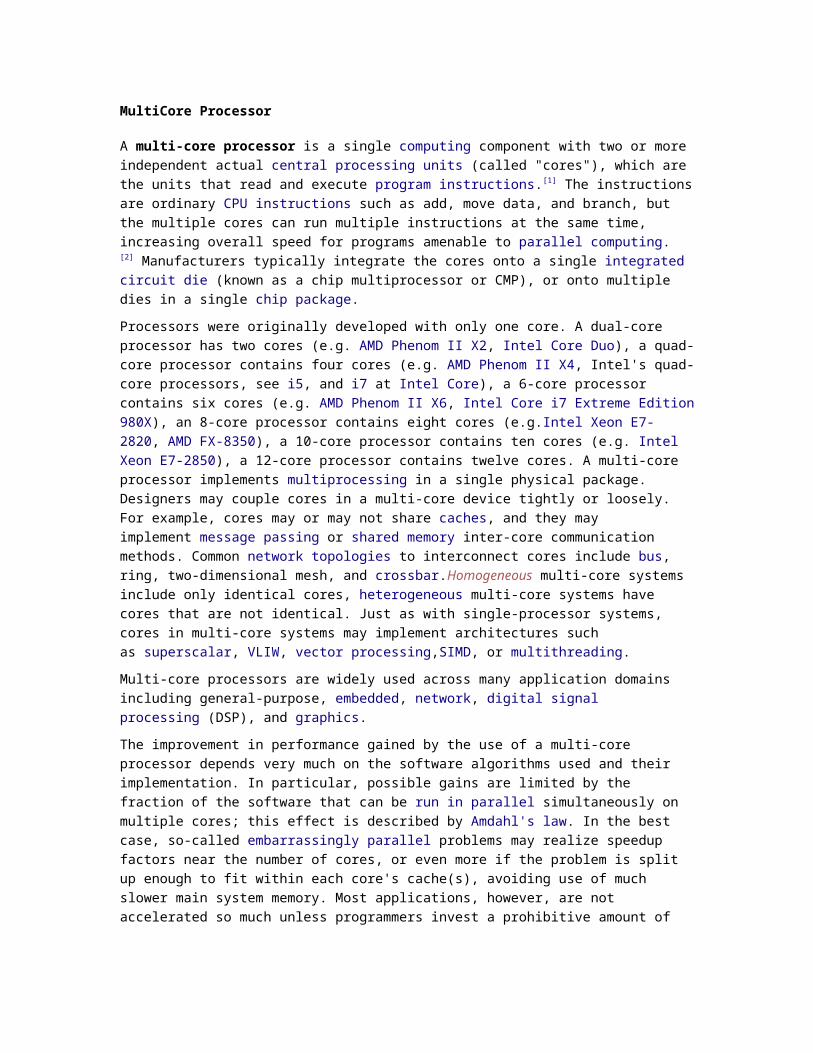
A multi-core processor is a single computing component with two or more independent actual central processing units (called "cores"), which are the units that read and execute program instructions.[1] The instructions are ordinary CPU instructions such as add, move data, and branch, but the multiple cores can run multiple instructions at the same time, increasing overall speed for programs amenable to parallel computing.[2] Manufacturers typically integrate the cores onto a single integrated circuit die (known as a chip multiprocessor or CMP), or onto multiple dies in a single chip package.
Processors were originally developed with only one core. A dual-core processor has two cores (e.g. AMD Phenom II X2, Intel Core Duo), a quad-core processor contains four cores (e.g. AMD Phenom II X4, Intel's quad-core processors, see i5, and i7 at Intel Core), a 6-core processor contains six cores (e.g. AMD Phenom II X6, Intel Core i7 Extreme Edition 980X), an 8-core processor contains eight cores (e.g.Intel Xeon E7-2820, AMD FX-8350), a 10-core processor contains ten cores (e.g. Intel Xeon E7-2850), a 12-core processor contains twelve cores. A multi-core processor implements multiprocessing in a single physical package. Designers may couple cores in a multi-core device tightly or loosely. For example, cores may or may not share caches, and they may implement message passing or shared memory inter-core communication methods. Common network topologies to interconnect cores include bus, ring, two-dimensional mesh, and crossbar.Homogeneous multi-core systems include only identical cores, heterogeneous multi-core systems have cores that are not identical. Just as with single-processor systems, cores in multi-core systems may implement architectures such as superscalar, VLIW, vector processing,SIMD, or multithreading.
Multi-core processors are widely used across many application domains including general-purpose, embedded, network, digital signal processing (DSP), and graphics.
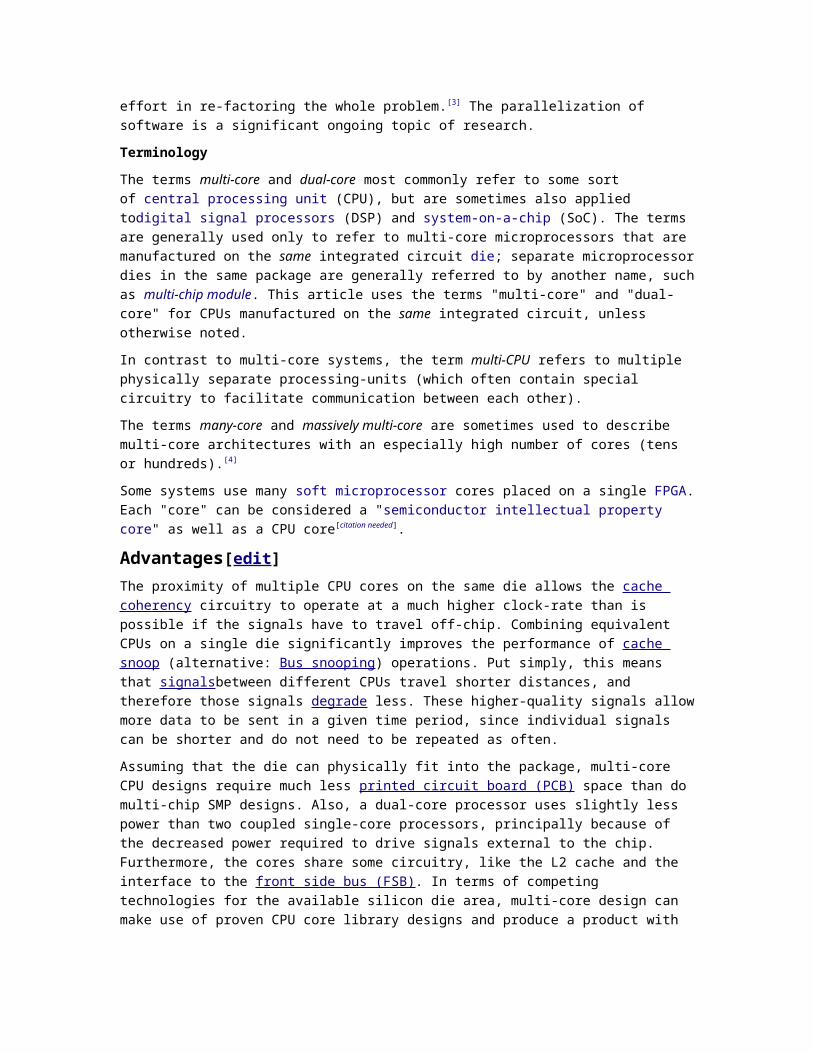
The improvement in performance gained by the use of a multi-core processor depends very much on the software algorithms used and their implementation. In particular, possible gains are limited by the fraction of the software that can be run in parallel simultaneously on multiple cores; this effect is described by Amdahl's law. In the best case, so-called embarrassingly parallel problems may realize speedup factors near the number of cores, or even more if the problem is split up enough to fit within each core's cache(s), avoiding use of much slower main system memory. Most applications, however, are not accelerated so much unless programmers invest a prohibitive amount of effort in re-factoring the whole problem.[3] The parallelization of software is a significant ongoing topic of research.
Terminology
The terms multi-core and dual-core most commonly refer to some sort of central processing unit (CPU), but are sometimes also applied todigital signal processors (DSP) and system-on-a-chip (SoC). The terms are generally used only to refer to multi-core microprocessors that are manufactured on the same integrated circuit die; separate microprocessor dies in the same package are generally referred to by another name, such as multi-chip module. This article uses the terms "multi-core" and "dual-core" for CPUs manufactured on the same integrated circuit, unless otherwise noted.
In contrast to multi-core systems, the term multi-CPU refers to multiple physically separate processing-units (which often contain special circuitry to facilitate communication between each other).
The terms many-core and massively multi-core are sometimes used to describe multi-core architectures with an especially high number of cores (tens or hundreds).[4]
Some systems use many soft microprocessor cores placed on a single FPGA. Each "core" can be considered a "semiconductor intellectual property core" as well as a CPU core[citation needed].
Advantages[edit]The proximity of multiple CPU cores on the same die allows the cache coherency circuitry to operate at a much higher clock-rate than is possible if the signals have to travel off-chip. Combining equivalent CPUs on a single die significantly improves the performance of cache snoop (alternative: Bus snooping) operations. Put simply, this means that signalsbetween different CPUs travel shorter distances, and therefore those signals degrade less. These higher-quality signals allow more data to be sent in a given time period, since individual signals can be shorter and do not need to be repeated as often.
Assuming that the die can physically fit into the package, multi-core CPU designs require much less printed circuit board (PCB) space than do multi-chip SMP designs. Also, a dual-core processor uses slightly less power than two coupled single-core processors, principally because of the decreased power required to drive signals external to the chip. Furthermore, the cores share some circuitry, like the L2 cache and the interface to the front side bus (FSB). In terms of competing technologies for the available silicon die area, multi-core design can make use of proven CPU core library designs and produce a product with lower risk of design error than devising a new wider core-design. Also, adding more cache suffers from diminishing returns.[citation
needed]
Multi-core chips also allow higher performance at lower energy. This can be a big factor in mobile devices that operate on batteries. Since each and every core in multi-core is generally more energy-efficient, the chip becomes more efficient than having a single large monolithic core. This allows higher performance with less energy. The challenge of writing parallel code clearly offsets this benefit.[7]
Disadvantages[edit]Maximizing the utilization of the computing resources provided by multi-core processors requires adjustments both to the operating system (OS) support and to existing application software. Also, the ability of multi-core processors to increase application performance depends on the use of multiple threads within applications. The situation is improving: for example the Valve Corporation's Source engine offers multi-core support,[8][9] and Crytek has developed similar technologies for CryEngine 2, which powers their game, Crysis.Emergent Game Technologies' Gamebryo engine includes their Floodgate technology,[10] which simplifies multi-core development across game platforms. In addition, Apple Inc.'sOS X, starting with Mac OS X Snow Leopard, and iOS starting with iOS 4, have a built-in multi-core facility called Grand Central Dispatch.
Integration of a multi-core chip drives chip production yields down and they are more difficult to manage thermally than lower-density single-chip designs. Intel has partially countered this first problem by creating its quad-core designs by combining two dual-core on a single die with a unified cache, hence any two working dual-core dies can be used, as opposed to producing four cores on a single die and requiring all four to work to produce a quad-core. From an architectural point of view, ultimately, single CPU designs may make better use of the silicon surface area than multiprocessing cores, so a development commitment to this architecture may carry the risk of obsolescence. Finally, raw processing power is not the only constraint on system performance. Two processing cores sharing the same system bus and memory bandwidth limits the real-world performance advantage. It has been claimed[by whom?] that if a single core is close to being memory-bandwidth limited, then going to dual-core might give 30% to 70% improvement; if memory bandwidth is not a problem, then a 90% improvement can be expected; however, Amdahl's law makes this claim dubious.[11] It would be possible for an application that used two CPUs to end up running faster on one dual-core if communication between the CPUs was the limiting factor, which would count as more than 100% improvement.
Core-2Core 2 is a brand encompassing a range of Intel's consumer 64-bit x86-64 single-, dual-, and quad-core microprocessors based on theCore microarchitecture. The single- and dual-core models are single-die, whereas the quad-core models comprise two dies, each containing two cores, packaged in a multi-chip module.[1] The introduction of Core 2 relegated the Pentium brand to the mid-range market, and reunified laptop and desktop CPU lines, which previously had been divided into the Pentium 4, Pentium D, and Pentium Mbrands.
The Core 2 brand was introduced on 27 July 2006,[2] comprising the Solo (single-core), Duo (dual-core), Quad (quad-core), and in 2007, the Extreme (dual- or quad-core CPUs for enthusiasts) subbrands.[3] Intel Core 2 processors with vPro technology (designed for businesses) include the dual-core and quad-core branches.[4]
Diffrence Between Dual and Quad coreKey Difference: A dual-core processor is a type of a central processing unit (CPU) that has two complete execution cores. Quad-core processors have four independent central processing units that can read and execute instructions. The constant evolution of computers requires it to be faster, stronger and better. This requirement has been getting companies to bud heads trying to figure out ways to make the computers faster and more power processors. This has given birth to technologies such as dual-core and quad-core processors. Dual-core and quad-core are also known as multi-core processors.
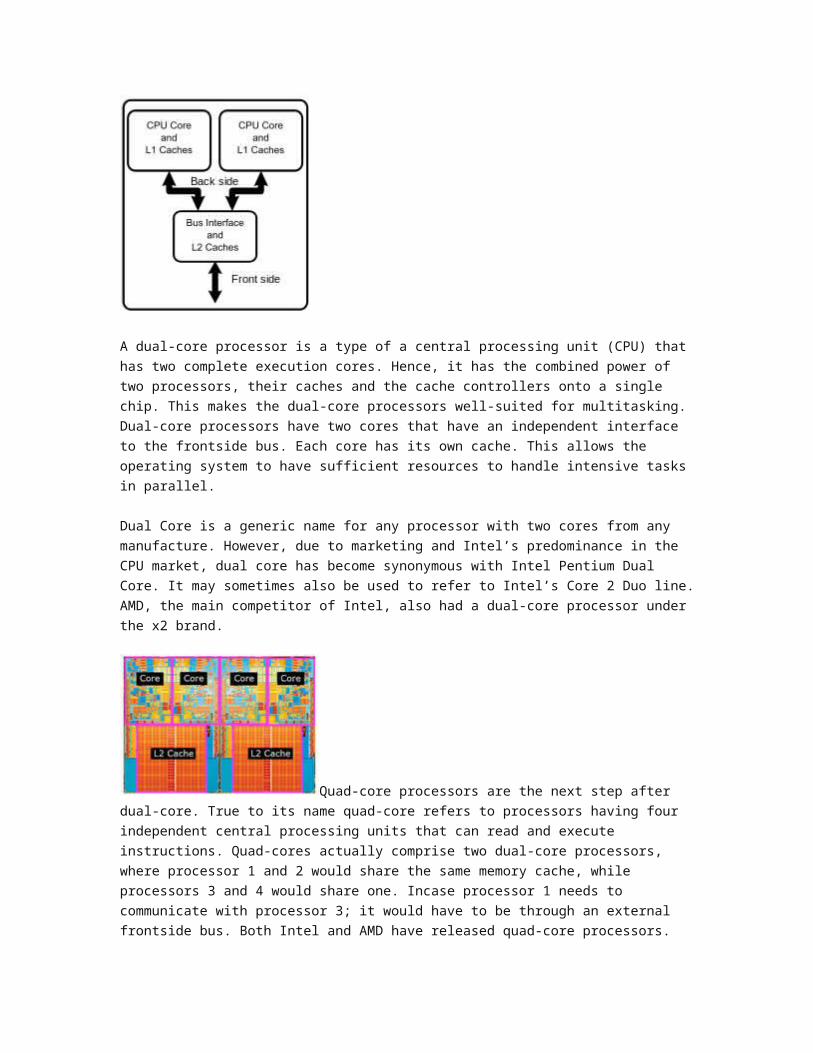
A dual-core processor is a type of a central processing unit (CPU) that has two complete execution cores. Hence, it has the combined power of two processors, their caches and the cache controllers onto a single chip. This makes the dual-core processors well-suited for multitasking. Dual-core processors have two cores that have an independent interface to the frontside bus. Each core has its own cache. This allows the operating system to have sufficient resources to handle intensive tasks in parallel. Dual Core is a generic name for any processor with two cores from any manufacture. However, due to marketing and Intel’s predominance in the CPU market, dual core has become synonymous with Intel Pentium Dual Core. It may sometimes also be used to refer to Intel’s Core 2 Duo line. AMD, the main competitor of Intel, also had a dual-core processor under the x2 brand.
Quad-core processors are the next step after dual-core. True to its name quad-core refers to processors having four independent central processing units that can read and execute instructions. Quad-cores actually comprise two dual-core processors, where processor 1 and 2 would share the same memory cache, while processors 3 and 4 would share one. Incase processor 1 needs to communicate with processor 3; it would have to be through an external frontside bus. Both Intel and AMD have released quad-core processors. Though quad-core is a faster and better technology, it also has some limitations. The true performance of quad-core is often lacking due to external problems. One such problem is heat, each core generate a lot of heat while running, so four cores requires powerful cooling measure such as liquid cooling (which are harder to implant) or to reduce the total speed of the core. This provides a dip in the performance of the cores. Another problem that arises is the hardware,
though the processors have been upgraded, the hardware has not yet caught up to the processor. Because of this, during the execution of heavy tasks, the data of the processors would become more congested. Even though there are minor limitations with the quad-core, it is soon expected to be dealt with. The supporting hardware and software are soon expected to catch up with these cores. Other multiple-core processors are also in the works including a hexa-core processor, which contains six cores and an octa-core processor, which contains eight cores.
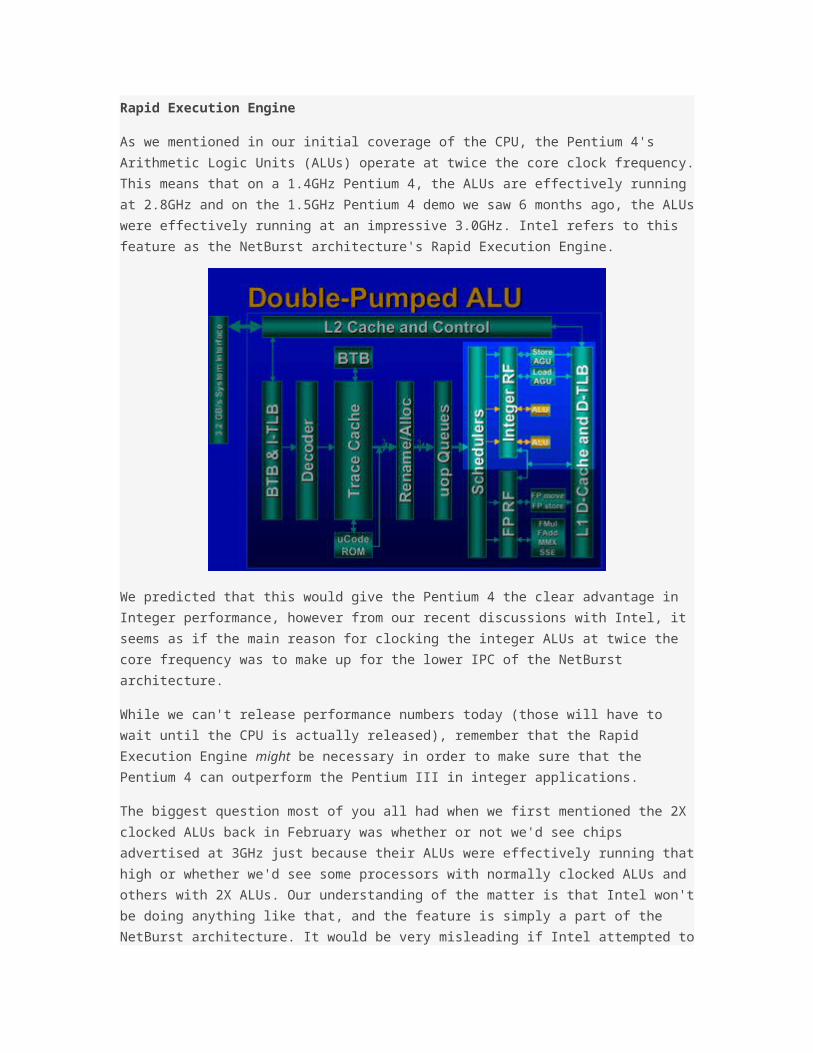
Rapid Execution Engine
As we mentioned in our initial coverage of the CPU, the Pentium 4's Arithmetic Logic Units (ALUs) operate at twice the core clock frequency. This means that on a 1.4GHz Pentium 4, the ALUs are effectively running at 2.8GHz and on the 1.5GHz Pentium 4 demo we saw 6 months ago, the ALUs were effectively running at an impressive 3.0GHz. Intel refers to this feature as the NetBurst architecture's Rapid Execution Engine.
We predicted that this would give the Pentium 4 the clear advantage in Integer performance, however from our recent discussions with Intel, it seems as if the main reason for clocking the integer ALUs at twice the core frequency was to make up for the lower IPC of the NetBurst architecture.
While we can't release performance numbers today (those will have to wait until the CPU is actually released), remember that the Rapid Execution Engine might be necessary in order to make sure that the Pentium 4 can outperform the Pentium III in integer applications.
The biggest question most of you all had when we first mentioned the 2X clocked ALUs back in February was whether or not we'd see chips advertised at 3GHz just because their ALUs were effectively running that high or whether we'd see some processors with normally clocked ALUs and others with 2X ALUs. Our understanding of the matter is that Intel won't be doing anything like that, and the feature is simply a part of the NetBurst architecture. It would be very misleading if Intel attempted to pursue either of those avenues of marketing, and chances are that they won't.
Advanced Dynamic ExecutionThe advanced dynamic execution engine is a very deep out-of-order speculative execution engine that keeps the execution units executing instructions. It also includes an
enhanced branch prediction algorithm that has the net effect of reducing the number of branch prediction
Cache MemoryCache (pronounced cash) memory is extremely fast memory that is built into a computer’s central processing unit (CPU), or located next to it on a separate chip. The CPU uses cache memory to store instructions that are repeatedly required to run programs, improving overall system speed. The advantage of cache memory is that the CPU does not have to use the motherboard’s system bus for data transfer. Whenever data must be passed through the system bus, the data transfer speed slows to the motherboard’s capability. The CPU can process data much faster by avoiding the bottleneck created by the system bus.
As it happens, once most programs are open and running, they use very few resources. When these resources are kept in cache, programs can operate more quickly and efficiently. All else being equal, cache is so effective in system performance that a computer running a fast CPU with little cache can have lower benchmarks than a system running a somewhat slower CPU with more cache. Cache built into the CPU itself is referred to as Level 1 (L1) cache. Cache that resides on a separate chip next to the CPU is called Level 2 (L2) cache. Some CPUs have both L1 and L2 cache built-in and designate the separate cache chip as Level 3 (L3) cache.
Cache that is built into the CPU is faster than separate cache, running at the speed of the microprocessor itself. However, separate cache is still roughly twice as fast as Random Access Memory (RAM). Cache is more expensive than RAM, but it is well worth getting a CPU and motherboard with built-in cache in order to maximize system performance.
Disk caching applies the same principle to the hard disk that memory caching applies to the CPU. Frequently accessed hard disk data is stored in a separate segment of RAM in order to avoid having to retrieve it from the hard disk over and over. In this case, RAM is faster than the platter technology used in conventional hard disks. This situation will change, however, as hybrid hard disks become ubiquitous. These disks have built-in flash memory caches. Eventually, hard drives will be 100% flash drives, eliminating the need for RAM disk caching, as flash memory is faster than RAM.
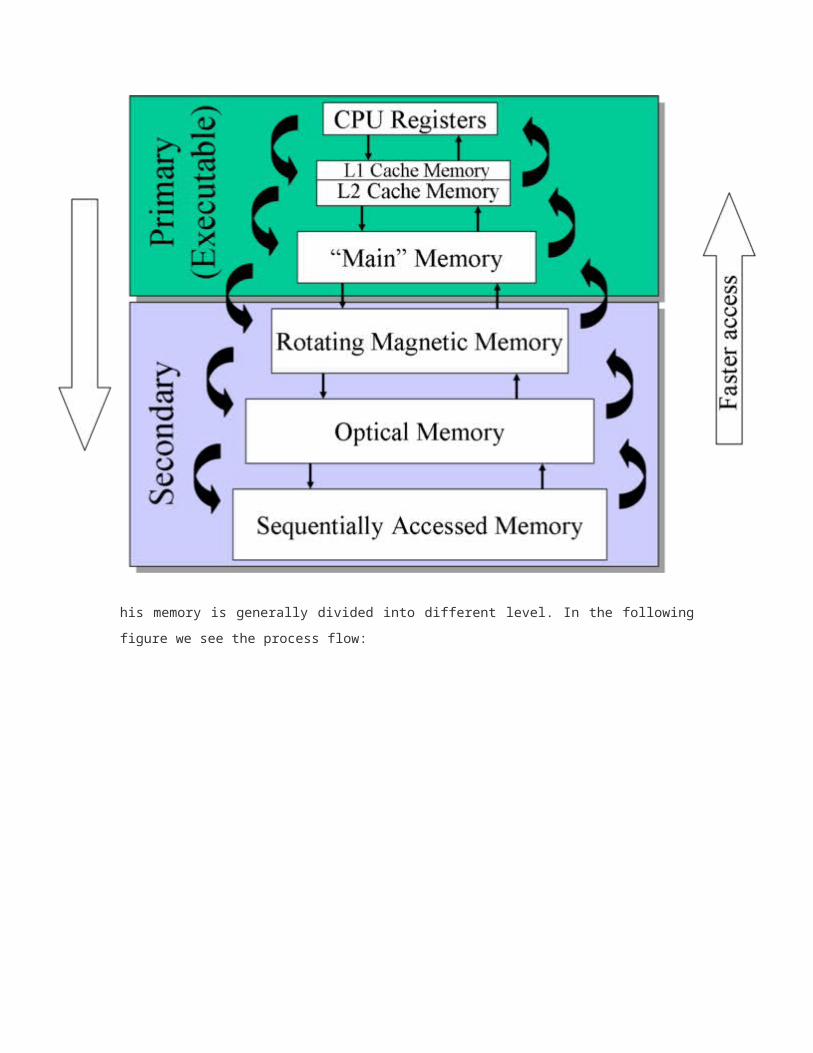
his memory is generally divided into different level. In the following figure we see the process
flow:
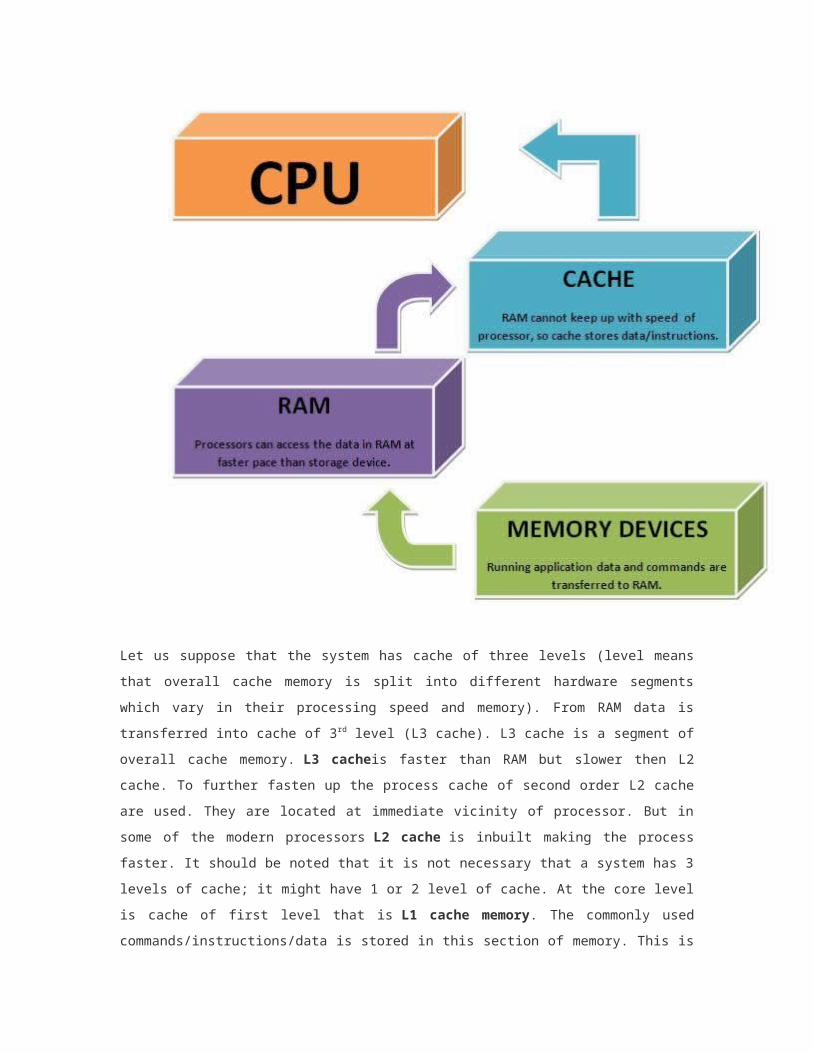
Let us suppose that the system has cache of three levels (level means that overall cache memory
is split into different hardware segments which vary in their processing speed and memory). From
RAM data is transferred into cache of 3rd level (L3 cache). L3 cache is a segment of overall cache
memory. L3 cacheis faster than RAM but slower then L2 cache. To further fasten up the process
cache of second order L2 cache are used. They are located at immediate vicinity of processor.
But in some of the modern processors L2 cache is inbuilt making the process faster. It should be
noted that it is not necessary that a system has 3 levels of cache; it might have 1 or 2 level of
cache. At the core level is cache of first level that is L1 cache memory. The commonly used
commands/instructions/data is stored in this section of memory. This is built in the processor
itself. Thus this is fastest of all the cache memory.
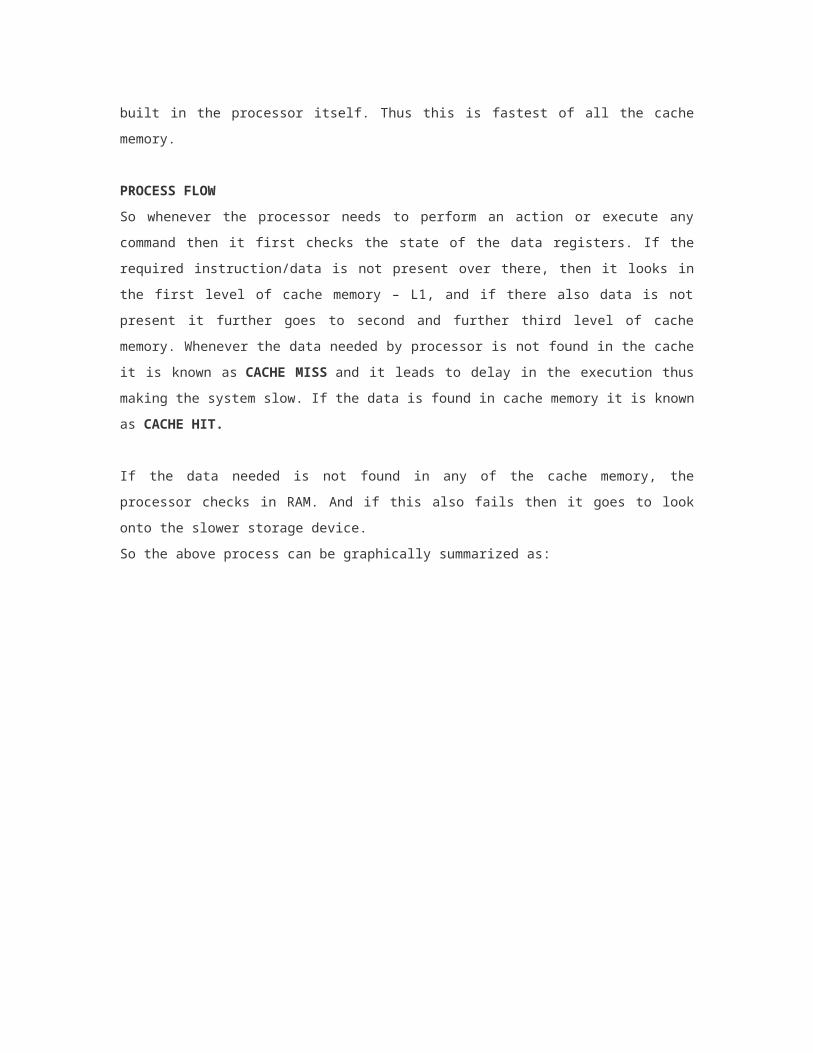
PROCESS FLOW
So whenever the processor needs to perform an action or execute any command then it first
checks the state of the data registers. If the required instruction/data is not present over there,
then it looks in the first level of cache memory – L1, and if there also data is not present it further
goes to second and further third level of cache memory. Whenever the data needed by processor
is not found in the cache it is known as CACHE MISS and it leads to delay in the execution thus
making the system slow. If the data is found in cache memory it is known as CACHE HIT.
If the data needed is not found in any of the cache memory, the processor checks in RAM. And if
this also fails then it goes to look onto the slower storage device.
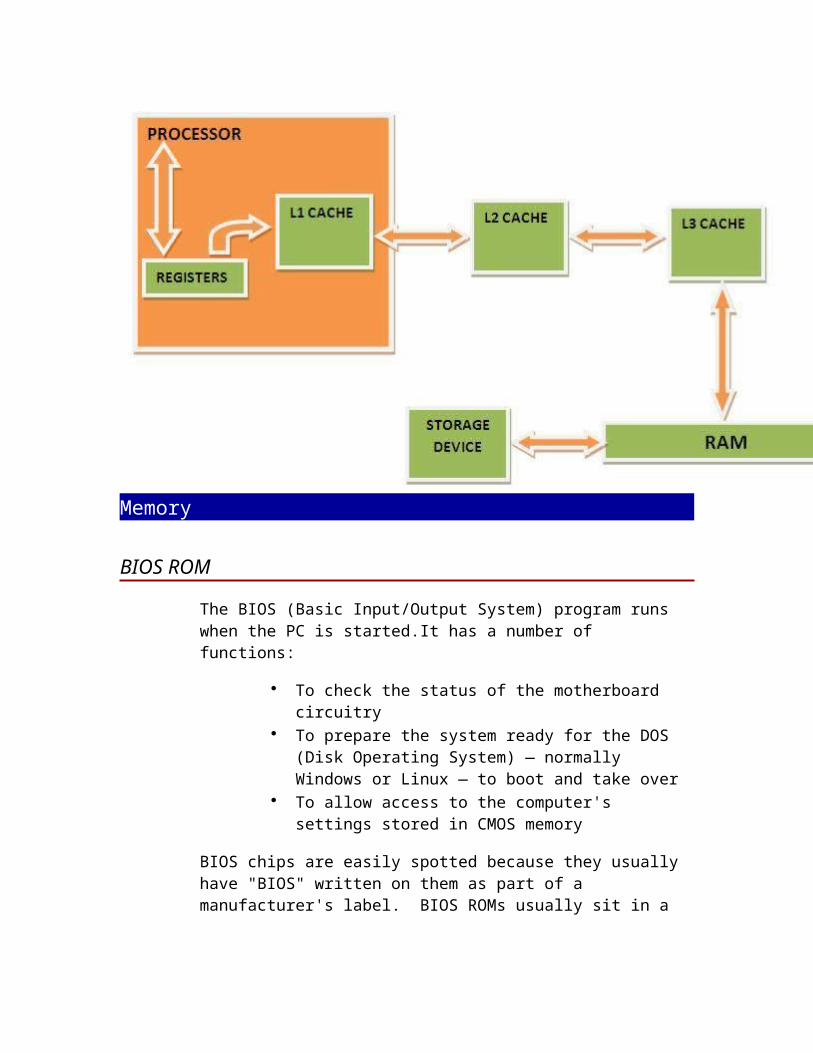
So the above process can be graphically summarized as:
Memory
BIOS ROM
The BIOS (Basic Input/Output System) program runs when the PC is started.It has a number of functions:
To check the status of the motherboard circuitry
To prepare the system ready for the DOS (Disk Operating System) — normally Windows or Linux — to boot and take over
To allow access to the computer's settings stored in CMOS memory
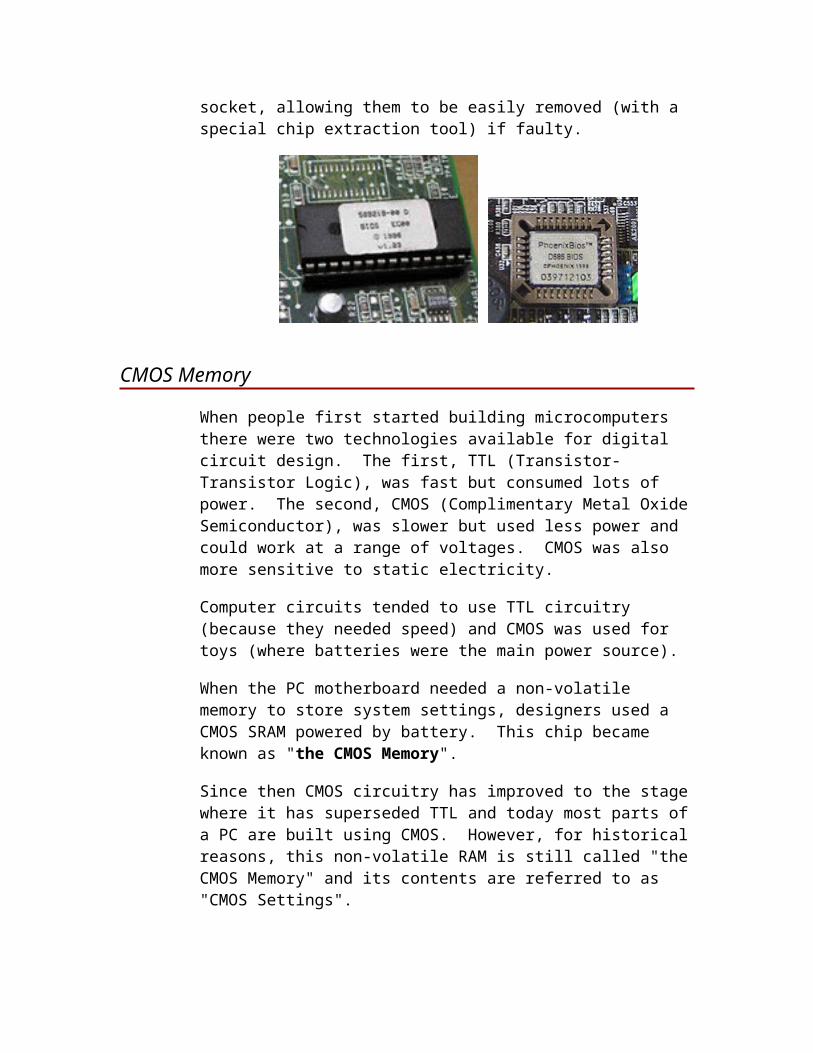
BIOS chips are easily spotted because they usually have "BIOS" written on them as part of a manufacturer's label. BIOS ROMs usually sit in a socket, allowing them to be easily removed (with a special chip extraction tool) if faulty.
CMOS Memory
When people first started building microcomputers there were two technologies available for digital circuit design. The first, TTL (Transistor-Transistor Logic), was fast but consumed lots of power. The second, CMOS (Complimentary Metal Oxide Semiconductor), was slower but used less power and could work at a range of voltages. CMOS was also more sensitive to static electricity.
Computer circuits tended to use TTL circuitry (because they needed speed) and CMOS was used for toys (where batteries were the main power source).
When the PC motherboard needed a non-volatile memory to store system settings, designers used a CMOS SRAM powered by battery. This chip became known as "the CMOS Memory".
Since then CMOS circuitry has improved to the stage where it has superseded TTL and today most parts of a PC are built using CMOS. However, for historical reasons, this non-volatile RAM is still called "the CMOS Memory" and its contents are referred to as "CMOS Settings".
The CMOS Memory used to be powered by a lithium watch battery, typically a CR2032. This battery also powered the PC's real-time clock (RTC).
Modern motherboards use Flash ROM for CMOS settings instead.
Cache Memory
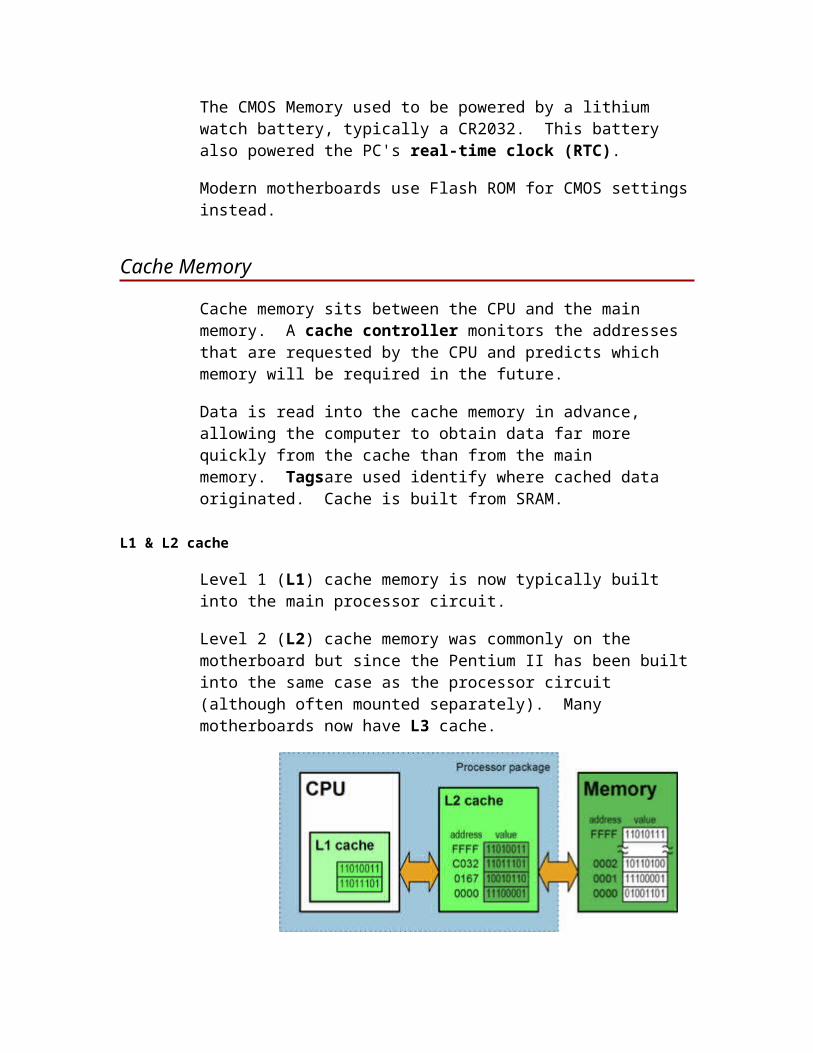
Cache memory sits between the CPU and the main memory. A cache controller monitors the addresses that are requested by the CPU and predicts which memory will be required in the future.
Data is read into the cache memory in advance, allowing the computer to obtain data far more quickly from the cache than from the main memory. Tagsare used identify where cached data originated. Cache is built from SRAM.
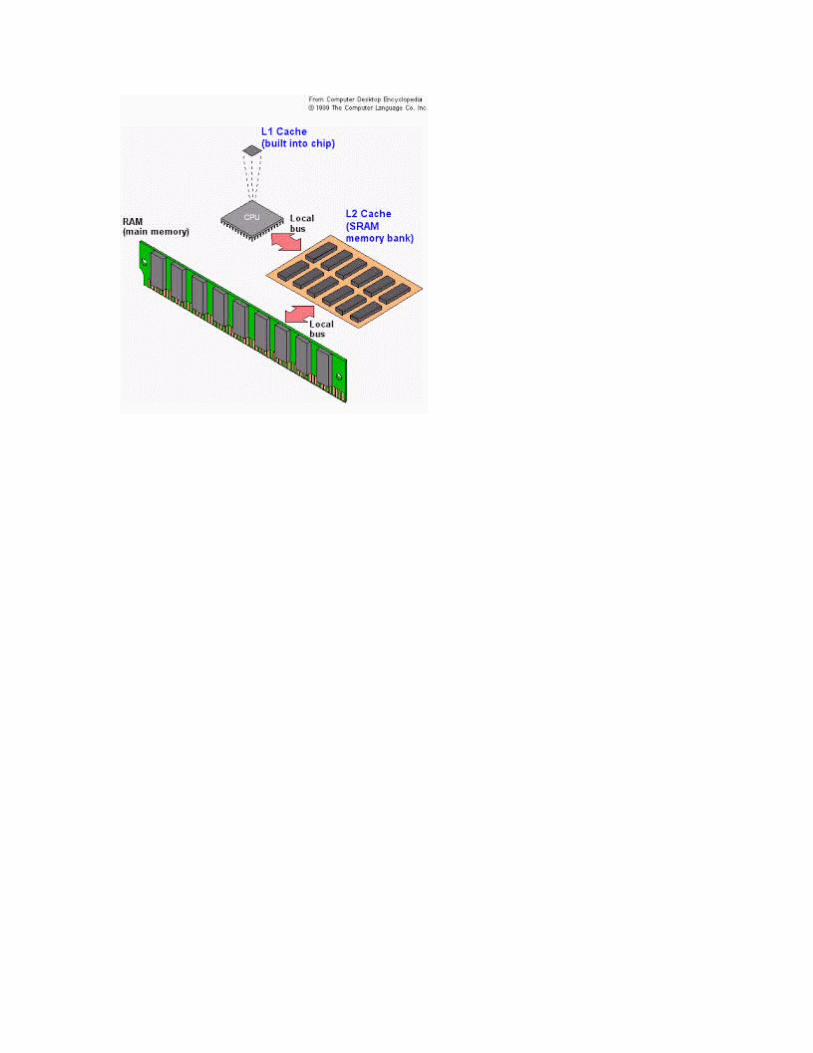
L1 & L2 cache
Level 1 (L1) cache memory is now typically built into the main processor circuit.
Level 2 (L2) cache memory was commonly on the motherboard but since the Pentium II has been built into the same case as the processor circuit (although often mounted separately). Many motherboards now have L3 cache.
Main memory
SIMMs
SIMMs (Single Inline Memory Module) were used from the 286 up to the early Pentiums. These were designed to make the process of installing memory easier and faster. There were two sizes: 30-pin (8
bits wide) and 72pin (32 bits wide). They needed to be inserted at a 45 angle and tilted into an upright position. SIMMs often needed to be installed in banks (groups of 2 or 4) to ensure that memory widths matched the processor's data bus width.
Parity
Parity uses an extra bit as an error-checking bit for every 8 bits. Thus 30-pin SIMMs 'with parity' are 9-bit and 72-pin SIMMs 'with parity' are 36-bit.
FPM, EDO and bursts
EDO (Extended Data Outburst) DRAM is around 30% faster than standard Fast Page Mode (FPM) DRAM.
DIMMs
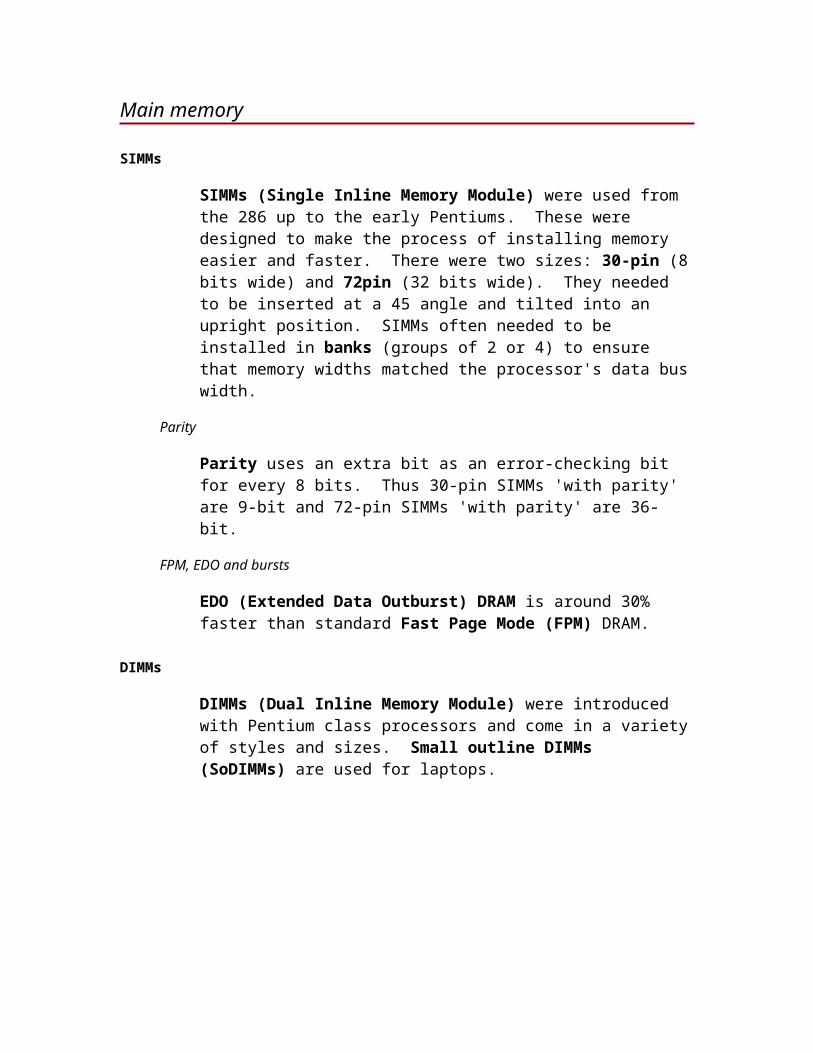
DIMMs (Dual Inline Memory Module) were introduced with Pentium class processors and come in a variety of styles and sizes. Small outline DIMMs (SoDIMMs) are used for laptops.
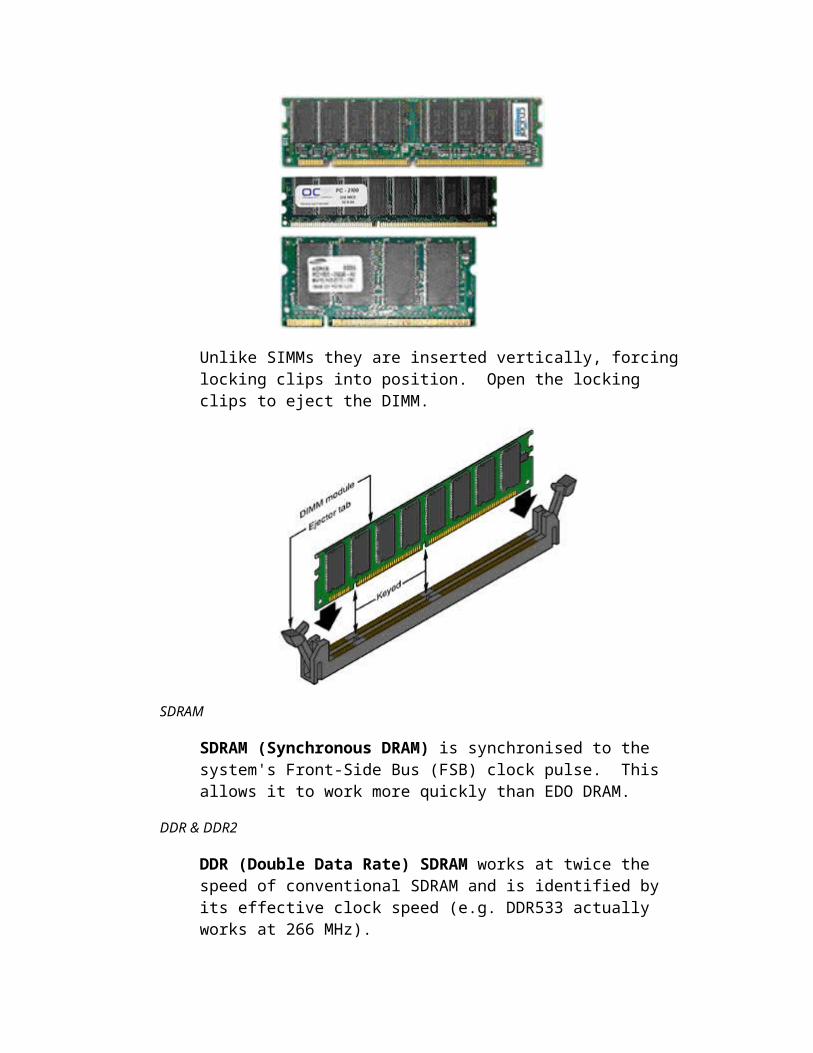
Unlike SIMMs they are inserted vertically, forcing locking clips into position. Open the locking clips to eject the DIMM.
SDRAM
SDRAM (Synchronous DRAM) is synchronised to the system's Front-Side Bus (FSB) clock pulse. This allows it to work more quickly than EDO DRAM.
DDR & DDR2
DDR (Double Data Rate) SDRAM works at twice the speed of conventional SDRAM and is identified by its effective clock speed (e.g. DDR533 actually works at 266 MHz).
To make speed comparisons easier, DDR RAM is rated by its peak bandwidth in the form of a "PC" number (e.g. PC 2700 transfers 2700 MB/s).
DDR-2 is a faster form of DDR memory, measured in a similar way to DDR.
ECC
Error-Correcting Code (ECC) uses parity bits to perform a more sophisticated type of error-checking. DIMMs that support ECC are known as ECC memory and thus provide 72-bit storage.
Unbuffered or Registered
Unbuffered DDR memory allows control signals to pass quickly to RAM, which can be a problem in systems with large amounts of memory. Registered memory adds extra circuitry and eases this problem but at a financial cost.
Dual channel
Many motherboards support dual channel memory. This gives a significant speed increase by accessing two DIMMs simultaneously but requires performance-matched DIMMs.
Rambus (RIMMs)
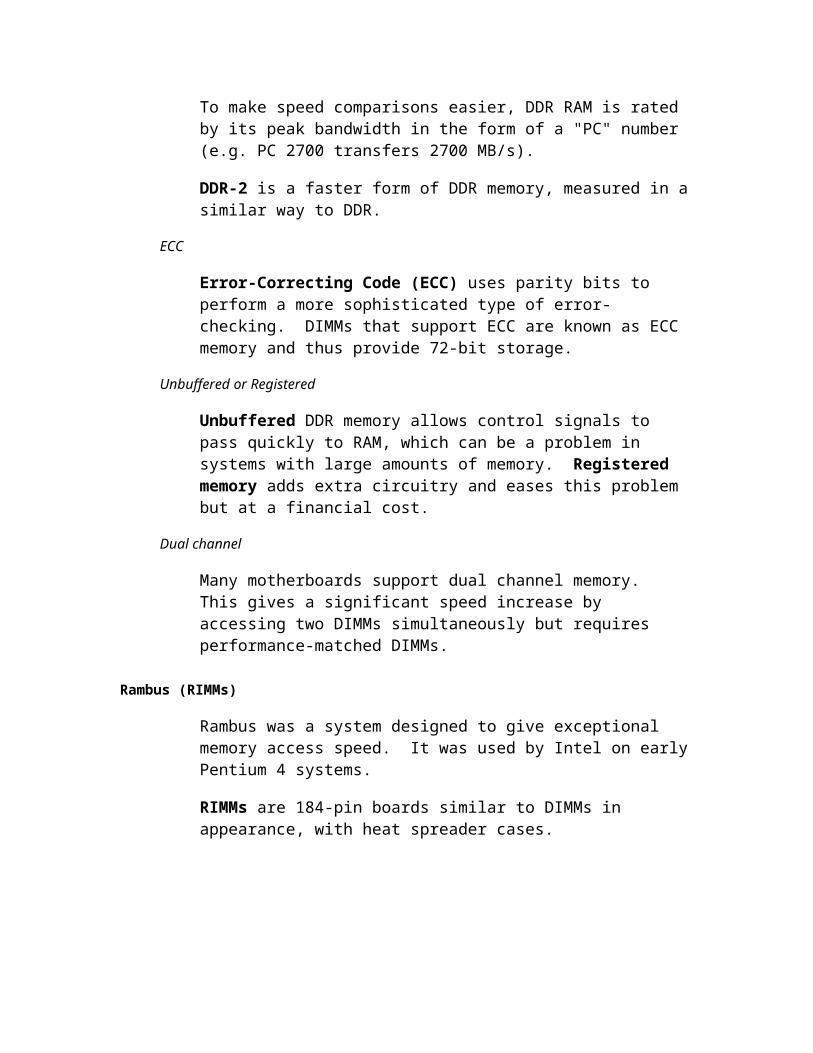
Rambus was a system designed to give exceptional memory access speed. It was used by Intel on early Pentium 4 systems.
RIMMs are 184-pin boards similar to DIMMs in appearance, with heat spreader cases.
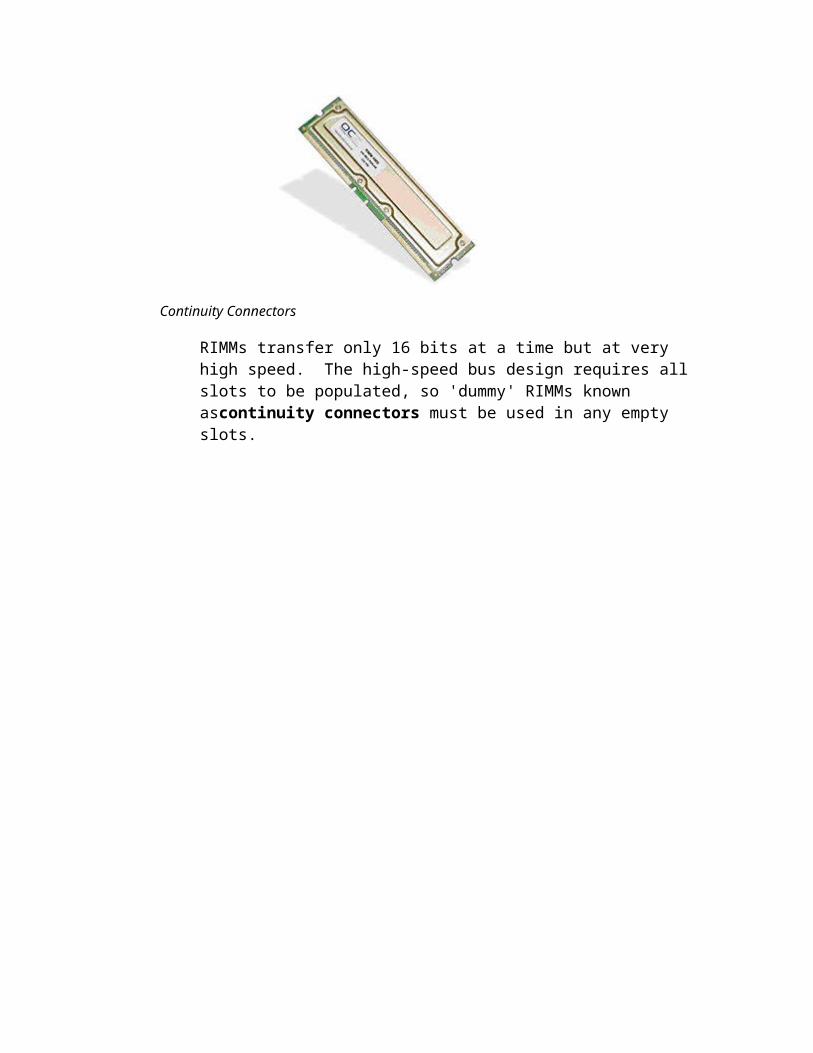
Continuity Connectors
RIMMs transfer only 16 bits at a time but at very high speed. The high-speed bus design requires all slots to be populated, so 'dummy' RIMMs known ascontinuity connectors must be used in any empty slots.
Motherboards
Chipset
North & South Bridge
The PCI bus (see next section) requires a pairs of chips to manage communication between parts of a PC. These chips are known as the North Bridge (ormemory controller) and South Bridge (or I/O controller).
The bridges are collectively known as the motherboard chipset (a term that sometimes includes the CPU) and this chipset forms the heart of a modern motherboard. Some chipsets include extra facilities, such as onboard graphics or wireless networking (e.g. Intel's Centrino chipset).
Older desktop Pentium designs feature a three-chip chipset: the third IC interfaces the ISA bus to the PCI bus.
Early bus architecture
ISA
Industry Standard Architecture (ISA) was the original PC bus. Initially it carried an 8-bit data bus signal (synchronised to a 4MHz clock). When the AT was introduced this was widened to 16 bits at 8MHz.
Attempts to improve or replace ISA
When IBM released its PS/2 in 1987 it tried to introduce a major redesign: the MicroChannel Architecture (MCA) bus. This 16 / 32 bit design was completely incompatible with ISA and failed to catch on.
Extended ISA (EISA) used taller slots to extend the system to a 32-bit data bus (still at 8MHz) but it was not widely supported.
Graphics cards used the Video Electronics Standards Association (VESA) local bus extension. This extended the ISA slot to create a 32-bit, higher-speed bus.
PCI bus
How the PCI bus operates
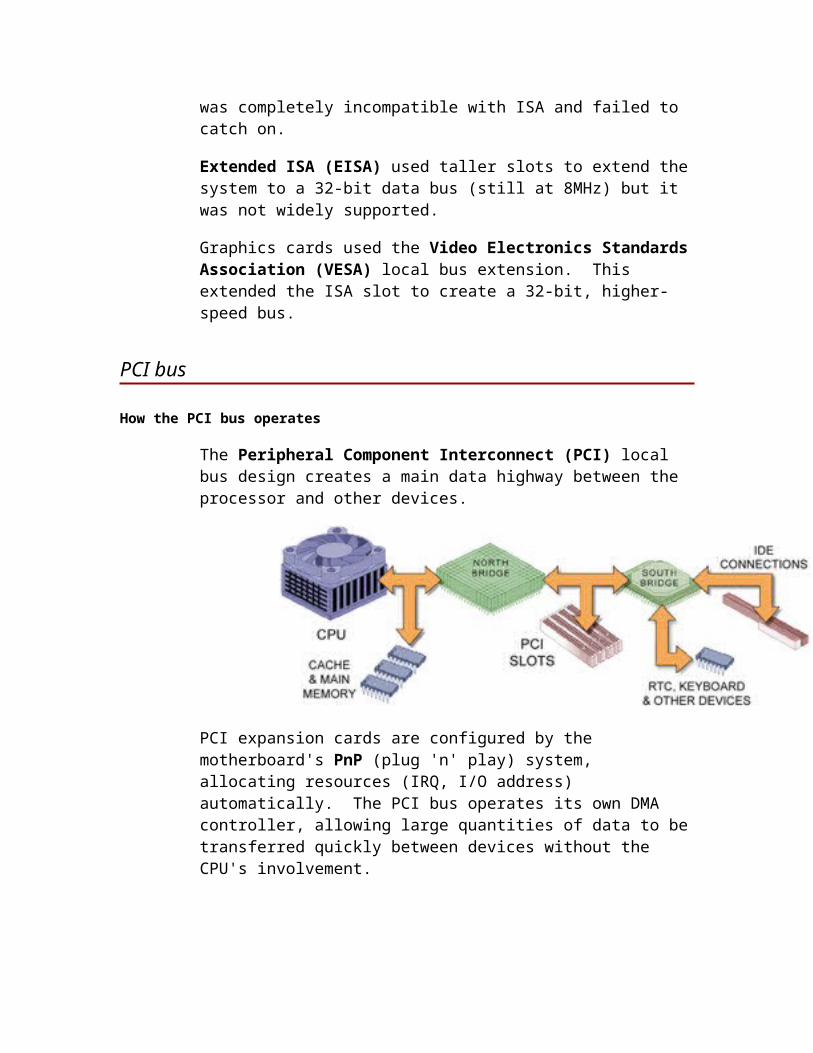
The Peripheral Component Interconnect (PCI) local bus design creates a main data highway between the processor and other devices.
PCI expansion cards are configured by the motherboard's PnP (plug 'n' play) system, allocating resources (IRQ, I/O address) automatically. The PCI bus operates its own DMA controller, allowing large quantities of data to be transferred quickly between devices without the CPU's involvement.
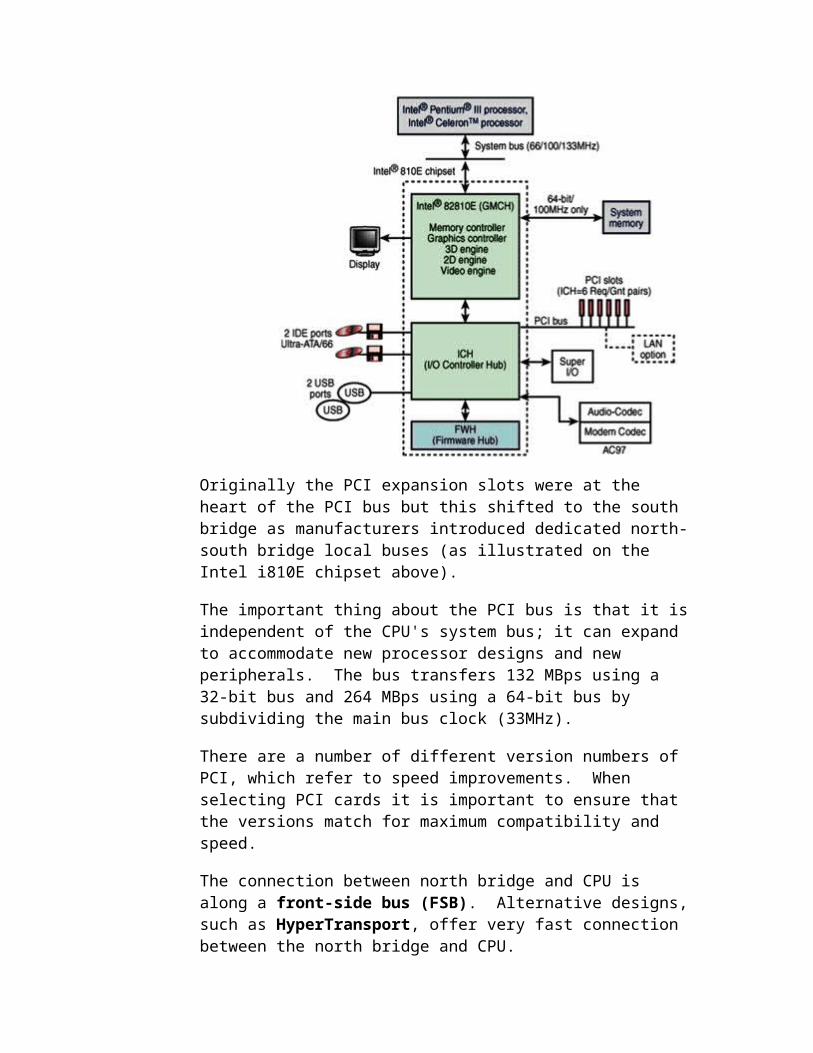
Originally the PCI expansion slots were at the heart of the PCI bus but this shifted to the south bridge as manufacturers introduced dedicated north-south bridge local buses (as illustrated on the Intel i810E chipset above).
The important thing about the PCI bus is that it is independent of the CPU's system bus; it can expand to accommodate new processor designs and new peripherals. The bus transfers 132 MBps using a 32-bit bus and 264 MBps using a 64-bit bus by subdividing the main bus clock (33MHz).
There are a number of different version numbers of PCI, which refer to speed improvements. When selecting PCI cards it is important to ensure that the versions match for maximum compatibility and speed.
The connection between north bridge and CPU is along a front-side bus (FSB). Alternative designs, such as HyperTransport, offer very fast connection between the north bridge and CPU.
AGP
Accelerated Graphics Port (AGP) modified the PCI bus design to handle the high data traffic associated with three-dimensional graphics.
AGP provides a 32-bit video channel that runs at 66MHz in basic 1X video mode. AGP also supports three high-speed modes that include 2X (5.33 MBps),4X (1.07 GBps), and 8X (2.1 GBps).
AGP provides a direct channel between the AGP graphic controller and the system's main memory, instead of using the expansion buses for video data. This removes the video data traffic from the PCI buses. The speed provided by this direct link permits video data to be stored in system RAM instead of in special video memory.
8X employs a lower supply voltage (0.8) than the 2X and 4X specifications. When upgrading an AGP card or system board containing an AGP slot, you should always consult the system board and AGP adapter card's documentation to verify their compatibility with each other.
AMR & CNR
Audio Modem Risers (AMR) and Mobile Daughter Card (MDC) were sometimes used to connect sounds cards and modems. These have been replaced by a new design called the Communication and Networking Riser (CNR) card. This
includes support for V.90 modems, multi-channel audio, telephone-based dial-up networking, USB devices, and 10/100 Ethernet-based LAN adapters.
PCI Express
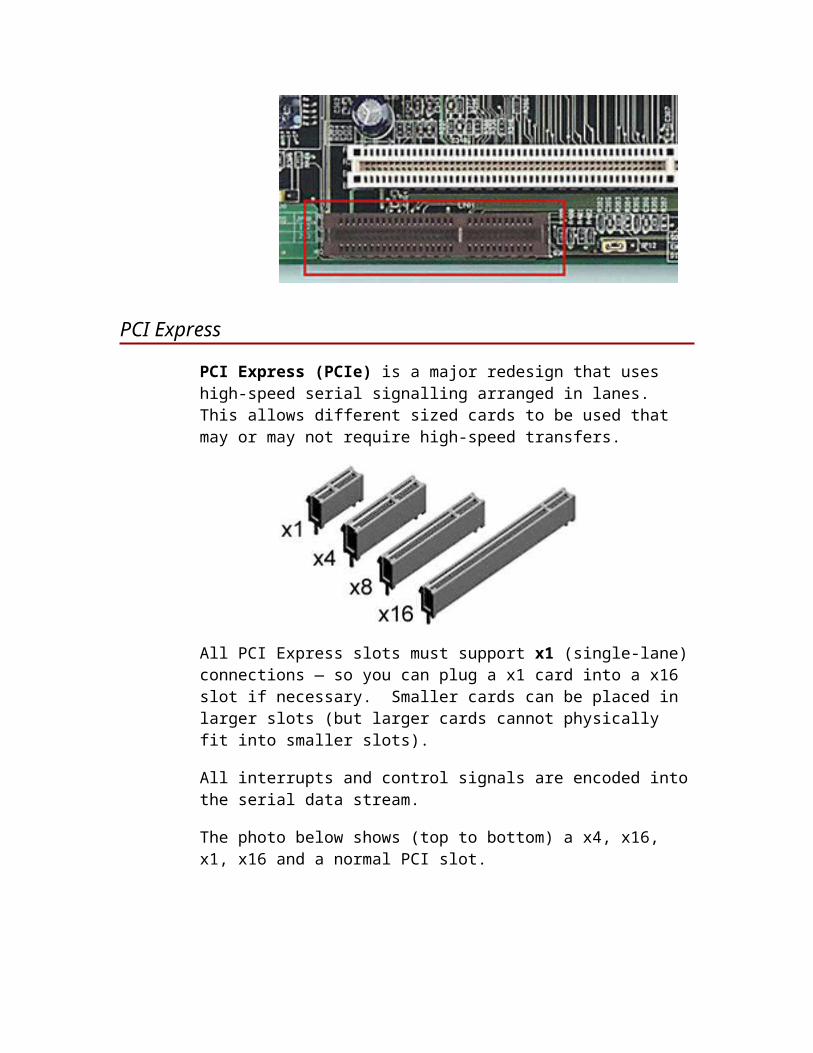
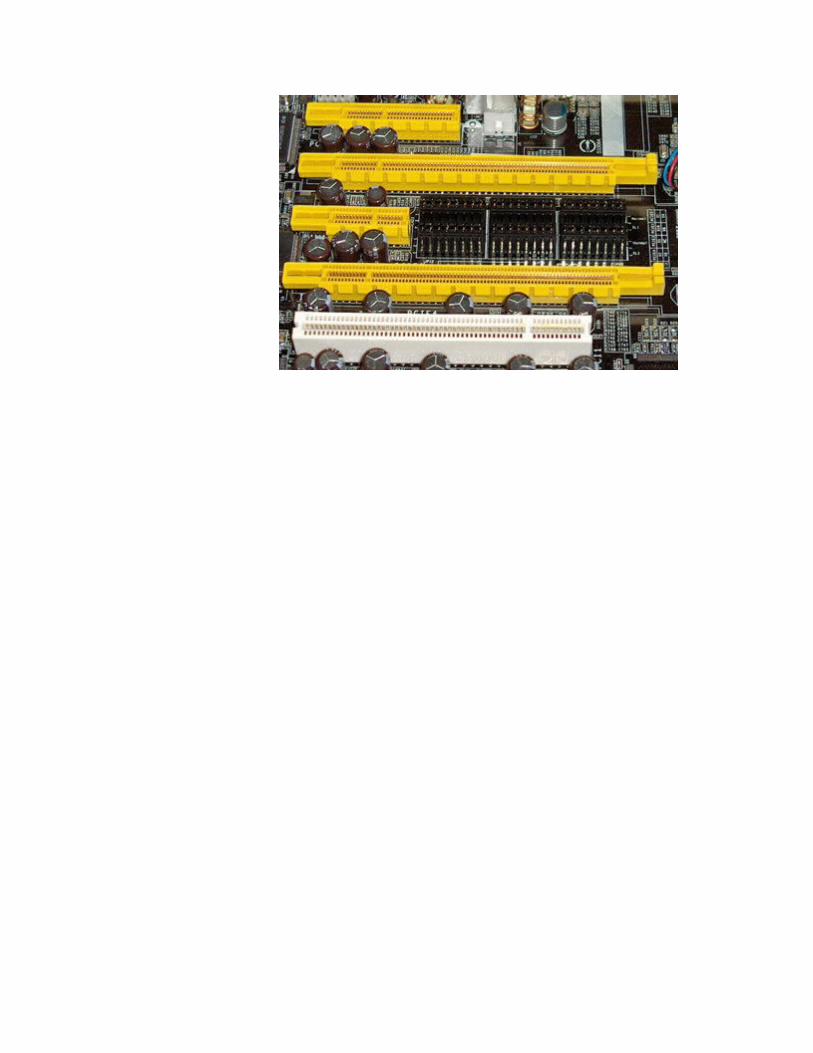
PCI Express (PCIe) is a major redesign that uses high-speed serial signalling arranged in lanes. This allows different sized cards to be used that may or may not require high-speed transfers.
All PCI Express slots must support x1 (single-lane) connections — so you can plug a x1 card into a x16 slot if necessary. Smaller cards can be placed in larger slots (but larger cards cannot physically fit into smaller slots).
All interrupts and control signals are encoded into the serial data stream.
The photo below shows (top to bottom) a x4, x16, x1, x16 and a normal PCI slot.
CPU Technologies
Processor cores
What is a core?
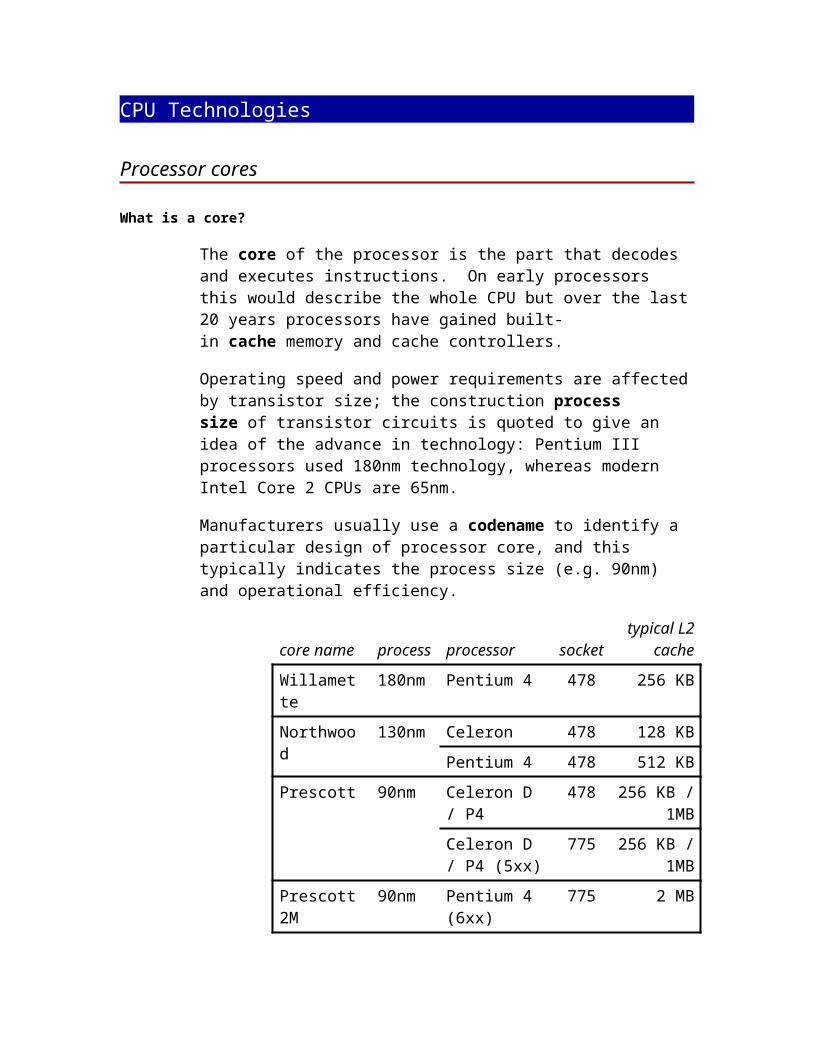
The core of the processor is the part that decodes and executes instructions. On early processors this would describe the whole CPU but over the last 20 years processors have gained built-in cache memory and cache controllers.
Operating speed and power requirements are affected by transistor size; the construction process size of transistor circuits is quoted to give an idea of the advance in technology: Pentium III processors used 180nm technology, whereas modern Intel Core 2 CPUs are 65nm.
Manufacturers usually use a codename to identify a particular design of processor core, and this typically indicates the process size (e.g. 90nm) and operational efficiency.
core name process processor sockettypical L2
cache
Willamette 180nm Pentium 4 478 256 KB
Northwood 130nm Celeron 478 128 KB
Pentium 4 478 512 KB
Prescott 90nm Celeron D / P4
478 256 KB / 1MB
Celeron D / P4 (5xx)
775 256 KB / 1MB
Prescott 2M 90nm Pentium 4 (6xx)
775 2 MB
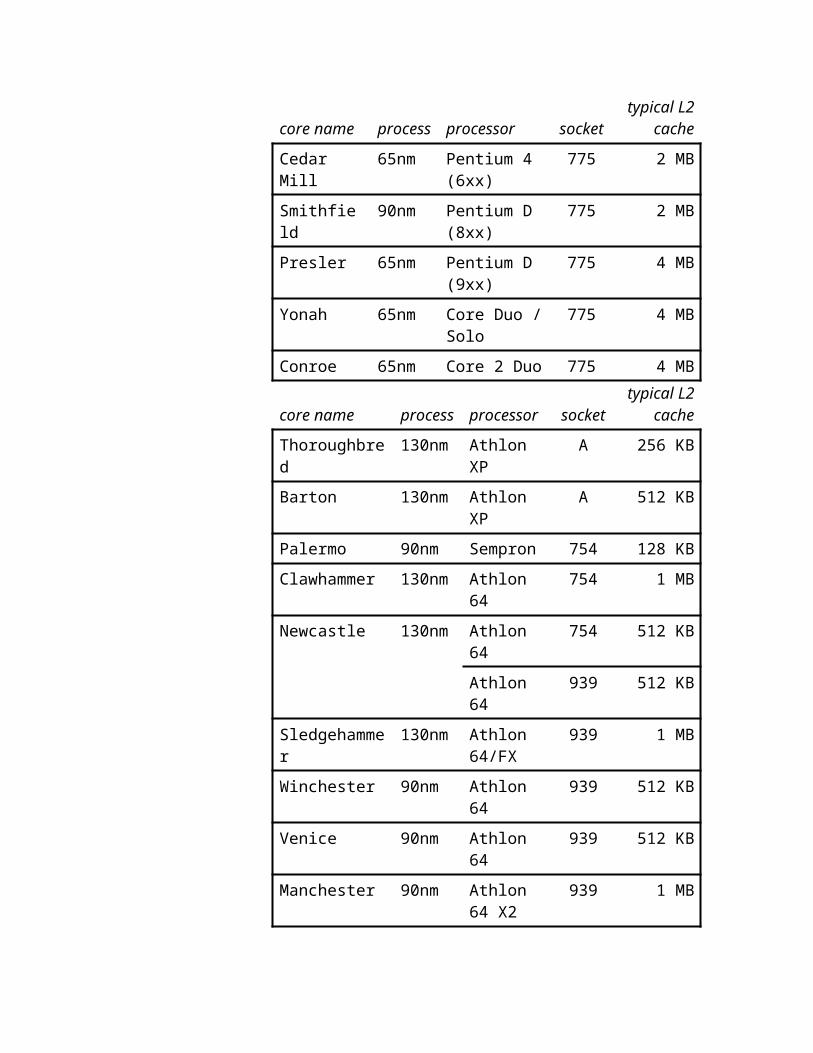
Cedar Mill 65nm Pentium 4 (6xx)
775 2 MB
Smithfield 90nm Pentium D (8xx)
775 2 MB
Presler 65nm Pentium D (9xx)
775 4 MB
Yonah 65nm Core Duo / Solo
775 4 MB
core name process processor sockettypical L2
cache
Conroe 65nm Core 2 Duo 775 4 MB
core name process processor sockettypical L2
cache
Thoroughbred 130nm Athlon XP A 256 KB
Barton 130nm Athlon XP A 512 KB
Palermo 90nm Sempron 754 128 KB
Clawhammer 130nm Athlon 64 754 1 MB
Newcastle 130nm Athlon 64 754 512 KB
Athlon 64 939 512 KB
Sledgehammer 130nm Athlon 64/FX
939 1 MB
Winchester 90nm Athlon 64 939 512 KB
Venice 90nm Athlon 64 939 512 KB
Manchester 90nm Athlon 64 X2
939 1 MB
Toledo 90nm Athlon 64 X2
939 2 MB
Core names are like version numbers; stepping numbers indicate revisions or bug-fixes. It is important to match core & stepping in multi-processor systems.
The diagram below shows the architecture of a Conroe core:
Microcode
x86 processors are CISC (complex instruction set computer) designs, which means that some instructions are built from a combination of others. These combinations are stored as microcode inside the processor. There has been a shift away from CISC technology to wards RISC (reduced instruction set) commands in newer CPUs. RISC instructions can be more easily pipelined, allowing one instruction to be executed while another is being decoded.
Hyperthreading
Threads are independent parts of a computer program. Multi-tasking operating systems (e.g. Windows or Linux) work by allocating each thread a certain amount of "CPU time" in which to execute some instructions. This means that they can run dozens of programs "at the same time".
Multi-processor systems allow the OS to literally run two or more program threads simultaneously on different CPUs. This means that there is less competition for CPU time and therefore the computer should operate more quickly. However, multiprocessor systems are expensive.
Hyper-Threading Technology (HTT) was introduced by Intel to give a cost-effective compromise. By duplicating some of the parts of the main core it pretends to be two processors. This gives a small speed increase (up to 30%).
Dual Core & multi-core
Dual core designs have two cores on a single chip, sometimes sharing L2 cache memory and always sharing bus interfaces. A dual-core chip is not as good as having two processors; however it gives typically 25%–75% faster performance than a single core processor.
The Athlon 64 X2 and Pentium D were the first dual-core processors released for the PC, followed by the Intel Core Duo, Core 2 Duo and AMDAthlon FX60. Intel has released a four-core Core 2 Quadro processor.
Instruction set
The x86 family of processors has a common set of instructions that the processor recognises. This instruction set has been extended on several occasions. The first major revision was with the 386 processor, which introduced special 32-bit instruction codes.
MMX
Early processors could perform integer arithmetic only (i.e. calculations involving whole numbers). Manufacturers soon added Floating-Point Units (FPU) to process numbers with decimal points. These were quickly integrated within the main processor core.
The Pentium MMX (Matrix Math Extensions but more commonly misnamed Multi-Media eXtensions) introduced extra instructions to make floating-point maths easier, especially when manipulating several numbers at once. This concept is called SIMD (Single Instruction, Multiple Data) and means that graphics and sound software can run more quickly.
SSE / SSE2 / SSE3
AMD fought back with an expanded MMX instruction set called 3DNow!
Intel created their own version of 3DNow called SSE (Streaming SIMD Extensions), adding 70 new maths instructions. This was taken further with the Pentium 4's SSE2 and SSE3 extensions.
A multimedia program that supports SSE3 can run from 10% to 100% faster on an SSE3-compatible processor.
Protected execution
The binary codes used for instructions are indistinguishable from those used for storing data. If a computer programmer issues an incorrect instruction it is possible to accidentally start executing data codes as if they were proper instructions. This is surprisingly common and leads to unexpected results and crashed software.
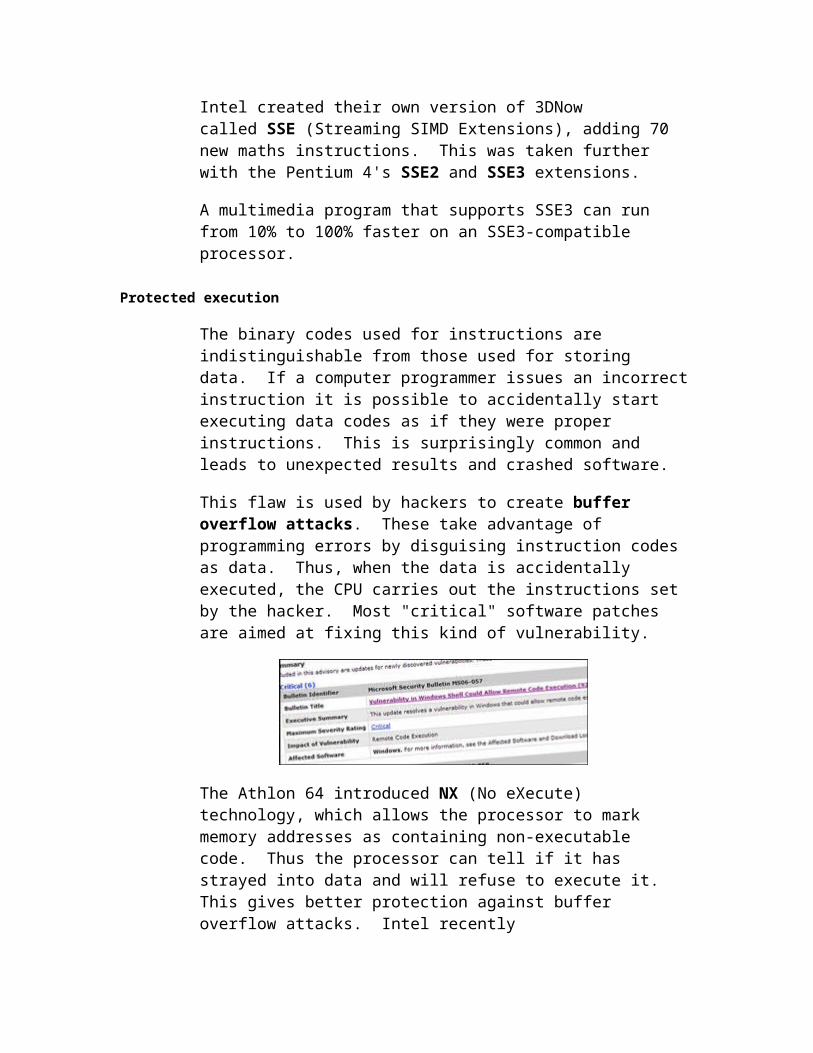
This flaw is used by hackers to create buffer overflow attacks. These take advantage of programming errors by disguising instruction codes as data. Thus, when the data is accidentally executed, the CPU carries out the instructions set by the hacker. Most "critical" software patches are aimed at fixing this kind of vulnerability.
The Athlon 64 introduced NX (No eXecute) technology, which allows the processor to mark memory addresses as containing non-executable code. Thus the processor can tell if it has strayed into data and will refuse to execute it. This gives better protection against buffer overflow attacks. Intel recently introduced, XDB (eXecute Disable Bit), which does the same thing.
Speed
Clock speed
The processing of instructions in a CPU is governed by a single repeating signal — the clock — that synchronises the movement of data within the CPU.
It used to be easy to measure the performance of a processor by looking at its clock frequency (also called clock speed or clock rate). However that is no longer the case...
There is a maximum limit to the clock frequency: this is determined by the signalling voltage and the transistor design. If a clock goes too fast then internal buses will change state too quickly and numeric codes will not be read properly.
VRM
Lower signalling voltages mean faster clock rates, because the signal can slew to the desired levels more quickly. To ensure that the core
has the appropriate level of voltage a Voltage Regulator Module (VRM) is required.
ATX motherboards have VRM built in. Older, AT-based systems do not get a 3V power line and therefore need more hefty VRMs; these sometimes plug in on a separate card beside the processor.
Real speed vs. actual speed
However, AMD started producing CPUs that did more work in every clock cycle. Thus a 1.8 GHz Athlon would carry out the same number of instructions per second as a 2.4 GHz Pentium III. Therefore AMD started identifying their chips by the equivalent speed: the 1.8GHz Athlon was sold as the "Athlon 2400+".
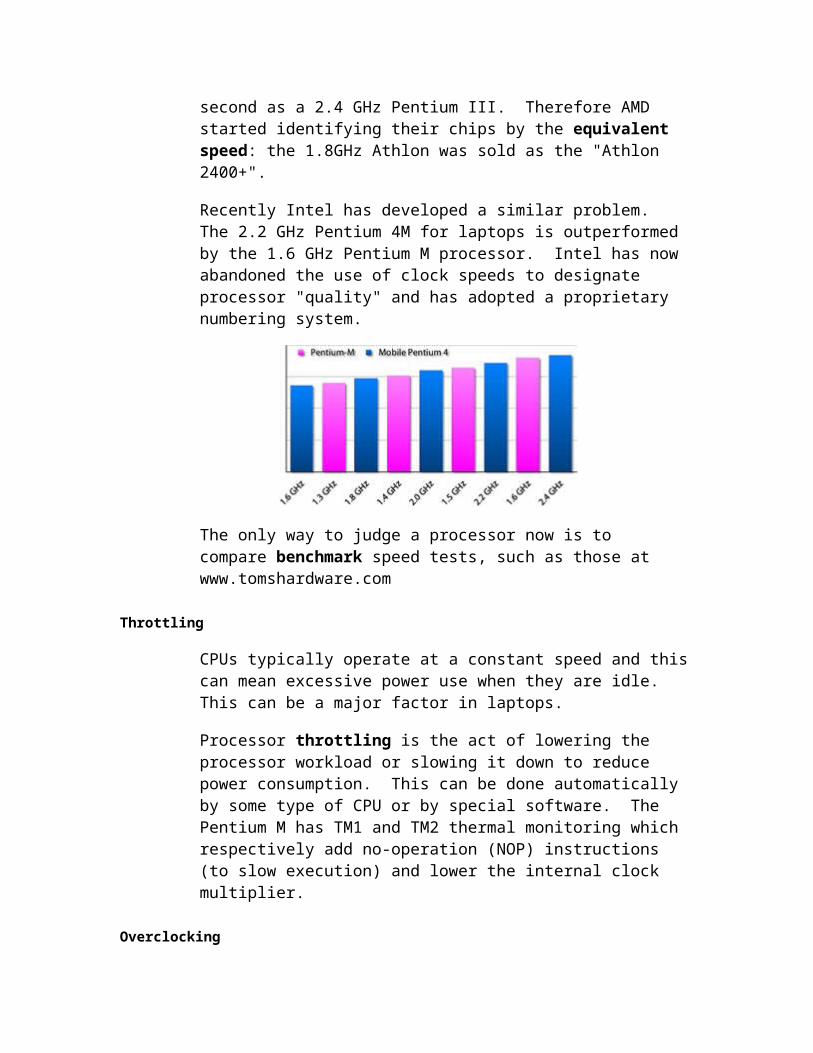
Recently Intel has developed a similar problem. The 2.2 GHz Pentium 4M for laptops is outperformed by the 1.6 GHz Pentium M processor. Intel has now abandoned the use of clock speeds to designate processor "quality" and has adopted a proprietary numbering system.
The only way to judge a processor now is to compare benchmark speed tests, such as those at www.tomshardware.com
Throttling
CPUs typically operate at a constant speed and this can mean excessive power use when they are idle. This can be a major factor in laptops.
Processor throttling is the act of lowering the processor workload or slowing it down to reduce power consumption. This can be done automatically by some type of CPU or by special software. The Pentium M has TM1 and TM2 thermal monitoring which respectively add no-operation (NOP) instructions (to slow execution) and lower the internal clock multiplier.
Overclocking
Overclocking is the process of increasing the processor clock frequency to the maximum possible level. This can have a number of side effects:
Increased temperature, requiring better cooling systems
Occasional crashes due to illegal instruction codes
Many processors can be overclocked and there are numerous websites dedicated to statistics regarding relative performance and stability.
CPUs
What is a computer?
Mechanical calculating machines have existed for many centuries, albeit in crude form. The Industrial Revolution introduced programmable machines that could carry out a sequence of tasks by following a shaped gear, or pegs in a board or wheel. It was Charles Babbage who first thought of putting the two together, to create a programmable calculating machine: the computer.
CPU
The heart of a modern electronic computer is the central processing unit (CPU or processor): a calculator that can be controlled by numeric machine codes representing instructions (e.g. add, subtract).
The microprocessor is a CPU circuit contained within a silicon chip.
Main Memory
The CPU is fed a sequence of machine codes from main memory. This memory is formed from ROM and RAM chips. Each machine code occupies a numbered location — an address — in the memory. Codes are usually read in consecutive order.
I/O Circuitry
The CPU can also send data to-and-from external devices (e.g. keyboard, disk drive, video card) through input / output circuitry.
This design of computer (CPU, memory and I/O) is known as von Neumann architecture.
Inside a CPU
Early CPUs are split into three main sections:
ALU (Arithmetic & Logic Unit) — this is a circuit that performs calculations and logical comparisons.
Registers — numbers that are being processed are stored here. Each register is "word"-sized and can be accessed at high-speed.
Instruction Decoder — this controls all other parts of the CPU, sending signals in preset patterns to shift data between registers, the ALU and the main data and address buses.
A word is defined by the size of the CPU's registers. This measurement is also used to describe the capability of the processor. Thus a "16-bit CPU" has 16bit-sized registers. The external data bus is often the same width as the registers.
The external address bus will have a different width, depending on the amount of memory that it may access.
Internal cache
Cache memory is a higher-speed memory device located between the CPU and main memory. This allows data to be pre-fetched into cache memory and read faster than main memory would allow. The

cache closest to the processor is called level 1 (L1) cache and is often built within the CPU circuit itself. Level 2 (L2) cache used to be located on the motherboard but is now integrated onto the processor circuit board.
History
Things have come a long way since the Intel 4004, the first microprocessor.
The Intel 8086 family of processors (known as x86) was so successful that a number of other chip manufacturers made their own versions of these chips. Companies like Cyrix, AMD and IBM produced 286, 386 and 486 processor clones. To counter this Intel trademarked the next generation chip with the name Pentium: competitors chose different names (K5, 5x86, etc).
386 & 486
The 386 processor introduced wider 32-bit internal registers and a wide range of new instructions to take advantage of them. Programs written to use these new instructions were labelled as i386 compatible (also IA-32). The 386 also included memory management circuits. The 486 improved on this.
Pentium
The original Pentium was essentially two 486 processors in one chip and contained 16KB of L1 cache (one 8KB cache for instructions or code, and another for data). It came in a 273-pin Pin Grid Array (PGA) package (known as Socket 4) and operated at 60 MHz. It was powered at 5V and generated enough heat to require a CPU cooling fan.
The second generation Pentium came in a 296-pin Staggered Pin Grid Array (SPGA) package (Socket 7) in speeds from 75 to 166 MHz. The power-supply voltage level dropped to 3.3V, consuming less power and provide faster operating speeds. This design used an internal clock multiplier: this meant that the insides of the chip ran much faster than the main data bus that was attached to the processor. (This bus is called the Front-Side Bus or FSB).
The Pentium also introduced a 64-bit external data bus. The internal design remained 32-bit, but the double-width interface allowed the CPU to move data in and out more quickly.
The main competitors to the Pentium were the AMD K5 and Cyrix 5x86, and they were designed to use Socket 7. The AMD processor was designed in such a way that more processing was done in each clock cycle: in other words an AMD chip running at 100 MHz might perform as well as an Intel Pentium at 133 MHz. To solve this confusion, AMD chips were rated by the equivalent P-speed (e.g. P133 = equivalent to Pentium 133).
Pentium MMX
The third generation Pentium also used the 296-pin SPGA arrangement (Super Socket 7) and was produced in 166 – 233MHz speeds with 32KB cache. These devices had 57 extra instruction codes for multimedia work and were known as Pentium MMX processors. The K6 and MII are, respectively, the AMD and Cyrix equivalents of the MMX processor.
Pentium Pro
The Pentium Pro was designed for multi-processor systems. It used a 387-pin PGA (Socket 8) package; came with 16KB L1 cache and an onboard 256 or 512KB L2 cache
Pentium II / III class
Pentium II
The Pentium II used a new Single-Edge Contact (SEC) cartridge (also known as SECC). The 242-contact design is called Slot 1 and requires a special Fan Heat Sink (FHS) module and fan. The cartridge contains the Pentium II processor core (incorporating 32KB L1 cache) and 512KB L2 cache.
The K6-2 was AMD's answer to the Pentium II and it added 21 further instructions to support multimedia work. It still used Super Socket 7.
Pentium III & Celeron
The original Pentium III was a Pentium II core with 512KB L2 cache. Speed increased to 600MHz, including a 100MHz front-side bus (FSB). Early models used Slot 1 but later versions switched to the FC-PGA Socket 418 package.
The Celeron was designed as a cheap version of the Pentium II & III. Originally the main difference was a lack of cache memory but later Celerons added cache. The chips originally came in Slot 1 designed but soon switched to Plastic PGA (PPGA) Intel Socket 370 packages.
AMD Athlon & Duron
The K7 Athlon originally ran at 500 MHz with 128KB L1 cache and a 512KB L2 cache. Early Athlons used Slot A, (mechanically identical to Slot 1 but different electrical connections), however, they soon switched to using Socket A.
Duron was introduced as a cheap alternative, mimicking the Celeron. It also uses Socket A.
Pentium Xeon
The Xeon is the replacement for the Pentium Pro range: essentially a special version of the Pentium II for multiprocessor systems. They also featured up to 2MB of internal cache memory. Up to 32 Xeon processors could be mounted in a single system.
Pentium 4 class
Pentium 4
The early Pentium 4 used 423-pin PGA (Socket 423) but later models employed the improved Socket 478 package.
The 64-bit external data bus of the Pentium design expanded to 128 bits and the minimum FSB speed increased to 400MHz. The core voltage dropped to 1.7V, allowing even faster execution — but the design requires a separate 12V power supply to the motherboard.
Athlon XP & Sempron
The Athlon XP range covers 1500 to 3000 (note that numbers are not MHz but Pentium speed equivalents). The Duron and lower-end Athlon XPs were renamed Sempron.
Pentium 4 HT ("Prescott")
Hyperthreading is Intel's name for a design that duplicates many parts of the processor, allowing two program threads to run simultaneously, but not as quickly as a full dual core.
Xeon & Athlon MP
The (P4-based) Xeon and Athlon MP processors are designed for multiprocessor systems.
Pentium M
The Pentium M is a variant of the Pentium 4 designed specially for laptops. It significantly outperforms the P4 at the same clock speed. The Pentium M forms part of the Intel Centrino chipset, along with wireless networking support chips.
The shift to 64-bit
Itanium & Itanium 2
The Itanium was a drastic departure from the x86 design. A new, more efficient 64-bit instruction set was introduced (known as IA-64) but this was totally incompatible with i386 programs. Hence the processor did not catch on, and is only used in high-end server systems. The Itanium is mounted in a Pin Array Cartridge (PAC).
AMD Athlon 64 & Sempron/64
The Athlon 64 also featured a new 64-bit instruction set but it maintained full compatibility with the older i386 codes. This design is called AMD64, x86-64or more commonly x64.
The Athlon 64 introduces a new processor socket: Socket 754, which looks similar to the newer Pentium 4 Socket 478 and Xeon Socket 603 and uses the same type of mPGA connectors. As with the Pentium 4 processor, motherboards for the Athlon 64 also require the ATX12V connector to provide adequate 12V power.
The Sempron/64 is intended to cover the lower end of the Athlon market and fits in socket 754.
Pentium 4 EM64T, Celeron D
Intel knew they were in trouble when the Athlon 64 appeared. Therefore they introduced versions of the P4 and Celeron that support the x86-64 instruction set. However, they refer to these instructions as EM64T codes. Note that Celeron D does not contain dual cores.
Athlon64 X2, Pentium D & Pentium M Dual Core
These feature dual cores: multiprocessor systems can be expensive but an alternative is to mount two processor cores in the same package, sharing some circuitry.
Xeon EM64T & AMD Opteron
The Xeon EM64T supports the x86-64 instruction set.
The Opteron is AMD's equivalent to the Xeon EM64T and is aimed at the server market.
AMD Turion 64
The Turion 64 is designed to compete with the Pentium M in the laptop market. This uses the new Socket S.
Last of the 32-bit processors
Intel Core Duo
The 32-bit processor market is not dead. In January 2006 Intel announced the Core Duo processors that would be used in laptops (branded as part of the Centrino Duo chipset) and also the new range of Apple iMacs.
The Core Duo replaces the Pentium M and significantly outperforms it at the same clock frequency. Core Solo is a scaled-down version with only one core.
Preventative Maintenance
Cleaning
General cleaning
Caring for hardware can extend its Mean Time Between Failures (MTBF) period considerably.
A toolkit should contain cleaning supplies. You'll certainly need a lint-free soft cloth (chamois). Outer-surfaces can be cleaned with a simple soap-and-water solution, followed by a clear water rinse, ensuring that none of the liquid drips into inner workings.
You can then apply an antistatic solution (spray) to prevent the build-up of static charges. To remove dust from inside cabinets, you will find a small paintbrush is handy.
Oxidation
Corrosion or oxidation build-up on electrical contacts reduces the flow of electricity through the connection. The easiest way to reduce corrosion is to never touch electrical contacts with your skin — because the moisture on your body can start corrosive action.
The oxide build-up can be gently rubbed off with a fine emery cloth, a pencil eraser, or a special solvent-wipe. It can also be dissolved with an electrical-contact cleaner spray. If you use the emery cloth or eraser, always rub toward the outer edge of the board to prevent damage to the contacts. Rubbing the edge may lift the foil from the PCB.
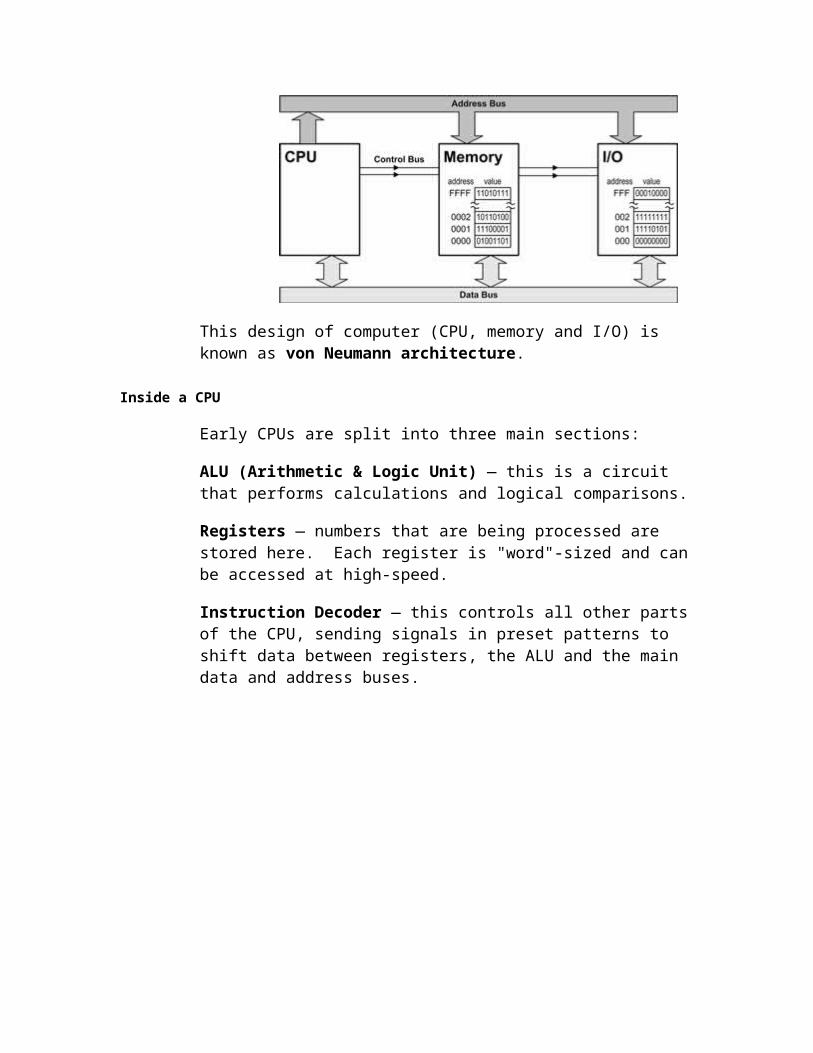
Chip creep
Thermal cycling (heating and cooling, when equipment is switched on and switched off) can cause socket-mounted devices to move slightly, causing pin contact problems. This phenomenon, known as chip creep, can be solved by re-seating (removing and reinstalling).
Use of alcohol-based cleaners
To clean other internal components, such as disk-drive read/write heads, use lint-free foam swabs and isopropyl alcohol (IPA) or methanol. However be sure to avoid using these on plastic surfaces, which can become tarnished.
Preventive maintenance procedures
Dust
The electrical charges inside a PC attract dust particles, forming an insulating blanket that traps heat and can cause components to overheat.
The PC can never be dust-free because the PSU fan pulls air from outside through the case. Another access point is uncovered expansion-slot openings. Note that missing slot covers also disrupt the designed airflow patterns inside the case, causing components to overheat due to missing or inadequate airflow. It's best to keep all slots holes covered.
Smoke also collects on all exposed surfaces. Its residue is sticky and clings to the surfaces. Smoke residue is particularly destructive to moving parts like floppy disks & fan motors.
Dust build-up can be taken care of with a soft brush. Special static-free canisters of compressed gas or air can also be used to blow dust out. A static-free vacuum can also be used. Be sure to use a static-free vacuum because normal vacuums are, by their nature, static generators. The static-free vacuum has special grounding.
Heat Build-up
PCs are designed to run at normal room temperatures. If the ambient temperature rises above 85 °F, heat build-up can become a problem. High humidity can also increase problems.
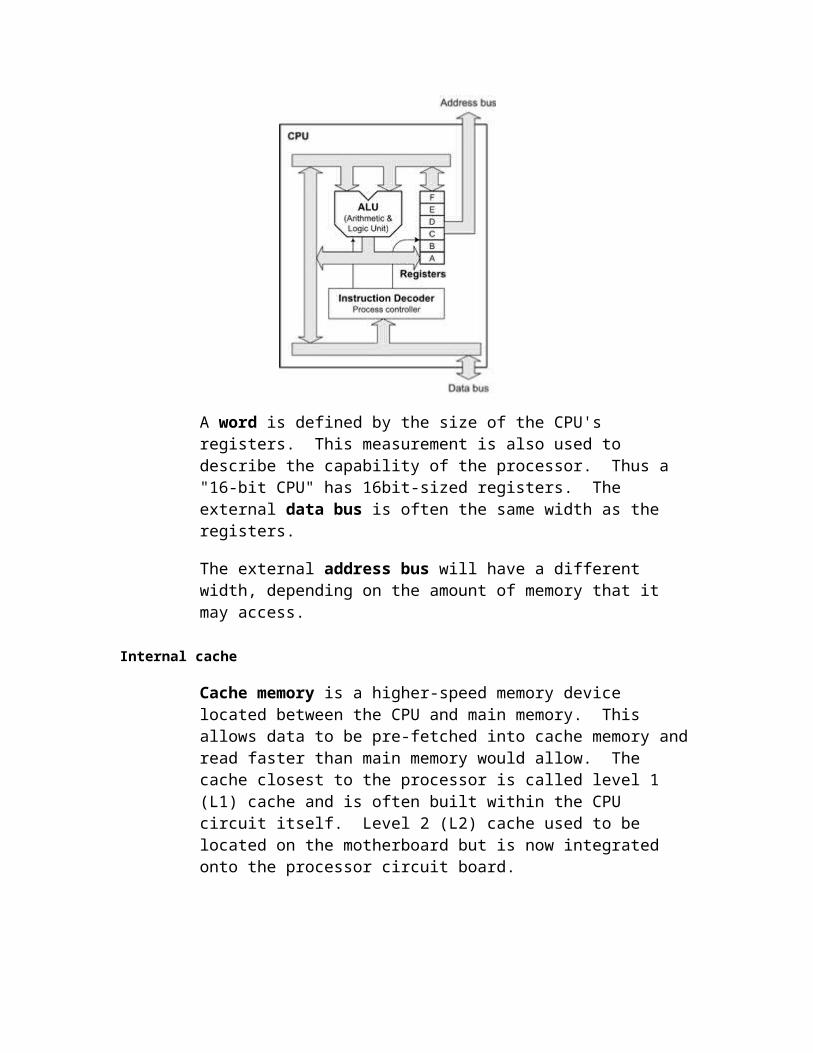
Make sure that the area around the PC is uncluttered so that air can flow freely. It is very easy for a high-speed component to fry if its fan fails. Check for other sources of heat such as direct sunlight or portable heaters.
Protecting Monitors
Monitors benefit from periodic cleaning & dusting. Aerosol sprays, solvents, and commercial cleaners should be avoided because they can damage the screen and cabinet.
A cloth that is damp (not dripping) with soapy water is fine for cleaning the monitor. Make sure that the monitor's power cord is disconnected from any power source before washing. The screen should be dried with a soft cloth after rinsing.
If a monitor is to be left on for extended periods with the same image displayed on the screen, turn down the intensity level of the monitor or install a screen saver program to avoid burn-in. Most modern monitors have automatic level adjustment to protect against burn-in.
Caring for LCD Displays
LCD screens should be cleaned periodically with a glass cleaner and a soft, lint-free cloth. Spray the cleaner on the cloth and then wipe the screen. Never spray the cleaner directly on the screen. Also, avoid scratching the surface of the screen. It is relatively easy to damage the front polariser of the display. Take care to remove any liquid droplets from the screen because they can cause permanent staining. After cleaning, allow 30 minutes for complete drying. The screen should be shielded from bright sunlight and heat sources.
Moving the laptop from a cool to a hot location can cause damaging moisture to condense inside the housing (including the display). It should also be kept away from ultraviolet light sources and extremely cold temperatures. The liquid crystals can freeze in extremely cold weather. A freeze / thaw cycle may damage the display and cause it to be unusable.
Protecting Hard-Disk Drives
Rough handling is responsible for more hard-disk drive damage than any other factor. The drive should never be moved while you can still hear its disks spinning. The disk is most vulnerable during start-up and shutdown, when the heads are not fully flying. If the drive must be moved, a waiting period of one full minute should be allotted after turning off the system.
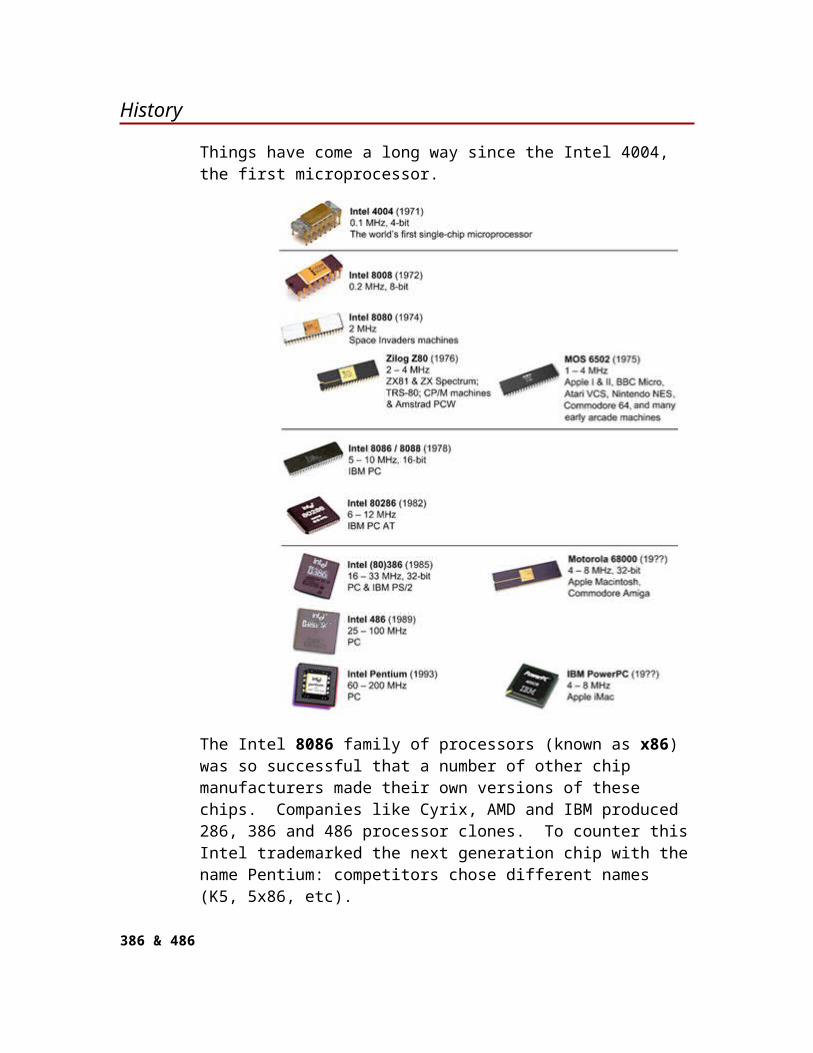
If a hard-disk drive is to be transported or shipped, make sure to pack it properly, in an oversized box, with antistatic foam all around the drive. You may also pack the drive in a box-within-a-box configuration, once again using foam as a cushion.
At no time should the hard drive's housing, which protects the platters, be removed in open air. The drive's disks and R/W heads are sealed in the airtight housing. The contaminants floating in normal air will virtually ruin the drive.
Protecting Removable Media Drives
Protecting Removable Media
Magnetic tapes and floppy disks store information using magnetised spots, so external magnetic fields will have an adverse effect on their stored data. Never bring tape cartridges or floppies near magnetic field–producing devices, such as CRT monitors, television sets, power supplies or loudspeakers. They should also never be placed on or near appliances such as refrigerators, freezers, vacuum cleaners, and other equipment containing motors.
Proper positioning of the drive, and proper connection of peripheral interface cables, helps to minimise noise and radio frequency interference (RFI). Signal cables should be positioned away from magnetic-field sources as well.
Store media in a cool, dry, clean environment, out of direct sunlight. You should never touch the surface of the magnetic tape, floppy disk, or CD/DVD disc — the natural oils from your skin can cause physical damage to the floppy's coating and partially block the laser in a CD-ROM or DVD drive, causing it to be unreadable.
Maintaining Removable Media Drives
Cleaning the R/W heads in tape and floppy drives removes residue and oxide build-ups from the face of the head to ensure accurate transfer of data from the head to the disk. Likewise, cleaning CD-ROM and DVD drives removes contaminants and build-up from the laser lens in the drive.
In the case of floppies and tape drives, you should manually clean the heads with lint-free or cellular foam swab coated with IPA. Automatic cleaning kits include abrasive disks that scrub the faces of the R/W heads to remove build-up. These kits can eventually wear away the R/W head and damage it and should be avoided.
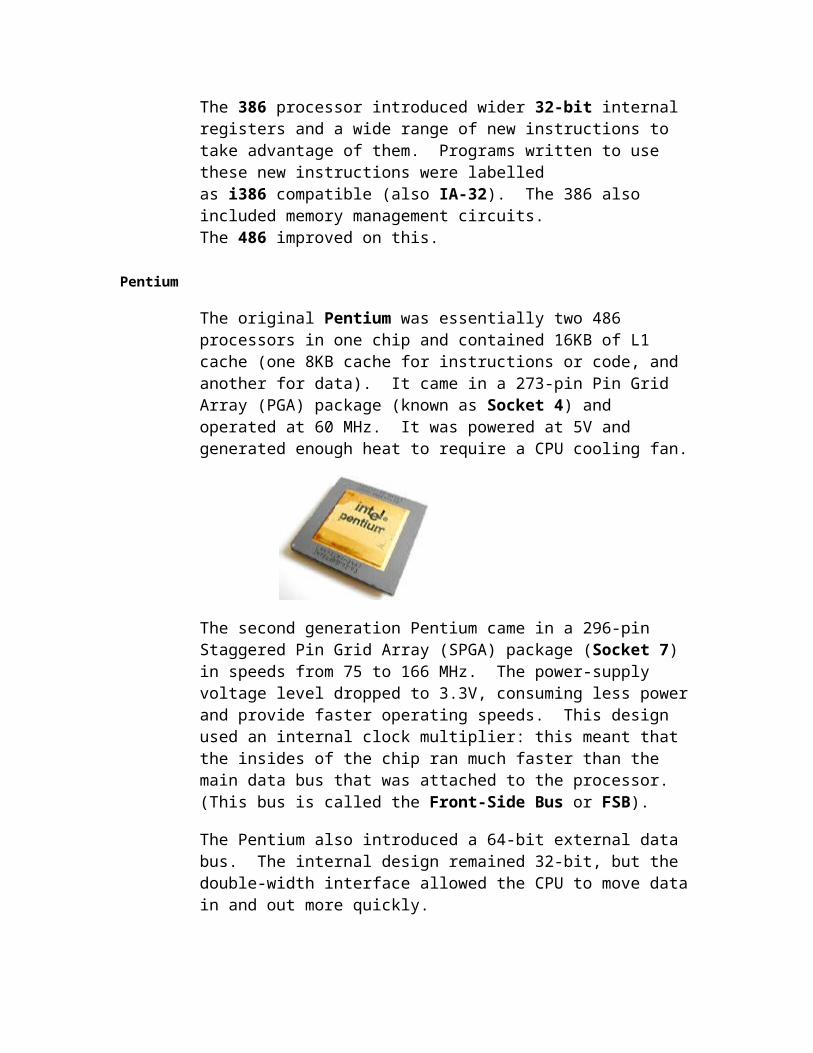
On the other hand, CD-ROM/DVD drive-cleaning kits offer cleaning discs that brush the laser lens to remove dust and other contaminants. It is also common practice to keep discs free from smudges and dust by wiping them gently with a soft cloth. Wipe from the centre outwards.
Manual cleaning operations involve removing the cover of the drive, gaining access to the R/W heads, and cleaning them manually with a swab that has been dipped in alcohol. Together, these steps provide an excellent preventive maintenance program that should ensure effective, long-term operation of the drive.
Protecting Input Devices
To remove dirt and dust particles from inside a keyboard, disassemble the keyboard and carefully brush particles away from the board with a soft brush.
When using a trackball mouse, keep its workspace clear, dry, and free from dust. The ball should be removed and cleaned periodically. Use a lint-free swab to clean the X and Y rollers inside the mouse. Removing build-up from the trackball rollers with a sharp instrument — such as a knife — can place cuts and divots in the roller and permanently damage the mouse.
Touchpad panels should be cleaned periodically with mild soap and water and a soft, lint-free cloth. Rinse the residue from the pad by wiping it with a cloth dampened in clear water. Never pour or spray liquids directly on the computer or the touch pad. After cleaning, allow 30 minutes for complete drying. Never use sharp or pointed objects to tap the pad because these items may damage the surface of the pad.
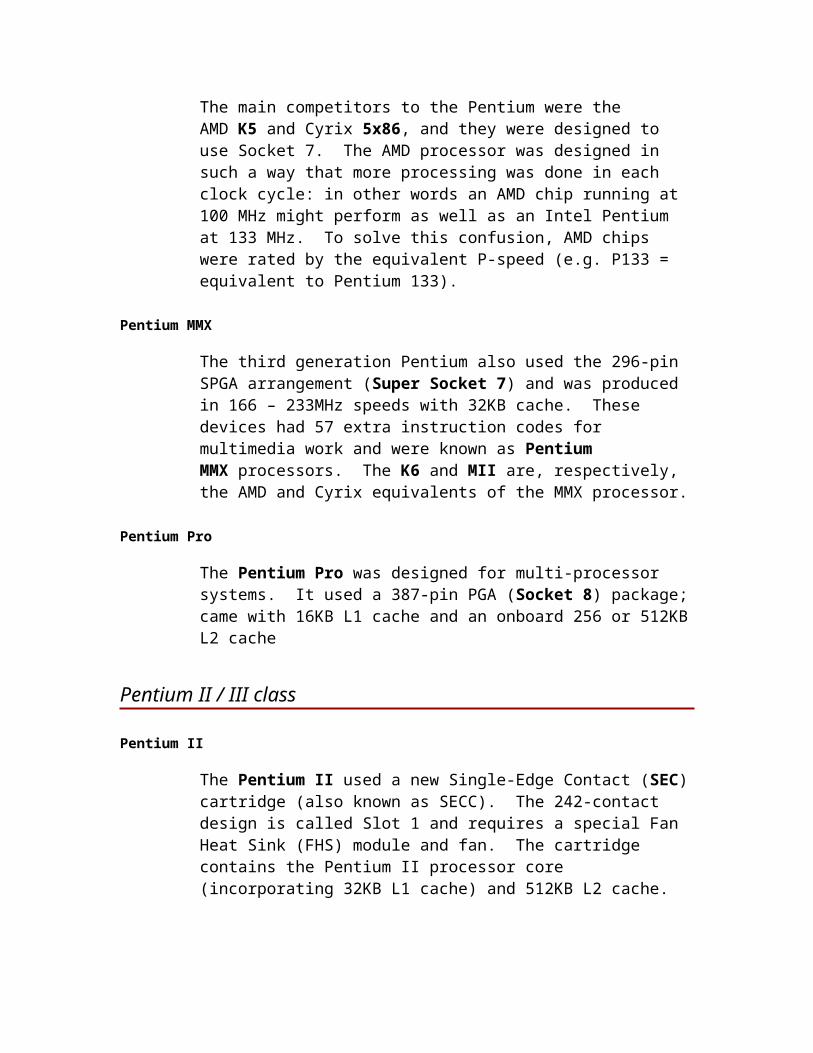
Troubleshooting
Basic troubleshooting techniques
Preparing a proper work area
You need a clear, flat workspace with an adequate number of main sockets. In addition to usual work comforts the area should be away from bustle and well-lit. The following will help:
A compartmentalised tray to keep track of small parts, such as screws and connectors.
Masking tape — to label parts, where they go, and how they are connected.
A small notepad or book to keep track of your assembly / troubleshooting steps.
A magnifying glass to help with reading small part numbers.
Diagnostic and repair tools
Hand Tools
Your tool kit should contain a range of both flat-blade and Phillips-head screwdrivers in both jeweller's-size and medium-size. You may want to include a small set of miniature nut drivers, a set of Torx drivers, and a special non-conductive screwdriver-like device called an alignment tool. You also need a couple of pairs of needle-nose pliers and wire-cutters. When working with older PCs, IC pullers (extractors) may be useful for removing ICs prior to reseating..
Using a Multimeter
Multimeters are available with both analogue and digital read-out and can directly measure values of voltage (V), current in milliamps (mA) or amps (A), andresistance, in ohms (O). They are referred to as analogue VOMs (volt-ohm-milliammeters), or DMMs (digital multimeters). You can also use a meter to check diodes, transistors, capacitors, motor windings, relays & coils.
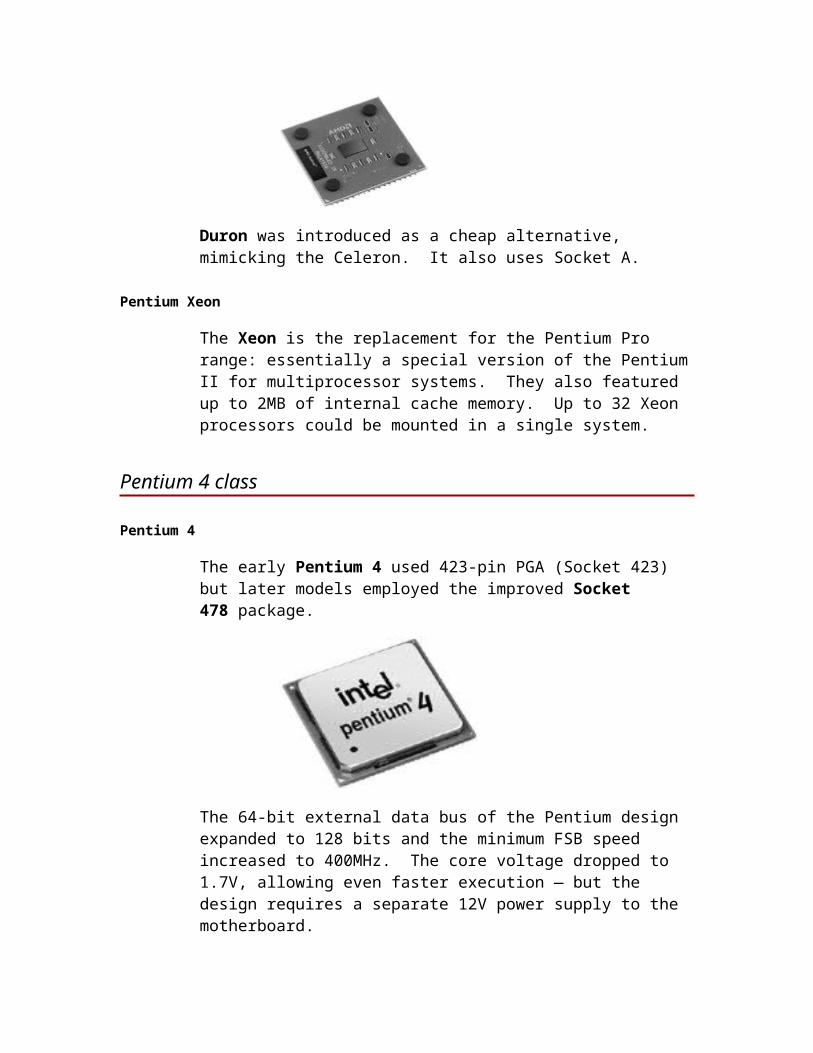
Select the proper measurement function, usually DC voltage for testing the PSU's DC output. Make the readings between 0V ("ground") and system board power-supply connector. The DC voltages that normally expected in a PC are +12V, +5V, +3.3V, –5V, and –12V, varying ±5%.
First set the meter to its highest voltage range to ensure that the voltage being measured does not damage the meter. You can then decrease the range setting to achieve a more accurate reading.
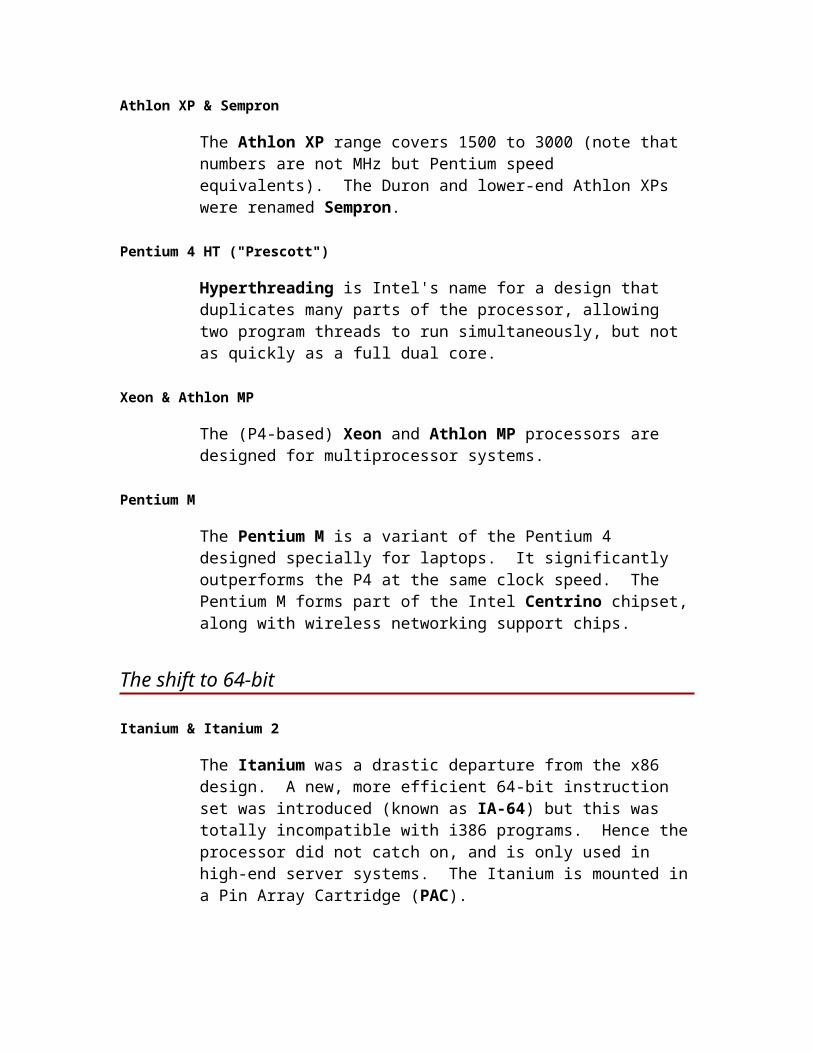
Voltage is measured by placing the meter in parallel with (i.e. wired across) a component, or measured between a pin and ground. Current is measured by placing the meter in series with (i.e. acting as part of the wire) components.
Resistance is measured in parallel, across a component — but that component must be disconnected from the circuit (leaving, at most, one circuit connection).
The second most popular test is the resistance, or continuity test, often used to test fuses. The second most popular test is the resistance, or continuity test, often used to test fuses. Unlike the voltage check, resistance checks are always made with power removed from the system.
Resistance checks also require that you electrically isolate or remove the component being tested from the system. For some components, this means de-soldering at one end.
If a fuse is good, the meter should read near 0 ohms. If it is bad, the meter reads infinite. The resistance function also is useful in checking for cables and connectors.
To check a speaker, just disconnect the speaker from the system and connect a meter lead to each end. If the speaker is good, the meter should read near 8 ohms. If the speaker is defective, the resistance reading should be 0 or infinite.
Occasionally you may need to check the mains power being applied to the PSU, usually at the end of the mains lead. This is rare in the
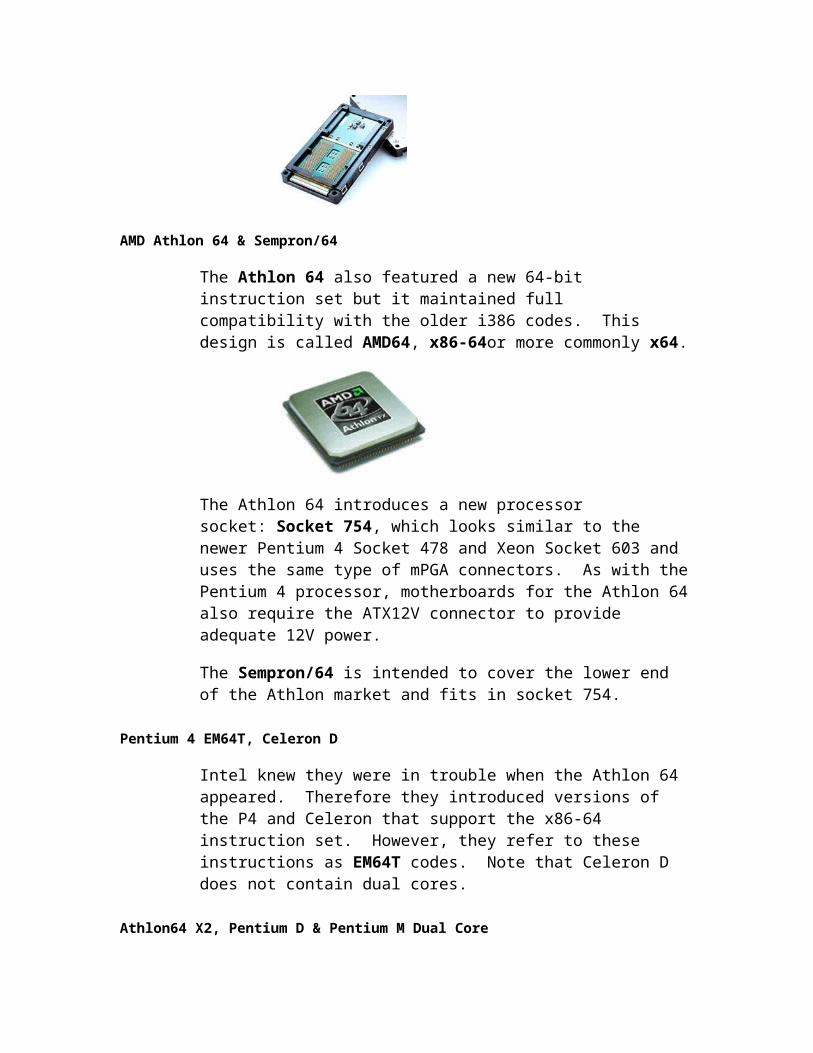
field because there will usually be alternative mains-powered devices you can use to test power leads. Care must be taken with these potentially lethal voltages.
Information Gathering
Gather information from users about the system's surroundings, any symptoms or error codes, and the situation that existed when failure occurred. Ask the user to list the steps that led to the malfunction. This can help you narrow a problem down to a particular section of the computer.
Observe the symptoms of a malfunction to verify the problem for yourself. Remember: the user is one of the most common sources of PC problems.Look for signs of extended use (frayed cords, missing slot covers) for clues that problems might be caused by usage or aging.
Power-On Self-Test (POST)
Some PCs give number codes on the display, or beep on the internal speaker when errors occur. Conversely, other PCs display a written description of the error. The error messages and codes will vary among different BIOS manufacturers and from version to version. A useful guide can be found atwww.bioscentral.com
Initial Troubleshooting Steps
Successful troubleshooting results from careful observation, deductive reasoning, and an organised approach to solving problems. Begin at the outside of the system and move inward. Always try the system to see what symptoms you produce and isolate the problem to either software or hardware. Finally, isolate the problem to a section of hardware or software.
Performing the Visual Inspection
Check the outside of the system first. Look for loose or disconnected cables. Consult all the front-panel lights. If no lights display, check the power outlet, the plugs and power cords, as well as any power switches that may affect the operation of the system. Try to localise the problem by systematically removing peripherals.
Once inside the case, try swapping suspected devices with known good parts from another computer of the same type. Try to restart the system after performing each correctional step.
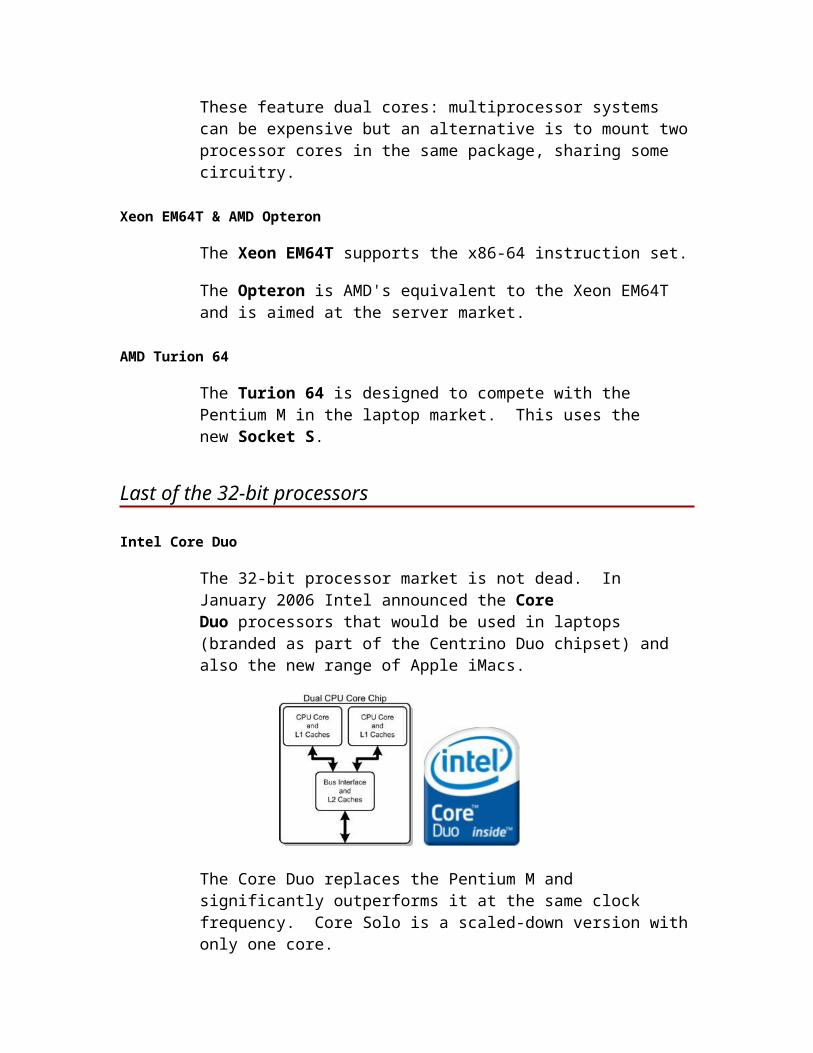
Check all system jumper settings to see that they are set correctly for the actual configuration of the system. Check the CMOS setup for enabled settings that may not be correct. Consult any user or operations manuals for built-in self-diagnostic features. In addition, a manual may contain probable cause and suggested remedies.
Watching the Boot-Up Procedure
1.When power is applied, the power-supply fan activates.
2.The keyboard lights flash as the rest of the system components are being reset.
3.BIOS message displays on the monitor.
4.Memory test flickers on the monitor.
5.The floppy disk drive access light comes on briefly.
6.The hard disk drive access light comes on briefly.
7.The system beeps, indicating that it has completed its POST and initialisation process.
8.The FDD or HDD lights illuminate as the BIOS tries to find the bootstrap loader.
9.For Windows machines, the Starting Windows message appears on-screen.
By knowing the sections involved in each step, you can suspect a particular section of causing the problem if the system does not advance past that step.
Software Diagnostics
The most common packages test the memory, processor, keyboard, display, and the disk drive's speed. The menu's IRQ Information, I/O Port Information, and Device Drivers options are valuable in locating conflicts.
If a diagnostic program indicates that multiple items should be replaced, replace the units one at a time until the system starts up.
For companies that repair or build computers, diagnostic programs that perform continuous burn-in tests are a valuable tool. A program runs continuous tests on the system for an extended burn-in period, without intervention from a technician or operator.

Hardware Troubleshooting
After removing the cover, perform a careful visual inspection looking for signs of overheating. Make a very quick check of the ICs by just touching the tops of the chips with your finger to see whether they are excessively hot. — i.e. hotter than usual. Check that components and connections have not come loose, and for foreign objects. Remove any built-up dust.
Field-Replaceable Unit Troubleshooting
Field-replaceable units (FRUs) are the portions of the system that you can conveniently replace in the field. When exchanging system components, be sure to replace the device being removed with one of exactly the same type. Just because two components have the same function does not mean that they can be substituted for each other. Interchanging similar parts is possible in some cases and not in others.
Always check connections after plugging them in. Look for missed connections, bent pins, and so on. Try to avoid unnecessary strain on the cable. Route cables away from ICs as much as possible — some ICs, such as CPUs, can become quite hot and may eventually damage cables. Avoid routing cables near cooling fans because they produce high levels of EMI.
It is often helpful to just reseat (remove and reinstall) connections and adapter cards in the expansion slots when a problem occurs. Oxidation may build up on the computer's connection points and cause a poor electrical contact. By reseating, the contact problem often disappears.
The Shotgun Approach
When you have no idea what the problem is, you should test all external devices before removing the outer cover to check internal devices.
The basic system consists of the system unit, the keyboard, and the display. Other devices are optional as far as the system's operation is concerned. When a problem occurs, you should first remove the optional items from the system. By doing so, you divide the system in half and can determine whether the problem exists in one of the main components or in one of the options.
The next components to exchange are the floppy drives and the power-supply unit, in that order. The system board is the last logical
and most difficult component to exchange. Therefore, it should be the last component in the system to be exchanged.
Fault-Finding
Common Faults
Power Supply Problems
The PSU is connected to virtually every other component — if it fails, it can affect the whole system. Typical symptoms include:
No indicator lights; no drive action; no display. The system is dead.
"On" light but no drive & no display. System fan may or may not run.
The system produces a continuous beep tone.
Checking a 'Dead' System
Visually inspect, checking for unseated cards, loose cables or foreign objects.
1. Check that the power cable is plugged into a functioning mains outlet.
2. Check the position of the on / off switch.3. Examine the power cord for good connection at the
rear of the unit.4. Check the setting of the 110 / 230 switch setting on the
outside of the power supply. This should be 110V in the US and 230V in the UK.
5. Check the mains voltage by plugging other mains equipment into the outlet. Alternatively use an electrician's screwdriver or a multimeter.
6. Use a multimeter to check motherboard & disk drive connector voltages.
If the PSU is not the cause, one of the other components must be overloading the supply. Uninstall components one-at-a-time to identify the cause.
Remember: with the power button off, there may still be some levels of voltages applied to the system board. Turn off all system power before removing parts!
Common fault: A short-circuit inside a hard drive can force the PSU into fail-safe 'off' mode. Therefore, when

testing a PSU be sure to unplug hard drive power connectors.
Common fault: A faulty motherboard can fail to signal an ATX supply to power-up, but a PSU MUST have some kind of an electrical load (e.g. the motherboard) when being tested.
Active lights and spinning fans mean that at least some portion of the PSU is functional. There are two likely possibilities:
A portion of the supply has failed or is being overloaded. One or more of the voltages supplied by the PSU is missing.
A key component on the system board has failed, preventing it from processing, even though the system has power.
Check the supply by substitution with a known-working PSU. By elimination, if the cause is not the PSU then something else must be overloading the PSU.
Common fault: the CPU fan spins once or twice and then stops. The PSU is switching on and then overloading. Usually indicates a faulty PSU, and should be checked by swapping-in a known-working PSU.
System Board Troubleshooting
Observe the boot up and operation. What steps lead to the failure? Note any error messages / beep codes. Refer to the motherboard user manual to check for hardware configuration problems. If possible, run software diagnostics.
Configuration Checks
If the battery fails, or has been changed, the contents of the CMOS will be lost. After replacing the battery, it is always necessary to reconfigure the CMOS setup. (If the motherboard has been recently removed, CMOS pins may have inadvertently been short-circuited by anti-static measures. CMOS should always be checked after installing a system board.)
RAM
If software diagnostics are unavailable, use logical rotation (swapping) of the RAM modules to locate a defective RAM module.
The first is soft-memory errors are caused by infrequent and random glitches in the operation of applications and the system. You can clear these events just by restarting the system. Hard-memory errors are permanent physical failures.
Mixing RAM types / speeds can cause the system to lock up and give errors.
Processor
If the CPU is faulty the speaker may issue a slow, single beep, with no display or other I/O operation. If the system consistently locks up after a few minutes, this is a good indication that some heat build-up problem is occurring.
Troubleshooting Video
If the screen flickers upon entering Windows, reboot and press F8 when the "Starting Windows" message appears, and select Safe Mode. This should load Windows with the standard 640×480×16-color VGA driver, which nearly all monitors support.
Troubleshooting Monitors
The first step in isolating the monitor as the cause of the problem is to exchange it for a known good one. If the replacement works, the problem must be located in the monitor. Refer the monitor to qualified technicians.
Troubleshooting Floppy Disk Drives
Activity light stays on constantly — means the signal cable is reversed.
FDD errors are encountered during boot up. IBM-compatible 6xx (that is, 601) error code.
Check for foreign objects, e.g. a dust cover that may have fallen off a disk.
Troubleshooting Hard Disk Drives
The computer does not boot up when turned on. No motor sounds are produced by the HDD Controller Failure, indicating a failure to communicate
with the HDD.
No Boot Record Found / Non-System Disk / Disk Error / Invalid System Disk — boot files are not located in the root directory.
Missing Operating System / Hard Drive Boot Failure / Invalid Drive or Drive Specification — disk's Master Boot Record is missing or corrupt.
An IBM-compatible 17xx error code is produced on the monitor screen.
If the configuration information is correct and you suspect a hard disk drive problem, the first task is to determine how extensive the problem is.
Check the signal cable for proper connection at both ends. Exchange the signal cable(s) for a known good one. Check the Master/Slave/CS jumper settings. Exchange the HDD power connector with another one from the power supply, to make certain that it is not a source of problems.
Windows NT / 2000 / XP / Server 2003 boot failures
If the main partition is NTFS-formatted then it cannot be read using MS-DOS or Windows 9x boot floppies. Instead, you should use a bootable CD such as Windows PE or Bart PE, or use the Windows 2000 / XP Recovery Console. To correct the master boot record, use FIXMBR.
http://www.bootdisk.com/ contains handy hints on how to fix boot problems and how to create bootable CDs.
CD-ROM Drives
The steps for a CD-ROM drive are almost identical to those of an HDD.
In addition, check for simple user problems. Is there a CD in the drive? Is the label side of the disk facing upward? If there is a CD locked inside, insert a straightened paper clip into the tray-release access hole.
USB Port Checks
Check the CMOS to make sure that the USB function is enabled there. If the USB function is enabled in BIOS, check in the Windows Control Panel > System > Device Manager to check that the USB controller appears there. If a USB device does not install itself automatically, you may have conflicting drivers loaded for that device and you may need to remove them.
Fault-finding technique
Rule 1 — Visual inspection
Carry out a visual inspection looking for obvious signs of problems:
Poorly-seated connectors or expansion cards
Loose connectors (but some connectors are meant to be loose!)
Foreign objects — for example loose screws
Physical damage
Motherboard power connector incorrectly aligned
Rule 2 — Methodical testing
Operation of the PC can be broken down into three stages:
Power
The clearest sign of a power problem is when the power supply fan fails to spin. If the fan is spinning then main power must be available.
If the CPU fan fails to spin then there may be a fault with the power supply's output. Check the power connector voltages with a voltmeter.
Core system
A PC requires only three parts for basic operation: a CPU, motherboard and RAM. We'll also need a graphics card so we can see whether the core system is working.
If the core system fails then we should resort to testing each part individually by swapping with similar parts in a known-working computer.
The BIOS can produce patterns of beeps on a speaker that identify common faults (such as no video card or memory error). These are known as POST (Power On Self-Test) codes.
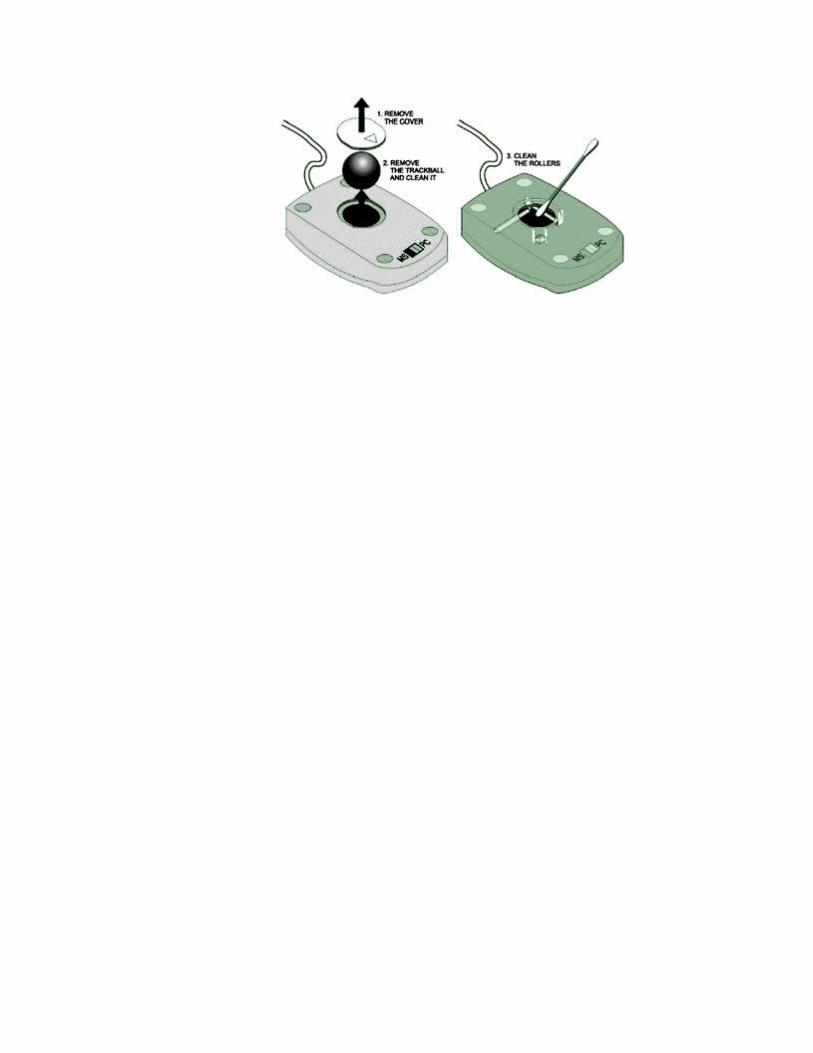
Extras
If the core system works, plug in extra components one at a time, testing each for full functionality before continuing. It is recommended that you test the floppy drive first: this will give you access to disk utilities when testing hard drives. It is then recommended that you test the hard disk drive. If you can install a working operating system then this will allow you to test other devices such as CD-ROMs, sound cards and network cards properly.
L1 , L2 and L3 CacheLevel 3 or L3 cache is specialized memory that works hand-in-hand with L1 and L2 cache to improve computer performance. L1, L2 and L3 cache are computer processing unit (CPU) caches, verses other types of caches in the system such as hard disk cache. CPU cache caters to the needs of the microprocessor by anticipating data requests so that processing instructions are provided without delay. CPU cache is faster than random access memory (RAM), and is designed to prevent bottlenecks in performance.
When a request is made of the system the CPU requires instructions for executing that request. The CPU works many times faster than system RAM, so to cut down on delays, L1 cache has bits of data at the ready that it anticipates will be needed. L1 cache is very small, which allows it to be very fast. If the instructions aren’t present in L1 cache, the CPU checks L2, a slightly larger pool of cache, with a little longer latency. With each cache miss it looks to the next level of cache. L3 cache can be far larger than L1 and L2, and even though it’s also slower, it’s still a lot faster than fetching from RAM.
Assuming the needed instructions are found in L3 cache (a cache hit), bits of data might be evicted from L1 cache to hold the new instructions in case they’re needed again. L3 cache can then remove that line of instructions since it now resides in another cache (referred to as exclusive cache), or it might hang on to a copy (referred to as inclusive cache), depending on the design of the CPU.
For example, in November 2008 AMD® released their quad-core Shanghai chip. Each core has its own L1 and L2 caches, but the cores share a common L3 cache. L3 keeps copies of requested items in case a different core makes a subsequent request.
The architecture for multi-level cache continues to evolve. L1 cache used to be external to the CPU, built into the motherboard, but now both L1 and L2 caches are commonly incorporated into the CPU die. L3 cache has typically been built into the motherboard, but some CPU models are already incorporating L3 cache. The advantage of having on-board cache is that it’s faster, more efficient and less expensive than placing separate cache on the motherboard.
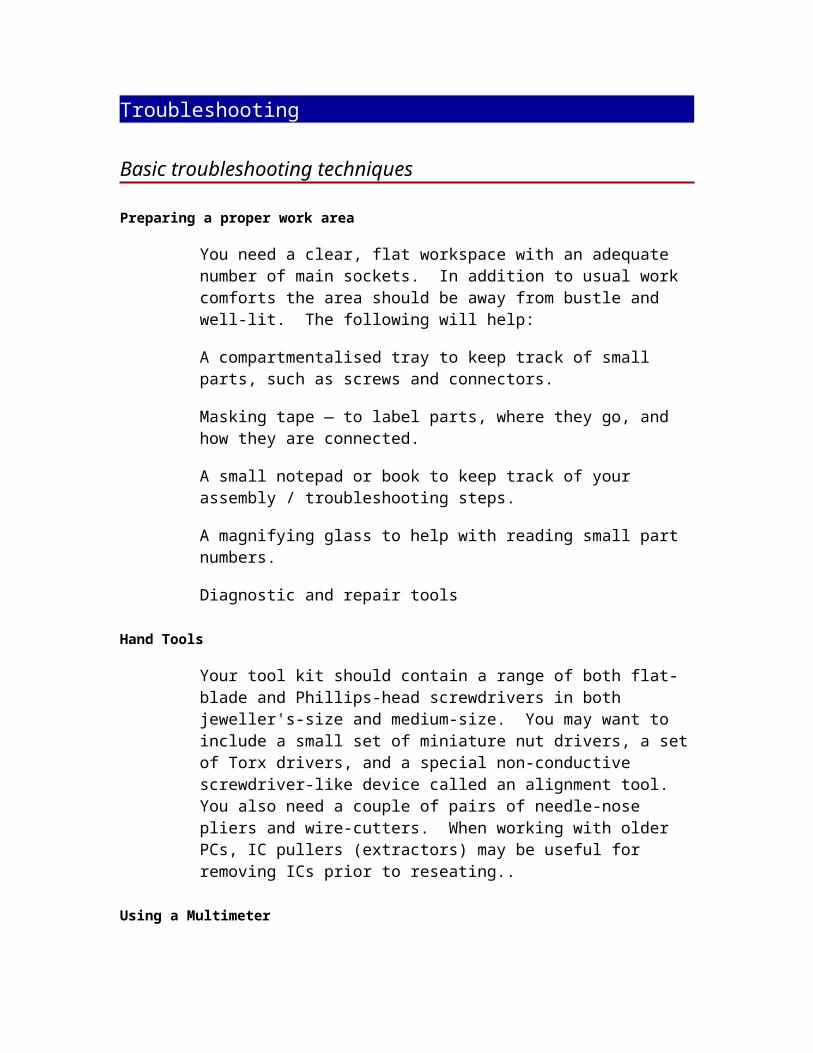
Fetching instructions from cache is faster than calling upon system RAM, and a good cache design greatly improves system performance. Cache design and strategy will be different on various motherboards and CPUs, but all else being equal, more cache is better.
"L1 cache is physically next to the processing core and is implemented in SRAM, or Static RAM which is fast and constant when powered on. It does not require refresh cycles. It is generally split with half used for instruction code and the the other used for data.L2 cache is physically close to the core, but is implemented in DRAM or Dynamic RAM and goes through refresh cycles many time a second to retain its memory. It is not as fast as L1 and cannot be accessed during refresh.L3 cache has come into vogue with the advent of multi-core CPUs. Whereas these chips will have both L1 and L2 caches for each separate core; there is a common fairly large L3 shared by all cores. It is usually the size of all other caches combined or a few multiples of all other caches combined. It is also implemented in DRAM. One unusual thing is that a multi-core chip that is running software that may not be capable of or need all cores will have a core flush its caches into the L3 before that core goes dormant.
L1 Cache is the fastest Cache, each core has its own L1 cache its the smallest but its the fastest and the first one to accesses by the Core.
L2 Cache is slower than L1, L2 cache is the 2nd cache that the core search's for its data, and bigger than L1.
L3 Cache is shard between all of the cores, in the core i7 for example, is shared between all 4 cores, and bigger than both L1 and L2.
so basically what your saying is, Cpu first search's L1 cache, if a miss happens, then it goes to the bigger cache which is L2, if it don't find the data that is looking for there,then it goes to the bigger Cache which is L3 Which is Shared between all 4 cores.
so is L1 Cache faster because its smaller than l2 and l3 or is it faster because its the first cache the cpu looks into?
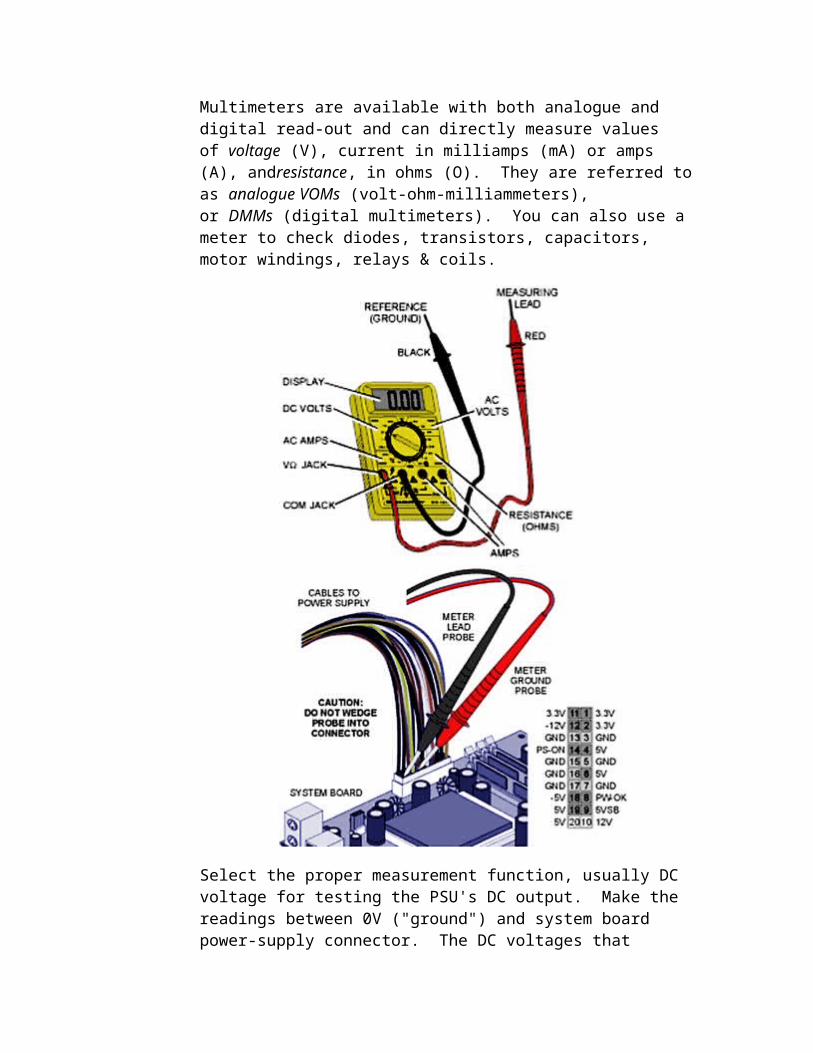
How to Select the Best Motherboard for Your Computing Needsegardless of whether one is building a computer from scratch or trying to upgrade their old one, selecting themotherboard is one of the most important decisions they will make. Not only does the motherboard house the central processing unit (CPU), or the computer’s "brain," but everything else on the computer connects to the motherboard in some way or another. This makes it one of the most critical components in the computer.Typically, motherboards and CPUs are bought and installed together. The only exception to this would be when a motherboard has gone bad, but the CPU still works. Since the motherboard and CPU must match, the CPU is a major part of deciding which motherboard to buy.
There are two main CPU manufacturers: Intel and AMD. Other manufacturers that make CPUs manufacture them to meet one of these two companies’ design criteria. Intel was the leading CPU manufacturer for many years, with AMD following behind playing catch-up. Today, however, these two manufacturers each create their own designs, which, while being similar in capacity, are not identical. Nor are they replacements one for another.There are a large number of motherboard manufacturers in the marketplace. This makes choosing a motherboard a challenge, even for an experienced computer geek. While the major computer manufacturers produce their own proprietary motherboards, these other manufacturers provide their wares to individuals and smaller computer manufacturers.
Determine How Much Computer Is NeededAsk any computer geek or sales representative which motherboard to buy, and their advice will likely be to buy the newest, biggest, and fastest. The standard argument is that since computers change so fast, buying anything less than the latest ensures that the computer will be obsolete all the sooner.
While this advice is valid if one is trying to keep up with the latest technology, it may not be valid for the average computer user. More than anything, advances in computer designs are driven by graphics applications and 3D gaming, which are the heaviest computer power- and memory-users. For those who use these sorts of applications, there is never enough computer power, memory, or speed.
However, if a computer is only going to be used for surfing the Internet, sending emails, and keeping track of family photos, the motherboard with the fastest speed and greatest computing power is not needed. In reality, an old 386 processor will perform those functions. Yes, a fast computer will load those pictures faster, but whether this is worth the extra cost is something each buyer has to decide for him/herself.
While it is always best to buy a little more than what one needs in order to have expansion room for future uses, it is easy to become carried away and buy the biggest and best.
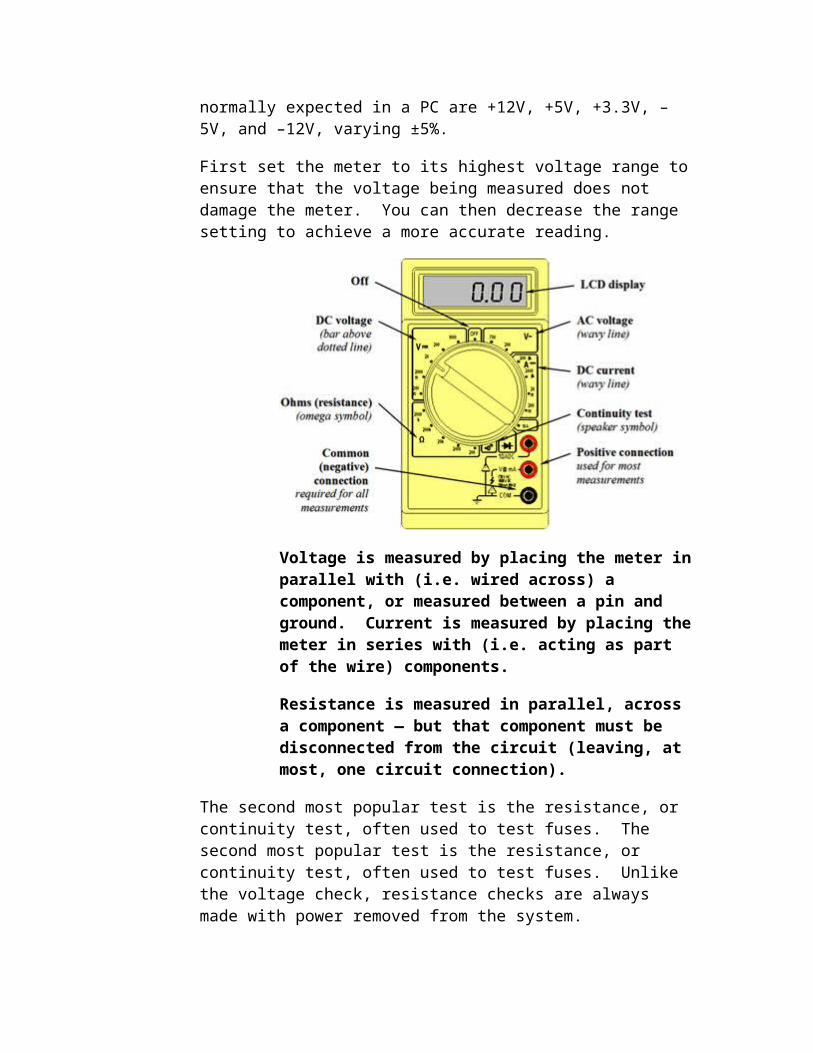
However, the perfect computer for anyone is one that provides a little more capacity than they will ever use, without costing more than they need to spend.
Major Selection CriteriaWhile there may be a host of reasons why an individual selects a particular motherboard, there are only four major factors that one must consider. The following selection criteria should be used to narrow down the available motherboards so that the motherboard which is selected can be used for the intended application.
ProcessorBefore deciding on a motherboard, it is important to determine which type of CPU will be used. CPUs vary in size and pin configurations. Typically, a motherboard will work for a number of different CPUs, but not all will fit in the same motherboard. Intel and AMD, the two major CPU manufacturers, each use different pinouts for their chips, so a motherboard that works for one will not work for the other.
In addition, each of these manufactures uses several different socket pinouts. The socket must match the CPU exactly for the two to be able to work together. There is no sense in trying to provide a listing of which sockets fit which processors, as the available processors are constantly changing; however, the most common sockets are as follows:
Manufacturer
Socket Used For
Intel Socket 2011
Intel’s most recent LGA socket. Used mostly by gamers for six core i7 processors.
Intel Socket 1366
Workstation class computer using the i7 core or the Xenon 3XXX series. Has the pins on the motherboard.
Intel Socket 1156
The average consumer socket for i3, i5, and i7 processors.
Intel Socket 1155
A newer version of the socket 1156. Although it supports everything the 1156 does, it adds additional
support for SATA III.
Intel Socket 775 Intel’s first LGA socket. Still a very popular socket. The first with the CPU pins on the motherboard.
Intel Socket 771 The first Intel socket which allows for the use of dual
Manufacturer
Socket Used For
processors. Used only for server applications.
AMD Socket AM3
AMD’s latest consumer socket. Same as AM2+ but uses only DDR3 memory.
AMD Socket AM2+
The most common AMD socket. Supports both AM2 and AM3 processors.
AMD Socket AM2
The oldest AMD socket in current production. Cannot support AM3 CPUs or DDR3 memory.
AMD Socket F The latest server socket by AMD. The first socket by AMD with the pins on the motherboard instead of on the
CPU.
Motherboards are usually listed with the socket type as one of the specifications. CPUs are listed with the type of socket they require. Therefore, picking a motherboard which will work with a particular CPU mostly consists of checking on the sockets. When in doubt, it is best to check with the manufacturer of the motherboard in order to see which processors are compatible with it.
Form FactorNot all motherboards are the same physical size. The most common size is ATX; however, the specification which created the ATX standard also provided for several alternate configurations. All ATX motherboards will have the same general configuration, with the major components located in the same places. While it is usually possible to mount a smaller motherboard into a computer case, mounting a larger one may be impossible.
A second motherboard configuration standard called "BTX" was created by Intel at a later time, in an attempt to solve airflow problems with the original ATX standard. However, this standard never caught on. While there are some BTX motherboards on the market, especially proprietary ones made by major computer manufacturers, they are not all that common.
The DTX standard was created by AMD as an answer to Intel’s failed BTX standard.
Motherboard Form Factor Size in Inches
Flex ATX 9.00 inches by 7.50 inches
Micro ATX/Embedded ATX 9.60 inches by 9.60 inches
Mini ATX 11.20 inches by 8.20 inches
Standard ATX 9.60 inches by 12.00 inches
Extended ATX (EATX) 12.00 inches by 13.00 inches
Workstation ATX (WATX) 14.00 inches by 16.75 inches
DTX 9.60 inches by 8.00 inches
Mini DTX 8.00 inches by 6.70 inches
ITX 8.46 inches by 7.50 inches
Mini ITX 6.70 inches by 6.70 inches
Nano ITX 4.70 inches by 4.70 inches
Pico ITX 3.90 inches by 2.80 inches
These dimensions are given only to help identify the type of motherboard currently in a computer. These motherboard standards not only affect the size of the motherboard, but also the configuration of the various connectors. Attempting to put an ITX motherboard into a computer case which previously housed an ATX motherboard can cause serious problems, as the card slots and connectors will not line up properly.
Memory TypeIf one is replacing an existing motherboard and wants to reuse the existing memory modules, it is important to verify that the memory modules will fit into the new motherboard. Most modern computers use either DDR 2 orDDR 3 memory, with some of the older ones still using DDR (sometimes referred to as DDR1). Most will have four memory slots, configured in two banks of two slots. The other consideration for memory is speed. Not all motherboards and memory modules have the same speed.
Chipset
The chipset configures the motherboard and controls how the computer’s CPU communicates with the rest of the computer. It also controls the bus speed of the motherboard; as such, it is vitally important. Chipsets will be rated by the speed at which they operate. Choosing a high-speed chipset allows faster memory to be used, and generally helps the computer run faster.
Please note that chipsets are not replaceable, but instead are a permanent part of the motherboard.
Besides features, the chipset also controls what features the motherboard has. Things like RAID control, surround sound, and support for USB 3 are all controlled by the chipset. The features of a motherboard will normally be listed, rather than specific information about the chipset.
Other Features and Options to ConsiderWhile the four areas listed above are the major deciding factors when choosing any motherboard, especially to eliminate a motherboard from the running, there are a number of other features which can make the difference between one motherboard and another.
PCI SlotsThe number and type of PCI extension card slots a motherboard has will affect the user’s ability to add expansion cards. If the application for that computer requires a lot of expansion cards, then a motherboard needs to be selected which has room for them. As a general rule of thumb, the larger motherboard formats also have more expansion slots.
Input-Output (I/O) ConnectorsBack in the early days of personal computers, most input and output functions were performed by expansion cards. Today’s motherboards bring all of those functions on-board, eliminating the need for buying and installing additional cards. The number and types of connectors available can be critically important to some users and some applications. At a minimum, a motherboard will have the following:
VGA monitor connection
USB 2.0 ports
10/100 Ethernet connection
Audio input and output connections
In addition, some motherboards may have any combination of the following:
USB 3.0 port
PS/2 mouse port
PS/2 keyboard port
Coaxial video jack
Optical port
Bluetooth transmitter
eSATA ports
Firewire port
While almost any computer peripheral will connect through a USB port, having these other connections can reduce the number of things connected through USB. Although as many as 127 devices can be connected to a single USB host controller, it must be remembered that the bandwidth of the bus must be shared between all those devices. Therefore, the more devices which can be directly connected through other ports, the better.
Onboard NetworkingAlmost all motherboards have onboard networking. This eliminates the need to add a card for the network connector. Some also have wireless network connectivity built-in.
Onboard VideoAlmost all motherboards also have onboard video processing. This eliminates the need to add a separate video card. However, with heavy graphics applications or multiple monitors, or to gain speed, a separate video card is still recommended. Graphics accelerator cards are especially useful for gaming.
SLI and Crossfire CompatibilityThis is of special importance to high-end gamers or others who are using 3D graphics. SLI and Crossfire are the methods for using multiple video cards together to increase performance and quality. Most boards will have one or the other, although there are a few boards which are compatible with both.
Selecting a MotherboardSelecting a motherboard consists of following some basic steps. These steps work to eliminate all the motherboards which are not what the user wants, leaving them with a reasonable number of choices to review and compare when making the final decision.
1. Choose the microprocessor CPU.
2. Eliminate motherboards which do not support that CPU.
3. Eliminate motherboards which do not fit the form factor of the computer case.
4. Compare chipsets for the ones which best meets the user’s needs.
5. Compare features to determine which is best for the specific application.
Buying Motherboards on eBayAt any given time, you can expect to find over 50,000 motherboards available for sale on eBay. With such a vast selection to choose from, it is important to know what you want before going shopping. A proper analysis based on the information provided in this guide will prepare you to shop for a motherboard for your computer.
Motherboards have their own category on eBay. To find them, start from Electronics on the main eBay navigation menu. From there, you can select Computers and Tablets. Motherboards are located under the categoryComponents and Parts, so go there next. Finally, select the Motherboards category. There is also a category forMotherboard and CPU Combos. Buying a combo is a great way to avoid potential compatibility problems when selecting a motherboard.Within the Motherboards category, there are filters which allow you to narrow down your search by brand, form factor, and compatible CPU brand. These help narrow down the search to only those motherboards which will meet your particular needs.
ConclusionBuying a motherboard, whether for building a new computer or upgrading an old one, requires research and careful consideration. All components and especially the motherboard and CPU must match for the motherboard to function correctly. As a general rule of thumb, it is best to select the desired CPU, and then find a motherboard which is compatible with it.
Form factor is an important consideration, as not all motherboards will fit in all cases. Although the Standard ATX format will fit most computer cases which are sold separately, when buying a motherboard to replace an existing one, especially a slim-line computer, this is a major consideration.
Finally, the features the motherboard offers should be considered carefully. While these are not the main factor for determining whether or not a particular motherboard is a potential candidate for purchase, they can be the tiebreaker between similar units. Input-output ports are especially important because of the vast amount of peripherals that most people connect to their computers.
The right motherboard choice will help ensure a high-speed computer which works well over the long-term. However, choosing the wrong motherboard, or not choosing the right components to go with a motherboard can turn a lightning-fast motherboard or CPU into a slow, unreliable unit.
When in doubt about choosing motherboards and other components, it is always useful to check manufacturers’ websites for more information and to talk to the vendor. Often, they have information available to them which is not included in the listing.
Choosing a MotherboardThere are a wide variety of motherboards available today. When selecting a new mobo for your homebuilt computer, many things have to be taken into consideration, including:
Form Factor. The form factor is a set of standards that include the size and shape of the board, the arrangement of the mounting holes, the power interface, and the type and placement of ports and connectors. Generally, you should choose the case to fit the mobo, not vice-versa. But if there is a case that you simply mustuse (either because it's the one you happen to have or because you really, really like that case), then make sure the motherboard you choose is of a compatible form factor.
Processor support. You must select a mobo that supports the type and speed of processor you want to use and has the correct type of socket for that processor.
RAM support. Make sure that the motherboard you select supports enough RAM of the type (DDR-SDRAM, DDR2-SDRAM, RDRAM, etc.) that you want to use. Most motherboards manufactured as of this writing can support at least 4 Gig of RAM, with DDR2 being the most popular type because of its speed and relatively low cost. Most DDR motherboards also support dual channelDDR, which can further improve performance. But to take advantage of dual-channel, the RAM sticks must be installed in matched pairs, and the mobo must support it.
Chipset. The chipset pretty much runs the show on the motherboard, and some chipsets are better than others. The chipset cannot be replaced, so the only way to solve problems caused by a bad chipset is to replace the mobo. Read the reviews of other motherboards using the same chipset as the one you are considering to see if a lot of people have reported problems with it.
SATA support. There's really very little reason not to use SATA drives these days. They're priced comparably to EIDE drives, but deliver much higher data transfer. But to use SATA, your motherboard must have SATA support. (Well, you can actually install aftermarket SATA expansion cards, but why do that on a new computer?)
Expansion Slots and Ports. How many of each type of expansion slot are included? Will they be enough to meet your current and future needs? How about Firewire support? And does it have enough USB slots for all the peripherals you want to dangle off of it?
Reputation. Search the newsgroups to see if others have found the board you are considering to be a lemon. One excellent Web resource for motherboard research is Motherboards.org. When choosing a motherboard, reliability is the most important factor. Replacing a failed motherboard requires essentially disassembling the entire computer, and may also require reinstalling the operating system and applications from scratch.
Compatibility. Most motherboards include drivers for all recent Windows versions, but check the documentation just to be sure. If you plan to use the
board for a computer running another operating system (Linux, UNIX, BSD, etc.) first check the with the motherboard manufacturer to see if it is compatible, and then search the hardware newsgroups for the OS you will be using to see how that particular board has worked out for others.
On-Board Features. Do you want integrated audio or video? If you don't plan on using the computer for graphics, multimedia, or gaming, then you may be able to save money by buying a motherboard with less-than-spectacular integrated audio and/or video.
RAID Support. RAID (Redundant Array of Independent Disks) is a set of protocols for arranging multiple hard drives into "arrays" to provide fault tolerance and/or increase the speed of data access from the hard drives. Many motherboards have RAID controllers built-in, saving you the cost of installing an add-on RAID controller.
Cost. Even if you are on a budget, the motherboard is not the place to cut corners. Try a less fancy case, instead. A good motherboard is more important than neon lights. But at the same time, the fact that one mobo costs twice as much as another doesn't mean it is twice as good. By searching newsgroups and reading hardware reviews, you're likely to find some inexpensive boards that perform as well as (or even better than) boards costing a great deal more.
Selecting Mother Board ntroduction There are many steps in choosing a motherboard, and I will go through each step in the process. However, I believe it is important to know about the motherboard types before you can make an educated decision. In this article I shall discuss the different motherboards for Intel which includes: Socket 771, Socket 775, Socket 1156 and Socket 1366, and the motherboards for AMD which include: Socket AM2, Socket AM2+, Socket AM3 and Socket F. After discussing each motherboard I will explain how to choose the best motherboard for your application. IntelSocket 2011 Socket 2011 is the latest LGA type socket produced by Intel. Geared mostly towards the enthusiast gamers and supporting the latest six core 32nm i7 processors it is definitely among the fastest chips available. Just like its predecessor Socket 1366 the 2011 socket supports both crossfire and sli. However, the socket 2011 has a lot of features 1366 didn’t have. Among these are USB 3.0, SATA III, PCI-E 3.0, Quad channel memory, and a lot of other cool features. The down side to all this greatness is price. Unless your looking to spend a good amount of money Socket 2011 is not for you. With processor prices at a minimum of $600 and motherboards at a minimum of $260 this is definitely not the proper hardware for someone on a budget. Socket 1366 Socket 1366 is the workstation class produced by Intel. This socket uses the i7 core or the Xeon 3XXX series which, like the previous Socket 775, contains the pins on the motherboard instead of on the cpu. Almost all Socket 1366 motherboards support either SLI or Crossfire, and all Socket 1366 motherboards use triple-channel DDR3 memory. Socket 1156 Socket 1156 is the average consumer socket for Core i3, i5, and i7 processors. Socket 1156 will have a lot of the same features as socket 1366, however it will be more cost effective. Socket 1156 will support the lower end i7 processors as well as the i3 and i5 processors. Socket 1156 will support only DDR3 memory, but in dual-channel configuration instead of the triple-channel configuration of Socket 1366. Socket 1155 Socket 1155 is the new revision of the previously released 1156 socket. Supporting almost identically what the 1156 socket supports it also has some extra support for SATA III and sever other small features. The biggest change between the 2 sockets is the BIOS. Socket 1156 uses the typical BIOS while Socket 1155 uses the new UEFI bios which supports full mouse support and allows for easy customizations for how the system runs. Socket 775 Socket 775 was the first LGA socket created by Intel where the cpu pins were located on the motherboard. Socket 775 is still the most popular motherboard being purchased by consumers due to its price and compatibility. Socket 775 motherboards support a range of processors from single core to quad core and support both DDR2 and DDR3 memory. Socket 775 replaced Socket 478 when it came out. You cannot use Socket 478 parts with Socket 775. Socket 771
Socket 771 is cpu interface which allows for the use of dual processors. LGA 771 was the first server motherboards to carry pins on the motherboard instead of the cpu. Socket 771 is strictly meant for server applications. Socket 771 motherboards support DDR2 FBDIMM’s.
AMDSocket AM3 Socket AM3 is AMD’s latest socket for consumer use. Socket AM3 mother boards have the similar basic socket as an AM2+ board; however AM3 boards only support DDR3 memory. Therefore an AM2 or AM2+ processor will not work in an AM3 board. Socket AM2+ Socket AM2+ motherboards are probably the most commonly chosen AMD motherboards. This is because Socket AM2+ motherboards support both AM2 and AM3 processors and allow you to mix an AM3 processor with DDR2 memory whereas when you use an AM3 board it only supports DDR3. Socket AM2 Socket AM2 is the oldest socket i am going to discuss in this article. Socket AM2 boards can not support the AM3 processor and only support DDR2. Socket AM2 boards were replaced with the Socket AM2+ motherboards. Socket F Socket F is the latest server socket by AMD. It uses the LGA design with the pins on the motherboard instead of on the processor. It is the first socket to be created by AMD with this technology. Socket F allows for the dual processor setup and uses DDR2 memory.
Choosing a Motherboard 1. Motherboard Compatibility
Processor- When choosing a motherboard one of the major things you need to consider is the processor which you’re going to use. Whether it is AMD or Intel and what socket you’re going to be using as explained above. The second thing you need to look at with the processors is to see if the core size (45nm or 65nm) is supported along with the front side bus, Hyper Transport, or QPI depending on which the processor has. To understand processors better please visit How to choose a CPU. Memory- Choosing the proper memory for your motherboard is extremely important. If you choose the wrong memory the computer won’t work at all. The first thing you need to see is whether the computer supports DDR, DDR2 or DDR3. DDR2 and DDR3 are the standard for memory right now but could change soon in the future. The second thing that has to be looked at is the memory speed which can easily be found by looking for a measurement in MHz or megahertz. Form Factor- Choosing the form factor for your motherboard is extremely important because in order to choose a proper case you have to determine your motherboard size. If you have already chosen a case, make sure to identify which motherboard form factors the case will support, such as EATX, ATX, Micro ATX, or ITX. Motherboard form factor is also important - the larger the motherboard, the more options that motherboard will have. For example, a Micro ATX board may only have 1 PCI-E and 2 PCI slots while an ATX board may have 2-3 PCI-E slots, 3 PCI slots, and 2 PCI-E x1 slots. EATX is a
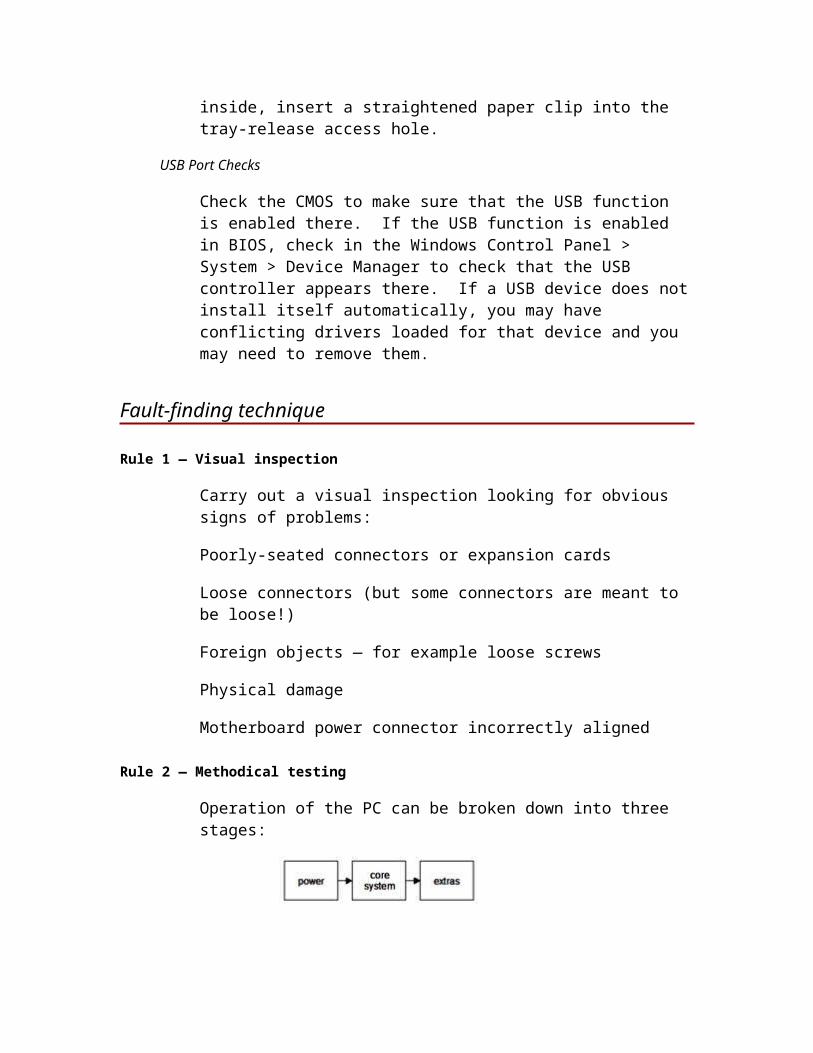
motherboard form factor that is only found in servers and workstations, and is not for use in a typical consumer desktop system.
2. Motherboard Features Onboard Video- This option is important for the individuals who are not going to install separate video cards in their system. Onboard video is not meant for gaming of any sort and is best suited to the people who browse the internet or watch videos. Onboard NIC- This is a good option for every one due to the fact a separate network card is no longer needed. This frees up room in the machine allowing for better airflow and at the same time allows for more slots for video cards or other necessary expansion cards. When looking at motherboards onboard NIC is always a good option. Onboard USB- All motherboards have onboard USB. The only difference is the number of USB each board has. The only way to determine the right number for you is to decide how many USB items you will connect to your computer. Always make sure to have a few more USB then necessary to make sure you have room for adding something in the future. SLI & Crossfire Compatibility- This option is most important to high end gamers or 3d graphics engineers. SLI and Crossfire is the method of using multiple video cards together to increase performance and quality. Most boards you will see that carry these attributes are either Crossfire or SLI. However, there are a few boards which allow the compatibility for both SLI and Crossfire since the release of the LGA 1366 motherboards.


![Untitled-1 [insurem.com.mx]insurem.com.mx/MercadoLibre/Catalogo HardWare.pdfintel CORE i7 intel CORE i7 intel CORE i7 intel CORE i7 inter CORE inside inter CORE inside inter CORE inside](https://img.dokumen.tips/doc/110x75/5ea5f42d3dcb49308f6ef996/untitled-1-hardwarepdf-intel-core-i7-intel-core-i7-intel-core-i7-intel-core.jpg)