Embed Size (px)
Citation preview
Integrated ServicesDigital Network (ISDN)8510T Voice TerminalFeature Package 3User’s Manual
555-021-736Comcode 107964504Issue 2December 1996
WARRANTYAll terms and conditions specified in the owner’s agreement with LucentTechnologies apply.
NOTICEWhile reasonable efforts were made to ensure that the information in thisdocument was complete and accurate at the time of printing, LucentTechnologies can assume no responsibility for any errors. Changes orcorrections to the information contained in this document may be incorporatedinto future issues.
TO ORDER COPIES OF THIS DOCUMENT
DISCLAIMERIntellectual property related to this product (including trademarks) and registeredto AT&T Corporation has been transferred to Lucent Technologies Incorporated.Any references within this text to American Telephone and Telegraph Corporationor AT&T should be interpreted as references to Lucent TechnologiesIncorporated. The exception is cross-references to books published prior toDecember 31, 1996, which retain their original AT&T titles.
HERITAGELucent Technologies — formed as a result of AT&T’s planned restructuring —designs, builds, and delivers a wide range of public and private networks,communication systems and software, consumer and business telephonesystems, and microelectronics components. The world-renowned BellLaboratories is the research and development arm for the company.
THE “CE” MARKThe “CE” mark affixed to this equipment means that it conforms to the EuropeanUnion Electromagnetic Compatibility Directive (89/336/EEC) and the Low VoltageDirective (73/23/EEC).
HEARING AID COMPATIBILITY
These voice terminals are Hearing Aid Compatible (“HAC”). In addition, someunits have an “HAC” label on them.
TRADEMARKSDEFINITY and 5ESS are registered trademarks of Lucent Technologies.
Prepared by © 1996 Lucent TechnologiesBCS Product Documentation Development All Rights ReservedMiddletown, NJ 07748-9972 Printed in USA
Write: Lucent Technologies BCS Publications CenterP.O. Box 4100Crawfordsville, IN 47933
Call: Voice 1 800 457-1235International Voice 317 361-5353
Fax: Fax 1 800 457-1764International Fax 317 361-5355
Order: Document No. 555-021-736Issue 2, December 1996

INTERFERENCE WARNING INFORMATION
If the apparatus code on the bottom of your voice terminal is marked withthe suffix “(RS)” (for example, 8510TND03A(RS)-003), then it complieswith electromagnetic interference criteria specified by the FCC as suitablefor residential (or business) installation. As such, the FCC requires us toprovide the following warning for Class B residential installations.
WARNING: This equipment has been tested and found to comply with thelimits for a Class B digital device, pursuant to Part 15 of the FCC Rules.These limits are designed to provide reasonable protection againstharmful interference in a residential installation. This equipmentgenerates, uses, and can radiate radio frequency energy and, if notinstalled and used in accordance with the instructions, may cause harmfulinterference to radio and television communications. However, there is noguarantee that interference will not occur in a particular installation. If thisequipment does cause harmful interference to radio or televisionreception, which can be determined by turning the equipment off and on,the user is encouraged to try to correct the interference by one or more ofthe following measures:
■ Reorient or relocate the receiving antennae.
■ Increase the separation between the equipment and receiver.
■ Connect the equipment into an outlet on a circuit different fromthat to which the receiver is connected.
■ Consult the dealer or an experienced radio/tv technician forhelp.
If the apparatus code on the bottom of your voice terminal is NOT markedwith the suffix “(RS)” , then it complies with criteria specified by the FCC assuitable for a Class A business installation only. In this case, the FCCrequires us to provide the following warning for Class A businessinstallations.
WARNING: This equipment has been tested and found to comply with thelimits for a Class A digital device, pursuant to Part 15 of the FCC Rules.These limits are designed to provide reasonable protection aginst harmfulinterference when the equipment is operated in a commercialenvironment. This equipment generates, uses, and can radiate radiofrequency energy and, if not installed and used in accordance with theinstruction manual, may cause harmful interference to radio and televisioncommunications. Operation of this equipment in a residential area is likelyto cause harmful interference in which case the user will be required tocorrect the interference at his own expense.

IMPORTANT SAFETY INSTRUCTIONS Only the most careful attention has been devoted to quality standards inthe manufacture of your new telephone. Safety is a major factor in thedesign of every set. But, safety is YOUR responsibility too.
Please read carefully the helpful tips listed below and on the next page.These suggestions will enable you to take fullest advantage of your newvoice terminal. Then, retain these tips for later use.
When using your telephone equipment, the following safety precautionsshould always be followed to reduce the risk of fire, electric shock, andinjury to persons.
d Read and understand all instructions.
d Follow all warnings and instructions marked on the telephone.
d This telephone can be hazardous if immersed in water. To avoid thepossibility of electrical shock, do not use the telephone while you arein the bathtub or shower, or when you are wet. If you accidentallydrop the telephone into water, do not retrieve the equipment until youhave first unplugged the line cord from the modular wall jack. Do notreconnect the telephone until it has dried thoroughly.
d Avoid using the telephone (other than the cordless type) duringelectrical storms in your immediate area. There is a remote risk ofelectric shock from lightning. Urgent calls should be brief. Eventhough protective measures may have been installed to limitelectrical surges from entering your home or business, absoluteprotection from lightning is impossible.
d If you suspect a natural gas leak in the vicinity of the telephone,report it immediately, but use a telephone away from the area inquestion. The telephone’s electrical contacts could generate a tinyspark. While unlikely, it is possible that this spark could ignite heavyconcentrations of gas.
d Never push objects of any kind into the telephone through housingslots since they may touch hazardous voltage points or short outparts that could result in a risk of electric shock. Never spill liquid ofany kind on the telephone. If liquid is spilled, however, dryimmediately, and refer any service problems to qualified servicepersonnel.
d To reduce the risk of electric shock, do not disassemble thetelephone. There are no user serviceable parts inside. Opening orremoving covers may expose you to hazardous voltages. Incorrectreassembly can cause electric shock when the telephone issubsequently used.
d Slots and openings in the housing must not be blocked or covered.The openings should never be blocked by placing the telephone on asofa, rug or other similar surface. This product should never beplaced near or over a radiator or heat register. This product shouldnot be placed in a built-in installation unless proper ventilation isprovided.
d The telephone should be operated only from the type of powersource indicated on the marking label. If you are not sure of the typeof power supply being used, contact a qualified service person.
d Do not allow anything to rest on the power cord. Do not locate thisproduct where the cord will be abused by persons walking on it.
d Do not overload the AC wall outlets and extension cords as this canresult in risk of fire or electric shock.
d Before cleaning, disconnect all cords from the telephone. Do notuse liquid cleaners or aerosol cleaners. Use a damp cloth forcleaning.
d Disconnect the cords on the telephone and refer servicing to qualifiedservice personnel when these conditions exist:
When the power supply cord or plug is damaged or frayed.
If liquid has been spilled into the product.
If the product has been exposed to rain or water.
If the telephone does not operate normally by following theoperating instructions. Do not attempt to adjust any othercontrols since doing so may result in damage and will requireextensive work by a qualified technician to restore the product tonormal operation.
If the product has been dropped or the housing has beendamaged.
If the product exhibits a distinct change in performance.
SAVE THESE INSTRUCTIONSWhen you see this warning symbol on the product, refer to theinstructions booklet packed with the product for information beforeproceeding.!

Contents
Introduction……………………………………………………………1
Organization of this Manual ………………………………………1Conventions Used in this Manual …………………………………2
A Note on the Term, System Manager …………………………2
Your ISDN 8510T Voice Terminal …………………………………3
Feature Descriptions ………………………………………………7
Voice Features………………………………………………………7Features Accessed with the Display and Softkeys………………8
Voice Features ………………………………………………………10Answering and Placing a Call ……………………………………10Conference…………………………………………………………11
Drop…………………………………………………………………11Hold…………………………………………………………………12
Message Retrieval ………………………………………………12Mute ………………………………………………………………13Redial (Last Number Dialed) ……………………………………13
Speakerphone and Speaker ……………………………………14Transfer ……………………………………………………………16
Features Accessed with the Display and Softkeys……………17Entering and Exiting Softkey Mode(Using the Menu and the Exit Buttons) …………………………18
The Voice Terminal Self-Test Feature …………………………19Using the Next, the Prev, and the Dir Buttons …………………19
Responding to Quit and Done……………………………………19A Softkey Display Screen Flowchart ……………………………20Setting the Clock …………………………………………………22
Setting the Speakerphone ………………………………………24Adding, Editing, and Deleting
a Number and Name in the Directory……………………………26Viewing a Directory Entry (and Placing a Call)…………………33
Using the Dir Button to Place a Call ……………………………35
Using the Call Log…………………………………………………36Locking and Unlocking the Directory,
Call Log, and All Softkeys ………………………………………51Changing or Removing Your Password…………………………55Self-Test ……………………………………………………………57
Choosing the Contrast Level for the Display……………………59Selecting a Personalized Ring……………………………………61
Setting the Rate at Which You View the Display Messages …63Turning on or off Softkey Information Tones……………………65Setting the Number of Names on the Directory Page…………67
Tones and Their Meanings ………………………………………68Voice Terminal Tones ……………………………………………68
Labeling and Installing the Designation Cardand the Telephone Number Card ………………………………69
Installation……………………………………………………………71
Contents of the 8510T Package …………………………………71Desktop Installation ………………………………………………71
Attaching Adjunct Equipment ……………………………………73
Technical Description ……………………………………………74
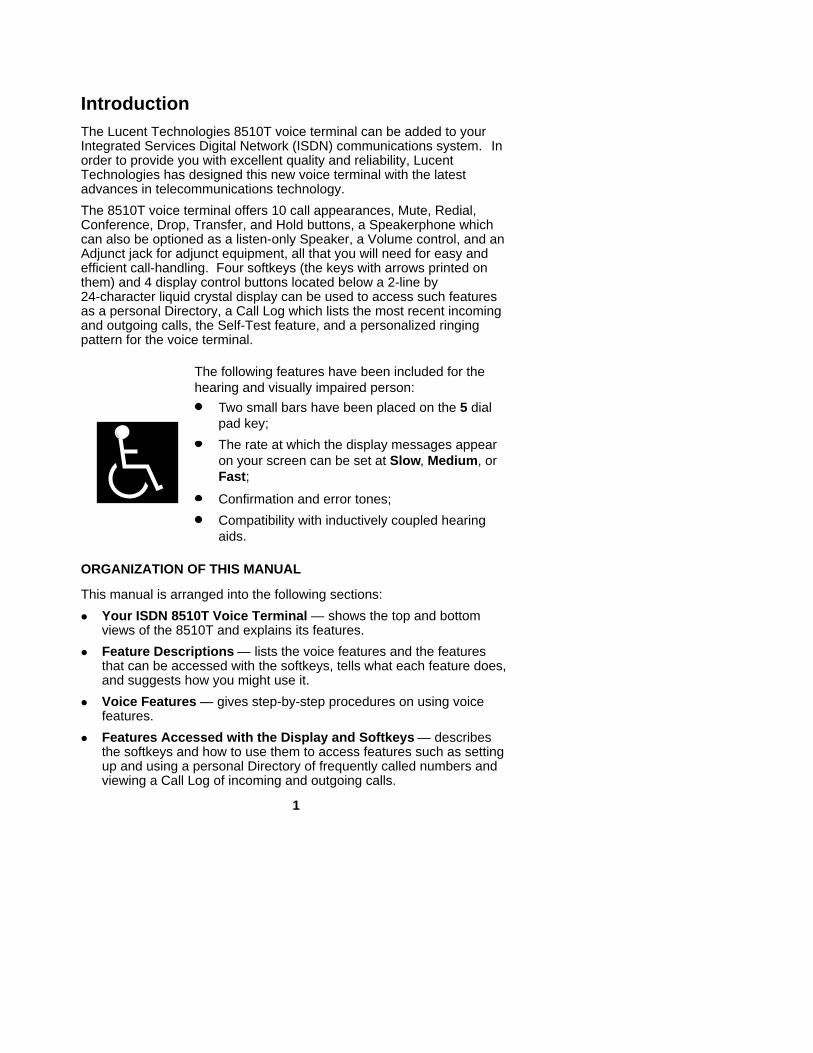
IntroductionThe Lucent Technologies 8510T voice terminal can be added to yourIntegrated Services Digital Network (ISDN) communications system. Inorder to provide you with excellent quality and reliability, LucentTechnologies has designed this new voice terminal with the latestadvances in telecommunications technology.
The 8510T voice terminal offers 10 call appearances, Mute, Redial,Conference, Drop, Transfer, and Hold buttons, a Speakerphone whichcan also be optioned as a listen-only Speaker, a Volume control, and anAdjunct jack for adjunct equipment, all that you will need for easy andefficient call-handling. Four softkeys (the keys with arrows printed onthem) and 4 display control buttons located below a 2-line by24-character liquid crystal display can be used to access such featuresas a personal Directory, a Call Log which lists the most recent incomingand outgoing calls, the Self-Test feature, and a personalized ringingpattern for the voice terminal.
The following features have been included for thehearing and visually impaired person:
Two small bars have been placed on the 5 dialpad key;
The rate at which the display messages appearon your screen can be set at Slow , Medium , orFast ;
Confirmation and error tones;
Compatibility with inductively coupled hearingaids.
ORGANIZATION OF THIS MANUAL
This manual is arranged into the following sections:
d Your ISDN 8510T Voice Terminal — shows the top and bottomviews of the 8510T and explains its features.
d Feature Descriptions — lists the voice features and the featuresthat can be accessed with the softkeys, tells what each feature does,and suggests how you might use it.
d Voice Features — gives step-by-step procedures on using voicefeatures.
d Features Accessed with the Display and Softkeys — describesthe softkeys and how to use them to access features such as settingup and using a personal Directory of frequently called numbers andviewing a Call Log of incoming and outgoing calls.
1
d Tones and Their Meaning — lists and describes the various voiceterminal tones.
d Labeling and Installing the Designation Card — explains how toremove and label the designation card.
d Installation — gives brief step-by-step procedures for connectingyour voice terminal to the system, desktop installation such asconnecting the handset and the line cord, and, if appropriate,attaching adjunct equipment.
d Technical Description — provides information on the technicalaspects of the 8510T voice terminal.
CONVENTIONS USED IN THIS MANUAL
A rectangular box containing a feature name, such as cbbbbbbbcbbbbbbbRedial ,
represents any button having a feature assigned to it, with acorresponding feature name label.
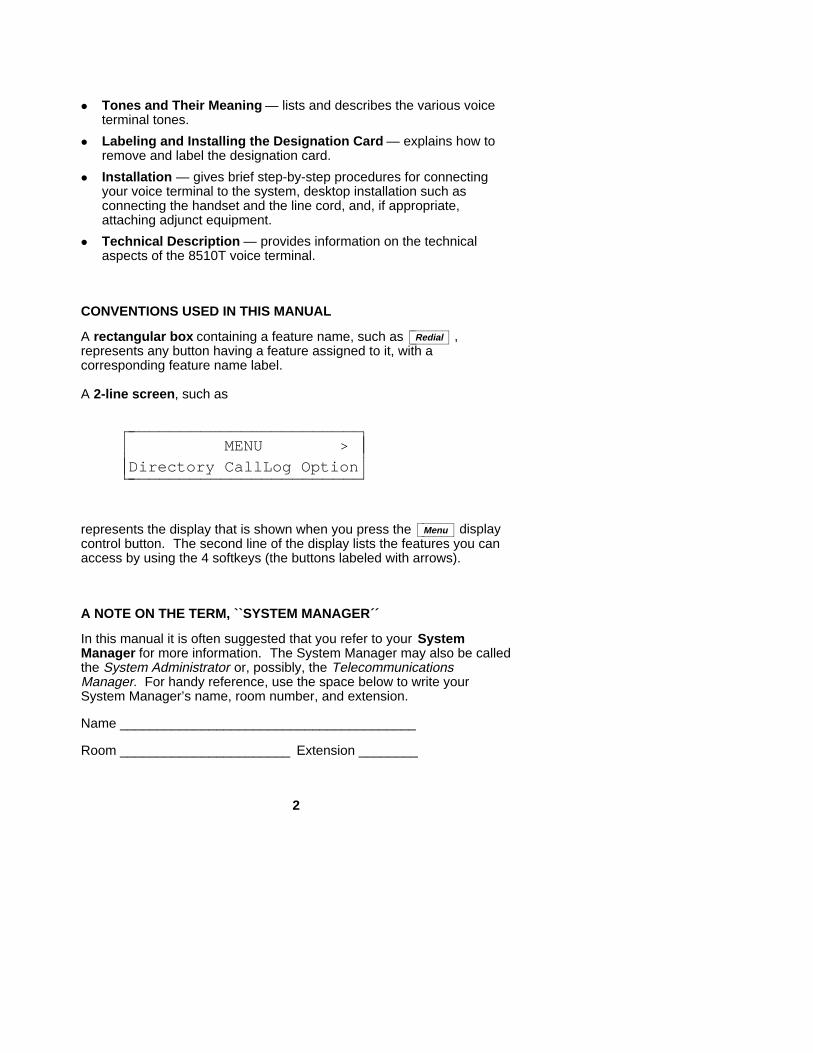
A 2-line screen, such as
MENU >Directory CallLog Optioncccbbbbbbbbbbbbbbbbbbbbbbbb
cccbbbbbbbbbbbbbbbbbbbbbbbb
represents the display that is shown when you press the cbbbbbbcbbbbbbMenu display
control button. The second line of the display lists the features you canaccess by using the 4 softkeys (the buttons labeled with arrows).
A NOTE ON THE TERM, ``SYSTEM MANAGER´´
In this manual it is often suggested that you refer to your SystemManager for more information. The System Manager may also be calledthe System Administrator or, possibly, the TelecommunicationsManager. For handy reference, use the space below to write yourSystem Manager’s name, room number, and extension.
Name ________________________________________
Room _______________________ Extension ________
2
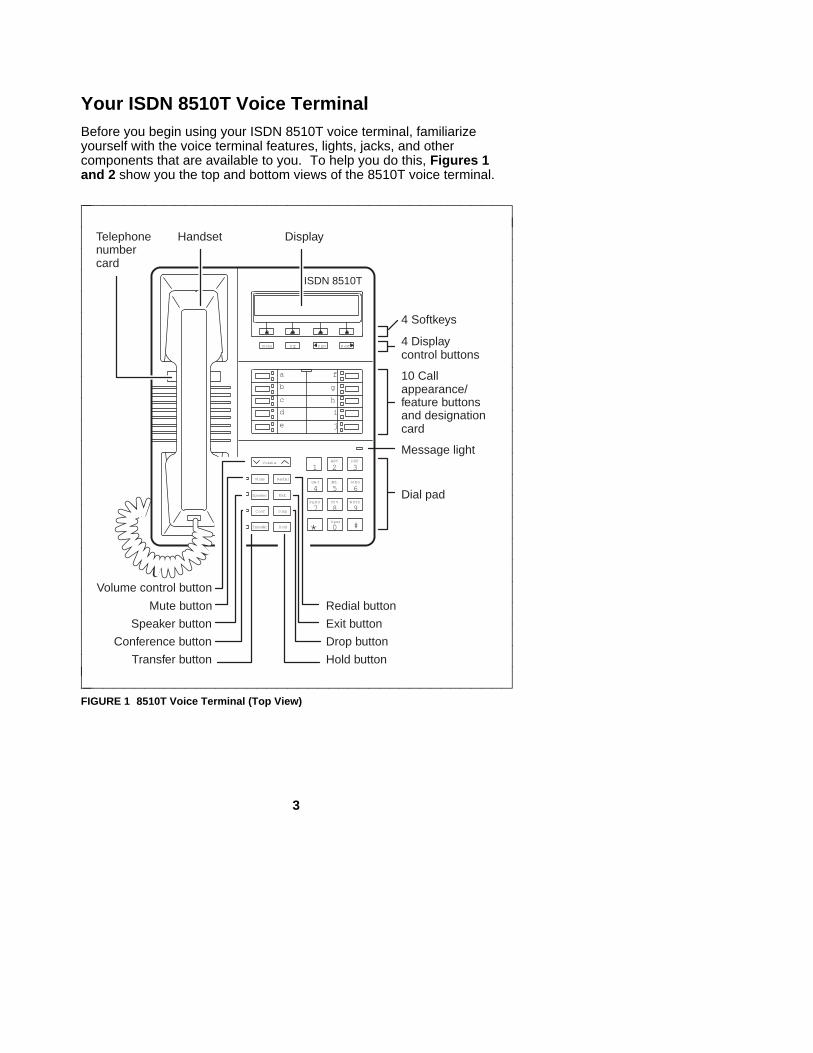
Your ISDN 8510T Voice TerminalBefore you begin using your ISDN 8510T voice terminal, familiarizeyourself with the voice terminal features, lights, jacks, and othercomponents that are available to you. To help you do this, Figures 1and 2 show you the top and bottom views of the 8510T voice terminal.
1 2 3
a
b
c
d
e
f
g
h
i
j
4 5 6
7 8 9
* 0 #
Volume control button
Mute button
Speaker button
Conference button
Transfer button
Redial button
Exit button
Drop button
Hold button
Dial pad
Message light
10 Callappearance/feature buttonsand designationcard
4 Displaycontrol buttons
4 Softkeys
DisplayHandset
ISDN 8510T
M enu Dir Pr ev N ext
Volum e
M ute
Speaker
Conf
Transf er
Redial
Drop
H old
Exit
ABC DEF
JKL M N OGH I
TUV W XYZPQ RS
O per
Telephonenumbercard
cccccccccccccccccccccccbbbbbbbbbbbbbbbbbbbbbbbbbbbbbbbbbbbbbbbbbbb
cccccccccccccccccccccccbbbbbbbbbbbbbbbbbbbbbbbbbbbbbbbbbbbbbbbbbbb
FIGURE 1 8510T Voice Terminal (Top View)
3
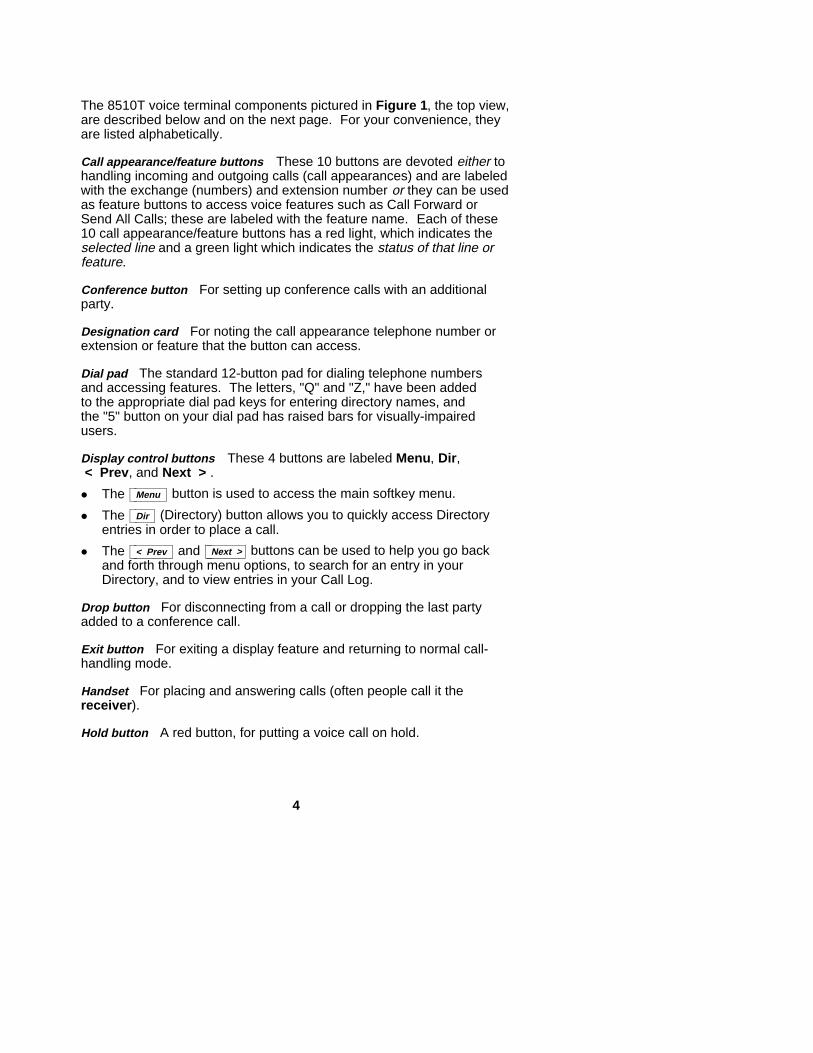
The 8510T voice terminal components pictured in Figure 1, the top view,are described below and on the next page. For your convenience, theyare listed alphabetically.
Call appearance/feature buttons These 10 buttons are devoted either tohandling incoming and outgoing calls (call appearances) and are labeledwith the exchange (numbers) and extension number or they can be usedas feature buttons to access voice features such as Call Forward orSend All Calls; these are labeled with the feature name. Each of these10 call appearance/feature buttons has a red light, which indicates theselected line and a green light which indicates the status of that line orfeature.
Conference button For setting up conference calls with an additionalparty.
Designation card For noting the call appearance telephone number orextension or feature that the button can access.
Dial pad The standard 12-button pad for dialing telephone numbersand accessing features. The letters, "Q" and "Z," have been addedto the appropriate dial pad keys for entering directory names, andthe "5" button on your dial pad has raised bars for visually-impairedusers.
Display control buttons These 4 buttons are labeled Menu, Dir,< Prev, and Next > .
d The cbbbbbbcbbbbbbMenu button is used to access the main softkey menu.
d The cbbbbcbbbbDir (Directory) button allows you to quickly access Directory
entries in order to place a call.
d The cbbbbbbbcbbbbbbb< Prev and cbbbbbbbcbbbbbbb
Next > buttons can be used to help you go backand forth through menu options, to search for an entry in yourDirectory, and to view entries in your Call Log.
Drop button For disconnecting from a call or dropping the last partyadded to a conference call.
Exit button For exiting a display feature and returning to normal call-handling mode.
Handset For placing and answering calls (often people call it thereceiver).
Hold button A red button, for putting a voice call on hold.
4
Message light A red light which goes on steadily when a message hasbeen left for you. See your System Manager for instructions regardingyour local message retrieval procedures.
Mute button For turning off (and then back on again) the microphone ofthe handset or the speakerphone so the other person on the call cannothear you.
Redial button For automatically redialing the last number that you dialedfrom the dial pad.
Softkeys The 4 buttons located below the display and labeled witharrows ( ), correspond to words on the display screen. Softkeysare used along with display control keys to access or create a personalDirectory of frequently-called numbers, a Call Log of the most recentincoming and outgoing calls, and such features as selecting apersonalized ringing pattern, doing a self-test of your voice terminal, andsetting the speakerphone and the clock.
Speaker button For turning on and off the speakerphone or thelisten-only speaker.
Telephone number card For noting the area code and telephone numberof your voice terminal.
Transfer button For transferring a call to another voice terminal.
Volume control button When on a call, used to increase or decrease thereceive volume of the handset or speakerphone (if on a call). When youare not on a call, the Volume control button is used to increase ordecrease the volume of the ringer and the tones.
5
Line jack
Adjunctjack
Handsetjack
Kickstand
Routingchannel
!
FCC Warninglabel
Bar Codelabel
cccccccccccccccccbbbbbbbbbbbbbbbbbbbbbbbbbbbbbbbbbbbbbbbbbbb
cccccccccccccccccbbbbbbbbbbbbbbbbbbbbbbbbbbbbbbbbbbbbbbbbbbb
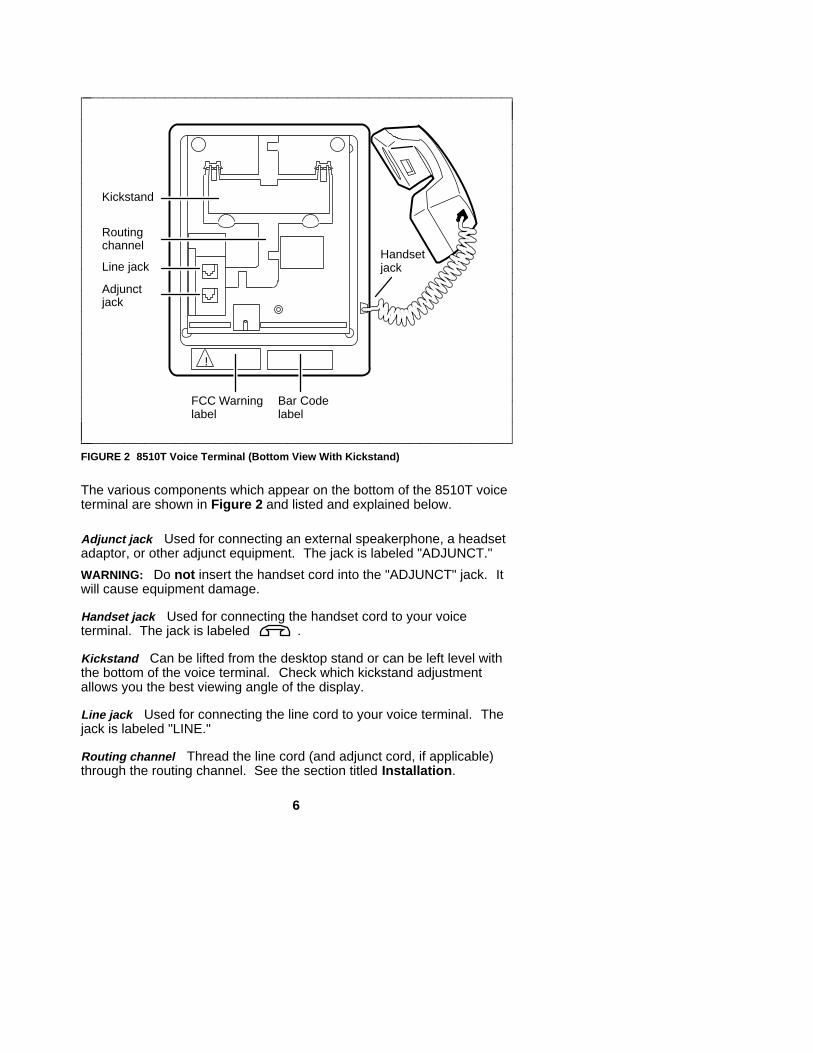
FIGURE 2 8510T Voice Terminal (Bottom View With Kickstand)
The various components which appear on the bottom of the 8510T voiceterminal are shown in Figure 2 and listed and explained below.
Adjunct jack Used for connecting an external speakerphone, a headsetadaptor, or other adjunct equipment. The jack is labeled "ADJUNCT."
WARNING: Do not insert the handset cord into the "ADJUNCT" jack. Itwill cause equipment damage.
Handset jack Used for connecting the handset cord to your voiceterminal. The jack is labeled
.
Kickstand Can be lifted from the desktop stand or can be left level withthe bottom of the voice terminal. Check which kickstand adjustmentallows you the best viewing angle of the display.
Line jack Used for connecting the line cord to your voice terminal. Thejack is labeled "LINE."
Routing channel Thread the line cord (and adjunct cord, if applicable)through the routing channel. See the section titled Installation.
6
Feature DescriptionsHere are brief descriptions of the voice features and the featuresaccessed with the softkeys, including what each one does and how youmight want to use it.
VOICE FEATURES
Conference Allows you to add an additional party to a call so that youcan conduct a conversation with more than one party. Use to set uptime-saving conferences, or to spontaneously include a party importantto a discussion.
Drop Disconnects you from a call without requiring you to hang up thehandset or press the switchhook. Can also be used with the Conferencefeature to disconnect the last party added. Use whenever you are usingthe handset and want to continue using it for another action after endinga call.
Hold Temporarily disconnects you from a call, holding it until you canreturn to it. While a call is on hold, you can place another call, activateanother feature, answer a waiting call, or leave your voice terminal toperform another task. Use when you have a call that you don’t wish todrop, but for which you have to interrupt briefly to do something else.
Message Retrieval Your Message light goes on to let you know that acaller has left a message. Follow your System’s message retrievalprocedures to get your message.
Mute Turns off the microphone associated with the handset or thespeakerphone, whichever is currently active. Use when you want toconfer with someone in the room with you, but you do not want the otherparty on the call to hear your conversation. (You are still able to hear theperson on the call.)
Redial (Last Number Dialed) Automatically redials the last number youdialed manually from the dial pad, either an extension or an outsidenumber. Use to save time in redialing a busy or unanswered number.
Speakerphone Your voice terminal has either the Speaker (listen-only)or the Speakerphone (listen and talk) function or it may have neither.Check with the System Manager to see how your voice terminal is set.
The Speaker feature allows you to place calls or access other voicefeatures without lifting the handset. (Press cbbbbbbbbcbbbbbbbb
Speaker .) However, inorder to speak to the other party, you must use the handset (the speakermust be off). Use with feature activities that require listening only, suchas on-hook dialing or monitoring calls on hold.
7
The Speakerphone feature allows you to place and answer calls oraccess other voice features without lifting the handset. (Presscbbbbbbbbcbbbbbbbb
Speaker .) You may use the softkeys on the voice terminal to set orreset the speakerphone. When you set the built-in speakerphone, itperforms a test of the surrounding environment and adjusts itself foroptimal performance. Use the built-in speakerphone any time you preferhands-free communications, both speaking and listening, or for groupconference situations.
Transfer Transfers a call from your voice terminal to another extension.Use when your caller needs to speak further with someone else.
FEATURES ACCESSED WITH THE DISPLAY AND SOFTKEYSThe following features can be accessed using the 4 softkeys locatedbelow the display.
Call Log The Call Log is initially set to list the 10 most recent incomingunanswered calls only. An option is provided so that you may alsochoose to access the most 10 recent answered calls, and the 10 mostrecent outgoing calls placed from your voice terminal. Use to check oncalls that you missed (the unanswered calls) and to remind you of thosecalls that you answered or placed most recently.
Clock For setting the date and time on your voice terminal display.
Contrast Change the contrast level of your display so that the letters ornumbers are darker or lighter against the background of the screen.
Directory Used to create and edit a personal directory of up to 30extensions or outside numbers and the names of the associated party.Use cbbbbcbbbb
Dir to quickly dial a call. Use as a handy place to store numbersyou frequently call.
Dir Button When you press cbbbbcbbbbDir followed by a softkey button
associated with that Directory entry, a call is immediately placed to atelephone number. The phone number appears on the display screen asit dials.
Exit button Exits a display feature and returns the voice terminal displayto normal call-handling mode.
Lock Allows you to lock your Directory so that no one can makeunauthorized changes in it; lock your Call Log so that no one else canview your Call Log entries; lock all of the softkeys so that no one canview or change any of the features accessed by the softkeys.
8

Number of Names (on a Directory Page) Allows you to view either4 names or 3 names + Quit on the second line of an individual Directorypage. If you choose to have 4 names on the Directory screen at onetime, you can leave the Directory or cancel calling a name in yourDirectory only by pressing cbbbbbcbbbbb
Exit (rather than using Quit).
Personalized Ring Allows you to select your own personalized ringingpattern from among 8 available patterns. Use to distinguish your voiceterminal’s ring from that of other nearby voice terminals.
Screen Timing (Rate at which the Display Message is Shown) Allows youto set the length of time the display message remains on the screen.There are 3 rates: Slow, Medium, and Fast.
Self-Test Performs a diagnostic test of your voice terminal including thelights, ringer, dial pad keys, and display.
NOTE: When you perform a self-test of the voice terminal, it clears thecontents of the Call Log and the last number dialed from Redial, andreturns the volume control to the default setting.
Set Speakerphone When you set the built-in speakerphone, it performsa test of the surrounding environment and adjusts itself for optimalperformance.
Tones A confirmation tone (sequential low and high tones) is providedto let you know a selection has been accepted; an error tone (one beep)alerts you that you made a mistake in your softkey entries. You maychoose to turn these softkey information tones on or off.
9
Voice FeaturesThe procedures which follow give short, step-by-step instructions forusing each feature. For your convenience, the features are listedalphabetically. Unless otherwise noted, the calling procedure assumesthat the handset is off-hook.
aaaaaaaaaaaaaaaaaaaaaaaaaaaaaaaaaaaaaaaaaaaaaaaaaaaaaaaaaaaaaaaaaaaa
ANSWERING AND PLACING A CALLaaaaaaaaaaaaaaaaaaaaaaaaaaaaaaaaaaaaaaaaaaaaaaaaaaaaaaaaaaaaaaaaaaaaTo answer a call
1 Lift the handset.
d The green light (below the red light) goes on steadily at theselected call appearance button.
NOTE: If you are not connected immediately, press the callappearance button next to the flashing green light.
To place a call
1 Lift the handset.
d The green (below the red light) goes on steadily at the selectedcall appearance button.
2 Listen for the dial tone and dial the number you want to call.
To end (or drop) a call
1 Hang up the handset or press the cbbbbbbcbbbbbbDrop button
NOTE: If you use the cbbbbbbcbbbbbbDrop button, you will hear a dial tone and your
voice terminal is ready for another call.
To adjust the receive volume of the handset, the speakerphone, orthe listen-only speaker
1 While on a call,
to raise the volume, press the right half of the Volume control buttonlabeled
;
to lower the volume, press the left half of the Volume control buttonlabeled
.
10
aaaaaaaaaaaaaaaaaaaaaaaaaaaaaaaaaaaaaaaaaaaaaaaaaaaaaaaaaaaaaaaaaaaa
CONFERENCEaaaaaaaaaaaaaaaaaaaaaaaaaaaaaaaaaaaaaaaaaaaaaaaaaaaaaaaaaaaaaaaaaaaaTo add another party to a call
1 While on a call, press cbbbbbbcbbbbbbConf to add the next party.
d The current call is placed on hold.
d The red Conference light flutters.
NOTE: If an idle call appearance button is not automaticallyselected, press one yourself.
2 Listen for the dial tone, and dial the number of the next party.
3 Press cbbbbbbcbbbbbbConf when the next party answers.
d The red Conference light goes off.
d All parties are now connected.
To drop a party from a conference call
1 Press cbbbbbbcbbbbbbDrop .
d The last party you added is dropped.
aaaaaaaaaaaaaaaaaaaaaaaaaaaaaaaaaaaaaaaaaaaaaaaaaaaaaaaaaaaaaaaaaaaa
DROPaaaaaaaaaaaaaaaaaaaaaaaaaaaaaaaaaaaaaaaaaaaaaaaaaaaaaaaaaaaaaaaaaaaaTo disconnect from a call and obtain dial tone without hanging up
1 Press cbbbbbbcbbbbbbDrop .
d Listen for dial tone.
NOTE: Pressing cbbbbbbcbbbbbbDrop will also disconnect the last party added to a
conference call. See the procedures for the Conference feature inthis section.
11
aaaaaaaaaaaaaaaaaaaaaaaaaaaaaaaaaaaaaaaaaaaaaaaaaaaaaaaaaaaaaaaaaaaa
HOLDaaaaaaaaaaaaaaaaaaaaaaaaaaaaaaaaaaaaaaaaaaaaaaaaaaaaaaaaaaaaaaaaaaaaTo put a call on hold while you answer another call
NOTE: The green light is flashing beside the call appearance button ofthe incoming call.
1 Press cbbbbbbcbbbbbbHold .
d The red light goes off, and the green light flutters (next to the callappearance button of the held call).
2 Press the call appearance button of the second call.
d The red light goes on, and the green light goes on steadily.
d You are connected to the second call.
NOTE: If you put a conference call on hold, the other parties remainconnected.
To return to the held call
1 Press the call appearance button next to the held call.
d The red light goes on, and the green light goes on steadily (nextto the call appearance button of the previously held call).
d You are connected to the held call.
aaaaaaaaaaaaaaaaaaaaaaaaaaaaaaaaaaaaaaaaaaaaaaaaaaaaaaaaaaaaaaaaaaaa
MESSAGE RETRIEVALaaaaaaaaaaaaaaaaaaaaaaaaaaaaaaaaaaaaaaaaaaaaaaaaaaaaaaaaaaaaaaaaaaaaSee your System Manager for instructions regarding the messageretrieval procedures for your system.
12
aaaaaaaaaaaaaaaaaaaaaaaaaaaaaaaaaaaaaaaaaaaaaaaaaaaaaaaaaaaaaaaaaaaa
MUTEaaaaaaaaaaaaaaaaaaaaaaaaaaaaaaaaaaaaaaaaaaaaaaaaaaaaaaaaaaaaaaaaaaaaTo turn off the microphone associated with the handset or thespeakerphone so the other party cannot hear you
1 While on a call, press cbbbbbbcbbbbbbMute .
d The red Mute light goes on.
d The other party cannot hear your conversation, but you can hearthe other party.
To turn on the microphone associated with the handset orspeakerphone again, so the other party can hear you again
1 Press cbbbbbbcbbbbbbMute again.
d The red Mute light goes off.
d You can resume your conversation with the other party.
aaaaaaaaaaaaaaaaaaaaaaaaaaaaaaaaaaaaaaaaaaaaaaaaaaaaaaaaaaaaaaaaaaaa
REDIAL (LAST NUMBER DIALED)aaaaaaaaaaaaaaaaaaaaaaaaaaaaaaaaaaaaaaaaaaaaaaaaaaaaaaaaaaaaaaaaaaaaTo automatically redial the last number you dialed manually (thiscan be an extension, outside number, or trunk/feature code)
NOTE: The 8510T voice terminal redials numbers consisting of up to37 digits.
1 Lift the handset.
2 Listen for the dial tone, and press cbbbbbbbcbbbbbbbRedial .
d The last number you dialed (from the dial pad) is automaticallyredialed.
3 Wait for the called party to answer.
13
aaaaaaaaaaaaaaaaaaaaaaaaaaaaaaaaaaaaaaaaaaaaaaaaaaaaaaaaaaaaaaaaaaaa
SPEAKERPHONE AND SPEAKERaaaaaaaaaaaaaaaaaaaaaaaaaaaaaaaaaaaaaaaaaaaaaaaaaaaaaaaaaaaaaaaaaaaaNOTE: Your voice terminal is set for the Speaker (listen-only) or for theSpeakerphone (listen and speak) function or for neither. Check withyour System Manager to see how your voice terminal is set.
SpeakerUse the following procedures if your voice terminal is set for the Speaker(listen only) feature.
To place/answer a call without lifting the handset or to use thespeaker with any listening-only feature
1 Press cbbbbbbbbcbbbbbbbbSpeaker .
d The red light next to cbbbbbbbbcbbbbbbbbSpeaker and the red light next to cbbbbbbcbbbbbb
Mute goon.
2 Place or answer the call or access a selected feature.
3 If you are placing a call, dial the telephone number.
4 Adjust speaker volume, if necessary.
d To raise the volume, press the right half of the Volume controlbutton labeled
;
to lower the volume, press the left half of the Volume controlbutton labeled
.
5 Press cbbbbbbbbcbbbbbbbbSpeaker to hang up.
d The red light next to cbbbbbbbbcbbbbbbbbSpeaker and the red light next to cbbbbbbcbbbbbb
Mute gooff.
To activate the speaker while using the handset
1 Press cbbbbbbbbcbbbbbbbbSpeaker .
d The red light next to cbbbbbbbbcbbbbbbbbSpeaker and the red light next to cbbbbbbcbbbbbb
Mute
go on.
d The speaker is active, and the handset is turned off.
2 Hang up handset.
NOTE: If you want to speak to the other party, you must pick up thehandset (which turns off the speaker).
14
Speakerphone
Use the following procedures if your voice terminal is set for theSpeakerphone (listen and speak) feature.
NOTE: If your voice terminal is set for the Speakerphone feature, youcan adjust the speakerphone to the surrounding room acoustics toprovide optimal performance. Use the directions in "Setting theSpeakerphone" in the section titled Features Accessed with theDisplay and Softkeys.
To place/answer a call without lifting the handset or to use thespeakerphone with any voice feature
1 Press cbbbbbbbbcbbbbbbbbSpeaker .
d The red light next to cbbbbbbbbcbbbbbbbbSpeaker goes on.
2 Place or answer the call or access a selected feature.
3 If you are placing a call, dial the telephone number.
4 Adjust the speakerphone volume if necessary.
d To raise the volume, press the right half of the Volume controlbutton labeled
;
to lower the volume, press the left half of the Volume controlbutton labeled
.
5 Press cbbbbbbbbcbbbbbbbbSpeaker to hang up.
d The red light next to cbbbbbbbbcbbbbbbbbSpeaker goes off.
To prevent the other party from hearing you
NOTE: If the Speakerphone feature is not active, the Mute feature turnsoff the microphone associated with the handset (not the speakerphone).
1 Press cbbbbbbcbbbbbbMute .
d The red light goes on and the other party cannot hear you.
2 Press cbbbbbbcbbbbbbMute again to resume talking to other party.
d The red light goes off and the other party can hear you again.
To change from speakerphone to handset
1 Lift handset and talk.
d The red light next to cbbbbbbbbcbbbbbbbbSpeaker goes off.
15
Speakerphone (Continued)
To change from handset to speakerphone
1 Press cbbbbbbbbcbbbbbbbbSpeaker .
d The red light next to cbbbbbbbbcbbbbbbbbSpeaker goes on.
d The speaker is active, and the handset is turned off.
2 Hang up the handset.
aaaaaaaaaaaaaaaaaaaaaaaaaaaaaaaaaaaaaaaaaaaaaaaaaaaaaaaaaaaaaaaaaaaa
TRANSFERaaaaaaaaaaaaaaaaaaaaaaaaaaaaaaaaaaaaaaaaaaaaaaaaaaaaaaaaaaaaaaaaaaaaTo send a call to another extension
1 Press cbbbbbbbbcbbbbbbbbTransfer .
d The present call is put on hold.
d The red Transfer light flutters.
2 Listen for dial tone.
3 Dial the number that the call is to be transferred to (third party).
d Remain on the line and announce the call when the third partyanswers.
NOTE: If the number of the third party is busy or there is no answer,press the call appearance button next to the fluttering green light todisconnect the incomplete call and to return to the call on hold.
4 Press cbbbbbbbbcbbbbbbbbTransfer again.
d The party on hold is transferred to the third party.
d Your voice terminal is released from the call.
5 Hang up.
NOTE: To prevent a transfer call from disconnecting, complete thetransfer process before entering into another action, such asanswering another call.
16
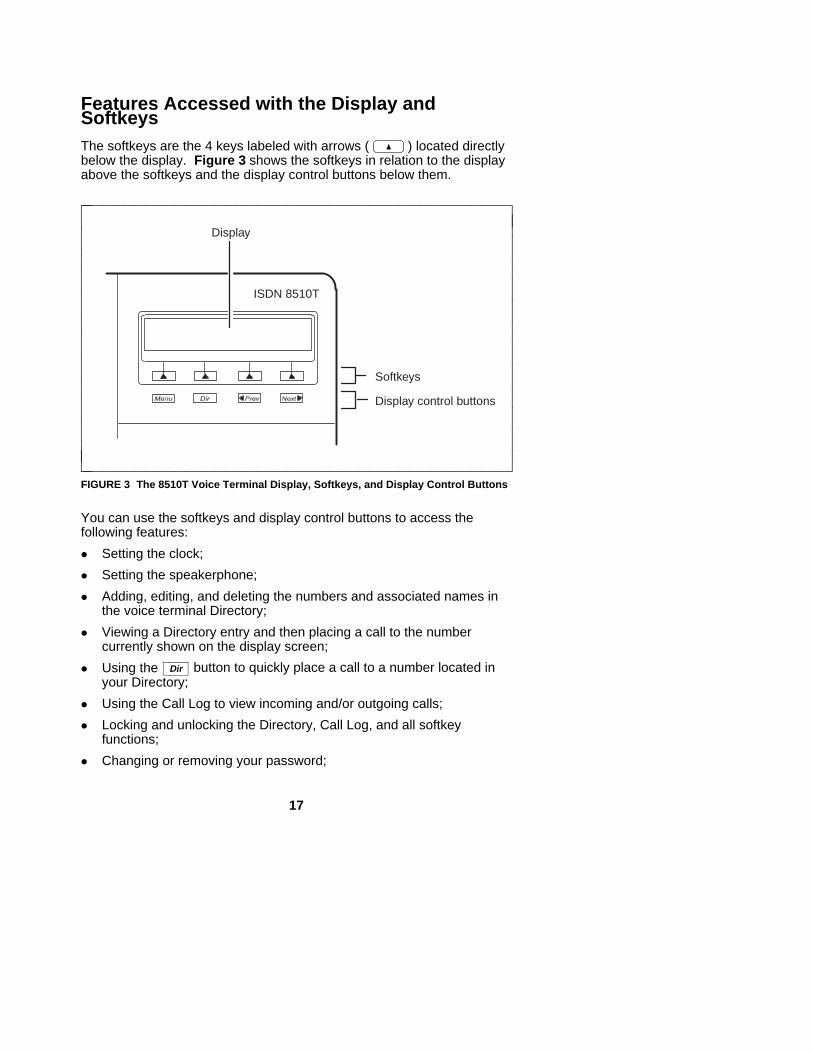
Features Accessed with the Display andSoftkeysThe softkeys are the 4 keys labeled with arrows ( ) located directlybelow the display. Figure 3 shows the softkeys in relation to the displayabove the softkeys and the display control buttons below them.
Display control buttons
Softkeys
Display
ISDN 8510T
cccccccccccccbbbbbbbbbbbbbbbbbbbbbbbbbbbbbbbbbbbbbbbbbbb
cccccccccccccbbbbbbbbbbbbbbbbbbbbbbbbbbbbbbbbbbbbbbbbbbb
FIGURE 3 The 8510T Voice Terminal Display, Softkeys, and Display Control Buttons
You can use the softkeys and display control buttons to access thefollowing features:
d Setting the clock;
d Setting the speakerphone;
d Adding, editing, and deleting the numbers and associated names inthe voice terminal Directory;
d Viewing a Directory entry and then placing a call to the numbercurrently shown on the display screen;
d Using the cbbbbcbbbbDir button to quickly place a call to a number located in
your Directory;
d Using the Call Log to view incoming and/or outgoing calls;
d Locking and unlocking the Directory, Call Log, and all softkeyfunctions;
d Changing or removing your password;
17
d Initiating a self-test of the voice terminal’s lights, ringer, buttons, anddial pad keys;
d Selecting the contrast level for the display;
d Selecting a personalized ringing pattern;
d Setting the rate at which the display messages are shown on thescreen;
d Adding confirmation or error tones to display messages;
d Setting the number of names on a Directory page.
ENTERING AND EXITING SOFTKEY MODE(USING THE MENU AND THE EXIT BUTTONS)
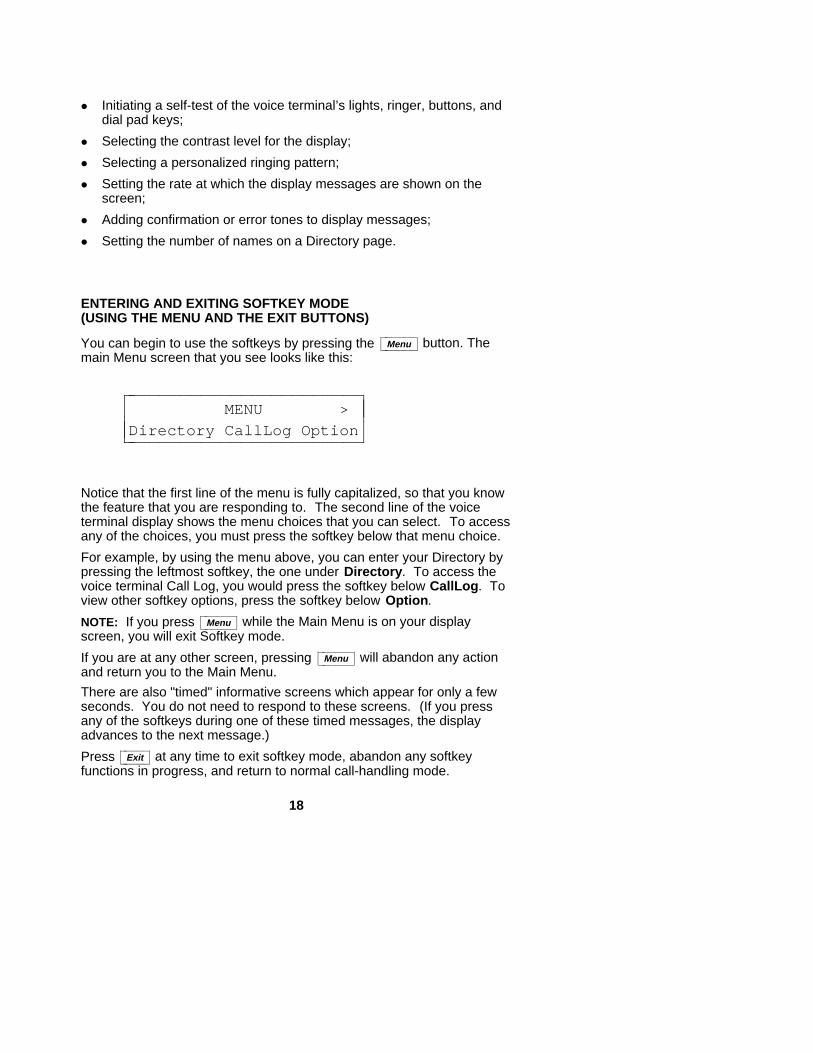
You can begin to use the softkeys by pressing the cbbbbbbcbbbbbbMenu button. The
main Menu screen that you see looks like this:
MENU >
Directory CallLog Optioncccbbbbbbbbbbbbbbbbbbbbbbbb
cccbbbbbbbbbbbbbbbbbbbbbbbb
Notice that the first line of the menu is fully capitalized, so that you knowthe feature that you are responding to. The second line of the voiceterminal display shows the menu choices that you can select. To accessany of the choices, you must press the softkey below that menu choice.
For example, by using the menu above, you can enter your Directory bypressing the leftmost softkey, the one under Directory. To access thevoice terminal Call Log, you would press the softkey below CallLog. Toview other softkey options, press the softkey below Option.
NOTE: If you press cbbbbbbcbbbbbbMenu while the Main Menu is on your display
screen, you will exit Softkey mode.
If you are at any other screen, pressing cbbbbbbcbbbbbbMenu will abandon any action
and return you to the Main Menu.
There are also "timed" informative screens which appear for only a fewseconds. You do not need to respond to these screens. (If you pressany of the softkeys during one of these timed messages, the displayadvances to the next message.)
Press cbbbbbcbbbbbExit at any time to exit softkey mode, abandon any softkey
functions in progress, and return to normal call-handling mode.
18
THE VOICE TERMINAL SELF-TEST FEATURE
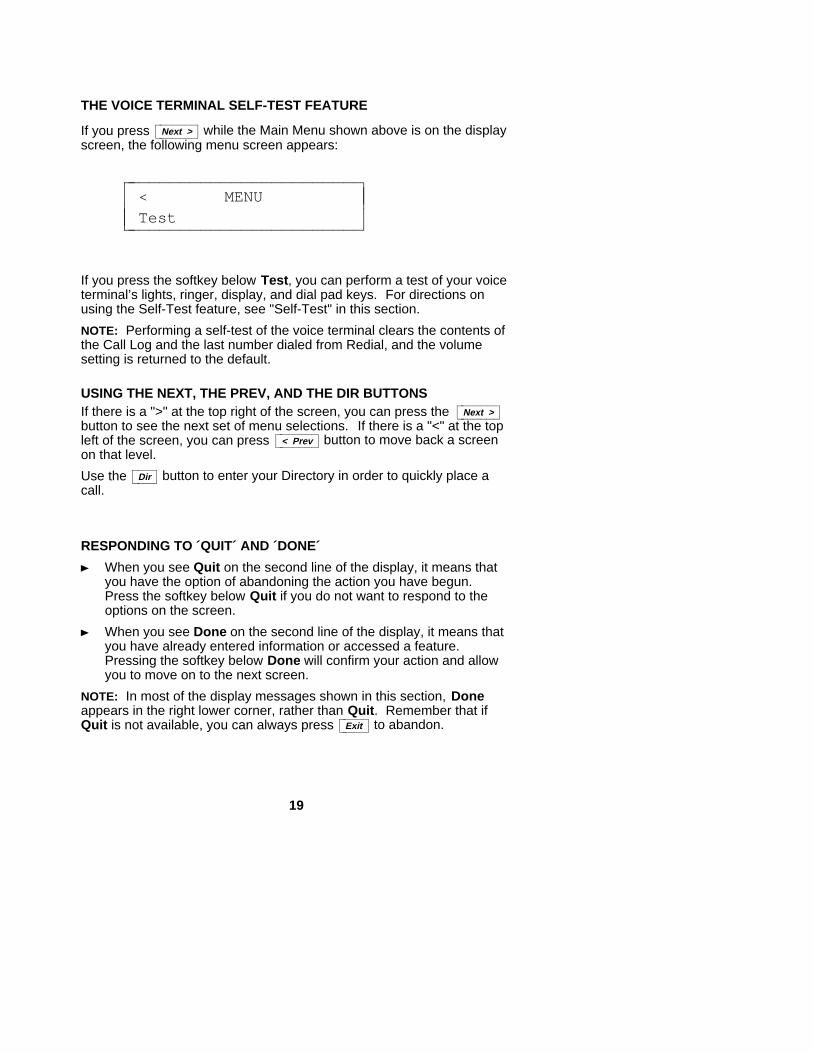
If you press cbbbbbbbcbbbbbbbNext > while the Main Menu shown above is on the display
screen, the following menu screen appears:
< MENU Testcc
cbbbbbbbbbbbbbbbbbbbbbbbb
cccbbbbbbbbbbbbbbbbbbbbbbbb
If you press the softkey below Test, you can perform a test of your voiceterminal’s lights, ringer, display, and dial pad keys. For directions onusing the Self-Test feature, see "Self-Test" in this section.
NOTE: Performing a self-test of the voice terminal clears the contents ofthe Call Log and the last number dialed from Redial, and the volumesetting is returned to the default.
USING THE NEXT, THE PREV, AND THE DIR BUTTONSIf there is a ">" at the top right of the screen, you can press the cbbbbbbbcbbbbbbb
Next >
button to see the next set of menu selections. If there is a "<" at the topleft of the screen, you can press cbbbbbbbcbbbbbbb
< Prev button to move back a screenon that level.
Use the cbbbbcbbbbDir button to enter your Directory in order to quickly place a
call.
RESPONDING TO ´QUIT´ AND ´DONE´
When you see Quit on the second line of the display, it means thatyou have the option of abandoning the action you have begun.Press the softkey below Quit if you do not want to respond to theoptions on the screen.
When you see Done on the second line of the display, it means thatyou have already entered information or accessed a feature.Pressing the softkey below Done will confirm your action and allowyou to move on to the next screen.
NOTE: In most of the display messages shown in this section, Doneappears in the right lower corner, rather than Quit. Remember that ifQuit is not available, you can always press cbbbbbcbbbbb
Exit to abandon.
19

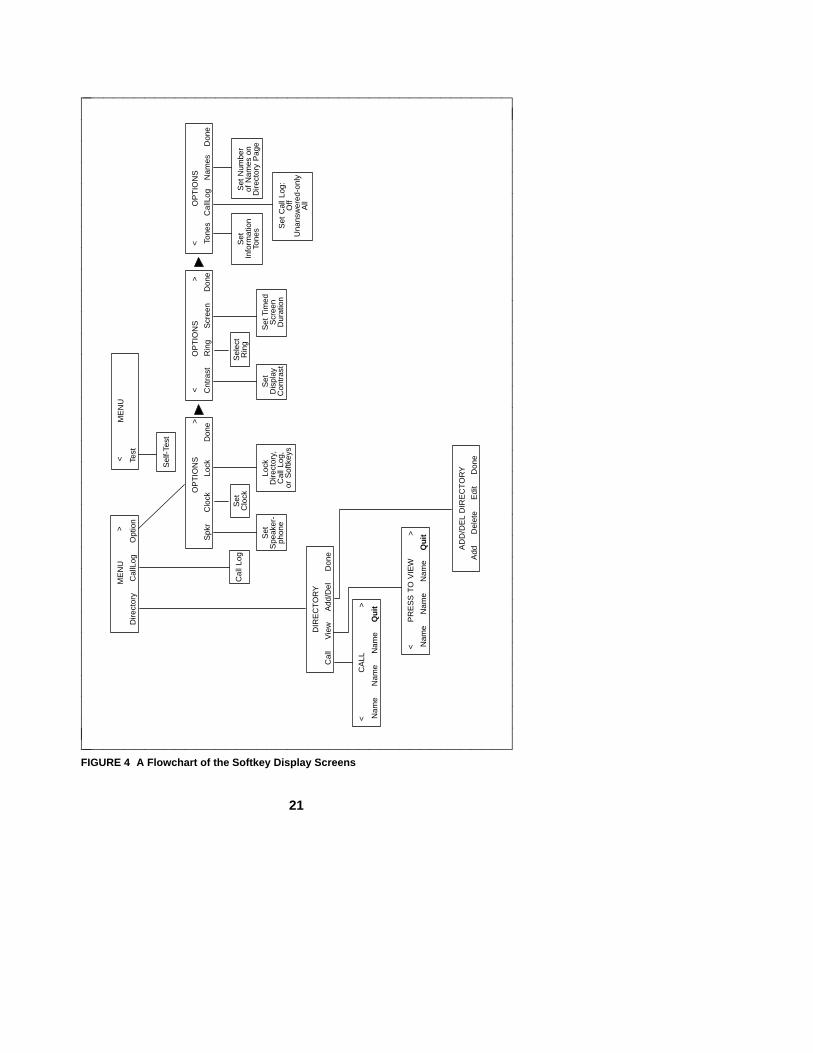
A SOFTKEY DISPLAY SCREEN FLOWCHART
Review the display screen flowchart in Figure 4 before you begin usingthe softkey features. A more detailed flowchart appears in the ISDN8510T Voice Terminal Quick Reference Guide.
20
Spk
r
ME
NU
Dire
ctor
y
C
allL
og
O
ptio
n
>
DIR
EC
TO
RY
Cal
l
Vie
w
Add
/Del
Don
e
AD
D/D
EL
DIR
EC
TO
RY
Add
D
elet
e
Edi
t
Don
e
Cal
l Log
OP
TIO
NS
>
Set
Spe
aker
-ph
one
Set
Clo
ck
Lock
Dire
ctor
y,C
all L
og,
or S
oftk
eys
ME
NU
Test
<
Sel
f-Te
st
OP
TIO
NS
Cnt
rast
R
ing
S
cree
n
Don
e>
Set
Dis
play
Sel
ect
Set
Tim
ed
< Con
tras
t
Rin
g
Scr
een
Dur
atio
n
OP
TIO
NS
Tone
s
Set
Info
rmat
ion
Set
Cal
l Log
:
< Tone
s
Off
Una
nsw
ered
-onl
yA
ll
CA
LL
Nam
e
Nam
e
Nam
e
><
Qui
t
PR
ES
S T
O V
IEW
Nam
e
Nam
e
Nam
e
><
Qui
t
Don
eC
allL
ogD
one
Clo
ckLo
ckN
ames
Set
Num
ber
of N
ames
on
Dire
ctor
y P
age
cccccccccccccccccccccccccccccccbbbbbbbbbbbbbbbbbbbbbbbbbbbbbbbbbbbbbbbbbbb
cccccccccccccccccccccccccccccccbbbbbbbbbbbbbbbbbbbbbbbbbbbbbbbbbbbbbbbbbbb
FIGURE 4 A Flowchart of the Softkey Display Screens
21
aaaaaaaaaaaaaaaaaaaaaaaaaaaaaaaaaaaaaaaaaaaaaaaaaaaaaaaaaaaaaaaaaaaa
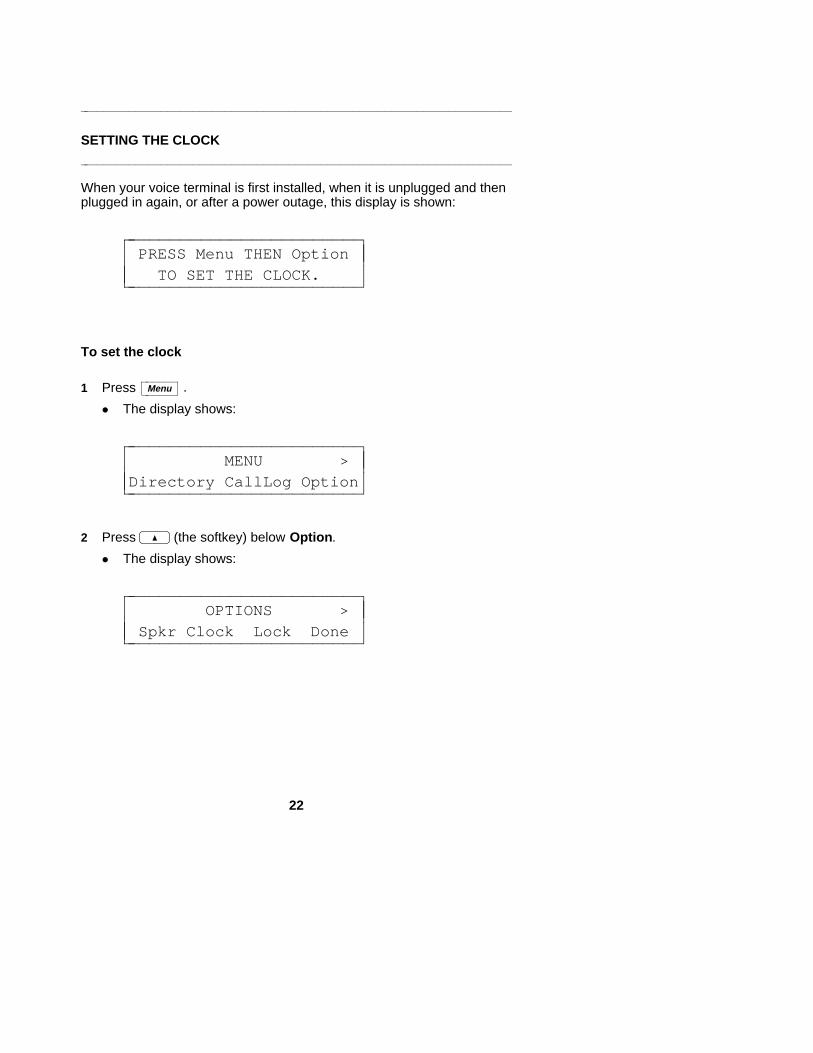
SETTING THE CLOCKaaaaaaaaaaaaaaaaaaaaaaaaaaaaaaaaaaaaaaaaaaaaaaaaaaaaaaaaaaaaaaaaaaaaWhen your voice terminal is first installed, when it is unplugged and thenplugged in again, or after a power outage, this display is shown:
PRESS Menu THEN Option
TO SET THE CLOCK.cccbbbbbbbbbbbbbbbbbbbbbbbb
cccbbbbbbbbbbbbbbbbbbbbbbbb
To set the clock
1 Press cbbbbbbcbbbbbbMenu .
d The display shows:
MENU >Directory CallLog Optioncccbbbbbbbbbbbbbbbbbbbbbbbb
cccbbbbbbbbbbbbbbbbbbbbbbbb2 Press (the softkey) below Option.
d The display shows:
OPTIONS >
Spkr Clock Lock Donecccbbbbbbbbbbbbbbbbbbbbbbbb
cccbbbbbbbbbbbbbbbbbbbbbbbb
22
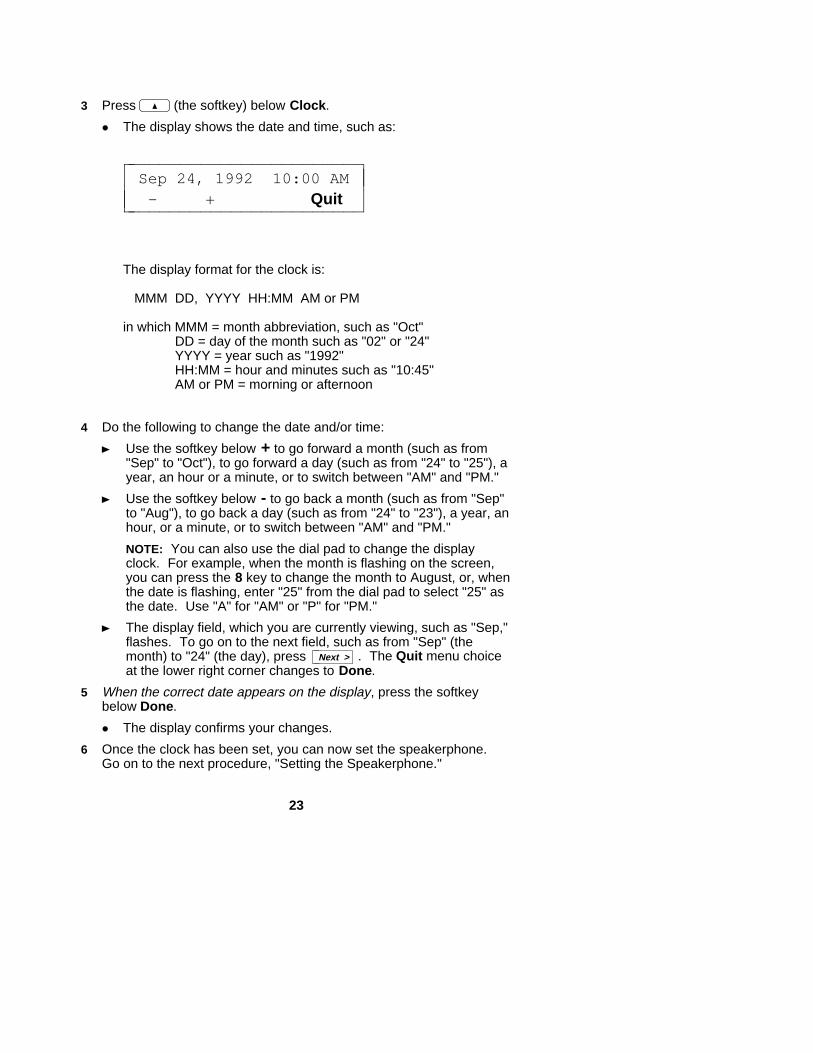
3 Press (the softkey) below Clock.
d The display shows the date and time, such as:
Sep 24, 1992 10:00 AM- + Quitcc
cbbbbbbbbbbbbbbbbbbbbbbbbcccbbbbbbbbbbbbbbbbbbbbbbbb
The display format for the clock is:
MMM DD, YYYY HH:MM AM or PM
in which MMM = month abbreviation, such as "Oct" DD = day of the month such as "02" or "24" YYYY = year such as "1992" HH:MM = hour and minutes such as "10:45" AM or PM = morning or afternoon
4 Do the following to change the date and/or time:
Use the softkey below + to go forward a month (such as from"Sep" to "Oct"), to go forward a day (such as from "24" to "25"), ayear, an hour or a minute, or to switch between "AM" and "PM."
Use the softkey below - to go back a month (such as from "Sep"to "Aug"), to go back a day (such as from "24" to "23"), a year, anhour, or a minute, or to switch between "AM" and "PM."
NOTE: You can also use the dial pad to change the displayclock. For example, when the month is flashing on the screen,you can press the 8 key to change the month to August, or, whenthe date is flashing, enter "25" from the dial pad to select "25" asthe date. Use "A" for "AM" or "P" for "PM."
The display field, which you are currently viewing, such as "Sep,"flashes. To go on to the next field, such as from "Sep" (themonth) to "24" (the day), press cbbbbbbbcbbbbbbb
Next > . The Quit menu choiceat the lower right corner changes to Done.
5 When the correct date appears on the display, press the softkeybelow Done.
d The display confirms your changes.
6 Once the clock has been set, you can now set the speakerphone.Go on to the next procedure, "Setting the Speakerphone."
23
aaaaaaaaaaaaaaaaaaaaaaaaaaaaaaaaaaaaaaaaaaaaaaaaaaaaaaaaaaaaaaaaaaaa
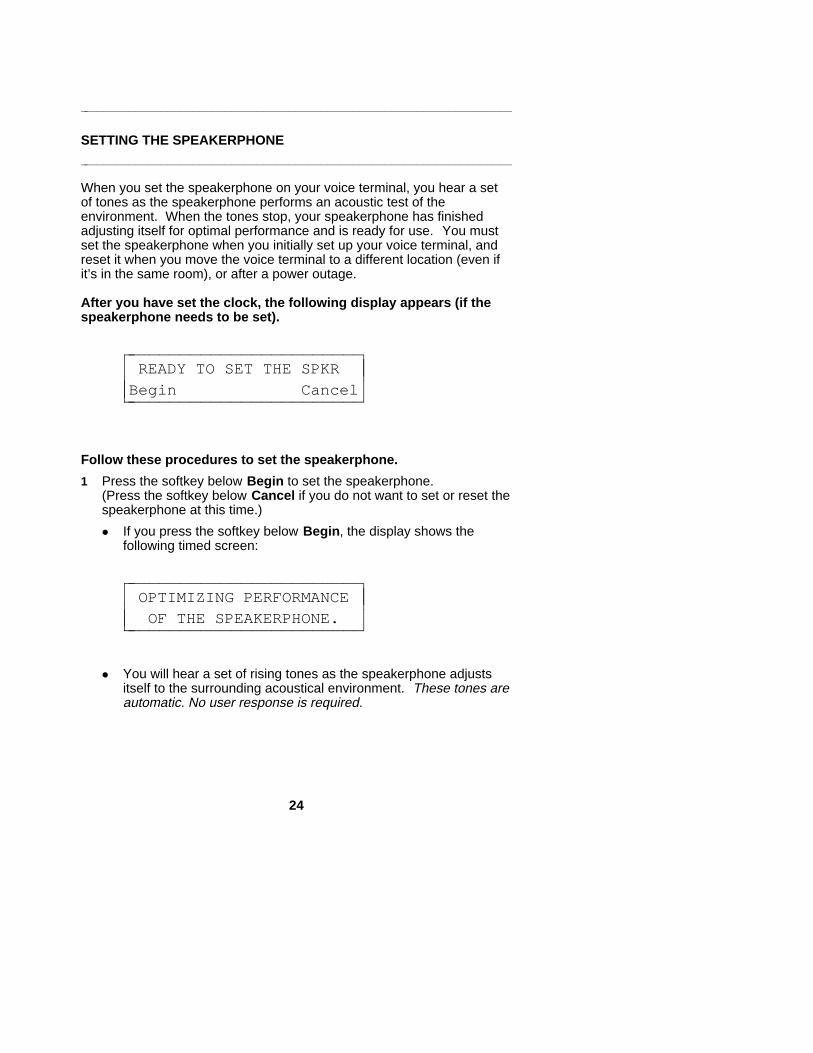
SETTING THE SPEAKERPHONEaaaaaaaaaaaaaaaaaaaaaaaaaaaaaaaaaaaaaaaaaaaaaaaaaaaaaaaaaaaaaaaaaaaaWhen you set the speakerphone on your voice terminal, you hear a setof tones as the speakerphone performs an acoustic test of theenvironment. When the tones stop, your speakerphone has finishedadjusting itself for optimal performance and is ready for use. You mustset the speakerphone when you initially set up your voice terminal, andreset it when you move the voice terminal to a different location (even ifit’s in the same room), or after a power outage.
After you have set the clock, the following display appears (if thespeakerphone needs to be set).
READY TO SET THE SPKR
Begin Cancelcccbbbbbbbbbbbbbbbbbbbbbbbb
cccbbbbbbbbbbbbbbbbbbbbbbbb
Follow these procedures to set the speakerphone.
1 Press the softkey below Begin to set the speakerphone.(Press the softkey below Cancel if you do not want to set or reset thespeakerphone at this time.)
d If you press the softkey below Begin, the display shows thefollowing timed screen:
OPTIMIZING PERFORMANCE OF THE SPEAKERPHONE.cc
cbbbbbbbbbbbbbbbbbbbbbbbb
cccbbbbbbbbbbbbbbbbbbbbbbbb
d You will hear a set of rising tones as the speakerphone adjustsitself to the surrounding acoustical environment. These tones areautomatic. No user response is required.
24

The following procedure is an alternate way of using the softkeys toset the speakerphone.
1 Press cbbbbbbcbbbbbbMenu .
2 Press the softkey below Option.
d The display shows:
OPTIONS >Spkr Clock Lock Donecc
cbbbbbbbbbbbbbbbbbbbbbbbb
cccbbbbbbbbbbbbbbbbbbbbbbbb3 Press the softkey below Spkr.
d The display shows:
OPTIMIZING PERFORMANCE
OF THE SPEAKERPHONE.cccbbbbbbbbbbbbbbbbbbbbbbbb
cccbbbbbbbbbbbbbbbbbbbbbbbb
d You hear a set of rising tones as the speakerphone adjusts itselfto the surrounding acoustical environment. These tones areautomatic. No user response is required.
25
aaaaaaaaaaaaaaaaaaaaaaaaaaaaaaaaaaaaaaaaaaaaaaaaaaaaaaaaaaaaaaaaaaaa
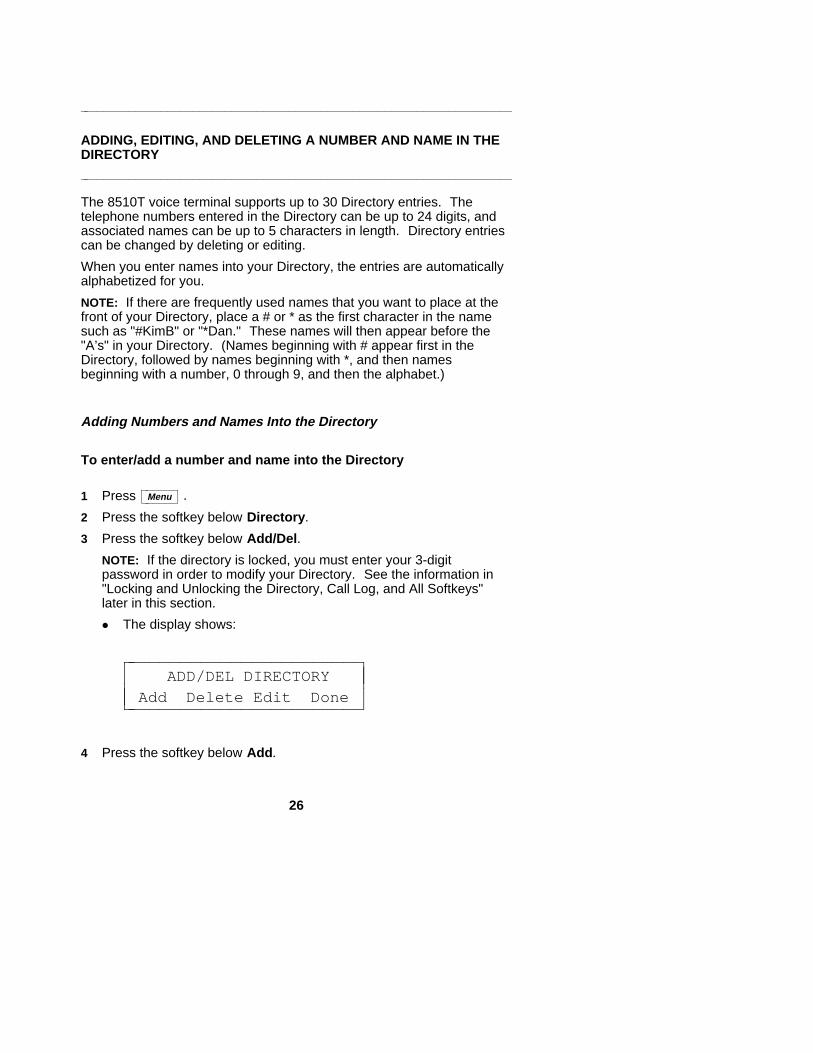
ADDING, EDITING, AND DELETING A NUMBER AND NAME IN THEDIRECTORYaaaaaaaaaaaaaaaaaaaaaaaaaaaaaaaaaaaaaaaaaaaaaaaaaaaaaaaaaaaaaaaaaaaaThe 8510T voice terminal supports up to 30 Directory entries. Thetelephone numbers entered in the Directory can be up to 24 digits, andassociated names can be up to 5 characters in length. Directory entriescan be changed by deleting or editing.
When you enter names into your Directory, the entries are automaticallyalphabetized for you.
NOTE: If there are frequently used names that you want to place at thefront of your Directory, place a # or * as the first character in the namesuch as "#KimB" or "*Dan." These names will then appear before the"A’s" in your Directory. (Names beginning with # appear first in theDirectory, followed by names beginning with *, and then namesbeginning with a number, 0 through 9, and then the alphabet.)
Adding Numbers and Names Into the Directory
To enter/add a number and name into the Directory
1 Press cbbbbbbcbbbbbbMenu .
2 Press the softkey below Directory.
3 Press the softkey below Add/Del.
NOTE: If the directory is locked, you must enter your 3-digitpassword in order to modify your Directory. See the information in"Locking and Unlocking the Directory, Call Log, and All Softkeys"later in this section.
d The display shows:
ADD/DEL DIRECTORYAdd Delete Edit Donecc
cbbbbbbbbbbbbbbbbbbbbbbbb
cccbbbbbbbbbbbbbbbbbbbbbbbb4 Press the softkey below Add.
26
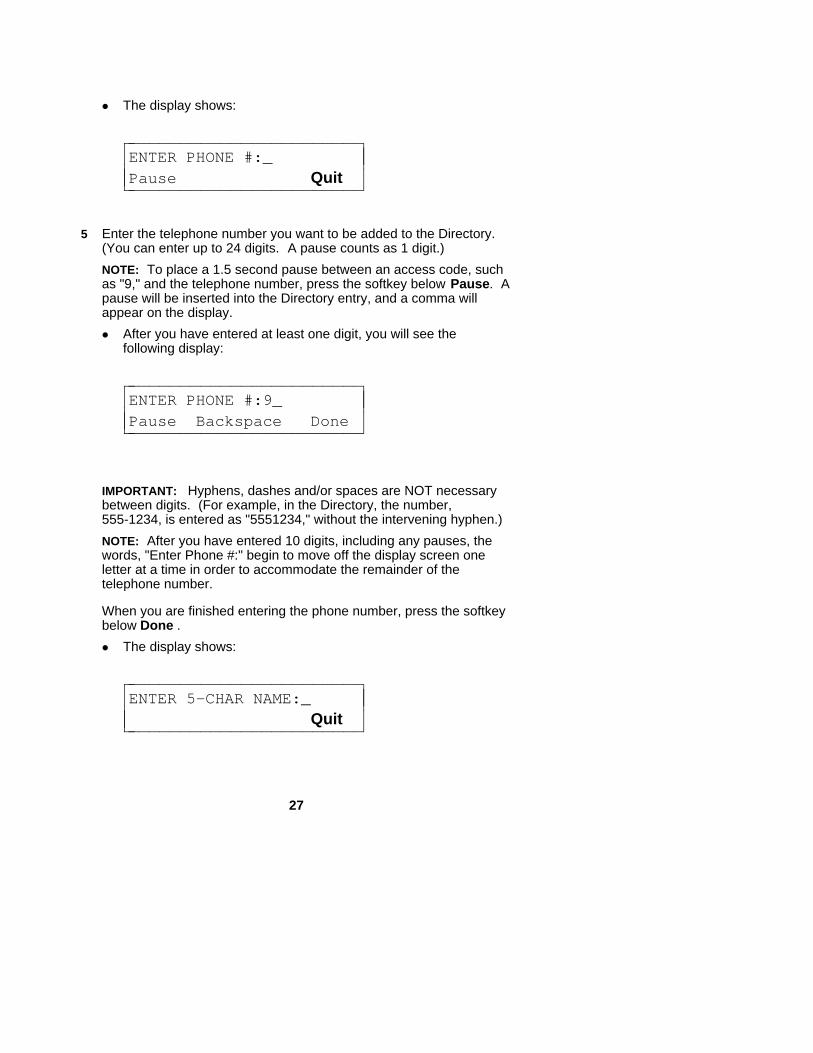
d The display shows:
ENTER PHONE #:_
Pause Quitcccbbbbbbbbbbbbbbbbbbbbbbbb
cccbbbbbbbbbbbbbbbbbbbbbbbb
5 Enter the telephone number you want to be added to the Directory.(You can enter up to 24 digits. A pause counts as 1 digit.)
NOTE: To place a 1.5 second pause between an access code, suchas "9," and the telephone number, press the softkey below Pause. Apause will be inserted into the Directory entry, and a comma willappear on the display.
d After you have entered at least one digit, you will see thefollowing display:
ENTER PHONE #:9_Pause Backspace Donecccbbbbbbbbbbbbbbbbbbbbbbbb
cccbbbbbbbbbbbbbbbbbbbbbbbb
IMPORTANT: Hyphens, dashes and/or spaces are NOT necessarybetween digits. (For example, in the Directory, the number,555-1234, is entered as "5551234," without the intervening hyphen.)
NOTE: After you have entered 10 digits, including any pauses, thewords, "Enter Phone #:" begin to move off the display screen oneletter at a time in order to accommodate the remainder of thetelephone number.
When you are finished entering the phone number, press the softkeybelow Done .
d The display shows:
ENTER 5-CHAR NAME:_ Quitcc
cbbbbbbbbbbbbbbbbbbbbbbbb
cccbbbbbbbbbbbbbbbbbbbbbbbb
27

6 Use the dial pad keys to enter the name of the person whose numberyou have just added to the Directory. Pressing the softkey belowQuit now will abandon the procedure. The number you entered willnot be saved.
IMPORTANT: You may need to press the dial pad key more thanonce to enter the correct character. For example, press the GHI (or4) key once to enter a "G"; press the 4 key twice to enter an "H";press the key a third time to enter an "I." If you press the dial padkey a fourth time, a "4" appears on the screen. If you press the keyagain, the screen will again print a "G."
You can also use a # or a * at the beginning of or within the name.
Once the letter on the screen is correct, you must press cbbbbbbbcbbbbbbbNext > to
enter the next letter.
d After you have entered at least one character, the followingdisplay appears:
ENTER 5-CHAR NAME:A
Case DeleteChar Donecccbbbbbbbbbbbbbbbbbbbbbbbb
cccbbbbbbbbbbbbbbbbbbbbbbbb
NOTE: As you enter each letter of the name, that letter flashes onthe screen until you move on to the next letter.
When a letter is flashing, use Case to switch between UPPERCASE and lower case letters. Of course, you may have acombination of both in your 5-character name (such as Sandy orHarvW).
When a letter is flashing, use DeleteChar to erase that letter.
Use cbbbbbcbbbbbNext to advance to the next letter.
ENTER 5-CHAR NAME:A_Backspace Donecc
cbbbbbbbbbbbbbbbbbbbbbbbb
cccbbbbbbbbbbbbbbbbbbbbbbbbWhen Backspace appears on the second line of the display, youcan use this feature to go back 1 space and erase the previousletter.
28
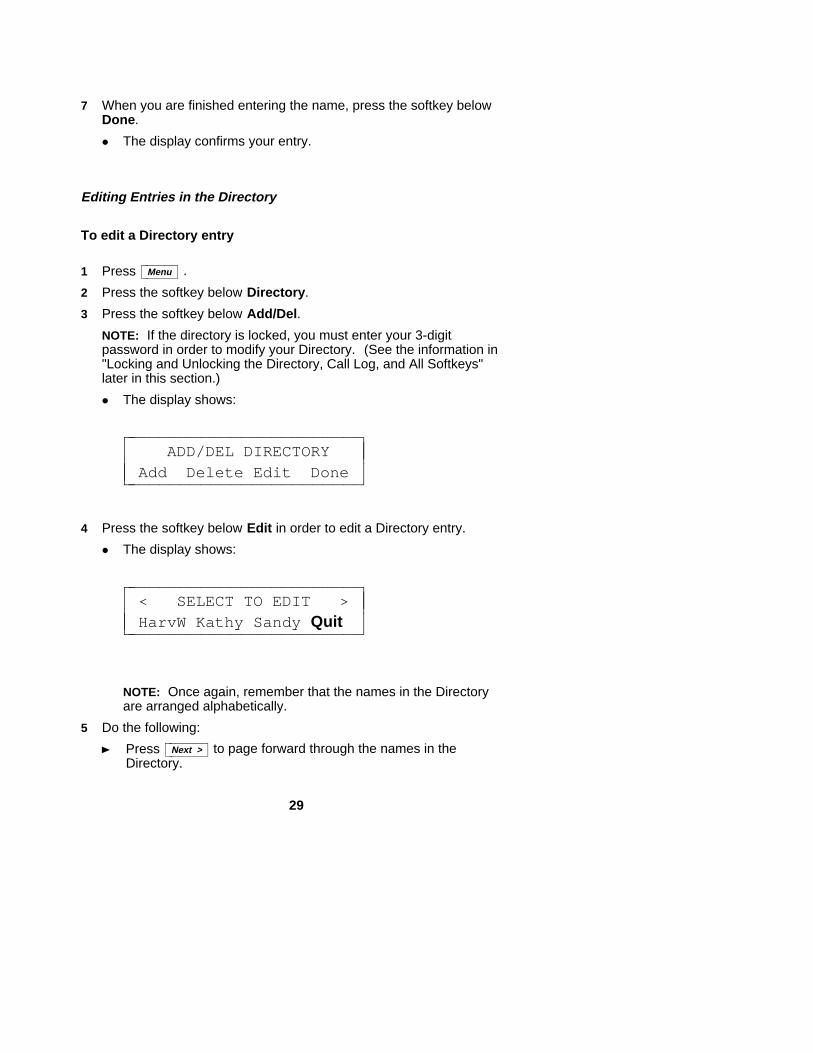
7 When you are finished entering the name, press the softkey belowDone.
d The display confirms your entry.
Editing Entries in the Directory
To edit a Directory entry
1 Press cbbbbbbcbbbbbbMenu .
2 Press the softkey below Directory.
3 Press the softkey below Add/Del.
NOTE: If the directory is locked, you must enter your 3-digitpassword in order to modify your Directory. (See the information in"Locking and Unlocking the Directory, Call Log, and All Softkeys"later in this section.)
d The display shows:
ADD/DEL DIRECTORYAdd Delete Edit Donecc
cbbbbbbbbbbbbbbbbbbbbbbbbcccbbbbbbbbbbbbbbbbbbbbbbbb
4 Press the softkey below Edit in order to edit a Directory entry.
d The display shows:
< SELECT TO EDIT >HarvW Kathy Sandy Quitcc
cbbbbbbbbbbbbbbbbbbbbbbbb
cccbbbbbbbbbbbbbbbbbbbbbbbb
NOTE: Once again, remember that the names in the Directoryare arranged alphabetically.
5 Do the following:
Press cbbbbbbbcbbbbbbbNext > to page forward through the names in the
Directory.
29
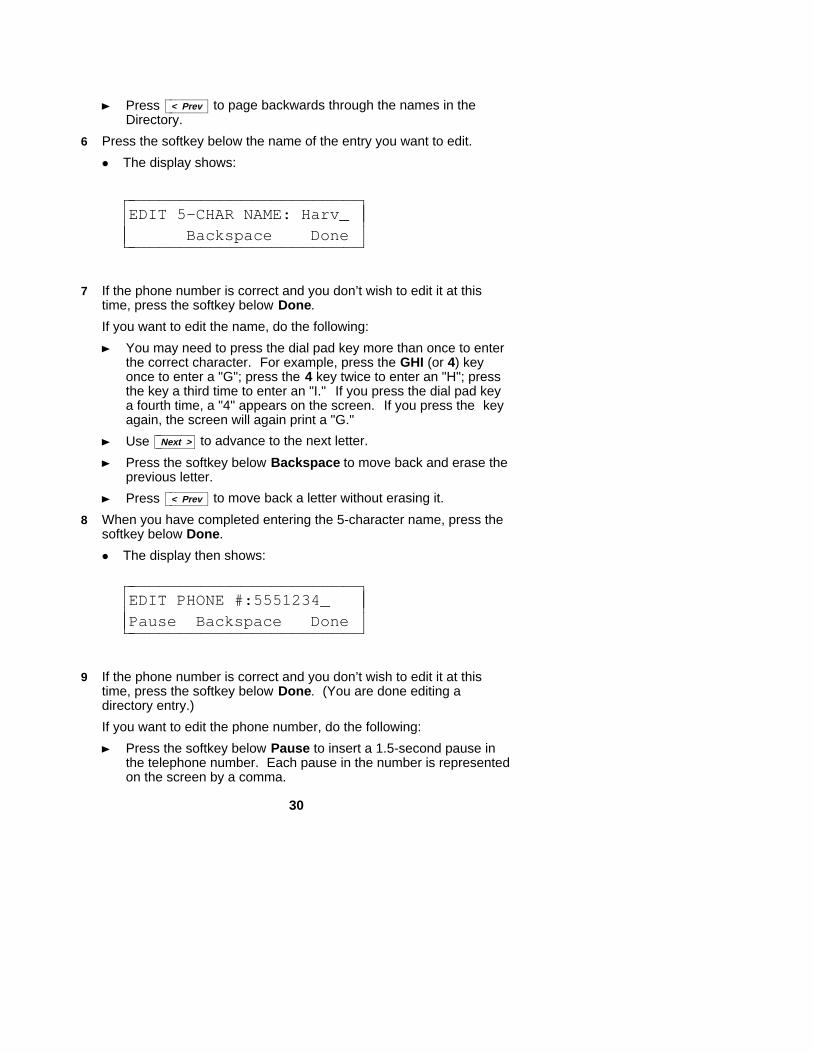
Press cbbbbbbbcbbbbbbb< Prev to page backwards through the names in the
Directory.
6 Press the softkey below the name of the entry you want to edit.
d The display shows:
EDIT 5-CHAR NAME: Harv_Backspace Donecc
cbbbbbbbbbbbbbbbbbbbbbbbb
cccbbbbbbbbbbbbbbbbbbbbbbbb
7 If the phone number is correct and you don’t wish to edit it at thistime, press the softkey below Done.
If you want to edit the name, do the following:
You may need to press the dial pad key more than once to enterthe correct character. For example, press the GHI (or 4) keyonce to enter a "G"; press the 4 key twice to enter an "H"; pressthe key a third time to enter an "I." If you press the dial pad keya fourth time, a "4" appears on the screen. If you press the keyagain, the screen will again print a "G."
Use cbbbbbbbcbbbbbbbNext > to advance to the next letter.
Press the softkey below Backspace to move back and erase theprevious letter.
Press cbbbbbbbcbbbbbbb< Prev to move back a letter without erasing it.
8 When you have completed entering the 5-character name, press thesoftkey below Done.
d The display then shows:
EDIT PHONE #:5551234_
Pause Backspace Donecccbbbbbbbbbbbbbbbbbbbbbbbb
cccbbbbbbbbbbbbbbbbbbbbbbbb
9 If the phone number is correct and you don’t wish to edit it at thistime, press the softkey below Done. (You are done editing adirectory entry.)
If you want to edit the phone number, do the following:
Press the softkey below Pause to insert a 1.5-second pause inthe telephone number. Each pause in the number is representedon the screen by a comma.
30
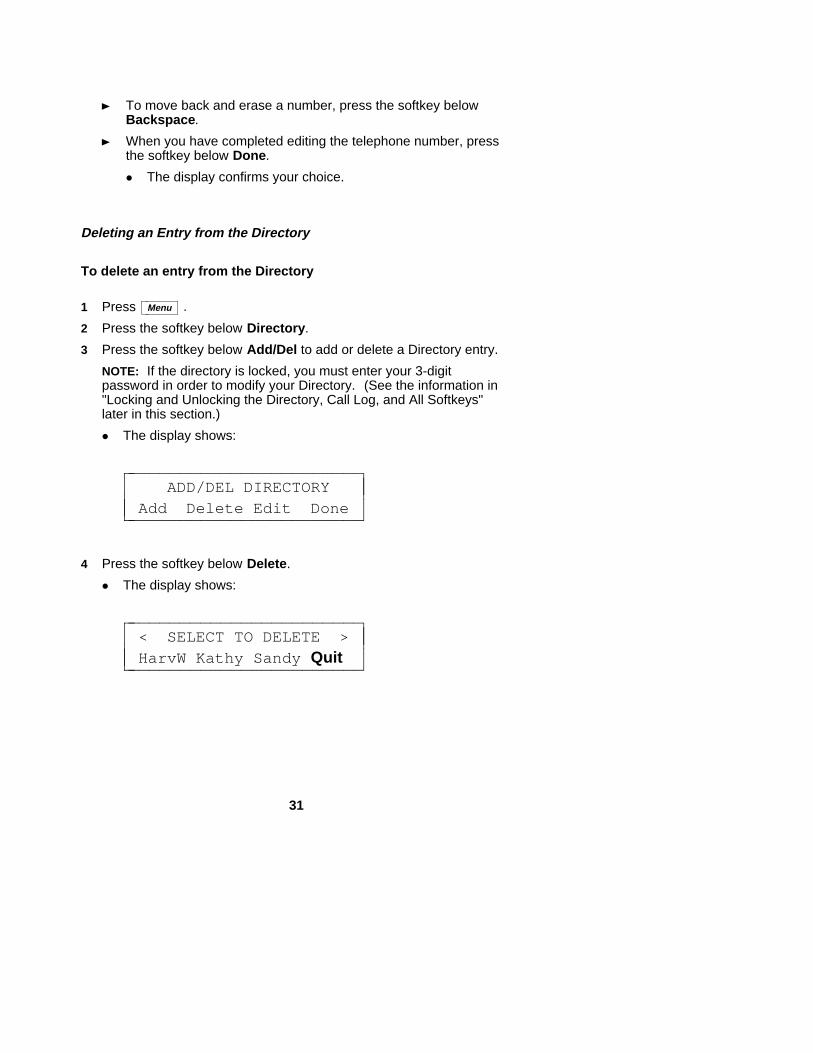
To move back and erase a number, press the softkey belowBackspace.
When you have completed editing the telephone number, pressthe softkey below Done.
d The display confirms your choice.
Deleting an Entry from the Directory
To delete an entry from the Directory
1 Press cbbbbbbcbbbbbbMenu .
2 Press the softkey below Directory.
3 Press the softkey below Add/Del to add or delete a Directory entry.
NOTE: If the directory is locked, you must enter your 3-digitpassword in order to modify your Directory. (See the information in"Locking and Unlocking the Directory, Call Log, and All Softkeys"later in this section.)
d The display shows:
ADD/DEL DIRECTORYAdd Delete Edit Donecc
cbbbbbbbbbbbbbbbbbbbbbbbb
cccbbbbbbbbbbbbbbbbbbbbbbbb
4 Press the softkey below Delete.
d The display shows:
< SELECT TO DELETE >
HarvW Kathy Sandy Quitcccbbbbbbbbbbbbbbbbbbbbbbbb
cccbbbbbbbbbbbbbbbbbbbbbbbb
31

5 Do the following:
Press cbbbbbbbcbbbbbbbNext > to page forward through the names in the
Directory.
Press cbbbbbbbcbbbbbbb< Prev to page backwards through the names in the
Directory.
6 Press the softkey below the name of the entry you want to delete.
d The display shows:
5551234
HarvW Delete Quitcccbbbbbbbbbbbbbbbbbbbbbbbb
cccbbbbbbbbbbbbbbbbbbbbbbbb
7 Press the softkey below Delete if you want to delete this entry.
d The display confirms your choice.
32
aaaaaaaaaaaaaaaaaaaaaaaaaaaaaaaaaaaaaaaaaaaaaaaaaaaaaaaaaaaaaaaaaaaa
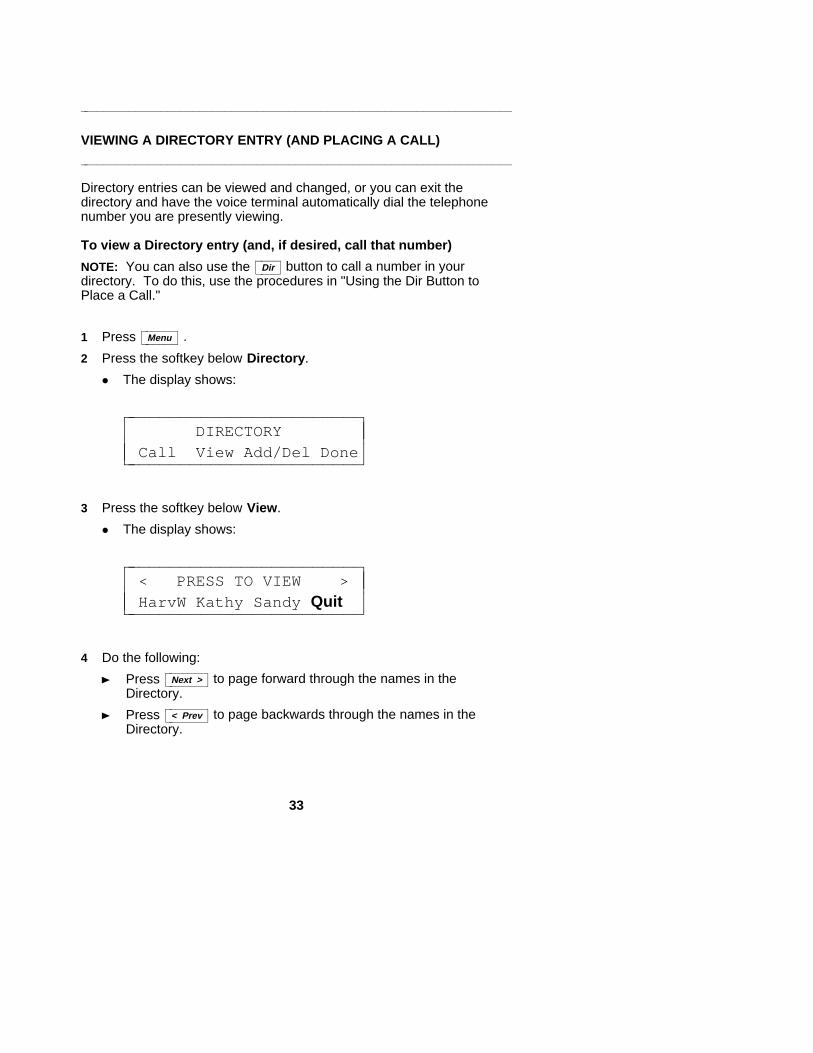
VIEWING A DIRECTORY ENTRY (AND PLACING A CALL)aaaaaaaaaaaaaaaaaaaaaaaaaaaaaaaaaaaaaaaaaaaaaaaaaaaaaaaaaaaaaaaaaaaaDirectory entries can be viewed and changed, or you can exit thedirectory and have the voice terminal automatically dial the telephonenumber you are presently viewing.
To view a Directory entry (and, if desired, call that number)
NOTE: You can also use the cbbbbcbbbbDir button to call a number in your
directory. To do this, use the procedures in "Using the Dir Button toPlace a Call."
1 Press cbbbbbbcbbbbbbMenu .
2 Press the softkey below Directory.
d The display shows:
DIRECTORYCall View Add/Del Done cc
cbbbbbbbbbbbbbbbbbbbbbbbb
cccbbbbbbbbbbbbbbbbbbbbbbbb
3 Press the softkey below View.
d The display shows:
< PRESS TO VIEW >
HarvW Kathy Sandy Quitcccbbbbbbbbbbbbbbbbbbbbbbbb
cccbbbbbbbbbbbbbbbbbbbbbbbb
4 Do the following:
Press cbbbbbbbcbbbbbbbNext > to page forward through the names in the
Directory.
Press cbbbbbbbcbbbbbbb< Prev to page backwards through the names in the
Directory.
33
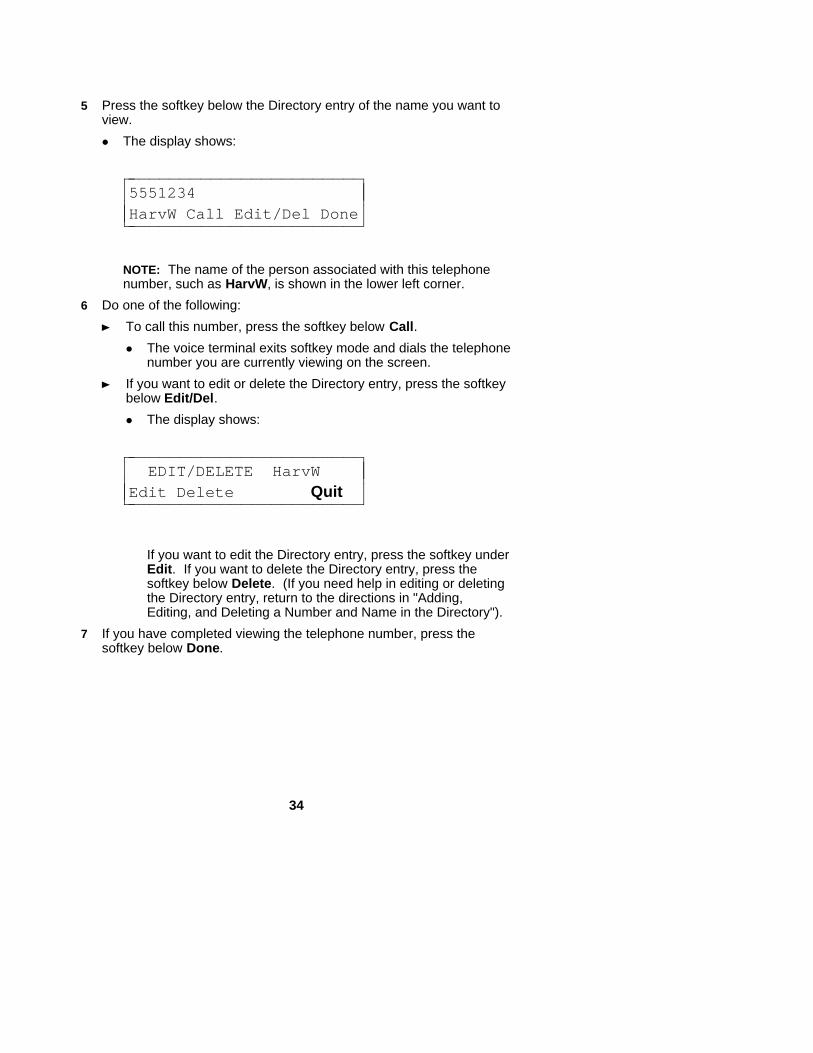
5 Press the softkey below the Directory entry of the name you want toview.
d The display shows:
5551234HarvW Call Edit/Del Donecccbbbbbbbbbbbbbbbbbbbbbbbbcc
cbbbbbbbbbbbbbbbbbbbbbbbbNOTE: The name of the person associated with this telephonenumber, such as HarvW, is shown in the lower left corner.
6 Do one of the following:
To call this number, press the softkey below Call.
d The voice terminal exits softkey mode and dials the telephonenumber you are currently viewing on the screen.
If you want to edit or delete the Directory entry, press the softkeybelow Edit/Del.
d The display shows:
EDIT/DELETE HarvWEdit Delete Quitcccbbbbbbbbbbbbbbbbbbbbbbbb
cccbbbbbbbbbbbbbbbbbbbbbbbb
If you want to edit the Directory entry, press the softkey underEdit. If you want to delete the Directory entry, press thesoftkey below Delete. (If you need help in editing or deletingthe Directory entry, return to the directions in "Adding,Editing, and Deleting a Number and Name in the Directory").
7 If you have completed viewing the telephone number, press thesoftkey below Done.
34

aaaaaaaaaaaaaaaaaaaaaaaaaaaaaaaaaaaaaaaaaaaaaaaaaaaaaaaaaaaaaaaaaaaa
USING THE DIR BUTTON TO PLACE A CALLaaaaaaaaaaaaaaaaaaaaaaaaaaaaaaaaaaaaaaaaaaaaaaaaaaaaaaaaaaaaaaaaaaaaYou can also use the cbbbbcbbbb
Dir button to place a call to a number entered inyour Directory.
IMPORTANT: When you press the softkey under the name in theDirectory you wish to call, the call is placed immediately. The menudoes not ask you to respond to a screen before the call is placed.
To use the Dir button to call a person whose number appears inyour Directory
1 Press cbbbbcbbbbDir to enter your Directory.
d The display shows:
< CALL >HarvW Kathy Sandy Quitcc
cbbbbbbbbbbbbbbbbbbbbbbbb
cccbbbbbbbbbbbbbbbbbbbbbbbb
NOTE: The word "CALL" flashes to remind you that if you press asoftkey below a name, it will automatically call that entry.
2 Do the following:
Press cbbbbbbbcbbbbbbbNext > to page forward through the names in the
Directory.
Press cbbbbbbbcbbbbbbb< Prev to page backwards through the names in the
Directory.
3 When the name of the person whose number you want to callappears on the second line of the screen, press the softkey belowthat name.
d The voice terminal exits softkey mode and dials the telephonenumber you have selected immediately.
35
aaaaaaaaaaaaaaaaaaaaaaaaaaaaaaaaaaaaaaaaaaaaaaaaaaaaaaaaaaaaaaaaaaaa
USING THE CALL LOGaaaaaaaaaaaaaaaaaaaaaaaaaaaaaaaaaaaaaaaaaaaaaaaaaaaaaaaaaaaaaaaaaaaaThe voice terminal Call Log stores the 10 most recent unansweredincoming calls, the 10 most recent answered incoming calls, and the10 most recent calls that were placed at the voice terminal.
NOTE: If multiple calls from the same telephone number are received,only the most recent call from that number appears in the Call Log.
When an eleventh call comes in or is placed, it is added to the top of theCall Log in the appropriate category; the call listed at the bottom of thelist in that category is deleted from the list.
When your voice terminal arrives and is initially set up, it will have anUnanswered Call Log. If you want to readjust your own Call Log, see theprocedures in the sub-section titled "Setting the Call Log." You maydesignate whether you want to:
d Place only incoming unanswered calls into your Call Log;
d Turn off the Call Log;
d Place all calls, incoming and outgoing, into your Call Log.
NOTE: Incoming Call Log will reflect information provided by the networkyour voice terminal is connected to. If no information appears in yourCall Log, see your System Manager.
Viewing Unanswered Incoming Calls in the Call Log(When the Call Log is set to Unanswered Calls Only)
To view the 10 most recent unanswered calls (with Call Log set to"Unanswered Only")
1 Press cbbbbbbcbbbbbbMenu .
2 Press the softkey below CallLog.
NOTE: If the Call Log is locked, you will need to enter your 3-digitpassword before you can use the Call Log. (See the information in"Locking and Unlocking the Directory, Call Log, and All Softkeys"later in this section.)
36
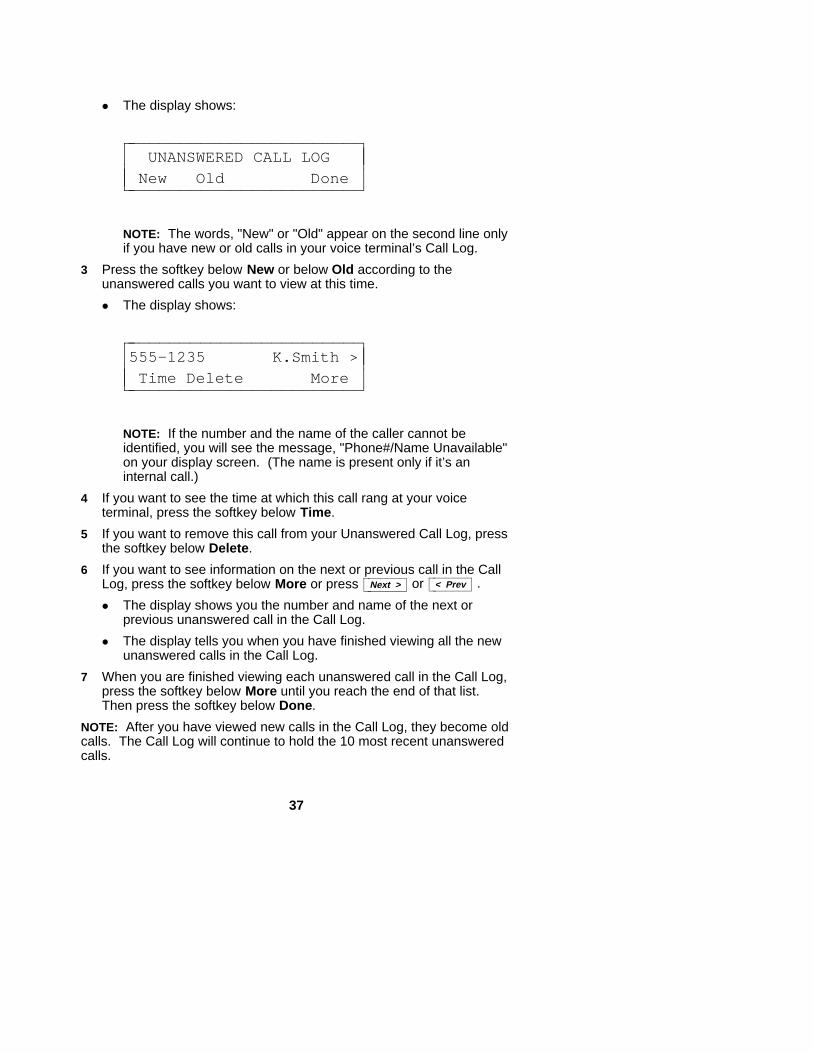
d The display shows:
UNANSWERED CALL LOG
New Old Donecccbbbbbbbbbbbbbbbbbbbbbbbb
cccbbbbbbbbbbbbbbbbbbbbbbbb
NOTE: The words, "New" or "Old" appear on the second line onlyif you have new or old calls in your voice terminal’s Call Log.
3 Press the softkey below New or below Old according to theunanswered calls you want to view at this time.
d The display shows:
555-1235 K.Smith > Time Delete Morecc
cbbbbbbbbbbbbbbbbbbbbbbbb
cccbbbbbbbbbbbbbbbbbbbbbbbbNOTE: If the number and the name of the caller cannot beidentified, you will see the message, "Phone#/Name Unavailable"on your display screen. (The name is present only if it’s aninternal call.)
4 If you want to see the time at which this call rang at your voiceterminal, press the softkey below Time.
5 If you want to remove this call from your Unanswered Call Log, pressthe softkey below Delete.
6 If you want to see information on the next or previous call in the CallLog, press the softkey below More or press cbbbbbbbcbbbbbbb
Next > or cbbbbbbbcbbbbbbb< Prev .
d The display shows you the number and name of the next orprevious unanswered call in the Call Log.
d The display tells you when you have finished viewing all the newunanswered calls in the Call Log.
7 When you are finished viewing each unanswered call in the Call Log,press the softkey below More until you reach the end of that list.Then press the softkey below Done.
NOTE: After you have viewed new calls in the Call Log, they become oldcalls. The Call Log will continue to hold the 10 most recent unansweredcalls.
37
Setting the Call Log
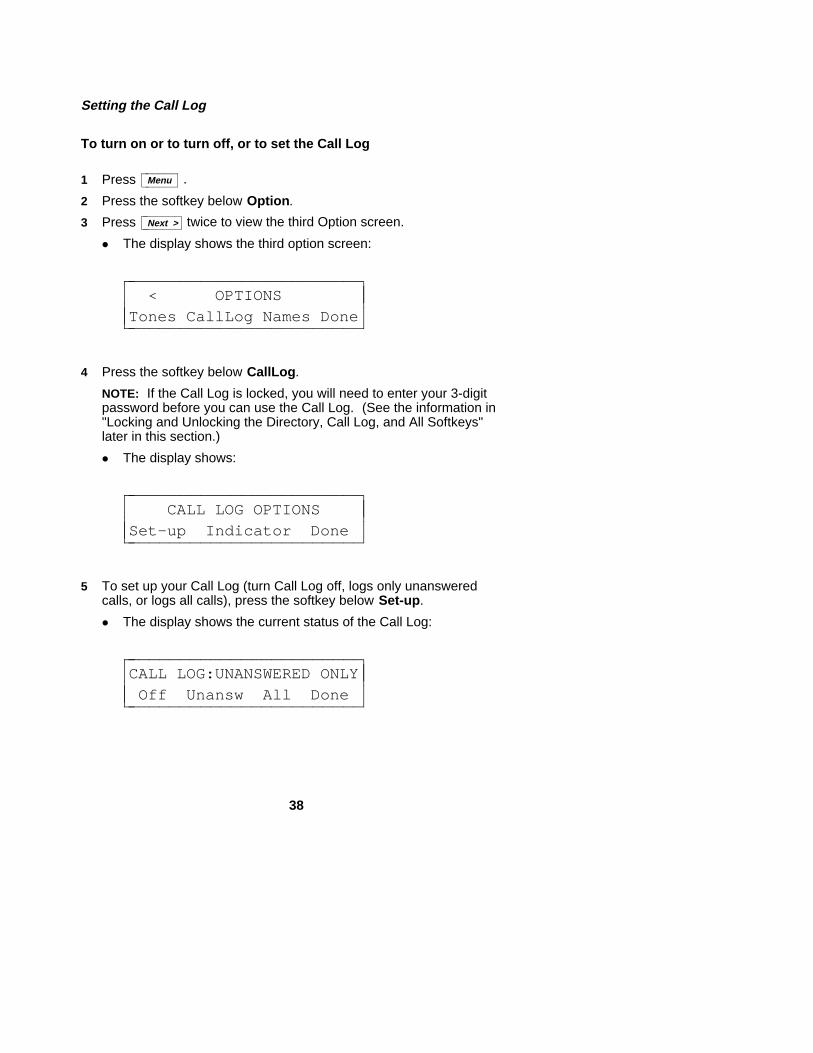
To turn on or to turn off, or to set the Call Log
1 Press cbbbbbbcbbbbbbMenu .
2 Press the softkey below Option.
3 Press cbbbbbbbcbbbbbbbNext > twice to view the third Option screen.
d The display shows the third option screen:
< OPTIONS
Tones CallLog Names Donecccbbbbbbbbbbbbbbbbbbbbbbbb
cccbbbbbbbbbbbbbbbbbbbbbbbb
4 Press the softkey below CallLog.
NOTE: If the Call Log is locked, you will need to enter your 3-digitpassword before you can use the Call Log. (See the information in"Locking and Unlocking the Directory, Call Log, and All Softkeys"later in this section.)
d The display shows:
CALL LOG OPTIONSSet-up Indicator Donecccbbbbbbbbbbbbbbbbbbbbbbbb
cccbbbbbbbbbbbbbbbbbbbbbbbb
5 To set up your Call Log (turn Call Log off, logs only unansweredcalls, or logs all calls), press the softkey below Set-up.
d The display shows the current status of the Call Log:
CALL LOG:UNANSWERED ONLY
Off Unansw All Donecccbbbbbbbbbbbbbbbbbbbbbbbb
cccbbbbbbbbbbbbbbbbbbbbbbbb
38
6 Do one of the following:
If you do not want your voice terminal to collect Call Loginformation, press the softkey below Off.
If you want to have only unanswered calls entered into the CallLog, press the softkey below Unansw.
If you want both unanswered and answered incoming calls andall outgoing calls to be entered into your Call Log, press thesoftkey below All.
d The display shows you the Call Log setting you have selected.
7 If the correct Call Log setting appears on your screen, press thesoftkey below Done.
d The display confirms your choice.
d If the Call Log is turned off, the display asks you to confirm yourchoice to clear and turn off the Call Log.
If you press the softkey below Yes, your Call Log is cleared andthen turned off, and the word "CallLog" will not appear on theMain Menu.
Returning Calls to Callers Listed in Your Incoming Call Log
NOTE: You can use this feature only if your 8510 voice terminal hasFeature Package 3.6 firmware.
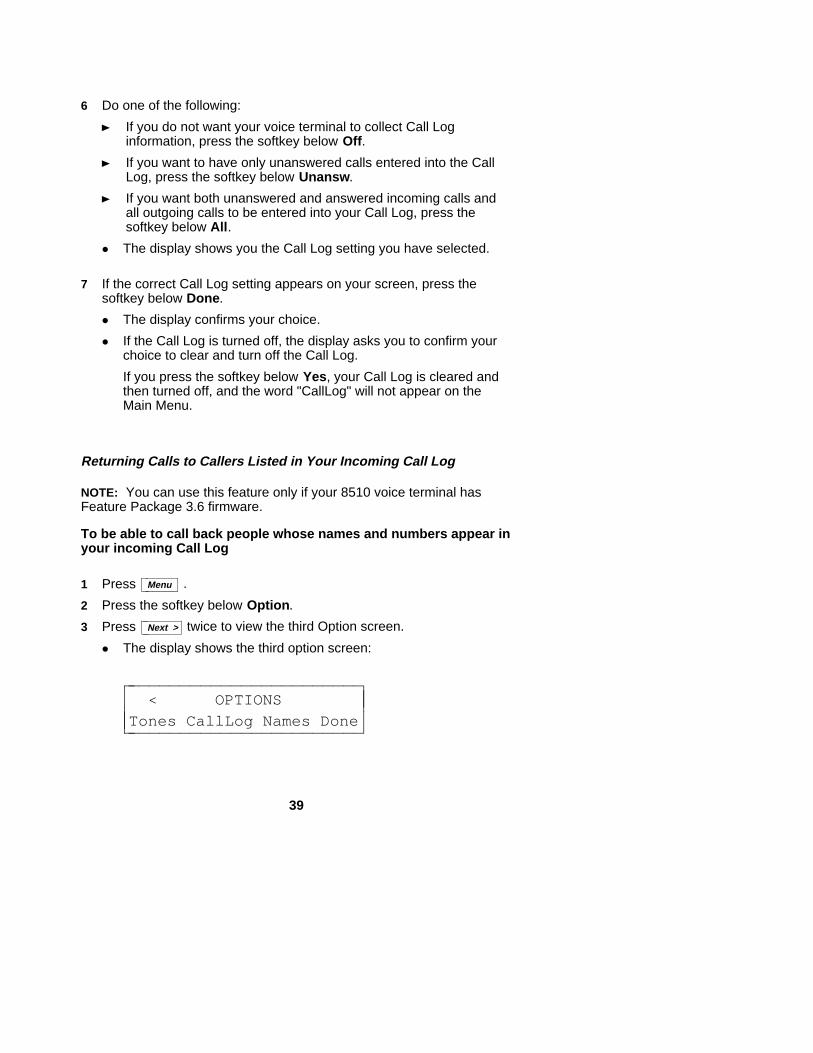
To be able to call back people whose names and numbers appear inyour incoming Call Log
1 Press cbbbbbbcbbbbbbMenu .
2 Press the softkey below Option.
3 Press cbbbbbbbcbbbbbbbNext > twice to view the third Option screen.
d The display shows the third option screen:
< OPTIONS
Tones CallLog Names Donecccbbbbbbbbbbbbbbbbbbbbbbbb
cccbbbbbbbbbbbbbbbbbbbbbbbb
39
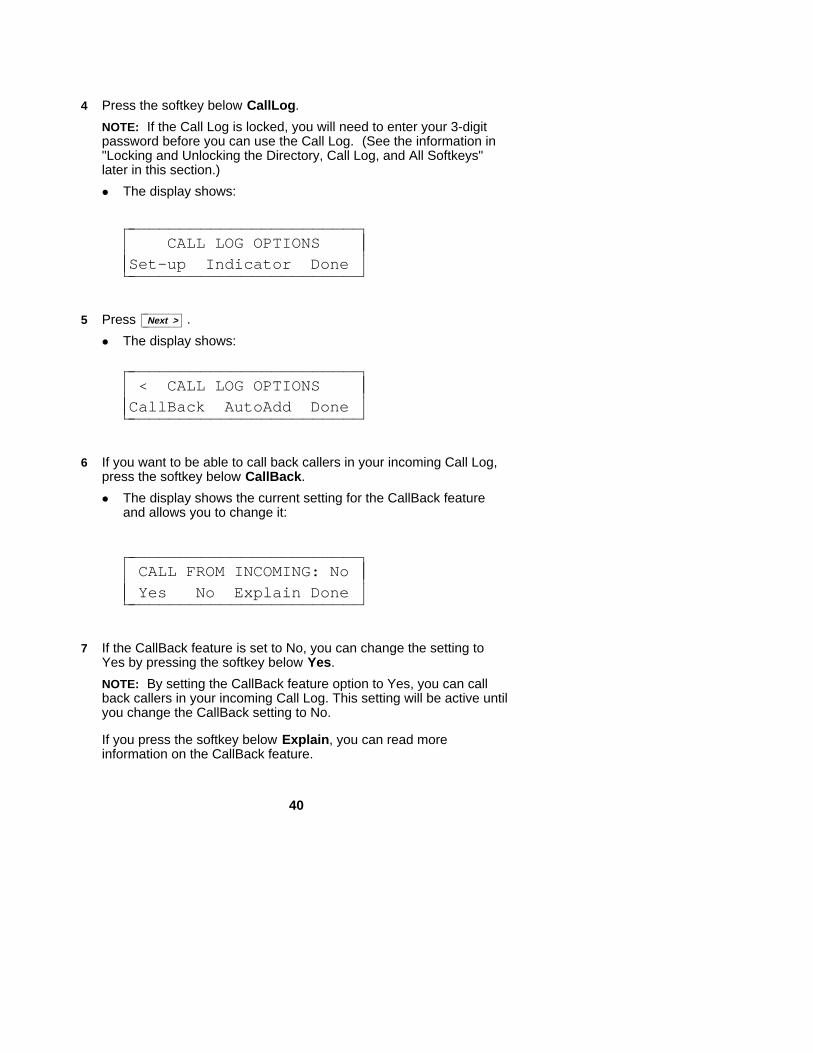
4 Press the softkey below CallLog.
NOTE: If the Call Log is locked, you will need to enter your 3-digitpassword before you can use the Call Log. (See the information in"Locking and Unlocking the Directory, Call Log, and All Softkeys"later in this section.)
d The display shows:
CALL LOG OPTIONSSet-up Indicator Donecccbbbbbbbbbbbbbbbbbbbbbbbb
cccbbbbbbbbbbbbbbbbbbbbbbbb
5 Press cbbbbbbbcbbbbbbbNext > .
d The display shows:
< CALL LOG OPTIONSCallBack AutoAdd Donecccbbbbbbbbbbbbbbbbbbbbbbbb
cccbbbbbbbbbbbbbbbbbbbbbbbb6 If you want to be able to call back callers in your incoming Call Log,
press the softkey below CallBack.
d The display shows the current setting for the CallBack featureand allows you to change it:
CALL FROM INCOMING: No
Yes No Explain Donecccbbbbbbbbbbbbbbbbbbbbbbbb
cccbbbbbbbbbbbbbbbbbbbbbbbb
7 If the CallBack feature is set to No, you can change the setting toYes by pressing the softkey below Yes.
NOTE: By setting the CallBack feature option to Yes, you can callback callers in your incoming Call Log. This setting will be active untilyou change the CallBack setting to No.
If you press the softkey below Explain, you can read moreinformation on the CallBack feature.
40
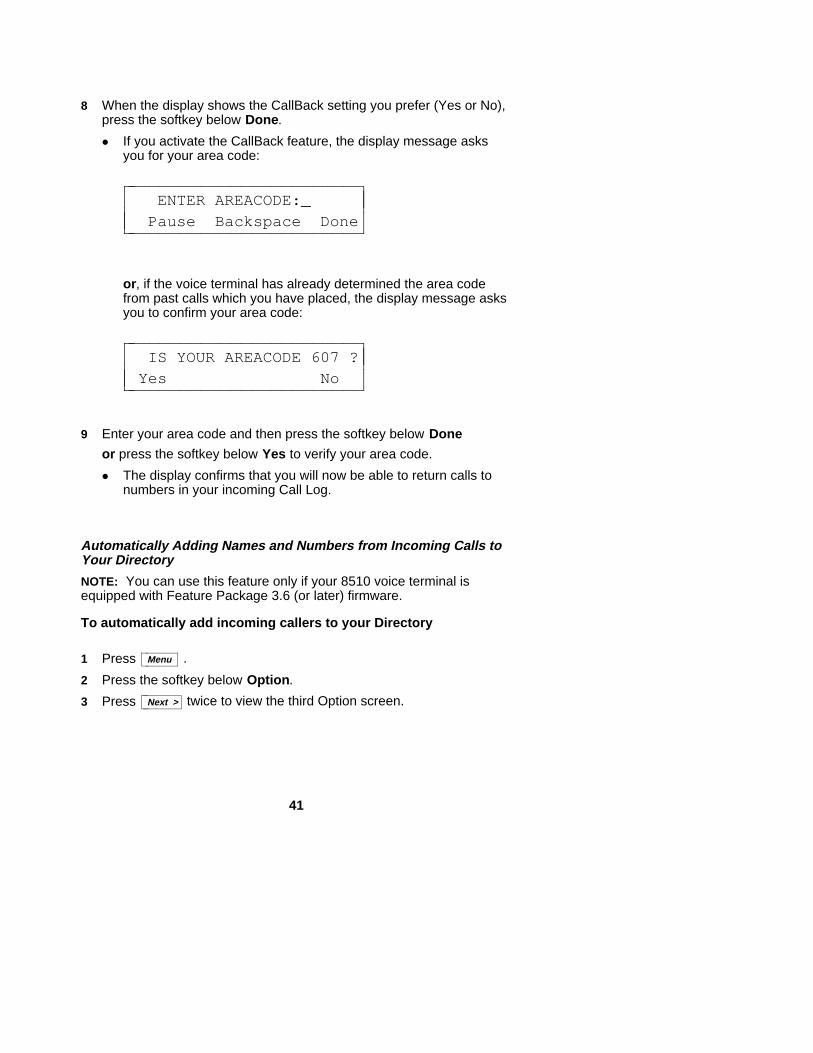
8 When the display shows the CallBack setting you prefer (Yes or No),press the softkey below Done.
d If you activate the CallBack feature, the display message asksyou for your area code:
ENTER AREACODE:_
Pause Backspace Donecccbbbbbbbbbbbbbbbbbbbbbbbb
cccbbbbbbbbbbbbbbbbbbbbbbbb
or, if the voice terminal has already determined the area codefrom past calls which you have placed, the display message asksyou to confirm your area code:
IS YOUR AREACODE 607 ?Yes Nocc
cbbbbbbbbbbbbbbbbbbbbbbbbcccbbbbbbbbbbbbbbbbbbbbbbbb
9 Enter your area code and then press the softkey below Done
or press the softkey below Yes to verify your area code.
d The display confirms that you will now be able to return calls tonumbers in your incoming Call Log.
Automatically Adding Names and Numbers from Incoming Calls toYour Directory
NOTE: You can use this feature only if your 8510 voice terminal isequipped with Feature Package 3.6 (or later) firmware.
To automatically add incoming callers to your Directory
1 Press cbbbbbbcbbbbbbMenu .
2 Press the softkey below Option.
3 Press cbbbbbbbcbbbbbbbNext > twice to view the third Option screen.
41
d The display shows the third option screen:
< OPTIONS
Tones CallLog Names Donecccbbbbbbbbbbbbbbbbbbbbbbbb
cccbbbbbbbbbbbbbbbbbbbbbbbb
4 Press the softkey below CallLog.
NOTE: If the Call Log is locked, you will need to enter your 3-digitpassword before you can use the Call Log. (See the information in"Locking and Unlocking the Directory, Call Log, and All Softkeys"later in this section.)
d The display shows:
CALL LOG OPTIONSSet-up Indicator Donecccbbbbbbbbbbbbbbbbbbbbbbbb
cccbbbbbbbbbbbbbbbbbbbbbbbb5 Press cbbbbbbbcbbbbbbb
Next > .
d The display shows:
< CALL LOG OPTIONS
CallBack AutoAdd Donecccbbbbbbbbbbbbbbbbbbbbbbbb
cccbbbbbbbbbbbbbbbbbbbbbbbb
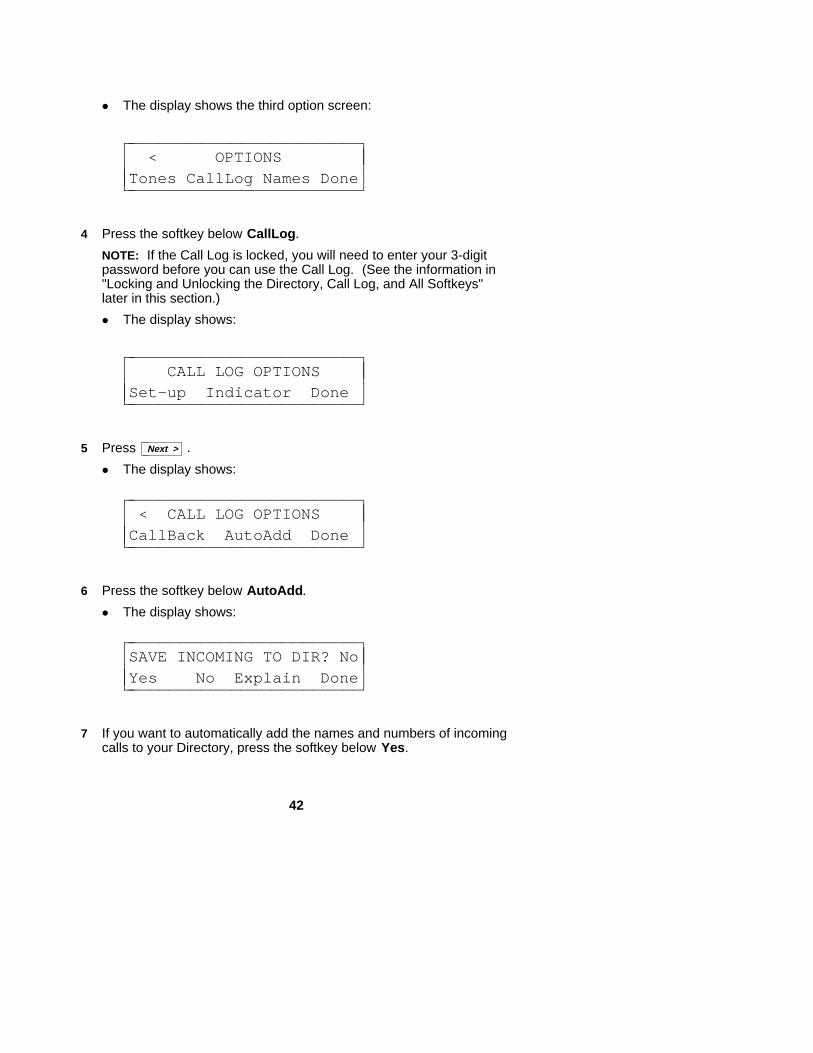
6 Press the softkey below AutoAdd.
d The display shows:
SAVE INCOMING TO DIR? No
Yes No Explain Donecccbbbbbbbbbbbbbbbbbbbbbbbb
cccbbbbbbbbbbbbbbbbbbbbbbbb
7 If you want to automatically add the names and numbers of incomingcalls to your Directory, press the softkey below Yes.
42
NOTE: If you select the Yes option, the names and numbers ofincoming callers will automatically be added to your Directory untilyou change the AutoAdd setting to No.
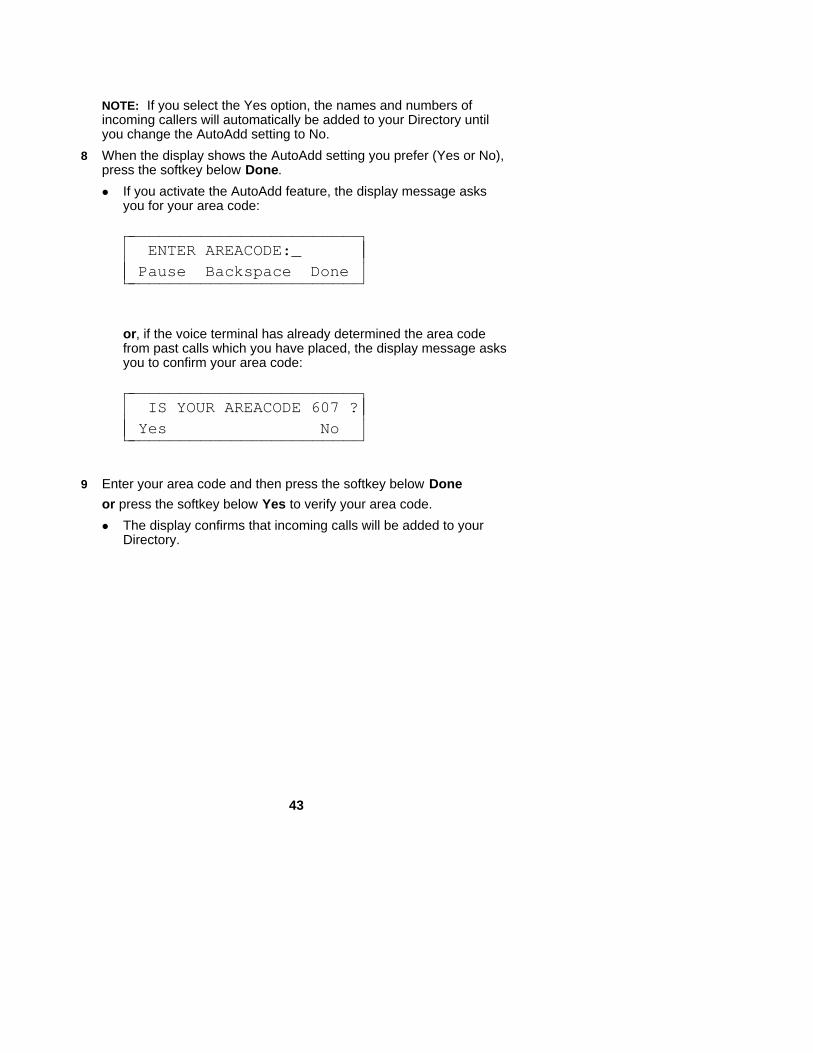
8 When the display shows the AutoAdd setting you prefer (Yes or No),press the softkey below Done.
d If you activate the AutoAdd feature, the display message asksyou for your area code:
ENTER AREACODE:_Pause Backspace Donecc
cbbbbbbbbbbbbbbbbbbbbbbbbcccbbbbbbbbbbbbbbbbbbbbbbbb
or, if the voice terminal has already determined the area codefrom past calls which you have placed, the display message asksyou to confirm your area code:
IS YOUR AREACODE 607 ?Yes Nocc
cbbbbbbbbbbbbbbbbbbbbbbbb
cccbbbbbbbbbbbbbbbbbbbbbbbb
9 Enter your area code and then press the softkey below Done
or press the softkey below Yes to verify your area code.
d The display confirms that incoming calls will be added to yourDirectory.
43
Seeing Indication of New Unanswered Incoming Call(s)Under the Date and Time on Your Display Screen
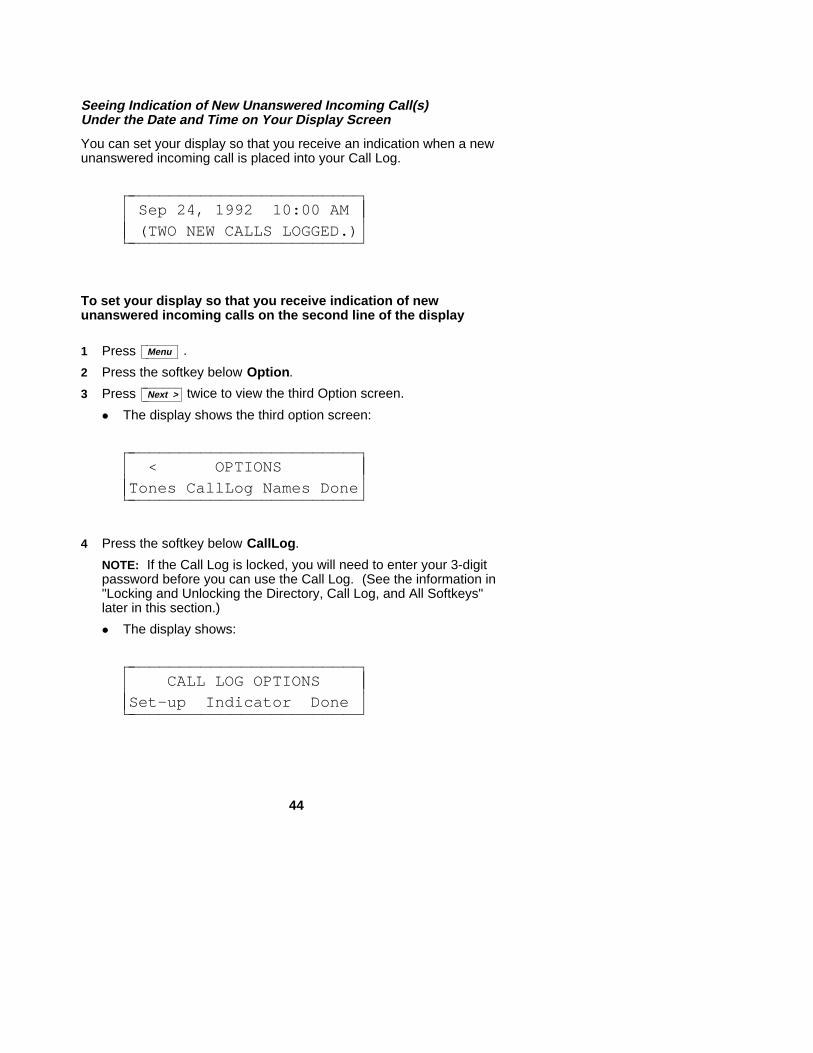
You can set your display so that you receive an indication when a newunanswered incoming call is placed into your Call Log.
Sep 24, 1992 10:00 AM
(TWO NEW CALLS LOGGED.)cccbbbbbbbbbbbbbbbbbbbbbbbb
cccbbbbbbbbbbbbbbbbbbbbbbbb
To set your display so that you receive indication of newunanswered incoming calls on the second line of the display
1 Press cbbbbbbcbbbbbbMenu .
2 Press the softkey below Option.
3 Press cbbbbbbbcbbbbbbbNext > twice to view the third Option screen.
d The display shows the third option screen:
< OPTIONS
Tones CallLog Names Donecccbbbbbbbbbbbbbbbbbbbbbbbb
cccbbbbbbbbbbbbbbbbbbbbbbbb
4 Press the softkey below CallLog.
NOTE: If the Call Log is locked, you will need to enter your 3-digitpassword before you can use the Call Log. (See the information in"Locking and Unlocking the Directory, Call Log, and All Softkeys"later in this section.)
d The display shows:
CALL LOG OPTIONSSet-up Indicator Donecccbbbbbbbbbbbbbbbbbbbbbbbb
cccbbbbbbbbbbbbbbbbbbbbbbbb
44
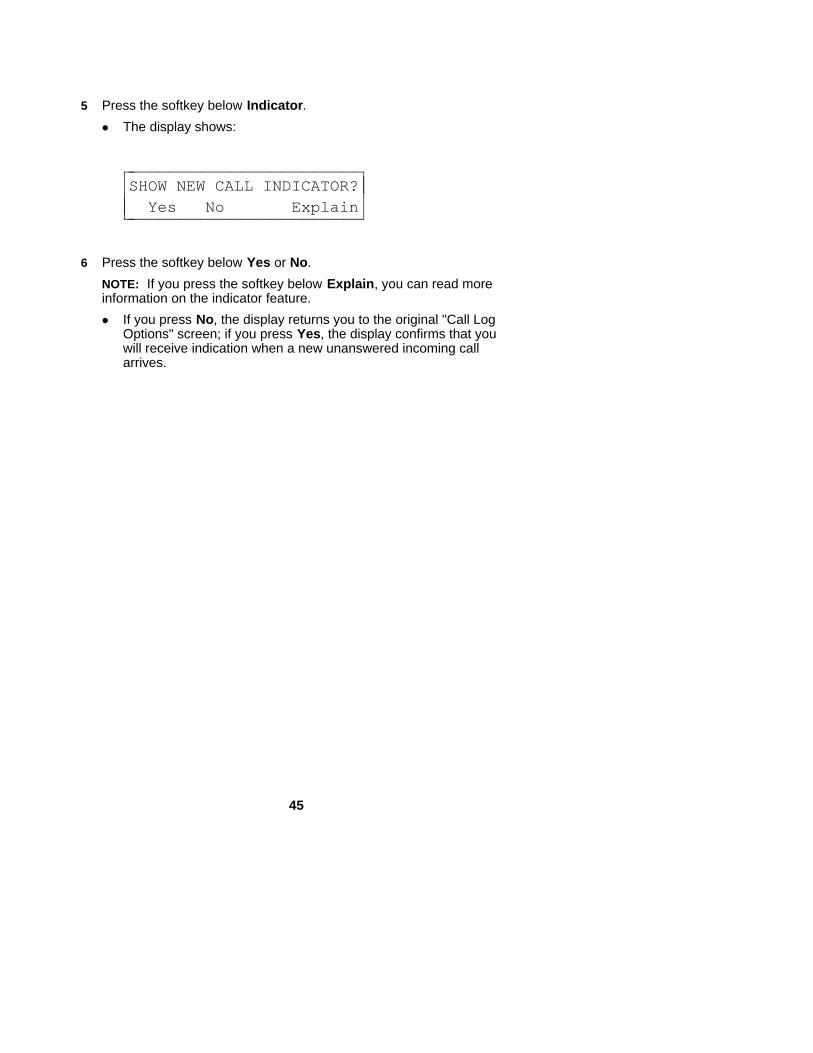
5 Press the softkey below Indicator.
d The display shows:
SHOW NEW CALL INDICATOR?
Yes No Explaincccbbbbbbbbbbbbbbbbbbbbbbbb
cccbbbbbbbbbbbbbbbbbbbbbbbb
6 Press the softkey below Yes or No.
NOTE: If you press the softkey below Explain, you can read moreinformation on the indicator feature.
d If you press No, the display returns you to the original "Call LogOptions" screen; if you press Yes, the display confirms that youwill receive indication when a new unanswered incoming callarrives.
45
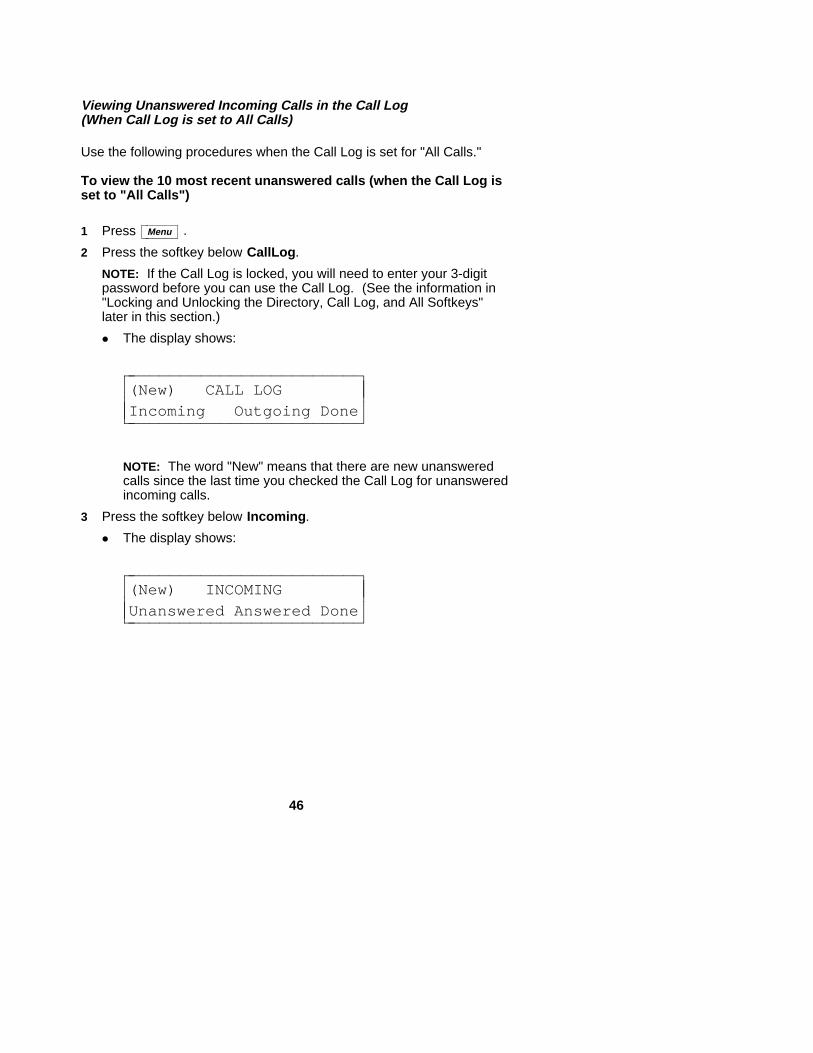
Viewing Unanswered Incoming Calls in the Call Log(When Call Log is set to All Calls)
Use the following procedures when the Call Log is set for "All Calls."
To view the 10 most recent unanswered calls (when the Call Log isset to "All Calls")
1 Press cbbbbbbcbbbbbbMenu .
2 Press the softkey below CallLog.
NOTE: If the Call Log is locked, you will need to enter your 3-digitpassword before you can use the Call Log. (See the information in"Locking and Unlocking the Directory, Call Log, and All Softkeys"later in this section.)
d The display shows:
(New) CALL LOGIncoming Outgoing Donecccbbbbbbbbbbbbbbbbbbbbbbbb
cccbbbbbbbbbbbbbbbbbbbbbbbb
NOTE: The word "New" means that there are new unansweredcalls since the last time you checked the Call Log for unansweredincoming calls.
3 Press the softkey below Incoming.
d The display shows:
(New) INCOMING
Unanswered Answered Donecccbbbbbbbbbbbbbbbbbbbbbbbb
cccbbbbbbbbbbbbbbbbbbbbbbbb
46
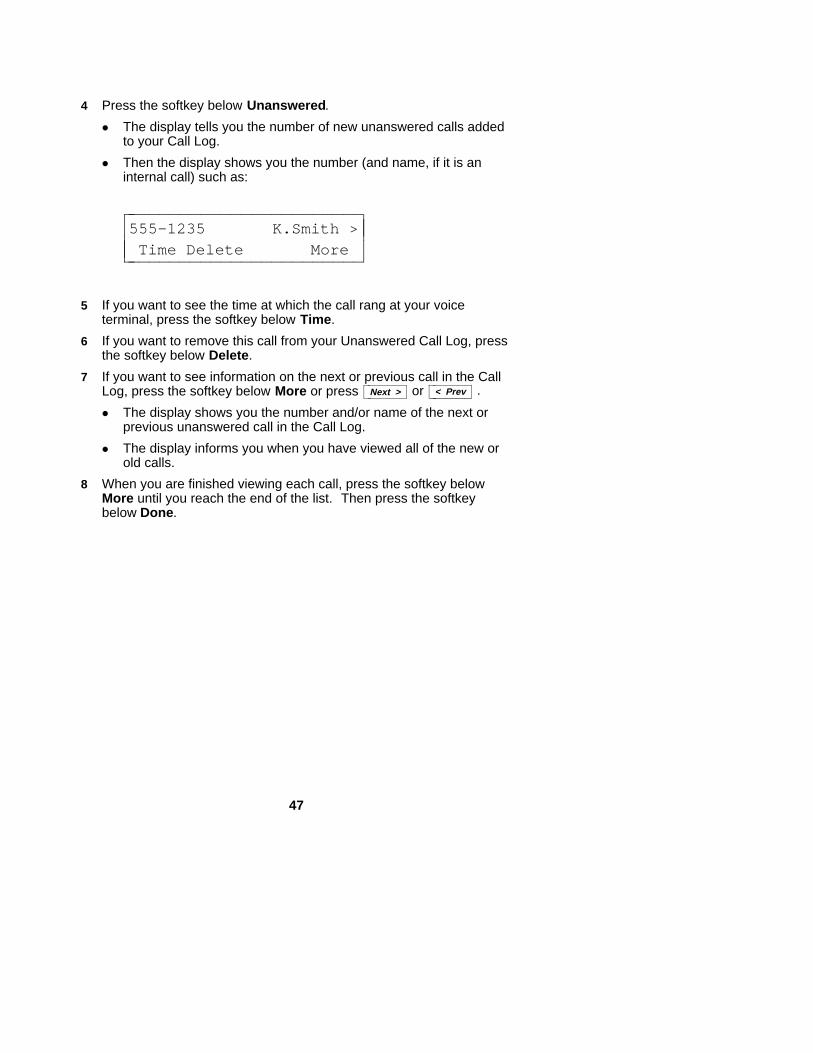
4 Press the softkey below Unanswered.
d The display tells you the number of new unanswered calls addedto your Call Log.
d Then the display shows you the number (and name, if it is aninternal call) such as:
555-1235 K.Smith > Time Delete Morecc
cbbbbbbbbbbbbbbbbbbbbbbbb
cccbbbbbbbbbbbbbbbbbbbbbbbb
5 If you want to see the time at which the call rang at your voiceterminal, press the softkey below Time.
6 If you want to remove this call from your Unanswered Call Log, pressthe softkey below Delete.
7 If you want to see information on the next or previous call in the CallLog, press the softkey below More or press cbbbbbbbcbbbbbbb
Next > or cbbbbbbbcbbbbbbb< Prev .
d The display shows you the number and/or name of the next orprevious unanswered call in the Call Log.
d The display informs you when you have viewed all of the new orold calls.
8 When you are finished viewing each call, press the softkey belowMore until you reach the end of the list. Then press the softkeybelow Done.
47
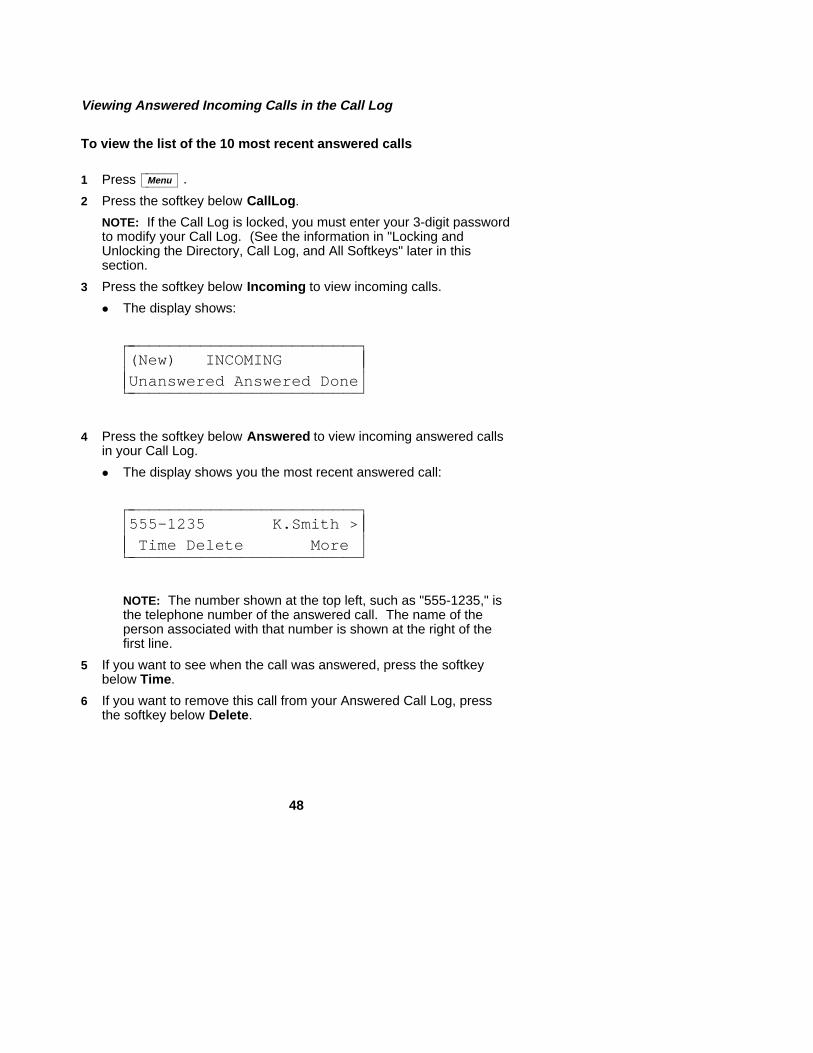
Viewing Answered Incoming Calls in the Call Log
To view the list of the 10 most recent answered calls
1 Press cbbbbbbcbbbbbbMenu .
2 Press the softkey below CallLog.
NOTE: If the Call Log is locked, you must enter your 3-digit passwordto modify your Call Log. (See the information in "Locking andUnlocking the Directory, Call Log, and All Softkeys" later in thissection.
3 Press the softkey below Incoming to view incoming calls.
d The display shows:
(New) INCOMING
Unanswered Answered Donecccbbbbbbbbbbbbbbbbbbbbbbbb
cccbbbbbbbbbbbbbbbbbbbbbbbb
4 Press the softkey below Answered to view incoming answered callsin your Call Log.
d The display shows you the most recent answered call:
555-1235 K.Smith > Time Delete Morecc
cbbbbbbbbbbbbbbbbbbbbbbbb
cccbbbbbbbbbbbbbbbbbbbbbbbb
NOTE: The number shown at the top left, such as "555-1235," isthe telephone number of the answered call. The name of theperson associated with that number is shown at the right of thefirst line.
5 If you want to see when the call was answered, press the softkeybelow Time.
6 If you want to remove this call from your Answered Call Log, pressthe softkey below Delete.
48
7 If you want to see more of the most recent calls you have answered,press the softkey below More or press cbbbbbbbcbbbbbbb
Next > or cbbbbbbbcbbbbbbb< Prev .
d The display again shows you the telephone number of the next orprevious incoming call.
d The display informs you when you have viewed all of theanswered calls in your Call Log.
8 When you are finished viewing each answered call in the Call Log,press the softkey below More until you reach the end of the list.Then press the softkey below Done.
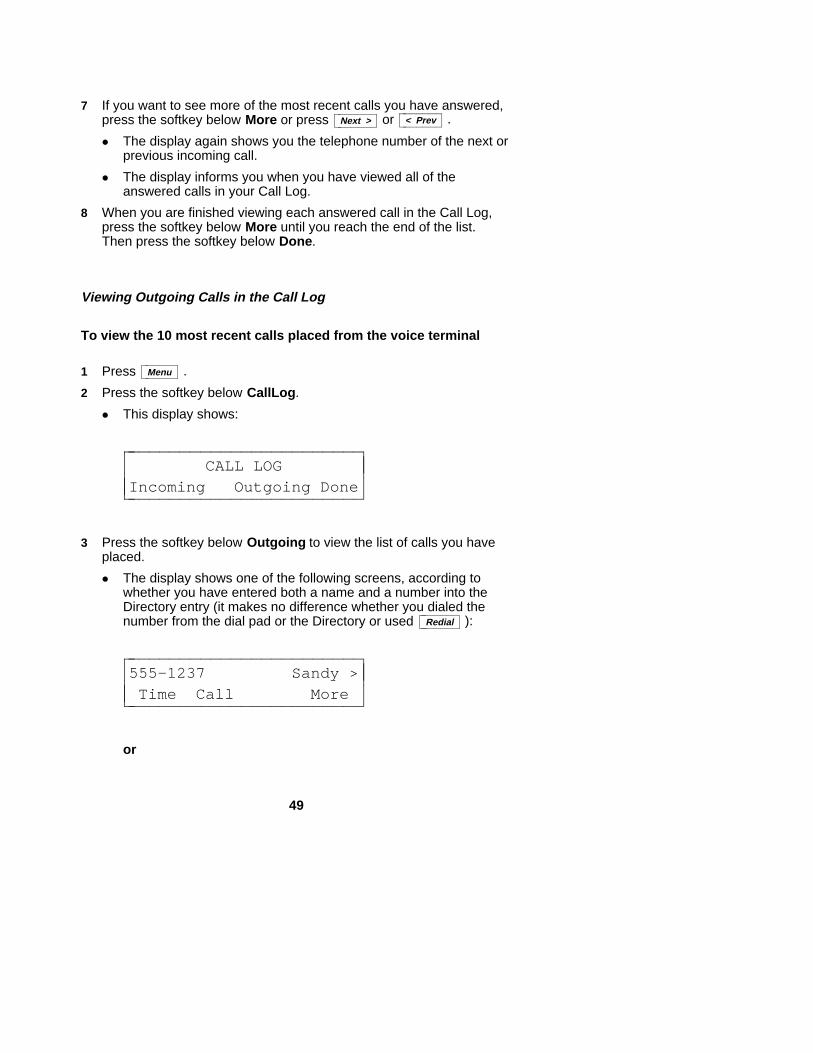
Viewing Outgoing Calls in the Call Log
To view the 10 most recent calls placed from the voice terminal
1 Press cbbbbbbcbbbbbbMenu .
2 Press the softkey below CallLog.
d This display shows:
CALL LOGIncoming Outgoing Donecccbbbbbbbbbbbbbbbbbbbbbbbbcc
cbbbbbbbbbbbbbbbbbbbbbbbb3 Press the softkey below Outgoing to view the list of calls you have
placed.
d The display shows one of the following screens, according towhether you have entered both a name and a number into theDirectory entry (it makes no difference whether you dialed thenumber from the dial pad or the Directory or used cbbbbbbbcbbbbbbb
Redial ):
555-1237 Sandy >Time Call Morecc
cbbbbbbbbbbbbbbbbbbbbbbbb
cccbbbbbbbbbbbbbbbbbbbbbbbbor
49
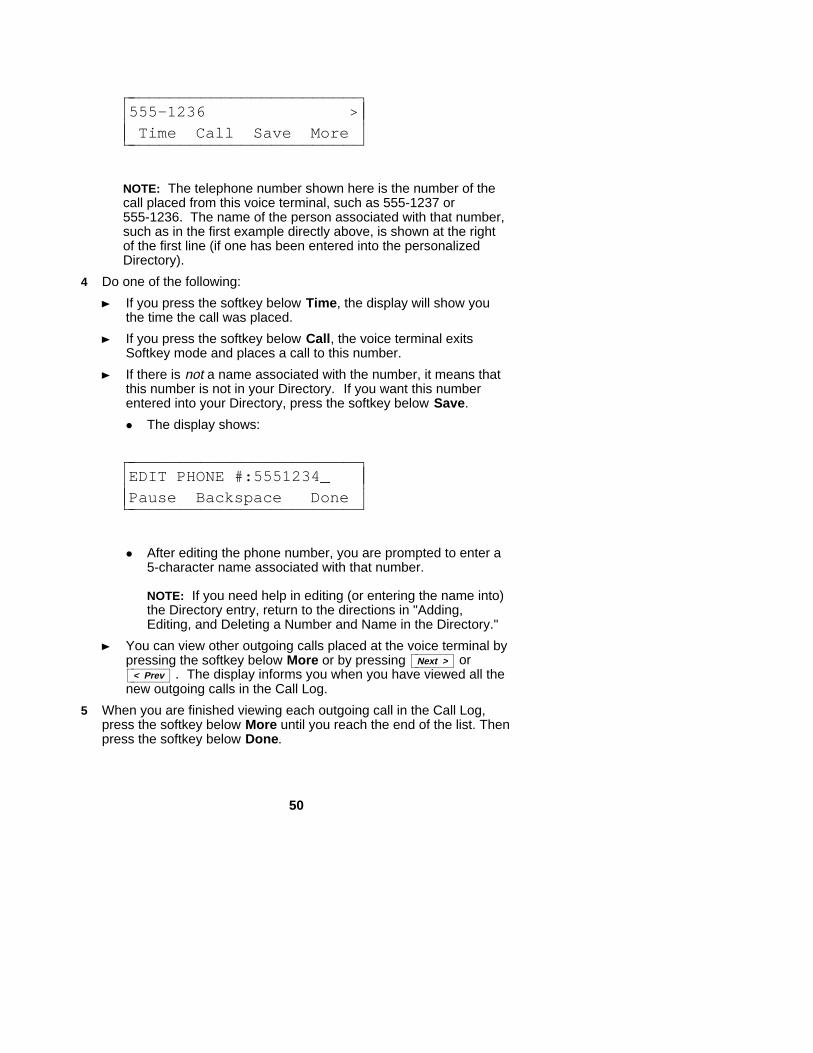
555-1236 >
Time Call Save Morecccbbbbbbbbbbbbbbbbbbbbbbbb
cccbbbbbbbbbbbbbbbbbbbbbbbb
NOTE: The telephone number shown here is the number of thecall placed from this voice terminal, such as 555-1237 or555-1236. The name of the person associated with that number,such as in the first example directly above, is shown at the rightof the first line (if one has been entered into the personalizedDirectory).
4 Do one of the following:
If you press the softkey below Time, the display will show youthe time the call was placed.
If you press the softkey below Call, the voice terminal exitsSoftkey mode and places a call to this number.
If there is not a name associated with the number, it means thatthis number is not in your Directory. If you want this numberentered into your Directory, press the softkey below Save.
d The display shows:
EDIT PHONE #:5551234_
Pause Backspace Donecccbbbbbbbbbbbbbbbbbbbbbbbb
cccbbbbbbbbbbbbbbbbbbbbbbbb
d After editing the phone number, you are prompted to enter a5-character name associated with that number.
NOTE: If you need help in editing (or entering the name into)the Directory entry, return to the directions in "Adding,Editing, and Deleting a Number and Name in the Directory."
You can view other outgoing calls placed at the voice terminal bypressing the softkey below More or by pressing cbbbbbbbcbbbbbbb
Next > orcbbbbbbbcbbbbbbb
< Prev . The display informs you when you have viewed all thenew outgoing calls in the Call Log.
5 When you are finished viewing each outgoing call in the Call Log,press the softkey below More until you reach the end of the list. Thenpress the softkey below Done.
50
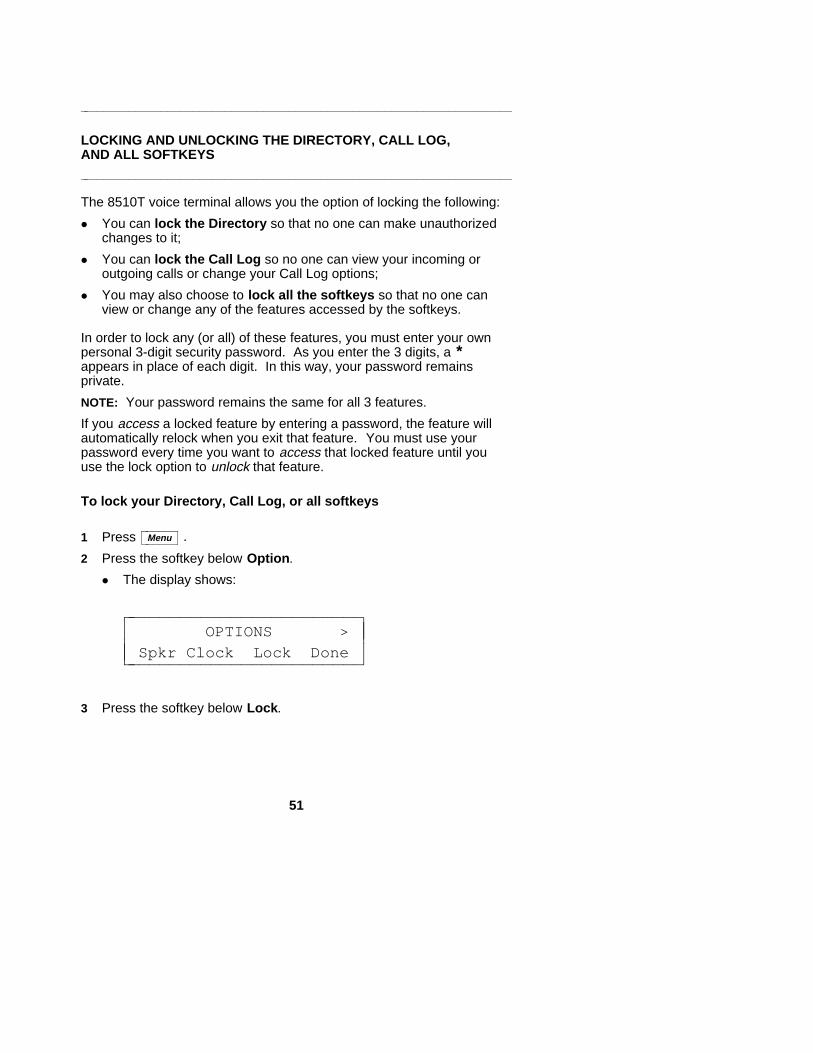
aaaaaaaaaaaaaaaaaaaaaaaaaaaaaaaaaaaaaaaaaaaaaaaaaaaaaaaaaaaaaaaaaaaa
LOCKING AND UNLOCKING THE DIRECTORY, CALL LOG,AND ALL SOFTKEYSaaaaaaaaaaaaaaaaaaaaaaaaaaaaaaaaaaaaaaaaaaaaaaaaaaaaaaaaaaaaaaaaaaaaThe 8510T voice terminal allows you the option of locking the following:
d You can lock the Directory so that no one can make unauthorizedchanges to it;
d You can lock the Call Log so no one can view your incoming oroutgoing calls or change your Call Log options;
d You may also choose to lock all the softkeys so that no one canview or change any of the features accessed by the softkeys.
In order to lock any (or all) of these features, you must enter your ownpersonal 3-digit security password. As you enter the 3 digits, a *appears in place of each digit. In this way, your password remainsprivate.
NOTE: Your password remains the same for all 3 features.
If you access a locked feature by entering a password, the feature willautomatically relock when you exit that feature. You must use yourpassword every time you want to access that locked feature until youuse the lock option to unlock that feature.
To lock your Directory, Call Log, or all softkeys
1 Press cbbbbbbcbbbbbbMenu .
2 Press the softkey below Option.
d The display shows:
OPTIONS >Spkr Clock Lock Donecc
cbbbbbbbbbbbbbbbbbbbbbbbb
cccbbbbbbbbbbbbbbbbbbbbbbbb3 Press the softkey below Lock.
51
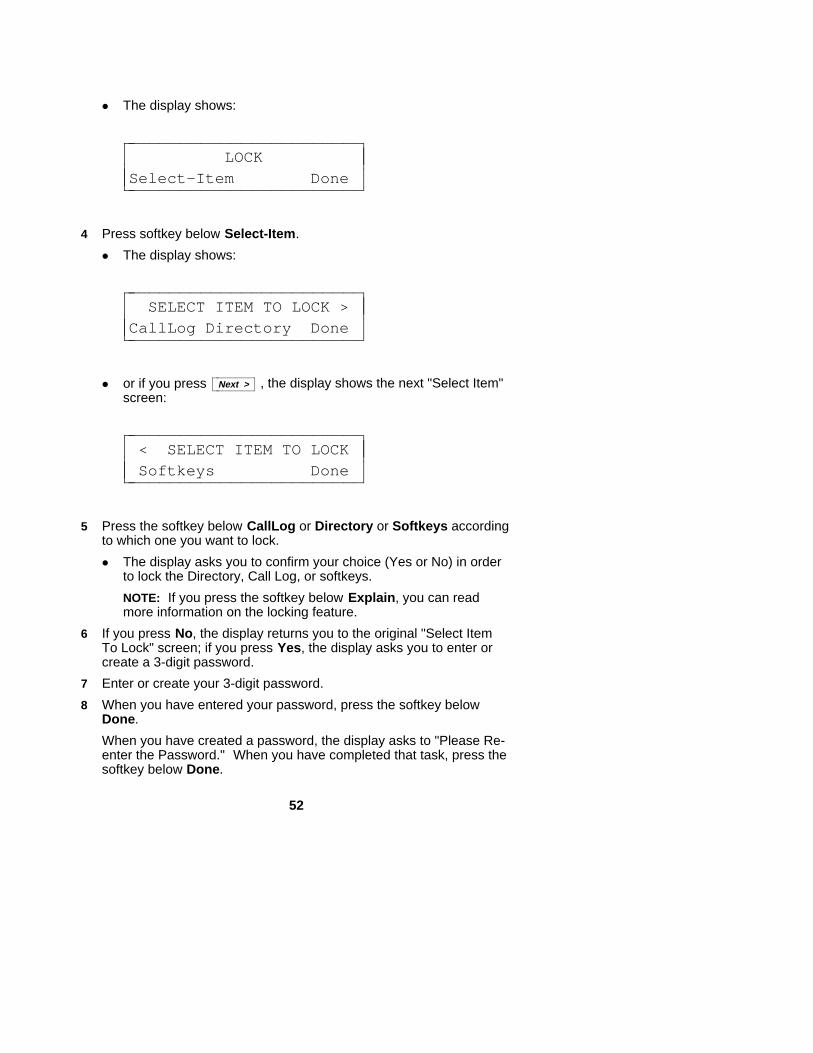
d The display shows:
LOCK
Select-Item Donecccbbbbbbbbbbbbbbbbbbbbbbbb
cccbbbbbbbbbbbbbbbbbbbbbbbb
4 Press softkey below Select-Item.
d The display shows:
SELECT ITEM TO LOCK >CallLog Directory Donecccbbbbbbbbbbbbbbbbbbbbbbbb
cccbbbbbbbbbbbbbbbbbbbbbbbb
d or if you press cbbbbbbbcbbbbbbbNext > , the display shows the next "Select Item"
screen:
< SELECT ITEM TO LOCK Softkeys Donecc
cbbbbbbbbbbbbbbbbbbbbbbbb
cccbbbbbbbbbbbbbbbbbbbbbbbb5 Press the softkey below CallLog or Directory or Softkeys according
to which one you want to lock.
d The display asks you to confirm your choice (Yes or No) in orderto lock the Directory, Call Log, or softkeys.
NOTE: If you press the softkey below Explain, you can readmore information on the locking feature.
6 If you press No, the display returns you to the original "Select ItemTo Lock" screen; if you press Yes, the display asks you to enter orcreate a 3-digit password.
7 Enter or create your 3-digit password.
8 When you have entered your password, press the softkey belowDone.
When you have created a password, the display asks to "Please Re-enter the Password." When you have completed that task, press thesoftkey below Done.
52
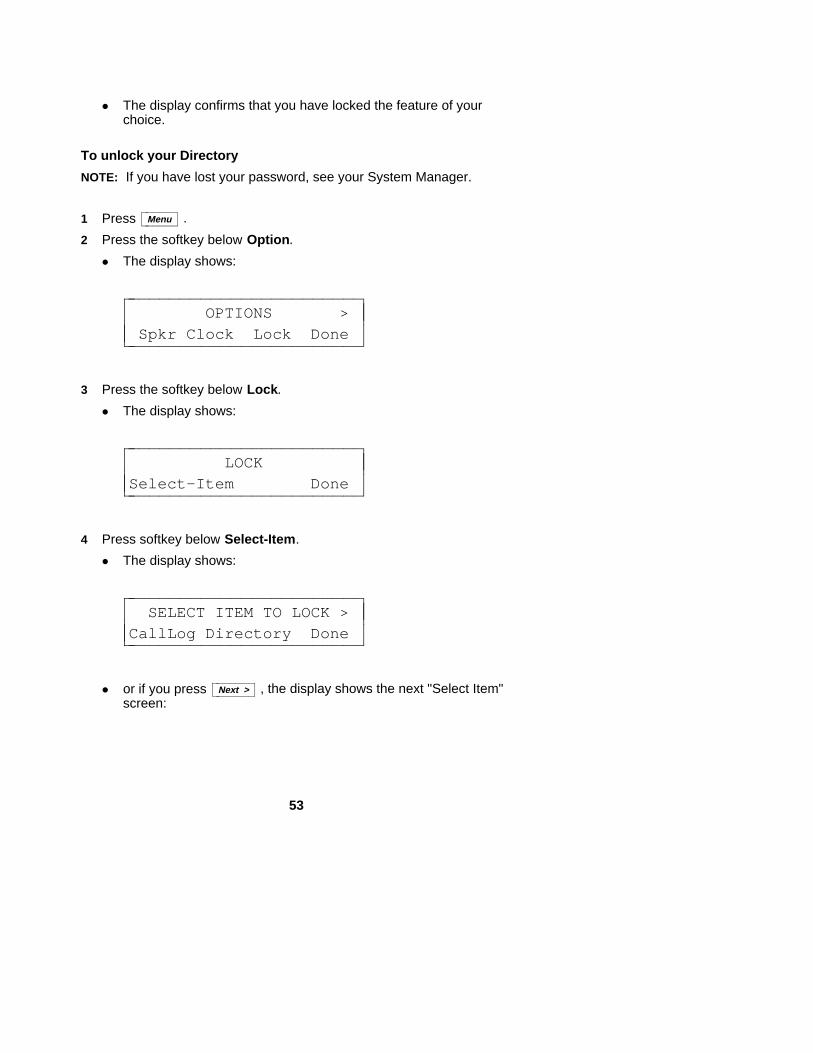
d The display confirms that you have locked the feature of yourchoice.
To unlock your Directory
NOTE: If you have lost your password, see your System Manager.
1 Press cbbbbbbcbbbbbbMenu .
2 Press the softkey below Option.
d The display shows:
OPTIONS >
Spkr Clock Lock Donecccbbbbbbbbbbbbbbbbbbbbbbbb
cccbbbbbbbbbbbbbbbbbbbbbbbb
3 Press the softkey below Lock.
d The display shows:
LOCKSelect-Item Donecccbbbbbbbbbbbbbbbbbbbbbbbbcc
cbbbbbbbbbbbbbbbbbbbbbbbb4 Press softkey below Select-Item.
d The display shows:
SELECT ITEM TO LOCK >CallLog Directory Donecccbbbbbbbbbbbbbbbbbbbbbbbb
cccbbbbbbbbbbbbbbbbbbbbbbbbd or if you press cbbbbbbbcbbbbbbb
Next > , the display shows the next "Select Item"screen:
53
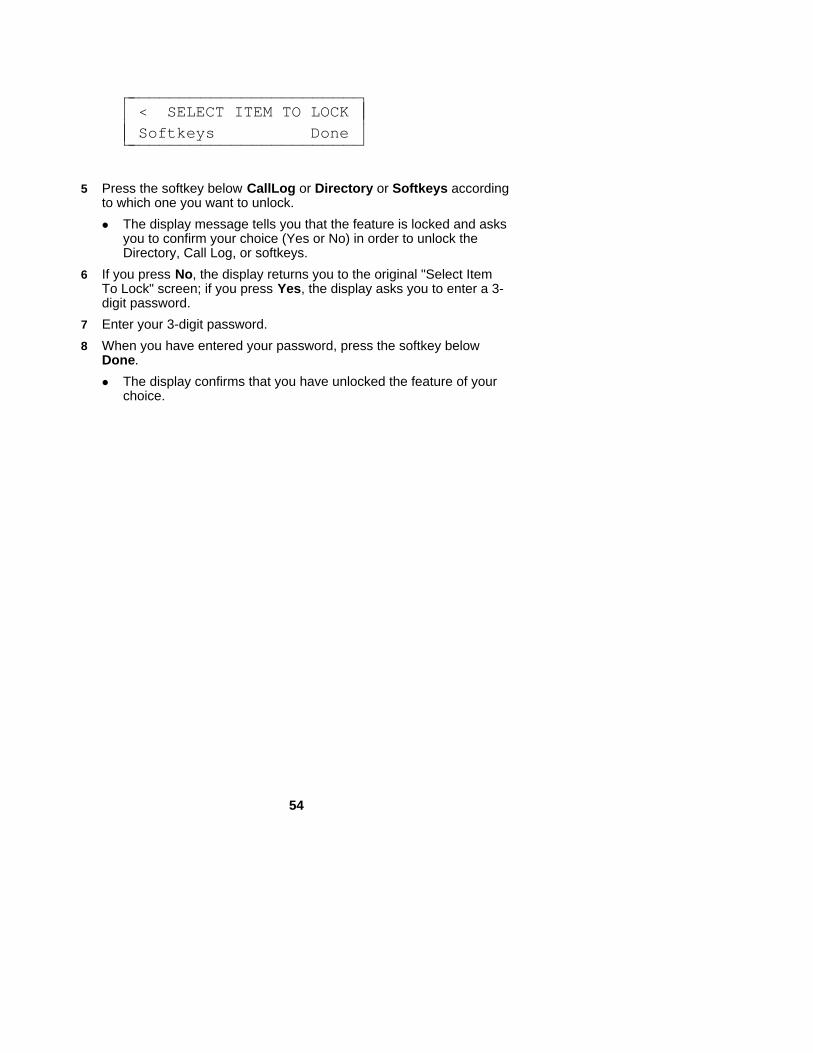
< SELECT ITEM TO LOCK
Softkeys Donecccbbbbbbbbbbbbbbbbbbbbbbbb
cccbbbbbbbbbbbbbbbbbbbbbbbb
5 Press the softkey below CallLog or Directory or Softkeys accordingto which one you want to unlock.
d The display message tells you that the feature is locked and asksyou to confirm your choice (Yes or No) in order to unlock theDirectory, Call Log, or softkeys.
6 If you press No, the display returns you to the original "Select ItemTo Lock" screen; if you press Yes, the display asks you to enter a 3-digit password.
7 Enter your 3-digit password.
8 When you have entered your password, press the softkey belowDone.
d The display confirms that you have unlocked the feature of yourchoice.
54
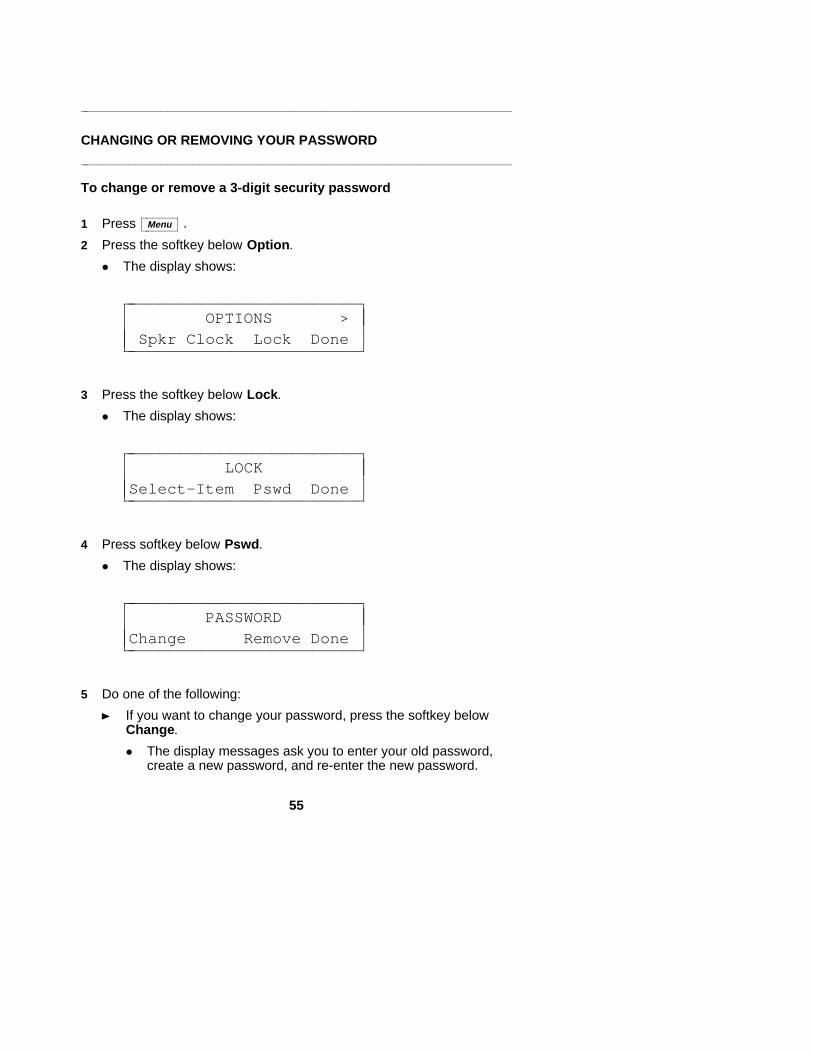
aaaaaaaaaaaaaaaaaaaaaaaaaaaaaaaaaaaaaaaaaaaaaaaaaaaaaaaaaaaaaaaaaaaa
CHANGING OR REMOVING YOUR PASSWORDaaaaaaaaaaaaaaaaaaaaaaaaaaaaaaaaaaaaaaaaaaaaaaaaaaaaaaaaaaaaaaaaaaaaTo change or remove a 3-digit security password
1 Press cbbbbbbcbbbbbbMenu .
2 Press the softkey below Option.
d The display shows:
OPTIONS >Spkr Clock Lock Donecc
cbbbbbbbbbbbbbbbbbbbbbbbb
cccbbbbbbbbbbbbbbbbbbbbbbbb
3 Press the softkey below Lock.
d The display shows:
LOCK
Select-Item Pswd Donecccbbbbbbbbbbbbbbbbbbbbbbbb
cccbbbbbbbbbbbbbbbbbbbbbbbb
4 Press softkey below Pswd.
d The display shows:
PASSWORDChange Remove Donecccbbbbbbbbbbbbbbbbbbbbbbbbcc
cbbbbbbbbbbbbbbbbbbbbbbbb5 Do one of the following:
If you want to change your password, press the softkey belowChange.
d The display messages ask you to enter your old password,create a new password, and re-enter the new password.
55

d When you have done this, the display confirms that the newpassword is now active.
If you want to remove your 3-digit password, press the softkeybelow Remove.
d The display asks you to enter your 3-digit password.
d When you have entered the password, the display confirmsthat the password is removed and everything is unlocked.
56
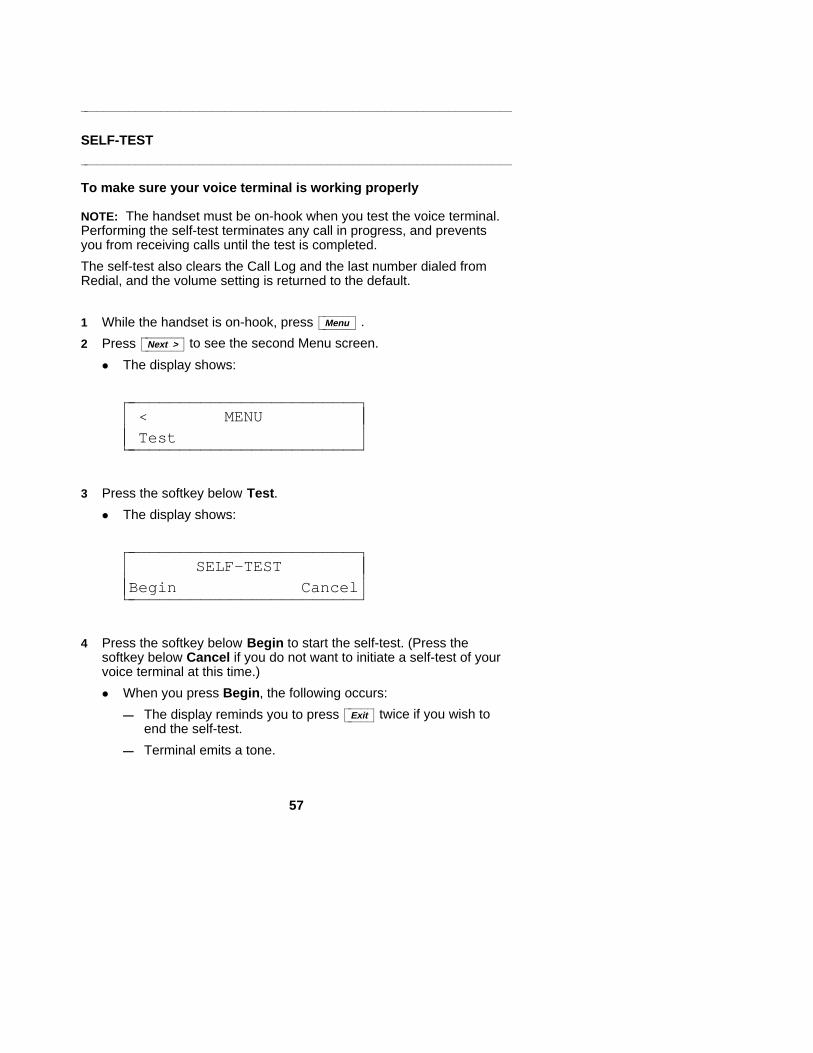
aaaaaaaaaaaaaaaaaaaaaaaaaaaaaaaaaaaaaaaaaaaaaaaaaaaaaaaaaaaaaaaaaaaa
SELF-TESTaaaaaaaaaaaaaaaaaaaaaaaaaaaaaaaaaaaaaaaaaaaaaaaaaaaaaaaaaaaaaaaaaaaaTo make sure your voice terminal is working properly
NOTE: The handset must be on-hook when you test the voice terminal.Performing the self-test terminates any call in progress, and preventsyou from receiving calls until the test is completed.
The self-test also clears the Call Log and the last number dialed fromRedial, and the volume setting is returned to the default.
1 While the handset is on-hook, press cbbbbbbcbbbbbbMenu .
2 Press cbbbbbbbcbbbbbbbNext > to see the second Menu screen.
d The display shows:
< MENU
Testcccbbbbbbbbbbbbbbbbbbbbbbbb
cccbbbbbbbbbbbbbbbbbbbbbbbb
3 Press the softkey below Test.
d The display shows:
SELF-TESTBegin Cancelcccbbbbbbbbbbbbbbbbbbbbbbbbcc
cbbbbbbbbbbbbbbbbbbbbbbbb4 Press the softkey below Begin to start the self-test. (Press the
softkey below Cancel if you do not want to initiate a self-test of yourvoice terminal at this time.)
d When you press Begin, the following occurs:
— The display reminds you to press cbbbbbcbbbbbExit twice if you wish to
end the self-test.
— Terminal emits a tone.
57
— Message light goes on.
— The display shows you the Feature Package number and theSelf-Test passed message.
NOTE: If these events do not occur, contact your SystemManager.
5 After you hear repeated tone, press any button on the voice terminal.
d Terminal emits a key click.
6 Press cbbbbbbcbbbbbbMute , cbbbbbbbbcbbbbbbbb
Speaker , cbbbbbbcbbbbbbConf , and cbbbbbbbbcbbbbbbbb
Transfer .
d Lights to the left of the Mute, Speaker, Conf, and Transferbuttons go on steadily.
7 Press cbbbbbbbcbbbbbbbRedial , cbbbbbcbbbbb
Exit , cbbbbbbcbbbbbbDrop , and cbbbbbbcbbbbbb
Hold .
d Lights to the left of the Mute, Speaker, Conf, and Transferbuttons flutter.
8 Pick up handset and press each dial pad key.
d Message light flutters.
d Handset emits a touch tone as each key is pressed.
9 Hang up handset.
10 When the self-test is completed, press cbbbbbcbbbbbExit twice.
NOTE: If you do not press cbbbbbcbbbbbExit twice to end the test, the voice
terminal automatically exits the self-test after 30 seconds.
58
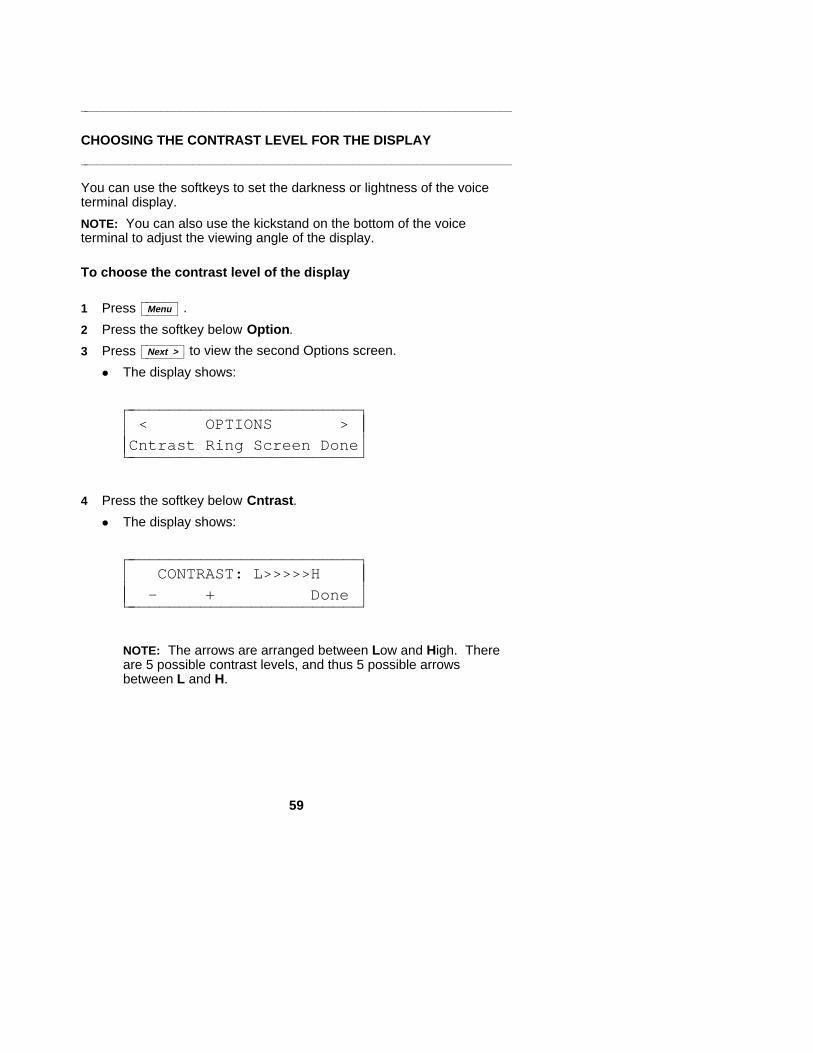
aaaaaaaaaaaaaaaaaaaaaaaaaaaaaaaaaaaaaaaaaaaaaaaaaaaaaaaaaaaaaaaaaaaa
CHOOSING THE CONTRAST LEVEL FOR THE DISPLAYaaaaaaaaaaaaaaaaaaaaaaaaaaaaaaaaaaaaaaaaaaaaaaaaaaaaaaaaaaaaaaaaaaaaYou can use the softkeys to set the darkness or lightness of the voiceterminal display.
NOTE: You can also use the kickstand on the bottom of the voiceterminal to adjust the viewing angle of the display.
To choose the contrast level of the display
1 Press cbbbbbbcbbbbbbMenu .
2 Press the softkey below Option.
3 Press cbbbbbbbcbbbbbbbNext > to view the second Options screen.
d The display shows:
< OPTIONS >Cntrast Ring Screen Donecccbbbbbbbbbbbbbbbbbbbbbbbb
cccbbbbbbbbbbbbbbbbbbbbbbbb4 Press the softkey below Cntrast.
d The display shows:
CONTRAST: L>>>>>H
- + Donecccbbbbbbbbbbbbbbbbbbbbbbbb
cccbbbbbbbbbbbbbbbbbbbbbbbb
NOTE: The arrows are arranged between Low and High. Thereare 5 possible contrast levels, and thus 5 possible arrowsbetween L and H.
59

5 Press the softkey below - or cbbbbbbbcbbbbbbb< Prev to make the contrast lighter.
Each button press decreases the number of arrows by one.
Press the softkey below + or cbbbbbbbcbbbbbbbNext > to make the contrast darker.
Each button press increases the number of arrows by one.
6 Press the softkey below Done when you are finished.
d The display confirms that the contrast level has been set.
60
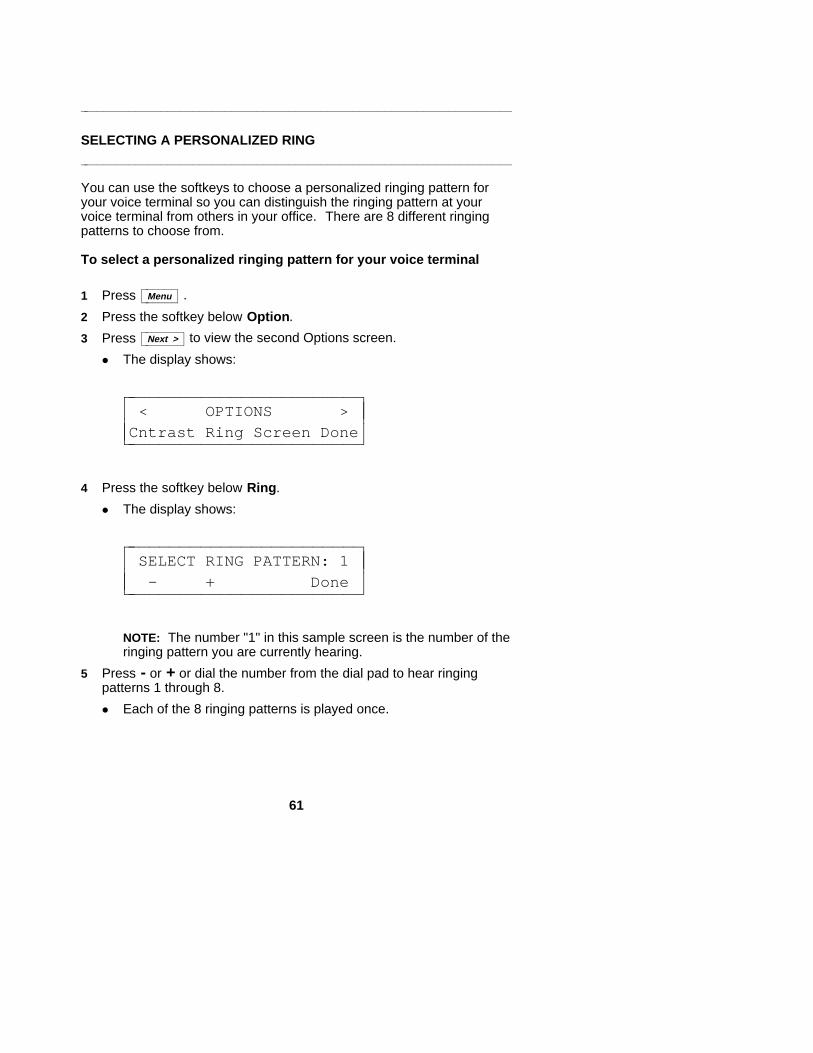
aaaaaaaaaaaaaaaaaaaaaaaaaaaaaaaaaaaaaaaaaaaaaaaaaaaaaaaaaaaaaaaaaaaa
SELECTING A PERSONALIZED RINGaaaaaaaaaaaaaaaaaaaaaaaaaaaaaaaaaaaaaaaaaaaaaaaaaaaaaaaaaaaaaaaaaaaaYou can use the softkeys to choose a personalized ringing pattern foryour voice terminal so you can distinguish the ringing pattern at yourvoice terminal from others in your office. There are 8 different ringingpatterns to choose from.
To select a personalized ringing pattern for your voice terminal
1 Press cbbbbbbcbbbbbbMenu .
2 Press the softkey below Option.
3 Press cbbbbbbbcbbbbbbbNext > to view the second Options screen.
d The display shows:
< OPTIONS >Cntrast Ring Screen Donecccbbbbbbbbbbbbbbbbbbbbbbbb
cccbbbbbbbbbbbbbbbbbbbbbbbb4 Press the softkey below Ring.
d The display shows:
SELECT RING PATTERN: 1
- + Donecccbbbbbbbbbbbbbbbbbbbbbbbb
cccbbbbbbbbbbbbbbbbbbbbbbbb
NOTE: The number "1" in this sample screen is the number of theringing pattern you are currently hearing.
5 Press - or + or dial the number from the dial pad to hear ringingpatterns 1 through 8.
d Each of the 8 ringing patterns is played once.
61

.
62

aaaaaaaaaaaaaaaaaaaaaaaaaaaaaaaaaaaaaaaaaaaaaaaaaaaaaaaaaaaaaaaaaaaa
SETTING THE RATE AT WHICH YOU VIEW THE DISPLAYMESSAGESaaaaaaaaaaaaaaaaaaaaaaaaaaaaaaaaaaaaaaaaaaaaaaaaaaaaaaaaaaaaaaaaaaaaYou can use the softkeys to set the length of time the display messagestays on the screen. When you receive your voice terminal, the rate isset at Medium. However, there are actually 3 rate settings: Slow,Medium, and Fast. You may want to test all 3 reading rates before youmake a final selection.
To select the rate at which you see the display messages
1 Press cbbbbbbcbbbbbbMenu .
2 Press the softkey below Option.
3 Press cbbbbbbbcbbbbbbbNext > to view the second Option screen.
d The display shows:
< OPTIONS >Cntrast Ring Screen Donecccbbbbbbbbbbbbbbbbbbbbbbbb
cccbbbbbbbbbbbbbbbbbbbbbbbb4 Press the softkey below Screen.
d The display shows the current rate:
TIMED MESSAGE RATE: MED
Slow Med Fast Donecccbbbbbbbbbbbbbbbbbbbbbbbb
cccbbbbbbbbbbbbbbbbbbbbbbbb
63

5 Press the softkey below either Slow, Medium, or Fast, according tothe rate at which you want the display messages to be shown.
d The display reflects the choice you have made.
6 When the display screen shows the display message rate you want,press the softkey below Done.
NOTE: Be sure to check the timing of the message for the rate atwhich you have set the messages to be displayed. If it is too fast ortoo slow, you may modify the rate again.
64

aaaaaaaaaaaaaaaaaaaaaaaaaaaaaaaaaaaaaaaaaaaaaaaaaaaaaaaaaaaaaaaaaaaa
TURNING ON OR OFF SOFTKEY INFORMATION TONESaaaaaaaaaaaaaaaaaaaaaaaaaaaaaaaaaaaaaaaaaaaaaaaaaaaaaaaaaaaaaaaaaaaaAlong with timed confirmation screens, the voice terminal also providessoftkey mode confirmation tones (sequential low and high tones). Alsoavailable are error tones (one beep) to alert you if you have made amistake in your softkey entries. You may choose to turn these softkeyinformation tones on or off.
NOTE: This procedure turns on or off the information tones associatedwith the softkeys. The confirmation and error tones associated withthose features not used with the softkeys are not turned on or off by theprocedure described here.
To turn on or off the confirmation and error tones
1 Press cbbbbbbcbbbbbbMenu .
2 Press the softkey below Option.
3 Press cbbbbbbbcbbbbbbbNext > twice to view the third Options screen.
d The display shows:
< OPTIONS Tones CallLog Names Donecccbbbbbbbbbbbbbbbbbbbbbbbb
cccbbbbbbbbbbbbbbbbbbbbbbbb4 Press the softkey below Tones.
d The display shows the current setting (On or Off):
INFORMATION TONES: OFF
Off On Donecccbbbbbbbbbbbbbbbbbbbbbbbb
cccbbbbbbbbbbbbbbbbbbbbbbbb
65

5 Press the softkey below Off to turn off the softkey mode informationtones, or press the softkey below On to turn on the information tones.
d The display changes to reflect your choice (On or Off).
6 When the display screen reflects your choice (On or Off), press thesoftkey below Done.
66
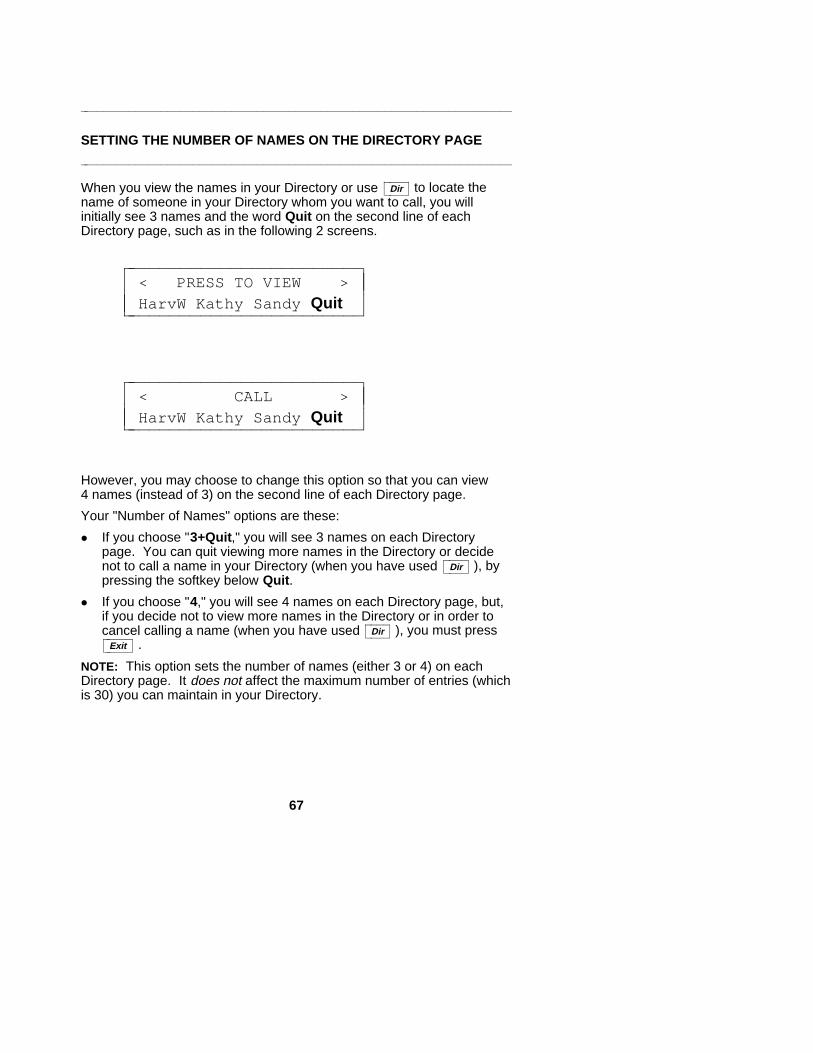
aaaaaaaaaaaaaaaaaaaaaaaaaaaaaaaaaaaaaaaaaaaaaaaaaaaaaaaaaaaaaaaaaaaa
SETTING THE NUMBER OF NAMES ON THE DIRECTORY PAGEaaaaaaaaaaaaaaaaaaaaaaaaaaaaaaaaaaaaaaaaaaaaaaaaaaaaaaaaaaaaaaaaaaaaWhen you view the names in your Directory or use cbbbbcbbbb
Dir to locate thename of someone in your Directory whom you want to call, you willinitially see 3 names and the word Quit on the second line of eachDirectory page, such as in the following 2 screens.
< PRESS TO VIEW >
HarvW Kathy Sandy Quitcccbbbbbbbbbbbbbbbbbbbbbbbb
cccbbbbbbbbbbbbbbbbbbbbbbbb
< CALL >
HarvW Kathy Sandy Quitcccbbbbbbbbbbbbbbbbbbbbbbbb
cccbbbbbbbbbbbbbbbbbbbbbbbb
However, you may choose to change this option so that you can view4 names (instead of 3) on the second line of each Directory page.
Your "Number of Names" options are these:
d If you choose "3+Quit," you will see 3 names on each Directorypage. You can quit viewing more names in the Directory or decidenot to call a name in your Directory (when you have used cbbbbcbbbb
Dir ), bypressing the softkey below Quit.
d If you choose "4," you will see 4 names on each Directory page, but,if you decide not to view more names in the Directory or in order tocancel calling a name (when you have used cbbbbcbbbb
Dir ), you must presscbbbbbcbbbbb
Exit .
NOTE: This option sets the number of names (either 3 or 4) on eachDirectory page. It does not affect the maximum number of entries (whichis 30) you can maintain in your Directory.
67
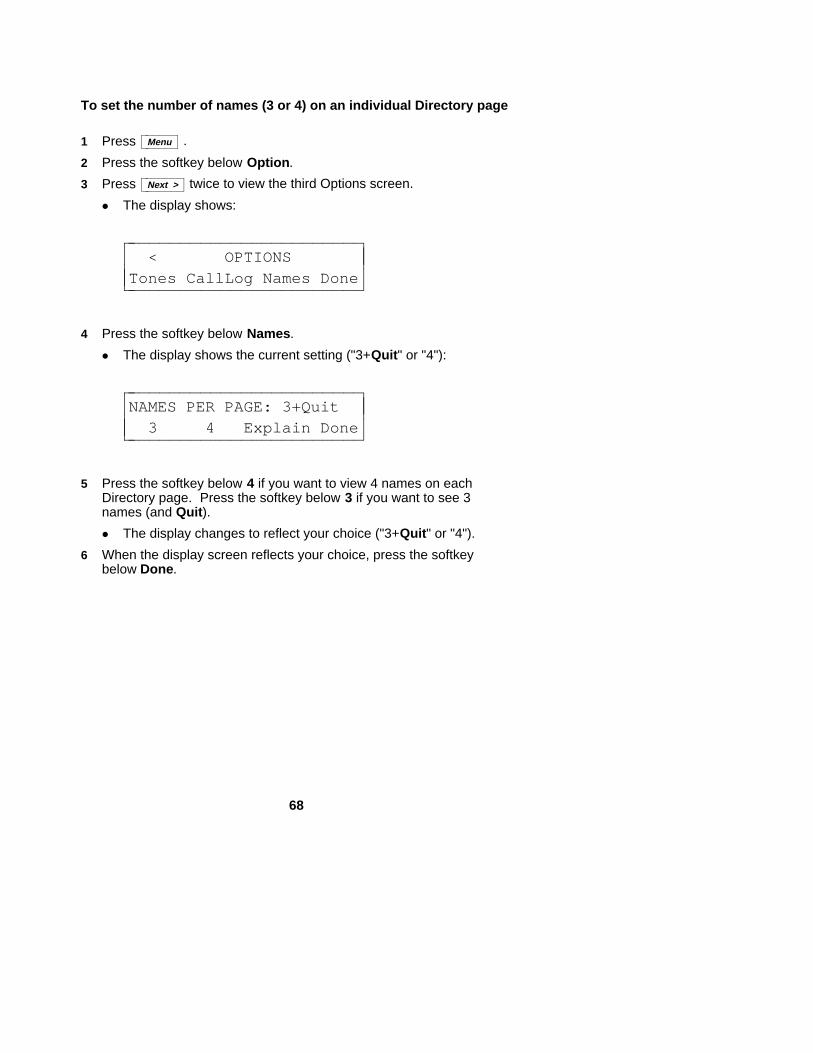
To set the number of names (3 or 4) on an individual Directory page
1 Press cbbbbbbcbbbbbbMenu .
2 Press the softkey below Option.
3 Press cbbbbbbbcbbbbbbbNext > twice to view the third Options screen.
d The display shows:
< OPTIONS
Tones CallLog Names Donecccbbbbbbbbbbbbbbbbbbbbbbbb
cccbbbbbbbbbbbbbbbbbbbbbbbb
4 Press the softkey below Names.
d The display shows the current setting ("3+Quit" or "4"):
NAMES PER PAGE: 3+Quit3 4 Explain Donecc
cbbbbbbbbbbbbbbbbbbbbbbbbcccbbbbbbbbbbbbbbbbbbbbbbbb
5 Press the softkey below 4 if you want to view 4 names on eachDirectory page. Press the softkey below 3 if you want to see 3names (and Quit).
d The display changes to reflect your choice ("3+Quit" or "4").
6 When the display screen reflects your choice, press the softkeybelow Done.
68

Tones and Their Meanings
VOICE TERMINAL TONES
d busy signal—A low-pitched tone repeated 60 times a minute;indicates the number dialed is in use.
d confirmation tone—Two rising tones; indicates a feature activationor cancellation has been accepted.
d dial tone—A continuous tone; indicates dialing can begin.
d error tone—An alternating high and low tone; indicates a dialingerror, a denial of the service requested, or a failure to dial within apreset interval (usually 10 seconds) after lifting the handset or dialingthe previous digit.
d local error tone—A steady low tone; indicates an incorrect buttonpress.
d reorder tone—A fast busy signal; indicates a call is blocked.
d self-test tone—Periodic tones; indicates that the voice terminal iscontinuing to perform a self-test.
d speakerphone reset tones—A rising set of tones; indicates thespeakerphone is adjusting itself to the surrounding room acoustics.
Labeling and Installing the Designation Cardand the Telephone Number Card
Inside the front cover of this user’s manual are four button designationcards on which you can write the telephone number, extension, name, orfeature that each call appearance/feature button can access. Thesedesignation cards match the call appearance/feature buttons on thevoice terminal; that is, the left column is labeled a through e; the secondcolumn is labeled f through j.
Below the perforated bottom edge of each designation card is atelephone number card on which you can write your telephone number.
At the bottom of each designation and telephone number card is anadditional attached section which will make it easier for you to insertthese cards in a typewriter or run the cards through a laser printer.
69
To label and install the designation card and telephone number card
1 Tear the button designation card, along with the telephone numbercard and attached "tail," from the user’s manual along the perforatededges. (You may choose to take out one card at a time and leavethe remaining cards in the manual for future use, or you may chooseto tear out all four at one time.)
2 Label the button designation card with the appropriate number,extension, name, or feature for each call appearance/feature button.Label the telephone number card with your own telephone number.You can handwrite or type the information on the cards or run thecards through a laser printer.
3 Separate the button designation card and telephone number cardalong the perforated border. You may discard the attached "tail"section.
4 Place the button designation card under the plastic card cover on thevoice terminal. Place the telephone number card under thetelephone number card cover located beneath the handset.
70

Installation
CONTENTS OF THE 8510T PACKAGEBefore you begin, make sure you have the following parts in the box:
d 8510T voice terminal (with attached desktop stand)
d K-type handset
d 9-foot handset cord
d 7-foot line cord
d Designation card(s)
d Cover(s) for Designation card(s)
d This user’s manual
d A quick reference manual for using the softkeys
DESKTOP INSTALLATION
NOTE: The following instructions describe the installation of the 8510Tvoice terminal on a desk or table. If you choose, instead, to mount thevoice terminal on the wall, use the instructions included in the 8510TVoice Terminal Wall Mounting Kit (COMCODE: 106614894).
IMPORTANT: The tasks of setting the terminal resistor jumpers and thephantom/auxiliary power jumpers can only be done by qualified servicepersonnel. DO NOT attempt to remove the voice terminal desktop standor set either type of jumpers yourself.
Use the following directions to connect the line cord and adjunct cord tothe appropriate jacks on the voice terminal.
1 Place the voice terminal face down on a flat surface.
2 Using the thumb notches beside the kickstand, lift the kickstand fromthe desktop stand.
3 Pass the line cord (and adjunct cord, if applicable) under thekickstand.
4 Snap one end of the 7-foot line cord into the "LINE" jack and theadjunct cord (if applicable) into the "ADJUNCT" jack on the bottom ofthe voice terminal. See Figure 5 for the location of the jacks. Formore information on installing adjuncts, refer to the section "AttachingAdjunct Equipment."
71
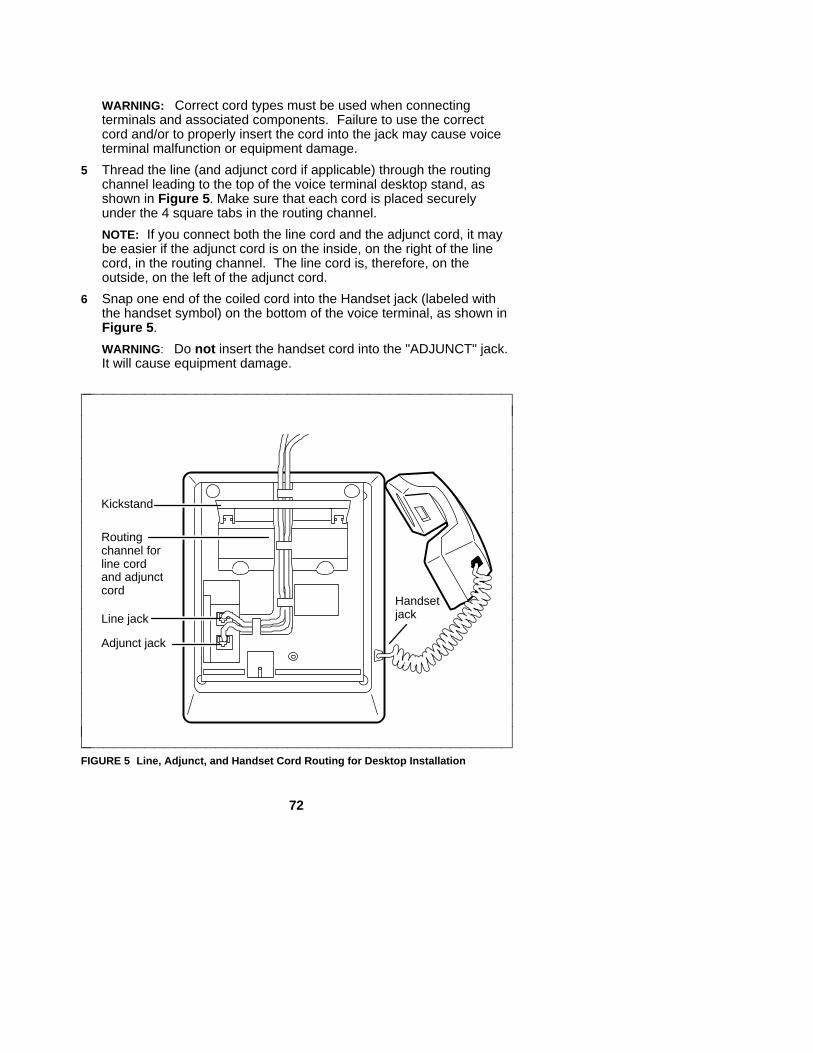
WARNING: Correct cord types must be used when connectingterminals and associated components. Failure to use the correctcord and/or to properly insert the cord into the jack may cause voiceterminal malfunction or equipment damage.
5 Thread the line (and adjunct cord if applicable) through the routingchannel leading to the top of the voice terminal desktop stand, asshown in Figure 5. Make sure that each cord is placed securelyunder the 4 square tabs in the routing channel.
NOTE: If you connect both the line cord and the adjunct cord, it maybe easier if the adjunct cord is on the inside, on the right of the linecord, in the routing channel. The line cord is, therefore, on theoutside, on the left of the adjunct cord.
6 Snap one end of the coiled cord into the Handset jack (labeled withthe handset symbol) on the bottom of the voice terminal, as shown inFigure 5.
WARNING: Do not insert the handset cord into the "ADJUNCT" jack.It will cause equipment damage.
Kickstand
Routingchannel forline cordand adjunctcord
Line jack
Adjunct jack
Handsetjack
cccccccccccccccccbbbbbbbbbbbbbbbbbbbbbbbbbbbbbbbbbbbbbbbbbbb
cccccccccccccccccbbbbbbbbbbbbbbbbbbbbbbbbbbbbbbbbbbbbbbbbbbb
FIGURE 5 Line, Adjunct, and Handset Cord Routing for Desktop Installation
72
7 Turn the voice terminal right side up, with the front facing you.
8 Decide whether you want the kickstand up, lifted from the desktopstand, or whether you want the kickstand down, level with thedesktop stand. Check which of these kickstand adjustments allowsyou the best viewing angle of the display.
9 Snap the free end of the handset cord into the handset and place thehandset in the cradle.
10 Snap the free end of the line cord into the modular jack. Lift thehandset and listen for the dial tone.
ATTACHING ADJUNCT EQUIPMENTIf you are installing a speakerphone (models Lucent S101A, S201A, orQUORUM CS201A), a headset adapter (model Lucent 500A or the507A adapter), or other adjunct that may be offered, follow these stepsto connect the adjunct equipment to your voice terminal.
1 Place the voice terminal face down on a flat surface.
2 Using the thumb notches beside the kickstand, lift the kickstand fromthe desktop stand.
3 Pass the line cord (and adjunct cord, if applicable) under thekickstand.
4 Snap the adjunct cord into the "ADJUNCT" jack until you hear a click.See Figure 5 for the location of the "ADJUNCT" jack.
5 Route the adjunct cord through the channel. Refer to the "DesktopInstallation" section for instructions.
6 Connect the free end of the adjunct cord to your speakerphone orheadset adapter.
NOTE: Refer to the adjunct’s installation documentation for its powerrequirements.
73
Technical Description
Physical Dimension and Weight
The 8510T voice terminal is convertible for either desktop or wallmounting.
The desktop-mounted voice terminal measures
d 7.8 inches (19.8 cm) wide
d 9.5 inches (24.1 cm) long
d 5.3 inches (13.4 cm) high (with handset)6.1 inches high with kickstand up
d 3.07 lbs (1,39 kg)
Power Requirements
The 8510T voice terminal requires phantom power or auxiliary power;either is selected by setting a pair of jumpers. If phantom power is used,less than 1 Watt of power is drawn from the switch to support a normaloperating mode. If adjunct equipment is connected to the voice terminal,auxiliary power must be used.
WARNING: If auxiliary power is selected, use only a nominal 40 or 48Vdc, UL-Listed Communications Circuit Power source.
Environmental Requirements
The 8510T can operate in temperatures ranging from 40 to120 degrees F (4 to 48 degrees C) and relative humidity ranging from 5to 95 percent.
74
IndexAadding numbers and names
into the Directory, 26adjunct equipment
attaching, 73Adjunct jack
connection, 71, 73description, 6location, 73
adjusting the volumereceive, 10speaker/speakerphone, 10, 14, 15tone ringer, 62
answering calls, 10
Bbuttons
call appearance, 4Conference, 4dial pad, 4display control, 4
Dir, 4, 8, 19Exit, 4, 18Menu, 4, 18Next >, 4, 19< Prev, 4, 19
Drop, 4Exit, 4, 8Hold, 4Mute, 5Redial, 5Speaker, 5Transfer, 5Volume control, 5
CCall Log, 8, 36
adding incoming callsto Directory, 41
indication of newunanswered calls, 44
locking, 51returning calls to callers
listed in Call Log, 39setting, 36
all calls, 39turning on or off, 38unanswered calls only, 39
turning on or off, 38unlocking, 53viewing calls
answered incoming, 48outgoing, 49unanswered incoming, 36, 46
callsanswering, 10Conference, 11Drop, 11ending, 10Hold, 12message retrieval of, 12Mute, 13placing
from dial pad, 10from Dir button, 35from Directory softkey, 33
Redial, 13speakerphone, 14Transfer, 16
changing the password, 55clock, 8
setting the, 22Conference, 7, 11contrast, 8contrast display level
adjusting kickstand, 59setting the, 59
creating the password, 52, 55
Ddeleting an entry in the Directory, 31designation card, 4
installing, 69labeling, 69
dial pad, 4Dir button, 8, 19, 35Directory, 8
adding, 26calling, 33, 35deleting, 31editing, 29locking, 51number of names on page, 9, 67unlocking, 53viewing, 33
I-1
displaycontrast level
setting the, 59using kickstand, 59
control buttons, 4, 17, 19messages, 18
Doneresponding to, 19
Drop, 7, 11
Eediting the Directory, 29entering a number and name
in the Directory, 26entering Softkey Mode, 18Exit button, 8, 18exiting Softkey Mode, 18
Ffeature descriptions
display, 8Self-Test, 19softkeys, 8voice, 7
features accessed with thedisplay and softkeys, 8, 17
Flowchart of softkeydisplay screens, 20
Hhandset, 4Handset jack
connection, 72, 73description, 6location, 73
Hold, 7, 12
Iinformation tones
turning on or off, 65installing
adjunct equipment, 73designation card, 69handset cord, 71line cord, 71telephone number card, 69
Kkickstand, 6
Llabeling the designation card, 69labeling the telephone
number card, 69Line jack
connection, 71, 73description, 6location, 73
Lock feature, 8locking
Call Log, 51Directory, 51Softkeys, 51
MMenu button, 18Message light, 5messages
retrieving, 7, 12setting display rate of screens, 63
Mute, 7, 13, 15
NNext button, 19number and name into Directory
adding, 26deleting, 31editing, 29entering, 26
Ppassword
changing, 55creating, 52, 55removing, 55
Personalized Ring, 9selecting, 61
placing callsfrom dial pad, 10from Directory
using Dir button, 35using the softkeys, 33
Prev button, 19
I-2
QQuit
responding to, 19
Rrate
setting viewing timeof display messages, 63
Redial (Last Number Dialed), 7, 13removing the password, 55Ring
selecting a personalized pattern, 61ringer
adjusting the volume, 62
SScreen Timing, 9selecting a personalized ring, 61Self-Test, 9, 19, 57Set Speakerphone, 9setting
Call Log, 36, 38clock, 22display contrast level, 59information tones, 65message display rate, 63number of names
on Directory page, 67ringing pattern, 61speakerphone, 24
setting the Call Log, 36all calls, 39turning of or off, 38unanswered calls only, 39
softkeysCall Log, 36clock, 22contrast, 59description of, 5, 17Directory, 26done, 19enter, 18exit, 18flowchart, 20information tones, 65locking, 51number of names on Directory page, 67personalized ring, 61quit, 19Self-Test feature, 19, 57
speakerphone, 24unlocking, 53
softkeys display screens flowchart, 20Speaker, 7, 14
adjusting the volume, 10, 14Speakerphone, 7, 14, 24
adjusting the volume, 10, 15setting, 24
Ttechnical description, 74telephone number card, 5
installing, 69labeling, 69
tone ringeradjusting the volume, 62
tones, 9description, 68setting, 65
Transfer, 8, 16
Uunlocking
Call Log, 53Directory, 53Softkeys, 53
Vviewing
Call Loganswered incoming, 48outgoing, 49unanswered incoming, 36, 46
Directory entry, 33voice features, 10
I-3


![The User Network Interface of the Public ISDN · Layer 1 specification; ETS 300 012-1, second edition, October 1998 [ETS 300 048] Integrated Services Digital Network (ISDN); ISDN](https://img.dokumen.tips/doc/110x75/5fda1a5c03a67a71e2142182/the-user-network-interface-of-the-public-isdn-layer-1-specification-ets-300-012-1.jpg)