Embed Size (px)
Citation preview

March 20133725-23982-012/A
Installing Software and Options for Polycom® HDX® Systems and Accessories
By upgrading your Polycom® software or by purchasing additional system options, your organization continues to benefit from the latest video conferencing technology.
OverviewThis document describes how to update your Polycom HDX® software and system options, Polycom Touch Control, and Polycom EagleEye™ Director.
For details on software compatibility, refer to the appropriate version of the Release Notes for Polycom HDX Systems available at support.polycom.com.
Polycom HDX System and OptionsTo activate and install Polycom video software updates and options:
1 Collect your license numbers and system serial numbers.
2 Obtain key codes through the Polycom web site.
3 Download the software update file from the Polycom web site, then extract the contents.
4 Install the software and options key codes.
For more information about updating your Polycom HDX system, refer to Updating Polycom HDX System Software and Options on page 3.
Polycom Touch ControlThe Polycom Touch Control does not require a license number or key code.
You can get the Polycom Touch Control software updates using any of the following:
• The online software server hosted by Polycom
• A USB storage device that you connect to the side of the Polycom Touch Control
If you need to update your HDX system, Polycom Touch Control, and Polycom EagleEye Director software, complete your update in this order:
1 Polycom HDX system
2 Polycom Touch Control
3 Polycom EagleEye Director

Installing Software and Options for Polycom HDX Systems and Accessories
2 Polycom, Inc.
• A server on your network
• A Polycom Converged Management Application™ (CMA®) system
• A Polycom RealPresence® Resource Manager system
For more information about updating the Polycom Touch Control, refer to Updating Polycom Touch Control Software on page 13.
Polycom EagleEye DirectorThe Polycom EagleEye Director does not require a license number or key code.
To activate and install Polycom EagleEye Director software updates and options:
1 Download the software update file from the Polycom web site.
2 Install the software.
For more information about updating the Polycom EagleEye Director, refer to Updating Software for the Polycom EagleEye Director on page 17.
You can also update using a web browser. For information about updating remotely, refer to the Administrator's Guide for Polycom HDX Systems.

Installing Software and Options for Polycom HDX Systems and Accessories
Polycom, Inc. 3
Updating Polycom HDX System Software and Options
Preparing for Polycom HDX System Software Updates
If you are installing software on a Polycom HDX system that is under warranty or a service plan, you need an upgrade key to activate the software. You can get that key by logging in to support.polycom.com and requesting the upgrade key. You need the Polycom HDX system’s serial number to get the key.
If the Polycom HDX system is not under warranty or a service plan, you need to contact an authorized Polycom dealer to get a license and then activate the license on support.polycom.com to obtain an upgrade key.
Guidelines for Updating a System Paired with a Polycom Touch ControlBefore upgrading an HDX system manually or by using a management system, ensure one of the following conditions is met. If neither of these conditions is met, the Polycom Touch Control and HDX system may become unpaired after updating, without displaying a warning message.
• The existing Polycom Touch Control version is compatible with the new HDX software version being installed.
• A software upgrade is available for Polycom Touch Control which is compatible with the new HDX software version being installed. The software can reside on a URL or a USB storage device.
Points to Note about HDX System Software Updates:
• Because of changes in software functionality and the user interface, some settings might be lost when you upgrade to the latest version or reinstall an older version after upgrading. Polycom recommends that you store your system settings using profiles and download your system directory before updating your system software. Do not manually edit locally saved profile and directory files. For more information about storing system settings, refer to the Administrator’s Guide for Polycom HDX Systems.
• Systems perform an internal restart before running Software Update, which usually takes about 2 or 3 minutes. This process improves the reliability of the update process by freeing up memory before performing the update. If you are updating a Polycom HDX system using a web browser, the internal restart is not visible from the web interface.
• Polycom HDX 6000 series, Polycom HDX 7000 series, and Polycom HDX 8000 series systems must be connected to one of the Polycom EagleEye cameras to receive infrared (IR) signals from the remote control. Point the remote control at the camera to control those Polycom HDX systems.

Installing Software and Options for Polycom HDX Systems and Accessories
4 Polycom, Inc.
For version compatibility information, refer to the appropriate version of the Release Notes for Polycom HDX Systems available at support.polycom.com.
Installing By Using a Management System in Traditional Management ModeTo install the latest software version on a Polycom HDX system that is in traditional management mode, you must use a management system that supports the Software Update method that involves an internal restart on the system. The following management systems support this Software Update method:
• Polycom CMA system versions 5.5.0, 6.0.1, or later
• Polycom RealPresence Resource Manager system version 7.0 or later
• Polycom ReadiManager® SE200 version 3.0.7 or later
• Polycom Global Management System™ version 7.1.10 or later
Installing an Older HDX System Version after UpgradingIf you reinstall an older version of software after upgrading to a later version, which is also known as downgrading, Polycom recommends performing a Custom installation and selecting Erase System Flash Memory. This setting is available when you use Software Update.
When the HDX system is paired with a Polycom Touch Control, you cannot use the Polycom Touch Control USB port to update the HDX system software.
Points to note about downgrading:
• To determine the software version you are using, go to System > System Information in the local interface or Admin > Tools > System Information in the web interface. For more information on accessing the web interface, refer to the Administrator’s Guide for Polycom HDX Systems.
• Before downgrading, refer to the Release Notes for Polycom HDX Systems to verify the interoperability of your system hardware and peripherals with the software version you plan to install. For example, Polycom 8000 HD systems and Polycom 7000 HD systems with Hardware Version B require HDX version 2.5 or later and cannot be downgraded to previous software versions.
• To downgrade from HDX software version 2.6.1 or later software to 2.6 or earlier software, first downgrade to version 2.6.0.2, then to the desired software release.
• If you downgrade your HDX software, you must also downgrade the Polycom Touch Control software. For version compatibility information, refer to the appropriate version of the Release Notes for Polycom HDX Systems available at support.polycom.com.

Installing Software and Options for Polycom HDX Systems and Accessories
Polycom, Inc. 5
To reinstall an older version of software after upgrading the Polycom Touch Control, save the unzipped software package on an internal web server or a USB storage device, and configure the Polycom Touch Control to install updates from that location. For more information about updating Polycom Touch Control software, refer to Updating Polycom Touch Control Software on page 13.
Collecting System Information for your Polycom HDX System Update
Serial and License NumbersMake a note of your Polycom HDX system serial number and license number. You will need to provide them in order to get the key codes that activate software updates and system options.
• The 14-digit serial number is the unique number that identifies your system. You can find it on the System Information screen and on a label on the back of the system.
• The license number is the number that you receive when you purchase a software update or system option. License numbers have the following format:
Software update license: U1000-0000-0000-0000-0000
System option license: K1000-0000-0000-0000-0000
If you want to update multiple systems, you can obtain key codes from Polycom for all of the systems at one time. To obtain multiple key codes for purchased software updates or system options, create a text file that contains the license numbers and serial numbers of the systems that you want to update.
To obtain multiple key codes for software updates covered by a software warranty or service agreement, create a text file containing a list of serial numbers only.
If your software updates are covered by a software warranty or service agreement and you did not purchase additional system options, you only need to provide a serial number. If you are running a major or minor software version (x.y), you can update to a patch version (x.y.z) without a license. If the software has had a major or minor upgrade, you need a key code to get the new software.
Serial numbers are case sensitive.

Installing Software and Options for Polycom HDX Systems and Accessories
6 Polycom, Inc.
Use this format for text files that contain license numbers and serial numbers:
license number<TAB>system serial number
For example, a text file with update license numbers and serial numbers might look like this:
U1000-000-000-0000<TAB>82040903F01AB1
U1000-000-000-0000<TAB>82043604G18VR2
A text file with system option license numbers and serial numbers might look like this:
K1000-000-000-5001<TAB>82040903F01AB1
K1000-000-000-5003<TAB>82043604G18VR2
A text file with only serial numbers might look like this:
82040903F01AB1
82043604G18VR2
Key Codes for HDX System Software Updates and System OptionsTo activate options or perform a major or minor software update, you will need to obtain a key code before you run the software update. A key code is the number that activates software or options on a specific system.
• A key code is valid only on the system for which it is generated.
• Software key codes are valid for the software release you are installing as well as for any patch releases that may later become available.
• Option key codes are valid across all software releases.
You need an account on support.polycom.com before you begin. Be sure to set up an account if you don’t already have one.
Obtaining Software and Option Key Codes for a Single Polycom HDX System
To obtain software or option key codes for a single HDX system:
1 On a computer, open Internet Explorer version 6.x, 7.x, or 8.x.
2 Log in at support.polycom.com.
3 Under Licensing & Product Registration, click Activation/Upgrade.
4 Click Site & Single Activation/Upgrade.
Follow the onscreen instructions to request the key code. Make a note of this number for use during installation.

Installing Software and Options for Polycom HDX Systems and Accessories
Polycom, Inc. 7
Obtaining Software and Option Key Codes for Multiple Polycom HDX Systems
To obtain software or option key codes for multiple HDX systems:
1 On a computer, open Internet Explorer version 6.x, 7.x, or 8.x.
2 Log in at support.polycom.com.
3 Under Licensing & Product Registration click Activation/Upgrade.
4 Do one of the following steps to receive serial number and key code combinations:
— To update systems not covered by a software warranty or service agreement, click Batch Activation.
— To update multiple systems covered by a software warranty or service agreement, click Batch Upgrade and then select your product.
5 Follow the onscreen instructions to submit the text file that contains license numbers and serial numbers, or serial numbers only. These text files are described in Serial and License Numbers on page 5.
For each file you upload, Polycom returns a text file that contains the key codes.
The Key Code file uses this format:
License Number<TAB>Serial Number<TAB>Option Key Code
The following example shows a Software Key Code file:
U1000-0000-0000-0000-0003<TAB>82041003E070B0<TAB>U8FB-0D4E-6E30-0000-0009
U1000-0000-0000-0000-0004<TAB>820327024193AK<TAB>U982-4507-5D80-0000-0009
The following example shows an Option Key Code file:
K1000-0000-0000-0000-0001<TAB>82041003F082B1<TAB>K15B-DC2D-E120-0000-0009
K1000-0000-0000-0000-0002<TAB>82041503E093B0<TAB>K27E-30F9-2D20-0000-0009
The following example shows a Software Key Code file for systems covered by a software warranty or service agreement:
U<TAB>82041003F082B1<TAB>U7B6-698E-1640-0000-02C1
U<TAB>82041503E093B0<TAB>UCC1-C9A6-FE60-0000-02C1
U<TAB>82041003E070B0<TAB>UEC6-FDA0-8F00-0000-02C1
U<TAB>820327024193AK<TAB>U7B7-D6BD-3610-0000-02C1

Installing Software and Options for Polycom HDX Systems and Accessories
8 Polycom, Inc.
Creating One Text File for Upgrading Multiple Polycom HDX Systems
To create a single text file for upgrading multiple HDX systems:
1 Concatenate the key code file and the option key code file you received from Polycom by following these steps:
a Open the key code files with a text editor, such as Notepad.
b Copy the contents of one file to the end of the other file.
c Save the combined file with a new name.
You now have a single text file that contains all of your key codes for software and options.
2 Use the key codes and option key codes in the file to upgrade your applicable HDX systems.
Activating Options on the Polycom HDX SystemIf you want to activate Polycom HDX system options without upgrading your software, you do not need to download software or run the software update. To activate system options on a single system, go to System > Admin Settings > General Settings > Options and enter the option key.
Downloading Polycom HDX System Software1 On a computer, open Internet Explorer version 6.x, 7.x, or 8.x.
2 Go to support.polycom.com.
3 Select Documents and Downloads > Telepresence and Video.
4 Select your product.
5 Download the appropriate software release and extract the contents of the .zip file.
Installing a Software Update and System Options on a Single HDX System
To update HDX system software using the Polycom HDX web interface:
1 Open Internet Explorer version 6.x, 7.x, or 8.x and configure it to allow cookies.
2 In the browser address line, enter the IP address of the HDX system using the http://IPaddress (for example, http://10.11.12.13) or https://IPaddress format. If you operate within a secure environment with the Maximum Security Profile or Security Mode enabled, you must use the https://IPaddress format.

Installing Software and Options for Polycom HDX Systems and Accessories
Polycom, Inc. 9
3 In the HDX system web interface, select Admin Settings.
4 If necessary, enter the Admin ID as the user name (default is admin), and then enter the Admin remote access password, if one is set.
The first time you open the web interface each day, you might need to enter a user name and password after you select any of the interface options.
5 Go to General Settings > Software Update > Polycom HDX System, and follow the instructions on the screen.
To update system software on a single system using the USB port on a Polycom HDX system:
After version 2.0 or later is installed on a Polycom HDX system, future software installations can be initiated using the USB port on the system.
1 Download the desired software package (.zip) file from the Polycom web site.
2 Using a standard Windows zip utility, extract the contents of the software package to access the .pup file.
3 Save the .pup file and one key code (.txt) file, obtained from the Polycom web site, to the root of a USB storage device.
4 Insert the USB storage device into the USB port on the system.
5 A prompt appears for installing the software found on the USB device.
6 Follow the instructions on the screen.
7 If you choose to cancel the installation, you can install the software at a later time by pressing Option on the remote control or keypad and selecting Software Update.
Use the HTTPS protocol to ensure that the configuration of all login information (such as user names and passwords) is transmitted using an encrypted channel, including those user names and passwords used to communicate with third-party systems on your network. Using HTTPS severely limits the ability of anyone on the network to discover these credentials.
When the HDX system is paired with a Polycom Touch Control, you cannot use the Polycom Touch Control USB port to update the HDX system software.

Installing Software and Options for Polycom HDX Systems and Accessories
10 Polycom, Inc.
Using a USB Device to Update Multiple HDX SystemsTo use a USB device to install a software update package on more than one HDX system, copy the key codes for each system that you want to update to the key code (.txt) file.
Use the steps in the previous section to install the update package on each HDX system for which you copied key codes to your USB device.
Using a Polycom CMA or RealPresence Resource Manager System to Update Multiple HDX Systems
If you expect to implement the RealPresence Resource Manager system multi-tenancy feature, refer to the Polycom RealPresence Resource Manager Operations Guide for more information about this feature before updating the HDX systems.
You can use a Polycom CMA system to update multiple endpoint systems after you complete the steps in Obtaining Software and Option Key Codes for Multiple Polycom HDX Systems on page 7 and Downloading Polycom HDX System Software on page 8.
To perform an automatic software update:
1 In the CMA system’s web interface, go to Admin > Software Updates > Automatic Software Updates and select the tab for the endpoint type whose software you want to update, such as HDX Series.
2 Click Upload Software Update.
3 In the Upload Software Update dialog box, verify the endpoint type.
4 If an activation key code is required to activate the software update, click the Update Requires Key checkbox, and in the Software Update Key File field, browse to and select the .txt key file you saved to your local system.
5 In the Software Update File field, browse to and select the .pup update file you saved to your local system.
6 Enter a meaningful description that will help other users to understand the purpose of the software update. (Note that the field is ASCII only.)
7 Click OK.
If a Polycom HDX system is running software version 2.5.0.6 or later, the CMA system must be running software version 4.1.4 or later. Use either of these options to update the HDX software:
• To update the Polycom HDX system using dynamic management mode, perform an automatic software update.
• To update the Polycom HDX system using traditional management mode, perform a scheduled software update.

Installing Software and Options for Polycom HDX Systems and Accessories
Polycom, Inc. 11
An automatic softupdate profile for the endpoint type appears in the Automatic Software Updates list.
To perform a scheduled software update:
1 In the CMA system’s web interface, go to Admin > Software Updates > Scheduled Software Updates and select the endpoint type and model whose software you want to update.
2 Click Upload Software Update.
3 In the Upload Software Update dialog box, verify the endpoint type and model.
4 If an activation key code is required to activate the software update, click the Update Requires Key checkbox, and in the Software Update Key File field, browse to and select the .txt key file you saved to your local system.
5 In the Software Update File field, browse to and select the .pup update file you saved to your local system.
6 Enter a meaningful description that will help other users to understand the purpose of the software update. (Note that the field is ASCII only.)
7 Click OK.
A scheduled softupdate profile for the endpoint type and model type appears in the Scheduled Software Updates list.
For more information about updating system software in automatic or traditional mode, setting an automatic software update policy, and testing a trial version software update package, refer to the Polycom CMA System Operations Guide available at support.polycom.com.
Using the Polycom ReadiManager System to Update Multiple HDX Systems If your organization uses the Polycom ReadiManager platform to manage systems on your network, you can use it to update multiple HDX systems.
1 In the Polycom ReadiManager interface, select System Management > Profiles/Policies > Software Update Profiles.
2 On the Software Update Profiles tab, select the types of systems you want to update and click Upload Software Update Profile.
3 Specify the location of the software and of the key file, if one is required. Click OK.
4 Select Device > Softupdate View.
If a Polycom HDX system is running version 2.5.0.6 or later, the SE200 must be running version 3.0.7 or later to update the Polycom HDX system.
Installing Software and Options for Polycom HDX Systems and Accessories
12 Polycom, Inc.
5 Select the devices you want to update, and click Software Update.
6 Specify when the update should occur, and click Schedule.
For information about updating system software using the Polycom ReadiManager solution, refer to the Polycom ReadiManager Operations Guide available at support.polycom.com.
Using Polycom Global Management System to Update Multiple HDX Systems
If your organization uses the Polycom Global Management System to manage systems on your network, you can use it to update multiple HDX systems.
1 Log in to the Global Management System screen.
2 Click Software Update.
3 Click Configure SoftUpdate.
4 Choose the device type and model, and click Upload.
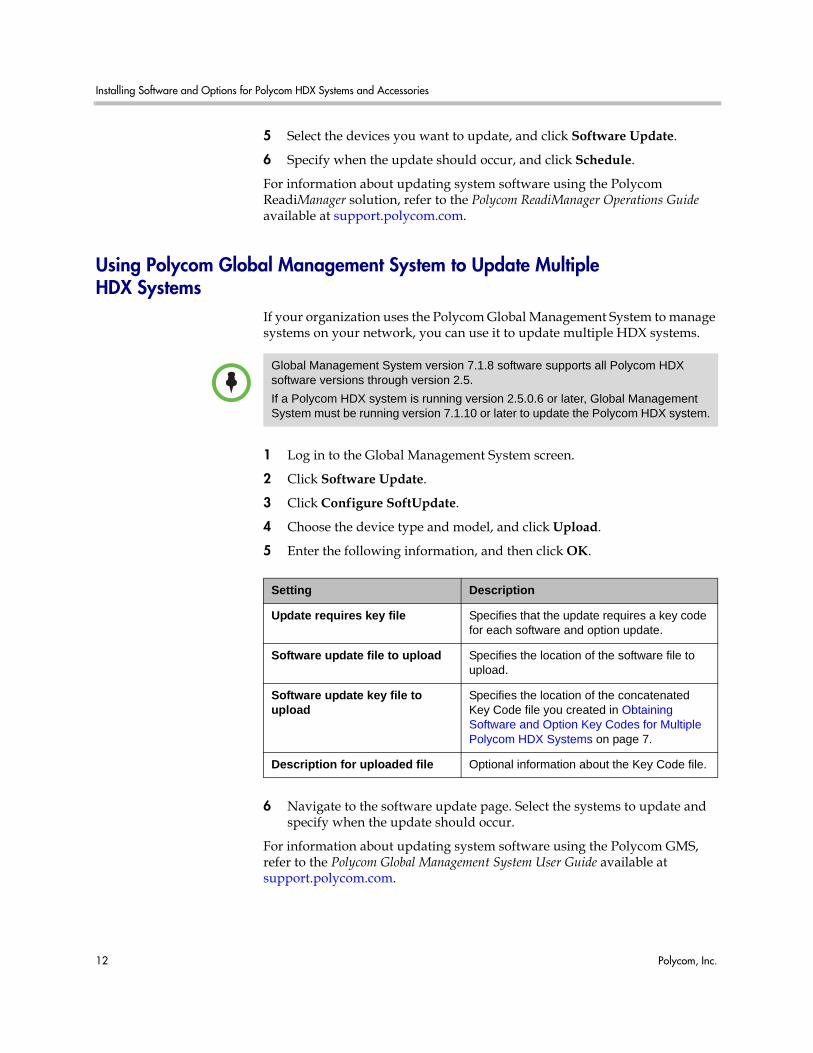
5 Enter the following information, and then click OK.
6 Navigate to the software update page. Select the systems to update and specify when the update should occur.
For information about updating system software using the Polycom GMS, refer to the Polycom Global Management System User Guide available at support.polycom.com.
Global Management System version 7.1.8 software supports all Polycom HDX software versions through version 2.5.
If a Polycom HDX system is running version 2.5.0.6 or later, Global Management System must be running version 7.1.10 or later to update the Polycom HDX system.
Setting Description
Update requires key file Specifies that the update requires a key code for each software and option update.
Software update file to upload Specifies the location of the software file to upload.
Software update key file to upload
Specifies the location of the concatenated Key Code file you created in Obtaining Software and Option Key Codes for Multiple Polycom HDX Systems on page 7.
Description for uploaded file Optional information about the Key Code file.

Installing Software and Options for Polycom HDX Systems and Accessories
Polycom, Inc. 13
Updating Polycom Touch Control SoftwareIn order for the systems to work together, the Polycom Touch Control must run a software version that is compatible with the software version on the HDX system. Polycom recommends that you install the latest compatible Polycom Touch Control software for any given HDX system software version. For additional details on software compatibility, refer to the appropriate version of the Release Notes for Polycom HDX Systems available at support.polycom.com.
You might need to update your HDX system at the same time you update the Polycom Touch Control. If the HDX software needs to be updated, update it before you update the Polycom Touch Control. For more information about updating your HDX system, refer to Updating Polycom HDX System Software and Options on page 3.
Update files for the Polycom Touch Control are located on the Polycom support server. You can also store these update files on a USB device, a CMA or RealPresence Resource Manager system, or your own web server.
When checking for software updates, the Polycom Touch Control first checks for the presence of a USB storage device. The system then lists the available Polycom Touch Control updates.
For information about updating the Polycom Touch Control software from a web browser, refer to the Administrator's Guide for Polycom HDX Systems.
Installing the Software from a Polycom ServerPolycom recommends setting the maintenance window time so that the Polycom Touch Control is updated about an hour after the last HDX system update has completed.
To install updates from the Polycom support site automatically:
1 From the Home screen, touch Administration and then Updates.
2 Ensure the correct server address is entered in the Server Address field. To use the Polycom server, enter polycom. The field is not case sensitive.
3 Enable Automatically Check for Software Updates.
4 Specify the automatic update options:
a Start Time: Touch Hour, Minute, and AM/PM to specify the beginning of the time window within which the Polycom Touch Control checks for updates.
b Touch Duration to select the length of the time window within which the Polycom Touch Control can check for updates.
After the Start Time and Duration settings are configured, the Polycom Touch Control calculates a random time within the defined update window at which to check for updates. It will then check for
Installing Software and Options for Polycom HDX Systems and Accessories
14 Polycom, Inc.
updates at this time on a daily basis as long as the Start Time and Duration values do not change. If the Start Time or Duration values change, a new random time within the new time window is calculated.
c Touch Action for Available Software Updates and select whether to be notified of available status updates only or to download and install software when updates are available.
To install updates from the Polycom support site manually:
1 From the Home screen, touch Administration and then Updates.
2 Ensure the correct server address is entered in the Server Address field. To use the Polycom server, enter polycom. The field is not case sensitive.
3 Touch Check for Software Updates.
4 Touch Select All Software Updates or touch only the updates that you want to install.
5 Touch Download and Install Software.
Installing Updates from a USB Storage Device1 On a computer, open Internet Explorer version 6.x, 7.x, or 8.x.
2 Go to support.polycom.com.
3 Select Documents and Downloads > Telepresence and Video.
4 Navigate to the page for the Polycom HDX system that you use with the Polycom Touch Control.
5 Download the latest version of these distribution package files to your hard drive:
— Polycom Touch Control Operating System
— Polycom Touch Control Panel Software
6 Using a standard Windows zip utility, extract all contents of the files you downloaded to the root directory of a USB storage device.
When extracting multiple distribution packages to the USB drive, a pop up message might appear asking if you want to overwrite certain files that already exist. Select Yes to All.
7 Connect the USB device to the side of the Polycom Touch Control.
8 From the Home screen, touch Administration and then Updates.
9 Touch Check for Software Updates.
10 Touch Select All Software Updates or touch only the updates that you want to install.
11 Touch Download and Install Software.

Installing Software and Options for Polycom HDX Systems and Accessories
Polycom, Inc. 15
Using a CMA or RealPresence Resource Manager System to Update the Software
Administrators can post Polycom Touch Control software to a CMA system or a RealPresence Resource Manager system and then configure the Polycom Touch Control devices to get updates there. For supported management system versions, refer to Installing By Using a Management System in Traditional Management Mode on page 4.
When using a CMA system or RealPresence Resource Manager system to automatically update the software for an HDX system with an associated Polycom Touch Control, use the same management server for the Polycom Touch Control updates. This helps you control the version of software installed on the Polycom Touch Control. Also, Polycom recommends setting the maintenance window time so that the Polycom Touch Control is updated about an hour after the HDX system update has completed.
To use a CMA or RealPresence Resource Manager system as the update site:
1 Go to support.polycom.com, and navigate to the page for the Polycom HDX system that you use with the Polycom Touch Control.
2 Download the latest version of these distribution packages to your hard drive:
— Polycom Touch Control Operating System
— Polycom Touch Control Panel Software
3 In the CMA or RealPresence Resource Manager system’s web interface, go to Admin > Software Updates > Automatic Software Updates and select the tab for the endpoint type whose software you want to update, such as Touch Control.
4 Click Upload Software Update.
5 In the Select File dialog box, navigate to and select the .zip files you downloaded in step 2. You must select the .zip files separately.
6 Click Open.
An automatic softupdate profile for the Polycom Touch Control appears in the Automatic Software Updates list.
For information about configuring production and trial versions of software update package, refer to the Polycom CMA System Operations Guide available at support.polycom.com.
7 In the CMA or RealPresence Resource Manager system’s web interface, find the URL of the update site. Depending on how you plan to use the update, enter the Production URL or Trial URL on the Update screen on the Polycom Touch Control.
8 Follow the steps described in Installing the Software from a Polycom Server on page 13 to automatically or manually update the Polycom Touch Control software.

Installing Software and Options for Polycom HDX Systems and Accessories
16 Polycom, Inc.
Using Your Server to Update the SoftwareAdministrators can post Polycom Touch Control software to their own web servers and then configure the Polycom Touch Control devices to get updates there.
To use your web server as the update site:
1 Make sure that your server allows clients to download files with the following extensions:
— .tar.gz
— .txt
— .sig
2 Define a URL on your server that the Polycom Touch Control can use for software updates, and create a corresponding root directory to it.
3 Go to support.polycom.com, and navigate to the page for the Polycom HDX system that you use with the Polycom Touch Control.
4 Download the latest version of these distribution packages to your hard drive:
— Polycom Touch Control Operating System
— Polycom Touch Control Panel Software
5 Extract the files to the root directory of the update site.
6 Open a command line interface, and enter the command appropriate for your operating system:
— Unix or Linux: <root dir>/dists/venus/geninfo.sh
— Windows: <root dir>\dists\venus\geninfo.bat
7 Enter the URL of the update site on the Update screen on the Polycom Touch Control.
8 Follow the steps described in Installing the Software from a Polycom Server on page 13 to automatically or manually update the Polycom Touch Control software.
When checking for software updates on your server, the Polycom Touch Control checks only for what is referred to as the “current” release of the operating system and panel software. By default, the current release comprises the operating system and panel software distribution packages that were most recently extracted on your server.
Over time, you might extract other versions of the operating system and panel software on your server, resetting the current release with every extraction. In addition, you will accumulate multiple versions of the same software. Each software distribution package contains two commands, setcurrel and removerel, that you can use to maintain all of the Polycom Touch Control software extracted on your server.
Installing Software and Options for Polycom HDX Systems and Accessories
Polycom, Inc. 17
1 setcurrelThis command sets a specific version of a software release as the current release.
— For panel software, run the appropriate setcurrel command below, with no parameters, and follow the command’s instructions for selecting the current release:
» Unix or Linux: <root dir>/dists/venus/HDXctrl/setcurrel.sh
» Windows: <root dir>\dists\venus\HDXctrl\setcurrel.bat
— For operating system software:
» Unix or Linux: <root dir>/dists/venus/platform/setcurrel.sh
» Windows: <root dir>\dists\venus\platform\setcurrel.bat
2 removerelThis command removes a specific version of a software release from your server.
— For panel software, run the appropriate removerel command below, with no parameters, and the follow the command’s instructions for removing a specific release from your server:
» Unix or Linux: <root dir>/dists/venus/HDXCtrl/removerel.sh
» Windows: <root dir>\dists\venus\HDXCtrl\removerel.bat
— For operating system software:
» Unix or Linux: <root dir>/dists/venus/platform/removerel.sh
» Windows: <root dir>\dists\venus\platform\removerel.bat
Updating Software for the Polycom EagleEye DirectorYou might need to update your HDX system at the same time you update the Polycom EagleEye Director. If the HDX software needs to be updated, update it before you update the Polycom EagleEye Director. For more information about updating your HDX system, refer to Updating Polycom HDX System Software and Options on page 3. You must be running Polycom HDX system software version 3.0.1 or later to use the Polycom EagleEye Director.
The Polycom EagleEye Director must be detected by the HDX system before you can update the EagleEye Director software.

Installing Software and Options for Polycom HDX Systems and Accessories
18 Polycom, Inc.
Installing Polycom EagleEye Director Software1 On a computer, open Internet Explorer version 6.x, 7.x, or 8.x and
configure the web browser to allow cookies.
2 Go to support.polycom.com.
3 Select Documents and Downloads > Telepresence and Video.
4 Navigate to the page for the Polycom HDX system that you use with the Polycom EagleEye Director.
5 Download the latest version of the software to your hard drive.
6 Enter the HDX system’s IP address to access its web interface.
For more information about using the web interface, refer to Installing a Software Update and System Options on a Single HDX System on page 8.
7 Go to Admin Settings > General Settings > Software Update > Polycom EagleEye Director.
8 Select Next.
9 Browse to the location of the software update package you downloaded on your system.
10 Select Update all EagleEye Director software modules to force a complete update of every software module for the Polycom EagleEye Director. This setting is selected by default.
To update only the required software modules, clear Update all EagleEye Director software modules. This selection reduces the amount of time needed to complete the software update.
11 Select Begin Update to begin the software update.
The software update might take 15 minutes or more to complete.

Installing Software and Options for Polycom HDX Systems and Accessories
Polycom, Inc. 19
Copyright Information© 2013 Polycom, Inc. All rights reserved.
Polycom, Inc.6001 America Center DriveSan Jose, CA 95002USA
No part of this document may be reproduced or transmitted in any form or by any means, electronic or mechanical, for any purpose, without the express written permission of Polycom, Inc. Under the law, reproducing includes translating into another language or format.
As between the parties, Polycom, Inc., retains title to and ownership of all proprietary rights with respect to the software contained within its products. The software is protected by United States copyright laws and international treaty provision. Therefore, you must treat the software like any other copyrighted material (e.g., a book or sound recording).
Every effort has been made to ensure that the information in this manual is accurate. Polycom, Inc., is not responsible for printing or clerical errors. Information in this document is subject to change without notice.
Trademark InformationPolycom® and the names and marks associated with Polycom’s products are trademarks and/or service marks of Polycom, Inc., and are registered and/or common-law marks in the United States and various other countries.
Other product and corporate names may be trademarks of other companies and are used only as a fair use reference without intent to infringe.
Patent Information The accompanying products may be protected by one or more U.S. and foreign patents and/or pending patent applications held by Polycom, Inc.
Customer FeedbackWe are constantly working to improve the quality of our documentation, and we would appreciate your feedback. Please send email to [email protected].