Embed Size (px)
Citation preview

Installing Snort 2.8.5.2 on Windows 7by Kasey Efaw
This guide is meant to assist the user is installing, configuring and running the Snort IDS technology on a Windows 7 (32-bit) operating system. This guide could easily be used for other Windows based Operating Systems, just remember with Vista and later you are working with the UAC. Configuring rules, deciphering alerts and tailoring to your specific network is beyond the scope of this guide. It is not advised to test an installation within a production environment and neither Snort or the Author offer any warranty against negative impacts to your systems that may be derived from following this guide.
I have received many e-mails as a result of my original guide (Snort Installation on Windows XP) and would like to thank the Open Source Community for their kind words and questions requiring troubleshooting. As a result of your feedback, this guide has been updated to answer some common questions as well as includes screen shots. In the future, I will have installation and usage videos posted on YouTube under the user name “snortguide”.
Although it is recommended to perform the installation from a clean, formatted drive, this guide will work through the steps installed from within a virtual environment. With the exception of the operating system itself, all software is freely available (check Eula's for Commercial usage). All links are valid as of 1/31/2010 and different steps may be required if using a version differing from those listed below.
Microsoft Windows 7 Professional:http://store.microsoft.com/microsoft/Windows-7-Professional/product/B985134B?
WT.mc_id=winonlinetest_shop3_PROfull_r3Mozilla Firefox 3.6:
http://www.mozilla.com/en-US/products/download.html?product=firefox-3.6&os=win&lang=en-USMicrosoft Security Essentials: http://www.microsoft.com/security_essentials/COMODO Firewall 3.14:
http://www.comodo.com/home/download/download.php?prod=firewallMicrosoft Baseline Security Analyzer 2.1.1:
http://www.microsoft.com/downloads/details.aspx?FamilyID=b1e76bbe-71df-41e8-8b52-c871d012ba78&displaylang=enActivePerl 5.10.1.1006: http://www.activestate.com/activeperl/Notepad++ 5.6.6
http://sourceforge.net/projects/notepad-plus/files/notepad%2B%2B%20releases%20binary/npp%205.6.6%20bin/npp.5.6.6.Installer.exe/downloadFoxit Reader 3.1.4:
http://download.cnet.com/Foxit-Reader/3000-10743_4-10313206.html?part=dl-116442&subj=dl&tag=buttonKiwi Syslog Server 9.0.3:
http://kiwisyslog.com/kiwi-syslog-server-download/7-Zip 4.65:
http://sourceforge.net/projects/sevenzip/files/7-Zip/4.65/7z465.exe/download
WinPcap 4.1.1:http://www.winpcap.org/install/default.htm
Snort 2.8.5.2 http://dl.snort.org/snort-current/Snort_2_8_5_2_Installer.exeOinkmaster 2.0
http://sourceforge.net/projects/oinkmaster/files/oinkmaster/2.0/oinkmaster-2.0.tar.gz/download
1) After installing the Operating System and downloading all of the software listed above, I would advise both copying of the software to an external drive as well as creating a System Restore Point. This will shorten reinstall times should something not work as expected.
2) With the exception of Oinkmaster, you should now systematically install all of the downloaded software. Note that you may substitute some of the software (ex. Use IE instead of Firefox or skip installing the Foxit Reader), however some software such as WinPcap are integral to running Snort in the method used in this guide.
a) When installing the software, take note of the following:1) I would recommend using the default options and allow the applicable components to be run as a service/at startup. 2) When installing Kiwi, uncheck the Web Access, as it will expire after 30 days.3) During the installation and running of software, the COMODO Firewall will be triggered multiple times and you will need to Allow Kiwi access.
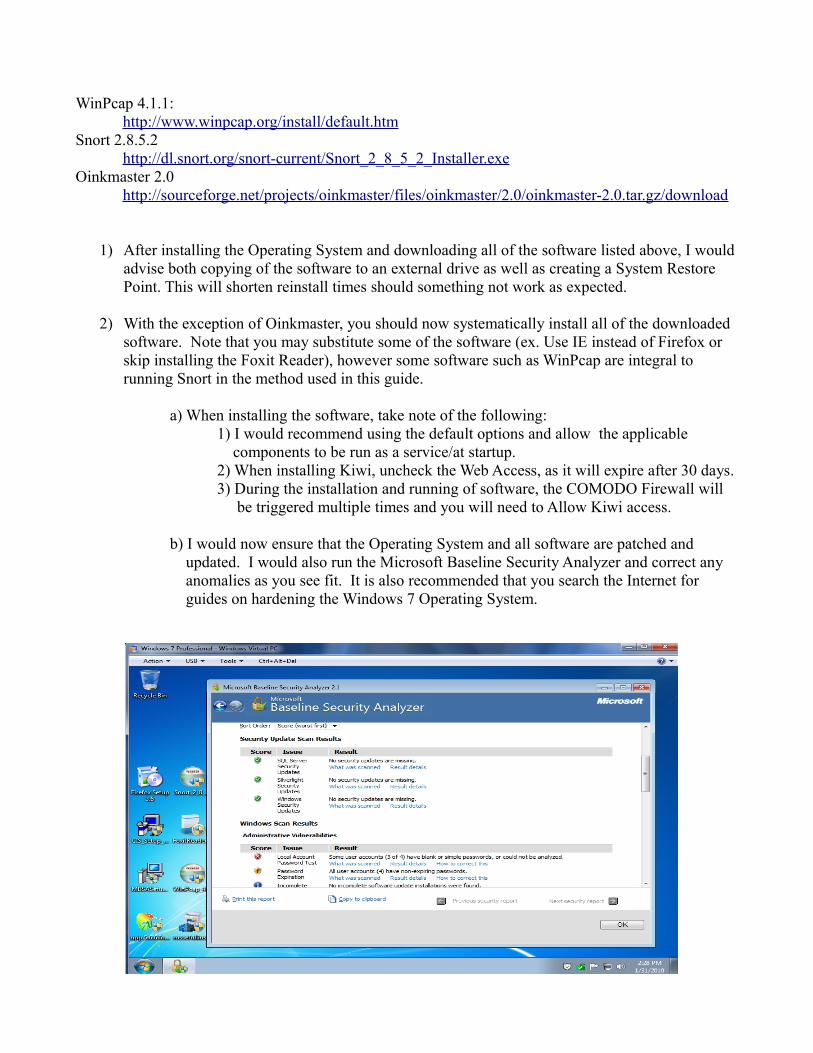
b) I would now ensure that the Operating System and all software are patched and updated. I would also run the Microsoft Baseline Security Analyzer and correct any anomalies as you see fit. It is also recommended that you search the Internet for guides on hardening the Windows 7 Operating System.
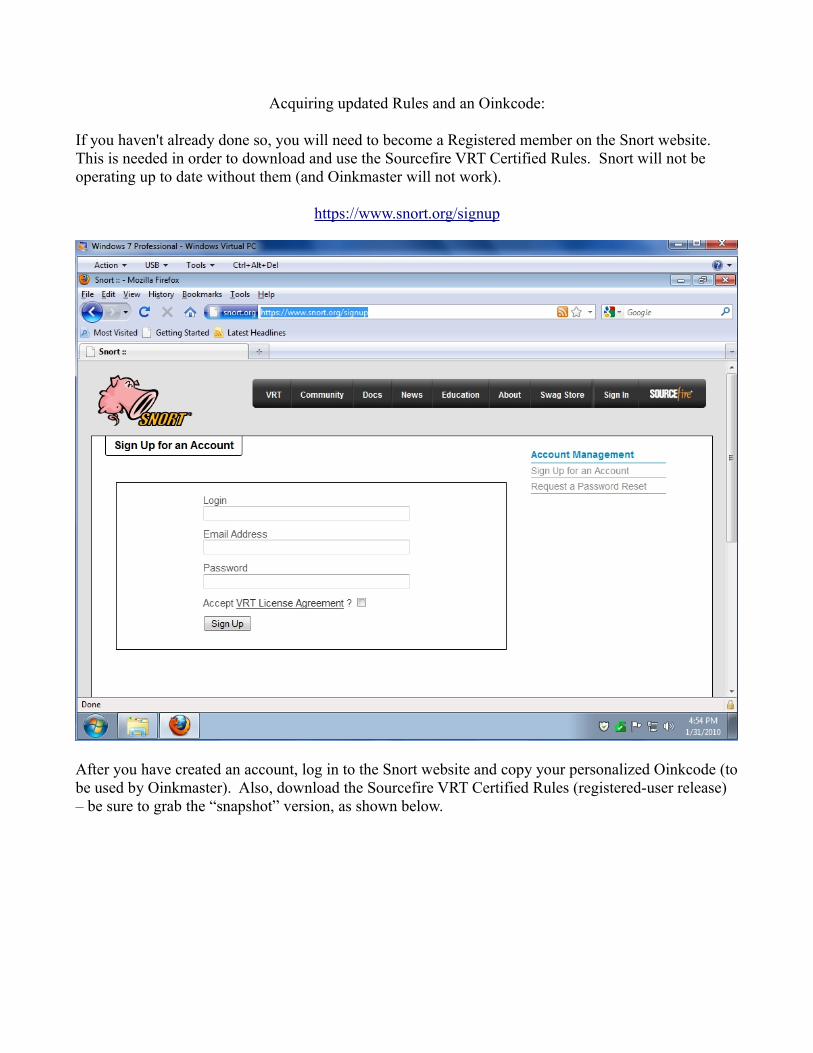
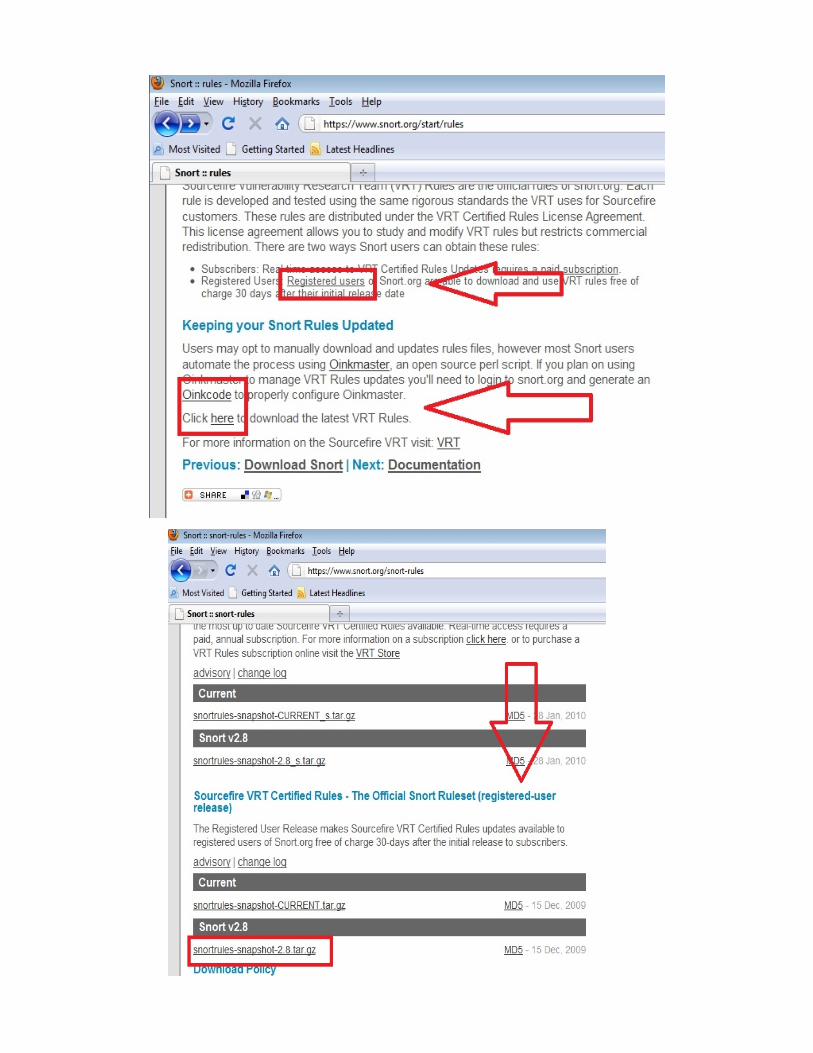
Acquiring updated Rules and an Oinkcode:
If you haven't already done so, you will need to become a Registered member on the Snort website. This is needed in order to download and use the Sourcefire VRT Certified Rules. Snort will not be operating up to date without them (and Oinkmaster will not work).
https://www.snort.org/signup
After you have created an account, log in to the Snort website and copy your personalized Oinkcode (to be used by Oinkmaster). Also, download the Sourcefire VRT Certified Rules (registered-user release) – be sure to grab the “snapshot” version, as shown below.
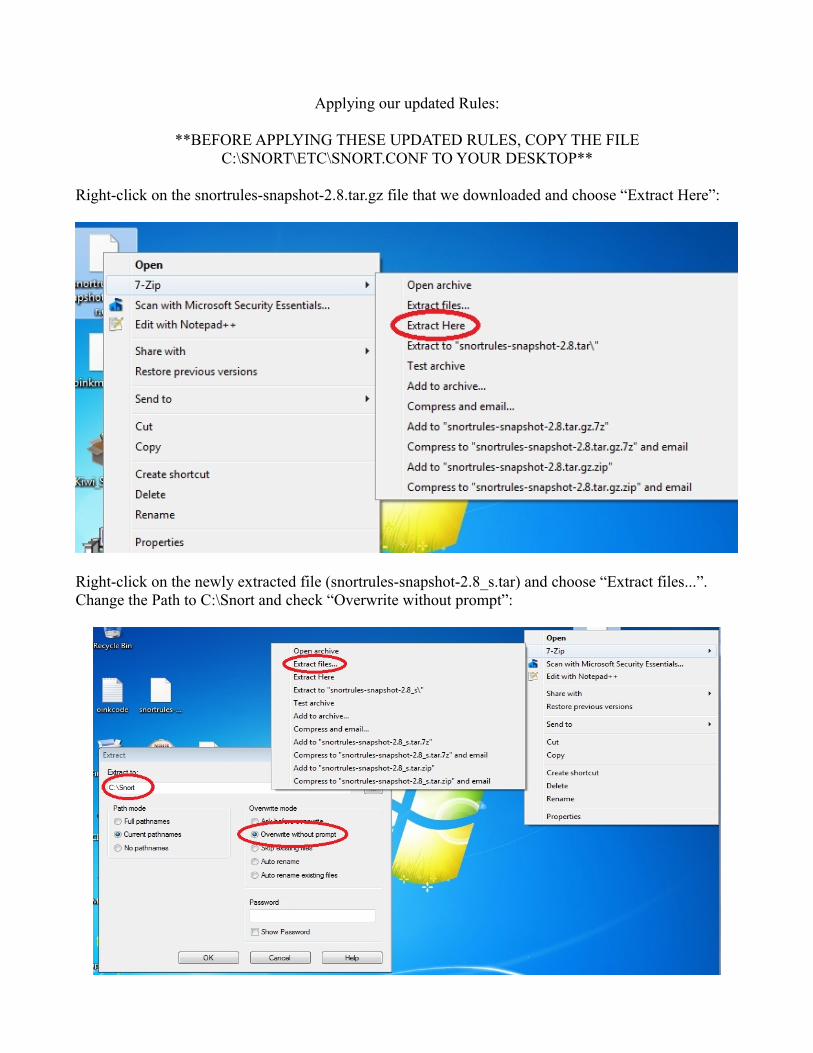
Applying our updated Rules:
**BEFORE APPLYING THESE UPDATED RULES, COPY THE FILE C:\SNORT\ETC\SNORT.CONF TO YOUR DESKTOP**
Right-click on the snortrules-snapshot-2.8.tar.gz file that we downloaded and choose “Extract Here”:
Right-click on the newly extracted file (snortrules-snapshot-2.8_s.tar) and choose “Extract files...”. Change the Path to C:\Snort and check “Overwrite without prompt”:
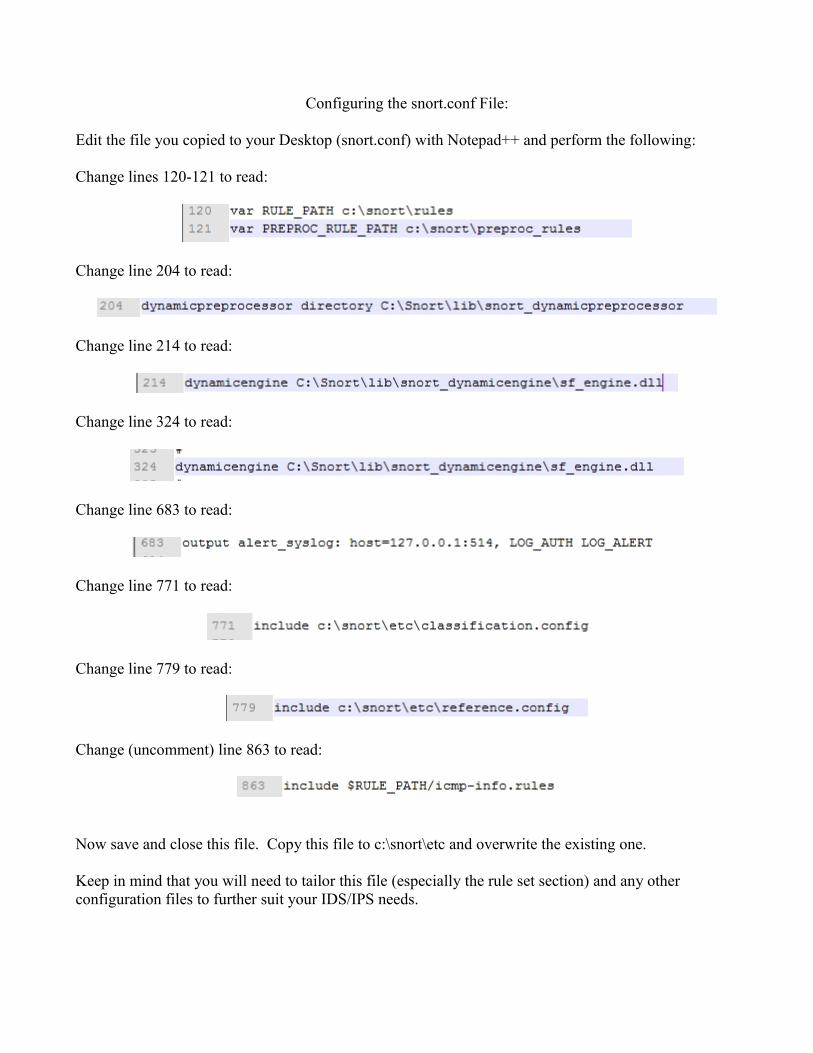
Configuring the snort.conf File:
Edit the file you copied to your Desktop (snort.conf) with Notepad++ and perform the following:
Change lines 120-121 to read:
Change line 204 to read:
Change line 214 to read:
Change line 324 to read:
Change line 683 to read:
Change line 771 to read:
Change line 779 to read:
Change (uncomment) line 863 to read:
Now save and close this file. Copy this file to c:\snort\etc and overwrite the existing one.
Keep in mind that you will need to tailor this file (especially the rule set section) and any other configuration files to further suit your IDS/IPS needs.
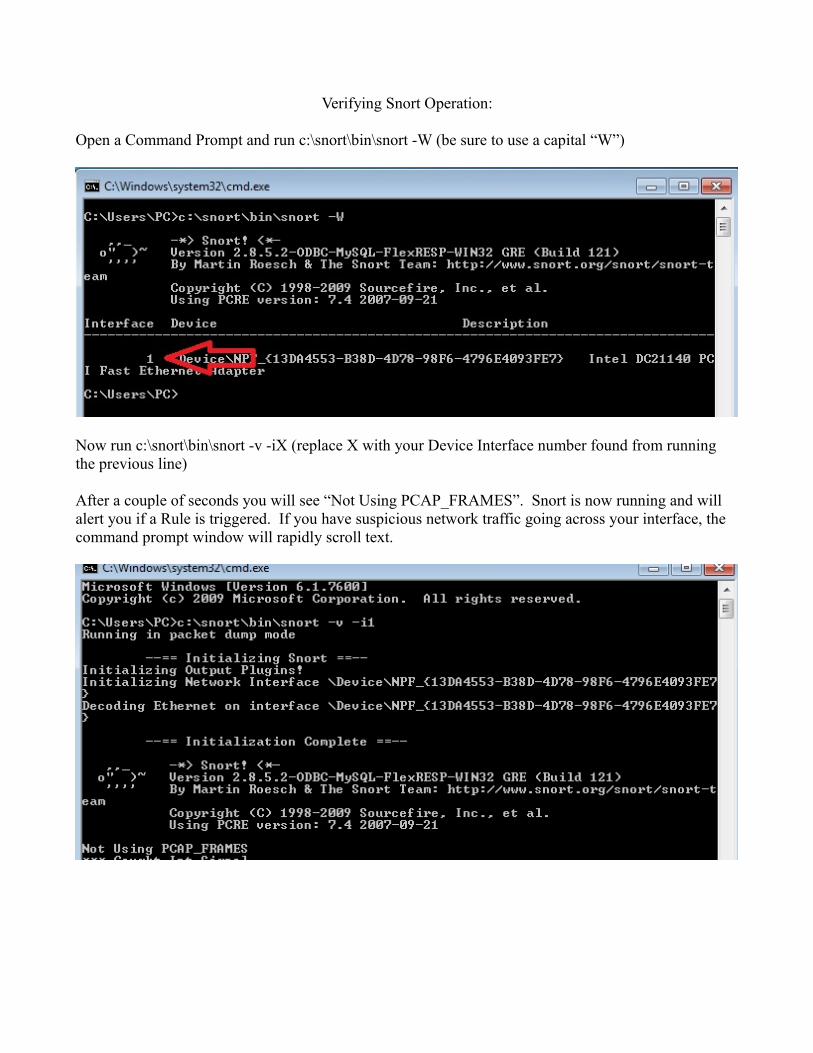
Verifying Snort Operation:
Open a Command Prompt and run c:\snort\bin\snort -W (be sure to use a capital “W”)
Now run c:\snort\bin\snort -v -iX (replace X with your Device Interface number found from running the previous line)
After a couple of seconds you will see “Not Using PCAP_FRAMES”. Snort is now running and will alert you if a Rule is triggered. If you have suspicious network traffic going across your interface, the command prompt window will rapidly scroll text.
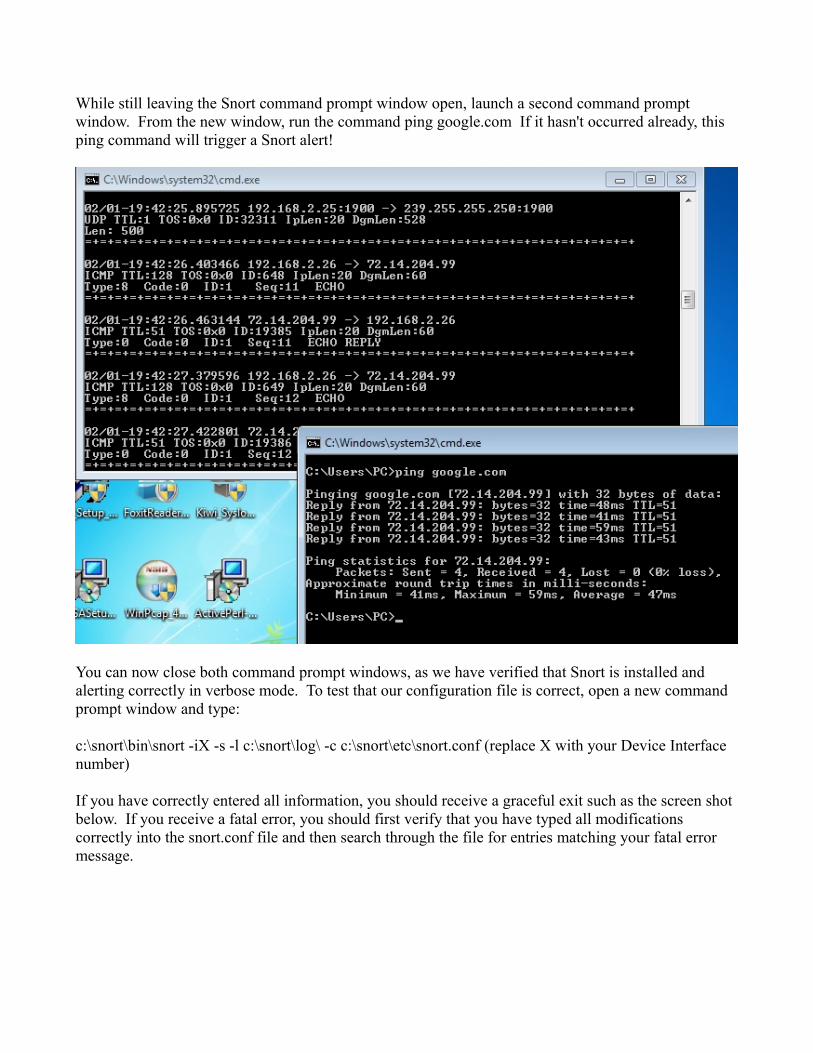
While still leaving the Snort command prompt window open, launch a second command prompt window. From the new window, run the command ping google.com If it hasn't occurred already, this ping command will trigger a Snort alert!
You can now close both command prompt windows, as we have verified that Snort is installed and alerting correctly in verbose mode. To test that our configuration file is correct, open a new command prompt window and type:
c:\snort\bin\snort -iX -s -l c:\snort\log\ -c c:\snort\etc\snort.conf (replace X with your Device Interface number)
If you have correctly entered all information, you should receive a graceful exit such as the screen shot below. If you receive a fatal error, you should first verify that you have typed all modifications correctly into the snort.conf file and then search through the file for entries matching your fatal error message.
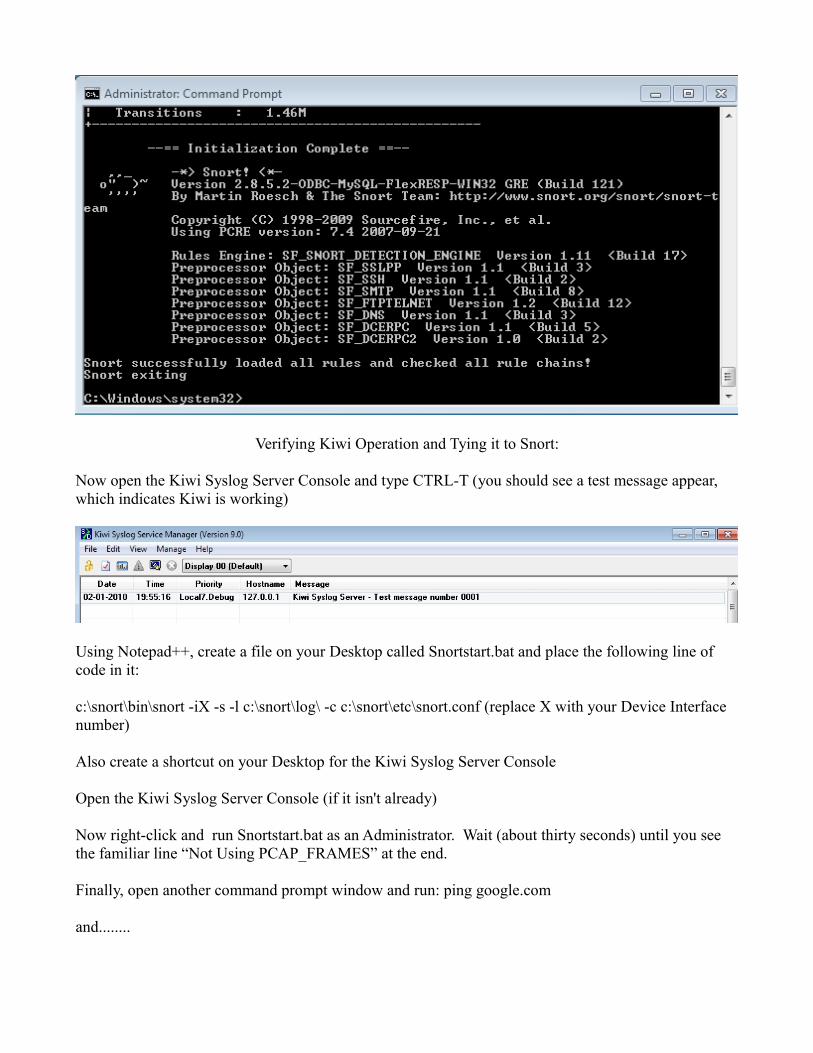
Verifying Kiwi Operation and Tying it to Snort:
Now open the Kiwi Syslog Server Console and type CTRL-T (you should see a test message appear, which indicates Kiwi is working)
Using Notepad++, create a file on your Desktop called Snortstart.bat and place the following line of code in it:
c:\snort\bin\snort -iX -s -l c:\snort\log\ -c c:\snort\etc\snort.conf (replace X with your Device Interface number)
Also create a shortcut on your Desktop for the Kiwi Syslog Server Console
Open the Kiwi Syslog Server Console (if it isn't already)
Now right-click and run Snortstart.bat as an Administrator. Wait (about thirty seconds) until you see the familiar line “Not Using PCAP_FRAMES” at the end.
Finally, open another command prompt window and run: ping google.com
and........
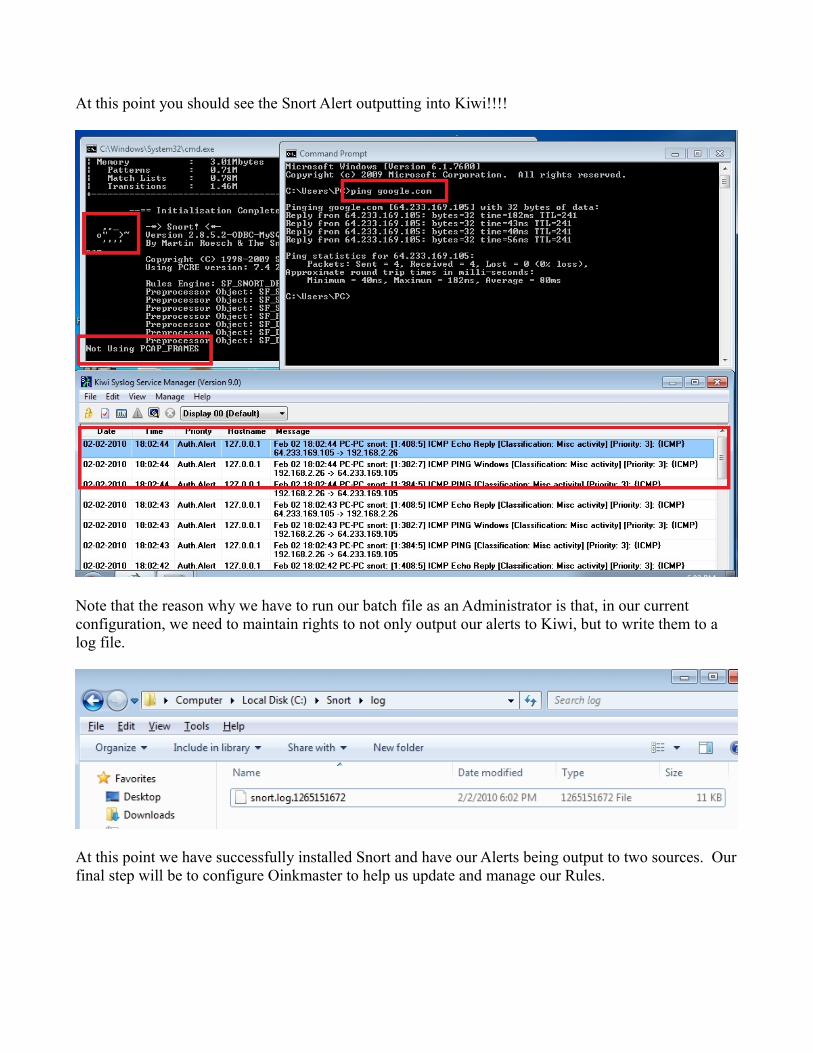
At this point you should see the Snort Alert outputting into Kiwi!!!!
Note that the reason why we have to run our batch file as an Administrator is that, in our current configuration, we need to maintain rights to not only output our alerts to Kiwi, but to write them to a log file.
At this point we have successfully installed Snort and have our Alerts being output to two sources. Our final step will be to configure Oinkmaster to help us update and manage our Rules.

Configuring Oinkmaster and Verifying its Operation:
Right-click on the oinkmaster-2.0.tar.gz file that we downloaded and choose “Extract Here”
Right-click on this new file (oinkmaster-2.0.tar) and choose “Extract Here”
Now we have a new folder called oinkmaster-2.0. Move this new folder into c:\snort
Go to c:\snort and create a folder named: temp
Go to c:\snort\oinkmaster-2.0\contrib and copy the oinkgui file to your Desktop. Rename this file to: Update Snort Rules
Now we have an additional module we need to download and install:

Once the file has been downloaded, open a command prompt window and type the line as shown below (note that your path name might be different. Once the installation has been complete, you can close the command prompt window.
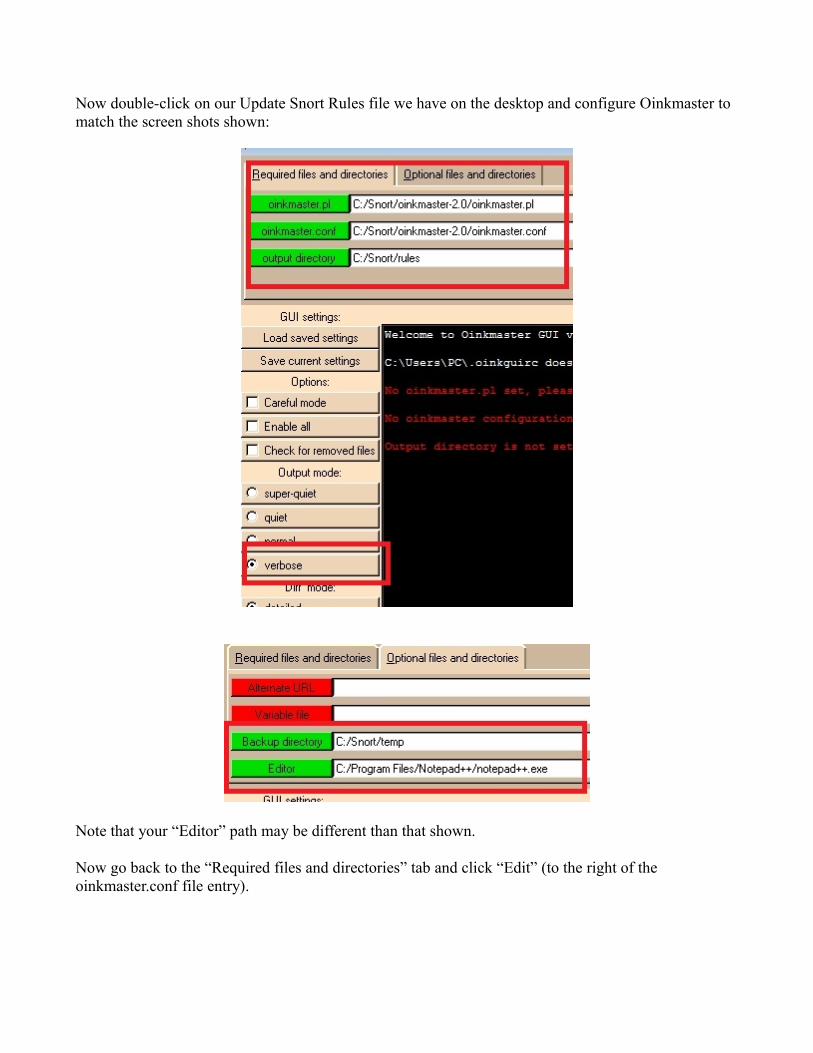
Now double-click on our Update Snort Rules file we have on the desktop and configure Oinkmaster to match the screen shots shown:
Note that your “Editor” path may be different than that shown.
Now go back to the “Required files and directories” tab and click “Edit” (to the right of the oinkmaster.conf file entry).
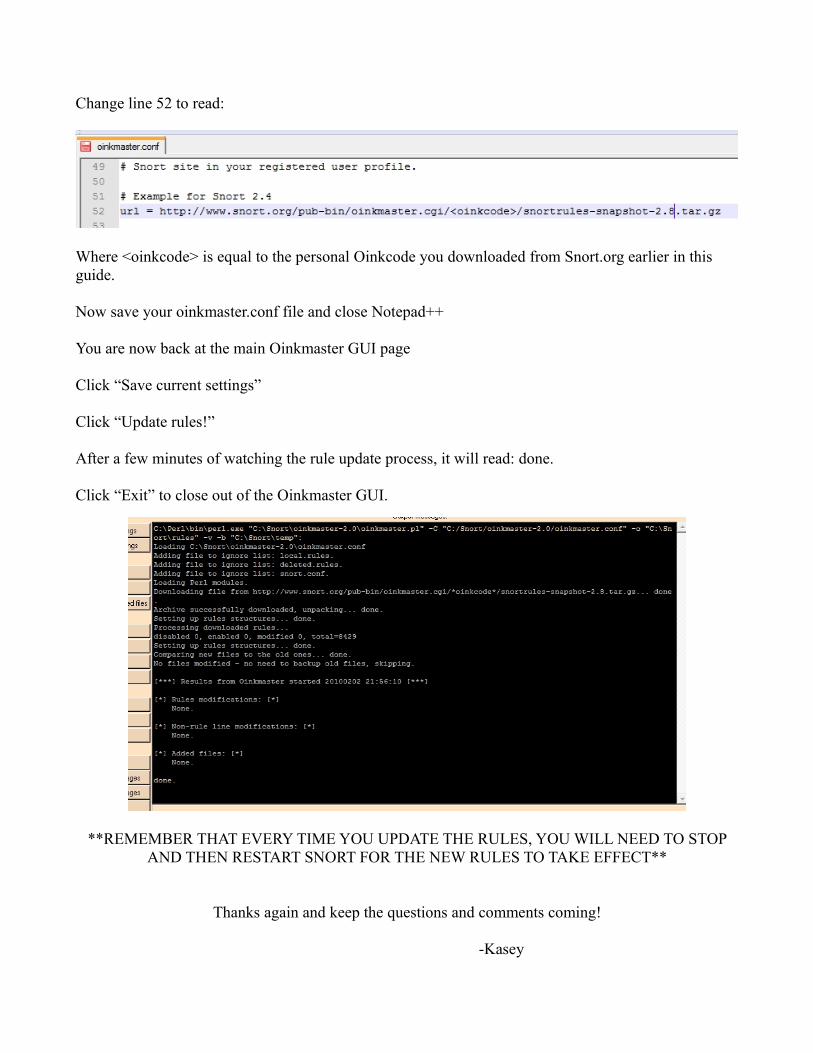
Change line 52 to read:
Where <oinkcode> is equal to the personal Oinkcode you downloaded from Snort.org earlier in this guide.
Now save your oinkmaster.conf file and close Notepad++
You are now back at the main Oinkmaster GUI page
Click “Save current settings”
Click “Update rules!”
After a few minutes of watching the rule update process, it will read: done.
Click “Exit” to close out of the Oinkmaster GUI.
**REMEMBER THAT EVERY TIME YOU UPDATE THE RULES, YOU WILL NEED TO STOP AND THEN RESTART SNORT FOR THE NEW RULES TO TAKE EFFECT**
Thanks again and keep the questions and comments coming!
-Kasey