Embed Size (px)
Citation preview

Installing and ConfiguringTivoli Enterprise Data WarehouseVersion 1.1 (Revised August 2003)
GC32-0744-01
���

Installing and ConfiguringTivoli Enterprise Data WarehouseVersion 1.1 (Revised August 2003)
GC32-0744-01
���
NoteBefore using this information and the product it supports, read the information in Appendix E, “Notices”, on page 333.
Second Edition (August 2003)
This edition applies to version 1, release 1 of Tivoli Enterprise Data Warehouse and to all subsequent releases andmodifications until otherwise indicated in new editions.
This edition replaces GC32-0744–00.
© Copyright International Business Machines Corporation 2001, 2003. All rights reserved.US Government Users Restricted Rights – Use, duplication or disclosure restricted by GSA ADP Schedule Contractwith IBM Corp.
Contents
READ THIS FIRST . . . . . . . . . . ixIncompatible warehouse packs . . . . . . . . xiiAbout this guide . . . . . . . . . . . . xiiWho should read this guide . . . . . . . . . xiiPublications . . . . . . . . . . . . . . xii
The Tivoli Enterprise Data Warehousepublications . . . . . . . . . . . . . xiiiRelated publications . . . . . . . . . . xiiiAccessing publications online . . . . . . . xvOrdering publications. . . . . . . . . . xvi
Accessibility . . . . . . . . . . . . . . xviContacting software support . . . . . . . . xviParticipating in newsgroups . . . . . . . . xviConventions used in this guide . . . . . . . xvii
Typeface conventions . . . . . . . . . xviiOperating system-dependent variables andpaths . . . . . . . . . . . . . . . xvii
Part 1. Planning for Tivoli EnterpriseData Warehouse . . . . . . . . . . 1
Chapter 1. Overview of Tivoli EnterpriseData Warehouse . . . . . . . . . . . 3Why use Tivoli Enterprise Data Warehouse? . . . . 3How Tivoli Enterprise Data Warehouse fits into yourIT enterprise . . . . . . . . . . . . . . 4The components of a Tivoli Enterprise DataWarehouse deployment . . . . . . . . . . . 6
Tivoli Enterprise Data Warehouse control server . 7Central data warehouse. . . . . . . . . . 7Data marts . . . . . . . . . . . . . . 7Report interface . . . . . . . . . . . . 7DB2 warehouse agents and agent sites . . . . . 7Warehouse packs . . . . . . . . . . . . 8
Comparing Tivoli Enterprise Data Warehouse andTivoli Decision Support . . . . . . . . . . . 8
Chapter 2. Planning for TivoliEnterprise Data Warehouse . . . . . . 11How you deploy Tivoli Enterprise Data Warehousesupport . . . . . . . . . . . . . . . . 11
Software that generates operational data . . . . 11Tivoli Enterprise Data Warehouse . . . . . . 12Warehouse packs . . . . . . . . . . . 12
Prerequisite hardware and software . . . . . . 13Overview of the installation process . . . . . . 13Types of deployments . . . . . . . . . . . 14Operational data. . . . . . . . . . . . . 16Control server . . . . . . . . . . . . . 16Central data warehouse . . . . . . . . . . 17Data marts . . . . . . . . . . . . . . 17Report server . . . . . . . . . . . . . . 17DB2 warehouse agents and agent sites . . . . . 18Accessing data in the central data warehouse . . . 20
Web browser considerations . . . . . . . . . 21Warehouse packs . . . . . . . . . . . . 21
Where to install a warehouse pack. . . . . . 21Software prerequisites . . . . . . . . . . 21Understanding ETL processes . . . . . . . 22Before you install a warehouse pack . . . . . 22
Estimating the size of your Tivoli Enterprise DataWarehouse deployment . . . . . . . . . . 23
General considerations . . . . . . . . . 23Estimating central data warehouse database anddata mart database storage requirements for awarehouse pack . . . . . . . . . . . . 24
Security considerations . . . . . . . . . . 26Firewalls . . . . . . . . . . . . . . 26Authority required to install Tivoli EnterpriseData Warehouse . . . . . . . . . . . . 26Controlling access to data in Tivoli EnterpriseData Warehouse . . . . . . . . . . . . 27Protecting database connection information in thereport interface . . . . . . . . . . . . 27Secure sockets layer (SSL) connections to the IBMConsole. . . . . . . . . . . . . . . 28
Support for multiple customer environments andmultiple data centers . . . . . . . . . . . 28DB2 Considerations . . . . . . . . . . . 29Coexistence . . . . . . . . . . . . . . 29
Coexistence with Tivoli Decision Support . . . 29Coexistence with other data warehouses. . . . 30Coexistence with other DB2 database applications 30
Database naming conventions . . . . . . . . 30Selecting port numbers . . . . . . . . . . 31
Chapter 3. Planning worksheets . . . . 35Planning worksheets for a quick start deployment 36Planning worksheets for a distributed deploymentwithout DB2 remote warehouse agent sites . . . . 39Planning worksheets for a distributed deploymentwith DB2 remote warehouse agent sites . . . . . 45Planning worksheet for installing warehouse packs 49Planning worksheet for creating DB2 users on aUNIX system . . . . . . . . . . . . . . 51
Part 2. Installing, configuring, anduninstalling Tivoli Enterprise DataWarehouse . . . . . . . . . . . . 53
Chapter 4. Installing a quick startdeployment. . . . . . . . . . . . . 57Preparing the environment . . . . . . . . . 57Installing and configuring DB2 Universal Database 58Installing the Tivoli Enterprise Data Warehousecomponents . . . . . . . . . . . . . . 60
About the installation wizard . . . . . . . 60Performing the installation . . . . . . . . 61
© Copyright IBM Corp. 2001, 2003 iii
Configuring the control database for the DB2 DataWarehouse Center . . . . . . . . . . . . 64Completing the installation . . . . . . . . . 64
Chapter 5. Installing Tivoli EnterpriseData Warehouse in a distributeddeployment that does not use DB2remote warehouse agent sites . . . . 67Preparing the environment . . . . . . . . . 67Installing and configuring DB2 Universal Database 69
Installing DB2 Universal Database on Windowssystems. . . . . . . . . . . . . . . 70Installing DB2 Universal Database on AIXsystems. . . . . . . . . . . . . . . 71Installing DB2 Universal Database on Solarissystems. . . . . . . . . . . . . . . 73
Installing Tivoli Enterprise Data Warehousecomponents . . . . . . . . . . . . . . 77
About the installation wizard . . . . . . . 77Performing the installation . . . . . . . . 78
Configuring the control database . . . . . . . 82Completing the installation . . . . . . . . . 83
Chapter 6. Installing Tivoli EnterpriseData Warehouse in a distributeddeployment that uses DB2 remotewarehouse agent sites . . . . . . . . 85Preparing the environment . . . . . . . . . 85Installing and configuring DB2 Universal Database 88
Installing DB2 Universal Database on Windowssystems. . . . . . . . . . . . . . . 88Installing DB2 Universal Database on AIXsystems. . . . . . . . . . . . . . . 90Installing DB2 Universal Database on Solarissystems. . . . . . . . . . . . . . . 92
Obtaining bash for DB2 remote warehouse agentinstallation . . . . . . . . . . . . . . 95Installing DB2 Warehouse Manager . . . . . . 95
Installing DB2 Warehouse Manager on aWindows system . . . . . . . . . . . 95Installing DB2 Warehouse Manager on a UNIXsystem . . . . . . . . . . . . . . . 96
Installing Tivoli Enterprise Data Warehousecomponents . . . . . . . . . . . . . . 96
About the installation wizard . . . . . . . 96Performing the installation . . . . . . . . 97
Configuring the control database . . . . . . . 102Defining a DB2 warehouse agent site . . . . . 103Configuring DB2 remote warehouse agent sites . . 103
Configuring a DB2 remote warehouse agent siteon a UNIX system. . . . . . . . . . . 103
Completing the installation . . . . . . . . . 107
Chapter 7. Enabling Secure SocketsLayer for the Web version of the IBMConsole. . . . . . . . . . . . . . 109Preparing for configuration changes . . . . . . 109
Defining a user ID and password for HTTPAdministration . . . . . . . . . . . . 109
Enabling HTTP Administration to updateconfiguration files on UNIX-based systems . . 110
Configuring the HTTP server . . . . . . . . 111Step 1: Creating a security certificate. . . . . 111Step 2: Connecting to the HTTP Server . . . . 114Step 3: Configuring the security module . . . 114Step 4: Configuring a secure host IP and anadditional port for the secure server . . . . . 114Step 5: Configuring the virtual host structure forthe secure server . . . . . . . . . . . 115Step 6: Configuring the virtual host documentroot for the secure server . . . . . . . . 115Step 7: Setting the key file and SSL timeoutvalues for the secure server. . . . . . . . 116Step 8: Enabling SSL and determining the modeof client authorization . . . . . . . . . 116Step 9: Restarting services or systems . . . . 116
Verifying your configuration . . . . . . . . 116
Chapter 8. Installing and usinglanguage support. . . . . . . . . . 119Overview of language support . . . . . . . 119Installing language support. . . . . . . . . 120
Installing language support with the reportinterface . . . . . . . . . . . . . . 120Applying language support to an existing reportserver . . . . . . . . . . . . . . . 121
Using language support in the report interface . . 122
Chapter 9. Getting started with theIBM Console. . . . . . . . . . . . 123Terms and definitions used in the IBM Console . . 123An overview of the IBM Console . . . . . . . 123Getting started with the IBM Console . . . . . 126
Overview of system administration tasks . . . 126Signing on to the IBM Console . . . . . . 127Using the portfolio . . . . . . . . . . 128Opening the Task Assistant . . . . . . . . 128
Using the IBM Console with Tivoli Enterprise DataWarehouse . . . . . . . . . . . . . . 128
Managing user groups . . . . . . . . . 128Managing Tivoli Enterprise Data Warehousereports . . . . . . . . . . . . . . 130Managing data marts . . . . . . . . . . 133
Chapter 10. Installing and upgradingwarehouse packs. . . . . . . . . . 135Installing warehouse packs . . . . . . . . . 135
Incompatible warehouse packs . . . . . . 135Step 1. Planning to install warehouse packs . . 135Step 2. Preparing the environment . . . . . 137Step 3. Installing the warehouse pack . . . . 140Step 4. Completing the installation . . . . . 142
Configuring warehouse packs . . . . . . . . 142Copying the warehouse pack files for a DB2remote warehouse agent site . . . . . . . 142Creating ODBC data sources on the controlserver for warehouse packs. . . . . . . . 143Creating ODBC data sources on DB2 remotewarehouse agent sites . . . . . . . . . 145
iv Installing and Configuring Tivoli Enterprise Data Warehouse
Specifying user IDs and passwords for TivoliEnterprise Data Warehouse sources and targets . 146Scheduling warehouse pack ETL processes . . 147Confirming the ETL processes . . . . . . . 156
Configuring for a multiple customer environmentor multiple data centers . . . . . . . . . . 157
Configuring a multiple customer environment 157Configuring a multiple data center environment 159Maintaining a multiple customer or multipledata center environment. . . . . . . . . 160
Applying a fix to a warehouse pack . . . . . . 161Planning for the patch process. . . . . . . 161
Chapter 11. IBM Tivoli Monitoringintegration with Tivoli Enterprise DataWarehouse . . . . . . . . . . . . 173Names and acronyms used in other documents . . 173Integration overview . . . . . . . . . . . 173Skills for successful implementation . . . . . . 175Required documentation . . . . . . . . . 176Required CDs . . . . . . . . . . . . . 177Database considerations . . . . . . . . . . 178
ITM_DB database considerations . . . . . . 178Tivoli Enterprise Data Warehouse databaseconsiderations . . . . . . . . . . . . 179Database communications . . . . . . . . 179
Tasks to collect data for Tivoli Enterprise DataWarehouse . . . . . . . . . . . . . . 180
Troubleshooting tips . . . . . . . . . . 187Tasks to move data into Tivoli Enterprise DataWarehouse . . . . . . . . . . . . . . 188
Changing the schema name for the ITM_DBdatabase tables . . . . . . . . . . . . 194Troubleshooting tips . . . . . . . . . . 198
Chapter 12. Removing TivoliEnterprise Data Warehouse from yourenterprise . . . . . . . . . . . . . 199Uninstalling warehouse packs . . . . . . . . 199
Overview of uninstalling warehouse packs . . 199Performing the uninstallation . . . . . . . 200The uninstallation configuration file . . . . . 203More about twh_app_deinstall.sh. . . . . . 205
Uninstalling language packs . . . . . . . . 205Uninstalling the Tivoli Enterprise Data Warehousecore application . . . . . . . . . . . . 206
Overview of uninstalling the Tivoli EnterpriseData Warehouse core application . . . . . . 206Considerations for a distributed deployment 207Uninstalling on Windows . . . . . . . . 207Uninstalling on UNIX . . . . . . . . . 208Using DB2 Warehouse Manager afteruninstalling Tivoli Enterprise Data Warehouse . 209
Uninstalling Tivoli Presentation Services . . . . 210Uninstalling on Windows systems . . . . . 210Uninstalling on UNIX-based systems . . . . 210
Uninstalling DB2 Universal Database EnterpriseEdition . . . . . . . . . . . . . . . 211Removing data from the central data warehouse 211
Part 3. Installation scenarios . . . 213
Chapter 13. Using a DB2 defaultwarehouse agent . . . . . . . . . . 215Completing the configuration checklists . . . . 216Installing and configuring DB2 on tdwcdwdm . . 219Creating the control server on tdwserver . . . . 219Installing the data mart component on tdwcdwdm 221Creating the report server on tdwrep . . . . . 221Backing up the new installation . . . . . . . 223Installing the warehouse pack on the control serverand report server . . . . . . . . . . . . 223Configuring the control server for the warehousepack . . . . . . . . . . . . . . . . 224
Setting up RDBMS client software and ODBCdata sources . . . . . . . . . . . . . 224Configuring the warehouse pack sources andtargets. . . . . . . . . . . . . . . 225Configuring and scheduling ETL steps to run onthe central data warehouse and data mart server 225
Chapter 14. Using DB2 remotewarehouse agents . . . . . . . . . 227Distributed installation scenario with a DB2 remotewarehouse agent . . . . . . . . . . . . 227
Completing the installation checklists . . . . 229Preparing for the central data warehouse anddata mart server on tdwcdwdm . . . . . . 231Creating the control server on tdwserver . . . 233Creating the central data warehouse and datamart server on tdwcdwdm . . . . . . . . 234Creating the report server on tdwrep . . . . 236Backing up the new installation . . . . . . 237Installing the warehouse pack on the controlserver and report server . . . . . . . . . 237Copying the warehouse pack files to the centraldata warehouse and data mart server ontdwcdwdm . . . . . . . . . . . . . 238Configuring the DB2 remote warehouse agenton the central data warehouse and data martserver on tdwcdwdm. . . . . . . . . . 239Completing the control server configuration ontdwserver . . . . . . . . . . . . . 241
If you have trouble using DB2 remote warehouseagents . . . . . . . . . . . . . . . . 244
Part 4. Administration andproblem determination . . . . . . 245
Chapter 15. DB2 Data WarehouseCenter essentials. . . . . . . . . . 247Starting the DB2 Data Warehouse Center . . . . 247Using the Work in Progress window . . . . . 247Reviewing exception table information . . . . . 248Disabling and re-enabling ETL scheduling . . . . 248
Disabling ETL scheduling . . . . . . . . 249Re-enabling ETL scheduling . . . . . . . 249
Stopping and starting the DB2 warehouse services 249
Contents v
Stopping the DB2 warehouse services . . . . 249Starting the DB2 warehouse services . . . . 250
Removing old data from the DB2 Data WarehouseCenter logs . . . . . . . . . . . . . . 250
Chapter 16. Administering TivoliEnterprise Data Warehouse . . . . . 253Determining what is installed . . . . . . . . 253
Determining what level of Tivoli EnterpriseData Warehouse is installed . . . . . . . 253Determining what level of a warehouse pack isinstalled . . . . . . . . . . . . . . 254
Creating agent sites after the installation of TivoliEnterprise Data Warehouse . . . . . . . . . 254
Installing a DB2 warehouse agent . . . . . 254Defining an agent site . . . . . . . . . 255
Managing warehouse packs . . . . . . . . 256Determining which warehouse packs areinstalled . . . . . . . . . . . . . . 256Manually reconfiguring a warehouse pack. . . 256Reviewing the ETL logs . . . . . . . . . 256
Backing up and restoring a Tivoli Enterprise DataWarehouse deployment . . . . . . . . . . 257
Road map for backing up and restoring TivoliEnterprise Data Warehouse . . . . . . . . 257A review of deployment configurations. . . . 257Backing up and restoring databases . . . . . 258Backing up and restoring the Tivoli EnterpriseData Warehouse software . . . . . . . . 261
Backing up and restoring Tivoli PresentationServices . . . . . . . . . . . . . . . 263
Backing up Tivoli Presentation Services. . . . 263Restoring Tivoli Presentation Services . . . . 263
Upgrading DB2 Universal Database EnterpriseEdition . . . . . . . . . . . . . . . 265Changing the DB2 heap size for the central datawarehouse database . . . . . . . . . . . 266Changing DB2 passwords for your TivoliEnterprise Data Warehouse deployment . . . . 266Deleting old data from the central data warehousedatabase . . . . . . . . . . . . . . . 269
Scheduling deletion . . . . . . . . . . 269Specifying the data to be deleted . . . . . . 269Verifying your central data warehouse deletionprocess . . . . . . . . . . . . . . 270
Deleting old data from the data mart database . . 270Increment time change for rollup . . . . . . . 270Restarting of Tivoli Presentation Services serviceswhen the data mart database is recycled . . . . 271
Chapter 17. Problem determination 273Log files . . . . . . . . . . . . . . . 273
Installation log files . . . . . . . . . . 273Uninstallation log files . . . . . . . . . 276Warehouse pack log files . . . . . . . . 276Warehouse pack patch log files . . . . . . 276Fix pack and interim fix log files . . . . . . 277Tivoli Presentation Services log files . . . . . 277Language pack log files . . . . . . . . . 277
Messages . . . . . . . . . . . . . . . 277
Installation messages . . . . . . . . . . 277DB2 messages . . . . . . . . . . . . 278Uninstallation messages . . . . . . . . . 279Tivoli Presentation Services messages . . . . 279
Problems installing DB2 . . . . . . . . . . 279DB2 cannot be installed because NIS is installedin your environment . . . . . . . . . . 279
Problems installing Tivoli Enterprise DataWarehouse . . . . . . . . . . . . . . 279
Things to check first . . . . . . . . . . 279Common problems and solutions. . . . . . 280
Recovering from an incomplete installation ofTivoli Enterprise Data Warehouse . . . . . . 285
Additional steps for recovering from anincomplete installation on AIX systems . . . . 287Additional steps for recovering from anincomplete Tivoli Presentation Servicesinstallation . . . . . . . . . . . . . 287
Problems with reinstalling Tivoli Enterprise DataWarehouse . . . . . . . . . . . . . . 288Problems with uninstalling Tivoli Enterprise DataWarehouse . . . . . . . . . . . . . . 289Problems with configuring and using TivoliEnterprise Data Warehouse . . . . . . . . . 290
What to do if your DB2 Data Warehouse Centerlogon fails . . . . . . . . . . . . . 290Tivoli Presentation Services services do not startcorrectly on AIX . . . . . . . . . . . 292The Web Services for the IBM Console servicedoes not start on UNIX systems . . . . . . 293Extended shared memory error on AIX with thereport interface when one of the DB2 databasesis on the same machine . . . . . . . . . 294Authentication error with Informix on AIX . . 295Unexpected DB2 Data Warehouse Center errors 295Other report interface errors . . . . . . . 295Problems using DB2 remote warehouse agents 296
Understanding the report interface (RPI) vault . . 297Problems installing warehouse packs . . . . . 297
Installation fails in a distributed deployment 297Unable to import the tag file during awarehouse pack installation . . . . . . . 298Warehouse pack installation fails to load datainto the translated term table . . . . . . . 298
Problems with uninstalling warehouse packs . . . 298Recovering from an unsuccessful installation or anunsuccessful reinstallation of a warehouse pack . . 299
Recovery steps for an unsuccessful warehousepack uninstall . . . . . . . . . . . . 299
Warehouse pack configuration problems . . . . 302ETL processes do not complete or extract stepsdo not run . . . . . . . . . . . . . 304Modifying, copying or deleting directories. . . 304Sybase ETL error . . . . . . . . . . . 304
Adding trace information to the log files for ETLprocesses . . . . . . . . . . . . . . . 304
Example of adding trace information to the logfile for a central data warehouse ETL process. . 305Example of adding trace information to the logfile for a data mart ETL process . . . . . . 307
Tivoli Presentation Services not starting . . . . 309
vi Installing and Configuring Tivoli Enterprise Data Warehouse
Problems with reports . . . . . . . . . . 310
Part 5. Appendixes . . . . . . . . 311
Appendix A. System administrationhints and tips . . . . . . . . . . . 313Running DB2 commands . . . . . . . . . 313Determining what level of DB2 is installed . . . 314Reusing an existing DB2 instance. . . . . . . 314DB2 user name, user ID, group name, and instancename rules . . . . . . . . . . . . . . 315Specifying an alternate temporary directory . . . 316Mounting a CD on UNIX systems . . . . . . 316
Mounting the CD on AIX . . . . . . . . 316Mounting the CD on Linux. . . . . . . . 317Mounting the CD-ROM on Solaris . . . . . 317
Appendix B. Accessibility . . . . . . 319Navigating the interface using the keyboard . . . 319Magnifying what is displayed on the screen . . . 319Accessibility features of the Web version of theIBM Console . . . . . . . . . . . . . 319
Appendix C. Installing with aresponse file. . . . . . . . . . . . 321Limitations of installing from a response file . . . 321The procedure for installing with a response file 321Response file options . . . . . . . . . . . 322Response file installation example . . . . . . 325
Appendix D. Starting and stoppingTivoli Presentation Services . . . . . 329Starting and stopping the Server for IBM Console 329Starting and stopping the HTTP server . . . . . 330Starting and stopping HTTP administration . . . 330Starting and stopping Web Services for the IBMConsole . . . . . . . . . . . . . . . 331
Appendix E. Notices . . . . . . . . 333Trademarks . . . . . . . . . . . . . . 335
Glossary . . . . . . . . . . . . . 337
Index . . . . . . . . . . . . . . . 341
Contents vii

viii Installing and Configuring Tivoli Enterprise Data Warehouse
READ THIS FIRST
This supplement provides the latest information about Tivoli® Enterpise DataWarehouse and supersedes all other versions of the Installing and Configuring TivoliEnterprise Data Warehouse. Information in this guide supersedes any duplicatedinformation in the Tivoli Enterprise Data Warehouse Release Notes, GI11-0857.
This version of the Installing and Configuring Tivoli Enterprise Data Warehousecontains the following additions and enhancements:v Levels of software, fix packs, and patches required for Tivoli Enterprise Data
Warehouse as of the time of this writing.v Additional planning information when planning your Tivoli Enterprise Data
Warehouse deployment.v Enhanced installation and configuration instructions for Tivoli Enterprise Data
Warehouse and warehouse packs.v New information describing how IBM® Tivoli Monitoring fits into your Tivoli
Enterprise Data Warehouse deployment.v Additional troubleshooting information for installation, uninstallation, and
configuration procedures.
As of the time of this writing, the following fix packs, interim fixes, and patchesapply to Tivoli Enterprise Data Warehouse. Occasionally, interim fixes aresuperseded by fix packs. Go to the IBM Software Support Web site to obtainnecessary fix packs, interim fixes, and patches and install them according to theinstructions provided with each fix pack and patch:
http://www.ibm.com/software/sysmgmt/products/support/
On the IBM Software Support Web site, select Tivoli Data Warehouse from thedrop down list.
Make sure that you obtain the most recent fix packs and any additional patchesand interim fixes that apply to your enterprise.
Notes:
1. Before applying a fix pack to Tivoli Enterprise™ Data Warehouse, back up theTivoli Enterprise Data Warehouse installation. This allows you to return to avalid state in the event that you encounter errors with the fix pack installation.When applying patches to Tivoli Enterprise Data Warehouse, back up thedirectory specified by the TWH_TOPDIR environment variable and back up thecontrol database. See Chapter 16, “Administering Tivoli Enterprise DataWarehouse”, on page 253 for information on backing up Tivoli Enterprise DataWarehouse.
2. If you have a distributed installation of Tivoli Enterprise Data Warehouse withone or more DB2® remote warehouse agent sites on UNIX® systems, back upyour IWH.environment file before applying a DB2 fix pack so customizationsthat you have made for Tivoli Enterprise Data Warehouse are not lost.
3. Installing a fix pack or an interim fix for Tivoli Enterprise Data Warehouse doesnot copy the associated readme file. Copy this file manually to a directory otherthan the Tivoli Enterprise Data Warehouse installation directory.
© Copyright IBM Corp. 2001, 2003 ix

v IBM DB2 Fix Pack 8Tivoli Enterprise Data Warehouse 1.1 has been certified to operate correctly withIBM DB2 UDB Version 7.2 Fix Pack 8, which became available after TivoliEnterprise Data Warehouse, Version 1.1. DB2 Fix Pack 8 is recommended forTivoli Enterprise Data Warehouse, Version 1.1 and can be downloaded from theDB2 support Web site. Download the special fix for DB2 Fix Pack 8 from theDB2 support Web site and install it after you have completed the installation ofDB2 Fix Pack 8.DB2 Fix Pack 6 is the minimum DB2 fix pack level that must be installed inorder to install and operate Tivoli Enterprise Data Warehouse, Version 1.1. Youcan upgrade DB2 to Fix Pack 8 either before or after doing the initial installationof Tivoli Enterprise Data Warehouse, Version 1.1. Alternatively, you can upgradeDB2 to fix pack 8 either before or after installing Tivoli Enterprise DataWarehouse, Version 1.1 Fix Pack 2 (1.1-TDW-FP02).
Notes:
1. Do not install IBM DB2 UDB Version 7.2 Fix Pack 7.2. IBM DB2 UDB Version 7.2 fix packs later than fix pack 8 are not supported
for use with Tivoli Enterprise Data Warehouse, Version 1.1 as of the time ofthis writing.
3. If you upgrade from IBM DB2 UDB Version 7.2 Fix Pack 6 to IBM DB2 7.2Fix Pack 8 after you install Tivoli Enterprise Data Warehouse, Version 1.1 andafter you have installed Tivoli Enterprise Data Warehouse, Version 1.1 FixPack 2 (1.1-TDW-FP02), then you must do the following after installing DB2Fix Pack 8:– On a Windows® system:
a. Copy the db2java.zip file from the DB2_directory\sqllib\java directoryto the Tivoli Presentation Services installation directory and the%TWH_TOPDIR%\tools\bin directory. The DB2_directory\ is your DB2installation drive and path.
b. Stop and restart the Tivoli Presentation Services services. SeeAppendix D, “Starting and stopping Tivoli Presentation Services”, onpage 329 for instructions on restarting Tivoli Presentation Servicesservices.
– On a UNIX system:a. Copy the db2java.zip file from the DB2_directory/sqllib/java directory
to the Tivoli Presentation Services installation directory and$TWH_TOPDIR/tools/bin directories. The DB2_directory\ is your DB2installation drive and path.
b. Stop and restart the Tivoli Presentation Services services. SeeAppendix D, “Starting and stopping Tivoli Presentation Services”, onpage 329 for instructions on restarting Tivoli Presentation Servicesservices.
These steps are done automatically for you when you install Tivoli EnterpriseData Warehouse, Version 1.1 or Tivoli Enterprise Data Warehouse, Version 1.1Fix Pack 2 after installing DB2 Fix Pack 8.
v Tivoli Enterprise Data Warehouse Fix Pack 2 (1.1–TDW-FP02)This is the second fix pack for Tivoli Enterprise Data Warehouse and is requiredfor the correct operation of many of the warehouse packs for Tivoli EnterpriseData Warehouse 1.1. This fix pack installs several fixes to Tivoli Enterprise DataWarehouse, and is required as a prerequisite for the installation of the interimfixes listed below.
x Installing and Configuring Tivoli Enterprise Data Warehouse
v Tivoli Enterprise Data Warehouse Interim Fix 3 (Package 1.1–TDW-0006E)This interim fix is required for the proper operation of updates to the warehouseenablement pack for IBM Tivoli Monitoring for Messaging and Collaboration 5.1:Lotus® Domino™. If this interim fix applies to your enterprise, install thisinterim fix after installing Tivoli Enterprise Data Warehouse Fix Pack 2(1.1–TDW-FP02).
v Tivoli Enterprise Data Warehouse Interim Fix 4 (Package 1.1–TDW-0007E)This interim fix corrects a problem where the output of a summary report mightcontain information that is misaligned. If this interim fix applies to yourenterprise, install this interim fix after installing Tivoli Enterprise DataWarehouse Interim Fix 3 (Package 1.1–TDW-0006E).
v Tivoli Enterprise Data Warehouse Interim Fix 5 (Package 1.1–TDW-0008E)This interim fix resolves a problem in the central data warehouse schema.Processing errors occur from unexpired relationships and attributes associatedwith expired components. If this interim fix applies to your enterprise, installthis interim fix after installing Tivoli Enterprise Data Warehouse Interim Fix 4(Package 1.1–TDW-0007E).
v Tivoli Enterprise Data Warehouse Interim Fix 6 (Package 1.1–TDW-0009E)This interim fix resolves the extraction problem of application data fromMicrosoft® SQL Server database by the IBM Tivoli Enterprise Console® Version3.8. If this interim fix applies to your enterprise, install this interim fix afterinstalling Tivoli Enterprise Data Warehouse Interim Fix 5 (Package1.1–TDW-0008E).
v Tivoli Enterprise Data Warehouse Interim Fix 7 (Package 1.1–TDW-0010LA)This interim fix resolves the problem of the crashing of summary report outputproduced by the report interface component if special characters such as &<>are included in the report output. If this interim fix applies to your enterprise,install this interim fix after installing Tivoli Enterprise Data Warehouse InterimFix 6 (Package 1.1–TDW-0009E).
v Tivoli Enterprise Data Warehouse Interim Fix 8 (Package 1.1–TDW-0011LA)This interim fix resolves the problem of the failure of the installation ofwarehouse pack fix packs when two or more digits are used for the fix packversion number. This is a required interim fix. Install this interim fix afterinstalling Tivoli Enterprise Data Warehouse Interim Fix 7 (Package1.1–TDW-00010LA).
v Tivoli Enterprise Data Warehouse Interim Fix 9 (Package 1.1–TDW-0012LA)This interim fix resolves the problem with exposed passwords for warehousesource and target databases in log files produced by the data aggregation androllup programs. The 1.1–TDW–0012LA.README file for information about theinterim fix and specific installation instructions. Install this interim fix afterinstalling Tivoli Enterprise Data Warehouse Interim Fix 8 (Package1.1–TDW-00011LA).
v Security Vulnerabilities Fix for HTTP Server (1.1–TDW-0004)This patch contains a fix for security vulnerabilities that exist in the HTTP serverthat is installed with Tivoli Enterprise Data Warehouse.
In addition, Tivoli Enterprise Data Warehouse has been certified for the following:v AIX® 5.2 64 bit platform with the Tivoli Presentation Services limitation as
follows::The IBM Web Console does not start in the background on AIX. You must setthe value of the DISPLAY environment variable in the
READ THIS FIRST xi
/opt/PS/bin/generic/tcwebsvcssubsys file to a server other than the one onwhich the Web Console is running and reboot the AIX machine.
v MS SQL Server 2000 SP3 as a source database.
Incompatible warehouse packsMake sure that any warehouse packs that you plan to install are supported byTivoli Enterprise Data Warehouse, Version 1.1. If you attempt to install awarehouse pack that is not compatible with Tivoli Enterprise Data Warehouse,Version 1.1, you will receive an error similar to the following:==> Reading Config File (e:/samplepack/0705A/dgr1.2/e1e2/twh_install_props.cfg)
(F) CDWIC0007E Illegal option found.Illegal value is (APP_DISPLAY_NAME)
No recovery procedures are necessary. Obtain the correct warehouse pack for TivoliEnterprise Data Warehouse version 1.1 and run the installation program again.
About this guideInstalling and Configuring Tivoli Enterprise Data Warehouse describes how TivoliEnterprise Data Warehouse fits into your enterprise, explains how to plan for itsdeployment, and gives installation and configuration instructions. It provides anintroduction to the built-in program for creating and running reports, and containsmaintenance procedures and troubleshooting information.
Who should read this guideThis guide is for administrators and installers who plan for, install, configure, andmaintain Tivoli Enterprise Data Warehouse.
Chapter 9, “Getting started with the IBM Console”, on page 123 and Chapter 15,“DB2 Data Warehouse Center essentials”, on page 247 are a starting point for thosewho want to use the IBM Console to work with Tivoli Enterprise Data Warehousereports. Additional information for these users is found in the Tivoli Assistant, theonline help built into the IBM Console.
Administrators and installers should have the following knowledge:v Basic system administration and file management of the operating systems on
which the components of Tivoli Enterprise Data Warehouse are installed.v An understanding of the basic concepts of relational database managementv Experience administering IBM DB2 databases
Report users should be familiar with the following:v A Web browserv The business use of the information stored in the central data warehouse
PublicationsThis section lists publications in the Tivoli Enterprise Data Warehouse library andany other related documents. It also describes how to access Tivoli publicationsonline, how to order Tivoli publications, and how to make comments on Tivolipublications.
xii Installing and Configuring Tivoli Enterprise Data Warehouse

The Tivoli Enterprise Data Warehouse publicationsThe following documents are available in the Tivoli Enterprise Data Warehouselibrary. The entire library, except the latest version of this guide, is available on theTivoli Enterprise Data Warehouse Documentation CD, LK3T-8111. All the documents,except Enabling an Application for Tivoli Enterprise Data Warehouse, are also availableonline, as described in “Accessing publications online” on page xv.v Tivoli Enterprise Data Warehouse Documentation CD, LK3T-8111
Provides an information center with the complete Tivoli Enterprise DataWarehouse library in both PDF and HTML. All documents are available inEnglish; selected documents are available in other languages.
v Tivoli Enterprise Data Warehouse Release Notes, GI11-0857Provides late-breaking information about Tivoli Enterprise Data Warehouse andlists hardware requirements and software prerequisites.
v Installing and Configuring Tivoli Enterprise Data Warehouse, GC32-0744Describes how Tivoli Enterprise Data Warehouse fits into your enterprise,explains how to plan for its deployment, and gives installation and configurationinstructions. It provides an introduction to the built-in program for creating andrunning reports, and contains maintenance procedures and troubleshootinginformation. Additionally, this guide describes how to install warehouse packsand reports.
v Enabling an Application for Tivoli Enterprise Data Warehouse, GC32-0745Provides information about connecting an application to Tivoli Enterprise DataWarehouse. This document is for application programmers who use TivoliEnterprise Data Warehouse to store and report on their application’s data, datawarehousing experts who import Tivoli Enterprise Data Warehouse data intobusiness intelligence applications, and customers who view reports.
For information about creating and using groups to control access to data marts;creating, customizing, and running reports; and viewing and saving the output ofreports, consult the help topics in the IBM Console. Information about gettingstarted with the IBM Console is provided in the Installing and Configuring TivoliEnterprise Data Warehouse.
Related publicationsThe following section describes additional publications that can help youunderstand and use Tivoli Enterprise Data Warehouse.
The Tivoli GlossaryThe Tivoli Software Glossary includes definitions for many of the technical termsrelated to Tivoli software. The Tivoli Software Glossary is available, in English only,at the following Web site:
http://publib.boulder.ibm.com/tividd/glossary/termsmst04.htm
Access the glossary by clicking the Glossary link on the left pane of the Tivolisoftware library window.
IBM Redbooks™
IBM Redbooks are developed and published by the IBM International TechnicalSupport Organization, the ITSO. They explore integration, implementation, andoperation of realistic customer scenarios. The following Redbooks containinformation about Tivoli Enterprise Data Warehouse:v Introduction to Tivoli Enterprise Data Warehouse, SG24-6607
READ THIS FIRST xiii
Provides a broad understanding of Tivoli Enterprise Data Warehouse. Some ofthe topics that are covered are concepts, architecture, writing your own ETLs,and best practices in creating data marts.
v Planning a Tivoli Enterprise Data Warehouse Project, SG24-6608Explains the needed planning before deploying Tivoli Enterprise DataWarehouse. The guide shows how to apply these planning steps in a real-life,warehouse pack implementation using IBM Tivoli Monitoring. It also containsfrequently used Tivoli and DB2 commands and lists troubleshooting tips forTivoli Enterprise Data Warehouse.
DB2 Universal Database publicationsThe DB2 library contains important information about the database system anddata warehousing technology provided by DB2 Universal Database EnterpriseEdition, DB2 Warehouse Manager, and the DB2 Data Warehouse Center.
For those new to data warehousing and DB2, the Business Intelligence Tutorialleads you through the basics of data warehousing and the use of the DB2 DataWarehouse Center. This online tutorial is available from both the DB2 HTMLDocumentation CD and the DB2 First Steps component after installing DB2Universal Database on your system.
Refer to the DB2 library for help in installing, configuring, administering, andtroubleshooting DB2 products. The DB2 library is available online at the followingWeb address:
http://www.ibm.com/software/data/db2/library/
After installing DB2, the library is also available on your system.
The following documents are particularly relevant for people working with TivoliEnterprise Data Warehouse:v IBM DB2 Universal Database™ for Windows Quick Beginnings, GC09-2971
Guides you through the planning, installation, migration (if necessary), andsetup of a partitioned database system using the IBM DB2 product on MicrosoftWindows systems.
v IBM DB2 Universal Database for UNIX Quick Beginnings, GC09-2970Guides you through the planning, installation, migration (if necessary), andsetup of a partitioned database system using the IBM DB2 product on UNIXsystems.
v IBM DB2 Universal Database Administration Guide: Implementation, SC09-2944Covers the details of implementing your database design. Topics includecreating and altering a database, database security, database recovery, andadministration using the DB2 Control Center, a DB2 graphical user interface(GUI).
v IBM DB2 Universal Database Administration Guide: Performance, SC09-2945Provides information about configuring and tuning your database environmentto improve performance.
v IBM DB2 Universal Database Data Warehouse Center Administration Guide,SC26-9993Provides information on how to build and maintain a data warehouse using theDB2 Data Warehouse Center.
v IBM DB2 Warehouse Manager Installation Guide, GC26-9998
xiv Installing and Configuring Tivoli Enterprise Data Warehouse
Provides the information to install the following DB2 Warehouse Managercomponents: Information Catalog Manager, warehouse agents, and warehousetransformers.
v IBM DB2 Universal Database and DB2 Connect™ Installation and ConfigurationSupplement, GC09-2957Provides advanced installation considerations and guides you through theplanning, installation, migration (if necessary), and setup of a platform-specificDB2 client. Once the DB2 client is installed, you then configure communicationsfor both the client and server, using the DB2 GUI tools or the Command LineProcessor. This supplement also contains information on binding, setting upcommunications on the server, the DB2 GUI tools, Distributed RelationalDatabase Architecture™ application server (DRDA® AS), distributed installation,the configuration of distributed requests, and accessing heterogeneous datasources.
v IBM DB2 SQL Reference Volume 1, SC09-2974 and IBM DB2 SQL Reference Volume2, SC09-2975Describes SQL syntax, semantics, and the rules of the language. This book alsoincludes information about release-to-release incompatibilities, product limits,and catalog views.You can order both volumes of the SQL Reference in the English language inNorth America with the form number SBOF-8933.
v IBM DB2 Universal Database Message Reference Volume 1, GC09-2978 and IBM DB2Universal Database Message Reference Volume 2, GC09-2979Lists the messages and codes issued by DB2, the Information Catalog Manager,and the DB2 Data Warehouse Center, and describes the actions you should take.
v IBM DB2 Universal Database Business Intelligence Tutorial
Provides an end-to-end tutorial for typical business intelligence tasks. It teachesyou how to use the DB2 Control Center and DB2 Data Warehouse Center tocreate a warehouse database, move and transform source data, and write thedata to the warehouse target database. It also teaches you how to use the OLAPStarter Kit to perform multidimensional analysis on relational data using OnlineAnalytical Processing (OLAP) techniques.
Accessing publications onlineThe documentation CD, Tivoli Enterprise Data Warehouse Documentation CD, containsthe publications that are in the product library. The format of the publications isPDF, HTML, or both. Translated documents are also available for some products.
IBM posts publications for this and all other Tivoli products, as they becomeavailable and whenever they are updated, to the Tivoli Software InformationCenter Web site. The Tivoli Software Information Center is located at the followingWeb address:
http://publib.boulder.ibm.com/tividd/td/tdprodlist.html
Click the Tivoli Enterprise Data Warehouse link to access the product library.
The DB2 product library is located at the following Web address:
http://www.ibm.com/software/data/db2/library/
Note: If you print PDF documents on other than letter-sized paper, select the Fit topage check box in the Adobe Acrobat Print dialog. This option is available
READ THIS FIRST xv
when you click File → Print. Fit to page ensures that the full dimensions of aletter-sized page print on the paper that you are using.
Ordering publicationsYou can order many IBM and Tivoli publications online at the following Web site:
http://www.elink.ibmlink.ibm.com/public/applications/publications/cgibin/pbi.cgi
You can also order by telephone by calling one of these numbers:v In the United States: 800-879-2755v In Canada: 800-426-4968v In other countries, for a list of telephone numbers, see the following Web site:
http://www.ibm.com/software/tivoli/order-lit/
AccessibilityAccessibility features help users with a physical disability, such as restrictedmobility or limited vision, to use software products successfully. For informationabout the accessibility of Tivoli Enterprise Data Warehouse, refer to Appendix B,“Accessibility”, on page 319.
Contacting software supportIf you have a problem with any Tivoli product, refer to the following IBM SoftwareSupport Web site:
http://www.ibm.com/software/sysmgmt/products/support/
If you want to contact customer support, see the IBM Software Support Guide at thefollowing Web site:
http://techsupport.services.ibm.com/guides/handbook.html
The guide provides information about how to contact IBM Software Support,depending on the severity of your problem, and the following information:v Registration and eligibilityv Telephone numbers and e-mail addresses, depending on the country in which
you are locatedv Information you must have before contacting IBM Software Support
Participating in newsgroupsUser groups provide software professionals with a forum for communicating ideas,technical expertise, and experiences related to the product. They are located on theInternet, and are available using standard news reader programs. These groups areprimarily intended for user-to-user communication, and are not a replacement forformal support.
The Tivoli Enterprise Data Warehouse newsgroup is at the following Web address:
news://news.software.ibm.com/ibm.software.tivoli.enterprise-data-warehouse
xvi Installing and Configuring Tivoli Enterprise Data Warehouse
Conventions used in this guideThis book uses several conventions for special terms and actions, and operatingsystem-dependent commands and paths.
Typeface conventionsThis guide uses the following typeface conventions:
Bold
v Lowercase commands and mixed case commands that are otherwisedifficult to distinguish from surrounding text
v Interface controls (check boxes, push buttons, radio buttons, spinbuttons, fields, folders, icons, list boxes, items inside list boxes,multicolumn lists, containers, menu choices, menu names, tabs, propertysheets), labels (such as Tip:, and Operating system considerations:)
v Keywords and parameters in text
Italic
v Words defined in textv Emphasis of words (words as words)v New terms in text (except in a definition list)v Variables and values you must provide
Monospace
v Examples and code examplesv File names, programming keywords, and other elements that are difficult
to distinguish from surrounding textv Message text and prompts addressed to the userv Text that the user must typev Values for arguments or command options
Operating system-dependent variables and pathsWhen referring to environment variables in a context that can occur only on asystem running a Windows operating system, environment variables and pathnames are displayed using the Windows notation. For example, %SystemRoot%and C:\Program Files\TWH\, respectively. If the context applies to both Windowsand UNIX operating systems, this guide uses the UNIX convention for specifyingenvironment variables and for directory notation. For example, $TEMP and/usr/local/bin/.
To convert from the UNIX format to the Windows format, replace $variable with%variable% for environment variables and replace each forward slash (/) with abackslash (\) in directory paths.
Note: If you are using the bash shell on a Windows system, you can use the UNIXconventions.
This guide uses the following environment variables:
Variable name Meaning
%ProgramFiles% Identifies the directory where program files areinstalled. Usually, this is C:\Program Files\, but itcan also be represented with the SystemDrive
READ THIS FIRST xvii
environment variable as%SystemDrive%:\Program Files\.
$TWH_TOPDIR The top-level directory in which the TivoliEnterprise Data Warehouse files are installed. Thedefault value on Windows systems is%ProgramFiles%\TWH\. The default value onUNIX systems is /opt/twh/.
xviii Installing and Configuring Tivoli Enterprise Data Warehouse
Part 1. Planning for Tivoli Enterprise Data Warehouse
Chapter 1. Overview of Tivoli Enterprise DataWarehouse . . . . . . . . . . . . . . 3Why use Tivoli Enterprise Data Warehouse? . . . . 3How Tivoli Enterprise Data Warehouse fits into yourIT enterprise . . . . . . . . . . . . . . 4The components of a Tivoli Enterprise DataWarehouse deployment . . . . . . . . . . . 6
Tivoli Enterprise Data Warehouse control server . 7Central data warehouse. . . . . . . . . . 7Data marts . . . . . . . . . . . . . . 7Report interface . . . . . . . . . . . . 7DB2 warehouse agents and agent sites . . . . . 7Warehouse packs . . . . . . . . . . . . 8
Comparing Tivoli Enterprise Data Warehouse andTivoli Decision Support . . . . . . . . . . . 8
Chapter 2. Planning for Tivoli Enterprise DataWarehouse . . . . . . . . . . . . . . 11How you deploy Tivoli Enterprise Data Warehousesupport . . . . . . . . . . . . . . . . 11
Software that generates operational data . . . . 11Tivoli Enterprise Data Warehouse . . . . . . 12Warehouse packs . . . . . . . . . . . 12
Prerequisite hardware and software . . . . . . 13Overview of the installation process . . . . . . 13Types of deployments . . . . . . . . . . . 14Operational data. . . . . . . . . . . . . 16Control server . . . . . . . . . . . . . 16Central data warehouse . . . . . . . . . . 17Data marts . . . . . . . . . . . . . . 17Report server . . . . . . . . . . . . . . 17DB2 warehouse agents and agent sites . . . . . 18Accessing data in the central data warehouse . . . 20Web browser considerations . . . . . . . . . 21Warehouse packs . . . . . . . . . . . . 21
Where to install a warehouse pack. . . . . . 21Software prerequisites . . . . . . . . . . 21Understanding ETL processes . . . . . . . 22Before you install a warehouse pack . . . . . 22
Estimating the size of your Tivoli Enterprise DataWarehouse deployment . . . . . . . . . . 23
General considerations . . . . . . . . . 23Estimating central data warehouse database anddata mart database storage requirements for awarehouse pack . . . . . . . . . . . . 24
Estimating the number of rows in the Msmttable. . . . . . . . . . . . . . . 24Estimate the size of the table space allocatedfor the Msmt table . . . . . . . . . . 25Calculating the size of the index spaceallocated for the Msmt table . . . . . . . 26
Security considerations . . . . . . . . . . 26Firewalls . . . . . . . . . . . . . . 26Authority required to install Tivoli EnterpriseData Warehouse . . . . . . . . . . . . 26
Controlling access to data in Tivoli EnterpriseData Warehouse . . . . . . . . . . . . 27Protecting database connection information in thereport interface . . . . . . . . . . . . 27Secure sockets layer (SSL) connections to the IBMConsole. . . . . . . . . . . . . . . 28
Support for multiple customer environments andmultiple data centers . . . . . . . . . . . 28DB2 Considerations . . . . . . . . . . . 29Coexistence . . . . . . . . . . . . . . 29
Coexistence with Tivoli Decision Support . . . 29Coexistence with other data warehouses. . . . 30Coexistence with other DB2 database applications 30
Database naming conventions . . . . . . . . 30Selecting port numbers . . . . . . . . . . 31
Chapter 3. Planning worksheets . . . . . . . 35Planning worksheets for a quick start deployment 36Planning worksheets for a distributed deploymentwithout DB2 remote warehouse agent sites . . . . 39Planning worksheets for a distributed deploymentwith DB2 remote warehouse agent sites . . . . . 45Planning worksheet for installing warehouse packs 49Planning worksheet for creating DB2 users on aUNIX system . . . . . . . . . . . . . . 51
© Copyright IBM Corp. 2001, 2003 1

2 Installing and Configuring Tivoli Enterprise Data Warehouse

Chapter 1. Overview of Tivoli Enterprise Data Warehouse
With Tivoli Enterprise Data Warehouse, customers can analyze historical trendsfrom various Tivoli and customer applications. The Tivoli Enterprise DataWarehouse infrastructure enables a set of extract, transform, and load (ETL)utilities to extract and move data from Tivoli application data stores to a centralrepository. The open architecture of Tivoli Enterprise Data Warehouse also enablesdata from non-Tivoli applications to be integrated into its central repository.Customers can then generate task-oriented data marts from this repository, andthese data marts can be used to produce cross application reports.
This chapter introduces and addresses the following topics:v Why use Tivoli Enterprise Data Warehouse?v The components of a Tivoli Enterprise Data Warehouse deploymentv Warehouse packsv Comparing Tivoli Enterprise Data Warehouse and Tivoli Decision Support
Why use Tivoli Enterprise Data Warehouse?Using Tivoli Enterprise Data Warehouse, you can create a data warehouse thatcontains data about your IT infrastructure, including network devices andconnections, desktops, hardware, software, events, and other information. With thisinformation in a data warehouse, you can look at your IT costs, performance, andother trends across your enterprise. Tivoli Enterprise Data Warehouse can be usedto show the value and return on investment of Tivoli and IBM software, and it canbe used to identify areas where you can be more effective. Moving data from youroperation data stores into a data warehouse keeps your operation data storesefficient while preserving historical data longer.
Tivoli Enterprise Data Warehouse provides the following capabilities:v An open architecture for storing, aggregating, and correlating historical data
In addition to the data collected by diverse IBM Tivoli software, TivoliEnterprise Data Warehouse has the flexibility and extensibility to enable you tointegrate your own application data.
v The infrastructure and tools necessary for maintaining and viewing the dataThese tools include the Tivoli Enterprise Data Warehouse application, DB2Universal Database Enterprise Edition, the DB2 Data Warehouse Center, the DB2Warehouse Manager, and the report interface, which includes the IBM Consoleand Tivoli Presentation Services.
v The ability to use your choice of data analysis tools to examine your historicaldata.In addition to the report interface that is shipped with Tivoli Enterprise DataWarehouse, you can analyze your data using other products such as onlineanalytical processing (OLAP), planning, trending, analysis, accounting, or datamining.
v A zero-footprint client.Users can access Tivoli Enterprise Data Warehouse reports from any system byusing a Web browser. No special software is required on the user’s system.
v Multicustomer and multicenter support
© Copyright IBM Corp. 2001, 2003 3
You can keep data about multiple customers and multiple data centers in onewarehouse, but restrict access so that customers can see and work with data andreports based only on their data and not any other customer’s data. You can alsorestrict an individual user’s ability to access data.
v Internationalization supportNot only is the report interface localized, application programmers can localizethe data stored in the central data warehouse.
How Tivoli Enterprise Data Warehouse fits into your IT enterpriseFigure 1 on page 5 illustrates how Tivoli Enterprise Data Warehouse fits into yourIT enterprise. The numbers in the figure correspond to those in following list:1. Your environment contains many products and services that monitor and
manage your IT enterprise. This software can run on distributed systems suchas Windows, AIX, and other UNIX-based operating systems. These productsand services generate data that is stored in a variety of formats, includingrelational databases, spreadsheet data, log files, and others. This data is calledoperational data, and the databases and files in which it is stored are known asoperational data stores.
2. Extract, transform, and load (ETL) programs take the data from these varioussources and place it in the central data warehouse. This action often requiresthat the data be cleansed, aggregated, and converted into the standard formatfor historical data in the central data warehouse. These central data warehouseETL programs are provided in warehouse packs, which come from varioussources including the following:v The product that generates the operational data. For example, the IBM Tivoli
Enterprise Console product provides a warehouse pack that places itsoperational data into the central data warehouse.
v A product that analyzes data captured by other products. For example, anindependent software vendor might write a warehouse pack to extractoperational data collected by a system management product that does notprovide a warehouse pack.
v A customer created warehouse pack. For example, if there are no productsthat analyze the data that is important to your enterprise, you can write yourown customized ETL program to capture the specific historical data youwant to analyze.
3. The central data warehouse contains the historical data from all your diversesources. This data store is optimized for the efficient storage of large amountsof data and is published, which makes the data accessible to many analysissolutions. See the Enabling an Application for Tivoli Enterprise Data Warehouse,GC32-0745 and warehouse pack implementation guides for additionalinformation.
4. Another set of ETL programs extracts a subset of historical data from thecentral data warehouse. This subset of data, called a data mart, contains datatailored to and optimized for a specific reporting or analysis task. Like the ETLprograms in step 2, these data mart ETL programs are typically packaged inwarehouse packs and come from a variety of sources. A data mart ETLprogram can access any data in the central data warehouse, including dataplaced there by the central data warehouse ETL program of another warehousepack.
5. The data marts, which are subsets of the historical data that satisfy the needs ofa specific department, team, or customer, are optimized for interactive reportingand data analysis.
4 Installing and Configuring Tivoli Enterprise Data Warehouse
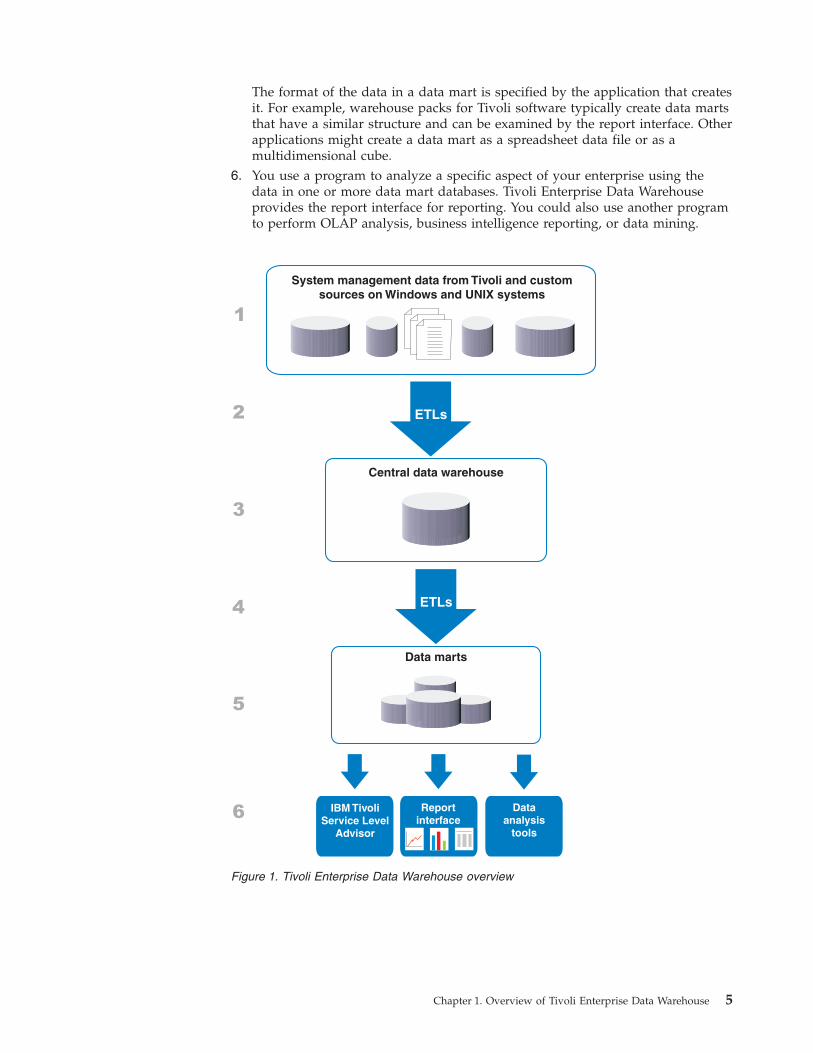
The format of the data in a data mart is specified by the application that createsit. For example, warehouse packs for Tivoli software typically create data martsthat have a similar structure and can be examined by the report interface. Otherapplications might create a data mart as a spreadsheet data file or as amultidimensional cube.
6. You use a program to analyze a specific aspect of your enterprise using thedata in one or more data mart databases. Tivoli Enterprise Data Warehouseprovides the report interface for reporting. You could also use another programto perform OLAP analysis, business intelligence reporting, or data mining.
System management data from Tivoli and customsources on Windows and UNIX systems
Central data warehouse
Data marts
ETLs
ETLs4
3
2
1
5
6 IBM TivoliService Level
Advisor
Reportinterface
Dataanalysis
tools
Figure 1. Tivoli Enterprise Data Warehouse overview
Chapter 1. Overview of Tivoli Enterprise Data Warehouse 5
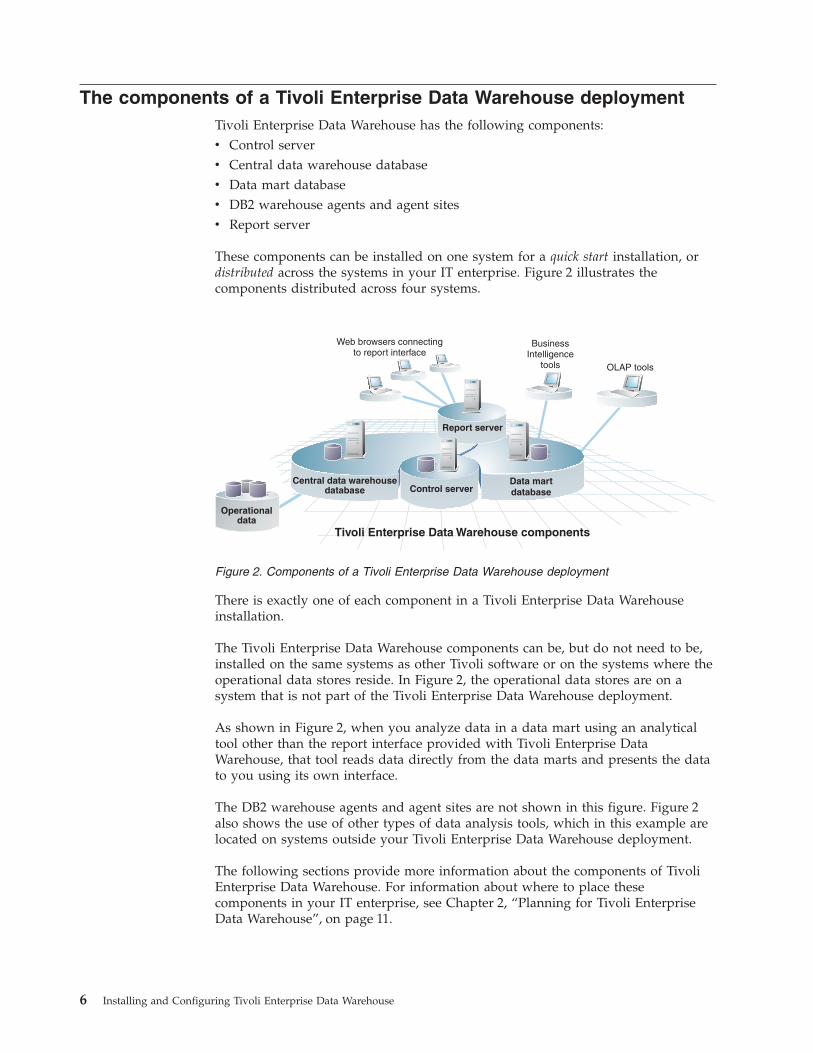
The components of a Tivoli Enterprise Data Warehouse deploymentTivoli Enterprise Data Warehouse has the following components:v Control serverv Central data warehouse databasev Data mart databasev DB2 warehouse agents and agent sitesv Report server
These components can be installed on one system for a quick start installation, ordistributed across the systems in your IT enterprise. Figure 2 illustrates thecomponents distributed across four systems.
There is exactly one of each component in a Tivoli Enterprise Data Warehouseinstallation.
The Tivoli Enterprise Data Warehouse components can be, but do not need to be,installed on the same systems as other Tivoli software or on the systems where theoperational data stores reside. In Figure 2, the operational data stores are on asystem that is not part of the Tivoli Enterprise Data Warehouse deployment.
As shown in Figure 2, when you analyze data in a data mart using an analyticaltool other than the report interface provided with Tivoli Enterprise DataWarehouse, that tool reads data directly from the data marts and presents the datato you using its own interface.
The DB2 warehouse agents and agent sites are not shown in this figure. Figure 2also shows the use of other types of data analysis tools, which in this example arelocated on systems outside your Tivoli Enterprise Data Warehouse deployment.
The following sections provide more information about the components of TivoliEnterprise Data Warehouse. For information about where to place thesecomponents in your IT enterprise, see Chapter 2, “Planning for Tivoli EnterpriseData Warehouse”, on page 11.
Operationaldata
Tivoli Enterprise Data Warehouse components
OLAP tools
Data martdatabase
Central data warehousedatabase Control server
BusinessIntelligence
tools
Web browsers connectingto report interface
Report server
Figure 2. Components of a Tivoli Enterprise Data Warehouse deployment
6 Installing and Configuring Tivoli Enterprise Data Warehouse
Tivoli Enterprise Data Warehouse control serverThe Tivoli Enterprise Data Warehouse control server is the system from which youmanage your data. It contains the control database for Tivoli Enterprise DataWarehouse. The control database contains metadata for both Tivoli Enterprise DataWarehouse and for the warehouse management functions of DB2 UniversalDatabase Enterprise Edition, such as the DB2 Data Warehouse Center and the DB2Warehouse Manager. You can have only one control server in a Tivoli EnterpriseData Warehouse deployment.
The control server has the following subcomponents:v A server that controls communication between the control server, the central
data warehouse server, the data mart server, and the report server.v The control database, which contains metadata for Tivoli Enterprise Data
Warehouse.
Central data warehouseThe central data warehouse contains the historical data for your enterprise. Youcan have only one central data warehouse database in a Tivoli Enterprise DataWarehouse deployment. The system that hosts the central data warehouse is calledthe central data warehouse server.
Data martsA separate DB2 database contains the data marts for your enterprise. Each datamart contains a subset of the historical data from the central data warehouse thatsatisfies the analysis and reporting needs of a specific department, team, customer,or application. The system that hosts the data mart databases is called the datamart server. Although you can have many data marts in a Tivoli Enterprise DataWarehouse deployment, you can have only one data mart server. Each data martdatabase can contain the data for multiple data marts.
Report interfaceThe Tivoli Enterprise Data Warehouse report interface (RPI) provides tools and agraphical user interface that other Tivoli software products utilize to create anddisplay reports that help you analyze the data in your warehouse to answerquestions that are important to your business. It enables you to customize reportsprovided with Tivoli software and to create new reports. You also use the reportinterface to control access to data marts and to the reports associated with a datamart. The system on which you install the report interface is called the reportserver.
DB2 warehouse agents and agent sitesThe DB2 warehouse agent is the component of DB2 Warehouse Manager thatmanages the flow of data between data sources and targets that are on differentcomputers. By default, the control server uses a DB2 default warehouse agent tomanage the data flow between operational data sources, the central datawarehouse database, and the data mart database.
You can optionally install the DB2 warehouse agent component of DB2 WarehouseManager on a computer other than the control server. Typically, you place a DB2remote warehouse agent on the computer that is the target of a data transfer. Thatcomputer becomes a DB2 remote warehouse agent site, which the DB2 Data
Chapter 1. Overview of Tivoli Enterprise Data Warehouse 7
Warehouse Center uses to manage the transfer of Tivoli Enterprise Data Warehousedata. This can speed up the data transfer as well as reduce the workload on thecontrol server.
For more information about DB2 warehouse agents and where to place agent sites,see “DB2 warehouse agents and agent sites” on page 18.
Warehouse packsA warehouse pack is separately-installable software that provides data warehousefunctionality for a specific system management purpose. You can think of it as awarehouse plug-in that provides any combination of the following functions:v Database tables and constants that define the data to be collectedv The ETL programs that put historical data into the central data warehousev The ETL programs that extract data into data marts for reporting purposesv Prepackaged reports about a specific aspect of system management
Although some warehouse packs provide all of these functions, others mightprovide only a subset. For example, one warehouse pack might only load historicaldata into the central data warehouse. Another warehouse pack might only analyzedata provided by other warehouse packs.
Because Tivoli Enterprise Data Warehouse provides an open architecture, datacollected by one warehouse pack can be used by other warehouse packs. In somecases, warehouse packs work together to provide a cross-product solution.
Comparing Tivoli Enterprise Data Warehouse and Tivoli DecisionSupport
As the next generation of historical data reporting and analysis solutions, TivoliEnterprise Data Warehouse is a successor to Tivoli Decision Support. The followingitems compare and contrast them:v Both Tivoli Enterprise Data Warehouse and Tivoli Decision Support collect and
analyze data gathered by the system management products in your enterprise.v Both provide an infrastructure for reporting and analysis, but do not themselves
extract data or provide reports. Each relies on other applications to use theinfrastructure to extract and analyze data and to provide reports to satisfy aspecific reporting or analysis need.In Tivoli Decision Support, an application that provides a solution to a specificreporting need is called a Tivoli Decision Support guide. In Tivoli EnterpriseData Warehouse, the corresponding application is called a warehouse pack.
v Some Tivoli Decision Support guides require direct access to the data in youroperational data stores, which can decrease the performance of the productscreating and using those data stores. In Tivoli Enterprise Data Warehouse, theuse of a central data warehouse and data marts ensure that your operationaldata stores are not impacted by users running reports. It also ensures that userscan run reports efficiently by accessing databases that are optimized forinteractive reporting.
v Tivoli Decision Support stores and accesses data using Cognos Powerplay andCrystal Reports. In contrast, Tivoli Enterprise Data Warehouse publishes theformat of the data in its central data warehouse and data marts, as well as theformat of the data in the products that feed the central data warehouse. This
8 Installing and Configuring Tivoli Enterprise Data Warehouse
enables you to use, in addition to the built-in reporting interface provided byTivoli Enterprise Data Warehouse, the business intelligence solutions you alreadyknow.
v Tivoli Enterprise Data Warehouse provides support for multiple languages.Tivoli Decision Support is available only in English.
Chapter 1. Overview of Tivoli Enterprise Data Warehouse 9

10 Installing and Configuring Tivoli Enterprise Data Warehouse
Chapter 2. Planning for Tivoli Enterprise Data Warehouse
This chapter provides an overview of how the installation of Tivoli Enterprise DataWarehouse relates to the rest of your system management software; listsinstallation considerations, information you need to gather, and decisions you needto make; and provides other information to help you plan your deployment ofTivoli Enterprise Data Warehouse.
The chapter includes the following topics:v “How you deploy Tivoli Enterprise Data Warehouse support”v “Prerequisite hardware and software” on page 13v “Overview of the installation process” on page 13v “Types of deployments” on page 14v “Operational data” on page 16v “Control server” on page 16v “Central data warehouse” on page 17v “Data marts” on page 17v “Report server” on page 17v “DB2 warehouse agents and agent sites” on page 18v “Accessing data in the central data warehouse” on page 20v “Web browser considerations” on page 21v “Warehouse packs” on page 21v “Estimating the size of your Tivoli Enterprise Data Warehouse deployment” on
page 23v “Security considerations” on page 26v “Support for multiple customer environments and multiple data centers” on
page 28v “DB2 Considerations” on page 29v “Coexistence” on page 29v “Database naming conventions” on page 30v “Selecting port numbers” on page 31
How you deploy Tivoli Enterprise Data Warehouse supportTivoli Enterprise Data Warehouse support for a Tivoli product requires that youinstall the following types of software:v Software that generates the operational data you want to analyze. See page 11.v Tivoli Enterprise Data Warehouse, which provides the warehouse infrastructure.
See page 12.v One or more warehouse enablement packs, also called warehouse packs, which are
applications that make use of the infrastructure to collect and analyze historicaldata. See page 12.
Software that generates operational dataThe Tivoli software and other system management products installed in your ITenterprise might already generate the operational data you need, or you might
© Copyright IBM Corp. 2001, 2003 11
have to install software to generate and record historical data. If you needadditional software, it can be provided in the following ways:v As part of a new release of a productv As a fix to a currently-installed release of a productv As a separately installable component of a product
Tivoli Enterprise Data WarehouseThe Tivoli Enterprise Data Warehouse core program provides the infrastructure forthe Tivoli Enterprise Data Warehouse. It provides the following functions:v An installation wizard that installs the Tivoli Enterprise Data Warehouse
infrastructurev An installation wizard that installs warehouse packsv The SQL scripts that define the standardized format, or database schema, used to
store datav Tools that summarize data
You receive Tivoli Enterprise Data Warehouse as a collection of CDs that is shippedas part of each Tivoli software product that uses the Tivoli Enterprise DataWarehouse infrastructure. Although you might receive the Tivoli Enterprise DataWarehouse CDs with multiple Tivoli software products, you need to install andconfigure it only once. The collection includes the following CDs:v Tivoli Enterprise Data Warehouse, the installation media for the Tivoli Enterprise
Data Warehouse application.v Tivoli Enterprise Data Warehouse Language Support, the files necessary to use Tivoli
Enterprise Data Warehouse in non-English languages. This CD contains bothSBCS and DBCS language support.
v Tivoli Enterprise Data Warehouse Documentation CD. For more information aboutthe Tivoli Enterprise Data Warehouse Documentation library, see “The TivoliEnterprise Data Warehouse publications” on page xiii.
v DB2 Universal Database Enterprise Edition CDsThe number of DB2 CDs you receive varies depending on whether you receivethe single-byte character set (SBCS) or double-byte character set (DBCS) packageof Tivoli Enterprise Data Warehouse.The DB2 CDs contain products that are not required by or installed with TivoliEnterprise Data Warehouse. For example, you receive the installation media anddocumentation for DB2 OLAP Server and Starter Kit, Information CatalogManager, and DB2 Query Patroller. If you choose to use these products, you caninstall them by following the instructions in the DB2 library. For moreinformation about the DB2 library, see “DB2 Universal Database publications” onpage xiv.
Warehouse packsYou receive a warehouse pack in one of the following ways:v In the tedw_apps_etl subdirectory of the installation media for the productv On a separate CDv Downloaded from a Web site
The documentation for a warehouse pack is called an implementation guide. Animplementation guide provides the information you need to successfully install,configure, use, maintain, and customize a warehouse pack.
12 Installing and Configuring Tivoli Enterprise Data Warehouse
The implementation guide is a PDF file in the doc\ subdirectory of the warehousepack installation media. If the warehouse pack does not come on a separate CD,the documentation for the product that provides the warehouse pack describeshow to find the installation media.
For additional information, see “Warehouse packs” on page 21.
Prerequisite hardware and softwareRefer to the Tivoli Enterprise Data Warehouse Release Notes for information abouthardware and software prerequisites, specific database and operating systemsupport, and product prerequisites. Refer to “READ THIS FIRST” on page ix forinformation about fix packs and interim fixes that are required at the time of thispublication. For late-breaking news about prerequisites, see the Tivoli EnterpriseData Warehouse Support Web site at the following Web address:
http://www-3.ibm.com/software/sysmgmt/products/support/TivoliDataWarehouse.html.
Before installing Tivoli Enterprise Data Warehouse, be sure you have all therequired operating system and software prerequisites. Missing prerequisites canresult in installation or operational problems that are difficult to debug.
Make sure that at least 2 GB of hard disk space is available for the TivoliEnterprise Data Warehouse installation, and that at least 600 MB of hard disk spaceis available for temporary usage by the installation program.
Set the TEMP environment variable to the name of a writable directory that meetsthese criteria:v The directory is not accessible to general users, because it will temporarily
contain unencrypted passwords.v The directory name is relatively short. A long directory name, including a
system default value such as C:\Documents and Settings\Administrator\LocalSettings\Temp, might cause problems. See “Installation cannot copy files to thehard drive” on page 280 for additional information.
Overview of the installation processTivoli Enterprise Data Warehouse provides an infrastructure that Tivoli softwareproducts, as well as software from other vendors, use to provide integrated captureand analysis of the data collected in your IT enterprise. The following explains thehigh-level process for installing Tivoli software products, Tivoli Enterprise DataWarehouse, warehouse packs, and third-party OLAP or data analysis tools:1. Tivoli software and other system management products in your IT enterprise
generate data that you want to turn into information, and then into businessintelligence, to help you better manage your business. These products can beinstalled on systems throughout your enterprise.
2. Deploy Tivoli Enterprise Data Warehouse in your IT enterprise.This involves installing the following products:v DB2 Universal Database Enterprise Edition, on all computers in your Tivoli
Enterprise Data Warehouse deploymentv DB2 Warehouse Manager, on selected computers in your deployment,
depending on the type of deployment you select.
Chapter 2. Planning for Tivoli Enterprise Data Warehouse 13
v Tivoli Enterprise Data Warehouse, on another Windows system in yourdeployment. Depending on the type of deployment you select, you mightneed to install Tivoli Enterprise Data Warehouse on additional computers inyour deployment.
If you will be using DB2 remote warehouse agent sites, you also install DB2Warehouse Manager and Tivoli Enterprise Data Warehouse on other computersin your Tivoli Enterprise Data Warehouse deployment.
3. Configure the DB2 Data Warehouse Center, which is used to manage thecentral data warehouse, for use with Tivoli Enterprise Data Warehouse.The DB2 Data Warehouse Center is automatically installed when you installDB2 Universal Database Enterprise Edition on the control server.
4. Back up your Tivoli Enterprise Data Warehouse deployment.5. Install warehouse packs one at a time on the control server and report server
and configure them to connect to the data collected by the IT managementsoftware described in item 1 on page 13.
6. Back up your Tivoli Enterprise Data Warehouse deployment. It is important tobe able to return to a known working state if you encounter problems installinga warehouse pack.
7. Optionally, install reporting, analysis, and business intelligence software inaddition to the Tivoli Enterprise Data Warehouse report interface. This softwaremight be installed on a user’s workstation, on a server, or might requirecomponents on both. Or it might be a Web-based reporting tool that enablesusers to analyze data without installing any special software. The TivoliEnterprise Data Warehouse report interface enables users to examine, create,customize, and run reports using the Web browser-based IBM Console.
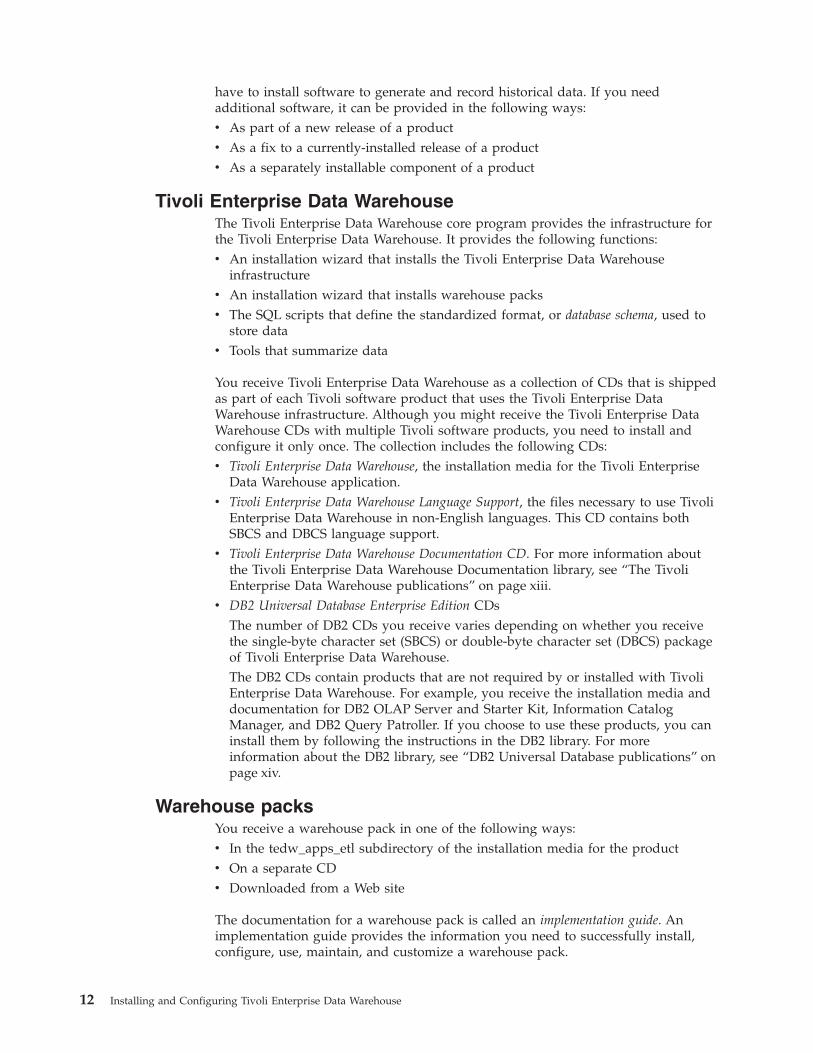
Types of deploymentsYou can deploy Tivoli Enterprise Data Warehouse using one of theseconfigurations:v As a quick start deployment, also known as a single system installation, with the
Tivoli Enterprise Data Warehouse and all of its databases on a single Windowscomputer.
This deployment is convenient for demonstrations, as an educational or testplatform, and for companies that do not plan to have many users concurrentlyanalyzing data and that do not need to capture and analyze large amounts ofdata in the central data warehouse.
v As a distributed deployment, with the components installed on multiplecomputers in your enterprise, including UNIX servers. A distributed deploymentis applicable for most production systems and for customers who already run
Data martWindowsCentral data
warehouse Control server
Reportserver
Figure 3. A quick start deployment
14 Installing and Configuring Tivoli Enterprise Data Warehouse
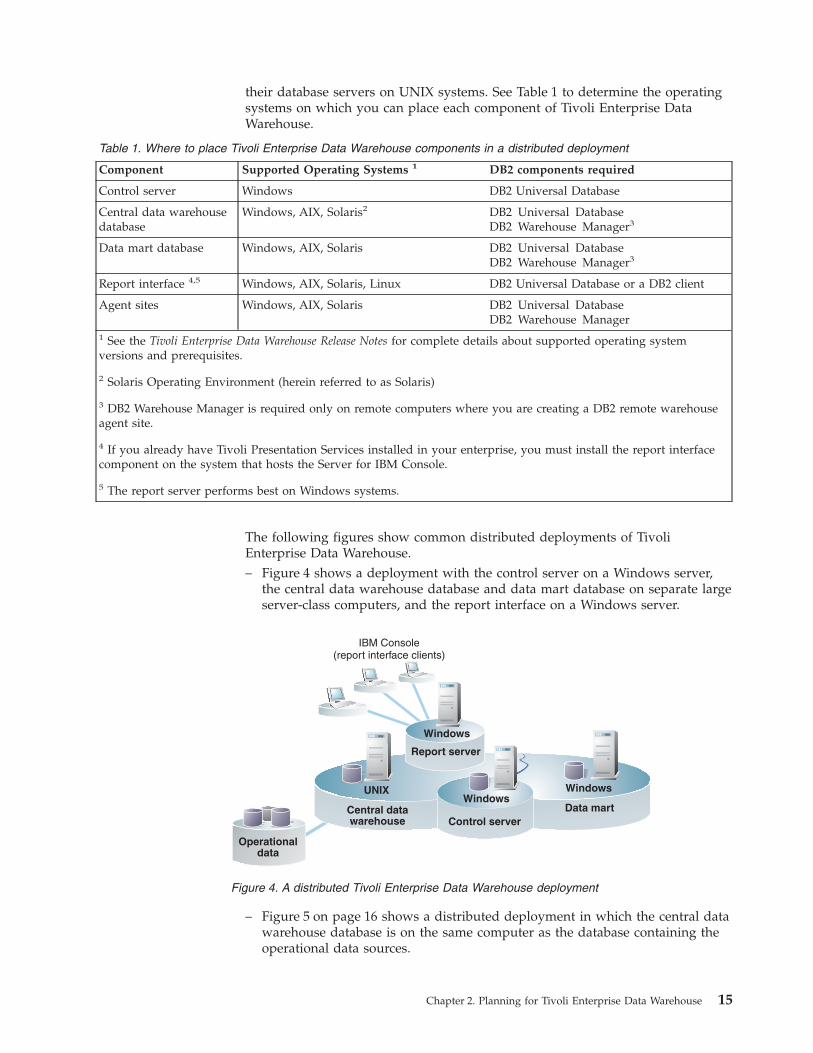
their database servers on UNIX systems. See Table 1 to determine the operatingsystems on which you can place each component of Tivoli Enterprise DataWarehouse.
Table 1. Where to place Tivoli Enterprise Data Warehouse components in a distributed deployment
Component Supported Operating Systems 1 DB2 components required
Control server Windows DB2 Universal Database
Central data warehousedatabase
Windows, AIX, Solaris2 DB2 Universal DatabaseDB2 Warehouse Manager3
Data mart database Windows, AIX, Solaris DB2 Universal DatabaseDB2 Warehouse Manager3
Report interface 4,5 Windows, AIX, Solaris, Linux DB2 Universal Database or a DB2 client
Agent sites Windows, AIX, Solaris DB2 Universal DatabaseDB2 Warehouse Manager
1 See the Tivoli Enterprise Data Warehouse Release Notes for complete details about supported operating systemversions and prerequisites.
2 Solaris Operating Environment (herein referred to as Solaris)
3 DB2 Warehouse Manager is required only on remote computers where you are creating a DB2 remote warehouseagent site.
4 If you already have Tivoli Presentation Services installed in your enterprise, you must install the report interfacecomponent on the system that hosts the Server for IBM Console.
5 The report server performs best on Windows systems.
The following figures show common distributed deployments of TivoliEnterprise Data Warehouse.– Figure 4 shows a deployment with the control server on a Windows server,
the central data warehouse database and data mart database on separate largeserver-class computers, and the report interface on a Windows server.
– Figure 5 on page 16 shows a distributed deployment in which the central datawarehouse database is on the same computer as the database containing theoperational data sources.
Operationaldata
Data martCentral datawarehouse Control server
WindowsWindowsUNIX
IBM Console(report interface clients)
Report server
Windows
Figure 4. A distributed Tivoli Enterprise Data Warehouse deployment
Chapter 2. Planning for Tivoli Enterprise Data Warehouse 15

Operational dataThere can be one or more source databases that contain operational data. As statedpreviously, Tivoli software and other system management products installed inyour IT enterprise might already generate the operational data you need.
Control serverThere can be exactly one control server in a Tivoli Enterprise Data Warehousedeployment. The control server must be installed on a Windows system.
The control server uses the following parts of the DB2 product, which you mustinstall manually before installing the control server. These parts are all installedwhen you install DB2 Universal Database Enterprise Edition on a Windowssystem.v DB2 Universal Database Enterprise Edition, a component that includes the
database server and administration clientv The DB2 Data Warehouse Center, a component that automates data warehouse
processingYou use the DB2 Data Warehouse Center to schedule, maintain, and monitor theETL processes that place data into the central data warehouse database and datamart database.
v The DB2 default warehouse agentDB2 warehouse agents manage the flow of data between the data sources andthe targets in your Tivoli Enterprise Data Warehouse deployment. For moreinformation about DB2 warehouse agents, see “DB2 warehouse agents and agentsites” on page 18.
The system on which you install the control server must connect to the operationaldata stores of your enterprise, which potentially reside on other systems and inrelational databases other than DB2. To enable the control server to access thesedata sources, you must install the appropriate database client for each data sourceon the control server system.
Before installing Tivoli Enterprise Data Warehouse on the control server, you mustinstall DB2 Universal Database Enterprise Edition on each computer that willcontain a central data warehouse database or a data mart database. Optionally, youcan create and tune a DB2 database for the central data warehouse or data martserver on those computers.
The metadata or control database (TWH_MD) is on the control server.
Data martWindowsUNIX
Central datawarehouse Control server
Operationaldata
Report server
UNIX
Figure 5. A distributed Tivoli Enterprise Data Warehouse deployment
16 Installing and Configuring Tivoli Enterprise Data Warehouse
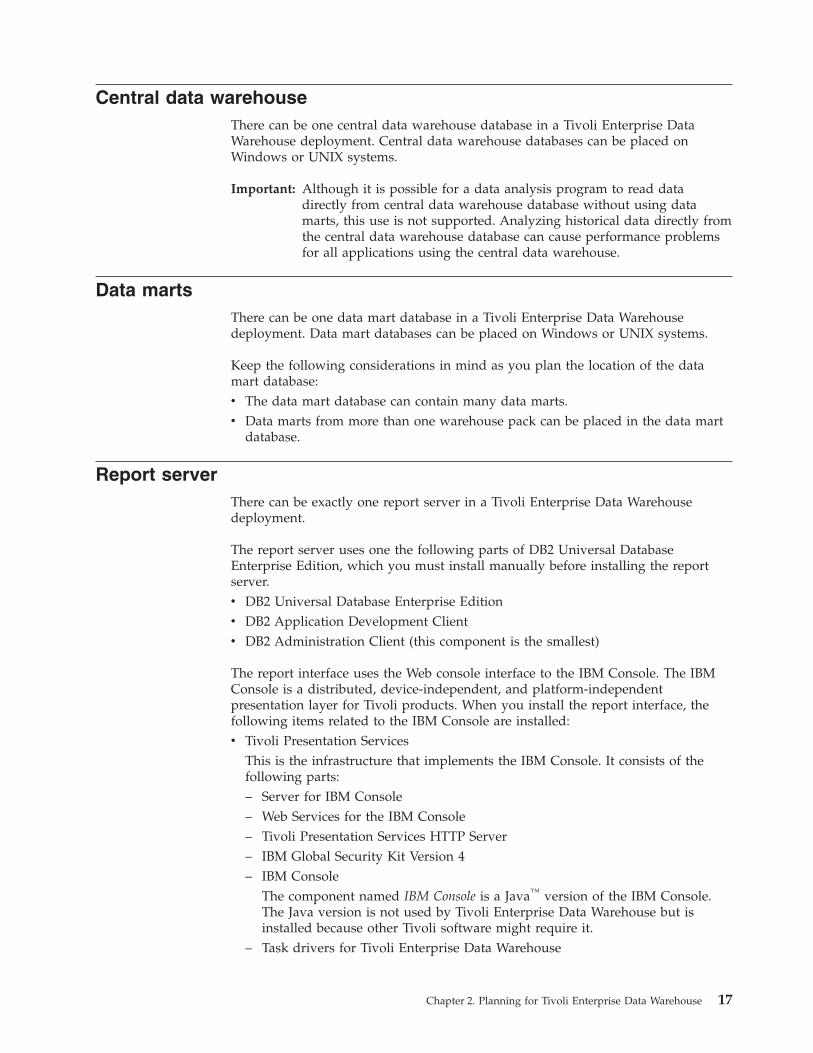
Central data warehouseThere can be one central data warehouse database in a Tivoli Enterprise DataWarehouse deployment. Central data warehouse databases can be placed onWindows or UNIX systems.
Important: Although it is possible for a data analysis program to read datadirectly from central data warehouse database without using datamarts, this use is not supported. Analyzing historical data directly fromthe central data warehouse database can cause performance problemsfor all applications using the central data warehouse.
Data martsThere can be one data mart database in a Tivoli Enterprise Data Warehousedeployment. Data mart databases can be placed on Windows or UNIX systems.
Keep the following considerations in mind as you plan the location of the datamart database:v The data mart database can contain many data marts.v Data marts from more than one warehouse pack can be placed in the data mart
database.
Report serverThere can be exactly one report server in a Tivoli Enterprise Data Warehousedeployment.
The report server uses one the following parts of DB2 Universal DatabaseEnterprise Edition, which you must install manually before installing the reportserver.v DB2 Universal Database Enterprise Editionv DB2 Application Development Clientv DB2 Administration Client (this component is the smallest)
The report interface uses the Web console interface to the IBM Console. The IBMConsole is a distributed, device-independent, and platform-independentpresentation layer for Tivoli products. When you install the report interface, thefollowing items related to the IBM Console are installed:v Tivoli Presentation Services
This is the infrastructure that implements the IBM Console. It consists of thefollowing parts:– Server for IBM Console– Web Services for the IBM Console– Tivoli Presentation Services HTTP Server– IBM Global Security Kit Version 4– IBM Console
The component named IBM Console is a Java™ version of the IBM Console.The Java version is not used by Tivoli Enterprise Data Warehouse but isinstalled because other Tivoli software might require it.
– Task drivers for Tivoli Enterprise Data Warehouse
Chapter 2. Planning for Tivoli Enterprise Data Warehouse 17
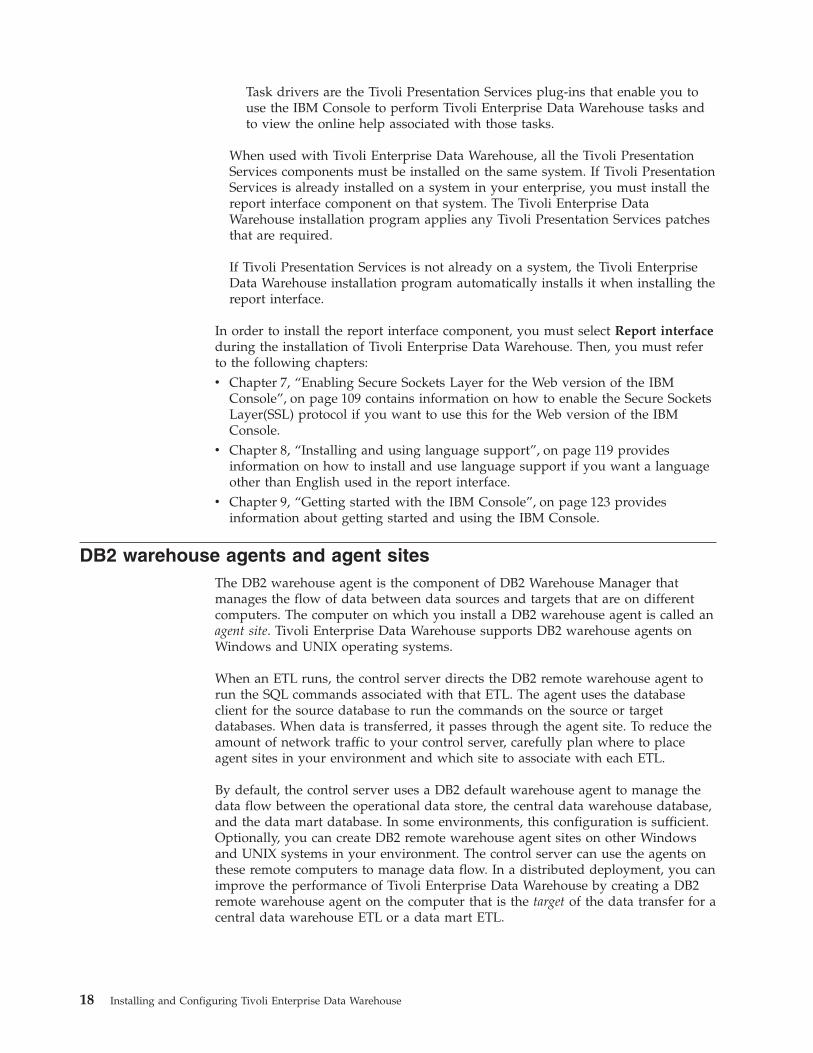
Task drivers are the Tivoli Presentation Services plug-ins that enable you touse the IBM Console to perform Tivoli Enterprise Data Warehouse tasks andto view the online help associated with those tasks.
When used with Tivoli Enterprise Data Warehouse, all the Tivoli PresentationServices components must be installed on the same system. If Tivoli PresentationServices is already installed on a system in your enterprise, you must install thereport interface component on that system. The Tivoli Enterprise DataWarehouse installation program applies any Tivoli Presentation Services patchesthat are required.
If Tivoli Presentation Services is not already on a system, the Tivoli EnterpriseData Warehouse installation program automatically installs it when installing thereport interface.
In order to install the report interface component, you must select Report interfaceduring the installation of Tivoli Enterprise Data Warehouse. Then, you must referto the following chapters:v Chapter 7, “Enabling Secure Sockets Layer for the Web version of the IBM
Console”, on page 109 contains information on how to enable the Secure SocketsLayer(SSL) protocol if you want to use this for the Web version of the IBMConsole.
v Chapter 8, “Installing and using language support”, on page 119 providesinformation on how to install and use language support if you want a languageother than English used in the report interface.
v Chapter 9, “Getting started with the IBM Console”, on page 123 providesinformation about getting started and using the IBM Console.
DB2 warehouse agents and agent sitesThe DB2 warehouse agent is the component of DB2 Warehouse Manager thatmanages the flow of data between data sources and targets that are on differentcomputers. The computer on which you install a DB2 warehouse agent is called anagent site. Tivoli Enterprise Data Warehouse supports DB2 warehouse agents onWindows and UNIX operating systems.
When an ETL runs, the control server directs the DB2 remote warehouse agent torun the SQL commands associated with that ETL. The agent uses the databaseclient for the source database to run the commands on the source or targetdatabases. When data is transferred, it passes through the agent site. To reduce theamount of network traffic to your control server, carefully plan where to placeagent sites in your environment and which site to associate with each ETL.
By default, the control server uses a DB2 default warehouse agent to manage thedata flow between the operational data store, the central data warehouse database,and the data mart database. In some environments, this configuration is sufficient.Optionally, you can create DB2 remote warehouse agent sites on other Windowsand UNIX systems in your environment. The control server can use the agents onthese remote computers to manage data flow. In a distributed deployment, you canimprove the performance of Tivoli Enterprise Data Warehouse by creating a DB2remote warehouse agent on the computer that is the target of the data transfer for acentral data warehouse ETL or a data mart ETL.
18 Installing and Configuring Tivoli Enterprise Data Warehouse
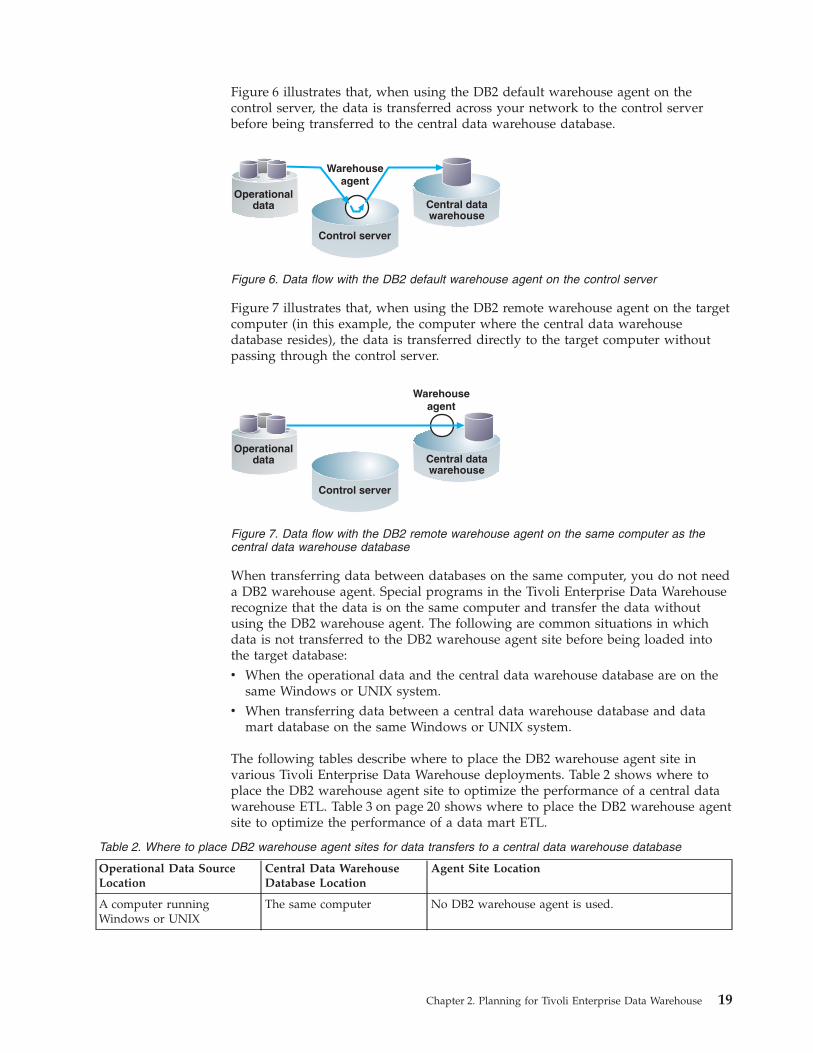
Figure 6 illustrates that, when using the DB2 default warehouse agent on thecontrol server, the data is transferred across your network to the control serverbefore being transferred to the central data warehouse database.
Figure 7 illustrates that, when using the DB2 remote warehouse agent on the targetcomputer (in this example, the computer where the central data warehousedatabase resides), the data is transferred directly to the target computer withoutpassing through the control server.
When transferring data between databases on the same computer, you do not needa DB2 warehouse agent. Special programs in the Tivoli Enterprise Data Warehouserecognize that the data is on the same computer and transfer the data withoutusing the DB2 warehouse agent. The following are common situations in whichdata is not transferred to the DB2 warehouse agent site before being loaded intothe target database:v When the operational data and the central data warehouse database are on the
same Windows or UNIX system.v When transferring data between a central data warehouse database and data
mart database on the same Windows or UNIX system.
The following tables describe where to place the DB2 warehouse agent site invarious Tivoli Enterprise Data Warehouse deployments. Table 2 shows where toplace the DB2 warehouse agent site to optimize the performance of a central datawarehouse ETL. Table 3 on page 20 shows where to place the DB2 warehouse agentsite to optimize the performance of a data mart ETL.
Table 2. Where to place DB2 warehouse agent sites for data transfers to a central data warehouse database
Operational Data SourceLocation
Central Data WarehouseDatabase Location
Agent Site Location
A computer runningWindows or UNIX
The same computer No DB2 warehouse agent is used.
Central datawarehouse
Control server
Warehouseagent
Operationaldata
Figure 6. Data flow with the DB2 default warehouse agent on the control server
Central datawarehouse
Control server
Warehouseagent
Operationaldata
Figure 7. Data flow with the DB2 remote warehouse agent on the same computer as thecentral data warehouse database
Chapter 2. Planning for Tivoli Enterprise Data Warehouse 19
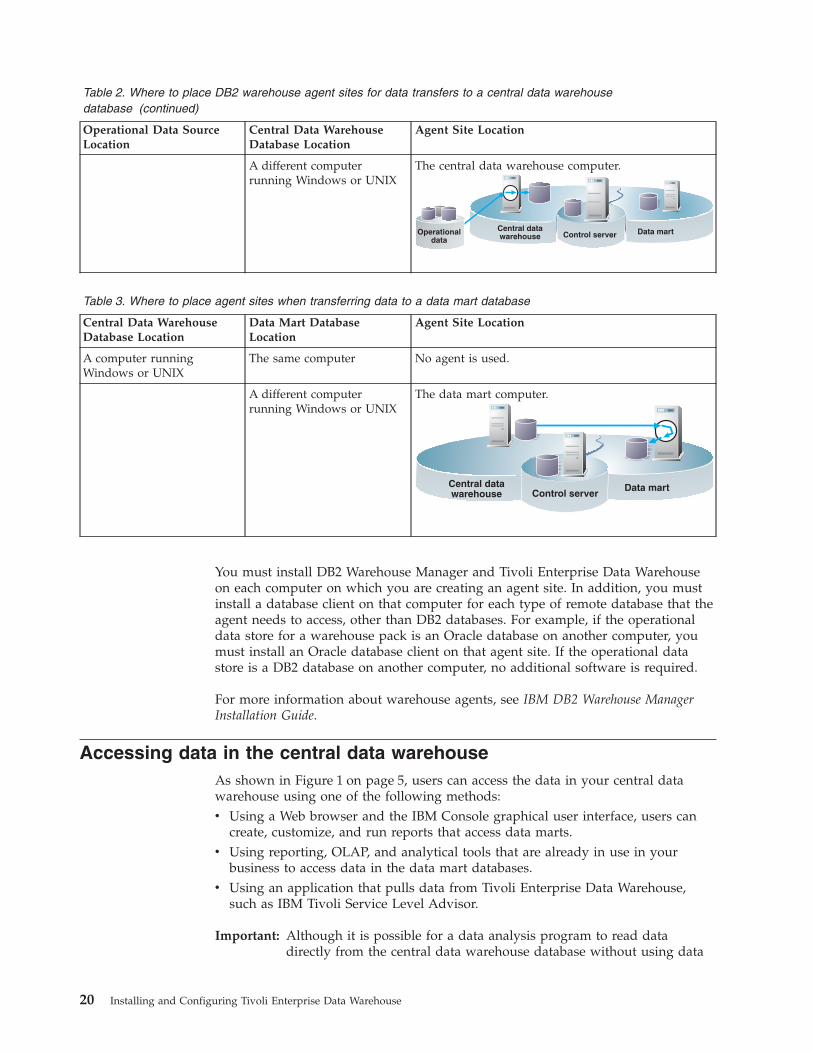
Table 2. Where to place DB2 warehouse agent sites for data transfers to a central data warehousedatabase (continued)
Operational Data SourceLocation
Central Data WarehouseDatabase Location
Agent Site Location
A different computerrunning Windows or UNIX
The central data warehouse computer.
Data martCentral datawarehouse Control serverOperational
data
Table 3. Where to place agent sites when transferring data to a data mart database
Central Data WarehouseDatabase Location
Data Mart DatabaseLocation
Agent Site Location
A computer runningWindows or UNIX
The same computer No agent is used.
A different computerrunning Windows or UNIX
The data mart computer.
Data martCentral datawarehouse Control server
You must install DB2 Warehouse Manager and Tivoli Enterprise Data Warehouseon each computer on which you are creating an agent site. In addition, you mustinstall a database client on that computer for each type of remote database that theagent needs to access, other than DB2 databases. For example, if the operationaldata store for a warehouse pack is an Oracle database on another computer, youmust install an Oracle database client on that agent site. If the operational datastore is a DB2 database on another computer, no additional software is required.
For more information about warehouse agents, see IBM DB2 Warehouse ManagerInstallation Guide.
Accessing data in the central data warehouseAs shown in Figure 1 on page 5, users can access the data in your central datawarehouse using one of the following methods:v Using a Web browser and the IBM Console graphical user interface, users can
create, customize, and run reports that access data marts.v Using reporting, OLAP, and analytical tools that are already in use in your
business to access data in the data mart databases.v Using an application that pulls data from Tivoli Enterprise Data Warehouse,
such as IBM Tivoli Service Level Advisor.
Important: Although it is possible for a data analysis program to read datadirectly from the central data warehouse database without using data
20 Installing and Configuring Tivoli Enterprise Data Warehouse
marts, this use is not supported. Analyzing historical data directly froma central data warehouse database can cause performance problems.
Web browser considerationsTo use the report interface, users must have one of the following Web browsers:v Netscape Communicatorv Microsoft Internet Explorer
Netscape 6.x is not supported. See the Tivoli Enterprise Data Warehouse Release Notesfor detailed information about which versions of each browser are supported.
The user must enable JavaScript and style sheets in these browsers.
If you plan to use the Secure Sockets Layer (SSL), all browsers must have 128–bitencryption.
Warehouse packsThis section contains the following topics:v “Where to install a warehouse pack”v “Software prerequisites”v “Understanding ETL processes” on page 22v “Before you install a warehouse pack” on page 22
Where to install a warehouse packInstall all warehouse packs on the control server and report server. If you are usinga remote DB2 remote warehouse agent site, you must additionally copy warehousepack files to the agent site.
Using the DB2 Data Warehouse Center GUI, you can schedule reports to runautomatically after the data mart ETL completes. Typically, the last step of the datamart ETL invokes the runReport.sh program.
If you upgrade or apply a fix pack to a warehouse pack, you must repeat themanual configuration if the upgrade or fix pack changes any ETL programs. Referto the implementation guide or README file for the upgrade or fix pack todetermine whether this is necessary.
Software prerequisitesBefore you can install any warehouse packs, you must perform the following tasks:v If you plan to use a DB2 remote warehouse agent site to run ETLs for the
warehouse pack, create the agent site and make sure Tivoli Enterprise DataWarehouse is at the same version and fix level as on the control server
v Make sure that the agent sites that run central data warehouse ETLs can connectto the operational data stores of your enterprise. If the data resides on acomputer other than the agent site and in a relational database other than DB2,you must install the appropriate database client for each data source. Forexample, if your operational data is in an Oracle database, there must be anOracle client on the agent site.If you are using the DB2 default warehouse agent site, install the database clienton the control server. If you are using a DB2 remote warehouse agent site, installthe database client on the remote computer.
Chapter 2. Planning for Tivoli Enterprise Data Warehouse 21
Understanding ETL processesAn ETL is a series of processes and a process is a series of steps that extract data,transform it, and load it into the appropriate location. The warehouse packimplementation guide identifies the processes contained in a warehouse pack, thesteps that make up each process, and how often each process should be run.However, only you can determine what scheduling is appropriate for yourenvironment.
ETLs can run once, occasionally, or on a regular schedule. You, the customer, haveto carefully consider if, when, and how to schedule ETLs that need to runregularly. Consider the following factors when scheduling ETLs to run:v Is the ETL dependent on another ETL? If so, link the ETLs instead of scheduling
them. For example, a data mart ETL is frequently dependent on one or moredata mart ETLs.
v Can you predict when prerequisite ETL processes and tasks are complete?The time each process requires to complete depends on many factors, includingthe amount of data it has to process, the speed of the database in which thesource and target data reside, the performance of the network, and so forth.Note that the default scheduling interval is set for a minimum level of data andthat you should adjust the interval for your environment and data level.
ETL processes can run one of the following ways:v Manually, by starting the process using the DB2 Data Warehouse Center.v Automatically, at a predetermined time every day.v Automatically, whenever a specified prerequisite process completes.
For more information, see “Scheduling your ETL steps” on page 153.
You can disable a scheduled ETL and re-enable a scheduled ETL process. For moreinformation, see “Disabling and re-enabling ETL scheduling” on page 248.
Before you install a warehouse packBefore you install a warehouse pack, you should locate and read itsimplementation guide and complete the planning worksheet in “Planningworksheet for installing warehouse packs” on page 49.
To ensure that you can return to a known valid state if you encounter an errorwhile installing a warehouse pack, back up your Tivoli Enterprise Data Warehousedeployment first. For more information, see “Backing up and restoring a TivoliEnterprise Data Warehouse deployment” on page 257.
In addition, you should determine which warehouse packs are installed on yoursystem and which versions you are about to install because some warehouse packsare dependent on others and it is necessary to plan for this and otherdependencies. See the ″Prerequisites″ section in the implementation guide for eachwarehouse pack for information about prerequisites.
22 Installing and Configuring Tivoli Enterprise Data Warehouse

Estimating the size of your Tivoli Enterprise Data Warehousedeployment
This section lists general considerations for estimating the amount of storageneeded on the computers in your Tivoli Enterprise Data Warehouse deployment,and provides a formula by which you can estimate the amount of central datawarehouse space required for a warehouse pack.
General considerationsWhen planning for your deployment, be sure to allocate sufficient storage for thefiles and the DB2 databases used by Tivoli Enterprise Data Warehouse. Considerthe space required for the following items:v On the control server, allow space for:
– The installation of files for Tivoli Enterprise Data Warehouse and for allwarehouse packs.
– The control database. This database holds these types of metadata:- The Tivoli Enterprise Data Warehouse metadata that defines the central
data warehouse schema- The metadata that defines each warehouse pack- The DB2 metadata used to manage a data warehouse
– Allow space for report output. Report output is saved in the control databaseon the control server.
v On each remote computer that is an DB2 remote warehouse agent site, allowspace for:– The files for Tivoli Enterprise Data Warehouse– The files for DB2 Warehouse Manager– The files for each warehouse pack that uses the computer as an agent site– The database clients that the DB2 warehouse agent uses to connect to remote
operational data stores
Also, make sure that the computer has enough resources to run the DB2warehouse agent and database clients.
v In the central data warehouse database, allow space for the accumulation oflarge amounts of historical data. This data grows over time, so allocate spacegenerously.
v In the data mart database, allow space for data marts created for each of yourcustomer’s specific reporting needs.
v Space for warehouse packs. For each warehouse pack, allow space the following:– On the control server, allow space for the installed files– In the control database on the control server, allow space for the metadata
that defines the warehouse pack– In the central data warehouse database, allow space for the historical data
collected by each warehouse pack– In the data mart database, allow space for the data marts created for each
group’s reporting needs
For complete information about the size requirements of each warehouse pack,refer to its implementation guide. For information about minimum spacerequirements for Tivoli Enterprise Data Warehouse, see the Tivoli Enterprise Data
Chapter 2. Planning for Tivoli Enterprise Data Warehouse 23
Warehouse Release Notes. For additional information about planning for spacerequirements, see the IBM Redbook Planning a Tivoli Enterprise Data WarehouseProject.
You can limit the size of your databases by regularly deleting old data from thecentral data warehouse database and the data mart database. For more informationsee “Deleting old data from the data mart database” on page 270.
Estimating central data warehouse database and data martdatabase storage requirements for a warehouse pack
Before installing a warehouse pack, make sure the central data warehouse databaseand data mart database have sufficient storage for the data collected by thiswarehouse pack. If the implementation guide for a warehouse pack does notcontain detailed instructions for estimating the amount of storage a warehousepack needs in the central data warehouse database, use the following calculationsas an approximation:1. Estimate the number of rows in the measurement (Msmt) table, as described on
page 24.2. Estimate the amount of space allocated for the Msmt table in bytes, as
described on page 25.3. Estimate the index space allocated for the Msmt table in bytes, as described on
page 26.
Estimating the number of rows in the Msmt table1. “Estimate the number of rows in the Msmt table for a single component type”2. “Sum the number of Msmt rows for all component types” on page 25
Estimate the number of rows in the Msmt table for a single component type:Estimate the size of the Msmt table, which is one of the largest tables in the centraldata warehouse database.
Estimating the number of rows in the Msmt table of the central data warehousedatabase for this warehouse pack requires these calculations:1. Consider the component tree (CompTyp table) from the root to the farthest leaf;
then estimate the number of different values for each component based on yourenvironment. This information is in the implementation guide for thewarehouse pack.
2. Consider the number of measurement types (MsmtTyp table) that are valid foreach component type (Table MsmtRul). This information is in theimplementation guide for the warehouse pack.
3. Multiply by the number of measurement intervals in a day. For example,multiply by 24 for hourly measurements.
4. Multiply by the number of days before the data will be deleted (tablePrune_Msmt_Control). The default value for hourly measurements is 31.
Note: The value specified in the Prune_Msmt_Control table can vary for eachwarehouse pack.
Calculate the number of rows using the following formula:
Msmt_rows (for one component type) = components x MsmtTypes xNumberOfMesasurements x PruneDays where:
24 Installing and Configuring Tivoli Enterprise Data Warehouse
The variables in this formula are:
Msmt_rowsEstimated number of rows for the Msmt table for one component type.
componentsEstimated number of different instances of a component type, added for allthe systems for which you are collecting data.
MsmtTypesNumber of measurement types that apply to this component type (fromthe MsmtRul table)
NumberOfMesasurementsThe number of measurements in a day for this component type.
PruneDaysThe interval at which data is deleted from the central data warehousedatabase. This is the value of the field PMsmtC_Age_In_Days in thePrune_Msmt_Control Table.
For example, if you estimate that your environment will have 1000 components ofa particular component type that is generated hourly, and the MsmtRul tableindicates that there are 10 different measurement types for this component type,and the pruning interval is 31 days, the calculation is as follows:
Msmt_rows = 1000 x 10 x 24 x 31 = 7,440,000 rows
Sum the number of Msmt rows for all component types: Add the number ofrows in the Msmt table for all component types.
Estimate the size of the table space allocated for the Msmt tableTo estimate the size of the table space needed for the Msmt table, use the followingformulas:
RecordsPerPage = ROUND DOWN(4020 / (Msmt_record_length + 10)), whereROUND DOWN indicates truncation, or setting the digits after the decimal pointto zero. For example, 4.5 becomes 4.0.
NumberOfPages = (Msmt_rows / Records_per_page) x 1.1
MsmtTableSpace (in bytes) = NumberOfPages x PageSize
The variables in these formulas are:
Msmt_record_lengthThe length of an entry in the Msmt table (89 bytes).
Msmt_rowsEstimated total number of rows in the Msmt table. This is the valuecalculated in “Sum the number of Msmt rows for all component types”
PageSizeThe size, in bytes, of pages in your system. By default, DB2 uses 4 KB(4096 byte) pages.
For example, if you estimated that you will have 7,440,000 rows in the Msmt table,then the size of the table space for the Msmt table is calculated as follows:v RecordsPerPage = ROUND DOWN(4020 / (89 + 10)) = 40v NumberOfPages = (7,440,000 / 40) * 1.1 = 204,600
Chapter 2. Planning for Tivoli Enterprise Data Warehouse 25
v MsmtTableSpace (in bytes) = 204,600 * 4096 = 838,041,600 bytes
Calculating the size of the index space allocated for the MsmttableTo estimate the size needed for the index space to allocate for the Msmt table, usethe following formula:
MsmtIndexSpace (in bytes) = (Msmt_index_record_length + 8) * Msmt_rows * 2
The variables in the formula are:
Msmt_index_record_lengthThe length of a record in the Msmt index (20 bytes).
Msmt_rowsEstimated total number of rows in the Msmt table. This is the valuecalculated in “Sum the number of Msmt rows for all component types” onpage 25
For example:
MsmtIndexSpace (in bytes) = (20 + 8) * 7,440,000 * 2 = 416,640,000 bytes
Security considerationsThe following sections describe security considerations for installing and usingTivoli Enterprise Data Warehouse. The following topics are covered:
FirewallsYou cannot have a firewall between any of the computers in a Tivoli EnterpriseData Warehouse deployment. This includes the control server, each system with acentral data warehouse or data mart database, and the operational data sources foreach warehouse pack.
Authority required to install Tivoli Enterprise Data WarehouseWhen installing the Tivoli Enterprise Data Warehouse core product, the DB2instance owner ID and password or a DB2 user ID with the same privileges as theDB2 instance owner of the original DB2 installation must be used. Contact yourDB2 administrator if you need this information.
Use the same user name and password for both the control server and central datawarehouse components. Because the DB2 administrators might be different for thedatabases, add an administrator to either the control server or the central datawarehouse database that matches the other database, as follows:v On Windows, add a user and add the new user to the Local Administrators
Group.v On UNIX, add a user and add the new user to the group that is the primary
group of the DB2 instance owner.
The following table lists the authority needed to install Tivoli Enterprise DataWarehouse and to perform other administrative tasks.
26 Installing and Configuring Tivoli Enterprise Data Warehouse
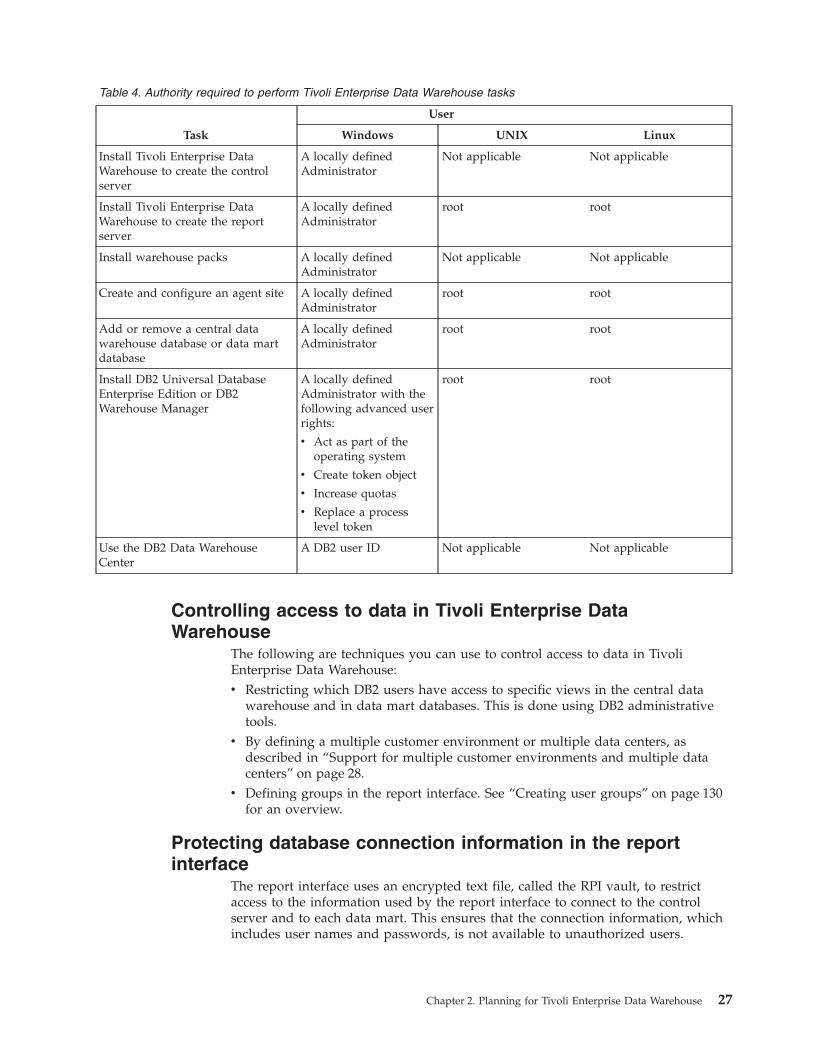
Table 4. Authority required to perform Tivoli Enterprise Data Warehouse tasks
Task
User
Windows UNIX Linux
Install Tivoli Enterprise DataWarehouse to create the controlserver
A locally definedAdministrator
Not applicable Not applicable
Install Tivoli Enterprise DataWarehouse to create the reportserver
A locally definedAdministrator
root root
Install warehouse packs A locally definedAdministrator
Not applicable Not applicable
Create and configure an agent site A locally definedAdministrator
root root
Add or remove a central datawarehouse database or data martdatabase
A locally definedAdministrator
root root
Install DB2 Universal DatabaseEnterprise Edition or DB2Warehouse Manager
A locally definedAdministrator with thefollowing advanced userrights:
v Act as part of theoperating system
v Create token object
v Increase quotas
v Replace a processlevel token
root root
Use the DB2 Data WarehouseCenter
A DB2 user ID Not applicable Not applicable
Controlling access to data in Tivoli Enterprise DataWarehouse
The following are techniques you can use to control access to data in TivoliEnterprise Data Warehouse:v Restricting which DB2 users have access to specific views in the central data
warehouse and in data mart databases. This is done using DB2 administrativetools.
v By defining a multiple customer environment or multiple data centers, asdescribed in “Support for multiple customer environments and multiple datacenters” on page 28.
v Defining groups in the report interface. See “Creating user groups” on page 130for an overview.
Protecting database connection information in the reportinterface
The report interface uses an encrypted text file, called the RPI vault, to restrictaccess to the information used by the report interface to connect to the controlserver and to each data mart. This ensures that the connection information, whichincludes user names and passwords, is not available to unauthorized users.
Chapter 2. Planning for Tivoli Enterprise Data Warehouse 27
Secure sockets layer (SSL) connections to the IBM ConsoleYou can configure the Web version of the IBM Console to use a secure socketslayer connection to client Web browsers. For instructions, see Chapter 7, “EnablingSecure Sockets Layer for the Web version of the IBM Console”, on page 109.
Support for multiple customer environments and multiple data centersWith Tivoli Enterprise Data Warehouse, you can keep data about multiplecustomers and data centers in one central data warehouse database, whilerestricting access so that customers can see and work with data and reports basedonly on their data and not any other customer’s data. For example, support formultiple customer environments enables a service provider to keep historical dataabout all of its customers in one deployment of Tivoli Enterprise Data Warehouse.Multiple data center support provides a way to partition data by customizablecriteria such as geography (such as Indonesia or Australia) or by business purpose(such as Development, Marketing, and Retail). For example, data centers can beused as a grouping to build data marts if you want to track performance based ona data center rather than the entire company.
Data centers can also be used to clean up source data when it is missing anattribute. For example, all timestamps in the central data warehouse database mustbe in coordinated universal time (UTC). If your source data contains timestampsthat do not include time zone information, you can use data centers to associatetime zones with data and convert incoming data to UTC. Define your data centerssuch that each one has a known time zone. The UTC offset for that time zone canbe looked up in the TWG.TmZon table. This value can be subtracted from theincoming timestamp to convert it to a UTC timestamp.
Before you implement support for a multiple customer environment or multipledata centers, ensure that an administrator fully understands the central datawarehouse tables TWG.Cust, productCode.cust_lookup, andproductCode.centr_lookup to avoid mingling data from multiple customers or datacenters.
Table 5 describes where to get information about tasks associated with supportingmultiple customer environments and multiple data centers.
Table 5. Where to find information about tasks relating to support for multiple customerenvironments or multiple data centers
Task Information
Understanding how support for a multiplecustomer environment and multiple datacenters is implemented
Enabling an Application for Tivoli EnterpriseData Warehouse
Configuring a multiple customerenvironment or multiple data centers for awarehouse pack
“Configuring for a multiple customerenvironment or multiple data centers” onpage 157
Maintaining a multiple customerenvironment or multiple data centers
“Maintaining a multiple customer ormultiple data center environment” onpage 160
If you plan to use a multiple customer environment or multiple data centers, evenif you do not need the ability at the time you install the warehouse pack, you mustconfigure the central data warehouse database for it before running the ETL thatimports data into the central data warehouse database for that warehouse pack. If
28 Installing and Configuring Tivoli Enterprise Data Warehouse
application data from one customer environment is imported into a central datawarehouse database without associating it with a particular customer or datacenter, the database cannot be used to in a multiple customer or multiple centerenvironment. If this happens, you can address the problem as follows:v Suspend all ETLs, add or modify the necessary database tables, convert the data
to the correct format, and then reenable ETLs.
To use support for multiple customer environments or multiple data centers for awarehouse pack, you populate and maintain a set of database tables. These tablesprovide the following features:v Define the customers and centers you are supportingv Map incoming data to specific customers or data centers
In addition to the one-time configuration that is performed when you install thewarehouse pack, the database tables must be maintained throughout the life of awarehouse pack. For more information, see “Configuring for a multiple customerenvironment or multiple data centers” on page 157.
DB2 ConsiderationsThe following are things to consider when planning to install DB2 UniversalDatabase for use with Tivoli Enterprise Data Warehouse:v Use the DB2 installation CDs provided with Tivoli Enterprise Data Warehouse.
Installing from other sources can lead to installation or operational problems thatare hard to debug. Once you install DB2 using the installation CDs providedwith Tivoli Enterprise Data Warehouse, go to the support Web site to obtain IBMDB2 Fix Pack 8 and the special fix for DB2 Fix Pack 8. Refer to “READ THISFIRST” on page ix for additional information on necessary fix packs and interimfixes required.
v Follow the DB2 installation instructions in this document to be sure you installall of the DB2 components that are needed. If you have already installed DB2,see “Reusing an existing DB2 instance” on page 314 for a list of requiredcomponents that are required.
v When installing DB2 Universal Database on UNIX operating systems, do notchange the installation directory. Tivoli Enterprise Data Warehouse requires thatthe product is installed in the default location.
v Disable Lightweight Directory Access Protocol (LDAP) before attempting toinstall Tivoli Enterprise Data Warehouse. Instructions for this are included in theinstallation procedures in Chapter 4, “Installing a quick start deployment”, onpage 57, Chapter 5, “Installing Tivoli Enterprise Data Warehouse in a distributeddeployment that does not use DB2 remote warehouse agent sites”, on page 67,and Chapter 6, “Installing Tivoli Enterprise Data Warehouse in a distributeddeployment that uses DB2 remote warehouse agent sites”, on page 85.
CoexistenceTivoli Enterprise Data Warehouse can coexist with Tivoli Decision Support andwith other DB2 databases and data warehouses.
Coexistence with Tivoli Decision SupportYou can continue to use Tivoli Decision Support at the same time and on the samesystems as Tivoli Enterprise Data Warehouse. For the best performance, do notschedule Tivoli Enterprise Data Warehouse ETLs and Tivoli Decision Support cubebuilds concurrently, if they access the same databases.
Chapter 2. Planning for Tivoli Enterprise Data Warehouse 29
Coexistence with other data warehousesDo not mix components from different deployments of Tivoli Enterprise DataWarehouse on any computer. For example, you can have both a productiondeployment and a test deployment of Tivoli Enterprise Data Warehouse in yourdata center. However, do not place any components of the test deployment on thesame computer as any components of the production deployment. For example, ifa computer has a central data warehouse database of your production deployment,do not place any components of the test deployment on that computer.
You can use the DB2 Data Warehouse Center to manage multiple data warehouses.However, only one data warehouse can be active (running scheduled jobs) at atime. Scheduled jobs run only for the warehouse whose control database is selectedin the DB2 Data Warehouse Center. Other warehouses, each identified by adifferent control database, retain their information but do not run scheduled jobsuntil their control database is selected in the DB2 Data Warehouse Center.
The control database for Tivoli Enterprise Data Warehouse is named TWH_MD.
The DB2 Data Warehouse Center can manage only one Tivoli Enterprise DataWarehouse control database.
Coexistence with other DB2 database applicationsTivoli Enterprise Data Warehouse uses the following databases. If you are installingTivoli Enterprise Data Warehouse in an existing DB2 instance, make sure thatdatabases with these names are not already in use by other applications.
TWH_MDThe control database on the control server
TWH_CDWThe central data warehouse database that is defined on a Windows orUNIX system
TWH_MARTThe data mart database that is defined on a Windows or UNIX system
If you install Tivoli Enterprise Data Warehouse in an existing DB2 instance, otherclients that are connected to that DB2 instance lose their DB2 connections duringthe Tivoli Enterprise Data Warehouse installation. Before you start the TivoliEnterprise Data Warehouse installation process, stop all DB2 clients and otherapplications that communicate with the DB2 servers on which you are installingcomponents of Tivoli Enterprise Data Warehouse.
Database naming conventionsTivoli Enterprise Data Warehouse creates or reuses databases as part of theinstallation. The databases are created based on the following naming conventions:
Table 6. Tivoli Enterprise Data Warehouse database naming conventions
DatabaseODBC client/server
connection nameDatabase alias
Control database on thecontrol server
TWH_MD TWH_MD
DB2 UDB central datawarehouse database on aWindows or UNIX system
TWH_CDW TWH_CDW
30 Installing and Configuring Tivoli Enterprise Data Warehouse
Table 6. Tivoli Enterprise Data Warehouse database naming conventions (continued)
DatabaseODBC client/server
connection nameDatabase alias
DB2 UDB data mart databaseon a Windows or UNIXsystem
TWH_MART TWH_MART
Selecting port numbersYou must allocate port numbers for Tivoli Enterprise Data Warehouse for thefollowing:v Communication between the Tivoli Enterprise Data Warehouse control server
and the remote DB2 databasesv Communications for the IBM Consolev Secure Sockets Layer (SSL) connections to the IBM Console (optional)
Note: You must specify unused port numbers when you install Tivoli EnterpriseData Warehouse. Specifying port numbers that are already in use by otherprograms causes the installation to lock up. In particular, if there is already aWeb server on the system where you plan to install the report server, youmust uninstall or disable that Web server, or specify a different port numberfor the HTTP Server Port for Tivoli Presentation Services.
Table 7 on page 32 lists the default port numbers that are used by Tivoli EnterpriseData Warehouse. You can use the same or different port numbers for the controlserver, report server, data mart database system, and central data warehousedatabase computer.
To determine which port numbers are in use on a particular computer, follow theinstructions for your operating system:v On Windows systems, enter either of the following commands from a command
prompt:– netstat -a
– netstat -an
The port numbers in use on the system are listed in the Local Address columnof the output. On Windows systems, this field has the format host:port.
v On UNIX systems, enter either of the following commands from a commandprompt:– netstat -a
– netstat -an
The port numbers in use on the system are listed in the Local Address columnof the output. On UNIX systems, this field has the format host.port.
Some addresses might contain a named service instead of a port number. Refer toyour operating system documentation for information about determining whichports are used by the named services or for more information about the netstatcommand.
Chapter 2. Planning for Tivoli Enterprise Data Warehouse 31
If there are multiple DB2 instances in your DB2 installation, make sure that theuser name you specify is the owner of the instance whose DB2 port you specify. Amismatch between user name and port number results in installation errors thatare difficult to identify.
To determine the port number for your DB2 instance, use the following technique:1. Determine the service name by entering the following command at a DB2
command prompt:db2 get dbm cfg
Find the following statement in the output:TCP/IP Service name (SVCENAME) = service_name
2. Edit the services file (/etc/services on UNIX systems) and locate the line thatdefines the connection port for the service service_name. For example, if theservice name returned is db2cdb2inst1, look for a line similar to this in theservices file:db2cdb2inst1 50000/tcp #connection port for the DB2 instance db2admin
Be sure to find an exact match for the service name.
Table 7. Default port numbers used by Tivoli Enterprise Data Warehouse
Defaultportnumber
Tivoli Enterprise DataWarehouse component
Record on thisworksheet (fordistributeddeployment)
Description
50000 Control database on thecontrol server
For a quick startdeployment: Table 9 onpage 37
Without DB2 remotewarehouse agents:Table 12 on page 41
With DB2 remotewarehouse agents:Table 16 on page 45
In a distributed deployment, this port is used tocommunicate with DB2 on the control server.
50000 Central data warehousedatabase on Windows orUNIX systems
Without DB2 remotewarehouse agents:Table 13 on page 43
With DB2 remotewarehouse agents:Table 18 on page 47
In a distributed deployment, this port is used tocommunicate with DB2 on a remote central datawarehouse computer.
50000 Data mart database onWindows or UNIX systems
Without DB2 remotewarehouse agents:Table 14 on page 44
With DB2 remotewarehouse agents:Table 19 on page 48
In a distributed deployment, this port is used tocommunicate with DB2 on a remote data martdatabase computer.
32 Installing and Configuring Tivoli Enterprise Data Warehouse
Table 7. Default port numbers used by Tivoli Enterprise Data Warehouse (continued)
Defaultportnumber
Tivoli Enterprise DataWarehouse component
Record on thisworksheet (fordistributeddeployment)
Description
80 IBM HTTP Server For a quick startdeployment: Table 9 onpage 37
Without DB2 remotewarehouse agents:Table 12 on page 41
With DB2 remotewarehouse agents:Table 17 on page 46
Used by Tivoli Presentation Services HTTPServer for HTTP communications
8008 IBM HTTP Administration For a quick startdeployment: Table 9 onpage 37
Without DB2 remotewarehouse agents:Table 12 on page 41
With DB2 remotewarehouse agents:Table 17 on page 46
Used by Tivoli Presentation Services HTTPAdministration
8010 Server for IBM Console IPC For a quick startdeployment: Table 9 onpage 37
Without DB2 remotewarehouse agents:Table 12 on page 41
With DB2 remotewarehouse agents:Table 17 on page 46
Used by Server for IBM Console (part of TivoliPresentation Services)
8007 Web Console For a quick startdeployment: Table 9 onpage 37
Without DB2 remotewarehouse agents:Table 12 on page 41
With DB2 remotewarehouse agents:Table 17 on page 46
Used by Web Services for the IBM Console (partof Tivoli Presentation Services)
8040 Web Console IPC For a quick startdeployment: Table 9 onpage 37
Without DB2 remotewarehouse agents:Table 12 on page 41
With DB2 remotewarehouse agents:Table 17 on page 46
Used by Web Services for the IBM Console (partof Tivoli Presentation Services)
Chapter 2. Planning for Tivoli Enterprise Data Warehouse 33
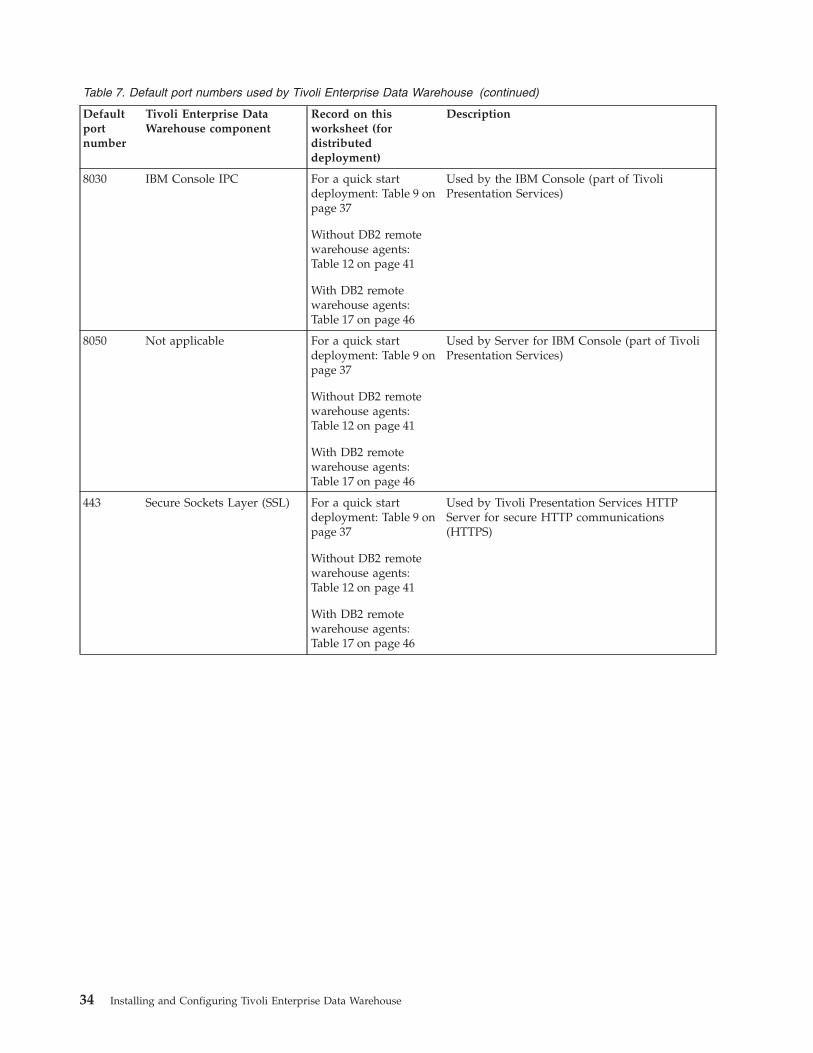
Table 7. Default port numbers used by Tivoli Enterprise Data Warehouse (continued)
Defaultportnumber
Tivoli Enterprise DataWarehouse component
Record on thisworksheet (fordistributeddeployment)
Description
8030 IBM Console IPC For a quick startdeployment: Table 9 onpage 37
Without DB2 remotewarehouse agents:Table 12 on page 41
With DB2 remotewarehouse agents:Table 17 on page 46
Used by the IBM Console (part of TivoliPresentation Services)
8050 Not applicable For a quick startdeployment: Table 9 onpage 37
Without DB2 remotewarehouse agents:Table 12 on page 41
With DB2 remotewarehouse agents:Table 17 on page 46
Used by Server for IBM Console (part of TivoliPresentation Services)
443 Secure Sockets Layer (SSL) For a quick startdeployment: Table 9 onpage 37
Without DB2 remotewarehouse agents:Table 12 on page 41
With DB2 remotewarehouse agents:Table 17 on page 46
Used by Tivoli Presentation Services HTTPServer for secure HTTP communications(HTTPS)
34 Installing and Configuring Tivoli Enterprise Data Warehouse
Chapter 3. Planning worksheets
This section contains planning worksheets that help you plan and document yourdeployment of Tivoli Enterprise Data Warehouse. Answer the questions, collect theinformation, and perform the pre-installation tasks specified in the worksheetsbefore you start to install or upgrade Tivoli Enterprise Data Warehousecomponents. Worksheets are provided for the following tasks:v “Planning worksheets for a quick start deployment” on page 36v “Planning worksheets for a distributed deployment without DB2 remote
warehouse agent sites” on page 39v “Planning worksheets for a distributed deployment with DB2 remote warehouse
agent sites” on page 45v “Planning worksheet for installing warehouse packs” on page 49v “Planning worksheet for creating DB2 users on a UNIX system” on page 51
© Copyright IBM Corp. 2001, 2003 35
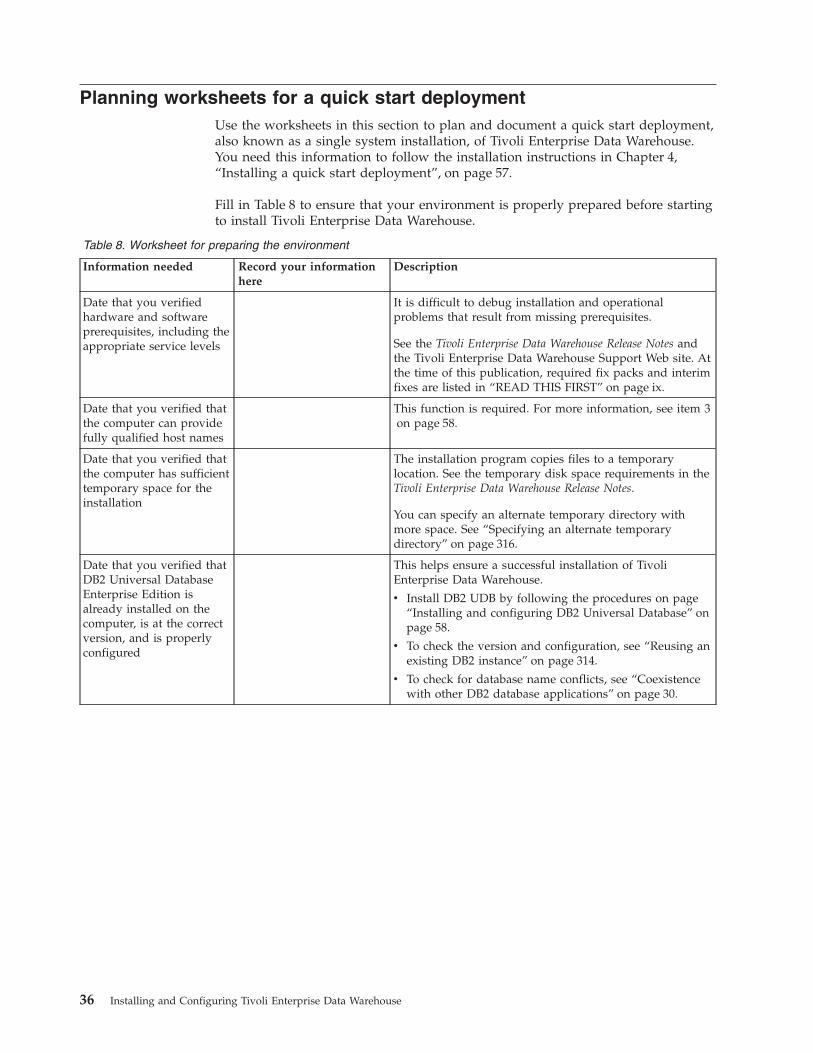
Planning worksheets for a quick start deploymentUse the worksheets in this section to plan and document a quick start deployment,also known as a single system installation, of Tivoli Enterprise Data Warehouse.You need this information to follow the installation instructions in Chapter 4,“Installing a quick start deployment”, on page 57.
Fill in Table 8 to ensure that your environment is properly prepared before startingto install Tivoli Enterprise Data Warehouse.
Table 8. Worksheet for preparing the environment
Information needed Record your informationhere
Description
Date that you verifiedhardware and softwareprerequisites, including theappropriate service levels
It is difficult to debug installation and operationalproblems that result from missing prerequisites.
See the Tivoli Enterprise Data Warehouse Release Notes andthe Tivoli Enterprise Data Warehouse Support Web site. Atthe time of this publication, required fix packs and interimfixes are listed in “READ THIS FIRST” on page ix.
Date that you verified thatthe computer can providefully qualified host names
This function is required. For more information, see item 3on page 58.
Date that you verified thatthe computer has sufficienttemporary space for theinstallation
The installation program copies files to a temporarylocation. See the temporary disk space requirements in theTivoli Enterprise Data Warehouse Release Notes.
You can specify an alternate temporary directory withmore space. See “Specifying an alternate temporarydirectory” on page 316.
Date that you verified thatDB2 Universal DatabaseEnterprise Edition isalready installed on thecomputer, is at the correctversion, and is properlyconfigured
This helps ensure a successful installation of TivoliEnterprise Data Warehouse.
v Install DB2 UDB by following the procedures on page“Installing and configuring DB2 Universal Database” onpage 58.
v To check the version and configuration, see “Reusing anexisting DB2 instance” on page 314.
v To check for database name conflicts, see “Coexistencewith other DB2 database applications” on page 30.
36 Installing and Configuring Tivoli Enterprise Data Warehouse
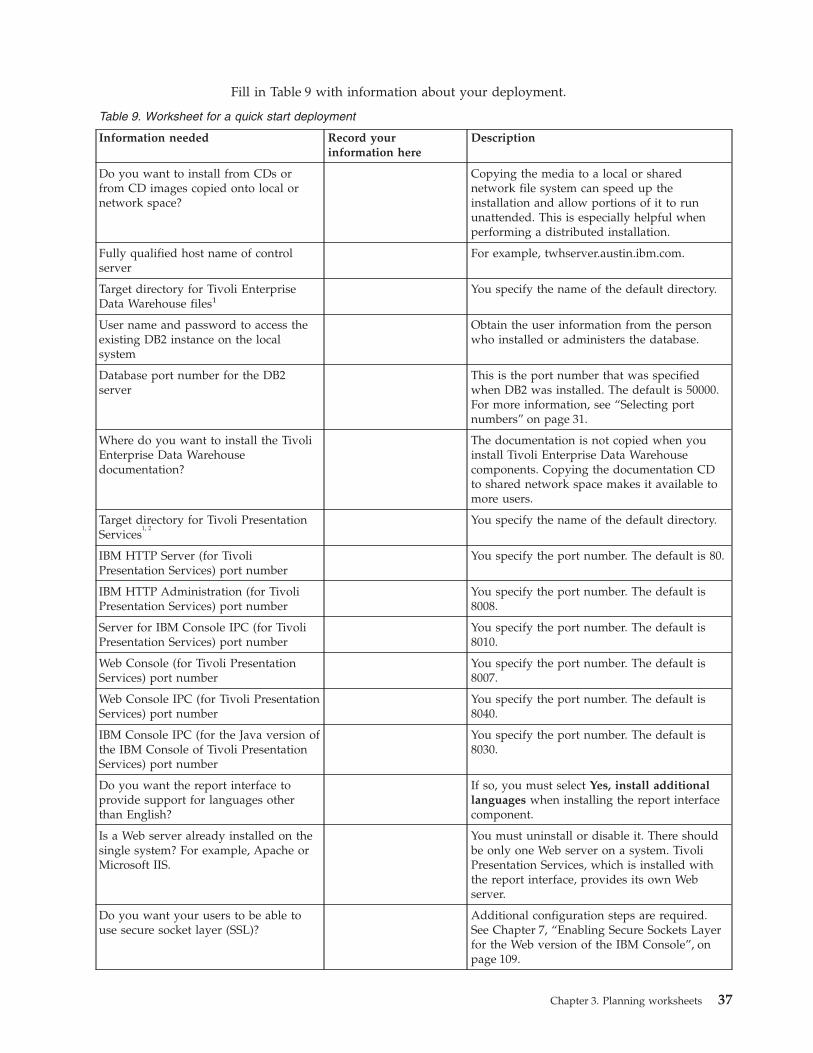
Fill in Table 9 with information about your deployment.
Table 9. Worksheet for a quick start deployment
Information needed Record yourinformation here
Description
Do you want to install from CDs orfrom CD images copied onto local ornetwork space?
Copying the media to a local or sharednetwork file system can speed up theinstallation and allow portions of it to rununattended. This is especially helpful whenperforming a distributed installation.
Fully qualified host name of controlserver
For example, twhserver.austin.ibm.com.
Target directory for Tivoli EnterpriseData Warehouse files1
You specify the name of the default directory.
User name and password to access theexisting DB2 instance on the localsystem
Obtain the user information from the personwho installed or administers the database.
Database port number for the DB2server
This is the port number that was specifiedwhen DB2 was installed. The default is 50000.For more information, see “Selecting portnumbers” on page 31.
Where do you want to install the TivoliEnterprise Data Warehousedocumentation?
The documentation is not copied when youinstall Tivoli Enterprise Data Warehousecomponents. Copying the documentation CDto shared network space makes it available tomore users.
Target directory for Tivoli PresentationServices
1, 2You specify the name of the default directory.
IBM HTTP Server (for TivoliPresentation Services) port number
You specify the port number. The default is 80.
IBM HTTP Administration (for TivoliPresentation Services) port number
You specify the port number. The default is8008.
Server for IBM Console IPC (for TivoliPresentation Services) port number
You specify the port number. The default is8010.
Web Console (for Tivoli PresentationServices) port number
You specify the port number. The default is8007.
Web Console IPC (for Tivoli PresentationServices) port number
You specify the port number. The default is8040.
IBM Console IPC (for the Java version ofthe IBM Console of Tivoli PresentationServices) port number
You specify the port number. The default is8030.
Do you want the report interface toprovide support for languages otherthan English?
If so, you must select Yes, install additionallanguages when installing the report interfacecomponent.
Is a Web server already installed on thesingle system? For example, Apache orMicrosoft IIS.
You must uninstall or disable it. There shouldbe only one Web server on a system. TivoliPresentation Services, which is installed withthe report interface, provides its own Webserver.
Do you want your users to be able touse secure socket layer (SSL)?
Additional configuration steps are required.See Chapter 7, “Enabling Secure Sockets Layerfor the Web version of the IBM Console”, onpage 109.
Chapter 3. Planning worksheets 37
Table 9. Worksheet for a quick start deployment (continued)
Information needed Record yourinformation here
Description
1 This directory name cannot contain double-byte characters.
2 This directory name cannot contain the space character.
38 Installing and Configuring Tivoli Enterprise Data Warehouse
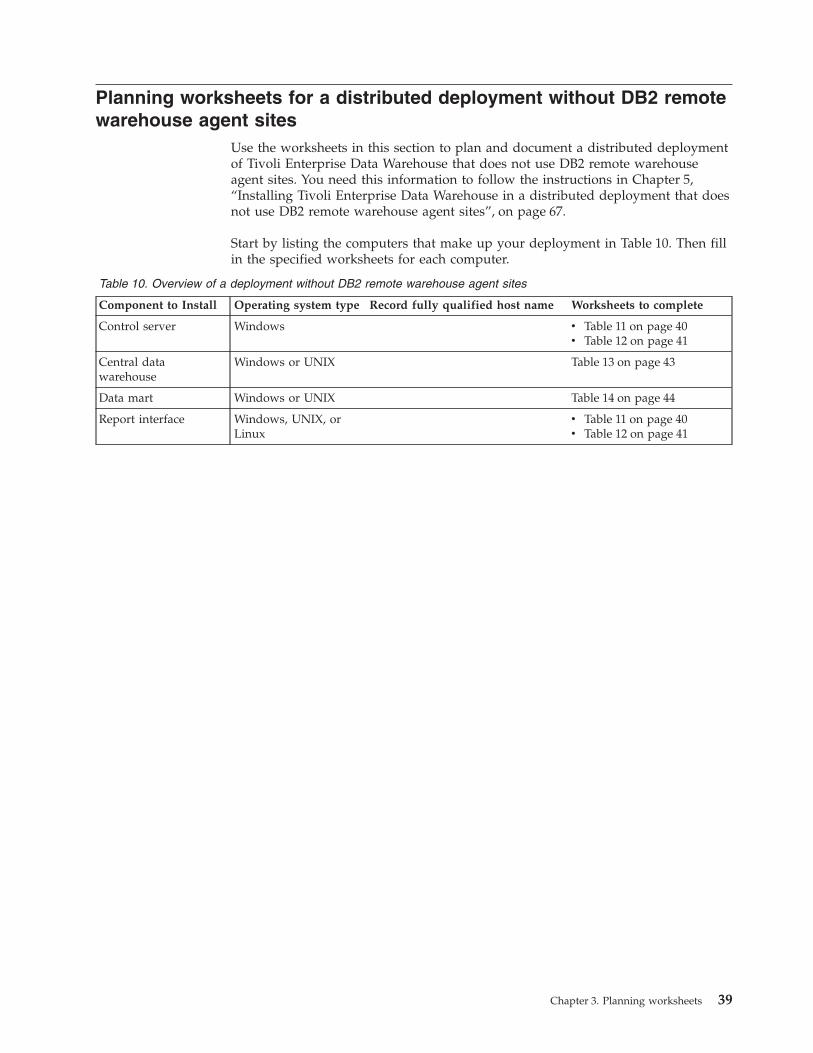
Planning worksheets for a distributed deployment without DB2 remotewarehouse agent sites
Use the worksheets in this section to plan and document a distributed deploymentof Tivoli Enterprise Data Warehouse that does not use DB2 remote warehouseagent sites. You need this information to follow the instructions in Chapter 5,“Installing Tivoli Enterprise Data Warehouse in a distributed deployment that doesnot use DB2 remote warehouse agent sites”, on page 67.
Start by listing the computers that make up your deployment in Table 10. Then fillin the specified worksheets for each computer.
Table 10. Overview of a deployment without DB2 remote warehouse agent sites
Component to Install Operating system type Record fully qualified host name Worksheets to complete
Control server Windows v Table 11 on page 40v Table 12 on page 41
Central datawarehouse
Windows or UNIX Table 13 on page 43
Data mart Windows or UNIX Table 14 on page 44
Report interface Windows, UNIX, orLinux
v Table 11 on page 40v Table 12 on page 41
Chapter 3. Planning worksheets 39

Fill in Table 11 to ensure that your environment is properly prepared beforestarting to install Tivoli Enterprise Data Warehouse.
Table 11. Worksheet for preparing the environment
Information needed Record your informationhere
Description
Date that you verifiedhardware and softwareprerequisites, including theappropriate service levels
It is difficult to debug installation and operationalproblems that result from missing prerequisites.
See the Tivoli Enterprise Data Warehouse Release Notesand the Tivoli Enterprise Data Warehouse SupportWeb site. At the time of this publication, required fixpacks and interim fixes are listed in “READ THISFIRST” on page ix.
Date that you verified thateach computer can providefully qualified host names
This function is required. For more information, seeitem 2 on page 67.
Date that you verified thateach computer has sufficienttemporary space for theinstallation
The installation program copies files to a temporarylocation. See the temporary disk space requirementsin the Tivoli Enterprise Data Warehouse Release Notes.
You can specify an alternate temporary directory withmore space. See “Specifying an alternate temporarydirectory” on page 316.
Date that you verified thatDB2 Universal DatabaseEnterprise Edition is alreadyinstalled on each computer,is at the correct version, andis properly configured
This helps ensure a successful installation of TivoliEnterprise Data Warehouse.
v Install DB2 UDB by following the procedures onpage “Installing and configuring DB2 UniversalDatabase” on page 58.
v To check the version and configuration, see“Reusing an existing DB2 instance” on page 314.
v To check for database name conflicts, see“Coexistence with other DB2 database applications”on page 30.
Do you want to install fromCDs or from CD imagescopied onto local or networkspace?
Copying the media to a local or shared network filesystem can speed up the installation and allowportions of it to run unattended. This is especiallyhelpful when performing a distributed installation.
40 Installing and Configuring Tivoli Enterprise Data Warehouse
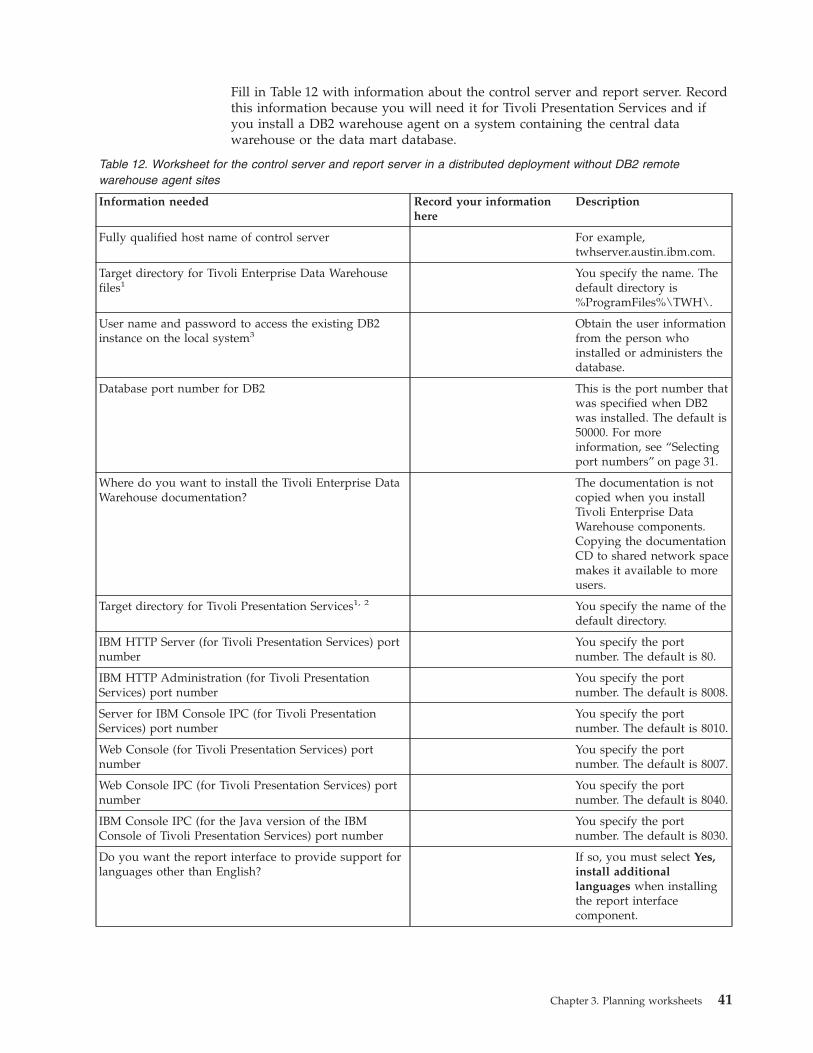
Fill in Table 12 with information about the control server and report server. Recordthis information because you will need it for Tivoli Presentation Services and ifyou install a DB2 warehouse agent on a system containing the central datawarehouse or the data mart database.
Table 12. Worksheet for the control server and report server in a distributed deployment without DB2 remotewarehouse agent sites
Information needed Record your informationhere
Description
Fully qualified host name of control server For example,twhserver.austin.ibm.com.
Target directory for Tivoli Enterprise Data Warehousefiles1
You specify the name. Thedefault directory is%ProgramFiles%\TWH\.
User name and password to access the existing DB2instance on the local system3
Obtain the user informationfrom the person whoinstalled or administers thedatabase.
Database port number for DB2 This is the port number thatwas specified when DB2was installed. The default is50000. For moreinformation, see “Selectingport numbers” on page 31.
Where do you want to install the Tivoli Enterprise DataWarehouse documentation?
The documentation is notcopied when you installTivoli Enterprise DataWarehouse components.Copying the documentationCD to shared network spacemakes it available to moreusers.
Target directory for Tivoli Presentation Services1, 2 You specify the name of thedefault directory.
IBM HTTP Server (for Tivoli Presentation Services) portnumber
You specify the portnumber. The default is 80.
IBM HTTP Administration (for Tivoli PresentationServices) port number
You specify the portnumber. The default is 8008.
Server for IBM Console IPC (for Tivoli PresentationServices) port number
You specify the portnumber. The default is 8010.
Web Console (for Tivoli Presentation Services) portnumber
You specify the portnumber. The default is 8007.
Web Console IPC (for Tivoli Presentation Services) portnumber
You specify the portnumber. The default is 8040.
IBM Console IPC (for the Java version of the IBMConsole of Tivoli Presentation Services) port number
You specify the portnumber. The default is 8030.
Do you want the report interface to provide support forlanguages other than English?
If so, you must select Yes,install additionallanguages when installingthe report interfacecomponent.
Chapter 3. Planning worksheets 41
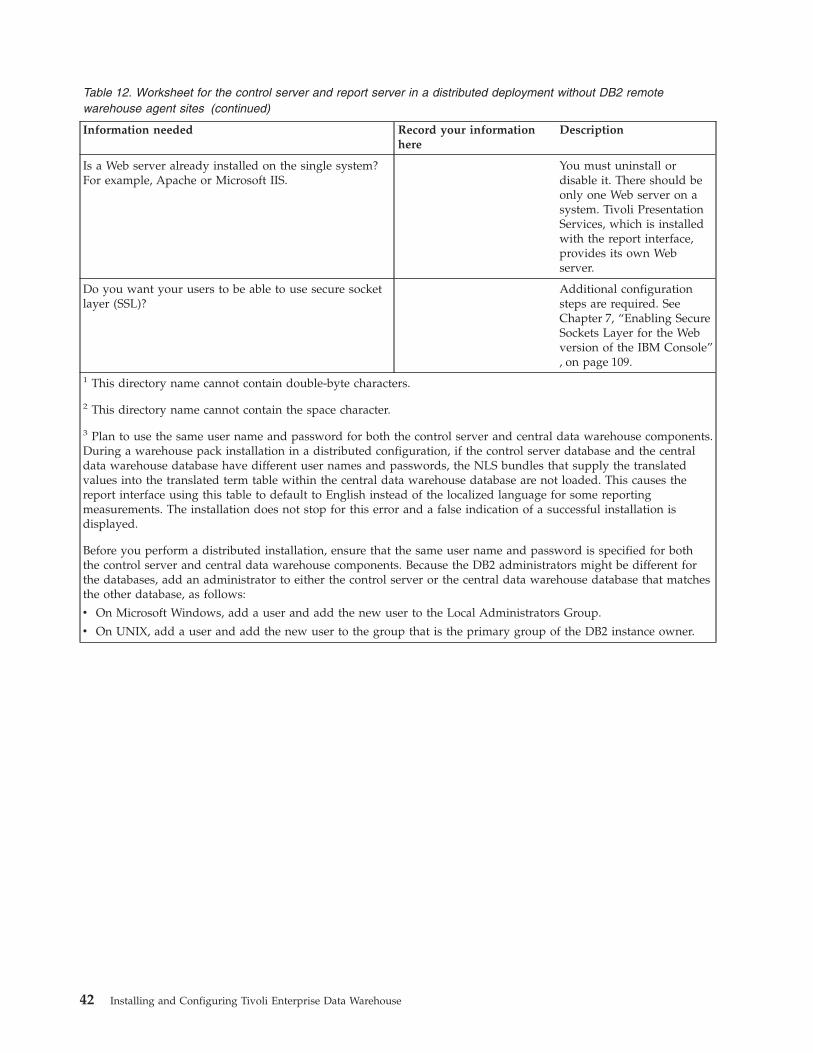
Table 12. Worksheet for the control server and report server in a distributed deployment without DB2 remotewarehouse agent sites (continued)
Information needed Record your informationhere
Description
Is a Web server already installed on the single system?For example, Apache or Microsoft IIS.
You must uninstall ordisable it. There should beonly one Web server on asystem. Tivoli PresentationServices, which is installedwith the report interface,provides its own Webserver.
Do you want your users to be able to use secure socketlayer (SSL)?
Additional configurationsteps are required. SeeChapter 7, “Enabling SecureSockets Layer for the Webversion of the IBM Console”, on page 109.
1 This directory name cannot contain double-byte characters.
2 This directory name cannot contain the space character.
3 Plan to use the same user name and password for both the control server and central data warehouse components.During a warehouse pack installation in a distributed configuration, if the control server database and the centraldata warehouse database have different user names and passwords, the NLS bundles that supply the translatedvalues into the translated term table within the central data warehouse database are not loaded. This causes thereport interface using this table to default to English instead of the localized language for some reportingmeasurements. The installation does not stop for this error and a false indication of a successful installation isdisplayed.
Before you perform a distributed installation, ensure that the same user name and password is specified for boththe control server and central data warehouse components. Because the DB2 administrators might be different forthe databases, add an administrator to either the control server or the central data warehouse database that matchesthe other database, as follows:
v On Microsoft Windows, add a user and add the new user to the Local Administrators Group.
v On UNIX, add a user and add the new user to the group that is the primary group of the DB2 instance owner.
42 Installing and Configuring Tivoli Enterprise Data Warehouse
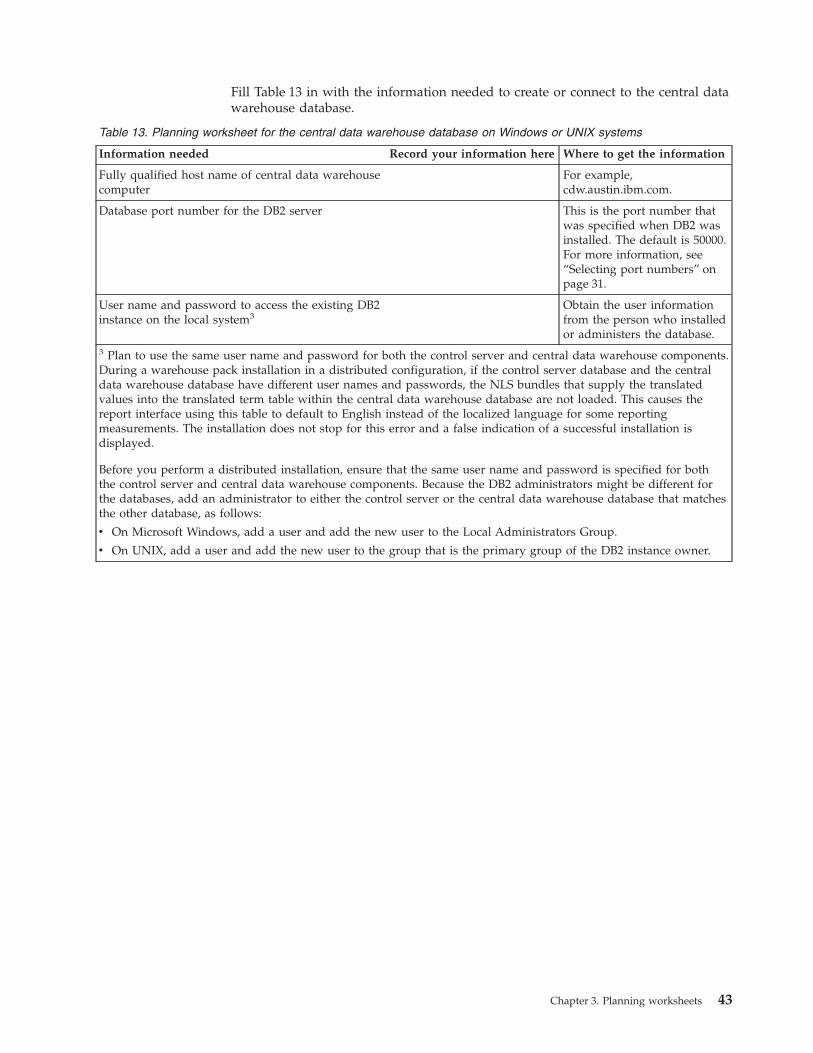
Fill Table 13 in with the information needed to create or connect to the central datawarehouse database.
Table 13. Planning worksheet for the central data warehouse database on Windows or UNIX systems
Information needed Record your information here Where to get the information
Fully qualified host name of central data warehousecomputer
For example,cdw.austin.ibm.com.
Database port number for the DB2 server This is the port number thatwas specified when DB2 wasinstalled. The default is 50000.For more information, see“Selecting port numbers” onpage 31.
User name and password to access the existing DB2instance on the local system3
Obtain the user informationfrom the person who installedor administers the database.
3 Plan to use the same user name and password for both the control server and central data warehouse components.During a warehouse pack installation in a distributed configuration, if the control server database and the centraldata warehouse database have different user names and passwords, the NLS bundles that supply the translatedvalues into the translated term table within the central data warehouse database are not loaded. This causes thereport interface using this table to default to English instead of the localized language for some reportingmeasurements. The installation does not stop for this error and a false indication of a successful installation isdisplayed.
Before you perform a distributed installation, ensure that the same user name and password is specified for boththe control server and central data warehouse components. Because the DB2 administrators might be different forthe databases, add an administrator to either the control server or the central data warehouse database that matchesthe other database, as follows:
v On Microsoft Windows, add a user and add the new user to the Local Administrators Group.
v On UNIX, add a user and add the new user to the group that is the primary group of the DB2 instance owner.
Chapter 3. Planning worksheets 43
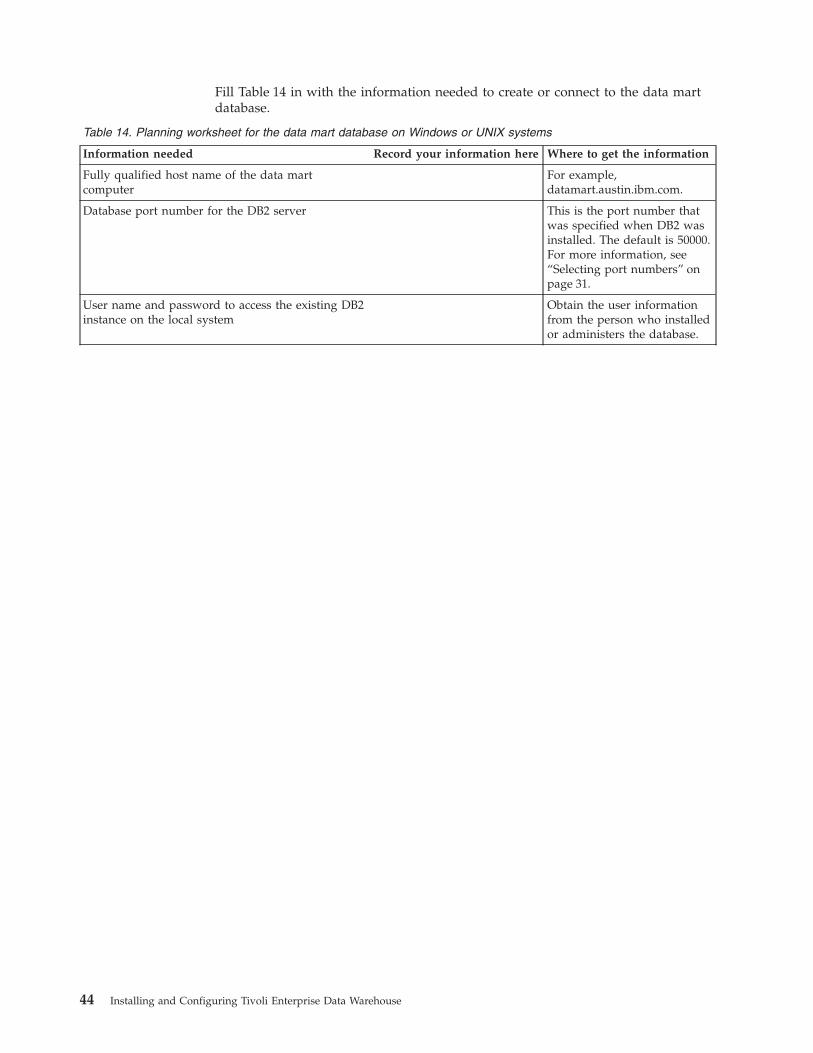
Fill Table 14 in with the information needed to create or connect to the data martdatabase.
Table 14. Planning worksheet for the data mart database on Windows or UNIX systems
Information needed Record your information here Where to get the information
Fully qualified host name of the data martcomputer
For example,datamart.austin.ibm.com.
Database port number for the DB2 server This is the port number thatwas specified when DB2 wasinstalled. The default is 50000.For more information, see“Selecting port numbers” onpage 31.
User name and password to access the existing DB2instance on the local system
Obtain the user informationfrom the person who installedor administers the database.
44 Installing and Configuring Tivoli Enterprise Data Warehouse
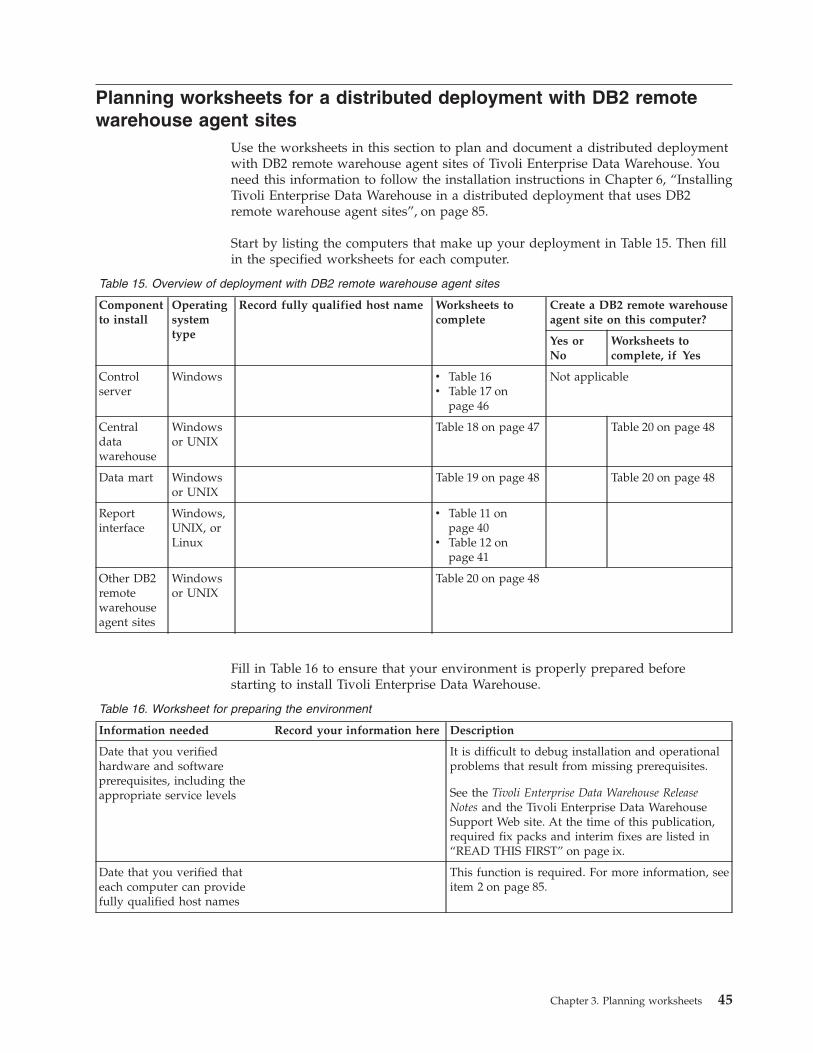
Planning worksheets for a distributed deployment with DB2 remotewarehouse agent sites
Use the worksheets in this section to plan and document a distributed deploymentwith DB2 remote warehouse agent sites of Tivoli Enterprise Data Warehouse. Youneed this information to follow the installation instructions in Chapter 6, “InstallingTivoli Enterprise Data Warehouse in a distributed deployment that uses DB2remote warehouse agent sites”, on page 85.
Start by listing the computers that make up your deployment in Table 15. Then fillin the specified worksheets for each computer.
Table 15. Overview of deployment with DB2 remote warehouse agent sites
Componentto install
Operatingsystemtype
Record fully qualified host name Worksheets tocomplete
Create a DB2 remote warehouseagent site on this computer?
Yes orNo
Worksheets tocomplete, if Yes
Controlserver
Windows v Table 16v Table 17 on
page 46
Not applicable
Centraldatawarehouse
Windowsor UNIX
Table 18 on page 47 Table 20 on page 48
Data mart Windowsor UNIX
Table 19 on page 48 Table 20 on page 48
Reportinterface
Windows,UNIX, orLinux
v Table 11 onpage 40
v Table 12 onpage 41
Other DB2remotewarehouseagent sites
Windowsor UNIX
Table 20 on page 48
Fill in Table 16 to ensure that your environment is properly prepared beforestarting to install Tivoli Enterprise Data Warehouse.
Table 16. Worksheet for preparing the environment
Information needed Record your information here Description
Date that you verifiedhardware and softwareprerequisites, including theappropriate service levels
It is difficult to debug installation and operationalproblems that result from missing prerequisites.
See the Tivoli Enterprise Data Warehouse ReleaseNotes and the Tivoli Enterprise Data WarehouseSupport Web site. At the time of this publication,required fix packs and interim fixes are listed in“READ THIS FIRST” on page ix.
Date that you verified thateach computer can providefully qualified host names
This function is required. For more information, seeitem 2 on page 85.
Chapter 3. Planning worksheets 45
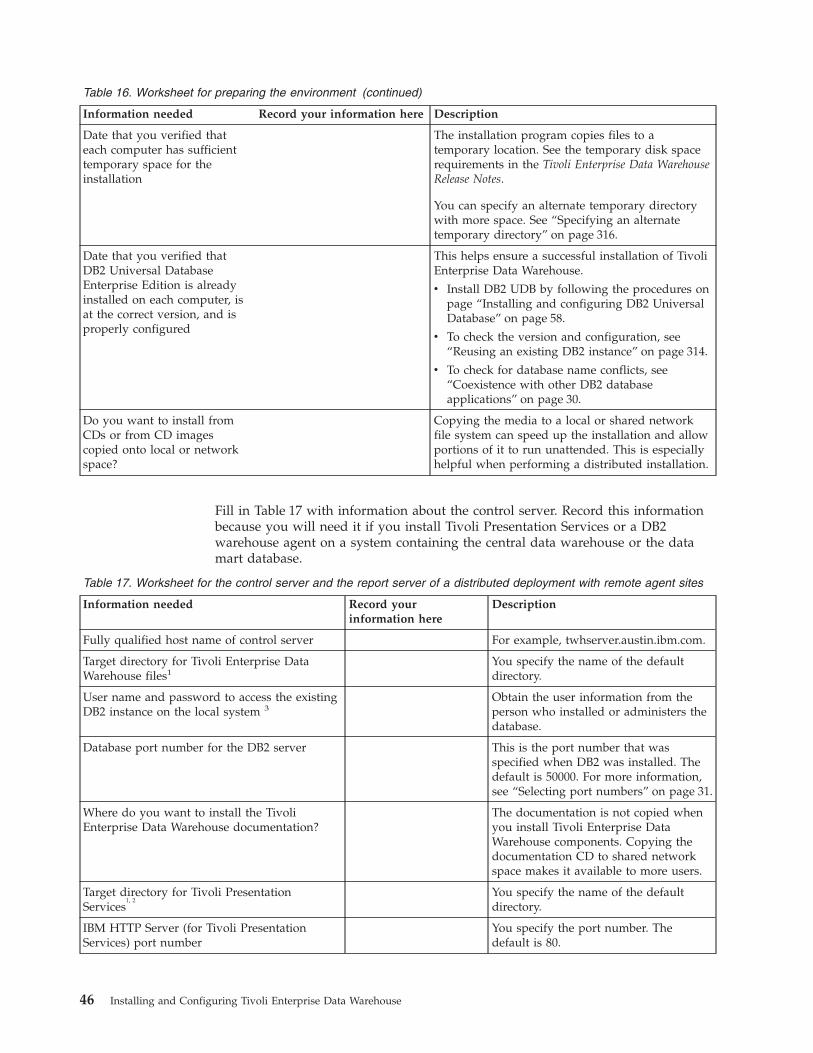
Table 16. Worksheet for preparing the environment (continued)
Information needed Record your information here Description
Date that you verified thateach computer has sufficienttemporary space for theinstallation
The installation program copies files to atemporary location. See the temporary disk spacerequirements in the Tivoli Enterprise Data WarehouseRelease Notes.
You can specify an alternate temporary directorywith more space. See “Specifying an alternatetemporary directory” on page 316.
Date that you verified thatDB2 Universal DatabaseEnterprise Edition is alreadyinstalled on each computer, isat the correct version, and isproperly configured
This helps ensure a successful installation of TivoliEnterprise Data Warehouse.
v Install DB2 UDB by following the procedures onpage “Installing and configuring DB2 UniversalDatabase” on page 58.
v To check the version and configuration, see“Reusing an existing DB2 instance” on page 314.
v To check for database name conflicts, see“Coexistence with other DB2 databaseapplications” on page 30.
Do you want to install fromCDs or from CD imagescopied onto local or networkspace?
Copying the media to a local or shared networkfile system can speed up the installation and allowportions of it to run unattended. This is especiallyhelpful when performing a distributed installation.
Fill in Table 17 with information about the control server. Record this informationbecause you will need it if you install Tivoli Presentation Services or a DB2warehouse agent on a system containing the central data warehouse or the datamart database.
Table 17. Worksheet for the control server and the report server of a distributed deployment with remote agent sites
Information needed Record yourinformation here
Description
Fully qualified host name of control server For example, twhserver.austin.ibm.com.
Target directory for Tivoli Enterprise DataWarehouse files1
You specify the name of the defaultdirectory.
User name and password to access the existingDB2 instance on the local system 3
Obtain the user information from theperson who installed or administers thedatabase.
Database port number for the DB2 server This is the port number that wasspecified when DB2 was installed. Thedefault is 50000. For more information,see “Selecting port numbers” on page 31.
Where do you want to install the TivoliEnterprise Data Warehouse documentation?
The documentation is not copied whenyou install Tivoli Enterprise DataWarehouse components. Copying thedocumentation CD to shared networkspace makes it available to more users.
Target directory for Tivoli PresentationServices
1, 2You specify the name of the defaultdirectory.
IBM HTTP Server (for Tivoli PresentationServices) port number
You specify the port number. Thedefault is 80.
46 Installing and Configuring Tivoli Enterprise Data Warehouse
Table 17. Worksheet for the control server and the report server of a distributed deployment with remote agentsites (continued)
Information needed Record yourinformation here
Description
IBM HTTP Administration (for TivoliPresentation Services) Port number
You specify the port number. Thedefault is 8008.
Server for IBM Console IPC (for TivoliPresentation Services) Port number
You specify the port number. Thedefault is 8010.
Web Console (for Tivoli Presentation Services)Port number
You specify the port number. Thedefault is 8007.
Web Console IPC (for Tivoli PresentationServices) Port number
You specify the port number. Thedefault is 8040.
IBM Console IPC (for the Java version of theIBM Console of Tivoli Presentation Services)port number
You specify the port number. Thedefault is 8030.
Do you want the report interface to providesupport for languages other than English?
If so, you must select Yes, installadditional languages when installingthe report interface component.
Is a Web server already installed on the singlesystem? For example, Apache or Microsoft IIS.
You must uninstall or disable it. Thereshould be only one Web server on asystem. Tivoli Presentation Services,which is installed with the reportinterface, provides its own Web server.
Do you want your users to be able to usesecure socket layer (SSL)?
Additional configuration steps arerequired. See Chapter 7, “EnablingSecure Sockets Layer for the Webversion of the IBM Console”, onpage 109.
1 This directory name cannot contain double-byte characters.
2 This directory name cannot contain the space character.
3 Plan to use the same user name and password for both the control server and central data warehouse components.During a warehouse pack installation in a distributed configuration, if the control server database and the centraldata warehouse database have different user names and passwords, the NLS bundles that supply the translatedvalues into the translated term table within the central data warehouse database are not loaded. This causes thereport interface using this table to default to English instead of the localized language for some reportingmeasurements. The installation does not stop for this error and a false indication of a successful installation isdisplayed.
Before you perform a distributed installation, ensure that the same user name and password is specified for boththe control server and central data warehouse components. Because the DB2 administrators might be different forthe databases, add an administrator to either the control server or the central data warehouse database that matchesthe other database, as follows:
v On Microsoft Windows, add a user and add the new user to the Local Administrators Group.
v On UNIX, add a user and add the new user to the group that is the primary group of the DB2 instance owner.
Fill Table 13 on page 43 in with the information needed to create or connect to thecentral data warehouse database.
Table 18. Planning worksheet for central data warehouse database on Windows or UNIX systems
Information needed Record your information here Where to get the information
Fully qualified host name of control server For example,twhserver.austin.ibm.com.
Chapter 3. Planning worksheets 47

Table 18. Planning worksheet for central data warehouse database on Windows or UNIX systems (continued)
Information needed Record your information here Where to get the information
Database port number for the DB2 server This is the port number thatwas specified when DB2 wasinstalled. The default is 50000.For more information, see“Selecting port numbers” onpage 31.
User name and password to access the existingDB2 instance on the local system 3
Obtain the user informationfrom the person who installedor administers the database.
3 Plan to use the same user name and password for both the control server and central data warehouse components.During a warehouse pack installation in a distributed configuration, if the control server database and the centraldata warehouse database have different user names and passwords, the NLS bundles that supply the translatedvalues into the translated term table within the central data warehouse database are not loaded. This causes thereport interface using this table to default to English instead of the localized language for some reportingmeasurements. The installation does not stop for this error and a false indication of a successful installation isdisplayed.
Before you perform a distributed installation, ensure that the same user name and password is specified for boththe control server and central data warehouse components. Because the DB2 administrators might be different forthe databases, add an administrator to either the control server or the central data warehouse database that matchesthe other database, as follows:
v On Microsoft Windows, add a user and add the new user to the Local Administrators Group.
v On UNIX, add a user and add the new user to the group that is the primary group of the DB2 instance owner.
Fill Table 14 on page 44 in with the information needed to create or connect to thedata mart database.
Table 19. Planning worksheet for the data mart database on Windows or UNIX systems
Information needed Record your informationhere
Where to get theinformation
Fully qualified host name of data mart computer For example,datamart.austin.ibm.com.
Database port number for the DB2 server This is the port number thatwas specified when DB2 wasinstalled. The default is50000. For more information,see “Selecting port numbers”on page 31.
User name and password to access the existing DB2instance on the local system
Obtain the user informationfrom the person whoinstalled or administers thedatabase.
Table 20. Planning worksheet for creating DB2 agent sites
Is DB2 Warehouse Manager installed on each computer onwhich you are creating an agent site?
If it is not, you mustinstall it. See “InstallingDB2 WarehouseManager” on page 95.
Fully qualified host name of agent site For example,whagent.austin.ibm.com.
Target directory for Tivoli Enterprise Data Warehouse files1 You specify the name.
48 Installing and Configuring Tivoli Enterprise Data Warehouse
Table 20. Planning worksheet for creating DB2 agent sites (continued)
User name and password to access the existing DB2 instanceon the local system
Obtain the userinformation from theperson who installed oradministers thedatabase.
Planning worksheet for installing warehouse packsFill in Table 21 with information about each warehouse pack that you areinstalling. This table is only a guideline for the information you need to collect.Because different warehouse packs perform different functions, you may not needto record all the information for each warehouse pack. For example, if thewarehouse pack that you are installing does not perform central data warehouseETLs, you do not need to complete the information about central data warehouseETLs in the table. Consult the implementation guide for the warehouse pack thatyou are installing to see what kind of information you need to collect.
You need this information to follow the instructions in Chapter 10, “Installing andupgrading warehouse packs”, on page 135.
Table 21. Planning worksheet for all warehouse packs
Information needed Record your information here Why you need to know
Is the Tivoli Enterprise DataWarehouse installationcomplete? You must have acontrol server, and thecentral data warehousedatabase and data martdatabase. You can also havea report server.
This is a required prerequisite step.
Where is the installationmedia for the warehousepacks?
The installation media can be:
v In the tedw_apps_etl subdirectory of theinstallation media for the product
v On a separate CD
v Downloaded from a Web site
Where is the implementationguide for each warehousepack?
It contains instructions for installing andconfiguring the warehouse pack. To locatethe implementation guide, see “Warehousepacks” on page 12.
Does the warehouse packrequire other warehousepacks as a prerequisite?
Some warehouse packs require otherwarehouse packs as prerequisites. You mustinstall the prerequisite warehouse packsbefore the dependent warehouse pack, in aseparate invocation of the installationprogram.
Refer to the implementation guide for thewarehouse pack to see if there are anyprerequisite warehouse packs.
Does the warehouse packrequire a patch, a fix pack, ora Tivoli Enterprise DataWarehouse interim fix as aprerequisite?
Refer to the implementation guide for thewarehouse pack to see if there are anyprerequisite patches.
Chapter 3. Planning worksheets 49
Table 21. Planning worksheet for all warehouse packs (continued)
Information needed Record your information here Why you need to know
Do the computers hostingthe central data warehouseand data mart database havesufficient disk space for thenew data, data marts, andreports?
Planning for the additional load in advanceprevents the difficult recovery from failureswhile running an ETL process.
For DB2, Oracle, Sybase, andInformix data sources, doesthe user name match thename of the schema?
This is required to establish a connection tothe data source.
Configuring the central data warehouse ETL
If this warehouse packprovides support formultiple customers and datacenters, do you plan to usethis feature, either now or inthe future?
You must configure the warehouse packbefore inserting any data into a central datawarehouse database. See theimplementation guide for the warehousepack to determine if it provides thissupport. For instructions, see“Support formultiple customer environments andmultiple data centers” on page 28.
Which agent site do youwant to use for the centraldata warehouse ETL for thiswarehouse pack?
You specify this after the installation.
Is there a database client onthe agent site thatcorresponds to the databasetype that is the source for thecentral data warehouse ETL?This applies whether you usethe DB2 default warehouseagent on the control serveror a DB2 remote warehouseagent site.
This is required to establish a connection tothe data source.
For more information, see “Softwareprerequisites” on page 21.
The agent site that will runthe central data warehouseETL.
Using a DB2 warehouse agent canpotentially improve performance.
For information about where to put agentsites, see “DB2 warehouse agents and agentsites” on page 18.
Do you want the central datawarehouse ETL to runautomatically on a dailybasis? If so, at what time?
Select a time according to your specificrequirements. For information aboutscheduling ETL processes, see “Schedulingwarehouse pack ETL processes” onpage 147.
The name of and type ofdata source for the centraldata warehouse ETL.
This is the source for the central datawarehouse ETL.
The user ID and password ofthe data source for thecentral data warehouse ETL.
Obtain the user information from theperson who installed or administers thedatabase.
50 Installing and Configuring Tivoli Enterprise Data Warehouse
Table 21. Planning worksheet for all warehouse packs (continued)
Information needed Record your information here Why you need to know
Client/server connectioninformation includingv Name of connectionv Remote hostv Remote portv Remote database name
This is required for database client/servercommunications for the warehouse pack.
Configuring the data mart ETL
The agent site that will runthe data mart ETL.
Using a DB2 warehouse agent canpotentially improve performance.
For information about where to put agentsites, see “DB2 warehouse agents and agentsites” on page 18.
Do you want the data martETL to run automatically ona daily basis? If so, at whattime?
Select a time according to your specificrequirements. For information aboutscheduling ETL processes,see“Understanding ETL processes” onpage 22.
Planning worksheet for creating DB2 users on a UNIX systemComplete Table 22 for each UNIX system in your Tivoli Enterprise Data Warehousedeployment on which you will be installing DB2.
Table 22. Planning worksheet for installing DB2 on a UNIX system
Information needed Record your information here Why you need to know
Does the system use NetworkInformation Service (NIS) to maintainconsistent configuration filesthroughout your network?
v If it does, you must create usersand groups manually.
v If it does not, the DB2 installationprogram can create the users andgroups for you.
User name of the DB2 instanceowner1
The DB2 instance is created in theinstance owner’s home directory.Typically the user name is db2inst1.
Group name for the DB2 instanceowner1
Typically the group name isdb2iadm1.
User name of the DB2 administrationserver user1
The user ID for the DB2administration server user is used torun the DB2 administration server onyour system. Typically the user nameis db2as.
Group name for the DB2administration server user1
Typically the group name isdb2asgrp.
User name for fenced user definedfunctions (UDFs) and storedprocedures1
The fenced user is used to run userdefined functions (UDFs) and storedprocedures outside of the addressspace used by the DB2 database.Typically the user name is db2fenc1.
Group name for fenced user definedfunctions (UDFs) and storedprocedures1
Typically the group name isdb2fadm1.
Chapter 3. Planning worksheets 51
Table 22. Planning worksheet for installing DB2 on a UNIX system (continued)
Information needed Record your information here Why you need to know1 User names for the default DB2 instance and DB2 administration server should conform to both your operatingsystem’s naming rules and those of DB2. For more information on DB2 naming rules, see “DB2 user name, user ID,group name, and instance name rules” on page 315.
52 Installing and Configuring Tivoli Enterprise Data Warehouse

Part 2. Installing, configuring, and uninstalling TivoliEnterprise Data Warehouse
Chapter 4. Installing a quick start deployment . . 57Preparing the environment . . . . . . . . . 57Installing and configuring DB2 Universal Database 58Installing the Tivoli Enterprise Data Warehousecomponents . . . . . . . . . . . . . . 60
About the installation wizard . . . . . . . 60Performing the installation . . . . . . . . 61
Verifying the installation of Tivoli EnterpriseData Warehouse core components . . . . . 62
Configuring the control database for the DB2 DataWarehouse Center . . . . . . . . . . . . 64Completing the installation . . . . . . . . . 64
Chapter 5. Installing Tivoli Enterprise DataWarehouse in a distributed deployment thatdoes not use DB2 remote warehouse agent sites 67Preparing the environment . . . . . . . . . 67Installing and configuring DB2 Universal Database 69
Installing DB2 Universal Database on Windowssystems. . . . . . . . . . . . . . . 70Installing DB2 Universal Database on AIXsystems. . . . . . . . . . . . . . . 71Installing DB2 Universal Database on Solarissystems. . . . . . . . . . . . . . . 73
Installing Tivoli Enterprise Data Warehousecomponents . . . . . . . . . . . . . . 77
About the installation wizard . . . . . . . 77Performing the installation . . . . . . . . 78
Verifying the installation of Tivoli EnterpriseData Warehouse core components . . . . . 80
Configuring the control database . . . . . . . 82Completing the installation . . . . . . . . . 83
Chapter 6. Installing Tivoli Enterprise DataWarehouse in a distributed deployment thatuses DB2 remote warehouse agent sites . . . 85Preparing the environment . . . . . . . . . 85Installing and configuring DB2 Universal Database 88
Installing DB2 Universal Database on Windowssystems. . . . . . . . . . . . . . . 88Installing DB2 Universal Database on AIXsystems. . . . . . . . . . . . . . . 90Installing DB2 Universal Database on Solarissystems. . . . . . . . . . . . . . . 92
Obtaining bash for DB2 remote warehouse agentinstallation . . . . . . . . . . . . . . 95Installing DB2 Warehouse Manager . . . . . . 95
Installing DB2 Warehouse Manager on aWindows system . . . . . . . . . . . 95Installing DB2 Warehouse Manager on a UNIXsystem . . . . . . . . . . . . . . . 96
Installing Tivoli Enterprise Data Warehousecomponents . . . . . . . . . . . . . . 96
About the installation wizard . . . . . . . 96
Performing the installation . . . . . . . . 97Verifying the installation of Tivoli EnterpriseData Warehouse core components . . . . 100
Configuring the control database . . . . . . . 102Defining a DB2 warehouse agent site . . . . . 103Configuring DB2 remote warehouse agent sites . . 103
Configuring a DB2 remote warehouse agent siteon a UNIX system. . . . . . . . . . . 103
Configuring the DB2 remote warehouseagent on AIX . . . . . . . . . . . 103Configuring the DB2 remote warehouseagent on Solaris . . . . . . . . . . 105
Completing the installation . . . . . . . . . 107
Chapter 7. Enabling Secure Sockets Layer forthe Web version of the IBM Console . . . . . 109Preparing for configuration changes . . . . . . 109
Defining a user ID and password for HTTPAdministration . . . . . . . . . . . . 109Enabling HTTP Administration to updateconfiguration files on UNIX-based systems . . 110
Changing file permissions . . . . . . . 110Creating a user or group that represents theHTTP server. . . . . . . . . . . . 110
Configuring the HTTP server . . . . . . . . 111Step 1: Creating a security certificate. . . . . 111
On Windows systems: determining where theIBM Global Security kit Is installed . . . . 111On UNIX-based systems: ensuring the Javadirectory is in the path . . . . . . . . 112Using the key management utility . . . . 113
Step 2: Connecting to the HTTP Server . . . . 114Step 3: Configuring the security module . . . 114Step 4: Configuring a secure host IP and anadditional port for the secure server . . . . . 114Step 5: Configuring the virtual host structure forthe secure server . . . . . . . . . . . 115Step 6: Configuring the virtual host documentroot for the secure server . . . . . . . . 115Step 7: Setting the key file and SSL timeoutvalues for the secure server. . . . . . . . 116Step 8: Enabling SSL and determining the modeof client authorization . . . . . . . . . 116Step 9: Restarting services or systems . . . . 116
Verifying your configuration . . . . . . . . 116
Chapter 8. Installing and using languagesupport . . . . . . . . . . . . . . . 119Overview of language support . . . . . . . 119Installing language support. . . . . . . . . 120
Installing language support with the reportinterface . . . . . . . . . . . . . . 120Applying language support to an existing reportserver . . . . . . . . . . . . . . . 121
© Copyright IBM Corp. 2001, 2003 53
Using language support in the report interface . . 122
Chapter 9. Getting started with the IBM Console 123Terms and definitions used in the IBM Console . . 123An overview of the IBM Console . . . . . . . 123Getting started with the IBM Console . . . . . 126
Overview of system administration tasks . . . 126Signing on to the IBM Console . . . . . . 127Using the portfolio . . . . . . . . . . 128Opening the Task Assistant . . . . . . . . 128
Using the IBM Console with Tivoli Enterprise DataWarehouse . . . . . . . . . . . . . . 128
Managing user groups . . . . . . . . . 128About users and user groups . . . . . . 128Creating a user . . . . . . . . . . . 129The Tivoli Enterprise Data Warehouse roles 129Assigning roles to a user . . . . . . . 130Creating user groups . . . . . . . . . 130Assigning users to user groups . . . . . 130
Managing Tivoli Enterprise Data Warehousereports . . . . . . . . . . . . . . 130
About Tivoli Enterprise Data Warehousereports . . . . . . . . . . . . . 131Running a report . . . . . . . . . . 131Automatically running reports. . . . . . 131Modifying default settings for report creation 131Creating a report . . . . . . . . . . 132
Managing data marts . . . . . . . . . . 133About data marts . . . . . . . . . . 133Assigning user groups to a data mart . . . 133
Chapter 10. Installing and upgrading warehousepacks . . . . . . . . . . . . . . . 135Installing warehouse packs . . . . . . . . . 135
Incompatible warehouse packs . . . . . . 135Step 1. Planning to install warehouse packs . . 135Step 2. Preparing the environment . . . . . 137Step 3. Installing the warehouse pack . . . . 140Step 4. Completing the installation . . . . . 142
Configuring warehouse packs . . . . . . . . 142Copying the warehouse pack files for a DB2remote warehouse agent site . . . . . . . 142Creating ODBC data sources on the controlserver for warehouse packs. . . . . . . . 143Creating ODBC data sources on DB2 remotewarehouse agent sites . . . . . . . . . 145Specifying user IDs and passwords for TivoliEnterprise Data Warehouse sources and targets . 146Scheduling warehouse pack ETL processes . . 147
Running ETL initialization processes . . . 148Determining application ETL processdependencies . . . . . . . . . . . 149Creating shortcuts to link ETL processes . . 151Scheduling your ETL steps . . . . . . . 153
Confirming the ETL processes . . . . . . . 156Verifying shortcut definitions and the orderin which processes run . . . . . . . . 156Verifying scheduling parameters . . . . . 156Checking ETL process task flow . . . . . 156
Configuring for a multiple customer environmentor multiple data centers . . . . . . . . . . 157
Configuring a multiple customer environment 157Configuring a multiple data center environment 159Maintaining a multiple customer or multipledata center environment. . . . . . . . . 160
Applying a fix to a warehouse pack . . . . . . 161Planning for the patch process. . . . . . . 161
Patch installation prerequisites . . . . . 162Installing the patch . . . . . . . . . 164Using the warehouse pack patching program 165After installing the patch . . . . . . . 170Copying patched warehouse pack files to aDB2 remote warehouse agent site . . . . 171
Chapter 11. IBM Tivoli Monitoring integrationwith Tivoli Enterprise Data Warehouse . . . . 173Names and acronyms used in other documents . . 173Integration overview . . . . . . . . . . . 173Skills for successful implementation . . . . . . 175Required documentation . . . . . . . . . 176Required CDs . . . . . . . . . . . . . 177Database considerations . . . . . . . . . . 178
ITM_DB database considerations . . . . . . 178Creation of the ITM_DB database objects . . 178Purging old data from the ITM_DB database 179
Tivoli Enterprise Data Warehouse databaseconsiderations . . . . . . . . . . . . 179Database communications . . . . . . . . 179
DB2 warehouse agents . . . . . . . . 180ODBC connection . . . . . . . . . . 180
Tasks to collect data for Tivoli Enterprise DataWarehouse . . . . . . . . . . . . . . 180
Troubleshooting tips . . . . . . . . . . 187Tasks to move data into Tivoli Enterprise DataWarehouse . . . . . . . . . . . . . . 188
Changing the schema name for the ITM_DBdatabase tables . . . . . . . . . . . . 194Troubleshooting tips . . . . . . . . . . 198
What to do if the central data warehouseETL ran before a data mart ETL was installed 198
Chapter 12. Removing Tivoli Enterprise DataWarehouse from your enterprise . . . . . . 199Uninstalling warehouse packs . . . . . . . . 199
Overview of uninstalling warehouse packs . . 199Performing the uninstallation . . . . . . . 200The uninstallation configuration file . . . . . 203More about twh_app_deinstall.sh. . . . . . 205
Uninstalling language packs . . . . . . . . 205Uninstalling the Tivoli Enterprise Data Warehousecore application . . . . . . . . . . . . 206
Overview of uninstalling the Tivoli EnterpriseData Warehouse core application . . . . . . 206Considerations for a distributed deployment 207Uninstalling on Windows . . . . . . . . 207Uninstalling on UNIX . . . . . . . . . 208Using DB2 Warehouse Manager afteruninstalling Tivoli Enterprise Data Warehouse . 209
Specifying an alternate control database forthe DB2 Warehouse Manager . . . . . . 209
Uninstalling Tivoli Presentation Services . . . . 210Uninstalling on Windows systems . . . . . 210
54 Installing and Configuring Tivoli Enterprise Data Warehouse
Uninstalling on UNIX-based systems . . . . 210Uninstalling DB2 Universal Database EnterpriseEdition . . . . . . . . . . . . . . . 211Removing data from the central data warehouse 211
Part 2. Installing, configuring, and uninstalling Tivoli Enterprise Data Warehouse 55

56 Installing and Configuring Tivoli Enterprise Data Warehouse
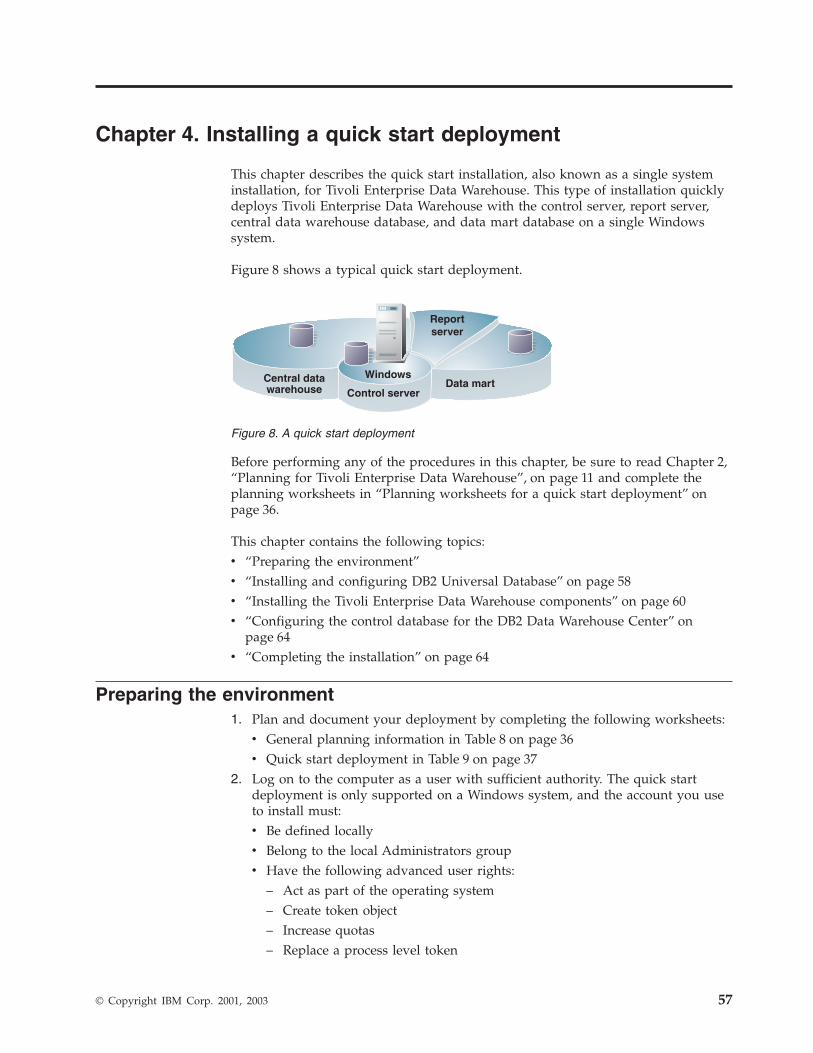
Chapter 4. Installing a quick start deployment
This chapter describes the quick start installation, also known as a single systeminstallation, for Tivoli Enterprise Data Warehouse. This type of installation quicklydeploys Tivoli Enterprise Data Warehouse with the control server, report server,central data warehouse database, and data mart database on a single Windowssystem.
Figure 8 shows a typical quick start deployment.
Before performing any of the procedures in this chapter, be sure to read Chapter 2,“Planning for Tivoli Enterprise Data Warehouse”, on page 11 and complete theplanning worksheets in “Planning worksheets for a quick start deployment” onpage 36.
This chapter contains the following topics:v “Preparing the environment”v “Installing and configuring DB2 Universal Database” on page 58v “Installing the Tivoli Enterprise Data Warehouse components” on page 60v “Configuring the control database for the DB2 Data Warehouse Center” on
page 64v “Completing the installation” on page 64
Preparing the environment1. Plan and document your deployment by completing the following worksheets:
v General planning information in Table 8 on page 36v Quick start deployment in Table 9 on page 37
2. Log on to the computer as a user with sufficient authority. The quick startdeployment is only supported on a Windows system, and the account you useto install must:v Be defined locallyv Belong to the local Administrators groupv Have the following advanced user rights:
– Act as part of the operating system– Create token object– Increase quotas– Replace a process level token
Data martWindowsCentral data
warehouse Control server
Reportserver
Figure 8. A quick start deployment
© Copyright IBM Corp. 2001, 2003 57
3. Make sure that the operating system is configured to provide Tivoli EnterpriseData Warehouse and Tivoli Presentation Services with a fully qualified hostname rather than a short name (for example, bonaire.austin.ibm.com instead ofbonaire) for all computers in your deployment, including any computerscontaining the operational data sources for the warehouse.Run the nslookup command as follows:nslookup short_name
The variable short_name is the host name of a remote computer in yourdeployment.
The command is successful if the output contains a fully qualified host nameand IP address. The following is a portion of the output of nslookup bonaireon a system that is correctly configured:Name: bonaire.austin.ibm.comAddress: 10.12.123.123
If the command output does not contain a fully qualified host name and IPaddress, correct the problem by following the procedure for the appropriateoperating system:v On Windows 2000 systems:
a. On the desktop, right-click My Computer and select Properties.b. In the System Properties window, click the Network Identification tab.c. Make sure that the Full computer name field contains a fully qualified
computer name, for example, mycomputer.mygroup.mydomain.com. If itcontains only a short name, for example, mycomputer, follow these steps:1) Click Properties.2) In the Identification Changes window, click More.3) In the Primary DNS suffix of this computer field of the DNS Suffix
and NetBIOS Computer Name window, type the primary DNS suffix,and then click OK.
4) Click OK to close the Identification Changes window.5) Click OK to close the DNS Suffix and NetBIOS Computer Name
window.6) Click OK to close the System Properties window.7) Restart the computer when prompted.
v On Windows NT systems:
a. From the Windows taskbar, click Start → Settings → Control Panel.b. In the Control Panel window, double-click Network.c. Click the Protocols tab.d. Select the TCP/IP protocol and then click Properties.e. Click the DNS tab.f. Ensure that the field Domain contains a domain suffix, for example,
mygroup.mydomain.com. If it does not, type the suffix, click OK, andrestart the computer when prompted.
Installing and configuring DB2 Universal DatabaseThis section provides instructions for installing and configuring DB2 UniversalDatabase on the control server.
58 Installing and Configuring Tivoli Enterprise Data Warehouse
For details about the authority required to install DB2 products, see IBM DB2Universal Database for Windows Quick Beginnings, IBM DB2 Universal Database forUNIX Quick Beginnings, and IBM DB2 Warehouse Manager Installation Guide.
If you reuse an existing instance of DB2 Universal Database, you must stop allapplications that connect to it before installing Tivoli Enterprise Data Warehouse.The Tivoli Enterprise Data Warehouse installation stops and restarts the server,which causes stale connection handles for any applications that were connected toit when it was stopped. For more information about reusing an existing instance ofDB2 Universal Database, see “Reusing an existing DB2 instance” on page 314.
To install and configure DB2 Universal Database, complete the following steps:1. Review the IBM DB2 Universal Database for Windows/UNIX Quick Beginnings
manual for information about prerequisites. This manual can also assist you ifyou want to perform a more customized installation of DB2 UniversalDatabase, or if you have trouble performing the installation as described here.
2. Use the DB2 installation media provided with Tivoli Enterprise DataWarehouse.
3. Insert the DB2 installation media into the CD-ROM drive. If the program doesnot start automatically when you insert the DB2 installation CD, run thesetup.exe program in the root directory of the CD. Click Install and thenprovide the following information when prompted:a. Select the DB2 Enterprise Edition product.b. Select the Typical installation.c. You can change the default destination folder. Accept the default values for
the remaining items.d. For the DB2 user name, specify a user that does not already exist on your
system. When the DB2 installation wizard creates the user for you, itensures that the user has the correct roles and privileges. If the user alreadyexists, consider deleting it and letting the DB2 installation recreate it.The user name must follow the DB2 naming conventions, which aredescribed in “DB2 user name, user ID, group name, and instance namerules” on page 315.Accept the option to use the same values for all DB2 user name andpassword settings.
e. Record in a safe place the DB2 user name and password that you specifiedfor each DB2 installation. You need the DB2 user and password informationto install Tivoli Enterprise Data Warehouse and warehouse packs.
f. Select Do not install the OLAP Starter Kit. Tivoli Enterprise DataWarehouse does not require the OLAP Starter Kit.
4. Test the connection by completing the following steps:a. Start a DB2 Command Line Processing (CLP) window by entering the
following command at a command prompt:db2cmd
b. To list the local databases, enter the following command:db2 list database directory
In most cases, the command lists at least one database, even in newinstallations.
c. If the command does not list any databases, create a database using thefollowing command:db2 create database name
Chapter 4. Installing a quick start deployment 59
The variable name is a name you choose for the new database.d. To test a local connection, enter the following command:
db2 connect to name user userName using password
The variable name is the name of a local database returned by the db2 listdatabase directory command or the name of the database you created withthe db2 create database command. The variables userName and password arethe user name and password you specified during the DB2 installation.
If this command is successful, DB2 Universal Database Enterprise Edition isinstalled and ready for remote connections. If the command is unsuccessful,see the DB2 documentation listed in “DB2 Universal Database publications”on page xiv for troubleshooting information.
5. If you have Lightweight Directory Access Protocol (LDAP), make sure that it isdisabled for this DB2 instance.In a DB2 command window, run the following command:db2set -all | more
Examine the value of DB2_ENABLE_LDAP. If this value is listed and is set toYES, disable LDAP and restart the DB2 server by running the followingcommands in a DB2 command window:db2set db2_enable_ldap=NOdb2stop forcedb2start
If the value is not listed or is set to NO, then no action is required.6. Go to the IBM Support Web site and obtain IBM DB2 Fix Pack 8 and the special
fix provided with DB2 Fix Pack 8. Install this fix pack and the special fixaccording to the instructions provided with it. See “READ THIS FIRST” onpage ix for additional information on obtaining the necessary fix packs andinterim fixes for Tivoli Enterprise Data Warehouse.
7. Restart the system.
Installing the Tivoli Enterprise Data Warehouse componentsThis section provides instructions for installing Tivoli Enterprise Data Warehouseon the control server and report server and provides instructions for creating thecentral data warehouse database and data mart database.
About the installation wizardUnderstanding the following items about the installation wizard helps yousuccessfully use the wizard to install Tivoli Enterprise Data Warehouse.v The installation wizard installs Tivoli Enterprise Data Warehouse components
only on the local system. When selecting the features you want to install, selectonly the ones that you want installed on the system where you are running thewizard.If the control server is not on the same system as both the central datawarehouse and data mart servers, databases are created and cataloged on theremote systems during the installation of the control server component.However, no Tivoli Enterprise Data Warehouse files are written to the remotesystems.
v The Tivoli Enterprise Data Warehouse installation wizard copies itself from theCD to temporary space on your system. This lets you use the CD-ROM drive to
60 Installing and Configuring Tivoli Enterprise Data Warehouse
insert other installation CDs for additional language support or warehousepacks. You can remove the installation CD from the CD-ROM drive as soon asthe Welcome window appears.
v The installation program prompts for all of the information needed to performthe installation before beginning to install any components. This means youpotentially insert the language support and warehouse pack CDs twice: once toselect and validate the source directory and again when it is time to install thatcomponent.To avoid this, the installation program gives you the ability to defer thevalidation of the installation source locations for additional language supportand warehouse packs until the wizard is ready to install that component. Todecide whether to defer validation, consider the following:– Deferring validation until the media is required for the installation of a
specific component prevents your having to insert each CD twice, but addsthe potential for an installation failure if you do not correctly specify thelocation.
– Validating the media at the time the location is specified identifiestypographical and directory selection errors as soon as they are made.However, to perform validation, the installation media must be available. Ifyou are installing from CDs, this means you insert each CD twice. The wizardprompts you when it is time for each CD.You can avoid this by copying the installation CDs onto a local hard drive ora shared network file system. This is suggested when performing adistributed installation, if you have a network file system that is accessiblefrom all the systems on which you plan to install Tivoli Enterprise DataWarehouse components.
v The installation process does not copy the installation wizard onto your system.Be sure to keep the CD in a safe place or copy it to your system to ensure thatyou have the installation wizard when you need to install additional warehousepacks. If you copy it to network space, copy the entire CD. Copying only thewizard’s executable files is not sufficient.
v The installation wizard defines the TWH_TOPDIR environment variable on eachsystem where it installs a component of Tivoli Enterprise Data Warehouse. Thisvariable points to the directory in which Tivoli Enterprise Data Warehouse wasinstalled.
v The installation process does not validate DB2 user IDs and passwords. Ensureyou enter these values correctly to avoid errors in subsequent installationprocedures.
Performing the installationTo perform the installation, complete the following steps on the computer that willbe the control server. These steps use the worksheets you completed in item 1 of“Preparing the environment” on page 57.
You can optionally install Tivoli Enterprise Data Warehouse from the commandline using a configuration file. This enables you to perform silent installations andto automate installation tasks. For more information about this installationtechnique, see Appendix C, “Installing with a response file”, on page 321.1. Start the Tivoli Enterprise Data Warehouse installation wizard.
The installation wizard is located in the root directory of the Tivoli EnterpriseData Warehouse CD. Use the program appropriate to the operating system onwhich you are installing:v Windows: setup.exe
Chapter 4. Installing a quick start deployment 61

v UNIX: setup_unix.sh
If you want the installation wizard to use another temporary directory, see“Specifying an alternate temporary directory” on page 316 for an alternateprocedure.
2. Specify Single machine when asked for the type of installation.3. Complete the installation wizard, providing the values you collected in Table 9
on page 37.The installation program does not validate user ID and password informationwhen it is entered. Make sure that you use the correct user ID and passwordfor the Tivoli Enterprise Data Warehouse installation in order to avoid errorsduring the installation.You can install support for other languages by selecting Yes, I want to installother languages when asked about language support. Alternatively, you caninstall language support later by following the instructions in Chapter 8,“Installing and using language support”, on page 119.
4. When the wizard installs Tivoli Presentation Services, wait for the help set to berebuilt. The help set contains the user assistance for the IBM Console. Thisprocess happens asynchronously and might require up to 15 minutes tocomplete. Do not restart the system until the help set is complete. If you do,follow the procedure documented in the Tivoli Enterprise Data Warehouse ReleaseNotes to build the help set.To determine whether the help set rebuild is complete, look for the completionmessage in the Tivoli Presentation Services installation log. This log is indirectory PS_directory/log/fwp_mcr, where PS_directory is the target directoryyou specified for Tivoli Presentation Services. The logs are named stdoutn.Look for the following message in the most recent stdoutn file. In some cases,the message can be in the second most recent stdoutn file.FWP1734I The utilty that was started by the Management Component Repository
to build the help set has completed successfully.
5. Restart the computer.6. Optionally, enable secure sockets layer (SSL) connections for the IBM Console,
using the instructions in Chapter 7, “Enabling Secure Sockets Layer for the Webversion of the IBM Console”, on page 109.
Verifying the installation of Tivoli Enterprise Data Warehousecore componentsAfter you’ve installed the Tivoli Enterprise Data Warehouse core components, youcan verify that the installation is complete by performing the following checks:v Make sure the installation wizard completion window does not list any errors.
See “Messages” on page 277 for more information.v If the completion window lists warnings, check the TWH.log to ensure that the
warnings can safely be ignored.If you find errors or warnings that may need corrective action, see Chapter 17,“Problem determination”, on page 273 for assistance.
v Ensure the $TWH_TOPDIR\.twh_core_v1.1.0.marker file has been installed.v To verify the installation of Tivoli Enterprise Data Warehouse Fix Pack 2:
– Ensure the $TWH_TOPDIR\.twh_core_v1.1.2.marker file has been installed.– Check the $TWH_TOPDIR\install\logs\patch_1.1.2\twh_install_v1.1.2.log file
for errors.v Verify the following databases have been created. You can use th DB2 Control
Center or a DB2 command to do this.:
62 Installing and Configuring Tivoli Enterprise Data Warehouse
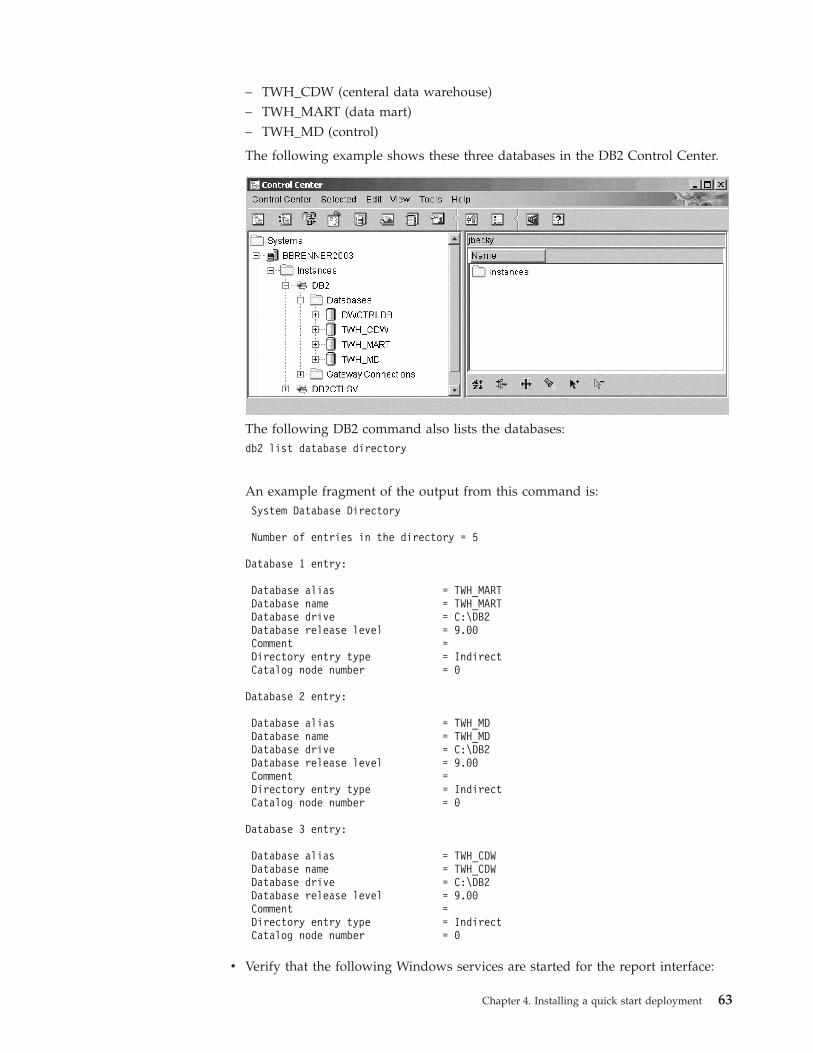
– TWH_CDW (centeral data warehouse)– TWH_MART (data mart)– TWH_MD (control)
The following example shows these three databases in the DB2 Control Center.
The following DB2 command also lists the databases:db2 list database directory
An example fragment of the output from this command is:System Database Directory
Number of entries in the directory = 5
Database 1 entry:
Database alias = TWH_MARTDatabase name = TWH_MARTDatabase drive = C:\DB2Database release level = 9.00Comment =Directory entry type = IndirectCatalog node number = 0
Database 2 entry:
Database alias = TWH_MDDatabase name = TWH_MDDatabase drive = C:\DB2Database release level = 9.00Comment =Directory entry type = IndirectCatalog node number = 0
Database 3 entry:
Database alias = TWH_CDWDatabase name = TWH_CDWDatabase drive = C:\DB2Database release level = 9.00Comment =Directory entry type = IndirectCatalog node number = 0
v Verify that the following Windows services are started for the report interface:
Chapter 4. Installing a quick start deployment 63
– Server for IBM Console– Tivoli Presentation Services HTTP Administration– Tivoli Presentation Services HTTP Server– Web Services for IBM Console
v Log into the IBM Console and verify there are tasks in the Work with Reportstask group of the portfolio.
Configuring the control database for the DB2 Data Warehouse CenterThis section contains instructions for configuring the control database. Thisdatabase contains metadata for Tivoli Enterprise Data Warehouse and the DB2Data Warehouse Center.
To configure the control database, complete the following steps:1. Configure the control database for Tivoli Enterprise Data Warehouse by
completing the following steps:a. On the Windows taskbar, click Start → Programs → IBM DB2 → Control
Center.b. From the DB2 Control Center, start the DB2 Data Warehouse Center by
clicking Tools → Data Warehouse Center.c. In the DB2 Data Warehouse Center Logon window, click Advanced. You do
not need to provide login information.d. In the Advanced window, type TWH_MD in the Control database field.e. Do not change the schema name.f. In the Advanced login window, type the DB2 user name and password for
the control server, and then click OK.g. When the Processing has completed message appears, click Cancel. The
OK button might not become active; look for the Processing has completedmessage.
h. Click Cancel to close the logon panel.2. Configure the control database for the DB2 Warehouse Control Database
Manager by completing the following steps:a. Open the DB2 Data Warehouse Center - Control Database Management
window by selecting Start → Programs → IBM DB2 → Warehouse ControlDatabase Management.
b. Type TWH_MD in New control database.c. Do not change the schema name.d. Type the DB2 user ID and password for the control database, and then click
OK.e. When the Processing has completed message appears, click Cancel.
The OK button might not become active; look for the Processing hascompleted message.
Completing the installationAfter the installation completes successfully, perform these final actions:1. Back up the Tivoli Enterprise Data Warehouse deployment as described in
“Backing up and restoring a Tivoli Enterprise Data Warehouse deployment” onpage 257.
64 Installing and Configuring Tivoli Enterprise Data Warehouse
2. Check the DB2 applications control heap size for the central data warehousedatabase to ensure it is set to at least 512 KB. This value prevents possible heapsize errors from occurring during central data warehouse ETL processing. See“Changing the DB2 heap size for the central data warehouse database” onpage 266 for the procedure.
3. Optionally, after a successful installation, delete the temporary directory createdduring the installation. This directory is named tmptedw_1_1_install. To locatethe temporary directory, see “Specifying an alternate temporary directory” onpage 316.
4. Install the Tivoli Enterprise Data Warehouse documentation by copying thecontents of the Tivoli Enterprise Data Warehouse Documentation CD to a localhard drive or shared network space.
5. Optionally, copy the Tivoli Presentation Services readme file to thedocumentation directory. The file is found on the Tivoli Enterprise DataWarehouse installation CD in the file ps_docs/readme22_en. This file containslate-breaking information and known problems about Tivoli PresentationServices, which implements the IBM Console.
6. Optionally, use the installation wizard to install the warehouse packs that allowyour Tivoli software to work with the Tivoli Enterprise Data Warehouse. Installeach warehouse pack individually, and back up your Tivoli Enterprise DataWarehouse deployment after each warehouse pack installation. Refer to thedocumentation for the warehouse pack and refer to Chapter 10, “Installing andupgrading warehouse packs”, on page 135 for instructions on installingwarehouse packs.
7. Keep the Tivoli Enterprise Data Warehouse installation CD in a safe place orcopy it to your system to ensure that you have the installation wizard whenyou need to install a warehouse pack. If you copy the CD to network space,copy the entire CD. Copying the wizard start up files is not sufficient.
Chapter 4. Installing a quick start deployment 65

66 Installing and Configuring Tivoli Enterprise Data Warehouse
Chapter 5. Installing Tivoli Enterprise Data Warehouse in adistributed deployment that does not use DB2 remotewarehouse agent sites
This chapter describes how to create a distributed deployment of Tivoli EnterpriseData Warehouse in which all data transfers use the DB2 default warehouse agenton the control server. No DB2 remote warehouse agent sites are used. A distributeddeployment has a central data warehouse or data mart database that is not on thecontrol server.
Before performing any of the procedures in this chapter, be sure to read Chapter 2,“Planning for Tivoli Enterprise Data Warehouse”, on page 11 and complete theplanning worksheets in “Planning worksheets for a distributed deploymentwithout DB2 remote warehouse agent sites” on page 39.
This chapter contains the following topics:v “Preparing the environment”v “Installing and configuring DB2 Universal Database” on page 69v “Configuring the control database” on page 82v “Completing the installation” on page 83
Preparing the environment1. Plan and document the configuration of your deployment by completing the
following worksheets:v General planning information in Table 10 on page 39 and Table 11 on page 40v Control server, report server, and report interface information in Table 12 on
page 41v Central data warehouse database information in Table 13 on page 43v Data mart database information in Table 14 on page 44v If installing DB2 on UNIX systems, DB2 installation information in “Planning
worksheet for creating DB2 users on a UNIX system” on page 512. Make sure that the operating system on each computer is configured to provide
Tivoli Enterprise Data Warehouse and Tivoli Presentation Services with a fullyqualified host name rather than a short name (for example,bonaire.austin.ibm.com instead of bonaire). This is especially important inenvironments with a mix of operating systems.Run the nslookup command as follows:nslookup short_name
The variable short_name is the host name of a remote computer in yourdeployment.
The command is successful if the output contains a fully qualified host nameand IP address. The following is a portion of the output of nslookup bonaireon a system that is correctly configured:Name: bonaire.austin.ibm.comAddress: 10.12.123.123
© Copyright IBM Corp. 2001, 2003 67
If the command output does not contain a fully qualified host name and IPaddress, correct the problem by following the procedure for the appropriateoperating system:a. On UNIX operating systems, ask the system administrator to correct the
configuration.b. On Windows 2000 systems:
1) On the desktop, right-click My Computer and select Properties.2) In the System Properties window, click the Network Identification tab.3) Make sure that the Full computer name field contains a fully qualified
computer name, for example, mycomputer.mygroup.mydomain.com. Ifit contains only a short name, for example, mycomputer, follow thesesteps:a) Click Properties.b) In the Identification Changes window, click More.c) In the Primary DNS suffix of this computer field of the DNS Suffix
and NetBIOS Computer Name window, type the primary DNSsuffix, and then click OK.
d) Click OK to close the Identification Changes window.e) Click OK to close the DNS Suffix and NetBIOS Computer Name
window.f) Click OK to close the System Properties window.g) Restart the computer when prompted.
c. On Windows NT systems:
1) From the Windows taskbar, click Start → Settings → Control Panel.2) In the Control Panel window, double-click Network.3) Click the Protocols tab.4) Select the TCP/IP protocol and then click Properties.5) Click the DNS tab.6) Ensure that the field Domain contains a domain suffix, for example,
mygroup.mydomain.com. If it does not, type the suffix, click OK, andrestart the computer when prompted.
d. On AIX systems:
The default domain name search order is as follows:1) Domain Name System (DNS) server2) Network Information Service (NIS)3) Local /etc/hosts file
If the /etc/resolv.conf file does not exist, the /etc/hosts file is used. If onlythe /etc/hosts file is used, the fully qualified computer name must be thefirst one that is listed after the IP address.
Verify that the /etc/resolv.conf file exists and contains the appropriateinformation, such as:domain mydivision.mycompany.comnameserver 123.123.123.123
If NIS is installed, the /etc/irs.conf file overrides the system default. Itcontains the following information:hosts = bind,local
68 Installing and Configuring Tivoli Enterprise Data Warehouse
The /etc/netsvc.conf file, if it exists, overrides the /etc/irs.conf file and thesystem default. It contains the following information:hosts = bind,local
If the NSORDER environment variable is set, it overrides all of thepreceding files. It contains the following information:export NSORDER=bind,local
e. On Linux systems:
Verify that the /etc/resolv.conf file exists and contains the appropriateinformation, such as:domain mydivision.mycompany.comnameserver 123.123.123.123
A short name is used if the /etc/nsswitch.conf file contains a line thatbegins as follows and if the /etc/hosts file contains the short name for thecomputer:hosts: files
To correct this, follow these steps:1) Change the line in the /etc/nsswitch.conf file to:
hosts: dns nis files
2) Stop the network service.3) Restart the network service.
f. On Solaris systems:
Verify that the /etc/resolv.conf file exists and contains the appropriateinformation, such as:domain mydivision.mycompany.comnameserver 123.123.123.123
A short name is used if the /etc/nsswitch.conf file contains a line thatbegins as follows and if the /etc/hosts file contains the short name for thecomputer:hosts: files
To correct this, follow these steps:1) Change the line in the /etc/nsswitch.conf file to:
hosts: dns nis files
2) Enter the following command to stop the inet service:/etc/init.d/inetsvc stop
3) Enter the following command to restart the inet service:/etc/init.d/inetsvc start
Installing and configuring DB2 Universal DatabaseThis step installs and configures DB2 Universal Database on the computers in yourdeployment. Install DB2 Universal Database on the control server and on eachcomputer where you plan to place one of the Tivoli Enterprise Data Warehousedatabases.
If you reuse an existing instance of DB2 Universal Database, you must stop allapplications that connect to it before installing Tivoli Enterprise Data Warehouse.The Tivoli Enterprise Data Warehouse installation stops and restarts the server,
Chapter 5. Installing Tivoli Enterprise Data Warehouse without DB2 remote warehouse agent sites 69
which causes stale connection handles for any applications that were connected toit when it was stopped. For more information about reusing an existing instance ofDB2 Universal Database, see “Reusing an existing DB2 instance” on page 314.
The following sections provide information specific to the following operatingsystems:v “Installing DB2 Universal Database on Windows systems”v “Installing DB2 Universal Database on AIX systems” on page 71v “Installing DB2 Universal Database on Solaris systems” on page 73
Installing DB2 Universal Database on Windows systemsOn the control server and on each Windows system where you will place thecentral data warehouse database, the data mart database, or an agent site, completethe following steps to install DB2 Universal Database:1. Review the IBM DB2 Universal Database for Windows/UNIX Quick Beginnings
manual for information about prerequisites. This manual can also assist you ifyou want to perform a more customized installation of DB2 UniversalDatabase, or if you have trouble performing the installation as described here.
2. Use the DB2 installation media provided with Tivoli Enterprise DataWarehouse.
3. Log on to the computer as a user with sufficient authority. On Windowssystems, the account on which you are logged in must meet the followingconditions:v Be defined locallyv Belong to the local Administrators groupv Have the following advanced user rights:
– Act as part of the operating system– Create token object– Increase quotas– Replace a process level token
4. Insert the DB2 installation media into the CD-ROM drive. If the program doesnot start automatically when you insert the DB2 installation CD, run thesetup.exe program in the root directory of the CD. Click Install and thenprovide the following information when prompted:a. Select the DB2 Enterprise Edition product.b. Select the Typical installation.c. You can change the default destination folder. Accept the default values for
the remaining items.d. For the DB2 user name, specify a user that does not already exist on your
system. When the DB2 installation wizard creates the user for you, itensures that the user has the correct roles and privileges. If the user alreadyexists, consider deleting it and letting the DB2 installation recreate it.The user name must follow the DB2 naming conventions, which aredescribed in “DB2 user name, user ID, group name, and instance namerules” on page 315.Accept the option to use the same values for all DB2 user name andpassword settings.
e. Record in a safe place the DB2 user name and password that you specifiedfor each DB2 installation. You need the DB2 user and password informationto install Tivoli Enterprise Data Warehouse and warehouse packs.
70 Installing and Configuring Tivoli Enterprise Data Warehouse
f. Select Do not install the OLAP Starter Kit. Tivoli Enterprise DataWarehouse does not require the OLAP Starter Kit.
5. Test the connection by completing the following steps:a. Start a DB2 Command Line Processing (CLP) window by entering the
following command at a command prompt:db2cmd
b. To list the local databases, enter the following command:db2 list database directory
In most cases, the command lists at least one database, even in newinstallations.
c. If the command does not list any databases, create a database using thefollowing command:db2 create database name
The variable name is a name you choose for the new database.d. To test a local connection, enter the following command:
db2 connect to name user userName using password
The variable name is the name of a local database returned by the db2 listdatabase directory command or the name of the database you created withthe db2 create database command. The variables userName and password arethe user name and password you specified during the DB2 installation.
If this command is successful, DB2 Universal Database Enterprise Edition isinstalled and ready for remote connections. If the command is unsuccessful,see the DB2 documentation listed in “DB2 Universal Database publications”on page xiv for troubleshooting information.
6. If you have Lightweight Directory Access Protocol (LDAP), make sure that it isdisabled for this DB2 instance.In a DB2 command window, run the following command:db2set -all | more
Examine the value of DB2_ENABLE_LDAP. If this value is listed and is set toYES, disable LDAP and restart the DB2 server by running the followingcommands in a DB2 command window:db2set db2_enable_ldap=NOdb2stop forcedb2start
If the value is not listed or is set to NO, then no action is required.7. Go to the IBM Support Web site and obtain IBM DB2 Fix Pack 8 and the special
fix provided with DB2 Fix Pack 8. Install this fix pack and the special fixaccording to the instructions provided with it. See “READ THIS FIRST” onpage ix for additional information on obtaining the necessary fix packs andinterim fixes for Tivoli Enterprise Data Warehouse.
8. Restart the system.
Installing DB2 Universal Database on AIX systemsOn each AIX system where you want to create the central data warehousedatabase, the data mart database, or an agent site, complete the following steps toinstall DB2 Universal Database.
Chapter 5. Installing Tivoli Enterprise Data Warehouse without DB2 remote warehouse agent sites 71
1. Review the IBM DB2 Universal Database for Windows/UNIX Quick Beginningsmanual for information about prerequisites. This manual can also assist you ifyou want to perform a more customized installation of DB2 UniversalDatabase, or if you have trouble performing the installation as described here.
2. Use the DB2 installation media provided with Tivoli Enterprise DataWarehouse.
3. Complete the planning worksheet in “Planning worksheet for creating DB2users on a UNIX system” on page 51.
4. Log on to the computer as a user with sufficient authority. On UNIX systems,you must be logged in as a user with root authority.For details about the authority required to install DB2 products, see IBM DB2Universal Database for UNIX Quick Beginnings.
5. Use the db2setup utility to install DB2 for AIX:a. If the system does not use Network Information Service (NIS), let the
db2setup utility automatically create DB2 users and groups. Ensure that theDB2 users and groups you specify to create do not already exist.If the system uses NIS, use the standard system administration tools tocreate DB2 users and groups before starting the db2setup utility.Create the following users:v The instance owner, typically db2inst1v The fenced user, typically db2fenc1v The administration server user, typically db2as
Create the following groups:v The DB2 administrators group, typically db2admin1v The fenced user group, typically db2fadm1v The administration server group, typically db2asgrp
b. Insert the DB2 product CD into the CD-ROM drive.c. Mount the CD file system. For instructions for mounting a CD file system
on AIX, see “Mounting the CD on AIX” on page 316.d. Change to the directory where the CD is mounted by entering the cd /cdrom
command, where cdrom is the mount point of your product CD.e. Enter the ./db2setup command.f. In the DB2 Setup Utility window, select Install and press Enter.g. In the Install DB2 V7 window, select DB2 UDB Enterprise Edition. Use the
Tab key to move between available options and fields. Press Enter to selector deselect a field or option. Selected options are denoted by an asterisk.
h. Select Customize to view and change the optional components that will beinstalled for DB2 UDB Enterprise Edition,, and then press Enter.
i. In the list of product features, select Control Center.j. Select OK and then press Enter to continue the installation process or select
Cancel and press Enter to go back to a previous window. Select Help andpress Enter for more information or for assistance during the installation ofany DB2 product.
When the installation is complete, your DB2 software is installed in the/usr/lpp/db2_07_01/ directory.
6. Test the connection by completing the following steps:a. Log on as the instance user.
72 Installing and Configuring Tivoli Enterprise Data Warehouse
b. To list the local databases, enter the following command:db2 list database directory
In most cases, the command lists at least one database, even in newinstallations.
c. If the command does not list any databases, create a database using thefollowing command:db2 create database name
The variable name is a name you choose for the new database.d. To test a local connection, enter the following command:
db2 connect to name user userName using password
The variable name is the name of a local database returned by the db2 listdatabase directory command or the name of the database you created withthe db2 create database command. The variables userName and password arethe user name and password you specified during the DB2 installation.
If this command is successful, DB2 Universal Database Enterprise Edition isinstalled and ready for remote connections. If the command is unsuccessful,see the DB2 documentation listed in “DB2 Universal Database publications”on page xiv for troubleshooting information.
7. If you have Lightweight Directory Access Protocol (LDAP), make sure that it isdisabled for this DB2 instance.In a DB2 command window, run the following command:db2set -all | more
Examine the value of DB2_ENABLE_LDAP. If this value is listed and is set toYES, disable LDAP and restart the DB2 server by running the followingcommands in a DB2 command window:db2set db2_enable_ldap=NOdb2stop forcedb2start
If the value is not listed or is set to NO, then no action is required.8. Go to the IBM Support Web site and obtain IBM DB2 Fix Pack 8 and the special
fix provided with DB2 Fix Pack 8. Install this fix pack and the special fixaccording to the instructions provided with it. See “READ THIS FIRST” onpage ix for additional information on obtaining the necessary fix packs andinterim fixes for Tivoli Enterprise Data Warehouse.
9. Restart the system.
Installing DB2 Universal Database on Solaris systemsOn each Solaris Operating Environment (herein referred to as Solaris) systemwhere you want to create the central data warehouse database, the data martdatabase, or an agent site, complete the following steps to install DB2 UniversalDatabase:1. Review the IBM DB2 Universal Database for Windows/UNIX Quick Beginnings
manual for information about prerequisites. This manual can also assist you ifyou want to perform a more customized installation of DB2 UniversalDatabase, or if you have trouble performing the installation as described here.
2. Use the DB2 installation media provided with Tivoli Enterprise DataWarehouse.
Chapter 5. Installing Tivoli Enterprise Data Warehouse without DB2 remote warehouse agent sites 73
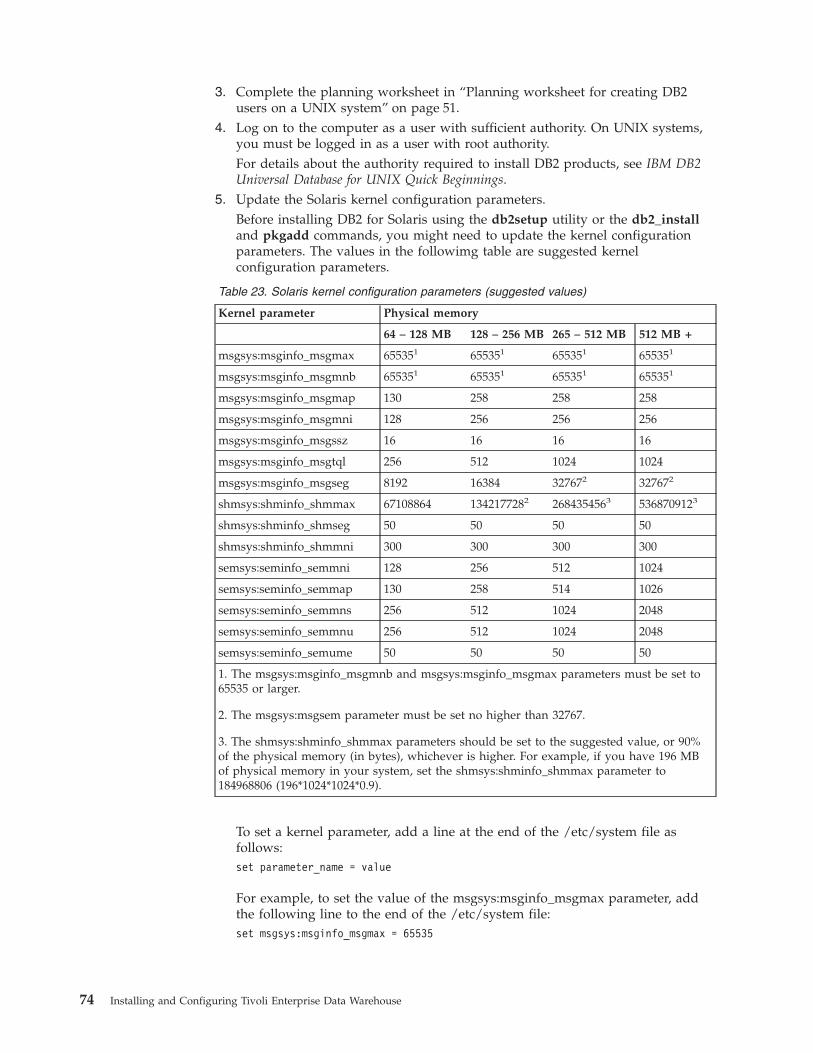
3. Complete the planning worksheet in “Planning worksheet for creating DB2users on a UNIX system” on page 51.
4. Log on to the computer as a user with sufficient authority. On UNIX systems,you must be logged in as a user with root authority.For details about the authority required to install DB2 products, see IBM DB2Universal Database for UNIX Quick Beginnings.
5. Update the Solaris kernel configuration parameters.Before installing DB2 for Solaris using the db2setup utility or the db2_installand pkgadd commands, you might need to update the kernel configurationparameters. The values in the followimg table are suggested kernelconfiguration parameters.
Table 23. Solaris kernel configuration parameters (suggested values)
Kernel parameter Physical memory
64 – 128 MB 128 – 256 MB 265 – 512 MB 512 MB +
msgsys:msginfo_msgmax 655351 655351 655351 655351
msgsys:msginfo_msgmnb 655351 655351 655351 655351
msgsys:msginfo_msgmap 130 258 258 258
msgsys:msginfo_msgmni 128 256 256 256
msgsys:msginfo_msgssz 16 16 16 16
msgsys:msginfo_msgtql 256 512 1024 1024
msgsys:msginfo_msgseg 8192 16384 327672 327672
shmsys:shminfo_shmmax 67108864 1342177282 2684354563 5368709123
shmsys:shminfo_shmseg 50 50 50 50
shmsys:shminfo_shmmni 300 300 300 300
semsys:seminfo_semmni 128 256 512 1024
semsys:seminfo_semmap 130 258 514 1026
semsys:seminfo_semmns 256 512 1024 2048
semsys:seminfo_semmnu 256 512 1024 2048
semsys:seminfo_semume 50 50 50 50
1. The msgsys:msginfo_msgmnb and msgsys:msginfo_msgmax parameters must be set to65535 or larger.
2. The msgsys:msgsem parameter must be set no higher than 32767.
3. The shmsys:shminfo_shmmax parameters should be set to the suggested value, or 90%of the physical memory (in bytes), whichever is higher. For example, if you have 196 MBof physical memory in your system, set the shmsys:shminfo_shmmax parameter to184968806 (196*1024*1024*0.9).
To set a kernel parameter, add a line at the end of the /etc/system file asfollows:set parameter_name = value
For example, to set the value of the msgsys:msginfo_msgmax parameter, addthe following line to the end of the /etc/system file:set msgsys:msginfo_msgmax = 65535
74 Installing and Configuring Tivoli Enterprise Data Warehouse
Sample files for updating the kernel configuration parameters are provided inthe /opt/IBMdb2/V7.1/cfg/ directory, or on your DB2 product CD in the/db2/install/samples/ directory. The names for these files are as follows:
kernel.param.64MBFor systems with 64 MB–128 MB of physical memory
kernel.param.128MBFor systems with 128 MB–256 MB of physical memory
kernel.param.256MBFor systems with 256 MB–512 MB of physical memory
kernel.param.512MBFor systems with 512 MB–1 GB of physical memory
Depending upon the amount of physical memory in your system, append theappropriate kernel configuration parameter file to the /etc/system file. Ifnecessary, change the value of the shmsys:shminfo_shmmax parameter asdescribed in table note 3.
6. After updating the /etc/system file, reboot the system.7. Install DB2 for Solaris using the db2setup utility by completing the following
steps:a. If the system does not use Network Information Service (NIS), let the
db2setup utility automatically create DB2 users and groups. Ensure that theDB2 users and groups you specify to create do not already exist.If the system uses NIS, use the standard system administration tools tocreate DB2 users and groups before starting the db2setup utility.Create the following users:v The instance owner, typically db2inst1v The fenced user, typically db2fenc1v The administration server user, typically db2as
Create the following groups:v The DB2 administrators group, typically db2admin1v The fenced user group, typically db2fadm1v The administration server group, typically db2asgrp
b. Insert the DB2 product CD into the CD-ROM drive.c. Insert and mount your DB2 product CD.d. Mount the CD file system. For instructions for mounting a CD on Solaris,
see “Mounting the CD-ROM on Solaris” on page 317.e. Change to the directory where the CD is mounted by entering the cd /cdrom
command, where cdrom is the mount point of your product CD.f. Enter the ./db2setup command.g. In the DB2 Setup Utility window, select Install and press Enter.h. In the Install DB2 V7 window, select DB2 UDB Enterprise Edition. Use the
Tab key to move between available options and fields. Press Enter to selector deselect a field or option. Selected options are denoted by an asterisk.
i. Select Customize to view and change the optional components that will beinstalled for DB2 UDB Enterprise Edition, and then press Enter.
j. In the list of product features, select Control Center.
Chapter 5. Installing Tivoli Enterprise Data Warehouse without DB2 remote warehouse agent sites 75

k. Select OK and then press Enter to continue the installation process or selectCancel and press Enter to go back to a previous window. Select Help andpress Enter for more information or for assistance during the installation ofany DB2 product.
When installation is complete, the DB2 software will be installed in the/opt/IBMdb2/V7.1/ directory.
8. Test the connection by completing the following steps:a. Log on as the instance user.b. To list the local databases, enter the following command:
db2 list database directory
In most cases, the command lists at least one database, even in newinstallations.
c. If the command does not list any databases, create a database using thefollowing command:db2 create database name
The variable name is a name you choose for the new database.d. To test a local connection, enter the following command:
db2 connect to name user userName using password
The variable name is the name of a local database returned by the db2 listdatabase directory command or the name of the database you created withthe db2 create database command. The variables userName and password arethe user name and password you specified during the DB2 installation.
If this command is successful, DB2 Universal Database Enterprise Edition isinstalled and ready for remote connections. If the command is unsuccessful,see the DB2 documentation listed in “DB2 Universal Database publications”on page xiv for troubleshooting information.
9. If you have Lightweight Directory Access Protocol (LDAP), make sure that it isdisabled for this DB2 instance.In a DB2 command window, run the following command:db2set -all | more
Examine the value of DB2_ENABLE_LDAP. If this value is listed and is set toYES, disable LDAP and restart the DB2 server by running the followingcommands in a DB2 command window:db2set db2_enable_ldap=NOdb2stop forcedb2start
If the value is not listed or is set to NO, then no action is required.10. Go to the IBM Support Web site and obtain IBM DB2 Fix Pack 8 and the
special fix provided with DB2 Fix Pack 8. Install this fix pack and the specialfix according to the instructions provided with it. See “READ THIS FIRST” onpage ix for additional information on obtaining the necessary fix packs andinterim fixes for Tivoli Enterprise Data Warehouse.
11. Restart the system.
76 Installing and Configuring Tivoli Enterprise Data Warehouse

Installing Tivoli Enterprise Data Warehouse componentsThis section provides instructions for installing the Tivoli Enterprise DataWarehouse control server and report server, and for creating the central datawarehouse database and data mart database.
About the installation wizardUnderstanding the following items about the installation wizard helps yousuccessfully use the wizard to install Tivoli Enterprise Data Warehouse.v The installation wizard installs Tivoli Enterprise Data Warehouse components
only on the local system. When selecting the features you want to install, selectonly the ones that you want installed on the system where you are running thewizard.If the control server is not on the same system as both the central datawarehouse and data mart servers, databases are created and cataloged on theremote systems during the installation of the control server component.However, no Tivoli Enterprise Data Warehouse files are written to the remotesystems.
v The Tivoli Enterprise Data Warehouse installation wizard copies itself from theCD to temporary space on your system. This lets you use the CD-ROM drive toinsert other installation CDs for additional language support or warehousepacks. You can remove the installation CD from the CD-ROM drive as soon asthe Welcome window appears.
v The installation program prompts for all of the information needed to performthe installation before beginning to install any components. This means youpotentially insert the language support and warehouse pack CDs twice: once toselect and validate the source directory and again when it is time to install thatcomponent.To avoid this, the installation program gives you the ability to defer thevalidation of the installation source locations for additional language supportand warehouse packs until the wizard is ready to install that component. Todecide whether to defer validation, consider the following:– Deferring validation until the media is required for the installation of a
specific component prevents your having to insert each CD twice, but addsthe potential for an installation failure if you do not correctly specify thelocation.
– Validating the media at the time the location is specified identifiestypographical and directory selection errors as soon as they are made.However, to perform validation, the installation media must be available. Ifyou are installing from CDs, this means you insert each CD twice. The wizardprompts you when it is time for each CD.You can avoid this by copying the installation CDs onto a local hard drive ora shared network file system. This is suggested when performing adistributed installation, if you have a network file system that is accessiblefrom all the systems on which you plan to install Tivoli Enterprise DataWarehouse components.
v The installation process does not copy the installation wizard onto your system.Be sure to keep the CD in a safe place or copy it to your system to ensure thatyou have the installation wizard when you need to install additional warehousepacks. If you copy it to network space, copy the entire CD. Copying only thewizard’s executable files is not sufficient.
Chapter 5. Installing Tivoli Enterprise Data Warehouse without DB2 remote warehouse agent sites 77
v The installation wizard defines the TWH_TOPDIR environment variable on eachsystem where it installs a component of Tivoli Enterprise Data Warehouse. Thisvariable points to the directory in which Tivoli Enterprise Data Warehouse wasinstalled.
v The installation process does not validate DB2 user IDs and passwords. Ensureyou enter these values correctly to avoid errors in subsequent installationprocedures.
Performing the installationTo perform the Tivoli Enterprise Data Warehouse installation, complete thefollowing steps on the computer that will be the control server. These steps use theworksheets you completed in item 1 of “Preparing the environment” on page 85.1. Install Tivoli Enterprise Data Warehouse on the system that is to be the control
server by completing the following steps:a. Start the Tivoli Enterprise Data Warehouse installation wizard.
The installation wizard is located in the root directory of the TivoliEnterprise Data Warehouse CD. Use the program appropriate to theoperating system on which you are installing:v Windows: setup.exe
v UNIX: setup_unix.sh
If you want the installation wizard to use another temporary directory, see“Specifying an alternate temporary directory” on page 316 for an alternateprocedure.
b. Specify Custom/Distributed when asked for the type of installation.c. Select the Tivoli Enterprise Data Warehouse control server component.
Note: The installation wizard displays an additional feature, Installationtools and scripts. This feature is required for each of the TivoliEnterprise Data Warehouse components, but you do not have toselect it manually. It is automatically included when it is required. Itis not needed when installing warehouse packs (listed in theinstallation wizard as Application ETL and report packages).
d. Complete the installation wizard, providing the values you collected inTable 12 on page 41, Table 13 on page 43, and Table 14 on page 44.
Note: Installing the control server creates the central data warehouse anddata mart databases. To create a distributed configuration using alocal warehouse agent, you do not need to install any TivoliEnterprise Data Warehouse components on the central datawarehouse server. However, the Tivoli Enterprise Data Warehouseinstallation program must be run on the system that is to be the datamart server.
e. Restart the system.2. Install Tivoli Enterprise Data Warehouse on the system that is to be the report
server by completing the following steps on that system:a. Start the Tivoli Enterprise Data Warehouse installation wizard.
The installation wizard is located in the root directory of the TivoliEnterprise Data Warehouse CD. Use the program appropriate to theoperating system on which you are installing:v Windows: setup.exe
v UNIX: setup_unix.sh
78 Installing and Configuring Tivoli Enterprise Data Warehouse
If you want the installation wizard to use another temporary directory, see“Specifying an alternate temporary directory” on page 316 for an alternateprocedure.
b. Specify Custom/Distributed when asked for the type of installation.c. Select the Report interface feature. During a distributed installation on AIX
and Linux, when the feature selection window of the Tivoli Enterprise DataWarehouse installation wizard is displayed, you must wait for the screen todisplay and then redisplay before making any selections. If you do not wait,your selections are discarded.
d. Complete the installation wizard, providing the values you collected inTable 12 on page 41.
e. Optionally install language support. Language support is installed only onthe report server, not on the control server, the central data warehouseserver, or the data mart server.
f. When the installation wizard finishes you are prompted to reboot thecomputer. The wizard has finished but the IBM Console still needs to finishbuilding its help set. Wait for the help set to finish building. This processmay take up to 15 minutes.To determine whether the help set build is complete, look for the completionmessage in the Tivoli Presentation Services installation log. This log is indirectory PS_directory/log/fwp_mcr, where PS_directory is the targetdirectory you specified for Tivoli Presentation Services. The logs are namedstdoutn. Look for the following message in the most recent stdoutn file. Insome cases, the message can be in the second most recent stdoutn file.FWP1734I The utilty that was started by the Management ComponentRepository to build the help set has completed successfully.
Do not restart the system until the help set is complete. If you do, follow theprocedure documented in the Tivoli Enterprise Data Warehouse Release Notes tobuild the help set.
g. Restart the report server.h. Optionally, enable secure sockets layer (SSL) connections for the IBM
Console, using the instructions in Chapter 7, “Enabling Secure Sockets Layerfor the Web version of the IBM Console”, on page 109.
3. Install Tivoli Enterprise Data Warehouse on the system that is to be the host forthe data mart database by completing the following steps on that system:a. Start the Tivoli Enterprise Data Warehouse installation wizard.
The installation wizard is located in the root directory of the TivoliEnterprise Data Warehouse CD. Use the program appropriate to theoperating system on which you are installing:v Windows: setup.exe
v UNIX: setup_unix.sh
If you want the installation wizard to use another temporary directory, see“Specifying an alternate temporary directory” on page 316 for an alternateprocedure.
b. Specify Custom/Distributed when asked for the type of installation.c. For features to install, select Data mart.
During a distributed installation on AIX and Linux, when the featureselection window of the Tivoli Enterprise Data Warehouse installation
Chapter 5. Installing Tivoli Enterprise Data Warehouse without DB2 remote warehouse agent sites 79
wizard is displayed, you must wait for the screen to display and thenredisplay before making any selections. If you do not wait, your selectionsare discarded.
d. Type the name of the directory where the Tivoli Enterprise Data Warehousedata mart component is to be installed.
e. Confirm the host name of the local system.f. Type the DB2 user name and password for the local system.g. Type connection information (user name, password, host name, and
database port) for the existing DB2 instance on the system that contains thecentral data warehouse and data mart databases.
Note: The central data warehouse and data mart databases were createdand configured in the DB2 instance during the installation of thecontrol server. To create a distributed configuration using a localwarehouse agent, you do not need to install any Tivoli EnterpriseData Warehouse components on the central data warehouse server.
h. Complete the installation wizard.i. Restart the system.
Verifying the installation of Tivoli Enterprise Data Warehousecore componentsAfter you have installed the Tivoli Enterprise Data Warehouse core components,you can verify that the installation is complete by performing the following checks:v Make sure the installation wizard completion window does not list any errors.
See “Messages” on page 277 for more information.v If the completion window lists warnings, check the TWH.log to ensure that the
warnings can safely be ignored.If you find errors or warnings that may need corrective action, see Chapter 17,“Problem determination”, on page 273 for assistance.
v Ensure the $TWH_TOPDIR/.twh_core_v1.1.0.marker file has been installed.v To verify the installation of Tivoli Enterprise Data Warehouse Fix Pack 2:
– Ensure the $TWH_TOPDIR/.twh_core_v1.1.2.marker file has been installed.– Check the $TWH_TOPDIR/install/logs/patch_1.1.2/twh_install_v1.1.2.log file
for errors.v On the Tivoli Enterprise Data Warehouse control server, verify the following
databases have been created. You can use th DB2 Control Center or a DB2command to do this.:– TWH_CDW (centeral data warehouse)– TWH_MART (data mart)– TWH_MD (control)
80 Installing and Configuring Tivoli Enterprise Data Warehouse

The following example shows these three databases in the DB2 Control Center.The ITM_DB database is an operational data source used in this deployment.
The following DB2 command also lists the databases:db2 list database directory
An example fragment of the output from this command is:System Database Directory
Number of entries in the directory = 6
Database 1 entry:
Database alias = TWH_MARTDatabase name = TWH_MARTNode name = TEDW002Database release level = 9.00Comment =Directory entry type = RemoteCatalog node number = -1
Database 2 entry:
Database alias = ITM_DBDatabase name = ITM_DBNode name = LANAI00Database release level = 9.00Comment =Directory entry type = RemoteCatalog node number = -1
Chapter 5. Installing Tivoli Enterprise Data Warehouse without DB2 remote warehouse agent sites 81

Database 3 entry:
Database alias = TWH_MDDatabase name = TWH_MDDatabase drive = C:\DB2Database release level = 9.00Comment =Directory entry type = IndirectCatalog node number = 0
Database 4 entry:
Database alias = TWH_CDWDatabase name = TWH_CDWNode name = TEDW001Database release level = 9.00Comment =Directory entry type = RemoteCatalog node number = -1
v Verify that the following Windows services are started on the computer for thereport server:– Server for IBM Console– Tivoli Presentation Services HTTP Administration– Tivoli Presentation Services HTTP Server– Web Services for IBM Console
v Log into the IBM Console and verify there are tasks in the Work with Reportstask group of the portfolio.
Configuring the control databaseThis section contains instructions for configuring the control database. Thisdatabase contains metadata for Tivoli Enterprise Data Warehouse and the DB2Data Warehouse Center.
To configure the control database, complete the following steps:1. Configure the control database for Tivoli Enterprise Data Warehouse by
completing the following steps:a. On the Windows taskbar, click Start → Programs → IBM DB2 → Control
Center.b. From the DB2 Control Center, start the DB2 Data Warehouse Center by
clicking Tools → Data Warehouse Center.c. In the DB2 Data Warehouse Center Logon window, click Advanced. You do
not need to provide login information.d. In the Advanced window, type TWH_MD in the Control database field.e. Do not change the schema name.f. In the Advanced login window, type the DB2 user name and password for
the control server, and then click OK.g. When the Processing has completed message appears, click Cancel. The
OK button might not become active; look for the Processing has completedmessage.
h. Click Cancel to close the logon panel.2. Configure the control database for the DB2 Warehouse Control Database
Manager by completing the following steps:
82 Installing and Configuring Tivoli Enterprise Data Warehouse
a. Open the DB2 Data Warehouse Center - Control Database Managementwindow by selecting Start → Programs → IBM DB2 → Warehouse ControlDatabase Management.
b. Type TWH_MD in New control database.c. Do not change the schema name.d. Type the DB2 user ID and password for the control database, and then click
OK.e. When the Processing has completed message appears, click Cancel.
The OK button might not become active; look for the Processing hascompleted message.
Completing the installationAfter the installation completes successfully, perform these final actions:1. Back up the Tivoli Enterprise Data Warehouse deployment as described in
“Backing up and restoring a Tivoli Enterprise Data Warehouse deployment” onpage 257.
2. Check the DB2 applications control heap size for the central data warehousedatabase to ensure it is set to at least 512 KB. This value prevents possible heapsize errors from occurring during central data warehouse ETL processing. See“Changing the DB2 heap size for the central data warehouse database” onpage 266 for the procedure.
3. Optionally, after a successful installation, delete the temporary directory createdduring the installation. This directory is named tmptedw_1_1_install. To locatethe temporary directory, see “Specifying an alternate temporary directory” onpage 316.
4. Install the Tivoli Enterprise Data Warehouse documentation by copying thecontents of the Tivoli Enterprise Data Warehouse Documentation CD to a localhard drive or shared network space.
5. Optionally, copy the Tivoli Presentation Services readme file to thedocumentation directory. The file is found on the Tivoli Enterprise DataWarehouse installation CD in the file ps_docs/readme22_en. This file containslate-breaking information and known problems about Tivoli PresentationServices, which implements the IBM Console.
6. Optionally, use the installation wizard to install the warehouse packs that allowyour Tivoli software to work with the Tivoli Enterprise Data Warehouse. Installeach warehouse pack individually, and back up your Tivoli Enterprise DataWarehouse deployment after each warehouse pack installation. Refer to thedocumentation for the warehouse pack and refer to Chapter 10, “Installing andupgrading warehouse packs”, on page 135 for instructions on installingwarehouse packs.
7. Keep the Tivoli Enterprise Data Warehouse installation CD in a safe place orcopy it to your system to ensure that you have the installation wizard whenyou need to install a warehouse pack. If you copy the CD to network space,copy the entire CD. Copying the wizard start up files is not sufficient.
Chapter 5. Installing Tivoli Enterprise Data Warehouse without DB2 remote warehouse agent sites 83

84 Installing and Configuring Tivoli Enterprise Data Warehouse
Chapter 6. Installing Tivoli Enterprise Data Warehouse in adistributed deployment that uses DB2 remote warehouseagent sites
This chapter describes how to create a distributed deployment of Tivoli EnterpriseData Warehouse that uses DB2 warehouse agents that are not on the control server.A distributed deployment has a central data warehouse or data mart database thatis not on the control server.
Before performing any of the procedures in this chapter, be sure to read Chapter 2,“Planning for Tivoli Enterprise Data Warehouse”, on page 11 and complete theplanning worksheets in “Planning worksheets for a distributed deployment withDB2 remote warehouse agent sites” on page 45.
This chapter contains the following topics:v “Preparing the environment”v “Installing and configuring DB2 Universal Database” on page 88v “Installing DB2 Warehouse Manager” on page 95v “Installing Tivoli Enterprise Data Warehouse components” on page 96v “Configuring the control database” on page 102v “Defining a DB2 warehouse agent site” on page 103v “Configuring DB2 remote warehouse agent sites” on page 103v “Completing the installation” on page 107
Preparing the environment1. Plan and document your desired deployment by completing the following
worksheets:v General planning information in Table 15 on page 45 and Table 16 on page 45v Control server and report server information in Table 17 on page 46v Central data warehouse database information in Table 18 on page 47v Data mart database information in Table 19 on page 48v DB2 Warehouse agent site information in Table 20 on page 48v If installing DB2 on UNIX systems, DB2 installation information in “Planning
worksheet for creating DB2 users on a UNIX system” on page 512. Make sure that the operating system on each computer is configured to provide
Tivoli Enterprise Data Warehouse and Tivoli Presentation Services with a fullyqualified host name rather than a short name (for example,bonaire.austin.ibm.com instead of bonaire). This is especially important inenvironments with a mix of operating systems.Run the nslookup command as follows:nslookup short_name
The variable short_name is the host name of a remote computer in yourdeployment.
© Copyright IBM Corp. 2001, 2003 85
The command is successful if the output contains a fully qualified host nameand IP address. The following is a portion of the output of nslookup bonaireon a system that is correctly configured:Name: bonaire.austin.ibm.comAddress: 10.12.123.123
If the command output does not contain a fully qualified host name and IPaddress, correct the problem by following the procedure for the appropriateoperating system:a. On UNIX operating systems, ask the system administrator to correct the
configuration.b. On Windows 2000 systems:
1) On the desktop, right-click My Computer and select Properties.2) In the System Properties window, click the Network Identification tab.3) Make sure that the Full computer name field contains a fully qualified
computer name, for example, mycomputer.mygroup.mydomain.com. Ifit contains only a short name, for example, mycomputer, follow thesesteps:a) Click Properties.b) In the Identification Changes window, click More.c) In the Primary DNS suffix of this computer field of the DNS Suffix
and NetBIOS Computer Name window, type the primary DNSsuffix, and then click OK.
d) Click OK to close the Identification Changes window.e) Click OK to close the DNS Suffix and NetBIOS Computer Name
window.f) Click OK to close the System Properties window.g) Restart the computer when prompted.
c. On Windows NT systems:
1) From the Windows taskbar, click Start → Settings → Control Panel.2) In the Control Panel window, double-click Network.3) Click the Protocols tab.4) Select the TCP/IP protocol and then click Properties.5) Click the DNS tab.6) Ensure that the field Domain contains a domain suffix, for example,
mygroup.mydomain.com. If it does not, type the suffix, click OK, andrestart the computer when prompted.
d. On AIX systems:
The default domain name search order is as follows:1) Domain Name System (DNS) server2) Network Information Service (NIS)3) Local /etc/hosts file
If the /etc/resolv.conf file does not exist, the /etc/hosts file is used. If onlythe /etc/hosts file is used, the fully qualified computer name must be thefirst one that is listed after the IP address.
Verify that the /etc/resolv.conf file exists and contains the appropriateinformation, such as:
86 Installing and Configuring Tivoli Enterprise Data Warehouse
domain mydivision.mycompany.comnameserver 123.123.123.123
If NIS is installed, the /etc/irs.conf file overrides the system default. Itcontains the following information:hosts = bind,local
The /etc/netsvc.conf file, if it exists, overrides the /etc/irs.conf file and thesystem default. It contains the following information:hosts = bind,local
If the NSORDER environment variable is set, it overrides all of thepreceding files. It contains the following information:export NSORDER=bind,local
e. On Linux systems:
Verify that the /etc/resolv.conf file exists and contains the appropriateinformation, such as:domain mydivision.mycompany.comnameserver 123.123.123.123
A short name is used if the /etc/nsswitch.conf file contains a line thatbegins as follows and if the /etc/hosts file contains the short name for thecomputer:hosts: files
To correct this, follow these steps:1) Change the line in the /etc/nsswitch.conf file to:
hosts: dns nis files
2) Stop the network service.3) Restart the network service.
f. On Solaris systems:
Verify that the /etc/resolv.conf file exists and contains the appropriateinformation, such as:domain mydivision.mycompany.comnameserver 123.123.123.123
A short name is used if the /etc/nsswitch.conf file contains a line thatbegins as follows and if the /etc/hosts file contains the short name for thecomputer:hosts: files
To correct this, follow these steps:1) Change the line in the /etc/nsswitch.conf file to:
hosts: dns nis files
2) Enter the following command to stop the inet service:/etc/init.d/inetsvc stop
3) Enter the following command to restart the inet service:/etc/init.d/inetsvc start
Chapter 6. Installing Tivoli Enterprise Data Warehouse to use DB2 remote warehouse agents 87
Installing and configuring DB2 Universal DatabaseThis step installs and configures DB2 Universal Database and DB2 WarehouseManager on the computers in your deployment. Install DB2 Universal Database onthe control server, on each computer where you plan to place one of the TivoliEnterprise Data Warehouse databases, and on any computer where you want tocreate a DB2 warehouse agent site.
If you reuse an existing instance of DB2 Universal Database, you must stop allapplications that connect to it before installing Tivoli Enterprise Data Warehouse.The Tivoli Enterprise Data Warehouse installation stops and restarts the server,which causes stale connection handles for any applications that were connected toit when it was stopped. For more information about reusing an existing instance ofDB2 Universal Database, see “Reusing an existing DB2 instance” on page 314.
The following sections provide information specific to the following operatingsystems:v “Installing DB2 Universal Database on Windows systems”v “Installing DB2 Universal Database on AIX systems” on page 90v “Installing DB2 Universal Database on Solaris systems” on page 92
Installing DB2 Universal Database on Windows systemsOn the control server and on each Windows system where you will place thecentral data warehouse database, the data mart database, or an agent site, completethe following steps to install DB2 Universal Database:1. Review the IBM DB2 Universal Database for Windows/UNIX Quick Beginnings
manual for information about prerequisites. This manual can also assist you ifyou want to perform a more customized installation of DB2 UniversalDatabase, or if you have trouble performing the installation as described here.
2. Use the DB2 installation media provided with Tivoli Enterprise DataWarehouse.
3. Log on to the computer as a user with sufficient authority. On Windowssystems, the account on which you are logged in must meet the followingconditions:v Be defined locallyv Belong to the local Administrators groupv Have the following advanced user rights:
– Act as part of the operating system– Create token object– Increase quotas– Replace a process level token
4. Insert the DB2 installation media into the CD-ROM drive. If the program doesnot start automatically when you insert the DB2 installation CD, run thesetup.exe program in the root directory of the CD. Click Install and thenprovide the following information when prompted:a. Select the DB2 Enterprise Edition product.b. Select the Typical installation.c. You can change the default destination folder. Accept the default values for
the remaining items.d. For the DB2 user name, specify a user that does not already exist on your
system. When the DB2 installation wizard creates the user for you, it
88 Installing and Configuring Tivoli Enterprise Data Warehouse
ensures that the user has the correct roles and privileges. If the user alreadyexists, consider deleting it and letting the DB2 installation recreate it.The user name must follow the DB2 naming conventions, which aredescribed in “DB2 user name, user ID, group name, and instance namerules” on page 315.Accept the option to use the same values for all DB2 user name andpassword settings.
e. Record in a safe place the DB2 user name and password that you specifiedfor each DB2 installation. You need the DB2 user and password informationto install Tivoli Enterprise Data Warehouse and warehouse packs.
f. Select Do not install the OLAP Starter Kit. Tivoli Enterprise DataWarehouse does not require the OLAP Starter Kit.
5. Test the connection by completing the following steps:a. Start a DB2 Command Line Processing (CLP) window by entering the
following command at a command prompt:db2cmd
b. To list the local databases, enter the following command:db2 list database directory
In most cases, the command lists at least one database, even in newinstallations.
c. If the command does not list any databases, create a database using thefollowing command:db2 create database name
The variable name is a name you choose for the new database.d. To test a local connection, enter the following command:
db2 connect to name user userName using password
The variable name is the name of a local database returned by the db2 listdatabase directory command or the name of the database you created withthe db2 create database command. The variables userName and password arethe user name and password you specified during the DB2 installation.
If this command is successful, DB2 Universal Database Enterprise Edition isinstalled and ready for remote connections. If the command is unsuccessful,see the DB2 documentation listed in “DB2 Universal Database publications”on page xiv for troubleshooting information.
6. If you have Lightweight Directory Access Protocol (LDAP), make sure that it isdisabled for this DB2 instance.In a DB2 command window, run the following command:db2set -all | more
Examine the value of DB2_ENABLE_LDAP. If this value is listed and is set toYES, disable LDAP and restart the DB2 server by running the followingcommands in a DB2 command window:db2set db2_enable_ldap=NOdb2stop forcedb2start
If the value is not listed or is set to NO, then no action is required.
Chapter 6. Installing Tivoli Enterprise Data Warehouse to use DB2 remote warehouse agents 89
7. Install DB2 Warehouse Manager on every computer that will be a DB2 remotewarehouse agent site. This installs the warehouse agent. See “Installing DB2Warehouse Manager on a Windows system” on page 95 or “Installing DB2Warehouse Manager on a UNIX system” on page 96 for the procedure.
8. Go to the IBM Support Web site and obtain IBM DB2 Fix Pack 8 and the specialfix provided with DB2 Fix Pack 8. Install this fix pack and the special fixaccording to the instructions provided with it. See “READ THIS FIRST” onpage ix for additional information on obtaining the necessary fix packs andinterim fixes for Tivoli Enterprise Data Warehouse.
9. Restart the system.
Installing DB2 Universal Database on AIX systemsOn each AIX system where you want to create the central data warehousedatabase, the data mart database, or an agent site, complete the following steps toinstall DB2 Universal Database.1. Review the IBM DB2 Universal Database for Windows/UNIX Quick Beginnings
manual for information about prerequisites. This manual can also assist you ifyou want to perform a more customized installation of DB2 UniversalDatabase, or if you have trouble performing the installation as described here.
2. Use the DB2 installation media provided with Tivoli Enterprise DataWarehouse.
3. Complete the planning worksheet in “Planning worksheet for creating DB2users on a UNIX system” on page 51.
4. Log on to the computer as a user with sufficient authority. On UNIX systems,you must be logged in as a user with root authority.For details about the authority required to install DB2 products, see IBM DB2Universal Database for UNIX Quick Beginnings.
5. Use the db2setup utility to install DB2 for AIX:a. If the system does not use Network Information Service (NIS), let the
db2setup utility automatically create DB2 users and groups. Ensure that theDB2 users and groups you specify to create do not already exist.If the system uses NIS, use the standard system administration tools tocreate DB2 users and groups before starting the db2setup utility.Create the following users:v The instance owner, typically db2inst1v The fenced user, typically db2fenc1v The administration server user, typically db2as
Create the following groups:v The DB2 administrators group, typically db2admin1v The fenced user group, typically db2fadm1v The administration server group, typically db2asgrp
b. Insert the DB2 product CD into the CD-ROM drive.c. Mount the CD file system. For instructions for mounting a CD file system
on AIX, see “Mounting the CD on AIX” on page 316.d. Change to the directory where the CD is mounted by entering the cd /cdrom
command, where cdrom is the mount point of your product CD.e. Enter the ./db2setup command.f. In the DB2 Setup Utility window, select Install and press Enter.
90 Installing and Configuring Tivoli Enterprise Data Warehouse
g. In the Install DB2 V7 window, select DB2 UDB Enterprise Edition. Use theTab key to move between available options and fields. Press Enter to selector deselect a field or option. Selected options are denoted by an asterisk.
h. Select Customize to view and change the optional components that will beinstalled for DB2 UDB Enterprise Edition,, and then press Enter.
i. In the list of product features, select Control Center.j. Select OK and then press Enter to continue the installation process or select
Cancel and press Enter to go back to a previous window. Select Help andpress Enter for more information or for assistance during the installation ofany DB2 product.
When the installation is complete, your DB2 software is installed in the/usr/lpp/db2_07_01/ directory.
6. Test the connection by completing the following steps:a. Log on as the instance user.b. To list the local databases, enter the following command:
db2 list database directory
In most cases, the command lists at least one database, even in newinstallations.
c. If the command does not list any databases, create a database using thefollowing command:db2 create database name
The variable name is a name you choose for the new database.d. To test a local connection, enter the following command:
db2 connect to name user userName using password
The variable name is the name of a local database returned by the db2 listdatabase directory command or the name of the database you created withthe db2 create database command. The variables userName and password arethe user name and password you specified during the DB2 installation.
If this command is successful, DB2 Universal Database Enterprise Edition isinstalled and ready for remote connections. If the command is unsuccessful,see the DB2 documentation listed in “DB2 Universal Database publications”on page xiv for troubleshooting information.
7. If you have Lightweight Directory Access Protocol (LDAP), make sure that it isdisabled for this DB2 instance.In a DB2 command window, run the following command:db2set -all | more
Examine the value of DB2_ENABLE_LDAP. If this value is listed and is set toYES, disable LDAP and restart the DB2 server by running the followingcommands in a DB2 command window:db2set db2_enable_ldap=NOdb2stop forcedb2start
If the value is not listed or is set to NO, then no action is required.8. Install DB2 Warehouse Manager on every computer that will be a DB2 remote
warehouse agent site. This installs the warehouse agent. See “Installing DB2
Chapter 6. Installing Tivoli Enterprise Data Warehouse to use DB2 remote warehouse agents 91
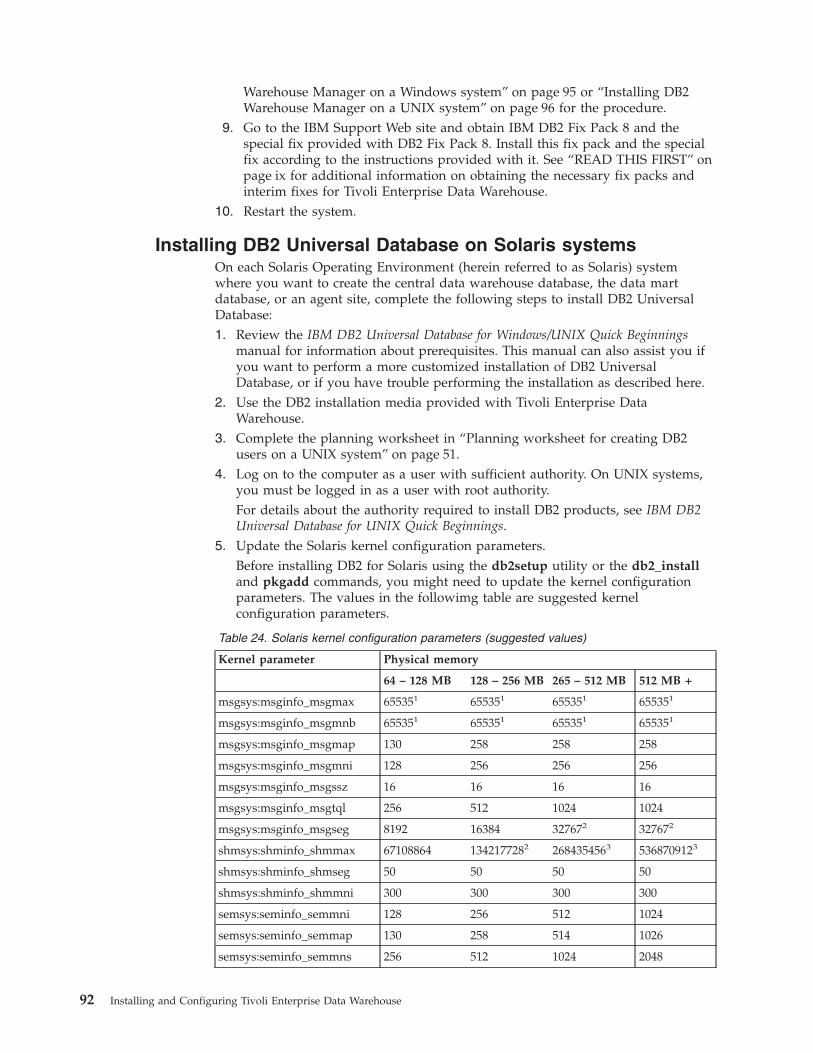
Warehouse Manager on a Windows system” on page 95 or “Installing DB2Warehouse Manager on a UNIX system” on page 96 for the procedure.
9. Go to the IBM Support Web site and obtain IBM DB2 Fix Pack 8 and thespecial fix provided with DB2 Fix Pack 8. Install this fix pack and the specialfix according to the instructions provided with it. See “READ THIS FIRST” onpage ix for additional information on obtaining the necessary fix packs andinterim fixes for Tivoli Enterprise Data Warehouse.
10. Restart the system.
Installing DB2 Universal Database on Solaris systemsOn each Solaris Operating Environment (herein referred to as Solaris) systemwhere you want to create the central data warehouse database, the data martdatabase, or an agent site, complete the following steps to install DB2 UniversalDatabase:1. Review the IBM DB2 Universal Database for Windows/UNIX Quick Beginnings
manual for information about prerequisites. This manual can also assist you ifyou want to perform a more customized installation of DB2 UniversalDatabase, or if you have trouble performing the installation as described here.
2. Use the DB2 installation media provided with Tivoli Enterprise DataWarehouse.
3. Complete the planning worksheet in “Planning worksheet for creating DB2users on a UNIX system” on page 51.
4. Log on to the computer as a user with sufficient authority. On UNIX systems,you must be logged in as a user with root authority.For details about the authority required to install DB2 products, see IBM DB2Universal Database for UNIX Quick Beginnings.
5. Update the Solaris kernel configuration parameters.Before installing DB2 for Solaris using the db2setup utility or the db2_installand pkgadd commands, you might need to update the kernel configurationparameters. The values in the followimg table are suggested kernelconfiguration parameters.
Table 24. Solaris kernel configuration parameters (suggested values)
Kernel parameter Physical memory
64 – 128 MB 128 – 256 MB 265 – 512 MB 512 MB +
msgsys:msginfo_msgmax 655351 655351 655351 655351
msgsys:msginfo_msgmnb 655351 655351 655351 655351
msgsys:msginfo_msgmap 130 258 258 258
msgsys:msginfo_msgmni 128 256 256 256
msgsys:msginfo_msgssz 16 16 16 16
msgsys:msginfo_msgtql 256 512 1024 1024
msgsys:msginfo_msgseg 8192 16384 327672 327672
shmsys:shminfo_shmmax 67108864 1342177282 2684354563 5368709123
shmsys:shminfo_shmseg 50 50 50 50
shmsys:shminfo_shmmni 300 300 300 300
semsys:seminfo_semmni 128 256 512 1024
semsys:seminfo_semmap 130 258 514 1026
semsys:seminfo_semmns 256 512 1024 2048
92 Installing and Configuring Tivoli Enterprise Data Warehouse
Table 24. Solaris kernel configuration parameters (suggested values) (continued)
Kernel parameter Physical memory
64 – 128 MB 128 – 256 MB 265 – 512 MB 512 MB +
semsys:seminfo_semmnu 256 512 1024 2048
semsys:seminfo_semume 50 50 50 50
1. The msgsys:msginfo_msgmnb and msgsys:msginfo_msgmax parameters must be set to65535 or larger.
2. The msgsys:msgsem parameter must be set no higher than 32767.
3. The shmsys:shminfo_shmmax parameters should be set to the suggested value, or 90%of the physical memory (in bytes), whichever is higher. For example, if you have 196 MBof physical memory in your system, set the shmsys:shminfo_shmmax parameter to184968806 (196*1024*1024*0.9).
To set a kernel parameter, add a line at the end of the /etc/system file asfollows:set parameter_name = value
For example, to set the value of the msgsys:msginfo_msgmax parameter, addthe following line to the end of the /etc/system file:set msgsys:msginfo_msgmax = 65535
Sample files for updating the kernel configuration parameters are provided inthe /opt/IBMdb2/V7.1/cfg/ directory, or on your DB2 product CD in the/db2/install/samples/ directory. The names for these files are as follows:
kernel.param.64MBFor systems with 64 MB–128 MB of physical memory
kernel.param.128MBFor systems with 128 MB–256 MB of physical memory
kernel.param.256MBFor systems with 256 MB–512 MB of physical memory
kernel.param.512MBFor systems with 512 MB–1 GB of physical memory
Depending upon the amount of physical memory in your system, append theappropriate kernel configuration parameter file to the /etc/system file. Ifnecessary, change the value of the shmsys:shminfo_shmmax parameter asdescribed in table note 3.
6. After updating the /etc/system file, reboot the system.7. Install DB2 for Solaris using the db2setup utility by completing the following
steps:a. If the system does not use Network Information Service (NIS), let the
db2setup utility automatically create DB2 users and groups. Ensure that theDB2 users and groups you specify to create do not already exist.If the system uses NIS, use the standard system administration tools tocreate DB2 users and groups before starting the db2setup utility.Create the following users:v The instance owner, typically db2inst1v The fenced user, typically db2fenc1
Chapter 6. Installing Tivoli Enterprise Data Warehouse to use DB2 remote warehouse agents 93
v The administration server user, typically db2as
Create the following groups:v The DB2 administrators group, typically db2admin1v The fenced user group, typically db2fadm1v The administration server group, typically db2asgrp
b. Insert the DB2 product CD into the CD-ROM drive.c. Insert and mount your DB2 product CD.d. Mount the CD file system. For instructions for mounting a CD on Solaris,
see “Mounting the CD-ROM on Solaris” on page 317.e. Change to the directory where the CD is mounted by entering the cd /cdrom
command, where cdrom is the mount point of your product CD.f. Enter the ./db2setup command.g. In the DB2 Setup Utility window, select Install and press Enter.h. In the Install DB2 V7 window, select DB2 UDB Enterprise Edition. Use the
Tab key to move between available options and fields. Press Enter to selector deselect a field or option. Selected options are denoted by an asterisk.
i. Select Customize to view and change the optional components that will beinstalled for DB2 UDB Enterprise Edition, and then press Enter.
j. In the list of product features, select Control Center.k. Select OK and then press Enter to continue the installation process or select
Cancel and press Enter to go back to a previous window. Select Help andpress Enter for more information or for assistance during the installation ofany DB2 product.
When installation is complete, the DB2 software will be installed in the/opt/IBMdb2/V7.1/ directory.
8. Test the connection by completing the following steps:a. Log on as the instance user.b. To list the local databases, enter the following command:
db2 list database directory
In most cases, the command lists at least one database, even in newinstallations.
c. If the command does not list any databases, create a database using thefollowing command:db2 create database name
The variable name is a name you choose for the new database.d. To test a local connection, enter the following command:
db2 connect to name user userName using password
The variable name is the name of a local database returned by the db2 listdatabase directory command or the name of the database you created withthe db2 create database command. The variables userName and password arethe user name and password you specified during the DB2 installation.
If this command is successful, DB2 Universal Database Enterprise Edition isinstalled and ready for remote connections. If the command is unsuccessful,see the DB2 documentation listed in “DB2 Universal Database publications”on page xiv for troubleshooting information.
94 Installing and Configuring Tivoli Enterprise Data Warehouse
9. If you have Lightweight Directory Access Protocol (LDAP), make sure that it isdisabled for this DB2 instance.In a DB2 command window, run the following command:db2set -all | more
Examine the value of DB2_ENABLE_LDAP. If this value is listed and is set toYES, disable LDAP and restart the DB2 server by running the followingcommands in a DB2 command window:db2set db2_enable_ldap=NOdb2stop forcedb2start
If the value is not listed or is set to NO, then no action is required.10. Install DB2 Warehouse Manager on every computer that will be a DB2 remote
warehouse agent site. This installs the warehouse agent. See “Installing DB2Warehouse Manager on a Windows system” or “Installing DB2 WarehouseManager on a UNIX system” on page 96 for the procedure.
11. Go to the IBM Support Web site and obtain IBM DB2 Fix Pack 8 and thespecial fix provided with DB2 Fix Pack 8. Install this fix pack and the specialfix according to the instructions provided with it. See “READ THIS FIRST” onpage ix for additional information on obtaining the necessary fix packs andinterim fixes for Tivoli Enterprise Data Warehouse.
12. Restart the system.
Obtaining bash for DB2 remote warehouse agent installationOn UNIX, bash is required to run the SQLScript.sh file in order to run ETLprocesses remotely. By default, bash is installed on Windows systems wheninstalling Tivoli Enterprise Data Warehouse. You must obtain and install bash onany AIX and Solaris machines on which a DB2 remote warehouse agent isinstalled. At the time of this publication, you can obtain bash from the followingWeb sites:v http://www-1.ibm.com/servers/aix/products/aixos/linux/download.htmlv http://www.sunfreeware.com/programlist.html
Installing DB2 Warehouse ManagerThis step installs DB2 Warehouse Manager on the computers in your deployment.Install DB2 Warehouse Manager on each computer where you plan to create a DB2warehouse agent site.
The following sections provide information specific to the following operatingsystems:v “Installing DB2 Warehouse Manager on a Windows system”v “Installing DB2 Warehouse Manager on a UNIX system” on page 96
Installing DB2 Warehouse Manager on a Windows systemTo install a warehouse agent on a Windows system:1. Close all programs.2. Insert the DB2 Warehouse Manager CD into your CD-ROM drive. Use the CD
shipped with Tivoli Enterprise Data Warehouse to ensure that you have thecorrect version.
3. In the launchpad, click Install.
Chapter 6. Installing Tivoli Enterprise Data Warehouse to use DB2 remote warehouse agents 95
4. In the Select Products window, make sure that DB2 Warehouse Manager isselected, and then click Next.
5. In the Select Installation Type window, click Custom, and then click Next.6. In the Select DB2 Components window, select Warehouse Agent and
Documentation, and then click Next.7. In the Start Copying Files window, review your selections. If you want to
change any of your selections, click Back to return to the window where youcan change the selection. Click Next to begin copying files.
8. In the Setup Complete window, click Finish to restart the computer.
Installing DB2 Warehouse Manager on a UNIX systemTo install a warehouse agent on a UNIX system using the db2setup utility:1. Log in as a user with root authority.2. Insert the DB2 Warehouse Manager CD into your CD-ROM drive. Use the CD
shipped with Tivoli Enterprise Data Warehouse to ensure that you have thecorrect version.
3. Mount the CD-ROM file system. For instructions for mounting a CD on UNIX,see “Mounting a CD on UNIX systems” on page 316.
4. Change to the directory where the CD is mounted by entering the cd /cdromcommand, where cdrom is the mount point of the CD-ROM file system.
5. Enter the ./db2setup command.6. In the Install DB2 V7 window, select DB2 Data Warehouse Agent from the list
of products.7. In the Configuration — DB2 Data Warehouse Agent Services window, accept
the default service names and port numbers.8. In the Create DB2 Services window, accept the default selections Do not create
a DB2 instance and Do not create the Administration Server, and then clickOK.When the installation process completes, your warehouse agent is installed inthe following directory:v On AIX systems, the /usr/lpp/db2_07_01/ directoryv On Solaris Operating Environment (herein referred to as Solaris) systems, the
/opt/IBMdb2/V7.1/ directory
Installing Tivoli Enterprise Data Warehouse componentsThis section provides instructions for installing the Tivoli Enterprise DataWarehouse control server, report server, and for creating the central datawarehouse database and data mart database.
About the installation wizardUnderstanding the following items about the installation wizard helps yousuccessfully use the wizard to install Tivoli Enterprise Data Warehouse.v The installation wizard installs Tivoli Enterprise Data Warehouse components
only on the local system. When selecting the features you want to install, selectonly the ones that you want installed on the system where you are running thewizard.If the control server is not on the same system as both the central datawarehouse and data mart servers, databases are created and cataloged on the
96 Installing and Configuring Tivoli Enterprise Data Warehouse
remote systems during the installation of the control server component.However, no Tivoli Enterprise Data Warehouse files are written to the remotesystems.
v The Tivoli Enterprise Data Warehouse installation wizard copies itself from theCD to temporary space on your system. This lets you use the CD-ROM drive toinsert other installation CDs for additional language support or warehousepacks. You can remove the installation CD from the CD-ROM drive as soon asthe Welcome window appears.
v The installation program prompts for all of the information needed to performthe installation before beginning to install any components. This means youpotentially insert the language support and warehouse pack CDs twice: once toselect and validate the source directory and again when it is time to install thatcomponent.To avoid this, the installation program gives you the ability to defer thevalidation of the installation source locations for additional language supportand warehouse packs until the wizard is ready to install that component. Todecide whether to defer validation, consider the following:– Deferring validation until the media is required for the installation of a
specific component prevents your having to insert each CD twice, but addsthe potential for an installation failure if you do not correctly specify thelocation.
– Validating the media at the time the location is specified identifiestypographical and directory selection errors as soon as they are made.However, to perform validation, the installation media must be available. Ifyou are installing from CDs, this means you insert each CD twice. The wizardprompts you when it is time for each CD.You can avoid this by copying the installation CDs onto a local hard drive ora shared network file system. This is suggested when performing adistributed installation, if you have a network file system that is accessiblefrom all the systems on which you plan to install Tivoli Enterprise DataWarehouse components.
v The installation process does not copy the installation wizard onto your system.Be sure to keep the CD in a safe place or copy it to your system to ensure thatyou have the installation wizard when you need to install additional warehousepacks. If you copy it to network space, copy the entire CD. Copying only thewizard’s executable files is not sufficient.
v The installation wizard defines the TWH_TOPDIR environment variable on eachsystem where it installs a component of Tivoli Enterprise Data Warehouse. Thisvariable points to the directory in which Tivoli Enterprise Data Warehouse wasinstalled.
v The installation process does not validate DB2 user IDs and passwords. Ensureyou enter these values correctly to avoid errors in subsequent installationprocedures.
Performing the installationTo perform the installation, complete the following steps on the computer that willbe the control server. These steps use the worksheets you completed in item 1 of“Preparing the environment” on page 85.1. Install Tivoli Enterprise Data Warehouse on the system that is to be the control
server by completing the following steps:a. Start the Tivoli Enterprise Data Warehouse installation wizard.
Chapter 6. Installing Tivoli Enterprise Data Warehouse to use DB2 remote warehouse agents 97
The installation wizard is located in the root directory of the TivoliEnterprise Data Warehouse CD. Use the program appropriate to theoperating system on which you are installing:v Windows: setup.exe
v UNIX: setup_unix.sh
If you want the installation wizard to use another temporary directory, see“Specifying an alternate temporary directory” on page 316 for an alternateprocedure.
b. Specify Custom/Distributed when asked for the type of installation.c. Select the Tivoli Enterprise Data Warehouse control server feature.
Note: The installation wizard displays an additional feature, Installationtools and scripts. This feature is required for each of the TivoliEnterprise Data Warehouse components, but you do not have toselect it manually. It is automatically included when it is required. Itis not needed when installing warehouse packs (listed in theinstallation wizard as Application ETL and report packages).
d. Complete the installation wizard, providing the values you collected inTable 17 on page 46, Table 18 on page 47, and Table 19 on page 48.
e. Restart the system.2. Install Tivoli Enterprise Data Warehouse on the system that is to be the report
server by completing the following steps on that system:a. Start the Tivoli Enterprise Data Warehouse installation wizard.
The installation wizard is located in the root directory of the TivoliEnterprise Data Warehouse CD. Use the program appropriate to theoperating system on which you are installing:v Windows: setup.exe
v UNIX: setup_unix.sh
If you want the installation wizard to use another temporary directory, see“Specifying an alternate temporary directory” on page 316 for an alternateprocedure.
b. Specify Custom/Distributed when asked for the type of installation.c. Select the Report interface feature. During a distributed installation on AIX
or Linux, when the feature selection window of the Tivoli Enterprise DataWarehouse installation wizard is displayed, you must wait for the screen todisplay and then redisplay before making any selections. If you do not wait,your selections are discarded.
d. Complete the installation wizard, providing the values you collected inTable 17 on page 46, Table 18 on page 47, and Table 19 on page 48.
e. Optionally install language support. Language support is installed only onthe report server, not on the control server, the central data warehouseserver, or the data mart server.
f. When the installation wizard finishes you are prompted to reboot thecomputer. The wizard has finished but the IBM Console still needs to finishbuilding its help set. Wait for the help set to finish building. This processmay take up to 15 minutes.To determine whether the help set build is complete, look for the completionmessage in the Tivoli Presentation Services installation log. This log is indirectory PS_directory/log/fwp_mcr, where PS_directory is the targetdirectory you specified for Tivoli Presentation Services. The logs are named
98 Installing and Configuring Tivoli Enterprise Data Warehouse

stdoutn. Look for the following message in the most recent stdoutn file. Insome cases, the message can be in the second most recent stdoutn file.FWP1734I The utilty that was started by the Management ComponentRepository to build the help set has completed successfully.
Do not restart the system until the help set is complete. If you do, follow theprocedure documented in the Tivoli Enterprise Data Warehouse Release Notes tobuild the help set.
g. Restart the report server.h. Optionally, enable secure sockets layer (SSL) connections for the IBM
Console, using the instructions in Chapter 7, “Enabling Secure Sockets Layerfor the Web version of the IBM Console”, on page 109.
3. Install Tivoli Enterprise Data Warehouse on the system that is to be the host forthe central data warehouse database and the system that is to be the host forthe data mart database by completing the following steps on those systems,respectively:a. Start the Tivoli Enterprise Data Warehouse installation wizard.
The installation wizard is located in the root directory of the TivoliEnterprise Data Warehouse CD. Use the program appropriate to theoperating system on which you are installing:v Windows: setup.exe
v UNIX: setup_unix.sh
If you want the installation wizard to use another temporary directory, see“Specifying an alternate temporary directory” on page 316 for an alternateprocedure.
b. Specify Custom/Distributed when asked for the type of installation.c. For features to install, select the following, depending upon the components
you are installing:v Central Data Warehouse
v Data mart
v Installation scripts and tools
During a distributed installation on AIX or Linux, when the featureselection window of the Tivoli Enterprise Data Warehouse installationwizard is displayed, you must wait for the screen to display and thenredisplay before making any selections. If you do not wait, your selectionsare discarded.
d. Type the name of the directory where the Tivoli Enterprise Data Warehousecomponents are to be installed.
e. Confirm the host name of the local system.f. Type the DB2 user name and password for the local system.g. Type connection information (user name, password, host name, and
database port) for the existing DB2 instance on the system that contains thecentral data warehouse and data mart databases.
Note: The central data warehouse and data mart databases were createdand configured in the DB2 instance during the installation of thecontrol server.
h. Complete the installation wizard.i. Restart the system.
Chapter 6. Installing Tivoli Enterprise Data Warehouse to use DB2 remote warehouse agents 99
Verifying the installation of Tivoli Enterprise Data Warehousecore componentsAfter you have installed the Tivoli Enterprise Data Warehouse core components,you can verify that the installation is complete by performing the following checks:v Make sure the installation wizard completion window does not list any errors.
See “Messages” on page 277 for more information.v If the completion window lists warnings, check the TWH.log to ensure that the
warnings can safely be ignored.If you find errors or warnings that may need corrective action, see Chapter 17,“Problem determination”, on page 273 for assistance.
v Ensure the $TWH_TOPDIR/.twh_core_v1.1.0.marker file has been installed.v To verify the installation of Tivoli Enterprise Data Warehouse Fix Pack 2:
– Ensure the $TWH_TOPDIR/.twh_core_v1.1.2.marker file has been installed.– Check the $TWH_TOPDIR/install/logs/patch_1.1.2/twh_install_v1.1.2.log file
for errors.v On the Tivoli Enterprise Data Warehouse control server, verify the following
databases have been created. You can use th DB2 Control Center or a DB2command to do this.:– TWH_CDW (centeral data warehouse)– TWH_MART (data mart)– TWH_MD (control)
100 Installing and Configuring Tivoli Enterprise Data Warehouse
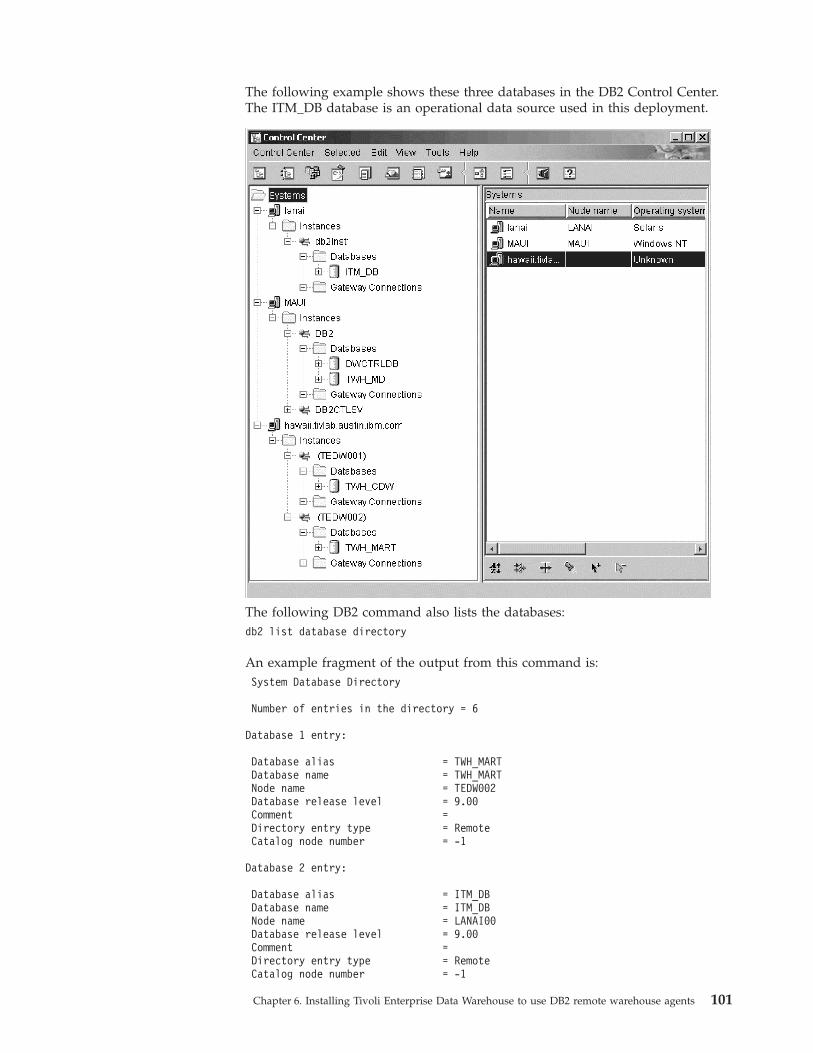
The following example shows these three databases in the DB2 Control Center.The ITM_DB database is an operational data source used in this deployment.
The following DB2 command also lists the databases:db2 list database directory
An example fragment of the output from this command is:System Database Directory
Number of entries in the directory = 6
Database 1 entry:
Database alias = TWH_MARTDatabase name = TWH_MARTNode name = TEDW002Database release level = 9.00Comment =Directory entry type = RemoteCatalog node number = -1
Database 2 entry:
Database alias = ITM_DBDatabase name = ITM_DBNode name = LANAI00Database release level = 9.00Comment =Directory entry type = RemoteCatalog node number = -1
Chapter 6. Installing Tivoli Enterprise Data Warehouse to use DB2 remote warehouse agents 101

Database 3 entry:
Database alias = TWH_MDDatabase name = TWH_MDDatabase drive = C:\DB2Database release level = 9.00Comment =Directory entry type = IndirectCatalog node number = 0
Database 4 entry:
Database alias = TWH_CDWDatabase name = TWH_CDWNode name = TEDW001Database release level = 9.00Comment =Directory entry type = RemoteCatalog node number = -1
v Verify that the following Windows services are started on the computer for thereport server:– Server for IBM Console– Tivoli Presentation Services HTTP Administration– Tivoli Presentation Services HTTP Server– Web Services for IBM Console
v Log into the IBM Console and verify there are tasks in the Work with Reportstask group of the portfolio.
Configuring the control databaseThis section contains instructions for configuring the control database. Thisdatabase contains metadata for Tivoli Enterprise Data Warehouse and the DB2Data Warehouse Center.
To configure the control database, complete the following steps:1. Configure the control database for Tivoli Enterprise Data Warehouse by
completing the following steps:a. On the Windows taskbar, click Start → Programs → IBM DB2 → Control
Center.b. From the DB2 Control Center, start the DB2 Data Warehouse Center by
clicking Tools → Data Warehouse Center.c. In the DB2 Data Warehouse Center Logon window, click Advanced. You do
not need to provide login information.d. In the Advanced window, type TWH_MD in the Control database field.e. Do not change the schema name.f. In the Advanced login window, type the DB2 user name and password for
the control server, and then click OK.g. When the Processing has completed message appears, click Cancel. The
OK button might not become active; look for the Processing has completedmessage.
h. Click Cancel to close the logon panel.2. Configure the control database for the DB2 Warehouse Control Database
Manager by completing the following steps:
102 Installing and Configuring Tivoli Enterprise Data Warehouse
a. Open the DB2 Data Warehouse Center - Control Database Managementwindow by selecting Start → Programs → IBM DB2 → Warehouse ControlDatabase Management.
b. Type TWH_MD in New control database.c. Do not change the schema name.d. Type the DB2 user ID and password for the control database, and then click
OK.e. When the Processing has completed message appears, click Cancel.
The OK button might not become active; look for the Processing hascompleted message.
Defining a DB2 warehouse agent site1. Open the DB2 Data Warehouse Center.2. Expand the Administration folder.3. From the Data Warehouse Center tree, expand the Administration folder.4. Right-click the Agent Sites folder and then select Define. The Define Agent
Site window opens. Use this window to define a DB2 warehouse agent site forthe central data warehouse and data mart server. The DB2 warehouse agent siteidentifies the system on which the control server runs the DB2 warehouseagent.v On the Agent Site page, enter the DB2 warehouse agent name, host name,
operating system type, user name, and password. The user name is theinstance owner of the DB2 instance for the central data warehouse and datamart databases.
v On the Programs page, move SQLScript and rollup to the list of selectedprograms.
5. Click OK to save.
For more information about defining DB2 warehouse agent sites, see IBM DB2Universal Database Data Warehouse Center Administration Guide.
Configuring DB2 remote warehouse agent sitesPerform the following steps on each UNIX computer that will be a DB2 remotewarehouse agent site. You already installed DB2 Warehouse Manager on eachcomputer in “Installing DB2 Warehouse Manager” on page 95. No otherconfiguration operations are required for a DB2 remote warehouse agent site on aWindows system.
Configuring a DB2 remote warehouse agent site on a UNIXsystem
This section discusses:v Configuring the DB2 remote warehouse agent on AIXv “Configuring the DB2 remote warehouse agent on Solaris” on page 105
Configuring the DB2 remote warehouse agent on AIXTo configure the DB2 remote warehouse agent, perform the following tasks:v Modifying the DB2 remote warehouse agent environment settingsv Switching to the version of the DB2 remote warehouse agent that uses the
Merant ODBC Driver Manager
Chapter 6. Installing Tivoli Enterprise Data Warehouse to use DB2 remote warehouse agents 103
v Restarting the DB2 remote warehouse agent
For more information about linking the DB2 remote warehouse agent to an ODBCdriver manager, see IBM DB2 Universal Database Data Warehouse CenterAdministration Guide.
Information in this section is specific to AIX. For the corresponding Solarisconfiguration information, see “Configuring the DB2 remote warehouse agent onSolaris” on page 105.
Modifying the DB2 remote warehouse agent environment settings: To use theDB2 remote warehouse agent, you must set the environment variables for the DB2remote warehouse agent by completing the following steps:1. Logged in as root, change to the DB2 program directory by entering the
following command:cd /usr/lpp/db2_07_01/bin
2. Edit the file IWH.environment and make the following changes:v Add the following lines after the line that sets the CLASSPATH environment
variable. Set the TWH_TOPDIR environment variable to the name of thedirectory in which you installed Tivoli Enterprise Data Warehouse on thecentral data warehouse and data mart server.TWH_TOPDIR=/data/TWHexport TWH_TOPDIR
PATH=${PATH?}:${TWH_TOPDIR?}/tools/binexport PATH
LIBPATH=${LIBPATH:-""}:${DB2DIR?}/odbc/libexport LIBPATH
ODBCINI=${DB2DIR?}/odbc/.odbc.iniexport ODBCINI
v Edit the line that sets the DB2INSTANCE environment variable and changethe DB2 instance name to the name of the instance containing the centraldata warehouse and data mart databases, as follows:DB2INSTANCE=name_of_your_DB2_instance
Switching to the version of the DB2 remote warehouse agent that uses theMerant ODBC Driver Manager: The DB2 remote warehouse agent must beconfigured to use the ODBC driver manager that is supported by Tivoli EnterpriseData Warehouse, the Merant ODBC Driver Manager. To change which drivermanager the DB2 remote warehouse agent uses, complete the following steps1. Logged in as root, change to the following directory:
cd /usr/lpp/db2_07_01/bin
2. Enter the following command to change ODBC driver managers:sh ./IWH.agent.db.interface intersolv
A message similar to the following is displayed:Establishing soft link to /usr/lpp/db2_07_01/bin/IWH2AGNT.ivodbcCompleted soft link to /usr/lpp/db2_07_01/bin/IWH2AGNT.ivodbc
Restarting the DB2 remote warehouse agent: Restart the DB2 remote warehouseagent so that it runs using the new settings. Complete the following steps:1. Restart the Warehouse Agent Daemon by entering the following commands:
104 Installing and Configuring Tivoli Enterprise Data Warehouse
ps -ef|grep vwdaemonkill -3 pid_of_/usr/bin/vwdaemon
2. Verify that the Warehouse Agent Daemon restarted successfully by entering thefollowing command:cat /var/IWH/vwdaemon.log
If the daemon did not restart successfully, the log contains an error message.
Configuring the DB2 remote warehouse agent on SolarisTo configure the DB2 remote warehouse agent, perform the following tasks:v Modifying the DB2 remote warehouse agent environment settingsv Switching to the version of the DB2 remote warehouse agent that uses the
Merant ODBC Driver Managerv Restarting the DB2 remote warehouse agent
For more information about linking the DB2 remote warehouse agent to an ODBCdriver manager, see IBM DB2 Universal Database Data Warehouse CenterAdministration Guide.
Information in this section is specific to Solaris. For the corresponding AIXconfiguration information, see “Configuring the DB2 remote warehouse agent onAIX” on page 103.
Modifying the DB2 remote warehouse agent environment settings: To use theDB2 remote warehouse agent, you must set the environment variables for the DB2remote warehouse agent by completing the following steps:1. To determine whether the DB2 remote warehouse agent is installed on a Solaris
system, enter the following command:pkginfo | grep db2
The DB2 warehouse agent package at V7.2 Fix Pack 8 displays:application db2dwa71 Data Warehouse Agent (PTF 1720500-024)
2. Logged in as root, change to the DB2 program directory by entering thefollowing command:cd /opt/IBMdb2/V7.1/bin
3. Edit the file IWH.environment and make the following changes:v Add the following lines after the line that sets the CLASSPATH environment
variable. Set the TWH_TOPDIR environment variable to the name of thedirectory in which you installed Tivoli Enterprise Data Warehouse on thecentral data warehouse and data mart server.TWH_TOPDIR=/data/TWHexport TWH_TOPDIR
PATH=${PATH?}:${TWH_TOPDIR?}/tools/binexport PATH
LIBPATH=${LIBPATH:-""}:${DB2DIR?}/odbc/libexport LIBPATH
ODBCINI=${DB2DIR?}/odbc/.odbc.iniexport ODBCINI
v Edit the line that sets the DB2INSTANCE environment variable and changethe DB2 instance name to the name of the instance containing the centraldata warehouse and data mart databases, as follows:DB2INSTANCE=name_of_your_DB2_instance
Chapter 6. Installing Tivoli Enterprise Data Warehouse to use DB2 remote warehouse agents 105
Switching to the version of the DB2 remote warehouse agent that uses theMerant ODBC Driver Manager: The DB2 remote warehouse agent must beconfigured to use the ODBC driver manager that is supported by Tivoli EnterpriseData Warehouse, the Merant ODBC Driver Manager. To change which drivermanager the DB2 remote warehouse agent uses, complete the following steps1. Logged in as root, change to the following directory:
cd /opt/IBMdb2/V7.1/bin
2. Enter the following commands to change ODBC driver managers:rm /usr/bin/IWH2AGNTln -sf /opt/IBMdb2/V7.1/bin/IWH2AGNT.ivodbc /usr/bin/IWH2AGNT
A message similar to the following is displayed:Establishing soft link to /opt/IBMdb2/V7.1/bin/IWH2AGNT.ivodbcCompleted soft link to /opt/IBMdb2/V7.1/bin/IWH2AGNT.ivodbc
Restarting the DB2 remote warehouse agent: Restart the DB2 remote warehouseagent so that it runs using the new settings. Complete the following steps:1. Restart the Warehouse Agent Daemon by entering the following commands:
ps -ef|grep vwdaemonkill -3 pid_of_/usr/bin/vwdaemon
2. Verify that the Warehouse Agent Daemon restarted successfully by entering thefollowing command:cat /var/IWH/vwdaemon.log
If the daemon did not restart successfully, the log contains an error message.
The following versions (or higher) of the database clients are recommended:v Oracle: Client Version 8.1.6, Installation Type: Programmerv Sybase: Open Client Version 11.1.1 EBF8376v Informix: Client SDK 2.70 UC3-1
The following is a sample odbc.ini file with DB2, Oracle, Sybase, and Informixentries. In this example, the Sybase client is installed in /data/sybase_client andthe Sybase shared library is ibsyb15.so.[ODBC Data Sources]ptapm=IBM DB2 ODBC DRIVERjcook1=Oracle 8.1lvassberg=Sybase 11ping5=Informix 9.1
[ptapm]Driver=/opt/IBMdb2/V7.1/lib/libdb2_36.soDescription=DB2 ODBC DatabaseDatabase=ptapm
[lvassberg]Driver=/opt/IBMdb2/V7.1/odbc/lib/ibsyb15.soDescription=Sybase 11 ODBC DatabaseDatabase=tecServerName=lvassbergInterfacesFile=/data/syb_client/interfaces
[jcook1]Driver=/opt/IBMdb2/V7.1/odbc/lib/ibor815.soDescription=Oracle 8 ODBC DatabaseServerName=jcook1
[ping5]
106 Installing and Configuring Tivoli Enterprise Data Warehouse
Driver=/opt/IBMdb2/V7.1/odbc/lib/ibinf15.soDescription=Informix 9 ODBC DatabaseDatabase=tedwHostName=pingpongServerName=pingpong5Service=inf5
For all databases, the /opt/IBMdb2/V7.1/bin/IWH.environment file must containthe following lines, where Tivoli Enterprise Data Warehouse is installed in thedirectory /data/TWH.# start TEDW env vars
TWH_TOPDIR=/data/TWHexport TWH_TOPDIR
PATH=${PATH?}:${TWH_TOPDIR?}/tools/binexport PATH
# end TEDW env vars
LD_LIBRARY_PATH=$LD_LIBRARY_PATH:/opt/IBMdb2/V7.1/odbc/libexport LD_LIBRARY_PATH
ODBCINI=${DB2DIR?}/odbc/.odbc.iniexport ODBCINI
v For Oracle support, here are sample entries:ORACLE_HOME=/data/ora_client/OraHome1ORACLE_SID=pingpongPATH=/data/ora_client/OraHome1/bin:$PATHLD_LIBRARY_PATH=/data/ora_client/jre/1.1.7/lib/sparc/green_threads:/data/ora_client/OraHome1/lib:$LD_LIBRARY_PATHexport LIBPATH PATH ORACLE_HOME ORACLE_SID
In this example, the Oracle client is installed in /data/ora_client. Note that thegreen_threads version of the JRE included in the Oracle client is used. OtherOracle client tools, such as sqlplus, might require the native_threads version ofthe JRE.
v For Sybase support, the following is a sample stanza:SYBASE=/data/syb_clientINTERFACES=/data/syb_client/interfacesPATH=/data/syb_client:$PATHLD_LIBRARY_PATH=/data/syb_client/lib:$LD_LIBRARY_PATHexport LIBPATH PATH SYBASE INTERFACES
v For Informix support, the following is a sample stanza:INFORMIXDIR=/data/inf_clientINFORMIXSERVER=pingpong5PATH=/data/inf_client/bin:/data/inf_client:$PATHLD_LIBRARY_PATH=/data/inf_client/lib:/data/inf_client/lib/esql:$LD_LIBRARY_PATHexport LIBPATH PATH INFORMIXDIR INFORMIXSERVER
In the preceding example, the Informix client is installed in /data/inf_client.
For the entry in $INFORMIXDIR/etc/sqlhosts, you might be required to use theontlitcp protocol, for example:pingpong5 ontlitcp pingpong inf5
Completing the installationAfter the installation completes successfully, perform these final actions:
Chapter 6. Installing Tivoli Enterprise Data Warehouse to use DB2 remote warehouse agents 107
1. Back up the Tivoli Enterprise Data Warehouse deployment as described in“Backing up and restoring a Tivoli Enterprise Data Warehouse deployment” onpage 257.
2. Check the DB2 applications control heap size for the central data warehousedatabase to ensure it is set to at least 512 KB. This value prevents possible heapsize errors from occurring during central data warehouse ETL processing. See“Changing the DB2 heap size for the central data warehouse database” onpage 266 for the procedure.
3. Optionally, after a successful installation, delete the temporary directory createdduring the installation. This directory is named tmptedw_1_1_install. To locatethe temporary directory, see “Specifying an alternate temporary directory” onpage 316.
4. Install the Tivoli Enterprise Data Warehouse documentation by copying thecontents of the Tivoli Enterprise Data Warehouse Documentation CD to a localhard drive or shared network space.
5. Optionally, copy the Tivoli Presentation Services readme file to thedocumentation directory. The file is found on the Tivoli Enterprise DataWarehouse installation CD in the file ps_docs/readme22_en. This file containslate-breaking information and known problems about Tivoli PresentationServices, which implements the IBM Console.
6. Optionally, use the installation wizard to install the warehouse packs that allowyour Tivoli software to work with the Tivoli Enterprise Data Warehouse. Installeach warehouse pack individually, and back up your Tivoli Enterprise DataWarehouse deployment after each warehouse pack installation. Refer to thedocumentation for the warehouse pack and refer to Chapter 10, “Installing andupgrading warehouse packs”, on page 135 for instructions on installingwarehouse packs.
7. Keep the Tivoli Enterprise Data Warehouse installation CD in a safe place orcopy it to your system to ensure that you have the installation wizard whenyou need to install a warehouse pack. If you copy the CD to network space,copy the entire CD. Copying the wizard start up files is not sufficient.
108 Installing and Configuring Tivoli Enterprise Data Warehouse
Chapter 7. Enabling Secure Sockets Layer for the Webversion of the IBM Console
You can configure Tivoli Presentation Services to use the Secure Sockets Layer(SSL) protocol for the Web version of the IBM Console. This chapter describes thefollowing high-level steps in that process:1. “Preparing for configuration changes”2. “Configuring the HTTP server” on page 1113. “Verifying your configuration” on page 116
Preparing for configuration changesBefore you can configure Tivoli Presentation Services to use SSL for the Webversion of the IBM Console, you must complete the following steps:1. Ensure that all client browsers support 128-bit encryption.2. Define a user ID and password for Tivoli Presentation Services HTTP
Administration as described in “Defining a user ID and password for HTTPAdministration”.
3. On UNIX-based systems, enable Tivoli Presentation Services HTTPAdministration to update configuration files as described in “Enabling HTTPAdministration to update configuration files on UNIX-based systems” onpage 110.
Defining a user ID and password for HTTP AdministrationTivoli Presentation Services HTTP Administration is installed with authenticationenabled. To configure the Tivoli Presentation Services HTTP Server using TivoliPresentation Services HTTP Administration, you must define a valid user ID andpassword for HTTP Administration. On the computer where Web Services for theIBM Console is installed, this user ID must have the user rights to log on as aservice. Typically, a user ID that has administrator privileges is defined with thelocal security settings that are required to log on as a service.
To define a user ID and password, you can use the HTPASSWD utility that ispackaged with Tivoli Presentation Services HTTP Administration. Complete thefollowing steps:1. At a command prompt, change to the ibmhttpd subdirectory of the directory
where Tivoli Presentation Services is installed.2. Type one of the following commands, where user_ID is the user ID for logging
on to HTTP Administration:v On AIX systems:
bin/htpasswd -c conf/admin.passwd user_ID
v On Linux systems:bin/htpasswd -c conf/admin.passwd user_ID
v On Solaris systems:bin/htpasswd -c conf/admin.passwd user_ID
v On Microsoft Windows systems:htpasswd –c conf\admin.passwd user_ID
Once you enter the command, you are prompted twice for a password.
© Copyright IBM Corp. 2001, 2003 109
Enabling HTTP Administration to update configuration files onUNIX-based systems
On UNIX-based systems, you must enable Tivoli Presentation Services HTTPAdministration to update the following configuration files, whereinstallation_directory is the directory where Tivoli Presentation Services isinstalled:v installation_directory/ibmhttpd/conf/httpd.conf
v installation_directory/ibmhttpd/conf/admin.conf
The following sections describe two methods for doing this:v Changing file permissionsv Creating a user or group that represents the HTTP server
Changing file permissionsYou can use file permissions to allow Tivoli Presentation Services HTTPAdministration to update these files by temporarily changing their permissions. Tochange the file permissions for the configuration files, complete the followingsteps:1. Enter the following commands at a command prompt to change to the
directory continuing the files and list their current permissions:cd installation_directory/ibmhttpd/confls -l httpd.conf admin.conf
Make a note of the original file permissions.2. Enter the following commands:
chmod 777 httpd.confchmod 777 admin.conf
3. Perform the rest of the steps in this chapter.4. Use the chmod command to restore the original file permissions, to prevent
unauthorized access to these files.
Creating a user or group that represents the HTTP serverThe following steps outline a method of enabling Tivoli Presentation ServicesHTTP Administration to update the configuration files without changing the filepermissions:1. Create a new user or group that represents the HTTP Server. The HTTP Server
can then run as this user or group.2. Modify the User or Group sections from the httpd.conf file to reflect this user
or group ID setting:v User user_ID
v Group group_ID
3. Verify that the configuration files can be updated by this user or group ID.4. Restart the following services to enable processes to run as the new user or
group credential:v Tivoli Presentation Services HTTP Administrationv Tivoli Presentation Services HTTP Server
For information about stopping and starting these services, see Appendix D,“Starting and stopping Tivoli Presentation Services”, on page 329.
110 Installing and Configuring Tivoli Enterprise Data Warehouse

Configuring the HTTP serverThe following instructions explain how to configure the Tivoli PresentationServices HTTP Server to enable the SSL for the Web version of the IBM Console.This process consists of the following high-level steps:1. Creating a security certificate2. Connecting to the HTTP server3. Configuring the security module4. Configuring a secure host IP and an additional port for the secure server5. Configuring the virtual host structure for the secure server6. Configuring the virtual host document root for the secure server7. Setting the key file and SSL timeout values for the secure server8. Enabling SSL and determining the mode of client authorization9. Restarting services or systems
Step 1: Creating a security certificateCreate a security certificate. If you already have a security certificate that wasissued by an authorized certificate authority, go to “Step 2: Connecting to theHTTP Server” on page 114.
Otherwise, to create the certificate, you must start the key management utility forthe IBM Global Security Kit, as described in “Using the key management utility”on page 113. However, before starting the key management utility, see these
sections:v For Windows systems, see “On Windows systems: determining where the IBM
Global Security kit Is installed”.v For UNIX-based systems, see “On UNIX-based systems: ensuring the Java
directory is in the path” on page 112.
On Windows systems: determining where the IBM GlobalSecurity kit Is installedOn Windows systems, before you can start the key management utility, you mustdetermine the path where the IBM Global Security Kit is installed. To determinethis path, open a new command prompt after Tivoli Presentation Services isinstalled, and type this command:set path
In the paths that are shown, locate the gsk4 directory, which is where the IBMGlobal Security Kit is installed. For example, you might find the gsk4 directory inthe following path, where path_for_gsk_installation is also the directory where TivoliPresentation Services is installed:path_for_gsk_installation\ibm\gsk4
If you do not see the gsk4 directory in any of the paths that result from thecommand gsk4, follow these steps:1. Determine whether the gsk4 directory exists on your system. If the following
directory exists, where gsk_installation_directory is the directory where TivoliPresentation Services is installed, the Tivoli Presentation Services installationprogram has installed the IBM Global Security Kit:gsk_installation_directory\ibm\gsk4
Chapter 7. Enabling Secure Sockets Layer for the Web version of the IBM Console 111
In this case, the preceding path is the path where the IBM Global Security Kit isinstalled. Continue with item 3.
2. If you did not locate the gsk4 directory in step 1 on page 111, an instance of theIBM Global Security Kit is already installed on your system, and you mustlocate it by following these steps:a. At a command prompt, type the following command:
regedit
b. In the left navigation pane, double-click HKEY_LOCAL_MACHINE.c. Under HKEY_LOCAL_MACHINE, double-click SOFTWARE.d. Under SOFTWARE, double-click IBM.e. Under IBM, double-click GSK4.f. Under GSK4, double-click CurrentVersion.g. In the right content pane, note the value of the InstallPath key. This value is
the path where the IBM Global Security Kit is installed and is the value forgsk_installation_directory in instruction 3.
3. Add the path where the IBM Global Security Kit is installed to your systemenvironment. To do this, follow these steps:v On Windows NT systems:
a. On the desktop, right-click My Computer.b. Click Properties.c. Click the Environment tab.d. Under System Variables, select the Path variable and its value. This
variable and its value are now shown in the Variable and Value fields,respectively.
e. For the field titled Value, add the following path at the beginning, wheregsk_installation_directory is the directory where the IBM Global SecurityKit is installed:gsk_installation_directory\lib;
f. Click Set.g. Click OK.
v On Windows 2000 systems:a. On the desktop, right-click My Computer.b. Click Properties.c. Click the Advanced tab.d. Click Environment Variables.e. Under System variables, select the Path variable and its value, and click
Edit. This variable and its value are now shown in the Variable Nameand Variable Value fields, respectively.
f. For the field titled Variable Value, add the following path at thebeginning, where gsk_installation_directory is the directory where the IBMGlobal Security Kit is installed:gsk_installation_directory\lib;
g. Click OK.
On UNIX-based systems: ensuring the Java directory is in thepathThe IBM Global Security Kit uses the Java programming language. Therefore, onUNIX-based systems, ensure that the Java directory is shown in the path by typingthe following commands:
112 Installing and Configuring Tivoli Enterprise Data Warehouse
PATH=installation_directory/psjvm/jre/bin:$PATHexport PATH
Where installation_directory is the directory where Tivoli Presentation Servicesis installed
Using the key management utilityTo create the security certificate, follow these steps:1. Start the key management utility for the IBM Global Security Kit as indicated:
v On AIX systems, run this script:/usr/opt/ibm/gskit/bin/gsk4ikm
v On Linux systems, run this script:/usr/local/ibm/gsk4/bin/gsk4ikm
v On Solaris systems, run this script:/opt/ibm/gsk4/bin/gsk4ikm
v On Windows systems, run this program, where gsk_installation_directoryis the directory where the IBM Global Security Kit is installed:gsk_installation_directory\bin\gsk4ikm.exe
2. In the Key Database File menu, click New.3. In the New window:
a. For the field titled Key database type, select CMS key database file.b. For the fields titled File Name and Location, either accept the default
values, or type the name (such as key.kdb) and the directory location (suchas C:\psinstall\ibm\gsk4\bin\) for the key database file. Remember thisname and directory location because you need it for step 4 on page 116under “Step 7: Setting the key file and SSL timeout values for the secureserver” on page 116.
c. Click OK.4. In the Password Prompt window:
a. For the fields titled Password and Confirm Password, type a password. Thecharacters in the password must be from the U.S. English character set.
b. Ensure that the field titled Stash the password to a file has a check in thecheck box. If it does not, click the check box to select it.
c. Click OK.5. In the IBM Key Management window under the section titled Key database
content, select Personal Certificates, and click New Self-Signed.6. In the Create New Self-Signed Certificate window, type the values for the
following fields. For the other fields, you can accept the default values.v Key Label. This is the certificate name. Remember this name because you
need it for instruction 5 on page 116 under “Step 8: Enabling SSL anddetermining the mode of client authorization” on page 116.
v Common Name. This is the fully qualified name of the computer where WebServices for the IBM Console is installed, for example,mycomputer.raleigh.ibm.com.
v Organization. This is the name of your organization.v Validity Period. This is the number of days for which the certificate is valid.
7. Click OK.8. In the Key Database File menu, click Exit.
Chapter 7. Enabling Secure Sockets Layer for the Web version of the IBM Console 113
Step 2: Connecting to the HTTP ServerConnect to the Tivoli Presentation Services HTTP Server by following these steps:1. In your Web browser, type the following address, where computer_name is the
fully qualified name of the computer where Web Services for the IBM Consoleis running:http://computer_name
2. Click Configure server.3. When prompted, type the user ID and password that you defined in the
“Defining a user ID and password for HTTP Administration” on page 109.
Step 3: Configuring the security moduleConfigure the security module by following these steps:1. In the left navigation pane, expand the category titled Basic Settings.2. In the expanded list under Basic Settings, select Module Sequence. Ensure that
Scope is set to <GLOBAL>.3. Click Add.4. Click Select a module to add, and click the down arrow to view the associated
list of modules. In this list, select ibm_ssl (IBMModuleSSL128.dll) forWindows systems or ibm_ssl (mod_ibm_ssl_128.so) for UNIX-based systems.This selection is now shown as the value for the load module.
5. Click Apply.6. Click Close.7. Click Submit.
Note: On UNIX-based systems, ignore the message regarding the order ofmodules.
Step 4: Configuring a secure host IP and an additional port forthe secure server
Configure a secure host Internet Protocol (IP) and an additional port for the secureserver by following these steps:1. In the left navigation pane, expand the category titled Basic Settings.2. In the expanded list under Basic Settings, select Advanced Properties. Ensure
that Scope is set to <GLOBAL>.
Note: In this window, ignore the message regarding the module mod_ibm_mt.This module is not required to be loaded.
3. For the field titled Specify additional ports and IP addresses, click Add. Thevalue for the IP address should remain blank. Type the value for the port. Thisvalue is probably 443 because 443 is the default port number for the SSL.If SSL is already in use on the computer where Web Services for the IBMConsole is installed, you must use a different port number for the SSL for WebServices. Also, in the httpd.conf file, you must update the twoRedirectPermanent entries for IBMConsoleSecure with this number. Thehttpd.conf file is located in the following directory, whereinstallation_directory is the directory where Tivoli Presentation Services isinstalled:installation_directory/ibmhttpd/conf
114 Installing and Configuring Tivoli Enterprise Data Warehouse
The following sample shows the two RedirectPermanent entries forIBMConsoleSecure. For the variable SSL_port_number, you must substitute theSSL port number that you are using for Web Services for the IBM Console.RedirectPermanent /IBMConsoleSecure/https://mycomputer.raleigh.ibm.com:SSL_port_number/servlet/com.tivoli.pf.wc.WcSignOn
RedirectPermanent /IBMConsoleSecurehttps://mycomputer.raleigh.ibm.com:SSL_port_number/servlet/com.tivoli.pf.wc.WcSignOn
4. Click Apply.5. Click Close.6. If you are using the configuration where Web Services for the IBM Console is
installed on the same computer as the Server for IBM Console, you must alsofollow these steps. Otherwise, go to step 7.a. For the field titled Specify additional ports and IP addresses, click Add.
The value for the IP address should remain blank. Type 80 as the value forthe port.
b. Click Apply.7. Click Close.8. Click Submit.
Step 5: Configuring the virtual host structure for the secureserver
Configure the virtual host structure for the secure server by following these steps:1. In the left navigation pane, expand the category titled Configuration Structure.2. In the expanded list under Configuration Structure, select Create Scope.3. For the field titled Select a valid scope to insert within the scope selected in
right panel, select VirtualHost.4. For the field titled Virtual host IP address or fully qualified domain name,
type the appropriate value, for example, mycomputer.raleigh.ibm.com.5. As the value for the virtual host port, type the same number that you used for
the port in instruction 3 on page 114 under “Step 4: Configuring a secure hostIP and an additional port for the secure server” on page 114. This value isprobably 443.
6. Click Submit.
Step 6: Configuring the virtual host document root for thesecure server
Configure the virtual host document root for the secure server by following thesesteps:1. In the left navigation pane, expand the category titled Basic Settings.2. In the expanded list under Basic Settings, select Core Settings. Ensure that
Scope is set to the virtual host with which you are working, for example,<VirtualHost hostname.raleigh.ibm.com:443>.
3. Type the server name as a fully qualified domain name.4. For the document root directory name, type one of the following. Forward
slashes are required in the document root directory name.v For Windows systems, type installation_directory/ibmhttpd/htdocs, where
installation_directory is the directory where Tivoli Presentation Services isinstalled.
Chapter 7. Enabling Secure Sockets Layer for the Web version of the IBM Console 115
v For UNIX-based systems, typeinstallation_directory/ibmhttpd/htdocs/en_US, whereinstallation_directory is the directory where Tivoli Presentation Services isinstalled.
5. Click Submit.
Step 7: Setting the key file and SSL timeout values for thesecure server
Set the key file and SSL timeout values for the secure server by following thesesteps:1. In the left navigation pane, expand the category titled Security.2. In the expanded list under Security, select Server Security. Ensure that Scope
is set to <GLOBAL>.3. For the field titled Enable SSL, select No. This disables SSL for global scope.4. For the field titled Keyfile filename, type the path and file name for the key
database file, for example, C:\psinstall\ibm\gsk4\bin\key.kdb. Type the sameinformation that you used for step 3b on page 113 under “Using the keymanagement utility” on page 113.
5. Type a timeout value for SSL Version 2 session IDs.6. Type a timeout value for SSL Version 3 session IDs.7. Click Submit.
Step 8: Enabling SSL and determining the mode of clientauthorization
Enable SSL and determine the mode of client authorization by following thesesteps:1. In the left navigation pane, expand the category titled Security.2. In the expanded list under Security, select Host Authorization. Ensure that
Scope is set to the virtual host with which you are working, for example,<VirtualHost hostname.raleigh.ibm.com:443>.
3. For the field titled Enable SSL, select Yes. This enables SSL for the securevirtual host.
4. For the field titled Mode of client authentication to be used, select none.5. For the field titled Server certificate to use for this virtual host, type the
certificate name from instruction 6 on page 113 under “Using the keymanagement utility” on page 113.
6. Click Submit.
Step 9: Restarting services or systemsTo have the new SSL settings take effect, follow these steps:v On UNIX-based systems, restart the Tivoli Presentation Services HTTP Server on
the computer where Web Services for the IBM Console is installed. See “Startingand stopping the HTTP server” on page 330.
v On Windows systems, restart the computer where Web Services for the IBMConsole is installed.
Verifying your configurationTo verify your configuration, follow these steps:
116 Installing and Configuring Tivoli Enterprise Data Warehouse
1. Start Web Services for the IBM Console. See “Starting and stopping WebServices for the IBM Console” on page 331.
2. Sign on to the Web version of the IBM Console as described in “Getting startedwith the IBM Console” on page 126. Use one of the following addresses, wherecomputer_name is the fully qualified name of the computer where Web Servicesfor the IBM Console is running:v If the SSL port number on the computer where Web Services for the IBM
Console is running is 443 (the default port number for SSL), type thisaddress:https://computer_name/IBMConsoleSecure
v Otherwise, type the following address, where SSL_port_number is the SSLport number on the computer where Web Services for the IBM Console isrunning:https://computer_name:SSL_port_number/IBMConsoleSecure
Chapter 7. Enabling Secure Sockets Layer for the Web version of the IBM Console 117

118 Installing and Configuring Tivoli Enterprise Data Warehouse
Chapter 8. Installing and using language support
This chapter gives an overview of internationalization support for Tivoli EnterpriseData Warehouse, provides instructions for installing language support, anddescribes how to use the language support.
Overview of language supportTivoli Enterprise Data Warehouse provides language support as follows:v For working with reports in the IBM Console, you receive a language pack that
you install on the report server. The language support is on the Tivoli EnterpriseData Warehouse Language Support CD.
v For data displayed in reports, the warehouse pack that places the data into thecentral data warehouse or data mart can make localized measurement namesavailable.
v For the installation interfaces, messages are automatically displayed to the userin the language specified by the current locale. English messages withcorresponding numbers are recorded in the installation log.
v For tasks performed using the DB2 product, including using the DB2 ControlCenter, the DB2 Data Warehouse Center, and the DB2 Warehouse Manager,language support is provided by the DB2 product. Be sure to use theappropriate DB2 installation media for your target languages. Read the IBM DB2Universal Database for Windows Quick Beginnings or IBM DB2 Universal Databasefor UNIX Quick Beginnings for additional information.Depending on the packaging of the Tivoli software with which you receivedTivoli Enterprise Data Warehouse, it might be necessary to order DBCS supportseparately. Your Tivoli sales representative can provide additional information.
Tivoli Enterprise Data Warehouse supports many code sets and locales withouttranslating the messages for the corresponding languages. Supporting a localemeans that you can create and view reports in that locale, but you might have toview all windows and messages in a different language, if translated messages arenot available. The following languages are supported:
Table 25. Languages and language codes for Tivoli Enterprise Data Warehouse
Language Language code
German de
French fr
Italian it
Spanish es
Brazilian Portuguese br
Japanese jp
Korean kr
Simplified Chinese (PRC) cn
Traditional Chinese (Taiwan) tw
© Copyright IBM Corp. 2001, 2003 119
Installing language supportYou can install language support at the same time that you install the TivoliEnterprise Data Warehouse report interface component, or afterwards. Thefollowing sections describe these methods.
Note: In a distributed installation, you can install language support with the reportinterface component only after all other components are installed.
Installing language support with the report interfaceTo install support for languages other than English at the same time that youinstall the report interface, do the following:1. Locate the Tivoli Enterprise Data Warehouse installation CD and the Tivoli
Enterprise Data Warehouse Language Support CD.2. Start the Tivoli Enterprise Data Warehouse installation wizard. If you are
performing a single system installation, do this on the system where you areinstalling all the Tivoli Enterprise Data Warehouse components. If you areperforming a distributed installation, do this on the system where you areinstalling the report server. This procedure works in either type of installation.The installation wizard is located in the root directory of the Tivoli EnterpriseData Warehouse CD. Use the program appropriate to the operating system onwhich you are installing:v Windows: setup.exe
v UNIX: setup_unix.sh
If you want the installation wizard to use another temporary directory, see“Specifying an alternate temporary directory” on page 316 for an alternateprocedure.
3. Complete the Tivoli Enterprise Data Warehouse installation wizard until youare asked if you want to install additional languages. Select Yes, I want toinstall other languages and click Next.
Note: When completing the wizard, do not use directory names that containdouble byte character set (DBCS) characters.
4. Specify the Tivoli Enterprise Data Warehouse Language Support CD as thesource directory for the language support, then click Next.The language support installation starts a separate InstallShield program. Thismeans that the following installation programs are running at the same time:v The Tivoli Enterprise Data Warehouse installation wizardv The Tivoli Enterprise Data Warehouse language support installation wizard
Complete the language support installation wizard, whose windows are titledInstaller, before continuing with the Tivoli Enterprise Data Warehouseinstallation wizard, whose windows are titled Tivoli Enterprise Data WarehouseInstallation.
5. Provide the following information in the Installer windows:v Do not change the name of the directory in which to install the language
support files. This directory name and location must specify the existinglocation of the report server files.
v Specify whether you want to install all languages or a subset.v If you want a subset of languages, select them from the list presented by the
wizard.
120 Installing and Configuring Tivoli Enterprise Data Warehouse
6. On the summary window of the language support installation wizard, clickNext to start the installation.
7. When the language support installation wizard completes, click Finish to exitthe language support installation wizard and return to the Tivoli EnterpriseData Warehouse installation wizard.
8. When the Tivoli Enterprise Data Warehouse installation wizard completes, donot restart your system until the IBM Console finishes building the help set.The help set contains the user assistance (online help) for the IBM Console.This process happens asynchronously and is not always complete by the timethe wizard has completed the installation of Tivoli Enterprise Data Warehouse.The help set might require up to 15 minutes to build.To determine whether the help set rebuild is complete, look for the completionmessage in the Tivoli Presentation Services installation log. This log is indirectory PS_directory/log/fwp_mcr, where PS_directory is the target directoryyou specified for Tivoli Presentation Services. The logs are named stdoutn.Look for the following message in the most recent stdoutn file. In some cases,the message can be in the second most recent stdoutn file.FWP1734I The utilty that was started by the Management Component Repository
to build the help set has completed successfully.
Applying language support to an existing report serverTo add additional language support on an existing report server, complete thefollowing steps:1. Make sure that all of the Tivoli Enterprise Data Warehouse components are
successfully installed.2. Locate the Tivoli Enterprise Data Warehouse Language Support CD.3. On the report server, start the language support installation wizard using the
program appropriate to the operating system:v AIX: TWHLPsetup_aix.bin
v Linux: TWHLPsetup_lin.bin
v Solaris: TWHLPsetup_sol.bin
v Microsoft Windows: TWHLPsetup_win.exe
These programs are located in the root directory of the language support CD.4. Provide the following information in the Installer windows:
v Do not change the name of the directory in which to install the languagesupport files. This directory name and location must match the location ofthe report server files.
v Specify whether you want to install all languages or a subset.v If you want a subset of languages, select them from the list presented by the
wizard.5. On the summary window of the language support installation wizard, click
Next to start the installation.6. When the language support installation wizard completes, click Finish to exit.7. Wait until the IBM Console finishes building the help set, which contains the
user assistance for the IBM Console. This process happens asynchronously andis not always complete by the time the wizard has completed. The help setmight require up to 15 minutes to build.To determine whether the help set rebuild is complete, look for the completionmessage in the Tivoli Presentation Services installation log. This log is indirectory PS_directory/log/fwp_mcr, where PS_directory is the target directory
Chapter 8. Installing and using language support 121
you specified for Tivoli Presentation Services. The logs are named stdoutn.Look for the following message in the most recent stdoutn file. In some cases,the message can be in the second most recent stdoutn file.FWP1734I The utilty that was started by the Management Component Repository
to build the help set has completed successfully.
Using language support in the report interfaceThe report interface uses the locale settings of your Web browser. No additionalconfiguration is required. See the help for your particular Web browser forinstructions about changing the locale.
122 Installing and Configuring Tivoli Enterprise Data Warehouse
Chapter 9. Getting started with the IBM Console
The IBM Console is the role-based user interface for performing tasks using Tivolimanagement software. It presents and authorizes only the tasks that are relevant toeach role that a user is assigned. The IBM Console also provides consistent controlsand behaviors across tasks and includes embedded user assistance.
Tivoli Enterprise Data Warehouse uses the Web version of the IBM Console. To usethe Web version, users need only the appropriate Web browser (as described in theTivoli Enterprise Data Warehouse Release Notes) and the Web address for the IBMConsole.
This chapter provides the following:v “Terms and definitions used in the IBM Console”v “An overview of the IBM Console”v “Getting started with the IBM Console” on page 126v “Using the IBM Console with Tivoli Enterprise Data Warehouse” on page 128v “Managing Tivoli Enterprise Data Warehouse reports” on page 130v “Managing data marts” on page 133
Terms and definitions used in the IBM ConsoleThe following terms represent important concepts in the IBM Console.
context menu A menu that presents the actions that are relevant for a particularitem and that is shown only when a user requests it.
resource A hardware, software, or data entity that is managed by Tivolimanagement software.
role A job function, such as software distributor, that identifies the tasksthat a user can perform and the resources to which a user hasaccess. A user can be assigned one or more roles.
task An activity that has business value, is initiated by a user, and isperformed by software.
task group A method for organizing tasks into logical categories.
user A person who uses Tivoli management software and is assignedone or more roles.
An overview of the IBM ConsoleFollowing are the key components of the Web browser-based interface to the IBMConsole. These components are illustrated in Figure 9 on page 125 and Figure 10 onpage 126.
banner areaThe area that is located below the title bar and can be customized by asystem administrator to include relevant information for a particularorganization. For example, in the banner area, an organization might wantto include the role descriptor for the particular user, the company logo,and links to Internet and intranet sites.
© Copyright IBM Corp. 2001, 2003 123
portfolioThe primary way that your work is organized within the IBM Console. Theportfolio is a container for the tasks that apply to each role that you havebeen assigned. It is titled My Work. When the portfolio is closed, it isindicated by the down arrow on the portfolio title bar. When the portfoliois open, it displays within the IBM Console to the left of the work area.
taskbarThe bar that is located below the work area and contains a button for eachtask window. As shown in Figure 9 on page 125, the far right section of thetaskbar also includes a button for each of these actions:v Resetting your Web browser if you have display problemsv Signing off of the IBM Console
task buttonA button on the taskbar that represents a task window. A task can havemultiple task windows. When you click a task button, the associated taskwindow opens in the work area. Each task button also includes a smallicon that indicates the status of the task.
Task AssistantThe place to go for answers to your questions. The Task Assistant isrepresented by the question mark in the upper right of the IBM Console.When it is open, the Task Assistant displays within the IBM Console to theright of the work area.
The Task Assistant provides help for the tasks that you are performing atany given moment. This includes help for all Tivoli management softwarethat is installed at your location.
For detailed information about the IBM Console, refer to the Overviewsection within the Table of Contents in the Task Assistant.
work areaThe area in which task windows are displayed. This area does not includethe portfolio and the Task Assistant.
Notes:
1. The Web version of the IBM Console includes a context menu icon thatindicates whether an item has a context menu. This icon is illustrated inFigure 9 on page 125.
2. The Web version of the IBM Console runs in kiosk mode. Kiosk mode is themode of a Web browser in which none of the browser controls, such as thebrowser menu bar and toolbar, are shown.
124 Installing and Configuring Tivoli Enterprise Data Warehouse
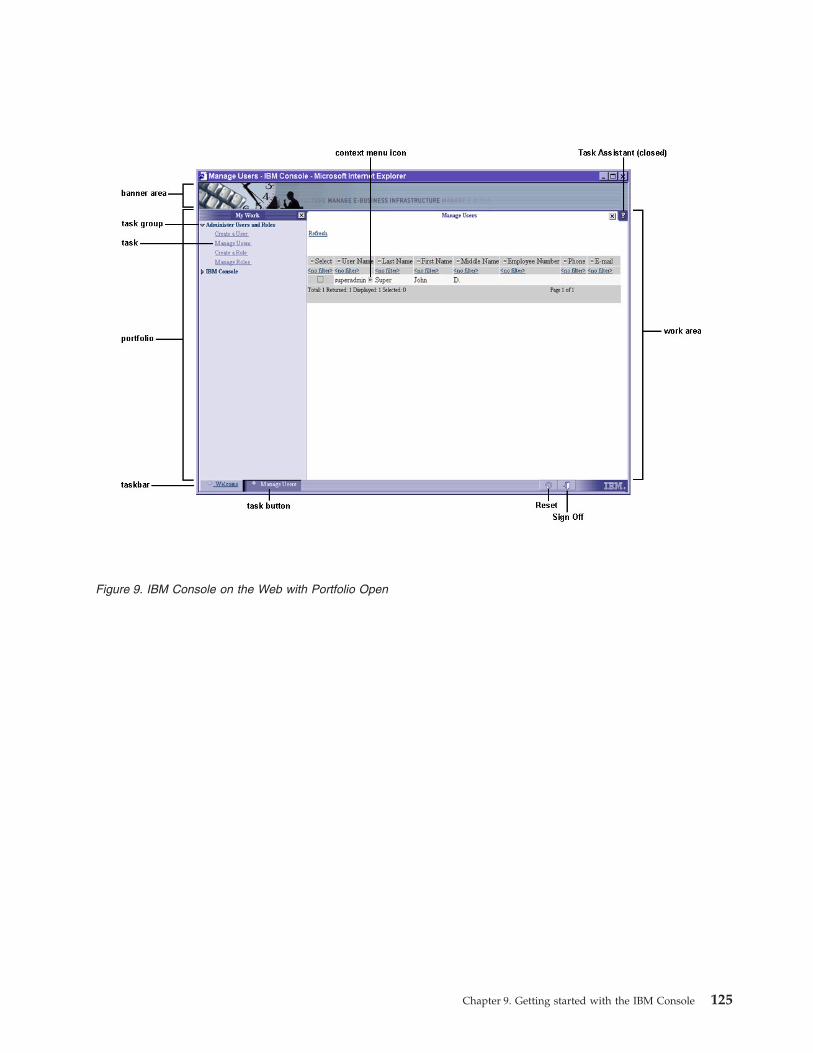
Figure 9. IBM Console on the Web with Portfolio Open
Chapter 9. Getting started with the IBM Console 125
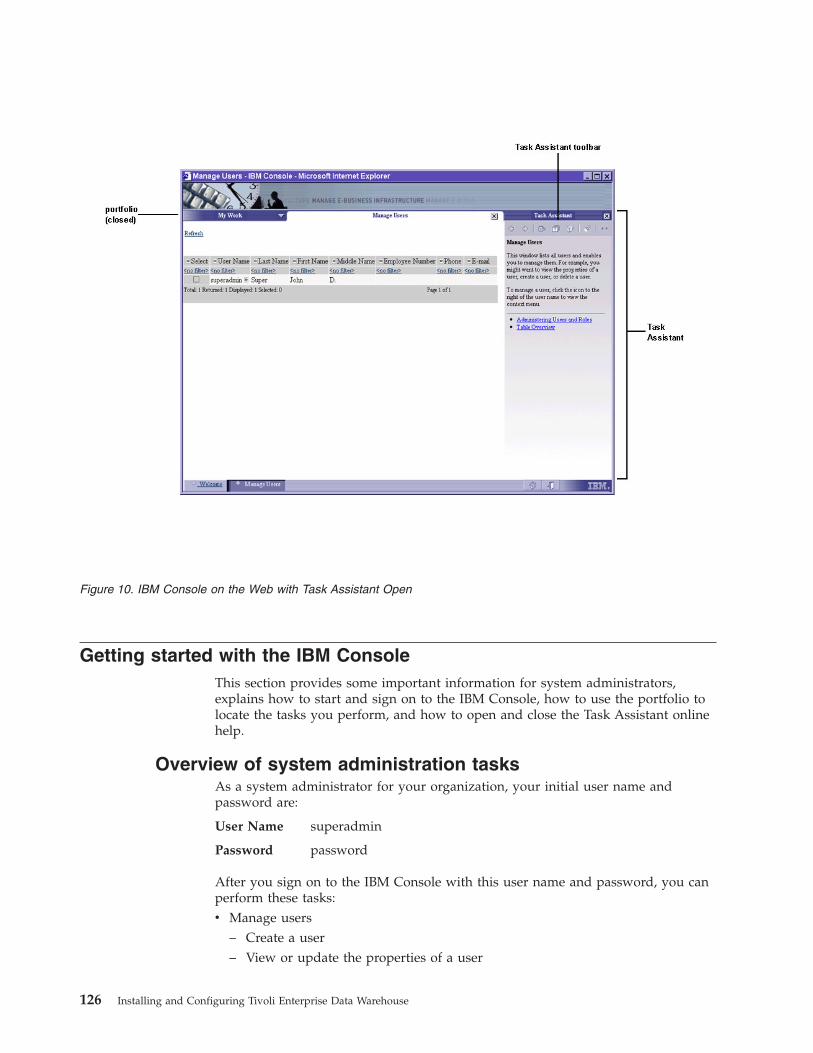
Getting started with the IBM ConsoleThis section provides some important information for system administrators,explains how to start and sign on to the IBM Console, how to use the portfolio tolocate the tasks you perform, and how to open and close the Task Assistant onlinehelp.
Overview of system administration tasksAs a system administrator for your organization, your initial user name andpassword are:
User Name superadmin
Password password
After you sign on to the IBM Console with this user name and password, you canperform these tasks:v Manage users
– Create a user– View or update the properties of a user
Figure 10. IBM Console on the Web with Task Assistant Open
126 Installing and Configuring Tivoli Enterprise Data Warehouse
– Delete a userv Manage roles
– Create a role– View or update the properties of a role– Delete a role
To ensure the integrity of your organization’s e-business infrastructure, change theinitial password for the superadmin user name after you sign on to the IBMConsole. To do this, click Manage Users in the portfolio, and follow theinstructions in the Task Assistant.
For the IBM Console, do not use passwords with double-byte characters. Somesystems do not have an input method for double-byte character sets, and mostWeb browsers do not allow the direct entry of double-byte characters in passwordfields. If necessary, you can bypass this problem by cutting and pasting thepassword into the password field.
Signing on to the IBM ConsoleTo sign on to the Web version of the IBM Console, follow these steps:1. Open your Web browser.2. Type one of the following addresses, where computer_name is the fully qualified
name of a computer where Web Services for the IBM Console is running. Thetext “IBMConsole” is case-sensitive; type it exactly as shown. The address youuse depends on whether the SSL has been enabled on the computer where WebServices for the IBM Console is running and which port number the server isusing.v If SSL is not enabled and the number for the HTTP server port on the
computer where Web Services for the IBM Console is running is 80 (thedefault port number), type this address:http://computer_name/IBMConsole
If an alternate port is used, type this address, where port_number is thenumber for the HTTP server port on the computer where Web Services forthe IBM Console is running:http://computer_name:port_number/IBMConsole
v If SSL has been enabled on the computer where Web Services for the IBMConsole is running and the SSL port number on that computer is 443 (thedefault port number for SSL), type this address:https://computer_name/IBMConsoleSecure
If an alternate port is used, type this address, where SSL_port_number is thenumber for the SSL port on the computer where Web Services for the IBMConsole is running and SSL is enabled:https://computer_name:SSL_port_number/IBMConsoleSecure
For more information about the SSL port, see “Step 4: Configuring a securehost IP and an additional port for the secure server” on page 114.
3. Press Enter.4. In the signon window that opens, type your user name and password.
Chapter 9. Getting started with the IBM Console 127

Notes:
1. Do not use the IBM Console icon, if one is installed on your desktop, as ameans of signing on to the IBM Console. The icon is used with the Java consolefor Tivoli Presentation Services, which is not supported by Tivoli EnterpriseData Warehouse.
2. Similarly, do not use the IBM Console option from the Start menu to sign on tothe IBM Console. This mechanism for starting the IBM Console is notsupported by Tivoli Enterprise Data Warehouse.
Using the portfolioAfter you have signed on to the IBM Console, open the portfolio to begin the tasksthat have been assigned to you as part of your role. Within the portfolio, yourtasks are organized into task groups. To view the list of tasks under a particulartask group, click the task group to expand it. When the task group is expanded,click the task that you want to start.
The user assistance that is available in the Task Assistant contains more detailedinformation about the IBM Console in general and the tasks in your portfolio.
Opening the Task AssistantOpen or close the Task Assistant by clicking the question mark (?) in the upperright corner of the work area.
Using the IBM Console with Tivoli Enterprise Data WarehouseUse the Work with Reports task group in the portfolio to manage users, groups,and data marts for Tivoli Enterprise Data Warehouse or to run, create, and viewTivoli Enterprise Data Warehouse reports. This following sections describe how todo the following tasks:v Working with users, roles, and groupsv Working with data martsv Working with reports
Note: These sections only apply to applications that use the report interface todisplay reports and manage data marts. If you are using an application thatprovides reports in a different format and does not use the report interfaceformat for its data marts, you do not perform any of these operations.
Managing user groupsThis section describes tasks associated with managing user groups for TivoliEnterprise Data Warehouse. It includes the following topics:v An overview of users and user groupsv Creating an IBM Console userv An overview of the Tivoli Enterprise Data Warehouse rolesv Assigning roles to a userv Creating a user groupv Assigning users to a user group
About users and user groupsTivoli Enterprise Data Warehouse is displayed using the IBM Console, which isalso used by other Tivoli software products. A user is given access to tasks in theIBM Console based on the roles that are assigned to that user. One user can have
128 Installing and Configuring Tivoli Enterprise Data Warehouse
roles for diverse tasks including administering IBM Console users, managing TivoliEnterprise Data Warehouse user groups and data marts, running and viewing theoutput of Tivoli Enterprise Data Warehouse reports, and performing tasksassociated with other Tivoli software products.
You control access to data in Tivoli Enterprise Data Warehouse data marts byspecifying which user groups (collections of users) can run the reports that accessthe data in each data mart. Each user in a user group is given access to all reportsthat access the data in the data marts to which that user group has access.
By default, Tivoli Enterprise Data Warehouse provides the TWHAdmin user group,which contains a single user: superadmin. You can customize the TWHAdmin usergroup for the needs of your enterprise.
A user can be assigned to more than one user group.
Creating a userTo create an IBM Console user, complete the following steps:1. From the portfolio of the IBM Console, select Administer Users and Roles →
Create a User.2. Open the Task Assistant and follow the instructions provided in the online help
to create a user.You can assign roles to a user when you create the user or at a later time. See“The Tivoli Enterprise Data Warehouse roles” for information about TivoliEnterprise Data Warehouse roles and see “Assigning roles to a user” onpage 130 for instructions for adding roles later.
The online help also guides you through additional tasks for managing users, suchas updating or displaying the properties of a user and deleting a user.
The Tivoli Enterprise Data Warehouse rolesThe following Tivoli Enterprise Data Warehouse roles control access to tasks andactivities in the Work with Reports task group:v Warehouse Security Administrator
With this role, a user can create and manage groups and data marts. A user withthis role controls access to data marts by assigning users to groups and bygiving groups access to specific data marts. In effect, this role controls access tothe Tivoli Enterprise Data Warehouse data using user groups and data marts.
v Report roles control a user’s ability to create and modify reports for the datamarts his user groups can access. Assign only one of the following roles to eachuser:– Advanced Report Author
With this role, a user can create, modify, run, and delete public and their ownpersonal reports, and save the output of reports, both public and personal.
– Report AuthorWith this role, a user can run and save the output of public reports and createand modify their own personal reports. They can run public and personalreports, and create, modify, and delete personal reports.
– Report ReaderWith this role, a user can run public reports and view the saved output ofpublic reports.
Chapter 9. Getting started with the IBM Console 129
For general information about IBM Console roles, see the online help in the TaskAssistant.
Assigning roles to a userTo assign a role to a user, complete the following steps:1. From the portfolio of the IBM Console, select Administer Users and Roles →
Manage Users.2. From the table of users, click the context menu icon of a user and select
Properties.3. Follow the instructions in the Task Assistant about assigning roles to the user.
The online help also guides you through additional tasks for managing users,such as updating or displaying the properties of a user and deleting a user.
Creating user groupsTo create a user group, complete the following steps:1. From the portfolio of the IBM Console, select Work with Reports → Manage
User Groups.2. In the Manage User Groups window, click the context menu icon of Root and
select Create.3. Follow the instructions in the Task Assistant about creating user groups.
The online help also guides you through additional tasks for managing usergroups, such as updating or displaying the properties of a user group, addingusers to a user group, and deleting a user group.
Assigning users to user groupsTo assign one or more users to a user group, perform the following steps:1. From the portfolio of the IBM Console, select Work with Reports → Manage
User Groups.2. In the Manage User Groups window, click the context menu icon of a group
and select Properties.3. Follow the instructions in the Task Assistant about assigning users to user
groups.
The online help also guides you through additional tasks for managing usergroups, such as updating or displaying the properties of a user group, adding orremoving users from a user group, and deleting a user group.
Managing Tivoli Enterprise Data Warehouse reportsTivoli Enterprise Data Warehouse reports display a static view of the data in a datamart. Reports are provided by a warehouse pack, along with the data martsrequired to collect the data used in the report.
This section describes the following tasks:v Running a reportv Automatically running reportsv Modifying default settings for report creationv Creating a report
For more information about working with reports, see the online help in the TaskAssistant.
130 Installing and Configuring Tivoli Enterprise Data Warehouse
About Tivoli Enterprise Data Warehouse reportsTivoli software products using the Tivoli Enterprise Data Warehouse can provideprepackaged reports that allow you to access specific information about yourbusiness environment. All of these reports are listed in the Manage Reports andReport Output task of the Work with Reports task group in the portfolio. Thisincludes reports from all Tivoli software products that use the Tivoli EnterpriseData Warehouse report interface. Tivoli software products can also provide adifferent reporting interface.
A Tivoli Enterprise Data Warehouse report uses data from a single data mart.
If you have the appropriate role, you can also create additional reports or modifyexisting reports. Before you can create a new report or modify an existing report,you must understand the structure of the underlying warehouse data and of theoperational data that is the source of that data. For information about a Tivolisoftware product’s data sources, see the documentation provided with thatproduct. For information about the structure of data in the data mart and in thecentral data warehouse, see Enabling an Application for Tivoli Enterprise DataWarehouse.
Running a reportTo run a report using the report interface, complete the following steps:1. From the portfolio of the IBM Console, select Work with Reports → Manage
Reports and Report Output.2. In the Manage Reports and Report Output window, in the Reports view, click
the context menu icon of a report and select Run.3. For more information about running reports, see the online help in the Task
Assistant.
The online help can also guide you through additional tasks for reports, such asdisplaying the properties of a report and deleting a report.
Automatically running reportsUsing the Tivoli Enterprise Data Warehouse report interface, you can schedule areport to run automatically when the associated data mart is updated. This ensuresthat when you examine the output of the report, it displays the most recent data inthe warehouse.
To schedule a report to run automatically when the associated data mart isupdated, complete the following steps:1. From the portfolio of the IBM Console, select Work with Reports → Manage
Reports and Report Output.2. In the Manage Reports and Report Output window, in the Reports view, click
Reports.3. Click the context menu icon of a report and select Properties.4. For more information about automatically running reports, see the online help
in the Task Assistant.
The online help can also guide you through additional tasks for reports, such asmodifying or displaying the properties of a report and deleting a report.
Modifying default settings for report creationWhen you create or modify a report, you select predetermined values for the timeframe of the report. The predetermined values of Peak Hours and Weekdays
Chapter 9. Getting started with the IBM Console 131
specified under Filtering in the Time page of report properties can be modified.Do this by modifying the information in the control database on the control server.
The default value for Peak Hours is 9:00 am through 5:00 PM, or 0900 to 1700.This value can be modified to reflect different peak hours if necessary.
The default value for Weekdays is Monday through Friday. This value can also bemodified.
The RPI.TimeFilters table contains the following filters and default filter values.
Table 26. Default time filter names and values
TIME_FILTER_NAME TIME_FILTER_VALUES
Peak Hours hour(meas_hour) in (9,10,11,12,13,14,15,16,17)
Weekdays dayofweek(meas_date) between 2 and 6
To change the values displayed in the report interface, perform the following steps:1. Connect to the control database (TWH_MD).2. Use an SQL statement similar to the following to modify the values for Peak
Hours or Weekdays in the RPI.TimeFilters table. The following example setsthe Weekdays filter to represent Sunday through Thursday:Update RPI.TimeFilters set TIME_FILTER_VALUES = ’dayofweek(meas_date)
between 1 and 5’ where TIME_FILTER_NAME = ’Weekdays’
After doing this, when a user selects a Weekdays filter for a report in the reportinterface, the data returned is for Sunday through Thursday.
Note: There is no error checking for the values inserted into the tables for PeakHours and Weekdays. Therefore, make sure that the information you insertinto the tables is correct. You can save a report that contains incorrect valuesfor these parameters without receiving an error message. The message is notgenerated until the report is run.
For additional information on the properties of the RPI.TimeFilters table, seeEnabling an Application for Tivoli Enterprise Data Warehouse.
Creating a reportTo create a report, complete the following steps:1. From the portfolio of the IBM Console, select Work with Reports → Create a
Report.2. For more information about creating a report, see the online help in the Task
Assistant.
Note: Make sure that you use descriptive and meaningful names for the reportsyou create. Report names are unique across all users of Tivoli EnterpriseData Warehouse. You can receive a message that the name you specified isalready in use, even if you do not have access to the report with that name.
The online help also guides you through additional tasks for reports, such asmodifying or displaying the properties of a report and deleting a report.
132 Installing and Configuring Tivoli Enterprise Data Warehouse
Managing data martsThe Managing Data Marts task in the portfolio lets you work with data marts. Thissection includes the following topics:v An introduction to data martsv Assigning user groups to a data mart
For more information about working with data marts, see the online help in theTask Assistant.
About data martsWarehouse packs that use the report interface to display reports must create datamarts whose structure is suitable for the report interface. They do this byproviding an extract, transform, and load (ETL) process, called a data mart ETL,that creates the data mart and loads it with data from the central data warehouse.
You can modify an existing data mart, or create new data marts that containslightly different data, to address a reporting need specific to your situation. Tomodify or create a data mart, you must be familiar with database ETL processesand with the internal representation of a data mart as star schemas in the TivoliEnterprise Data Warehouse databases. For information about this, see Enabling anApplication for Tivoli Enterprise Data Warehouse.
Assigning user groups to a data martTo assign user groups to a data mart, complete the following steps:1. From the portfolio of the IBM Console, select Work with Reports → Manage
Data Marts.2. In the Manage Data Marts window, in the Data Mart view, click the context
menu icon for the data mart that you want to change and click Properties.3. Select the User Groups tab.4. For more information about assigning user groups to a data mart, see the
online help in the Task Assistant.
Note: Grant access to only those user groups whose users need the data mart toperform tasks.
The online help can guide you through additional tasks for managing user groups,such as updating or displaying the properties of a user group, removing usersfrom a user group, and removing data mart access from a user group.
Chapter 9. Getting started with the IBM Console 133

134 Installing and Configuring Tivoli Enterprise Data Warehouse
Chapter 10. Installing and upgrading warehouse packs
This chapter describes how to install and configure warehouse packs. It alsodescribes how to apply fixes and how to upgrade warehouse packs. Review “Howyou deploy Tivoli Enterprise Data Warehouse support” on page 11 and “Warehousepacks” on page 21 for more information about warehouse packs and planningconsiderations.
Unless otherwise noted, all of the installation and configuration steps in thischapter are performed on the control server.
Installing warehouse packsTo install and configure one or more warehouse packs, complete the followingtasks on the control server:1. Planning for the installation. See page 135.2. Preparing the environment. See page 137.3. Installing warehouse packs using the warehouse pack installation wizard. See
page 140.4. Completing the installation. See page 142.
Incompatible warehouse packsMake sure that any warehouse packs that you plan to install are supported byTivoli Enterprise Data Warehouse version 1.1. If you attempt to install a warehousepack that is not compatible with Tivoli Enterprise Data Warehouse version 1.1, youwill receive the following error:==> Reading Config File (e:/samplepack/0705A/dgr1.2/e1e2/twh_install_props.cfg)
(F) CDWIC0007E Illegal option found.Illegal value is (APP_DISPLAY_NAME)
If you receive this error message, no recovery procedures are necessary. Obtain thecorrect warehouse pack for Tivoli Enterprise Data Warehouse version 1.1 and runthe installation program again.
Step 1. Planning to install warehouse packsBefore installing a warehouse pack, complete the following tasks:1. Review the implementation guide for each warehouse pack you plan to install.
The implementation guide is in a PDF file on the installation media for thewarehouse pack. It is usually in thetedw_apps_etl/productCode/pkg/version/doc subdirectory of the warehousepack installation media, where productCode and version specify, respectively, theproduct code and version of the warehouse pack.
2. Plan to install one warehouse pack at a time, followed by a backup of TivoliEnterprise Data Warehouse deployment. This ensures that you can return to aknown valid state if you encounter an unrecoverable error while installing awarehouse pack. See “Backing up and restoring a Tivoli Enterprise DataWarehouse deployment” on page 257 for more information.
3. When installing a warehouse pack, the same user ID and password that wasused for the Tivoli Enterprise Data Warehouse core installation must be used.Contact your DB2 administrator if you need this information. Otherwise, if a
© Copyright IBM Corp. 2001, 2003 135
different DB2 user ID than was used to install the original core TivoliEnterprise Data Warehouse components is installing a warehouse pack after theTivoli Enterprise Data Warehouse core product installation, a temporary tablespace must be created for both the central data warehouse database and datamart database before starting the installation program. The user temporarytable space that is created in the central data warehouse database and datamart database during the installation of Tivoli Enterprise Data Warehouse isaccessible only to the user that performed the installation.If you are installing the warehouse pack using the same database user thatinstalled Tivoli Enterprise Data Warehouse, or if your database user has accessto another user temporary table space in the target databases, no additionalaction is required.If you do not know the user name that was used to install Tivoli EnterpriseData Warehouse, you can determine whether the table space is accessible byattempting to declare a temporary table while connected to each database asthe user that will install the warehouse pack. The following commands are oneway to do this:db2 "connect to TWH_CDW user id using password"
db2 "declare global temporary table t1 (c1 char(1))with replace on commitpreserve rows not logged"
db2 "disconnect TWH_CDW"
db2 "connect to TWH_MART user id using password"
db2 "declare global temporary table t1 (c1 char(1))with replace on commitpreserve rows not logged"
db2 "disconnect TWH_MART"
Where:
id The DB2 user ID of the person that will install the warehouse pack.
passwordThe DB2 password of the person that will install the warehouse pack.
If the declare command is successful, the specified database user can install thewarehouse pack. No additional action is required.
If the declare command fails, run the following DB2 commands to create a newtable space for the installation in both the central data warehouse and datamart databases:db2 "connect to TWH_CDW user id using password"
db2 "create user temporary tablespace usertmp2 managed by system using(’usertmp2’)"
db2 "disconnect TWH_CDW"
db2 "connect to TWH_MART user id using password"
db2 "create user temporary tablespace usertmp3 managed by systemusing (’usertmp3’)"
db2 "disconnect TWH_MART"
Where:
136 Installing and Configuring Tivoli Enterprise Data Warehouse
id The DB2 user ID of the person that will install the warehouse pack.
passwordThe DB2 password of the person that will install the warehouse pack.
4. Complete a planning worksheet for each warehouse pack you plan to install.The worksheet is located in “Planning worksheet for installing warehousepacks” on page 49.
Step 2. Preparing the environmentTo prepare the environment for the installation of one or more warehouse packs,complete the following steps on the control server:1. Make sure you have created any DB2 warehouse agent sites where you plan to
run the extract, transform, and load (ETL) processes for the warehouse packs.See “Configuring DB2 remote warehouse agent sites” on page 103.
2. If the warehouse pack provides a central data warehouse ETL, which readsdata from operational data sources, make sure the DB2 warehouse agent sitethat will run the ETL can connect to the operational data.a. For operational source data in Oracle, Sybase, MS SQL Server, or Informix
databases, ensure that the client for the database is installed on the DB2warehouse agent site that will run the central data warehouse ETL.Database clients typically support multiple versions of the database server.Consult the documentation provided by the database vendor for additionalinformation about which database server versions a particular clientsupports.The following versions of database clients were supported by TivoliEnterprise Data Warehouse, Version 1.1, at the time of publication of thisbook:v Oracle: Oracle Client Version 8.1.7, Installation Type: Programmerv Sybase: Open Client Version 12.0v Informix: Client SDK 2.70 UC3-1v MS SQL Server: Microsoft SQL Server: Microsoft SQL Server 7 SP3 Client
Refer to the ″Data sources and targets″ section in each warehouse pack’simplementation guide for specific information about operational source datafor each Tivoli Enterprise Data Warehouse-enabled application.
b. Configure the client for the database application so that it can communicatewith the source database.v For DB2 data sources, see IBM DB2 Universal Database for UNIX Quick
Beginnings or IBM DB2 Universal Database for Windows Quick Beginnings.v For Oracle, Microsoft SQL Server, Sybase, or Informix data sources, see
the IBM DB2 Universal Database Data Warehouse Center AdministrationGuide for information about setting up warehouse sources.When setting up a client/server connection for Oracle data sources, verifythat the extension on the connection name matches the value of theNAMES.DEFAULT_DOMAIN entry in the network\admin\sqlnet.ora file,if the entry exists or has not been commented out. For example, if theconnection name in the sqlnet.ora file is INST1_HTTP.austin.ibm.com, thenNAMES.DEFAULT_DOMAIN=austin.ibm.com.To set up a client/server connection for Informix data sources, you mightneed modify the entry in $INFORMIXDIR/etc/sqlhosts to use theonsoctcp protocol, for example:pingpong5 onsoctcp pingpong inf5
Chapter 10. Installing and upgrading warehouse packs 137
If necessary, consult the documentation provided by the database vendor.c. If you are configuring a DB2 remote warehouse agent on a UNIX system
and the source operational data resides in an Informix, Oracle, or Sybasedatabase, set some environment variables on the DB2 remote warehouseagent site to enable the agent to connect to the appropriate databaseapplication. These settings depend on the database application you intendto use. If the DB2 remote warehouse agent site is a Windows system, followthe instructions in “Creating ODBC data sources on the control server forwarehouse packs” on page 143. If the agent site is an AIX system, completethe following steps on the AIX system to create an ODBC data source. Forthe equivalent steps for a Solaris system, see the IBM DB2 Universal DatabaseData Warehouse Center Administration Guide..1) Change to the directory where IWH.environment file is installed. For
example:cd /usr/lpp/db2_07_01/bin
2) Edit the IWH.environment file to add the entries for the databaseapplication you use.Here are sample Oracle, Sybase, and Informix entries. In this example,the clients for the database application are installed in the followingdirectories:v Oracle: /data/ora_clientv Sybase: /data/sybase_clientv Informix: /data/inf_client# OracleORACLE_HOME=/data/ora_client/orahomeORACLE_SID=ORCLPATH=/data/ora_client/orahome/bin:$PATHLIBPATH=$LIBPATH:/data/ora_client/orahome/libexport LIBPATH PATH ORACLE_HOME ORACLE_SID
# SybaseSYBASE=/data/sybase_clientINTERFACES=/data/sybase_client/interfacesPATH=/data/sybase_client/bin:$PATHLIBPATH=$LIBPATH:/data/sybase_client/libexport LIBPATH PATH SYBASE INTERFACES
# InformixINFORMIXDIR=/data/inf_clientINFORMIXSERVER=pingpong5PATH=/data/inf_client/bin:$PATHLIBPATH=$LIBPATH:/data/inf_client/libexport LIBPATH PATH INFORMIXDIR INFORMIXSERVER
The values in this file must match the values you specified wheninstalling the database client for each type of data source. If you havejust installed the database clients, use the current value of theseenvironment variables. Use the shell set command to display the currentvalues.
For more information about this procedure, see the information aboutaccessing non-DB2 database warehouse sources in IBM DB2 UniversalDatabase Data Warehouse Center Administration Guide.
3) Test a connection to the ODBC data source name using the execsqlcommand. For example:. /usr/lpp/db2_07_01/bin/IWH.environmentexecsql dummy dummy.out odbcDataSourceName user passwordcat dummy.out
138 Installing and Configuring Tivoli Enterprise Data Warehouse
If the name of the database vendor appears in the dummy.out file, thenthe connection to the ODBC data source was successful.
3. If you are installing the warehouse pack in a distributed deployment, verifythat you can connect to the TWH_CDW database.a. Click Start → Programs → IBM DB2 → Command Line Processor.b. List the databases your system can connect to:
list db directory
If the TWH_CDW database is listed and is cataloged to the TEDW001 node,try to connect to TWH_CDW:connect to TWH_CDW user userId using password
If you can connect to the database, go to step 4. Otherwise do the following:1) Uncatalog the node, ignoring any errors that are generated:
uncatalog node TEDW001
2) Catalog the node:catalog tcpip node TEDW001 remote fullyQualHostName server portNumber
In this command, fullyQualHostName is the fully qualified host name ofthe server where the central data warehouse resides, and portNumber isthe server port number. The default server port number is 50000.
3) Uncatalog the TWH_CDW database, ignoring any errors that aregenerated:uncatalog db TWH_CDW
4) Catalog the TWH_CDW database:catalog db TWH_CDW at node TEDW001 authentication server
5) Verify the connection by terminating it and then reconnecting to thedatabase:terminateconnect to TWH_CDW user userId using password
4. If you are installing the warehouse pack in a distributed deployment, verifythat you can connect to the TWH_MART database.a. Click Start → Programs → IBM DB2 → Command Line Processor.b. List the databases your system can connect to:
list db directory
If the TWH_MART database is listed and is cataloged to the TEDW002node, try to connect to TWH_MART:connect to TWH_MART user userId using password
If you can connect to the database, go to step 5 on page 140. Otherwise dothe following:1) Uncatalog the node, ignoring any errors that are generated:
uncatalog node TEDW002
2) Catalog the node:catalog tcpip node TEDW002 remote fullyQualHostName server portNumber
In this command, fullyQualHostName is the fully qualified host name ofthe server where the data mart resides, and portNumber is the serverport number. The default server port number is 50000.
Chapter 10. Installing and upgrading warehouse packs 139
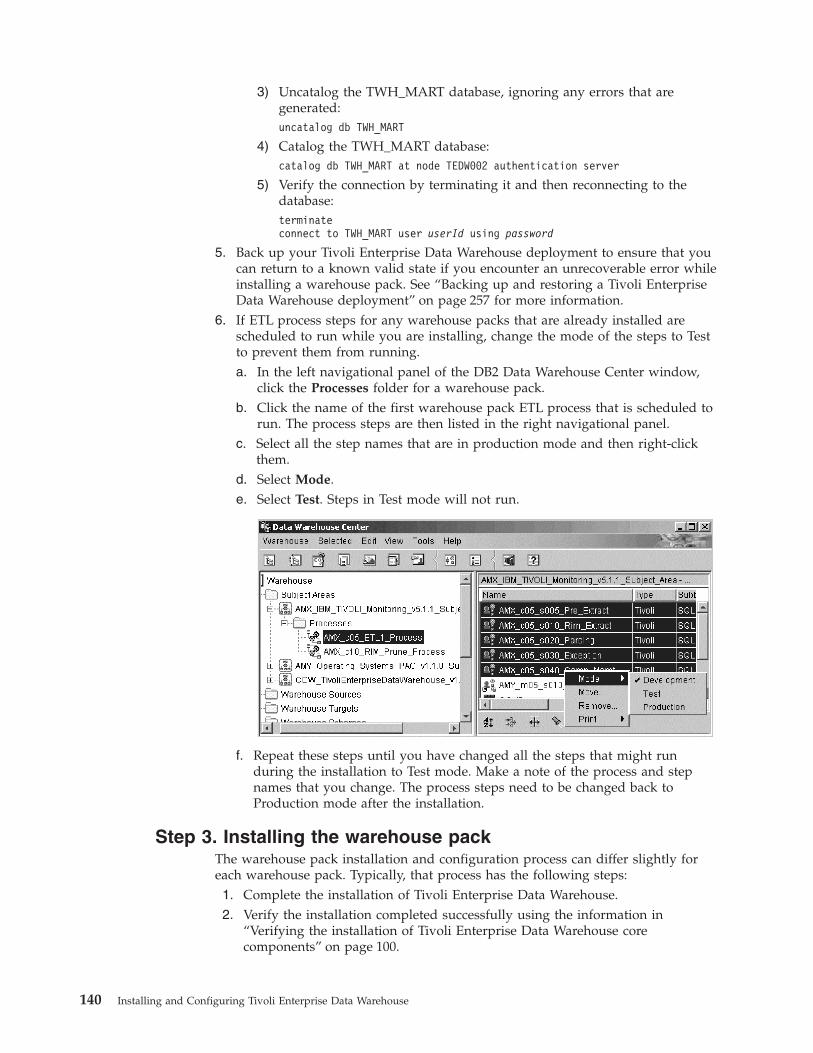
3) Uncatalog the TWH_MART database, ignoring any errors that aregenerated:uncatalog db TWH_MART
4) Catalog the TWH_MART database:catalog db TWH_MART at node TEDW002 authentication server
5) Verify the connection by terminating it and then reconnecting to thedatabase:terminateconnect to TWH_MART user userId using password
5. Back up your Tivoli Enterprise Data Warehouse deployment to ensure that youcan return to a known valid state if you encounter an unrecoverable error whileinstalling a warehouse pack. See “Backing up and restoring a Tivoli EnterpriseData Warehouse deployment” on page 257 for more information.
6. If ETL process steps for any warehouse packs that are already installed arescheduled to run while you are installing, change the mode of the steps to Testto prevent them from running.a. In the left navigational panel of the DB2 Data Warehouse Center window,
click the Processes folder for a warehouse pack.b. Click the name of the first warehouse pack ETL process that is scheduled to
run. The process steps are then listed in the right navigational panel.c. Select all the step names that are in production mode and then right-click
them.d. Select Mode.e. Select Test. Steps in Test mode will not run.
f. Repeat these steps until you have changed all the steps that might runduring the installation to Test mode. Make a note of the process and stepnames that you change. The process steps need to be changed back toProduction mode after the installation.
Step 3. Installing the warehouse packThe warehouse pack installation and configuration process can differ slightly foreach warehouse pack. Typically, that process has the following steps:1. Complete the installation of Tivoli Enterprise Data Warehouse.2. Verify the installation completed successfully using the information in
“Verifying the installation of Tivoli Enterprise Data Warehouse corecomponents” on page 100.
140 Installing and Configuring Tivoli Enterprise Data Warehouse
3. Backup your Tivoli Enterprise Data Warehouse installation. Information aboutbacking up Tivoli Enterprise Data Warehouse is described in “Backing up andrestoring a Tivoli Enterprise Data Warehouse deployment” on page 257.
4. Locate and read the documentation for the warehouse pack. Thedocumentation is on the installation media for the warehouse pack, in a PDFfile in the subdirectory tedw_apps_etl/product_code/pkg/version/doc.product_code and version specify, respectively, the product that is being enabledto use Tivoli Enterprise Data Warehouse and the version of the warehousepack.
5. When you install a warehouse pack, its documentation is automatically copiedinto the doc subdirectory of its files under $TWH_TOPDIR/apps, where$TWH_TOPDIR is the directory where Tivoli Enterprise Data Warehouse isinstalled.
6. Install any product patches specified by the warehouse pack documentation.7. Perform any pre-installation configuration steps specified by the warehouse
pack documentation. For example, this might include tasks such as creatingadditional tables in an existing database or establishing an ODBC connection.See “Creating ODBC data sources on the control server for warehouse packs”on page 143 for instructions.
8. Use the Tivoli Enterprise Data Warehouse installation program to install thewarehouse pack on each machine where it is needed. In general, this is thecontrol server and the report interface server. The warehouse pack’sdocumentation describes whether it needs to be installed on additional orfewer systems.
Note: Do not install warehouse packs with the Tivoli Enterprise DataWarehouse core application. Installing a warehouse pack with the TivoliEnterprise Data Warehouse core application can lead to databaseconsistency problems if you encounter an error while installing awarehouse pack.
9. After starting the installation wizard, select Application installation only inthe setup type window.
10. After you install a warehouse pack on the report server, manually stop andthen restart the following services for Tivoli Presentation Services:v Server for IBM Consolev Web Services for the IBM Console
This is described in Appendix D, “Starting and stopping Tivoli PresentationServices”, on page 329.
11. Optionally, install language support for the warehouse pack by following theinstructions in “Using language support in the report interface” on page 122.
12. Restart the system.13. Perform any post-installation configuration steps specified by the warehouse
pack documentation. For example, this might include performing a manualconfiguration task such as defining warehouse sources and targets. See“Specifying user IDs and passwords for Tivoli Enterprise Data Warehousesources and targets” on page 146 for instructions.
If you have trouble installing a warehouse pack, see Chapter 17, “Problemdetermination”, on page 273.
Chapter 10. Installing and upgrading warehouse packs 141
Step 4. Completing the installationAfter the installation wizard exits, perform the following steps on the controlserver to complete the installation and configuration of a warehouse pack:1. If you changed any warehouse pack ETL processes to Test mode to prevent
them from running during the installation (in step 6 on page 140), change themback to Production mode by completing the following steps:a. In the left navigational panel of the DB2 Data Warehouse Center window,
click the Processes folder for a warehouse pack.b. Click the name of a warehouse pack ETL process that you changed
previously. The process steps are then listed in the right navigational panel.c. Select all the step names that you changed to Test mode and then right-click
them.d. Select Mode.e. Select Production. Steps in Production mode can run.f. Repeat these steps until all the steps you changed are in Production mode.
2. If you plan to use support for a multiple customer environment or for multipledata centers, now or in the future, configure the warehouse pack for thatsupport, as described in “Configuring for a multiple customer environment ormultiple data centers” on page 157.
3. Back up your Tivoli Enterprise Data Warehouse deployment before installinganother warehouse pack. See “Backing up and restoring a Tivoli EnterpriseData Warehouse deployment” on page 257 for more information.
Configuring warehouse packsTo configure a warehouse pack, perform the following tasks:1. If you will be using a DB2 remote warehouse agent, copy the warehouse pack
files from the control server to the agent site. See page 142.2. Create ODBC data sources to access the operational data sources of the
warehouse pack. See page 143.3. If you will be using a DB2 remote warehouse agent, create ODBC data sources
on the remote agent site to access the operational data sources. See page 145.4. Specify user IDs and passwords for warehouse sources and targets. See page
146.5. Configure and schedule warehouse pack ETL processes. See page 147.6. Verify the ETL processes before running them. See page 156.
Important: Make sure that you write down the configuration steps you performand save this information. When you install a patch to a warehousepack, it might be necessary to reconfigure it and to reschedule its ETLprocesses and the information you write down will enable you to moreeasily accomplish this.
Copying the warehouse pack files for a DB2 remotewarehouse agent site
If you are installing a warehouse pack and plan to configure its ETL processes torun on a DB2 remote warehouse agent site, you must manually copy thewarehouse pack ETL files from the control server to the agent site.
To copy the files, perform the following steps:
142 Installing and Configuring Tivoli Enterprise Data Warehouse
1. Locate the warehouse pack files on the control server. They are in%TWH_TOPDIR%\apps\productCode, where productCode is the three characteridentifier for the warehouse pack.
2. Copy the warehouse pack directory,%TWH_TWH_TOPDIR%\apps\productCode, from the control server to the DB2remote warehouse agent site. The agent site must already be configured byfollowing the procedures in Chapter 6, “Installing Tivoli Enterprise DataWarehouse in a distributed deployment that uses DB2 remote warehouse agentsites”, on page 85.One way to do this is by completing the following steps:a. On the control server, enter the following commands in a DOS Command
window:bashcd $TWH_TOPDIRtar -cvf appetl.tar apps/productCode/*
The bash and tar commands are made available when you install TivoliEnterprise Data Warehouse on the control server.
b. Use FTP to copy the appetl.tar file to the DB2 remote warehouse agent site.Place the tar file in /tmp.
c. On the DB2 remote warehouse agent site, extract the files from the archiveand place them in the appropriate directories. For example, at a shellprompt on UNIX enter the following commands:. /usr/lpp/db2_07_01/bin/IWH.environmentcd $TWH_TOPDIRtar -xvf /tmp/appetl.tarchmod -R 755 $TWH_TOPDIR/*rm /tmp/appetl.tar
3. Verify that the directory structure under $TWH_TOPDIR/apps/productCode onthe DB2 remote warehouse agent site is identical to the corresponding directorystructure on the control server. The file and directory names must have thesame case on both systems.
Creating ODBC data sources on the control server forwarehouse packs
After installing or patching a warehouse pack, you must create one or more ODBCdata sources to create data connections between the warehouse pack and its datasources.
To create an ODBC data source for a warehouse pack, perform the following stepson the control server:1. Read the warehouse pack implementation guide to determine the
configuration information you need to set, such as:v The name of the ODBC data sources to connect to operational datav The name of the ODBC driver for each data source
2. On Windows NT, perform the following steps:a. On the Windows taskbar, click Start → Settings → Control Panel.b. Double-click ODBC Data Sources.
3. On Windows 2000, perform the following steps:a. On the Windows taskbar, click Start → Settings → Control Panel.b. Double-click Administrative Tools.c. Double-click Data Sources (ODBC).
Chapter 10. Installing and upgrading warehouse packs 143
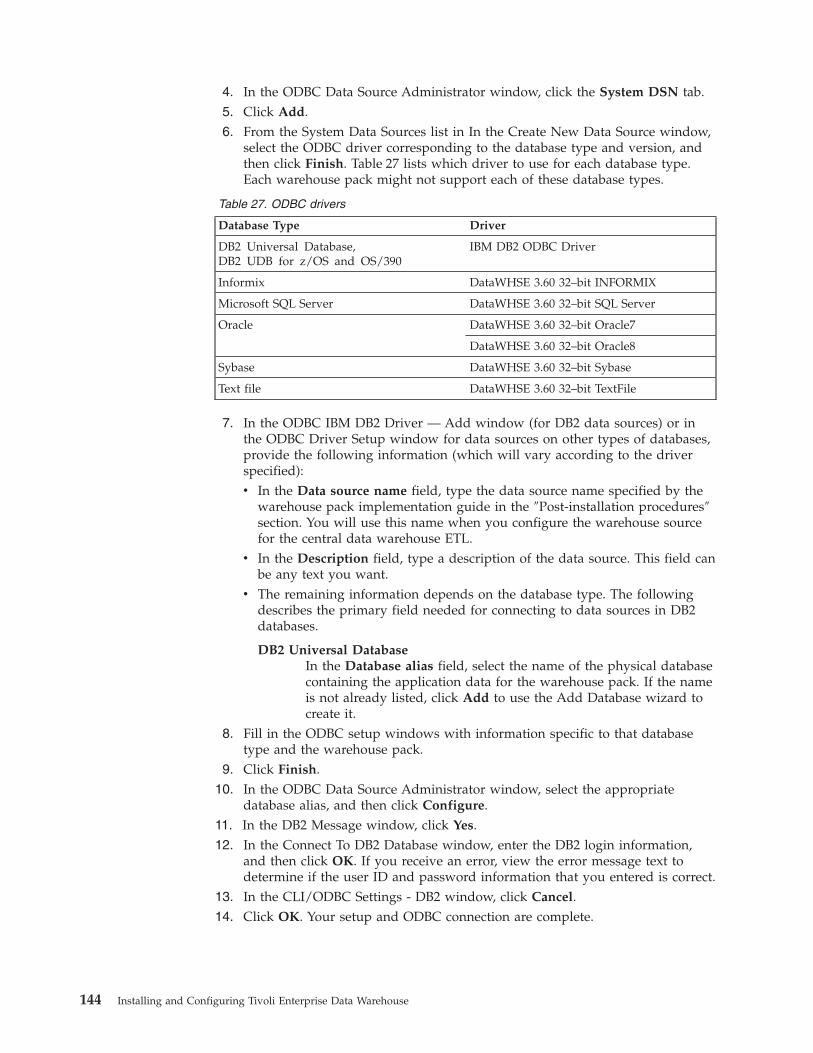
4. In the ODBC Data Source Administrator window, click the System DSN tab.5. Click Add.6. From the System Data Sources list in In the Create New Data Source window,
select the ODBC driver corresponding to the database type and version, andthen click Finish. Table 27 lists which driver to use for each database type.Each warehouse pack might not support each of these database types.
Table 27. ODBC drivers
Database Type Driver
DB2 Universal Database,DB2 UDB for z/OS and OS/390
IBM DB2 ODBC Driver
Informix DataWHSE 3.60 32–bit INFORMIX
Microsoft SQL Server DataWHSE 3.60 32–bit SQL Server
Oracle DataWHSE 3.60 32–bit Oracle7
DataWHSE 3.60 32–bit Oracle8
Sybase DataWHSE 3.60 32–bit Sybase
Text file DataWHSE 3.60 32–bit TextFile
7. In the ODBC IBM DB2 Driver — Add window (for DB2 data sources) or inthe ODBC Driver Setup window for data sources on other types of databases,provide the following information (which will vary according to the driverspecified):v In the Data source name field, type the data source name specified by the
warehouse pack implementation guide in the ″Post-installation procedures″section. You will use this name when you configure the warehouse sourcefor the central data warehouse ETL.
v In the Description field, type a description of the data source. This field canbe any text you want.
v The remaining information depends on the database type. The followingdescribes the primary field needed for connecting to data sources in DB2databases.
DB2 Universal DatabaseIn the Database alias field, select the name of the physical databasecontaining the application data for the warehouse pack. If the nameis not already listed, click Add to use the Add Database wizard tocreate it.
8. Fill in the ODBC setup windows with information specific to that databasetype and the warehouse pack.
9. Click Finish.10. In the ODBC Data Source Administrator window, select the appropriate
database alias, and then click Configure.11. In the DB2 Message window, click Yes.12. In the Connect To DB2 Database window, enter the DB2 login information,
and then click OK. If you receive an error, view the error message text todetermine if the user ID and password information that you entered is correct.
13. In the CLI/ODBC Settings - DB2 window, click Cancel.14. Click OK. Your setup and ODBC connection are complete.
144 Installing and Configuring Tivoli Enterprise Data Warehouse
Creating ODBC data sources on DB2 remote warehouse agentsites
After installing a warehouse pack, if you are using DB2 remote warehouse agents,create an ODBC data source on the DB2 remote warehouse agent site to provide adata connection between the warehouse pack and the operational data source. Ifthe DB2 remote warehouse agent site is a Windows system, create an ODBC datasource on the agent site by following the instructions in “Creating ODBC datasources on the control server for warehouse packs” on page 143. If the agent site isan AIX system, complete the following steps on the AIX system to create an ODBCdata source. For the equivalent steps for a Solaris system, see the IBM DB2Universal Database Data Warehouse Center Administration Guide.1. To add ODBC data sources, the file specified by the value of the ODBCINI
environment variable must contain an entry for each data source.For example, to make entries in /usr/lpp/db2_07_01/odbc/.odbc.ini, completethe following steps:a. Copy the sample file provided by DB2. Enter the following commands:
cd /usr/lpp/db2_07_01/odbccp odbc.ini.intersolv .odbc.ini
b. Add an entry for each ODBC data source in the [ODBC Data Sources]stanza, and create a stanza with the name of each entry you create.In the following sample .odbc.ini file, the data source ptapm uses IBM DB2ODBC DRIVER, the data source jcook1 uses an Oracle data source, the datasource lvassberg uses a Sybase data source, and ping5 is an Informix datasource. The Sybase client is installed in /data/sybase_client:[ODBC Data Sources]ptapm=IBM DB2 ODBC DRIVERjcook1=Oracle 8.1lvassberg=Sybase 12ping5=Informix 9.1
[ptapm]Driver=/usr/lpp/db2_07_01/lib/db2_36.oDescription=DB2 ODBC DatabaseDatabase=ptapm
[jcook1]Driver=/usr/lpp/db2_07_01/odbc/lib/ibor815.soDescription=Oracle 8 ODBC DatabaseServerName=jcook1
[lvassberg]Driver=/usr/lpp/db2_07_01/odbc/lib/ibsyb1115.soDescription=Sybase 11 ODBC DatabaseDatabase=inventoryServerName=lvassbergInterfacesFile=/data/sybase_client/interfaces
[ping5]Driver=/usr/lpp/db2_07_01/odbc/lib/ibinf15.soDescription=Informix 9 ODBC DatabaseDatabase=TEDWHostName=pingpongServerName=pingpong5Service=inf5
For detailed information about options for non-DB2 databases, visithttp://www.datadirect-technologies.com/odbc/techresources/productdoc/otdocument.asp.
Chapter 10. Installing and upgrading warehouse packs 145
Note: In the sample odbc.ini.intersolv file, the DB2 stanza uses the sharedlibrary/usr/lpp/db2_07_01/lib/db2.o. You must change this to/usr/lpp/db2_07_01/lib/db2_36.o.
For more information about this procedure, see the information about accessingnon-DB2 database warehouse sources in IBM DB2 Universal Database DataWarehouse Center Administration Guide.
2. Test a connection to the ODBC data source name using the execsql command,as follows:. /usr/lpp/db2_07_01/bin/IWH.environmentexecsql dummy dummy.out odbcDataSourceName user passwordcat dummy.out
If the name of the RDBMS vendor appears in the dummy.out file, then theconnection to the ODBC data source was successful.
Specifying user IDs and passwords for Tivoli Enterprise DataWarehouse sources and targets
Use the DB2 Data Warehouse Center to specify user IDs and passwords for datasources and targets for warehouse data. The warehouse sources and targetstypically used by the ETLs of a warehouse pack are created during the installationof a warehouse pack. Sources and targets for the Tivoli Enterprise Data Warehousedatabases are configured automatically, but you must manually configure thewarehouse sources for the application data after the warehouse pack is installed.
To specify the user ID and password for a data source or target, perform thefollowing steps:1. Open the DB2 Data Warehouse Center, as follows:
a. On the Windows taskbar, click Start → Programs → IBM DB2 → ControlCenter.
b. In the DB2 Control Center, click Tools → Data Warehouse Center. The DataWarehouse Center and Data Warehouse Center Logon windows aredisplayed.
c. In the Data Warehouse Center Logon window, type the user ID andpassword for the control database of the DB2 Data Warehouse Center. Thisinformation was specified when installing the Tivoli Enterprise DataWarehouse control server. If you do not know the user ID and password,contact your database administrator or the person who installed TivoliEnterprise Data Warehouse.If you cannot connect, make sure that you configured the control databaseas part of completing the installation. See “Specifying the control database(TWH_MD) for the DB2 Data Warehouse Center” on page 291 or“Specifying the control database (TWH_MD) for the DB2 WarehouseControl Database Manager” on page 291 for additional information.
d. Click OK.e. After the logon process completes, the Data Warehouse Center Launchpad
window might be displayed. You can close this window.2. In the left pane of the DB2 Data Warehouse Center window, expand the
Warehouse Sources folder and Warehouse Targets folder.3. Identify the warehouse sources and targets for the warehouse pack that you are
configuring. The first three characters of the name of a source or target contain
146 Installing and Configuring Tivoli Enterprise Data Warehouse
the product code for the warehouse pack. If the warehouse pack readsoperational data from more than one database, you must specify the user IDand password for each one.The following list describes the sources and targets for a typical warehousepack. The variable productCode represents the 3 character product code of thewarehouse pack.
productCode_odbcDataSourceName_SourceSpecifies the source from which the central data warehouse ETLextracts operational data. The variable odbcDataSourceName representsthe ODBC data source that is used to connect to the data source. Forexample, ABC_ABCMSMT_Source specifies a warehouse source for thewarehouse pack whose product code is ABC and which connects usingthe ODBC data source named ABCMSMT.
productCode_TWH_CDW_TargetSpecifies the central data warehouse database that is the target of thecentral data warehouse ETL. This target can be only the databasenamed TWH_CDW.
productCode_TWH_CDW_SourceSpecifies the central data warehouse database that is the source of thedata mart ETL. This source can be only the database namedTWH_CDW.
productCode_TWH_MART_TargetSpecifies the data mart database that is the target of the data mart ETL.This target can be only the database named TWH_MART.
Important: If the application did not follow this naming convention, thewarehouse pack might not install properly. If this is the case,contact the support team for the application.
4. For each item in the Warehouse Sources folder and Warehouse Targets folderthat belongs to the warehouse pack you are configuring, complete the followingsteps:a. Select and right-click the source or target name and select Properties.b. Click the Data source tab.c. In the System name field, do not change the default value.d. In the User ID and Password fields, type the user ID and password that
connect to the source or target database.e. Click OK.
5. Close the DB2 Data Warehouse Center and DB2 Control Center windows.
Scheduling warehouse pack ETL processesOnly you can determine when to schedule ETLs to run in your environment.Consider any dependencies carefully before scheduling your ETLs. See“Understanding ETL processes” on page 22 for a general description of ETLs anddependencies.
To configure and schedule ETL processes, do the following:1. Run the ETL initialization processes, only one time, that are specified in the
″Post-installation procedures″ section in the implementation guide for thewarehouse pack. Not all warehouse packs have initialization processes.
2. Determine whether any of the ETL processes for the warehouse packs havedependencies on other ETL processes. Dependencies can exist between the ETL
Chapter 10. Installing and upgrading warehouse packs 147
processes for a single warehouse pack and between ETL processes of differentwarehouse packs. The implementation guide provided with each warehousepack indicates if there are dependencies for any of its ETL processes. Foradditional information, see page “Determining application ETL processdependencies” on page 149.
3. If there are dependencies between any ETL processes, then you can specifyshortcuts to link the dependent processes together and run them sequentially.For additional information, see page “Creating shortcuts to link ETL processes”on page 151.
If there are no dependencies between any ETL processes or if you know whenyou want your ETL processes to run and know how long they will take, youcan schedule ETL processes to run at specified times.
4. Specify a time frame and interval for when and how often to run the ETLprocesses. For additional information, see page “Scheduling your ETL steps” onpage 153.
5. Verify that the shortcut definitions and ETL scheduling information is correct.For additional information, see page “Confirming the ETL processes” onpage 156.
You can combine scheduling methods and schedule some steps to run sequentiallyand others to run at specified times. In this case, you must follow both sets ofinstructions as appropriate for configuring some ETL steps to run sequentially andothers to run at specified times.
Note: As you schedule ETL processes for each warehouse pack, write down andsave the scheduling information and the order in which you link them. Ifyou install a patch to the warehouse pack, it is possible that you will haveto reschedule ETL processes and this information will help you do this.
Running ETL initialization processesEach warehouse pack folder in the Subject Areas folder contains a Processesfolder that contains the ETL processes defined by the warehouse pack. Expand theProcesses folder for each warehouse pack by clicking the plus sign (+) next to thefolder name.
ETL initialization processes are provided by some warehouse packs and areidentified in the ″Post-installation procedures″ section in the implementation guidethat is provided with the warehouse pack. The naming convention for ETLinitialization processes helps you identify them in the Processes folder for eachwarehouse pack. For example, the names of ETL initialization processes contain theword Initialize, as follows:productCode_c05_Initialize_Process
The names of ETL steps contain the string init, as follows:productCode_c05_s010_init
ETL initialization processes are run only one time. You must run them manually.
Attention: Running the ETL initialization processes more than one time can resultin errors in your central data warehouse.
Follow the instructions in “Scheduling your ETL steps” on page 153 to schedule theETL initialization processes to run one time. After the initialization steps run, viewthe log information as specified in “Using the Work in Progress window” onpage 247 to verify that the ETL initialization processes completed successfully.
148 Installing and Configuring Tivoli Enterprise Data Warehouse
Note: Some warehouse packs provide additional processes, such as archivingprocesses, that should also be run only once. See the ″ETL processes″ sectionof the implementation guide provided with each warehouse pack in order todetermine if there are other processes that should be run only once for thewarehouse pack.
Determining application ETL process dependenciesThere are a variety of ways to schedule ETL processes. The way that you choose toschedule your ETL processes will depend on dependencies between the ETLprocesses in your environment. Some warehouse packs ship with both central datawarehouse ETLs and data mart ETLs. Others only ship with central datawarehouse ETLs. ETL process dependencies are provided in the ″Post-installationprocedures″ section of the implementation guide for each warehouse pack.
Some sample scheduling scenarios include the following:v Schedule a central data warehouse ETL to run at a specified time each day and
schedule a data mart ETL to run at a different specified time each day.v Schedule multiple central data warehouse ETLs to run at the same specified time
and then link data mart ETL processes to run sequentially when they havecompleted.
v Link multiple data mart ETLs to the same central data warehouse ETL.
The ETL process names listed in the Processes folder follow a naming conventiondefined in Enabling an Application for Tivoli Enterprise Data Warehouse. The names ofthe ETL processes can help determine the order in which they should run.
ETL process names are constructed as follows:productCode_processID_processDescription_Process
The variables in this process name are as follows:v productCode is the unique code identifying the warehouse pack.v processID is either cnn or mnn. The cnn process IDs are ETL processes that load
data into a central data warehouse database, and are also known as central datawarehouse ETL processes. The mnn process IDs are ETL processes that writedata to the one or more star schemas from which reports are created, and arealso known as data mart ETL processes. nn is a two digit number starting with05.
v processDescription is a description of the process.
For example:APM_c05_Initialize_Process
Processes should run in the following order:1. Processes named productCode_cnn_processDescription_Process, in increasing order
of the nn value for each warehouse pack2. Processes named productCode_mnn_processDescription_Process, in increasing
order of the nn value for each warehouse pack
You must schedule the ETL processes with dependencies to run after the ETLprocesses on which they are dependent. Determine the order of ETL scheduling forthe warehouse packs listed and make a note of it for easy reference.
For example, if you have two warehouse packs, AP1 and AP2, and AP2 has adependency on AP1, and the following ETL steps for the two warehouse packs:
Chapter 10. Installing and upgrading warehouse packs 149
v AP1_c05_s010_Extractv AP1_c10_s010_Transformv AP1_c15_s010_Loadv AP1_m05_s010_Martv AP2_c05_s010_Extractv AP2_m05_s010_Mart
The ETL steps must be linked together in the following order:1. AP1_c05_s010_Extract (contains a shortcut to AP1_c10_s010_Transform)2. AP1_c10_s010_Transform (contains a shortcut to AP1_c15_s010_Load)3. AP1_c15_s010_Load (contains a shortcut to AP2_c05_s010_Extract)4. AP2_c05_s010_Extract (contains a shortcut to AP1_m05_s010_Mart)5. AP1_m05_s010_Mart (contains a shortcut to AP2_m05_s010_Mart)6. AP2_m05_s010_Mart
Attention: It is important that ETL processes with dependencies are run in theproper order. Failure to do so can result in errors in the central data warehouse.
Considerations for scheduling ETL processes to run at specified times: You canschedule ETL processes without dependencies to run at specified times. This doesnot guarantee that they run sequentially. Less time is required initially to set upthe ETL processes, but you also need to consider the following:v All ETL processes that are scheduled to run at a specified time attempt to run
even if an ETL process fails. If the problem occurred with a specific ETL, thenthe remaining ETL processes attempt to run. If other ETL processes aredependent on the process that failed, they will also fail. If the problem occurreddue to a space constraint or another problem that affects all ETL processes, thenother ETL processes also fail.
v Running ETL processes at specified times can cause errors if there are unknowndependencies between any of the ETL processes.
v All ETL processes that update tables in the central data warehouse should not bescheduled at the same time. There might be unknown dependencies in the data,and updates to the same tables might cause performance problems dependingon your environment.
v Performance problems can result if multiple warehouse pack ETL processes arescheduled to run at the same time.
You can schedule ETL processes to run sequentially even if there are nodocumented dependencies. This ensures that ETL processes do not start unless allpreceding processes completed successfully, which allows you to easily identify thefailing process in the event of an error.
Considerations for scheduling ETL processes to run sequentially: If there aredependencies between ETL processes as indicated in the ″Post-installationprocedures″ section of the implementation guide for the warehouse packs, you canschedule these ETL processes to run sequentially. This requires more time initiallyto set up the ETL processes, but if there are errors during the ETL run cycle,debugging and recovery procedures require less effort.
The following list describes some of the considerations for scheduling your ETLprocesses to run sequentially:
150 Installing and Configuring Tivoli Enterprise Data Warehouse
v You must create shortcuts to link all dependent ETL processes together. Withshortcuts, you specify only when and how often the first ETL process runs. Allother dependent application ETL processes run automatically because they arelinked to that process. See “Creating shortcuts to link ETL processes” for moreinformation about creating shortcuts.
v When an error is encountered, the subsequent step in the ETL process does notrun. This situation results in a less complicated recovery scenario.
v Disabling the scheduling for processes that are linked together only requires youto disable the first process. None of the processes that are linked to the firstprocess run if the first process does not run.
Creating shortcuts to link ETL processesYou create shortcuts for application ETL processes in order to run them in aspecified order and ensure that they do not run if the previous ETL process didnot complete successfully.
Some applications provide processes, such as initialization processes, that shouldonly be run once. Do not link these processes with shortcuts. See theimplementation guide provided with each warehouse pack to determine whichprocesses, if any, should run only once.
Before creating shortcuts, make a backup copy of the TWH_MD database in caseyou need to recover to the initial state of the installed warehouse pack. Also, writedown which processes you link and the steps that you take to link these processesand save this information. If you install a patch to warehouse pack, it is possiblethat you will have to reschedule all ETL processes and the information you writedown now will help you do this.
Perform the following steps to create a shortcut:1. In the DB2 Data Warehouse Center window in the Processes folder for a
warehouse pack, double-click the name of the first warehouse pack ETL processto be run. The Process Model window is displayed, which illustrates how datais transformed by that ETL process. The ETL process flow is defined in steps,and the data tables used in the process are distinguished from the actual stepsby different icons. Scroll down in the Process Model window to find the nameof the last step run in the process.
Chapter 10. Installing and upgrading warehouse packs 151
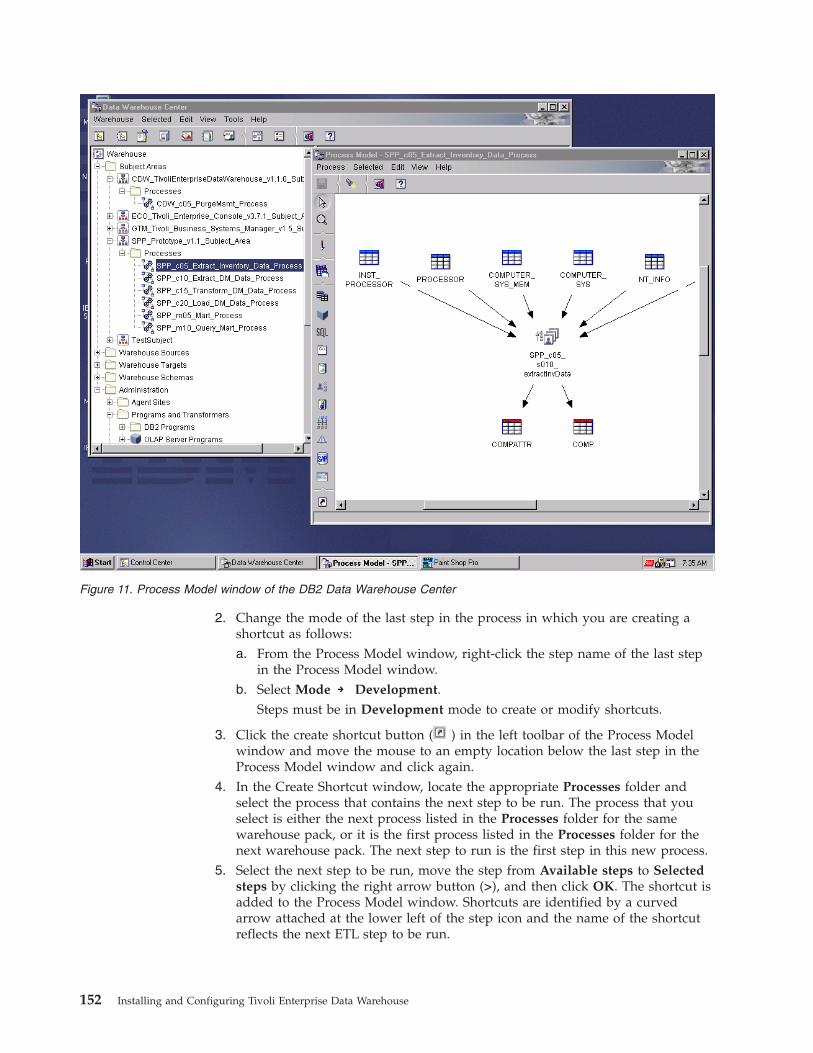
2. Change the mode of the last step in the process in which you are creating ashortcut as follows:a. From the Process Model window, right-click the step name of the last step
in the Process Model window.b. Select Mode → Development.
Steps must be in Development mode to create or modify shortcuts.
3. Click the create shortcut button ( ) in the left toolbar of the Process Modelwindow and move the mouse to an empty location below the last step in theProcess Model window and click again.
4. In the Create Shortcut window, locate the appropriate Processes folder andselect the process that contains the next step to be run. The process that youselect is either the next process listed in the Processes folder for the samewarehouse pack, or it is the first process listed in the Processes folder for thenext warehouse pack. The next step to run is the first step in this new process.
5. Select the next step to be run, move the step from Available steps to Selectedsteps by clicking the right arrow button (>), and then click OK. The shortcut isadded to the Process Model window. Shortcuts are identified by a curvedarrow attached at the lower left of the step icon and the name of the shortcutreflects the next ETL step to be run.
Figure 11. Process Model window of the DB2 Data Warehouse Center
152 Installing and Configuring Tivoli Enterprise Data Warehouse
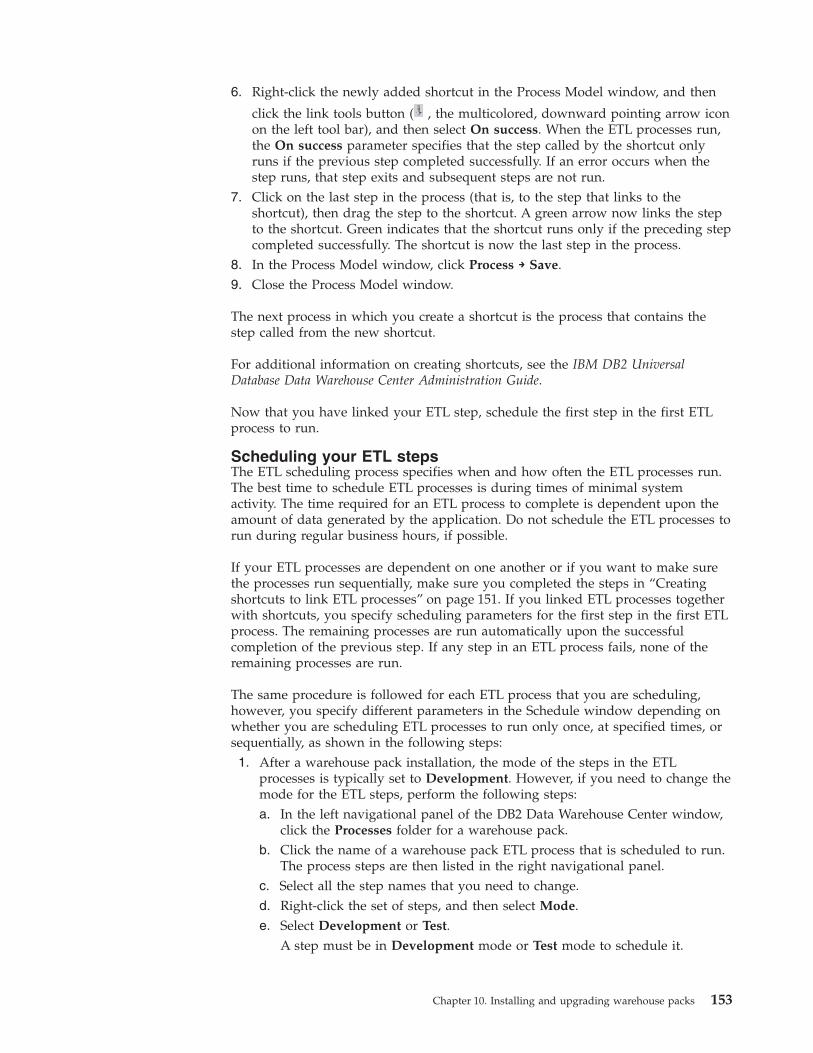
6. Right-click the newly added shortcut in the Process Model window, and then
click the link tools button ( , the multicolored, downward pointing arrow iconon the left tool bar), and then select On success. When the ETL processes run,the On success parameter specifies that the step called by the shortcut onlyruns if the previous step completed successfully. If an error occurs when thestep runs, that step exits and subsequent steps are not run.
7. Click on the last step in the process (that is, to the step that links to theshortcut), then drag the step to the shortcut. A green arrow now links the stepto the shortcut. Green indicates that the shortcut runs only if the preceding stepcompleted successfully. The shortcut is now the last step in the process.
8. In the Process Model window, click Process → Save.9. Close the Process Model window.
The next process in which you create a shortcut is the process that contains thestep called from the new shortcut.
For additional information on creating shortcuts, see the IBM DB2 UniversalDatabase Data Warehouse Center Administration Guide.
Now that you have linked your ETL step, schedule the first step in the first ETLprocess to run.
Scheduling your ETL stepsThe ETL scheduling process specifies when and how often the ETL processes run.The best time to schedule ETL processes is during times of minimal systemactivity. The time required for an ETL process to complete is dependent upon theamount of data generated by the application. Do not schedule the ETL processes torun during regular business hours, if possible.
If your ETL processes are dependent on one another or if you want to make surethe processes run sequentially, make sure you completed the steps in “Creatingshortcuts to link ETL processes” on page 151. If you linked ETL processes togetherwith shortcuts, you specify scheduling parameters for the first step in the first ETLprocess. The remaining processes are run automatically upon the successfulcompletion of the previous step. If any step in an ETL process fails, none of theremaining processes are run.
The same procedure is followed for each ETL process that you are scheduling,however, you specify different parameters in the Schedule window depending onwhether you are scheduling ETL processes to run only once, at specified times, orsequentially, as shown in the following steps:1. After a warehouse pack installation, the mode of the steps in the ETL
processes is typically set to Development. However, if you need to change themode for the ETL steps, perform the following steps:a. In the left navigational panel of the DB2 Data Warehouse Center window,
click the Processes folder for a warehouse pack.b. Click the name of a warehouse pack ETL process that is scheduled to run.
The process steps are then listed in the right navigational panel.c. Select all the step names that you need to change.d. Right-click the set of steps, and then select Mode.e. Select Development or Test.
A step must be in Development mode or Test mode to schedule it.
Chapter 10. Installing and upgrading warehouse packs 153
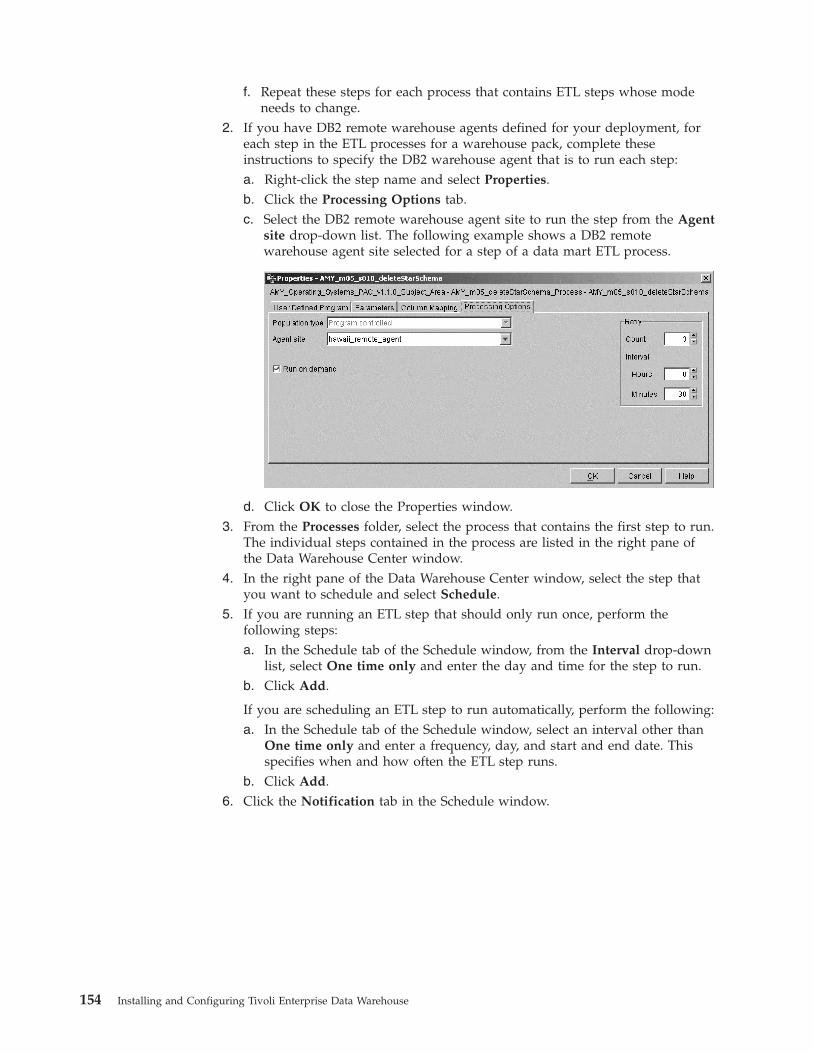
f. Repeat these steps for each process that contains ETL steps whose modeneeds to change.
2. If you have DB2 remote warehouse agents defined for your deployment, foreach step in the ETL processes for a warehouse pack, complete theseinstructions to specify the DB2 warehouse agent that is to run each step:a. Right-click the step name and select Properties.b. Click the Processing Options tab.c. Select the DB2 remote warehouse agent site to run the step from the Agent
site drop-down list. The following example shows a DB2 remotewarehouse agent site selected for a step of a data mart ETL process.
d. Click OK to close the Properties window.3. From the Processes folder, select the process that contains the first step to run.
The individual steps contained in the process are listed in the right pane ofthe Data Warehouse Center window.
4. In the right pane of the Data Warehouse Center window, select the step thatyou want to schedule and select Schedule.
5. If you are running an ETL step that should only run once, perform thefollowing steps:a. In the Schedule tab of the Schedule window, from the Interval drop-down
list, select One time only and enter the day and time for the step to run.b. Click Add.
If you are scheduling an ETL step to run automatically, perform the following:a. In the Schedule tab of the Schedule window, select an interval other than
One time only and enter a frequency, day, and start and end date. Thisspecifies when and how often the ETL step runs.
b. Click Add.6. Click the Notification tab in the Schedule window.
154 Installing and Configuring Tivoli Enterprise Data Warehouse
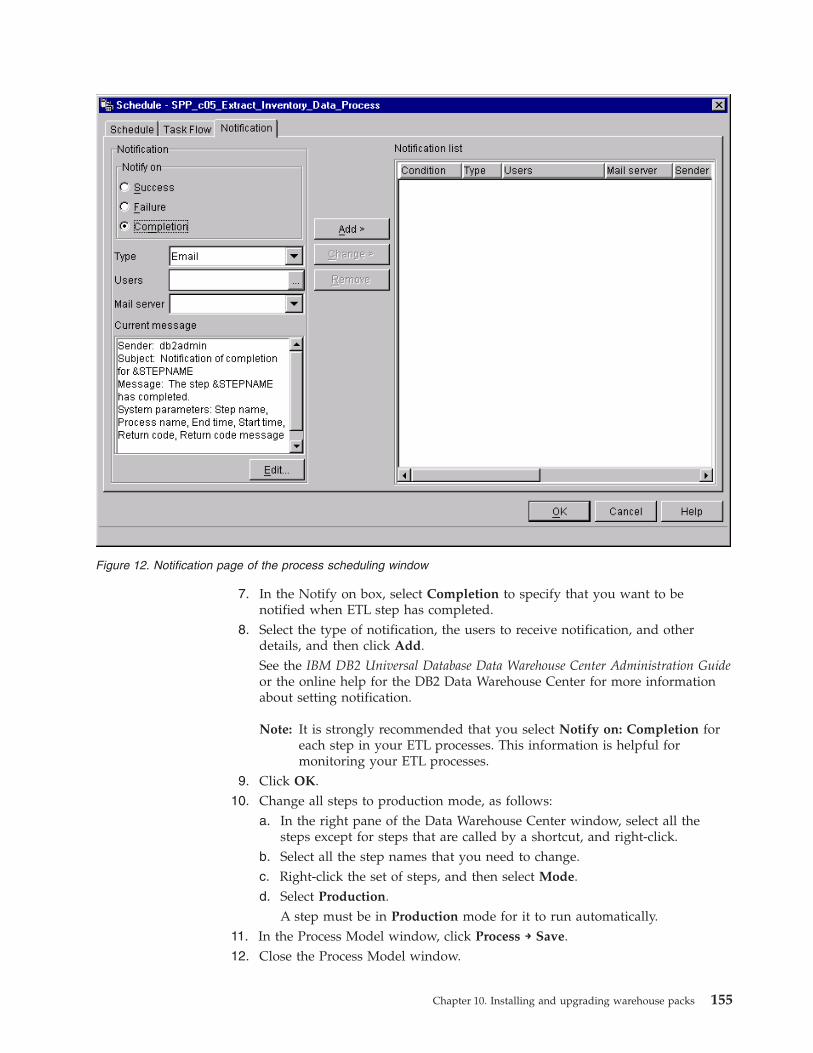
7. In the Notify on box, select Completion to specify that you want to benotified when ETL step has completed.
8. Select the type of notification, the users to receive notification, and otherdetails, and then click Add.See the IBM DB2 Universal Database Data Warehouse Center Administration Guideor the online help for the DB2 Data Warehouse Center for more informationabout setting notification.
Note: It is strongly recommended that you select Notify on: Completion foreach step in your ETL processes. This information is helpful formonitoring your ETL processes.
9. Click OK.10. Change all steps to production mode, as follows:
a. In the right pane of the Data Warehouse Center window, select all thesteps except for steps that are called by a shortcut, and right-click.
b. Select all the step names that you need to change.c. Right-click the set of steps, and then select Mode.d. Select Production.
A step must be in Production mode for it to run automatically.11. In the Process Model window, click Process → Save.12. Close the Process Model window.
Figure 12. Notification page of the process scheduling window
Chapter 10. Installing and upgrading warehouse packs 155
For additional information on scheduling ETL processes through the DB2 DataWarehouse Center, see the IBM DB2 Universal Database Data Warehouse CenterAdministration Guide or the online help for the DB2 Data Warehouse Center.
Confirming the ETL processesTo prevent errors in the central data warehouse, you should verify shortcutdefinitions, if you defined any, and your scheduling settings before ETL processesare run. When ETL processes are running, they should be monitored and theappropriate action taken if any ETL step is unsuccessful.
Verifying shortcut definitions and the order in which processesrunIf you defined shortcuts to link your ETL processes together, open the Work inProgress window to verify the following. Information about the Work in Progresswindow can be found in “Using the Work in Progress window” on page 247.v Shortcuts link ETL processes in the following order:
1. All central data warehouse ETL processes for all warehouse packs2. The last central data warehouse ETL process to the first data mart ETL
process3. All remaining data mart ETL processes for all warehouse packs.
v All shortcuts are set to On success. This ensures that subsequent steps do notrun if an error is encountered. See “Creating shortcuts to link ETL processes” onpage 151 for the procedure.
v All shortcuts are set to send e-mail notification upon completion. See“Scheduling your ETL steps” on page 153 for the procedure.
v Initialization processes and other processes that should only run one time are notlinked with shortcuts.
Verifying scheduling parametersFor all steps in all processes, verify the following:v All steps in all processes are set to Production mode. See step 10.v All parameters specified in the Schedule window are correct. See steps 4 through
9 on pages 154 through 155.v For the ETL processes linked together with shortcuts, only the first ETL process
is scheduled to run.
Checking ETL process task flowYou can check the order in which ETL steps are scheduled to run with thefollowing methods:v For processes linked together with shortcuts, right-click an ETL process in the
Processes folder and select Task Flow. Task flow information is displayed,showing the predecessor step name, the name of the next step selected, and theconditions under which the selected process runs. The Condition field should beset to Starts on success. This controls the running of the ETL processes andprevents subsequent processes from running if an error is encountered.
v Open the Process Model window for each process and verify the sequence ofsteps for that process. The process and step naming conventions can help youdetermine whether the order in which the steps run is correct.
156 Installing and Configuring Tivoli Enterprise Data Warehouse
Configuring for a multiple customer environment or multiple datacenters
You must configure the central data warehouse database for a multiple customerenvironment or for multiple data centers after installing the warehouse pack thatloads the data but before running the ETLs that load data. See “Support formultiple customer environments and multiple data centers” on page 28. Inaddition, you must periodically update the database tables that define thecustomers and centers. You can use an automated process that you design yourselfto populate and update the tables, but it must run as a distinct step that isscheduled separately from the central data warehouse ETL processes.Automatically populating the tables during the central data warehouse ETLprocesses can cause automatic generation of customers or centers that have notbeen explicitly configured by an administrator.
When the central data warehouse ETL is run, data from applications is assignedvalid customer account codes by matching certain data fields in the incoming datawith pre-identified values in a matching database table. Because each applicationcan use different fields and a different number of fields to identify customers, eachapplication has its own matching table that it uses during the central datawarehouse ETL process.
Before you implement a multiple customer environment or multiple data centers,ensure that an administrator fully understands the data contents of the TWG.Cust,productCode.cust_lookup, and productCode.centr_lookup tables to avoid minglingdata from multiple customers or centers. The following table lists information tasksassociated with supporting these environments.
Attention: Read the Enabling an Application for Tivoli Enterprise Data Warehouse tounderstand how multicustomer and multicenter support works. If youimplement it incorrectly, you might damage the data in the central datawarehouse database.
Table 28. Where to find information about tasks relating to support for multiple customerenvironments or multiple data centers
Task Information
Understanding how support for a multiplecustomer environment and multiple datacenters is implemented
Enabling an Application for Tivoli EnterpriseData Warehouse
Configuring a multiple customerenvironment or multiple data centers for awarehouse pack
“Configuring for a multiple customerenvironment or multiple data centers”
Maintaining a multiple customerenvironment or multiple data centers
“Maintaining a multiple customer ormultiple data center environment” onpage 160
Configuring a multiple customer environmentWhen configuring a multiple customer or multiple data center environment, youmust customize these actions for the particular combination of a warehouse packand the source data that is generated in your IT environment. Do not populate thetables in the following procedure without fully understanding:v Your source data, including its possible values
Chapter 10. Installing and upgrading warehouse packs 157
v The field or fields that the warehouse pack uses to differentiate customers.Frequently, the warehouse pack uses the fully-qualified host name of acomputer, but not always. If the implementation guide for a warehouse packdoes not contain this information, examine the ETL process that performs thematching operation or contact the customer support team of the application todetermine this information.
v The Tivoli warehouse schema design
To configure the central data warehouse to implement a multiple customerenvironment, perform the following actions:1. Backup the control server metadata database (TWH_MD), the central data
warehouse database (TWH_CDW), and the data mart database (TWH_MART).See “Backing up and restoring a Tivoli Enterprise Data Warehouse deployment”on page 257 for details.
2. Delete the single row in the productCode.cust_lookup table. The contents of thisrow depend on whether matching is based on the customer account code or thecustomer ID, as follows:Cust_Acct_Cd=DEF, Value=@
Cust_ID=1, Value=@
3. Define your customers by populating the TWG.Cust table with valid values.For example, suppose you have two customers, the Kansas City Corporationand the San Francisco Corporation. Data specific to these customers isgenerated by a warehouse pack whose product code is inv. The Kansas CityCorporation is in time zone 8 and has the customer account code KSCorp. TheSan Francisco Corporation, which is in time zone 5, has the customer accountcode SFCorp. Both are in the geographic area US. Use the following SQL todefine those customers:insert into TWG.Cust
(Cust_ID, Cust_Parent_ID, GeoArea_Cd, TmZon_ID, Cust_Acct_Cd, Cust_Nm)values (0, NULL,’US’, 8, ’KSCorp’, ’Kansas City Corporation’);
insert into TWG.Cust(Cust_ID, Cust_Parent_ID, GeoArea_Cd, TmZon_ID, Cust_Acct_Cd, Cust_Nm)values (0, NULL,’US’, 5, ’SFCorp’, ’San Francisco Corporation’);
You define the Cust_ID column with the value 0 (zero). The Cust_ID column isautomatically populated with a sequential add ″trigger″ number; the value 0 isreplaced by the next value in the sequence. The TWG.Cust table includescustomer IDs for all warehouse packs.
4. Populate the productCode.cust_lookup table.The data in the lookup table is typically generated by an application ordatabase that describes the hosts in a customer environment. Often, awarehouse pack uses the host name to differentiate between customers.In the previous example, all hosts in the kccorp.com domain belong to theKansas City Corporation, while hosts in the sfcorp.com domain belong to theSan Fransisco Corporation. However, this warehouse pack requires that youspecify the fully-qualified host name for each computer in each customer. Ifyou manage two computers for each company, you need to create four entriesin the inv.cust_lookup table.The format of the cust_lookup table is defined by the warehouse pack. Anapplication might differentiate customers using the fully qualified host nameand identify the customer using one of these columns in the TWG.Cust table:v The customer account code
If using the customer account code, define the customers with SQL similar tothe following:
158 Installing and Configuring Tivoli Enterprise Data Warehouse
insert into inv.cust_lookup values (’KSCorp’,’a123.dev.kccorp.com’)insert into inv.cust_lookup values (’KSCorp’,’b123.sales.kccorp.com’)insert into inv.cust_lookup values (’SFCorp’,’s123.dev.sfcorp.com’)insert into inv.cust_lookup values (’SFCorp’,’t123.sales.sfcorp.com’)
The Cust_Acct_Cd field in the TWG.Cust table must match theCust_Acct_Cd field in the productCode.cust_lookup table.
v The customer IDIf using the customer ID, define the customers with SQL similar to thefollowing:insert into inv.cust_lookup values (4,’a123.dev.kccorp.com’)insert into inv.cust_lookup values (4,’b123.sales.kccorp.com’)insert into inv.cust_lookup values (5,’s123.dev.sfcorp.com’)insert into inv.cust_lookup values (5,’t123.sales.sfcorp.com’)
The Cust_ID field in the TWG.Cust table must match the Cust_ID field in theproductCode.cust_lookup table. You must know the specific sequential valuethat was assigned to each customer in the Cust_ID column before you canupdate the productCode.cust_lookup table.
v If the warehouse pack uses a source data field other than the fully qualifiedhost name or maps data using a value other than the customer ID or thecustomer account code, its implementation guide documents the format andcontent of the lookup tables you create. Always check the ″Multiple datacenters″ and ″Multiple customer environments″ sections of theimplementation guide for information about implementing multicustomersupport for each warehouse pack.
In this example, you know from having checked the TWG.Cust table that theKansas City Corporation has the customer ID 4 and that the San FransiscoCorporation has the customer ID 5.
When properly configured, the central data warehouse ETL runs and populates thevalid data into the central data warehouse database, with the appropriate customerID. However, if the source data contains a value that is not listed in theproductCode.cust_lookup and TWG.Cust tables (in our example, a host name otherthan one of the four values specified above), that data is placed into an exceptiontable instead of being placed into the central data warehouse database.
Configuring a multiple data center environmentWhen configuring a multiple customer or multiple data center environment, youmust customize these actions for the particular combination of a warehouse packand the source data that is generated in your IT environment. Do not populate thetables in the following procedure without fully understanding:v Your source data, including its possible valuesv The field or fields that the warehouse pack uses to differentiate customers.
Frequently, the warehouse pack uses the fully-qualified host name of acomputer, but not always. If the implementation guide for a warehouse packdoes not contain this information, examine the ETL process that performs thematching operation or contact the customer support team of the application todetermine this information.
v The Tivoli warehouse schema design
To implement multiple data center support, complete the following steps:
Chapter 10. Installing and upgrading warehouse packs 159
1. Backup the control server metadata database (TWH_MD), the central datawarehouse database (TWH_CDW), and the data mart database (TWH_MART).See “Backing up and restoring a Tivoli Enterprise Data Warehouse deployment”on page 257 for details.
2. Define the centers that are needed to support your installation by populatingthe TWG.Centr table with valid values. For example, suppose you have twodata centers, the Kansas City Center and the San Francisco Center. Data specificto these centers is generated by a warehouse pack whose product code is inv.The Kansas City Center is in time zone 8 and has the center code KS. The SanFrancisco Corporation, which is in time zone 5, has the center code SF. Both arein the geographic area US. Create the following SQL to define those centers:insert into TWG.centr(Centr_Cd, Centr_Parent_Cd, GeoArea_Cd, TmZon_ID, Centr_Nm)values (’KS’, NULL,’US’, 8, ’Kansas City Center’);insert into TWG.centr(Centr_Cd, Centr_Parent_Cd, GeoArea_Cd, TmZon_ID, Centr_Nm)values (’SF’, NULL,’US’, 5, ’San Francisco Center’);
3. Populate the productCode.centr_lookup table with values that relate a host ordata to a center. For example:insert into inv.centr_lookup values (’KS’,’a123.dev.kccorp.com’)insert into inv.centr_lookup values (’KS’,’b123.sales.kccorp.com’)insert into inv.centr_lookup values (’SF’,’s123.dev.sfcorp.com’)insert into inv.centr_lookup values (’SF’,’t123.sales.sfcorp.com’)
When properly configured, the central data warehouse ETL runs and populates thevalid data into the central data warehouse database with the appropriate centercode. However, if the source data contains a value that is not listed in theproductCode.centr_lookup and TWG.Cust tables (in our example, this would be ahost name other than one of the four values specified above), that data is placedinto an exception table instead of being extracted into the central data warehousedatabase.
Maintaining a multiple customer or multiple data centerenvironment
The following table shows which database tables must be updated when you addor remove a customer or center.
Event Update these tables
Adding or removing a customer productCode.cust_lookupTWG.Cust
Adding or removing a data center productCode.centr_lookupTWG.Centr
Look for ways to automate or at least flag the need for an update of the lookuptables. For example, if the differentiating field is the fully-qualified host name of acomputer, make sure that you add each new computer to the lookup table for theappropriate customer as soon as that host name is created.
Always check the exception tables after ETLs run. Clean up the data and correctthe central data warehouse database. The implementation guide lists the exceptiontables.
160 Installing and Configuring Tivoli Enterprise Data Warehouse
Applying a fix to a warehouse packWhen you apply a fix to a warehouse pack, make sure that you keep the followingconstraints in mind:v You might have to reconfigure the warehouse pack when you install a patch.
The patch documentation indicates whether this is necessary.v If possible, apply all patches to a warehouse pack before configuring it, so that
you will only have to configure it once.
For any configuration steps that are required, see “Configuring warehouse packs”on page 142.
Planning for the patch processConsult your Tivoli Enterprise Data Warehouse configuration planninginformation. This information was recorded at the time of the initial installation ofTivoli Enterprise Data Warehouse and may have been updated for the installationof subsequent fix packs and e-fixes.
To install patches to warehouse packs:v For a single system installation, also known as a quick start installation, you
need the following information:– The directory where Tivoli Enterprise Data Warehouse files are installed.– If the Tivoli Enterprise Data Warehouse report interface (RPI) is installed, the
directory where the Tivoli Presentation Services files are installed.v For a distributed installation, you need the following information:
– The Tivoli Enterprise Data Warehouse component, or components, installedon each system.
– The directory where Tivoli Enterprise Data Warehouse files are installed onthe control server.
– Whether or not DB2 remote warehouse agents are installed in theconfiguration as described in Chapter 14, “Using DB2 remote warehouseagents”, on page 227.
– If a DB2 remote warehouse agent is installed on the system where the centraldata warehouse component is installed, the directory where Tivoli EnterpriseData Warehouse files are installed on that system.
– If a DB2 remote warehouse agent is installed on the system where the datamart component is installed, the directory where Tivoli Enterprise DataWarehouse files are installed on that system.
– If the report interface (RPI) is installed, the directory where Tivoli EnterpriseData Warehouse files are installed on the system where the RPI is installed.
– If the RPI is installed, the directory where Tivoli Presentation Services files areinstalled on the system where the RPI is installed.
Consult your configuration planning information for the warehouse pack that isbeing patched. This information was recorded at the time of the initial installationof the warehouse pack. This information might have been updated for subsequentpatches and might provide additional knowledge that is specific to the warehousepack.
Consult the warehouse pack patch documentation for the patch that is beinginstalled. This documentation is in the package in which each patch is distributed,and describes where the files that contain the patch are located in the distribution
Chapter 10. Installing and upgrading warehouse packs 161
package and how to make them available to the patch installation program. Thisdocumentation might also describe additional requirements that are specific to thepatch that are not contained in this guide, such as the following:v The scope and type of the changes being implemented by the patch might
require you to use the DB2 Data Warehouse Center to set the ETL steps of thewarehouse pack to development mode before installing the patch in order topermit changes to be made.
v You might have to perform tasks after the patch is installed, includingre-entering the configuration information that was entered after the warehousepack was initially installed.
Note: The patch documentation might contain summary instructions about how tooperate the patch installation program. However, this documentation doesnot describe the process for installing the patch on all possibleconfigurations of Tivoli Enterprise Data Warehouse. Be sure to read all thespecific instructions contained in this section so that you understand thepatch installation process required for your configuration.
If you need to install patches for more than one warehouse pack, it isrecommended that you install all the patches in a single session. See the patchinstallation preparation and operation instructions for more information. Installingmultiple patches provides the following advantages:v Tivoli Enterprise Data Warehouse databases are offline at one time, rather than
being offline for each patch.v One backup of the Tivoli Enterprise Data Warehouse and warehouse packs
databases and software files is needed, rather than a backup for each patch.v If you have DB2 remote warehouse agents installed, you copy files from the
control server system to each remote warehouse agent system happens once,rather than multiple times.
If you are uncertain about any of the patch installation planning information listedabove or in the following sections, contact IBM customer support before you startthe installation.
Patch installation prerequisitesThe following steps describe how to prepare for the installation of one or morepatches to warehouse packs.1. Each system in the Tivoli Enterprise Data Warehouse configuration must be
rebooted between the Tivoli Enterprise Data Warehouse 1.1 Fix Pack 2installation and the installation of any warehouse pack patch. This ensures thatall of the required changes to the system environment that are required for theinstallation of warehouse pack patches have been implemented. Refer to thereadme file for Tivoli Enterprise Data Warehouse 1.1 Fix Pack 2 for moreinformation.
2. Make sure that the patch source files directory for each patch that you aregoing to install is accessible to the patch installation program.The patch distribution package provides a directory of source files for eachwarehouse pack patch that the package contains. This directory must contain atwh_install_props.cfg file. This directory also contains one or moresubdirectories containing additional source files for the patch. You need to copythis source file directory to each local system where the patch installationprogram is to be run, or you can place it at a location that is network-accessiblefrom each system.
162 Installing and Configuring Tivoli Enterprise Data Warehouse

Verify that the patch installation program can access the directory of sourcefiles for each patch that you are about to install by performing the followingsteps on each system on which the patch installation program is to be run:a. Log on to the system as the user who will run the patch installation
program.v On a Windows system, log on as a user in the local administrators group.v On a UNIX system, log on as user root.
b. Open a command or terminal session.c. For each patch to be installed:
1) Change to the directory of the source files for that patch.2) Display the contents of the twh_install_props.cfg file in that directory:
v On UNIX, use the cat command.v On Windows, use the typecommand.
3) Verify that all files and subdirectories in the directory of source files forthe patch, as well as the main directory and the twh_install_props.cfgfile, have the same access permission for the user.
3. Perform the following steps to verify that the TWH_TOPDIR and TEMPenvironment variables are set on each system where the patch installationprogram will be run and on each system where a DB2 remote warehouse agentis installed.a. Issue the set command in the command or terminal session.b. Verify that the TWH_TOPDIR environment variable is set to the directory
where Tivoli Enterprise Data Warehouse files are installed on the system.c. If this variable is not set, then you must set it by performing the following
steps in the command session before running the patch installationprogram.v On Windows systems, issue the command
set TWH_TOPDIR="install-dir"
where install-dir represents the path of the directory where TivoliEnterprise Data Warehouse files are installed on the system.
v On UNIX systems, issue the commands:set TWH_TOPDIR="install-dir"export TWH_TOPDIR
where install-dir represents the path of the directory where TivoliEnterprise Data Warehouse files are installed on the system.
d. Verify that the TEMP environment variable is set to a directory that thepatch installation program will be able to open and to which it can write tofiles.
e. If this variable is not set, then you must set it by performing the followingsteps in a command session before running the patch installation program.v On Windows systems, issue the command:
set TEMP="temp-dir"
where temp-dir represents the path of to a directory that the patchinstallation program will be able to open and write to files.
v On UNIX systems, issue the commands:set TEMP="temp-dir"export TEMP
Chapter 10. Installing and upgrading warehouse packs 163
where temp-dir represents the path of a directory that the patchinstallation program will be able to open and write to files.
4. Ensure that Tivoli Enterprise Data Warehouse and all its databases are off-lineand not available for production operations before starting the backupprocedures recommended in the next step. The installation of all patches shouldbe completed before bringing Tivoli Enterprise Data Warehouse and itsdatabases back online.
5. Backup the following components before installing patches to warehouse packs.Backup procedures are described in Chapter 16, “Administering TivoliEnterprise Data Warehouse”.v The Tivoli Enterprise Data Warehouse databasesv The Tivoli Enterprise Data Warehouse application software on each system in
your configuration. This includes the files for the warehouse packs.v Tivoli Presentation Services on the system where the Tivoli Enterprise Data
Warehouse RPI component is installed, if applicable.
Attention: There is no mechanism to uninstall any patch installed to awarehouse pack other than to restore the software files and databases to a statethat existed before the patch was installed.
6. Perform any patch installation preparation activities indicated in the warehousepack documentation in the distribution package(s) that contains each patch tobe installed.
Installing the patchv For a single system installation:
Installing patches for one or more warehouse packs can be achieved byfollowing the steps in “Using the warehouse pack patching program” onpage 165 on the single system.
v For a distributed installation:1. Perform the steps in “Using the warehouse pack patching program” on page
165 on the system where the control server component is installed. The patchinstallation program must be run on the system where the Tivoli EnterpriseData Warehouse control server component is installed.
2. If there are any systems where a DB2 remote warehouse agent is installed,then the process described in the section entitled “Copying patchedwarehouse pack files to a DB2 remote warehouse agent site” on page 171must be performed to copy the patched warehouse packs from the controlserver system to each system where a DB2 remote warehouse agent isinstalled.
Note: If you are ready to patch more than one warehouse pack, the numberof copy operations is reduced if all the patches are installed to thecontrol server system before doing the copy operations.
3. If the Tivoli Enterprise Data Warehouse report interface component isinstalled on a different system than the Tivoli Enterprise Data Warehousecontrol server, then you might have to install some or all the patchesinstalled on the control server system onto the report server system. If awarehouse pack that is being patched has components that are installed foruse with the report server on the remote report server system, then the patchfor that warehouse pack must be installed on the remote report serversystem. Use the process described in the section below entitled “Using thewarehouse pack patching program” on page 165 to install each of thesepatches.
164 Installing and Configuring Tivoli Enterprise Data Warehouse
Note: If a DB2 remote warehouse agent and the report server component areboth installed on the same system, then the patched warehousepack(s) must be copied from the control server system to that systembefore the installation of the report interface portion of the patch(es) isperformed on that system. Both the copy and the installation processare required because each does different actions that are required toupdate the operation of the warehouse pack. Some of the effects ofthese different actions overlap each other. The correct results occur ifthe copy of the updated warehouse pack from the control server isperformed before the installation of the report interface portion of theeach patch.
4. After all the required patch processes that are required for your TivoliEnterprise Data Warehouse configuration are complete, perform anypost-patching processes that are indicated in the documentation for thepatches that have been installed.
5. After all post-patching processes have been completed for the warehousepacks that were patched, reboot each system in the Tivoli Enterprise DataWarehouse deployment and bring Tivoli Enterprise Data Warehouse and itsdatabases back on-line for production operations.
Using the warehouse pack patching programThis section describes how to use the warehouse pack patching program to installone or more patches on the control server. It may be necessary to repeat thisprocess on a remote report server in a distributed configuration. For additionalinformation, see “Planning for the patch process” on page 161 and “Installing thepatch” on page 164.
The warehouse pack patching program operates with just one patch to onewarehouse pack each time that it is run. It must be run multiple times if multiplepatches are being installed to multiple warehouse packs.
Important information about the options that you can use to operate thewarehouse pack patching program can be obtained by displaying the helpinformation for this program. You can list the warehouse packs and the versionsthat are installed on the current system, as described below.
The following steps describe the procedure to use the warehouse pack patchingprogram for the installation of one or more patches to warehouse packs on onesystem.1. Open a command or terminal session. You must be logged on as root on UNIX
or as a member of the local Administrators group on Windows. In addition, theTWH_TOPDIR and TEMP system environment variables must be defined inthis session. See step 3 on page 163 for information on how to set theTWH_TOPDIR and TEMP system environment variables.
2. If you are on a Windows system enter the command:bash
Bash shell support is provided when Tivoli Enterprise Data Warehouse isinstalled on a Windows system. The shell script for the warehouse pack patchinstallation program should run under the system default shell on UNIXsystems.
3. Enter the command:cd "$TWH_TOPDIR/install/bin"
Chapter 10. Installing and upgrading warehouse packs 165
The double quotes (″) are required if Tivoli Enterprise Data Warehouse isinstalled in a directory with a path containing space (or blank) characters, forexample C:\Program Files\TWH.
If the system environment variable TWH_TOPDIR is not defined, go to step 3for instructions on how to define it. Make sure that the system environmentvariable TEMP is also defined.
4. Enter the command:./tedw_wpack_patchadm.sh
In order to perform the installation of a patch for a warehouse pack, you mustenter the command with no options or with the -c option and the full pathname of a separate patch configuration file. This generates and uses the defaultpatch configuration file. You can get more information about the command byentering the -h option with it:./tedw_wpack_patchadm.sh -h
You can list version information for Tivoli Enterprise Data Warehouse and listthe installed warehouse packs on this system, with their versions, by enteringthe ’-l’ option with the command:./tedw_wpack_patchadm.sh -l
5. When this program stops running, one of the following examples of output isdisplayed:v In the first case, the following lines are the last lines displayed:
*********************************************************************
==> The config file is located at temp_dir/twh_app_patcher.cfg==> Please edit this file and fill in the correct information forthe following tags:
APP_MEDIA_DIRPS_HOMEDB2PASSCOPT_CTRL_DB2PASSCOPT_CDW_DB2PASSCOPT_MART_DB2PASS
Once the editing is complete, rerun the tedw_wpack_patchadm.shscript that was originally run.
*********************************************************************
where temp_dir represents the directory defined by the TEMP environmentvariable.
This outcome occurs if the patch configuration file located attemp_dir/twh_app_patcher.cfg did not exist before thetedw_wpack_patchadm.sh command was run. This is the case if this is thefirst warehouse pack patch ever installed on this system, or if the patchconfiguration file was deleted after the last patch was installed.
Continue with step 6 to edit the patch configuration file.
PS_HOME is displayed only if the report server component is installed onthis system.
v In the second case, the following lines are the last lines displayed:
166 Installing and Configuring Tivoli Enterprise Data Warehouse
**********************************************************************==> Reading Config File (temp_dir/twh_app_patcher.cfg)
(F) CDWIC0005E Error. Property DB2PASS not found in config file**********************************************************************
This outcome occurs if the patch configuration file located attemp_dir/twh_app_patcher.cfg already exists when thetedw_wpack_patchadm.sh command was run. This is the case if warehousepack patches have been previously installed, or if you have previously listedthe installed versions on this system with the -l option as described above.
Output other than the two examples previously discussed indicates an errorfrom the patch installation program. Correct the problem specified by themessages that are displayed or contact IBM customer support for assistance.
6. Use a text editor to edit the patch configuration file located attemp_dir/twh_app_patcher.cfg.Invoke this editor in a separate session. You will be issuing thetedw_wpack_patchadm.sh command again from the same directory as you didin Step 4.If you are installing multiple patches, opening the editor in a separate session ismore efficient. You can leave the editor in this separate session open to updatethe patch configuration file as required for each patch that is being installed.This saves several of the steps in this procedure for each patch being installed.See Step 7.When you edit the patch configuration file, the USER SUPPLIED SECTION ofthe file resembles the following:*********************************************************************
############ USER SUPPLIED SECTION ################################### Edit the following lines with the information specific to your# setup. For more information on the definition of each of these# property tags, please see README file ’wep_patch.txt’ in the# Tivoli Enterprise Data Warehouse 1.1 Fix Pack 2 package.#APP_MEDIA_DIR=PS_HOME=DB2PASS=COPT_CTRL_DB2PASS=COPT_CDW_DB2PASS=COPT_MART_DB2PASS=############# AUTO-GENERATED SECTION #################################
*********************************************************************
The PS_HOME= tag appears only if the report server component is installed onthe current system.
The example given above is how the USER SUPPLIED SECTION appears in thefirst output listed in step 5.
Following the output listed as the second option in step 5, the tagAPP_MEDIA_DIR= is followed by the directory used for the last warehousepack patch that was installed on the current system. This must be changed tothe directory used for the current warehouse pack being installed on thecurrent system. Also, the tag PS_HOME=, if present, is followed by thedirectory where Tivoli Presentation Services is installed. This directory does not
Chapter 10. Installing and upgrading warehouse packs 167
have to be changed if it is correct. The other four tags (...DB2PASS=) appear asshown above because the passwords are deleted from this file after eachwarehouse pack patch is installed.
Each of the patch installation configuration parameter tags listed in the USERSUPPLIED SECTION must be assigned the correct value by entering that valueimmediately after the equal sign(=) character. See the syntax for the tags listedin the AUTO-GENERATED SECTION appearing immediately below the USERSUPPLIED SECTION for examples.
Notes:
a. Do not enter any spaces on the line after you enter a directory path valuefor any tag. For instance, do not enter any spaces in the PS_HOME tag afterentering the path of the directory where Tivoli Presentation Services isinstalled.
b. Use the forward slash (″/″) as a directory separator character when youenter a directory path value for any tag. This must be done on UNIX andWindows systems. Do not use the backward slash (″\″). For example,specify C:/PS (no quotes) and not C:\PS if the PS_HOME directory islocated in the root directory of the C: drive on a Windows system.
The APP_MEDIA_DIR tag must be assigned the directory path of the directoryof source files for the warehouse pack patch that you are currently installing.This is the directory that you determined in step 2 in “Patch installationprerequisites” on page 162, and it must contain a file namedtwh_install_props.cfg.
The PS_HOME tag appears only on a system where the report interface isinstalled. This tag must be assigned a value that is the directory path whereTivoli Presentation Services is installed.
The DB2PASS tag must be assigned the password of the user indicated by theDB2USER tag in the AUTO-GENERATED SECTION of this file that appearsimmediately below the USER SUPPLIED SECTION. This is a DB2 user definedfor the current system.
The COPT_CTRL_DB2PASS tag must be assigned the password of the userindicated by the COPT_CTRL_DB2USER tag in the AUTO-GENERATEDSECTION of this file that appears immediately below the USER SUPPLIEDSECTION. This is a DB2 user defined for the system where the control server isinstalled as indicated by the COPT_CTRL_DB2HOST tag in theAUTO-GENERATED SECTION.
The COPT_CDW_DB2PASS tag must be assigned the password of the userindicated by the COPT_CDW_DB2USER tag in the AUTO-GENERATEDSECTION of this file that appears immediately below the USER SUPPLIEDSECTION. This is a DB2 user defined for the system where the central datawarehouse database is installed as indicated by the COPT_CDW_DB2HOST tagin the AUTO-GENERATED SECTION.
The COPT_MART_DB2PASS tag must be assigned the password of the userindicated by the COPT_MART_DB2USER tag in the AUTO-GENERATEDSECTION of this file that appears immediately below the USER SUPPLIEDSECTION. This is a DB2 user defined for the system where the data martdatabase is installed as indicated by the the COPT_MART_DB2HOST tag in theAUTO-GENERATED SECTION.
168 Installing and Configuring Tivoli Enterprise Data Warehouse
When you complete the editing of this file, the USER SUPPLIED SECTION ofthe file resembles the following example:*********************************************************************
############ USER SUPPLIED SECTION ################################### Edit the following lines with the information specific to your# setup. For more information on the definition of each of these# property tags, please see README file ’wep_patch.txt’ in the# Tivoli Enterprise Data Warehouse 1.1 Fix Pack 2 package.#APP_MEDIA_DIR=G:/app_patcher/tedw_pkg/bwmPS_HOME=G:/PSDB2PASS=db2psswdCOPT_CTRL_DB2PASS=db2psswdCOPT_CDW_DB2PASS=db2psswdCOPT_MART_DB2PASS=db2psswd############# AUTO-GENERATED SECTION #################################
*********************************************************************
7. Save the changes to the temp_dir/twh_app_patcher.cfg file.If you are installing additional warehouse pack patches, and you opened thetext editor in a session other than the session where you issued the./tedw_wpack_patchadm.sh command in the previous step, use the text editorto re-edit the temp_dir/twh_app_patcher.cfg after you have completed theinstallation of the current patch in the following step. If you do this, you onlyhave to change the value of the APP_MEDIA_DIR tag to the patch installsource directory for the next patch that you are installing (the directory thatcontains the file twh_install_props.cfg for the next patch).If you do not have another warehouse pack patch to install, or if you wish toinstall each patch separately, then exit the text editor.
8. In the same command or terminal session that you performed the patchinstallation, issue the following command again:./tedw_wpack_patchadm.sh
When this command runs again, it reads the contents oftemp_dir/twh_app_patcher.cfg file and performs the patching of the warehousepack as indicated by the twh_install_props.cfg file in the patch installationsource directory indicated by the APP_MEDIA_DIR tag.
9. When the patch installation completes, output similar to the following will bethe last lines displayed:*********************************************************************==> TEDW Warehouse Pack Application Patch Installation Details:
Application: Tivoli Enterprise Console,Example package for Wpack patching.
Installed in: G:/Program Files/TWH/apps/eco
Installation Properties:AVA Code: ecoRequired Core Version: 1.1.1App Patch Version: 371.1.0.1Pre Script: nullPre ETL Script: nullAfter Script: nullDatamart Schmea name: ecoCDW Included: TRUEDocs Included: TRUEETL SQL Included: TRUEETL Tag Included: TRUE
Chapter 10. Installing and upgrading warehouse packs 169
I18n Included: TRUEMart Included: TRUEReports Included: TRUEPre Required WPACK:
(I) TEDW Warehouse Pack Details completed
==> TEDW Warehouse Pack Patch Installation Successfully Completed!!!
*********************************************************************
After installing the patchIf the patch installation is not successful, information can be obtained from thefollowing files:v temp_dir/twh_install_wpack_patcher.logv temp_dir/twh_ibm_db2_wpack_patch_runlog.log
There might be additional files listed in thetemp_dir/twh_install_wpack_patcher.log file which can be found in the temp_dirdirectory. Also, files associated with the installation of a warehouse pack patch canbe found in the following directory:TWH_TOPDIR/apps/AVA/vPACK_VER/install/logs/patch_PATCH_VER
wherev TWH_TOPDIR is the directory where the Tivoli Enterprise Data Warehouse files
are installed.v AVA is the three-character code for the warehouse pack that is being patched.
This code can be found in the twh_install_props.cfg file in the patch installsource directory. It is the value of the AVA_CODE tag in that file.
v PACK_VER is the version of the warehouse pack that is being patched. Thisversion can be found in the twh_install_props.cfg file in the patch install sourcedirectory. It can be found from the value of the APP_REL_VERSION tag afterremoval of the period(.) characters and the removal of the last number (the patchlevel number) after the last period(.) character.
v PATCH_VER is the version of the warehouse pack patch that is being installed.This version matches the value of the APP_REL_VERSION tag in thetwh_install_props.cfg in the patch install source directory, including the period(.)characters and the last number.
If the patch installation is successful, select one of the following actions:v If you are going to install another warehouse pack patch immediately, choose
one of the following actions:– If you still have the file temp_dir/twh_app_patcher.cfg open in a text editor,
change the value of the APP_MEDIA_DIR tag to the patch install sourcedirectory for the next patch that you are installing (the directory that containsthe file twh_install_props.cfg for the next patch). Do not change the values ofthe other tags. Save the updated tag values in temp_dir/twh_app_patcher.cfgfile. Go to step 8 in “Using the warehouse pack patching program” onpage 165 to perform the installation of the next patch of a warehouse pack.
– If you do not have the file temp_dir/twh_app_patcher.cfg <open in a texteditor, go to step 4 in the Using the warehouse pack patching programsection to install the next patch.
v If you are not going to install another warehouse pack patch and you do nothave a distributed Tivoli Enterprise Data Warehouse configuration, then you
170 Installing and Configuring Tivoli Enterprise Data Warehouse
have concluded the patch installation. However, if you have a distributedconfiguration of Tivoli Enterprise Data Warehouse, you might need to performthe steps in “Copying patched warehouse pack files to a DB2 remote warehouseagent site”. In addition, check the warehouse pack patch documentation in orderto determine the configuration procedures that are needed, if any, for your TivoliEnterprise Data Warehouse configuration, as described in “Configuringwarehouse packs” on page 142.
Copying patched warehouse pack files to a DB2 remotewarehouse agent siteThis section needs to be performed only if you have systems with DB2 remotewarehouse agents installed as described in Chapter 14, “Using DB2 remotewarehouse agents”, on page 227.
This section describes how to copy the directory containing all the files thatsupport the operation of all installed warehouse packs. This directory is copiedfrom the system where the control server is installed to each system where a DB2remote warehouse agent is installed. You must copy the directory each time one ormore warehouse packs have been installed or patched on the control server.
Performing this copy ensures that the warehouse pack functions that areperformed to support operations in the DB2 Data Warehouse Center are the sameversion of those functions regardless of whether those functions are executedlocally for the Data Warehouse Center on the control server system or are executedon a remote system using the DB2 remote warehouse agent.
The following steps describe the copy process:1. Open a command session on the control server. You must be logged on as a
member of the local Administrators group, and the TWH_TOPDIR systemenvironment variable must be defined in this session.
2. Enter the command:bash
Note the bash shell support is provided when Tivoli Enterprise DataWarehouse is installed on a Windows system.
3. Enter the command:cd "$TWH_TOPDIR"
Quotation marks(″) are required if Tivoli Enterprise Data Warehouse is installedin a directory path containing space (or blank) characters, for instanceC:\Program Files\TWH. If the system environment variable TWH_TOPDIR isnot defined, go to step 3 in “Patch installation prerequisites” on page 162 forinstructions on how to define it.
4. Enter the command:tar -cvf appweps.tar apps
Tar command support is provided when Tivoli Enterprise Data Warehouse isinstalled on a Windows system.
5. Copy the appweps.tar file that has been created in the directory defined by theTWH_TOPDIR system environment variable on the control server system to thedirectory defined by the TEMP system environment variable on each of thesystems where a DB2 remote warehouse agent is installed.
Chapter 10. Installing and upgrading warehouse packs 171
This file can be large, and you might have to use a network file transfermethod, such as FTP, to perform the copy. Be sure that the appweps.tar file iscopied as a binary format file so the file is transferred without any changesbeing made to the contents of the file.
6. Perform the following steps on each system where a DB2 remote warehouseagent is installed. If there is more than one system, all the steps are performedfirst on one system, and then on another system.a. Open a command or terminal session. Log on as root on UNIX, or as a
member of the local Administrators group on Windows. The TWH_TOPDIRand TEMP system environment variables must be defined in this session.
b. If you are on a Windows system enter the command:bash
Note the bash shell support is provided when Tivoli Enterprise DataWarehouse is installed on a Windows system. The shell script for thewarehouse pack patch installation program should run under the systemdefault shell on UNIX systems.
c. Enter the command:cd "$TWH_TOPDIR"
Quotation marks(″) are required if Tivoli Enterprise Data Warehouse isinstalled into a directory path containing space (or blank) characters, forinstance C:\Program Files\TWH. If the system environment variableTWH_TOPDIR is not defined, go to step 3 in “Patch installationprerequisites” on page 162 for instructions on how to define it. Make surethat the system environment variable TEMP is defined also.
d. Enter the following commands. Wait for each command to complete.tar -xvf "$TEMP/appweps.tar"chmod -R 755 appsrm "$TEMP/appweps.tar"
e. Verify that the directory structure under TWH_TOPDIR/apps on the DB2remote warehouse agent site is identical to the directory structure underTWH_TOPDIR/apps on the control server system. The alphabeticalcharacters in the file and directory names must have the same case on eachsystem.
172 Installing and Configuring Tivoli Enterprise Data Warehouse
Chapter 11. IBM Tivoli Monitoring integration with TivoliEnterprise Data Warehouse
This chapter provides overview and task information for deploying TivoliEnterprise Data Warehouse in an IBM Tivoli Monitoring environment. There is alarge volume of information available in numerous documents about theintegration of these two products; for example, in addition to many IBM redbookson this topic, see the list in “Required documentation” on page 176. This chapterprovides guidance about which components need to be installed in what order,and other important topics pertinent to this environment. Where important detailsor procedures exist in other places, references to them are provided.
At the time of publication for this version of the Installing and Configuring TivoliEnterprise Data Warehouse, IBM Tivoli Monitoring, Version 5.1.1 was the currentrelease. The product name of IBM Tivoli Monitoring is used in the remainder ofthis chapter to refer to Version 5.1.1, although this information should apply tolater releases of IBM Tivoli Monitoring that are enabled for Tivoli Enterprise DataWarehouse, Version 1.1. This chapter assumes that you have installed the IBMTivoli Monitoring product, and any other IBM Tivoli Monitoring applications formonitoring resources, and that monitoring is functioning as expected.
Names and acronyms used in other documentsVarious other documents sometimes refer to IBM Tivoli Monitoring componentsrelated to Tivoli Enterprise Data Warehouse support with different names oracronyms than Installing and Configuring Tivoli Enterprise Data Warehouse. Table 29shows a mapping of most variants to the names used in Installing and ConfiguringTivoli Enterprise Data Warehouse.
Table 29. Name and acronym map for IBM Tivoli Monitoring and Tivoli Enterprise DataWarehouse components
Name or acronym used in other documents Usage in this document
AMX ETL, ETL1, Generic ETL1 central data warehouse ETL
ETL2 data mart ETL
Middle Layer Repository, RIM database, RIMrepository
ITM_DB database
Integration overviewFigure 13 on page 174 illustrates a conceptual system view and data flow for anIBM Tivoli Monitoring and Tivoli Enterprise Data Warehouse integratedenvironment. There are various ways to install and configure both IBM TivoliMonitoring and Tivoli Enterprise Data Warehouse. This illustration is meant toprovide a simple conceptual view of a distributed environment. For the varioustypes of deployment for Tivoli Enterprise Data Warehouse, see “Types ofdeployments” on page 14.
© Copyright IBM Corp. 2001, 2003 173
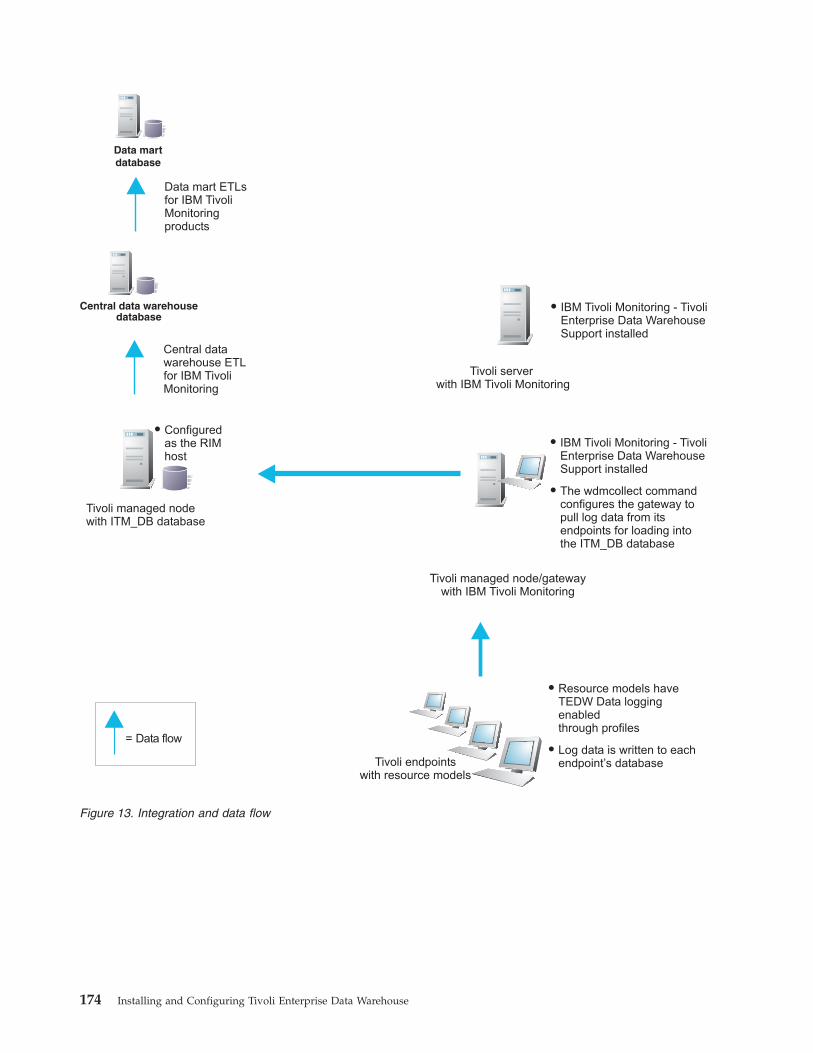
� Configuredas the RIMhost
Tivoli managed nodewith ITM_DB database
Central datawarehouse ETLfor IBM TivoliMonitoring
Data mart ETLsfor IBM TivoliMonitoringproducts
Tivoli managed node/gatewaywith IBM Tivoli Monitoring
�
�
IBM Tivoli Monitoring - TivoliEnterprise Data WarehouseSupport installed
The wdmcollect commandconfigures the gateway topull log data from itsendpoints for loading intothe ITM_DB database
Tivoli serverwith IBM Tivoli Monitoring
� IBM Tivoli Monitoring - TivoliEnterprise Data WarehouseSupport installed
�
�
Resource models haveTEDW Data loggingenabledthrough profiles
Log data is written to eachendpoint’s databaseTivoli endpoints
with resource models
= Data flow
Data martdatabase
Central data warehousedatabase
Figure 13. Integration and data flow
174 Installing and Configuring Tivoli Enterprise Data Warehouse

IBM Tivoli Monitoring data from resource model logging is accumulated atintervals from endpoints by managed nodes configured as gateways. The datastored on the managed nodes is then loaded into an operational database for IBMTivoli Monitoring data. This operational database is referred to as the ITM_DBdatabase in this chapter.
From the ITM_DB database the data is extracted and transformed (cleansed,aggregated, and mapped to the central data warehouse schema), and loaded intothe central data warehouse database using the IBM Tivoli Monitoring central datawarehouse ETL. The data is then extracted from the central data warehousedatabase, transformed, and loaded into data marts within a data mart databaseusing the data mart ETLs provided by the various IBM Tivoli Monitoringapplications. Report development and analysis can then be performed on the datain the data marts.
An important concept to understand is that the IBM Tivoli Monitoring baseproduct provides the one and only central data warehouse ETL for the IBM TivoliMonitoring applications. The warehouse pack for the IBM Tivoli Monitoring baseproduct must be installed before any warehouse packs for IBM Tivoli Monitoringapplications. When a warehouse pack for an IBM Tivoli Monitoring is installed itprovides the information required by the central data warehouse ETL for loadingthe appropriate records into the central data warehouse database.
Skills for successful implementationA successful deployment of Tivoli Enterprise Data Warehouse in an IBM TivoliMonitoring environment requires additional skills beyond installation, support, andusage of typical Tivoli software systems management products. In manyorganizations these skills cross departmental boundaries. If your Tivoli EnterpriseData Warehouse deployment team does not possess all of the skills shown inTable 30, add people with those skills to the team during the deployment planningphase.
Table 30. Skills for successful deployment
Skills needed Why
Tivoli software product support To install and configure Tivoli softwarecomponents that:
v Enable resource model logging of data foruse with Tivoli Enterprise DataWarehouse
v Collect resource model data from withinthe Tivoli management region
v Provide the ITM_DB database for storingthe collected resource model data for laterextraction and loading into the centraldata warehouse database
Profile configuration and distribution, RIMconfiguration, and command-line usage aresome of the key skills required.
Chapter 11. IBM Tivoli Monitoring integration with Tivoli Enterprise Data Warehouse 175
Table 30. Skills for successful deployment (continued)
Skills needed Why
Database administration To install and configure:
v The ITM_DB database
v The three Tivoli Enterprise DataWarehouse databases
v Various other database-relatedcomponents such as DB2 remotewarehouse agent sites, database clientsoftware, and so forth
Database administration skills may also beneeded for:
v Scheduling ETL processes
v Database maintenance and tuning
v Troubleshooting database problems
Application developers To customize or troubleshoot:
v Shell scripts
v SQL scripts
Required documentationThis section lists the required documentation you should have available duringinstallation. Before developing your deployment strategy, review the sections of thedocuments related to Tivoli Enterprise Data Warehouse for each product you willbe installing. You should also review the Release Notes for each product and havethem available during installation. Release Notes typically contain information aboutsupported platforms, late-breaking information, known problems andworkarounds, and so forth.
All of the documents described in this section are shipped with the products theysupport and can be obtained online. See “Accessing publications online” onpage xv for additional information.v The IBM Tivoli Monitoring User’s Guide
This guide contains a chapter devoted to the installation and configuration ofthe IBM Tivoli Monitoring components required for integration with TivoliEnterprise Data Warehouse. It also contains reference information for all IBMTivoli Monitoring commands and troubleshooting information.
v The installation guides for all IBM Tivoli Monitoring applications installedwhose data will be loaded into the Tivoli Enterprise Data Warehouse.These guides usually contain information about enabling Tivoli Enterprise DataWarehouse support that is specific to each IBM Tivoli Monitoring application.
v The warehouse pack implementation guides for all IBM Tivoli Monitoringproducts installed whose data will be loaded into Tivoli Enterprise DataWarehouse.These guides provide detailed information about how to install and configurethe ETLs. They include topics such as database sizing considerations,pre-installation procedures, the installation procedure, post-installationprocedures, backup and restoration of data, data maintenance, ETL processdetails, schema mapping, and so forth. All of the warehouse packs for IBMTivoli Monitoring applications are different, so it is very important that youreview each warehouse pack’s implementation guide.
176 Installing and Configuring Tivoli Enterprise Data Warehouse
An implementation guide is in a PDF file on the installation media for thewarehouse pack and is usually in thetedw_apps_etl/productCode/pkg/version/doc subdirectory of the warehouse packinstallation media, where productCode and version specify, respectively, theproduct code and version of the warehouse pack.
v The Installing and Configuring Tivoli Enterprise Data Warehouse guideThis is the book you are currently reading, which covers all Tivoli EnterpriseData Warehouse installation and configuration topics except those that arespecific to individual applications, except for this IBM Tivoli Monitoring chapterof course.
v The Enabling Tivoli Enterprise Data Warehouse IBM Tivoli Monitoring Products roadmapThis road map provides the information about the procedural steps required forenabling the logging and collection of resource model data and installing andrunning IBM Tivoli Monitoring ETL programs. If this document was notprovided with the application’s document set, it is available online with theapplication’s other documentation from the Tivoli Information Center. See“Accessing publications online” on page xv for additional information. Thisdocument was made available recently and is scheduled to be provided witheach IBM Tivoli Monitoring application’s document set.
See “Related publications” on page xiii for other documents that you may want touse.
Required CDsThis section lists the CDs you should have available for installation. In addition tothe CDs, always ensure that you install any fix packs or interim fixes that arerequired for the products. Refer to a product’s release notes, user or installationguide, and warehouse pack implementation guide for information about fix packsor interim fixes that may need to be applied. To prevent installation problems, besure that your system meets all prerequisites for the particular versions of softwareyou are installing.v The Tivoli Enterprise Data Warehouse, Version 1.1 CDs
This set also contains the appropriate version of DB2 CDs. See “Tivoli EnterpriseData Warehouse” on page 12 for a description of this CD set. Even though youmay have already installed Tivoli Enterprise Data Warehouse components inyour environment, you still need the CD containing the Tivoli Enterprise DataWarehouse installation program to install additional warehouse packs.
v The IBM Tivoli Monitoring base product CDsThis CD set contains the Tivoli Enterprise Data Warehouse Support component.This component is installed on various computers in your IBM Tivoli Monitoringenvironment.
v The CDs containing the IBM Tivoli Monitoring warehouse packs to installWarehouse packs can be provided in various locations. They can be on aninstallation CD along with the other product’s files, on a separate CD, or in acollection of warehouse packs. See the warehouse pack implementation guidesfor the locations of the warehouse packs you plan to install.
Chapter 11. IBM Tivoli Monitoring integration with Tivoli Enterprise Data Warehouse 177
Database considerationsIn an integrated IBM Tivoli Monitoring and Tivoli Enterprise Data Warehouseenvironment you have the following databases to plan for:v The ITM_DB databasev The central data warehouse databasev The data mart databasev The control database
Because of the number of databases in this environment it is very important tohave a member of your deployment team that is knowledgeable in the installation,backup, and maintenance of the database systems you will use. Script and SQLprogramming are also essential skills to have available for customizing ortroubleshooting.
The more current warehouse pack implementation guides contain database sizinginformation.
This section identifies some important items to consider in your deploymentplanning.
ITM_DB database considerationsThe ITM_DB database is the operational data source for IBM Tivoli Monitoringdata in a Tivoli Enterprise Data Warehouse deployment. The database server forthe ITM_DB database must be one of the vendor types supported by TivoliManagement Framework. You can install the database server either within oroutside the Tivoli region.
If you install the database server within the Tivoli region, the RDBMS InterfaceModule (RIM) object can be installed either on the same or different managed nodeas the database server. The RIM object is a Tivoli software component on amanaged node that enables communication between IBM Tivoli Monitoring andthe database server.
Only install the database server and the RIM object on the same managed node ifthat computer is dedicated solely to ITM_DB database processing. If the RIM objectand database server are on different computers, you must install the databaseclient software on the RIM host (the computer where the RIM object is installed) toenable communication between IBM Tivoli Monitoring and the database server onthe different computer.
Creation of the ITM_DB database objectsThe scripts that create the ITM_DB database objects contain adequate defaults forstoring operational data. If you need to tailor the database objects for yourinstallation, you can customize the scripts.
Procedures to run the scripts that create the ITM_DB database objects varydepending on whether you installed the database server within your Tivolimanagement region or outside of it.
Note: Run the scripts to create the ITM_DB database objects after you install theRIM object. The scripts obtain configuration information from the RIMobject. If you run the scripts before creating the RIM object, you are asked toenter the missing information from the command line during scriptprocessing.
178 Installing and Configuring Tivoli Enterprise Data Warehouse
See the IBM Tivoli Monitoring User’s Guide for additional information about thescripts for creating ITM_DB database objects.
Purging old data from the ITM_DB databaseThere are two ways to purge old data from the ITM_DB database. As part of yourplanning activities, decide to use one of the following methods:v Setting the number of days to keep data in the ITM_DB database and the time
of day for removal with the datacollector.db_purge_interval anddatacollector.db_purge_time options of the wdmconfig command. See the IBMTivoli Monitoring User’s Guide for additional information about the wdmconfigcommand.
v In the DB2 Data Warehouse Center, scheduling the AMX_c10_Prune_Process asthe last step for the IBM Tivoli Monitoring central data warehouse ETL. Thenumber of days to keep data is configurable. See the IBM Tivoli MonitoringWarehouse Enablement Pack: Implementation Guide for additional information aboutthis pruning process.
Tivoli Enterprise Data Warehouse database considerationsAll three of the Tivoli Enterprise Data Warehouse databases (central datawarehouse, data mart, and control) are DB2 databases. The DB2 product must firstbe installed on every machine that will contain a Tivoli Enterprise Data Warehousedatabase. You must install the control database on Windows platforms only, it isnot supported on UNIX platforms.
If you plan to use a DB2 remote warehouse agent site for a database target, youwill need to install the DB2 UDB Warehouse Manager on that computer. See “DB2warehouse agents” on page 180 for additional information.
After the DB2 systems are installed, the Tivoli Enterprise Data Warehouseinstallation program for the control server creates the central data warehouse anddata mart databases, on the local computer and on any remote computer.
If you are using a DB2 remote warehouse agent site, you must install the TivoliEnterprise Data Warehouse central data warehouse and data mart components onthe remote computer.
Database communicationsAn IBM Tivoli Monitoring and Tivoli Enterprise Data Warehouse integratedenvironment is comprised of multiple databases that can be installed in variousdistributed deployment scenarios. Configuring communications between theprograms and databases is a critical task for successful deployment. This sectionprovides an overview of the database communications used in this environment.
The computer with the Tivoli Enterprise Data Warehouse control database is calledthe control server. The control server uses various components of the DB2 productto manage data in Tivoli Enterprise Data Warehouse. The control server must beable to connect to the ITM_DB database, either with the DB2 default warehouseagent installed on the control server, or with a DB2 warehouse agent on a remotecomputer. To connect to an ITM_DB database other than DB2 from the controlserver or a DB2 remote warehouse agent site, you must install a database client. Ifthe ITM_DB database is a DB2 database, the appropriate software is alreadyinstalled and a database client is not needed.
Chapter 11. IBM Tivoli Monitoring integration with Tivoli Enterprise Data Warehouse 179
After the DB2 systems are installed, the Tivoli Enterprise Data Warehouseinstallation program for the control server creates the central data warehouse anddata mart databases.
DB2 warehouse agentsDB2 warehouse agents are components of DB2 UDB Warehouse Manager thatmanage the flow of data between data sources and targets. A DB2 defaultwarehouse agent is created on the Tivoli Enterprise Data Warehouse control server.To improve data transfer performance and reduce the workload on the controlserver you can create a DB2 warehouse agent site on a remote computer that is thetarget of a data transfer. In the environment shown in Figure 13 on page 174, DB2remote warehouse agent sites can be created on the computers hosting the centraldata warehouse and data marts.
If the ITM_DB database is not a DB2 database, you must install the database clientfor the ITM_DB database on either the Tivoli Enterprise Data Warehouse controlserver (if you are using the DB2 default warehouse agent) or on the DB2 remotewarehouse agent site to provide access to the source operational data. See “DB2warehouse agents and agent sites” on page 18 for additional information.
ODBC connectionThe Tivoli Enterprise Data Warehouse control server, or DB2 remote warehouseagent site if used, needs to access the ITM_DB database for central data warehouseETL processing. Therefore, you must define an ODBC data source connection tothe ITM_DB database. See “Creating ODBC data sources on the control server forwarehouse packs” on page 143 or “Creating ODBC data sources on DB2 remotewarehouse agent sites” on page 145 for additional information.
Tasks to collect data for Tivoli Enterprise Data WarehouseThis section describes the high-level tasks to configure IBM Tivoli Monitoring forcollecting resource model data for Tivoli Enterprise Data Warehouse. Each stepprovides an information source section where you can find procedure details andadditional information.1. Install the database server for the ITM_DB database.
Information source:v “ITM_DB database considerations” on page 178.v For supported database systems, see the Tivoli Management Framework Release
Notes®.v For database server or client installation procedures, see the database
vendor’s documentation.v For DB2 Universal Database installation, “Installing and configuring DB2
Universal Database” on page 88 provides a condensed version of installationinstructions for all platforms.
This task involves installing the appropriate RDBMS for later creation of theITM_DB database.
2. From the Tivoli desktop, install the IBM Tivoli Monitoring -Tivoli EnterpriseData Warehouse Support, Version 5.1.1 component.Information source:v IBM Tivoli Monitoring User’s Guide.v For additional details about RIM commands, see the Tivoli Management
Framework Reference Manual.
180 Installing and Configuring Tivoli Enterprise Data Warehouse
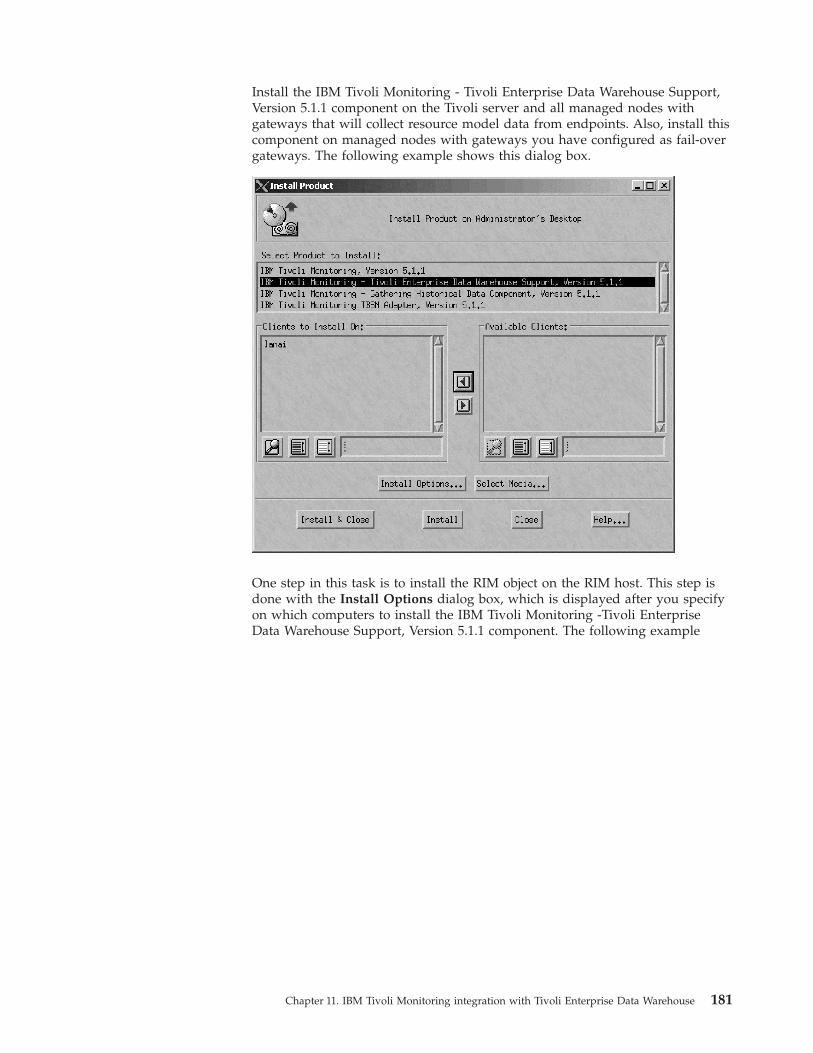
Install the IBM Tivoli Monitoring - Tivoli Enterprise Data Warehouse Support,Version 5.1.1 component on the Tivoli server and all managed nodes withgateways that will collect resource model data from endpoints. Also, install thiscomponent on managed nodes with gateways you have configured as fail-overgateways. The following example shows this dialog box.
One step in this task is to install the RIM object on the RIM host. This step isdone with the Install Options dialog box, which is displayed after you specifyon which computers to install the IBM Tivoli Monitoring -Tivoli EnterpriseData Warehouse Support, Version 5.1.1 component. The following example
Chapter 11. IBM Tivoli Monitoring integration with Tivoli Enterprise Data Warehouse 181
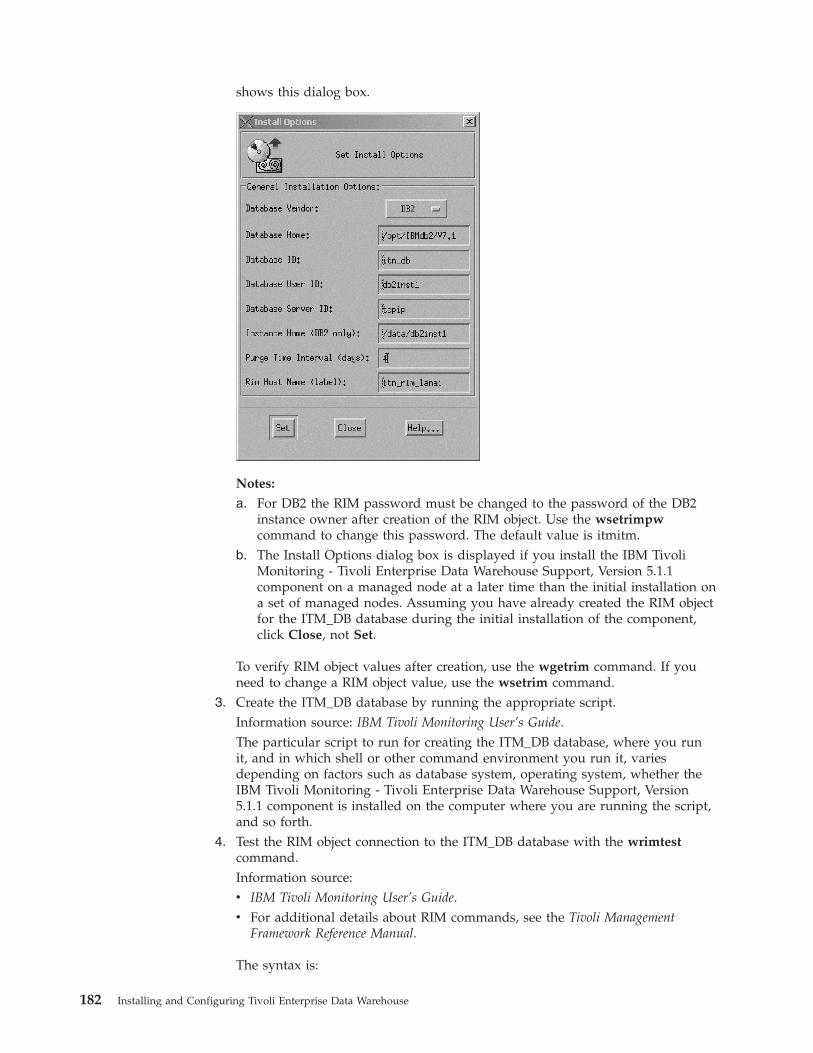
shows this dialog box.
Notes:
a. For DB2 the RIM password must be changed to the password of the DB2instance owner after creation of the RIM object. Use the wsetrimpwcommand to change this password. The default value is itmitm.
b. The Install Options dialog box is displayed if you install the IBM TivoliMonitoring - Tivoli Enterprise Data Warehouse Support, Version 5.1.1component on a managed node at a later time than the initial installation ona set of managed nodes. Assuming you have already created the RIM objectfor the ITM_DB database during the initial installation of the component,click Close, not Set.
To verify RIM object values after creation, use the wgetrim command. If youneed to change a RIM object value, use the wsetrim command.
3. Create the ITM_DB database by running the appropriate script.Information source: IBM Tivoli Monitoring User’s Guide.The particular script to run for creating the ITM_DB database, where you runit, and in which shell or other command environment you run it, variesdepending on factors such as database system, operating system, whether theIBM Tivoli Monitoring - Tivoli Enterprise Data Warehouse Support, Version5.1.1 component is installed on the computer where you are running the script,and so forth.
4. Test the RIM object connection to the ITM_DB database with the wrimtestcommand.Information source:v IBM Tivoli Monitoring User’s Guide.v For additional details about RIM commands, see the Tivoli Management
Framework Reference Manual.
The syntax is:
182 Installing and Configuring Tivoli Enterprise Data Warehouse
wrimtest –l itm_rim_RIMhostname
If the connection is successful information about the RIM object is displayed.Enter x to release the session. The following example shows the output from asuccessful connection:# wrimtest -l itm_rim_lanaiResource Type : RIMResource Label : itm_rim_lanaiHost Name : lanaiUser Name : db2inst1Vendor : DB2Database : itm_dbDatabase Home : /opt/IBMdb2/V7.1Server ID : tcpipInstance Home : /data/db2inst1Opening Regular Session...Session OpenedRIM : Enter Option >xReleasing session
If the connection is not successful, you can use the wsetrim command tocorrect most errors and test the connection again. If you cannot correct an errorwith the wsetrim command, you can use the wdel @RIM command to deletethe RIM object and then recreate it with the wcrtrim command.
5. Configure data collection with the wdmconfig command.Information source: IBM Tivoli Monitoring User’s Guide.You can configure data collection differently for each managed node if desired.The command options for data collection have the syntax ofdatacollector.option. You can update one, multiple, or all data-collectingmanaged nodes at the same time. The following example shows use of thecommand:# wdmconfig -m all -D datacollector.rim_name=itm_rim_lanai \> -D datacollector.db_purge_interval=5 \> -D datacollector.db_purge_time=1 \> -D datacollector.delay=25 \> -D datacollector.sleep_time=2 \> -D datacollector.max_retry_time=5
Use the –G argument to verify the configuration options set by this commandbecause it does no validation of your input. You can use the asterisk (*)wildcard character. The following example shows the output of the commandto verify options:# wdmconfig -m lanai -G datacollector.*Managed Node: ’lanai’:=======================
datacollector.max_retry_time = 5datacollector.sleep_time = 2datacollector.delay = 25datacollector.db_purge_time = 1datacollector.db_purge_interval = 5datacollector.db_interval = 30datacollector.rim_name = itm_rim_lanai
6. Activate resource model logging of data for Tivoli Enterprise Data Warehouse.Information source: IBM Tivoli Monitoring User’s Guide.For each resource model from which you want to collect data for TivoliEnterprise Data Warehouse, perform the following procedure:
Chapter 11. IBM Tivoli Monitoring integration with Tivoli Enterprise Data Warehouse 183
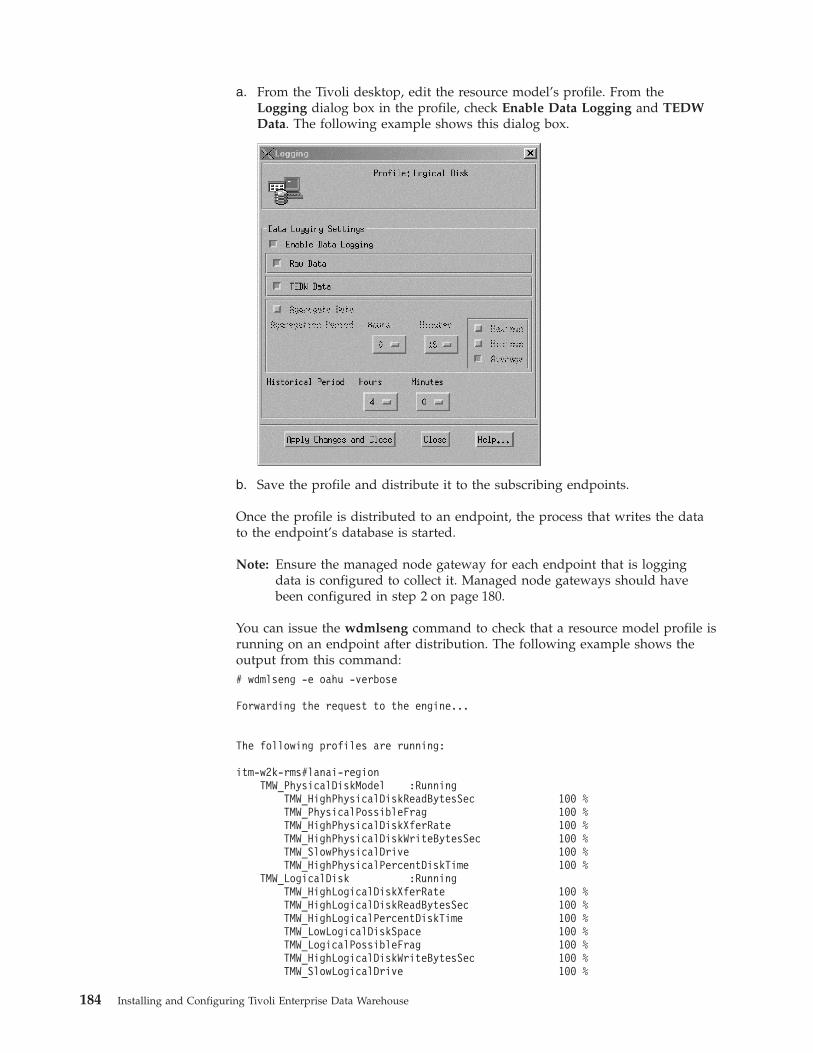
a. From the Tivoli desktop, edit the resource model’s profile. From theLogging dialog box in the profile, check Enable Data Logging and TEDWData. The following example shows this dialog box.
b. Save the profile and distribute it to the subscribing endpoints.
Once the profile is distributed to an endpoint, the process that writes the datato the endpoint’s database is started.
Note: Ensure the managed node gateway for each endpoint that is loggingdata is configured to collect it. Managed node gateways should havebeen configured in step 2 on page 180.
You can issue the wdmlseng command to check that a resource model profile isrunning on an endpoint after distribution. The following example shows theoutput from this command:# wdmlseng -e oahu -verbose
Forwarding the request to the engine...
The following profiles are running:
itm-w2k-rms#lanai-regionTMW_PhysicalDiskModel :Running
TMW_HighPhysicalDiskReadBytesSec 100 %TMW_PhysicalPossibleFrag 100 %TMW_HighPhysicalDiskXferRate 100 %TMW_HighPhysicalDiskWriteBytesSec 100 %TMW_SlowPhysicalDrive 100 %TMW_HighPhysicalPercentDiskTime 100 %
TMW_LogicalDisk :RunningTMW_HighLogicalDiskXferRate 100 %TMW_HighLogicalDiskReadBytesSec 100 %TMW_HighLogicalPercentDiskTime 100 %TMW_LowLogicalDiskSpace 100 %TMW_LogicalPossibleFrag 100 %TMW_HighLogicalDiskWriteBytesSec 100 %TMW_SlowLogicalDrive 100 %
184 Installing and Configuring Tivoli Enterprise Data Warehouse

TMW_Processor :RunningTMW_ProcessorBusy 100 %TMW_HighProcesses 100 %TMW_CPUCantKeepUpWithHW 100 %TMW_HWKeepingCPUBusy 100 %TMW_BusyHardware 100 %TMW_HighPercentUsageDelta 100 %
Logging of monitoring data for Tivoli Enterprise Data Warehouse starts at thenext full hour after a profile containing enabled resource models is distributed.
The hourly aggregated data is exported from the endpoint database to an XMLfile twenty minutes after the hour. The XML file can be seen in the$LCF_DATDIR/LCFNEW/Tmw2k/tedw/archive directory until it is collectedby the managed node. There is no XML DTD available for the file so it appearsunstructured if you view its contents. Figure 14 illustrates Tivoli EnterpriseData Warehouse data logging at the endpoint by resource models.
7. Activate endpoint data collection for loading into the ITM_DB database.Information source: IBM Tivoli Monitoring User’s Guide.Issue the wdmcollect command to all the endpoints that will have monitoringdata to collect. The syntax is:wdmcollect –e endpoint_name –s time_interval
The time_interval option is the number of hours between collections.Alternatively, you can specify a list of endpoints in a file with the @endpoint_fileargument instead of a single endpoint_name argument.
You can query the status of the data collection process on managed nodes withthe wdmcollect command. The following example shows use of this command:# wdmcollect -qProcessing ManagedNode lanai...<Requests>
<Request Id="4767e4c2" Endpoint="oahu" RefreshTime="3600"LastCall="Tue Jul 01 15:49:40 2003"/>
</Requests>
If the data collected by a managed node does not load into the ITM_DBdatabase, check the msg_DataCollector.log in the $DBDIR/AMW/logs directory
distributiontime
first XML fileproduced at theendpoint
first datalogged into theendpoint database
only data logged during this timeframewill be aggregated and inserted intothe endpoint database
12:05 13:00 14:00 14:20time{
Figure 14. Data logging on a monitored endpoint
Chapter 11. IBM Tivoli Monitoring integration with Tivoli Enterprise Data Warehouse 185
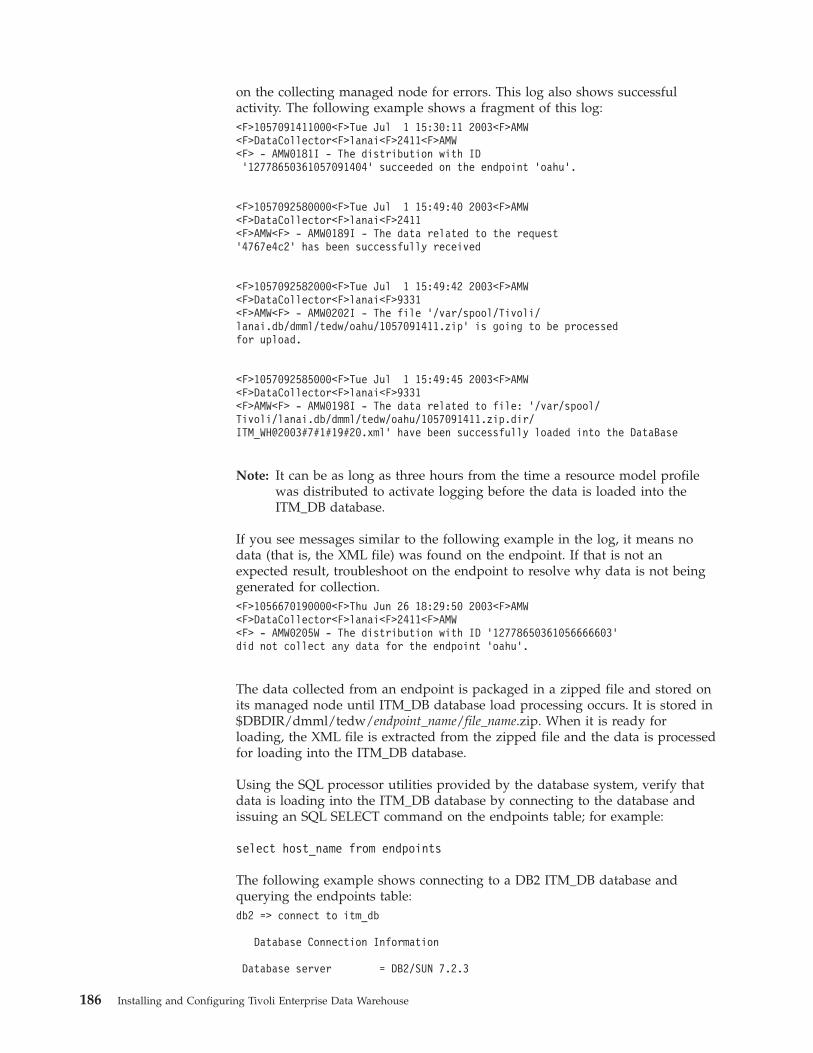
on the collecting managed node for errors. This log also shows successfulactivity. The following example shows a fragment of this log:<F>1057091411000<F>Tue Jul 1 15:30:11 2003<F>AMW<F>DataCollector<F>lanai<F>2411<F>AMW<F> - AMW0181I - The distribution with ID’12778650361057091404’ succeeded on the endpoint ’oahu’.
<F>1057092580000<F>Tue Jul 1 15:49:40 2003<F>AMW<F>DataCollector<F>lanai<F>2411<F>AMW<F> - AMW0189I - The data related to the request’4767e4c2’ has been successfully received
<F>1057092582000<F>Tue Jul 1 15:49:42 2003<F>AMW<F>DataCollector<F>lanai<F>9331<F>AMW<F> - AMW0202I - The file ’/var/spool/Tivoli/lanai.db/dmml/tedw/oahu/1057091411.zip’ is going to be processedfor upload.
<F>1057092585000<F>Tue Jul 1 15:49:45 2003<F>AMW<F>DataCollector<F>lanai<F>9331<F>AMW<F> - AMW0198I - The data related to file: ’/var/spool/Tivoli/lanai.db/dmml/tedw/oahu/1057091411.zip.dir/ITM_WH@2003#7#1#19#20.xml’ have been successfully loaded into the DataBase
Note: It can be as long as three hours from the time a resource model profilewas distributed to activate logging before the data is loaded into theITM_DB database.
If you see messages similar to the following example in the log, it means nodata (that is, the XML file) was found on the endpoint. If that is not anexpected result, troubleshoot on the endpoint to resolve why data is not beinggenerated for collection.<F>1056670190000<F>Thu Jun 26 18:29:50 2003<F>AMW<F>DataCollector<F>lanai<F>2411<F>AMW<F> - AMW0205W - The distribution with ID ’12778650361056666603’did not collect any data for the endpoint ’oahu’.
The data collected from an endpoint is packaged in a zipped file and stored onits managed node until ITM_DB database load processing occurs. It is stored in$DBDIR/dmml/tedw/endpoint_name/file_name.zip. When it is ready forloading, the XML file is extracted from the zipped file and the data is processedfor loading into the ITM_DB database.
Using the SQL processor utilities provided by the database system, verify thatdata is loading into the ITM_DB database by connecting to the database andissuing an SQL SELECT command on the endpoints table; for example:
select host_name from endpoints
The following example shows connecting to a DB2 ITM_DB database andquerying the endpoints table:db2 => connect to itm_db
Database Connection Information
Database server = DB2/SUN 7.2.3
186 Installing and Configuring Tivoli Enterprise Data Warehouse
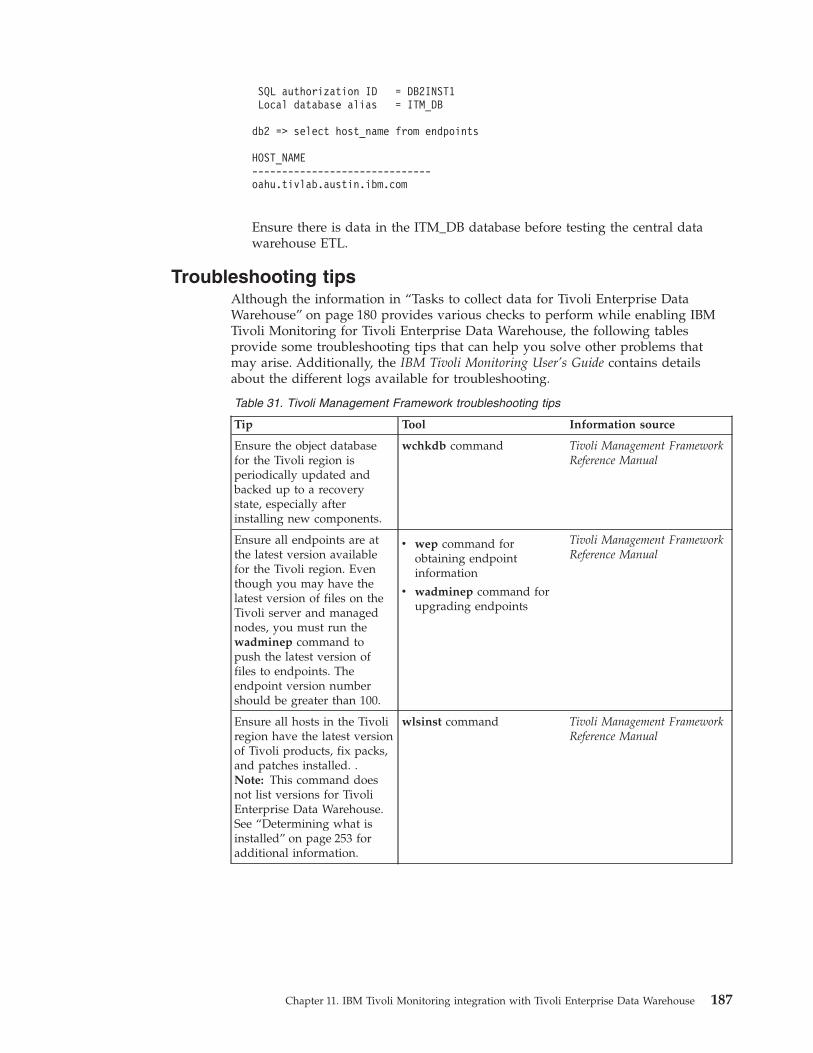
SQL authorization ID = DB2INST1Local database alias = ITM_DB
db2 => select host_name from endpoints
HOST_NAME------------------------------oahu.tivlab.austin.ibm.com
Ensure there is data in the ITM_DB database before testing the central datawarehouse ETL.
Troubleshooting tipsAlthough the information in “Tasks to collect data for Tivoli Enterprise DataWarehouse” on page 180 provides various checks to perform while enabling IBMTivoli Monitoring for Tivoli Enterprise Data Warehouse, the following tablesprovide some troubleshooting tips that can help you solve other problems thatmay arise. Additionally, the IBM Tivoli Monitoring User’s Guide contains detailsabout the different logs available for troubleshooting.
Table 31. Tivoli Management Framework troubleshooting tips
Tip Tool Information source
Ensure the object databasefor the Tivoli region isperiodically updated andbacked up to a recoverystate, especially afterinstalling new components.
wchkdb command Tivoli Management FrameworkReference Manual
Ensure all endpoints are atthe latest version availablefor the Tivoli region. Eventhough you may have thelatest version of files on theTivoli server and managednodes, you must run thewadminep command topush the latest version offiles to endpoints. Theendpoint version numbershould be greater than 100.
v wep command forobtaining endpointinformation
v wadminep command forupgrading endpoints
Tivoli Management FrameworkReference Manual
Ensure all hosts in the Tivoliregion have the latest versionof Tivoli products, fix packs,and patches installed. .Note: This command doesnot list versions for TivoliEnterprise Data Warehouse.See “Determining what isinstalled” on page 253 foradditional information.
wlsinst command Tivoli Management FrameworkReference Manual
Chapter 11. IBM Tivoli Monitoring integration with Tivoli Enterprise Data Warehouse 187
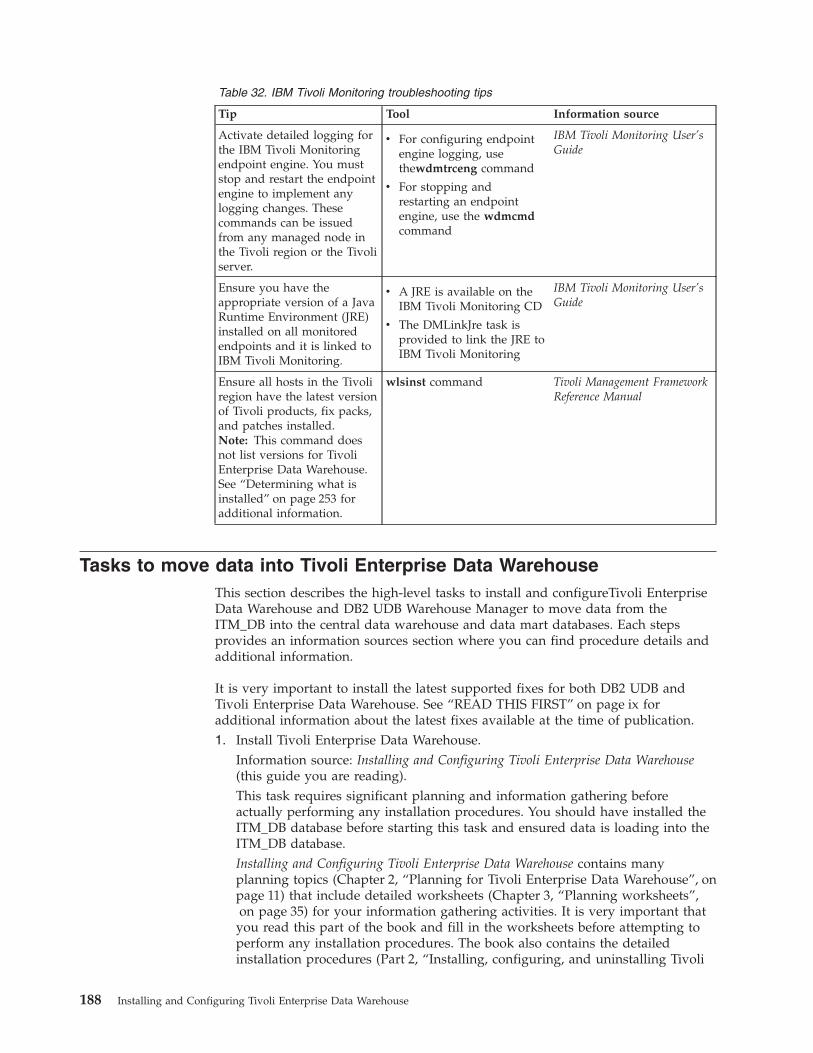
Table 32. IBM Tivoli Monitoring troubleshooting tips
Tip Tool Information source
Activate detailed logging forthe IBM Tivoli Monitoringendpoint engine. You muststop and restart the endpointengine to implement anylogging changes. Thesecommands can be issuedfrom any managed node inthe Tivoli region or the Tivoliserver.
v For configuring endpointengine logging, usethewdmtrceng command
v For stopping andrestarting an endpointengine, use the wdmcmdcommand
IBM Tivoli Monitoring User’sGuide
Ensure you have theappropriate version of a JavaRuntime Environment (JRE)installed on all monitoredendpoints and it is linked toIBM Tivoli Monitoring.
v A JRE is available on theIBM Tivoli Monitoring CD
v The DMLinkJre task isprovided to link the JRE toIBM Tivoli Monitoring
IBM Tivoli Monitoring User’sGuide
Ensure all hosts in the Tivoliregion have the latest versionof Tivoli products, fix packs,and patches installed.Note: This command doesnot list versions for TivoliEnterprise Data Warehouse.See “Determining what isinstalled” on page 253 foradditional information.
wlsinst command Tivoli Management FrameworkReference Manual
Tasks to move data into Tivoli Enterprise Data WarehouseThis section describes the high-level tasks to install and configureTivoli EnterpriseData Warehouse and DB2 UDB Warehouse Manager to move data from theITM_DB into the central data warehouse and data mart databases. Each stepsprovides an information sources section where you can find procedure details andadditional information.
It is very important to install the latest supported fixes for both DB2 UDB andTivoli Enterprise Data Warehouse. See “READ THIS FIRST” on page ix foradditional information about the latest fixes available at the time of publication.1. Install Tivoli Enterprise Data Warehouse.
Information source: Installing and Configuring Tivoli Enterprise Data Warehouse(this guide you are reading).This task requires significant planning and information gathering beforeactually performing any installation procedures. You should have installed theITM_DB database before starting this task and ensured data is loading into theITM_DB database.Installing and Configuring Tivoli Enterprise Data Warehouse contains manyplanning topics (Chapter 2, “Planning for Tivoli Enterprise Data Warehouse”, onpage 11) that include detailed worksheets (Chapter 3, “Planning worksheets”,on page 35) for your information gathering activities. It is very important that
you read this part of the book and fill in the worksheets before attempting toperform any installation procedures. The book also contains the detailedinstallation procedures (Part 2, “Installing, configuring, and uninstalling Tivoli
188 Installing and Configuring Tivoli Enterprise Data Warehouse
Enterprise Data Warehouse”, on page 53). Installing Tivoli Enterprise DataWarehouse is a complex task and thorough planning is crucial success.The following list describes the high level installation procedures for this task:a. Install DB2 UDB on all computers where Tivoli Enterprise Data Warehouse
components will be installed. See“Installing and configuring DB2 UniversalDatabase” on page 88 for the procedure.
b. On the Tivoli Enterprise Data Warehouse control server and any remotecomputer that will be a DB2 remote warehouse agent site, install DB2 UDBWarehouse Manager. On the control server this installs necessary DB2 toolsand the default warehouse agent. On a DB2 remote warehouse agent site,this installs the warehouse agent. See “Installing DB2 Warehouse Manager”on page 95 for the procedure.
c. Install any fixes to DB2 UDB that are required.d. If the ITM_DB database is not a DB2 database, install and configure a
database client either on the Tivoli Enterprise Data Warehouse controlserver (if the DB2 default warehouse agent is used) or the DB2 remotewarehouse agent site where the IBM Tivoli Monitoring central datawarehouse ETL will run.
e. Install the Tivoli Enterprise Data Warehouse control server component. Thecentral data warehouse and data mart databases are created automaticallyduring this procedure.
f. If the Tivoli Enterprise Data Warehouse data mart component will be on aremote computer, install it on the remote computer. Certain files are neededfor data mart processing on a remote computer. There is no need to installthe Tivoli Enterprise Data Warehouse central data warehouse on a remotecomputer.
g. Install the Tivoli Enterprise Data Warehouse report interface component onthe appropriate computer.
Note: When the installation wizard finishes with the report interfacecomponent you are prompted to reboot the computer. The wizard hasfinished but the IBM Console still needs to finish building its helpset. Wait for the help set to finish building. This process may take upto 15 minutes. To determine whether the help set build is complete,look for the completion message in the Tivoli Presentation Servicesinstallation log. This log is in directory PS_directory/log/fwp_mcr,where PS_directory is the target directory you specified for TivoliPresentation Services. The logs are named stdoutn. Look for thefollowing message in the most recent stdoutn file. In some cases, themessage can be in the second most recent stdoutn file.FWP1734I The utilty that was started by the Management ComponentRepository to build the help set has completed successfully.
h. If you are using a DB2 remote warehouse agent site, define the agent site tothe DB2 Data Warehouse Center on the Tivoli Enterprise Data Warehousecontrol server and verify that the DB2 warehouse agent is running on theremote computer. The DB2 warehouse agent runs as the Warehouse AgentDaemon service in Windows systems and the vwd process on UNIXsystems.
i. Install any fixes required for Tivoli Enterprise Data Warehouse.
Chapter 11. IBM Tivoli Monitoring integration with Tivoli Enterprise Data Warehouse 189
j. Back up the Tivoli Enterprise Data Warehouse deployment before installingany warehouse packs to ensure a rollback state. See “Backing up andrestoring a Tivoli Enterprise Data Warehouse deployment” on page 257 foradditional information.
The following sections present the different deployment scenarios and the tasksfor basic (using the DB2 default warehouse agent on the Tivoli Enterprise DataWarehouse control server) and advanced (using a DB2 remote warehouse agentsite) installations:v Chapter 13, “Using a DB2 default warehouse agent”, on page 215v Chapter 14, “Using DB2 remote warehouse agents”, on page 227
2. Install the IBM Tivoli Monitoring warehouse pack for the central datawarehouse ETL.Information source:v For details about planning, preparing the environment, and installation
procedures, see Chapter 10, “Installing and upgrading warehouse packs”, onpage 135.
v For IBM Tivoli Monitoring warehouse pack-specific information, see the IBMTivoli Monitoring Warehouse Enablement Pack: Implementation Guide
First, review the IBM Tivoli Monitoring Warehouse Enablement Pack:Implementation Guide. It contains important information for installing andconfiguring this warehouse pack, such as data source and target names, pre-and post-installation steps, installation steps, and so forth.
Note: You should install this and all other warehouse packs with the same DB2user ID as was used for installing Tivoli Enterprise Data Warehousedatabases. If you do not use the same DB2 user ID, you must create atemporary table space for the DB2 user ID installing the warehouse packin both the central data warehouse and data mart databases, beforeinstalling the warehouse pack. See step 3 on page 135 for the procedureto check and create temporary table spaces if necessary.
Use the installation wizard from the Tivoli Enterprise Data Warehouse CD toinstall the warehouse pack on the control server. Select the Applicationinstallation only option.
The central data warehouse ETL provided by this warehouse pack can run oneither the Tivoli Enterprise Data Warehouse control server, or on a remotecomputer using the DB2 default warehouse agent on the control server or aDB2 warehouse agent on the remote computer.
If you are going to run this ETL on a DB2 remote warehouse agent site, youmust first install it on the control server and then manually copy thewarehouse pack files from the control server to the DB2 remote warehouseagent site. See “Copying the warehouse pack files for a DB2 remote warehouseagent site” on page 142 for the procedure. Additionally, you must manuallycopy the AMX_Create_Comp_Msmt.sh file from the$TWH_TOPDIR/apps/amx/v511/misc directory to the$TWH_TOPDIR/tools/bin directory on the DB remote warehouse agent site.
If this warehouse pack requires a fix, apply it immediately after installation onthe Tivoli Enterprise Data Warehouse control server. The IBM Tivoli Monitoring
190 Installing and Configuring Tivoli Enterprise Data Warehouse
Warehouse Enablement Pack: Implementation Guide or customer support Web siteshould contain information about required fixes.
3. Check the DB2 applications control heap size for the central data warehousedatabase to ensure it is set to at least 512 KB.Information source: See “Changing the DB2 heap size for the central datawarehouse database” on page 266.This value prevents possible heap size errors from occurring during centraldata warehouse ETL processing.
4. Check the user temporary table space.Information source: Step 3 on page 135.User temporary table spaces are created for the DB2 user declared during theTivoli Enterprise Data Warehouse core installation. It is created for the centraldata warehouse and data mart databases. In order to prevent problems fromsubsequent installations of additional warehouse packs, it is a good idea toverify that these table spaces are correctly setup now.
5. Configure an ODBC data source connection to the ITM_DB database.Information source:v For ODBC data source connection configuration procedures, see Installing and
Configuring Tivoli Enterprise Data Warehouse.v For IBM Tivoli Monitoring warehouse pack-specific information pertaining to
data sources, see the IBM Tivoli Monitoring Warehouse Enablement Pack:Implementation Guide.
Defining an ODBC data source connection to the ITM_DB database configures aconnection between the IBM Tivoli Monitoring warehouse pack and its datasource (the ITM_DB database). An ODBC data source connection is configuredon the computer where the IBM Tivoli Monitoring central data warehouse ETLwill run, which is either on the Tivoli Enterprise Data Warehouse control serveror a DB2 remote warehouse agent site.v To configure an ODBC data source connection on the control server or a DB2
remote warehouse agent site on a Windows system, see “Creating ODBCdata sources on the control server for warehouse packs” on page 143.
v To configure an ODBC data source connection on a DB2 remote warehouseagent site on a UNIX system, see “Creating ODBC data sources on DB2remote warehouse agent sites” on page 145.
Ensure that the client for the database application, except for DB2, is installedwhere you configure the ODBC data source connection. For a DB2 sourcedatabase, the necessary client software is already installed. See “Step 2.Preparing the environment” on page 137 for additional information.
6. Configure user IDs and passwords for the data source and target of the IBMTivoli Monitoring warehouse pack using the DB2 Data Warehouse Center onthe Tivoli Enterprise Data Warehouse control server.Information source:v For the procedure, see “Specifying user IDs and passwords for Tivoli
Enterprise Data Warehouse sources and targets” on page 146.v For additional information about using the DB2 Data Warehouse Center for
this procedure, see the IBM DB2 Universal Database Data Warehouse CenterAdministration Guide.
v For IBM Tivoli Monitoring warehouse pack data source and targetinformation, see the IBM Tivoli Monitoring Warehouse Enablement Pack:Implementation Guide.
Chapter 11. IBM Tivoli Monitoring integration with Tivoli Enterprise Data Warehouse 191
Specify a user ID and password for the data source and target beginning withproduct code AMX.
7. For the ITM_DB database, check the schema name in the DB2 Data WarehouseCenter and modify if necessary.Information source: “Changing the schema name for the ITM_DB databasetables” on page 194.The IBM Tivoli Monitoring central data warehouse ETL assumes by default theschema name to be db2admin. If db2admin is not the schema name for theITM_DB database, you need to change the schema name used by the ETL.
8. Back up the Tivoli Enterprise Data Warehouse deployment.Information source: “Backing up and restoring a Tivoli Enterprise DataWarehouse deployment” on page 257.
9. Install an IBM Tivoli Monitoring application warehouse pack for a data martETL.Information source:v For details about planning, preparing the environment, and installation
procedures, see Chapter 10, “Installing and upgrading warehouse packs”, onpage 135.
v For warehouse pack-specific information for an IBM Tivoli Monitoringapplication, see its warehouse pack implementation guide.
First, review the warehouse pack implementation guide for that product. Itcontains important information for installing and configuring this warehousepack, such as data source and target names, pre- and post-installation steps,installation steps, and so forth.
Note: You should install this and all other warehouse packs with the same DB2user ID as was used for installing Tivoli Enterprise Data Warehousedatabases. If you do not use the same DB2 user ID, you must create atemporary table space for the DB2 user ID installing the warehouse packin both the central data warehouse and data mart databases, beforeinstalling the warehouse pack. See step 3 on page 135 for the procedureto check and create temporary table spaces if necessary.
Use the installation wizard from the Tivoli Enterprise Data Warehouse CD toinstall the warehouse pack on the control server. Select the Applicationinstallation only option.
The data mart ETL provided by this warehouse pack can run on either theTivoli Enterprise Data Warehouse control server, or on a remote computer usingthe DB2 default warehouse agent on the control server or a DB2 warehouseagent on the remote computer.
If you are going to run this ETL on a DB2 remote warehouse agent site, youmust first install it on the control server and then manually copy thewarehouse pack files from the control server to the DB2 remote warehouseagent site. See “Copying the warehouse pack files for a DB2 remote warehouseagent site” on page 142 for the procedure.
10. On the Tivoli Enterprise Data Warehouse control server, configure DB2 IDsand passwords for the data source and target of the IBM Tivoli Monitoringapplication warehouse pack using the DB2 Data Warehouse Center.Information source:
192 Installing and Configuring Tivoli Enterprise Data Warehouse
v For the procedure, see “Specifying user IDs and passwords for TivoliEnterprise Data Warehouse sources and targets” on page 146.
v For additional information about using the DB2 Data Warehouse Center forthis procedure, see the IBM DB2 Universal Database Data Warehouse CenterAdministration Guide.
v For IBM Tivoli Monitoring application warehouse pack data source andtarget information, see the warehouse pack implementation guide for theapplication.
Specify a user ID and password for the data source and target beginning withproduct code AMY.
11. Back up the Tivoli Enterprise Data Warehouse deployment.Information source: “Backing up and restoring a Tivoli Enterprise DataWarehouse deployment” on page 257.
12. Schedule, promote, and test the ETLs.Information source:v For the procedures, see “Scheduling warehouse pack ETL processes” on
page 147.v For additional information about using the DB2 Data Warehouse Center for
the procedures, see the IBM DB2 Universal Database Data Warehouse CenterAdministration Guide.
v For IBM Tivoli Monitoring central data warehouse ETL process information,see the IBM Tivoli Monitoring Warehouse Enablement Pack: ImplementationGuide.
The process steps for a newly installed ETL are initially in Development modeafter the installation of its warehouse pack. In Development mode you canschedule an ETL to run. The DB2 Data Warehouse Center is used to scheduleETLs. The IBM Tivoli Monitoring Warehouse Enablement Pack: ImplementationGuide recommends scheduling the IBM Tivoli Monitoring central datawarehouse ETL to run daily. After scheduling both the IBM Tivoli Monitoringcentral data warehouse and IBM Tivoli Monitoring application data martETLs, test them. Check warehouse pack implementation guides for schedulingconsiderations.
Notes:
a. Do not run the IBM Tivoli Monitoring central data warehouse ETL withoutan IBM Tivoli Monitoring application data mart ETL installed. Doing sowill result in errors and prevent subsequent data extractions. If the IBMTivoli Monitoring central data warehouse ETL was mistakenly run beforethe installation of an IBM Tivoli Monitoring application data mart ETL, see“What to do if the central data warehouse ETL ran before a data mart ETLwas installed” on page 198.
b. You can create shortcuts in the DB2 Data Warehouse Center for ETLprocesses to run in a specified order so they do not run if the previousETL process did not complete. Before creating shortcuts, make a backupcopy of the Tivoli Enterprise Data Warehouse control database in case youneed to recover to the initial state of an installed warehouse pack. Also,record which processes you link and the steps that you take to link themand save this information. If you install a patch to a warehouse pack, it ispossible that you will have to reschedule all ETL processes for thewarehouse pack and the information you recorded will help you with thistask.
Chapter 11. IBM Tivoli Monitoring integration with Tivoli Enterprise Data Warehouse 193
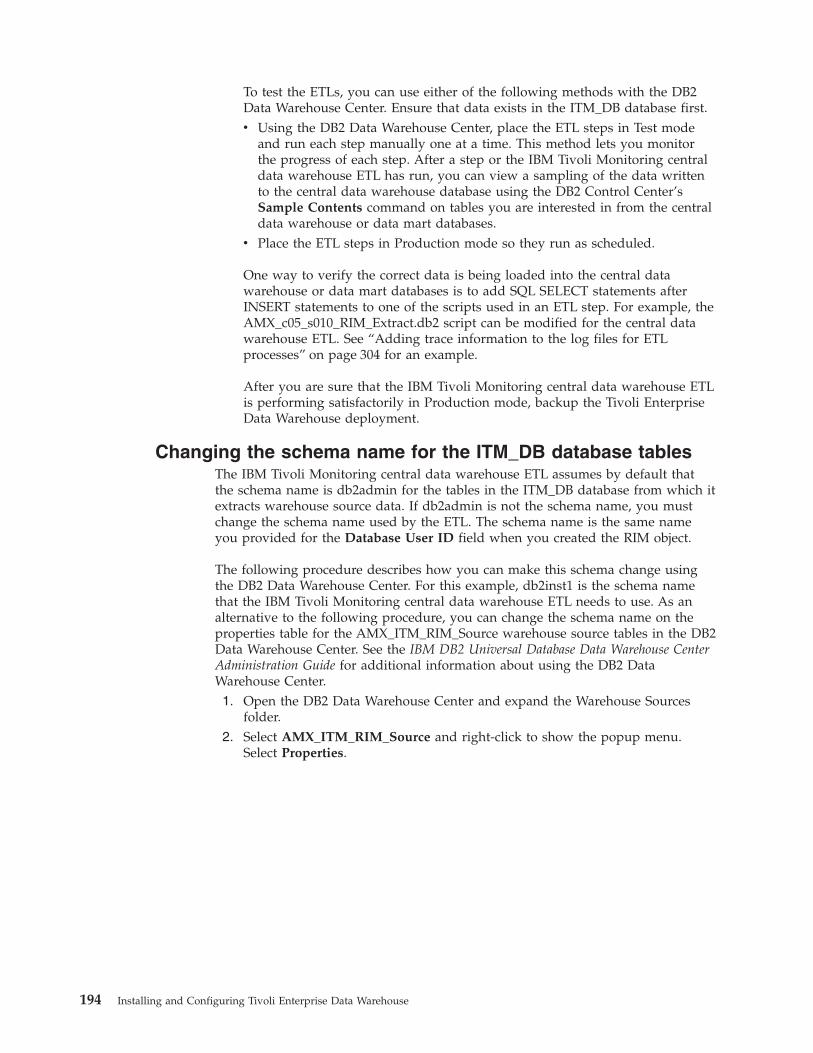
To test the ETLs, you can use either of the following methods with the DB2Data Warehouse Center. Ensure that data exists in the ITM_DB database first.v Using the DB2 Data Warehouse Center, place the ETL steps in Test mode
and run each step manually one at a time. This method lets you monitorthe progress of each step. After a step or the IBM Tivoli Monitoring centraldata warehouse ETL has run, you can view a sampling of the data writtento the central data warehouse database using the DB2 Control Center’sSample Contents command on tables you are interested in from the centraldata warehouse or data mart databases.
v Place the ETL steps in Production mode so they run as scheduled.
One way to verify the correct data is being loaded into the central datawarehouse or data mart databases is to add SQL SELECT statements afterINSERT statements to one of the scripts used in an ETL step. For example, theAMX_c05_s010_RIM_Extract.db2 script can be modified for the central datawarehouse ETL. See “Adding trace information to the log files for ETLprocesses” on page 304 for an example.
After you are sure that the IBM Tivoli Monitoring central data warehouse ETLis performing satisfactorily in Production mode, backup the Tivoli EnterpriseData Warehouse deployment.
Changing the schema name for the ITM_DB database tablesThe IBM Tivoli Monitoring central data warehouse ETL assumes by default thatthe schema name is db2admin for the tables in the ITM_DB database from which itextracts warehouse source data. If db2admin is not the schema name, you mustchange the schema name used by the ETL. The schema name is the same nameyou provided for the Database User ID field when you created the RIM object.
The following procedure describes how you can make this schema change usingthe DB2 Data Warehouse Center. For this example, db2inst1 is the schema namethat the IBM Tivoli Monitoring central data warehouse ETL needs to use. As analternative to the following procedure, you can change the schema name on theproperties table for the AMX_ITM_RIM_Source warehouse source tables in the DB2Data Warehouse Center. See the IBM DB2 Universal Database Data Warehouse CenterAdministration Guide for additional information about using the DB2 DataWarehouse Center.1. Open the DB2 Data Warehouse Center and expand the Warehouse Sources
folder.2. Select AMX_ITM_RIM_Source and right-click to show the popup menu.
Select Properties.
194 Installing and Configuring Tivoli Enterprise Data Warehouse
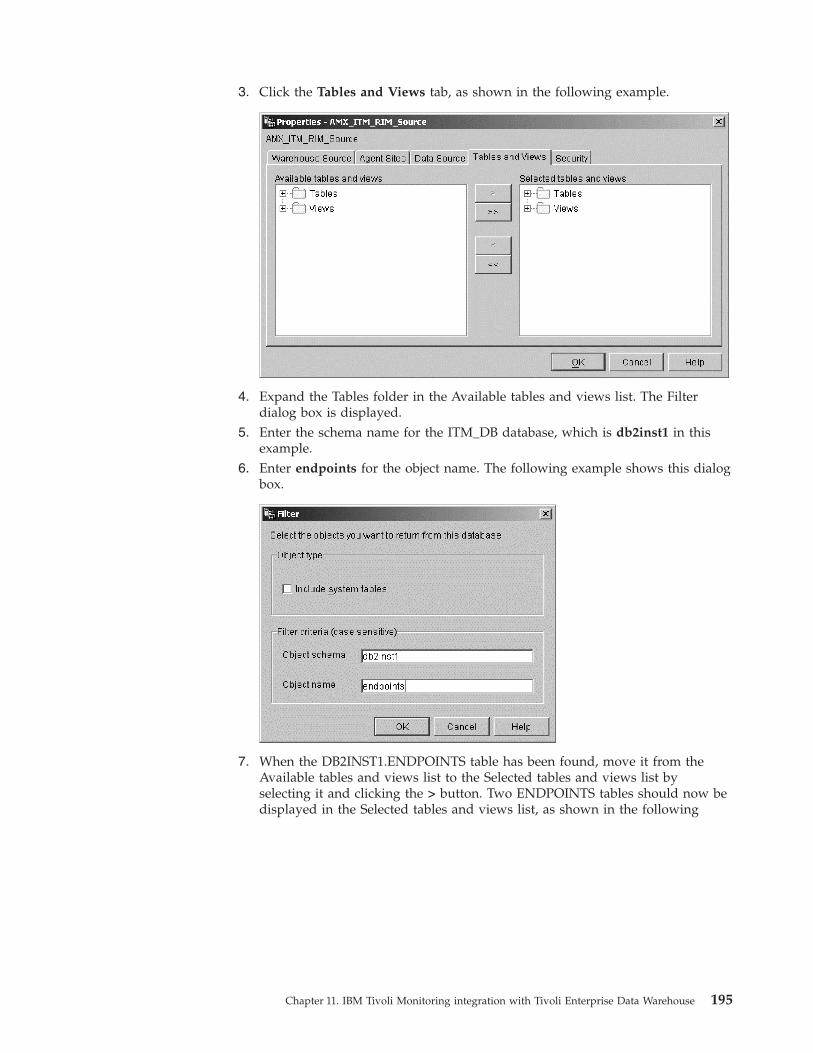
3. Click the Tables and Views tab, as shown in the following example.
4. Expand the Tables folder in the Available tables and views list. The Filterdialog box is displayed.
5. Enter the schema name for the ITM_DB database, which is db2inst1 in thisexample.
6. Enter endpoints for the object name. The following example shows this dialogbox.
7. When the DB2INST1.ENDPOINTS table has been found, move it from theAvailable tables and views list to the Selected tables and views list byselecting it and clicking the > button. Two ENDPOINTS tables should now bedisplayed in the Selected tables and views list, as shown in the following
Chapter 11. IBM Tivoli Monitoring integration with Tivoli Enterprise Data Warehouse 195
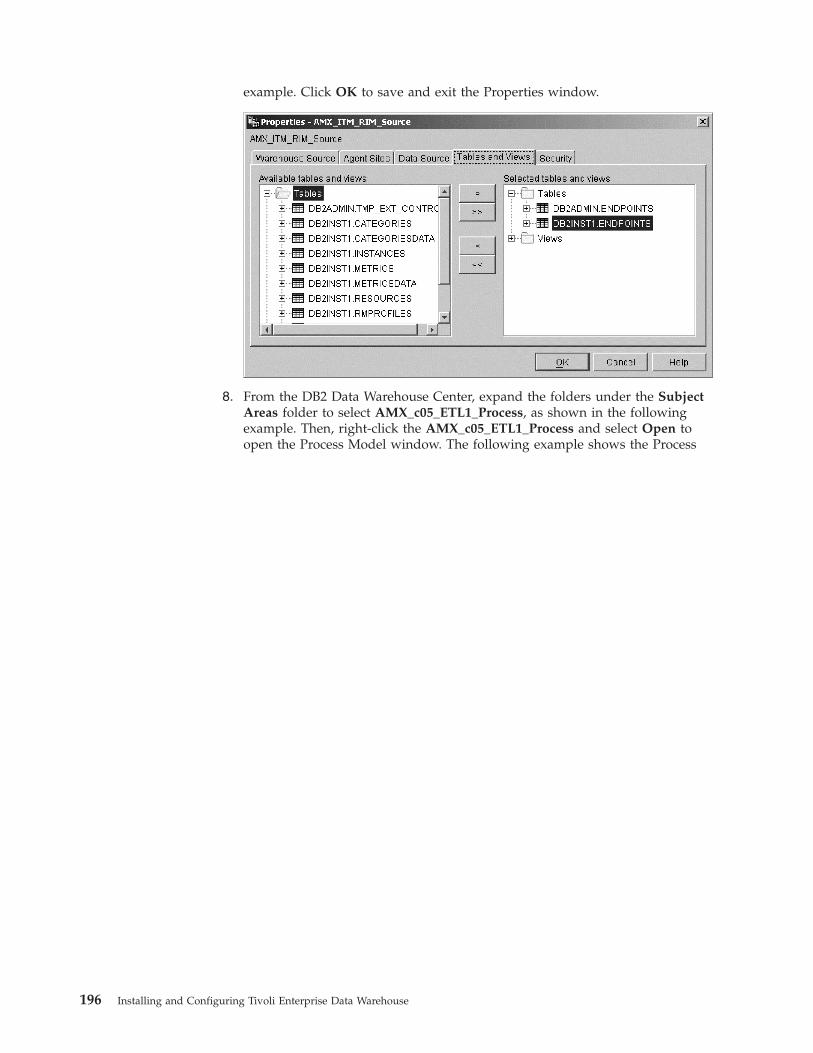
example. Click OK to save and exit the Properties window.
8. From the DB2 Data Warehouse Center, expand the folders under the SubjectAreas folder to select AMX_c05_ETL1_Process, as shown in the followingexample. Then, right-click the AMX_c05_ETL1_Process and select Open toopen the Process Model window. The following example shows the Process
196 Installing and Configuring Tivoli Enterprise Data Warehouse

Model window with this process in the work area.
9. Click the tables icon , then click the work area. The Add Data dialog boxlike the following example is displayed.
10. From the Add Data dialog box, select the appropriate schema.ENDPOINTStable from the Available source and target tables list for the ITM_DB database.
Chapter 11. IBM Tivoli Monitoring integration with Tivoli Enterprise Data Warehouse 197
For this example, the DB2INST1.ENDPOINTS table is the appropriate table.Click the > button to move the table to the Selected source and target tableslist; then, click OK to save your changes and exit the dialog box. A new tablewith the appropriate schema name is now in the work area of the ProcessModel window.
Note: You only need to change the schema name of the ENDPOINTS table.11. Connect the new ENDPOINTS table to the first step in the process, which is
the AMX_c05_s010_RIM_Extract step. To connect it, click the link icon
and select Data Link from the Link tools popup menu that is displayed.12. Drag the cursor in the Process Model work area from the new ENDPOINTS
table to the AMX_c05_s010_RIM_Extract step to create a new link.13. Remove the old link from the old ENDPOINTS table to the process by
selecting the link, right click, and select Remove from the popup menu.14. Remove the old ENDPOINTS table by selecting the table, right click, and
select Remove from the popup menu.15. Save the process changes by selecting Process → Save and then close the
Process Model window.
Troubleshooting tipsAlthough the information in “Tasks to move data into Tivoli Enterprise DataWarehouse” on page 188 provides various checks to perform while installingwarehouse packs for IBM Tivoli Monitoring and its applications, see Chapter 17,“Problem determination”, on page 273 for extensive troubleshooting techniques.Also, troubleshooting information may be available for a warehouse pack in itsimplementation guide.
What to do if the central data warehouse ETL ran before a datamart ETL was installedIf the IBM Tivoli Monitoring central data warehouse ETL runs without an IBMTivoli Monitoring application data mart ETL installed, the central data warehouseETL will fail and prevent subsequent data extractions for the IBM TivoliMonitoring warehouse pack. If this occurs, perform the following steps:1. Install, configure, and schedule the IBM Tivoli Monitoring application
warehouse pack that provides the data mart ETL.2. Reset the Extract_Control window to the beginning; otherwise, no data will be
collected when the processes for the central data warehouse ETL are run, eventhough they may appear to complete successfully. To reset the Extract_Controlwindow to the beginning, run the$TWH_TOPDIR\apps\amx\v511\misc\tools\.AMX_Reset_Extract_Window.batprogram.
Note: This program must only be used to restart the Extract_Control windowfor the AMX_c05_ETL1_Process from the beginning. If you need to resetthe window to a point other than the last extract, see the tools sections ofthe IBM Tivoli Monitoring Warehouse Enablement Pack: Implementation Guideor contact IBM customer support.
198 Installing and Configuring Tivoli Enterprise Data Warehouse
Chapter 12. Removing Tivoli Enterprise Data Warehouse fromyour enterprise
This chapter explains how to remove Tivoli Enterprise Data Warehouse from yourenterprise. When you uninstall Tivoli Enterprise Data Warehouse from yourenterprise, you remove not only the application software but the related databasesas well.
The following tasks completely uninstall Tivoli Enterprise Data Warehouse:v “Uninstalling warehouse packs”v “Uninstalling language packs” on page 205v “Uninstalling the Tivoli Enterprise Data Warehouse core application” on
page 206v “Uninstalling Tivoli Presentation Services” on page 210v “Uninstalling DB2 Universal Database Enterprise Edition” on page 211v “Removing data from the central data warehouse” on page 211
When you uninstall Tivoli Enterprise Data Warehouse, you must uninstallwarehouse packs, core components, and related software in the following order forboth single system and distributed installations:1. Warehouse packs2. Language packs3. Report server, data mart server, and central data warehouse server4. Control server5. Tivoli Presentation Services6. DB2 Universal Database Enterprise Edition
Uninstalling warehouse packsYou can uninstall individual warehouse packs without removing the TivoliEnterprise Data Warehouse core components.
In a single system installation, warehouse packs are installed on the control server.In a distributed installation, warehouse packs are installed on the control serverand report server. In a distributed installation, warehouse pack files are also placedon each agent site that runs ETLs for that warehouse pack.
Attention: Make sure that you are aware of any dependencies betweenwarehouse packs. Do not uninstall warehouse packs upon which other warehousepacks are dependent.
Overview of uninstalling warehouse packsUninstalling a warehouse pack deletes the warehouse pack files and relateddatabase objects. The files for each warehouse pack are located in the installationdirectory $TWH_TOPDIR/apps/PRODUCT_CODE, where PRODUCT_CODE is theunique three-character identifier for the application. The following items aredeleted during the warehouse pack uninstallation:v Warehouse pack files and directories
© Copyright IBM Corp. 2001, 2003 199
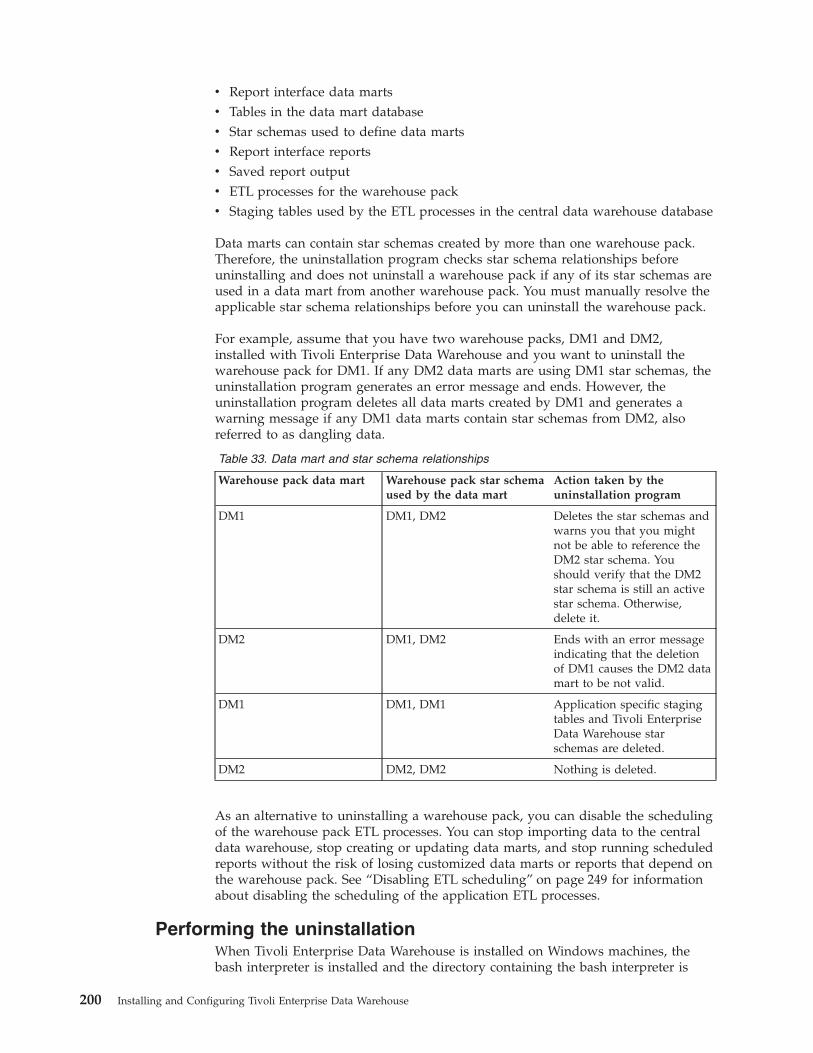
v Report interface data martsv Tables in the data mart databasev Star schemas used to define data martsv Report interface reportsv Saved report outputv ETL processes for the warehouse packv Staging tables used by the ETL processes in the central data warehouse database
Data marts can contain star schemas created by more than one warehouse pack.Therefore, the uninstallation program checks star schema relationships beforeuninstalling and does not uninstall a warehouse pack if any of its star schemas areused in a data mart from another warehouse pack. You must manually resolve theapplicable star schema relationships before you can uninstall the warehouse pack.
For example, assume that you have two warehouse packs, DM1 and DM2,installed with Tivoli Enterprise Data Warehouse and you want to uninstall thewarehouse pack for DM1. If any DM2 data marts are using DM1 star schemas, theuninstallation program generates an error message and ends. However, theuninstallation program deletes all data marts created by DM1 and generates awarning message if any DM1 data marts contain star schemas from DM2, alsoreferred to as dangling data.
Table 33. Data mart and star schema relationships
Warehouse pack data mart Warehouse pack star schemaused by the data mart
Action taken by theuninstallation program
DM1 DM1, DM2 Deletes the star schemas andwarns you that you mightnot be able to reference theDM2 star schema. Youshould verify that the DM2star schema is still an activestar schema. Otherwise,delete it.
DM2 DM1, DM2 Ends with an error messageindicating that the deletionof DM1 causes the DM2 datamart to be not valid.
DM1 DM1, DM1 Application specific stagingtables and Tivoli EnterpriseData Warehouse starschemas are deleted.
DM2 DM2, DM2 Nothing is deleted.
As an alternative to uninstalling a warehouse pack, you can disable the schedulingof the warehouse pack ETL processes. You can stop importing data to the centraldata warehouse, stop creating or updating data marts, and stop running scheduledreports without the risk of losing customized data marts or reports that depend onthe warehouse pack. See “Disabling ETL scheduling” on page 249 for informationabout disabling the scheduling of the application ETL processes.
Performing the uninstallationWhen Tivoli Enterprise Data Warehouse is installed on Windows machines, thebash interpreter is installed and the directory containing the bash interpreter is
200 Installing and Configuring Tivoli Enterprise Data Warehouse
added to your environment path variable. To run the warehouse packuninstallation program, use the bash shell on machines running Windows, and thebourne shell, located in the /bin/sh directory, on machines running UNIX.
Note: See “More about twh_app_deinstall.sh” on page 205 for options you can usewith the warehouse pack uninstallation program, twh_app_deinstall.sh. Ofparticular note is the –r option to show return code descriptions.
To uninstall a warehouse pack:1. Backup your Tivoli Enterprise Data Warehouse installation as described in
“Backing up and restoring a Tivoli Enterprise Data Warehouse deployment”on page 257.
2. Depending upon the operating system running on your machine, do one ofthe following:v For Windows, type the following command in a command prompt window:
bash
v For UNIX, open a terminal window.3. Enter the following command:
cd $TWH_TOPDIR/install/bin
4. List all installed warehouse packs by running the following command on thecontrol server:./twh_app_deinstall.sh -c "twh_app_deinstall.cfg" --listapps
In the output generated, note the three-character product identifier for thewarehouse pack you want to uninstall.
5. Edit the configuration file, $TWH_TOPDIR/install/bin/twh_app_deinstall.cfg,to add or correct property information as described in “The uninstallationconfiguration file” on page 203. Modify property information in theconfiguration file as follows:v Enter the three-character identifier of the warehouse pack you want to
delete (output in step 4) for the APPLICATION_TO_DELETE property.v Enter the DB2 user IDs and passwords for the control server, data mart
server, and central data warehouse server.If Tivoli Enterprise Data Warehouse is installed on a single system, supplythe same information for all properties containing DB2USER and DB2PASS.If you have a distributed installation of Tivoli Enterprise Data Warehouse,specify the DB2 user ID and password of the local DB2 administrator forthe DB2USER and DB2PASS properties. For each property starting withCOPT_ and containing DB2USER and DB2PASS, enter the appropriate DB2user ID and password for that component.
Notes:
a. Entries in the uninstallation configuration file must contain only onevalue per property. You cannot assign multiple values to one property.
b. For a single system installation, port values in the configuration filemight be set to NULL.
c. There must be no trailing spaces on any property containing a pathname, for example, $TWH_TOPDIR.
d. Be sure to place the correct access control on this file to allow it to berun but also prevent unauthorized users from accessing user ID andpassword information. When the uninstallation program runs, it deletesthe DB2 passwords from the configuration file. Use the same
Chapter 12. Removing Tivoli Enterprise Data Warehouse from your enterprise 201
configuration file to uninstall another warehouse pack by changing theAPPLICATION_TO_DELETE property information for the warehousepack and resupply the user IDs and passwords.
e. Do not modify information in the uninstallation configuration file otherthan the warehouse pack identifier and DB2 user IDs and passwords.All other properties are set by the installation program.
6. If there are star schemas created by the warehouse pack you are uninstallingthat have relationships with data marts from another warehouse pack, youmust remove these star schema relationships. Table 33 on page 200 can helpyou determine the star schema relationships that need to be removed, if any.Run the following command to list the data mart and star schemadependencies and the data to be deleted for the warehouse pack you areuninstalling../twh_app_deinstall.sh -c "twh_app_deinstall.cfg" --listrels
7. From the output in step 5, determine if there are data marts withdependencies on the star schemas created by the warehouse pack you areuninstalling. For each of these star schemas, use the report interface to removethe star schema relationships as follows:a. From the portfolio, select Work with Reports → Manage Data Marts.b. In the Manage Data Marts window, in the Data Mart view, click the
context menu icon for the data mart that you want to change and clickProperties.
c. Select the Star Schemas tab.d. Select the star schemas that need to be removed from the data mart and
click Remove.8. To uninstall the warehouse pack, run the following command on the control
server if you have a single system installation or the control server and thereport server if you have a distributed installation:./twh_app_deinstall.sh -c "twh_app_deinstall.cfg"
9. To remove ODBC source information, perform the following steps:a. If you are using a machine running Windows NT®, perform the following
steps:1) From the Windows taskbar, click Start → Settings → Control Panel.2) Double-click ODBC Data Sources.3) Click the System DSN tab.4) Select each entry for the warehouse pack you are uninstalling and
select Remove. Entries must be removed one at a time. See thedocumentation for the warehouse pack you are uninstalling forinformation about the entries you need to remove.
b. If you are using a machine running Windows 2000, perform the followingsteps:1) From the Windows taskbar, click Start → Settings → Control Panel.2) Double-click Administrative Tools.3) Double-click Data Sources (ODBC).4) Click the System DSN tab.5) Select each entry for the warehouse pack you are uninstalling and
select Remove. Entries must be removed one at a time. See thedocumentation for the warehouse pack you are uninstalling forinformation about the entries you need to remove.
202 Installing and Configuring Tivoli Enterprise Data Warehouse
c. If you are uninstalling an advanced configuration, see Chapter 14, “UsingDB2 remote warehouse agents”, on page 227 for information aboutremoving ODBC information using a machine running UNIX.
10. Exit the bash shell or the bourne shell environment by typing exit at thecommand prompt.
11. In a distributed installation, warehouse pack files are also placed on eachagent site that runs ETLs for that warehouse pack. On each agent site, deletethe installation directory used by the warehouse pack.
Note: If you have warehouse pack ETL processes scheduled through the IBM DB2Data Warehouse Center that contain shortcuts to ETL processes for thewarehouse pack you are uninstalling, you must verify the shortcuts for yourscheduled ETL processes after you uninstall the warehouse pack. SeeChapter 15, “DB2 Data Warehouse Center essentials”, on page 247 forinformation on scheduling ETL processes.
The uninstallation configuration fileThe uninstallation configuration file, twh_app_deinstall.cfg, has the followingformat:#################################################################### Instructions: This config file provides information needed to# uninstall a Tivoli Enterprise Data Warehouse application package. You# must uninstall each application package separately.## 1. Specify the application you want to uninstall in the UNINSTALL ME# section.# 2. You should typically only need to add the appropriate passwords# for each DB2PASS property in this file. Note that on a single system# installation, all the DB2PASS values are the same. Also note that# for security, passwords are removed from this file after the# application package has been uninstalled.# To reuse the file, reenter the passwords for the next application# and change the application to delete property.## NOTES:# 1. Check that the values in SAVED AT INSTALLATION section are still# correct. This information was saved when the Tivoli Enterprise# Data Warehouse was installed. It typically does not need to change.# 2. Do not change the values in the SUPPORT USE ONLY section unless# told to do so by your support provider.# 3. All file paths must be absolute and not relative. Also all paths# must be defined in the Unix format not the Windows format. This# means that c:\temp should be c:/temp with a forward slash (/) for in
# the path, not a backslash (\) in the path. This is the case for all# operating systems.# 4. All properties must have a supplied value and must take the form# of property=value exactly. You cannot have more than one value per# property.############# UNINSTALL ME ############################################# Below, specify the application package to uninstall. This is the# directory name in the (TEDW TOP product top)/apps tree that# relates to the product you want to delete.APPLICATION_TO_DELETE=############# SAVED AT INSTALLATION ################################### These values are pre-filled during the product installation.# The only values that must be filled in are all the DB2PASS values.##
Chapter 12. Removing Tivoli Enterprise Data Warehouse from your enterprise 203
# Top directory of the Tivoli Enterprise Data Warehouse installation# treeTWH_TOPDIR=$P(absoluteInstallLocation)## Temporary directory to use while uninstallingTMPDIR=$D(temp)## DB2 Installed Instance directory (Windows Only)DB2_INST_DIR=$W(resolveDB2.installLocation)## DB2 connection information# For a single system installation, this is the DB2 user information for# that system. For a distributed installation, this is always the local host# DB2 user and password.DB2USER=$W(localDbInfo.username) # DB2 User IDDB2PASS= # DB2 Password## For a single system installation, the user and password should be the same# as the DB2USER and DB2PASS above. The host and port information specified# are for the local DB2 database.# For distributed, the user and password are the user and password to# the Control server.COPT_CTRL_DB2HOST=$P(twhDbConfig.dwcHostname)COPT_CTRL_DB2PORT=$P(twhDbConfig.dwcPort)COPT_CTRL_DB2USER=$P(twhDbConfig.dwcUsername)COPT_CTRL_DB2PASS=## For a single system installation, the user and password should be the same# as the DB2USER and DB2PASS above. The host and port information# are for the local DB2 database.# For distributed, the user and password are the user and password to# the CDW server.COPT_CDW_DB2HOST=$P(twhDbConfig.cdwHostname)COPT_CDW_DB2PORT=$P(twhDbConfig.cdwPort)COPT_CDW_DB2USER=$P(twhDbConfig.cdwUsername)COPT_CDW_DB2PASS=## For a single system installation, the user and password should be the same# as the DB2USER and DB2PASS above. The host and port information# are for the local DB2 database.# For distributed, the user and password are the user and password to# the Mart server.COPT_MART_DB2HOST=$P(twhDbConfig.dataMartHostname)COPT_MART_DB2PORT=$P(twhDbConfig.dataMartPort)COPT_MART_DB2USER=$P(twhDbConfig.dataMartUsername)COPT_MART_DB2PASS=############## SUPPORT USE ONLY ######################################## Do not change values in lines from here to the end of the file# unless instructed to do so by your support provider.## The Tivoli Enterprise Data Warehouse databasesTWH_CTRL_DB=TWH_MD # Metadata DatabaseTWH_CDW_DB=TWH_CDW # CDW DatabaseTWH_DM_DB=TWH_MART # Datamart Database## IBM DB2 log for executed DB2 commands (Found in TMPDIR directory)DB2_INSTALL_LOG=twh_ibm_db2_runlog.log## Tivoli Enterprise Data Warehouse Version information (static value# per installation engine deployment)TWH_VERSION=1.1.0## Do you want to keep the temporary files after the uninstallation# program completes for analysis. Type either true or false.
204 Installing and Configuring Tivoli Enterprise Data Warehouse
TWH_KEEP_TMP_FILES=false###.done
More about twh_app_deinstall.shThe twh_app_deinstall.sh script uninstalls warehouse packs from Tivoli EnterpriseData Warehouse. It has the following command line options:
-c, --configSpecifies the configuration file needed to run the uninstallation program.
-d, --debugRuns the uninstallation program in debug mode.
-h, --helpDisplays the syntax and use of the command.
-l, --listappsLists the warehouse packs that are installed. Using this parameter does notuninstall any warehouse packs.
-n, --nocountUninstalls the specified application bypassing the warning countdown. Bydefault, the uninstallation program displays a warning message andprovides a 30–second countdown during which you can stop the programwithout uninstalling the application. The countdown helps preventaccidental uninstalls of a warehouse pack. To end the uninstallationprogram during a countdown, enter Ctrl-C.
-r, --retcodeShows definitions for return and error codes issued by the uninstallationprogram.
-v, --versionDisplays the version information about the uninstallation program.
-z, --listrelsProvides a report of the warehouse pack data mart and star schemarelationships.
Uninstalling language packsIf you are uninstalling language packs, you must uninstall them before uninstallingTivoli Enterprise Data Warehouse and Tivoli Presentation Services and you mustuninstall the applicable warehouse packs before uninstalling language packs. Thelanguage bundles used by the Tivoli Enterprise Data Warehouse core applicationare uninstalled when you uninstall the Tivoli Enterprise Data Warehouse coreapplication. The language bundles that are installed and used by warehouse packsare deleted when Tivoli Presentation Services is uninstalled. However, you mustrun the language pack uninstall program to remove additional information relatedto the language pack.
The following command uninstalls the Tivoli Enterprise Data Warehouse languagepack. Run it from the command line to uninstall a language pack:v If you are using a machine running Windows:
%TWH_TOPDIR%\_jvm\bin\java -jar %TWH_TOPDIR%\nls\_uninst\uninstall.jar
v If you are using a machine running AIX or Linux:$TWH_TOPDIR/_jvm/jre/bin/java -jar $TWH_TOPDIR/nls/_uninst/uninstall.jar
Chapter 12. Removing Tivoli Enterprise Data Warehouse from your enterprise 205
v If you are using a machine running UNIX other than AIX or Linux:$TWH_TOPDIR/_jvm/bin/java -jar $TWH_TOPDIR/nls/_uninst/uninstall.jar
If the uninstallation of the language pack fails, you must do the following:1. Delete the language pack files located in $TWH_TOPDIR/nls.2. Restart the Tivoli Presentation Services server and Web Console.
Log information for the language pack uninstall can be found in$TWH_TOPDIR/nls/TWHLP.log.
Uninstalling the Tivoli Enterprise Data Warehouse core application
Overview of uninstalling the Tivoli Enterprise Data Warehousecore application
Removing a component will allow a reinstall of the same component on thatmachine. If you remove the control server, then all other components on all othermachines must be removed.
When you run the uninstallation program for Tivoli Enterprise Data Warehouse, allTivoli Enterprise Data Warehouse components installed on that machine aredeleted. There is no option for selecting an individual component to uninstall.
You need to run the uninstallation program on each machine on which youinstalled one or more Tivoli Enterprise Data Warehouse components. The followingcomponents and related files are deleted if they were installed on the machine:v Central data warehouse server
– Deletes all installed files related to the central data warehouse server– Uncatalogs all Tivoli Enterprise Data Warehouse databases– Uncatalogs any nodes that were cataloged during install
v Data mart server– Deletes all installed files related to the data mart server– Uncatalogs all Tivoli Enterprise Data Warehouse databases– Uncatalogs any nodes that were cataloged during install
v Report interface server– Deletes all installed files related to the report interface server– Uninstalls Tivoli Presentation Services task drivers– Deletes the Tivoli Enterprise Data Warehouse metadata database
v Control server– Deletes all installed files related to the control server– Drops all Tivoli Enterprise Data Warehouse (TWH_MD, TWH_CDW,
TWH_MART) databases– Uncatalogs any remote servers that were cataloged during the installation
To uninstall Tivoli Enterprise Data Warehouse, you must know the user ID andpassword to connect to DB2 databases used by Tivoli Enterprise Data Warehouse.For security reasons, Tivoli Enterprise Data Warehouse does not retain DB2password information.
206 Installing and Configuring Tivoli Enterprise Data Warehouse
The uninstallation program does not delete the directory specified by$TWH_TOPDIR. This directory contains log information from the uninstallationprogram. If you do not need the log files in $TWH_TOPDIR, delete the files anddelete the $TWH_TOPDIR directory.
The uninstallation program might not delete all the entries in the vpd.propertiesfile that are related to Tivoli Enterprise Data Warehouse. See “Recovering from anincomplete installation of Tivoli Enterprise Data Warehouse” on page 285 forinformation on how to remove unnecessary entries in the vpd.properties file.
Uninstalling the Tivoli Enterprise Data Warehouse core application does notuninstall warehouse packs. For information on uninstalling warehouse packs, see“Uninstalling warehouse packs” on page 199.
Notes:
1. When you uninstall Tivoli Enterprise Data Warehouse, all data contained inTivoli Enterprise Data Warehouse databases is lost! Perform database backupsof any databases that you might want to recover after running theuninstallation program. The Tivoli Enterprise Data Warehouse databases shouldonly be used with Tivoli Enterprise Data Warehouse applications.
2. After uninstalling Tivoli Enterprise Data Warehouse, ensure all databases aredropped and nodes are uncataloged. View the log information provided by theuninstallation program to make sure the uninstallation completed successfully.Information for these activities is provided in “Problems with uninstallingTivoli Enterprise Data Warehouse” on page 289.
Considerations for a distributed deploymentThe type of installation you have, single system or distributed, determines howyou uninstall. If you are uninstalling a distributed installation, the following listprovides necessary information:v You must supply DB2 user ID and password information for each DB2 server in
your installation.v When running the uninstallation program in a distributed installation, you must
uninstall the control server last. If the control server is not uninstalled last, youmight not be able to completely uninstall the remaining Tivoli Enterprise DataWarehouse components.
v The uninstallation program attempts to drop all the databases in theconfiguration, including remote databases. If a database is locked or in use, theuninstallation program is unable to drop it and the uninstallation program logsan error in the twh_ibm_db2_runlog.log. View this file to determine the namesof any central data warehouse or data mart databases that could not be dropped.
v To ensure that no databases are locked or are in use on a remote central datawarehouse or data mart component, do the following on the central datawarehouse server and data mart server before uninstalling the control server:1. Log on as a DB2 administrator.2. Enter the following commands at the DB2 command prompt:
DB2stop forceDB2start
Uninstalling on WindowsTo uninstall the Tivoli Enterprise Data Warehouse core application on the WindowsNT or Windows 2000 operating systems, complete the following steps:1. Stop the following services using the Services window.
Chapter 12. Removing Tivoli Enterprise Data Warehouse from your enterprise 207
v Web Services for the IBM Consolev Server for IBM Consolev Tivoli Presentation Services HTTP Serverv Tivoli Presentation Services HTTP Administration
To stop these services, perform the following steps:a. To open the Services window:
v If you are using a machine running Windows NT, do the following:1) From the Windows taskbar, click Start → Settings → Control Panel.2) Double-click Services.
v If you are using a machine running Windows 2000, do the following:1) From the Windows taskbar, click Start → Settings → Control Panel.2) Select Administrative Tools.3) Double-click Services.
b. Select the name of the service and select Stop.2. For a distributed installation, disconnect all database applications using the
following commands:db2stop force
This command terminates all connections to the databases in order for them tobe dropped.db2start
3. Run the uninstallation program as follows:If you are using a machine running Windows NT, perform the following steps:a. From the Windows taskbar, click Start → Settings→Control Panel.b. Double-click Add/Remove Programs.c. Click Tivoli Enterprise Data Warehouse and click Remove.
If you are using a machine running Windows 2000, perform the followingsteps:a. From the Windows taskbar, click Start → Settings → Control Panel.b. Click Administrative Tools → Add/Remove Programs.c. Select Tivoli Enterprise Data Warehouse and then click Remove.
You can also run the following batch file manually on either Windowsoperating system:%TWH_TOPDIR%\uninstall\uninstall.exe
4. At a convenient time after you uninstall, restart the systems on which theuninstallation program was run in order to clean up environment variables thatwere removed from your environment.
Uninstalling on UNIXRun the Tivoli Enterprise Data Warehouse uninstallation program as follows:$TWH_TOPDIR/uninstall/uninstall.bin
At a convenient time after you uninstall, restart the system on which theuninstallation program was run in order to clean up environment variables thatwere removed from your environment.
208 Installing and Configuring Tivoli Enterprise Data Warehouse
Using DB2 Warehouse Manager after uninstalling TivoliEnterprise Data Warehouse
Specifying an alternate control database for the DB2 WarehouseManagerAfter the uninstallation, if you want to use the DB2 Warehouse Manager outside ofTivoli Enterprise Data Warehouse, you must use the DB2 Data Warehouse Centerto specify a new metadata database as the control database. The control database isset in the DB2 Data Warehouse Center, the DB2 Warehouse Center DatabaseManager, and for ODBC sources.
Specifying the alternate metadata database when logging on to the DB2 DataWarehouse Center: If you are using a machine running Windows NT, perform thefollowing steps:1. From the Windows taskbar, click Start → Settings → Control Panel.2. Double-click ODBC Data Sources.3. Click the System DSN tab.4. In the Advanced window, set Control database to the new metadata database.
If you are using a machine running Windows 2000, perform the following steps:1. From the Windows taskbar, click Start → Settings → Control Panel.2. Select Administrative Tools→ Data Sources (ODBC).3. Click the System DSN tab.4. In the Advanced window, set Control database to the new metadata database.
Specifying the alternate metadata database in the DB2 Warehouse ControlDatabase Manager:
1. Open the Data Warehouse Center - Control Database Management window byselecting Start → Programs → IBM DB2 → Warehouse Control DatabaseManagement.
2. Enter the new metadata database for New control database.3. Enter the DB2 User ID and Password and click OK.4. When the Processing has completed message appears, click Cancel.
Specifying the alternate metadata database for ODBC sources:
1. From the Windows taskbar, click Start → Settings → Control Panel.2. If you are on a machine running Windows 2000, select Administrative Tools
from the Control Panel window.3. Double-click Data Sources (ODBC).4. Click the System DSN tab and click Add.5. In the Create New Data Source window, select IBM DB2 ODBC Driver from
the list and click Finish.6. In the ODBC IBM DB2 Driver — Add window, enter the new metadata
database for the Data source name, the new metadata database alias for theDatabase alias, and a description of the new metadata database forDescription. Click OK.
7. In the ODBC Data Source Administrator window, select the new metadatadatabase and click Configure.
8. In the DB2 Message window, click Yes.
Chapter 12. Removing Tivoli Enterprise Data Warehouse from your enterprise 209
9. In the Connect To DB2 Database window, enter the DB2 logon informationand click OK. If you receive an error, view the error message text todetermine if the user ID and password information entered is correct.
10. In the CLI/ODBC Settings - DB2 window, click Cancel.11. Click OK. Your set up and connection are complete.
Uninstalling Tivoli Presentation ServicesTivoli Enterprise Data Warehouse does not automatically uninstall TivoliPresentation Services because it might be in use by other Tivoli software. If you donot have any other software that uses the IBM Console, uninstall TivoliPresentation Services as described below.
Uninstalling Tivoli Presentation Services deletes files that are in the directorywhere Tivoli Presentation Services is installed. This includes language pack filesand files installed by other applications, such as jar files, that run with TivoliPresentation Services. If you want to save any of these files, copy them to adifferent directory prior to uninstalling. See Chapter 16, “Administering TivoliEnterprise Data Warehouse”, on page 253 for backup recommendations.
Uninstalling on Windows systemsIf any Tivoli Enterprise Data Warehouse components exist on the machine withTivoli Presentation Services, uninstall the Tivoli Enterprise Data Warehousecomponents before uninstalling Tivoli Presentation Services.
To uninstall Tivoli Presentation Services on Windows systems, do one of thefollowing:v From the Windows taskbar, click Start Programs → Tivoli Presentation
Services → Uninstaller and follow the instructions in the wizard.v Run the following batch file, where installation_directory is the directory
where Tivoli Presentation Services is installed:installation_directory\uninstall.bat
Follow the instructions in the wizard.
When the Tivoli Presentation Services uninstallation has completed, manuallyclean up the Tivoli Presentation Services installation directory or delete the TivoliPresentation Services installation folder. Restart the machine.
Uninstalling on UNIX-based systemsIf any Tivoli Enterprise Data Warehouse components exist on the machine withTivoli Presentation Services, uninstall the Tivoli Enterprise Data Warehousecomponents before uninstalling Tivoli Presentation Services.
To uninstall Tivoli Presentation Services on UNIX-based systems, follow thesesteps:1. Run the following script, where installation_directory is the directory where
Tivoli Presentation Services is installed:installation_directory/_uninst/uninstall.sh
2. Follow the instructions in the wizard.3. When the Tivoli Presentation Services uninstallation has completed, manually
clean up the Tivoli Presentation Services installation directory or delete theTivoli Presentation Services installation folder. Restart the machine.
210 Installing and Configuring Tivoli Enterprise Data Warehouse
Uninstalling DB2 Universal Database Enterprise EditionTivoli Enterprise Data Warehouse does not automatically uninstall DB2 UniversalDatabase Enterprise Edition because it might be in use by other software. If you donot have other applications using this DB2 installation, uninstall it using thestandard DB2 uninstallation program. Refer to the instructions in the IBM DB2library for complete information.
Removing data from the central data warehouseThe data in the central data warehouse database is not tied to a specificapplication. It is a historical record of activity and conditions in your enterprise.Although it might have been placed in the central data warehouse database by oneapplication, it can be read by other applications, including those you writeyourself. Therefore, Tivoli Enterprise Data Warehouse does not automatically deletedata from the central data warehouse database, aside from the data pruningmechanisms. For more information about pruning, see “Deleting old data from thedata mart database” on page 270.
If you are sure you want to delete specific data from the central data warehousedatabase, use DB2 commands to find and delete that data. For more informationabout this, see the DB2 product library. The DB2 library is described in “Relatedpublications” on page xiii.
Chapter 12. Removing Tivoli Enterprise Data Warehouse from your enterprise 211

212 Installing and Configuring Tivoli Enterprise Data Warehouse
Part 3. Installation scenarios
Chapter 13. Using a DB2 default warehouseagent . . . . . . . . . . . . . . . . 215Completing the configuration checklists . . . . 216Installing and configuring DB2 on tdwcdwdm . . 219Creating the control server on tdwserver . . . . 219Installing the data mart component on tdwcdwdm 221Creating the report server on tdwrep . . . . . 221Backing up the new installation . . . . . . . 223Installing the warehouse pack on the control serverand report server . . . . . . . . . . . . 223Configuring the control server for the warehousepack . . . . . . . . . . . . . . . . 224
Setting up RDBMS client software and ODBCdata sources . . . . . . . . . . . . . 224Configuring the warehouse pack sources andtargets. . . . . . . . . . . . . . . 225Configuring and scheduling ETL steps to run onthe central data warehouse and data mart server 225
Chapter 14. Using DB2 remote warehouseagents . . . . . . . . . . . . . . . 227Distributed installation scenario with a DB2 remotewarehouse agent . . . . . . . . . . . . 227
Completing the installation checklists . . . . 229Preparing for the central data warehouse anddata mart server on tdwcdwdm . . . . . . 231
Installing DB2 Universal Database EnterpriseEdition . . . . . . . . . . . . . 232Installing DB2 Warehouse Manager . . . . 232
Creating the control server on tdwserver . . . 233Installing DB2 Universal Database EnterpriseEdition . . . . . . . . . . . . . 233Installing the control server component. . . 233
Creating the central data warehouse and datamart server on tdwcdwdm . . . . . . . . 234
Installing the central data warehouse anddata mart components . . . . . . . . 234Configuring the DB2 remote warehouseagent on AIX . . . . . . . . . . . 234
Creating the report server on tdwrep . . . . 236Installing DB2 Universal Database EnterpriseEdition . . . . . . . . . . . . . 236Installing the report interface component . . 236
Backing up the new installation . . . . . . 237Installing the warehouse pack on the controlserver and report server . . . . . . . . . 237Copying the warehouse pack files to the centraldata warehouse and data mart server ontdwcdwdm . . . . . . . . . . . . . 238Configuring the DB2 remote warehouse agenton the central data warehouse and data martserver on tdwcdwdm. . . . . . . . . . 239
Setting up RDBMS client software and ODBCdata sources . . . . . . . . . . . . 239Configuring the DB2 remote warehouseagent for the the source database . . . . . 241
Completing the control server configuration ontdwserver . . . . . . . . . . . . . 241
Configure the control database . . . . . 242Define the DB2 remote warehouse agent . . 242Configure warehouse sources and targets . . 242Configuring and scheduling ETL steps to runon the central data warehouse and data martserver . . . . . . . . . . . . . . 243
If you have trouble using DB2 remote warehouseagents . . . . . . . . . . . . . . . . 244
© Copyright IBM Corp. 2001, 2003 213

214 Installing and Configuring Tivoli Enterprise Data Warehouse
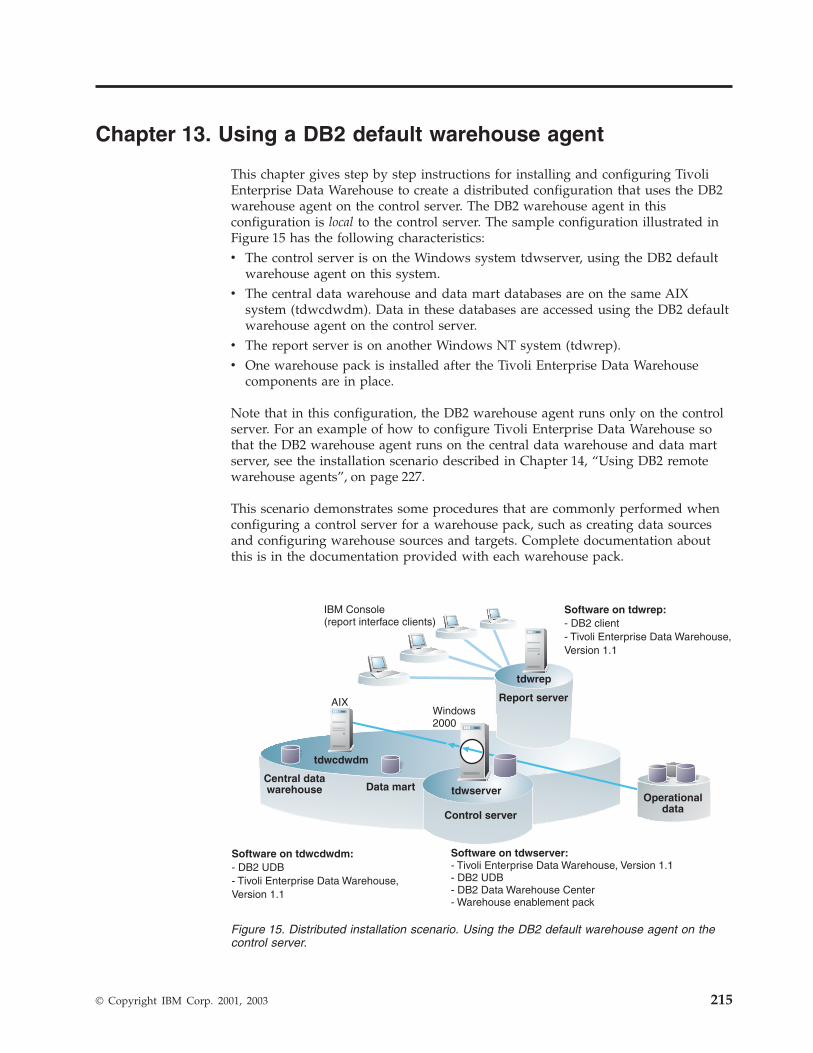
Chapter 13. Using a DB2 default warehouse agent
This chapter gives step by step instructions for installing and configuring TivoliEnterprise Data Warehouse to create a distributed configuration that uses the DB2warehouse agent on the control server. The DB2 warehouse agent in thisconfiguration is local to the control server. The sample configuration illustrated inFigure 15 has the following characteristics:v The control server is on the Windows system tdwserver, using the DB2 default
warehouse agent on this system.v The central data warehouse and data mart databases are on the same AIX
system (tdwcdwdm). Data in these databases are accessed using the DB2 defaultwarehouse agent on the control server.
v The report server is on another Windows NT system (tdwrep).v One warehouse pack is installed after the Tivoli Enterprise Data Warehouse
components are in place.
Note that in this configuration, the DB2 warehouse agent runs only on the controlserver. For an example of how to configure Tivoli Enterprise Data Warehouse sothat the DB2 warehouse agent runs on the central data warehouse and data martserver, see the installation scenario described in Chapter 14, “Using DB2 remotewarehouse agents”, on page 227.
This scenario demonstrates some procedures that are commonly performed whenconfiguring a control server for a warehouse pack, such as creating data sourcesand configuring warehouse sources and targets. Complete documentation aboutthis is in the documentation provided with each warehouse pack.
Data martCentral datawarehouse
Software on tdwcdwdm:- DB2 UDB- Tivoli Enterprise Data Warehouse,Version 1.1
Software on tdwrep:- DB2 client- Tivoli Enterprise Data Warehouse,Version 1.1
Software on tdwserver:- Tivoli Enterprise Data Warehouse, Version 1.1- DB2 UDB- DB2 Data Warehouse Center- Warehouse enablement pack
Control server
Windows2000
AIX
tdwcdwdm
tdwserverOperational
data
IBM Console(report interface clients)
Report server
tdwrep
Figure 15. Distributed installation scenario. Using the DB2 default warehouse agent on thecontrol server.
© Copyright IBM Corp. 2001, 2003 215
In the configuration shown in Figure 15 on page 215, the DB2 default warehouseagent runs on the control server (tdwserver). To configure Tivoli Enterprise DataWarehouse so that the DB2 warehouse agent runs on the AIX system with thecentral data warehouse and data mart databases, see Chapter 14, “Using DB2remote warehouse agents”, on page 227.
This is an overview of the tasks in setting up the configuration shown in Figure 15on page 215:1. Complete the installation checklists.2. On the system that is to be the central data warehouse and data mart server
(tdwcdwdm), install and configure IBM DB2 Enterprise Edition.3. On the system that is to be the control server (tdwserver):
a. Install and configure IBM DB2 Enterprise Edition.b. Install the control server component.
4. On the data mart server (tdwcdwdm):a. Install the data mart component. Running the installation program for the
data mart component installs the rollup program needed on this computer.5. On the computer that is to be the report server (tdwrep):
a. Install a DB2 client.b. Install the report interface component.
6. Back up the newly created Tivoli Enterprise Data Warehouse installation.7. On the control server and report server, install the warehouse pack.8. On the control server, configure the warehouse pack by performing these steps:
a. Install and configure RDBMS client software and ODBC data sources.b. Configure the warehouse sources and targets.c. Back up the control server.
The following sections walk you through these tasks.
Completing the configuration checklistsTable 34. Information for all installations. Values filled in for the DB2 default warehouse agent scenario.
Information needed Value for this scenario
Do you want a single system or a distributed installation? Distributed
Do you want to install from CDs or from CD images copied onto localor network space?
From CD
Do you want the report interface to provide support for languages otherthan English?
No
Is a Web server already installed on the report interface server(distributed) or the single system? For example, Apache or MicrosoftIIS.
No
Can each system provide fully qualified host names? Yes
Do you want your users to be able to use secure socket layer (SSL)connections?
No
Does each system have the required hardware and softwareprerequisites, include patch levels?
Yes
Did you check the Web site for the most current information aboutprerequisites and required service?
Yes
Does each system have sufficient temporary space for the installation? Yes
216 Installing and Configuring Tivoli Enterprise Data Warehouse
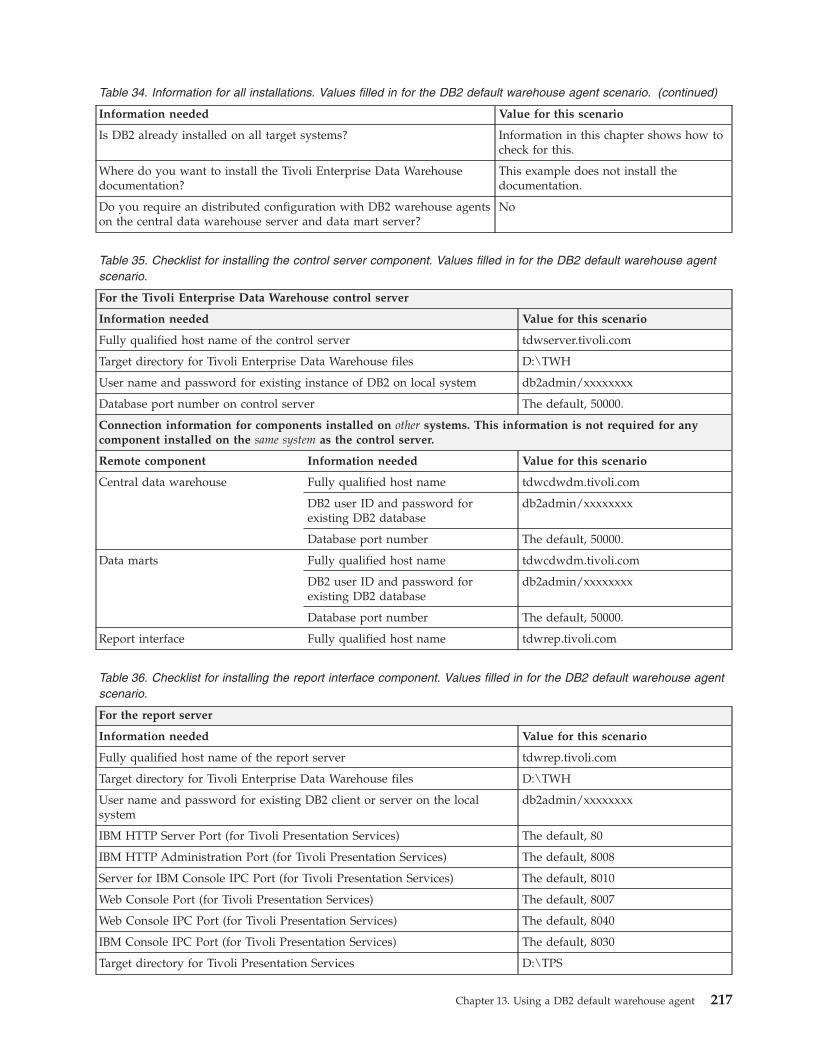
Table 34. Information for all installations. Values filled in for the DB2 default warehouse agent scenario. (continued)
Information needed Value for this scenario
Is DB2 already installed on all target systems? Information in this chapter shows how tocheck for this.
Where do you want to install the Tivoli Enterprise Data Warehousedocumentation?
This example does not install thedocumentation.
Do you require an distributed configuration with DB2 warehouse agentson the central data warehouse server and data mart server?
No
Table 35. Checklist for installing the control server component. Values filled in for the DB2 default warehouse agentscenario.
For the Tivoli Enterprise Data Warehouse control server
Information needed Value for this scenario
Fully qualified host name of the control server tdwserver.tivoli.com
Target directory for Tivoli Enterprise Data Warehouse files D:\TWH
User name and password for existing instance of DB2 on local system db2admin/xxxxxxxx
Database port number on control server The default, 50000.
Connection information for components installed on other systems. This information is not required for anycomponent installed on the same system as the control server.
Remote component Information needed Value for this scenario
Central data warehouse Fully qualified host name tdwcdwdm.tivoli.com
DB2 user ID and password forexisting DB2 database
db2admin/xxxxxxxx
Database port number The default, 50000.
Data marts Fully qualified host name tdwcdwdm.tivoli.com
DB2 user ID and password forexisting DB2 database
db2admin/xxxxxxxx
Database port number The default, 50000.
Report interface Fully qualified host name tdwrep.tivoli.com
Table 36. Checklist for installing the report interface component. Values filled in for the DB2 default warehouse agentscenario.
For the report server
Information needed Value for this scenario
Fully qualified host name of the report server tdwrep.tivoli.com
Target directory for Tivoli Enterprise Data Warehouse files D:\TWH
User name and password for existing DB2 client or server on the localsystem
db2admin/xxxxxxxx
IBM HTTP Server Port (for Tivoli Presentation Services) The default, 80
IBM HTTP Administration Port (for Tivoli Presentation Services) The default, 8008
Server for IBM Console IPC Port (for Tivoli Presentation Services) The default, 8010
Web Console Port (for Tivoli Presentation Services) The default, 8007
Web Console IPC Port (for Tivoli Presentation Services) The default, 8040
IBM Console IPC Port (for Tivoli Presentation Services) The default, 8030
Target directory for Tivoli Presentation Services D:\TPS
Chapter 13. Using a DB2 default warehouse agent 217
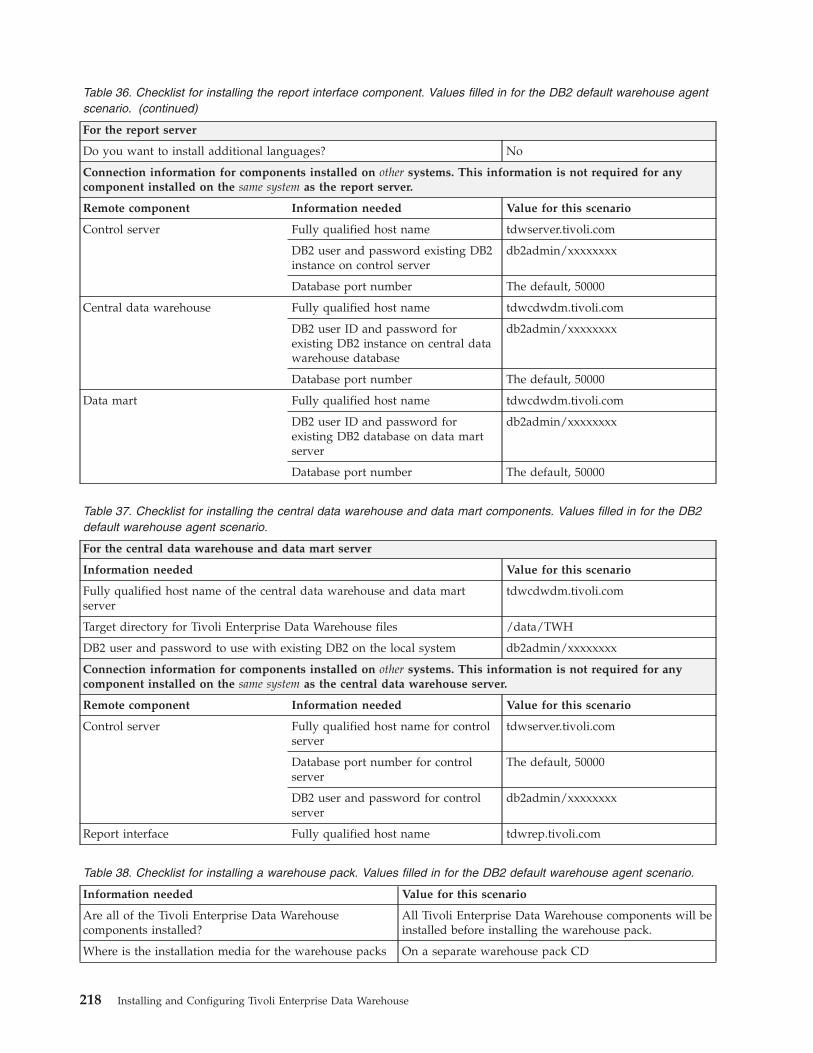
Table 36. Checklist for installing the report interface component. Values filled in for the DB2 default warehouse agentscenario. (continued)
For the report server
Do you want to install additional languages? No
Connection information for components installed on other systems. This information is not required for anycomponent installed on the same system as the report server.
Remote component Information needed Value for this scenario
Control server Fully qualified host name tdwserver.tivoli.com
DB2 user and password existing DB2instance on control server
db2admin/xxxxxxxx
Database port number The default, 50000
Central data warehouse Fully qualified host name tdwcdwdm.tivoli.com
DB2 user ID and password forexisting DB2 instance on central datawarehouse database
db2admin/xxxxxxxx
Database port number The default, 50000
Data mart Fully qualified host name tdwcdwdm.tivoli.com
DB2 user ID and password forexisting DB2 database on data martserver
db2admin/xxxxxxxx
Database port number The default, 50000
Table 37. Checklist for installing the central data warehouse and data mart components. Values filled in for the DB2default warehouse agent scenario.
For the central data warehouse and data mart server
Information needed Value for this scenario
Fully qualified host name of the central data warehouse and data martserver
tdwcdwdm.tivoli.com
Target directory for Tivoli Enterprise Data Warehouse files /data/TWH
DB2 user and password to use with existing DB2 on the local system db2admin/xxxxxxxx
Connection information for components installed on other systems. This information is not required for anycomponent installed on the same system as the central data warehouse server.
Remote component Information needed Value for this scenario
Control server Fully qualified host name for controlserver
tdwserver.tivoli.com
Database port number for controlserver
The default, 50000
DB2 user and password for controlserver
db2admin/xxxxxxxx
Report interface Fully qualified host name tdwrep.tivoli.com
Table 38. Checklist for installing a warehouse pack. Values filled in for the DB2 default warehouse agent scenario.
Information needed Value for this scenario
Are all of the Tivoli Enterprise Data Warehousecomponents installed?
All Tivoli Enterprise Data Warehouse components will beinstalled before installing the warehouse pack.
Where is the installation media for the warehouse packs On a separate warehouse pack CD
218 Installing and Configuring Tivoli Enterprise Data Warehouse
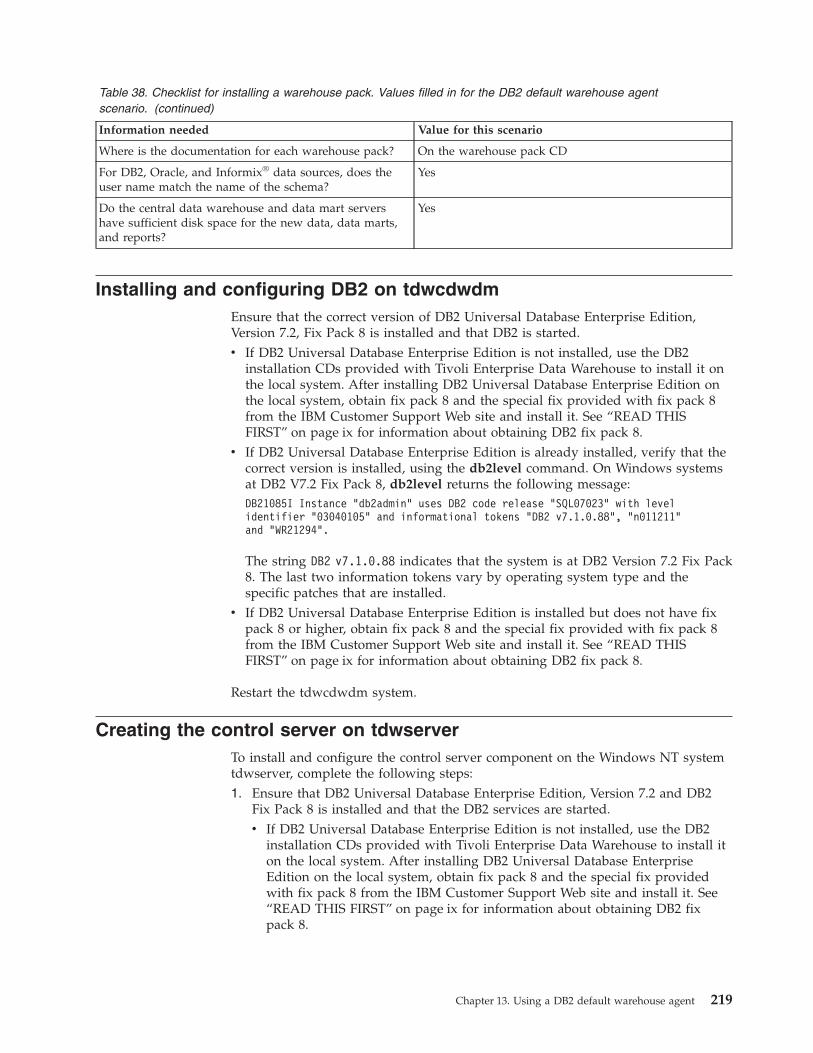
Table 38. Checklist for installing a warehouse pack. Values filled in for the DB2 default warehouse agentscenario. (continued)
Information needed Value for this scenario
Where is the documentation for each warehouse pack? On the warehouse pack CD
For DB2, Oracle, and Informix® data sources, does theuser name match the name of the schema?
Yes
Do the central data warehouse and data mart servershave sufficient disk space for the new data, data marts,and reports?
Yes
Installing and configuring DB2 on tdwcdwdmEnsure that the correct version of DB2 Universal Database Enterprise Edition,Version 7.2, Fix Pack 8 is installed and that DB2 is started.v If DB2 Universal Database Enterprise Edition is not installed, use the DB2
installation CDs provided with Tivoli Enterprise Data Warehouse to install it onthe local system. After installing DB2 Universal Database Enterprise Edition onthe local system, obtain fix pack 8 and the special fix provided with fix pack 8from the IBM Customer Support Web site and install it. See “READ THISFIRST” on page ix for information about obtaining DB2 fix pack 8.
v If DB2 Universal Database Enterprise Edition is already installed, verify that thecorrect version is installed, using the db2level command. On Windows systemsat DB2 V7.2 Fix Pack 8, db2level returns the following message:DB21085I Instance "db2admin" uses DB2 code release "SQL07023" with levelidentifier "03040105" and informational tokens "DB2 v7.1.0.88", "n011211"and "WR21294".
The string DB2 v7.1.0.88 indicates that the system is at DB2 Version 7.2 Fix Pack8. The last two information tokens vary by operating system type and thespecific patches that are installed.
v If DB2 Universal Database Enterprise Edition is installed but does not have fixpack 8 or higher, obtain fix pack 8 and the special fix provided with fix pack 8from the IBM Customer Support Web site and install it. See “READ THISFIRST” on page ix for information about obtaining DB2 fix pack 8.
Restart the tdwcdwdm system.
Creating the control server on tdwserverTo install and configure the control server component on the Windows NT systemtdwserver, complete the following steps:1. Ensure that DB2 Universal Database Enterprise Edition, Version 7.2 and DB2
Fix Pack 8 is installed and that the DB2 services are started.v If DB2 Universal Database Enterprise Edition is not installed, use the DB2
installation CDs provided with Tivoli Enterprise Data Warehouse to install iton the local system. After installing DB2 Universal Database EnterpriseEdition on the local system, obtain fix pack 8 and the special fix providedwith fix pack 8 from the IBM Customer Support Web site and install it. See“READ THIS FIRST” on page ix for information about obtaining DB2 fixpack 8.
Chapter 13. Using a DB2 default warehouse agent 219
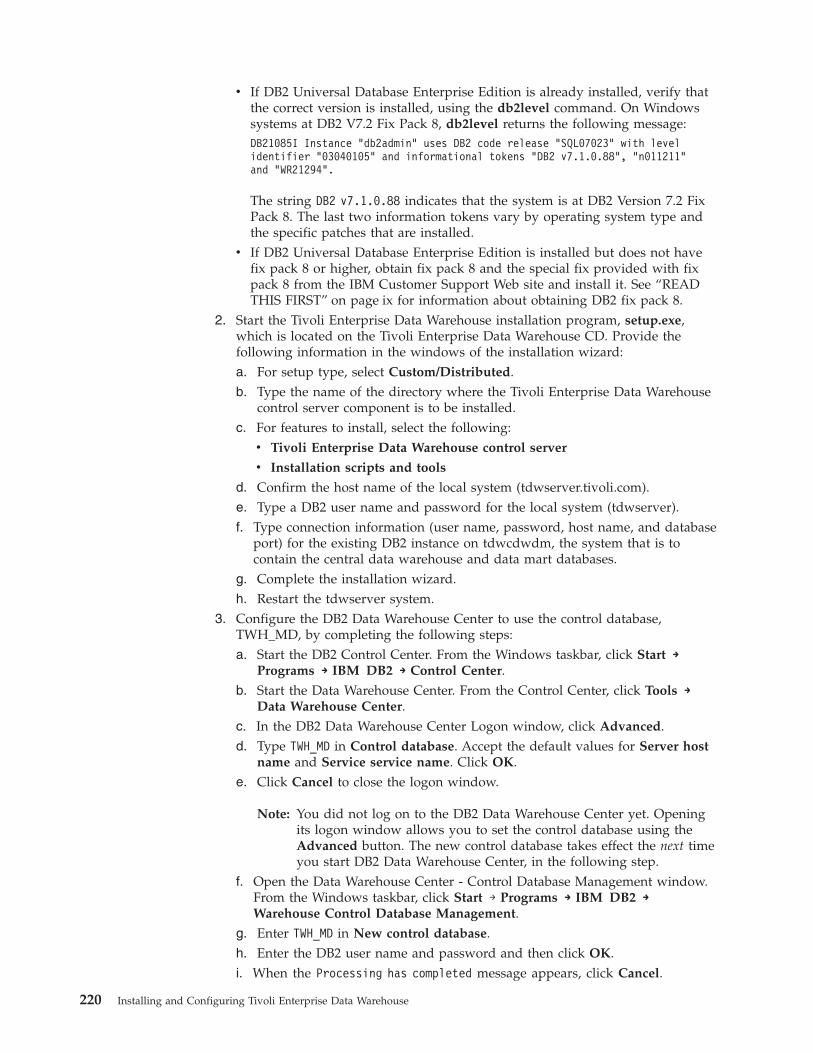
v If DB2 Universal Database Enterprise Edition is already installed, verify thatthe correct version is installed, using the db2level command. On Windowssystems at DB2 V7.2 Fix Pack 8, db2level returns the following message:DB21085I Instance "db2admin" uses DB2 code release "SQL07023" with levelidentifier "03040105" and informational tokens "DB2 v7.1.0.88", "n011211"and "WR21294".
The string DB2 v7.1.0.88 indicates that the system is at DB2 Version 7.2 FixPack 8. The last two information tokens vary by operating system type andthe specific patches that are installed.
v If DB2 Universal Database Enterprise Edition is installed but does not havefix pack 8 or higher, obtain fix pack 8 and the special fix provided with fixpack 8 from the IBM Customer Support Web site and install it. See “READTHIS FIRST” on page ix for information about obtaining DB2 fix pack 8.
2. Start the Tivoli Enterprise Data Warehouse installation program, setup.exe,which is located on the Tivoli Enterprise Data Warehouse CD. Provide thefollowing information in the windows of the installation wizard:a. For setup type, select Custom/Distributed.b. Type the name of the directory where the Tivoli Enterprise Data Warehouse
control server component is to be installed.c. For features to install, select the following:
v Tivoli Enterprise Data Warehouse control server
v Installation scripts and tools
d. Confirm the host name of the local system (tdwserver.tivoli.com).e. Type a DB2 user name and password for the local system (tdwserver).f. Type connection information (user name, password, host name, and database
port) for the existing DB2 instance on tdwcdwdm, the system that is tocontain the central data warehouse and data mart databases.
g. Complete the installation wizard.h. Restart the tdwserver system.
3. Configure the DB2 Data Warehouse Center to use the control database,TWH_MD, by completing the following steps:a. Start the DB2 Control Center. From the Windows taskbar, click Start →
Programs → IBM DB2 → Control Center.b. Start the Data Warehouse Center. From the Control Center, click Tools →
Data Warehouse Center.c. In the DB2 Data Warehouse Center Logon window, click Advanced.d. Type TWH_MD in Control database. Accept the default values for Server host
name and Service service name. Click OK.e. Click Cancel to close the logon window.
Note: You did not log on to the DB2 Data Warehouse Center yet. Openingits logon window allows you to set the control database using theAdvanced button. The new control database takes effect the next timeyou start DB2 Data Warehouse Center, in the following step.
f. Open the Data Warehouse Center - Control Database Management window.From the Windows taskbar, click Start → Programs → IBM DB2 →Warehouse Control Database Management.
g. Enter TWH_MD in New control database.h. Enter the DB2 user name and password and then click OK.i. When the Processing has completed message appears, click Cancel.
220 Installing and Configuring Tivoli Enterprise Data Warehouse
Installing the data mart component on tdwcdwdmFor the distributed configuration in which the DB2 default warehouse agent runson the control server, you do not install the central data warehouse and data martcomponents on the system with the control server. The central data warehousedatabase and all necessary information for the central data warehouse componentis created during the Tivoli Enterprise Data Warehouse installation of the controlserver. However, the installation program is run on the computer that will host thedata mart component in order to install necessary programs such as the rollupprogram.
To install the Tivoli Enterprise Data Warehouse data mart component, start theTivoli Enterprise Data Warehouse installation program on the remote computer(tdwcdwdm), setup_unix.sh. The installation program is located on the TivoliEnterprise Data Warehouse CD.
It is required to run the installation program on the machine that is going to hostthe data mart component. The actual central data warehouse and data martdatabases were created during the installation of the control server.
Provide the following information in the windows of the installation wizard:1. For setup type, select Custom/Distributed. After selecting Custom/Distributed,
you must wait for the screen to be refreshed if you are on an AIX or Linuxmachine. If you attempt to enter information for the panel following yourselection of the type of installation, your selections will not be accepted unlessyou submit them once the screen is refreshed.
2. Type the name of the directory where the Tivoli Enterprise Data Warehousedata mart component is to be installed.
3. For features to install, select the following:v Data mart
4. Confirm the host name of the local system (tdwcdwdm.tivoli.com).5. Type the DB2 user name and password for the local system.6. Type connection information (user name, password, host name, and database
port) for the existing DB2 instance on tdwcdwdm, the system that contains thecentral data warehouse and data mart databases.
Note: The central data warehouse and data mart databases were created andconfigured in the DB2 instance on tdwcdwdm during the installation ofthe control server.
7. Complete the installation wizard.8. Restart the tdwcdwdm system.
Creating the report server on tdwrepTo install the report server component, complete the following steps on tdwrep:1. Ensure that a DB2 client or DB2 Server is installed at V7.2, Fix Pack 8.
v If DB2 Universal Database Enterprise Edition is not installed, use the DB2installation CDs provided with Tivoli Enterprise Data Warehouse to install iton the local system. For the Tivoli Enterprise Data Warehouse report server,you can install DB2 Server or you can select any of the following clients inthe DB2 installation wizard:– DB2 Enterprise Edition– DB2 Application Development Client
Chapter 13. Using a DB2 default warehouse agent 221
– DB2 Administration Client (this is the smallest)
After installing DB2 Universal Database Enterprise Edition on the localsystem, obtain fix pack 8 from the IBM Customer Support Web site andinstall it. See “READ THIS FIRST” on page ix for information about obtainingDB2 fix pack 8.
v If DB2 Universal Database Enterprise Edition is already installed, verify thatthe correct version is installed, using the db2level command. On Windowssystems at DB2 V7.2, Fix Pack 8, db2level returns the following message:DB21085I Instance "db2admin" uses DB2 code release "SQL07023" with levelidentifier "03040105" and informational tokens "DB2 v7.1.0.88", "n011211"and "WR21294".
The string DB2 v7.1.0.88 indicates that the system is at DB2 V7.2 Fix Pack 8.The last two information tokens vary by operating system type and thespecific patches that are installed.
v If DB2 Universal Database Enterprise Edition is installed but does not haveDB2 Fix Pack 8 or higher, obtain DB2 Fix Pack 8 and the special fix providedwith DB2 Fix Pack 8 from the IBM Customer Support Web site and installthem. See “READ THIS FIRST” on page ix for information about obtainingDB2 Fix Pack 8 and the special fix provided with DB2 Fix Pack 8.
2. Run the Tivoli Enterprise Data Warehouse installation program, located on theTivoli Enterprise Data Warehouse CD. Provide the following information in thewindows of the installation wizard:a. For setup type, select Custom/Distributed. After selecting
Custom/Distributed, you must wait for the screen to be refreshed if you areon an AIX or Linux machine. If you attempt to enter information for thepanel following your selection of the type of installation, your selectionswill not be accepted unless you submit them once the screen is refreshed.
b. Type the name of the directory where the Tivoli Enterprise Data Warehousereport interface component is to be installed.
c. For features to install, select the following:v Report interface
v Installation scripts and tools
d. Confirm the host name of the local system (tdwrep).e. Type a DB2 user name and password for the local system (tdwrep).f. Specify the port number information for Tivoli Presentation Services.g. Specify the directory where Tivoli Presentation Services is to be installed.h. Select additional languages if required.i. Type connection information (user name, password, host name, and database
port) for the DB2 instance on the control server, tdwserver. This wasinstalled in “Creating the control server on tdwserver” on page 219.
j. Type connection information (user, password, host name, and port) for theDB2 instance on the tdwcdwdm system that already contains the centraldata warehouse database (TWH_CDW). It was created when the controlserver was installed in “Creating the control server on tdwserver” onpage 219.
k. Type connection information (user name, password, host name, anddatabase port) for the DB2 instance on the tdwcdwdm system that alreadycontains the data mart database (TWH_MART).
l. Complete the installation wizard.
222 Installing and Configuring Tivoli Enterprise Data Warehouse
3. When the installation wizard finishes you are prompted to reboot the computer.The wizard has finished but the IBM Console still needs to finish building itshelp set. Wait for the help set to finish building. This process may take up to 15minutes. Restart the tdwrep system.
Backing up the new installationBack up the newly-created Tivoli Enterprise Data Warehouse installation so thatyou can return to a usable state if you have trouble installing a warehouse pack.You must back up the following items:v The directory and all subdirectories in which you installed Tivoli Enterprise Data
Warehouse files, represented by the TWH_TOPDIR environment variablev The directory in which you installed Tivoli Presentation Servicesv The Tivoli Enterprise Data Warehouse databases:
TWH_MD: the control database on the control server, tdwserverTWH_CDW: the central data warehouse database on tdwcdwdmTWH_MART: the data mart database on tdwcdwdm
v The vpd.properties file
For more information about backing up and restoring Tivoli Enterprise DataWarehouse, see “Backing up and restoring a Tivoli Enterprise Data Warehousedeployment” on page 257.
Installing the warehouse pack on the control server and report serverTo install the warehouse pack, perform the following steps on the control serverand then repeat them on the report server:1. Run the Tivoli Enterprise Data Warehouse installation program setup.exe,
located on the Tivoli Enterprise Data Warehouse CD. Provide the followinginformation in the windows of the installation wizard:a. For setup type, choose Custom/Distributed. After selecting
Custom/Distributed, you must wait for the screen to be refreshed if you areon an AIX or Linux machine. If you attempt to enter information for thepanel following your selection of the type of installation, your selectionswill not be accepted unless you submit them once the screen is refreshed.
b. For features to install, select Application ETL and report packages.c. Confirm the host name of the local system.d. Type the DB2 user name and password for the local system.e. Type connection information (user name, password, host name, and
database port) for the existing DB2 instance on the tdwcdwdm, the systemthat is to contain the central data warehouse and data mart databases.
f. Specify the directory that contains the installation media for the warehousepack you want to install.
g. Complete the installation wizard.h. Restart the system.
Chapter 13. Using a DB2 default warehouse agent 223
Configuring the control server for the warehouse packBefore you can use a warehouse pack, you must configure it as specified by itsdocumentation. Typically, a warehouse pack requires you to install and configureRDBMS client software and to establish ODBC data sources to connect to sourcedata. Additional tasks might be required. The following sections describe thesestandard tasks.
Setting up RDBMS client software and ODBC data sourcesTo install and configure RDBMS client software and to establish ODBC datasources to connect to source data, complete the following steps on the controlserver:1. Read the warehouse pack documentation to determine the configuration
information you need to set, such as:v The name of the ODBC data sources to connect to operational datav The name of the ODBC driver for each data source
2. Install the RDBMS client software needed to connect to the operational datastores collected by the application. This operational data is your data source.v If the source databases are DB2 Version 6 or Version 7, then the DB2 server
software that is already installed provides the necessary connections.v If the source databases are Oracle, Microsoft SQL Server, Sybase, or Informix
databases, then you must install the RDBMS client for that database vendor.If necessary, consult the documentation provided by the database vendor.
3. Configure the RDBMS client so that it can communicate with the data source.v For DB2 data sources, start the Client Configuration Assistant. From the
Windows taskbar, click Start → Programs → IBM DB2 →Client Configuration Assistant.For more details about this, see the IBM DB2 Universal Database for WindowsQuick Beginnings.
v For Oracle, Microsoft SQL Server, Sybase, or Informix data sources, see theIBM DB2 Universal Database Data Warehouse Center Administration Guide forinformation about setting up warehouse sources.If necessary, consult the documentation provided by the database vendor.
4. Verify the RDBMS client/server connection using the utilities provided by theRDBMS vendor. For example, the db2 command for DB2, sqlplus for Oracle,isql for Microsoft SQL Server or Sybase, and dbaccess for Informix.
5. Using the ODBC Data Source Administrator window (started from the ControlPanel), create an ODBC data source for each RDBMS client connection. Thewarehouse pack documentation specifies the name of the data sources youmust create and the ODBC driver to use for each.
6. Test a connection to the ODBC data source name. If this is not offered in theODBC Data Source Administrator window, use the execsql command asfollows:execsql dummy dummy.out ODBC_data_source_name user passwordcat dummy.out
If the name of the RDBMS vendor appears in the dummy.out file, then theconnection to the ODBC data source was successful.
224 Installing and Configuring Tivoli Enterprise Data Warehouse
Configuring the warehouse pack sources and targetsTo use a warehouse pack, you typically define sources and targets to make theODBC data sources created in “Setting up RDBMS client software and ODBC datasources” on page 224 available to the DB2 Data Warehouse Center. To do this,complete the following steps:1. Read the warehouse pack documentation to determine which sources and
targets to configure.2. Start the DB2 Control Center. From the Windows taskbar, click Start →
Programs → IBM DB2 → Control Center.3. Start the DB2 Data Warehouse Center. From the DB2 Control Center, click Tools
→ Data Warehouse Center.4. Supply logon information for the control database of the DB2 Data Warehouse
Center. This is the user ID and password that was specified when the controlserver was installed.If the Data Warehouse Center Launchpad is displayed, close it.The Data Warehouse Center window is displayed.
5. In the left pane of the Data Warehouse Center window, do the following foreach entry in Warehouse Source and Warehouse Target:a. Right-click the entry and click Properties. The name of each entry is an
ODBC data source you created in step 5 of “Setting up RDBMS clientsoftware and ODBC data sources” on page 224.
b. Select the Data Source tab in the Properties window.c. Specify the user name and password to connect to the ODBC data source.
Get this information from the person responsible for the source database.For example, if the warehouse pack is extracting data from an Informixdatabase, this is the user and password information used for that Informixdatabase.Accept the default value for host name of the system where the DB2warehouse agent should run. In this scenario, the value localhost indicatesthat the DB2 warehouse agent runs on the control server.
d. Select the Tables and Views tab or the Tables tab. Expand Tables byclicking the plus sign (+) next to Tables.This tests the connection to the operational data source.
e. If the Filter window displays correctly, click OK to close the window.If this step displays an error message, make sure the ODBC data sourcedefinition and the connection information in the Warehouse SourceProperties window are correct and then try again.
f. If a list of tables is displayed, then the DB2 warehouse agent is configuredcorrectly to access the ODBC data source.
6. If you encounter errors, exit from the DB2 Data Warehouse Center, stop theWarehouse logger and Warehouse server NT services, log on to the DB2 DataWarehouse Center again, and restart the procedure at step 5. If you still havetrouble, see the IBM DB2 Universal Database Data Warehouse CenterAdministration Guide and IBM DB2 Universal Database Troubleshooting Guide inthe DB2 library for more information.
Configuring and scheduling ETL steps to run on the centraldata warehouse and data mart server
To schedule ETL steps to run on the central data warehouse and data mart servertdwcdwdm:
Chapter 13. Using a DB2 default warehouse agent 225
1. In the warehouse pack implementation guide, determine the names of thesubject areas defined by the warehouse pack.
2. Start the DB2 Control Center. From the Windows taskbar, click Start →Programs → IBM DB2 → Control Center.
3. Start the Data Warehouse Center. From the Control Center, click Tools → DataWarehouse Center.
4. Type the user name and password to log on to the DB2 Data Warehouse Centerand click OK.
5. Expand Subject Areas in the DB2 Data Warehouse Center tree.6. For each subject area listed in the warehouse pack documentation, configure
the steps in each of its processes by performing the following instructions:a. Select the name of the process. The right side of the Data Warehouse Center
window displays a list of the steps in the process.b. Select all of the steps in the list.c. Ensure all the steps are in either Development or Test mode. Steps must be
in Development or Test mode to schedule them. If you need to change themode, right-click the selected list of steps and select Mode from the popupmenu.
7. Schedule the ETLs. See “Scheduling warehouse pack ETL processes” onpage 147 for details.
8. Put ETL steps in Production mode.
226 Installing and Configuring Tivoli Enterprise Data Warehouse
Chapter 14. Using DB2 remote warehouse agents
If you install the central data warehouse or data mart database on a system otherthan the control server, you might be able to improve the performance of yourwarehouse if you use the DB2 warehouse agent on the central data warehouse ordata mart servers. This is considered a distributed configuration using a DB2remote warehouse agent. These DB2 warehouse agents are considered remotebecause they are not located on the control server.
Creating this configuration requires the following tasks in addition to those youperform for the distributed configuration with the DB2 default warehouse agent:v Installing DB2 Warehouse Manager on the systems that become the central data
warehouse and data mart servers.v Installing the central data warehouse and data mart components of Tivoli
Enterprise Data Warehousev Configuring the warehouse agent daemon on the central data warehouse server
and data mart server.
Contrast this with the distributed configuration where a DB2 default warehouseagent runs on the control server, making it a local warehouse agent. In thedistributed configuration where a DB2 default warehouse agent runs on the controlserver, you do not install any Tivoli Enterprise Data Warehouse components on thecentral data warehouse server or configure the warehouse agent daemon.
This chapter provides additional checklists that are required for the distributedconfiguration using a DB2 remote warehouse agent, and gives step by stepinstructions for a sample installation. It also contains information about configuringa warehouse agent on Solaris systems and troubleshooting information specific tothe distributed configuration with a DB2 remote warehouse agent.
Distributed installation scenario with a DB2 remote warehouse agentThis chapter gives step by step instructions for installing and configuring TivoliEnterprise Data Warehouse to create a distributed configuration in which a DB2remote warehouse agent runs on the central data warehouse and data mart server.The sample configuration illustrated in Figure 16 on page 228 has the followingcharacteristics:v The control server is on the Windows system tdwserver.v The central data warehouse and data mart servers are on the same AIX system,
tdwcdwdm. Databases on these systems are accessed using the DB2 warehouseagent located on system tdwcdwdm.
v The report server is on another Microsoft Windows system, tdwrep.v One warehouse pack is installed after the Tivoli Enterprise Data Warehouse
components are in place
Note that in this configuration, the DB2 warehouse agent runs on the central datawarehouse and data mart server. For an example of how to configure TivoliEnterprise Data Warehouse so that the DB2 warehouse agent runs only on thecontrol server, see the installation scenario described in Chapter 13, “Using a DB2default warehouse agent”, on page 215.
© Copyright IBM Corp. 2001, 2003 227

The following is an overview of the steps in setting up this configuration. Stepsthat are required for the distributed configuration using a DB2 remote warehouseagent are marked with an asterisk (*).1. On the system that is to be the central data warehouse and data mart server
(tdwcdwdm):a. Install and configure DB2 Universal Database Enterprise Edition.b. Install DB2 Warehouse Manager.*
2. On the system that is to be the control server (tdwserver):a. Install and configure DB2 Universal Database Enterprise Edition.b. Install the control server component. The data mart database and central
data warehouse database are created on the remote machine during theinstallation of the control server.
3. On the system that is to be the central data warehouse and data mart server(tdwcdwdm):a. Install the central data warehouse and data mart server components.*
4. On the system that is to be the report server (tdwrep):a. Install and configure a DB2 client.b. Install the report interface.
5. Back up the newly created Tivoli Enterprise Data Warehouse installation.6. On the newly-installed control server (tdwserver) and report server (tdwrep),
install the warehouse pack.7. On the central data warehouse and data mart server (tdwcdwdm):
a. Copy warehouse pack files.*b. Configure the DB2 remote warehouse agent.*c. Set up RDBMS client software and ODBC data sources.*
Data martCentral datawarehouse
Software on tdwcdwdm:- Tivoli Enterprise Data Warehouse, Version 1.1- DB2 UDB- DB2 Warehouse Manager
Software on tdwrep:-- DB2 client- Warehouse enablement pack
Tivoli Enterprise Data Warehouse, Version 1.1
Software on tdwserver:-- DB2 UDB- DB2 Data Warehouse Center- Warehouse enablement pack
Tivoli Enterprise Data Warehouse, Version 1.1
AIX
Operationaldata
IBM Console(report interface clients)
Report server
tdwcdwdm
Control server
Windows2000
tdwserver
tdwrep
Figure 16. Distributed configuration scenario. Using the DB2 remote warehouse agent on thecentral data warehouse and data mart server
228 Installing and Configuring Tivoli Enterprise Data Warehouse
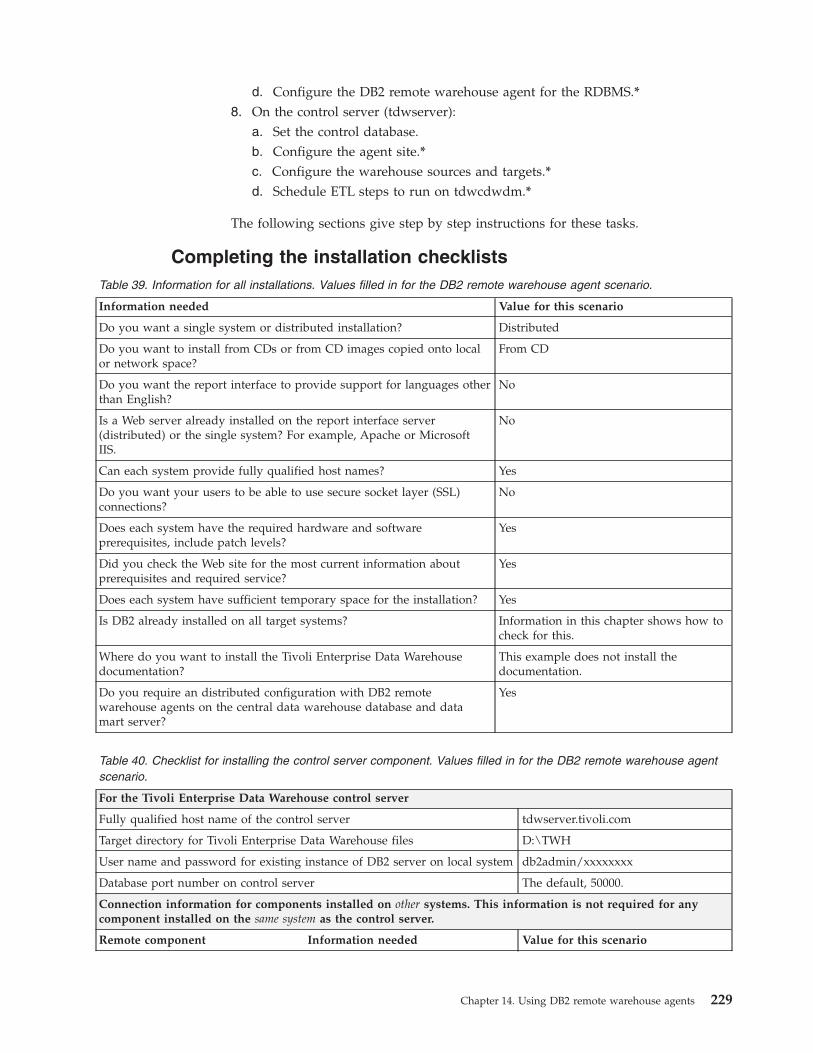
d. Configure the DB2 remote warehouse agent for the RDBMS.*8. On the control server (tdwserver):
a. Set the control database.b. Configure the agent site.*c. Configure the warehouse sources and targets.*d. Schedule ETL steps to run on tdwcdwdm.*
The following sections give step by step instructions for these tasks.
Completing the installation checklistsTable 39. Information for all installations. Values filled in for the DB2 remote warehouse agent scenario.
Information needed Value for this scenario
Do you want a single system or distributed installation? Distributed
Do you want to install from CDs or from CD images copied onto localor network space?
From CD
Do you want the report interface to provide support for languages otherthan English?
No
Is a Web server already installed on the report interface server(distributed) or the single system? For example, Apache or MicrosoftIIS.
No
Can each system provide fully qualified host names? Yes
Do you want your users to be able to use secure socket layer (SSL)connections?
No
Does each system have the required hardware and softwareprerequisites, include patch levels?
Yes
Did you check the Web site for the most current information aboutprerequisites and required service?
Yes
Does each system have sufficient temporary space for the installation? Yes
Is DB2 already installed on all target systems? Information in this chapter shows how tocheck for this.
Where do you want to install the Tivoli Enterprise Data Warehousedocumentation?
This example does not install thedocumentation.
Do you require an distributed configuration with DB2 remotewarehouse agents on the central data warehouse database and datamart server?
Yes
Table 40. Checklist for installing the control server component. Values filled in for the DB2 remote warehouse agentscenario.
For the Tivoli Enterprise Data Warehouse control server
Fully qualified host name of the control server tdwserver.tivoli.com
Target directory for Tivoli Enterprise Data Warehouse files D:\TWH
User name and password for existing instance of DB2 server on local system db2admin/xxxxxxxx
Database port number on control server The default, 50000.
Connection information for components installed on other systems. This information is not required for anycomponent installed on the same system as the control server.
Remote component Information needed Value for this scenario
Chapter 14. Using DB2 remote warehouse agents 229

Table 40. Checklist for installing the control server component. Values filled in for the DB2 remote warehouse agentscenario. (continued)
For the Tivoli Enterprise Data Warehouse control server
Central data warehouse Fully qualified host name tdwcdwdm.tivoli.com
DB2 user ID and password forexisting DB2 database
db2admin/xxxxxxxx
Database port number The default, 50000.
Data marts Fully qualified host name tdwcdwdm.tivoli.com
DB2 user ID and password forexisting DB2 database
db2admin/xxxxxxxx
Database port number The default, 50000.
Report interface Fully qualified host name tdwrep.tivoli.com
Table 41. Checklist for installing the report interface component. Values filled in for the DB2 remote warehouse agentscenario.
For the report server
Information needed Value for this scenario
Fully qualified host name of the report server tdwrep.tivoli.com
Target directory for Tivoli Enterprise Data Warehouse files D:\TWH
User name and password for existing DB2 client on the local system db2admin/xxxxxxxx
IBM HTTP Server Port (for Tivoli Presentation Services) The default, 80
IBM HTTP Administration Port (for Tivoli Presentation Services) The default, 8008
Server for IBM Console IPC Port (for Tivoli Presentation Services) The default, 8010
Web Console Port (for Tivoli Presentation Services) The default, 8007
Web Console IPC Port (for Tivoli Presentation Services) The default, 8040
IBM Console IPC Port (for Tivoli Presentation Services) The default, 8030
Target directory for Tivoli Presentation Services D:\TPS
Do you want to install additional languages? No
Connection information for components installed on other systems. This information is not required for anycomponent installed on the same system as the report server.
Remote component Information needed Value for this scenario
Control server Fully qualified host name tdwserver.tivoli.com
DB2 user and password existing DB2instance on control server
db2admin/xxxxxxxx
Database port number The default, 50000
Central data warehouse Fully qualified host name tdwcdwdm.tivoli.com
DB2 user ID and password forexisting DB2 instance on central datawarehouse database
db2admin/xxxxxxxx
Database port number The default, 50000
Data mart Fully qualified host name tdwcdwdm.tivoli.com
DB2 user ID and password forexisting DB2 database on data martserver
db2admin/xxxxxxxx
Database port number The default, 50000
230 Installing and Configuring Tivoli Enterprise Data Warehouse
Table 42 shows the completed checklist for the data mart component. Because thedata marts are on the same system as the central data warehouse database, youneed only a single checklist for both components.
Table 42. Checklist for installing the central data warehouse and data mart components. Values filled in for the DB2remote warehouse agent scenario.
For the central data warehouse and data mart server
Information needed Value for this scenario
Fully qualified host name of the central data warehouse and data martserver
tdwcdwdm.tivoli.com
Database port number The default, 50000
Target directory for Tivoli Enterprise Data Warehouse files /data/TWH
DB2 user and password to use with existing DB2 on the local system db2admin/xxxxxxxx
Connection information for components installed on other systems. This information is not required for anycomponent installed on the same system as the central data warehouse server.
Remote component Information needed Value for this scenario
Control server Fully qualified host name for controlserver
tdwserver.tivoli.com
Database port number for controlserver
The default, 50000
DB2 user and password for controlserver
db2admin/xxxxxxxx
Report interface Fully qualified host name tdwrep.tivoli.com
Table 43. Checklist for installing a warehouse pack. Values filled in for the DB2 remote warehouse agent scenario.
Information needed Value for this scenario
Are all of the Tivoli Enterprise Data Warehousecomponents installed?
All Tivoli Enterprise Data Warehouse components will beinstalled before installing the warehouse pack.
Where is the installation media for the warehouse packs On a separate warehouse pack CD
Where is the documentation for each warehouse pack? On the warehouse pack CD
For DB2, Oracle, and Informix data sources, does theuser name match the name of the schema?
Yes
Do the central data warehouse and data mart servershave sufficient disk space for the new data, data marts,and reports?
Yes
Preparing for the central data warehouse and data mart serveron tdwcdwdm
This section describes how to install the DB2 components needed for the centraldata warehouse and data mart server on tdwcdwdm.
Installing and configuring the central data warehouse and data mart server in aconfiguration with a DB2 remote warehouse agent involves the following tasks:1. Installing DB2 Universal Database Enterprise Edition.2. Installing DB2 Warehouse Manager, which includes the DB2 warehouse agent.3. Installing Tivoli Enterprise Data Warehouse components on the system that is
to run the DB2 warehouse agent. This allows the agent to access TivoliEnterprise Data Warehouse tools and files it must run locally.
Chapter 14. Using DB2 remote warehouse agents 231
4. Configuring the DB2 warehouse agent.
You must perform this installation in two phases. You install the Tivoli EnterpriseData Warehouse control server before installing any other components, such as thecentral data warehouse and data mart server. However, installing the control serverrequires that the DB2 instance already exists on the system that is to be the centraldata warehouse and data mart server. Therefore, you do steps 1 and 2 now, andthen do steps 3 and 4 after the control server is installed.
This is an important difference between this configuration and the one described inChapter 13, “Using a DB2 default warehouse agent”, on page 215. In that scenario,only step 1 is required. You do not install any Tivoli Enterprise Data Warehousecomponents on the central data warehouse or data mart server, and do not need toinstall the DB2 Warehouse Manager on any systems.
Installing DB2 Universal Database Enterprise EditionEnsure that the correct version of DB2 Universal Database Enterprise Edition,Version 7.2, (Fix Pack 8 or higher) is installed and that the DB2 services are started.v If DB2 Universal Database Enterprise Edition is not installed, use the DB2
installation CDs provided with Tivoli Enterprise Data Warehouse to install it onthe local system. After installing DB2 Universal Database Enterprise Edition onthe local system, obtain fix pack 8 and the special fix provided with fix pack 8from the IBM Customer Support Web site and install it. See “READ THISFIRST” on page ix for information about obtaining DB2 fix pack 8.
v If DB2 Universal Database Enterprise Edition is already installed, verify that thecorrect version is installed, using the db2level command. On Windows systemsat DB2 V7.2 Fix Pack 8, db2level returns the following message:DB21085I Instance "db2admin" uses DB2 code release "SQL07023" with levelidentifier "03040105" and informational tokens "DB2 v7.1.0.88", "n011211"and "WR21294".
The string DB2 v7.1.0.88 indicates that the system is at DB2 Version 7.2 Fix Pack8. The last two information tokens vary by operating system type and thespecific patches that are installed.
v If DB2 Universal Database Enterprise Edition is installed but does not have fixpack 8 or higher, obtain fix pack 8 and the special fix provided with fix pack 8from the IBM Customer Support Web site and install it. See “READ THISFIRST” on page ix for information about obtaining DB2 fix pack 8.
Restart the tdwcdwdm system.
Installing DB2 Warehouse ManagerUse the System Management Interface Tool (SMIT) or the installp command toinstall DB2 Warehouse Manager Version 7.2 from the DB2 Warehouse Manager CDthat is provided with Tivoli Enterprise Data Warehouse. After installing DB2Warehouse Manager, obtain fix pack 8 for DB2 Warehouse Manager Version 7.2and the special fix provided with DB2 Fix Pack 8 from the IBM Customer SupportWeb site and install them. For more information about installing the DB2Warehouse Manager, see IBM DB2 Warehouse Manager Installation Guide. For moreinformation about obtaining and installing Fix Pack 8 for DB2 Warehouse ManagerVersion 7.2 and the special fix provided with DB2 Fix Pack 8, see “READ THISFIRST” on page ix.
To verify that the DB2 Warehouse Manager is installed at the correct version, enterthe following on an AIX command line:lslpp -L | grep dwa
232 Installing and Configuring Tivoli Enterprise Data Warehouse
When the DB2 Warehouse Manager is at Version 7.2, Fix Pack 8, the commandreturns the following result:db2_07_01.dwa 7.1.0.88 C Data Warehouse Agent
Creating the control server on tdwserverInstalling and configuring the control server on the Windows system tdwserverconsists of the following tasks:v Installing DB2 Universal Database Enterprise Edition.v Installing Tivoli Enterprise Data Warehouse
Installing DB2 Universal Database Enterprise EditionEnsure that DB2 UDB V7.2 Enterprise Edition Fix Pack 8 or higher is installed andthat the DB2 services are started.v If DB2 UDB is not already installed, install it using the CDs provided with Tivoli
Enterprise Data Warehouse and upgrade to Fix Pack 8. For more informationabout installing Fix Pack 8 for DB2 Warehouse Manager Version 7.2, see “READTHIS FIRST” on page ix.
v If DB2 is already installed, verify the version of DB2 using the db2levelcommand. At DB2 V7.2 Fix Pack 8, db2level returns:DB21085I Instance "db2admin" uses DB2 code release "SQL07023" with levelidentifier "03040105" and informational tokens "DB2 v7.1.0.88", "n011211"and "WR21294".
The string DB2 v7.1.0.88 indicates that the system is at DB2 V7.2 Fix Pack 8.The last two information tokens vary by operating system type and the specificpatches that are installed.
v If DB2 is installed but not at the Fix Pack 8 level or higher, upgrade DB2 to V7.2Fix Pack 8 and the special fix provided with DB2 Fix Pack 8 before running theTivoli Enterprise Data Warehouse installation program. See “READ THIS FIRST”on page ix for information on obtaining DB2 Fix Pack 8 and the special fix
provided with DB2 Fix Pack 8.v Check the IBM Customer Support Web site to determine whether additional DB2
service is required.
Installing the control server componentTo install the Tivoli Enterprise Data Warehouse control server component on theWindows system tdwserver, start the Tivoli Enterprise Data Warehouse installationprogram, setup.exe, which is located on the Tivoli Enterprise Data Warehouse CD.
During the installation of the control server, the installation program creates thedata mart database and the central data warehouse database.
Provide the following information in the windows of the installation wizard:1. For setup type, choose Custom/Distributed.2. Type the name of the directory where the Tivoli Enterprise Data Warehouse
control server component is to be installed, D:\TWH.3. For features to install, select the following:
a. Tivoli Enterprise Data Warehouse control server
b. Installation scripts and tools
4. Confirm the host name of the local system (tdwserver.tivoli.com).5. Type a DB2 user name and password for the local system.
Chapter 14. Using DB2 remote warehouse agents 233
6. Type connection information (user, password, host name and port) for the DB2instance on tdwcdwdm.
7. Complete the installation wizard.8. Restart the tdwserver system.
Creating the central data warehouse and data mart server ontdwcdwdm
This section discusses:v Installing the central data warehouse and data mart componentsv Configuring the DB2 remote warehouse agent on AIX
Installing the central data warehouse and data mart componentsTo install the Tivoli Enterprise Data Warehouse central data warehouse and datamart components, start the Tivoli Enterprise Data Warehouse installation program,setup_unix.sh, which is located on the Tivoli Enterprise Data Warehouse CD.
It is necessary to run the installation program on the machine or machines that aregoing to host the central data warehouse and data mart components. Running theinstallation program is necessary in order to be able to run the rollup script andprovide the information that is necessary to establish connections to the controlserver. The actual central data warehouse and data mart databases were createdduring the installation of the control server.
Provide the following information in the installation wizard:1. For setup type, select Custom/Distributed. After selecting Custom/Distributed,
you must wait for the screen to be refreshed if you are on an AIX or Linuxmachine. If you attempt to enter information for the panel following yourselection of the type of installation, your selections will not be accepted unlessyou submit them once the screen is refreshed.
2. Type the name of the directory where the Tivoli Enterprise Data Warehousecomponents are to be installed.
3. For features to install, select the following:v Central Data Warehouse Component
v Data Mart Component
v Installation scripts and tools
4. Confirm the host name of the local system (tdwcdwdm.tivoli.com).5. Type the DB2 user name and password for the local system.6. Type connection information (user name, password, host name, and database
port) for the existing DB2 instance on tdwcdwdm, the system that contains thecentral data warehouse and data mart databases.
Note: The central data warehouse and data mart databases were created andconfigured in the DB2 instance on tdwcdwdm during the installation ofthe control server.
7. Complete the installation wizard.8. Restart the tdwcdwdm system.
Configuring the DB2 remote warehouse agent on AIXTo configure the DB2 remote warehouse agent, perform the following tasks:v Modify the DB2 remote warehouse agent environment settings
234 Installing and Configuring Tivoli Enterprise Data Warehouse
v Switch to the version of the DB2 remote warehouse agent that uses the MerantODBC Driver Manager
v Restart the DB2 remote warehouse agent
For more information about linking the DB2 remote warehouse agent to an ODBCdriver manager, see IBM DB2 Universal Database Data Warehouse CenterAdministration Guide.
Information in this section is specific to AIX.
Modify the DB2 remote warehouse agent environment settings: To use the DB2remote warehouse agent, you must set the environment variables for the DB2remote warehouse agent by completing the following steps:1. Logged in as root, change to the DB2 program directory by entering the
following command:cd /usr/lpp/db2_07_01/bin
2. Edit the file IWH.environment and make the following changes:v Add the following lines after the line that sets the CLASSPATH environment
variable. Set the TWH_TOPDIR environment variable to the name of thedirectory in which you installed Tivoli Enterprise Data Warehouse on thecentral data warehouse and data mart server on tdwcdwdm. As shown inTable 42 on page 231, the directory name in this scenario is /data/TWH.TWH_TOPDIR=/data/TWHexport TWH_TOPDIR
PATH=${PATH?}:${TWH_TOPDIR?}/tools/binexport PATH
LIBPATH=${LIBPATH:-""}:${DB2DIR?}/odbc/libexport LIBPATH
ODBCINI=${DB2DIR?}/odbc/.odbc.iniexport ODBCINI
v Edit the line that sets the DB2INSTANCE environment variable and changethe DB2 instance name to the name of the instance containing the centraldata warehouse and data mart databases, as follows:DB2INSTANCE=name_of_your_DB2_instance
Switch to the version of the DB2 remote warehouse agent that uses the MerantODBC Driver Manager: The DB2 remote warehouse agent must be configured touse the ODBC driver manager that is supported by Tivoli Enterprise DataWarehouse, the Merant ODBC Driver Manager. To change which driver managerthe DB2 remote warehouse agent uses, complete the following steps1. Logged in as root, change to the following directory:
cd /usr/lpp/db2_07_01/bin
2. Enter the following command to change ODBC driver managers:sh ./IWH.agent.db.interface intersolv
A message similar to the following is displayed:Establishing soft link to /usr/lpp/db2_07_01/bin/IWH2AGNT.ivodbcCompleted soft link to /usr/lpp/db2_07_01/bin/IWH2AGNT.ivodbc
Restart the DB2 remote warehouse agent: Restart the DB2 remote warehouseagent so that it runs using the new settings. Complete the following steps:1. Restart the Warehouse Agent Daemon by entering the following commands:
Chapter 14. Using DB2 remote warehouse agents 235
ps -ef|grep vwdaemonkill -3 pid_of_/usr/bin/vwdaemon
2. Verify that the Warehouse Agent Daemon restarted successfully by entering thefollowing command:cat /var/IWH/vwdaemon.log
If the daemon did not restart successfully, the log contains an error message.
Creating the report server on tdwrepInstalling and configuring the report interface component to create the reportserver consists of the following tasks:v Installing DB2 Universal Database Enterprise Editionv Installing the report interface component
Installing DB2 Universal Database Enterprise EditionEnsure that DB2 Universal Database Enterprise Edition, Version 7.2, Fix Pack 8 orhigher is installed. For the report server, you can install DB2 Server or you canselect any of the following in the DB2 installation wizard:v DB2 Enterprise Editionv DB2 Application Development Clientv DB2 Administration Client (this takes the least disk space)v If DB2 client or server is already installed, verify the version of DB2 using the
db2level command. At DB2 V7.2 Fix Pack 8, db2level returns:DB21085I Instance "db2admin" uses DB2 code release "SQL07023" with levelidentifier "03040105" and informational tokens "DB2 v7.1.0.88", "n011211"and "WR21294".
The string DB2 v7.1.0.88 indicates that the system is at DB2 V7.2 Fix Pack 8.The last two information tokens vary by operating system type and the specificpatches that are installed.
v If DB2 client or server is installed but not at the Fix Pack 8 level or higher,obtain and install DB2 V7.2 Fix Pack 8 and the special fix provided with DB2 FixPack 8. For more information about installing Fix Pack 8 for DB2 WarehouseManager Version 7.2 and the special fix provided with DB2 Fix Pack 8, see“READ THIS FIRST” on page ix.
v Check the IBM Customer Support Web site to determine whether additional DB2service is required.
Installing the report interface componentTo install Tivoli Enterprise Data Warehouse the report interface component on theWindows system tdwrep, start the Tivoli Enterprise Data Warehouse installationprogram, setup.exe, which is located on the Tivoli Enterprise Data Warehouse CD.Provide the following information in the windows of the installation wizard:1. For setup type, choose Custom/Distributed. After selecting
Custom/Distributed, you must wait for the screen to be refreshed if you areon an AIX or Linux machine. If you attempt to enter information for the panelfollowing your selection of the type of installation, your selections will not beaccepted unless you submit them once the screen is refreshed.
2. Specify the directory where the Tivoli Enterprise Data Warehouse reportinterface component is to be installed. In this example, the directory isD:\TWH.
3. For features to install, select the following:a. Report interface
236 Installing and Configuring Tivoli Enterprise Data Warehouse
b. Installation scripts and tools
4. Confirm the host name of the local system (tdwrep.tivoli.com).5. Type a DB2 user and password for the local system.6. Verify the port information for the IBM Console, which is implemented with
Tivoli Presentation Services. In this example, accept the default port numbers.7. Specify the directory where Tivoli Presentation Services is to be installed. In
this example, the directory is D:\TPS.8. Specify connection information (user, password, host name and port) for the
DB2 instance on the tdwserver system where the control server is alreadyinstalled.
9. Type connection information (user, password, host name and port) for the DB2instance on the tdwcdwdm system that already contains the central datawarehouse database.
10. Type connection information (user, password, host name and port) for the DB2instance on the tdwcdwdm system that already contains the data martdatabase.
11. Complete the windows of the installation wizard.12. Wait for the IBM Console to finish rebuilding the help set, which contains the
user assistance for the IBM Console. This process occurs asynchronously andmight not complete by the time the wizard has completed the installation ofthe remaining components of Tivoli Enterprise Data Warehouse and mightrequire up to 15 minutes to complete.
13. Restart the tdwrep system.
Backing up the new installationBack up the newly-created Tivoli Enterprise Data Warehouse installation so thatyou can return to a usable state if you have trouble installing a warehouse pack.You must back up the following items:v On all systems:
– The directory and all subdirectories in which you installed Tivoli EnterpriseData Warehouse files, represented by the TWH_TOPDIR environment variable
– The vpd.properties filev On the report server, the directory in which you installed Tivoli Presentation
Servicesv On the system where each database resides, the Tivoli Enterprise Data
Warehouse databases:TWH_MD: the control database on the control serverTWH_CDW: the central data warehouse databaseTWH_MART: the data mart database
For more information about backing up and restoring Tivoli Enterprise DataWarehouse, see “Backing up and restoring a Tivoli Enterprise Data Warehousedeployment” on page 257.
Installing the warehouse pack on the control server and reportserver
To install the warehouse pack, perform the following steps on the control serverand then repeat them on the report server:1. Run the Tivoli Enterprise Data Warehouse installation program setup.exe,
located on the Tivoli Enterprise Data Warehouse CD. Provide the followinginformation in the windows of the installation wizard:
Chapter 14. Using DB2 remote warehouse agents 237
a. For setup type, choose Custom/Distributed.b. Type the name of the directory where Tivoli Enterprise Data Warehouse is
to be installed.c. For features to install, select Application ETL and report packages.d. Confirm the host name of the local system.e. Type the DB2 user name and password for the local system.f. Type connection information (user name, password, host name, and database
port) for the existing DB2 instance on the tdwcdwdm, the system thatcontains the central data warehouse and data mart databases.
g. Specify the directory that contains the installation media for the warehousepack you want to install.
h. Complete the installation wizard.i. Restart the system.
Copying the warehouse pack files to the central datawarehouse and data mart server on tdwcdwdm
To complete the installation of the warehouse pack, copy the warehouse pack ETLfiles into the correct location on that system. You do not use the Tivoli EnterpriseData Warehouse installation program to do this.
To set up the warehouse pack ETL files on the central data warehouse and datamart server, tdwcdwdm, perform the following steps:1. Check whether the files already exist by entering the following commands at a
shell prompt on tdwcdwdm:. /usr/lpp/db2_07_01/bin/IWH.environmentls -l $TWH_TOPDIR/apps
2. If no files are listed, copy them from the control server (tdwserver) to thecentral data warehouse and data mart server (tdwcdwdm). You can copy all ofthe files in the $TWH_TOPDIR/apps directory if you want, although only asubset are required. The subset you need is $TWH_TOPDIR/apps*/*/etl/sql/*.One way to do this is by completing the following steps:a. On the control server (tdwserver), enter the following commands in a DOS
command window:bashcd $TWH_TOPDIRtar -cvf appetl.tar apps/*/*/etl/sql/*
The bash and tar commands are made available when you install TivoliEnterprise Data Warehouse on the control server.
b. Use FTP to copy the appetl.tar file to the central data warehouse and datamart server tdwcdwdm. Place the tar file in /tmp.
c. At a shell prompt on tdwcdwdm, enter the following commands to extractthe files from the archive and place them in the appropriate directories:. /usr/lpp/db2_07_01/bin/IWH.environmentcd $TWH_TOPDIRtar -xvf /tmp/appetl.tarchmod -R 755 $TWH_TOPDIR/*rm /tmp/appetl.tar
3. Verify that the directory structure under $TWH_TOPDIR/apps on the centraldata warehouse and data mart server, tdwcdwdm, is identical to the directorystructure under $TWH_TOPDIR/apps on the control server (tdwserver). Thefile and directory names must have the same case on both systems.
238 Installing and Configuring Tivoli Enterprise Data Warehouse
Configuring the DB2 remote warehouse agent on the centraldata warehouse and data mart server on tdwcdwdm
This section discusses:v Setting up RDBMS client software and ODBC data sourcesv Configuring the DB2 remote warehouse agent for the the source database
Setting up RDBMS client software and ODBC data sourcesTo install and configure RDBMS client software and to establish ODBC datasources to connect to source data, complete the following steps on the central datawarehouse and data mart server:1. Read the warehouse pack documentation to determine the configuration
information you need to set, such as:v The name of the ODBC data sources to connect to operational datav The name of the ODBC driver for each data source
2. Install the RDBMS client software needed to connect to the operational datastores collected by the application. This operational data is your data source.v If the source databases are DB2 Version 6 or Version 7, then the DB2 server
software that is already installed provides the necessary connections.v If the source databases are Oracle, Microsoft SQL Server, Sybase, or Informix
databases, then you must install the RDBMS client for that database vendor.If necessary, consult the documentation provided by the database vendor.The following versions of database clients were supported by TivoliEnterprise Data Warehouse, Version 1.1, at the time of publication of thisbook:– Oracle: Oracle Client Version 8.1.7, Installation Type: Programmer– Sybase: Open Client Version 12.0– Informix: Client SDK 2.70 UC3-1– MS SQL Server: Microsoft SQL Server: Microsoft SQL Server 7 SP3 Client
3. Configure the RDBMS client so that it can communicate with the sourcedatabase.v For DB2 data sources, see IBM DB2 Universal Database for UNIX Quick
Beginnings.v For Oracle, Microsoft SQL Server, Sybase, or Informix data sources, see the
IBM DB2 Universal Database Data Warehouse Center Administration Guide forinformation about setting up warehouse sources.To set up a client/server connection for Informix data sources, you mightneed modify the entry in $INFORMIXDIR/etc/sqlhosts to use the onsoctcpprotocol, for example:pingpong5 onsoctcp pingpong inf5
If necessary, consult the documentation provided by the database vendor.4. To add ODBC database sources, the file specified by the value of the ODBCINI
environment variable must contain an entry for each data source. In thisscenario, the value was set to /usr/lpp/db2_07_01/odbc/.odbc.ini in “Modifythe DB2 remote warehouse agent environment settings” on page 235.To make entries in this file, complete the following steps:a. Copy the sample file provided by DB2. Enter the following commands:
cd /usr/lpp/db2_07_01/odbccp odbc.ini.intersolv .odbc.ini
Chapter 14. Using DB2 remote warehouse agents 239
b. Add an entry for each ODBC data source in the [ODBC Data Sources]stanza, and create a stanza with the name of each entry you create.In the following sample .odbc.ini file, the data source ptapm uses IBM DB2ODBC DRIVER, the data source jcook1 uses an Oracle data source, the datasource lvassberg uses a Sybase data source, and ping5 is an Informix datasource. The Sybase client is installed in /data/sybase_client.:[ODBC Data Sources]ptapm=IBM DB2 ODBC DRIVERjcook1=Oracle 8.1lvassberg=Sybase 12ping5=Informix 9.1
[ptapm]Driver=/usr/lpp/db2_07_01/lib/db2_36.oDescription=DB2 ODBC DatabaseDatabase=ptapm
[jcook1]Driver=/usr/lpp/db2_07_01/odbc/lib/ibor815.soDescription=Oracle 8 ODBC DatabaseServerName=jcook1
[lvassberg]Driver=/usr/lpp/db2_07_01/odbc/lib/ibsyb1115.soDescription=Sybase 11 ODBC DatabaseDatabase=inventoryServerName=lvassbergInterfacesFile=/data/sybase_client/interfaces
[ping5]Driver=/usr/lpp/db2_07_01/odbc/lib/ibinf15.soDescription=Informix 9 ODBC DatabaseDatabase=TEDWHostName=pingpongServerName=pingpong5Service=inf5
For detailed information about options for non-DB2 databases, visithttp://www.datadirect-technologies.com/odbc/techresources/productdoc/otdocument.asp.
Note: In the sample odbc.ini.intersolv file, the DB2 stanza uses the sharedlibrary/usr/lpp/db2_07_01/lib/db2.o. You must change this to/usr/lpp/db2_07_01/lib/db2_36.o.
For more information about this procedure, see the information about accessingnon-DB2 database warehouse sources in IBM DB2 Universal Database DataWarehouse Center Administration Guide.
5. Test a connection to the ODBC data source name using the execsql command,as follows:. /usr/lpp/db2_07_01/bin/IWH.environmentexecsql dummy dummy.out ODBC_data_source_name user passwordcat dummy.out
If the name of the RDBMS vendor appears in the dummy.out file, then theconnection to the ODBC data source was successful.
240 Installing and Configuring Tivoli Enterprise Data Warehouse
Configuring the DB2 remote warehouse agent for the the sourcedatabaseTo enable the DB2 remote warehouse agent to connect to the source database, someenvironment variables must be set. These settings depend on the RDBMS youintend to use. Set these environment variable as follows:1. Change to the following directory:
cd /usr/lpp/db2_07_01/bin
2. Edit the IWH.environment file to add the entries for the RDBMS you use.Here are sample Oracle, Sybase, and Informix entries. In this example, theclients for the RDBMS are installed in the following directories:v Oracle: /data/ora_clientv Sybase: /data/sybase_clientv Informix: /data/inf_client# OracleORACLE_HOME=/data/ora_client/orahomeORACLE_SID=ORCLPATH=/data/ora_client/orahome/bin:$PATHLIBPATH=$LIBPATH:/data/ora_client/orahome/libexport LIBPATH PATH ORACLE_HOME ORACLE_SID
# SybaseSYBASE=/data/sybase_clientINTERFACES=/data/sybase_client/interfacesPATH=/data/sybase_client/bin:$PATHLIBPATH=$LIBPATH:/data/sybase_client/libexport LIBPATH PATH SYBASE INTERFACES
# InformixINFORMIXDIR=/data/inf_clientINFORMIXSERVER=pingpong5PATH=/data/inf_client/bin:$PATHLIBPATH=$LIBPATH:/data/inf_client/libexport LIBPATH PATH INFORMIXDIR INFORMIXSERVER
The values in this file must match the values you specified when installing thedatabase client for each type of data source. If you have just installed thedatabase clients, use the current value of these environment variables. Use theshell set command to display the current values.
For more information about this procedure, see the information about accessingnon-DB2 database warehouse sources in IBM DB2 Universal Database DataWarehouse Center Administration Guide.
3. Test a connection to the ODBC data source name using the execsql command,as follows:. /usr/lpp/db2_07_01/bin/IWH.environmentexecsql dummy dummy.out ODBC_data_source_name user passwordcat dummy.out
If the name of the RDBMS vendor appears in the dummy.out file, then theconnection to the ODBC data source was successful.
Completing the control server configuration on tdwserverTo complete the configuration of the control server, perform the following tasks:1. Configure the control database.2. Define the DB2 remote warehouse agent.3. Configure warehouse sources and targets.
Chapter 14. Using DB2 remote warehouse agents 241
4. Configuring and scheduling ETL steps to run on the central data warehouseand data mart server.
These tasks are described in the following sections.
Configure the control databaseThe first time you use the DB2 Data Warehouse Center with Tivoli Enterprise DataWarehouse, you must change the control database to TWH_MD, by completing thefollowing steps:1. Start the DB2 Control Center. From the Windows taskbar, click Start →
Programs → IBM DB2 → Control Center.2. Start the Data Warehouse Center. From the Control Center, click Tools → Data
Warehouse Center.3. In the Data Warehouse Center Logon window, click Advanced.4. Type TWH_MD in Control database. Accept the default values for Server host
name and Service service name. Click OK.5. Click Cancel to close the logon window.6. Open the Data Warehouse Center - Control Database Management window.
From the Windows taskbar, click Start → Programs → IBM DB2 → WarehouseControl Database Management.
7. Type TWH_MD in New control database.8. Type the DB2 user name and password and then click OK.9. When the Processing has completed message appears, click Cancel.
Define the DB2 remote warehouse agent1. Restart the DB2 Data Warehouse Center.2. Expand the Administration folder.3. From the Data Warehouse Center tree, expand the Administration folder.4. Right-click the Agent Sites folder and then select Define. The Define Agent
Site window opens. Use this window to define an agent site for the central datawarehouse and data mart server. The agent site identifies the system on whichthe control server runs the DB2 warehouse agent.v On the Agent Site page, enter the agent name (tdwcdwdm_remote_agent),
host name (tdwcdwdm), the operating system type (AIX), user name, andpassword. The user name is the instance owner of the DB2 instance ontdwcdwdm, the central data warehouse and data mart server.
v On the Programs page, move SQLScript and rollup to the list of selectedprograms.
5. Click OK to define the agent site.
For more information about defining agent sites, see IBM DB2 Universal DatabaseData Warehouse Center Administration Guide.
Configure warehouse sources and targetsFrom the DB2 Data Warehouse Center tree, expand Warehouse Sources andWarehouse Targets. For each warehouse source or target that will use an ODBCdata source defined on the central data warehouse and data mart server, performthe following steps:1. Right-click each item in the Warehouse Sources and Warehouse Targets lists,
and then select Properties.
242 Installing and Configuring Tivoli Enterprise Data Warehouse
2. Click the Agent Sites tab and make sure that the agent site for central datawarehouse and data mart server (tdwcdwdm_remote_agent) is in the Selectedagent sites field.
3. Click the Data Source tab. Provide the following information:a. In Database name, type the ODBC data source name.b. In System name, select the system where the DB2 warehouse agent should
run. This is the central data warehouse and data mart server (tdwcdwdm).c. Specify the user ID and password to connect to the ODBC data source.
4. Select the Tables and Views tab. Expand Tables. From the Filter window, clickOK.
5. If a list of tables is displayed, then the DB2 warehouse agent is correctlyconfigured to access the ODBC data source.
6. Click OK.
Configuring and scheduling ETL steps to run on the central datawarehouse and data mart serverTo schedule ETL steps to run on the central data warehouse and data mart servertdwcdwdm:1. In the warehouse pack implementation guide, determine the names of the
subject areas defined by the warehouse pack.2. Start the DB2 Control Center. From the Windows taskbar, click Start →
Programs → IBM DB2 → Control Center.3. Start the Data Warehouse Center. From the Control Center, click Tools → Data
Warehouse Center.4. Type the user name and password to log on to the DB2 Data Warehouse Center
and click OK.5. Expand Subject Areas in the DB2 Data Warehouse Center tree.6. For each subject area listed in the warehouse pack documentation, configure
the steps in each of its processes by performing the following instructions:a. Select the name of the process. The right side of the Data Warehouse Center
window displays a list of the steps in the process.b. Select all of the steps in the list.c. Ensure all the steps are in either Development or Test mode. Steps must be
in Development or Test mode to schedule them. If you need to change themode, right-click the selected list of steps and select Mode from the popupmenu.
d. For each of the steps in the process, complete these instructions to specifythe DB2 remote warehouse agent that is to run the step:1) Right-click the step name and select Properties.2) Click the Processing Options tab.3) Select the agent site for the central data warehouse and data mart server
(tdwcdwdm_remote_agent) from the Agent sites drop-down list.4) Click OK to close the Properties window.
7. Schedule the ETLs. See “Scheduling warehouse pack ETL processes” onpage 147 for details.
8. Put ETL steps in Production mode.
Chapter 14. Using DB2 remote warehouse agents 243
If you have trouble using DB2 remote warehouse agentsIf you encounter problems using DB2 remote warehouse agents, see “Problemsusing DB2 remote warehouse agents” on page 296.
244 Installing and Configuring Tivoli Enterprise Data Warehouse
Part 4. Administration and problem determination
Chapter 15. DB2 Data Warehouse Centeressentials . . . . . . . . . . . . . . 247Starting the DB2 Data Warehouse Center . . . . 247Using the Work in Progress window . . . . . 247Reviewing exception table information . . . . . 248Disabling and re-enabling ETL scheduling . . . . 248
Disabling ETL scheduling . . . . . . . . 249Re-enabling ETL scheduling . . . . . . . 249
Stopping and starting the DB2 warehouse services 249Stopping the DB2 warehouse services . . . . 249Starting the DB2 warehouse services . . . . 250
Removing old data from the DB2 Data WarehouseCenter logs . . . . . . . . . . . . . . 250
Chapter 16. Administering Tivoli EnterpriseData Warehouse . . . . . . . . . . . . 253Determining what is installed . . . . . . . . 253
Determining what level of Tivoli EnterpriseData Warehouse is installed . . . . . . . 253Determining what level of a warehouse pack isinstalled . . . . . . . . . . . . . . 254
Creating agent sites after the installation of TivoliEnterprise Data Warehouse . . . . . . . . . 254
Installing a DB2 warehouse agent . . . . . 254Installing warehouse agents on Windowssystems . . . . . . . . . . . . . 254Installing warehouse agents on UNIXsystems . . . . . . . . . . . . . 255
Defining an agent site . . . . . . . . . 255Managing warehouse packs . . . . . . . . 256
Determining which warehouse packs areinstalled . . . . . . . . . . . . . . 256Manually reconfiguring a warehouse pack. . . 256Reviewing the ETL logs . . . . . . . . . 256
Backing up and restoring a Tivoli Enterprise DataWarehouse deployment . . . . . . . . . . 257
Road map for backing up and restoring TivoliEnterprise Data Warehouse . . . . . . . . 257A review of deployment configurations. . . . 257Backing up and restoring databases . . . . . 258
Backing up databases. . . . . . . . . 259Restoring databases . . . . . . . . . 261
Backing up and restoring the Tivoli EnterpriseData Warehouse software . . . . . . . . 261
Backing up the Tivoli Enterprise DataWarehouse software . . . . . . . . . 262Restoring the Tivoli Enterprise DataWarehouse software . . . . . . . . . 262
Backing up and restoring Tivoli PresentationServices . . . . . . . . . . . . . . . 263
Backing up Tivoli Presentation Services. . . . 263Restoring Tivoli Presentation Services . . . . 263
Restoring a server environment that iscompletely lost . . . . . . . . . . . 264The Tivoli Presentation Services directory orsoftware is removed or corrupt . . . . . 264
Restoring Tivoli Presentation Services to aworking Tivoli Presentation Servicesinstallation . . . . . . . . . . . . 265
Upgrading DB2 Universal Database EnterpriseEdition . . . . . . . . . . . . . . . 265Changing the DB2 heap size for the central datawarehouse database . . . . . . . . . . . 266Changing DB2 passwords for your TivoliEnterprise Data Warehouse deployment . . . . 266Deleting old data from the central data warehousedatabase . . . . . . . . . . . . . . . 269
Scheduling deletion . . . . . . . . . . 269Specifying the data to be deleted . . . . . . 269Verifying your central data warehouse deletionprocess . . . . . . . . . . . . . . 270
Deleting old data from the data mart database . . 270Increment time change for rollup . . . . . . . 270Restarting of Tivoli Presentation Services serviceswhen the data mart database is recycled . . . . 271
Chapter 17. Problem determination . . . . . 273Log files . . . . . . . . . . . . . . . 273
Installation log files . . . . . . . . . . 273The TWH.log file . . . . . . . . . . 274The DB2 log file . . . . . . . . . . 275
Uninstallation log files . . . . . . . . . 276The DB2 log file . . . . . . . . . . 276
Warehouse pack log files . . . . . . . . 276Warehouse pack patch log files . . . . . . 276Fix pack and interim fix log files . . . . . . 277Tivoli Presentation Services log files . . . . . 277Language pack log files . . . . . . . . . 277
Messages . . . . . . . . . . . . . . . 277Installation messages . . . . . . . . . . 277DB2 messages . . . . . . . . . . . . 278Uninstallation messages . . . . . . . . . 279Tivoli Presentation Services messages . . . . 279
Problems installing DB2 . . . . . . . . . . 279DB2 cannot be installed because NIS is installedin your environment . . . . . . . . . . 279
Problems installing Tivoli Enterprise DataWarehouse . . . . . . . . . . . . . . 279
Things to check first . . . . . . . . . . 279Common problems and solutions. . . . . . 280
Installation cannot copy files to the harddrive . . . . . . . . . . . . . . 280Installation error when PATH variable is toolong . . . . . . . . . . . . . . 281DB2 version error . . . . . . . . . . 281The DB2 log contains DB2 command errors 281Processor license error is displayed in theDB2 logs . . . . . . . . . . . . . 282Export fails . . . . . . . . . . . . 282The control database cannot be created . . . 283Installation log file contains errors . . . . 284
© Copyright IBM Corp. 2001, 2003 245
Installation program stops and asks forinstallation media . . . . . . . . . . 284The installation locks up during theinstallation of Tivoli Presentation Services . . 284Silent install does not complete . . . . . 285
Recovering from an incomplete installation ofTivoli Enterprise Data Warehouse . . . . . . 285
Additional steps for recovering from anincomplete installation on AIX systems . . . . 287Additional steps for recovering from anincomplete Tivoli Presentation Servicesinstallation . . . . . . . . . . . . . 287
Problems with reinstalling Tivoli Enterprise DataWarehouse . . . . . . . . . . . . . . 288Problems with uninstalling Tivoli Enterprise DataWarehouse . . . . . . . . . . . . . . 289Problems with configuring and using TivoliEnterprise Data Warehouse . . . . . . . . . 290
What to do if your DB2 Data Warehouse Centerlogon fails . . . . . . . . . . . . . 290
Specifying the control database (TWH_MD)for the DB2 Data Warehouse Center . . . . 291Specifying the control database (TWH_MD)for the DB2 Warehouse Control DatabaseManager . . . . . . . . . . . . . 291Verifying the control database (TWH_MD)for ODBC data sources . . . . . . . . 291Restarting warehouse server NT and loggerservices . . . . . . . . . . . . . 292
Tivoli Presentation Services services do not startcorrectly on AIX . . . . . . . . . . . 292The Web Services for the IBM Console servicedoes not start on UNIX systems . . . . . . 293Extended shared memory error on AIX with thereport interface when one of the DB2 databasesis on the same machine . . . . . . . . . 294Authentication error with Informix on AIX . . 295Unexpected DB2 Data Warehouse Center errors 295Other report interface errors . . . . . . . 295Problems using DB2 remote warehouse agents 296
Understanding the report interface (RPI) vault . . 297Problems installing warehouse packs . . . . . 297
Installation fails in a distributed deployment 297Unable to import the tag file during awarehouse pack installation . . . . . . . 298Warehouse pack installation fails to load datainto the translated term table . . . . . . . 298
Problems with uninstalling warehouse packs . . . 298Recovering from an unsuccessful installation or anunsuccessful reinstallation of a warehouse pack . . 299
Recovery steps for an unsuccessful warehousepack uninstall . . . . . . . . . . . . 299
Warehouse pack configuration problems . . . . 302ETL processes do not complete or extract stepsdo not run . . . . . . . . . . . . . 304Modifying, copying or deleting directories. . . 304Sybase ETL error . . . . . . . . . . . 304
Adding trace information to the log files for ETLprocesses . . . . . . . . . . . . . . . 304
Example of adding trace information to the logfile for a central data warehouse ETL process. . 305
Example of a central data warehouse ETLprocess log file with trace information . . . 306
Example of adding trace information to the logfile for a data mart ETL process . . . . . . 307
Example of a data mart ETL process log filewith trace information . . . . . . . . 308
Tivoli Presentation Services not starting . . . . 309Problems with reports . . . . . . . . . . 310
246 Installing and Configuring Tivoli Enterprise Data Warehouse
Chapter 15. DB2 Data Warehouse Center essentials
This chapter describes common tasks you perform using the DB2 Data WarehouseCenter and other DB2 utilities. These tasks include the following:v “Starting the DB2 Data Warehouse Center”v “Using the Work in Progress window”v “Reviewing exception table information” on page 248v “Disabling and re-enabling ETL scheduling” on page 248v “Stopping and starting the DB2 warehouse services” on page 249v “Removing old data from the DB2 Data Warehouse Center logs” on page 250
For complete information about using the DB2 Data Warehouse Center, see theIBM DB2 Universal Database Data Warehouse Center Administration Guide.
Starting the DB2 Data Warehouse CenterMany of the administration and maintenance tasks for Tivoli Enterprise DataWarehouse are performed using the DB2 Data Warehouse Center. This sectiondescribes how to start that graphical user interface (GUI).
To open the DB2 Data Warehouse Center, perform the following steps:1. On the Windows taskbar, click Start → Programs → IBM DB2 → Control Center.2. In the DB2 Control Center, click Tools → Data Warehouse Center. The Data
Warehouse Center and Data Warehouse Center Logon windows are displayed.3. In the Data Warehouse Center Logon window, type the user ID and password
for the control database of the DB2 Data Warehouse Center. This informationwas specified when installing the Tivoli Enterprise Data Warehouse controlserver. If you do not know the user ID and password, contact your databaseadministrator or the person who installed Tivoli Enterprise Data Warehouse.If you cannot connect, make sure that you configured the control database aspart of completing the installation. See “Specifying the control database(TWH_MD) for the DB2 Data Warehouse Center” on page 291 or “Specifyingthe control database (TWH_MD) for the DB2 Warehouse Control DatabaseManager” on page 291 for additional information.
4. Click OK.5. After the logon process completes, the Data Warehouse Center Launchpad
window might be displayed. You can close this window.
If you cannot start or log onto the DB2 Data Warehouse Center, see “What to do ifyour DB2 Data Warehouse Center logon fails” on page 290.
Using the Work in Progress windowThe DB2 Data Warehouse Center provides the Work in Progress window tomonitor the running of ETL processes. Use the Work In Progress window tomonitor the steps that are currently scheduled to run, are running, or havecompleted running, and to determine whether each step completed successfully.
To use the Work in Progress window to review logs, perform the following steps:
© Copyright IBM Corp. 2001, 2003 247
1. Start the DB2 Data Warehouse Center. For instructions, see “Starting the DB2Data Warehouse Center” on page 247.
2. In the DB2 Data Warehouse Center window, select Warehouse → Work inProgress.
3. Use the Work in Progress window to view information about the steps that arecurrently scheduled to run, running, or have completed successfully.v To display information about the icons that graphically represent the status
of each step, select View → Legend.v To display the log for a step, right-click a step name in the Work in Progress
window and select Show Log. In the log, look for the first entry with amessage type of Run Time Error. Right click this entry and select ShowDetails.
v To display the log of all steps, select Work in Progress → Show Log.
For online information about using the Work in Progress window, press F1 orclick the question mark icon in the tool bar.
For information on various ETL failures and the necessary actions for recovery, seeEnabling an Application for Tivoli Enterprise Data Warehouse.
See IBM DB2 Universal Database Data Warehouse Center Administration Guide formore information about the Work In Progress window and about monitoring therunning of your ETL processes.
Reviewing exception table informationIf an ETL process discovers errors in the source data, then data might be, but is notalways, placed in exception tables. If exceptions exist, manually update the data asnecessary.
The exception tables are located in the central data warehouse database for thewarehouse pack providing the ETL. To determine whether a warehouse packcreates exception tables, to locate its exception tables, and to determine theappropriate action to take on data in the exception table, see the implementationguide for each warehouse pack.
Attention: There is no notification process for exception tables. You mustmanually check for newly generated exception tables after each ETL processcompletes.
Disabling and re-enabling ETL schedulingWhen investigating and correcting problems with ETL processes, you often need todisable ETL processing, to prevent scheduled ETLs from running until you havefound and corrected the problem. Also, during the upgrade of a warehouse packor Tivoli Enterprise Data Warehouse, you need to disable ETL processes.
Attention: In the event of an error in the ETL run cycle, you should disable thescheduling of all ETL processes that failed until the problem is fixed. Failure tocorrect a problem can result in a loss of data if the failing ETL processes are startedagain before resolving a problem.
The following sections describe how to disable and re-enable ETL scheduling.
248 Installing and Configuring Tivoli Enterprise Data Warehouse
Disabling ETL schedulingIf your ETL processes are linked together with shortcuts, you need to disable onlythe first scheduled step in the sequence. None of the steps linked together will runif the first step in the sequence is disabled.
Perform the following steps to disable the scheduling for an ETL process that didnot complete successfully:1. Start the DB2 Data Warehouse Center. For instructions, see “Starting the DB2
Data Warehouse Center” on page 247.2. In Data Warehouse Center window, expand the Subject Areas folder.3. Expand the subject area for the warehouse pack whose process you want to
disable.4. Expand the Processes folder.5. In the list of processes, select the name of the process for which you want to
disable scheduling. If all of your processes are linked together with shortcutsthen this is the name of the first process that has been scheduled.
6. In the right pane of the Data Warehouse Center window, select the steps youwant to disable, and then right-click.
7. Select Mode and then select Test or Development. Steps do not run unless theyare in Production mode.
Re-enabling ETL schedulingPerform the following steps to enable the scheduling for an ETL process:1. Start the DB2 Data Warehouse Center. For instructions, see “Starting the DB2
Data Warehouse Center” on page 247.2. In Data Warehouse Center window, expand the Subject Areas folder.3. Expand the subject area for the warehouse pack whose process you want to
enable.4. Expand the Processes folder.5. In the list of processes, select the name of the process for which you want to
enable scheduling. If all of your processes are linked together with shortcutsthen this is the name of the first process that has been scheduled.
6. In the right pane of the Data Warehouse Center window, select the steps youwant to enable, and then right-click.
7. Select Mode and then select Production. Steps do not run unless they are inProduction mode.
Stopping and starting the DB2 warehouse servicesThe DB2 warehouse services are the Warehouse logger (vwlogger) and theWarehouse server (vwkernel). The following sections provide instructions forstopping and starting these services.
Stopping the DB2 warehouse servicesTo stop the DB2 warehouse services, use one of the following methods:v On either Windows NT or Windows 2000, enter the following commands from
the command line:net stop vwkernelnet stop vwlogger
v On Windows NT, do the following:
Chapter 15. DB2 Data Warehouse Center essentials 249
1. From the Windows taskbar, click Start → Settings → Control Panel.2. Double-click Services.3. In the Services window, select Warehouse logger, and then click Stop.4. In the Stop Other Services window, click OK to stop the Warehouse server in
addition to the Warehouse logger service.v On Windows 2000, do the following:
1. From the Windows taskbar, click Start → Settings → Control Panel.2. Double-click Administrative Tools.3. Double-click Services.4. Right-click Warehouse logger, and then click Stop.5. In the Stop Other Services window, click Yes to stop the Warehouse server
service in addition to the Warehouse logger service.
Starting the DB2 warehouse servicesTo start the DB2 warehouse services, use one of the following methods:v On either Windows NT or Windows 2000, enter the following commands from
the command line:net start vwloggernet start vwkernel
v On Windows NT, do the following:1. From the Windows taskbar, click Start → Settings → Control Panel.2. Double-click Services.3. In the Services window, right-click Warehouse server, and then click Start.
This starts both the Warehouse server and the Warehouse logger services.v On Windows 2000, do the following:
1. From the Windows taskbar, click Start → Settings → Control Panel.2. Double-click Administrative Tools.3. Double-click Services.4. In the Services window, right-click Warehouse server, and then click Start.
This starts both the Warehouse server and the Warehouse logger services.
Removing old data from the DB2 Data Warehouse Center logsYou should regularly delete information in the Data Warehouse Center log files,IWH2SERV.LOG (Warehouse server log) and IWH2LOG.LOG (Warehouse loggerlog) , located in the directory specified by the VWS_LOGGING environmentvariable. These log files grow rapidly. You can delete information from these filesonly when the DB2 Data Warehouse Center is stopped. You can either edit the filesto remove old information or you can delete the files. If you delete the files, theservices create new files.
Note: On a UNIX system, the VWS_LOGGING environment variable should notspecify a location in the root file system because the log files grow rapidlyand contribute to inadequate space in the file system.
You can use either the command line or Windows GUIs to clean up the log files.The following describes how to stop and restart the necessary Data WarehouseCenter services and edit the DB2 log files:v On either Windows NT or Windows 2000, enter the following sequence of
commands from the command line:
250 Installing and Configuring Tivoli Enterprise Data Warehouse
net stop vwkernelnet stop vwlogger<delete or edit the log files>net start vwloggernet start vwkernel
v On Windows NT, do the following:1. From the Windows taskbar, click Start → Settings → Control Panel.2. Double-click Services.3. In the Services window, select Warehouse logger, and then click Stop.4. In the Stop Other Services window, click OK to stop the Warehouse server in
addition to the Warehouse logger service.5. Delete or edit the log files.6. In the Services window, right-click Warehouse server, and then click Start.
This starts both the Warehouse server and the Warehouse logger services.v On Windows 2000, do the following:
1. From the Windows taskbar, click Start → Settings → Control Panel.2. Double-click Administrative Tools.3. Double-click Services.4. Right-click Warehouse logger, and then click Stop.5. In the Stop Other Services window, click Yes to stop the Warehouse server
service in addition to the Warehouse logger service.6. Delete or edit the necessary log files.7. In the Services window, right-click Warehouse server, and then click Start.
This starts both the Warehouse server and the Warehouse logger services.
Chapter 15. DB2 Data Warehouse Center essentials 251

252 Installing and Configuring Tivoli Enterprise Data Warehouse
Chapter 16. Administering Tivoli Enterprise Data Warehouse
This chapter describes the following common tasks related to administering TivoliEnterprise Data Warehouse:v “Determining what is installed”v “Creating agent sites after the installation of Tivoli Enterprise Data Warehouse”
on page 254v “Managing warehouse packs” on page 256v “Backing up and restoring a Tivoli Enterprise Data Warehouse deployment” on
page 257v “Backing up and restoring Tivoli Presentation Services” on page 263v “Upgrading DB2 Universal Database Enterprise Edition” on page 265v “Changing the DB2 heap size for the central data warehouse database” on
page 266v “Changing DB2 passwords for your Tivoli Enterprise Data Warehouse
deployment” on page 266v “Deleting old data from the central data warehouse database” on page 269v “Deleting old data from the data mart database” on page 270v “Increment time change for rollup” on page 270v “Restarting of Tivoli Presentation Services services when the data mart database
is recycled” on page 271
Determining what is installedThis section describes how to determine the version and fix pack level of TivoliEnterprise Data Warehouse and warehouse packs that are installed.
Determining what level of Tivoli Enterprise Data Warehouse isinstalled
To determine which version and service level of Tivoli Enterprise Data Warehouseis installed, perform the following steps after the installation of Tivoli EnterpriseData Warehouse is complete:1. In the $TWH_TOPDIR directory, look for files named .twh_core_v1.1.x.marker,
where x specifies Tivoli Enterprise Data Warehouse with a fix pack of one ofthe following values:
0 Specifies Tivoli Enterprise Data Warehouse Version 1.1 with no installedfix packs.
1 Specifies Tivoli Enterprise Data Warehouse Version 1.1 with fix pack 1installed.
2 Specifies Tivoli Enterprise Data Warehouse Version 1.1 with fix pack 2installed.
2. In the $TWH_TOPDIR/.installed directory look for files [email protected], where x is defined in the preceding step and yis the identifier for an interim fix. See “READ THIS FIRST” on page ix forinformation about interim fixes.
© Copyright IBM Corp. 2001, 2003 253
Determining what level of a warehouse pack is installed1. Open the DB2 Data Warehouse Center.2. In the left pane of the Data Warehouse Center window is a Subject Areas
folder. This folder contains a folder for Tivoli Enterprise Data Warehouse and afolder for each warehouse pack. Naming conventions for the application folderslisted in the Subject Areas folder are defined in Enabling an Application for TivoliEnterprise Data Warehouse.
3. Expand the Subject Areas folder by clicking the plus sign (+) next to SubjectAreas. The order of the applications listed in Subject Areas is alphabetical.
Creating agent sites after the installation of Tivoli Enterprise DataWarehouse
In a distributed Tivoli Enterprise Data Warehouse deployment, using a DB2 remotewarehouse agent on the machine that is the target of a central data warehouse ETLor a data mart ETL can potentially improve the performance of Tivoli EnterpriseData Warehouse. As an alternative you can use the DB2 default warehouse agentthat is already installed on the control server.
You can create DB2 remote agent sites when initially creating your TivoliEnterprise Data Warehouse deployment or as a separate task after yourdeployment is operational. This section describes how to create an agent site for anexisting distributed deployment that uses the DB2 default warehouse agent on thecontrol server. For information about creating an initial deployment that uses agentsites, see Chapter 6, “Installing Tivoli Enterprise Data Warehouse in a distributeddeployment that uses DB2 remote warehouse agent sites”, on page 85.
Setting up an agent site for a central data warehouse database or data martdatabase involves the following steps:1. Installing a DB2 warehouse agent.2. Defining an agent site..
For guidelines about using DB2 warehouse agents see “DB2 warehouse agents andagent sites” on page 18.
Installing a DB2 warehouse agentThis section provides instructions for installing a DB2 warehouse agent on thefollowing operating systems:v For Windows systems, see page “Installing warehouse agents on Windows
systems”v For UNIX systems, see “Installing warehouse agents on UNIX systems” on
page 255
For complete information about installing DB2 warehouse agents, see IBM DB2Warehouse Manager Installation Guide.
Installing warehouse agents on Windows systemsTo install a warehouse agent on a Windows system:1. Close all programs.2. Insert the DB2 Warehouse Manager CD into your CD-ROM drive. Use the CD
shipped with Tivoli Enterprise Data Warehouse to ensure that you have thecorrect version.
254 Installing and Configuring Tivoli Enterprise Data Warehouse
3. In the launchpad, click Install.4. In the Select Products window, make sure that DB2 Warehouse Manager is
selected, and then click Next.5. In the Select Installation Type window, click Custom, and then click Next.6. In the Select DB2 Components window, select Warehouse Agent and
Documentation, and then click Next.7. In the Start Copying Files window, review your selections. If you want to
change any of your selections, click Back to return to the window where youcan change the selection. Click Next to begin copying files.
8. In the Setup Complete window, click Finish to restart the computer.
Installing warehouse agents on UNIX systemsTo install a warehouse agent on a UNIX system using the db2setup utility:1. Log in as a user with root authority.2. Insert the DB2 Warehouse Manager CD into your CD-ROM drive. Use the CD
shipped with Tivoli Enterprise Data Warehouse to ensure that you have thecorrect version.
3. Mount the CD-ROM file system. For instructions for mounting a CD on UNIX,see “Mounting a CD on UNIX systems” on page 316.
4. Change to the directory where the CD is mounted by entering the cd /cdromcommand, where cdrom is the mount point of the CD-ROM file system.
5. Enter the ./db2setup command.6. In the Install DB2 V7 window, select DB2 Data Warehouse Agent from the list
of products.7. In the Configuration — DB2 Data Warehouse Agent Services window, accept
the default service names and port numbers.8. In the Create DB2 Services window, accept the default selections Do not create
a DB2 instance and Do not create the Administration Server, and then clickOK.When the installation process completes, your warehouse agent is installed inthe following directory:v On AIX systems, the /usr/lpp/db2_07_01/ directoryv On Solaris Operating Environment (herein referred to as Solaris) systems, the
/opt/IBMdb2/V7.1/ directory
Defining an agent site1. Open the DB2 Data Warehouse Center from the DB2 Control Center → Tools
menu.2. Expand the Administration folder.3. From the Data Warehouse Center tree, expand the Administration folder.4. Right-click the Agent Sites folder and then select Define. The Define Agent
Site window opens. Use this window to define an agent site for the central datawarehouse and data mart server. The agent site identifies the system on whichthe control server runs the warehouse agent.v On the Agent Site tab, enter the agent name, host name, operating system
type, user name, and password. The user name is the instance owner of theDB2 instance for the central data warehouse and data mart databases.
v On the Programs page, move SQLScript and rollup to the list of selectedprograms.
5. Click OK to save.
Chapter 16. Administering Tivoli Enterprise Data Warehouse 255

Managing warehouse packsManaging the warehouse packs that are installing in your Tivoli Enterprise DataWarehouse deployment consists of the following tasks:v Determining which warehouse packs are installedv Manually reconfiguring a warehouse packv Reviewing the ETL logs
Determining which warehouse packs are installedTo determine the warehouse packs and versions currently installed:1. Open the apps folder in the $TWH_TOPDIR directory.2. Open each folder in the apps folder and view the twh_install_props.cfg file
with a text editor.The APP_DISPLAY_NAME and APP_REL_VERSION keywords define thewarehouse pack name and version installed, respectively.
Manually reconfiguring a warehouse packYou can manually reconfigure a warehouse pack to run its ETLs on a differentagent site if you have made modifications to warehouse pack processes or do notwant to reschedule the processes.1. On the computer where you created the new agent site, make sure that there is
a database client for each database type that is used by the warehouse pack.For example, if the operational data source for the warehouse pack is an Oracledatabase, make sure that an Oracle database client is installed. Because theagent site uses DB2 UDB, you do not need a separate client for a DB2 datasource.
2. Copy the warehouse pack directory structure from the control server tocorresponding location on the agent site. See “Copying the warehouse packfiles for a DB2 remote warehouse agent site” on page 142.
3. If the agent site is a Windows system, create an ODBC data source on theWindows system by following the instructions in “Creating ODBC data sourceson the control server for warehouse packs” on page 143. If the agent site is aUNIX system, create an ODBC data source on the UNIX system by followingthe instructions in “Creating ODBC data sources on DB2 remote warehouseagent sites” on page 145.
4. Change the steps in the data warehouse center to use the new agent.
Reviewing the ETL logsIf you errors occurred while running an ETL process, you must check the loginformation to determine and correct the errors.
Attention: It is important to take the appropriate action immediately when you arenotified of an error. If the ETL process runs again before the errors are corrected, itcan cause serious errors in the central data warehouse data.
See Chapter 17, “Problem determination”, on page 273 for information aboutlocating logs and resolving problems with an ETL process.
256 Installing and Configuring Tivoli Enterprise Data Warehouse
Backing up and restoring a Tivoli Enterprise Data Warehousedeployment
This section contains recommendations for backing up and restoring TivoliEnterprise Data Warehouse and Tivoli Presentation Services. Backup andrestoration instructions for DB2 product files are not covered. Refer to the DB2library for information on backing up and restoring DB2.
You do not backup or restore warehouse packs separately. Warehouse pack data isbacked up with the Tivoli Enterprise Data Warehouse databases. Warehouse packprogram files are backed up along with Tivoli Enterprise Data Warehouse andTivoli Presentation Services.
Use the backup recommendations in this chapter to maintain your system andprevent data loss or prolonged outages of Tivoli Enterprise Data Warehouse.
Road map for backing up and restoring Tivoli Enterprise DataWarehouse
To back up and restore Tivoli Enterprise Data Warehouse, complete the followingsteps:1. Back up and restore Tivoli Enterprise Data Warehouse databases. See page 258.2. Back up and restore the Tivoli Enterprise Data Warehouse core application. See
page 261.
Before planning your backup and restore strategy, consider reading Enabling anApplication for Tivoli Enterprise Data Warehouse to fully understand the relationshipsbetween the various databases.
A review of deployment configurationsBecause Tivoli Enterprise Data Warehouse can be installed in a variety ofconfigurations on different operating systems, the backup and restorationrecommendations for Tivoli Enterprise Data Warehouse must be tailored to yourspecific deployment. You must determine how Tivoli Enterprise Data Warehouse isinstalled in your environment and determine the necessary steps for yourenterprise, following the recommendations provided in this chapter.
Tivoli Enterprise Data Warehouse can be installed either on a single computer,which is called a quick start deployment, or on multiple computers, which is calleda distributed deployment.
In a distributed deployment, you can use the DB2 default warehouse agent on thecontrol server, or you can install DB2 remote warehouse agents on the central datawarehouse server and data mart server. There are Tivoli Enterprise DataWarehouse files on each computer with a warehouse agent. For more informationabout warehouse agents see “DB2 warehouse agents and agent sites” on page 18.
In a quick start deployment, you need to back up and restore the single computer.
For a distributed deployment, you must back up and restore each database and theTivoli Enterprise Data Warehouse software on each computer. The followinginstructions assume that each component of Tivoli Enterprise Data Warehouse is ona different computer. When more than one database is located on the samecomputer, perform the instructions for each database.
Chapter 16. Administering Tivoli Enterprise Data Warehouse 257
The control serverThe control server contains both DB2 databases and Tivoli Enterprise DataWarehouse software. For this system, you back up both the databases andthe application software.
Central data warehouse databaseIf there is not a warehouse agent on the system with the central datawarehouse database, you back up only the database; there is no applicationsoftware to back up.
If you are using the warehouse agent on a system with a central datawarehouse database, there is both application software and a database toback up.
Data mart databaseIf there is not a warehouse agent on the system with the data martdatabase, you back up only the database; there is no application softwareto back up.
If you are using the warehouse agent on a system with a data martdatabase, there is both application software and databases to back up.
Report serverThe system on which you install the report interface component does notrequire a DB2 database. For this system, you back up only the applicationfiles.
Backing up and restoring databasesThis section provides information about backing up and restoring the followingTivoli Enterprise Data Warehouse databases:v Central data warehouse databasev Data mart databasev Tivoli Enterprise Data Warehouse control database
When planning backup operations or performing restoration operations, you mustconsider the relationships between the data in Tivoli Enterprise Data Warehousedatabases. Some examples are as follows:v If an older version of the control database is restored into a deployment with a
newer version of the central data warehouse database, the log messages, andETL run status generated by the DB2 Data Warehouse Center are lost and willnot match the state of the central data warehouse database.
v If a data mart database is completely lost and no backup exists, you might beable to recreate the data mart database from data in the central data warehouse.To recreate the data mart database, you must adjust the extract controlinformation for the star schemas in the data mart database, located in the centraldata warehouse, and then run the data mart ETL processes for each star schemain the lost data mart database. It is not possible to recreate a data mart databasefrom data that has been deleted from the central data warehouse. The extractcontrol parameters in the database must be manually changed to ensure that alldata is restored. For more information on extract control, see Enabling anApplication for Tivoli Enterprise Data Warehouse.
v If an old copy of the central data warehouse database is restored along withnewer copies of the control database and newer copies of data mart databases,manual adjustment of extract control tables is required to pull additional datafrom source applications to bring the central data warehouse database up todate. In some cases, source data might have been deleted after data was
258 Installing and Configuring Tivoli Enterprise Data Warehouse
populated into the central data warehouse database, making it impossible torecover all of the data. Some data mart ETL processes might encounter problemsas they attempt to reinsert records from the recovered central data warehousedatabase into more recent copies of data mart databases. In these cases, manualintervention by a database administrator might be required to fully recover thesystem.
v User definitions for the report interface are stored in the Tivoli PresentationServices directory. When the users are assigned to user groups in the reportinterface, a subset of user information is stored in the Tivoli Enterprise DataWarehouse control database.
If the backup and restoration recommendations in this chapter are followedconsistently, and a catastrophic error occurs while running a central datawarehouse ETL that causes errors in the Tivoli Enterprise Data Warehousedatabases, the most recent copy of the database backup can be restored to thesystem and the central data warehouse ETL process rerun. Likewise, if acatastrophic error occurs when running a data mart ETL process, you can restore adata mart database to its initial state and run data mart ETL again.
Backing up databasesAn underlying strategy of the recommended backup approach is to make sure avalid backup of a given database exists prior to making changes to that database.
In general, databases can be backed up either offline, when the database isunavailable for users, or online. (Online backups are sometimes referred to as hotbackups.) For Tivoli Enterprise Data Warehouse databases, use the offline method.Online backup procedures are not provided.
Offline backups of databases require that the database be completely unavailableduring the backup procedure. Plan for regular outage windows, and scheduleadequate time between ETL processes and the running of reports to perform offlinebackups.
You should regularly delete old data from the databases in order to manage theamount of data. If the data is not deleted or archived from central datawarehouses, offline backups take increasing amounts of time and backup media.See the Enabling an Application for Tivoli Enterprise Data Warehouse for detailedinformation.
For both quick start deployments and distributed deployments, back up all TivoliEnterprise Data Warehouse information at the same time, following these steps inorder:1. Back up the central data warehouse database.2. Back up the data mart database.3. Back up the control database.4. Back up Tivoli Presentation Services. (This is only necessary if report interface
user information changed since the last backup.)5. Back up the Tivoli Enterprise Data Warehouse application software (This is only
necessary if you installed a warehouse pack or a Tivoli Enterprise DataWarehouse patch.)
6. Run central data warehouse ETL processes.7. Run data mart ETL processes.8. Run reports.
Chapter 16. Administering Tivoli Enterprise Data Warehouse 259
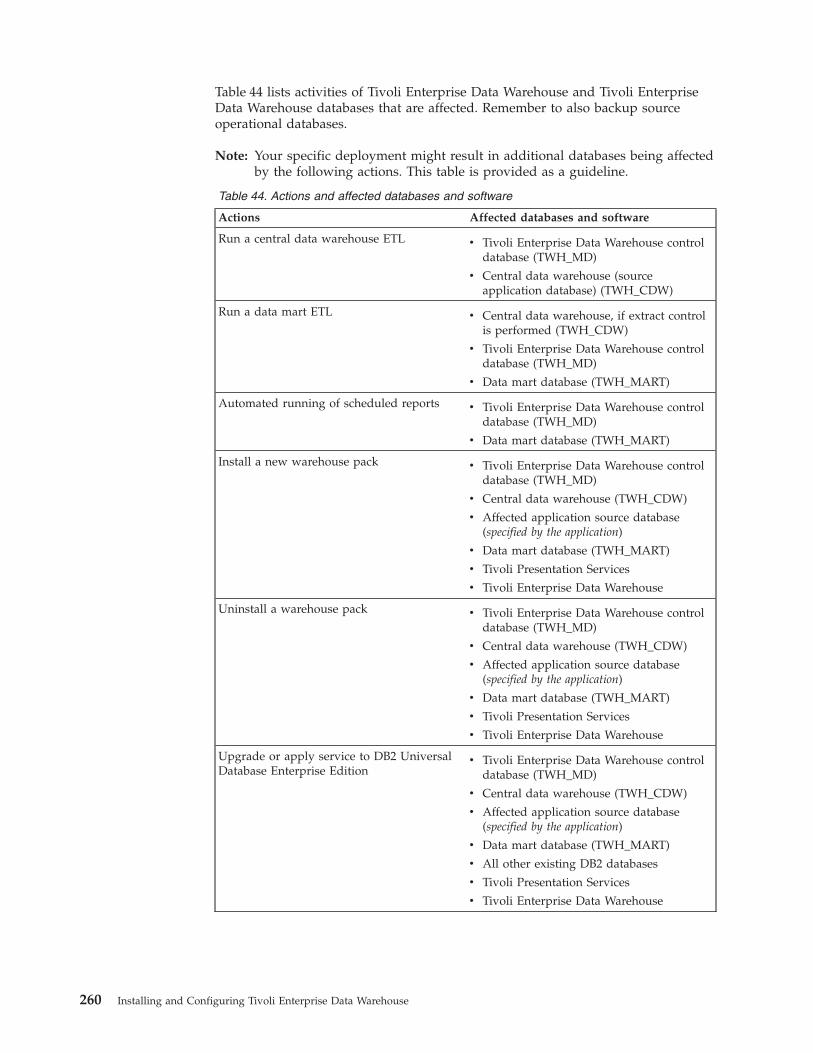
Table 44 lists activities of Tivoli Enterprise Data Warehouse and Tivoli EnterpriseData Warehouse databases that are affected. Remember to also backup sourceoperational databases.
Note: Your specific deployment might result in additional databases being affectedby the following actions. This table is provided as a guideline.
Table 44. Actions and affected databases and software
Actions Affected databases and software
Run a central data warehouse ETL v Tivoli Enterprise Data Warehouse controldatabase (TWH_MD)
v Central data warehouse (sourceapplication database) (TWH_CDW)
Run a data mart ETL v Central data warehouse, if extract controlis performed (TWH_CDW)
v Tivoli Enterprise Data Warehouse controldatabase (TWH_MD)
v Data mart database (TWH_MART)
Automated running of scheduled reports v Tivoli Enterprise Data Warehouse controldatabase (TWH_MD)
v Data mart database (TWH_MART)
Install a new warehouse pack v Tivoli Enterprise Data Warehouse controldatabase (TWH_MD)
v Central data warehouse (TWH_CDW)
v Affected application source database(specified by the application)
v Data mart database (TWH_MART)
v Tivoli Presentation Services
v Tivoli Enterprise Data Warehouse
Uninstall a warehouse pack v Tivoli Enterprise Data Warehouse controldatabase (TWH_MD)
v Central data warehouse (TWH_CDW)
v Affected application source database(specified by the application)
v Data mart database (TWH_MART)
v Tivoli Presentation Services
v Tivoli Enterprise Data Warehouse
Upgrade or apply service to DB2 UniversalDatabase Enterprise Edition
v Tivoli Enterprise Data Warehouse controldatabase (TWH_MD)
v Central data warehouse (TWH_CDW)
v Affected application source database(specified by the application)
v Data mart database (TWH_MART)
v All other existing DB2 databases
v Tivoli Presentation Services
v Tivoli Enterprise Data Warehouse
260 Installing and Configuring Tivoli Enterprise Data Warehouse
Table 44. Actions and affected databases and software (continued)
Actions Affected databases and software
Upgrade or apply service to TivoliEnterprise Data Warehouse
v Tivoli Enterprise Data Warehouse controldatabase (TWH_MD)
v Central data warehouse (TWH_CDW)
v Affected application source database(specified by the application)
v Data mart database (TWH_MART)
v All other existing DB2 databases
v Tivoli Presentation Services
v Tivoli Enterprise Data Warehouse
Upgrade or apply service to TivoliPresentation Services
Tivoli Presentation Services
Create Tivoli Presentation Services user IDsfor the Tivoli Enterprise Data Warehousereport interface
v Tivoli Enterprise Data Warehouse controldatabase (TWH_MD)
v Data mart database (TWH_MART)
v Tivoli Presentation Services
It is important to follow standard backup procedures, such as the following:v Use the same or compatible file systems for hard-drive to hard-drive backups.v Do not copy files across NFS links on UNIX. This can affect file permissions and
render the backup image unusable.v Verify tape backups for accuracy.
Restoring databasesIf databases are lost or corrupted, restore all the Tivoli Enterprise Data Warehousedatabases using the complete set of database information. In other words, youmust determine which databases in your deployment are no longer synchronizedand restore only the affected ones.
You might have to catalog your databases on local and remote nodes in order toreestablish your database connections.
For a quick start deployment, it is possible to regularly backup the entire contentsof the hard drive on which the Tivoli Enterprise Data Warehouse application anddatabases are installed. This approach enables all of the databases to be restored,but individual databases cannot be restored easily. Full system backups can also beused in a distributed environment, but individual database backups are typicallyfaster and easier to perform.
Backing up and restoring the Tivoli Enterprise DataWarehouse software
Tivoli Enterprise Data Warehouse software is located under the directory specifiedby the TWH_TOPDIR environment variable. The contents of each directory forTivoli Enterprise Data Warehouse vary depending on the components installed onthe particular server.
For quick start deployments, Tivoli Enterprise Data Warehouse application andwarehouse pack files reside on a single server. For a distributed deployment, TivoliEnterprise Data Warehouse application and warehouse pack files can reside onmultiple servers depending on if a basic or an advanced configuration is used.
Chapter 16. Administering Tivoli Enterprise Data Warehouse 261
Each server in a distributed deployment can contain a slightly differentconfiguration of files, so a backup should be maintained for each server.
Note: Tivoli Enterprise Data Warehouse and warehouse packs do not currently setenvironment variables on either UNIX or Microsoft Windows platforms.However, they do use existing environment variables, for example, thelocation of the temporary directory. Environment variable settings areimportant when recovering a server.
It is important to follow standard backup procedures, such as the following:v Use the same or compatible file systems for hard drive to hard drive backups.v Do not copy files across NFS links on UNIX. This can affect file permissions and
render the backup image unusable.v Verify tape backups for accuracy.
Backing up the Tivoli Enterprise Data Warehouse softwareThe entire contents of the directory specified by the TWH_TOPDIR environmentvariable should be backed up on each server where files are installed.
Installing a warehouse pack adds Tivoli Enterprise Data Warehouse applicationfiles to the TWH_TOPDIR directory on the control server, report server, and on anyagent site used by that warehouse pack. Therefore, back up the TWH_TOPDIRdirectory after installing a warehouse pack.
Restoring the Tivoli Enterprise Data Warehouse softwareThe files that comprise Tivoli Enterprise Data Warehouse remain unchanged afterinstallation, so a recent backup of the Tivoli Enterprise Data Warehouse applicationfiles for that specific system can be used to restore the application.
There are different scenarios for restoring:v Restoring a server environment that is completely lost
If you followed the recommendations in this chapter for backing up the TivoliEnterprise Data Warehouse databases and Tivoli Presentation Services, youshould apply the backup copy of the Tivoli Enterprise Data Warehouse softwareto the server once it is functional. The TWH_TOPDIR environment variableshould be verified and redefined if necessary.
v The Tivoli Enterprise Data Warehouse directory or software is removed orcorrupted.The backup copy of the Tivoli Enterprise Data Warehouse software must beapplied. The TWH_TOPDIR environment variable should already be correctlydefined.
The Tivoli Enterprise Data Warehouse installation CD cannot be used to recover asubset of the Tivoli Enterprise Data Warehouse components on a particular system.Backup copies of all databases and other important data must be taken prior tousing the installation CD to recover a server. Before a reinstallation can beaccomplished, all existing Tivoli Enterprise Data Warehouse software must beuninstalled or manually removed from the system.
Reinstallation is necessary if your backup copy contains errors or if TivoliPresentation Services files are corrupted.
Restoring the Tivoli Enterprise Data Warehouse software to a different hard driveor directory from the original installation directory is not supported.
262 Installing and Configuring Tivoli Enterprise Data Warehouse
Backing up and restoring Tivoli Presentation ServicesThis section provides information about backing up and restoring TivoliPresentation Services. Tivoli Presentation Services provides the IBM Consoleinterface used by the report interface.
The following Tivoli Presentation Services services must be stopped prior tobacking up or restoring. You can stop them using the Windows Services window.1. Server for IBM Console2. Web Services for IBM Console3. Tivoli Presentation Services HTTP Administration4. Tivoli Presentation Services HTTP Server
Tivoli Presentation Services stores all of its operational data, such as user and roledefinitions, application and task drivers definitions and security definitions, on asingle server known as the report server.
Tivoli Presentation Services stores operational data that can change as the system isused. For example, adding new user IDs to the IBM Console causes changes todata files stored under the Tivoli Presentation Services directory. As a result,frequent backups of the entire Tivoli Presentation Services directory should bemade.
There is a relationship between data saved by Tivoli Presentation Services and datastored in, for example, the control database (TWH_MD). Because of this datarelationship, the Tivoli Presentation Services directory should be backed up eachtime the control database is backed up if you have added Tivoli PresentationServices user information or installed a new warehouse pack. See Table 44 onpage 260 for more information.
Backing up Tivoli Presentation ServicesTo perform the backup of Tivoli Presentation Services, backup the entire TivoliPresentation Services installation directory on the report server after stopping allTivoli Presentation Services related servers and processes as mentioned previously.
You should back up the entire Tivoli Presentation Services installation directory,which was specified when Tivoli Presentation Services was previously installed.On Microsoft Windows systems, the default installation directory is /PS. On UNIXsystems, the default installation directory is /opt/PS.
Restoring Tivoli Presentation ServicesA Tivoli Presentation Services backup can only be restored to the same server fromwhich it was backed up.
Tivoli Presentation Services is specific to the server environment where it isinstalled because of the use of specific ports, system services, IP addresses, andhost names. Therefore, the restoration process for the Tivoli Presentation Servicesinvolves a new installation of all previously existing components, after they areuninstalled, of Tivoli Enterprise Data Warehouse software on the server followedby a restoration of the previous Tivoli Presentation Services directory on top of thenew installation.
The definition used in this documentation for restoring to the same server is:v Same IP address
Chapter 16. Administering Tivoli Enterprise Data Warehouse 263
v Same host namev Same disk partition characteristics
The restored Tivoli Presentation Services servers and data are placed in the samedirectory structure as the original installation.
v Same set of operating system user and group definitionsv Same set of available ports
You must make sure current backups exist for all affected databases on a serverbefore reinstalling Tivoli Presentation Services.
The procedures for restoring a single system versus a distributed installation of theTivoli Presentation Services are the same. However, due to possible differences inenvironments, the amount of software on the server to be reinstalled varies.
Depending on the failure that necessitated the restoration, you might need toremove some components and services of Tivoli Presentation Services from thereport server before beginning the restoration.
There are different scenarios for restoring, which are described in the followingsections:v Restoring a server environment that is completely lostv The Tivoli Presentation Services directory or software is removed or corruptv Restoring Tivoli Presentation Services to a working Tivoli Presentation Services
installation
Copying a backup of the Tivoli Presentation Services installation directory onto theaffected server where Tivoli Presentation Services is not currently installed is notsufficient to restore the Tivoli Presentation Services software.
Restoring a server environment that is completely lostTo restore a server environment that was completely lost, complete the followingsteps:1. Use the Tivoli Enterprise Data Warehouse installation CD and reinstall all Tivoli
Enterprise Data Warehouse components previously installed on the server.2. Stop all relevant Tivoli Presentation Services services that are listed on
Appendix D, “Starting and stopping Tivoli Presentation Services”, on page 329.3. Overlay the new installation of the Tivoli Presentation Services with the backup
copy of the entire Tivoli Presentation Services installation directory.4. Overlay the new installation of the Tivoli Enterprise Data Warehouse
application in the directory specified by the TWH_TOPDIR environmentvariable with the backup copy of the Tivoli Enterprise Data Warehouseapplication directory.
5. Restore backup copies of each of the Tivoli Enterprise Data Warehousedatabases. Validate that all the databases are cataloged properly.
6. Restart Tivoli Presentation Services.
The Tivoli Presentation Services directory or software isremoved or corruptIf remnants of the Tivoli Presentation Services software are on the system, do thefollowing:1. Remove the remaining Tivoli Presentation Services software by running the
Tivoli Presentation Services uninstallation script, uninstall.bat or uninstall.sh for
264 Installing and Configuring Tivoli Enterprise Data Warehouse
Microsoft Windows and UNIX systems, respectively, located in the _uninstdirectory under the top level installation directory for Tivoli PresentationServices.
2. Uninstall all existing Tivoli Enterprise Data Warehouse software on the server.3. Restart the server.4. Use the Tivoli Enterprise Data Warehouse installation CD and reinstall all Tivoli
Enterprise Data Warehouse components previously installed on the server.5. Stop all relevant Tivoli Presentation Services services that are listed on
Appendix D, “Starting and stopping Tivoli Presentation Services”, on page 329.6. Overlay the new installation of the Tivoli Presentation Services with the backup
copy of the entire Tivoli Presentation Services installation directory.7. Overlay the new installation of the Tivoli Enterprise Data Warehouse
application with the backup copy of the Tivoli Enterprise Data Warehouseapplication directory.
8. Restore backup copies of each of the Tivoli Enterprise Data Warehousedatabases. Validate that all the databases are cataloged properly.
9. Restart Tivoli Presentation Services.
Restoring Tivoli Presentation Services to a working TivoliPresentation Services installationIf you are restoring Tivoli Presentation Services to a working Tivoli PresentationServices installation, complete the following steps:1. Delete the existing Tivoli Presentation Services installation directory.2. Copy the entire Tivoli Presentation Services installation directory from the
backup onto the server.3. Depending on when user information was last defined for the report interface,
you might need to restore the Tivoli Enterprise Data Warehouse controldatabase in order to synchronize user information with Tivoli PresentationServices. If the Tivoli Enterprise Data Warehouse control database is restored,its contents should match ODBC, data mart, and star schema definitions.
Upgrading DB2 Universal Database Enterprise EditionTivoli Enterprise Data Warehouse must use the same version of Java as DB2. TheTivoli Enterprise Data Warehouse installation program copies the DB2 file toensure this. After installing Tivoli Enterprise Data Warehouse, if you apply a DB2fix pack that updates db2java.zip, you must manually copy the new version to theTivoli Enterprise Data Warehouse directories by completing these steps on eachsystem where you upgraded a DB2 component:1. Run the DB2 program DB2_directory\java12\usejdbc2.bat, where DB2_directory
is your DB2 installation path.2. Copy the file db2java.zip from DB2_directory\java12 to the following
directories:v On the report server, PS_directory\db2, where PS_directory is the directory in
which you installed Tivoli Presentation Services.v On any system, $TWH_TOPDIR/tools/bin, where $TWH_TOPDIR is the
environment variable specifying the directory in which you installed TivoliEnterprise Data Warehouse.
In addition, Tivoli Presentation Services services must be restarted. SeeAppendix D, “Starting and stopping Tivoli Presentation Services”, on page 329 forinformation on restarting Tivoli Presentation Services services.
Chapter 16. Administering Tivoli Enterprise Data Warehouse 265
Changing the DB2 heap size for the central data warehouse databaseThe DB2 control heap size setting for the central data warehouse database shouldbe set to 512 or higher for warehouse pack ETL processing. This parameter definesthe number of private memory pages available for use by the DB2 WarehouseControl Database Manager. The amount allocated is the minimum amount neededto process a request for an application. If the application requires more heap spaceto process larger SQL statements, the DB2 Warehouse Control Database Managerallocates memory as needed, up to the value specified by this parameter.Increasing the heap size to at least 512 helps prevent getting heap size errors.
Change the control heap size using the following steps:1. Log in using your DB2 administrator user ID on the Tivoli Enterprise Data
Warehouse control server.2. Connect to the TWH_CDW database by running the following command:
db2 connect to TWH_CDW user userID using password
where userID is the DB2 user ID and password is the DB2 password foraccessing the central data warehouse database.
3. To determine the current setting for heap size, issue the following command:db2 get db cfg for TWH_CDW | grep CTL_HEAP
The output from this command is similar to the following:Max appl. control heap size (4KB) (APP_CTL_HEAP_SZ) = 128
4. If the heap size setting is less than 512, change it by issuing the followingcommand:db2 update db cfg for TWH_CDW using APP_CTL_HEAP_SZ 512
The output from this command is similar to the following:DB20000I The UPDATE DATABASE CONFIGURATION command completed successfully.DB21026I For most configuration parameters, all applications mustdisconnectfrom this database before the changes become effective.
5. Restart DB2 by issuing the following commands:db2 disconnect THW_CDWdb2 force application alldb2 terminatedb2stopdb2admin stopdb2admin startdb2start
Changing DB2 passwords for your Tivoli Enterprise Data Warehousedeployment
When you change DB2 passwords previously configured for Tivoli Enterprise DataWarehouse, you must follow the procedures below to ensure that passwordinformation is updated for DB2 services and all logon procedures that use yourDB2 user ID.1. Change the password for your ODBC data sources as follows:
a. On Windows NT, perform the following steps:1) On the Windows taskbar, click Start → Settings → Control Panel.2) Double-click ODBC Data Sources.
b. On Windows 2000, perform the following steps:
266 Installing and Configuring Tivoli Enterprise Data Warehouse
1) On the Windows taskbar, click Start → Settings → Control Panel.2) Double-click Administrative Tools.3) Double-click Data Sources (ODBC).
c. In the ODBC Data Source Administrator window, click the System DSNtab.
d. For each source listed in the left pane that applies to Tivoli Enterprise DataWarehouse, select the source and click Configure.
e. Select Change password, enter the new password information, and clickOK.
Note: Do not change password information for the TWH_MD,TWH_MART, and TWH_CDW databases in this step. The correctprocedure for changing password information for the TWH_MD,TWH_MART, and TWH_CDW databases is described later.
2. On the Tivoli Enterprise Data Warehouse control server, change passwordinformation in the DB2 Data Warehouse Center:a. Log on to the DB2 Data Warehouse Center using your old DB2 password.b. In the left pane, double-click Administrators.c. In the left pane, double-click Warehouse Users and Groups.d. In the left pane, double-click Warehouse Users.e. In the right pane of the Data Warehouse Center window, select your user
ID.f. Select Properties.g. Enter the new password information and click OK.
3. Change the DB2 password information required to log on to DB2:a. On Windows systems, perform the following steps:
1) Log on to the machine as Administrator.2) From the Control Panel, select Users and Passwords.3) Select the instance owner user name.4) Select Set Password and enter the new password information.5) Click OK.6) Change the password information for DB2 services, as follows:
a) On Windows NT, perform the following steps:i. On the Windows taskbar, click Start → Settings → Control Panel.ii. Double-click Services.
b) On Windows 2000, perform the following steps:i. On the Windows taskbar, click Start → Settings → Control Panel.ii. Double-click Administrative Tools.iii. Double-click Services.
c) Stop the DB2 - DB2, DB2 - DB2CLTSV, and DB2 - DB2DAS00services.
d) For each of the DB2 - DB2, DB2 - DB2CLTSV, and DB2 -DB2DAS00 services, perform the following steps:i. In the Services window, right-click the service and select
Properties.ii. Select the LogOn tab.iii. Enter the new password information and click OK.
Chapter 16. Administering Tivoli Enterprise Data Warehouse 267
iv. Restart the service by right-clicking on the service name onselecting Restart.
b. On UNIX systems hosting the central data warehouse server, data martserver, or report interface (not the control server), perform the followingsteps:1) Log on as the DB2 instance owner.2) Issue the following command at the command prompt:
passwd
3) Enter the new password information and press Enter.4) Reboot the machine.
4. If you have a distributed installation of Tivoli Enterprise Data Warehouse, youmust also update password information in the vault file on the control serverand report server as follows:a. Verify that Tivoli Enterprise Data Warehouse Interim Fix 8 (Package
1.1–TDW-0011LA) is installed. This interim fix is required. It is installed ifthe $TWH_TOPDIR/.installed/[email protected] file exists.See “READ THIS FIRST” on page ix for information about obtaining thisinterim fix if necessary.
b. Open a command or terminal session.v On a UNIX system, log on as root. Open a terminal session.v On a Windows system, log on as a member of the local Administrators
group. Enter the following command:bash
Bash shell support was provided when Tivoli Enterprise Data Warehousewas installed on a Windows system.
c. Enter the following command:./twh_update_userinfo.sh -n username -p password
username is the new user name and password is the new password.d. On the report server, stop and restart Tivoli Presentation Services services as
described in Appendix D, “Starting and stopping Tivoli PresentationServices”, on page 329. This is necessary after updating the .rpidb.propertiesfile, which is the vault file. Make sure that the report server is not currentlyprocessing reports before stopping these services. Stop the services in thefollowing order:1) Web Services for IBM Console2) Server for IBM Console
e. Wait five minutes for the services to stop completely.f. Start the services in the following order:
1) Server for IBM Console2) Web Services for IBM Console
Note: It is not necessary to stop and restart the Tivoli Presentation ServicesHTTP Server service or the Tivoli Presentation Services HTTPAdministration service.
5. Change password information for all data mart administrators in the reportinterface. To do this, sign on to the IBM Web Console and follow theinstructions provided in the Task Assistant to change the password information.
268 Installing and Configuring Tivoli Enterprise Data Warehouse
Deleting old data from the central data warehouse databaseYou can control how often data is deleted from the central data warehouse using acombination of triggers and warehouse processes. This is done by completing thesetasks:1. Scheduling the deletion process2. Specifying the data to be deleted
For more information on data deletion processes, and the database tables used, seethe Enabling an Application for Tivoli Enterprise Data Warehouse.
Deletion processes for warehouse packs are defined by each application. See thedocumentation provided with each warehouse pack for information about deletingthe data for that application.
Scheduling deletionSchedule the deletion process using the CDW_C05_PurgeMsmt_Process process inthe CDW_TivoliEnterpriseDataWarehouse_v1.1.0_Subject_Area subject area usingthe Data Warehouse Center.
If you have created another deletion process for the central data warehouse, youmust perform the following steps for the deletion process you created in additionto scheduling the CDW_C05_PurgeMsmt_Process.
Complete these steps to schedule the process:1. Start the DB2 Data Warehouse Center.2. In the Data Warehouse Center window, expand the Subject Areas folder by
clicking the plus sign (+) next to Subject Areas.3. Expand the CDW_TivoliEnterpriseDataWarehouse_v1.1.0_Subject_Area.4. Double-click the Processes folder.5. Click CDW_C05_PurgeMsmt_Process.6. In the right pane of the Data Warehouse Center window, right-click
CDW_C05_S010_PurgeMsmt and select Schedule.7. The Schedule window is displayed. Use the fields in this window to specify the
interval (weekly, monthly, or daily) and frequency with which the process runs.
Specifying the data to be deletedSpecify the data to be deleted by setting the value of the PMsmtC_Age_In_Dayscolumn of the Prune_Msmt_Control table. The default value is set by theapplication that places data into the central data warehouse. Modify the valueusing an SQL statement.
For example, the following SQL statement sets up the deletion of data after 1month (PMSMTC_AGE_IN_DAYS = 100), for data with an hourly time summary code(MSUM_CD = ’H’) and a measurement source code indicating data from TivoliApplication Performance Management (MSRC_CD = ’APF’):UPDATE TWG.Prune_Msmt_ControlSET PMSMTC_AGE_IN_DAYS = 100WHERE TMSUM_CD = ’H’AND MSRC_CD = ’APF’;
Chapter 16. Administering Tivoli Enterprise Data Warehouse 269
The measurement source code is an identifier for the application that generated theoriginal data. For Tivoli software and other products from IBM, this is thethree-character prefix assigned by IBM to a product. Third-party applications canuse three-character prefixes containing at least one numeric character, to ensurethat they do not conflict with IBM products. This code is used in log messages andother places where an application must be uniquely identified.
Verifying your central data warehouse deletion processTo determine if your central data warehouse deletion process ran successfully,examine the following log information:1. Use the Work in Progress window to view DB2 Data Warehouse Center log
information:a. In the Data Warehouse Center window, expand the Subject Areas folder by
clicking the plus sign (+) next to Subject Areas.b. Expand the CDW_TivoliEnterpriseDataWarehouse_v1.1.0_Subject_Area.c. Click CDW_C05_PurgeMsmt_Process.d. Double-click the Processes folder.e. In the right pane of the Data Warehouse Center window, select
CDW_C05_S010_PurgeMsmt and right-click.f. From the context menu, select Show Log. Log information for the central
data warehouse deletion process is displayed.2. Examine the log information provided in the log files specified by the
VWS_LOGGING environment variable to obtain error information for thedeletion process.
Deleting old data from the data mart databaseEach warehouse pack deletes its own data from the data mart database. See theimplementation guide provided with each warehouse pack for information aboutdeleting the data for that application.
Increment time change for rollupThe rollup program uses the TWG.day_aggreg table to convert the HOUR facttable to the local time of the data mart database when aggregating to days. Thefollowing steps show how to update the twg.day_aggreg table in the TWH_MARTdatabase with an offset for the local time. This allows you to perform an hourlyincrement time change and adjust the time for daylight savings time (DST). Afteryou complete these steps, no other modifications are necessary to allow for DSTchanges. The rollup program will provide the updates for the local time when itruns.1. Edit the $TWH_TOPDIR/tools/bin/rollup.db2.template file.2. Add the following at the top of the script: TWG.DAY_AGGREG set
GMT_OFFSET = current timezone;
3. Save the $TWH_TOPDIR/tools/bin/rollup.db2.template file.
Note: This change applies to all your data. For example, if you rollup 6 months ofdata and 3 months of the data is in a different DST time zone, then thataggregation will be off by an hour.
Refer to the Enabling an Application for Tivoli Enterprise Data Warehouse foradditional information about performing an hourly increment time change.
270 Installing and Configuring Tivoli Enterprise Data Warehouse
Restarting of Tivoli Presentation Services services when the data martdatabase is recycled
Tivoli Presentation Services services need to be restarted any time the data martdatabase is stopped and started again. For example, when new sources or targetsare added to a data mart, the data mart database is recycled. After the data martdatabase is recycled, you must restart your Tivoli Presentation Services services foryour reports to run properly. You can restart the Tivoli Presentation Servicesservices manually or by rebooting the Tivoli Presentation Services server.
The report interface stores data mart connection information in memory on theTivoli Presentation Services server. If the data mart database is stopped, the cachedconnection information is no longer valid. You do not receive an error message, butreports are blank. To clear memory and create a new connection to the data martdatabase, restart the Tivoli Presentation Services services.
To restart the Tivoli Presentation Services services manually, refer to Appendix D,“Starting and stopping Tivoli Presentation Services”, on page 329.
Chapter 16. Administering Tivoli Enterprise Data Warehouse 271

272 Installing and Configuring Tivoli Enterprise Data Warehouse
Chapter 17. Problem determination
This chapter lists installation, configuration, and other problems and theirsolutions. It also describes how to get information to debug problems. It containsthe following topics:v “Log files”v “Messages” on page 277v “Problems installing DB2” on page 279v “Problems installing Tivoli Enterprise Data Warehouse” on page 279v “Recovering from an incomplete installation of Tivoli Enterprise Data
Warehouse” on page 285v “Problems with reinstalling Tivoli Enterprise Data Warehouse” on page 288v “Problems with uninstalling Tivoli Enterprise Data Warehouse” on page 289v “Problems with configuring and using Tivoli Enterprise Data Warehouse” on
page 290v “Understanding the report interface (RPI) vault” on page 297v “Problems installing warehouse packs” on page 297v “Problems with uninstalling warehouse packs” on page 298v “Recovering from an unsuccessful installation or an unsuccessful reinstallation of
a warehouse pack” on page 299v “Warehouse pack configuration problems” on page 302v “Adding trace information to the log files for ETL processes” on page 304v “Tivoli Presentation Services not starting” on page 309v “Problems with reports” on page 310
Log filesThis section lists the log files created during the installation and use of TivoliEnterprise Data Warehouse. These include the logs created by the Tivoli EnterpriseData Warehouse core application, as well as logs that you encounter while usingTivoli Enterprise Data Warehouse that are created by other software, such as DB2Universal Database Enterprise Edition and Tivoli Presentation Services.
Installation log filesEvery machine on which Tivoli Enterprise Data Warehouse is installed contains loginformation for the components installed on that machine.
If you experience problems, look at the log information on the local machine. Ifyou need additional information, look at the log information on remote machineson which you have already installed Tivoli Enterprise Data Warehouse. In theevent of a database connection error, log information on remote machines can behelpful.
When you install Tivoli Enterprise Data Warehouse, information is collected in thefollowing log files.
© Copyright IBM Corp. 2001, 2003 273
The TWH.log fileThis log file contains a detailed list of activities that occurred during theinstallation of Tivoli Enterprise Data Warehouse and its components. This file islocated in the directory containing the installed Tivoli Enterprise Data Warehousefiles. By default, this directory is C:\Program Files\TWH on Windows systems,and c:/opt for Solaris, Linux, and AIX systems. Check the environment variableTWH_TOPDIR for the location in your installation.
Be sure to check the date and time stamps in the log file to make sure that you areviewing the most recent installation information. In addition, you might want toview the information in the log file starting from the bottom in order to view themost recently added contents first. This might avoid problems if the log filecontains information from multiple installations.
Enabling enhanced logging for Tivoli Enterprise Data Warehouse componentsduring installation: You can enable more detailed information pertaining to theinstallation of the Tivoli Enterprise Data Warehouse components than is providedwith normal logging to the TWH.log file. To enable enhanced logging to theTWH.log file, follow these steps:1. Determine the installation program name for your platform. The /ismp
directory of the installation CD contains the installation programs for eachplatform, as shown in Table 45.
Table 45. Installation program by platform
Platform Installation program name
AIX twh_setup.aix4-r1
Linux twh_setup.linux-ix86
Solaris twh_setup.solaris2
Windows twh_setup.exe
2. Determine the components to enable enhanced logging for and theircorresponding arguments for the command from Table 46.
Table 46. Components for enhanced logging
Component Argument
Central data warehouse cdwConfigure.scriptDebug=true
Data mart martConfigure.scriptDebug=true
Central data warehouse, data mart, andcontrol server
dwcConfigure.scriptDebug=true
Report interface rpiConfigure.scriptDebug=true
3. From the command line on the computer to install the component on, changeto the /ismp directory of the CD and issue the command for your platformfollowing the syntax shown in the example. If you are enabling enhancedlogging for multiple components specify another –P option and argument.program_name -P argument
The following are some examples of command usage:v To enable enhanced logging during the installation of the control server and
report interface components on a Windows system:twh_setup.exe -P dwcConfigure.scriptDebug=true-P rpiConfigure.scriptDebug=true
274 Installing and Configuring Tivoli Enterprise Data Warehouse
v To enable enhanced logging during the installation of the report interfacecomponent on a Windows system:twh_setup.exe -P rpiConfigure.scriptDebug=true
v To enable enhanced logging during the installation of the central datawarehouse component on a Windows system:twh_setup.exe -P cdwConfigure.scriptDebug=true
v To enable enhanced logging during the installation of the central datawarehouse and data mart components on a Solaris system:./twh_setup.solaris -P cdwConfigure.scriptDebug=true-P martConfigure.scriptDebug=true
v To enable enhanced logging during the installation of the data martcomponent on a Solaris system:./twh_setup.solaris -P martConfigure.scriptDebug=true
4. Continue with the installation program.
The DB2 log fileThe DB2 log file twh_ibm_db2_runlog.log is located in the temporary directory(%TEMP% on Windows systems, $TMPDIR on UNIX systems). If you specified adifferent temporary directory during installation, this log file is contained in thedirectory you specified. After the Tivoli Enterprise Data Warehouse installation hascompleted successfully, the twh_ibm_db2_runlog.log file is moved to%TWH_TOPDIR%\install\logs on Windows systems andTWH_TOPDIR/install/logs directory on UNIX systems.twh_ibm_db2_runlog.logcontains markers to identify the beginning of each component in the installation.These markers are:
MARKCOREIndicates the beginning of the log section for installing a Tivoli EnterpriseData Warehouse core component. Every installation attempt for each of thefour Tivoli Enterprise Data Warehouse components generates aMARKCORE marker in the log file.
MARKpacknameIndicates the beginning of the log section for the warehouse pack whoseinstallation directory is named packname. For example, MARKECOindicates the beginning of the log entries for installing a warehouse packfrom the directory eco.
These markers are created when attempting to connect to a database with themarker name, which records a connection failure. This marker generates a failuremessage so you can quickly locate the Tivoli Enterprise Data Warehouseinstallation information in the log file. The log file always contains a failuremessage for the connection attempts to MARKCORE, one for each componentinstalled on the machine, and a failure message for the connection attempt toMARKappname for each warehouse pack you install.
Be sure to check the date and time stamps in the log file to make sure that you areviewing the most recent installation information. In addition, you might want toview the information in the log file starting from the bottom in order to view themost recently added contents first. This might avoid problems if the log filecontains information from multiple installations.
Chapter 17. Problem determination 275
Uninstallation log filesThe Tivoli Enterprise Data Warehouse core application uninstallation log,TWHUninstall.log, contains information about the activities that occurred duringthe uninstallation of Tivoli Enterprise Data Warehouse and its components. It islocated in the directory specified by the TWH_TOPDIR environment variable.Information for warehouse pack uninstallations is directed to the screen.
The DB2 log fileThe DB2 log file twh_ibm_db2_runlog.log contains output and errors from DB2commands run during the installation process. This file is located in the temporarydirectory (%TEMP% on Windows operating systems, $TMPDIR on UNIX operatingsystems). If you specified a different temporary directory during installation, thislog file is contained in the directory you specified. The twh_ibm_db2_runlog.logfile contains markers to identify the beginning of each component in theuninstallation. These markers are:
MARKcomponent_identifierRMIndicates the beginning of the log section for componentcomponent_identifier. Components are identified as follows:
A Control server
C Central data warehouse server
M Data mart server
R Report server
MARKADELIndicates the beginning of the log section for a warehouse packuninstallation.
These markers are created by attempting to connect to a database with the markername, which records a connection failure. This marker generates a failure messageso you can quickly locate the Tivoli Enterprise Data Warehouse uninstallationinformation in the log file. The log file always contains a failure message for theconnection attempts to MARKcomponent_identifierRM, one for each component youare uninstalling from the machine
Be sure to check the date and time stamps in the log file to make sure that you areviewing the most recent installation information. In addition, you might want toview the information in the log file starting from the bottom in order to view themost recently added contents first. This might avoid problems if the log filecontains information from multiple installations.
Warehouse pack log filesThe warehouse packs log information to a log file in theTWH_TOPDIR/apps/PRODUCT_CODE directory, where PRODUCT_CODE is theunique three-character identifier for the warehouse pack.
Warehouse pack patch log filesThe warehouse pack patch installation program logs information to the followingfiles:v twh_ibm_db2_wpack_patch_runlog.logv twh_install_wpack_patcher.log
276 Installing and Configuring Tivoli Enterprise Data Warehouse
These files are located in theTWH_TOPDIR/apps/PRODUCT_CODE/install/logs/PATCH_ID directory, wherePRODUCT_CODE is the unique three-character identifier for the warehouse packand PATCH_ID is an alphanumeric identifier for the patch.
Fix pack and interim fix log filesInstalling Tivoli Enterprise Data Warehouse Fix Pack 2 or an interim fix creates thefollowing log files:v For Tivoli Enterprise Data Warehouse Fix Pack 2:
– twh_ibm_db2_patch_runlog.log@patch_v1.1.2– twh_install_v1.1.2.log
These files are created in the TWH_TOPDIR/install/logs/patch_1.1.2 directory.v For interim fixes, information is logged to the twh_install_v1.1.2@efixnum file,
where num indicates the numerical identifier of the interim fix.These files are created in the TWH_TOPDIR/install/logs/patch_1.1.2@efixnumdirectory.
Tivoli Presentation Services log filesThe Tivoli Presentation Services application logs information to a number of logfiles in the ps_installdir/log directory, where ps_installdir is the directory whereTivoli Presentation Services is installed.
When Tivoli Presentation Services is running, log information for the TivoliPresentation Services services is written to the log files in the /fwp_wc and/fwp_mcr for the Server for IBM Console service and the Web Services for the IBMConsole service, respectively. A start and stop message for each Tivoli PresentationServices task that is run is written to theps_installdir/log/fwp_wc/GlobalMsg.number log file, where the most recent log hasnumber = 1.
Language pack log filesLog information for the language packs installed on the machine is located in thedirectory specified by $TWH_TOPDIR/nls.
MessagesYou may encounter messages from the following applications when installing andusing Tivoli Enterprise Data Warehouse:v Installation messagesv DB2 messagesv Uninstallation messagesv Tivoli Presentation Services messages
These messages are described in the following sections.
Installation messagesTivoli Enterprise Data Warehouse installation messages are displayed to the user inthe language of the current locale and recorded in the log files in English. Inaddition, the message information written to the logs contains more detail about a
Chapter 17. Problem determination 277
problem than the information displayed to the user. To assist you in associating themessages displayed to a user with the information in the logs, most error messagesare numbered.
The messages displayed to the user have the format CDWppnnnnS, where:
CDW Identifies the component. The component code CDW identifies an errormessage as coming from Tivoli Enterprise Data Warehouse.
pp Indicates the phase of the installation in which the error occurred. Thefollowing values are possible:
IA Indicates that the error occurred during the installation of awarehouse pack.
IC Indicates that the error occurred during the installation of one ofthe core components of the Tivoli Enterprise Data Warehouseapplication.
ID Indicates that the error occurred during the configuration of DB2or one of its components.
IJ Indicates that the error occurred during the configuration of theJava components required by DB2 Universal Database EnterpriseEdition.
IS Indicates that the error was detected in the InstallShield programbefore starting the installation of Tivoli Enterprise Data Warehouseor any of its components or prerequisite applications.
nnnn Indicates the message number. This is a four digit number, padded withzeroes.
S Indicates the severity of the error. Severities are as follows:
I Informational. This type of message provides you with informationor feedback about typical events that have occurred or areoccurring, or requests information from you in cases where theoutcome is not negative, regardless of the response.
W Warning. This type of message indicates that potentiallyundesirable conditions have occurred or could occur, but theprogram was able to continue. Warning messages sometimes askyou to make a decision before processing continues.
E Error. This type of message indicates a problem that requiresintervention or correction before the program can continue.
DB2 messagesBecause Tivoli Enterprise Data Warehouse uses DB2 commands during theinstallation of its components, you might encounter messages from DB2components also. For more detailed information about a DB2 error message, enterthe following command as the DB2 administrator from a DB2 command prompt:db2 ? db2 SQLerror_numberletter
where error_number is the number of the error message, and letter is the letterappended to the error number.
This provides complete information about the error message, including how itoccurs and what action you should take to correct it.
278 Installing and Configuring Tivoli Enterprise Data Warehouse
For additional information about DB2 messages, view the twh_ibm_db2_runlog.logfile located in the temporary directory and in the TWH_TOPDIR\install\logsdirectory if the installation was successful. In addition, refer to the DB2 messagemanuals.
Uninstallation messagesMessage information from the uninstallation program is displayed to the user andwritten to the TWHUninstall.log file, located in the directory specified by theTWH_TOPDIR environment variable.
Tivoli Presentation Services messagesBecause Tivoli Enterprise Data Warehouse installs Tivoli Presentation Services, youmight see messages from this program as well. Information about these messagescan be found in the online help for the IBM Console.
Problems installing DB2This section lists some problems that you might run into when installing DB2 onyour systems.
See the following link for some general DB2 support information:http://www.ibm.com/software/data/db2/udb/winos2unix/support
DB2 cannot be installed because NIS is installed in yourenvironment
When installing DB2, I received a message that DB2 cannot be installed becauseNIS (Network Information Systems) is installed in my environment. What should Ido?
Possible problem: The DB2 installation cannot create user IDs and group IDs.
Solution: Manually create user IDs and group IDs and then restart the DB2installation. You must create a DB2 instance user ID, a Fenced User ID, anAdministration Server ID, and the associated groups. You can also install DB2using the db2install command. For more information, see IBM DB2 UniversalDatabase for UNIX Quick Beginnings.
Problems installing Tivoli Enterprise Data WarehouseThis section describes problems you might encounter while installing TivoliEnterprise Data Warehouse.
Things to check firstMany times errors are caused by not doing the following things. Verify that youhave done or are doing the following things:v Make sure that you use the correct DB2 user names and passwords. For remote
central data warehouse and data mart databases, the install program verifies thehost name and port but does not verify the user name or password. Wheninstalling the Tivoli Enterprise Data Warehouse core product, the DB2 instanceowner ID and password or a DB2 user ID with the same priviledges as the DB2instance owner of the original DB2 installation must be used. Contact your DB2administrator for user and password information.
Chapter 17. Problem determination 279
v Make sure that you installed Tivoli Enterprise Data Warehouse components andrelated software in the following order:1. DB2 Universal Database and all prerequisite patches on all systems2. DB2 Warehouse Manager on any system that will be an agent site (if desired)3. Control server4. Central data warehouse5. Data mart server6. Report server7. Agent sites (if desired)8. Tivoli Enterprise Data Warehouse Fix Pack 29. Warehouse packs
v View the TWH.log file located in the directory specified by the TWH_TOPDIRenvironment variable.
v Make sure that the Tivoli Enterprise Data Warehouse hardware and softwareprerequisites are met on all systems in your installation. This includes ensuringthat each system has the appropriate operating system version and service level.Refer to the Tivoli Enterprise Data Warehouse Release Notes for detailedrequirements.
Common problems and solutionsRefer to the following sections for descriptions and solutions for commonproblems.v “Installation cannot copy files to the hard drive”v “Installation error when PATH variable is too long” on page 281v “DB2 version error” on page 281v “The DB2 log contains DB2 command errors” on page 281v “Processor license error is displayed in the DB2 logs” on page 282v “Export fails” on page 282v “The control database cannot be created” on page 283v “Installation log file contains errors” on page 284v “Installation program stops and asks for installation media” on page 284v “The installation locks up during the installation of Tivoli Presentation Services”
on page 284v “Silent install does not complete” on page 285
Installation cannot copy files to the hard driveThis is the first installation of Tivoli Enterprise Data Warehouse, and theinstallation failed because it could not copy files to the hard drive.
Possible problem: You do not have at least 2 GB of hard disk space available forthe installation and at least 600 MB of hard disk space available for temporaryusage by the installation program. Or, the value of the TEMP environment variablespecified a path that is too long. A long directory name, including a system defaultvalue such as C:\Documents and Settings\Administrator\Local Settings\Temp,can cause problems.
Solution: Allocate at least 2 GB of hard disk space for the installation and at least600 MB of hard disk space for temporary usage by the installation program.Change the value of the TEMP environment variable to a short path name toprevent installation errors. After this is complete, see “Recovering from an
280 Installing and Configuring Tivoli Enterprise Data Warehouse
incomplete installation of Tivoli Enterprise Data Warehouse” on page 285 forinformation on how to recover from a failed installation and then run the installprogram again.
Installation error when PATH variable is too longPossible problem: Installation of Tivoli Enterprise Data Warehouse might fail withthe following message in the TWH.log file:==> Testing DB2 exec path(F) CDWIC0024E Could not execute/locate DB2 command!!!==>
Solution: This is because the PATH environment variable has become too long.The PATH environment variable is limited to 2075 characters in length. Performstep 1 below. If the problem persists, perform step 2.1. During installation, specify a short temporary directory. For example, by
default, Windows 2000 sets the TEMP variable to C:\Documents andSettings\db2admin\Local Settings\Temp. Specify C:\temp.
2. Before you start to install Tivoli Enterprise Data Warehouse, temporarilyshorten the PATH environment variable. During the installation, the PATHvariable is appended to the end of the PATH that is created.
In addition, check the path specified by the TEMP environment variable. Changingthe value of the TEMP environment variable to a short path name can preventinstallation errors. A long directory name, including a system default value such asC:\Documents and Settings\Administrator\Local Settings\Temp, might causeproblems.
Once this is complete, see “Recovering from an incomplete installation of TivoliEnterprise Data Warehouse” on page 285 for information on how to recover from afailed installation and then run the install program again.
DB2 version errorI received the following error message when I tried to install the DB2 server on amachine with the DB2 administrator client already on it:Setup has detected that you have version 7.1.5.0 of DB2 installed and theproduct you are installing requires version 7.1.5.*.
Possible problems and solutions:
Choose the situation that applies to you and complete the specified actions tofix the problem.– If you are installing on a UNIX system, you might have entered the wrong
user name and password for the local DB2 user. Click the Back button, entervalid user name and password information, and continue with theinstallation.
– If you are installing on a UNIX system and the Message of the Day option isenabled, the Tivoli Enterprise Data Warehouse installation fails if themessage is greater than one line long. Turn the MOTD option off, and restartthe Tivoli Enterprise Data Warehouse installation.
– The DB2 administrator client exists, and you need to install the DB2 server.Uninstall the DB2 client using the DB2 uninstall procedures, and then installthe DB2 server.
The DB2 log contains DB2 command errorsThe twh_ibm_db2_runlog.log file contains DB2 command failure information forDB2 commands that failed during the install process.
Chapter 17. Problem determination 281
Possible problem: You entered a DB2 user name or password that is not valid.
Solution: Run the installation program again, and enter the correct DB2 user nameand password information.
Processor license error is displayed in the DB2 logsThe following message is displayed in the DB2 logs:SQL8017W The number of processors on this machine exceeds the defined entitlementof "1" for the product "DB2 Enterprise Edition". The number of processors on thismachine is "8". You should purchase additional processor entitlements from yourIBM representative or authorized dealer and update your license using the LicenseCenter or the db2licm command line utility. For more information on updatingprocessor licenses, refer to the Quick Beginnings manual for your platform. Formore information on the db2licm utility, refer to the DB2 Command Reference.
Possible problem: Although a warning message is logged, it does not negativelyimpact database operations. Tivoli Enterprise Data Warehouse provides a restrictedlicense for DB2, which does not require you to acquire the correct number ofprocessor licenses as long as you follow the restricted license terms. See yourlicense agreements for more information.
Solution: No action is required for this situation. If you want to disable theprocessor checking and update the number of licensed processors, perform thefollowing steps:1. An instance must be created on UNIX systems before performing these steps.2. Log in as a user with SYSADM, SYSCTRL or SYSMAINT authority. The
db2licm utility can be found in the following locations:v For UNIX-based operating systems, if INSTHOME/sqllib/adm is not in your
PATH, change your directory.v For Windows 32-bit operating systems and OS/2®, go to
x:\DB2_directory\bin, where x:\DB2_directory\ is your DB2 installation driveand path.
3. Determine which product you have by issuing the db2licm -l command. TheDB2 product passwords relevant to this section are listed as follows:
DB2 UDB Enterprise Extended Edition:DB2UDBEEE
Enterprise Edition:DB2UDBEE
Warehouse Manager:DB2UDBWM
4. Update the number of processors using:db2licm -n productPassword numberOfProcessors
Export failsI received the following SQL error:SQL0805N Package "packageName" was not found.
Possible problem: The installation failed during the export phase. If you havetrouble exporting, it is likely that the DB2 utility programs and applications are notproperly bound to the database.
Solution: Bind the DB2 utilities and application programs to the database from theDB2 command line or from a graphical user interface.v Using the command line:
282 Installing and Configuring Tivoli Enterprise Data Warehouse
– To rebind the DB2 utility programs to the database from a command prompt,log on as a user with database administrator authority, open a DB2 CLPwindow, and enter the following command from the bnd\ subdirectory of theinstance, while connected to the database specified in the message:db2 bind @db2ubind.lst blocking all grant public
– To rebind the DB2 applications to the database from a command prompt, logon as a user with database administrator authority, open a DB2 CLP window,and enter the following command from the bnd\ subdirectory of the instance,while connected to the database specified in the message:db2 bind @db2cli.lst blocking all grant public
v Using the graphical user interface:– To bind DB2 utilities, perform the following steps:
1. Click Start → Programs → IBM DB2 → Client Configuration Assistant.2. In the Client Configuration Assistant window, select the database alias,
and then click Bind.3. In the Bind Database window, select Bind DB2 utilities, and then click
Continue.4. In the Connect to DB2 Database window, type the user ID and password
used to connect to the database, and then click OK.5. In the Bind Utilities window, select all of the utilities in the list, and then
click OK.6. In the Bind Results window, make sure that the binding was successful,
and then click Close.– To bind DB2 commands, perform the following steps:
1. Click Start → Programs → IBM DB2 → Client Configuration Assistant.The Client Configuration Assistant opens.
2. In the Client Configuration Assistant window, select the database alias,and then click Bind.
3. In the Bind Database window, select Bind user applications, and thenclick Continue.
4. In the Connect to DB2 Database window, type the user ID and passwordused to connect to the database, and then click OK.
5. In the Bind Applications window, select all of the applications in the list,and then click OK. The Bind Results window appears.
6. In the Bind Results window, make sure that each binding was successful,and then click Close.
The control database cannot be createdDB2 is not able to create the Tivoli Enterprise Data Warehouse control database. Or,my Tivoli Enterprise Data Warehouse application and warehouse pack installationsare unable to create the Tivoli Enterprise Data Warehouse control database.
Possible problem: DB2 is unable to recognize that you have administratorauthority. You are logged on with a user ID that is defined in another Windowsdomain and not as a user ID defined locally on the DB2 installation targetmachine. Therefore, you cannot create databases.
Solution: Log on with a user ID that is defined locally on the DB2 installationtarget machine. If necessary, create a user on the DB2 installation target machinethat has administrator authority, and install both DB2 and Tivoli Enterprise DataWarehouse as that user.
Chapter 17. Problem determination 283
Installation log file contains errorsAfter the installation completes, the twh_ibm_db2_runlog.log file containsmessages similar to the following:SQL1013N The database alias name or database name "MARKCORE" could not befound. SQLSTATE=42705SQL1013N The database alias name or database name "TWH_MD" could not befound. SQLSTATE=42705SQL1013N The database alias name or database name "TWH_MD" could not befound. SQLSTATE=42705
drop tablespace usertempDB21034E The command was processed as an SQL statement because it was not avalid Command Line Processor command. During SQL processing it returned:SQL0204N "USERTEMP" is an undefined name. SQLSTATE=42704
These messages are generated when the installation program attempts to drop atable space or other database object before creating it. The installation programdoes this in order to ensure that the object is created through the Tivoli EnterpriseData Warehouse installer. Neither of the above messages indicates an actualproblem.
Installation program stops and asks for installation mediaThe installation stops during the actual installation of components and asks forinstallation media.
Possible problem and solution: This can reflect one of the following problems:v The incorrect CD is in the drive. Insert the correct CD and continue with the
installation.v You specified an incorrect source location during the data collection phase at the
beginning of the installation and selected the option to verify later. Stop andrestart the installation.
v Your user ID does not have the correct permissions to access and use theinstallation media. A person with the correct permissions must restart andperform the installation, as follows:– On UNIX systems, this is typically the root user or administrator account.– On Windows NT systems, this is an account with administrator privilege.– On Windows 2000 systems, this is an account with administrators group
privilege.
The installation locks up during the installation of TivoliPresentation ServicesDuring the installation of Tivoli Presentation Services, the installation programlocks up.
Possible problem: An existing Web server such as Apache or Microsoft IIS is onthat system and is using the same ports.
Solution: Follow the instructions for a failed uninstallation as described in“Uninstalling warehouse packs” on page 199 and then do one of the following:v Uninstall or disable the existing Web server and allow the Tivoli Enterprise Data
Warehouse install program to install the Web server required by TivoliPresentation Services.
v Enter the following command to list all ports on the machine and theapplications using them:netstat -an
284 Installing and Configuring Tivoli Enterprise Data Warehouse
Then change the ports used for the Tivoli Enterprise Data Warehouseinstallation.
Reinstall Tivoli Enterprise Data Warehouse.
Silent install does not completev You are using a response file to perform a silent installation and the installation
appears to begin but does not complete. No messages or logs are generated.Possible problem: The last line of the response file is not correct.Solution: Check the last line of the response file. It must be #.done. There cannotbe cannot be a blank or empty line after this line.
Recovering from an incomplete installation of Tivoli Enterprise DataWarehouse
If there is a failure during the installation of the Tivoli Enterprise Data Warehousecore application, determine if the uninstallation program was copied:v On Windows systems, check the %TWH_TOPDIR%\uninstall directory for
uninstall.exe.v On UNIX systems, check the $TWH_TOPDIR/uninstall directory for
uninstall.bin.
See “Uninstalling the Tivoli Enterprise Data Warehouse core application” onpage 206 for additional information.
If there is a failure during the installation of the Tivoli Enterprise Data Warehousecore application before the uninstallation program is copied, you need to performthe following steps before reinstalling:1. Review the TWH.log file. Contact customer support if necessary. After the
problem is determined and fixed, then perform the following steps beforereinstalling.
2. Verify that the directory specified by the TEMP environment variable meetsthe criteria specified in “Prerequisite hardware and software” on page 13.Make sure that at least 2 GB of hard disk space is available for the TivoliEnterprise Data Warehouse installation, and that at least 600 MB of hard diskspace is available for temporary usage by the installation program.
3. Stop the following services as described in Appendix D, “Starting andstopping Tivoli Presentation Services”, on page 329.v Web Services for the IBM Consolev Server for IBM Consolev Tivoli Presentation Services HTTP Serverv Tivoli Presentation Services HTTP Administration
4. Delete the directory specified by the TWH_TOPDIR environment variable andall its subdirectories.
5. Delete the installation directory used for Tivoli Presentation Services.6. Make a backup copy of the vpd.properties file. This file is located in the the
following location:v For Windows, the file is located in the WINNT/ directory.v For AIX, the file is located in /usr/lib/objrepos/.v For Linux, the file is located in /root/.
Chapter 17. Problem determination 285
7. Use a text editor to edit the vpd.properties file and delete entries beginningwith TEDW, TDW, Tivoli_Enterprise_Data_Warehouse, andTivoli_Data_Warehouse and the entries for Tivoli Presentation Services. Entriesfor Tivoli Presentation Services are usually prefixed with a sequence ofhexadecimal digits and the remainder of the entry consists of information thatindicates an association with Tivoli Presentation Services.
Note: For Solaris systems, instead of editing the vpd.properties file, typepkginfo from a command line to view all the packages that areinstalled. Remove all packages beginning with TDW or TEDW. Typepkgrm packageName to remove the Tivoli Enterprise Data Warehousepackages.
Do not delete the vpd.properties file. This file is used by all applications thatuse InstallShield MultiPlatform and deleting it can affect those applications.
8. Verify that the local and remote Tivoli Enterprise Data Warehouse controldatabases (TWH_MD, TWH_MART, TWH_CDW) are deleted by completingthe following steps:a. On the computer on which the database or databases reside, logon as a
DB2 administrator.b. Enter the following command at the DB2 CLP prompt to list the local and
remote databases:db2 list database directory
c. Enter the following commands to disconnect all applications using thedatabase instance:db2stop forcedb2start
d. There should not be an entry for TWH_MD, TWH_MART, or TWH_CDW.If one or more of these entries exist, enter the following command for eachlocal database listed in order to drop and uncatalog the database, wherelocalDatabaseName is the name of the local database:db2 drop database localDatabaseName
Enter the following command for each remote database listed, to uncatalogthe database, where databaseName is the name of the remote database:db2 uncatalog database databaseName
9. Uncatalog the ODBC data sources associated with Tivoli Enterprise DataWarehouse. Enter the following command to list the ODBC data sources:db2 list system ODBC DATA SOURCES
Enter the following command to uncatalog the data sources, wheredataSourceName is the name of the ODBC data source you want to uncatalog:db2 uncatalog system dataSourceName
10. Uncatalog all Tivoli Enterprise Data Warehouse remote nodes that are notuncataloged. Using a DB2 administrator user account, type the followingdb2 list node directory
If TEDW001, TEDW002, or TEDW003 is listed, enter the following commandfor each remote node listed in order to uncatalog the node:db2 uncatalog node remote_node_name
11. If your deployment contains one or more AIX systems, perform the stepslisted in “Additional steps for recovering from an incomplete installation onAIX systems” on page 287.
286 Installing and Configuring Tivoli Enterprise Data Warehouse
Additional steps for recovering from an incompleteinstallation on AIX systems
In addition to the above steps, do the following to completely uninstall TivoliEnterprise Data Warehouse on an AIX system if the uninstallation program fails.
Start the System Management Interface Tool (SMIT) and complete the followingsteps:1. Select Software Installation and Maintenance.2. Select Software Maintenance and Utilities.3. Select Remove Installed Software.4. In the Software name field, click List or press F4 to list installed software.5. Locate the entries for Tivoli Enterprise Data Warehouse. Tivoli Enterprise Data
Warehouse entries begin with TEDW or Tivoli_Enterprise_Data_Warehouse.6. Press F7 to select each of the entries.7. When all entries are selected, press Enter.8. Set the following fields in the Remove Installed Software window:
a. Set Preview only to no.b. Set Remove dependent software to yes.c. Set Extend File System to yes.d. Set Detailed output to yes.
9. Click OK, or press Enter.10. Press Enter to confirm the removal. If everything completes successfully, OK
appears at the top of the Command Status window. If an error occurs, use theCommand Status window to determine the failure and take the appropriateaction.
Additional steps for recovering from an incomplete TivoliPresentation Services installation
If Tivoli Presentation Services fails to install, you must do the following beforeattempting to reinstall:v Make a backup copy of the vpd.properties file located in the WINNT/ directory
for Windows and in the following directories for UNIX:– For AIX, the vpd.properties file is located in /usr/lib/objrepos.– For Linux, the vpd.properties file is located in /root.
Use a text editor to delete entries beginning with TEDW and entries beginningwith Tivoli_Enterprise_Data_Warehouse. Using a text editor, remove TivoliPresentation Services entries from the vpd.properties file.
v Clean up the product registry. Depending upon the operating system that youare using, this might not be applicable.1. For systems running Windows NT or Windows 2000:
a. On the taskbar, click the Start button, then select Run.b. Select regedt32.c. Click OK.d. In the Registry Editor window, select HKEY_LOCAL_MACHINE.e. Expand the System folder.f. Repeat the following steps for the CurrentControlSet folder, and all
ControlSetxxx folders.
Chapter 17. Problem determination 287
1) Expand the folder.2) Expand the Services folder.3) Delete the following folders:
– TivoliPresentationServicesHTTPAdministration– TivoliPresentationServicesHTTPServer– ps_mcr– ps_wc
v Delete the installation directory for Tivoli Presentation Services.
Problems with reinstalling Tivoli Enterprise Data WarehouseRunning the uninstallation program makes the system ready for the nextinstallation if the next installation has the same components as the previousinstallation. For example, if the machine hosts the central data warehouse in adistributed configuration, uninstalling that component allows the reinstallation ofthe central data warehouse database with no extra work required on that host.However, if you want to change your configuration by installing a different set ofcomponents or you want to move components, you need to make sure that youuninstall all components from every machine in the configuration and reinstallaccordingly. For more information, see Chapter 12, “Removing Tivoli EnterpriseData Warehouse from your enterprise”, on page 199.
After uninstalling Tivoli Enterprise Data Warehouse, ensure all databases aredropped and nodes are uncataloged before reinstalling. View log informationprovided by the uninstallation program to make sure the uninstallation completedsuccessfully. Instructions for these activities are provided in “Problems withuninstalling Tivoli Enterprise Data Warehouse” on page 289.
Symptom:
v You select to install a component in the installation wizard that is not listed inthe subsequent Summary window.
v You select to install a component in the installation wizard that is listed in thesubsequent Summary window as having a size of 0 bytes.
v You see inconsistencies between the selections available in the installationwizard and the actual windows presented by the installation program.
Possible problem: The vpd.properties file contains Tivoli Enterprise DataWarehouse entries.
Solution: Make a backup copy of the vpd.properties file. Using a text editor edit,the vpd.properties file and remove the lines that begin with TEDW and the linethat begins with Tivoli_Enterprise_Data_Warehouse. Do not delete thevpd.properties file. This file is used by all applications that use the InstallShieldMultiPlatform and deleting it can affect those applications. If the installationcompleted, you must uninstall before restarting the installation. If the installationfailed or you cancelled the installation, you do not have to uninstall.
288 Installing and Configuring Tivoli Enterprise Data Warehouse
Problems with uninstalling Tivoli Enterprise Data WarehouseThe uninstallation program is written to support rollback for errors duringinstallation. This means that when an error is encountered during installation, theuninstallation program is run automatically to undo the installation. Therefore, theuninstallation attempts to remove as much as possible and appends loginformation in the following log files:v TWHUninstall.log file, located in the directory specified by the TWH_TOPDIR
environment variablev twh_ibm_db2_runlog.log (for DB2 command failures), located as follows:
– /tmp directory for UNIX– The location specified by the TEMP environment variable for Windows
Notes:
1. If you specified a different value for the temporary directory duringinstallation, the log information written by the uninstall program is in thetemporary directory you specified.
2. Review all log file information each time the uninstallation program is run toconfirm that the uninstallation program ran successfully.
To drop a database that could not be dropped during the uninstallation of thecontrol server, perform the following steps:1. From the server on which the database resides, log on as a DB2 administrator.2. Enter the following command:
db2 list database directory
3. If the database that was not dropped is not listed in the directory, this meansthat the database might exist but does not have a directory entry. Databasesmust have a directory entry in order to drop them. Create a directory entrywith the following command:db2 catalog database database_name authentication server
If this command returns an error indicating that the database does not exist,ignore this error. This indicates that there is no physical database and you cancontinue with step 5.
4. Enter the following command:db2stop force
5. Enter the following command:db2 drop database database_name
6. Enter the following command:db2start
If the uninstall fails with errors not discussed in this section, perform the followingsteps with assistance from your local DB2 database administrator or contactcustomer support. Do not run the uninstallation program again.1. Make a backup copy of the vpd.properties file located in the \WINNT
directory. Use a text editor to delete all entries beginning with TEDW and allentries beginning with Tivoli_Enterprise_Data_Warehouse.
2. Verify the Tivoli Enterprise Data Warehouse control databases (TWH_MD,TWH_MART, TWH_CDW) have been deleted by completing the followingsteps:a. From the server on which the database or databases reside, log on as a DB2
administrator.
Chapter 17. Problem determination 289
b. Enter the following command:db2 list database directory
c. Entries for TWH_MD, TWH_MART, TWH_CDW should not exist.3. Verify all Tivoli Enterprise Data Warehouse remote databases have been
uncataloged. Using a DB2 administrator user account, enter the followingcommand:db2 list database directory
4. If TWH_MD, TWH_MART, or TWH_CDW is listed as output from step 3, enterthe following command for each remote database listed, in order to uncatalogthe database:db2 drop database remote_database_name
5. Verify that all Tivoli Enterprise Data Warehouse remote nodes have beenuncataloged. Using a DB2 administrator user account, enter the followingcommand:db2 list node directory
6. If TEDW001, TEDW002, or TEDW003 is listed as output from step 4, enter thefollowing command for each remote node listed, in order to uncatalog thenode:db2 uncatalog node remote_node_name
7. Delete the directory specified by the TWH_TOPDIR environment variable.
Problems with configuring and using Tivoli Enterprise Data WarehouseRefer to the following sections for descriptions and solutions to common problems.v “What to do if your DB2 Data Warehouse Center logon fails”v “Tivoli Presentation Services services do not start correctly on AIX” on page 292v “The Web Services for the IBM Console service does not start on UNIX systems”
on page 293v “Extended shared memory error on AIX with the report interface when one of
the DB2 databases is on the same machine” on page 294v “Authentication error with Informix on AIX” on page 295v “Unexpected DB2 Data Warehouse Center errors” on page 295v “Other report interface errors” on page 295v “Problems using DB2 remote warehouse agents” on page 296
What to do if your DB2 Data Warehouse Center logon failsIf your DB2 Data Warehouse Center logon fails, make sure that DB2 user ID andpassword information are correct and that the control database correctly specifiesTWH_MD in each of the following areas:v The DB2 Data Warehouse Center, as described in “Specifying the control
database (TWH_MD) for the DB2 Data Warehouse Center” on page 291v The DB2 Warehouse Control Database Manager, as described in “Specifying the
control database (TWH_MD) for the DB2 Warehouse Control Database Manager”on page 291
v The ODBC data sources for warehouse packs, as described in “Verifying thecontrol database (TWH_MD) for ODBC data sources” on page 291
The first time you open the DB2 Data Warehouse Center or if you are using theDB2 Data Warehouse Center with applications other than Tivoli Enterprise DataWarehouse, you might need to set the control database in the DB2 Data Warehouse
290 Installing and Configuring Tivoli Enterprise Data Warehouse
Center and DB2 Warehouse Control Database Manager as described in thefollowing sections. If you did not set the user information in the DB2 WarehouseControl Database Manager, you receive a message similar to the following:DWC07322E The warehouse server was unable to authenticate the password providedfor user "db2admin". The error occurred in response to an authentication requestfrom client "jbecky". RC = 7322 RC2 = 0
In the preceding example, db2admin is the user name that was specified in the DataWarehouse Center Logon window and jbecky is the name of the Windows usercontrol server who initiated the logon request.
Specifying the control database (TWH_MD) for the DB2 DataWarehouse CenterThe first time you open the DB2 Data Warehouse Center and if you are using theDB2 Data Warehouse Center with applications other than Tivoli Enterprise DataWarehouse, you might need to set the control database in the DB2 Data WarehouseCenter.
To specify the control database for Tivoli Enterprise Data Warehouse in the DB2Data Warehouse Center:1. On the Windows taskbar, click Start → Programs → IBM DB2 → Control Center.2. From the DB2 Control Center, start the DB2 Data Warehouse Center by clicking
Tools → Data Warehouse Center.3. In the DB2 Data Warehouse Center Logon window, click Advanced. You do not
need to provide login information.4. In the Advanced window, type TWH_MD in the Control database field.5. Click OK.
Specifying the control database (TWH_MD) for the DB2Warehouse Control Database ManagerThe control database is configured during the initial installation of TivoliEnterprise Data Warehouse. Perform the procedure in this section only if you havetrouble starting the DB2 Data Warehouse Center.
To specify the control database for Tivoli Enterprise Data Warehouse in the DB2Warehouse Control Database Manager:1. Open the DB2 Data Warehouse Center - Control Database Management
window by selecting Start → Programs → IBM DB2 → Warehouse ControlDatabase Management.
2. Type TWH_MD in New control database.3. Do not change the schema name.4. Type the DB2 user ID and password for the control database, and then click
OK.5. When the Processing has completed message appears, click Cancel.
The OK button might not become active; look for the Processing hascompleted message.
Verifying the control database (TWH_MD) for ODBC data sourcesThe ODBC data source TWH_MD is automatically created and configured duringthe installation of Tivoli Enterprise Data Warehouse. Perform this procedure toverify the ODBC data source for the control database has been created, and ifneeded, create and configure this ODBC data source.1. On Windows NT, perform the following steps:
a. On the Windows taskbar, click Start → Settings → Control Panel.
Chapter 17. Problem determination 291
b. Double-click ODBC Data Sources.2. On Windows 2000, perform the following steps:
a. On the Windows taskbar, click Start → Settings → Control Panel.b. Double-click Administrative Tools.c. Double-click Data Sources (ODBC).
3. In the ODBC Data Source Administrator window, click the the System DSNtab.
4. Look for the data source named TWH_MD.If the TWH_MD data source exists:a. Select it and then click Configure.b. Click Yes in the DB2 Message window.c. Proceed to step 5.
If the TWH_MD does not exist, click Add and proceed to step 6.5. Make sure that the user ID and password specified for this data source is
correct. If the information is correct, close the data source windows, and thenexit from this procedure.
6. In the Create New Data Source window, select IBM DB2 ODBC Driver fromthe list and click Finish.
7. In the ODBC IBM DB2 Driver - Add window, enter TWH_MD for the Datasource name, TWH_MD for the Database alias, and TWH_MD for the Description.Click OK.
8. In the ODBC Data Source Administrator window, select TWH_MD and clickConfigure.
9. In the DB2 Message window, click Yes.10. In the Connect To DB2 Database window, enter the DB2 logon information
and click OK. If you receive an error, view the error message text todetermine if the user ID and password information entered is correct.
11. In the CLI/ODBC Settings - DB2 window, click Cancel.12. Click OK.
Your setup and connection are complete.
Restarting warehouse server NT and logger servicesBefore attempting to logon to DB2 again, you must restart the warehouse serverNT and logger services as described in “Stopping and starting the DB2 warehouseservices” on page 249.
Tivoli Presentation Services services do not start correctly onAIX
The Web Services for the IBM Console (tcwebsvcs) service and the Server for IBMConsole (tcserver) service do not start and stop automatically on certain AIXsystems. For this reason there is a problem getting certain jar files copied to theTivoli Presentation Services installation directory during the installation of TivoliEnterprise Data Warehouse. After the Tivoli Enterprise Data Warehouse reportserver installation completes on an AIX machine, the user needs to restart thesystem to correctly complete the install; however, after the restart when the userlogs in to the IBM Console, they might see the following error message:The resource bundlecom.tivoli.twh.rpi.nls.RPIResources cannot befound. This message will not be repeated for thisfile.
292 Installing and Configuring Tivoli Enterprise Data Warehouse
After this message is closed the following error message is displayed:The resource bundlecom.tivoli.twh.rpi.security.nls.SecNavigatorResourcescannot be found. This message will not be repeatedfor this file.
After closing this message the IBM Web Console displays _WWReportsGroup_ inthe Portfolio instead of the Work With Reports task.
Possible problem: There is a known problem with starting and stopping the TivoliPresentation Services services on some AIX machines. These service problems aresymptoms that the Web Services for the IBM Console started before all of thenecessary jar files were copied by the Server for IBM Console service.
Solution: In order to fix this problem the user has to stop and restart these twoservices by running the following commands:v For the Web Services for the IBM Console service:
PS_install_dir/bin/private/generic_unix/stopwc.sh
v For the Server for IBM Console service:PS_install_dir/bin/private/generic_unix/stopmcr.sh
PS_install_dir is the Tivoli Presentation Services installation directory.
If this does not work you must use the kill command to stop each of therespective processes. After the processes have been stopped, restart them using thefollowing commands:v Start the Web Services for the IBM Console service first, using the following
command:PS_install_dir/bin/generic_unix/mcr.sh
v Next, start the Server for IBM Console service:PS_install_dir/bin/generic_unix/wc.sh
You can check the Tivoli Presentation Services services logs, which are located asfollows:v For Web Services for IBM Console service, logs are in the following directory:
PS_install_dir/log/fwp_mcr
v For Server for IBM Console service, logs are in the following directory:PS_install_dir/log/fwp_wc
The Web Services for the IBM Console service does not starton UNIX systems
Web Services for the IBM Console (tcwebsvcs) service is not starting on UNIXsystems. If you find that the Web Services for the IBM Console (tcwebsvcs) servicedoes not start, look for the following exception in the/PS_inst_dir/log/fwp_wc/stdoutn.txt, where PS_inst_dir is the directory whereTivoli Presentation Services is installed and n is a number, starting at zero (0) thatincrements each time the service is stopped and started.2002.02.19 11:48:34.177 com.tivoli.pf.orblet.Orblet startOrbApp() FWP4151E An erroroccurred on object request broker (ORB) com.tivoli.pf.wc.WcOrbletApp@3f192d3. whiletrying to execute the following routine: startup. Exception: (null)2002.02.19 11:48:34.180 com.tivoli.pf.orblet.Orblet runAppRoutine()java.lang.reflect.InvocationTargetException: java.lang.InternalError:Can’t connect to X11 window server using ’localhost:0’ as the value of the DISPLAYvariable.
at sun.awt.X11GraphicsEnvironment.initDisplay(Native Method)
Chapter 17. Problem determination 293
at sun.awt.X11GraphicsEnvironment.((((clinit>(X11GraphicsEnvironment.java:63)at java.lang.Class.forName1(Native Method)at java.lang.Class.forName(Class.java:134)at java.awt.GraphicsEnvironment.getLocalGraphicsEnvironment
(GraphicsEnvironment.java:64)at sun.awt.motif.MToolkit.((((clinit>(MToolkit.java:61)at java.lang.Class.forName1(Native Method)at java.lang.Class.forName(Class.java:134)at java.awt.Toolkit$2.run(Toolkit.java:509)at java.security.AccessController.doPrivileged(Native Method)
Possible problem: This indicates that the system where Tivoli Presentation Servicesis running does not have an X11 server running (this sometimes occurs on systemsthat do not have a display attached). If you are performing a silent installation ofTivoli Enterprise Data Warehouse on a UNIX system without a local X11 server,you must set and export the DISPLAY environment variable to a valid X11 server.The X11 server can be on a different system. The Web Services for the IBM Consoleservice needs to connect to an X11 server, which might be running on a differentmachine.
Solution:
v On Solaris and Linux, set the DISPLAY variable to an X11 server running on anysystem and start the service using the command/PS_inst_dir/bin/generic_unix/wc.sh.
v On AIX, perform the following steps:1. Modify the Web Services for IBM Console start script found at
/PS_inst_dir/bin/generic_unix/tcwebsvcsubsys. That script is similar to thefollowing:if [ -z "$DISPLAY" ]; then
DISPLAY=localhost:0fiexport DISPLAY
Change the statement to set the DISPLAY variable to any running X11 server.2. Start the Web Services for the IBM Console using the command
/PS_inst_dir/bin/generic_unix/wc.sh.
This is not a problem when using Windows.
Extended shared memory error on AIX with the reportinterface when one of the DB2 databases is on the samemachine
An extended shared memory error occurs on AIX with the report interface whenone of the DB2 databases is on the same machine:COM.ibm.db2.jdbc.DB2Exception: [IBM][CLI Driver] SQL1224NA database agent could not be started toservice a request,or was terminated as a result of a database system shutdownor a force command.SQLSTATE=55032
Possible problem: By default, AIX does not permit 32–bit applications to attach tomore than 11 shared memory segments per process, of which a maximum of 10can be used for local DB2 connections. When there is a local database on AIX, thereport interface encounters the following memory constraint error when accessingthat database, because the number of concurrent processes exceeds the allowableamount.
294 Installing and Configuring Tivoli Enterprise Data Warehouse
Solution: On a machine with DB2 Universal Database Enterprise Edition installed,run the following:export EXTSHM=ONdb2set DB2ENVLIST=EXTSHMdb2start
Authentication error with Informix on AIXThe following message occurs when attempting to use the Tables and Views pageof the Warehouse Source window on the control server:[MERANT][ODBC Informix driver][Informix] Authentication error.
Possible problem: This error prevents you from using the DB2 Data WarehouseCenter to list the tables and views in the Informix database.
Solution: Use the Informix client to list the tables and views. It does not preventyou from using the warehouse source with Tivoli Enterprise Data Warehouseprocesses and steps.
Unexpected DB2 Data Warehouse Center errorsUnexpected errors, like the following, are generated from the DB2 Data WarehouseCenter:v Sources or targets are not found.v You cannot log on.
Possible problem: DB2 Data Warehouse Center services need to be restarted.
Solution: Follow the procedures in “Stopping and starting the DB2 warehouseservices” on page 249 to stop and restart the Warehouse logger and Warehouseserver DB2 warehouse services.
Other report interface errorsv Symptom: The report, user group, or data mart you just created is not listed in
the right pane of the IBM Console.Possible problem: The IBM Console needs to be refreshed.Solution: Click the refresh link.
v Symptom: You are unable to see any public reports.Possible problem: You might not be a member of the user group assigned tothat associated data mart.Solution: Contact the Warehouse Security Administrator for Tivoli EnterpriseData Warehouse to obtain access to reports.
v Symptom: While creating a Summary report using a Netscape Navigatorbrowser, you encounter no Order By drop-down list values by which to orderyour metric attributes.Possible problem: There is not enough space to display all drop-down listvalues.Solution: From the Netscape Navigator menu bar, click Edit → Preferences Inthe left pane of the Preferences window, expand Appearance and select Fonts. Inthe For the Encoding drop-down list, select Unicode and decrease the variableand fixed width font sizes. This allows for more space in the field used formetric attributes in the IBM Console.
v Symptom: You scheduled a report to run automatically but it did not run.
Chapter 17. Problem determination 295
Possible problem: Your extract, transform, and load (ETL) processes might notbe scheduled to run automatically.Solution: In the DB2 Data Warehouse Center, verify that your ETL processes arescheduled to run automatically. See Chapter 15, “DB2 Data Warehouse Centeressentials”, on page 247 for more information.
Problems using DB2 remote warehouse agentsTo debug problems when installing and using DB2 Universal Database EnterpriseEdition, the DB2 Data Warehouse Center, or the DB2 Warehouse Manager, see theIBM DB2 Universal Database Troubleshooting Guide for general troubleshootinginformation. The following are specific actions to take if you have trouble runningwith DB2 remote warehouse agents:1. On the control server:
a. If the DB2 Data Warehouse Center is open, exit from it.b. Restart the Data Warehouse Center - Control Database Management
window. From the Windows taskbar, click Start → Programs → IBM DB2 →Warehouse Control Database Management.
c. Type TWH_MD in New control database.d. Type the DB2 user name and password and click OK.e. When the Processing has completed message appears, click Cancel.f. Log back on to the DB2 Data Warehouse Center and try again.
2. On the central data warehouse and data mart server:a. Restart the warehouse agent daemon by entering the following commands:
ps -ef|grep vwdaemonkill -3 pid_of_/usr/bin/vwdaemonps -ef|grep vwdaemon
You should see a new process ID for /usr/bin/vwdaemon.b. By default, the start of the DB2 warehouse agent by the warehouse agent
daemon is not logged. It helps to know when the agent starts and whethererrors are encountered. You can create a script to monitor the warehouseagent daemon and DB2 warehouse agent. It is suggested that you name thescript mon.sh and place it in the directory /var/IWH. A monitoring scriptcontains statements like the following:while truedo
cat startup.logcat vwdaemon.logps -ef|grep IWHsleep 1
done
Use this script to see when the agent process is started (IWH2AGNT) and tosee error messages generated by the warehouse agent daemon (vwdaemon)or the warehouse agent (IWH2AGNT).
3. On the control server:
Note: If you can determine the ETL process step that fails from the errormessage it will help you resolve the problem quicker. Otherwise,perform the following procedure for each step of an ETL process thatfails.
a. In the left navigational panel of the DB2 Data Warehouse Center window,click the Processes folder for a warehouse pack.
296 Installing and Configuring Tivoli Enterprise Data Warehouse
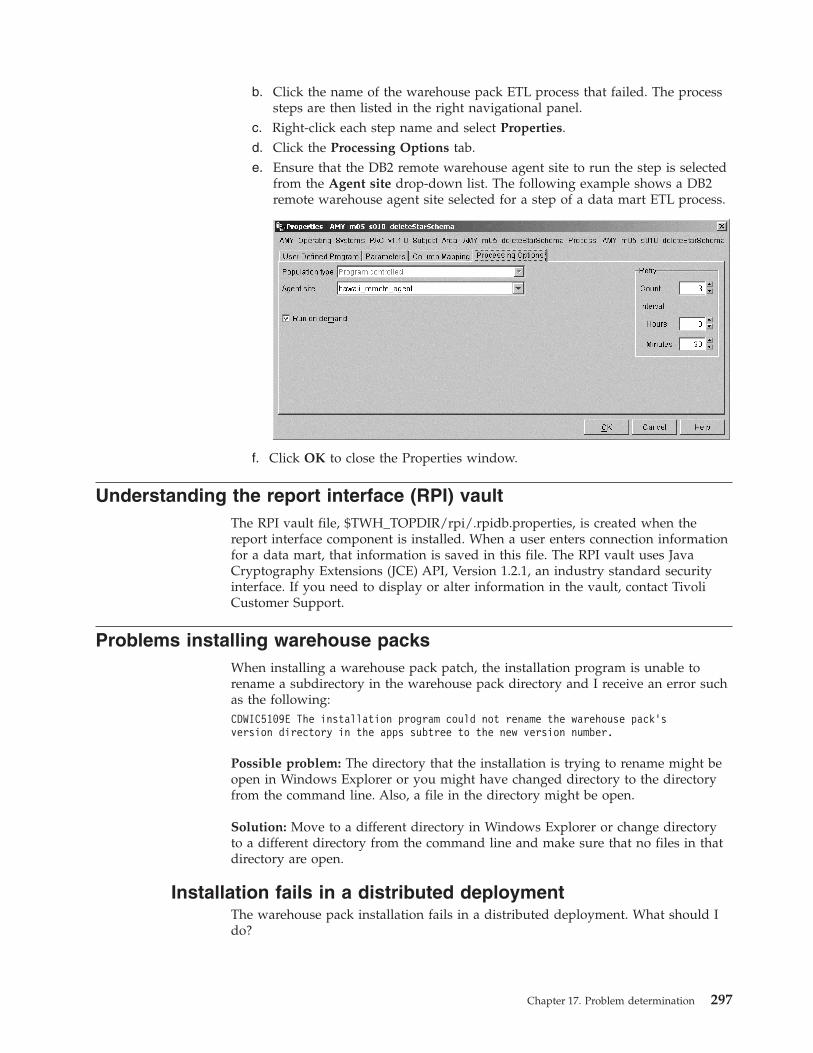
b. Click the name of the warehouse pack ETL process that failed. The processsteps are then listed in the right navigational panel.
c. Right-click each step name and select Properties.d. Click the Processing Options tab.e. Ensure that the DB2 remote warehouse agent site to run the step is selected
from the Agent site drop-down list. The following example shows a DB2remote warehouse agent site selected for a step of a data mart ETL process.
f. Click OK to close the Properties window.
Understanding the report interface (RPI) vaultThe RPI vault file, $TWH_TOPDIR/rpi/.rpidb.properties, is created when thereport interface component is installed. When a user enters connection informationfor a data mart, that information is saved in this file. The RPI vault uses JavaCryptography Extensions (JCE) API, Version 1.2.1, an industry standard securityinterface. If you need to display or alter information in the vault, contact TivoliCustomer Support.
Problems installing warehouse packsWhen installing a warehouse pack patch, the installation program is unable torename a subdirectory in the warehouse pack directory and I receive an error suchas the following:CDWIC5109E The installation program could not rename the warehouse pack’sversion directory in the apps subtree to the new version number.
Possible problem: The directory that the installation is trying to rename might beopen in Windows Explorer or you might have changed directory to the directoryfrom the command line. Also, a file in the directory might be open.
Solution: Move to a different directory in Windows Explorer or change directoryto a different directory from the command line and make sure that no files in thatdirectory are open.
Installation fails in a distributed deploymentThe warehouse pack installation fails in a distributed deployment. What should Ido?
Chapter 17. Problem determination 297
Possible problem: The nodes TEDW001 and TEDW002 that were created toconnect to the remote databases TWH_CDW and TWH_MART have been deletedand the warehouse pack cannot connect to these databases.
Solution: Recreate these connections. See steps 3 on page 139 and 4 on page 139 forinstructions.
Unable to import the tag file during a warehouse packinstallation
If the TWHApp.log file shows error code 1256 and the following message, then theDB2 Data Warehouse Center was unable to import the tag file. The tag file is thefile that defines the ETLs for the warehouse pack.CDWIA0092E Cannot import the metadata into the DWC using the .tag file
Possible problem: The DB2 Data Warehouse Center already contains some of theitems defined in the tag file. This can happen if you try to reinstall a warehousepack after uninstalling it, if the uninstallation program fails to remove all of itsobjects and object types from the DB2 Data Warehouse Center.
Solution: Contact customer support to help you perform the instructions in“Recovering from an unsuccessful installation or an unsuccessful reinstallation of awarehouse pack” on page 299 to recover from the unsuccessful warehouse packinstallation.
Warehouse pack installation fails to load data into thetranslated term table
During a warehouse pack installation in a distributed configuration, if the controlserver database and the central data warehouse database have different user namesand passwords, the National Language Support (NLS) bundles that supply thetranslated values into the translated term table within the central data warehousedatabase are not loaded. This causes the report interface using this table to defaultto English instead of the localized language for some reporting measurements. Theinstallation does not stop for this error and a false indication of a successfulinstallation is displayed.
Before you perform a distributed installation, ensure that the same user name andpassword is specified for both the control server and central data warehouse.Because the DB2 administrators might be different for the databases, add anadministrator to either the control server or the central data warehouse databasethat matches the other database, as follows:v On Windows, add a user and add the new user to the Local Administrators
Group.v On UNIX, add a user and add the new user to the group that is the primary
group of the DB2 instance owner.
Problems with uninstalling warehouse packsThe uninstallation program is written to support rollback for errors duringinstallation. This means that when an error is encountered during installation, theuninstallation program is run automatically to undo the installation. Therefore, theuninstall attempts to remove as much as possible and logs information to thescreen. You can redirect the information to a log file if you want to save it.
298 Installing and Configuring Tivoli Enterprise Data Warehouse
Information for DB2 commands that are run during an uninstallation procedure iswritten to the twh_ibm_db2_runlog.log file located in the directory specified by theTEMP environment variable.
The warehouse pack documentation might contain additional information aboutproblems uninstalling the warehouse pack.
Recovering from an unsuccessful installation or an unsuccessfulreinstallation of a warehouse pack
When the installation of a warehouse pack fails, the following steps should only bedone with the assistance of a support representative from the involved warehousepack. Incorrectly removing items can result in the failure of any or all otherwarehouse packs that are installed.1. Attempt to uninstall the warehouse pack that failed using
TWH_TOPDIR\install\bin\twh_app_deinstall.sh2. Enter the following commands to disconnect all applications using the database
instance:db2stop forcedb2start
3. From a DB2 command prompt, restore the TWH_MD database from a backup:a. cd %TWH_TOPDIR%\apps_backups\product_code\install
b. db2 restore db twh_md from .
4. Reinstall the warehouse pack that failed.
If you are uninstalling a warehouse pack to recover from an unsuccessfulinstallation of that same warehouse pack, you might be prompted to restore abackup copy of the control database. If you receive this prompt, you must restorethe backup copy of the control database before attempting to run the installationprogram again the for warehouse pack.
After you complete an uninstallation procedure, open the DB2 Data WarehouseCenter and verify that all items pertaining to the warehouse pack that youuninstalled have been removed. If they have not been removed, they can bemanually removed from the DB2 Data Warehouse Center GUI using theinstructions provided in “Recovery steps for an unsuccessful warehouse packuninstall”. The warehouse pack items to be removed can be identified by thespecific product name and product code for the warehouse pack. Extreme careshould be taken to remove only those items for the applicable warehouse pack.
Recovery steps for an unsuccessful warehouse pack uninstallThis section provides the steps necessary to recover from an unsuccessfulwarehouse pack uninstallation. These steps show you how to manually remove allitems pertaining to a warehouse pack from the DB2 Data Warehouse Center GUI.
Attention: Perform these instructions only if advised to do so by customersupport. Removing an inappropriate item can cause the failure of any or all otherwarehouse packs.
Some warehouse packs do not have all of the items in the following instructions.
Chapter 17. Problem determination 299
The following procedure has confirmation windows to prevent the accidentaldeletion of warehouse objects. For simplicity, these windows are not shown in theprocedure. When these windows are displayed, click OK to confirm the removal.
To manually remove any remaining parts of the warehouse pack that remain in theDB2 Data Warehouse Center:1. Open the DB2 Data Warehouse Center:
a. On the Windows taskbar, click Start → Programs → IBM DB2 → ControlCenter.
b. In the DB2 Control Center, click Tools → Data Warehouse Center. The DataWarehouse Center and Data Warehouse Center Logon windows aredisplayed.
c. In the Data Warehouse Center Logon window, type the user ID andpassword for the control database of the DB2 Data Warehouse Center. Thisinformation was specified when installing the Tivoli Enterprise DataWarehouse control server. If you do not know the user ID and password,contact your database administrator or the person who installed TivoliEnterprise Data Warehouse.If you cannot connect, make sure that you configured the control databaseas part of completing the installation. See “Specifying the control database(TWH_MD) for the DB2 Data Warehouse Center” on page 291 or“Specifying the control database (TWH_MD) for the DB2 WarehouseControl Database Manager” on page 291 for additional information.
d. Click OK.e. After the logon process completes, the Data Warehouse Center Launchpad
window might be displayed. You can close this window.2. Remove the subject area for the warehouse pack:
a. In the left-hand pane of the Data Warehouse Center window, expand theSubject Areas folder.
b. Identify and expand the subject area that represents the warehouse pack.The name of the subject area that corresponds to a warehouse pack startswith the three-character product code for that warehouse pack. Forexample, the name of the subject area that corresponds to the TivoliEnterprise Console warehouse pack is ECO.
c. Expand Processes folder for the subject area.d. Select the first process for the warehouse pack.e. In the list of steps and tables in the right-hand pane, select all of the steps
in the process.f. Right-click the set of steps, and then click Mode → Development.g. Right-click the set of steps, and then click Remove.h. In the list of steps and tables in the right-hand pane, select all of the tables
in the process.i. Right-click the set of tables, and then click Remove.j. Repeat steps 2d through 2i to remove the steps and tables for each process
in the subject area.k. In the left-hand pane of the Data Warehouse Center window, select the
name of the subject area.l. In the right-hand pane, select all of the processes for the subject area.m. Right-click the set of processes, and then click Remove.n. Right-click the name of the subject area, and then click Remove.
300 Installing and Configuring Tivoli Enterprise Data Warehouse
o. In the left-hand pane of the Data Warehouse Center window, collapse theSubject Areas folder and expand the Warehouse Schemas folder.
3. Remove the warehouse schema for the warehouse pack:a. Select the name of the first warehouse schema for this warehouse pack. The
names start with the three-character product code of the warehouse pack.b. In the right-hand pane of the Data Warehouse Center window, select all of
the tables in the warehouse schema.c. Right-click the set of tables, and then click Remove.d. Repeat steps 3a through 3c to remove the tables from each schema.e. In the left-hand pane, select the Warehouse Schemas folder.f. In the right-hand pane of the Data Warehouse Center window, select all of
the schema names.g. Right-click the set of schema names, and then click Remove.h. Right-click the name of the warehouse schema, and then click Remove.i. In the left-hand pane of the Data Warehouse Center window, collapse the
Warehouse Schemas folder, and then expand the Warehouse Sources folder.4. Remove warehouse sources for the warehouse pack:
a. Select the name of the first warehouse source for this warehouse pack. Thenames start with the three-character product code of the warehouse pack.
b. In the right-hand pane, select all tables, if any, in the warehouse source.c. Right-click the set of tables, if any, and then click Remove.d. In the right-hand pane, select all views, if any, in the warehouse source.e. Right-click the set of views, if any, and then click Remove.f. Repeat steps 4a through 4e to remove the tables and views of all warehouse
sources for this warehouse pack.g. In the left-hand pane, select the Warehouse Sources folder.h. Select all of the warehouse sources for this warehouse pack.i. Right-click the set of warehouse sources, and then click Remove.j. In the left-hand pane of the Data Warehouse Center window, collapse the
Warehouse Schemas folder, and then expand the Warehouse Targets folder.5. Remove warehouse targets for the warehouse pack:
a. Select the name of the first warehouse target for this warehouse pack. Thenames start with the three-character product code of the warehouse pack.
b. In the right-hand pane, select all of tables in the warehouse target.c. Right-click the set of tables, and then click Remove.d. Repeat steps 5a through 5c to remove the tables of all warehouse target for
this warehouse pack.e. In the left-hand pane, select the Warehouse Targets folder.f. Select all of the warehouse targets for this warehouse pack.g. Right-click the set of warehouse targets, and then click Remove.h. In the left-hand pane of the Data Warehouse Center window, collapse the
Warehouse Targets folder.6. In some cases, a warehouse pack might contain its own user-defined programs.
If so, this should be documented in the warehouse pack documentation. Youmust remove the user-defined programs. These can be found underAdministration->Programs and Transformers->User-Defined Programs andTransformers->Tivoli. Note that most of these are defined by Tivoli Enterprise
Chapter 17. Problem determination 301
Data Warehouse itself, shared by all the warehouse packs, and should not beremoved. So, only if you are certain that one of these are warehouse packspecific should it be removed.
If the above commands are unsuccessful, or if the installation failure is a result of acorrupted tag file, then the following steps can be performed manually to uninstalla warehouse pack with the assistance and direction of a support representativefrom the involved warehouse pack. Removing an incorrect item can result in thefailure of any or all other warehouse packs installed.
Warehouse pack configuration problemsThe DB2 Data Warehouse Center provides the Work in Progress window tomonitor the running of ETL processes. Use the Work In Progress window tomonitor the steps that are currently scheduled to run, are running, or havecompleted running, and to determine whether each step completed successfully.
To use the Work in Progress window to review logs, perform the following steps:1. Start the DB2 Data Warehouse Center. For instructions, see “Starting the DB2
Data Warehouse Center” on page 247.2. In the DB2 Data Warehouse Center window, select Warehouse → Work in
Progress.3. Use the Work in Progress window to view information about the steps that are
currently scheduled to run, running, or have completed successfully.v To display information about the icons that graphically represent the status
of each step, select View → Legend.v To display the log for a step, right-click a step name in the Work in Progress
window and select Show Log. In the log, look for the first entry with amessage type of Run Time Error. Right click this entry and select ShowDetails.
v To display the log of all steps, select Work in Progress → Show Log.
For online information about using the Work in Progress window, press F1 orclick the question mark icon in the tool bar.
For information on various ETL failures and the necessary actions for recovery, seeEnabling an Application for Tivoli Enterprise Data Warehouse.
See IBM DB2 Universal Database Data Warehouse Center Administration Guide formore information about the Work In Progress window and about monitoring therunning of your ETL processes.
Errors can occur in ETL processes or in DB2 Universal Database Enterprise Edition.Some potential problems include the following errors:v Running out of space for the log filesv Running out of table spacev Running out of disk spacev Errors in the source application data
All of these scenarios require recovery measures. Contact your databaseadministrator for assistance.
302 Installing and Configuring Tivoli Enterprise Data Warehouse
Log files named productCode_cnn_snn_Description.log are generated by EXECSQLand are placed in the DB2 logging directory, DB2_directory\logging, specified bythe VWS_LOGGING environment variable. These log files contain informationabout the ODBC data sources used, the SQL statements run, the databases androws in the databases that were affected by an SQL statement, and the elapsedtime for the running of the SQL statement.
The individual that receives e-mail notification from ETL processes or the databaseadministrator who is responsible for maintaining the ETLS must check the loginformation following every ETL cycle in order to determine if errors occurred. Logfiles are necessary for debugging problems with ETL processes.
Log files are always generated for each step in the ETL process and are overwritteneach time the ETL step runs. You must review the most recent log files after everyETL run cycle to examine all steps that generated an error.
Attention: Take the appropriate action immediately when an error is encountered.Repeating ETL steps without first correcting errors can result in serious errors inthe central data warehouse data.
A warehouse pack can fail in the following ways:v An SQL error might occur which stops the process.v Data exceptions might be written to an exception table.
In both cases there should be information in the warehouse pack implementationguide that explains what actions need to be taken to resolve the problem.
In general, check to see if the warehouse pack you are running generates exceptiontables. If so, the names of the tables and monitoring activities are listed in the″Exception tables″ section of the warehouse pack implementation guide. Usuallydata cleansing problems are reported in the table, which require that the sourcedata be manually updated. This will not cause an SQL failure. Instead, theapplication traps likely data problems and rejects those records, so that theremainder of the data can be loaded.
If you get an SQL error, the step will fail and any other dependent steps will notrun. The situation that caused the error needs to be corrected, and the steps needto be run again manually. Refer to “Using the Work in Progress window” onpage 247 and “Disabling ETL scheduling” on page 249.
All steps are coded so they can be run again in case of failure. They are codedwith the SQL WHERE, NOT, and EXISTS clauses, or extract control mechanismsare used to ensure duplicate data is not populated. However, the steps must be runin order, or it is likely that data will be lost.1. Disable scheduling to ensure that processes do not run and lose data.2. Check for data in exception tables, if they are used by the warehouse pack.3. Review the SQL run-time program log, and take corrective actions based on the
SQL errors generated in the log.4. After the problem has been fixed, run the process that failed and any
dependent processes again.5. Enable scheduling.
Chapter 17. Problem determination 303
ETL processes do not complete or extract steps do not runAn ETL process that extracts data from a source database does not end or completeor there is a problem while running an extract step.
Possible problem: The database installation might be installed with a differentlanguage than the operating system that it is installed on.
Solution: Reinstall the database with the same language and country code as theoperating system.
Modifying, copying or deleting directoriesPossible problem: The directory or file that the installation is trying to copy,modify, or delete might be open in Windows Explorer or you might have changeddirectory to the directory from the command line. Also, a file in the directorymight be open.
Solution: Move to a different directory in Windows Explorer or change directoryto a different directory from the command line and make sure that no files in thatdirectory are open.
Sybase ETL errorWhen using Sybase as an operational data source, the following DB2 error messagemight be displayed:= CDW8087E : SQL_ERROR: ’ExecDirect’ 2003.04.03 16:27:34.343
= CDW8087E (HY000) : (Err:2762) [MERANT][ODBC Sybase driver][SQL Server]The ’CREATE TABLE’ command is not allowed within a multi-statement transactionin the ’database_name’ database.=
Contact your Sybase database administrator if you encounter this error message.The following procedure should be performed by a Sybase database administratoras a workaround:1. From the isql command line, enter use master.2. Enter go.3. Type sp_dboption db_name ″ddl in tran″, true where db_name is the name of
the database.4. Enter go. The following message is displayed:
Database option ’ddl in tran’ turned ON for database ’dbname’Run the CHECKPOINT command in the database that was changed.(return status = 0)
5. Enter use dbname.6. Enter go.7. Enter checkpoint.8. Enter go.9. Enter quit.
Adding trace information to the log files for ETL processesYou can add SQL commands to a process script so data is written to the process’log file for verification or troubleshooting.
304 Installing and Configuring Tivoli Enterprise Data Warehouse
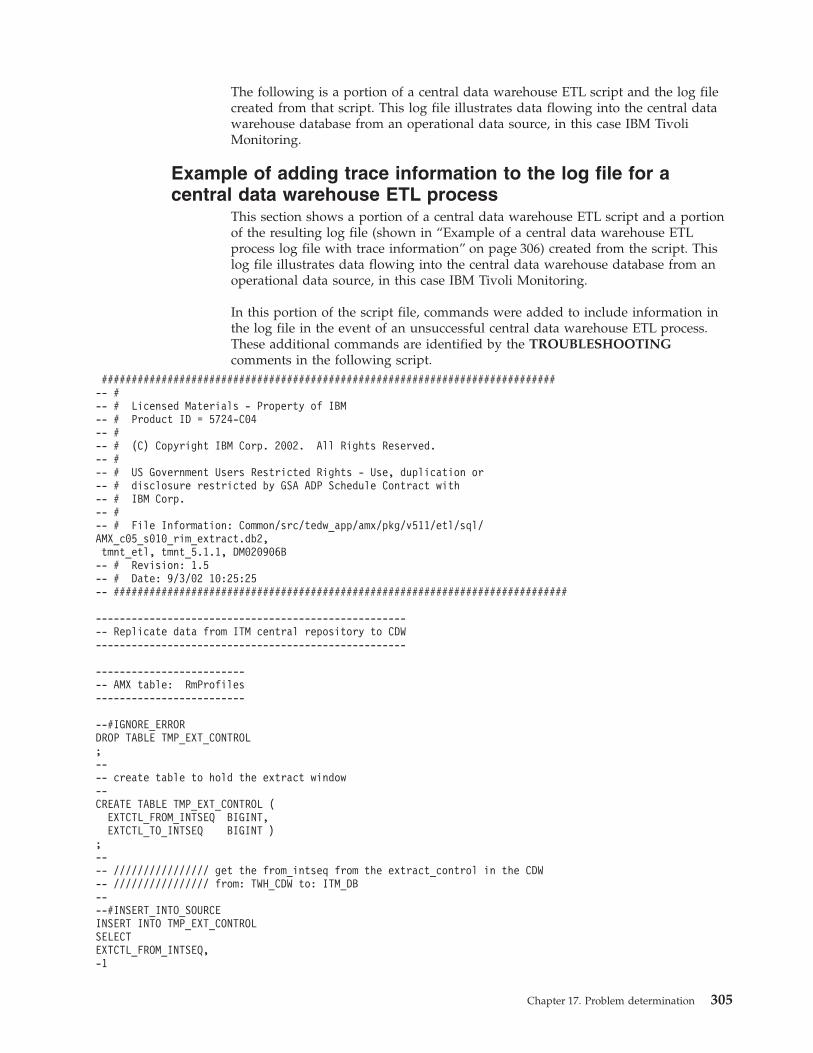
The following is a portion of a central data warehouse ETL script and the log filecreated from that script. This log file illustrates data flowing into the central datawarehouse database from an operational data source, in this case IBM TivoliMonitoring.
Example of adding trace information to the log file for acentral data warehouse ETL process
This section shows a portion of a central data warehouse ETL script and a portionof the resulting log file (shown in “Example of a central data warehouse ETLprocess log file with trace information” on page 306) created from the script. Thislog file illustrates data flowing into the central data warehouse database from anoperational data source, in this case IBM Tivoli Monitoring.
In this portion of the script file, commands were added to include information inthe log file in the event of an unsuccessful central data warehouse ETL process.These additional commands are identified by the TROUBLESHOOTINGcomments in the following script.
############################################################################-- #-- # Licensed Materials - Property of IBM-- # Product ID = 5724-C04-- #-- # (C) Copyright IBM Corp. 2002. All Rights Reserved.-- #-- # US Government Users Restricted Rights - Use, duplication or-- # disclosure restricted by GSA ADP Schedule Contract with-- # IBM Corp.-- #-- # File Information: Common/src/tedw_app/amx/pkg/v511/etl/sql/AMX_c05_s010_rim_extract.db2,tmnt_etl, tmnt_5.1.1, DM020906B-- # Revision: 1.5-- # Date: 9/3/02 10:25:25-- ############################################################################
------------------------------------------------------ Replicate data from ITM central repository to CDW----------------------------------------------------
--------------------------- AMX table: RmProfiles-------------------------
--#IGNORE_ERRORDROP TABLE TMP_EXT_CONTROL;---- create table to hold the extract window--CREATE TABLE TMP_EXT_CONTROL (
EXTCTL_FROM_INTSEQ BIGINT,EXTCTL_TO_INTSEQ BIGINT )
;---- //////////////// get the from_intseq from the extract_control in the CDW-- //////////////// from: TWH_CDW to: ITM_DB----#INSERT_INTO_SOURCEINSERT INTO TMP_EXT_CONTROLSELECTEXTCTL_FROM_INTSEQ,-1
Chapter 17. Problem determination 305
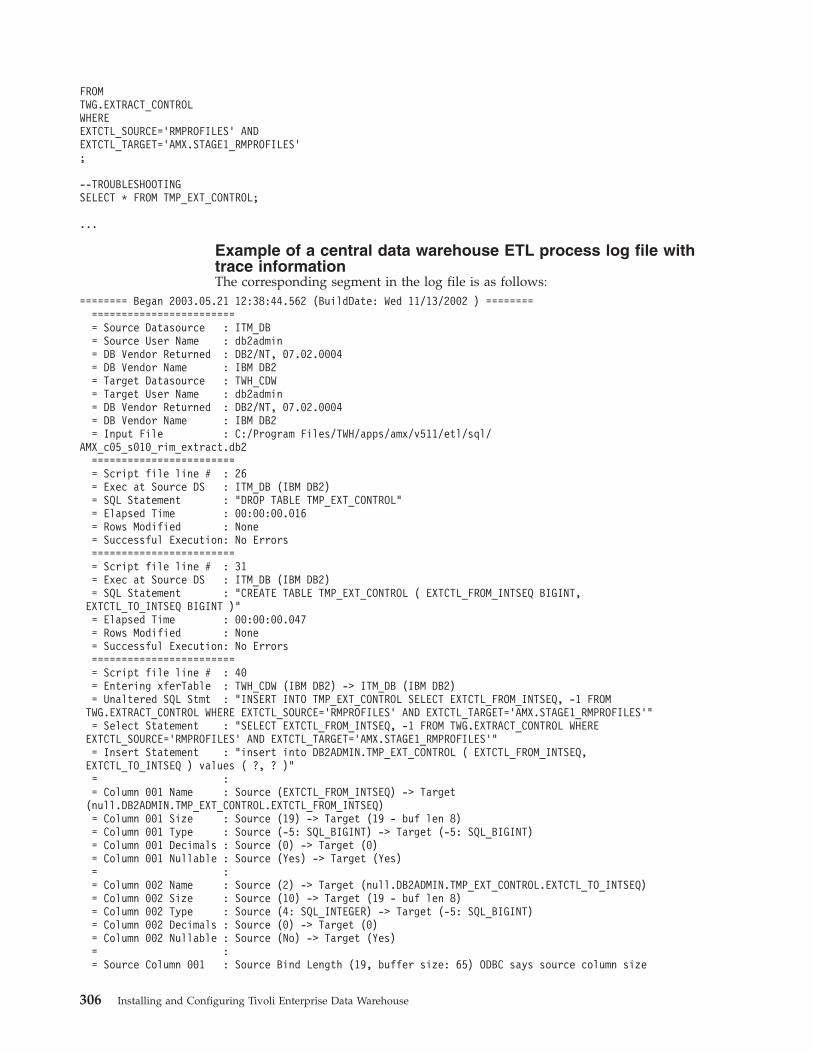
FROMTWG.EXTRACT_CONTROLWHEREEXTCTL_SOURCE=’RMPROFILES’ ANDEXTCTL_TARGET=’AMX.STAGE1_RMPROFILES’;
--TROUBLESHOOTINGSELECT * FROM TMP_EXT_CONTROL;
...
Example of a central data warehouse ETL process log file withtrace informationThe corresponding segment in the log file is as follows:
======== Began 2003.05.21 12:38:44.562 (BuildDate: Wed 11/13/2002 ) ================================= Source Datasource : ITM_DB= Source User Name : db2admin= DB Vendor Returned : DB2/NT, 07.02.0004= DB Vendor Name : IBM DB2= Target Datasource : TWH_CDW= Target User Name : db2admin= DB Vendor Returned : DB2/NT, 07.02.0004= DB Vendor Name : IBM DB2= Input File : C:/Program Files/TWH/apps/amx/v511/etl/sql/
AMX_c05_s010_rim_extract.db2========================= Script file line # : 26= Exec at Source DS : ITM_DB (IBM DB2)= SQL Statement : "DROP TABLE TMP_EXT_CONTROL"= Elapsed Time : 00:00:00.016= Rows Modified : None= Successful Execution: No Errors========================= Script file line # : 31= Exec at Source DS : ITM_DB (IBM DB2)= SQL Statement : "CREATE TABLE TMP_EXT_CONTROL ( EXTCTL_FROM_INTSEQ BIGINT,EXTCTL_TO_INTSEQ BIGINT )"= Elapsed Time : 00:00:00.047= Rows Modified : None= Successful Execution: No Errors========================= Script file line # : 40= Entering xferTable : TWH_CDW (IBM DB2) -> ITM_DB (IBM DB2)= Unaltered SQL Stmt : "INSERT INTO TMP_EXT_CONTROL SELECT EXTCTL_FROM_INTSEQ, -1 FROMTWG.EXTRACT_CONTROL WHERE EXTCTL_SOURCE=’RMPROFILES’ AND EXTCTL_TARGET=’AMX.STAGE1_RMPROFILES’"= Select Statement : "SELECT EXTCTL_FROM_INTSEQ, -1 FROM TWG.EXTRACT_CONTROL WHEREEXTCTL_SOURCE=’RMPROFILES’ AND EXTCTL_TARGET=’AMX.STAGE1_RMPROFILES’"= Insert Statement : "insert into DB2ADMIN.TMP_EXT_CONTROL ( EXTCTL_FROM_INTSEQ,EXTCTL_TO_INTSEQ ) values ( ?, ? )"= := Column 001 Name : Source (EXTCTL_FROM_INTSEQ) -> Target(null.DB2ADMIN.TMP_EXT_CONTROL.EXTCTL_FROM_INTSEQ)= Column 001 Size : Source (19) -> Target (19 - buf len 8)= Column 001 Type : Source (-5: SQL_BIGINT) -> Target (-5: SQL_BIGINT)= Column 001 Decimals : Source (0) -> Target (0)= Column 001 Nullable : Source (Yes) -> Target (Yes)= := Column 002 Name : Source (2) -> Target (null.DB2ADMIN.TMP_EXT_CONTROL.EXTCTL_TO_INTSEQ)= Column 002 Size : Source (10) -> Target (19 - buf len 8)= Column 002 Type : Source (4: SQL_INTEGER) -> Target (-5: SQL_BIGINT)= Column 002 Decimals : Source (0) -> Target (0)= Column 002 Nullable : Source (No) -> Target (Yes)= := Source Column 001 : Source Bind Length (19, buffer size: 65) ODBC says source column size
306 Installing and Configuring Tivoli Enterprise Data Warehouse
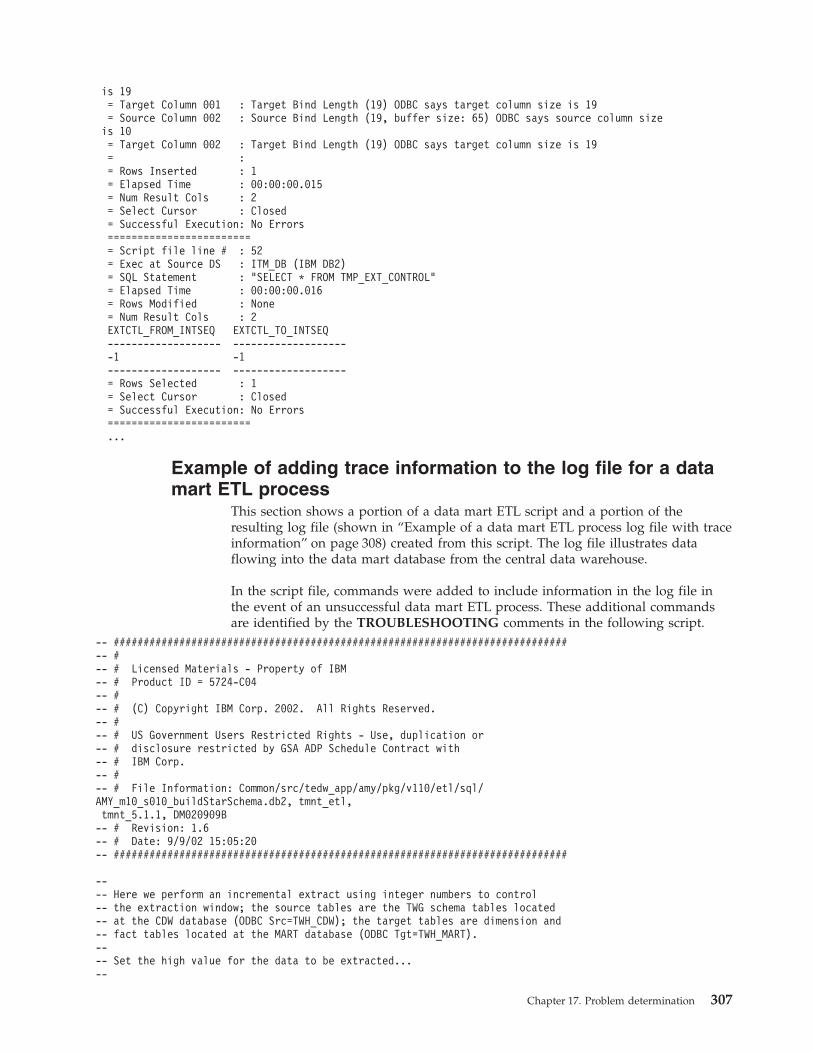
is 19= Target Column 001 : Target Bind Length (19) ODBC says target column size is 19= Source Column 002 : Source Bind Length (19, buffer size: 65) ODBC says source column sizeis 10= Target Column 002 : Target Bind Length (19) ODBC says target column size is 19= := Rows Inserted : 1= Elapsed Time : 00:00:00.015= Num Result Cols : 2= Select Cursor : Closed= Successful Execution: No Errors========================= Script file line # : 52= Exec at Source DS : ITM_DB (IBM DB2)= SQL Statement : "SELECT * FROM TMP_EXT_CONTROL"= Elapsed Time : 00:00:00.016= Rows Modified : None= Num Result Cols : 2EXTCTL_FROM_INTSEQ EXTCTL_TO_INTSEQ------------------- --------------------1 -1------------------- -------------------= Rows Selected : 1= Select Cursor : Closed= Successful Execution: No Errors========================...
Example of adding trace information to the log file for a datamart ETL process
This section shows a portion of a data mart ETL script and a portion of theresulting log file (shown in “Example of a data mart ETL process log file with traceinformation” on page 308) created from this script. The log file illustrates dataflowing into the data mart database from the central data warehouse.
In the script file, commands were added to include information in the log file inthe event of an unsuccessful data mart ETL process. These additional commandsare identified by the TROUBLESHOOTING comments in the following script.
-- ############################################################################-- #-- # Licensed Materials - Property of IBM-- # Product ID = 5724-C04-- #-- # (C) Copyright IBM Corp. 2002. All Rights Reserved.-- #-- # US Government Users Restricted Rights - Use, duplication or-- # disclosure restricted by GSA ADP Schedule Contract with-- # IBM Corp.-- #-- # File Information: Common/src/tedw_app/amy/pkg/v110/etl/sql/AMY_m10_s010_buildStarSchema.db2, tmnt_etl,tmnt_5.1.1, DM020909B-- # Revision: 1.6-- # Date: 9/9/02 15:05:20-- ############################################################################
---- Here we perform an incremental extract using integer numbers to control-- the extraction window; the source tables are the TWG schema tables located-- at the CDW database (ODBC Src=TWH_CDW); the target tables are dimension and-- fact tables located at the MART database (ODBC Tgt=TWH_MART).---- Set the high value for the data to be extracted...--
Chapter 17. Problem determination 307
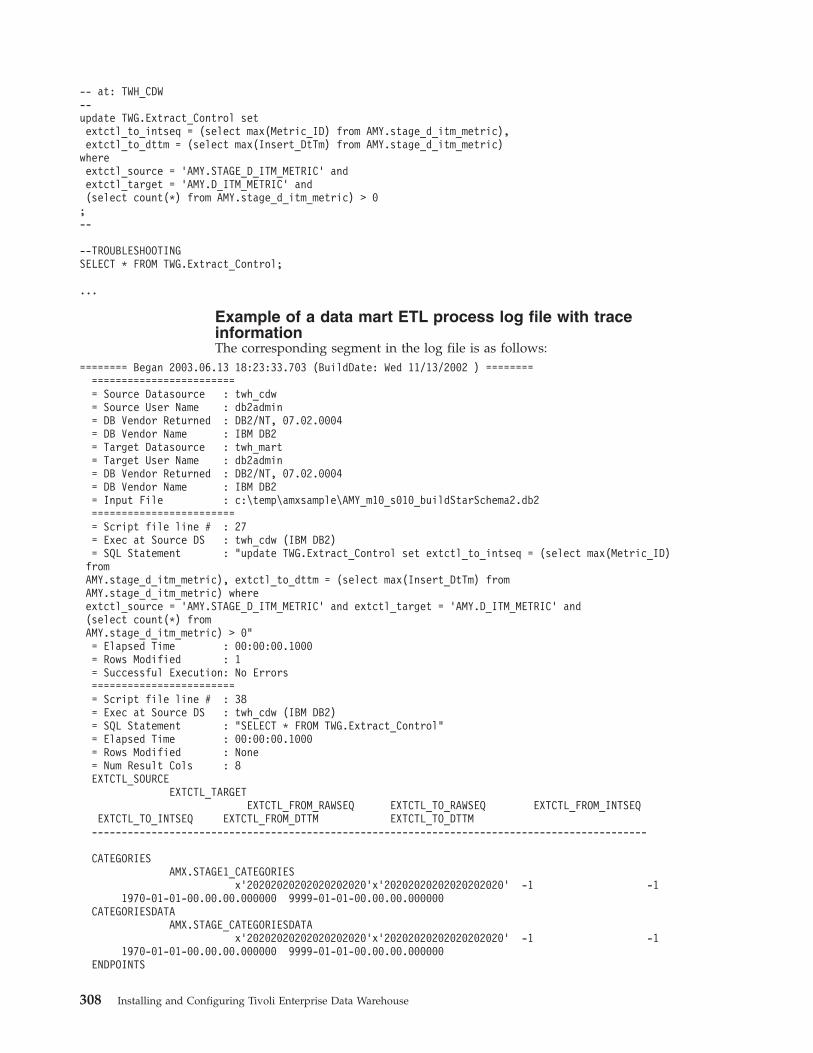
-- at: TWH_CDW--update TWG.Extract_Control setextctl_to_intseq = (select max(Metric_ID) from AMY.stage_d_itm_metric),extctl_to_dttm = (select max(Insert_DtTm) from AMY.stage_d_itm_metric)
whereextctl_source = ’AMY.STAGE_D_ITM_METRIC’ andextctl_target = ’AMY.D_ITM_METRIC’ and(select count(*) from AMY.stage_d_itm_metric) > 0
;--
--TROUBLESHOOTINGSELECT * FROM TWG.Extract_Control;
...
Example of a data mart ETL process log file with traceinformationThe corresponding segment in the log file is as follows:
======== Began 2003.06.13 18:23:33.703 (BuildDate: Wed 11/13/2002 ) ================================= Source Datasource : twh_cdw= Source User Name : db2admin= DB Vendor Returned : DB2/NT, 07.02.0004= DB Vendor Name : IBM DB2= Target Datasource : twh_mart= Target User Name : db2admin= DB Vendor Returned : DB2/NT, 07.02.0004= DB Vendor Name : IBM DB2= Input File : c:\temp\amxsample\AMY_m10_s010_buildStarSchema2.db2========================= Script file line # : 27= Exec at Source DS : twh_cdw (IBM DB2)= SQL Statement : "update TWG.Extract_Control set extctl_to_intseq = (select max(Metric_ID)fromAMY.stage_d_itm_metric), extctl_to_dttm = (select max(Insert_DtTm) fromAMY.stage_d_itm_metric) whereextctl_source = ’AMY.STAGE_D_ITM_METRIC’ and extctl_target = ’AMY.D_ITM_METRIC’ and(select count(*) fromAMY.stage_d_itm_metric) > 0"= Elapsed Time : 00:00:00.1000= Rows Modified : 1= Successful Execution: No Errors========================= Script file line # : 38= Exec at Source DS : twh_cdw (IBM DB2)= SQL Statement : "SELECT * FROM TWG.Extract_Control"= Elapsed Time : 00:00:00.1000= Rows Modified : None= Num Result Cols : 8EXTCTL_SOURCE
EXTCTL_TARGETEXTCTL_FROM_RAWSEQ EXTCTL_TO_RAWSEQ EXTCTL_FROM_INTSEQ
EXTCTL_TO_INTSEQ EXTCTL_FROM_DTTM EXTCTL_TO_DTTM---------------------------------------------------------------------------------------------
CATEGORIESAMX.STAGE1_CATEGORIES
x’20202020202020202020’x’20202020202020202020’ -1 -11970-01-01-00.00.00.000000 9999-01-01-00.00.00.000000
CATEGORIESDATAAMX.STAGE_CATEGORIESDATA
x’20202020202020202020’x’20202020202020202020’ -1 -11970-01-01-00.00.00.000000 9999-01-01-00.00.00.000000
ENDPOINTS
308 Installing and Configuring Tivoli Enterprise Data Warehouse
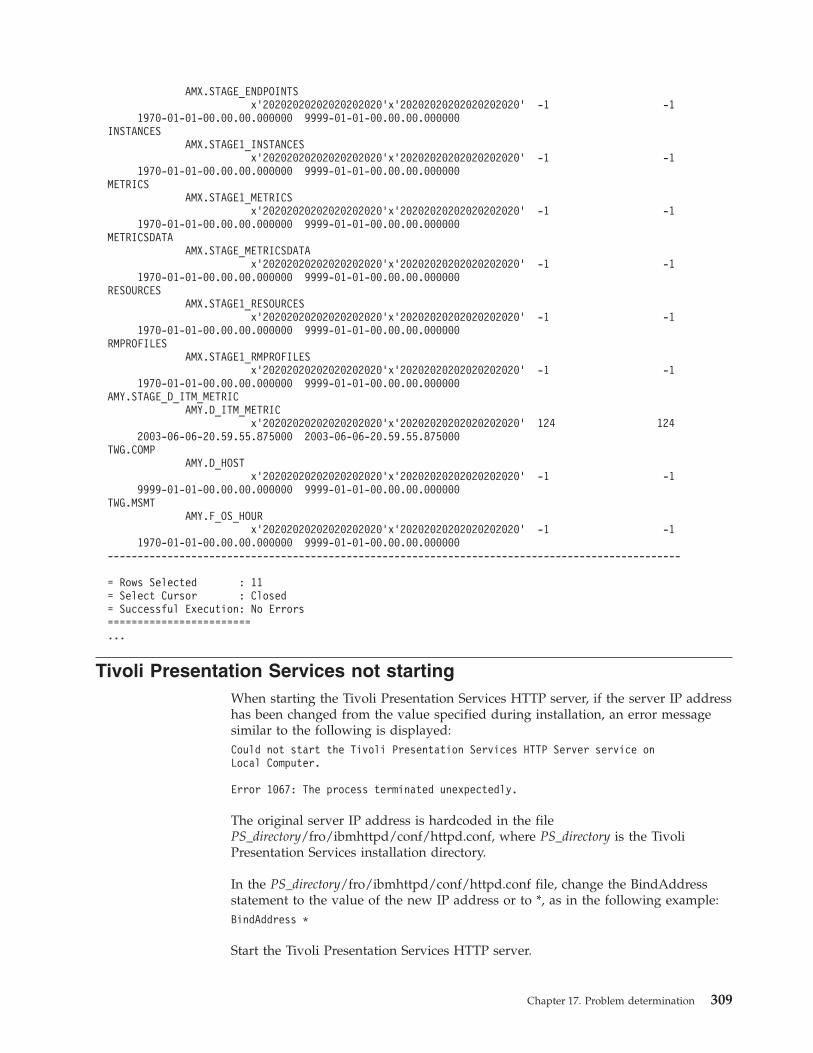
AMX.STAGE_ENDPOINTSx’20202020202020202020’x’20202020202020202020’ -1 -1
1970-01-01-00.00.00.000000 9999-01-01-00.00.00.000000INSTANCES
AMX.STAGE1_INSTANCESx’20202020202020202020’x’20202020202020202020’ -1 -1
1970-01-01-00.00.00.000000 9999-01-01-00.00.00.000000METRICS
AMX.STAGE1_METRICSx’20202020202020202020’x’20202020202020202020’ -1 -1
1970-01-01-00.00.00.000000 9999-01-01-00.00.00.000000METRICSDATA
AMX.STAGE_METRICSDATAx’20202020202020202020’x’20202020202020202020’ -1 -1
1970-01-01-00.00.00.000000 9999-01-01-00.00.00.000000RESOURCES
AMX.STAGE1_RESOURCESx’20202020202020202020’x’20202020202020202020’ -1 -1
1970-01-01-00.00.00.000000 9999-01-01-00.00.00.000000RMPROFILES
AMX.STAGE1_RMPROFILESx’20202020202020202020’x’20202020202020202020’ -1 -1
1970-01-01-00.00.00.000000 9999-01-01-00.00.00.000000AMY.STAGE_D_ITM_METRIC
AMY.D_ITM_METRICx’20202020202020202020’x’20202020202020202020’ 124 124
2003-06-06-20.59.55.875000 2003-06-06-20.59.55.875000TWG.COMP
AMY.D_HOSTx’20202020202020202020’x’20202020202020202020’ -1 -1
9999-01-01-00.00.00.000000 9999-01-01-00.00.00.000000TWG.MSMT
AMY.F_OS_HOURx’20202020202020202020’x’20202020202020202020’ -1 -1
1970-01-01-00.00.00.000000 9999-01-01-00.00.00.000000------------------------------------------------------------------------------------------------
= Rows Selected : 11= Select Cursor : Closed= Successful Execution: No Errors========================...
Tivoli Presentation Services not startingWhen starting the Tivoli Presentation Services HTTP server, if the server IP addresshas been changed from the value specified during installation, an error messagesimilar to the following is displayed:Could not start the Tivoli Presentation Services HTTP Server service onLocal Computer.
Error 1067: The process terminated unexpectedly.
The original server IP address is hardcoded in the filePS_directory/fro/ibmhttpd/conf/httpd.conf, where PS_directory is the TivoliPresentation Services installation directory.
In the PS_directory/fro/ibmhttpd/conf/httpd.conf file, change the BindAddressstatement to the value of the new IP address or to *, as in the following example:BindAddress *
Start the Tivoli Presentation Services HTTP server.
Chapter 17. Problem determination 309
Problems with reportsIf a report displays no data or it displays incomplete data, make sure that all ETLprocesses required for that report completed successfully. Check all ETL processesthat generate the data used in the report, even if they are provided by anotherapplication. See “Using the Work in Progress window” on page 247 and“Reviewing exception table information” on page 248 for more information.
310 Installing and Configuring Tivoli Enterprise Data Warehouse
Part 5. Appendixes
© Copyright IBM Corp. 2001, 2003 311

312 Installing and Configuring Tivoli Enterprise Data Warehouse
Appendix A. System administration hints and tips
This appendix contains supplementary information about system administrationtopics that are performed by users installing and configuring Tivoli Enterprise DataWarehouse and its prerequisite software. It contains the following topics:v “Running DB2 commands”v “Determining what level of DB2 is installed” on page 314v “Reusing an existing DB2 instance” on page 314v “DB2 user name, user ID, group name, and instance name rules” on page 315v “Specifying an alternate temporary directory” on page 316v “Mounting a CD on UNIX systems” on page 316
Running DB2 commandsUse any of the following methods to run a DB2 command:v On a Windows system, log in as the DB2 instance owner and perform any of the
following methods:– Open a DOS window, then enter db2cmd to start a DB2 CLP window.
When running DB2 commands shown in this document in a DB2 CLPwindow, DB2 commands start with the command db2. For example, when thisdocument shows the following DB2 command:db2 list db directory
You should type the command exactly as shown in a window whose title isDB2 CLP.
The current directory is the one that was current when you entered thedb2cmd command.
– Click Start → Programs → IBM DB2 → Command Window.This method is similar to running the db2cmd command, except that thecurrent diectory is the DB2 programs directory.
– Click Start → Programs → IBM DB2 → Command Center.In the Command Center, you do not need to type db2 at the beginning of thecommands shown in this document. For example, suppose this documentinstructs you to enter the following command:db2 list db directory
If you are using the Command Center instead of a DB2 CLP window, omitthe leading db2 and enter the following command:list db directory
– Click Start → Programs → IBM DB2 → Command Window.– Click Start → Programs → IBM DB2 → Command Line Processor.
v On a UNIX system:1. Log in as the DB2 instance owner.2. Enter a DB2 command in one of the following ways:
– Enter the DB2 command prefixed with db2, as follows:db2cmd command
© Copyright IBM Corp. 2001, 2003 313
– Enter db2 and press Enter to open a DB2 command prompt.– Enter the DB2 command.
Determining what level of DB2 is installedYou must have the correct version of DB2 Universal Database Enterprise Editioninstalled on each computer where you place a component or database of TivoliEnterprise Data Warehouse. This document describes the version of DB2 requiredat the time this document was published. For the most current information, see theIBM Customer Support Web site.
To determine the version and service level, use the DB2 command db2level. On aWindows system with DB2 V7.2 at DB2 fix pack 8 with the special fix applied,db2level returns a message similar to the following:DB21085I Instance "DB2" uses DB2 code release "SQL07026" with level identifier"03070105" and informational tokens "DB2 v7.1.0.75", "n021110" and "WR21314".
On a Solaris system with DB2 Universal Database with the special fix applied,db2level returns a message similar to the following:DB21085I Instance "db2admin" uses DB2 code release "SQL07026" with levelidentifier "03070105" and informational tokens "DB2 v7.1.0.75", "s021110" and"U484613".
On an AIX system, with DB2 Universal Database with the special fix applied,db2level returns a message similar to the following:DB21085I Instance "db2admin" uses DB2 code release "SQL07026" with levelidentifier "03070105" and informational tokens "DB2 v7.1.0.75", "s021110" and"U484610".
The string DB2 v7.1.0.75 indicates that the system is at DB2 V7.2 with DB2 fixpack 8 and the special fix applied. The last two information tokens vary byoperating system type and the specific patches that are installed.
If the string DB2 v7.1.0.72 is displayed, DB2 V7.2 with DB2 fix pack 8 has beenapplied, but the special fix has not been applied.1. Go to http://www.ibm.com/software/data/db2/udb/winos2unix/support to
download the special fix.2. Under Downloads, click DB2 Version 7 FixPaks and find fix pack 8 for the
appropriate operating system.3. Click the appropriate PTF and then click special_PTF.zip and download the zip
file that contains the special fix.4. Follow the instructions in the readme file to apply the special fix.
Reusing an existing DB2 instanceTo reuse an existing DB2 instance on a UNIX or Windows system:v Make sure the DB2 instance is at the version and patch level specified in the
Tivoli Enterprise Data Warehouse Release Notes. Apply the required DB2 fix packsbefore running the Tivoli Enterprise Data Warehouse installation wizard. Forinformation, see “Determining what level of DB2 is installed”.
v On UNIX systems, make sure that the administration client is installed. If youcan start the DB2 Control Center, the client is installed.
v On Windows systems, if you did not perform a typical installation of DB2Universal Database, make sure you have the following components:
314 Installing and Configuring Tivoli Enterprise Data Warehouse
– Administration and Configuration Tool– Application Development Interfaces– Data Warehousing Tools
If you selected the Typical installation when installing DB2 Universal Databaseon a Windows system, all of the necessary components are available.
v Make sure that other applications using the DB2 instance do not have databasenames that duplicate those of Tivoli Enterprise Data Warehouse. For a list ofdatabase names used by Tivoli Enterprise Data Warehouse, see “Coexistencewith other DB2 database applications” on page 30.
DB2 user name, user ID, group name, and instance name rulesUser names or user IDs are the identifiers assigned to individual users. All namescan include the following characters:v A through Z. In general, when naming users, groups, or instances:
UNIX Use lowercase names.
Windows 32-bit operating systemsUse any case.
When used in most names, characters A through Z are converted from lowercaseto uppercase.
v 0 through 9v @, #, $, and _ (underscore)
Unless otherwise specified, all names must begin with one of the followingcharacters:v A through Zv @, #, and $
Do not use SQL reserved words to name tables, views, columns, indexes, orauthorization IDs. For a list of SQL reserved words, refer to the IBM DB2 SQLReference.
In addition to the general naming rules:v User names on UNIX can contain 1 to 8 characters.v User names on Windows can contain 1 to 30 characters. The Windows operating
systems currently have a limit of 20 characters.v Group and instance names can contain 1 to 8 characters.v Names cannot be any of the following:
– USERS– ADMINS– GUESTS– PUBLIC– LOCAL
v Names cannot begin with:– IBM– SQL– SYS
Appendix A. System administration hints and tips 315
v Names cannot include accented characters.
For more information about DB2 naming rules, refer to IBM DB2 Universal Databasefor Windows Quick Beginnings or IBM DB2 Universal Database for UNIX QuickBeginnings.
Specifying an alternate temporary directoryThis section gives instructions for specifying an alternate location for thetemporary directory when starting the Tivoli Enterprise Data Warehouseinstallation program.
On Windows operating systems, the installation program places temporary files inthe directory specified by the %TEMP% environment variable. To specify adifferent temporary directory, set the %TEMP% environment variable to the fullpath name of the directory in which you want temporary files copied duringinstallation. For example, enter the following commands at the command promptto install using temporary files in x:\scratch\tdw:set TEMP=x:\scratch\tdwsetup.exe -is:tempdir x:\scratch\tdwsetup.exe
On UNIX systems, the installation program places temporary files in the directory/tmp by default. To specify a different temporary directory, set the $TMPDIRenvironment variable to the full path name of the directory in which you wanttemporary files copied during installation and specify the -is:tempdir argument tothe setup command. The following example shows how to install using temporaryfiles in /scratch/tdw:TMPDIR=/scratch/tdwexport TMPDIRsetup_unix.sh -is:tempdir $TMPDIR
It is necessary to both set the environment variable and specify the command lineargument on UNIX systems.
Note: The environment variable that Tivoli Enterprise Data Warehouse uses tocontrol the temporary directory is the same one used by other applications.If necessary, set these environment variables back to their original valuesafter installing.
Mounting a CD on UNIX systemsWhen installing on UNIX systems, you must make sure that the CD-ROM device ismounted so the installation programs can see it. If the CD-ROM is not properlymounted, the installation informs you that the media is not available and waits foryou to select a new source location.
The following sections describe how to mount a CD-ROM device on UNIXsystems.
Mounting the CD on AIXTo mount the CD-ROM on AIX using the System Management Interface Tool(SMIT), perform the following steps:1. Log on as a user with root authority.2. Insert the CD in the drive.
316 Installing and Configuring Tivoli Enterprise Data Warehouse
3. Create a CD-ROM mount point by entering the mkdir -p /cdrom command,where cdrom represents the CD-ROM mount point directory.
4. Allocate a CD-ROM file system using SMIT by entering the smit storagecommand.
5. After SMIT starts, select File Systems → Add / Change / Show /Delete File Systems → CDROM File Systems → Add CDROM File System.
6. In the Add a File System window:v Enter a device name for your CD-ROM file system in the DEVICE Name
field. Device names for CD-ROM file systems must be unique. If there is aduplicate device name, you might need to delete a previously-definedCD-ROM file system or use another name for your directory. In this example,/dev/cd0 is the device name.
v Enter the CD-ROM mount point directory in the MOUNT POINT window. Inthis example, the mount point directory is /cdrom.
v In the Mount AUTOMATICALLY at system restart field, select yes to enableautomatic mounting of the file system.
v Click OK to close the window, then click Cancel three times to exit SMIT.7. Next, mount the CD-ROM file system by entering the smit mountfs command.8. In the Mount a File System window:
v Enter the device name for this CD-ROM file system in the FILE SYSTEMname field. In our example, the device name is /dev/cd0.
v Enter the CD-ROM mount point in the Directory over which to mount field.In our example, the mount point is /cdrom.
v Enter cdrfs in the Type of Filesystem field. To view the other kinds of filesystems you can mount, click List.
v In the Mount as READ-ONLY system field, click yes.v Accept the remaining default values and click OK to close the window.
Your CD-ROM file system is now mounted. To view the contents of the CD, enterthe following command:cd /cdrom
Where /cdrom is the CD-ROM mount point directory.
Mounting the CD on LinuxTo mount the CD-ROM on Linux:1. Log on as a user with root authority.2. Insert the CD-ROM in the drive and enter the following command:
mount -t iso9660 -o ro /dev/cdrom /cdrom
Where /cdrom represents the mount point of the CD-ROM.3. Log out.
Note that some window managers automatically mount your CD-ROM device foryou. Consult your system documentation for more information.
Mounting the CD-ROM on SolarisTo mount the CD-ROM on Solaris:1. Log on as a user with root authority.2. Insert the CD-ROM into the drive.
Appendix A. System administration hints and tips 317
3. If the Volume Manager (vold) is running on your system, the CD-ROM isautomatically mounted as /cdrom/cd_label if the CD has a label or/cdrom/unnamed_cdrom if it is unlabeled.If the Volume Manager is not running on your system, complete the followingsteps to mount the CD-ROM:a. Determine the name of the device by entering the following command:
ls -al /dev/sr* |awk ’{print "/" $11}’
This command returns the name of the CD-ROM device. In this example,the command returns the string /dev/dsk/c0t6d0s2.
b. Enter the following commands to mount the CD-ROM:mkdir -p /cdrom/unnamed_cdrommount -F hsfs -o ro /dev/dsk/c0t6d0s2 /cdrom/unnamed_cdrom
Where /dev/dsk/c0t6d0s2 is the name of the device that was returned inthe preceding step and /cdrom/unnamed_cdrom represents the CD-ROMmount directory.
Note: If you are mounting the CD-ROM drive from a remote system usingNFS, the CD-ROM file system on the remote machine must beexported with root access. You must also mount that file system withroot access on the local machine.
4. Log out.
318 Installing and Configuring Tivoli Enterprise Data Warehouse
Appendix B. Accessibility
Accessibility features help users with physical disabilities, such as restrictedmobility or limited vision, to use software products successfully. The majoraccessibility features in this product enable users to do the following:v Use assistive technologies, such as screen-reader software and digital speech
synthesizer, to hear what is displayed on the screen. Consult the productdocumentation of the assistive technology for details on using those technologieswith this product.
v Operate specific or equivalent features using only the keyboard.v Magnify what is displayed on the screen.
In addition, the product documentation was modified to include features to aidaccessibility:v All documentation is available in both HTML and convertible PDF formats to
give the maximum opportunity for users to apply screen-reader software.v All images in the documentation are provided with alternative text so that users
with vision impairments can understand the contents of the images.
Navigating the interface using the keyboardStandard shortcut and accelerator keys are used by the product and aredocumented by the operating system. Refer to the documentation provided byyour operating system for more information.
Magnifying what is displayed on the screenYou can enlarge information on the product windows using facilities provided bythe operating systems on which the product is run. For example, in a MicrosoftWindows environment, you can lower the resolution of the screen to enlarge thefont sizes of the text on the screen. Refer to the documentation provided by youroperating system for more information.
Accessibility features of the Web version of the IBM ConsoleThese are the major accessibility features of the Web version of the IBM Console:v You can use voice recognition software, such as IBM ViaVoice®, to enter data
and to navigate the user interface.v You can operate all features using the keyboard instead of the mouse. The
keyboard shortcuts are the standard keyboard shortcuts for your Web browser.v You can change the font size and color scheme through the standard controls for
these items in your Web browser.
You can use the JAWS (Job Access with Speech) screen reader with the IBMConsole. For information about this screen reader, see the following Web site:
http://www.freedomscientific.com/fs_products/software_jaws.asp
© Copyright IBM Corp. 2001, 2003 319

320 Installing and Configuring Tivoli Enterprise Data Warehouse
Appendix C. Installing with a response file
This appendix tells you how to perform a silent installation of Tivoli EnterpriseData Warehouse. In a silent installation, installation options are read from a file.The user is not prompted for information. This appendix includes the followingtopics:v The limitations of a silent installationv The procedure you followv A definition of response file statementsv An example
Important: The last line of a configuration file cannot be blank or the silentinstallation will fail.
Limitations of installing from a response fileThe command line installation method has the following limitations:v You cannot install using multiple installation CDs. You must copy all installation
media to your hard drive or other file system. This includes Tivoli EnterpriseData Warehouse and warehouse pack media. The installation program does notprompt for media when running silently.
v You cannot install support for languages other than English during a silentinstallation. Install language support after the silent installation, as described inChapter 8, “Installing and using language support”, on page 119.
v To perform a silent installation of the report interface component on a UNIX orLinux system, the DISPLAY environment variable must specify a running X11server. This X11 server does not have to be on the local system.
v Passwords are not encrypted in the response file. Ensure that directory and filepermissions do not allow unauthorized users to access this information.
The procedure for installing with a response fileTo perform a silent installation, complete the following steps:1. Make a copy of the sample response file, SilentInstall.rsp, which is located in
the ismp directory of the Tivoli Enterprise Data Warehouse CD.2. Modify the response file using the information in “Response file options” on
page 322.3. Start the installation using the following command, which is located in the
ismp directory of the Tivoli Enterprise Data Warehouse CD:twh_setup.platform -options response_file
Where:
platformIs the extension for the operating system on which you are installing,as follows:
Operating system Use this extension
AIX aix4-r1
Solaris solaris2
© Copyright IBM Corp. 2001, 2003 321
Linux linux-ix86
Microsoft Windows exe
-options response_fileSpecifies the name of the response file that contains the installationoptions.
4. Verify that the installation was successful by examining the installation logs.For more information about installation logs, see “Log files” on page 273.
Response file optionsA response file can contain the following statements:
-silent Specifies a silent installation. If you omit -silent, the installationwizard starts and the fields of the graphical user interface containthe values from the file.
-P TWH.installLocation=TWH_install_dirSpecifies the full path name of the directory where TivoliEnterprise Data Warehouse is installed. On Windows systems, theslashes that separate directories can be written either as c:\path orc:/path. If you omit this statement, the default directory namedepends on the operating system. If the directory does not exist, itis created.
-P dwcFeature.active=[True|False]Required. Specifies whether you are installing the control servercomponent on the local system. Valid values are True and False,and are not case-sensitive.
-P cdwFeature.active=[True|False]Required. Specifies whether to install the central data warehousecomponent on the local system. Valid values are True and False,and are not case-sensitive. (Specify True only when creating theadvanced configuration using remote warehouse agents. For moreinformation, see “DB2 warehouse agents and agent sites” onpage 18.
-P datamartFeature.active=[True|False]Required. Specifies whether to install the data mart component onthe local system. Valid values are True and False, and are notcase-sensitive. (Specify True only when creating the advancedconfiguration using remote warehouse agents. For moreinformation, see “DB2 warehouse agents and agent sites” onpage 18.
-P rpiFeature.active=[True|False]Required. Specifies whether to install the report interfacecomponent on the local system. Valid values are True and False,and are not case-sensitive.
-P psComponent.installLocation=TPS_install_directorySpecifies the full path name of the directory where TivoliPresentation Services is installed. This option is valid only wheninstalling the report interface component(-P rpiFeature.active=true). On Windows systems, the slashes thatseparate directories can be written either as c:\path or c:/path. Ifyou omit this statement when installing the report interface
322 Installing and Configuring Tivoli Enterprise Data Warehouse
component, the default directory name depends on the operatingsystem. If the directory does not exist, it is created.
-W localDbInfo.username=user_IDRequired. Specifies the DB2 user name to use when connecting tothe database or database client on the local system.
-W localDbInfo.password=passwordRequired. Specifies the password for the DB2 user on the localsystem.
-W remoteDWCInfo.remoteHost=host_nameSpecifies the host name on which the remote control server isrunning (the DB2 Data Warehouse Center runs on this system). Donot use this option when installing the control server or wheninstalling another component on the same system as the controlserver.
-W remoteDWCInfo.username=user_IDSpecifies the DB2 user name to use when connecting to the remotecontrol server. Do not use this option when installing the controlserver or when installing another component on the same systemas the control server.
-W remoteDWCInfo.password=passwordSpecifies the password to use with the DB2 user name for theremote control server. Do not use this option when installing thecontrol server or when installing another component on the samesystem as the control server.
-W remoteDWCInfo.remotePort=port_numberSpecifies the port number to use to connect to databases on theremote control server. Do not use this option when installing thecontrol server or when installing another component on the samesystem as the control server.
-W remoteCDWInfo.remoteHost=host_nameSpecifies the host name on which the remote central datawarehouse is running. Do not use this option when installing thecentral data warehouse or when installing another component onthe same system as the central data warehouse. This option is validfor the advanced configuration only.
-W remoteCDWInfo.username=user_IDSpecifies the DB2 user name to use when connecting to the remotecentral data warehouse. Do not use this option when installing thecentral data warehouse or when installing another component onthe same system as the central data warehouse. This option is validfor the advanced configuration only.
-W remoteCDWInfo.password=passwordSpecifies the password to use with the DB2 user name for theremote central data warehouse. Do not use this option wheninstalling the central data warehouse or when installing anothercomponent on the same system as the central data warehouse. Thisoption is valid for the advanced configuration only.
-W remoteCDWInfo.remotePort=port_numberSpecifies the port number to use to connect to databases on theremote central data warehouse. Do not use this option wheninstalling the central data warehouse or when installing another
Appendix C. Installing with a response file 323
component on the same system as the central data warehouse. Thisoption is valid for the advanced configuration only.
-W remoteDatamart.remoteHost=host_nameSpecifies the host name on which the remote data mart database islocated. Do not use this option when installing the data martserver or when installing another component on the same systemas the data mart server. This option is valid for the advancedconfiguration only.
-W remoteDatamart.username=user_IDSpecifies the DB2 user name to use when connecting to the remotedata mart. Do not use this option when installing the data martserver or when installing another component on the same systemas the data mart server. This option is valid for the advancedconfiguration only.
-W remoteDatamart.password=passwordSpecifies the password to use with the DB2 user name for theremote data mart. Do not use this option when installing the datamart server or when installing another component on the samesystem as the data mart server. This option is valid for theadvanced configuration only.
-W remoteDatamart.remotePort=port_numberSpecifies the port number to use to connect to the remote datamart. Do not use this option when installing the data mart serveror when installing another component on the same system as thedata mart server. This option is valid for the advancedconfiguration only.
-W appCheck.selected=[True|False]Specifies whether to install warehouse packs on the local system.Valid values are True and False, and are not case-sensitive.Specifying True for this option is only valid when the-P dwcFeature.active=[True or -P rpiFeature.active=[True.
-W appSources.sourceLocations=list_of_directoriesSpecifies the location of installation media for one or morewarehouse packs. For Windows, this is a semicolon-separated listof directories. For UNIX, this is a colon-separated list of directories.This option is valid only with -W appCheck.selected=true.
Note: You should install warehouse packs one at a time after thecompletion of the Tivoli Enterprise Data Warehouse coreprogram installation. After the installation of eachwarehouse pack, backup your Tivoli Enterprise DataWarehouse deployment so that you can return to a knownstate in the event you encounter an unrecoverable errorduring the installation of a warehouse pack.
-W psInformation.httpPort=[80|port_number]Specifies the port number for Tivoli Presentation Services HTTPServer. This option is valid only with -P rpiFeature.active=true.
-W psInformation.webConsolePort=[8007|port_number]Specifies the port number for Web Services for the IBM Console(Tivoli Presentation Services). This option is valid only with-P rpiFeature.active=true.
324 Installing and Configuring Tivoli Enterprise Data Warehouse
-W psInformation.httpAdminPort=[8008|port_number]Specifies the port number for Tivoli Presentation Services HTTPAdministration (Tivoli Presentation Services). This option is validonly with -P rpiFeature.active=true.
-W psInformation.serverConsoleIpc=[8010|port_number]Specifies the port number for Server for IBM Console (TivoliPresentation Services). This option is valid only with-P rpiFeature.active=true.
-W psInformation.ibmConsoleIpc=[8030|port_number]Specifies the IPC port number for IBM Console (Tivoli PresentationServices). This option is valid only with -P rpiFeature.active=true.
-W psInformation.webConsoleIpc=[8040|port_number]Specifies the IPC port number for Web Services for the IBMConsole (Tivoli Presentation Services). This option is valid onlywith -P rpiFeature.active=true.
# comments Indicates a comment. These statements are ignored during theresponse file processing.
(blank or empty lines)A response file can contain blank lines and empty lines, exceptfollowing the #.done statement.
#.done Required. Indicates the last line of the response file. If it is followedby a blank or empty line, the installation appears to begin but doesnot complete. No messages or logs are generated.
Note: Be careful to use the correct option flag, -P or -W, with each option. The flagthat is required depends on processing internal to the installation wizard.
Response file installation exampleThis sample silently installs the control server and report interface components onthe Windows NT system bbrenner2.dev.tivoli.com. The sample installation has thefollowing characteristics:v Tivoli Enterprise Data Warehouse and Tivoli Presentation Services are to be
installed in the folders c:\twh and c:\ps, respectively.v Tivoli Presentation Services is to use the default port numbers.v The central data warehouse and data mart databases have already been created.
Both databases are on the system cygnus.dev.tivoli.com. The DB2 user name andpassword are db2admin, and DB2 connections use the default port number,50000.
v No warehouse packs are to be installed.
Enter the following command at a command prompt:twh_setup.exe -option SilentInstall.rsp
The response file is as follows:####################################################################### This is a sample response file that shows the available options# for use during a silent installation. To use this file, update# the options as indicated by the comments and use the following# command to start the installation:## twh_setup.<platform ext> -options <response file>#
Appendix C. Installing with a response file 325
# where <platform ext> is the extention for each platform.# - AIX: aix4-r1# - Solaris: solaris2# - Linux: linux-ix86# - Windows: exe## These files are located in the ismp directory on the Tivoli Enterprise# Data Warehouse product CD.## Silent installation requires that all source directories must be# available locally or on the network. You cannot be prompted for# installation CDs during a command line installation.#######################################################################
####################################################################### Indicates to InstallShield that this is a silent installation.# If this is omitted, the InstallShield wizard starts, using the data# provided in this file.######################################################################-silent
####################################################################### Specifies the directory where Tivoli Enterprise Data Warehouse is to# be installed.######################################################################-P TWH.installLocation=c:/twh
####################################################################### Indicates which Tivoli Enterprise Data Warehouse components should# be installed.######################################################################-P dwcFeature.active=true-P cdwFeature.active=false-P datamartFeature.active=false-P rpiFeature.active=true-W appCheck.selected=false
####################################################################### Specifies the host name of the local system.######################################################################-W localHostname.resolvedHostname=bbrenner2.dev.tivoli.com
####################################################################### Indicates user information for the DB2 instance on the local system.######################################################################-W localDbInfo.username=db2admin-W localDbInfo.password=db2admin
####################################################################### Specifies connection information for the remote databases.# Uncomment only the ones that are required on remote systems.######################################################################## -W remoteDWCInfo.username=db2admin# -W remoteDWCInfo.password=# -W remoteDWCInfo.remoteHost=# -W remoteDWCInfo.remotePort=50000-W remoteCDWInfo.username=db2admin-W remoteCDWInfo.password=db2admin-W remoteCDWInfo.remoteHost=cygnus.dev.tivoli.com-W remoteCDWInfo.remotePort=50000-W remoteDatamart.username=db2admin-W remoteDatamart.password=db2admin-W remoteDatamart.remoteHost=cygnus.dev.tivoli.com-W remoteDatamart.remotePort=50000
######################################################################
326 Installing and Configuring Tivoli Enterprise Data Warehouse
# Specifies installation information for Tivoli Presentation Services.# Numbers shown are the installation defaults.######################################################################-P psComponent.installLocation=c:/ps#-W psInformation.serverConsoleIpc=8010#-W psInformation.httpPort=80#-W psInformation.httpAdminPort=8008#-W psInformation.webConsoleIpc=8040#-W psInformation.webConsolePort=8007#-W psInformation.ibmConsoleIpc=8030
######################################################################## Warehouse enablement pack installation information. This is specified# as a list of directories separated by the platform’s path separator.## On Microsoft Windows operating systems, the path separator is the# semicolon (;).## On UNIX operating systems, the path separator is the colon (:).## For example:# Windows: -W appSources.sourceLocations=c:/dir1;d:/dir2# UNIX: -W appSources.sourceLocations=/dir1:/dir2######################################################################## -W appSources.sourceLocations=d:/cd_app/eco;d:/cd_app/gtm
#.done
Appendix C. Installing with a response file 327

328 Installing and Configuring Tivoli Enterprise Data Warehouse
Appendix D. Starting and stopping Tivoli PresentationServices
The following components of Tivoli Presentation Services are installed as services:v Server for IBM Consolev Tivoli Presentation Services HTTP Serverv Tivoli Presentation Services HTTP Administrationv Web Services for the IBM Console
Before users can sign on to the IBM Console, these services must be started on thecomputer or computers where they are installed. The following sections describehow to start and stop these services.
Starting and stopping the Server for IBM ConsoleThis service is set to start automatically after the installation completes and duringeach restart of the computer.
To determine whether this service is started, follow these instructions:v On UNIX systems, type this command:
ps -efl | grep mcr
If you see a process that is named mcr.sh, this service is started. Otherwise, theservice is not started.
v On Windows systems, use the Services administration tool.1. If you are using a machine running Windows NT, perform the following
steps:a. From the Windows taskbar, click Start → Settings → Control Panel.b. Click the Services tab.
2. If you are using a machine running Windows 2000, perform the followingsteps:a. From the Windows taskbar, click Start → Settings → Control Panel.b. Double-click Administrative Tools.c. Click the Services tab.
To start the Server for IBM Console when necessary, follow these instructions:v On UNIX systems, type this command, where installation_directory is the
directory where Tivoli Presentation Services is installed:installation_directory/bin/generic_unix/mcr.sh
v On Windows systems, either use the Services administration tool, or type thiscommand, where installation_directory is the directory where TivoliPresentation Services is installed:installation_directory\bin\w32-ix86\mcr.bat
To stop the Server for IBM Console when necessary, follow these instructions:v On UNIX systems, type this command, where installation_directory is the
directory where Tivoli Presentation Services is installed:installation_directory/bin/generic_unix/stopmcr.sh
© Copyright IBM Corp. 2001, 2003 329
v On Windows systems, either use the Services administration tool, or type thiscommand, where installation_directory is the directory where TivoliPresentation Services is installed:installation_directory\bin\w32-ix86\stopmcr.bat
Starting and stopping the HTTP serverThis service is set to start automatically after the installation completes and duringeach restart of the computer.
To start the Tivoli Presentation Services HTTP Server when necessary, follow theseinstructions:v On UNIX systems, type this command, where installation_directory is the
directory where Tivoli Presentation Services is installed:installation_directory/ibmhttpd/bin/apachectl start
v On Windows systems, use the Services administration tool.
To stop the Tivoli Presentation Services HTTP Server when necessary, follow theseinstructions:v On UNIX systems, type this command, where installation_directory is the
directory where Tivoli Presentation Services is installed:installation_directory/ibmhttpd/bin/apachectl stop
v On Windows systems, use the Services administration tool.
Starting and stopping HTTP administrationIf users plan to change the configuration of the Tivoli Presentation Services HTTPServer (for example, to enable the Secure Sockets Layer for the Web version of theIBM Console as described in Chapter 7, “Enabling Secure Sockets Layer for theWeb version of the IBM Console”, on page 109), this service must be started. Thisservice is set to start automatically after the installation completes and during eachrestart of the computer.
To start Tivoli Presentation Services HTTP Administration when necessary, followthese instructions:v On UNIX systems, type this command, where installation_directory is the
directory where Tivoli Presentation Services is installed:installation_directory/ibmhttpd/bin/adminctl start
v On Windows systems, use the Services administration tool.
To stop Tivoli Presentation Services HTTP Administration when necessary, followthese instructions:v On UNIX systems, type this command, where installation_directory is the
directory where Tivoli Presentation Services is installed:installation_directory/ibmhttpd/bin/adminctl stop
v On Windows systems, use the Services administration tool.
330 Installing and Configuring Tivoli Enterprise Data Warehouse

Starting and stopping Web Services for the IBM ConsoleIf users plan to use the Web version of the IBM Console, this service must bestarted. Web Services for the IBM Console is set to start automatically during eachrestart of the computer but not after the installation completes.
To determine whether this service is started, follow these instructions:v On UNIX systems, type this command:
ps -efl | grep wc
If you see a process that is named wc.sh, this service is started. Otherwise, theservice is not started.
v On Windows systems, use the Services administration tool.
Note: On Linux systems, Web Services for the IBM Console sometimes fails to startautomatically during each restart of the computer. This problem occursbecause this service is dependent on being able to connect to the X11 server,and on Linux systems, the X11 server is not configured to start in a specificrun level. To resolve this problem when it occurs, follow these steps:1. Make sure the X11 server is started and the DISPLAY environment
variable is set correctly. If you cannot start the X11 server, set theDISPLAY variable to an X11 server on another system. Details about thisare on page 294.
2. Make sure the Server for IBM Console is started. For instructions formaking this test and starting the server if necessary, see “Starting andstopping the Server for IBM Console” on page 329
3. Start Web Services for the IBM Console as described in the followingparagraph.
To start Web Services for the IBM Console when necessary, follow theseinstructions:v On UNIX systems, type this command, where installation_directory is the
directory where Tivoli Presentation Services is installed:installation_directory/bin/generic_unix/wc.sh
v On Windows systems, either use the Services administration tool, or type thiscommand, where installation_directory is the directory where TivoliPresentation Services is installed:installation_directory\bin\w32-ix86\wc.bat
To stop Web Services for the IBM Console when necessary, follow theseinstructions:v On UNIX systems, type this command, where installation_directory is the
directory where Tivoli Presentation Services is installed:installation_directory/bin/generic_unix/stopwc.sh
v On Windows systems, either use the Services administration tool, or type thiscommand, where installation_directory is the directory where TivoliPresentation Services is installed:installation_directory\bin\w32-ix86\stopwc.bat
Appendix D. Starting and stopping Tivoli Presentation Services 331

332 Installing and Configuring Tivoli Enterprise Data Warehouse

Appendix E. Notices
This information was developed for products and services offered in the U.S.A.
IBM may not offer the products, services, or features discussed in this document inother countries. Consult your local IBM representative for information on theproducts and services currently available in your area. Any reference to an IBMproduct, program, or service is not intended to state or imply that only that IBMproduct, program, or service may be used. Any functionally equivalent product,program, or service that does not infringe any IBM intellectual property right maybe used instead. However, it is the user’s responsibility to evaluate and verify theoperation of any non-IBM product, program, or service.
IBM may have patents or pending patent applications covering subject matterdescribed in this document. The furnishing of this document does not give youany license to these patents. You can send license inquiries, in writing, to:
IBM Director of LicensingIBM CorporationNorth Castle DriveArmonk, NY 10504-1785U.S.A.
For license inquiries regarding double-byte (DBCS) information, contact the IBMIntellectual Property Department in your country or send inquiries, in writing, to:
IBM World Trade Asia CorporationLicensing2-31 Roppongi 3-chome, Minato-kuTokyo 106, Japan
The following paragraph does not apply to the United Kingdom or any othercountry where such provisions are inconsistent with local law:INTERNATIONAL BUSINESS MACHINES CORPORATION PROVIDES THISPUBLICATION ″AS IS″ WITHOUT WARRANTY OF ANY KIND, EITHEREXPRESS OR IMPLIED, INCLUDING, BUT NOT LIMITED TO, THE IMPLIEDWARRANTIES OF NON-INFRINGEMENT, MERCHANTABILITY OR FITNESSFOR A PARTICULAR PURPOSE. Some states do not allow disclaimer of express orimplied warranties in certain transactions, therefore, this statement may not applyto you.
This information could include technical inaccuracies or typographical errors.Changes are periodically made to the information herein; these changes will beincorporated in new editions of the publication. IBM may make improvementsand/or changes in the product(s) and/or the program(s) described in thispublication at any time without notice.
Any references in this information to non-IBM Web sites are provided forconvenience only and do not in any manner serve as an endorsement of those Websites. The materials at those Web sites are not part of the materials for this IBMproduct and use of those Web sites is at your own risk.
IBM may use or distribute any of the information you supply in any way itbelieves appropriate without incurring any obligation to you.
© Copyright IBM Corp. 2001, 2003 333
Licensees of this program who wish to have information about it for the purposeof enabling: (i) the exchange of information between independently createdprograms and other programs (including this one) and (ii) the mutual use of theinformation which has been exchanged, should contact:
IBM Corporation2Z4A/10111400 Burnet RoadAustin, TX 78758U.S.A.
Such information may be available, subject to appropriate terms and conditions,including in some cases, payment of a fee.
The licensed program described in this document and all licensed materialavailable for it are provided by IBM under terms of the IBM Customer Agreement,IBM International Program License Agreement or any equivalent agreementbetween us.
Any performance data contained herein was determined in a controlledenvironment. Therefore, the results obtained in other operating environments mayvary significantly. Some measurements may have been made on development-levelsystems and there is no guarantee that these measurements will be the same ongenerally available systems. Furthermore, some measurement may have beenestimated through extrapolation. Actual results may vary. Users of this documentshould verify the applicable data for their specific environment.
Information concerning non-IBM products was obtained from the suppliers ofthose products, their published announcements or other publicly available sources.IBM has not tested those products and cannot confirm the accuracy ofperformance, compatibility or any other claims related to non-IBM products.Questions on the capabilities of non-IBM products should be addressed to thesuppliers of those products.
All statements regarding IBM’s future direction or intent are subject to change orwithdrawal without notice, and represent goals and objectives only.
This information contains examples of data and reports used in daily businessoperations. To illustrate them as completely as possible, the examples include thenames of individuals, companies, brands, and products. All of these names arefictitious and any similarity to the names and addresses used by an actual businessenterprise is entirely coincidental.
COPYRIGHT LICENSE:
This information contains sample application programs in source language, whichillustrates programming techniques on various operating platforms. You may copy,modify, and distribute these sample programs in any form without payment toIBM, for the purposes of developing, using, marketing or distributing applicationprograms conforming to the application programming interface for the operatingplatform for which the sample programs are written. These examples have notbeen thoroughly tested under all conditions. IBM, therefore, cannot guarantee orimply reliability, serviceability, or function of these programs. You may copy,modify, and distribute these sample programs in any form without payment toIBM for the purposes of developing, using, marketing, or distributing applicationprograms conforming to IBM’s application programming interfaces.
334 Installing and Configuring Tivoli Enterprise Data Warehouse
TrademarksThe following terms are trademarks of International Business MachinesCorporation in the United States, other countries, or both:
AIX Distributed RelationalDatabase Architecture
Tivoli
CICS DRDA Tivoli EnterpriseDataJoiner IBM Tivoli Enterprise ConsoleDB2 Informix ViaVoiceDB2 Connect OS/2 z/OSDB2 Universal Database OS/390
Java and all Java-based trademarks and logos are trademarks orregistered trademarks of Sun Microsystems, Inc.
Microsoft, Windows, and Windows NT are registered trademarks of MicrosoftCorporation.
Pentium is a trademark of Intel.
UNIX is a registered trademark of The Open Group.
Other company, product or service names may be trademarks or service marks ofothers.
Appendix E. Notices 335

336 Installing and Configuring Tivoli Enterprise Data Warehouse
Glossary
advanced report author. A Tivoli Enterprise DataWarehouse role that gives a user the ability to create,modify, run, display, and save both personal and publicreports. Contrast with report author. See also reportreader.
agent site. In the DB2 Data Warehouse Center, thelocation, defined by a single network host name, wherea warehouse agent application is installed. See alsodefault agent site and remote agent site.
attribute. Data associated with a component. Forexample, a server component might have attributessuch as host name, IP address, operating system type,operating system version, number of CPUs, CPU speed,type of RAM, number of hard drives, network domain,and so on.
banner area. The area that is located below the titlebar and can be customized by a system administratorto include relevant information for a particularorganization. For example, in the banner area, anorganization might want to include the role descriptorfor the particular user, the company logo, and links toInternet and intranet sites.
base table. A table created with the CREATE TABLEstatement. Such a table has both its description anddata physically stored in the database. Contrast withview.
central data warehouse. The component of TivoliEnterprise Data Warehouse that contains the cleansedhistorical data. Data in the central data warehousedatabase is derived from operational data, althoughoperational data is not stored directly in the centraldata warehouse database.
central data warehouse ETL. In Tivoli Enterprise DataWarehouse, the extract, transform, and load (ETL)process that reads the data from the operational datastores of the application that collects it (for example, alog file, a Tivoli Inventory repository, or a TivoliEnterprise Console database), verifies the data, makesthe data conform to the Tivoli Enterprise DataWarehouse schema, and places the data into the centraldata warehouse database. See also extract, transform,and load. Contrast with data mart ETL.
central data warehouse server. The machine wherethe central data warehouse component of TivoliEnterprise Data Warehouse is installed.
CIM. See common information model.
cleanse. To transform the data extracted fromoperational data stores so as to make it usable by thedata warehouse.
common information model (CIM). Animplementation-neutral, object-oriented schema fordescribing network management information. TheDistributed Management Task Force (DMTF) developsand maintains CIM specifications.
component. An entity about which measurements arecollected for reporting purposes. Sample componentsinclude a specific network storage device; the Webaddress http://www.ibm.com; and a person withwhom you have a customer relationship. Eachcomponent type in the data model has a set ofmeasurements and attributes that apply to allcomponents of that type.
consumer application. An application that uses thedata in the central data warehouse for a specificbusiness need. Consumer applications utilize reportingand third-party online analytical processing (OLAP)tools as well as planning, trend-tracking, analysis,accounting, and data mining tools. See also sourceapplication.
context menu. A menu that presents the actions thatare relevant for a particular item and that is shownonly when a user requests it.
Control Center. See DB2 Control Center.
control database. The component of Tivoli EnterpriseData Warehouse that contains the metadata thatdescribes the data in the warehouse, including thesource of the data, how the data was transformedbefore being placed in the warehouse, when the datawas collected, and the formats used to publish the data(for example, the star schemas used to create TivoliEnterprise Data Warehouse data marts).
control server. (1) In Tivoli Enterprise DataWarehouse, the machine where the control databasecomponent of Tivoli Enterprise Data Warehouse isinstalled. (2) In DB2 replication, the database location ofthe applicable subscription definitions and Applyprogram control tables.
database manager. A computer program that managesdata by providing the services of centralized control,data independence, and complex physical structures forefficient access, integrity, recovery, concurrency control,privacy, and security.
data definition language (DDL). A language fordescribing data and its relationships in a database.
© Copyright IBM Corp. 2001, 2003 337
data description language. See data definitionlanguage.
data mart. A subset of a data warehouse that containsdata that is tailored and optimized for the specificreporting needs of a department or team. A data martcan be a subset of a warehouse for an entireorganization, such as data contained in onlineanalytical processing (OLAP) tools.
data mart ETL. In Tivoli Enterprise Data Warehouse,the extract, transform, and load (ETL) process thatextracts a subset of data from the central datawarehouse database, transforms it, and loads it into oneor more star schemas. These schemas then can beincluded in data marts to answer specific businessquestions. See also extract, transform, and load. Contrastwith central data warehouse ETL.
data mart server. A machine that hosts one or moredata marts. Multiple data mart servers can draw datafrom the same central data warehouse.
data warehouse. A subject-oriented non-volatilecollection of data used to support strategic decisionmaking. The warehouse is the central point of dataintegration for business intelligence. It is the source ofdata for data marts within an enterprise and delivers acommon view of enterprise data.
Data Warehouse Center. See DB2 Data WarehouseCenter.
DB2 Control Center. The component of DB2 UniversalDatabase Enterprise Edition that provides the graphicalinterface that shows database objects (such as databasesand tables) and their relationship to each other. Fromthe Control Center, you can perform the tasks providedby the DBA Utility, Visual Explain, and PerformanceMonitor tools. Contrast with DataJoiner® ReplicationAdministration (DJRA) tool.
DB2 Data Warehouse Center. The component of DB2Universal Database Enterprise Edition that provides thegraphical interface and the software behind it thatenables you to work with the components of thewarehouse. You can use the DB2 Data WarehouseCenter to define and manage the warehouse data andthe processes that create the data in the warehouse.
DDL. See data definition language.
default agent site. An agent site that is located on thesame computer as the control server. A default agentsite does not require the installation of DB2 WarehouseManager. See also “agent site” on page 337 and remoteagent site.
ETL. See extract, transform, and load.
extract, transform, and load (ETL). The process ofcollecting data from one or more sources, cleansing andtransforming it, and then loading it into a database.
extension script. A script that augments the TivoliEnterprise Data Warehouse scripts. For example,extension scripts might be scripts that run before orafter the ETL process is run.
extreme case report. A Tivoli Enterprise DataWarehouse report that shows the instances of acomponent that have either the highest or the lowestvalues (but not both) for a specified metric. Typically,an extreme case report shows the best or worst n cases(where n is a number), such as the 10 servers havingthe most critical events. See also health check report andsummary report.
fenced. In DB2 Universal Database Enterprise Edition,pertaining to a type of user-defined function or storedprocedure that is defined to protect the databasemanager from modifications by the function. Thedatabase manager is isolated from the function orstored procedure by a barrier. See also not-fenced.
health check report. A Tivoli Enterprise DataWarehouse report that shows the values over time ofone or more metrics, which can be selected from one ormore star schemas, for one or more components.Typically, a health check report shows atime-delineated, diagnostic report showing thefluctuation of key indicators. See also extreme casereport and summary report.
IBM Console. The role-based user interface forperforming tasks using Tivoli management software.
metadata. Data that describes the characteristics ofstored data; descriptive data. For example, themetadata for a database table might include the nameof the table, the name of the database that contains thetable, the names of the columns in the table, and thecolumn descriptions, either in technical terms orbusiness terms.
metric. A measurement type. Each resource that canbe monitored for performance, availability, reliability,and other attributes has one or more metrics aboutwhich you collect data. Sample metrics include theamount of RAM on a PC, the number of help desk callsmade by a customer, the average CPU busy time for aserver, and mean time to failure for a hardware device.
not-fenced. Pertaining to a type of user-definedfunction or stored procedure that is defined to be runin the database manager process. There is no protectionfor the database manager from changes by thisfunction. See also fenced.
OLAP. See online analytical processing.
online analytical processing (OLAP). The process ofcollecting data from one or many sources; transformingand analyzing the consolidated data quickly andinteractively; and examining the results across different
338 Installing and Configuring Tivoli Enterprise Data Warehouse
dimensions of the data by looking for patterns, trends,and exceptions within complex relationships of thatdata.
operational data. Data that is collected by anapplication during its operation. An application canstore its operational data in many formats, such asrelational databases, log files, and spreadsheet files. It is″live″ data, as opposed to the historical data in thecentral data warehouse. See also operational data store.
operational data store. The place where operationaldata resides, such as a database or a log file. See alsooperational data.
personal report. A Tivoli Warehouse report that isavailable only to its author. Contrast with public report.
portfolio. In the IBM Console, the primary way thatyour work is organized within the IBM Console. Theportfolio is a container for the tasks that apply to eachrole that you have been assigned. It is titled “MyWork.” When the portfolio is closed, it is indicated bythe down arrow on the portfolio title bar. When theportfolio is open, it displays within the IBM Console tothe left of the work area.
public report. A Tivoli Warehouse report that isavailable to all users with access to the data mart fromwhich the report extracts its data. Contrast withpersonal report.
RDBMS. See relational database management system.
relational database. A database that can be perceivedas a set of tables and manipulated in accordance withthe relational model of data.
relational database management system (RDBMS). Acollection of hardware and software that organizes andprovides access to a relational database.
remote agent site. An agent site that is not located onthe same computer as the control server. A remoteagent site requires the installation of DB2 WarehouseManager. See also “agent site” on page 337 and defaultagent site.
report author. A Tivoli Enterprise Data Warehouserole that gives a user the ability to run, display, andsave the output of both personal and public reportsand to create and modify personal reports. Contrastwith advanced report author. See also report reader.
report interface (RPI). The component of TivoliEnterprise Data Warehouse that provides historicalreporting capabilities. Using the report interface, userscan create and run reports; create and manage datamarts that have the format required by the TivoliEnterprise Data Warehouse report-generating tools; andcreate and manage the groups that control access tothose data marts.
report reader. A Tivoli Enterprise Data Warehouse rolethat gives a user the ability to run, display, and savethe output of public reports. See also advanced reportauthor and report author.
resource. A hardware, software, or data entity that ismanaged by Tivoli software
role. A job function, such as software distributor, thatidentifies the tasks that a user can perform and theresources to which a user has access. A user can beassigned one or more roles.
report server. The machine where the report interfacecomponent of Tivoli Enterprise Data Warehouse isinstalled. See also report interface (RPI).
RPI. See report interface (RPI).
source application. An application whose data iscollected from its operational data stores and placedinto the central data warehouse using an extract,transform, and load (ETL) process. See also consumerapplication.
star schema. A type of relational database schemamade up of a fact table and a set of dimension tables.In Tivoli Enterprise Data Warehouse, the fact tableholds the values of the component’s metrics, and thedimension tables hold the values of the attributes of acomponent or a metric.
summary report. A Tivoli Enterprise Data Warehousereport that shows the values of many metrics for manycomponents from only one star schema. Typically, asummary report examines large numbers of metrics,often showing subtotals for a particular grouping andgrand totals for the entire report. Data in a summaryreport is typically displayed as a text table, rather thanin a graphical format. See also extreme case report andhealth check report.
tag file. A file that contains tag language whichdescribes objects and object types to be added, updatedor deleted in the Data Warehouse Center or in theinformation catalog, when the file is imported.
tag language file. See “tag file”.
task. An activity that has business value, is initiatedby a user, and is performed by software.
taskbar. In the IBM Console, the bar that is locatedbelow the work area and contains a button for eachtask window. The taskbar also includes a button foreach of these actions:
v Resetting your Web browser if you have displayproblems
v Signing off of the IBM Console
Task Assistant. In the IBM Console, the place to gofor answers to your questions. The Task Assistant isrepresented by the question mark in the upper right of
Glossary 339
the IBM Console. When it is open, the Task Assistantdisplays within the IBM Console to the right of thework area.
The Task Assistant provides help for the tasks that youare performing at any given moment. This includeshelp for all Tivoli management software that isinstalled at your location.
For detailed information about the IBM Console, referto the Overview section within the Table of Contentsfor the Task Assistant.
task button. In the IBM Console, the button on thetaskbar that represents a task window. A task can havemultiple task windows. When you click a task button,the associated task window opens in the work area.Each task button also includes a small icon thatindicates the status of the task.
task driver. In Tivoli Presentation Services, thefunction that interacts with the appropriate Tivolimanagement software to perform a task. Also, if therespective task has a user interface, the task driverprovides that interface.
task group. In the IBM Console, a method fororganizing tasks into logical categories.
Tivoli Presentation Services. The Tivoli user interfacearchitecture. It is a distributed, device-independent, andplatform-independent presentation layer for all Tivoliproducts. The IBM Console is an integral part of thisarchitecture.
trigger. In a database, a set of Structured QueryLanguage (SQL) statements that automatically initatean action when a specific operation, such as changingdata in a table, occurs. A trigger consists of an event(an INSERT, DELETE, or UPDATE statement issuedagainst an associated table) and an action (the relatedprocedure). Triggers are used to preserve data integrityby checking on or changing data in a consistentmanner.
user. A person who uses Tivoli management softwareand is assigned one or more roles.
user-defined program. In DB2 Universal Database, aprogram that a user supplies and defines to the DB2Data Warehouse Center, as contrasted with suppliedprograms, which are included with and definedautomatically in the DB2 Data Warehouse Center.
view. A logical table that consists of data that isgenerated by a query. A view is based on anunderlying set of base tables, and the data in a view isdetermined by a SELECT statement that is run on thebase tables. Contrast with base table.
warehouse. See “data warehouse” on page 338.
warehouse agent. In the DB2 Data Warehouse Center,software that manages the flow of data between one or
more data sources and one or more target warehouses.Warehouse agents use Open Database Connectivity(ODBC) drivers or the DB2 command line interface(CLI) to communicate with different databases.
warehouse enablement pack. A separately-installablepart of a Tivoli software product that provides TivoliEnterprise Data Warehouse functionality by providingextract, transform, and load (ETL) programs topopulate the central data warehouse and create datamarts, as well as customizable reports to answerspecific business questions. Also called a warehousepack. See also “extract, transform, and load” onpage 338.
warehouse source. A subset of tables and views froma single database, or a set of files, that have beendefined to the DB2 Data Warehouse Center.
warehouse target. A subset of tables, indexes, andaliases from a single database that are managed by theDB2 Data Warehouse Center.
warehouse pack. See warehouse enablement pack.
warehouse security administrator. A Tivoli EnterpriseData Warehouse role that gives a user the ability tocontrol access to Tivoli Enterprise Data Warehouse databy creating and managing user groups and data marts.
work area. In the IBM Console, the area in which taskwindows are displayed. This area does not include theportfolio and the Task Assistant.
340 Installing and Configuring Tivoli Enterprise Data Warehouse
Index
Special characters.rpidb.properties vault file 297$TWH_TOPDIR environment
variable 61, 78, 97%TWH_TOPDIR% environment
variable 61, 78, 97
Aaccess to data, controlling 27accessibility xvi, 319administration
road map 253advanced and basic configuration 190agent site
configuring 103, 242, 255placing 19
agentsSee warehouse agents
AIXincomplete installation 287troubleshooting an extended shared
memory error 294troubleshooting Tivoli Presentation
Services start 292alternate temporary directory 316architecture, Tivoli Enterprise Data
Warehouse 6, 14authorization, installation 26
Bbacking up
central data warehouse 258control server 257data mart database 258distributed deployments 257new installation 223overview 257, 259preparation 258quick start deployments 257road map 257single system 257Tivoli Enterprise Data
Warehouse 261Tivoli Presentation Services 263
basic and advanced configuration 190benefits of Tivoli Enterprise Data
Warehouse 3books
DB2 xivonline xvordering xvisee publications xiiTivoli Enterprise Data
Warehouse xiii
Ccapabilities of Tivoli Enterprise Data
Warehouse 3CD-ROM
mounting on AIX 316mounting on Linux 317mounting on Solaris 317mounting on UNIX 316
central data warehouseaccessing data 20actions affecting databases for
ETL 260backing up and restoring 258configuring steps 225, 243database 30defined 7deleting
databases 259firewalls 26installing a warehouse pack on 238introduction 7name of 30naming conventions 30planning worksheet for Windows and
UNIX 43, 47remote warehouse agents, using 227removing data 211scheduling deletion 269where to install 17
clientversions 137
coexistencewith other DB2 database
applications 30with other warehouses 30with Tivoli Decision Support 29
commandsdb2cmd 313db2level 314
components of Tivoli Enterprise DataWarehouse 6
configuration file, uninstalling 203configuration, basic and advanced 190configuring
agent site 103, 242, 255checklist for installing a warehouse
pack 218, 219checklist for installing the control
server component 217checklist for installing the report
server component 217, 218completing checklists 216control server for the warehouse
pack 224DB2 remote warehouse agent on
Solaris systems 105secure host IP 114security module 114steps to run on central data
warehouse and data martserver 225
configuring (continued)steps to run on central data
warehouse and data martservers 243
virtual host document for secureserver 115
virtual host structure for secureserver 115
warehouse agent for RDBMS 241warehouse sources and targets 225,
242control database
about 7backing up and restoring 258coexistence 30DB2 Data Warehouse Center
[for] 291DB2 Warehouse Control Database
Manager 291for DB2 Warehouse Manager 209metadata 7naming conventions 30ODBC data sources 291troubleshooting 283Warehouse Control Database Manager
[for] 64, 82, 102, 291control server
backing up and restoring 257checklist for installing 217configuring for warehouse pack 224defined 7firewalls 26installing warehouse pack 223introduction 7planning worksheet 41where to install 16
controlling data access 27conventions
typeface xviicore application
installation wizard overview 60, 77,96
specifying new control database 209uninstalling 206uninstalling on UNIX 208uninstalling on Windows 207
customer support xvi
Ddata flow
and Tivoli Enterprise DataWarehouse 4
warehouse agents 19data mart database
actions affecting databases forETL 260
backing up and restoring 258firewalls 26introduction 7name of 30
© Copyright IBM Corp. 2001, 2003 341
data mart database (continued)naming conventions 31planning worksheet for Windows and
UNIX 44, 48data marts
configuring steps 225, 243defined 7managing 133overview 133remote warehouse agents, using 227server, installing a warehouse pack
on 238uninstalling 200user groups, assigning 133where to install 17
data sourcesfirewalls 26setting properties 146
Data Warehouse CenterSee also DB2 Data Warehouse Centerinstalled warehouse packs 256
DB2See also DB2 Data Warehouse Centeractions affecting databases and
software 260command errors 281documentation xivIWH.environment file ixlog files 275logging onto the DB2 Data Warehouse
Center 247messages 278naming conventions 315opening the Control Center 247opening the Data Warehouse
Center 247other applications, coexistence with
Tivoli Enterprise DataWarehouse 30
password change 266planning 29, 51port numbers 32remote warehouse agents, using 227reusing an instance 314starting the DB2 Data Warehouse
Center 247uninstalling 211upgrading 265user and group names 315Warehouse Manager
See Warehouse Managerwhat version is installed 314wrong version is installed 281
DB2 Command Center, starting 313DB2 Command Window, starting 313DB2 commands
entering on UNIX 313entering on Windows 313
DB2 Control Centerstarting 247
DB2 Data Warehouse Centerlogon fails 290Notification Tab view 155opening the DB2 Data Warehouse
Center 247Process Model window view 152
DB2 Data Warehouse Center (continued)processes
creating shortcuts 151dependencies 149scheduling 153task flow 156
setting source and targetproperties 146
troubleshooting 295Work in Progress window 247, 302
DB2 default warehouse agent deploymentfinal steps 83
DB2 default warehouse agentspreparing to install 67using local 215
DB2 remote warehouse agent deploymentfinal steps 107
DB2 remote warehouse agentsSee also DB2 remote warehouse agentscreating sites 103creating sites on UNIX 103on Solaris systems 105scenario 227
DB2 warehouse agentssites, creating 103sites, creating on UNIX 103
DB2 Warehouse ManagerSee Warehouse Manager
DB2 warehouse servicesstarting 250
db2cmd command 313db2level command 314DBCS
See double byte character set (DBCS)debugging
See troubleshootingdeleting central data warehouse data
scheduling 269specifying data 269verifying process 270
deleting datadatabases 259
deleting logs 250dependencies
ETL processes 149deployment
central data warehouse worksheet forWindows and UNIX 43, 47
configurations 14data mart database worksheet for
Windows and UNIX 44, 48DB2 default warehouse agent on
control server, with 67DB2 remote warehouse agents,
with 85default agent site
control server planningworksheet 41
quick start 14quick start planning worksheet 36typical 15, 16
deploymentsdistributed 14
diagnosing problemsSee troubleshooting
directory names, notation xviidisability 319
distributed deploymentsbacking up and restoring 257supported configurations 14
distributed installationDB2 Warehouse Manager 232distributed installation
procedures 228installation with remote agents 227procedure 228scenario 215scenarios 227uninstalling considerations 207
documentationconfiguring virtual host 115DB2 xivTivoli Enterprise Data
Warehouse xiiidouble byte character set (DBCS) 120
See language supportdouble byte characters 37, 38, 41, 42, 46,
47
Eenabling SSL 109, 116environment variables
notation xviiTWH_TOPDIR 61, 78, 97VWS_LOGGING 250
errorsimporting tag file 298
ETL processeschecklist for running 156configuring steps 225, 243creating shortcuts 151determining application
dependencies 149exception tables 248logging 247, 302name construction 149running initialization 148scheduling
disabling 249overview 147re-enabling 249run times 150sequential run times 150steps 153
scheduling to run sequentially 151task flow 156
examplesdistributed installation with
warehouse agents 227installing with a response file 325using a DB2 default warehouse
agent 215warehouse agents 227
exceptions 248
Ffile permissions, UNIX 110files
.rpidb.properties vault 297IWH.environment file ixlog 273
342 Installing and Configuring Tivoli Enterprise Data Warehouse

files (continued)trace 273twh_ibm_db2_runlog file 276twh_ibm_db2_runlog file file 275TWH.log file 274TWHUninstall.log file 279vpd.properties 285
firewalls 26fix packs, warehouse packs 161
Ggroup
creating for HTTP server 110groups
See user groups
Hhardware requirements 13HTPASSWD utility 109HTTP administration
creating a user group to representserver 110
defining user ID and password 109representing the server 110starting and stopping 330UNIX, enabling for configuration 110
HTTP serverSee also HTTP administrationconfiguration 111connecting to 114creating user or group for 110starting and stopping 330
IIBM Console
See also Tivoli Presentation Servicescreating a user 129creating a user group 130data marts, assigning user
groups 133data marts, managing 133data marts, overview 133default password 126definitions and components 123groups, assigning users 130introduction 17Java version 17portfolio illustration 125portfolio, using 128report interface, troubleshooting 295reports, automatically running 131reports, creating 132reports, managing 130reports, modifying default
settings 131reports, overview 131reports, running 131sign on 127starting and stopping the server 329starting and stopping Web
services 331system administration 126task assistant illustration 126
IBM Console (continued)Task Assistant, opening 128Tivoli Enterprise Data Warehouse
roles 129Tivoli Enterprise Data Warehouse
roles, assigning 130troubleshooting 293user groups, managing 128user groups, overview 128using with Tivoli Enterprise Data
Warehouse 128IBM customer support xviIBM Global Security Kit, finding 111IBM Tivoli Monitoring integration 173Informix
client version 137Informix on AIX error 295installation
incomplete 285listing versions 253things to check first 279
installation filesTivoli Enterprise Data Warehouse 12warehouse packs 12
installation log files 273installation wizard overview 60, 77, 96installing
checklist for a warehouse pack 218,219
checklist for the control servercomponent 217
checklist for the report servercomponent 217, 218
configuration checklists 216DB2 Warehouse Manager 232language support 120process overview 13quick start deployments 57warehouse agents 254warehouse pack on control server and
report server 223warehouse packs 135, 140
instances, reusing 314international language codes 119IWH.environment file ix
JJAWS for Windows screen reader 319
Kkey file, setting for secure server 116key management utility, using 113keyboard 319
Llanguage codes 119language pack
See language supportlanguage support
directory name restrictions 120installing 120installing with report server 120list of languages 119
language support (continued)log files 277overview 119uninstalling 205
link tools button 153log files
DB2 275for ETL processes 247, 256, 302installation 273language pack 277overview 273removing from central data
warehouse 250Tivoli Presentation Services 277twh_ibm_db2_runlog file 275, 276TWH.log file 274TWHUninstall.log file 276, 279uninstallation 276warehouse enablement packs 276,
277logging on the DB2 Data Warehouse
Center 247logging, enhanced installation 274logon fails, DB2 Data Warehouse
Center 290
Mmaintenance
multiple customer environments anddata centers 160
overview 253road map 253
manualsDB2 xivonline xvordering xvisee publications xiiTivoli Enterprise Data
Warehouse xiiimessages
DB2 278installation 277uninstallation 279
Microsoft SQL serverclient version 137MS SQL Server 137
Monitoring, IBM Tivoli 173mounting CD-ROM devices
AIX 316Linux 317Solaris 317UNIX 316
multiple customer environments 28configuring 157maintaining 160overview 157
multiple data centers 28configuring 159maintaining 160overview 157
Nnames, of ETL processes 149naming conventions 30
Index 343
Network Information Service (NIS)installation considerations 72, 75, 90,
93newsgroups xviNIS
See Network Information Service (NIS)NIS (Network Information Systems) and
installing DB2 279notation
environment variables xviipath names xviitypeface xvii
OODBC
connections for warehouse packs 143data sources 291setting up data sources 145, 224, 239
online publications xvopening the DB2 Data Warehouse
Center 247operational data 11operational data sources
configuring connections to 145Oracle
client version 137ordering publications xvioverview
graphic 5Tivoli Enterprise Data Warehouse 3
overview, IBM Tivoli Monitoringintegration
graphic 174
Ppackaging 11password, changing DB2 266path names, notation xviiperformance tracking 28permissions, installation 26planning
central data warehouse worksheet forWindows and UNIX 43, 47
control server installationworksheet 41
data mart database worksheet forWindows and UNIX 44, 48
DB2 installations 29overview 11quick start planning worksheet 36warehouse packs 21
portadding on secure server 114
port numbersdefault values 32, 33, 34multiple DB2 32selecting 31
portfolio illustration of IBM Console 125prerequisites 13problem determination
See troubleshootingproblems, diagnosing
See troubleshootingprocess IDs, of ETL processes 149
process task flow, checking 156publications xii
online xvordering xvi
Qquick start deployment
backing up and restoring 257control server 60creating databases 60DB2 58final steps 64overview 57planning worksheet 36preparation 57supported configurations 14
RRDBMS
configuring DB2 remote warehouseagents 241
setting up client software 224, 239reinstalling
troubleshooting 288remote agents
See DB2 remote warehouse agentsremote warehouse agents
configuring for RDBMS 241troubleshooting 296
removing log data 250report interface
installing language support 120introduction 7troubleshooting 295
report serveradding language support 121checklist for installing 217, 218installing warehouse pack 223planning worksheet 41where to install 17
reportsautomatically running 131creating 132managing 130modifying default settings 131overview 131running 131
resource models 173response file
installation example 325options 322procedure 321restrictions 321using 321
restoringoverview 257, 261preparation 258road map 257Tivoli Enterprise Data
Warehouse 261road maps
administration 253backing up and restoring 257maintenance 253
RPI vault.rpidb.properties file 297about 27
Sscenarios
distributed installation 215distributed installation with DB2
remote warehouse agents 227distributed installation with remote
agents 227installing with a response file 325using a DB2 default warehouse
agent 215scheduling
ETL processes 147, 249verifying parameters 156
scheduling data deletion 269scheduling ETL processes 151screen reader 319secure host IP, configuring 114secure server
additional port 114setting key file 116setting SSL timeout values 116virtual host document,
configuring 115virtual host structure,
configuring 115Secure Sockets Layer
enabling 109, 116setting timeout values for secure
server 116security 26
creating a certificate 111database connection information 27
security certificate, creating 111security module, configuring 114shortcut button 152shortcuts, ETL
creating 151verifying 156
silent installationabout 321installation example 325procedure 321restrictions 321
single system deploymentsbacking up and restoring 257
software requirements 13sources
See also ODBC data sourcesSee also warehouse sourcessetting properties 146
SSLenabling 109, 116setting timeout values for secure
server 116star schemas
backing up and restoring 258installing language support 120uninstalling 200
startingDB2 Control Center 247DB2 Data Warehouse Center 247HTTP administration 330
344 Installing and Configuring Tivoli Enterprise Data Warehouse

starting (continued)HTTP server 330Server for IBM Console 329Tivoli Presentation Services 329Web Services for the IBM
Console 331stopping
HTTP administration 330HTTP server 330Server for IBM Console 329Tivoli Presentation Services 329Web Services for the IBM
Console 331Sybase
client version 137system administration tips 313
Ttag file
errors during import 298targets
See also warehouse targetssetting properties 146
task assistant illustration of IBMConsole 126
temporary, alternate directory 316time zones 28Tivoli customer support
See IBM customer supportTivoli Decision Support
coexistence with 29comparing with Tivoli Enterprise Data
Warehouse 8Tivoli Enterprise Data Warehouse
about 11architecture 6backing up and restoring 261benefits 3data flow 4documentation xiiioverview 3packaging 11
Tivoli Presentation ServicesSee also IBM Consolebacking up and restoring 263components 17HTTP administration
See HTTP administrationincomplete installation 287log files 277starting and stopping 329troubleshooting start on AIX 292uninstalling 210
Tivoli Software Information Center xvtrace files
installation 274overview 273
troubleshootingabout 273common problems 280, 290control database 283DB2 command errors 281DB2 Data Warehouse Center 295export fails 282extended shared memory error 294IBM Console start on UNIX 293
troubleshooting (continued)IBM Tivoli Monitoring 187, 198incompleteTivoli Presentation Services
installation 287Informix on AIX error 295installations 279, 285, 287installing DB2 279reinstalling 288remote warehouse agents 296report interface 295things to check first 279Tivoli Presentation Services start on
AIX 292uninstalling 289warehouse pack uninstall 298warehouse packs 297wrong version of DB2 281
twh_app_deinstall.cfg file 203twh_app_deinstall.sh script 205TWH_CDW
See central data warehousetwh_ibm_db2_runlog.log file 275, 276TWH_MART
See data mart databaseTWH_MD
See control databaseTWH_TOPDIR environment variable 61,
78, 97TWH.log file 274TWHUninstall.log file 276, 279typeface conventions xvii
Uuninstalling
configuration file 203core application 206
distributed 207on UNIX 208on Windows 207specifying new control
database 209data marts 200DB2 211language packs 205overview 199removing data from central data
warehouse 211star schemas 200Tivoli Presentation Services 210troubleshooting 289
warehouse packs 298twh_app_deinstall.sh script 205warehouse packs 199
UNIXtroubleshooting IBM Console
start 293upgrading
warehouse packs 135user
creating for HTTP server 110user authorization, installation 26user groups
assigning Tivoli Enterprise DataWarehouse roles 130
assigning to data marts 133assigning users 130
user groups (continued)creating 130creating a user 129managing 128overview 128
Vvariables, notation for xviiversions installed, listing 253virtual host
configuring document for secureserver 115
configuring structure for secureserver 115
vpd.properties file 285vwlogger
See Warehouse logger serviceVWS_LOGGING environment
variable 250vwserver
See Warehouse server service
Wwarehouse agent sites
defined 7warehouse agents
See also DB2 default warehouse agentsSee also DB2 remote warehouse agentsabout 18defined 7installing
on UNIX 255on Windows 254
Warehouse logger servicestarting 250stopping 249
Warehouse Managerinstalling 232specifying new control database 209
warehouse packsactions affecting databases and
software 260checklist for installing 218, 219configuring 256configuring sources and targets 225configuring the control server 224customized 256defined 8determining currently installed 256ETL processes, configuring and
scheduling 147fix packs 161installing 140
considerations 21files 12procedure 135road map 135
installing on control server and reportserver 223
installing on the central datawarehouse 238
installing on the data martserver 238
ODBC connections 143
Index 345
warehouse packs (continued)planning 22, 49software requirements 21troubleshooting 297troubleshooting uninstall 298upgrading 135
Warehouse server servicestopping 249, 250
warehouse sourcesconfiguring 242
warehouse targetsconfiguring 242
Web browser considerations 21wizard overview 60, 77, 96Work in Progress window
using for problem determination 247,302
worksheetscentral data warehouse for Windows
and UNIX 43, 47control server 41data mart database for Windows and
UNIX 44, 48DB2 51quick start deployment 36warehouse packs 49
346 Installing and Configuring Tivoli Enterprise Data Warehouse

����
Printed in U.S.A.
GC32-0744-01


![[1]Oracle® Fusion Middleware Installing and Configuring ... · Installing and Configuring Oracle Enterprise Data Quality 12c ... Oracle Fusion Middleware Installing and Configuring](https://img.dokumen.tips/doc/110x75/5b8396637f8b9a47588d872b/1oracle-fusion-middleware-installing-and-configuring-installing-and.jpg)