Embed Size (px)
Citation preview

Oracle® Fusion MiddlewareInstalling and Configuring Oracle Identity andAccess Management
12c (12.2.1.3.0)E95501-02October 2018

Oracle Fusion Middleware Installing and Configuring Oracle Identity and Access Management, 12c(12.2.1.3.0)
E95501-02
Copyright © 2017, 2018, Oracle and/or its affiliates. All rights reserved.
Primary Author: Shynitha K S
This software and related documentation are provided under a license agreement containing restrictions onuse and disclosure and are protected by intellectual property laws. Except as expressly permitted in yourlicense agreement or allowed by law, you may not use, copy, reproduce, translate, broadcast, modify,license, transmit, distribute, exhibit, perform, publish, or display any part, in any form, or by any means.Reverse engineering, disassembly, or decompilation of this software, unless required by law forinteroperability, is prohibited.
The information contained herein is subject to change without notice and is not warranted to be error-free. Ifyou find any errors, please report them to us in writing.
If this is software or related documentation that is delivered to the U.S. Government or anyone licensing it onbehalf of the U.S. Government, then the following notice is applicable:
U.S. GOVERNMENT END USERS: Oracle programs, including any operating system, integrated software,any programs installed on the hardware, and/or documentation, delivered to U.S. Government end users are"commercial computer software" pursuant to the applicable Federal Acquisition Regulation and agency-specific supplemental regulations. As such, use, duplication, disclosure, modification, and adaptation of theprograms, including any operating system, integrated software, any programs installed on the hardware,and/or documentation, shall be subject to license terms and license restrictions applicable to the programs.No other rights are granted to the U.S. Government.
This software or hardware is developed for general use in a variety of information management applications.It is not developed or intended for use in any inherently dangerous applications, including applications thatmay create a risk of personal injury. If you use this software or hardware in dangerous applications, then youshall be responsible to take all appropriate fail-safe, backup, redundancy, and other measures to ensure itssafe use. Oracle Corporation and its affiliates disclaim any liability for any damages caused by use of thissoftware or hardware in dangerous applications.
Oracle and Java are registered trademarks of Oracle and/or its affiliates. Other names may be trademarks oftheir respective owners.
Intel and Intel Xeon are trademarks or registered trademarks of Intel Corporation. All SPARC trademarks areused under license and are trademarks or registered trademarks of SPARC International, Inc. AMD, Opteron,the AMD logo, and the AMD Opteron logo are trademarks or registered trademarks of Advanced MicroDevices. UNIX is a registered trademark of The Open Group.
This software or hardware and documentation may provide access to or information about content, products,and services from third parties. Oracle Corporation and its affiliates are not responsible for and expresslydisclaim all warranties of any kind with respect to third-party content, products, and services unless otherwiseset forth in an applicable agreement between you and Oracle. Oracle Corporation and its affiliates will not beresponsible for any loss, costs, or damages incurred due to your access to or use of third-party content,products, or services, except as set forth in an applicable agreement between you and Oracle.
Contents
Preface
Audience ix
Documentation Accessibility ix
Related Documents ix
Conventions x
1 About the Oracle Identity and Access Management Installation
1.1 About Oracle Identity and Access Management 12c 1-1
1.2 About the Modes of Installation 1-2
1.3 Using the Standard Installation Topology as a Starting Point 1-4
1.3.1 About the Oracle Identity and Access Management Standard InstallationTopology 1-4
1.3.2 About Elements in the Standard Installation Topology Illustration 1-6
1.4 Using This Document to Extend an Existing Domain 1-7
2 Preparing to Install and Configure Oracle Identity and AccessManagement
2.1 Roadmap for Installing and Configuring a Standard Installation Topology 2-1
2.2 Roadmap for Verifying Your System Environment 2-3
2.2.1 Verifying Certification, System, and Interoperability Requirements 2-4
2.2.2 Selecting an Installation User 2-5
2.2.2.1 About User Permissions 2-5
2.2.2.2 About Non-Default User Permissions on UNIX Operating Systems 2-7
2.2.2.3 Verifying that the Installation User has Administrator Privileges onWindows Operating Systems 2-8
2.2.3 About the Directories for Installation and Configuration 2-8
2.2.3.1 About the Recommended Directory Structure 2-9
2.2.3.2 About the Oracle Home Directory 2-10
2.2.3.3 About the Domain Home Directory 2-11
2.2.3.4 About the Application Home Directory 2-11
2.2.3.5 Installing Multiple Products in the Same Domain 2-11
iii
2.2.3.6 Preparing for Shared Storage 2-12
2.2.4 About JDK Requirements for an Oracle Fusion Middleware Installation 2-13
2.2.5 About Database Requirements for an Oracle Fusion MiddlewareInstallation 2-13
2.3 Obtaining the Product Distribution 2-14
2.4 About Product Distributions 2-14
3 Installing the Oracle Identity and Access Management Software
3.1 Verifying the Installation Checklist 3-3
3.2 Starting the Installation Program 3-4
3.3 Navigating the Installation Screens 3-5
3.4 Verifying the Installation 3-6
3.4.1 Reviewing the Installation Log Files 3-7
3.4.2 Checking the Directory Structure 3-7
3.4.3 Viewing the Contents of the Oracle Home 3-7
4 Configuring Oracle Access Management Domain
4.1 Creating the Database Schemas 4-1
4.1.1 Installing and Configuring a Certified Database 4-2
4.1.2 Starting the Repository Creation Utility 4-2
4.1.3 Navigating the Repository Creation Utility Screens to Create Schemas 4-2
4.1.3.1 Introducing the RCU 4-3
4.1.3.2 Selecting a Method of Schema Creation 4-3
4.1.3.3 Providing Database Connection Details 4-3
4.1.3.4 Specifying a Custom Prefix and Selecting Schemas 4-4
4.1.3.5 Specifying Schema Passwords 4-5
4.1.3.6 Specifying Custom Variables 4-6
4.1.3.7 Completing Schema Creation 4-6
4.2 Configuring the Domain 4-6
4.2.1 Starting the Configuration Wizard 4-6
4.2.2 Navigating the Configuration Wizard Screens to Create and Configurethe Domain 4-7
4.2.2.1 Selecting the Domain Type and Domain Home Location 4-9
4.2.2.2 Selecting the Configuration Templates for Oracle AccessManagement 4-9
4.2.2.3 Selecting the Application Home Location 4-9
4.2.2.4 Configuring the Administrator Account 4-10
4.2.2.5 Specifying the Domain Mode and JDK 4-10
4.2.2.6 Specifying the Database Configuration Type 4-10
4.2.2.7 Specifying JDBC Component Schema Information 4-11
iv

4.2.2.8 Testing the JDBC Connections 4-11
4.2.2.9 Selecting Advanced Configuration 4-12
4.2.2.10 Configuring the Administration Server Listen Address 4-12
4.2.2.11 Configuring Node Manager 4-12
4.2.2.12 Configuring Managed Servers for Oracle Access Management 4-13
4.2.2.13 Configuring a Cluster for Oracle Access Management 4-14
4.2.2.14 Defining Server Templates 4-15
4.2.2.15 Configuring Dynamic Servers 4-15
4.2.2.16 Assigning Oracle Access Management Managed Servers to theCluster 4-15
4.2.2.17 Configuring Coherence Clusters 4-16
4.2.2.18 Creating a New Oracle Access Management Machine 4-16
4.2.2.19 Assigning Servers to Oracle Access Management Machines 4-17
4.2.2.20 Virtual Targets 4-17
4.2.2.21 Partitions 4-17
4.2.2.22 Configuring Domain Frontend Host 4-17
4.2.2.23 Targeting the Deployments 4-17
4.2.2.24 Targeting the Services 4-18
4.2.2.25 Reviewing Your Configuration Specifications and Configuring theDomain 4-18
4.2.2.26 Writing Down Your Domain Home and Administration ServerURL 4-18
4.2.3 Updating the System Properties for SSL Enabled Servers 4-18
4.3 Starting the Servers 4-18
4.4 Verifying the Configuration 4-20
4.5 Setting the Memory Parameters for OAM Domain (Optional) 4-20
4.6 Updating the java.security File (Optional) 4-20
4.7 Troubleshooting 4-21
4.7.1 MDS ReadOnlyStoreException in OAM Policy Manager Diagnostic log 4-21
4.7.2 Ignorable Warnings in the Administration Server Logs 4-21
5 Configuring the Oracle Identity Governance Domain
5.1 Verifying the Memory Settings 5-2
5.2 Creating the Database Schemas 5-2
5.2.1 Installing and Configuring a Certified Database 5-3
5.2.2 Starting the Repository Creation Utility 5-3
5.2.3 Navigating the Repository Creation Utility Screens to Create Schemas 5-3
5.2.3.1 Introducing the RCU 5-4
5.2.3.2 Selecting a Method of Schema Creation 5-4
5.2.3.3 Providing Database Connection Details 5-4
5.2.3.4 Specifying a Custom Prefix and Selecting Schemas 5-5
v

5.2.3.5 Specifying Schema Passwords 5-6
5.2.3.6 Specifying Custom Variables 5-6
5.2.3.7 Completing Schema Creation 5-7
5.3 Configuring the Domain 5-7
5.3.1 Starting the Configuration Wizard 5-7
5.3.2 Navigating the Configuration Wizard Screens to Create and Configurethe Domain 5-7
5.3.2.1 Selecting the Domain Type and Domain Home Location 5-10
5.3.2.2 Selecting the Configuration Templates for Oracle IdentityManager 5-10
5.3.2.3 Configuring High Availability Options 5-10
5.3.2.4 Selecting the Application Home Location 5-12
5.3.2.5 Configuring the Administrator Account 5-12
5.3.2.6 Specifying the Domain Mode and JDK 5-12
5.3.2.7 Specifying the Database Configuration Type 5-12
5.3.2.8 Specifying JDBC Component Schema Information 5-13
5.3.2.9 Testing the JDBC Connections 5-14
5.3.2.10 Entering Credentials 5-14
5.3.2.11 Specifying the Path to the Keystore Certificate or Key 5-15
5.3.2.12 Selecting Advanced Configuration 5-15
5.3.2.13 Configuring the Administration Server Listen Address 5-15
5.3.2.14 Configuring Node Manager 5-16
5.3.2.15 Configuring Managed Servers for Oracle Identity Manager 5-16
5.3.2.16 Configuring a Cluster for Oracle Identity Manager 5-17
5.3.2.17 Defining Server Templates 5-17
5.3.2.18 Configuring Dynamic Servers 5-18
5.3.2.19 Assigning Oracle Identity Manager Managed Servers to theCluster 5-18
5.3.2.20 Configuring Coherence Clusters 5-19
5.3.2.21 Creating a New Oracle Identity Manager Machine 5-19
5.3.2.22 Assigning Servers to Oracle Identity Manager Machines 5-20
5.3.2.23 Virtual Targets 5-20
5.3.2.24 Partitions 5-21
5.3.2.25 Configuring Domain Frontend Host 5-21
5.3.2.26 Targeting the Deployments 5-21
5.3.2.27 Targeting the Services 5-21
5.3.2.28 File Stores 5-21
5.3.2.29 Reviewing Your Configuration Specifications and Configuring theDomain 5-21
5.3.2.30 Writing Down Your Domain Home and Administration ServerURL 5-22
5.4 Performing Post-Configuration Tasks 5-22
vi
5.4.1 Running the Offline Configuration Command 5-22
5.4.2 Updating the System Properties for SSL Enabled Servers 5-23
5.5 Starting the Servers 5-23
5.6 Integrating Oracle Identity Governance with Oracle SOA Suite 5-24
5.7 Verifying the Configuration 5-25
5.8 Analyzing the Bootstrap Report 5-25
5.9 Accessing the Oracle Identity Governance Design Console (Optional) 5-26
5.10 Troubleshooting 5-26
5.10.1 Description of the Log Codes 5-27
5.10.2 Exception in the Oracle Identity Manager Server Logs After Startingthe Servers 5-28
5.10.3 Oracle Identity Manager Bootstrap Fails with Hostname VerificationError 5-28
5.10.4 Oracle Identity Manager Server log Shows IOException When IPv6 isUsed 5-29
5.10.5 Error When Accessing Pending Approvals Page in a Multinode Setup 5-30
5.10.6 OIM Gridlink Datasources Show Suspended State When 11.2.0.4.0RAC Database is Used 5-30
5.10.7 Server Consoles are Inaccessible in a Clustered Domain 5-31
5.10.8 OIM Server Fails to Come up Due to SOA Server not Completely Up 5-31
5.10.9 Oracle Identity Manager Server Throws OutOfMemoryError 5-31
5.10.10 ‘ADFContext leak detected’ Message in the OIM Server Logs 5-32
5.10.11 ADF Controller Exception in the SOA Server Logs 5-32
6 Installing and Configuring Oracle Identity Governance UsingSimplified Installation Process
6.1 About the Simplified Installation Process 6-2
6.2 Roadmap for Installing and Configuring Oracle Identity Governance UsingSimplified Installation 6-2
6.3 Installing Oracle Identity Governance Using Quick Installer 6-3
6.3.1 Obtaining the Quick Installer 6-4
6.3.2 Starting the Quick Installation Program 6-4
6.3.3 Navigating the Quick Installation Screens 6-4
6.3.4 Verifying the Installation 6-5
6.3.4.1 Reviewing the Installation Log Files 6-5
6.3.4.2 Checking the Directory Structure 6-6
6.3.4.3 Viewing the Contents of the Oracle Home 6-6
6.4 Creating Database Schemas 6-6
6.5 Configuring the Oracle Identity Governance Domain 6-7
6.6 Performing Post-Configuration Tasks 6-8
6.6.1 Running the Offline Configuration Command 6-8
vii
6.6.2 Updating the System Properties for SSL Enabled Servers 6-9
6.7 Starting the Servers 6-9
6.8 Integrating Oracle Identity Governance with Oracle SOA Suite 6-10
6.9 Verifying the Configuration 6-11
6.10 Analyzing the Bootstrap Report 6-11
6.11 Accessing the Oracle Identity Governance Design Console (Optional) 6-11
7 Next Steps After Configuring the Domain
7.1 Performing Basic Administrative Tasks 7-1
7.2 Performing Additional Domain Configuration Tasks 7-1
7.3 Preparing Your Environment for High Availability 7-2
8 Uninstalling or Reinstalling Oracle Identity and Access Management
8.1 About Product Uninstallation 8-1
8.2 Stopping Oracle Fusion Middleware 8-2
8.3 Removing Your Database Schemas 8-2
8.4 Uninstalling the Software 8-3
8.4.1 Starting the Uninstall Wizard 8-3
8.4.2 Selecting the Product to Uninstall 8-3
8.4.3 Navigating the Uninstall Wizard Screens 8-4
8.5 Removing the Oracle Home Directory Manually 8-4
8.6 Removing the Program Shortcuts on Windows Operating Systems 8-4
8.7 Removing the Domain and Application Data 8-5
8.8 Reinstalling the Software 8-5
A Updating the JDK After Installing and Configuring an Oracle FusionMiddleware Product
A.1 About Updating the JDK Location After Installing an Oracle FusionMiddleware Product A-1
A.1.1 Updating the JDK Location in an Existing Oracle Home A-2
A.1.2 Updating the JDK Location in an Existing Domain Home A-3
viii
Preface
This document describes how to install and configure Oracle Identity and AccessManagement.
• Audience
• Documentation Accessibility
• Related Documents
• ConventionsLearn about the conventions used in this document.
AudienceThis guide is intended for system administrators or application developers who areinstalling and configuring Oracle Identity and Access Management. It is assumed thatreaders are familiar with web technologies and have a general understanding ofWindows and UNIX platforms.
Documentation AccessibilityFor information about Oracle's commitment to accessibility, visit the OracleAccessibility Program website at http://www.oracle.com/pls/topic/lookup?ctx=acc&id=docacc.
Access to Oracle Support
Oracle customers that have purchased support have access to electronic supportthrough My Oracle Support. For information, visit http://www.oracle.com/pls/topic/lookup?ctx=acc&id=info or visit http://www.oracle.com/pls/topic/lookup?ctx=acc&id=trsif you are hearing impaired.
Related DocumentsFor more information, see the following documents in the 12c (12.2.1.3.0)documentation set:
• For installation information, see Fusion Middleware Installation Documentation.
• For upgrade information, see Fusion Middleware Upgrade Documentation.
• For administration-related information, see Fusion Middleware AdministrationDocumentation.
• For release-related information, see Fusion Middleware Release Notes.
ix
ConventionsLearn about the conventions used in this document.
This document uses the following text conventions:
Convention Meaning
boldface Boldface type indicates graphical user interface elements associatedwith an action, or terms defined in text or the glossary.
italic Italic type indicates book titles, emphasis, or placeholder variables forwhich you supply particular values.
monospace Monospace type indicates commands within a paragraph, URLs, codein examples, text that appears on the screen, or text that you enter.
Preface
x
1About the Oracle Identity and AccessManagement Installation
The standard installation for Oracle Identity and Access Management described in thisguide creates the standard topology, which represents a sample starting topology forthis product.
Note:
The product Oracle Identity Manager is referred to as Oracle IdentityManager (OIM) and Oracle Identity Governance (OIG) interchangeably in theguide.
• About Oracle Identity and Access Management 12cOracle Identity and Access Management 12c (12.2.1.3.0) installation process ismuch simpler than any earlier release.
• About the Modes of InstallationOracle Identity and Access Management supports two modes of installation —standalone and collocated.
• Using the Standard Installation Topology as a Starting PointThe standard installation topology is a flexible topology that you can use as astarting point in production environments.
• Using This Document to Extend an Existing DomainThe procedures in this guide describe how to create a new domain. Theassumption is that no other Oracle Fusion Middleware products are installed onyour system.
1.1 About Oracle Identity and Access Management 12cOracle Identity and Access Management 12c (12.2.1.3.0) installation process is muchsimpler than any earlier release.
Oracle Identity and Access Management 12c (12.2.1.3.0) suite has two components:
• Oracle Access Management (OAM)
• Oracle Identity Governance (OIG)
Note:
The product Oracle Identity Manager is referred to as Oracle IdentityManager (OIM) and Oracle Identity Governance (OIG) interchangeably in theguide.
1-1
From an installation and configuration perspective, the following are some of theimprovements made in 12c (12.2.1.3.0):
• For Oracle Access Management (OAM):
– Simplified installation process with reduced number of steps (compared toearlier releases).
– Bootstrapping is the process of creating out of the box OAM artifacts in theOAM store. For example, authentication schemes under policy components.12c (12.2.1.3.0) allows to re-bootstrap individual components if failed. Forexample, policy, system, federation.
This makes the installation process easier. In case of failure, individualcomponents can be re-run again instead of starting over from the beginning.
– Reduced post-configuration steps.
• For Oracle Identity Governance (OIG):
– Integrated quick installer has been introduced in 12c (12.2.1.3.0) for OracleIdentity Governance. This can be used to install Oracle Fusion MiddlewareInfrastructure 12c (12.2.1.3.0), Oracle SOA Suite 12c (12.2.1.3.0), and OracleIdentity and Access Management 12c (12.2.1.3.0) using one installer. You donot have to use multiple installers to install the products required for OracleIdentity Governance.
– Configuration through Bootstrapping as part of server startup has beenintroduced in 12c (12.2.1.3.0). Post-configuration steps required earlier (in 11greleases) are now done through auto-discovery during bootstrap (both in caseof cluster mode and out-of-the box configuration).
– Reduced post-configuration steps.
For more information about Oracle Access Management 12c (12.2.1.3.0), and it’sfeatures, refer to the following topics in the Administrator's Guide for Oracle AccessManagement:
• Features of Access Manager 12.2.1.3.0
• Features Not Supported in Access Manager 12.2.1.3.0
• Understanding Oracle Access Management Services
• Understanding Oracle Access Management Access Manager
For more information about Oracle Identity Governance 12c (12.2.1.3.0), refer to thefollowing topics in the Administering Oracle Identity Governance:
• New and Changed Features for 12c (12.2.1.3.0)
• What is Oracle Identity Governance?
• What are the Different Modes of Oracle Identity Governance?
1.2 About the Modes of InstallationOracle Identity and Access Management supports two modes of installation —standalone and collocated.
• Standalone Mode of Installation:
Standalone mode refers to the type of installation that is managed independentlyof WebLogic Server. However, this mode is NOT supported for Oracle Identity
Chapter 1About the Modes of Installation
1-2
Governance and Oracle Access Management 12c (12.2.1.3.0). The onlycomponent that you can install using standalone mode is the Oracle IdentityGovernance Design Console.
• Collocated Mode of Installation:
Collocated mode refers to the type of installation that is managed throughWebLogic Server. This mode is supported for both Oracle Identity Governanceand Oracle Access Management. To install Oracle Identity and AccessManagement in collocated mode, you must also install the necessary dependantsoftwares.
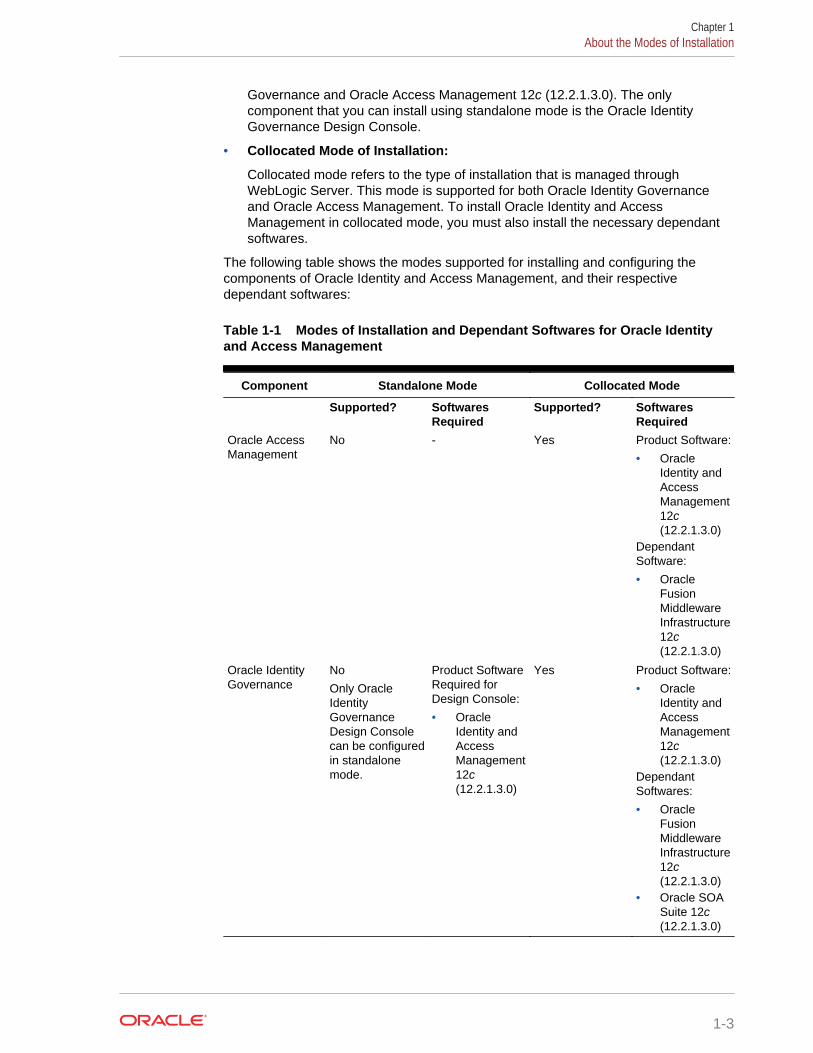
The following table shows the modes supported for installing and configuring thecomponents of Oracle Identity and Access Management, and their respectivedependant softwares:
Table 1-1 Modes of Installation and Dependant Softwares for Oracle Identityand Access Management
Component Standalone Mode Collocated Mode
Supported? SoftwaresRequired
Supported? SoftwaresRequired
Oracle AccessManagement
No - Yes Product Software:
• OracleIdentity andAccessManagement12c(12.2.1.3.0)
DependantSoftware:
• OracleFusionMiddlewareInfrastructure12c(12.2.1.3.0)
Oracle IdentityGovernance
No
Only OracleIdentityGovernanceDesign Consolecan be configuredin standalonemode.
Product SoftwareRequired forDesign Console:
• OracleIdentity andAccessManagement12c(12.2.1.3.0)
Yes Product Software:
• OracleIdentity andAccessManagement12c(12.2.1.3.0)
DependantSoftwares:
• OracleFusionMiddlewareInfrastructure12c(12.2.1.3.0)
• Oracle SOASuite 12c(12.2.1.3.0)
Chapter 1About the Modes of Installation
1-3
Note:
A quick installer is available for Oracle Identity Governance 12c (12.2.1.3.0),which installs Infrastructure, Oracle SOA Suite, and Oracle Identity andAccess Management 12c (12.2.1.3.0) in one go. In other words, no separateinstallers are required for installing all the three softwares. If you wish to usethe simplified installation process for Oracle Identity Governance, see Installing and Configuring Oracle Identity Governance Using SimplifiedInstallation Process.
For more information about the product distributions and the instructions forinstalling the dependant softwares, see About Product Distributions.
1.3 Using the Standard Installation Topology as a StartingPoint
The standard installation topology is a flexible topology that you can use as a startingpoint in production environments.
The information in this guide helps you to create a standard installation topology forOracle Identity and Access Management. If required, you can later extend thestandard installation topology to create a secure and highly available productionenvironment, see Next Steps After Configuring the Domain.
The standard installation topology represents a sample topology for this product. It isnot the only topology that this product supports. See About the Standard InstallationTopology in Oracle Fusion Middleware Planning an Installation of Oracle FusionMiddleware.
• About the Oracle Identity and Access Management Standard Installation TopologyThis topology represents a standard WebLogic Server domain that contains anAdministration Server and one or more clusters containing one or more ManagedServers.
• About Elements in the Standard Installation Topology IllustrationThe standard installation topology typically includes common elements.
1.3.1 About the Oracle Identity and Access Management StandardInstallation Topology
This topology represents a standard WebLogic Server domain that contains anAdministration Server and one or more clusters containing one or more ManagedServers.
The following figure shows the standard installation topology for Oracle Identity andAccess Management.
See Table 1-2 for information on elements of this topology.
Chapter 1Using the Standard Installation Topology as a Starting Point
1-4
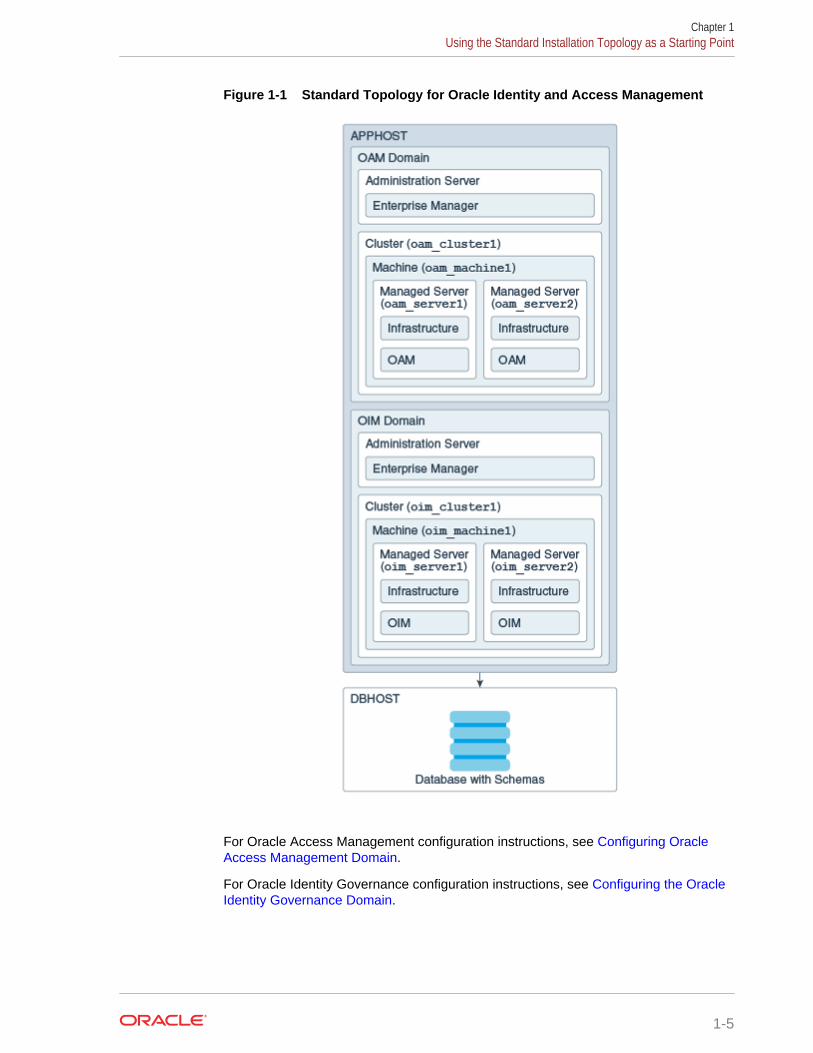
Figure 1-1 Standard Topology for Oracle Identity and Access Management
For Oracle Access Management configuration instructions, see Configuring OracleAccess Management Domain.
For Oracle Identity Governance configuration instructions, see Configuring the OracleIdentity Governance Domain.
Chapter 1Using the Standard Installation Topology as a Starting Point
1-5
1.3.2 About Elements in the Standard Installation Topology IllustrationThe standard installation topology typically includes common elements.
The following table describes all elements of the topology illustration:
Table 1-2 Description of Elements in Standard Installation Topologies
Element Description and Links to Related Documentation
APPHOST A standard term used in Oracle documentation to referto the machine that hosts the application tier.
DBHOST A standard term used in Oracle documentation to referto the machine that hosts the database.
WebLogic Domain A logically related group of Java components (in thiscase, the Administration Server, Managed Servers, andother related software components).See What Is an Oracle WebLogic Server Domain? inOracle Fusion Middleware Understanding Oracle FusionMiddleware.
Administration Server Central control entity of a WebLogic domain. It maintainsconfiguration objects for that domain and distributesconfiguration changes to Managed Servers.See What Is the Administration Server? in Oracle FusionMiddleware Understanding Oracle Fusion Middleware.
Enterprise Manager The Oracle Enterprise Manager Fusion MiddlewareControl is a primary tool used to manage a domain.See Oracle Enterprise Manager Fusion MiddlewareControl in Oracle Fusion Middleware UnderstandingOracle Fusion Middleware.
Cluster A collection of multiple WebLogic Server instancesrunning simultaneously and working together.See Overview of Managed Servers and ManagedServer Clusters in Oracle Fusion MiddlewareUnderstanding Oracle Fusion Middleware.
Machine A logical representation of the computer that hosts oneor more WebLogic Server instances (servers). Machinesare also the logical glue between the Managed Serversand the Node Manager. In order to start or stop theManaged Servers using the Node Manager, associatethe Managed Servers with a machine.
Managed Server A host for your applications, application components,web services, and their associated resources.See Overview of Managed Servers and ManagedServer Clusters in Oracle Fusion MiddlewareUnderstanding Oracle Fusion Middleware.
Chapter 1Using the Standard Installation Topology as a Starting Point
1-6
Table 1-2 (Cont.) Description of Elements in Standard Installation Topologies
Element Description and Links to Related Documentation
Infrastructure A collection of services that include the following:• Metadata repository (MDS) contains the metadata
for Oracle Fusion Middleware components, such asthe Oracle Application Developer Framework. See What Is the Metadata Repository? in Oracle FusionMiddleware Understanding Oracle FusionMiddleware.
• Oracle Application Developer Framework (OracleADF).
• Oracle Web Services Manager (OWSM).
1.4 Using This Document to Extend an Existing DomainThe procedures in this guide describe how to create a new domain. The assumption isthat no other Oracle Fusion Middleware products are installed on your system.
If you have installed and configured other Oracle Fusion Middleware products on yoursystem (for example, Fusion Middleware Infrastructure, with a domain that is up andrunning) and wish to extend the same domain to include Oracle Identity and AccessManagement, see Installing Multiple Products in the Same Domain.
Chapter 1Using This Document to Extend an Existing Domain
1-7
2Preparing to Install and Configure OracleIdentity and Access Management
To prepare for your Oracle Identity and Access Management installation, verify thatyour system meets the basic requirements, then obtain the correct installationsoftware.
• Roadmap for Installing and Configuring a Standard Installation TopologyThis roadmap provides the steps required to install and configure a standardOracle Identity and Access Management installation topology.
• Roadmap for Verifying Your System EnvironmentBefore you begin the installation and configuration process, you must verify yoursystem environment.
• Obtaining the Product DistributionYou can obtain the Oracle Fusion Middleware Infrastructure and Oracle Identityand Access Management distribution on the Oracle Technology Network (OTN).
• About Product DistributionsYou create the initial Oracle Identity and Access Management domain using theOracle Fusion Middleware Infrastructure distribution, which contains both OracleWebLogic Server software and Oracle Java Required Files (JRF) software.
2.1 Roadmap for Installing and Configuring a StandardInstallation Topology
This roadmap provides the steps required to install and configure a standard OracleIdentity and Access Management installation topology.
Table 2-1 provides the high-level steps required for installing a standard installationtopology.
Table 2-1 Standard Installation Roadmap
Task Description Documentation
Verify your systemenvironment.
Before you begin the installation,verify that the minimum systemand network requirements are met.
See Roadmap for Verifying Your System Environment.
Check for anymandatory patchesthat are requiredbefore theinstallation.
Review the Oracle FusionMiddleware Infrastructure releasenotes to see if there are anymandatory patches required for thesoftware products that you areinstalling.
See Install and Configure in Oracle Fusion MiddlewareRelease Notes for Oracle Fusion MiddlewareInfrastructure.
2-1
Table 2-1 (Cont.) Standard Installation Roadmap
Task Description Documentation
Obtain theappropriatedistributions.
To configure Oracle AccessManagement (OAM), you mustinstall Oracle Fusion MiddlewareInfrastructure 12.2.1.3.0 prior toinstalling Oracle Identity andAccess Management 12.2.1.3.0.Therefore, obtain the Infrastructureand the Oracle Identity and AccessManagement distributions forOAM.
To configure Oracle IdentityGovernance, you need OracleFusion Middleware Infrastructure12.2.1.3.0 and Oracle SOA Suite12.2.1.3.0. A quick installer isavailable for Oracle IdentityGovernance, which installsInfrastructure, Oracle SOA Suite,and Oracle Identity and AccessManagement 12.2.1.3.0 in one go.In other words, no separateinstallers are required for installingall the three softwares. Obtain thequick installer(fmw_12.2.1.3.0_idmqs_Disk1_1of2.zip,fmw_12.2.1.3.0_idmqs_Disk1_2of2.zip) if you choose this option.
If you choose to install OracleIdentity Governance using thegeneric Oracle Identity and AccessManagement 12.2.1.3.0 installer,then you must manually installInfrastructure 12.2.1.3.0 andOracle SOA Suite 12.2.1.3.0 usingtheir respective installers, as aprerequisite. If you choose thisoption, obtain all of threedistributions.
For more information about themodes of installation (standaloneand collocated) supported forOracle Identity and AccessManagement, see About theModes of Installation.
See Obtaining the Product Distribution.
See About Product Distributions.
Determine yourinstallationdirectories.
Verify that the installer can accessor create the required installerdirectories. Also, verify that thedirectories exist on systems thatmeet the minimum requirements.
See What Are the Key Oracle Fusion MiddlewareDirectories? in Oracle Fusion MiddlewareUnderstanding Oracle Fusion Middleware.
Chapter 2Roadmap for Installing and Configuring a Standard Installation Topology
2-2
Table 2-1 (Cont.) Standard Installation Roadmap
Task Description Documentation
Install prerequisitesoftware.
If you are configuring OracleAccess Management, you mustfirst install Oracle FusionMiddleware Infrastructure12.2.1.3.0. If you are configuringOracle Identity Governance, youmust install Oracle FusionMiddleware Infrastructure12.2.1.3.0 and Oracle SOA Suite12.2.1.3.0 prior to installing OracleIdentity and Access Management.
See Installing the Infrastructure Softwarein OracleFusion Middleware Installing and Configuring the OracleFusion Middleware Infrastructure.
See Installing the Oracle SOA Suite and OracleBusiness Process Management Software in OracleFusion Middleware Installing and Configuring OracleSOA Suite and Business Process Management.
Install the software. Run the Oracle Universal Installerto install Oracle Identity andAccess Management.
Installing the software transfers thesoftware to your system andcreates the Oracle home directory.
See Installing the Oracle Identity and AccessManagement Software.
Select a databaseprofile and reviewany required customvariables.
Before you install the requiredschemas in the database, reviewthe information about any customvariables you need to set for theOracle Identity and AccessManagement schemas.
See About Database Requirements for an OracleFusion Middleware Installation.
Create theschemas.
Run the Repository Creation Utilityto create the schemas required forconfiguration.
See Creating the Database Schemas.
Create a WebLogicdomain.
Use the Configuration Wizard/Assistant to create and configurethe WebLogic domain.
See Configuring Oracle Access Management Domainfor creating the standard topology for Oracle AccessManagement. See Configuring the Oracle IdentityGovernance Domain for creating the standard topologyfor Oracle Identity Governance.
Administer andprepare yourdomain for highavailability.
Discover additional tools andresources to administer yourdomain and configure your domainto be highly available.
See Next Steps After Configuring the Domain.
2.2 Roadmap for Verifying Your System EnvironmentBefore you begin the installation and configuration process, you must verify yoursystem environment.
Table 2-2 identifies important tasks and checks to perform to ensure that yourenvironment is prepared to install and configure Oracle Identity and AccessManagement.
Chapter 2Roadmap for Verifying Your System Environment
2-3
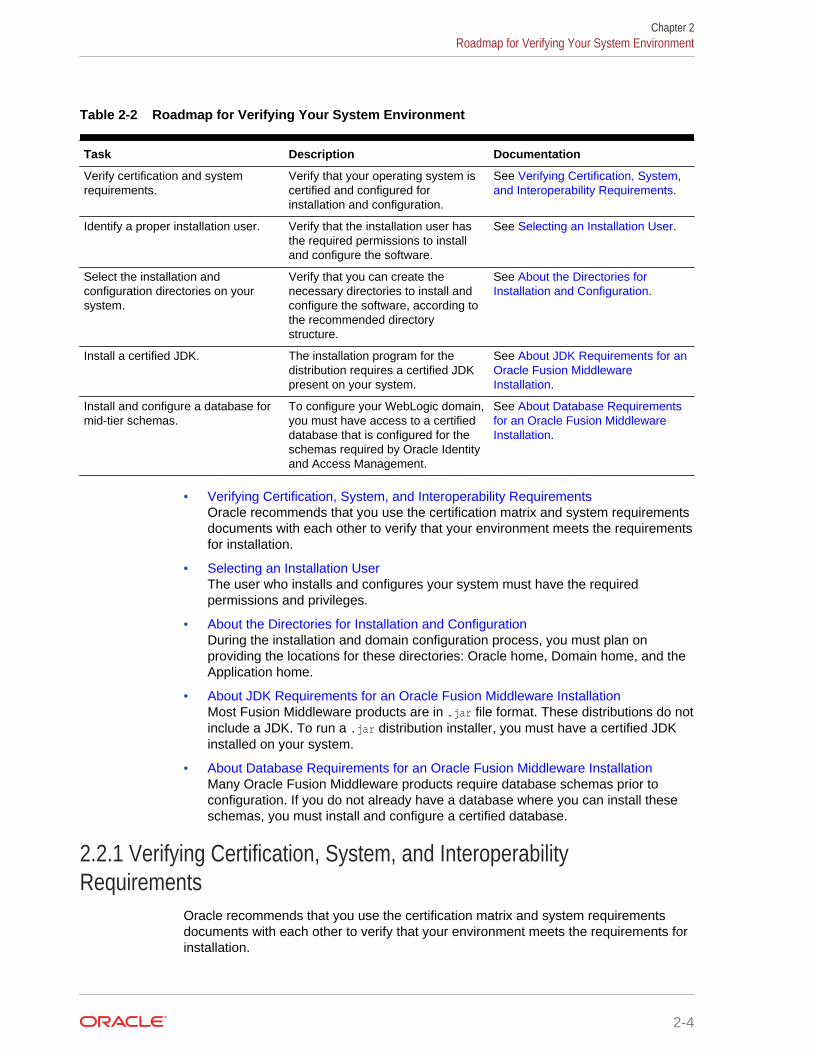
Table 2-2 Roadmap for Verifying Your System Environment
Task Description Documentation
Verify certification and systemrequirements.
Verify that your operating system iscertified and configured forinstallation and configuration.
See Verifying Certification, System,and Interoperability Requirements.
Identify a proper installation user. Verify that the installation user hasthe required permissions to installand configure the software.
See Selecting an Installation User.
Select the installation andconfiguration directories on yoursystem.
Verify that you can create thenecessary directories to install andconfigure the software, according tothe recommended directorystructure.
See About the Directories forInstallation and Configuration.
Install a certified JDK. The installation program for thedistribution requires a certified JDKpresent on your system.
See About JDK Requirements for anOracle Fusion MiddlewareInstallation.
Install and configure a database formid-tier schemas.
To configure your WebLogic domain,you must have access to a certifieddatabase that is configured for theschemas required by Oracle Identityand Access Management.
See About Database Requirementsfor an Oracle Fusion MiddlewareInstallation.
• Verifying Certification, System, and Interoperability RequirementsOracle recommends that you use the certification matrix and system requirementsdocuments with each other to verify that your environment meets the requirementsfor installation.
• Selecting an Installation UserThe user who installs and configures your system must have the requiredpermissions and privileges.
• About the Directories for Installation and ConfigurationDuring the installation and domain configuration process, you must plan onproviding the locations for these directories: Oracle home, Domain home, and theApplication home.
• About JDK Requirements for an Oracle Fusion Middleware InstallationMost Fusion Middleware products are in .jar file format. These distributions do notinclude a JDK. To run a .jar distribution installer, you must have a certified JDKinstalled on your system.
• About Database Requirements for an Oracle Fusion Middleware InstallationMany Oracle Fusion Middleware products require database schemas prior toconfiguration. If you do not already have a database where you can install theseschemas, you must install and configure a certified database.
2.2.1 Verifying Certification, System, and InteroperabilityRequirements
Oracle recommends that you use the certification matrix and system requirementsdocuments with each other to verify that your environment meets the requirements forinstallation.
Chapter 2Roadmap for Verifying Your System Environment
2-4
1. Verifying that your environment meets certification requirements:
Make sure that you install your product on a supported hardware and softwareconfiguration. See the certification document for your release on the Oracle FusionMiddleware Supported System Configurations page.
Oracle has tested and verified the performance of your product on all certifiedsystems and environments. Whenever new certifications are released, they areadded to the certification document right away. New certifications can be releasedat any time. Therefore, the certification documents are kept outside thedocumentation libraries and are available on Oracle Technology Network.
2. Using the system requirements document to verify certification:
Oracle recommends that you use the Oracle Fusion Middleware SystemRequirements and Specifications document to verify that the certificationrequirements are met. For example, if the certification document indicates thatyour product is certified for installation on 64-Bit Oracle Linux 6.5, use thisdocument to verify that your system meets the required minimum specifications.These include disk space, available memory, specific platform packages andpatches, and other operating system-specific requirements. System requirementscan change in the future. Therefore, the system requirement documents are keptoutside of the documentation libraries and are available on Oracle TechnologyNetwork.
3. Verifying interoperability among multiple products:
To learn how to install and run multiple Fusion Middleware products from the samerelease or mixed releases with each other, see Oracle Fusion Middleware 12cInteroperability and Compatibility in Oracle Fusion Middleware UnderstandingInteroperability and Compatibility.
2.2.2 Selecting an Installation UserThe user who installs and configures your system must have the required permissionsand privileges.
• About User PermissionsThe user who installs a Fusion Middleware product owns the files and has certainpermissions on the files.
• About Non-Default User Permissions on UNIX Operating SystemsChanging the default permission setting reduces the security of the installation andyour system. Oracle does not recommend that change the default permissionsettings.
• Verifying that the Installation User has Administrator Privileges on WindowsOperating SystemsTo update the Windows Registry, you must have administrator privileges.
2.2.2.1 About User PermissionsThe user who installs a Fusion Middleware product owns the files and has certainpermissions on the files.
• Read and write permissions on all non-executable files (forexample, .jar, .properties, or .xml). All other users in the same group as the fileowner have read permissions only.
Chapter 2Roadmap for Verifying Your System Environment
2-5

• Read, write, and execute permissions on all executable files (forexample, .exe, .sh, or .cmd). All other users in the same group as the file ownerhave read and execute permissions only.
This means that someone other than the person who installs the software can use theinstalled binaries in the Oracle home directory to configure a domain or set of FusionMiddleware products.
During configuration, the files generated by the configuration process are owned bythe user who ran the Configuration Wizard. This user has the same permissions asdescribed above for the installation user. However, security-sensitive files are notcreated with group permissions. Only the user that created the domain has read andwrite permissions and can administer the domain.
Consider the following examples:
• Example 1: A Single User Installs the Software and Configures the Domain
This example explains the file permissions where the same user installs thesoftware and configures the domain.
To ensure proper permissions and privileges for all files, Oracle recommends thatthe same owner perform both tasks: install the Oracle Fusion Middleware productand configure the WebLogic Server domain by using the Configuration Wizard.
Figure 2-1 Directory Structure when a Single User Installs the Software andConfigures the Domain
The Oracle home is created by User1 during product
installation. User1 has read/write/execute permissions
on all executable files, and read/write permissions on all
other files. All other users in User1’s group have
read/execute permissions on all executable files, and
read permissions on all other files.
product
Oracle Home
(Oracle_Home)
Application Home (applications)
oracle
home
Domain Home(domains)
configThe Domain home and Application home are created by
User1 during product installation. User1 has
read/write/execute permissions on all executable files,
and read/write permissions on all other files. All other
users in User1’s group have read/execute permissions
on all executable files, and read permissions on all
other files.
If the user who creates the domain is different than the user who installed thesoftware, then both users must have the same privileges, as shown in the nextexample.
• Example 2: The Oracle Home Directory and Domain are Created by DifferentUsers
This example explains the file permissions where one user creates the Oraclehome and another user configures the domain.
Chapter 2Roadmap for Verifying Your System Environment
2-6
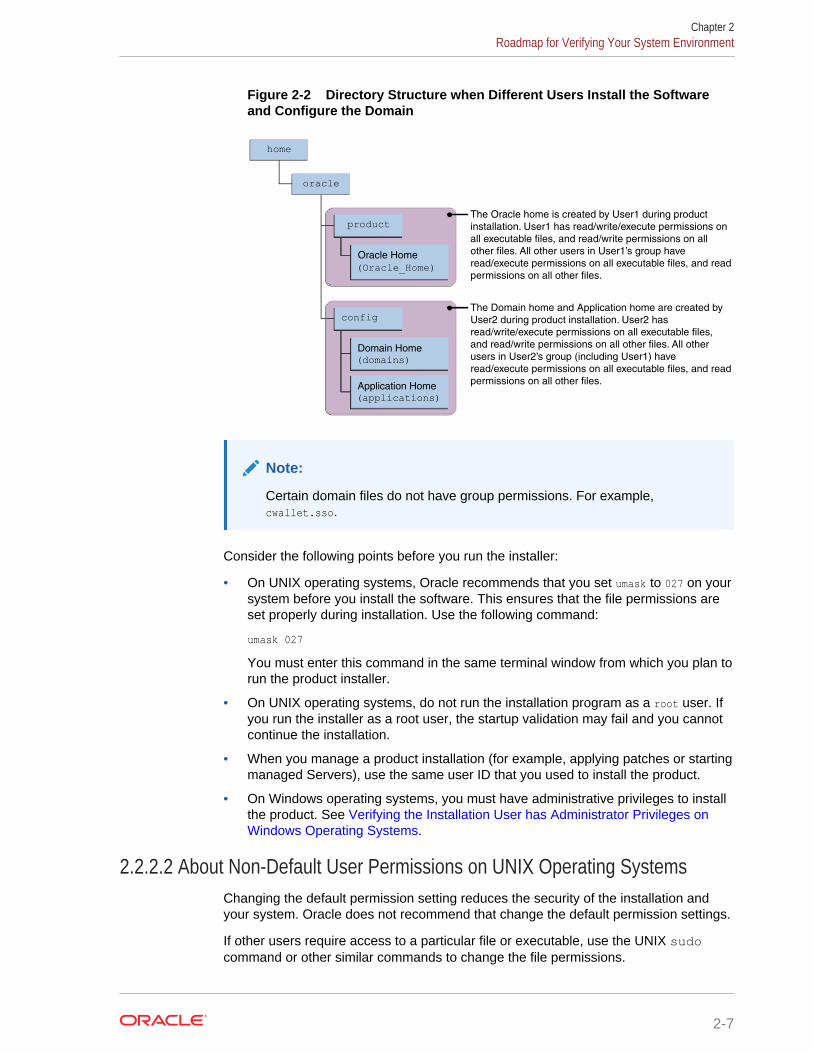
Figure 2-2 Directory Structure when Different Users Install the Softwareand Configure the Domain
The Oracle home is created by User1 during product
installation. User1 has read/write/execute permissions on
all executable files, and read/write permissions on all
other files. All other users in User1’s group have
read/execute permissions on all executable files, and read
permissions on all other files.
product
Oracle Home
(Oracle_Home)
Application Home (applications)
oracle
home
Domain Home(domains)
configThe Domain home and Application home are created by
User2 during product installation. User2 has
read/write/execute permissions on all executable files,
and read/write permissions on all other files. All other
users in User2’s group (including User1) have
read/execute permissions on all executable files, and read
permissions on all other files.
Note:
Certain domain files do not have group permissions. For example,cwallet.sso.
Consider the following points before you run the installer:
• On UNIX operating systems, Oracle recommends that you set umask to 027 on yoursystem before you install the software. This ensures that the file permissions areset properly during installation. Use the following command:
umask 027
You must enter this command in the same terminal window from which you plan torun the product installer.
• On UNIX operating systems, do not run the installation program as a root user. Ifyou run the installer as a root user, the startup validation may fail and you cannotcontinue the installation.
• When you manage a product installation (for example, applying patches or startingmanaged Servers), use the same user ID that you used to install the product.
• On Windows operating systems, you must have administrative privileges to installthe product. See Verifying the Installation User has Administrator Privileges onWindows Operating Systems.
2.2.2.2 About Non-Default User Permissions on UNIX Operating SystemsChanging the default permission setting reduces the security of the installation andyour system. Oracle does not recommend that change the default permission settings.
If other users require access to a particular file or executable, use the UNIX sudocommand or other similar commands to change the file permissions.
Chapter 2Roadmap for Verifying Your System Environment
2-7
Refer to your UNIX operating system Administrator's Guide or contact your operatingsystem vendor, if you need further assistance.
2.2.2.3 Verifying that the Installation User has Administrator Privileges onWindows Operating Systems
To update the Windows Registry, you must have administrator privileges.
By default, users with the administrator privilege sign in to the system with regularprivileges, but can request elevated permissions to perform administrative tasks.
To perform a task with elevated privileges:
1. Find the Command Prompt icon, either from the Start menu or the Windows iconin the lower-left corner.
2. Right-click Command Prompt and select Run as administrator.
This opens a new command prompt window, and all actions performed in thiswindow are done with administrator privileges.
Note:
If you have User Access Control enabled on your system, you may seean additional window asking you to confirm this action. Confirm andcontinue with this procedure.
Note:
For Oracle Identity and Access Management components, ensure thatyou have enabled User Account Control (UAC). If you have not done soalready, enable UAC by following the instructions in the Enabling UserAccount Control (UAC) section from the appropriate version of OracleFusion Middleware System Requirements and Specifications for yourinstallation.
3. Perform the desired task.
For example, to start the product installer:
For a jar file, enter:
java —jar distribution_name.jar
For an executable (.exe, .bin, or .sh file), enter:
distribution_name.exe
2.2.3 About the Directories for Installation and ConfigurationDuring the installation and domain configuration process, you must plan on providingthe locations for these directories: Oracle home, Domain home, and the Applicationhome.
Chapter 2Roadmap for Verifying Your System Environment
2-8
• About the Recommended Directory StructureOracle recommends specific locations for the Oracle Home, Domain Home, andApplication Home.
• About the Oracle Home DirectoryWhen you install any Oracle Fusion Middleware product, you must use an Oraclehome directory.
• About the Domain Home DirectoryThe Domain home is the directory where domains that you configure are created.
• About the Application Home DirectoryThe Application home is the directory where applications for domains youconfigure are created.
• Installing Multiple Products in the Same DomainThere are two methods to install and configure multiple products in one domain.This is also known as extending a domain.
• Preparing for Shared StorageOracle Fusion Middleware allows you to configure multiple WebLogic Serverdomains from a single Oracle home. This allows you to install the Oracle home ina single location on a shared volume and reuse the Oracle home for multiple hostinstallations.
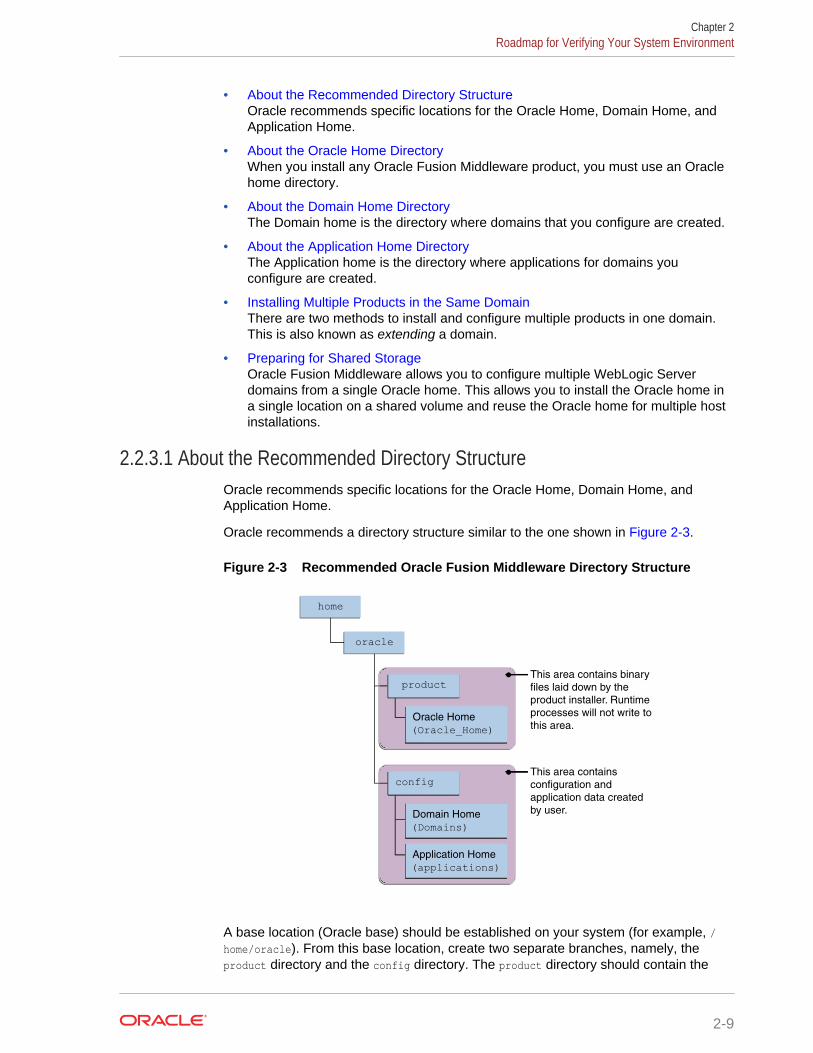
2.2.3.1 About the Recommended Directory StructureOracle recommends specific locations for the Oracle Home, Domain Home, andApplication Home.
Oracle recommends a directory structure similar to the one shown in Figure 2-3.
Figure 2-3 Recommended Oracle Fusion Middleware Directory Structure
This area contains binary
files laid down by the
product installer. Runtime
processes will not write to
this area.
product
Oracle Home
(Oracle_Home)
Application Home
(applications)
oracle
home
Domain Home
(Domains)
configThis area contains
configuration and
application data created
by user.
A base location (Oracle base) should be established on your system (for example, /home/oracle). From this base location, create two separate branches, namely, theproduct directory and the config directory. The product directory should contain the
Chapter 2Roadmap for Verifying Your System Environment
2-9
product binary files and all the Oracle home directories. The config directory shouldcontain your domain and application data.
Oracle recommends that you do not keep your configuration datain the Oracle homedirectory; if you upgrade your product to another major release, are required to createa new Oracle home for binaries. You must also make sure that your configuration dataexists in a location where the binaries in the Oracle home have access.
The /home/oracle/product (for the Oracle home) and /home/oracle/config (for theapplication and configuration data) directories are used in the examples throughout thedocumentation; be sure to replace these directories with the actual directories on yoursystem.
2.2.3.2 About the Oracle Home DirectoryWhen you install any Oracle Fusion Middleware product, you must use an Oraclehome directory.
This directory is a repository for common files that are used by multiple FusionMiddleware products installed on the same machine. These files ensure that FusionMiddleware operates correctly on your system. They facilitate checking of cross-product dependencies during installation. For this reason, you can consider the Oraclehome directory a central support directory for all Oracle Fusion Middleware productsinstalled on your system.
Fusion Middleware documentation refers to the Oracle home directory asORACLE_HOME.
Oracle Home Considerations
Keep the following in mind when you create the Oracle home directory and installFusion Middleware products:
• Do not include spaces in the name of your Oracle home directory; the installerdisplays an error message if your Oracle home directory path contains spaces.
• You can install only one instance of each Oracle Fusion Middleware product in asingle Oracle home directory. If you need to maintain separate versions of aproduct on the same machine, each version must be in its own Oracle homedirectory.
Although you can have several different products in a single Oracle home, onlyone version of each product can be in the Oracle home.
Multiple Home Directories
Although in most situations, a single Oracle home directory is sufficient, it is possibleto create more than one Oracle home directory. For example, you need to maintainmultiple Oracle home directories in the following situations:
• You prefer to maintain separate development and production environments, with aseparate product stack for each. With two directories, you can update yourdevelopment environment without modifying the production environment until youare ready to do so.
• You want to maintain two different versions of a Fusion Middleware product at thesame time. For example, you want to install a new version of a product whilekeeping your existing version intact. In this case, you must install each productversion in its own Oracle home directory.
Chapter 2Roadmap for Verifying Your System Environment
2-10
• You need to install multiple products that are not compatible with each other. See Oracle Fusion Middleware 12c (12.2.1.3.0) Interoperability and Compatibility inOracle Fusion Middleware Understanding Interoperability and Compatibility .
Note:
If you create more than one Oracle home directory, you must provide non-overlapping port ranges during the configuration phase for each product.
2.2.3.3 About the Domain Home DirectoryThe Domain home is the directory where domains that you configure are created.
The default Domain home location is ORACLE_HOME/user_projects/domains/domain_name. However, Oracle strongly recommends that you do not use this defaultlocation. Put your Domain home outside of the Oracle home directory, for example,in /home/oracle/config/domains. The config directory should contain domainand application data. Oracle recommends a separate domain directory so that newinstalls, patches, and other operations update the ORACLE_HOME only, not thedomain configuration.
See About the Recommended Directory Structure for more on the recommendeddirectory structure and locating your Domain home.
Fusion Middleware documentation refers to the Domain home directory asDOMAIN_HOME and includes all folders up to and including the domain name. Forexample, if you name your domain exampledomain and locate your domain data in the /home/oracle/config/domains directory, the documentation would useDOMAIN_HOME to refer to /home/oracle/config/domains/exampledomain.
2.2.3.4 About the Application Home DirectoryThe Application home is the directory where applications for domains you configureare created.
The default Application home location is ORACLE_HOME/user_projects/applications/domain_name. However, Oracle strongly recommends that you locate your Applicationhome outside of the Oracle home directory; if you upgrade your product to anothermajor release, you must create a new Oracle home for binaries.
See About the Recommended Directory Structure for more on the recommendeddirectory structure and locating your Application home..
Fusion Middleware documentation refers to the Application home directory asAPPLICATION_HOME and includes all folders up to and including the domain name. Forexample, if you name your domain exampledomain and you locate your application datain the /home/oracle/config/applications directory, the documentation usesAPPLICATION_HOME to refer to /home/oracle/config/applications/exampledomain.
2.2.3.5 Installing Multiple Products in the Same DomainThere are two methods to install and configure multiple products in one domain. Thisis also known as extending a domain.
Chapter 2Roadmap for Verifying Your System Environment
2-11
• Method 1.
Install and configure Product A, including creating the schemas and starting allservers in the domain to verify a successful domain configuration.
This is the method used in all installation guides in the Fusion Middleware library.You can repeat this process for as many products as necessary. It allows you tovalidate one product at a time and add more products incrementally.
To install Product B in the same domain as Product A:
1. Stop all servers to prevent any updates to the domain while you add the newproduct.
See Starting and Stopping Oracle Fusion Middleware in Oracle FusionMiddleware Administering Oracle Fusion Middleware.
2. Follow the instructions in the installation guide for Product B, including creatingthe necessary schemas.
3. Run the Configuration Wizard to configure the domain.
During configuration, the Configuration Wizard automatically detects thecomponents that have been installed and offers you the option to extend theexisting Product A domain to include Product B.
• Method 2.
Install all of the required products, then create the schemas for all of the products.After you create the schemas, configure the domain by using the necessaryproduct templates, then start all the servers.
This method of creating a multi-product domain may be slightly faster than Method1; however, the installation guides in the Fusion Middleware library do not providespecific instructions for this method of domain creation.
See Also:
• To update WebLogic domains, see Updating WebLogic Domains inOracle Fusion Middleware Creating WebLogic Domains Using theConfiguration Wizard.
• For important information regarding the ability of Oracle FusionMiddleware products to function with previous versions of other OracleFusion Middleware, Oracle, or third-party products, see Oracle FusionMiddleware 12c (12.2.1.3.0) Interoperability and Compatibility in OracleFusion Middleware Understanding Interoperability and Compatibility.
2.2.3.6 Preparing for Shared StorageOracle Fusion Middleware allows you to configure multiple WebLogic Server domainsfrom a single Oracle home. This allows you to install the Oracle home in a singlelocation on a shared volume and reuse the Oracle home for multiple host installations.
If you plan to use shared storage in your environment, see Using Shared Storage inOracle Fusion Middleware High Availability Guide for more information.
Chapter 2Roadmap for Verifying Your System Environment
2-12
2.2.4 About JDK Requirements for an Oracle Fusion MiddlewareInstallation
Most Fusion Middleware products are in .jar file format. These distributions do notinclude a JDK. To run a .jar distribution installer, you must have a certified JDKinstalled on your system.
Make sure that the JDK is installed outside of the Oracle home. If you install the JDKunder the Oracle home, you may encounter problems when you try to perform tasks inthe future. Oracle Universal Installer validates that the Oracle home directory is empty;the install does not progress until you specify an empty directory. Oracle recommendsthat you locate your JDK installation in the /home/oracle/products/jdk directory.
Platform-specific distributions have a .bin (for UNIX operating systems) or .exe (forWindows operating systems) installer; in these cases, a platform-specific JDK is in thedistribution and you do not need to install a JDK separately. However, you may needto upgrade this JDK to a more recent version, depending on the JDK versions that arecertified.
Always verify the required JDK version by reviewing the certification information on the Oracle Fusion Middleware Supported System Configurations page. For 12c(12.2.1.3.0), the certified JDK is 1.8.0_131 and later.
To download the required JDK, navigate to the following URL and download the JavaSE JDK:
http://www.oracle.com/technetwork/java/javase/downloads/index.html
2.2.5 About Database Requirements for an Oracle Fusion MiddlewareInstallation
Many Oracle Fusion Middleware products require database schemas prior toconfiguration. If you do not already have a database where you can install theseschemas, you must install and configure a certified database.
Note:
Multi-tenancy feature is supported in 12c, that is, Pluggable Database (PDB)and Container Database (CDB) are supported.
To find a certified database for your operating system, see the certification documentfor your release on the Oracle Fusion Middleware Supported System Configurationspage on the Oracle Technology Network (OTN).
To make sure that your database is properly configured for schema creation, seeRepository Creation Utility Requirements in the Oracle Fusion Middleware SystemRequirements and Specifications document.
After your database is properly configured, you use the Repository Creation Utility(RCU) to create product schemas in your database. This tool is available in the Oraclehome for your Oracle Fusion Middleware product. See About the Repository Creation
Chapter 2Roadmap for Verifying Your System Environment
2-13
Utility in Oracle Fusion Middleware Creating Schemas with the Repository CreationUtility.
Note:
Based on your deployment topology and the work load, it is recommendedthat you refer to the following note on My Oracle Support, and takeappropriate actions for your deployment.
Performance Tuning Guidelines and Diagnostics Collection for OracleIdentity Manager (OIM) (Doc ID 1539554.1)
2.3 Obtaining the Product DistributionYou can obtain the Oracle Fusion Middleware Infrastructure and Oracle Identity andAccess Management distribution on the Oracle Technology Network (OTN).
To prepare to install Oracle Fusion Middleware Infrastructure and Oracle Identity andAccess Management:
1. Enter java -version on the command line to verify that a certified JDK is installedon your system. For 12c (12.2.1.3.0), the certified JDK is 1.8.0_131 and later.
See About JDK Requirements for an Oracle Fusion Middleware Installation.
2. Locate and download the Oracle Fusion Middleware Infrastructure and OracleIdentity and Access Management software. To configure Oracle IdentityGovernance in collocated mode, you must download Oracle SOA Suite 12.2.1.3.0.
See Obtaining Product Distributions in Oracle Fusion Middleware Planning anInstallation of Oracle Fusion Middleware.
2.4 About Product DistributionsYou create the initial Oracle Identity and Access Management domain using theOracle Fusion Middleware Infrastructure distribution, which contains both OracleWebLogic Server software and Oracle Java Required Files (JRF) software.
Oracle JRF software consists of:
• Oracle Web Services Manager
• Oracle Application Development Framework (Oracle ADF)
• Oracle Enterprise Manager Fusion Middleware Control
• Repository Creation Utility (RCU)
• Other libraries and technologies required to support Oracle Fusion Middlewareproducts
Installing Oracle Fusion Middleware Infrastructure is a prerequisite to installing OracleIdentity and Access Management.
Chapter 2Obtaining the Product Distribution
2-14
Note:
• Dependant Softwares for Oracle Access Management:
To configure Oracle Access Management, you must install OracleFusion Middleware Infrastructure 12c (12.2.1.3.0) prior to installingOracle Identity and Access Management.
For information about installing Oracle Fusion Middleware Infrastructure12c (12.2.1.3.0), see Installing the Infrastructure Softwarein OracleFusion Middleware Installing and Configuring the Oracle FusionMiddleware Infrastructure.
• Dependant Softwares for Oracle Identity Governance:
Oracle Identity Governance requires Oracle Fusion MiddlewareInfrastructure 12c (12.2.1.3.0) and Oracle SOA Suite 12c (12.2.1.3.0). Aquick installer is available for Oracle Identity Governance 12c(12.2.1.3.0), which installs Infrastructure, Oracle SOA Suite, and OracleIdentity and Access Management 12c (12.2.1.3.0) in one go. In otherwords, no separate installers are required for installing all the threesoftwares. If you wish to use the simplified installation process for OracleIdentity Governance, see Installing and Configuring Oracle IdentityGovernance Using Simplified Installation Process.
The other way is to install and configure Oracle Identity Governance in atraditional method, that is, installing Oracle Fusion MiddlewareInfrastructure and Oracle SOA Suite 12c (12.2.1.3.0) first, using theirrespective installers, and then installing Oracle Identity Governance.
For information about installing Oracle Fusion Middleware Infrastructure12c (12.2.1.3.0), see Installing the Infrastructure Softwarein OracleFusion Middleware Installing and Configuring the Oracle FusionMiddleware Infrastructure.
For information about installing Oracle SOA Suite 12c (12.2.1.3.0), see Installing the Oracle SOA Suite and Oracle Business ProcessManagement Software in Oracle Fusion Middleware Installing andConfiguring Oracle SOA Suite and Business Process Management.
For more information about the modes of installation supported for OracleIdentity and Access Management, see About the Modes of Installation.
Chapter 2About Product Distributions
2-15
3Installing the Oracle Identity and AccessManagement Software
Follow the steps in this section to install the Oracle Identity and Access Managementsoftware.Before beginning the installation, ensure that you have verified the prerequisites andcompleted all steps covered in Preparing to Install and Configure Oracle Identity andAccess Management.
Note:
The product Oracle Identity Manager is referred to as Oracle IdentityManager (OIM) and Oracle Identity Governance (OIG) interchangeably in theguide.
3-1
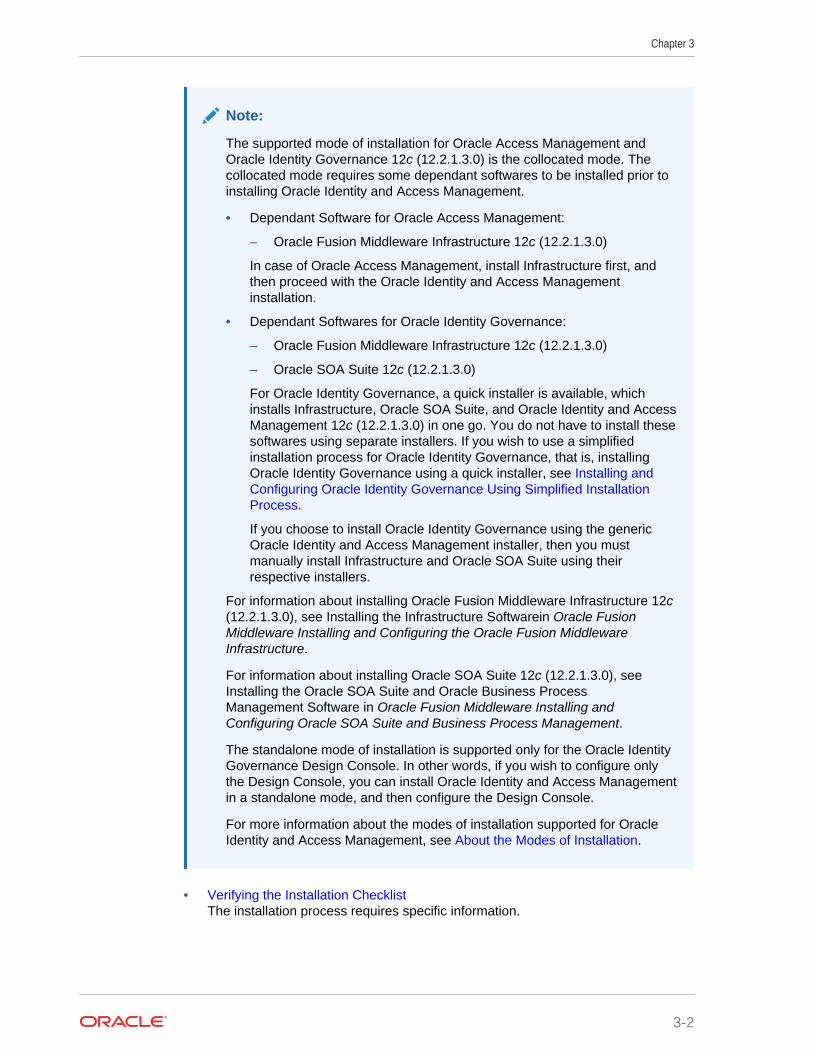
Note:
The supported mode of installation for Oracle Access Management andOracle Identity Governance 12c (12.2.1.3.0) is the collocated mode. Thecollocated mode requires some dependant softwares to be installed prior toinstalling Oracle Identity and Access Management.
• Dependant Software for Oracle Access Management:
– Oracle Fusion Middleware Infrastructure 12c (12.2.1.3.0)
In case of Oracle Access Management, install Infrastructure first, andthen proceed with the Oracle Identity and Access Managementinstallation.
• Dependant Softwares for Oracle Identity Governance:
– Oracle Fusion Middleware Infrastructure 12c (12.2.1.3.0)
– Oracle SOA Suite 12c (12.2.1.3.0)
For Oracle Identity Governance, a quick installer is available, whichinstalls Infrastructure, Oracle SOA Suite, and Oracle Identity and AccessManagement 12c (12.2.1.3.0) in one go. You do not have to install thesesoftwares using separate installers. If you wish to use a simplifiedinstallation process for Oracle Identity Governance, that is, installingOracle Identity Governance using a quick installer, see Installing andConfiguring Oracle Identity Governance Using Simplified InstallationProcess.
If you choose to install Oracle Identity Governance using the genericOracle Identity and Access Management installer, then you mustmanually install Infrastructure and Oracle SOA Suite using theirrespective installers.
For information about installing Oracle Fusion Middleware Infrastructure 12c(12.2.1.3.0), see Installing the Infrastructure Softwarein Oracle FusionMiddleware Installing and Configuring the Oracle Fusion MiddlewareInfrastructure.
For information about installing Oracle SOA Suite 12c (12.2.1.3.0), see Installing the Oracle SOA Suite and Oracle Business ProcessManagement Software in Oracle Fusion Middleware Installing andConfiguring Oracle SOA Suite and Business Process Management.
The standalone mode of installation is supported only for the Oracle IdentityGovernance Design Console. In other words, if you wish to configure onlythe Design Console, you can install Oracle Identity and Access Managementin a standalone mode, and then configure the Design Console.
For more information about the modes of installation supported for OracleIdentity and Access Management, see About the Modes of Installation.
• Verifying the Installation ChecklistThe installation process requires specific information.
Chapter 3
3-2
• Starting the Installation ProgramBefore running the installation program, you must verify the JDK and prerequisitesoftware is installed.
• Navigating the Installation ScreensThe installer shows a series of screens where you verify or enter information.
• Verifying the InstallationAfter you complete the installation, verify whether it was successful by completinga series of tasks.
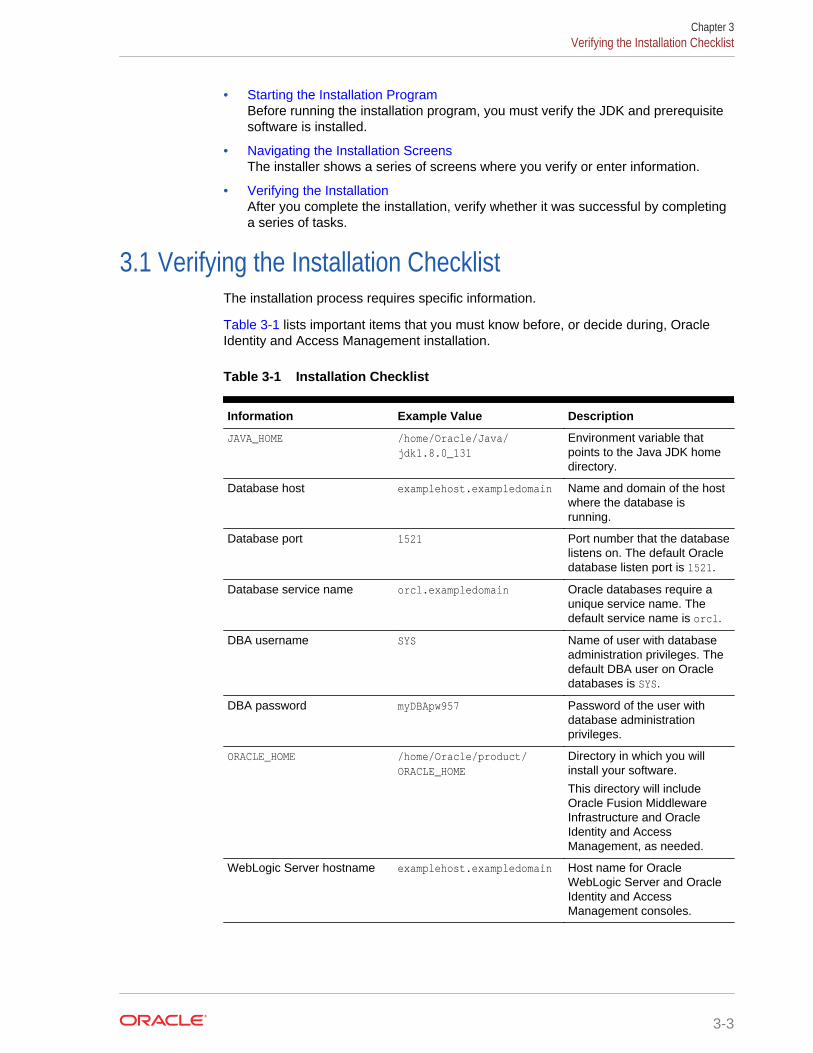
3.1 Verifying the Installation ChecklistThe installation process requires specific information.
Table 3-1 lists important items that you must know before, or decide during, OracleIdentity and Access Management installation.
Table 3-1 Installation Checklist
Information Example Value Description
JAVA_HOME /home/Oracle/Java/jdk1.8.0_131
Environment variable thatpoints to the Java JDK homedirectory.
Database host examplehost.exampledomain Name and domain of the hostwhere the database isrunning.
Database port 1521 Port number that the databaselistens on. The default Oracledatabase listen port is 1521.
Database service name orcl.exampledomain Oracle databases require aunique service name. Thedefault service name is orcl.
DBA username SYS Name of user with databaseadministration privileges. Thedefault DBA user on Oracledatabases is SYS.
DBA password myDBApw957 Password of the user withdatabase administrationprivileges.
ORACLE_HOME /home/Oracle/product/ORACLE_HOME
Directory in which you willinstall your software.
This directory will includeOracle Fusion MiddlewareInfrastructure and OracleIdentity and AccessManagement, as needed.
WebLogic Server hostname examplehost.exampledomain Host name for OracleWebLogic Server and OracleIdentity and AccessManagement consoles.
Chapter 3Verifying the Installation Checklist
3-3
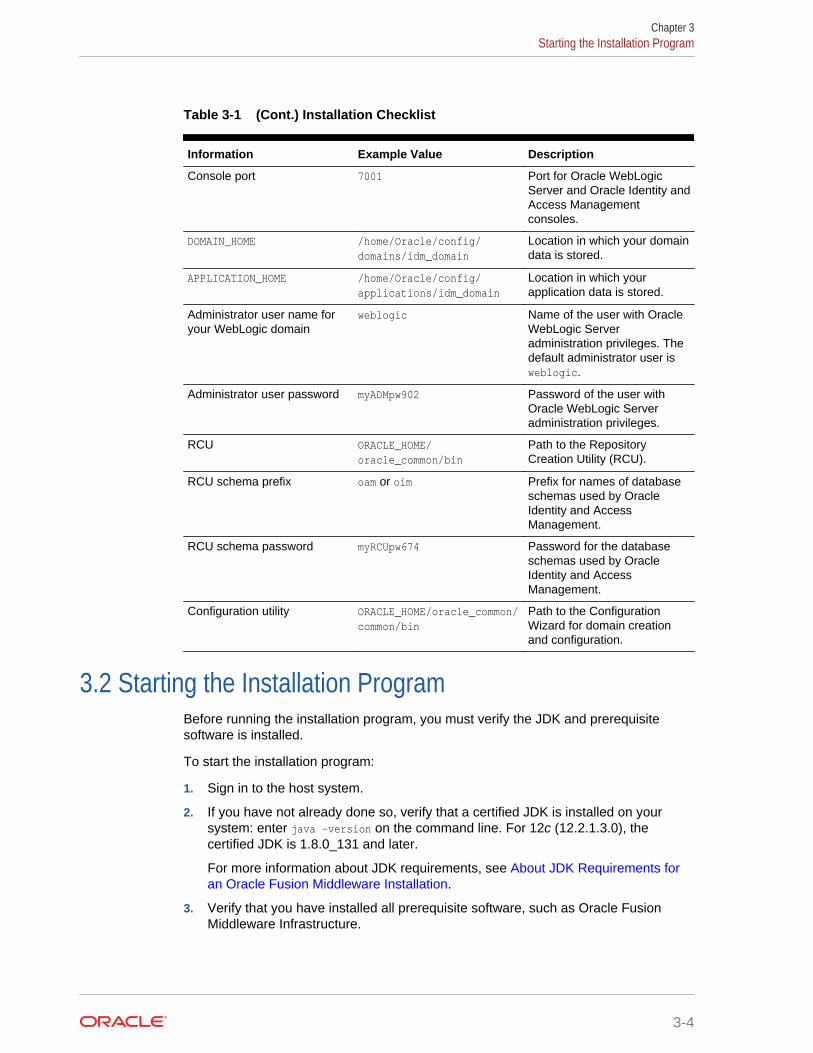
Table 3-1 (Cont.) Installation Checklist
Information Example Value Description
Console port 7001 Port for Oracle WebLogicServer and Oracle Identity andAccess Managementconsoles.
DOMAIN_HOME /home/Oracle/config/domains/idm_domain
Location in which your domaindata is stored.
APPLICATION_HOME /home/Oracle/config/applications/idm_domain
Location in which yourapplication data is stored.
Administrator user name foryour WebLogic domain
weblogic Name of the user with OracleWebLogic Serveradministration privileges. Thedefault administrator user isweblogic.
Administrator user password myADMpw902 Password of the user withOracle WebLogic Serveradministration privileges.
RCU ORACLE_HOME/oracle_common/bin
Path to the RepositoryCreation Utility (RCU).
RCU schema prefix oam or oim Prefix for names of databaseschemas used by OracleIdentity and AccessManagement.
RCU schema password myRCUpw674 Password for the databaseschemas used by OracleIdentity and AccessManagement.
Configuration utility ORACLE_HOME/oracle_common/common/bin
Path to the ConfigurationWizard for domain creationand configuration.
3.2 Starting the Installation ProgramBefore running the installation program, you must verify the JDK and prerequisitesoftware is installed.
To start the installation program:
1. Sign in to the host system.
2. If you have not already done so, verify that a certified JDK is installed on yoursystem: enter java -version on the command line. For 12c (12.2.1.3.0), thecertified JDK is 1.8.0_131 and later.
For more information about JDK requirements, see About JDK Requirements foran Oracle Fusion Middleware Installation.
3. Verify that you have installed all prerequisite software, such as Oracle FusionMiddleware Infrastructure.
Chapter 3Starting the Installation Program
3-4
For more information about the prerequisites softwares required for Oracle Identityand Access Management, see Roadmap for Installing and Configuring a StandardInstallation Topology.
4. Go to the directory where you downloaded the installation program.
5. Start the installation program by running the java executable from the JDKdirectory. For example:
• (UNIX) /home/Oracle/Java/jdk1.8.0_131/bin/java —jar fmw_12.2.1.3.0_idm.jar
• (Windows) C:\home\Oracle\Java\jdk1.8.0_131\bin\java -jarfmw_12.2.1.3.0_idm.jar
Note:
You can also start the installer in silent mode using a saved response fileinstead of launching the installer screens. For more about silent or commandline installation, see Using the Oracle Universal Installer in Silent Mode inOracle Fusion Middleware Installing Software with the Oracle UniversalInstaller.
When the installation program appears, you are ready to begin the installation.
3.3 Navigating the Installation ScreensThe installer shows a series of screens where you verify or enter information.
The following table lists the order in which installer screens appear. If you needadditional help with an installation screen, click Help.
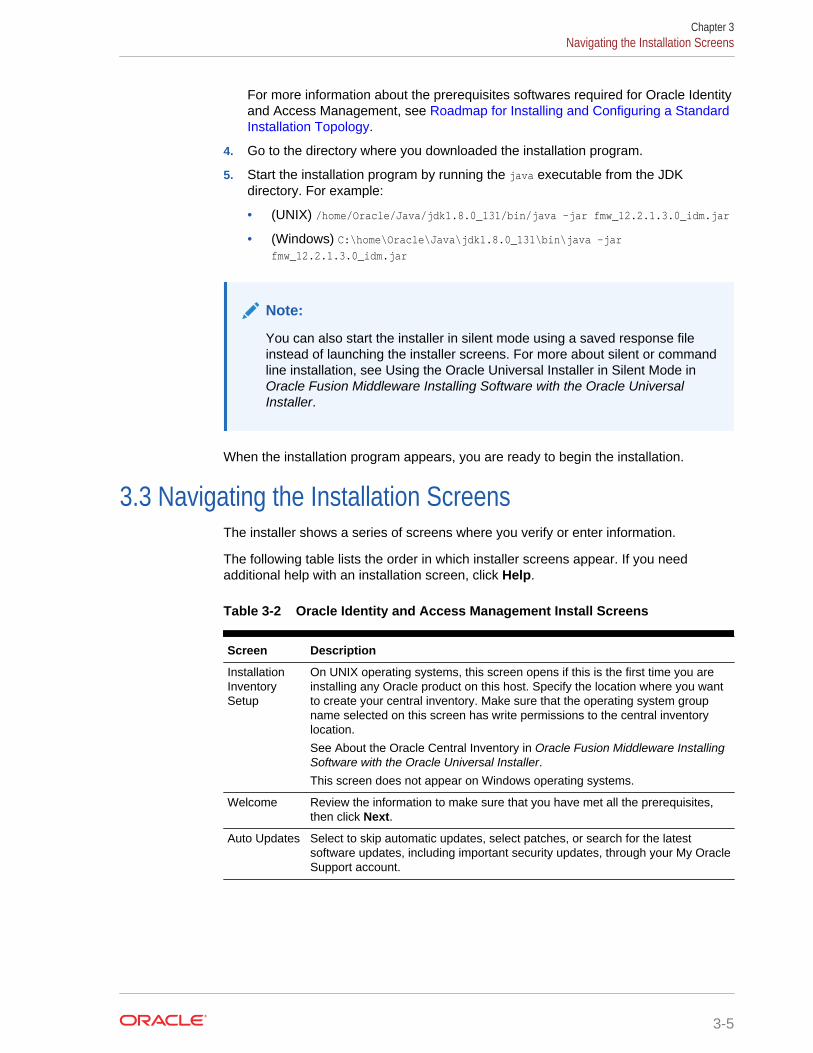
Table 3-2 Oracle Identity and Access Management Install Screens
Screen Description
InstallationInventorySetup
On UNIX operating systems, this screen opens if this is the first time you areinstalling any Oracle product on this host. Specify the location where you wantto create your central inventory. Make sure that the operating system groupname selected on this screen has write permissions to the central inventorylocation.
See About the Oracle Central Inventory in Oracle Fusion Middleware InstallingSoftware with the Oracle Universal Installer.This screen does not appear on Windows operating systems.
Welcome Review the information to make sure that you have met all the prerequisites,then click Next.
Auto Updates Select to skip automatic updates, select patches, or search for the latestsoftware updates, including important security updates, through your My OracleSupport account.
Chapter 3Navigating the Installation Screens
3-5
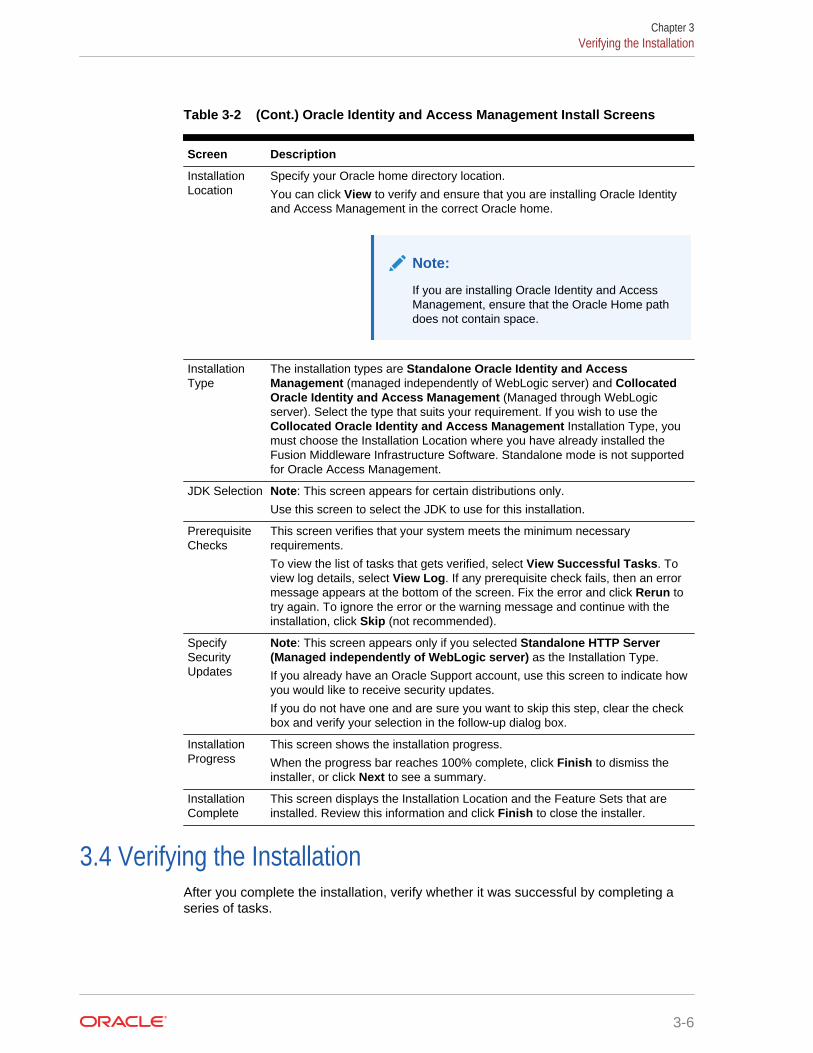
Table 3-2 (Cont.) Oracle Identity and Access Management Install Screens
Screen Description
InstallationLocation
Specify your Oracle home directory location.
You can click View to verify and ensure that you are installing Oracle Identityand Access Management in the correct Oracle home.
Note:
If you are installing Oracle Identity and AccessManagement, ensure that the Oracle Home pathdoes not contain space.
InstallationType
The installation types are Standalone Oracle Identity and AccessManagement (managed independently of WebLogic server) and CollocatedOracle Identity and Access Management (Managed through WebLogicserver). Select the type that suits your requirement. If you wish to use theCollocated Oracle Identity and Access Management Installation Type, youmust choose the Installation Location where you have already installed theFusion Middleware Infrastructure Software. Standalone mode is not supportedfor Oracle Access Management.
JDK Selection Note: This screen appears for certain distributions only.
Use this screen to select the JDK to use for this installation.
PrerequisiteChecks
This screen verifies that your system meets the minimum necessaryrequirements.
To view the list of tasks that gets verified, select View Successful Tasks. Toview log details, select View Log. If any prerequisite check fails, then an errormessage appears at the bottom of the screen. Fix the error and click Rerun totry again. To ignore the error or the warning message and continue with theinstallation, click Skip (not recommended).
SpecifySecurityUpdates
Note: This screen appears only if you selected Standalone HTTP Server(Managed independently of WebLogic server) as the Installation Type.
If you already have an Oracle Support account, use this screen to indicate howyou would like to receive security updates.
If you do not have one and are sure you want to skip this step, clear the checkbox and verify your selection in the follow-up dialog box.
InstallationProgress
This screen shows the installation progress.
When the progress bar reaches 100% complete, click Finish to dismiss theinstaller, or click Next to see a summary.
InstallationComplete
This screen displays the Installation Location and the Feature Sets that areinstalled. Review this information and click Finish to close the installer.
3.4 Verifying the InstallationAfter you complete the installation, verify whether it was successful by completing aseries of tasks.
Chapter 3Verifying the Installation
3-6
• Reviewing the Installation Log FilesReview the contents of the installation log files to make sure that the installer didnot encounter any problems.
• Checking the Directory StructureThe contents of your installation vary based on the options that you selectedduring the installation.
• Viewing the Contents of the Oracle HomeYou can view the contents of the Oracle home directory by using the viewInventoryscript.
3.4.1 Reviewing the Installation Log FilesReview the contents of the installation log files to make sure that the installer did notencounter any problems.
By default, the installer writes logs files to the Oracle_Inventory_Location/logs (onUNIX operating systems) or Oracle_Inventory_Location\logs (on Windows operatingsystems) directory.
For a description of the log files and where to find them, see Installation Log Files inOracle Fusion Middleware Installing Software with the Oracle Universal Installer.
3.4.2 Checking the Directory StructureThe contents of your installation vary based on the options that you selected duringthe installation.
See What Are the Key Oracle Fusion Middleware Directories? in Oracle FusionMiddleware Understanding Oracle Fusion Middleware.
3.4.3 Viewing the Contents of the Oracle HomeYou can view the contents of the Oracle home directory by using the viewInventoryscript.
See Viewing the Contents of an Oracle Home in Oracle Fusion Middleware InstallingSoftware with the Oracle Universal Installer.
Chapter 3Verifying the Installation
3-7
4Configuring Oracle Access ManagementDomain
After you have installed Oracle Access Management, you can configure the domain,which you can also extend for high availability.
The configuration steps presented here assume that you have completed theinstallation steps covered in:
• Preparing to Install and Configure Oracle Identity and Access Management
• Installing the Oracle Identity and Access Management Software
Refer to the following sections to create the database schemas, configure a WebLogicdomain, and verify the configuration:
• Creating the Database SchemasBefore you can configure an Oracle Identity and Access Management domain, youmust install required schemas on a certified database for use with this release ofOracle Fusion Middleware.
• Configuring the DomainUse the Configuration Wizard to create and configure a domain.
• Starting the ServersAfter a successful configuration, start all processes and servers, including theAdministration Server and any Managed Servers.
• Verifying the ConfigurationAfter completing all configuration steps, you can perform additional steps to verifythat your domain is properly configured.
• Setting the Memory Parameters for OAM Domain (Optional)If the initial startup parameter in Oracle Access Management domain, whichdefines the memory usage, is insufficient, you can increase the value of thisparameter.
• Updating the java.security File (Optional)If you wish to integrate Oracle Access Management 12c (12.2.1.3.0) with OracleAdaptive Access Manager (OAAM) 11g Release 2 (11.1.2.3.0), you must updatejava.security file with the following changes, post upgrade:
• TroubleshootingThis section lists the common issues encountered while configuring Oracle AccessManagement and their workarounds.
4.1 Creating the Database SchemasBefore you can configure an Oracle Identity and Access Management domain, youmust install required schemas on a certified database for use with this release ofOracle Fusion Middleware.
4-1
• Installing and Configuring a Certified DatabaseBefore you create the database schemas, you must install and configure acertified database, and verify that the database is up and running.
• Starting the Repository Creation UtilityStart the Repository Creation Utility (RCU) after you verify that a certified JDK isinstalled on your system.
• Navigating the Repository Creation Utility Screens to Create SchemasEnter required information in the RCU screens to create the database schemas.
4.1.1 Installing and Configuring a Certified DatabaseBefore you create the database schemas, you must install and configure a certifieddatabase, and verify that the database is up and running.
See About Database Requirements for an Oracle Fusion Middleware Installation.
4.1.2 Starting the Repository Creation UtilityStart the Repository Creation Utility (RCU) after you verify that a certified JDK isinstalled on your system.
To start the RCU:
1. Verify that a certified JDK already exists on your system by running java -versionfrom the command line. For 12c (12.2.1.3.0), the certified JDK is 1.8.0_131 andlater.
See About JDK Requirements for an Oracle Fusion Middleware Installation.
2. Ensure that the JAVA_HOME environment variable is set to the location of the certifiedJDK. For example:
• (UNIX) setenv JAVA_HOME /home/Oracle/Java/jdk1.8.0_131
• (Windows) set JAVA_HOME=C:\home\Oracle\Java\jdk1.8.0_131
3. Change to the following directory:
• (UNIX) ORACLE_HOME/oracle_common/bin
• (Windows) ORACLE_HOME\oracle_common\bin
4. Enter the following command:
• (UNIX) ./rcu
• (Windows) rcu.bat
4.1.3 Navigating the Repository Creation Utility Screens to CreateSchemas
Enter required information in the RCU screens to create the database schemas.
• Introducing the RCUThe Welcome screen is the first screen that appears when you start the RCU.
• Selecting a Method of Schema CreationUse the Create Repository screen to select a method to create and loadcomponent schemas into the database.
Chapter 4Creating the Database Schemas
4-2
• Providing Database Connection DetailsOn the Database Connection Details screen, provide the database connectiondetails for the RCU to connect to your database.
• Specifying a Custom Prefix and Selecting Schemas
• Specifying Schema PasswordsOn the Schema Passwords screen, specify how you want to set the schemapasswords on your database, then enter and confirm your passwords.
• Specifying Custom Variables
• Completing Schema CreationNavigate through the remaining RCU screens to complete schema creation.
4.1.3.1 Introducing the RCUThe Welcome screen is the first screen that appears when you start the RCU.
Click Next.
4.1.3.2 Selecting a Method of Schema CreationUse the Create Repository screen to select a method to create and load componentschemas into the database.
On the Create Repository screen:
• If you have the necessary permissions and privileges to perform DBA activities onyour database, select System Load and Product Load. This procedure assumesthat you have SYSDBA privileges.
• If you do not have the necessary permissions or privileges to perform DBAactivities in the database, you must select Prepare Scripts for System Load onthis screen. This option generates a SQL script that you can give to your databaseadministrator. See About System Load and Product Load in Oracle FusionMiddleware Creating Schemas with the Repository Creation Utility.
• If the DBA has already run the SQL script for System Load, select PerformProduct Load.
4.1.3.3 Providing Database Connection DetailsOn the Database Connection Details screen, provide the database connection detailsfor the RCU to connect to your database.
Note:
If you are unsure of the service name for your database, you can obtain itfrom the SERVICE_NAMES parameter in the initialization parameter file of thedatabase. If the initialization parameter file does not contain theSERVICE_NAMES parameter, then the service name is the same as the globaldatabase name, which is specified in the DB_NAME and DB_DOMAIN parameters.
For example:
Chapter 4Creating the Database Schemas
4-3
Database Type: Oracle DatabaseConnection String Format: Connection Parameters or ConnectionString
Connection String: examplehost.exampledomain.com:1521:Orcl.exampledomain.com
Host Name: examplehost.exampledomain.comPort: 1521Service Name: Orcl.exampledomain.comUser Name: sysPassword: ******Role: SYSDBA
Click Next to proceed, then click OK in the dialog window that confirms a successfuldatabase connection.
4.1.3.4 Specifying a Custom Prefix and Selecting SchemasSelect Create new prefix, specify a custom prefix, then select the Oracle AccessManager schema. This action automatically selects the following schemas asdependencies:
• Common Infrastructure Services (STB)
• Oracle Platform Security Services (OPSS)
• Audit Services (IAU)
• Audit Services Append (IAU_Append)
• Audit Services Viewer (IAU_Viewer)
• Metadata Services (MDS)
• WebLogic Services (WLS)
The schema Common Infrastructure Services (STB) is automatically created. Thisschema is dimmed; you cannot select or deselect it. This schema enables you toretrieve information from RCU during domain configuration. For more information, see "Understanding the Service Table Schema" in Oracle Fusion Middleware CreatingSchemas with the Repository Creation Utility.
The custom prefix is used to logically group these schemas together for use in thisdomain only; you must create a unique set of schemas for each domain. Schemasharing across domains is not supported.
Tip:
For more information about custom prefixes, see "Understanding CustomPrefixes" in Oracle Fusion Middleware Creating Schemas with theRepository Creation Utility.
For more information about how to organize your schemas in a multi-domainenvironment, see "Planning Your Schema Creation" in Oracle FusionMiddleware Creating Schemas with the Repository Creation Utility.
Chapter 4Creating the Database Schemas
4-4
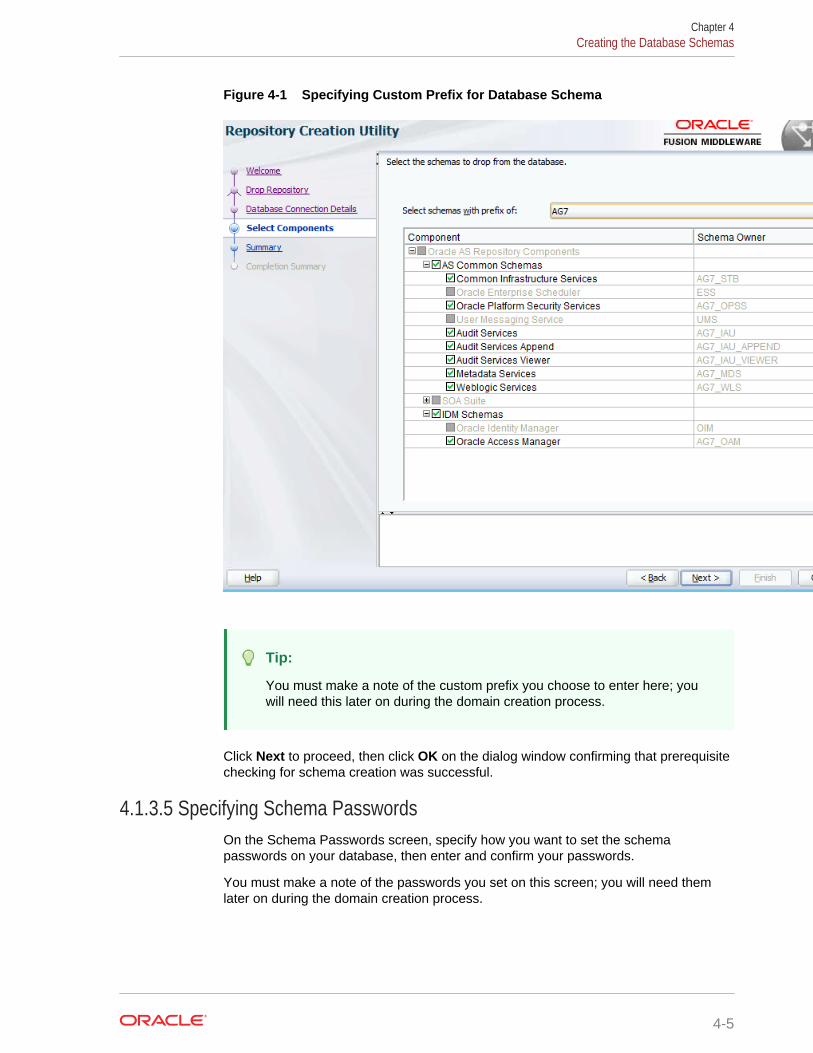
Figure 4-1 Specifying Custom Prefix for Database Schema
Tip:
You must make a note of the custom prefix you choose to enter here; youwill need this later on during the domain creation process.
Click Next to proceed, then click OK on the dialog window confirming that prerequisitechecking for schema creation was successful.
4.1.3.5 Specifying Schema PasswordsOn the Schema Passwords screen, specify how you want to set the schemapasswords on your database, then enter and confirm your passwords.
You must make a note of the passwords you set on this screen; you will need themlater on during the domain creation process.
Chapter 4Creating the Database Schemas
4-5
4.1.3.6 Specifying Custom VariablesOn the Custom Variables screen, click Next. The custom variables are not needed forOracle Access Management.
Tip:
For more information about options on this screen, see Custom Variables inOracle Fusion Middleware Creating Schemas with the Repository CreationUtility.
4.1.3.7 Completing Schema CreationNavigate through the remaining RCU screens to complete schema creation.
On the Map Tablespaces screen, the Encrypt Tablespace check box appears only ifyou enabled Transparent Data Encryption (TDE) in the database (Oracle or OracleEBR) when you start the RCU. Select the Encrypt Tablespace check box if you wantto encrypt all new tablespaces that the RCU creates.
When you reach the Completion Summary screen, click Close to dismiss the RCU.
4.2 Configuring the DomainUse the Configuration Wizard to create and configure a domain.
For information on other methods to create domains, see Additional Tools for Creating,Extending, and Managing WebLogic Domains in Oracle Fusion Middleware CreatingWebLogic Domains Using the Configuration Wizard.
• Starting the Configuration WizardStart the Configuration Wizard to begin configuring a domain.
• Navigating the Configuration Wizard Screens to Create and Configure the DomainEnter required information in the Configuration Wizard screens to create andconfigure the domain for the topology.
• Updating the System Properties for SSL Enabled ServersFor SSL enabled servers, you must set the required properties in the setDomainEnvfile in the domain home.
4.2.1 Starting the Configuration WizardStart the Configuration Wizard to begin configuring a domain.
To start the Configuration Wizard:
1. Change to the following directory:
(UNIX) ORACLE_HOME/oracle_common/common/bin
(Windows) ORACLE_HOME\oracle_common\common\bin
where ORACLE_HOME is your 12c (12.2.1.3.0) Oracle home.
Chapter 4Configuring the Domain
4-6
2. Enter the following command:
(UNIX) ./config.sh
(Windows) config.cmd
4.2.2 Navigating the Configuration Wizard Screens to Create andConfigure the Domain
Enter required information in the Configuration Wizard screens to create and configurethe domain for the topology.
Note:
You can use this procedure to extend an existing domain. If your needs donot match the instructions in the procedure, be sure to make your selectionsaccordingly, or see the supporting documentation for more details.
• Selecting the Domain Type and Domain Home LocationUse the Configuration Type screen to select a Domain home directory location,optimally outside the Oracle home directory.
• Selecting the Configuration Templates for Oracle Access Management
• Selecting the Application Home LocationUse the Application Location screen to select the location to store applicationsassociated with your domain, also known as the Application home directory.
• Configuring the Administrator AccountUse the Administrator Account screen to specify the user name and password forthe default WebLogic Administrator account for the domain.
• Specifying the Domain Mode and JDKUse the Domain Mode and JDK screen to specify the domain mode and JavaDevelopment Kit (JDK).
• Specifying the Database Configuration TypeUse the Database Configuration type screen to specify details about the databaseand database schema.
• Specifying JDBC Component Schema InformationUse the JDBC Component Schema screen to verify or specify details about thedatabase schemas.
• Testing the JDBC ConnectionsUse the JDBC Component Schema Test screen to test the data sourceconnections.
• Selecting Advanced ConfigurationUse the Advanced Configuration screen to complete the domain configuration.
• Configuring the Administration Server Listen AddressUse the Administration Server screen to select the IP address of the host.
• Configuring Node ManagerUse the Node Manager screen to select the type of Node Manager you want toconfigure, along with the Node Manager credentials.
Chapter 4Configuring the Domain
4-7
• Configuring Managed Servers for Oracle Access Management
• Configuring a Cluster for Oracle Access ManagementUse the Clusters screen to create a new cluster.
• Defining Server TemplatesIf you are creating dynamic clusters for a high availability setup, use the ServerTemplates screen to define one or more server templates for domain.
• Configuring Dynamic ServersYou can skip this screen for Oracle Access Management configuration.
• Assigning Oracle Access Management Managed Servers to the ClusterUse the Assign Servers to Clusters screen to assign Managed Servers to a newconfigured cluster. A configured cluster is a cluster you configure manually. Youdo not use this screen if you are configuring a dynamic cluster, a cluster thatcontains one or more generated server instances that are based on a servertemplate.
• Configuring Coherence ClustersUse the Coherence Clusters screen to configure the Coherence cluster.
• Creating a New Oracle Access Management MachineUse the Machines screen to create new machines in the domain. A machine isrequired so that Node Manager can start and stop servers.
• Assigning Servers to Oracle Access Management MachinesUse the Assign Servers to Machines screen to assign the Administration Serverand Managed Servers to the new machine you just created.
• Virtual TargetsYou can skip this screen for Oracle Access Management configuration.
• PartitionsThe Partitions screen is used to configure partitions for virtual targets in WebLogicServer Multitenant (MT) environments. Select Next without selecting any options.
• Configuring Domain Frontend HostThe Domain Frontend Host screen can be used to configure the frontend host forthe domain.
• Targeting the DeploymentsThe Deployments Targeting screen can be used to target the availabledeployments to the servers.
• Targeting the ServicesThe Services Targeting screen can be used to target the available services to theServers.
• Reviewing Your Configuration Specifications and Configuring the DomainThe Configuration Summary screen shows detailed configuration information forthe domain you are about to create.
• Writing Down Your Domain Home and Administration Server URLThe End of Configuration screen shows information about the domain you justconfigured.
Chapter 4Configuring the Domain
4-8
4.2.2.1 Selecting the Domain Type and Domain Home LocationUse the Configuration Type screen to select a Domain home directory location,optimally outside the Oracle home directory.
Oracle recommends that you locate your Domain home in accordance with thedirectory structure in What Are the Key Oracle Fusion Middleware Directories? inOracle Fusion Middleware Understanding Oracle Fusion Middleware, where theDomain home is located outside the Oracle home directory. This directory structurehelps avoid issues when you need to upgrade or reinstall software.
To specify the Domain type and Domain home directory:
1. On the Configuration Type screen, select Create a new domain.
2. In the Domain Location field, specify your Domain home directory.
For more details about this screen, see Configuration Type in Oracle FusionMiddleware Creating WebLogic Domains Using the Configuration Wizard.
4.2.2.2 Selecting the Configuration Templates for Oracle Access ManagementOn the Templates screen, make sure Create Domain Using Product Templates isselected, then select the template Oracle Access Management Suite.
Selecting this template automatically selects the following as dependencies:
• Oracle Enterprise Manager
• Oracle JRF
• WebLogic Coherence Cluster Extension
Note:
The basic WebLogic domain is pre-selected.
More information about the options on this screen can be found in Templates in OracleFusion Middleware Creating WebLogic Domains Using the Configuration Wizard.
4.2.2.3 Selecting the Application Home LocationUse the Application Location screen to select the location to store applicationsassociated with your domain, also known as the Application home directory.
Oracle recommends that you locate your Application home in accordance with thedirectory structure in What Are the Key Oracle Fusion Middleware Directories? inOracle Fusion Middleware Understanding Oracle Fusion Middleware, where theApplication home is located outside the Oracle home directory. This directory structurehelps avoid issues when you need to upgrade or re-install your software.
For more about the Application home directory, see About the Application HomeDirectory.
For more information about this screen, see Application Location in Oracle FusionMiddleware Creating WebLogic Domains Using the Configuration Wizard.
Chapter 4Configuring the Domain
4-9
4.2.2.4 Configuring the Administrator AccountUse the Administrator Account screen to specify the user name and password for thedefault WebLogic Administrator account for the domain.
Oracle recommends that you make a note of the user name and password that youenter on this screen; you need these credentials later to boot and connect to thedomain's Administration Server.
For more information about this screen, see Administrator Account in CreatingWebLogic Domains Using the Configuration Wizard.
4.2.2.5 Specifying the Domain Mode and JDKUse the Domain Mode and JDK screen to specify the domain mode and JavaDevelopment Kit (JDK).
On the Domain Mode and JDK screen:
• Select Production in the Domain Mode field.
• Select the Oracle HotSpot JDK in the JDK field.
For more information about this screen, see Domain Mode and JDK in Oracle FusionMiddleware Creating WebLogic Domains Using the Configuration Wizard.
4.2.2.6 Specifying the Database Configuration TypeUse the Database Configuration type screen to specify details about the database anddatabase schema.
On the Database Configuration type screen, select RCU Data. This option instructsthe Configuration Wizard to connect to the database and Service Table (STB) schemato automatically retrieve schema information for schemas needed to configure thedomain.
Note:
If you select Manual Configuration on this screen, you must manually fill inparameters for your schema on the next screen.
After selecting RCU Data, specify details in the following fields:
Field Description
DBMS/Service Enter the database DBMS name, or service name if you selected aservice type driver.
Example: orcl.exampledomain.com
Host Name Enter the name of the server hosting the database.
Example: examplehost.exampledomain.com
Port Enter the port number on which the database listens.
Example: 1521
Chapter 4Configuring the Domain
4-10
Field Description
Schema Owner
Schema Password
Enter the username and password for connecting to the database'sService Table schema. This is the schema username and passwordentered for the Service Table component on the Schema Passwordsscreen in the RCU (see Specifying Schema Passwords).
The default username is prefix_STB, where prefix is the custom prefixthat you defined in the RCU.
Click Get RCU Configuration when you finish specifying the database connectioninformation. The following output in the Connection Result Log indicates that theoperation succeeded:
Connecting to the database server...OKRetrieving schema data from database server...OKBinding local schema components with retrieved data...OK
Successfully Done.
For more information about the schema installed when the RCU is run, see About theService Table Schema in Oracle Fusion Middleware Creating Schemas with theRepository Creation Utility.
See Database Configuration Type in Oracle Fusion Middleware Creating WebLogicDomains Using the Configuration Wizard .
4.2.2.7 Specifying JDBC Component Schema InformationUse the JDBC Component Schema screen to verify or specify details about thedatabase schemas.
Verify that the values populated on the JDBC Component Schema screen are correctfor all schemas. If you selected RCU Data on the previous screen, the schema tableshould already be populated appropriately. If you selected Manual configuration onthe Database Configuration screen, you must configure the schemas listed in the tablemanually, before you proceed.
For high availability environments, see the following sections in Oracle FusionMiddleware High Availability Guide for additional information on configuring datasources for Oracle RAC databases:
• Configuring Active GridLink Data Sources with Oracle RAC
• Configuring Multi Data Sources
See JDBC Component Schema in Oracle Fusion Middleware Creating WebLogicDomains Using the Configuration Wizard for more details about this screen.
4.2.2.8 Testing the JDBC ConnectionsUse the JDBC Component Schema Test screen to test the data source connections.
A green check mark in the Status column indicates a successful test. If you encounterany issues, see the error message in the Connection Result Log section of the screen,fix the problem, then try to test the connection again.
Chapter 4Configuring the Domain
4-11

By default, the schema password for each schema component is the password youspecified while creating your schemas. If you want different passwords for differentschema components, manually edit them in the previous screen (JDBC ComponentSchema) by entering the password you want in the Schema Password column,against each row. After specifying the passwords, select the check box correspondingto the schemas that you changed the password in and test the connection again.
For more information about this screen, see JDBC Component Schema Test in OracleFusion Middleware Creating WebLogic Domains Using the Configuration Wizard.
4.2.2.9 Selecting Advanced ConfigurationUse the Advanced Configuration screen to complete the domain configuration.
On the Advanced Configuration screen, select:
• Administration Server
Required to properly configure the listen address of the Administration Server.
• Node Manager
Required to configure Node Manager.
• Topology
Required to configure the Oracle Access Management Managed Server.
Optionally, select other available options as required for your desired installationenvironment. The steps in this guide describe a standard installation topology, but youmay choose to follow a different path. If your installation requirements extend toadditional options outside the scope of this guide, you may be presented withadditional screens to configure those options. For information about all ConfigurationWizard screens, see Configuration Wizard Screens in Oracle Fusion MiddlewareCreating WebLogic Domains Using the Configuration Wizard.
4.2.2.10 Configuring the Administration Server Listen AddressUse the Administration Server screen to select the IP address of the host.
Select the drop-down list next to Listen Address and select the IP address of the hostwhere the Administration Server will reside, or use the system name or DNS namethat maps to a single IP address. Do not use All Local Addresses.
Do not specify any server groups for the Administration Server.
4.2.2.11 Configuring Node ManagerUse the Node Manager screen to select the type of Node Manager you want toconfigure, along with the Node Manager credentials.
Select Per Domain Default Location as the Node Manager type, then specify NodeManager credentials.
For more information about this screen, see Node Manager in Oracle FusionMiddleware Creating WebLogic Domains Using the Configuration Wizard.
For more about Node Manager types, see Node Manager Overview in Oracle FusionMiddleware Administering Node Manager for Oracle WebLogic Server.
Chapter 4Configuring the Domain
4-12
4.2.2.12 Configuring Managed Servers for Oracle Access ManagementOn the Managed Servers screen, the new Managed Servers named oam_server_1 andoam_policy_mgr1 are displayed:
1. In the Listen Address drop-down list, select the IP address of the host on whichthe Managed Server will reside or use the system name or DNS name that mapsto a single IP address. Do not use "All Local Addresses."
2. In the Server Groups drop-down list, select the server group for your managedserver. By default, OAM-MGD-SVRS is selected for oam_server1 and OAM-POLICY-MANAGED-SERVER is selected for oam_policy_mgr1.
Server groups target Fusion Middleware applications and services to one or moreservers by mapping defined application service groups to each defined servergroup. A given application service group may be mapped to multiple server groupsif needed. Any application services that are mapped to a given server group areautomatically targeted to all servers that are assigned to that group. For moreinformation, see "Application Service Groups, Server Groups, and ApplicationService Mappings" in Oracle Fusion Middleware Domain Template Reference.
3. Configuring a second Managed Server is one of the steps needed to configure thestandard topology for high availability. If you are not creating a highly availableenvironment, then this step is optional.
Click Clone and repeat this process to create a second Managed Server namedoam_policy_mgr2.
Note:
If you wish to configure additional Managed Servers, use the Cloneoption and add the Managed Server. For example, if we want toconfigure oam_server2, click Clone and select oam_server1 to clone thisserver. Do not use the add option to add a new Managed Server.
Configuring a second Managed Server is one of the steps needed to configure thestandard topology for high availability. If you are not creating a highly availableenvironment, then this step is optional.
For more information about the high availability standard topology, see "Understanding the Fusion Middleware Standard HA Topology" in Oracle FusionMiddleware High Availability Guide.
For more information about the next steps to prepare for high availability after yourdomain is configured, see Preparing Your Environment for High Availability.
These server names and will be referenced throughout this document; if you choosedifferent names be sure to replace them as needed.
Chapter 4Configuring the Domain
4-13
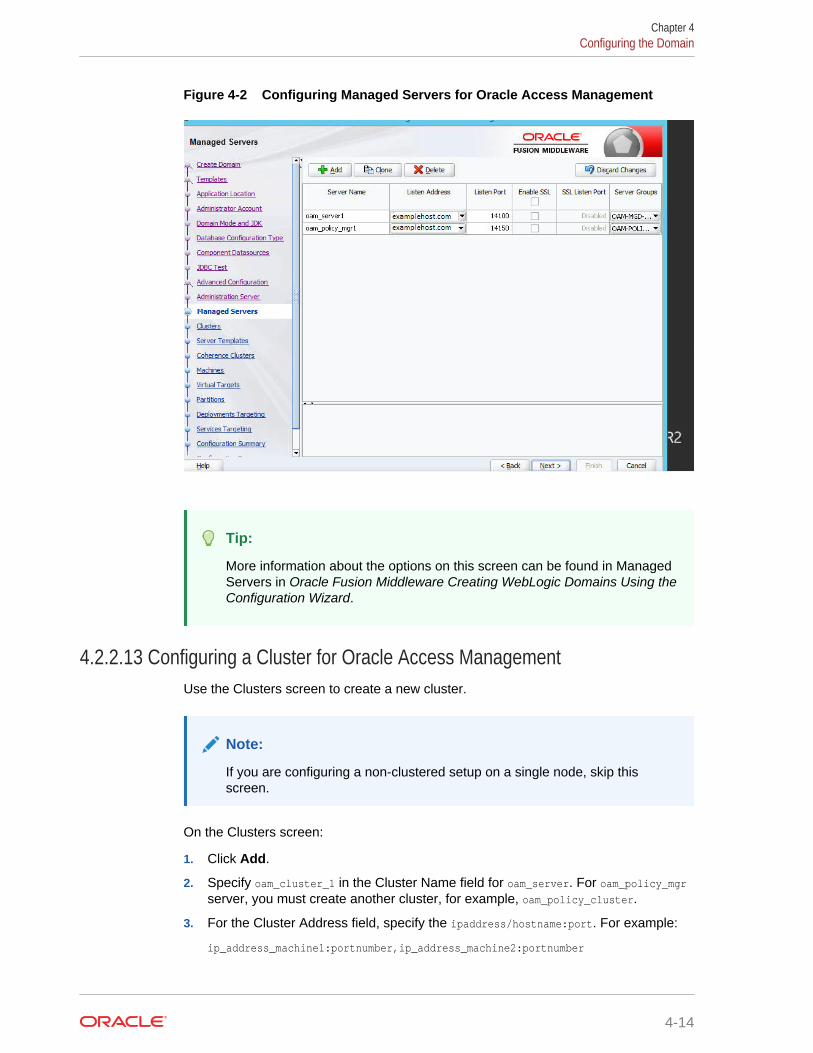
Figure 4-2 Configuring Managed Servers for Oracle Access Management
Tip:
More information about the options on this screen can be found in ManagedServers in Oracle Fusion Middleware Creating WebLogic Domains Using theConfiguration Wizard.
4.2.2.13 Configuring a Cluster for Oracle Access ManagementUse the Clusters screen to create a new cluster.
Note:
If you are configuring a non-clustered setup on a single node, skip thisscreen.
On the Clusters screen:
1. Click Add.
2. Specify oam_cluster_1 in the Cluster Name field for oam_server. For oam_policy_mgrserver, you must create another cluster, for example, oam_policy_cluster.
3. For the Cluster Address field, specify the ipaddress/hostname:port. For example:
ip_address_machine1:portnumber,ip_address_machine2:portnumber
Chapter 4Configuring the Domain
4-14
By default, server instances in a cluster communicate with one another using unicast.If you want to change your cluster communications to use multicast, see Considerations for Choosing Unicast or Multicast in Oracle Fusion MiddlewareAdministering Clusters for Oracle WebLogic Server.
You can also create clusters using Fusion Middleware Control. In this case, you canconfigure cluster communication (unicast or multicast) when you create the newcluster. See Create and configure clusters in Oracle Fusion Middleware OracleWebLogic Server Administration Console Online Help.
For more information about this screen, see Clusters in Oracle Fusion MiddlewareCreating WebLogic Domains Using the Configuration Wizard.
4.2.2.14 Defining Server TemplatesIf you are creating dynamic clusters for a high availability setup, use the ServerTemplates screen to define one or more server templates for domain.
To continue configuring the domain, click Next.
For steps to create a dynamic cluster for a high availability setup, see Using DynamicClusters in Oracle Fusion Middleware High Availability Guide.
4.2.2.15 Configuring Dynamic ServersYou can skip this screen for Oracle Access Management configuration.
Click Next and proceed.
4.2.2.16 Assigning Oracle Access Management Managed Servers to theCluster
Use the Assign Servers to Clusters screen to assign Managed Servers to a newconfigured cluster. A configured cluster is a cluster you configure manually. You do notuse this screen if you are configuring a dynamic cluster, a cluster that contains one ormore generated server instances that are based on a server template.
For more on configured cluster and dynamic cluster terms, see About DynamicClusters in Oracle Fusion Middleware Understanding Oracle WebLogic Server.
On the Assign Servers to Clusters screen:
1. In the Clusters pane, select the cluster to which you want to assign the ManagedServers; in this case, oam_cluster_1.
2. In the Servers pane, assign oam_server_1 to oam_cluster_1 by doing one of thefollowing:
• Click once on oam_server_1 to select it, then click the right arrow to move itbeneath the selected cluster (oam_cluster_1) in the Clusters pane.
• Double-click on oam_server_1 to move it beneath the selected cluster(oam_cluster_1) in the Clusters pane.
3. Repeat to assign oam_policy_mgr to oam_policy_cluster.
For more information about this screen, see Assign Servers to Clusters in OracleFusion Middleware Creating WebLogic Domains Using the Configuration Wizard.
Chapter 4Configuring the Domain
4-15
4.2.2.17 Configuring Coherence ClustersUse the Coherence Clusters screen to configure the Coherence cluster.
Leave the default port number as the Coherence cluster listen port. After configuration,the Coherence cluster is automatically added to the domain.
Note:
Setting the unicast listen port to 0 creates an offset for the Managed Serverport numbers. The offset is 5000, meaning the maximum allowed value thatyou can assign to a Managed Server port number is 60535, instead of 65535.
See Table 5-2 for more information and next steps for configuring Coherence.
For Coherence licensing information, see Oracle Coherence Products in LicensingInformation.
4.2.2.18 Creating a New Oracle Access Management MachineUse the Machines screen to create new machines in the domain. A machine isrequired so that Node Manager can start and stop servers.
If you plan to create a high availability environment and know the list of machines yourtarget topology requires, you can follow the instructions in this section to create all themachines at this time. For more about scale out steps, see Optional Scale OutProcedure in Oracle Fusion Middleware High Availability Guide.
To create a new Oracle Access Management machine so that Node Manager can startand stop servers:
1. Select the Machine tab (for Windows) or the UNIX Machine tab (for UNIX), thenclick Add to create a new machine.
2. In the Name field, specify a machine name, such as oam_machine_1.
3. In the Node Manager Listen Address field, select the IP address of the machine inwhich the Managed Servers are being configured.
You must select a specific interface and not localhost. This allows Coherencecluster addresses to be dynamically calculated.
4. Verify the port in the Node Manager Listen Port field.
5. Repeat these steps to add more machines, if required.
Note:
If you are extending an existing domain, you can assign servers to anyexisting machine. It is not necessary to create a new machine unless yoursituation requires it.
Chapter 4Configuring the Domain
4-16

For more information about this screen, see Machines in Oracle Fusion MiddlewareCreating WebLogic Domains Using the Configuration Wizard.
4.2.2.19 Assigning Servers to Oracle Access Management MachinesUse the Assign Servers to Machines screen to assign the Administration Server andManaged Servers to the new machine you just created.
On the Assign Servers to Machines screen:
1. In the Machines pane, select the machine to which you want to assign the servers;in this case, oam_machine_1.
2. In the Servers pane, assign AdminServer to oam_machine_1 by doing one of thefollowing:
• Click once on AdminServer to select it, then click the right arrow to move itbeneath the selected machine (oam_machine_1) in the Machines pane.
• Double-click on AdminServer to move it beneath the selected machine(oam_machine_1) in the Machines pane.
3. Repeat these steps to assign all Managed Servers to their respective machines.
For more information about this screen, see Assign Servers to Machines in OracleFusion Middleware Creating WebLogic Domains Using the Configuration Wizard.
4.2.2.20 Virtual TargetsYou can skip this screen for Oracle Access Management configuration.
Click Next and proceed.
4.2.2.21 PartitionsThe Partitions screen is used to configure partitions for virtual targets in WebLogicServer Multitenant (MT) environments. Select Next without selecting any options.
For details about options on this screen, see Partitions in Oracle Fusion MiddlewareCreating WebLogic Domains Using the Configuration Wizard.
4.2.2.22 Configuring Domain Frontend HostThe Domain Frontend Host screen can be used to configure the frontend host for thedomain.
Select Plain or SSL and specify the respective host value.
Click Next.
4.2.2.23 Targeting the DeploymentsThe Deployments Targeting screen can be used to target the available deployments tothe servers.
Make the required modifications, and click Next.
Chapter 4Configuring the Domain
4-17

4.2.2.24 Targeting the ServicesThe Services Targeting screen can be used to target the available services to theServers.
Make necessary modifications, and click Next.
4.2.2.25 Reviewing Your Configuration Specifications and Configuring theDomain
The Configuration Summary screen shows detailed configuration information for thedomain you are about to create.
Review each item on the screen and verify that the information is correct. To make anychanges, go back to a screen by clicking the Back button or selecting the screen inthe navigation pane. Domain creation does not start until you click Create.
For more details about options on this screen, see Configuration Summary in OracleFusion Middleware Creating WebLogic Domains Using the Configuration Wizard.
4.2.2.26 Writing Down Your Domain Home and Administration Server URLThe End of Configuration screen shows information about the domain you justconfigured.
Make a note of the following items because you need them later:
• Domain Location
• Administration Server URL
You need the domain location to access scripts that start Node Manager andAdministration Server, and you need the URL to access the Administration Server.
Click Finish to dismiss the Configuration Wizard.
4.2.3 Updating the System Properties for SSL Enabled ServersFor SSL enabled servers, you must set the required properties in the setDomainEnv filein the domain home.
Set the following properties in the DOMAIN_HOME/bin/setDomainEnv.sh (for UNIX) orDOMAIN_HOME\bin\setDomainEnv.cmd (for Windows) file before you start the servers:
• -Dweblogic.security.SSL.ignoreHostnameVerification=true
• -Dweblogic.security.TrustKeyStore=DemoTrust
4.3 Starting the ServersAfter a successful configuration, start all processes and servers, including theAdministration Server and any Managed Servers.
The components may be dependent on each other so they must be started in thecorrect order.
Chapter 4Starting the Servers
4-18
Note:
The procedures in this section describe how to start servers and processusing the WLST command line or a script. You can also use the OracleFusion Middleware Control and the Oracle WebLogic Server AdministrationConsole. See Starting and Stopping Administration and Managed Serversand Node Manager in Administering Oracle Fusion Middleware.
To start your Fusion Middleware environment, follow the steps below.
Step 1: Start Node Manager
To start Node Manager, use the startNodeManager script:
• (UNIX) EXISTING_DOMAIN_HOME/bin/startNodeManager.sh
• (Windows) EXISTING_DOMAIN_HOME\bin\startNodeManager.cmd
Step 2: Start the Administration Server
When you start the Administration Server, you also start the processes running in theAdministration Server, including the WebLogic Server Administration Console andFusion Middleware Control.
To start the Administration Server, use the startWebLogic script:
• (UNIX) EXISTING_DOMAIN_HOME/bin/startWebLogic.sh
• (Windows) EXISTING_DOMAIN_HOME\bin\startWebLogic.cmd
When prompted, enter your user name, password, and the URL of the AdministrationServer.
Step 3: Start the Managed Servers
To start a WebLogic Server Managed Server, use the startManagedWebLogic script:
• (UNIX) EXISTING_DOMAIN_HOME/bin/startManagedWebLogic.sh managed_server_nameadmin_url
• (Windows) EXISTING_DOMAIN_HOME\bin\startManagedWebLogic.cmdmanaged_server_name admin_url
When prompted, enter your user name and password.
Note:
The startup of a Managed Server will typically start the applications that aredeployed to it. Therefore, it should not be necessary to manually startapplications after the Managed Server startup.
Chapter 4Starting the Servers
4-19
4.4 Verifying the ConfigurationAfter completing all configuration steps, you can perform additional steps to verify thatyour domain is properly configured.
You can start using the functionality of Oracle Access Management after yousuccessfully configure it. See Getting Started with Oracle Access Management inAdministering Oracle Access Management.
For information about integrating Oracle Access Management with other IdentityManagement components, see Introduction to IdM Suite Components Integration inIntegration Guide for Oracle Identity Management Suite.
For more information about performing additional domain configuration tasks, see Performing Additional Domain Configuration Tasks.
4.5 Setting the Memory Parameters for OAM Domain(Optional)
If the initial startup parameter in Oracle Access Management domain, which definesthe memory usage, is insufficient, you can increase the value of this parameter.
To change the memory allocation setting, do the following:
1. Edit the ORACLE_HOME/bin/setUserOverrides.sh file to add the following line:
MEM_ARGS="-Xms1024m -Xmx3072m"
2. Save and close the file.
3. Change the following memory allocation by updating the Java maximum memoryallocation pool (Xmx) to 3072m and initial memory allocation pool (Xms) to 1024m.For example, change the following line to be:
WLS_MEM_ARGS_64BIT="-Xms1024m -Xmx3072m"
4. Save and close the file.
4.6 Updating the java.security File (Optional)If you wish to integrate Oracle Access Management 12c (12.2.1.3.0) with OracleAdaptive Access Manager (OAAM) 11g Release 2 (11.1.2.3.0), you must updatejava.security file with the following changes, post upgrade:
To do this:
1. Open the java.security file located at JAVA_HOME/jre/lib/security/ in an editor.
2. Remove TLSv1, TLSv1.1, MD5withRSA from the following key:
key - jdk.tls.disabledAlgorithms
3. Remove MD5 from the following key:
key - jdk.certpath.disabledAlgorithms
Chapter 4Verifying the Configuration
4-20
4.7 TroubleshootingThis section lists the common issues encountered while configuring Oracle AccessManagement and their workarounds.
Topics
• MDS ReadOnlyStoreException in OAM Policy Manager Diagnostic logAfter you configure Oracle Access Management (OAM)12c (12.2.1.3.0), when youstart the servers, the following exception is seen in the Administration Server andOAM Policy Manager diagnostic logs:
• Ignorable Warnings in the Administration Server LogsAfter you configure Oracle Access Management 12c (12.2.1.3.0), when you startthe Administration Server, the following warning are seen in the AdministrationServer logs:
4.7.1 MDS ReadOnlyStoreException in OAM Policy ManagerDiagnostic log
After you configure Oracle Access Management (OAM)12c (12.2.1.3.0), when youstart the servers, the following exception is seen in the Administration Server and OAMPolicy Manager diagnostic logs:
oracle.mds.exception.ReadOnlyStoreException: MDS-01273: The operation on the resource /oracle/oam/ui/adfm/DataBindings.cpx failed because source metadata store mapped to the namespace / DEFAULT is read only.
This exception does not impact the Administration Console functionality and hencecan be safely ignore.
4.7.2 Ignorable Warnings in the Administration Server LogsAfter you configure Oracle Access Management 12c (12.2.1.3.0), when you start theAdministration Server, the following warning are seen in the Administration Serverlogs:
<Warning> <oracle.adfinternal.view.faces.renderkit.rich.NavigationPaneRenderer> <adc2140146.us.oracle.com> <AdminServer> <[ACTIVE] ExecuteThread: '42' for queue: 'weblogic.kernel.Default (self-tuning)'> <weblogic> <> <b6ba191d-9c3f-44ce-ad9d-64bd7123baf5-000000e3> <1502889425767> <[severity-value: 16] [rid: 0] [partition-id: 0] [partition-name: DOMAIN] > <BEA-000000> <Warning: There are no items to render for this level> ####<Aug 16, 2017 6:17:06,241 AM PDT> <Warning> <org.apache.myfaces.trinidad.component.UIXFacesBeanImpl>
This has no impact on the functionality, and therefore you can ignore it.
Chapter 4Troubleshooting
4-21
5Configuring the Oracle Identity GovernanceDomain
After you have installed Oracle Identity Governance, you can configure the domain,which you can also extend for high availability.
The configuration steps presented here assume that you have completed theinstallation steps covered in:
• Preparing to Install and Configure Oracle Identity and Access Management
• Installing the Oracle Identity and Access Management Software
Note:
The product Oracle Identity Manager is referred to as Oracle IdentityManager (OIM) and Oracle Identity Governance (OIG) interchangeably in theguide.
In this document, the variable OIM_HOME is used for ORACLE_HOME/idm (Unix) andORACLE_HOME\idm (Windows).
Refer to the following sections to create the database schemas, configure a WebLogicdomain, and verify the configuration:
• Verifying the Memory SettingsTo avoid the memory issues for Oracle Identity Manager, ensure that the memorysettings are updated as per the requirements.
• Creating the Database SchemasBefore you can configure an Oracle Identity Governance domain, you must installrequired schemas on a certified database for use with this release of OracleFusion Middleware.
• Configuring the DomainUse the Configuration Wizard to create and configure a domain.
• Performing Post-Configuration TasksAfter you configure the Oracle Identity Governance domain, perform the necessarypost-configuration tasks.
• Starting the ServersAfter a successful configuration, start all processes and servers, including theAdministration Server and any Managed Servers.
• Integrating Oracle Identity Governance with Oracle SOA SuiteIf you wish to integrate Oracle Identity Governance with Oracle SOA Suite, use theEnterprise Manager console to do the same.
5-1
• Verifying the ConfigurationAfter completing all configuration steps, you can perform additional steps to verifythat your domain is properly configured.
• Analyzing the Bootstrap ReportWhen you start the Oracle Identity Governance server, the bootstrap report isgenerated at DOMAIN_HOME/servers/oim_server1/logs/BootStrapReportPreStart.html.
• Accessing the Oracle Identity Governance Design Console (Optional)After you configure Oracle Identity Governance (OIG) 12c (12.2.1.3.0), if you wishto access the Oracle Identity Governance Design Console, you can do so byinvoking the xlclient command from the new Oracle Home.
• TroubleshootingThis section lists the common issues encountered while configuring Oracle IdentityGovernance and their workarounds.
5.1 Verifying the Memory SettingsTo avoid the memory issues for Oracle Identity Manager, ensure that the memorysettings are updated as per the requirements.
On Linux, do the following:
1. Ensure that you set the following parameters in the /etc/security/limits.conf file,to the specified values:
• FUSION_USER_ACCOUNT soft nofile 32767
• FUSION_USER_ACCOUNT hard nofile 327679
2. Ensure that you set UsePAM to Yes in the /etc/ssh/sshd_config file.
3. Restart sshd.
4. Log out (or reboot) and log in to the system again.
Note:
Before you start the Oracle Identity Governance 12c Server, postconfiguration, run the following command to increase the limit of open files,so that you do not run into memory issues:limit maxproc 16384
5.2 Creating the Database SchemasBefore you can configure an Oracle Identity Governance domain, you must installrequired schemas on a certified database for use with this release of Oracle FusionMiddleware.
• Installing and Configuring a Certified DatabaseBefore you create the database schemas, you must install and configure acertified database, and verify that the database is up and running.
Chapter 5Verifying the Memory Settings
5-2
• Starting the Repository Creation UtilityStart the Repository Creation Utility (RCU) after you verify that a certified JDK isinstalled on your system.
• Navigating the Repository Creation Utility Screens to Create SchemasEnter required information in the RCU screens to create the database schemas.
5.2.1 Installing and Configuring a Certified DatabaseBefore you create the database schemas, you must install and configure a certifieddatabase, and verify that the database is up and running.
See About Database Requirements for an Oracle Fusion Middleware Installation.
5.2.2 Starting the Repository Creation UtilityStart the Repository Creation Utility (RCU) after you verify that a certified JDK isinstalled on your system.
To start the RCU:
1. Verify that a certified JDK already exists on your system by running java -versionfrom the command line. For 12c (12.2.1.3.0), the certified JDK is 1.8.0_131 andlater.
See About JDK Requirements for an Oracle Fusion Middleware Installation.
2. Ensure that the JAVA_HOME environment variable is set to the location of the certifiedJDK. For example:
• (UNIX) setenv JAVA_HOME /home/Oracle/Java/jdk1.8.0_131
• (Windows) set JAVA_HOME=C:\home\Oracle\Java\jdk1.8.0_131
3. Change to the following directory:
• (UNIX) ORACLE_HOME/oracle_common/bin
• (Windows) ORACLE_HOME\oracle_common\bin
4. Enter the following command:
• (UNIX) ./rcu
• (Windows) rcu.bat
5.2.3 Navigating the Repository Creation Utility Screens to CreateSchemas
Enter required information in the RCU screens to create the database schemas.
• Introducing the RCUThe Welcome screen is the first screen that appears when you start the RCU.
• Selecting a Method of Schema CreationUse the Create Repository screen to select a method to create and loadcomponent schemas into the database.
• Providing Database Connection DetailsOn the Database Connection Details screen, provide the database connectiondetails for the RCU to connect to your database.
Chapter 5Creating the Database Schemas
5-3
• Specifying a Custom Prefix and Selecting Schemas
• Specifying Schema PasswordsOn the Schema Passwords screen, specify how you want to set the schemapasswords on your database, then enter and confirm your passwords.
• Specifying Custom Variables
• Completing Schema CreationNavigate through the remaining RCU screens to complete schema creation.
5.2.3.1 Introducing the RCUThe Welcome screen is the first screen that appears when you start the RCU.
Click Next.
5.2.3.2 Selecting a Method of Schema CreationUse the Create Repository screen to select a method to create and load componentschemas into the database.
On the Create Repository screen:
• If you have the necessary permissions and privileges to perform DBA activities onyour database, select System Load and Product Load. This procedure assumesthat you have SYSDBA privileges.
• If you do not have the necessary permissions or privileges to perform DBAactivities in the database, you must select Prepare Scripts for System Load onthis screen. This option generates a SQL script that you can give to your databaseadministrator. See About System Load and Product Load in Oracle FusionMiddleware Creating Schemas with the Repository Creation Utility.
• If the DBA has already run the SQL script for System Load, select PerformProduct Load.
5.2.3.3 Providing Database Connection DetailsOn the Database Connection Details screen, provide the database connection detailsfor the RCU to connect to your database.
Note:
If you are unsure of the service name for your database, you can obtain itfrom the SERVICE_NAMES parameter in the initialization parameter file of thedatabase. If the initialization parameter file does not contain theSERVICE_NAMES parameter, then the service name is the same as the globaldatabase name, which is specified in the DB_NAME and DB_DOMAIN parameters.
For example:
Database Type: Oracle DatabaseConnection String Format: Connection Parameters or ConnectionString
Chapter 5Creating the Database Schemas
5-4
Connection String: examplehost.exampledomain.com:1521:Orcl.exampledomain.com
Host Name: examplehost.exampledomain.comPort: 1521Service Name: Orcl.exampledomain.comUser Name: sysPassword: ******Role: SYSDBA
Click Next to proceed, then click OK in the dialog window that confirms a successfuldatabase connection.
5.2.3.4 Specifying a Custom Prefix and Selecting SchemasSelect Create new prefix, specify a custom prefix, then select the Oracle IdentityGovernance schema. This action automatically selects the following schemas asdependencies:
• User Messaging Service (UMS)
• Metadata Services (MDS)
• Oracle Platform Security Services (OPSS)
• Audit Services (IAU)
• Audit Services Append (IAU_Append)
• Audit Services Viewer (IAU_Viewer)
• WebLogic Services (WLS)
• Common Infrastructure Services (STB)
• SOA Infrastructure (SOAINFRA)
The schema Common Infrastructure Services (STB) is automatically created. Thisschema is dimmed; you cannot select or deselect it. This schema enables you toretrieve information from RCU during domain configuration. For more information, see "Understanding the Service Table Schema" in Oracle Fusion Middleware CreatingSchemas with the Repository Creation Utility.
The custom prefix is used to logically group these schemas together for use in thisdomain only; you must create a unique set of schemas for each domain. Schemasharing across domains is not supported.
Tip:
For more information about custom prefixes, see "Understanding CustomPrefixes" in Oracle Fusion Middleware Creating Schemas with theRepository Creation Utility.
For more information about how to organize your schemas in a multi-domainenvironment, see "Planning Your Schema Creation" in Oracle FusionMiddleware Creating Schemas with the Repository Creation Utility.
Chapter 5Creating the Database Schemas
5-5
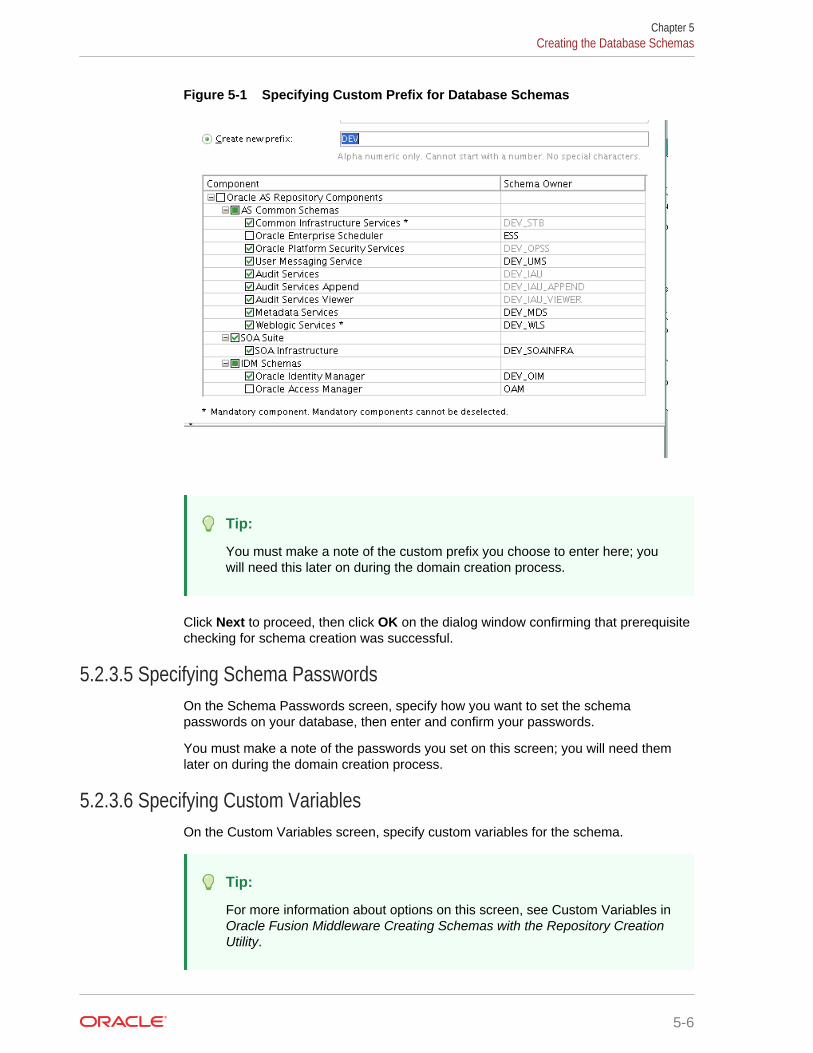
Figure 5-1 Specifying Custom Prefix for Database Schemas
Tip:
You must make a note of the custom prefix you choose to enter here; youwill need this later on during the domain creation process.
Click Next to proceed, then click OK on the dialog window confirming that prerequisitechecking for schema creation was successful.
5.2.3.5 Specifying Schema PasswordsOn the Schema Passwords screen, specify how you want to set the schemapasswords on your database, then enter and confirm your passwords.
You must make a note of the passwords you set on this screen; you will need themlater on during the domain creation process.
5.2.3.6 Specifying Custom VariablesOn the Custom Variables screen, specify custom variables for the schema.
Tip:
For more information about options on this screen, see Custom Variables inOracle Fusion Middleware Creating Schemas with the Repository CreationUtility.
Chapter 5Creating the Database Schemas
5-6
5.2.3.7 Completing Schema CreationNavigate through the remaining RCU screens to complete schema creation.
On the Map Tablespaces screen, the Encrypt Tablespace check box appears only ifyou enabled Transparent Data Encryption (TDE) in the database (Oracle or OracleEBR) when you start the RCU. Select the Encrypt Tablespace check box if you wantto encrypt all new tablespaces that the RCU creates.
When you reach the Completion Summary screen, click Close to dismiss the RCU.
5.3 Configuring the DomainUse the Configuration Wizard to create and configure a domain.
For information on other methods to create domains, see Additional Tools for Creating,Extending, and Managing WebLogic Domains in Oracle Fusion Middleware CreatingWebLogic Domains Using the Configuration Wizard.
• Starting the Configuration WizardStart the Configuration Wizard to begin configuring a domain.
• Navigating the Configuration Wizard Screens to Create and Configure the DomainEnter required information in the Configuration Wizard screens to create andconfigure the domain for the topology.
5.3.1 Starting the Configuration WizardStart the Configuration Wizard to begin configuring a domain.
To start the Configuration Wizard:
1. Change to the following directory:
(UNIX) ORACLE_HOME/oracle_common/common/bin
(Windows) ORACLE_HOME\oracle_common\common\bin
where ORACLE_HOME is your 12c (12.2.1.3.0) Oracle home.
2. Enter the following command:
(UNIX) ./config.sh
(Windows) config.cmd
5.3.2 Navigating the Configuration Wizard Screens to Create andConfigure the Domain
Enter required information in the Configuration Wizard screens to create and configurethe domain for the topology.
Chapter 5Configuring the Domain
5-7
Note:
You can use this procedure to extend an existing domain. If your needs donot match the instructions in the procedure, be sure to make your selectionsaccordingly, or see the supporting documentation for more details.
• Selecting the Domain Type and Domain Home LocationUse the Configuration Type screen to select a Domain home directory location,optimally outside the Oracle home directory.
• Selecting the Configuration Templates for Oracle Identity Manager
• Configuring High Availability OptionsUse this screen to configure service migration and persistence settings that affecthigh availability. This screen appears for the first time when you create a clusterthat uses automatic service migration, persistent stores, or both, and allsubsequent clusters that are added to the domain by using the ConfigurationWizard, automatically apply the selected HA options.
• Selecting the Application Home LocationUse the Application Location screen to select the location to store applicationsassociated with your domain, also known as the Application home directory.
• Configuring the Administrator AccountUse the Administrator Account screen to specify the user name and password forthe default WebLogic Administrator account for the domain.
• Specifying the Domain Mode and JDKUse the Domain Mode and JDK screen to specify the domain mode and JavaDevelopment Kit (JDK).
• Specifying the Database Configuration TypeUse the Database Configuration type screen to specify details about the databaseand database schema.
• Specifying JDBC Component Schema InformationUse the JDBC Component Schema screen to verify or specify details about thedatabase schemas.
• Testing the JDBC ConnectionsUse the JDBC Component Schema Test screen to test the data sourceconnections.
• Entering CredentialsUse the Credentials screen to set credentials for each key in the domain.
• Specifying the Path to the Keystore Certificate or Key
• Selecting Advanced ConfigurationUse the Advanced Configuration screen to complete the domain configuration.
• Configuring the Administration Server Listen AddressUse the Administration Server screen to select the IP address of the host.
• Configuring Node ManagerUse the Node Manager screen to select the type of Node Manager you want toconfigure, along with the Node Manager credentials.
• Configuring Managed Servers for Oracle Identity Manager
Chapter 5Configuring the Domain
5-8

• Configuring a Cluster for Oracle Identity ManagerUse the Clusters screen to create a new cluster. This is required in for an OracleIdentity Governance high availability setup.
• Defining Server TemplatesIf you are creating dynamic clusters for a high availability setup, use the ServerTemplates screen to define one or more server templates for domain.
• Configuring Dynamic ServersIf you are creating dynamic clusters for a high availability setup, use the DynamicServers screen to configure the dynamic servers.
• Assigning Oracle Identity Manager Managed Servers to the ClusterUse the Assign Servers to Clusters screen to assign Managed Servers to a newconfigured cluster. A configured cluster is a cluster you configure manually. Youdo not use this screen if you are configuring a dynamic cluster, a cluster thatcontains one or more generated server instances that are based on a servertemplate.
• Configuring Coherence ClustersUse the Coherence Clusters screen to configure the Coherence cluster.
• Creating a New Oracle Identity Manager MachineUse the Machines screen to create new machines in the domain. A machine isrequired so that Node Manager can start and stop servers.
• Assigning Servers to Oracle Identity Manager MachinesUse the Assign Servers to Machines screen to assign the Administration Serverand Managed Servers to the new machine you just created.
• Virtual TargetsIf you have a WebLogic Server Multitenant (MT) environment, you use the VirtualTargets screen to add or delete virtual targets. For this installation (not aWebLogic Server MT environment), you do not enter any values; just select Next.
• PartitionsThe Partitions screen is used to configure partitions for virtual targets in WebLogicServer Multitenant (MT) environments. Select Next without selecting any options.
• Configuring Domain Frontend HostThe Domain Frontend Host screen can be used to configure the frontend host forthe domain.
• Targeting the DeploymentsThe Deployments Targeting screen can be used to target the availabledeployments to the servers.
• Targeting the ServicesThe Services Targeting screen can be used to target the available services to theServers.
• File StoresThe File Stores screen lists the available file stores.
• Reviewing Your Configuration Specifications and Configuring the DomainThe Configuration Summary screen shows detailed configuration information forthe domain you are about to create.
• Writing Down Your Domain Home and Administration Server URLThe End of Configuration screen shows information about the domain you justconfigured.
Chapter 5Configuring the Domain
5-9
5.3.2.1 Selecting the Domain Type and Domain Home LocationUse the Configuration Type screen to select a Domain home directory location,optimally outside the Oracle home directory.
Oracle recommends that you locate your Domain home in accordance with thedirectory structure in What Are the Key Oracle Fusion Middleware Directories? inOracle Fusion Middleware Understanding Oracle Fusion Middleware, where theDomain home is located outside the Oracle home directory. This directory structurehelps avoid issues when you need to upgrade or reinstall software.
To specify the Domain type and Domain home directory:
1. On the Configuration Type screen, select Create a new domain.
2. In the Domain Location field, specify your Domain home directory.
For more details about this screen, see Configuration Type in Oracle FusionMiddleware Creating WebLogic Domains Using the Configuration Wizard.
5.3.2.2 Selecting the Configuration Templates for Oracle Identity ManagerOn the Templates screen, make sure Create Domain Using Product Templates isselected, then select the Oracle Identity Manager — 12.2.1.3.0 [idm] template, alongwith the following dependencies:
• Basic WebLogic Server Domain
• Oracle SOA Suite — 12.2.1.3.0
• Oracle Enterprise Manager — 12.2.1.3.0 [em]
• Oracle WSM Policy Manager — 12.2.1.3 [oracle_common]
• Oracle JRF — 12.2.1.3.0 [oracle_common]
• WebLogic Coherence Cluster Extension — 12.2.1.3.0
More information about the options on this screen can be found in Templates in OracleFusion Middleware Creating WebLogic Domains Using the Configuration Wizard.
5.3.2.3 Configuring High Availability OptionsUse this screen to configure service migration and persistence settings that affect highavailability. This screen appears for the first time when you create a cluster that usesautomatic service migration, persistent stores, or both, and all subsequent clusters thatare added to the domain by using the Configuration Wizard, automatically apply theselected HA options.
Enable Automatic Service Migration
Select Enable Automatic Service Migration to enable pinned services to migrateautomatically to a healthy Managed Server for failover. It configures migratable targetdefinitions that are required for automatic service migration and the cluster leasing.Choose one of these cluster leasing options:
• Database Leasing - Managed Servers use a table on a valid JDBC SystemResource for leasing. Requires that the Automatic Migration data source have avalid JDBC System Resource. If you select this option, the Migration Basis is
Chapter 5Configuring the Domain
5-10
configured to Database and the Data Source for Automatic Migration is alsoautomatically configured by the Configuration Wizard. If you have a highavailability database, such as Oracle RAC, to manage leasing information,configure the database for server migration according to steps in High-availabilityDatabase Leasing.
• Consensus Leasing - Managed Servers maintain leasing information in-memory.You use Node Manager to control Managed Servers in a cluster. (All servers thatare migratable, or which could host a migratable target, must have a NodeManager associated with them.) If you select this option, the Migration Basis isconfigured to Consensus by the Configuration Wizard.
See Leasing for more information on leasing.
See Service Migration for more information on Automatic Service Migration.
JTA Transaction Log Persistence
This section has two options: Default Persistent Store and JDBC TLog Store.
• Default Persistent Store - Configures the JTA Transaction Log store of the serversin the default file store.
• JDBC TLog Store - Configures the JTA Transaction Log store of the servers inJDBC stores.
Oracle recommends that you select JDBC TLog Store. When you complete theconfiguration, you have a cluster where JDBC persistent stores are set up forTransaction logs.
For more details on persistent and TLOG stores, see the following topics in OracleFusion Middleware Developing JTA Applications for Oracle WebLogic Server:
• Using the Default Persistent Store
• Using a JDBC TLOG Store
JMS Service Persistence
A persistent JMS store is a physical repository for storing persistent message dataand durable subscribers. It can be either a disk-based file store or a JDBC-accessibledatabase. You can use a JMS file store for paging of messages to disk when memoryis exhausted.
• JMS File Store - Configures a component to use JMS File Stores. If you select thisoption, you can choose the File Store option in the Advanced ConfigurationScreen to change the settings, if required. In the File Stores screen, you can setfile store names, directories, and synchronous write policies.
• JMS JDBC Store - Configures a component to use JDBC stores for all its JMSservers. When you complete the configuration, you have a cluster and JDBCpersistent stores are configured for the JMS servers.
This is the recommended option for Oracle Identity and Access Management 12c(12.2.1.3.0).
Chapter 5Configuring the Domain
5-11
5.3.2.4 Selecting the Application Home LocationUse the Application Location screen to select the location to store applicationsassociated with your domain, also known as the Application home directory.
Oracle recommends that you locate your Application home in accordance with thedirectory structure in What Are the Key Oracle Fusion Middleware Directories? inOracle Fusion Middleware Understanding Oracle Fusion Middleware, where theApplication home is located outside the Oracle home directory. This directory structurehelps avoid issues when you need to upgrade or re-install your software.
For more about the Application home directory, see About the Application HomeDirectory.
For more information about this screen, see Application Location in Oracle FusionMiddleware Creating WebLogic Domains Using the Configuration Wizard.
5.3.2.5 Configuring the Administrator AccountUse the Administrator Account screen to specify the user name and password for thedefault WebLogic Administrator account for the domain.
Oracle recommends that you make a note of the user name and password that youenter on this screen; you need these credentials later to boot and connect to thedomain's Administration Server.
For more information about this screen, see Administrator Account in CreatingWebLogic Domains Using the Configuration Wizard.
5.3.2.6 Specifying the Domain Mode and JDKUse the Domain Mode and JDK screen to specify the domain mode and JavaDevelopment Kit (JDK).
On the Domain Mode and JDK screen:
• Select Production in the Domain Mode field.
• Select the Oracle HotSpot JDK in the JDK field.
For more information about this screen, see Domain Mode and JDK in Oracle FusionMiddleware Creating WebLogic Domains Using the Configuration Wizard.
5.3.2.7 Specifying the Database Configuration TypeUse the Database Configuration type screen to specify details about the database anddatabase schema.
On the Database Configuration type screen, select RCU Data. This option instructsthe Configuration Wizard to connect to the database and Service Table (STB) schemato automatically retrieve schema information for schemas needed to configure thedomain.
Chapter 5Configuring the Domain
5-12
Note:
If you select Manual Configuration on this screen, you must manually fill inparameters for your schema on the next screen.
After selecting RCU Data, specify details in the following fields:
Field Description
DBMS/Service Enter the database DBMS name, or service name if you selected aservice type driver.
Example: orcl.exampledomain.com
Host Name Enter the name of the server hosting the database.
Example: examplehost.exampledomain.com
Port Enter the port number on which the database listens.
Example: 1521
Schema Owner
Schema Password
Enter the username and password for connecting to the database'sService Table schema. This is the schema username and passwordentered for the Service Table component on the Schema Passwordsscreen in the RCU (see Specifying Schema Passwords).
The default username is prefix_STB, where prefix is the custom prefixthat you defined in the RCU.
Click Get RCU Configuration when you finish specifying the database connectioninformation. The following output in the Connection Result Log indicates that theoperation succeeded:
Connecting to the database server...OKRetrieving schema data from database server...OKBinding local schema components with retrieved data...OK
Successfully Done.
For more information about the schema installed when the RCU is run, see About theService Table Schema in Oracle Fusion Middleware Creating Schemas with theRepository Creation Utility.
See Database Configuration Type in Oracle Fusion Middleware Creating WebLogicDomains Using the Configuration Wizard .
5.3.2.8 Specifying JDBC Component Schema InformationUse the JDBC Component Schema screen to verify or specify details about thedatabase schemas.
Verify that the values populated on the JDBC Component Schema screen are correctfor all schemas. If you selected RCU Data on the previous screen, the schema tableshould already be populated appropriately. If you selected Manual configuration onthe Database Configuration screen, you must configure the schemas listed in the tablemanually, before you proceed.
Chapter 5Configuring the Domain
5-13
For high availability environments, see the following sections in Oracle FusionMiddleware High Availability Guide for additional information on configuring datasources for Oracle RAC databases:
• Configuring Active GridLink Data Sources with Oracle RAC
• Configuring Multi Data Sources
See JDBC Component Schema in Oracle Fusion Middleware Creating WebLogicDomains Using the Configuration Wizard for more details about this screen.
5.3.2.9 Testing the JDBC ConnectionsUse the JDBC Component Schema Test screen to test the data source connections.
A green check mark in the Status column indicates a successful test. If you encounterany issues, see the error message in the Connection Result Log section of the screen,fix the problem, then try to test the connection again.
By default, the schema password for each schema component is the password youspecified while creating your schemas. If you want different passwords for differentschema components, manually edit them in the previous screen (JDBC ComponentSchema) by entering the password you want in the Schema Password column,against each row. After specifying the passwords, select the check box correspondingto the schemas that you changed the password in and test the connection again.
For more information about this screen, see JDBC Component Schema Test in OracleFusion Middleware Creating WebLogic Domains Using the Configuration Wizard.
5.3.2.10 Entering CredentialsUse the Credentials screen to set credentials for each key in the domain.
The following table lists the key names, and the values that you must specify for theirrespective username and password.
Note:
Ensure that you specify keystore as the username for the key Keystore, andxelsysadm as the username for the key sysadmin.
Table 5-1 Values to be Specified on the Credentials Screen
Key Name Username Password Store Name
Keystore keystore Specify the passwordfor keystore.
oim
OIMSchemaPassword
Specify the schemausername for OIMoperations database.
Specify the schemapassword of the OIMoperations databaseschema owner.
oim
sysadmin xelsysadm Specify the sysadminpassword.
oim
Chapter 5Configuring the Domain
5-14
Table 5-1 (Cont.) Values to be Specified on the Credentials Screen
Key Name Username Password Store Name
WebLogicAdminKey Specify the usernameof the WebLogicadministrator accountfor OIM domain.
Specify the passwordof the WebLogicadministrator accountfor OIM domain.
oim
5.3.2.11 Specifying the Path to the Keystore Certificate or Key
Use the Keystore screen to specify either the path to the trusted certificate for eachkeystore, or the path to each keystore’s private key and other private key information.
When you click in the Trusted Certificate, Private Key, or Identity Certificate fields, abrowse icon appears to the right of the field. Click this icon to browse to theappropriate file.
For more information about this screen, see Keystore in Oracle Fusion MiddlewareCreating WebLogic Domains Using the Configuration Wizard .
5.3.2.12 Selecting Advanced ConfigurationUse the Advanced Configuration screen to complete the domain configuration.
On the Advanced Configuration screen, select:
• Administration Server
Required to properly configure the listen address of the Administration Server.
• Node Manager
Required to configure Node Manager.
• Topology
Required to configure the Oracle Identity Governance Managed Server.
Optionally, select other available options as required for your desired installationenvironment. The steps in this guide describe a standard installation topology, but youmay choose to follow a different path. If your installation requirements extend toadditional options outside the scope of this guide, you may be presented withadditional screens to configure those options. For information about all ConfigurationWizard screens, see Configuration Wizard Screens in Oracle Fusion MiddlewareCreating WebLogic Domains Using the Configuration Wizard.
5.3.2.13 Configuring the Administration Server Listen AddressUse the Administration Server screen to select the IP address of the host.
Select the drop-down list next to Listen Address and select the IP address of the hostwhere the Administration Server will reside, or use the system name or DNS namethat maps to a single IP address. Do not use All Local Addresses.
Do not specify any server groups for the Administration Server.
Chapter 5Configuring the Domain
5-15
5.3.2.14 Configuring Node ManagerUse the Node Manager screen to select the type of Node Manager you want toconfigure, along with the Node Manager credentials.
Select Per Domain Default Location as the Node Manager type, then specify NodeManager credentials.
For more information about this screen, see Node Manager in Oracle FusionMiddleware Creating WebLogic Domains Using the Configuration Wizard.
For more about Node Manager types, see Node Manager Overview in Oracle FusionMiddleware Administering Node Manager for Oracle WebLogic Server.
5.3.2.15 Configuring Managed Servers for Oracle Identity ManagerOn the Managed Servers screen, the new Managed Server named oim_server1 andsoa_server1 are automatically created by default.
To configure Managed Servers for Oracle Identity Governance and Oracle SOA Suite:
1. In the Listen Address drop-down list, select the IP address of the host on whichthe Managed Server will reside or use the system name or DNS name that mapsto a single IP address. Do not use All Local Addresses.
2. In the Server Groups drop-down list, make sure that oim_server1 is associated withOIM-MGD-SVRS group and soa_server1 is associated with SOA-MGD-SVRS group. Thisensures that the correct service(s) target the Managed Servers you are creating.
Server groups target Fusion Middleware applications and services to one or moreservers by mapping defined application service groups to each defined servergroup. A given application service group may be mapped to multiple server groupsif needed. Any application services that are mapped to a given server group areautomatically targeted to all servers that are assigned to that group. For moreinformation, see Application Service Groups, Server Groups, and ApplicationService Mappings in Oracle Fusion Middleware Domain Template Reference.
3. Click Clone to create a second Managed Server oim_server2 of type oim_server1.Repeat it to create a second Managed Server soa_server2 of type soa_server2.
Configuring a second Managed Server is one of the steps needed to configure thestandard topology for high availability. If you are not creating a highly availableenvironment, then this step is optional.
For more information about the high availability standard topology, see Understanding the Fusion Middleware Standard HA Topology in Oracle FusionMiddleware High Availability Guide.
For more information about the next steps to prepare for high availability after yourdomain is configured, see Preparing Your Environment for High Availability.
These server names are referenced throughout this document; if you choose differentnames be sure to replace them as needed.
Chapter 5Configuring the Domain
5-16

Tip:
For details about options on this screen, see Managed Servers in OracleFusion Middleware Creating WebLogic Domains Using the ConfigurationWizard.
5.3.2.16 Configuring a Cluster for Oracle Identity ManagerUse the Clusters screen to create a new cluster. This is required in for an OracleIdentity Governance high availability setup.
On the Clusters screen:
1. Click Add.
2. Specify oim_cluster_1 in the Cluster Name field.
3. For the Cluster Address field, specify the ipaddress/hostname:port. For example:
ip_address_machine1:portnumber,ip_address_machine2:portnumber
4. Repeat the steps to add soa_cluster1.
By default, server instances in a cluster communicate with one another using unicast.If you want to change your cluster communications to use multicast, see Considerations for Choosing Unicast or Multicast in Oracle Fusion MiddlewareAdministering Clusters for Oracle WebLogic Server.
You can also create clusters using Fusion Middleware Control. In this case, you canconfigure cluster communication (unicast or multicast) when you create the newcluster. See Create and configure clusters in Oracle Fusion Middleware OracleWebLogic Server Administration Console Online Help.
Tip:
For more information about this screen, see Clusters in Oracle FusionMiddleware Creating WebLogic Domains Using the Configuration Wizard.
5.3.2.17 Defining Server TemplatesIf you are creating dynamic clusters for a high availability setup, use the ServerTemplates screen to define one or more server templates for domain.
To continue configuring the domain, click Next.
For steps to create a dynamic cluster for a high availability setup, see Using DynamicClusters in Oracle Fusion Middleware High Availability Guide.
Chapter 5Configuring the Domain
5-17
5.3.2.18 Configuring Dynamic ServersIf you are creating dynamic clusters for a high availability setup, use the DynamicServers screen to configure the dynamic servers.
If you are not configuring a dynamic cluster, click Next to continue configuring thedomain.
Note:
When you create dynamic clusters, keep in mind that after you assign theMachine Name Match Expression, you do not need to create machines foryour dynamic cluster.
To create a dynamic cluster for a high availability setup, see Using Dynamic Clustersin Oracle Fusion Middleware High Availability Guide.
5.3.2.19 Assigning Oracle Identity Manager Managed Servers to the ClusterUse the Assign Servers to Clusters screen to assign Managed Servers to a newconfigured cluster. A configured cluster is a cluster you configure manually. You do notuse this screen if you are configuring a dynamic cluster, a cluster that contains one ormore generated server instances that are based on a server template.
For more on configured cluster and dynamic cluster terms, see About DynamicClusters in Oracle Fusion Middleware Understanding Oracle WebLogic Server.
On the Assign Servers to Clusters screen:
1. In the Clusters pane, select the cluster to which you want to assign the ManagedServers; in this case, oim_cluster1.
2. In the Servers pane, assign oim_server1 to oim_cluster1 by doing one of thefollowing:
• Click once on oim_server1 to select it, then click the right arrow to move itbeneath the selected cluster (oim_cluster1) in the Clusters pane.
• Double-click on oim_server1 to move it beneath the selected cluster(oim_cluster1) in the Clusters pane.
3. Repeat to assign soa_server1 to soa_cluster1.
Tip:
For more information about this screen, see Assign Servers to Clusters inOracle Fusion Middleware Creating WebLogic Domains Using theConfiguration Wizard.
Chapter 5Configuring the Domain
5-18
5.3.2.20 Configuring Coherence ClustersUse the Coherence Clusters screen to configure the Coherence cluster.
Leave the default port number as the Coherence cluster listen port. After configuration,the Coherence cluster is automatically added to the domain.
Note:
Setting the unicast listen port to 0 creates an offset for the Managed Serverport numbers. The offset is 5000, meaning the maximum allowed value thatyou can assign to a Managed Server port number is 60535, instead of 65535.
See Table 5-2 for more information and next steps for configuring Coherence.
For Coherence licensing information, see Oracle Coherence Products in LicensingInformation.
5.3.2.21 Creating a New Oracle Identity Manager MachineUse the Machines screen to create new machines in the domain. A machine isrequired so that Node Manager can start and stop servers.
Tip:
If you plan to create a high availability environment and know the list ofmachines your target topology requires, you can follow the instructions in thissection to create all the machines at this time. For more about scale outsteps, see Optional Scale Out Procedure in Oracle Fusion Middleware HighAvailability Guide.
To create a new Oracle Identity Governance machine so that Node Manager can startand stop servers:
1. Select the Machine tab (for Windows) or the UNIX Machine tab (for UNIX), thenclick Add to create a new machine.
2. In the Name field, specify a machine name, such as oim_machine1.
3. In the Node Manager Listen Address field, select the IP address of the machine inwhich the Managed Servers are being configured. You can also specify the hostname for this field.
You must select a specific interface and not localhost. This allows Coherencecluster addresses to be dynamically calculated.
4. Verify the port in the Node Manager Listen Port field.
5. Repeat these steps to add more machines, if required.
Chapter 5Configuring the Domain
5-19
Note:
If you are extending an existing domain, you can assign servers to anyexisting machine. It is not necessary to create a new machine unless yoursituation requires it.
Tip:
For more information about this screen, see Machines in Oracle FusionMiddleware Creating WebLogic Domains Using the Configuration Wizard.
5.3.2.22 Assigning Servers to Oracle Identity Manager MachinesUse the Assign Servers to Machines screen to assign the Administration Server andManaged Servers to the new machine you just created.
On the Assign Servers to Machines screen:
1. In the Machines pane, select the machine to which you want to assign the servers;in this case, oim_machine_1.
2. In the Servers pane, assign AdminServer to oim_machine_1 by doing one of thefollowing:
• Click once on AdminServer to select it, then click the right arrow to move itbeneath the selected machine (oim_machine_1) in the Machines pane.
• Double-click on AdminServer to move it beneath the selected machine(oim_machine_1) in the Machines pane.
3. Repeat these steps to assign all Managed Servers to their respective machines.
Tip:
For more information about this screen, see Assign Servers to Machines inOracle Fusion Middleware Creating WebLogic Domains Using theConfiguration Wizard.
5.3.2.23 Virtual TargetsIf you have a WebLogic Server Multitenant (MT) environment, you use the VirtualTargets screen to add or delete virtual targets. For this installation (not a WebLogicServer MT environment), you do not enter any values; just select Next.
For details about this screen, see Virtual Targets in Oracle Fusion MiddlewareCreating WebLogic Domains Using the Configuration Wizard.
Chapter 5Configuring the Domain
5-20

5.3.2.24 PartitionsThe Partitions screen is used to configure partitions for virtual targets in WebLogicServer Multitenant (MT) environments. Select Next without selecting any options.
For details about options on this screen, see Partitions in Oracle Fusion MiddlewareCreating WebLogic Domains Using the Configuration Wizard.
5.3.2.25 Configuring Domain Frontend HostThe Domain Frontend Host screen can be used to configure the frontend host for thedomain.
Select Plain or SSL and specify the respective host value.
Click Next.
5.3.2.26 Targeting the DeploymentsThe Deployments Targeting screen can be used to target the available deployments tothe servers.
Make the required modifications, and click Next.
5.3.2.27 Targeting the ServicesThe Services Targeting screen can be used to target the available services to theServers.
Make necessary modifications, and click Next.
5.3.2.28 File StoresThe File Stores screen lists the available file stores.
You can specify the Synchronous Write Policy for each of the file stores. After youmake the changes, click Next.
5.3.2.29 Reviewing Your Configuration Specifications and Configuring theDomain
The Configuration Summary screen shows detailed configuration information for thedomain you are about to create.
Review each item on the screen and verify that the information is correct. To make anychanges, go back to a screen by clicking the Back button or selecting the screen inthe navigation pane. Domain creation does not start until you click Create.
For more details about options on this screen, see Configuration Summary in OracleFusion Middleware Creating WebLogic Domains Using the Configuration Wizard.
Chapter 5Configuring the Domain
5-21
5.3.2.30 Writing Down Your Domain Home and Administration Server URLThe End of Configuration screen shows information about the domain you justconfigured.
Make a note of the following items because you need them later:
• Domain Location
• Administration Server URL
You need the domain location to access scripts that start Node Manager andAdministration Server, and you need the URL to access the Administration Server.
Click Finish to dismiss the Configuration Wizard.
5.4 Performing Post-Configuration TasksAfter you configure the Oracle Identity Governance domain, perform the necessarypost-configuration tasks.
Topics
• Running the Offline Configuration CommandAfter you configure the Oracle Identity Governance domain, run theofflineConfigManager script to perform post configuration tasks.
• Updating the System Properties for SSL Enabled ServersFor SSL enabled servers, you must set the required properties in the setDomainEnvfile in the domain home.
5.4.1 Running the Offline Configuration CommandAfter you configure the Oracle Identity Governance domain, run theofflineConfigManager script to perform post configuration tasks.
Ensure that you run this command before you start any server. To run theofflineConfigManager command, do the following:
1. Set the following environment variables to the right values:
• DOMAIN_HOME
• JAVA_HOME
2. Ensure that you have execute permissions for the file OIM_HOME/server/bin/offlineConfigManager.sh.
3. Run the following command from the location OIM_HOME/server/bin/:
• On Unix: ./offlineConfigManager.sh
• On Windows: offlineConfigManager.bat
Note:
OIM_HOME refers to ORACLE_HOME/idm.
Chapter 5Performing Post-Configuration Tasks
5-22
5.4.2 Updating the System Properties for SSL Enabled ServersFor SSL enabled servers, you must set the required properties in the setDomainEnv filein the domain home.
Set the following properties in the DOMAIN_HOME/bin/setDomainEnv.sh (for UNIX) orDOMAIN_HOME\bin\setDomainEnv.cmd (for Windows) file before you start the servers:
• -Dweblogic.security.SSL.ignoreHostnameVerification=true
• -Dweblogic.security.TrustKeyStore=DemoTrust
5.5 Starting the ServersAfter a successful configuration, start all processes and servers, including theAdministration Server and any Managed Servers.
The components may be dependent on each other so they must be started in thecorrect order.
Note:
The procedures in this section describe how to start servers and processusing the WLST command line or a script. You can also use the OracleFusion Middleware Control and the Oracle WebLogic Server AdministrationConsole. See Starting and Stopping Administration and Managed Serversand Node Manager in Administering Oracle Fusion Middleware.
To start your Fusion Middleware environment, follow the steps below.
Step 1: Start Node Manager
To start Node Manager, use the startNodeManager script:
• (UNIX) EXISTING_DOMAIN_HOME/bin/startNodeManager.sh
• (Windows) EXISTING_DOMAIN_HOME\bin\startNodeManager.cmd
Step 2: Start the Administration Server
When you start the Administration Server, you also start the processes running in theAdministration Server, including the WebLogic Server Administration Console andFusion Middleware Control.
To start the Administration Server, use the startWebLogic script:
• (UNIX) EXISTING_DOMAIN_HOME/bin/startWebLogic.sh
• (Windows) EXISTING_DOMAIN_HOME\bin\startWebLogic.cmd
When prompted, enter your user name, password, and the URL of the AdministrationServer.
Chapter 5Starting the Servers
5-23
Step 3: Start the Managed Servers
Start the Oracle SOA Suite Managed Server first and then the Oracle IdentityGovernance Managed Server.
To start a WebLogic Server Managed Server, use the startManagedWebLogic script:
• (UNIX) EXISTING_DOMAIN_HOME/bin/startManagedWebLogic.sh managed_server_nameadmin_url
• (Windows) EXISTING_DOMAIN_HOME\bin\startManagedWebLogic.cmdmanaged_server_name admin_url
When prompted, enter your user name and password.
Note:
The startup of a Managed Server will typically start the applications that aredeployed to it. Therefore, it should not be necessary to manually startapplications after the Managed Server startup.
5.6 Integrating Oracle Identity Governance with Oracle SOASuite
If you wish to integrate Oracle Identity Governance with Oracle SOA Suite, use theEnterprise Manager console to do the same.
To integrate Oracle Identity Governance with Oracle SOA Suite, do the following:
1. Log in to Oracle Fusion Middleware Control:
http://administration_server_host:administration_server_port/em
The Administration Server host and port number were in the URL on the End ofConfiguration screen (Writing Down Your Domain Home and AdministrationServer URL). The default Administration Server port number is 7001.
The login credentials were provided on the Administrator Account screen(Configuring the Administrator Account).
2. Click weblogic_domain and then click System Mbean Browser.
3. In the search box, enter OIMSOAIntegrationMBean, and click Search. Thembean is displayed.
Note:
If Oracle Identity Governance is still starting (coming up) or is just started(RUNNING MODE), the Enterprise Manager does not show any Mbeansdefined by OIG. Wait for two minutes for the server to start, and then trysearching for the Mbean in System Mbean Browser of the EnterpriseManager,.
Chapter 5Integrating Oracle Identity Governance with Oracle SOA Suite
5-24
4. Go to the Operations tab of mbean, and select integrateWithSOAServer.
5. Enter the required attributes and click Invoke.
5.7 Verifying the ConfigurationAfter completing all configuration steps, you can perform additional steps to verify thatyour domain is properly configured.
You can start using the functionality of Oracle Identity Governance after yousuccessfully configure it. See Oracle Identity System Administration Interface inAdministering Oracle Identity Governance.
For information about integrating Oracle Identity Governance with other IdentityManagement components, see Introduction to IdM Suite Components Integration inIntegration Guide for Oracle Identity Management Suite.
For more information about performing additional domain configuration tasks, see Performing Additional Domain Configuration Tasks.
5.8 Analyzing the Bootstrap ReportWhen you start the Oracle Identity Governance server, the bootstrap report isgenerated at DOMAIN_HOME/servers/oim_server1/logs/BootStrapReportPreStart.html.
The bootstrap report BootStrapReportPreStart.html is an html file that containsinformation about the topology that you have deployed, the system level details, theconnection details like the URLs to be used, the connectivity check, and the taskexecution details. You can use this report to check if the system is up, and also totroubleshoot the issues, post-configuration.Every time you start the Oracle Identity Governance server, the bootstrap report isupdated.
Sections in the Bootstrap Report
• Topology Details
This section contains information about your deployment. It shows whether youhave configured a cluster setup, SSL enabled, or upgraded an Oracle IdentityManager environment from 11g to 12c.
• System Level Details
This section contains information about the JDK version, Database version,JAVA_HOME, DOMAIN_HOME, OIM_HOME, and MIDDLEWARE_HOME.
• Connection Details
This section contains information about the connect details like the AdministrationURL, OIM Front End URL, SOA URL, and RMI URL.
This also shows whether the Administration Server, Database, and SOA server isup or not.
• Execution Details
This section lists the various tasks and their statuses.
Chapter 5Verifying the Configuration
5-25
5.9 Accessing the Oracle Identity Governance DesignConsole (Optional)
After you configure Oracle Identity Governance (OIG) 12c (12.2.1.3.0), if you wish toaccess the Oracle Identity Governance Design Console, you can do so by invoking thexlclient command from the new Oracle Home.
To access the Oracle Identity Governance Design Console, do the following:
1. Ensure that the JAVA_HOME environment variable is set to the location of the certifiedJDK. For example:
• (UNIX) setenv JAVA_HOME /home/Oracle/Java/jdk1.8.0_131
• (Windows) set JAVA_HOME=C:\home\Oracle\Java\jdk1.8.0_131
2. Invoke the Design Console by running the following command from the locationORACLE_HOME\idm\designconsole:
• (UNIX) ./xlclient.sh
• (Windows) xlclient.cmd
Enter the following details when prompted:
• Server url: Enter the Oracle Identity Governance server URL in the formatt3://oim_server_hostname:oimport.
• User ID: Enter the OIG Administrator user login. For example, xelsysadm.
• Password: Enter the OIG Administrator user password. For example,xelsysadm_password.
If you wish to set up only the Oracle Identity Governance Design Console onWindows, without configuring the server, you must install Oracle Identity and AccessManagement 12c (12.2.1.3.0) in standalone mode, on the Windows machine, and theninvoke the Design Console using the instructions in this section.
5.10 TroubleshootingThis section lists the common issues encountered while configuring Oracle IdentityGovernance and their workarounds.
Topics
• Description of the Log CodesWhen you encounter any error during the Oracle Identity Governance 12c(12.2.1.3.0) installation, search for the log code in the DOMAIN_HOME/servers/oim_server/logs/oim-diagnostic.log file to diagnose the issue.
• Exception in the Oracle Identity Manager Server Logs After Starting the ServersAfter you configure the Oracle Identity Manager domain, when you start theservers, “Unable to resolve 'TaskQueryService’” exception is seen in the OracleIdentity Manager (OIM) Server logs, which can be ignored.
• Oracle Identity Manager Bootstrap Fails with Hostname Verification ErrorIf the Oracle Identity Manager bootstrap fails with the following SSL hostnameverification failing error, use the workaround described in this section:
Chapter 5Accessing the Oracle Identity Governance Design Console (Optional)
5-26
• Oracle Identity Manager Server log Shows IOException When IPv6 is UsedIf you are using IPv6 in a cluster setup, the Oracle Identity Manager server logsshows the following error when you start the Oracle Identity Manager ManagedServer:
• Error When Accessing Pending Approvals Page in a Multinode SetupIn a Oracle Identity Governance multinode setup, the following error is displayedwhen you access the Pending Approvals page on a remote node:
• OIM Gridlink Datasources Show Suspended State When 11.2.0.4.0 RACDatabase is UsedWhen you run the Configuration Wizard to configure Oracle Identity Managergridlink datasources with 11.2.0.4.0 RAC Database, the following warning isdisplayed:
• Server Consoles are Inaccessible in a Clustered DomainAfter you configure the Oracle Identity Governance domain, the AdministrationServer console and the managed Server consoles are inaccessible.
• OIM Server Fails to Come up Due to SOA Server not Completely UpIf the Oracle SOA Server (SOA) is not up completely, the Oracle Identity Manager(OIM) Server fails to start.
• Oracle Identity Manager Server Throws OutOfMemoryErrorAfter you configure Oracle Identity Manager 12c, when you start the OIM 12cServer, OutOfMemoryError is thrown.
• ‘ADFContext leak detected’ Message in the OIM Server LogsWhen you start the Oracle Identity Manager (OIM) 12c (12.2.1.3.0) server, thefollowing error is seen in the OIM server logs:
• ADF Controller Exception in the SOA Server LogsAfter you configure Oracle Identity Governance 12c (12.2.1.3.0), when you startthe Oracle SOA Suite (SOA) server, the following exception is shown in the SOAserver logs:
5.10.1 Description of the Log CodesWhen you encounter any error during the Oracle Identity Governance 12c (12.2.1.3.0)installation, search for the log code in the DOMAIN_HOME/servers/oim_server/logs/oim-diagnostic.log file to diagnose the issue.
The following are log codes and their descriptions for various tasks:
• IAM-3070001 — Error loading configuration required for Bootstrap
• IAM-3070002 — Could not connect to DB using CSF Credentials, Please verifycrednetials seeded in CSF under key
• IAM-3070003 — Could not connect to WLS using CSF credentials ,Please verifycredentials seeded in CSF for
• IAM-3070004 — Validation for CSF Credentials failed. Exiting OIM_CONFIG,Please verify and fix CSF Credentials
• IAM-3070005 — Validation for CSF Credentials Successful
• IAM-3070006 — Task Not Found
• IAM-3070007 — Task failed
• IAM-3070008 — BootStrap configuration Failed
Chapter 5Troubleshooting
5-27
• IAM-3070009 — BootStrap configuration Successful
• IAM-3070010 — Successfully completed
5.10.2 Exception in the Oracle Identity Manager Server Logs AfterStarting the Servers
After you configure the Oracle Identity Manager domain, when you start the servers,“Unable to resolve 'TaskQueryService’” exception is seen in the Oracle IdentityManager (OIM) Server logs, which can be ignored.
The following exception is displayed in the OIM Server logs:
javax.naming.NameNotFoundException: Unable to resolve 'TaskQueryService'. Resolved ''; remaining name 'TaskQueryService'
This exception can be ignored.
5.10.3 Oracle Identity Manager Bootstrap Fails with HostnameVerification Error
If the Oracle Identity Manager bootstrap fails with the following SSL hostnameverification failing error, use the workaround described in this section:
<Warning> <Security> <BEA-090960> <The servers SSL configuration is not available. There will potentially be SSL handshake failures.> <Mar 23, 2017 8:04:32 AM PDT> <Warning> <Security> <BEA-090924> <JSSE hasbeen selected by default, since the SSLMBean is not available.> <Mar 23, 2017 8:04:32 AM PDT> <Info> <Security> <BEA-090908> <Using thedefault WebLogic SSL Hostname Verifier implementation.><Mar 23, 2017 8:04:34 AM PDT> <Notice> <Security> <BEA-090169> <Loadingtrusted certificates from the kss keystore file kss://system/trust.>Mar 23, 2017 8:04:34 AMoacle.security.opss.internal.runtime.ServiceContextManagerImpl getContext WARNING: Bootstrap services are used by OPSS internally and clients should never need to directly read/write bootstrap credentials. If required, use Wlst or configuration management interfaces. <Mar 23, 2017 8:04:34 AM PDT> <Notice> <Security> <BEA-090169> <Loadingtrusted certificates from the jks keystore file /host/jdk1.8.0_121/jre/lib/security/cacerts.> <Mar 23, 2017 8:04:34 AM PDT> <Info> <Management> <BEA-141307> <Unable toconnect to the Administration Server. Waiting 5 second(s) to retry (attempt number 1 of 3).>
To resolve this issue, start the Oracle Identity Governance Managed Server using thefollowing command:
• On Unix:
./startManagedWebLogic.sh oim_server_name t3://admin_server_host:port
• On Windows:
startManagedWebLogic.cmd oim_server_name t3://admin_server_host:port
In this command, you must specify the non-SSL port for port.
Chapter 5Troubleshooting
5-28
5.10.4 Oracle Identity Manager Server log Shows IOException WhenIPv6 is Used
If you are using IPv6 in a cluster setup, the Oracle Identity Manager server logs showsthe following error when you start the Oracle Identity Manager Managed Server:
<Error> <org.jgroups.protocols.UDP> <BEA-000000> <failed sending message to null (58 bytes) java.lang.Exception: dest=/235.110.223.3:45566 (61 bytes) at org.jgroups.protocols.UDP._send(UDP.java:212) at org.jgroups.protocols.UDP.sendToAllMembers(UDP.java:167) at org.jgroups.protocols.TP.doSend(TP.java:1102) at org.jgroups.protocols.TP.send(TP.java:1088) at org.jgroups.protocols.TP.down(TP.java:907) at org.jgroups.protocols.PING.sendMcastDiscoveryRequest(PING.java:276) at org.jgroups.protocols.PING.sendGetMembersRequest(PING.java:256) at org.jgroups.protocols.Discovery$PingSenderTask$1.run(Discovery.java:396) at java.util.concurrent.Executors$RunnableAdapter.call(Executors.java:511) at java.util.concurrent.FutureTask.runAndReset(FutureTask.java:308) at java.util.concurrent.ScheduledThreadPoolExecutor$ScheduledFutureTask.access$30 1(ScheduledThreadPoolExecutor.java:180) at java.util.concurrent.ScheduledThreadPoolExecutor$ScheduledFutureTask.run(Sched uledThreadPoolExecutor.java:294) at java.util.concurrent.ThreadPoolExecutor.runWorker(ThreadPoolExecutor.java:1142 ) at java.util.concurrent.ThreadPoolExecutor$Worker.run(ThreadPoolExecutor.java:617 ) at java.lang.Thread.run(Thread.java:745) Caused By: java.io.IOException: Invalid argument (sendto failed) at java.net.PlainDatagramSocketImpl.send(Native Method)
To resolve this issue, do the following:
1. Log in to the WebLogic Console as weblogic user, using the following URL:
http://admin_server_host/console
2. Expand Environments and then Servers.
3. Click Lock and Edit.
4. Click the Managed Server..
5. Go to the Server Start tab.
6. Add the following to the Arguments field:
-Djava.net.preferIPv4Stack=true
7. Click Save.
8. Repeat the steps for the second Managed Server.
9. Restart the Managed Servers.
Chapter 5Troubleshooting
5-29
5.10.5 Error When Accessing Pending Approvals Page in a MultinodeSetup
In a Oracle Identity Governance multinode setup, the following error is displayed whenyou access the Pending Approvals page on a remote node:
[oim_server1] [ERROR] [] [oracle.iam] [tid: [ACTIVE].ExecuteThread: '0' for queue: 'weblogic.kernel.Default (self-tuning)'] [userId: xelsysadm] [ecid: cea9a502-afb8-4d3d-85a4-cb61d2878065-0000276e,0] [APP: oracle.iam.console.identity.self-service.ear] [partition-name: DOMAIN] [tenant-name: GLOBAL] [DSID: 0000LfRXW3_7Y7QLIag8yf1OmuCL000004] Unable to retrieve User View Listoracle.bpel.services.workflow.client.WorkflowServiceClientException: javax.naming.CommunicationException: Failed to initialize JNDI context, tried 2 time or times totally, the interval of each time is 0ms. [[ t3://oimhost.example.com:24806: Destination 10.244.201.97, 24806 unreachable.; nested exception is: java.net.ConnectException: Connection refused; No available router to destination.; nested exception is: java.rmi.ConnectException: No available router to destination. [Root exception is java.net.ConnectException: t3://oimhost.example.com:24806: Destination 10.244.201.97, 24806 unreachable.; nested exception is: java.net.ConnectException: Connection refused; No available router to destination.; nested exception is: java.rmi.ConnectException: No available router to destination.]
To resolve this, you must use the machine name of the second node during thedomain creation step, that is, when running the configuration wizard on the first node.After this, you must proceed with the pack and unpack command.
5.10.6 OIM Gridlink Datasources Show Suspended State When11.2.0.4.0 RAC Database is Used
When you run the Configuration Wizard to configure Oracle Identity Manager gridlinkdatasources with 11.2.0.4.0 RAC Database, the following warning is displayed:
<May 12, 2017 5:15:31,157 AM MDT> <Warning> <JDBC> <BEA-001129> <Received exception while creating connection for pool "ApplicationDB": Listener refused the connection with the following error: ORA-12516, TNS:listener could not find available handler with matching protocol stack
The data source is pushed to suspended state if the connection fails in the retry afterwaiting for TEST Frequency. To resolve this, you must manually resume thesuspended data sources by doing the following:
1. Navigate to the data source that you want to resume:
2. Go to the Control tab.
3. On the Control page, select the instances of the data source that you want toresume.
Date source instances are listed by the server on which they are deployed.
4. Click Resume and then click Yes to confirm the action.
Chapter 5Troubleshooting
5-30
Results are displayed at the top of the page, and the state of the selected data sourceinstances is changed to Running.
5.10.7 Server Consoles are Inaccessible in a Clustered DomainAfter you configure the Oracle Identity Governance domain, the Administration Serverconsole and the managed Server consoles are inaccessible.
To resolve this, either specify the IP address of machine as listen address formachines having multiple interfaces, or disable all other interfaces.If you wish to enter machine name as listen address in a clustered or non-clustereddomain, disable all other interfaces.
5.10.8 OIM Server Fails to Come up Due to SOA Server notCompletely Up
If the Oracle SOA Server (SOA) is not up completely, the Oracle Identity Manager(OIM) Server fails to start.
The following error is displayed when OIM Server fails to start if the SOA Server is notcompletely up:
Could not fetch ServerRuntime mbean for soa_server1. Server seems to be down!
To resolve this, restart the OIM Server.
5.10.9 Oracle Identity Manager Server Throws OutOfMemoryErrorAfter you configure Oracle Identity Manager 12c, when you start the OIM 12c Server,OutOfMemoryError is thrown.
The following error is seen in the OIM server logs for this issue:
[oim_server1] [NOTIFICATION] [] [oracle.iam.oimdataproviders.impl] [tid: [ACTIVE].ExecuteThread: '9' for queue: 'weblogic.kernel.Default (self-tuning)'] [userId: xelsysadm] [ecid: 5679ce10-f0df-457f-88f1-6bc04e10aa13-000013b1,0] [APP: oim-runtime] [partition-name: DOMAIN] [tenant-name: GLOBAL] [DSID: 0000Lg0PPYTBd5I_Ipt1if1OpGGi00000U] RM_DEBUG_PERF - 2017-03-24 06:09:51.087 - search criteria = arg1 = (usr_key) EQUAL arg2 = (1)[[ query = Select usr.usr_key, usr.usr_status from usr where usr.usr_key = ? time = 1 ]] [2017-03-24T06:09:52.286-07:00] [oim_server1] [NOTIFICATION] [] [oracle.iam.oimdataproviders.impl] [tid: [ACTIVE].ExecuteThread: '9' for queue: 'weblogic.kernel.Default (self-tuning)'] [userId: xelsysadm] [ecid: 5679ce10-f0df-457f-88f1-6bc04e10aa13-000013b1,0] [APP: oim-runtime] [partition-name: DOMAIN] [tenant-name: GLOBAL] [DSID: 0000Lg0PPYTBd5I_Ipt1if1OpGGi00000U] oracle.iam.oimdataproviders.impl.OIMUserDataProvider [2017-03-24T06:11:52.171-07:00] [oim_server1] [ERROR] [ADFC-50018] [oracle.adfinternal.controller.application.AdfcExceptionHandler] [tid: [ACTIVE].ExecuteThread: '27' for queue: 'weblogic.kernel.Default (self-tuning)'] [userId: xelsysadm] [ecid: 5679ce10-f0df-457f-88f1-6bc04e10aa13-000013e0,0] [APP: oracle.iam.console.identity.self-service.ear] [partition-name: DOMAIN]
Chapter 5Troubleshooting
5-31
[tenant-name: GLOBAL] [DSID: 0000Lg0RtM9Bd5I_Ipt1if1OpGGi00000V] ADFc: No exception handler was found for an application exception.[[ java.lang.OutOfMemoryError: GC overhead limit exceeded ]
To resolve this issue, do the following (on Linux):
1. Ensure that you set the following parameters in the /etc/security/limits.conf file,to the specified values:
• FUSION_USER_ACCOUNT soft nofile 32767
• FUSION_USER_ACCOUNT hard nofile 327679
2. Ensure that you set UsePAM to Yes in the /etc/ssh/sshd_config file.
3. Restart sshd.
4. Log out (or reboot) and log in to the system again.
Before you start the Oracle Identity Manager 12c Server, run the following commandto increase the limit of open files, so that you do not hit into memory issues:limit maxproc 16384
5.10.10 ‘ADFContext leak detected’ Message in the OIM Server LogsWhen you start the Oracle Identity Manager (OIM) 12c (12.2.1.3.0) server, thefollowing error is seen in the OIM server logs:
2b8fd3a0-06e3-4de6-be10-801551745664-000000a5,0] [partition-name: DOMAIN] [tenant-name: GLOBAL] ADFContext leak detected.[[ oracle.adf.share.ADFContext.setAsCurrent(ADFContext.java:1501) oracle.adf.mbean.share.AdfMBeanInterceptor.resetADFIfNeeded(AdfMBeanInterceptor.java:140)
This has no impact on the functionality, and therefore you can ignore this error.
5.10.11 ADF Controller Exception in the SOA Server LogsAfter you configure Oracle Identity Governance 12c (12.2.1.3.0), when you start theOracle SOA Suite (SOA) server, the following exception is shown in the SOA serverlogs:
oracle.adf.controller.ControllerException: ADFC-12013: Controller state has not been initialized for the current request.
This does not impact the functionality, and therefore it can be ignored.
Chapter 5Troubleshooting
5-32
6Installing and Configuring Oracle IdentityGovernance Using Simplified InstallationProcess
You can install and configure Oracle Identity Governance using a simplified process,where a quick installer can be used to install Oracle Infrastructure, Oracle SOA Suite,and Oracle Identity Governance at once. You do not have to install them separately.
Note:
The product Oracle Identity Manager is referred to as Oracle IdentityManager (OIM) and Oracle Identity Governance (OIG) interchangeably in theguide.
Topics
• About the Simplified Installation ProcessThe simplified installation process allows you to install Oracle Fusion MiddlewarInfrastructure, Oracle SOA Suite, and Oracle Identity Governance using the quickinstaller.
• Roadmap for Installing and Configuring Oracle Identity Governance UsingSimplified InstallationUse the roadmap provided in this section to install and configure Oracle IdentityGovernance (OIG) using the simplified installation process.
• Installing Oracle Identity Governance Using Quick InstallerDownload the quick installer and install Oracle Identity Governance and otherdependant applications like Oracle Fusion Middleware Infrastructure and OracleSOA Suite.
• Creating Database SchemasBefore you configure the Oracle Identity Governance domain, you must createnecessary database schemas using Repository Creation Utility (RCU).
• Configuring the Oracle Identity Governance DomainUse the Configuration Wizard to create and configure the Oracle IdentityGovernance (OIG) domain.
• Performing Post-Configuration TasksAfter you configure the Oracle Identity Governance domain, perform the necessarypost-configuration tasks.
• Starting the ServersAfter a successful configuration, start all processes and servers, including theAdministration Server and any Managed Servers.
6-1
• Integrating Oracle Identity Governance with Oracle SOA SuiteIf you wish to integrate Oracle Identity Governance with Oracle SOA Suite, use theEnterprise Manager console to do the same.
• Verifying the ConfigurationAfter completing all configuration steps, you can perform additional steps to verifythat your domain is properly configured.
• Analyzing the Bootstrap ReportWhen you start the Oracle Identity Governance server, the bootstrap report isgenerated at DOMAIN_HOME/servers/oim_server1/logs/BootStrapReportPreStart.html.
• Accessing the Oracle Identity Governance Design Console (Optional)After you configure Oracle Identity Governance (OIG) 12c (12.2.1.3.0), if you wishto access the Oracle Identity Governance Design Console, you can do so byinvoking the xlclient command from the new Oracle Home.
6.1 About the Simplified Installation ProcessThe simplified installation process allows you to install Oracle Fusion MiddlewarInfrastructure, Oracle SOA Suite, and Oracle Identity Governance using the quickinstaller.
To install and configure Oracle Identity Governance, the following products arerequired:
• Oracle Fusion Middleware Infrastructure
• Oracle SOA Suite
• Oracle Identity Governance
All of the above products are integrated with one installer, and hence you do not haveto install these products separately.
6.2 Roadmap for Installing and Configuring Oracle IdentityGovernance Using Simplified Installation
Use the roadmap provided in this section to install and configure Oracle IdentityGovernance (OIG) using the simplified installation process.
This table provides the high-level steps for installing and configuring Oracle IdentityGovernance.
Table 6-1 Task Roadmap for Installing and Configuring Oracle Identity Governance UsingSimplified Installation
Task Description
Verify if your system meets the minimum hardware andsoftware requirements.
See, Roadmap for Verifying Your System Environment
Chapter 6About the Simplified Installation Process
6-2
Table 6-1 (Cont.) Task Roadmap for Installing and Configuring Oracle Identity GovernanceUsing Simplified Installation
Task Description
Install Oracle Fusion Middleware Infrastructure, OracleSOA Suite, and Oracle Identity Governance 12.2.1.3.0using the quick installer.
This task involves obtaining the quick installer, startingthe installation program, and navigating the installerscreens.
See, Installing Oracle Identity Governance Using QuickInstaller
Create the database schemas using RepositoryCreation Utility (RCU).
See, Creating Database Schemas
Configure the Oracle Identity Governance domain usingthe Configuration Wizard.
See, Configuring the Oracle Identity GovernanceDomain
Perform the necessary post-configuration tasks. Thisincludes, running the offline configuration command forOracle Identity Governance and updating the systemproperties for SSL configuration.
See, Performing Post-Configuration Tasks
Start the Node Manager, Administration Server, OracleSOA Suite Managed Server, and the OIG ManagedServer.
See, Starting the Servers
Integrate Oracle Identity Governance with Oracle SOASuite, if required.
See, Integrating Oracle Identity Governance with OracleSOA Suite
Verify the configuration. See, Verifying the Configuration
Refer to the bootstrap report for the configuration detailsand for any issues or warnings thrown during theinstallation process.
See, Analyzing the Bootstrap Report
Access the Oracle Identity Governance Design Console,if required.
See, Accessing the Oracle Identity Governance DesignConsole (Optional)
6.3 Installing Oracle Identity Governance Using QuickInstaller
Download the quick installer and install Oracle Identity Governance and otherdependant applications like Oracle Fusion Middleware Infrastructure and Oracle SOASuite.
Topics
• Obtaining the Quick InstallerYou can obtain the quick installer distribution on the Oracle Technology Network(OTN), which can be used to install Oracle Fusion Middleware Infrastructure,Oracle SOA Suite and Oracle Identity Governance 12.2.1.3.0.
• Starting the Quick Installation ProgramStart the quick installation program by running the java executable from the JDKdirectory.
• Navigating the Quick Installation ScreensThe quick installer shows a series of screens where you verify or enterinformation.
Chapter 6Installing Oracle Identity Governance Using Quick Installer
6-3
• Verifying the InstallationAfter you complete the installation, verify whether it was successful by completinga series of tasks.
6.3.1 Obtaining the Quick InstallerYou can obtain the quick installer distribution on the Oracle Technology Network(OTN), which can be used to install Oracle Fusion Middleware Infrastructure, OracleSOA Suite and Oracle Identity Governance 12.2.1.3.0.
Locate and download the Oracle Fusion Middleware Infrastructure and Oracle Identityand Access Management software.
See Obtaining Product Distributions in Oracle Fusion Middleware Planning anInstallation of Oracle Fusion Middleware.
6.3.2 Starting the Quick Installation ProgramStart the quick installation program by running the java executable from the JDKdirectory.
Run the following command from the JDK directory:
• On UNIX:
$JAVA_HOME/bin/java —jar fmw_12.2.1.3.0_idmquickstart.jar
• On Windows:
$JAVA_HOME\bin\java —jar fmw_12.2.1.3.0_idmquickstart.jar
6.3.3 Navigating the Quick Installation ScreensThe quick installer shows a series of screens where you verify or enter information.
The following table lists the order in which installer screens appear. If you needadditional help with an installation screen, click Help.
Table 6-2 Oracle Identity Governance Quick Install Screens
Screen Description
Welcome Review the information to make sure that you have met all the prerequisites,then click Next.
Auto Updates Select to skip automatic updates, select patches, or search for the latestsoftware updates, including important security updates, through your My OracleSupport account.
InstallationLocation
Specify your Oracle home directory location.
You can click View to verify and ensure that you are installing the products inthe correct Oracle home.
Chapter 6Installing Oracle Identity Governance Using Quick Installer
6-4
Table 6-2 (Cont.) Oracle Identity Governance Quick Install Screens
Screen Description
PrerequisiteChecks
This screen verifies that your system meets the minimum necessaryrequirements.
To view the list of tasks that gets verified, select View Successful Tasks. Toview log details, select View Log. If any prerequisite check fails, then an errormessage appears at the bottom of the screen. Fix the error and click Rerun totry again. To ignore the error or the warning message and continue with theinstallation, click Skip (not recommended).
InstallationSummary
Use this screen to verify installation options you selected. If you want to savethese options to a response file, click Save Response File and enter theresponse file location and name. The response file collects and stores all theinformation that you have entered, and enables you to perform a silentinstallation (from the command line) at a later time.
Click Install to begin the installation.
InstallationProgress
This screen shows the installation progress.
When the progress bar reaches 100% complete, click Finish to dismiss theinstaller, or click Next to see a summary.
InstallationComplete
This screen displays the Installation Location and the Feature Sets that areinstalled. Review this information and click Finish to close the installer.
6.3.4 Verifying the InstallationAfter you complete the installation, verify whether it was successful by completing aseries of tasks.
• Reviewing the Installation Log FilesReview the contents of the installation log files to make sure that the installer didnot encounter any problems.
• Checking the Directory StructureThe contents of your installation vary based on the options that you selectedduring the installation.
• Viewing the Contents of the Oracle HomeYou can view the contents of the Oracle home directory by using the viewInventoryscript.
6.3.4.1 Reviewing the Installation Log FilesReview the contents of the installation log files to make sure that the installer did notencounter any problems.
By default, the installer writes logs files to the Oracle_Inventory_Location/logs (onUNIX operating systems) or Oracle_Inventory_Location\logs (on Windows operatingsystems) directory.
For a description of the log files and where to find them, see Installation Log Files inOracle Fusion Middleware Installing Software with the Oracle Universal Installer.
Chapter 6Installing Oracle Identity Governance Using Quick Installer
6-5
6.3.4.2 Checking the Directory StructureThe contents of your installation vary based on the options that you selected duringthe installation.
See What Are the Key Oracle Fusion Middleware Directories? in Oracle FusionMiddleware Understanding Oracle Fusion Middleware.
6.3.4.3 Viewing the Contents of the Oracle HomeYou can view the contents of the Oracle home directory by using the viewInventoryscript.
See Viewing the Contents of an Oracle Home in Oracle Fusion Middleware InstallingSoftware with the Oracle Universal Installer.
6.4 Creating Database SchemasBefore you configure the Oracle Identity Governance domain, you must createnecessary database schemas using Repository Creation Utility (RCU).
To create database schemas, complete the following steps:
1. Ensure that you have installed and configured a certified database, and verify thatthe database is up and running.
See About Database Requirements for an Oracle Fusion Middleware Installation.
2. Ensure that the JAVA_HOME environment variable is set to the location of the certifiedJDK. For example:
• (UNIX) setenv JAVA_HOME /home/Oracle/Java/jdk1.8.0_131
• (Windows) set JAVA_HOME=C:\home\Oracle\Java\jdk1.8.0_131
3. Start the RCU by running the following command from the ORACLE_HOME/oracle_common/bin directory
• (UNIX) ./rcu
• (Windows) rcu.bat
4. Navigate the screens by specifying the required information. The following tableprovides the description for each of the RCU screens:
Table 6-3 RCU Screens
Screen Description
Welcome This is the welcome page. Click Next.
Create Repository If you have the necessary permissions andprivileges to perform DBA activities on yourdatabase, select System Load andProduct Load. This procedure assumesthat you have SYSDBA privileges.
Click Next.
Chapter 6Creating Database Schemas
6-6

Table 6-3 (Cont.) RCU Screens
Screen Description
Database Connection Details Provide the database connection details.For example:
• Database Type: Oracle Database• Name:
examplehost.exampledomain.com
• Port: 1521• Service
Name: Orcl.exampledomain.com• User Name: sys• Password: ******• Role: SYSDBAClick Next.
Select Components Select Create new prefix and select OracleIdentity Manager in the Component list.
Click Next to proceed, then click OK on thedialog window confirming that prerequisitechecking for schema creation wassuccessful.
Schema Passwords Specify the schema password, and confirmby re-entering it.
Click Next.
Custom Variables Specify custom variables for the schema.
Click Next.
Map Tablespaces On this screen, the Encrypt Tablespacecheck box appears only if you enabledTransparent Data Encryption (TDE) in thedatabase (Oracle or Oracle EBR) when youstart the RCU. Select the EncryptTablespace check box if you want toencrypt all new tablespaces that the RCUcreates.
Click Next.
Completion Summary Click Close to dismiss the RCU.
6.5 Configuring the Oracle Identity Governance DomainUse the Configuration Wizard to create and configure the Oracle Identity Governance(OIG) domain.
To configure the Oracle Identity Governance domain, complete the following steps:
1. Start the Configuration Wizard by running the following command from theORACLE_HOME/oracle_common/common/bin directory:
• (UNIX) ./config.sh
• (Windows) config.cmd
Here, ORACLE_HOME refers to your 12c (12.2.1.3.0) Oracle home.
2. Navigate the Configuration Wizard screens to create a domain.
Chapter 6Configuring the Oracle Identity Governance Domain
6-7
See, Navigating the Configuration Wizard Screens to Create and Configure theDomain
Note:
• Ensure that you select Oracle Identity Manager on the Templatesscreen. The dependencies of OIM are selected automatically.
• When specifying the OIMSchemaPassword, ensure that theusername of the schema is correct. For example, SchemaPrefix_OIM.
6.6 Performing Post-Configuration TasksAfter you configure the Oracle Identity Governance domain, perform the necessarypost-configuration tasks.
Topics
• Running the Offline Configuration CommandAfter you configure the Oracle Identity Governance domain, run theofflineConfigManager script to perform post configuration tasks.
• Updating the System Properties for SSL Enabled ServersFor SSL enabled servers, you must set the required properties in the setDomainEnvfile in the domain home.
6.6.1 Running the Offline Configuration CommandAfter you configure the Oracle Identity Governance domain, run theofflineConfigManager script to perform post configuration tasks.
Ensure that you run this command before you start any server. To run theofflineConfigManager command, do the following:
1. Set the following environment variables to the right values:
• DOMAIN_HOME
• JAVA_HOME
2. Ensure that you have execute permissions for the file OIM_HOME/server/bin/offlineConfigManager.sh.
3. Run the following command from the location OIM_HOME/server/bin/:
• On Unix: ./offlineConfigManager.sh
• On Windows: offlineConfigManager.bat
Note:
OIM_HOME refers to ORACLE_HOME/idm.
Chapter 6Performing Post-Configuration Tasks
6-8
6.6.2 Updating the System Properties for SSL Enabled ServersFor SSL enabled servers, you must set the required properties in the setDomainEnv filein the domain home.
Set the following properties in the DOMAIN_HOME/bin/setDomainEnv.sh (for UNIX) orDOMAIN_HOME\bin\setDomainEnv.cmd (for Windows) file before you start the servers:
• -Dweblogic.security.SSL.ignoreHostnameVerification=true
• -Dweblogic.security.TrustKeyStore=DemoTrust
6.7 Starting the ServersAfter a successful configuration, start all processes and servers, including theAdministration Server and any Managed Servers.
The components may be dependent on each other so they must be started in thecorrect order.
Note:
The procedures in this section describe how to start servers and processusing the WLST command line or a script. You can also use the OracleFusion Middleware Control and the Oracle WebLogic Server AdministrationConsole. See Starting and Stopping Administration and Managed Serversand Node Manager in Administering Oracle Fusion Middleware.
To start your Fusion Middleware environment, follow the steps below.
Step 1: Start Node Manager
To start Node Manager, use the startNodeManager script:
• (UNIX) EXISTING_DOMAIN_HOME/bin/startNodeManager.sh
• (Windows) EXISTING_DOMAIN_HOME\bin\startNodeManager.cmd
Step 2: Start the Administration Server
When you start the Administration Server, you also start the processes running in theAdministration Server, including the WebLogic Server Administration Console andFusion Middleware Control.
To start the Administration Server, use the startWebLogic script:
• (UNIX) EXISTING_DOMAIN_HOME/bin/startWebLogic.sh
• (Windows) EXISTING_DOMAIN_HOME\bin\startWebLogic.cmd
When prompted, enter your user name, password, and the URL of the AdministrationServer.
Chapter 6Starting the Servers
6-9

Step 3: Start the Managed Servers
Start the Oracle SOA Suite Managed Server first and then the Oracle IdentityGovernance Managed Server.
To start a WebLogic Server Managed Server, use the startManagedWebLogic script:
• (UNIX) EXISTING_DOMAIN_HOME/bin/startManagedWebLogic.sh managed_server_nameadmin_url
• (Windows) EXISTING_DOMAIN_HOME\bin\startManagedWebLogic.cmdmanaged_server_name admin_url
When prompted, enter your user name and password.
Note:
The startup of a Managed Server will typically start the applications that aredeployed to it. Therefore, it should not be necessary to manually startapplications after the Managed Server startup.
6.8 Integrating Oracle Identity Governance with Oracle SOASuite
If you wish to integrate Oracle Identity Governance with Oracle SOA Suite, use theEnterprise Manager console to do the same.
To integrate Oracle Identity Governance with Oracle SOA Suite, do the following:
1. Log in to Oracle Fusion Middleware Control:
http://administration_server_host:administration_server_port/em
The Administration Server host and port number were in the URL on the End ofConfiguration screen (Writing Down Your Domain Home and AdministrationServer URL). The default Administration Server port number is 7001.
The login credentials were provided on the Administrator Account screen(Configuring the Administrator Account).
2. Click weblogic_domain and then click System Mbean Browser.
3. In the search box, enter OIMSOAIntegrationMBean, and click Search. Thembean is displayed.
Note:
If Oracle Identity Governance is still starting (coming up) or is just started(RUNNING MODE), the Enterprise Manager does not show any Mbeansdefined by OIG. Wait for two minutes for the server to start, and then trysearching for the Mbean in System Mbean Browser of the EnterpriseManager,.
Chapter 6Integrating Oracle Identity Governance with Oracle SOA Suite
6-10
4. Go to the Operations tab of mbean, and select integrateWithSOAServer.
5. Enter the required attributes and click Invoke.
6.9 Verifying the ConfigurationAfter completing all configuration steps, you can perform additional steps to verify thatyour domain is properly configured.
To verify that the domain is configured properly, see Performing Additional DomainConfiguration Tasks.
6.10 Analyzing the Bootstrap ReportWhen you start the Oracle Identity Governance server, the bootstrap report isgenerated at DOMAIN_HOME/servers/oim_server1/logs/BootStrapReportPreStart.html.
The bootstrap report BootStrapReportPreStart.html is an html file that containsinformation about the topology that you have deployed, the system level details, theconnection details like the URLs to be used, the connectivity check, and the taskexecution details. You can use this report to check if the system is up, and also totroubleshoot the issues, post-configuration.Every time you start the Oracle Identity Governance server, the bootstrap report isupdated.
Sections in the Bootstrap Report
• Topology Details
This section contains information about your deployment. It shows whether youhave configured a cluster setup, SSL enabled, or upgraded an Oracle IdentityManager environment from 11g to 12c.
• System Level Details
This section contains information about the JDK version, Database version,JAVA_HOME, DOMAIN_HOME, OIM_HOME, and MIDDLEWARE_HOME.
• Connection Details
This section contains information about the connect details like the AdministrationURL, OIM Front End URL, SOA URL, and RMI URL.
This also shows whether the Administration Server, Database, and SOA server isup or not.
• Execution Details
This section lists the various tasks and their statuses.
6.11 Accessing the Oracle Identity Governance DesignConsole (Optional)
After you configure Oracle Identity Governance (OIG) 12c (12.2.1.3.0), if you wish toaccess the Oracle Identity Governance Design Console, you can do so by invoking thexlclient command from the new Oracle Home.
To access the Oracle Identity Governance Design Console, do the following:
Chapter 6Verifying the Configuration
6-11
1. Ensure that the JAVA_HOME environment variable is set to the location of the certifiedJDK. For example:
• (UNIX) setenv JAVA_HOME /home/Oracle/Java/jdk1.8.0_131
• (Windows) set JAVA_HOME=C:\home\Oracle\Java\jdk1.8.0_131
2. Invoke the Design Console by running the following command from the locationORACLE_HOME\idm\designconsole:
• (UNIX) ./xlclient.sh
• (Windows) xlclient.cmd
Enter the following details when prompted:
• Server url: Enter the Oracle Identity Governance server URL in the formatt3://oim_server_hostname:oimport.
• User ID: Enter the OIG Administrator user login. For example, xelsysadm.
• Password: Enter the OIG Administrator user password. For example,xelsysadm_password.
If you wish to set up only the Oracle Identity Governance Design Console onWindows, without configuring the server, you must install Oracle Identity and AccessManagement 12c (12.2.1.3.0) in standalone mode, on the Windows machine, and theninvoke the Design Console using the instructions in this section.
Chapter 6Accessing the Oracle Identity Governance Design Console (Optional)
6-12
7Next Steps After Configuring the Domain
After you configure a product domain, there are additional tasks that you may want toperform.
• Performing Basic Administrative TasksReview the administrative tasks you will likely want to perform on a new domain.
• Performing Additional Domain Configuration TasksReview additional configuration tasks you will likely want to perform on a newdomain.
• Preparing Your Environment for High AvailabilityScaling out for high availability requires additional steps.
7.1 Performing Basic Administrative TasksReview the administrative tasks you will likely want to perform on a new domain.
Table 7-1 Basic Administration Tasks for a New Domain
Task Description More Information
Getting familiar with FusionMiddleware administration tools
Get familiar with various tools thatyou can use to manage yourenvironment.
See Overview of Oracle FusionMiddleware Administration Tools inOracle Fusion MiddlewareAdministering Oracle FusionMiddleware.
Starting and stopping products andservers
Learn how to start and stop OracleFusion Middleware, including theAdministration Server, ManagedServers, and components.
See Starting and Stopping OracleFusion Middleware in Oracle FusionMiddleware Administering OracleFusion Middleware.
Configuring Secure Sockets Layer(SSL)
Learn how to set up securecommunications between OracleFusion Middleware componentsusing SSL.
See Configuring SSL in OracleFusion Middleware in Oracle FusionMiddleware Administering OracleFusion Middleware.
Monitoring Oracle FusionMiddleware
Learn how to keep track of the statusof Oracle Fusion Middlewarecomponents.
See Monitoring Oracle FusionMiddleware in Oracle FusionMiddleware Administering OracleFusion Middleware.
Understanding Backup andRecovery Procedures
Learn the recommended backup andrecovery procedures for OracleFusion Middleware.
See Introduction to Backup andRecovery in Oracle FusionMiddleware Administering OracleFusion Middleware.
7.2 Performing Additional Domain Configuration TasksReview additional configuration tasks you will likely want to perform on a new domain.
7-1
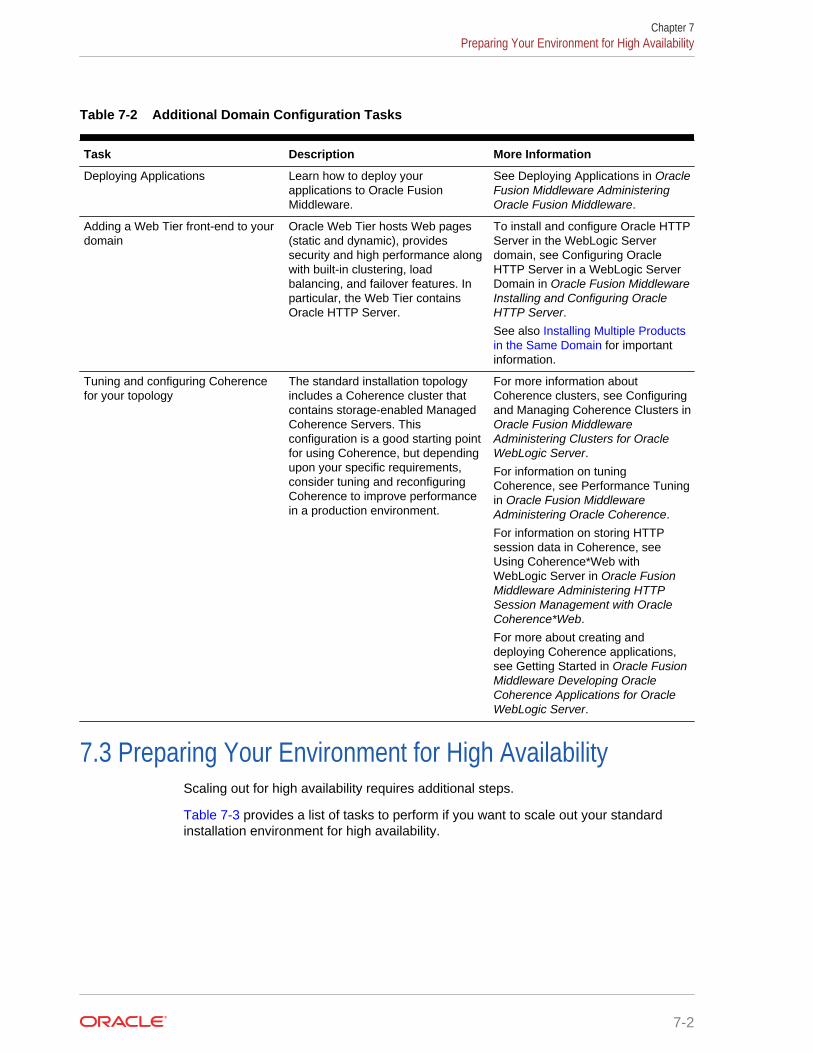
Table 7-2 Additional Domain Configuration Tasks
Task Description More Information
Deploying Applications Learn how to deploy yourapplications to Oracle FusionMiddleware.
See Deploying Applications in OracleFusion Middleware AdministeringOracle Fusion Middleware.
Adding a Web Tier front-end to yourdomain
Oracle Web Tier hosts Web pages(static and dynamic), providessecurity and high performance alongwith built-in clustering, loadbalancing, and failover features. Inparticular, the Web Tier containsOracle HTTP Server.
To install and configure Oracle HTTPServer in the WebLogic Serverdomain, see Configuring OracleHTTP Server in a WebLogic ServerDomain in Oracle Fusion MiddlewareInstalling and Configuring OracleHTTP Server.See also Installing Multiple Productsin the Same Domain for importantinformation.
Tuning and configuring Coherencefor your topology
The standard installation topologyincludes a Coherence cluster thatcontains storage-enabled ManagedCoherence Servers. Thisconfiguration is a good starting pointfor using Coherence, but dependingupon your specific requirements,consider tuning and reconfiguringCoherence to improve performancein a production environment.
For more information aboutCoherence clusters, see Configuringand Managing Coherence Clusters inOracle Fusion MiddlewareAdministering Clusters for OracleWebLogic Server.For information on tuningCoherence, see Performance Tuningin Oracle Fusion MiddlewareAdministering Oracle Coherence.
For information on storing HTTPsession data in Coherence, see Using Coherence*Web withWebLogic Server in Oracle FusionMiddleware Administering HTTPSession Management with OracleCoherence*Web.
For more about creating anddeploying Coherence applications,see Getting Started in Oracle FusionMiddleware Developing OracleCoherence Applications for OracleWebLogic Server.
7.3 Preparing Your Environment for High AvailabilityScaling out for high availability requires additional steps.
Table 7-3 provides a list of tasks to perform if you want to scale out your standardinstallation environment for high availability.
Chapter 7Preparing Your Environment for High Availability
7-2
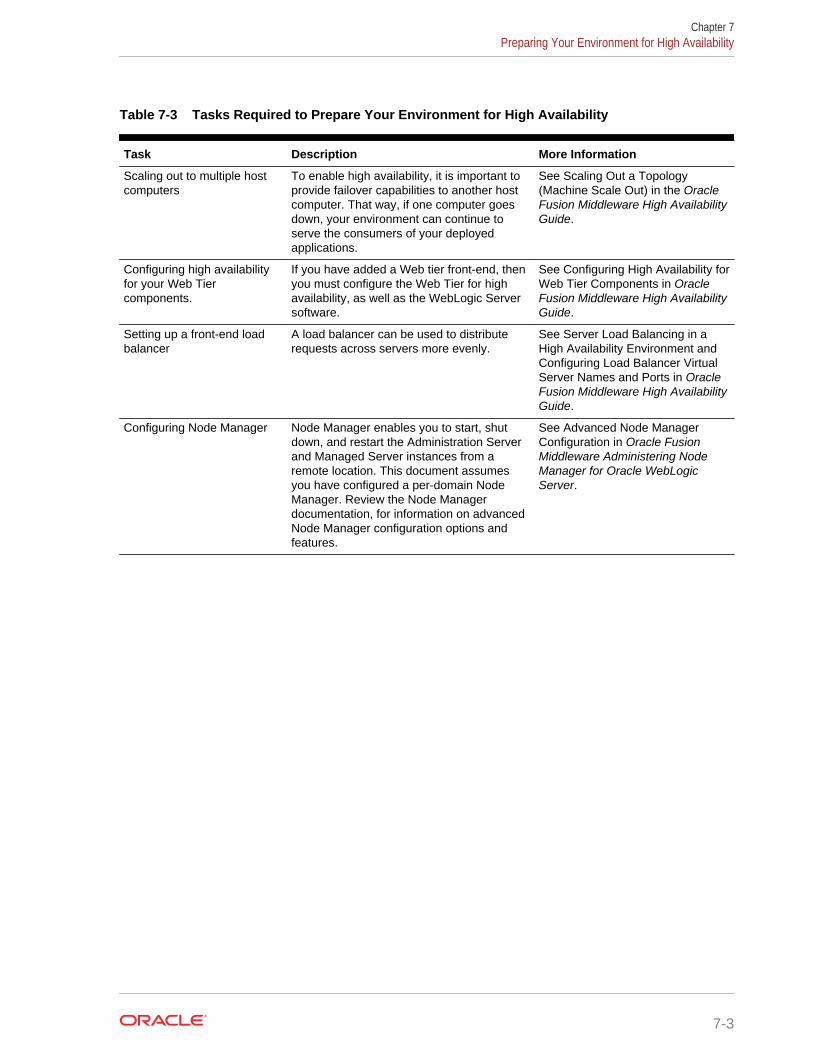
Table 7-3 Tasks Required to Prepare Your Environment for High Availability
Task Description More Information
Scaling out to multiple hostcomputers
To enable high availability, it is important toprovide failover capabilities to another hostcomputer. That way, if one computer goesdown, your environment can continue toserve the consumers of your deployedapplications.
See Scaling Out a Topology(Machine Scale Out) in the OracleFusion Middleware High AvailabilityGuide.
Configuring high availabilityfor your Web Tiercomponents.
If you have added a Web tier front-end, thenyou must configure the Web Tier for highavailability, as well as the WebLogic Serversoftware.
See Configuring High Availability forWeb Tier Components in OracleFusion Middleware High AvailabilityGuide.
Setting up a front-end loadbalancer
A load balancer can be used to distributerequests across servers more evenly.
See Server Load Balancing in aHigh Availability Environment and Configuring Load Balancer VirtualServer Names and Ports in OracleFusion Middleware High AvailabilityGuide.
Configuring Node Manager Node Manager enables you to start, shutdown, and restart the Administration Serverand Managed Server instances from aremote location. This document assumesyou have configured a per-domain NodeManager. Review the Node Managerdocumentation, for information on advancedNode Manager configuration options andfeatures.
See Advanced Node ManagerConfiguration in Oracle FusionMiddleware Administering NodeManager for Oracle WebLogicServer.
Chapter 7Preparing Your Environment for High Availability
7-3
8Uninstalling or Reinstalling Oracle Identityand Access Management
Follow the instructions in this section to uninstall or reinstall Oracle Identity and AccessManagement.
Oracle recommends that you always use the instructions in this section to remove thesoftware. If you try to remove the software manually, you may encounter problemswhen you try to reinstall the software again at a later time. Following the procedures inthis section ensures that the software is properly removed.
• About Product UninstallationThe Oracle Fusion Middleware uninstaller removes the software from the Oraclehome directory.
• Stopping Oracle Fusion MiddlewareBefore running the Uninstall Wizard, Oracle recommends that you stop all serversand processes associated with the Oracle home you are going to remove.
• Removing Your Database SchemasBefore you remove the Oracle home, Oracle recommends that you run theRepository Creation Utility (RCU) to remove database schemas associated withthis domain.
• Uninstalling the SoftwareFollow the instructions in this section to start the Uninstall Wizard and remove thesoftware.
• Removing the Oracle Home Directory ManuallyAfter you uninstall the software, you must manually remove your Oracle homedirectory and any existing subdirectories that the Uninstall Wizard did not remove.
• Removing the Program Shortcuts on Windows Operating SystemsOn Windows operating systems, you must also manually remove the programshortcuts; the Deinstallation Wizard does not remove them for you.
• Removing the Domain and Application DataAfter you uninstall the software, you must remove the domain and applicationdata.
• Reinstalling the SoftwareYou can reinstall your software into the same Oracle home as a previousinstallation only if you uninstalled the software by following the instructions in thissection, including manually removing the Oracle home directory.
8.1 About Product UninstallationThe Oracle Fusion Middleware uninstaller removes the software from the Oracle homedirectory.
The following table summarizes the tasks to uninstall Fusion Middleware products.
8-1
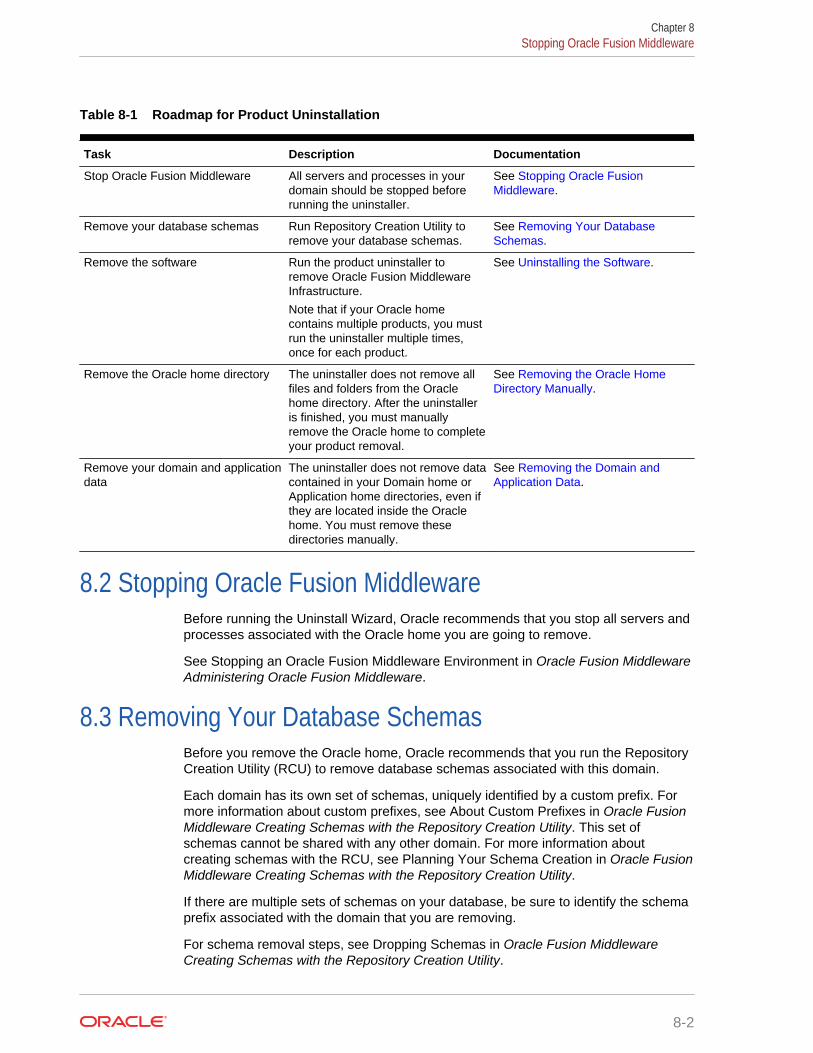
Table 8-1 Roadmap for Product Uninstallation
Task Description Documentation
Stop Oracle Fusion Middleware All servers and processes in yourdomain should be stopped beforerunning the uninstaller.
See Stopping Oracle FusionMiddleware.
Remove your database schemas Run Repository Creation Utility toremove your database schemas.
See Removing Your DatabaseSchemas.
Remove the software Run the product uninstaller toremove Oracle Fusion MiddlewareInfrastructure.
Note that if your Oracle homecontains multiple products, you mustrun the uninstaller multiple times,once for each product.
See Uninstalling the Software.
Remove the Oracle home directory The uninstaller does not remove allfiles and folders from the Oraclehome directory. After the uninstalleris finished, you must manuallyremove the Oracle home to completeyour product removal.
See Removing the Oracle HomeDirectory Manually.
Remove your domain and applicationdata
The uninstaller does not remove datacontained in your Domain home orApplication home directories, even ifthey are located inside the Oraclehome. You must remove thesedirectories manually.
See Removing the Domain andApplication Data.
8.2 Stopping Oracle Fusion MiddlewareBefore running the Uninstall Wizard, Oracle recommends that you stop all servers andprocesses associated with the Oracle home you are going to remove.
See Stopping an Oracle Fusion Middleware Environment in Oracle Fusion MiddlewareAdministering Oracle Fusion Middleware.
8.3 Removing Your Database SchemasBefore you remove the Oracle home, Oracle recommends that you run the RepositoryCreation Utility (RCU) to remove database schemas associated with this domain.
Each domain has its own set of schemas, uniquely identified by a custom prefix. Formore information about custom prefixes, see About Custom Prefixes in Oracle FusionMiddleware Creating Schemas with the Repository Creation Utility. This set ofschemas cannot be shared with any other domain. For more information aboutcreating schemas with the RCU, see Planning Your Schema Creation in Oracle FusionMiddleware Creating Schemas with the Repository Creation Utility.
If there are multiple sets of schemas on your database, be sure to identify the schemaprefix associated with the domain that you are removing.
For schema removal steps, see Dropping Schemas in Oracle Fusion MiddlewareCreating Schemas with the Repository Creation Utility.
Chapter 8Stopping Oracle Fusion Middleware
8-2
8.4 Uninstalling the SoftwareFollow the instructions in this section to start the Uninstall Wizard and remove thesoftware.
If you want to uninstall the product in a silent (command-line) mode, see Running theOracle Universal Installer for Silent Uninstallation in Oracle Fusion MiddlewareInstalling Software with the Oracle Universal Installer.
• Starting the Uninstall Wizard
• Selecting the Product to Uninstall
• Navigating the Uninstall Wizard Screens
8.4.1 Starting the Uninstall WizardTo start the Uninstall Wizard:
1. Change to the following directory:
(UNIX) ORACLE_HOME/oui/bin
(Windows) ORACLE_HOME\oui\bin
2. Enter the following command:
(UNIX) ./deinstall.sh
(Windows) deinstall.cmd
8.4.2 Selecting the Product to UninstallBecause multiple products exist in the Oracle home, ensure that you are uninstallingthe correct product.
After you run the Uninstall Wizard, the Distribution to Uninstall screen opens. From thedropdown menu, select Oracle Identity and Access Management and click Uninstall.The uninstallation program shows the screens listed in Navigating the Uninstall WizardScreens.
Note:
You can uninstall Oracle Fusion Middleware Infrastructure after you uninstallOracle Identity and Access Management software by running the UninstallWizard again. Before doing so, make sure that there are no other productsusing the Infrastructure; those products will no longer function once theInfrastructure is removed. You will not encounter the Distribution to Uninstallscreen if no other software depends on Oracle Fusion MiddlewareInfrastructure. See Uninstalling Oracle Fusion Middleware Infrastructure inOracle Fusion Middleware Installing and Configuring the Oracle FusionMiddleware Infrastructure.
Chapter 8Uninstalling the Software
8-3
8.4.3 Navigating the Uninstall Wizard ScreensThe Uninstall Wizard shows a series of screens to confirm the removal of the software.
If you need help on screen listed in Table 8-2, click Help on the screen.
Table 8-2 Uninstall Wizard Screens and Descriptions
Screen Description
Welcome Introduces you to the product Uninstall Wizard.
Uninstall Summary Shows the Oracle home directory and its contents that are uninstalled. Verify that this is thecorrect directory.
If you want to save these options to a response file, click Save Response File and enterthe response file location and name. You can use the response file later to uninstall theproduct in silent (command-line) mode. See Running the Oracle Universal Installer forSilent Uninstall in Installing Software with the Oracle Universal Installer.Click Deinstall, to begin removing the software.
Uninstall Progress Shows the uninstallation progress.
Uninstall Complete Appears when the uninstallation is complete. Review the information on this screen, thenclick Finish to close the Uninstall Wizard.
8.5 Removing the Oracle Home Directory ManuallyAfter you uninstall the software, you must manually remove your Oracle homedirectory and any existing subdirectories that the Uninstall Wizard did not remove.
For example, if your Oracle home directory is /home/Oracle/product/ORACLE_HOME on a UNIX operating system, enter the following commands:
cd /home/Oracle/product rm -rf ORACLE_HOME
On a Windows operating system, if your Oracle home directory is C:\Oracle\Product\ORACLE_HOME, use a file manager window and navigate to the C:\Oracle\Productdirectory. Right-click on the ORACLE_HOME folder and select Delete.
8.6 Removing the Program Shortcuts on WindowsOperating Systems
On Windows operating systems, you must also manually remove the programshortcuts; the Deinstallation Wizard does not remove them for you.
To remove the program shortcuts on Windows:
1. Change to the following directory: C:\ProgramData\Microsoft\Windows\Start Menu\Programs\Oracle\ORACLE_HOME\Product
2. If you only have one product installed in your Oracle home, delete theORACLE_HOME directory. If you have multiple products installed in your Oraclehome, delete all products before you delete the ORACLE_HOME directory.
Chapter 8Removing the Oracle Home Directory Manually
8-4
8.7 Removing the Domain and Application DataAfter you uninstall the software, you must remove the domain and application data.
To remove the domain and application data:
1. Manually remove your Domain home directory. For example:
On a UNIX operating system, if your Domain home directory is /home/Oracle/config/domains/idm_domain, enter the following command:
cd /home/Oracle/config/domains
rm -rf idm_domain
On a Windows operating system, if your Domain home directory is C:\Oracle\Config\domains\idm_domain, use a file manager window and navigate to the C:\Oracle\Config\domains directory. Right-click on the idm_domain folder and selectDelete.
2. Manually remove your Application home directory. For example:
On a UNIX operating system, if your Application home directory is /home/Oracle/config/applications/idm_domain, enter the following commands:
cd /home/Oracle/config/applications
rm -rf idm_domain
On a Windows operating system, if your Application home directory is C:\Oracle\Config\applications\idm_domain, use a file manager window and navigate to theC:\Oracle\Config\applications directory. Right-click on the idm_domain folder andselect Delete.
3. Back up the domain_registry.xml file in your Oracle home, then edit the file andremove the line associated with the domain that you are removing. For example,to remove the idm_domain, find the following line and remove it:
<domain location="/home/Oracle/config/domains/idm_domain"/>
Save and exit the file when you are finished.
8.8 Reinstalling the SoftwareYou can reinstall your software into the same Oracle home as a previous installationonly if you uninstalled the software by following the instructions in this section,including manually removing the Oracle home directory.
When you reinstall, you can then specify the same Oracle home as your previousinstallation.
If ODI is installed again in the same location where it was previously deleted, deletethe entire Oracle Home where it was previously installed.
Consider the following cases where the Oracle home is not empty:
• Installing in an existing Oracle home that contains the same feature sets.
The installer warns you that the Oracle home that you specified during installationalready contains the same software you are trying to install.
Chapter 8Removing the Domain and Application Data
8-5
• Installing in an existing, non-empty Oracle home.
For example, suppose you chose to create your Domain home or Applicationhome somewhere inside your existing Oracle home. This data is not removedwhen you uninstall a product, so if you try to reinstall into the same Oracle home,the installer does not allow it. Your options are:
– Uninstall your software from the Oracle home (as this section describes) andthen remove the Oracle home directory. After you uninstall the software andremove the Oracle home directory, you can reinstall and reuse the sameOracle home location. Any domain or application data that was in the Oraclehome must be re-created.
– Select a different Oracle home directory.
Chapter 8Reinstalling the Software
8-6

AUpdating the JDK After Installing andConfiguring an Oracle Fusion MiddlewareProduct
Consider that you have a JDK version jdk1.8.0_121 installed on your machine. Whenyou install and configure an Oracle Fusion Middleware product, the utilities, such asConfiguration Wizard (config.sh|exe), OPatch, or RCU point to a default JDK, forexample, jdk1.8.0_121. After some time, Oracle releases a new version of the JDK,say jdk1.8.0_131 that carries security enhancements and bug fixes.From 12c (12.2.1.3.0) onwards, you can upgrade the existing JDK to a newer version,and can have the complete product stack point to the newer version of the JDK.
You can maintain multiple versions of JDK and switch to the required version on needbasis.
• About Updating the JDK Location After Installing an Oracle Fusion MiddlewareProductThe binaries and other metadata and utility scripts in the Oracle home and Domainhome, such as RCU or Configuration Wizard, use a JDK version that was usedwhile installing the software and continue to refer to the same version of the JDK.The JDK path is stored in a variable called JAVA_HOME which is centrally locatedin .globalEnv.properties file inside the ORACLE_HOME/oui directory.
A.1 About Updating the JDK Location After Installing anOracle Fusion Middleware Product
The binaries and other metadata and utility scripts in the Oracle home and Domainhome, such as RCU or Configuration Wizard, use a JDK version that was used whileinstalling the software and continue to refer to the same version of the JDK. The JDKpath is stored in a variable called JAVA_HOME which is centrally locatedin .globalEnv.properties file inside the ORACLE_HOME/oui directory.
The utility scripts such as config.sh|cmd, launch.sh, or opatch reside in theORACLE_HOME, and when you invoke them, they refer to the JAVA_HOME variablelocated in .globalEnv.properties file. To point these scripts and utilities to the newerversion of JDK, you must update the value of the JAVA_HOME variable inthe .globalEnv.properties file by following the directions listed in Updating the JDKLocation in an Existing Oracle Home .
To make the scripts and files in your Domain home directory point to the newer versionof the JDK, you can follow one of the following approaches:
• Specify the path to the newer JDK on the Domain Mode and JDK screen whilerunning the Configuration Wizard.
For example, consider that you installed Oracle Fusion Middleware Infrastructurewith the JDK version 8u121. So while configuring the WebLogic domain with theConfiguration Assistant, you can select the path to the newer JDK on the Domain
A-1
Mode and JDK screen of the Configuration Wizard. Example: /scratch/jdk/jdk1.8.0_131.
• Manually locate the files that have references to the JDK using grep (UNIX) orfindstr (Windows) commands and update each reference. See Updating theJDK Location in an Existing Domain Home.
Note:
If you install the newer version of the JDK in the same location as theexisting JDK by overwriting the files, then you don’t need to take any action.
When you upgrade Oracle Identity Manager in an integrated environment, you mayencounter the OPSS processing error. The following exception is seen when yourun reconfig.sh command to reconfigure the Oracle Identity Manager domain:
SEVERE [93] com.oracle.cie.domain.progress.AbstractProgressGenerator - Error occurred in phase {OPSS Processing} execution. java.lang.IllegalStateException: SecurityContext: Domain Name: IAMGovernanceDomain JDBC URL: opss-audit-DBDS:jdbc:oracle:thin:@//slc03rmj.us.oracle.com:1521/IDMDB.US.ORACLE.COM JDBC URL: opss-data-source:jdbc:oracle:thin:@//slc03rmj.us.oracle.com:1521/idmdb.us.orac le.com Caused by: java.security.InvalidKeyException: Illegal key size at javax.crypto.Cipher.checkCryptoPerm(Cipher.java:1039) at javax.crypto.Cipher.implInit(Cipher.java:805) at javax.crypto.Cipher.chooseProvider(Cipher.java:864) at javax.crypto.Cipher.init(Cipher.java:1396) at javax.crypto.Cipher.init(Cipher.java:1327)
To resolve this issue:
1. Install the Java Cryptography Extension (JCE) Unlimited Strength JurisdictionPolicy Files from the following location: Java Cryptography Extension (JCE)Unlimited Strength Jurisdiction Policy Files 8 Download.
2. Copy the local_policy.jar and the US_export_policy.jar files to thelocation JAVA_HOME/jre/lib/security/. If the files already exist in thedestination folder, overwrite them.
• Updating the JDK Location in an Existing Oracle HomeThe getProperty.sh|cmd script displays the value of a variable, such asJAVA_HOME, from the .globalEnv.properties file. The setProperty.sh|cmd script isused to set the value of variables, such as OLD_JAVA_HOME or JAVA_HOMEthat contain the locations of old and new JDKs in the .globalEnv.properties file.
• Updating the JDK Location in an Existing Domain HomeYou must search the references to the current JDK, for example jdk1.8.0_121manually, and replace those instances with the location of the new JDK.
A.1.1 Updating the JDK Location in an Existing Oracle HomeThe getProperty.sh|cmd script displays the value of a variable, such as JAVA_HOME,from the .globalEnv.properties file. The setProperty.sh|cmd script is used to set the
Appendix AAbout Updating the JDK Location After Installing an Oracle Fusion Middleware Product
A-2
value of variables, such as OLD_JAVA_HOME or JAVA_HOME that contain thelocations of old and new JDKs in the .globalEnv.properties file.
The getProperty.sh|cmd and setProperty.sh|cmd scripts are located in the followinglocation:
(UNIX) ORACLE_HOME/oui/bin(Windows) ORACLE_HOME\oui\binWhere, ORACLE_HOME is the directory that contains the products using the currentversion of the JDK, such as jdk1.8.0_121.
To update the JDK location in the .globalEnv.properties file:
1. Use the getProperty.sh|cmd script to display the path of the current JDK from theJAVA_HOME variable. For example:
(UNIX) ORACLE_HOME/oui/bin/getProperty.sh JAVA_HOME(Windows) ORACLE_HOME\oui\bin\getProperty.cmd JAVA_HOMEecho JAVA_HOMEWhere JAVA_HOME is the variable in the .globalEnv.properties file that containsthe location of the JDK.
2. Back up the path of the current JDK to another variable such asOLD_JAVA_HOME in the .globalEnv.properties file by entering the followingcommands:
(UNIX) ORACLE_HOME/oui/bin/setProperty.sh -name OLD_JAVA_HOME-value specify_the_path_of_current_JDK(Windows) ORACLE_HOME\oui\bin\setProperty.cmd -nameOLD_JAVA_HOME -value specify_the_path_of_current_JDK
This command creates a new variable called OLD_JAVA_HOME inthe .globalEnv.properties file, with a value that you have specified.
3. Set the new location of the JDK in the JAVA_HOME variable ofthe .globalEnv.properties file, by entering the following commands:
(UNIX) ORACLE_HOME/oui/bin/setProperty.sh -name JAVA_HOME -value specify_the_location_of_new_JDK(Windows) ORACLE_HOME\oui\bin\setProperty.cmd -name JAVA_HOME-value specify_the_location_of_new_JDK
After you run this command, the JAVA_HOME variable inthe .globalEnv.properties file now contains the path to the new JDK, such asjdk1.8.0_131.
A.1.2 Updating the JDK Location in an Existing Domain HomeYou must search the references to the current JDK, for example jdk1.8.0_121manually, and replace those instances with the location of the new JDK.
You can use the grep (UNIX) or findstr (Windows) commands to search for thejdk-related references.
You’ll likely be required to update the location of JDK in the following three files:
(UNIX) DOMAIN_HOME/bin/setNMJavaHome.sh(Windows) DOMAIN_HOME\bin\setNMJavaHome.cmd
Appendix AAbout Updating the JDK Location After Installing an Oracle Fusion Middleware Product
A-3
(UNIX) DOMAIN_HOME/nodemanager/nodemanager.properties(Windows) DOMAIN_HOME\nodemanager\nodemanager.properties
(UNIX) DOMAIN_HOME/bin/setDomainEnv.sh(Windows) DOMAIN_HOME\bin\setDomainEnv.cmd
Appendix AAbout Updating the JDK Location After Installing an Oracle Fusion Middleware Product
A-4

![[1]Oracle® GoldenGate Installing and Configuring Oracle … · 2015-09-29 · [1]Oracle® GoldenGate Installing and Configuring Oracle GoldenGate for Informix 12c (12.1.2) E50195-06](https://img.dokumen.tips/doc/110x75/5e262db5781848173f1f7900/1oracle-goldengate-installing-and-configuring-oracle-2015-09-29-1oracle.jpg)


![[1]Oracle® GoldenGate Installing, Configuring, and Upgrading ......[1]Oracle® GoldenGate Installing, Configuring, and Upgrading Oracle GoldenGate Monitor Agent 12c (12.1.3) E52750-05](https://img.dokumen.tips/doc/110x75/60c90954ec44dc58de0605a3/1oracle-goldengate-installing-configuring-and-upgrading-1oracle.jpg)


![[1]Oracle® GoldenGate Installing and Configuring Oracle ... · This guide helps you get started with installing Oracle GoldenGate in a Teradata database environment and configuring](https://img.dokumen.tips/doc/110x75/5f681e114f1d0476816c5636/1oracle-goldengate-installing-and-configuring-oracle-this-guide-helps-you.jpg)


![[1]Oracle® Fusion Middleware Installing and Configuring ... · Installing and Configuring Oracle Enterprise Data Quality 12c ... Oracle Fusion Middleware Installing and Configuring](https://img.dokumen.tips/doc/110x75/5b8396637f8b9a47588d872b/1oracle-fusion-middleware-installing-and-configuring-installing-and.jpg)

![[1]Oracle® GoldenGate Installing and Configuring …Oracle GoldenGate Installing and Configuring Oracle GoldenGate for Sybase amount of RAM available to Oracle GoldenGate may significantly](https://img.dokumen.tips/doc/110x75/5ea7f8fedf00744b9f21f82e/1oracle-goldengate-installing-and-configuring-oracle-goldengate-installing-and.jpg)