Embed Size (px)
Citation preview
Installer Guide – SQL Server 2008
Window Book, Inc. Revision 2010-09-30. Page 1 of 28
Overview The Window Book .NET software products require .Net Framework 3.5 SP1 and a connection to
Microsoft SQL Server 2008. The purpose of this guide is to instruct users on how to install SQL Server
2008 Express.
Step 1 - Install SQL Server 2008 Express The Window Book SQL Server Express installations are targeted for a server; this means that whoever is
running the install must be logged into the server with administrative rights to perform the install.
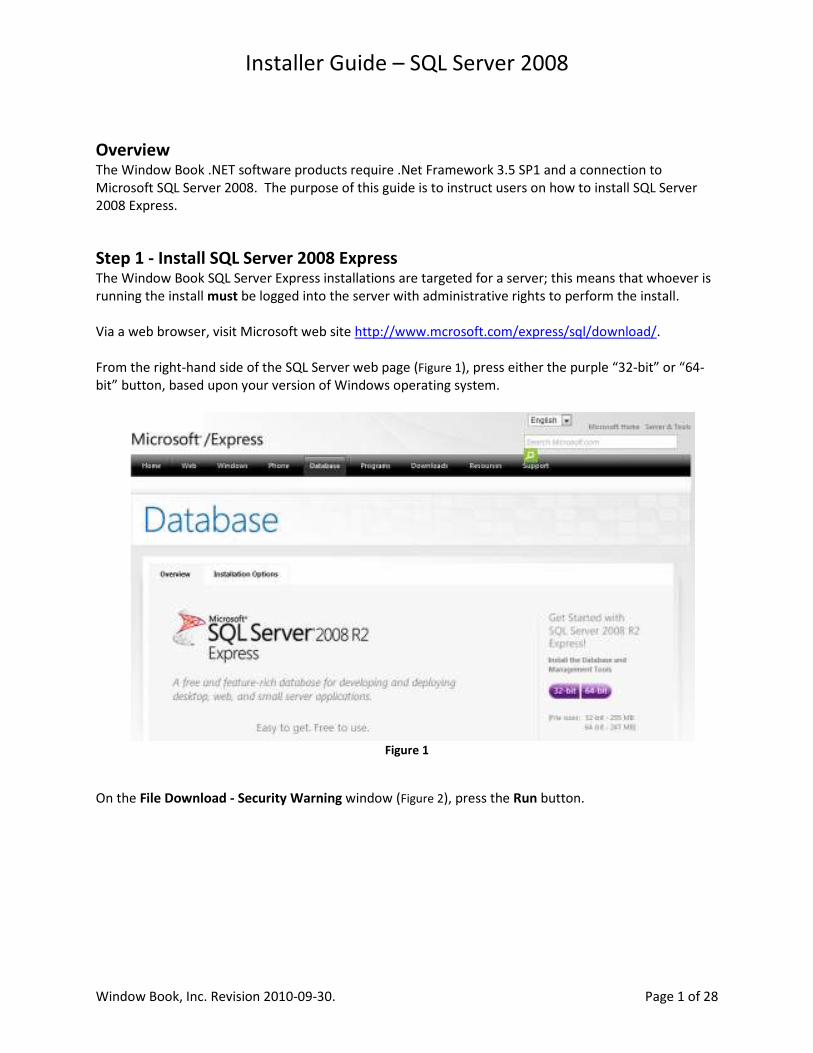
Via a web browser, visit Microsoft web site http://www.mcrosoft.com/express/sql/download/.
From the right-hand side of the SQL Server web page (Figure 1), press either the purple “32-bit” or “64-
bit” button, based upon your version of Windows operating system.
Figure 1
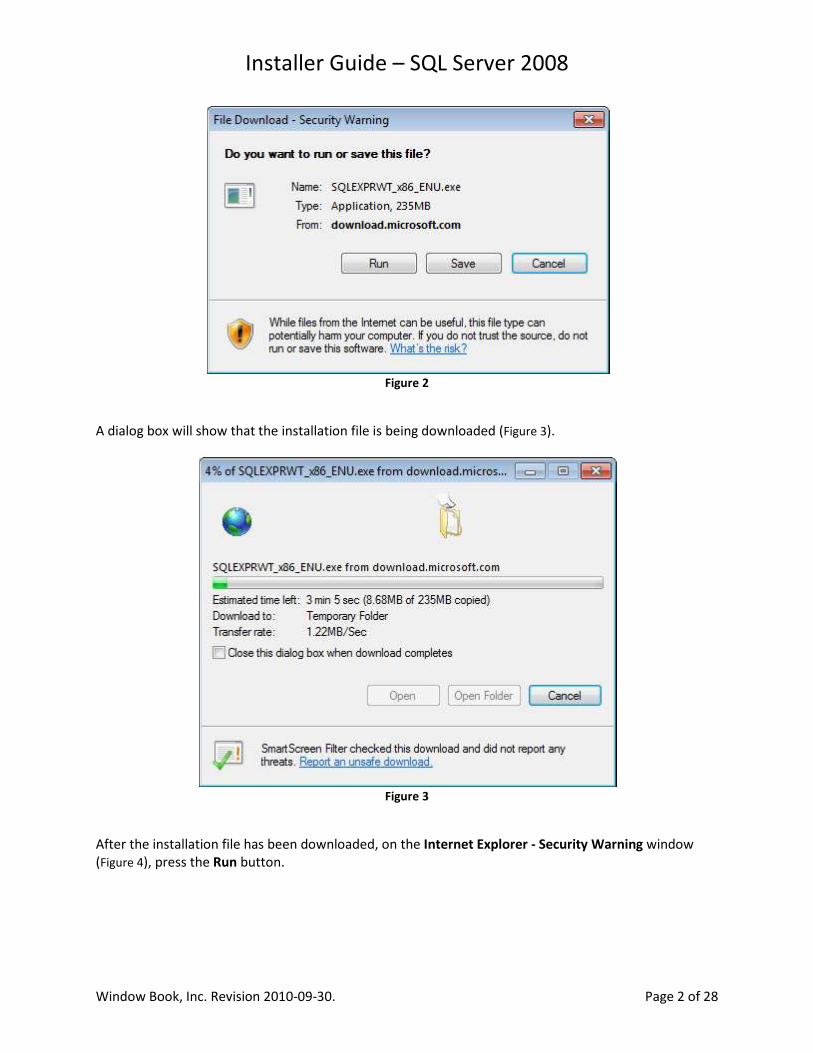
On the File Download - Security Warning window (Figure 2), press the Run button.
Installer Guide – SQL Server 2008
Window Book, Inc. Revision 2010-09-30. Page 2 of 28
Figure 2
A dialog box will show that the installation file is being downloaded (Figure 3).
Figure 3
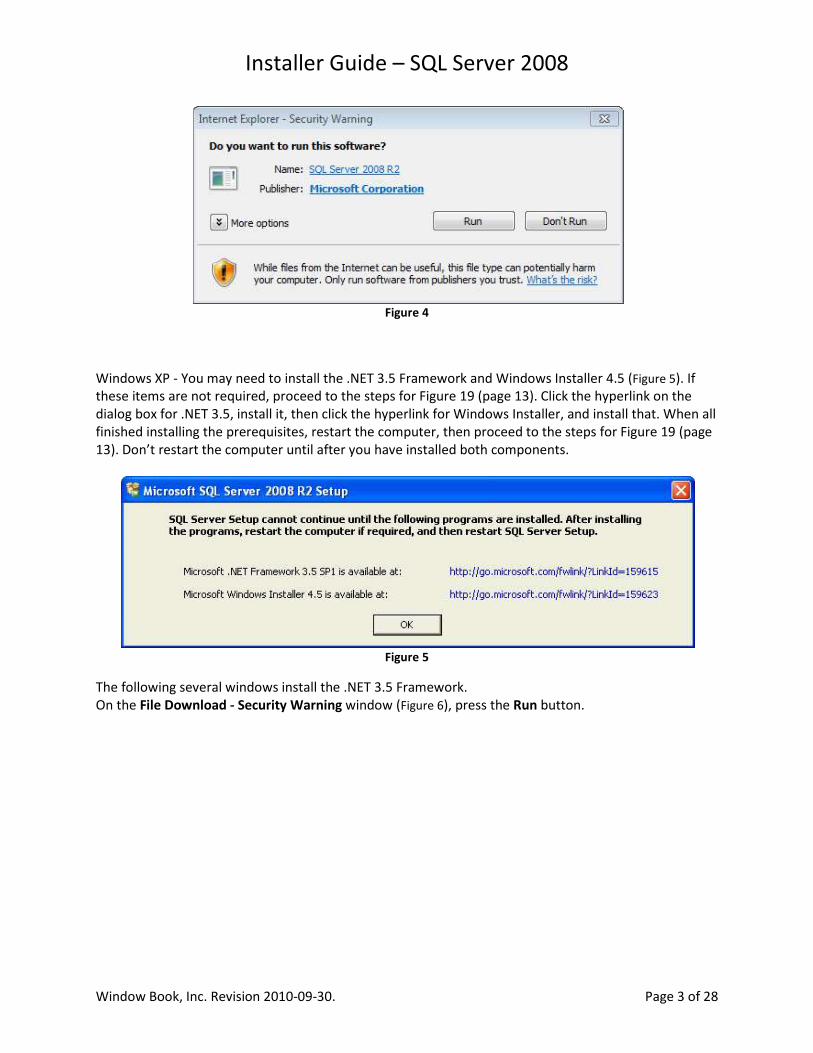
After the installation file has been downloaded, on the Internet Explorer - Security Warning window
(Figure 4), press the Run button.
Installer Guide – SQL Server 2008
Window Book, Inc. Revision 2010-09-30. Page 3 of 28
Figure 4
Windows XP - You may need to install the .NET 3.5 Framework and Windows Installer 4.5 (Figure 5). If
these items are not required, proceed to the steps for Figure 19 (page 13). Click the hyperlink on the
dialog box for .NET 3.5, install it, then click the hyperlink for Windows Installer, and install that. When all
finished installing the prerequisites, restart the computer, then proceed to the steps for Figure 19 (page
13). Don’t restart the computer until after you have installed both components.
Figure 5
The following several windows install the .NET 3.5 Framework.
On the File Download - Security Warning window (Figure 6), press the Run button.
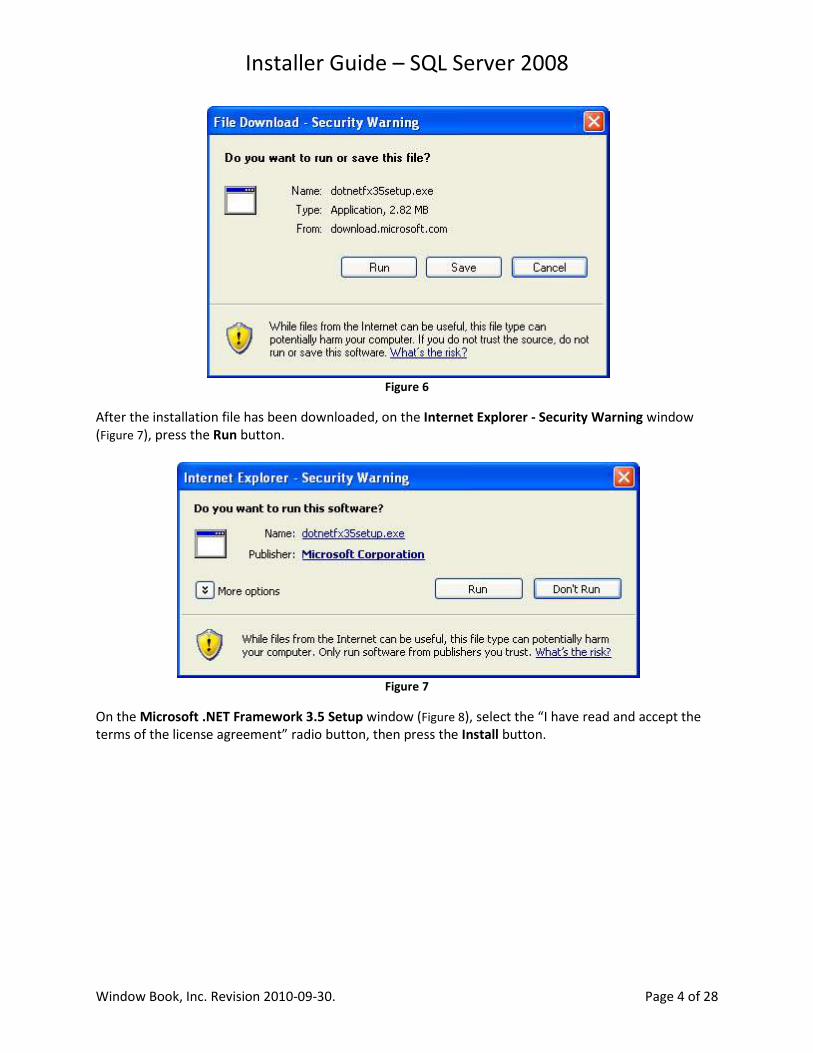
Installer Guide – SQL Server 2008
Window Book, Inc. Revision 2010-09-30. Page 4 of 28
Figure 6
After the installation file has been downloaded, on the Internet Explorer - Security Warning window
(Figure 7), press the Run button.
Figure 7
On the Microsoft .NET Framework 3.5 Setup window (Figure 8), select the “I have read and accept the
terms of the license agreement” radio button, then press the Install button.
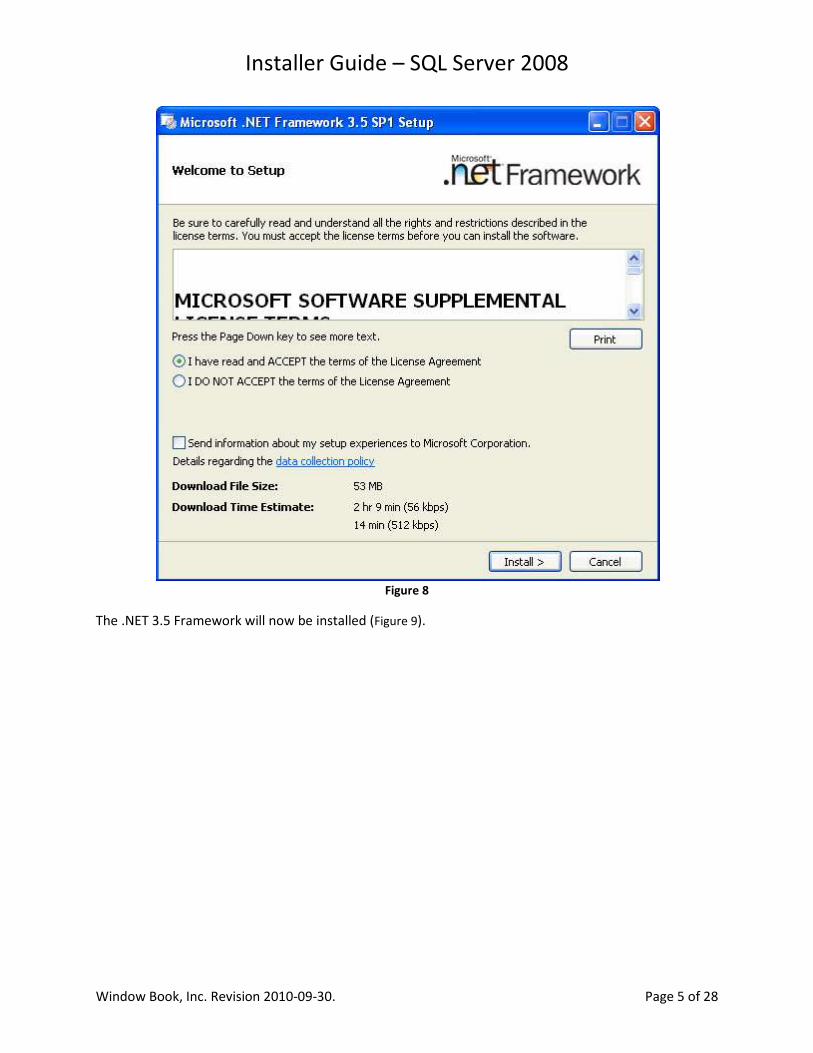
Installer Guide – SQL Server 2008
Window Book, Inc. Revision 2010-09-30. Page 5 of 28
Figure 8
The .NET 3.5 Framework will now be installed (Figure 9).
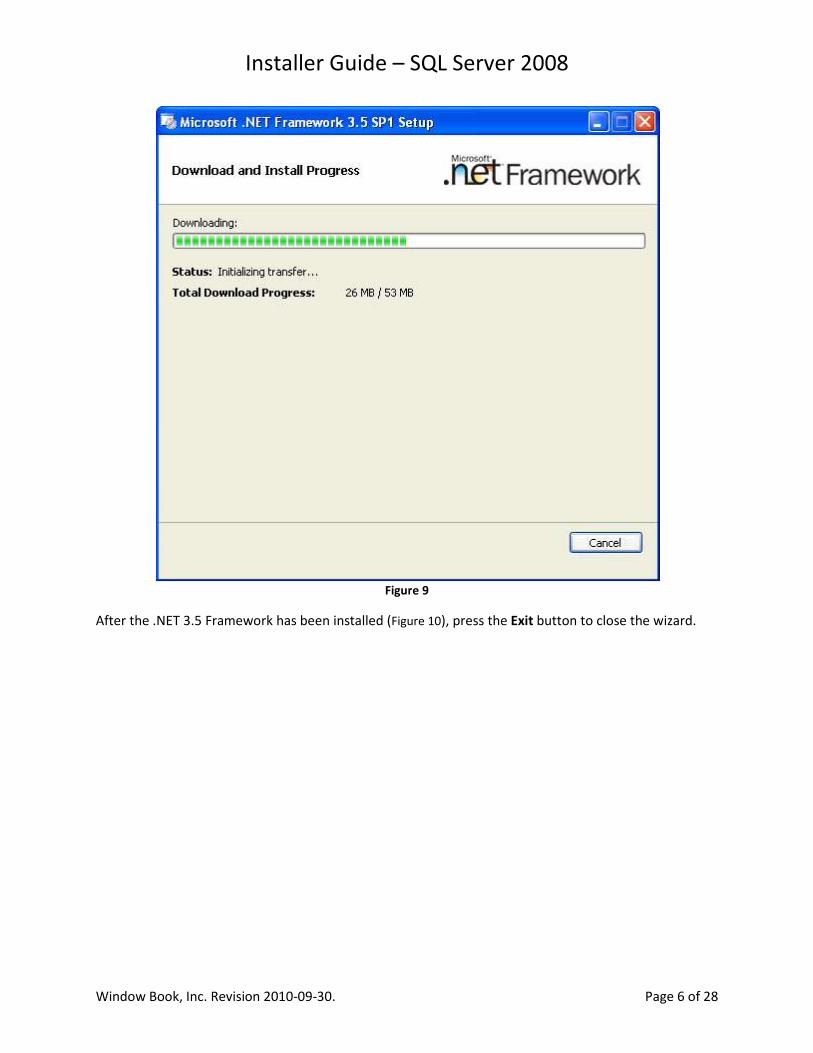
Installer Guide – SQL Server 2008
Window Book, Inc. Revision 2010-09-30. Page 6 of 28
Figure 9
After the .NET 3.5 Framework has been installed (Figure 10), press the Exit button to close the wizard.

Installer Guide – SQL Server 2008
Window Book, Inc. Revision 2010-09-30. Page 7 of 28
Figure 10
The following several windows install Windows Installer 4.5.
On the File Download - Security Warning window (Figure 11), press the Run button.
Figure 11
Installer Guide – SQL Server 2008
Window Book, Inc. Revision 2010-09-30. Page 8 of 28
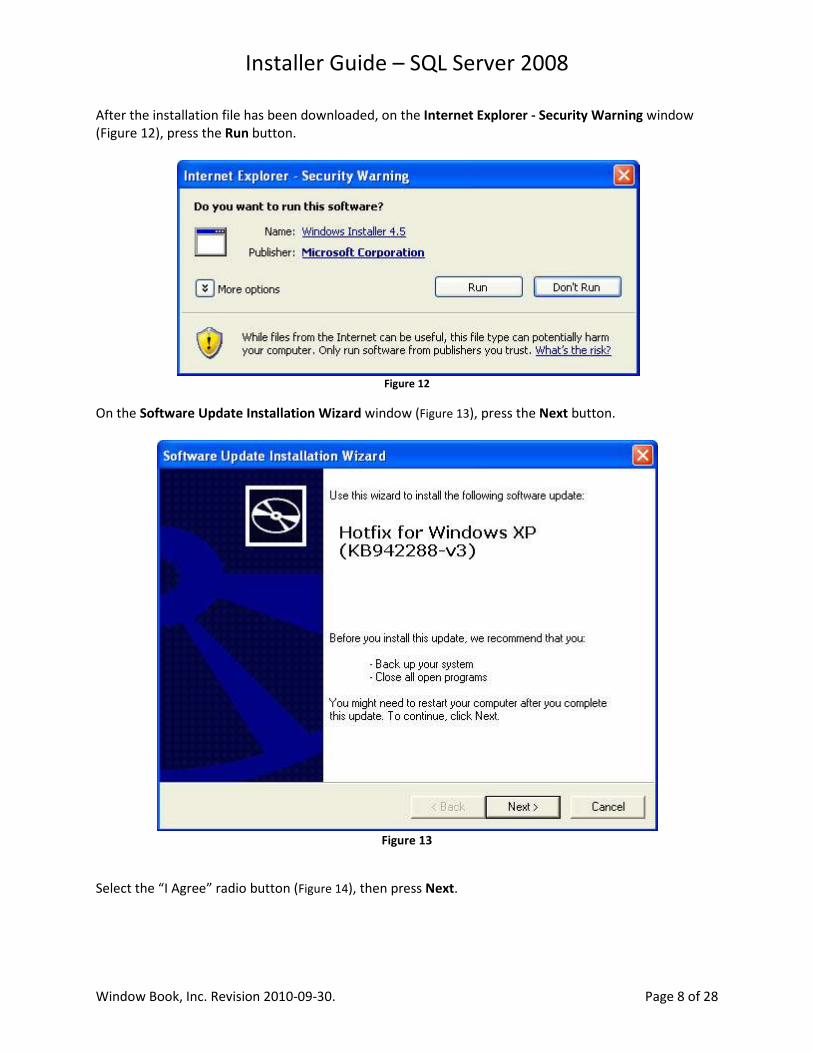
After the installation file has been downloaded, on the Internet Explorer - Security Warning window
(Figure 12), press the Run button.
Figure 12
On the Software Update Installation Wizard window (Figure 13), press the Next button.
Figure 13
Select the “I Agree” radio button (Figure 14), then press Next.

Installer Guide – SQL Server 2008
Window Book, Inc. Revision 2010-09-30. Page 9 of 28
Figure 14
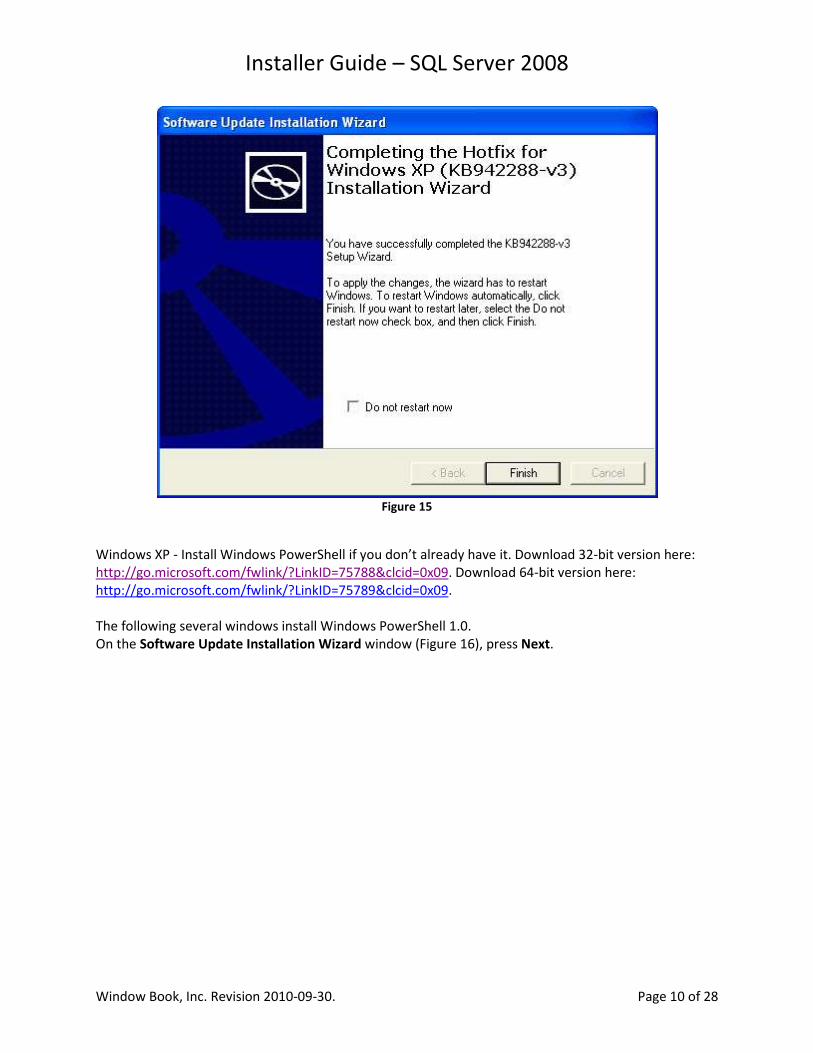
Windows Installer 4.5 will now be installed. After installation is complete, press Finish to close the
wizard (Figure 15).
Installer Guide – SQL Server 2008
Window Book, Inc. Revision 2010-09-30. Page 10 of 28
Figure 15
Windows XP - Install Windows PowerShell if you don’t already have it. Download 32-bit version here:
http://go.microsoft.com/fwlink/?LinkID=75788&clcid=0x09. Download 64-bit version here:
http://go.microsoft.com/fwlink/?LinkID=75789&clcid=0x09.
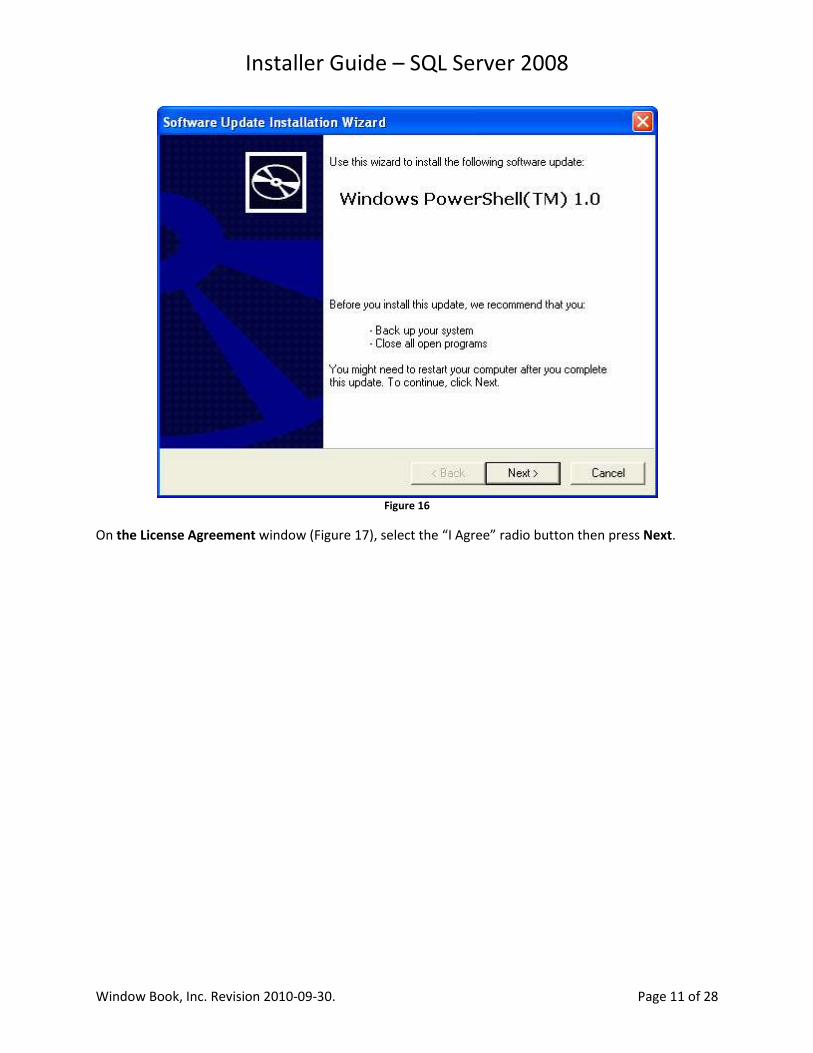
The following several windows install Windows PowerShell 1.0.
On the Software Update Installation Wizard window (Figure 16), press Next.
Installer Guide – SQL Server 2008
Window Book, Inc. Revision 2010-09-30. Page 11 of 28
Figure 16
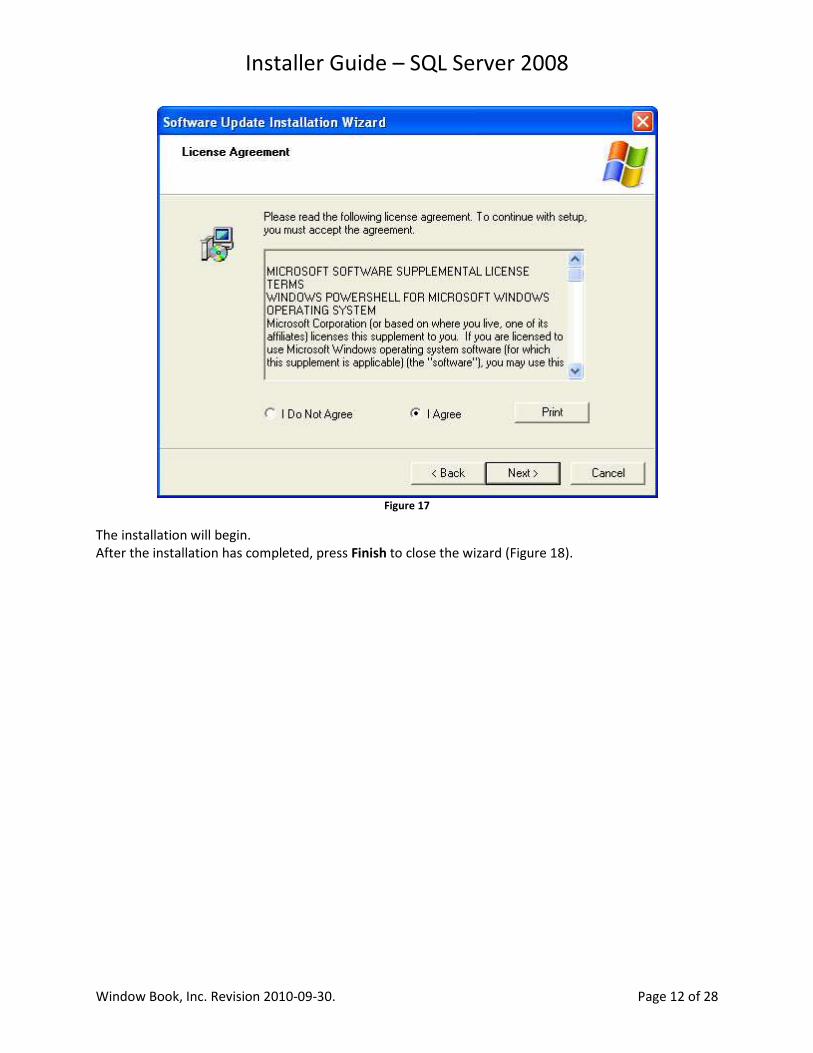
On the License Agreement window (Figure 17), select the “I Agree” radio button then press Next.
Installer Guide – SQL Server 2008
Window Book, Inc. Revision 2010-09-30. Page 12 of 28
Figure 17
The installation will begin.
After the installation has completed, press Finish to close the wizard (Figure 18).
Installer Guide – SQL Server 2008
Window Book, Inc. Revision 2010-09-30. Page 13 of 28
Figure 18
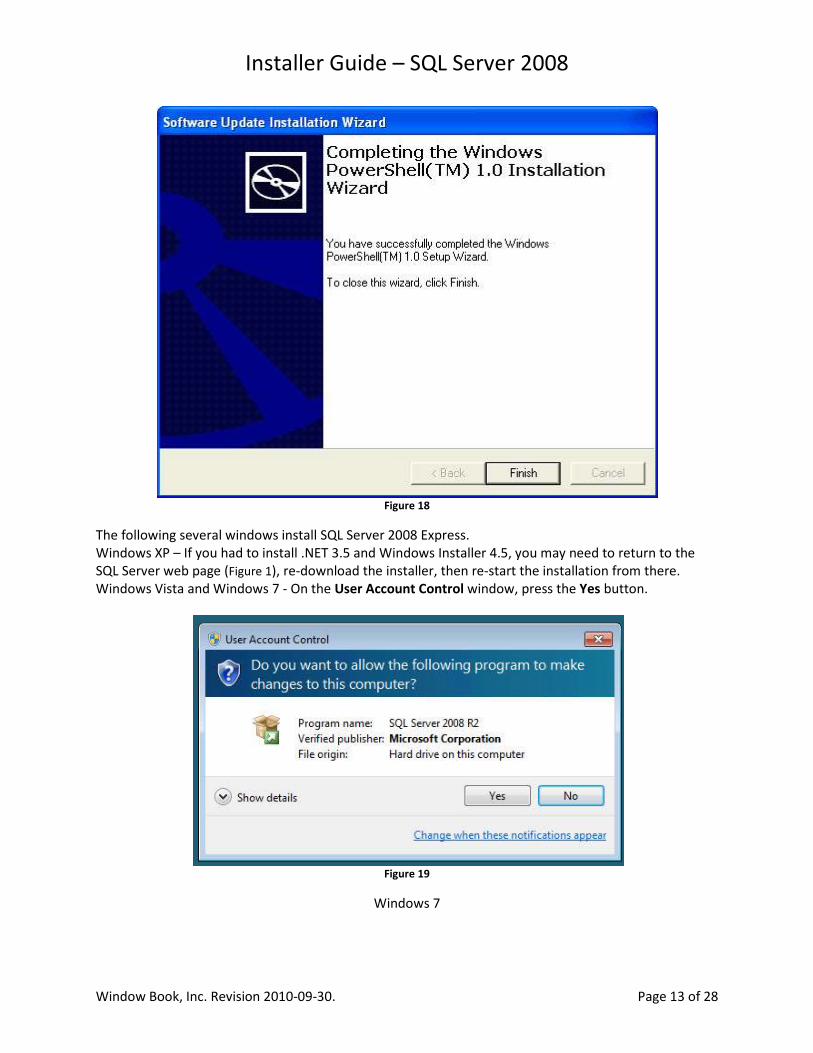
The following several windows install SQL Server 2008 Express.
Windows XP – If you had to install .NET 3.5 and Windows Installer 4.5, you may need to return to the
SQL Server web page (Figure 1), re-download the installer, then re-start the installation from there.
Windows Vista and Windows 7 - On the User Account Control window, press the Yes button.
Figure 19
Windows 7

Installer Guide – SQL Server 2008
Window Book, Inc. Revision 2010-09-30. Page 14 of 28
On the SQL Server Installation Center window (Figure 20), click the “New installation or add features to
an existing installation” link button.
Figure 20
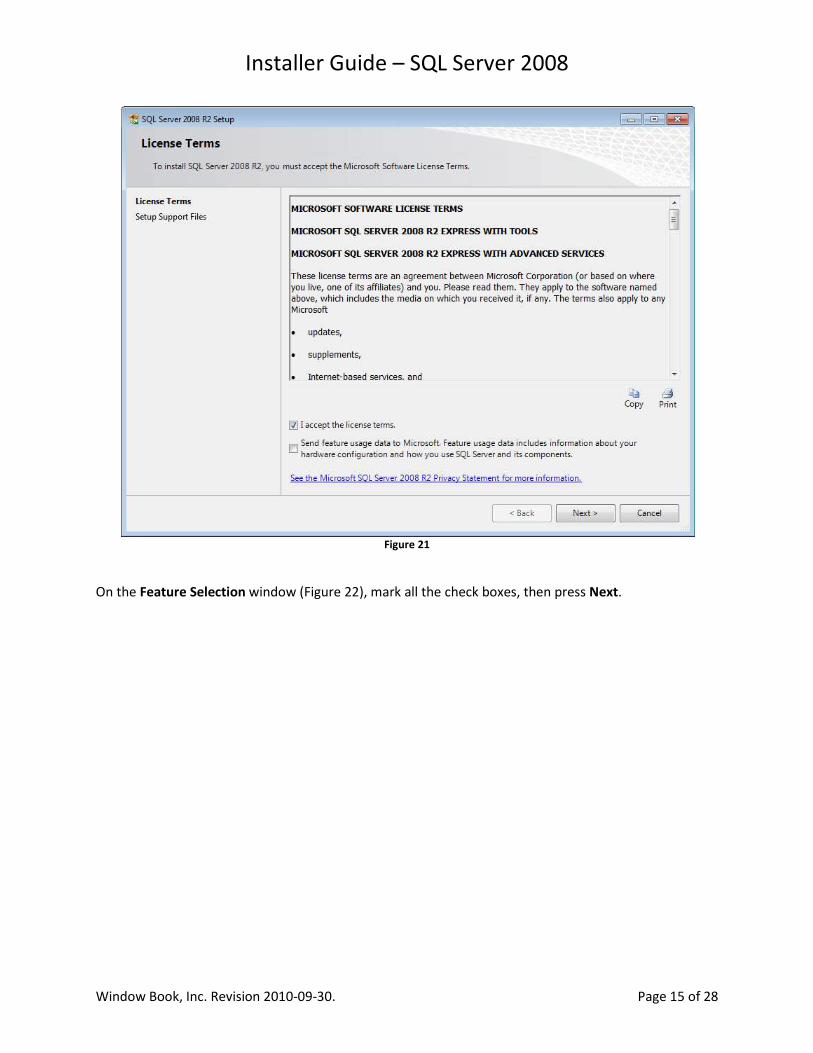
On the SQL Server 2008 RS Setup - License Terms window (Figure 21), mark the “I accept the license
terms” check box, then press Next.
Installer Guide – SQL Server 2008
Window Book, Inc. Revision 2010-09-30. Page 15 of 28
Figure 21
On the Feature Selection window (Figure 22), mark all the check boxes, then press Next.

Installer Guide – SQL Server 2008
Window Book, Inc. Revision 2010-09-30. Page 16 of 28
Figure 22
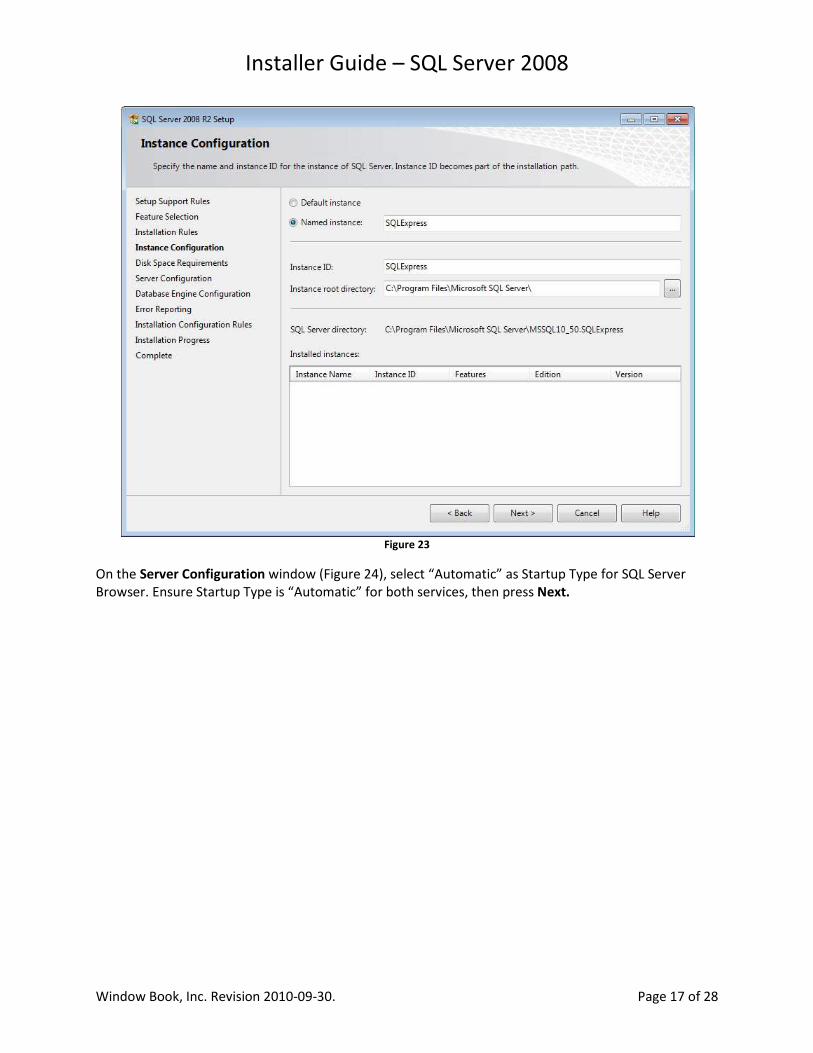
On the Instance Configuration window (Figure 23), accept the default instance name of “SQLExpress”,
then press Next.
Installer Guide – SQL Server 2008
Window Book, Inc. Revision 2010-09-30. Page 17 of 28
Figure 23
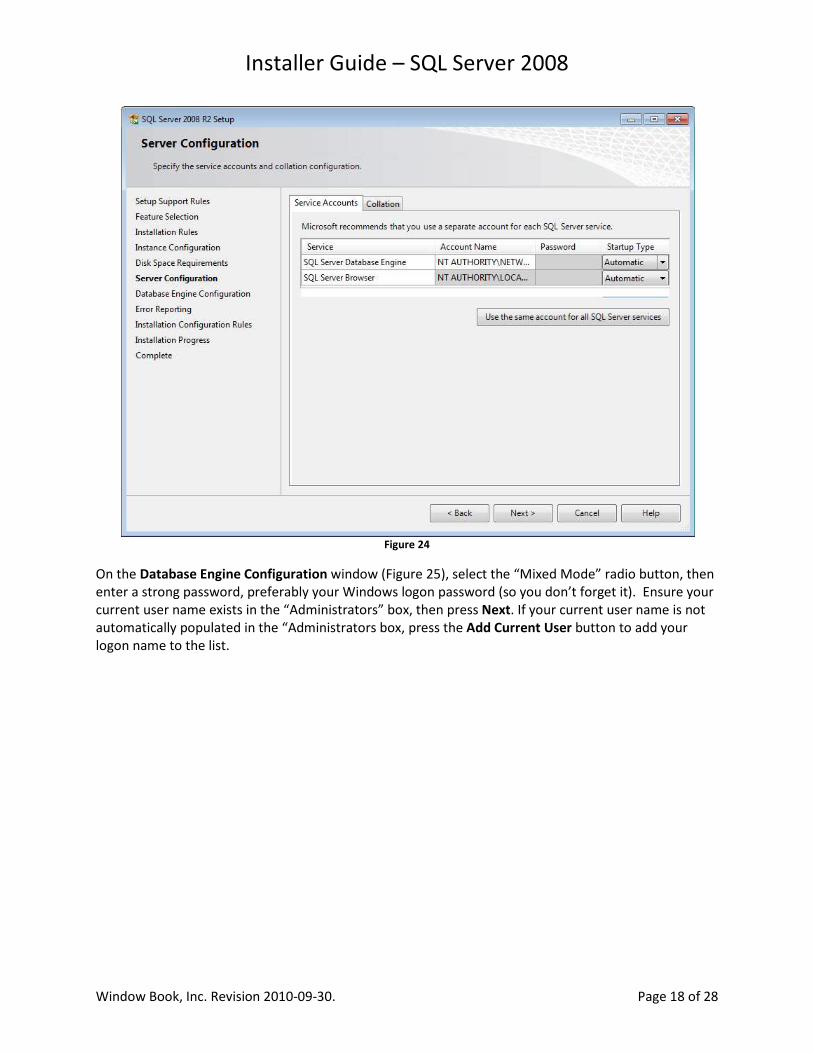
On the Server Configuration window (Figure 24), select “Automatic” as Startup Type for SQL Server
Browser. Ensure Startup Type is “Automatic” for both services, then press Next.
Installer Guide – SQL Server 2008
Window Book, Inc. Revision 2010-09-30. Page 18 of 28
Figure 24
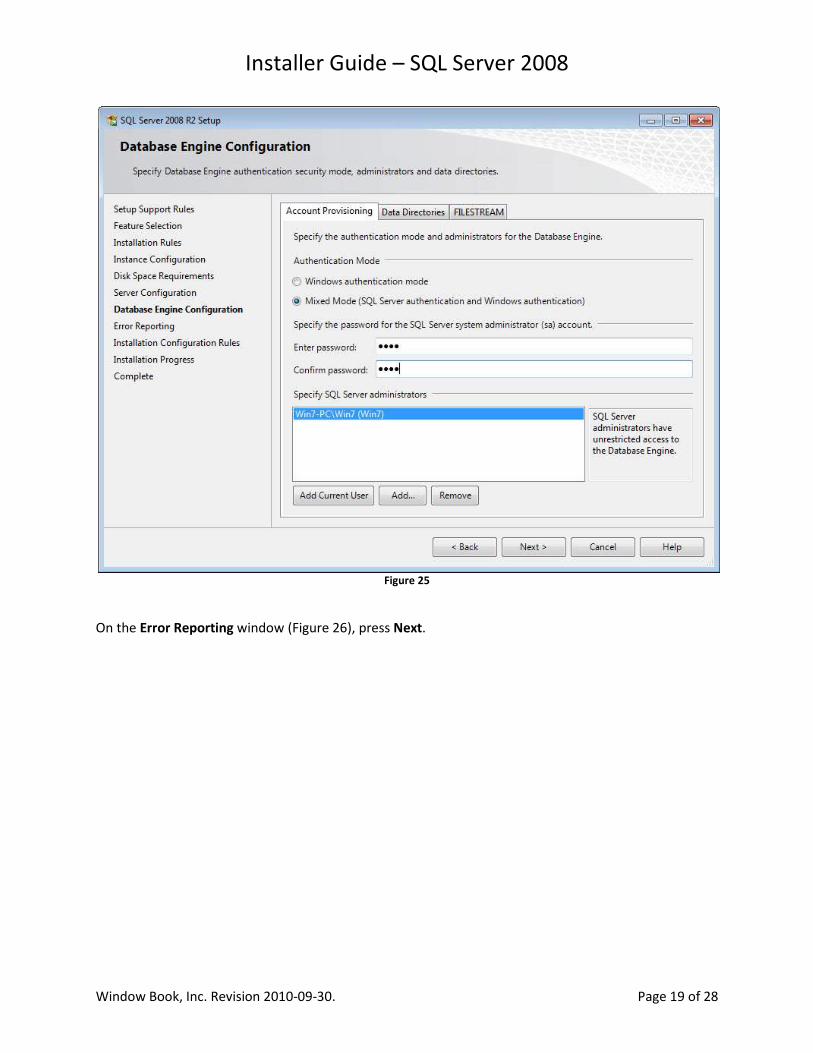
On the Database Engine Configuration window (Figure 25), select the “Mixed Mode” radio button, then
enter a strong password, preferably your Windows logon password (so you don’t forget it). Ensure your
current user name exists in the “Administrators” box, then press Next. If your current user name is not
automatically populated in the “Administrators box, press the Add Current User button to add your
logon name to the list.
Installer Guide – SQL Server 2008
Window Book, Inc. Revision 2010-09-30. Page 19 of 28
Figure 25
On the Error Reporting window (Figure 26), press Next.
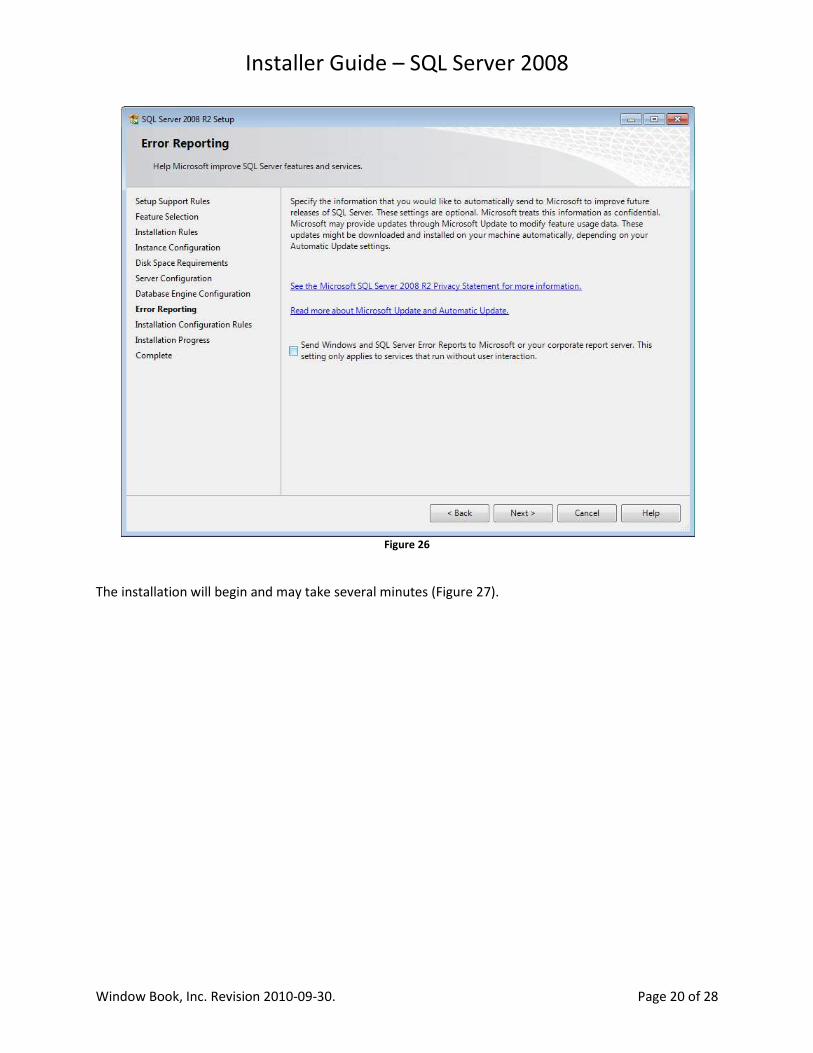
Installer Guide – SQL Server 2008
Window Book, Inc. Revision 2010-09-30. Page 20 of 28
Figure 26
The installation will begin and may take several minutes (Figure 27).
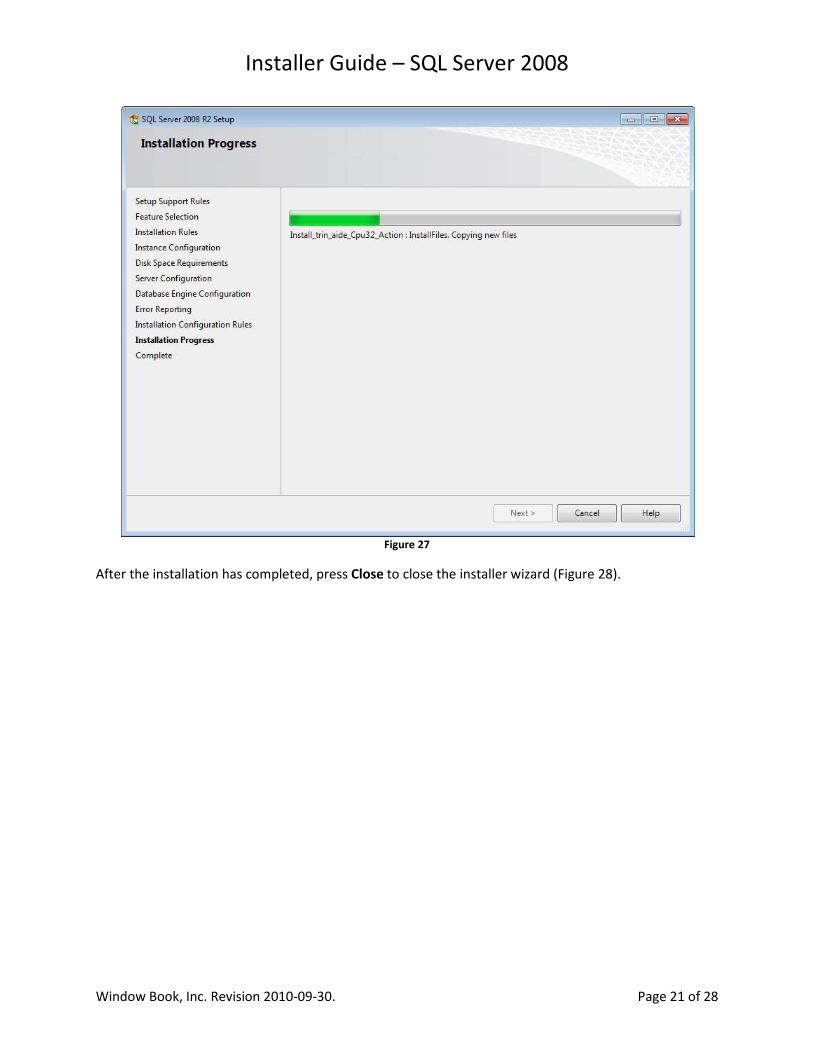
Installer Guide – SQL Server 2008
Window Book, Inc. Revision 2010-09-30. Page 21 of 28
Figure 27
After the installation has completed, press Close to close the installer wizard (Figure 28).
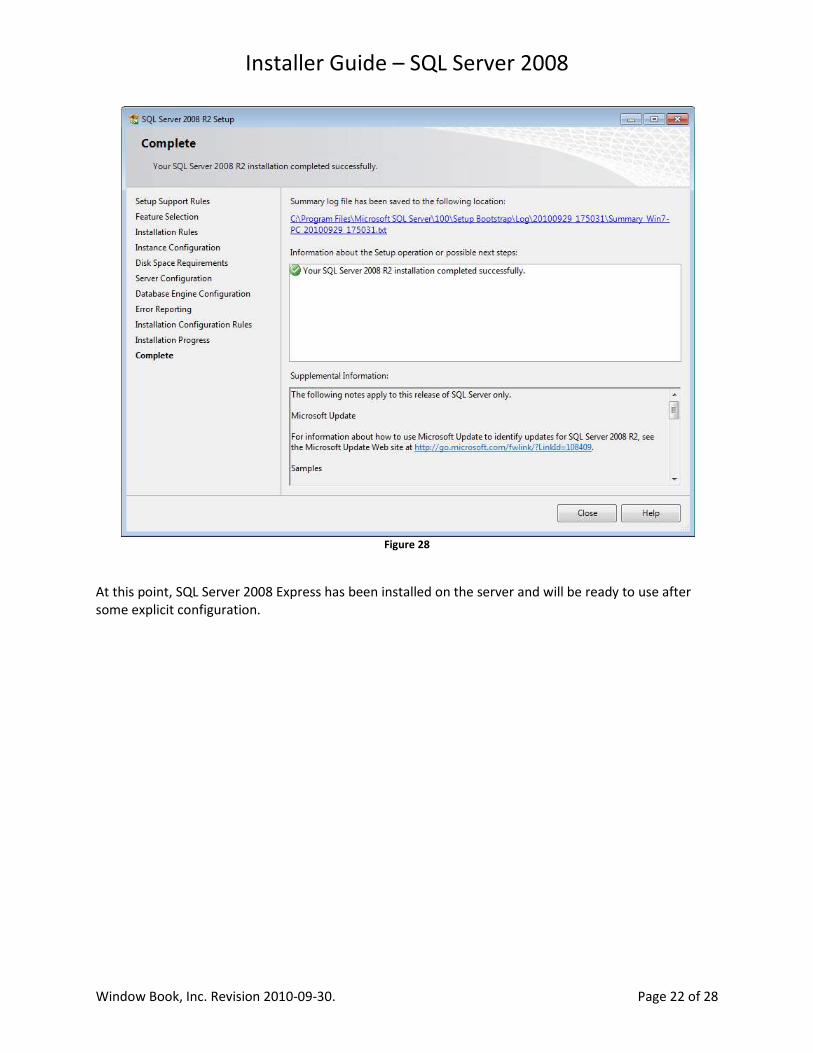
Installer Guide – SQL Server 2008
Window Book, Inc. Revision 2010-09-30. Page 22 of 28
Figure 28
At this point, SQL Server 2008 Express has been installed on the server and will be ready to use after
some explicit configuration.
Installer Guide – SQL Server 2008
Window Book, Inc. Revision 2010-09-30. Page 23 of 28
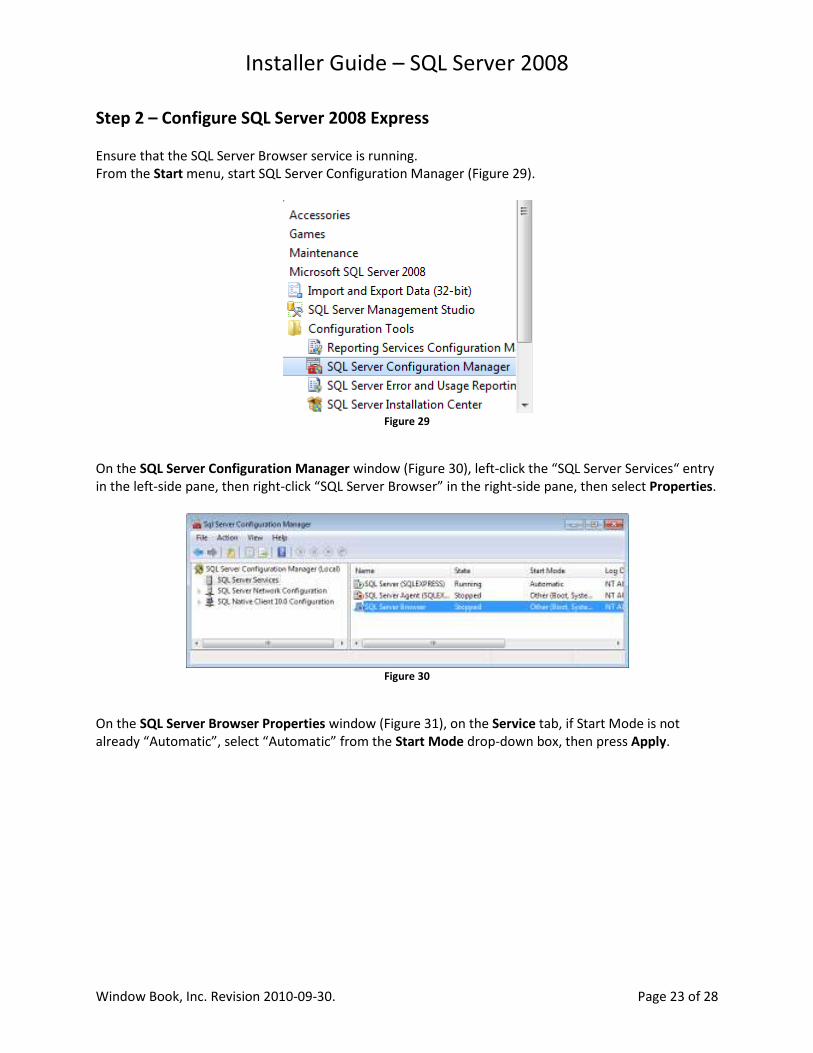
Step 2 – Configure SQL Server 2008 Express
Ensure that the SQL Server Browser service is running.
From the Start menu, start SQL Server Configuration Manager (Figure 29).
Figure 29
On the SQL Server Configuration Manager window (Figure 30), left-click the “SQL Server Services“ entry
in the left-side pane, then right-click “SQL Server Browser” in the right-side pane, then select Properties.
Figure 30
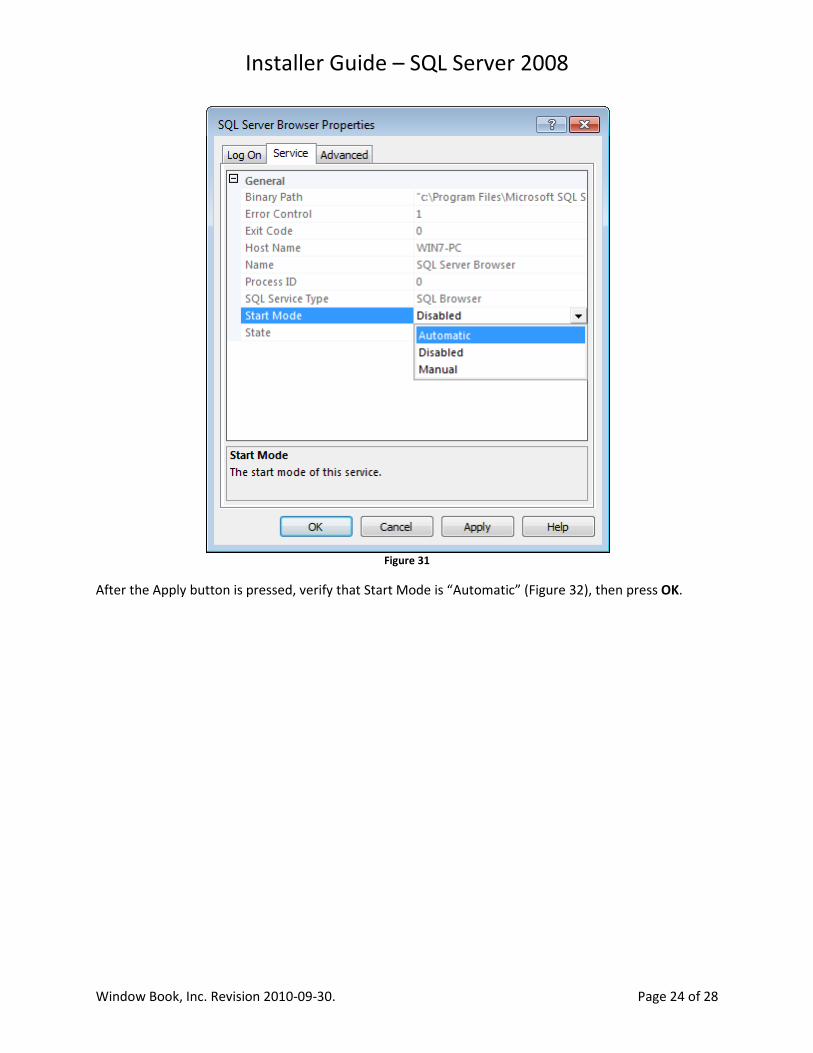
On the SQL Server Browser Properties window (Figure 31), on the Service tab, if Start Mode is not
already “Automatic”, select “Automatic” from the Start Mode drop-down box, then press Apply.
Installer Guide – SQL Server 2008
Window Book, Inc. Revision 2010-09-30. Page 24 of 28
Figure 31
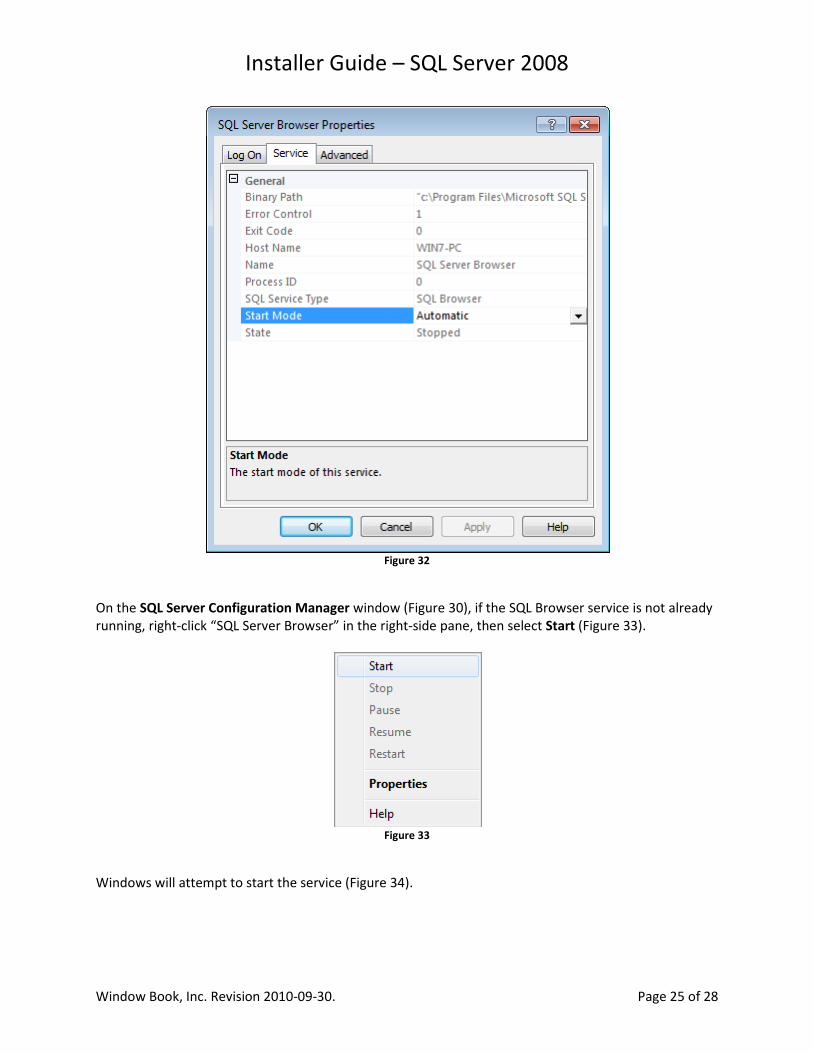
After the Apply button is pressed, verify that Start Mode is “Automatic” (Figure 32), then press OK.
Installer Guide – SQL Server 2008
Window Book, Inc. Revision 2010-09-30. Page 25 of 28
Figure 32
On the SQL Server Configuration Manager window (Figure 30), if the SQL Browser service is not already
running, right-click “SQL Server Browser” in the right-side pane, then select Start (Figure 33).
Figure 33
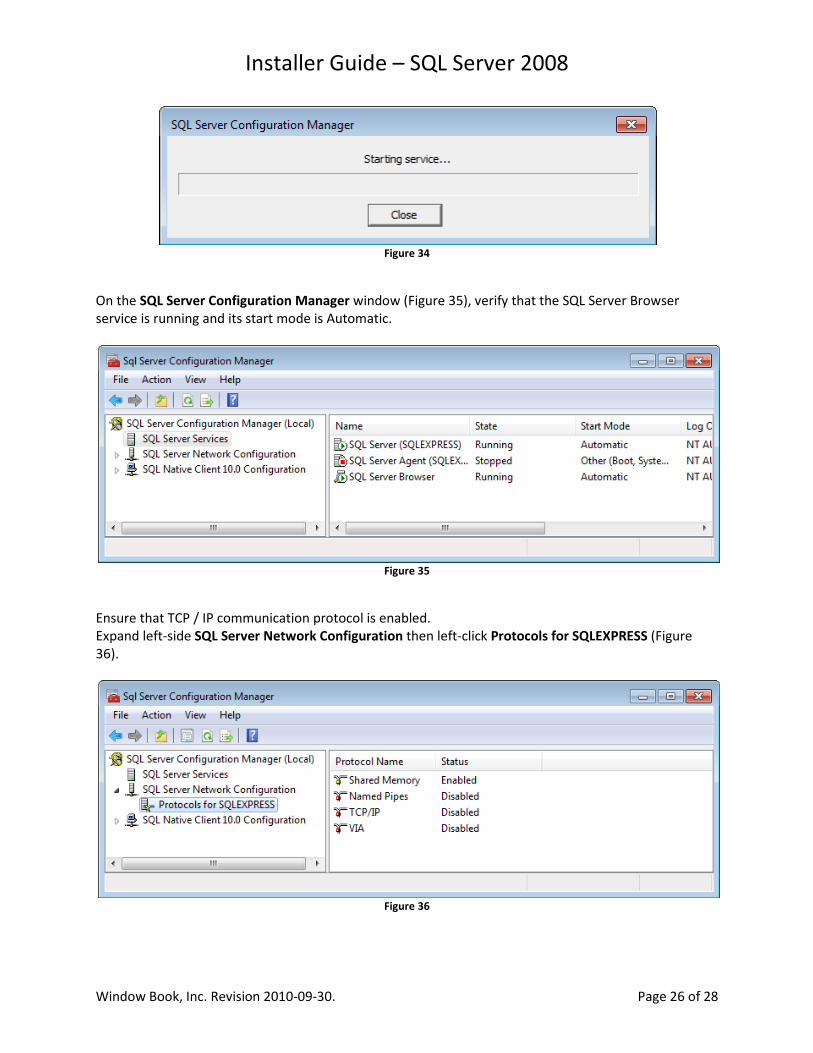
Windows will attempt to start the service (Figure 34).
Installer Guide – SQL Server 2008
Window Book, Inc. Revision 2010-09-30. Page 26 of 28
Figure 34
On the SQL Server Configuration Manager window (Figure 35), verify that the SQL Server Browser
service is running and its start mode is Automatic.
Figure 35
Ensure that TCP / IP communication protocol is enabled.
Expand left-side SQL Server Network Configuration then left-click Protocols for SQLEXPRESS (Figure
36).
Figure 36
Installer Guide – SQL Server 2008
Window Book, Inc. Revision 2010-09-30. Page 27 of 28
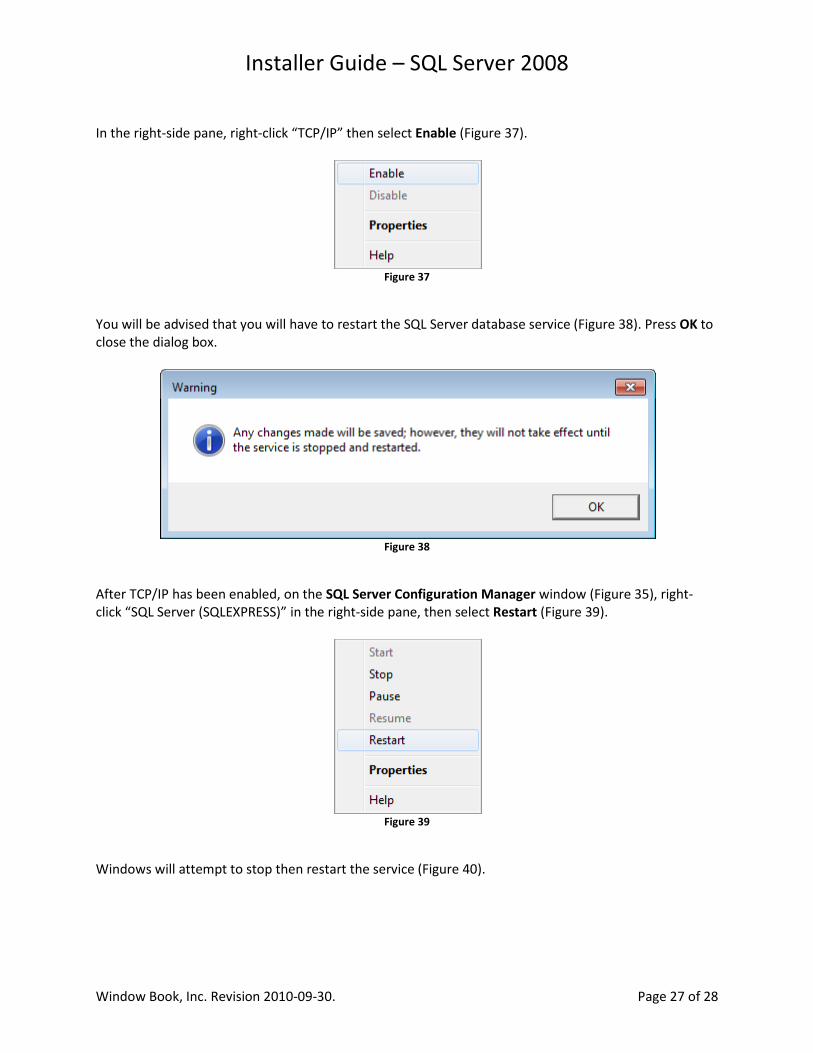
In the right-side pane, right-click “TCP/IP” then select Enable (Figure 37).
Figure 37
You will be advised that you will have to restart the SQL Server database service (Figure 38). Press OK to
close the dialog box.
Figure 38
After TCP/IP has been enabled, on the SQL Server Configuration Manager window (Figure 35), right-
click “SQL Server (SQLEXPRESS)” in the right-side pane, then select Restart (Figure 39).
Figure 39
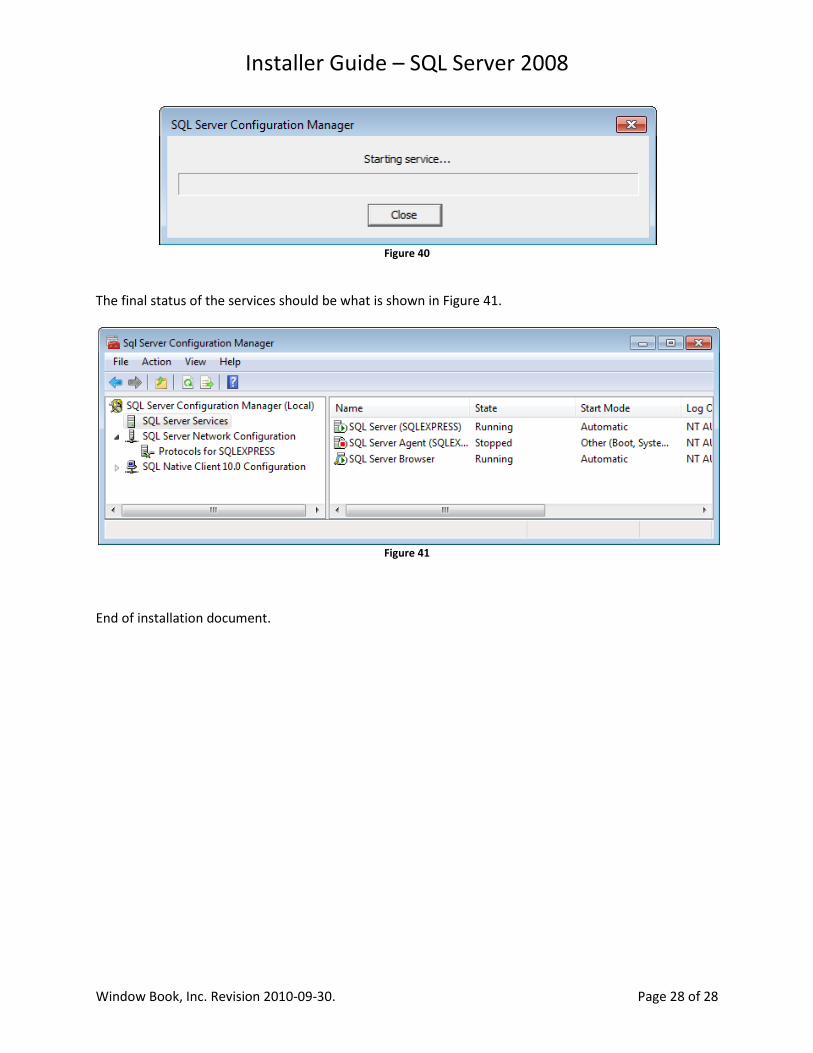
Windows will attempt to stop then restart the service (Figure 40).
Installer Guide – SQL Server 2008
Window Book, Inc. Revision 2010-09-30. Page 28 of 28
Figure 40
The final status of the services should be what is shown in Figure 41.
Figure 41
End of installation document.

![Installer SQL Server 2012 sur Windows Server 2012 · Installer SQL Server 2012 sur Windows Server 2012 août 3, 2012spasipeLaisser un commentaireAller aux commentaires 1 Vote [MAJ]](https://img.dokumen.tips/doc/110x75/5e7ad0f1aad2477bdc2c65cc/installer-sql-server-2012-sur-windows-server-installer-sql-server-2012-sur-windows.jpg)