Embed Size (px)
Citation preview

Autodesk®3ds Max
®/ Autodesk
®3ds Max
®Design 2012
InstallationOverview and FAQ
April 2011

Autodesk® 3ds Max® 2012/Autodesk® 3ds Max® Design 2012© 2011 Autodesk, Inc. All rights reserved. Except as otherwise permitted by Autodesk, Inc., this publication, or parts thereof, may notbe reproduced in any form, by any method, for any purpose.Certain materials included in this publication are reprinted with the permission of the copyright holder.RSA Data Security, Inc., MD5 Message-Digest Algorithm © 1991-2007 RSA Data Security, Inc. All rights reserved. RSA Data Security, Inc. makesno representations concerning either the merchantability of this software or the suitability of this software for any particular purpose. It is provided"as is" without express or implied warranty of any kind.The following are registered trademarks or trademarks of Autodesk, Inc., and/or its subsidiaries and/or affiliates in the USA and other countries:3DEC (design/logo), 3December, 3December.com, 3ds Max, Algor, Alias, Alias (swirl design/logo), AliasStudio, Alias|Wavefront (design/logo),ATC, AUGI, AutoCAD, AutoCAD Learning Assistance, AutoCAD LT, AutoCAD Simulator, AutoCAD SQL Extension, AutoCAD SQL Interface,Autodesk, Autodesk Intent, Autodesk Inventor, Autodesk MapGuide, Autodesk Streamline, AutoLISP, AutoSnap, AutoSketch, AutoTrack, Backburner,Backdraft, Beast, Built with ObjectARX (logo), Burn, Buzzsaw, CAiCE, Civil 3D, Cleaner, Cleaner Central, ClearScale, Colour Warper, Combustion,Communication Specification, Constructware, Content Explorer, Dancing Baby (image), DesignCenter, Design Doctor, Designer's Toolkit,DesignKids, DesignProf, DesignServer, DesignStudio, Design Web Format, Discreet, DWF, DWG, DWG (logo), DWG Extreme, DWG TrueConvert,DWG TrueView, DXF, Ecotect, Exposure, Extending the Design Team, Face Robot, FBX, Fempro, Fire, Flame, Flare, Flint, FMDesktop, Freewheel,GDX Driver, Green Building Studio, Heads-up Design, Heidi, HumanIK, IDEA Server, i-drop, Illuminate Labs AB (design/logo), ImageModeler,iMOUT, Incinerator, Inferno, Inventor, Inventor LT, Kynapse, Kynogon, LandXplorer, LiquidLight, LiquidLight (design/logo), Lustre, MatchMover,Maya, Mechanical Desktop, Moldflow, Moldflow Plastics Advisers, MPI, Moldflow Plastics Insight, Moldflow Plastics Xpert, Moondust, MotionBuilder,Movimento, MPA, MPA (design/logo), MPX, MPX (design/logo), Mudbox, Multi-Master Editing, Navisworks, ObjectARX, ObjectDBX, Opticore,Pipeplus, PolarSnap, PortfolioWall, Powered with Autodesk Technology, Productstream, ProMaterials, RasterDWG, RealDWG, Real-time Roto,Recognize, Render Queue, Retimer, Reveal, Revit, RiverCAD, Robot, Showcase, Show Me, ShowMotion, SketchBook, Smoke, Softimage,Softimage|XSI (design/logo), Sparks, SteeringWheels, Stitcher, Stone, StormNET, StudioTools, ToolClip, Topobase, Toxik, TrustedDWG, U-Vis,ViewCube, Visual, Visual LISP, Volo, Vtour, WaterNetworks, Wire, Wiretap, WiretapCentral, XSI.Acresso, AdminStudio, FLEXnet Connect, InstallShield, InstallShield Developer, InstallShield DevStudio, InstallShield Professional, OneClickInstall,and QuickPatch are registered trademarks or trademarks of Acresso Software Inc. and/or InstallShield Co. Inc. in the United States of Americaand/or other countries.ACE™, TAO™, CIAO™, and CoSMIC™ are copyrighted by Douglas C. Schmidt and his research group at Washington University, University ofCalifornia, Irvine, and Vanderbilt University, Copyright (c) 1993-2009, all rights reserved.ArchVision, realpeople, and RPC are either registered trademarks or trademarks of ArchVision, Inc.Spatial, ACIS, and SAT are either registered trademarks or trademarks of Spatial Corp. in the United States and/or other countries.D-Cubed is a trademark of Siemens Industry Software Limited.clothfx™ is a trademark of Size8 Software, Inc.mental ray and mental mill are registered trademarks of mental images GmbH licensed for use by Autodesk, Inc.Python is a registered trademark of Python Software Foundation.Microsoft, Direct3D, DirectX, Excel, Windows are either registered trademarks or trademarks of Microsoft Corp. in the United States and/orother countries.RSA is either a registered trademark or trademark of RSA Security, Inc., in the United States and/or other countries.Wise Solutions is either a registered trademark or trademark of Wise Solutions, Inc., in the United States and/or other countries.All other brand names, product names or trademarks belong to their respective holders.
DisclaimerTHIS PUBLICATION AND THE INFORMATION CONTAINED HEREIN IS MADE AVAILABLE BY AUTODESK, INC. "AS IS." AUTODESK, INC. DISCLAIMSALL WARRANTIES, EITHER EXPRESS OR IMPLIED, INCLUDING BUT NOT LIMITED TO ANY IMPLIED WARRANTIES OF MERCHANTABILITY ORFITNESS FOR A PARTICULAR PURPOSE REGARDING THESE MATERIALS.
Contents
Chapter 1 Autodesk 3ds Max 2012 Installation Overview and FAQ . . . . . 1Overview . . . . . . . . . . . . . . . . . . . . . . . . . . . . . . . . . . 1
Prepare for Installation . . . . . . . . . . . . . . . . . . . . . . . . 1Select Install Type . . . . . . . . . . . . . . . . . . . . . . . . . . . 2Specify License . . . . . . . . . . . . . . . . . . . . . . . . . . . . 3Configure and Install . . . . . . . . . . . . . . . . . . . . . . . . . 4Activate Products . . . . . . . . . . . . . . . . . . . . . . . . . . . 4Create Deployment . . . . . . . . . . . . . . . . . . . . . . . . . . 5Change Product Language . . . . . . . . . . . . . . . . . . . . . . 5
Frequently Asked Questions . . . . . . . . . . . . . . . . . . . . . . . . 6What if I have lost my serial number or product key? . . . . . . . . 7Why do I need to activate a product after installation? . . . . . . . 7How does a trial license work in a product suite or bundle?
. . . . . . . . . . . . . . . . . . . . . . . . . . . . . . . . . . . 7How do I switch my license from stand-alone to network or
network to stand-alone? . . . . . . . . . . . . . . . . . . . . . . 7Where can I find product license information after
installation? . . . . . . . . . . . . . . . . . . . . . . . . . . . . . 8After installation, how can I change product configuration,
repair, or uninstall the product? . . . . . . . . . . . . . . . . . . 8
Chapter 2 Installation Information Specific to Autodesk 3ds Max . . . . . . 9Switch from Online (Default) to Local Help . . . . . . . . . . . . . . . . 9
iii
Sub-Components Installed with 3ds Max . . . . . . . . . . . . . . . . 103ds Max Composite 2012 . . . . . . . . . . . . . . . . . . . . . . 10Autodesk Material Libraries . . . . . . . . . . . . . . . . . . . . . 10Autodesk Backburner 2012 . . . . . . . . . . . . . . . . . . . . . 11
Backburner for Managing and Monitoring Only . . . . . . . 12Tools and Utilities . . . . . . . . . . . . . . . . . . . . . . . . . . . . . 12Installing a 32-bit Product on a 64-bit Operating System . . . . . . . . 14
Index . . . . . . . . . . . . . . . . . . . . . . . . . . . . . . . . 15
iv | Contents

Autodesk 3ds Max 2012Installation Overviewand FAQ
OverviewThe following diagram shows the major parts of the installation process:
Further details are provided in the following sections.
Prepare for Installation
Before starting to install, check the following details:■ Confirm that your computer meets the minimum system requirements. If
in doubt, click System Requirements at the bottom of the installer screen.
■ Review product documentation to clarify details such as the type ofinstallation to do (stand-alone or network) and which products to install.Documentation is accessible from links on the lower left corner of theinstaller:
1
1

■ Ensure that your user name has Administrator permissions to installapplications on the computer or network.
■ Obtain serial numbers and product keys for all products you want to install.These are on the product package or provided at the time you downloadthe software.
■ Close all running applications.
Select Install Type
Here is some basic information to help you choose the right path.■ Install is recommended for individual users or small groups. The key
point is that you will repeat the installation process on each computer.This is the only valid installation type for a stand-alone license, but it canalso be used with a multi-seat stand-alone or network license.
■ Create Deployment is recommended for network administrators, usingeither a multi-seat stand-alone or network license. In the deploymentprocess, the installation is configured once, stored on the network, andthen distributed efficiently to users' computers.
For more information on deployments, see Create Deployment (page 5)or the Network Administrator's Guide.
■ Install Tools & Utilities is used to install tools and utilities related toyour suite or product. If you have a network license for your Autodeskproduct, you will need to use this option to install the Network LicenseManager before any users can run the product. Consult the documentationfor your suite or product to identify the available tools and utilities ofinterest.
Select Installer Language
On the first screen of the installer, you can select the language for the installerscreens, using this control on the upper right:
2 | Chapter 1 Autodesk 3ds Max 2012 Installation Overview and FAQ
For some Autodesk products, later in the install process you can select thelanguage for installed products. For more information, see Change ProductLanguage (page 5).
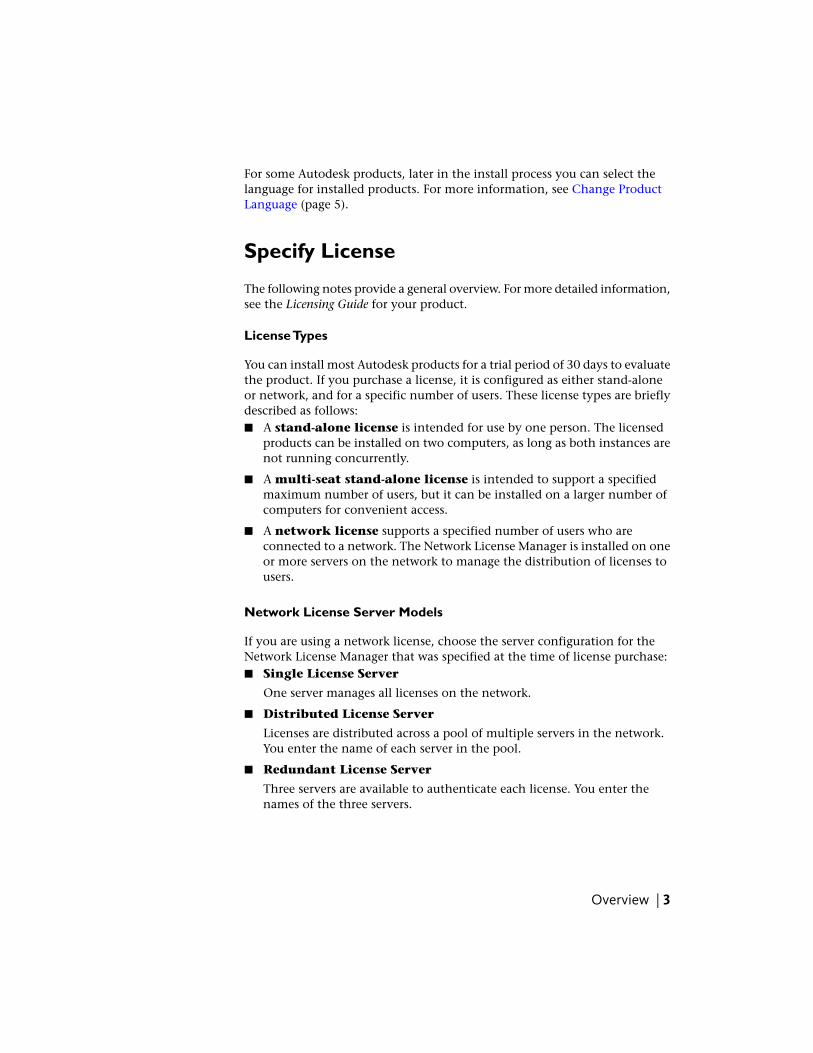
Specify License
The following notes provide a general overview. For more detailed information,see the Licensing Guide for your product.
License Types
You can install most Autodesk products for a trial period of 30 days to evaluatethe product. If you purchase a license, it is configured as either stand-aloneor network, and for a specific number of users. These license types are brieflydescribed as follows:■ A stand-alone license is intended for use by one person. The licensed
products can be installed on two computers, as long as both instances arenot running concurrently.
■ A multi-seat stand-alone license is intended to support a specifiedmaximum number of users, but it can be installed on a larger number ofcomputers for convenient access.
■ A network license supports a specified number of users who areconnected to a network. The Network License Manager is installed on oneor more servers on the network to manage the distribution of licenses tousers.
Network License Server Models
If you are using a network license, choose the server configuration for theNetwork License Manager that was specified at the time of license purchase:■ Single License Server
One server manages all licenses on the network.
■ Distributed License Server
Licenses are distributed across a pool of multiple servers in the network.You enter the name of each server in the pool.
■ Redundant License Server
Three servers are available to authenticate each license. You enter thenames of the three servers.
Overview | 3
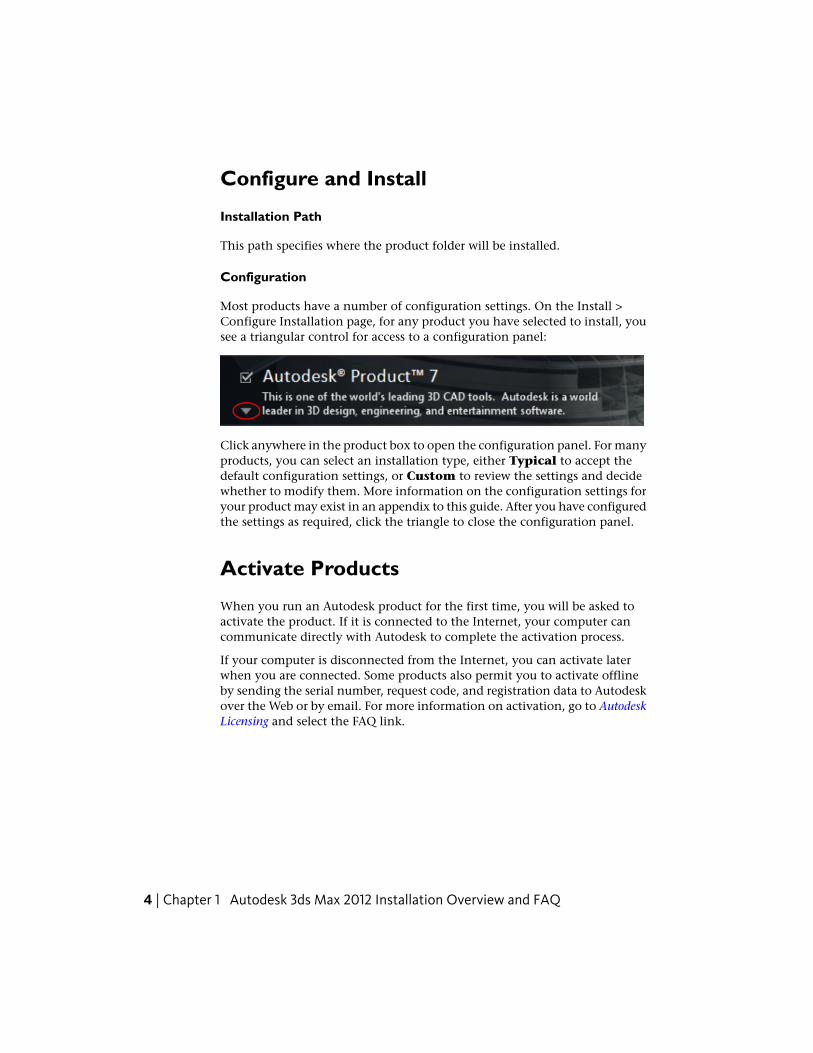
Configure and Install
Installation Path
This path specifies where the product folder will be installed.
Configuration
Most products have a number of configuration settings. On the Install >Configure Installation page, for any product you have selected to install, yousee a triangular control for access to a configuration panel:
Click anywhere in the product box to open the configuration panel. For manyproducts, you can select an installation type, either Typical to accept thedefault configuration settings, or Custom to review the settings and decidewhether to modify them. More information on the configuration settings foryour product may exist in an appendix to this guide. After you have configuredthe settings as required, click the triangle to close the configuration panel.
Activate Products
When you run an Autodesk product for the first time, you will be asked toactivate the product. If it is connected to the Internet, your computer cancommunicate directly with Autodesk to complete the activation process.
If your computer is disconnected from the Internet, you can activate laterwhen you are connected. Some products also permit you to activate offlineby sending the serial number, request code, and registration data to Autodeskover the Web or by email. For more information on activation, go to AutodeskLicensing and select the FAQ link.
4 | Chapter 1 Autodesk 3ds Max 2012 Installation Overview and FAQ
Create Deployment
Administrative Image
This is a customized set of installation files created by the deployment process.It is used to install a consistent configuration of programs on each computer.Other settings:■ Administrative image path. Specify a shared network location where
you have Full Control permissions. Users will go to this path to install theprograms.
■ Target platform. Select either 32-bit or 64-bit to match the operatingsystem of the computers that will use the deployment.
■ Include only products required by this deploymentconfiguration. If selected, the deployment cannot be modified in thefuture to include additional products. If unselected, the administrativeimage will include all possible products, and the deployment can bemodified in the future in any way.
Installation Settings
■ Silent mode runs the installation in background, without user input.
IMPORTANT In silent mode, the user's computer can restart automaticallyand without warning when the installation is complete.
■ A log file records installation data for each computer.
■ A network log file keeps a central record of installation data for allcomputers that run the deployment. It has the same name as yourdeployment, and must reside in a shared folder where users have Changepermissions, so that their computers can write to the log file.
Change Product Language
This topic does not apply to Autodesk products that provide each languageversion on separate media. For these products, you must specify the productlanguage when purchasing, and cannot change it.
For some Autodesk products, you can select the product language at the timeof installation, using this drop-down menu on the installer:
Overview | 5
If the language you want is not available from this control, and if you see theAdd Language option on the menu, you can add a language pack.
NOTE The Add Language Pack option is available only to subscription customers.
For deployments, language packs can be included in an administrative imagewhen you initially create a deployment, or when you create a new deploymentconfiguration, but not when you modify a deployment.
To Download a Language Pack
You can obtain language packs from the Subscription Center website, as follows:
1 On the Select the Products to Install page, click the language drop-downarrow and select Add Language Pack.
2 In the Language Pack dialog box, click the Browse button and select thelanguage pack downloaded from the subscription center.
The following rules apply to language selection:
■ Only one language can be chosen per installation session. For example,you cannot chose English for one product and German for another productduring the same installation.
■ Deployments must be in a single language. One administrative image cansupport deployments for different languages, but each deployment is forone language.
■ If you are modifying a deployment, or creating a new deployment usingan existing deployment as a template, you cannot change the language ofthe deployment.
■ If you select a language that is not supported by some products, a defaultlanguage is chosen.
Frequently Asked QuestionsFor advice and assistance with topics not covered here, go to Autodesk Support,click your product name, and search in the Knowledgebase for your product.
6 | Chapter 1 Autodesk 3ds Max 2012 Installation Overview and FAQ
What if I have lost my serial number orproduct key?
Check your product packaging or purchase records, if available, or contactAutodesk Customer Service for assistance.
Why do I need to activate a product afterinstallation?
Activation verifies for Autodesk and for you as a license holder that yourAutodesk product is installed on an eligible computer. The activation processimproves license security and management. For example, it ensures that amulti-seat license is not in use by more than the authorized number of users.
How does a trial license work in a productsuite or bundle?
A single trial period, usually 30 days, applies to all Autodesk products in thesuite or bundle. When the first product is started, the trial period countdownbegins for all products. If the user does not activate one of the products beforethe trial period ends, access to all of the products is denied. After the trialperiod ends, the user can restore access to the products by entering anactivation code.
How do I switch my license from stand-aloneto network or network to stand-alone?
If you simply entered the wrong license type by mistake, and are still runningthe installer, use the Back button to return to the Product Information dialog,and change the license type.
If you want to change the license type for an installed product, contact yourAutodesk reseller or license supplier to obtain the new license and serialnumber. Then uninstall your product and run a new install to change thelicense type and enter the new serial number.
Frequently Asked Questions | 7
Where can I find product licenseinformation after installation?
Select Help menu About, or About [Product Name]. If your product usesInfoCenter, that is where you can find the Help menu.
After installation, how can I change productconfiguration, repair, or uninstall theproduct?
1 Go to the Windows control panel:■ Windows XP: On the Start menu, click Settings Control Panel Add
or Remove Programs.
■ Windows Vista or 7: On the Start menu, click Settings ControlPanel Programs/Uninstall a Program.
2 In Windows control panel, click the product name, and then clickChange/Remove (Windows XP) or Uninstall/Change (Windows Vistaand 7).
The Installer opens in maintenance mode, and directs you through theprocess.
8 | Chapter 1 Autodesk 3ds Max 2012 Installation Overview and FAQ
Installation InformationSpecific to Autodesk3ds Max
Certain items are unique to the Autodesk® 3ds Max
® / Autodesk
® 3ds Max
® Design
install process (in contrast with other Autodesk products). In this chapter learn aboutthe process for switching to the local version of the help and the sub-componentsand tools and utilities that ship with 3ds Max (also includes 3ds Max Design unlessotherwise noted). Also learn how to install the 32-bit version of 3ds Max on a 64-bitmachine.
Switch from Online (Default) to Local HelpBy default the Help in 3ds Max is internet-based. If you do not have a dedicatedinternet connection, you can download a local version of your help. To overridethe default behavior you then need to change the corresponding preference.
1 Download and run the Help installer fromwww.autodesk.com/3dsmax-helpdownload-enu.
2 Once installed, in 3ds Max / 3ds Max Design go to Customize > Preferences> Help Tab and select Local Computer / Network.
NOTE If you are using the default path this is all you need to do. Change the pathif you have not used the default location. To revert to the default location (whichmatches the Help installer's default), click Reset. You an switch back to the onlineversion of the Help at any time, which is the most up-to-date version of the Helpavailable.
2
9
Sub-Components Installed with 3ds MaxThe sub-components installed with Autodesk 3ds Max 2012 include 3ds MaxComposite 2012, the various Autodesk Material Libraries, and AutodeskBackburner 2012. The only optional sub-component is 3ds Max Composite.
3ds Max Composite 2012
When installing 3ds Max, 3ds Max Composite is checked for install by default.3ds Max Composite 2012 includes:■ Raster and Vector Paint
■ Image Processing
■ Color Correction
■ Keying and Rotoscoping
■ Stereoscopic Production Support
■ Motion Blur
■ Advanced 2D Tracking
■ Camera Mapping
■ Depth of Field
■ Node and Layer-based Compositing Options
■ Spline-Based Warping
■ Enhanced Render Passes
■ Data Managing and Collaborating
Autodesk Material Libraries
The Autodesk Material Libraries are shared libraries installed with Autodeskproducts such as Inventor, AutoCAD, Revit and 3ds Max. These three itemsare selected for install by default when you install 3ds Max. They might beinstalled already, if one of these applications is already installed.
NOTE If you uninstall or remove a library, the library is no longer available for anyproducts. Uninstalling also means you will be unable to view or display scenes thathave Autodesk Materials currently in them.
10 | Chapter 2 Installation Information Specific to Autodesk 3ds Max
The Autodesk Material Library consists of three sub-libraries:■ Autodesk Material Library 2012: Contains the material appearances used
for Realistic Appearance in color styles. This component is installed bydefault, and it is required for 3ds Max to have full visual style and colorstyle functionality. It is recommended you do not uninstall this componentunless you are also uninstalling all Autodesk products that require thislibrary.
■ Autodesk Material Library 2012 Base Image Library: Contains low-resolution(approximately 512 x 512) images for use with Autodesk Materials. This isalso installed by default.
■ Autodesk Material Library 2012 Medium Image Library: Containsmedium-resolution (approximately 1024 x 1024) images for renderingmaterials in medium detail. This library is used for close-ups, and forrendering objects at a larger scale. This library is an installation optionavailable on the Select Products to Install page in the installation wizard.
NOTE To reinstall the material libraries, run the corresponding MSI:■ Autodesk Material Library 2012 -
\Content\ADSKMaterials\2012\CM\MaterialLibrary2012.msi
■ Autodesk Material Library 2012 Base Image Library -\Content\ADSKMaterials\2012\ILB\BaseImageLibrary.msi
■ Autodesk Material Library 2012 Medium Image Library -\Content\ADSKMaterials\2012\ILM\MediumImageLibrary.msi
Autodesk Backburner 2012
Autodesk© Backburner
™is the 3ds Max network-rendering management
software, also used by products such as Autodesk© Flame
©, and Autodesk
©
Smoke©. Backburner is a required install and is installed by default when you
install Autodesk 3ds Max 2012 / Autodesk 3ds Max Design 2012. You mustuninstall older versions of Backburner before installing Backburner 2012.Backburner 2012 is backward compatible but settings do no migrate fromearlier versions. For information about using Backburner from inside 3ds Max,refer to the "Network Rendering" section in the "Rendering" chapter of the 3dsMax Help. For further information about installing and using Backburner seethe Help menu in the Backburner Manager.
Sub-Components Installed with 3ds Max | 11
Backburner for Managing and Monitoring Only
You can install Autodesk Backburner on a machine without 3ds Max or 3dsMax Design. However, such an installation of Autodesk Backburner cannotbe used for rendering. You can use this machine only to manage or monitorjobs. Although the Autodesk Backburner server can be installed on a singlemachine, it will not do anything; it will work only if it detects a supportedprogram such as Autodesk 3ds Max, Autodesk 3ds Max Design, AutodeskFlame, or Autodesk Smoke. This means that you must have AutodeskBackburner installed with at least one additional Autodesk product for amachine in your configuration to be capable of rendering.
Tools and UtilitiesThe following table summarizes the optional installs available from the 3dsMax / 3ds Max Design Tools and Utilities section in the installer.
Website:Description:Tool or Utility:
www.autodesk.com/devel-op3dsmax
Use the SDK to create newAutodesk 3ds Max featuresand tools by writing yourown plug-ins.
Autodesk 3ds Max 2012SDK
NOTE The SDK is notshipped with Autodesk 3dsMax Design.
www.autodesk.com/me-licens-ing-2012-enu
You must install the Net-work License Manager ifyou are using network licens-ing.
Network License Manager
www.allegorithmic.com/Install the Allegorithmic -Substance Bonus Pack (Extra
Allegorithmic - SubstanceBonus Pack (Designer andPlayer) Content) for additional sub-
stances that work with theSubstance Designer trial,that is also included.
12 | Chapter 2 Installation Information Specific to Autodesk 3ds Max
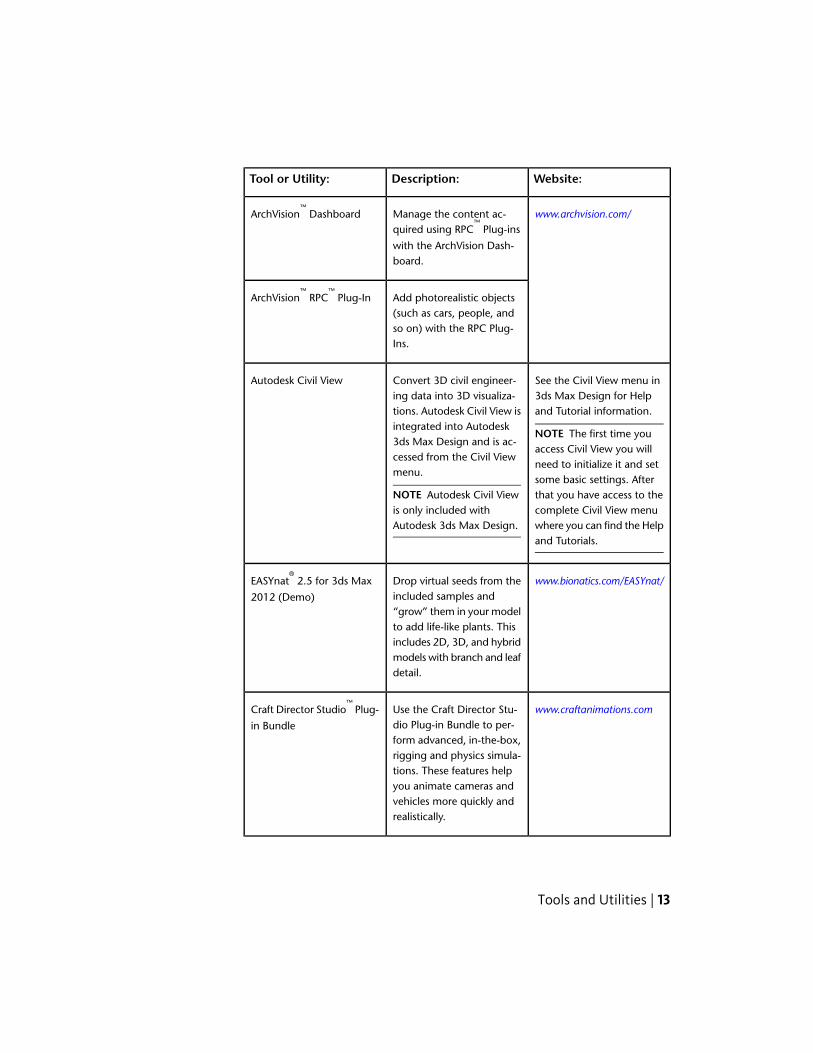
Website:Description:Tool or Utility:
www.archvision.com/Manage the content ac-quired using RPC
™ Plug-ins
ArchVision™
Dashboard
with the ArchVision Dash-board.
Add photorealistic objects(such as cars, people, and
ArchVision™
RPC™
Plug-In
so on) with the RPC Plug-Ins.
See the Civil View menu in3ds Max Design for Helpand Tutorial information.
NOTE The first time youaccess Civil View you willneed to initialize it and setsome basic settings. Afterthat you have access to thecomplete Civil View menuwhere you can find the Helpand Tutorials.
Convert 3D civil engineer-ing data into 3D visualiza-tions. Autodesk Civil View isintegrated into Autodesk3ds Max Design and is ac-cessed from the Civil Viewmenu.
NOTE Autodesk Civil Viewis only included withAutodesk 3ds Max Design.
Autodesk Civil View
www.bionatics.com/EASYnat/Drop virtual seeds from theincluded samples and
EASYnat® 2.5 for 3ds Max
2012 (Demo)“grow” them in your modelto add life-like plants. Thisincludes 2D, 3D, and hybridmodels with branch and leafdetail.
www.craftanimations.comUse the Craft Director Stu-dio Plug-in Bundle to per-
Craft Director Studio™
Plug-
in Bundleform advanced, in-the-box,rigging and physics simula-tions. These features helpyou animate cameras andvehicles more quickly andrealistically.
Tools and Utilities | 13
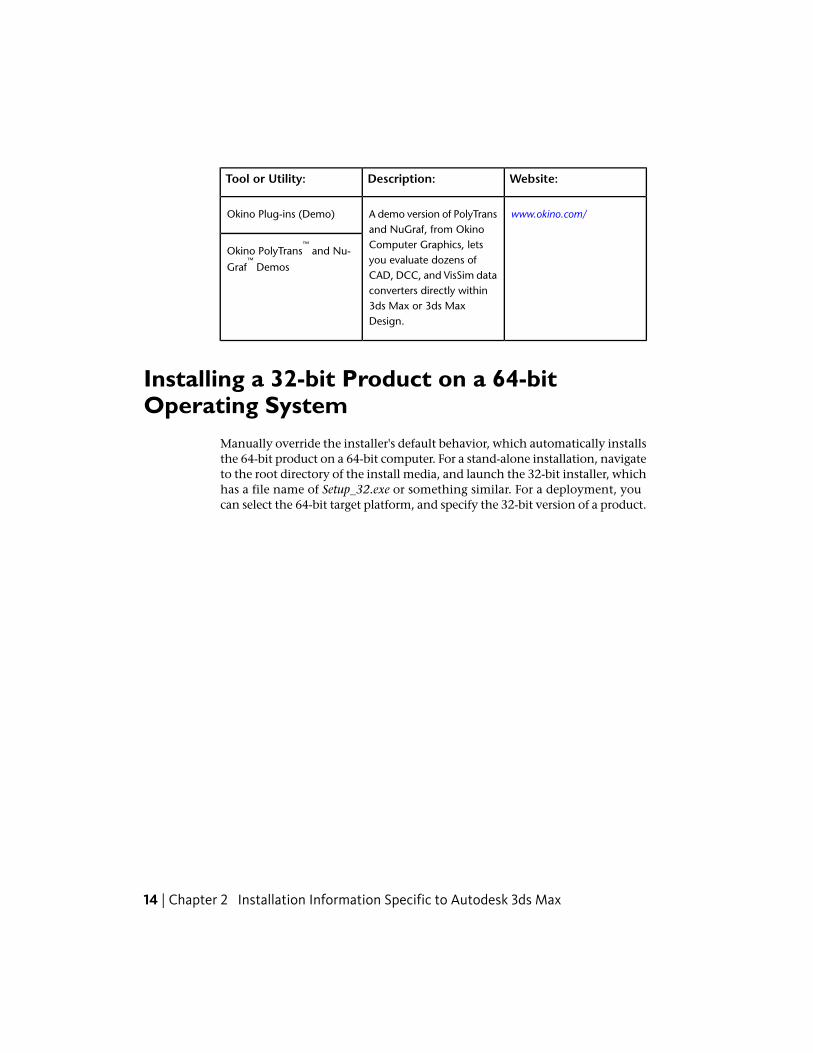
Website:Description:Tool or Utility:
www.okino.com/A demo version of PolyTransand NuGraf, from Okino
Okino Plug-ins (Demo)
Okino PolyTrans™
and Nu-
Graf™
Demos
Computer Graphics, letsyou evaluate dozens ofCAD, DCC, and VisSim dataconverters directly within3ds Max or 3ds MaxDesign.
Installing a 32-bit Product on a 64-bitOperating System
Manually override the installer's default behavior, which automatically installsthe 64-bit product on a 64-bit computer. For a stand-alone installation, navigateto the root directory of the install media, and launch the 32-bit installer, whichhas a file name of Setup_32.exe or something similar. For a deployment, youcan select the 64-bit target platform, and specify the 32-bit version of a product.
14 | Chapter 2 Installation Information Specific to Autodesk 3ds Max
Index
32-bit install on 64-bit machine 143ds Max Composite 103ds Max specific information 9
A
activation 4, 7administrative image 5Autodesk Material Libraries
3ds Max 10
B
Backburner 11
C
change license type 7configuration settings 4custom settings 4
D
distributed license server 3documentation links 1
I
InfoCenter 8installation log 5installation process diagram 1
K
Knowledgebase 6
L
languages 2, 5
license server models 3license types 3
change 7local help
installing for 3ds Max 9log files 5
N
network license 2
O
operating system selection 5
P
product settings 4
R
redundant license server 3repair product 8
S
serial number 1, 7silent mode 5single license server 3stand-alone license 2sub-components
3ds Max 10suite 7system requirements 1
T
tools and utilities 23ds Max 12
typical settings 4
15 | Index

U uninstall product 8
16 | Index