Embed Size (px)
Citation preview
B1WD-2773-06ENZ0(00)March 2012
Windows
Systemwalker Desktop Keeper V14g
Installation Guide

Preface
Purpose of This GuideThis guide describes how to use the following products:
- Systemwalker Desktop Keeper V14g(14.2.0)
The target readers of this guide are the users of Windows.
Intended Readers
This guide is for readers who construct/apply information protection systems using Systemwalker Desktop Keeper.This guide assumes readers have the following knowledge:
- General knowledge of PCs
- General knowledge of Microsoft® Windows
- General knowledge of the Internet
- General knowledge of Microsoft® SQL Server (when updating from V12)
- General knowledge of VMware ViewTM (when installing client (CT) in the VMware ViewTM environment)
- General knowledge of Citrix XenDesktopTM (when installing client (CT) in the VMware ViewTM environment)
- General knowledge of Citrix XenAppTM (when using the monitoring function of Citrix XenAppTM)
Structure of This Guide
This guide consists of 5 chapters.
Chapter 1 Design
This chapter introduces the design of Systemwalker Desktop Keeper.
Chapter 2 Installation
This chapter describes how to install Systemwalker Desktop Keeper.
Chapter 3 Maintenance
This chapter describes how to maintain Systemwalker Desktop Keeper.
Chapter 4 Version Upgrade
This chapter describes how to update from old versions of Systemwalker Desktop Keeper to Systemwalker Desktop Keeper V14.2.0.
Chapter 5 Uninstallation
This chapter describes how to uninstall Systemwalker Desktop Keeper.
Location of This Guide
The location of this guide in Systemwalker Desktop Keeper manuals is as follows.
Manual Name Content
Systemwalker Desktop KeeperUser’s Guide
This guide describes the summary and the operating environment ofSystemwalker Desktop Keeper.
Systemwalker Desktop KeeperInstallation Guide (This Guide)
This guide describes the installation settings, as well as maintenanceand management measures for Systemwalker Desktop Keeper.
- i -
Manual Name Content
Systemwalker Desktop KeeperUser's Guide: for Administrator
This guide describes how to use Systemwalker Desktop Keeper.
Systemwalker Desktop KeeperUser's Guide : for Client (Note)
This guide describes the function summary and operation methods ofSystemwalker Desktop Keeper Export Utility.
Systemwalker Desktop KeeperReference Manual
This manual describes the commands, files, messages and port numbersused in Systemwalker Desktop Keeper.
Systemwalker Desktop KeeperTroubleshooting Guide
This guide describes the causes and processing methods for assumedexceptions in Systemwalker Desktop Keeper.
Note: "Systemwalker Desktop Keeper User's Guide for Client" can also be viewed from the "Help" menu of the Systemwalker DesktopKeeper Export Utility.
Notations
For the convenience of description, this guide uses the following names, symbols and abbreviations.
Symbols Used in Commands
This subsection describes the symbols used in examples of commands.Meaning of symbol
Symbol Meaning
[ ] Indicates that the items enclosed in these brackets can be omitted.
| Indicates that one of the items separated by this symbol should be selected.
Icons
The following icons are used in manuals.
Note
The above symbol applies to items requiring special attention.
Point
The above symbol applies to skills required for more efficient use of this software.
Abbreviations
The manual uses abbreviations of the following products.
Product Name Abbreviation
Systemwalker Desktop Keeper Base Edition V12.0L10 BEV12.0L10
Systemwalker Desktop Keeper Base Edition V12.0L20 BEV12.0L20
Systemwalker Desktop Keeper Base Edition V13.0.0 BEV13.0.0
Systemwalker Desktop Keeper Base Edition V13.2.0 BEV13.2.0
Systemwalker Desktop Keeper Base Edition V13.3.0 BEV13.3.0
- ii -
Product Name Abbreviation
Systemwalker Desktop Keeper Standard Edition V12.0L20 SEV12.0L20
Systemwalker Desktop Keeper Standard Edition V13.0.0 SEV13.0.0
Systemwalker Desktop Keeper Standard Edition V13.2.0Systemwalker Desktop Keeper Standard Edition V13.2.1
SEV13.2.0
Systemwalker Desktop Keeper Standard Edition V13.3.0 SEV13.3.0
Systemwalker Desktop Keeper V14g (14.0.0) V14.0.0
Systemwalker Desktop Keeper V14g (14.0.1) V14.0.1
Systemwalker Desktop Keeper V14g (14.1.0) V14.1.0
Systemwalker Desktop Keeper V14g (14.2.0) V14.2.0
Microsoft® Internet Explorer® 6.0Windows® Internet Explorer® 7Windows® Internet Explorer® 8Windows® Internet Explorer® 9
Internet Explorer®
The manual uses abbreviations of the following operation systems.
OS Abbreviation
Microsoft® Windows Server® 2008 Foundation, Microsoft® Windows Server® 2008 Standard, Microsoft® Windows Server® 2008 Enterprise, Microsoft® Windows Server® 2008 Standard without Hyper-V™, Microsoft® Windows Server® 2008 Enterprise without Hyper-V™, Microsoft® Windows Server® 2008 R2 Foundation, Microsoft® Windows Server® 2008 R2 Standard, Microsoft® Windows Server® 2008 R2 EnterpriseMicrosoft® Windows Server® Small Business Server 2011 Essentials
Windows Server® 2008 (*)
Microsoft® Windows Server® 2003, Standard Edition, Microsoft® Windows Server® 2003, Enterprise Edition, Microsoft® Windows Server® 2003, Standard x64 Edition, Microsoft® Windows Server® 2003, Enterprise x64 EditionMicrosoft® Windows Server® 2003 R2, Standard Edition, Microsoft® Windows Server® 2003 R2, Enterprise Edition, Microsoft® Windows Server® 2003 R2, Standard x64 EditionMicrosoft® Windows Server® 2003 R2, Enterprise x64 Edition
Windows Server® 2003 (*)
Microsoft® Windows® 2000 Professional operating system, Microsoft® Windows® 2000 Server operating system, Microsoft® Windows® 2000 Advanced Server operating system
Windows® 2000
Microsoft® Windows NT® Server Version 4.0, Microsoft® Windows NT® Workstation Version 4.0
Windows NT®
Microsoft® Windows® XP Professional, Microsoft® Windows® XP Home Edition
Windows® XP (*)
Windows Vista® Home Basic, Windows Vista® Home Premium, Windows Vista® Business, Windows Vista® Enterprise, Windows Vista® Ultimate
Windows Vista® (*)
Windows® 7 Ultimate, Windows® 7 Enterprise, Windows® 7 Professional, Windows® 7 Home Premium
Windows® 7 (*)
- iii -
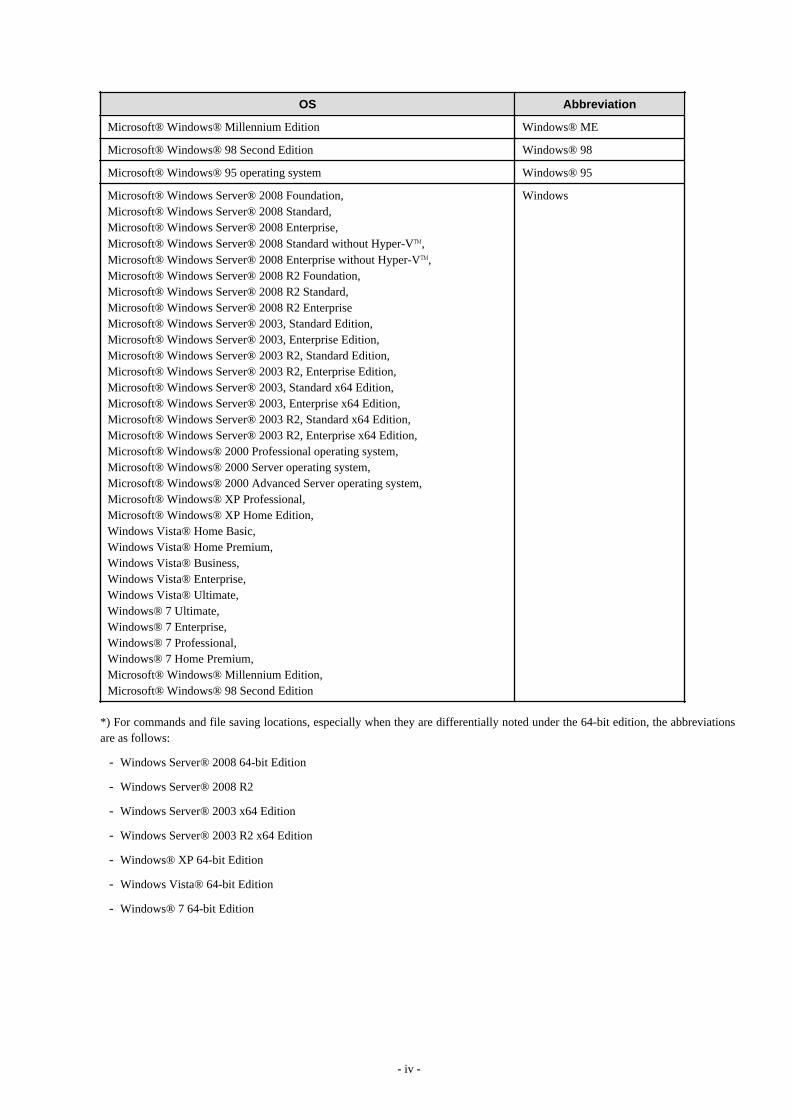
OS Abbreviation
Microsoft® Windows® Millennium Edition Windows® ME
Microsoft® Windows® 98 Second Edition Windows® 98
Microsoft® Windows® 95 operating system Windows® 95
Microsoft® Windows Server® 2008 Foundation, Microsoft® Windows Server® 2008 Standard, Microsoft® Windows Server® 2008 Enterprise, Microsoft® Windows Server® 2008 Standard without Hyper-V™, Microsoft® Windows Server® 2008 Enterprise without Hyper-V™, Microsoft® Windows Server® 2008 R2 Foundation, Microsoft® Windows Server® 2008 R2 Standard, Microsoft® Windows Server® 2008 R2 EnterpriseMicrosoft® Windows Server® 2003, Standard Edition, Microsoft® Windows Server® 2003, Enterprise Edition, Microsoft® Windows Server® 2003 R2, Standard Edition, Microsoft® Windows Server® 2003 R2, Enterprise Edition, Microsoft® Windows Server® 2003, Standard x64 Edition, Microsoft® Windows Server® 2003, Enterprise x64 Edition, Microsoft® Windows Server® 2003 R2, Standard x64 Edition, Microsoft® Windows Server® 2003 R2, Enterprise x64 Edition, Microsoft® Windows® 2000 Professional operating system, Microsoft® Windows® 2000 Server operating system, Microsoft® Windows® 2000 Advanced Server operating system, Microsoft® Windows® XP Professional, Microsoft® Windows® XP Home Edition, Windows Vista® Home Basic, Windows Vista® Home Premium, Windows Vista® Business, Windows Vista® Enterprise, Windows Vista® Ultimate, Windows® 7 Ultimate, Windows® 7 Enterprise, Windows® 7 Professional, Windows® 7 Home Premium, Microsoft® Windows® Millennium Edition, Microsoft® Windows® 98 Second Edition
Windows
*) For commands and file saving locations, especially when they are differentially noted under the 64-bit edition, the abbreviationsare as follows:
- Windows Server® 2008 64-bit Edition
- Windows Server® 2008 R2
- Windows Server® 2003 x64 Edition
- Windows Server® 2003 R2 x64 Edition
- Windows® XP 64-bit Edition
- Windows Vista® 64-bit Edition
- Windows® 7 64-bit Edition
- iv -
Specific Operations of Operation SystemFor specific operations of the operating system (such as LAN connection), this manual takes Windows Server® 2003 as an example fordescription. For operations apart from Windows Server® 2003, please refer to the operation methods of the respective operating systems.
Export Restriction
Our documentation may contain certain technologies subject to regulation by the Foreign Exchange and Foreign Trade Control Law. Theexport of any document that contains such technologies and supply of such a document to any nonresident requires an appropriate exportlicense under the above law.
General Restriction
The following functions are recorded in this manual but cannot be used.
(These functions can be used in the Japanese version, but are not available in English and Chinese versions.)
- Prohibition Function
- Encryption Function in File Export
- Encryption Function in E-mail Attachment
- Logon Prohibition Function
- E-mail Attachment Prohibition Function
- E-mail Recipient Address Confirmation Function
- USB Device Individual Identification Function
- Record Function
- Command Prompt Operation
- Citrix XenApp Monitoring Function
- Others
- Notification to Client
- All-in-one Machine Linkage Report
In addition, for the specification of characters recorded in this manual, please pay attention to the following points:
- For character code, please replace Shift-JIS with local character code (character code that corresponds to the code page on OS).
- Please replace ”Japanese” or ”Double-byte” with multi-byte character.
- For number of characters that can be used, multi-byte characters such as double-byte in this manual are calculated as 2 bytes, but whenactually saving to database, one character may occupy 2~6 bytes, please pay attention.
The following versions do not exist, please ignore relevant record.
Systemwalker Desktop Keeper Base Edition V12.0L10
Systemwalker Desktop Keeper Base Edition V12.0L20
Systemwalker Desktop Keeper Base Edition V13.0.0
Systemwalker Desktop Keeper Base Edition V13.2.0
- v -
Systemwalker Desktop Keeper Base Edition V13.3.0
Systemwalker Desktop Keeper Standard Edition V13.2.1
Systemwalker Desktop Keeper Standard Edition V13.3.0
Systemwalker Desktop Keeper V14g (14.0.0)
Systemwalker Desktop Keeper V14g (14.0.1)
Systemwalker Desktop Keeper V14g (14.1.0)
For example, when it is described as “V13.3.0 or later”, since V13.3.0 does not exist, please replace it with “V14.2.0 or later. In addition,when it is described as ”V14.0.0 or earlier”, please replace it with “V13.2.0 or earlier” for the same reason.
Trademarks
Microsoft, Windows, Windows Vista and Windows Server or other Microsoft product names are trademarks or registered trademarks ofMicrosoft Corporation in the United States and other countries.
Citrix, Xen, Citrix XenApp, Citrix XenServer, Citrix XenDesktop and Citrix Presentation Server are trademarks or registered trademarksCitrix Systems, Inc in the United States and other countries.
Vmware is registered trademark or trademark of VMware, Inc. in the United States and other countries.
Other product names are trademarks or registered trademarks of their respective holders.
Screenshots are used according to the guidelines of Microsoft Corporation
March 2012
Revision History
March 2012, First Edition
Copyright 2005 - 2012 FUJITSU LIMITED
- vi -
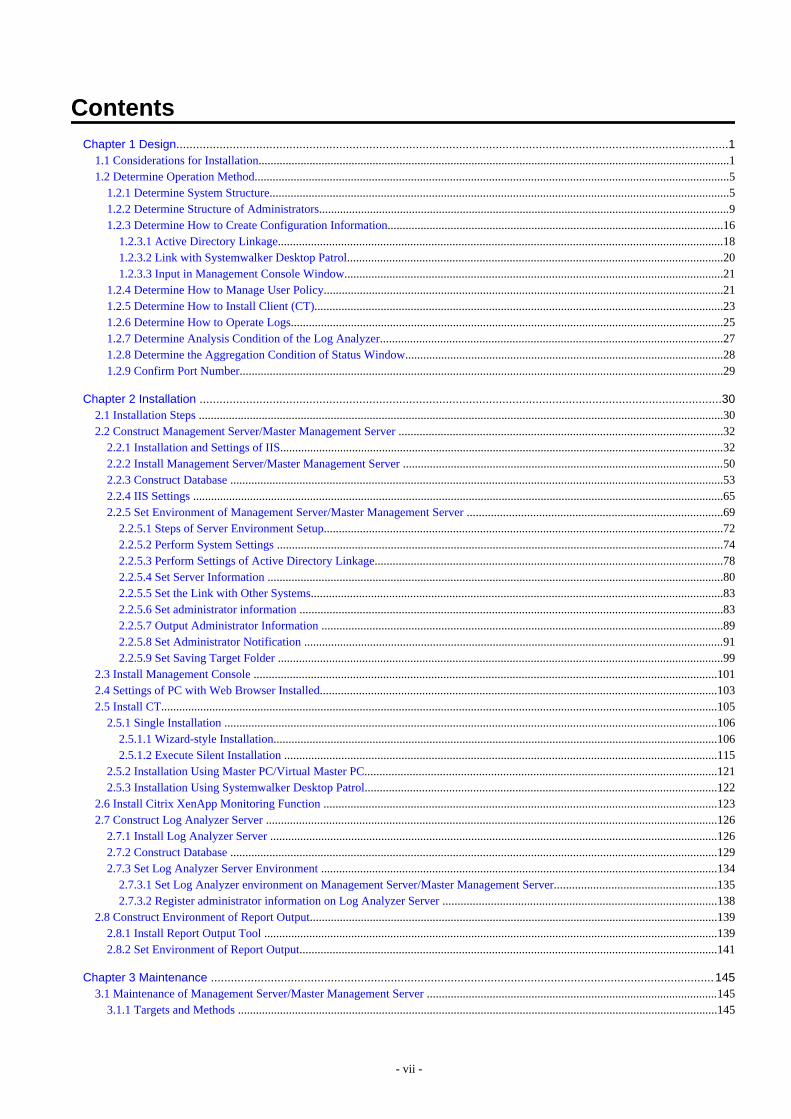
ContentsChapter 1 Design......................................................................................................................................................................1
1.1 Considerations for Installation.............................................................................................................................................................11.2 Determine Operation Method..............................................................................................................................................................5
1.2.1 Determine System Structure.........................................................................................................................................................51.2.2 Determine Structure of Administrators.........................................................................................................................................91.2.3 Determine How to Create Configuration Information................................................................................................................16
1.2.3.1 Active Directory Linkage....................................................................................................................................................181.2.3.2 Link with Systemwalker Desktop Patrol.............................................................................................................................201.2.3.3 Input in Management Console Window..............................................................................................................................21
1.2.4 Determine How to Manage User Policy.....................................................................................................................................211.2.5 Determine How to Install Client (CT)........................................................................................................................................231.2.6 Determine How to Operate Logs................................................................................................................................................251.2.7 Determine Analysis Condition of the Log Analyzer..................................................................................................................271.2.8 Determine the Aggregation Condition of Status Window..........................................................................................................281.2.9 Confirm Port Number.................................................................................................................................................................29
Chapter 2 Installation .............................................................................................................................................................302.1 Installation Steps ...............................................................................................................................................................................302.2 Construct Management Server/Master Management Server ............................................................................................................32
2.2.1 Installation and Settings of IIS....................................................................................................................................................322.2.2 Install Management Server/Master Management Server ...........................................................................................................502.2.3 Construct Database ....................................................................................................................................................................532.2.4 IIS Settings .................................................................................................................................................................................652.2.5 Set Environment of Management Server/Master Management Server .....................................................................................69
2.2.5.1 Steps of Server Environment Setup.....................................................................................................................................722.2.5.2 Perform System Settings .....................................................................................................................................................742.2.5.3 Perform Settings of Active Directory Linkage....................................................................................................................782.2.5.4 Set Server Information ........................................................................................................................................................802.2.5.5 Set the Link with Other Systems.........................................................................................................................................832.2.5.6 Set administrator information .............................................................................................................................................832.2.5.7 Output Administrator Information ......................................................................................................................................892.2.5.8 Set Administrator Notification ............................................................................................................................................912.2.5.9 Set Saving Target Folder ....................................................................................................................................................99
2.3 Install Management Console ..........................................................................................................................................................1012.4 Settings of PC with Web Browser Installed....................................................................................................................................1032.5 Install CT.........................................................................................................................................................................................105
2.5.1 Single Installation ....................................................................................................................................................................1062.5.1.1 Wizard-style Installation....................................................................................................................................................1062.5.1.2 Execute Silent Installation ................................................................................................................................................115
2.5.2 Installation Using Master PC/Virtual Master PC.....................................................................................................................1212.5.3 Installation Using Systemwalker Desktop Patrol.....................................................................................................................122
2.6 Install Citrix XenApp Monitoring Function ...................................................................................................................................1232.7 Construct Log Analyzer Server ......................................................................................................................................................126
2.7.1 Install Log Analyzer Server .....................................................................................................................................................1262.7.2 Construct Database ..................................................................................................................................................................1292.7.3 Set Log Analyzer Server Environment ....................................................................................................................................134
2.7.3.1 Set Log Analyzer environment on Management Server/Master Management Server......................................................1352.7.3.2 Register administrator information on Log Analyzer Server ...........................................................................................138
2.8 Construct Environment of Report Output........................................................................................................................................1392.8.1 Install Report Output Tool .......................................................................................................................................................1392.8.2 Set Environment of Report Output...........................................................................................................................................141
Chapter 3 Maintenance .......................................................................................................................................................1453.1 Maintenance of Management Server/Master Management Server .................................................................................................145
3.1.1 Targets and Methods ................................................................................................................................................................145
- vii -
3.1.1.1 Product Assets ...................................................................................................................................................................1463.1.1.2 User Assets .......................................................................................................................................................................148
3.1.2 BackUp User Assets ................................................................................................................................................................1523.1.2.1 Using the Backup Tool (GUI) ..........................................................................................................................................1533.1.2.2 Automatic Data Backup and Deletion...............................................................................................................................1643.1.2.3 Using the Backup Commands ...........................................................................................................................................168
3.1.3 Restoring User Assets ..............................................................................................................................................................1893.1.3.1 Using the Restoration Tool ...............................................................................................................................................189
3.2 Maintenance of Log Analyzer Server .............................................................................................................................................2003.2.1 Summary and Backup Target Assets........................................................................................................................................2003.2.2 Backup Assets ..........................................................................................................................................................................202
3.2.2.1 Using Backup Commands.................................................................................................................................................2023.2.3 Restore Assets ..........................................................................................................................................................................203
3.2.3.1 Restoration Process............................................................................................................................................................2033.2.3.2 Using the Restoration Commands.....................................................................................................................................205
Chapter 4 Version Upgrade..................................................................................................................................................2064.1 Notes between Different Versions...................................................................................................................................................2064.2 Version Upgrade Procedures...........................................................................................................................................................210
4.2.1 Version Upgrade of Management Server/Master Management Server on the Same Server....................................................2104.2.2 Version Upgrade of Management Server/Master Management Server on Different Servers..................................................214
4.3 Version Upgrade of Management Server/Master Management Server...........................................................................................2154.3.1 Version Upgrade on the Same Server.......................................................................................................................................2154.3.2 Version Upgrade on Different Servers.....................................................................................................................................222
4.4 Version Upgrade of Management Console......................................................................................................................................2244.5 Uninstall Log Viewer.......................................................................................................................................................................2254.6 Perform Terminal Initial Settings and Terminal Operation Settings...............................................................................................2254.7 Version Upgrade of CT....................................................................................................................................................................227
4.7.1 Version Upgrade of Wizard Pattern..........................................................................................................................................2274.7.2 Execute Silent Version Upgrade...............................................................................................................................................2324.7.3 Version Upgrade by Using Self Version Management Function.............................................................................................233
4.8 Version Upgrade of Citrix XenApp Monitoring Function..............................................................................................................2404.9 Start Transfer from Systemwalker Desktop Log Analyzer.............................................................................................................242
4.9.1 Transfer Report Output Tool....................................................................................................................................................2424.10 List of Incompatible Items.............................................................................................................................................................242
4.10.1 Terms......................................................................................................................................................................................2424.10.2 Setup.......................................................................................................................................................................................2424.10.3 Management Server................................................................................................................................................................2434.10.4 Management Console.............................................................................................................................................................2464.10.5 Log Viewer.............................................................................................................................................................................2494.10.6 Client (CT)..............................................................................................................................................................................2504.10.7 Port Number............................................................................................................................................................................251
Chapter 5 Uninstallation ......................................................................................................................................................2535.1 Uninstallation Steps ........................................................................................................................................................................2535.2 Uninstall CT.....................................................................................................................................................................................254
5.2.1 Wizard-styleUninstallation.......................................................................................................................................................2545.2.2 Silent Uninstallation.................................................................................................................................................................255
5.3 Uninstall Citrix XenApp Monitoring Function...............................................................................................................................2565.4 Uninstall Management Console ......................................................................................................................................................2565.5 Unistall Log Analyzer Server..........................................................................................................................................................2575.6 Uninstall Management Server/Master Management Server ...........................................................................................................2615.7 Uninstall Report Output Tool..........................................................................................................................................................266
Index.....................................................................................................................................................................................268
- viii -
Chapter 1 DesignThis chapter describes the design of Systemwalker Desktop Keeper.
1.1 Considerations for InstallationThis section explains the considerations for installing Systemwalker Desktop Keeper.
For considerations relating to each particular function, please refer to "Systemwalker Desktop Keeper User's Guide for Administrator".
Network Environment
- Please use the following protocols to communicate:
- [Management Server/Master Management Server] - [Management Server/Master Management Server]: HTTP
- [Management Server/Master Management Server] - [Management Console]: HTTP
- [Management Server/Master Management Server] - [Client (CT)]: TCP/IP Socket communications
- [Management Server/Master Management Server] - [Log Analyzer Server]: TCP/IP Socket communications
- [Management Server/Master Management Server] - [Web Console]: HTTP
- [Log Analyzer Server] - [Report Output Tool]: TCP/IP Socket communications
- In [Management Server/Master Management Server] - [Client (CT)], or [Management Server/Master Management Server] -[Management Server/Master Management Server], when the communication data packet is restricted by the firewall, the server mustbe configured in a place where communication with the client (CT) can be performed. At this time, it will be closed within the domainarea available for communication, and multiple independent systems that are not linked will start working.
- When communication between segments is restricted due to the use of VLAN, servers that can communicate directly must be set ineach domain, which means that multiple Systemwalker Desktop Keeper servers need to be set.
- When performing the following communications, ports 137-139 and port 445 must be opened.When the printing logs of printing jobs performed on the printer server are not obtained, it is unnecessary to open these ports.
- Communications between Master Management Server and Management Servers
- Communications between Master Management Server and client (CT)
- Communications between Management Server and client (CT)
- The environment constructed by NAT (Network Address Translation) cannot be used between server and client (CT).
- When connecting the Management Server/Master Management Server with the CT through a VPN connection, the operations ofSystemwalker Desktop Keeper, such as the collection of E-mail sending logs, may be affected. It is recommended to confirm theoperations in advance when operating under such environment.
- It cannot run under the Ipv6 environment. Please use it under the Ipv4 operating environment.
- When using a firewall in the Log Analyzer Server, please open the port to be used by the Log Analyzer Server. For informationregarding the port used by the Log Analyzer Server, please refer to “Port Numbers and Services” of “Systemwalker Desktop KeeperReference Manual”.
Virtual Environment
- In the provisioning environment, based on settings, use data may be discarded during shutdown of the virtual PC. When it is set tosave the log saving folder to a disk on the virtual PC, the saved operation logs or violation logs may be discarded. Please take any ofthe following measures to prevent logs from being discarded:
- In the settings of the virtual environment, set to not discard user data on the virtual PC.
- 1 -
- In the settings of the provisioning environment, set an area in which user data will not be discarded and save the log saving folderin this area.
- In case of a dirty shutdown of the virtual PC (cut off the power of the virtual PC by force, etc.), and in case of a dirty shutdown of therunning terminal of the virtual PC (cut off the power of the physical PC or Hypervisor, etc.), operation logs and violation logs maynot be saved. Please be sure to shut down the virtual PC and physical PC by normal procedure.
- For a clone PC, since it is not managed on the Management Server, CT policy and user policy cannot be applied immediately. Pleaseapply user policy after logging off and then logging on again.
Installer
- Considerations for using UNICODE charactersWhen the ID for logon to Windows is a user ID that contains UNICODE specific characters, an error will occur in all installers duringthe installation process and installation will be interrupted.
- If a Windows firewall is enabled in any of the following OS, after the product has been installed, register the port number used in theproduct as “Exception” in the firewall and open the port.
- Windows® 7
- Windows Vista®
- Windows® XP
- Windows Server® 2003
- Windows Server® 2008
Management Server/Master Management Server
- Please do not make significant changes to the system time of the Management Server and Master Management Server. When thesystem time is modified, the Management Server and Master Management Server may not run normally. When the system time is modified significantly, please restart the Management Server and Master Management Server.
- The logon information in the Server Settings Tool and the execution information of the Active Directory Linkage will be output tothe event log (application).
- The Web Console of Systemwalker Desktop Keeper is provided as a 32-bit application. Therefore, during the installation of theManagement Server/Master Management Server, IIS will be set automatically in the same way as when creating work processes of a32-bit application. Thus, a 64-bit application cannot be used IIS.
Log Analyzer Server
- When the log data aggregation results and the number of target items exceeds 2GB and the available disk space is not enough,aggregation processing and result display or report output will not run normally and an error will occur.
- About character dataPlease do not use characters apart from ASCII (UNICODE characters that include JIS 2004 and do not include supported code ofASCII). In addition, please also do not use characters apart from ASCII when using Log Analyzer (Windows account for logon toWindows).After a character apart from ASCII has been entered, it will be converted to another character or an error will occur and it will not runnormally. However, in the [Keyword] column of [Aggregate by Objective] of Log Analyzer (Web Console), and in the [Keyword] column of[Screening Condition Settings] of the [Configuration Management] window, UNICODE characters including JIS 2004 can be entered.
- 2 -
Management Console
- In a 3-level system structure, if the Management Console is set by the Management Server/Master Management Server, when policyis set through multiple Management Consoles, the policy set finally will be updated to the client (CT).
Client (CT)
- When applications similar to Systemwalker Desktop Keeper control, such as the filter driver control that restricts writing in devicesand hook control (when installing products like INSTANT COPY), exist at the same time, operation will not be guaranteed.
What is hook control:
Hook control refers to the control that intercepts and views required content from the data transferred through a particular interface,and returns to the original processing flow after processing.
- After upgrading an OS with the client (CT) installed, the client (CT) may not run normally. (For example: upgrading from Windows®XP to Windows Vista®) When upgrading the OS, please perform the upgrade after uninstalling the client (CT), and then install the client (CT) again. Wheninstalling again, in order to bound and register the CT in the same way as before, please modify “OS Type” in the CT judgmentcondition that is the same as CT registration to “Not use”.
- When a new CD/DVD device is connected for the first time, please restart once. Without restarting, the newly connected CD/DVDdevice will not work properly.
- When playing a DVD-ROM (DVD-Video) in the case that an export prohibition for the CD/DVD has been set, it is likely that theDVD-ROM cannot be played through the DVD play software. Please remove the export prohibition for the CD/DVD temporarily, oruse another DVD play software like Windows Media Player to play.
- The CT cannot coexist with “Net screen Remote” of Juniper Corporation. At this time, it can be run by uninstalling the Virtual Adapterfunction of “Net screen Remote”.In addition, when VPN software (Net screen Remote) exists simultaneously, communication may fail.
- If a capture product exists at the same time, the function of each may not run normally.
- When the client (CT) is installed on the computer with Virus Buster 2007 installed, the "Network connection environment has beenchanged" dialog box of Virus Buster 2007 may appear, but this is okay.
- When the OS of the client (CT) is Windows Vista®, Windows Server 2008® or Windows® 7, and authority promotion is allowedand operation can be continued in UAC, the following logs cannot be collected:
- The printing log oriented for network printer
- The structure change log of network driver
- Under the environment with TC Plink installed, after the PrintScreen key has been pressed, the network printer may print two piecesof paper.At this time, please modify the settings of this network printer from [Lan Manager Printer Port] to [Standard TCP/IP Port].
- In an environment using an Intel LAN adapter under Windows Vista® (No Service Pack), when using the “Receiving scaling” functionof the LAN adapter, E-mail may not be sent. Please use Windows Vista® Service Pack 1 or later.
When Shutting down or Restarting Computer
When shutting down or restarting the Management Server and Master Management Server, it is necessary to follow the steps below.
Note
How to stop server correctly
In order to prevent loss of previous logs of the client (CT) saved in the database, please be sure to follow the steps below.
- 3 -
1. When the Windows Services window is displayed in the Management Server or Master Management Server, select the followingservices, and select "Stop" from the "Action" menu. It may take about 30 seconds to 1 minute to stop. In addition, after startingSWServerService or during date change (12am), confirmation of available database capacity will be performed. In the 15 minutestill the confirmation operation has completed, service may not be able to be stopped, please confirm later.
- SWLevelControlService
- SWServerService
- SymfoWARE RDB SWDTK
2. Shun down or restart the Management Server/Master Management Server.
Restrictions of Remote Operation
Under the following environments, operations such as “Remote Desktop Connection” of Windows cannot be performed remotely throughthe Windows Terminal Service. It is the same when the session of a remote connection remains. If remote connection has been performed,please make sure to log out.
- When shifting command is used to perform a version upgrade of Systemwalker Desktop Keeper V13.0.0/V13.2.0/V13.2.1
- An environment with the following database products installed:
- Symfoware Server Enterprise Edition V8.0 for Windows
- Symfoware Server Enterprise Edition V7.0 for Windows
- Symfoware Server Enterprise Edition V6.0 for Windows
- An environment in which a version prior to V13.2 of the following products that share a database with Systemwalker Desktop Keeperis installed before Systemwalker Desktop Keeper:
- Systemwalker Centric Manager
- Systemwalker Desktop Patrol
- Systemwalker Desktop Rights Master
When Performing System Backup
When the system backup software is used in the Management Server/Master Management Server/Log Analyzer Server for system backup,it is necessary to pay attention to the following points:
- During the installation of the Management Server/Master Management Server/Log Analyzer Server, even if the drive that is not thesystem drive is specified as the installation drive, part of Systemwalker Desktop Keeper programs will be installed on the system drive. Therefore, during backup and restoration, please target both the system drive and the drive specified during installation.
- It is required to stop the service during backup. Please perform backup according to the following procedure:
[In case of Management Server/Master Management Server]
1. When the Windows Services window is displayed in the Management Server or Master Management Server, select the servicesin the following order, and select "Stop" from the "Action" menu. It may take about 30 seconds to 1 minute to stop. In addition,after starting SWServerService or during date change (12am), confirmation of available database capacity will be performed.In the 15 minutes till the confirmation operation has completed, service may not be able to be stopped, please confirm later.
a. SWLevelControlService
b. SWServerService
c. SymfoWARE RDB SWDTK
2. After system backup has completed, please start the stopped serviced in the following order:
a. SymfoWARE RDB SWDTK
- 4 -
b. SWServerService
c. SWLevelControlService
[In case of Log Analyzer Server]
1. Please confirm the Log Analyzer functions that are not used.
2. When the Windows Services window is displayed in the Management Server or Master Management Server, select the servicesin the following order, and select "Stop" from the "Action" menu. It may take about 30 seconds to 1 minute to stop.
a. SymfoWARE RDB SWDTLA
3. After system backup has completed, please start the stopped services in the following order:
a. SymfoWARE RDB SWDTLA
1.2 Determine Operation MethodBased on various elements such as the scale of the Client being managed, functions being used, methods of importing the configurationinformation, configuration of administrators, etc., there are several operation methods. This section explains those operation methods anddescribes how to combine them.
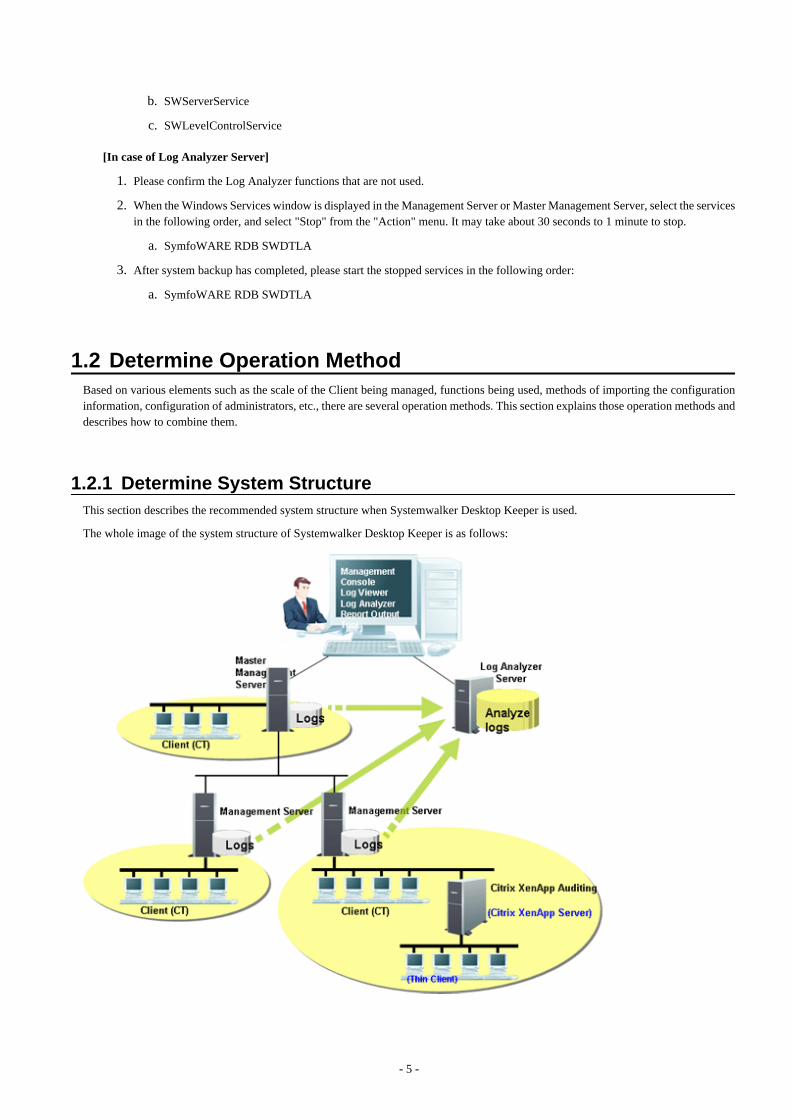
1.2.1 Determine System StructureThis section describes the recommended system structure when Systemwalker Desktop Keeper is used.
The whole image of the system structure of Systemwalker Desktop Keeper is as follows:
- 5 -
This describes the setting standard for the Management, Master Management Server and the Log Analyzer Server. When using the loganalysis function or the report output function, please determine the structure after judging the respective setting standard of theManagement Server/Master Management Server or the Log Analyzer Server comprehensively.
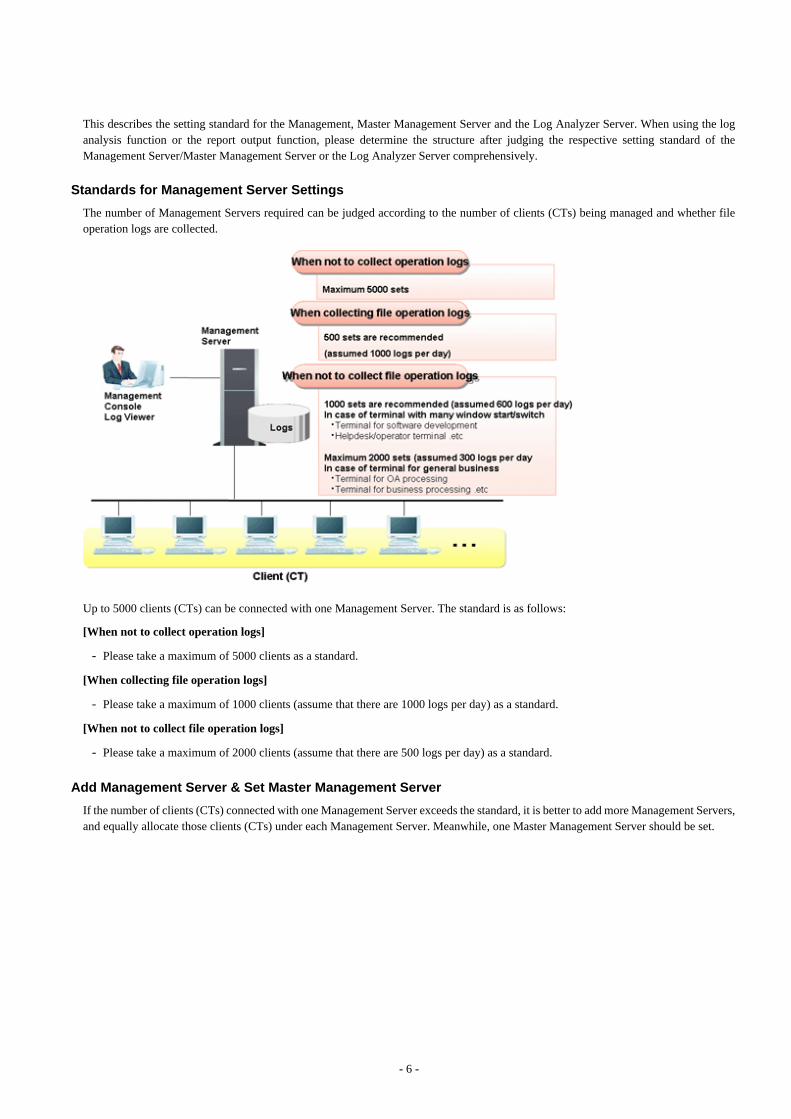
Standards for Management Server Settings
The number of Management Servers required can be judged according to the number of clients (CTs) being managed and whether fileoperation logs are collected.
Up to 5000 clients (CTs) can be connected with one Management Server. The standard is as follows:
[When not to collect operation logs]
- Please take a maximum of 5000 clients as a standard.
[When collecting file operation logs]
- Please take a maximum of 1000 clients (assume that there are 1000 logs per day) as a standard.
[When not to collect file operation logs]
- Please take a maximum of 2000 clients (assume that there are 500 logs per day) as a standard.
Add Management Server & Set Master Management Server
If the number of clients (CTs) connected with one Management Server exceeds the standard, it is better to add more Management Servers,and equally allocate those clients (CTs) under each Management Server. Meanwhile, one Master Management Server should be set.
- 6 -

Point
Create client (CT) group for every department
As for the creation of client groups, creating groups for every department of an enterprise will facilitate the management of clients (CTs).
However, client (CT) groups cannot be created across multiple Management Servers. Please create a client (CT) group for the client (CT)being managed in one Management Server.
Set Log Analyzer Server
When the log analysis function and report output function are used, the number of needed Log Analyzer Servers can be judged.
Judgment of the number of Log Analyzer Servers to be set can be performed according to the following three points:
- Organization structure
Log analysis and report output of Systemwalker Desktop Keeper is performed in the unit of the Log Analyzer Server.
If a specific organization (company) uses multiple Log Analyzer Servers, neither the aggregation of the whole organization (company)nor its whole organization (company) can be summarized in one report.
Therefore, it is necessary to consider organization structure, determine the aggregation unit and report summarization unit and set theLog Analyzer Server accordingly.
- 7 -
- Aggregation condition
In order to analyze and aggregate logs, set “Screening Condition” and “Exclusion Condition” in the unit of the Log Analyzer Server.
Set the keyword for log aggregation, etc., in “Screening Condition”. Set the PC that is not the aggregation target in “ExclusionCondition”.
Therefore, if the same Log Analyzer Server is set when conditions completely change with organization, the range of conditions willbe enlarged too much, which may lead to lower accuracy of analysis. It is necessary to set the Log Analyzer Server in the organizationunit with relatively similar conditions.
For what kind of conditions should be set, please refer to “1.2.7 Determine Analysis Condition of the Log Analyzer”.
- Amount of logs
When the amount of logs being analyzed or aggregated is too great, the aggregation process may take some time, and an error mayoccur.
Please take up to 180 million logs (this number comes from one year of collection, with 500 PCs with 1000 logs collected on eachPC per day) to be analyzed on one Log Analyzer Server as a standard. In addition, please take around 500 thousand logs to be movedin at most per day as a standard.
When this standard is exceeded, consider adding more Log Analyzer Servers.
In addition, apart from examining the above factors, the relationship with the Management Server/Master Management Server should alsobe considered.
The Log Analyzer Server can be installed on the computer with the Management Server/Master Management Server installed. In addition,it can also be installed on a computer that is different from the one with the Management Server/Master Management Server installed.
Log information of multiple Management Servers/Master Management Servers can be analyzed on one Log Analyzer Server. However,log information on one Management Server/Master Management Server cannot be distributed to multiple Log Analyzer Servers for analysisand aggregation.
In addition, the environment between the Log Analyzer Server and the Management Server/Master Management Server should enable thesetting of a network shared folder. The shared folder is created on the Log Analyzer Server.
The following information is transferred from the Management Server/Master Management Server to the Log Analyzer Server using thisshared folder:
- Operation logs collected on the Management Server/Master Management Server
- Administrator information
The transmission schedule can be set separately, but it is recommended to perform this during the night while business is stopped. Logtransmission cannot be performed multiple times in one day.
The system structure of the Management Server/Master Management Server and the Log Analyzer Server includes the following twopatterns:
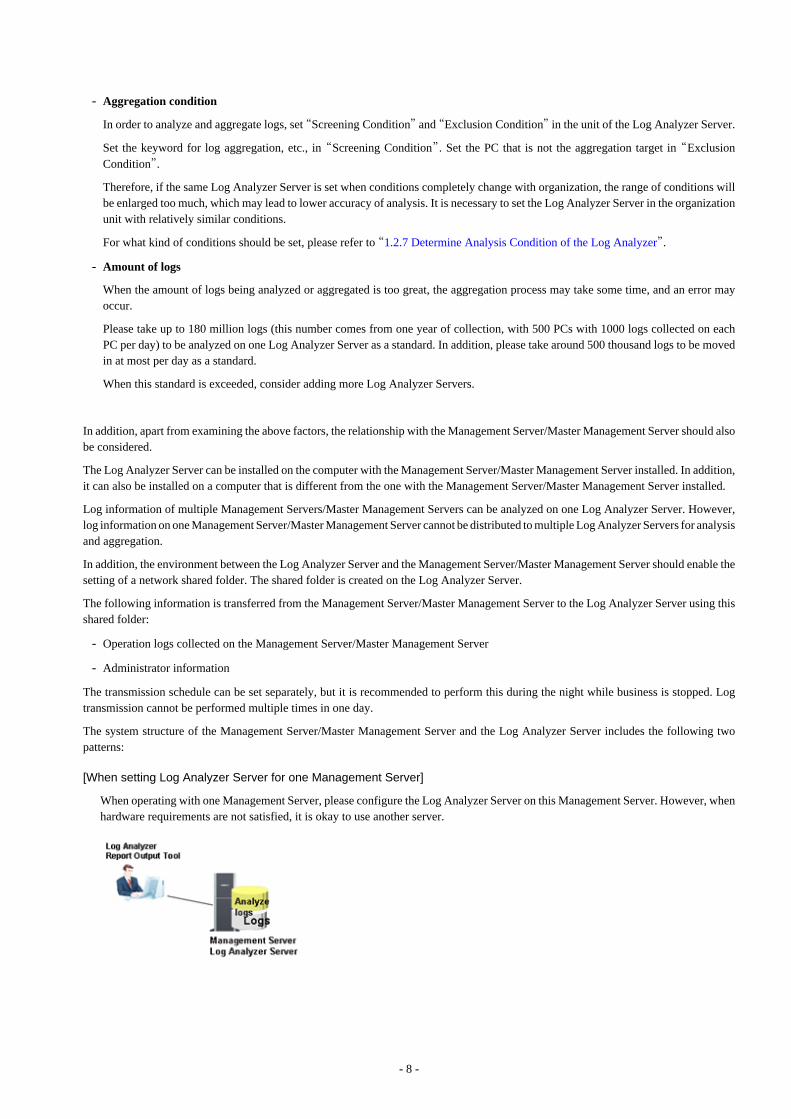
[When setting Log Analyzer Server for one Management Server]
When operating with one Management Server, please configure the Log Analyzer Server on this Management Server. However, whenhardware requirements are not satisfied, it is okay to use another server.
- 8 -
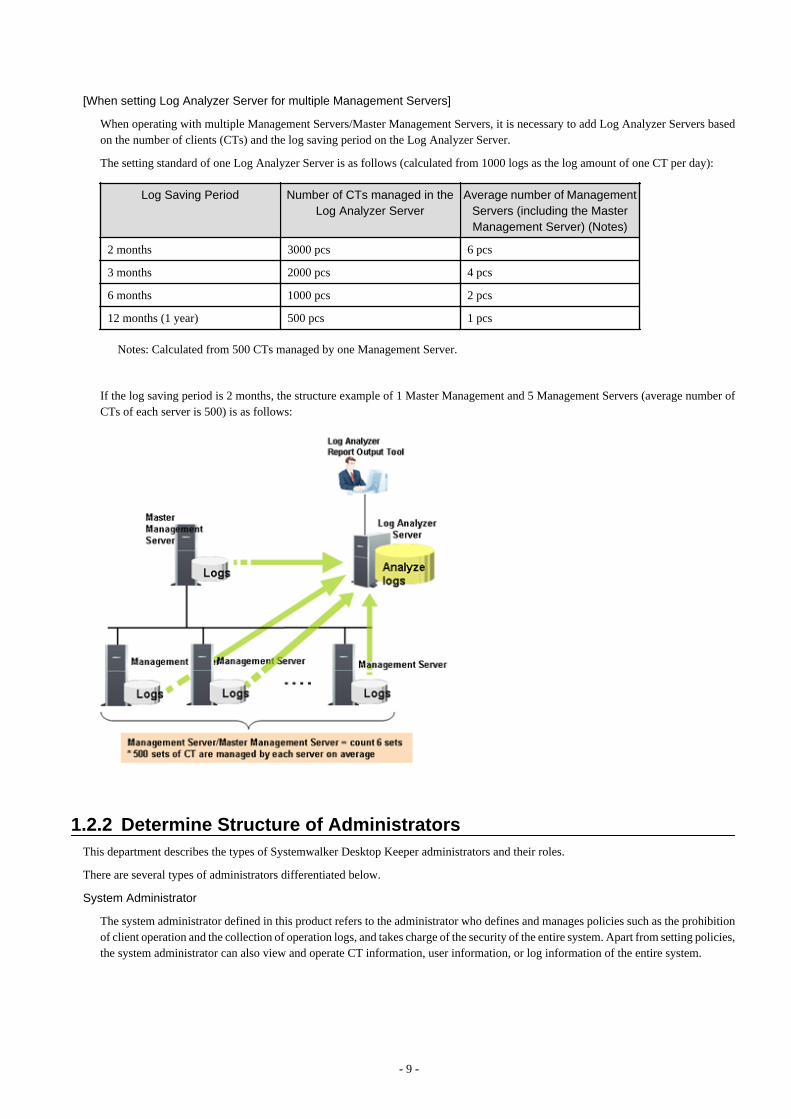
[When setting Log Analyzer Server for multiple Management Servers]
When operating with multiple Management Servers/Master Management Servers, it is necessary to add Log Analyzer Servers basedon the number of clients (CTs) and the log saving period on the Log Analyzer Server.
The setting standard of one Log Analyzer Server is as follows (calculated from 1000 logs as the log amount of one CT per day):
Log Saving Period Number of CTs managed in the
Log Analyzer ServerAverage number of Management
Servers (including the MasterManagement Server) (Notes)
2 months 3000 pcs 6 pcs
3 months 2000 pcs 4 pcs
6 months 1000 pcs 2 pcs
12 months (1 year) 500 pcs 1 pcs
Notes: Calculated from 500 CTs managed by one Management Server.
If the log saving period is 2 months, the structure example of 1 Master Management and 5 Management Servers (average number ofCTs of each server is 500) is as follows:
1.2.2 Determine Structure of AdministratorsThis department describes the types of Systemwalker Desktop Keeper administrators and their roles.
There are several types of administrators differentiated below.
System Administrator
The system administrator defined in this product refers to the administrator who defines and manages policies such as the prohibitionof client operation and the collection of operation logs, and takes charge of the security of the entire system. Apart from setting policies,the system administrator can also view and operate CT information, user information, or log information of the entire system.
- 9 -
Department Administrator
Differing from the system administrator, department administrators only have authority under a particular department. Departmentadministrators are assigned with necessary rights depending on purpose, and they cannot view or operate information of departmentsfor which they are not authorized. Department administrators can be set in each CT group and user group.
The system administrator will be overloaded if he or she must always control the whole system.
Therefore, by setting department administrators who only have authority under particular departments (CT groups) and assigning themwith appropriate rights for managing information, the system administrator can reduce his or her workload.
Department administrator can also be configured after the operation has been started. For details of functions that can be used bydepartment administrator, please refer to “Functions Available for Each Type of Administrator ”.
USB Device Administrator
Differing from the system administrator and department administrator, USB device administrators are only authorized to register/modify/delete USB devices. They cannot perform policy settings, etc. By setting USB device administrators, the workload of thesystem administrator and department administrators can be reduced.
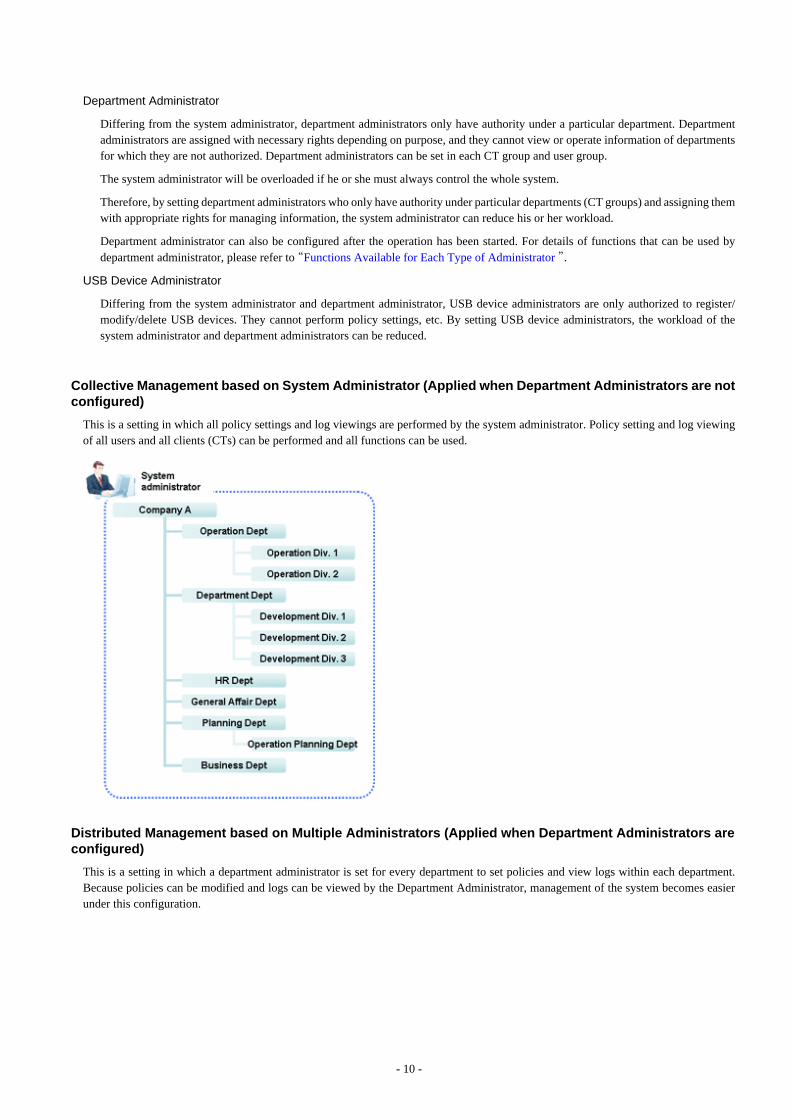
Collective Management based on System Administrator (Applied when Department Administrators are notconfigured)
This is a setting in which all policy settings and log viewings are performed by the system administrator. Policy setting and log viewingof all users and all clients (CTs) can be performed and all functions can be used.
Distributed Management based on Multiple Administrators (Applied when Department Administrators areconfigured)
This is a setting in which a department administrator is set for every department to set policies and view logs within each department.Because policies can be modified and logs can be viewed by the Department Administrator, management of the system becomes easierunder this configuration.
- 10 -
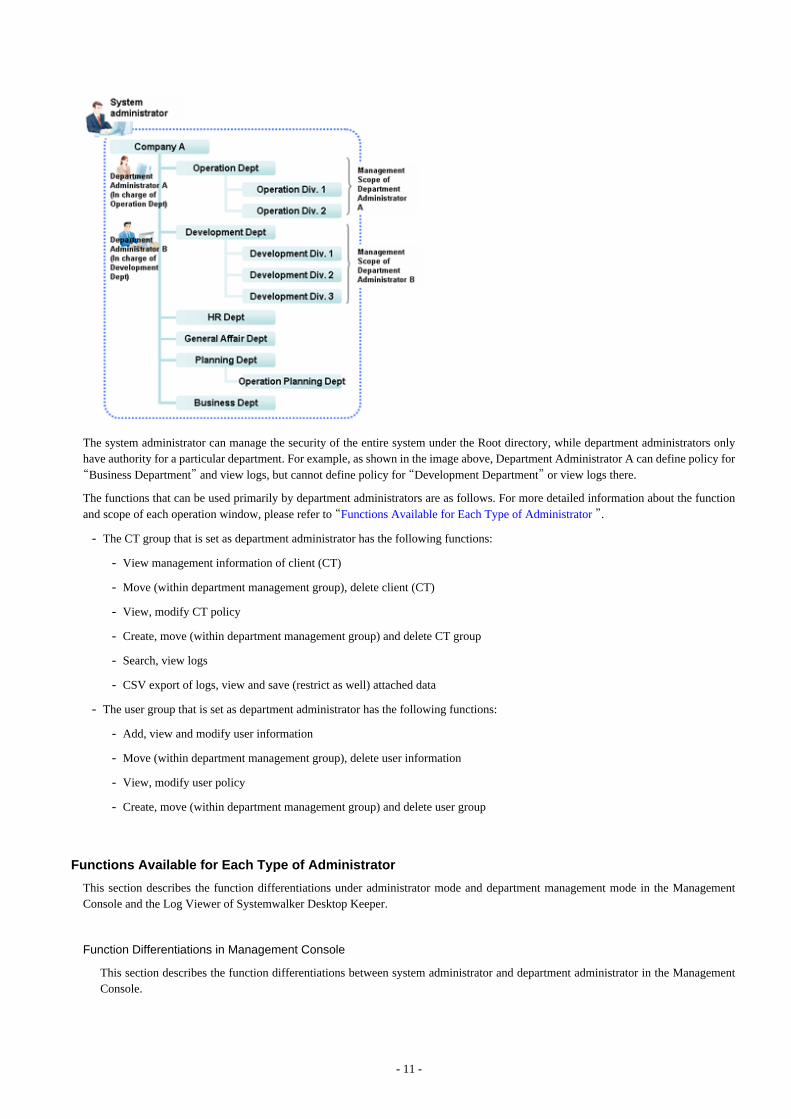
The system administrator can manage the security of the entire system under the Root directory, while department administrators onlyhave authority for a particular department. For example, as shown in the image above, Department Administrator A can define policy for“Business Department” and view logs, but cannot define policy for “Development Department” or view logs there.
The functions that can be used primarily by department administrators are as follows. For more detailed information about the functionand scope of each operation window, please refer to “Functions Available for Each Type of Administrator ”.
- The CT group that is set as department administrator has the following functions:
- View management information of client (CT)
- Move (within department management group), delete client (CT)
- View, modify CT policy
- Create, move (within department management group) and delete CT group
- Search, view logs
- CSV export of logs, view and save (restrict as well) attached data
- The user group that is set as department administrator has the following functions:
- Add, view and modify user information
- Move (within department management group), delete user information
- View, modify user policy
- Create, move (within department management group) and delete user group
Functions Available for Each Type of Administrator
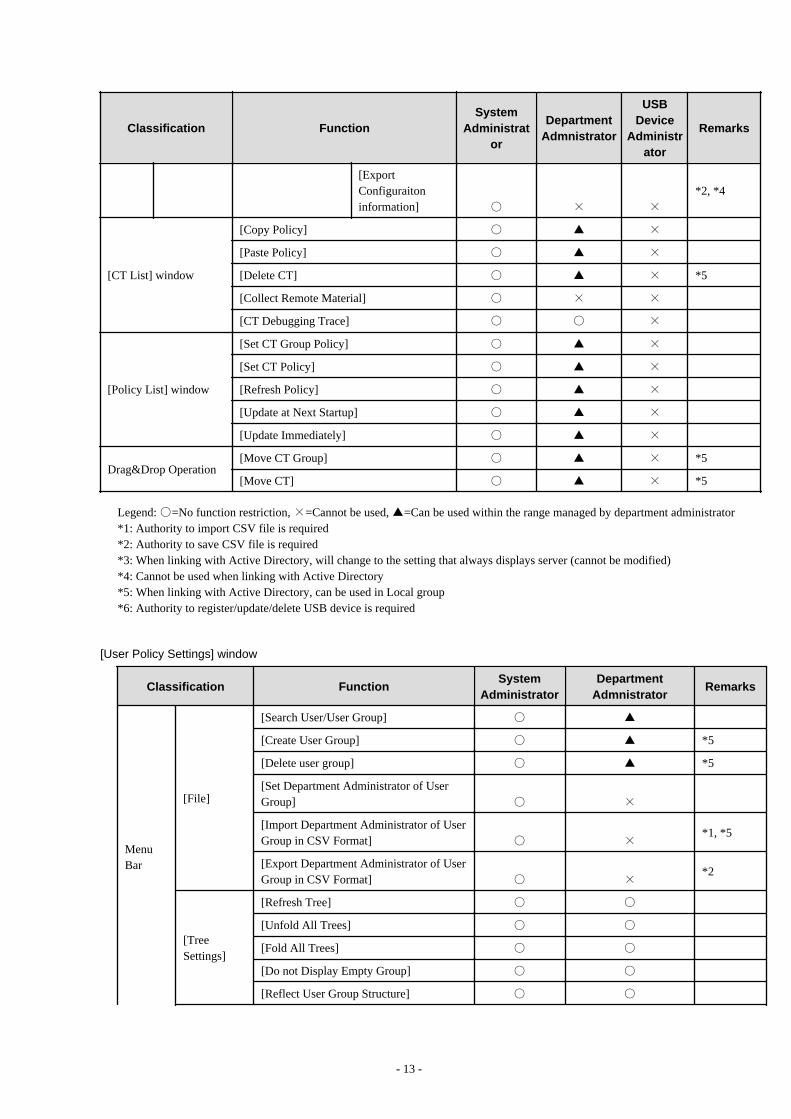
This section describes the function differentiations under administrator mode and department management mode in the ManagementConsole and the Log Viewer of Systemwalker Desktop Keeper.
Function Differentiations in Management Console
This section describes the function differentiations between system administrator and department administrator in the ManagementConsole.
- 11 -
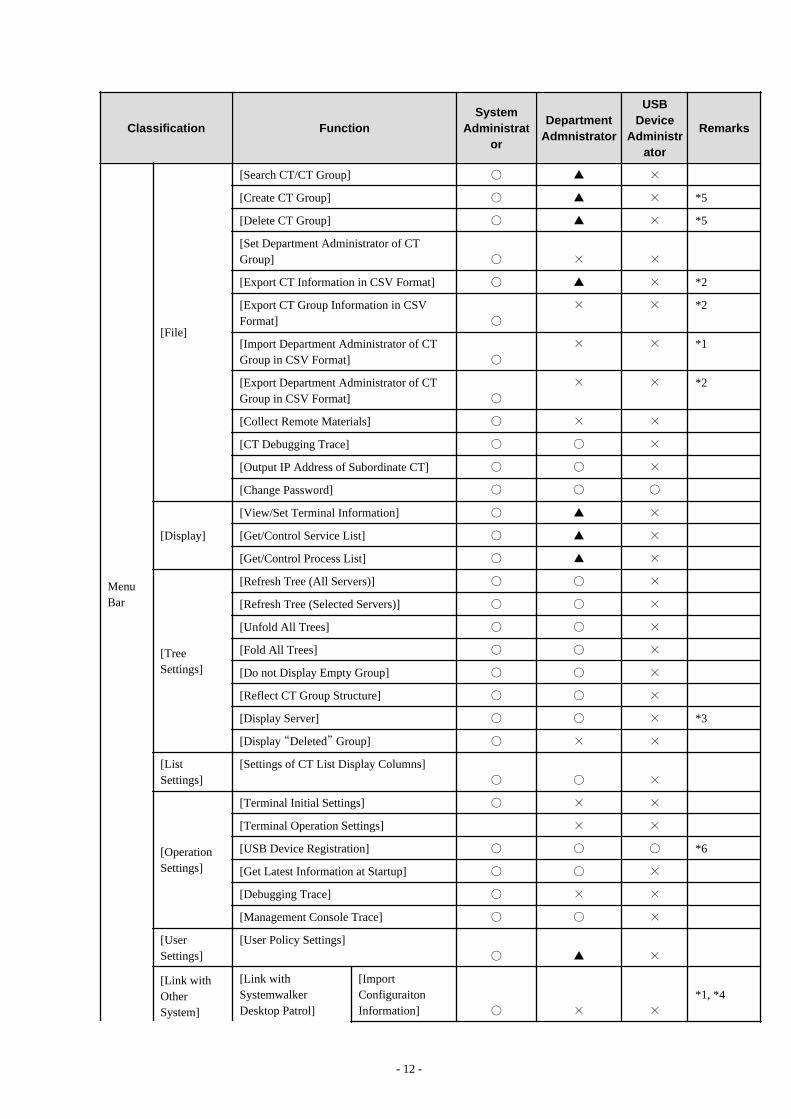
Classification FunctionSystem
Administrator
DepartmentAdmnistrator
USBDevice
Administrator
Remarks
MenuBar
[File]
[Search CT/CT Group] ○ ▲ ×
[Create CT Group] ○ ▲ × *5
[Delete CT Group] ○ ▲ × *5
[Set Department Administrator of CTGroup] ○ × ×
[Export CT Information in CSV Format] ○ ▲ × *2
[Export CT Group Information in CSVFormat] ○
× × *2
[Import Department Administrator of CTGroup in CSV Format] ○
× × *1
[Export Department Administrator of CTGroup in CSV Format] ○
× × *2
[Collect Remote Materials] ○ × ×
[CT Debugging Trace] ○ ○ ×
[Output IP Address of Subordinate CT] ○ ○ ×
[Change Password] ○ ○ ○
[Display]
[View/Set Terminal Information] ○ ▲ ×
[Get/Control Service List] ○ ▲ ×
[Get/Control Process List] ○ ▲ ×
[TreeSettings]
[Refresh Tree (All Servers)] ○ ○ ×
[Refresh Tree (Selected Servers)] ○ ○ ×
[Unfold All Trees] ○ ○ ×
[Fold All Trees] ○ ○ ×
[Do not Display Empty Group] ○ ○ ×
[Reflect CT Group Structure] ○ ○ ×
[Display Server] ○ ○ × *3
[Display “Deleted” Group] ○ × ×
[ListSettings]
[Settings of CT List Display Columns]○ ○ ×
[OperationSettings]
[Terminal Initial Settings] ○ × ×
[Terminal Operation Settings] × ×
[USB Device Registration] ○ ○ ○ *6
[Get Latest Information at Startup] ○ ○ ×
[Debugging Trace] ○ × ×
[Management Console Trace] ○ ○ ×
[UserSettings]
[User Policy Settings]○ ▲ ×
[Link withOtherSystem]
[Link withSystemwalkerDesktop Patrol]
[ImportConfiguraitonInformation] ○ × ×
*1, *4
- 12 -
Classification FunctionSystem
Administrator
DepartmentAdmnistrator
USBDevice
Administrator
Remarks
[ExportConfiguraitoninformation] ○ × ×
*2, *4
[CT List] window
[Copy Policy] ○ ▲ ×
[Paste Policy] ○ ▲ ×
[Delete CT] ○ ▲ × *5
[Collect Remote Material] ○ × ×
[CT Debugging Trace] ○ ○ ×
[Policy List] window
[Set CT Group Policy] ○ ▲ ×
[Set CT Policy] ○ ▲ ×
[Refresh Policy] ○ ▲ ×
[Update at Next Startup] ○ ▲ ×
[Update Immediately] ○ ▲ ×
Drag&Drop Operation[Move CT Group] ○ ▲ × *5
[Move CT] ○ ▲ × *5
Legend: ○=No function restriction, ×=Cannot be used, ▲=Can be used within the range managed by department administrator*1: Authority to import CSV file is required*2: Authority to save CSV file is required*3: When linking with Active Directory, will change to the setting that always displays server (cannot be modified)*4: Cannot be used when linking with Active Directory *5: When linking with Active Directory, can be used in Local group*6: Authority to register/update/delete USB device is required
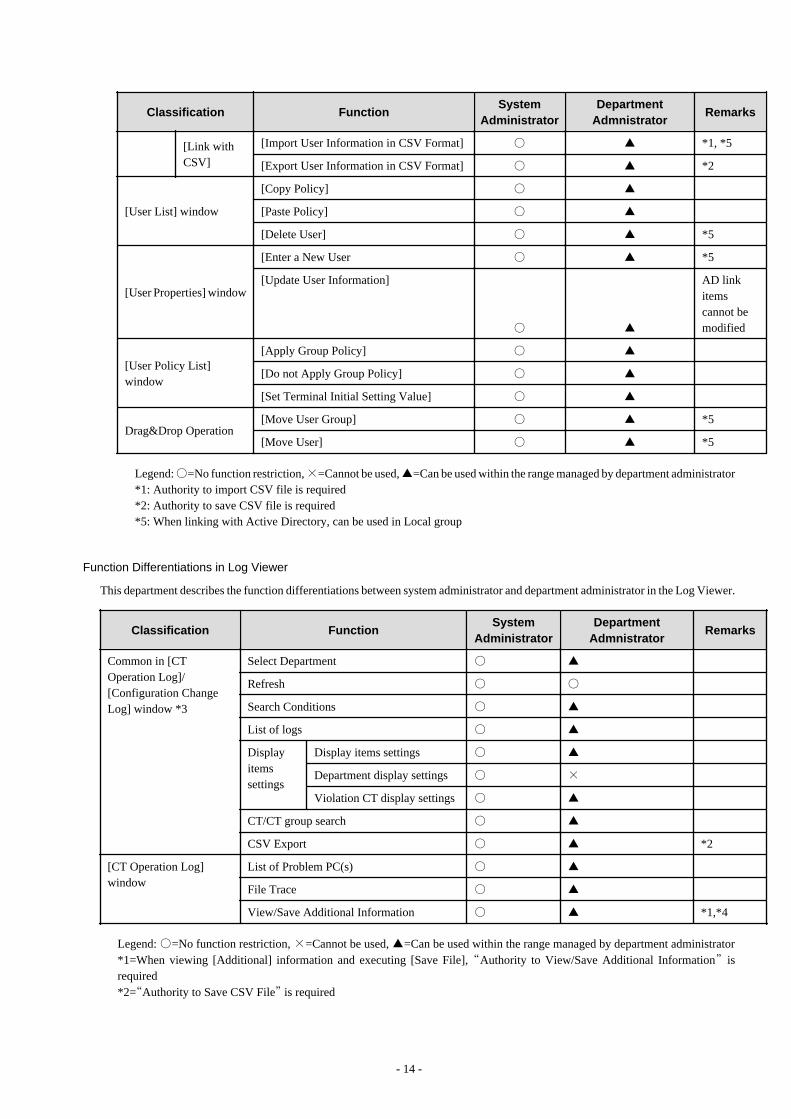
[User Policy Settings] window
Classification FunctionSystem
AdministratorDepartment
AdmnistratorRemarks
MenuBar
[File]
[Search User/User Group] ○ ▲
[Create User Group] ○ ▲ *5
[Delete user group] ○ ▲ *5
[Set Department Administrator of UserGroup] ○ ×
[Import Department Administrator of UserGroup in CSV Format] ○ ×
*1, *5
[Export Department Administrator of UserGroup in CSV Format] ○ ×
*2
[TreeSettings]
[Refresh Tree] ○ ○
[Unfold All Trees] ○ ○
[Fold All Trees] ○ ○
[Do not Display Empty Group] ○ ○
[Reflect User Group Structure] ○ ○
- 13 -
Classification FunctionSystem
AdministratorDepartment
AdmnistratorRemarks
[Link withCSV]
[Import User Information in CSV Format] ○ ▲ *1, *5
[Export User Information in CSV Format] ○ ▲ *2
[User List] window
[Copy Policy] ○ ▲
[Paste Policy] ○ ▲
[Delete User] ○ ▲ *5
[User Properties] window
[Enter a New User ○ ▲ *5
[Update User Information]
○ ▲
AD linkitemscannot bemodified
[User Policy List]window
[Apply Group Policy] ○ ▲
[Do not Apply Group Policy] ○ ▲
[Set Terminal Initial Setting Value] ○ ▲
Drag&Drop Operation[Move User Group] ○ ▲ *5
[Move User] ○ ▲ *5
Legend: ○=No function restriction, ×=Cannot be used, ▲=Can be used within the range managed by department administrator*1: Authority to import CSV file is required*2: Authority to save CSV file is required*5: When linking with Active Directory, can be used in Local group
Function Differentiations in Log Viewer
This department describes the function differentiations between system administrator and department administrator in the Log Viewer.
Classification FunctionSystem
AdministratorDepartment
AdmnistratorRemarks
Common in [CTOperation Log]/[Configuration ChangeLog] window *3
Select Department ○ ▲
Refresh ○ ○
Search Conditions ○ ▲
List of logs ○ ▲
Displayitemssettings
Display items settings ○ ▲
Department display settings ○ ×
Violation CT display settings ○ ▲
CT/CT group search ○ ▲
CSV Export ○ ▲ *2
[CT Operation Log]window
List of Problem PC(s) ○ ▲
File Trace ○ ▲
View/Save Additional Information ○ ▲ *1,*4
Legend: ○=No function restriction, ×=Cannot be used, ▲=Can be used within the range managed by department administrator*1=When viewing [Additional] information and executing [Save File], “Authority to View/Save Additional Information” isrequired*2=“Authority to Save CSV File” is required
- 14 -
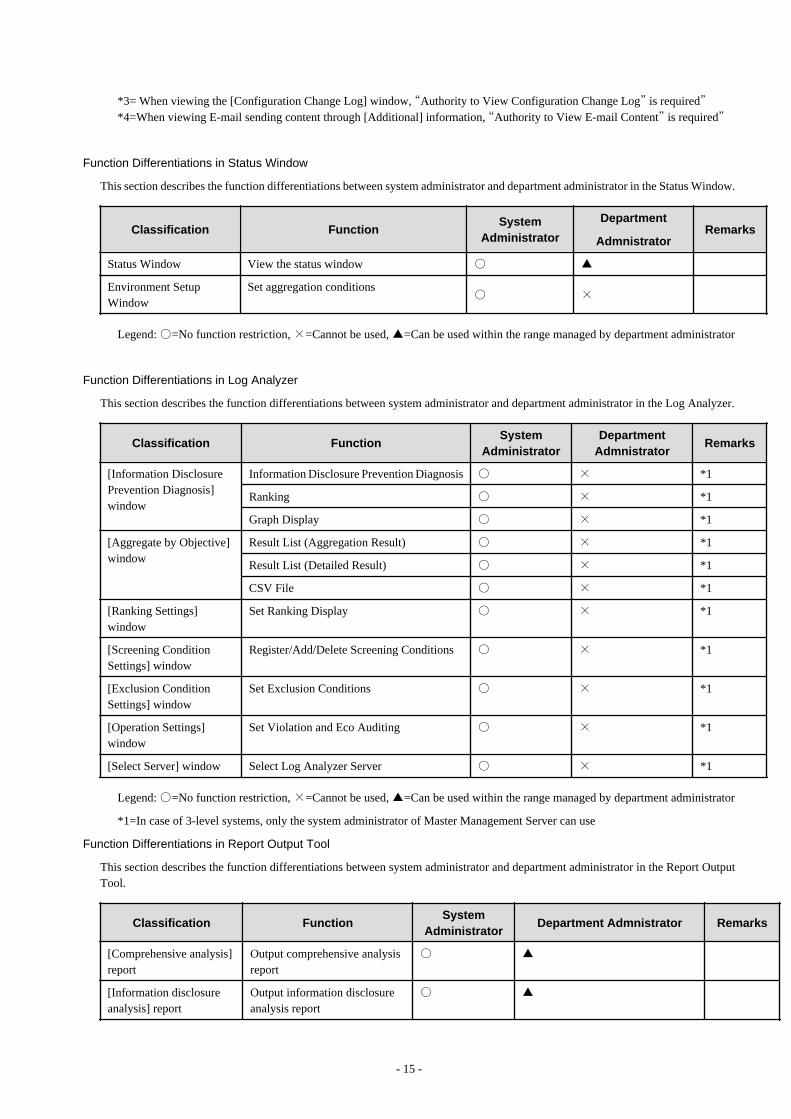
*3= When viewing the [Configuration Change Log] window, “Authority to View Configuration Change Log” is required”*4=When viewing E-mail sending content through [Additional] information, “Authority to View E-mail Content” is required”
Function Differentiations in Status Window
This section describes the function differentiations between system administrator and department administrator in the Status Window.
Classification FunctionSystem
Administrator
Department
AdmnistratorRemarks
Status Window View the status window ○ ▲
Environment SetupWindow
Set aggregation conditions○ ×
Legend: ○=No function restriction, ×=Cannot be used, ▲=Can be used within the range managed by department administrator
Function Differentiations in Log Analyzer
This section describes the function differentiations between system administrator and department administrator in the Log Analyzer.
Classification FunctionSystem
AdministratorDepartment
AdmnistratorRemarks
[Information DisclosurePrevention Diagnosis]window
Information Disclosure Prevention Diagnosis ○ × *1
Ranking ○ × *1
Graph Display ○ × *1
[Aggregate by Objective]window
Result List (Aggregation Result) ○ × *1
Result List (Detailed Result) ○ × *1
CSV File ○ × *1
[Ranking Settings]window
Set Ranking Display ○ × *1
[Screening ConditionSettings] window
Register/Add/Delete Screening Conditions ○ × *1
[Exclusion ConditionSettings] window
Set Exclusion Conditions ○ × *1
[Operation Settings]window
Set Violation and Eco Auditing ○ × *1
[Select Server] window Select Log Analyzer Server ○ × *1
Legend: ○=No function restriction, ×=Cannot be used, ▲=Can be used within the range managed by department administrator
*1=In case of 3-level systems, only the system administrator of Master Management Server can use
Function Differentiations in Report Output Tool
This section describes the function differentiations between system administrator and department administrator in the Report OutputTool.
Classification FunctionSystem
AdministratorDepartment Admnistrator Remarks
[Comprehensive analysis]report
Output comprehensive analysisreport
○ ▲
[Information disclosureanalysis] report
Output information disclosureanalysis report
○ ▲
- 15 -
Classification FunctionSystem
AdministratorDepartment Admnistrator Remarks
[Terminal usage analysis]report
Output terminal usage analysisreport
○ ▲
[Violation operationanalysis] report
Output violation operationanalysis report
○ ▲
[Printing volume auditing]report
Output print volume auditingreport
○ ▲
[Paper usage of all-in-onePC/printer] report
Output paper usage report of all-in-one PC
○ × Thisfunction isnotavailable.
Legend: ○=No function restriction, ×=Cannot be used, ▲=Can be used within the range managed by department administrator
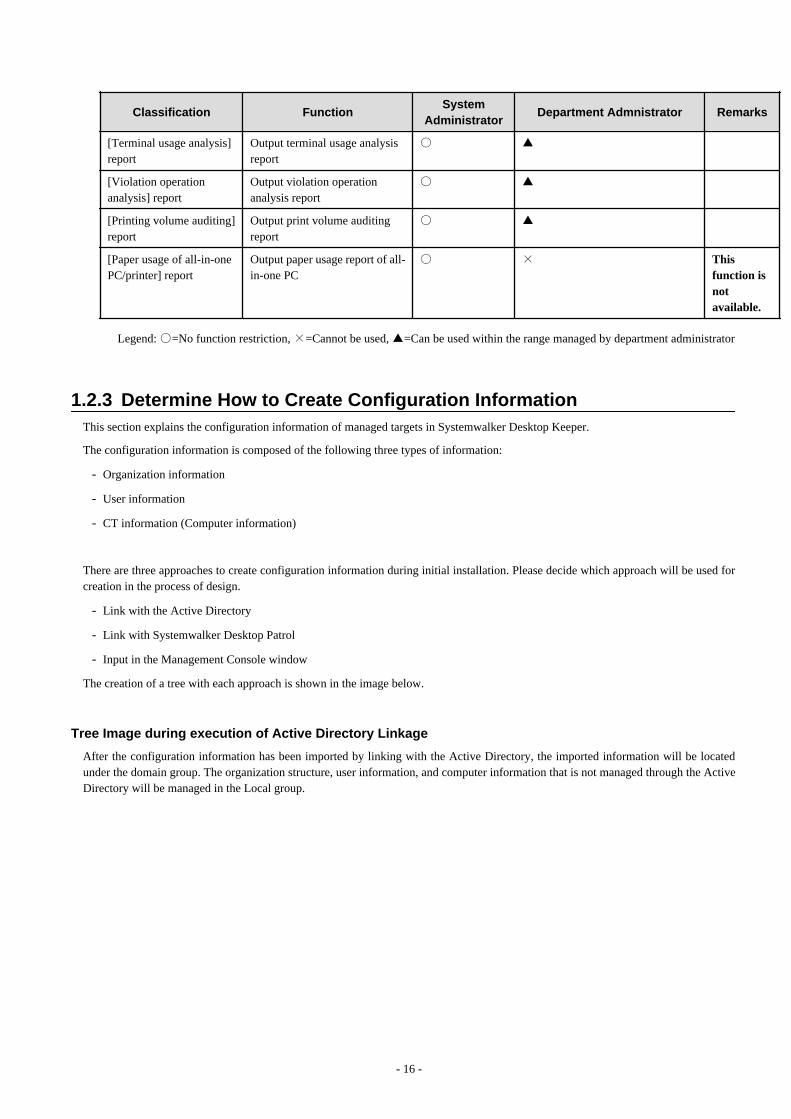
1.2.3 Determine How to Create Configuration InformationThis section explains the configuration information of managed targets in Systemwalker Desktop Keeper.
The configuration information is composed of the following three types of information:
- Organization information
- User information
- CT information (Computer information)
There are three approaches to create configuration information during initial installation. Please decide which approach will be used forcreation in the process of design.
- Link with the Active Directory
- Link with Systemwalker Desktop Patrol
- Input in the Management Console window
The creation of a tree with each approach is shown in the image below.
Tree Image during execution of Active Directory Linkage
After the configuration information has been imported by linking with the Active Directory, the imported information will be locatedunder the domain group. The organization structure, user information, and computer information that is not managed through the ActiveDirectory will be managed in the Local group.
- 16 -
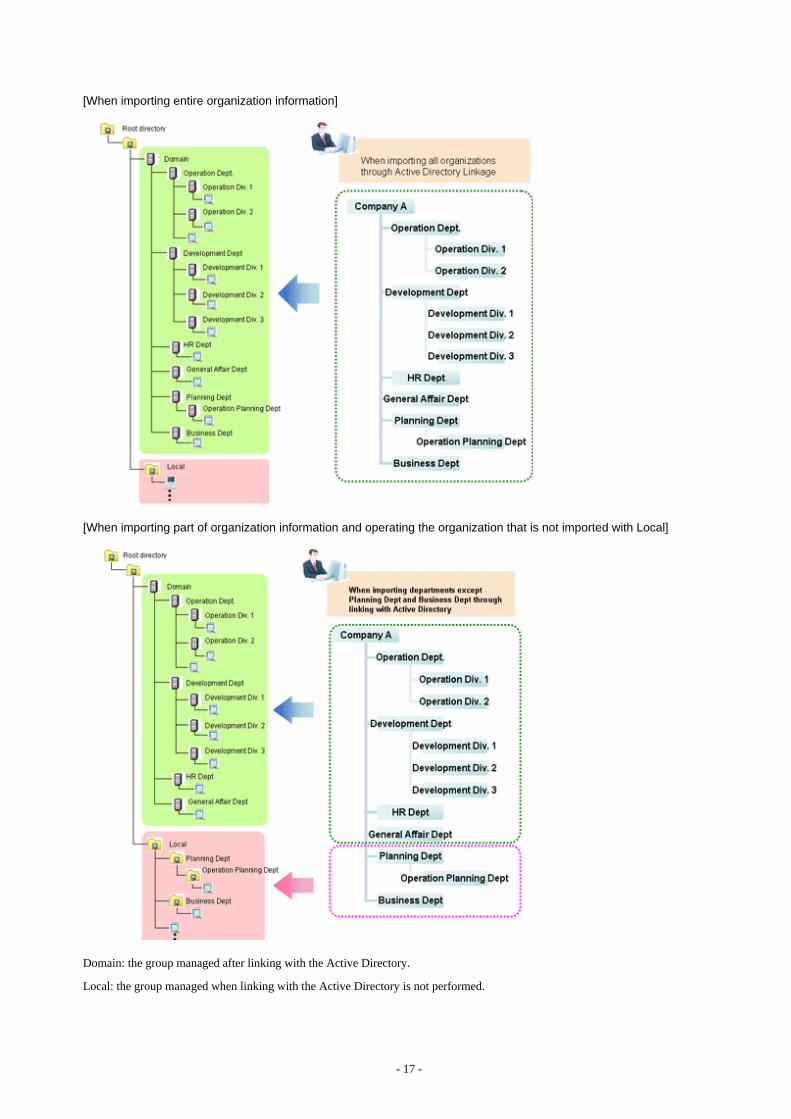
[When importing entire organization information]
[When importing part of organization information and operating the organization that is not imported with Local]
Domain: the group managed after linking with the Active Directory.
Local: the group managed when linking with the Active Directory is not performed.
- 17 -
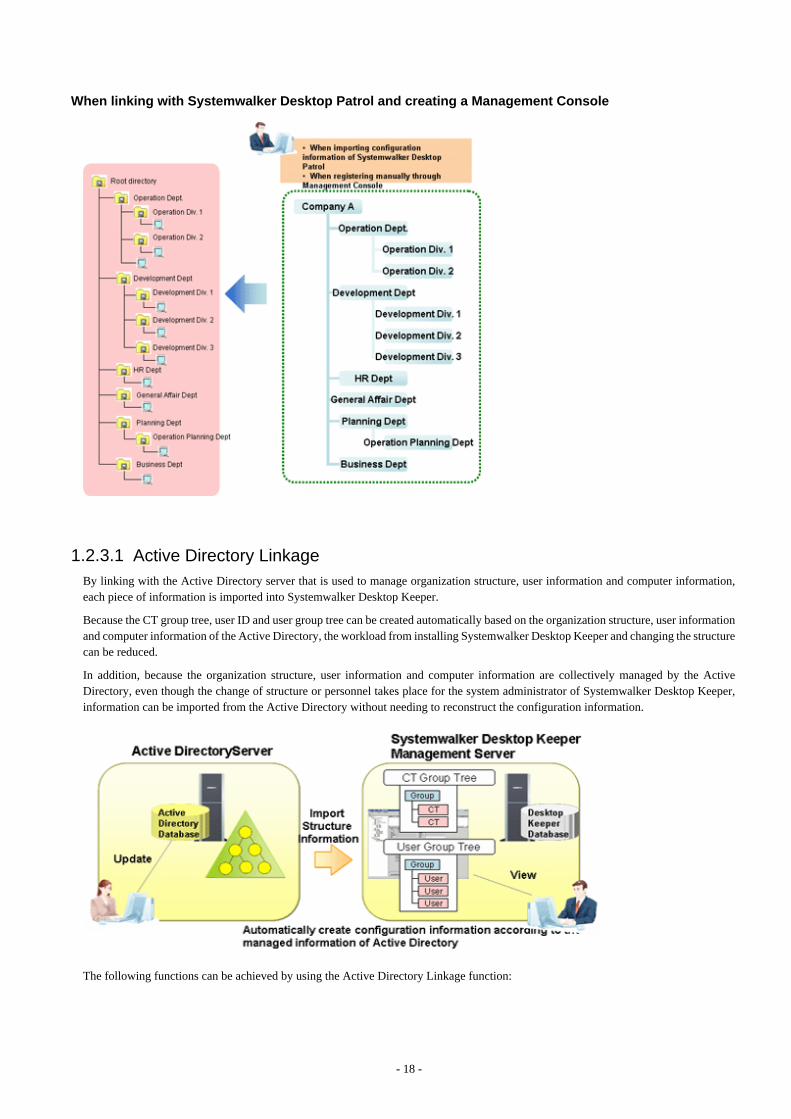
When linking with Systemwalker Desktop Patrol and creating a Management Console
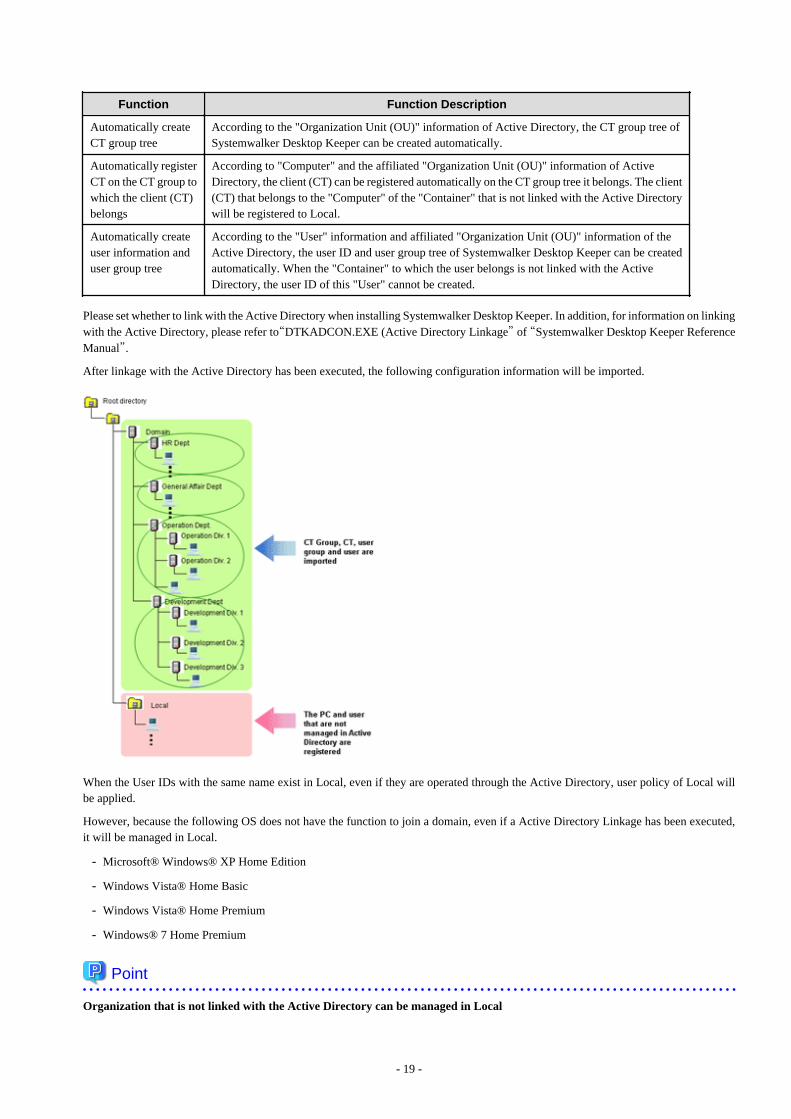
1.2.3.1 Active Directory LinkageBy linking with the Active Directory server that is used to manage organization structure, user information and computer information,each piece of information is imported into Systemwalker Desktop Keeper.
Because the CT group tree, user ID and user group tree can be created automatically based on the organization structure, user informationand computer information of the Active Directory, the workload from installing Systemwalker Desktop Keeper and changing the structurecan be reduced.
In addition, because the organization structure, user information and computer information are collectively managed by the ActiveDirectory, even though the change of structure or personnel takes place for the system administrator of Systemwalker Desktop Keeper,information can be imported from the Active Directory without needing to reconstruct the configuration information.
The following functions can be achieved by using the Active Directory Linkage function:
- 18 -
Function Function Description
Automatically createCT group tree
According to the "Organization Unit (OU)" information of Active Directory, the CT group tree ofSystemwalker Desktop Keeper can be created automatically.
Automatically registerCT on the CT group towhich the client (CT)belongs
According to "Computer" and the affiliated "Organization Unit (OU)" information of ActiveDirectory, the client (CT) can be registered automatically on the CT group tree it belongs. The client(CT) that belongs to the "Computer" of the "Container" that is not linked with the Active Directorywill be registered to Local.
Automatically createuser information anduser group tree
According to the "User" information and affiliated "Organization Unit (OU)" information of theActive Directory, the user ID and user group tree of Systemwalker Desktop Keeper can be createdautomatically. When the "Container" to which the user belongs is not linked with the ActiveDirectory, the user ID of this "User" cannot be created.
Please set whether to link with the Active Directory when installing Systemwalker Desktop Keeper. In addition, for information on linkingwith the Active Directory, please refer to“DTKADCON.EXE (Active Directory Linkage” of “Systemwalker Desktop Keeper ReferenceManual”.
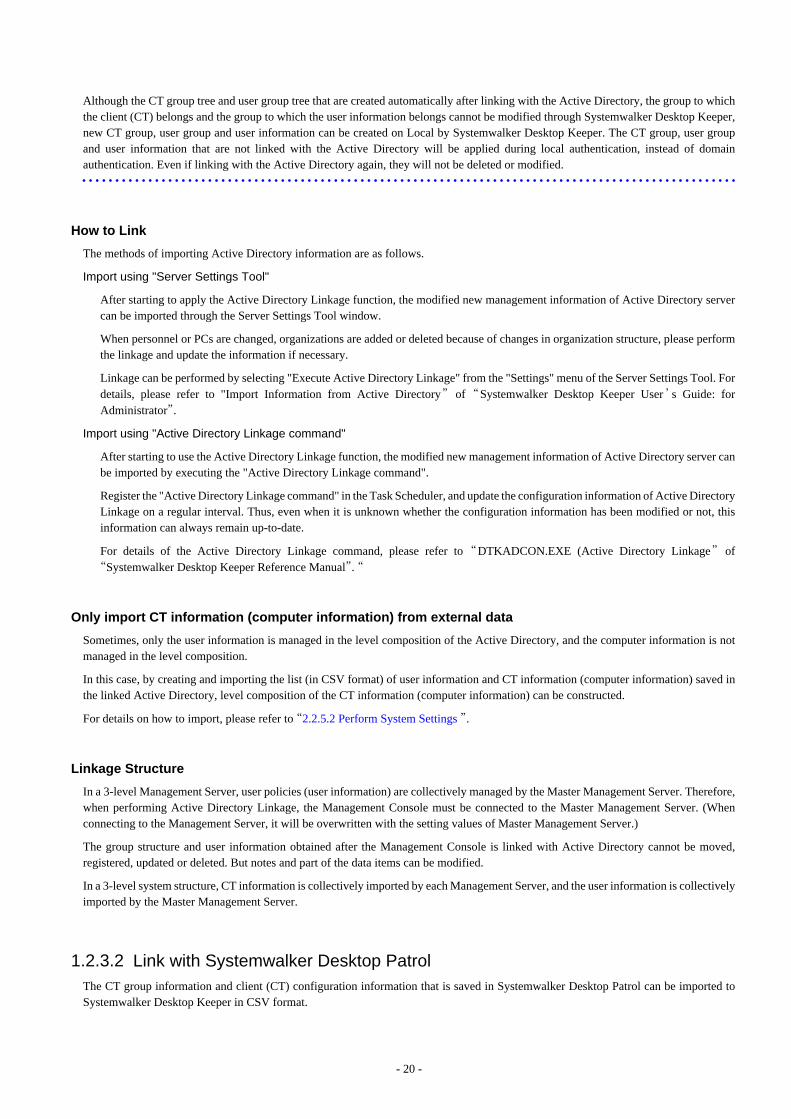
After linkage with the Active Directory has been executed, the following configuration information will be imported.
When the User IDs with the same name exist in Local, even if they are operated through the Active Directory, user policy of Local willbe applied.
However, because the following OS does not have the function to join a domain, even if a Active Directory Linkage has been executed,it will be managed in Local.
- Microsoft® Windows® XP Home Edition
- Windows Vista® Home Basic
- Windows Vista® Home Premium
- Windows® 7 Home Premium
Point
Organization that is not linked with the Active Directory can be managed in Local
- 19 -
Although the CT group tree and user group tree that are created automatically after linking with the Active Directory, the group to whichthe client (CT) belongs and the group to which the user information belongs cannot be modified through Systemwalker Desktop Keeper,new CT group, user group and user information can be created on Local by Systemwalker Desktop Keeper. The CT group, user groupand user information that are not linked with the Active Directory will be applied during local authentication, instead of domainauthentication. Even if linking with the Active Directory again, they will not be deleted or modified.
How to Link
The methods of importing Active Directory information are as follows.
Import using "Server Settings Tool"
After starting to apply the Active Directory Linkage function, the modified new management information of Active Directory servercan be imported through the Server Settings Tool window.
When personnel or PCs are changed, organizations are added or deleted because of changes in organization structure, please performthe linkage and update the information if necessary.
Linkage can be performed by selecting "Execute Active Directory Linkage" from the "Settings" menu of the Server Settings Tool. Fordetails, please refer to "Import Information from Active Directory” of “Systemwalker Desktop Keeper User’s Guide: forAdministrator”.
Import using "Active Directory Linkage command"
After starting to use the Active Directory Linkage function, the modified new management information of Active Directory server canbe imported by executing the "Active Directory Linkage command".
Register the "Active Directory Linkage command" in the Task Scheduler, and update the configuration information of Active DirectoryLinkage on a regular interval. Thus, even when it is unknown whether the configuration information has been modified or not, thisinformation can always remain up-to-date.
For details of the Active Directory Linkage command, please refer to “DTKADCON.EXE (Active Directory Linkage” of“Systemwalker Desktop Keeper Reference Manual”. “
Only import CT information (computer information) from external data
Sometimes, only the user information is managed in the level composition of the Active Directory, and the computer information is notmanaged in the level composition.
In this case, by creating and importing the list (in CSV format) of user information and CT information (computer information) saved inthe linked Active Directory, level composition of the CT information (computer information) can be constructed.
For details on how to import, please refer to “2.2.5.2 Perform System Settings ”.
Linkage Structure
In a 3-level Management Server, user policies (user information) are collectively managed by the Master Management Server. Therefore,when performing Active Directory Linkage, the Management Console must be connected to the Master Management Server. (Whenconnecting to the Management Server, it will be overwritten with the setting values of Master Management Server.)
The group structure and user information obtained after the Management Console is linked with Active Directory cannot be moved,registered, updated or deleted. But notes and part of the data items can be modified.
In a 3-level system structure, CT information is collectively imported by each Management Server, and the user information is collectivelyimported by the Master Management Server.
1.2.3.2 Link with Systemwalker Desktop PatrolThe CT group information and client (CT) configuration information that is saved in Systemwalker Desktop Patrol can be imported toSystemwalker Desktop Keeper in CSV format.
- 20 -
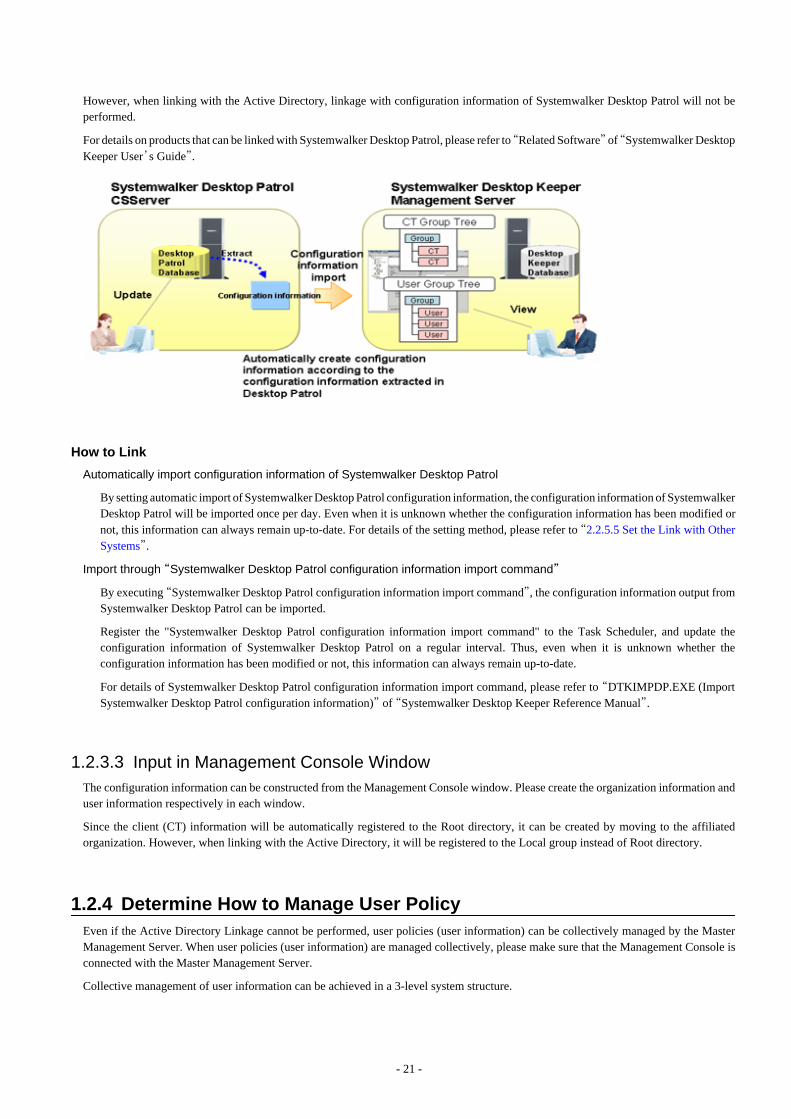
However, when linking with the Active Directory, linkage with configuration information of Systemwalker Desktop Patrol will not beperformed.
For details on products that can be linked with Systemwalker Desktop Patrol, please refer to “Related Software” of “Systemwalker DesktopKeeper User’s Guide”.
How to Link
Automatically import configuration information of Systemwalker Desktop Patrol
By setting automatic import of Systemwalker Desktop Patrol configuration information, the configuration information of SystemwalkerDesktop Patrol will be imported once per day. Even when it is unknown whether the configuration information has been modified ornot, this information can always remain up-to-date. For details of the setting method, please refer to “2.2.5.5 Set the Link with OtherSystems”.
Import through “Systemwalker Desktop Patrol configuration information import command”
By executing “Systemwalker Desktop Patrol configuration information import command”, the configuration information output fromSystemwalker Desktop Patrol can be imported.
Register the "Systemwalker Desktop Patrol configuration information import command" to the Task Scheduler, and update theconfiguration information of Systemwalker Desktop Patrol on a regular interval. Thus, even when it is unknown whether theconfiguration information has been modified or not, this information can always remain up-to-date.
For details of Systemwalker Desktop Patrol configuration information import command, please refer to “DTKIMPDP.EXE (ImportSystemwalker Desktop Patrol configuration information)” of “Systemwalker Desktop Keeper Reference Manual”.
1.2.3.3 Input in Management Console WindowThe configuration information can be constructed from the Management Console window. Please create the organization information anduser information respectively in each window.
Since the client (CT) information will be automatically registered to the Root directory, it can be created by moving to the affiliatedorganization. However, when linking with the Active Directory, it will be registered to the Local group instead of Root directory.
1.2.4 Determine How to Manage User PolicyEven if the Active Directory Linkage cannot be performed, user policies (user information) can be collectively managed by the MasterManagement Server. When user policies (user information) are managed collectively, please make sure that the Management Console isconnected with the Master Management Server.
Collective management of user information can be achieved in a 3-level system structure.
- 21 -
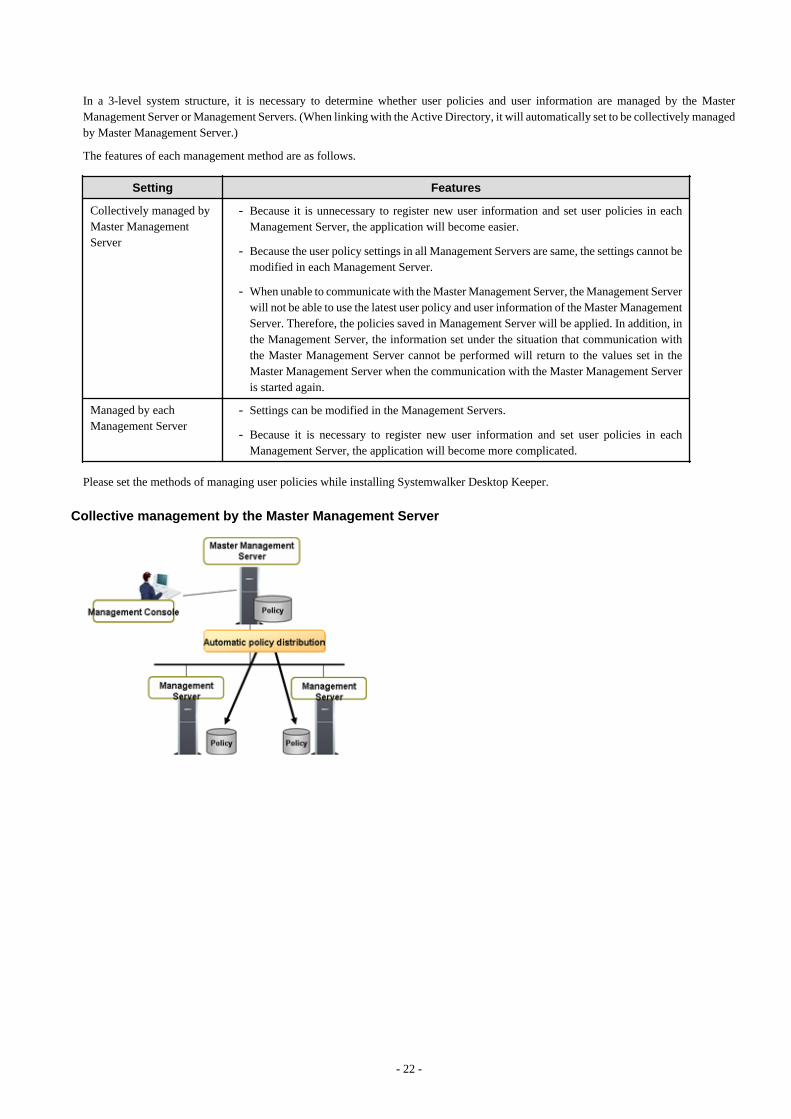
In a 3-level system structure, it is necessary to determine whether user policies and user information are managed by the MasterManagement Server or Management Servers. (When linking with the Active Directory, it will automatically set to be collectively managedby Master Management Server.)
The features of each management method are as follows.
Setting Features
Collectively managed byMaster ManagementServer
- Because it is unnecessary to register new user information and set user policies in eachManagement Server, the application will become easier.
- Because the user policy settings in all Management Servers are same, the settings cannot bemodified in each Management Server.
- When unable to communicate with the Master Management Server, the Management Serverwill not be able to use the latest user policy and user information of the Master ManagementServer. Therefore, the policies saved in Management Server will be applied. In addition, inthe Management Server, the information set under the situation that communication withthe Master Management Server cannot be performed will return to the values set in theMaster Management Server when the communication with the Master Management Serveris started again.
Managed by eachManagement Server
- Settings can be modified in the Management Servers.
- Because it is necessary to register new user information and set user policies in eachManagement Server, the application will become more complicated.
Please set the methods of managing user policies while installing Systemwalker Desktop Keeper.
Collective management by the Master Management Server
- 22 -
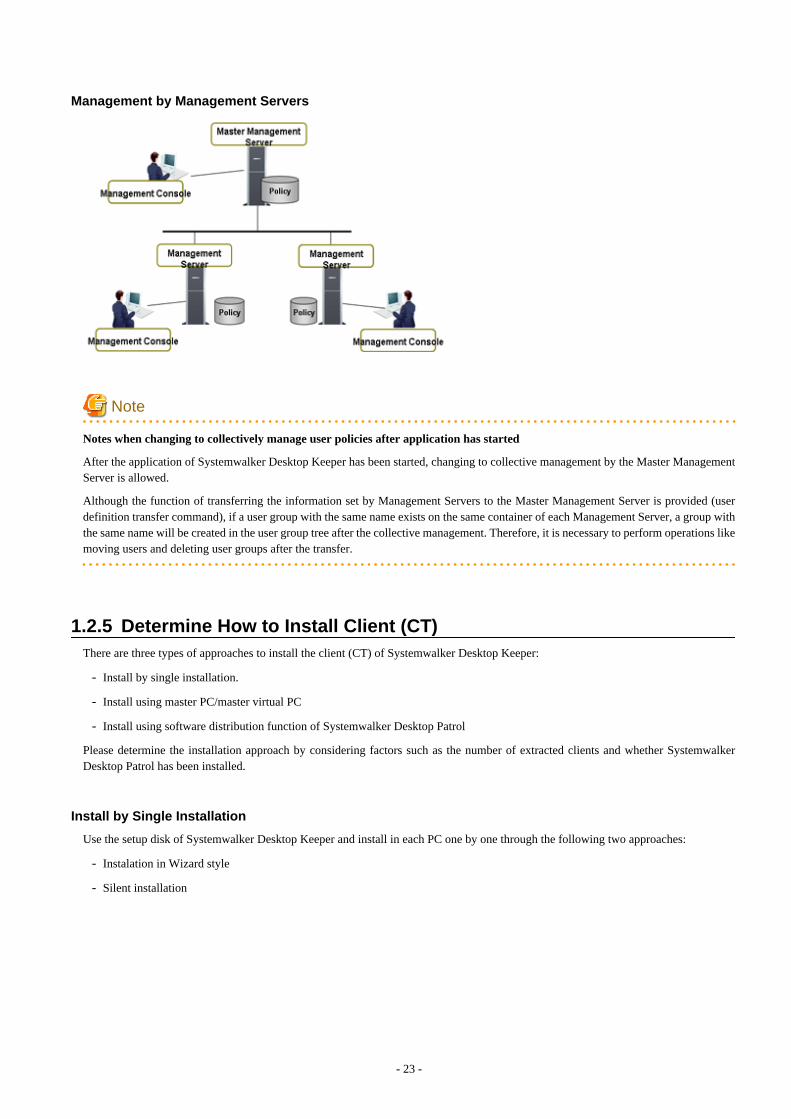
Management by Management Servers
Note
Notes when changing to collectively manage user policies after application has started
After the application of Systemwalker Desktop Keeper has been started, changing to collective management by the Master ManagementServer is allowed.
Although the function of transferring the information set by Management Servers to the Master Management Server is provided (userdefinition transfer command), if a user group with the same name exists on the same container of each Management Server, a group withthe same name will be created in the user group tree after the collective management. Therefore, it is necessary to perform operations likemoving users and deleting user groups after the transfer.
1.2.5 Determine How to Install Client (CT)There are three types of approaches to install the client (CT) of Systemwalker Desktop Keeper:
- Install by single installation.
- Install using master PC/master virtual PC
- Install using software distribution function of Systemwalker Desktop Patrol
Please determine the installation approach by considering factors such as the number of extracted clients and whether SystemwalkerDesktop Patrol has been installed.
Install by Single Installation
Use the setup disk of Systemwalker Desktop Keeper and install in each PC one by one through the following two approaches:
- Instalation in Wizard style
- Silent installation
- 23 -
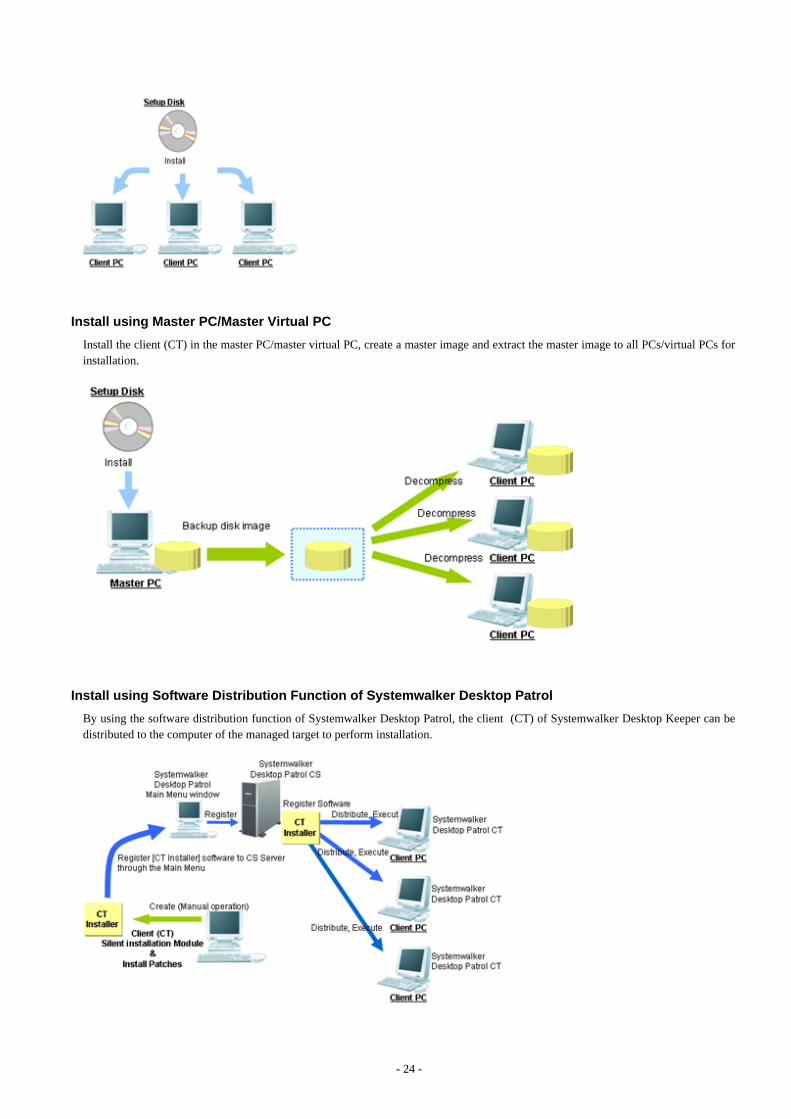
Install using Master PC/Master Virtual PC
Install the client (CT) in the master PC/master virtual PC, create a master image and extract the master image to all PCs/virtual PCs forinstallation.
Install using Software Distribution Function of Systemwalker Desktop Patrol
By using the software distribution function of Systemwalker Desktop Patrol, the client (CT) of Systemwalker Desktop Keeper can bedistributed to the computer of the managed target to perform installation.
- 24 -
1.2.6 Determine How to Operate LogsThe following describes the items that should be examined during the design process regarding the operation method of logs.
Items to be examined in Management Server/Master Management Server
When Systemwalker Desktop Keeper is used to collect logs continuously, the storage space will be insufficient. Therefore, throughregularly backing up logs on the Management Server/Master Management Server and deleting database space, stable operation can beachieved without insufficient database space.
The following three items in Management Server/Master Management Server should be determined in advance:
- Database capacity (operation database, log viewing database)
- Log backup and deletion method
- Backup method of attached data
Determine database capacity
- Determine the capacity of the operation database
The operation database is the database that manages daily operation information (management information, operation loginformation).
Please examine the following information during the design process to determine the factors of capacity estimation during theconstruction of the operation database.
- Number of CT managed
- Number of file operation logs
- Number of non-file operation logs
- Number of months to save
For the number of months to save, since it will become linked with log backup and deletion period, it is necessary to determinewhich period the logs are always viewed.
- Determine the capacity of the log viewing database
The log viewing database is the database for moving the previous operation logs for viewing.
Please examine the following information during design process and determine the factors of capacity asset during the constructionof log viewing database:
- Number of CT managed
- Number of months to save
For the number of file operation logs and non-file operation logs, please perform the capacity asset according to the value of theoperation database.
Determine how to backup and delete logs
Log backup/deletion can be performed by executing tasks with the GUI and command. When performing fixed operations, pleasecreate the batch file for executing the backup command and execute regularly. For the example of creating a GUI, command and batchfile, please refer to “3.1.2 BackUp User Assets ”.
Viewpoint of Log Backup
The following are points about the timing for backing up logs:
- Backup the logs that exceed the saving period and delete the logs that have been backed up
- Backup recent logs and delete the logs that exceed the saving period
- 25 -
It is necessary to note the situation when the log amount increases temporarily and construct a sufficient number of months to save.
Determine how to backup attached data
Attached data cannot be saved to the database. In addition, since it is not the backup target of the backup tool, it is likely that a largeamount of screen capture data and original file backup data will be accumulated on the server by settings, which will lead to anexhaustion of disk capacity. Therefore, different from the log operation mentioned above, please perform capacity confirmation, aswell as backup and deletion regularly.
The structure of folder for saving the screen capture data with attached data and original file backup data is as follows. For the destinationto save attached data, please refer to “2.2.5.9 Set Saving Target Folder ”.
[Structure]
Target folder for saving attached data+-Folder of day unit
+-Folder of CT unit
[Example]
Determine how to backup E-mail data
E-mail data cannot be saved to database. In addition, since it is not the backup target of the backup tool, it is likely that large amountof E-mail text and attachments will be accumulated on the server through settings, which will lead to an exhaustion of disk capacity.Therefore, different from the log operation mentioned above, please perform capacity confirmation, as well as backup and deletionregularly.
To delete, please use DTKMLDL.BAT (Delete E-mail Content) command. For details of how to use the command, please refer to“DTKMLDL.BAT (Delete E-mail Content)” of “Systemwalker Desktop Keeper Reference Manual”.
The structure of folder for saving E-mail text and attachments is as follows. For the destination to save E-mail data, please refer to“2.2.5.9 Set Saving Target Folder ”.
[Structure]
Target folder for saving E-mail content
+- Folder of day unit+- Folder of CT unit
[Example]
- 26 -
Items to be examined in the Log Analyzer Server
When building the Log Analyzer Server and using the log analysis function and report output function, logs collected by the ManagementServer/Master Management Server will be transferred to the shared folder of the Log Analyzer Server.
Logs saved in the shared folder will be analyzed, aggregated and saved to the database of the Log Analyzer Server, but the logs on theshared folder will be kept all the time.
Therefore, by regularly backing up logs saved in the shared folder on the Log Analyzer server and deleting the logs that have been backedup, stable operation without running out of shared folder space can be achieved.
In addition, since transmission to the shared folder (data transfer) and saving to the database of the Log Analyzer Server (data move-in)are required to be performed once a day, operate after registering commands to Task. During this Task registration, the time of executingtask also needs to be examined (leave sufficient time required for transmission after the transmission has completed; since the transmission/moving process will increase workload, it will be performed during night-time, etc.).
Determine how to backup shared folder of the Log Analyzer Server
When the capacity of the shared folder is exhausted, logs cannot be transferred from the Management Server/Master ManagementServer. Therefore, please confirm the capacity of shared folder regularly and delete the logs that have been analyzed and aggregatedafter they have been backed up.
The structure of the shared folder of the Log Analyzer Server is as follows:
In addition, please do not backup or delete the logs for which analysis and aggregation has not been completed in the Log AnalyzerServer.
The “File for conforming completion of log transmission (conv_end)” folder created under the folder of transmission source logcollection day indicates that the log analysis and aggregation has been completed and logs have been saved to the database on LogAnalyzer Server.
When “File for conforming completion of log transmission (conv_end)” has been created in all “Folder of transmission source logcollection day” exist in the “Transmission Source Management Server Name” folder under the “Transmission Command ExecutionDay” folder in the above image, saving and deletion can be performed. Please save and delete in the unit of “Transmission CommandExecution Day” folder.
1.2.7 Determine Analysis Condition of the Log AnalyzerWhen analyzing and aggregating the collected logs in the Log Analyzer Server, set the screening condition and exclusion condition thathave been set in advance.
- 27 -
If the setting of this condition is inappropriate, the accuracy of analysis and aggregation results will be reduced. Therefore, please determinewhat kind of condition should be set during the design stage.
The settings are as follows:
Screening Condition
Specify the following items and determine the analysis condition.
- Keyword: string contained in a file or file path (partially match)
- Domain: string contained in E-mail address (partial match)
- URL: string contained in URL (partially match)
- Application: executable file name apart from extensions (complete match)
Exclusion Condition
In order to exclude PC from the aggregation target, determine the exclusion conditions as follows.
- PC required to access to important files on business
- PC that performs large amount of daily file access
In order to perform analysis with higher accuracy, it is necessary to consider the following:
- Set screening conditions on every Log Analyzer Server. Therefore, when multiple organizations are targeted, after the keyword limitedto particular organizations has been set, analysis that is not for this organization may become inappropriate. Please try to extract common keywords and do not refine the setting of keywords limited to the department. In addition, please configure the organization that processes same confidential information to the same Log Analyzer Server formanagement. For viewpoints of configuration, please refer to “Set Log Analyzer Server” of “1.2.1 Determine System Structure
- Distinguishing the exception PC mentioned above is important for exclusion conditions. Please do not set a PC with lower accuracyin aggregate results as the aggregation target.
1.2.8 Determine the Aggregation Condition of Status WindowIn order to aggregate logs collected by the Management Server/Master Management Server and confirm the number of malfunctioningPCs, aggregation conditions should be set in environment setup in advance. When the setting of this condition is inappropriate, the accuracyof the aggregation result will be reduced. Therefore, please examine and determine what kind of condition should be set in design stage.
The settings are as follows:
- Overall settingsSet the following items and determine the aggregation and display condition:
- Aggregation schedule
- Graph color
- URL of Desktop Patrol
- Notify/Do not notify department administrator by E-mail
- Setting of each aggregation itemSet the following items and determine the aggregation condition:
- Aggregate/Do not aggregate
- Auditing period
- Setting items of each item (Time frame, day of a week, type of target drive, etc.)
- 28 -

1.2.9 Confirm Port NumberPlease confirm whether any problem exists in the port number used in Systemwalker Desktop Keeper and whether it is available for usein the design stage.
For the port number used in Systemwalker Desktop Keeper, please refer to “Port Numbers and Services” of “Systemwalker DesktopKeeper Reference Manual”.
When the port number to be used in Systemwalker Desktop Keeper is already used in the system, please modify the port number.
In addition, management is performed by using a Web browser in Systemwalker Desktop Keeper. In order to use and manage IIS, pleaseset the port number of IIS to “80”.If the port number “80” is already used in the system, please modify the port number.
For how to modify the port number, please refer to “Port Numbers and Services” of “Systemwalker Desktop Keeper Reference Manual”.
- 29 -
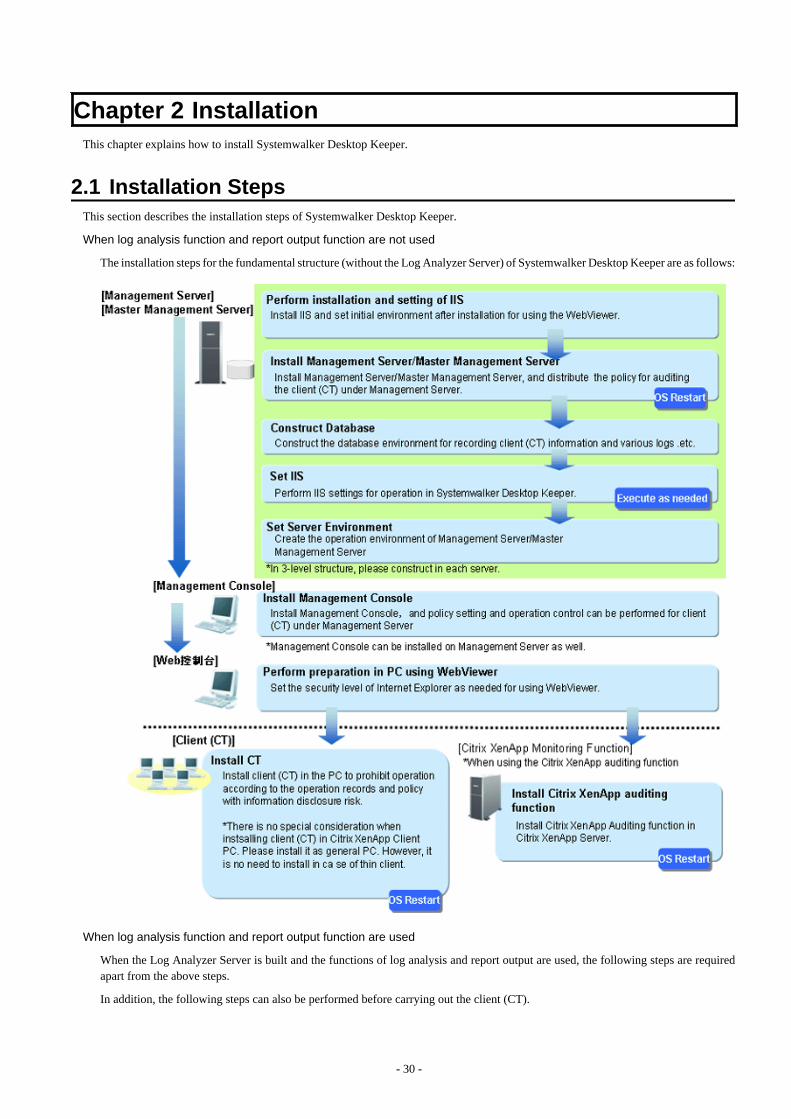
Chapter 2 Installation This chapter explains how to install Systemwalker Desktop Keeper.
2.1 Installation Steps This section describes the installation steps of Systemwalker Desktop Keeper.
When log analysis function and report output function are not used
The installation steps for the fundamental structure (without the Log Analyzer Server) of Systemwalker Desktop Keeper are as follows:
When log analysis function and report output function are used
When the Log Analyzer Server is built and the functions of log analysis and report output are used, the following steps are requiredapart from the above steps.
In addition, the following steps can also be performed before carrying out the client (CT).
- 30 -
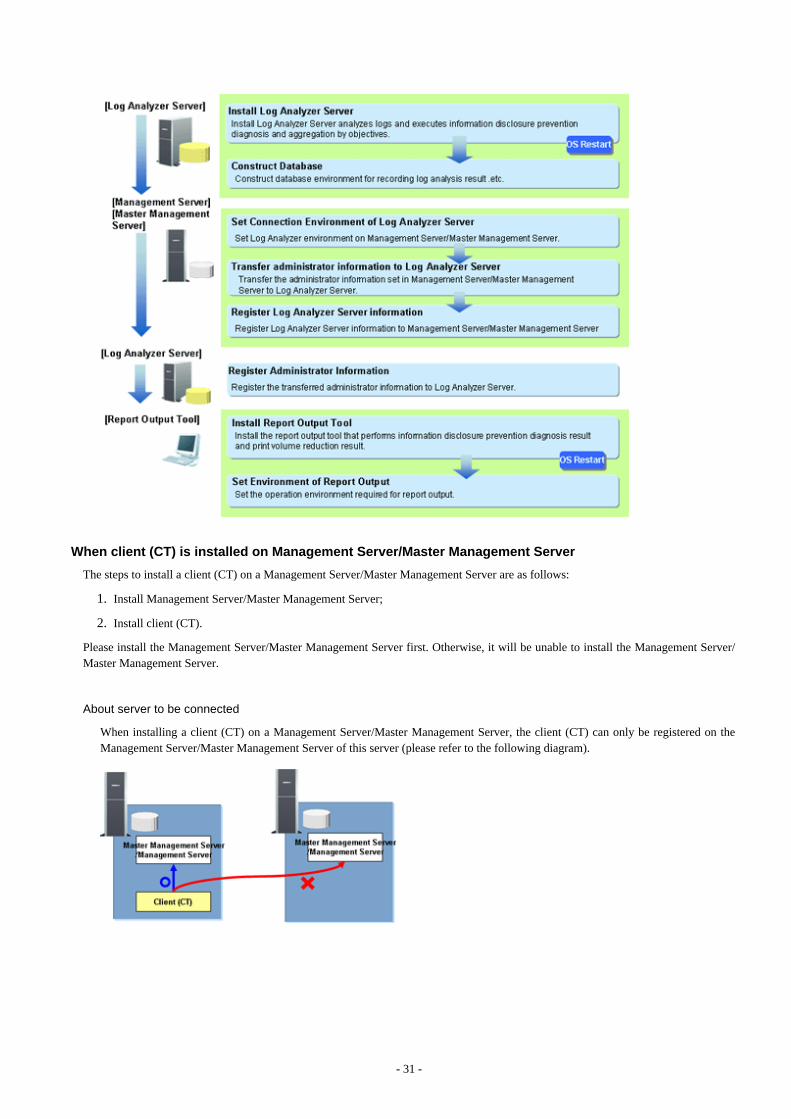
When client (CT) is installed on Management Server/Master Management Server
The steps to install a client (CT) on a Management Server/Master Management Server are as follows:
1. Install Management Server/Master Management Server;
2. Install client (CT).
Please install the Management Server/Master Management Server first. Otherwise, it will be unable to install the Management Server/Master Management Server.
About server to be connected
When installing a client (CT) on a Management Server/Master Management Server, the client (CT) can only be registered on theManagement Server/Master Management Server of this server (please refer to the following diagram).
- 31 -
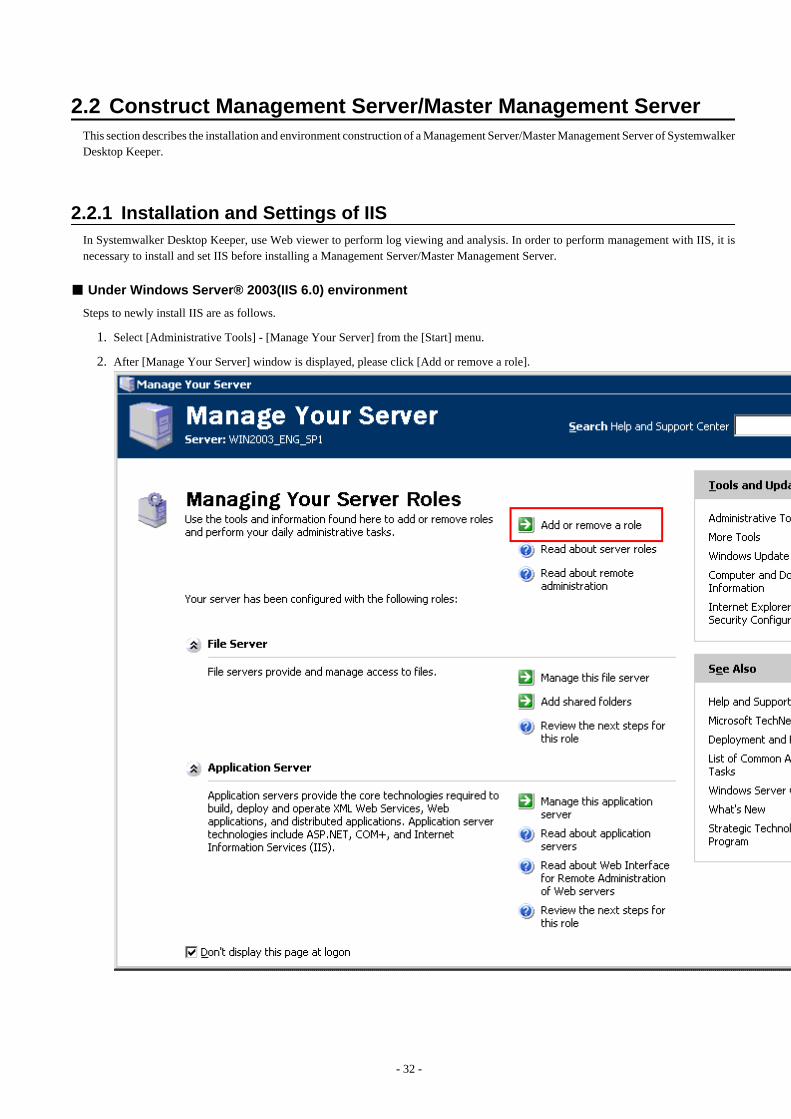
2.2 Construct Management Server/Master Management Server This section describes the installation and environment construction of a Management Server/Master Management Server of SystemwalkerDesktop Keeper.
2.2.1 Installation and Settings of IISIn Systemwalker Desktop Keeper, use Web viewer to perform log viewing and analysis. In order to perform management with IIS, it isnecessary to install and set IIS before installing a Management Server/Master Management Server.
■ Under Windows Server® 2003(IIS 6.0) environment
Steps to newly install IIS are as follows.
1. Select [Administrative Tools] - [Manage Your Server] from the [Start] menu.
2. After [Manage Your Server] window is displayed, please click [Add or remove a role].
- 32 -
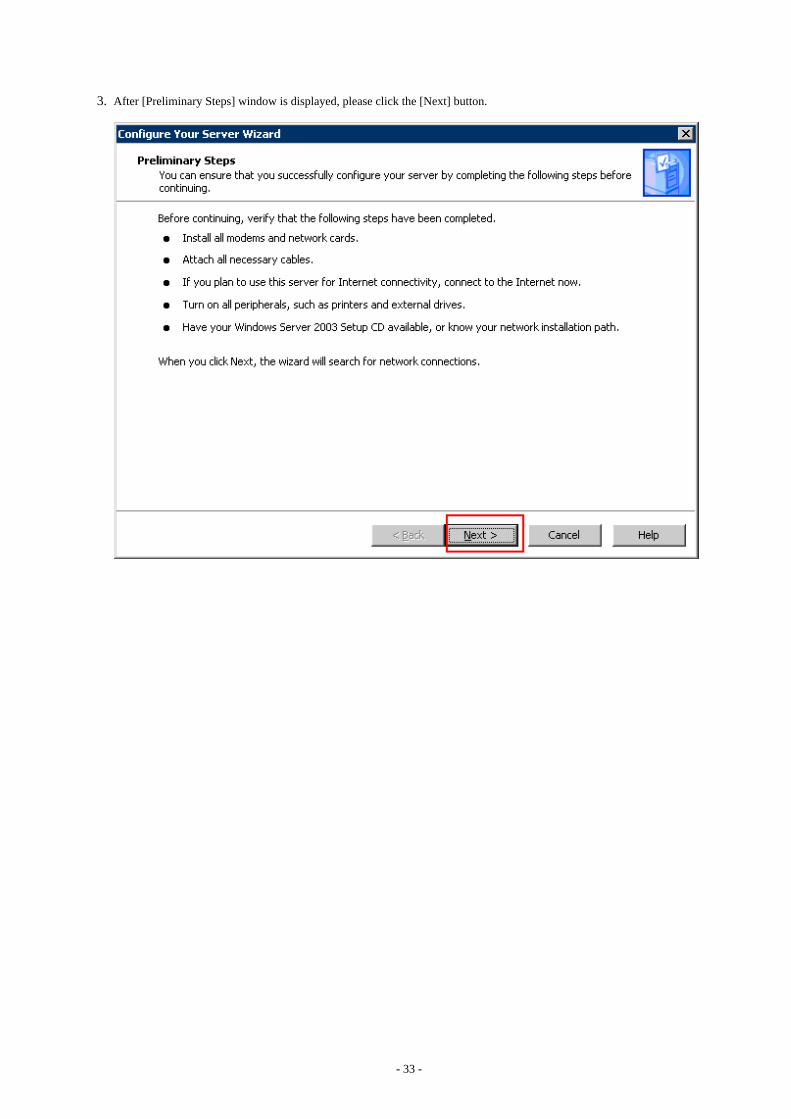
3. After [Preliminary Steps] window is displayed, please click the [Next] button.
- 33 -
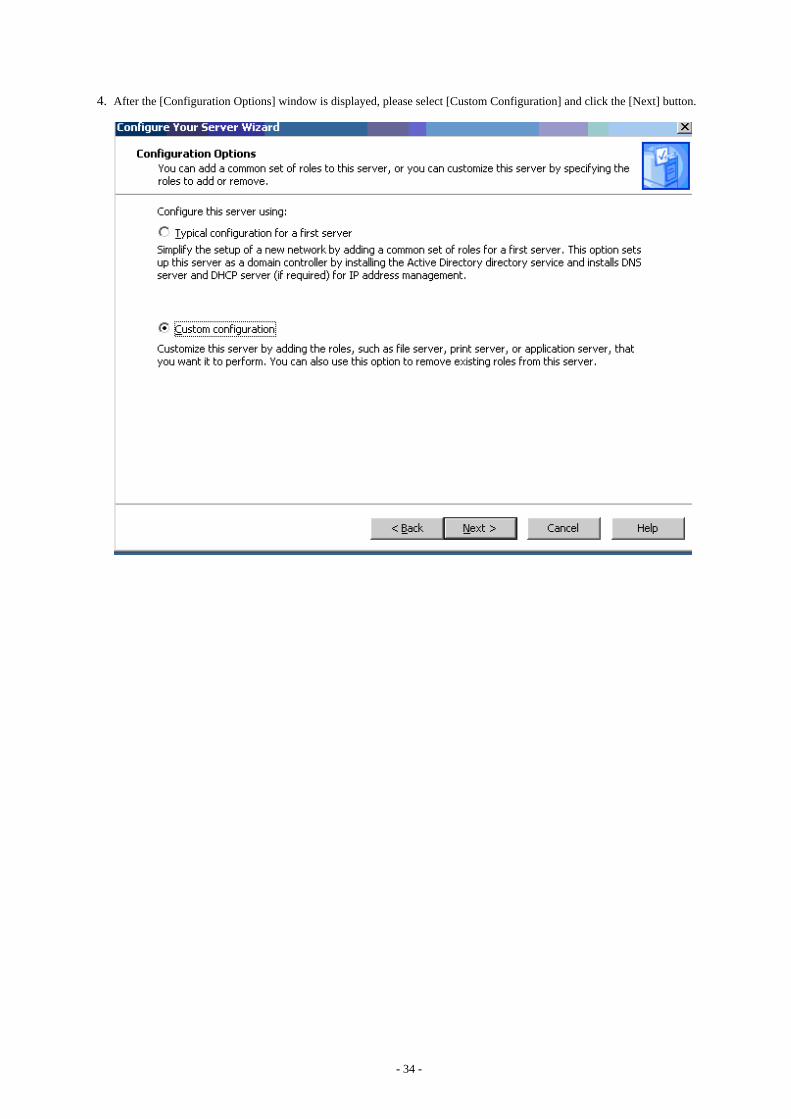
4. After the [Configuration Options] window is displayed, please select [Custom Configuration] and click the [Next] button.
- 34 -
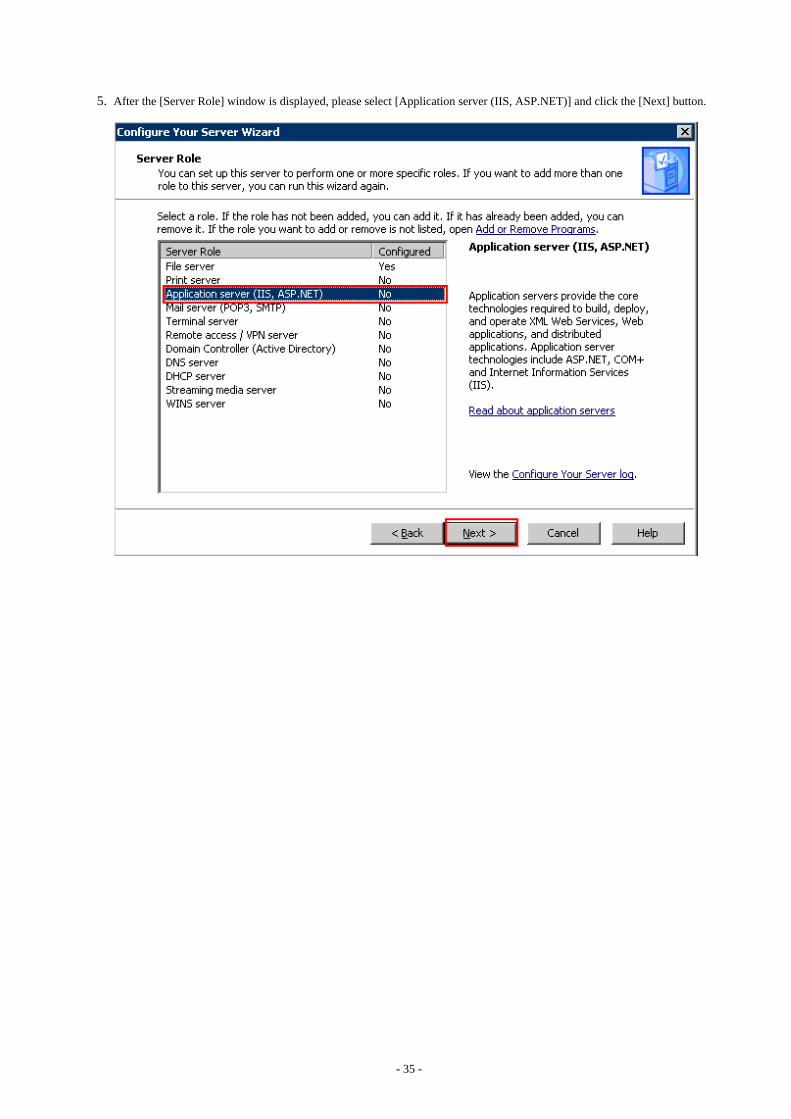
5. After the [Server Role] window is displayed, please select [Application server (IIS, ASP.NET)] and click the [Next] button.
- 35 -
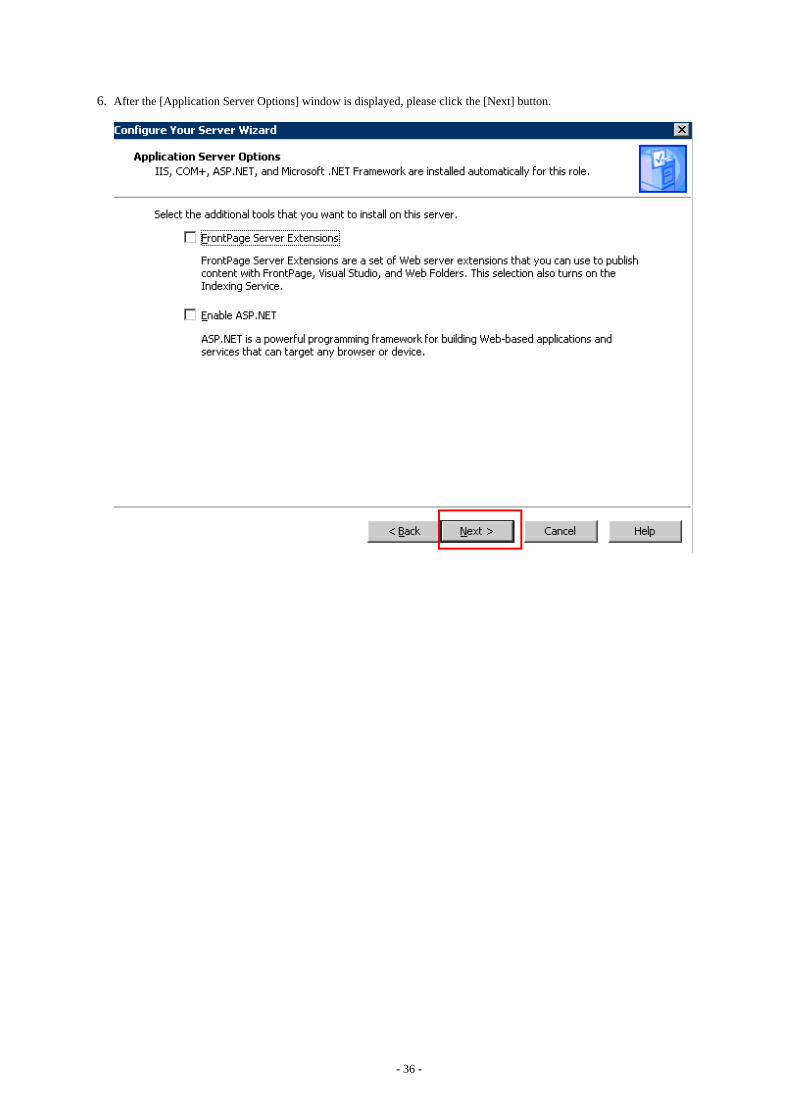
6. After the [Application Server Options] window is displayed, please click the [Next] button.
- 36 -
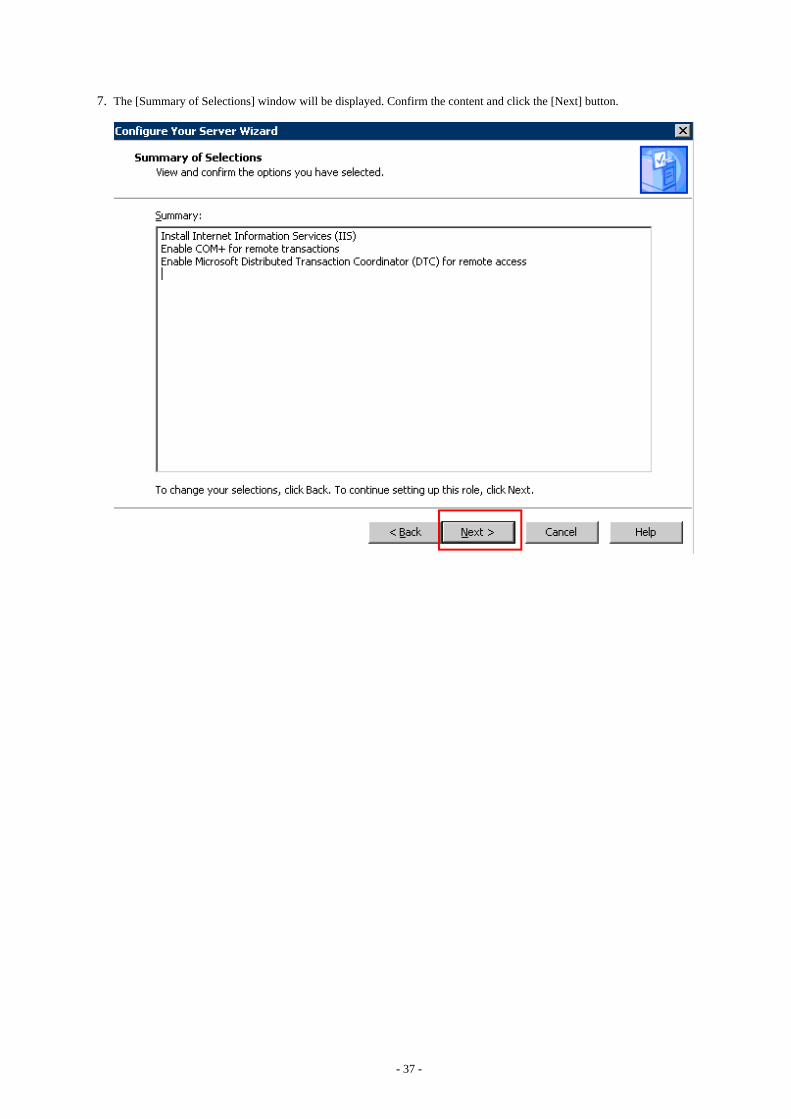
7. The [Summary of Selections] window will be displayed. Confirm the content and click the [Next] button.
- 37 -
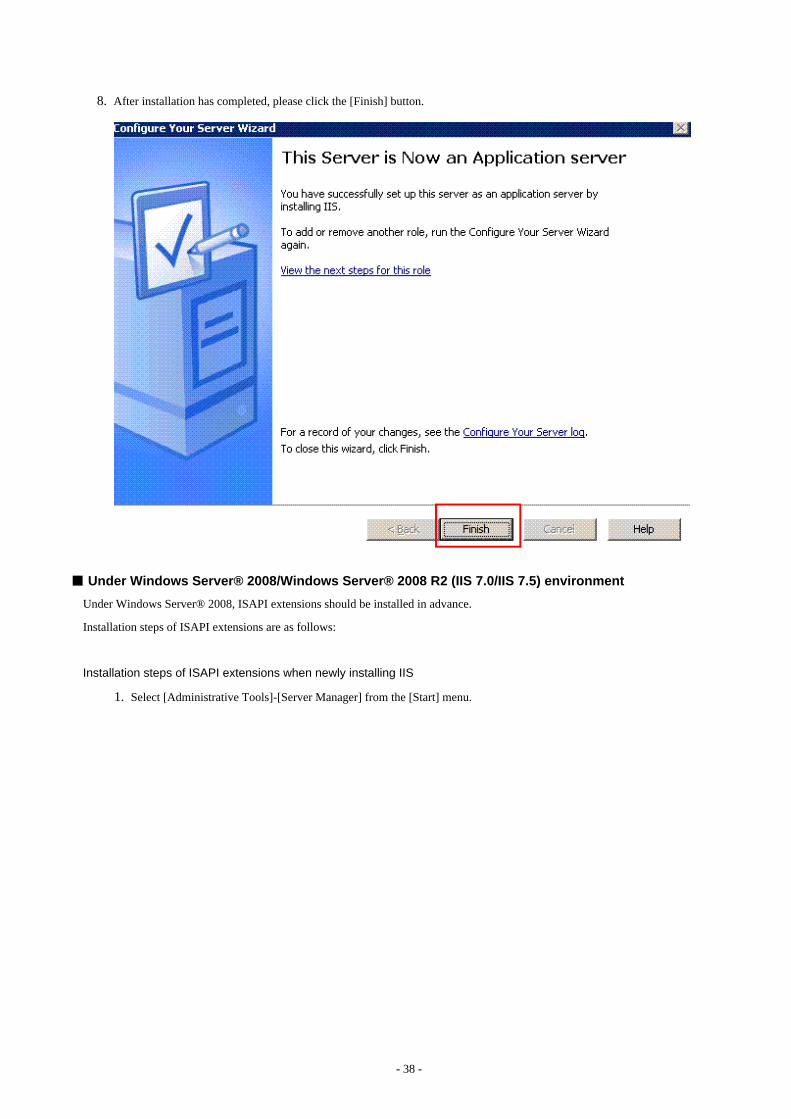
8. After installation has completed, please click the [Finish] button.
■ Under Windows Server® 2008/Windows Server® 2008 R2 (IIS 7.0/IIS 7.5) environment
Under Windows Server® 2008, ISAPI extensions should be installed in advance.
Installation steps of ISAPI extensions are as follows:
Installation steps of ISAPI extensions when newly installing IIS
1. Select [Administrative Tools]-[Server Manager] from the [Start] menu.
- 38 -
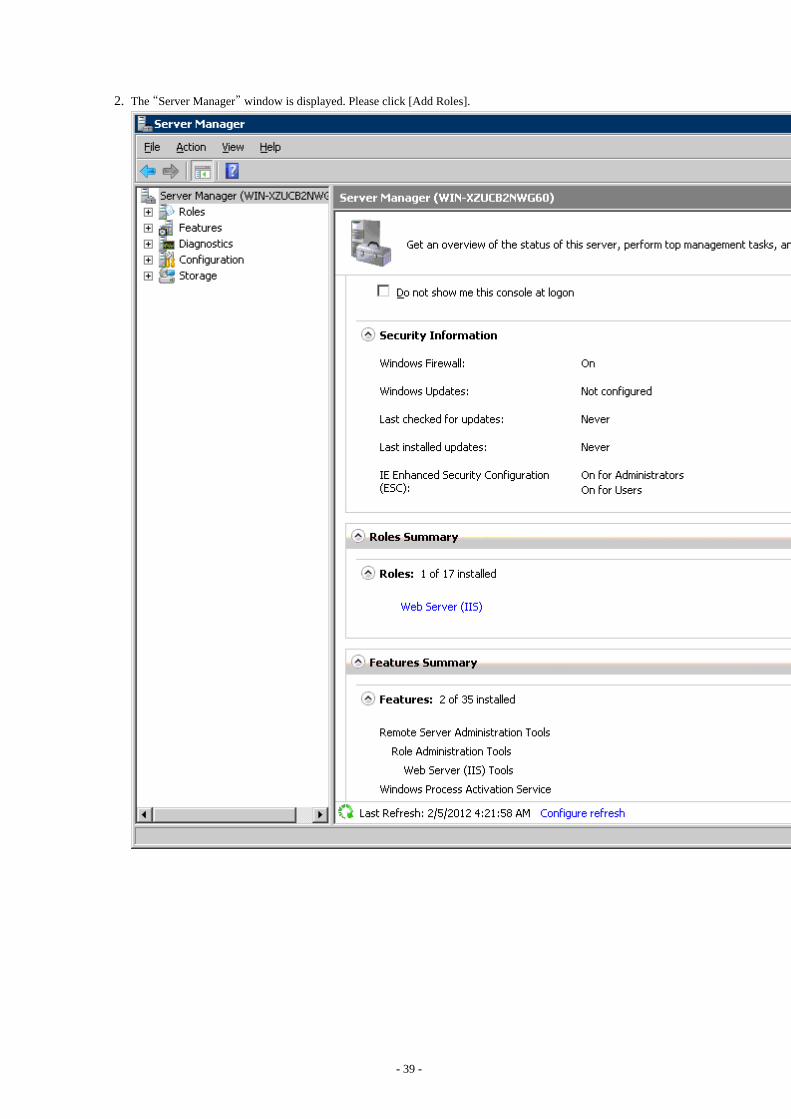
2. The “Server Manager” window is displayed. Please click [Add Roles].
- 39 -
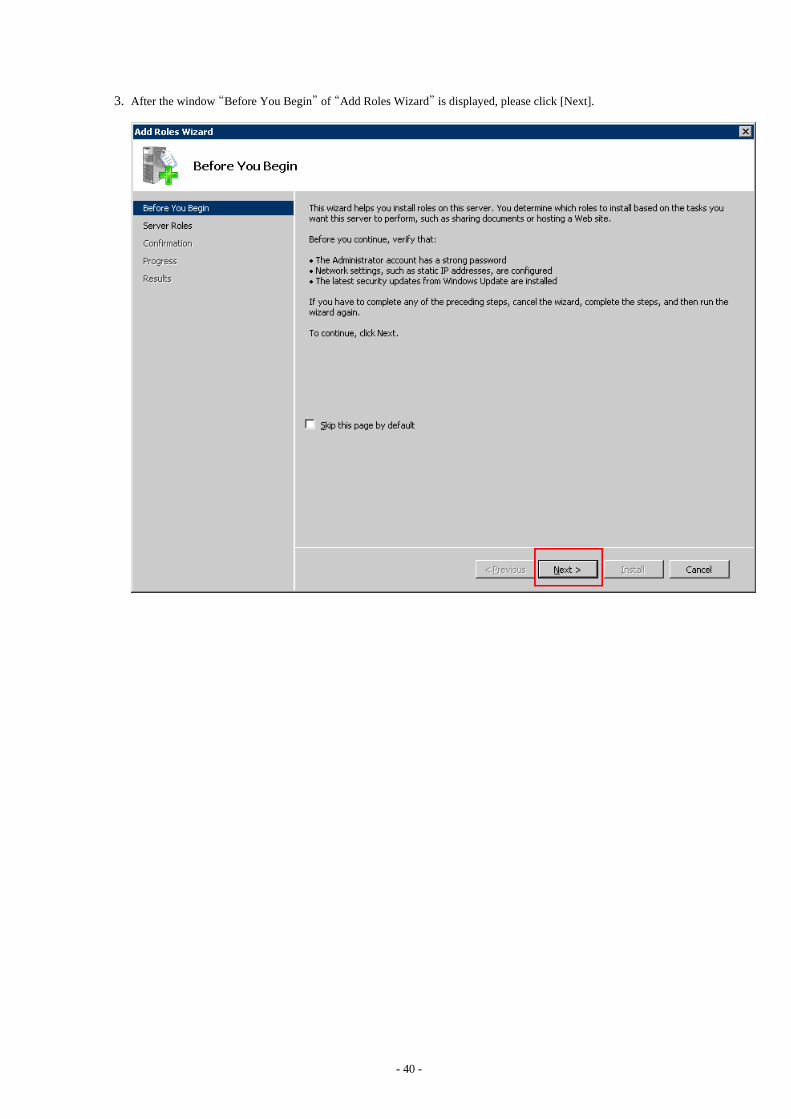
3. After the window “Before You Begin” of “Add Roles Wizard” is displayed, please click [Next].
- 40 -
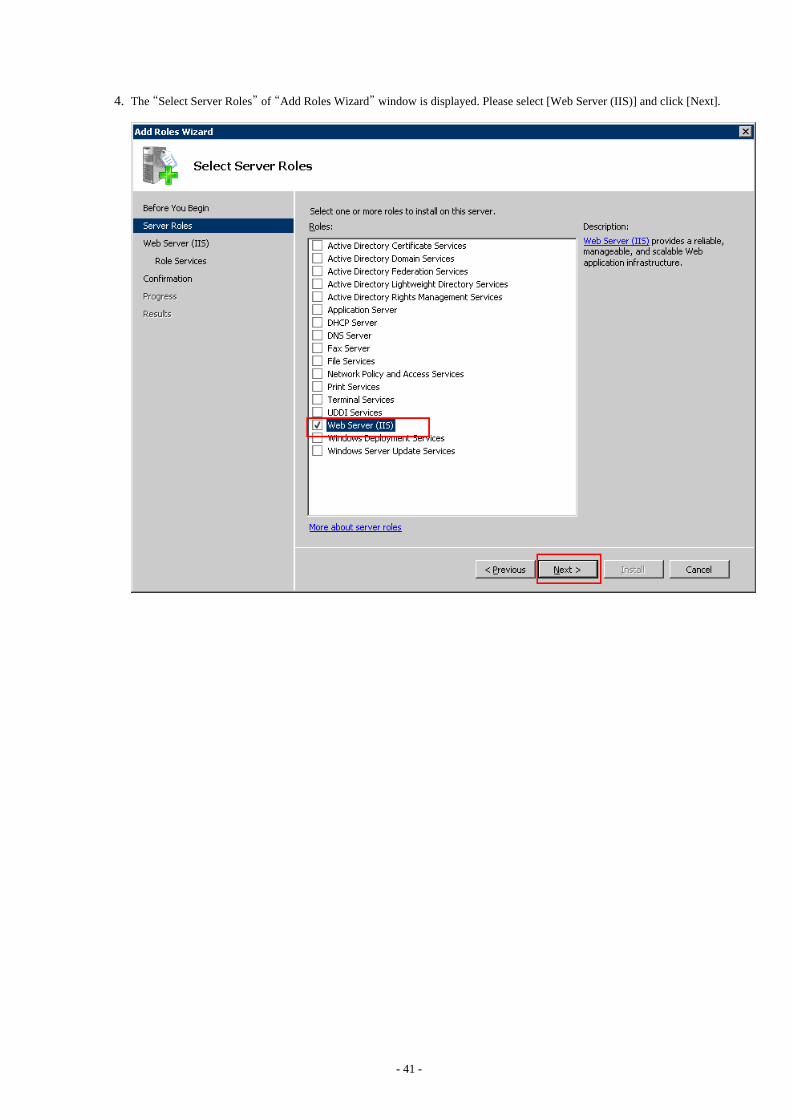
4. The “Select Server Roles” of “Add Roles Wizard” window is displayed. Please select [Web Server (IIS)] and click [Next].
- 41 -

5. The “Web Server (IIS)” of “Add Roles Wizard” window is displayed. Please click [Next].
6. The “Select Role Services” of “Add Roles Wizard” window is displayed. Select the following items and click [Next]:
- [Application Development]-[ISAPI Extensions]
- [Management Tools]-[IIS 6 Management Compatibility]
In addition, please select the following items if they are not selected:
- [Common HTTP Features]-[Static Content]
- [Common HTTP Features]-[Default Document]
- [Common HTTP Features]-[Directory Browsing]
- 42 -
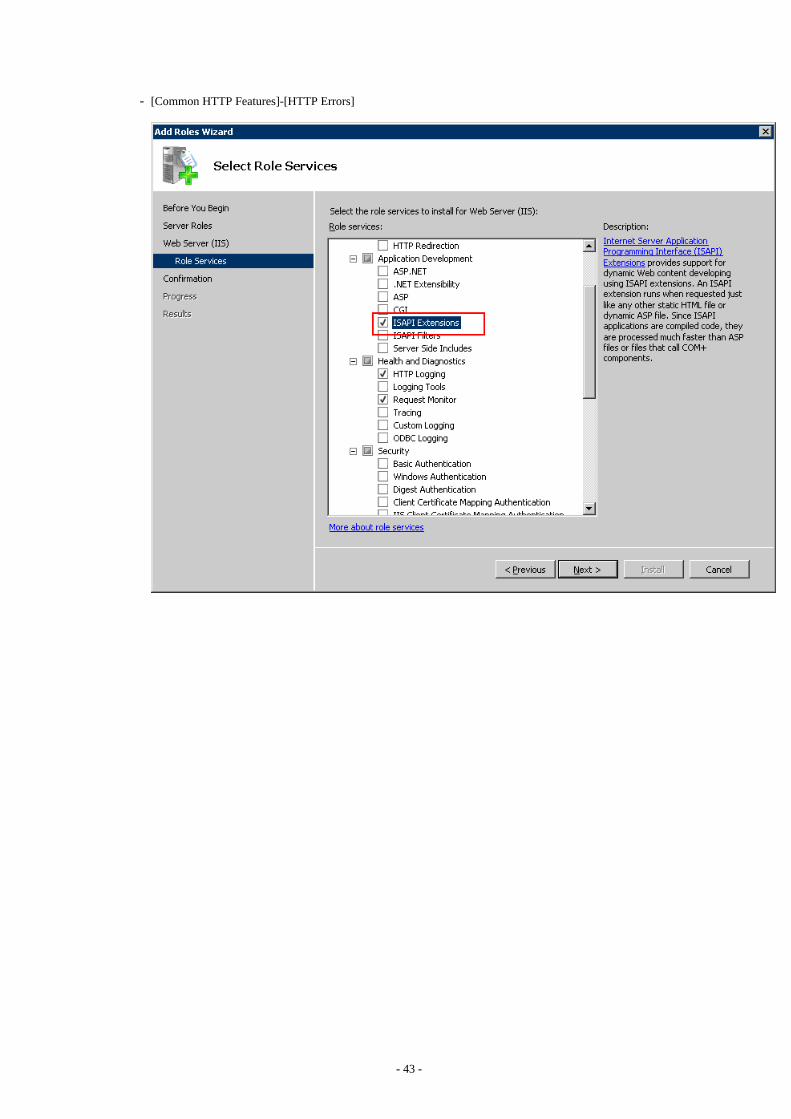
- [Common HTTP Features]-[HTTP Errors]
- 43 -
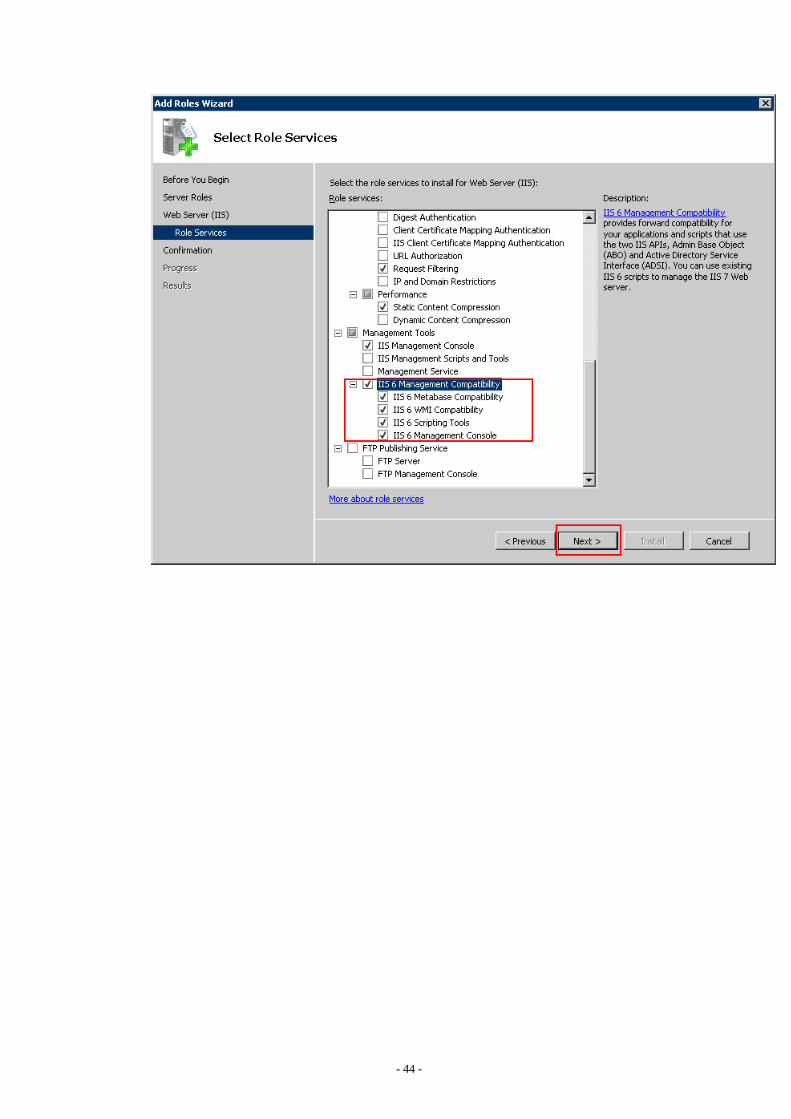
- 44 -
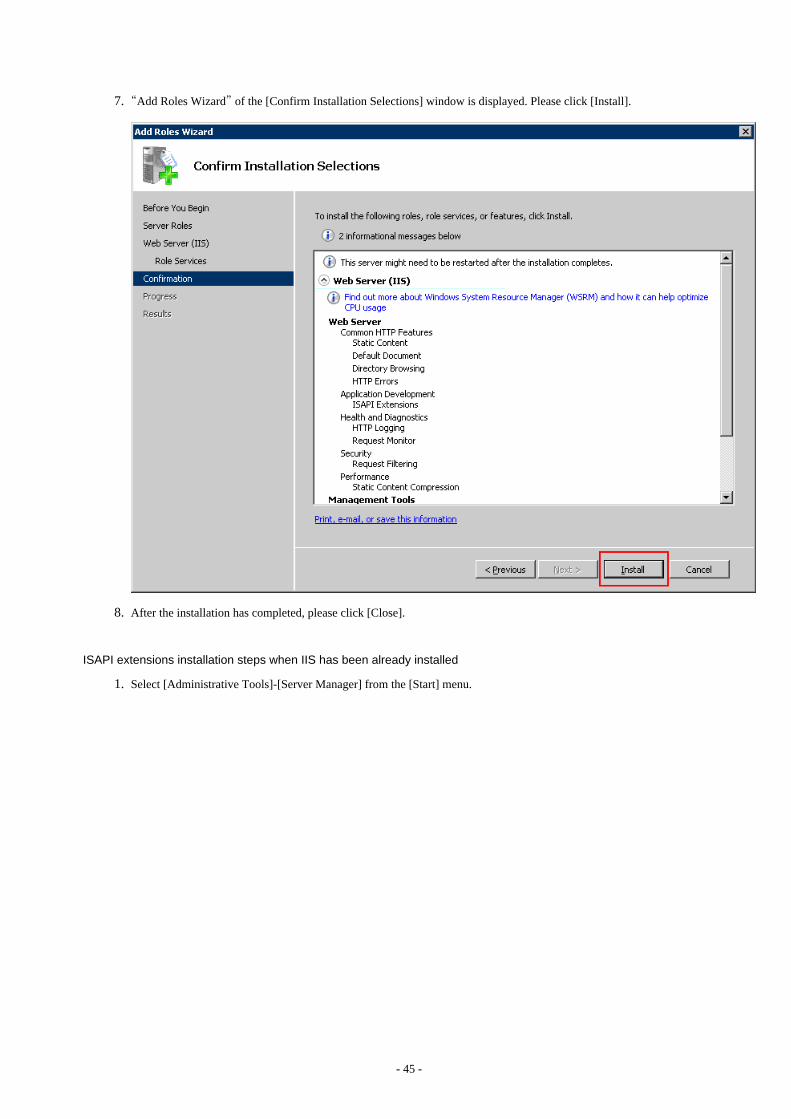
7. “Add Roles Wizard” of the [Confirm Installation Selections] window is displayed. Please click [Install].
8. After the installation has completed, please click [Close].
ISAPI extensions installation steps when IIS has been already installed
1. Select [Administrative Tools]-[Server Manager] from the [Start] menu.
- 45 -
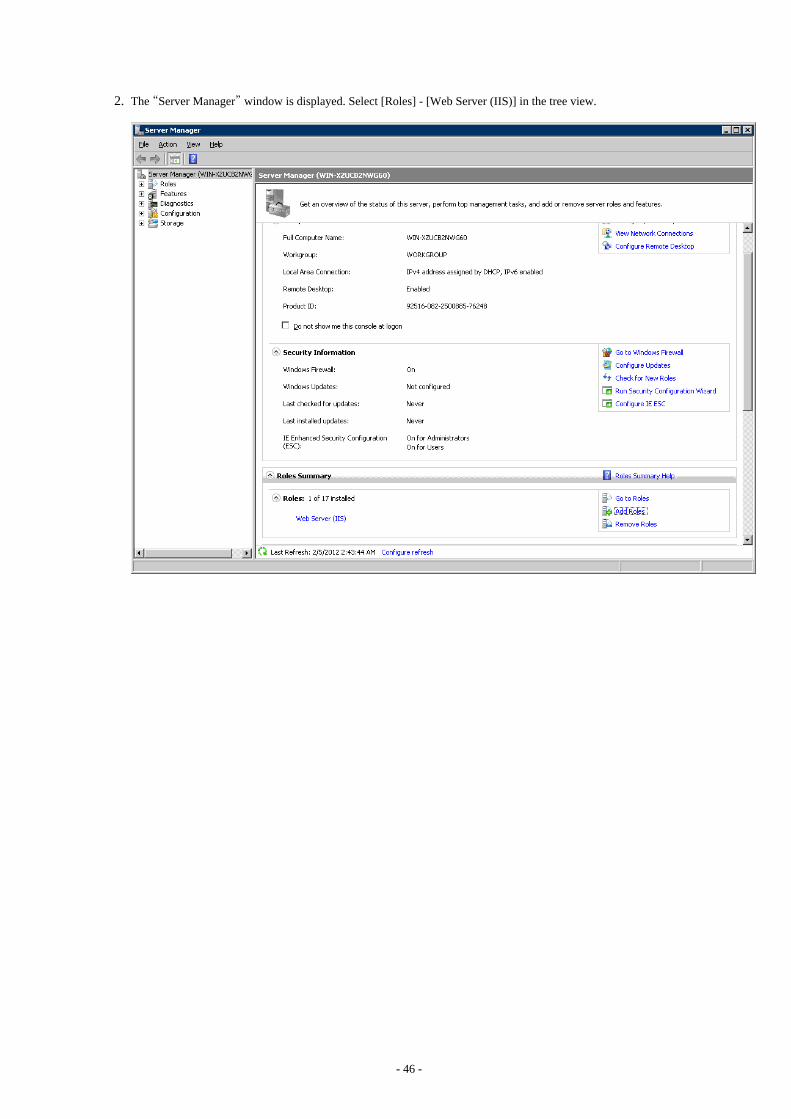
2. The “Server Manager” window is displayed. Select [Roles] - [Web Server (IIS)] in the tree view.
- 46 -
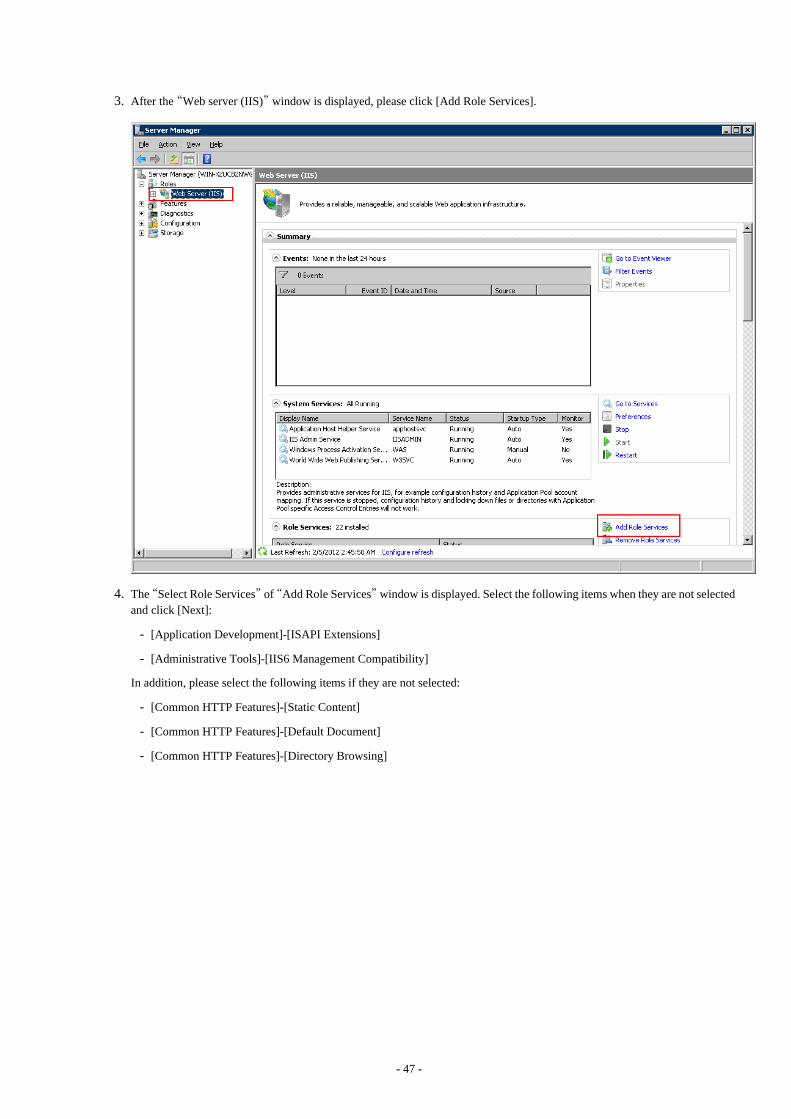
3. After the “Web server (IIS)” window is displayed, please click [Add Role Services].
4. The “Select Role Services” of “Add Role Services” window is displayed. Select the following items when they are not selectedand click [Next]:
- [Application Development]-[ISAPI Extensions]
- [Administrative Tools]-[IIS6 Management Compatibility]
In addition, please select the following items if they are not selected:
- [Common HTTP Features]-[Static Content]
- [Common HTTP Features]-[Default Document]
- [Common HTTP Features]-[Directory Browsing]
- 47 -
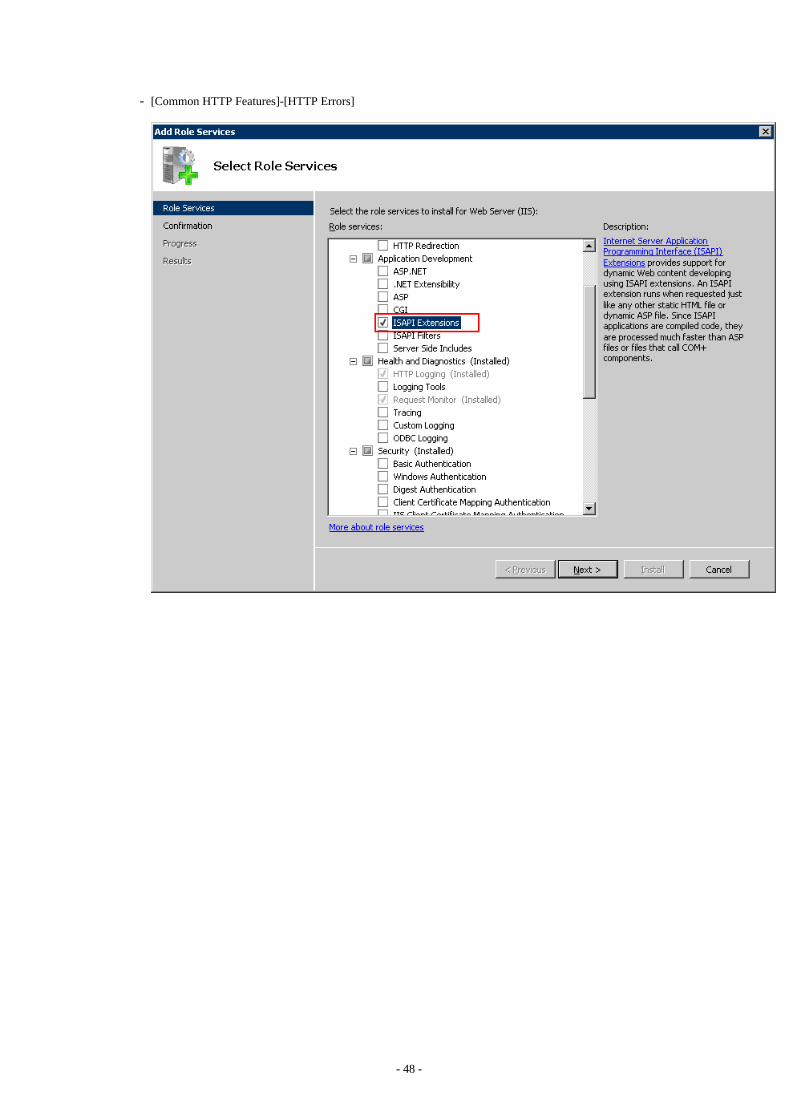
- [Common HTTP Features]-[HTTP Errors]
- 48 -
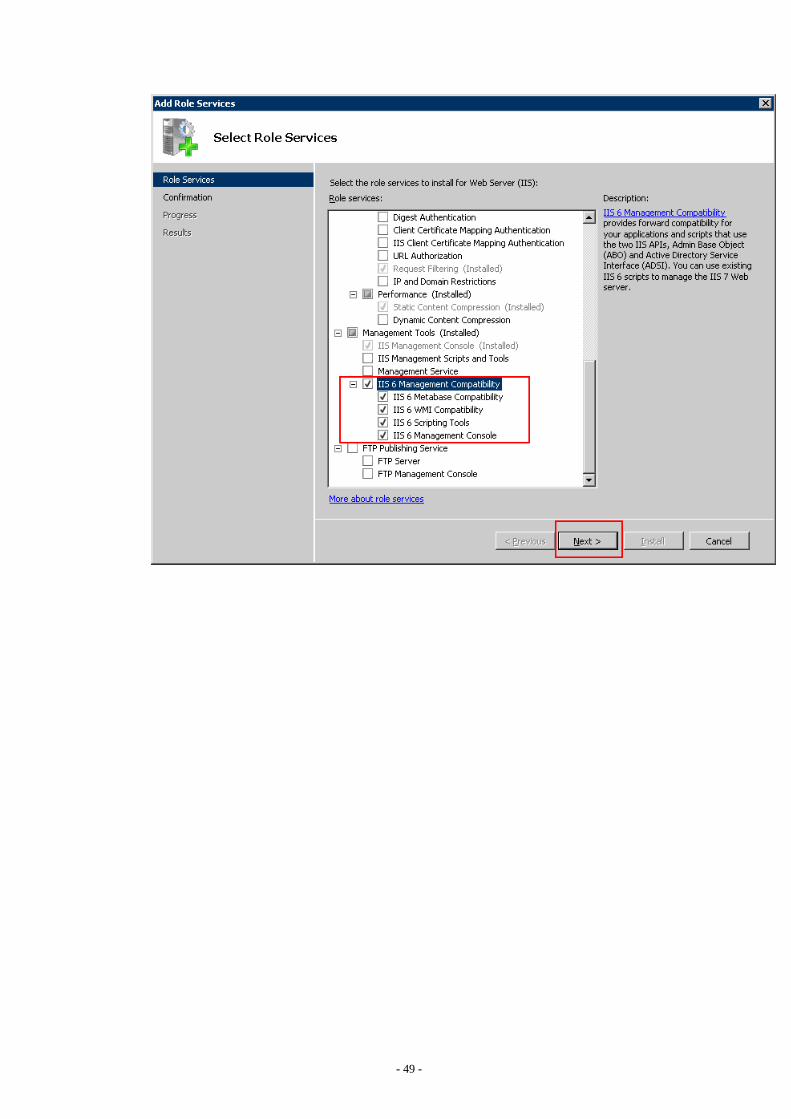
- 49 -
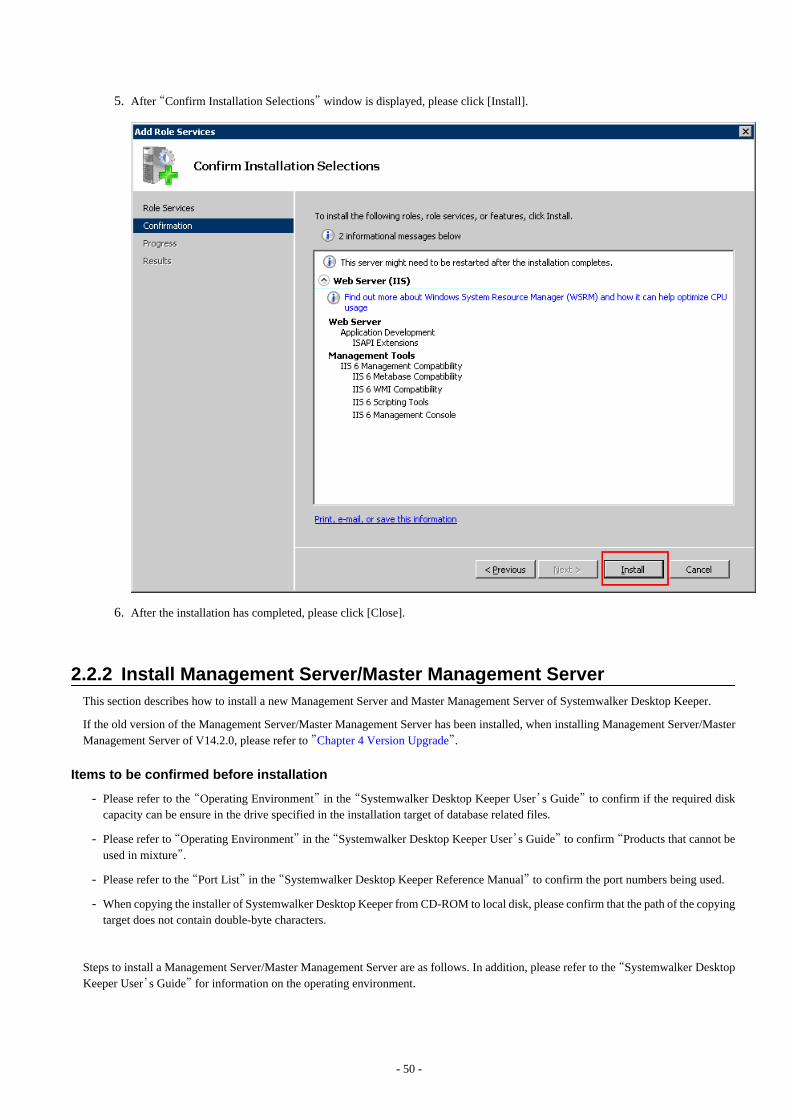
5. After “Confirm Installation Selections” window is displayed, please click [Install].
6. After the installation has completed, please click [Close].
2.2.2 Install Management Server/Master Management Server This section describes how to install a new Management Server and Master Management Server of Systemwalker Desktop Keeper.
If the old version of the Management Server/Master Management Server has been installed, when installing Management Server/MasterManagement Server of V14.2.0, please refer to ”Chapter 4 Version Upgrade”.
Items to be confirmed before installation
- Please refer to the “Operating Environment” in the “Systemwalker Desktop Keeper User’s Guide” to confirm if the required diskcapacity can be ensure in the drive specified in the installation target of database related files.
- Please refer to “Operating Environment” in the “Systemwalker Desktop Keeper User’s Guide” to confirm “Products that cannot beused in mixture”.
- Please refer to the “Port List” in the “Systemwalker Desktop Keeper Reference Manual” to confirm the port numbers being used.
- When copying the installer of Systemwalker Desktop Keeper from CD-ROM to local disk, please confirm that the path of the copyingtarget does not contain double-byte characters.
Steps to install a Management Server/Master Management Server are as follows. In addition, please refer to the “Systemwalker DesktopKeeper User’s Guide” for information on the operating environment.
- 50 -
1. Log in to Windows with a user that belongs to the Administrators group or a user that belongs to the Domain Admins group. If otherapplications are being used, please close them.
2. After the CD-ROM of Systemwalker Desktop Keeper is inserted into the PC, the following window will be displayed:
Please select “Management Server Installation”.
If the above-mentioned installer is not started, please start “swsetup.exe” from the CD-ROM drive.
3. After the “Welcome to user Systemwalker Desktop Keeper Server installation” window is displayed, please click the [Next] button.
4. The “Select the installation target” window of server functions is displayed.
If the installation target displayed is not to be changed, click [Next].
If the installation target displayed is to be changed, please click the [Browse] button of the folder to be changed, and click the [Next]button after the folder has been changed.
Note
Please remove compressed and encrypted targets
When the installation target folder of server functions and the installation target folder of the following database related files aretaken as compressed or encrypted target, the running of the application might be affected. Therefore, please do not performcompression or encryption settings.
5. The “Select the installation target” window of database related file is displayed.
When the installation target displayed is not to be changed, click [Next].
When the installation target displayed is to be changed, please click the [Browse] button of the folder to be changed, and then clickthe [Next] button.
- 51 -

The maximum length of the installation folder path of database related file is 10 bytes. Multi-byte characters such as space, Hiragana,Katakana and Chinese characters cannot be specified. In addition, the following drives cannot be specified:
- Root directory of drive (C:\, D:\, etc.)
- Network drive
- Drive not in NTFS format
When the Symfoware database system has already been installed, the bound Symfoware Server will not be installed. Even ifinstallation target of database related file has been specified, the installation target of the Symfoware database system will not bechanged.
6. The “Select the installation target” window for IIS main directory settings is displayed.
When installation target displayed is not to be changed, please click the button [Next].
When installation target displayed is to be changed, please click the [Browse] button of the folder to be changed, and then click the[Next] button.
Please make sure to specify the home directory of [Default Web Site].
7. The “Enter the password” window is displayed. Please set the primary administrator password of Server Administrative Tools, andclick the [Next] button.
In addition, the password set here is also the password of Secure Admin in Sever Setting Tool, Backup Tool and Restoration Tool.The conditions of input content are as follows:
- Up to 32 bytes of single-byte alphanumeric characters and symbols apart from the following can be entered.
- Symbols that cannot be entered are “&”“<”“>”“|”“\”“"”“~”“'”“?”“:”“^”.
- Double-byte and single-byte spaces cannot be entered.
- Single-byte kana cannot be entered.
Note
Please do not forget the password
Please do not forget the primary administrator password of the Server Administrative Tools because the operating environmentcannot be constructed without the password. Therefore, it may be required to uninstall Management Server and install again.
8. The “The installation preparation is completed.” window is displayed.
To start the installation, please click [Install] to start the installation process.
To check or modify the settings, please click the [Return] button to reset.
Note
Do not restart at moment
Sometimes the window “Microsoft Visual C++ 2005 SP1 Redistributable Package” will be displayed during installation, but pleasedo not restart and continue the installation of Management Server.
Moreover, if restart has been executed by mistake, the installation of Management Server will be interrupted. Reinstallation will beneeded.
9. After the processing has completed normally, the “Installation is completed.” window will be displayed.
To use the program, it is required to restart the system. Select one of the following items and click the [Finish] button.
- [Yes, restart the computer immediately].
- [No, restart the computer later].
- 52 -

In addition, when Symfoware Server has already been installed, the indication for restart will not be displayed. Therefore, pleaserestart the system manually right after the [Finish] button is clicked.
After installing the Management Server, the database environment required for running the Management Server must be created. Pleaserefer to “2.2.3 Construct Database ” and execute the construction of database.
2.2.3 Construct Database This section describes how to create a new database for a Systemwalker Desktop Keeper Management Server/Master Management Server.
Database includes the operation database for saving operation information (management information and operation log information) andthe log viewing database for migrating and viewing the previous operation logs.
It is required to construct the operation database. Please construct the log viewing database according to need.
When the database information used in the old version is used directly in V14.2.0, please refer to “Chapter 4 Version Upgrade”.
Data saved in database will not be automatically deleted. Backup of data should be deleted regularly.
In addition, in order to prevent database insufficiency, please perform notification setting when the database space is insufficient. Fornotification settings when database is insufficient, please refer to “2.2.5.8 Set Administrator Notification ”.
Note
When constructing database, there are following restrictions and notes
[Compression and encryption of database creation target]
Please do not set compression or encryption for the drive and the folder to construct database.
[Virus scan of database creation target]
Please exclude the folder to construct database from the target of virus scan software.
[Users at database creation]
For the logon user name of Windows, please specify alphanumeric characters beginning with a letter and with no more than 18characters, with the Administrator authority.
Please do not delete the Windows logon user when the database environment has been constructed. When deleting the databaseenvironment, migrating database environment and restoring management information and log data, the Windows logon user used forconstructing the database environment is required.
[Settings of event viewer]
Please confirm the maximum log size of event viewer (application log) and the settings of operation when the maximum is reached inadvance so that the new event log can be recorded without any problems. Database construction may be interrupted if no event log isrecorded.
Items to be confirmed before database construction
Please use the following ports to access database in Management Server/Master Management Server:
- Operation database: 10011
If the above-mentioned port number has been used, before constructing the operation database, please refer to the “Port NumberList” in the “Systemwalker Desktop Keeper Reference Manual” to change the environment of Systemwalker Desktop Keeper.
- Log viewing database: 10050
When the above-mentioned port number has been used, before constructing the log viewing database, please refer to the “Port NumberList” in the “Systemwalker Desktop Keeper Reference Manual” to change the environment of Systemwalker Desktop Keeper.
About the standard of database construction time
The time to construct the database will vary based on the capacity of that database. The standard of creation time is as follows:
- 53 -

- When the capacity of the database is about 250GB (Xeon 2.0GHz, memory 2GB and RAID5 structure)
DB construction time: around 15 hours. *More time may be consumed depending on server performance and RAID structure.
Construct operation database
The steps to create the operation database of a Systemwalker Desktop Keeper Management Server/Master Management Server are asfollows:
1. Log in to Windows with the user that belongs to the Administrators group or the user that belongs to the Domain Admins group.When other application is being used, close it.
Please refer to the notes mentioned above for existence condition of user name.
2. Select [All Programs] - [Systemwalker Desktop Keeper] - [Server] - [Operating Environment Maintenance Wizard (Construct orDelete Environment)] from the [Start] menu.
3. After the “Welcome to use Operating Environment Maintenance Wizard (Construct/Delete Environment)” window is displayed,please click the [Next] button.
- 54 -
4. The [Select a process] window is displayed. Please set [Executed process] and [Construction Options], and click the [Next] button.
Item Name Description
[Executed process] Select a process to be executed. Please select “Construct operating environment”:
- Construct operation enviornment
- Delete operation environment
[Specify the database ofprocessing target]
This is automatically selected according to the construction status of database.
[Construction options] Select the type of server to be executed:
- Master Management Server
- Management Server
5. The “Enter the database information” window is displayed. (The following window is the example of construction as a MasterManagement Server).
6. Please set [Database creation target] and [Estimate database capacity]. Click the [Capacity Estimation] button.
Please confirm the [Database capacity] and [Available disk capacity] displayed in [Capacity], and change [Database creation target]when [Available disk capacity] is insufficient. In addition, [Estimate database capacity] can be increased if necessary. Please set[Database capacity] directly.
- 55 -
After determining [Database creation target] and [Estimate database capacity], please click the [Next] button.
Item Name Description
[Database creation target] Enter the creation target of database. The initial setting is “C:\DTK\SFWD”. When changing the displayed creation target, click the[View] button to change the folder.
Folders on network and file systems that are not in NTFS formatcannot be specified.
The number of characters specified as a folder name of databasecreation target can be no more than 32 bytes. Multi-byte characterssuch as space, Hiragana, Katakana and Chinese characters cannot bespecified.
[Estimate databasecapacity]
[Number of all CTs] Enter the total number of CTs managed in Master Management Serverwithin the range of 1-50000.
This is unable to be entered when a Management Server is selected.
[Number of CTsmanaged in thisserver] (required)
Enter the number of CTs managed in this server within the range of1-50000.
[Number of fileoperation logs]
Enter the number of file operation logs within the range of 1-99999.
- 56 -
Item Name Description
[Number of non-fileoperation records](required)
Enter the number of non-file operation logs within the range of1-99999.
[Number of monthsto save]
Select the number of months to be saved ranging from 1 to 12.
Note
The number of months saved here is used for capacity estimationonly
The [Number of months to save] at the time of database constructionis the number specified for capacity calculation. Even if the storageperiod is exceeded, it will still be saved. (The log information thatexceeds the storage period will not be backed up/deletedautomatically.)
[Capacity] [Database capacity](required)
Set the items of [Estimate database capacity] and the estimated valueis displayed when the [Capacity Estimation] button is clicked.
When available disk capacity of the database creation target issufficient, and it is expected to create with a capacity that is largerthan the estimated value, please reset this item within the range ofavailable disk capacity.
[Available diskcapacity]
Display the available capacity of the creation target disk.
- 57 -
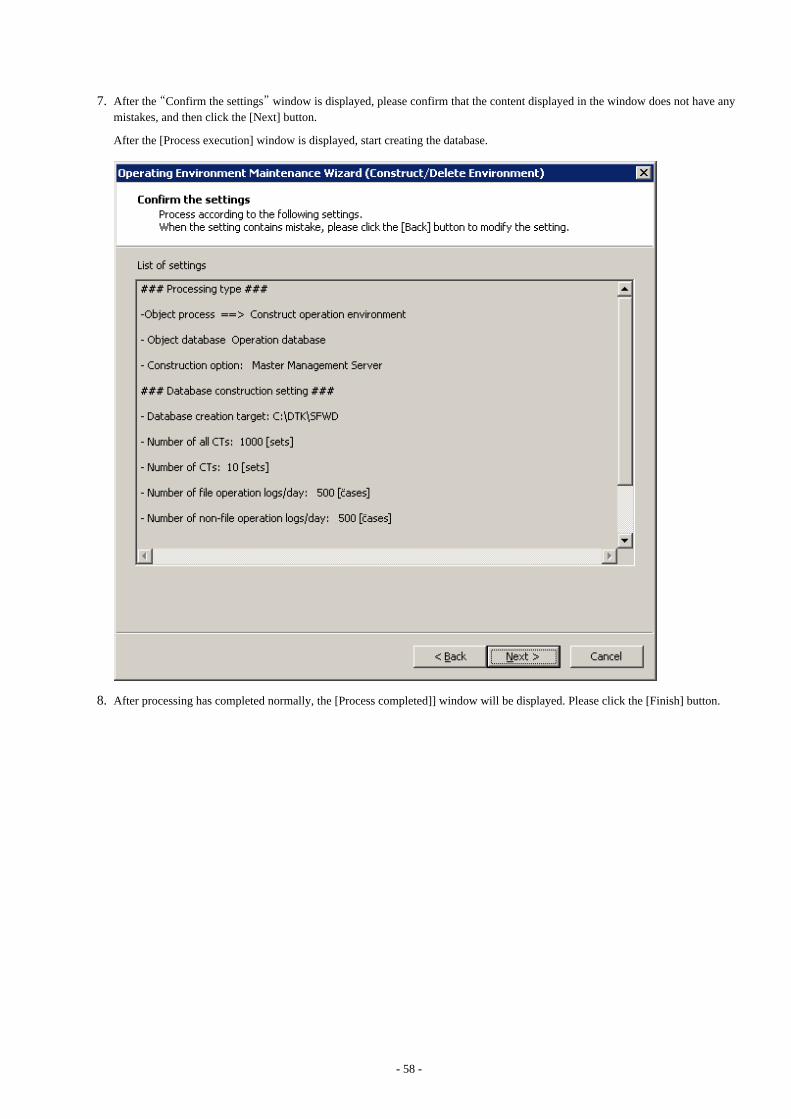
7. After the “Confirm the settings” window is displayed, please confirm that the content displayed in the window does not have anymistakes, and then click the [Next] button.
After the [Process execution] window is displayed, start creating the database.
8. After processing has completed normally, the [Process completed]] window will be displayed. Please click the [Finish] button.
- 58 -
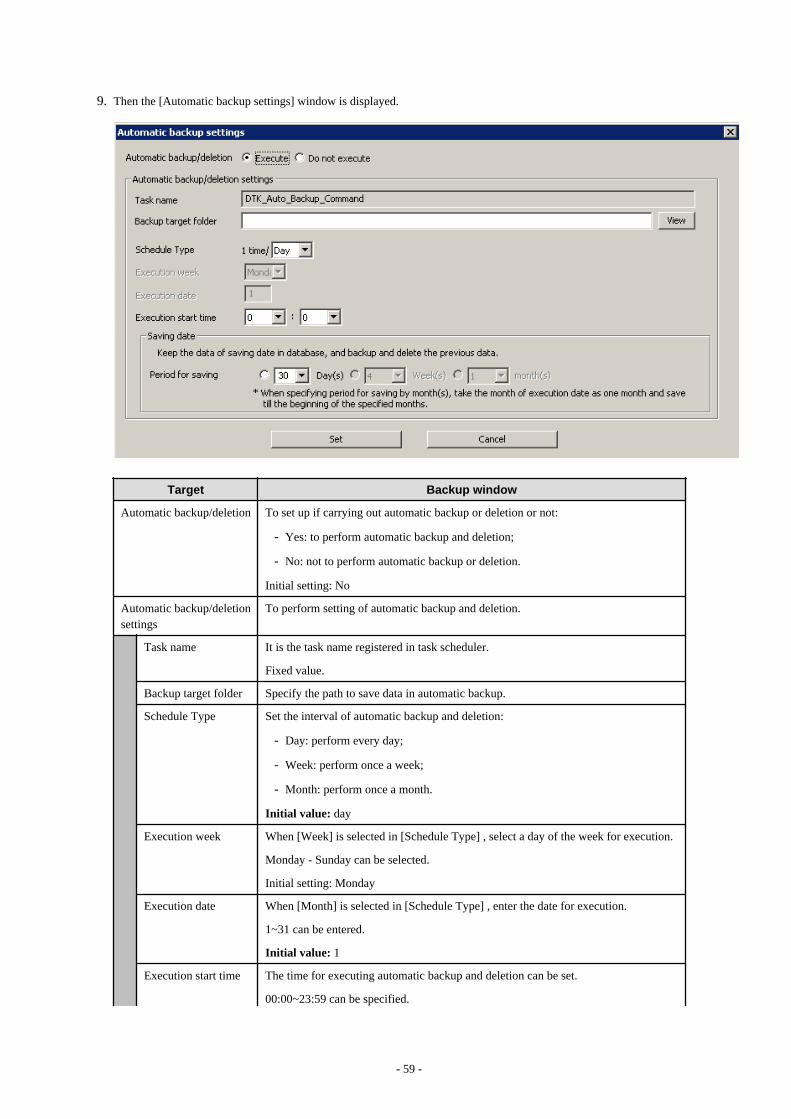
9. Then the [Automatic backup settings] window is displayed.
Target Backup window
Automatic backup/deletion To set up if carrying out automatic backup or deletion or not:
- Yes: to perform automatic backup and deletion;
- No: not to perform automatic backup or deletion.
Initial setting: No
Automatic backup/deletionsettings
To perform setting of automatic backup and deletion.
Task name It is the task name registered in task scheduler.
Fixed value.
Backup target folder Specify the path to save data in automatic backup.
Schedule Type Set the interval of automatic backup and deletion:
- Day: perform every day;
- Week: perform once a week;
- Month: perform once a month.
Initial value: day
Execution week When [Week] is selected in [Schedule Type] , select a day of the week for execution.
Monday - Sunday can be selected.
Initial setting: Monday
Execution date When [Month] is selected in [Schedule Type] , enter the date for execution.
1~31 can be entered.
Initial value: 1
Execution start time The time for executing automatic backup and deletion can be set.
00:00~23:59 can be specified.
- 59 -
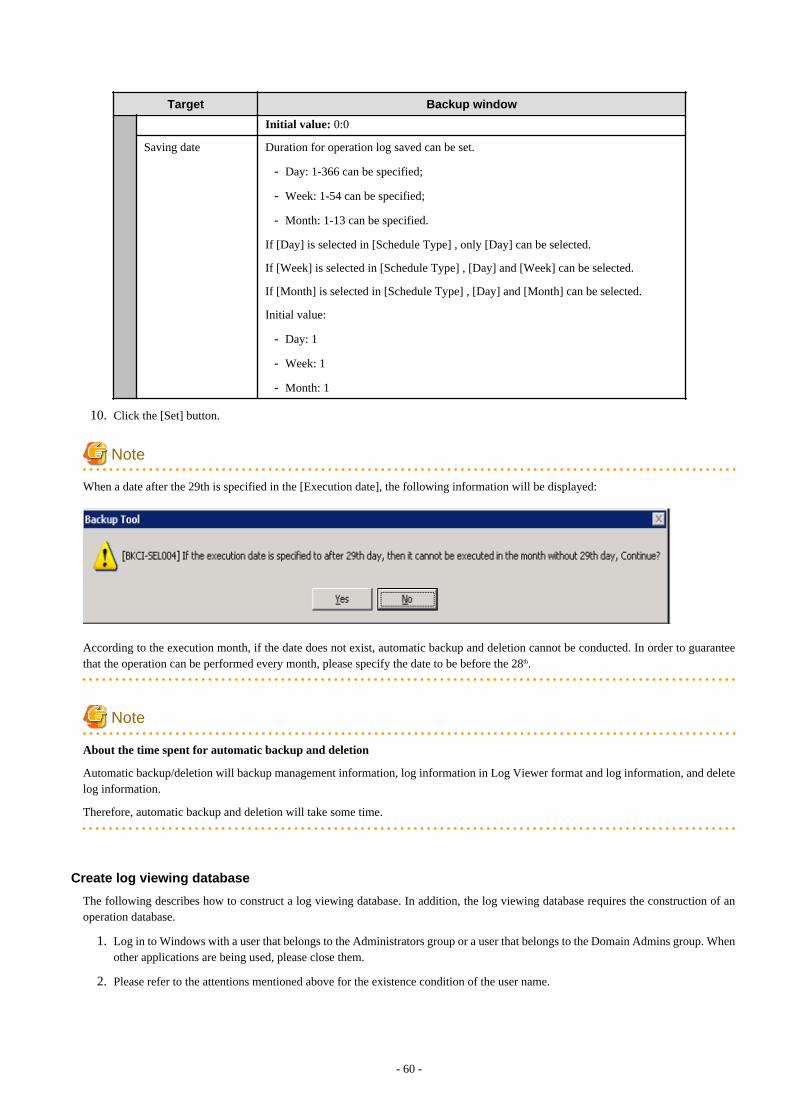
Target Backup window
Initial value: 0:0
Saving date Duration for operation log saved can be set.
- Day: 1-366 can be specified;
- Week: 1-54 can be specified;
- Month: 1-13 can be specified.
If [Day] is selected in [Schedule Type] , only [Day] can be selected.
If [Week] is selected in [Schedule Type] , [Day] and [Week] can be selected.
If [Month] is selected in [Schedule Type] , [Day] and [Month] can be selected.
Initial value:
- Day: 1
- Week: 1
- Month: 1
10. Click the [Set] button.
Note
When a date after the 29th is specified in the [Execution date], the following information will be displayed:
According to the execution month, if the date does not exist, automatic backup and deletion cannot be conducted. In order to guaranteethat the operation can be performed every month, please specify the date to be before the 28th.
Note
About the time spent for automatic backup and deletion
Automatic backup/deletion will backup management information, log information in Log Viewer format and log information, and deletelog information.
Therefore, automatic backup and deletion will take some time.
Create log viewing database
The following describes how to construct a log viewing database. In addition, the log viewing database requires the construction of anoperation database.
1. Log in to Windows with a user that belongs to the Administrators group or a user that belongs to the Domain Admins group. Whenother applications are being used, please close them.
2. Please refer to the attentions mentioned above for the existence condition of the user name.
- 60 -
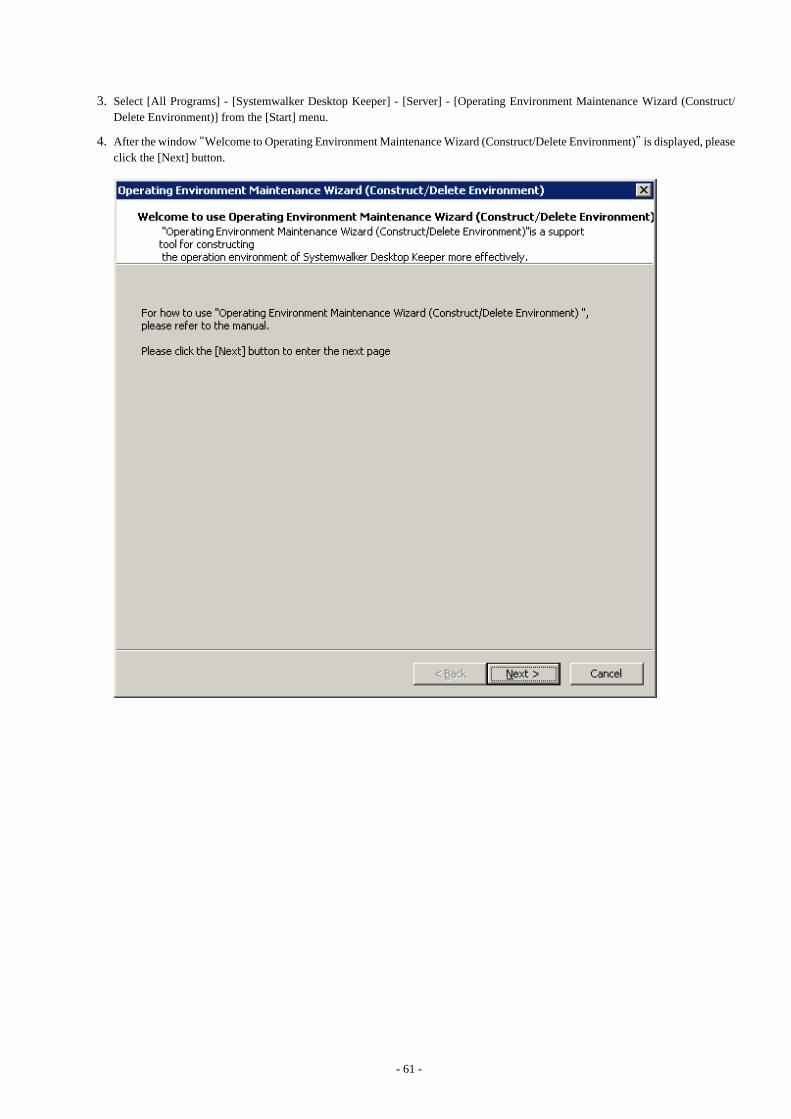
3. Select [All Programs] - [Systemwalker Desktop Keeper] - [Server] - [Operating Environment Maintenance Wizard (Construct/Delete Environment)] from the [Start] menu.
4. After the window “Welcome to Operating Environment Maintenance Wizard (Construct/Delete Environment)” is displayed, pleaseclick the [Next] button.
- 61 -
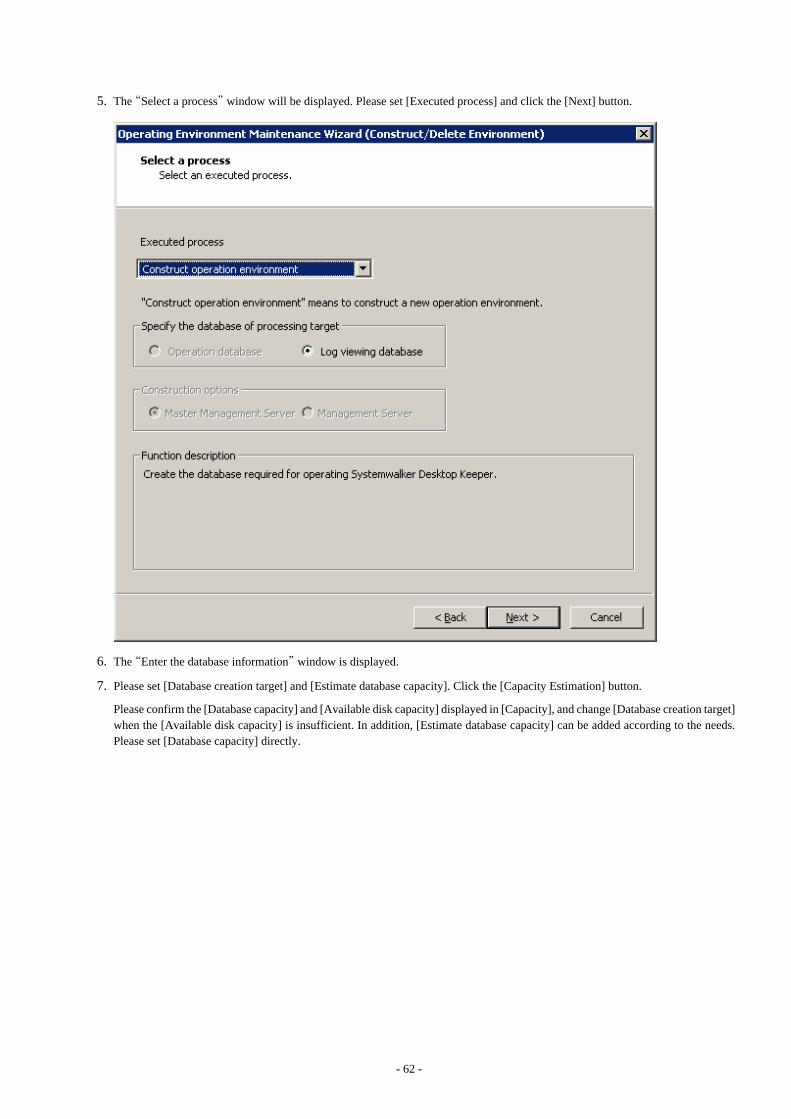
5. The “Select a process” window will be displayed. Please set [Executed process] and click the [Next] button.
6. The “Enter the database information” window is displayed.
7. Please set [Database creation target] and [Estimate database capacity]. Click the [Capacity Estimation] button.
Please confirm the [Database capacity] and [Available disk capacity] displayed in [Capacity], and change [Database creation target]when the [Available disk capacity] is insufficient. In addition, [Estimate database capacity] can be added according to the needs.Please set [Database capacity] directly.
- 62 -
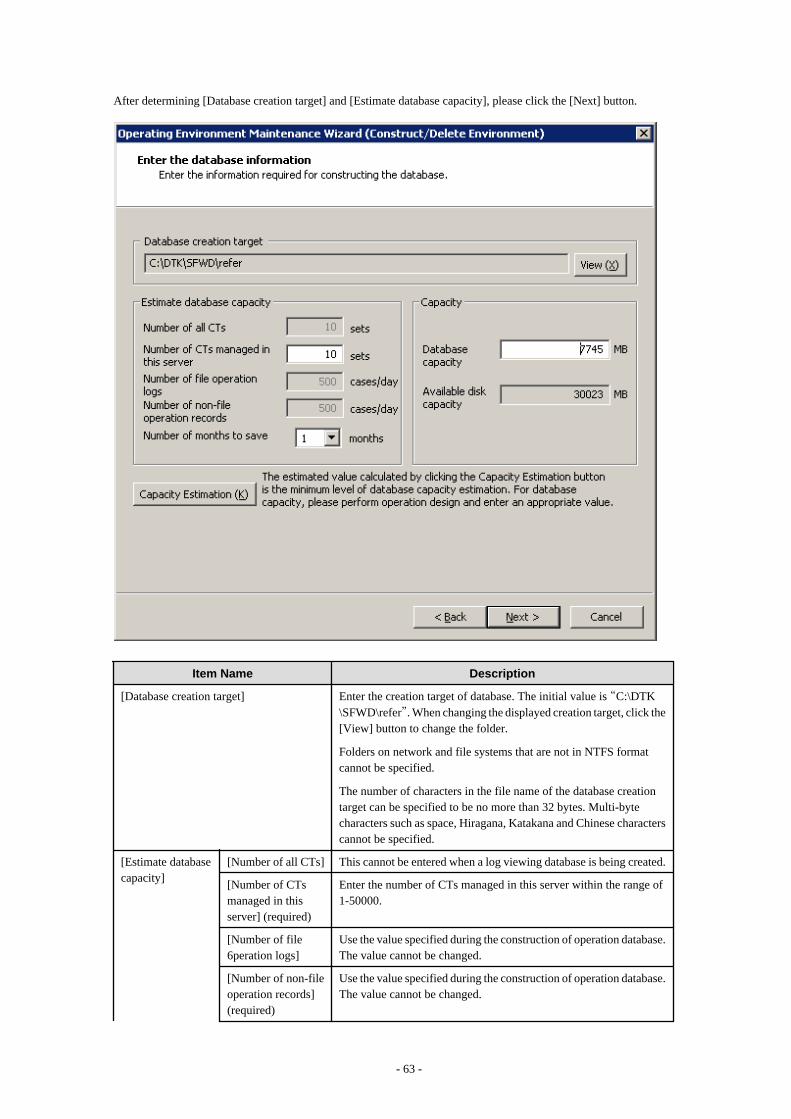
After determining [Database creation target] and [Estimate database capacity], please click the [Next] button.
Item Name Description
[Database creation target] Enter the creation target of database. The initial value is “C:\DTK\SFWD\refer”. When changing the displayed creation target, click the[View] button to change the folder.
Folders on network and file systems that are not in NTFS formatcannot be specified.
The number of characters in the file name of the database creationtarget can be specified to be no more than 32 bytes. Multi-bytecharacters such as space, Hiragana, Katakana and Chinese characterscannot be specified.
[Estimate databasecapacity]
[Number of all CTs] This cannot be entered when a log viewing database is being created.
[Number of CTsmanaged in thisserver] (required)
Enter the number of CTs managed in this server within the range of1-50000.
[Number of file6peration logs]
Use the value specified during the construction of operation database.The value cannot be changed.
[Number of non-fileoperation records](required)
Use the value specified during the construction of operation database.The value cannot be changed.
- 63 -
Item Name Description
[Number of monthsto save]
Select the number of months to save within 1-12.
Note
The number of months to save here is only used for the target ofcapacity asset.
The [Number of months to save] at the time of database constructionis the number specified for capacity calculation. Even if it exceedsthe storage period, it will still be saved. (The log information thatexceeds the storage period will not be backed up or deletedautomatically)
[Capacity] [Database capacity](required)
Set the items of [Estimate database capacity] and display theestimated value when the [Capacity Estimation] button is clicked.
When disk capacity available for the database creation target issufficient, and it is expected to create with a capacity that is largerthan the estimated value, please reset this item within the range ofavailable disk capacity.
[Available diskcapacity]
Display the available capacity of creation target disk.
8. After the “Confirm the Settings” window is displayed, please confirm that the content displayed in the window does not containany mistakes, and click the [Next] button.
- 64 -

9. After the window [Process execution] is displayed, start creating the database.
10. After processing has completed normally, the [Process completed] window will be displayed. Please click the [Finish] button.
2.2.4 IIS Settings In order to perform management on the Web browser used in Systemwalker Desktop Keeper, IIS will be used as the Web server.
IIS will be set automatically when a Management Server/Master Management Server is being installed.
However, when changing the application pool by [DefaultAppPool] in Windows Server® 2003, please execute the following steps.
Under the environment of Windows Server® 2008/Windows Server® 2008 R2, only [DefaultAppPool] can be used.
Note
Under the environment of Windows Server® 2008/Windows Server® 2008 R2
Please do not set [Read User Profile] to [True] in the detailed setting of the application pool ([DefaultAppPool]) used in SystemwalkerDesktop Keeper.
If it is set to [True], the Web Console will not be able to run normally.
- 65 -
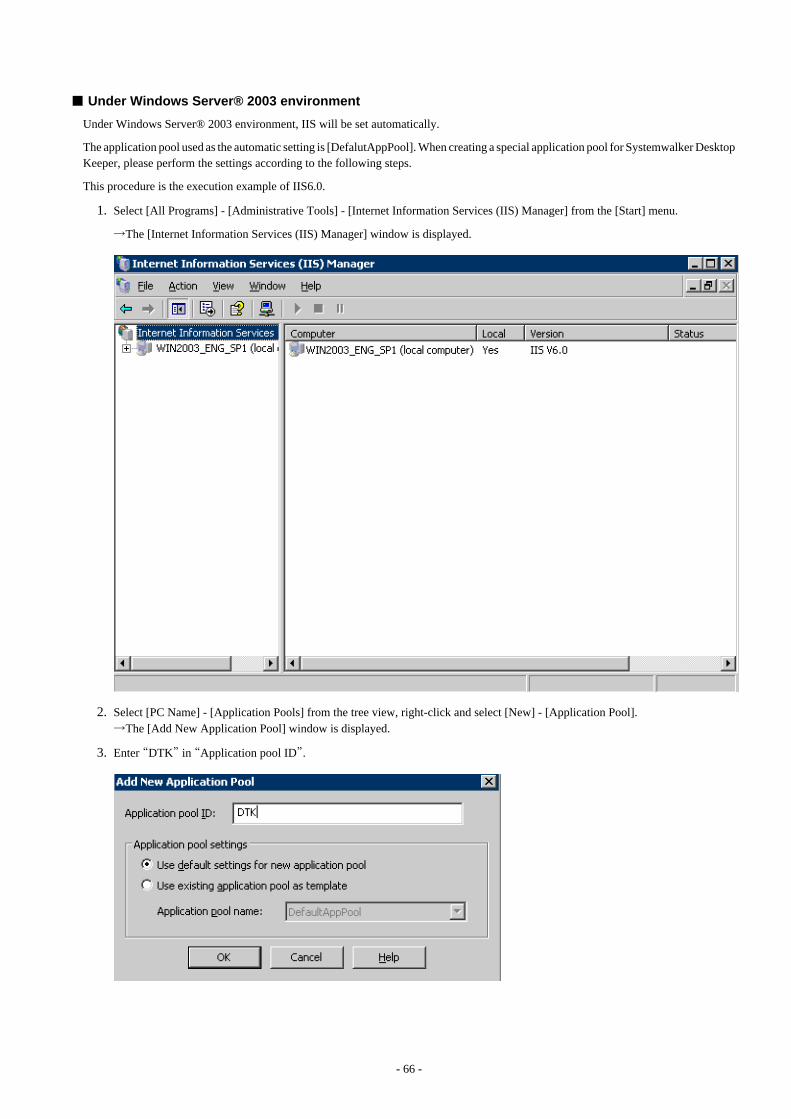
■ Under Windows Server® 2003 environment
Under Windows Server® 2003 environment, IIS will be set automatically.
The application pool used as the automatic setting is [DefalutAppPool]. When creating a special application pool for Systemwalker DesktopKeeper, please perform the settings according to the following steps.
This procedure is the execution example of IIS6.0.
1. Select [All Programs] - [Administrative Tools] - [Internet Information Services (IIS) Manager] from the [Start] menu.
→The [Internet Information Services (IIS) Manager] window is displayed.
2. Select [PC Name] - [Application Pools] from the tree view, right-click and select [New] - [Application Pool]. →The [Add New Application Pool] window is displayed.
3. Enter “DTK” in “Application pool ID”.
- 66 -
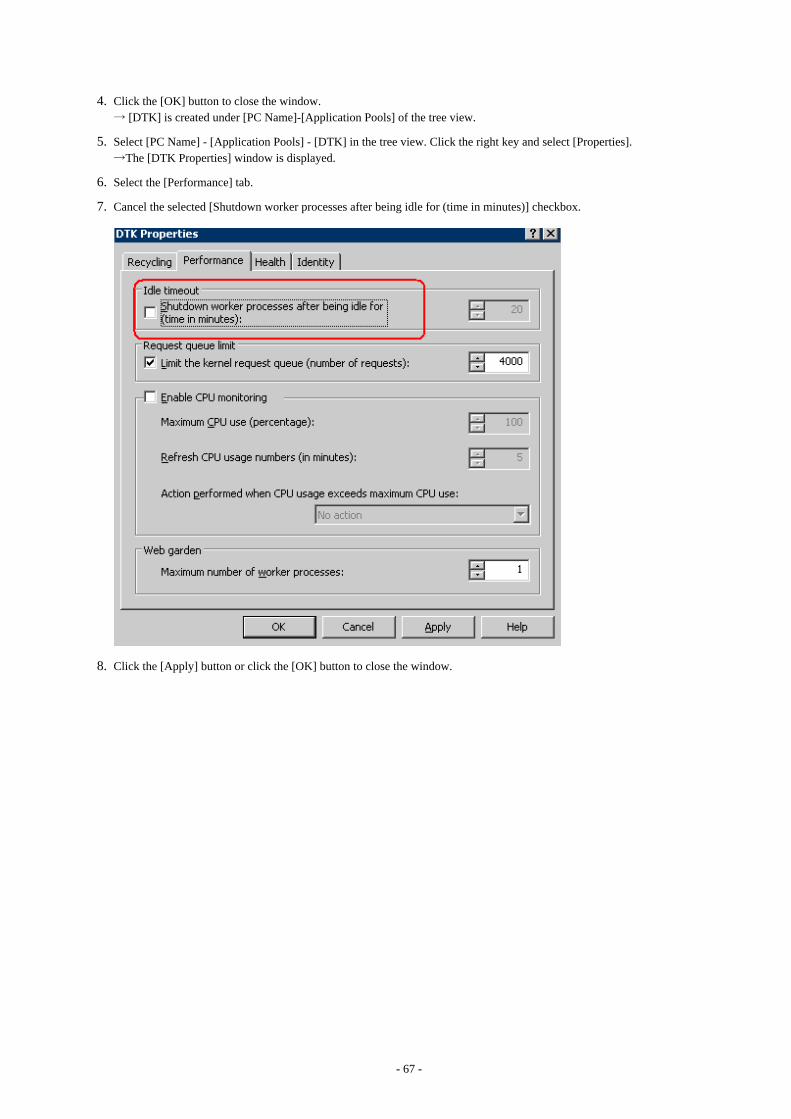
4. Click the [OK] button to close the window. → [DTK] is created under [PC Name]-[Application Pools] of the tree view.
5. Select [PC Name] - [Application Pools] - [DTK] in the tree view. Click the right key and select [Properties]. →The [DTK Properties] window is displayed.
6. Select the [Performance] tab.
7. Cancel the selected [Shutdown worker processes after being idle for (time in minutes)] checkbox.
8. Click the [Apply] button or click the [OK] button to close the window.
- 67 -

9. Select [PC Name] - [Website] - [Default Web Site] - [Scripts] - [DTK] in the tree view. Right-click and select [Properties].→The [DTK Properties] window is displayed.
10. Click the [Create] button. → [Application name] becomes “DTK”, and the pull-down menu of [Application pool] can be selected.
- 68 -
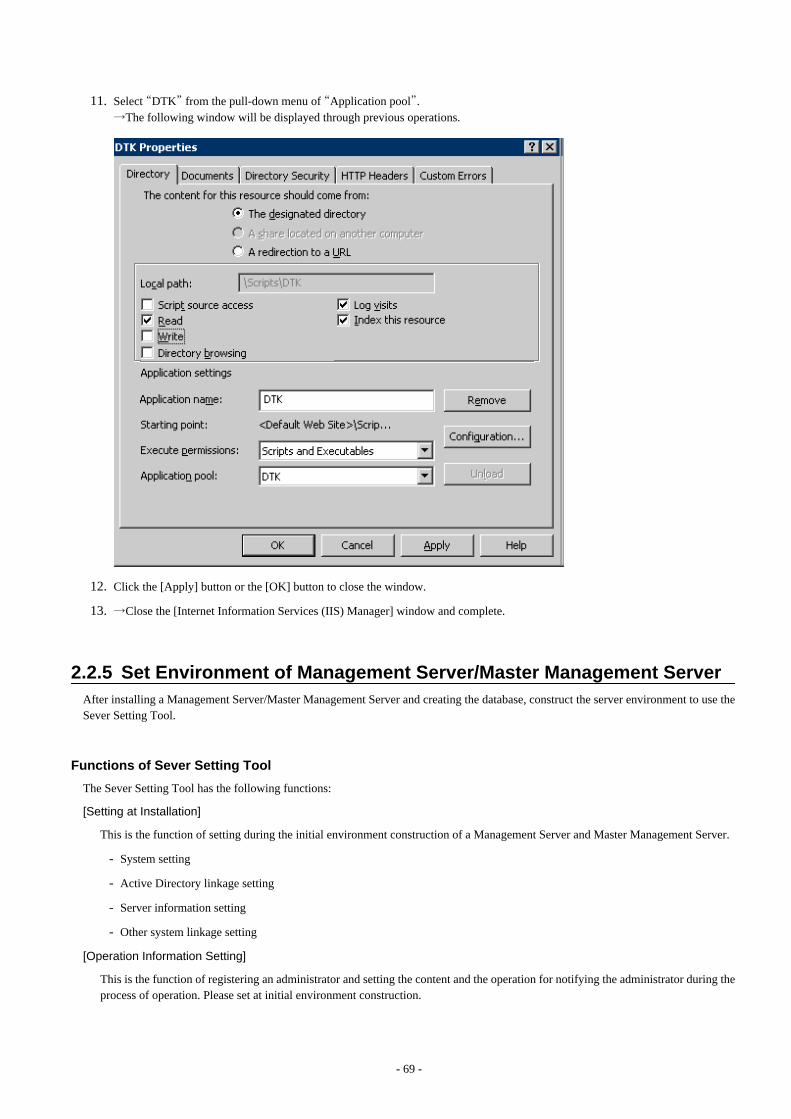
11. Select “DTK” from the pull-down menu of “Application pool”.→The following window will be displayed through previous operations.
12. Click the [Apply] button or the [OK] button to close the window.
13. →Close the [Internet Information Services (IIS) Manager] window and complete.
2.2.5 Set Environment of Management Server/Master Management Server After installing a Management Server/Master Management Server and creating the database, construct the server environment to use theSever Setting Tool.
Functions of Sever Setting Tool
The Sever Setting Tool has the following functions:
[Setting at Installation]
This is the function of setting during the initial environment construction of a Management Server and Master Management Server.
- System setting
- Active Directory linkage setting
- Server information setting
- Other system linkage setting
[Operation Information Setting]
This is the function of registering an administrator and setting the content and the operation for notifying the administrator during theprocess of operation. Please set at initial environment construction.
- 69 -
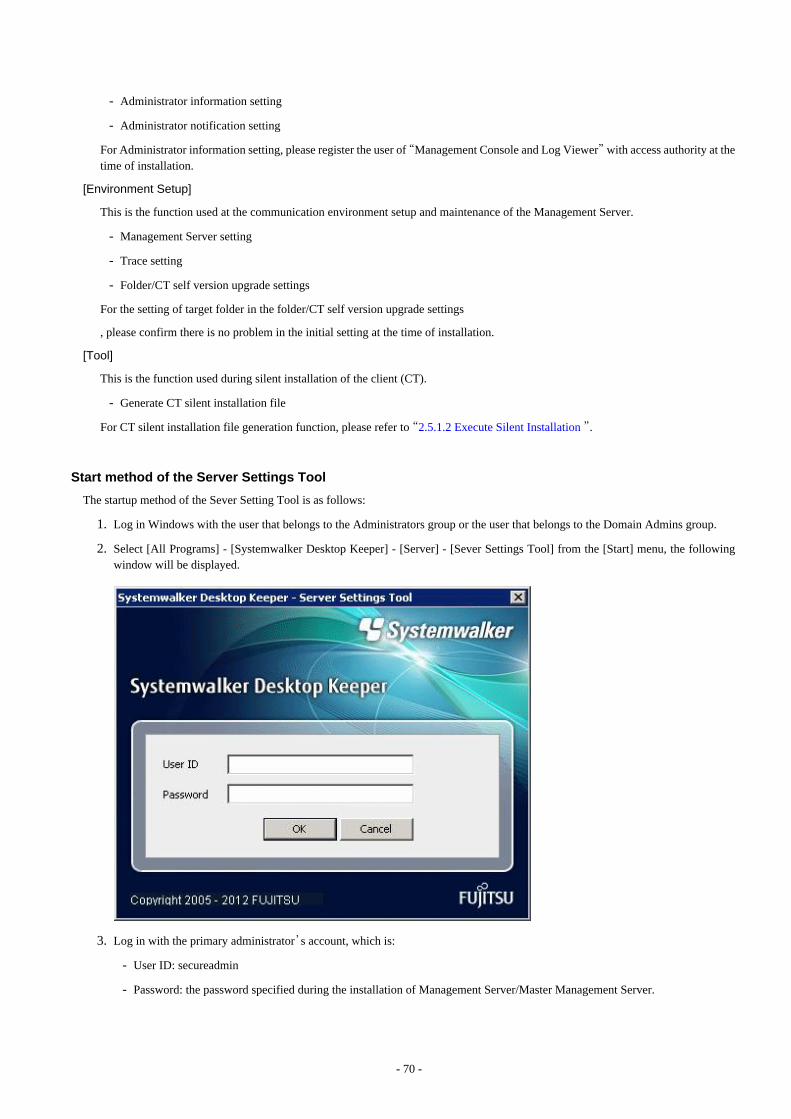
- Administrator information setting
- Administrator notification setting
For Administrator information setting, please register the user of “Management Console and Log Viewer” with access authority at thetime of installation.
[Environment Setup]
This is the function used at the communication environment setup and maintenance of the Management Server.
- Management Server setting
- Trace setting
- Folder/CT self version upgrade settings
For the setting of target folder in the folder/CT self version upgrade settings
, please confirm there is no problem in the initial setting at the time of installation.
[Tool]
This is the function used during silent installation of the client (CT).
- Generate CT silent installation file
For CT silent installation file generation function, please refer to “2.5.1.2 Execute Silent Installation ”.
Start method of the Server Settings Tool
The startup method of the Sever Setting Tool is as follows:
1. Log in Windows with the user that belongs to the Administrators group or the user that belongs to the Domain Admins group.
2. Select [All Programs] - [Systemwalker Desktop Keeper] - [Server] - [Sever Settings Tool] from the [Start] menu, the followingwindow will be displayed.
3. Log in with the primary administrator’s account, which is:
- User ID: secureadmin
- Password: the password specified during the installation of Management Server/Master Management Server.
- 70 -
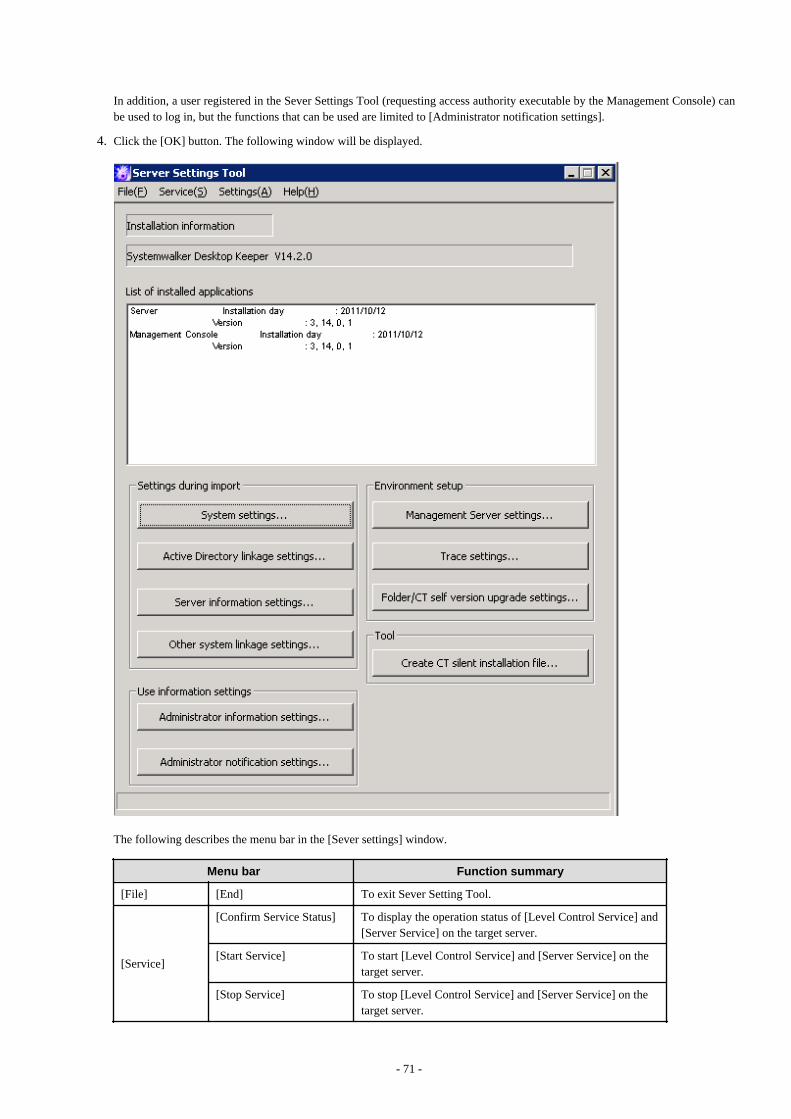
In addition, a user registered in the Sever Settings Tool (requesting access authority executable by the Management Console) canbe used to log in, but the functions that can be used are limited to [Administrator notification settings].
4. Click the [OK] button. The following window will be displayed.
The following describes the menu bar in the [Sever settings] window.
Menu bar Function summary
[File] [End] To exit Sever Setting Tool.
[Service]
[Confirm Service Status] To display the operation status of [Level Control Service] and[Server Service] on the target server.
[Start Service] To start [Level Control Service] and [Server Service] on thetarget server.
[Stop Service] To stop [Level Control Service] and [Server Service] on thetarget server.
- 71 -
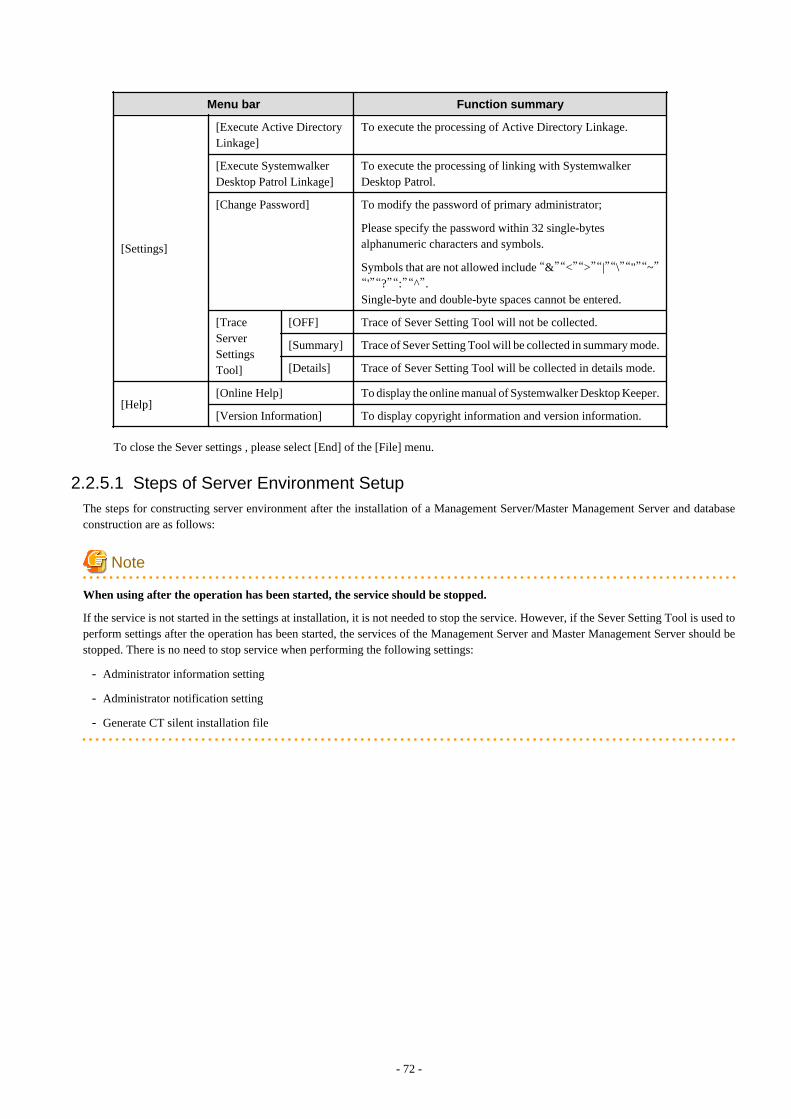
Menu bar Function summary
[Settings]
[Execute Active DirectoryLinkage]
To execute the processing of Active Directory Linkage.
[Execute SystemwalkerDesktop Patrol Linkage]
To execute the processing of linking with SystemwalkerDesktop Patrol.
[Change Password] To modify the password of primary administrator;
Please specify the password within 32 single-bytesalphanumeric characters and symbols.
Symbols that are not allowed include “&”“<”“>”“|”“\”“"”“~”“'”“?”“:”“^”. Single-byte and double-byte spaces cannot be entered.
[TraceServerSettingsTool]
[OFF] Trace of Sever Setting Tool will not be collected.
[Summary] Trace of Sever Setting Tool will be collected in summary mode.
[Details] Trace of Sever Setting Tool will be collected in details mode.
[Help][Online Help] To display the online manual of Systemwalker Desktop Keeper.
[Version Information] To display copyright information and version information.
To close the Sever settings , please select [End] of the [File] menu.
2.2.5.1 Steps of Server Environment SetupThe steps for constructing server environment after the installation of a Management Server/Master Management Server and databaseconstruction are as follows:
Note
When using after the operation has been started, the service should be stopped.
If the service is not started in the settings at installation, it is not needed to stop the service. However, if the Sever Setting Tool is used toperform settings after the operation has been started, the services of the Management Server and Master Management Server should bestopped. There is no need to stop service when performing the following settings:
- Administrator information setting
- Administrator notification setting
- Generate CT silent installation file
- 72 -
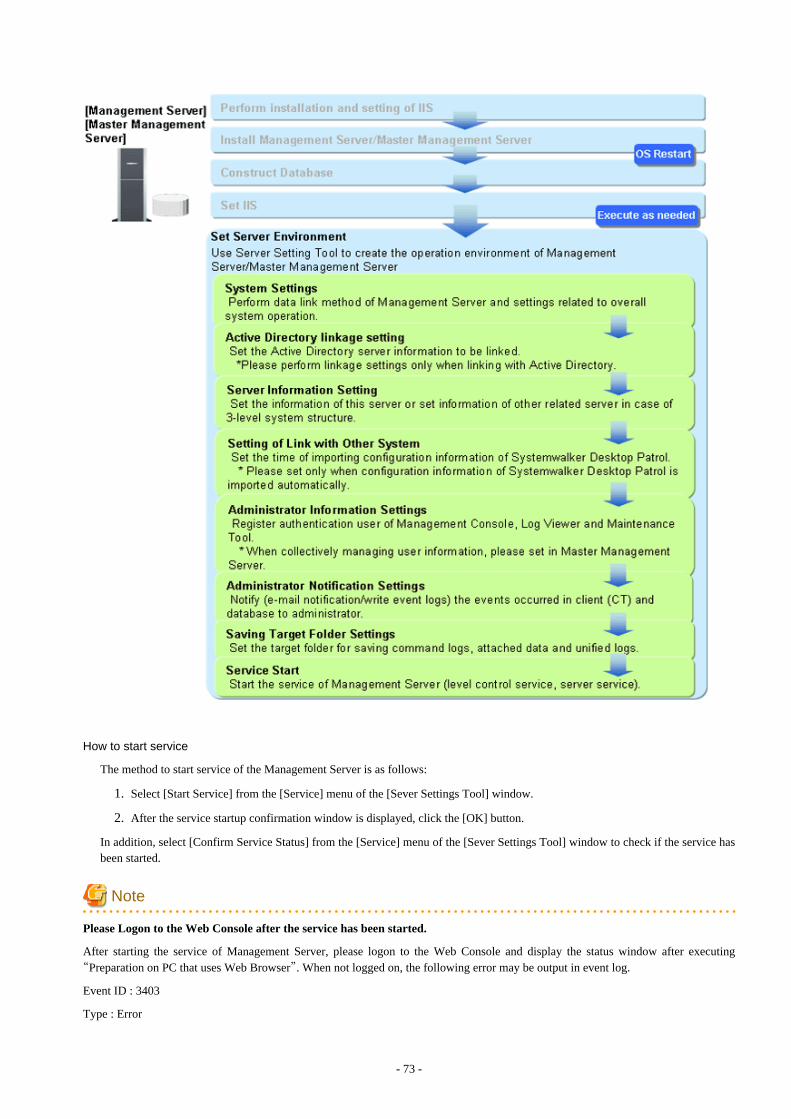
How to start service
The method to start service of the Management Server is as follows:
1. Select [Start Service] from the [Service] menu of the [Sever Settings Tool] window.
2. After the service startup confirmation window is displayed, click the [OK] button.
In addition, select [Confirm Service Status] from the [Service] menu of the [Sever Settings Tool] window to check if the service hasbeen started.
Note
Please Logon to the Web Console after the service has been started.
After starting the service of Management Server, please logon to the Web Console and display the status window after executing“Preparation on PC that uses Web Browser”. When not logged on, the following error may be output in event log.
Event ID : 3403
Type : Error
- 73 -
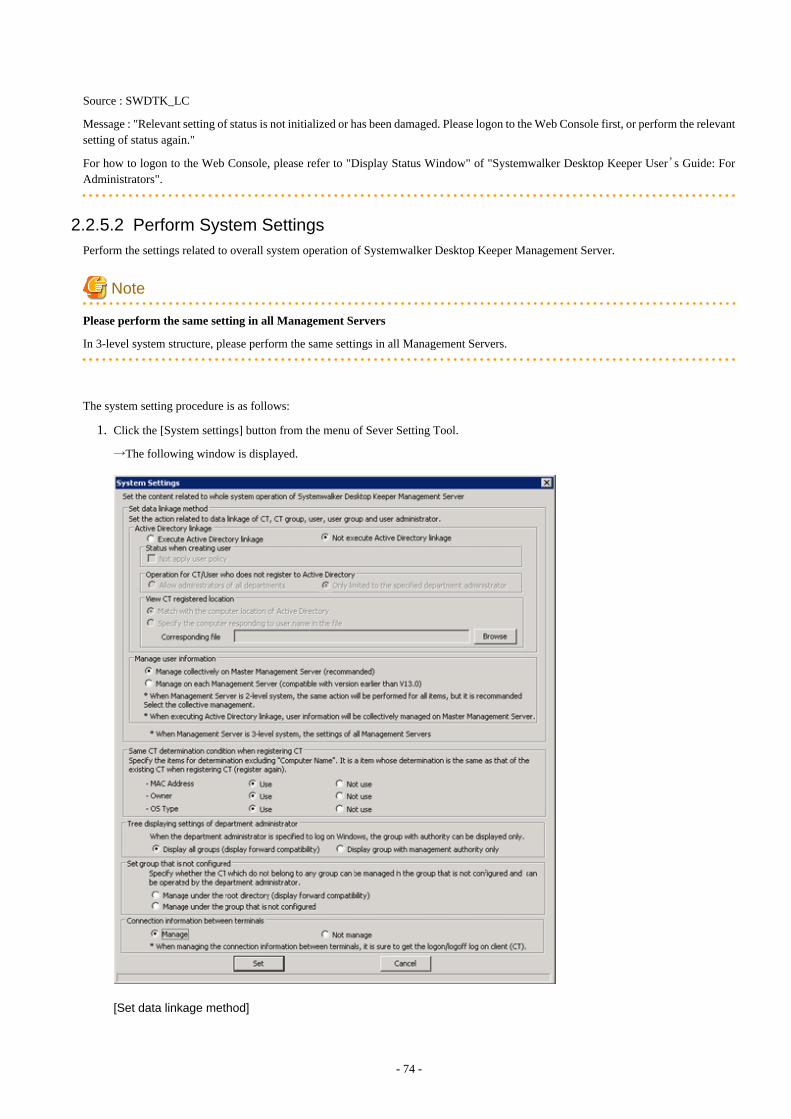
Source : SWDTK_LC
Message : "Relevant setting of status is not initialized or has been damaged. Please logon to the Web Console first, or perform the relevantsetting of status again."
For how to logon to the Web Console, please refer to "Display Status Window" of "Systemwalker Desktop Keeper User’s Guide: ForAdministrators".
2.2.5.2 Perform System Settings Perform the settings related to overall system operation of Systemwalker Desktop Keeper Management Server.
Note
Please perform the same setting in all Management Servers
In 3-level system structure, please perform the same settings in all Management Servers.
The system setting procedure is as follows:
1. Click the [System settings] button from the menu of Sever Setting Tool.
→The following window is displayed.
[Set data linkage method]
- 74 -

Item Name Description
[Active Directory linkage] To set whether to perform Active Directory Linkage or not. The setting has been specified at installation of the Management Server.Therefore, the setting should be performed when changing the settingsat installation of the Management Server.
Execute Active Directory linkage
When “Execute Active Directory linkage” is selected, the followinginformation is created according to the information of ActiveDirectory. Therefore, it is not necessary to set in SystemwalkerDesktop Keeper. When linking with Active Directory, informationof local management not linked can also be set.
- CT group and tree information
- CT group affiliation information of the client (CT)
- User group and tree information
- User name
- User group affiliation information of user name
Not execute Active Directory linkage
To select when it is not linked with Active Directory.
When “Not execute Active Directory linkage” is selected, theconfiguration information of Systemwalker Desktop Patrol cannot beimported. In addition, the information of the product cannot be outputto Systemwalker Desktop Patrol.
After using Systemwalker Desktop Keeper and when changing thesetting of active directory linkage, please refer to the “Change ImportMethod of Configuration information” in the “Systemwalker DesktopKeeper User's Guide: for Administrator”.
[Status when creating user] For a new user of Active Directory, please select the [Not apply userpolicy] check box when importing under the [Not apply user policy]status.
[Operation for CT/User whodoes not register to ActiveDirectory]
Setting of client (CT) and user ID not registered to Active Directory isto be made. (Processing of client (CT)/user ID under localmanagement.)
This setting has been specified at the installation of the ManagementServer. Therefore, please set when changing the setting at theinstallation of the Management Server.
Allow administrators of all departments
This is selected when all department administrators are allowed toprocess the client (CT) and user ID that are not registered to ActiveDirectory.
Only limited to the specified department administrator
Only the administrators specified in the Management Console areallowed to process the client (CT) and user ID that are not registeredto Active Directory. When this is set to not link with ActiveDirectory, it is limited to specified department administrators only.
When the setting is “Only limited to the specified departmentadministrator”, the department administrators cannot set local groupaffiliation, CT and user directly that belong to the local group will
- 75 -
Item Name Description
not be displayed. In this case, the system administrator should movethe CT and user to the group that can be processed by departmentadministrators.
[View CT registeredlocation]
To set CT location acquisition information through Active Directorycorresponding files.
Match with the computer location of Active Directory
To select when acquiring location information of CT from ActiveDirectory.
Specify the computer responding to user name in the file
Select this when acquiring the location information of CT from the“List of Correspondence between Computer and User”. (In ActiveDirectory, when computer information is not managed under levelcomposition, association can be performed separately.)
When this item is selected, please click the [Browse] button toimport corresponding files (in CSV format) that have already beencreated. The maximum length of the absolute path that can bespecified is 255 single-byte characters. However, the followingsymbols should not be used in the file name.
Symbols that are not allowed are: “\”“/”“:”“*”“?”“"”“<”“>”“|”For information on how to create corresponding files, please referto “Reference File of Active Directory Linkage” in “SystemwalkerDesktop Keeper Reference Manual”.
[Manage user information] In a 3-level system structure, the setting of whether to perform collectivemanagement of the user policy information in the Master ManagementServer or not will be executed.
Because this setting has been specified when the Management Serveris installed, please perform the setting when changing the setting at thetime of Management Server installation.
Manage collectively on Master Management Server(recommended)
To select when managing the user policy information in the MasterManagement Server. When this is set as linked with ActiveDirectory, it is unconditionally set as the Master ManagementServer.
Manage on each Management Server(compatible with versionearlier than V13.0)
Select this when managing user policy information in eachManagement Server.
[Same CT determination condition when registering CT]
Item Name Description
[MAC Address] Set whether the MAC address will also be taken as the judgment itemfor client (CT) consistency at client (CT) registration (re-registration)apart from computer name.
Use
Select this when MAC address is used as consistency judgment item.
- 76 -
Item Name Description
Not use
Select this when MAC address is not used as consistency judgmentitem.
[Owner] Set whether the owner information will also be taken as the judgmentitem for client (CT) consistency at client (CT) registration (re-registration) apart from the computer name.
Use
Select this when owner’s information is used as consistencyjudgment item.
Not use
Select this when owner’s information is not used as consistencyjudgment item.
[OS Type] Set whether the OS type will also be taken as the judgment item forclient (CT) consistency at client (CT) registration (re-registration) apartfrom computer name.
In addition, Service Pack or version type will not be taken as consistencyjudgment condition.
Use
Select this when OS type is used as consistency judgment item.
Not use
Select this when OS type is not used as consistency judgment item.
Tree displaying settings of department administrator
Item Name Description
[Display all groups (displayforward compatibility)]
To display the group tree that is displayed when Management Consoleor Log Viewer is started.
[Display group with managementauthority only]
To display only the group that has administrator authority whenManagement Console or Log Viewer is started.
Set group that is not configured group
Item Name Description
[Manage under the Root directory(display forward compatibility)]
To directly manage the client (CT) that is newly registered toManagement Server and the client (CT) that does not belong to anygroup under the Root directory group.
[Manage under the group that is notconfigured]
To directly manage the client (CT) that is newly registered toManagement Server and the client (CT) that does not belong to anygroup under the unconfigured group.
Please perform the settings when the following operations areperformed:
- When department administrator is expected to configure the client(CT) newly registered in the Management Server;
- When department administrator is expected to manage the policyof the client (CT) that does not belong to any group.
- 77 -
Item Name Description
Note
About the status window and Log Viewer
Department administrator cannot view the group that is not configured.Only the system administrator can view the group that is not configured.
About Log Analyzer or Report Output Tool
Even this setting has been performed in Log Analyzer or Report OutputTool, client (CT) will not be managed in the “Unconfigured” group, butin the “root” group instead.
Connection information between terminals
Item Name Description
[Manage] To manage the information of remote connection to physical PC andvirtual PC.
[Not manage] Not manage the information of remote connection to physical PC andvirtual PC.
2. Confirm the content of settings and change according to the needs. Click the [Set] button.
2.2.5.3 Perform Settings of Active Directory LinkageWhen linking with Active Directory, set the server information of the Active Directory to be linked.
The steps for Active Directory linkage setting are as follows.
- 78 -
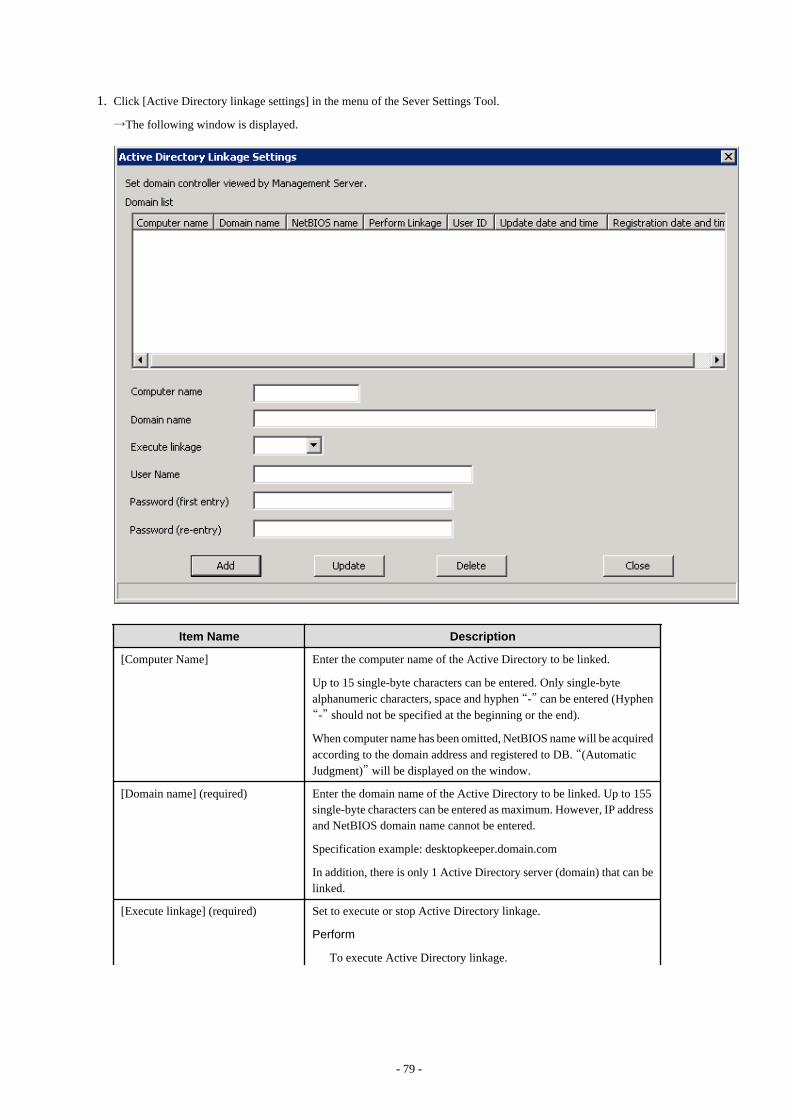
1. Click [Active Directory linkage settings] in the menu of the Sever Settings Tool.
→The following window is displayed.
Item Name Description
[Computer Name] Enter the computer name of the Active Directory to be linked.
Up to 15 single-byte characters can be entered. Only single-bytealphanumeric characters, space and hyphen “-” can be entered (Hyphen“-” should not be specified at the beginning or the end).
When computer name has been omitted, NetBIOS name will be acquiredaccording to the domain address and registered to DB. “(AutomaticJudgment)” will be displayed on the window.
[Domain name] (required) Enter the domain name of the Active Directory to be linked. Up to 155single-byte characters can be entered as maximum. However, IP addressand NetBIOS domain name cannot be entered.
Specification example: desktopkeeper.domain.com
In addition, there is only 1 Active Directory server (domain) that can belinked.
[Execute linkage] (required) Set to execute or stop Active Directory linkage.
Perform
To execute Active Directory linkage.
- 79 -
Item Name Description
Stop
To stop Active Directory linkage. When scheduler is used to execute Active Directory linkage, thisshould be used when the linkage is stopped temporarily.
[User Name] (required) Enter the user name registered in Active Directory for viewing theinformation of Active Directory (before @ of the logon name of user inActive Directory). Up to 40 single-byte characters can be entered.Characters that can be entered include single-byte alphanumericcharacters, spaces and the following symbols: (! # $ % & ’ ( ) - . ^ _ `{ })
[Password (first entry)] (requiredwhen adding)
Enter the password of the above user name. Up to 32 single-bytecharacters can be entered. Characters that can be entered include single-byte alphanumeric characters, spaces and the following symbols. ( ` ~ !@ # $ % ^ & * ( ) _ + - = { } | [ ] \ : " ; ' < > ? , . /)
[Password (re-entry)] (required whenadding)
In order to avoid wrong registration, enter the password again.
2. Enter the required setting items, and click the [Add] button.
3. Click the [Close] button.
2.2.5.4 Set Server Information Information of the server will be registered during initial installation. In a 3-level system structure, information of other relevant serverswill be set.
Steps to set server information are as follows:
- 80 -
1. Click the [Server information settings] button in the menu of Sever Settings Tool.
→The following window is displayed.
Item Name Description
[Node type] Select the classification of the server node to be set.
Own node
Select this in the following cases:
- When setting 2-level Management Server
- When setting this server on 3-level Master Management Server
- When setting this server on 3-level Management Server.
Local node information will be registered as initial status. Please select at thetime of update.
Other node
Select this in case of setting other servers:
- When setting a Master Management Server on the 3-level ManagementServer
In a 3-level Master Management Server: Information of other nodes will be automatically registered when thecommunication with Management Server is started. Therefore, it is not necessaryto set the information of other nodes.
- 81 -

Item Name Description
In a 2-level the Management Server:Please register only the local node and the node of Master Management Server.Please do not set the node of other Management Server.
[Node name] Enter the node name of the server being set. Up to 36 single-byte characters canbe entered. Only single-byte alphanumeric characters and hyphen “-” can beentered (hyphen “-” should not be specified at the beginning or the end). Single-byte lower-case letter will be automatically converted to single-byte upper-caseletter.
In addition, it will automatically set as the local computer name under local node,but will set to “NODE” when it is unable to acquire from the system or thecomputer name exceeds 16 bytes. Please set again at this time if necessary.
[Computer name] When the node is classified as local node, enter the computer name of the server.
When the node is classified as other node, enter the computer name of MasterManagement Server.
Up to 15 single-byte characters can be entered. Only single-byte letters, numbersand hyphen “-” can be entered (hyphen “-” should not be specified at the beginningor the end).
In addition, under local node, the computer name will be set automatically.However, when it is unable to acquire from the system or the computer nameexceeds 16 bytes, it will be set to “COMPUTER”. Please set again at this time ifnecessary.
The computer name set here will be displayed in the CT group of the ManagementConsole.
[IP address] When the node is classified as local node, enter the IP address of the server.
When the node is classified as other node, enter the IP address of the MasterManagement Server.
In addition, under local node, the IP address of the computer will be setautomatically. However, when it is unable to acquire from the system or the IPaddress has not been set at the time of registration, it will be set to loop backaddress “127.0.0.1”. Please reset at this time.
[Server classification] Enter the classification of server.
Root Server:
Select this in case of an upper-level server:
- When it is the Management Server of 2-level system;
- When it is the Master Management Server of 3-level system.
Sub-Level Server
Select this in case of a sub-level server:
- When it is the Management Server of 3-level system.
In initial status, it will be set to “Root Server” (not relying on constructionoptions).
[Update date and time] To display the date on which the server information is updated. The date of updating other nodes (Management Server) in the MasterManagement Server of 3-level system will be updated when the level controlservice is started in other nodes (Management Server).
The date of updating other nodes (Master Management Server) in a ManagementServer of a 3-level system is blank.
- 82 -

Item Name Description
In initial status, the date of database construction will be displayed in the list.
[Registration date and time] To display the date on which the server information is registered.The date of registering other nodes (Management Server) in the MasterManagement Server of 3 a-level system will be registered when the level controlservice is started in other nodes (Management Server) for the first time.
In initial status, the date of database construction will be displayed in the list.
2. Enter the required setting items and click the [Add] button.
3. Click the [Close] button.
2.2.5.5 Set the Link with Other SystemsPerform the setting when Systemwalker Desktop Patrol configuration information is imported automatically.
1. Click the [Other system linkage settings] button in the menu of Sever Setting Tool.
2. →The following window is displayed.
Item Name Description
[Import configuration information] Please select this when the configuration information ofSystemwalker Desktop Patrol is imported automatically.
[Start time] Please set when to start the automatic import if the [Importconfiguration information] is selected as ON.
Note
Please do not make settings during the time frame when theManagement Server service is stopped.
2.2.5.6 Set administrator information Register the authenticated user of the Management Console, Log Viewer, Log Analyzer, status window, environment setup, report outputtool, backup tool and restoration tool. In addition, when department management mode is used, register the department administrator.During installation, please make sure to register the administrator whose access authority is “Management Console and Log Viewer”.
However, in case of collectively managing user policy (user information) in the Master Management Server with a 3-level structure, ifsetting has been performed in the Master Management Server, then it is no need to set in the Management Servers. After the operationhas been started, it will be reflected to all Management Servers automatically.
There are following two methods for the procedure of administrator information settings:
- 83 -
- Register administrators one by one;
- Use CSV file to register administrators collectively
Register administrators one by one
1. Click the [Administrator information settings] button in the menu of Sever Setting Tool.
→The following window is displayed.
Item Name Description
[User ID] Up to 40 single-byte characters (20 double-bytecharacters) of alphanumeric characters, Chinesecharacters and symbols (except the followingsymbols) can be entered.
Symbols that cannot be entered are: “&”“<”“>”“|”“\”“"”“~”“'”“?”“:”“^”.
In addition, double-byte or single-byte spaces shouldnot be entered. It is not case-sensitive.
[User name] Up to 40 single-byte characters (20 double-bytecharacters) of alphanumeric characters, Chinesecharacters and symbols can be entered.
[Access authority] Select the following authority.
No Authority for Browsing
Users that cannot execute Management Console,Log Viewer, Log Analyzer, status window,environment setup, report output tool, backuptool, backup command, restoration tool and Sever
- 84 -
Item Name Description
Settings Tool (some functions) (to use when theydo not have execution authority temporarily)
Log Viewer
Users that can only execute Log Viewer, LogAnalyzer, status window, environment setup, andreport output tool.
Management Console / Log Viewer
Users that can execute Management Console, LogViewer, Log Analyzer, status window,environment setup, report output tool and SeverSettings Tool (partial functions).
Management Console
Users that can execute the administratornotification setting of the Management Consoleand Sever Settings Tool.
(Department Administrator) Log Viewer
Department administrators that can only executeLog Viewer, status window and report outputtool.
(Department Administrator) Log Viewer /Management Console
Department administrators that can executeManagement Console, Log Viewer, statuswindow and report output tool.
(Department Administrator) ManagementConsole
Department administrators that can only executeManagement Console.
Backup / Restore
Users that can execute backup tool, restorationcommand and restoration tool.
[Password (first entry)] Up to 32 single-byte alphanumeric characters andcontent except the following symbols can be entered.
Symbols that cannot be entered are: “&”“<”“>”“|”“\”“"”“~”“'”“?”“:”“^”.
In addition, double-byte or single-byte spaces cannotbe entered.
[Password (re-entry)] In order to avoid wrong registrations, re-enter thepassword.
[E-mail address] Enter the E-mail address of registered user.
[Notes] Up to 256 single-byte characters (128 double-bytecharacters) of alphanumeric characters, Chinesecharacters and symbols can be entered.
[Detailedauthority]
[Management] [Import CSV file] Select when granting the following executionauthority in the Management Console to theregistered users (selected).
- 85 -
Item Name Description
- Import user information of user policy
- Import configuration information throughSystemwalker Desktop Patrol linkage
[Save CSV file] Select when granting the following executionauthority in Management Console to the registereduser (selected).
- User information export of user policy
- Export configuration information throughSystemwalker Desktop Patrol linkage
[Register/update/deleteUSB device
Select when granting the operation authority of theUSB device individual identification function in theManagement Console to the registered user(selected).
[Unable to use otherfunctions]
Select when granting registration/modification/deletion authorities to USB device throughManagement Console (selected).
This can only be set when the setting of [AccessAuthority] is [(Department Administrator)Management Console].
[Log Viewer] [Save CSV file] Select when granting the execution authority of CSVexport log in the Log Viewer to the registered user(selected).
[View/save attachedinformation]
Select when granting the following executionauthorities in the Log Viewer to the registered user(selected):
- Display the image of screen capture data
- Save original backup file
[Save E-mail contents] Select when granting the following executionauthorities in the Log Viewer to registered user(selected):
- View the content of sent E-mail
- View the content of file attachment
[View ConfigurationChange Log]
Select when granting the view authorities ofconfiguration change logs in the Log Viewer to theregistered user (selected).
[View backup log] Select when granting the view authorities of backuplog logs in the Log Viewer to the registered user(selected).
[Password change date] Display the last date on which the password ischanged.
[Update date and time] Display the date on which the user information isupdated.
[Registration date and time] Display the date on which the user information isregistered.
2. Enter necessary setting items and click [Add].Repeated the Step 2 for continuous setting.
- 86 -
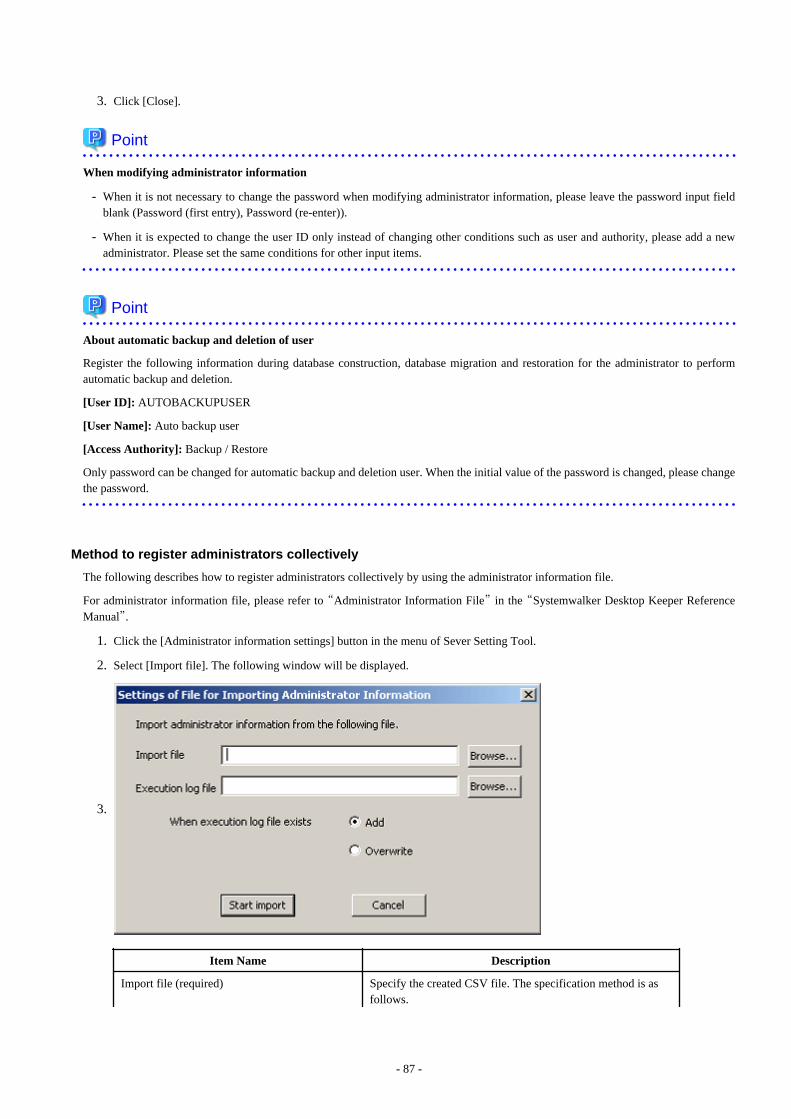
3. Click [Close].
Point
When modifying administrator information
- When it is not necessary to change the password when modifying administrator information, please leave the password input fieldblank (Password (first entry), Password (re-enter)).
- When it is expected to change the user ID only instead of changing other conditions such as user and authority, please add a newadministrator. Please set the same conditions for other input items.
Point
About automatic backup and deletion of user
Register the following information during database construction, database migration and restoration for the administrator to performautomatic backup and deletion.
[User ID]: AUTOBACKUPUSER
[User Name]: Auto backup user
[Access Authority]: Backup / Restore
Only password can be changed for automatic backup and deletion user. When the initial value of the password is changed, please changethe password.
Method to register administrators collectively
The following describes how to register administrators collectively by using the administrator information file.
For administrator information file, please refer to “Administrator Information File” in the “Systemwalker Desktop Keeper ReferenceManual”.
1. Click the [Administrator information settings] button in the menu of Sever Setting Tool.
2. Select [Import file]. The following window will be displayed.
3.
Item Name Description
Import file (required) Specify the created CSV file. The specification method is asfollows.
- 87 -
- Enter the file name with full path. Enter with a full path till the CSV file to be imported in theinput field.
- Enter through the [Browse] button.When [Specify the imported file] window is displayed,specify the importing CSV file and click the [Save] button.
The length of the full path that can be specified should beno more than 218 characters. However, the followingsymbols cannot be used as the file name.Symbols that are not allowed: “\”“/”“:”“*”“?”“"”“<”“>”“|”
Execution log file (required) Specify the file to output execution result when importing CSVfile. The error during import will also be output in this file. Thespecification method is as follows.
- Enter the file name with full path.Enter with a full path till the log file to be output in the inputfield.
- Enter through the [Browse] button. When [Specify the executed log file] window is displayed,specify the log file to be exported and click the [Save]button.
The length of the full path that can be specified should beno more than 218 characters. However, the followingsymbols cannot be used as the file name.Symbols that are not allowed: “\”“/”“:”“*”“?”“"”“<”“>”“|”
When execution log file exists (required) In [Execution log file], select the exporting method when the filefor log output has been already specified.
- [Add] Add execution log with the previous information beingretained.
- [Overwrite] Output execution log without retaining the previousinformation.
- 88 -
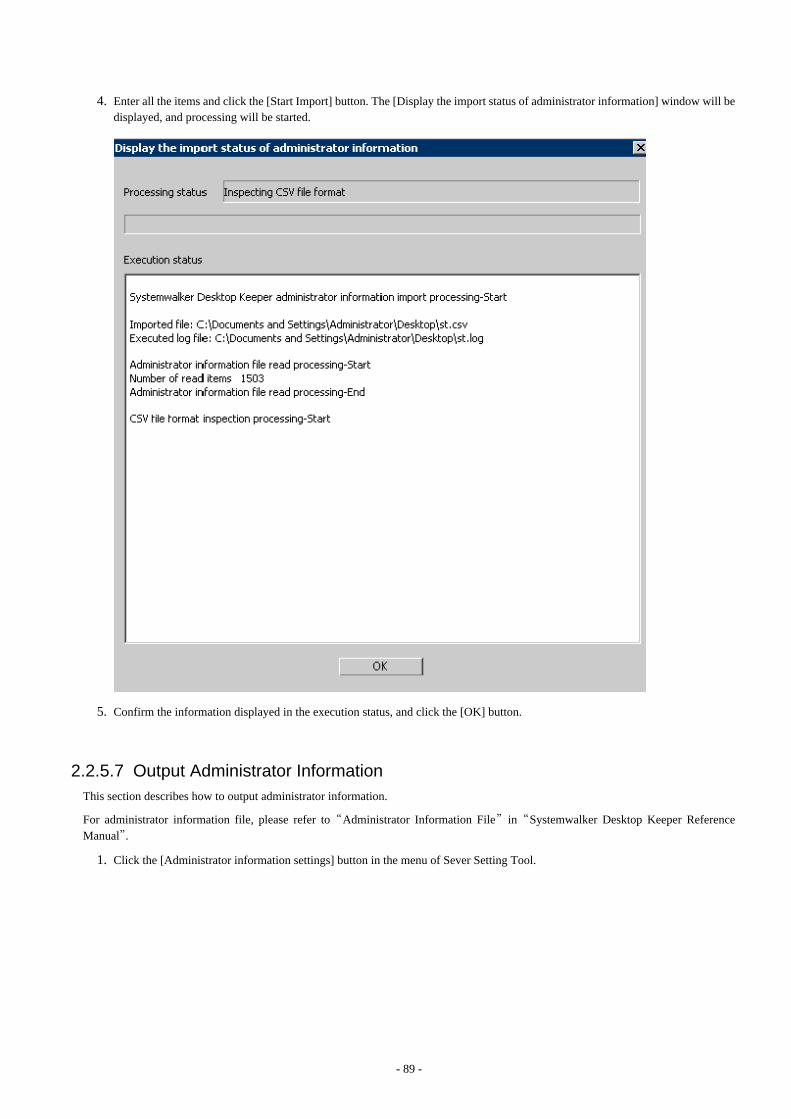
4. Enter all the items and click the [Start Import] button. The [Display the import status of administrator information] window will bedisplayed, and processing will be started.
5. Confirm the information displayed in the execution status, and click the [OK] button.
2.2.5.7 Output Administrator InformationThis section describes how to output administrator information.
For administrator information file, please refer to “Administrator Information File” in “Systemwalker Desktop Keeper ReferenceManual”.
1. Click the [Administrator information settings] button in the menu of Sever Setting Tool.
- 89 -
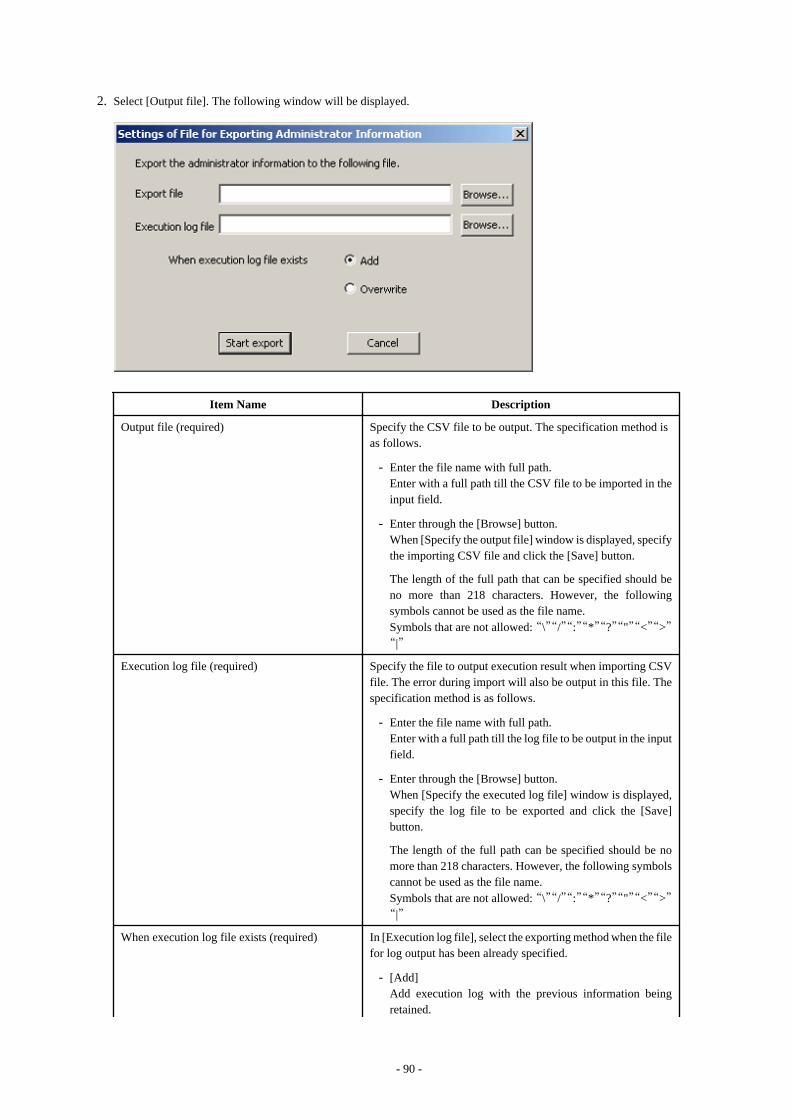
2. Select [Output file]. The following window will be displayed.
Item Name Description
Output file (required) Specify the CSV file to be output. The specification method isas follows.
- Enter the file name with full path. Enter with a full path till the CSV file to be imported in theinput field.
- Enter through the [Browse] button.When [Specify the output file] window is displayed, specifythe importing CSV file and click the [Save] button.
The length of the full path that can be specified should beno more than 218 characters. However, the followingsymbols cannot be used as the file name.Symbols that are not allowed: “\”“/”“:”“*”“?”“"”“<”“>”“|”
Execution log file (required) Specify the file to output execution result when importing CSVfile. The error during import will also be output in this file. Thespecification method is as follows.
- Enter the file name with full path.Enter with a full path till the log file to be output in the inputfield.
- Enter through the [Browse] button. When [Specify the executed log file] window is displayed,specify the log file to be exported and click the [Save]button.
The length of the full path can be specified should be nomore than 218 characters. However, the following symbolscannot be used as the file name.Symbols that are not allowed: “\”“/”“:”“*”“?”“"”“<”“>”“|”
When execution log file exists (required) In [Execution log file], select the exporting method when the filefor log output has been already specified.
- [Add] Add execution log with the previous information beingretained.
- 90 -
- [Overwrite] Output execution log without retaining the previousinformation.
3. Enter all the items and click the [Start Output] button.
2.2.5.8 Set Administrator Notification Events occurred in the client (CT) and database can be notified to the administrator (E-mail notification, writing to event log).
Events that can be notified and timing of notification are as follows:
- Notification of prohibition operation and violation operation in client (CT).
Notify immediately after prohibition logs are collected.
System administrator and department administrator can be notified by E-mail.
- Notification of database exception
Notify when the threshold of database space and disk space is reached.
Notify immediately when there is no available database space and it is unable to write information into the database.
Only notification to the system administrator by E-mail is allowed.
- Notification of client (CT) information
When client (CT) is started, notify immediately when Management Server detects modification of client (CT) information.
System administrator and department administrator of CT group can be notified by E-mail.
When notifying the department administrator, please refer to “Allocate Department Administrator” in “Systemwalker Desktop KeeperUser’s Guide: for Administrator”.
The steps to set administrator notification are as follows:
- 91 -
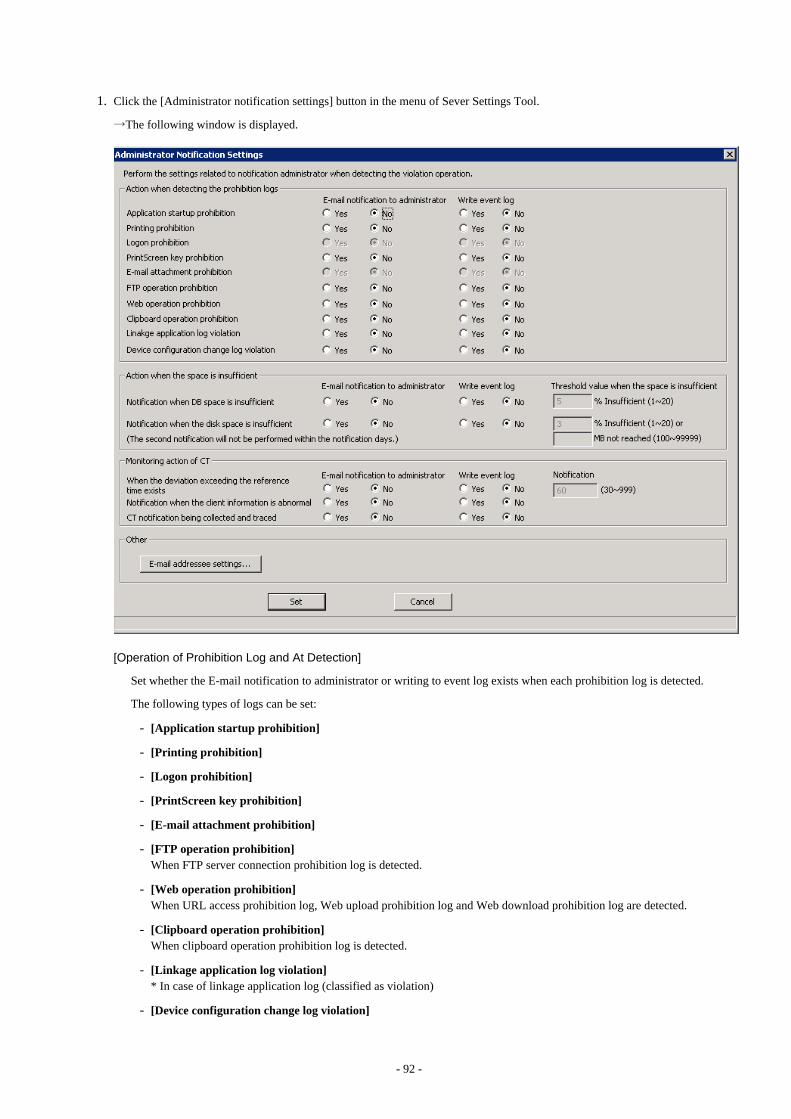
1. Click the [Administrator notification settings] button in the menu of Sever Settings Tool.
→The following window is displayed.
[Operation of Prohibition Log and At Detection]
Set whether the E-mail notification to administrator or writing to event log exists when each prohibition log is detected.
The following types of logs can be set:
- [Application startup prohibition]
- [Printing prohibition]
- [Logon prohibition]
- [PrintScreen key prohibition]
- [E-mail attachment prohibition]
- [FTP operation prohibition] When FTP server connection prohibition log is detected.
- [Web operation prohibition] When URL access prohibition log, Web upload prohibition log and Web download prohibition log are detected.
- [Clipboard operation prohibition]When clipboard operation prohibition log is detected.
- [Linkage application log violation]* In case of linkage application log (classified as violation)
- [Device configuration change log violation]
- 92 -
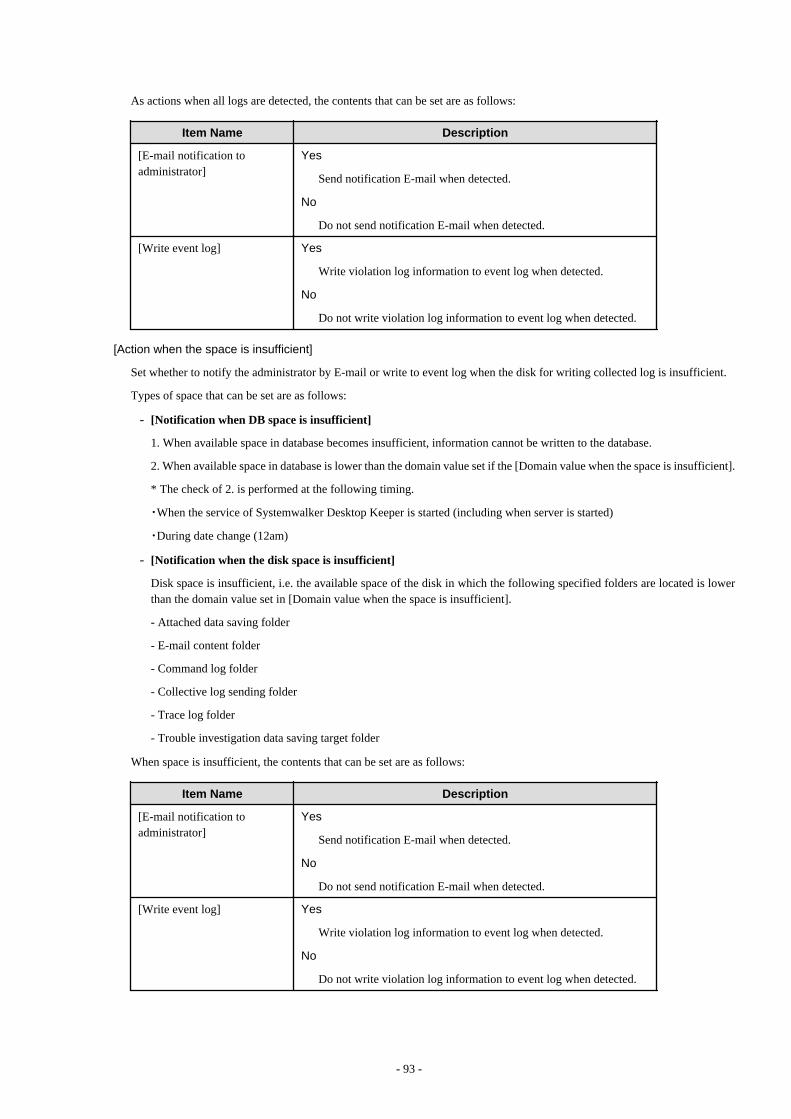
As actions when all logs are detected, the contents that can be set are as follows:
Item Name Description
[E-mail notification toadministrator]
Yes
Send notification E-mail when detected.
No
Do not send notification E-mail when detected.
[Write event log] Yes
Write violation log information to event log when detected.
No
Do not write violation log information to event log when detected.
[Action when the space is insufficient]
Set whether to notify the administrator by E-mail or write to event log when the disk for writing collected log is insufficient.
Types of space that can be set are as follows:
- [Notification when DB space is insufficient]
1. When available space in database becomes insufficient, information cannot be written to the database.
2. When available space in database is lower than the domain value set if the [Domain value when the space is insufficient].
* The check of 2. is performed at the following timing.
・When the service of Systemwalker Desktop Keeper is started (including when server is started)
・During date change (12am)
- [Notification when the disk space is insufficient]
Disk space is insufficient, i.e. the available space of the disk in which the following specified folders are located is lowerthan the domain value set in [Domain value when the space is insufficient].
- Attached data saving folder
- E-mail content folder
- Command log folder
- Collective log sending folder
- Trace log folder
- Trouble investigation data saving target folder
When space is insufficient, the contents that can be set are as follows:
Item Name Description
[E-mail notification toadministrator]
Yes
Send notification E-mail when detected.
No
Do not send notification E-mail when detected.
[Write event log] Yes
Write violation log information to event log when detected.
No
Do not write violation log information to event log when detected.
- 93 -
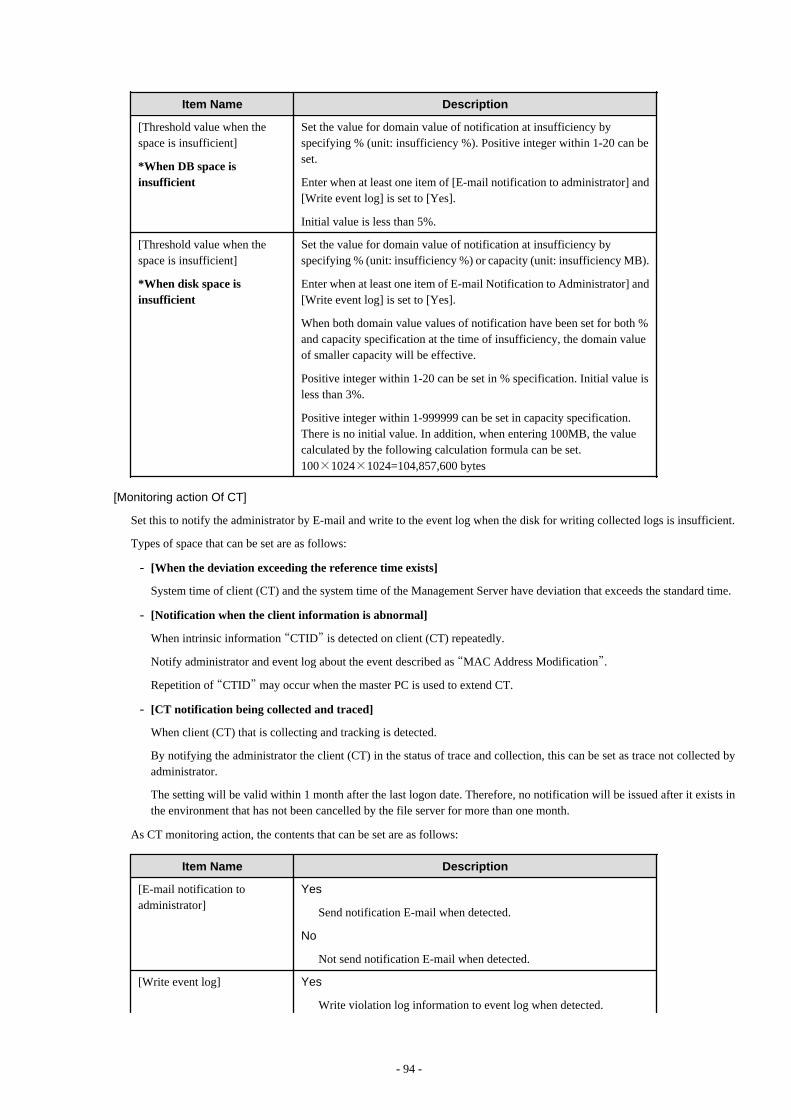
Item Name Description
[Threshold value when thespace is insufficient]
*When DB space isinsufficient
Set the value for domain value of notification at insufficiency byspecifying % (unit: insufficiency %). Positive integer within 1-20 can beset.
Enter when at least one item of [E-mail notification to administrator] and[Write event log] is set to [Yes].
Initial value is less than 5%.
[Threshold value when thespace is insufficient]
*When disk space isinsufficient
Set the value for domain value of notification at insufficiency byspecifying % (unit: insufficiency %) or capacity (unit: insufficiency MB).
Enter when at least one item of E-mail Notification to Administrator] and[Write event log] is set to [Yes].
When both domain value values of notification have been set for both %and capacity specification at the time of insufficiency, the domain valueof smaller capacity will be effective.
Positive integer within 1-20 can be set in % specification. Initial value isless than 3%.
Positive integer within 1-999999 can be set in capacity specification.There is no initial value. In addition, when entering 100MB, the valuecalculated by the following calculation formula can be set. 100×1024×1024=104,857,600 bytes
[Monitoring action Of CT]
Set this to notify the administrator by E-mail and write to the event log when the disk for writing collected logs is insufficient.
Types of space that can be set are as follows:
- [When the deviation exceeding the reference time exists]
System time of client (CT) and the system time of the Management Server have deviation that exceeds the standard time.
- [Notification when the client information is abnormal]
When intrinsic information “CTID” is detected on client (CT) repeatedly.
Notify administrator and event log about the event described as “MAC Address Modification”.
Repetition of “CTID” may occur when the master PC is used to extend CT.
- [CT notification being collected and traced]
When client (CT) that is collecting and tracking is detected.
By notifying the administrator the client (CT) in the status of trace and collection, this can be set as trace not collected byadministrator.
The setting will be valid within 1 month after the last logon date. Therefore, no notification will be issued after it exists inthe environment that has not been cancelled by the file server for more than one month.
As CT monitoring action, the contents that can be set are as follows:
Item Name Description
[E-mail notification toadministrator]
Yes
Send notification E-mail when detected.
No
Not send notification E-mail when detected.
[Write event log] Yes
Write violation log information to event log when detected.
- 94 -
Item Name Description
No
Not write violation log information to event log when detected.
[Notification] (note) Taking minute as unit, specify the time difference between the system timeof client (CT) and the system time of the Management Server. Positiveinteger within 30-999 can be set.
Enter when at least one between [E-mail notification to administrator] and[Write event log] is set to [Yes].
Initial value is 60 minutes.
Note) setting items when [Deviation that Exceeds Standard Time Exists].
[Other]
Click [E-mail addressee settings]. The [E-mail addressee settings] window will be displayed.
Item Name Description
[Sending E-mail server /address]
When notifying the administrator by E-mail, enter the SMTP server name.Up to 255 characters can be entered.
Symbols apart from “-” cannot be specified. When SMTP server nameshall be restricted, please use IP address to specify.
[port number] Enter the port number used for sending E-mail.
Initial value is 25.
[Perform SMTPauthentication]
Set whether to perform SMTP authentication in the communication withthe E-mail sending server.
Yes
Select when performing SMTP authentication.
- 95 -
Item Name Description
No
Select when SMTP authentication is not performed.
[Authentication method] Select authentication method when [Perform SMTP authentication] is setto “Yes”. The methods that can be selected are as follows:
- CRAM-MD5
- LOGIN
- PLAIN
- AUTO
When AUTO is selected, authentication method will be automaticallydetermined according to the following sequence. The initial value isAUTO.
1) CRAM-MD52) PLAIN3) LOGIN
[Authentication user ID] Enter the user ID when carrying out SMTP authentication in thecommunication with the E-mail sending server.
[Authentication password(first entry)]
Enter the password of SMTP authentication user ID.
[Authentication password(re-entry)]
Re-enter the password in order to avoid wrong registration.
[E-mail address (TO)] Enter the address of E-mail recipient (To) when notifying the systemadministrator by E-mail. Up to 255 characters or 5 E-mail addresses canbe entered. When entering multiple E-mail addresses, use semicolon “;”between the E-mail addresses.
[E-mail address (CC)] Enter the address of E-mail recipient (CC) when notifying the systemadministrator by E-mail. It is not required to enter when not sending toCC. Up to 255 characters or 5 E-mail addresses can be entered. Whenseveral E-mail addresses are entered, use semicolon “;” in between the E-mail addresses.
[E-mail address (FROM)] Enter the address of the E-mail sender when notifying the systemadministrator by E-mail. Up to 255 characters can be entered.
2. Enter the required setting items and click the [Set] button.
E-mail notification format
Format of notifying events occurred in the client (CT) and database to administrator by E-mail is as follows:
Item Name Format
E-mail Title Systemwalker Desktop Keeper WARNING Report at [yyyy/mm/dd hh:mm:ss]
Text (Subject) When prohibition log is detected
Operation category: Management server: User name: Terminal: CT version:
- 96 -
Item Name Format
Operation date: Details:
When database is abnormal
Error contents: Management server: Occurrence date and time: Details:
When MAC address is changed
Operation category: Management server: User name: Terminal: CT version: Operation log: Details: ■MAC address Before change: [ ]After change: [ ]■Computer name Before change: [ ]After change: [ ]■IP address Before change: [ ]After change: [ ]
Event log display format
This describes the format of the event occurred in the client (CT) and database displayed in the event viewer of Windows.
The notified information is displayed in “Application Log” of the event log of Windows. The displayed contents are describes as follows:
Item Name Description
Category [Warning] will be displayed.
Date It is the date of notification information displayed in event viewer.
Time It is the time of notification information displayed in event viewer.
User It is user ID.
Computer Name It is computer name.
Source [SWDTK] will be displayed.
Category [None] will be displayed.
Event ID →The following serial numbers will be displayed.
When prohibition log is detected
8001: Application startup prohibition
8002: Printing prohibition
8003: Logon prohibition
8004: PrintScreen key is pressed.
8005: Linkage application
8006: E-mail attachment prohibition
- 97 -
Item Name Description
8010: Device configuration change
8012: URL access prohibition
8013: FTP server connection prohibition
8014: Web upload prohibition
8015: Web download prohibition
8017: Clipboard operation prohibition
Monitoring action of CT
8007: CT terminal time inconsistent
8008: MAC address changed
8011: CT that is collecting trace
When database is abnormal
3006: DB space is insufficient
3007: Disk space of attached data saving folder is insufficient
3008: Disk space of command log folder is insufficient
3009: Disk space of collective log sending folders is insufficient
3010: Disk space of trace log folder is insufficient
3015: Disk space of E-mail contents saving target is insufficient
3016: Disk space of trouble investigation data saving target is insufficient.
For details, please refer to “Message Output with Event Log” in “Systemwalker DesktopKeeper Reference Manual”.
Explanations The following information will be displayed.
When prohibition log is detected
Operation category: Management server: User name: Terminal: CT version: Operation date: Details:
When database is abnormal
Error contents: Management server:Occurrence date and time: Details:
When MAC address is changed
Operation category: Management server: User name: Terminal: CT version: Operation log: Details:■MAC address Before change: [ ]After change: [ ]
- 98 -
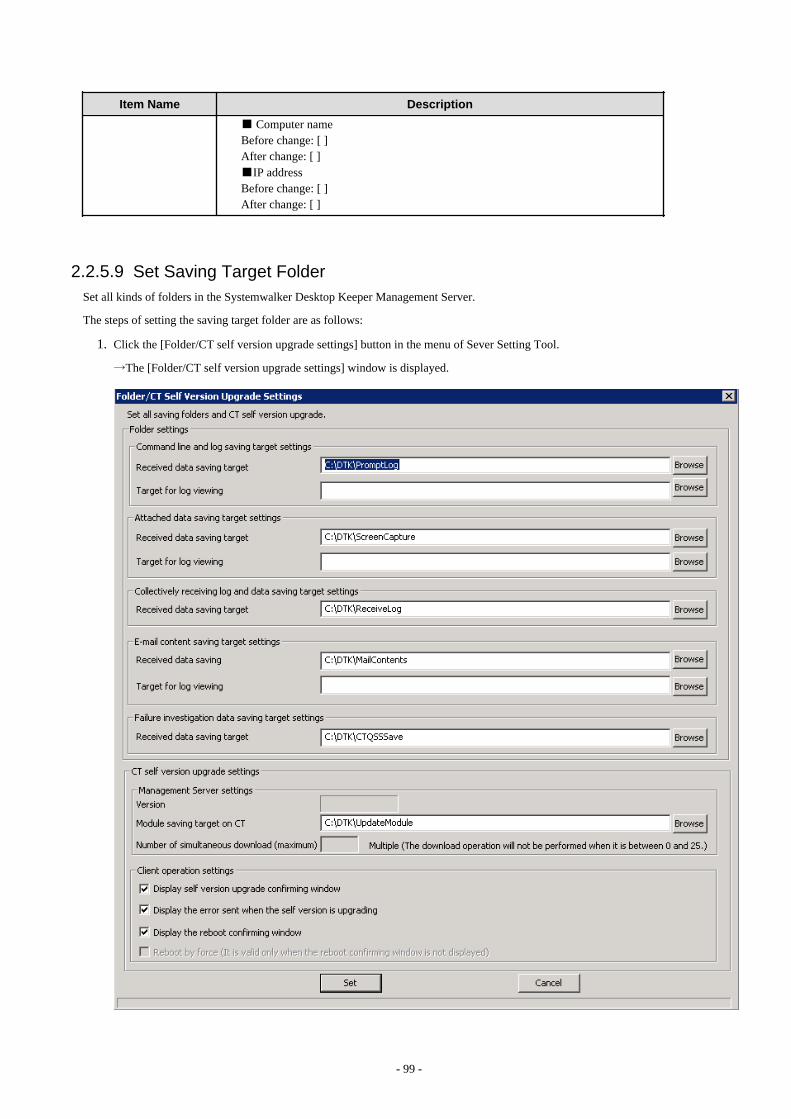
Item Name Description
■ Computer name Before change: [ ]After change: [ ]■IP address Before change: [ ]After change: [ ]
2.2.5.9 Set Saving Target Folder Set all kinds of folders in the Systemwalker Desktop Keeper Management Server.
The steps of setting the saving target folder are as follows:
1. Click the [Folder/CT self version upgrade settings] button in the menu of Sever Setting Tool.
→The [Folder/CT self version upgrade settings] window is displayed.
- 99 -
2. Confirm the initial value of saving target of the following information displayed in [Folder settings]. Click the [Browse] button tomodify the saving target.
3. (It is not necessary to set [CT self-version upgrade settings] here. For the setting content, please refer to “4.7 Version Upgrade ofCT”.)
[Folder settings]
Item Name Description
[Command line and log savingtarget settings]
The method to specify the saving target folder of command log inManagement Server is as follows:
- Enter folder name with full path.
- Enter the path of saving target folder of command log with fullpath. Network drive cannot be specified.
- Specify through the [Browse] button.
- The [Browse For Folder] window will be displayed. Select thefolder to save command log and click the [OK] button.
The length of the full path that can be specified is no more than 96single-byte characters. However, the following symbols are notallowed in the folder name. Symbols that are not allowed: “\” “/” “:” “*” “?” “"” “<” “>” “|”
[Received data saving target] Specify the folder to save the data in operation.
[Target for log viewing] Specify the folder to save data for log viewing.
Specify when creating the log viewing database and restoringoperation logs.
[Attached data saving targetsettings]
Specify the saving target folder of additional data (screen capture data,original backup file, and clipboard operation original backup file) inthe Management Server. The specification method is as follows:
- Enter folder name with full path.
- Enter the path of saving target folder of attached data with fullpath. Network drive cannot be specified.
- Specify through the [Browse] button.
- The [Browse For Folder] window will be displayed. Select thefolder to save command log and click the [OK] button.
- The length of the full path that can be specified is no more than96 single-byte characters. However, the following symbols are notallowed in the folder name. Symbols that are not allowed: “\” “/” “:” “*” “?” “"” “<” “>”“|”
[Received data saving target] Specify the folder to save the data in operation.
[Target for log viewing] Specify the folder to save data for log viewing.
Specify when creating the log viewing database and restoringoperation logs.
[Collectively receiving log anddata saving target settings]
Specify the saving target folder of collective log data in theManagement Server. The specification method is as follows:
- Enter folder name with full path.
- Enter the path of saving target folder of collective log data withfull path. Network drive cannot be specified.
- 100 -
Item Name Description
- Specify through the [Browse] button.
- The [View Folder] window will be displayed. Select the folder tosave command log and click the [OK] button.
The length of the full path that can be specified is no more than 96single-byte characters. However, the following symbols are notallowed in the folder name. Symbols that are not allowed: “\” “/” “:” “*” “?” “"” “<” “>” “|”
[E-mail content saving targetsettings]
Specify the saving target folder of E-mail contents data (E-mail textand attachment) in the Management Server. The specification methodis as follows:
- Enter folder name with full path.
- Enter the path of saving target folder of E-mail contents data withfull path. Network drive cannot be specified.
- Specify through the [Browse] button.
- The [Browse For Folder] window will be displayed. Select thefolder to save command log and click the [OK] button.
The length of the full path that can be specified is no more than 96single-byte characters. However, the following symbols are notallowed in the folder name. Symbols that are not allowed: “\” “/” “:” “*” “?” “"” “<” “>” “|”
[Received data saving target] Specify the folder to save the data in operation.
[Target for log viewing] Specify the folder to save data for log viewing.
Specify when creating the log viewing database and restoringoperation logs.
[Failure investigation data savingtarget settings]
Specify the saving target folder of QSS (Trouble Investigation Data)collected remotely in the Management Server. The specificationmethod is as follows:
- Enter folder name with full path.
- Enter the path of saving target folder of trouble investigation datawith full path. Network drive cannot be specified.
- Specify through the [Browse] button.
- The [Browse For Folder] window will be displayed. Select thefolder to save command log and click the [OK] button.
The length of the full path that can be specified is no more than 96single-byte characters. However, the following symbols are notallowed in the folder name. Symbols that are not allowed: “\” “/” “:” “*” “?” “"” “<” “>” “|”.
2.3 Install Management Console This section describes how to newly install Systemwalker Desktop Keeper Management Console.
If the Management Console of an old version has been installed, please refer to “Chapter 4 Version Upgrade” when installing theManagement Console of V14.2.0.
- 101 -
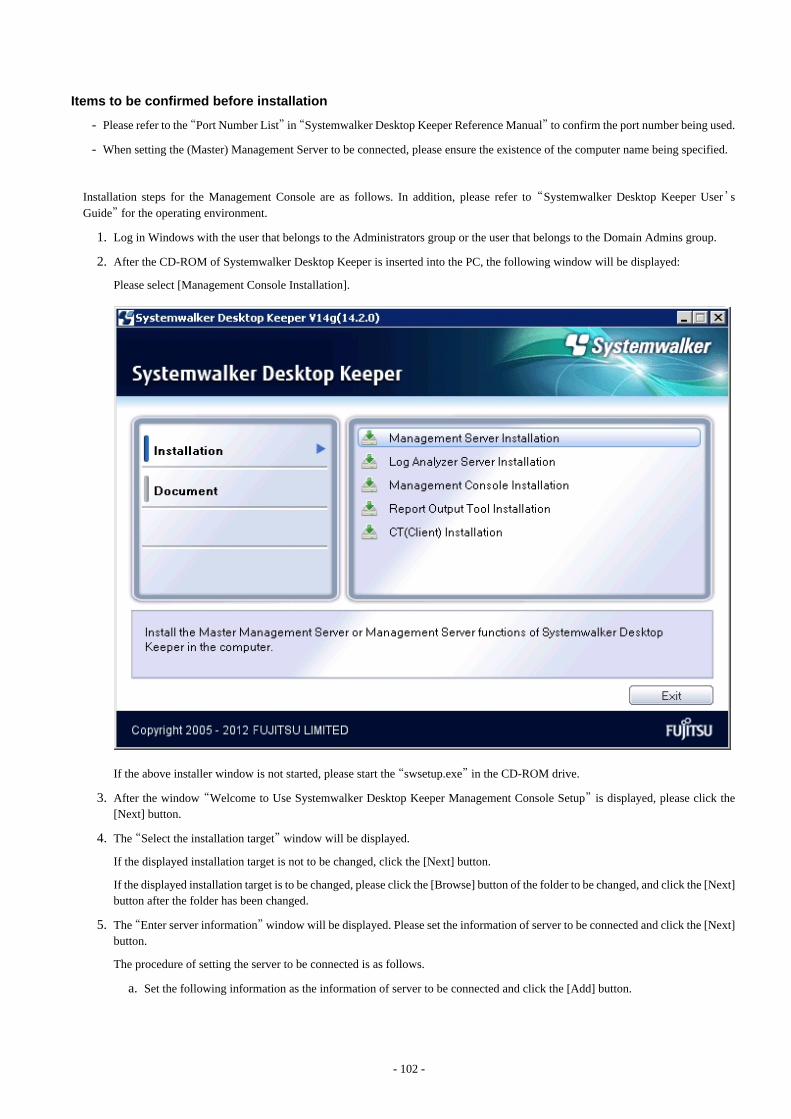
Items to be confirmed before installation
- Please refer to the “Port Number List” in “Systemwalker Desktop Keeper Reference Manual” to confirm the port number being used.
- When setting the (Master) Management Server to be connected, please ensure the existence of the computer name being specified.
Installation steps for the Management Console are as follows. In addition, please refer to “Systemwalker Desktop Keeper User’sGuide” for the operating environment.
1. Log in Windows with the user that belongs to the Administrators group or the user that belongs to the Domain Admins group.
2. After the CD-ROM of Systemwalker Desktop Keeper is inserted into the PC, the following window will be displayed:
Please select [Management Console Installation].
If the above installer window is not started, please start the “swsetup.exe” in the CD-ROM drive.
3. After the window “Welcome to Use Systemwalker Desktop Keeper Management Console Setup” is displayed, please click the[Next] button.
4. The “Select the installation target” window will be displayed.
If the displayed installation target is not to be changed, click the [Next] button.
If the displayed installation target is to be changed, please click the [Browse] button of the folder to be changed, and click the [Next]button after the folder has been changed.
5. The “Enter server information” window will be displayed. Please set the information of server to be connected and click the [Next]button.
The procedure of setting the server to be connected is as follows.
a. Set the following information as the information of server to be connected and click the [Add] button.
- 102 -
Note
Please confirm the setting of the (Master) Management Server to be connected.
Please set the information of the (Master) Management Server to be connected to be the same as the setting in the ManagementConsole. The confirmation method is as follows:
1. Please start [All Programs] - [Systemwalker Desktop Keeper] - [Server] - [Sever Settings Tool] from the [Start] menuon the connected (Master) Management Server.
2. Click the [Management Server Settings] button.
3. Confirm the following items:
-Configuration value of [IP address of server] of [Server settings];
-Configuration value of [Management Console <---->Level Control Service] of the [Port number settings].
- [Computer name or IP address of connected (Master) Management Server]: Enter the computer name or IP addressof the connected (Master) Management Server.
When entering the computer name, please confirm the correctness of the name. If the name cannot be analyzed correctly,the (Master) Management Server and Management Console cannot be connected. The value set here will be displayed as the alternative selection of [Connection Target Server Name] in the login windowof the Management Console.
- [Port number being used]: Enter the port number used for communication between the Management Console and levelcontrol service.
After being added, the set information will be displayed under the [Add] button.
b. If there are multiple servers being connected, perform the operation in Step a. according to the number of servers. In addition, move up or down the servers that are often connected using the [Up] or [Down] buttons.
6. The “Complete installation preparation” window will be displayed.
When starting the installation, please click the [Install] button to start installation.
When confirming the set content or wishing to modify it, please click the [Return] button to reset.
7. After processing has completed normally, [Installation has completed.] will be displayed. Please click the [Finish] button.
Note
It is required to register the administrator information when using the Management Console.
When using the Management Console, “Sever Setting Tool” should be used to register administrator information. For registration ofadministrator information, please refer to “2.2.5.6 Set administrator information ”.
2.4 Settings of PC with Web Browser InstalledIn Systemwalker Desktop Keeper, use a Web browser to perform log viewing and analysis.
The following browsers can be used as a Web browser:
- Microsoft® Internet Explorer® 6.0 (ServicePack1)
- Windows® Internet Explorer® 7.0
- Windows® Internet Explorer® 8.0
- Windows® Internet Explorer® 9.0
Please set the security level of Internet Explorer according to needs of the PC that uses the Web browser.
- 103 -
If the security level of the zone to which site (URL) of Web browser belongs is higher than the following levels, it will not be able to runnormally:
- “Medium” in Microsoft® Internet Explorer® 6.0;
- “Medium High” in Microsoft® Internet Explorer® 7.0
- “Medium High” in Microsoft® Internet Explorer® 8.0
- “Medium High” in Microsoft® Internet Explorer® 9.0
When it is impossible to run normally due to the above reasons, the site (URL) of Web browser should be adjusted to the zone with lowersecurity level than the above, or the security level of the current zone should be reduced.
Normally, because the zones of “Intranet” or “Trusted Sites” are in the security levels by default, it is suggested to register the site (URL)of Web browser to [Site] of any zone.
In addition, when Web browser is displayed, the current zone (“Intranet”, “Internet” and etc.) will be displayed at the bottom right of thebrowser.
In Microsoft® Internet Explorer® 8.0
Before logon to the Web console, please change (add or delete) the registration status of “Trusted Site” of the site (URL) of Webconsole. If this operation is performed during the logon process, operations such as logout may be unable to perform.
About settings of Internet Explorer® in 64-bit OS
In 64-bit OS, please use the 32-bit Internet Explorer® as Web browser. When setting Internet Explorer®, select [Start] - [All Programs]- [Internet Explorer (32-bit)] or [Internet Explorer] to perform settings in the Internet Explorer of 32-bit edition.
Setting when file is not downloaded successfully
There are several types of file download operations:
- File download in the CSV export function after log searching, file tracing and search of configuration change log;
- File download in the function of “Command Log Content Downloading”;
- File download in the function of “Attached Data of File Export Log”;
- Download through file saving from the image display window.
If the downloading operation of the above files has been executed, after entering the file name of the saving target, the [~ copied] windowwill be displayed continuously, and download will take some time. Sometimes, the downloading may not be finished.
At that time, please modify the following settings:
When using Windows® Internet Explorer® 8.0
1. Register the site of Systemwalker Desktop Keeper to trusted sites, and prohibit the [SmartScreen Filter Function] of InternetExplorer®. In addition, through this setting, [SmartScreen Filter Function] will be prohibited in all the sites registered to trusted sites.
2. Start Log Viewer and display the [Login] window. Please perform the following settings when the [Login] window is displayed. For information on how to start Log Viewer, pleaserefer to “Start Log Viewer” in “Systemwalker Desktop Keeper User’s Guide: for Administrator”.
3. Select [Tool] - [Internet Options] from the menu of Internet Explorer®. The [Internet Options] window will be displayed.
4. Open the [Security] tab, click [Trusted Sites] icon and click the [Sites] Button. [Trusted Sites] window will be displayed.
5. Confirm the site (URL) of Systemwalker Desktop Keeper that has already been set in [Add this website to zone], and click the[Add] button.
6. Click the [Close] button in [Trusted Sites] window to close the window.
7. Select [Trusted Sites] icon in [Internet Options], and click [User-defined Level].
- 104 -
8. Find [Others] - [Use SmartScreen Filter Function] in the settings of the [Security Settings - Trusted Zone] window, and clickthe [Disable] button.
9. Click the [OK] button in the [Security Settings - Trusted Zone] window to close it.
10. Click the [OK] button in the [Internet Options] window to close it.
In Windows® Internet® Explorer 7.0 or Windows® Internet® Explorer 8.0 in Windows Server® 2003 or Windows® XP, andwhen IME is used
In Windows® XP, it can be avoided by applying the latest Service Pack. Under Windows Server® 2003, it can be avoided by applyingthe KB932823 patch. If the patch is not applied, it can be avoided by prohibiting the [Advanced Text Service Function] of IME. Inaddition, the language bar will be closed and cannot be displayed when [Advanced Text Service Function] of IME has been disabled.
The procedure to avoid this through setting of IME is as follows.
1. Select [Run] from the [Start] menu.
2. Enter [control international] in the name and click the [OK] button. The [Region and Language Option] window will be displayed.
3. Click [Language] in the window [Region and Language Option], and click the [Details] button. The [Text Service and InputLanguage] window will be displayed.
4. Click the [Advanced] tab in the [Text Service and Input Language] window and select the [OFF the Advanced Text Service]checkbox to close it.
5. Click the [OK] button in the [Text Service and Input Language] window to close it.
6. Click the [OK] button in the [Region and Language Option] window to close it.
2.5 Install CTThis section describes how to newly install the client (CT) of Systemwalker Desktop Keeper.
The installation method of client (CT) of Systemwalker Desktop Keeper is as follows. For an overview, please refer to “1.2.5 DetermineHow to Install Client (CT)”.
- Single installation
- Wizard-style installation
- Silent installation
- Installation using master PC/master virtual PC
- Installation using the distribution function of Systemwalker Desktop Patrol
If the old version of client (CT) has been installed, please refer to “Chapter 4 Version Upgrade” when installing the client (CT) V14.2.0.
Note
When installing client (CT) on Management (Master Management) Server
When installing the client (CT) on a Management Server, please pay attention to the following two points:
- Installation sequence
- Server to be connected
For details, please refer to “When client (CT) is installed on Management Server/Master Management Server”.
Note
When unable to confirm the installed client (CT) through Management Console
- 105 -
When unable to confirm the installed client through the Management Console, the following reasons can be taken into consideration:
- IP address of the Management Server specified during CT installation is incorrect.
- Port number specified during CT installation is different from the configuration value of the Management Server.
- Due to reasons such as the router, the port used between the CT and the Management Server has been blocked.
Note
Network has been disconnected in the installation process of client (CT)
The network will be temporarily disconnected during the installation of client (CT). If the network folder is opened by Explorer, pleaseclose it.
Point
Installation in Windows Server® 2008 and Windows® 7
The following information will be output in the event log during installation.
Event log content
Source : Service Control Manager Eventlog Provider
Time ID: 7030
Level: Error
Content: The SWServerService service is marked as an interactive service. However, the system is
configured to not allow interactive services. This service may not function properly.
This message is displayed because the OS does not recommend interactive service, but it will not affect the operation.
2.5.1 Single Installation There are two methods for a single installation of a client (CT).
Wizard-style installation
Installation of wizard style is carried out in interactive mode. Please refer to “2.5.1.1 Wizard-style Installation”.
Silent installation
Automatic installation can be used for silent installation according to the prepared installation setting files. Please refer to “2.5.1.2Execute Silent Installation ”.
2.5.1.1 Wizard-style InstallationThis section describes how to newly install a client (CT) of Systemwalker Desktop Keeper in wizard style.
Items to be confirmed before installation
- Please refer to “Port Number List” in the “Systemwalker Desktop Keeper Reference Manual” to confirm the port number being used.
The steps to install a client (CT) in wizard style are as follows. In addition, for operating environment, please refer to “SystemwalkerDesktop Keeper User’s Guide”.
1. Log in to Windows with the user that belongs to the Administrators group or the user that belongs to the Domain Admins group.When other applications are being used, please close them.
- 106 -

2. After the CD-ROM of Systemwalker Desktop Keeper is inserted into the PC, the following window will be displayed:
Please select [CT (Client) Installation].
If the above installer is not started, please start the “swsetup.exe” in the CD-ROM drive.
3. After the “Welcome to use Systemwalker Desktop Keeper Client installation” window is displayed, please click the [Next] button.
- 107 -
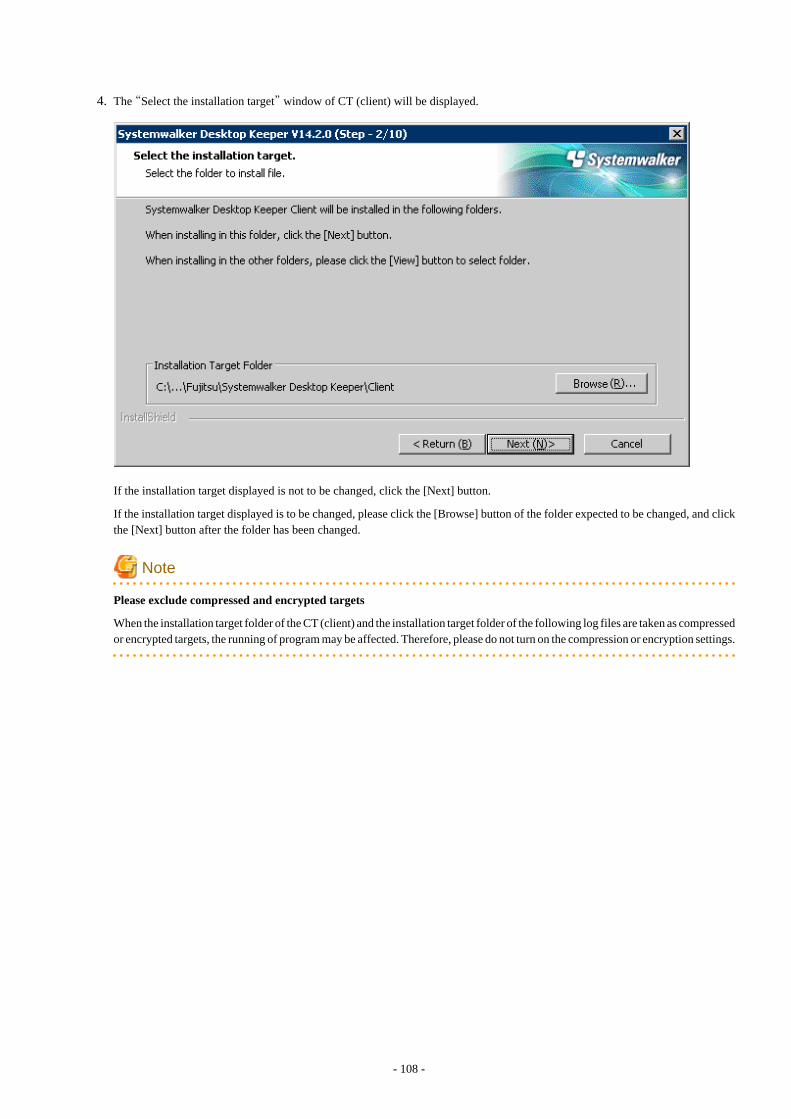
4. The “Select the installation target” window of CT (client) will be displayed.
If the installation target displayed is not to be changed, click the [Next] button.
If the installation target displayed is to be changed, please click the [Browse] button of the folder expected to be changed, and clickthe [Next] button after the folder has been changed.
Note
Please exclude compressed and encrypted targets
When the installation target folder of the CT (client) and the installation target folder of the following log files are taken as compressedor encrypted targets, the running of program may be affected. Therefore, please do not turn on the compression or encryption settings.
- 108 -
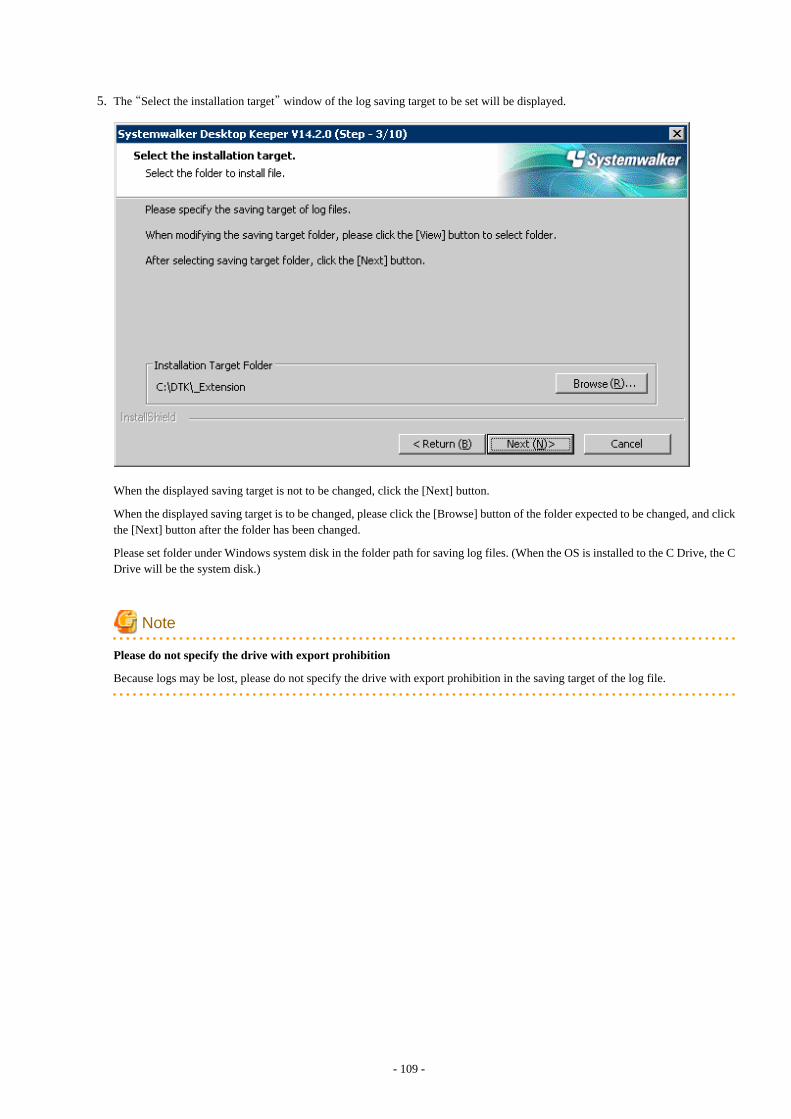
5. The “Select the installation target” window of the log saving target to be set will be displayed.
When the displayed saving target is not to be changed, click the [Next] button.
When the displayed saving target is to be changed, please click the [Browse] button of the folder expected to be changed, and clickthe [Next] button after the folder has been changed.
Please set folder under Windows system disk in the folder path for saving log files. (When the OS is installed to the C Drive, the CDrive will be the system disk.)
Note
Please do not specify the drive with export prohibition
Because logs may be lost, please do not specify the drive with export prohibition in the saving target of the log file.
- 109 -
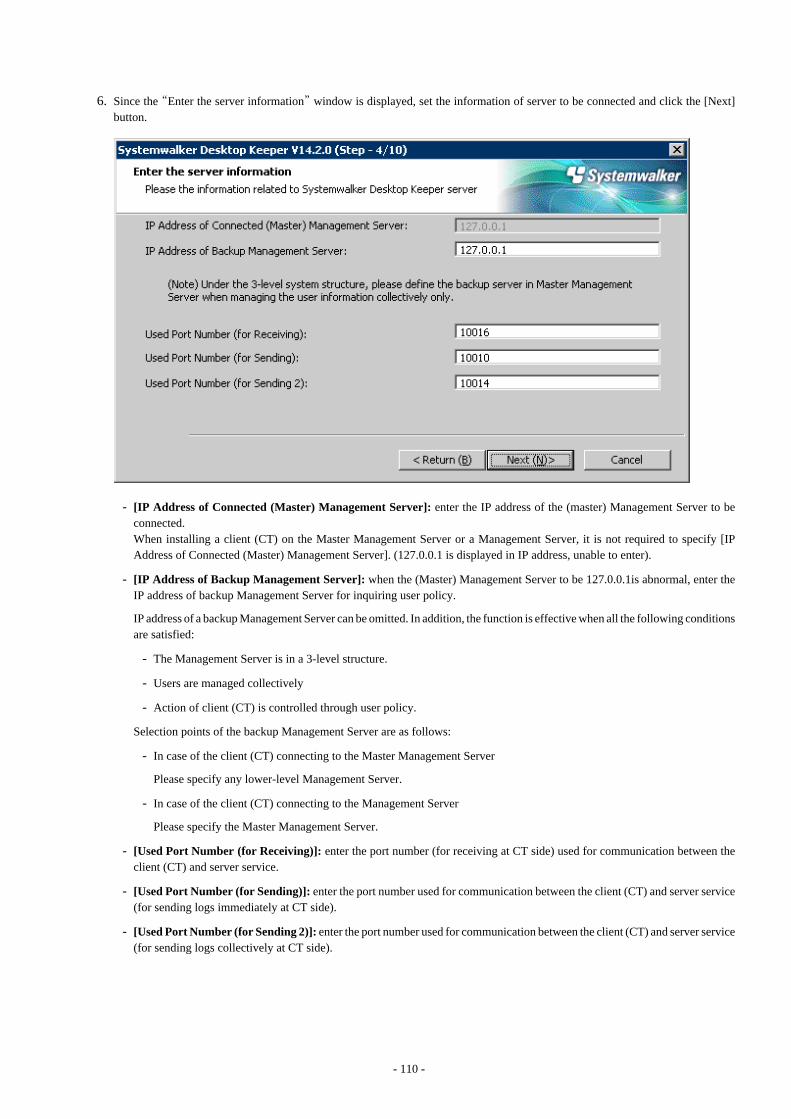
6. Since the “Enter the server information” window is displayed, set the information of server to be connected and click the [Next]button.
- [IP Address of Connected (Master) Management Server]: enter the IP address of the (master) Management Server to beconnected. When installing a client (CT) on the Master Management Server or a Management Server, it is not required to specify [IPAddress of Connected (Master) Management Server]. (127.0.0.1 is displayed in IP address, unable to enter).
- [IP Address of Backup Management Server]: when the (Master) Management Server to be 127.0.0.1is abnormal, enter theIP address of backup Management Server for inquiring user policy.
IP address of a backup Management Server can be omitted. In addition, the function is effective when all the following conditionsare satisfied:
- The Management Server is in a 3-level structure.
- Users are managed collectively
- Action of client (CT) is controlled through user policy.
Selection points of the backup Management Server are as follows:
- In case of the client (CT) connecting to the Master Management Server
Please specify any lower-level Management Server.
- In case of the client (CT) connecting to the Management Server
Please specify the Master Management Server.
- [Used Port Number (for Receiving)]: enter the port number (for receiving at CT side) used for communication between theclient (CT) and server service.
- [Used Port Number (for Sending)]: enter the port number used for communication between the client (CT) and server service(for sending logs immediately at CT side).
- [Used Port Number (for Sending 2)]: enter the port number used for communication between the client (CT) and server service(for sending logs collectively at CT side).
- 110 -
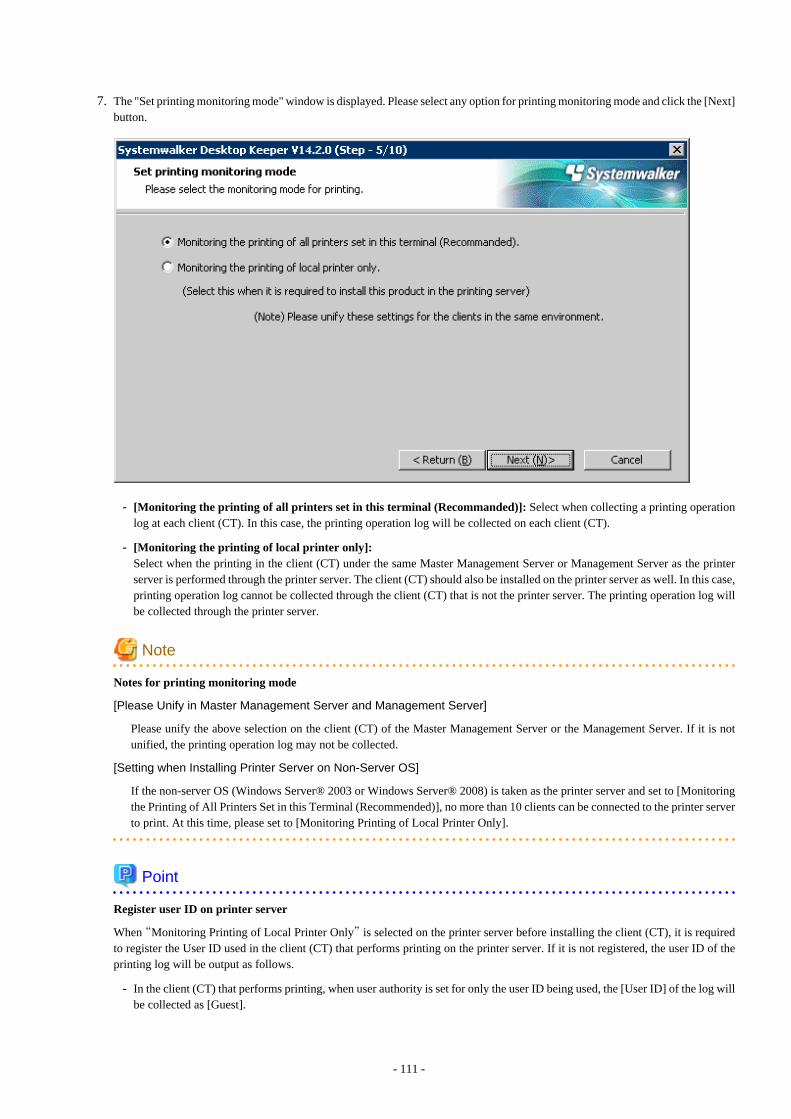
7. The "Set printing monitoring mode" window is displayed. Please select any option for printing monitoring mode and click the [Next]button.
- [Monitoring the printing of all printers set in this terminal (Recommanded)]: Select when collecting a printing operationlog at each client (CT). In this case, the printing operation log will be collected on each client (CT).
- [Monitoring the printing of local printer only]: Select when the printing in the client (CT) under the same Master Management Server or Management Server as the printerserver is performed through the printer server. The client (CT) should also be installed on the printer server as well. In this case,printing operation log cannot be collected through the client (CT) that is not the printer server. The printing operation log willbe collected through the printer server.
Note
Notes for printing monitoring mode
[Please Unify in Master Management Server and Management Server]
Please unify the above selection on the client (CT) of the Master Management Server or the Management Server. If it is notunified, the printing operation log may not be collected.
[Setting when Installing Printer Server on Non-Server OS]
If the non-server OS (Windows Server® 2003 or Windows Server® 2008) is taken as the printer server and set to [Monitoringthe Printing of All Printers Set in this Terminal (Recommended)], no more than 10 clients can be connected to the printer serverto print. At this time, please set to [Monitoring Printing of Local Printer Only].
Point
Register user ID on printer server
When “Monitoring Printing of Local Printer Only” is selected on the printer server before installing the client (CT), it is requiredto register the User ID used in the client (CT) that performs printing on the printer server. If it is not registered, the user ID of theprinting log will be output as follows.
- In the client (CT) that performs printing, when user authority is set for only the user ID being used, the [User ID] of the log willbe collected as [Guest].
- 111 -
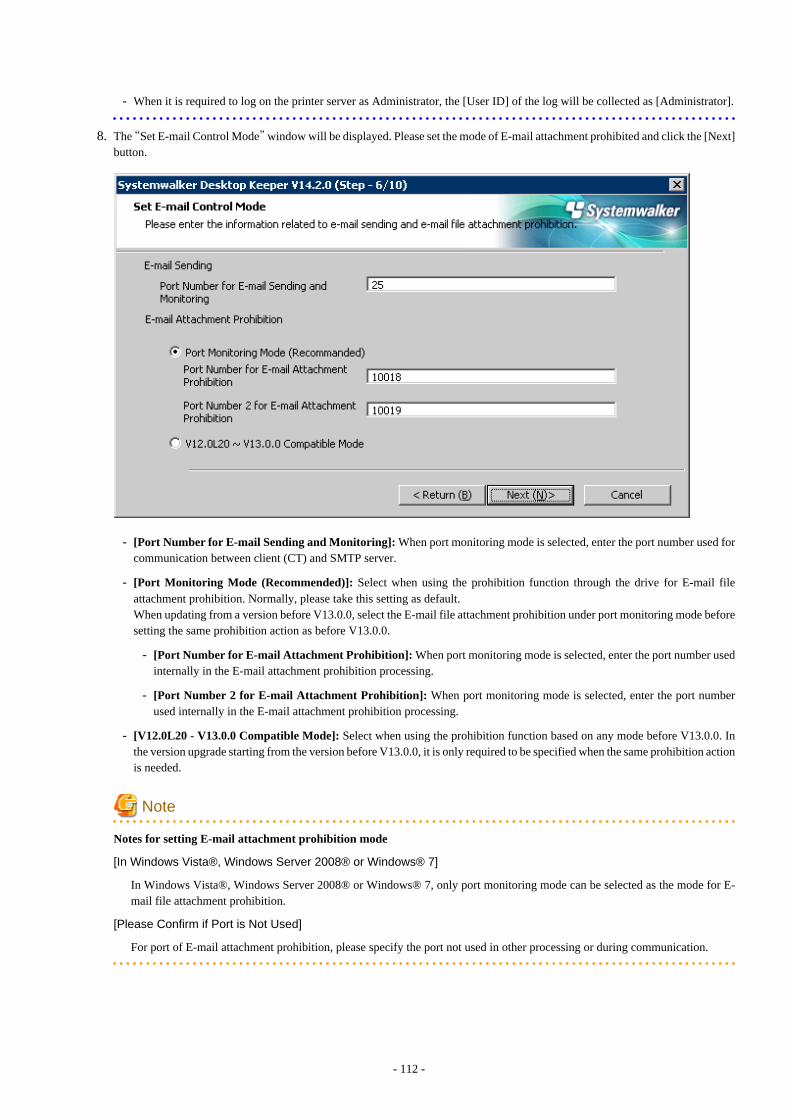
- When it is required to log on the printer server as Administrator, the [User ID] of the log will be collected as [Administrator].
8. The “Set E-mail Control Mode” window will be displayed. Please set the mode of E-mail attachment prohibited and click the [Next]button.
- [Port Number for E-mail Sending and Monitoring]: When port monitoring mode is selected, enter the port number used forcommunication between client (CT) and SMTP server.
- [Port Monitoring Mode (Recommended)]: Select when using the prohibition function through the drive for E-mail fileattachment prohibition. Normally, please take this setting as default. When updating from a version before V13.0.0, select the E-mail file attachment prohibition under port monitoring mode beforesetting the same prohibition action as before V13.0.0.
- [Port Number for E-mail Attachment Prohibition]: When port monitoring mode is selected, enter the port number usedinternally in the E-mail attachment prohibition processing.
- [Port Number 2 for E-mail Attachment Prohibition]: When port monitoring mode is selected, enter the port numberused internally in the E-mail attachment prohibition processing.
- [V12.0L20 - V13.0.0 Compatible Mode]: Select when using the prohibition function based on any mode before V13.0.0. Inthe version upgrade starting from the version before V13.0.0, it is only required to be specified when the same prohibition actionis needed.
Note
Notes for setting E-mail attachment prohibition mode
[In Windows Vista®, Windows Server 2008® or Windows® 7]
In Windows Vista®, Windows Server 2008® or Windows® 7, only port monitoring mode can be selected as the mode for E-mail file attachment prohibition.
[Please Confirm if Port is Not Used]
For port of E-mail attachment prohibition, please specify the port not used in other processing or during communication.
- 112 -
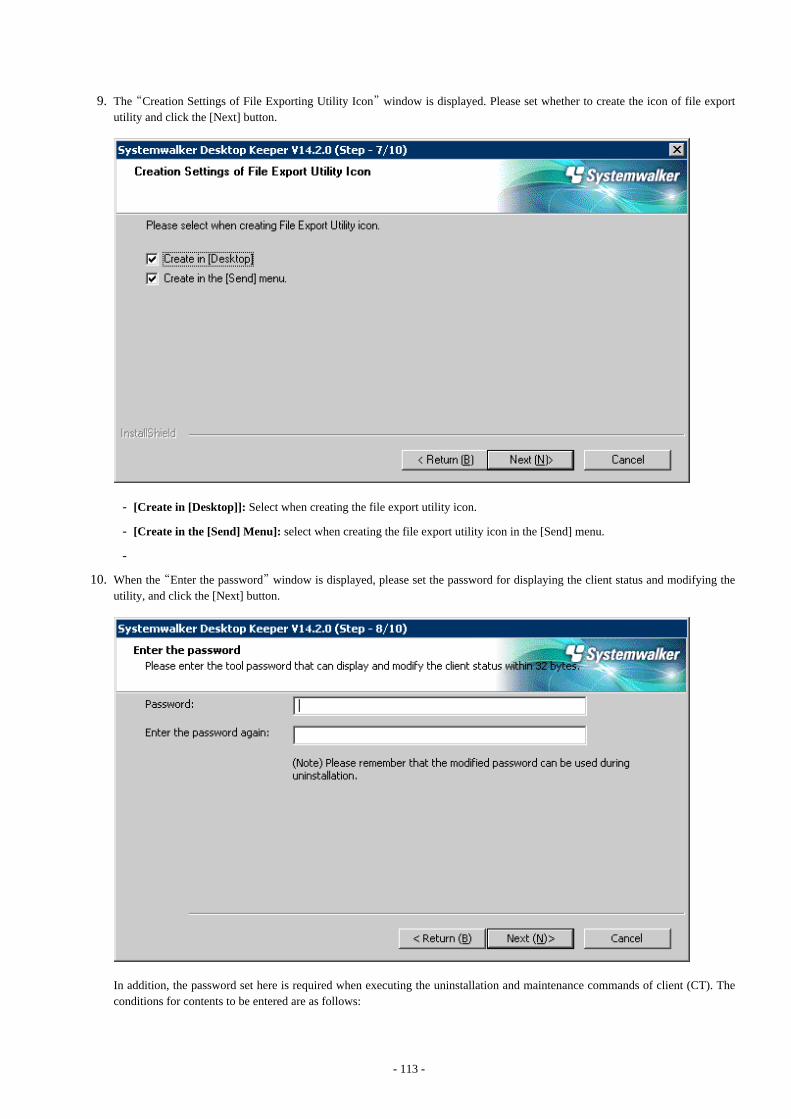
9. The “Creation Settings of File Exporting Utility Icon” window is displayed. Please set whether to create the icon of file exportutility and click the [Next] button.
- [Create in [Desktop]]: Select when creating the file export utility icon.
- [Create in the [Send] Menu]: select when creating the file export utility icon in the [Send] menu.
-
10. When the “Enter the password” window is displayed, please set the password for displaying the client status and modifying theutility, and click the [Next] button.
In addition, the password set here is required when executing the uninstallation and maintenance commands of client (CT). Theconditions for contents to be entered are as follows:
- 113 -
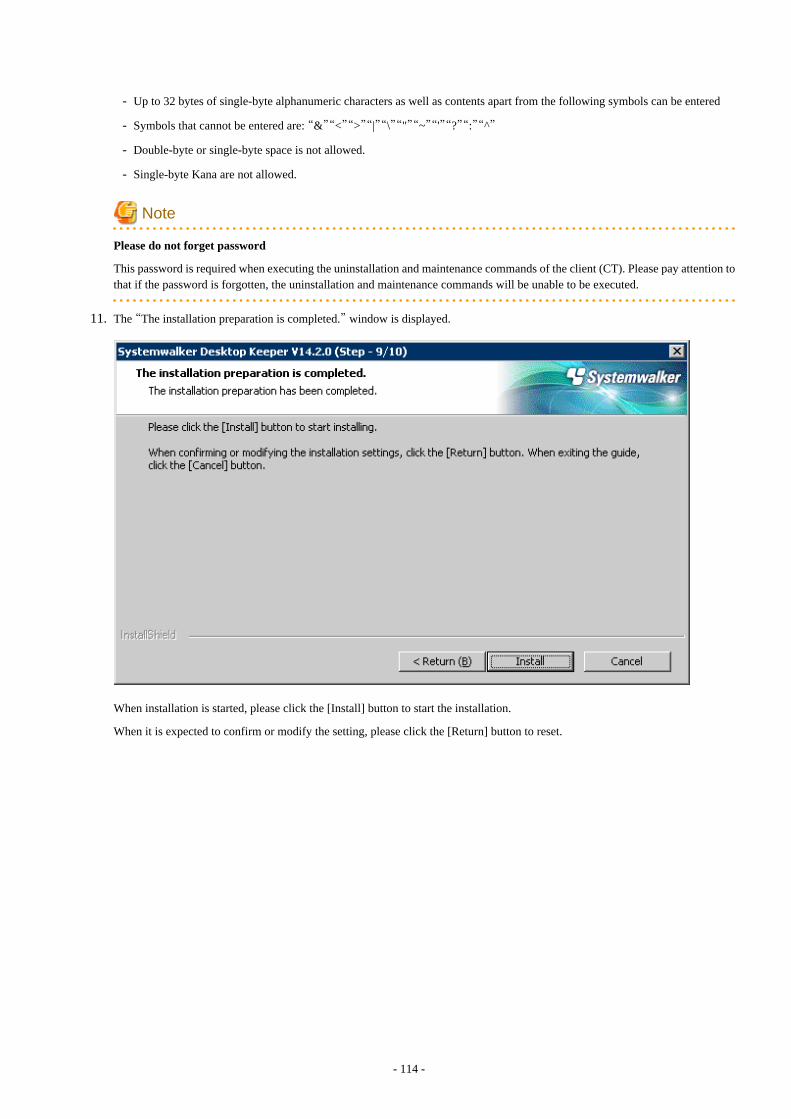
- Up to 32 bytes of single-byte alphanumeric characters as well as contents apart from the following symbols can be entered
- Symbols that cannot be entered are: “&”“<”“>”“|”“\”“"”“~”“'”“?”“:”“^”
- Double-byte or single-byte space is not allowed.
- Single-byte Kana are not allowed.
Note
Please do not forget password
This password is required when executing the uninstallation and maintenance commands of the client (CT). Please pay attention tothat if the password is forgotten, the uninstallation and maintenance commands will be unable to be executed.
11. The “The installation preparation is completed.” window is displayed.
When installation is started, please click the [Install] button to start the installation.
When it is expected to confirm or modify the setting, please click the [Return] button to reset.
- 114 -
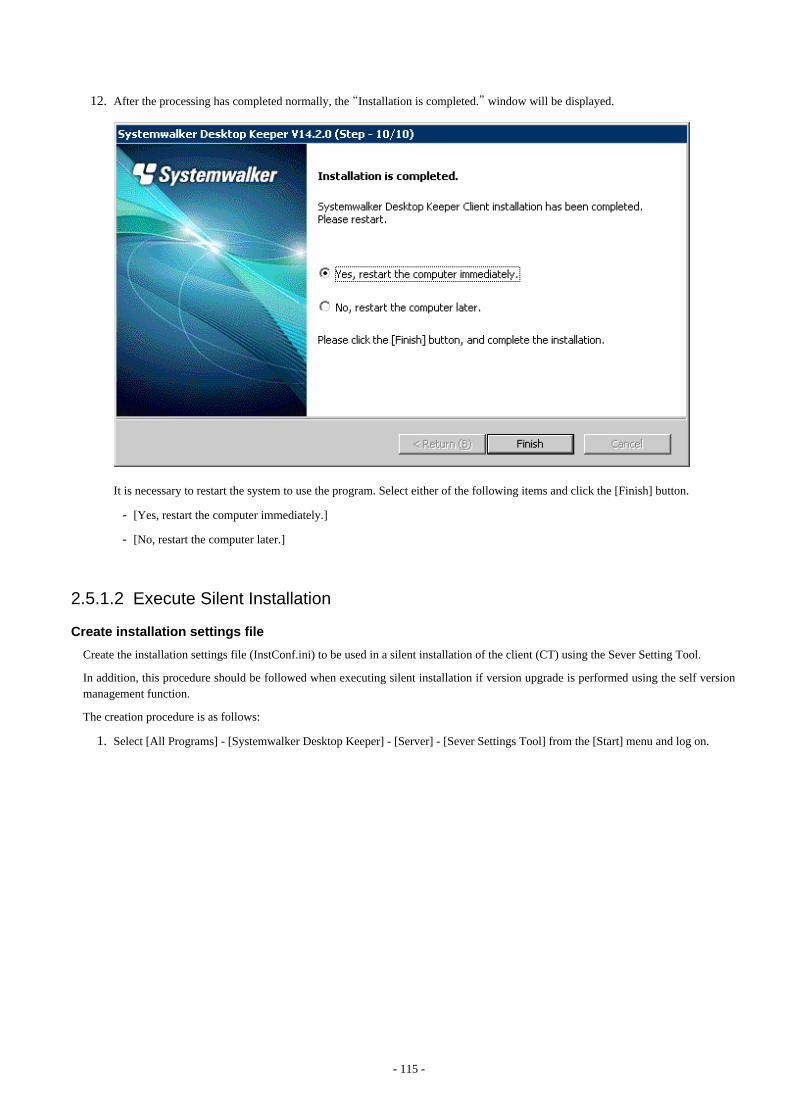
12. After the processing has completed normally, the “Installation is completed.” window will be displayed.
It is necessary to restart the system to use the program. Select either of the following items and click the [Finish] button.
- [Yes, restart the computer immediately.]
- [No, restart the computer later.]
2.5.1.2 Execute Silent Installation
Create installation settings file
Create the installation settings file (InstConf.ini) to be used in a silent installation of the client (CT) using the Sever Setting Tool.
In addition, this procedure should be followed when executing silent installation if version upgrade is performed using the self versionmanagement function.
The creation procedure is as follows:
1. Select [All Programs] - [Systemwalker Desktop Keeper] - [Server] - [Sever Settings Tool] from the [Start] menu and log on.
- 115 -
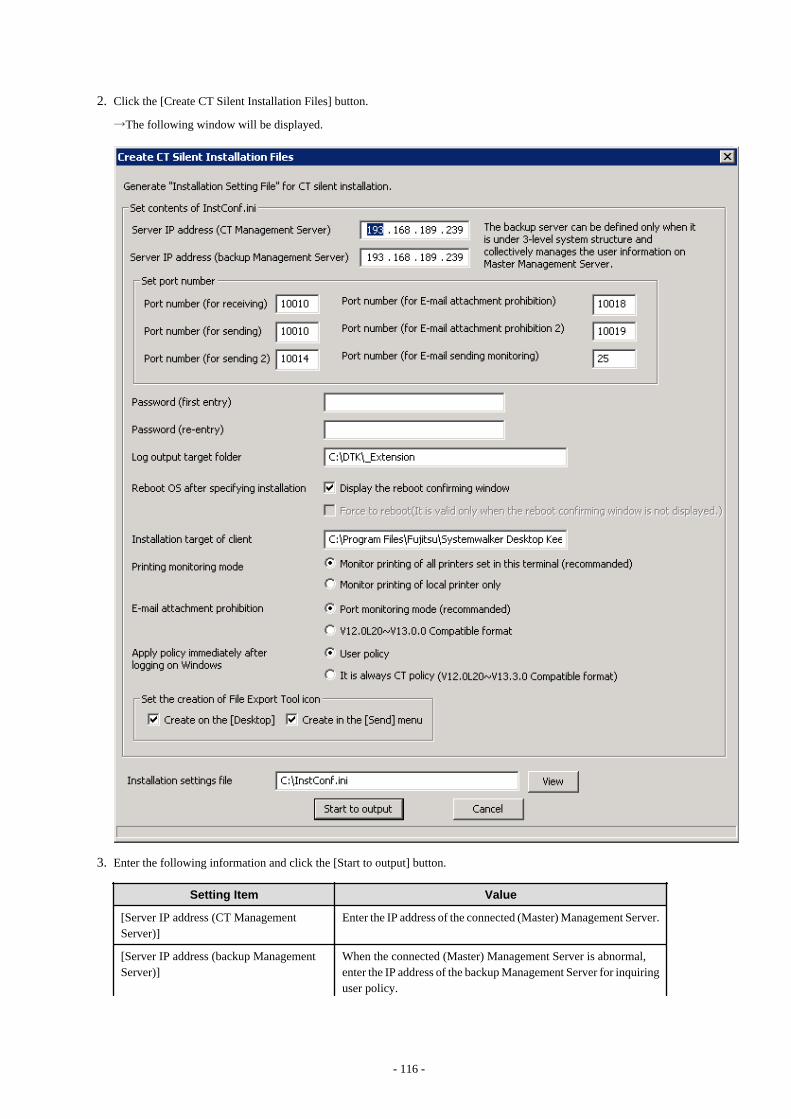
2. Click the [Create CT Silent Installation Files] button.
→The following window will be displayed.
3. Enter the following information and click the [Start to output] button.
Setting Item Value
[Server IP address (CT ManagementServer)]
Enter the IP address of the connected (Master) Management Server.
[Server IP address (backup ManagementServer)]
When the connected (Master) Management Server is abnormal,enter the IP address of the backup Management Server for inquiringuser policy.
- 116 -
Setting Item Value
Under initial status, the same value as [Server IP Address (CTManagement Server)] will be displayed. Please modify if necessary.
The function will be effective all the following conditions aresatisfied.
- The Management Server is in a 3-level structure
- Users are managed collectively
- The actions of the client (CT) are controlled by user policy
If the conditions are not applicable, please set the same value as[Server IP Address (CT Management Server)].
[Set portnumber]
[Port number (forreceiving)]
Enter the port number (for CT receiving) used for communicationbetween client (CT) and server service.
[Port number (forsending)]
Enter the port number (for sending CT logs immediately) used forcommunication between client (CT) and server service.
[Port number (for sending2)]
Enter the port number used (for sending CT logs collectively) forcommunication between client (CT) and server service.
[Port number (for E-mailattachment prohibition)]
When [E-mail Attachment Prohibited Function] is selected as [Portmonitoring mode (Recommended)], enter the port number usedinternally for E-mail attachment prohibition processing.
When [E-mail Attachment Prohibited Function] is selected as[V12.0L20 - V13.0.0 Compatible Mode], entering the port numberis not required.
[Port number (for E-mailattachment prohibition 2)]
When [E-mail file attachment prohibition] is selected as [Portmonitoring mode (Recommended)], enter the port number usedinternally for E-mail attachment prohibition processing.
When [E-mail file attachment prohibition] is selected as [V12.0L20- V13.0.0 Compatible Mode], entering the port number is notrequired.
[Port number (for E-mailsending monitoring)]
Enter the port number for the E-mail sending monitoring.
[Password (first entry)] Enter the password. Up to 32 bytes of single-byte alphanumericcharacters as well as contents apart from the following symbols canbe entered. Symbols that cannot be entered are:“&” “<” “>” “|” “\” “"” “~”“'” “?” “:” “^”. Multi-byte or single-byte space is not allowed.
Note
Please do not forget password
This password is required during the execution of uninstallation andmaintenance commands of the client (CT). Please be aware that ifthe password is forgotten, the uninstallation and maintenancecommands will be unable to be executed.
[Password (re-entry)] In order to avoid incorrect registration, please re-enter the password.
[Log output target folder] Please specify the folder under the Windows system disk as thefolder to save the logs of the client (CT). When the OS is installedto the C Drive, the C Drive will become the system disk.
- 117 -
Setting Item Value
The length of absolute path that can be specified is no more than 96single-byte characters. However, the following symbols cannot beused as the folder name. Symbols that cannot be used: “\” “/” “:” “*” “?” “"” “<” “>” “|”
Environment variable can also be specified. Example: %ProgramFiles%
Note
- Because the log may be lost, please do not specify the drivewith the export prohibition in the saving target of log file.
- Because program operation might be affected, please do notperform compression or encryption setting in the saving targetof log file.
[Reboot OS after specifying installation] (*) Specify to restart OS after installation.
Display the reboot confirming window
After installation has been implemented in the client (CT), therestart window will be displayed. This item is only effectivewhen “Reboot by Force” is not selected. After “Reboot byForce” is selected, this button will be grayed out.
When this item is selected, restart will be performedautomatically after the installation has completed. Please select either one from “Yes, restart the computerimmediately.”, or “No, restart the computer later”.
If no item is selected, nothing will be displayed after theinstallation has completed. Whether to restart will bedetermined according to the [Restart by Force] setting of thefollowing items.
Force to reboot (It is valid only when the reboot confirmingwindow is not displayed)
Select to restart by force after the installation of client (CT). Theitem is only effective when “Display Restart ConfirmationWindow” is not selected. If “Display Restart ConfirmationWindow” is selected, the button will be grayed out.
When this item has been selected, restart will be executedautomatically after the installation has completed. When file isopened, the content will not be saved but directly completed,please pay attention to that content might be lost.
If it is not selected, processing will be completed after theinstallation has completed. If “Display Restart ConfirmationWindow” is not selected, the restart confirmation window willnot be displayed, and restart will not be executed automatically.Instead, user has to restart manually.
[Installation target of client] Specify the path of the CT installation folder.
The absolute path length that can be specified is no more than 96single-byte characters. However, the following symbols cannot beused as file name. Symbols that cannot be used: “\” “/” “:” “*” “?” “"” “<” “>” “|”
- 118 -
Setting Item Value
Environment variable can also be specified. For example) %ProgramFiles%
Note
Please exclude the compressed and encrypted targets
Because the operation of program might be affected, please do notenable compression or encryption settings in the client installationtarget.
[Printing monitoring mode] (*) Specify the monitoring mode of printing.
Monitor printing of all printers set in the terminal(recommended):
Specify when the printing operation log is selected at each client(CT). In this case, the printing operation log will be collected ineach client (CT).
Monitor printing of local printer only:
Printing operation in the client (CT) that is in the same MasterManagement Server or Management Server as the printer serverwill be selected through the printer server. The client (CT)should also be installed on the printer server. In this case, theprinting operation log cannot be collected through the client(CT) that is not the one of printer server. The printing operationlog will be collected through the printer server.
Note
- Please unify the printing monitoring mode in the client (CT)under the Master Management Server or Management Server.If unification is not achieved, printing operation logs may notbe collected
- If the OS that is not of server type (Windows Server® 2003,Windows Server® 2008) is used as the printer server, and thesetting is [Monitoring the Printing of All Printers Set in thisTerminal (Recommended)], the printer server cannot connectwith more than 10 clients for printing. At this time, please setto [ Monitoring the Printing of Local Printer Only].
[E-mail attachment prohibition] (*) Specify the E-mail attachment prohibited function.
Port monitoring mode (recommended):
Port monitoring mode based on drivers. This setting is specifiedas default.
V12.0L20~V13.0.0 compatible mode
It is the E-mail attachment prohibition mode in the previousversion. When the version is updated, the setting should beperformed when the prohibition is the same as the previousversion.
[Apply policy immediately after logging onWindows]
Specify whether to apply user policy immediately after logon.
- 119 -
Setting Item Value
User policy (under Windows Vista®, Windows Server® 2008and Windows® 7 only)
Apply user policy immediately after logon. (Initial value)
However, under Windows® XP and Windows Server® 2003,even [User Policy] is selected, it will run as [CT Policy].
It is always as CT policy (V12.0L20~V13.2.0 compatibleformat)
Run with CT policy after logon.
[Set the creation of File Export Tool icon] Specify whether to create icons of File Export Utility.
Create on the [Desktop]
Select when File Export Utility icons are created on desktop.
Create in the [Send] menu
Select when File Export Utility icons are created in the [Send]menu.
[Installation settings file] Specify the saving target of silent installation setting file(InstConf.ini). The specification method is as follows:
- Enter file name with absolute path. Enter the path of silentinstallation setting file with absolute path.
- Select through the [View] button. The [Save As] window will be displayed. Select the folder tosave silent installation setting file, and click the [Save] buttonafter entering the file name.
The absolute path length that can be specified is no more than255 single-byte characters. However, the following symbolsare not allowed: “\” “/” “:” “*” “?” “"” “<” “>” “|”.
Point
Items become effective when self version management function is used to perform version upgrade
When the self version management function is used to perform the version upgrade, the above 3 items with (*) will be effective.
- [Printing monitoring mode]
- [E-mail attachment prohibition]
- [Reboot OS after specifying installation]
Other items will be omitted even if they have been set.
Point
Register user ID on printer server
When “Monitoring the printing of local printer only” is selected and the client (CT) is installed on the printer server, it is also necessaryto register the user ID used in the printing client (CT) on the printer server. If it is not registered, the user ID for printing logs will be outputas follows:
- When only setting user authority to the user ID being used in the printing client (CT), [User ID] of log will be collected as [Guest].
- 120 -
- When it is required to log in printer server and register as Administrator at the time of printing, [User ID] of log will be collected as[Administrator].
Execute silent installation
Before installation, please refer to “Port Number List” in “Systemwalker Desktop Keeper Reference Manual” to confirm the port numberbeing used.
When silent installation is performed in the client (CT) with CT installed, installation by overwriting will be performed. In this case,modify the IP address, port number and log saving target directory. In addition, even if the password used in initial installation is specifiedto be modified, the password will not be changed.
1. Logon to the PC as a user who belongs to the Administrators group of local computer or a user that belongs to the Domain Adminsgroup of domain. When other applications are being used, please close them.
2. Insert the setup disk into the drive.Copy the silent installation settings file (InstConf.ini) for client (CT) created according to “Create installation settings file ” to anydrive or folder.
3. Select [Start]-[Run] or start the command prompt.
4. Execute installation command (Setup.exe). The installation command is in the “win32\DTKClient” folder of setup disk.
- Options are not case-sensitive.
- If no option is specified, error message will be displayed and installation will be terminated.
Specification Example
Assume the following conditions.
- Setup disk is inserted into D Drive.
- The Setup.exe command is under D:\win32\DTKClient.
- Installation settings file is in C:\Dtk.
D:\win32\DTKClient\Setup.exe /Silent "C:\Dtk\InstConf.ini"
Note
About execution in Windows Vista®, Windows Server® 2008 or Windows® 7
When executing the command in Windows Vista®, Windows Server 2008® or Windows® 7, please execute this command in thecommand prompt run by the administrator.
→ After the installation has completed, the CT silent installation file is generated and specified as “Display Dialog” and the windowprompting restart will be displayed.
5. After the window indicating restart is displayed, restart the client (CT).Then, please select one of the following items and click the [Finish] button.[Yes, restart the computer immediately.]: select to restart immediately.
6. [No, restart the computer later.]: select to restart later.
2.5.2 Installation Using Master PC/Virtual Master PC
Install to physical environment
The method of installation using a master PC in the physical environment is as follows. For an overview of the installation method, pleaserefer to “1.2.5 Determine How to Install Client (CT)”.
- 121 -
1. Remove the LAN Cable of the PC being used as the master PC.Please do not connect the LAN Cable before the following Step 3 is completed.
2. Install the client (CT). For installation method, please refer to single installation “2.5.1.1 Wizard-style Installation” or “2.5.1.2 Execute SilentInstallation ”.
3. Create the master image with image creation software.
4. Distribute images of the client (CT) to each PC to which the client (CT) is installed.
5. Start the distributed PC, and confirm the content registered to the Management Server.
(Next, please execute when managing the terminal as master PC on the DTK Management Server.)
6. Connect the LAN Cable of the master PC and restart Windows.
7. Please confirm the content of the master PC registered to the Management Server.
Note
Notes for creating master PC
When creating the client (CT) image and installing the client (CT), it is necessary to install the CT and create the image when theManagement Server is not connected to network. (When creating the image and extracting to other PCs under the status that communicationwith Management Server has been performed only once, please be aware that the PC will be registered to the server by mistake.)
In addition, please be aware that the structures of image creation source terminal and decompression target terminal are the same. Wheninstalling the drive connected with a USB (such as the CD Drive) when creating the image, an error message will be displayed in the eventlog of the decompression target terminal.
Installation under virtual environment
The method to install a client (CT) in the virtual environment is as follows. For an overview of the installation method, please refer to“1.2.5 Determine How to Install Client (CT)”.
1. Install the client (CT) in the master image of the virtual environment. For installation method, please refer to single installation “2.5.1.1 Wizard-style Installation” or “2.5.1.2 Execute Silent Installation ”. Please make sure to restart after installation.
2. Log on to the master image of the virtual environment with administrator’s authority.
3. Start the Management Console and confirm the client (CT) installed in the master image has been registered.
4. Start the command prompt in the master image of the virtual environment, and execute the following command.
fsw11ej7.exe [password] /image provisioning
5. Please save the master image using the functions of the virtual environment.
6.
2.5.3 Installation Using Systemwalker Desktop PatrolThe method to collectively install the clients (CT) of Systemwalker Desktop Keeper to the management target computer using the softwaredistribution function of Systemwalker Desktop Patrol is as follows. For an overview of the installation method, please refer to “1.2.5Determine How to Install Client (CT)”.
1. Create silent installation settings file using the Sever Setting Tool.For information on how to create, please refer to “Create installation settings file ”.
2. Log on to the PC as a user that belongs to the Administrators group of local computer or a user that belongs to the Domain Adminsgroup of domain. When other applications are being used, please close them.
- 122 -
3. Insert the setup disk into the drive.
Copy the silent installation settings file (InstConf.ini) for client (CT) created according to “Create installation settings file ” to anydrive or folder.
4. Copy the folder “win32\DTKClient” to any folder (Example: C:\work\dtkclient).
5. Copy the installation setting file (InstConf.ini) created in Step 1 to any folder created in Step 4 (Example: C:\work\dtkclient).
6. Create the batch file executed through the Contents distribution function of Systemwalker Desktop Patrol.The following example of batch is the situation when silent installation file is created as InstConf.ini. (Batch name: Setup.bat)
rem ********************************************************
rem * Systemwalker Desktop Keeper Contents Distribution Registration Batch *
rem ********************************************************
@ECHO OFF
SETLOCAL
rem acquire batch startup drive
SET STARTDRIVE=%~d0
rem acquire batch startup directory
SET STARTDIR=%~p0
rem create installation path
SET INSTALLDIR=%STARTDRIVE%%STARTDIR%
rem move the drive
%STARTDRIVE%
rem move the current directory
cd %INSTALLDIR%
rem execute silent installation
.\setup.exe /Silent "%INSTALLDIR%InstConf.ini"
7. Register Contents to Systemwalker Desktop Patrol so as to execute Setup.bat.For information on how to use the software distribution function of Systemwalker Desktop Patrol, please refer to “SystemwalkerDesktop Keeper User’s Guide: for Administrator”.
2.6 Install Citrix XenApp Monitoring Function This function is not available.
This section describes how to install the Citrix XenApp monitoring function of Systemwalker Desktop Keeper.
If the Citrix Presentation Server monitoring function of an old version has been installed, when installing the V14.2.0 Citrix XenAppmonitoring function, please refer to “Chapter 4 Version Upgrade”.
[Items to be Confirmed before Installation]
- Please refer to the “Port Number List” in “Systemwalker Desktop Keeper Reference Manual” to confirm the port number beingused.
The steps to install the Citrix XenApp monitoring function in the Citrix XenApp Server are as follows. In addition, please refer to“Systemwalker Desktop Keeper User’s Guide” for the operating environment.
1. Log on to Windows with a user that belongs to the Administrators group or a user that belongs to the Domain Admins group. Ifother applications are being used, please close them.
- 123 -

2. After inserting the CD-ROM of Systemwalker Desktop Keeper into the PC, the following window will be displayed.
Please select “Citrix XenApp Monitoring Installation”.
If the above installer is not started, please start “swsetup.exe” of the CD-ROM Drive.
3. After the “Welcome to Citrix XenApp Monitoring Setup” window is displayed, please click the [Next] button.
4. The “Select the installation target” window of Citrix XenApp monitoring function is displayed.
If the displayed installation target is not to be changed, click the [Next] button.
If the displayed installation target is to be changed, please click the [Browse] button of the folder expected to be changed, and clickthe [Next] button after the folder has been changed.
Note
Please exclude the compressed and encrypted targets
When the installation target folder of the Citrix XenApp monitoring function is taken as a compressed or encrypted target, theapplication may be affected, so please do not apply compression or encryption settings.
5. The “Select the installation target” window of log saving target set is displayed.
When the displayed saving target is not to be changed, click the [Next] button.
When the displayed saving target is to be changed, please click the [Browse] button of the folder expected to be changed, and clickthe [Next] button after the folder has been changed.
Please set the folder under Windows system disk in the folder path for saving log files. (When the OS is installed to the C Drive,the C Drive will be the system disk.)
- 124 -
Note
Please do not specify export prohibited drive
Because logs may be lost, please do not specify the drive with export prohibition in the saving target of log file.
6. The “Enter the server information” window is displayed. Set the information of server to be connected and click the [Next] button.
- [IP Address of Connected (Master) Management Server]: Enter the IP address of the (Master) Management Server to beconnected. When the Citrix XenApp Server is used in multiple computers, please unify [IP Address of Connected (Master) ManagementServer] in all Citrix XenApp Servers.
- [IP Address of Backup Management Server]: When the connected (Master) Management Server is abnormal, enter the IPaddress of the backup Management Server for inquiring user policy.The IP address of the backup Management Server can be omitted. In addition, the function is effective when all the followingconditions are satisfied.
- The Management server is in a 3-level structure
- Users are managed collectively
- Action of the client (CT) is controlled by user policy.
- [Used Port Number (for Receiving)]: Enter the port number used for communication between Citrix XenApp monitoring andserver service (for receiving Citrix XenApp monitoring).
- [Used Port Number (for Sending)]: Enter the port number used for communication between Citrix XenApp monitoring andserver service (for sending the information of Citrix XenApp monitoring function).
- [Used Port Number (for Sending 2)]: Enter the port number used for communication between Citrix XenApp monitoring andserver service (for collective sending of logs of Citrix XenApp monitoring).
7. The [Set Printing Monitoring Mode] window will be displayed. Select [Monitoring Printing of All Printers Set in This Terminal(Recommended)] and click the [Next] button.
Note
Setting at installation of printer server on Non-Server OS
If the non-server OS (Windows Server® 2003 or Windows Server® 2008) is taken as the printer server and set to [Monitoring theprinting of all printers set in this terminal (Recommended)], the printer server will not be able to connect more than 10 clients forprinting. At this time, please set to [Monitoring Monitoring the printing of local printer only]. When setting [Monitoring the printingof local printer only], please refer to the Step 10 of “2.5.1.1 Wizard-style Installation”.
8. When the “Enter Password” window is displayed, please set the password of the tool that displays and changes the status of theclient, and click the [Next] button.
In addition, the password set here is required when executing the uninstallation and maintenance commands of the Citrix XenAppmonitoring function. The conditions for contents to be entered are as follows:
- Up to 32 bytes of single-byte alphanumeric characters and contents apart from the following symbols can be entered.
- Symbols that cannot be entered are: “&”“<”“>”“|”“\”“"”“~”“'”“?”“:”“^”.
- Double-byte or single-byte space is not allowed.
- Single-byte Kana is not allowed.
Note
Please do not forget password
- 125 -

This password is required when executing the uninstallation and maintenance commands of the Citrix XenApp monitoring function.Please be aware that if the password is forgotten, the uninstallation and maintenance commands will not be executed.
9. The “The installation preparation is completed.” window will be displayed.
When starting installation, please click the [Install] button to start the installation.
When expected to confirm or change the setting, please click the [Return] button to reset.
10. After normal completion, the “Installation is completed.” window is displayed.
It is required to restart the system to use the application. Select one of the following items and click the [Finish] button.
- [Yes, restart the computer immediately.]
- [No, restart the computer later.]
2.7 Construct Log Analyzer Server This section describes the installation and environment construction of Systemwalker Desktop Keeper Log Analyzer Server.
2.7.1 Install Log Analyzer Server This chapter describes how to newly install Systemwalker Desktop Keeper Log Analyzer Server.
Items to be confirmed before installation
- Please refer to the “Operating Environment” in the “Systemwalker Desktop Keeper User’s Guide” to confirm if the disk capacityrequired for the drive specified in installation target of database related file can be guaranteed.
- Please refer to the “Operating Environment” in the “Systemwalker Desktop Keeper User’s Guide” to confirm the “Products thatcannot be used in mixture”.
- Please refer to “Port Number List” in “Systemwalker Desktop Keeper Reference Manual” to confirm the port number to be used.
The following 3 ports will be taken as the default value in the Log Analyzer Server.
- 30001: for the function of aggregation by objective
- 30002: for access to database
- 30004: for report output tool and Log Analyzer.
- When copying the installer of Systemwalker Desktop Keeper from CD-ROM to local disk, please make sure that the path of the copytarget does not contain double-byte characters.
Note
About Log Analyzer user
The so-called “Log Analyzer User” is the Windows account used for database creation and data transfer on the Log Analyzer Server whenthe log analyzing function of Systemwalker Desktop Keeper is being used.
Before installation, please confirm the conditions and authority standards that can be specified as the following Log Analyzer users.
- If a local account has been specified in Log Analyzer, please execute the installation with the local account. In addition, if a domainaccount has been specified in the Log Analyzer, please execute the installation with the domain account.
- When a domain account is specified as the Log Analyzer user, please confirm that no local account with the same name exists.
- 126 -
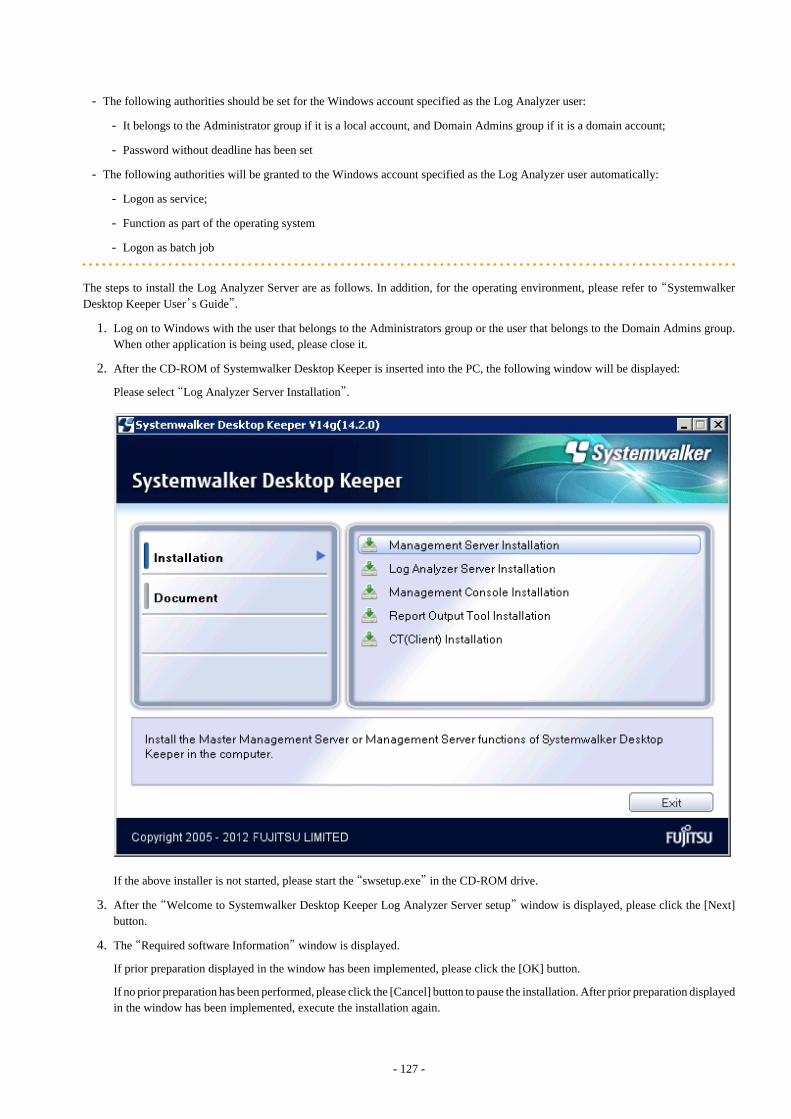
- The following authorities should be set for the Windows account specified as the Log Analyzer user:
- It belongs to the Administrator group if it is a local account, and Domain Admins group if it is a domain account;
- Password without deadline has been set
- The following authorities will be granted to the Windows account specified as the Log Analyzer user automatically:
- Logon as service;
- Function as part of the operating system
- Logon as batch job
The steps to install the Log Analyzer Server are as follows. In addition, for the operating environment, please refer to “SystemwalkerDesktop Keeper User’s Guide”.
1. Log on to Windows with the user that belongs to the Administrators group or the user that belongs to the Domain Admins group.When other application is being used, please close it.
2. After the CD-ROM of Systemwalker Desktop Keeper is inserted into the PC, the following window will be displayed:
Please select “Log Analyzer Server Installation”.
If the above installer is not started, please start the “swsetup.exe” in the CD-ROM drive.
3. After the “Welcome to Systemwalker Desktop Keeper Log Analyzer Server setup” window is displayed, please click the [Next]button.
4. The “Required software Information” window is displayed.
If prior preparation displayed in the window has been implemented, please click the [OK] button.
If no prior preparation has been performed, please click the [Cancel] button to pause the installation. After prior preparation displayedin the window has been implemented, execute the installation again.
- 127 -
5. The “Set installation target folder” window of the Log Analyzer Server is displayed.
Please confirm [Required capacity/ Available capacity] of [Installation target drive] displayed in the window.
If the Installation target folder is not to be changed, please click the [Next] button.
If the Installation target folder is to be changed, please click the [Browse] button of the folder expected to be changed, and click the[Next] button after the folder has been changed.
Multi-byte characters such as space, Hiragana, Katakana and Chinese characters cannot be specified in the installation folder of theLog Analyzer Server. In addition, the following drives cannot be specified:
- Root directory of drive (C:\, D:\, etc.)
- Network drive
- Drive not in NTFS format
Note
Please exclude compressed and encrypted targets
When the installation target folder of the Log Analyzer Server function and the installation target folder of the following databaserelated files are taken as compressed or encrypted targets, the application may be affected. Therefore, please do not applycompression or encryption settings.
6. The “Set database installation target folder” window of database-related files is displayed. (When the Symfoware Server is installed,this setting window will not be displayed. Please continue with the following installation steps.)
Please confirm that [Required capacity/Available capacity] of [Installation target drive] is displayed in the window.
If the Installation target folder is not to be changed, please click the [Next] button.
If the Installation target folder is to be changed, please click the [Browse] button of the folder expected to be changed, and click[Next] after the folder has been changed.
Multi-byte characters such as space, Hiragana, Katakana and Chinese characters cannot be specified in the installation folder of thedatabase-related files. In addition, the following drives cannot be specified. Single-byte space cannot be specified either.
- Root directory of drive (C:\, D:\, etc.)
- Network drive
- Drive not in NTFS format
7. The “Enter the port number” window is displayed. Please set the port number to be used by the Log Analyzer Server and click the[Next] button.
Moreover, when modifying the default value of port number, please use an unused port number between 5001 and 60000. Non-digital character strings cannot be specified.
- [Communication port 3]: for reporting output tool and Log Analyzer. The initial value is 30004.
8. The “Start Copying File” window will be displayed.
Confirm the set content. When starting installation, please click the [Next] button, and installation will be started.
When the settings are expected to be changed, please click the [Back] to reset.
9. After processing has completed normally, the “InstallShield Wizard finished.” window will be displayed.
It is required to restart the system to use the application. Select one of the following items and click the [Finish] button.
- [Yes, restart the computer now.]
- [No, restart the computer later.]
- 128 -
Note
Notes on installation in Windows Server® 2003 SP1/SP2, Windows Server® 2003 R2 or Windows Server® 2008.
Since the Log Analyzer Server cannot use the communication port when the Windows firewall function is started under the environmentof Windows Server® 2003 SP1/SP2, Windows Server® 2003 R2 or Windows Server® 2008, it may be unable to connect to the Webconsole or report output tool.
Please register the port numbers to be used in the Log Analyzer Server to the exceptions of Windows firewall (the default is 30001, 30002and 30004).
2.7.2 Construct Database This section describes how to newly construct a database of Systemwalker Desktop Keeper Log Analyzer Server.
Note
When constructing database, be aware of the following restrictions and notes
[Database of Systemwalker Desktop Log Analyzer Unable to Directly Transferred]
When migrating from Systemwalker Desktop Log Analyzer to Systemwalker Desktop Keeper V14.2.0, data shall be transferred again.Before constructing database, please refer to “Chapter 4 Version Upgrade”.
[About Compression and Encryption of Database Creation Target]
Please do not set compression or encryption settings for the drive and folder for constructing the database.
[About Virus Scan of Database Creation Target]
Please exclude the folder for constructing the database from the targets of virus scan software.
[About User at Database Creation (Log Analyzer User)]
Please do not delete the Windows logon user (Log Analyzer user) who has constructed the database environment constructed. Whendeleting the database environment, migrating database environment and restoring management information and log data, the Windowslogon user used when the database environment was constructed is required.
[About Setting of Event Viewer]
Please confirm the maximum log size of the event viewer (application log) and the operation settings when the maximum is reachedin advance, and confirm that the event logs can be recorded properly. Construction of the database will be interrupted if no event logis recorded.
Items to be confirmed before database construction
In the Log Analyzer Server, the following ports will be used for access to database:
- No. 30003
- No. 30004
If the above port numbers have been used, please refer to “Port Number List” of “Systemwalker Desktop Keeper ReferenceManual” before constructing the database, and change the environment of Systemwalker Desktop Keeper.
Standard of database construction time
The amount of time needed to construct the database will depend on the capacity of the database. The standard of creation time is asfollows:
- 129 -
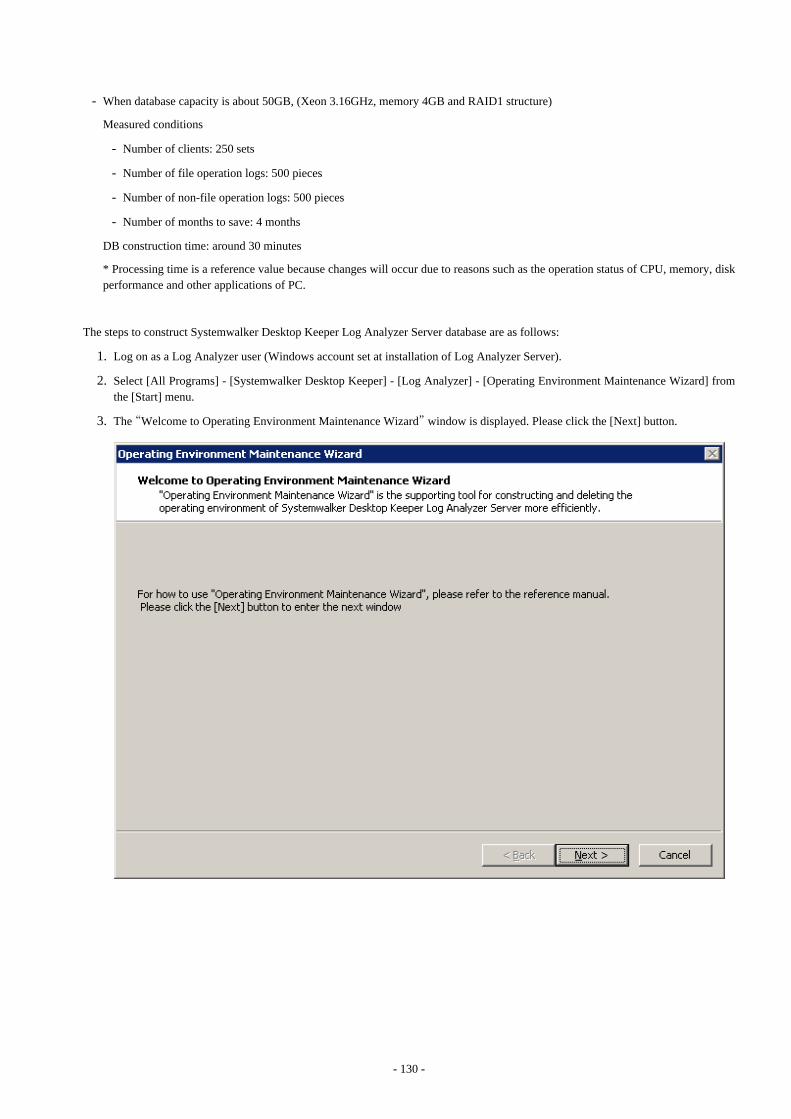
- When database capacity is about 50GB, (Xeon 3.16GHz, memory 4GB and RAID1 structure)
Measured conditions
- Number of clients: 250 sets
- Number of file operation logs: 500 pieces
- Number of non-file operation logs: 500 pieces
- Number of months to save: 4 months
DB construction time: around 30 minutes
* Processing time is a reference value because changes will occur due to reasons such as the operation status of CPU, memory, diskperformance and other applications of PC.
The steps to construct Systemwalker Desktop Keeper Log Analyzer Server database are as follows:
1. Log on as a Log Analyzer user (Windows account set at installation of Log Analyzer Server).
2. Select [All Programs] - [Systemwalker Desktop Keeper] - [Log Analyzer] - [Operating Environment Maintenance Wizard] fromthe [Start] menu.
3. The “Welcome to Operating Environment Maintenance Wizard” window is displayed. Please click the [Next] button.
- 130 -
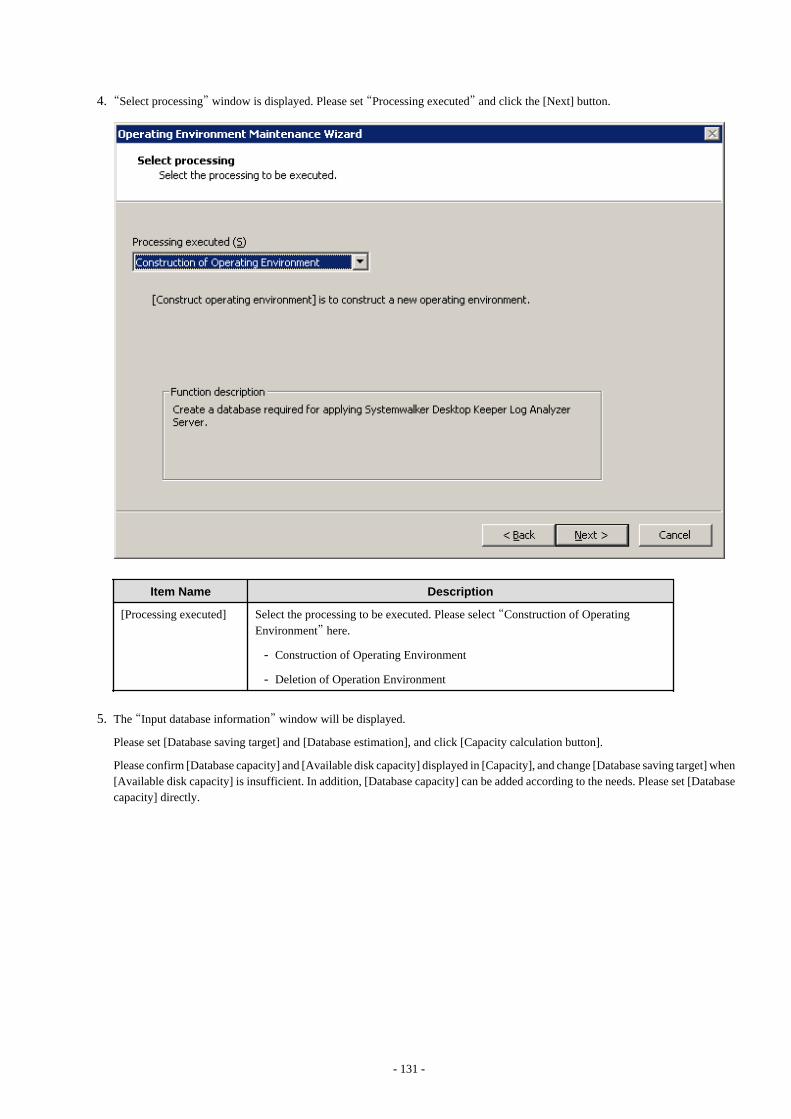
4. “Select processing” window is displayed. Please set “Processing executed” and click the [Next] button.
Item Name Description
[Processing executed] Select the processing to be executed. Please select “Construction of OperatingEnvironment” here.
- Construction of Operating Environment
- Deletion of Operation Environment
5. The “Input database information” window will be displayed.
Please set [Database saving target] and [Database estimation], and click [Capacity calculation button].
Please confirm [Database capacity] and [Available disk capacity] displayed in [Capacity], and change [Database saving target] when[Available disk capacity] is insufficient. In addition, [Database capacity] can be added according to the needs. Please set [Databasecapacity] directly.
- 131 -
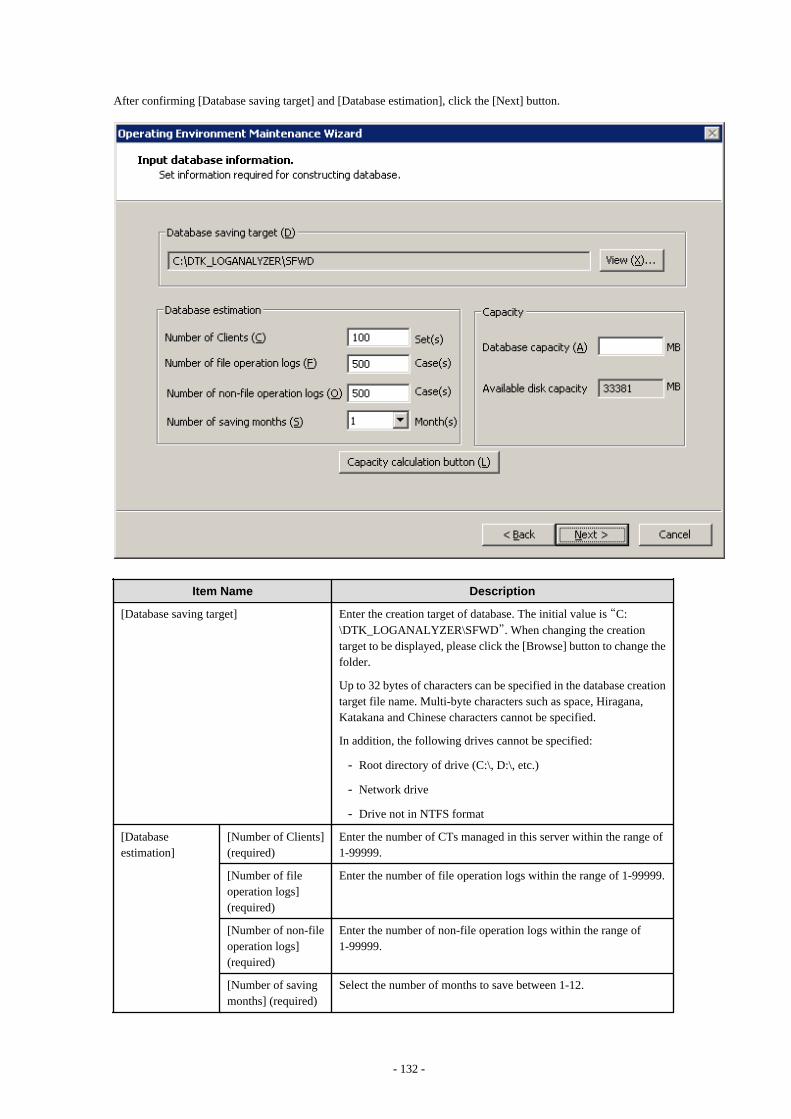
After confirming [Database saving target] and [Database estimation], click the [Next] button.
Item Name Description
[Database saving target] Enter the creation target of database. The initial value is “C:\DTK_LOGANALYZER\SFWD”. When changing the creationtarget to be displayed, please click the [Browse] button to change thefolder.
Up to 32 bytes of characters can be specified in the database creationtarget file name. Multi-byte characters such as space, Hiragana,Katakana and Chinese characters cannot be specified.
In addition, the following drives cannot be specified:
- Root directory of drive (C:\, D:\, etc.)
- Network drive
- Drive not in NTFS format
[Databaseestimation]
[Number of Clients](required)
Enter the number of CTs managed in this server within the range of1-99999.
[Number of fileoperation logs](required)
Enter the number of file operation logs within the range of 1-99999.
[Number of non-fileoperation logs](required)
Enter the number of non-file operation logs within the range of1-99999.
[Number of savingmonths] (required)
Select the number of months to save between 1-12.
- 132 -
Item Name Description
[Capacity] [Database capacity](required)
Set the items in [Database estimate] and display the estimated valuewhen the [Capacity calculation button] button is clicked.
When disk capacity available for the database creation target issufficient, and creation is made with the capacity expected to be largerthan the estimated capacity, please reset this item within the range ofdisk capacity available.
[Available diskcapacity]
The capacity available of the target disk of creation is displayed.
Note
About [Number of Months to Save]
The partition of the database is the specified number of months to save x 31 log saving spaces.
For example, if the number of months to save is 3, it is divided into 3×31=93 saving spaces.
Every time when data transfer command is started, data will be saved to saving space 1, saving space 2 and saving space 3, etc.However, after the saving space 93, it will return to saving space 1 and overwrite. Therefore, the old data of correspondent spacewill be deleted.
In addition, when the data saved by overwriting cannot be written into the existing saving space, several saving spaces after thatmight be deleted.
As mentioned above, in spite of circulated use of the saving space corresponding to [Number of Months to Save], please be awarethat not only the oldest data in operation time, but the old data that has been transferred in the earliest will also be overwritten.
- 133 -
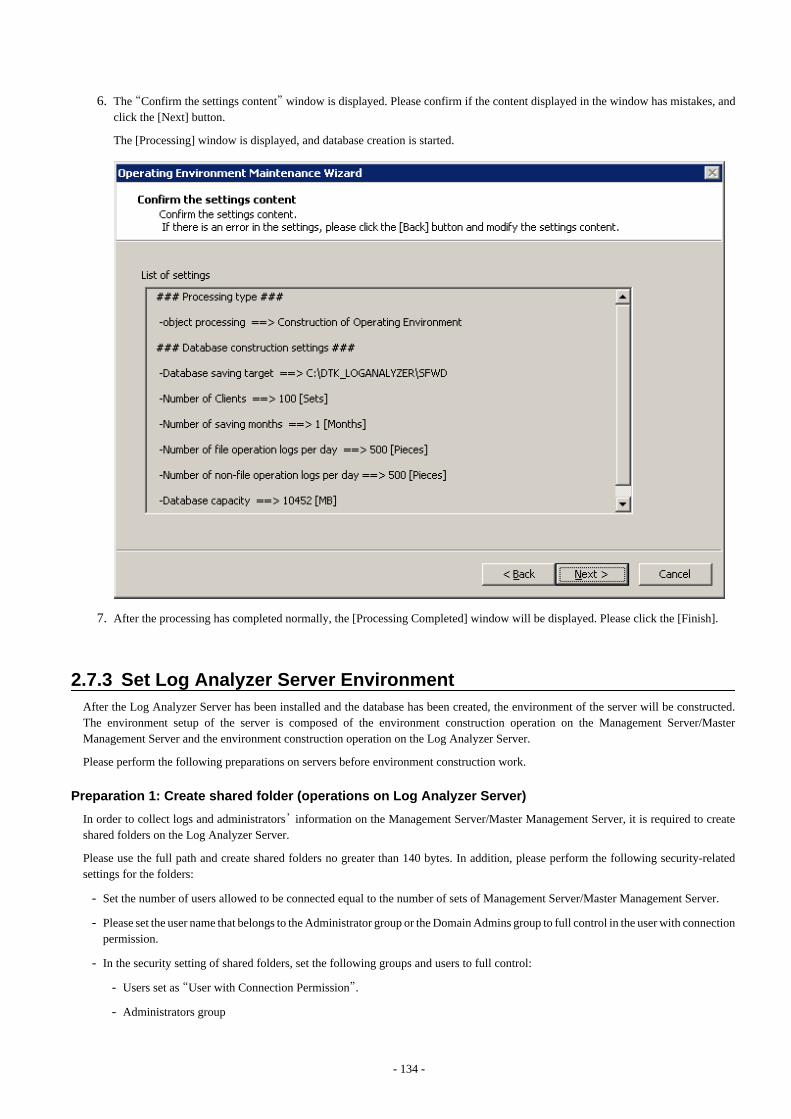
6. The “Confirm the settings content” window is displayed. Please confirm if the content displayed in the window has mistakes, andclick the [Next] button.
The [Processing] window is displayed, and database creation is started.
7. After the processing has completed normally, the [Processing Completed] window will be displayed. Please click the [Finish].
2.7.3 Set Log Analyzer Server Environment After the Log Analyzer Server has been installed and the database has been created, the environment of the server will be constructed.The environment setup of the server is composed of the environment construction operation on the Management Server/MasterManagement Server and the environment construction operation on the Log Analyzer Server.
Please perform the following preparations on servers before environment construction work.
Preparation 1: Create shared folder (operations on Log Analyzer Server)
In order to collect logs and administrators’ information on the Management Server/Master Management Server, it is required to createshared folders on the Log Analyzer Server.
Please use the full path and create shared folders no greater than 140 bytes. In addition, please perform the following security-relatedsettings for the folders:
- Set the number of users allowed to be connected equal to the number of sets of Management Server/Master Management Server.
- Please set the user name that belongs to the Administrator group or the Domain Admins group to full control in the user with connectionpermission.
- In the security setting of shared folders, set the following groups and users to full control:
- Users set as “User with Connection Permission”.
- Administrators group
- 134 -
- SYSTEM user
The shared folders created here will be used in the settings of the Log Analyzer and data transfer commands later.
- Please specify the format of shared network folder name (\\IP address\folder path) specified in the “Log Analyzer Settings” window.
- Please specify the local path of shared folders in “Data Transfer Command”.
Preparation 2: Create target folder for saving logs temporarily (operations on Management Server/MasterManagement Server)
The target folder for saving logs temporarily needs to be created on the Management Server/Master Management Server.
Please specify the target folder for saving logs temporarily with a full path no greater than 140 bytes. In addition, the shared folder createdin Preparation 1 cannot be used as the target folder for saving logs temporarily.
For an estimation of disk capacity required for the target folder for saving logs temporarily, please refer to the “OperatingEnvironment” of “Systemwalker Desktop Keeper User’s Guide”, and refer to the “Estimating temporary disk capacity required for sendinglog data”.
Preparation 3: Confirm [IP Address] of self-node in the [Server Information Settings] window (operation onManagement Server/Master Management Server)
In the server information settings of the Management Server/Master Management Server, when the self-node IP address is set to the loopback address “127.0.0.1”, please update it to the correct IP address before the following operations.
For the setting method, please refer to “2.2.5.4 Set Server Information ”.
2.7.3.1 Set Log Analyzer environment on Management Server/Master ManagementServer
Set the Log Analyzer Server link with the Management Server/Master Management Server on the Management Server/Master ManagementServer, and transfer the logs and the administrator information collected on the Management Server/Master Management Server to theenvironment of the Log Analyzer Server.
Settings performed on the Management Server/Master Management Server are as follows:
- Set the connection environment of the Log Analyzer Server
- Transfer the administrator information to the Log Analyzer Server
- Register the information of the Log Analyzer Server.
Set connection environment of Log Analyzer Server
The following settings should be performed on the Management Server/Master Management Server.
- 135 -
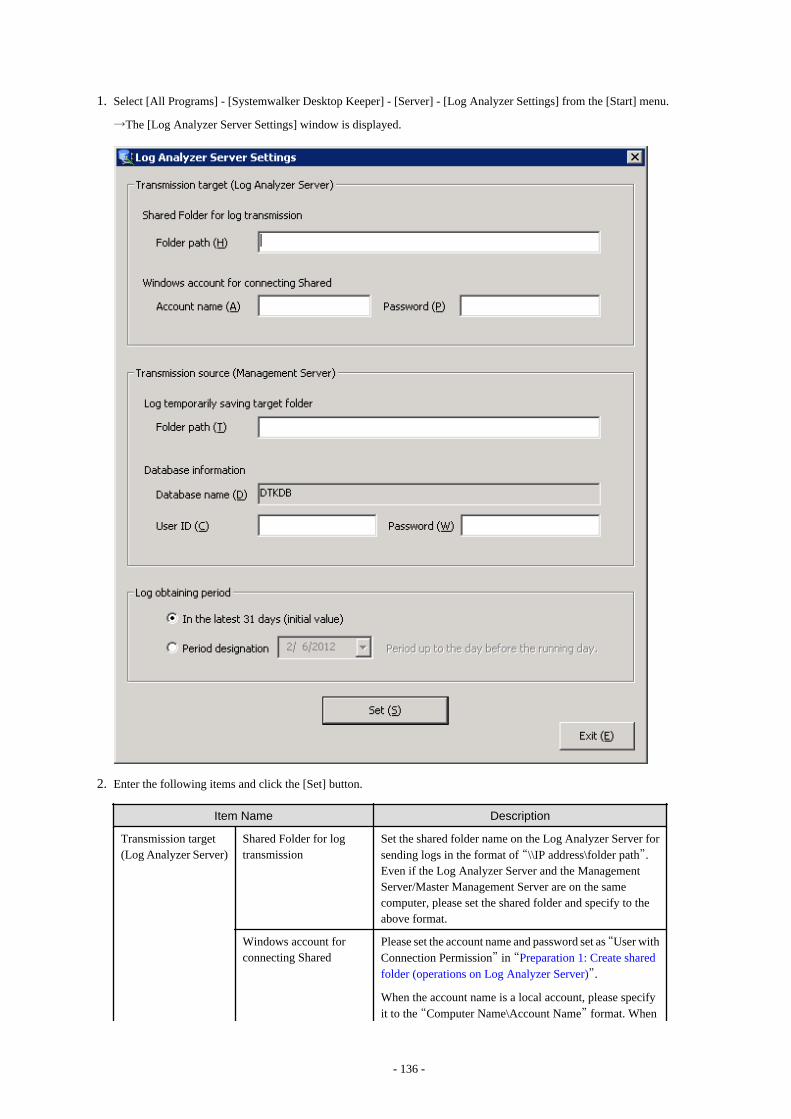
1. Select [All Programs] - [Systemwalker Desktop Keeper] - [Server] - [Log Analyzer Settings] from the [Start] menu.
→The [Log Analyzer Server Settings] window is displayed.
2. Enter the following items and click the [Set] button.
Item Name Description
Transmission target(Log Analyzer Server)
Shared Folder for logtransmission
Set the shared folder name on the Log Analyzer Server forsending logs in the format of “\\IP address\folder path”.Even if the Log Analyzer Server and the ManagementServer/Master Management Server are on the samecomputer, please set the shared folder and specify to theabove format.
Windows account forconnecting Shared
Please set the account name and password set as “User withConnection Permission” in “Preparation 1: Create sharedfolder (operations on Log Analyzer Server)”.
When the account name is a local account, please specifyit to the “Computer Name\Account Name” format. When
- 136 -
Item Name Description
the account name is a domain account, specify it to theformat of “Domain Name\Account Name”.
Up to 64 bytes can be specified in the password.
If the password exceeds 65 bytes, please change it to apassword less than 64 bytes and apply this setting.
Transmission source(Management Server)
Log temporarily savingtarget folder
This is the folder that saves logs temporarily (Note 1). Up to 140 bytes can be specified.
Database information Set the user ID and password set in Sever Setting Tool of(Master) Management Server with the access authority to“Backup and Restoration”.
Up to 64 bytes can be specified in password.
If the password exceeds 65 bytes, please change it to apassword less than 64 bytes and apply this setting.
Database name is a fixed value, which cannot be modified.
Log obtaining period Set log acquisition start date.
This item should be set at installation. Please decide thetransmission schedule of logs in the stage of organizing theoperating environment and perform this setting. Fordetailed information, please refer to “Set Log AcquisitionPeriod in Management Server” in “Systemwalker DesktopKeeper User’s Guide: for Administrator”.
Note 1: Please specify the folder created in preparation 2.
Transfer administrator information to Log Analyzer Server on Management Server/Master ManagementServer
Use the log transmission command (TRANS.bat) to transfer the administrator information set in the Management Server/MasterManagement Server. The transmission procedure is as follows:
Note
About execution in Windows Vista®, Windows Server® 2008 or Windows®
When executing the command under Windows Vista®, Windows Server 2008® or Windows® 7, please execute the command in thecommand prompt as an administrator.
Note
Please transfer administrator information in the time frame when services can be stopped.
When TRANS.bat has been executed, when saving or sending administrator information, the following service of management server willstop. Therefore, please execute in the time frame when services can be stopped.
- SWLevelControlService
- SWServerService
In addition, after starting SWServerService or at date change (12am), confirmation of available database capacity can be performed. Inthe 15 minutes till the confirmation operation has finished, service may not be able to be stopped.
Therefore, please do not transfer at the above time frame.
- 137 -
1. In the Management Server/Master Management Server, log on to Windows with a user that belongs to the Administrators group ora user that belongs to the Domain Admins group.
2. Execute the following command in the command prompt to move to the folder that saves tools:
cd "[Systemwalker Desktop Keeper Install Folder]\LogAnalyzer\TRANS"
3. Execute the following command to transfer the administrator information to the Log Analyzer Server:
cmd /c "TRANS.bat" -u
For details of the command, please refer to “LADBBKRS.BAT (Backup/Restore Log Analyzer Settings Information)” in“Systemwalker Desktop Keeper Reference Manual”.
Register information of Log Analyzer Server
Use the registration command (RegisterLAInfo.exe) of the Log Analyzer Server to register the information of the Log Analyzer Serverto the Management Server/Master Management Server. This procedure should be performed on the Management Server of a 2-level systemor the Master Management Server of a 3-level system.
The registration procedure is as follows:
1. In the Management Server/Master Management Server, log on to Windows with a user that belongs to the Administrators group ora user that belongs to the Domain Admins group.
2. Create information files of the Log Analyzer Server.
Create information files of the Log Analyzer Server and record the information of all the constructed Log Analyzer Servers (IPaddresses and port numbers).
For information on how to create information files of the Log Analyzer Server, please refer to “Information File of Log AnalyzerServer” in “Systemwalker Desktop Keeper Reference Manual”.
3. Execute the following command in the command prompt to move to the folder that saves tools:
cd "[Systemwalker Desktop Keeper Install Folder]\LogAnalyzer\TRANS"
4. Execute the following command to register the Log Analyzer information:
RegisterLAInfo.exe -r <Enter File Path >
For the input file path, please specify it to the saving target path of the information files of the Log Analyzer Server created in Step2. For details of command, please refer to “REGISTERLAINFO.EXE (Registration of the Log Analyzer Server Information)” in“Systemwalker Desktop Keeper Reference Manual”.
2.7.3.2 Register administrator information on Log Analyzer ServerUse the data transfer command (DttoolEx.exe) to register the administrator information transferred from the Log Analyzer Server. Theregistration procedure is as follows:
1. Use the Log Analyzer user (the Windows account set when the Log Analyzer Server is installed) to register the Log Analyzer Server.
2. Execute the following command in the command prompt:
[Log Analyzer Server Installation Folder]\bin\dttool\DttoolEx.exe -u [Local Path Name of Shared
Folder]
Please refer to “DTTOOLEX.EXE (Data Transfer to/Delete from the Log Analyzer Server)” in “Systemwalker Desktop KeeperReference Manual”.
- 138 -
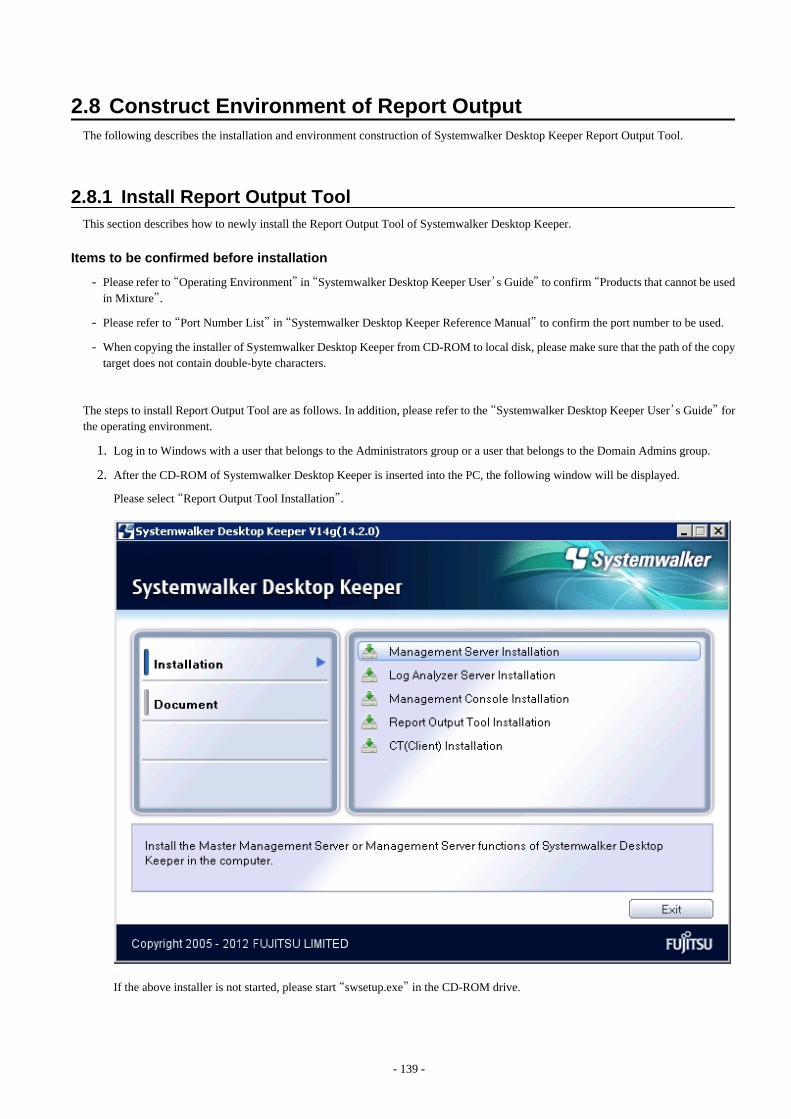
2.8 Construct Environment of Report OutputThe following describes the installation and environment construction of Systemwalker Desktop Keeper Report Output Tool.
2.8.1 Install Report Output Tool This section describes how to newly install the Report Output Tool of Systemwalker Desktop Keeper.
Items to be confirmed before installation
- Please refer to “Operating Environment” in “Systemwalker Desktop Keeper User’s Guide” to confirm “Products that cannot be usedin Mixture”.
- Please refer to “Port Number List” in “Systemwalker Desktop Keeper Reference Manual” to confirm the port number to be used.
- When copying the installer of Systemwalker Desktop Keeper from CD-ROM to local disk, please make sure that the path of the copytarget does not contain double-byte characters.
The steps to install Report Output Tool are as follows. In addition, please refer to the “Systemwalker Desktop Keeper User’s Guide” forthe operating environment.
1. Log in to Windows with a user that belongs to the Administrators group or a user that belongs to the Domain Admins group.
2. After the CD-ROM of Systemwalker Desktop Keeper is inserted into the PC, the following window will be displayed.
Please select “Report Output Tool Installation”.
If the above installer is not started, please start “swsetup.exe” in the CD-ROM drive.
- 139 -
3. After the “Welcome to Systemwalker Desktop Keeper Report Output Tool Setup” window is displayed, please click the [Next]button.
4. The “Select installation target” window of Report Output Tool function is displayed.
Please confirm the [Required Capacity/Available Capacity] displayed in [Installation Target Drive].
If the displayed installation target is not to be changed, click the [Next] button.
If the displayed installation target is to be changed, please click the [Browse] button of the folder expected to be changed, and clickthe [Next] button after the folder has been changed.
Multi-byte characters such as space, Hiragana, Katakana and Chinese characters cannot be specified in Report Output Tool. Inaddition, the following drives cannot be specified:
- Root directory of drive (C:\, D:\, etc.)
- Network drive
- Drive not in NTFS format.
The settings cannot be changed during overwriting installation (the [Browse] button will be disabled).
5. The “Select installation target” window of database-related files is displayed. (When the Symfoware Client that can be used hasalready been installed, this setting window will not be displayed. Please continue with the following steps.)
Please confirm the [Required Capacity/Available Capacity] displayed in [Installation Target Drive].
If the displayed installation target is not to be changed, click the [Next] button.
If the displayed installation target is to be changed, please click the [Browse] button of the folder expected to be changed, and clickthe [Next] button after the folder has been changed.
Multi-byte characters such as space, Hiragana, Katakana and Chinese characters cannot be specified in database-related files. Inaddition, the following drives cannot be specified. Single-byte space cannot be specified either.
- Root directory of drive (C:\, D:\, etc.)
- Network drive
- Drive not in NTFS format
6. The “Enter Log Analyzer Server information” window is displayed. Please set the IP address of Log Analyzer Server to be connectedand the communication port number to be used, and click the [Next] button.
[IP Address]: Please set the IP address of the Log Analyzer Server to be connected.
[Communication Port]: Please set the value that is the same as the one specified in “Communication Port 3” used in Report OutputTool in the “Enter Port Number” window during the installation of Log Analyzer Server.
In addition, the settings cannot be changed during overwriting installation.
7. The “Start Copying Files” window is displayed.
Confirm the set contents. When the installation is started, please click the [Next] button to start installation.
When the setting is expected to be changed, please click the [Back] to reset.
Note
When relevant window of Data Execution Prevention is displayed
When the OS of “Report Output Tool” to be installed is “Microsoft® Windows® XP Professional Service Pack 2/3”, due to theData Execution Prevention (DEP) function of Windows, the "Data Execution Prevention" window will be displayed.
When this window is displayed, please exclude the “F3CWDELA.EXE” program from the target of Data Execution Prevention(DEP) function according to the following procedure. In addition, the above window will not be displayed after the 2nd time.
1. Click the [Set] button of the performance column of the [Detailed Settings] tab of the [System Properties] window. The[Performance Options] window will be displayed.
2. Select the [Data Execution Prevention] tab in the [Performance Options] window.
- 140 -
3. Add the following contents to the list of programs in which DEP is disabled:
“Database Related File Installation Target”\ODOS\bin\F3CWDELA.exe
8. After the processing has completed normally, the “InstallShield Wizard completed.” window will be displayed.
To use this program, it is required to restart the system. Select one of the following items and click the [Finish] button:
- [Yes, restart the computer immediately].
- [No, restart the computer later.]
In addition, no indication for restart selection will be displayed when the Symfoware Client has been installed, so please click the[Finish] button directly.
After the Report Output Tool has been installed, the environment used for running the Report Output Tool should be set. (The informationof the Log Analyzer Server to be connected will be effective after the environment setup has been performed.)
Please continue referring to “2.8.2 Set Environment of Report Output” to perform environment setup.
2.8.2 Set Environment of Report OutputAfter the Report Output Tool has been installed, the environment for using the Report Output Tool should be constructed. This sectiondescribes the procedure for environment setup and the contents of setting required for report output.
Items to be set are as follows:
Server setting
Set the Log Analyzer Server connected when report is generated.
Batch user setting
Set the user ID and password of the administrator for executing the report output batch command in the Log Analyzer Server.
Trace level
Specify the detail level of logs to be output by the Report Output Tool.
Note
Environment setup must be performed after the installation of Report Output Tool
After the installation of the Report Output Tool, only [Trace Level] will be set. (for information of Log Analyzer Server, only the settingat installation is disabled.)
Before executing the Report Output Tool, please perform the settings in sequence of [Server] setting and [Batch User] setting accordingto the following operation procedure.
In addition, it is not necessary to change the setting of [Trace Level].
The operation procedure is as follows:
1. On the PC with Report Output Tool installed, log on to Windows with a user that belongs to the Administrators group or a user thatbelongs to the Domain Admins group.
Note
Do not forget the logon account
The user name and the password logged on to Windows here are required at the logon to Windows when the report output scheduleis set. Please write a note, and do not forget the password.
2. Select [All Programs] - [Systemwalker Desktop Keeper] - [Log Analyzer] - [Report Output Environment Setup] from the [Start]menu.
- 141 -
3. Select the [Server] tab to set server information.
Item Name Description
[Connection target] The IP address of Log Analyzer Server to be connected set atinstallation will be displayed.
Please modify if necessary. The size of characters that can beset is 18 bytes.
[Port number] Port number of Log Analyzer Server to be connected set atinstallation will be displayed.
Please modify if necessary.. The size of characters that canbe set is 5 bytes.
4. Click the [Set] button. The setting confirmation window will be displayed. Please click the [Yes] button to continue. In addition,the value after setting will become the default value at next startup.
Note
When window related with Data Execution Prevention is displayed
When the relevant window of Data Execution Prevention is displayed in the process of setting, please refer to the note of “WhenWindow Related with Data Execution Prevention is Displayed” in Step 7 of “2.8.1 Install Report Output Tool ” to exclude the“F3CWDELA.EXE” program from the target of Data Execution Prevention (DEP) function and reset.
5. After the sever setting has been perform normally, the completion message will be displayed. Click the [OK] button.
- 142 -
6. Select the [Batch User] tab and set the information of batch users.
Item Name Description
[IP address of Management Server] Specify the IP address of Systemwalker Desktop KeeperMaster Management Server or Management Server thatregisters batch users.
Enter the string within 15 bytes in the IP address format.Up to 10 IP addresses can be authenticated at one time. Afterthis time, it can be selected from the pull-down menu of thelogin window.
[User ID] Specify the user ID. The user ID of the administrator thatalready existed in the Sever Setting Tool can be specified.
[Password] Specify the password of the user ID to be entered in [UserID].
7. Click the [Set] button. The setting confirmation window will be displayed. Click the [Yes] button to continue.
8. After the setting of batch user has been performed normally, the completion message will be displayed. Click the [OK] button.
- 143 -
9. Select the [Trace Level] tab to set the detail level of log.
Item Name Description
[Trace Level] Specify the detail level of log. Values can be specified are asfollows:
1: Output startup/completion and error;
2: Output detailed trace information.
The initial value is 1.
10. Click the [Set] button. The setting confirmation window will be displayed. Click the [Yes] button to continue.
11. After the setting of trace level setting has been performed normally, the completion message will be displayed. Click the [OK]button.
12. After all the settings have been completed, click [Exit] to close the “Report Output Tool settings” window.
- 144 -
Chapter 3 Maintenance This chapter describes how to back up and restore the Systemwalker Desktop Keeper assets.
The assets of the Systemwalker Desktop Keeper are stored on the Management Server/Master Management Server and Log AnalyzerServer. This chapter describes the backup targets and the methods of backup and restoration in terms of the Management Server/MasterManagement Server and Log Analyzer Server. In addition, the Management Server/Master Management Server and Log Analyzer Serverare independent of each other and require separate asset backup.
3.1 Maintenance of Management Server/Master ManagementServer
This section describes how to maintain the Management Server/Master Management Server of the Systemwalker Desktop Keeper.
3.1.1 Targets and Methods The following are two purposes for the backup and restoration of Systemwalker Desktop Keeper Management Server/Master ManagementServer.
For precaution against environmental exceptions
Data backup is necessary to prevent data loss and restore data in case of a hard disk failure or file corruption.
For stable usage of backup logs
To avoid database space insufficient, set the storage life of the log information and delete the log information saved for a period longerthan the set storage life.*For details about the related windows, please see “1.2.6 Determine How to Operate Logs”.
The backup targets can be classified into the "product assets" related to the product operation, including configuration files, and the "userassets" including the log information. The following table describes the backup targets of the product asset classification and user assetclassification and the backup targets and methods corresponding to the preceding purposes:
Classification Backup Target Format Backup Method Backup in Case
ofEnvironmental
Exceptions
Stable LogBackup
Product asset Configuration file File Manual backup ○ -
CT update module of theself version managementfunction
File Manual backup ○ -
User asset Managementinformation
Database Backup Tool
(GUI/Command)
○ ○
Log information (notincluding commandlogs)
Database Backup Tool
(GUI/Command)
○ ○
Log information(command logs)
File Backup Tool
(GUI/Command)
○ ○
Attached data File Manual backup ○ △
E-mail contents File Manual backup ○ △
- 145 -
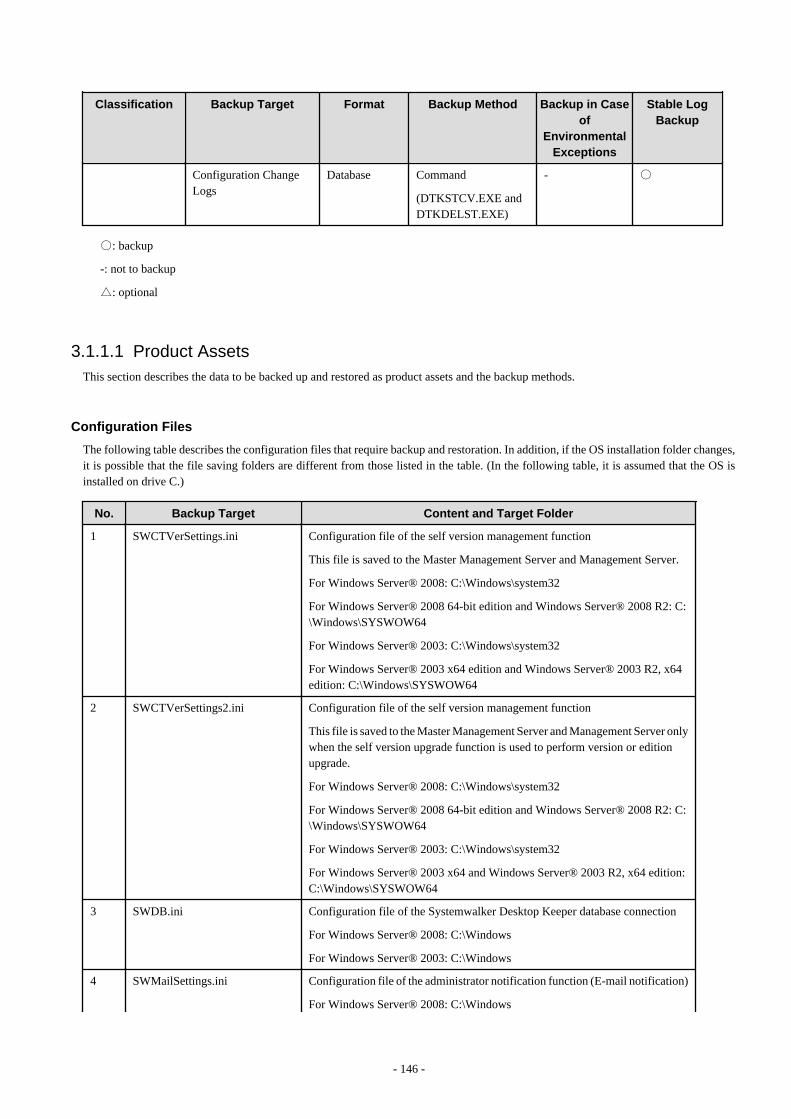
Classification Backup Target Format Backup Method Backup in Caseof
EnvironmentalExceptions
Stable LogBackup
Configuration ChangeLogs
Database Command
(DTKSTCV.EXE andDTKDELST.EXE)
- ○
○: backup
-: not to backup
△: optional
3.1.1.1 Product Assets This section describes the data to be backed up and restored as product assets and the backup methods.
Configuration Files
The following table describes the configuration files that require backup and restoration. In addition, if the OS installation folder changes,it is possible that the file saving folders are different from those listed in the table. (In the following table, it is assumed that the OS isinstalled on drive C.)
No. Backup Target Content and Target Folder
1 SWCTVerSettings.ini Configuration file of the self version management function
This file is saved to the Master Management Server and Management Server.
For Windows Server® 2008: C:\Windows\system32
For Windows Server® 2008 64-bit edition and Windows Server® 2008 R2: C:\Windows\SYSWOW64
For Windows Server® 2003: C:\Windows\system32
For Windows Server® 2003 x64 edition and Windows Server® 2003 R2, x64edition: C:\Windows\SYSWOW64
2 SWCTVerSettings2.ini Configuration file of the self version management function
This file is saved to the Master Management Server and Management Server onlywhen the self version upgrade function is used to perform version or editionupgrade.
For Windows Server® 2008: C:\Windows\system32
For Windows Server® 2008 64-bit edition and Windows Server® 2008 R2: C:\Windows\SYSWOW64
For Windows Server® 2003: C:\Windows\system32
For Windows Server® 2003 x64 and Windows Server® 2003 R2, x64 edition:C:\Windows\SYSWOW64
3 SWDB.ini Configuration file of the Systemwalker Desktop Keeper database connection
For Windows Server® 2008: C:\Windows
For Windows Server® 2003: C:\Windows
4 SWMailSettings.ini Configuration file of the administrator notification function (E-mail notification)
For Windows Server® 2008: C:\Windows
- 146 -
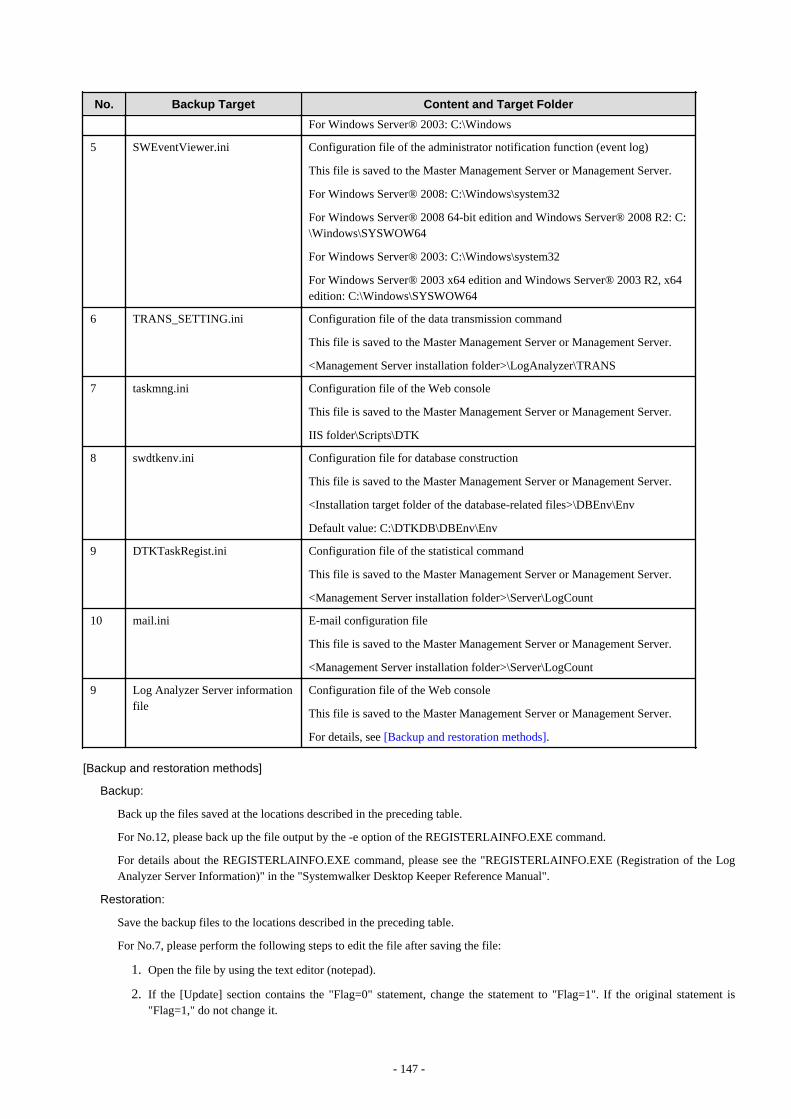
No. Backup Target Content and Target Folder
For Windows Server® 2003: C:\Windows
5 SWEventViewer.ini Configuration file of the administrator notification function (event log)
This file is saved to the Master Management Server or Management Server.
For Windows Server® 2008: C:\Windows\system32
For Windows Server® 2008 64-bit edition and Windows Server® 2008 R2: C:\Windows\SYSWOW64
For Windows Server® 2003: C:\Windows\system32
For Windows Server® 2003 x64 edition and Windows Server® 2003 R2, x64edition: C:\Windows\SYSWOW64
6 TRANS_SETTING.ini Configuration file of the data transmission command
This file is saved to the Master Management Server or Management Server.
<Management Server installation folder>\LogAnalyzer\TRANS
7 taskmng.ini Configuration file of the Web console
This file is saved to the Master Management Server or Management Server.
IIS folder\Scripts\DTK
8 swdtkenv.ini Configuration file for database construction
This file is saved to the Master Management Server or Management Server.
<Installation target folder of the database-related files>\DBEnv\Env
Default value: C:\DTKDB\DBEnv\Env
9 DTKTaskRegist.ini Configuration file of the statistical command
This file is saved to the Master Management Server or Management Server.
<Management Server installation folder>\Server\LogCount
10 mail.ini E-mail configuration file
This file is saved to the Master Management Server or Management Server.
<Management Server installation folder>\Server\LogCount
9 Log Analyzer Server informationfile
Configuration file of the Web console
This file is saved to the Master Management Server or Management Server.
For details, see [Backup and restoration methods].
[Backup and restoration methods]
Backup:
Back up the files saved at the locations described in the preceding table.
For No.12, please back up the file output by the -e option of the REGISTERLAINFO.EXE command.
For details about the REGISTERLAINFO.EXE command, please see the "REGISTERLAINFO.EXE (Registration of the LogAnalyzer Server Information)" in the "Systemwalker Desktop Keeper Reference Manual".
Restoration:
Save the backup files to the locations described in the preceding table.
For No.7, please perform the following steps to edit the file after saving the file:
1. Open the file by using the text editor (notepad).
2. If the [Update] section contains the "Flag=0" statement, change the statement to "Flag=1". If the original statement is"Flag=1," do not change it.
- 147 -
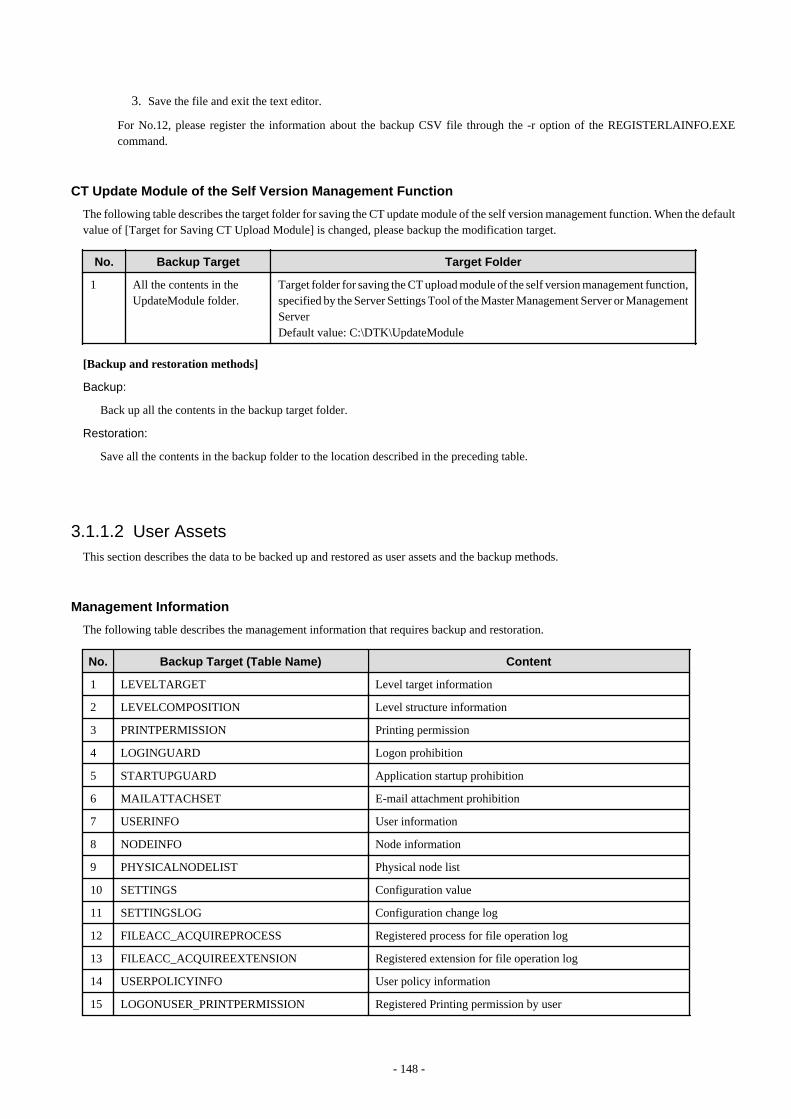
3. Save the file and exit the text editor.
For No.12, please register the information about the backup CSV file through the -r option of the REGISTERLAINFO.EXEcommand.
CT Update Module of the Self Version Management Function
The following table describes the target folder for saving the CT update module of the self version management function. When the defaultvalue of [Target for Saving CT Upload Module] is changed, please backup the modification target.
No. Backup Target Target Folder
1 All the contents in theUpdateModule folder.
Target folder for saving the CT upload module of the self version management function,specified by the Server Settings Tool of the Master Management Server or ManagementServerDefault value: C:\DTK\UpdateModule
[Backup and restoration methods]
Backup:
Back up all the contents in the backup target folder.
Restoration:
Save all the contents in the backup folder to the location described in the preceding table.
3.1.1.2 User Assets This section describes the data to be backed up and restored as user assets and the backup methods.
Management Information
The following table describes the management information that requires backup and restoration.
No. Backup Target (Table Name) Content
1 LEVELTARGET Level target information
2 LEVELCOMPOSITION Level structure information
3 PRINTPERMISSION Printing permission
4 LOGINGUARD Logon prohibition
5 STARTUPGUARD Application startup prohibition
6 MAILATTACHSET E-mail attachment prohibition
7 USERINFO User information
8 NODEINFO Node information
9 PHYSICALNODELIST Physical node list
10 SETTINGS Configuration value
11 SETTINGSLOG Configuration change log
12 FILEACC_ACQUIREPROCESS Registered process for file operation log
13 FILEACC_ACQUIREEXTENSION Registered extension for file operation log
14 USERPOLICYINFO User policy information
15 LOGONUSER_PRINTPERMISSION Registered Printing permission by user
- 148 -
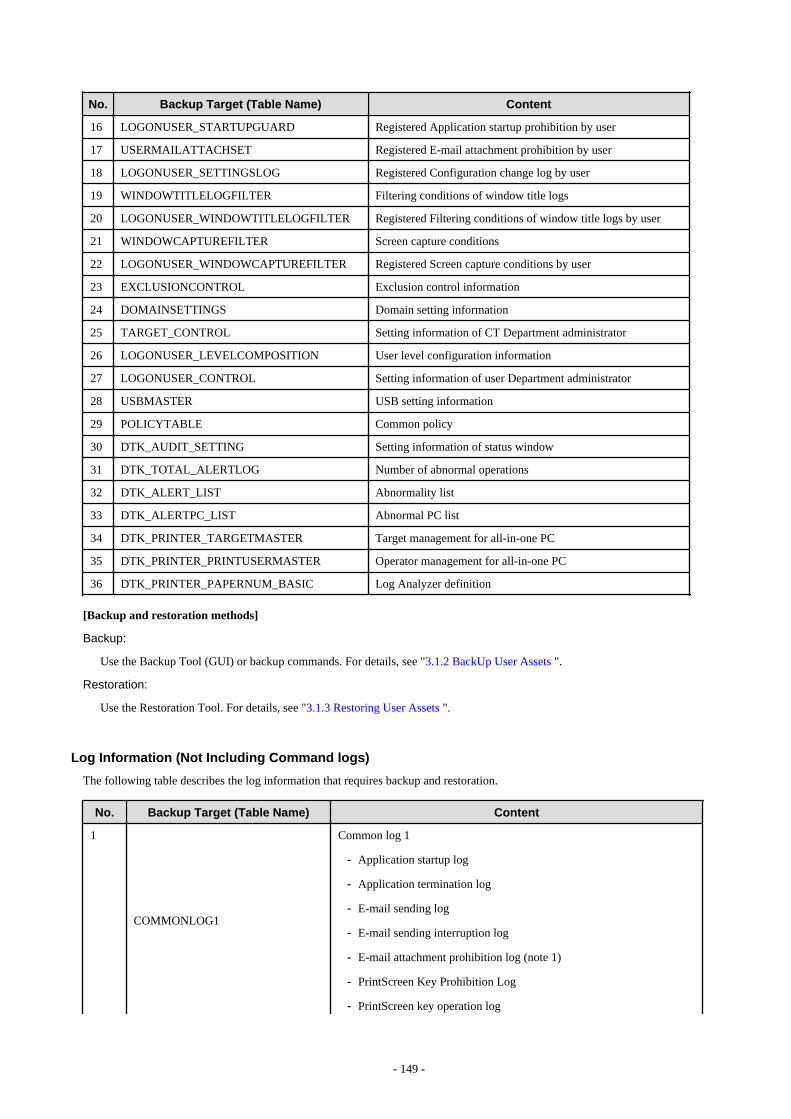
No. Backup Target (Table Name) Content
16 LOGONUSER_STARTUPGUARD Registered Application startup prohibition by user
17 USERMAILATTACHSET Registered E-mail attachment prohibition by user
18 LOGONUSER_SETTINGSLOG Registered Configuration change log by user
19 WINDOWTITLELOGFILTER Filtering conditions of window title logs
20 LOGONUSER_WINDOWTITLELOGFILTER Registered Filtering conditions of window title logs by user
21 WINDOWCAPTUREFILTER Screen capture conditions
22 LOGONUSER_WINDOWCAPTUREFILTER Registered Screen capture conditions by user
23 EXCLUSIONCONTROL Exclusion control information
24 DOMAINSETTINGS Domain setting information
25 TARGET_CONTROL Setting information of CT Department administrator
26 LOGONUSER_LEVELCOMPOSITION User level configuration information
27 LOGONUSER_CONTROL Setting information of user Department administrator
28 USBMASTER USB setting information
29 POLICYTABLE Common policy
30 DTK_AUDIT_SETTING Setting information of status window
31 DTK_TOTAL_ALERTLOG Number of abnormal operations
32 DTK_ALERT_LIST Abnormality list
33 DTK_ALERTPC_LIST Abnormal PC list
34 DTK_PRINTER_TARGETMASTER Target management for all-in-one PC
35 DTK_PRINTER_PRINTUSERMASTER Operator management for all-in-one PC
36 DTK_PRINTER_PAPERNUM_BASIC Log Analyzer definition
[Backup and restoration methods]
Backup:
Use the Backup Tool (GUI) or backup commands. For details, see "3.1.2 BackUp User Assets ".
Restoration:
Use the Restoration Tool. For details, see "3.1.3 Restoring User Assets ".
Log Information (Not Including Command logs)
The following table describes the log information that requires backup and restoration.
No. Backup Target (Table Name) Content
1
COMMONLOG1
Common log 1
- Application startup log
- Application termination log
- E-mail sending log
- E-mail sending interruption log
- E-mail attachment prohibition log (note 1)
- PrintScreen Key Prohibition Log
- PrintScreen key operation log
- 149 -
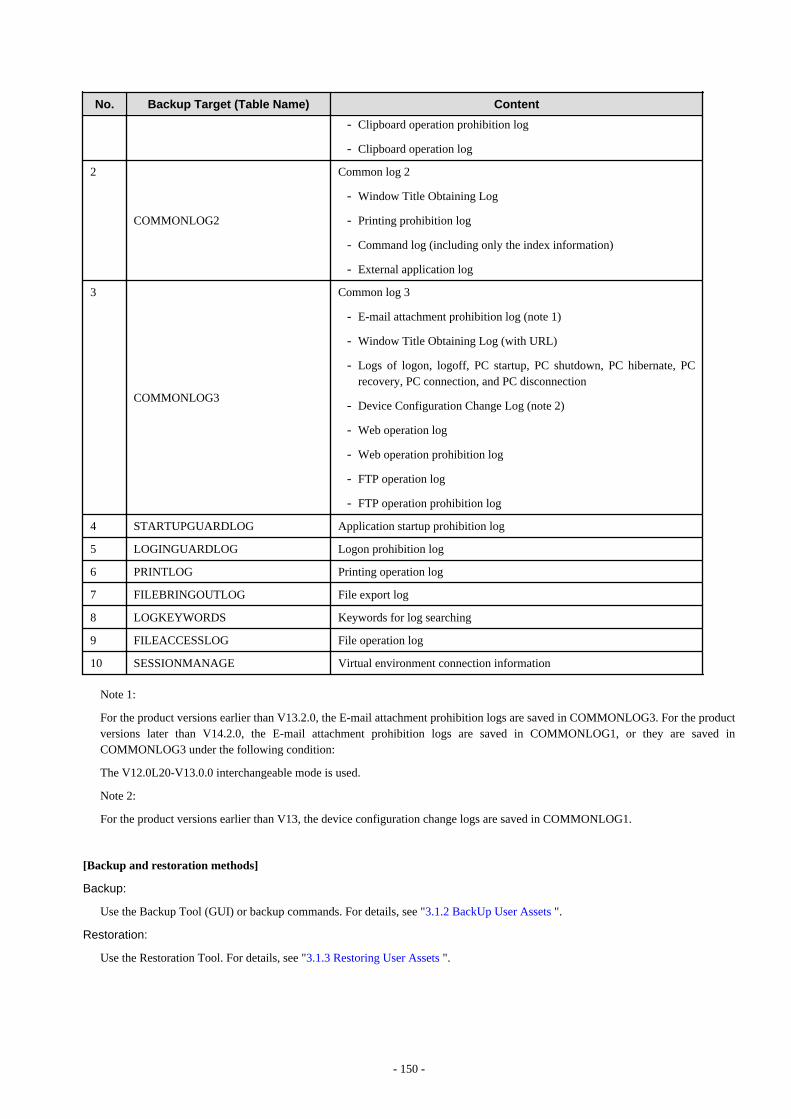
No. Backup Target (Table Name) Content
- Clipboard operation prohibition log
- Clipboard operation log
2
COMMONLOG2
Common log 2
- Window Title Obtaining Log
- Printing prohibition log
- Command log (including only the index information)
- External application log
3
COMMONLOG3
Common log 3
- E-mail attachment prohibition log (note 1)
- Window Title Obtaining Log (with URL)
- Logs of logon, logoff, PC startup, PC shutdown, PC hibernate, PCrecovery, PC connection, and PC disconnection
- Device Configuration Change Log (note 2)
- Web operation log
- Web operation prohibition log
- FTP operation log
- FTP operation prohibition log
4 STARTUPGUARDLOG Application startup prohibition log
5 LOGINGUARDLOG Logon prohibition log
6 PRINTLOG Printing operation log
7 FILEBRINGOUTLOG File export log
8 LOGKEYWORDS Keywords for log searching
9 FILEACCESSLOG File operation log
10 SESSIONMANAGE Virtual environment connection information
Note 1:
For the product versions earlier than V13.2.0, the E-mail attachment prohibition logs are saved in COMMONLOG3. For the productversions later than V14.2.0, the E-mail attachment prohibition logs are saved in COMMONLOG1, or they are saved inCOMMONLOG3 under the following condition:
The V12.0L20-V13.0.0 interchangeable mode is used.
Note 2:
For the product versions earlier than V13, the device configuration change logs are saved in COMMONLOG1.
[Backup and restoration methods]
Backup:
Use the Backup Tool (GUI) or backup commands. For details, see "3.1.2 BackUp User Assets ".
Restoration:
Use the Restoration Tool. For details, see "3.1.3 Restoring User Assets ".
- 150 -

Log Information (Command logs)
The following table describes the target folder for saving command logs. When the default value of [Target for Saving Command Lineand Logs] is changed, please backup the modification target.
No. Backup Target Target Folder
1 All the contents in thePromptLog folder
Target folder for saving the command lines and logs, specified by the Server SettingsTool of the Master Management Server or Management Server
(Default value: C:\DTK\PromptLog)
[Backup and restoration methods]
Backup:
Use the Backup Tool (GUI) or backup commands. For details, see "3.1.2 BackUp User Assets ".
Restoration:
Use the Restoration Tool. For details, see "3.1.3 Restoring User Assets ".
Attached Data
The following table describes the target folder for saving the attached data. In addition, when the default value of [Target for SavingAttached Data] is changed, please backup the modification target.
No. Backup Target Target Folder
1 All the contents in theScreenCapture folder
Target folder for saving the attached data, specified by the Server Settings Tool of theMaster Management Server or Management Server(Default value: C:\DTK\ScreenCapture)
The attached data is saved in [Folder of Day Unit]-[Folder of CT Unit] under thepreceding target folder.
[Backup and restoration methods]
Backup:
Back up all the contents in the backup target folder.
Please back up the attached data separately as required. In addition, the attached data cannot be deleted even by the Backup Tool orbackup commands.
Restoration:
Save all the contents under the backup folder to the location described in the preceding table.
E-mail Contents
The following table describes the target folder for saving the E-mail contents. When the default value of [Target for Saving E-mail Content]is changed, please backup the modification target.
No. Backup Target Target Folder
1 All the contents in theMainContents folder
Target folder for saving the E-mail contents, specified by the Server Settings Tool ofthe Master Management Server or Management Server
(Default value: C:\DTK\MailContents)
The E-mail contents are saved in [Folder of Day Unit]-[Folder of CT Unit] under thepreceding target folder.
[Backup and restoration methods]
- 151 -
Backup:
Back up all the contents in the backup target folder.
Please back up the E-mail contents separately as required. In addition, the E-mail contents cannot be deleted even by the Backup Toolor backup commands.
Restoration:
Save all the contents under the backup folder to the location described in the preceding table.
Trouble Investigation Data
The following table describes the target folder for saving the trouble investigation data. When the default value of [Target for SavingTrouble Investigation Data] is changed, please backup the modification target.
No. Backup Target Target Folder
1 All the contents in theCTQSSSave folder
Target folder for saving the trouble investigation data, specified by the Server SettingsTool of the Master Management Server or Management Server
(Default value: C:\DTK\CTQSSSave)
The trouble investigation data is saved in [Folder of Day Unit]-[Folder of CT Unit]under the preceding target folder.
[Backup and restoration methods]
Backup:
Back up all the contents in the backup target folder.
Please back up the trouble investigation data separately as required. In addition, the trouble investigation data cannot be deleted evenby the Backup Tool or backup commands.
Restoration:
Save all the contents under the backup folder to the location described in the preceding table.
3.1.2 BackUp User Assets This product provides the following two backup functions for user assets.
Backup Tool (GUI)
Set backup conditions through a GUI.
Backup Commands
Set backup conditions through command parameters. The commands themselves do not have a scheduling function.
Point
Adding the backup commands to the Task Scheduler will facilitate the command execution.
After being incorporated in a scheduled batch file, the backup commands can be executed at the specified time.
The Backup Tool (GUI) and backup commands can be used to perform the following operations:
- Back up data.
Data backup is a precaution against a hard disk failure or file corruption. In addition, the backup data can be used to re-construct thedatabase. The data that can be backed up is classified into the following two types:
- 152 -
- Management information
- Log information (log data in the DB and command logs)
For details about the information that can be backed up, see "3.1.1.2 User Assets ".
The time required for backing up data can be estimated according to the number of logs to be backed up. The estimation is as follows:
- 7,000 per second (Xeon, 2.0 GHz, 2 GB memory, and RAID1 architecture)
*More time may be consumed, depending on the server performance and RAID architecture.
- Delete data.
Delete the unnecessary data in the database to prevent the database from running out of space.
In addition, the time required for deleting data can be estimated according to the number of logs to be deleted. The purpose is asfollows:
- 200 per second (Xeon, 2.0 GHz, 2 GB memory, and RAID1 architecture)
*More time may be consumed, depending on the server performance and RAID architecture.
- Output log information (in Log Viewer format).
Output operation logs and prohibition logs to CSV files in Log Viewer format and view the logs. The information output in Log Viewerformat, however, cannot be used for restoration.
The time required by log information output can be estimated according to the number of logs to be backed up. The estimation is asfollows:
- 2,000 per second (Xeon, 2.0 GHz, 2 GB memory, and RAID1 architecture)
*More time may be consumed, depending on the server performance and RAID architecture.
- Set scheduled tasks for deleting or backing up data, which is supported only by the Backup Tool (GUI).
Set scheduled tasks so that data can be automatically backed up or deleted. The scheduled tasks will be added to the Task Scheduler.The following operations can be automatically performed:
- Back up data (management information, log information, and configuration change logs).
- Delete data (log information and configuration change logs).
- Output log information (in Log Viewer format).
- When an error occurs during automatic operation execution, an E-mail for notification will be sent to the administrator. Select [Server Settings Tool]-[Administrator Notification Settings]-[E-mail Sending Settings], and then set the E-mail address fornotification.
The operational status of the Backup Tool (GUI) or backup commands will be output to event logs.
The Backup Tool (GUI) and the backup commands can back up the user assets (including management information and log information)except the attached data, but they do not back up the information about programs and settings information of the product. Please use othersoftware to regularly back up all the information.
3.1.2.1 Using the Backup Tool (GUI) This section describes how to back up the user assets by using the Backup Tool (GUI).
Note
Notes on using the Backup Tool (GUI)
[Available space on the output target disk]
Please ensure that there is sufficient available space on the disk specified as the output target disk for the backup files. If the disk spaceis insufficient to save a large amount of data, please correspondingly narrow the date range of the targets to be saved.
- 153 -
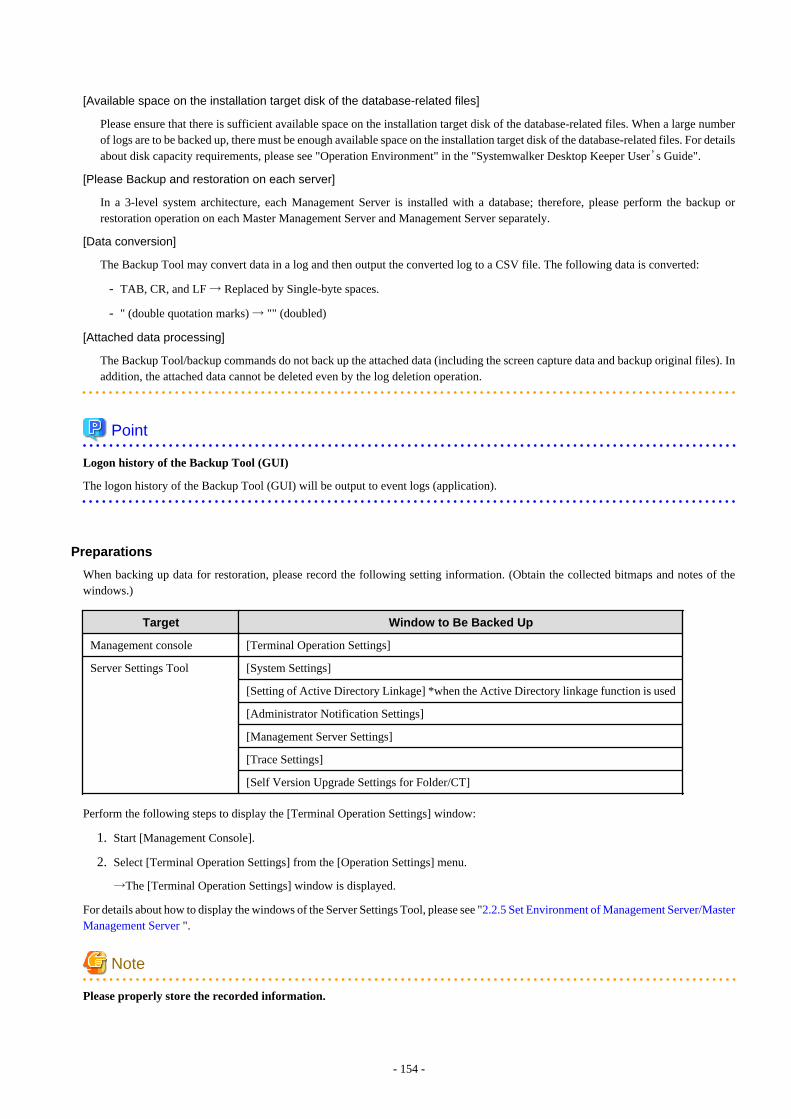
[Available space on the installation target disk of the database-related files]
Please ensure that there is sufficient available space on the installation target disk of the database-related files. When a large numberof logs are to be backed up, there must be enough available space on the installation target disk of the database-related files. For detailsabout disk capacity requirements, please see "Operation Environment" in the "Systemwalker Desktop Keeper User’s Guide".
[Please Backup and restoration on each server]
In a 3-level system architecture, each Management Server is installed with a database; therefore, please perform the backup orrestoration operation on each Master Management Server and Management Server separately.
[Data conversion]
The Backup Tool may convert data in a log and then output the converted log to a CSV file. The following data is converted:
- TAB, CR, and LF → Replaced by Single-byte spaces.
- " (double quotation marks) → "" (doubled)
[Attached data processing]
The Backup Tool/backup commands do not back up the attached data (including the screen capture data and backup original files). Inaddition, the attached data cannot be deleted even by the log deletion operation.
Point
Logon history of the Backup Tool (GUI)
The logon history of the Backup Tool (GUI) will be output to event logs (application).
Preparations
When backing up data for restoration, please record the following setting information. (Obtain the collected bitmaps and notes of thewindows.)
Target Window to Be Backed Up
Management console [Terminal Operation Settings]
Server Settings Tool [System Settings]
[Setting of Active Directory Linkage] *when the Active Directory linkage function is used
[Administrator Notification Settings]
[Management Server Settings]
[Trace Settings]
[Self Version Upgrade Settings for Folder/CT]
Perform the following steps to display the [Terminal Operation Settings] window:
1. Start [Management Console].
2. Select [Terminal Operation Settings] from the [Operation Settings] menu.
→The [Terminal Operation Settings] window is displayed.
For details about how to display the windows of the Server Settings Tool, please see "2.2.5 Set Environment of Management Server/MasterManagement Server ".
Note
Please properly store the recorded information.
- 154 -
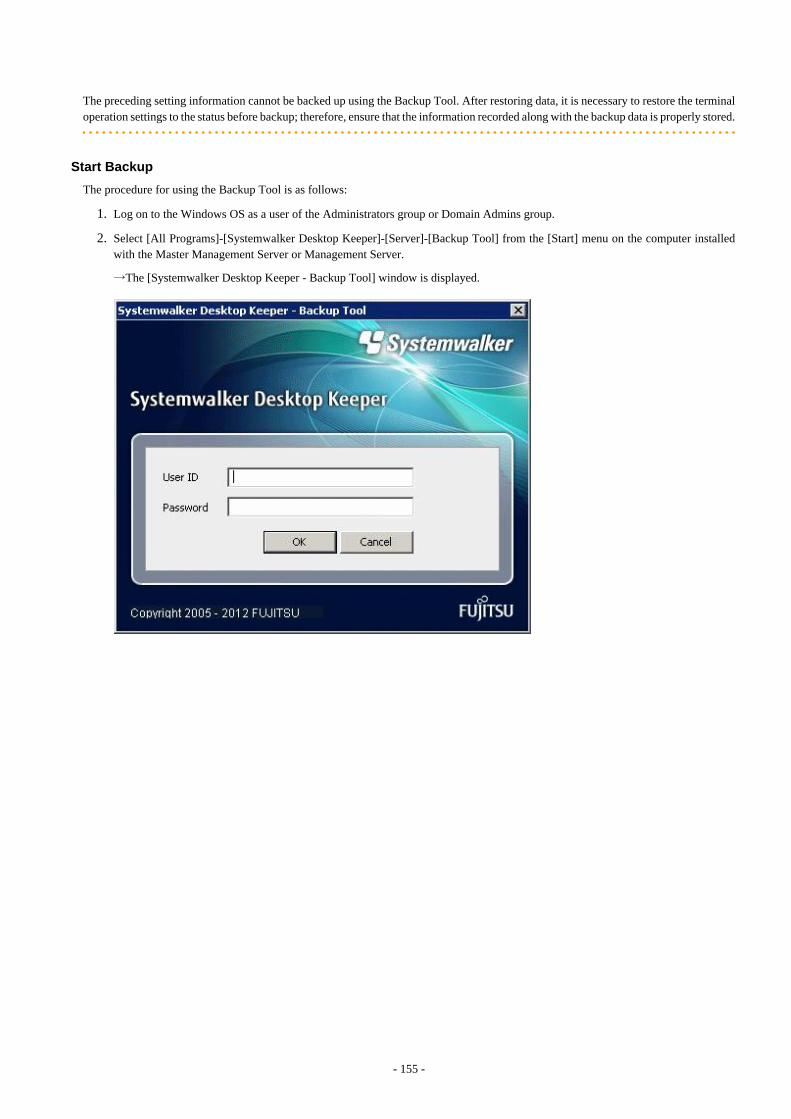
The preceding setting information cannot be backed up using the Backup Tool. After restoring data, it is necessary to restore the terminaloperation settings to the status before backup; therefore, ensure that the information recorded along with the backup data is properly stored.
Start Backup
The procedure for using the Backup Tool is as follows:
1. Log on to the Windows OS as a user of the Administrators group or Domain Admins group.
2. Select [All Programs]-[Systemwalker Desktop Keeper]-[Server]-[Backup Tool] from the [Start] menu on the computer installedwith the Master Management Server or Management Server.
→The [Systemwalker Desktop Keeper - Backup Tool] window is displayed.
- 155 -
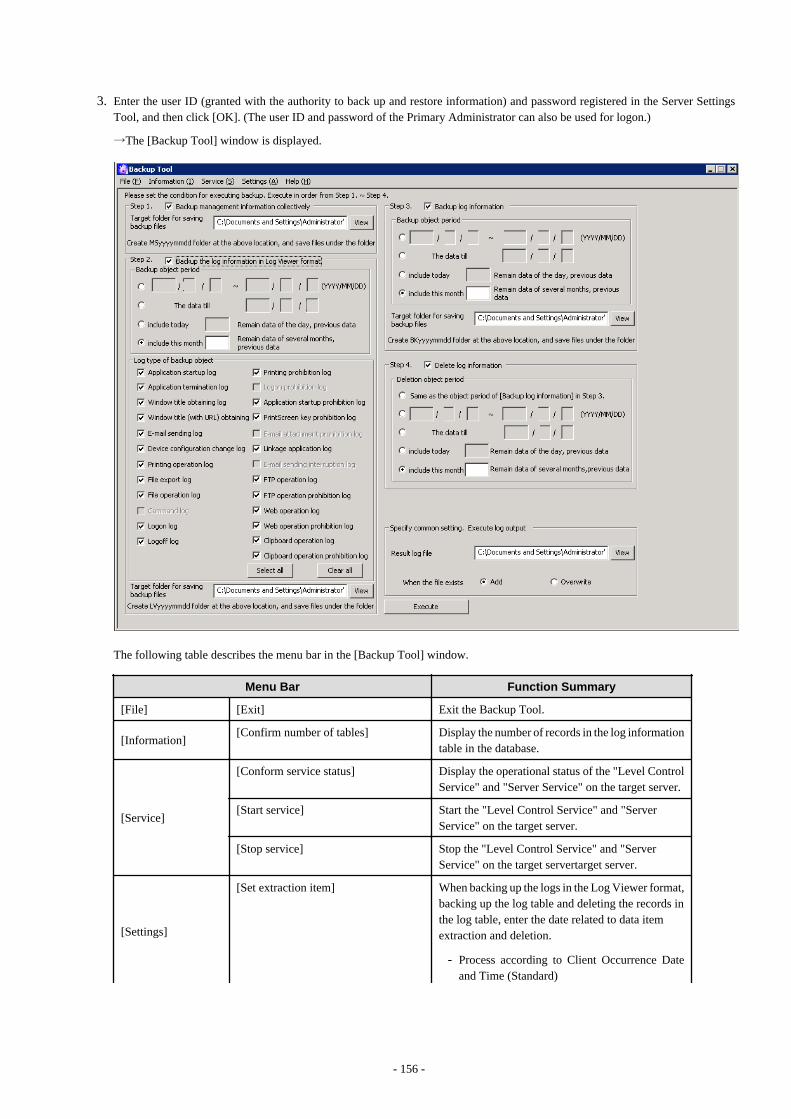
3. Enter the user ID (granted with the authority to back up and restore information) and password registered in the Server SettingsTool, and then click [OK]. (The user ID and password of the Primary Administrator can also be used for logon.)
→The [Backup Tool] window is displayed.
The following table describes the menu bar in the [Backup Tool] window.
Menu Bar Function Summary
[File] [Exit] Exit the Backup Tool.
[Information][Confirm number of tables] Display the number of records in the log information
table in the database.
[Service]
[Conform service status] Display the operational status of the "Level ControlService" and "Server Service" on the target server.
[Start service] Start the "Level Control Service" and "ServerService" on the target server.
[Stop service] Stop the "Level Control Service" and "ServerService" on the target servertarget server.
[Settings]
[Set extraction item] When backing up the logs in the Log Viewer format,backing up the log table and deleting the records inthe log table, enter the date related to data itemextraction and deletion.
- Process according to Client Occurrence Dateand Time (Standard)
- 156 -
Menu Bar Function Summary
- Process according to Server Saving Date andTime
[Automatic backup settings] Display the Automatic Backup Settings window.
[Backup tool trace] [No] Do not collect the traces of the Backup Tool.
[Summary] Collect the traces of the Backup Tool in summarymode.
[Details] Collect the traces of the Backup Tool in detailsmode.
[Help]
[Online Help] Display the online help manual.
[Version Information] Display the copyright information and versioninformation.
4. Before backing up the "management information" and "log information" by using the Backup Tool, it’s necessary to stop the "LevelControl Service" and "Server Service" on the target server.
a. Select [Stop Service] from the [Service] menu. A confirmation window is displayed. Click [OK] in the window to stop theservices.
b. The operation result window is displayed.
5. For first-time backup, set the data extraction method for log information backup and deletion. Select [Extraction item settings] fromthe [Settings] menu.
→The [Extraction item settings] window is displayed.
The extraction item settings specify the time for log backup and deletion. This can be the time that logs were generated on the clientor the time that logs were stored on the server.
- [Process in the client occurrence date and time (standard)]: Select this option when you want to operate based on the timethat logs were generated on the client.
- [Process in the server saving date and time]: Select this option when you want to operate based on the time that logs werestored on the server.
-
6. To extract logs according to the time that logs were generated on the client (CT), select "Process in the client occurrence date andtime (standard)". To extract logs according to the time that logs were stored on the server, select "Process in the server saving dateand time". Then, click [Set].
- 157 -
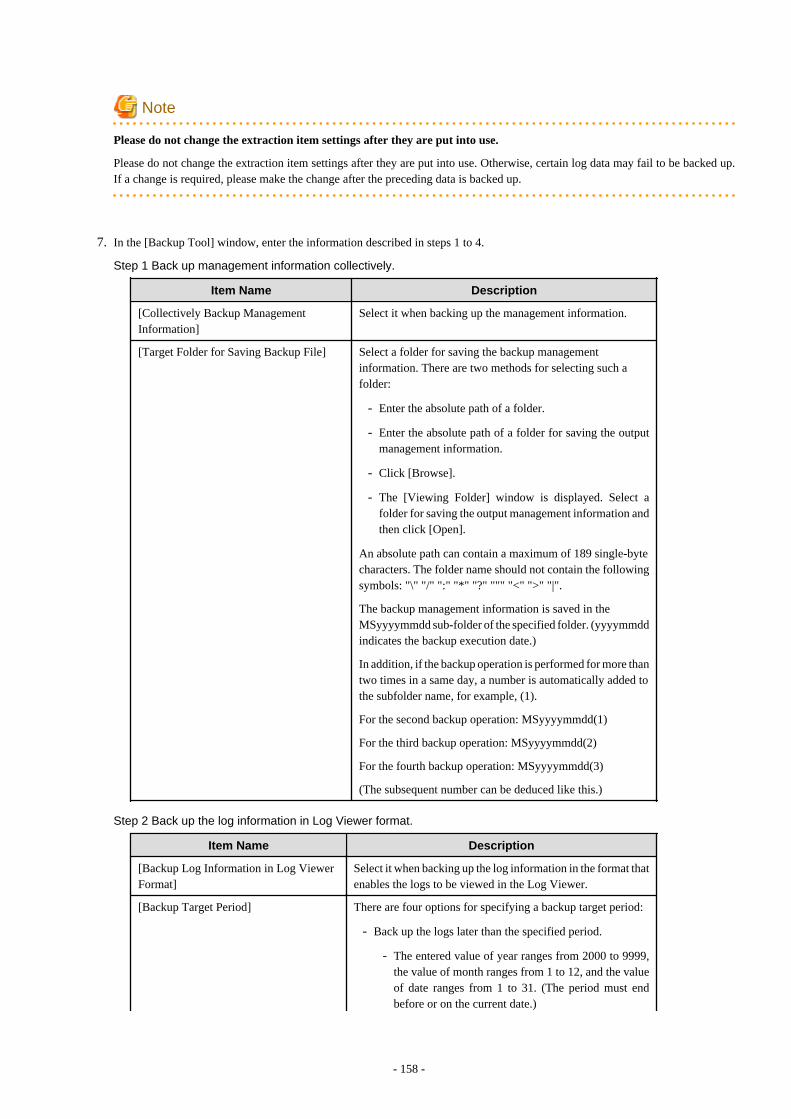
Note
Please do not change the extraction item settings after they are put into use.
Please do not change the extraction item settings after they are put into use. Otherwise, certain log data may fail to be backed up.If a change is required, please make the change after the preceding data is backed up.
7. In the [Backup Tool] window, enter the information described in steps 1 to 4.
Step 1 Back up management information collectively.
Item Name Description
[Collectively Backup ManagementInformation]
Select it when backing up the management information.
[Target Folder for Saving Backup File] Select a folder for saving the backup managementinformation. There are two methods for selecting such afolder:
- Enter the absolute path of a folder.
- Enter the absolute path of a folder for saving the outputmanagement information.
- Click [Browse].
- The [Viewing Folder] window is displayed. Select afolder for saving the output management information andthen click [Open].
An absolute path can contain a maximum of 189 single-bytecharacters. The folder name should not contain the followingsymbols: "\" "/" ":" "*" "?" """ "<" ">" "|".
The backup management information is saved in theMSyyyymmdd sub-folder of the specified folder. (yyyymmddindicates the backup execution date.)
In addition, if the backup operation is performed for more thantwo times in a same day, a number is automatically added tothe subfolder name, for example, (1).
For the second backup operation: MSyyyymmdd(1)
For the third backup operation: MSyyyymmdd(2)
For the fourth backup operation: MSyyyymmdd(3)
(The subsequent number can be deduced like this.)
Step 2 Back up the log information in Log Viewer format.
Item Name Description
[Backup Log Information in Log ViewerFormat]
Select it when backing up the log information in the format thatenables the logs to be viewed in the Log Viewer.
[Backup Target Period] There are four options for specifying a backup target period:
- Back up the logs later than the specified period.
- The entered value of year ranges from 2000 to 9999,the value of month ranges from 1 to 12, and the valueof date ranges from 1 to 31. (The period must endbefore or on the current date.)
- 158 -
Item Name Description
- Back up the logs earlier than the specified date.
- The entered value of year ranges from 2000 to 9999,the value of month ranges from 1 to 12, and the valueof date ranges from 1 to 31. (The date can be earlierthan or equal to the current date.)
- Back up the logs earlier than the specified number of days,counting from the current day.
- The entered value ranges from 0 to 999.
- If the entered value is 1, the logs earlier than the endof the last day will be backed up. If the entered valueis 0, the logs earlier than the present moment will bebacked up.
- Back up the logs earlier than the specified number ofmonths, counting from the current month.
- The entered value ranges from 0 to 99.
- If the entered value is 1, the logs earlier than the endof the last month will be backed up. If the entered valueis 0, the logs earlier than the present moment will bebacked up.
[Log Type of Backup Target] Select the type of logs to be backed up.
[Target Folder for Saving Backup File] Select a folder for saving the backup log information. Thereare two methods for selecting such a folder.
- Enter the absolute path of a folder.
- Enter the absolute path of a folder for saving the outputlogs.
- Click [Browse].
- The [Viewing Folder] window is displayed. Select a folderfor saving the output log information and then click [OK].
An absolute path can contain a maximum of 189 single-bytecharacters. The folder name should not contain the followingsymbols: "\" "/" ":" "*" "?" """ "<" ">" "|".
The backup logs are saved in the LVyyyymmdd sub-folder ofthe specified folder. (yyyymmdd indicates the backupexecution date.)
In addition, if the backup operation is performed for more thantwo times in a same day, a number is automatically added tothe subfolder name, for example, (1).
For the second backup operation: LVyyyymmdd(1)
For the third backup operation: LVyyyymmdd(2)
For the fourth backup operation: LVyyyymmdd(3)
(The subsequent number can be deduced like this.)
Step 3 Back up log information.
Item Name Description
[Backup Log Information] Select it when backing up log information.
- 159 -
Item Name Description
[Backup Target Period] There are four options for specifying a backup target period.
- Back up the logs later than the specified period.
- The entered value of year ranges from 2000 to 9999,the value of month ranges from 1 to 12, and the valueof date ranges from 1 to 31. (The period must endbefore or on the current date.)
- Back up the logs earlier than the specified date.
- The entered value of year ranges from 2000 to 9999,the value of month ranges from 1 to 12, and the valueof date ranges from 1 to 31. (The date can be earlierthan or equal to the current date.)
- Back up the logs earlier than the specified number of days,counting from the current day.
- The entered value ranges from 0 to 999.
- If the entered value is 1, the logs earlier than the endof the last day will be backed up. If the entered valueis 0, the logs earlier than the present moment will bebacked up.
- Back up the logs earlier than the specified number ofmonths, counting from the current month.
- The entered value ranges from 0 to 99.
- If the entered value is 1, the logs earlier than the endof the last month will be backed up. If the entered valueis 0, the logs earlier than the present moment will bebacked up.
[Target Folder for Saving Backup File] Select a folder for saving the backup log information. Thereare two methods for selecting such a folder:
- Enter the absolute path of a folder.
- Enter the absolute path of a folder for saving the outputlogs.
- Click [Browse].
- The [Viewing Folder] window is displayed. Select a folderfor saving the output log information and then click [OK].
An absolute path can contain a maximum of 189 single-bytecharacters. The folder name should not contain the followingsymbols: "\" "/" ":" "*" "?" """ "<" ">" "|".
The backup logs are saved in the BKyyyymmdd sub-folder ofthe specified folder. (yyyymmdd indicates the backupexecution date.)
In addition, if the backup operation is performed for more thantwo times in a same day, a number is automatically added tothe subfolder name, for example, (1).
For the second backup operation: BKyyyymmdd(1)
For the third backup operation: BKyyyymmdd(2)
For the fourth backup operation: BKyyyymmdd(3)
- 160 -
Item Name Description
(The subsequent number can be deduced like this.)
Step 4 Delete log information.
Item Name Description
[Delete Log Information] Select it when deleting the log information.
[Delete Target Period] There are five options for specifying a delete target period.
- Delete the logs of the backup target period specified in step3 “Back up log information”.
- Delete the logs of the specified period.
- The entered value of year ranges from 2000 to 9999,the value of month ranges from 1 to 12, and the valueof date ranges from 1 to 31. (The period must endbefore or on the current date.)
- Delete the logs earlier than the specified date.
- The entered value of year ranges from 2000 to 9999,the value of month ranges from 1 to 12, and the valueof date ranges from 1 to 31. (The date can be earlierthan or equal to the current date.)
- Delete the logs earlier than the number of days, countingfrom the current day.
- The entered value ranges from 0 to 999.
- If the entered value is 1, the logs earlier than the endof the last day will be deleted. If the entered value is0, the logs earlier than the present moment will bedeleted.
- Delete the logs earlier than the number of months, countingfrom the current month.
- The entered value ranges from 0 to 99.
- If the entered value is 1, the logs earlier than the endof the last month will be deleted. If the entered valueis 0, the logs earlier than the present moment will bedeleted.
8. Enter the common settings in the [Backup Tool] window.
Common settings, specifying the settings related to the output of the execution result logs
Item Name Description
[Result Log File] Specify the file for saving the execution results of the BackupTool. There are two methods for selecting such a file:
- Enter the absolute path of a file.
- Enter the absolute path of a file for saving the executionresults.
- Click [Browse].
- The [Open File] window is displayed. Select the folder forsaving the result log file, enter the file name, and then click[Open].
- 161 -
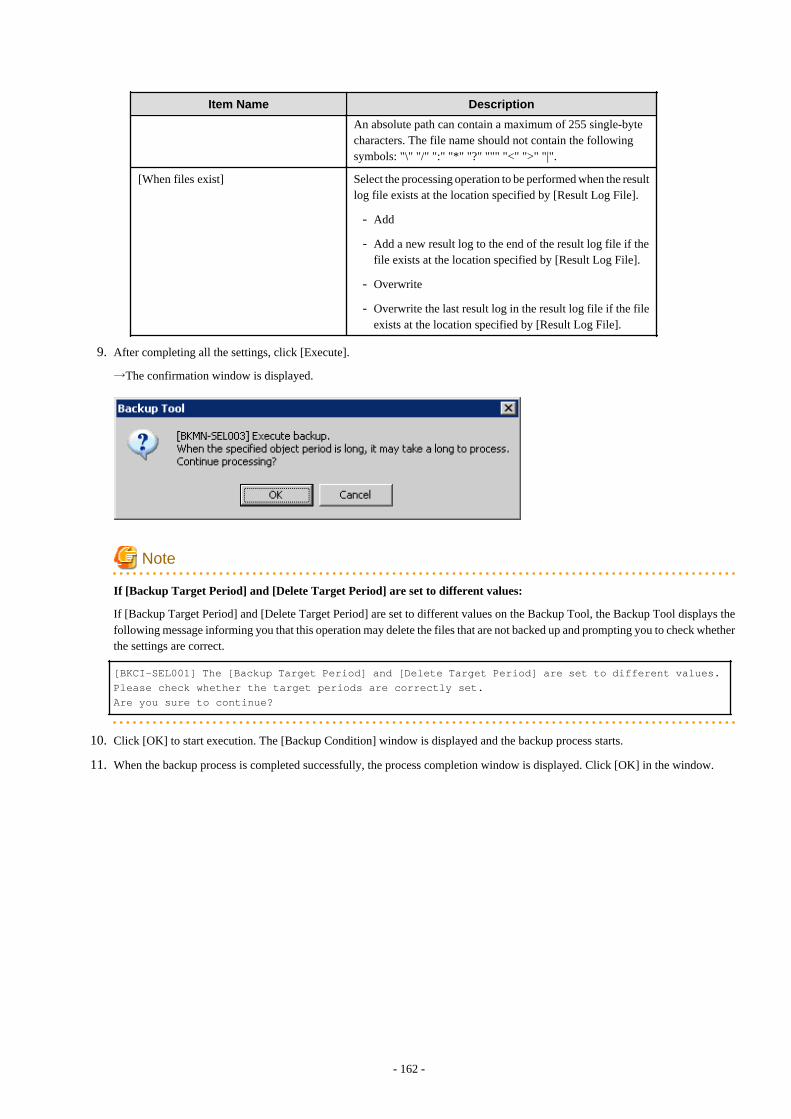
Item Name Description
An absolute path can contain a maximum of 255 single-bytecharacters. The file name should not contain the followingsymbols: "\" "/" ":" "*" "?" """ "<" ">" "|".
[When files exist] Select the processing operation to be performed when the resultlog file exists at the location specified by [Result Log File].
- Add
- Add a new result log to the end of the result log file if thefile exists at the location specified by [Result Log File].
- Overwrite
- Overwrite the last result log in the result log file if the fileexists at the location specified by [Result Log File].
9. After completing all the settings, click [Execute].
→The confirmation window is displayed.
Note
If [Backup Target Period] and [Delete Target Period] are set to different values:
If [Backup Target Period] and [Delete Target Period] are set to different values on the Backup Tool, the Backup Tool displays thefollowing message informing you that this operation may delete the files that are not backed up and prompting you to check whetherthe settings are correct.
[BKCI-SEL001] The [Backup Target Period] and [Delete Target Period] are set to different values.
Please check whether the target periods are correctly set.
Are you sure to continue?
10. Click [OK] to start execution. The [Backup Condition] window is displayed and the backup process starts.
11. When the backup process is completed successfully, the process completion window is displayed. Click [OK] in the window.
- 162 -
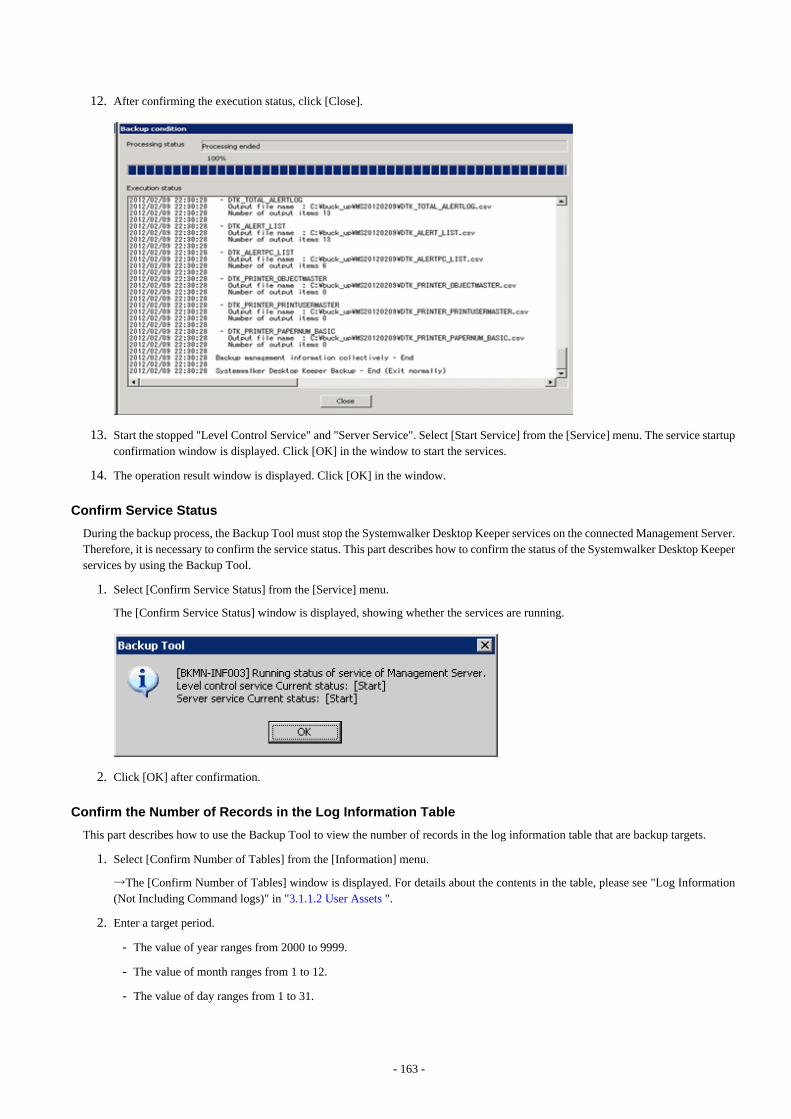
12. After confirming the execution status, click [Close].
13. Start the stopped "Level Control Service" and "Server Service". Select [Start Service] from the [Service] menu. The service startupconfirmation window is displayed. Click [OK] in the window to start the services.
14. The operation result window is displayed. Click [OK] in the window.
Confirm Service Status
During the backup process, the Backup Tool must stop the Systemwalker Desktop Keeper services on the connected Management Server.Therefore, it is necessary to confirm the service status. This part describes how to confirm the status of the Systemwalker Desktop Keeperservices by using the Backup Tool.
1. Select [Confirm Service Status] from the [Service] menu.
The [Confirm Service Status] window is displayed, showing whether the services are running.
2. Click [OK] after confirmation.
Confirm the Number of Records in the Log Information Table
This part describes how to use the Backup Tool to view the number of records in the log information table that are backup targets.
1. Select [Confirm Number of Tables] from the [Information] menu.
→The [Confirm Number of Tables] window is displayed. For details about the contents in the table, please see "Log Information(Not Including Command logs)" in "3.1.1.2 User Assets ".
2. Enter a target period.
- The value of year ranges from 2000 to 9999.
- The value of month ranges from 1 to 12.
- The value of day ranges from 1 to 31.
- 163 -
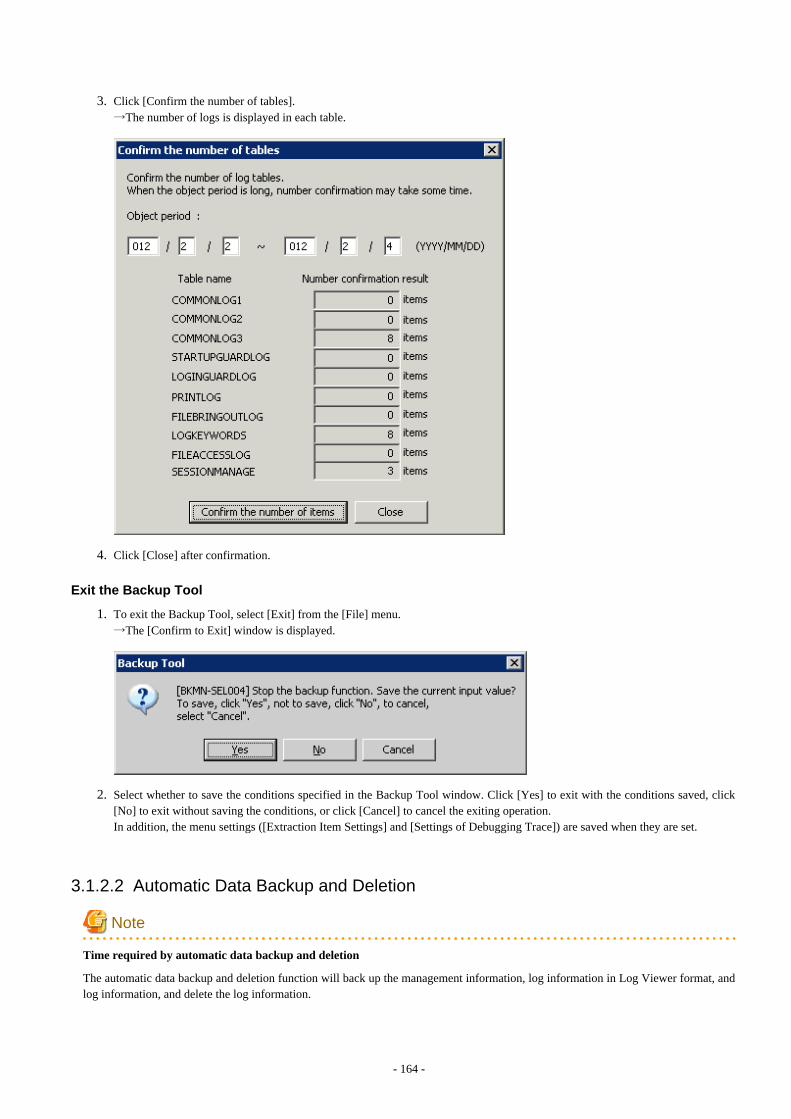
3. Click [Confirm the number of tables].→The number of logs is displayed in each table.
4. Click [Close] after confirmation.
Exit the Backup Tool
1. To exit the Backup Tool, select [Exit] from the [File] menu.→The [Confirm to Exit] window is displayed.
2. Select whether to save the conditions specified in the Backup Tool window. Click [Yes] to exit with the conditions saved, click[No] to exit without saving the conditions, or click [Cancel] to cancel the exiting operation.In addition, the menu settings ([Extraction Item Settings] and [Settings of Debugging Trace]) are saved when they are set.
3.1.2.2 Automatic Data Backup and Deletion
Note
Time required by automatic data backup and deletion
The automatic data backup and deletion function will back up the management information, log information in Log Viewer format, andlog information, and delete the log information.
- 164 -
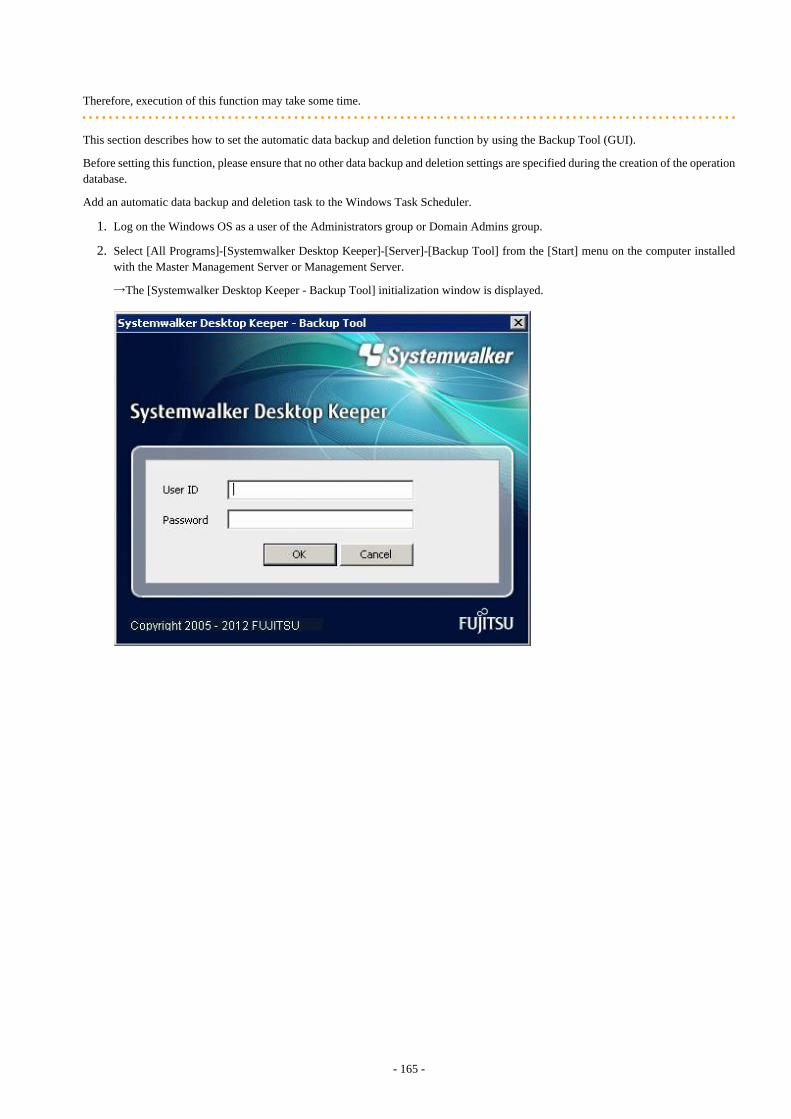
Therefore, execution of this function may take some time.
This section describes how to set the automatic data backup and deletion function by using the Backup Tool (GUI).
Before setting this function, please ensure that no other data backup and deletion settings are specified during the creation of the operationdatabase.
Add an automatic data backup and deletion task to the Windows Task Scheduler.
1. Log on the Windows OS as a user of the Administrators group or Domain Admins group.
2. Select [All Programs]-[Systemwalker Desktop Keeper]-[Server]-[Backup Tool] from the [Start] menu on the computer installedwith the Master Management Server or Management Server.
→The [Systemwalker Desktop Keeper - Backup Tool] initialization window is displayed.
- 165 -
3. Enter the user ID (granted with the authority to back up and restore information) and password registered in the Server SettingsTool, and then click [OK]. (The user ID and password of the Primary Administrator can also be used for logon.)
→The [Backup Tool] window is displayed.
- 166 -
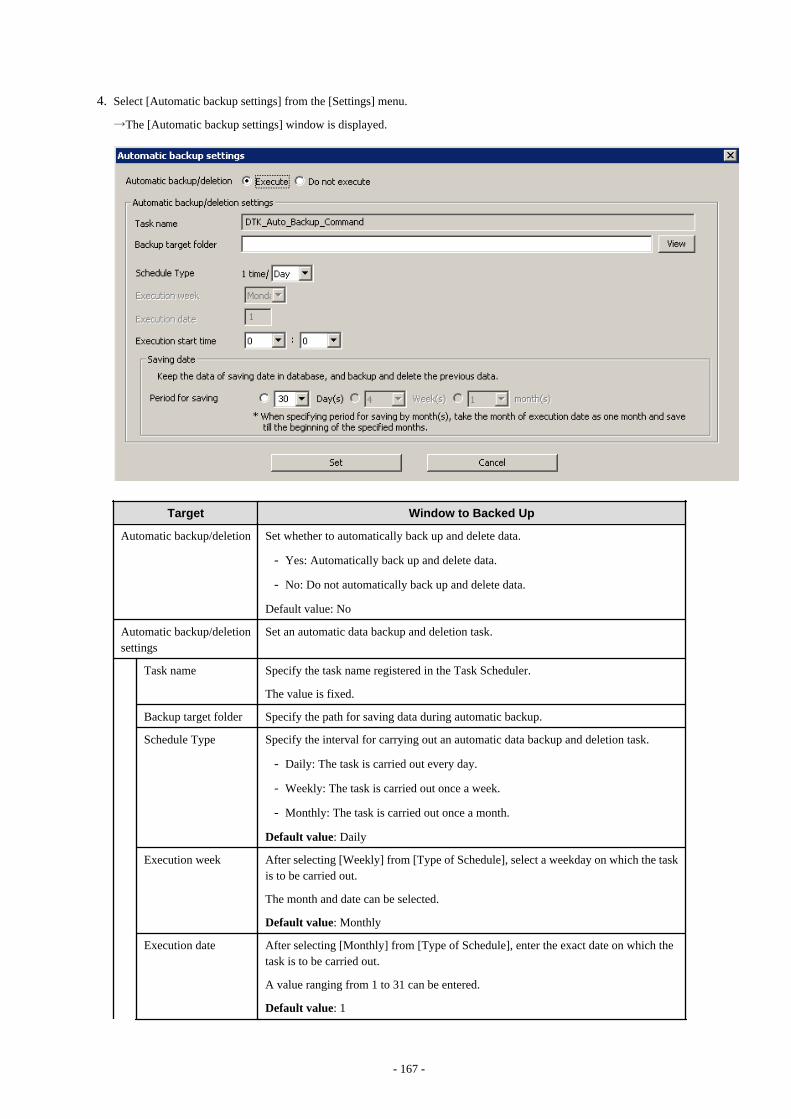
4. Select [Automatic backup settings] from the [Settings] menu.
→The [Automatic backup settings] window is displayed.
Target Window to Backed Up
Automatic backup/deletion Set whether to automatically back up and delete data.
- Yes: Automatically back up and delete data.
- No: Do not automatically back up and delete data.
Default value: No
Automatic backup/deletionsettings
Set an automatic data backup and deletion task.
Task name Specify the task name registered in the Task Scheduler.
The value is fixed.
Backup target folder Specify the path for saving data during automatic backup.
Schedule Type Specify the interval for carrying out an automatic data backup and deletion task.
- Daily: The task is carried out every day.
- Weekly: The task is carried out once a week.
- Monthly: The task is carried out once a month.
Default value: Daily
Execution week After selecting [Weekly] from [Type of Schedule], select a weekday on which the taskis to be carried out.
The month and date can be selected.
Default value: Monthly
Execution date After selecting [Monthly] from [Type of Schedule], enter the exact date on which thetask is to be carried out.
A value ranging from 1 to 31 can be entered.
Default value: 1
- 167 -
Target Window to Backed Up
Execution start time Set the time at which an automatic data backup and deletion task is to be carried out.
A time ranging from 00:00 to 23:59 can be set.
Default value: 00:00
Saving date Specify the time for saving operation logs.
- Day: The value ranges from 1 to 366.
- Week: The value ranges from 1 to 54.
- Month: The value ranges from 1 to 13.
If [Daily] is selected from [Type of Schedule], only [Day] is available here.
If [Weekly] is selected from [Type of Schedule], [Day] and [Week] are available here.
If [Monthly] is selected from [Type of Schedule], [Day] and [Month] are available here.
Default value:
- Day: 30
- Week: 4
- Month: 1
5. Click [Set].
Note
If a date later than 29 is specified for [Execution Date], the following message will be displayed:
If the selected date is unavailable in the specified execution month, the automatic data backup and deletion task cannot be carried out. Toensure that the task can be carried out every month, please specify a date earlier than 28.
Note
Edit a scheduled task by using the Task Scheduler of the OS.
After completing the Automatic Backup Settings, create a task named "DTK_Auto_Backup_Command" in the Task Scheduler of the OS.If the task is directly changed, the change cannot be updated in the [Automatic backup settings] window.
In addition, if the settings are changed in the [Automatic backup settings] window after a direct task change, the task change is overwrittenby the change of settings in the [Automatic backup settings] window.
3.1.2.3 Using the Backup Commands This section describes how to process the data in the database by using the backup commands provided by the Systemwalker DesktopKeeper. The backup commands do not provide the task scheduling function.
- 168 -

Point
Adding the backup commands to the Task Scheduler will facilitate the command execution.
The Task Scheduler provided by the OS by default or the task scheduling software ARCserve can be used to set scheduled backup tasks.If using the Windows Server® 2008 OS, please set scheduled tasks as the administrator.
Note
Notes on using the backup commands
[V14.2.0-dedicated commands]
The backup commands are dedicated to V14.2.0. These commands may fail if they are used in the environment constructed underother versions.
[Current folder during command execution]
When manually running the backup commands, please set the current folder of the backup commands to the folder that saves thebackup commands.
[Saving folder]Installation folder of the database-related files\BackupCommandExample: C:\DTKDB\BackupCommand
[Available space on the output target disk]
Please ensure that there is sufficient available space on the disk specified as the output target disk for the backup files. If the disk spaceis insufficient to save a large amount of data, please correspondingly narrow the date range of the targets to be saved.
[Available space on the installation target disk of the database-related files]
Please ensure that there is sufficient available space on the installation target disk of the database-related files. When a large numberof logs are to be backed up, there must be enough available space on the installation target disk of the database-related files. For detailsabout disk capacity requirements, please see "Operation Environment" in the "Systemwalker Desktop Keeper User’s Guide".
[Command execution authority in Windows Server® 2008]
In the Windows Server® 2008 OS, execution of the backup commands requires the administrator authority. Before running the backupcommands, please log on to the Windows OS as a user of the Administrators group or Domain Admins group.
[Enable the command extension function of the command prompt]
Execution of the backup commands requires that the command extension function of the command prompt be enabled.The command extension function is enabled by default. Run "echo %CMDEXTVERSION%" in the command prompt window. If theoutput value is larger than or equal to 2, you can infer that the command extension function is enabled.
[Date supported by the backup commands]
The date range that supports execution of the backup commands is from 2001-01-01 to 2034-12-31. The backup commands may notfunction on other dates.
[Data conversion]
The backup commands may convert data in a log and then output the converted log to a CSV file. The following data is converted:
- TAB, CR, and LF →Replaced by Single-byte spaces.
- " (double quotation marks) → "" (doubled)
[Attached data processing]
The backup commands do not back up the attached data (including the screen capture data and backup original files). The structure ofthe target folder that saves the attached data is as follows. Please back up the attached data separately by application. For details aboutthe target folder that saves the attached data, please see "2.2.5.9 Set Saving Target Folder ". In addition, the attached data cannot bedeleted even by the log deletion command (DTLDELR).
[Structure]
- 169 -
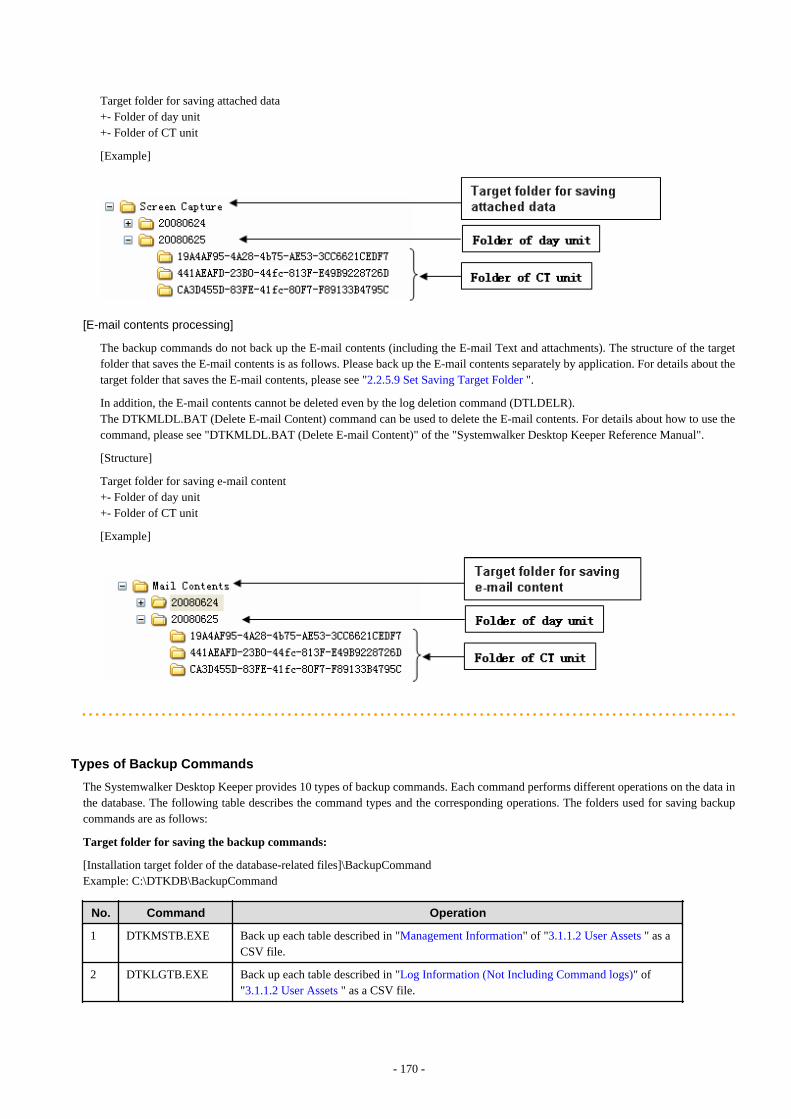
Target folder for saving attached data+- Folder of day unit+- Folder of CT unit
[Example]
[E-mail contents processing]
The backup commands do not back up the E-mail contents (including the E-mail Text and attachments). The structure of the targetfolder that saves the E-mail contents is as follows. Please back up the E-mail contents separately by application. For details about thetarget folder that saves the E-mail contents, please see "2.2.5.9 Set Saving Target Folder ".
In addition, the E-mail contents cannot be deleted even by the log deletion command (DTLDELR). The DTKMLDL.BAT (Delete E-mail Content) command can be used to delete the E-mail contents. For details about how to use thecommand, please see "DTKMLDL.BAT (Delete E-mail Content)" of the "Systemwalker Desktop Keeper Reference Manual".
[Structure]
Target folder for saving e-mail content+- Folder of day unit+- Folder of CT unit
[Example]
Types of Backup Commands
The Systemwalker Desktop Keeper provides 10 types of backup commands. Each command performs different operations on the data inthe database. The following table describes the command types and the corresponding operations. The folders used for saving backupcommands are as follows:
Target folder for saving the backup commands:
[Installation target folder of the database-related files]\BackupCommandExample: C:\DTKDB\BackupCommand
No. Command Operation
1 DTKMSTB.EXE Back up each table described in "Management Information" of "3.1.1.2 User Assets " as aCSV file.
2 DTKLGTB.EXE Back up each table described in "Log Information (Not Including Command logs)" of"3.1.1.2 User Assets " as a CSV file.
- 170 -
No. Command Operation
3 DTKLG1T.EXE Output the log information from the database to CSV files in a specified format supportedby the Log Viewer, and view the log information.
4 DTKLGAT.BAT Collectively output the log information from the database to CSV files in Log Viewer format,and view the log information.
5 DTKDELR.EXE Delete the data in all the tables described in "Log Information (Not Including Commandlogs)" of "3.1.1.2 User Assets " from the database.
6 DTKBKDL.BAT Back up each table described in "Log Information (Not Including Command logs)" of"3.1.1.2 User Assets " as a CSV file and then delete the backed up table data from thedatabase.
7 DTKCVDL.BAT Back up each table described in "Log Information (Not Including Command logs)" of"3.1.1.2 User Assets " as a CSV file and collectively output log information from the databaseto CSV files. Then, delete the backed up table data from the database.
8 DTKBFDM.EXE Internal command invoked by other backup commands
Used for calculating the number of past days
9 DTKELSET.BAT Internal command invoked by other backup commands
Used for re-setting the value of [ERRORLEVEL]
10 DTKNUMCK.BAT Internal command invoked by other backup commands
Used for checking whether the input parameter values of the backup commands are numeric
For details about each command, see "Command Reference" of the "Systemwalker Desktop Keeper Reference Manual".
Edit Backup Commands
The following commands must be edited before they are used. Please edit the following backup commands based on the operatingenvironment.
- DTKLGAT.BAT
- DTKBKDL.BAT
- DTKCVDL.BAT
DTKLGAT.BAT
To use "DTKLGAT.BAT", please open it with a text editor and edit the following contents that are underlined and in bold type.
rem *********************************************************
rem * Block for specifying operational parameters *
rem *********************************************************
rem Database name
set SQLDB=DTKDB
rem User ID used for connecting to the database
set SQLuser=(*1)
rem Password corresponding to the preceding user ID
set SQLpsw=(*2)
set startday=%1
set endday=%2
rem Name of the target drive for saving the output files
set bkdrive=(*3)
- 171 -
rem Name of the target folder for saving the output files (in the output process)
set bkdir=(*4)
rem Name of the folder created under the preceding bkdir folder
set csvdir=(*5)
rem Extraction key (A null value indicates that the client time is used. The value "SERVER"
indicates that the server time is used.)
set how=(*6)
rem *********************************************************
rem * Block for completing the process *
rem *********************************************************
:allend0
pause(*7)
EXIT /B 0
:allend1
pause(*7)
EXIT /B 1
No. Editing Content Configuration
Example
(*1) Enter the user ID (granted with the authority to back up and restore information) registeredin the Server Settings Tool.
BKUSER
(*2) Enter the password corresponding to the preceding user ID. BKPSW
(*3) Enter the name of the target drive for saving the output files. (The drive letter must befollowed by ":".)
C:
(*4) Enter the name of the target folder for saving the output files in the output process. ("\" mustbe added before the folder name.)
\DTKBKUP
(*5) Enter the name of the target folder for saving the output files, created under the folder set in(*4).
%2 indicates the end date of the backup target period, after which the folder is named.(Example: If the end date of the backup target period is April 20, 2007, the folder name is20070420.)
LV%2
(*6) Set whether client time (log occurrence date and time on the CT) or server time (log savingtime on the server) is used in extraction of logs of the backup/delete target period.
- Not specifiedUse the client time (log occurrence date and time on the CT).
- SERVERUse the server time (log saving time on the server).
SERVER
(*7) Enter "pause" or "rem pause".
- "pause"The program will remain paused after the command execution ends. To exit the pausestate, press any key in the command prompt window.
- "rem pause"The program will close after the command execution ends.
rem pause
- 172 -
DTKBKDL.BAT
To use "DTKBKDL.BAT", please open it with a text editor and edit the following contents that are underlined and in bold type.
rem *********************************************************
rem * Block for specifying operational parameters *
rem *********************************************************
rem Database name
set SQLDB=DTKDB
rem User ID used for connecting to the database
set SQLuser=(*1)
rem Password corresponding to the preceding user ID
set SQLpsw=(*2)
rem Name of the target drive for saving the output files
set bkdrive=(*3)
rem Name of the target folder for saving the output files (in the output process)
set bkdir=(*4)
rem Name of the folder created under the preceding bkdir folder
set logdir=(*5)
em Extraction key (A null value indicates that the client time is used. The value "SERVER"
indicates that the server time is used.)
set how=(*6)
rem *********************************************************
rem * Block for completing the process *
rem *********************************************************
:allend0
pause(*7)
EXIT /B 0
:allend1
pause(*7)
EXIT /B 1
No. Editing Content Configuration
Example
(*1) Enter the user ID (granted with the authority to back up and restore information) registeredin the Server Settings Tool.
BKUSER
(*2) Enter the password corresponding to the preceding user ID. BKPSW
(*3) Enter the name of the target drive for saving the output files. (The drive letter must befollowed by ":".)
C:
(*4) Enter the name of the target folder for saving the output files. ("\" must be added before thefolder name.)
\DTKBKUP
(*5) Enter the name of the target folder for saving the output files, created under the folder setin (*4).
%2 indicates the end date of the backup target period, after which the folder is named.(Example: If the end date of the backup target period is April 20, 2007, the folder name is20070420.)
BK%2
- 173 -
No. Editing Content ConfigurationExample
(*6) Set whether client time (log occurrence date and time on the CT) or server time (log savingtime on the server) is used in extraction of logs of the backup/delete target period.
- Not specifiedUse the client time (log occurrence date and time on the CT).
- SERVERUse the server time (log saving time on the server).
SERVER
(*7) Enter "pause" or "rem pause".
- "pause"The program will remain paused after the command execution ends. To exit the pausestate, press any key in the command prompt window.
- "rem pause"The program will close after the command execution ends.
rem pause
DTKCVDL.BAT
To use "DTKCVDL.BAT", please open it with a text editor and edit the following contents that are underlined and in bold type.
rem *********************************************************
rem * Block for specifying operational parameters *
rem *********************************************************
rem Database name
set SQLDB=DTKDB
rem User ID used for connecting to the database
set SQLuser=(*1)
rem Password corresponding to the preceding user ID
set SQLpsw=(*2)
rem Number of days from the end date of the target period to the execution date
set bkdays=(*3)
set bkMonth=(*3)
set bkdate=(*3)
rem State date of the target period (date of the first record to be processed)
set startday=(*4)
DTKBFDM.EXE %bkdays% %bkMonth% %bkdate%
if errorlevel 20350101 goto errend4
if errorlevel 20010101 goto next1
goto errend4
:next1
set endday=%errorlevel%
rem Name of the target drive for saving the output files
set bkdrive=(*5)
rem Name of the target folder for saving the output files (in the output process)
set bkdir=(*6)
rem Name of the folder created under the preceding bkdir folder (BK indicates the backup data
format.)
- 174 -
set logdir=(*7)
rem Name of the folder created under the preceding bkdir folder (LV indicates the Log Viewer
format.)
set csvdir=(*8)
rem Extraction key (A null value indicates that the client time is used. The value "SERVER"
indicates that the server time is used.)
set how=(*9)
rem *********************************************************
rem * Block for completing the process *
rem *********************************************************
:allend0
pause(*10)
EXIT /B 0
:allend1
pause(*10)
EXIT /B 1
No. Editing Content Configuration Example
(*1) Enter the user ID (granted with the authority to back up and restoreinformation) registered in the Server Settings Tool.
BKUSER
(*2) Enter the password corresponding to the preceding user ID. BKPSW
(*3) Enter the end date of the backup/delete target period, that is, a date severaldays or months before the date that “DTKCVDL.BAT” is executed. Fordetails about the values, please see "Backup/Delete Target Period".
- set bkdays= Enter the number of days or monthsThe number of days can range from 0 to 2000, and the number of monthscan range from 0 to 120. <bkmonth> determines whether the value of<bkdays> indicates the number of days or months.
- set bkMonth= If it is set to "MONTH", the value of <bkdays> indicatesthe number of months. If it is not set to any value, the value of <bkdays>indicates the number of days.If it is set to "MONTH", please set <bkdays> to the number of months.
- set bkdate= If the value of <bkmonth> is "MONTH", set <bkdate> to99 or a value ranging from 1 to 31. The value ranging from 1 to 31indicates a corresponding specific date in the specified month. The value99 indicates the end of the specified month. If <bkmonth> does not haveany value, it is not necessary to set <bkdate>.
(For example, to specify 90 days ago:)
set bkdays=90
set bkMonth=
set bkdate=
(For example, to specify the first day of the month that is three months ago:)
set bkdays=3
set bkMonth=MONTH
set bkdate=1
(To specify 90 days ago:)
set bkdays=90set bkMonth=set bkdate=
(To specify the first day of themonth that is three months ago:)
set bkdays=3set bkMonth=MONTHset bkdate=1
(To specify the last day of themonth that is three months ago:)
set bkdays=3set bkMonth=MONTHset bkdate=99
- 175 -

No. Editing Content Configuration Example
(For example, to specify the last day of the month that is three months ago:)
set bkdays=3
set bkMonth=MONTH
set bkdate=99
(*4) Enter the start date of the backup/delete target period. The data between thestart date and the end date set in (*4) will be backed up or deleted.
The start date can be set to "00000000" or a value ranging from "20010000"to "20349999". The start date must be earlier than the end date set in (*3).Otherwise, errors may occur.
If the last four digits of the value ranging from 20010000 to 20349999 cannotbe found in the calendar, the following dates will be specified:
- If the last four digits are "0000", the start date is January, 1.
- If the last four digits are a value ranging from "1232" to "9999", the startdate is January, 1 of the next year.
- If the last two digits are "00", the start date is the first day of the specifiedmonth.
- If the last two digits are a value ranging from "the day after the end dateof the specified month" to "99", the start date is the first day of the monthfollowing the specified month.
If "00000000" is entered, the start date is the date from which the databasestarts storing data.
For details about the values, please see "Backup/Delete Target Period".
00000000
(*5) Enter the name of the target drive for saving the output files. (The drive lettermust be followed by ":".)
C:
(*6) Enter the name of the target folder for saving the output files in the outputprocess. ("\" must be added before the folder name.)
\DTKBKUP
(*7) Enter the name of the target folder for saving the output files, created underthe folder set in (*7).
%endday% indicates the end date of the backup target period, after whichthe folder is named. (Example: If the end date of the backup target period isApril 20, 2007, the folder name is 20070420.)
BK%endday%
(*8) Enter the name of the target folder for saving the output files, created underthe folder set in (*7).
%endday% indicates the end date of the backup target period, after whichthe folder is named. (Example: If the end date of the backup target period isApril 20, 2007, the folder name is 20070420.)
LV%endday%
(*9) Set whether client time (log occurrence date and time on the CT) or servertime (log saving time on the server) is used in extraction of logs of thebackup/delete target period.
- Not specifiedUse the client time (log occurrence date and time on the CT).
- SERVERUse the server time (log saving time on the server).
SERVER
(*10) Enter "pause" or "rem pause". rem pause
- 176 -

No. Editing Content Configuration Example
- "pause"The program will remain paused after the command execution ends. Toexit the pause state, press any key in the command prompt window.
- "rem pause"The program will close after the command execution ends.
Backup/Delete Target Period
To use "DTKCVDL.BAT", the backup/delete target period must be specified. The following figure shows (*3) and (*4) described inthe preceding table, which are related to the configuration of the target period. For details about the editing contents, please see thepreceding table.
Preparations
When backing up data for restoration, please record the following setting information. (Obtain the collected bitmaps and notes of thewindows.)
Target Window to Be Backed Up
Management console [Terminal Operation Settings]
Server Settings Tool [System Settings]
[Setting of Active Directory Linkage] *when the Active Directory linkage function is used
[Administrator Notification Settings]
[Management Server Settings]
[Self Version Upgrade Settings for Folder/CT]
Perform the following steps to display the [Terminal Operation Settings] window:
1. Start [Management Console].
2. Select [Terminal Operation Settings] from the [Operation Settings] menu.
→The [Terminal Operation Settings] window is displayed.
- 177 -
For details about how to display the windows of the Server Settings Tool, please see "2.2.5 Set Environment of Management Server/MasterManagement Server ".
Note
Please properly store the recorded information.
The preceding setting information cannot be backed up by the Backup Tool. After restoring data, it is necessary to restore the terminaloperation settings to the status before backup; therefore, ensure that the information recorded along with the backup data is properly stored.
Start Backup
For details about how to use the backup commands, please see "Command Reference" of the "Systemwalker Desktop Keeper ReferenceManual".
Note
Please ensure that services are stopped before command execution.
Stop the "Level Control Service" and "Server Service" before the backup or restoration operation is performed. Otherwise, data may beincomplete during backup or restoration.
When selecting backup commands after batch files are created, please ensure that the Server Service and Level Control Service are stopped,as described in "Examples of Creating Batch Files in the Task Scheduler".
In addition, after starting SWServerService or during date change (12am), confirmation of available database capacity will be performed.In the 15 minutes till the confirmation operation has completed, service may not be able to be stopped.
Therefore, when registering to scheduled task, please prevent it from executing batch file at the above time frame.
The following procedure must be manually performed:
1. Log on the PC as a user of the local Administrators group or Domain Admins group. If there is another running application, exit it.
2. In the displayed Windows Services window, select the following services and select [Stop] from the [Action] menu. It will take 30seconds to 1 minute. In addition, after starting SWServerService or during date change (12am), confirmation of available databasecapacity will be performed. In the 15 minutes till the confirmation operation has completed, service may not be able to be stopped,please confirm later.
- SWLevelControlService
- SWServerService
The following examples are used to illustrate how to add the backup commands to the Task Scheduler and execute the commands in twomodes.
Example I: Backing Up and Deleting the Logs Saved 91 Days Ago (Log Storage Life: 3 Months)
Execution Conditions
- Set the data storage life to 90 days. The data stored longer than this period will be backed up to files and no longer be kept in thedatabase.
- Create a folder named after the backup date in the specified drive every day and back up the data stored in the database for longerthan 91 days to the created folder.
- The backup targets are as follows:
- All the tables described in “Management Information” (with DTKMSTB)
- 178 -
- All the tables (log data in the DB and command logs) described in “Log Information”, as well as the log information storedin the database (with DTKCVDL)
For details about the data to be backed up, please see "3.1.1.2 User Assets ".
- Delete the data that is already backed up from the database (with DTKCVDL).
- Use the Task Scheduler of the OS to enable automatic backup. Stop the services on the Systemwalker Desktop Keeper Server sidebefore command execution in order to avoid conflict between the access operation of services and the database record deletionoperation.
- After the server-side services are stopped, start command execution at 02:00 a.m. when there are fewer database connections.
- Verify the time required by backup and deletion of the database records. Assume that it takes about 30 minutes in total.
Execution Settings
To perform operations under the preceding execution conditions, use the two provided backup commands DTKMSTB and DTKCVDL.
In the execution settings, the structures of the target drive and folder for saving backup files are as follows (XXXXXXXX indicatesthe end date):
- All the tables described in “Management Information”
→In D:\BACKUP\XXXXXXXX\MSXXXXXXXX\
- All the tables (log data in the DB and command logs) described in “Log Information”
→In D:\BACKUP\XXXXXXXX\BKXXXXXXXX\
- Log information stored in the database
→In D:\BACKUP\XXXXXXXX\LVXXXXXXXX\
For details about the data to be backed up, please see "3.1.1.2 User Assets ".
To implement the execution settings, perform the following steps:
1. Modify the DTKCVDL contents as follows:
set SQLuser=bkuser ···Set the user ID used for connecting to the database.
set SQLpsw=bkpsw ···Set the password corresponding to the preceding user ID.
set bkdays=90 ···Set the data storage life.
set bkdrive=D: ···Set the target drive for backing up the logs.
set bkdir=\BACKUP\%endday% ···Set the target folder for backing up the logs.
Change pause to rem pause.
2. Use the text editor to create a batch file to be executed by the "Task Scheduler". For details about how to create a batch file, please see "Examples of Creating Batch Files in the Task Scheduler".
3. Save the created batch file as the "DailySch.bat" file under C:\DTK\BackupCommand.
4. Create the target folder for log backup, specified in the execution settings. That is, D:\BACKUP in the example of execution settings.
5. Add "XXXXX.bat" to the "Task Scheduler".
a. Select [Start]-[Settings]-[Control Panel]-[Task Scheduler] and double click to add a scheduled task.
b. Click [Browse] in the Start a Program window of the Task Scheduler and select "C:\DTK\BackupCommand\XXXXX.bat".
c. Enter the task name and set the task to run at 02:00 a.m. every day.
d. Since task execution requires a user ID and a password, set the user ID and password of a user with administrator authority.
Examples of Creating Batch Files
The following examples describe how to create an operation batch file and a registration batch file to be added to the Task Scheduler.
- 179 -
In this example of creating batch commands, the return value of the Net command invoked inside the batch file should not be used asthe return value of the batch commands. Please take cautions when using the return value of the Net command to control the furtherprocessing.
Example of Creating an Operation Batch File (DailySch.bat)
@ECHO OFF
SETLOCAL
rem ***********************************************************
rem * Set *
rem ***********************************************************
rem Name of the target drive for saving the output files
SET BKDRIVE=D:
rem Name of the target folder for saving the output files
SET BKFOLDERNAME=\BACKUP
rem Number of days from the end date of the target period to the execution date
SET DELEND=90
rem User ID used for connecting to the database
SET SQLUSER=dtkbkuser
rem Password used for connecting to the database
SET SQLPASSWORD=dtkpsw
rem Target folder for saving the backup commands
SET BACKUPCOMMANDFOLDER=C:\DTK\BackupCommand
rem Extraction key (A null value indicates that the client time is used. The value "SERVER"
indicates that the server time is used.)
SET HOW=SERVER
rem ***************************************************************
rem * Block for processing *
rem ***************************************************************
path %BACKUPCOMMANDFOLDER%;%path%
echo Start the backup process. (%TIME%)
%BKDRIVE%
CD %BKFOLDERNAME%
rem Calculate the backup end date.
%BACKUPCOMMANDFOLDER%\DTKBFDM.EXE %DELEND%
rem Create a folder named after the execution date.
SET TEMPDATE=%ERRORLEVEL%
MKDIR %TEMPDATE%
rem Create the target folder for saving backup files.
SET MSFOLDER=%BKDRIVE%%BKFOLDERNAME%\%TEMPDATE%\MS%TEMPDATE%
MKDIR %MSFOLDER%
echo Stop the DTK service (Level Control Service).
net stop SWLevelControlService
if ERRORLEVEL 1 goto recover1
echo Stop the DTK service (Server Service).
net stop SWServerService
if ERRORLEVEL 1 goto recover2
rem Back up the master system data.
%BACKUPCOMMANDFOLDER%\DTKMSTB.EXE DTKDB %SQLUSER% %SQLPASSWORD% %MSFOLDER%
- 180 -
if ERRORLEVEL 1 goto recover3
rem Back up and delete the log system data.
CALL %BACKUPCOMMANDFOLDER%\DTKCVDL
if ERRORLEVEL 1 goto recover4
echo Start the DTK service.
net start SWLevelControlService
net start SWServerService
echo The scheduled task is completed successfully. (%TIME%)
EXIT /B 0
:recover1
echo An error occurs when stopping the Level Control Service.
echo Cancel backup and start the DTK service (Level Control Service).
goto allend1
:recover2
echo An error occurs when stopping the Server Service.
echo Cancel backup and start the DTK services (Level Control Service and Server Service).
goto allend1
:recover3
echo An error occurs when backing up the management information.
echo Cancel backup and start the DTK services (Level Control Service and Server Service).
goto allend1
:recover4
echo An error occurs when backing up and deleting logs.
echo Cancel log backup and deletion and start the DTK services (Level Control Service and Server
Service).
goto allend1
:allend1
echo Start the DTK services.
net start SWLevelControlService
net start SWServerService
echo The scheduled task ends abnormally. (%TIME%)
EXIT /B 1
Example of Creating a Registration Batch File (XXXXX.bat)
@ECHO OFF
SETLOCAL
rem ***********************************************************
rem * Set *
rem ***********************************************************
set BACKUPCOMMANDFOLDER=C:\DTK\BackupCommand
rem ***********************************************************
rem * Block for processing *
rem ***********************************************************
rem Calculate the execution date.
%BACKUPCOMMANDFOLDER%\DTKBFDM.EXE 0
SET EXECDAY=%ERRORLEVEL%
call DailySch.bat > %EXECDAY%.log
if ERRORLEVEL 1 goto allend1
EXIT /B 0
- 181 -
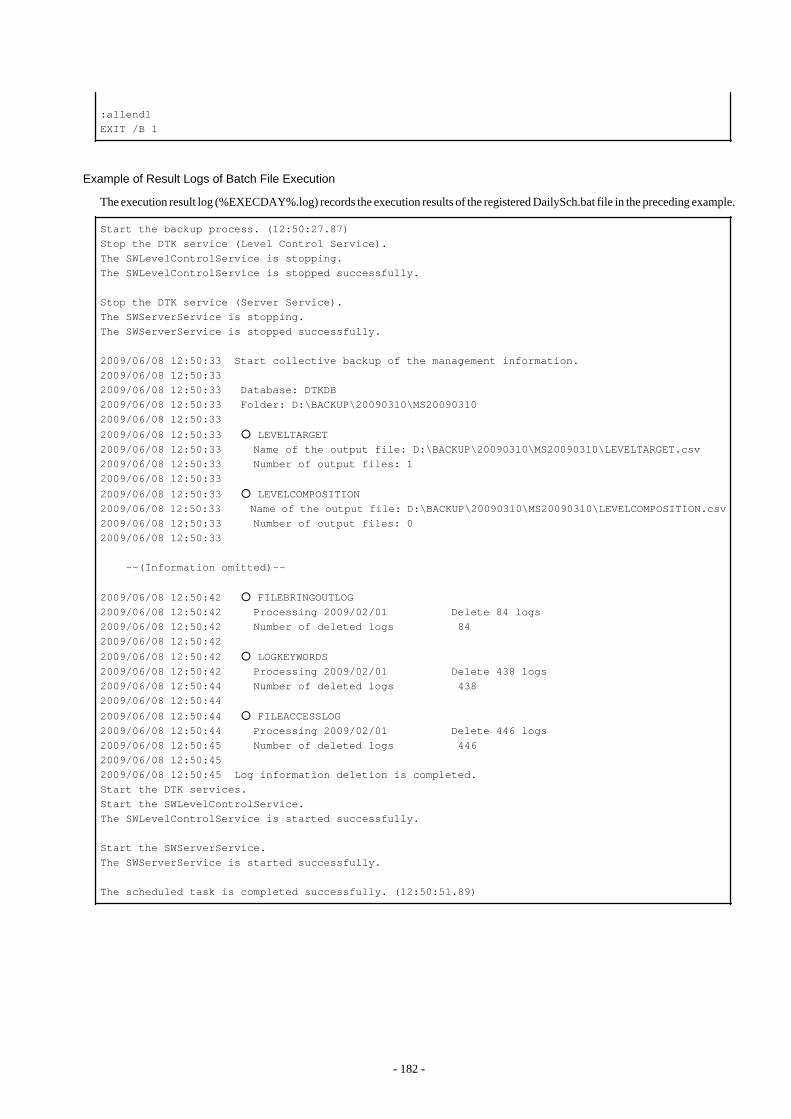
:allend1
EXIT /B 1
Example of Result Logs of Batch File Execution
The execution result log (%EXECDAY%.log) records the execution results of the registered DailySch.bat file in the preceding example.
Start the backup process. (12:50:27.87)
Stop the DTK service (Level Control Service).
The SWLevelControlService is stopping.
The SWLevelControlService is stopped successfully.
Stop the DTK service (Server Service).
The SWServerService is stopping.
The SWServerService is stopped successfully.
2009/06/08 12:50:33 Start collective backup of the management information.
2009/06/08 12:50:33
2009/06/08 12:50:33 Database: DTKDB
2009/06/08 12:50:33 Folder: D:\BACKUP\20090310\MS20090310
2009/06/08 12:50:33
2009/06/08 12:50:33 ○ LEVELTARGET
2009/06/08 12:50:33 Name of the output file: D:\BACKUP\20090310\MS20090310\LEVELTARGET.csv
2009/06/08 12:50:33 Number of output files: 1
2009/06/08 12:50:33
2009/06/08 12:50:33 ○ LEVELCOMPOSITION
2009/06/08 12:50:33 Name of the output file: D:\BACKUP\20090310\MS20090310\LEVELCOMPOSITION.csv
2009/06/08 12:50:33 Number of output files: 0
2009/06/08 12:50:33
~~(Information omitted)~~
2009/06/08 12:50:42 ○ FILEBRINGOUTLOG
2009/06/08 12:50:42 Processing 2009/02/01 Delete 84 logs
2009/06/08 12:50:42 Number of deleted logs 84
2009/06/08 12:50:42
2009/06/08 12:50:42 ○ LOGKEYWORDS
2009/06/08 12:50:42 Processing 2009/02/01 Delete 438 logs
2009/06/08 12:50:44 Number of deleted logs 438
2009/06/08 12:50:44
2009/06/08 12:50:44 ○ FILEACCESSLOG
2009/06/08 12:50:44 Processing 2009/02/01 Delete 446 logs
2009/06/08 12:50:45 Number of deleted logs 446
2009/06/08 12:50:45
2009/06/08 12:50:45 Log information deletion is completed.
Start the DTK services.
Start the SWLevelControlService.
The SWLevelControlService is started successfully.
Start the SWServerService.
The SWServerService is started successfully.
The scheduled task is completed successfully. (12:50:51.89)
- 182 -

Example II: Deleting the Logs Saved 91 Days Ago and Backing Up the Logs Saved in the Recent Week (LogStorage Life: 3 Months)
Execution Conditions
- Set the data storage life to 90 days. The data stored longer than this period will be backed up to files and no longer be kept in thedatabase.
- Create a folder named after the backup start date in the specified drive every day and back up the data of the recent week to thecreated folder.
- The backup targets are as follows:
- All the tables described in “Management Information” (with DTKMSTB)
- All the tables (log data in the DB and command logs) described in “Log Information”, as well as the log information storedin the database
For details about the data to be backed up, please see "3.1.1.2 User Assets ".
- Delete the data saved in the database 91 days ago.
- Use the Task Scheduler of the OS to enable automatic backup. Stop the services on the Systemwalker Desktop Keeper Server sidebefore command execution in order to avoid conflict between the access operation of services and the database record deletionoperation.
- After the server-side services are stopped, start command execution at 02:00 a.m. when there are fewer database connections.
- Verify the time required by backup and deletion of the database records. Assume that it takes about 30 minutes in total.
The following figure shows an example.
For example, set the backup target period to the week before the execution date and delete the logs saved 91 days ago.
Execution Settings
To perform operations under the preceding execution conditions, use the provided backup commands DTKMSTB, DTKLGTB,DTKLG1T and DTKDELR.
In the execution settings, the structures of the target drive and folder for saving backup files are as follows (XXXXXXXX indicatesthe backup start date):
- All the tables described in "Management Information"
→In D:\BACKUP\XXXXXXXX\MSXXXXXXXX\
- All the tables (log data and command logs in the DB) described in “Log Information”
→In D:\BACKUP\XXXXXXXX\BKXXXXXXXX\
- Log information stored in the database
→In D:\BACKUP\XXXXXXXX\LVXXXXXXXX\
For details about the data to be backed up, please see "3.1.1.2 User Assets ".
To implement the execution settings, perform the following steps:
- 183 -
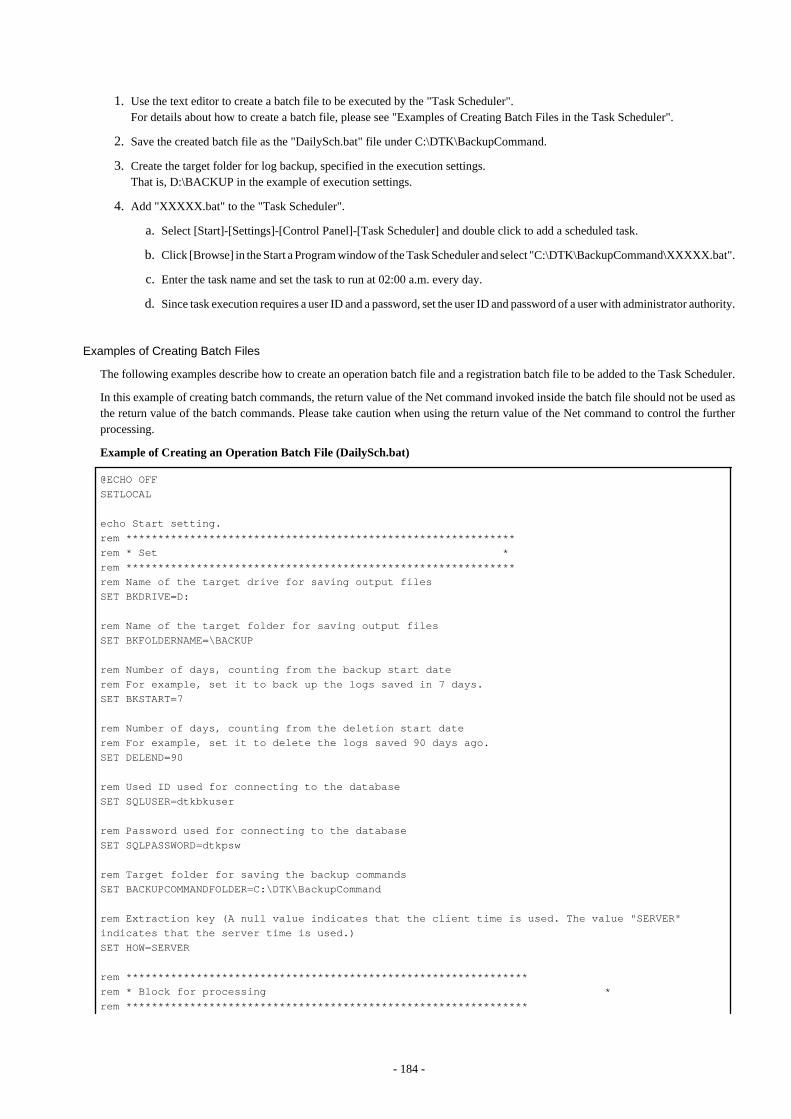
1. Use the text editor to create a batch file to be executed by the "Task Scheduler". For details about how to create a batch file, please see "Examples of Creating Batch Files in the Task Scheduler".
2. Save the created batch file as the "DailySch.bat" file under C:\DTK\BackupCommand.
3. Create the target folder for log backup, specified in the execution settings. That is, D:\BACKUP in the example of execution settings.
4. Add "XXXXX.bat" to the "Task Scheduler".
a. Select [Start]-[Settings]-[Control Panel]-[Task Scheduler] and double click to add a scheduled task.
b. Click [Browse] in the Start a Program window of the Task Scheduler and select "C:\DTK\BackupCommand\XXXXX.bat".
c. Enter the task name and set the task to run at 02:00 a.m. every day.
d. Since task execution requires a user ID and a password, set the user ID and password of a user with administrator authority.
Examples of Creating Batch Files
The following examples describe how to create an operation batch file and a registration batch file to be added to the Task Scheduler.
In this example of creating batch commands, the return value of the Net command invoked inside the batch file should not be used asthe return value of the batch commands. Please take caution when using the return value of the Net command to control the furtherprocessing.
Example of Creating an Operation Batch File (DailySch.bat)
@ECHO OFF
SETLOCAL
echo Start setting.
rem *************************************************************
rem * Set *
rem *************************************************************
rem Name of the target drive for saving output files
SET BKDRIVE=D:
rem Name of the target folder for saving output files
SET BKFOLDERNAME=\BACKUP
rem Number of days, counting from the backup start date
rem For example, set it to back up the logs saved in 7 days.
SET BKSTART=7
rem Number of days, counting from the deletion start date
rem For example, set it to delete the logs saved 90 days ago.
SET DELEND=90
rem Used ID used for connecting to the database
SET SQLUSER=dtkbkuser
rem Password used for connecting to the database
SET SQLPASSWORD=dtkpsw
rem Target folder for saving the backup commands
SET BACKUPCOMMANDFOLDER=C:\DTK\BackupCommand
rem Extraction key (A null value indicates that the client time is used. The value "SERVER"
indicates that the server time is used.)
SET HOW=SERVER
rem ***************************************************************
rem * Block for processing *
rem ***************************************************************
- 184 -
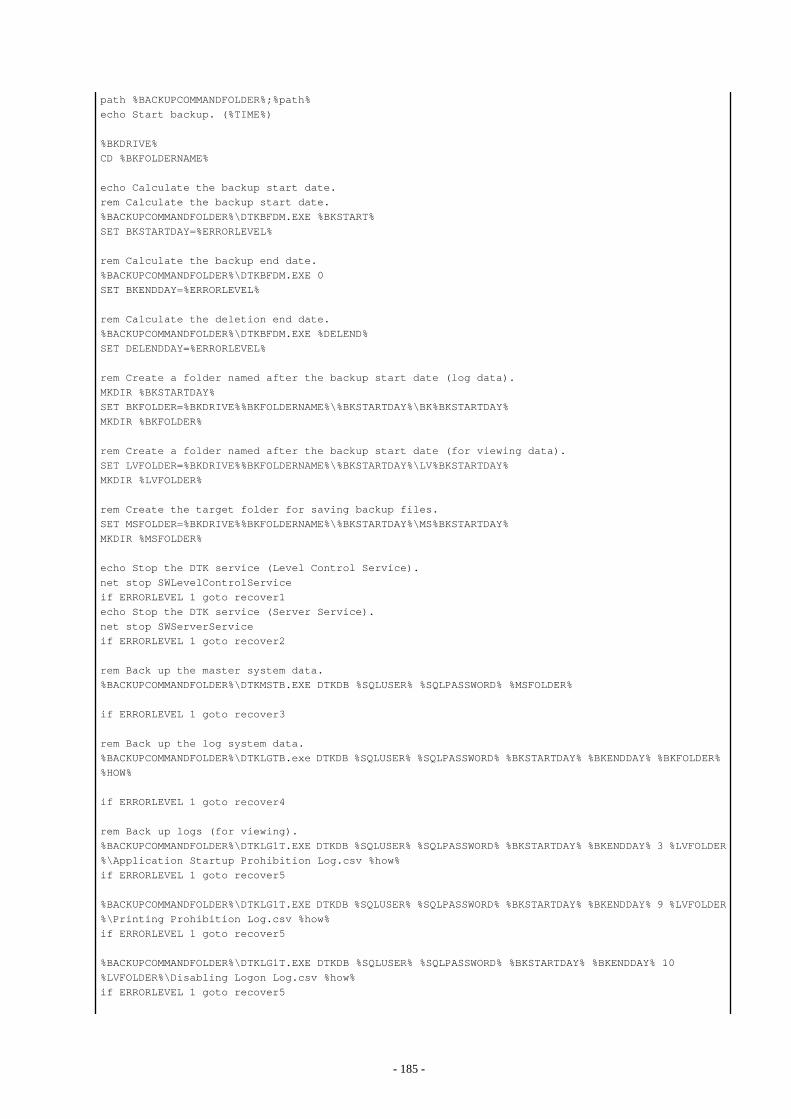
path %BACKUPCOMMANDFOLDER%;%path%
echo Start backup. (%TIME%)
%BKDRIVE%
CD %BKFOLDERNAME%
echo Calculate the backup start date.
rem Calculate the backup start date.
%BACKUPCOMMANDFOLDER%\DTKBFDM.EXE %BKSTART%
SET BKSTARTDAY=%ERRORLEVEL%
rem Calculate the backup end date.
%BACKUPCOMMANDFOLDER%\DTKBFDM.EXE 0
SET BKENDDAY=%ERRORLEVEL%
rem Calculate the deletion end date.
%BACKUPCOMMANDFOLDER%\DTKBFDM.EXE %DELEND%
SET DELENDDAY=%ERRORLEVEL%
rem Create a folder named after the backup start date (log data).
MKDIR %BKSTARTDAY%
SET BKFOLDER=%BKDRIVE%%BKFOLDERNAME%\%BKSTARTDAY%\BK%BKSTARTDAY%
MKDIR %BKFOLDER%
rem Create a folder named after the backup start date (for viewing data).
SET LVFOLDER=%BKDRIVE%%BKFOLDERNAME%\%BKSTARTDAY%\LV%BKSTARTDAY%
MKDIR %LVFOLDER%
rem Create the target folder for saving backup files.
SET MSFOLDER=%BKDRIVE%%BKFOLDERNAME%\%BKSTARTDAY%\MS%BKSTARTDAY%
MKDIR %MSFOLDER%
echo Stop the DTK service (Level Control Service).
net stop SWLevelControlService
if ERRORLEVEL 1 goto recover1
echo Stop the DTK service (Server Service).
net stop SWServerService
if ERRORLEVEL 1 goto recover2
rem Back up the master system data.
%BACKUPCOMMANDFOLDER%\DTKMSTB.EXE DTKDB %SQLUSER% %SQLPASSWORD% %MSFOLDER%
if ERRORLEVEL 1 goto recover3
rem Back up the log system data.
%BACKUPCOMMANDFOLDER%\DTKLGTB.exe DTKDB %SQLUSER% %SQLPASSWORD% %BKSTARTDAY% %BKENDDAY% %BKFOLDER%
%HOW%
if ERRORLEVEL 1 goto recover4
rem Back up logs (for viewing).
%BACKUPCOMMANDFOLDER%\DTKLG1T.EXE DTKDB %SQLUSER% %SQLPASSWORD% %BKSTARTDAY% %BKENDDAY% 3 %LVFOLDER
%\Application Startup Prohibition Log.csv %how%
if ERRORLEVEL 1 goto recover5
%BACKUPCOMMANDFOLDER%\DTKLG1T.EXE DTKDB %SQLUSER% %SQLPASSWORD% %BKSTARTDAY% %BKENDDAY% 9 %LVFOLDER
%\Printing Prohibition Log.csv %how%
if ERRORLEVEL 1 goto recover5
%BACKUPCOMMANDFOLDER%\DTKLG1T.EXE DTKDB %SQLUSER% %SQLPASSWORD% %BKSTARTDAY% %BKENDDAY% 10
%LVFOLDER%\Disabling Logon Log.csv %how%
if ERRORLEVEL 1 goto recover5
- 185 -
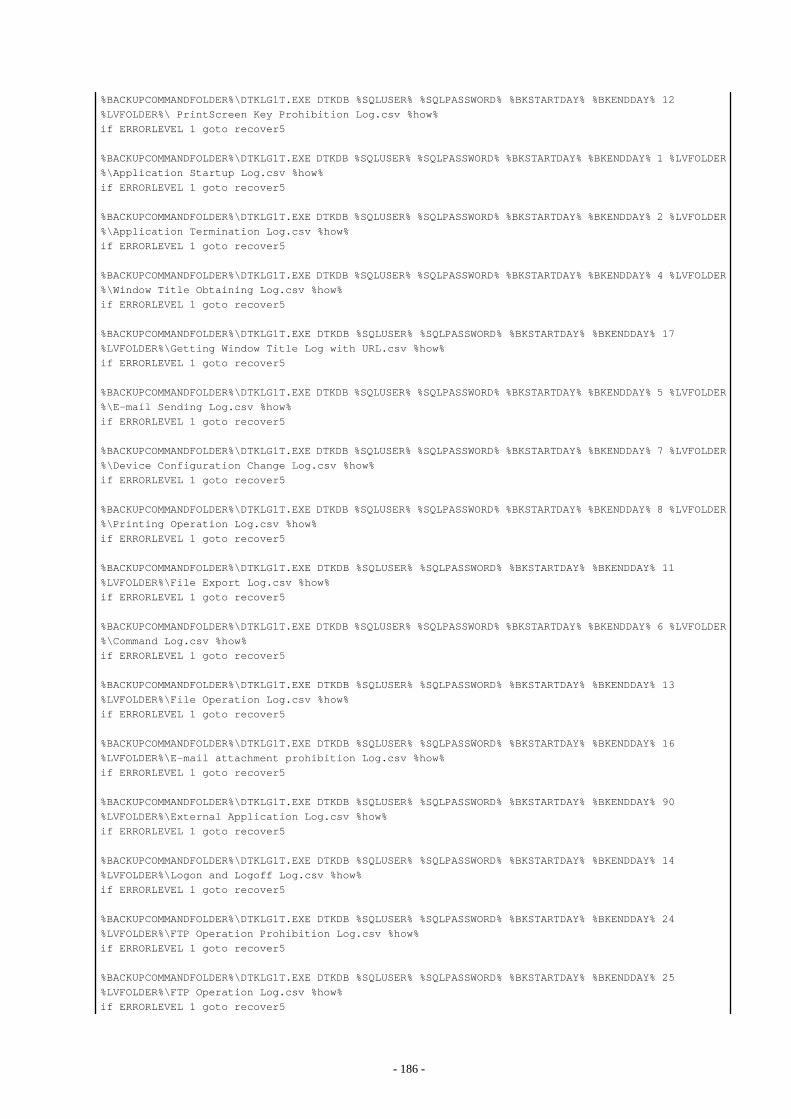
%BACKUPCOMMANDFOLDER%\DTKLG1T.EXE DTKDB %SQLUSER% %SQLPASSWORD% %BKSTARTDAY% %BKENDDAY% 12
%LVFOLDER%\ PrintScreen Key Prohibition Log.csv %how%
if ERRORLEVEL 1 goto recover5
%BACKUPCOMMANDFOLDER%\DTKLG1T.EXE DTKDB %SQLUSER% %SQLPASSWORD% %BKSTARTDAY% %BKENDDAY% 1 %LVFOLDER
%\Application Startup Log.csv %how%
if ERRORLEVEL 1 goto recover5
%BACKUPCOMMANDFOLDER%\DTKLG1T.EXE DTKDB %SQLUSER% %SQLPASSWORD% %BKSTARTDAY% %BKENDDAY% 2 %LVFOLDER
%\Application Termination Log.csv %how%
if ERRORLEVEL 1 goto recover5
%BACKUPCOMMANDFOLDER%\DTKLG1T.EXE DTKDB %SQLUSER% %SQLPASSWORD% %BKSTARTDAY% %BKENDDAY% 4 %LVFOLDER
%\Window Title Obtaining Log.csv %how%
if ERRORLEVEL 1 goto recover5
%BACKUPCOMMANDFOLDER%\DTKLG1T.EXE DTKDB %SQLUSER% %SQLPASSWORD% %BKSTARTDAY% %BKENDDAY% 17
%LVFOLDER%\Getting Window Title Log with URL.csv %how%
if ERRORLEVEL 1 goto recover5
%BACKUPCOMMANDFOLDER%\DTKLG1T.EXE DTKDB %SQLUSER% %SQLPASSWORD% %BKSTARTDAY% %BKENDDAY% 5 %LVFOLDER
%\E-mail Sending Log.csv %how%
if ERRORLEVEL 1 goto recover5
%BACKUPCOMMANDFOLDER%\DTKLG1T.EXE DTKDB %SQLUSER% %SQLPASSWORD% %BKSTARTDAY% %BKENDDAY% 7 %LVFOLDER
%\Device Configuration Change Log.csv %how%
if ERRORLEVEL 1 goto recover5
%BACKUPCOMMANDFOLDER%\DTKLG1T.EXE DTKDB %SQLUSER% %SQLPASSWORD% %BKSTARTDAY% %BKENDDAY% 8 %LVFOLDER
%\Printing Operation Log.csv %how%
if ERRORLEVEL 1 goto recover5
%BACKUPCOMMANDFOLDER%\DTKLG1T.EXE DTKDB %SQLUSER% %SQLPASSWORD% %BKSTARTDAY% %BKENDDAY% 11
%LVFOLDER%\File Export Log.csv %how%
if ERRORLEVEL 1 goto recover5
%BACKUPCOMMANDFOLDER%\DTKLG1T.EXE DTKDB %SQLUSER% %SQLPASSWORD% %BKSTARTDAY% %BKENDDAY% 6 %LVFOLDER
%\Command Log.csv %how%
if ERRORLEVEL 1 goto recover5
%BACKUPCOMMANDFOLDER%\DTKLG1T.EXE DTKDB %SQLUSER% %SQLPASSWORD% %BKSTARTDAY% %BKENDDAY% 13
%LVFOLDER%\File Operation Log.csv %how%
if ERRORLEVEL 1 goto recover5
%BACKUPCOMMANDFOLDER%\DTKLG1T.EXE DTKDB %SQLUSER% %SQLPASSWORD% %BKSTARTDAY% %BKENDDAY% 16
%LVFOLDER%\E-mail attachment prohibition Log.csv %how%
if ERRORLEVEL 1 goto recover5
%BACKUPCOMMANDFOLDER%\DTKLG1T.EXE DTKDB %SQLUSER% %SQLPASSWORD% %BKSTARTDAY% %BKENDDAY% 90
%LVFOLDER%\External Application Log.csv %how%
if ERRORLEVEL 1 goto recover5
%BACKUPCOMMANDFOLDER%\DTKLG1T.EXE DTKDB %SQLUSER% %SQLPASSWORD% %BKSTARTDAY% %BKENDDAY% 14
%LVFOLDER%\Logon and Logoff Log.csv %how%
if ERRORLEVEL 1 goto recover5
%BACKUPCOMMANDFOLDER%\DTKLG1T.EXE DTKDB %SQLUSER% %SQLPASSWORD% %BKSTARTDAY% %BKENDDAY% 24
%LVFOLDER%\FTP Operation Prohibition Log.csv %how%
if ERRORLEVEL 1 goto recover5
%BACKUPCOMMANDFOLDER%\DTKLG1T.EXE DTKDB %SQLUSER% %SQLPASSWORD% %BKSTARTDAY% %BKENDDAY% 25
%LVFOLDER%\FTP Operation Log.csv %how%
if ERRORLEVEL 1 goto recover5
- 186 -
%BACKUPCOMMANDFOLDER%\DTKLG1T.EXE DTKDB %SQLUSER% %SQLPASSWORD% %BKSTARTDAY% %BKENDDAY% 29
%LVFOLDER%\Web Operation Prohibition Log.csv %how%
if ERRORLEVEL 1 goto recover5
%BACKUPCOMMANDFOLDER%\DTKLG1T.EXE DTKDB %SQLUSER% %SQLPASSWORD% %BKSTARTDAY% %BKENDDAY% 31
%LVFOLDER%\Web Operation Log.csv %how%
if ERRORLEVEL 1 goto recover5
%BACKUPCOMMANDFOLDER%\DTKLG1T.EXE DTKDB %SQLUSER% %SQLPASSWORD% %BKSTARTDAY% %BKENDDAY% 34
%LVFOLDER%\E-mail sending interruption Log.csv %how%
if ERRORLEVEL 1 goto recover5
rem Delete the log system data.
C:\DTK\BackupCommand\DTKDELR.exe DTKDB %SQLUSER% %SQLPASSWORD% 00000000 %DELENDDAY% -Y %HOW%
if ERRORLEVEL 100 goto allend0
goto recover6
:recover1
echo An error occurs when stopping the Level Control Service.
echo Cancel backup and start the DTK service (Level Control Service).
goto allend1
:recover2
echo An error occurs when stopping the Server Service.
echo Cancel backup and start the DTK services (Level Control Service and Server Service).
goto allend1
:recover3
echo An error occurs when backing up the management information.
echo Cancel backup and start the DTK services (Level Control Service and Server Service).
goto allend1
:recover4
echo An error occurs when backing up the log information.
echo Cancel backup and start the DTK services (Level Control Service and Server Service).
goto allend1
:recover5
echo An error occurs when backing up the log information (for viewing).
echo Cancel backup and start the DTK services (Level Control Service and Server Service).
goto allend1
:recover6
echo An error occurs when deleting the log information.
echo Cancel the log information deletion and start the DTK services (Level Control Service and
Server Service).
goto allend1
:allend0
echo Start the DTK services.
net start SWLevelControlService
net start SWServerService
echo The scheduled task is completed successfully. (%TIME%)
EXIT /B 0
:allend1
echo Start the DTK services.
net start SWLevelControlService
net start SWServerService
echo The scheduled task ends abnormally. (%TIME%)
EXIT /B
- 187 -
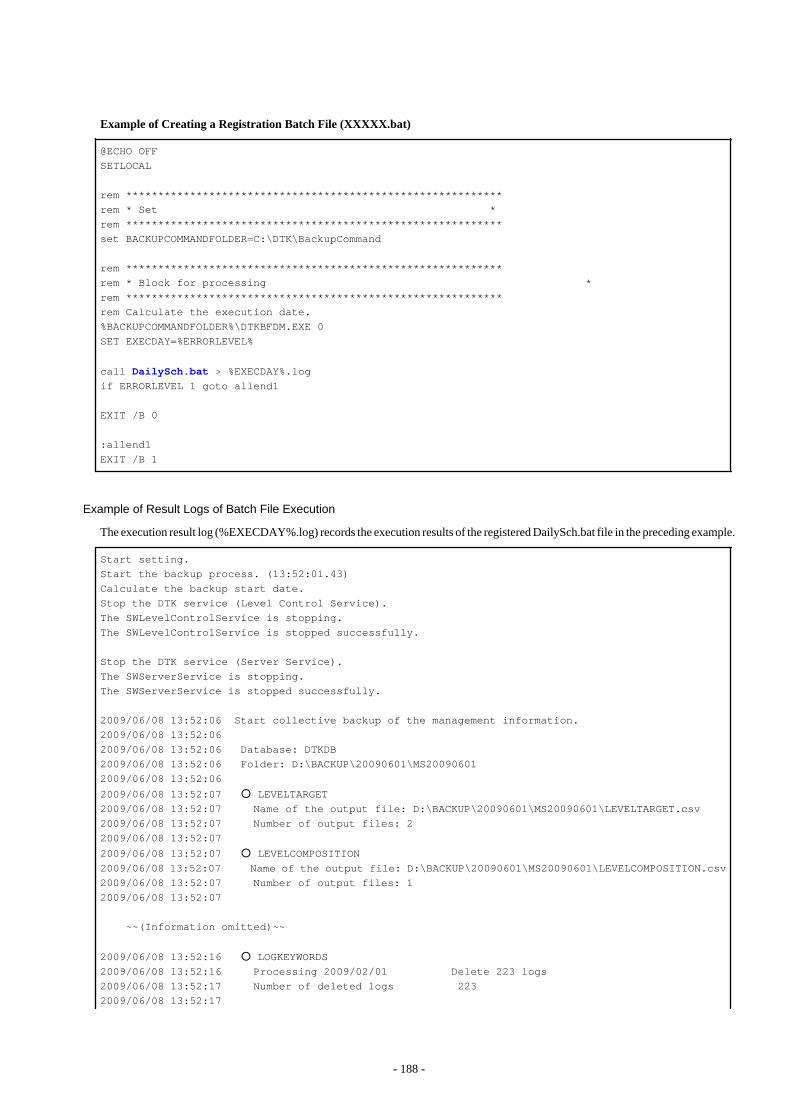
Example of Creating a Registration Batch File (XXXXX.bat)
@ECHO OFF
SETLOCAL
rem ***********************************************************
rem * Set *
rem ***********************************************************
set BACKUPCOMMANDFOLDER=C:\DTK\BackupCommand
rem ***********************************************************
rem * Block for processing *
rem ***********************************************************
rem Calculate the execution date.
%BACKUPCOMMANDFOLDER%\DTKBFDM.EXE 0
SET EXECDAY=%ERRORLEVEL%
call DailySch.bat > %EXECDAY%.log
if ERRORLEVEL 1 goto allend1
EXIT /B 0
:allend1
EXIT /B 1
Example of Result Logs of Batch File Execution
The execution result log (%EXECDAY%.log) records the execution results of the registered DailySch.bat file in the preceding example.
Start setting.
Start the backup process. (13:52:01.43)
Calculate the backup start date.
Stop the DTK service (Level Control Service).
The SWLevelControlService is stopping.
The SWLevelControlService is stopped successfully.
Stop the DTK service (Server Service).
The SWServerService is stopping.
The SWServerService is stopped successfully.
2009/06/08 13:52:06 Start collective backup of the management information.
2009/06/08 13:52:06
2009/06/08 13:52:06 Database: DTKDB
2009/06/08 13:52:06 Folder: D:\BACKUP\20090601\MS20090601
2009/06/08 13:52:06
2009/06/08 13:52:07 ○ LEVELTARGET
2009/06/08 13:52:07 Name of the output file: D:\BACKUP\20090601\MS20090601\LEVELTARGET.csv
2009/06/08 13:52:07 Number of output files: 2
2009/06/08 13:52:07
2009/06/08 13:52:07 ○ LEVELCOMPOSITION
2009/06/08 13:52:07 Name of the output file: D:\BACKUP\20090601\MS20090601\LEVELCOMPOSITION.csv
2009/06/08 13:52:07 Number of output files: 1
2009/06/08 13:52:07
~~(Information omitted)~~
2009/06/08 13:52:16 ○ LOGKEYWORDS
2009/06/08 13:52:16 Processing 2009/02/01 Delete 223 logs
2009/06/08 13:52:17 Number of deleted logs 223
2009/06/08 13:52:17
- 188 -
2009/06/08 13:52:17 ○ FILEACCESSLOG
2009/06/08 13:52:17 Processing 2009/02/01 Delete 446 logs
2009/06/08 13:52:18 Number of deleted logs 446
2009/06/08 13:52:18
2009/06/08 13:52:18 Log information deletion is completed.
Start the DTK services.
Start the SWLevelControlService.
The SWLevelControlService is started successfully.
Start the SWServerService.
The SWServerService is started successfully.
The scheduled task is completed successfully. (13:52:24.92)
3.1.3 Restoring User Assets The restoration function provided by the product carries the following Restoration Tool.
Restoration Tool
Set the restoration conditions on the GUI before restoring data.
The Restoration Tool can restore the data that is backed up through the following two methods:
- Backup Tool
- Backup commands
The following data can be restored by the Restoration Tool:
- Management information
- Log information (log data in the DB and command logs)
For details about the data to be restored, please see "3.1.1.2 User Assets ".
In addition, the time required by data restoration can be estimated according to the number of logs to be restored. The estimation is asfollows:
- 5,000 per second (Xeon, 2.0 GHz, 2 GB memory, and RAID1 architecture)
*More time may be consumed, depending on the server performance and RAID architecture.
The operational status of the Restoration Tool will be output to event logs.
3.1.3.1 Using the Restoration Tool This section describes how to restore data from the database by using the Restoration Tool provided by the Systemwalker Desktop Keeper.
Note
Notes on using the Restoration Tool
[Please do not restore data in the operation database]
When the Master Management Server or Management Server is running, please do not restore the "management information". If the"management information" is overwritten, it may result in incomplete "management information" and "log information".
[Separately restore the terminal operation settings of the management console and the settings of the Server Settings Tool]
These settings cannot be backed up by the Backup Tool (GUI) or backup commands. Therefore, please re-set these settings after theRestoration Tool restores the database.
- 189 -
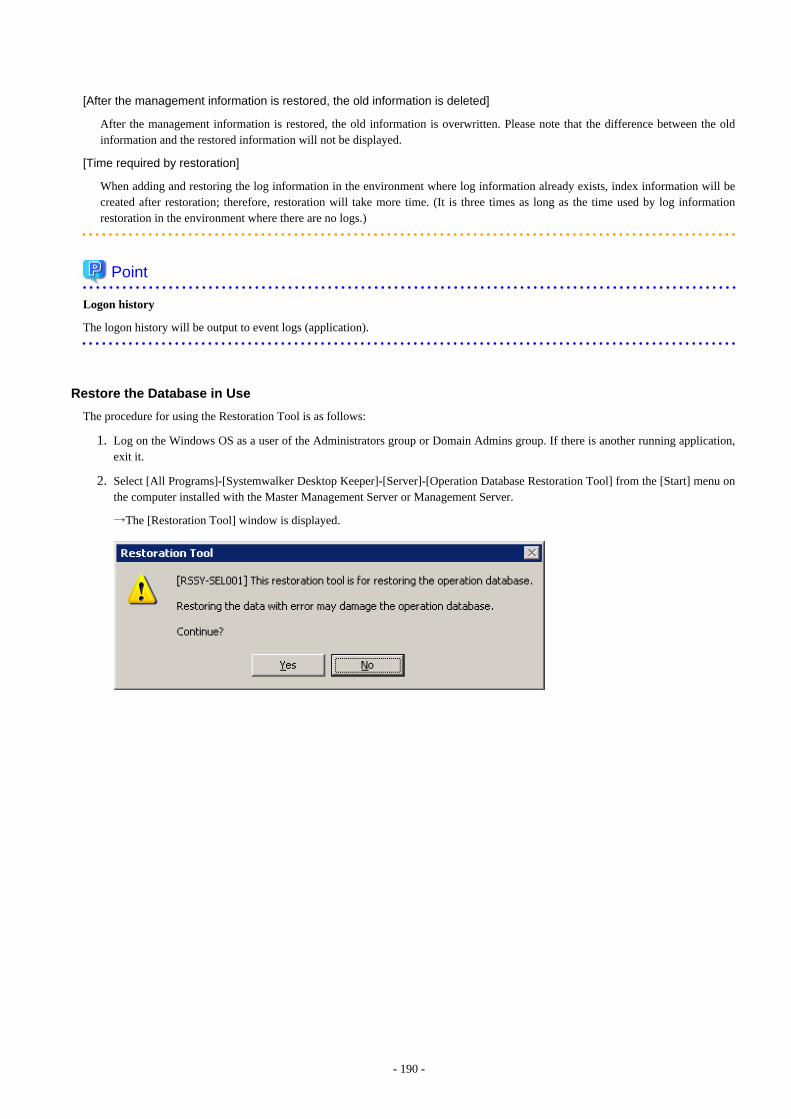
[After the management information is restored, the old information is deleted]
After the management information is restored, the old information is overwritten. Please note that the difference between the oldinformation and the restored information will not be displayed.
[Time required by restoration]
When adding and restoring the log information in the environment where log information already exists, index information will becreated after restoration; therefore, restoration will take more time. (It is three times as long as the time used by log informationrestoration in the environment where there are no logs.)
Point
Logon history
The logon history will be output to event logs (application).
Restore the Database in Use
The procedure for using the Restoration Tool is as follows:
1. Log on the Windows OS as a user of the Administrators group or Domain Admins group. If there is another running application,exit it.
2. Select [All Programs]-[Systemwalker Desktop Keeper]-[Server]-[Operation Database Restoration Tool] from the [Start] menu onthe computer installed with the Master Management Server or Management Server.
→The [Restoration Tool] window is displayed.
- 190 -
3. Click [Yes] to confirm restoration in the running database.
→The [Systemwalker Desktop Keeper - Operation Database Restoration Tool] window is displayed.
4. Log on by using the user ID (granted with the authority to back up and restore information) registered in the Server Settings Tool.(The user ID and password of the Primary Administrator can also be used for logon.)
- 191 -

5. Click [OK].
→The [Operation Database Restoration Tool] window is displayed.
The following table describes the menu bar in the [Restoration Tool of database for viewing logs] window.
Menu Bar Function Summary
[File] [Exit] Exit the Restoration Tool.
[Service]
[Confirm Service Status] Display the operational status of the "Level Control Service"and "Server Service" on the target server.
[Start Service] Start the "Level Control Service" and "Server Service" on thetarget server.
[Stop Service] Stop the "Level Control Service" and "Server Service" on thetarget server.
[Settings][Trace RestorationTool]
[No] Do not collect the traces of the Restoration Tool.
- 192 -
Menu Bar Function Summary
[Summary] Collect the traces of the Restoration Tool in summary mode.
[Details] Collect the traces of the Restoration Tool in details mode.
[Help][Online Help] Display the online help manual.
[Version Information] Display the copyright information and version information.
6. Before restoring the "management information" and "log information" by using the Restoration Tool, it is necessary to stop the"Level Control Service" and "Server Service" on the target server. Select [Stop Service] from the [Service] menu. A confirmationwindow is displayed. Click [OK] in the window to stop the services.
7. The operation result window is displayed. Click [OK] in the window.
8. In the [Restoration Tool of database for viewing logs] window, enter the information described in steps 1 and 2, common settinginformation, and working folder information.
Step 1 Restore management information.
Item Name Description
[Restore management information] Select this when restoring the management information.
[Folder for viewing restoration files] Specify the folder that saves the files used for restoration. (Specify thefolder that contains the LEVELTARGET.csv andLEVELCOMPOSITION.csv files backing up the managementinformation.)
There are two methods for specifying such a folder:
- Enter the absolute path of the folder.
- Enter the absolute path of the folder that saves the managementinformation used for restoration.
- Click [Browse].
- The [View Folders] window is displayed. Select the folder that savesthe management information used for restoration and then click [OK].
An absolute path can contain a maximum of 189 single-byte characters.The folder name should not contain the following symbols: "\" "/" ":" "*""?" """ "<" ">" "|".
Step 2 Restore log information.
Item Name Description
[Restore Log Information] Select this when restoring the log information.
[Folder for viewing restoration files] Click [Add] and then specify the folder that saves the file used forrestoration. Multiple files can be specified. (Specify the folder thatcontains the COMMONLOG1.csv and LOGKEWORDS.csv filesbacking up the log information.)
The related buttons and check boxes are as follows:
- [Add] buttonSelect the folder as the restoration target.
- [Delete] buttonDelete the selected folder from the folder list.
- [Delete All] buttonDelete all the folders from the folder list.
- Delete All (Fast Delete) check box
- 193 -
Item Name Description
An absolute path can contain a maximum of 189 single-byte characters.If an absolute path containing more than 189 characters is entered, only189 characters are displayed.
Specify the backup target of current management of information.
Item Name Description
[Target Folder for BackupManagement Information]
Specify the target folder that saves the backup management information.
(To avoid errors during management information restoration, back up themost recent management information before restoration is carried out.)
There are two methods:
- Enter the absolute path of the folder.
- Enter the absolute path of the folder that saves the managementinformation used for restoration.
- Click [Browse].
The [Viewing Folder] window is displayed. Select the folder that savesthe management information used for restoration and then click [OK].
An absolute path can contain a maximum of 189 single-byte characters.The folder name should not contain the following symbols: "\" "/" ":" "*""?" """ "<" ">" "|".
Specify common settings, Execute result logs.
Item Name Description
[Result Log File] Specify the file for saving the execution results of the Restoration Tool.There are two methods for specifying such a file:
- Enter the absolute path of a file.
- Enter the absolute path of a file for saving the output execution results.
- Click [Browse].
- The [Open File] window is displayed. Select the folder for saving theresult log file, enter the file name, and then click [Open].
An absolute path can contain a maximum of 255 single-byte characters.The file name should not contain the following symbols: "\" "/" ":" "*" "?"""" "<" ">" "|".
[When files exist] Select the processing operation to be performed when the result log fileexists at the location specified by [Result Log File].
- Add
- Add a new result log to the end of the result log file if the file existsat the location specified by [Result Log File].
- Overwrite
- Overwrite the last result log in the result log file if the file exists at thelocation specified by [Result Log File].
Specify a work folder.
Item Name Description
[Work folder] Specify a folder for saving the working file. A working file with the samesize as the data file to be restored will be created in the working folder;
- 194 -
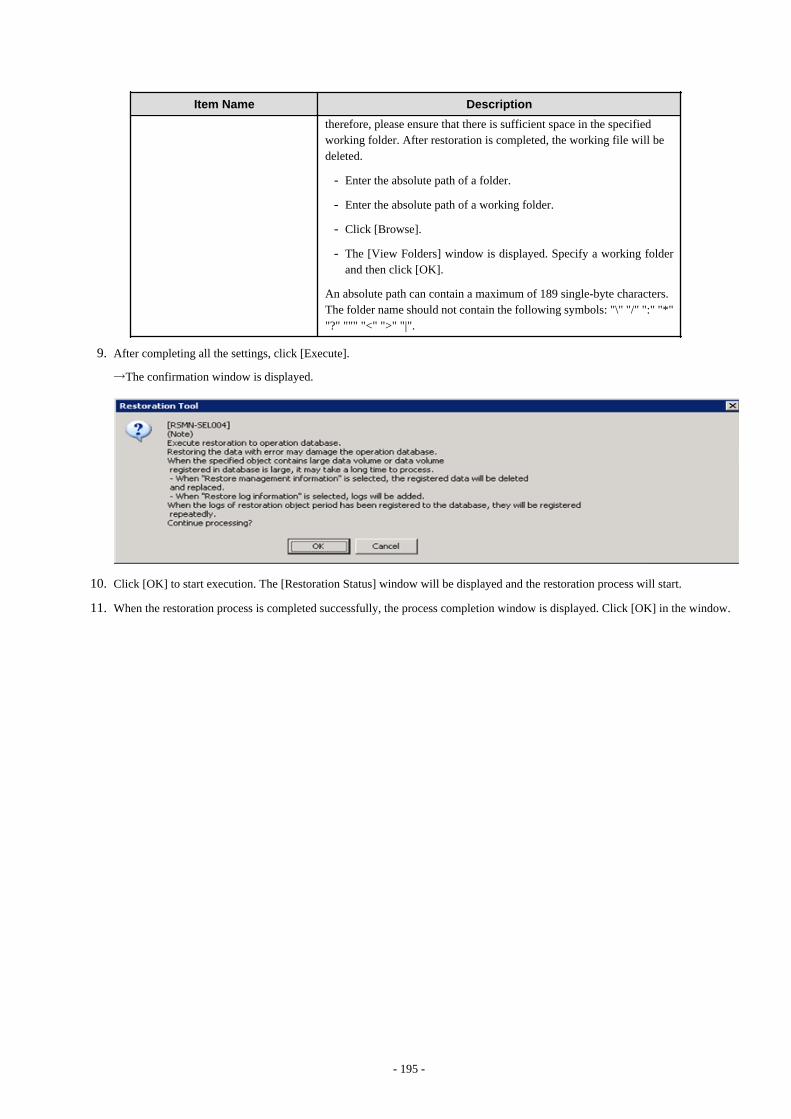
Item Name Description
therefore, please ensure that there is sufficient space in the specifiedworking folder. After restoration is completed, the working file will bedeleted.
- Enter the absolute path of a folder.
- Enter the absolute path of a working folder.
- Click [Browse].
- The [View Folders] window is displayed. Specify a working folderand then click [OK].
An absolute path can contain a maximum of 189 single-byte characters.The folder name should not contain the following symbols: "\" "/" ":" "*""?" """ "<" ">" "|".
9. After completing all the settings, click [Execute].
→The confirmation window is displayed.
10. Click [OK] to start execution. The [Restoration Status] window will be displayed and the restoration process will start.
11. When the restoration process is completed successfully, the process completion window is displayed. Click [OK] in the window.
- 195 -
12. After confirming the execution status, click [Close].
13. Re-set the following settings of the Server Settings Tool, which are recorded during backup:
- [System settings]
- [Setting of active directory linkage] *when the Active Directory linkage function is used
- [Administrator notification settings]
- [Management Server settings]
- [Settings for tracing/folder/CT Self-version upgrade]
For details about how to display the windows of the Server Settings Tool, please see "2.2.5 Set Environment of Management Server/Master Management Server ".
14. Start the stopped "Level Control Service" and "Server Service". Select [Start Service] from the [Service] menu. The service startupconfirmation window is displayed. Click [OK] in the window to start the services.
15. The operation result window is displayed. Click [OK] in the window.
16. Re-set the following settings in the [Terminal Operation Settings] window of the management console, which are recorded duringbackup.
Perform the following steps to display the [Terminal Operation Settings] window:
a. Start [Management Console].
b. Select [Terminal Operation Settings] from the [Operation Settings] menu.
→The [Terminal Operation Settings] window is displayed.
- 196 -
Restore the Database for Log Viewing
1. Log on the Windows OS as a user of the Administrators group or Domain Admins group. If there are other running applications,exit them.
2. Select [All Programs]-[Systemwalker Desktop Keeper]-[Server]-[Restoration Tool of Database for Log Viewing] from the [Start]menu on the computer installed with the Master Management Server or Management Server.
→The [Systemwalker Desktop Keeper - Operation Database Restoration Tool of Database for Log Viewing] window is displayed.
3. Log on by using the user ID (granted with the authority to back up and restore information) registered in the Server Settings Tool.(The user ID and password of the Primary Administrator can also be used for logon.)
- 197 -
4. Click [OK].
→The [Restoration Tool of database for viewing logs] window is displayed.
Except for certain items, the menu bar settings and input information of the Database Restoration Tool for Log Viewing are sameas those of the Operation Database Restoration Tool. For details about the items that are the same for both tools, please see thedescription about the Operation Database Restoration Tool. The items that can be set only by the Database Restoration Tool forLog Viewing are described here.
Step 2 Restore log information.
Item Name Description
[Existing log information beforerestoration]
If the database for log viewing contains log information, delete all the loginformation from the database before restoration.
- 198 -
5. After completing all the settings, click [Execute].
→The confirmation window is displayed.
6. Click [OK] to start execution. The [Restoration Status] window will be displayed and the restoration process will start.
7. When the restoration process is completed successfully, the process completion window is displayed. Click [OK] in the window.
8. After confirming the execution status, click [Close].
Confirm Service Status
During the restoration process, the Restoration Tool must stop the Systemwalker Desktop Keeper services on the connected ManagementServer. Therefore, it is necessary to confirm the service status. This part describes how to confirm the status of the Systemwalker DesktopKeeper services by using the Restoration Tool.
- 199 -
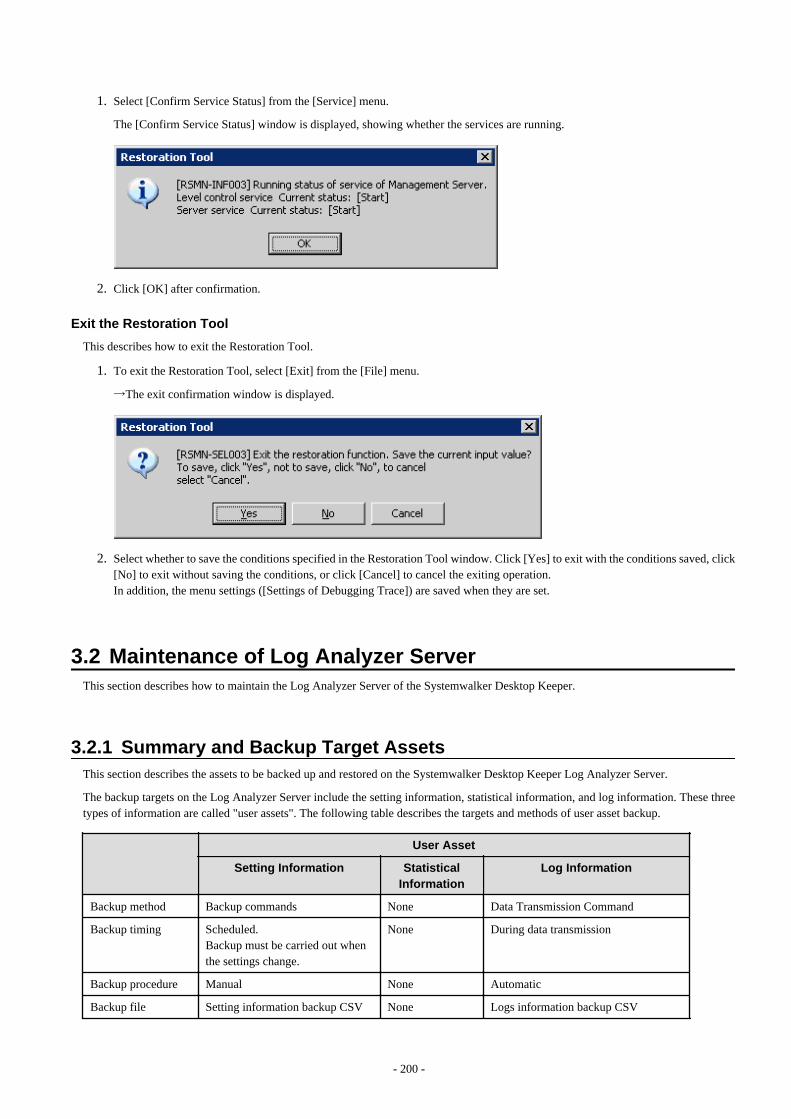
1. Select [Confirm Service Status] from the [Service] menu.
The [Confirm Service Status] window is displayed, showing whether the services are running.
2. Click [OK] after confirmation.
Exit the Restoration Tool
This describes how to exit the Restoration Tool.
1. To exit the Restoration Tool, select [Exit] from the [File] menu.
→The exit confirmation window is displayed.
2. Select whether to save the conditions specified in the Restoration Tool window. Click [Yes] to exit with the conditions saved, click[No] to exit without saving the conditions, or click [Cancel] to cancel the exiting operation.In addition, the menu settings ([Settings of Debugging Trace]) are saved when they are set.
3.2 Maintenance of Log Analyzer Server This section describes how to maintain the Log Analyzer Server of the Systemwalker Desktop Keeper.
3.2.1 Summary and Backup Target AssetsThis section describes the assets to be backed up and restored on the Systemwalker Desktop Keeper Log Analyzer Server.
The backup targets on the Log Analyzer Server include the setting information, statistical information, and log information. These threetypes of information are called "user assets". The following table describes the targets and methods of user asset backup.
User Asset
Setting Information StatisticalInformation
Log Information
Backup method Backup commands None Data Transmission Command
Backup timing Scheduled.Backup must be carried out whenthe settings change.
None During data transmission
Backup procedure Manual None Automatic
Backup file Setting information backup CSV None Logs information backup CSV
- 200 -
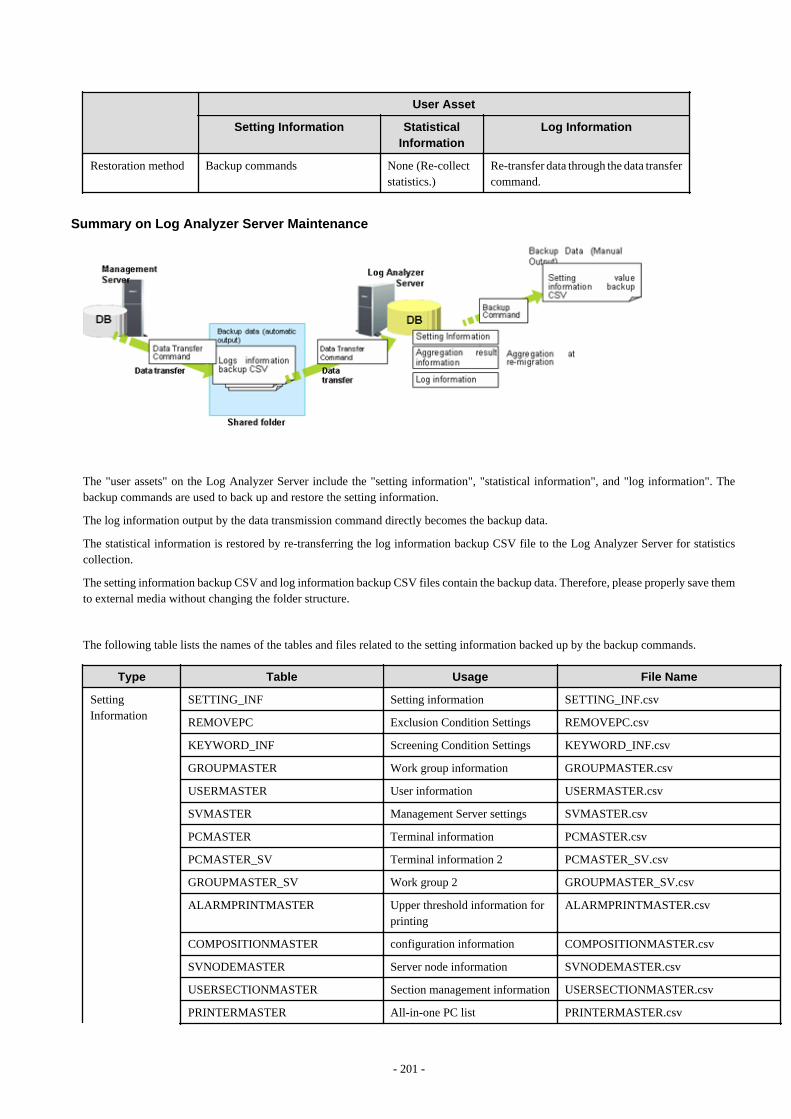
User Asset
Setting Information StatisticalInformation
Log Information
Restoration method Backup commands None (Re-collectstatistics.)
Re-transfer data through the data transfercommand.
Summary on Log Analyzer Server Maintenance
The "user assets" on the Log Analyzer Server include the "setting information", "statistical information", and "log information". Thebackup commands are used to back up and restore the setting information.
The log information output by the data transmission command directly becomes the backup data.
The statistical information is restored by re-transferring the log information backup CSV file to the Log Analyzer Server for statisticscollection.
The setting information backup CSV and log information backup CSV files contain the backup data. Therefore, please properly save themto external media without changing the folder structure.
The following table lists the names of the tables and files related to the setting information backed up by the backup commands.
Type Table Usage File Name
SettingInformation
SETTING_INF Setting information SETTING_INF.csv
REMOVEPC Exclusion Condition Settings REMOVEPC.csv
KEYWORD_INF Screening Condition Settings KEYWORD_INF.csv
GROUPMASTER Work group information GROUPMASTER.csv
USERMASTER User information USERMASTER.csv
SVMASTER Management Server settings SVMASTER.csv
PCMASTER Terminal information PCMASTER.csv
PCMASTER_SV Terminal information 2 PCMASTER_SV.csv
GROUPMASTER_SV Work group 2 GROUPMASTER_SV.csv
ALARMPRINTMASTER Upper threshold information forprinting
ALARMPRINTMASTER.csv
COMPOSITIONMASTER configuration information COMPOSITIONMASTER.csv
SVNODEMASTER Server node information SVNODEMASTER.csv
USERSECTIONMASTER Section management information USERSECTIONMASTER.csv
PRINTERMASTER All-in-one PC list PRINTERMASTER.csv
- 201 -
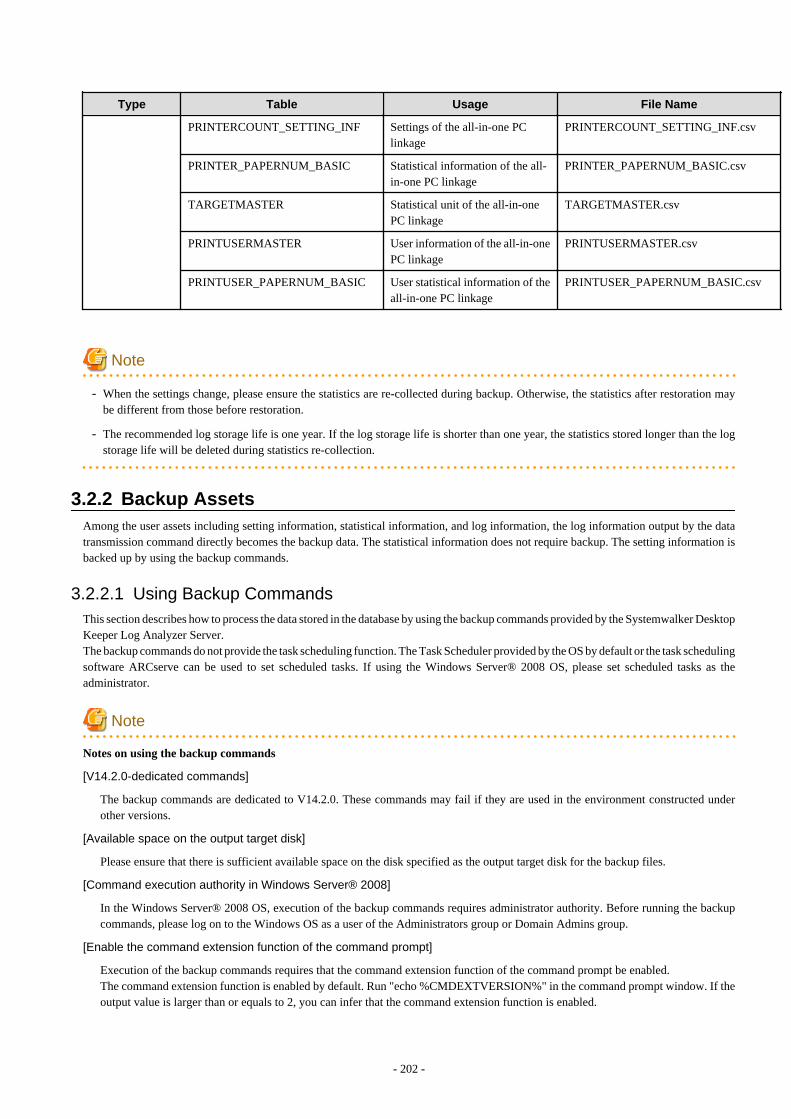
Type Table Usage File Name
PRINTERCOUNT_SETTING_INF Settings of the all-in-one PClinkage
PRINTERCOUNT_SETTING_INF.csv
PRINTER_PAPERNUM_BASIC Statistical information of the all-in-one PC linkage
PRINTER_PAPERNUM_BASIC.csv
TARGETMASTER Statistical unit of the all-in-onePC linkage
TARGETMASTER.csv
PRINTUSERMASTER User information of the all-in-onePC linkage
PRINTUSERMASTER.csv
PRINTUSER_PAPERNUM_BASIC User statistical information of theall-in-one PC linkage
PRINTUSER_PAPERNUM_BASIC.csv
Note
- When the settings change, please ensure the statistics are re-collected during backup. Otherwise, the statistics after restoration maybe different from those before restoration.
- The recommended log storage life is one year. If the log storage life is shorter than one year, the statistics stored longer than the logstorage life will be deleted during statistics re-collection.
3.2.2 Backup Assets Among the user assets including setting information, statistical information, and log information, the log information output by the datatransmission command directly becomes the backup data. The statistical information does not require backup. The setting information isbacked up by using the backup commands.
3.2.2.1 Using Backup CommandsThis section describes how to process the data stored in the database by using the backup commands provided by the Systemwalker DesktopKeeper Log Analyzer Server. The backup commands do not provide the task scheduling function. The Task Scheduler provided by the OS by default or the task schedulingsoftware ARCserve can be used to set scheduled tasks. If using the Windows Server® 2008 OS, please set scheduled tasks as theadministrator.
Note
Notes on using the backup commands
[V14.2.0-dedicated commands]
The backup commands are dedicated to V14.2.0. These commands may fail if they are used in the environment constructed underother versions.
[Available space on the output target disk]
Please ensure that there is sufficient available space on the disk specified as the output target disk for the backup files.
[Command execution authority in Windows Server® 2008]
In the Windows Server® 2008 OS, execution of the backup commands requires administrator authority. Before running the backupcommands, please log on to the Windows OS as a user of the Administrators group or Domain Admins group.
[Enable the command extension function of the command prompt]
Execution of the backup commands requires that the command extension function of the command prompt be enabled.The command extension function is enabled by default. Run "echo %CMDEXTVERSION%" in the command prompt window. If theoutput value is larger than or equals to 2, you can infer that the command extension function is enabled.
- 202 -
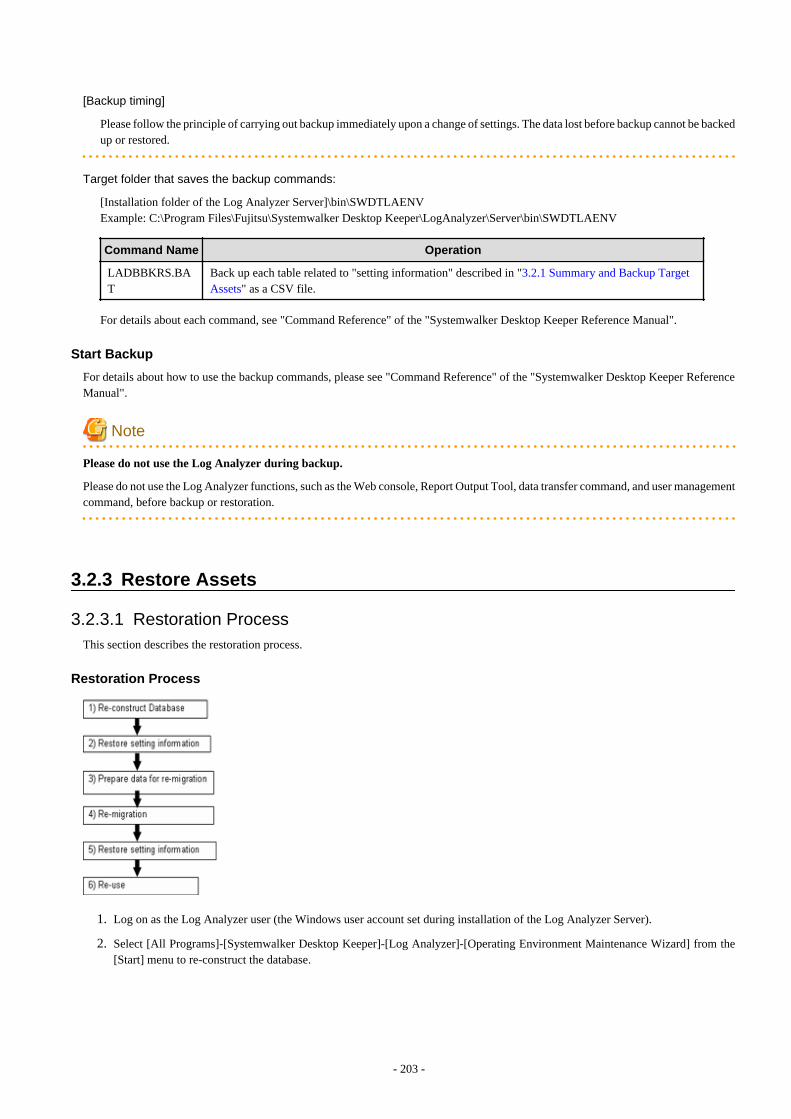
[Backup timing]
Please follow the principle of carrying out backup immediately upon a change of settings. The data lost before backup cannot be backedup or restored.
Target folder that saves the backup commands:
[Installation folder of the Log Analyzer Server]\bin\SWDTLAENVExample: C:\Program Files\Fujitsu\Systemwalker Desktop Keeper\LogAnalyzer\Server\bin\SWDTLAENV
Command Name Operation
LADBBKRS.BAT
Back up each table related to "setting information" described in "3.2.1 Summary and Backup TargetAssets" as a CSV file.
For details about each command, see "Command Reference" of the "Systemwalker Desktop Keeper Reference Manual".
Start Backup
For details about how to use the backup commands, please see "Command Reference" of the "Systemwalker Desktop Keeper ReferenceManual".
Note
Please do not use the Log Analyzer during backup.
Please do not use the Log Analyzer functions, such as the Web console, Report Output Tool, data transfer command, and user managementcommand, before backup or restoration.
3.2.3 Restore Assets
3.2.3.1 Restoration ProcessThis section describes the restoration process.
Restoration Process
1. Log on as the Log Analyzer user (the Windows user account set during installation of the Log Analyzer Server).
2. Select [All Programs]-[Systemwalker Desktop Keeper]-[Log Analyzer]-[Operating Environment Maintenance Wizard] from the[Start] menu to re-construct the database.
- 203 -
3. Use the setting information backup and restoration command (LADBBKRS.bat) of the Log Analyzer to restore the settinginformation backup CSV to the database.
For details about the commands, please see the "LADBBKRS.BAT (Backup/Restore Log Analyzer Settings Information)" in the"Systemwalker Desktop Keeper Reference Manual".
Example:
LADBBKRS.bat -rs -d c:\backup
4. Copy the log information backup CSV from the external media to a shared folder (the folder specified by the -f option of the datatransfer and deletion command adaptable to the Log Analyzer Server in step 5) without changing the folder structure.
5. Change the file name in the copied folder.
- File name before change: conv_end
- File name after change: trans_end
This file exists under each folder named after a date (for example, 20080421_20080421).If there are a large number of such files, change the file names by running the following batch commands.
[Example of a batch file]
ECHO OFF
IF %1.==. GOTO NOPARAM
FOR /R %1 /D %%f IN (*) DO (
IF EXIST %%f\conv_end (
move %%f\conv_end %%f\trans_end
)
)
GOTO END
:NOPARAM
ECHO Please specify a path to the folder.
:END
ECHO ON
For example, after moving the backup data from z:\DTKDATA to the share folder c:\DTKDATA, run the created batch commands.
Example:
conv.bat c:\DTKDATA
6. Use the transfer and deletion command (DTTOOLEX.EXE) adaptable to the Log Analyzer Server to re-transfer the log informationbackup CSV.
The re-transfer process may take some time.
For reference: The re-transfer of about 0.18 billion logs will take 24 hours.
For details about the commands, please see the "DTTOOLEX.EXE DTTOOLEX.EXE (Data Transfer to/Delete from the LogAnalyzer Server)" in the "Systemwalker Desktop Keeper Reference Manual".
Example:
dttoolEx.exe -f c:\DTKDATA
7. Restore the setting information backup CSV to the database by using the restoration commands again.
Example:
LADBBKRS.bat -rs -d c:\backup
8. Start operation again (by using the data transmission command and data transfer command).
- 204 -
Note
Run the restoration commands for two times.
If step 7 is not performed to restore the setting information again, the data may be incorrectly restored. For example, the user ID may bedeleted or the setting information may be outdated.
3.2.3.2 Using the Restoration CommandsThis section describes how to restore the backup data to the database by using the restoration commands provided by the SystemwalkerDesktop Keeper Log Analyzer Server. The restoration commands are the same as the backup commands.
Note
Notes on using the restoration commands
[V14.2.0-dedicated commands]
The restoration commands are dedicated to V14.2.0. These commands may fail if they are used in the environment constructed underother versions.
[Command execution authority in Windows Server® 2008]
In the Windows Server® 2008 OS, execution of the restoration commands requires administrator authority. Before running therestoration commands, please log on to the Windows OS as a user of the Administrators group or Domain Admins group.
[Enable the command extension function of the command prompt]
Execution of the restoration commands requires that the command extension function of the command prompt be enabled.The command extension function is enabled by default. Run "echo %CMDEXTVERSION%" in the command prompt window. If theoutput value is larger than or equal to 2, you can infer that the command extension function is enabled.
Target folder that saves the restoration commands:
[Installation folder of the Log Analyzer Server]\bin\SWDTLAENVExample: C:\Program Files\Fujitsu\Systemwalker Desktop Keeper\LogAnalyzer\Server\bin\SWDTLAENV
Command Name Operation
LADBBKRS.BAT
Restore each table related to "setting information" described in "3.2.1 Summary and Backup TargetAssets" as a CSV file.
For details about each command, please see "Command Reference" of the "Systemwalker Desktop Keeper Reference Manual".
Start Restoration
For details about how to use the restoration commands, please see "Command Reference" of the "Systemwalker Desktop Keeper ReferenceManual".
Note
Please do not use the Log Analyzer during restoration.
Please do not use the Log Analyzer functions, such as the Web console, Report Output Tool, data transfer command, and user managementcommand, before backup or restoration.
- 205 -
Chapter 4 Version UpgradeThis chapter describes how to upgrade the version of Systemwalker Desktop Keeper.
4.1 Notes between Different VersionsThis describes the operation status between different versions.
Between Master Management Server and Management Server
When the versions of the Master Management Server and the Management Server are different, they cannot operate well. Please makesure the versions are the same.
Between Management Server/Master Management Server and Log Analyzer Server
When the versions of the Management Server/Master Management Server and the Log Analyzer Server are different, they cannot operatewell. Please make sure the versions are the same.
Between Management Server/Master Management Server and Management Console
When the versions of the Management Server/Master Management Server and the Management Console are different, they cannot operatewell. Please make sure the versions are the same.
Between Management Server/Master Management Server and Client (CT)
The operation when the versions of the Management Server/Master Management Server and the Client (CT) are different is displayed inthe following table.
The CT version can be confirmed according to the CT version of the Management Console. The CT version is correspondent with productversion/edition; please refer to “CT Version” in “Systemwalker Desktop Keeper Reference Manual” for information on this.
When confirming CT version in Client (CT), please execute the following command:
fsw11ej7.exe <Password> /D /C
For details of the command, please refer to “Command Reference” of “Systemwalker Desktop Keeper Reference Manual”.
Client (CT)
V12.0L10
V12.0L20 V13.0.0V13.2.0V13.2.1
V13.3.0V14.2.0
BE BE SE BE SE BE SE BE SE
ManagementServer
MasterManagementServer
BEV12.0L10 ○ × × × × × × × × ×
BEV12.0L20 ○ ○ × × × × × × × ×
SEV12.0L20 ○ ○ ○ × × × × × × ×
BEV13.0.0 ○ ○ × ○ × × × × × ×
SEV13.0.0 ○ ○ ○ ○ ○ × × × × ×
BEV13.2.0 ○ ○ × ○ × ○ × × × ×
SEV13.2.0 ○ ○ ○ ○ ○ ○ ○ × × ×
SEV13.2.1 ○ ○ ○ ○ ○ ○ ○ × × ×
BEV13.3.0 ○ ○ × ○ × ○ × ○ × ×
- 206 -
Client (CT)
V12.0L10
V12.0L20 V13.0.0V13.2.0V13.2.1
V13.3.0V14.2.0
BE BE SE BE SE BE SE BE SE
SEV13.3.0 ○ ○ ○ ○ ○ ○ ○ ○ ○ ×
V14.0.0 ○ ○ ○ ○ ○ ○ ○ ○ ○ ×
V14.0.1 ○ ○ ○ ○ ○ ○ ○ ○ ○ ×
V14.1.0 ○ ○ ○ ○ ○ ○ ○ ○ ○ ×
V14.2.0 ○ ○ ○ ○ ○ ○ ○ ○ ○ ○
○: operate normally.×: operate abnormally.
According to the CT version/edition, policy function set in the Management Console of V14.2.0 will be restricted. According to CT version/edition, whether each function can be operated are as follows:
V14.2.0 SupportingFunctions
Client (CT)
V12.0L10 V12.0L20 V13.0.0V13.2.0V13.2.1
V13.3.0V14.2.0
BE BE SE BE SE BE SE BE SE
Collect Command Log (Thisfunction is not available.)
△
(Note 1)○ ○ ○ ○ ○ ○ ○ ○ ○
Collect File Operation Log(Local Drive)
× ○ ○ ○ ○ ○ ○ ○ ○ ○
Apply User Policy × ○ ○ ○ ○ ○ ○ ○ ○ ○
Collect Linkage Application Log × ○ ○ ○ ○ ○ ○ ○ ○ ○
Collect URL Information ofWindow Title Obtaining Log
× × ○ × ○ × ○ × ○ ○
Collect File Operation Log(Network Drive)
× × ○ × ○ × ○ × ○ ○
Apply E-mail attachmentprohibition Policy (Thisfunction is not available.)
× × ○ × ○ × ○ × ○ ○
Confirm Recipient AddressWhen E-mail Sending
× × × × × × × × × ○
View E-mail Content × × × × × × × × × ○
Set How to Send Operation Log(Excluding Sending Functionwith Specified Time)
× × × ○ ○ ○ ○ ○ ○ ○
Set How to Send Operation Log(Sending Function withSpecified Time)
× × × × × × × ○ ○ ○
Collect Logon/Logoff Log × × × ○ ○ ○ ○ ○ ○ ○
Log Filtering Function × × × × ○ × ○ × ○ ○
Collect Screen Capture (and SetScreen Capture Conditions inTerminal Operation Settings)
× × × × ○ × ○ × ○ ○
- 207 -
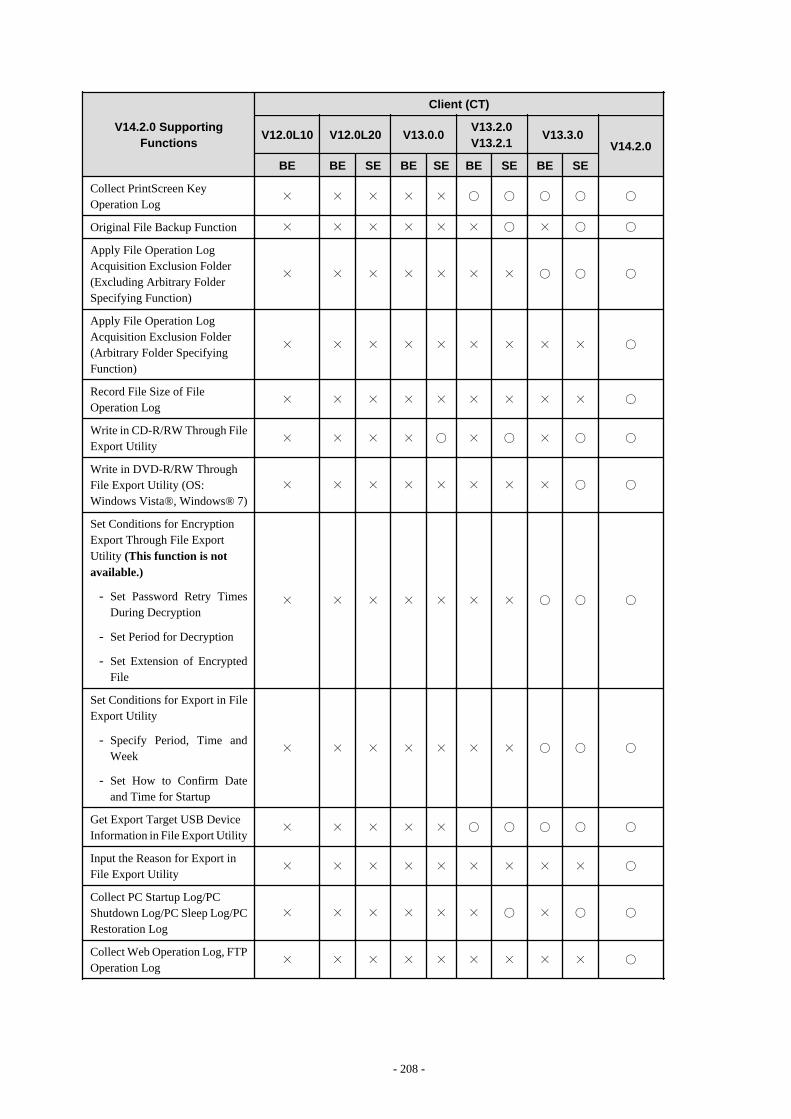
V14.2.0 SupportingFunctions
Client (CT)
V12.0L10 V12.0L20 V13.0.0V13.2.0V13.2.1
V13.3.0V14.2.0
BE BE SE BE SE BE SE BE SE
Collect PrintScreen KeyOperation Log
× × × × × ○ ○ ○ ○ ○
Original File Backup Function × × × × × × ○ × ○ ○
Apply File Operation LogAcquisition Exclusion Folder(Excluding Arbitrary FolderSpecifying Function)
× × × × × × × ○ ○ ○
Apply File Operation LogAcquisition Exclusion Folder(Arbitrary Folder SpecifyingFunction)
× × × × × × × × × ○
Record File Size of FileOperation Log
× × × × × × × × × ○
Write in CD-R/RW Through FileExport Utility
× × × × ○ × ○ × ○ ○
Write in DVD-R/RW ThroughFile Export Utility (OS:Windows Vista®, Windows® 7)
× × × × × × × × ○ ○
Set Conditions for EncryptionExport Through File ExportUtility (This function is notavailable.)
- Set Password Retry TimesDuring Decryption
- Set Period for Decryption
- Set Extension of EncryptedFile
× × × × × × × ○ ○ ○
Set Conditions for Export in FileExport Utility
- Specify Period, Time andWeek
- Set How to Confirm Dateand Time for Startup
× × × × × × × ○ ○ ○
Get Export Target USB DeviceInformation in File Export Utility
× × × × × ○ ○ ○ ○ ○
Input the Reason for Export inFile Export Utility
× × × × × × × × × ○
Collect PC Startup Log/PCShutdown Log/PC Sleep Log/PCRestoration Log
× × × × × × ○ × ○ ○
Collect Web Operation Log, FTPOperation Log
× × × × × × × × × ○
- 208 -
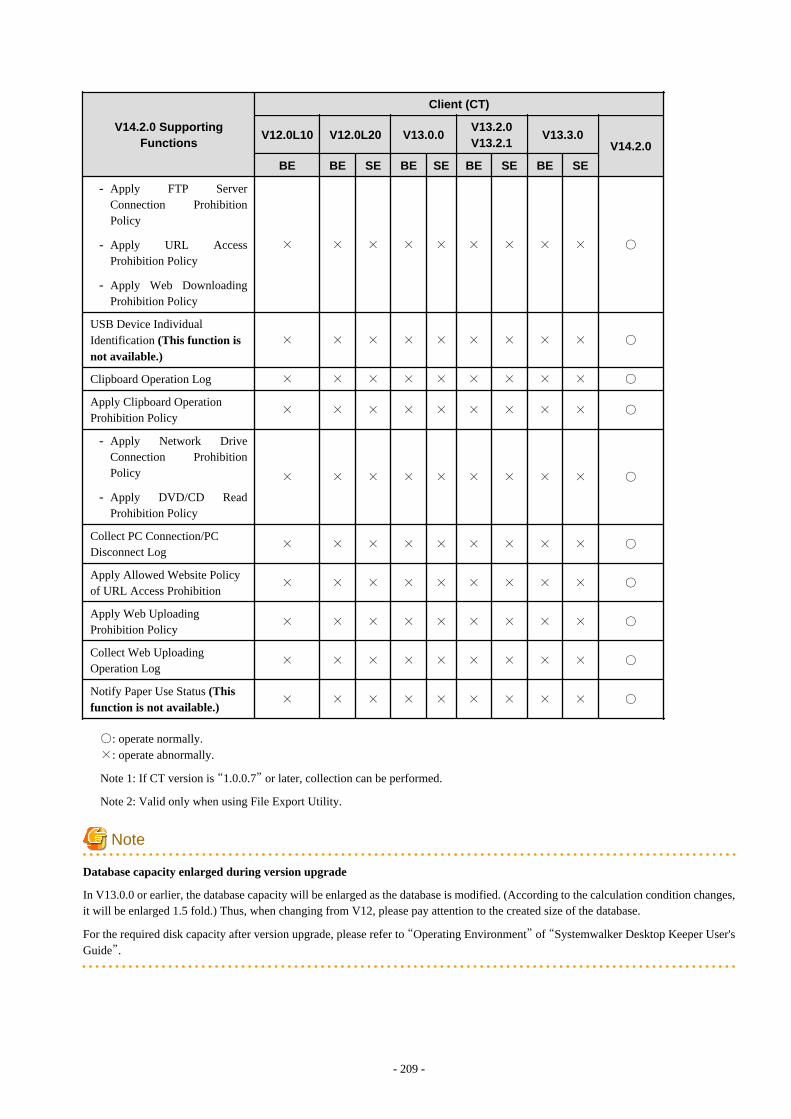
V14.2.0 SupportingFunctions
Client (CT)
V12.0L10 V12.0L20 V13.0.0V13.2.0V13.2.1
V13.3.0V14.2.0
BE BE SE BE SE BE SE BE SE
- Apply FTP ServerConnection ProhibitionPolicy
- Apply URL AccessProhibition Policy
- Apply Web DownloadingProhibition Policy
× × × × × × × × × ○
USB Device IndividualIdentification (This function isnot available.)
× × × × × × × × × ○
Clipboard Operation Log × × × × × × × × × ○
Apply Clipboard OperationProhibition Policy
× × × × × × × × × ○
- Apply Network DriveConnection ProhibitionPolicy
- Apply DVD/CD ReadProhibition Policy
× × × × × × × × × ○
Collect PC Connection/PCDisconnect Log
× × × × × × × × × ○
Apply Allowed Website Policyof URL Access Prohibition
× × × × × × × × × ○
Apply Web UploadingProhibition Policy
× × × × × × × × × ○
Collect Web UploadingOperation Log
× × × × × × × × × ○
Notify Paper Use Status (Thisfunction is not available.)
× × × × × × × × × ○
○: operate normally.×: operate abnormally.
Note 1: If CT version is “1.0.0.7” or later, collection can be performed.
Note 2: Valid only when using File Export Utility.
Note
Database capacity enlarged during version upgrade
In V13.0.0 or earlier, the database capacity will be enlarged as the database is modified. (According to the calculation condition changes,it will be enlarged 1.5 fold.) Thus, when changing from V12, please pay attention to the created size of the database.
For the required disk capacity after version upgrade, please refer to “Operating Environment” of “Systemwalker Desktop Keeper User'sGuide”.
- 209 -
Between Log Analyzer Server and Report Output Tool
When the versions of the Log Analyzer Server and the Report Output Tool are different, they cannot operate well. Please make sure theversions are the same.
4.2 Version Upgrade ProceduresThis describes the procedures for version upgrade.
Database can only be transferred in case of V13.2.
Only the file created with UTF-8 can be restored by the restoration tool.
4.2.1 Version Upgrade of Management Server/Master Management Serveron the Same Server
Procedures for upgrading the Management Server/Master Management Server from the old Systemwalker Desktop Keeper to V14.2.0 aredescribed through the following 2 patterns:
- When upgrading from V12
- When upgrading from V13
- When newly install Systemwalker Desktop Keeper V14.2.0, please refer to “Chapter 2 Installation”
Note
For security, please back up before version upgrade
After version upgrade, database for saving product assets and user assets will be updated. Thus, it is recommended to back up allenvironments before version upgrade in order to prevent unexpected errors.
For backup, please refer to “Chapter 3 Maintenance ”.
Note
OS where version upgrade cannot be performed
Version upgrade cannot be performed in the following OS:
- Windows® 98
- Windows® ME
- Windows NT®
- Windows® 2000
The Log Viewer and the Client (CT) V13.0.0 or later cannot be operated in Windows® 98 and Windows® ME.The Client (CT) V14.2.0 or later cannot be operated in Windows NT®.
The (Master) Management Server, Management Console and Client (CT) V14.2.0 or later cannot be operated in Windows® 2000.
Note
Backup operation after version upgrade
- The old backup command cannot be used after version upgrade. Please use the backup command of V14.2.0.
- 210 -

- The backup command has been modified in V12 or later, so please modify the schedule under the condition that all of the followingconditions are met. Please confirm that the backup command can be called correctly after modification.For changes of the backup command name, please refer to “Backup Command” of “4.10 List of Incompatible Items”.
- When upgrading from V12
- When executing the backup command by using schedule function
When upgrading from V12
The procedures for upgrading from V12.0L10 and V12.0L20 are as follows:
- 211 -
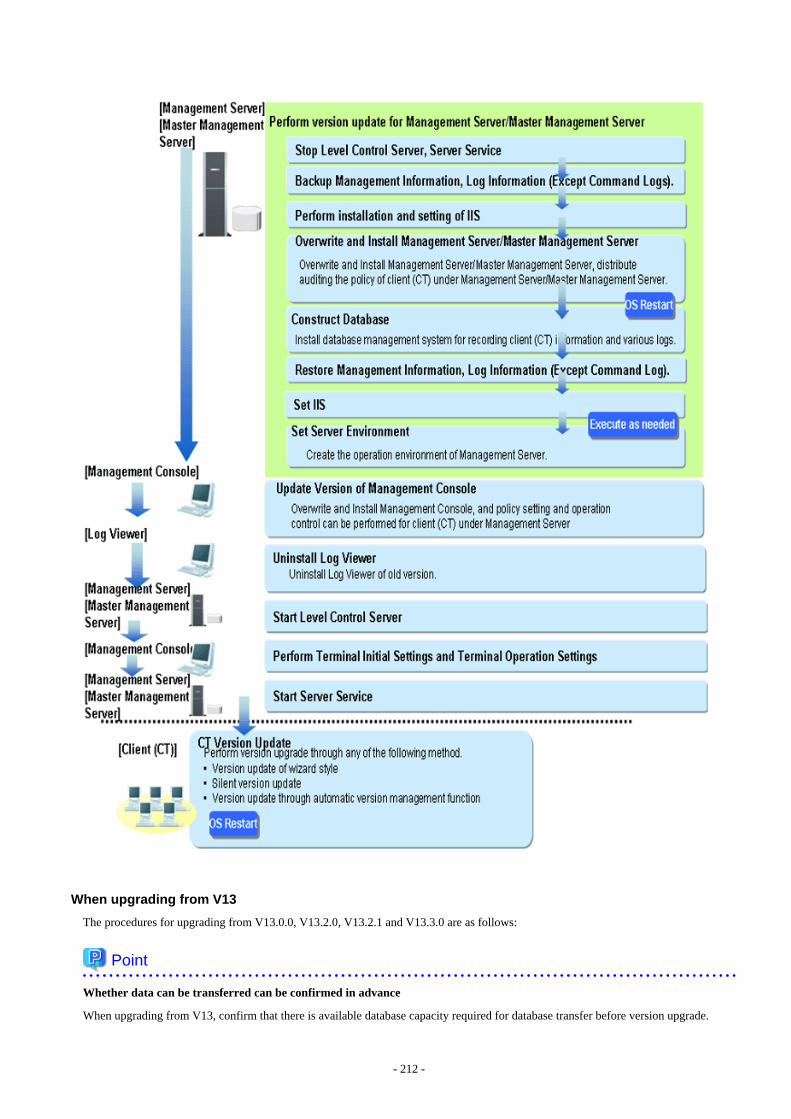
When upgrading from V13
The procedures for upgrading from V13.0.0, V13.2.0, V13.2.1 and V13.3.0 are as follows:
Point
Whether data can be transferred can be confirmed in advance
When upgrading from V13, confirm that there is available database capacity required for database transfer before version upgrade.
- 212 -
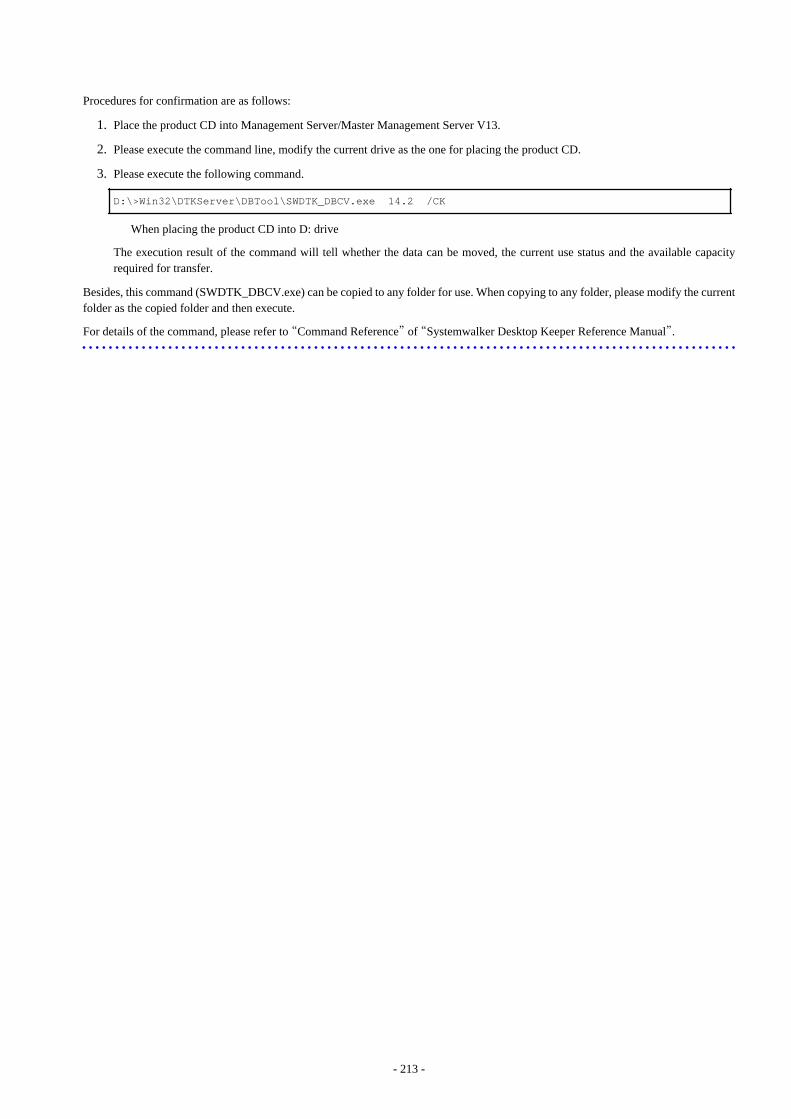
Procedures for confirmation are as follows:
1. Place the product CD into Management Server/Master Management Server V13.
2. Please execute the command line, modify the current drive as the one for placing the product CD.
3. Please execute the following command.
D:\>Win32\DTKServer\DBTool\SWDTK_DBCV.exe 14.2 /CK
When placing the product CD into D: drive
The execution result of the command will tell whether the data can be moved, the current use status and the available capacityrequired for transfer.
Besides, this command (SWDTK_DBCV.exe) can be copied to any folder for use. When copying to any folder, please modify the currentfolder as the copied folder and then execute.
For details of the command, please refer to “Command Reference” of “Systemwalker Desktop Keeper Reference Manual”.
- 213 -
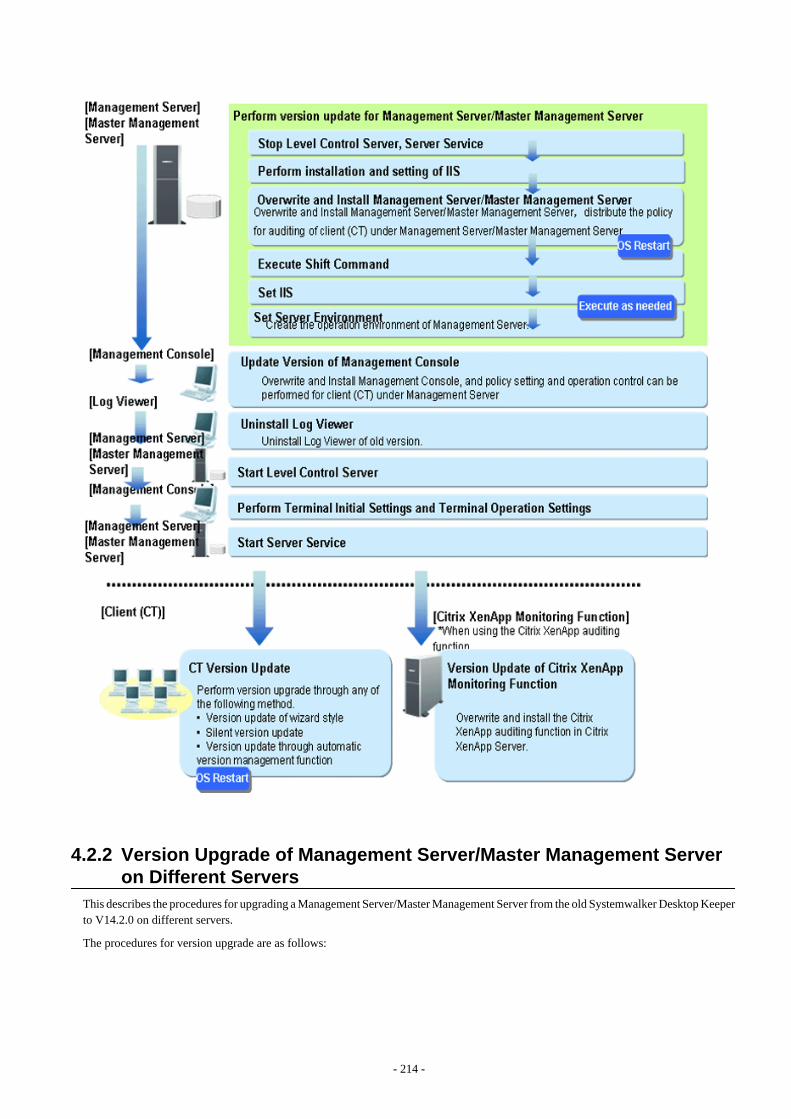
4.2.2 Version Upgrade of Management Server/Master Management Serveron Different Servers
This describes the procedures for upgrading a Management Server/Master Management Server from the old Systemwalker Desktop Keeperto V14.2.0 on different servers.
The procedures for version upgrade are as follows:
- 214 -
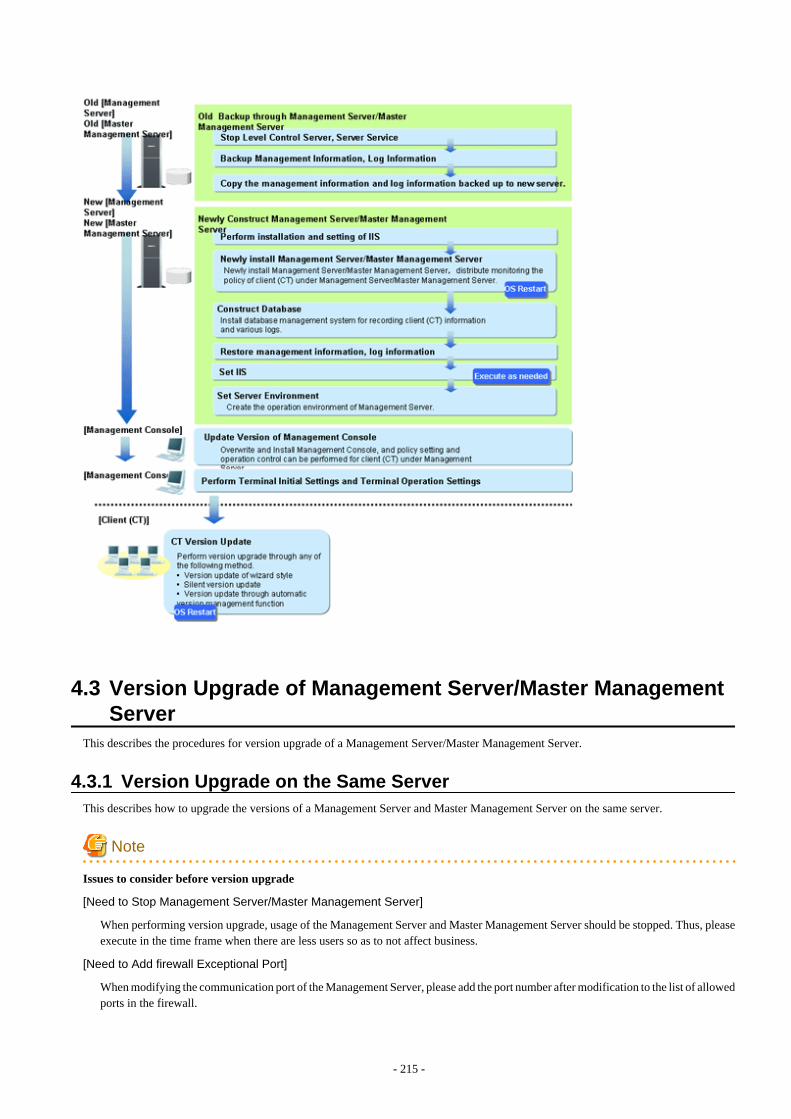
4.3 Version Upgrade of Management Server/Master ManagementServer
This describes the procedures for version upgrade of a Management Server/Master Management Server.
4.3.1 Version Upgrade on the Same ServerThis describes how to upgrade the versions of a Management Server and Master Management Server on the same server.
Note
Issues to consider before version upgrade
[Need to Stop Management Server/Master Management Server]
When performing version upgrade, usage of the Management Server and Master Management Server should be stopped. Thus, pleaseexecute in the time frame when there are less users so as to not affect business.
[Need to Add firewall Exceptional Port]
When modifying the communication port of the Management Server, please add the port number after modification to the list of allowedports in the firewall.
- 215 -
[Please Consider the Time for Data Transfer]
Data should be transferred when version upgrade. It takes some time to operate according to the database capacity.
[Overwriting Installation Will Take Some Time]
In the environment where a large amount of attached data and command logs exist, when executing the overwriting installation of aManagement Server/Master Management Server, access authority confirmation/modification of the attached data and command logwill take longer time. (Time standard for overwriting installation: it takes about 30 minutes for the attached data and command log of100,000 files.)
[Definition of Primary Administrator]
The available contents are different for the primary administrator (secureadmin) created by Systemwalker Desktop Keeper V12 andthe primary administrator (secureadmin) created by Systemwalker Desktop KeeperV13 or later.
The primary administrator of V13 or later (secureadmin) can start the server settings tool, backup tool and restoration tool, but cannotstart the Management Console and Log Viewer.
However, when upgrading from V12, the primary administrator of the old version (secure admin) will be transferred directly, so theadministrator can still use Management Console and Log Viewer and can operate as the primary administrator of V14.2.0. In this case,please specify the password for the primary administrator (secure admin) in the logon window of each window as follows:
- Server settings tool, backup tool and restoration tool
When starting by the primary administrator user (SecureAdmin) from V12, please specify the password for the primaryadministrator set in “Reinstall Management Server/Master Management Server” of the procedure below.
- Management Console and Log Viewer
When starting by the primary administrator user (SecureAdmin) from V12, please specify the password set in V12.
[Aggregation Schedule of Status Window]
When performing version upgrade from version prior to 14.2.0, the aggregation of status window will run according to the initial value1:00. Level control service needs to be started during aggregation of status window. Therefore, please confirm whether the aggregationof status window and stopping of level control service has been performed at the same time (backup and restoration, data transfer .etc). Ifprocessing at the same time, please modify the aggregation schedule of status window after version upgrade. For how to modify, pleaserefer to “Preparation for Using Status Window” of “Systemwalker Desktop Keeper User’s Guide: for Administrator”.
The procedures for version upgrade of a Management Server/Master Management Server are as follows: please execute the followingprocedure according to “4.2 Version Upgrade Procedures”.
When IIS has not been installed here, it should be installed before version upgrade of a Management Server/Master Management Server.For IIS installation, please refer to “2.2.1 Installation and Settings of IIS
Logon to Management Server/Master Management Server
1. Log on to Windows with an Administrators group affiliated user or Domain Admins group affiliated user. When other applicationsare in use, please end these applications.
When upgrading from V13 or V14.0.0/V14.0.1/V14.1.0, to transfer the database, please make sure to log on with the Windowslogon ID for database construction. In case of logon with another logon ID, errors will occur when overwriting the install of theManagement Server/Master Management Server.
Stop Level Control Service and Server Service
1. Select [Control Panel]-[Network Connection] from the [Start] menu.
2. Select “Local Area Connection” and disable local connection. Please wait for 1 minute after disabling before continuing to thefollowing procedures.
3. When the Windows service window is displayed, select each of the following services and select [Stop] from the [Operation] menu.It will take 30 seconds to 1 minute to stop. In addition, after starting SWServerService or during date change (12am), confirmation
- 216 -
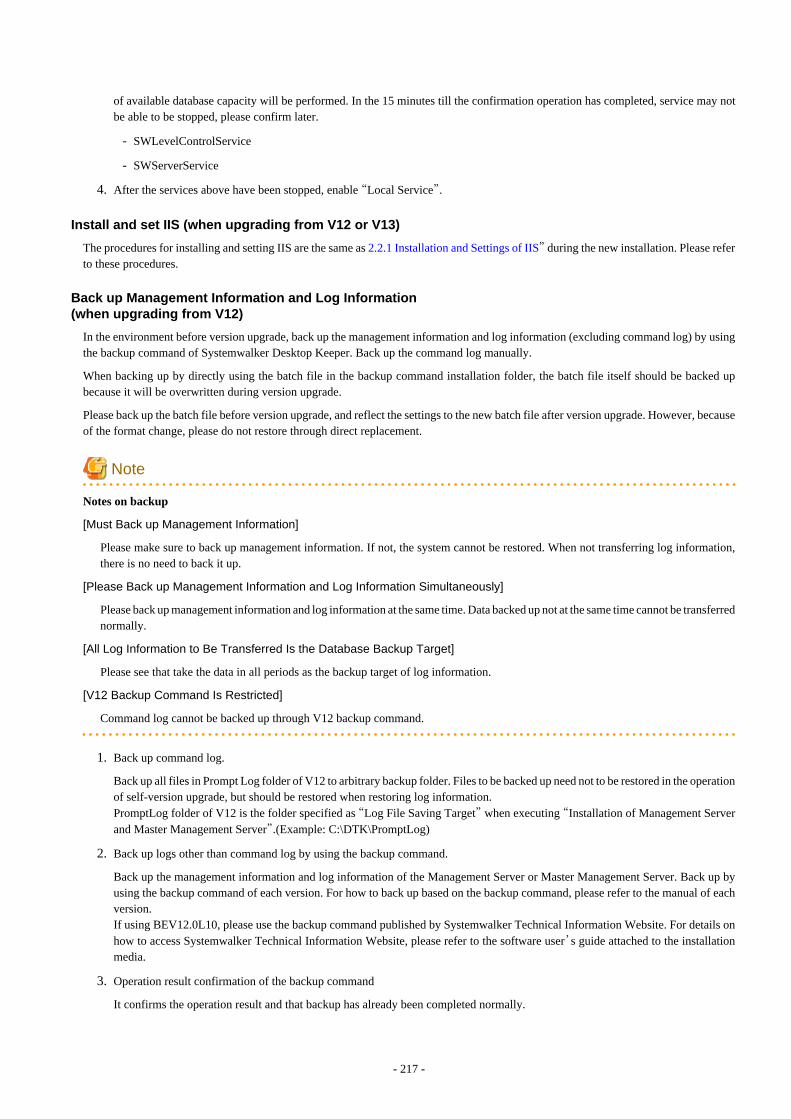
of available database capacity will be performed. In the 15 minutes till the confirmation operation has completed, service may notbe able to be stopped, please confirm later.
- SWLevelControlService
- SWServerService
4. After the services above have been stopped, enable “Local Service”.
Install and set IIS (when upgrading from V12 or V13)
The procedures for installing and setting IIS are the same as 2.2.1 Installation and Settings of IIS” during the new installation. Please referto these procedures.
Back up Management Information and Log Information(when upgrading from V12)
In the environment before version upgrade, back up the management information and log information (excluding command log) by usingthe backup command of Systemwalker Desktop Keeper. Back up the command log manually.
When backing up by directly using the batch file in the backup command installation folder, the batch file itself should be backed upbecause it will be overwritten during version upgrade.
Please back up the batch file before version upgrade, and reflect the settings to the new batch file after version upgrade. However, becauseof the format change, please do not restore through direct replacement.
Note
Notes on backup
[Must Back up Management Information]
Please make sure to back up management information. If not, the system cannot be restored. When not transferring log information,there is no need to back it up.
[Please Back up Management Information and Log Information Simultaneously]
Please back up management information and log information at the same time. Data backed up not at the same time cannot be transferrednormally.
[All Log Information to Be Transferred Is the Database Backup Target]
Please see that take the data in all periods as the backup target of log information.
[V12 Backup Command Is Restricted]
Command log cannot be backed up through V12 backup command.
1. Back up command log.
Back up all files in Prompt Log folder of V12 to arbitrary backup folder. Files to be backed up need not to be restored in the operationof self-version upgrade, but should be restored when restoring log information.PromptLog folder of V12 is the folder specified as “Log File Saving Target” when executing “Installation of Management Serverand Master Management Server”.(Example: C:\DTK\PromptLog)
2. Back up logs other than command log by using the backup command.
Back up the management information and log information of the Management Server or Master Management Server. Back up byusing the backup command of each version. For how to back up based on the backup command, please refer to the manual of eachversion.If using BEV12.0L10, please use the backup command published by Systemwalker Technical Information Website. For details onhow to access Systemwalker Technical Information Website, please refer to the software user’s guide attached to the installationmedia.
3. Operation result confirmation of the backup command
It confirms the operation result and that backup has already been completed normally.
- 217 -
4. Back up the batch file for backup. However, when the batch file is not in use, or it is moved to the user’s arbitrary folder that is notthe installation target of Systemwalker Desktop Keeper for use, there is no need to back it up.
For the installation target of the batch file for backup, please refer to the manual of each version.
Note
When upgrading from V13, V14.0.0/V14.0.1/V14.1.0, the batch file for backup should also be backed up
When upgrading from V13, V14.0.0/V14.0.1/V14.1.0, the backup procedures of the batch file for backup above will also be required.Please confirm the conditions required for the backup above and Procedure 4.
Overwriting Install Management Server/Master Management Server
Note
For version upgrade order for Management Server and Master Management Server
In a 3-level structure, please perform version upgrade on the Master Management Server first. After that, please perform version upgradeon the Management Server.Besides, to avoid accidents in the process of version upgrade, before completing version upgrade on all Management Serves and the MasterManagement Server, please do not view the subordinate Management Server information through the Master Management Server.
The procedures for overwriting installation Management Server/Master Management Server are as follows:
1. After inserting CD-ROM of Systemwalker Desktop Keeper into PC, the following window is displayed.
Please select “Management Server Installation”.
- 218 -
When the Setup above has not been started, please start “swsetup.exe” of CD-ROM drive.
2. After the “Welcome to Systemwalker Desktop Keeper Server Setup” window is displayed, please click the [Next] button.
3. When upgrading from V12, the “Select the installation target” window of the server function will be displayed. (Not displayedwhen upgrading from V13 or V14.0.0/V14.0.1/V14.1.0. Access the next procedure.)
When not to modify the displayed installation target, please click the [Next] button.
To modify the displayed installation target, please click the [View] button of the folder to be modified, and click the [Next] buttonafter the folder is modified.
4. When upgrading from V12, the “Select the installation target” window of the file related to the database will be displayed. (Notdisplayed when upgrading from V13 or V14.0.0/V14.0.1/V14.1.0. Access the next procedure.)
When not modifying the displayed installation target, click the [Next] button to start reinstallation.
To modify the displayed installation target, click the [View] button of the folder to be modified, and click the [Next] button afterthe folder is modified to start reinstallation.
Multibyte characters such as space, Hiragana, Katakana and Chinese characters cannot be specified in the installation folder of thefile related to the database. Moreover, the following drives cannot be specified:
- Root directory of drive (C:\, D:\, etc.)
- Network drive
- Drive not in NTFS format
If the Symfoware database system has been installed, the bundled Symfoware Server will not be installed. Even if the installationtarget of the file related to the database has been specified, the installation target of Symfoware database system will not change.
5. The “IIS Main Directory Settings” window is displayed.
When not modifying the displayed installation target, please click the [Next] button.
To modify the displayed installation target, please click the [View] button of the folder to be modified, and click the [Next] buttonafter the folder is modified.
6. When the old Log Viewer has been installed on the Management Server/Master Management Server, the following message willappear and Log Viewer will be uninstalled. After click the [OK] button in the message window, the old Log Viewer will be uninstalledbefore installation.
When the old Log Viewer has not been installed, continue to install.
Log Viewer V13.2.0 or earlier has been installed.
Functions of Log Viewer V14.2.0 or later are contained in Management Server already, Log View
will be uninstalled.
Note
Please do not delete the folder, or the database cannot be transferred
When uninstalling the Log Viewer, the following message for deleting the folder will appear, but please do not delete the folder.Please continue installing the Management Server directly.
The following folder might be reserved after uninstallation, please delete it manually.
・Trace Log Saving Folder:
[%1]
%1 : Folder path of trace log saving folder
Please do not restart here
A restart message will appear after the Log Viewer uninstallation is completed, but please do not restart and continue installing theManagement Server.
If restart is executed by mistake, the overwriting installation of the Management Server will be interrupted, so please reinstall itagain. In this case, because the uninstallation of Log Viewer has been completed, the message above will not appear.
- 219 -
7. When the log linkage adapter of the Systemwalker Desktop Log Analyzer has been installed on the Management Server/MasterManagement Server, the following message will appear and the Log Viewer will be uninstalled. After clicking the [OK] button inthe message window, linkage adapter will be uninstalled before installation. Also, the configuration value of the log linkage adapterin Systemwalker Desktop Log Analyzer will be adopted.
When the log linkage adapter has not been installed, continue to install.
Systemwalker Desktop Log Analyzer log linkage adapter V13.2.0 or earlier has been installed.
Functions of log linkage adapter V14.2.0 or later are contained in Systemwalker Desktop Keeper
Management Server already, the log linkage adapter will be uninstalled.
Note
Please do not restart here
Restart will be prompted after completing the uninstallation of the log linkage adapter; however, please do not restart and continueinstalling the Management Server.
When restart has been executed by mistake, the overwriting installation of the Management Server will be interrupted. If this happens,please reinstall again. In this case, the message above will not appear because the uninstallation of the log linkage adapter has beencompleted.
8. The following message will be displayed sometimes after installation. If it does, please click the [No] button.
Note
Please do not restart here
Please do not restart and continue installing the Management Server if this message appears.
If the restart has been executed by mistake, the overwriting installation of the Management Server will be interrupted. If this happens,please reinstall again.
9. The “Update Completed” window will be displayed after normal completion.
Reboot the system in order to use the program. Select either of the following options and click the [Finish] button:
- [Yes, restart the computer immediately.]
- [No, restart the computer later.]
Because the Symfoware Server has been installed, the message prompting reboot will not appear. Please reboot the system afterclicking the [Finish] button directly. In this case, the menu of the old version will be reserved after the processing is completed, butthe uninstallation of the old version has been completed normally. The menu of the old version will be deleted after logoff or reboot.
During version upgrade, the following error will be displayed in the event log, but there will be no problem:[Type] Error[Source] SWDTK[Event ID] 3014[Descriptions] Database structure of non current version. Please confirm the database environment.
Construct database(when upgrading from V12)
The procedures for constructing the database are the same as “2.2.3 Construct Database ”. Please refer to that for details.
- 220 -
Restore management information and log information (when upgrading from V12)
When overwriting the installation of the management information and log information (other than command log) of the old version backedup by Management Server (Master Management Server) previously, restore them by using the restoration tool of Systemwalker DesktopKeeper.Command log will be restored manually.
1. Restore management information and log information (other than command log) by using the restoration tool V14.2.0.
After the restoration, data will be transferred and the newly created information in V14.2.0 will be added automatically. For detailson how to use the restoration tool, please refer to “3.1.3 Restoring User Assets ”.
Execute Transfer Command(when upgrading from V13 or V14.0.0/V14.0.1/V14.1.0)
Please perform transfer operation according to the following procedure.
1. Perform conversion of data from old version of V13 or V14.0.0/V14.0.1/V14.1.0. The procedure is as follows.
a. Confirm the status of database and judge whether transfer can be performed or not.
[Installation folder of database related file] \DBEnv\SWDTK_DBCV.EXE 14.2 /CK
*The initial value of installation folder of database related file is “C: \DTKDB”.
b. Confirm the execution result of command and judge whether transfer can be performed according to result message.
c. Execute database transfer command.
[Installation folder of database related file] \DBEnv\SWDTK_DBCV.EXE 14.2 /GO
*The initial value of installation folder of database related file is “C: \DTKDB”.
2. To manage user policy collectively, execute the following command. Execute in each Management Server and Master ManagementServer.
Note
The data that was taken out with the old version command (for V13 or V14.0.0/V14.0.1/V14.1.0) cannot be imported intoV14.2.0
The transfer command of user definition of V14.2.0 cannot import the data files created with the old version command (for V13 orV14.0.0/V14.0.1/V14.1.0). Please make sure to use the transfer command of user definition of V14.2.0.
Procedure on Management Server:
a. Export “User Information Definition of Administrator”
[Installation folder of database related file] \DBEnv\DTKTBLCV.EXE 14.2 /UI [File name]
Example) Example when the file name is “C: \temp\userinfo.dat” in the default installation target.
C:\DTKDB\DBEnv\DTKTBLCV.EXE 14.2 /UI C:\temp\userinfo.dat
b. Export “User information, User policy definition”
[Installation folder of database related file] \DBEnv\ DTKTBLCV.EXE 14.2 /UP [File name]
Example) Example when the file name is “C: \temp\userpolicy.dat” in the default installation target.
C:\DTKDB\DBEnv\DTKTBLCV.EXE 14.2 /UP C:\temp\userpolicy.dat
Procedure on Master Management Server:
- 221 -
a. Import “User Information Definition of Administrator”
b. Use the following command for each Management Server.
[Installation folder of database related file] \DBEnv\DTKTBLCV.EXE 14.2 /IN [File name]
Example) Example when importing “C: \temp\userinfo.dat” in the default installation target
C:\DTKDB\DBEnv\DTKTBLCV.EXE 14.2 /IN C:\temp\userinfo.dat
c. Import “User Information, User Policy Definition”
d. Use the following command for each Management Server.
[Installation folder of database related file] \DBEnv\DTKTBLCV.EXE 14.2 /IN [File name]
Example) Example when importing “C: \temp\userpolicy.dat” in the default installation target
C:\DTKDB\DBEnv\DTKTBLCV.EXE 14.2 /IN C:\temp\userpolicy.dat
For details of the above command, please refer to “Command Reference” of “Systemwalker Desktop Keeper Reference Manual”.
Set IIS
IIS settings will be performed automatically. However, when upgrading from V12 or V13, please refer to “2.2.4 IIS Settings ”, and createthe Systemwalker Desktop Keeper specified application pool as required.
Set Environment of Management Server/Master Management Server
When the version is upgraded to V14.2.0, the configuration value in the previous version is still valid.
However, when upgrading from V13.0.0 or earlier, the detailed authority of user information set in the [Administrator Information Settings]of server settings tool will be transferred under the status of possessing all authorities. To modify, please perform after completing transfer.
Also, for [USB Device Registration/Update/Delete] and [E-mail Content Viewing] in the [Administrator Information Settings] window,because not all administrators are authorized, please authorize them after transfer if necessarily.
When upgrading from V13.2.0 or earlier, because the status window settings are not performed, please set the conditions for aggregationin the environment setup. For how to set, please refer to “Preparations Required for Using Status Window” of “Systemwalker DesktopKeeper User's Guide: for Administrator”.
Also, please perform server settings if the server environment is modified. The procedures for server settings are the same as “2.2.5 SetEnvironment of Management Server/Master Management Server ” during the initial installation. Please refer to that guide for details.
4.3.2 Version Upgrade on Different Servers[Note]
Contents to be considered before version upgrade
[Aggregation Schedule of Status Window]
When performing version upgrade from version prior to 14.2.0, the aggregation of status window will run according to the initial value1:00. Level control service needs to be started during aggregation of status window. Therefore, please confirm whether the aggregationof status window and stopping of level control service has been performed at the same time (backup and restoration, data transfer .etc). Ifprocessing at the same time, please modify the aggregation schedule of status window after version upgrade. For how to modify, pleaserefer to “Preparation for Using Status Window” of “Systemwalker Desktop Keeper User’s Guide: for Administrator”.
Logon to old Management Server/Master Management Server
1. Log on to Windows with an Administrators group affiliated user or Domain Admins group affiliated user. When other applicationsare in use, please end these applications.
Stop Level Control Service and Server Service of the old Management Server/Master Management Server.
1. Select [Control Panel]-[Network Connection] from the [Start] menu.
- 222 -
2. Select “Local Area Connection” and disable local connection. Besides, please wait for 1 minute after disabling before the followingprocedure.
3. The Windows service window is displayed, select each of the following services and select [Stop] from the [Operation] menu.Besides, it will take 30 seconds to 1 minute to stop. In addition, after starting SWServerService or during date change (12am),confirmation of available database capacity will be performed. In the 15 minutes till the confirmation operation has completed,service may not be able to be stopped, please confirm later.
- SWLevelControlService
- SWServerService
After the services above are stopped, enable “Local Connection”.
Back up the management information and log information on the old Management Server/MasterManagement Server
Back up the management information and log information by using the backup command or backup tool of Systemwalker Desktop Keeper.In the case of V12, backup the command log manually.
Copy the management information and log information backed up on the old Management Server/MasterManagement Server to the new server.
Please copy the management information and log information backed up on the old Management Server/Master Management Server tothe new server.
Install and set IIS on new Management Server/Master Management Server.
For details on how to install and set IIS, please refer to “2.2.1 Installation and Settings of IIS” during the new installation.
Newly install the new Management Server/Master Management Server
For details on how to install a Management Server/Master Management Server, please refer to “2.2.2 Install Management Server/MasterManagement Server ” during the new installation.
Construct the database in new Management Server/Master Management Server
For details on how to construct the database, please refer to “2.2.3 Construct Database ” during the new installation.
Restore the management information and log information on new Management Server/Master ManagementServer
For details on how to restore the management information and log information, please refer to “3.1.3 Restoring User Assets ”.
When upgrading from V12, restore the command log manually.
Set IIS on new Management Server/Master Management Server.
IIS settings will be performed automatically. Please refer to “2.2.4 IIS Settings ”, and create Systemwalker Desktop Keeper specifiedapplication pool as required.
Set the server environment on new Management Server/Master Management Server
When the version is upgraded to V14.2.0, the configuration value in the old version is still valid.
However, when upgrading from V13.0.0 or earlier, the detailed authority of user information set in the [Administrator Information Settings]of server settings tool will be transferred under the status of possessing all authorities. To modify, please perform after completing transfer.
Also, for [USB Device Registration/Update/Delete] and [E-mail Content Viewing] in the [Administrator Information Settings] window,because not all administrators are authorized, please authorize them after transfer if necessary.
When upgrading from V13.2.0 or earlier, because the status window settings are not performed, please set the conditions for aggregationin the environment setup. For how to set, please refer to “Preparations Required for Using Status Window” of “Systemwalker DesktopKeeper User's Guide : for Administrator”.
- 223 -
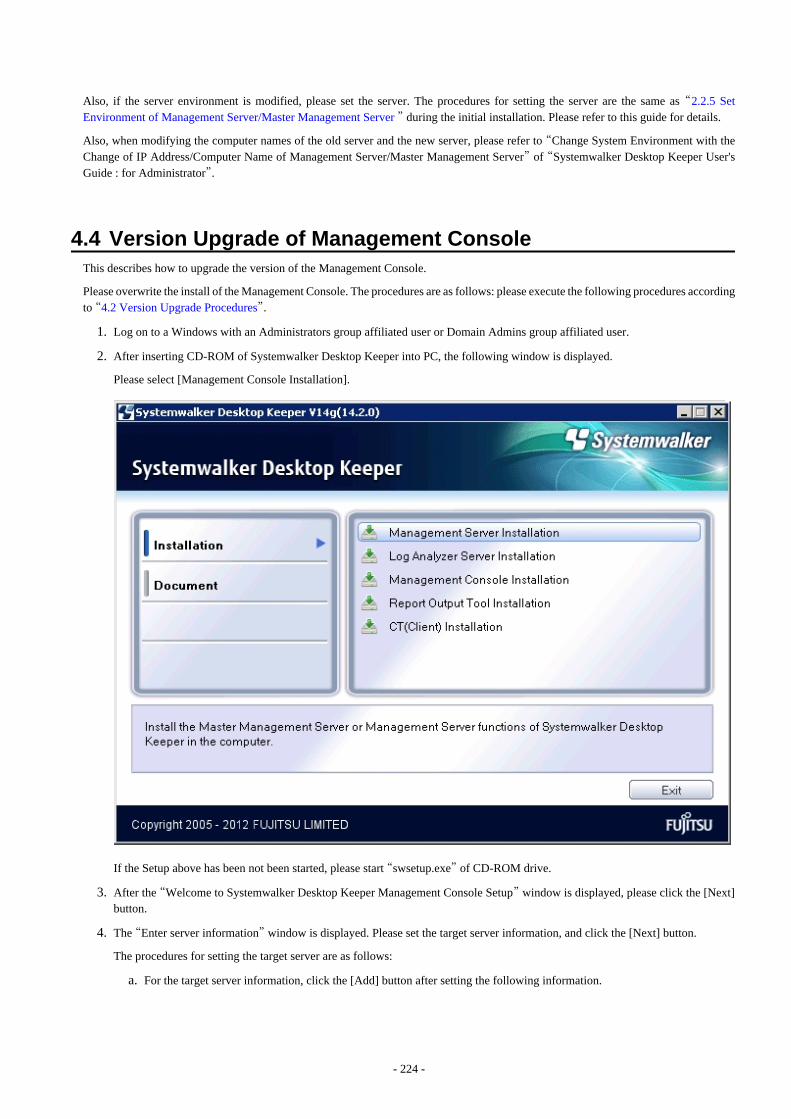
Also, if the server environment is modified, please set the server. The procedures for setting the server are the same as “2.2.5 SetEnvironment of Management Server/Master Management Server ” during the initial installation. Please refer to this guide for details.
Also, when modifying the computer names of the old server and the new server, please refer to “Change System Environment with theChange of IP Address/Computer Name of Management Server/Master Management Server” of “Systemwalker Desktop Keeper User'sGuide : for Administrator”.
4.4 Version Upgrade of Management ConsoleThis describes how to upgrade the version of the Management Console.
Please overwrite the install of the Management Console. The procedures are as follows: please execute the following procedures accordingto “4.2 Version Upgrade Procedures”.
1. Log on to a Windows with an Administrators group affiliated user or Domain Admins group affiliated user.
2. After inserting CD-ROM of Systemwalker Desktop Keeper into PC, the following window is displayed.
Please select [Management Console Installation].
If the Setup above has been not been started, please start “swsetup.exe” of CD-ROM drive.
3. After the “Welcome to Systemwalker Desktop Keeper Management Console Setup” window is displayed, please click the [Next]button.
4. The “Enter server information” window is displayed. Please set the target server information, and click the [Next] button.
The procedures for setting the target server are as follows:
a. For the target server information, click the [Add] button after setting the following information.
- 224 -
Note
Please confirm the settings of the connected (Master) Management Server
Please set the connected (Master) Management Server information as the same as the settings in the Management Console.The following explains how to confirm:
1. Please start [All Programs]-[Systemwalker Desktop Keeper]-[Server]-[Server Settings Tool] from the [Start] menu onthe connected (Master) Management Server.
2. Click the [Management Server Settings] button.
3. Confirm the following items.
-Configuration value of [IP address of server] of [Server settings]
-Configuration value of [Management Console<---->Level Control Service] of [Port number settings]
- [Computer name or IP address of connected (Master) Management Server]: Input the computer name or IP addressof the connected (Master) Management Server.
When inputting the computer name, please input the content with name analyzed. If the name is not analyzed, (Master)Management Server cannot be connected to Management Console.The value set here will be displayed as an option of [Connected Target Server Name] in the logon window of ManagementConsole.
- [Port number being used]: Enter the port number for communication between Management Console and Level ControlService.
After it is added, the set information will be displayed under the [Add] button.
b. When there are multiple target servers, operate as Procedure a. according to the number of servers.Servers that are connected frequently can be moved up and down through the [↑] button and the [↓] button.
5. The “Complete installation preparation” window is displayed.
To start installation, please click the [Install] button to start installation.
To confirm or modify the settings, please click the [Back] button to reset.
6. The [Update has completed] window is displayed after the processing is completed normally. Please click the [Finish] button.
When rebooting the PC is required after installation is completed, please reboot the computer.
4.5 Uninstall Log ViewerThis describes how to uninstall Log Viewer V13.2.0 or earlier.
1. Log on to Windows with an Administrators group affiliated user or Domain Admins group affiliated user. When other applicationsare in use, please end these applications.
2. Start [Add or Remove Programs] or [Add or Remove Applications] of [Control Panel].
3. Select “Systemwalker Desktop Keeper Log Viewer” and click the [Delete] button.
4. Execute uninstallation.
4.6 Perform Terminal Initial Settings and Terminal OperationSettings
This describes how to perform terminal initial settings and terminal operation settings after the version in each environment is upgraded.
The procedures are as follows: please execute the following procedures according to “4.2 Version Upgrade Procedures”.
- 225 -

Start Level Control Server
Start the stopped Level Control Service.
Note
Notes on starting Level Control Service
- In case of a 3-level structure, to avoid accidents, before completing the terminal initial settings and terminal operation settings on theMaster Management Server, please do not start the Level Control Service of a Lower-level Management Server.
- When starting the Level Control Service of a Lower-level Management Server, after performing collective management and settingsof data, data synchronization will be started between Management Servers. Thus, when starting multiple Management Servers, pleasestart another after a while. Also, the Management Console and the Log Viewer cannot be used during data synchronization.
1. When Windows service window is displayed, select Level Control Service (SWLevelControlService) and select [Start] from the[Operation] menu.
Set terminal initial settings
Open the [Terminal Initial Settings] window from the Management Console window.
1. Start the “Management Console” window.
2. Select [Terminal Initial Settings] from the [Operation Settings] menu.
→ The [Terminal Initial Settings] window is displayed.
Functions that do not exist before version upgrade will be set as the initial value. Please set as required. For details of settings, please referto “Perform Terminal Initial Settings” of “Systemwalker Desktop Keeper User's Guide : for Administrator”.
Also, through the procedures above, though the terminal initial settings of adding policy can be set, they are not reflected to the originalCT policy and user policy. Please reflect to CT policy and user policy of adding policy by other means. For details on how to reflect CTpolicy and user policy, please refer to “Modify CT Policy/User Policy” “Systemwalker Desktop Keeper User's Guide :f orAdministrator”.
Set terminal operation settings
When modifying the initial value of the [Terminal Operation Settings] window of Management Console
When modifying the initial value of the [Terminal Operation Settings] window of Management Console, execute the followingprocedures:
1. Start the [Management Console] window.
2. Select [Terminal Operation Settings] from the [Operation Settings] menu.
→ The [Terminal Operation Settings] window is displayed.
3. Set the value of [Terminal Operation Settings].
When not modifying the initial value of the [Terminal Operation Settings] window of Management Console, go to the next procedure.
Start server service
Start the stopped server service.
Note
Please start the service after Master Management Server settings is completed
In case of a 3-level structure, to avoid accidents, before completing “2.2.5 Set Environment of Management Server/Master ManagementServer ”, terminal initial settings and terminal operation settings, and please do not start server service.
- 226 -
1. When the Windows service window is displayed, select server service (SWServerService) and select [Start] from the [Operation]menu.
4.7 Version Upgrade of CTThis describes how to upgrade the version of the Client (CT).
Note
Please perform version upgrade of Client (CT) finally
Please perform version upgrade of the Client (CT) after completing the version upgrade of the other assets according to “4.2 VersionUpgrade Procedures”.
Note
When upgrading from the environment of V13.2.0 or earlier, the network should be disconnected.
When starting version upgrade of the Client (CT) from the environment of V13.2.0 or earlier, the network will be disconnected duringinstallation. When opening the network folder through Explorer, please install after closing it.
Version upgrade of the Client (CT) has the following 3 methods. Please conduct the overwriting install Client (CT) according to thesemethods based on your needs:
- Version Upgrade in Wizard Pattern
- Silent Version Upgrade
- Version Upgrade through Version Auto-upgrade Management Function
4.7.1 Version Upgrade of Wizard PatternThe procedures for version upgrade of the Client (CT) in the Wizard Pattern are as follows:
1. Log on to Windows with an Administrators group affiliated user or Domain Admins group affiliated user. When other applicationsare in use, please end these applications.
- 227 -
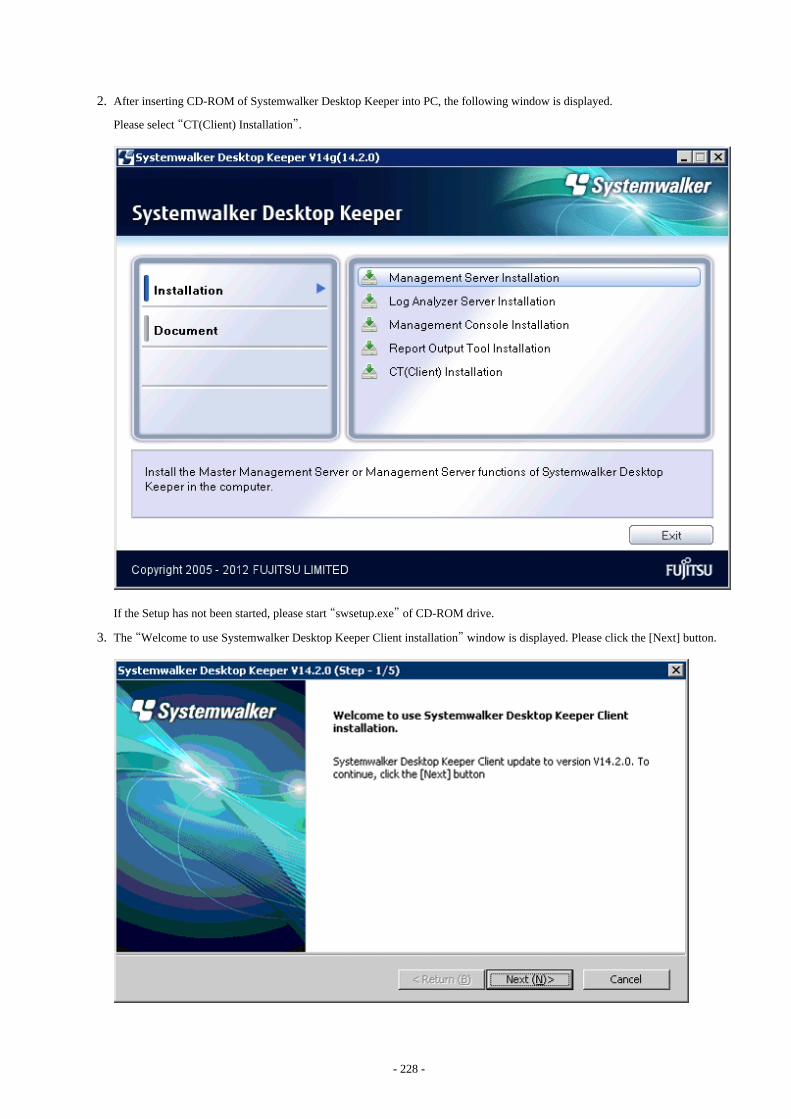
2. After inserting CD-ROM of Systemwalker Desktop Keeper into PC, the following window is displayed.
Please select “CT(Client) Installation”.
If the Setup has not been started, please start “swsetup.exe” of CD-ROM drive.
3. The “Welcome to use Systemwalker Desktop Keeper Client installation” window is displayed. Please click the [Next] button.
- 228 -
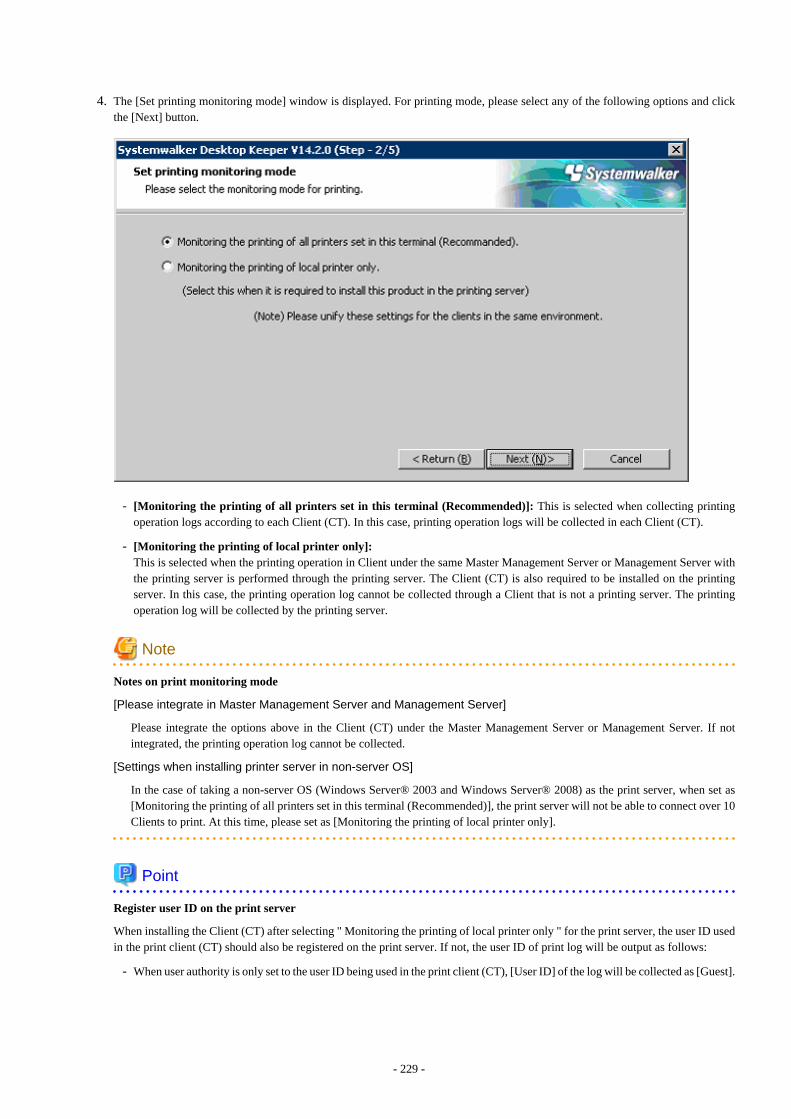
4. The [Set printing monitoring mode] window is displayed. For printing mode, please select any of the following options and clickthe [Next] button.
- [Monitoring the printing of all printers set in this terminal (Recommended)]: This is selected when collecting printingoperation logs according to each Client (CT). In this case, printing operation logs will be collected in each Client (CT).
- [Monitoring the printing of local printer only]:This is selected when the printing operation in Client under the same Master Management Server or Management Server withthe printing server is performed through the printing server. The Client (CT) is also required to be installed on the printingserver. In this case, the printing operation log cannot be collected through a Client that is not a printing server. The printingoperation log will be collected by the printing server.
Note
Notes on print monitoring mode
[Please integrate in Master Management Server and Management Server]
Please integrate the options above in the Client (CT) under the Master Management Server or Management Server. If notintegrated, the printing operation log cannot be collected.
[Settings when installing printer server in non-server OS]
In the case of taking a non-server OS (Windows Server® 2003 and Windows Server® 2008) as the print server, when set as[Monitoring the printing of all printers set in this terminal (Recommended)], the print server will not be able to connect over 10Clients to print. At this time, please set as [Monitoring the printing of local printer only].
Point
Register user ID on the print server
When installing the Client (CT) after selecting " Monitoring the printing of local printer only " for the print server, the user ID usedin the print client (CT) should also be registered on the print server. If not, the user ID of print log will be output as follows:
- When user authority is only set to the user ID being used in the print client (CT), [User ID] of the log will be collected as [Guest].
- 229 -
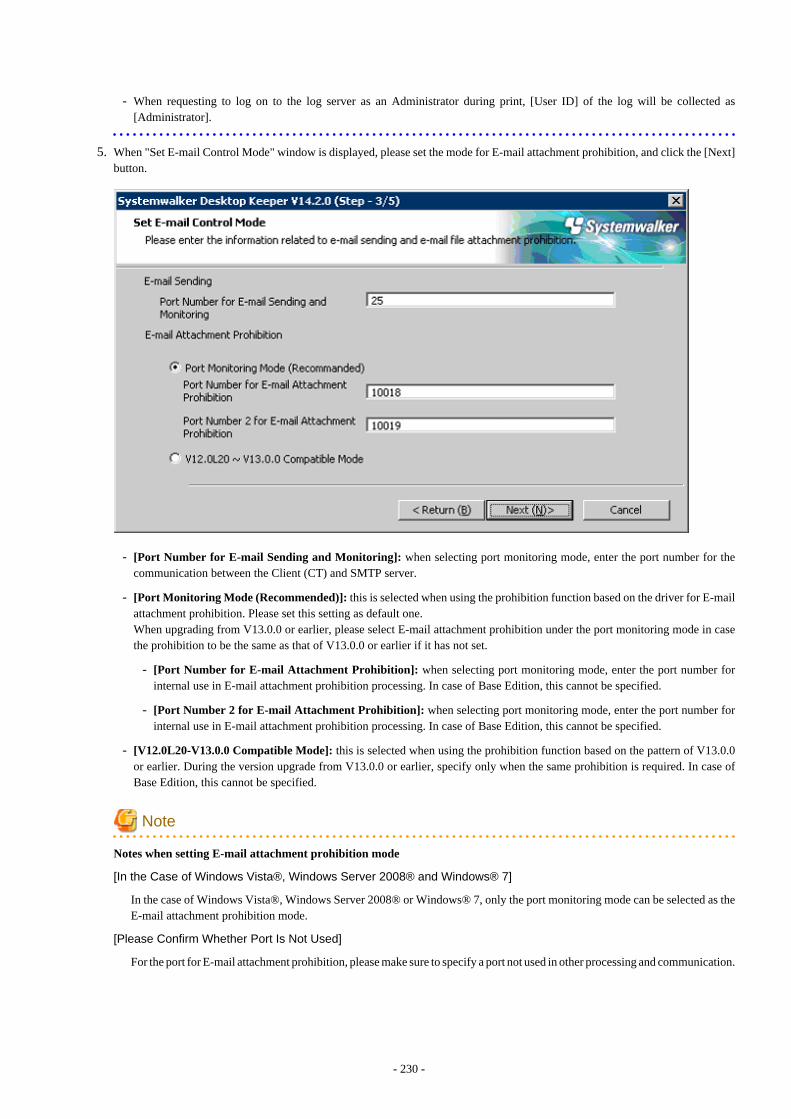
- When requesting to log on to the log server as an Administrator during print, [User ID] of the log will be collected as[Administrator].
5. When "Set E-mail Control Mode" window is displayed, please set the mode for E-mail attachment prohibition, and click the [Next]button.
- [Port Number for E-mail Sending and Monitoring]: when selecting port monitoring mode, enter the port number for thecommunication between the Client (CT) and SMTP server.
- [Port Monitoring Mode (Recommended)]: this is selected when using the prohibition function based on the driver for E-mailattachment prohibition. Please set this setting as default one.When upgrading from V13.0.0 or earlier, please select E-mail attachment prohibition under the port monitoring mode in casethe prohibition to be the same as that of V13.0.0 or earlier if it has not set.
- [Port Number for E-mail Attachment Prohibition]: when selecting port monitoring mode, enter the port number forinternal use in E-mail attachment prohibition processing. In case of Base Edition, this cannot be specified.
- [Port Number 2 for E-mail Attachment Prohibition]: when selecting port monitoring mode, enter the port number forinternal use in E-mail attachment prohibition processing. In case of Base Edition, this cannot be specified.
- [V12.0L20-V13.0.0 Compatible Mode]: this is selected when using the prohibition function based on the pattern of V13.0.0or earlier. During the version upgrade from V13.0.0 or earlier, specify only when the same prohibition is required. In case ofBase Edition, this cannot be specified.
Note
Notes when setting E-mail attachment prohibition mode
[In the Case of Windows Vista®, Windows Server 2008® and Windows® 7]
In the case of Windows Vista®, Windows Server 2008® or Windows® 7, only the port monitoring mode can be selected as theE-mail attachment prohibition mode.
[Please Confirm Whether Port Is Not Used]
For the port for E-mail attachment prohibition, please make sure to specify a port not used in other processing and communication.
- 230 -
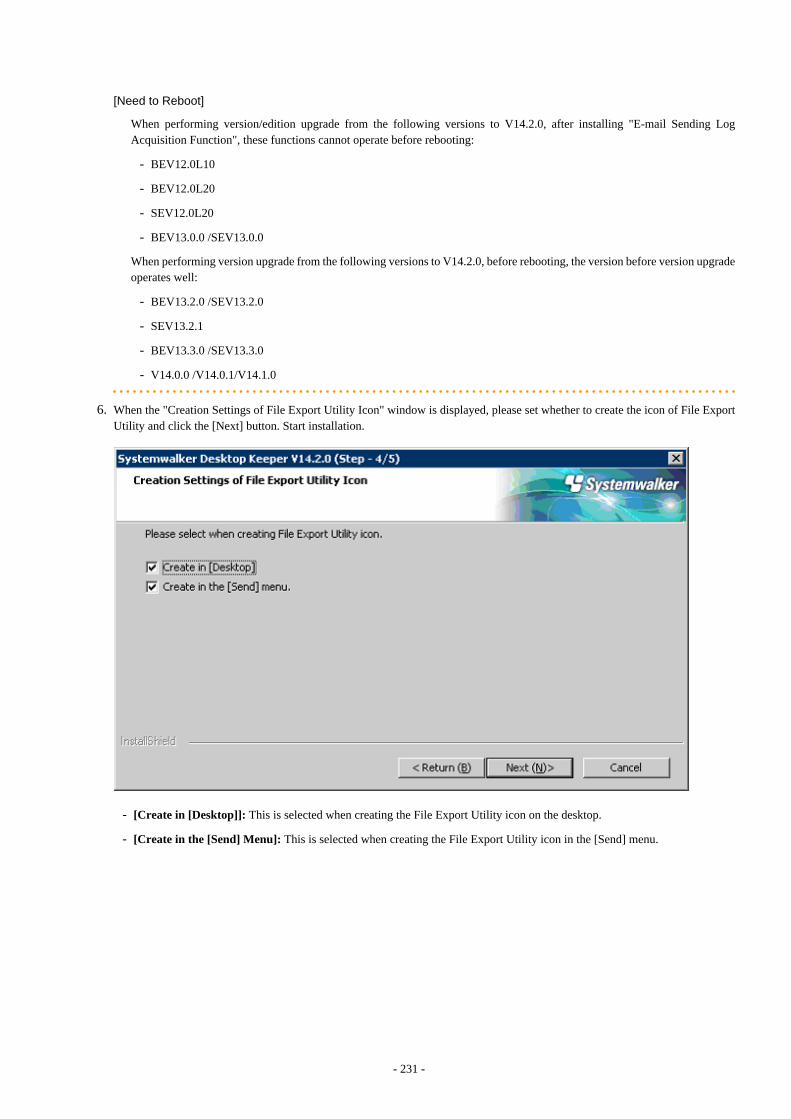
[Need to Reboot]
When performing version/edition upgrade from the following versions to V14.2.0, after installing "E-mail Sending LogAcquisition Function", these functions cannot operate before rebooting:
- BEV12.0L10
- BEV12.0L20
- SEV12.0L20
- BEV13.0.0 /SEV13.0.0
When performing version upgrade from the following versions to V14.2.0, before rebooting, the version before version upgradeoperates well:
- BEV13.2.0 /SEV13.2.0
- SEV13.2.1
- BEV13.3.0 /SEV13.3.0
- V14.0.0 /V14.0.1/V14.1.0
6. When the "Creation Settings of File Export Utility Icon" window is displayed, please set whether to create the icon of File ExportUtility and click the [Next] button. Start installation.
- [Create in [Desktop]]: This is selected when creating the File Export Utility icon on the desktop.
- [Create in the [Send] Menu]: This is selected when creating the File Export Utility icon in the [Send] menu.
- 231 -
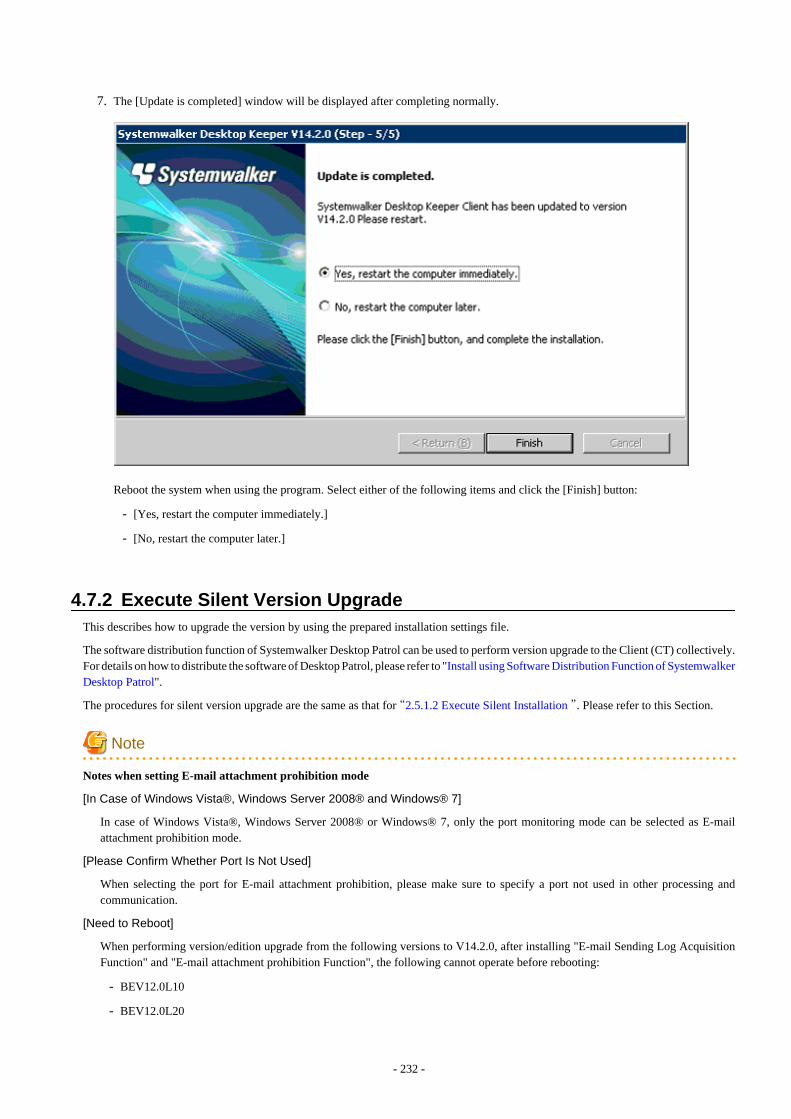
7. The [Update is completed] window will be displayed after completing normally.
Reboot the system when using the program. Select either of the following items and click the [Finish] button:
- [Yes, restart the computer immediately.]
- [No, restart the computer later.]
4.7.2 Execute Silent Version UpgradeThis describes how to upgrade the version by using the prepared installation settings file.
The software distribution function of Systemwalker Desktop Patrol can be used to perform version upgrade to the Client (CT) collectively.For details on how to distribute the software of Desktop Patrol, please refer to "Install using Software Distribution Function of SystemwalkerDesktop Patrol".
The procedures for silent version upgrade are the same as that for “2.5.1.2 Execute Silent Installation ”. Please refer to this Section.
Note
Notes when setting E-mail attachment prohibition mode
[In Case of Windows Vista®, Windows Server 2008® and Windows® 7]
In case of Windows Vista®, Windows Server 2008® or Windows® 7, only the port monitoring mode can be selected as E-mailattachment prohibition mode.
[Please Confirm Whether Port Is Not Used]
When selecting the port for E-mail attachment prohibition, please make sure to specify a port not used in other processing andcommunication.
[Need to Reboot]
When performing version/edition upgrade from the following versions to V14.2.0, after installing "E-mail Sending Log AcquisitionFunction" and "E-mail attachment prohibition Function", the following cannot operate before rebooting:
- BEV12.0L10
- BEV12.0L20
- 232 -
- SEV12.0L20
- BEV13.0.0 /SEV13.0.0
When performing version upgrade from the following versions to V14.2.0, before rebooting, the version before version upgrade canoperate well:
- BEV13.2.0 /SEV13.2.0
- SEV13.2.1
- BEV13.3.0 /SEV13.3.0
- V14.0.0 /V14.0.1/V14.1.0
4.7.3 Version Upgrade by Using Self Version Management FunctionThis describes how to upgrade the version based on the version upgrade by using self version management function as SystemwalkerDesktop Keeper function.
Note
Notes before using Self Version Management Function
[Preparations for operating self version management function]
The correspondent PC should be logged onto when operating the self version management function. If not, it cannot operate.
[Please disable firewall temporarily]
In the case of operating version upgrade through self version management, after enabling the Windows firewall function, the windowfor confirming version upgrade cannot be displayed in the Client. After disabling the Windows firewall function on the Client terminaltemporarily and rebooting Windows, the window for confirming version upgrade will be displayed. Please enable the Windows firewallfunction after completing version upgrade.
[Number of terminals that can be downloaded simultaneously]
Through the self version management function, the initial value of the number of terminals that can be applied simultaneously is 5.When modify this number of terminals, please modify it in [Simultaneous Downloading Number (Maximum)] in the "Folder/CTVersion auto-upgrade Settings" window of server settings tool. The terminal that exceeded this configuration value will execute theself version management function again when starting up next time.
[When using self version management function in Windows Vista® and Windows® 7]
When using the self version management function in the environment of Windows Vista® and Windows® 7, please do not use theremote logon through Windows terminal service such as Windows "Remote Desktop Connection".
Note
Notes when installing Client (CT) on (Master) Management Server
In the case of installing the Client (CT) on a (Master) Management Server, when setting version upgrade based on the self versionmanagement function of the Client (CT), whether to perform self-version upgrade through common self version management functionwill be requested. Because the server is required to restart after self-version upgrade, please consider the application status of otherClients(CTs) such as connection status and determine whether to apply.
Point
By specifying IP address, self-version upgrade can be performed to the specified Client (CT).
- 233 -
Not all Clients (CTs) should perform self-version upgrade collectively; only the specified Client (CT) should perform the upgrade.
For example, please use in the following cases:
- When trying to test the specific section before performing version upgrade completely
- When trying to perform according to the section and working place
- When trying to perform according to certain number of sets (CTs) in order to disperse the load
This function can be performed by creating "CT file (SWCTVerUpIP.txt) that can perform self-version upgrade".
The setting method is as follows: please perform this procedure before performing the after-mentioned procedures for version upgrade.
1. Please copy (or rename) "SWCTVerUpIP_sample.txt" as "SWCTVerUpIP.txt". Save "SWCTVerUpIP_sample.txt" to the followingfolder.
In the case of any server other than Windows Server® 2008:
[OS Installation Drive] \Document and Settings\All Users\Application Data\Fujitsu\Systemwalker
Desktop Keeper
In the case of Windows Server® 2008:
[OS Installation Drive] \ProgramData\Fujitsu\Systemwalker Desktop Keeper
2. Please open "SWCTVerUpIP.txt" through text editors such as Notepad.
3. Record IP address of CT that can be performed self-version upgrade.
4. Save "SWCTVerUpIP.txt". (Please do not move from the folder above.)
For file details and how to specify IP address, please refer to "CT settings file that can perform self-version upgrade " of"Systemwalker Desktop Keeper Reference Manual".
The procedures for version upgrade based on the self version management function are as follows. The file saving target indicated in thefollowing procedures is different from the installation target when modifying the OS.
Set Server
Perform the following settings on the subordinate Management Server and Master Management Server to the Client (CT).
[When Upgrading from Versions Other Than BEV12.0L10]
1. In the Master Management Server and Management Server, select [Control Panel]-[Network Connection] from the [Start] menu.
2. Select "Local Area Connection" and disable the local area connection. Please wait for 1 minute after disabling before performingthe following procedures.
3. The Windows service window is displayed on Management Server and Master Management Server. Select each of the followingservices and select "Stop" from the "Operation" menu". It will takes 30 seconds to 1 minute to stop. In addition, after startingSWServerService or during date change (12am), confirmation of available database capacity will be performed. In the 15 minutestill the confirmation operation has completed, service may not be able to be stopped, please confirm later.
- SWLevelControlService
- SWServerService
4. After the above services are stopped, enable "Local Connection".
5. On the Master Management Server and Management Server, save the file "SWCTVerSettings2.ini" under Setup folder"win32\DTKUpdate" to the following folder:
- In Windows Server® 2008: "C:\Windows\System32"
- In Windows Server® 2003: "C:\Windows\system32"
- 234 -

- In Windows Server® 2003, 2003 R2 x64 Edition, Windows Server® 2008 64-bit Edition, Windows Server® 2008 R2: "C:\Windows\SYSWOW64"
6. For the file "SWCTVerSettings2.ini", open the file properties, cancel the selection of "Read Only" checkbox, click the [OK]button.
7. On the Master Management Server and Management Server, save the following folder under Setup folder "win32\DTKUpdate"to the location recorded in [DistModuleDir] of file "SWCTVerSettings.ini".
- “Ver3.14.0.1”
Save the file "SWCTVerSettings.ini" to the following folder:
- In Windows Server® 2008: "C:\Windows\System32"
- In Windows Server® 2003: "C:\Windows\system32"
- In Windows Server® 2003, 2003 R2 x64 Edition, Windows Server® 2008 64-bit Edition, Windows Server® 2008 R2: "C:\Windows\SYSWOW64"
- 235 -
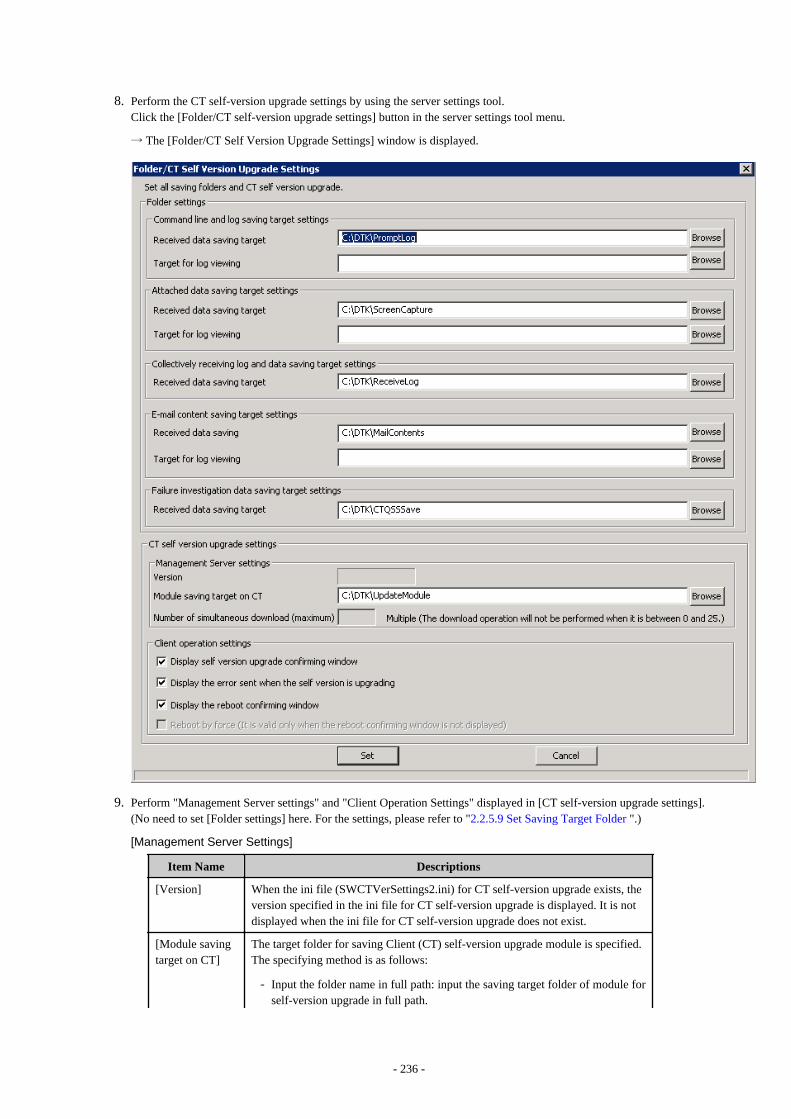
8. Perform the CT self-version upgrade settings by using the server settings tool.Click the [Folder/CT self-version upgrade settings] button in the server settings tool menu.
→ The [Folder/CT Self Version Upgrade Settings] window is displayed.
9. Perform "Management Server settings" and "Client Operation Settings" displayed in [CT self-version upgrade settings].(No need to set [Folder settings] here. For the settings, please refer to "2.2.5.9 Set Saving Target Folder ".)
[Management Server Settings]
Item Name Descriptions
[Version] When the ini file (SWCTVerSettings2.ini) for CT self-version upgrade exists, theversion specified in the ini file for CT self-version upgrade is displayed. It is notdisplayed when the ini file for CT self-version upgrade does not exist.
[Module savingtarget on CT]
The target folder for saving Client (CT) self-version upgrade module is specified.The specifying method is as follows:
- Input the folder name in full path: input the saving target folder of module forself-version upgrade in full path.
- 236 -
- Select [View] button: the [View Folder] window is displayed, select the savingtarget folder for self-version upgrade, click the [OK] button.
A maximum of 96 single-byte characters can be entered in the specified full path.The followings symbols are not allowed in the folder name:Characters not allowed: “\”“/”“:”“*”“?”“"”“<”“>”“|”
[Number ofsimultaneousdownload(Maximum)]
Multiplicity of Client (CT) self-version upgrade is set. The value that can be set iswithin 0-25. When specified as 0, self-version upgrade processing cannot beperformed.
When INI file for CT self-version upgrade does not exist, it cannot be displayed andset.
[Client Operation Settings]
Item Name Descriptions
[Display selfversion upgradeconfirmingwindow]
Settings to confirm whether to perform self-version upgrade in Client (CT) with theuser. However, when performing self-version upgrade from V13.2.0 or earlier, nomatter whether [Display the Window for Confirming Version Auto-upgrade] isselected or not, the window for confirming self-version upgrade will be displayed.(This will be valid if selected when executing Edition upgrading of the same version)
When the selecting button is ON, the following information will be displayed afterstarting the Client (CT) terminal, and the user can select whether to execute self-version upgrade. (Operation in V13.2.0 or earlier).When the selecting button is OFF, the confirmation window will not be displayed,execute after downloading self-version upgrade Setup file in the background.
------------------------------------------------------------
----------
S101-ASK002 provides with the latest version. When updating
to the latest module,
please click “Yes”. Not to update, please click “No”.
Reboot OS after selecting “Yes” and completing the update,
thus
please end the application.
------------------------------------------------------------
----------
Selecting "Yes" will execute self-version upgrade. Selecting "No” will not executeself-version upgrade.
[Display theerror sent whenthe self version isupgrading]
Settings whether to display the error window if errors occurred when performingself-version upgrade in the Client (CT).
When the selecting button is ON, if errors occur during self-version upgrade, thefollowing error information will be displayed and the processing will be cancelled.The user needs to close the error window manually, or self-version upgrade will notstop (up to the action of V13.2.0 or earlier).When the selecting button is OFF, the error will not be displayed, and self-versionupgrade will end directly with the error. To confirm whether self-version upgradeis applied in each Client, please confirm the CT version of the correspondent Client(CT) in the Management Console.
------------------------------------------------------------
----------
[I401-ERR011] Failed to install Systemwalker Desktop Keeper
Client.
Please confirm the errors in the installation log file.
Installation log file:[Name of Installation Log File].
Cancel installation
- 237 -
------------------------------------------------------------
----------
[Display therebootconfirmingwindow]
Settings whether to display the restart window after performing self-versionupgrading in the client (CT). This item is valid only when the selecting button of“Reboot by force” is OFF. When the selecting button of "Reboot by force" is ON,this button cannot be selected.
When the selecting button is ON, after the installation based on self-version upgradeis completed, the restart window is displayed.
Please select either "Yes, restart the computer immediately." or "No, restart thecomputer later".
When the selecting button is OFF, after the installation based on self-versionupgrade, no window will be displayed. Restart after completing modificationthrough “Reboot by force” settings of the following item.
Also, operate the Client (CT) of the version before applying self-version upgradebefore rebooting.
[Reboot byforce]
Settings whether to restart by force after performing self-version upgrade in Client(CT). This item is valid only when the selecting button of "Reboot confirmingwindow" is OFF. When the selecting button of "Reboot confirming window" is ON,this button cannot be selected.
When the selecting button is ON, reboot automatically after the installation basedon self-version upgrade has been completed. When the file is opened, because itwill be ended without being saved, content might be lost.
When the selecting button is OFF, the processing will be ended after the installationbased on self-version upgrade has been completed. When the selecting button of[Display the reboot confirming window] is OFF, the restart confirmation windowwill be neither displayed nor restarted. User should restart it manually.
Note
In case of Windows Vista®, Windows Server 2008®, Windows® 7, the window for reboot confirmation will not bedisplayed
When the OS is Windows Vista®, Windows Server 2008® or Windows® 7 and the environment self-version upgrade of V13.2.0/V13.2.1 Client (CT) has been installed, even if "Display Reboot Confirmation Window" is selected, the window for rebootconfirmation will not be displayed. Although the window for reboot confirmation is not displayed, the version upgrade will takeeffect after PC is rebooted because the installation has been completed. If the installation version is V13.3.0 Client (CT), thiscase will not occur.
10. Create the CT silent installation file by using server settings tool. For details on how to use the setting tool, please refer to "Createinstallation settings file ".
Point
Items viewed during version upgrade by using self version management function
When performing version upgrade by using self version management function, only the settings of [Printing monitoring mode],[E-mail file attachment prohibition] and [OS reboot settings after specifying installation] specified when creating CT silentinstallation folder can be viewed. Other items cannot be viewed.
11. Save the CT silent installation folder created in Procedure 10) to the following folder of the recorded location in [DistModuleDir]confirmed in Procedure 7).
- "Ver3.14.0.1"
- 238 -
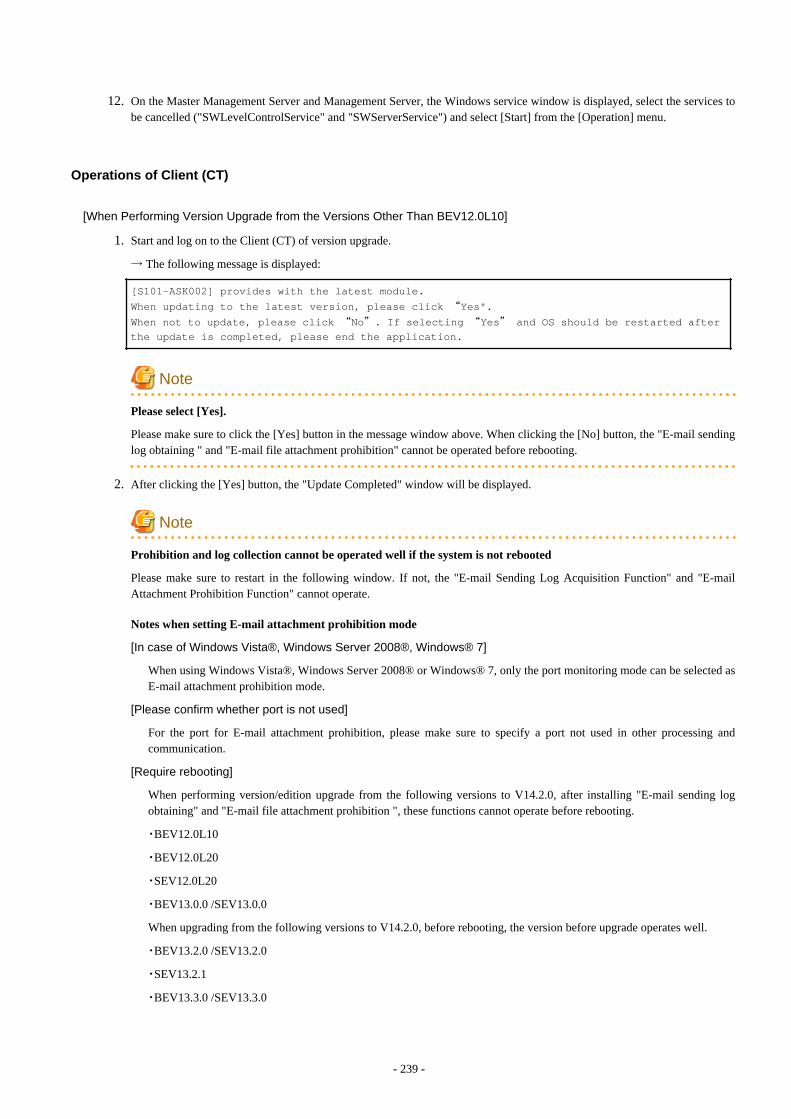
12. On the Master Management Server and Management Server, the Windows service window is displayed, select the services tobe cancelled ("SWLevelControlService" and "SWServerService") and select [Start] from the [Operation] menu.
Operations of Client (CT)
[When Performing Version Upgrade from the Versions Other Than BEV12.0L10]
1. Start and log on to the Client (CT) of version upgrade.
→ The following message is displayed:
[S101-ASK002] provides with the latest module.
When updating to the latest version, please click “Yes".
When not to update, please click “No”. If selecting “Yes” and OS should be restarted after
the update is completed, please end the application.
Note
Please select [Yes].
Please make sure to click the [Yes] button in the message window above. When clicking the [No] button, the "E-mail sendinglog obtaining " and "E-mail file attachment prohibition" cannot be operated before rebooting.
2. After clicking the [Yes] button, the "Update Completed" window will be displayed.
Note
Prohibition and log collection cannot be operated well if the system is not rebooted
Please make sure to restart in the following window. If not, the "E-mail Sending Log Acquisition Function" and "E-mailAttachment Prohibition Function" cannot operate.
Notes when setting E-mail attachment prohibition mode
[In case of Windows Vista®, Windows Server 2008®, Windows® 7]
When using Windows Vista®, Windows Server 2008® or Windows® 7, only the port monitoring mode can be selected asE-mail attachment prohibition mode.
[Please confirm whether port is not used]
For the port for E-mail attachment prohibition, please make sure to specify a port not used in other processing andcommunication.
[Require rebooting]
When performing version/edition upgrade from the following versions to V14.2.0, after installing "E-mail sending logobtaining" and "E-mail file attachment prohibition ", these functions cannot operate before rebooting.
・BEV12.0L10
・BEV12.0L20
・SEV12.0L20
・BEV13.0.0 /SEV13.0.0
When upgrading from the following versions to V14.2.0, before rebooting, the version before upgrade operates well.
・BEV13.2.0 /SEV13.2.0
・SEV13.2.1
・BEV13.3.0 /SEV13.3.0
- 239 -
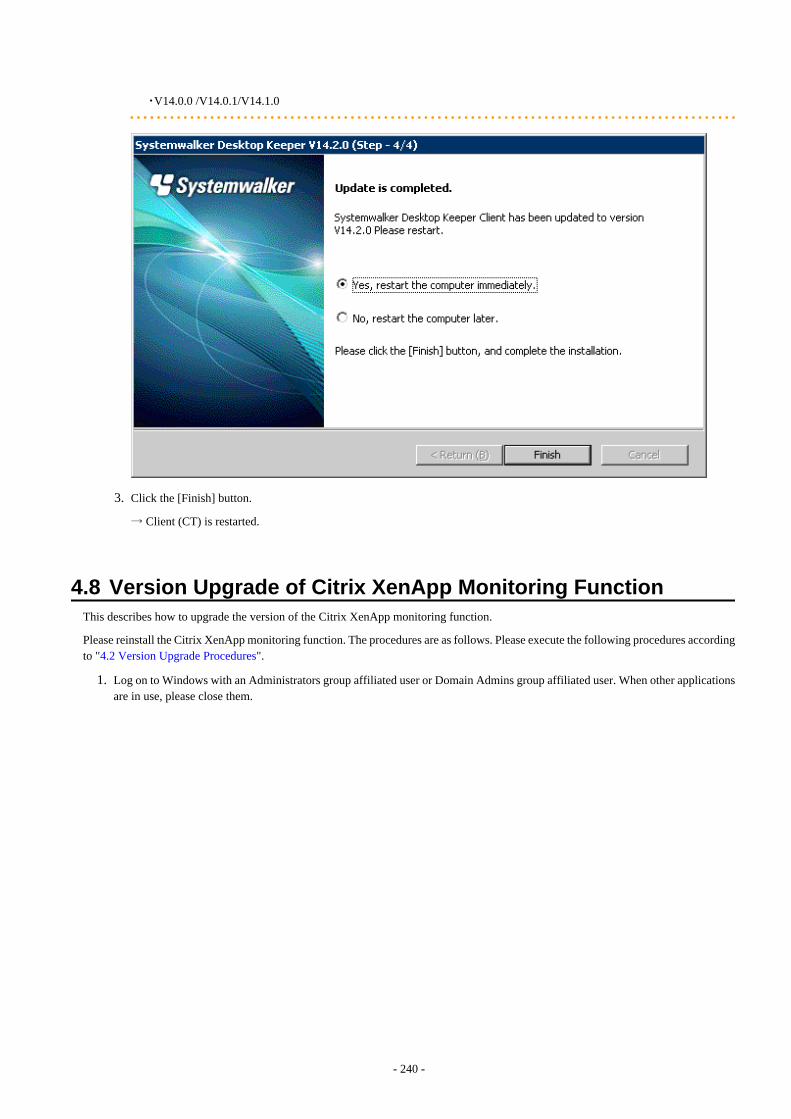
・V14.0.0 /V14.0.1/V14.1.0
3. Click the [Finish] button.
→ Client (CT) is restarted.
4.8 Version Upgrade of Citrix XenApp Monitoring FunctionThis describes how to upgrade the version of the Citrix XenApp monitoring function.
Please reinstall the Citrix XenApp monitoring function. The procedures are as follows. Please execute the following procedures accordingto "4.2 Version Upgrade Procedures".
1. Log on to Windows with an Administrators group affiliated user or Domain Admins group affiliated user. When other applicationsare in use, please close them.
- 240 -
2. After inserting CD-ROM of Systemwalker Desktop Keeper into PC, the following window is displayed.
Please select "Citrix XenApp Monitoring Installation".
If the above Setup has not been started, please start "swsetup.exe" of CD-ROM drive.
3. When the "Welcome to Use Citrix XenApp Monitoring Setup" window is displayed, please click the [Next] button.
4. When the [Set printing monitoring mode] window is displayed, select [Monitoring the printing of all printers set in this terminal(Recommended)]. Then click the [Next] button.
Note
Settings when installing the print server on non-server OS
In the case of taking the non-server OS (Windows Server® 2003 and Windows Server® 2008) as the print server, when set to[Monitoring the printing of all printers set in this terminal (Recommended)], the printer server cannot connect over 10 clients toprint. At this time, please set to [Monitor the printing of local printers only]. When setting [Monitor the Print of Local Printers Only],please refer to Procedure 10 of "2.5.1.1 Wizard-style Installation".
5. The "The installation preparation is completed." window is displayed.
When starting to install, please click the [Install] button to start installation.
To confirm or modify the last settings, please click the [Back] button to reset.
6. After completing normally, the "Installation is completed." window will be displayed.
When using the program, reboot the system. Select either of the following items, and then click the [Finish] button.
- [Yes, restart the computer immediately.]
- [No, restart the computer later.]
- 241 -

4.9 Start Transfer from Systemwalker Desktop Log AnalyzerThis describes how to transfer from Systemwalker Desktop Log Analyzer to Systemwalker Desktop Keeper.
4.9.1 Transfer Report Output ToolPlease reinstall the Systemwalker Desktop Keeper Report Output Tool in the environment of Systemwalker Desktop Log Analyzer ReportOutput Tool. For details on how to reinstall, please refer to “2.8.1 Install Report Output Tool ”.
4.10 List of Incompatible ItemsThis chapter describes incompatible items during version upgrade of Systemwalker Desktop Keeper.
4.10.1 TermsThe following terms are modified.
Terms modified in V14.0.0 or later
Terms modified in V14.0.0 or later are displayed in the following table:
Terms in V13.3.0 or Earlier Terms in V14.0.0 or Later
Suppression Prohibition
4.10.2 SetupModify the setup as follows.
Incompatibility when transferring from V13.2.1 or earlier
Modify the installation of the Management Server and Log Viewer.
Install Management Server
Modify the installation target initial value of the database-related file.
In the old version, the initial value folder is the same as the other folder (backup original file saving folder, etc.), but in this version,the single folder of database-related file will be the initial value.
V13.2.1 or Earlier V13.3.0 or Later
Installation Target of Initial Value: C:\DTK Installation Target of Initial Value: C:\DTKDB
However, in the environment where a Management Server has been installed, the installation target of the database-related filecannot be modified.
Incompatibility when transferring from V12
Modify the installation of the Client (CT).
Silently install to Client (CT)
Modify the parameter during silent installation.
For details on parameters after modification, please refer to "2.5.1.2 Execute Silent Installation " and "5.2.2 Silent Uninstallation".
- 242 -
4.10.3 Management Server
Log information table
Incompatibility when transferring from V14.0.1 or earlier
The saving target table of the E-mail file attachment prohibition log will be modified if any of the following conditions are met.・The policy of confirming recipient address during E-mail Sending is not applied.・V12.0L20-V13.0.0 compatible format is used.
V14.0.1 or Earlier V14.1.0
COMMONLOG3 (Common Log 3) COMMONLOG1 (Common Log 1)
Incompatibility when transferring from V13.3.0 or earlier
The content of the saving target table of the device configuration change log is modified.
V13.3.0 or Earlier V14.0.0
COMMONLOG1 (Common Log 1) COMMONLOG3 (Common Log 3)
Configuration change log
Incompatibility when transferring from V13.3.0 or earlier
The content output by DTKSTCV.EXE (output configuration change log) command is modified.
- The following information output during Log Viewer operation will not be output during the operation in Web Console:
- Operation computer name
- Operation logon user ID
- Operation logon domain name
- In the log with the password modification error, the error resulting from the password not entered will not be recorded.
- In [Operation Category] of a CSV file output item, the following contents are modified:
- “2011: save detailed screen capture image of log” and “2112: when Log Viewer trace is modified” cannot be output.
- “2014: command log search” is contained in the record of “2013: log search”.
Database (DBMS)
Modify the database (DBMS) as follows.
Incompatibility when transferring from V12
A DBMS (database management system) is modified as a unique DBMS (product built-in) from a Microsoft® SQL Server 2000.
As the modification of DBMS occurs, modifications also occur to the search result of the Log Viewer.
- In the search result, hiragana and katakana are processed as special characters. (In V12, they are processed as the same characters.)
- In the search result, multi-byte and single-byte alphanumeric characters are processed as special characters. (In V12, they areprocessed as the same characters.)
Server settings tool
Modify the server settings tool as follows.
- 243 -
Incompatibility when transferring from V14.0.1 or earlier
The “Maximum Number of CT Simultaneous Connections” (internal configuration value) during the communication between theManagement Server and Client (CT) is modified from “180” to “100”.
Incompatibility when transferring from V13.2.1 or earlier
“Management Server Settings” window
- The Server IP address is displayed only, so there is no need to set this in the Management Server settings window.
- The Server IP address is set in the “Server Information Settings” window.
- The input unit of [Connection Timeout Value between Servers] of [Communication Settings] is modified from “millisecond” to“second”.
- According to this modification, because the entered value is “1-999” second(s), the upper limit of the entered value is modifiedfrom “999999 milliseconds” to “999000 milliseconds”.
- The following items set in the “Communication Settings” window are missing:
- Communication retry times between servers
It is fixed as “1” internally.
- Communication retry times between CT-Server
It is fixed as “3” internally.
- Maximum number of CT simultaneous connections
It is fixed as “100” internally.
Incompatibility when transferring from V12
“Administrator Notification Settings” window
Unify the displayed items of the event log and items notified to the administrator by E-mail.
Active Directory Linkage command
Incompatibility when transferring from V13.2.1 or earlier
When UNICODE characters are contained in the OU name and user ID (UserPrincipalName), modify the operation as follows.
V13.2.1 or Earlier V13.3.0
After converting UNICODE characters as single-byte “?”, import it as the group and user informationof Systemwalker Desktop Keeper.
OU name and user ID (UserPrincipalName)containing UNICODE characters are not imported.
When transferring from V13.2.0 to V13.3.0, by executing the initial Active Directory Linkage command, the imported OU name anduser ID containing UNICODE characters will be removed from Systemwalker Desktop Keeper.
However, in the user information of Active Directory, even if “User ID”, “Employee Number”, “Post Name”, “Section Name”,“Position Code” which have been imported to Systemwalker Desktop Keeper contain UNICODE characters, they will be importedafter the characters are converted to “?”.
Backup command
Incompatibility when transferring from V13.3.0 or earlier
Content of CSV file
Modify the CSV file of the output operation log.
- 244 -
V13.3.0 or Earlier V14.0.0
The “Remarks” column isblank.
Set the following values in the “Remarks” column of Device configurationchange log.
- “Volume Label”
- “Device Name (Information Similar to the Hardware Device NameDisplayed in the Hardware Removed Safely window of OS)”
- “Internal Serial Number”
- “Server Name and Shared Name”
Incompatibility when transferring from V12
Command name
The following commands are modified as the commands of V12L10 BE~V12L20 SE. Commands of V13.0.0 or later are the same.
V12L10 BE V12L20 BE V12L20 SE V13.0 BE/SEV13.2BE/SE
V13.3BE/SE
V14.0.0V14.0.1V14.1.0V14.2.0
BackupManagementInformation
DTKMSTB1.BAT
DTKMSTB3.ATDTKMSTB4.BAT
DTKMSTB.EXE
← ← ←
Backup LogInformation
DTKLGTB1.BAT DTKLGTB3.ATDTKLGTB4.BAT
DTKLGTB.EXE ← ← ←
Output ViewingLog One by One
DTKLG1T1.BAT DTKLG1T3.ATDTKLG1T4.BAT
DTKLG1T.EXE ← ← ←
Log Deletion DTKDELR1.BATDTKDELR3.BAT
DTKDELR4.BAT
DTKDELR.EXE ← ← ←
CollectiveOutput ofViewing Log
DTKLGAT1.BAT
DTKLGAT3.BAT
DTKLGAT4.BAT
DTKLGAT.BAT
← ← ←
Backup/DeleteLog Information
DTKBKDL1.BAT
DTKBKDL3.BAT
DTKBKDL4.BAT
DTKBKDL.BAT
← ← ←
CollectivelyOutput/Deletethe Backup/Viewing Log ofLog Information
DTKCVDL1.BAT
DTKCVDL3.BAT
DTKCVDL4.BAT
DTKCVDL.BAT
← ← ←
Calculate thePast Date
DTKBFDAY.BAT
← ←DTKBFDM.EXE
← ← ←
Modify ErrorLevel as anArbitrary Value
DTKELSET.BAT ← ← ← ← ← ←
Number CheckDTKNUMCK.BAT
← ← ← ← ← ←
Separators of CSV data
The backed-up CSV data is changed from being separated by label to being separated by comma.
Output operation log CSV file
- 245 -
- Drive type
As the judgment that a hardware device can be popped up is modified, the drive type of “File Export Log”, “Device configurationchange Log” and “File Operation Log” will also be modified.
- Add item of log list
Add [Additional] to item of log list of the Log Viewer. According to this item, whether or not there is attached data can be confirmed.As the item is added, the CSV output result of the log list will also be modified.
Operating Environment Maintenance Wizard (Constructing and Deleting the Environment)
Incompatibility when transferring from V13.3.0 or earlier
The tool name is modified from “Desktop Keeper DB Environment Construction and Deletion Tool” as “Operating EnvironmentMaintenance Wizard (Constructing and Deleting the environment)”.
Thus, the shortcut name and the message will also be modified.
Operating Environment Maintenance Wizard (Display and Reconstruction Information)
Incompatibility when transferring from V13.3.0 or earlier
The tool name is modified from “Desktop Keeper DB Information Display and Reconstruction Tool” as “Operating EnvironmentMaintenance Wizard (Display and Reconstruction Information)”.
At the same time, the shortcut name and the message will also be modified.
4.10.4 Management ConsoleIncompatibility when transferring from V14.0.1 or earlier
“Terminal Initial Settings” window ([E-mail attachment prohibition] label)
- Modify label name.
V14.0.1 or Earlier V14.1.0
[E-mail attachment prohibition] Label [E-mail Sending] Label
Combine functions of V13.2.0 or earlier(settings related to E-mail attachmentprohibition) and new functions (confirmrecipient address and set exclusion domainwhen E-mail Sending) as one label.
When the prohibited file is contained in theattachment, the prohibited file cannot be sentor saved. However, E-mail can be sent.
Even if there is only one prohibition target filein the attachment, the E-mail (E-mail Text andall attachment) cannot be sent.
Incompatibility when transferring from V13.3.0 or earlier
“Terminal Initial Settings” window ([File Export Prohibition] label)
- Modify startup control for File Export Utility.
V13.3.0 or Earlier V14.0.0
When setting “File Export Supression” policyof Management Console as “Not Prohibited”,the File Export Utility cannot be started.
Even if “File Export Prohibition” policy is setas “Not Prohibited”, the startup of File ExportUtility can be set. Thus, [“File Export
- 246 -
V13.3.0 or Earlier V14.0.0
Utility” Policy= “Not Prohibited”, Startup ofFile Export Utility= ON] can be set, File ExportUtility can be started even if it is not prohibitedwriting.
- Modify export prohibition descriptions.
V13.3.0 or Earlier V14.0.0
File Export Supression
Yes No
File Access Control
Yes No
“CT Group Department Administrator Settings” window
- Layouts of “List of Department Administrators” and “Selected List of Department Administrator” are reversed up and down.
- Modify button name.
V13.3.0 or Earlier V14.0.0
[Add] Button [Select] Button
[Delete] Button [Deselect] Button
Incompatibility when transferring from V13.2.1 or earlier
“Communication Settings” window
Cancel the communication settings window.For [Connection Timeout Value between Servers] set in this window, this can be set in the “Management Server Settings” windowof the server settings tool. Items other than this have fixed values and cannot be set. Please refer to the incompatible items of serversettings tool above.
“Terminal Initial Settings” window ([File Export Prohibition] label)
Encryption Function is not available.
- Modify the specifying method of file export prohibition.
V13.2.1 or Earlier V13.3.0 or Later
[File Export Supression]
- [Yes (Cannot be Exported)]
- [Yes (Can be ExportedAfter Encryption)]
- [Yes (Can be ExportedCommonly)]
- [No]
[File Export Prohibition]
- [Yes]
- [No]
[Export by Using File Export Utility]
- Cannot
- Can
- Can only be exported after encryption
Please set as follows when performing version upgrade from V13.2.1 or earlier through the modification above.
- 247 -
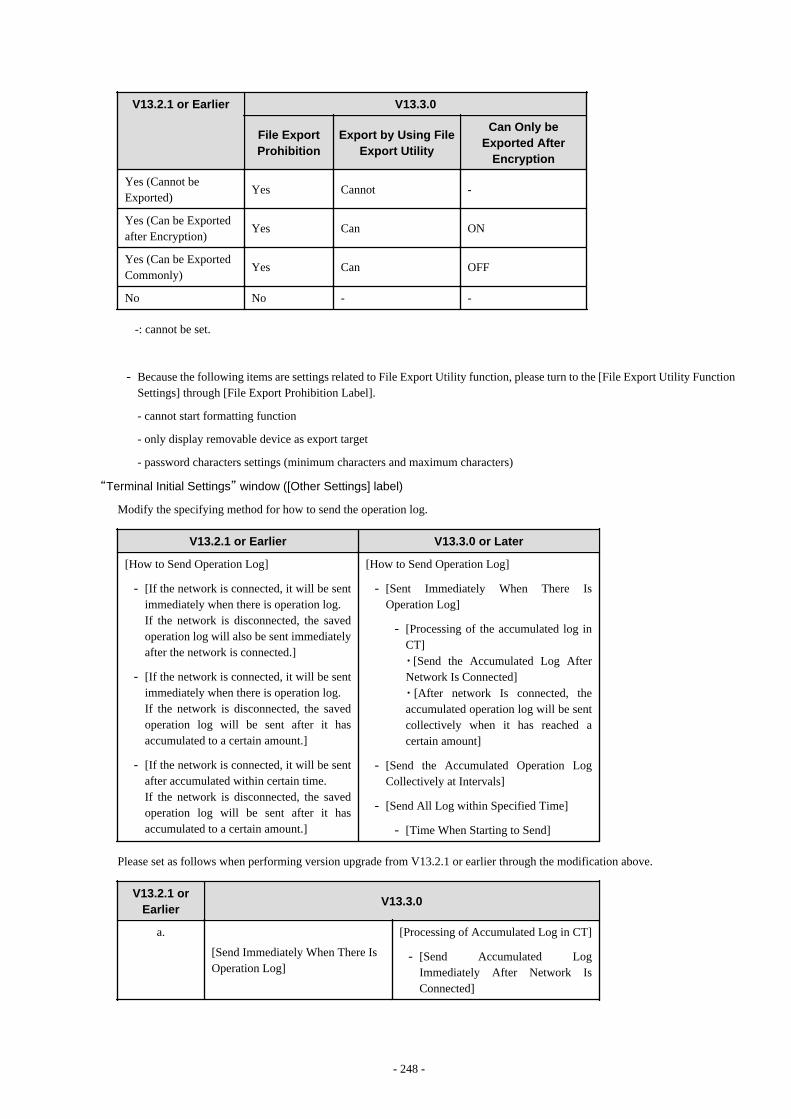
V13.2.1 or Earlier V13.3.0
File ExportProhibition
Export by Using FileExport Utility
Can Only beExported After
Encryption
Yes (Cannot beExported)
Yes Cannot -
Yes (Can be Exportedafter Encryption)
Yes Can ON
Yes (Can be ExportedCommonly)
Yes Can OFF
No No - -
-: cannot be set.
- Because the following items are settings related to File Export Utility function, please turn to the [File Export Utility FunctionSettings] through [File Export Prohibition Label].
- cannot start formatting function
- only display removable device as export target
- password characters settings (minimum characters and maximum characters)
“Terminal Initial Settings” window ([Other Settings] label)
Modify the specifying method for how to send the operation log.
V13.2.1 or Earlier V13.3.0 or Later
[How to Send Operation Log]
- [If the network is connected, it will be sentimmediately when there is operation log.If the network is disconnected, the savedoperation log will also be sent immediatelyafter the network is connected.]
- [If the network is connected, it will be sentimmediately when there is operation log.If the network is disconnected, the savedoperation log will be sent after it hasaccumulated to a certain amount.]
- [If the network is connected, it will be sentafter accumulated within certain time.If the network is disconnected, the savedoperation log will be sent after it hasaccumulated to a certain amount.]
[How to Send Operation Log]
- [Sent Immediately When There IsOperation Log]
- [Processing of the accumulated log inCT]・ [Send the Accumulated Log AfterNetwork Is Connected]・ [After network Is connected, theaccumulated operation log will be sentcollectively when it has reached acertain amount]
- [Send the Accumulated Operation LogCollectively at Intervals]
- [Send All Log within Specified Time]
- [Time When Starting to Send]
Please set as follows when performing version upgrade from V13.2.1 or earlier through the modification above.
V13.2.1 or
EarlierV13.3.0
a.
[Send Immediately When There IsOperation Log]
[Processing of Accumulated Log in CT]
- [Send Accumulated LogImmediately After Network IsConnected]
- 248 -
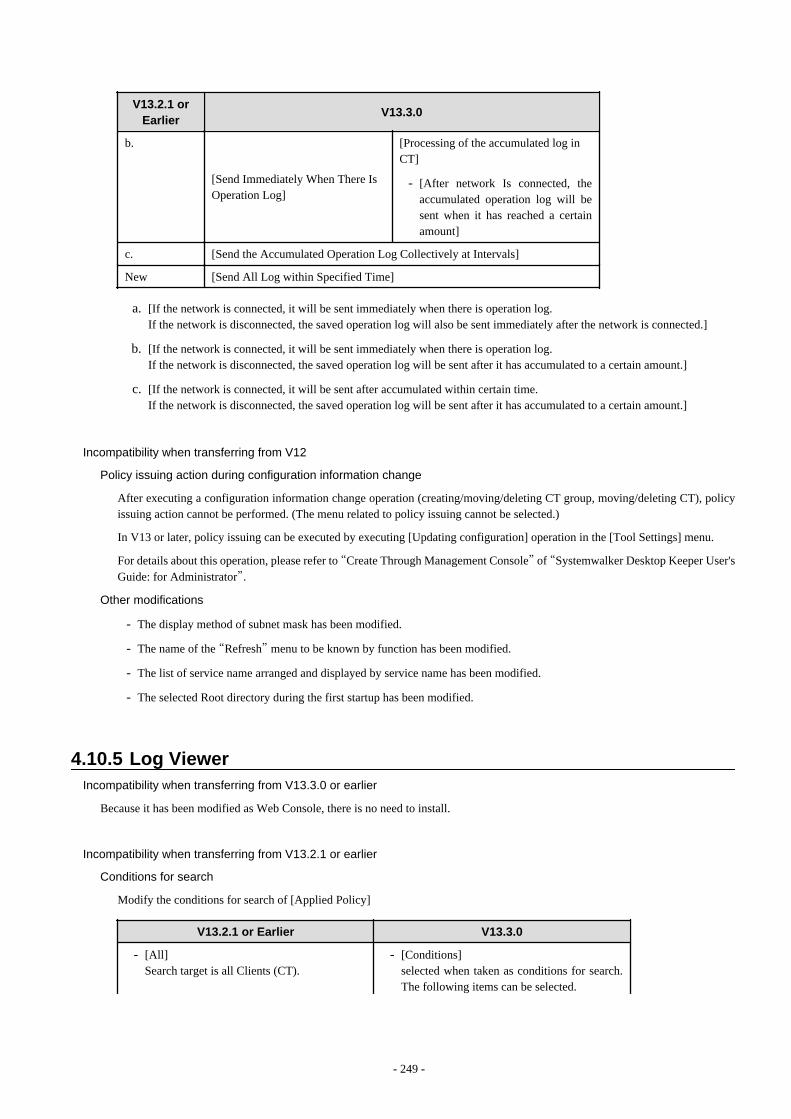
V13.2.1 orEarlier
V13.3.0
b.
[Send Immediately When There IsOperation Log]
[Processing of the accumulated log inCT]
- [After network Is connected, theaccumulated operation log will besent when it has reached a certainamount]
c. [Send the Accumulated Operation Log Collectively at Intervals]
New [Send All Log within Specified Time]
a. [If the network is connected, it will be sent immediately when there is operation log.If the network is disconnected, the saved operation log will also be sent immediately after the network is connected.]
b. [If the network is connected, it will be sent immediately when there is operation log.If the network is disconnected, the saved operation log will be sent after it has accumulated to a certain amount.]
c. [If the network is connected, it will be sent after accumulated within certain time.If the network is disconnected, the saved operation log will be sent after it has accumulated to a certain amount.]
Incompatibility when transferring from V12
Policy issuing action during configuration information change
After executing a configuration information change operation (creating/moving/deleting CT group, moving/deleting CT), policyissuing action cannot be performed. (The menu related to policy issuing cannot be selected.)
In V13 or later, policy issuing can be executed by executing [Updating configuration] operation in the [Tool Settings] menu.
For details about this operation, please refer to “Create Through Management Console” of “Systemwalker Desktop Keeper User'sGuide: for Administrator”.
Other modifications
- The display method of subnet mask has been modified.
- The name of the “Refresh” menu to be known by function has been modified.
- The list of service name arranged and displayed by service name has been modified.
- The selected Root directory during the first startup has been modified.
4.10.5 Log ViewerIncompatibility when transferring from V13.3.0 or earlier
Because it has been modified as Web Console, there is no need to install.
Incompatibility when transferring from V13.2.1 or earlier
Conditions for search
Modify the conditions for search of [Applied Policy]
V13.2.1 or Earlier V13.3.0
- [All]Search target is all Clients (CT).
- [Conditions]selected when taken as conditions for search.The following items can be selected.
- 249 -
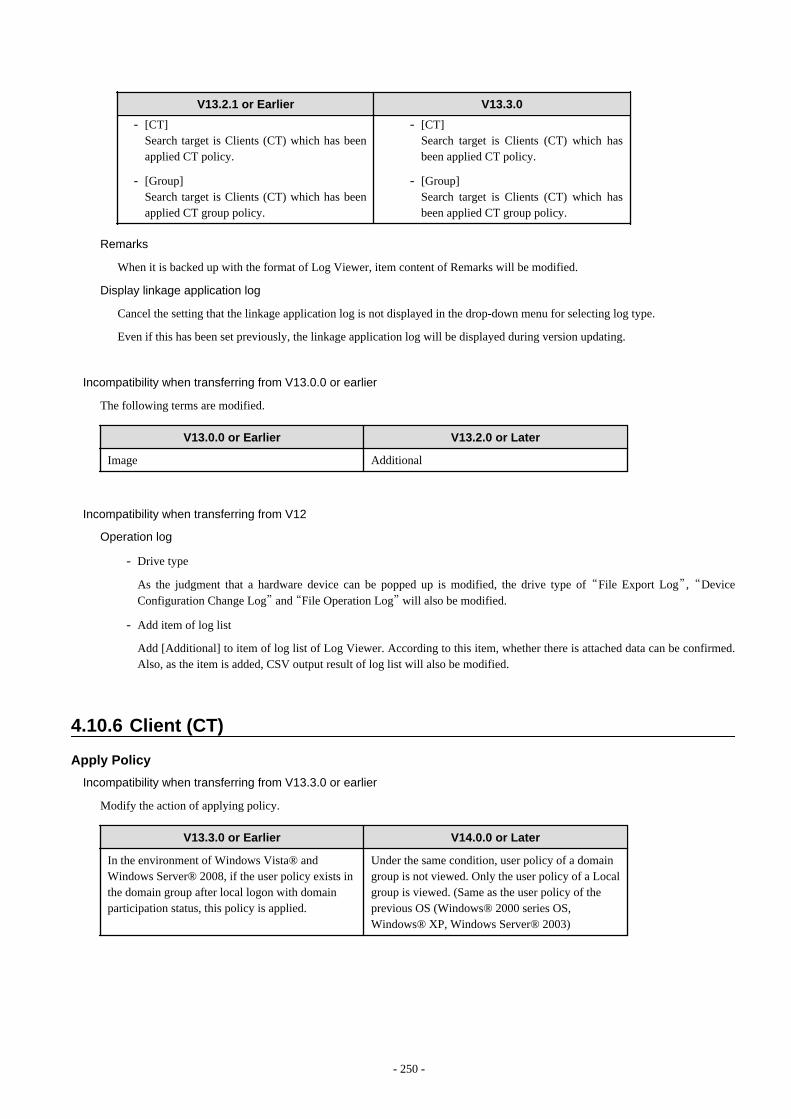
V13.2.1 or Earlier V13.3.0
- [CT]Search target is Clients (CT) which has beenapplied CT policy.
- [Group]Search target is Clients (CT) which has beenapplied CT group policy.
- [CT]Search target is Clients (CT) which hasbeen applied CT policy.
- [Group]Search target is Clients (CT) which hasbeen applied CT group policy.
Remarks
When it is backed up with the format of Log Viewer, item content of Remarks will be modified.
Display linkage application log
Cancel the setting that the linkage application log is not displayed in the drop-down menu for selecting log type.
Even if this has been set previously, the linkage application log will be displayed during version updating.
Incompatibility when transferring from V13.0.0 or earlier
The following terms are modified.
V13.0.0 or Earlier V13.2.0 or Later
Image Additional
Incompatibility when transferring from V12
Operation log
- Drive type
As the judgment that a hardware device can be popped up is modified, the drive type of “File Export Log”, “DeviceConfiguration Change Log” and “File Operation Log” will also be modified.
- Add item of log list
Add [Additional] to item of log list of Log Viewer. According to this item, whether there is attached data can be confirmed.Also, as the item is added, CSV output result of log list will also be modified.
4.10.6 Client (CT)
Apply Policy
Incompatibility when transferring from V13.3.0 or earlier
Modify the action of applying policy.
V13.3.0 or Earlier V14.0.0 or Later
In the environment of Windows Vista® andWindows Server® 2008, if the user policy exists inthe domain group after local logon with domainparticipation status, this policy is applied.
Under the same condition, user policy of a domaingroup is not viewed. Only the user policy of a Localgroup is viewed. (Same as the user policy of theprevious OS (Windows® 2000 series OS,Windows® XP, Windows Server® 2003)
- 250 -
PC Sleep Log and PC Restoration Log
Incompatibility when transferring from V13.3.0 or earlier
Modify the user ID of PC sleep log and PC restoration log.
V13.3.0 or Earlier V14.0.0 or Later
Record log with the user ID that logs onto theConsole actively.
(When user logon to Console does not exist, fixed as“SYSTEM”)
Record with the fixed user ID of “SYSTME” usually.
File Export Utility
Incompatibility when transferring from V12
- Cannot start File Export Utility of multiple Clients simultaneously.
- According to the export log when performing “Specify Folder” in File Export Utility, the full path of the file name is output.
- Through the Management Console, select [Displayed as Removable Export Target Only] in the selection dialog box of the exporttarget. Then removable hard disks such as USB, IEEE1394 and PCMCIA connection will also be the displayed target.
Incompatibility when transferring from V14.1.0 or earlier
When the file path of the export source is the network drive with drive letter, the export source file path described by UNC is displayed.
Incompatibility related to operation log and the output CSV file
Incompatibility when transferring from V12
Type of drive
As the judgment that hardware device can be popped up is modified, the drive type of “File Export Log”, “Device ConfigurationChange Log” and “File Operation Log” will also be modified.
Add item of log list
Add [Additional] to item of log list of the Log Viewer. According to this item, whether there is attached data can be confirmed.Also, as the item is added, CSV output result of the log list will also be modified.
Incompatibility when transferring from V14.1.0 or earlier
File export log
When the file path of export source and target is the network drive with drive letter, the acquisition log must be described throughUNC.
File operation log
When the file path of export source and target is the network drive with drive letter, the acquisition log must be described throughUNC.
4.10.7 Port NumberPlease modify the initial value of the port number as follows.
Incompatibility when starting transfer from V13.3.0 or earlier
V13.3.0 or Earlier V14.0.0 or Later
[Management Console ←→ Level Control Service] 10004 10015
[Log Viewer ←→ Level Control Service] 10002 10022
- 251 -

V13.3.0 or Earlier V14.0.0 or Later
[Level Control Service →Server Service] 10006 10017
- 252 -
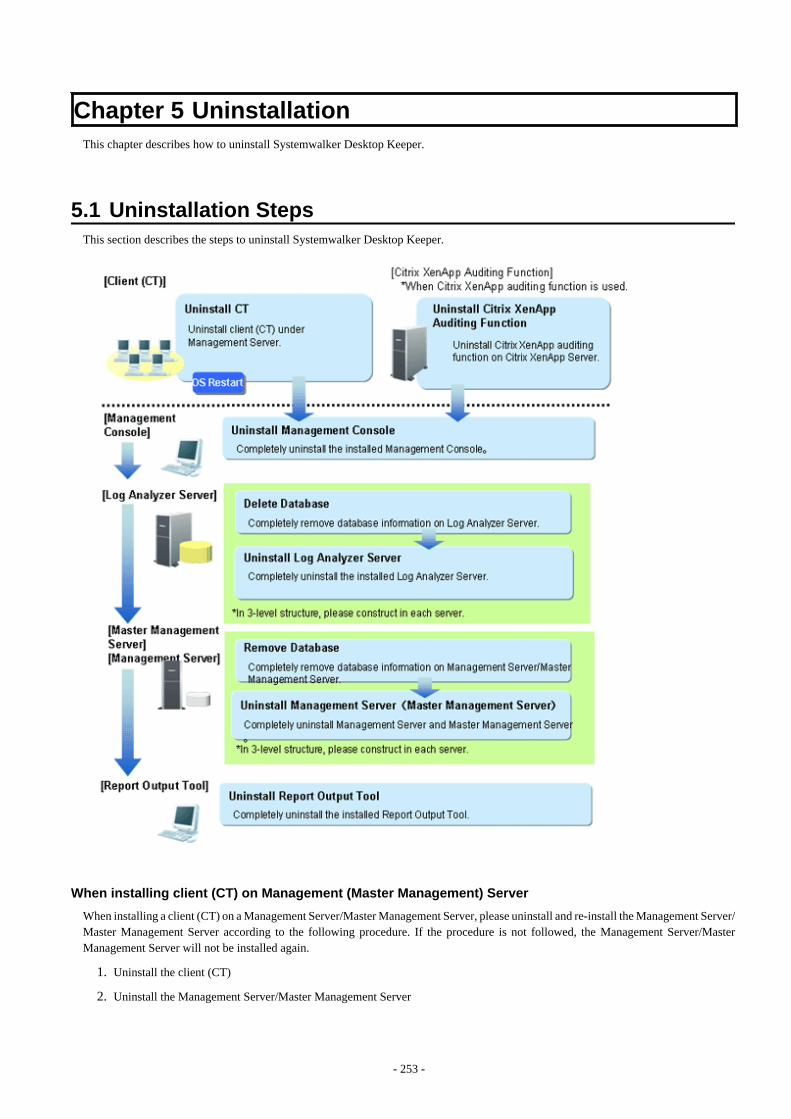
Chapter 5 Uninstallation This chapter describes how to uninstall Systemwalker Desktop Keeper.
5.1 Uninstallation Steps This section describes the steps to uninstall Systemwalker Desktop Keeper.
When installing client (CT) on Management (Master Management) Server
When installing a client (CT) on a Management Server/Master Management Server, please uninstall and re-install the Management Server/Master Management Server according to the following procedure. If the procedure is not followed, the Management Server/MasterManagement Server will not be installed again.
1. Uninstall the client (CT)
2. Uninstall the Management Server/Master Management Server
- 253 -
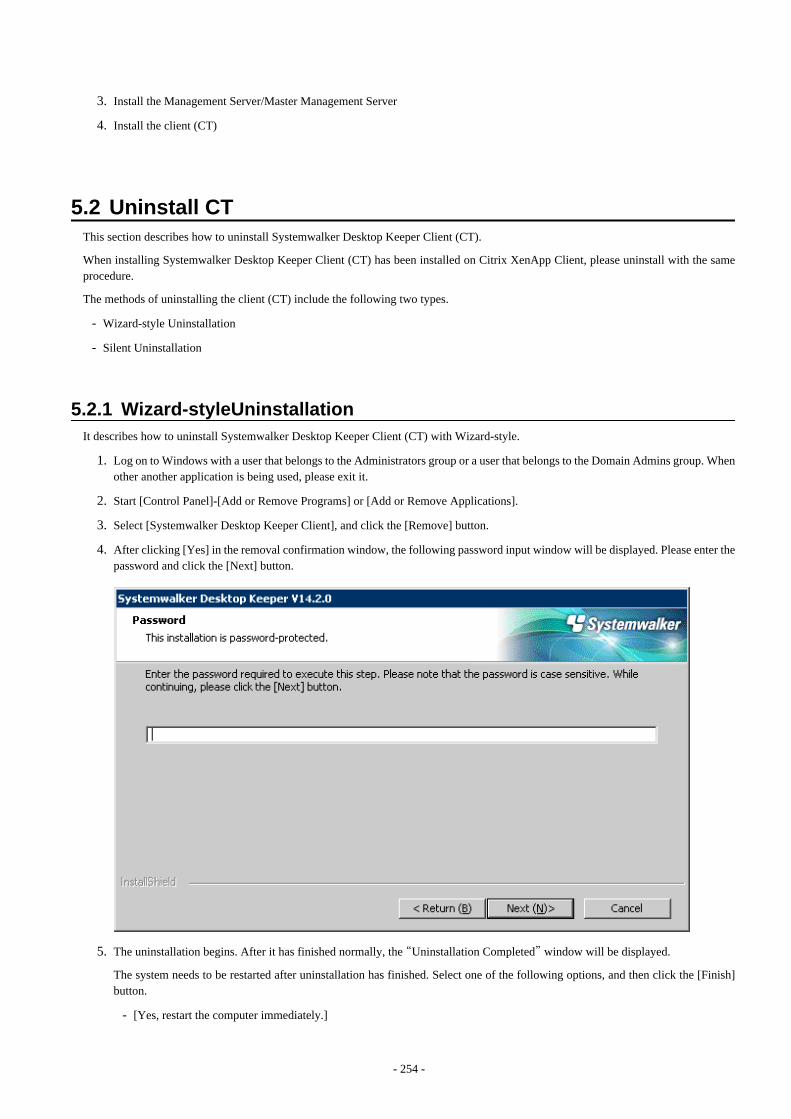
3. Install the Management Server/Master Management Server
4. Install the client (CT)
5.2 Uninstall CTThis section describes how to uninstall Systemwalker Desktop Keeper Client (CT).
When installing Systemwalker Desktop Keeper Client (CT) has been installed on Citrix XenApp Client, please uninstall with the sameprocedure.
The methods of uninstalling the client (CT) include the following two types.
- Wizard-style Uninstallation
- Silent Uninstallation
5.2.1 Wizard-styleUninstallationIt describes how to uninstall Systemwalker Desktop Keeper Client (CT) with Wizard-style.
1. Log on to Windows with a user that belongs to the Administrators group or a user that belongs to the Domain Admins group. Whenother another application is being used, please exit it.
2. Start [Control Panel]-[Add or Remove Programs] or [Add or Remove Applications].
3. Select [Systemwalker Desktop Keeper Client], and click the [Remove] button.
4. After clicking [Yes] in the removal confirmation window, the following password input window will be displayed. Please enter thepassword and click the [Next] button.
5. The uninstallation begins. After it has finished normally, the “Uninstallation Completed” window will be displayed.
The system needs to be restarted after uninstallation has finished. Select one of the following options, and then click the [Finish]button.
- [Yes, restart the computer immediately.]
- 254 -
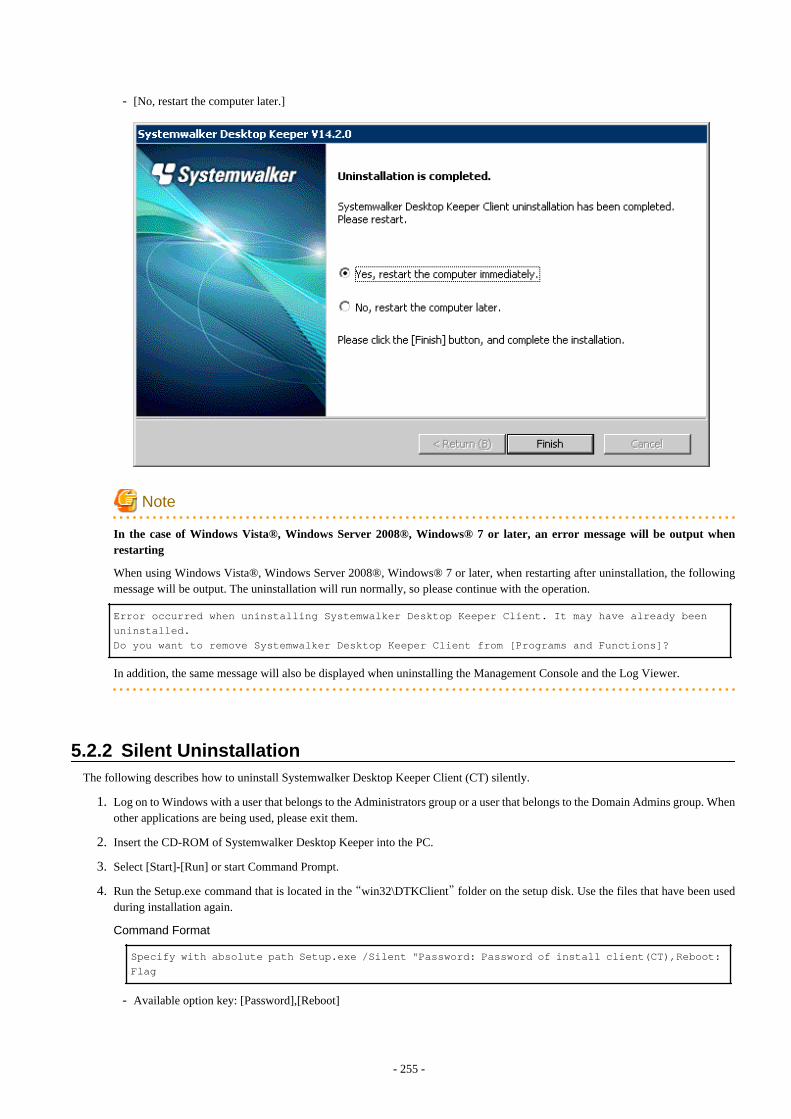
- [No, restart the computer later.]
Note
In the case of Windows Vista®, Windows Server 2008®, Windows® 7 or later, an error message will be output whenrestarting
When using Windows Vista®, Windows Server 2008®, Windows® 7 or later, when restarting after uninstallation, the followingmessage will be output. The uninstallation will run normally, so please continue with the operation.
Error occurred when uninstalling Systemwalker Desktop Keeper Client. It may have already been
uninstalled.
Do you want to remove Systemwalker Desktop Keeper Client from [Programs and Functions]?
In addition, the same message will also be displayed when uninstalling the Management Console and the Log Viewer.
5.2.2 Silent UninstallationThe following describes how to uninstall Systemwalker Desktop Keeper Client (CT) silently.
1. Log on to Windows with a user that belongs to the Administrators group or a user that belongs to the Domain Admins group. Whenother applications are being used, please exit them.
2. Insert the CD-ROM of Systemwalker Desktop Keeper into the PC.
3. Select [Start]-[Run] or start Command Prompt.
4. Run the Setup.exe command that is located in the “win32\DTKClient” folder on the setup disk. Use the files that have been usedduring installation again.
Command Format
Specify with absolute path Setup.exe /Silent "Password: Password of install client(CT),Reboot:
Flag
- Available option key: [Password],[Reboot]
- 255 -
- No Space between items in "[Key]:[Value],[Key]:[Value]".
- Options are not case-sensitive.
- If no option is specified, an error message will be displayed and then the uninstallation will be aborted.
The meaning of keys is as follows:
- [Password]: The password set during the installation of client (CT).
- [Reboot]: The flag specified after the uninstallation has been executed.
- 0: Do not reboot
- 1: Display the dialog box (reboot or not)
- 2: Reboot by force
Example
Assume the following situations:
- The setup disk is inserted in D Drive
- The Setup.exe command is located in D: \win32\DTKClient
- The password for displaying & updating the client status is admin
- Reboot by force after uninstallation
D:\win32\DTKClient\Setup.exe /Silent "Password:admin,Reboot:2"
5. When the dialog box is displayed, select whether to reboot or not.
5.3 Uninstall Citrix XenApp Monitoring FunctionThe following describes how to uninstall the Citrix XenApp monitoring function of Systemwalker Desktop Keeper.
The steps for uninstalling the Citrix XenApp monitoring function are as follows:
1. Log on to Windows with a user that belongs to the Administrators group or a user that belongs to the Domain Admins group. Whenother applications are being used, please exit them.
2. Start [Control Panel]-[Add or Remove Programs] or [Add or Remove Applications].
3. Select “Systemwalker Desktop Keeper - Citrix XenApp Monitoring”, and click the [Remove] button.
4. After clicking [Yes] in the removal confirmation window, the following password input window will be displayed. Please enter thepassword and click the [Next] button.
5. The uninstallation begins. After it has finished normally, the “Uninstallation Completed” window will be displayed.
The system needs to be restarted after uninstallation has finished. Select one of the following options, and then click the [Finish]button.
- [Yes, restart the computer immediately.]
- [No, restart the computer later.]
5.4 Uninstall Management Console The following describes how to uninstall Systemwalker Desktop Keeper Management Console.
1. Log on to Windows with a user that belongs to the Administrators group or a user that belongs to the Domain Admins group. Whenother applications are being used, please exit them.
- 256 -
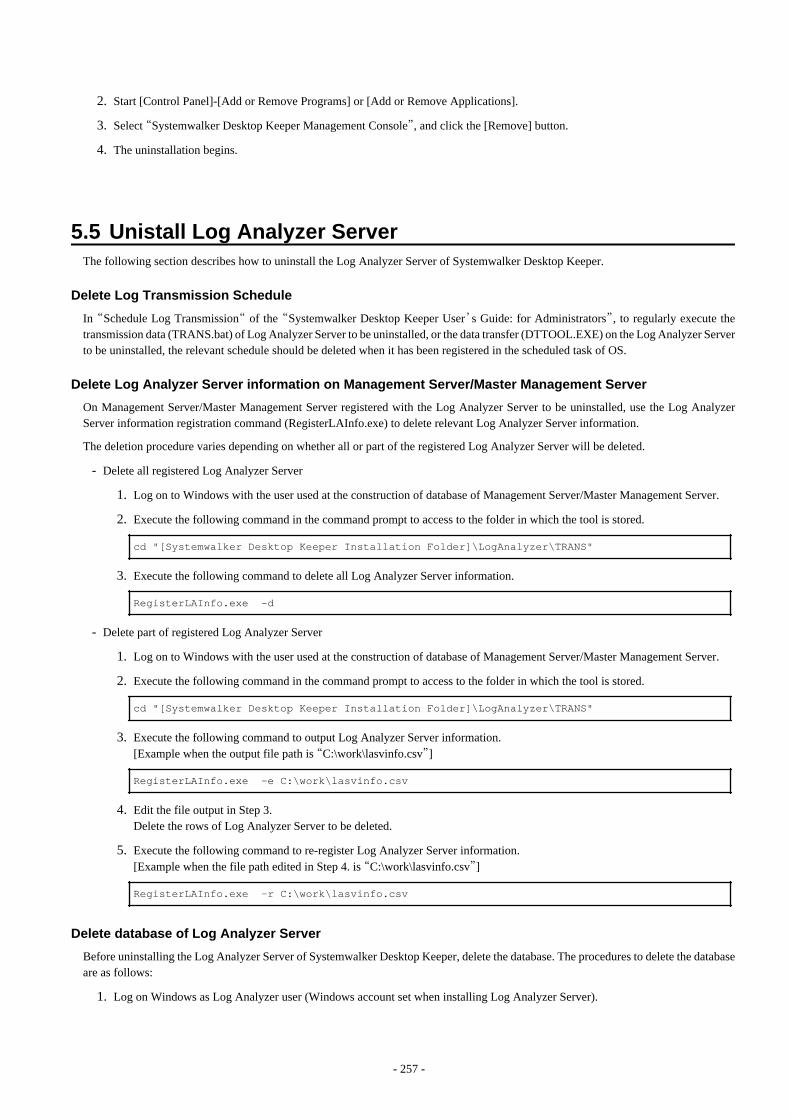
2. Start [Control Panel]-[Add or Remove Programs] or [Add or Remove Applications].
3. Select “Systemwalker Desktop Keeper Management Console”, and click the [Remove] button.
4. The uninstallation begins.
5.5 Unistall Log Analyzer ServerThe following section describes how to uninstall the Log Analyzer Server of Systemwalker Desktop Keeper.
Delete Log Transmission Schedule
In “Schedule Log Transmission“ of the “Systemwalker Desktop Keeper User’s Guide: for Administrators”, to regularly execute thetransmission data (TRANS.bat) of Log Analyzer Server to be uninstalled, or the data transfer (DTTOOL.EXE) on the Log Analyzer Serverto be uninstalled, the relevant schedule should be deleted when it has been registered in the scheduled task of OS.
Delete Log Analyzer Server information on Management Server/Master Management Server
On Management Server/Master Management Server registered with the Log Analyzer Server to be uninstalled, use the Log AnalyzerServer information registration command (RegisterLAInfo.exe) to delete relevant Log Analyzer Server information.
The deletion procedure varies depending on whether all or part of the registered Log Analyzer Server will be deleted.
- Delete all registered Log Analyzer Server
1. Log on to Windows with the user used at the construction of database of Management Server/Master Management Server.
2. Execute the following command in the command prompt to access to the folder in which the tool is stored.
cd "[Systemwalker Desktop Keeper Installation Folder]\LogAnalyzer\TRANS"
3. Execute the following command to delete all Log Analyzer Server information.
RegisterLAInfo.exe -d
- Delete part of registered Log Analyzer Server
1. Log on to Windows with the user used at the construction of database of Management Server/Master Management Server.
2. Execute the following command in the command prompt to access to the folder in which the tool is stored.
cd "[Systemwalker Desktop Keeper Installation Folder]\LogAnalyzer\TRANS"
3. Execute the following command to output Log Analyzer Server information.[Example when the output file path is “C:\work\lasvinfo.csv”]
RegisterLAInfo.exe -e C:\work\lasvinfo.csv
4. Edit the file output in Step 3.Delete the rows of Log Analyzer Server to be deleted.
5. Execute the following command to re-register Log Analyzer Server information.[Example when the file path edited in Step 4. is “C:\work\lasvinfo.csv”]
RegisterLAInfo.exe -r C:\work\lasvinfo.csv
Delete database of Log Analyzer Server
Before uninstalling the Log Analyzer Server of Systemwalker Desktop Keeper, delete the database. The procedures to delete the databaseare as follows:
1. Log on Windows as Log Analyzer user (Windows account set when installing Log Analyzer Server).
- 257 -

2. Select [All Programs] - [Systemwalker Desktop Keeper] - [Log Analyzer] - [Operating Environment Maintenance Wizard] fromthe [Start] menu.
3. The “Welcome to Operating Environment Maintenance Wizard” window will be displayed, and please click the [Next] button.
- 258 -
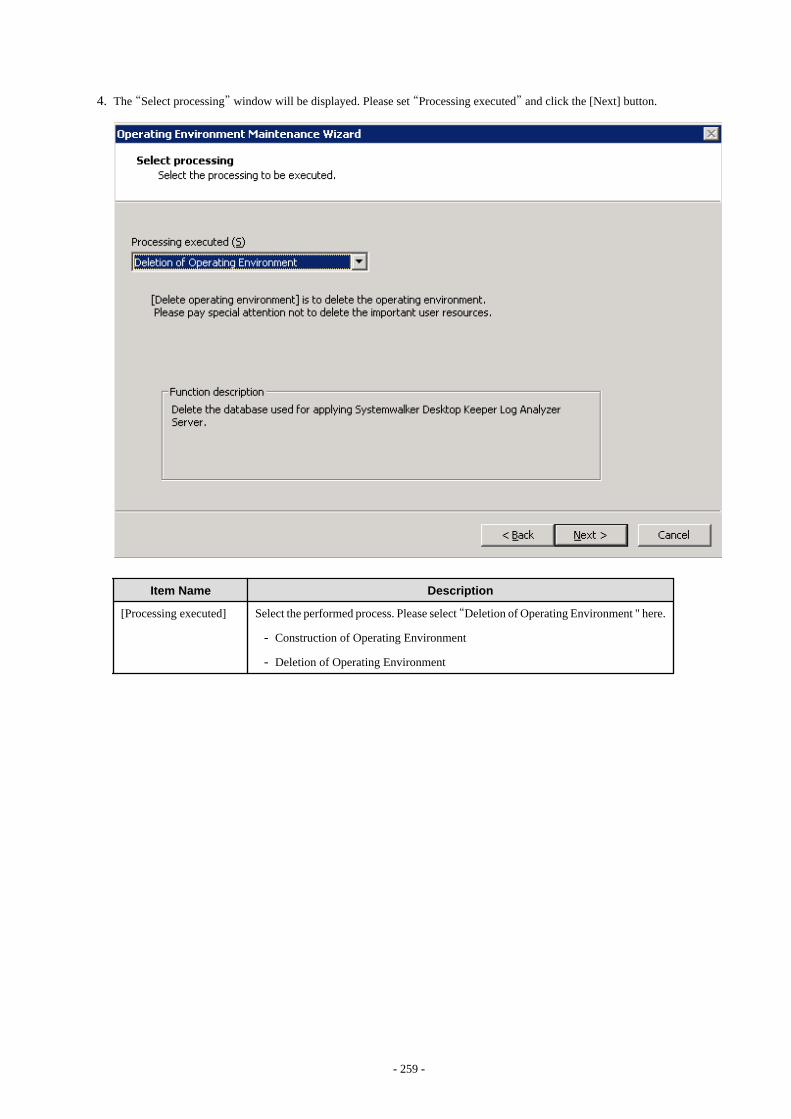
4. The “Select processing” window will be displayed. Please set “Processing executed” and click the [Next] button.
Item Name Description
[Processing executed] Select the performed process. Please select “Deletion of Operating Environment " here.
- Construction of Operating Environment
- Deletion of Operating Environment
- 259 -
5. The “Confirm the settings content” window will be displayed. Please confirm whether the contents displayed in window are incorrect,and click the [Next] button.
6. The execution confirmation window will be displayed, please click the [OK] button when continuing the execution.
The [Executed Process] window will be displayed and then start to delete the database.
7. The [Process Completed] window will be displayed when the process is completed normally. Please click the [Completed] button.
Uninstall Log Analyzer Server
The following procedures to uninstall the Log Analyzer Server are as follows:
1. Log on to Windows with the user used at the construction of database of Management Server/Master Management Server. Whenother applications are being used, please exit them.
2. Start [Add or Remove Programs] or [Add or Remove Applications] in [Control Panel].
3. Select “Systemwalker Desktop Keeper Log Analyzer Server” and click the [Delete] button.
In addition, though uninstalling the Log Analyzer Server, the module of part analysis function and database management system (DBMS)cannot be uninstalled. Please execute the following uninstallation continuously.
Uninstall database management system (DBMS)
Note
Please do not uninstall DBMS in PC in which the Management Server has been installed.
When the Log Analyzer Sever and Management Server are installed in the same PC, please do not uninstall database management system(DBMS) during uninstalling the Log Analyzer Server.
- 260 -
When the database management system has been uninstalled before the Management Server is uninstalled, the Management Server willnot be operated.
When uninstalling the database management system (DBMS), please confirm that there is no other operating application. Please do notuninstall when other applications are operating.
The procedures to uninstall the database management system are as follows:
1. Log on Windows as affiliated user of Administrators group or Domain Admins group. When using the other applications, pleaseexit this application.
2. Start [Add or Remove Programs] or [Add or Remove Applications] in [Control Panel].
3. Select “Symfoware Client” and click the [Delete] button.
Note
Messages about Symfoware client uninstallation
The message box “Symfoware .Net Data Provider Installer” of the Symfoware client may be displayed. Please click the [OK] buttonand continue the execution.
4. Select “Symfoware Server Enterprise Edition” and click the [Delete] button.
Delete installation folder
After uninstalling the Log Analyzer Server, analysis function module and database management system (DBMS), the installation folderof Log Analyzer Server will be left. Please manually delete the installation folder of Log Analyzer Server.
Note
Please do not delete when uninstalling the database management system.
When other application is using the database management system or the database management system of Systemwalker Desktop Keeperis left under the installation folder of Log Analyzer Server, please do not delete the installation folder of Log Analyzer Server. If it isdeleted, the database management system will not be operated.
Note
About log analysis user after uninstallation
Though the Log Analyzer Server is uninstalled, the new Log Analyzer user in installation will not be deleted. Please delete after confirmingthat the Log Analyzer user is not used.
When reinstalling Log Analyzer Server, please be sure to restart the system after the above procedures are performed, and then reinstall.
5.6 Uninstall Management Server/Master Management Server The following describes how to uninstall Systemwalker Desktop Keeper Management Server/Master Management Server.
Note
When installing client (CT) on Management (Master Management) Server
When installing a client (CT) on a Management (Master Management) Server, please pay attention to the uninstall order.For details, please refer to “When client (CT) is installed on Management Server/Master Management Server”.
- 261 -
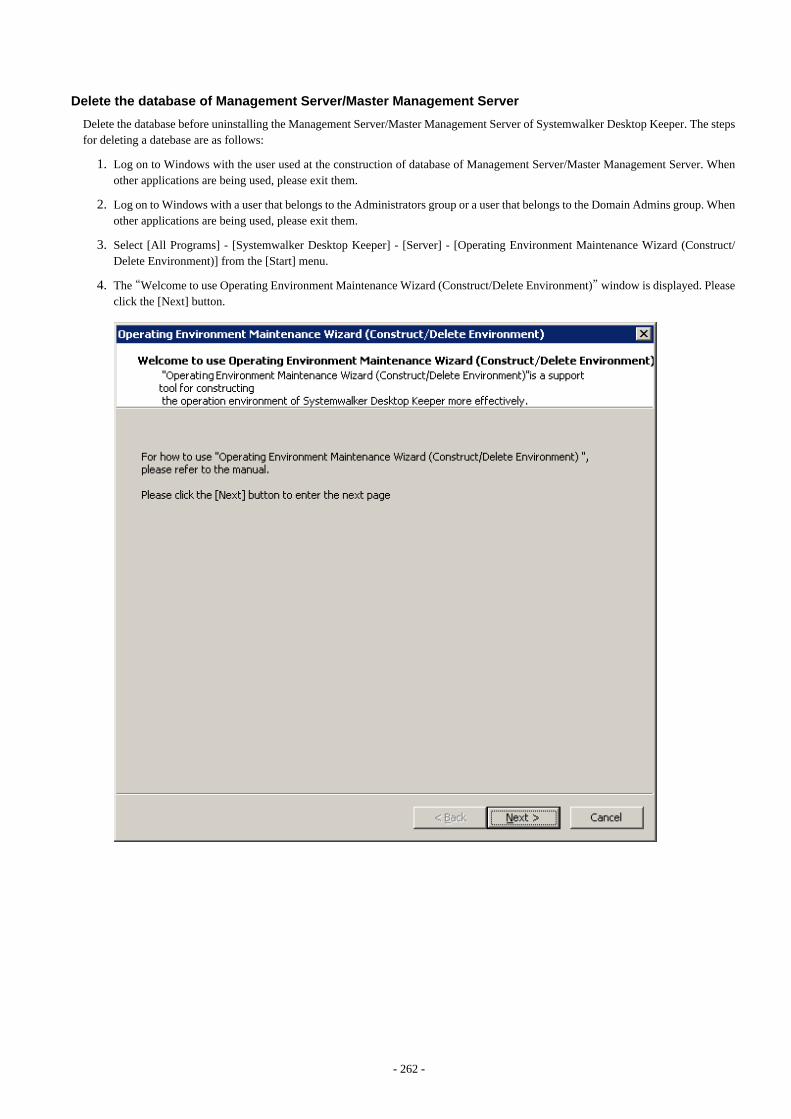
Delete the database of Management Server/Master Management Server
Delete the database before uninstalling the Management Server/Master Management Server of Systemwalker Desktop Keeper. The stepsfor deleting a datebase are as follows:
1. Log on to Windows with the user used at the construction of database of Management Server/Master Management Server. Whenother applications are being used, please exit them.
2. Log on to Windows with a user that belongs to the Administrators group or a user that belongs to the Domain Admins group. Whenother applications are being used, please exit them.
3. Select [All Programs] - [Systemwalker Desktop Keeper] - [Server] - [Operating Environment Maintenance Wizard (Construct/Delete Environment)] from the [Start] menu.
4. The “Welcome to use Operating Environment Maintenance Wizard (Construct/Delete Environment)” window is displayed. Pleaseclick the [Next] button.
- 262 -
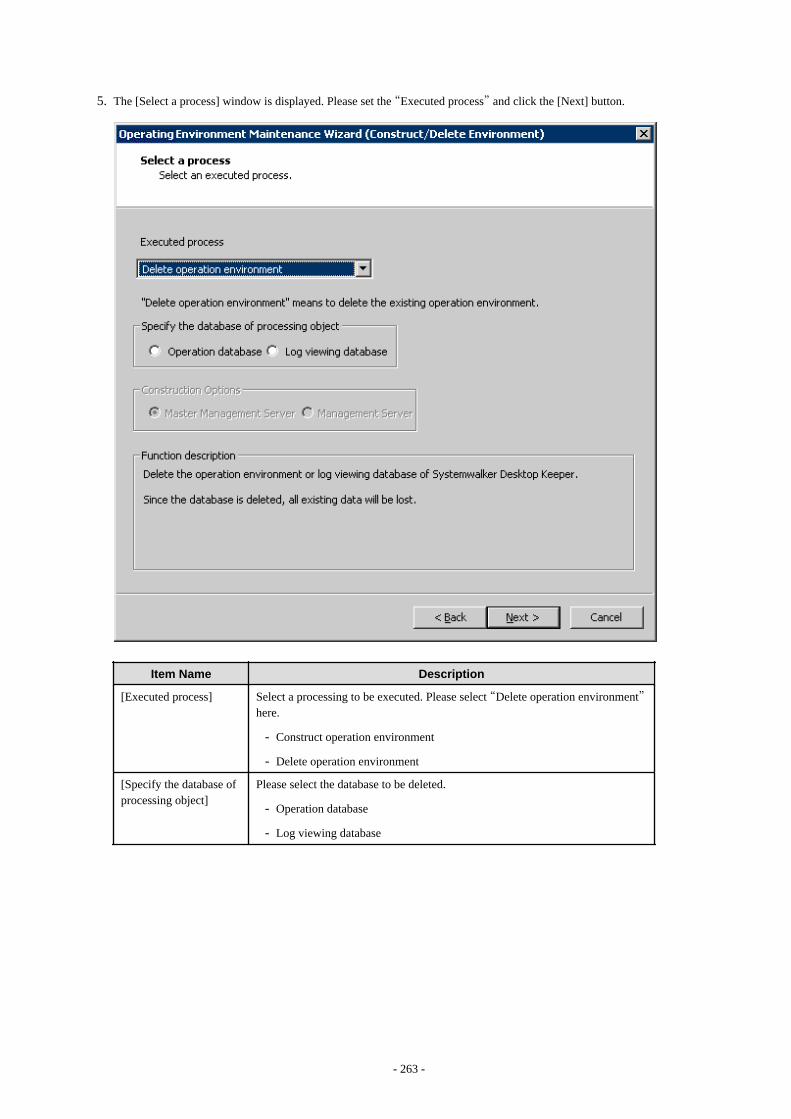
5. The [Select a process] window is displayed. Please set the “Executed process” and click the [Next] button.
Item Name Description
[Executed process] Select a processing to be executed. Please select “Delete operation environment”here.
- Construct operation environment
- Delete operation environment
[Specify the database ofprocessing object]
Please select the database to be deleted.
- Operation database
- Log viewing database
- 263 -
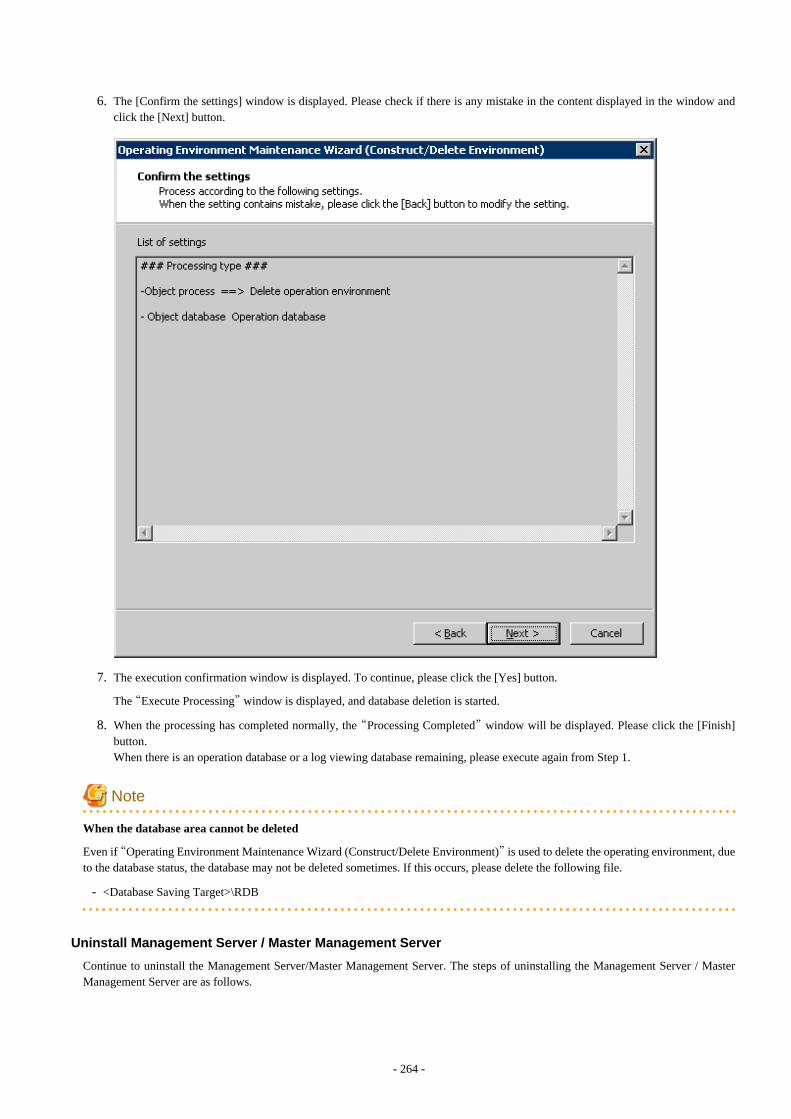
6. The [Confirm the settings] window is displayed. Please check if there is any mistake in the content displayed in the window andclick the [Next] button.
7. The execution confirmation window is displayed. To continue, please click the [Yes] button.
The “Execute Processing” window is displayed, and database deletion is started.
8. When the processing has completed normally, the “Processing Completed” window will be displayed. Please click the [Finish]button.When there is an operation database or a log viewing database remaining, please execute again from Step 1.
Note
When the database area cannot be deleted
Even if “Operating Environment Maintenance Wizard (Construct/Delete Environment)” is used to delete the operating environment, dueto the database status, the database may not be deleted sometimes. If this occurs, please delete the following file.
- <Database Saving Target>\RDB
Uninstall Management Server / Master Management Server
Continue to uninstall the Management Server/Master Management Server. The steps of uninstalling the Management Server / MasterManagement Server are as follows.
- 264 -
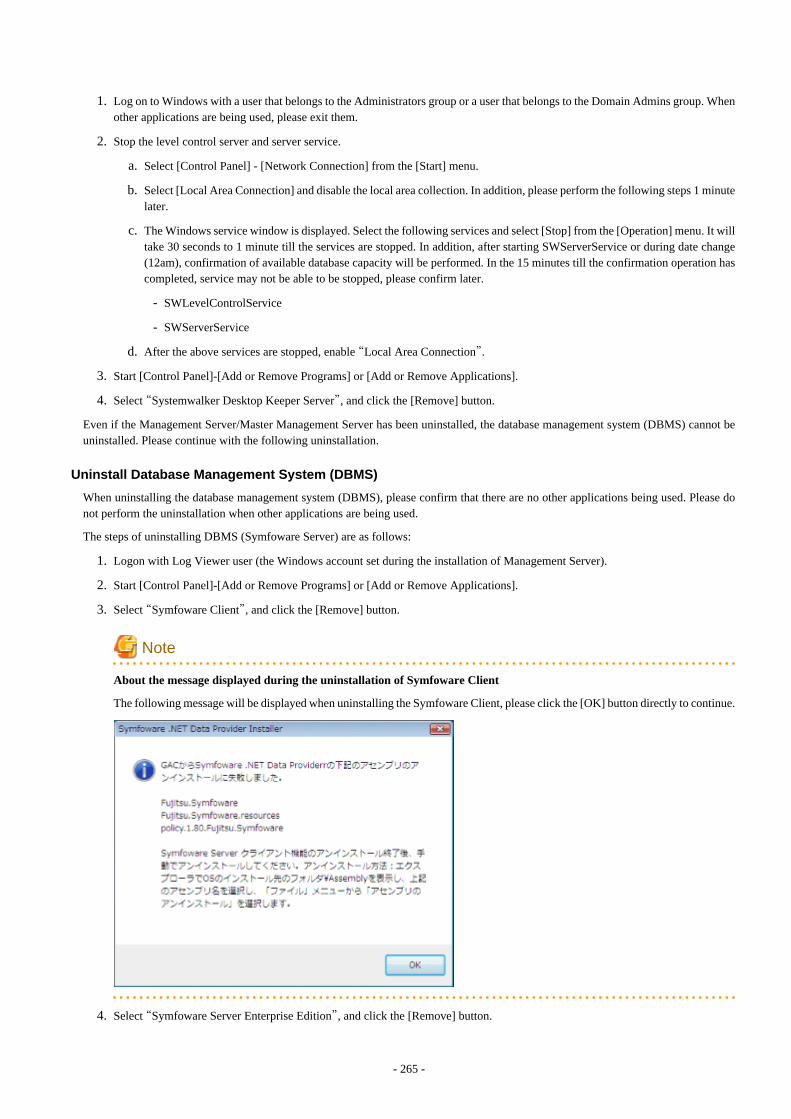
1. Log on to Windows with a user that belongs to the Administrators group or a user that belongs to the Domain Admins group. Whenother applications are being used, please exit them.
2. Stop the level control server and server service.
a. Select [Control Panel] - [Network Connection] from the [Start] menu.
b. Select [Local Area Connection] and disable the local area collection. In addition, please perform the following steps 1 minutelater.
c. The Windows service window is displayed. Select the following services and select [Stop] from the [Operation] menu. It willtake 30 seconds to 1 minute till the services are stopped. In addition, after starting SWServerService or during date change(12am), confirmation of available database capacity will be performed. In the 15 minutes till the confirmation operation hascompleted, service may not be able to be stopped, please confirm later.
- SWLevelControlService
- SWServerService
d. After the above services are stopped, enable “Local Area Connection”.
3. Start [Control Panel]-[Add or Remove Programs] or [Add or Remove Applications].
4. Select “Systemwalker Desktop Keeper Server”, and click the [Remove] button.
Even if the Management Server/Master Management Server has been uninstalled, the database management system (DBMS) cannot beuninstalled. Please continue with the following uninstallation.
Uninstall Database Management System (DBMS)
When uninstalling the database management system (DBMS), please confirm that there are no other applications being used. Please donot perform the uninstallation when other applications are being used.
The steps of uninstalling DBMS (Symfoware Server) are as follows:
1. Logon with Log Viewer user (the Windows account set during the installation of Management Server).
2. Start [Control Panel]-[Add or Remove Programs] or [Add or Remove Applications].
3. Select “Symfoware Client”, and click the [Remove] button.
Note
About the message displayed during the uninstallation of Symfoware Client
The following message will be displayed when uninstalling the Symfoware Client, please click the [OK] button directly to continue.
4. Select “Symfoware Server Enterprise Edition”, and click the [Remove] button.
- 265 -
Delete Installation Folder
After the Management Server/Master Management Server and Database Management System (DBMS) have been uninstalled, theinstallation folder of the Management Server/Master Management Server will be left. Please delete the installation folder of theManagement Server/Master Management Server manually.
Note
Please do not delete when the database management system is not uninstalled.
Please do not delete the installation folder of Systemwalker Desktop Keeper when the database management system of SystemwalkerDesktop Keeper remains under the installation folder of the Management Server/Master Management Server because another applicationis using the database management system, etc. After it has been deleted, the database management system will be unable to run.
5.7 Uninstall Report Output ToolThe following describes how to uninstall the Report Output Tool of Systemwalker Desktop Keeper.
Uninstall Report Output Tool
The steps of uninstalling the Report Output Tool are as follows:
1. Log on to Windows with a user that belongs to the Administrators group or a user that belongs to the Domain Admins group. Whenother applications are being used, please exit them.
2. Start [Control Panel]-[Add or Remove Programs] or [Add or Remove Applications].
3. Select “Systemwalker Desktop Keeper Report Output Tool”, and click the [Remove] button.
4. The uninstallation begins.
Uninstall Database Management System (DBMS)
When uninstalling the database management system (DBMS), please confirm that there are no other applications being used. Please donot perform the uninstallation when other applications are being used.
The steps of uninstalling DBMS (Symfoware Server) are as follows:
1. Log on to Windows with a user that belongs to the Administrators group or a user that belongs to the Domain group.
2. Start [Control Panel]-[Add or Remove Programs] or [Add or Remove Applications].
3. Select “Symfoware Client”, and click the [Remove] button.
Note
About the message displayed during the uninstallation of Symfoware Client
The following message will be displayed when uninstalling the Symfoware Client. Please click the [OK] button directly to continue.
Delete Installation Folder
After the Report Output Tool and Database Management System (DBMS) have been deleted, the logs of Report Output Tool will be left.Please delete them manually if necessary.
- In case of Windows Vista®, Windows® 7
%ALLUSERSPROFILE%\Fujitsu\Systemwalker Desktop Keeper\LogAnalyzer
The environment variable %ALLUSERPROFILE% is usually the following folder.
C:\ProgramData
- 266 -
- In case of Windows® XP
%ALLUSERSPROFILE%\Application Data\Fujitsu\ Systemwalker Desktop Keeper\LogAnalyzer
The environment variable %ALLUSERPROFILE% is usually the following folder.
C:\Documents and Settings\All Users
Note
Please do not delete when the database management system is not uninstalled.
Please do not delete the installation folder of Systemwalker Desktop Keeper when the database management system of SystemwalkerDesktop Keeper remains under the installation folder of the Log Analyzer Server because another application is using the databasemanagement system etc. After it has been deleted, the database management system will be unable to run.
- 267 -
Index[A]
Active Directory Linkage.........................................................78administrator information...........................................83,137,138Administrator Notification.......................................................91
[B]Backup Assets.........................................................................202Backup Commands.................................................................168Backup Tool (GUI).................................................................153BackUp User Assets...............................................................152between Different Versions....................................................206
[C]Citrix XenApp Monitoring Function........................123,240,256Client (CT)...........................................................................3,239Collective management by the Master Management Server....22Confirm Port Number...............................................................29connection environment of Log Analyzer Serve....................135Considerations for Installation....................................................1Construct Database............................................................53,129Construct database..................................................................220Construct Log Analyzer Server..............................................126Construct Management Server/Master Management Server ...32CT...........................................................................................254
[D]database management system (DBMS)..................................260Database Management System (DBMS).........................265,266database of Log Analyzer Server............................................257database of Management Server/Master Management Server262Design.........................................................................................1Determine Analysis Condition of the Log Analyzer................27Determine database capacity....................................................25Determine how to backup and delete logs................................25Determine how to backup attached data...................................26Determine How to Create Configuration Information.............16Determine How to Install Client (CT)......................................23Determine How to Manage User Policy...................................21Determine How to Operate Logs..............................................25Determine Operation Method.....................................................5Determine Structure of Administrators......................................9Determine System Structure.......................................................5
[E]Environment of Management Server/Master Management Server..................................................................................................69Environment of Management Server/Master Management Server................................................................................................222Environment of Report Output...............................................141
[I]IIS Settings...............................................................................65information of Log Analyzer Server......................................138Input in Management Console Window...................................21Installation................................................................................30Installation Folder...................................................................266
installation settings file...........................................................115Installation Steps ......................................................................30Installatio of IIS........................................................................32Install by Single Installation.....................................................23Install CT................................................................................105Installer.......................................................................................2Install Log Analyzer Server....................................................126Install Management Server/Master Management Server.........50Install using Master PC/Master Virtual PC..............................24Install using Software Distribution Function of SystemwalkerDesktop Patrol..........................................................................24Internet Explorer® in 64-bit OS ............................................104Items to be confirmed before database construction..............129Items to be confirmed before installation.................106,126,139
[L]Level Control Server..............................................................226Level Control Service.............................................................216Linkage Structure.....................................................................20Linking with Active Directory.................................................18Link with Systemwalker Desktop Patrol..................................20List of Incompatible Items......................................................242Log Analyzer environment.....................................................135Log Analyzer Server..............................................2,137,138,257Log Analyzer Server Environment.........................................134Log Viewer.............................................................................225
[M]Maintenance............................................................................145Maintenance of Log Analyzer Server.....................................200Maintenance of Management Server/Master Management Server................................................................................................145Management Console............................................3,101,224,256Management Information and Log Information.....................217management information and log information.......................221Management Server/Master Management Server.....2,135,137,215,261Management Server / Master Management Server................264Master PC...............................................................................121Methods of Asset Backup.......................................................145
[N]Network Environment................................................................1
[O]Only import CT information (computer information) fromexternal data..............................................................................20Overwriting Install..................................................................218
[P]PC with Web Browser Installed ............................................103Product Assets .......................................................................146
[R]Report Output Tool..........................................................139,266Restoration Tool.....................................................................189Restore Assets.........................................................................203
- 268 -
Restoring User Assets.............................................................189Restrictions of Remote Operation..............................................4
[S]Saving Target Folder................................................................99Self Version Management Function.......................................233Server Information....................................................................80Server Service.........................................................................216server service..........................................................................226Set Server................................................................................234Setup.exe.................................................................................255Silent Installation....................................................................115Silent Uninstallation...............................................................255Silent Version Upgrade..........................................................232Single Installation...................................................................106Steps of Server Environment Setup..........................................72System Settings.........................................................................74Systemwalker Desktop Log Analyzer....................................242Systemwalker Desktop Patrol.................................................122
[T]Targets of Asset Backup.........................................................145terminal initial settings...........................................................226Terminal Initial Settings and Terminal Operation Settings....225terminal operation settings......................................................226Transfer Command.................................................................221
[U]Uninstallation..........................................................................253Uninstallation Steps................................................................253User Assets.............................................................................148
[V]Version Upgrade.....................................................................206
[W]When Performing System Backup.............................................4When Shutting down or Restarting Computer...........................3Wizard-style.....................................................................106,254Wizard Pattern .......................................................................227
- 269 -


![software.fujitsu.comsoftware.fujitsu.com/jp/manual/manualfiles/m170004/j2x17617/08enz...[VMware] Sections related to VMware [Horizon View] Sections related to VMware Horizon View [Hyper-V]](https://img.dokumen.tips/doc/110x75/5b02ccf77f8b9a2e228b6ed4/vmware-sections-related-to-vmware-horizon-view-sections-related-to-vmware-horizon.jpg)