Embed Size (px)
Citation preview
Assembly Instruc�ons1. Check that you have all of the
components listed in column one.
2. Peel the protec�ve plas�c off therails and end sec�ons.
3. Join 2 end rails with corner bracketsusing the long side rails and insertscrews to form the base of the bedframe.
4. Now locate the end sec�on with thehole for the overflow pipe, as shownin Figure 1, and insert it into the railwith the hole for the overflow pipeposi�oned closest to the rail. Alignthe screw hole in the end sec�onand the matching hole in the rail andinsert screw to secure.
5. Repeat for the other end sec�on.
6. Add 1 short and 1 long wall panel toeach side of the bed.
7. A�ach the remaining 2 x long siderails to the remaining end rail andinsert screws.
8. Carefully push the end rail intoposi�on on the end sec�on and startto push the long side rails onto thewall panels. Note: this should be areasonably �ght fit. Be careful withany sharp edges.
9. Once in posi�on screw the top railsto the end panel as you did with thebo�om rail.
10. Now add the remaining end rail andscrew into posi�on.
WaterUps® Oasis 1240 wicking bed assembly guideThis guide is designed to assist you with the assembly of your newWaterUps® Oasis 1240 wicking bed kit.
What is in the kit?The following items should be included:
1. 4 x short end rails with cornerbrackets
2. 4 x long side rails
3. 1 x end sec�on
4. 1 x end sec�on with hole for theoverflow pipe
5. 2 x 760mm long wall panels
6. 2 x 380mm short wall panels
7. 1 x bag of screws
8. 3 x WaterUps® Wicking Cells
9. 1 x WaterUps® 1240 Reservoir LinerInsert
10. 1 xWaterUps® Inlet Pipe & Cap
11. 1 x WaterUps® Overflow Pipe Set(screw pipe fi�ng, washer, spacerpipe and nut)
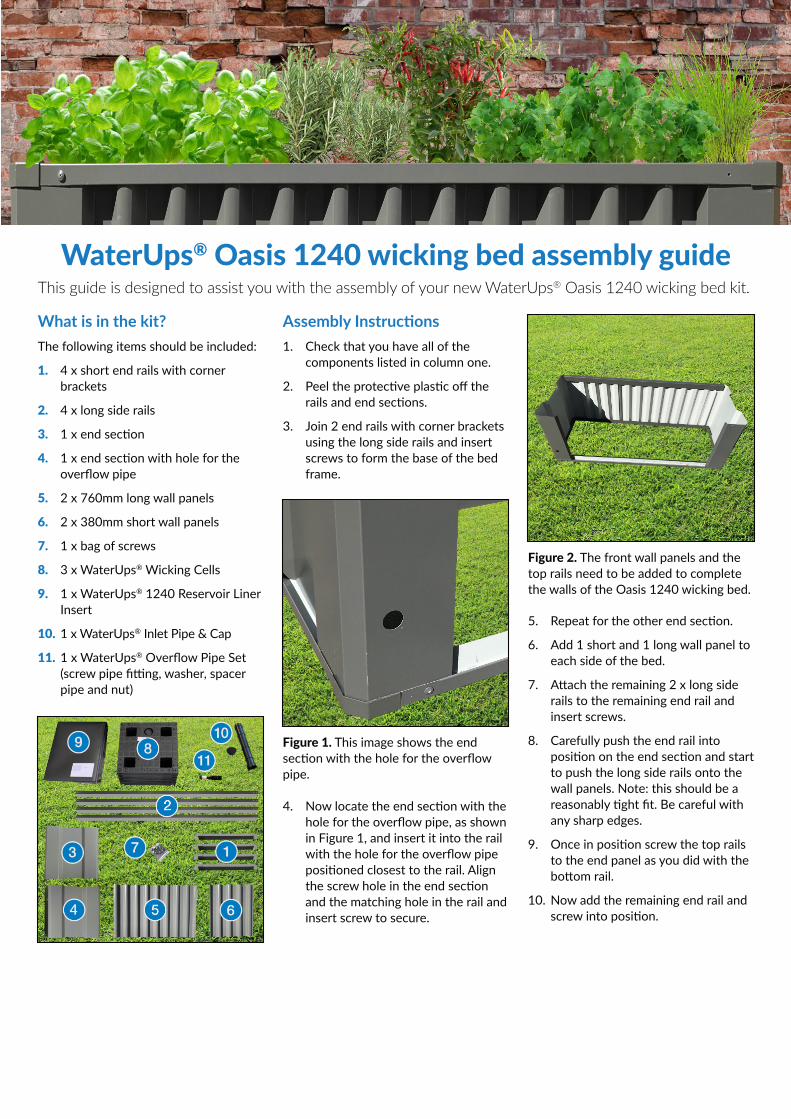
Figure 2. The front wall panels and thetop rails need to be added to completethe walls of the Oasis 1240 wicking bed.
Figure 1. This image shows the endsec�on with the hole for the overflowpipe.

Save Water... Save Time... Grow healthier plants
W www.waterups.com.au
P 1300 205 550
Published: 20 October 2020
Assembling the planter base1. Check that you have all of the
components listed above.
2. Place the caps on the square basesec�ons.
3. Place the square base sec�ons ona flat surface with the pre-drilledholes facing upwards.
4. Posi�on the long flat sheets so thatthe upturned edges are the outsideand align the predrilled holes withthe square base sec�ons. Add screwto secure.
Adding the WaterUps®Reservoir Liner Insert1. Unfold the reservoir liner insert and
clip corners in to posi�on.
2. Before placing the reservoir linerinsert in the base of the bed ensurethat the base is level and compactedand free from any sharp object suchas stones.
3. Place the reservoir liner insert in thebase so that it sits inside the bo�omrailing.
Adding the WaterUps® cells,plus the Inlet and overflow pipes1. Place a WaterUps® cell in the base
of the liner near the overflow holeto work out the correct posi�on toa�ach the overflow pipe to the cell.A�ach the overflow pipe to theunderside of the cell and click intoposi�on. Add the rubber washer tothe overflow pipe and push in un�lit abuts the reservoir liner insert.
2. Now carefully place the cell with theoverflow pipe in the base of thereservoir liner insert posi�oning it sothat the thread of the overflow pipeprotrudes from the external wall ofthe bed frame. Slide on the whitespacer pipe and push it through thehole in the steel frame un�l it abutsthe wall of the reservoir liner insert.Now screw on the nut and secure�ghtly in posi�on.
3. Cut out the circle in the top of oneof the remaining WaterUps® cellsand insert the inlet pipe – refer totheWaterUps® Installa�on Guide ifneeded (see the link below).
4. Place all remaining cells in posi�onand fold down the flaps on the topof the reservoir liner insert. Thesecan be secured in posi�on witheither cable �es orWaterUps®joiners or simply le� folded overas shown in Figure 4.
5. Now fill the 4 wicks of each cell withperlite and then add your po�ngmix, compost and plants. Refer to theWaterUps® Installa�on Guide for moreinforma�on (see the link below).
Click here to view & download theWaterUps® Installa�on Guide
Further Information
Figure 3. Screw the 2 x 1130mm longflat aluminium sheets to the 2 squareplanter base ‘feet’.
TheWaterUps® Oasis 1240Planter BaseIf you have purchased a planter basefor your Oasis 1240 wicking bed thefollowing items should be included:
1. 2 x XXmm long square aluminiumplanter base ‘feet’.
2. 2 x 1130mm long flat sheets ofaluminium with upturned edges.
3. 4 x black plas�c caps to cover theends of the square planter base ‘feet’.
4. 1 x bag of screws.
5. 2 x XXmm long sheets of aluminiumwith upturned edges.
Figure 4. The bed is now complete. Theonly thing remaining is to fill the feet ofthe WaterUps® cells with perlite, thenadd the po�ng mix, compost and plants,and fill the reservoir with water.