Embed Size (px)
Citation preview

AppNote003-WeConnect ver1.0
APPLICATION NOTE 003
WeConnect
Industrial Remote Access – Made Easy
www.westermo.com page 1
AppNote003-WeConnect ver1.0
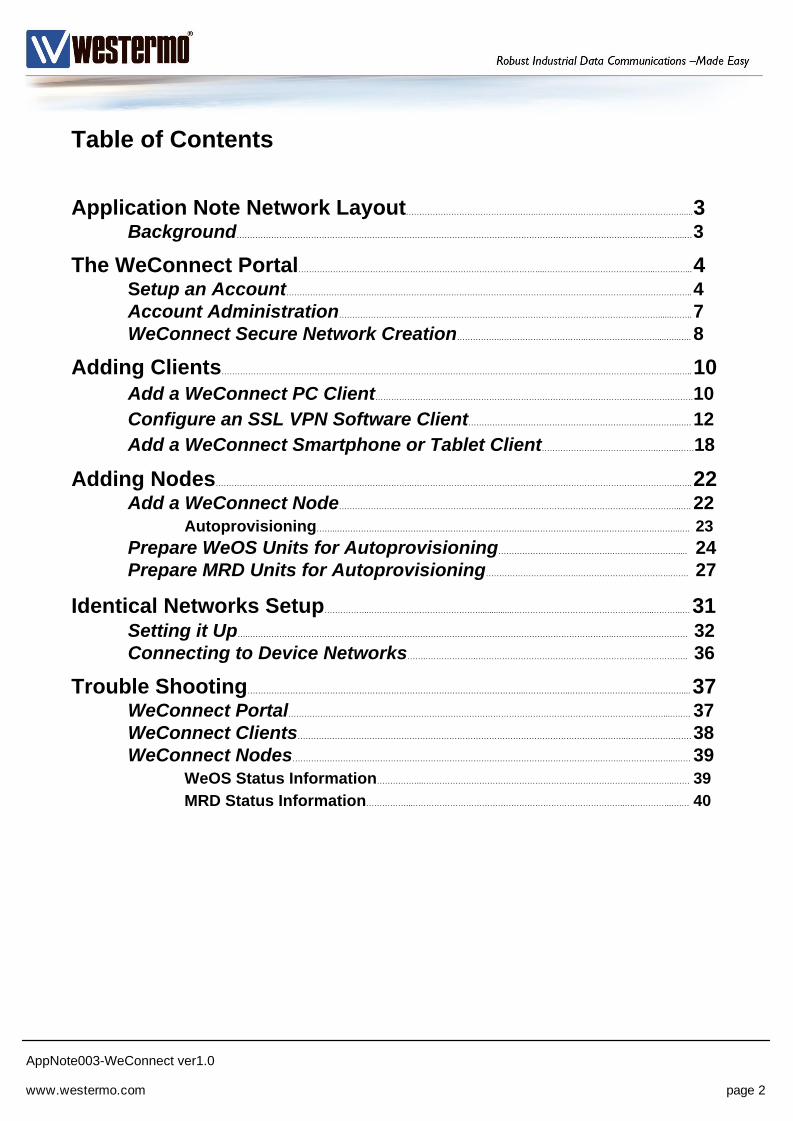
Table of Contents
Application Note Network Layout…………………………………………..……………………………………………….....3Background…………………………………………………………………………………………………………………………………………….……...…3
The WeConnect Portal………………………………………………………………………………...…………………………………...……...…...4Setup an Account……………………………………………………………………………………………………………………………….……..4
Account Administration…………………………………………………………………………………………………………......……..7
WeConnect Secure Network Creation……………..…………………………..………………………....…..….. 8
Adding Clients…………………………………………………………………………………………………………...…………………………………………..…..10
Add a WeConnect PC Client…………………………….…………………………………………………………………….…….10
Configure an SSL VPN Software Client………………...…………………………………………………...…. 12
Add a WeConnect Smartphone or Tablet Client…………………………………….……...……18
Adding Nodes………………………………………………………………..………………………………………………………………………………………..…..22Add a WeConnect Node………………………………………………………………………………………………………………...…. 22
Autoprovisioning……..………………..……………………………………………..………………………………………………...…. 23
Prepare WeOS Units for Autoprovisioning…………………………………….……………………..... 24
Prepare MRD Units for Autoprovisioning……………………………..……………………………..……. 27
Identical Networks Setup……………..……………………………………..............……………………………………………...………..… 31Setting it Up…..………………………………………………………………………………………………………………………..………………………. 32
Connecting to Device Networks…….……………….…………………………………………………………………….. 36
Trouble Shooting…………………………………………………………………………………………...……………..…………………………………….... 37WeConnect Portal……………………………………………………………………………………………………………………………...….…. 37
WeConnect Clients……………………………………………………………………………………………………..……..……………….……38
WeConnect Nodes……………………………………………………………………………………………………..……..………………...…… 39
WeOS Status Information……………...……………………………………………………………………..….………..…… 39
MRD Status Information……………...……………………………………………………………………..….…………..….… 40
www.westermo.com page 2
AppNote003-WeConnect ver1.0
INTERNET
WeConnect
This Application Note shows how to use the Westermo WeConnect service to access
remote sites without having public IP-addresses or any other connectivity servers.
Background
WeConnect controls exactly which units are allowed to access any resources within a
customer network.
It securely interconnect Clients (PCs, Smartphones or Tablets using VPN software) and
Nodes (WeOS or MRD VPN routers with connected Device Networks).
Nodes and Clients are placed in WeConnect Secure Networks, the Secure Networks
control how Clients and Nodes are allowed to connect to each other.
Both Clients and Nodes use secure SSL VPNs to safely access WeConnect over the
unsecure Internet.
No public IP-addresses are needed on either Clients or Nodes, only an access to Internet is
required. This dramatically decreases the risk of unwanted Internet traffic hitting the remote
networks.
All WeOS products (with VPN functionality) as well as Westermo MRD 3G/4G and ADSL
units can be used with WeConnect.
All configuration in this Application Note is made using WeOS version 4.17.0 and MRD
software version 1.7.1.10.B00680.
SSL software OpenVPN client version 2.3.4 for MS Windows 7 64-bit Professional.
Android version 5.0.1, Apple iOS 9 and OpenVPN Connect app version 1.1.16.
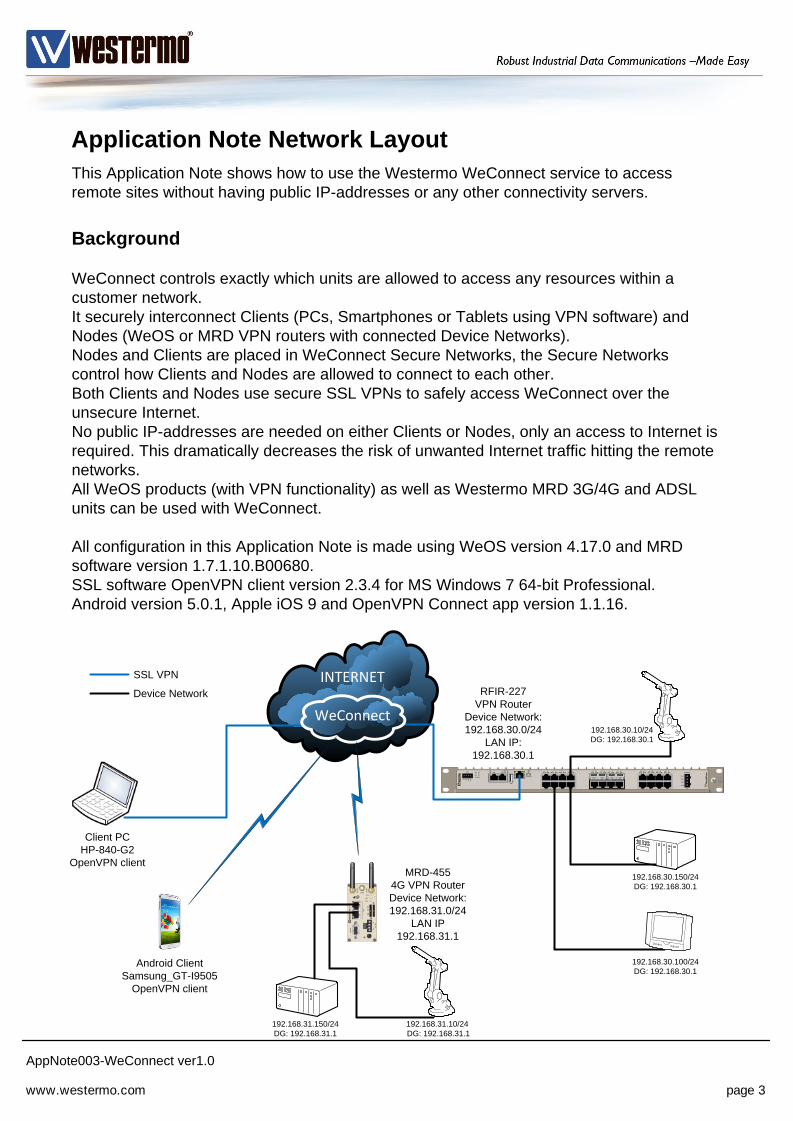
Application Note Network Layout
Client PC
HP-840-G2
OpenVPN client
Device Network
SSL VPN
MRD-455
4G VPN Router
Device Network:
192.168.31.0/24
LAN IP
192.168.31.1
RFIR-227
VPN Router
Device Network:
192.168.30.0/24
LAN IP:
192.168.30.1
192.168.30.10/24
DG: 192.168.30.1
192.168.30.150/24
DG: 192.168.30.1
192.168.30.100/24
DG: 192.168.30.1
192.168.31.10/24
DG: 192.168.31.1
192.168.31.150/24
DG: 192.168.31.1
Android Client
Samsung_GT-I9505
OpenVPN client
www.westermo.com page 3
AppNote003-WeConnect ver1.0
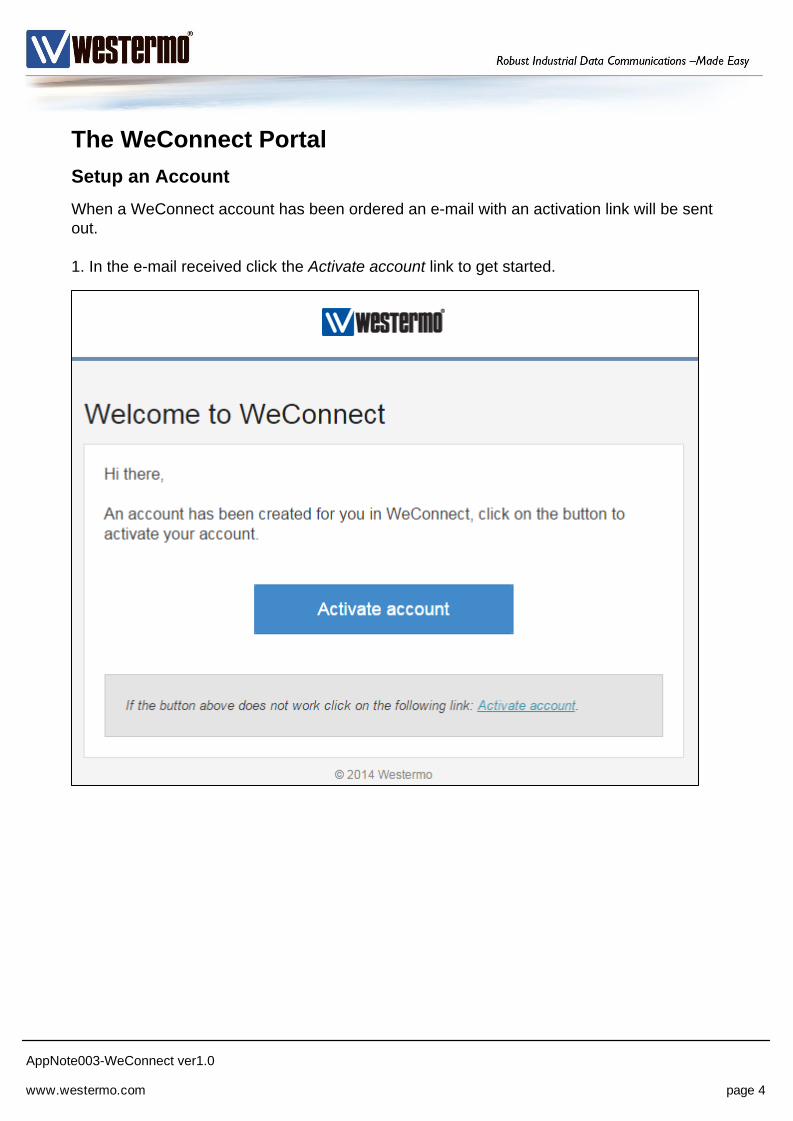
The WeConnect Portal
When a WeConnect account has been ordered an e-mail with an activation link will be sent
out.
1. In the e-mail received click the Activate account link to get started.
Setup an Account
www.westermo.com page 4
AppNote003-WeConnect ver1.0
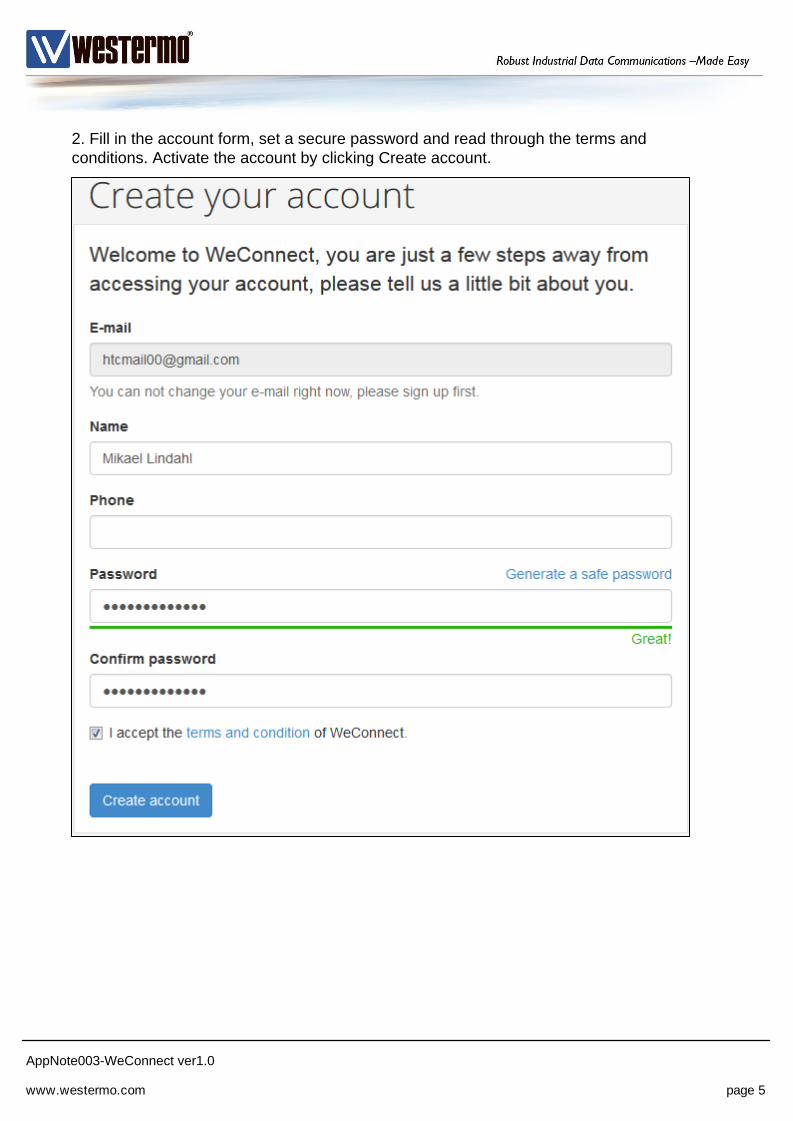
2. Fill in the account form, set a secure password and read through the terms and
conditions. Activate the account by clicking Create account.
www.westermo.com page 5
AppNote003-WeConnect ver1.0
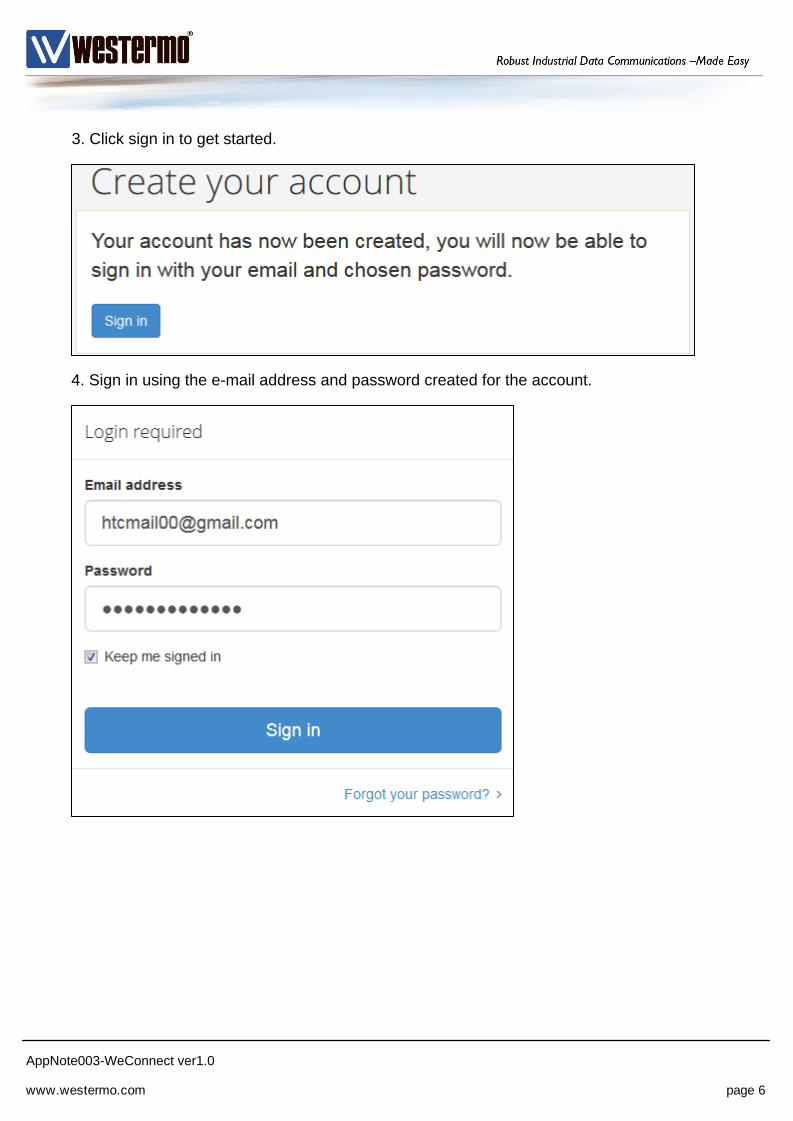
3. Click sign in to get started.
4. Sign in using the e-mail address and password created for the account.
www.westermo.com page 6
AppNote003-WeConnect ver1.0
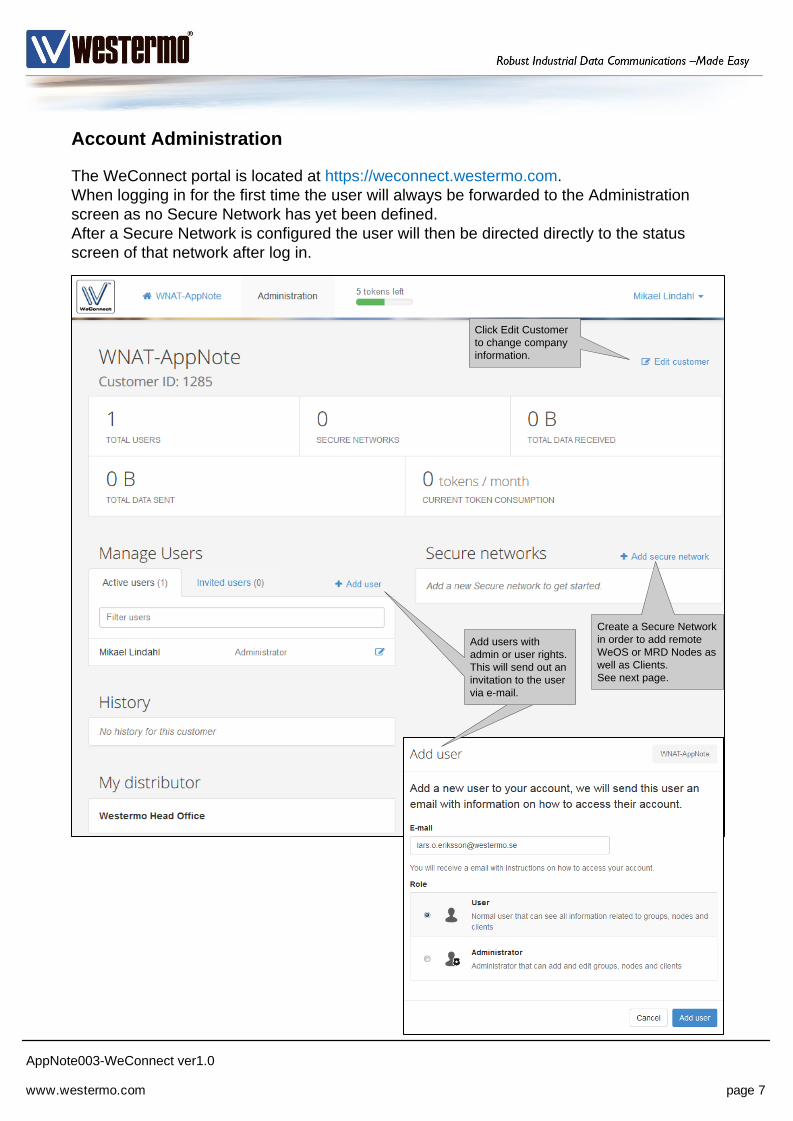
The WeConnect portal is located at https://weconnect.westermo.com.
When logging in for the first time the user will always be forwarded to the Administration
screen as no Secure Network has yet been defined.
After a Secure Network is configured the user will then be directed directly to the status
screen of that network after log in.
Click Edit Customer
to change company
information.
Create a Secure Network
in order to add remote
WeOS or MRD Nodes as
well as Clients.
See next page.
Account Administration
Add users with
admin or user rights.
This will send out an
invitation to the user
via e-mail.
www.westermo.com page 7
AppNote003-WeConnect ver1.0
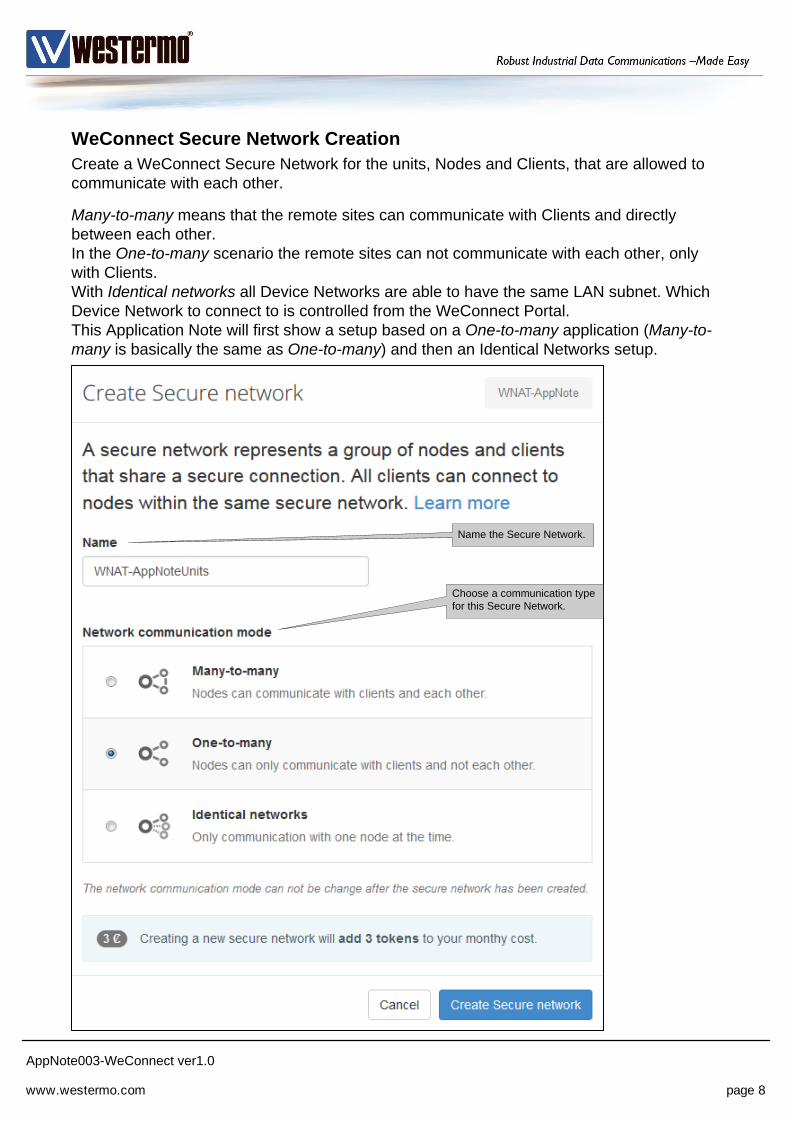
Create a WeConnect Secure Network for the units, Nodes and Clients, that are allowed to
communicate with each other.
Many-to-many means that the remote sites can communicate with Clients and directly
between each other.
In the One-to-many scenario the remote sites can not communicate with each other, only
with Clients.
With Identical networks all Device Networks are able to have the same LAN subnet. Which
Device Network to connect to is controlled from the WeConnect Portal.
This Application Note will first show a setup based on a One-to-many application (Many-to-
many is basically the same as One-to-many) and then an Identical Networks setup.
Name the Secure Network.
Choose a communication type
for this Secure Network.
WeConnect Secure Network Creation
www.westermo.com page 8
AppNote003-WeConnect ver1.0
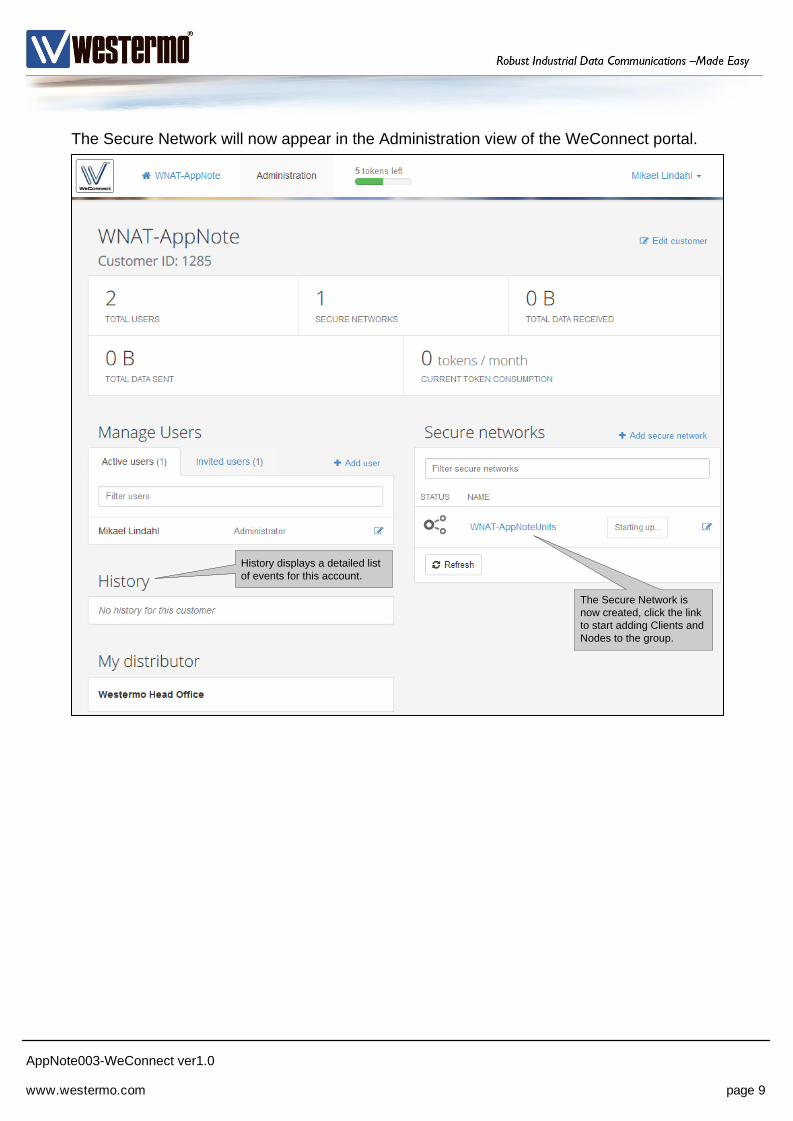
The Secure Network will now appear in the Administration view of the WeConnect portal.
The Secure Network is
now created, click the link
to start adding Clients and
Nodes to the group.
History displays a detailed list
of events for this account.
www.westermo.com page 9
AppNote003-WeConnect ver1.0
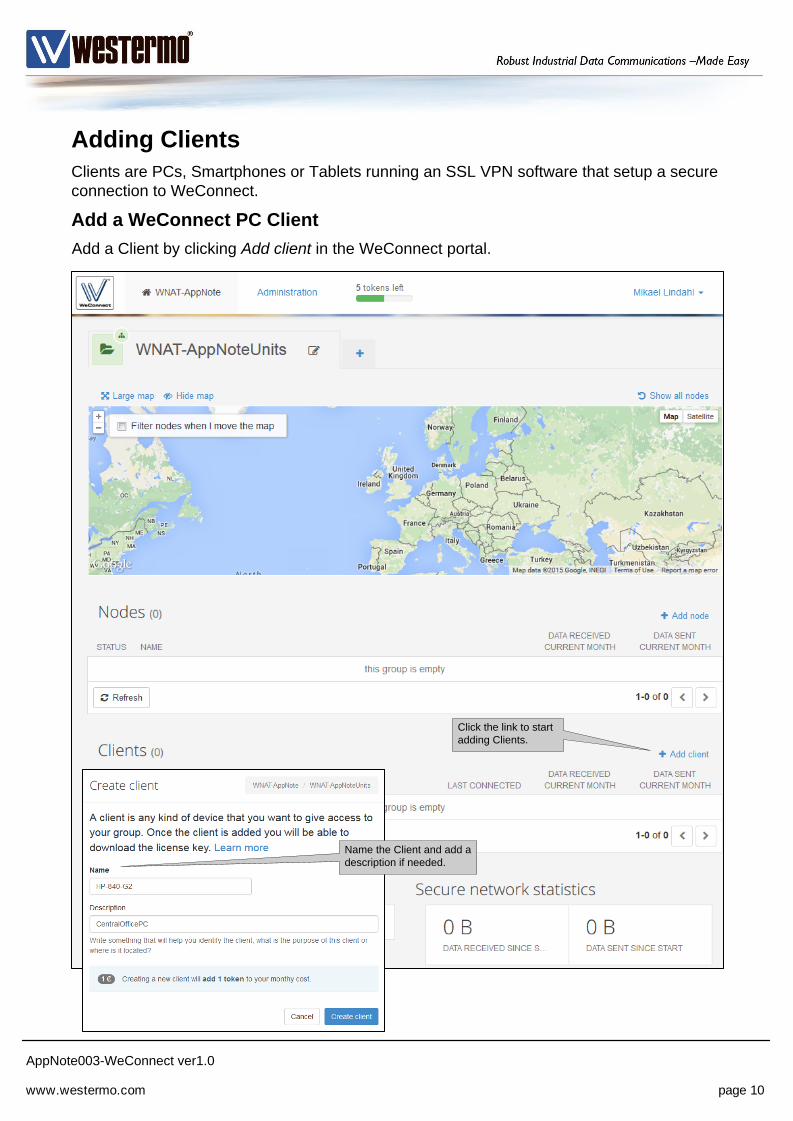
Adding Clients
Clients are PCs, Smartphones or Tablets running an SSL VPN software that setup a secure
connection to WeConnect.
Add a WeConnect PC Client
Add a Client by clicking Add client in the WeConnect portal.
Click the link to start
adding Clients.
Name the Client and add a
description if needed.
www.westermo.com page 10
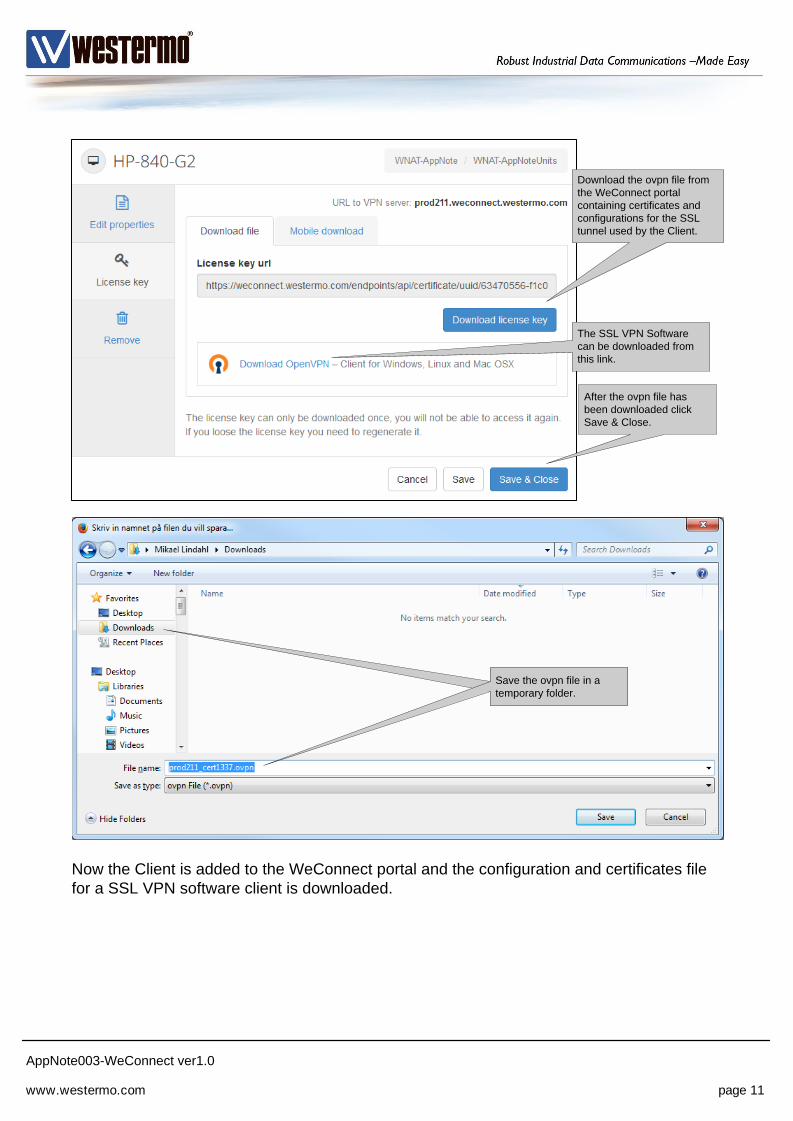
AppNote003-WeConnect ver1.0
Download the ovpn file from
the WeConnect portal
containing certificates and
configurations for the SSL
tunnel used by the Client.
Save the ovpn file in a
temporary folder.
After the ovpn file has
been downloaded click
Save & Close.
Now the Client is added to the WeConnect portal and the configuration and certificates file
for a SSL VPN software client is downloaded.
The SSL VPN Software
can be downloaded from
this link.
www.westermo.com page 11
AppNote003-WeConnect ver1.0
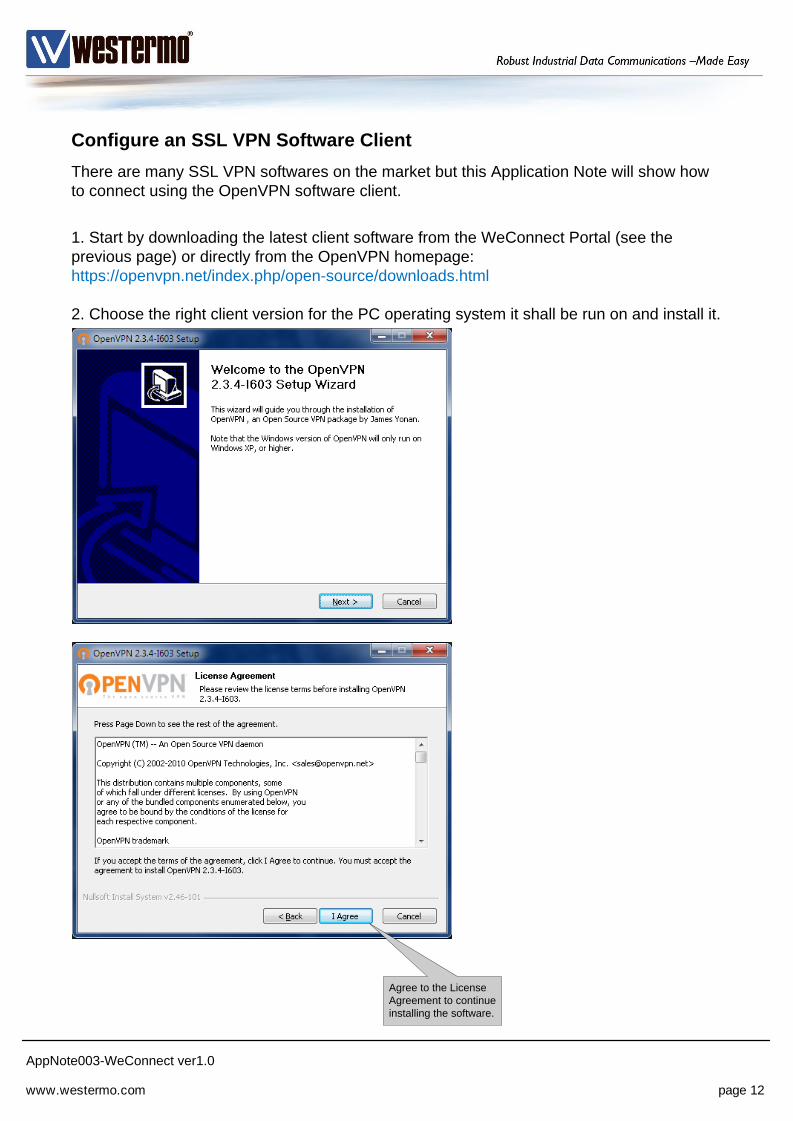
1. Start by downloading the latest client software from the WeConnect Portal (see the
previous page) or directly from the OpenVPN homepage:
https://openvpn.net/index.php/open-source/downloads.html
2. Choose the right client version for the PC operating system it shall be run on and install it.
Agree to the License
Agreement to continue
installing the software.
Configure an SSL VPN Software Client
There are many SSL VPN softwares on the market but this Application Note will show how
to connect using the OpenVPN software client.
www.westermo.com page 12
AppNote003-WeConnect ver1.0
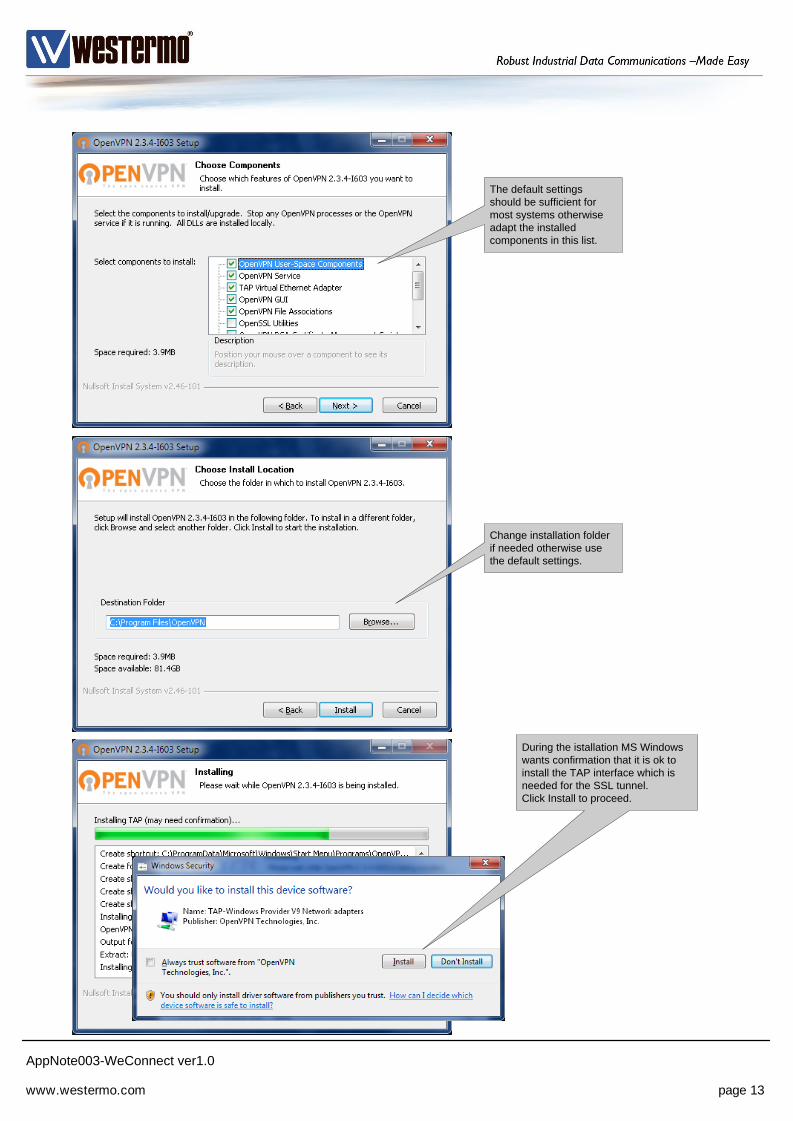
The default settings
should be sufficient for
most systems otherwise
adapt the installed
components in this list.
Change installation folder
if needed otherwise use
the default settings.
During the istallation MS Windows
wants confirmation that it is ok to
install the TAP interface which is
needed for the SSL tunnel.
Click Install to proceed.
www.westermo.com page 13
AppNote003-WeConnect ver1.0
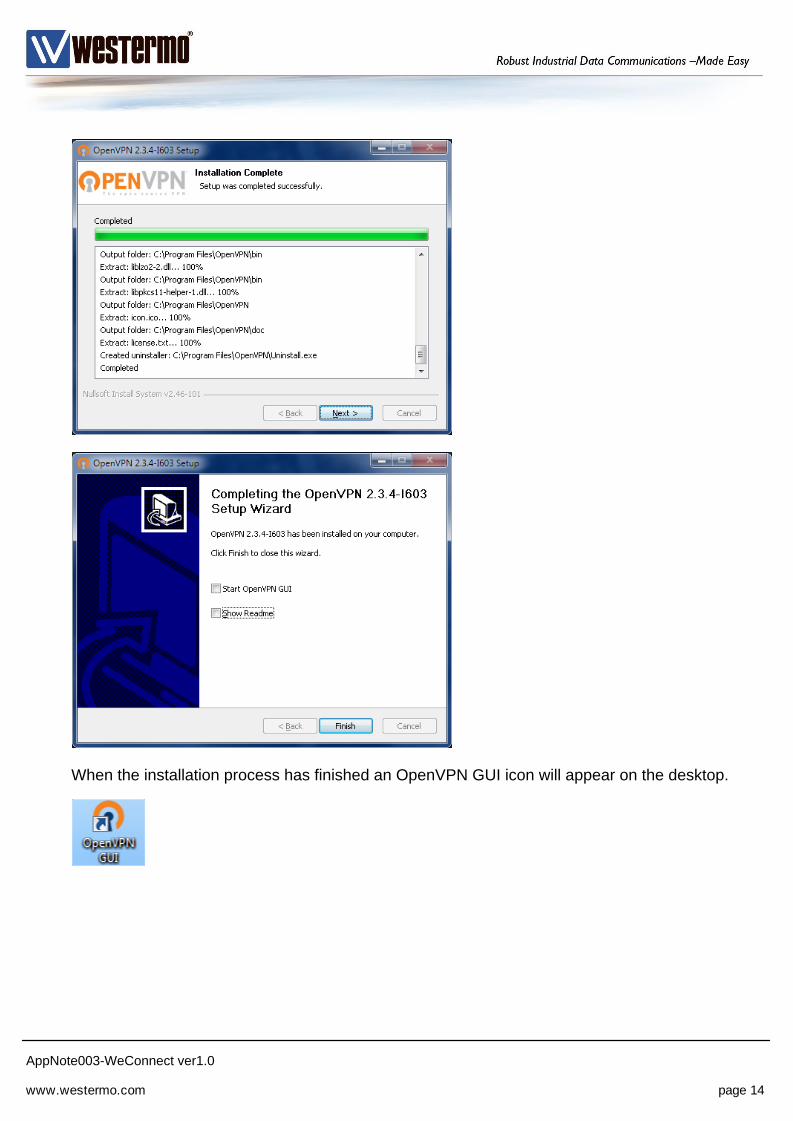
When the installation process has finished an OpenVPN GUI icon will appear on the desktop.
www.westermo.com page 14
AppNote003-WeConnect ver1.0
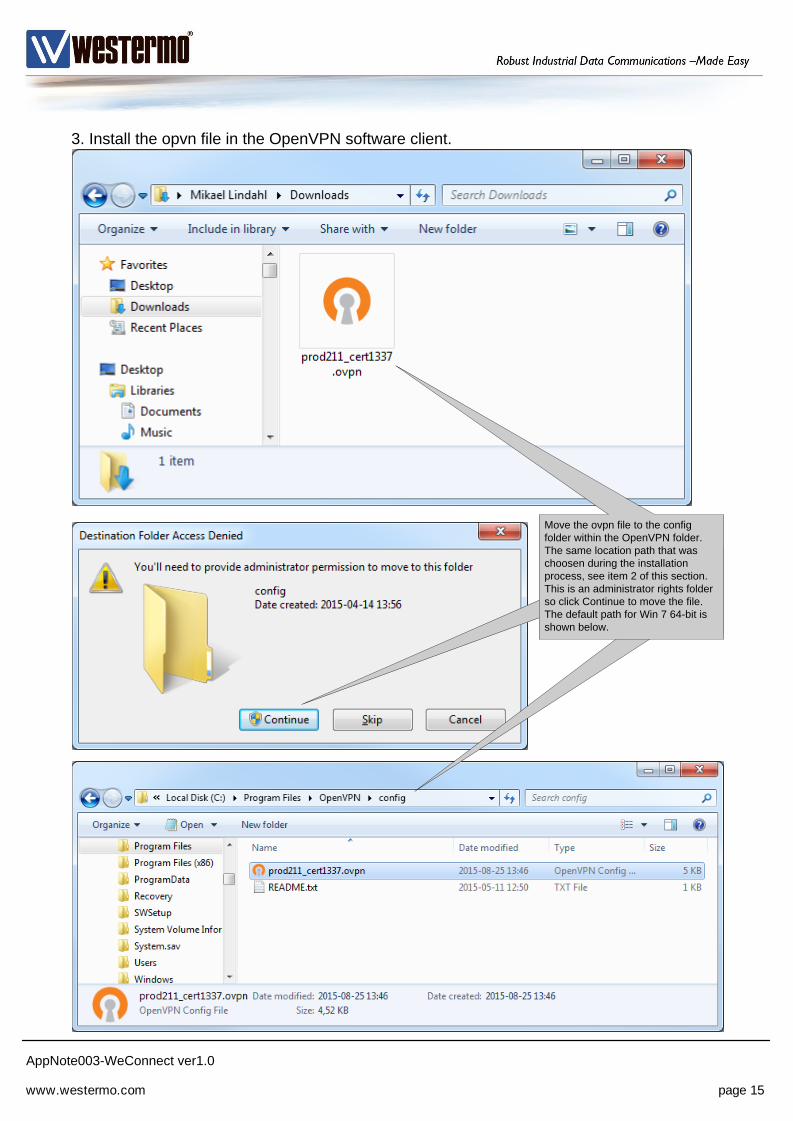
Move the ovpn file to the config
folder within the OpenVPN folder.
The same location path that was
choosen during the installation
process, see item 2 of this section.
This is an administrator rights folder
so click Continue to move the file.
The default path for Win 7 64-bit is
shown below.
3. Install the opvn file in the OpenVPN software client.
www.westermo.com page 15
AppNote003-WeConnect ver1.0
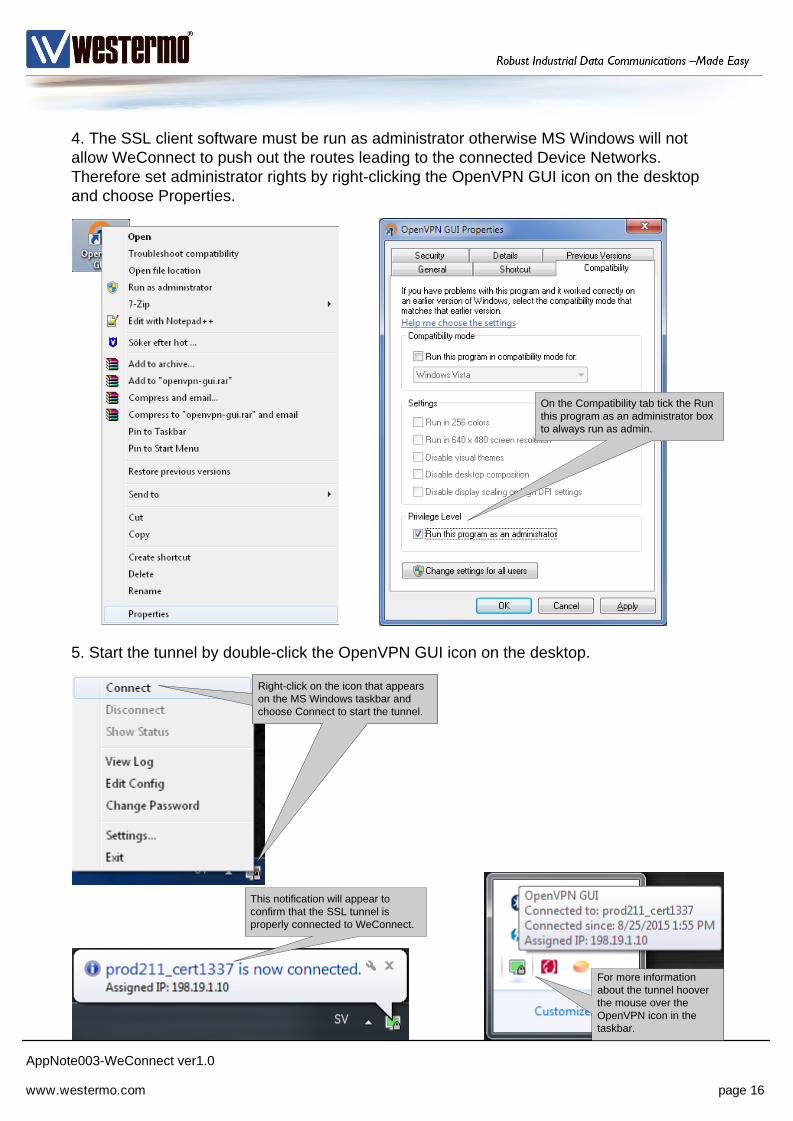
4. The SSL client software must be run as administrator otherwise MS Windows will not
allow WeConnect to push out the routes leading to the connected Device Networks.
Therefore set administrator rights by right-clicking the OpenVPN GUI icon on the desktop
and choose Properties.
Right-click on the icon that appears
on the MS Windows taskbar and
choose Connect to start the tunnel.
This notification will appear to
confirm that the SSL tunnel is
properly connected to WeConnect.
For more information
about the tunnel hoover
the mouse over the
OpenVPN icon in the
taskbar.
On the Compatibility tab tick the Run
this program as an administrator box
to always run as admin.
5. Start the tunnel by double-click the OpenVPN GUI icon on the desktop.
www.westermo.com page 16
AppNote003-WeConnect ver1.0
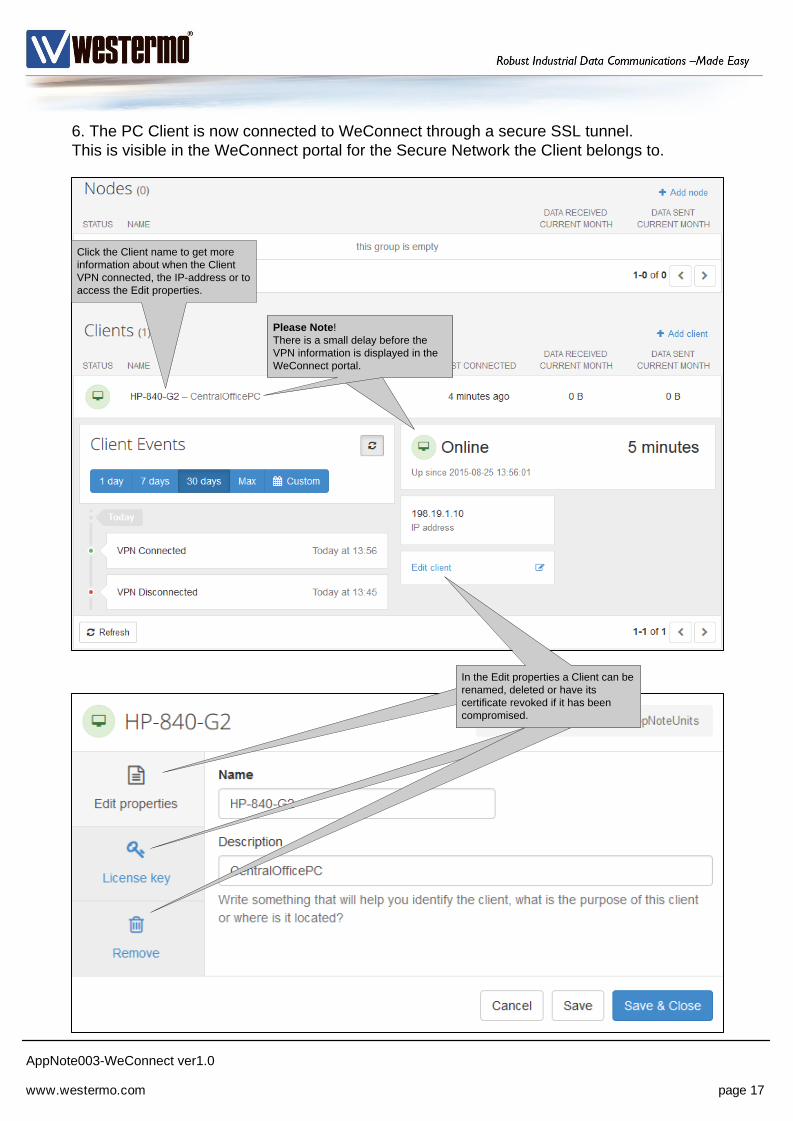
6. The PC Client is now connected to WeConnect through a secure SSL tunnel.
This is visible in the WeConnect portal for the Secure Network the Client belongs to.
Click the Client name to get more
information about when the Client
VPN connected, the IP-address or to
access the Edit properties.
In the Edit properties a Client can be
renamed, deleted or have its
certificate revoked if it has been
compromised.
Please Note!
There is a small delay before the
VPN information is displayed in the
WeConnect portal.
www.westermo.com page 17
AppNote003-WeConnect ver1.0
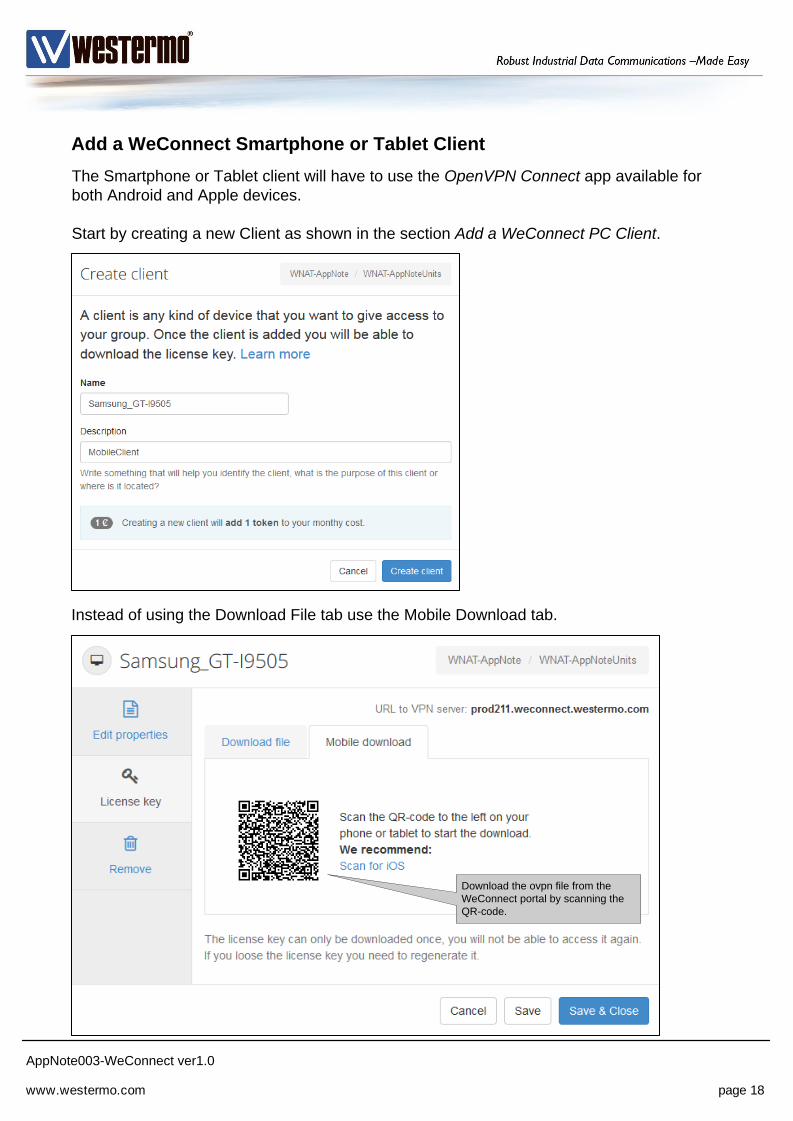
Add a WeConnect Smartphone or Tablet Client
The Smartphone or Tablet client will have to use the OpenVPN Connect app available for
both Android and Apple devices.
Start by creating a new Client as shown in the section Add a WeConnect PC Client.
Instead of using the Download File tab use the Mobile Download tab.
Download the ovpn file from the
WeConnect portal by scanning the
QR-code.
www.westermo.com page 18
AppNote003-WeConnect ver1.0
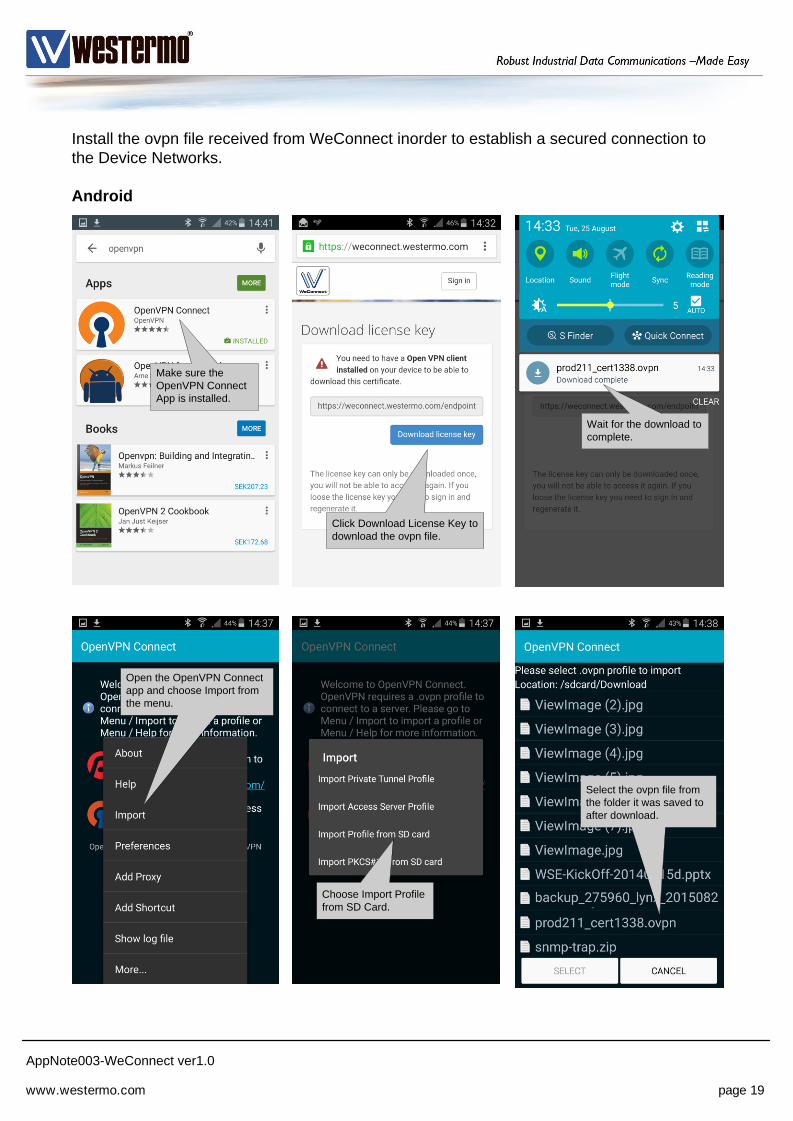
Make sure the
OpenVPN Connect
App is installed.
Click Download License Key to
download the ovpn file.
Wait for the download to
complete.
Open the OpenVPN Connect
app and choose Import from
the menu.
Choose Import Profile
from SD Card.
Select the ovpn file from
the folder it was saved to
after download.
Install the ovpn file received from WeConnect inorder to establish a secured connection to
the Device Networks.
Android
www.westermo.com page 19
AppNote003-WeConnect ver1.0
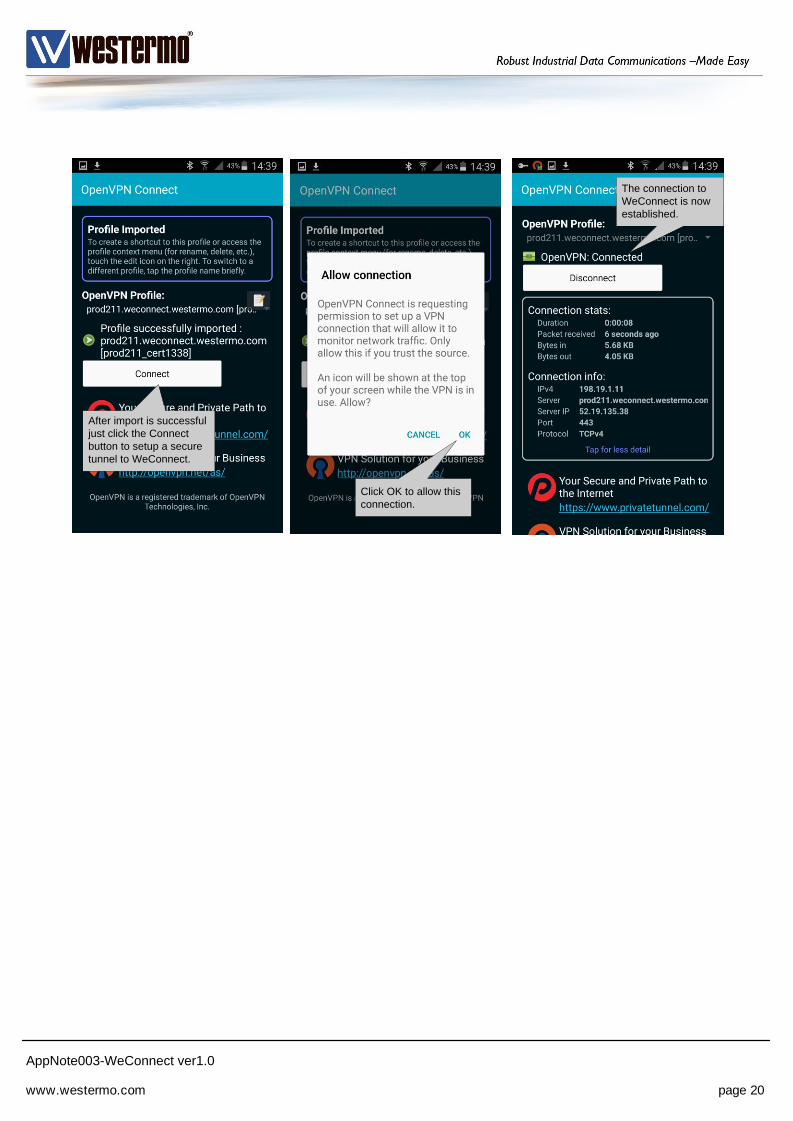
After import is successful
just click the Connect
button to setup a secure
tunnel to WeConnect.
Click OK to allow this
connection.
The connection to
WeConnect is now
established.
www.westermo.com page 20

AppNote003-WeConnect ver1.0
iOS
Choose Open in
”OpenVPN”.
Click the plus sign to
import the ovpn file
into the OpenVPN app.
After import is successful
just use the slider button
to setup a secure tunnel
to WeConnect.
The connection to
WeConnect is now
established.
Make sure the
OpenVPN Connect
App is installed.
Click Download License Key to
download the ovpn file.
www.westermo.com page 21
AppNote003-WeConnect ver1.0
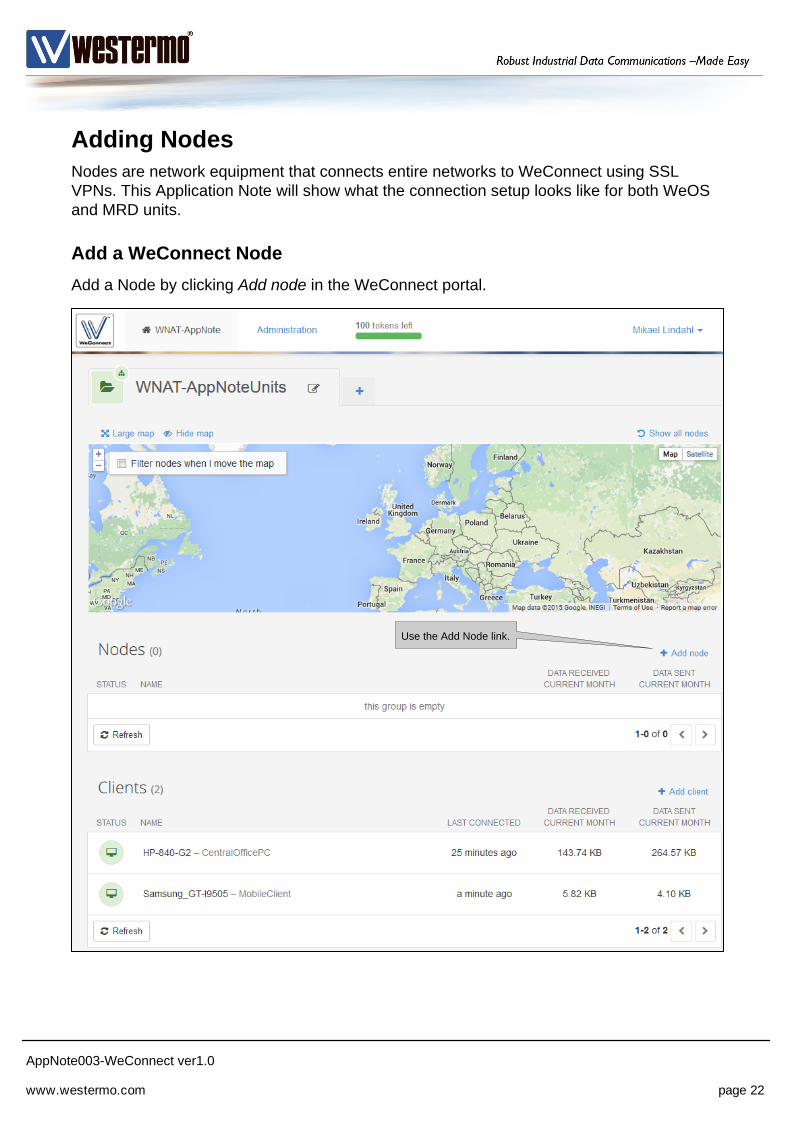
Adding Nodes
Nodes are network equipment that connects entire networks to WeConnect using SSL
VPNs. This Application Note will show what the connection setup looks like for both WeOS
and MRD units.
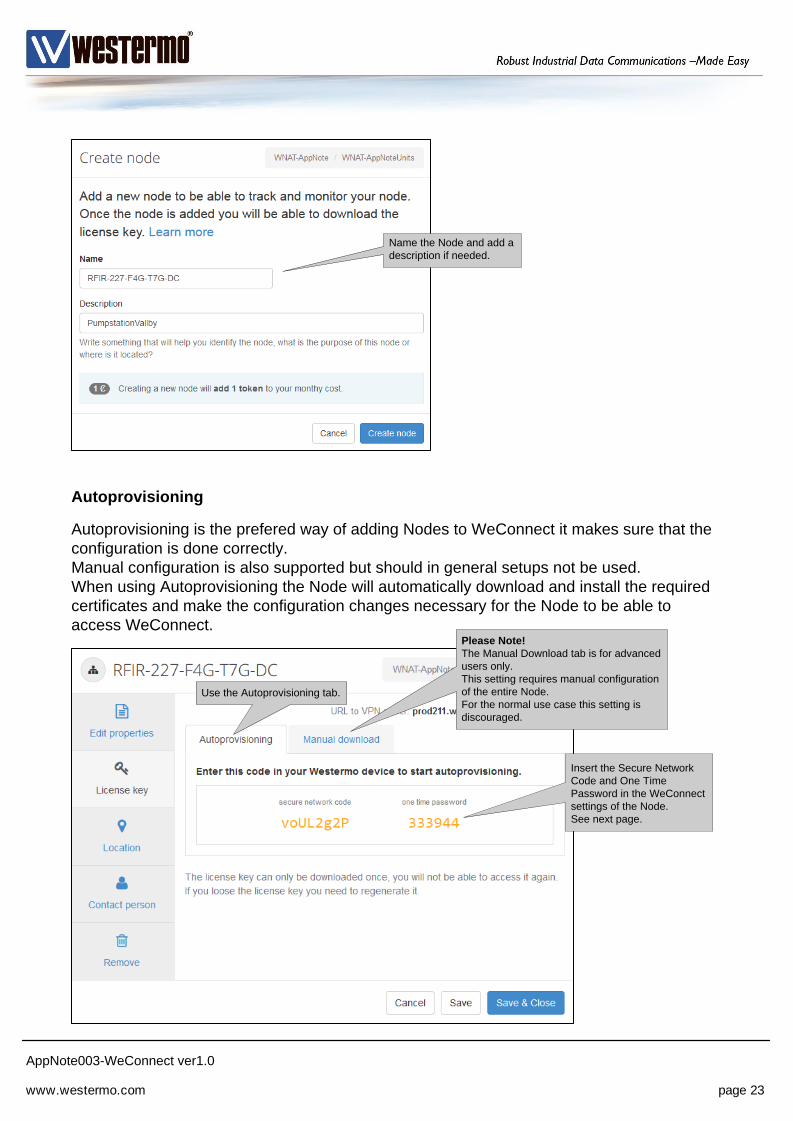
Add a WeConnect Node
Add a Node by clicking Add node in the WeConnect portal.
Use the Add Node link.
www.westermo.com page 22
AppNote003-WeConnect ver1.0
Name the Node and add a
description if needed.
Use the Autoprovisioning tab.
Insert the Secure Network
Code and One Time
Password in the WeConnect
settings of the Node.
See next page.
Autoprovisioning
Autoprovisioning is the prefered way of adding Nodes to WeConnect it makes sure that the
configuration is done correctly.
Manual configuration is also supported but should in general setups not be used.
When using Autoprovisioning the Node will automatically download and install the required
certificates and make the configuration changes necessary for the Node to be able to
access WeConnect.Please Note!
The Manual Download tab is for advanced
users only.
This setting requires manual configuration
of the entire Node.
For the normal use case this setting is
discouraged.
www.westermo.com page 23
AppNote003-WeConnect ver1.0
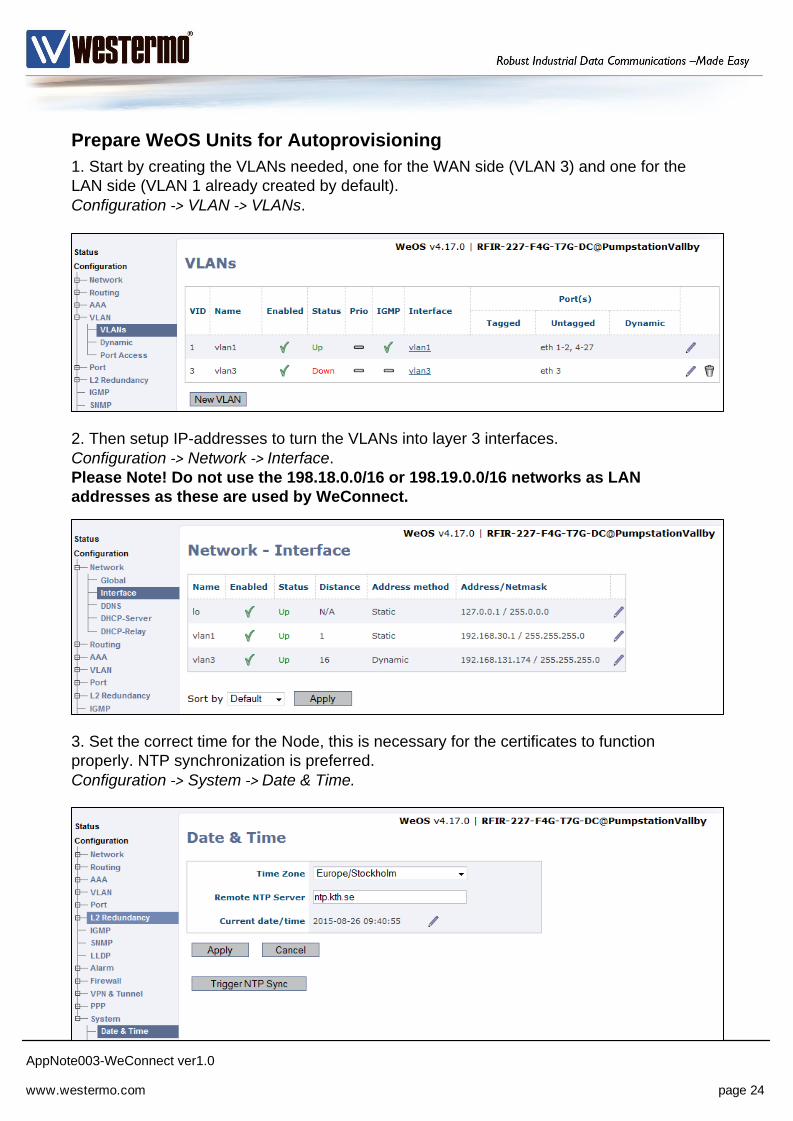
Prepare WeOS Units for Autoprovisioning
1. Start by creating the VLANs needed, one for the WAN side (VLAN 3) and one for the
LAN side (VLAN 1 already created by default).
Configuration -> VLAN -> VLANs.
2. Then setup IP-addresses to turn the VLANs into layer 3 interfaces.
Configuration -> Network -> Interface.
Please Note! Do not use the 198.18.0.0/16 or 198.19.0.0/16 networks as LAN
addresses as these are used by WeConnect.
3. Set the correct time for the Node, this is necessary for the certificates to function
properly. NTP synchronization is preferred.
Configuration -> System -> Date & Time.
www.westermo.com page 24
AppNote003-WeConnect ver1.0
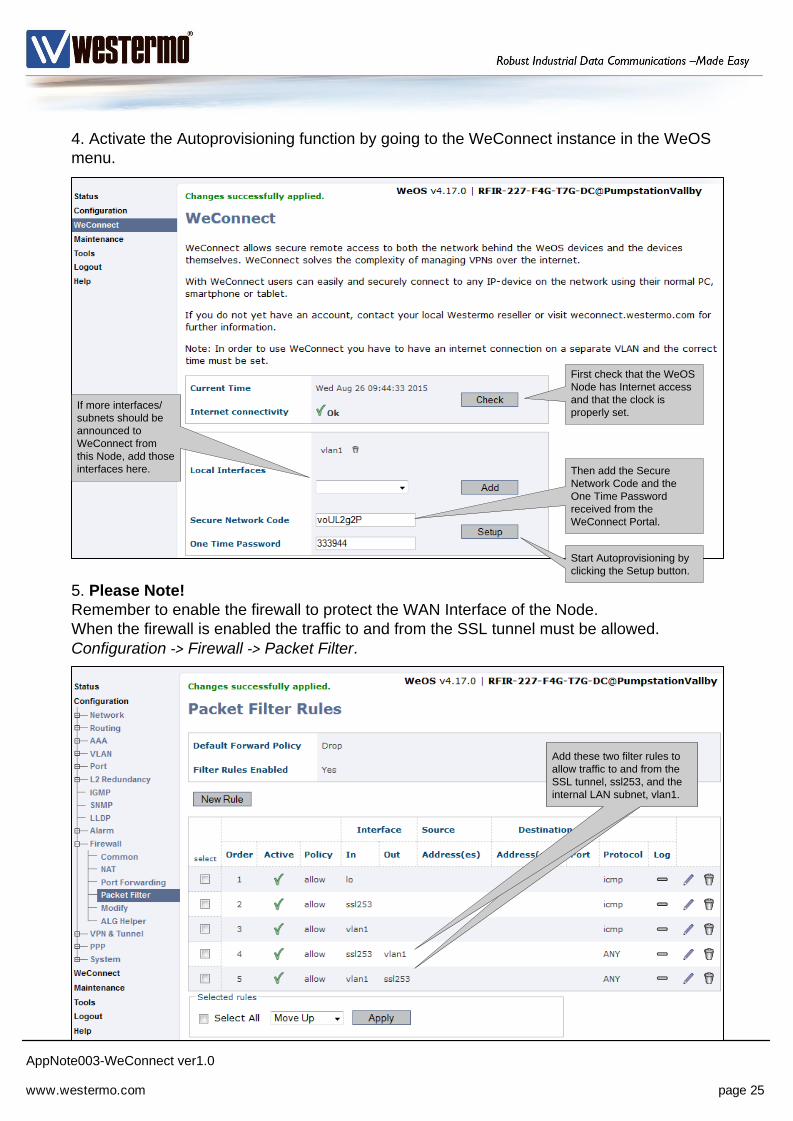
4. Activate the Autoprovisioning function by going to the WeConnect instance in the WeOS
menu.
First check that the WeOS
Node has Internet access
and that the clock is
properly set.
Start Autoprovisioning by
clicking the Setup button.
Then add the Secure
Network Code and the
One Time Password
received from the
WeConnect Portal.
If more interfaces/
subnets should be
announced to
WeConnect from
this Node, add those
interfaces here.
5. Please Note!
Remember to enable the firewall to protect the WAN Interface of the Node.
When the firewall is enabled the traffic to and from the SSL tunnel must be allowed.
Configuration -> Firewall -> Packet Filter.
Add these two filter rules to
allow traffic to and from the
SSL tunnel, ssl253, and the
internal LAN subnet, vlan1.
www.westermo.com page 25

AppNote003-WeConnect ver1.0
6. Done!
The Node will now automatically download and install the certificates needed and
configuration settings for the SSL VPN tunnel from the WeConnect Provisioning Server.
It will also configure the appropriate routing using RIPv2 to announce the Device
Network(s) to WeConnect.
www.westermo.com page 26
AppNote003-WeConnect ver1.0
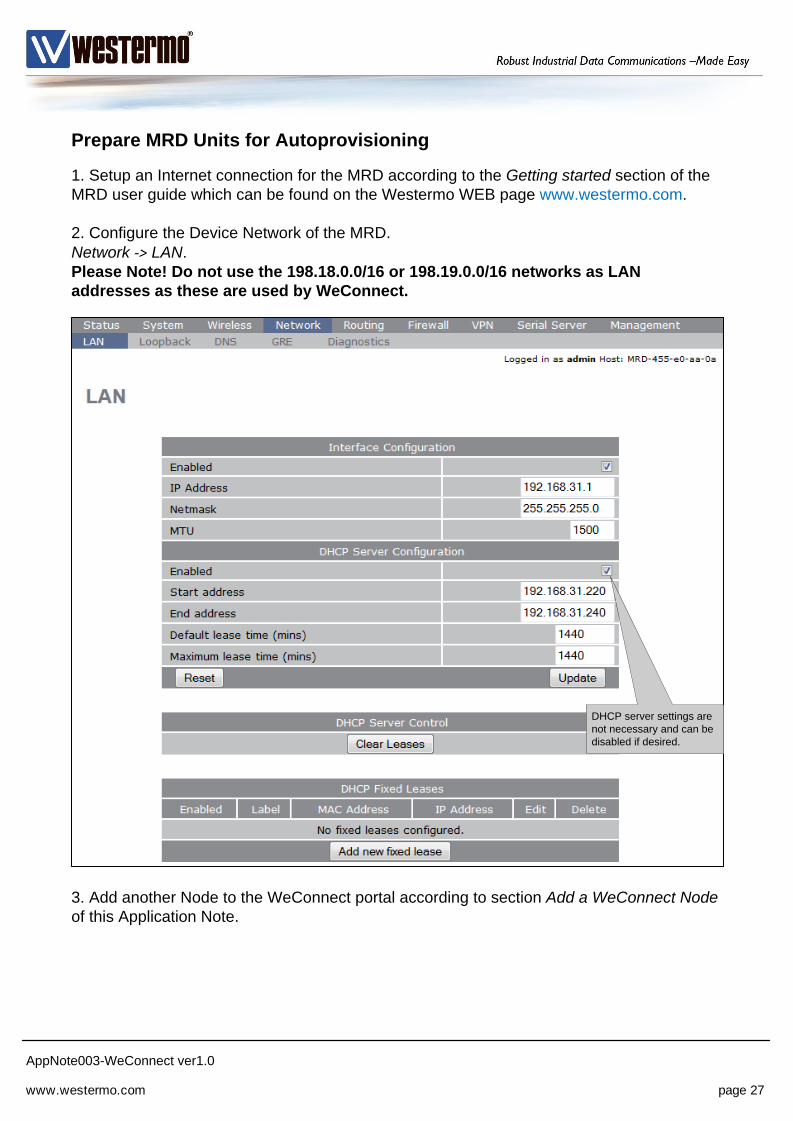
Prepare MRD Units for Autoprovisioning
1. Setup an Internet connection for the MRD according to the Getting started section of the
MRD user guide which can be found on the Westermo WEB page www.westermo.com.
2. Configure the Device Network of the MRD.
Network -> LAN.
Please Note! Do not use the 198.18.0.0/16 or 198.19.0.0/16 networks as LAN
addresses as these are used by WeConnect.
3. Add another Node to the WeConnect portal according to section Add a WeConnect Node
of this Application Note.
DHCP server settings are
not necessary and can be
disabled if desired.
www.westermo.com page 27
AppNote003-WeConnect ver1.0
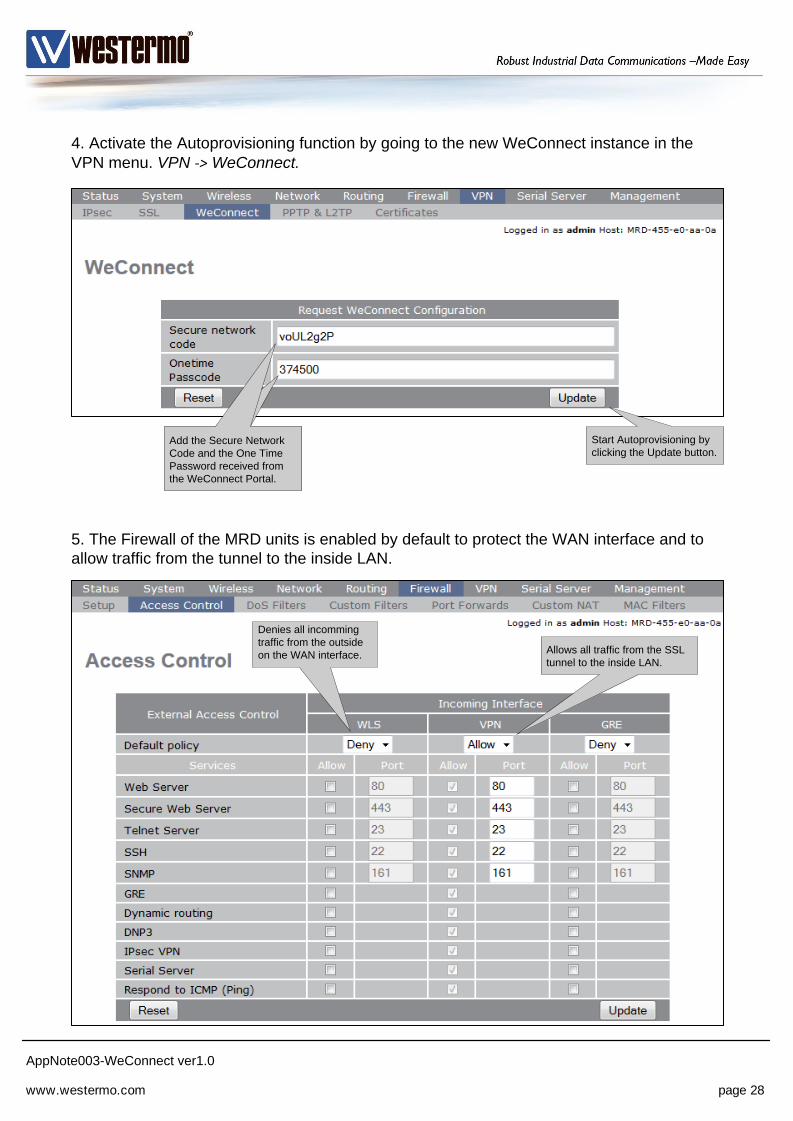
4. Activate the Autoprovisioning function by going to the new WeConnect instance in the
VPN menu. VPN -> WeConnect.
Start Autoprovisioning by
clicking the Update button.Add the Secure Network
ID and the One Time
Password received from
the WeConnect Portal.
5. The Firewall of the MRD units is enabled by default to protect the WAN interface and to
allow traffic from the tunnel to the inside LAN.
Add the Secure Network
Code and the One Time
Password received from
the WeConnect Portal.
Denies all incomming
traffic from the outside
on the WAN interface.Allows all traffic from the SSL
tunnel to the inside LAN.
www.westermo.com page 28
AppNote003-WeConnect ver1.0
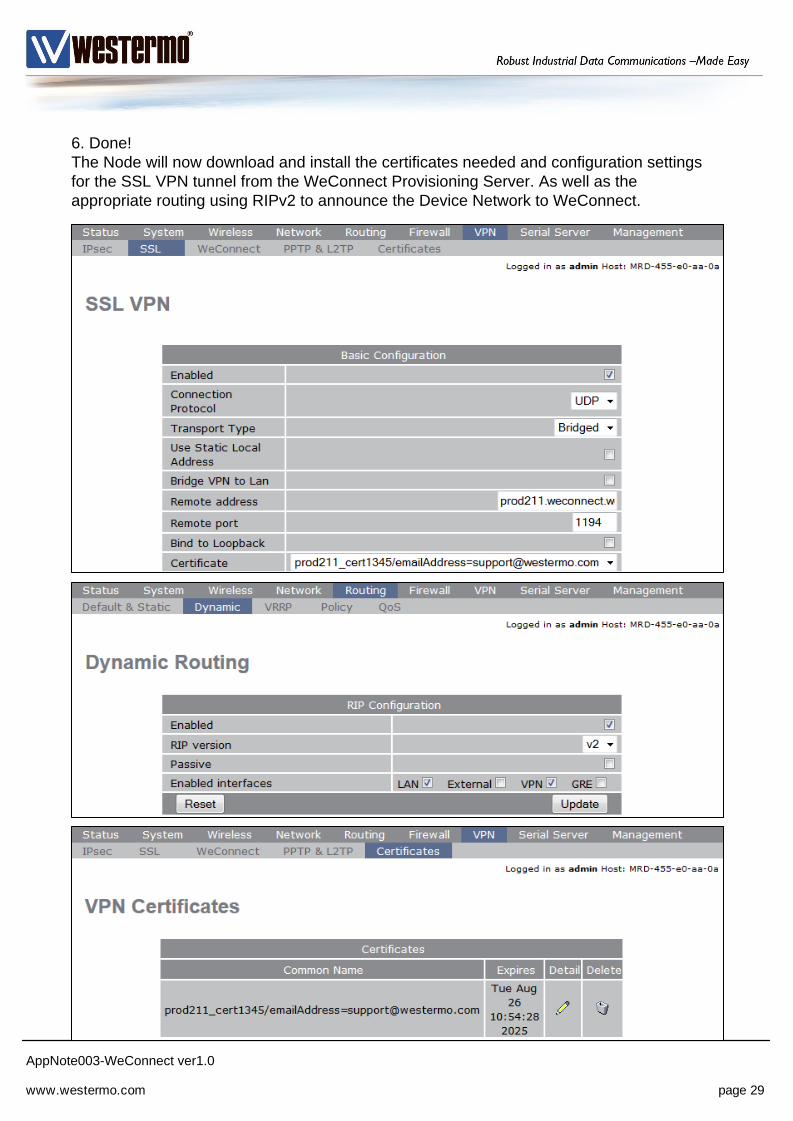
6. Done!
The Node will now download and install the certificates needed and configuration settings
for the SSL VPN tunnel from the WeConnect Provisioning Server. As well as the
appropriate routing using RIPv2 to announce the Device Network to WeConnect.
www.westermo.com page 29
AppNote003-WeConnect ver1.0
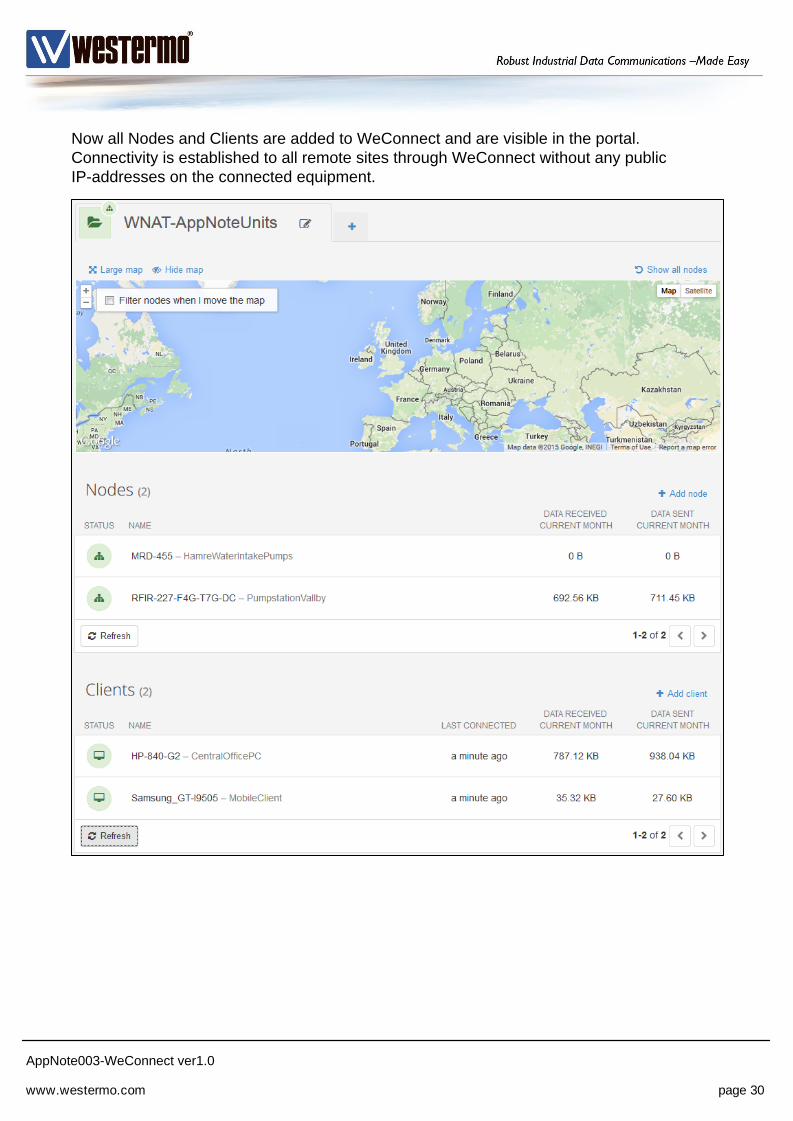
Now all Nodes and Clients are added to WeConnect and are visible in the portal.
Connectivity is established to all remote sites through WeConnect without any public
IP-addresses on the connected equipment.
www.westermo.com page 30
AppNote003-WeConnect ver1.0
INTERNET
WeConnect
Client PC
Bob
HVAC Engineer
OpenVPN client
Device Network
SSL VPN
Engine
192.168.10.10/24
DG: 192.168.10.1
HVAC
172.16.6.10/24
DG: 172.16.6.1
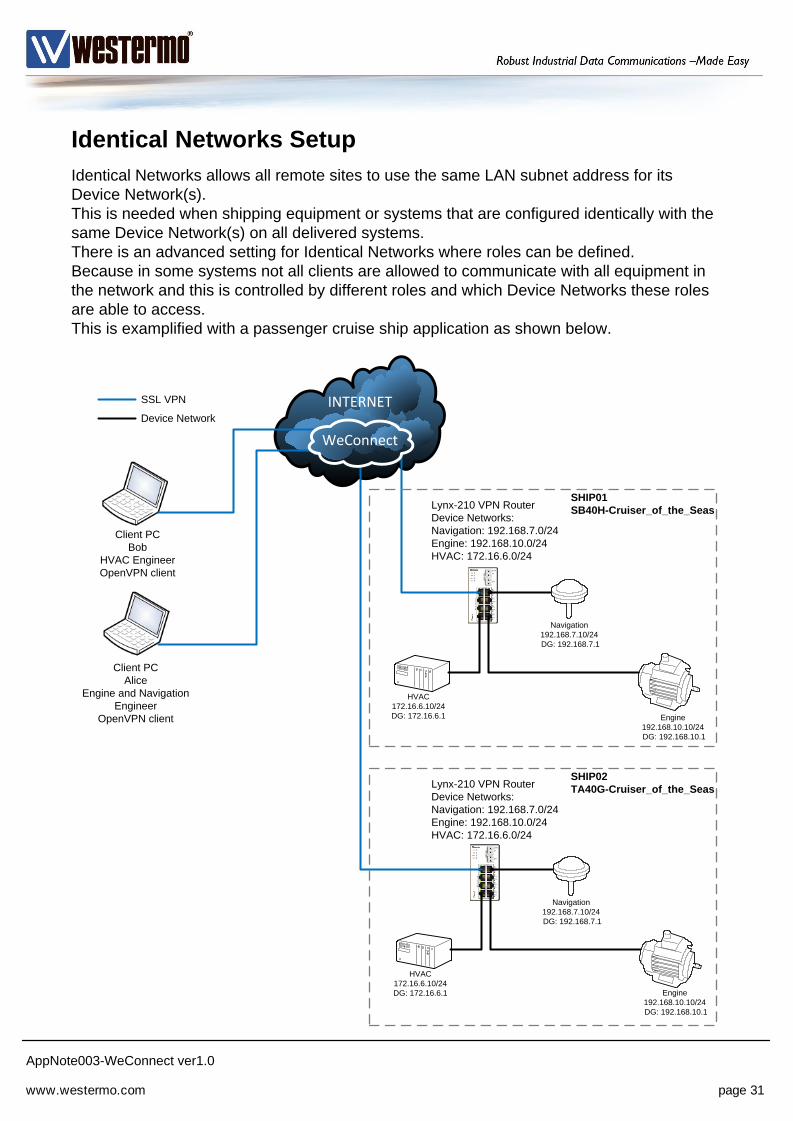
Identical Networks Setup
Identical Networks allows all remote sites to use the same LAN subnet address for its
Device Network(s).
This is needed when shipping equipment or systems that are configured identically with the
same Device Network(s) on all delivered systems.
There is an advanced setting for Identical Networks where roles can be defined.
Because in some systems not all clients are allowed to communicate with all equipment in
the network and this is controlled by different roles and which Device Networks these roles
are able to access.
This is examplified with a passenger cruise ship application as shown below.
Navigation
192.168.7.10/24
DG: 192.168.7.1
Client PC
Alice
Engine and Navigation
Engineer
OpenVPN client
Lynx-210 VPN Router
Device Networks:
Navigation: 192.168.7.0/24
Engine: 192.168.10.0/24
HVAC: 172.16.6.0/24
Engine
192.168.10.10/24
DG: 192.168.10.1
HVAC
172.16.6.10/24
DG: 172.16.6.1
Navigation
192.168.7.10/24
DG: 192.168.7.1
Lynx-210 VPN Router
Device Networks:
Navigation: 192.168.7.0/24
Engine: 192.168.10.0/24
HVAC: 172.16.6.0/24
SHIP01
SB40H-Cruiser_of_the_Seas
SHIP02
TA40G-Cruiser_of_the_Seas
www.westermo.com page 31
AppNote003-WeConnect ver1.0
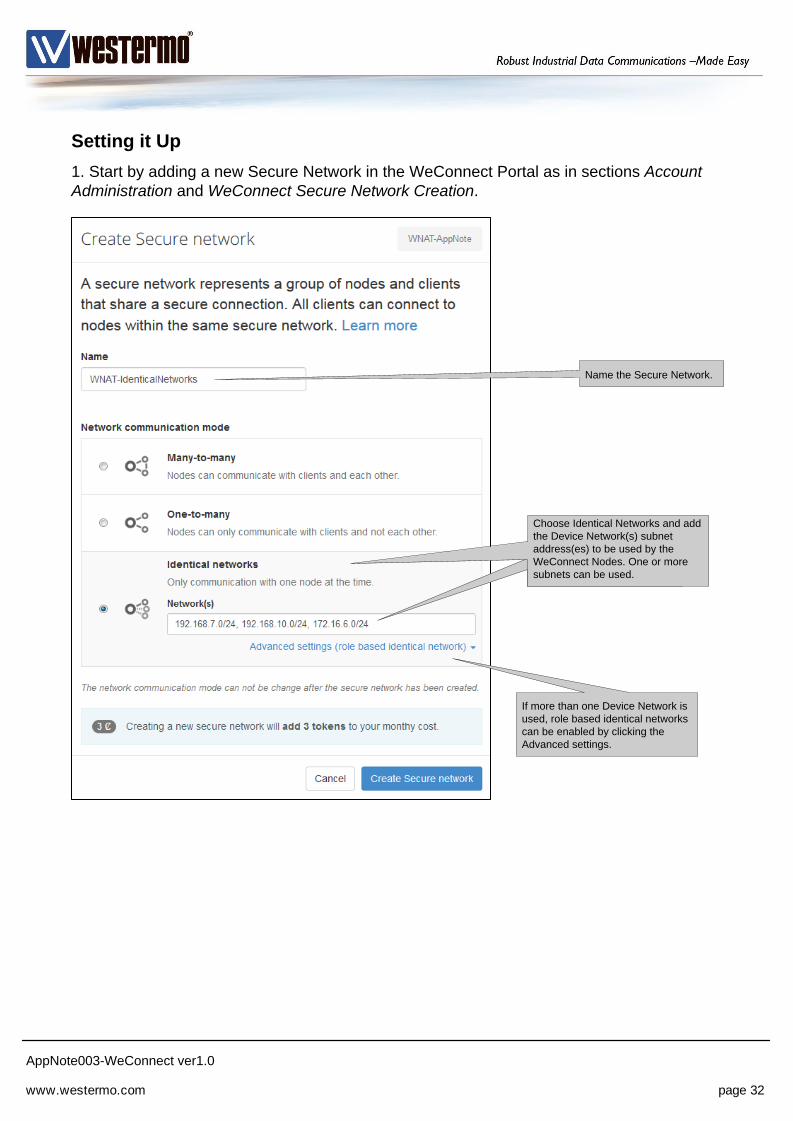
1. Start by adding a new Secure Network in the WeConnect Portal as in sections Account
Administration and WeConnect Secure Network Creation.
Name the Secure Network.
Choose Identical Networks
and add the LAN subnet
address to be used by the
WeConnect Nodes.
Choose Identical Networks and add
the Device Network(s) subnet
address(es) to be used by the
WeConnect Nodes. One or more
subnets can be used.
Setting it Up
If more than one Device Network is
used, role based identical networks
can be enabled by clicking the
Advanced settings.
www.westermo.com page 32
AppNote003-WeConnect ver1.0
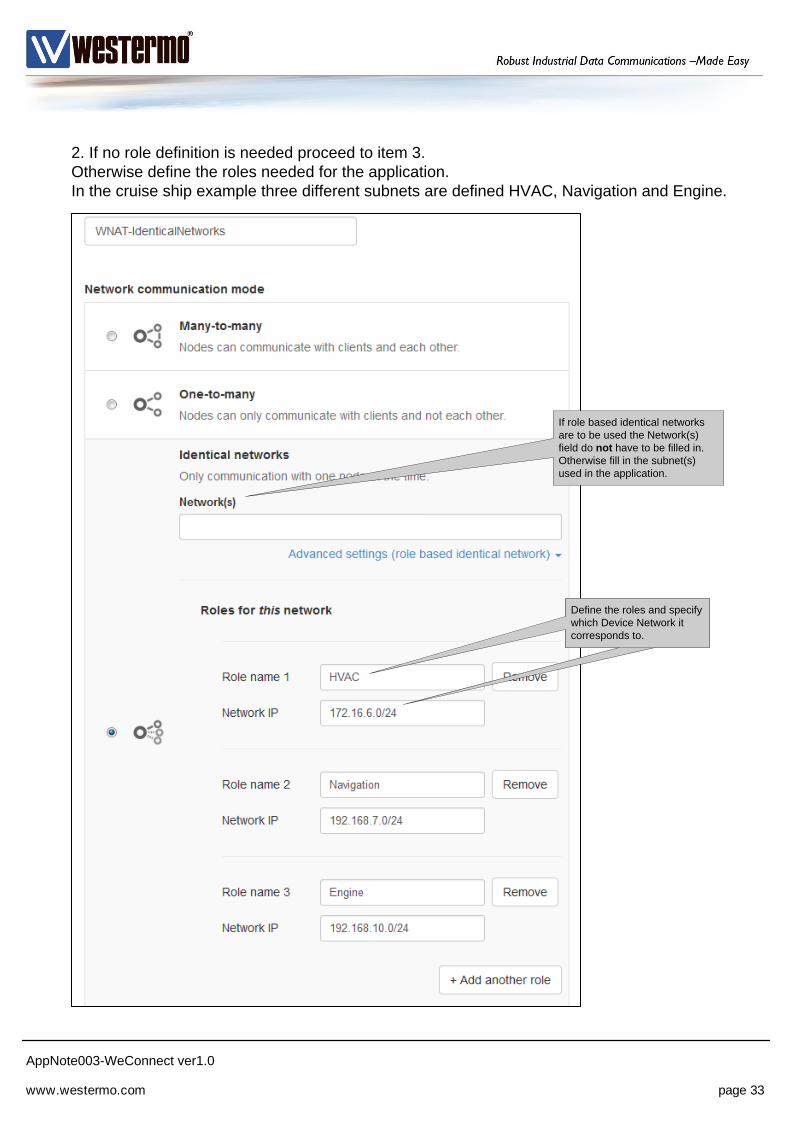
If role based identical networks
are to be used the Network(s)
field do not have to be filled in.
Otherwise fill in the subnet(s)
used in the application.
Define the roles and specify
which Device Network it
corresponds to.
2. If no role definition is needed proceed to item 3.
Otherwise define the roles needed for the application.
In the cruise ship example three different subnets are defined HVAC, Navigation and Engine.
www.westermo.com page 33
AppNote003-WeConnect ver1.0
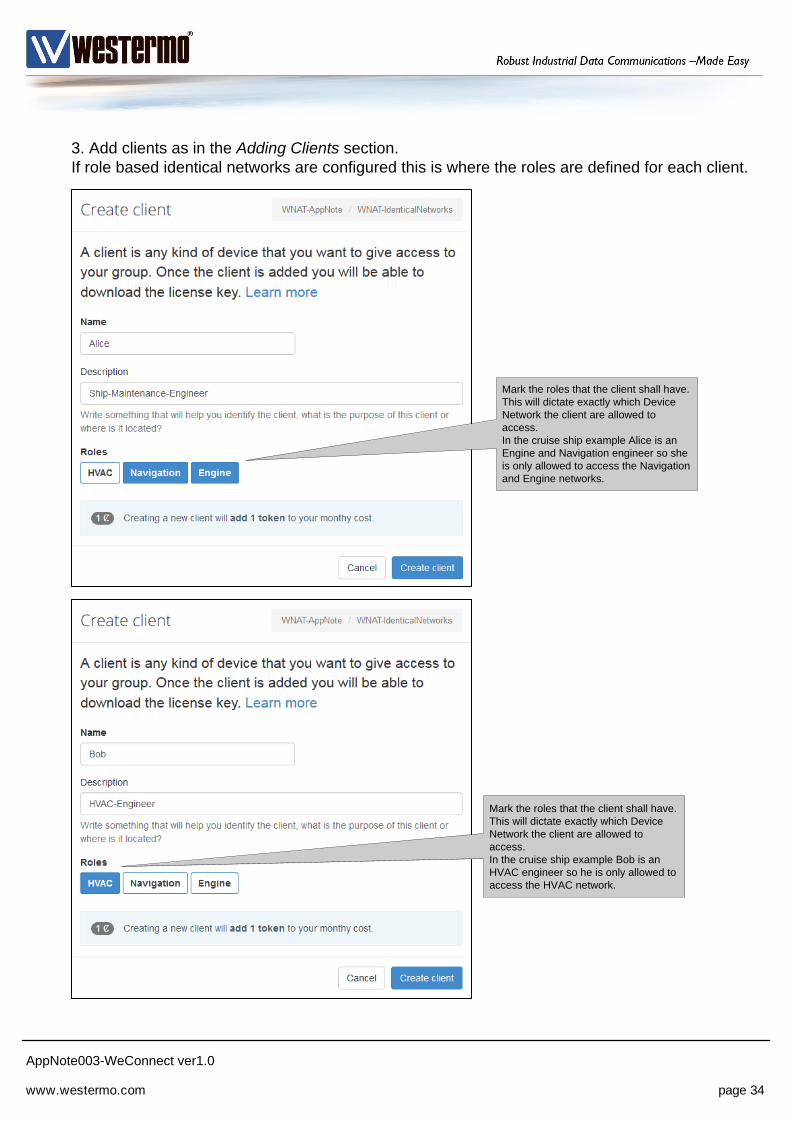
3. Add clients as in the Adding Clients section.
If role based identical networks are configured this is where the roles are defined for each client.
Mark the roles that the client shall have.
This will dictate exactly which Device
Network the client are allowed to
access.
In the cruise ship example Alice is an
Engine and Navigation engineer so she
is only allowed to access the Navigation
and Engine networks.
Mark the roles that the client shall have.
This will dictate exactly which Device
Network the client are allowed to
access.
In the cruise ship example Bob is an
HVAC engineer so he is only allowed to
access the HVAC network.
www.westermo.com page 34
AppNote003-WeConnect ver1.0
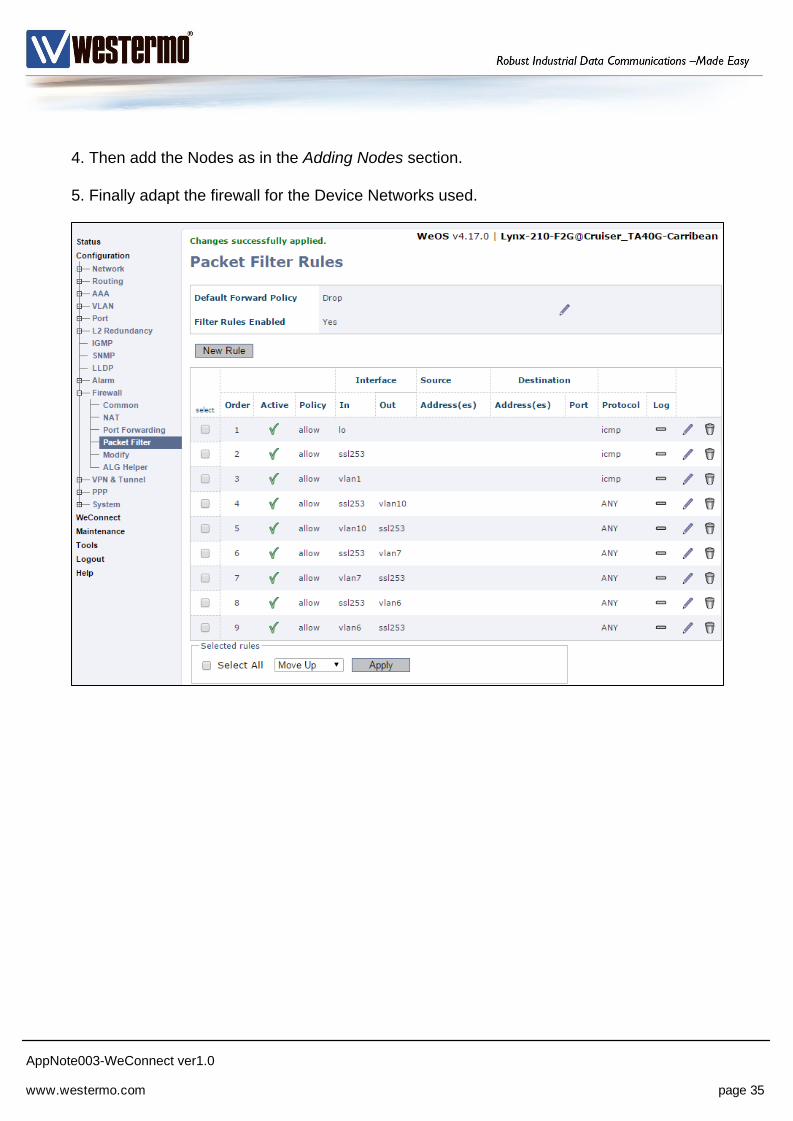
4. Then add the Nodes as in the Adding Nodes section.
5. Finally adapt the firewall for the Device Networks used.
www.westermo.com page 35
AppNote003-WeConnect ver1.0
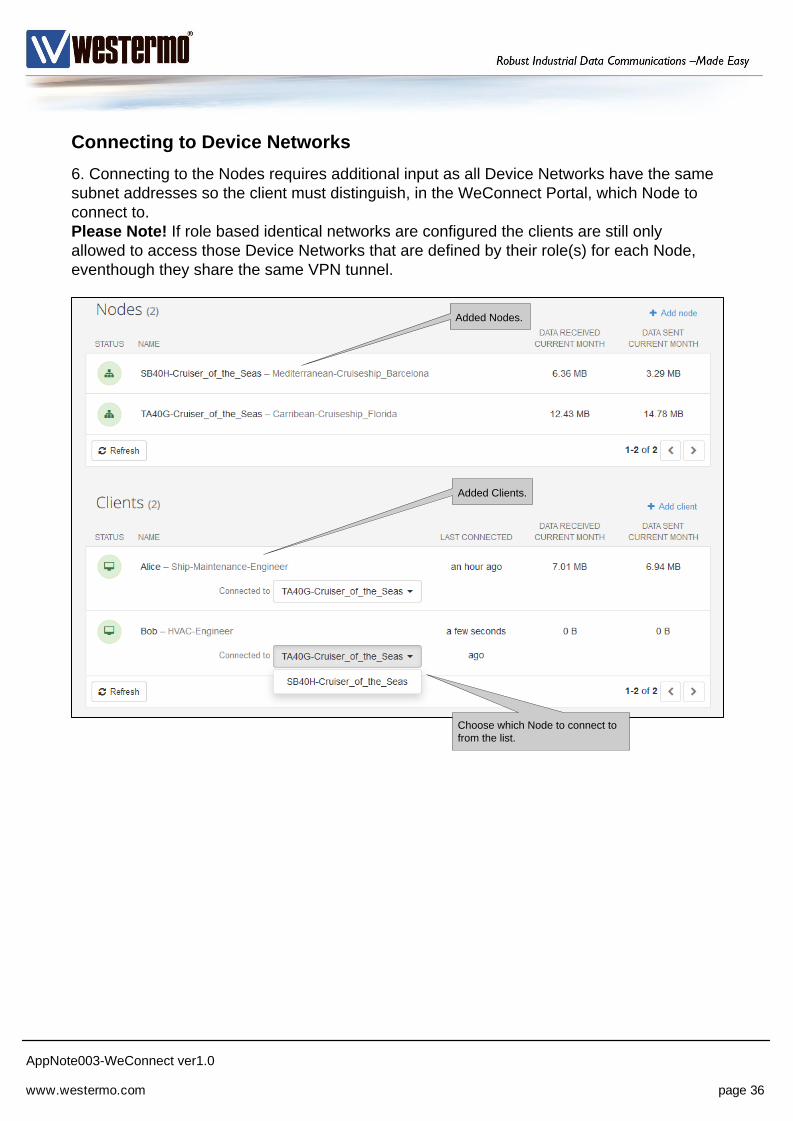
Added Nodes.
Added Clients.
Choose which Node to connect to
from the list.
6. Connecting to the Nodes requires additional input as all Device Networks have the same
subnet addresses so the client must distinguish, in the WeConnect Portal, which Node to
connect to.
Please Note! If role based identical networks are configured the clients are still only
allowed to access those Device Networks that are defined by their role(s) for each Node,
eventhough they share the same VPN tunnel.
Connecting to Device Networks
www.westermo.com page 36
AppNote003-WeConnect ver1.0
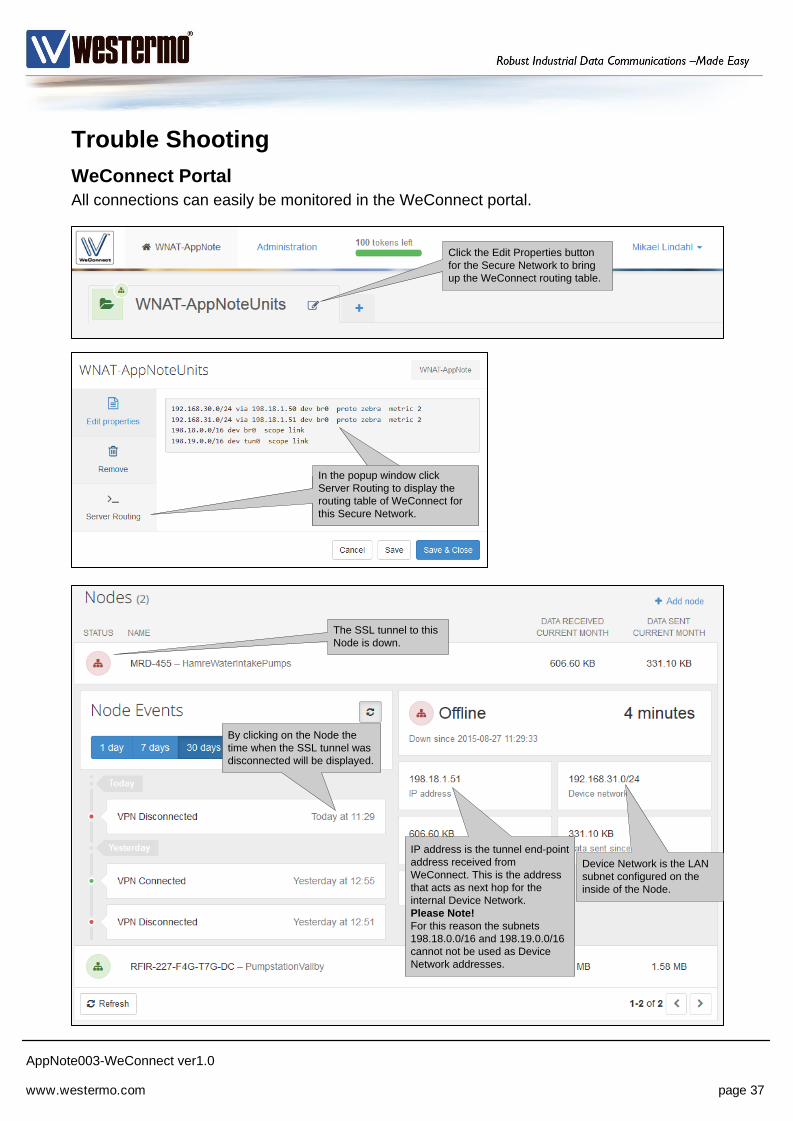
Trouble Shooting
WeConnect Portal
All connections can easily be monitored in the WeConnect portal.
The SSL tunnel to this
Node is down.
By clicking on the Node the
time when the SSL tunnel was
disconnected will be displayed.
IP address is the tunnel end-point
address received from
WeConnect. This is the address
that acts as next hop for the
internal Device Network.
Please Note!
For this reason the subnets
198.18.0.0/16 and 198.19.0.0/16
cannot not be used as Device
Network addresses.
Device Network is the LAN
subnet configured on the
inside of the Node.
In the popup window click
Server Routing to display the
routing table of WeConnect for
this Secure Network.
Click the Edit Properties button
for the Secure Network to bring
up the WeConnect routing table.
www.westermo.com page 37
AppNote003-WeConnect ver1.0
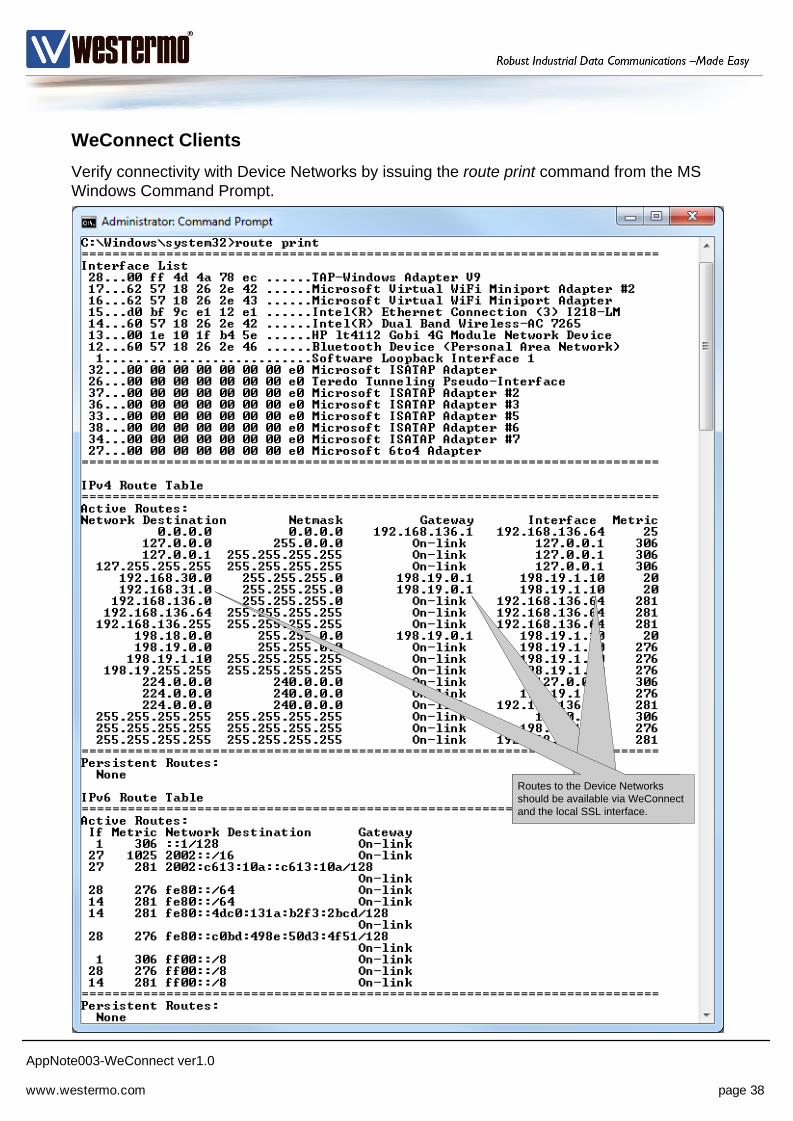
WeConnect Clients
Verify connectivity with Device Networks by issuing the route print command from the MS
Windows Command Prompt.
Routes to the Device Networks
should be available via WeConnect
and the local SSL interface.
www.westermo.com page 38

AppNote003-WeConnect ver1.0
WeOS Status Information
Verify functionality by checking the status of the SSL tunnel.
Status -> VPN & Tunnel -> SSL.
Verify that the proper routes are received from WeConnect.
Status -> Routing -> Routes
Routes received by RIPv2 from
WeConnect.
WeConnect Nodes
Problems establishing the VPN tunnel to WeConnect
If the VPN tunnel to WeConnect can not be established make sure that:
-The hostname of the VPN peer (WeConnect) can be properly resolved.
-UDP port 1194 is allowed out to the Internet from where the Node is located.
Problems connecting to the WeConnect provisioning server.
If the auto provisioning server can not be reached this message will be displayed in the
WeOS log:
WeConnect download failed with error code: 2
If this occurs make sure that:
-The hostname of the auto provisioning server can be properly resolved.
www.westermo.com page 39
AppNote003-WeConnect ver1.0
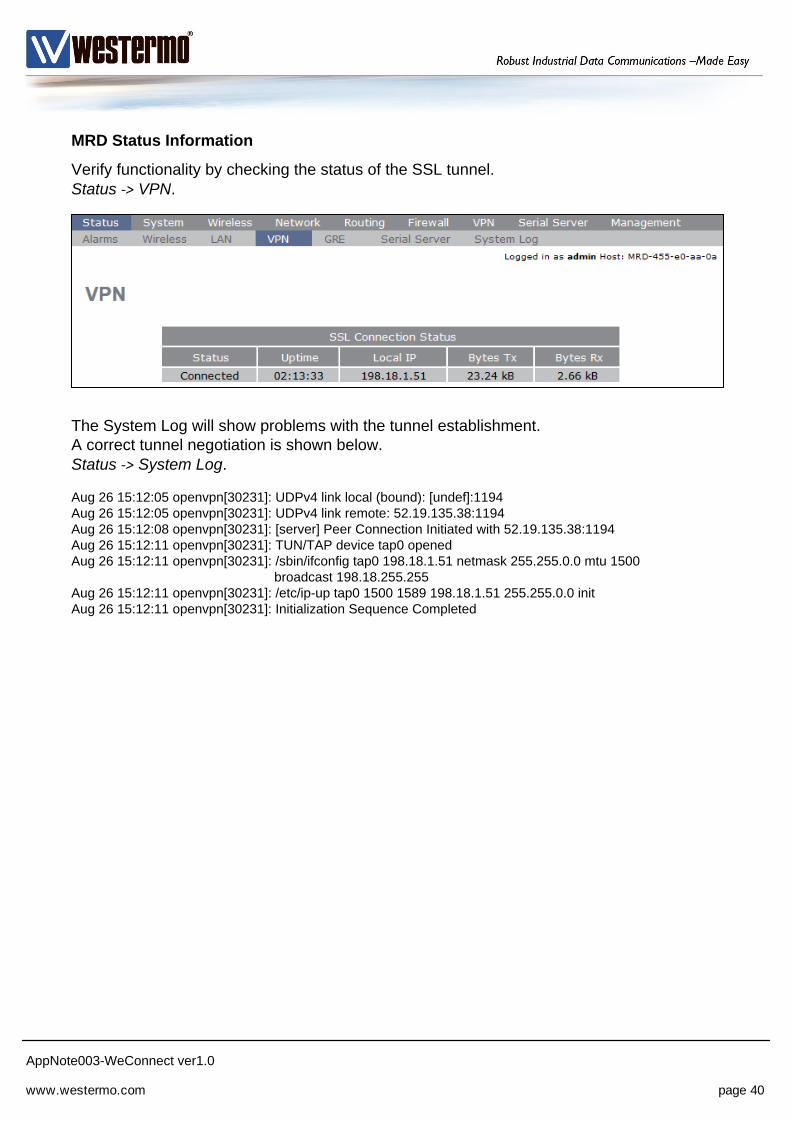
MRD Status Information
Verify functionality by checking the status of the SSL tunnel.
Status -> VPN.
The System Log will show problems with the tunnel establishment.
A correct tunnel negotiation is shown below.
Status -> System Log.
Aug 26 15:12:05 openvpn[30231]: UDPv4 link local (bound): [undef]:1194
Aug 26 15:12:05 openvpn[30231]: UDPv4 link remote: 52.19.135.38:1194
Aug 26 15:12:08 openvpn[30231]: [server] Peer Connection Initiated with 52.19.135.38:1194
Aug 26 15:12:11 openvpn[30231]: TUN/TAP device tap0 opened
Aug 26 15:12:11 openvpn[30231]: /sbin/ifconfig tap0 198.18.1.51 netmask 255.255.0.0 mtu 1500
broadcast 198.18.255.255
Aug 26 15:12:11 openvpn[30231]: /etc/ip-up tap0 1500 1589 198.18.1.51 255.255.0.0 init
Aug 26 15:12:11 openvpn[30231]: Initialization Sequence Completed
www.westermo.com page 40

AppNote003-WeConnect ver1.0
www.westermo.com page 41

AppNote003-WeConnect ver1.0
www.westermo.com page 42
AppNote003-WeConnect ver1.0
Revision Rev by Revision note Date
00 ML First version 151007
02
01
07
06
03
04
05
Revision history for version 1.0
www.westermo.com page 43

AppNote003-WeConnect ver1.0
www.westermo.com page 44