Embed Size (px)
Citation preview
I S S U E 3 3 1 J A N U A R Y 2 9 , 2 0 1 3
Apogee Components, Inc. — Your Source For Rocket Supplies That Will Take You To The “Peak-of-Flight”3355 Fillmore Ridge Heights
Colorado Springs, Colorado 80907-9024 USAwww.ApogeeRockets.com e-mail: [email protected]
Phone: 719-535-9335 Fax: 719-534-9050
How To Make A Hollow Nose Cone From Sheet Balsa
In This Issue
Cover Photo: North Coast Rocketry’s Lance Delta Rocket Kit. Get one at:www.ApogeeRockets.com/Rocket_Kits/Skill_Level_3_Kits/Lance_Delta
Page 2 I S S U E 3 3 1 J A N U A R Y 2 9 , 2 0 1 3
You can subscribe to receive this e-zine FREE at the Apogee Components web site (www.ApogeeRockets.com), or by sending an e-mail to: [email protected] with “SUB-SCRIBE” as the subject line of the message.
About this Newsletter Newsletter Staff
Writer: Tim Van MilliganLayout / Cover Artist: Tim Van MilliganProofreader: Michelle Mason
By Ian Voss
Continued on page 3
How to Make a Hollow Nose Cone From Sheet Balsa
If you enjoy designing and scratch-building rockets (or would like to), there may have been a time or two when you have been frustrated at the lack of availability of a particular size and shape of nose cone. Your design optimized, either for aesthetics or performance, you go in search of a nose cone and find that you’re going to have to either compro-mise on the design or make your own nose cone. If you’re willing to put the effort into making your own nose cone, you’ll have a design that is unique and looks/performs the way you want. The advantage of having a hollow nose cone is that you can put that space to use to house an altimeter or perhaps a system of adjustable nose weights - whatever your unique design calls for. Another advantage of having the altimeter further forward is that it moves the Cg forward (compared with just clipping it to the nose cone’s shoulder).
I’ve made several nose cones using a method similar to the one I’ll describe here (all low power rockets so far), and the results have been encouraging. Think coopers and wine barrels and you’re getting an idea of what I’m going to describe. Obviously you could adapt this method to suit your criteria: the size and shape of the nose cone, avail-ability and cost of materials, what you want it to contain, the strength required and your workshop and capabilities.
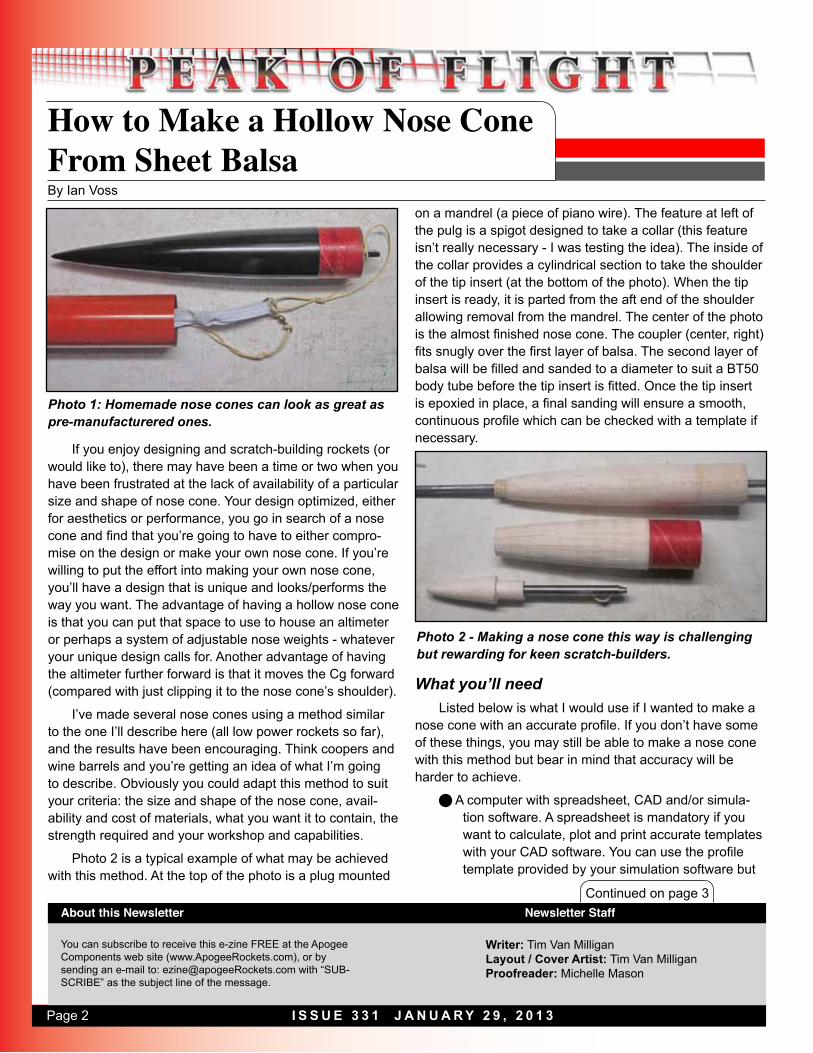
Photo 2 is a typical example of what may be achieved with this method. At the top of the photo is a plug mounted
on a mandrel (a piece of piano wire). The feature at left of the pulg is a spigot designed to take a collar (this feature isn’t really necessary - I was testing the idea). The inside of the collar provides a cylindrical section to take the shoulder of the tip insert (at the bottom of the photo). When the tip insert is ready, it is parted from the aft end of the shoulder allowing removal from the mandrel. The center of the photo is the almost finished nose cone. The coupler (center, right) fits snugly over the first layer of balsa. The second layer of balsa will be filled and sanded to a diameter to suit a BT50 body tube before the tip insert is fitted. Once the tip insert is epoxied in place, a final sanding will ensure a smooth, continuous profile which can be checked with a template if necessary.
Photo 1: Homemade nose cones can look as great as pre-manufacturered ones.
Photo 2 - Making a nose cone this way is challenging but rewarding for keen scratch-builders.
What you’ll needListed below is what I would use if I wanted to make a
nose cone with an accurate profile. If you don’t have some of these things, you may still be able to make a nose cone with this method but bear in mind that accuracy will be harder to achieve.
n A computer with spreadsheet, CAD and/or simula-tion software. A spreadsheet is mandatory if you want to calculate, plot and print accurate templates with your CAD software. You can use the profile template provided by your simulation software but

Page 3I S S U E 3 3 1 J A N U A R Y 2 9 , 2 0 1 3
Make Hollow Nose Cones From Balsa SheetContinued from page 2
Continued on page 4
I prefer to make an exercise of making my own templates. If you’re lucky enough to own a CNC lathe, you won’t need a profile template. You will need either a CAD drawing or a manually drawn template for cutting the sheet balsa. Laser cutting the sheet will give greater accuracy but keep in mind that determining the shape of the stringers may involve some trial and error. At best, it’s likely you’ll have to trim the stringers manually to achieve a suitable fit.
n A drill press. A lathe is preferable but for small nose cones, a drill press will suffice.
n A mandrel of about 3/16” diameter or greater and length to suit. I have some case-hardened, ground, pin off-cuts which are ideal but any kind of metal rod will do.
n A square file and a flat file (both coarse) to rough the profile of the plug.
n A selection of sandpaper (180/240 for shaping and 320 for smoothing)
n Dust masks are compulsory when working wood. Dust extraction would be better.
n Eye protection is a must when using any machine.n Vernier calipers to accurately measure diameters.n Some balsa sheet and round stock. 1mm sheet is
ideal for smaller nose cones as it will conform more easily. Careful balsa selection is required to ensure a good result – go for ‘tangent cut’ soft grained balsa for the sheet and harder grained balsa for the round stock. Keep in mind that softer balsa is more easily worked and can always be toughened up if need be with a coat of either CA or epoxy.
n Some mathematical skills will be needed to calculate the shape of your particular sheet template.
n A hobby knife with a brand new blade will cut the
balsa sheet more easily.n CyanoAcrylate (CA) adhesive is perfect for bonding
the nose cone ‘stringers’ together. (It’s also perfect for bonding your fingers together but we would want to avoid this.) Ideally, you would want some of the ‘gap filling’ and ‘water thin’ varieties.
n Cling wrap will be used to mask the plug when you apply the balsa ‘shell’. (CA won’t stick to cling wrap)
n Masking tape is ideal for holding the shell in place while you apply the CA.
n Epoxy adhesive is perfect for coating the surface of the nose cone to provide added strength.
Note: Read the directions on the label of any adhesive that you use. Generally, keep them out of the reach of children, avoid contact with skin and eyes and avoid inhaling any vapors.
How to ProceedAssuming you already have your drawings, templates,
tools and materials to work with, you can start cutting. Find the center of the blank and drill a hole on center, slightly smaller than the mandrel. This sounds way easier than it is as the drill bit will tend to follow the grain. You may need to drill from both ends to get all the way through on longer blanks. Don’t worry if the holes don’t line up perfectly – the soft balsa should allow the mandrel to pass through it. When the blank is dry fitted to the mandrel, give the man-drel a spin to see if the blank runs reasonably true. If it runs out by too much, save that blank for a smaller nose cone and prepare another blank. If it runs true enough, you can apply some CA to prevent it moving on the mandrel and mount it in your machine.
During assembly, you may want to take the mandrel out of the machine to make it easier to work on. If you find
We’re Paying CashFor Great Articles for This Newsletter
Are you a writer looking for some serious pocket change? We’re paying up to $350 for good how-to articles for this newsletter. If you’re interested, see our submission guidelines on the Apogee web site.
www.ApogeeRockets.com/Newsletter/Newsletter_Guidelines
Page 4 I S S U E 3 3 1 J A N U A R Y 2 9 , 2 0 1 3
Continued from page 3
Make Hollow Nose Cones From Balsa Sheet
Continued on page 5
that, upon replacing it in the machine it runs eccentrically, try loosening the chuck and rotating the mandrel slightly. With luck, you will find a position where it will run concentri-cally, allowing you to maintain accuracy (mark these points for future reference!). If it won’t run concentrically, aim for the least eccentricity.
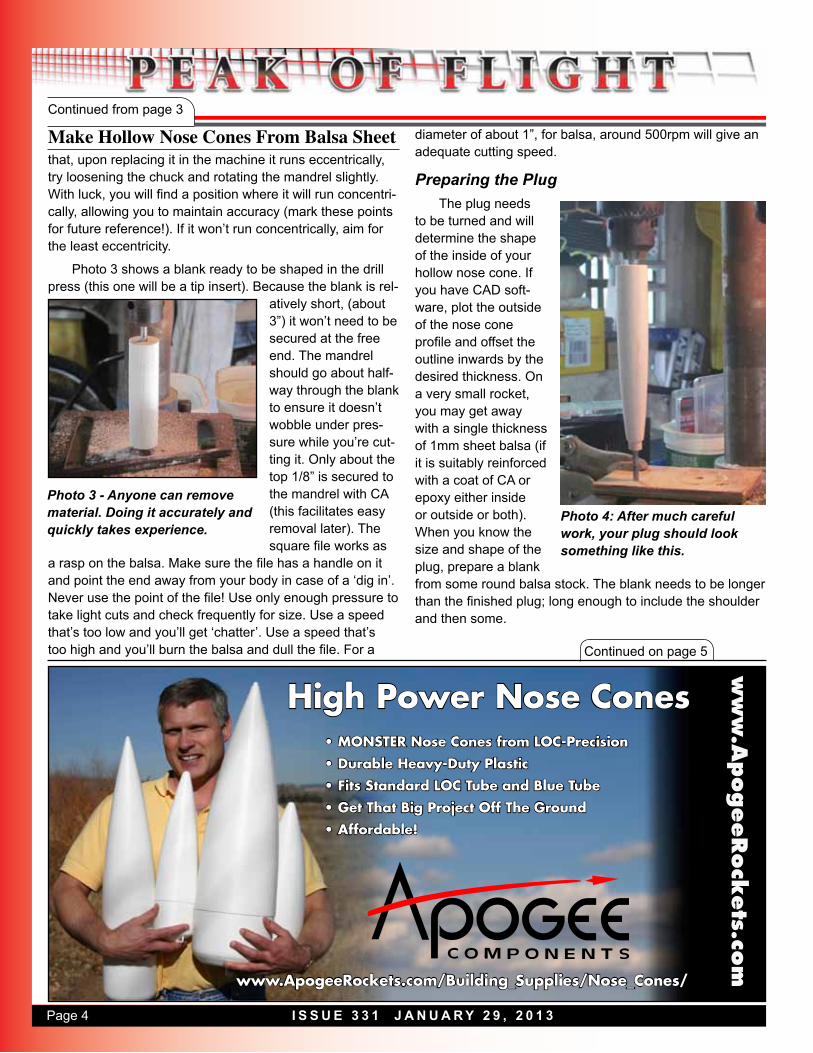
Photo 3 shows a blank ready to be shaped in the drill press (this one will be a tip insert). Because the blank is rel-
atively short, (about 3”) it won’t need to be secured at the free end. The mandrel should go about half-way through the blank to ensure it doesn’t wobble under pres-sure while you’re cut-ting it. Only about the top 1/8” is secured to the mandrel with CA (this facilitates easy removal later). The square file works as
a rasp on the balsa. Make sure the file has a handle on it and point the end away from your body in case of a ‘dig in’. Never use the point of the file! Use only enough pressure to take light cuts and check frequently for size. Use a speed that’s too low and you’ll get ‘chatter’. Use a speed that’s too high and you’ll burn the balsa and dull the file. For a
diameter of about 1”, for balsa, around 500rpm will give an adequate cutting speed.
Preparing the PlugThe plug needs
to be turned and will determine the shape of the inside of your hollow nose cone. If you have CAD soft-ware, plot the outside of the nose cone profile and offset the outline inwards by the desired thickness. On a very small rocket, you may get away with a single thickness of 1mm sheet balsa (if it is suitably reinforced with a coat of CA or epoxy either inside or outside or both). When you know the size and shape of the plug, prepare a blank from some round balsa stock. The blank needs to be longer than the finished plug; long enough to include the shoulder and then some.
High Power Nose Cones
ww
w.A
pogeeRock
ets.co
m
• MONSTER Nose Cones from LOC-Precision• Durable Heavy-Duty Plastic• Fits Standard LOC Tube and Blue Tube• Get That Big Project Off The Ground• Affordable!
www.ApogeeRockets.com/Building_Supplies/Nose_Cones/
Photo 3 - Anyone can remove material. Doing it accurately and quickly takes experience.
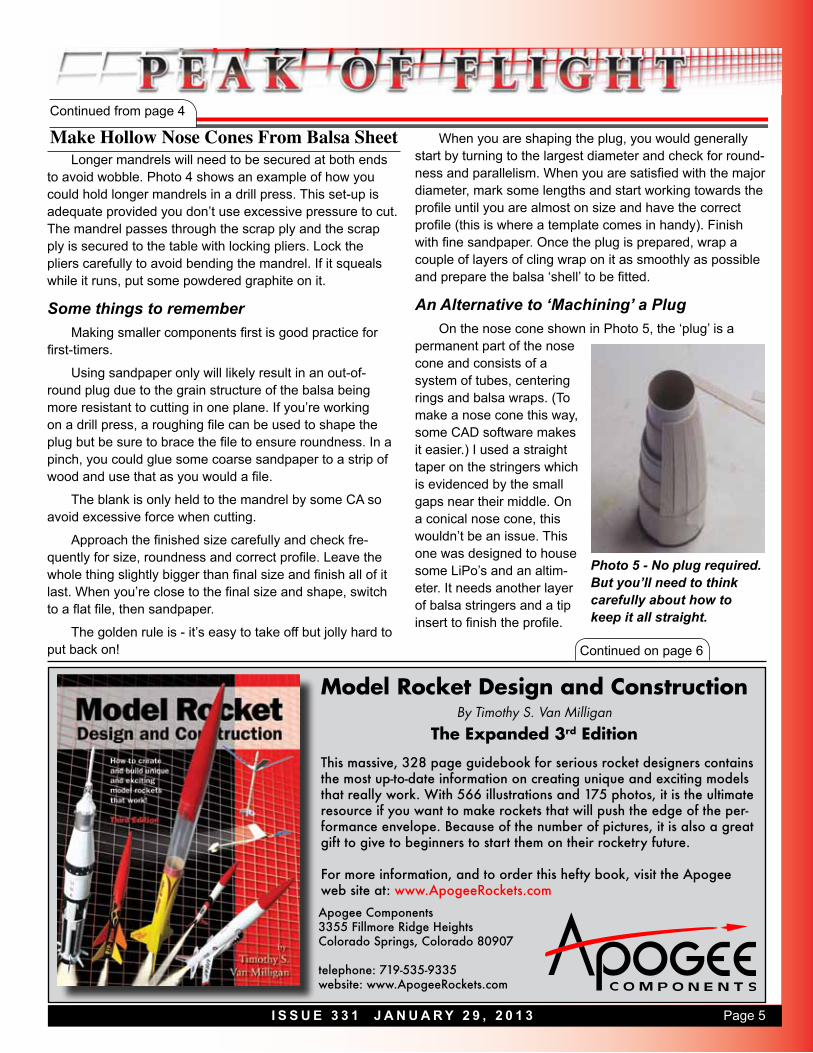
Photo 4: After much careful work, your plug should look something like this.
Page 5I S S U E 3 3 1 J A N U A R Y 2 9 , 2 0 1 3
Continued on page 6
Continued from page 4
Make Hollow Nose Cones From Balsa SheetLonger mandrels will need to be secured at both ends
to avoid wobble. Photo 4 shows an example of how you could hold longer mandrels in a drill press. This set-up is adequate provided you don’t use excessive pressure to cut. The mandrel passes through the scrap ply and the scrap ply is secured to the table with locking pliers. Lock the pliers carefully to avoid bending the mandrel. If it squeals while it runs, put some powdered graphite on it.
Some things to rememberMaking smaller components first is good practice for
first-timers.
Using sandpaper only will likely result in an out-of-round plug due to the grain structure of the balsa being more resistant to cutting in one plane. If you’re working on a drill press, a roughing file can be used to shape the plug but be sure to brace the file to ensure roundness. In a pinch, you could glue some coarse sandpaper to a strip of wood and use that as you would a file.
The blank is only held to the mandrel by some CA so avoid excessive force when cutting.
Approach the finished size carefully and check fre-quently for size, roundness and correct profile. Leave the whole thing slightly bigger than final size and finish all of it last. When you’re close to the final size and shape, switch to a flat file, then sandpaper.
The golden rule is - it’s easy to take off but jolly hard to put back on!
When you are shaping the plug, you would generally start by turning to the largest diameter and check for round-ness and parallelism. When you are satisfied with the major diameter, mark some lengths and start working towards the profile until you are almost on size and have the correct profile (this is where a template comes in handy). Finish with fine sandpaper. Once the plug is prepared, wrap a couple of layers of cling wrap on it as smoothly as possible and prepare the balsa ‘shell’ to be fitted.
An Alternative to ‘Machining’ a PlugOn the nose cone shown in Photo 5, the ‘plug’ is a
permanent part of the nose cone and consists of a system of tubes, centering rings and balsa wraps. (To make a nose cone this way, some CAD software makes it easier.) I used a straight taper on the stringers which is evidenced by the small gaps near their middle. On a conical nose cone, this wouldn’t be an issue. This one was designed to house some LiPo’s and an altim-eter. It needs another layer of balsa stringers and a tip insert to finish the profile.
Model Rocket Design and ConstructionBy Timothy S. Van Milligan
The Expanded 3rd Edition
Apogee Components3355 Fillmore Ridge HeightsColorado Springs, Colorado 80907
telephone: 719-535-9335website: www.ApogeeRockets.com
This massive, 328 page guidebook for serious rocket designers contains the most up-to-date information on creating unique and exciting models that really work. With 566 illustrations and 175 photos, it is the ultimate resource if you want to make rockets that will push the edge of the per-formance envelope. Because of the number of pictures, it is also a great gift to give to beginners to start them on their rocketry future.
For more information, and to order this hefty book, visit the Apogee web site at: www.ApogeeRockets.com
Photo 5 - No plug required. But you’ll need to think carefully about how to keep it all straight.
Page 6 I S S U E 3 3 1 J A N U A R Y 2 9 , 2 0 1 3
Continued from page 5
Make Hollow Nose Cones From Balsa Sheet
Continued on page 7
To determine the length of the stringers you need to allow for the length of the curve on the profile. On small diameter, long-ish nose cones, this is as simple as adding a couple of millimeters to the length of the plug. Any excess is easily trimmed off. Determining the shape of the stringers is where it gets tricky. The edges of the stringers will have a very slight curve as they must come together over gradu-ally reducing diameters towards the tip of the nose cone. To find the shape of this curve, pick a number of ‘stations’ at which you can measure the diameter of the plug. The more stations you use, the more accurate the curve. On a 1” diameter, 3” long plug, when shaping the shell template, I wouldn’t use more than 5 stations including the major and minor diameters. When shaping the curve on the plug (i.e. the profile of the nose cone) using software, increments should generally be no more than a few millimetres to en-sure the accuracy of the profile.
There will be a point at which it is not practical to con-tinue to reduce the width of the stringers. I aim for a mini-mum width of about 3/32”. If you have, for argument’s sake, 12 stringers with a forward width of 3mm each, the circum-ference at the forward end of the stringers will be: 3 x 12 = 36mm. This would give a diameter of: 36/π = 11.5mm. Sub-tracting the sheet thickness gives the diameter of the plug at this point: 11.5 – 1 = 10.5mm. From this point forward you would need to turn a solid tip insert which is epoxied in place after most of the work is done.
On shorter nose cones (which don’t have the mandrel sticking out of the forward end of the plug) you can epoxy a blank into the nose cone and shape the insert in-situ. This would involve some careful plug design as you would need to make room for the tip insert’s shoulder.
Photo 7 shows a picture of a plug (wrapped in cling wrap) and the ‘shell’, ready to be fitted to the plug.
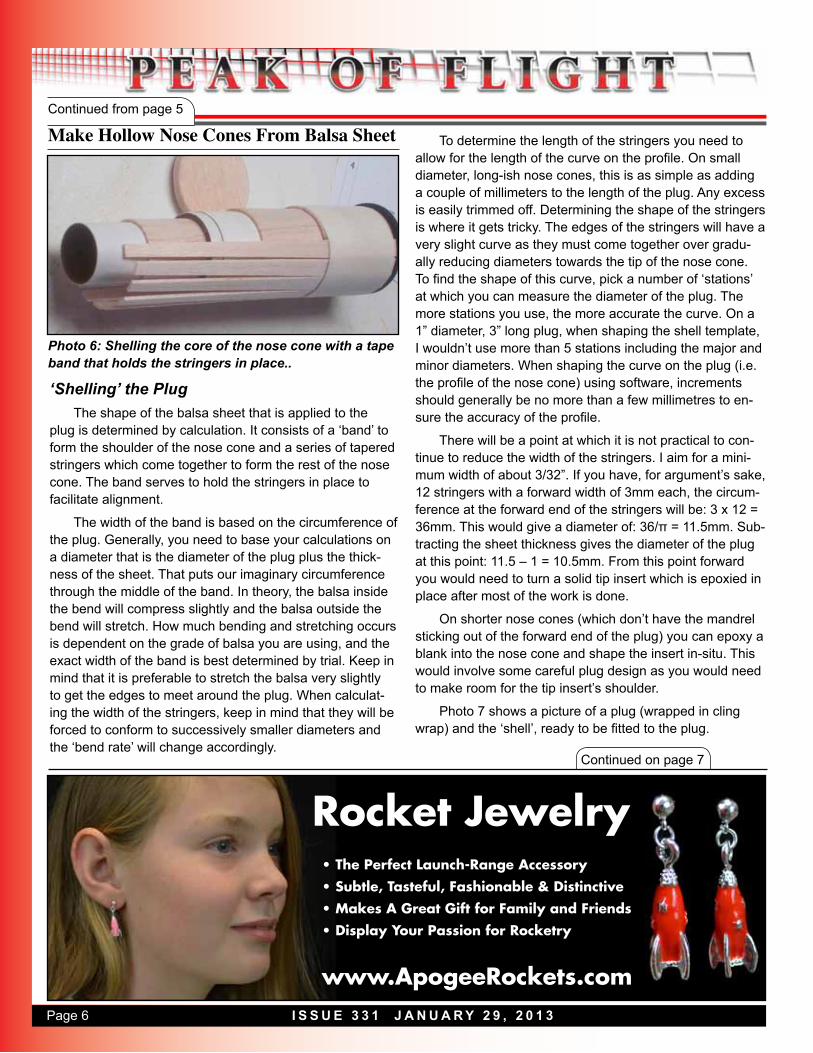
‘Shelling’ the PlugThe shape of the balsa sheet that is applied to the
plug is determined by calculation. It consists of a ‘band’ to form the shoulder of the nose cone and a series of tapered stringers which come together to form the rest of the nose cone. The band serves to hold the stringers in place to facilitate alignment.
The width of the band is based on the circumference of the plug. Generally, you need to base your calculations on a diameter that is the diameter of the plug plus the thick-ness of the sheet. That puts our imaginary circumference through the middle of the band. In theory, the balsa inside the bend will compress slightly and the balsa outside the bend will stretch. How much bending and stretching occurs is dependent on the grade of balsa you are using, and the exact width of the band is best determined by trial. Keep in mind that it is preferable to stretch the balsa very slightly to get the edges to meet around the plug. When calculat-ing the width of the stringers, keep in mind that they will be forced to conform to successively smaller diameters and the ‘bend rate’ will change accordingly.
Rocket Jewelry
www.ApogeeRockets.com
• The Perfect Launch-Range Accessory• Subtle, Tasteful, Fashionable & Distinctive• Makes A Great Gift for Family and Friends• Display Your Passion for Rocketry
Photo 6: Shelling the core of the nose cone with a tape band that holds the stringers in place..

Page 7I S S U E 3 3 1 J A N U A R Y 2 9 , 2 0 1 3
Continued from page 6
Make Hollow Nose Cones From Balsa Sheet
Continued on page 8
Putting it TogetherDouble check that the cling wrap is in place on the
former and that it has been laid as smoothly as possible. Use some thin strips of masking tape (about 1/8” wide) to secure the band around the plug as shown in Photo 8. Try to get the masking tape tight enough that it’s almost at breaking point and wrap it around the shell 3 or 4 times – this helps the balsa conform to the diameter of the plug. Leave gaps between the strips of tape where you can apply some CA to bond the edges of the shell together. Check
for correct alignment and apply some CA to the joints. Pull the stringers together and secure them with more strips of masking tape working from aft to forward. When you have the tape applied all the way forward, start applying CA to the edges of the stringers, between the strips of tape. When the CA has set, remove the tape, bond the remaining edges and let the whole thing cure.
Bear in mind that as you pull the stringers against the plug, it is preferable to have small gaps between them. (The size of the gaps is dependent on how accurately you can calculate and cut the shell template.) This ensures that they won’t push each other away from the plug and make bumps. The gaps are easily filled with gap filling CA. If you’re fanatical about saving weight, fill any gaps with sliv-ers of balsa or ‘balsa filler’ before applying water thin CA. If, when you do a trial fit you find that the stringers are too wide, sand the edges lightly and trial fit again. If there is too much material to remove, re-calculate the template dimen-
ww
w.A
pogeeRock
ets.co
m
Guillotine Fin Alignment Jig
• Get Perfectly Aligned Fins Every Time• Holds the Tube In a Horizontal Orientation
to Prevent Glue Drips• Self Adjusts to ANY Size Tube From 13mm
(BT-5) to 66mm (BT-80) • Securely Holds The Fin While The Glue Dries• Kid-Friendly! Helps Them Make Stronger
Fins, Resulting in Straighter Flights • Can Accomodate Fins Up To 1/2” Thick • Allows Any Number of Fins on the Tube
www.ApogeeRockets.com
The Most Versatile Alignment Jig Ever Manufactured
Photo 7 - The cling wrap prevents the CA from sticking to the plug.
Photo 8 - Wrap tape around the stringers to force them into shape.
Page 8 I S S U E 3 3 1 J A N U A R Y 2 9 , 2 0 1 3
Make Hollow Nose Cones From Balsa SheetContinued from page 7
Continued on page 9
sions and make some notes in case you want to try the technique on a different nose cone.
When the CA has cured, you can try removing the shell from the plug. If the cling wrap has done its job, you’ve got yourself most of a nose cone. (I found out the hard way that two layers of cling wrap are much, much better than one
layer.) Re-fit the shell to the plug and mount it in what-ever machine you’re using. Smooth the shell slightly with sandpaper before you add another layer of string-ers. Successive layers should overlap previous layers by half the width of the stringers and should be bonded with epoxy to allow an all over bond and plenty of working time.
After this comes the filling and sanding (some would call this tedious but I find it therapeutic). A smooth finish lessens drag
and increases satisfaction so aim for the best finish you can get in a reasonable amount of time. ‘Balsa filler’ will fix a lot of ugliness without adding too much weight. If you need to add weight, you could epoxy some small ball bearings into the tip of the nose cone. If you want to use lead, try to encapsulate it.
High-Power Reload Casings ww
w.A
pogeeRock
ets.co
m
• Reusable Rocket Motors Save Money• Holds Aerotech’s Reload Propellant• Sizes: 24mm To 98mm Diameter• Power Range: E Through N• Cases For Any Project• Rouse-Tech Quality• Affordable!
Your Source For Everything R
ocketry
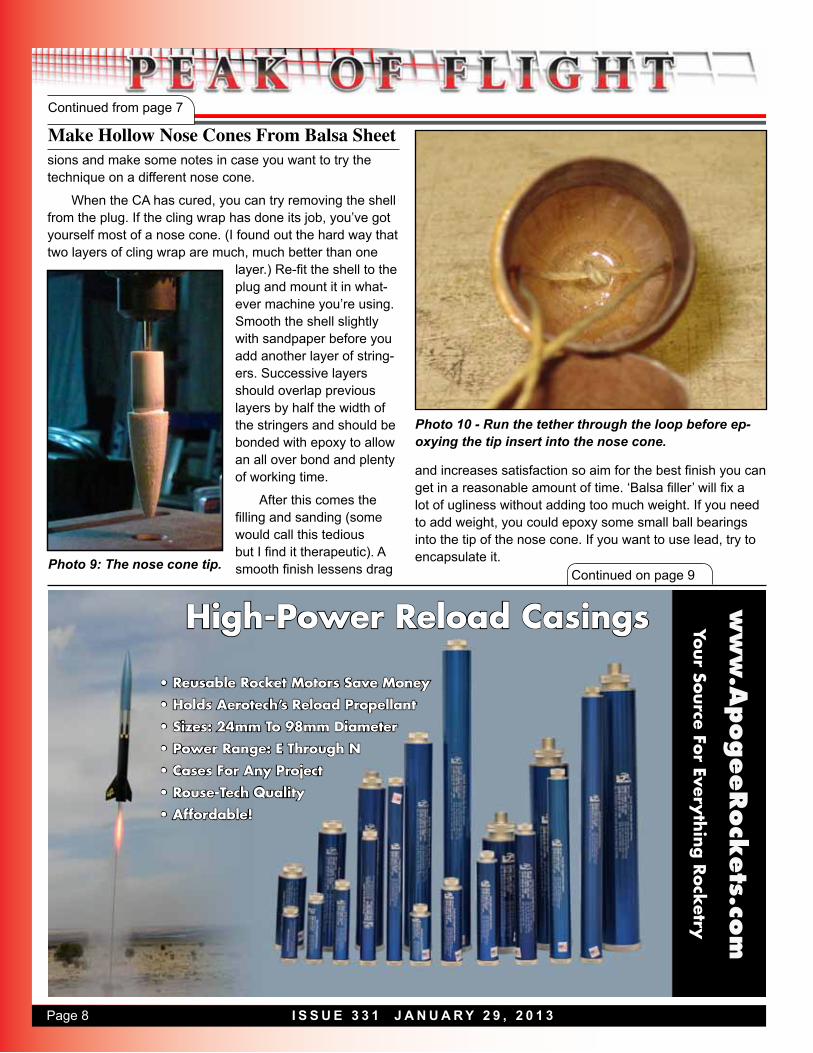
Photo 10 - Run the tether through the loop before ep-oxying the tip insert into the nose cone.
Photo 9: The nose cone tip.
Page 9I S S U E 3 3 1 J A N U A R Y 2 9 , 2 0 1 3
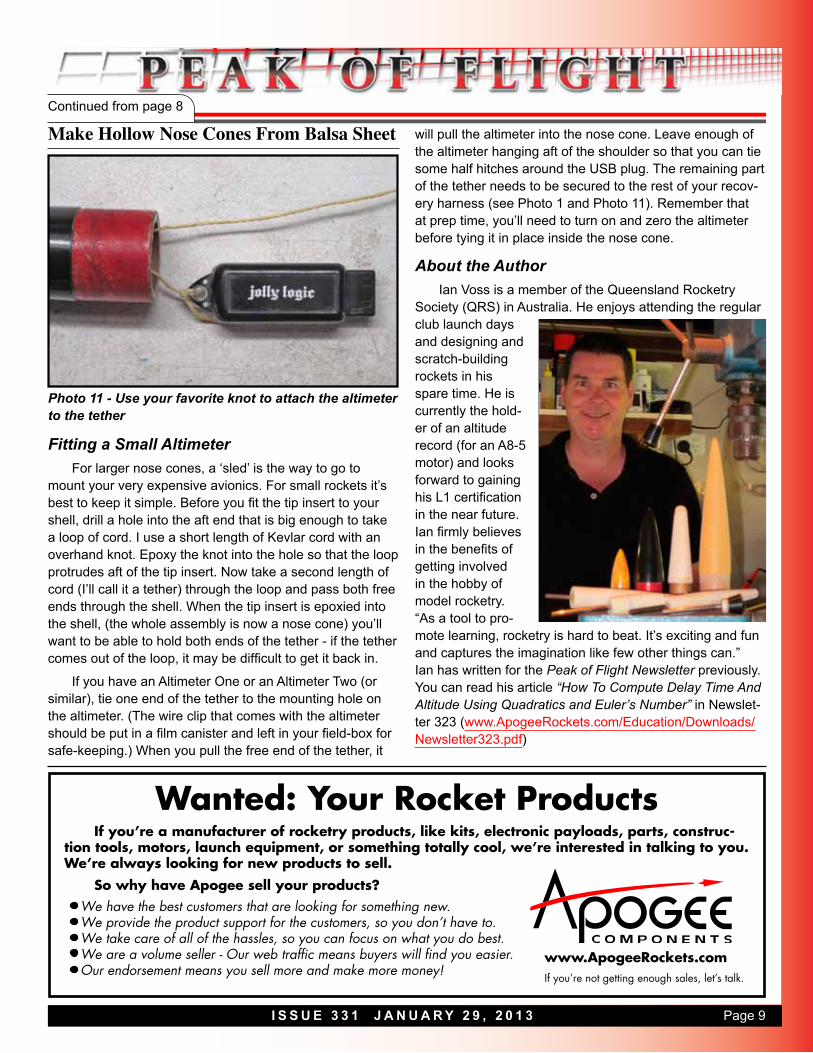
will pull the altimeter into the nose cone. Leave enough of the altimeter hanging aft of the shoulder so that you can tie some half hitches around the USB plug. The remaining part of the tether needs to be secured to the rest of your recov-ery harness (see Photo 1 and Photo 11). Remember that at prep time, you’ll need to turn on and zero the altimeter before tying it in place inside the nose cone.
About the AuthorIan Voss is a member of the Queensland Rocketry
Society (QRS) in Australia. He enjoys attending the regular club launch days and designing and scratch-building rockets in his spare time. He is currently the hold-er of an altitude record (for an A8-5 motor) and looks forward to gaining his L1 certification in the near future. Ian firmly believes in the benefits of getting involved in the hobby of model rocketry. “As a tool to pro-mote learning, rocketry is hard to beat. It’s exciting and fun and captures the imagination like few other things can.” Ian has written for the Peak of Flight Newsletter previously. You can read his article “How To Compute Delay Time And Altitude Using Quadratics and Euler’s Number” in Newslet-ter 323 (www.ApogeeRockets.com/Education/Downloads/Newsletter323.pdf)
Make Hollow Nose Cones From Balsa SheetContinued from page 8
Fitting a Small AltimeterFor larger nose cones, a ‘sled’ is the way to go to
mount your very expensive avionics. For small rockets it’s best to keep it simple. Before you fit the tip insert to your shell, drill a hole into the aft end that is big enough to take a loop of cord. I use a short length of Kevlar cord with an overhand knot. Epoxy the knot into the hole so that the loop protrudes aft of the tip insert. Now take a second length of cord (I’ll call it a tether) through the loop and pass both free ends through the shell. When the tip insert is epoxied into the shell, (the whole assembly is now a nose cone) you’ll want to be able to hold both ends of the tether - if the tether comes out of the loop, it may be difficult to get it back in.
If you have an Altimeter One or an Altimeter Two (or similar), tie one end of the tether to the mounting hole on the altimeter. (The wire clip that comes with the altimeter should be put in a film canister and left in your field-box for safe-keeping.) When you pull the free end of the tether, it
Wanted: Your Rocket ProductsIf you’re a manufacturer of rocketry products, like kits, electronic payloads, parts, construc-
tion tools, motors, launch equipment, or something totally cool, we’re interested in talking to you. We’re always looking for new products to sell.
So why have Apogee sell your products? We have the best customers that are looking for something new.We provide the product support for the customers, so you don’t have to.We take care of all of the hassles, so you can focus on what you do best.We are a volume seller - Our web traffic means buyers will find you easier.Our endorsement means you sell more and make more money!
www.ApogeeRockets.comIf you’re not getting enough sales, let’s talk.
Photo 11 - Use your favorite knot to attach the altimeter to the tether