Embed Size (px)
Citation preview
Cape Clear 6.6 Tutorial
Implementing Java Web Services Using Eclipse
Cape Clear 6.6 Tutorial | Implementing Java Web Services Using Eclipse
Tutorial: Implementing Java Web Services Using Eclipse (March 2006)
Copyright © 2006 Cape Clear Software, including this documentation, all demonstrations, and all software. All rights reserved. The document is not intended for production and is furnished “as is” without warranty of any kind. All warranties on this document are hereby disclaimed including the warranties of merchantability and fitness for a particular purpose.
Trademarks
Cape Clear is a registered trademark of Cape Clear Software. Cape Clear Software, Cape Clear Studio, Cape Clear Server, Cape Clear Data Transformer, Cape Clear Orchestrator, and Cape Clear Manager are trademarks of Cape Clear Software in the United States and other countries.
All other company, product, and service names mentioned in this product may be trademarks or service marks of others.
Copyright 2006, Cape Clear Software Inc. Page 2 of 36
Cape Clear 6.6 Tutorial | Implementing Java Web Services Using Eclipse
Contents
1. Introduction................................................................. 4
2. Getting Started with the Chat Application .................... 4 2.1. Downloading the Source Files .....................................................5 2.2. Setting Up the Source Files in Eclipse .........................................5 2.3. Running the Application............................................................30
3. Inside the Chat Application........................................ 32
4. Exposing the Chat Server as a Web Service ............... 35
5. Creating a Web Service Client .................................... 35
6. Implementing Call-Backs to the Client ....................... 36
7. Summary ................................................................... 36
Copyright 2006, Cape Clear Software Inc. Page 3 of 36

Cape Clear 6.6 Tutorial | Implementing Java Web Services Using Eclipse
1. Introduction
This tutorial demonstrates how to implement Java Web services. This is achieved using the example of a simple instant-messaging (chat) application. The following sections describe the various aspects of this tutorial:
Section 2 describes how to set up and run the simple chat application using the supplied defaults.
Section 3 provides details on the design of this application, including the client and server interfaces and how they are exposed.
Section 4 describes how to expose the chat server as a Web service.
Section 5 discusses creating a Web service client that will communicate with the chat server.
Section 6 explains how to implement a call-back mechanism to expose a service on the clients to which the server can make calls.
2. Getting Started with the Chat Application
Let’s take a look at this simple chat application, which consists of a server and multiple clients. The clients register with the server, send messages to it, and unregister from the server when they are finished. Any messages sent by a client are forwarded to all other currently connected clients. The server implements a Web service to expose the business logic described above (register, send message, and unregister), and the client implements a Web service that enables the server to send it new messages.
Figure 1: Sample chat client (left) and server
Copyright 2006, Cape Clear Software Inc. Page 4 of 36
Cape Clear 6.6 Tutorial | Implementing Java Web Services Using Eclipse
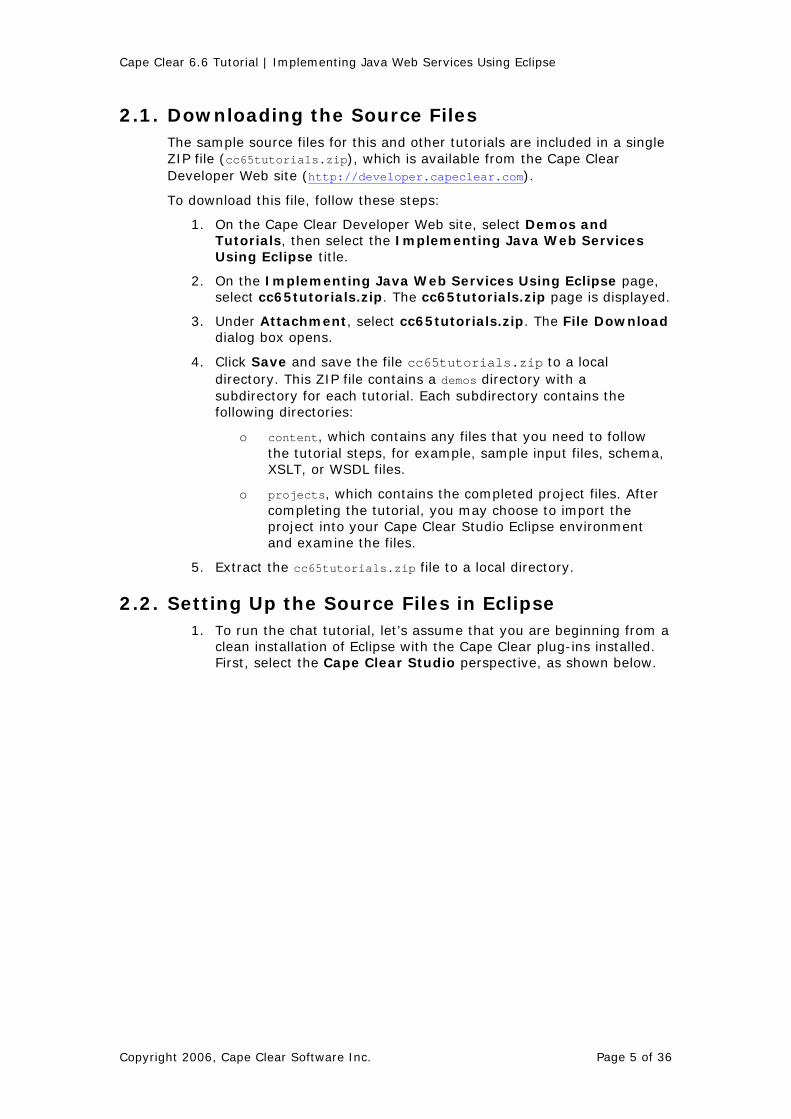
2.1. Downloading the Source Files The sample source files for this and other tutorials are included in a single ZIP file (cc65tutorials.zip), which is available from the Cape Clear Developer Web site (http://developer.capeclear.com).
To download this file, follow these steps:
1. On the Cape Clear Developer Web site, select Demos and Tutorials, then select the Implementing Java Web Services Using Eclipse title.
2. On the Implementing Java Web Services Using Eclipse page, select cc65tutorials.zip. The cc65tutorials.zip page is displayed.
3. Under Attachment, select cc65tutorials.zip. The File Download dialog box opens.
4. Click Save and save the file cc65tutorials.zip to a local directory. This ZIP file contains a demos directory with a subdirectory for each tutorial. Each subdirectory contains the following directories:
o content, which contains any files that you need to follow the tutorial steps, for example, sample input files, schema, XSLT, or WSDL files.
o projects, which contains the completed project files. After completing the tutorial, you may choose to import the project into your Cape Clear Studio Eclipse environment and examine the files.
5. Extract the cc65tutorials.zip file to a local directory.
2.2. Setting Up the Source Files in Eclipse 1. To run the chat tutorial, let’s assume that you are beginning from a
clean installation of Eclipse with the Cape Clear plug-ins installed. First, select the Cape Clear Studio perspective, as shown below.
Copyright 2006, Cape Clear Software Inc. Page 5 of 36

Cape Clear 6.6 Tutorial | Implementing Java Web Services Using Eclipse
Figure 2: Selecting the Cape Clear Studio perspective
2. To develop the Java code for the chat client and interfaces, create a Java Web Service Utility project by selecting Cape Clear Studio from the menu bar, then New Java Web Service Utility (or by
selecting from the toolbar), as shown below.
Figure 3: Creating a new Java Web service utility
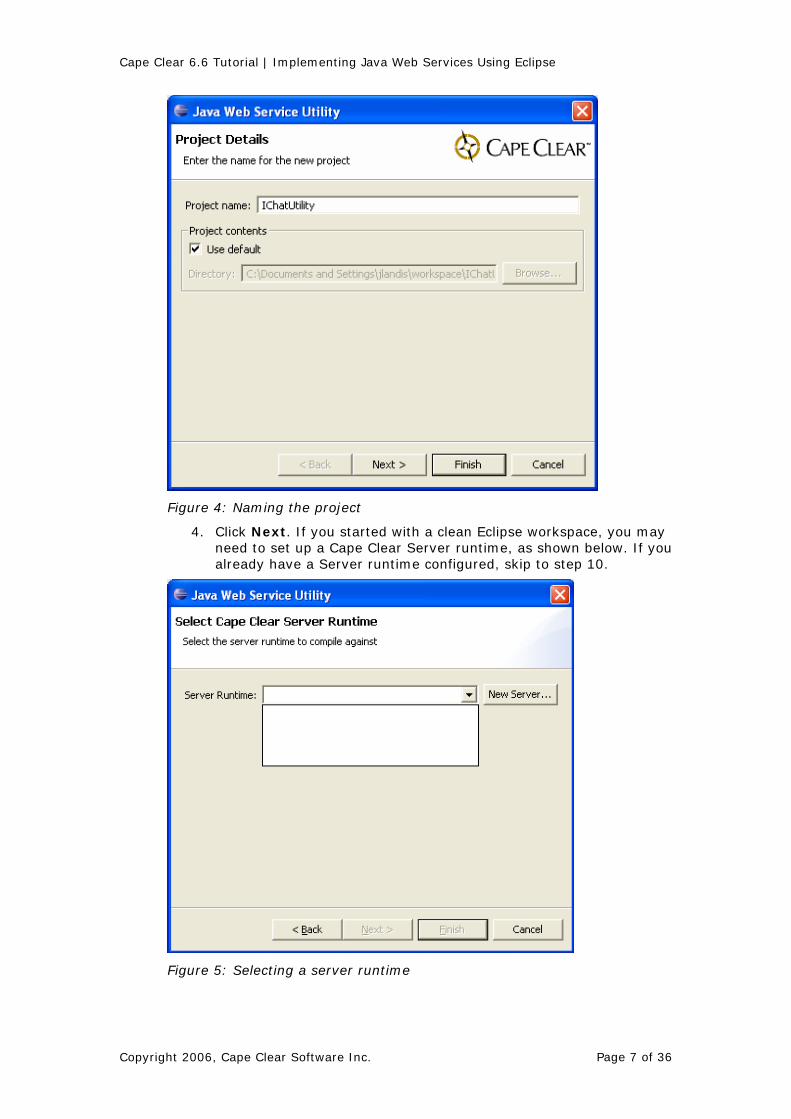
3. To create a Java utility project for the two interfaces that are shared between the client and the server, specify the project name IChatUtility.
Copyright 2006, Cape Clear Software Inc. Page 6 of 36
Cape Clear 6.6 Tutorial | Implementing Java Web Services Using Eclipse
Figure 4: Naming the project
4. Click Next. If you started with a clean Eclipse workspace, you may need to set up a Cape Clear Server runtime, as shown below. If you already have a Server runtime configured, skip to step 10.
Figure 5: Selecting a server runtime
Copyright 2006, Cape Clear Software Inc. Page 7 of 36

Cape Clear 6.6 Tutorial | Implementing Java Web Services Using Eclipse
5. Click New Server. If you have an installation of Cape Clear deployed inside JBoss (the default Cape Clear configuration), select Cape Clear 6 on JBoss Server (Local).
Figure 6: Selecting the server type
6. Click Next. Specify the folder where your Cape Clear installation is located.
Copyright 2006, Cape Clear Software Inc. Page 8 of 36

Cape Clear 6.6 Tutorial | Implementing Java Web Services Using Eclipse
Figure 7: Specifying the server installation folder
7. Click Next. Enter the port numbers and login information.
Figure 8: Specifying the server details
8. Click Finish.
Copyright 2006, Cape Clear Software Inc. Page 9 of 36
Cape Clear 6.6 Tutorial | Implementing Java Web Services Using Eclipse
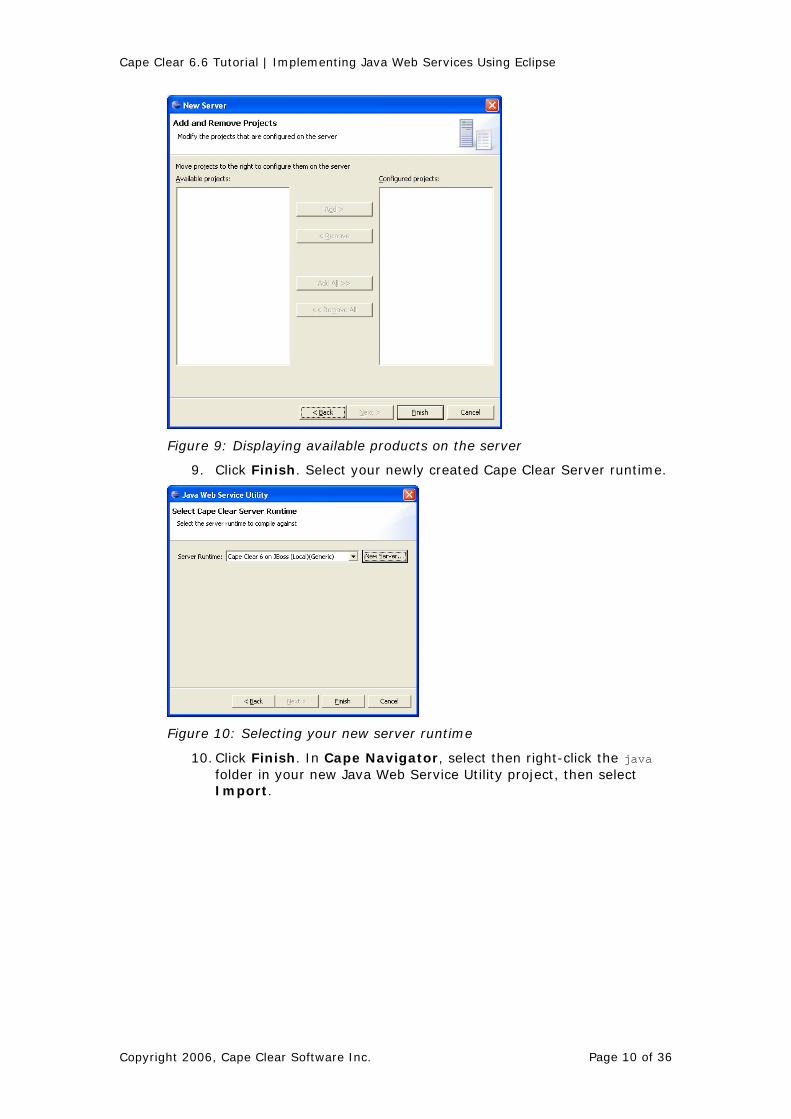
Figure 9: Displaying available products on the server
9. Click Finish. Select your newly created Cape Clear Server runtime.
Figure 10: Selecting your new server runtime
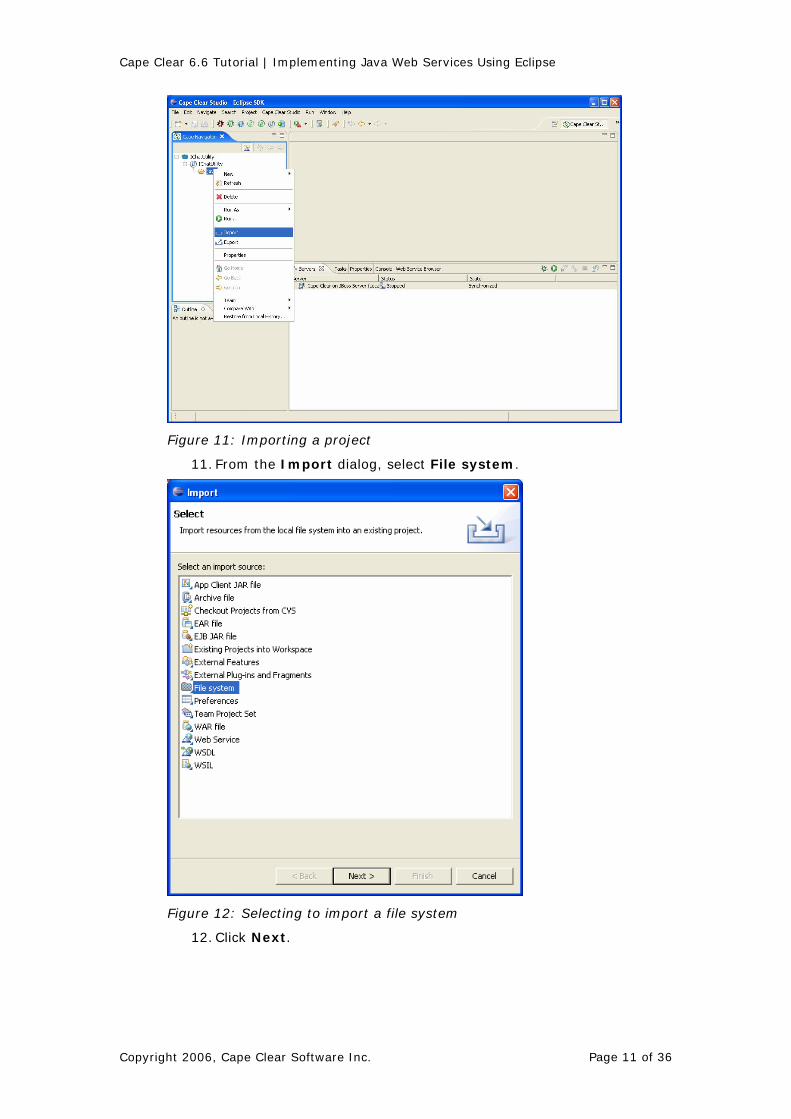
10. Click Finish. In Cape Navigator, select then right-click the java folder in your new Java Web Service Utility project, then select Import.
Copyright 2006, Cape Clear Software Inc. Page 10 of 36
Cape Clear 6.6 Tutorial | Implementing Java Web Services Using Eclipse
Figure 11: Importing a project
11. From the Import dialog, select File system.
Figure 12: Selecting to import a file system
12. Click Next.
Copyright 2006, Cape Clear Software Inc. Page 11 of 36

Cape Clear 6.6 Tutorial | Implementing Java Web Services Using Eclipse
Figure 13: Specifying source and target folders
13. Next to the From directory list box, click Browse to locate and copy the interfaces supplied with this tutorial (from the java folder).
Figure 14: Browsing the folders to import
Copyright 2006, Cape Clear Software Inc. Page 12 of 36
Cape Clear 6.6 Tutorial | Implementing Java Web Services Using Eclipse
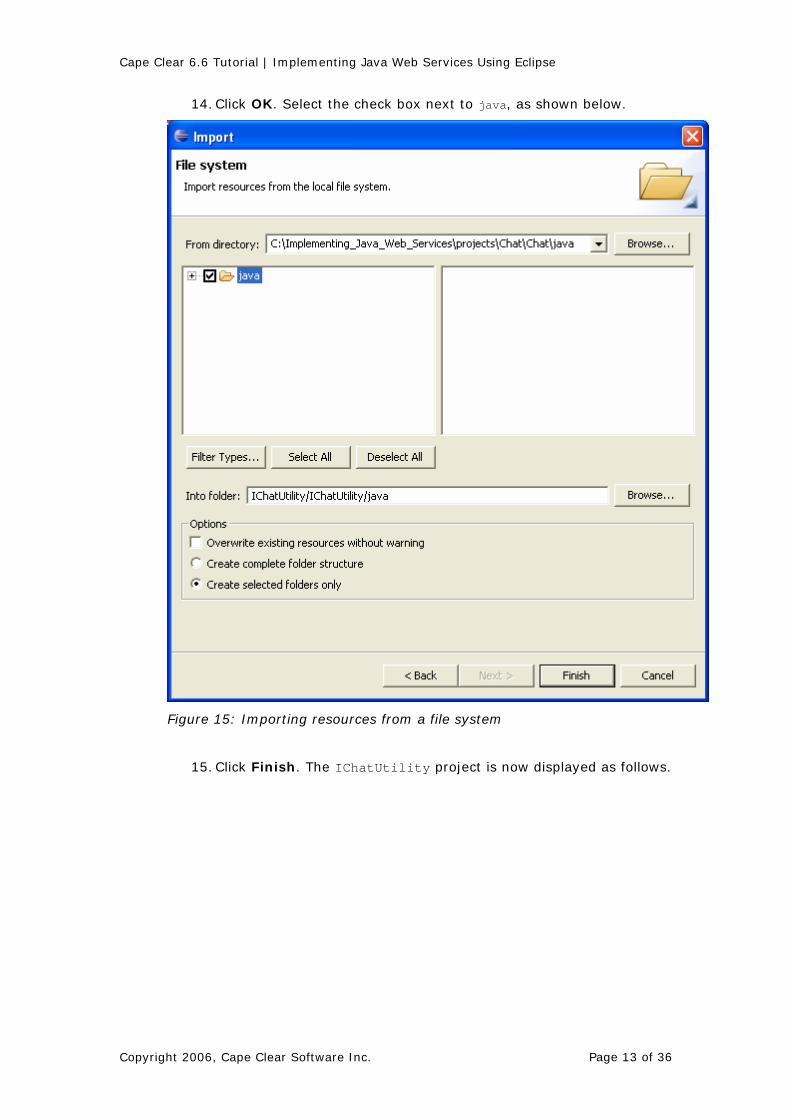
14. Click OK. Select the check box next to java, as shown below.
Figure 15: Importing resources from a file system
15. Click Finish. The IChatUtility project is now displayed as follows.
Copyright 2006, Cape Clear Software Inc. Page 13 of 36
Cape Clear 6.6 Tutorial | Implementing Java Web Services Using Eclipse
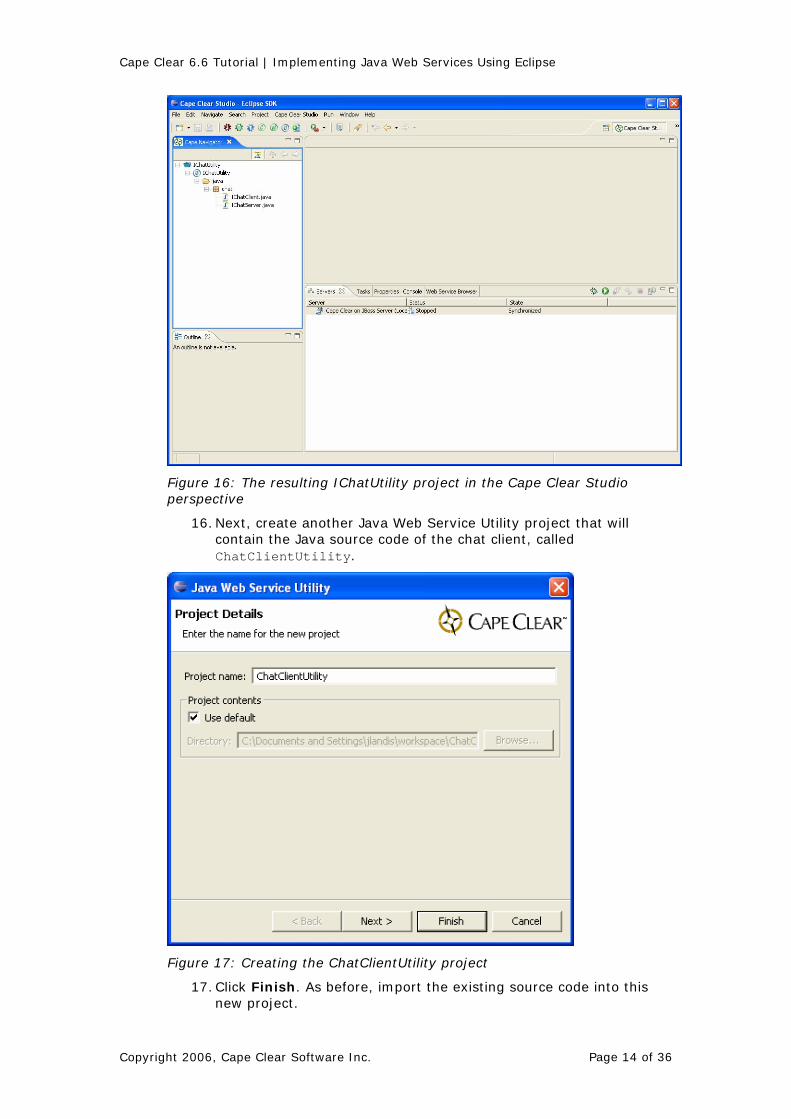
Figure 16: The resulting IChatUtility project in the Cape Clear Studio perspective
16. Next, create another Java Web Service Utility project that will contain the Java source code of the chat client, called ChatClientUtility.
Figure 17: Creating the ChatClientUtility project
17. Click Finish. As before, import the existing source code into this new project.
Copyright 2006, Cape Clear Software Inc. Page 14 of 36

Cape Clear 6.6 Tutorial | Implementing Java Web Services Using Eclipse
Figure 18: Browsing the client project files
18. Click OK.
Figure 19: Importing the project resources
Copyright 2006, Cape Clear Software Inc. Page 15 of 36

Cape Clear 6.6 Tutorial | Implementing Java Web Services Using Eclipse
19. Click Finish. In Cape Navigator, note that the red markers indicate that interfaces are missing in the client code.
Figure 20: Viewing the project files in Cape Navigator
20. Right-click the client utility project and select Properties.
Figure 21: Specifying project properties
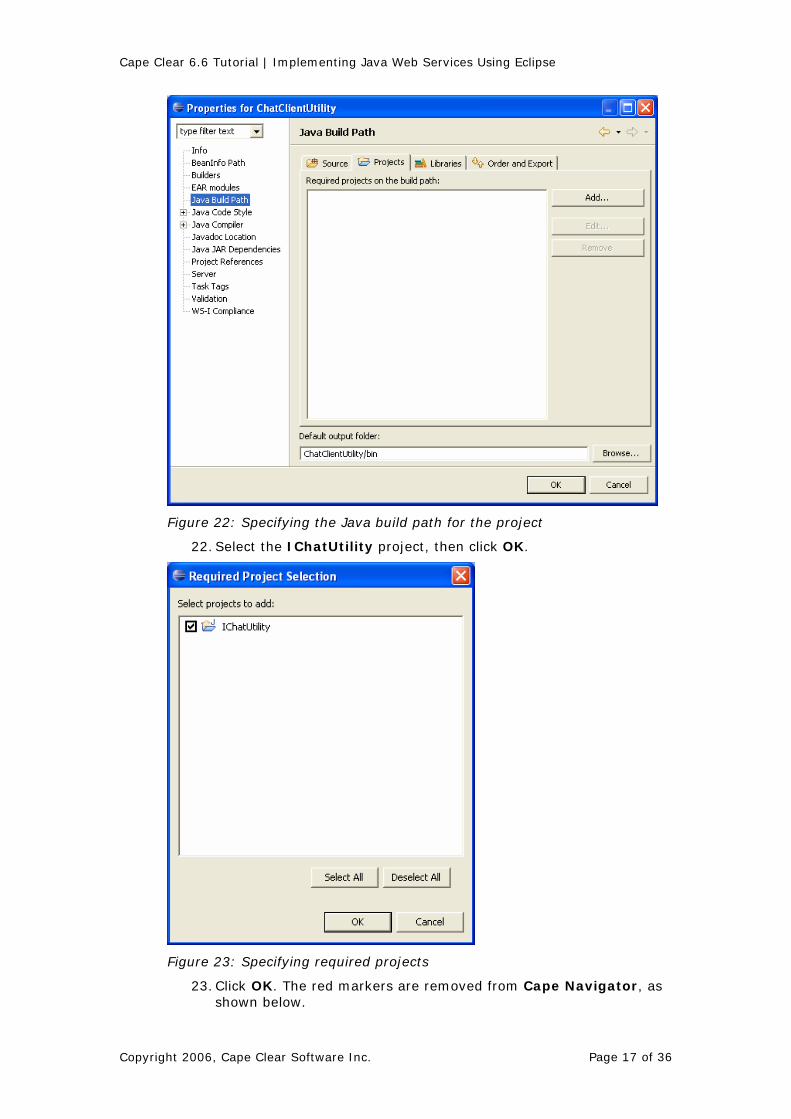
21. To add a dependency to the interface utility project, on the Properties dialog, select Java Build Path. Select the Projects page, then click Add.
Copyright 2006, Cape Clear Software Inc. Page 16 of 36
Cape Clear 6.6 Tutorial | Implementing Java Web Services Using Eclipse
Figure 22: Specifying the Java build path for the project
22. Select the IChatUtility project, then click OK.
Figure 23: Specifying required projects
23. Click OK. The red markers are removed from Cape Navigator, as shown below.
Copyright 2006, Cape Clear Software Inc. Page 17 of 36

Cape Clear 6.6 Tutorial | Implementing Java Web Services Using Eclipse
Figure 24: Viewing the projects in the Cape Navigator
24. Next, create another Java Web Service Utility project that will contain the Java source code of the chat server, called ChatServerUtility.
Figure 25: Creating the ChatServerUtility project
25. Click Finish. Import the existing source code into this new project.
Copyright 2006, Cape Clear Software Inc. Page 18 of 36

Cape Clear 6.6 Tutorial | Implementing Java Web Services Using Eclipse
Figure 26: Browsing the folders to be imported
26. Click OK.
Figure 27: Importing resources from the local file system
27. Select the java folder, then click Finish.
Copyright 2006, Cape Clear Software Inc. Page 19 of 36

Cape Clear 6.6 Tutorial | Implementing Java Web Services Using Eclipse
Figure 28: Viewing the project files
28. Note that in Cape Navigator the remaining red markers indicate that interfaces are missing in the server code. Add a dependency to the IChatUtility project, because these interfaces are needed by the chat server code as well.
Figure 29: Specifying required projects
29. Click OK. The red markers are removed from Cape Navigator, as shown below.
Copyright 2006, Cape Clear Software Inc. Page 20 of 36

Cape Clear 6.6 Tutorial | Implementing Java Web Services Using Eclipse
Figure 30: Viewing the project files in Cape Navigator
30. To publish the chat server Web service, create a Java Web Service project by selecting Cape Clear Studio, then New Java Web
Service (or by selecting from the toolbar), as shown below.
Figure 31: Creating a new Java Web service
Copyright 2006, Cape Clear Software Inc. Page 21 of 36

Cape Clear 6.6 Tutorial | Implementing Java Web Services Using Eclipse
31. For the project name, specify ChatServer, which is the name of the Web service that will be passed to the chat client in a later step.
Figure 32: Specifying the project name
32. Click Next, then Next again to use the default Cape Clear Server runtime. Because the Web service will be generated from the Java code in the chat server utility project, on the Type of Java-Based Web Service dialog, specify Use Java to generate Web service (Java2WSDL), as shown below.
Figure 33: Specifying the type of Web service
Copyright 2006, Cape Clear Software Inc. Page 22 of 36

Cape Clear 6.6 Tutorial | Implementing Java Web Services Using Eclipse
33. Click Next. To add in the required modules (that is, the chat server utility project that contains the source code of the Web service, and the interface utility project), click Add next to the Required Modules list box.
Figure 34: Adding required modules
34. Select the ChatServerUtility and IChatUtility modules.
Figure 35: Specifying the module names
35. Click OK, then click Next.
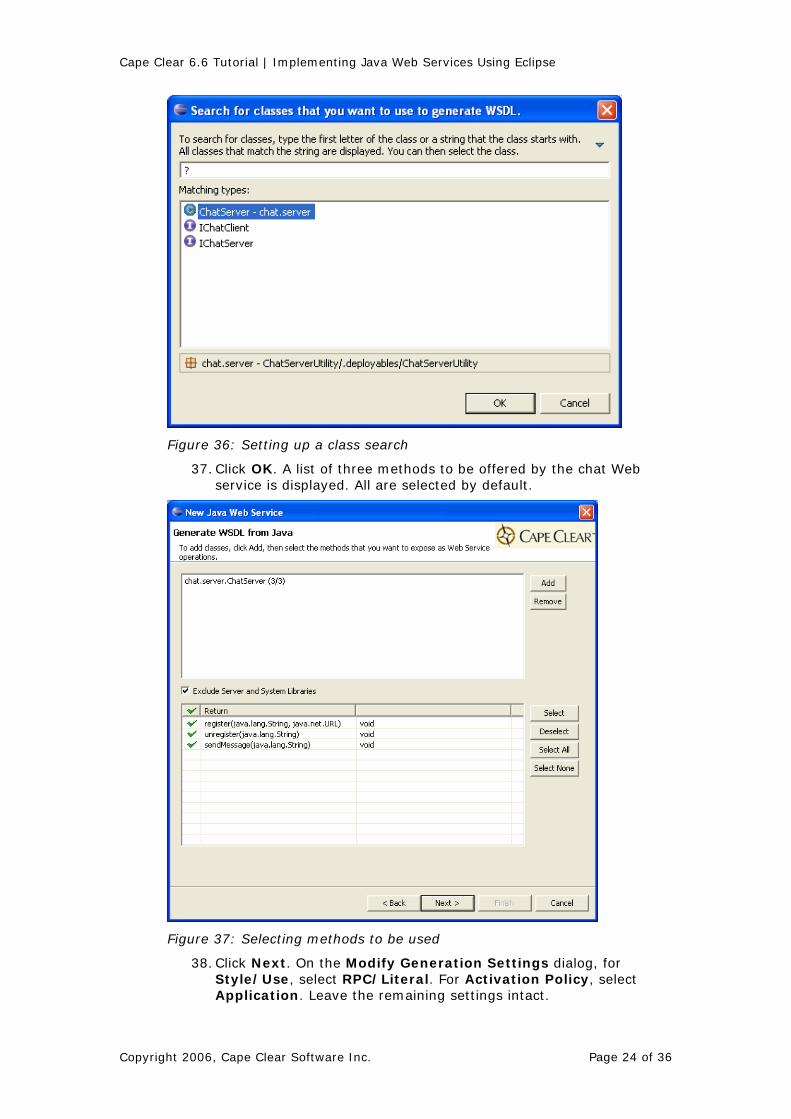
36. On the following panel, to search for classes that you want to use to generate WSDL, select the ChatServer class.
Copyright 2006, Cape Clear Software Inc. Page 23 of 36
Cape Clear 6.6 Tutorial | Implementing Java Web Services Using Eclipse
Figure 36: Setting up a class search
37. Click OK. A list of three methods to be offered by the chat Web service is displayed. All are selected by default.
Figure 37: Selecting methods to be used
38. Click Next. On the Modify Generation Settings dialog, for Style/Use, select RPC/Literal. For Activation Policy, select Application. Leave the remaining settings intact.
Copyright 2006, Cape Clear Software Inc. Page 24 of 36

Cape Clear 6.6 Tutorial | Implementing Java Web Services Using Eclipse
Figure 38: Modifying generation settings
39. Click Finish. In order to publish the Web service, start Cape Clear
Server by clicking , as shown below.
Figure 39: Starting Cape Clear Server
40. When the Ready for requests message appears in the server log, Server has fully started. To publish the ChatServer Web service,
Copyright 2006, Cape Clear Software Inc. Page 25 of 36

Cape Clear 6.6 Tutorial | Implementing Java Web Services Using Eclipse
select and right-click the ChatServer folder, then select Run As, then Run on Server, as shown below.
Figure 40: Publishing the ChatServer Web service
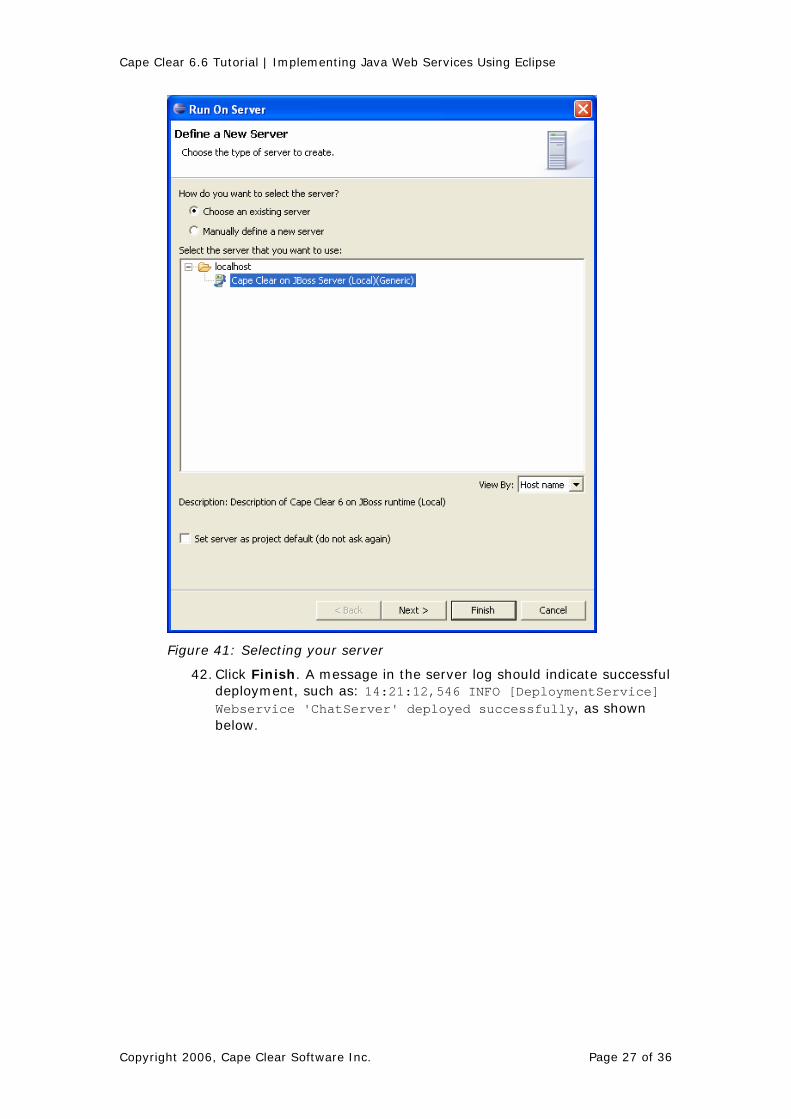
41. On the Run on Server dialog, select the server you have defined.
Copyright 2006, Cape Clear Software Inc. Page 26 of 36
Cape Clear 6.6 Tutorial | Implementing Java Web Services Using Eclipse
Figure 41: Selecting your server
42. Click Finish. A message in the server log should indicate successful deployment, such as: 14:21:12,546 INFO [DeploymentService] Webservice 'ChatServer' deployed successfully, as shown below.
Copyright 2006, Cape Clear Software Inc. Page 27 of 36

Cape Clear 6.6 Tutorial | Implementing Java Web Services Using Eclipse
Figure 42: Console displaying successful deployment
43. To verify successful deployment, select the Web Service Browser tab and check that an entry for the ChatServer Web service is displayed, as shown below. (If the Web Service Browser is not displayed, select Window from the menu bar, then select Show View, then select Web Service Browser).
Figure 43: Viewing ChatServer in the Web Service Browser
Copyright 2006, Cape Clear Software Inc. Page 28 of 36

Cape Clear 6.6 Tutorial | Implementing Java Web Services Using Eclipse
44. To prepare to run the Java application, select ChatClient.java from the ChatClientUtility folder, then select Run. On the Run a Java Application dialog that is displayed, from the list of configurations, under Java Application, select ChatClient. If ChatClient is not displayed, select Java Application, then click New.
Figure 44: Viewing the application’s configuration
45. Select the Arguments tab to specify the parameters for the chat client, for example, as follows:
-u Thomas –p 9000 –s http://localhost:8080/ccx/ChatServer -l c:\Licenses
In this example, the –u parameter identifies the user name with which to connect to the server, -p sets the port on which the client is exposed as a Web service, -s is the chat server endpoint URL where the client can register at startup, and –l is the location of the Cape Clear licenses folder.
Figure 45: Viewing the application's arguments
Copyright 2006, Cape Clear Software Inc. Page 29 of 36

Cape Clear 6.6 Tutorial | Implementing Java Web Services Using Eclipse
46. Click Apply to apply your changes.
47. Select the Classpath tab to specify the external JAR files that must be added to the CLASSPATH, including servlet-2_3.jar and jetty-4_2_8.jar.
Figure 46: Viewing the application's CLASSPATH
50. Click Apply to apply your changes.
2.3. Running the Application 1. To run the chat application, on the Run a Java application dialog,
click Run. A chat dialog box is displayed using the default argument values (that is, user name Thomas running on port 9000) as shown below.
Copyright 2006, Cape Clear Software Inc. Page 30 of 36

Cape Clear 6.6 Tutorial | Implementing Java Web Services Using Eclipse
Figure 47: Thomas' chat dialog
2. To open a chat dialog for another user (using another instance of the Cape Clear Embedded Server), select and right-click ChatServer again, then select Run. On the Arguments page, change the value for –u (user name) to James and the value for –p (port number) to 9080, for example, as shown below.
Figure 48: Setting up another chat user
Copyright 2006, Cape Clear Software Inc. Page 31 of 36

Cape Clear 6.6 Tutorial | Implementing Java Web Services Using Eclipse
3. Click Apply, then click Run. A second chat dialog is displayed, as shown below.
Figure 49: James' chat dialog
4. Using the bottom panel of each dialog, you can type messages from one user to another, as shown below.
Figure 50: Thomas and James chatting
3. Inside the Chat Application
This section takes you through the design of the sample chat application. It introduces the sequence of events and the interfaces necessary to implement the client and server.
Copyright 2006, Cape Clear Software Inc. Page 32 of 36

Cape Clear 6.6 Tutorial | Implementing Java Web Services Using Eclipse
Figure 51 shows the sequence of events between a chat client and the chat server. The operations in this sequence represent the public operations of both the client and server.
Figure 51: Interaction between a chat client and the chat server
Figure 51 also shows that the server must be able to call each client to inform it of any new messages. To enable this to happen, the client must expose an interface as a Web service for the server to use. This interface is defined as follows:
public interface IChatClient {
public void displayMessage( String msg ) throws RemoteException;
}
Example 1: Chat client interface
To expose this interface as a Web service, the client must run an embedded server. Running the embedded server will demonstrate the use of call-backs from the server to the client. This interface is used both by the client to expose a Web service and by the server to create a client proxy to call back to the client.
The client requires the following interface to be available from the server:
public interface IChatServer {
public void register( String userName, URL serviceEndpointURL )
throws RemoteException;
public void sendMessage( String msg );
public void unregister( String userName )
throws RemoteException;
}
Example 2: Chat server interface
We need to expose this interface as a Web service on which the client can invoke operations. As with the IChatClient interface, the IChatServer interface will be used both by the server to expose itself as a Web service, and by the client to create a client proxy to the Web service. Notice that
Copyright 2006, Cape Clear Software Inc. Page 33 of 36

Cape Clear 6.6 Tutorial | Implementing Java Web Services Using Eclipse
the client passes serviceEndpointURL to the register() method to tell the server how to contact the client. This endpoint is the Web service address of the client. Each client will have a different endpoint address.
The ChatServer Web service is deployed to the main server. The only information required to achieve this is the port number on which the service will be available (to keep our code simple, more complex configuration such as the service name is not provided in this example). The IChatServer interface is implemented by the chat.server.ChatServer class. The IChatClient interface is implemented by the chat.client.ChatClient class.
The server needs to implement the following functionality:
• Expose the IChatServer interface as a Web service.
• Accept register requests from clients.
• Create client proxies with which to call back the client.
• Call each client when a new message arrives, and unregister clients on request.
When the client is started with the arguments -u Thomas -p 9085, it registers with the chat server by invoking the following:
register(“Thomas”, “http://localhost:9085/clientCallBack”);
Example 3: Invoking register on the chat server
The server uses the call-back URL to create a proxy with which it can call displayMessage on the client. Once registration completes, the server makes the following call:
displayMessage(“Thomas has joined the chat.”);
Example 4: Invoking displayMessage on a chat client
with the following effect on each chat client, an example of which is shown in Figure 52).
Figure 52: Chat client GUI screen
During a chat session, when you enter text and press Return, the sendMessage method is invoked on the Web service of the chat server, which passes in the text that you enter. The server invokes displayMessage with this text on all registered clients. If the chat client window is closed,
Copyright 2006, Cape Clear Software Inc. Page 34 of 36

Cape Clear 6.6 Tutorial | Implementing Java Web Services Using Eclipse
the unregister method is invoked by the client, which removes that client from the list of registered clients in the server and sends out a notice to all clients by calling their displayMessage method.
The chat client GUI is implemented using the Java Swing framework. A detailed discussion of the GUI class is beyond the scope of this tutorial.
4. Exposing the Chat Server as a Web Service
The chat server is exposed as a Web service by exposing the IChatServer methods as WSDL operations and making an endpoint available for clients to contact the server.
The next section looks at how we create a client that uses this Web service remotely.
5. Creating a Web Service Client
To avoid dealing with SOAP messaging directly, we need a Java API to make calls to the chat server. In fact, we need to be able to invoke on a Java API, regardless of how the server is contacted (alternate methods include RMI, SOAP, and CORBA). We already have a Java interface IChatServer that provides the required functionality, so now we need to get an instance of an object implementing this interface that can communicate with the running chat server. Such an object is called a “proxy”.
Figure 53 illustrates a chat client using a proxy instance to interact with a chat server.
Figure 53: Invoking on a Web service
We create such a proxy by passing the IChatService interface of the remote chat server (see Example 2), the WSDL and application descriptor locations, and the endpoint location of the service to a proxy factory class, as shown in Example 5.
proxy = (IChatServer)ConcreteProxyFactory.createProxy(
IChatServer.class,
"ChatServer",
wsdlURL,
null,
serverURL);
Example 5: Creating the client-side dynamic proxy (from the ChatClient class)
Copyright 2006, Cape Clear Software Inc. Page 35 of 36
Cape Clear 6.6 Tutorial | Implementing Java Web Services Using Eclipse
Once the proxy is created, when we invoke its methods, the invocations are forwarded to the running chat server. This kind of proxy is called a dynamic proxy, because no stub code has been generated. The Java interface is bound to the proxy object dynamically at runtime (for more information on dynamic proxy classes, see http://java.sun.com/j2se/1.3/docs/guide/reflection/proxy.html). Example 6 shows the code for invoking the sendMessage business method on the server:
proxy.sendMessage(msg);
Example 6: Invoking the chat server sendMessage business method on the dynamic proxy
6. Implementing Call-Backs to the Client
The chat service works by having the server route the messages sent to it to all registered clients. This requires the clients to expose a service to which the server can make calls. In our example, the clients offer this call-back service through a Web service described by the IChatClient interface shown previously. The chat server acts as a client to this call-back service.
Because there can be multiple clients registered with the chat server, we need a client proxy for each chat client (each client proxy instance is bound to a single service instance, where each client represents a different service instance).
Within the chat server, the register method creates a client proxy for the endpoint passed from the client for the call-back. Each client proxy is stored in a map keyed by the user name that is passed by the client during register. Upon receiving a message from a client (by a call to sendMessage), the server makes the following call for each registered client: proxy.displayMessage( msg ).
The proxy relays the call to the client that it is bound to.
7. Summary
This tutorial demonstrated the use of Cape Clear APIs to expose business methods of Java classes as a Web service. We created an instance of a Cape Clear Embedded Server and deployed a Java class programmatically using only two lines of code.
A client invoking on a Web service required a dynamic proxy together with the interface of the Java class exposed as a Web service. Invoking a business method was then as simple as proxy.method_name(parameters);. We also saw that communication in a chat system is bi-directional, involving a Web service on the server and a call-back Web service on the client.
Copyright 2006, Cape Clear Software Inc. Page 36 of 36