Embed Size (px)
Citation preview

ImageNow and CaptureNow are registered trademarks of Perceptive Software, Inc. All other products produced by Perceptive Software, Inc., including WebNow, are Perceptive Software trademarks. All other brands and product names mentioned in this document are trademarks or registered trademarks of their respective owners.
Copyright© 2011 Perceptive Software, Inc. All rights reserved.
ImageNow Administrator Getting Started Guide
Version: 6.6.x
Written by: Product Documentation, R&D Date:
June 2011
Perceptive Software ImageNow Administrator Getting Started Guide
Page 2 of 69
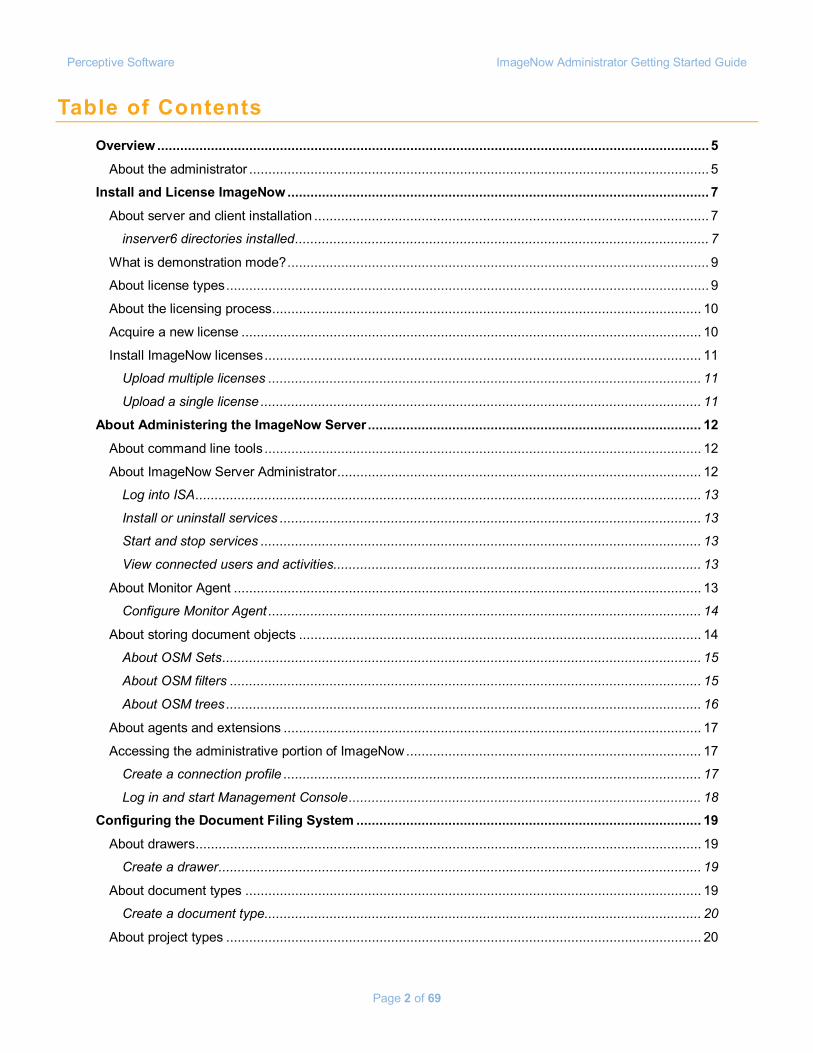
Table of Contents Overview ................................................................................................................................................ 5
About the administrator ........................................................................................................................ 5
Install and License ImageNow .............................................................................................................. 7
About server and client installation ....................................................................................................... 7
inserver6 directories installed ............................................................................................................ 7
What is demonstration mode? .............................................................................................................. 9
About license types .............................................................................................................................. 9
About the licensing process ................................................................................................................ 10
Acquire a new license ........................................................................................................................ 10
Install ImageNow licenses .................................................................................................................. 11
Upload multiple licenses ................................................................................................................. 11
Upload a single license ................................................................................................................... 11
About Administering the ImageNow Server ....................................................................................... 12
About command line tools .................................................................................................................. 12
About ImageNow Server Administrator ............................................................................................... 12
Log into ISA .................................................................................................................................... 13
Install or uninstall services .............................................................................................................. 13
Start and stop services ................................................................................................................... 13
View connected users and activities ................................................................................................ 13
About Monitor Agent .......................................................................................................................... 13
Configure Monitor Agent ................................................................................................................. 14
About storing document objects ......................................................................................................... 14
About OSM Sets ............................................................................................................................. 15
About OSM filters ........................................................................................................................... 15
About OSM trees ............................................................................................................................ 16
About agents and extensions ............................................................................................................. 17
Accessing the administrative portion of ImageNow ............................................................................. 17
Create a connection profile ............................................................................................................. 17
Log in and start Management Console ............................................................................................ 18
Configuring the Document Filing System .......................................................................................... 19
About drawers .................................................................................................................................... 19
Create a drawer .............................................................................................................................. 19
About document types ....................................................................................................................... 19
Create a document type.................................................................................................................. 20
About project types ............................................................................................................................ 20
Perceptive Software ImageNow Administrator Getting Started Guide
Page 3 of 69
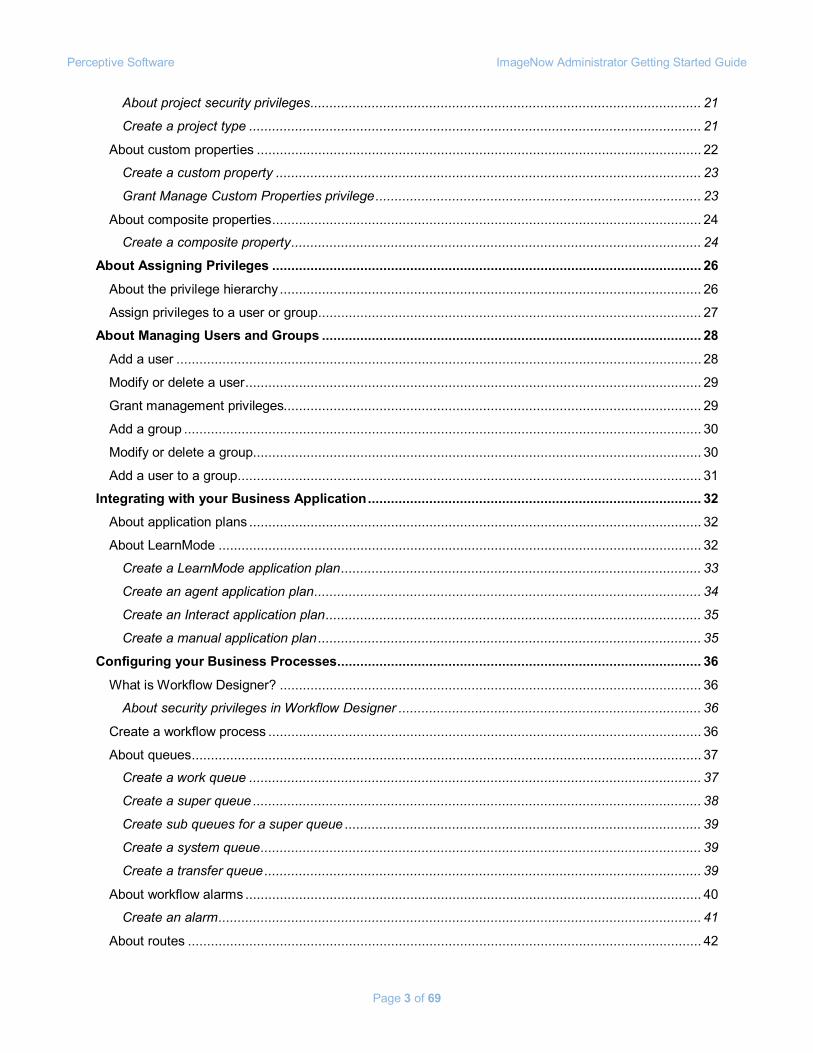
About project security privileges ...................................................................................................... 21
Create a project type ...................................................................................................................... 21
About custom properties .................................................................................................................... 22
Create a custom property ............................................................................................................... 23
Grant Manage Custom Properties privilege ..................................................................................... 23
About composite properties ................................................................................................................ 24
Create a composite property ........................................................................................................... 24
About Assigning Privileges ................................................................................................................ 26
About the privilege hierarchy .............................................................................................................. 26
Assign privileges to a user or group .................................................................................................... 27
About Managing Users and Groups ................................................................................................... 28
Add a user ......................................................................................................................................... 28
Modify or delete a user ....................................................................................................................... 29
Grant management privileges............................................................................................................. 29
Add a group ....................................................................................................................................... 30
Modify or delete a group ..................................................................................................................... 30
Add a user to a group ......................................................................................................................... 31
Integrating with your Business Application ....................................................................................... 32
About application plans ...................................................................................................................... 32
About LearnMode .............................................................................................................................. 32
Create a LearnMode application plan .............................................................................................. 33
Create an agent application plan ..................................................................................................... 34
Create an Interact application plan .................................................................................................. 35
Create a manual application plan .................................................................................................... 35
Configuring your Business Processes ............................................................................................... 36
What is Workflow Designer? .............................................................................................................. 36
About security privileges in Workflow Designer ............................................................................... 36
Create a workflow process ................................................................................................................. 36
About queues ..................................................................................................................................... 37
Create a work queue ...................................................................................................................... 37
Create a super queue ..................................................................................................................... 38
Create sub queues for a super queue ............................................................................................. 39
Create a system queue ................................................................................................................... 39
Create a transfer queue .................................................................................................................. 39
About workflow alarms ....................................................................................................................... 40
Create an alarm .............................................................................................................................. 41
About routes ...................................................................................................................................... 42

Perceptive Software ImageNow Administrator Getting Started Guide
Page 4 of 69
Create a route ................................................................................................................................ 44
Add a user to a queue ........................................................................................................................ 44
About rules and scripts ....................................................................................................................... 44
About Tasks ......................................................................................................................................... 45
Grant task template manager privileges ............................................................................................. 45
Create a task template ....................................................................................................................... 46
Define the template properties ........................................................................................................ 46
Define the template components ..................................................................................................... 46
Define the template action .............................................................................................................. 47
Define the template assignment list ................................................................................................. 47
Define the template reason lists ...................................................................................................... 48
Define the template due date method ............................................................................................. 49
Define the template security ............................................................................................................ 49
About CaptureNow .............................................................................................................................. 51
About scanner configuration ............................................................................................................... 51
Install a scanner ............................................................................................................................. 51
Create a scanning profile ................................................................................................................ 54
About barcodes .................................................................................................................................. 55
Configure ImageNow to recognize barcodes ................................................................................... 55
About patchcodes ........................................................................................................................... 56
Scan using a patchcode.................................................................................................................. 56
What is the ImageNow Printer? .......................................................................................................... 57
About capture profiles ........................................................................................................................ 57
Create a capture profile .................................................................................................................. 57
About Package mode ......................................................................................................................... 58
About Template Types ........................................................................................................................ 59
About addendums .............................................................................................................................. 59
Create an addendum template ........................................................................................................ 59
About annotation templates ................................................................................................................ 60
Create an annotation template ........................................................................................................ 60
About Administering Views ................................................................................................................ 62
Types of views ................................................................................................................................... 63
Create a view definition ...................................................................................................................... 66
Modify column and row display........................................................................................................... 66
About administering related views ...................................................................................................... 66
Create a related document view ...................................................................................................... 66
Index .................................................................................................................................................... 67

Perceptive Software ImageNow Administrator Getting Started Guide
Page 5 of 69
Overview ImageNow is a content management software system that adapts to your business process. It uploads organizes, and stores documents and content. This guide describes the role of the administrator in ImageNow and WebNow. It also explains step-by-step procedures of common functions an administrator may need to perform. This document assumes that to complete the tasks you are the manager or owner user or have the appropriate management privileges.
This guide contains the following sections:
• “Overview” introduces and defines the administrator user in ImageNow.
• “Install and License ImageNow” defines the licensing options available for implementation and gives step-by-step instructions for installing the ImageNow client.
• “About Administering the ImageNow Server” introduces the tools available to administer the ImageNow server and gives some step-by-step instructions on basic administration tasks. Identifies and defines the Server directories and document objects.
• “Configuring the Document Filing System” defines the concepts of the document filing organization and gives instructions for creating the filing system.
• “About Assigning Privileges” describes a high-level introduction to privileges and gives instructions on granting or denying privileges.
• “About Managing Users and Groups” describes groups and users and provides instructions for adding, modifying, deleting, and granting security privileges.
• “Integrating with your Business Application” gives information for creating application plans that map document keys when a user imports a document into ImageNow.
• “Configuring your Business Process” provides basic information on creating a detailed workflow that matches your business process using Workflow Designer.
• “Tasks” defines tasks and gives the procedures for creating task templates.
• “About CaptureNow” describes some of the most common uses of CaptureNow and gives step-by-step instructions on configuring CaptureNow, installing a scanner, creating a scanning profile, creating scanning profiles, and configuring barcodes.
• “About template types” defines ImageNow templates and gives detailed directions for creating optional addendum, and annotation templates.
• “About Administering Views” defines views, provides a table that gives available types of views, and defines the procedures to create views.
This document provides a high level overview of administration in ImageNow. For additional details, information about functionality that requires additional licensing (such as Business Insight and Retention Policy Manager), and topics about specific designers (such as View Designer and Workflow Designer), refer to the Perceptive Software website, in the Customer Portal, under Product Documentation. For information about purchasing additional functionality, contact your Perceptive Software representative.
About the administrator Before beginning administrative tasks in ImageNow, designate who will be the ImageNow administrator. The ImageNow administrator must have a solid understanding of how to manage network systems and TCP/IP architecture. ImageNow Server provides application services, database services for document metadata, and document file storage services.
ImageNow administrators plan and set up the filing system for documents. The administrator arranges the drawers, folders, and document keys to subdivide the filing system into a logical hierarchical structure. An organized data hierarchy is important for managing large document databases because it allows quick

Perceptive Software ImageNow Administrator Getting Started Guide
Page 6 of 69
and easy access to images when using ImageNow views and filters. The ImageNow administrator's ongoing duties include monitoring the use and growth of the filing system, as well as, moving and re-filing images for the ImageNow users.
ImageNow administrators design the security model and are responsible for configuring users and groups, and establishing roles and privileges for security. The administrator can assign the privilege to give other users the ability to manage users and groups. While designing the security, the administrator can assign access and management privileges to views, drawers, document types, and workflow queues, thereby controlling which users have access to departmental documents and workflow processes. ImageNow administrators also set up and maintain the workflow environment, which consists of work queues, system queues, and super queues, which include sub queues. These queues are then connected with automatic or manual links that simulate the path a document follows in an office environment.
Perceptive Software ImageNow Administrator Getting Started Guide
Page 7 of 69
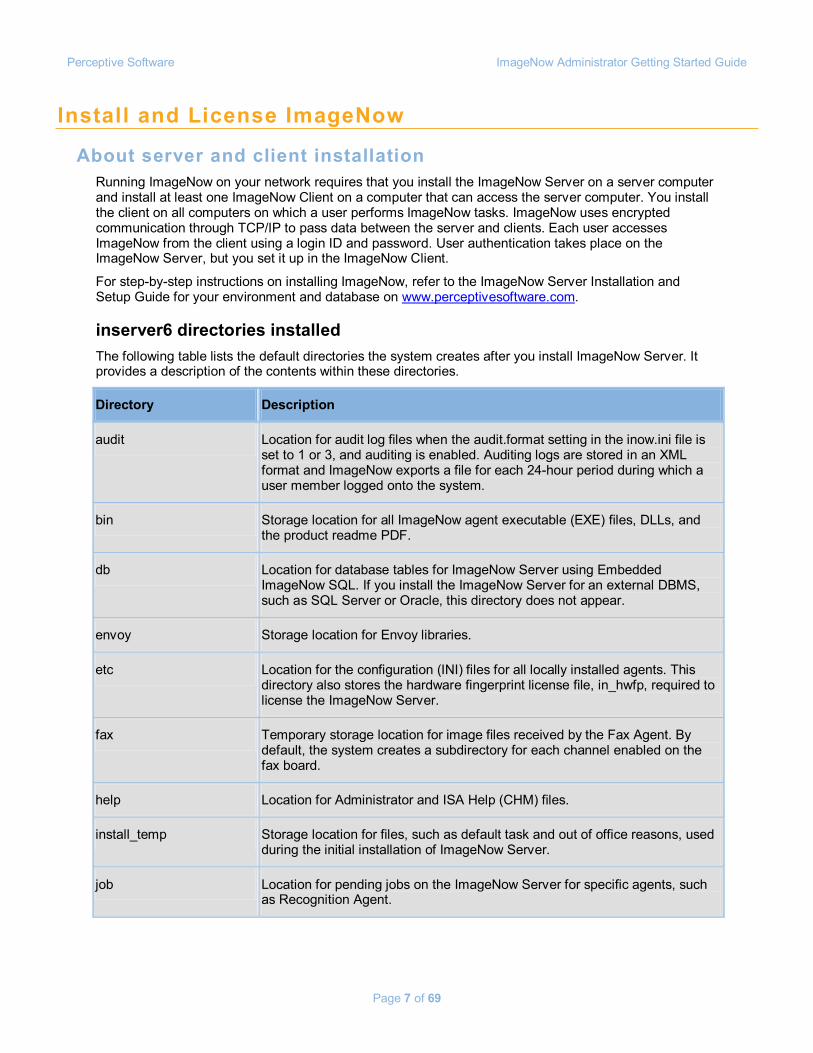
Install and License ImageNow
About server and client installation Running ImageNow on your network requires that you install the ImageNow Server on a server computer and install at least one ImageNow Client on a computer that can access the server computer. You install the client on all computers on which a user performs ImageNow tasks. ImageNow uses encrypted communication through TCP/IP to pass data between the server and clients. Each user accesses ImageNow from the client using a login ID and password. User authentication takes place on the ImageNow Server, but you set it up in the ImageNow Client.
For step-by-step instructions on installing ImageNow, refer to the ImageNow Server Installation and Setup Guide for your environment and database on www.perceptivesoftware.com.
inserver6 directories installed The following table lists the default directories the system creates after you install ImageNow Server. It provides a description of the contents within these directories.
Directory Description
audit Location for audit log files when the audit.format setting in the inow.ini file is set to 1 or 3, and auditing is enabled. Auditing logs are stored in an XML format and ImageNow exports a file for each 24-hour period during which a user member logged onto the system.
bin Storage location for all ImageNow agent executable (EXE) files, DLLs, and the product readme PDF.
db Location for database tables for ImageNow Server using Embedded ImageNow SQL. If you install the ImageNow Server for an external DBMS, such as SQL Server or Oracle, this directory does not appear.
envoy Storage location for Envoy libraries.
etc Location for the configuration (INI) files for all locally installed agents. This directory also stores the hardware fingerprint license file, in_hwfp, required to license the ImageNow Server.
fax Temporary storage location for image files received by the Fax Agent. By default, the system creates a subdirectory for each channel enabled on the fax board.
help Location for Administrator and ISA Help (CHM) files.
install_temp Storage location for files, such as default task and out of office reasons, used during the initial installation of ImageNow Server.
job Location for pending jobs on the ImageNow Server for specific agents, such as Recognition Agent.
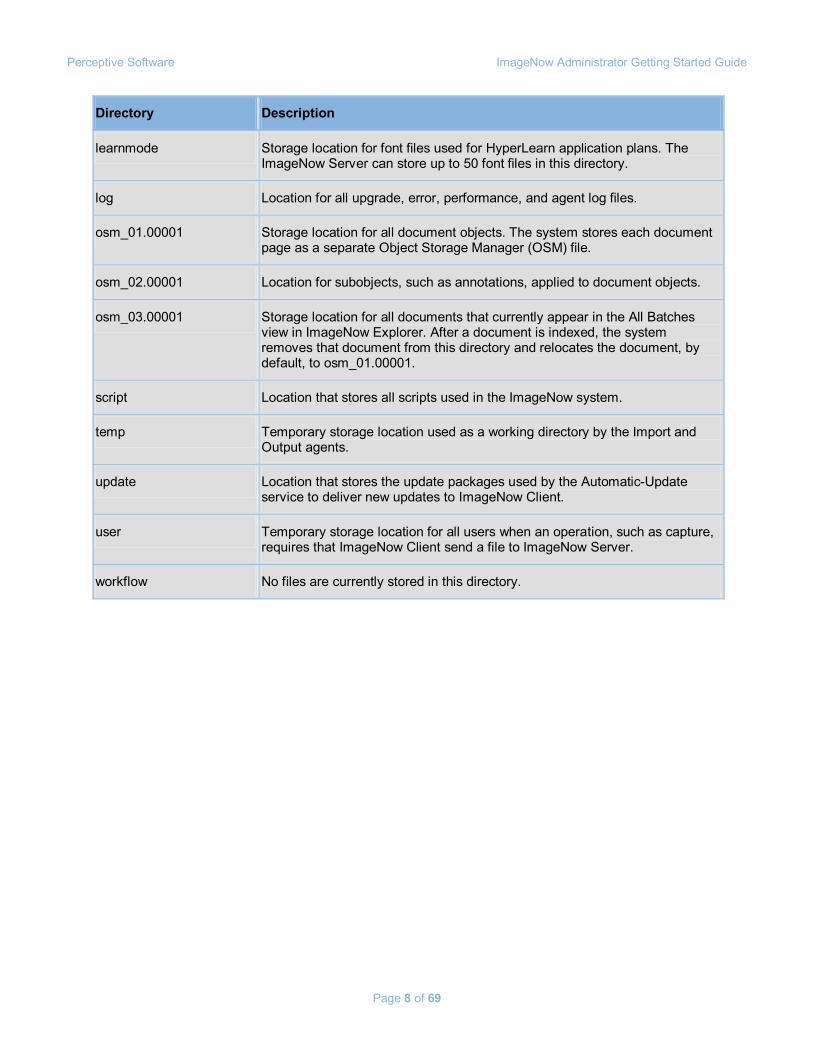
Perceptive Software ImageNow Administrator Getting Started Guide
Page 8 of 69
Directory Description
learnmode Storage location for font files used for HyperLearn application plans. The ImageNow Server can store up to 50 font files in this directory.
log Location for all upgrade, error, performance, and agent log files.
osm_01.00001 Storage location for all document objects. The system stores each document page as a separate Object Storage Manager (OSM) file.
osm_02.00001 Location for subobjects, such as annotations, applied to document objects.
osm_03.00001 Storage location for all documents that currently appear in the All Batches view in ImageNow Explorer. After a document is indexed, the system removes that document from this directory and relocates the document, by default, to osm_01.00001.
script Location that stores all scripts used in the ImageNow system.
temp Temporary storage location used as a working directory by the Import and Output agents.
update Location that stores the update packages used by the Automatic-Update service to deliver new updates to ImageNow Client.
user Temporary storage location for all users when an operation, such as capture, requires that ImageNow Client send a file to ImageNow Server.
workflow No files are currently stored in this directory.
Perceptive Software ImageNow Administrator Getting Started Guide
Page 9 of 69
What is demonstration mode? When you install ImageNow the first time, the product is in demonstration mode until you install an ImageNow Server and 5 ImageNow Client licenses. The system gives the first client that logs into the server and does not see any licenses in ImageNow a choice of two demonstration modes.
The first choice is 30 days with 5 concurrent users. A combined total of 5 ImageNow and WebNow users can log into ImageNow an unlimited number of times for 30 days. These users have unlimited access to all core ImageNow functionality. After the 30 days expires, users cannot log into ImageNow until you purchase licenses. The second choice is 5,000 documents with 5 concurrent users. This allows a total of 5 users to log in and add up to 5,000 documents to ImageNow. Once 5,000 documents are added to ImageNow, users cannot log into ImageNow until you purchase licenses.
Once you purchase a license and add it to your ImageNow Server, you cannot use demonstration mode anymore. Perceptive Software, Inc., issues licenses when you purchase ImageNow. If you do not have a license or you need to have your license re-issued, contact your Perceptive Software representative.
About license types Concurrent use is a software license that is based on the number of simultaneous users accessing the program. For example, in a five-user concurrent license, after five users log in to the program, the program prevents a sixth user from logging in. After any of the first five users log off, the next user can log in. Concurrent licensing limits the number of users running the program from a centralized location, such as the ImageNow Server, based on the current license agreement. The licenses in concurrent licensing are a pool of available licenses which a user can utilize from any client computer. These licenses are not node-locked to a specific client computer. The following products use concurrent licensing: ImageNow Client, WebNow Client, ImageNow/WebNow, Office Plug-In, and Retention Policy Manager. The Business Insight Author license is also a concurrent use license.
Per seat is a node-locked license that is based on the number of computers on which you install the software. A node-locked license is locked to a computer by specific information about the computer. For example, an ImageNow Client per-seat license is node locked by placing a token on the client computer the first time that client runs. For per-seat clients and some ImageNow Agents, the system generates this token in the background and stores it locally on the client computer. The token is a file that contains specific information about the license type. The token also contains the encoded hardware information consisting of 5-10 unique properties of the client computer, such as MAC address, disk drive serial number, disk drive size, and processor serial number. The license works as long as 60 percent of the hardware comprising the original encoded hardware information remains the same. Products that use per seat licensing are ImageNow Server, CaptureNow - Kofax, Fax Agent, Output Agent, ImageNow Client, Content Server, Import Agent, Recognition Agent (OCR), ERM Server (Processing), ERM Server (Retrieval), Mail Agent, User Replication Agent, CaptureNow - File IP, CaptureNow - ISIS Levels 1 to 3, and Message Agent Server.
Transaction package licensing limits volume for a specified period. Transaction package licensing is controlled from a centralized location. Transactions licenses are based on counting the number of transactions within ImageNow and decrementing this number over a period of time. The transactions are usually server calls or object retrievals. Once you use all of the transactions in a specified period, you cannot use any more transactions until the period expires. Products that use transaction package licensing are Message Agent Client and Message Agent External Viewer.
Feature licensing makes functionality available in ImageNow. Feature licenses are set at the server level and are either available or not available for all users. Products that use feature licensing are Document Management, ImageNow iScript, Output Agent - DICOM, ERM Server (APA), ERM Server (PCL), Fax Agent (Image Processing), MA HL7 Add-On, MA HL7 TCP/IP Connections, Recognition Agent (ICR), Recognition Agent (OMP), Retention Agent, and Business Insight (Reports).

Perceptive Software ImageNow Administrator Getting Started Guide
Page 10 of 69
About the licensing process In ImageNow, each server computer running ImageNow Server requires an ImageNow Server license. The ImageNow Server license is node-locked to the specific server computer by specific information about the computer. A hardware fingerprint file, in_hwfp, located in the [drive:]\inserver6\etc, stores the computer information. You must complete the following high-level procedure to successfully obtain licenses:
1. Contact your Perceptive Software representative who will send you the server utility file inhwinfo.exe, which you run on each ImageNow Server computer. This utility creates a Node ID text file that stores encoded hardware information comprised from physical information about the server computer. The utility does not collect any confidential or secure information.
2. Send the generated Node ID text files to your Perceptive Software representative. Perceptive Software uses the Node ID text file to create the ImageNow Server license. A License Group ID (LGID) is created with the ImageNow Server license, and all other licenses that connect to the server must have the same LGID. The LGID is a unique, random number that has no dependencies on hardware or software keys. Your remaining licenses, such as client licenses, are created based on the LGID.
3. Your Perceptive Software representative sends the license files to you.
4. Upload the licenses using the ImageNow Client or the ImageNow Management Console.
The Node ID text file contains encoded hardware information that is tied to your ImageNow Server. If the ImageNow Server license becomes invalid due to hardware changes, you must obtain a new ImageNow Server license. Also, if you move your ImageNow Server to a different server computer, you must obtain a new ImageNow Server license. Since the LGID remains the same for your new license, all of your other licenses are unaffected.
Acquire a new license Complete the following steps to obtain a new license. An example of a time when you may need to request a new license is if you move your ImageNow Server to a different server computer.
1. Run the inhwinfo.exe utility.
2. Send the new Node ID text file to your Perceptive Software representative.
3. When the new license arrives, you must upload the license file to the ImageNow Server computer.
Perceptive Software ImageNow Administrator Getting Started Guide
Page 11 of 69
Install ImageNow licenses Before entering your licenses, you must successfully install the ImageNow Server and at least one ImageNow Client. For step-by-step instructions on installing ImageNow, refer to the ImageNow Server Installation Guide for your environment and database on www.perceptivesoftware.com.
1. When you receive the license files from your Perceptive Software representative, copy them to a temporary folder where you can access them with an ImageNow Client.
2. Perform one of the following procedures: upload multiple licenses or upload a single license.
Upload multiple licenses 1. On the Start menu, point to All Programs, point to ImageNow 6, and then select one of the
following options:
• To upload the licenses using the ImageNow Client, click ImageNow.
• To upload the licenses using the ImageNow Management Console, click ImageNow Management Console.
2. In the login page, click License Manager.
3. In the License Management dialog box, select Upload Licenses and click OK.
4. Navigate to the folder where the ImageNow license files are stored, select the LIC files to upload, and then click Open.
Note The License Upload dialog box lets you view the type name, actual license code, and current status of each license upload. To display detailed information for a specific license, select the appropriate row.
Upload a single license 1. On the Start menu, point to All Programs, point to ImageNow 6, and then select one of the
following options:
• To upload the licenses using the ImageNow Client, click ImageNow.
• To upload the licenses using the ImageNow Management Console, click ImageNow Management Console.
2. In the login page, click License Manager.
3. In the ImageNow License Manager dialog box, select Create a new license.
4. Click Browse to select a single *LIC file to upload, and then click Open.
Perceptive Software ImageNow Administrator Getting Started Guide
Page 12 of 69
About Administering the ImageNow Server The tools you use to administer your ImageNow Server depend on the ImageNow Server environment. If you install your ImageNow Server in a Windows environment, you can use ImageNow Server Administration (ISA) to manage the server. If your ImageNow Server is running in Linux, Unix, or Windows, you can use INTool. INTool is a powerful command line tool that performs most of the tasks that are available in ISA, as well as additional tasks. By default, the system installs INTool during the ImageNow Server installation.
About command line tools Perceptive Software offers two powerful command line tools available to all ImageNow administrators: INTool and INUpgradeUtil. These command line tools provide you with the ability to administer aspects your server and database, and upgrade specific functionality without requiring a graphical interface.
Using INTool, you can administer your server by adding or deleting users, obtaining or changing owner information, or sending messages to connected ImageNow users. You can also add digital signature reasons, add annotation templates, assign audit templates, and unlock a workflow process. INTool provides commands for you to manage licenses and OSM data. You can also run iScript commands through INTool.
Using INTool, you can access areas of the ImageNow database. These tasks include exporting a table to a file and importing a file to a table, obtaining table structure information and the number of records in a table. You can add, update, or delete records using INTool. By default, the system installs INTool during the ImageNow Server installation.
Using INUpgradeUtil, you can migrate privileges and saved server queries to your version of ImageNow, as well as convert applets to application plans. In most cases, the upgrade utility runs these upgrade commands. Do not run these commands manually unless you are instructed to do so by Product Support.
About ImageNow Server Administrator The ImageNow Server Administration (ISA) is the administrator console used to control the ImageNow Server on Microsoft Windows. Using ISA, you can customize ImageNow Server configuration (. ini) files, manage and mirror storage locations, and monitor, and disconnect users. ISA also allows you to supervise specific users or groups for auditing purposes, view the structure of all database tables, workflow queues, and locked documents, and monitor the number of user licenses being used compared with the number of licenses available. Using ISA, you can also view, save, print, and email server log files using the Log and Activity Viewers.
In ISA, you can view summary or detailed information about your ImageNow system. Tabs appear at the bottom of the ImageNow Server Administration window so you can toggle between the two types of information. The Summary tab contains information about the current status of the services, connected users, and licensing. When you click the Details tab, the window splits into two panes: the console tree on the left and the results pane on the right. The console tree contains the administrative features for you to manage and monitor your ImageNow system.
Perceptive Software ImageNow Administrator Getting Started Guide
Page 13 of 69
Log into ISA Only users with the ISA privilege, managers, and the owner can log into ISA.
1. Click Start, point to Programs, point to ImageNow 6, and then click ImageNow Server Administrator.
Note You can also launch ImageNow Server Administrator by navigating to the [drive:]\inserver6\bin directory and double-clicking the isa.exe file.
2. In the ImageNow Server Administration dialog box, log in using one of the following methods, and then click OK:
• To log in with a machine login, simply type the user name and password.
• To log in as part of a domain, in User Name, enter the domain followed a backslash, and enter your user name (for example, "DomainName\UserName"), and in Password, type your password.
Note If you are unable to connect to the ISA Console, verify that you entered the user name and password correctly and that you are assigned the required role or privilege listed above.
Install or uninstall services The ImageNow Server and agents run as services. A service is an application that runs in the background, similar to a UNIX daemon. You can use ISA to start, stop, and view the status of these services.
1. Log into ISA. On the Details tab, in the console tree, open Status and then click Services.
2. In the results pane, select the service you want to install or uninstall.
3. On the Action menu, do one of the following:
• Click Install Service, and then on the Action menu, click Start to start the service.
• Click Uninstall Service.
Start and stop services 1. Log into ISA. On the Details tab, in the console tree, open Status and then click Services.
2. In the list of services in the right pane, select an ImageNow service.
3. On the Action menu, click one of the start or stop options.
View connected users and activities This section shows information about any users who are logged in to the ImageNow Server.
• Log into ISA. On the Details tab, in the console tree, open Status and then click Connected Users.
About Monitor Agent Monitor Agent functionality is supported in Windows and Unix environments except where noted. Monitor Agent enables you to track the status of any ImageNow agent and perform actions based on an event that occurred. For example, you can use Monitor Agent to send an email when a threshold is passed, such as when an agent is non-responsive. When an event occurs, you can perform other tasks, such as restarting an agent, sending an email, or archiving log reports.

Perceptive Software ImageNow Administrator Getting Started Guide
Page 14 of 69
You can use Monitor Agent to help you track the status of agents and perform tasks. By customizing the Monitor Agent configuration file (inserverMonitor.ini), you can use Monitor Agent to automate certain administrative actions of ImageNow agents when any of the following events occur:
• A certain amount of time passed since an agent restarted. (Windows only)
• An agent is non-responsive. (Windows only)
• Excessive memory leaks, thread leaks, GDI leaks, or handle leaks. (Windows only)
• An agent terminates abnormally.
• Dump files are created by crashing agents.
An action is an automated process initiated by Monitor Agent in response to an event. When an event occurs, Monitor Agent can perform the following actions in response:
• Restart the process.
• Run an external program.
• Notify administrators through email when an event occurs.
• Archive log reports on a schedule or in response to an event.
Additionally, Monitor Agent can perform an action on a defined schedule regardless of any events that may or may not have occurred.
Configure Monitor Agent The Monitor Agent configuration file (inserverMonitor.ini) contains several sections of settings that enable you to define the basic functionality of Monitor Agent. Each setting in inserverMonitor.ini is defined in detail in product help located on www.perceptivesoftware.com.
1. Navigate to the \Program Files\inserver6\etc folder, and then in a text editor, open the inserverMonitor.ini file.
2. Modify the .ini file to configure the settings in the following groups:
• Polling - Set polling.interval to a positive integer to represent the time in seconds you want Monitor Agent to wait between instances of polling the system, initiation of processes, and checking for actions and events.
• Event Log - Generates log files for events and actions managed by Monitor Agent.
• Logging - Enables you to troubleshoot Monitor Agent if an issue arises.
• Defaults - The Defaults section defines general settings.
• Email – Specifies the server and port Monitor Agent uses to route emails.
• Defines – Identifies the processes you want Monitor Agent to monitor.
About storing document objects ImageNow stores all document objects in the Object Storage Manager (OSM). The OSM stores objects in the original format, for example, TIFF, PDF, or Microsoft Word. Because each page of a document is stored as a separate object in the OSM, a scanned multi-page document is stored as multiple objects. The Object Storage Manager is organized in sections called sets, trees, and optional filters. A storage set contains one or more storage trees.
Using INTool, a command line tool, you can manage your OSM storage.
Perceptive Software ImageNow Administrator Getting Started Guide
Page 15 of 69
The OSM provides the following features:
• Multiple OSMs - You can create separate object storage structures that you can subdivide by virtually any logical construct. This enables you to create a separate OSM structure for each drawer in your ImageNow system. This feature is useful when you want to separate information, such as Human Resource information, from other information.
• OSM spanning - You can represent several physical drives as one logical drive, which allows a single OSM to expand beyond the bounds of a single physical drive.
• OSM mirroring - You can enable mirroring to distribute duplicate object storage structures to multiple sites. This feature enables you to create a real-time duplicate OSM to support mission-critical functions, disaster recovery, and real-time backup.
• Data set management - You can easily move, copy, or delete OSM structures based on a wide variety of business rules.
• OSM caching - You can cache files that are read or written to the main OSM storage device on a faster device, such as a SAN, to improve performance and reduce bottlenecks.
• OSM cache lifecycle management - You can adjust the cache lifecycle from the default of 1,440 minutes to a shorter or longer value.
About OSM Sets When you install ImageNow, several OSM sets are created automatically to contain different categories of data used in different phases of document capture and storage. For example, one OSM set contains temporary data for documents in batch processing, and another contains supporting data for annotations and forms. In addition to these standard OSM sets, you can create additional sets for special purposes, for example, to contain documents filtered on either of two document keys: Drawer and Document Type.
Add an OSM set After creating the OSM set, you must create a corresponding OSM tree before you can store objects in the OSM set.
1. On the ImageNow Server computer, do one of the following actions:
• In Windows, open a Command Prompt window, and change to the [drive]\inserver6\bin directory.
• In Unix, change to the $IMAGENOWDIR6/bin directory.
2. Enter the following command:
intool --cmd add-osm-set
3. The INTool command prompts you for the required properties.
4. Optional. You can provide information for the following parameters.
intool --cmd add-osm-set [--record <record>| [--delim <delim>]]
• <record> is the information that describes the OSM set record.
• <delim> is the delimiter that separates the values between the record fields. The default delimiter is ^.
About OSM filters An OSM filter enables you to store newly captured documents in separate OSM sets, which function as filter sets. When adding the filter, you specify a single condition: either a drawer name and value or a document type and value. As a result, you create a drawer filter or a document key filter.
Perceptive Software ImageNow Administrator Getting Started Guide
Page 16 of 69
For example, you could create an OSM filter to store all documents with a drawer value of AP in a separate OSM set. You could also create an OSM filter to store all documents with a document type value of Invoice in a separate OSM set. In the situation where a newly captured document has drawer value (for example, AP) that satisfies one filter's condition and also a document key value (for example, Invoice) that satisfies another filter's condition, the drawer filter is used instead of the document key filter.
You can update an existing filter by changing the OSM set in which filtered documents are stored. If you delete an OSM filter, the filtered documents remain in the filter set and can still be searched and processed in ImageNow or WebNow like unfiltered documents.
Note OSM filters affect only newly captured documents. They do not move documents captured before the filter was added. However, a filter does move a document out of the filter set to a different OSM set if you edit the document keys of the document and change the drawer or document type to a value that no longer satisfies the filter's condition.
Add an OSM filter 1. On the ImageNow Server computer, do one of the following actions:
• In Windows, open a Command Prompt window and change to the [drive:]\inserver6\bin directory.
• In Unix, change to the $IMAGENOWDIR6/bin directory.
2. Enter the following command:
intool --cmd add-osm-filter --osm-set <OSM Set ID> --type <type> --value<value>
3. Provide information for the following parameters:
• <OSM Set ID> is the ID of the OSM set in which the filter documents are stored.
• <type> is either DRAWER or DOCTYPE, depending on which document key you want to filter on. It is case sensitive.
• <value> is the name of the drawer or document type corresponding to the DRAWER or DOCTYPE selection.
About OSM trees Each OSM set must contain at least one OSM tree, which defines the structure of directories and subdirectories where captured documents are stored. There is no need for more than one OSM tree per OSM set unless the size and number of stored documents requires the OSM set to span additional drives. To set up an OSM set that you expect to become very large, you can create a separate OSM tree for each additional drive that may be needed. When the original OSM tree uses up its available disk space, ImageNow Server automatically moves to the next OSM tree with no interruption in service.
OSM sets and OSM trees use two integration types: FSS (File System Storage), which is supported by all platforms, and CAS (Content Addressed Storage), which is used only with Centera servers. You can add FSS trees only to FSS sets and add CAS trees only to CAS sets.
Add an OSM tree 1. On the ImageNow Server computer, do one of the following actions:
• In Windows, open a Command Prompt window and change to the [drive:]\inserver6\bin directory.
• In Unix, change to the $IMAGENOWDIR6/bin directory.
2. Enter the following command:
intool --cmd add-osm-tree --type <integration type>
Perceptive Software ImageNow Administrator Getting Started Guide
Page 17 of 69
3. Provide information for the following parameter:
• <integration type> is the storage device type. Valid values are FSS and CAS.
4. The INTool command prompts you for the required properties.
5. Optional. Provide information for the following parameters. intool --cmd add-osm-tree --type <integration type> [--record <record>| [--delim <delim>]]
• <record> is the information that describes the OSM tree record.
• <delim> is the delimiter that separates the values between the record fields. The default delimiter is ^.
About agents and extensions The ImageNow Server contains internal agents that process jobs and provide messaging to the ImageNow clients. In general, the ImageNow Server causes the internal agents to perform as needed without any manual steps. However, you can manually configure the ImageNow Import Agent, which is the internal agent that is responsible for handling all automated import routines on the server. You can set this internal agent to poll for information and a specific directory for specific files to import.
You can also purchase external agents to extend search, fax, mail, output, OSR, and user replication functionality. For more information about the ImageNow Content Server, ImageNow Fax Agent, ImageNow Mail Agent, ImageNow Output Agent, ImageNow Recognition Agent, or ImageNow User Replication Agent, refer to your online Help at www.perceptivesoftware.com.
Additionally, you can extend ImageNow functionality with add-on components like ImageNow DataCapture. DataCapture is a solution that automates forms processing, and it allows you to capture a form and then verify the collected data.
Accessing the administrative portion of ImageNow The Management Console is the administrator area in ImageNow. It enables you to configure ImageNow privileges, workflow, and so on. You must have the proper security privileges to access these areas of functionality.
Create a connection profile The connection profile gives you the ability to preconfigure a connection to a server, server type, port number, and other information. Each build of ImageNow on a computer can contain multiple connection profiles. The user can select to connect to this connection profile when logging in to the system.
1. To open Management Console, click Start, point to All Programs, point to ImageNow 6, and then click ImageNow Management Console.
2. Click Connection Profiles.
3. Click Edit connection profiles.
4. In the Connection Profiles dialog box, click Create.
Perceptive Software ImageNow Administrator Getting Started Guide
Page 18 of 69
5. In the New Connection Profile dialog box, do the following steps:
• In Name, type a name for the ImageNow Server.
• In ServerID, type the name of the computer on which ImageNow Server resides.
• In Server Type, select Development, Personal, Production, or Test to represent the type of server you are using.
• In Port Number, type the port number for the ImageNow Server computer, which is 6000 by default.
• In Username, select one of the following: Always prompt, Set to and type a default user name, or Remember last successful user name.
6. To use domain authentication with your connection profiles, select the Use domain authentication check box. To stop using domain authentication, leave the check box unselected. This is only available when using SYSTEM authentication.
7. Click OK.
Log in and start Management Console To access the administrator area in ImageNow, complete the following steps:
1. To start the Management Console, do one of the following steps:
• On the ImageNow toolbar, click Manage.
• To start a separate instance of Management Console, click Start, point to All Programs, point to ImageNow 6, and then click ImageNow Management Console.
• Right-click the ImageNow icon in the Windows System Tray, and then click Launch ImageNow Management Console. This appears when you enable the Windows System Tray icon for ImageNow during setup.
2. If you are already logged in to ImageNow, the Management Console displays. If you are not logged in, complete the following steps:
1. In the User name box, confirm or enter the user name and in the Password box, enter your password.
2. Click Connect to initiate the connection to the ImageNow Server. The Management Console displays if you are successfully logged in.
Note If you are unable to connect to the server, verify that you entered the user ID and password correctly.
Perceptive Software ImageNow Administrator Getting Started Guide
Page 19 of 69
Configuring the Document Filing System The filing system typically is determined in the design phase of your implementation. This organizational structure is made up of document keys and custom properties that identify a document and provide the searchability for files stored in ImageNow. The filing system and the document identifiers also provide the ability to implement security surrounding documents and their respective identifiers.
About drawers Drawers provide the first hierarchical level of organization for ImageNow documents. A drawer separates documents into logical categories. Some users think of drawers as individual departments. For example, the accounting department data can be stored separately from the sales department data by having separate "Accounting" and "Sales" drawers.
In addition to providing a distinct level of organization, you can use drawers to assign or deny access to particular documents. For example, only users in the accounting department may need to see certain types of documents. You can store these particular documents in a drawer named "Accounting." You can restrict access to that drawer at the user or group level by assigning the appropriate allow or deny Drawers privilege.
Create a drawer 1. In the Management Console, in the left pane, click Drawers.
2. In the right pane, click New.
3. On the General tab type the drawer name and enter an optional description.
4. Optional. If you want ImageNow to verify signatures for this drawer, on the Digital Signatures tab, select the Automatically verify signatures for this drawer check box and then, to specify how often the signatures are verified, in the Verification interval boxes, select the number and time unit and then click OK.
About document types Document type is a document key that categorizes a document according to a predefined list of values, which makes it similar to the drawer document key. For example, when you capture documents, you can assign all billing statements with the document type of Invoice, regardless of its drawer value. As with any document key, you can assign only one document type to a document. You assign the document type when capturing the document or while you are linking. You can also modify the document type after it has been assigned.
Unlike other document keys, document types can include custom properties, which are additional fields that you can assign values or leave blank. This means that you can add document keys to a document by assigning to that document a document type that includes custom properties. You select the custom properties associated with a document type in the Management Console (Document Types tab followed by Custom Properties tab). Document types can contain mutually exclusive sets of custom properties. On the other hand, one document type can also share one or more custom properties with other document types.
You can use document type lists throughout ImageNow to group sets of document types together based on a relationship. Thus, you can build groups of document types that are specific to one department, process, or set of business rules. For example, you can create an HR document type list that contains several types of document types, including resumes, invoices, and tax forms. You can include a document type in multiple document type lists.
Document type lists let you provide users with a filtered view or subset of the entire list of defined document types. For example, you can map a document type list to a LearnMode application plan to filter the available document types to assist the user in determining the correct document types to assign to
Perceptive Software ImageNow Administrator Getting Started Guide
Page 20 of 69
documents at link time. In addition, you set the order of the documents in the list, so you can place the commonly used document types at the beginning of the list for ease of use.
For security purposes, you can assign users or groups with Document, Explorer/Project Viewer, Viewer, and Document Management privileges by each document type (but not document type list). These action privileges are on the same privilege level as Drawer privileges, so you can assign privileges by drawer or document type, as needed. For example, you might assign privileges to a user to view the Invoices document type but deny the same user access to the HR drawer. In this example, the user can view all invoices except those in the HR drawer.
Create a document type To create a document type, complete the following steps:
1. In the Management Console, in the left pane, click Document Types.
2. In the right pane, on the Document Types tab, click New.
3. In the selected row under Document Type, type a name for the document type and then press ENTER.
4. Select the new document type and then click Modify.
5. In the Document Type dialog box, on the General tab, do the following:
• Optional. In the Description box, type a description of the document type.
• Make sure Document Type is Active is selected.
6. Optional. Click the Custom Properties tab, and add custom properties to the document type as follows:
• To restrict the rows displayed in the Available list to a single data type, in By type, select the type you want.
• In the Available list, select a custom property and click Add. In the confirmation box, click Yes.
• Optional. To make the custom property required, in the Added list, click the first column of a custom property to add the icon.
• In the Added list, click Move Up or Move Down to change the order of the custom properties. For example, you can move the most commonly used document types to the top of the list.
7. Optional. If you want ImageNow to verify signatures for this document type, click the Digital Signatures tab, select the Automatically verify signatures for this document type check box, and, to specify how often the signatures are verified, in the Verification interval boxes, select the number and time unit and then click OK.
Note If ImageNow Server is configured to use automatic form identification capture profiles, a Form tab appears.
8. Click OK.
About project types Projects let you group related documents independently of how they have been indexed in the ImageNow system. The project type is essentially a template from which a user creates individual projects. They provide a mechanism for managing whole classes of projects based on a project type. The project type also defines which properties are available for projects of a certain type.
Using project types, a user can select one or more documents and add them to an existing or a new project. When a user adds documents to a project, he or she can view and act on documents in Project
Perceptive Software ImageNow Administrator Getting Started Guide
Page 21 of 69
Viewer. Users can also route entire projects through ImageNow Workflow as a single workflow item. Like document objects in ImageNow, projects have their own system-level metadata while enabling you to capture an unlimited amount of metadata about a project using custom properties.
A project type can optionally specify required document types as well as the order in which document types appear in a project. Projects based on such project types can contain any document type, but they are not considered complete until they contain all of the required document types you specify in the project type definition.
A project type can include custom properties, which are additional fields that you can assign values or leave blank. You select the custom properties that are associated with a project type in the Management Console (Projects tab followed by Custom Properties tab). Project types can contain mutually exclusive sets of custom properties. On the other hand, one project type can also share one or more custom properties with other project types.
About project security privileges Global privileges set at the Group level or User level gives you the ability to create new project types and to act on projects in various ways. If you don't, for example, have the Projects, Create privilege set, then you will not be able to create new project types and the Project Types tab in the Management Console are not exposed to you. You must have the Manage Project Types privilege to change or modify existing project types. An owner can perform all available tasks for project types. The system contains six global privileges for project types.
Create a project type Before you begin, ensure that you define your custom properties master list, create your document types and document type lists.
To create a project type, complete the following steps:
1. In the Management Console, in the left pane, click Project Types.
2. On the Projects tab, click New and type a name for your project type.
3. Verify your new project type is selected and click Modify.
4. On the General tab, do the following:
1. In the Description box, type a description explaining briefly how this project type is used.
2. If you want this project type to be active, select Is active.
3. If you want this project to display as a form, select Is a form. If no forms are available, this option is unavailable and appears dimmed.
5. On the Document Types tab, do the following actions:
1. Select a document type list which will filter the document types according to the list in which they've been assigned.
2. Under Available, select from the available list of document types, and then click Add.
3. To make a document type required, in the Order list, click once in the column in front of the document type until is displayed.
4. To change the order in which the document types appear in a project, in the Order list, click Move Up or Move Down.
Note You can also order the document types in the View Preview window on the Appearance tab.
5. If you need to delete a document type form the list, select the document type and click Remove.
Perceptive Software ImageNow Administrator Getting Started Guide
Page 22 of 69
6. On the Custom Properties tab, do the following actions:
1. Select a custom property type which will filter the master list of properties.
2. Under Available, select from the available list of custom properties, and then click Add.
3. Under Added, click Move Up or Move Down to change the order in which the custom properties appear in a project.
4. To make a custom property required, in the Added list, click once in the column in front of the custom property until is displayed. A required custom property must contain a value whenever the associated document is linked or you change the document type of the associated document.
5. If you need to delete a custom properties form the list, select the custom properties and click Remove.
7. On the Appearance tab, do the following actions:
1. To change column layout of the project type view, click Preview and then click the Columns button.
2. To change the order in which the document types appear in a project, in the View Preview window, right-click the Document Type column heading and then select Sort Ascending or Sort Descending.
3. To add a statistic to the project type view, click the Statistics button.
4. To change the maximum number of rows to allow in the project type grid, in the Maximum results box, type or select a number between 100 and 10,000.
8. Click OK.
About custom properties Custom properties are property fields that users can populate with data relating to an ImageNow document or project. Custom properties let you store unlimited data to describe a document beyond the standard document keys. You can also create a composite property, which is a single property that contains one or more custom properties. You make these properties available to documents and projects by associating them with document types or project types.
You define a custom property using one of the following data types: strings, numbers/currency, dates, predefined lists, user names, and true/false flags. Formatting settings let you control the data entry and display appearance of the custom property for viewing by end-users. Some data types require default values, for others default values are optional.
After you create custom properties, you must associate the custom properties with existing document types or project types before end-users can enter data in, view, or search on the custom properties.
You have the option to make a custom property required. If you require a custom property, the user must enter a value for that property whenever a document is linked or the document type is changed.
Perceptive Software ImageNow Administrator Getting Started Guide
Page 23 of 69
Create a custom property 1. In the Management Console, in the left pane, click Custom Properties.
2. In the right pane, click New and then select an option:
• String - A text field that supports all printable ASCII characters within the Single Byte character set.
• Number - A decimal data type display format for number fields that supports both positive and negative numbers up to a limited number of digits.
• Date - A date stored as a string. The displayed date and time format is based on the settings chosen when you create the custom property.
• Flag - A data type always stored as TRUE (1) or FALSE (0). The values that appear are based on the settings chosen when creating the custom property.
• List - A data type that comprises a group of values that a user can select from a list box for the custom property.
• User - A data type that allows the user to select an ImageNow user to populate the custom property.
3. In the Custom Property dialog box, in the Name box, type the name of the custom property.
4. Choose your settings for the data type you selected. Some of the settings are optional.
Grant Manage Custom Properties privilege 1. In the Management Console, in the left pane, do one of the following actions:
• To assign the privilege to a group:
1. Select Groups.
2. In the right pane, on the Security tab, select a group, and then click Modify.
• To assign the privilege to a user:
1. Select Users.
2. In the right pane, on the Security tab, perform one of the following actions:
• In the Search for Users box, type all or part of a first name, last name, or user name of the user you want, and then click Search.
• Click Search. Note that this search returns all users. Depending on the number of users in your system, it may take some time to return the results. If you want to continue, in the User Search dialog box, click Yes.
Note By default, the results list displays a maximum of 500 users.
2. In the Select a user list, select the user you want to assign, and then click Modify.
2. In the Modify User Profile or Modify Group Profile dialog box, click the Global Privileges tab.
3. In the Privilege list, under the Manage group, select the Edit Custom Properties privilege.
4. Click in the column to the left of the privilege so that the allow icon is displayed to grant the privilege.
5. Click OK.

Perceptive Software ImageNow Administrator Getting Started Guide
Page 24 of 69
About composite properties Using a composite property, you can store multiple values or sets of values constructed from one or more existing custom properties. Composite properties let you group and refine the metadata that your users use to describe the documents and projects in your system. The following examples show how you might use composite properties:
• You define a composite property to store values using a single custom property. In this example, suppose you are tracking test scores for a student. Whenever a student repeats a test, the user tracking the test scores must add the new score to the Test Results property in that student's document. For one student, the score might contain one value, and for another it may contain fifteen values.
• You define a composite property to store sets of values using multiple custom properties. Expanding on the previous example, suppose the user tracking the test scores needs to enter a date along with each test score and a flag value that indicates whether a retest is required. This expanded Test Results property contains one property set for a student who has taken the test only once, but for a student who has taken the test and then retested five times, it contains six property sets, each with its own score, date, and retest values.
Composite properties allow users to store differing numbers of values in a single property. In the custom properties of a document or project, the user can add values to, change existing values in, remove values from, or search for a composite property at any time.
Create a composite property Before creating a composite property, you must create the custom properties that comprise the composite property.
To create a composite property from existing custom properties, complete the following steps:
1. In the Management Console, in the left pane, click Custom Properties.
2. In the right pane, click New and then click Composite.
3. In the Composite Property dialog box, in the Name box, type the name of the composite property and do the following substeps:
1. Optional. In the By Type list, select the data type of the custom property you want to add. Choosing a type reduces the number of items that appear in the Available list in the following step.
• String A text field that supports all printable ASCII characters within the Single Byte character set.
• Number A decimal data type display format for number fields that supports both positive and negative numbers up to a limited number of digits.
• Date A date stored as a string. The date and time format appears based on the settings you choose when creating the custom property.
• Flag A data type always stored as TRUE (1) or FALSE (0). The values that appear are based on the settings chosen when creating the custom property.
• List A data type that comprises a group of values that a user can select from a list box for the custom property.
• User A data type that allows the user to select an ImageNow user to populate the custom property.
2. In the Available list, select a custom property you want to include in the composite custom property and then click Add.

Perceptive Software ImageNow Administrator Getting Started Guide
Page 25 of 69
4. Repeat the previous substeps until you have added all the custom properties you need.
5. Optional. To rearrange the hierarchy of base properties within the composite custom property, in the Added list, select the property you want to move and then click Move Up or Move Down.
6. Click OK.
Perceptive Software ImageNow Administrator Getting Started Guide
Page 26 of 69
About Assigning Privileges A user with management privileges, a manager, or the owner can assign privileges to users and groups. You can assign a privilege using one of three actions: grant a privilege by allowing it, revoke a privilege by denying it, or choose not to set a privilege assignment at all. The system evaluates and displays a user's effective privileges at the user level, not at the group level. To determine the effective privileges, ImageNow evaluates all of the privilege assignments given to a user and all of the privilege assignments (if any) the user inherits from groups to which the user is a member and then determines which privilege assignments get priority over other privilege assignments.
In most cases, you grant privileges to groups of users who need similar privileges. However, certain users may need specific privileges. For example, you can grant a user access to delete documents in a particular drawer regardless of the privileges set for groups in which the user is a member. To do this, you would grant that user the privilege to delete documents in a specific drawer. Because this is a privilege granted to a user, it overrides any privileges assigned at the group level.
If you assign or manage privileges, consider adding groups using the following procedure. As an example, this procedure uses a departmental method of grouping.
• Add groups with names that describe a particular department or job, such as Finance, HR, and Marketing.
• Add drawers with names that correspond to the departments as well. However, the system does not require you match group names to drawer names and this approach may not always be the best implementation for a particular department.
• Assign allow and deny privileges within each new group that meet the needs for that department. For example, grant the Financial group complete allow privileges for the Financial drawer. Then, grant the HR access to the HR drawer, and so forth.
• Add the relevant users to each of the new groups.
• Add groups to allow for access to another group's drawers. For example, you can create a subgroup in the Financial group that has limited access to the HR drawer.
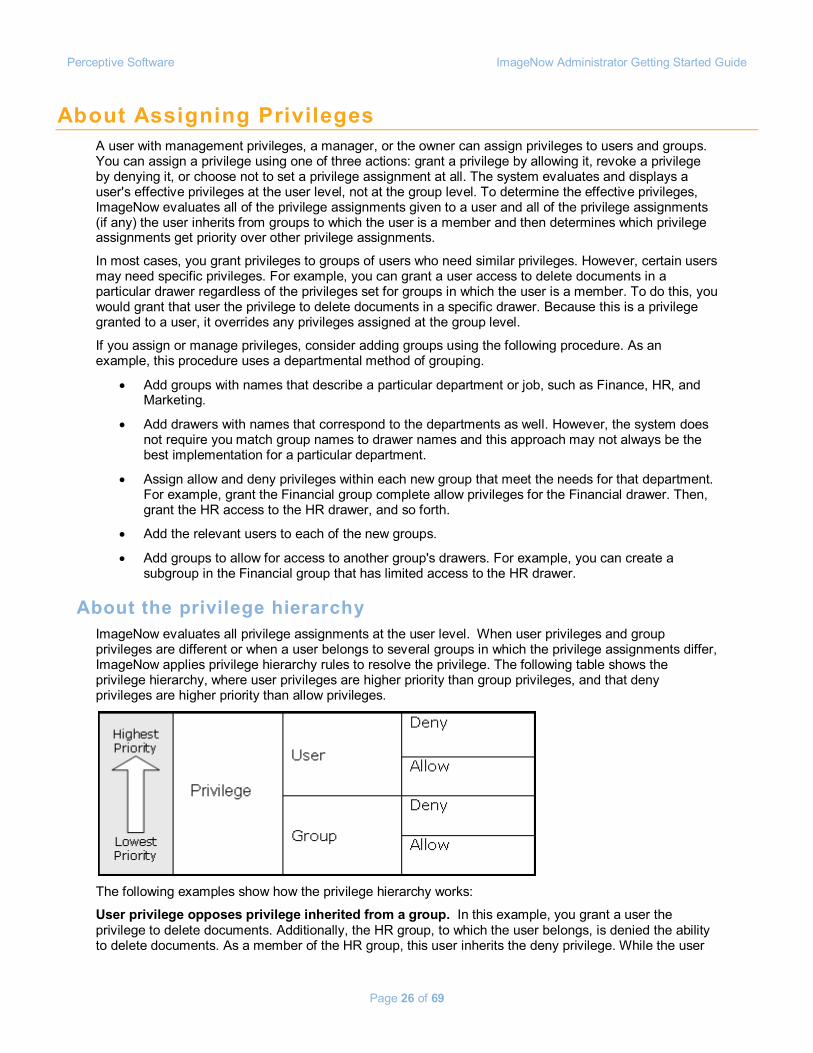
About the privilege hierarchy ImageNow evaluates all privilege assignments at the user level. When user privileges and group privileges are different or when a user belongs to several groups in which the privilege assignments differ, ImageNow applies privilege hierarchy rules to resolve the privilege. The following table shows the privilege hierarchy, where user privileges are higher priority than group privileges, and that deny privileges are higher priority than allow privileges.
The following examples show how the privilege hierarchy works:
User privilege opposes privilege inherited from a group. In this example, you grant a user the privilege to delete documents. Additionally, the HR group, to which the user belongs, is denied the ability to delete documents. As a member of the HR group, this user inherits the deny privilege. While the user
Perceptive Software ImageNow Administrator Getting Started Guide
Page 27 of 69
can delete documents; at the group level, the user cannot delete documents. ImageNow uses privilege hierarchy rules to determine whether the user can delete a document. Since user level privileges override group level privileges, the user can delete documents.
Group privilege opposes a privilege from another group. Another area where privilege assignment evaluations occur is at the group level. In this case, the user belongs to two groups. In the HR group, the user is denied the ability to delete documents. In the HR_Records group, the user inherits the ability to delete documents at the group level. So, one group allows the privilege and another group denies the privilege. Because the deny privilege overrides the allow privilege within the same group level, the user is denied the ability to delete documents. Additional resolutions. When a user is a member of multiple groups where a privilege is allowed or denied in one group and not assigned in any other group, the user's effective privilege is the allowed or denied privilege. In addition, if a privilege is not specifically assigned, the user cannot perform the function.
Assign privileges to a user or group To allow or deny users the ability to perform actions in ImageNow, complete the following steps:
1. In the Management Console, in the left pane, select either Users or Groups.
2. In the right pane, on the Security tab, perform one of the following actions:
• In the Select a user list, select a user, and then click Modify.
• In the Search for users box, type all or some of a user name, first or last name, and then click Search. In the Select a user list, select a user, and then click Modify.
3. In the Security Settings dialog box, assign the privileges you need for the following categories listed in the left pane:
• Batch privileges – Add users who can create batches.
• Document type privileges – For each document type you create, grant privileges to allow or deny users the ability to perform actions.
• Drawer privileges – For each drawer you create, grant privileges to allow or deny users the ability to perform actions.
• Global privileges – Select the privileges that users can perform globally.
• Process privileges – Select a workflow process that users can access.
• Project privileges – Select a project type and grant privileges to users in order to use or manage projects.
4. Optional. To grant the privilege, click the column in front of the user until appears.
5. Optional. To deny the privilege, click the column in front of the user until appears.
Perceptive Software ImageNow Administrator Getting Started Guide
Page 28 of 69
About Managing Users and Groups As a manager or administrator, you can manage the privileges for each user and group in ImageNow. You can assign privileges to users or you can use groups to streamline the task of assigning standard sets of privileges to large numbers of users.
You can create different groups for different types of users. There may be a group of users who perform all of the scanning tasks and require privileges to scan documents in a drawer but not to copy or move them. You can assign another group the privileges to create and process batches. You can assign both global privileges and drawer privileges at the group level or at the user level.
Using groups for the majority of work in assigning privileges cuts down on system administration work and reduces privilege confusion. You can always make exceptions for a particular user by denying a privilege at the user level because the user level privilege overrides the group level privilege within the same level (Drawer privileges or Global privileges). For example, you may have a manager who wants to restrict a particular user in a group from deleting documents in a certain drawer. Denying the Delete privilege at the user level allows the user to continue to perform all the other functions in the software that are assigned as privileges at the group level, while preventing just that user from deleting documents.
Add a user When adding a user, you provide personal and contact information about the user. You can optionally set an out of office event, and set up logging and auditing for the user. To add a user, complete the following steps:
1. In the Management Console, in the left pane, click Users.
1. In the right pane, on the User Profiles tab, click New, type the name you want and then press ENTER.
2. Select the user and then click Modify.
3. In the Modify User Profile dialog box, in the left pane, click each of following panes and add information as needed:
• Personal Information – In the Identity section, type user information in the following fields: First Name, Last Name, Prefix, Suffix, and External ID (if you require HL7 compliance). In the Miscellaneous section, type additional information such as Title, Organization and, Organization Unit. Leave the Is Active check box selected.
• Contact Information – Type additional user information, such as Phone, Mobile, Fax, Pager, Email, and Location.
• Out of Office – This pane has no events in the right side for new users. For more information, refer to the Management Console - Out of Office section in the Table of Contents.
• Logging – Set up logging for the user you are creating.
• Auditing – Assign existing audit templates to the user you are creating.
• Digital ID – A new user won't have a Digital ID when being created, so no action is necessary in this pane.
4. Click OK.
Perceptive Software ImageNow Administrator Getting Started Guide
Page 29 of 69
Modify or delete a user To change information or remove a user, complete the following steps:
1. In the Management Console, in the left pane, click Users.
2. In the right pane, on the User Profiles tab, perform one of the following actions:
• To remove a user, in the Select a user list, select a user and then click Delete.
• To change user information, in the Select a user list, select a user and then click Modify.
3. In the Modify User Profile dialog box, perform the following actions in each section of the left pane:
• Personal Information - In the Identity section, change information describing the new user's identity in the following fields: First Name, Last Name, Prefix, Suffix, and External ID (for HL7 compliance). In the Miscellaneous section, change additional information such as Title, Organization, and Organization Unit. Select or clear the Is Active check box according to whether you want the user be active or inactive.
• Contact Information - Change additional user information, such as Phone, Mobile, Fax, Pager, Email, and Location.
• Out of Office - You can create, modify, view, or disable a user's out of office event.
• Logging - Set up or modify logging for the user.
• Auditing - Assign or unassign audit templates to this user.
• Digital ID - Expire or void the user's existing Digital ID.
4. Click OK.
Grant management privileges To give the user management privileges, complete the following steps:
1. In the Management Console, in the left pane, click Users.
2. In the right pane, on the Security tab, perform one of the following actions:
• In the Select a user list, select a user and then click Modify.
• In the Search for users box, type all or some of a user name, first or last name and then click Search. In the Select a user list, select a user and then click Modify.
Note To sort the Select a user list in ascending or descending order, click the Name, Last Name, First Name, or Status column headers.
3. In the Security Settings dialog box, in the left pane, click Global Privileges.
4. In the Privileges list, perform one of the following actions:
• To grant all management privileges, click the column in front of the Manage privilege group until appears in front of the group.
• To grant specific management privileges, click the column in front of each privilege in the Manage group until appears.
5. Click OK.
Perceptive Software ImageNow Administrator Getting Started Guide
Page 30 of 69
Add a group To create a group, complete the following steps:
1. In the Management Console, in the left pane, click Groups.
2. In the right pane, on the Group Information tab, click New.
3. Type a group name and then press ENTER.
4. Optional. To add a group description, select the group and then click Modify. In the Group Properties dialog box, in the Description box, type a description for the group, and then click OK.
5. Optional. To add users to the group, on the Security tab, select the group and then click Modify.
6. In the Security Settings dialog box, in the left pane, click Group Members.
7. To add users to the group, under Group Members, perform the following substeps:
1. Click Add.
2. In the Select users dialog box, perform one or both of the following actions:
• In the Search results list, select one or more users and then click Add.
• In the Search for users box, type all or some of a user name, first or last name and then click Search. In the Search results list, select one or more users and then click Add.
Note To sort the Search results list in ascending or descending order, click the User Name, Last Name, or First Name column headers.
8. Click OK.
9. Optional. You can assign auditing templates and security privileges by clicking the corresponding pane on the left.
10. Click OK.
Modify or delete a group To remove or change a group, complete the following steps:
1. In the Management Console, in the left pane, click Groups, and then perform one of the following actions in the right pane, on the Group Information tab:
• To remove a group, in the Select a group list, select a group and then click Delete.
• To change group information, in the Select a group list, select a group and then click Modify.
• In the Search for groups box, type all or some of a group name and then click Search. In the Select a group list, select a group and then click Modify.
2. Optional. In the Group Properties dialog box, in the Description box, you can modify the description of the group, and then click OK.
3. To change the security settings and membership for the group, on the Security tab, select the group and then click Modify.
4. In the Security Settings dialog box, in the left pane click on any of the privilege panes, and change the security settings as needed in the right pane.
Perceptive Software ImageNow Administrator Getting Started Guide
Page 31 of 69
5. In the left pane, click Group Members and then, in the right pane, perform any of the following actions:
• Click Add to add additional users to this group
• In the Select Users dialog box, perform one of the following actions:
• In the Search results list, select one or more users and then click Add.
• In the Search for users box, type all or some of a user name, first or last name and then click Search. In the Search results list, select one or more users and then click Add.
• Click Remove to remove a user from this group. In the confirmation dialog box, click Yes.
6. Optional. You can assign auditing templates and security privileges by clicking the corresponding pane on the left.
7. Click OK.
Add a user to a group To add a user to an existing group, complete the following steps:
1. In the Management Console, in the left pane, click Groups.
2. In the right pane, on the Security tab, perform one of the following actions:
• In the Select a group list, select the group you want and then click Modify.
• In the Search for groups box, type all or some of a group name and then click Search. In the Select a group list, select a group and then click Modify.
3. In the Security Settings dialog box, in the left pane click Group Members, and then in the right pane under Group Members, perform the following substeps:
1. Click Add.
2. In the Select Users dialog box, perform one of the following actions:
• In the Search results list, select one or more users and then click Add.
• In the Search for users box, type all or some of a user name, first or last name and then click Search. In the Search results list, select one or more users and then click Add.
4. Click OK twice.
Perceptive Software ImageNow Administrator Getting Started Guide
Page 32 of 69
Integrating with your Business Application ImageNow can learn to identify information from your business application and associate that information with the document.
About application plans An application plan maps document keys and fields that the system populates when a user imports a document or project into ImageNow using that application plan. There are multiple types of application plans in ImageNow that employ different methods of mapping and populating. For example, you can click specified fields from your business application or you can import the document and select the fields manually.
You can create the following types of application plans:
• Agent application plan – Use this method with ImageNow agents, both internal and external, that process jobs and provide messaging to the ImageNow clients.
• Interact application plan – Use this method with the Interact line of products that integrate with ImageNow. These products consist primarily of software that works within a third party’s environment to expose ImageNow functionality.
• LearnMode application plan – Use this method for GUI-based, DOS-based, and terminal emulation applications. LearnMode can also learn applications that can communicate using OLE, DDE, and COM objects.
• Manual application plan – Use this method to create a stand-alone application plan. In special situations, ImageNow can be set to run as a stand-alone imaging system. In this case, images can be indexed and retrieved without the use of a business application.
About LearnMode LearnMode is a client-side, non-programmatic method of integrating your business application with ImageNow and learning screens or windows within that application. After the system learns a window, you can scan images and link them directly to records in your application. Thereafter, when you want to access an image that is linked to a particular record in your application, it is only one mouse click away.
LearnMode offers eight different methods to learn your business application, and the best method to use depends on the type of application you are using. For example, knowing whether your application is GUI-based, web-based, DOS-based, a terminal emulator, or other type of application will assist in determining the LearnMode type to use. Typically, each application ImageNow learns is stored in a container called an application plan. Each application plan can be a different LearnMode type. An application plan is comprised of screens: one screen for each screen or window in your business application you want to link images to. For example, a General Banking System business application may have a Main screen, a Summary screen, and a Loan screen.
To learn a screen in your business application, you must create a screen in an application plan. To create a screen, you capture the data from your business application screen, and create document index keys to link the image to the record in your application. Once you have created and tested the screen, you can scan images into ImageNow and link them to a particular record in your business application from that screen. Thereafter, you can view these images from your application anytime by opening the record in your business application and clicking one button on the ImageNow Client control bar.
The first task in learning your business application is to determine the appropriate LearnMode type. After you have determined the LearnMode type, you can create screens for each business application screen to which you need to link documents. After you create an application plan for your business application, scanning and viewing images is seamless and automatic.
Perceptive Software ImageNow Administrator Getting Started Guide
Page 33 of 69
Create a LearnMode application plan 1. Start your business application and open the window that you want ImageNow to learn.
2. Navigate to an active record.
3. On the ImageNow toolbar, click Manage.
4. In the Management Console, in the left pane, expand the Application Plans tree, and then click LearnMode.
5. In the right pane, on the Applications tab, click New.
6. In the Plan Settings dialog box, click the General tab.
7. Under Information, do the following actions:
• In Name, type a unique name for your application plan.
• In Description, type a description for your application plan.
• Select Is active if you want this application plan to be active and available to users.
8. To configure ImageNow to identify the application or screen, under Application, choose one of the following types and complete the associated steps:
• Window Title – To identify the business application based on the name that appears in the title of the applications window, complete the following steps: 1. From the Method list, select Window Title.
2. Click Identify.
3. In the Window Selector Starter dialog box, click Start.
4. Point to the title bar of the business application window and click the mouse button. The data captured from the business application window appears in the Value box.
• Class ID – To identify the business application based on the class ID designated for the application, complete the following steps: 1. From the Method list, select Class ID.
2. Click Identify.
3. In the Window Selector Starter dialog box, click Start.
4. Point to the title bar of the business application window and click the mouse button. The data captured from the business application window appears in the Value box.
• Application Name – To identify the application based on the name of the running executable, complete the following steps:
1. From the Method list, select Application Name.
2. Click Identify.
3. In the Window Selector Starter dialog box, click Start.
4. Click the title bar of the business application window . The data captured from the business application window appears in the Value box.
Perceptive Software ImageNow Administrator Getting Started Guide
Page 34 of 69
9. To configure ImageNow to identify the application or screen based on a value you enter, choose one of the following types and complete the associated steps:
• Window Title – To identify the business application based on the name that appears in the title of the applications window, complete the following steps:
1. From the Method list, select Window Title.
2. In Value, type the name of the application.
3. Click Test. The system attempts to find the business application window or screen with the given string in the Value box.
• Class ID – To identify the business application based on the class ID designated for the application, complete the following steps:
1. From the Method list, select Class ID.
2. In Value, type the class ID that is designated for the application.
3. Click Test. The system attempts to find the business application window or screen with the given string in the Value box.
• Application Name – To identify the business application based on the name of the running executable 1. From the Method list, select Application Name.
2. In Value, type the name of the application's executable.
Note The application name is the same name listed on the Processes tab in the Windows Task Manager.
3. Click Test. The system attempts to find the business application window or screen with the given string in the Value box.
10. Depending on the results, the system displays one of the following messages in the Status box:
• Application found - ImageNow has successfully connected to your business application. You can continue to the next step.
• Could not find application - Start your business application and open the window that you want ImageNow to learn and repeat the learning process.
• More than one application found - Close all applications, except the business application you want ImageNow to learn and repeat the learning process.
11. Click OK. ImageNow captures a screen shot of the business application window and displays it in LearnMode Application Plan Designer.
12. In LearnMode Application Plan Designer, make the necessary changes to the application plan, such as modifying or adding new screens or dictionary data elements, and mapping documents and projects. For more information, refer to the appropriate topics in ImageNow Application Plan Designer Help.
Create an agent application plan Use this method with ImageNow agents, both internal and external, that process jobs and provide messaging to the ImageNow clients.
1. On the ImageNow toolbar, click Manage.
2. In the Management Console, in the left pane, expand the Application Plans tree and then click Agents.
3. In the right pane, on the Applications tab, click New.
Perceptive Software ImageNow Administrator Getting Started Guide
Page 35 of 69
4. In the Plan Settings dialog box, click the General tab.
5. Under Information, do the following actions:
• In the Name box, type a unique name for your application plan.
• In the Description box, type a description for your application plan.
• Select Is active if you want this application plan to be active.
6. Click OK.
7. In Agent Application Plan Designer, modify your agent application plan as you normally would by mapping keys and configuring view actions for documents and projects. For more information, refer to the appropriate topics in ImageNow Application Plan Designer Help.
Create an Interact application plan Use this method with the Interact line of products that integrate with ImageNow. These products consist primarily of software that works within a third party’s environment to expose ImageNow functionality.
1. On the ImageNow toolbar, click Manage.
2. In the Management Console, in the left pane, expand the Application Plans tree and then click Interact.
3. In the right pane, on the Applications tab, click New.
4. In the Plan Settings dialog box, click the General tab.
5. Under Information, do the following actions:
• In the Name box, type a unique name for your application plan.
• In the Description box, type a description for your application plan.
• Select Is active if you want this application plan to be active.
6. Click OK.
7. In Agent Application Plan Designer, modify your Interact application plan as you normally would by mapping keys and configuring view actions for documents and projects. For more information, refer to the appropriate topics in ImageNow Application Plan Designer Help.
Create a manual application plan This method creates a stand-alone application plan. In special situations, ImageNow can run as a stand-alone imaging system. In this case, the system can index and retrieve images without a business application.
1. On the ImageNow toolbar, click Manage.
2. In the Management Console, in the left pane, expand the Application Plans tree and then click Manual.
3. In the right pane, on the Applications tab, click New.
4. In the Plan Settings dialog box, click the General tab.
5. Under Information, do the following actions:
• In the Name box, type a unique name for your application plan.
• In the Description box, type a description for your application plan.
• Select Is active if you want this application plan to be active.

Perceptive Software ImageNow Administrator Getting Started Guide
Page 36 of 69
6. Under Application, select None from the Type list, and then click OK. ImageNow opens LearnMode Designer.
7. In Manual Application Plan Designer, modify your manual application plan as you normally would by mapping keys and configuring view actions for documents and projects. For more information, refer to the appropriate topics in ImageNow Application Plan Designer Help.
Configuring your Business Processes ImageNow workflow lets you automate business processes and create review checkpoints. After you save a document in ImageNow, the system can route the document through any number of queues, which might represent different departments or different desks within a department.
In Management Console, you can create, modify, or delete a workflow process, and assign workflow privileges. You can also create reason lists to use in workflow for users to select from when placing items on hold in a queue. When you create or modify a workflow process, you enter the ImageNow Workflow Designer. For detailed information about workflow administration after you create or modify a process, click the Help menu in the ImageNow Workflow Designer window.
What is Workflow Designer? Workflow Designer for ImageNow provides administrators with the ability to graphically create queues and routes for their workflow processes from start to sign-off. Working in Workflow Designer is efficient. You can quickly manage workflow processes and user privileges without downtime.
There are three major types of workflow models and Perceptive Software supports each of them including variations where an organization may build multiple workflow models or combine them into a single process:
• Ad-hoc workflow - Used by dynamic workgroups that run individual processes for each document, which typically relies heavily on email and the use of alerts.
• Transaction-based workflow - This is a task-based workflow that usually involves lengthy and complicated processes, such as loan or claims processing, that involves multiple document types and a high level of customization.
• Document-centric workflow - Focus is on the document as the unifying object in the workflow process. Documents are associated with owners, applications, rules, and routes.
About security privileges in Workflow Designer In Workflow Designer, you have the ability to set workflow-specific privileges including the ability to add, process, archive, delete, or remove workflow items. You also create routes, queues, alarms and rules in Workflow Designer. See the sub-sections in this Help file for more information about how each of these features work.
Create a workflow process To create a new workflow, complete the following steps.
1. In the Management Console, in the left pane, click Workflow.
2. In the right pane, on the Workflow tab, click New.
3. In the Add Process dialog box, in the Name box, type a name, and then in the Description box, type the description of the process that will appear in the ToolTip for the process.
4. Click OK, select the process, and then click Modify.
The ImageNow Workflow Designer opens to create queues, routes, and workflow rules.
Perceptive Software ImageNow Administrator Getting Started Guide
Page 37 of 69
About queues Workflow is comprised of queues and routes that move items through your business processes. A workflow item is the base component for workflow, and it references a specific document or project in ImageNow. A workflow item is routed from queue to queue until it reaches its destination. These queues are linked by routes.
• Automated system queues - An Automated system queue (ASQ) is a predefined queue that performs a specific action. For example, a Content ASQ automatically submits items to Content Server. A Transfer ASQ sends items in the queue to the Object Storage Manager set that you specify when creating the queue. To learn about the Object Storage Manager, refer to ImageNow Administrator Help.
• Super queues - A Super queue redistributes workflow items to a collection of distinct queues that perform the same workflow function. These sub queues reduce the number of alarms, routes, and rules needed.
• System queues - A System queue performs an action that does not require user intervention. For example, a queue that automatically prints documents or faxes. You usually perform this action with a rule or script.
• Work queues - A Work queue is a queue that you assign to one or more users who are performing the same action upon the same workflow items within the queue.
• Complete queue property - This queue property sets the queue as the final queue in a process. Any work, system, or super queue can be a Complete queue.
• Join queue property - This queue property rejoins workflow items that have been routed in parallel. Any work, system or super queue is allowed to be a Join queue.
Create a work queue This procedure outlines the minimal steps required to create the different queue types. For setting some of the more advanced queue properties, refer to the online Help at www.perceptivesoftware.com.
1. In the Workflow Designer window, in the left pane, under Queues, select the Work queue and then drag it to the right in your process diagram.
2. Double-click the queue to modify its properties.
3. In the Queue Properties dialog box, in the left pane, select General.
4. In the right pane, in the Name box, enter the name for your work queue.
5. If you want to define a Join queue, select the Join queue check box. A Join Queue is one that rejoins a workflow item that you route in parallel by creating two or more copies (siblings) of the original item. When they arrive in the Join queue, the items are rejoined as the one workflow item that existed prior to the split.
6. To define this queue as the last queue in the process, select the Complete queue check box. As an item is routed into a Complete queue, its status is then changed to "completed."
7. Click OK.
Perceptive Software ImageNow Administrator Getting Started Guide
Page 38 of 69
Create a super queue This procedure outlines the minimal steps required to create the different queue types. For setting some of the more advanced queue properties, refer to the topics in the “Queue Properties” section.
1. In the Workflow Designer window, in the left pane, under Queues, select the Super queue and then drag it to the right in your process diagram.
2. Double-click the queue to modify its properties.
3. In the Super Queue Properties dialog box, in the left pane, click General.
4. In the right pane, in the Name box, enter the name for your super queue.
5. In the left pane, click Sub Queues.
6. In the right pane, click New.
7. In the New Sub Queues dialog box, perform one of the following actions:
• To create manual queues, complete the following actions.
1. On the General tab, click Manual queue creation and type a name in the Name box.
2. On the Users and Groups tab, click Add.
3. In the Select Users and Groups dialog box, on the Users tab, select each user you want to assign to this queue, click Add, and then click OK.
4. In the Select Users and Groups dialog box, on the Groups tab, select each group you want to assign to this queue, click Add, and then click OK.
5. For each sub queue you want to use in your process, in the left pane, click Sub Queue and in the right pane, click New.
• To create automatic queues, complete the following actions.
1. On the General tab, click Automatic queue creation so that the queue is named for you by the Workflow Designer.
2. On the Users and Groups tab, click Add.
3. In the Select Users and Groups dialog box, on the Users tab, select each user you want to assign to this queue, and then click Add.
4. In the Select Users and Groups dialog box, on the Groups tab, select each group you want to assign to this queue, click Add, and then click OK. Note If automatic is selected, a separate queue is created for each user and group using their user and group names for the sub queue name.
8. Click OK.
Perceptive Software ImageNow Administrator Getting Started Guide
Page 39 of 69
Create sub queues for a super queue 1. In the process containing the super queue you want, double-click the super queue.
2. In the Super Queue Properties dialog box, in the left pane, click Sub Queues.
3. In the right pane, click New.
4. In the New Sub Queues dialog box, on the General tab, select either Manual queue creation or Automatic queue creation. If you select Manual queue creation, type a name for your sub queue in the Name box. With Automatic queue creation, ImageNow creates the queue name for you that is based on the selected users and groups.
Note The name of the sub queue always includes the name of the corresponding super queue in parentheses. This allows you to re-use sub queue names in different super queues without encountering a conflict of duplicate sub queue names.
5. On the Users and Groups tab, click Add.
6. On the Users tab, search for and select the users you want to have access to this sub queue, click Add, and then click OK.
7. On the Groups tab, search for and select the groups you want to have access to this sub queue, click Add, and then click OK.
8. In the New Sub Queues dialog box, click OK.
Create a system queue This procedure outlines the minimal steps required to create the different queue types. For setting some of the more advanced queue properties, refer to the topics in the Queue Properties section.
1. In the Workflow Designer window, in the left pane, under Queues, select the System queue and then drag it to the right in your process diagram.
2. Double-click the queue to modify its properties.
3. In the Queue Properties dialog box, in the left pane, select General.
4. In the right pane, in the Name box, enter the name for your system queue.
5. In the left pane, click Actions.
6. In the right pane, on the Inbound, Within Queue, or Outbound tab, in the Action list, select the script or rule you want to use.
7. Click OK.
Create a transfer queue Use this procedure to create a queue that saves items in the OSM set you select. Before performing this procedure, you must create two queues: one queue for successful transfers to the OSM set and another queue for processing unsuccessful transfers.
1. In the Workflow Designer window, in the left pane, under Queues, select the Transfer automated system queue and then drag it to the right in your process diagram.
2. Double-click the queue to modify its properties.
3. In the Queue Properties dialog box, in the right pane, under Details, in the Name box, enter the name of the queue.

Perceptive Software ImageNow Administrator Getting Started Guide
Page 40 of 69
4. Under Automated Action, perform the following substeps:
1. To designate the process and queue for items successfully processed in this queue, in the Successful Action list, select a process in the Process list and then select a queue in the Queue list.
2. To designate the process and queue for items that are not successfully processed in this queue, in the Failure Action list, select a process in the Process list and then select a queue in the Queue list.
3. In the OSM list, select the OSM set in which ImageNow saves the documents.
Note The transfer queue references the OSM set by name. Ensure the target OSM set and the original OSM set names appear indentically.
5. Click OK.
Notes
• If you do not have a Content Server license, the Content ASQ does not appear in the Queues pane in Workflow Designer.
• You cannot manually create outgoing routes for a Content ASQ. To create outgoing routes, set the options in the Automated Action section for this queue.
• You are not able to designate sub queues as success or failure queues, therefore, they do not appear in the Queue list.
About workflow alarms ImageNow provides queue alarms that can alert users of a critical task that he or she needs to perform. For example, you can send an email alarm to the AP manager if the document key value = Reject. You can create another kind of alert that shows the AP manager that an item was routed from Legal Review to the current queue. Alarms relieve the user from repeatedly inspecting the status of multiple queues to determine whether critical tasks have been performed within a certain time frame.
You can add the following kinds of alarms to a queue:
• An Email alarm causes an email message to be sent to a person or group through an SMTP server.
• An ImageNow Icon alarm causes the ImageNow icon, in the upper left corner of the toolbar, to flash until the user has taken appropriate action with the affected queue. It also causes the ImageNow icon in the System tray to flash.
• A Message Center alarm scrolls across the marquee below the ImageNow toolbar and also is listed in the Message Center window.
• An Audible alarm plays a .WAV sound file on the user's computer when a specified condition in a queue has been satisfied.
You must be logged in as a workflow Administrator to be permitted to create alarms, rules, queues, and other elements comprising workflow from the Workflow Designer utility.
All of the users with the process privilege for the queue where the alarm was triggered receive the alarms, except for the owner, managers, and users with the global manage workflow processes privilege. That is because these user roles automatically have the process privilege for every queue in the system. These users can receive email alarms since email addresses can be added manually. Since Message Center, Icon, and Audible alarms are not activated for users with owner, manager, or user with management privileges roles, to test these three kinds of alarms, you must log in as a user who is not any of these three roles.
Perceptive Software ImageNow Administrator Getting Started Guide
Page 41 of 69
Create an alarm The following procedures explain how to define an email alarm rule and assign that rule to your email alarm.
Name your alarm 1. In Workflow Designer, double-click the queue where you want to add an alarm.
2. In the Queue Properties dialog box, in the left pane, click Alarms.
3. In the right pane, click Add.
4. In the Select Alarms dialog box, click Create.
5. In the Alarm Settings dialog box, perform the following steps:
1. In the Name box, type a name such as Email Alarm.
2. Optional. In the Timeout Period, type or select a time such as five minutes.
Note Before you change this setting, consult Perceptive Software Product Support. This timeout applies only if the client loses communication with Alarm Agent.
3. Verify that the Status is set to Active.
4. In the Alarm Rule list, select Edit Rules.
Build a rule 1. In the Rules dialog box, click Create.
2. In the Rules Editor, perform the following steps:
1. In the Rule name field, type the name you want.
2. In the Rule type list, select Alarm rule.
Add conditional statements and define your alarm 1. To create a statement for your rule, under Statements, click New.
2. In the Statement Editor dialog box, in the Statement name box, type a name.
3. Under Conditions, perform one or both of the following options:
• To modify the existing condition, click the blue underlined text.
• To add a new condition, click the Add button.
4. In the Add Condition dialog box, perform the following substeps:
1. In the Constrain by list, click the kind of constraint to set up the lists you need in the Type, Field, and Operator boxes.
2. In the Type list, verify that Normal is selected.
3. In the Field list, click the field for the comparison.
4. In the Operator list, select the operator to use in the comparison.
5. In the Value box, enter or select a value to use with the operator when comparing against the field.
6. Click OK.
Perceptive Software ImageNow Administrator Getting Started Guide
Page 42 of 69
7. Optional. Repeat these substeps for any additional condition rows.
Note If you add multiple conditions, you can toggle the Boolean operator between AND and OR by clicking it. If you need to delete a condition, select the condition and then click the Delete button.
5. To create an alarm for items that meet the conditional statements you just defined, perform the following substeps:
1. Under Actions, click Add and then select the type of alarm you would like to create.
2. Complete the appropriate information for the type of alarm you select.
Activate your rule 1. In the Rules Editor, click Active and then click OK.
2. To close the Rules dialog box, click OK.
3. In the Alarm Settings dialog box, in the Alarm Rule list, select the alarm rule you just created and then click OK.
4. In the Select Alarm dialog box, select the alarm you just created, and then click Add.
5. In the Queue Properties dialog box, verify that your email alarm is in the list, with a Queue Status of Enabled and an Alarm Status of Active.
6. If you don't have the Alarm Status column, click Columns. In the Columns dialog box, select the Alarm Status check box, and then click OK.
7. In the Queue Properties dialog box, click OK.
8. Close Workflow Designer.
About routes Routes connect workflow queues. They can be inbound or outbound or both. You can also route to a queue contained in the same process or to a queue in a different process.
Route type Description
Conditional routes A conditional route is a route that is determined by rules that occur dynamically in the process. The next queue in the process is determined by information received by the workflow process. For example, in an approval process where an invoice over $5,000 must go to the Finance Director, the process automatically routes invoices greater than that amount to the Finance Director.
Inter-process routes An inter-process route allows you to route items from a queue in one workflow process to a queue in another workflow process.
Load Balance routes A load balance route is designed for high volume processing, such as ten thousand or more items per day, and allows you to route items using distribution. The distribution option you select determines how your items are routed. You can choose to route an equal number of items among a set of destination queues. As an example, when
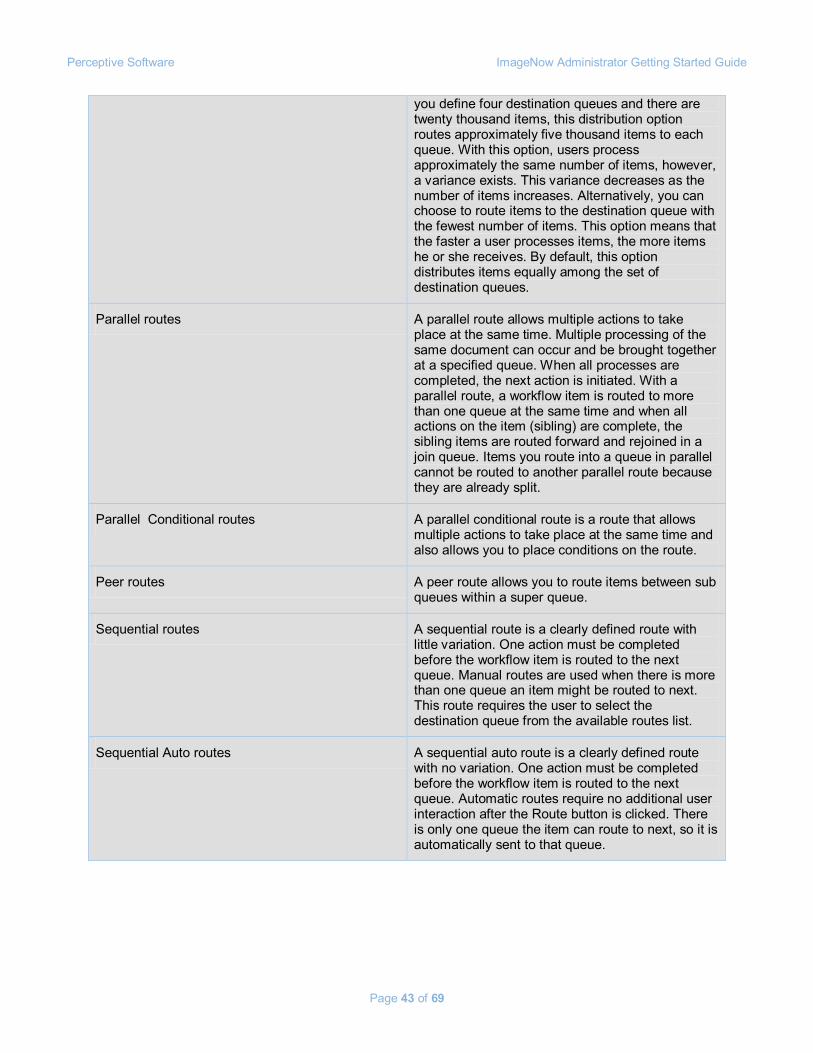
Perceptive Software ImageNow Administrator Getting Started Guide
Page 43 of 69
you define four destination queues and there are twenty thousand items, this distribution option routes approximately five thousand items to each queue. With this option, users process approximately the same number of items, however, a variance exists. This variance decreases as the number of items increases. Alternatively, you can choose to route items to the destination queue with the fewest number of items. This option means that the faster a user processes items, the more items he or she receives. By default, this option distributes items equally among the set of destination queues.
Parallel routes A parallel route allows multiple actions to take place at the same time. Multiple processing of the same document can occur and be brought together at a specified queue. When all processes are completed, the next action is initiated. With a parallel route, a workflow item is routed to more than one queue at the same time and when all actions on the item (sibling) are complete, the sibling items are routed forward and rejoined in a join queue. Items you route into a queue in parallel cannot be routed to another parallel route because they are already split.
Parallel Conditional routes A parallel conditional route is a route that allows multiple actions to take place at the same time and also allows you to place conditions on the route.
Peer routes A peer route allows you to route items between sub queues within a super queue.
Sequential routes A sequential route is a clearly defined route with little variation. One action must be completed before the workflow item is routed to the next queue. Manual routes are used when there is more than one queue an item might be routed to next. This route requires the user to select the destination queue from the available routes list.
Sequential Auto routes A sequential auto route is a clearly defined route with no variation. One action must be completed before the workflow item is routed to the next queue. Automatic routes require no additional user interaction after the Route button is clicked. There is only one queue the item can route to next, so it is automatically sent to that queue.
Perceptive Software ImageNow Administrator Getting Started Guide
Page 44 of 69
Create a route You can only create load balance, sequential, sequential auto, and parallel routes using the Task Pane. To create conditional or parallel conditional routes, refer to those topics.
1. In Workflow Designer, in the Task Pane, click Routes.
2. On the Grid toolbar, verify that the Normal Routes button is selected.
3. On the top of the left pane, click a route type.
4. Point to the queue you want to connect to until the pointer changes shape to a cross-hair, and then click this queue and drag to draw it to the other queue.
5. Repeat these steps to create all routes within your workflow process.
Add a user to a queue Adding a user to a queue also involves assigning privileges for that user about what actions they can take in the queue.
1. Open the process containing the queue to which you want to add a user.
2. Double-click the queue you want.
3. In the Queue Properties dialog box, in the left pane, select Users and then click New.
4. Perform one of the following actions:
• On the Users tab, under Available Users, select a user and then click Add.
• On the Groups tab, under Available Groups, select a group and then click Add.
5. Click OK, and then back in the Queue Properties dialog box, click under the column for the privilege you want to assign to the user or group.
6. Click OK.
About rules and scripts Rules and scripts help you manage items as you move them through workflow queues. In Workflow Designer, rules let you create conditional alarms and routes. Typically, you would use workflow rules to set up alarms and to route items through your work queues. Scripts are typically used when you want to automate actions such as to print, fax or email. You might also use a script to strip elements from a numeric string such as slashes from a telephone number or hyphens from a social security number. See ImageNow iScript Help in the ImageNow iScript Editor for programmability documentation.
The ability to create, modify, and remove scripts and rules is built into the Actions area of your Queue Properties. To create rules and specify conditions in order to trigger an event on a queue, you use the ImageNow Rules Editor. You set up these conditional routes similarly to the way you would set up email rules in Microsoft Outlook. There are two types of rules: Routing and Alarm. Once you have created your rules, you set the order in which you want to apply them, and then you activate them.
Perceptive Software ImageNow Administrator Getting Started Guide
Page 45 of 69
About Tasks A task is work that you assign to one or more users for documents and projects. ImageNow provides the following task types:
• Document deficiency - Create this task type to indicate when a document is missing or is incomplete.
• Pointer - Use this task type to draw attention to a specific document or project location for further action.
• Signature required - Assign this task type when a user needs to digitally sign a document.
Note You must have the Document Management Suite license installed on your ImageNow system to use the signature required task type.
To administer tasks, in Management Console, you create task templates for your users. In a task template, specify the task type, set locations (project, document, and page), actions (iScripts), an assignment list, a completion method (automatic with valid digital signature, manual and complete pending review), reasons (action and return), a due date method, and security options. Task template security allows you to determine the roles your users have when working with tasks. You can also manage reasons and reason lists for the task templates.
Grant task template manager privileges This privilege is necessary to create and manage task templates. You manage only the task templates you create. To manage another user's template, you must have the Manage privilege for that template.
1. In the Management Console, in the left pane, perform one of the following options:
• To grant a privilege to a user, click Users and then in the right pane, on the Security tab, perform one of the following actions:
• In the Select a user list, select a user, and then click Modify.
• In the Search for users box, type all or some of a user name, first or last name, and then click Search. In the Select a user list, select a user, and then click Modify.
• To grant a privilege to a group, click Groups and then in the right pane, on the Security tab, perform one of the following actions:
• On the Groups tab, in the Select a group list, select a group and then click Modify.
• On the Groups tab, in the Search for groups box, type all or part of a group name and then click Search. In the Select a group list, select a group and then click Modify.
2. In the Security Settings dialog box, click the Global Privileges pane.
3. In the Privileges list, under Manage, select the Task Templates privilege.
4. Click the column to the left of the privilege so that displays to grant the privilege.
5. Click OK until you return to the Management Console.
Perceptive Software ImageNow Administrator Getting Started Guide
Page 46 of 69
Create a task template To define the task type and the behavior of the task, complete the following steps.
1. In the Management Console, in the left pane, click Tasks.
2. In the right pane, on the Templates tab, in the Select a task type box, select an option:
• Document deficiency
• Pointer
• Signature required on document
3. Under Templates, click New.
Define the template properties 1. In the Task dialog box, in the left pane, select Properties. 2. In the right pane, under General, in the Name box, type a name for your task template.
3. In the Description box, type a template description.
4. Under Options, verify that the Is active check box is selected to make the task template available to task creators assigning tasks from the Tasks toolbar.
5. Optional. Select the Delete completed task check box to automatically and permanently delete a task and its related history after the task is completed.
Note If a task creator assigns a task series and the Delete completed task check box is selected, ImageNow does not delete the tasks in that series until the series is complete. After a series is complete, the system removes that entire series.
Define the template components 1. In the Task dialog box, in the left pane, select Components and perform the following steps:
1. In the right pane, under General, in the Task instructions box, type the instructions you want your task assignees to see.
2. Optional. Select the Modifiable during task creation check box to allow a task creator to modify the instructions on the Options tab in the New Task dialog box.
3. In the Task location section, select one or more of the following locations to determine where tasks created with this template can be assigned:
• Project - Create a task for a project.
• Document - Create a task for a document.
• Page without a visual representation - Create a task for a page in a document with no visual representation.
• Page with a visual representation - Create a task, along with a visual representation, for a page in a document.
Note You must select at least one task location.
Perceptive Software ImageNow Administrator Getting Started Guide
Page 47 of 69
4. In the Completion method box, select one of the following methods:
• Manual - After task assignees complete a task, the task status is Complete.
• Complete pending review - After task assignees complete a task, the task status is Complete Pending Review. Tasks with this status go to a reviewer.
5. Optional. Under Workflow Assignment, select one or both of the following workflow options:
• Send to queue - Select the destination queue option you want. The default option is (None), in which case documents or projects are not sent to any queue. If you want to prompt the task creator for a workflow queue, select (Prompt). All other options are the queues to which the current user has the Add privilege.
• Send the project to the workflow queue if the task location is a document in a project - If the task location is a document in a project, select this option to send the project to workflow.
Note To enable the Send the project to the workflow queue if the task location is a document in a project option, in the Send to queue box, select a queue or (Prompt).
Define the template action 1. In the Task dialog box, in the left pane, select Actions. 2. In the right pane, under Scripting, perform one or more of the following actions to apply an
iScript to:
• Assigned tasks, in the Assigned list, select a script.
• Returned tasks, in the Returned list, select a script.
• Pending review tasks, in the Pending review list, select a script.
• Complete tasks, in the Complete list, select a script.
• Canceled tasks, in the Canceled list, select a script.
• Invalid tasks, in the Invalid list, select a script.
3. Optional. To send an email notification to task assignees when a task is created with this template, under Creation Notification, select the Send email notification when task is created check box.
Note A task assignee must have an email address configured in his or her user profile in order to receive an email notification.
4. Optional. To include a link in the email notification, perform one or both of the following actions:
• To include an ImageNow link, select the Include ImageNow link check box.
• To include a WebNow URL link, select the Include WebNow URL link check box.
5. Click OK.
Define the template assignment list 1. In the Task dialog box, in the left pane, select Assignment. 2. In the right pane, click Add.
Perceptive Software ImageNow Administrator Getting Started Guide
Page 48 of 69
3. In the Select Users and Groups dialog box, to add users or groups so they are available for task assignment, select one of the following options:
• To add users to your assignment list, on the Users tab, select one of the following options:
• In the Search results list, select one or more users, click Add and then click OK.
• In the Search for users box, type all or part of a first name, last name, or user name of the user you want, and then click Search. In the Search results list, select one or more users, click Add and then click OK.
• To add groups to your assignment list, on the Groups tab, select one of the following options:
• In the Search results list, select one or more groups, click Add and then click OK.
• In the Search for groups box, type all or part of the group name you want and then click Search. In the Search results list, select one or more groups, click Add and then click OK.
Notes
• To sort the Search results list in ascending or descending order, click the User Name, Last Name, First Name, or Group Name column headings.
• The Assignment list must contain at least one user or group.
4. Optional. Select the Automatically assign the task to the task creator check box.
Define the template reason lists 1. In the Task dialog box, in the left pane, select Reasons and perform the following steps:
2. Optional. Under Action Reasons, in the Action list, select the action list you want.
1. Optional. To create a new reason list, click New and then perform the following steps:
1. In the Reason List dialog box, on the General tab, in the Name box, type a reason list name.
2. In the Description box, type a short description.
3. Verify that the Is active check box is selected.
4. On the List Members tab, under Available, select one or more reasons and then click Add.
5. Optional. To create new reasons, click New and in the text box, type a reason.
6. Click OK to close the Reason List dialog box.
3. Optional. Select the Assignee must specify a reason during task completion check box to require the task assignee to indicate why he or she is completing a task.
4. Under Return Reasons, in the Return list, click a return list.
Perceptive Software ImageNow Administrator Getting Started Guide
Page 49 of 69
Define the template due date method 1. In the Task dialog box, in the left pane, select Due Date. 2. In the right pane, under Due Date Calculation, in the Method list, select one of the following
methods:
• No due date
• In the Method list, click No due date.
• Based on assignment date
1. In the Method list, click Based on assignment date.
2. In the Days box, set the number of days you want.
• Based on start date
1. In the Method list, click Based on start date.
2. In the Days box, set the number of days you want.
• Prompt task creator for date
• In the Method list, click Prompt task creator for date.
Define the template security 1. In the Task dialog box, in the left pane, select Security.
2. In the right pane, under Users and Groups, click Add.
3. In the Select Users and Groups dialog box, to add users or groups for privilege assignment, select one of the following options :
• To add users, on the Users tab, select one of the following options:
• In the Search results list, select one or more users, click Add and then click OK.
• In the Search for users box, type all or part of a first name, last name, or user name of the user you want and then click Search. In the Search results list, select one or more users, click Add and then click OK.
• To add groups, on the Groups tab, select one of the following options:
• In the Search results list, select one or more groups, click Add and then click OK.
• In the Search for groups box, type all or part of the group name you want and then click Search. In the Search results list, select one or more groups, click Add and then click OK.
Note To sort the Search results list in ascending or descending order, click the User Name, Last Name, First Name or Group Name column headings.
4. Under Users and Groups, select a user or group.
5. To grant the user or group the following privileges, click the column in front of each privilege until appears. You can grant or deny privileges to create, delete, modify, review, and view tasks created with this template. Additionally, grant or deny the manage privilege for the template itself.
• Create - To allow the user or group to create tasks with this template, grant the Create privilege.
• Delete - To allow the user or group to delete tasks created with this template, grant the Delete privilege.
Perceptive Software ImageNow Administrator Getting Started Guide
Page 50 of 69
• Manage - To allow the user or group to manage this template, grant the Manage privilege.
Note In order for the user or group to access task templates in the Management Console, the user or group must have the Manage Task Templates privilege on the Global Privileges tab.
• Modify - To allow the user or group to modify tasks created with this template, grant the Modify privilege.
• Review - To allow the user or group to review tasks created with this template, grant the Review privilege. Reviewers look at tasks after they have been completed by a task assignee.
• View - To allow the user or group to view tasks created with this template, grant the View privilege. The user or group with this privilege can view tasks but cannot process or modify them.
Note The View privilege is not required for task assignees. The user or group assigned to a task automatically has the ability to view that task. Additionally, by default, task creators and reviewers are automatically able to view tasks they created or are reviewers for. However, because tasks are associated with documents and projects, the user or group must have the necessary document or project privileges.
• Manage Returned - To allow the user or group to view and modify returned tasks created with this template, grant the Manage Returned privilege. Granting this privilege also allows the user to manage returned tasks for tasks created using an iScript.
Note Alternatively, you can click Allow All, Deny All, or Deselect All to allow, deny or deselect all privileges for the selected user or group.
6. Verify that the Automatically grant task creators the Review privilege for the tasks they create check box is selected. If you don't want task creators to review the tasks they create, then clear this option.
7. Click OK.
Note The Incomplete Template dialog box appears if you did not add at least one user or group to the assignment list, if you did not select a return list, or if you selected the Send the project to the workflow queue if the task location is a document in a project check box, but did not select a queue in the Send to queue list. To save this template, click OK. The template is set to inactive. To return to the template to complete it, click Cancel.
Perceptive Software ImageNow Administrator Getting Started Guide
Page 51 of 69
About CaptureNow CaptureNow is a central ImageNow feature that lets users scan and import documents from multiple sources into ImageNow. In the capture profiles, you define your organization's scanning technology, and you set up and store all the options you need to obtain precise images and other documents in ImageNow. The following list defines some key terms used in CaptureNow.
• Capture profiles – ImageNow can capture hard-copy documents, files in a directory, or files from your computer. From a given source (File, Scanner, or ImageNow Printer), you build your capture profile and set the options you want for document indexing, workflow, image processing, and mode. Each new capture profile appears on the Capture menu on the ImageNow toolbar.
• Single mode – This profile copies the properties defined in an application plan to capture and index documents in ImageNow. Suitable for situations where you want to capture and link documents at the same time you scan them.
• Batch mode – This profile captures documents and stores them in a group (or batch) on your local computer, where the system eventually uploads to ImageNow Server and processes based on settings specified in the capture profile. Batch mode can import documents into ImageNow using index keys you specify or none at all.
• Package mode – This profile captures documents and allows you to index related data into a set of predefined baskets. Related data refers to documents that share at least one common index value such as Patient ID or Patient Name. Package mode is ideal for use in point-of-registration or walk-up environments, where document collectors are required to collect highly structured data in real time and need to verify and organize the data based on logical groups and other settings. Package Mode gives you the option of setting up document rules which, in conjunction with prompted scanning, assist the user in determining which documents are to be included in package mode capture.
• File – This source type lets you retrieve documents from a file system.
• Scanner – This source type lets you load paper (or other items) into the appropriate scanning device. The device will capture the items and load them into ImageNow.
• ImageNow Printer – This source type lets you import a document, such as an email, into ImageNow without having to scan it first. You import the document using the Print button within the software program that is displaying it.
About scanner configuration You can configure a scanner for any ImageNow Client computer in your enterprise. Scanning profiles and capture profiles define the behavior of the scanner in connection with the ImageNow Client. You can create up to ten capture profiles and distribute them according to user names, groups, or computer names.
Install a scanner You must log on to Windows using an account in the Windows Administrator Group to successfully install a scanner on your ImageNow system. The installation procedure varies depending on the type of scanner and drivers you install.
Install the SCSI card If using a USB scanner, you do not need to install a SCSI card. Mini-desktops do not have enough space for 650i SCSI cards. Follow your manufacturer's instructions to install the card.
1. Verify the SCSI card is an Adrenaline 650i, which includes a hardware license to use AIPE.
2. Insert the SCSI card in the desired PCI slot on the scanning workstation.
Perceptive Software ImageNow Administrator Getting Started Guide
Page 52 of 69
Note Do not connect the scanner to the SCSI port of the workstation yet. Connect the scanner only after you install all of the drivers.
3. Turn on the computer and log in as a user with administrative privileges on the computer where the SCSI is installed.
Note During startup, the SCSI cards name should appear. If it does not appear, you must shut down the computer and reinsert the card.
4. If the Windows Found new hardware wizard appears, follow the instructions and install the drivers. The next three steps verify that the installation was successful.
5. On the desktop, right-click My Computer and then click Properties.
6. In the System Properties dialog box, on the Hardware tab, click Device Manager.
7. Click the plus sign next to SCSI and RAID controllers and verify the name of your SCSI card appears in the device list.
• If it appears, continue the installation procedure.
• If it does not appear, shut down the computer and verify the SCSI card is inserted correctly. If the card does not appear in the device list after you restart the computer, install the card in a different PCI slot and repeat this procedure.
Install the drivers We recommend that you obtain the lastest version of the scanning drivers directly from the manufacturer and that you manually install them on the scanning computer, even if the Found New Hardware wizard installed the drivers during SCSI installation.
1. Download the necessary scanner ISIS software driver you need.
• For a Fujitsu scanner, use the following URL to download the drivers: http://www.fujitsu.com/us/services/computing/peripherals/scanners/support/downloads_isis.html
• For Canon scanners, use the following URL to download the drivers and the necessary .inf file: http://www.usa.canon.com/opd/controller?act=OPDDownloadCategoryIndexAct&fcategoryid=2420
• If the ISIS software driver is unavailable and you do not have the original manufacturer’s installer CD, refer to the scanner's manufacture's website or documentation.
2. Install the driver according to manufacturer’s instructions.
1. Note the path to which the files are extracted. This path is typically C:\<scanner name>.
2. Navigate to the path in the previous step and run the setup.exe, accepting the default settings.
3. Connect the scanner into the workstation by doing one of the following:
• For USB scanners, plug the USB cable into any available port.
• For SCSI scanners, with the scanner and computer turned off, plug the scanner into an available SCSI port, turn on the scanner, and then turn on the computer.
4. If the Found new hardware wizard appears, follow the instructions on the wizard pages.
Note For Canon and some other scanners, you need to enter the location of the .inf file that you downloaded in step 1. Other models may require you to insert the manufacturers CD.
Perceptive Software ImageNow Administrator Getting Started Guide
Page 53 of 69
5. Use the Windows Device Manager to verify that the scanner name appears in the device list under imaging devices.
• If it does not appear, make sure the scanner is turned on and check the SCSI card or USB port connections. If necessary, repeat this procedure.
• If a yellow question mark appears next to the name of your scanners, the .inf file associated with the scanner is missing. This error may appear for the Kofax DS2500 and other older scanners. For more information, refer to the Troubleshoot scanner configuration topic on the Perceptive Software website, in the Customer Portal, under Product Documentation.
Install Kofax Adrenaline If you use Pixel scanning drivers, you do not have to complete this step. You typically install both Kofax Adrenaline Software products except when your business case precludes either AIPE or VRS. For complete instructions for installing Kofax Adrenaline, refer to the following Kofax document: ftp://ftp.kofax.com/pub/support/vrs_scanning_apps/vrs/4.2/product_documentation/user_guides/english/VRS_Installation_Guide.pdf
1. To verify scanner compatibility and recommended configuration with Kofax product versions and controller type, access the Scanner Configurator tool from the following URL: http://www.kofax.com/configurator
2. Log in to the scanning computer as a user with administrative privileges.
3. Insert the Kofax CD into the CD ROM drive.
1. If the program does not run automatically after a few seconds, access the CD/DVD-ROM drive using Windows Explorer.
2. Double-click setup.exe.
4. On the Welcome dialog box, select Install VRS and an Adrenaline SCSI controller and click Next.
5. Enter your Kofax license information and click Next.
6. Accept the default values for the remaining dialog boxes of the wizard.
Note Refer to the Troubleshoot scanner configuration topic on the Perceptive Software website, in the Customer Portal, under Product Documentation to research any messages that appear during this part of the installation.
Test the scanner If you use Pixel scanning drivers, do not complete this step. Kofax installs a program to test the scanner and the Kofax driver. You can trace any problem that appears both in ImageNow and in this program to either the Kofax driver or the scanner.
1. On the Start menu, point to Programs, then point to Kofax VRS, and then click VCDemo.
2. In VCDemo, point to Source, click Scanner, select the correct source that you want to use, and then click OK. When the scanner is ready, the scanner icon appears.
3. Insert one or more documents in the scanner.
4. Point to Source and then click Process Batch. The result determines your next step:
• If configured properly, the scanner scans and displays the documents. You installed the scanner successfully.
• If an error appears, the SCSI card, ISIS driver, or Kofax driver is not configured properly.

Perceptive Software ImageNow Administrator Getting Started Guide
Page 54 of 69
Create a scanning profile Scanning profiles store information about the type of scanner you are using, along with scanner-specific features such as paper size, color mode, and image processing filters. Before you can create a scanning profile, you must install and license the scanner and then configure it to work with CaptureNow using the Device Manager dialog box.
To create a profile that contains information about your scanning hardware, complete the following steps.
1. On the ImageNow toolbar, on the Settings menu, click Options.
2. In the ImageNow Options dialog box, under Scanning Profiles, click Manage Profile List.
3. In the Scanning Profile Manager dialog box, click Create.
4. In the Scanning Profile dialog box, on the General tab, perform the following steps to create a new scanning profile:
1. In the Name box, type a unique profile name.
2. Description box, type a short description.
3. In the Device box, select the device name you want.
Note Depending on the type of driver you are using, the Scanning Profile dialog box will display different tabs. Pixel drivers use the General, Properties, and ImageNow Processing tabs. Kofax drivers use General, Properties, Advanced, and Options tabs. TWAIN drivers use General and Properties tabs.
5. On the Properties tab, under Properties, choose the options you want.
6. Optional. If you are working with a flatbed scanner, under Flatbed Settings, choose the options you want. If your scanner does not support flatbed scanning, then the Flatbed Settings options are dimmed and unavailable.
7. When using Kofax drivers, on the Advanced tab, under Options, choose one or more of the following options:
• In the Prescan box, specify the number of pages to be cached by the Kofax Accelerator.
• In the Timeout box, specify the time in seconds before the scanning process will stop after the last page is scanned.
• To delete blank pages from the scanning process by using a more advanced comparison, select the Calculate Blank Page Deletion check box.
• Click Advanced, and then choose the options you want. These vary based on the device you have installed.
• Click Units, and then specify what units of measurement you want for the current profile.
8. When using Kofax drivers, on the Options tab, choose the options you want in order to scan part of a document, not all of it. If your scanning device supports duplex scanning, then you can specify a picking rectangle for both front and back pages.
9. When using Pixel drivers, on the ImageNow Processing tab, select the filter you want and then add, remove, configure or move it up or down in the list. Before you configure a filter, first move it to the Selected Filters list.
10. Click OK three times.
Perceptive Software ImageNow Administrator Getting Started Guide
Page 55 of 69
Notes
• To create a scanning profile, the user logged in to the local machine must have the Write permission for the [drive]:\Documents and Settings\All Users\Application Data\ImageNow\etc folder.
• To add filters quickly to the Selected Filters list, you can double-click on the one you want to add it, or select multiple filters at once by using the CTRL or SHIFT keys, and then click Add (or Remove).
• When you remove a filter from the Selected Filters list, that filter is not removed completely. It is returned to the Available Filters list.
About barcodes You can use barcode recognition to detect barcodes on an image and convert them to their ASCII equivalents. The detection recognizes a barcode oriented on a page in any direction. During a barcode recognition operation, ImageNow searches the image for possible barcodes. If a potential barcode is found, ImageNow examines it for specific characteristics, such as the type of the barcode, the height of the barcode, the width of the narrowest barcode element, the length of the barcode (number of characters encoded), the size ratio of the narrowest element compared to the largest element, the font size (18 point is recommended), and the text format (for example, for text "ABC123" you have to type "*ABC123*" when produced from a Windows application). If ImageNow determines that the code has these characteristics, the code is deemed recognizable.
You use barcode triggers within a Capture Profile for the following three scenarios: to separate documents, to separate groups, or to use as an index key value. For example, you can use barcodes to separate large batches of documents, similar to using patchcodes. Using a barcode as a separator sheet trigger further simplifies the task of scanning and organizing documents. Each time the scanner detects a barcode, the system creates a new batch. The system places all newly scanned documents in the new batch until scanning finishes or the scanner detects another barcode.
A barcode grouping trigger categorizes documents based on one or more barcodes. You can specify a barcode filter that a barcode must match before a new batch is started. Enabling barcode grouping requires that you set one or more index keys for each barcode.
You can also use barcodes to automatically index your documents. You can use parts of barcodes as keys of a document. For example, you can break a barcode that contains the value 1650498029802011 into three pieces, and each piece can be a key. You can designate the first five digits as a key, the middle ten digits as a key, and the last digit as a key.
Configure ImageNow to recognize barcodes The following steps outline the high-level procedures that you need to perform to configure ImageNow to recognize barcodes.
1. Complete the following steps to access your scanning profile:
1. On the ImageNow toolbar, click the Capture arrow and then click Manage Capture Profiles.
2. Click Create.
3. In the New Capture Profile, on the General tab, in the Type section, in the Source list, select Scanner.
4. Click the Scanner tab.
2. Within your scanning profile, set the DPI to 300. 300 DPI (Dots Per Inch) is the recommended setting for optimal barcode recognition.
3. Enable barcode detection by selecting the Barcode Detection option within your scanning profile.
Perceptive Software ImageNow Administrator Getting Started Guide
Page 56 of 69
4. Set the Barcode Detection Properties that you want, for example, bar size, search directions, type, number of barcodes to be recognized on a page, and the quality condition of the barcode.
5. Set your capture profile for either Batch Separation or Auto Indexing.
6. For Batch Separation, select the Barcode Separator Sheet and Remove Separator Sheet options within your capture profile.
7. For auto indexing, set the following options within your capture profile:
• Select the Barcode Grouping option to index any remaining pages behind the barcode page.
• Set the Page Limit option to a value between 0 and 999 to set the maximum number of pages a barcode can link together. This limit serves as a safeguard should a barcode go undetected.
• Set the barcode grouping trigger to specify which barcode to use for grouping if more than one barcode is detected.
• Assign the barcode values to index keys. You can assign a barcode for one index key or all five.
• If a single barcode contains multiple pieces of data, you can parse the barcode into multiple index keys using a pipe character ( | ).
About patchcodes You can use a patchcode to create a new batch when it is detected by the scanner. Patchcodes are similar to barcodes in that they further simplify the task of scanning and organizing documents. Kofax scanning hardware and software can detect and recognize six separate patchcode patterns, while Pixel enabled devices recognize three patterns. If a potential patchcode is found, it is examined for specific characteristics to determine if it is recognizable.
Some of the patchcode characteristics examined are:
• The narrow bars must be 0.08 inch in height.
• The wide bars must be 0.20 inch in height.
• The entire patchcode must be 0.80 inch in height.
• The entire patchcode should be at least 2.0 inches in width.
Each time a patchcode is detected, a new batch is created for the documents that are scanned after it. All newly scanned documents are placed in the new batch until scanning finishes or another patchcode is detected.
Scan using a patchcode Verify that the patchcode is located on the leading edge of the page being inserted into the scanner (if inserted backwards, some patchcodes may accidentally scan as other patchcodes). Also, make sure that the patchcode is positioned horizontally on the page, that it is at least 0.20 inches from the leading edge of the page, and that it does not extend 3.75 inches from the leading edge of the page. Patchcodes are only detected on the front side of a page.
1. Download the patchcodes from the Perceptive Software, Inc., web site and print them.
2. Enable patchcode detection for the capture profile you want to use.
3. Insert the patchcode printouts to divide the documents you are going to scan into individual batches. Insert the patchcode printout on top of the documents you want to designate as a new batch.
Perceptive Software ImageNow Administrator Getting Started Guide
Page 57 of 69
4. Position the patchcode printout toward the scanner feed with the patchcode on the leading edge of the paper.
Note This could vary based on the type of scanner you have.
5. Scan your documents.
What is the ImageNow Printer? The ImageNow Printer allows you to import a document, such as a Microsoft Office document or an email, into ImageNow without having to print and scan it first. You can use the ImageNow Printer from any software program that has a print option. The options you set in an ImageNow Printer capture profile determine how the system processes your ImageNow Printer documents. Because ImageNow Printer stores documents as TIFF files, you can annotate them. You can also set the page orientation, color, and watermark options for the ImageNow Printer.
When you want the ability to highlight a Word document or add a sticky note to an email, consider importing your documents using the ImageNow Printer. When you don't need to annotate, you can use the import from disk or drag object options. With these methods, the system stores the files you import in the original file format. For example, when you import a Word document using the import from disk option, ImageNow stores the document as a DOC file. While you can view the Word document, you cannot annotate it.
About capture profiles A capture profile is a reusable collection of settings that makes capturing a single-click task. The profile stores all the options you need to capture and conduct related processing tasks with ImageNow Client. The scanning options in a capture profile include a source that designates where you are capturing documents from (File, Scanner, and Printer) and other options for document indexing, routing a captured document to a workflow queue, and image processing.
Create a capture profile To create a capture profile, complete the following steps.
1. On the ImageNow toolbar, click the Capture arrow and then click Manage Capture Profiles.
2. In the Capture Profiles dialog box, click Create.
3. In the New Capture Profile dialog box, perform the following steps:
1. On the General tab, under General, perform the following steps:
1. In the Name box, type a unique name for the profile.
2. In the Description box, type a short description of your profile.
2. Under Type, perform the following steps:
1. In the Source list, click ImageNow Printer, File, or Scanner as appropriate.
2. In the Mode list, click Single, Batch, or Package as appropriate.
3. Optional. If you have installed Content Server, select the Submit documents to Content Server check box if you want the captured objects to be submitted to Content Server for full text indexing.
3. Optional. Under Workflow, in the Send To box, click the destination queue option you want. The default option is <None>, in which case the documents are not sent to any queue. If you want to prompt the user for a workflow queue, click <Prompt User>. All other options are the queues to which the current user has Add access.
Perceptive Software ImageNow Administrator Getting Started Guide
Page 58 of 69
4. Depending on your selections on the General tab, complete the information on the File, Scanner, Single, Package, or Batch tabs as appropriate.
5. Optional. On the Index Keys tab, select the options you want, including the Document Type. Double-click a key to make any changes. If a key is set to Empty, this is a default setting and no key is set up for that field.
4. In the <name of capture profile> dialog box, click OK.
5. In the Capture Profiles dialog box, click Close.
Note To quickly create a new capture profile, you can base it on an existing profile by clicking Copy in the Capture Profiles dialog box. Next, click Modify and make the changes you want to create the new profile.
About Package mode Unlike Single or Batch mode, Package mode uses a set of pre-defined Basket Groups, Document Rules, and Capture Profile options to allow you to capture, organize, and verify that you have the documents you need. Package mode lets you collect and index documents with different physical attributes and from multiple sources. Package mode allows you to gather index keys at the point of scanning, much like Single mode, but also allows you to deal with varying sets of data, which is an advantage over Batch mode.
In ImageNow Viewer - Package, you can drag and drop your captured images between the Basket Groups you set up. With Package mode, you can gather the pages in groups or one at a time, and there is no limit to the number of objects you can collect.

Perceptive Software ImageNow Administrator Getting Started Guide
Page 59 of 69
About Template Types You can create many types of templates in ImageNow. A template defines the behavior of aspects of ImageNow such as the security and appearance. You can define a wide range of things including task properties, annotation appearances, addendum behaviors, and groups or users associated with template types.
About addendums A user creates an addendum page to correct or augment the content of a signed document without editing the document itself. Addendum pages differ from other document pages in two ways: the user can only add addendum pages to signed documents, and the user normally creates the content of the addendum using an addendum template. You define addendum templates in Management Console. The user must save and sign the addendum before other users can view it.
You create addendum templates either by typing and formatting the content of the template yourself or by importing an RTF or TXT file into ImageNow and modifying it as necessary. The default template selection is Blank page, which contains no text or formatting.
Create an addendum template To use document management functionality, which includes the version control feature described in this topic, a Document Management license is required.
Use the following procedure to add a template to the list that appears when the user clicks the Add an addendum button in the Viewer. The default template selection is Blank page, which contains no text or formatting.
1. In the Management Console, in the left pane, click Addendum Templates.
2. In the right pane, click New.
3. In the New Addendum Template dialog box, under General, type a name and optional description for the template and then, if you want to keep the template hidden from your users, clear the Is active check box.
4. Under Appearance, do one of the following actions:
• To import an RTF or TXT file, click the Import button and then, in the Select Addendum Template File dialog box, browse to the file, select it, and click Open.
Note Tables in the RTF file are included in the template, but in WebNow, they don't appear as tables.
Perceptive Software ImageNow Administrator Getting Started Guide
Page 60 of 69
• To compose your own template, begin typing in the space below the toolbar. You can use the toolbar buttons to apply the following styles or actions:
Button Style
Bold
Italic
Underline
Font family, font size, color
Undo
Redo
Set alignment
Note If you are creating templates for WebNow users, do not include the double strikethrough style or tables in the template.
5. When you are finished editing the template, click OK.
About annotation templates You provide templates for the annotations that a user can utilize to mark up and comment on a document. Users can annotate a document without affecting the original image. Each ImageNow annotation requires an annotation template.
You specify the security options based on the template. In the annotation template, you can grant users or groups the privilege to create, delete, hide, modify, and view specific annotation templates. For example, you can create a Stamp template with the following text: Received by Accounts Payable. You can set the template security so that only users in the Accounts Payable group can use, modify, or delete annotations created using that Stamp template. If you do not grant ImageNow users in the Human Resources access to view stamps created using that stamp template, those users cannot view, modify, or delete this annotation.
You can remove an annotation template from the list that appears to users without deleting the template completely. You can also remove (without deleting) an annotation type such as check, stamp, or line from the Annotation toolbar.
Create an annotation template To define a template that a user can utilize to mark up and comment on a document, complete the following steps.
1. In the Management Console, in the left pane, click Annotations.
2. In the right pane, perform the following steps:
1. In the Select an Annotation Type box, select an option from the list and then click New.
2. In the selected row under Template Name, type a name for the template and then press ENTER.
3. Select the template and then click Modify.
Perceptive Software ImageNow Administrator Getting Started Guide
Page 61 of 69
3. In the Annotation dialog box for whichever annotation type you selected, perform the following steps:
4. Define the template properties.
1. In the left pane, select Properties.
2. Optional. Supply a Description for the annotation template.
3. Under Options, verify that Is Active is selected so that it appears on the Annotations toolbar.
5. For some template types, you can modify the content.
6. Depending on the Annotation type, in the left pane, Content appears. If it is available, in the left pane, click Content.
7. Modify the options.

Perceptive Software ImageNow Administrator Getting Started Guide
Page 62 of 69
About Administering Views As an ImageNow administrator, you create views that display only the documents and projects your users need to work with. By tailoring your user's view to only the items they need to see, you simplify their user experience. While ImageNow may contain hundreds or thousands of documents, your users see only the subset of items that you enable in their view.
Views enable you to add another layer of protection to documents on ImageNow Server. In addition to the access privileges set for drawers and document types, your users can see the documents within a particular drawer or document type that satisfy the view definition.
Using views, you can customize the columns that the user needs to see in ImageNow Explorer. In the view definition, you can preset column names with meaningful labels and column widths to accommodate the specific data that appears. You can predefine the sort order and the grouping of items. Your view definition can also include a summary of statistical data about the columns. If a view includes statistics, they appear below the search grid.
After you create a view definition, you can assign one or more of the View privileges (Access, Filter, and Manage) to specific users or groups, or both. When your users open ImageNow Explorer, they see only the documents and projects to which you have granted them access via a view.
In Management Console, you can create, modify, and delete view definitions. You can also create relationships between documents, which display as views. To learn the details of creating views, defining column display, and granting user access to views, first create a new view definition or modify an existing one. When you do so, ImageNow View Designer opens.
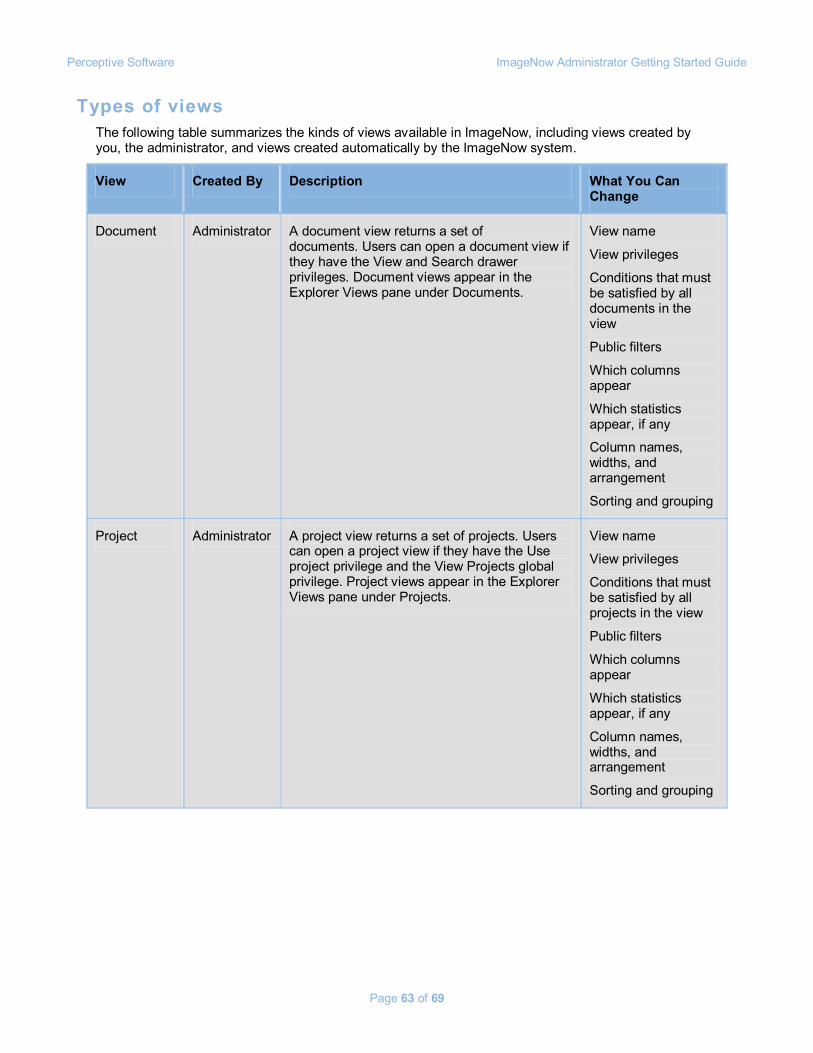
Perceptive Software ImageNow Administrator Getting Started Guide
Page 63 of 69
Types of views The following table summarizes the kinds of views available in ImageNow, including views created by you, the administrator, and views created automatically by the ImageNow system.
View Created By Description What You Can Change
Document Administrator A document view returns a set of documents. Users can open a document view if they have the View and Search drawer privileges. Document views appear in the Explorer Views pane under Documents.
View name
View privileges
Conditions that must be satisfied by all documents in the view
Public filters
Which columns appear
Which statistics appear, if any
Column names, widths, and arrangement
Sorting and grouping
Project Administrator A project view returns a set of projects. Users can open a project view if they have the Use project privilege and the View Projects global privilege. Project views appear in the Explorer Views pane under Projects.
View name
View privileges
Conditions that must be satisfied by all projects in the view
Public filters
Which columns appear
Which statistics appear, if any
Column names, widths, and arrangement
Sorting and grouping
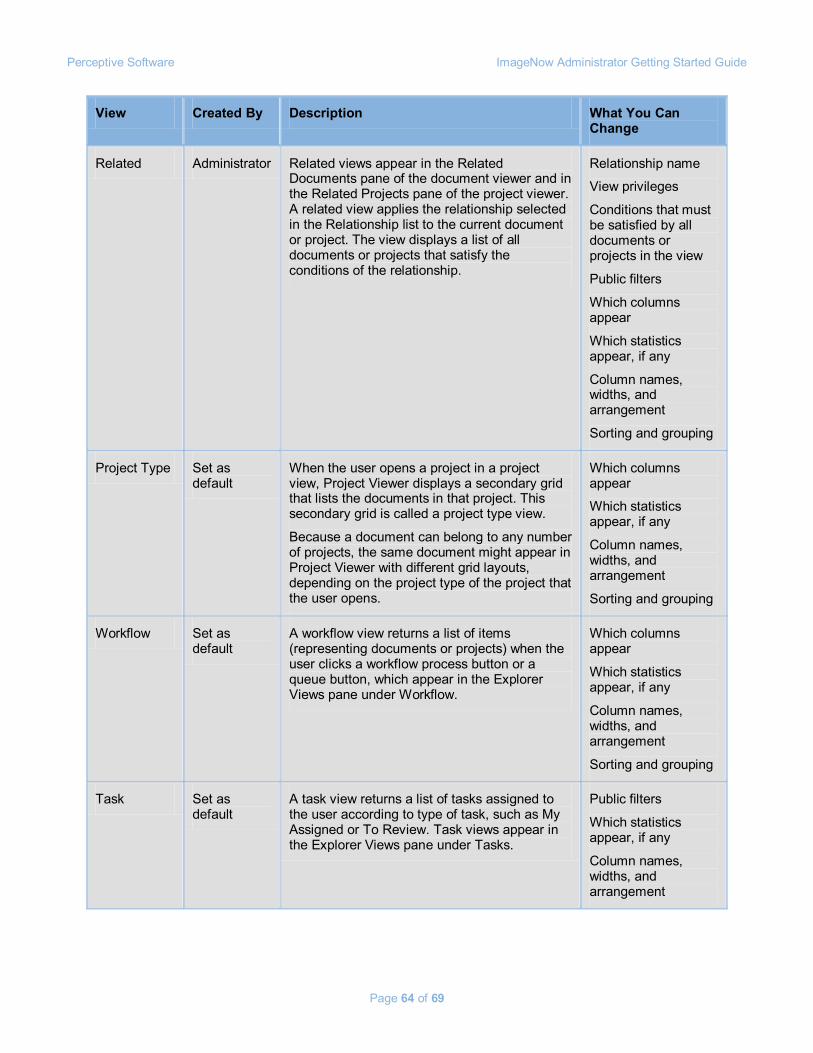
Perceptive Software ImageNow Administrator Getting Started Guide
Page 64 of 69
View Created By Description What You Can Change
Related Administrator Related views appear in the Related Documents pane of the document viewer and in the Related Projects pane of the project viewer. A related view applies the relationship selected in the Relationship list to the current document or project. The view displays a list of all documents or projects that satisfy the conditions of the relationship.
Relationship name
View privileges
Conditions that must be satisfied by all documents or projects in the view
Public filters
Which columns appear
Which statistics appear, if any
Column names, widths, and arrangement
Sorting and grouping
Project Type Set as default
When the user opens a project in a project view, Project Viewer displays a secondary grid that lists the documents in that project. This secondary grid is called a project type view.
Because a document can belong to any number of projects, the same document might appear in Project Viewer with different grid layouts, depending on the project type of the project that the user opens.
Which columns appear
Which statistics appear, if any
Column names, widths, and arrangement
Sorting and grouping
Workflow Set as default
A workflow view returns a list of items (representing documents or projects) when the user clicks a workflow process button or a queue button, which appear in the Explorer Views pane under Workflow.
Which columns appear
Which statistics appear, if any
Column names, widths, and arrangement
Sorting and grouping
Task Set as default
A task view returns a list of tasks assigned to the user according to type of task, such as My Assigned or To Review. Task views appear in the Explorer Views pane under Tasks.
Public filters
Which statistics appear, if any
Column names, widths, and arrangement
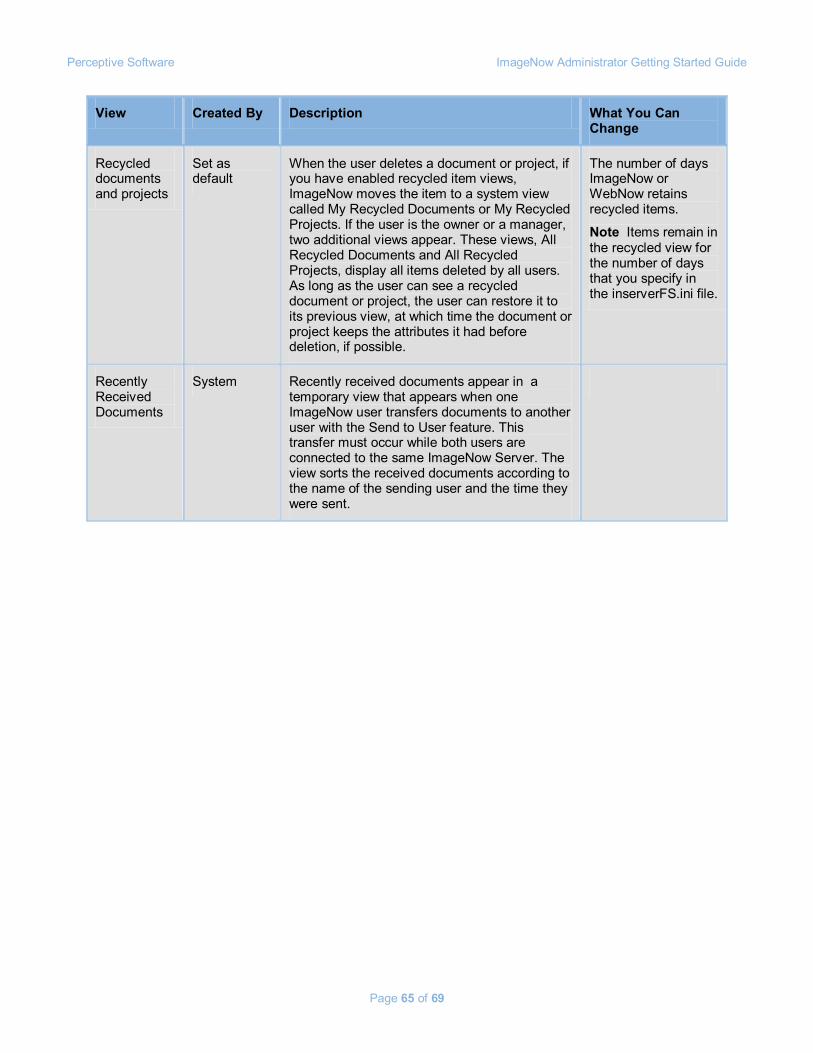
Perceptive Software ImageNow Administrator Getting Started Guide
Page 65 of 69
View Created By Description What You Can Change
Recycled documents and projects
Set as default
When the user deletes a document or project, if you have enabled recycled item views, ImageNow moves the item to a system view called My Recycled Documents or My Recycled Projects. If the user is the owner or a manager, two additional views appear. These views, All Recycled Documents and All Recycled Projects, display all items deleted by all users. As long as the user can see a recycled document or project, the user can restore it to its previous view, at which time the document or project keeps the attributes it had before deletion, if possible.
The number of days ImageNow or WebNow retains recycled items.
Note Items remain in the recycled view for the number of days that you specify in the inserverFS.ini file.
Recently Received Documents
System Recently received documents appear in a temporary view that appears when one ImageNow user transfers documents to another user with the Send to User feature. This transfer must occur while both users are connected to the same ImageNow Server. The view sorts the received documents according to the name of the sending user and the time they were sent.
Perceptive Software ImageNow Administrator Getting Started Guide
Page 66 of 69
Create a view definition To use the View Designer to create a view definition, complete the following steps:
1. In the Management Console, in the left pane, click Views.
2. In the right pane, on the Documents or Projects tab, click New.
3. In the New View dialog box, in the Name box, type a name, and then in the Description box, type the description of the view that will appear in the ToolTip for the view.
4. Click OK, select the view, and then click Modify.
5. In the View Designer window, on the Help menu, click ImageNow View Designer Help to review the steps for adding or changing conditions, adding or modifying public filters, modifying column layout, previewing the view, and assigning view privileges to users and groups.
Modify column and row display You can specify how columns are named, arranged, and sized as well as define sort and grouping of rows in the search grid. All of these procedures appear in the Help topics for ImageNow View Designer.
1. In the Management Console, in the left pane, click Views.
2. In the right pane, on the Document or Project tab, click the view you want to modify, and then click Modify.
3. In the View Designer, on the Help menu, click ImageNow View Designer Help.
About administering related views A user can display one or more related views from ImageNow Viewer or WebNow Viewer. When the user selects a related view to apply to the active document, the Related Documents pane displays documents that match the document with respect to the conditions you define for the related view.
With owner or manager privileges, you can create, rename, and delete related views in ImageNow. When you modify a related view, you automatically enter ImageNow View Designer, where you can create or modify relationship conditions, activate the view, and assign security settings to it.
Create a related document view To perform these procedures, you must be a user with management privileges, a manager, or the owner.
1. In the Management Console, in the left pane, click Relationships.
2. In the right pane, on the Related Documents or Related Projects tab, click New.
3. In the New Relationship dialog box, in the Name box, type a name, and then in the Description box, type the description of the view that will appear in the ToolTip for the view.
4. Click OK, select the view, and then click Modify.
5. In the View Designer window, on the Help menu, click ImageNow View Designer Help to review the steps for adding or changing relationship conditions and assigning view privileges to users and groups.
Perceptive Software ImageNow Administrator Getting Started Guide
Page 67 of 69
Index addendums
overview .....................................................59 templates, creating ......................................59
administrator
area,accessing ............................................18 role, overview ............................................... 5
Adrenaline 650i ..............................................51
AIPE ...............................................................51
annotation templates
creating .......................................................60 overview .....................................................60
application plans
overview .....................................................32 types ...........................................................32
barcodes
configuring ImageNow to recognize .............55 recognition, overview ..................................55
Basket Groups, Package mode ......................58
Batch mode capture profile .............................51
Business Insight Author license ....................... 9
Calculate Blank Page Deletion check box .......54
Canon scanners .............................................52
capture profiles
creating .......................................................57 overview .....................................................57
CaptureNow, overview ....................................51
changing
groups ........................................................30 users...........................................................29
composite properties
creating .......................................................24 overview .....................................................24
concurrent use license ..................................... 9
configuring scanners.......................................51
connection profiles
creating .......................................................17
creating
scanning profiles ........................................ 54 task templates ............................................ 46
custom properties
administering .............................................. 22 creating ...................................................... 23 granting the manage privilege ..................... 23
deleting
groups ........................................................ 30 users .......................................................... 29
demonstration mode ........................................ 9
directories, default, inserver6 ........................... 7
Document deficiency, task type .................. 45
document organization, administrator role ........ 5
Document Rules, Package mode ................... 58
document type lists, overview ......................... 19
document types
creating ...................................................... 20 overview ..................................................... 19
drawers
creating ...................................................... 19 overview ..................................................... 19
feature license ................................................. 9
filters .............................................................. 55
flatbed scanner options .................................. 54
folders, containing server files .......................... 7
Fujitsu scanners ............................................. 52
groups
adding ........................................................ 30 adding users to ........................................... 31 assigning privileges to ................................ 27 deleting ...................................................... 30 managing security for ................................. 28 modifying .................................................... 30
ImageNow Printer
and capture profiles .................................... 51 overview ..................................................... 57
Perceptive Software ImageNow Administrator Getting Started Guide
Page 68 of 69
ImageNow Processing tab ..............................54
ImageNow Server
tools for managing ......................................12
ImageNow Server Administration ....................12
inserver6, default directories ............................ 7
INTool ............................................................12
ISA .................................................................12
ISIS software driver ........................................52
Kofax Adrenaline, installing .............................53
license
Business Insight Author................................ 9 concurrent use ............................................. 9 feature ......................................................... 9 per seat ....................................................... 9 transaction package ..................................... 9
licenses
installing......................................................11
Management Console
overview .....................................................17 starting ........................................................18
management privileges, granting ....................29
OSM (Object Storage Manager)
folder locations ............................................. 8
Package mode
capture profile .............................................51 overview .....................................................58
per seat license ............................................... 9
Pointer, task type ..........................................45
Prescan box ...................................................54
privileges
assigning to users or groups .......................27 assigning, overview .....................................26 hierarchy of .................................................26 task template manager ................................45
project types
overview .....................................................20 security privileges .......................................21
related views
creating .......................................................66
related views, administering ........................... 66
scanners
Canon ........................................................ 52 configuring.................................................. 51 Fujitsu ........................................................ 52 installing ..................................................... 51 SCSI .......................................................... 52 testing ........................................................ 53 USB ........................................................... 52
scanning drivers, installing ............................. 52
scanning profiles, creating .............................. 54
SCSI
card ............................................................ 51 scanners .................................................... 52
security tasks
administrator role .......................................... 5
Signature required, task type ...................... 45
Single mode capture profile ............................ 51
task templates
actions........................................................ 47 assignment lists .......................................... 47 components ................................................ 46 creating ...................................................... 46 due date methods ....................................... 49 management privileges ............................... 45 properties ................................................... 46 reason lists ................................................. 48 security....................................................... 49
tasks, overview .............................................. 45
templates
overview ..................................................... 59
testing scanners ............................................. 53
transaction package license ............................. 9
USB scanners ................................................ 52
users
adding ........................................................ 28 adding to a group........................................ 31 assigning privileges to ................................ 27 deleting ...................................................... 29 managing security for ................................. 28

Perceptive Software ImageNow Administrator Getting Started Guide
Page 69 of 69
modifying ....................................................29
view definitions, creating .................................66
views
columns, modifying display..........................66 rows, modifying display ...............................66 types ...........................................................63
views, related
administering .............................................. 66
Word document, importing with ImageNow Printer ........................................................ 57
workflow management, administrator role......... 5
workflow processes
administering .............................................. 36 creating ...................................................... 36