Embed Size (px)
Citation preview
IM1200/IM2400 InterMail Voice Mail System
Administrator
Installation and Configuration Guide
10IM1224M.v246.EN1
DSG, DSG logo, AA9604, VL880, VL880L, IM1200, IM2400, IL1000 and IL5000 are trademarks of DSG Technology.
Windows and Outlook Express are trademarks of Microsoft Inc. Other names used here are trademarks of their
respective owners.
Copyright © DSG Technology, Inc. All rights reserved.
DSG Technology, Inc.
7F, 222 Cheng-Teh Road, Sec. 4, Taipei, Taiwan 111
Tel:886-2-88615558
Fax:886-2-88615557
E-mail:[email protected]
http://www.dsg.com.tw
Table of Contents
3
Table of Contents
Chapter 1 General Description .......................................................................................................... 6
New Generation Voice Mail ........................................................................................... 7
System Features ............................................................................................................... 7
Auto-Attendant Features ................................................................................................ 8
Voice Messaging Features .............................................................................................. 8
Chapter 2 Installing InterMail.......................................................................................................... 11
Package Content ............................................................................................................ 12
Environmental Requirements ...................................................................................... 12
Telephone System.................................................................................................12
Network Environment .........................................................................................13
UMS E-Mail Server...............................................................................................13
Installing InterMail – IM1200 ....................................................................................... 13
Installing InterMail - IM2400........................................................................................ 15
Chapter 3 Installing IMS Utility....................................................................................................... 19
Before You Start ............................................................................................................. 20
Installing IMS Utility ..................................................................................................... 20
Login to InterMail.......................................................................................................... 20
Overview of IMS Utility................................................................................................ 22
IMS Basic Settings.......................................................................................................... 23
Using Setup Wizard ...................................................................................................... 24
Chapter 4 Integration with PBX....................................................................................................... 25
Selecting Your PBX ........................................................................................................ 26
Call Transfer ................................................................................................................... 26
Setting Up InterMail in Non-Supervised Mode ........................................................ 29
In-Band DTMF Strings .........................................................................................30
Busy Time Lag.......................................................................................................33
Setting Up InterMail in Supervised Mode ................................................................. 33
Call Progress Tone................................................................................................34
Automatic Call Progress Learning .....................................................................35
DTMF Signall ........................................................................................................36
Setting Up InterMail in Semi-Supervised Mode ....................................................... 37
Busy Recall, Ring Releasee ..................................................................................37
Call Pickup.............................................................................................................37
Chapter 5 Auto Attendant................................................................................................................ 39
Designing Your Auto-Attendant ................................................................................. 40
Table of Contents 4
Creating Extension Blocks ............................................................................................ 40
Creating Operator & Extension Groups ..................................................................... 42
Setting Channel Parameters ......................................................................................... 43
Designing an AA-Menu................................................................................................ 45
Recording AA-Menu Greetings..........................................................................47
Transfer Options ...................................................................................................47
Defining Business Schedule ......................................................................................... 49
Defining Holiday Calendar .......................................................................................... 50
Chapter 6 Voice Messaging.............................................................................................................. 53
Defining Voice Messaging Parameters ....................................................................... 54
Setting Up Message Notifications ............................................................................... 56
Internal Notifications ...........................................................................................56
External Notifications ..........................................................................................57
Mailbox Management ................................................................................................... 58
Chapter 7 Unified Messaging System............................................................................................. 65
Setting Up E-mail Addresses ....................................................................................... 66
When Are E-mails Sent ................................................................................................. 67
Chapter 8 User Operations............................................................................................................... 69
Accessing Your Personal Mailbox ............................................................................... 70
Retrieving Your Messages ............................................................................................ 70
Sending a Message......................................................................................................... 71
Editing Your Personal Mailbox Options..................................................................... 72
Chapter 9 DTMF Programming....................................................................................................... 77
DTMF Programming Mode.......................................................................................... 78
Entering and Exiting the DTMF Programming Mode.............................................. 78
DTMF Programming Procedure.................................................................................. 78
DTMF and Action Code Table ............................................................................79
3-Digit Function Code Table ...............................................................................80
Chapter 10 Advanced Parameters................................................................................................. 105
Advanced Parameter 1................................................................................................ 106
Advanced Parameter 2................................................................................................ 107
Advanced Parameter 3 and 4 ..................................................................................... 108
Chapter 11 System Status and Backup ......................................................................................... 111
System Status................................................................................................................ 112
System Alarm ............................................................................................................... 113
System Backup & Restore ........................................................................................... 113
Parameters Backup & Restore.................................................................................... 114
System Upgrade........................................................................................................... 115

Table of Contents
5
Appendix A: 3-Digit Function Codes ........................................................................................... 117
Appendix B: System Prompts ........................................................................................................ 127
Appendix C: System Specifications............................................................................................... 149
Appendix D: Integrated PBX List .................................................................................................. 151
Index.................................................................................................................................................. 153
Chapter 1 General Description 6
Chapter 1 General Description
This chapter will guide you through the main features of InterMail.
Chapter 1 General Description
7
New Generation Voice Mail InterMail is a new generation voice mail system that combines the Internet with
voice processing technologies to provide a robust, dynamic, and user friendly
voice messaging system that meets your office communication needs today.
Designed with small-and-medium size business customers in mind, its features
and functionality nonetheless rival those used by Fortune 500’s.
System Features � Easy PBX Integration: Integrating with PBX has never been easier. Simply
pick the PBX from the PBX list and then select the call transfer method. The
call transfer methods include Supervised, Non-Supervised,
Semi-Supervised, and Call Pickup.
� Network Based Voicemail Management Software (IMS): Gives you an
easy graphical user interface to maintain the system via local and wide area
network. With the ubiquity of Internet, you can have full control of the
system from wherever the network is available.
� System Report: Offers the system administrator easy overview of call
statistics, mailbox usage, system status and performance.
� Incoherent Configuration Report: Keeps track of all system configurations
that are incoherent to other settings. This is very useful when the
administrator is trouble shooting the system configuration.
� Live System Monitoring: All system activities can be monitored through
the network using the IMS utility program. The DTMF inputs and outputs
at each voice channel can be captured by a built-in line monitor (digit
grabber).
� Voice-Guided System Configuration: InterMail allows you to do the
system setup and configuration changes using a simple touch-tone phone
instead of running a PC. It makes the process easy by providing
comprehensive voice prompts that guide you through every step of the
way.
� System Configuration Backup: The system parameters and mailbox
configurations can be backed up to the system administrator’s local hard
drive. This enables you to keep records of various installations and
expedite disaster recovery process.
� Dedicated Hardware and Software: InterMail integrated, all-in-one,
non-PC based architecture makes it a stable, secure, and reliable product.
� Multilingual System Announcement: Users and callers can select the
language they prefer to hear in the system greetings and announcements.
Chapter 1 General Description 8
� Name Directory: Gives the caller a quick and easy way to locate the person
they are trying to reach by entering their first or last name.
� Holiday Greetings: The administrator can set up a holiday calendar
containing single or a range of dates each capable of holding its own
holiday greeting.
Auto-Attendant Features � Custom Automated Attendant Menu: Up to 300 different Auto Attendant
Menus (AA Menus) can be designed and used to handle calls differently
per different time of day, day of week, and line of the system.
� Operator & Extension Groups: Extensions can be grouped together to
form a team of operators, a department, or for other purposes. Different
operator teams can be selected for Business Hours, Break Hours, After
Hours, and Closed Days.
� Call Distribution: Calls can be distributed among group members in linear,
circular, or ACD fashion.
� Automatic Call Forward & Do-Not-Disturb: These are convenient call
answering options that can be individually set for each extension.
� Conference Call: If supported by your PBX, InterMail can transfer calls to
an external phone number when the called party is not at his/her
extension.
Voice Messaging Features
� Unified Messaging System: Your voice message can be delivered to your
e-mail address as a Wave file attachment. The messages can be categorized
as new or old message after its delivery.
� Virtual and Multi-Tenant Mailboxes: Aside from Real mailboxes,
InterMail provides Virtual and Multi-Tenant mailboxes for messaging-only
or extension sharing applications.
� Personal Distribution Lists: Each mailbox can define up to 9 personal
message distribution lists. Messages can be sent to multiple recipients with
a simple selection of a list.
� Automatic Message Forward: Lets you forward all messages to a
co-worker’s mailbox or a distribution list when you are away. Messages
can be easily shared this way without any of them being overlooked.
� Versatile Message Notification: You can receive notification of incoming
messages via extension, message lamp, pager, regular phone, mobile phone,
and E-mail. You can also schedule the time you want the notification to be

Chapter 1 General Description
9
in effect, retry interval, and retry count.
� Urgent and Private Message Tags: Messages can be marked with different
tags to indicate the nature of the messages. The playback of the messages
can also be prioritized based on the tag.
� Message Play Control: A comprehensive set of commands including
Replay, Save, Delete, Time Stamp, Forward, Skip, Rewind, Fast Forward,
and Volume Adjustment, offers the user a convenient and efficient way of
playing back messages.


Chapter 2 Installing InterMail
11
Chapter 2 Installing InterMail
This chapter explains the environmental requirements and the installation steps
of InterMail.

Chapter 2 Installing InterMail 12
Package Content Thank you for purchasing InterMail Voice Mail System. InterMail includes two
models: IM1200 and IM2400. The content might vary depending on the location
and the dealer you have purchased the unit from. Report any damage or missing
items in the package to your dealer right away.
Items in your package include:
� InterMail Unit (IM1200 or IM2400)
� Power Supply (12V DC) (IM1200)
� Power Cord
� Installation Guide and IMS Utility (CD)
� RJ-45 Network Cable
� RJ14-to-RJ11 Line Splitters
Note: The network cable provided is a straight cable. Should you need to
connect a PC directly to the system, please prepare a crossover cable, i.e. pin 1, 3
and pin 2, 6 are swapped.
Environmental Requirements The InterMail should be located in a dust-free environment that is near the trunk
lines from your existing telephone system. The InterMail must have access to
your network wiring if you plan to access InterMail through your LAN (Local
Area Network) or WAN (Wide Area Network), or if you plan to use the Internet
telephony features of InterMail.
It is highly recommended that you use an Uninterruptible Power Supply (UPS)
in conjunction with the InterMail to protect against power surges and failures.
Telephone System InterMail is compatible with most major brands of Telephone Systems/PBX,
including:
Manufacturer Model (Examples)
ALCATEL 4200/4400, OmniPCX Office
AVAYA Partner, Merlin/Definity
NEC ICS7400/EDK, NDK, M80, M100, MCI140
NORTEL Mercator, Norstar, Option 11
Panasonic KXTD-1232/500, KXTA-308/824
Chapter 2 Installing InterMail
13
Philips D120, SOPHO FVM 805/810/300, DS-1000
SIEMENS Hicom 300, Hipath 4000
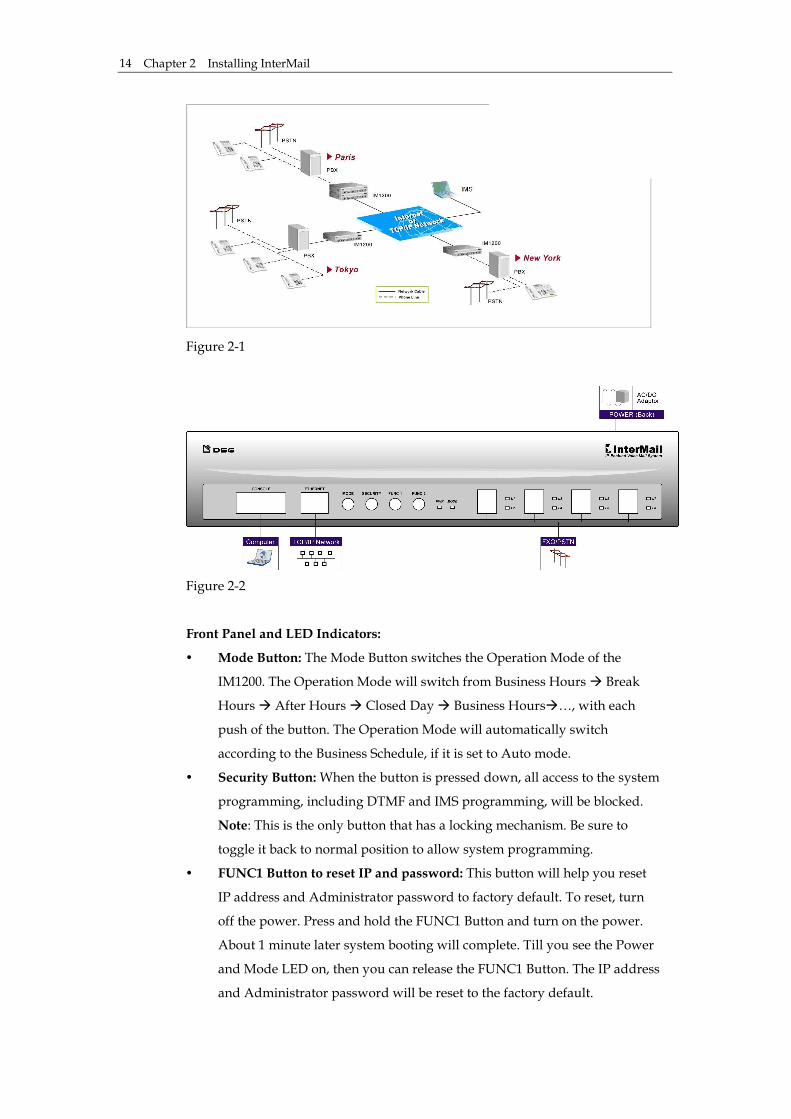
Figure 2-1
InterMail comes with 4 or 8 voice channels, and the same number of analogue
ports is required from the Telephone System. In most cases, the VM ports from
the Telephone System are the preferred ones to be connected to InterMail.
Network Environment IP Networks
InterMail provides an Ethernet port allowing you to connect it to your IP
network. Please prepare a fixed IP address for it. Then you will be able to access
the system using IMS utility for further configuration.
Note: When using a PC accessing InterMail, please make sure your PC is located
in the same subnet as the InterMail.
Direct Connection
When a LAN is not available, you could still access InterMail using a PC. Simply
assign an IP address to the InterMail. Connect one end of a crossover cable to
InterMail and the other end to your PC. Please make sure your PC is set to be in
the same subnet as the InterMail.
Note: A crossover cable requires pin 1, 3 and pin 2, 6 swapped.
UMS E-Mail Server
InterMail can automatically send an e-mail with the voice message attachment to
a designated e-mail address whenever a mailbox receives a new voice message.
In order for this to work, a standard SMTP e-mail server with a valid e-mail
address is required.
Installing InterMail – IM1200 The following is a schematic for the line configuration of IM1200 with other
devices.
Chapter 2 Installing InterMail 14
Figure 2-1
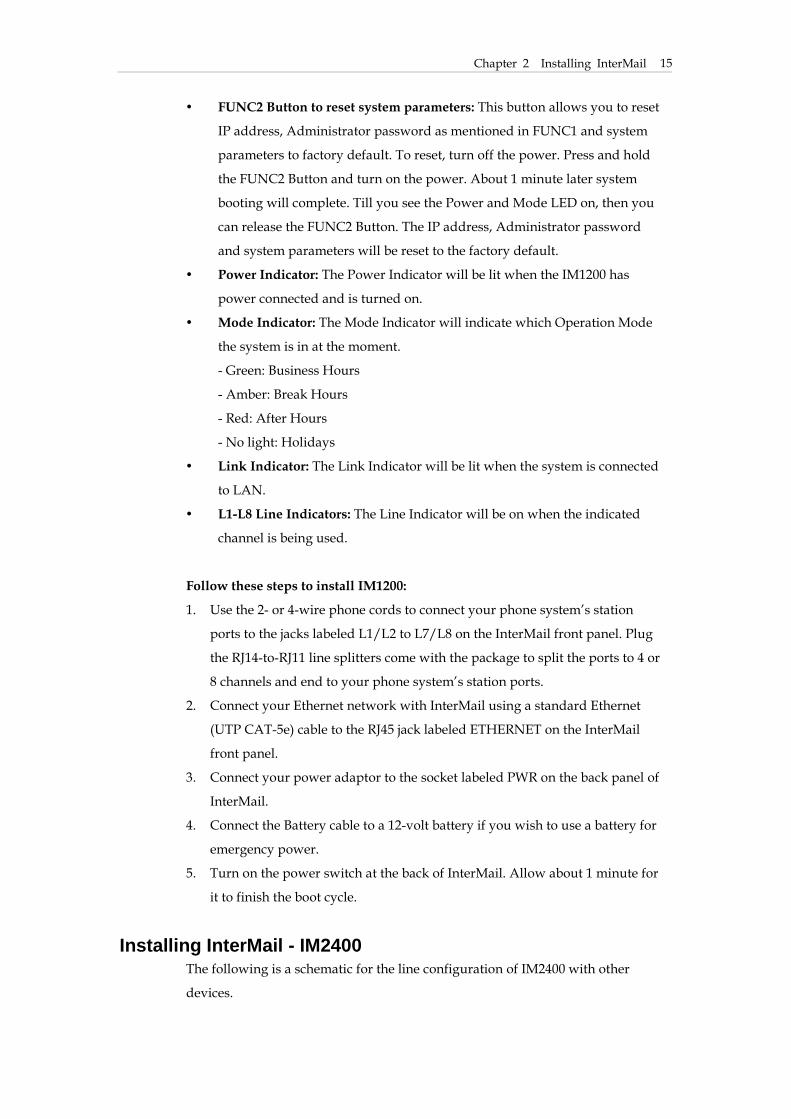
Figure 2-2
Front Panel and LED Indicators:
� Mode Button: The Mode Button switches the Operation Mode of the
IM1200. The Operation Mode will switch from Business Hours � Break
Hours � After Hours � Closed Day � Business Hours�…, with each
push of the button. The Operation Mode will automatically switch
according to the Business Schedule, if it is set to Auto mode.
� Security Button: When the button is pressed down, all access to the system
programming, including DTMF and IMS programming, will be blocked.
Note: This is the only button that has a locking mechanism. Be sure to
toggle it back to normal position to allow system programming.
� FUNC1 Button to reset IP and password: This button will help you reset
IP address and Administrator password to factory default. To reset, turn
off the power. Press and hold the FUNC1 Button and turn on the power.
About 1 minute later system booting will complete. Till you see the Power
and Mode LED on, then you can release the FUNC1 Button. The IP address
and Administrator password will be reset to the factory default.
Chapter 2 Installing InterMail
15
� FUNC2 Button to reset system parameters: This button allows you to reset
IP address, Administrator password as mentioned in FUNC1 and system
parameters to factory default. To reset, turn off the power. Press and hold
the FUNC2 Button and turn on the power. About 1 minute later system
booting will complete. Till you see the Power and Mode LED on, then you
can release the FUNC2 Button. The IP address, Administrator password
and system parameters will be reset to the factory default.
� Power Indicator: The Power Indicator will be lit when the IM1200 has
power connected and is turned on.
� Mode Indicator: The Mode Indicator will indicate which Operation Mode
the system is in at the moment.
- Green: Business Hours
- Amber: Break Hours
- Red: After Hours
- No light: Holidays
� Link Indicator: The Link Indicator will be lit when the system is connected
to LAN.
� L1-L8 Line Indicators: The Line Indicator will be on when the indicated
channel is being used.
Follow these steps to install IM1200:
1. Use the 2- or 4-wire phone cords to connect your phone system’s station
ports to the jacks labeled L1/L2 to L7/L8 on the InterMail front panel. Plug
the RJ14-to-RJ11 line splitters come with the package to split the ports to 4 or
8 channels and end to your phone system’s station ports.
2. Connect your Ethernet network with InterMail using a standard Ethernet
(UTP CAT-5e) cable to the RJ45 jack labeled ETHERNET on the InterMail
front panel.
3. Connect your power adaptor to the socket labeled PWR on the back panel of
InterMail.
4. Connect the Battery cable to a 12-volt battery if you wish to use a battery for
emergency power.
5. Turn on the power switch at the back of InterMail. Allow about 1 minute for
it to finish the boot cycle.
Installing InterMail - IM2400 The following is a schematic for the line configuration of IM2400 with other
devices.
Chapter 2 Installing InterMail 16
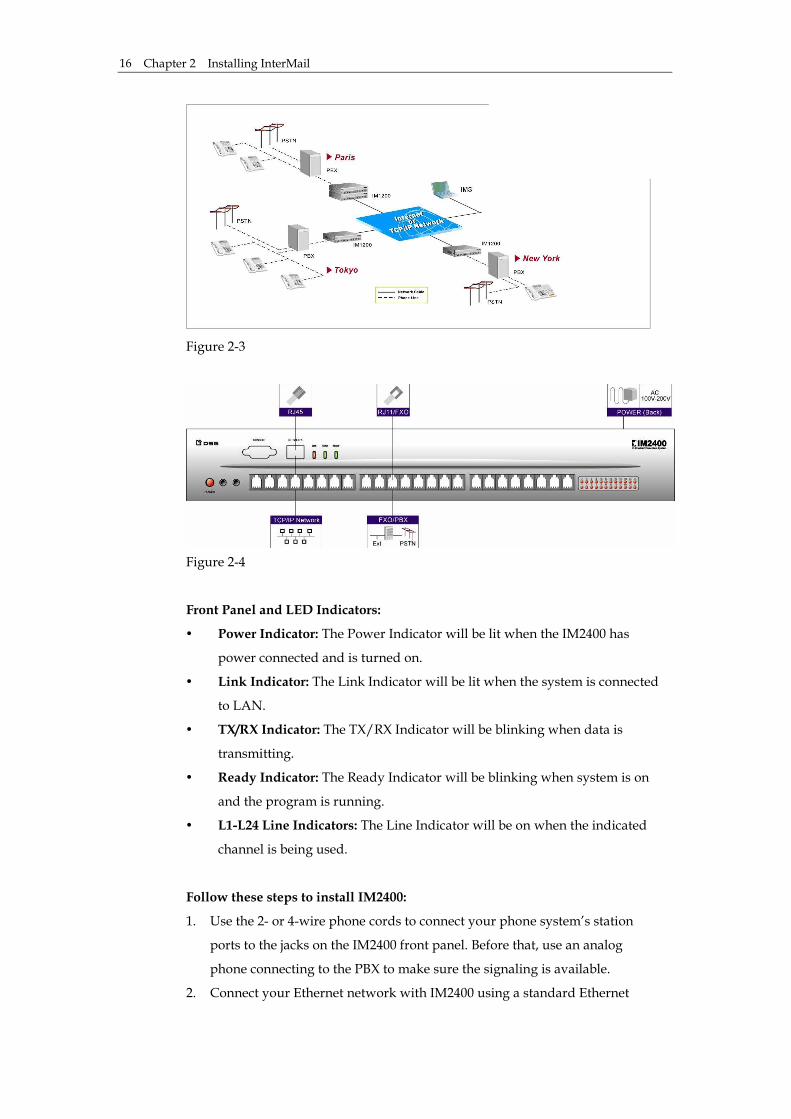
Figure 2-3
Figure 2-4
Front Panel and LED Indicators:
� Power Indicator: The Power Indicator will be lit when the IM2400 has
power connected and is turned on.
� Link Indicator: The Link Indicator will be lit when the system is connected
to LAN.
� TX/RX Indicator: The TX/RX Indicator will be blinking when data is
transmitting.
� Ready Indicator: The Ready Indicator will be blinking when system is on
and the program is running.
� L1-L24 Line Indicators: The Line Indicator will be on when the indicated
channel is being used.
Follow these steps to install IM2400:
1. Use the 2- or 4-wire phone cords to connect your phone system’s station
ports to the jacks on the IM2400 front panel. Before that, use an analog
phone connecting to the PBX to make sure the signaling is available.
2. Connect your Ethernet network with IM2400 using a standard Ethernet

Chapter 2 Installing InterMail
17
(UTP CAT-5e) cable to the RJ45 jack labeled ETHERNET on the IM2400 front
panel.
3. Connect your power adaptor to the socket labeled PWR on the back panel of
IM2400.
4. Turn on the power switch at the back of IM2400. Allow about 1 minute for it
to finish the boot cycle.

Chapter 3 Using IMS Utility
19
Chapter 3 Installing IMS Utility
The InterMail Management Software (IMS) is a Windows-based software
allowing you to setup and maintain the InterMail. This chapter describes the
installation and usage of the IMS utility.
Chapter 3 Using IMS Utility 20
Before You Start Before installing IMS utility, please make sure your computer conforms to the
minimum system requirement blow:
� Windows 2000, XP, VISTA, WIN7
� Pentium III or higher
� Memory: 128 MB or higher recommended
� Available Hard Disk Space: 20 MB or above
� CD-ROM drive (for installation)
� LAN for connecting to InterMail
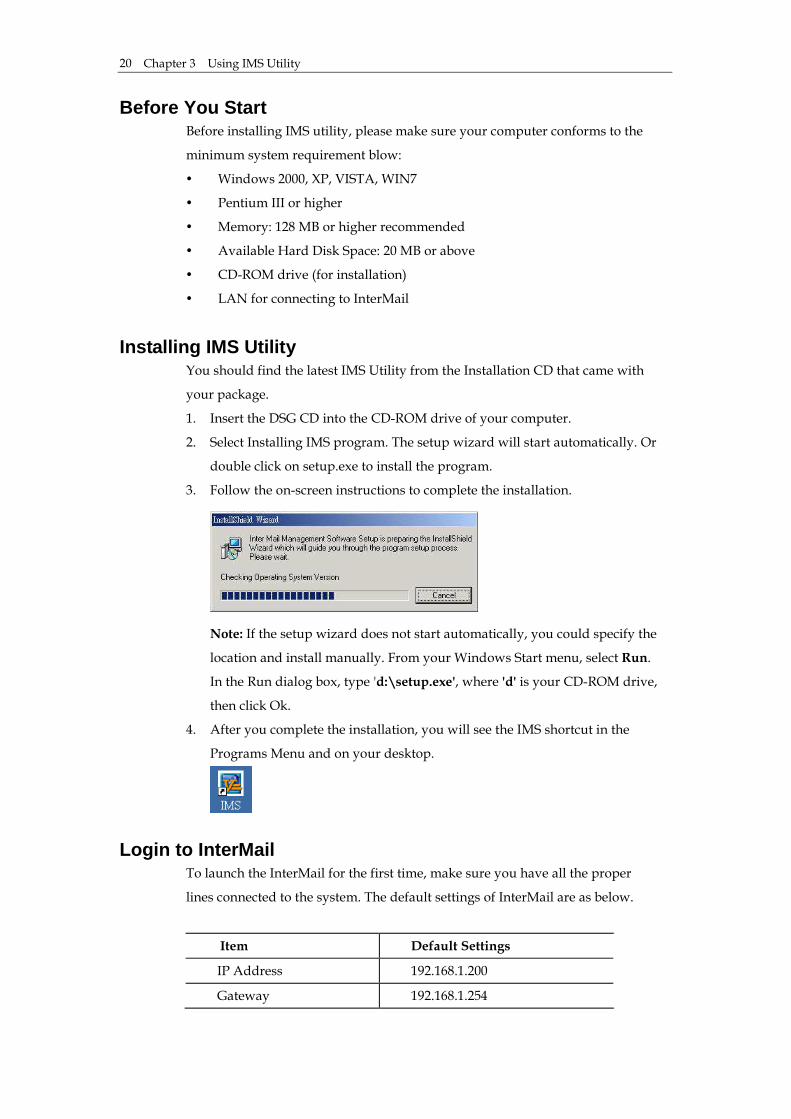
Installing IMS Utility You should find the latest IMS Utility from the Installation CD that came with
your package.
1. Insert the DSG CD into the CD-ROM drive of your computer.
2. Select Installing IMS program. The setup wizard will start automatically. Or
double click on setup.exe to install the program.
3. Follow the on-screen instructions to complete the installation.
Note: If the setup wizard does not start automatically, you could specify the
location and install manually. From your Windows Start menu, select Run.
In the Run dialog box, type 'd:\setup.exe', where 'd' is your CD-ROM drive,
then click Ok.
4. After you complete the installation, you will see the IMS shortcut in the
Programs Menu and on your desktop.
Login to InterMail To launch the InterMail for the first time, make sure you have all the proper
lines connected to the system. The default settings of InterMail are as below.
Item Default Settings
IP Address 192.168.1.200
Gateway 192.168.1.254
Chapter 3 Using IMS Utility
21
Subnet Mask 255.255.255.0
DNS 168.95.1.1
Password 1234
Table 3-1
1. Select a PC where IMS Utility is installed. Change the PC’s IP settings, if
necessary, to conform to InterMail default setting.
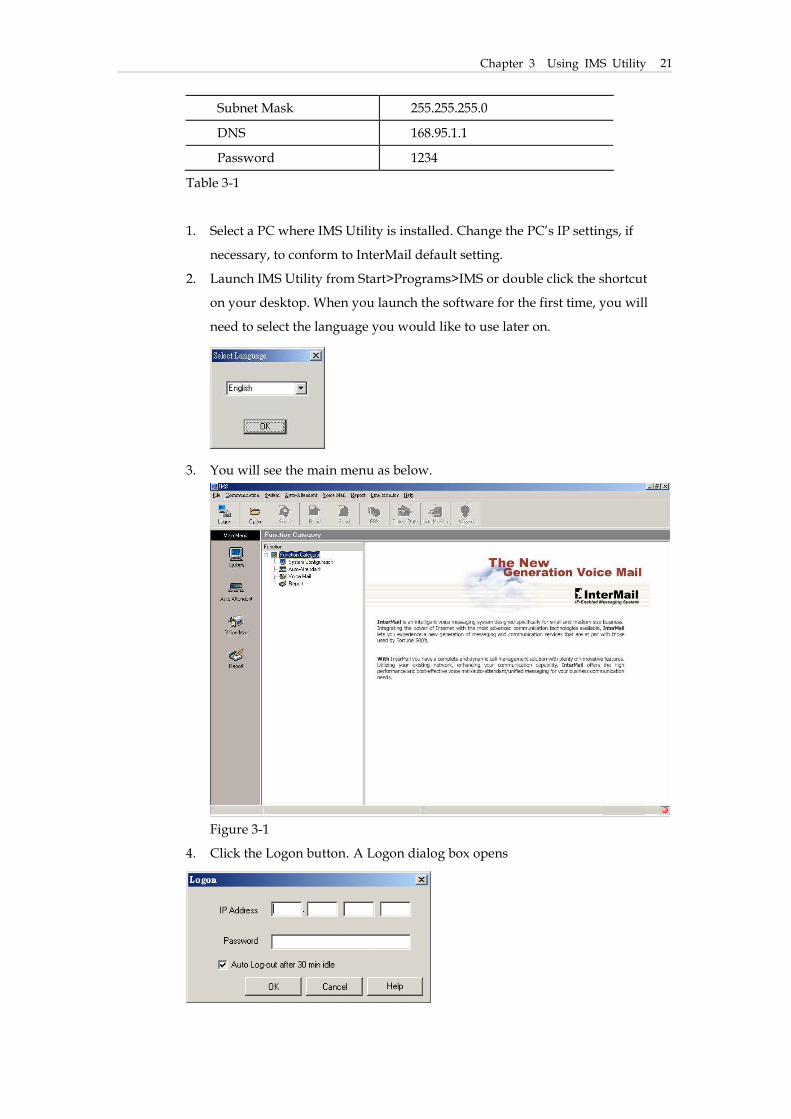
2. Launch IMS Utility from Start>Programs>IMS or double click the shortcut
on your desktop. When you launch the software for the first time, you will
need to select the language you would like to use later on.
3. You will see the main menu as below.
Figure 3-1
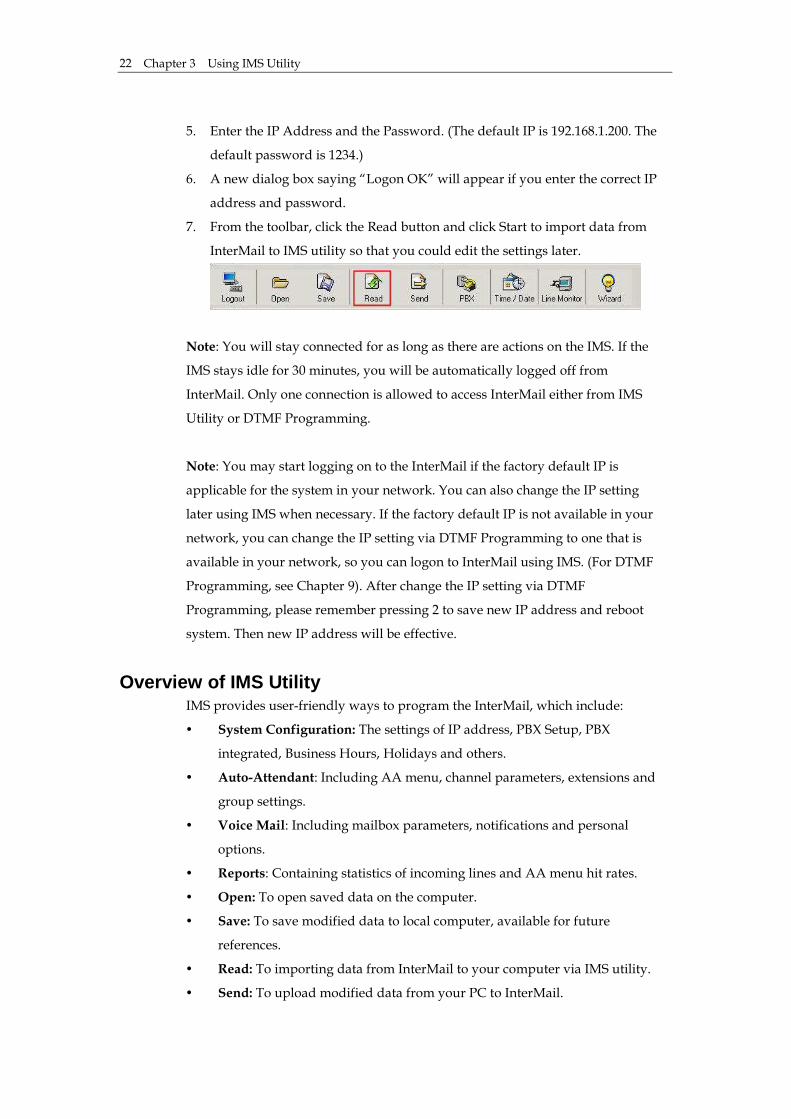
4. Click the Logon button. A Logon dialog box opens
Chapter 3 Using IMS Utility 22
5. Enter the IP Address and the Password. (The default IP is 192.168.1.200. The
default password is 1234.)
6. A new dialog box saying “Logon OK” will appear if you enter the correct IP
address and password.
7. From the toolbar, click the Read button and click Start to import data from
InterMail to IMS utility so that you could edit the settings later.
Note: You will stay connected for as long as there are actions on the IMS. If the
IMS stays idle for 30 minutes, you will be automatically logged off from
InterMail. Only one connection is allowed to access InterMail either from IMS
Utility or DTMF Programming.
Note: You may start logging on to the InterMail if the factory default IP is
applicable for the system in your network. You can also change the IP setting
later using IMS when necessary. If the factory default IP is not available in your
network, you can change the IP setting via DTMF Programming to one that is
available in your network, so you can logon to InterMail using IMS. (For DTMF
Programming, see Chapter 9). After change the IP setting via DTMF
Programming, please remember pressing 2 to save new IP address and reboot
system. Then new IP address will be effective.
Overview of IMS Utility
IMS provides user-friendly ways to program the InterMail, which include:
� System Configuration: The settings of IP address, PBX Setup, PBX
integrated, Business Hours, Holidays and others.
� Auto-Attendant: Including AA menu, channel parameters, extensions and
group settings.
� Voice Mail: Including mailbox parameters, notifications and personal
options.
� Reports: Containing statistics of incoming lines and AA menu hit rates.
� Open: To open saved data on the computer.
� Save: To save modified data to local computer, available for future
references.
� Read: To importing data from InterMail to your computer via IMS utility.
� Send: To upload modified data from your PC to InterMail.

Chapter 3 Using IMS Utility
23
� PBX: To specify a PBX model and import built-in parameters automatically.
This will reduce the setting tasks.
� Date/Time: To define the system date and time.
� Live Monitor: To check the system info such as storage and CPU loading
and monitor the current status of each channel.
� Wizard: Use Wizard to setup the system step by step.
IMS Basic Settings
After you log into the InterMail successfully, you will need to setup the basic
items.
1. Go to Main Menu. Select System Configuration>System Parameters.
2. Password: InterMail provides two kinds of password. One for the system
administrator; one for the person to record greetings. The administrator
could edit all functions from DTMF Programming Mode or access the IMS
utility. The person who uses Greeting Recording Password can only access
Function 330 from DTMF Programming Mode to record greetings for
protecting the system from non-technical engineers.
3. UMS: InterMail could send voice mails as wav file attachments via e-mail to
extension users. Input the email address assigned to InterMail and the SMTP
server IP address. If your mail server requires authentication, enable this
option and input the associated account name and password.
4. IP Settings: Change the IP settings of InterMail allowing it to conform to

Chapter 3 Using IMS Utility 24
your network configurations.
5. System Time and Date: From the toolbar, select Time/Date button. Set
system current time and date.
Using Setup Wizard
It is strongly advised to use the IMS Setup Wizard for first time configuration of
the system. The Setup Wizard will guide the Administrator through all the steps
of how to configure the system in detail. Click the Wizard icon and follow the
steps to configure the system.

Chapter 4 Integration with PBX
25
Chapter 4 Integration with PBX
This chapter includes the details of the integration of InterMail and PBX.
Chapter 5 Auto Attendant 26
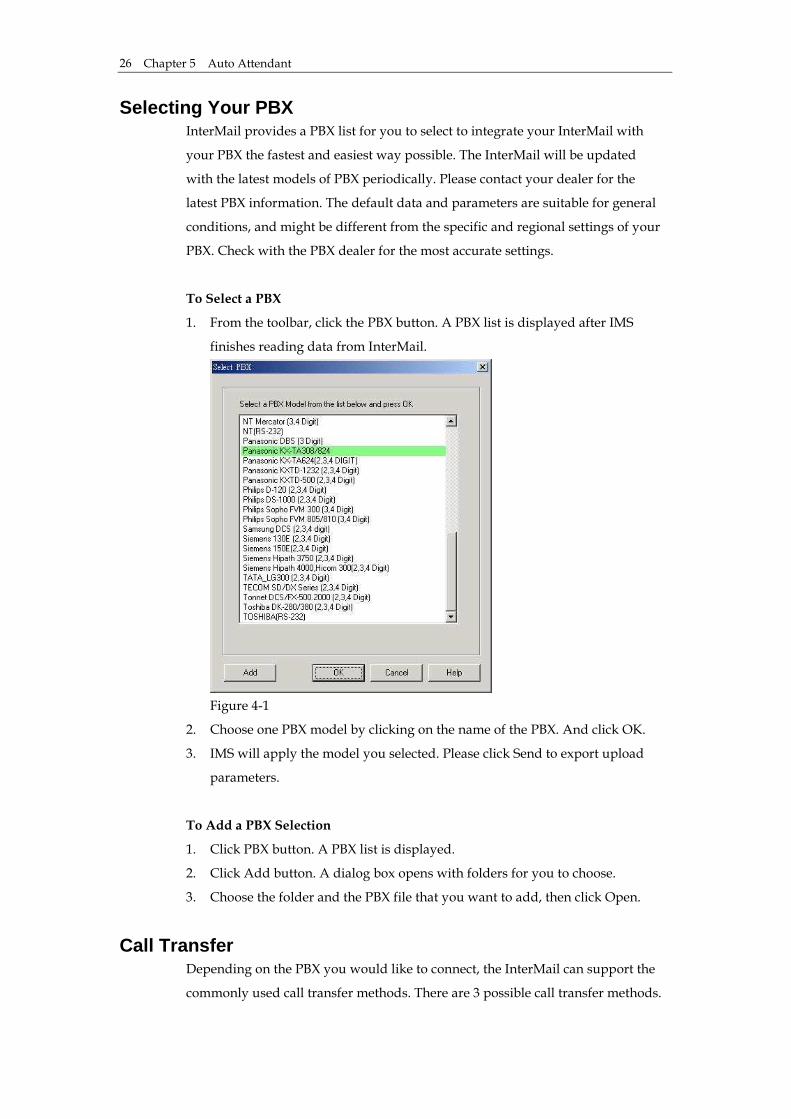
Selecting Your PBX InterMail provides a PBX list for you to select to integrate your InterMail with
your PBX the fastest and easiest way possible. The InterMail will be updated
with the latest models of PBX periodically. Please contact your dealer for the
latest PBX information. The default data and parameters are suitable for general
conditions, and might be different from the specific and regional settings of your
PBX. Check with the PBX dealer for the most accurate settings.
To Select a PBX
1. From the toolbar, click the PBX button. A PBX list is displayed after IMS
finishes reading data from InterMail.
Figure 4-1
2. Choose one PBX model by clicking on the name of the PBX. And click OK.
3. IMS will apply the model you selected. Please click Send to export upload
parameters.
To Add a PBX Selection
1. Click PBX button. A PBX list is displayed.
2. Click Add button. A dialog box opens with folders for you to choose.
3. Choose the folder and the PBX file that you want to add, then click Open.
Call Transfer
Depending on the PBX you would like to connect, the InterMail can support the
commonly used call transfer methods. There are 3 possible call transfer methods.
Chapter 4 Integration with PBX
27
� Non-Supervised: The line is released when InterMail transfers a call under
Non-Supervised Mode. The PBX should be configured to forward the call
back to the VM port when the extension is not available. This mode allows
InterMail to untie its resource and provides the best performance. This is
the recommended call transfer mode. There are two ways Non-Supervised
call transfer can be achieved:
- In-Band DTMF String: InterMail will check the In-Band DTMF String
sent by the PBX for the reason (Busy or Ring/No-Answer) the call is
sent back. This method requires the PBX be capable of sending
In-Band DTMF Strings with condition codes when forwarding calls
back to InterMail.
- Busy Time Lag: Some PBXes send the same In-Band DTMF strings for
both Busy and No-Answer Call Forward. This method uses the time
lag between receiving the Busy and No-Answer Call Forward when
the call is bounced back from the PBX to determine the extension is
Busy or No-Answer. This method is only recommended for certain
PBX models.
� Supervised: In contrast to Non-Supervised Mode, Supervised Mode does
not release the line when transferring the call. It instead holds and
monitors the line for the extension’s response. It then retrieves the call if
the extension is not available, or releases the line if the call has been picked
up by the extension. This mode will take up the most resource of
InterMail’s, but will be the only mode possible if the PBX does not provide
any extension status information when calls are transferred. There are two
things InterMail can use to monitor the call transfer:
- Call Progress Tone: InterMail monitors the Call Progress Tones (CPT)
when transferring a call, and retrieves the call when the defined
number of Busy or Ringback tones are received, then proceeds to take
the call to the corresponding call flow.
- DTMF Signal: Instead of Call Progress Tone, InterMail looks for the
DTMF Signal sent by the PBX when transferring the call. It will
retrieve the call and process it according to the DTMF Signal it
receives. Not all PBXes provide DTMF Signals for extension status.
� Semi-Supervised: In the case the PBX provides an incomplete set of
In-Band DTMF Strings, Semi-Supervised Mode can be used instead of
Supervised Mode to free up some system resource.
- Busy Recall, Ring Release: InterMail will first operate under
Supervised Mode to determine and retrieve the call if the extension is
Chapter 5 Auto Attendant 28
Busy. If the extension is not Busy, the line will be released in the
Non-Supervised Mode. This mode requires the Busy CPT parameters
in the Supervised mode and the In-Band DTMF String for the
No-Answer condition in the Non-Supervised mode be set properly
first.
- Call Pickup: Similar to Busy Recall, Ring Release method, the call is
retrieved if it is Busy and released otherwise. InterMail will then use
the Call Pickup function of the PBX to retrieve the call in a definite
amount of time, assuming the call is not answered.
To configure the transferring codes:
No matter which transfer method you select, you will need to configure the
transfer codes first.
1. Choose System Configuration > PBX Parameters. Select the Transfer Mode
Tab.
Figure 4-2
2. Different Transfer Modes can be selected for the operator and extensions
respectively for Business Hours and Non-Business Hours. Non-Business
Hours includes Break Hours, After Hours and Closed Days as defined in
Business Schedule (For Business Schedule, see Chapter 5).
Note: The Operator & Extension Group function can only be supported in
the Supervised Mode. (For Operator & Extension Group function, see
Chapter 5.)
3. Define the call transfer sequences using the codes in Table 4-1:
Chapter 4 Integration with PBX
29
DTMF and Action Codes
Code Action
0~9, *,#,A~D DTMF Signal
& First Hook Flash
h Second Hook Flash
, Pause for 0.5 second
; Pause for 1 second
X Extension Number
Table 4-1
� Transfer Sequence: Transfer Sequence transfers the call to the targeted
extension. An example would be: [&,x].
� Ringback Recall Sequence: Ringback Recall Sequence retrieves a call
when the extension status is No-Answer. An example would be: [&].
� Busy Recall Sequence: Busy Recall Sequence retrieves a call when the
extension status is Busy. An example would be: [&].
� Hang Up Sequence: Hang Up Sequence is used to disconnect the call. An
example would be: [h].
� CO Line Access Sequence: CO Line Access Sequence hunts for an
available CO line to make an external call.
� Conference Hold Sequence: Conference Hold Sequence puts the caller on
hold while connecting the third party for a conference call.
� Conference Sequence: Conference Sequence connects the caller who was
put on hold by Conference Hold Sequence to the third party that is
reached through the External Conference Call Number defined in the
mailbox.
� First Hook Flash [&]: InterMail provides two Hook Flash times for PBX
programming. First Hook Flash is usually used for transferring calls. “&”
is the symbol used to represent First Hook Flash time.
� Second Hook Flash [h] : Most PBXes only uses one Hook Flash time for
all operations, while some PBXes require an alternative Hook Flash time
to retrieve a call on hold. Second Hook Flash is usually longer than First
Hook Flash. “h” is the symbol used to represent Second Hook Flash time.
� Extension’s Size: Input the valid digit of extension numbers.
� Disconnect Signal: Input the PBX disconnect signal.
4. Click OK or Apply once you are done with the editing.
Setting Up InterMail in Non-Supervised Mode
Some PBXes have the capability of sending call information via DTMF or RS232

Chapter 5 Auto Attendant 30
strings when transferring calls. InterMail can make use of this information and
determine what action should follow allowing ports to be released immediately.
Note: Please set the related parameters properly so that strings can be sent to
InterMail. For example, the PBX has to enable the Busy/No-Answer Forward to
the voice mail port.
In-Band DTMF Strings Examples of PBXes supporting Non-Supervised Call Transfer with In-Band
DTMF Strings.
Manufacturer Model
Alcatel 4200, 4400, OmniPCX Office
Aristel AV Series
Avaya Partner, Merlin, Definity
Bitronic KDX-500
Fujitsu 9600 Series, E200
Hybrex Gi
Mitel SX Series
NEC ICS 740, M80, M100
Nortel Norstar
Panasonic KX-TA/KXTD
Philips Sopho, D120, DS-1000
Samsung DCS
Siemens Hi-Com 300, Hi-Path 4000
Tecom SD/DX Series
Tonnet DCS
Toshiba DK-280/380
Table 4-2
1. Choose System Configuration > PBX Parameters.
2. Click Edit tab, a PBX Parameters dialog page appears.
3. Choose the Non-Supervised tab.

Chapter 4 Integration with PBX
31
Figure 4-3
� Maximum Digits in In-Band DTMF Strings: The number of digits in the
In-Band DTMF Strings will be different depending on the PBX models.
This parameter will limit the maximum number of digits that can be
received by InterMail. Digits exceeding this number will be ignored.
� Maximum Time to Wait For First Digit: This parameter sets the
maximum time to wait for the first digit of the In-Band DTMF String sent
by the PBX to arrive when a call is answered. If no digit is received at the
end of this time, the call will be taken to the channel’s main AA menu
greeting.
� Maximum Time Between Digits: This parameter defines the timeout
between digits in the In-Band DTMF String sent by the PBX. If no further
digit is received after this timeout, InterMail will stop the waiting and use
the string received thus far to determine the status of the extension.
� No In-Band Code: Specify channels not offering in-band code. Greetings
will be played immediately without detecting codes.
4. To Define the In-Band DTMF Protocol: Choose System Configuration >
In-Band DTMF Protocol.
5. Click Edit tab, an In-Band Protocol Details dialog box appears. Input the
string sent by PBX.
Chapter 5 Auto Attendant 32
� String Sent by PBX: In-Band DTMF String sent by the PBX should be
entered in this field for the InterMail to determine the status of the call
transfer. The EXACT number of digits should be entered. InterMail will
compare the actual string received from the PBX against the defined
string here. The following codes should be used to compose the String
Sent by PBX.
In-Band DTMF
Code Definition
0~9, *,#,A~D Represents one digit of DTMF.
E E Represents one digit of the extension
number.
I I Represents this digit should be ignored.
Table 4-3
� Operation: Select one of the following operations you want InterMail to
execute when the actual DTMF string from the PBX matches the one
defined in String Sent by PBX:
- To Main AA-Menu: InterMail will take the call to the prevailing
AA-Menu and play that AA-Menu’s greeting defined for the channel.
(For AA-Menu, see Chapter 5) This operation will be activated in the
case when no strings in the String Sent by PBX fields can be found
matching the actual string from the PBX.
- To Busy Flow: The caller will be taken to the call path that handles the
Busy situation for the extension, i.e., playing a personal busy greeting
and asking the caller to leave a message.

Chapter 4 Integration with PBX
33
- To No-Answer Flow: The caller will be taken to the call path that
handles the No-Answer situation for the extension, i.e., playing a
personal not-available greeting and asking the caller to leave a
message.
- To Access a Mailbox: The caller will be taken to the mailbox whose
number is encoded in the string. This is usually used when the
mailbox owner wishes to retrieve his/her messages and calls the
voicemail from the extension directly.
- To Record on Demand: InterMail will record current calls.
� To Save/To Delete: If the PBX supports recording function, input the
string representing save and delete recordings.
6. Click Update for every String defined or modified.
7. Click OK or Apply when done with all the modifications.
Busy Time Lag
Busy Time Lag is most useful when the PBX does not send No-Answer In-Band
DTMF String or sends the same string for No-Answer and Busy situations. In
such case, a countdown parameter is used to determine if the extension status is
Busy or No-Answer. After the call is released, the countdown will start. If the
call is bounced back during the countdown, the extension status will be
identified as Busy. If the call is bounced back after the countdown, the extension
status will be identified as No-Answer.
1. Choose System Configuration > PBX Parameters.
2. Click Edit tab, a PBX Parameters dialog page appears.
3. Choose the Non-Supervised tab.
4. Define the following parameters:
� Enable Busy Time Lag: Checking this box tells InterMail to start the
timeout counter for every transferred call.
� Busy Time Lag: This parameter sets the timeout value for the count
down.
5. Click OK or Apply when done with all the modifications.
Setting Up InterMail in Supervised Mode
The Supervised Mode will be the only transfer mode available for some PBXes.
In Supervised mode, the line is not released while the call is being transferred.
InterMail will monitor and decipher the signals sent back by the PBX and
perform proper operation accordingly. If the call is picked up by the extension,

Chapter 5 Auto Attendant 34
the line will be released. This transfer mode will take up the most resource of
InterMail. There are two types of signals InterMail can monitor: Call Progress
Tone (CPT), and DTMF Signal.
Call Progress Tone Most PBXes send Call Progress Tones (CPT) while transferring calls to indicate
the status of the transfer. If you are not sure about the tones, you may use
Automatic Call Progress Learning function as described in the next section to get
the parameters.
1. Choose System Configuration > PBX Parameters.
2. Click Edit tab, a PBX Parameters dialog page appears.
3. Choose the Supervised tab.
Figure 4-5
4. From the Supervised Signal Type list, select Call Progress Tone.
5. Define the following parameters:
� Ringback CPT: Ringback CPT may vary depending on the PBX model.
Ringback CPT is usually composed of 1 ringing pulse, and 1 silence pulse.
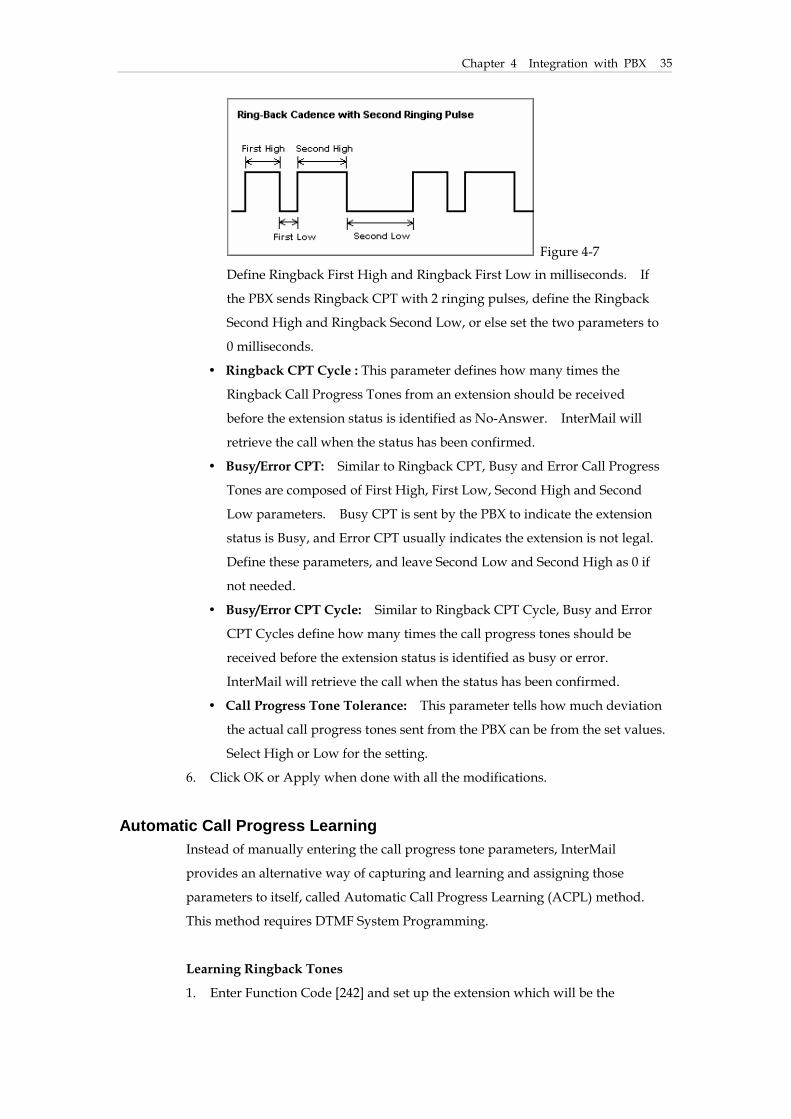
Figure 4-6
Some PBX sends Ringback CPT with 2 ringing pulses and 2 silence pulses.
Chapter 4 Integration with PBX
35
Figure 4-7
Define Ringback First High and Ringback First Low in milliseconds. If
the PBX sends Ringback CPT with 2 ringing pulses, define the Ringback
Second High and Ringback Second Low, or else set the two parameters to
0 milliseconds.
� Ringback CPT Cycle : This parameter defines how many times the
Ringback Call Progress Tones from an extension should be received
before the extension status is identified as No-Answer. InterMail will
retrieve the call when the status has been confirmed.
� Busy/Error CPT: Similar to Ringback CPT, Busy and Error Call Progress
Tones are composed of First High, First Low, Second High and Second
Low parameters. Busy CPT is sent by the PBX to indicate the extension
status is Busy, and Error CPT usually indicates the extension is not legal.
Define these parameters, and leave Second Low and Second High as 0 if
not needed.
� Busy/Error CPT Cycle: Similar to Ringback CPT Cycle, Busy and Error
CPT Cycles define how many times the call progress tones should be
received before the extension status is identified as busy or error.
InterMail will retrieve the call when the status has been confirmed.
� Call Progress Tone Tolerance: This parameter tells how much deviation
the actual call progress tones sent from the PBX can be from the set values.
Select High or Low for the setting.
6. Click OK or Apply when done with all the modifications.
Automatic Call Progress Learning Instead of manually entering the call progress tone parameters, InterMail
provides an alternative way of capturing and learning and assigning those
parameters to itself, called Automatic Call Progress Learning (ACPL) method.
This method requires DTMF System Programming.
Learning Ringback Tones
1. Enter Function Code [242] and set up the extension which will be the

Chapter 5 Auto Attendant 36
learning target to monitor ring-back tone.
2. Make sure the extension is on-hook.
3. Enter Function Code [214] (Ringback CPT 1st High). Press [1#] when it
prompts you to “Press 1 to edit, 2 to save, 3 to replay”. This will make
InterMail call the extension.
4. After ringing the extension for a few times, it will reconnect to you and
announce the value it has calculated and set for Ringback CPT 1st High
based on the ringback pattern.
Note: It also has calculated and set other Ringback CPT parameters such as
Ringback CPT 1st Low, Ringback CPT 2nd High/Low (when available), and
Ringback CPT Cycle.
5. Press 2 to save the parameter.
Learning Busy Tones
1. Make sure the target extension is off-hook.
2. Enter Function Code [219] (Busy 1st High). Press [1#] when it prompts you
to “Press 1 to edit, 2 to save, 3 to replay”. This will make InterMail to call the
extension.
3. It will analyze the Busy Call Progress Tone coming from the ACPL extension
and announce the value it has determined and set for the Busy 1st High
parameter
4. Note: It also has determined and set other Busy CPT parameters such Busy
CPT 1st Low, Busy CPT 2nd High/Low (when available), and Busy CPT
Cycle.
5. Press 2 to save the parameter.
6. You have completed the Automatic Call Progress Learning process and
assigned all the right values for the Ringback and Busy Call Progress Tone
parameters to InterMail.
DTMF Signal Some PBX sends DTMF Signals as well as Call Progress Tones to indicate call
transfer status. Similar to the CPT, the DTMF Signal will convey the current
extension status.
1. Choose System Configuration > PBX Parameters.
2. Click Edit tab, a PBX Parameters dialog page appears.
3. Choose the Supervised tab.
4. From the Supervised Signal Type list, select DTMF Signal.
Chapter 4 Integration with PBX
37
5. Define the following parameters using the codes in the DTMF and Action
Code Table (Table 4-1):
� Ringback Signal: Ringback Signal indicates the extension is ringing back.
� Busy Signal: Busy Signal indicates the extension status is busy.
� DND Signal: DND Signal indicates the extension status is
Do-Not-Disturb.
� Answer Signal: Some PBX provides the Answer Signal when the call is
picked up by the extension. When this signal is received, the call will be
released.
� No-Answer Timeout: Some PBX does not send Ringback Signal when
transferring the call. In such case InterMail will hold the call for the
No-Answer Timeout period and retrieve the call after the timeout.
6. Click OK or Apply when done with all the modifications.
Setting Up InterMail in Semi-Supervised Mode
This mode is the most commonly used when the PBX does not send a complete
set of In-Band DTMF Strings. You will have 2 options in this mode. One is Busy
Recall Ring Release; the other one is Call Pickup. For PBXes send DTMF signals
for ringback and busy tone for busy, please apply Busy Recall Ring Release
Mode. For PBXes supports call pickup, you may select Call Pickup option.
Notice in Semi-Supervised mode, busy status will always be under Supervised
Mode.
Busy Recall, Ring Release When Callpick is not selected, you will be in Busy Recall, Ring Release Mode.
Calls will initially be handled in the Supervised Mode when transferred, and
InterMail will monitor for the Busy tone or the Busy DTMF signal. If the Busy
CPT or the Busy DTMF Signal is not detected right away, the transfer is changed
to Non-Supervised mode and the line released. When detecting ringback tones,
lines will be release. You will need to setup the following items.
� Ringback: Go to Non-Supervised Mode and define DTMF strings (as
Figure 4-3). Then go to In-Band DTMF Protocol to input the String (as
Figure 4-4).
� Busy: Go to Supervised Mode. Set Busy Call Progress Tone parameters.
Call Pickup Similar to Busy Recall, Ring Release operation, the call is retrieved if it is
detected Busy right away and released if not. But instead of relying on the
Chapter 5 Auto Attendant 38
In-Band DTMF String from the PBX to tell the call is not answered, InterMail will
automatically use the Call Pickup function of the PBX to retrieve the call if the
call is not answered by the extension after a pre-defined amount of time.
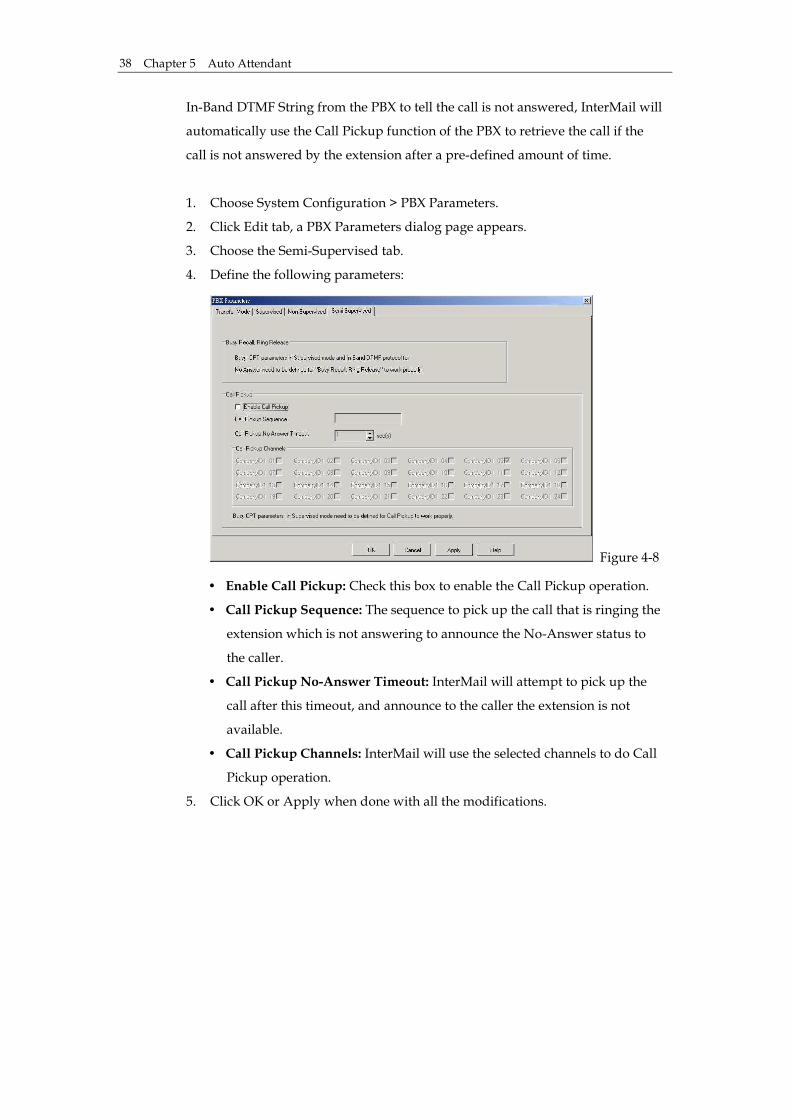
1. Choose System Configuration > PBX Parameters.
2. Click Edit tab, a PBX Parameters dialog page appears.
3. Choose the Semi-Supervised tab.
4. Define the following parameters:
Figure 4-8
� Enable Call Pickup: Check this box to enable the Call Pickup operation.
� Call Pickup Sequence: The sequence to pick up the call that is ringing the
extension which is not answering to announce the No-Answer status to
the caller.
� Call Pickup No-Answer Timeout: InterMail will attempt to pick up the
call after this timeout, and announce to the caller the extension is not
available.
� Call Pickup Channels: InterMail will use the selected channels to do Call
Pickup operation.
5. Click OK or Apply when done with all the modifications.

Chapter 5 Auto Attendant
39
Chapter 5 Auto Attendant
This chapter explains how to set up the Automated Attendant for InterMail.

Chapter 5 Auto Attendant 40
Designing Your Auto-Attendant The Auto-Attendant in InterMail is very flexible and easy to configure. It is
highly recommended that you prepare a draft for the Auto-Attendant flow that
you want to use VMS to set up before hand. Below is a sample draft for the
Auto-Attendant Setup.
Figure 5-1
Creating Extension Blocks
To create the Extension Blocks is the first step of the Auto Attendant setup.
InterMail will transfer calls to an extension that falls in an Extension Block.
InterMail support Multi-Tenant function. You could set extension blocks for
different companies.
001 - Business Hours Main Menu Welcome to ABC Company, If you know your party’s extension, please enter it now. Press 1 for 2nd Language, press 2 for Service Department, press 3 for Information Center or hold for the operator. 1: AA-Menu 010 2: Direct Transfer to Extension - 300 3: AA-Menu 003 4: Transfer to Extension 5: Transfer to Extension 6: Transfer to Extension 7: Transfer to Extension 8: Transfer to Extension 9: No Action *: No Action 0: Operator #: DTMF Programming Timeout: Operator
010 - Business Hours Main Menu in 2nd Language (In 2nd Language) Welcome to ABC Company, If you know your party’s extension, please enter it now. Press 2 for Service Department, press 3 for Information Center or hold for the operator. 1: AA-Menu 001 2: Direct Transfer to Extension - 300 3: AA-Menu 003 4: Transfer Extension 5: Transfer Extension 6: Transfer Extension 7: Transfer Extension 8: Transfer Extension 9: No Action *: No Action 0: Operator #: DTMF Programming Timeout: Operator
003 – Information Center Press 1 for Branch Office Information, Press 2 for Calling Rates, Press 3 for Directory, Press 9 to repeat this menu, or hold for the operator. 1: AA-Menu 021 2: AA-Menu 022 3: AA-Menu 023 4: No Action 5: No Action 6: No Action 7: No Action 8: No Action 9: Repeat Menu *: No Action 0: Operator #: No Action Timeout: Operator
ABC Technology Auto-Attendant Flow Extension: 400-450 500-550 600-650 700-750 800-850 Operator Group: 01-500,501,502 Extension Group: 02-601,602,603, ext code 300
Chapter 5 Auto Attendant
41
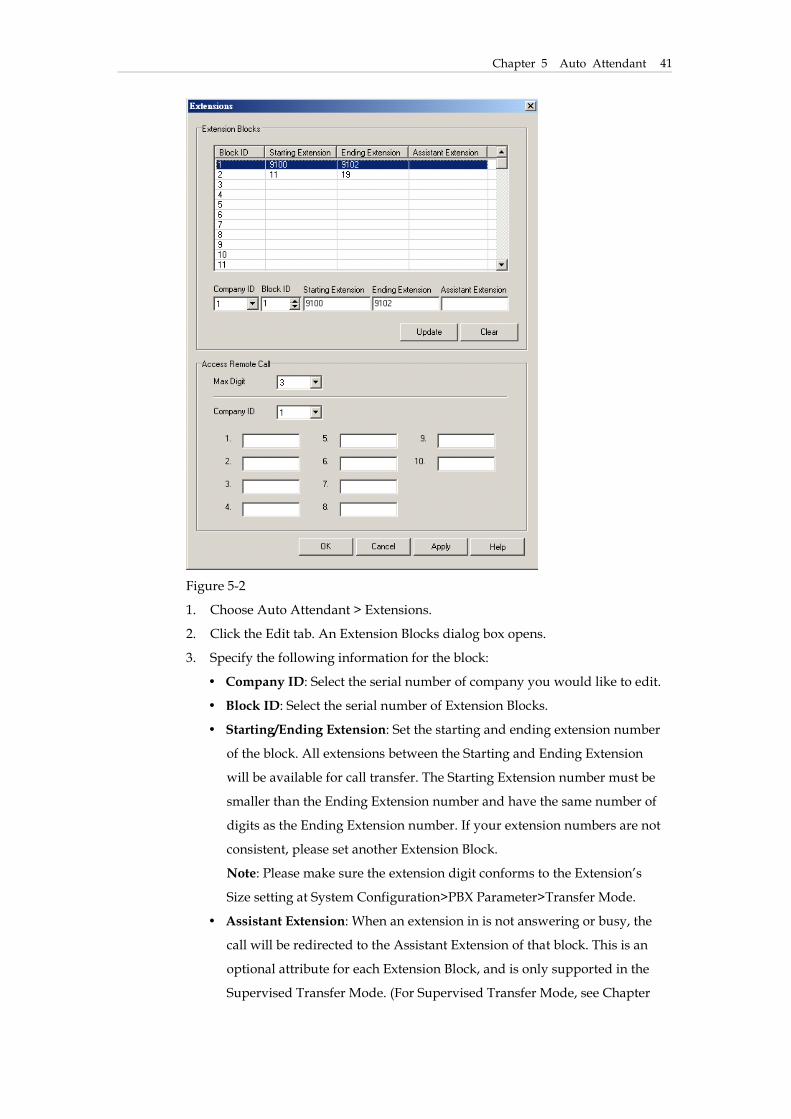
Figure 5-2
1. Choose Auto Attendant > Extensions.
2. Click the Edit tab. An Extension Blocks dialog box opens.
3. Specify the following information for the block:
� Company ID: Select the serial number of company you would like to edit.
� Block ID: Select the serial number of Extension Blocks.
� Starting/Ending Extension: Set the starting and ending extension number
of the block. All extensions between the Starting and Ending Extension
will be available for call transfer. The Starting Extension number must be
smaller than the Ending Extension number and have the same number of
digits as the Ending Extension number. If your extension numbers are not
consistent, please set another Extension Block.
Note: Please make sure the extension digit conforms to the Extension’s
Size setting at System Configuration>PBX Parameter>Transfer Mode.
� Assistant Extension: When an extension in is not answering or busy, the
call will be redirected to the Assistant Extension of that block. This is an
optional attribute for each Extension Block, and is only supported in the
Supervised Transfer Mode. (For Supervised Transfer Mode, see Chapter
Chapter 5 Auto Attendant 42
4)
4. Click Update after setting up one block, then continue to define the next
block.
5. After setting up Extension Blocks, it can by customer’s need to set Access
Remote Call for the following information:
� Maximum Digit: The length for Access Remote Call
� Company ID: Select the serial number of company you would like to
edit
� 1-10: The Access Remote Call number
6. Click OK or Apply once you are done with all the Extension Blocks setup
you want.
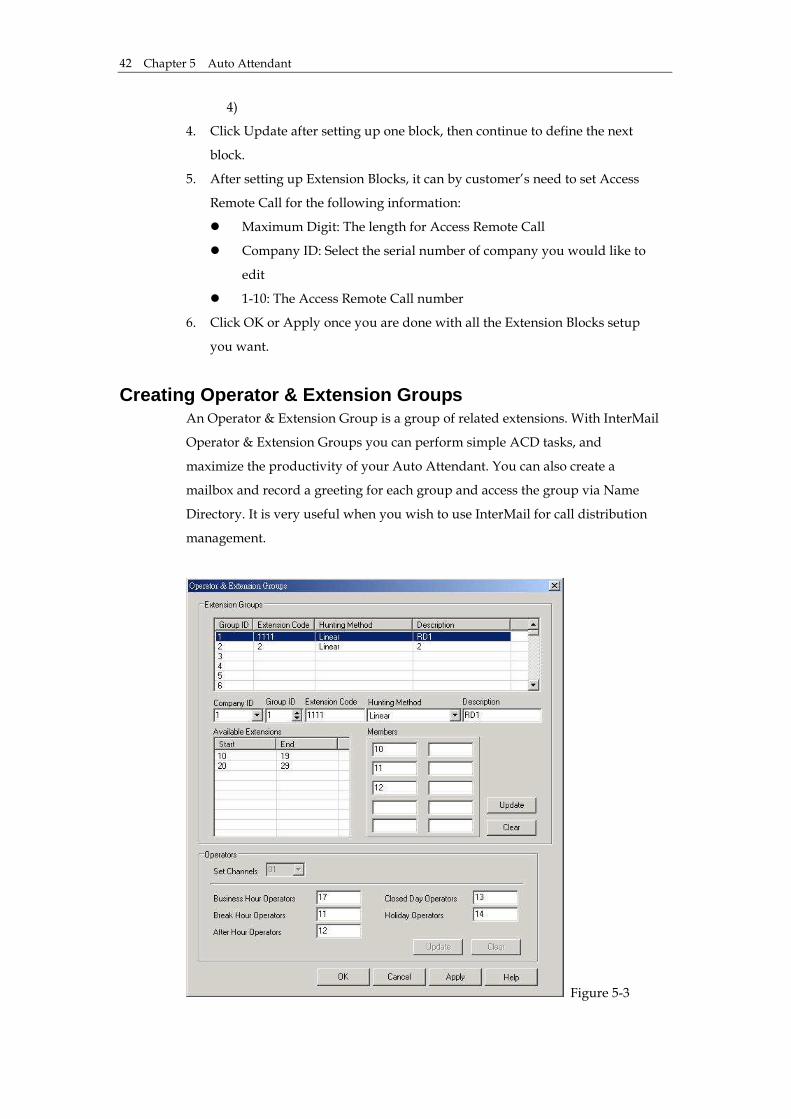
Creating Operator & Extension Groups
An Operator & Extension Group is a group of related extensions. With InterMail
Operator & Extension Groups you can perform simple ACD tasks, and
maximize the productivity of your Auto Attendant. You can also create a
mailbox and record a greeting for each group and access the group via Name
Directory. It is very useful when you wish to use InterMail for call distribution
management.
Figure 5-3
Chapter 5 Auto Attendant
43
1. Choose Auto Attendant > Operator & Extension Groups.
2. Click the Edit tab. An Operator & Extension Group dialog box opens.
3. Specify the Company ID. You will see the available extensions associated
with the company.
4. Select a Group ID serial number to edit.
� Extension Code: Assign an Extension Code represents this Group. Calls
for this group will be distributed to members of the group.
Note: Do not assign an Extension Code that is the same as one existed
regular extension. If so, the group will have higher call transfer priority
than the regular extension number.
� Description: Fill in information for this group, such as Sales Dept.
� Hunting Method: You can determine how to distribute calls for the
group.
- Linear: Calls will always be transferred to the first member of the
group. Only when the first member is not available, InterMail will
transfer calls to the next member.
- Circular: The first call will be transferred to the first member and the
second call to the next member and so on. InterMail will keep track of
which member should be the target for the next incoming call.
- ACD: Calls will be transferred to the member taking least number of
calls. InterMail will track the number of calls successfully transferred
to each member. The member with least number of calls answered will
be the target for the next incoming call transfer.
� Members: Refer to the available members, fill in the extension number of
the group. You could set up to 10 members for a group.
5. Click Update for every group created or edited.
6. Click OK or Apply once you are done with all the modification of all groups.
Operator Groups
1. Specify a channel. Each channel represents a company.
2. Input the operator extension number in charge of different business hours.
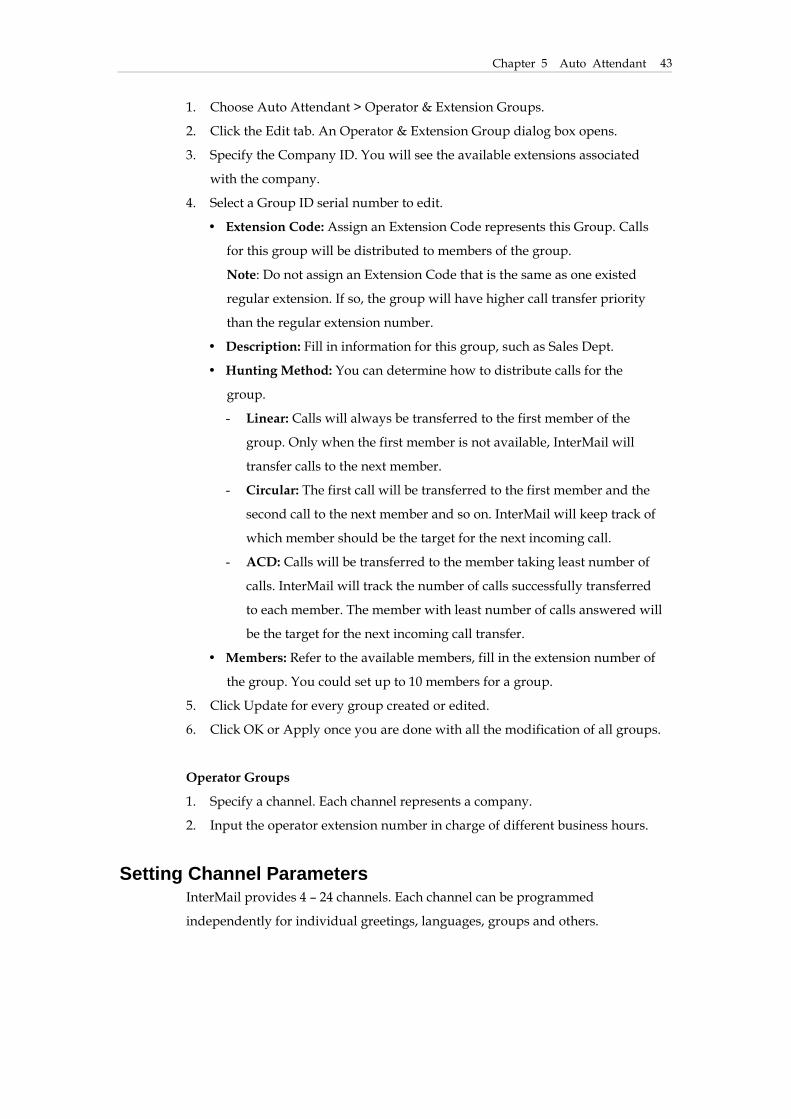
Setting Channel Parameters InterMail provides 4 – 24 channels. Each channel can be programmed
independently for individual greetings, languages, groups and others.
Chapter 5 Auto Attendant 44
Figure 5-4
1. Choose Auto Attendant > Channel Parameters.
2. Click the Edit tab. A Channel Parameters dialog box opens.
3. Specify the following information for the channel:
� Pickup After: The channel will pick up incoming calls after the set
number of rings.
� Default Language: InterMail supports up to 4 different languages. If you
set your default language as English, for example, all of your call transfer
announcements will be played in English. (The languages vary
depending on your location and installation. Refer to your dealer more
details.)
� Enable Holiday: When enabled, holiday greetings will be played during
holidays. Please go to System Configuration>Holiday Calendar to set up
your holidays.
� Company ID: Specify a company to use this channel.
� Main AA Menu: Set AA Menu for Business Hours, Break Hours, After
Hours and Closed Days. Different greetings will be played during
different hours.
4. When finish editing one channel, you may click the Synchronize button to
copy its settings to other channels. Or click Copy button to copy setting to
selected Synchronize channel ID.
5. Click Update to save setups.
6. Click OK or Apply once you are done with all the modification of all
channels.

Chapter 5 Auto Attendant
45
Designing an AA-Menu InterMail provides up to 300 AA Menus. The Auto Attendant is constructed
with independent scripts called AA-Menus. Each AA-Menu has its own greeting
and customized action keys. From the menu, the caller can be guided to the
extensions, service groups, operators, information bulletin, etc.
Figure 5-5
1. Choose Auto-Attendant > AA-Menu Management.
2. Click the Edit tab. An AA-Menu Management dialog box opens.
3. Specify a Menu ID and input its description, such as “Business Hours”.
4. AA Menu Action: Assign each DTMF tone (0-9,*,# as shown on the key pad)
with one specific AA-Menu Action. Possible actions are:
� 00 No Action: The system will play an error announcement then repeat
the Menu.
� 01 AA-Menu: The call will be transferred to another AA-Menu. Set the
target AA Menu ID accordingly.
� 02-05 AA-Menu in 1st/2nd/3rd/4th Language: The call will be transferred
to another AA-Menu in the specified language. Input the target AA Menu
ID in “Target” box. The following system prompts will also be switched
to the specified language.
� 06 Lead to Extension Number: It is helpful when the first digit of the
desired extension has been used or the extension number has a wide
range. Callers need to press one pre-defined DTMF keys for being led to
the desired Extension Number. For example, if the caller wishes to reach
extension "100" and “Lead to Extension Number” is set on "3", the caller
should press "3” and then “100" for reaching extension 100.
� 07 Transfer to Extension: The assigned DTMF digit is the first digit of an
Chapter 5 Auto Attendant 46
extension to be transferred. For example, if the action is set on "1", callers
will reach extension 100 by pressing “100”.
� 08 Direct Transfer to Extension: The call will be transferred to the target
extension directly. Set the target extension number accordingly. For
example, if the action is set on "6" with the target set as "100", callers will
be transferred to extension 100 directly by pressing “1”.
� 09 Transfer to Mailbox: The assigned DTMF digit is the first digit of the
mailbox to be transferred. For example, if the action is set on "2", callers
can dial "200" to leave a message directly at mailbox 200.
� 10 Direct Transfer to Mailbox : The caller can leave a message directly at
the target mailbox. Set the target mailbox accordingly. For example, if the
action is set on "7" with the target set to "200", callers will be taken directly
to mailbox 200 by pressing "7".
� 11 Access Mailboxes: Callers will be asked to enter voice mailbox number
and password to accessing mailbox. It is helpful for business travelers to
retrieve messages.
� 12 Name Directory: Depending on your setting, callers will be prompted
to enter the first name or the last name of the person to be reached. The
system will then announce the associated extension number. It is only
applicable to enter English names when the Name Directory is configured.
Go to System Configuration>Advanced Parameters>Parameter 2 to set
using first name or the last time.
� 16 Operator: Calls will be transferred to the Operator or Operator Group.
Refer to Chapter 5 for more details.
� 17 System Programming Mode: It allows administrators to enter DTMF
Programming Mode to setup the system or to record greetings.
� 18 Repeat Menu: The system will announce the prompt corresponding to
its AA Menu.
� 19 Hang Up: The call will be disconnected without announcement.
� 20 Hang Up with Announcement: The call will be disconnected after a
disconnect announcement is made.
� 21 Dialed a String: Please enter the strings as defined by the PBX to
function as a specific action.
� 22 Lead to Mailbox Number: It is helpful when the first digit of the
desired mailbox has been used or the mailbox number has a wide range.
Callers need to press one pre-defined DTMF keys for being led to the
desired mailbox. For example, if the caller wishes to reach extension "100"
and “Lead to Mailbox Number” is set on "3", the caller should press "3”
Chapter 5 Auto Attendant
47
and then “100" for reaching mailbox 100.
5. Click Update for every AA-Menu created or edited.
6. Click OK or Apply once you are done with all the modification of all the
AA-Menus.
Recording AA-Menu Greetings
Each AA-Menu should have an associated announcement of greeting and
options for callers. The system provides up to 300 AA Menus. The greeting of
each AA Menu goes with the AA Menu ID. If an AA-Menu does not have a
greeting recorded, a system default greeting will be played instead.
To Record a Greeting for an AA-Menu:
1. Call into InterMail. When hearing AA Menu greetings, press “#” (as default)
to enter the DTMF Programming Mode. If the administrator has define
another DTMF key for entering the DTMF Programming Mode, input the
specific key according. (For DTMF Programming Mode, see Chapter 9)
2. Enter the Greeting Recording Password. The recording password will allow
the caller to only record greetings. Because the recording is usually
performed by a person other than the administrator, this will prevent the
system settings from being modified by accident.
3. Enter Function Code [330] to record greetings.
4. Follow the voice guide to enter add or edit greetings.
5. Specify the AA-Menu ID to be recorded.
6. Follow the voice guide and record the greeting.
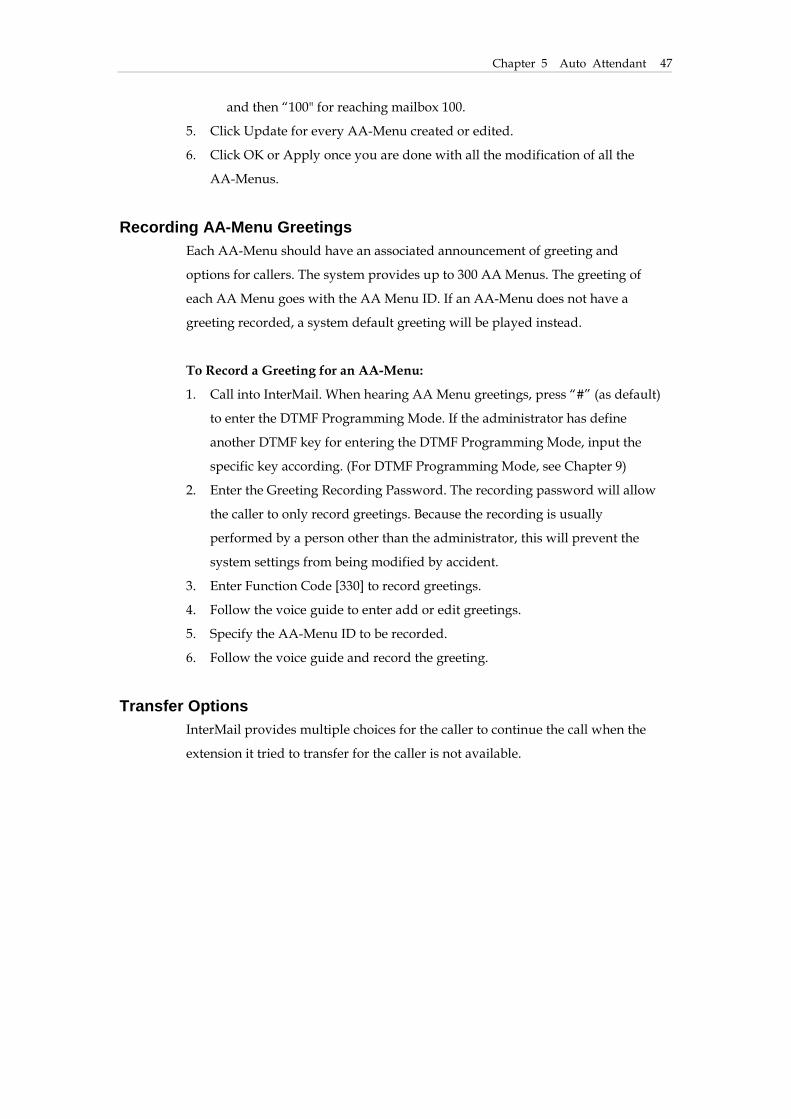
Transfer Options
InterMail provides multiple choices for the caller to continue the call when the
extension it tried to transfer for the caller is not available.
Chapter 5 Auto Attendant 48
Figure 5-6
To set up Transfer Options:
1. Choose Auto Attendant > Transfer Options.
2. Click the Edit tab. A Transfer Options dialog box opens.
3. Define transfer announcement.
� Announce Call Transfer: If enabled, the system will announce the call
transfer prompt, “Please hold, while I transfer you.” When this option is
disabled, the system will transfer the call without this announcement.
� Announce Name: When the above call transfer announcement is enabled,
set the content to be announced. You may select the extension number or
the name of the extension. If the name is not recorded, extension number
will be played instead. To record name, go to the personal mailbox.
4. When ring no answer or busy, you may allow callers to leave message
directly or offer other transfer options.
� Leave Message Directly: If enabled, the system will take the call directly
to the extension mailbox. The following transfer options will not be
provided and callers will not be able to press DTMF keys 0~9, * and # for
other options.
� Transfer Options: In addition to the above mentioned options as
described in AA Menu, there are some more options as below.
- 13 Leave a Message: The caller will be taken to the mailbox of the
Chapter 5 Auto Attendant
49
extension and asked to leave a message.
- 14 Hold for Busy: This option is applicable only when the extension
status is busy. The system will put the caller on hold and attempt to
transfer the caller to the extension again.
- 15 Conference : The caller will be connected with the predefined
external phone number. This function is applicable if your PBX
supports external call conference, and the Conference Hold Sequence
and the Conference Sequence in the PBX Parameters setup, and the
External Conference Call Number in the mailbox setup are done
correctly.
5. Click OK or Apply once you are done with the modifications for all the
options.
Note: When adopting external call forward function (conference), you need to
set up the related parameters in System Configuration>PBX
Parameters>Transfer Option for Conference Hold Sequence and conference
Sequence. In personal mail box settings, you need to assign an external phone
number for making conference calls.
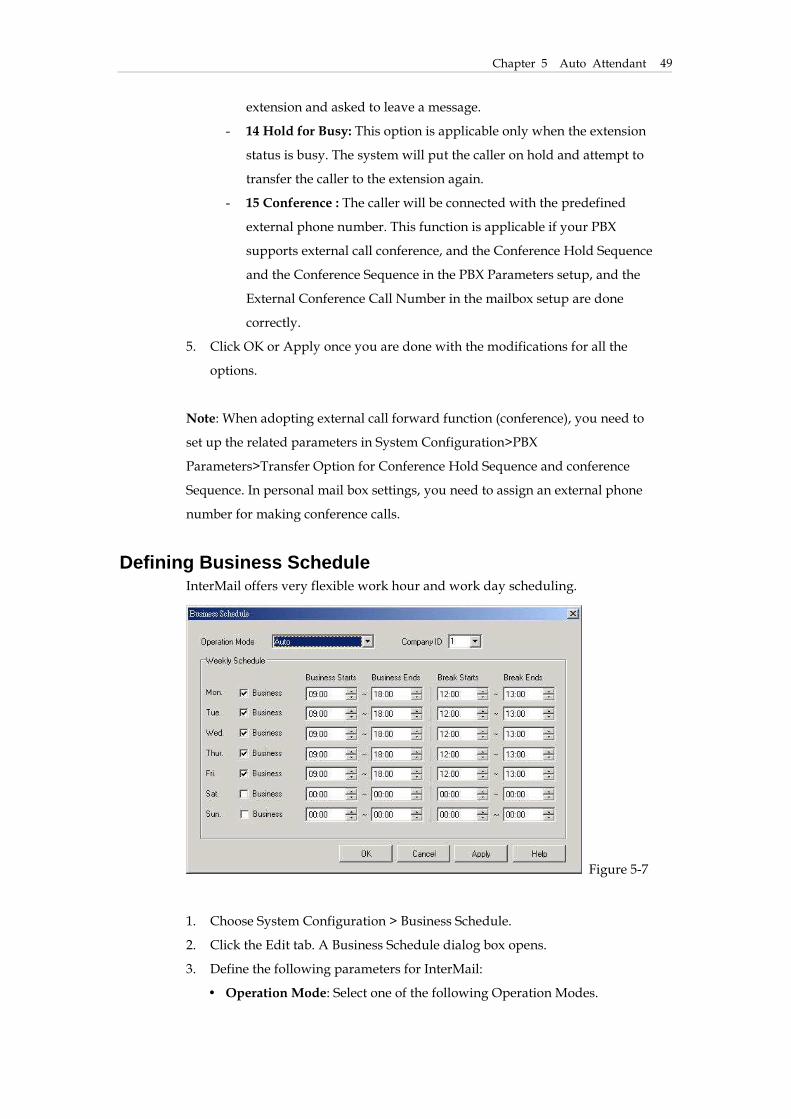
Defining Business Schedule
InterMail offers very flexible work hour and work day scheduling.
Figure 5-7
1. Choose System Configuration > Business Schedule.
2. Click the Edit tab. A Business Schedule dialog box opens.
3. Define the following parameters for InterMail:
� Operation Mode: Select one of the following Operation Modes.
Chapter 5 Auto Attendant 50
- Auto: This tells InterMail to use the respective Business Hours/Break
Hours/After Hours/Close Day AA-Menus according to the time of
day and day of the week to handle the incoming calls. This is the
normal mode of operation.
- Business Hours: This tells InterMail to use the Business Hours
AA-Menu to handle the incoming calls, no matter what the time of
day is.
- Break Hours: This tells InterMail to use the Break Hours AA-Menu to
handle the incoming calls, no matter what the time of day is.
- After Hours: This tells InterMail to use the After Hours AA-Menu to
handle the incoming calls, no matter what the time of day is.
- Closed: This tells InterMail to use the Closed Day AA-Menu to handle
the incoming calls, no matter what the time of day or the day of the
week is.
� Company ID: Select the company you would like to edit.
� Business: When this box is checked, the day is set as a work day, in
opposite to a Closed day.
� Business Starts and Ends: Enter the start and end of the business hours of
the work day.
� Break Starts and Ends: Enter the start and end of the break hours during
the work day.
4. Click OK or Apply once you are done with the modifications for all the
options.
Defining Holiday Calendar
In addition to the work week schedule, InterMail also offers a Holiday Calendar.
The administrator can assign up to 100 sets of Holidays and corresponding
Holiday AA-Menus per system.
Chapter 5 Auto Attendant
51
Figure 5-8
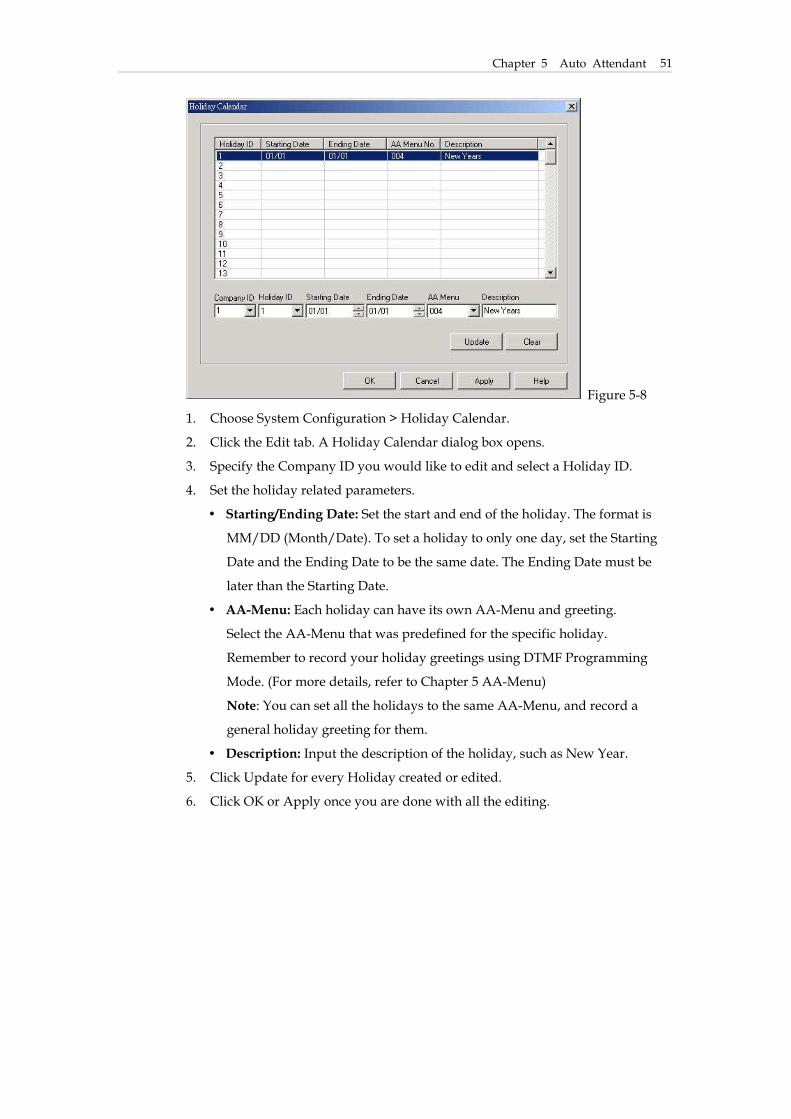
1. Choose System Configuration > Holiday Calendar.
2. Click the Edit tab. A Holiday Calendar dialog box opens.
3. Specify the Company ID you would like to edit and select a Holiday ID.
4. Set the holiday related parameters.
� Starting/Ending Date: Set the start and end of the holiday. The format is
MM/DD (Month/Date). To set a holiday to only one day, set the Starting
Date and the Ending Date to be the same date. The Ending Date must be
later than the Starting Date.
� AA-Menu: Each holiday can have its own AA-Menu and greeting.
Select the AA-Menu that was predefined for the specific holiday.
Remember to record your holiday greetings using DTMF Programming
Mode. (For more details, refer to Chapter 5 AA-Menu)
Note: You can set all the holidays to the same AA-Menu, and record a
general holiday greeting for them.
� Description: Input the description of the holiday, such as New Year.
5. Click Update for every Holiday created or edited.
6. Click OK or Apply once you are done with all the editing.

Chapter 6 Voice Messaging
53
Chapter 6 Voice Messaging
This chapter describes the details of the Voice Messaging of InterMail.
Chapter 7 Unified Messaging System 54
Defining Voice Messaging Parameters
The voice messaging features provided by InterMail is comprehensive and
dynamic and can be tailored to your specific needs.
To Set Up Voice Mail Parameters
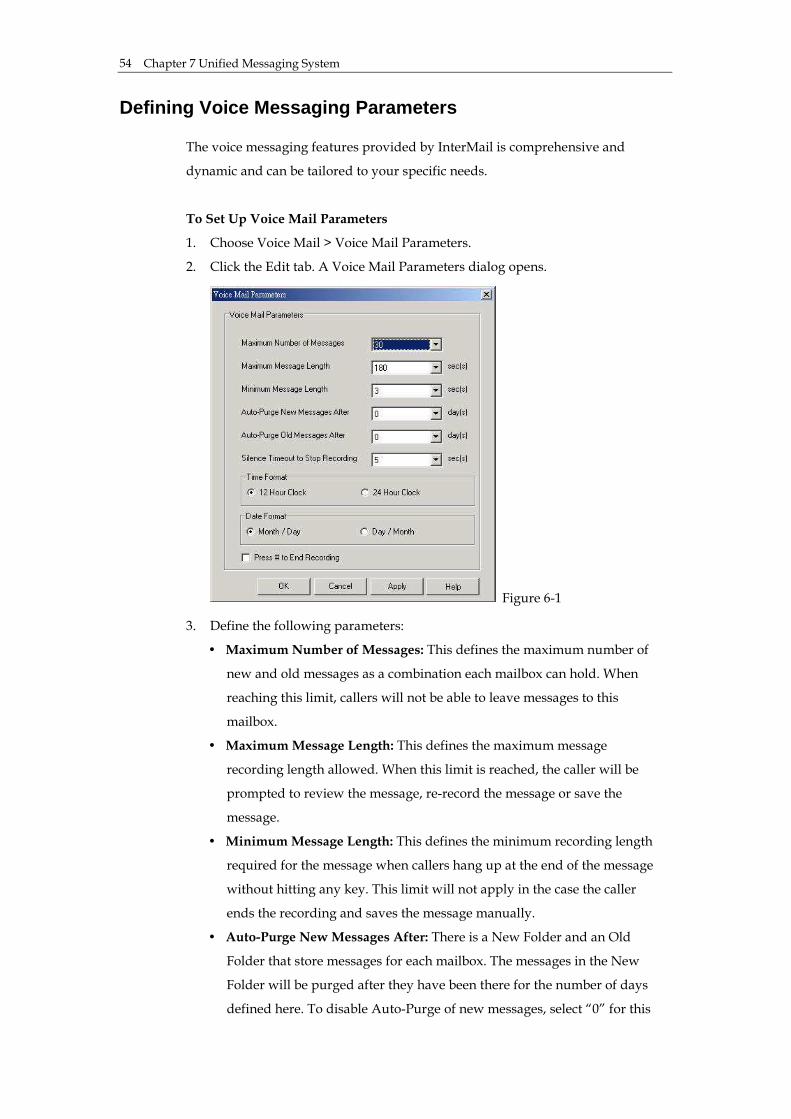
1. Choose Voice Mail > Voice Mail Parameters.
2. Click the Edit tab. A Voice Mail Parameters dialog opens.
Figure 6-1
3. Define the following parameters:
� Maximum Number of Messages: This defines the maximum number of
new and old messages as a combination each mailbox can hold. When
reaching this limit, callers will not be able to leave messages to this
mailbox.
� Maximum Message Length: This defines the maximum message
recording length allowed. When this limit is reached, the caller will be
prompted to review the message, re-record the message or save the
message.
� Minimum Message Length: This defines the minimum recording length
required for the message when callers hang up at the end of the message
without hitting any key. This limit will not apply in the case the caller
ends the recording and saves the message manually.
� Auto-Purge New Messages After: There is a New Folder and an Old
Folder that store messages for each mailbox. The messages in the New
Folder will be purged after they have been there for the number of days
defined here. To disable Auto-Purge of new messages, select “0” for this

Chapter 6 Voice Messaging
55
parameter.
� Auto-Purge Old Messages After: This parameter defines how many days
the messages in the Old Folder should be kept. To disable Auto-Purge of
old messages, select “0” for this parameter.
Note: Purged New or Old Messages will be permanently deleted and
cannot be recovered.
� Silence Timeout to Stop Recording: When InterMail detects continued
silence for the defined length of time, InterMail will stop the recording
and disconnect the call.
� Time and Date Format: Select the time and date format used by your
location allowing the system to play appropriate time stamp
announcement when playing recordings.
� Press # to End Recording: When selected, callers need to press the # key
to stop recording. If not selected, callers can press any key to stop
recording.
Subject Content Customization
InterMail supports message notification by email. When you enable this function,
InterMail will send message by email with attach file (in WAV format). You can
modify this email subject and content for message notification.
To Set Up Subject Content Customization
1. Choose Voice Mail > Voice Mail Parameters.
2. Click the Edit tab. A Voice Mail Parameters dialog opens.
3. Click Param2 and it will show Subject Content Customization.
Figure 6-2
Chapter 7 Unified Messaging System 56
4. Define the following parameters:
� Include System Message: After enable this function, InterMail will
modify message subject and content related information.
� Subject: This parameter defines email subject.
� Content: This parameter defines email content.
Setting Up Message Notifications
When receiving new messages, InterMail can notify the mailbox owner using
message lamp, ring notification or external notification.
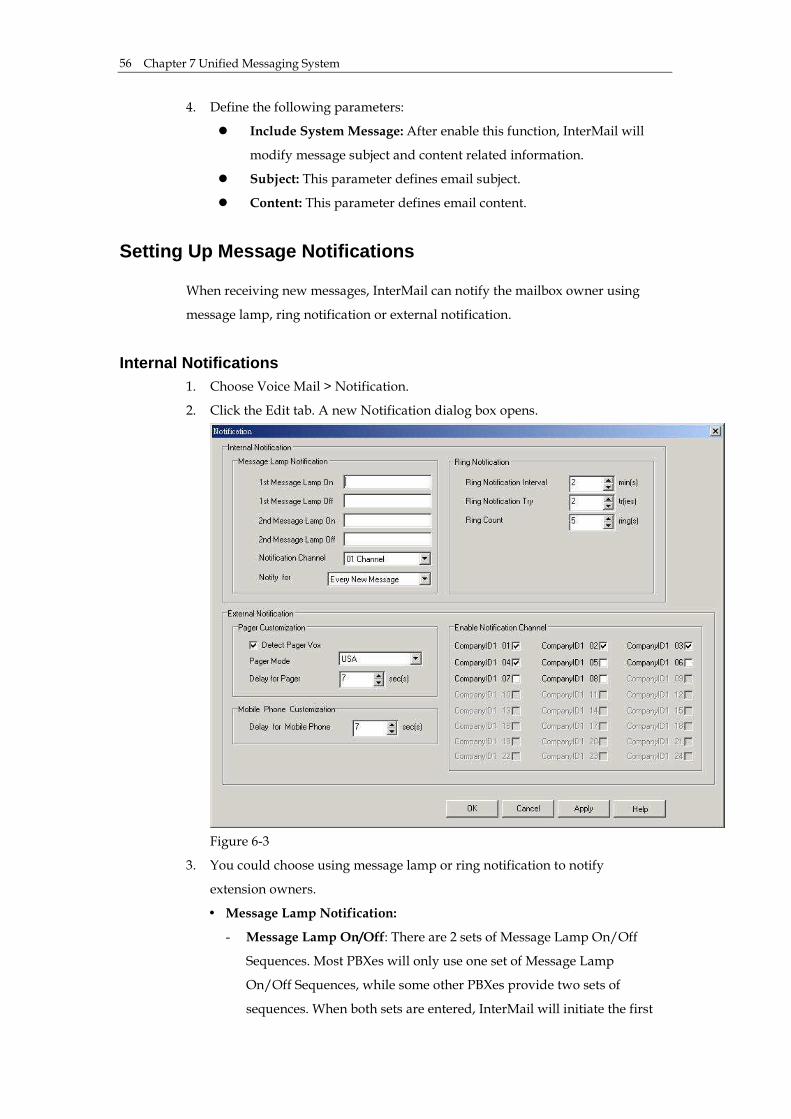
Internal Notifications 1. Choose Voice Mail > Notification.
2. Click the Edit tab. A new Notification dialog box opens.
Figure 6-3
3. You could choose using message lamp or ring notification to notify
extension owners.
� Message Lamp Notification:
- Message Lamp On/Off: There are 2 sets of Message Lamp On/Off
Sequences. Most PBXes will only use one set of Message Lamp
On/Off Sequences, while some other PBXes provide two sets of
sequences. When both sets are entered, InterMail will initiate the first
Chapter 6 Voice Messaging
57
sequence, then the second sequence consecutively.
- Internal Notification Channel: Specify one of the channel for
delivering lamp notification signal. It is recommended to assign a
channel that is least often occupied.
- Notify for: To reserve the resource of InterMail, there are two options
provided. One is First New Message Only. The system will only send
notification for the first new message when more than one message is
received by a mailbox. The other one is Every New Message which
will allow the system to notify whenever receiving new messages.
This will take up more resource of system.
� Ring Notification:
- Ring Notification Interval: Ring Notification Interval defines the
interval between attempts to call the extension for notification.
- Ring Notification Try: It defines the number of attempts the system
will make until the notification is successful. The attempts will stop if
the owner checks the voice mail.
- Ring Count: The Ring Count defines the maximum number of rings
the system should try for the notification. When not answered at the
end of the ring count, the attempt will be deemed unsuccessful.
External Notifications 1. Choose Voice Mail > Notification.
2. Click the Edit tab. A new Notification dialog opens.
3. Define the following parameters:
� Pager Customization: These parameters are designed to meet specific
requirements for pager operations in certain regions of the world.
Consult your local dealers regarding the setup of these parameters.
� Delay for Mobile Phone: Some mobile phone network needs extra time
to connect a call. The system will wait for a certain time defined here after
the number has been dialed to avoid misjudgment of the call status.
� Enabled Notification Channel: Multiple channels can be assigned for
delivering external notifications. The system will use enabled channels
that are available to do external notification.
Note: You will need to set external phone numbers for taking external
notifications. Please go to Main>Voice Mail>Mailbox Management or access
personal mailbox to set it up.
Chapter 7 Unified Messaging System 58
Mailbox Management InterMail provides personalized mailbox features such as personal distribution
lists, message playback options, Do-Not-Disturb mode, etc. These settings can be
done through IMS Utility or accessing personal voice mailbox.
To Create a Mailbox:
1. Choose Voice Mail > Mailbox Management.
2. Input the extension range you would like to edit. If there is no mailbox been
opened, click Cancel and go to the next step.
Figure 6-4
3. Click the Edit tab. A new Mailbox Management dialog page opens.
Figure 6-5
4. Click Create and a new Mailbox dialog opens, with default values in the
fields.

Chapter 6 Voice Messaging
59
Figure 6-6
5. Modify and edit the fields with the setting you want for this new mailbox.
(Note: Voice mailbox number only valid in the range between start to end
extension number. If not, it can not open this voice mailbox)
6. Click OK to finish creating the mailbox.
To Copy a Mailbox (and To Create a Range of Mailboxes):
1. Choose Voice Mail > Mailbox Management. Input the extension range you
would like to edit. If there is no mailbox been opened, click Cancel and go to
the next step.
2. Click the Edit tab. A new Mailbox Management dialog page opens.
3. Click Copy and a new Copy Mailbox dialog opens.
Figure 6-7
4. Enter the range of mailboxes you want to create. For example, From 100 To
130. Select the mailbox you want to Copy From. You should have some
predefined mailboxes for this operation.

Chapter 7 Unified Messaging System 60
5. Click OK to finish copying/creating the mailboxes.
To Delete a Mailbox:
1. Choose Voice Mail > Mailbox Management. Input the extension range you
would like to edit. If there is no mailbox been opened, click Cancel and go to
the next step.
2. Click the Edit tab. A new Mailbox Management dialog page opens.
3. Highlight the mailbox you wish to delete.
4. Click Delete. A confirmation box will open. Click Yes to finish deleting the
mailboxes.
To Edit a Mailbox:
1. Choose Voice Mail > Mailbox Management. Input the extension range you
would like to edit. If there is no mailbox been opened, click Cancel and go to
the next step.
2. Click the Edit tab. A new Mailbox Management dialog page opens.
3. Highlight the mailbox you wish to edit.
4. Click Edit. The selected Mailbox dialog page opens.
Figure 6-8
5. Edit the following Mailbox Settings:
� Mailbox Password: The Mailbox Password is the single keyword for
Chapter 6 Voice Messaging
61
entering the mailbox to retrieve and manage the voice mail over the
phone. It includes up to 8 digits. When the Mailbox Password is missed,
the administrator can modify it from IMS Utility.
� Mailbox Type: There are three different Mailboxes Types.
- Real: Real Mailboxes are regular mailboxes with physical extensions.
If the extension is not available to answer the call, the call will be
directed to the mailbox for the caller to leave a message.
- Virtual: A Virtual Mailbox does not have a physical extension
associated with it. The Virtual Mailbox number still needs to be within
the valid Extension Blocks. Virtual mailboxes are usually created for
people who need voice messaging only.
- Multi-Tenant: A Multi-Tenant Mailbox shares an extension with other
Multi-Tenant Mailboxes. When a caller dials the Multi-Tenant Mailbox
number, InterMail will transfer the call to the extension specified in
the Multi-Tenant Extension field, or to the Multi-Tenant Mailbox
when not available. Thus, several Multi-Tenant Mailboxes can share
one extension and meanwhile has independent mailbox. A
multi-tenant mailbox needs to fall in a valid Extension Block and is
supported in Supervised Transfer Mode. (For Supervised Transfer
Mode, see Chapter 4)
� Multi-Tenant Extension: When the mailbox type is Multi-Tenant, a
Multi-Tenant Extension needs to be specified. The extension number
needs to fall in a valid Extension Block.
� Language: This is the language of the prompts the box owner hears when
they access their mailbox. Please check with your dealer for the available
languages.
� Name for Directory Listing: Input the name of the mailbox owner
allowing callers to input the name to be reached using Name Directory.
� Extension Status: Input the current status of the extension.
� Call Forward Target: When the status is set as call forward, you need to
specify the call forward target extension number.
� Message Play Priority: The mailbox owner can specify the preferred
Message Play Priority when retrieving messages.
- Least Recent: Messages will be played in chronological order. Voice
mail received least recently will be played first.
- Most Recent: Messages will be played in counter chronological order.
Voice mail received most recently will be played first.
Note: Messages marked Urgent will always be played ahead of
Chapter 7 Unified Messaging System 62
regular new or old messages.
� Play Time Stamp: When selected, the time the message was recorded will
be announced before the message.
� Message Forward To : InterMail can automatically copy a new message
received to another mailbox. Please assign the targeted mailbox.
� Distribution List: The Mailbox owner can forward and broadcast
message to members in the personal Distribution List. Each mailbox can
define up to 9. Distribution Lists and each list can hold up to 15 members.
From the Available Mailboxes list select the mailboxes and click Select to
move them to the Members list. Click Update after finish editing a list.
6. Click the Notification tab to set Notification.
Figure 6-9
7. Edit personal mailbox notification functions:
� Internal Notification Method: Each mailbox can select its own method of
Internal Notification. The methods include the following:
- MsgLamp1: The Internal Notification will be done via the Message
Lamp on phone set. The Message Lamp On/Off Sequences must be
properly defined for the Message Lamp Notification to function
correctly. (For Message Lamp On/Off Sequence, see Chapter 6)
- MsgLamp2: Some PBX has more than 1 set of Message Lamp On/Off
Sequences. This allows you to use the second Message Lamp On/Off
Chapter 6 Voice Messaging
63
Sequences for the Message Lamp Notification to work.
- Extension: InterMail will call the extension and inform the mailbox
owner of the new messages. (For Ring Notification Parameters, see
page Chapter 6)
- Disabled: The Internal Notification can be disabled.
� Internal Notification Extension Number: A real extension must be
defined for the internal notification. This extension is usually the same as
the mailbox number.
� Enable External Notification: External Notification can also be enabled or
disabled. Once it is disabled, the mailbox owner cannot enable it again
from the extension. It can only be re-enabled through IMS Utility.
� Notify Urgent Message Only: To conserve the system resource, InterMail
can send External Notifications only for messages marked as urgent.
When enabled, regular massages will not be notified.
� External Notification Schedule: The External Notification can be selected
to be in effect during the following hours:
- Notify During Business Hours: The External Notification will be
performed only during the Business Hours as defined in the Business
Schedule. (For Business Schedule, see Chapter 5)
- Notify During Personal Hours: The External Notification will be
performed only during the customized hours.
� Phone Notification: Enter the phone number you want the system to
send external notifications. It can be your mobile phone, home phone,
another office phone, etc. Make sure the necessary country code or area
code is included.
� Pager Notification: Enter the pager number you want the system to dial
for external notification. Be sure to enter the necessary area and country
codes.
� Interval: Enter the time (in minutes) InterMail should wait before it
makes another attempt for the external notification.
� Try: Enter the total number of times InterMail should attempt to do the
external notification.
� External Conference Call Number: If the PBX supports external
conference call, the mailbox owner can enter the phone number when the
extension is not available and the caller can choose the conference call
option. The Conference Hold Sequence and the Conference Sequence in
the PBX Parameters need to be set up correctly for this function to work.
� Enable UMS: When this box is checked, InterMail will send an E-mail
Chapter 7 Unified Messaging System 64
with the message in WAV file for mat as an attachment to the E-mail
address assigned by the mailbox owner.
� Message after E-Mail Notification: After the message has been sent via
E-mail, InterMail can automatically categorize the voice message with the
following options:
- Keep as New: The message will be kept as a new message after it is
sent via E-mail.
- Save as Old: The message will be moved to the old folder after it is
sent via E-mail.
� E-Mail Address: This field is for the mailbox owner’s E-mail address from
which they wish to receive the message.
8. Click OK to save the new settings.
Chapter 7 Unified Messaging System
65
Chapter 7 Unified Messaging System
This chapter describes the necessary setup of Unified Messaging.
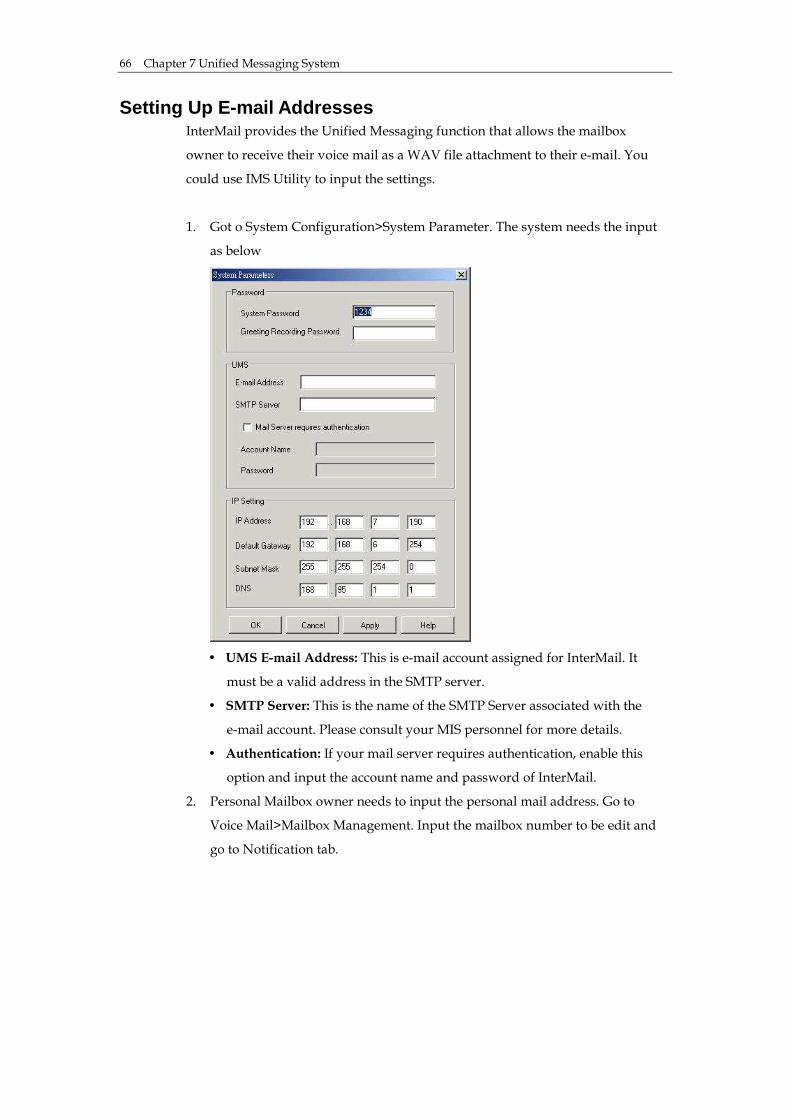
Chapter 7 Unified Messaging System 66
Setting Up E-mail Addresses InterMail provides the Unified Messaging function that allows the mailbox
owner to receive their voice mail as a WAV file attachment to their e-mail. You
could use IMS Utility to input the settings.
1. Got o System Configuration>System Parameter. The system needs the input
as below
� UMS E-mail Address: This is e-mail account assigned for InterMail. It
must be a valid address in the SMTP server.
� SMTP Server: This is the name of the SMTP Server associated with the
e-mail account. Please consult your MIS personnel for more details.
� Authentication: If your mail server requires authentication, enable this
option and input the account name and password of InterMail.
2. Personal Mailbox owner needs to input the personal mail address. Go to
Voice Mail>Mailbox Management. Input the mailbox number to be edit and
go to Notification tab.

Chapter 7 Unified Messaging System
67
� Enable UMS: Select the check box to enable the personal UMS function.
� Save Voicemail: You could choose to save sent voice messages as old or
as new.
� Mailbox E-mail Address: This is the e-mail address assigned for mailbox
owner.
When Are E-mails Sent E-mails will be sent to the designated e-mail address when a new message is
received. You could go to Report>UMS Report to check the emails been sent.

Chapter 8 User Operations
69
Chapter 8 User Operations
This chapter describes the end-user operations on InterMail.
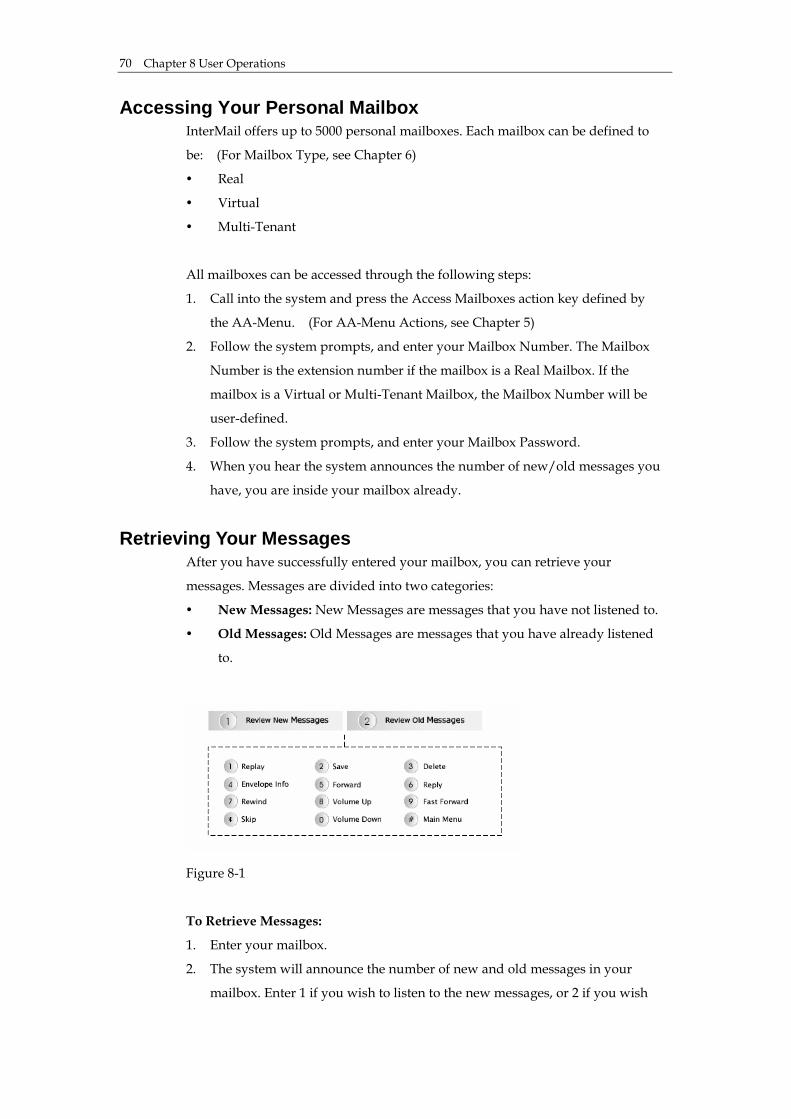
Chapter 8 User Operations 70
Accessing Your Personal Mailbox InterMail offers up to 5000 personal mailboxes. Each mailbox can be defined to
be: (For Mailbox Type, see Chapter 6)
� Real
� Virtual
� Multi-Tenant
All mailboxes can be accessed through the following steps:
1. Call into the system and press the Access Mailboxes action key defined by
the AA-Menu. (For AA-Menu Actions, see Chapter 5)
2. Follow the system prompts, and enter your Mailbox Number. The Mailbox
Number is the extension number if the mailbox is a Real Mailbox. If the
mailbox is a Virtual or Multi-Tenant Mailbox, the Mailbox Number will be
user-defined.
3. Follow the system prompts, and enter your Mailbox Password.
4. When you hear the system announces the number of new/old messages you
have, you are inside your mailbox already.
Retrieving Your Messages
After you have successfully entered your mailbox, you can retrieve your
messages. Messages are divided into two categories:
� New Messages: New Messages are messages that you have not listened to.
� Old Messages: Old Messages are messages that you have already listened
to.
Figure 8-1
To Retrieve Messages:
1. Enter your mailbox.
2. The system will announce the number of new and old messages in your
mailbox. Enter 1 if you wish to listen to the new messages, or 2 if you wish
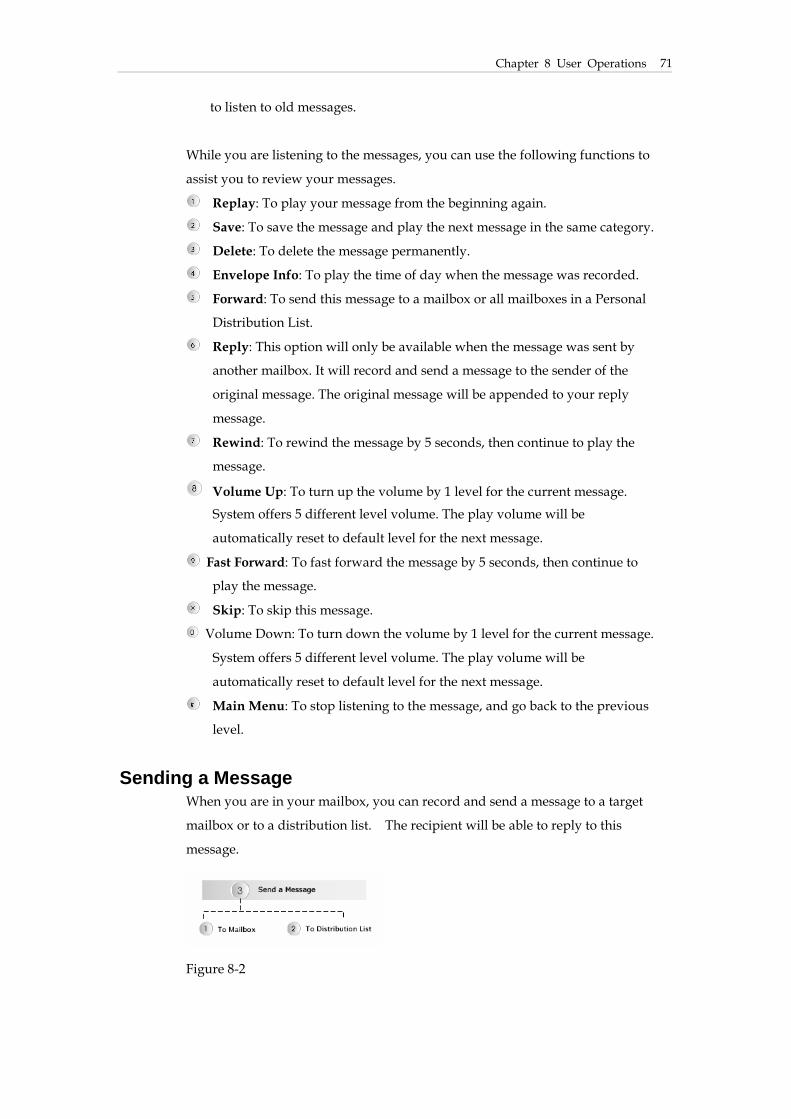
Chapter 8 User Operations
71
to listen to old messages.
While you are listening to the messages, you can use the following functions to
assist you to review your messages.
Replay: To play your message from the beginning again.
Save: To save the message and play the next message in the same category.
Delete: To delete the message permanently.
Envelope Info: To play the time of day when the message was recorded.
Forward: To send this message to a mailbox or all mailboxes in a Personal
Distribution List.
Reply: This option will only be available when the message was sent by
another mailbox. It will record and send a message to the sender of the
original message. The original message will be appended to your reply
message.
Rewind: To rewind the message by 5 seconds, then continue to play the
message.
Volume Up: To turn up the volume by 1 level for the current message.
System offers 5 different level volume. The play volume will be
automatically reset to default level for the next message.
Fast Forward: To fast forward the message by 5 seconds, then continue to
play the message.
Skip: To skip this message.
Volume Down: To turn down the volume by 1 level for the current message.
System offers 5 different level volume. The play volume will be
automatically reset to default level for the next message.
Main Menu: To stop listening to the message, and go back to the previous
level.
Sending a Message When you are in your mailbox, you can record and send a message to a target
mailbox or to a distribution list. The recipient will be able to reply to this
message.
Figure 8-2
Chapter 8 User Operations 72
To Send a Message:
1. Enter your mailbox.
2. Press 3 to send a message.
3. Press 1 to send a message to single mailbox, or press 2 to send a message to a
predefined distribution list.
4. Follow the system prompts, record and send your message.
Editing Your Personal Mailbox Options
When you are in your mailbox, you can modify the setting of your mailbox to
have it perform the tasks you wish , in the way you wish.
Figure 8-3
To Record/Re-record your Mailbox Greetings:
1. Enter your mailbox.
2. Pres 4 to enter the Personal Options.
3. Press 1 to record/re-record your greetings.
4. Select the greeting you wish to record/re-record. There are 2 types of
Mailbox Greetings.
� Press 1 for Personal Greeting. This is the general mailbox greeting, and
will be played when the extension is not available, status set on DND, or
the mailbox type is set as virtual.
� Press 2 for Busy Greeting. This greeting will be played when the
extension is busy.
� Press 3 for Your Name Recording. This will be played during the Name
Directory announcement, and during call transfer if the Announce Name
function is enabled. (For Announce Name option in Call Transfer, see
page Chapter 5)
5. Follow the system prompts, and record/re-record or delete your greetings.

Chapter 8 User Operations
73
Note: When there are no user-recorded greetings available, InterMail will play
the system default greetings.
To Modify the Notification Function:
1. Enter your mailbox.
2. Press 4 to enter the Personal Options.
3. Press 2 to modify the Notification Function.
� Press 1 for Internal Notification Function. The Internal Notification
options include Message Lamp 1, Message Lamp 2, and Ring Notification.
Follow the system prompts to select the option you want for the internal
notification.
� Press 2 for External Notification Function. You could set up to 5 external
phone numbers. The numbers can be of regular phone, mobile phone, or
pager. Follow the system prompts to enter the phone number and the
type of phone.
� Press 3 for Conference Telephone Number. When the extension is not
available, the caller can choose to connect to the Conference Telephone
Number defined here. InterMail will use the conference call function of
the PBX to connect the caller to the external telephone. Follow the system
prompts to modify the Conference Telephone Number. To disable this
function, simply delete the telephone number.
To Set Mailbox Preferences:
1. Enter your mailbox.
2. Pres 4 to enter the Personal Options.
3. Press 3 to Set Mailbox Preferences.
� Press 1 for Mailbox Password. The system will announce your current
mailbox password. Follow the system prompts to change and save the
new password.
� Press 2 for Directory Listing. You may spell the name of extension owner
allowing callers to use Name Directory to be transferred to. Refer to the
numeral/alphabet conversion as below to input the name.
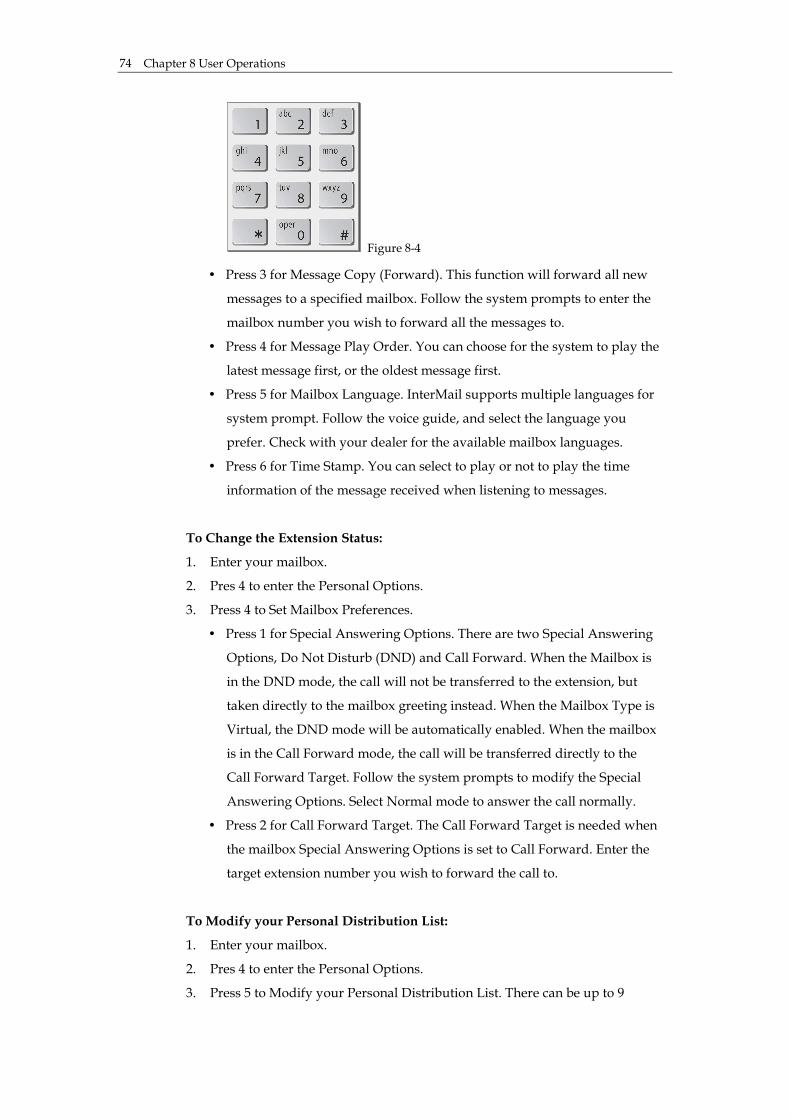
Chapter 8 User Operations 74
Figure 8-4
� Press 3 for Message Copy (Forward). This function will forward all new
messages to a specified mailbox. Follow the system prompts to enter the
mailbox number you wish to forward all the messages to.
� Press 4 for Message Play Order. You can choose for the system to play the
latest message first, or the oldest message first.
� Press 5 for Mailbox Language. InterMail supports multiple languages for
system prompt. Follow the voice guide, and select the language you
prefer. Check with your dealer for the available mailbox languages.
� Press 6 for Time Stamp. You can select to play or not to play the time
information of the message received when listening to messages.
To Change the Extension Status:
1. Enter your mailbox.
2. Pres 4 to enter the Personal Options.
3. Press 4 to Set Mailbox Preferences.
� Press 1 for Special Answering Options. There are two Special Answering
Options, Do Not Disturb (DND) and Call Forward. When the Mailbox is
in the DND mode, the call will not be transferred to the extension, but
taken directly to the mailbox greeting instead. When the Mailbox Type is
Virtual, the DND mode will be automatically enabled. When the mailbox
is in the Call Forward mode, the call will be transferred directly to the
Call Forward Target. Follow the system prompts to modify the Special
Answering Options. Select Normal mode to answer the call normally.
� Press 2 for Call Forward Target. The Call Forward Target is needed when
the mailbox Special Answering Options is set to Call Forward. Enter the
target extension number you wish to forward the call to.
To Modify your Personal Distribution List:
1. Enter your mailbox.
2. Pres 4 to enter the Personal Options.
3. Press 5 to Modify your Personal Distribution List. There can be up to 9

Chapter 8 User Operations
75
Personal Distribution Lists in each mailbox; each list can hold up to 5
members. Follow the system prompts to add and remove members from the
list.

Chapter 9 DTMF Programming
77
Chapter 9 DTMF Programming
There is an alternative way of programming InterMail to using a computer
based utility program. Through a touch-tone telephone, you can set up or
modify the system from anywhere.
Chapter 9 DTMF Programming 78
DTMF Programming Mode When you are without a computer or the proper network environment, you can
use the DTMF Programming to set up the InterMail from any touch-tone
telephone. InterMail can continue to take calls and operate normally when the
system is in the DTMF Programming Mode.
Entering and Exiting the DTMF Programming Mode The InterMail only allows one administrator in the Programming Mode, using
either DTMF Programming or IMS Utility.
Note: When the Security button on the InterMail is pressed down, the
programming mode will be locked.
To Enter the DTMF Programming Mode
1. Call from a touch tone phone to the InterMail.
2. During AA greeting, press the predefined key to enter the DTMF
Programming Mode. The default key “#” in main AA menu (ID 000).
Note: The key is set as “DTMF Programming” function in AA Menu.
3. You will be prompted to enter the Administrator’s Password. The default
password is “1234”.
4. Enter the 3-digit function code you would like to edit.
To Exit the DTMF Programming Mode
When finishing editing, press “#” when the system asks you to enter the
function or simply hang up the phone.
DTMF Programming Procedure All DTMF Programming will be guided by voice prompts. The following are the
general DTMF Programming procedure:
1. After you have entered the correct password, you will be prompted to enter
the 3-digit Function Code.
2. Enter the 3-digit Function Code to edit the function you would like to
modify.
3. Follow the system prompt and refer to the 3-digit Function Code Table for
modifications. In general, the system will announce the current setting of the
function first, and then ask you to press 1 to edit, 2 to save, and 3 to replay
the current setting.

Chapter 9 DTMF Programming
79
Note: Some functions require several steps to enter the parameter, while
some only need one step.
4. The new setting will be played back to you and followed by the standard
options (1 to edit, 2 to save, 3 to replay) mentioned in Step 3 above. Follow
the system prompts to confirm the setting and remember to save when you
finish editing.
DTMF and Action Code Table A 2-digit code table representing all DTMF signals (0-9, *, #, A, B, C, D) input
using telephone keypad. Unlike IMS Utility, what you see is what you input.
Signal Code
using keypad
GUI
from IMS Utility
DTMF 1 01 1
DTMF 2 02 2
DTMF 3 03 3
DTMF 4 04 4
DTMF 5 05 5
DTMF 6 06 6
DTMF 7 07 7
DTMF 8 08 8
DTMF 9 09 9
DTMF * 10 *
DTMF 0 11 0
DTMF # 12 #
First Flash 13 &
Second Flash 14 h
0.5 sec Pause Time 15 ,
Extension 16 x
1 sec Pause Time 17 ;
Timeout 18
DTMF A 19 A
DTMF B 20 B
DTMF C 21 C
DTMF D 22 D
Extension Digit 23 E
Ignore 24 I
Number of Messages 25 M

Chapter 9 DTMF Programming 80
3-Digit Function Code Table The following is a full listing of the 3-Digit Function Codes for your
programming reference.
Func.
Code Description Input Notes
100 System Password X + # X = 0~8-digit
101 Greeting Recording
Password
X + # X = 0~8-digit
102 IP Address XXX + * + XXX + * +
XXX + * + XXX + #
XXX = 000 ~ 255
103 Default Gateway
Address
XXX + * + XXX + * +
XXX + * + XXX + #
XXX = 000 ~ 255
104
Subnet Mask
XXX + * + XXX + * +
XXX + * + XXX + #
XXX = 000 ~ 255
105
DNS
XXX + * + XXX + * +
XXX + * + XXX + #
XXX = 000 ~ 255
106 DTMF Send On Time X + # X = 10, 20, 30, ~ 400
msec(s)
107 DTMF Send Off Time X + # X = 10, 20, 30, ~ 400
msec(s)
108 DTMF Send Gain X + # X = 1 ~ 10 level(s)
109 DTMF Inter-Digit
Timeout
X + # X = 1 ~ 10 sec(s)
110
DTMF AA-Menu
Timeout
X + # X = 1 ~ 10 sec(s)
111 Recording Gain X + # X = 1 ~ 10 level(s)
112 Play Gain X + # X = 1 ~ 10 level(s)
113 Dial Tone Duration X + # X = 0 (disable), 1 ~ 10
sec(s)
114 External Busy Tone
Counter
X + # X = 1 ~ 10 count(s)
115 Loop Current Drop
Duration
X + # X = 0 (disable), 1 ~ 10
sec(s)
116 Enable RS-232
Message Light
X + # X = 0 (Disabled), 1
(Enabled)
117 RS-232, Baud Rate X + # X = 1200, 2400, 4800,
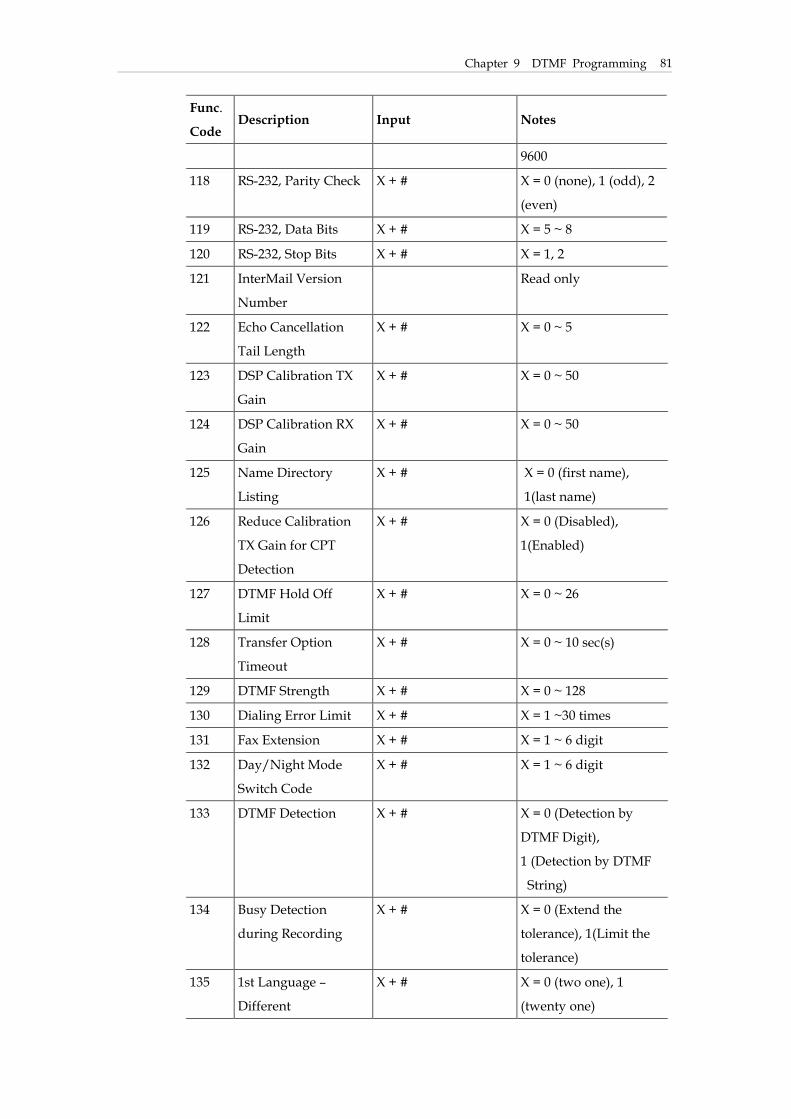
Chapter 9 DTMF Programming
81
Func.
Code Description Input Notes
9600
118 RS-232, Parity Check X + # X = 0 (none), 1 (odd), 2
(even)
119 RS-232, Data Bits X + # X = 5 ~ 8
120 RS-232, Stop Bits X + # X = 1, 2
121 InterMail Version
Number
Read only
122 Echo Cancellation
Tail Length
X + # X = 0 ~ 5
123 DSP Calibration TX
Gain
X + # X = 0 ~ 50
124 DSP Calibration RX
Gain
X + # X = 0 ~ 50
125 Name Directory
Listing
X + # X = 0 (first name),
1(last name)
126 Reduce Calibration
TX Gain for CPT
Detection
X + # X = 0 (Disabled),
1(Enabled)
127 DTMF Hold Off
Limit
X + # X = 0 ~ 26
128 Transfer Option
Timeout
X + # X = 0 ~ 10 sec(s)
129 DTMF Strength X + # X = 0 ~ 128
130 Dialing Error Limit X + # X = 1 ~30 times
131 Fax Extension X + # X = 1 ~ 6 digit
132 Day/Night Mode
Switch Code
X + # X = 1 ~ 6 digit
133 DTMF Detection X + # X = 0 (Detection by
DTMF Digit),
1 (Detection by DTMF
String)
134 Busy Detection
during Recording
X + # X = 0 (Extend the
tolerance), 1(Limit the
tolerance)
135 1st Language –
Different
X + # X = 0 (two one), 1
(twenty one)

Chapter 9 DTMF Programming 82
Func.
Code Description Input Notes
Announcement of
Number. (Take 21 as
an example)
136 2nd Language –
Different
announcement of
number. (Take 21 as
an example)
X + # X = 0 (two one), 1
(twenty one)
137 3rd Language -
Different
announcement of
number. (Take 21 as
an example)
X + # X = 0 (two one), 1
(twenty one)
138 4th Language -
Different
announcement of
number. (Take 21 as
an example)
X + # X = 0 (two one), 1
(twenty one)
139 Pickup Mode X + # X = 0 (Ring Low), 1
(Ring High)
140 Min Ring On X + # X = 300~2000 ms
141 Max Ring Off X + # X = 1000~5000 ms
142 DTMF Identification
Performance
X + # X = 0 (default), 1
(enhanced)
143 System Log X = 0 (Disabled), 1
(Enabled)
200 Business Hour
Operator Transfer
Mode
X + # X = 1 (Supervised),
2 (Non-Supervised),
3 (Semi-Supervised)
201 Business Hour
Extension Transfer
Mode
X + # X = 1 (Supervised),
2 (Non-Supervised),
3 (Semi-Supervised)
202 After Hour Operator
Transfer Mode
X + # X = 1 (Supervised),
2 (Non-Supervised),
3 (Semi-Supervised)
203 After Hour Extension X + # X = 1 (Supervised),
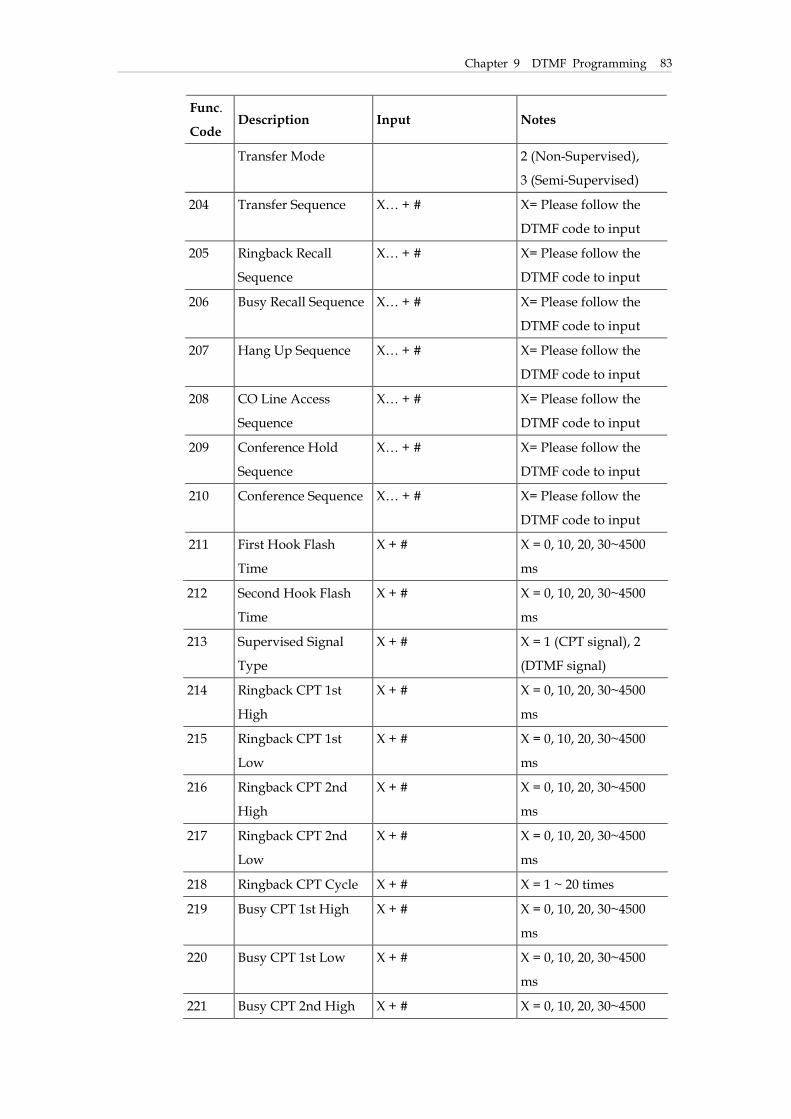
Chapter 9 DTMF Programming
83
Func.
Code Description Input Notes
Transfer Mode 2 (Non-Supervised),
3 (Semi-Supervised)
204 Transfer Sequence X… + # X= Please follow the
DTMF code to input
205 Ringback Recall
Sequence
X… + # X= Please follow the
DTMF code to input
206 Busy Recall Sequence X… + # X= Please follow the
DTMF code to input
207 Hang Up Sequence X… + # X= Please follow the
DTMF code to input
208 CO Line Access
Sequence
X… + # X= Please follow the
DTMF code to input
209 Conference Hold
Sequence
X… + # X= Please follow the
DTMF code to input
210 Conference Sequence X… + # X= Please follow the
DTMF code to input
211 First Hook Flash
Time
X + # X = 0, 10, 20, 30~4500
ms
212 Second Hook Flash
Time
X + # X = 0, 10, 20, 30~4500
ms
213 Supervised Signal
Type
X + # X = 1 (CPT signal), 2
(DTMF signal)
214 Ringback CPT 1st
High
X + # X = 0, 10, 20, 30~4500
ms
215 Ringback CPT 1st
Low
X + # X = 0, 10, 20, 30~4500
ms
216 Ringback CPT 2nd
High
X + # X = 0, 10, 20, 30~4500
ms
217 Ringback CPT 2nd
Low
X + # X = 0, 10, 20, 30~4500
ms
218 Ringback CPT Cycle X + # X = 1 ~ 20 times
219 Busy CPT 1st High X + # X = 0, 10, 20, 30~4500
ms
220 Busy CPT 1st Low X + # X = 0, 10, 20, 30~4500
ms
221 Busy CPT 2nd High X + # X = 0, 10, 20, 30~4500

Chapter 9 DTMF Programming 84
Func.
Code Description Input Notes
ms
222 Busy CPT 2nd Low X + # X = 0, 10, 20, 30~4500
ms
223 Busy CPT Cycle X + # X = 1 ~ 20 times
224 Error CPT 1st High X + # X = 0, 10, 20, 30~4500
ms
225 Error CPT 1st Low X + # X = 0, 10, 20, 30~4500
ms
226 Error CPT Cycle X + # X = 1 ~ 20 times
227 Call Progress Tone
Tolerance
X + # X = 1 (high), 2 (low)
228 Ringback Tone
DTMF Signal
X… + # X… = DTMF & Action
Code String
229 Busy Tone DTMF
Signal
X… + # X… = DTMF & Action
Code String
230 DND DTMF Signal X… + # X… = DTMF & Action
Code String
231 Answer Call DTMF
Signal
X… + # X… = DTMF & Action
Code String
232 Disconnect Call
DTMF Signal
X… + # X… = DTMF & Action
Code String
233 No Answer Time out
for DTMF Signal
X + # X = 1 ~ 60 sec
234 Maximum Digits in
In-Band DTMF
Strings
X + # X = 1 ~ 30 digit
235 Maximum Time to
Wait for First Digit
X + # X = 0 ~ 30 sec
236 Maximum Time
Between Digits
X + # X = 1 ~ 10 sec
237 Busy Time Lag X + # X = 0 (Disabled) ~ 20 sec
238 Call Pickup No
Answer Time out
X + # X = 0 (Disabled) ~ 60 sec
239 Call Pickup Sequence X… + # X… = DTMF & Action
Code String
240 Call Pickup X + # X = 1 ~ 8 (multiple
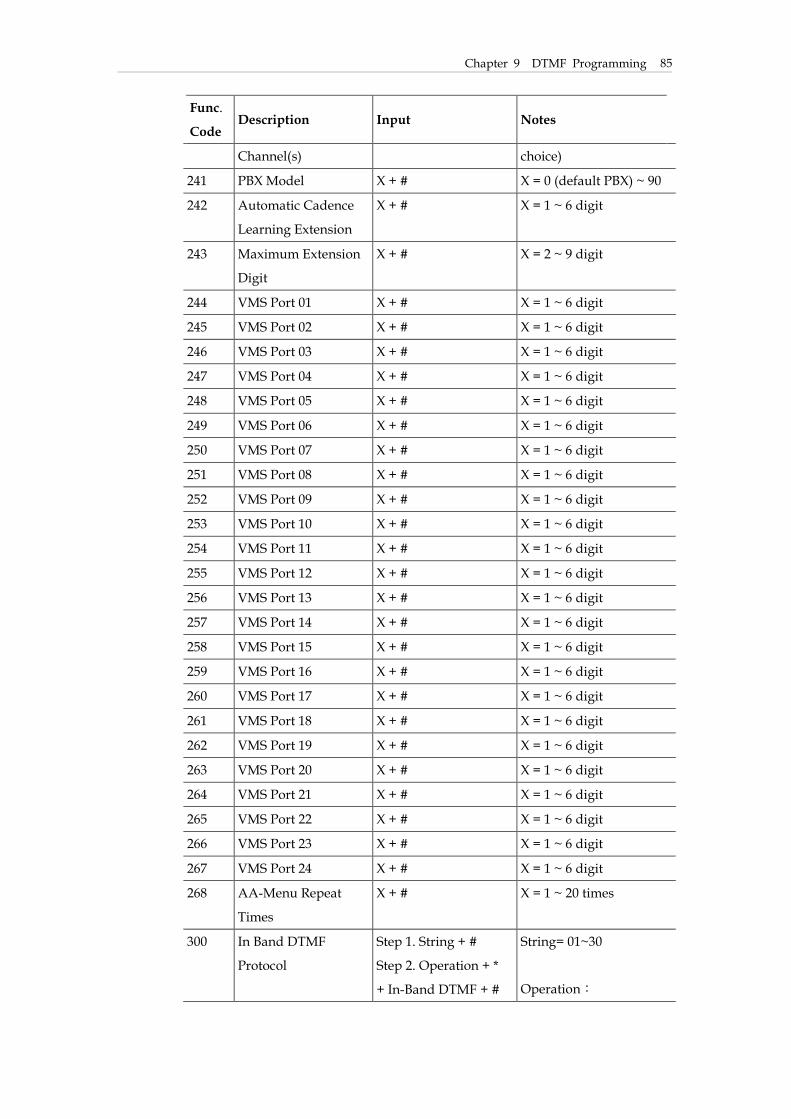
Chapter 9 DTMF Programming
85
Func.
Code Description Input Notes
Channel(s) choice)
241 PBX Model X + # X = 0 (default PBX) ~ 90
242 Automatic Cadence
Learning Extension
X + # X = 1 ~ 6 digit
243 Maximum Extension
Digit
X + # X = 2 ~ 9 digit
244 VMS Port 01 X + # X = 1 ~ 6 digit
245 VMS Port 02 X + # X = 1 ~ 6 digit
246 VMS Port 03 X + # X = 1 ~ 6 digit
247 VMS Port 04 X + # X = 1 ~ 6 digit
248 VMS Port 05 X + # X = 1 ~ 6 digit
249 VMS Port 06 X + # X = 1 ~ 6 digit
250 VMS Port 07 X + # X = 1 ~ 6 digit
251 VMS Port 08 X + # X = 1 ~ 6 digit
252 VMS Port 09 X + # X = 1 ~ 6 digit
253 VMS Port 10 X + # X = 1 ~ 6 digit
254 VMS Port 11 X + # X = 1 ~ 6 digit
255 VMS Port 12 X + # X = 1 ~ 6 digit
256 VMS Port 13 X + # X = 1 ~ 6 digit
257 VMS Port 14 X + # X = 1 ~ 6 digit
258 VMS Port 15 X + # X = 1 ~ 6 digit
259 VMS Port 16 X + # X = 1 ~ 6 digit
260 VMS Port 17 X + # X = 1 ~ 6 digit
261 VMS Port 18 X + # X = 1 ~ 6 digit
262 VMS Port 19 X + # X = 1 ~ 6 digit
263 VMS Port 20 X + # X = 1 ~ 6 digit
264 VMS Port 21 X + # X = 1 ~ 6 digit
265 VMS Port 22 X + # X = 1 ~ 6 digit
266 VMS Port 23 X + # X = 1 ~ 6 digit
267 VMS Port 24 X + # X = 1 ~ 6 digit
268 AA-Menu Repeat
Times
X + # X = 1 ~ 20 times
300 In Band DTMF
Protocol
Step 1. String + #
Step 2. Operation + *
+ In-Band DTMF + #
String= 01~30
Operation:
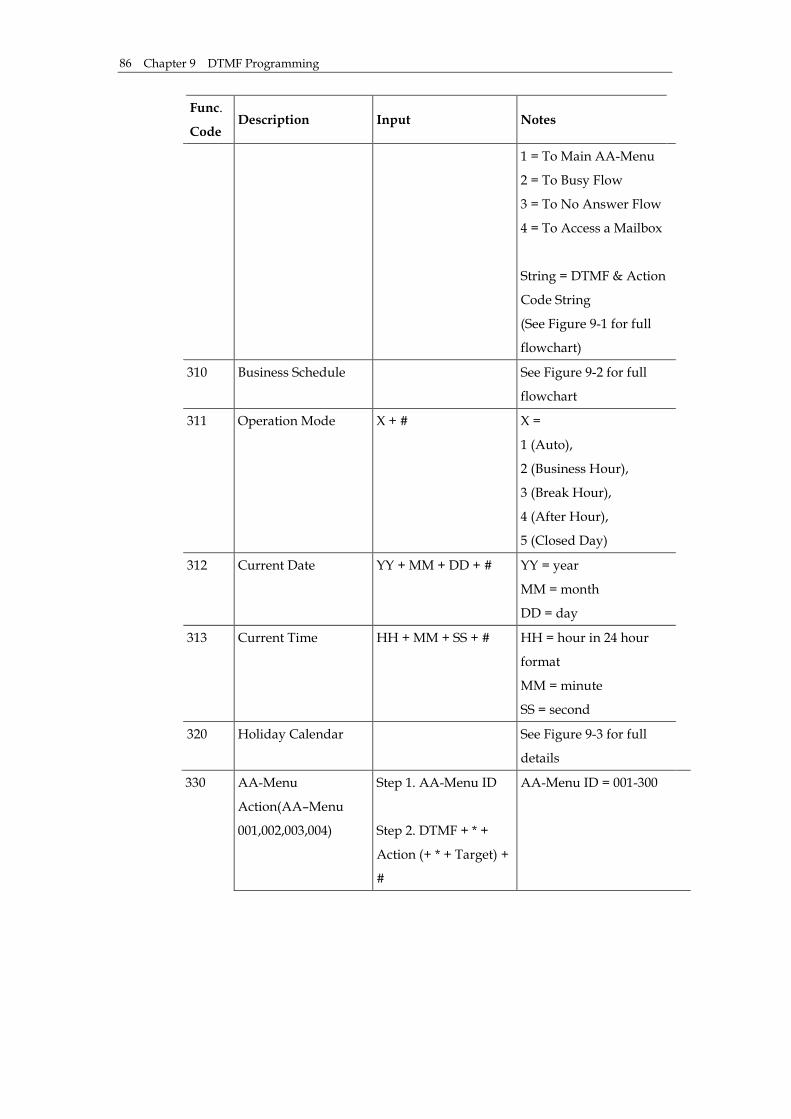
Chapter 9 DTMF Programming 86
Func.
Code Description Input Notes
1 = To Main AA-Menu
2 = To Busy Flow
3 = To No Answer Flow
4 = To Access a Mailbox
String = DTMF & Action
Code String
(See Figure 9-1 for full
flowchart)
310 Business Schedule See Figure 9-2 for full
flowchart
311
Operation Mode
X + # X =
1 (Auto),
2 (Business Hour),
3 (Break Hour),
4 (After Hour),
5 (Closed Day)
312 Current Date
YY + MM + DD + # YY = year
MM = month
DD = day
313
Current Time
HH + MM + SS + #
HH = hour in 24 hour
format
MM = minute
SS = second
320 Holiday Calendar See Figure 9-3 for full
details
330 AA-Menu
Action(AA–Menu
001,002,003,004)
Step 1. AA-Menu ID
Step 2. DTMF + * +
Action (+ * + Target) +
#
AA-Menu ID = 001-300

Chapter 9 DTMF Programming
87
Func.
Code Description Input Notes
See Figure 9-4 for full
flowchart
DTMF:
01 = DTMF 1
02 = DTMF 2
03 = DTMF 3
04 = DTMF 4
05 = DTMF 5
06 = DTMF 6
07 = DTMF 7
08 = DTMF 8
09 = DTMF 9
10 = DTMF *
11 = DTMF 0
12 = DTMF #
18= Time Out
Action:
00 = No Action
01 = AA Menu
02 = AA Menu in 1st
Language
03 = AA Menu in 2nd
Language
04 = AA Menu in 3rd
Language
05 = AA Menu in 4th
Language
06 = Lead to Extension
Number
07 = Transfer to Extension
08 = Direct Transfer to
Extension
09 = Transfer to Mailbox
10 = Direct Transfer to
Mailbox
11 = Access Mailbox
12 = Name Directory
16 = Operator
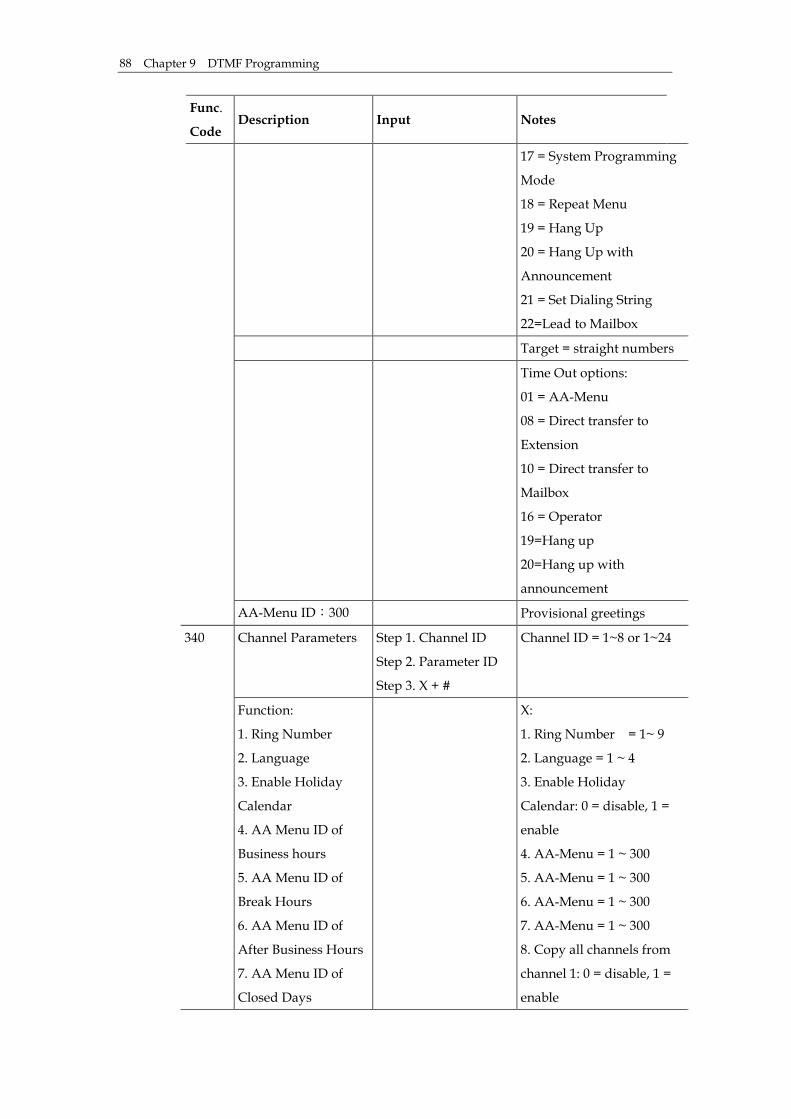
Chapter 9 DTMF Programming 88
Func.
Code Description Input Notes
17 = System Programming
Mode
18 = Repeat Menu
19 = Hang Up
20 = Hang Up with
Announcement
21 = Set Dialing String
22=Lead to Mailbox
Target = straight numbers
Time Out options:
01 = AA-Menu
08 = Direct transfer to
Extension
10 = Direct transfer to
Mailbox
16 = Operator
19=Hang up
20=Hang up with
announcement
AA-Menu ID:300 Provisional greetings
340 Channel Parameters Step 1. Channel ID
Step 2. Parameter ID
Step 3. X + #
Channel ID = 1~8 or 1~24
Function:
1. Ring Number
2. Language
3. Enable Holiday
Calendar
4. AA Menu ID of
Business hours
5. AA Menu ID of
Break Hours
6. AA Menu ID of
After Business Hours
7. AA Menu ID of
Closed Days
X:
1. Ring Number = 1~ 9
2. Language = 1 ~ 4
3. Enable Holiday
Calendar: 0 = disable, 1 =
enable
4. AA-Menu = 1 ~ 300
5. AA-Menu = 1 ~ 300
6. AA-Menu = 1 ~ 300
7. AA-Menu = 1 ~ 300
8. Copy all channels from
channel 1: 0 = disable, 1 =
enable

Chapter 9 DTMF Programming
89
Func.
Code Description Input Notes
8. Apply to channel 1
parameters
350 Multi-Tenant and
Transfer Options
Press 1: Enable
multi-tenant
Press 2: Transfer
option
0: Disable multi-tenant
1: Enable multi-tenant
350 Transfer Options DTMF + * + Action (+
* + Target) + #
DTMF:
01 = DTMF 1
02 = DTMF 2
03 = DTMF 3
04 = DTMF 4
05 = DTMF 5
06 = DTMF 6
07 = DTMF 7
08 = DTMF 8
09 = DTMF 9
10 = DTMF *
11 = DTMF 0
12 = DTMF #
Action:
00 = No Action
01 = AA Menu
06 = Lead to Extension
Number
07 = Transfer to Extension
08=Direct transfer to
Extension
09= Transfer to Mailbox
10=Direct transfer to
Mailbox
11=Access Mailbox
13 = Leave a Message
14=Hold for busy
15=Conference
16 = Operator
17= System Programming
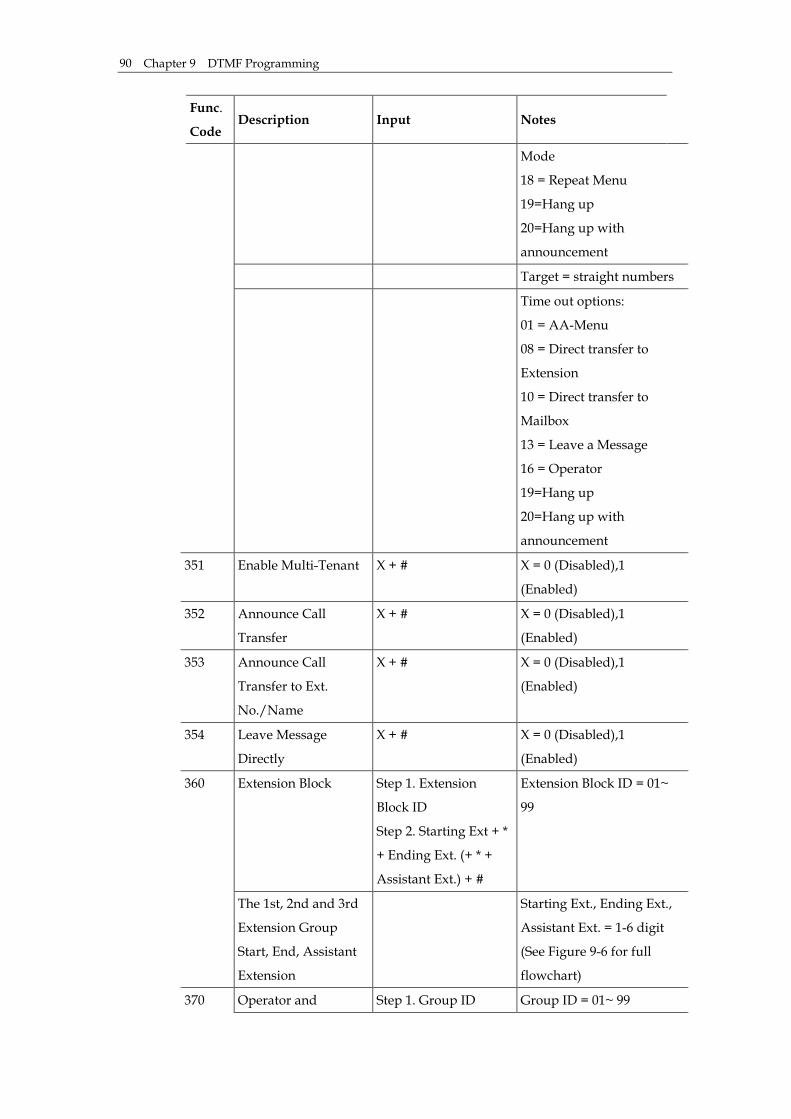
Chapter 9 DTMF Programming 90
Func.
Code Description Input Notes
Mode
18 = Repeat Menu
19=Hang up
20=Hang up with
announcement
Target = straight numbers
Time out options:
01 = AA-Menu
08 = Direct transfer to
Extension
10 = Direct transfer to
Mailbox
13 = Leave a Message
16 = Operator
19=Hang up
20=Hang up with
announcement
351 Enable Multi-Tenant X + # X = 0 (Disabled),1
(Enabled)
352 Announce Call
Transfer
X + # X = 0 (Disabled),1
(Enabled)
353 Announce Call
Transfer to Ext.
No./Name
X + # X = 0 (Disabled),1
(Enabled)
354 Leave Message
Directly
X + # X = 0 (Disabled),1
(Enabled)
360 Extension Block Step 1. Extension
Block ID
Step 2. Starting Ext + *
+ Ending Ext. (+ * +
Assistant Ext.) + #
Extension Block ID = 01~
99
The 1st, 2nd and 3rd
Extension Group
Start, End, Assistant
Extension
Starting Ext., Ending Ext.,
Assistant Ext. = 1-6 digit
(See Figure 9-6 for full
flowchart)
370 Operator and Step 1. Group ID Group ID = 01~ 99

Chapter 9 DTMF Programming
91
Func.
Code Description Input Notes
Departments Step 2. Extension
Code + * + Hunting
Method + #
The 1st, 2nd and 3rd
Department
Extension Code = 1-6 digit
Hunting Method:
1 = Linear
2 = Circular
3 = ACD
371 Operator for
Different Hours
Step 1. Select Hours
Step 2. Ext. No. + #
Hours= 1~5
1= Business Hour
Operator
2= Break Hour Operator
3= After Hour Operator
4= Closed Day Operator
5= Holiday Operator
380 Prompt Recording
(ID 001~063)
Step 1. Select language
Step 2. Select ID
Step 3. After ding +
start recording..+ #
1st language: press 1
2nd language: press 2
3rd language: press 3
4th language: press 4
Lang0\AA\FLW001 ID001 Thank you and good bye.
Lang0\AA\FLW002 ID002 Invalid entry, please try
again.
Lang0\AA\FLW003 ID003 Please hold while I transfer you.
Lang0\AA\FLW005 ID004 ...Extension…
Lang0\AA\FLW006 ID005 …Operator …
Lang0\AA\FLW007 ID006 Please enter…
Lang0\AA\FLW008 ID007 Mailbox number
Lang0\AA\FLW009 ID008 The first few letters of the
last name of the person
you'd like to call.
Lang0\AA\FLW010 ID009 Department.
Lang0\AA\FLW011 ID010 ...The first few letters of
the first name of the
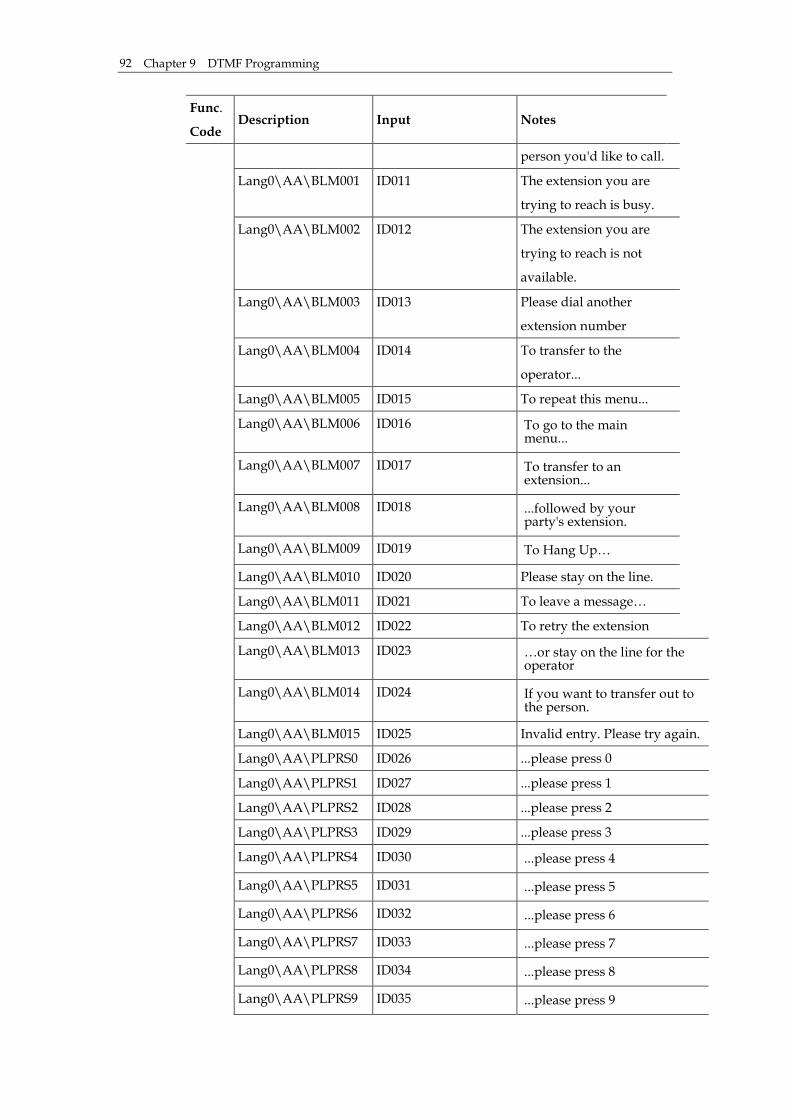
Chapter 9 DTMF Programming 92
Func.
Code Description Input Notes
person you'd like to call.
Lang0\AA\BLM001 ID011 The extension you are
trying to reach is busy.
Lang0\AA\BLM002 ID012 The extension you are
trying to reach is not
available.
Lang0\AA\BLM003 ID013 Please dial another
extension number
Lang0\AA\BLM004 ID014 To transfer to the
operator...
Lang0\AA\BLM005 ID015 To repeat this menu...
Lang0\AA\BLM006 ID016 To go to the main menu...
Lang0\AA\BLM007 ID017 To transfer to an extension...
Lang0\AA\BLM008 ID018 ...followed by your party's extension.
Lang0\AA\BLM009 ID019 To Hang Up…
Lang0\AA\BLM010 ID020 Please stay on the line.
Lang0\AA\BLM011 ID021 To leave a message…
Lang0\AA\BLM012 ID022 To retry the extension
Lang0\AA\BLM013 ID023 …or stay on the line for the operator
Lang0\AA\BLM014 ID024 If you want to transfer out to the person.
Lang0\AA\BLM015 ID025 Invalid entry. Please try again.
Lang0\AA\PLPRS0 ID026 ...please press 0
Lang0\AA\PLPRS1 ID027 ...please press 1
Lang0\AA\PLPRS2 ID028 ...please press 2
Lang0\AA\PLPRS3 ID029 ...please press 3
Lang0\AA\PLPRS4 ID030 ...please press 4
Lang0\AA\PLPRS5 ID031 ...please press 5
Lang0\AA\PLPRS6 ID032 ...please press 6
Lang0\AA\PLPRS7 ID033 ...please press 7
Lang0\AA\PLPRS8 ID034 ...please press 8
Lang0\AA\PLPRS9 ID035 ...please press 9
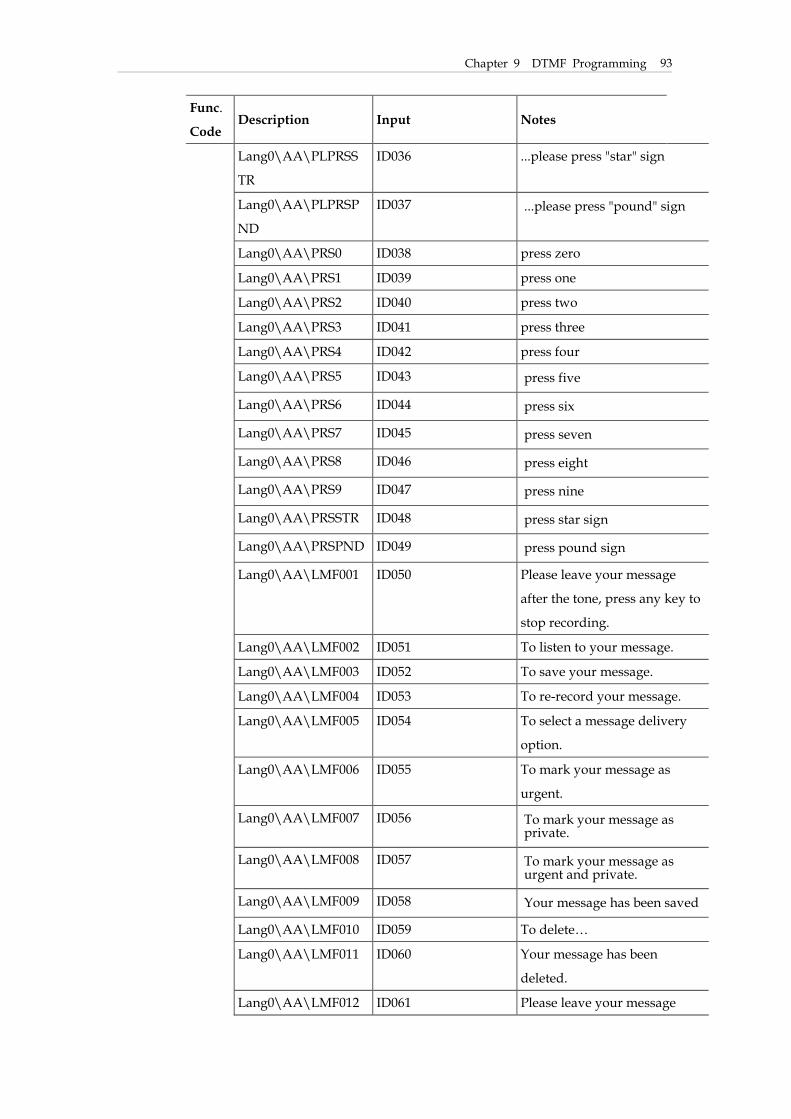
Chapter 9 DTMF Programming
93
Func.
Code Description Input Notes
Lang0\AA\PLPRSS
TR
ID036 ...please press "star" sign
Lang0\AA\PLPRSP
ND
ID037 ...please press "pound" sign
Lang0\AA\PRS0 ID038 press zero
Lang0\AA\PRS1 ID039 press one
Lang0\AA\PRS2 ID040 press two
Lang0\AA\PRS3 ID041 press three
Lang0\AA\PRS4 ID042 press four
Lang0\AA\PRS5 ID043 press five
Lang0\AA\PRS6 ID044 press six
Lang0\AA\PRS7 ID045 press seven
Lang0\AA\PRS8 ID046 press eight
Lang0\AA\PRS9 ID047 press nine
Lang0\AA\PRSSTR ID048 press star sign
Lang0\AA\PRSPND ID049 press pound sign
Lang0\AA\LMF001 ID050 Please leave your message
after the tone, press any key to
stop recording.
Lang0\AA\LMF002 ID051 To listen to your message.
Lang0\AA\LMF003 ID052 To save your message.
Lang0\AA\LMF004 ID053 To re-record your message.
Lang0\AA\LMF005 ID054 To select a message delivery
option.
Lang0\AA\LMF006 ID055 To mark your message as
urgent.
Lang0\AA\LMF007 ID056 To mark your message as private.
Lang0\AA\LMF008 ID057 To mark your message as urgent and private.
Lang0\AA\LMF009 ID058 Your message has been saved
Lang0\AA\LMF010 ID059 To delete…
Lang0\AA\LMF011 ID060 Your message has been
deleted.
Lang0\AA\LMF012 ID061 Please leave your message

Chapter 9 DTMF Programming 94
Func.
Code Description Input Notes
after the tone.
Lang0\AA\LMF013 ID062 Press any key to stop
recording.
Lang0\AA\LMF014 ID063 Press the “#” key to stop
recording.
400 The 1st Message
Lamp On Sequence
X… + # X= Follow the DTMF input
code
401 The 1st Message
Lamp Off Sequence
X… + # X= Follow the DTMF input
code
402 The 2nd Message
Lamp On Sequence
X… + # X= Follow the DTMF input
code
403 The 2nd Message
Lamp Off Sequence
X… + # X= Follow the DTMF input
code
404 Internal Notification
Channel
X + # X = 1 ~ 8, (single choice)
405
Notify for X + #
X: 1 = Only for the 1st new
message, 2 = Every new
message
406 Ring Notification
Interval
X + # X = 1 ~ 300 min
407 Ring Notification
Retrials
X + # X = 1 ~ 9 times
408 Ring Duration X + # X = 1 ~ 9 times
409 Pager Mode X + # X= 0 (US), 1 ( Singapore)
410 Detect Pager Vox X + # X = 0 (Disabled),1 (Enabled)
411 Delay for Pager X + # X = 1 ~ 20 sec
412 Delay for Mobile
Phone
X + # X = 1 ~ 20 sec
413 External Notification
Channel
X + # X = 1 ~ 8, (multiple choices)
Example: 1234 represents
channel 1, 2, 3 and 4.
414 Maximum Number
of Messages
X + # X = 1 ~ 255 messages
415 Maximum Messages
Length
X + # X = 10 ~ 600 sec
416 Minimum Messages X + # X = 1 ~ 9 sec
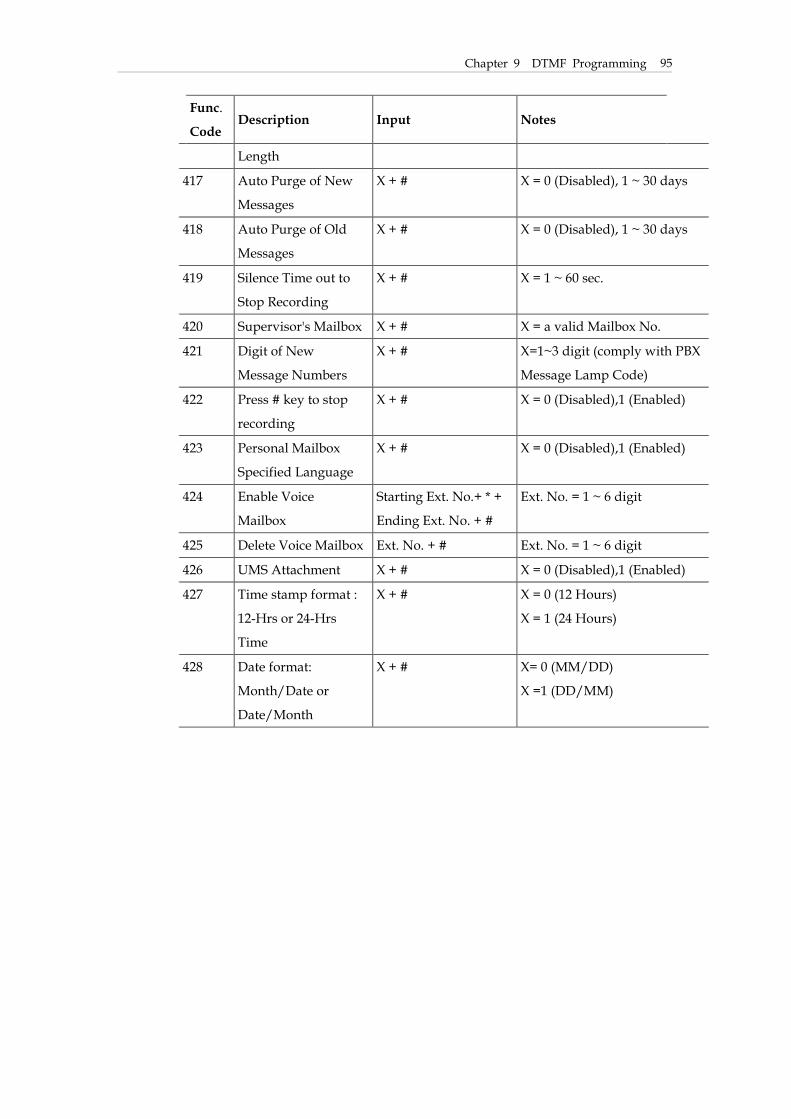
Chapter 9 DTMF Programming
95
Func.
Code Description Input Notes
Length
417 Auto Purge of New
Messages
X + # X = 0 (Disabled), 1 ~ 30 days
418 Auto Purge of Old
Messages
X + # X = 0 (Disabled), 1 ~ 30 days
419 Silence Time out to
Stop Recording
X + # X = 1 ~ 60 sec.
420 Supervisor's Mailbox X + # X = a valid Mailbox No.
421 Digit of New
Message Numbers
X + # X=1~3 digit (comply with PBX
Message Lamp Code)
422 Press # key to stop
recording
X + # X = 0 (Disabled),1 (Enabled)
423 Personal Mailbox
Specified Language
X + # X = 0 (Disabled),1 (Enabled)
424 Enable Voice
Mailbox
Starting Ext. No.+ * +
Ending Ext. No. + #
Ext. No. = 1 ~ 6 digit
425 Delete Voice Mailbox Ext. No. + # Ext. No. = 1 ~ 6 digit
426 UMS Attachment X + # X = 0 (Disabled),1 (Enabled)
427 Time stamp format :
12-Hrs or 24-Hrs
Time
X + # X = 0 (12 Hours)
X = 1 (24 Hours)
428 Date format:
Month/Date or
Date/Month
X + # X= 0 (MM/DD)
X =1 (DD/MM)

Chapter 9 DTMF Programming 96
Figure 9-1
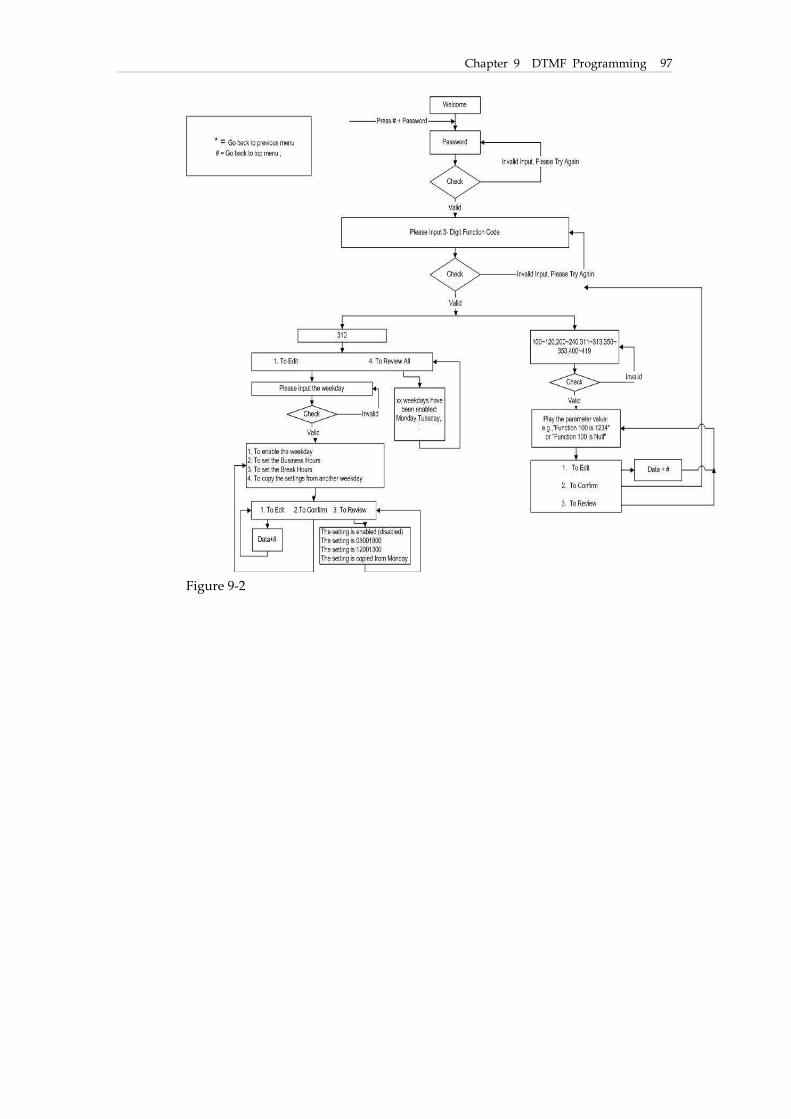
Chapter 9 DTMF Programming
97
Figure 9-2
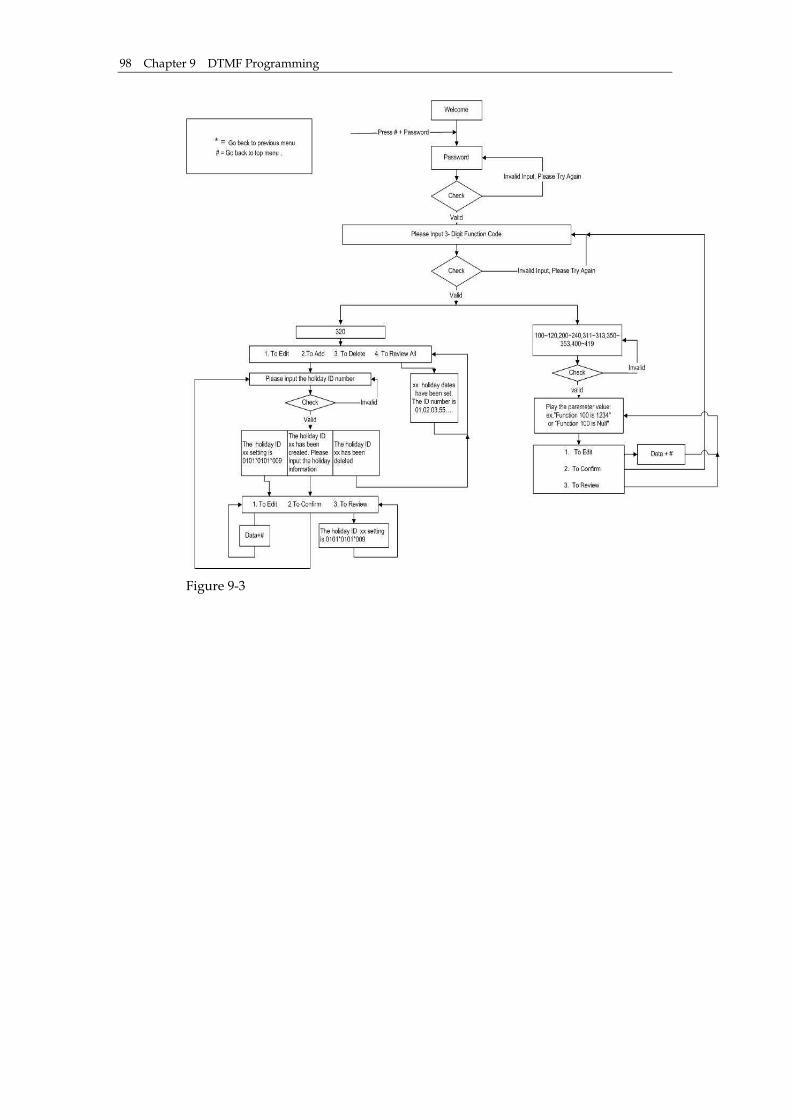
Chapter 9 DTMF Programming 98
Figure 9-3

Chapter 9 DTMF Programming
99
Figure 9-4
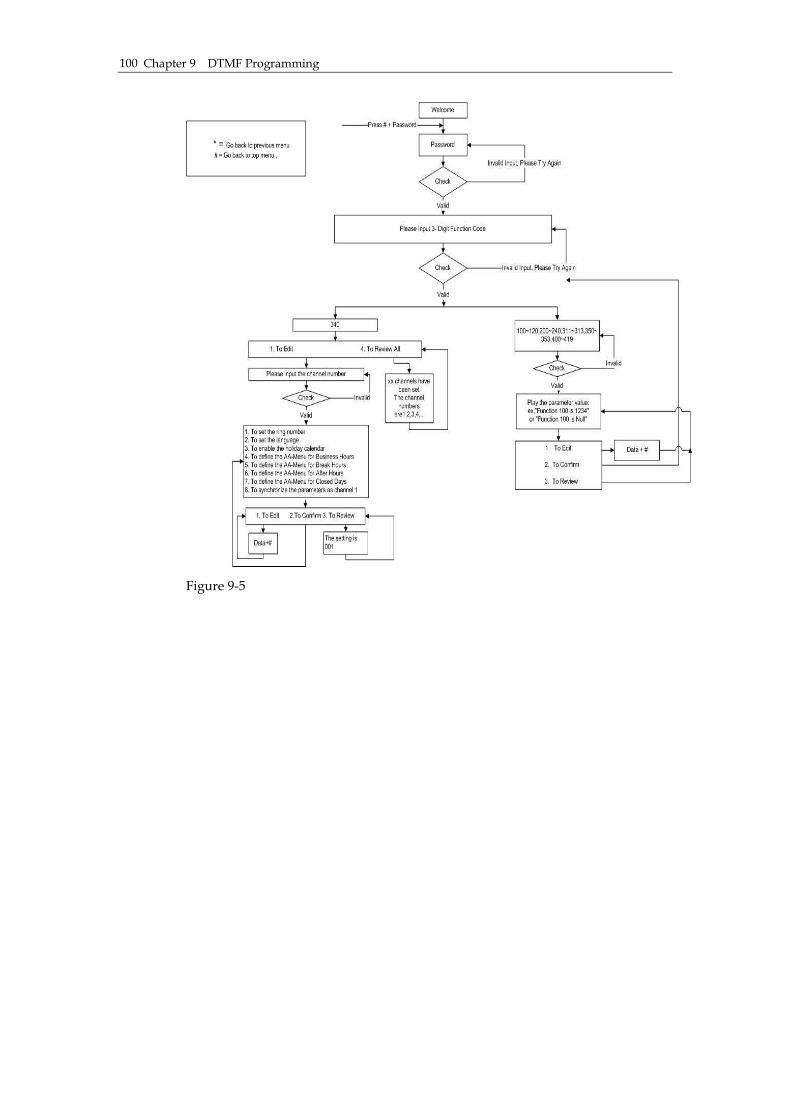
Chapter 9 DTMF Programming 100
Figure 9-5

Chapter 9 DTMF Programming
101
Figure 9-6
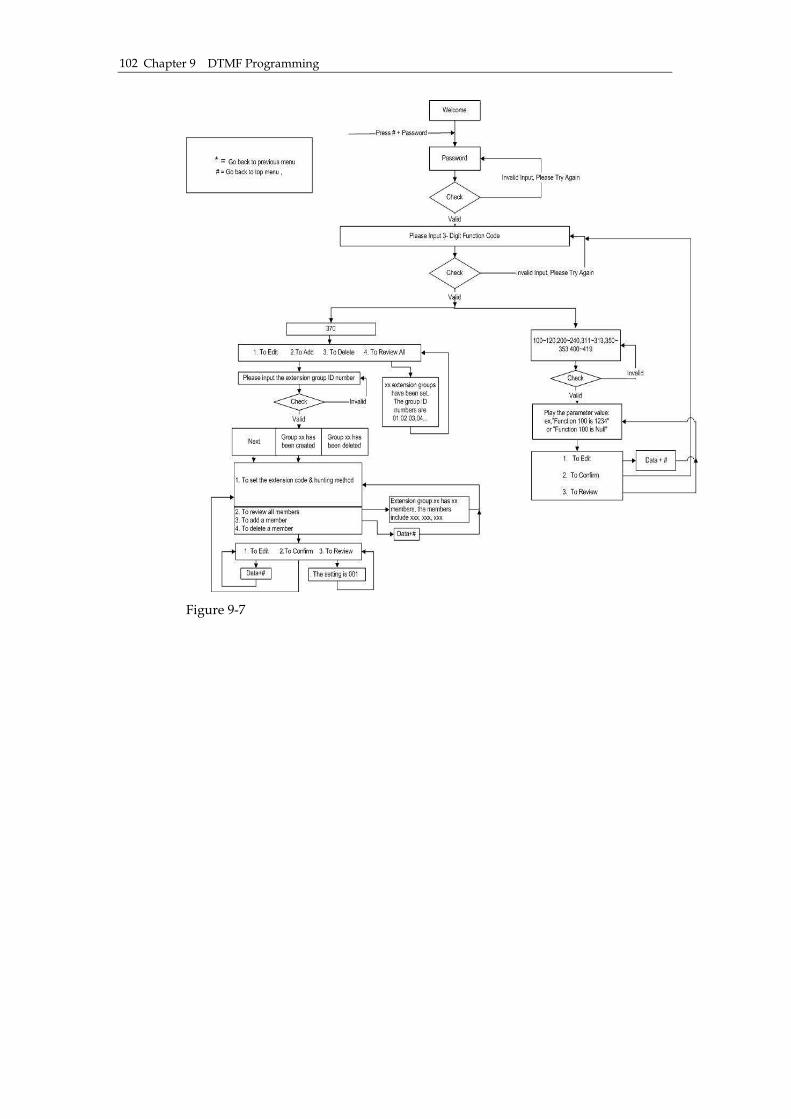
Chapter 9 DTMF Programming 102
Figure 9-7
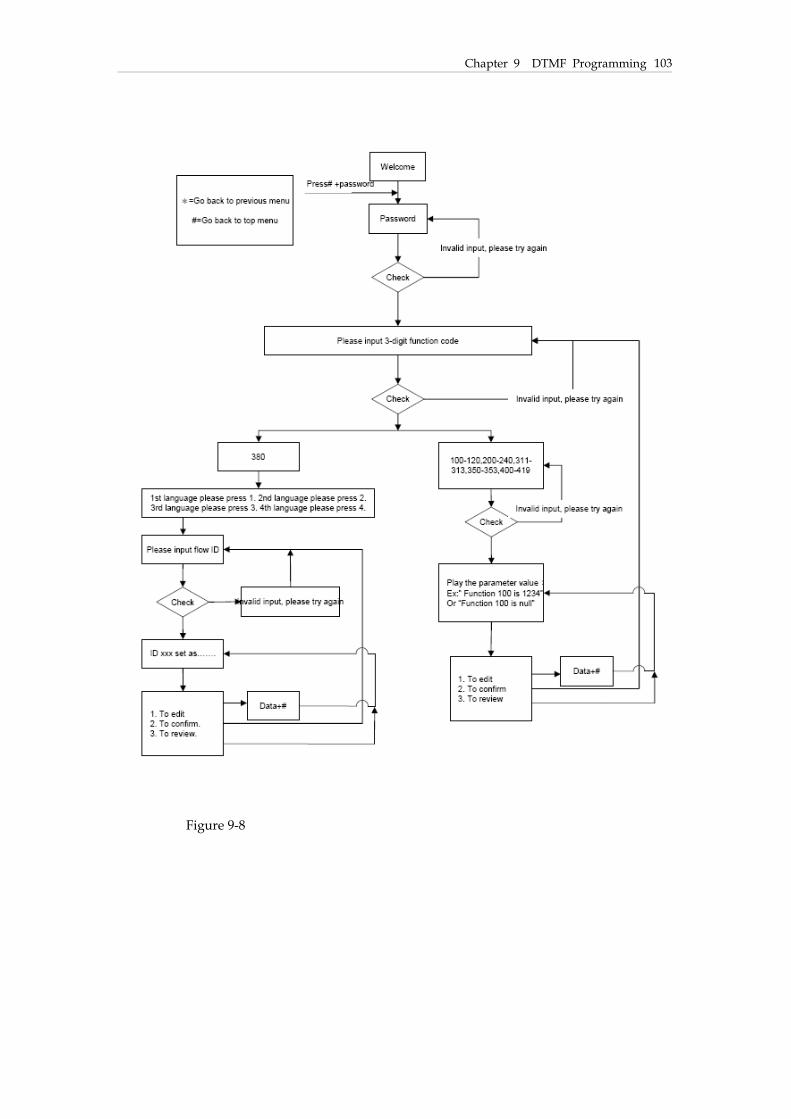
Chapter 9 DTMF Programming
103
Figure 9-8


Chapter 10 Advanced Parameters
105
Chapter 10 Advanced Parameters
This chapter will guide you through the advanced parameter settings.
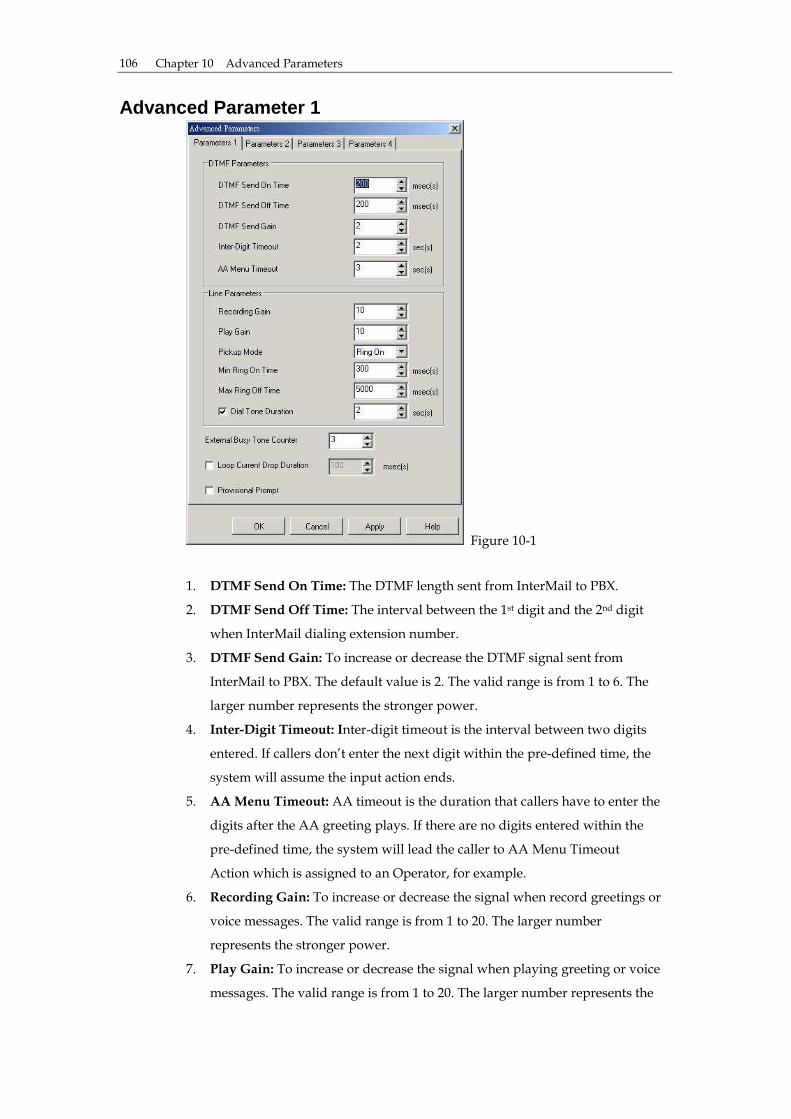
Chapter 10 Advanced Parameters 106
Advanced Parameter 1
Figure 10-1
1. DTMF Send On Time: The DTMF length sent from InterMail to PBX.
2. DTMF Send Off Time: The interval between the 1st digit and the 2nd digit
when InterMail dialing extension number.
3. DTMF Send Gain: To increase or decrease the DTMF signal sent from
InterMail to PBX. The default value is 2. The valid range is from 1 to 6. The
larger number represents the stronger power.
4. Inter-Digit Timeout: Inter-digit timeout is the interval between two digits
entered. If callers don’t enter the next digit within the pre-defined time, the
system will assume the input action ends.
5. AA Menu Timeout: AA timeout is the duration that callers have to enter the
digits after the AA greeting plays. If there are no digits entered within the
pre-defined time, the system will lead the caller to AA Menu Timeout
Action which is assigned to an Operator, for example.
6. Recording Gain: To increase or decrease the signal when record greetings or
voice messages. The valid range is from 1 to 20. The larger number
represents the stronger power.
7. Play Gain: To increase or decrease the signal when playing greeting or voice
messages. The valid range is from 1 to 20. The larger number represents the
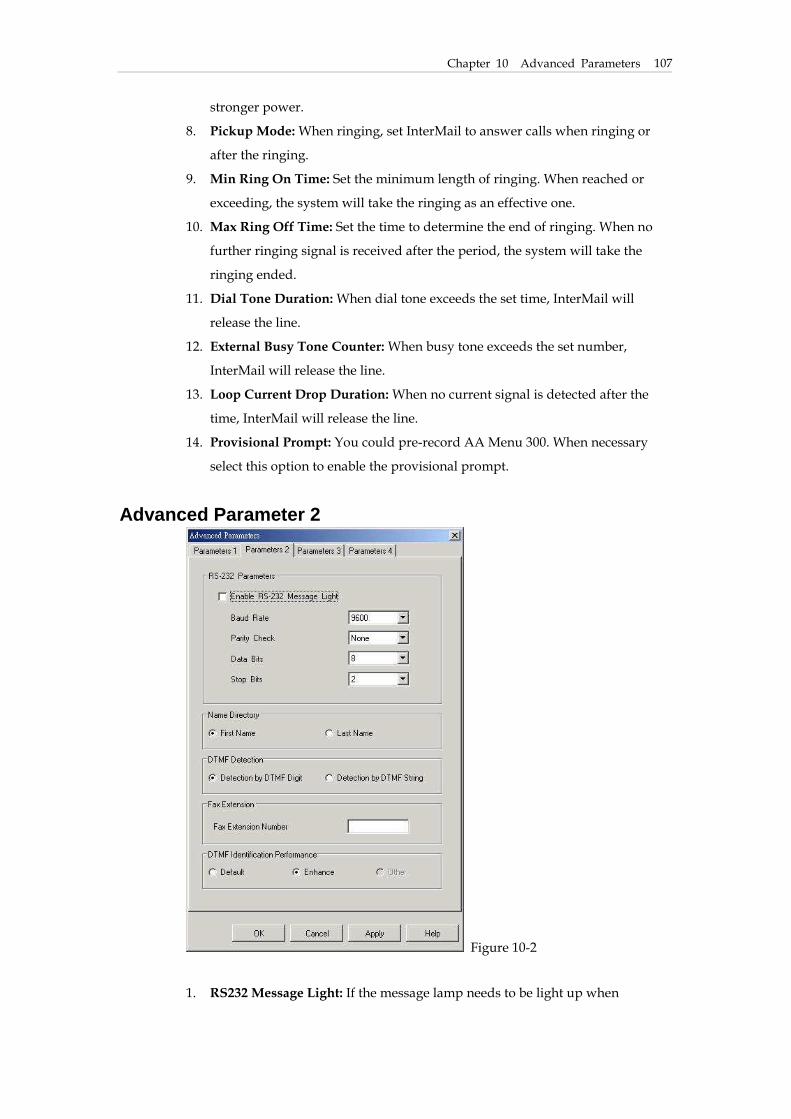
Chapter 10 Advanced Parameters
107
stronger power.
8. Pickup Mode: When ringing, set InterMail to answer calls when ringing or
after the ringing.
9. Min Ring On Time: Set the minimum length of ringing. When reached or
exceeding, the system will take the ringing as an effective one.
10. Max Ring Off Time: Set the time to determine the end of ringing. When no
further ringing signal is received after the period, the system will take the
ringing ended.
11. Dial Tone Duration: When dial tone exceeds the set time, InterMail will
release the line.
12. External Busy Tone Counter: When busy tone exceeds the set number,
InterMail will release the line.
13. Loop Current Drop Duration: When no current signal is detected after the
time, InterMail will release the line.
14. Provisional Prompt: You could pre-record AA Menu 300. When necessary
select this option to enable the provisional prompt.
Advanced Parameter 2
Figure 10-2
1. RS232 Message Light: If the message lamp needs to be light up when

Chapter 10 Advanced Parameters 108
receiving messages, select this option and set the Baud Rate, Parity Check,
Data Bits and Stop Bits. The settings need to conform to the PBX settings
allowing command to be delivered through PBX RS232 interface.
2. Name Directory: When enabled, callers will be prompted to enter the first
name or last name of the person to be reached. The system will then
announce the associated extension number. It is only applicable to enter
English names when the Name Directory is configured.
3. DTMF Detection: Set DTMF Detection using either DTMF Digit or DTMF
String. If DTMF Digit is selected, the system will decide to perform
transferring or do other actions right after receiving the 1st digit. This will
speed up the process but only one action can be assigned to one individual
digit. When DTMF String is selected, the system will wait till the complete
DTMF digits are received and decide what to do next.
4. Fax Extension: the extension number where the fax machine is connected.
When detecting fax tones, the fax will be automatically transported to the
fax machine.
5. DTMF Identification Performance: If InterMail is deployed in an area with
weak DTMF signal, you could select “Enhance” to better improve the
identification of DTMF signals.
Advanced Parameter 3 and 4 When RS232 integration between InterMail and PBX is required, in general you
will need to set VMS Port 1 as the extension number connected to it and so forth.
Figure 10-3
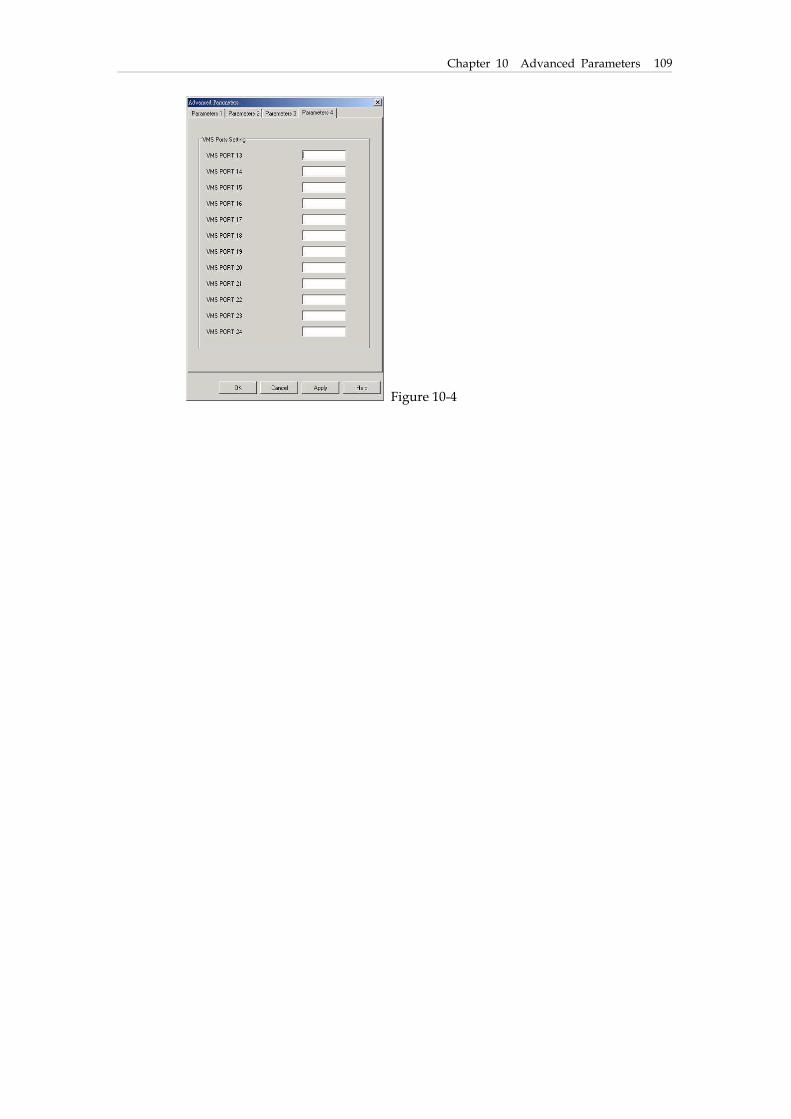
Chapter 10 Advanced Parameters
109
Figure 10-4

Appendix A: 3-Digit Function Codes
111
Chapter 11 System Status and Backup
This chapter will guide you how to check system current status and back up the
system.

Appendix A: 3-Digit Function Code 112
System Status From the main menu, click Live Monitor button and you will be able to view the
current available disk space and CPU loading.
You could also go to Report>System Report to check the software versions,
available languages, storage capacity and percentage used.
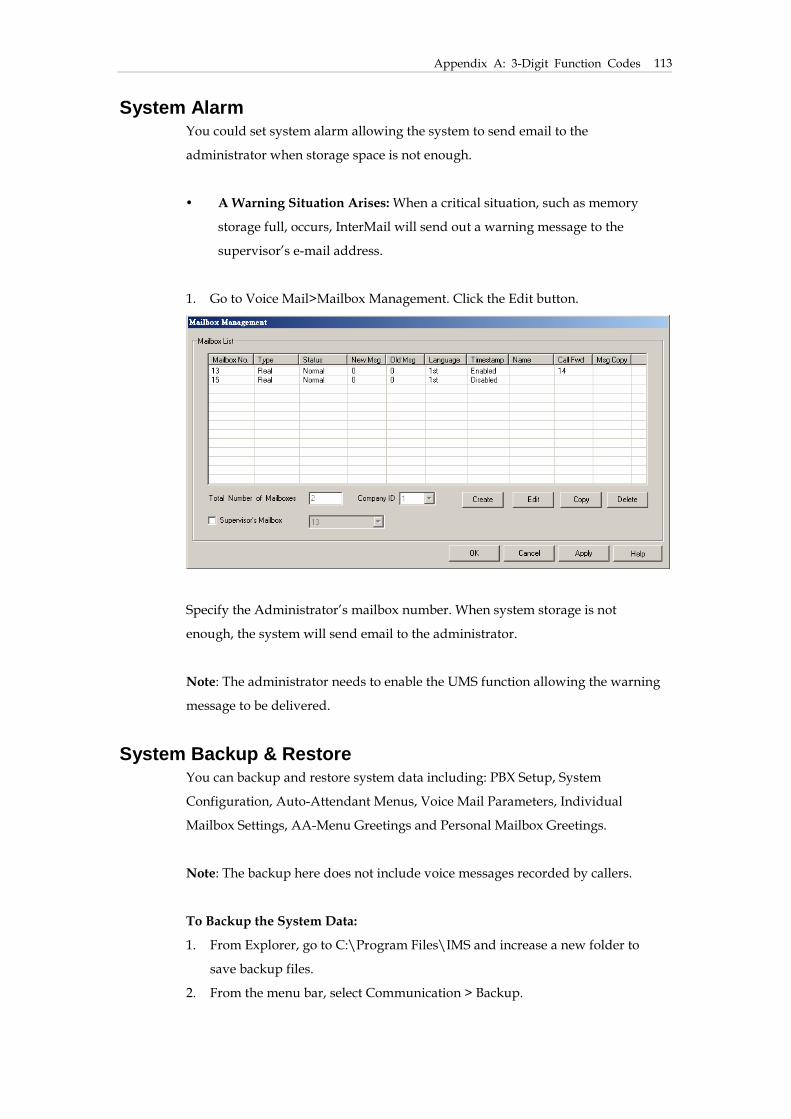
Appendix A: 3-Digit Function Codes
113
System Alarm You could set system alarm allowing the system to send email to the
administrator when storage space is not enough.
� A Warning Situation Arises: When a critical situation, such as memory
storage full, occurs, InterMail will send out a warning message to the
supervisor’s e-mail address.
1. Go to Voice Mail>Mailbox Management. Click the Edit button.
Specify the Administrator’s mailbox number. When system storage is not
enough, the system will send email to the administrator.
Note: The administrator needs to enable the UMS function allowing the warning
message to be delivered.
System Backup & Restore
You can backup and restore system data including: PBX Setup, System
Configuration, Auto-Attendant Menus, Voice Mail Parameters, Individual
Mailbox Settings, AA-Menu Greetings and Personal Mailbox Greetings.
Note: The backup here does not include voice messages recorded by callers.
To Backup the System Data:
1. From Explorer, go to C:\Program Files\IMS and increase a new folder to
save backup files.
2. From the menu bar, select Communication > Backup.
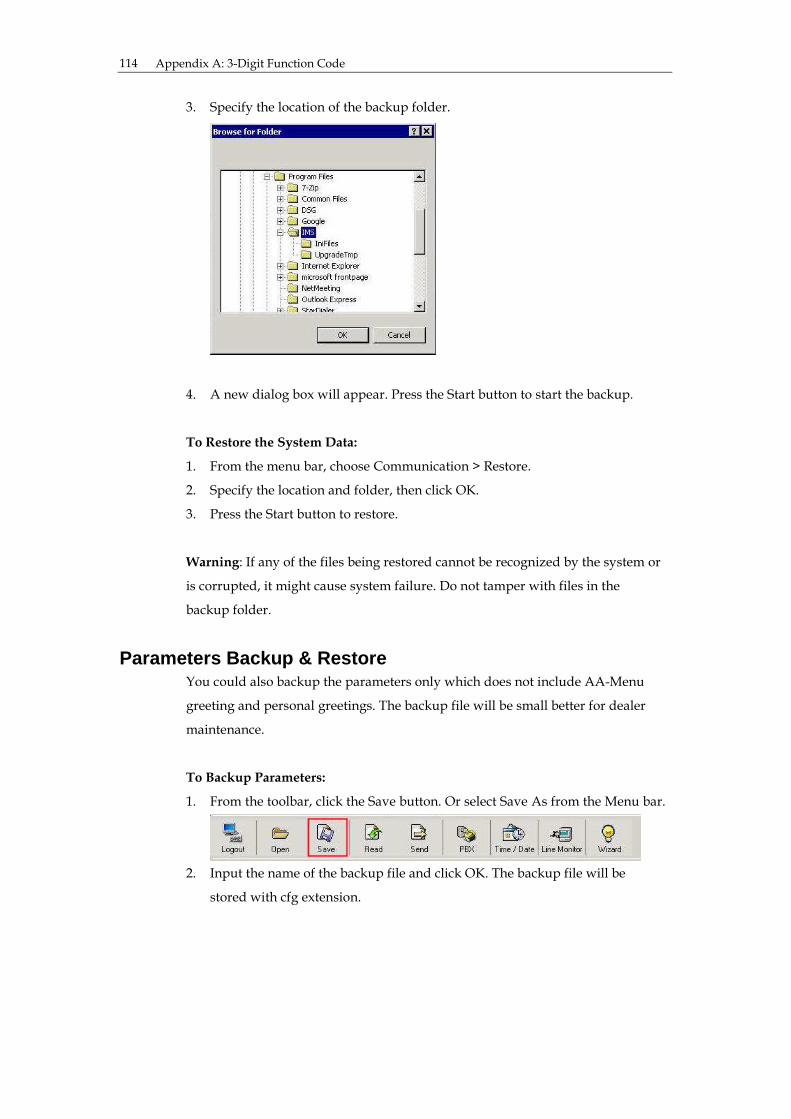
Appendix A: 3-Digit Function Code 114
3. Specify the location of the backup folder.
4. A new dialog box will appear. Press the Start button to start the backup.
To Restore the System Data:
1. From the menu bar, choose Communication > Restore.
2. Specify the location and folder, then click OK.
3. Press the Start button to restore.
Warning: If any of the files being restored cannot be recognized by the system or
is corrupted, it might cause system failure. Do not tamper with files in the
backup folder.
Parameters Backup & Restore
You could also backup the parameters only which does not include AA-Menu
greeting and personal greetings. The backup file will be small better for dealer
maintenance.
To Backup Parameters:
1. From the toolbar, click the Save button. Or select Save As from the Menu bar.
2. Input the name of the backup file and click OK. The backup file will be
stored with cfg extension.
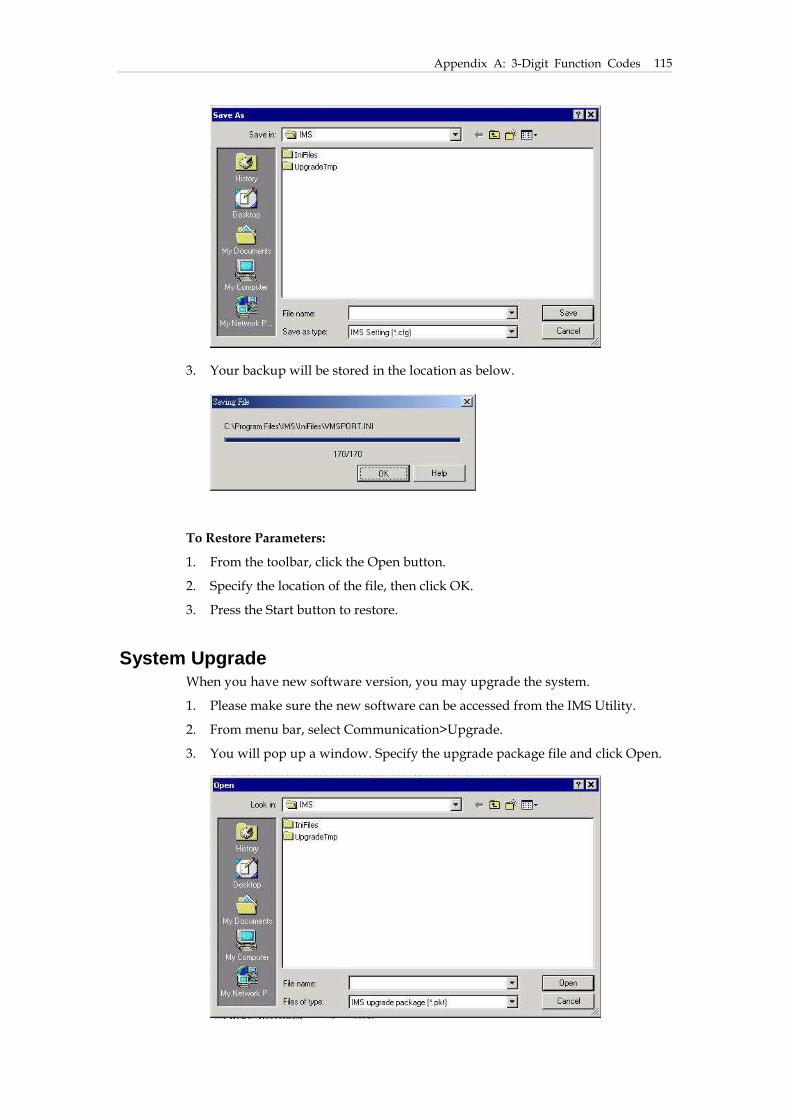
Appendix A: 3-Digit Function Codes
115
3. Your backup will be stored in the location as below.
To Restore Parameters:
1. From the toolbar, click the Open button.
2. Specify the location of the file, then click OK.
3. Press the Start button to restore.
System Upgrade When you have new software version, you may upgrade the system.
1. Please make sure the new software can be accessed from the IMS Utility.
2. From menu bar, select Communication>Upgrade.
3. You will pop up a window. Specify the upgrade package file and click Open.

Appendix A: 3-Digit Function Code 116
You will need to restart the system after the upgrade completes.

Appendix A: 3-Digit Function Codes
117
Appendix A: 3-Digit Function Codes
Func.
Code Function Description Default
100 System Password 1234
101 Greeting Recording Password
N/A UMS E-mail Address N/A
N/A UMS SMTP Server N/A
102 IP Address 192.168.1.200
103 Default Gateway Address 192.168.1.254
104 Subnet Mask 255.255.255.0
105 DNS 168.95.1.1
106 DTMF Send On Time 200 msec(s)
107 DTMF Send Off Time 200 msec(s)
108 DTMF Send Gain 2
109 Inter-Digit Timeout 2 sec(s)
110 AA Menu Timeout 3 sec(s)
111 Recording Gain 10
112 Play Gain 10
113 Detect Dial Tone Before Dialing 2 sec(s)
114 External Busy Tone Counter 3 cycle(s)
115 Loop Current Drop Duration 2000 msec(s)
116 Enable RS-232 Message Light 0 = Disabled
117 RS-232,Baud Rate 9600
118 RS-232,Parity Check 0 = none
119 RS-232,Data Bits 8
120 RS-232,Stop Bits 2
121 InterMail Version Number xxxx
122 Echo Cancel Tail Length 1
123 Calibration TX Gain 25
124 Calibration RX Gain 25
125 Name Directory Listing 0 = First Name
126 Reduce Calibration TX Gain for CPT
Detection
0
127 DTMF Hold Off Limit 0
128 Transfer Option Time Out 3 sec
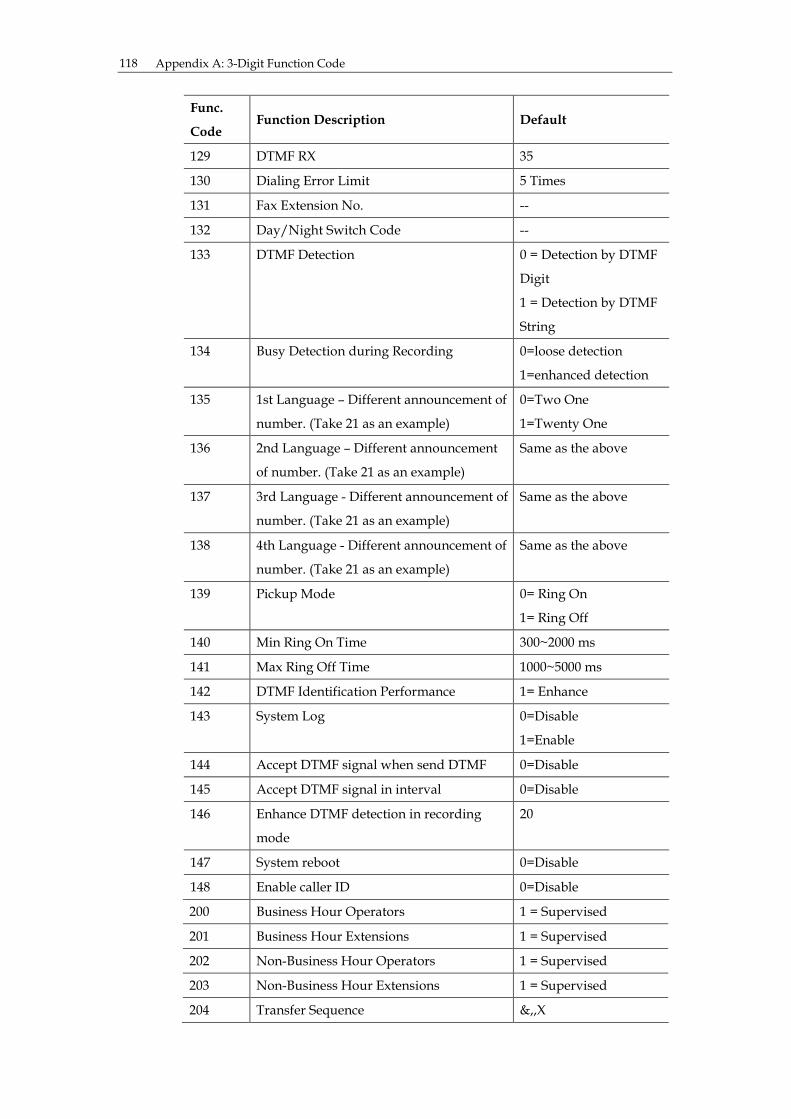
Appendix A: 3-Digit Function Code 118
Func.
Code Function Description Default
129 DTMF RX 35
130 Dialing Error Limit 5 Times
131 Fax Extension No. --
132 Day/Night Switch Code --
133 DTMF Detection 0 = Detection by DTMF
Digit
1 = Detection by DTMF
String
134 Busy Detection during Recording 0=loose detection
1=enhanced detection
135 1st Language – Different announcement of
number. (Take 21 as an example)
0=Two One
1=Twenty One
136 2nd Language – Different announcement
of number. (Take 21 as an example)
Same as the above
137 3rd Language - Different announcement of
number. (Take 21 as an example)
Same as the above
138 4th Language - Different announcement of
number. (Take 21 as an example)
Same as the above
139 Pickup Mode 0= Ring On
1= Ring Off
140 Min Ring On Time 300~2000 ms
141 Max Ring Off Time 1000~5000 ms
142 DTMF Identification Performance 1= Enhance
143 System Log 0=Disable
1=Enable
144 Accept DTMF signal when send DTMF 0=Disable
145 Accept DTMF signal in interval 0=Disable
146 Enhance DTMF detection in recording
mode
20
147 System reboot 0=Disable
148 Enable caller ID 0=Disable
200 Business Hour Operators 1 = Supervised
201 Business Hour Extensions 1 = Supervised
202 Non-Business Hour Operators 1 = Supervised
203 Non-Business Hour Extensions 1 = Supervised
204 Transfer Sequence &,,X

Appendix A: 3-Digit Function Codes
119
Func.
Code Function Description Default
205 Ringback Recall Sequence &,
206 Busy Recall Sequence &,
207 Hang Up Sequence --
208 Reach CO Line Sequence ,,0
209 Conference Hold Sequence &,,
210 Conference Sequence --
211 First Hook Flash 500 msec(s)
212 Second Hook Flash 0 msec(s)
213 Supervise Signal Type 1 = Call Progress Tone
214 Ringback CPT 1st High 540 msec(s)
215 Ringback CPT 1st Low 240 msec(s)
216 Ringback CPT 2nd High 0 msec(s)
217 Ringback CPT 2nd Low 3840 msec(s)
218 Ringback CPT Cycle 5 cycle(s)
219 Busy CPT 1st High 540 msec(s)
220 Busy CPT 1st Low 450 msec(s)
221 Busy CPT 2nd High 0 msec(s)
222 Busy CPT 2nd Low 0 msec(s)
223 Busy CPT Cycle 2 cycle(s)
224 Error Tone High 250 msec(s)
225 Error Tone Low 250 msec(s)
226 Error Tone Cycle 2 Cycle
227 Call Progress Tone Tolerance 1 = high
228 Ringback Tone DTMF Signal --
229 Busy Tone DTMF Signal --
230 DND DTMF Signal --
231 Answer Call DTMF Signal --
232 Disconnect Call DTMF Signal --
233 No Answer Time out for DTMF Signal 20 sec(s)
234 Maximum Digits in In-Band DTMF Strings 30
235 Maximum Time to wait for First Digit
Strings 0
236 Maximum Time Between Digit 1
237 Busy Time Lag --
238 Call Pick up Function 0 = Disabled

Appendix A: 3-Digit Function Code 120
Func.
Code Function Description Default
239 Call Pick up Sequence --
240 Call Pick up Channel --
241 PBX Model 0
242 Automatic Cadence Learning Extension --
243 Maximum Extension Digit 6
244 VMS Port 01 --
245 VMS Port 02 --
246 VMS Port 03 --
247 VMS Port 04 --
248 VMS Port 05 --
249 VMS Port 06 --
250 VMS Port 07 --
251 VMS Port 08 --
252 VMS Port 09 --
253 VMS Port 10 --
254 VMS Port 11 --
255 VMS Port 12 --
256 VMS Port 13 --
257 VMS Port 14 --
258 VMS Port 15 --
259 VMS Port 16 --
260 VMS Port 17 --
261 VMS Port 18 --
262 VMS Port 19 --
263 VMS Port 20 --
264 VMS Port 21 --
265 VMS Port 22 --
266 VMS Port 23 --
267 VMS Port 24 --
268 AA-Menu Repeat Times 3
300 In-Band DTMF Protocol --
1. To enable the weekday --
2. To set the Business Hours --
310
3. To set the Break Hours --
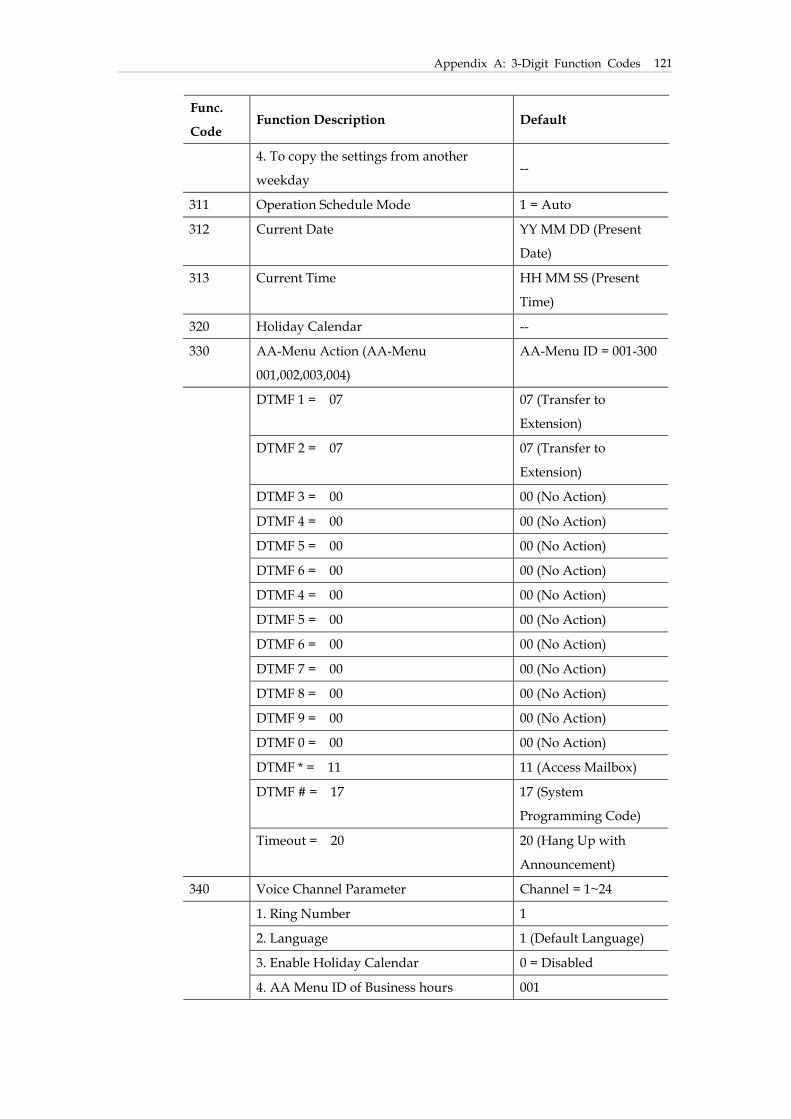
Appendix A: 3-Digit Function Codes
121
Func.
Code Function Description Default
4. To copy the settings from another
weekday --
311 Operation Schedule Mode 1 = Auto
312 Current Date YY MM DD (Present
Date)
313 Current Time HH MM SS (Present
Time)
320 Holiday Calendar --
330 AA-Menu Action (AA-Menu
001,002,003,004)
AA-Menu ID = 001-300
DTMF 1 = 07 07 (Transfer to
Extension)
DTMF 2 = 07 07 (Transfer to
Extension)
DTMF 3 = 00 00 (No Action)
DTMF 4 = 00 00 (No Action)
DTMF 5 = 00 00 (No Action)
DTMF 6 = 00 00 (No Action)
DTMF 4 = 00 00 (No Action)
DTMF 5 = 00 00 (No Action)
DTMF 6 = 00 00 (No Action)
DTMF 7 = 00 00 (No Action)
DTMF 8 = 00 00 (No Action)
DTMF 9 = 00 00 (No Action)
DTMF 0 = 00 00 (No Action)
DTMF * = 11 11 (Access Mailbox)
DTMF # = 17 17 (System
Programming Code)
Timeout = 20 20 (Hang Up with
Announcement)
340 Voice Channel Parameter Channel = 1~24
1. Ring Number 1
2. Language 1 (Default Language)
3. Enable Holiday Calendar 0 = Disabled
4. AA Menu ID of Business hours 001
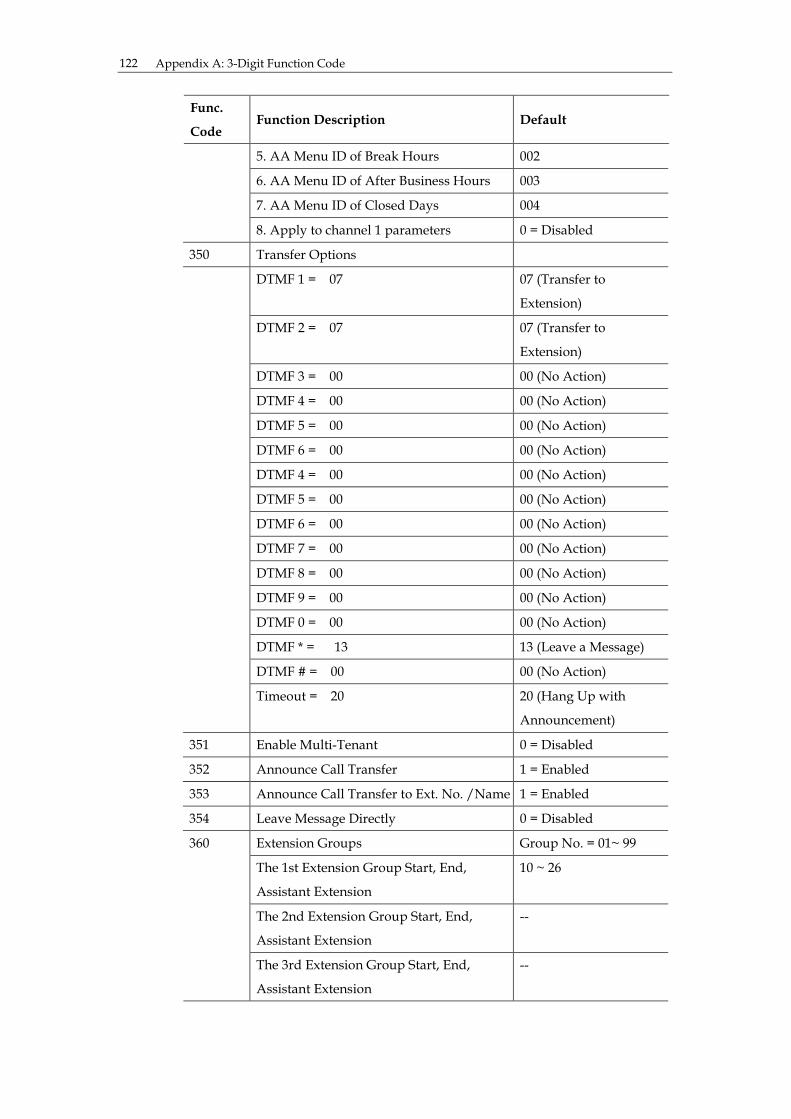
Appendix A: 3-Digit Function Code 122
Func.
Code Function Description Default
5. AA Menu ID of Break Hours 002
6. AA Menu ID of After Business Hours 003
7. AA Menu ID of Closed Days 004
8. Apply to channel 1 parameters 0 = Disabled
350 Transfer Options
DTMF 1 = 07 07 (Transfer to
Extension)
DTMF 2 = 07 07 (Transfer to
Extension)
DTMF 3 = 00 00 (No Action)
DTMF 4 = 00 00 (No Action)
DTMF 5 = 00 00 (No Action)
DTMF 6 = 00 00 (No Action)
DTMF 4 = 00 00 (No Action)
DTMF 5 = 00 00 (No Action)
DTMF 6 = 00 00 (No Action)
DTMF 7 = 00 00 (No Action)
DTMF 8 = 00 00 (No Action)
DTMF 9 = 00 00 (No Action)
DTMF 0 = 00 00 (No Action)
DTMF * = 13 13 (Leave a Message)
DTMF # = 00 00 (No Action)
Timeout = 20 20 (Hang Up with
Announcement)
351 Enable Multi-Tenant 0 = Disabled
352 Announce Call Transfer 1 = Enabled
353 Announce Call Transfer to Ext. No. /Name 1 = Enabled
354 Leave Message Directly 0 = Disabled
360 Extension Groups Group No. = 01~ 99
The 1st Extension Group Start, End,
Assistant Extension
10 ~ 26
The 2nd Extension Group Start, End,
Assistant Extension
--
The 3rd Extension Group Start, End,
Assistant Extension
--
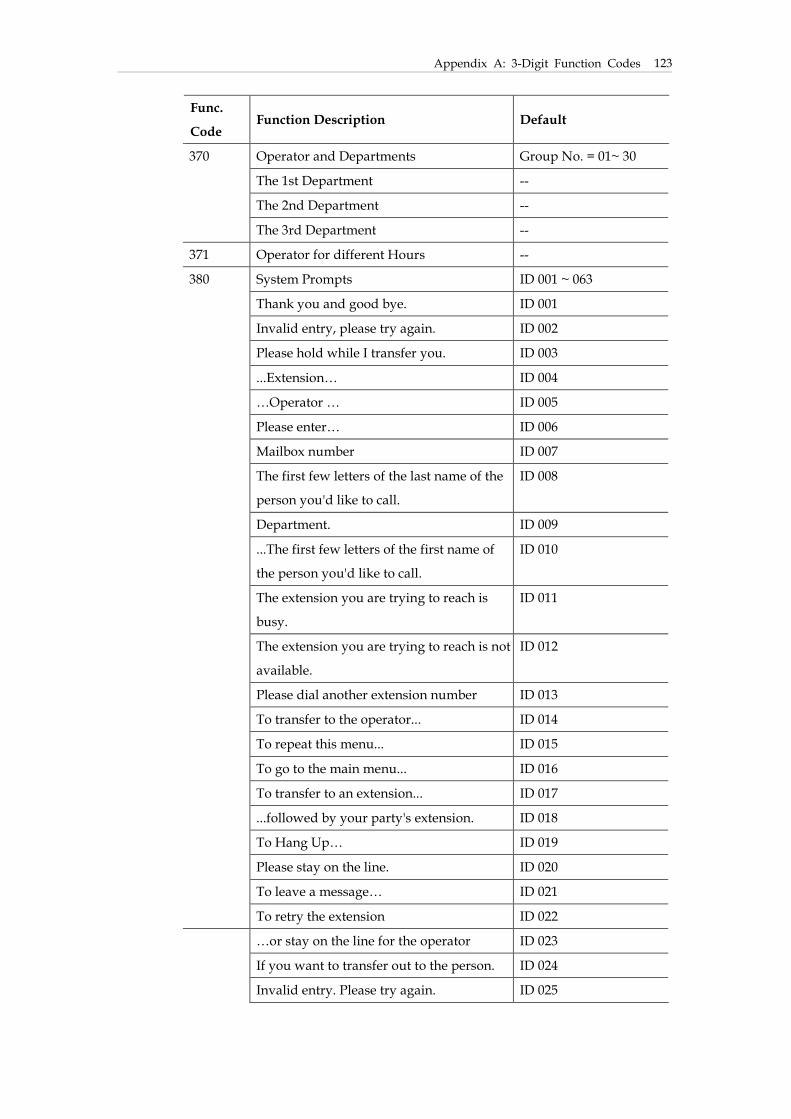
Appendix A: 3-Digit Function Codes
123
Func.
Code Function Description Default
370 Operator and Departments Group No. = 01~ 30
The 1st Department --
The 2nd Department --
The 3rd Department --
371 Operator for different Hours --
380 System Prompts ID 001 ~ 063
Thank you and good bye. ID 001
Invalid entry, please try again. ID 002
Please hold while I transfer you. ID 003
...Extension… ID 004
…Operator … ID 005
Please enter… ID 006
Mailbox number ID 007
The first few letters of the last name of the
person you'd like to call.
ID 008
Department. ID 009
...The first few letters of the first name of
the person you'd like to call.
ID 010
The extension you are trying to reach is
busy.
ID 011
The extension you are trying to reach is not
available.
ID 012
Please dial another extension number ID 013
To transfer to the operator... ID 014
To repeat this menu... ID 015
To go to the main menu... ID 016
To transfer to an extension... ID 017
...followed by your party's extension. ID 018
To Hang Up… ID 019
Please stay on the line. ID 020
To leave a message… ID 021
To retry the extension ID 022
…or stay on the line for the operator ID 023
If you want to transfer out to the person. ID 024
Invalid entry. Please try again. ID 025
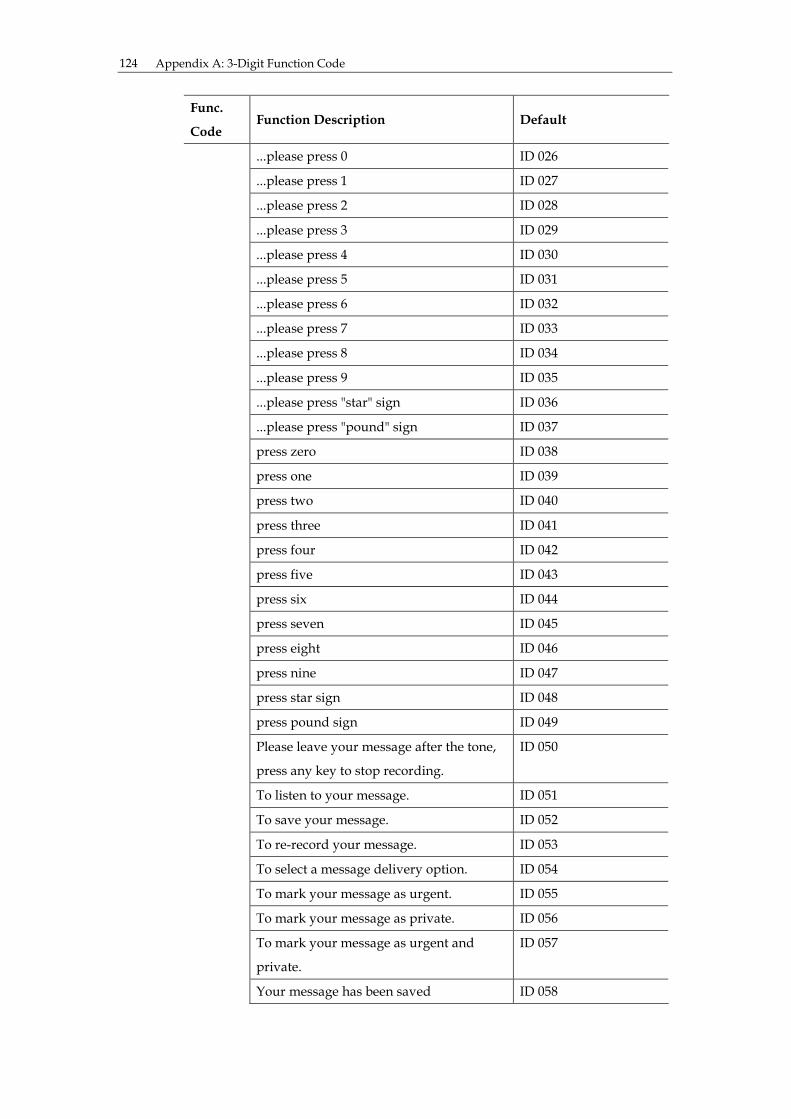
Appendix A: 3-Digit Function Code 124
Func.
Code Function Description Default
...please press 0 ID 026
...please press 1 ID 027
...please press 2 ID 028
...please press 3 ID 029
...please press 4 ID 030
...please press 5 ID 031
...please press 6 ID 032
...please press 7 ID 033
...please press 8 ID 034
...please press 9 ID 035
...please press "star" sign ID 036
...please press "pound" sign ID 037
press zero ID 038
press one ID 039
press two ID 040
press three ID 041
press four ID 042
press five ID 043
press six ID 044
press seven ID 045
press eight ID 046
press nine ID 047
press star sign ID 048
press pound sign ID 049
Please leave your message after the tone,
press any key to stop recording.
ID 050
To listen to your message. ID 051
To save your message. ID 052
To re-record your message. ID 053
To select a message delivery option. ID 054
To mark your message as urgent. ID 055
To mark your message as private. ID 056
To mark your message as urgent and
private.
ID 057
Your message has been saved ID 058

Appendix A: 3-Digit Function Codes
125
Func.
Code Function Description Default
To delete… ID 059
Your message has been deleted. ID 060
Please leave your message after the tone. ID 061
Press any key to stop recording. ID 062
Press the “#” key to stop recording. ID 063
400 The 1st Message Lamp On Sequence --
401 The 1st Message Lamp Off Sequence ---
402 The 2nd Message Lamp On Sequence --
403 The 2nd Message Lamp Off Sequence --
404 Internal Notification Channel 1
405 Notify for 2 = Every New Message
406 Ring Notification Interval 30 min(s)
407 Ring Notification Retrials 3
408 Ring Duration 5
409 Pager Mode 0 = USA
410 Detect Pager Vox 1 = Enabled
411 Delay for Pager 7 sec(s)
412 Delay for Mobile Phone 7 sec(s)
413 External Notification Channel 1
414 Maximum Number of Messages 30 messages
415 Maximum Messages Length 180 sec(s)
416 Minimum Messages Length 3 sec(s)
417 Auto Purge of New Messages 0 = Disabled
418 Auto Purge of Old Messages 0 = Disabled
419 Silence Time out to Stop Recording 5 sec(s)
420 Supervisor's Mailbox --
421 Digit of New Voice Message Numbers 2
422 Press # key to stop recording 0 = Disabled
423 Personal Mailbox Specified Language 0 = Disabled
424 Enable Voice Mailbox --
425 Delete Voice Mailbox --
426 UMS Attachment 1 = Enabled
427 Time stamp format : 12-Hrs or 24-Hrs Time 0=12 Hours
428 Date format: Month/Date or Date/Month 0=MM/DD
1=DD/MM


Appendix B: System Prompts
127
Appendix B: System Prompts
General Greetings (Directory: Lang0\AA)
File Name Content
GRT001 Thank you for calling, it is our business hour, If you know your
party's extension, please enter it now, or hold for the operator.
GRT002 Thank you for Calling, it is our break hour, If you know your
party's extension, please enter it now, or call back during our office
hours.
GRT003 Thank you for calling, our office will be closed for the day. If you
know your party's extension, please enter it now, or Call back
during our office hours.
GRT004 Thank you for calling, today is national holiday, If you know your
party's extension, please enter it now, or call back during our office
hours.
GRT005 Your greeting has not been set. Please record your greeting.
AA Flow. (Directory: Lang0\AA)
File Name Content
FLW001 Thank you and good bye.
FLW002 Invalid entry, please try again.
FLW003 Please hold while I transfer you.
FLW004 ...to...
FLW005 ...Extension…
FLW006 …Operator …
FLW007 Please enter…
FLW008 Mailbox number
FLW009 The first few letters of the last name of the person you'd like to call.
FLW010 Department.
FLW011 ...The first few letters of the first name of the person you'd like to
call.
Before Leaving Messages. (Directory: Lang0\AA)
File Name Content
BLM001 The extension you are trying to reach is busy.
BLM002 The extension you are trying to reach is not available.
BLM003 Please dial another extension number
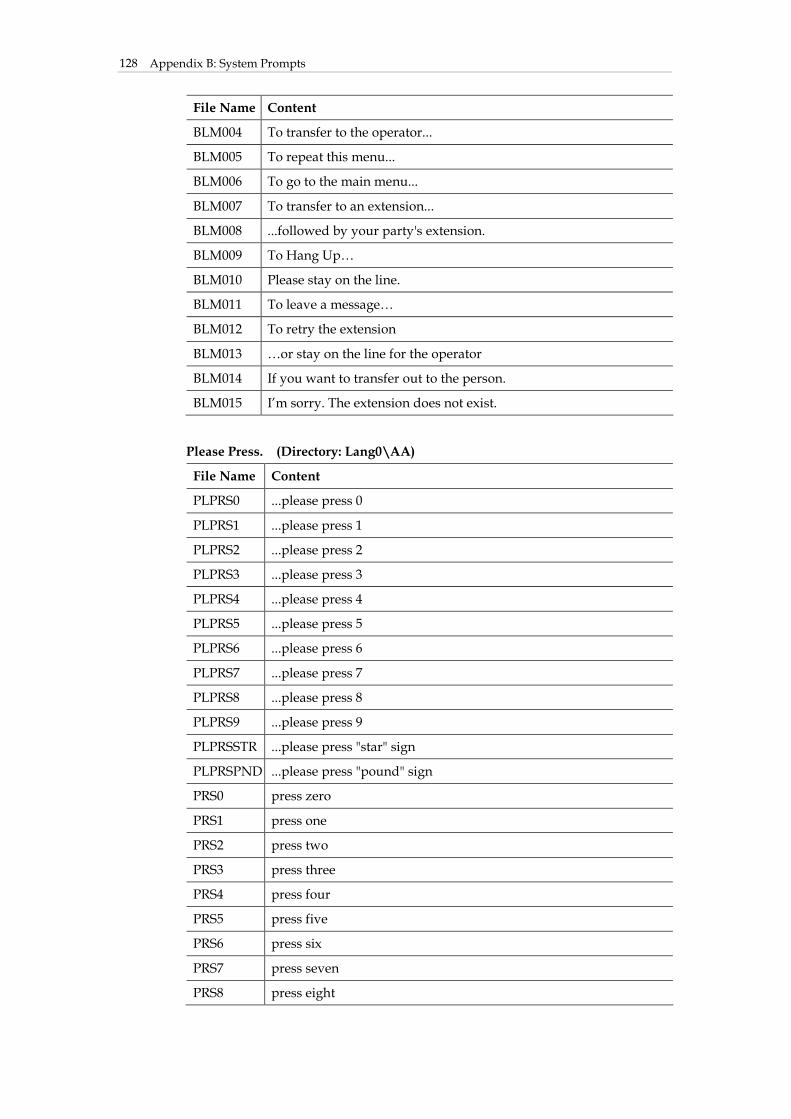
Appendix B: System Prompts 128
File Name Content
BLM004 To transfer to the operator...
BLM005 To repeat this menu...
BLM006 To go to the main menu...
BLM007 To transfer to an extension...
BLM008 ...followed by your party's extension.
BLM009 To Hang Up…
BLM010 Please stay on the line.
BLM011 To leave a message…
BLM012 To retry the extension
BLM013 …or stay on the line for the operator
BLM014 If you want to transfer out to the person.
BLM015 I’m sorry. The extension does not exist.
Please Press. (Directory: Lang0\AA)
File Name Content
PLPRS0 ...please press 0
PLPRS1 ...please press 1
PLPRS2 ...please press 2
PLPRS3 ...please press 3
PLPRS4 ...please press 4
PLPRS5 ...please press 5
PLPRS6 ...please press 6
PLPRS7 ...please press 7
PLPRS8 ...please press 8
PLPRS9 ...please press 9
PLPRSSTR ...please press "star" sign
PLPRSPND ...please press "pound" sign
PRS0 press zero
PRS1 press one
PRS2 press two
PRS3 press three
PRS4 press four
PRS5 press five
PRS6 press six
PRS7 press seven
PRS8 press eight

Appendix B: System Prompts
129
PRS9 press nine
PRSSTR press star sign
PRSPND press pound sign
DING Ding.
Leave Message Flow. (Directory: Lang0\AA)
File Name Content
LMF001 Please leave your message after the tone, press any key to stop
recording.
LMF002 To listen to your message.
LMF003 To save your message.
LMF004 To re-record your message.
LMF005 To select a message delivery option.
LMF006 To mark your message as urgent.
LMF007 To mark your message as private.
LMF008 To mark your message as urgent and private.
LMF009 Your message has been saved
LMF010 Delete
LMF011 Your recording has been delete.
LMF012 Please leave your message after the beep tone.
LMF013 Press any key to stop recording.
LMF014 Press “#” key to stop recording.
Month, Day, Hour and Minutes. (Directory: Lang0\Time)
File Name Content
MTH001 January
MTH002 February
MTH003 March
MTH004 April
MTH005 May
MTH006 June
MTH007 July
MTH008 August
MTH009 September
MTH010 October
MTH011 November
MTH012 December
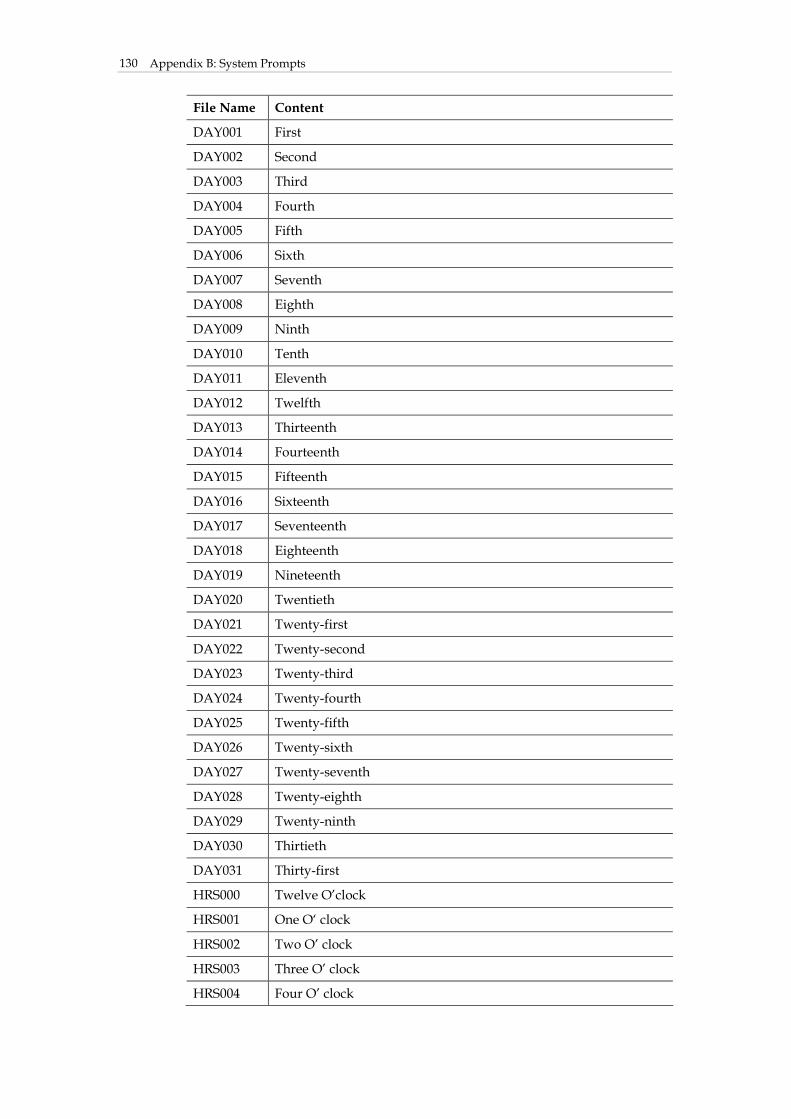
Appendix B: System Prompts 130
File Name Content
DAY001 First
DAY002 Second
DAY003 Third
DAY004 Fourth
DAY005 Fifth
DAY006 Sixth
DAY007 Seventh
DAY008 Eighth
DAY009 Ninth
DAY010 Tenth
DAY011 Eleventh
DAY012 Twelfth
DAY013 Thirteenth
DAY014 Fourteenth
DAY015 Fifteenth
DAY016 Sixteenth
DAY017 Seventeenth
DAY018 Eighteenth
DAY019 Nineteenth
DAY020 Twentieth
DAY021 Twenty-first
DAY022 Twenty-second
DAY023 Twenty-third
DAY024 Twenty-fourth
DAY025 Twenty-fifth
DAY026 Twenty-sixth
DAY027 Twenty-seventh
DAY028 Twenty-eighth
DAY029 Twenty-ninth
DAY030 Thirtieth
DAY031 Thirty-first
HRS000 Twelve O’clock
HRS001 One O‘ clock
HRS002 Two O’ clock
HRS003 Three O’ clock
HRS004 Four O’ clock

Appendix B: System Prompts
131
File Name Content
HRS005 Five O’ clock
HRS006 Six O’ clock
HRS007 Seven O’ clock
HRS008 Eight O’ clock
HRS009 Nine O’ clock
HRS010 Ten O’ clock
HRS011 Eleven O’ clock
HRS012 Twelve O’ clock
MIN000 .
MIN001 One Minute
MIN002 Two Minutes
MIN003 Three Minutes
MIN004 Four Minutes
MIN005 Five Minutes
MIN006 Six Minutes
MIN007 Seven Minutes
MIN008 Eight Minutes
MIN009 Nine Minutes
MIN010 Ten Minutes
MIN011 Eleven Minutes
MIN012 Twelve Minutes
MIN013 Thirteen Minutes
MIN014 Fourteen Minutes
MIN015 Fifteen Minutes
MIN016 Sixteen Minutes
MIN017 Seventeen Minutes
MIN018 Eighteen Minutes
MIN019 Nineteen Minutes
MIN020 Twenty Minutes
MIN021 Twenty-one Minutes
MIN022 Twenty-two Minutes
MIN023 Twenty-three Minutes
MIN024 Twenty-four Minutes
MIN025 Twenty-five Minutes
MIN026 Twenty-six Minutes
MIN027 Twenty-seven Minutes
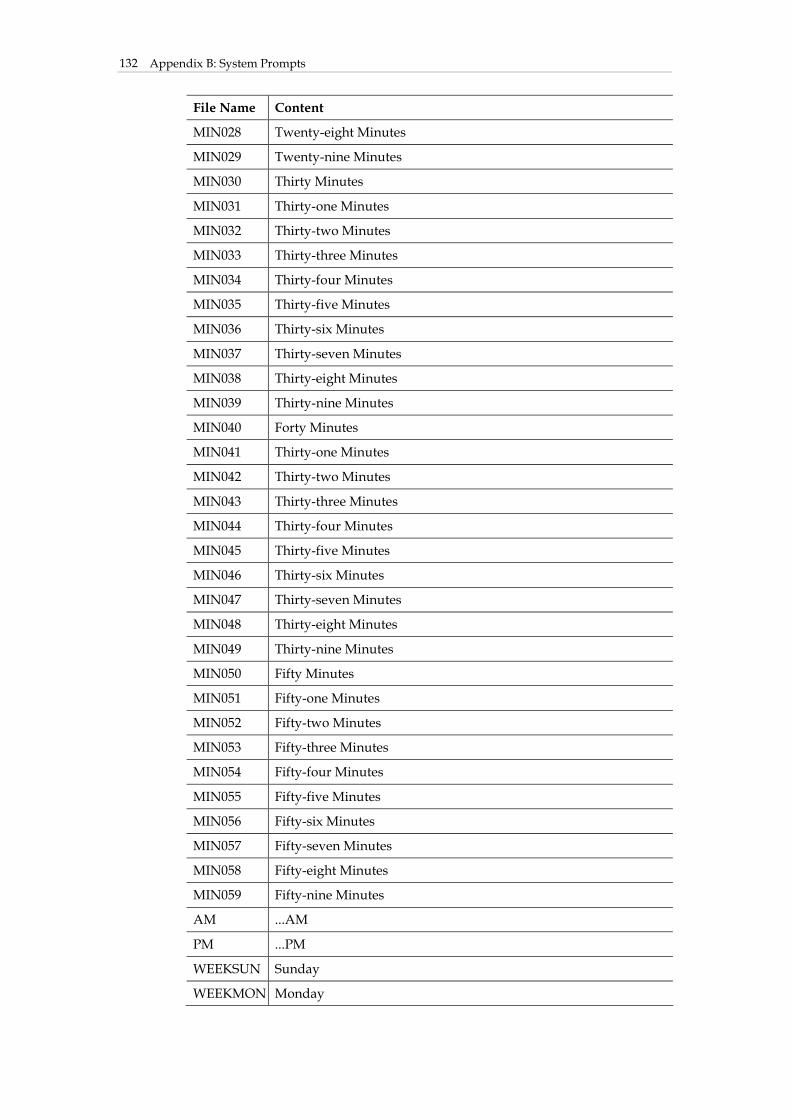
Appendix B: System Prompts 132
File Name Content
MIN028 Twenty-eight Minutes
MIN029 Twenty-nine Minutes
MIN030 Thirty Minutes
MIN031 Thirty-one Minutes
MIN032 Thirty-two Minutes
MIN033 Thirty-three Minutes
MIN034 Thirty-four Minutes
MIN035 Thirty-five Minutes
MIN036 Thirty-six Minutes
MIN037 Thirty-seven Minutes
MIN038 Thirty-eight Minutes
MIN039 Thirty-nine Minutes
MIN040 Forty Minutes
MIN041 Thirty-one Minutes
MIN042 Thirty-two Minutes
MIN043 Thirty-three Minutes
MIN044 Thirty-four Minutes
MIN045 Thirty-five Minutes
MIN046 Thirty-six Minutes
MIN047 Thirty-seven Minutes
MIN048 Thirty-eight Minutes
MIN049 Thirty-nine Minutes
MIN050 Fifty Minutes
MIN051 Fifty-one Minutes
MIN052 Fifty-two Minutes
MIN053 Fifty-three Minutes
MIN054 Fifty-four Minutes
MIN055 Fifty-five Minutes
MIN056 Fifty-six Minutes
MIN057 Fifty-seven Minutes
MIN058 Fifty-eight Minutes
MIN059 Fifty-nine Minutes
AM ...AM
PM ...PM
WEEKSUN Sunday
WEEKMON Monday
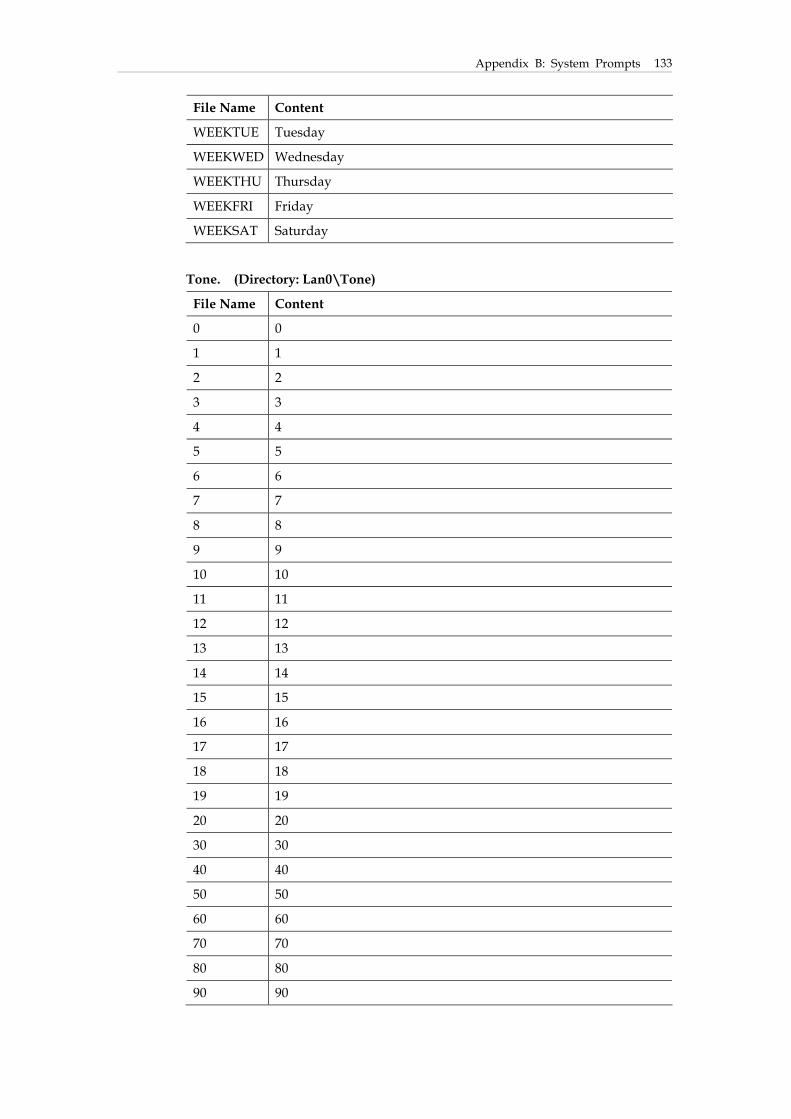
Appendix B: System Prompts
133
File Name Content
WEEKTUE Tuesday
WEEKWED Wednesday
WEEKTHU Thursday
WEEKFRI Friday
WEEKSAT Saturday
Tone. (Directory: Lan0\Tone)
File Name Content
0 0
1 1
2 2
3 3
4 4
5 5
6 6
7 7
8 8
9 9
10 10
11 11
12 12
13 13
14 14
15 15
16 16
17 17
18 18
19 19
20 20
30 30
40 40
50 50
60 60
70 70
80 80
90 90
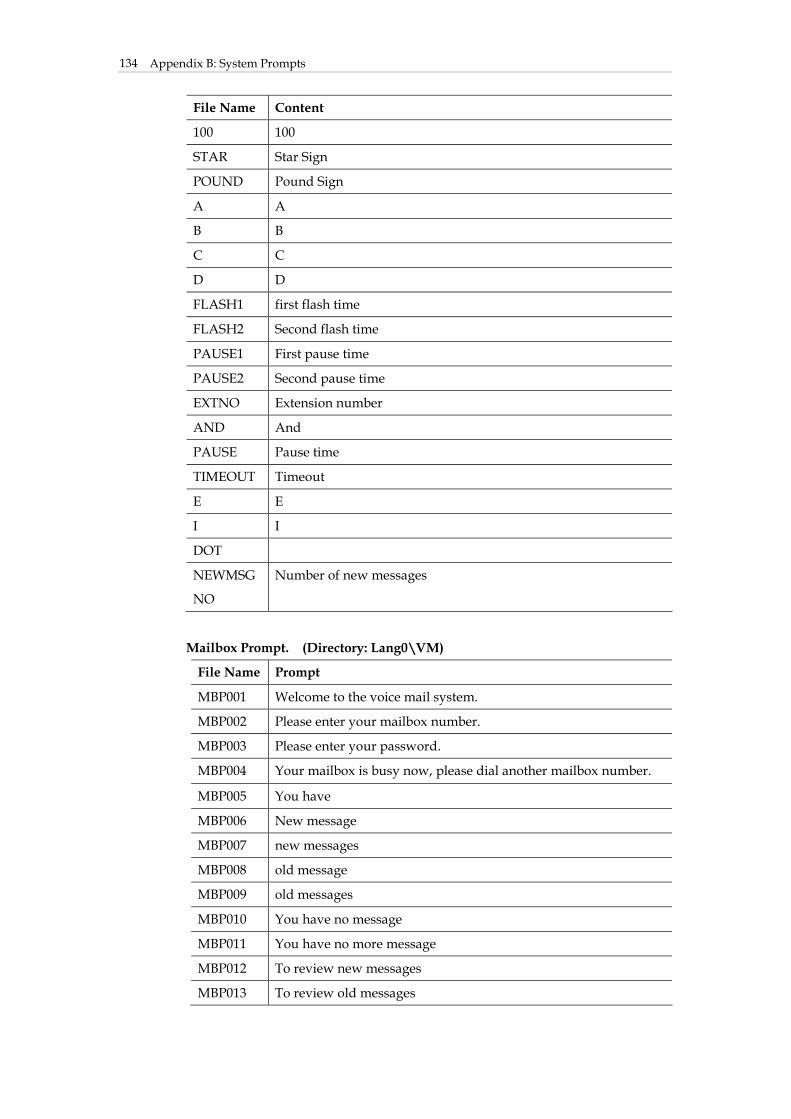
Appendix B: System Prompts 134
File Name Content
100 100
STAR Star Sign
POUND Pound Sign
A A
B B
C C
D D
FLASH1 first flash time
FLASH2 Second flash time
PAUSE1 First pause time
PAUSE2 Second pause time
EXTNO Extension number
AND And
PAUSE Pause time
TIMEOUT Timeout
E E
I I
DOT
NEWMSG
NO
Number of new messages
Mailbox Prompt. (Directory: Lang0\VM)
File Name Prompt
MBP001 Welcome to the voice mail system.
MBP002 Please enter your mailbox number.
MBP003 Please enter your password.
MBP004 Your mailbox is busy now, please dial another mailbox number.
MBP005 You have
MBP006 New message
MBP007 new messages
MBP008 old message
MBP009 old messages
MBP010 You have no message
MBP011 You have no more message
MBP012 To review new messages
MBP013 To review old messages

Appendix B: System Prompts
135
File Name Prompt
MBP014 To send a message
MBP015 To change personal options
MBP016 To replay the message
MBP017 To save the message
MBP018 To delete the message
MBP019 To forward the message
MBP020 To listen to the envelope information
MBP021 To reply to the message
MBP022 To skip the message
MBP023 This message was received on.
MBP024 marked as urgent.
MBP025 marked as private.
MBP026 marked as urgent and private.
MBP027 Please input target mailbox number.
MBP028 The mailbox you've dialed is not recognized.
MBP029 The mailbox is full.
MBP030 Please leave your note after the tone, press any key to stop
recording.
MBP031 To review your note.
MBP032 To send this message.
MBP033 To Re-record your note.
MBP034 Message send complete.
MBP035 You have reached mailbox number.
MBP036 To send a message to a mailbox.
MBP037 To send a message to a distribution list.
MBP038 This message has been
MBP039 Please select your distribution list from 1 to 9.
MBP040 Distribution list.
MBP041 has
MBP042 has no member
MBP043 members
MBP044 member
MBP045 To record your greetings.
MBP046 To edit notification function.
MBP047 To set mailbox preferences.
MBP048 To modify your personal distribution lists.
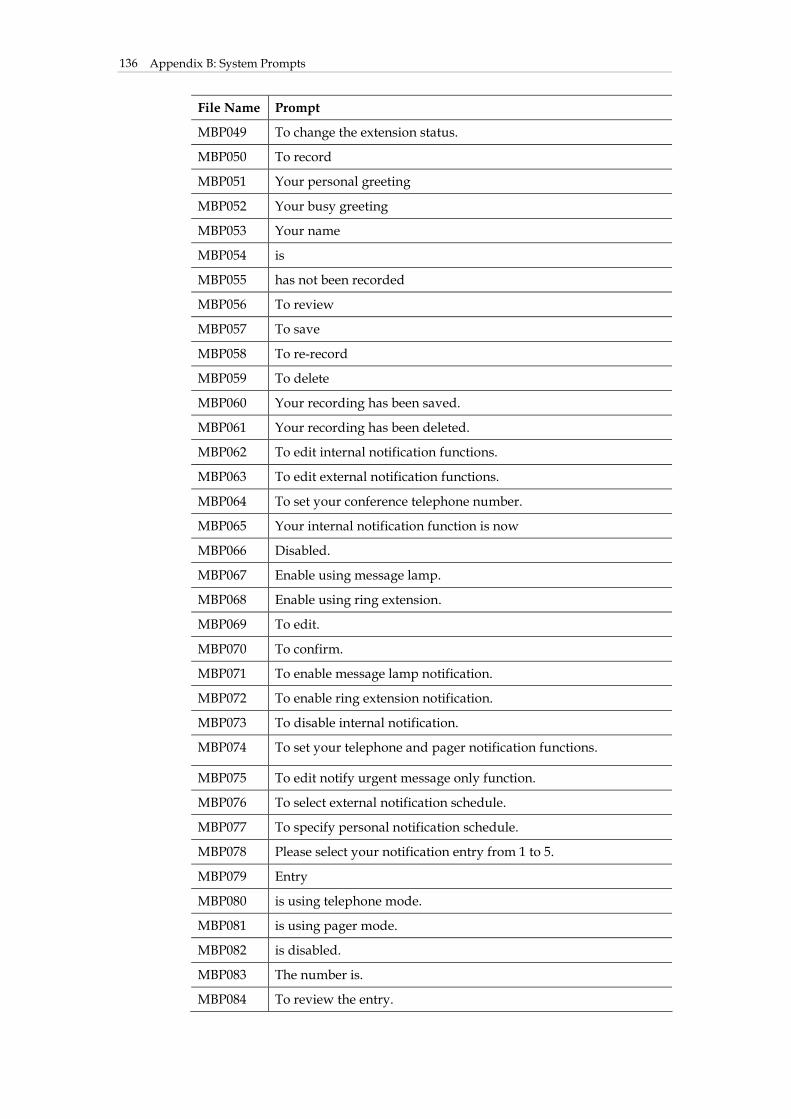
Appendix B: System Prompts 136
File Name Prompt
MBP049 To change the extension status.
MBP050 To record
MBP051 Your personal greeting
MBP052 Your busy greeting
MBP053 Your name
MBP054 is
MBP055 has not been recorded
MBP056 To review
MBP057 To save
MBP058 To re-record
MBP059 To delete
MBP060 Your recording has been saved.
MBP061 Your recording has been deleted.
MBP062 To edit internal notification functions.
MBP063 To edit external notification functions.
MBP064 To set your conference telephone number.
MBP065 Your internal notification function is now
MBP066 Disabled.
MBP067 Enable using message lamp.
MBP068 Enable using ring extension.
MBP069 To edit.
MBP070 To confirm.
MBP071 To enable message lamp notification.
MBP072 To enable ring extension notification.
MBP073 To disable internal notification.
MBP074 To set your telephone and pager notification functions.
MBP075 To edit notify urgent message only function.
MBP076 To select external notification schedule.
MBP077 To specify personal notification schedule.
MBP078 Please select your notification entry from 1 to 5.
MBP079 Entry
MBP080 is using telephone mode.
MBP081 is using pager mode.
MBP082 is disabled.
MBP083 The number is.
MBP084 To review the entry.

Appendix B: System Prompts
137
File Name Prompt
MBP085 To change notification type.
MBP086 To edit the notification number.
MBP087 For telephone
MBP088 :For pager
MBP089 To disable the entry
MBP090 Your notification number
MBP091 is
MBP092 has not been set.
MBP093 To review entry.
MBP094 To confirm.
MBP095 To edit.
MBP096 Please enter the notification number followed by a pound sign.
MBP097 Notify urgent message only function is now
MBP098 Enabled.
MBP099 Disabled.
MBP100 To edit.
MBP101 To confirm.
MBP102 To enable
MBP103 To disable
MBP104 External notification is now
MBP105 Using business schedule.
MBP106 Using personal notification schedule.
MBP107 To edit.
MBP108 To confirm.
MBP109 To use business schedule.
MBP110 To use personal notification schedule.
MBP111 Your personal notification schedule
MBP112 is
MBP113 has not been defined.
MBP114 To review entry.
MBP115 To confirm.
MBP116 To edit.
MBP117 Please enter the time to start and stop external notification in
twenty-four hour format followed by a pound sign. For example,
from eight thirty AM, to six o'clock PM. Enter zero, eight, three,
zero, one, eight, zero, zero, pound.
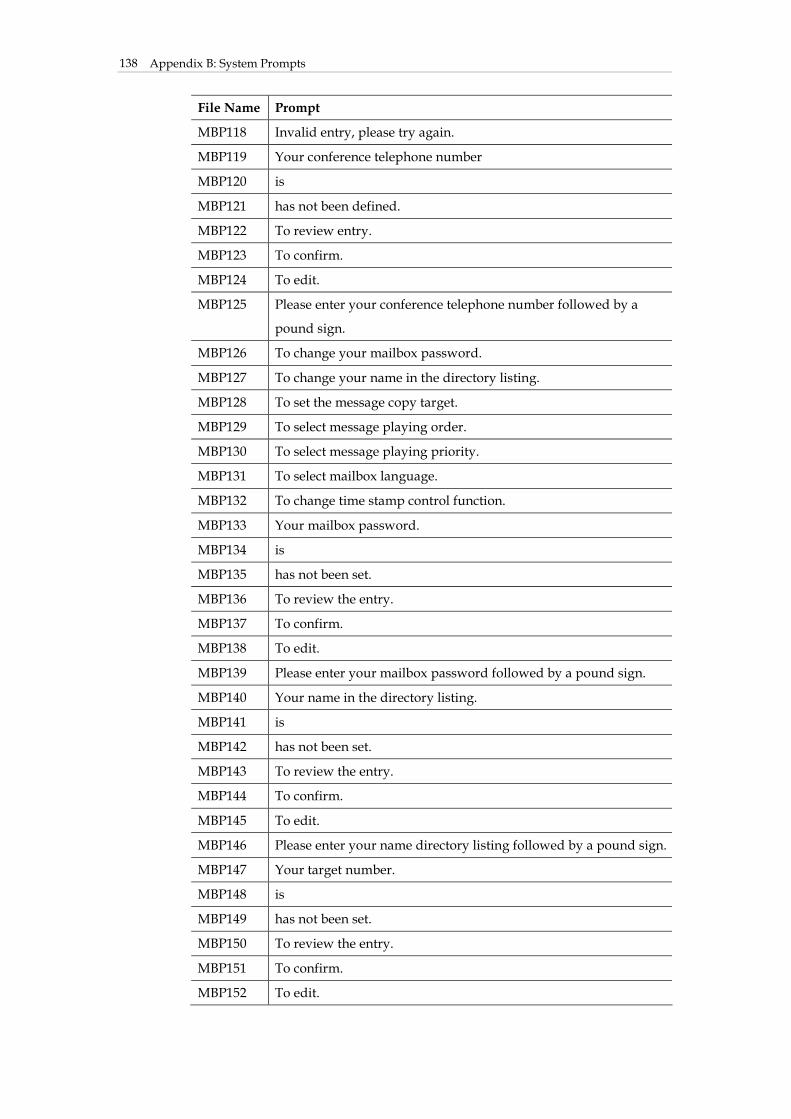
Appendix B: System Prompts 138
File Name Prompt
MBP118 Invalid entry, please try again.
MBP119 Your conference telephone number
MBP120 is
MBP121 has not been defined.
MBP122 To review entry.
MBP123 To confirm.
MBP124 To edit.
MBP125 Please enter your conference telephone number followed by a
pound sign.
MBP126 To change your mailbox password.
MBP127 To change your name in the directory listing.
MBP128 To set the message copy target.
MBP129 To select message playing order.
MBP130 To select message playing priority.
MBP131 To select mailbox language.
MBP132 To change time stamp control function.
MBP133 Your mailbox password.
MBP134 is
MBP135 has not been set.
MBP136 To review the entry.
MBP137 To confirm.
MBP138 To edit.
MBP139 Please enter your mailbox password followed by a pound sign.
MBP140 Your name in the directory listing.
MBP141 is
MBP142 has not been set.
MBP143 To review the entry.
MBP144 To confirm.
MBP145 To edit.
MBP146 Please enter your name directory listing followed by a pound sign.
MBP147 Your target number.
MBP148 is
MBP149 has not been set.
MBP150 To review the entry.
MBP151 To confirm.
MBP152 To edit.
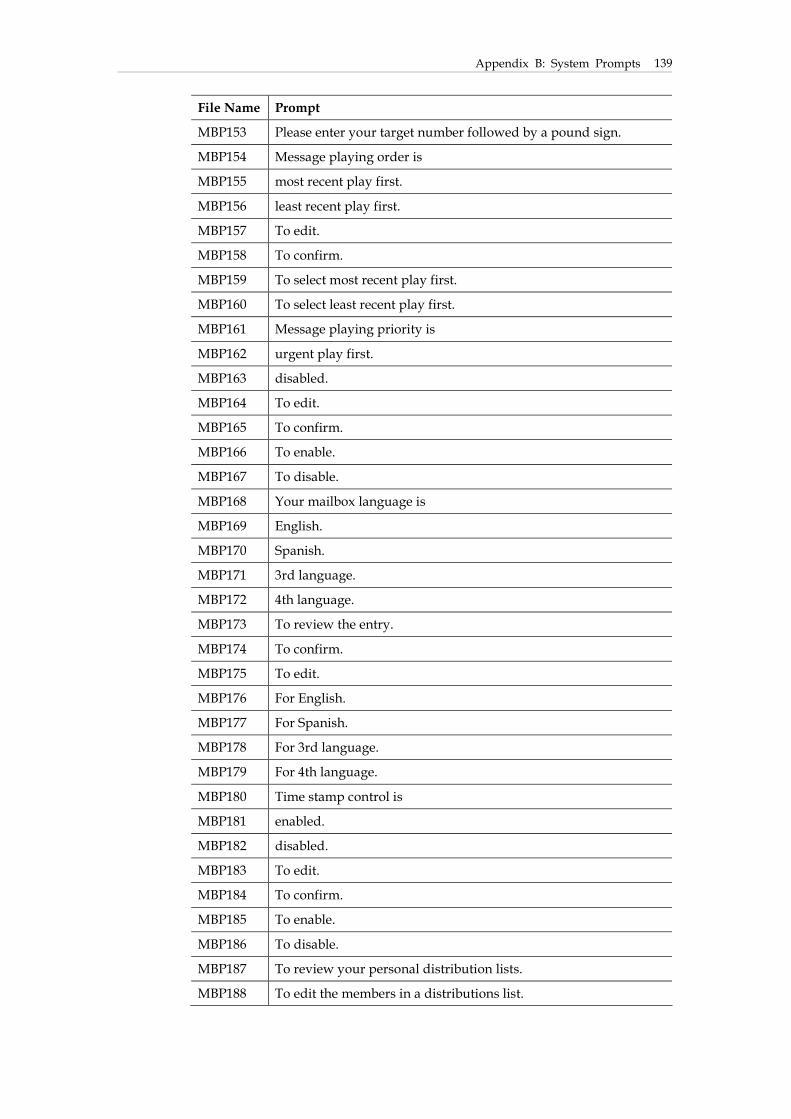
Appendix B: System Prompts
139
File Name Prompt
MBP153 Please enter your target number followed by a pound sign.
MBP154 Message playing order is
MBP155 most recent play first.
MBP156 least recent play first.
MBP157 To edit.
MBP158 To confirm.
MBP159 To select most recent play first.
MBP160 To select least recent play first.
MBP161 Message playing priority is
MBP162 urgent play first.
MBP163 disabled.
MBP164 To edit.
MBP165 To confirm.
MBP166 To enable.
MBP167 To disable.
MBP168 Your mailbox language is
MBP169 English.
MBP170 Spanish.
MBP171 3rd language.
MBP172 4th language.
MBP173 To review the entry.
MBP174 To confirm.
MBP175 To edit.
MBP176 For English.
MBP177 For Spanish.
MBP178 For 3rd language.
MBP179 For 4th language.
MBP180 Time stamp control is
MBP181 enabled.
MBP182 disabled.
MBP183 To edit.
MBP184 To confirm.
MBP185 To enable.
MBP186 To disable.
MBP187 To review your personal distribution lists.
MBP188 To edit the members in a distributions list.
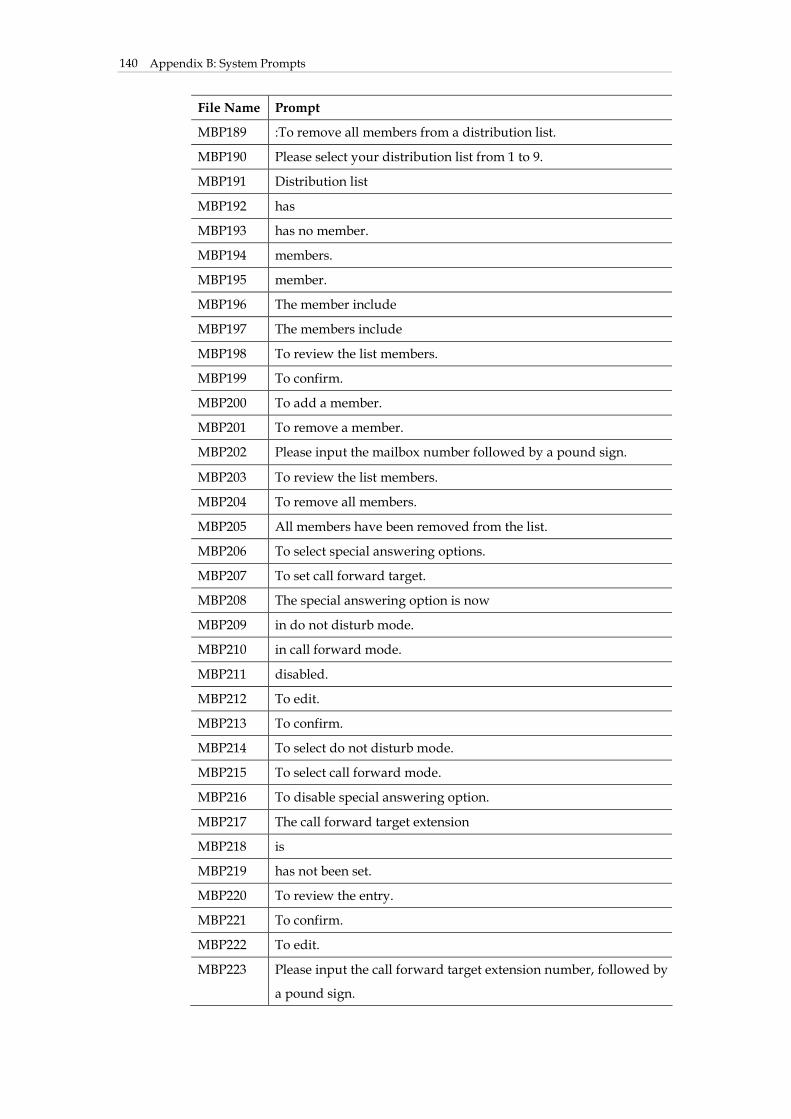
Appendix B: System Prompts 140
File Name Prompt
MBP189 :To remove all members from a distribution list.
MBP190 Please select your distribution list from 1 to 9.
MBP191 Distribution list
MBP192 has
MBP193 has no member.
MBP194 members.
MBP195 member.
MBP196 The member include
MBP197 The members include
MBP198 To review the list members.
MBP199 To confirm.
MBP200 To add a member.
MBP201 To remove a member.
MBP202 Please input the mailbox number followed by a pound sign.
MBP203 To review the list members.
MBP204 To remove all members.
MBP205 All members have been removed from the list.
MBP206 To select special answering options.
MBP207 To set call forward target.
MBP208 The special answering option is now
MBP209 in do not disturb mode.
MBP210 in call forward mode.
MBP211 disabled.
MBP212 To edit.
MBP213 To confirm.
MBP214 To select do not disturb mode.
MBP215 To select call forward mode.
MBP216 To disable special answering option.
MBP217 The call forward target extension
MBP218 is
MBP219 has not been set.
MBP220 To review the entry.
MBP221 To confirm.
MBP222 To edit.
MBP223 Please input the call forward target extension number, followed by
a pound sign.
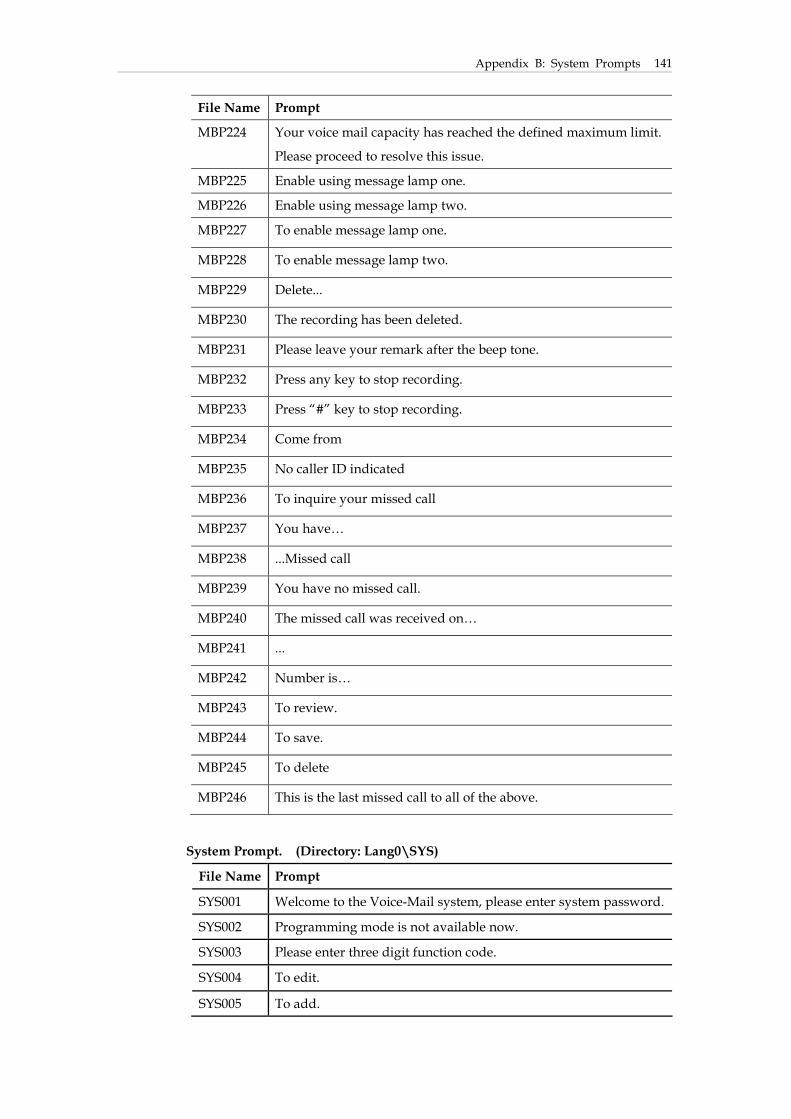
Appendix B: System Prompts
141
File Name Prompt
MBP224 Your voice mail capacity has reached the defined maximum limit.
Please proceed to resolve this issue.
MBP225 Enable using message lamp one.
MBP226 Enable using message lamp two.
MBP227 To enable message lamp one.
MBP228 To enable message lamp two.
MBP229 Delete...
MBP230 The recording has been deleted.
MBP231 Please leave your remark after the beep tone.
MBP232 Press any key to stop recording.
MBP233 Press “#” key to stop recording.
MBP234 Come from
MBP235 No caller ID indicated
MBP236 To inquire your missed call
MBP237 You have…
MBP238 ...Missed call
MBP239 You have no missed call.
MBP240 The missed call was received on…
MBP241 ...
MBP242 Number is…
MBP243 To review.
MBP244 To save.
MBP245 To delete
MBP246 This is the last missed call to all of the above.
System Prompt. (Directory: Lang0\SYS)
File Name Prompt
SYS001 Welcome to the Voice-Mail system, please enter system password.
SYS002 Programming mode is not available now.
SYS003 Please enter three digit function code.
SYS004 To edit.
SYS005 To add.
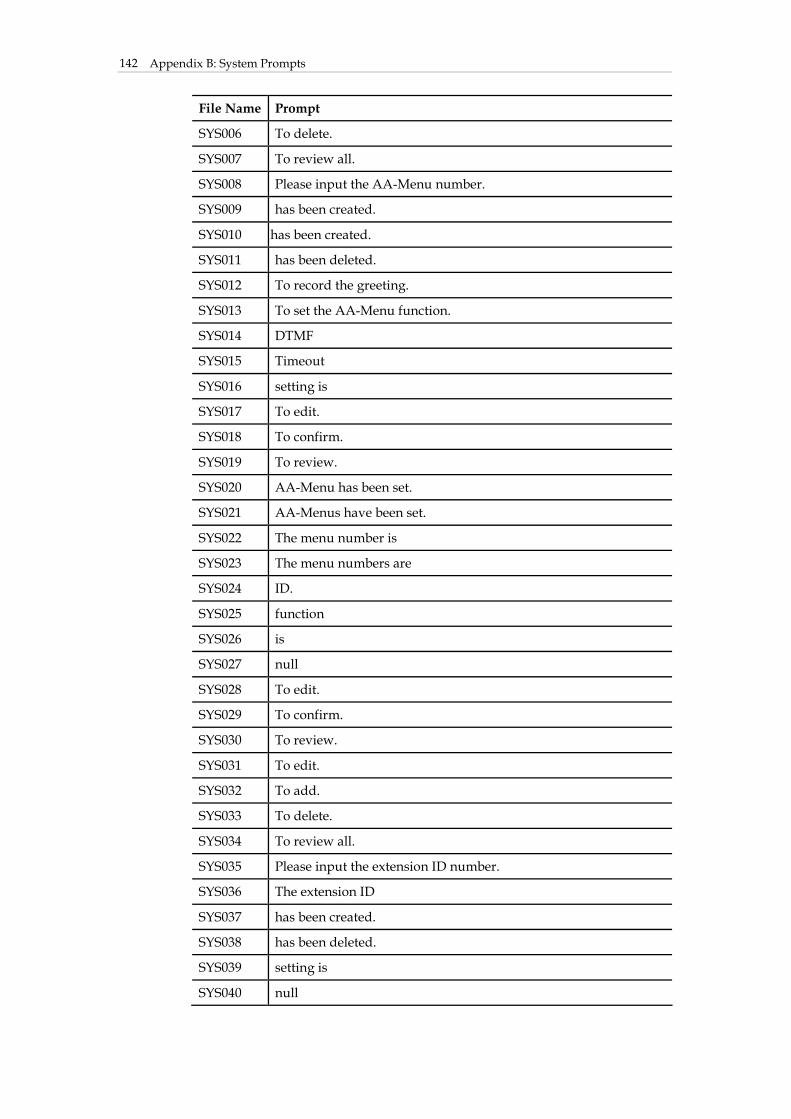
Appendix B: System Prompts 142
File Name Prompt
SYS006 To delete.
SYS007 To review all.
SYS008 Please input the AA-Menu number.
SYS009 has been created.
SYS010 has been created.
SYS011 has been deleted.
SYS012 To record the greeting.
SYS013 To set the AA-Menu function.
SYS014 DTMF
SYS015 Timeout
SYS016 setting is
SYS017 To edit.
SYS018 To confirm.
SYS019 To review.
SYS020 AA-Menu has been set.
SYS021 AA-Menus have been set.
SYS022 The menu number is
SYS023 The menu numbers are
SYS024 ID.
SYS025 function
SYS026 is
SYS027 null
SYS028 To edit.
SYS029 To confirm.
SYS030 To review.
SYS031 To edit.
SYS032 To add.
SYS033 To delete.
SYS034 To review all.
SYS035 Please input the extension ID number.
SYS036 The extension ID
SYS037 has been created.
SYS038 has been deleted.
SYS039 setting is
SYS040 null
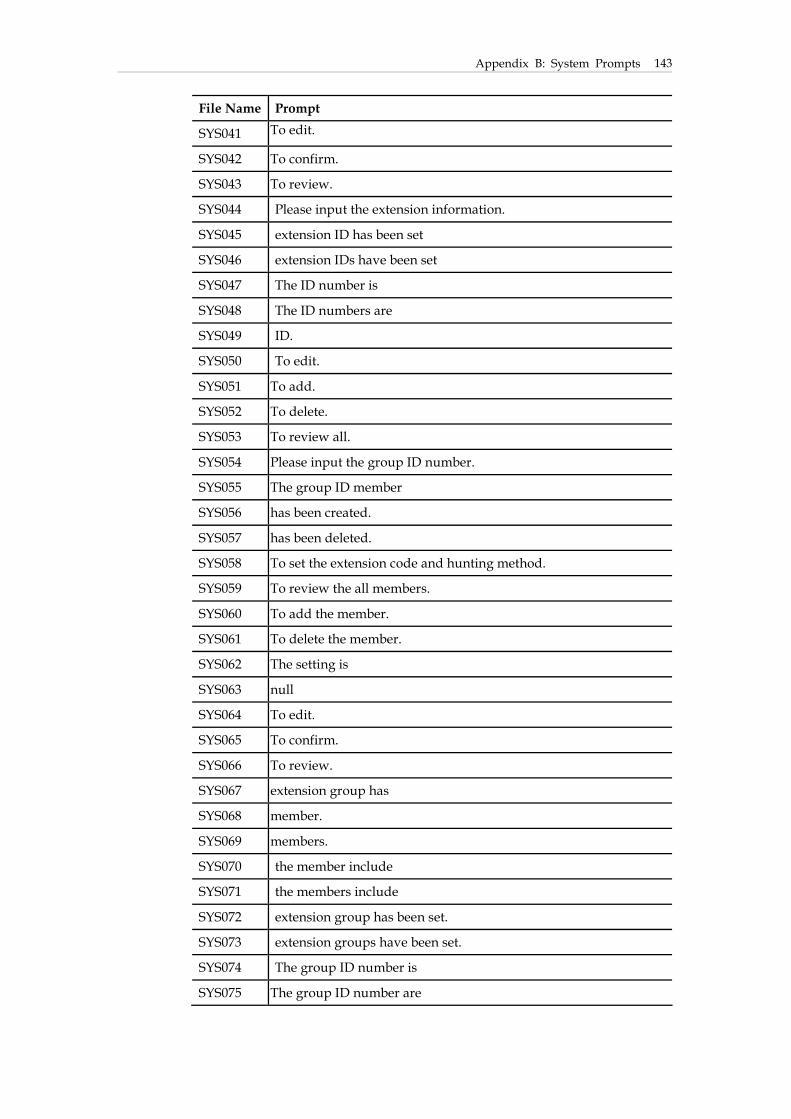
Appendix B: System Prompts
143
File Name Prompt
SYS041 To edit.
SYS042 To confirm.
SYS043 To review.
SYS044 Please input the extension information.
SYS045 extension ID has been set
SYS046 extension IDs have been set
SYS047 The ID number is
SYS048 The ID numbers are
SYS049 ID.
SYS050 To edit.
SYS051 To add.
SYS052 To delete.
SYS053 To review all.
SYS054 Please input the group ID number.
SYS055 The group ID member
SYS056 has been created.
SYS057 has been deleted.
SYS058 To set the extension code and hunting method.
SYS059 To review the all members.
SYS060 To add the member.
SYS061 To delete the member.
SYS062 The setting is
SYS063 null
SYS064 To edit.
SYS065 To confirm.
SYS066 To review.
SYS067 extension group has
SYS068 member.
SYS069 members.
SYS070 the member include
SYS071 the members include
SYS072 extension group has been set.
SYS073 extension groups have been set.
SYS074 The group ID number is
SYS075 The group ID number are
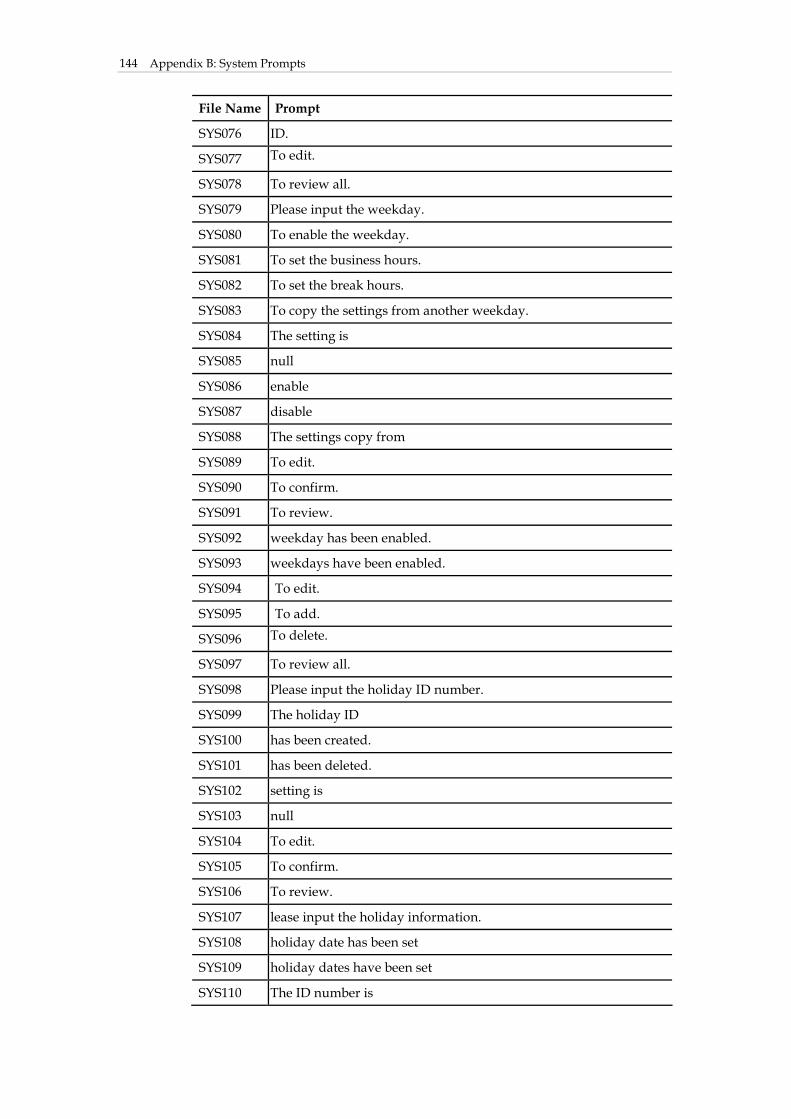
Appendix B: System Prompts 144
File Name Prompt
SYS076 ID.
SYS077 To edit.
SYS078 To review all.
SYS079 Please input the weekday.
SYS080 To enable the weekday.
SYS081 To set the business hours.
SYS082 To set the break hours.
SYS083 To copy the settings from another weekday.
SYS084 The setting is
SYS085 null
SYS086 enable
SYS087 disable
SYS088 The settings copy from
SYS089 To edit.
SYS090 To confirm.
SYS091 To review.
SYS092 weekday has been enabled.
SYS093 weekdays have been enabled.
SYS094 To edit.
SYS095 To add.
SYS096 To delete.
SYS097 To review all.
SYS098 Please input the holiday ID number.
SYS099 The holiday ID
SYS100 has been created.
SYS101 has been deleted.
SYS102 setting is
SYS103 null
SYS104 To edit.
SYS105 To confirm.
SYS106 To review.
SYS107 lease input the holiday information.
SYS108 holiday date has been set
SYS109 holiday dates have been set
SYS110 The ID number is

Appendix B: System Prompts
145
File Name Prompt
SYS111 The ID numbers are
SYS112 ID.
SYS113 To edit.
SYS114 To review all.
SYS115 Please input the channel number.
SYS116 To set the ring number.
SYS117 To set the language.
SYS118 To enable the holiday calendar.
SYS119 To define the AA-Menu for business hour.
SYS120 To define the AA-Menu for break hour.
SYS121 To define the AA-Menu for after business hour.
SYS122 To define the AA-Menu for closed days.
SYS123 To synchronize the parameter as channel 1.
SYS124 To edit.
SYS125 To confirm.
SYS126 To review.
SYS127 The setting is
SYS128 null
SYS129 channels have been set.
SYS130 The channel numbers are
SYS131 enable.
SYS132 disable.
SYS133 To edit.
SYS134 To review all.
SYS135 Please enter the in-Band code number.
SYS136 To edit.
SYS137 To confirm.
SYS138 To review.
SYS139 In-Band code
SYS140 setting is
SYS141 null
SYS142 In-Band signals have been set.
SYS143 In-Band signals have been set
SYS150 Copy settings to other AA Menu.
SYS151 Please input AA Menu you would like to copy.
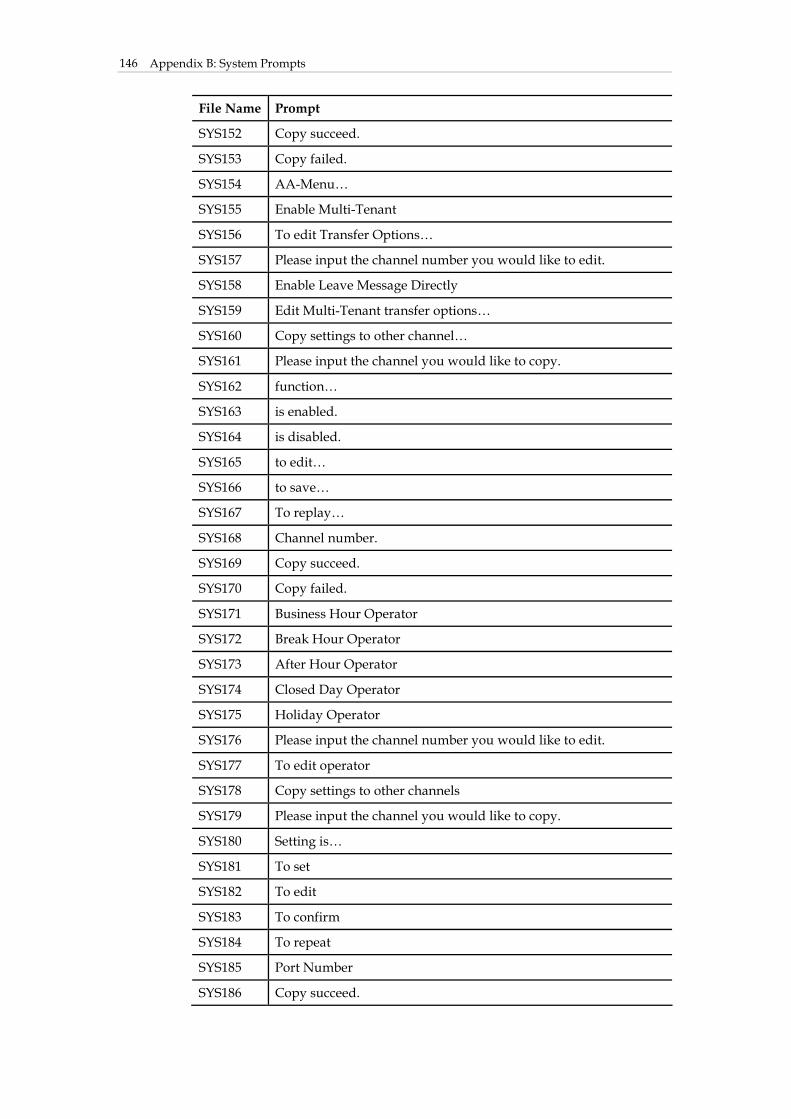
Appendix B: System Prompts 146
File Name Prompt
SYS152 Copy succeed.
SYS153 Copy failed.
SYS154 AA-Menu…
SYS155 Enable Multi-Tenant
SYS156 To edit Transfer Options…
SYS157 Please input the channel number you would like to edit.
SYS158 Enable Leave Message Directly
SYS159 Edit Multi-Tenant transfer options…
SYS160 Copy settings to other channel…
SYS161 Please input the channel you would like to copy.
SYS162 function…
SYS163 is enabled.
SYS164 is disabled.
SYS165 to edit…
SYS166 to save…
SYS167 To replay…
SYS168 Channel number.
SYS169 Copy succeed.
SYS170 Copy failed.
SYS171 Business Hour Operator
SYS172 Break Hour Operator
SYS173 After Hour Operator
SYS174 Closed Day Operator
SYS175 Holiday Operator
SYS176 Please input the channel number you would like to edit.
SYS177 To edit operator
SYS178 Copy settings to other channels
SYS179 Please input the channel you would like to copy.
SYS180 Setting is…
SYS181 To set
SYS182 To edit
SYS183 To confirm
SYS184 To repeat
SYS185 Port Number
SYS186 Copy succeed.

Appendix B: System Prompts
147
File Name Prompt
SYS187 Copy failed
SYS188 First Language
SYS189 Second Language
SYS190 Third Language
SYS191 Fourth Language
SYS192 Please input the Menu ID
SYS193 ID…
SYS194 Set as
SYS195 To edit
SYS196 To confirm
SYS197 To repeat

Appendix C: System Specifications
149
Appendix C: System Specifications
InterMail - IM1200
Voice Compressions G.726
LAN Port Ethernet, 100BaseT, RJ45
Capacity 2700 Hours
Voice Ports 4 ~ 8 Ports
Voice Port Interfaces FXO, RJ11
COM Port: RS232 1200,2400,4800,9600 bps
Internet Protocols TCP/IP, SMTP
LED Indicators 8 voice ports status, 3 system active indicators
Buttons Mode, Security, Func1 and Func2 buttons
Power Input DC 12V
Temperature 0 C ~ 50 C (32 F ~ 122 F)
Humidity 10% ~ 90% (Non-condensing)
Dimensions 315 mm x 198 mm x 60 mm
Weight 3.5 kg(7.72 lb)
InterMail – IM2400
Voice Compressions G.726
LAN Port Ethernet, 100BaseT, RJ45
Capacity 2700 Hours
Voice Ports 4 ~ 24 Ports
Voice Port Interfaces FXO, RJ11
COM Port: RS232 1200,2400,4800,9600 bps
Internet Protocols TCP/IP, SMTP
LED Indicators 24 voice ports status, 4 system active indicators
Power Input AC 100 ~ 240 V
Temperature 0 C ~ 50 C (32 F ~ 122 F)
Humidity 10% ~ 90% (Non-condensing)
Dimensions 65 mm x 270 mm x 440 mm
Weight 5.2 kg (11.46 lb)

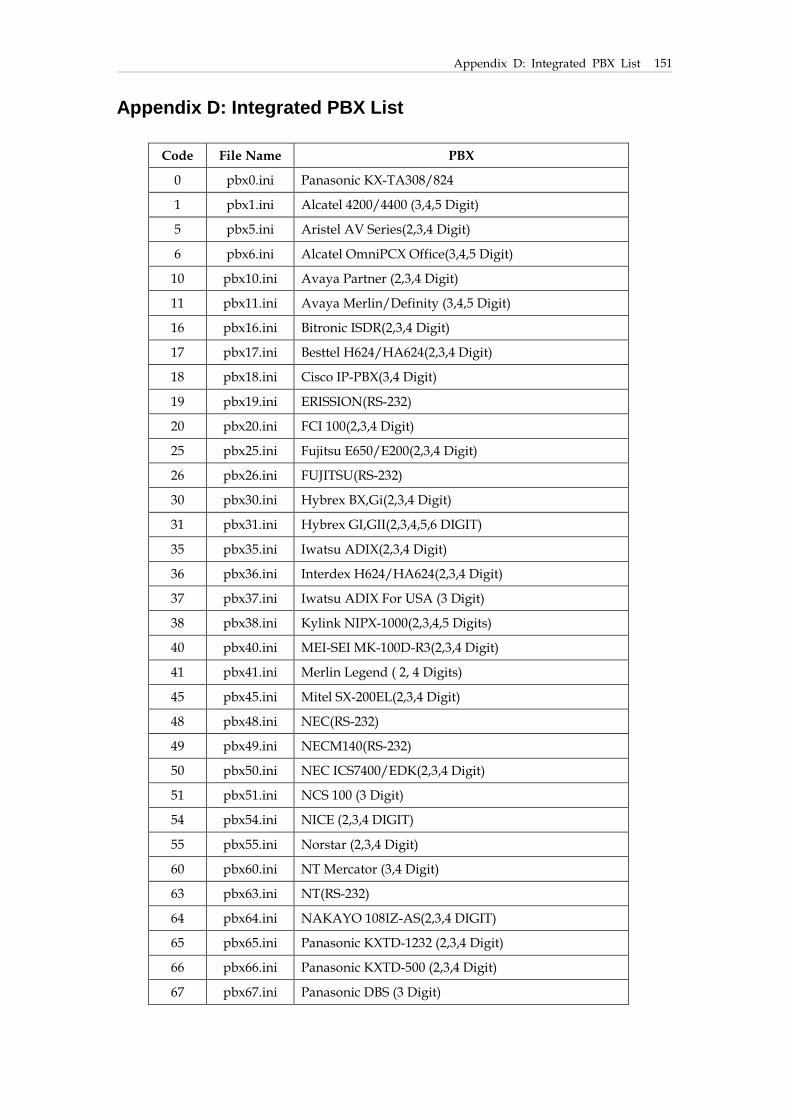
Appendix D: Integrated PBX List
151
Appendix D: Integrated PBX List
Code File Name PBX
0 pbx0.ini Panasonic KX-TA308/824
1 pbx1.ini Alcatel 4200/4400 (3,4,5 Digit)
5 pbx5.ini Aristel AV Series(2,3,4 Digit)
6 pbx6.ini Alcatel OmniPCX Office(3,4,5 Digit)
10 pbx10.ini Avaya Partner (2,3,4 Digit)
11 pbx11.ini Avaya Merlin/Definity (3,4,5 Digit)
16 pbx16.ini Bitronic ISDR(2,3,4 Digit)
17 pbx17.ini Besttel H624/HA624(2,3,4 Digit)
18 pbx18.ini Cisco IP-PBX(3,4 Digit)
19 pbx19.ini ERISSION(RS-232)
20 pbx20.ini FCI 100(2,3,4 Digit)
25 pbx25.ini Fujitsu E650/E200(2,3,4 Digit)
26 pbx26.ini FUJITSU(RS-232)
30 pbx30.ini Hybrex BX,Gi(2,3,4 Digit)
31 pbx31.ini Hybrex GI,GII(2,3,4,5,6 DIGIT)
35 pbx35.ini Iwatsu ADIX(2,3,4 Digit)
36 pbx36.ini Interdex H624/HA624(2,3,4 Digit)
37 pbx37.ini Iwatsu ADIX For USA (3 Digit)
38 pbx38.ini Kylink NIPX-1000(2,3,4,5 Digits)
40 pbx40.ini MEI-SEI MK-100D-R3(2,3,4 Digit)
41 pbx41.ini Merlin Legend ( 2, 4 Digits)
45 pbx45.ini Mitel SX-200EL(2,3,4 Digit)
48 pbx48.ini NEC(RS-232)
49 pbx49.ini NECM140(RS-232)
50 pbx50.ini NEC ICS7400/EDK(2,3,4 Digit)
51 pbx51.ini NCS 100 (3 Digit)
54 pbx54.ini NICE (2,3,4 DIGIT)
55 pbx55.ini Norstar (2,3,4 Digit)
60 pbx60.ini NT Mercator (3,4 Digit)
63 pbx63.ini NT(RS-232)
64 pbx64.ini NAKAYO 108IZ-AS(2,3,4 DIGIT)
65 pbx65.ini Panasonic KXTD-1232 (2,3,4 Digit)
66 pbx66.ini Panasonic KXTD-500 (2,3,4 Digit)
67 pbx67.ini Panasonic DBS (3 Digit)
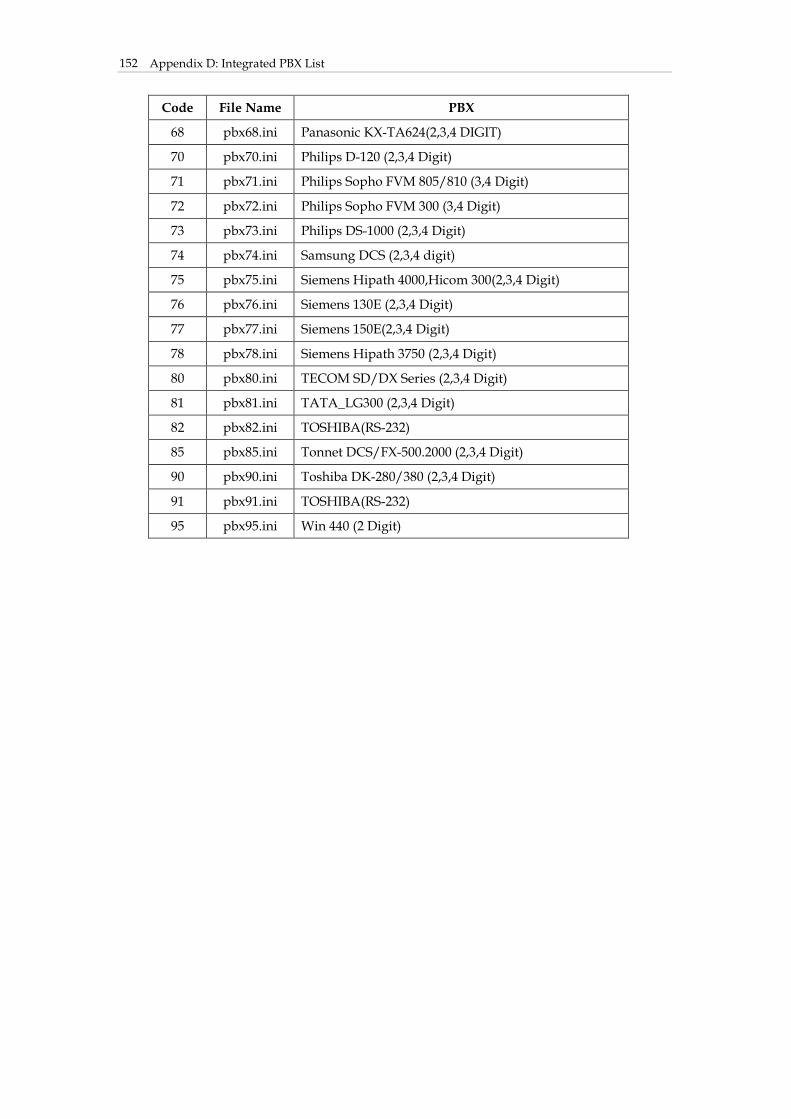
Appendix D: Integrated PBX List 152
Code File Name PBX
68 pbx68.ini Panasonic KX-TA624(2,3,4 DIGIT)
70 pbx70.ini Philips D-120 (2,3,4 Digit)
71 pbx71.ini Philips Sopho FVM 805/810 (3,4 Digit)
72 pbx72.ini Philips Sopho FVM 300 (3,4 Digit)
73 pbx73.ini Philips DS-1000 (2,3,4 Digit)
74 pbx74.ini Samsung DCS (2,3,4 digit)
75 pbx75.ini Siemens Hipath 4000,Hicom 300(2,3,4 Digit)
76 pbx76.ini Siemens 130E (2,3,4 Digit)
77 pbx77.ini Siemens 150E(2,3,4 Digit)
78 pbx78.ini Siemens Hipath 3750 (2,3,4 Digit)
80 pbx80.ini TECOM SD/DX Series (2,3,4 Digit)
81 pbx81.ini TATA_LG300 (2,3,4 Digit)
82 pbx82.ini TOSHIBA(RS-232)
85 pbx85.ini Tonnet DCS/FX-500.2000 (2,3,4 Digit)
90 pbx90.ini Toshiba DK-280/380 (2,3,4 Digit)
91 pbx91.ini TOSHIBA(RS-232)
95 pbx95.ini Win 440 (2 Digit)

Index
153
Index
3-Digit Function Code....................... 80, 117
AA-Menu.................................................... 45
Access Mailbox........................................... 70
ACPL ........................................................... 35
Automatic Call Progress Learning .......... 35
Available Languages............................... 112
Backup Parameters .................................. 114
Backup System ......................................... 113
Business Schedule...................................... 49
Busy Recall, Ring Release ......................... 37
Busy Time Lag............................................ 33
Call Pickup ................................................. 37
Call Progress Tone..................................... 34
Call Transfer ............................................... 26
Channel Parameters .................................. 43
Default Settings.......................................... 20
DTMF Administrator Password .............. 78
DTMF and Action Code............................ 79
DTMF and Action Codes .......................... 29
DTMF Gain............................................... 106
DTMF Programming................................. 77
DTMF Settings ......................................... 106
DTMF Signal............................................... 36
Extension Blocks ........................................ 40
External Notifications ............................... 57
Fax Extension ........................................... 108
Holiday Calendar ...................................... 50
Hunting Method ........................................ 43
IMS Basic Settings...................................... 23
In-Band DTMF Strings .............................. 30
Installing IM1200 ....................................... 13
Installing IM2400 ....................................... 15
Installing IMS Utility................................. 20
Integrated PBX List.................................. 151
Internal Notifications ................................ 56
Language .................................................... 61
Live Monitor ...............................................23
Login to InterMail ......................................20
Mailbox........................................................58
Message Light...........................................107
Message Notifications ...............................56
Multi-Tenant ...............................................61
Name Directory..........................................61
Name Directory........................................108
Non-Supervised .........................................27
Non-Supervised Mode ..............................29
Open Button................................................22
Operator & Extension Groups..................42
Package Content.........................................12
Password .....................................................23
PBX Button ..................................................23
Read Button ................................................22
Recording AA-Menu Greeting .................47
Reset Default...............................................14
Reset System Parameters ..........................15
Restore Parameters ..................................115
Restore System .........................................114
Retrieving Messages ..................................70
RS232 Message Light ...............................107
Save Button .................................................22
Security Button ...........................................14
Selecting Your PBX ....................................26
Semi- Supervised........................................27
Semi-Supervised Mode .............................37
Send Button.................................................22
Setup Wizard ..............................................24
Software Version ......................................112
Specifications ............................................149
Storage Capacity.......................................112
Supervised...................................................27
Supervised Mode .......................................33
System Alarm ...........................................113

Index 154
System Status ........................................... 112
System Time and Date .............................. 24
System Upgrade....................................... 115
Transfer Options ........................................ 47
UMS .......................................................63, 66
UMS E-Mail Server ....................................13
Voice Messaging Parameters....................54


