Embed Size (px)
Citation preview

Document Revision V1.2, © Austral Surveillance 2012, PH: 1300 130 508 1
CCTVWIFI
IE Operating Instruction Manual
Austral Surveillance
1300 130 508
Custom Camera Configuration
IP Address: 192. 168. 0.65
Subnet mask: 255. 255. 255. 0
Gateway: 192. 168. 0. 1
User name: admin
password::::admin
(Refer to 1.1 below for factory default settings)

Document Revision V1.2, © Austral Surveillance 2012, PH: 1300 130 508 2
Contents
1. Before logging in IE Settings--------------------------------------------------------------------------------------------------------3
1.1 The camera factory defaults----------------------------------------------------------------------------------------------------------------3
1. 2 IE plug-in associated Settings-------------------------------------------------------------------------------------------------------------3
2. login ------------------------------------------------------------------------------------------------------------------------------------------6
3. Real-time image browse -------------------------------------------------------------------------------------------------------------7
3.1 Viewing area --------------------------------------------------------------------------------------------------------------------------------8
3.2 PTZ Control area--------------------------------------------------------------------------------------------------------------------------8
3.3 Other Settings -------------------------------------------------------------------------------------------------------------------------------9
4. setting ---------------------------------------------------------------------------------------------------------------------------------------11
4.1 system settings -----------------------------------------------------------------------------------------------------------------------------11
4.2 Video and audio Settings -----------------------------------------------------------------------------------------------------------------12
4.3 OSD setting-------------------------------------------------------------------------------------------------------------------------------13
4.4 Network Settings --------------------------------------------------------------------------------------------------------------------------14
4.5 IPNP Settings ------------------------------------------------------------------------------------------------------------------------------14
4.6 DDNS Settings -----------------------------------------------------------------------------------------------------------------------------15
4.7 Motion detecting ---------------------------------------------------------------------------------------------------------------------------15
4.8 Alarm setting -------------------------------------------------------------------------------------------------------------------------------16
4.9 WIFI setting ---------------------------------------------------------------------------------------------------------------------------------18
4.10 Video Settings -----------------------------------------------------------------------------------------------------------------------------20
4.11 Image settings -----------------------------------------------------------------------------------------------------------------------------21
4.12 Login account Settings ------------------------------------------------------------------------------------------------------------------22
4.13 Maintenance Settings---------------------------------------------------------------------------------------------------------------------22
5 IE FAQ -------------------------------------------------------------------------------------------------------------------------------------23
5.1 IE in the switch between the Chinese and English -----------------------------------------------------------------------------------23
5.2 IE can go in, but no pictures showed ----------------------------------------------------------------------------------------------------24
5.3 IE how to video -----------------------------------------------------------------------------------------------------------------------------24
5.4 How to use double streaming ------------------------------------------------------------------------------------------------------------25
5.5 IE how to realize two-way voice talkback----------------------------------------------------------------------------------------------25
5.6 How to set up the camera on remote access -------------------------------------------------------------------------------------------25
5.7 How to in IE on board the program to upgrade ---------------------------------------------------------------------------------------25
5.8 How to restore the camera set out --------------------------------------------------------------------------------------------------------25
5.9 Night vision effect, a picture of mobile object has a point card, how to solve --------------------------------------------------25
5.10IE language appeared after switch code, how to solve?------------ ---------------------------------------------------------------26
5.11 SD card can't use -----------------------------------------------------------------------------------------------------------------------26
5.12 Search less than camera IP address?---------------------- ---------------------------------------------------------------------------27
5.13 External Housing Connection---------------------------------------------------------------------------------------------------------27

Document Revision V1.2, © Austral Surveillance 2012, PH: 1300 130 508 3
NOTES: 1. CD Contains compliation of various manuals and software. This assures you have everything should support be
required
2. The CCTVWifi OS is based on Windows system, specifically Internet Explorer, in order to achieve better effect, please
ensure your Windows system comes with IE browser as the firmware does not support other browsers like Mozilla or
Chrome
3. This manual will be updated live, if necessary, please contact the business personnel or technical personnel.
1 Ensure Internet Explorer v6 or above is installed
1. 1 Camera factory defaults
The default IP: 192. 168. 1. 128
Subnet mask: 255. 255. 255. 0
The default gateway: 192. 168. 1. 1
PTZ protocol: PELCO-D
Baud rate: 2400
Address: 1
User name: admin
password::::admin
1. 2 IE plug-in associated Settings
For Camera plugins to work, active x controls must be enabled. Once configuration is complete, these can be
automatically reset from within browser.
When using Win Vista or Win7, ensure you are using 32Bit version of IE and ensure you are running as Administrator
This is achieved by Right Clicking on IE icon and selecting ‘ Run as administrator’
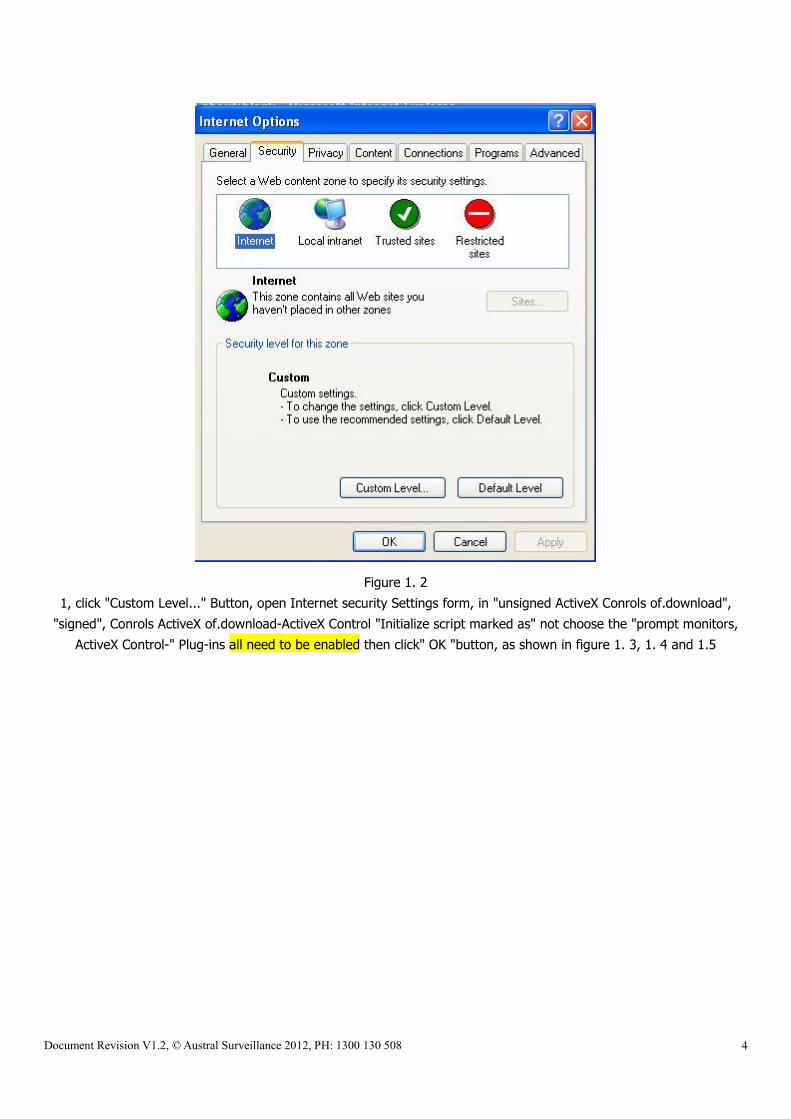
Figure 1. 1
At this time will show on Internet, choose the "Security", as shown in figure 1. 2 shows
Document Revision V1.2, © Austral Surveillance 2012, PH: 1300 130 508 4
Figure 1. 2
1, click "Custom Level..." Button, open Internet security Settings form, in "unsigned ActiveX Conrols of.download",
"signed", Conrols ActiveX of.download-ActiveX Control "Initialize script marked as" not choose the "prompt monitors,
ActiveX Control-" Plug-ins all need to be enabled then click" OK "button, as shown in figure 1. 3, 1. 4 and 1.5

Document Revision V1.2, © Austral Surveillance 2012, PH: 1300 130 508 5
Figure 1. 3
Figure 1. 4

Document Revision V1.2, © Austral Surveillance 2012, PH: 1300 130 508 6
Figure 1. 5
3. In one Resrticted Sites and Local (figure 1. 2), the repeat above a few steps Settings.
2. Login 1. In IE browser address bar the IP address of the input video cameras, video cameras default IP address is 192. 168. 1.
128. As shown in figure 2. 1 below
Figure 2. 1
When using Win Vista or Win7, ensure you are using 32Bit version of IE and ensure you are running as Administrator
This is achieved by Right Clicking on IE icon and selecting ‘ Run as administrator’
2. In IE window, click "Refresh", the following window, as shown in figure 2. 2 shows, to enter your user name and
password and click on the "brings a" button, then enter into the interface (the camera is the default factory user name is
admin, the password is admin)

Document Revision V1.2, © Austral Surveillance 2012, PH: 1300 130 508 7
Figure 2. 2
3 The interface, as shown in figure 2. 3 shows

Document Revision V1.2, © Austral Surveillance 2012, PH: 1300 130 508 8
Figure 2. 3
4, into the main interface later, if is the first time to watch, and may not display images, now have to click on the FIG 2.3,
Download and install the of.download OCX, clean up after the cache, IE image to create a display.
3. Real-time image browse
3.1 The viewing area, as shown in figure 3. 1 below

Document Revision V1.2, © Austral Surveillance 2012, PH: 1300 130 508 9
Figure 3. 1
3.2 PTZ control area, as shown in figure 3. 2 shows
Figure 3. 2
1) it can through the button on the up and down or so to PTZ control
2) through the "complex modulation ZOOM lens change" to adjust the equipment, with The Times, just the ball machine

Document Revision V1.2, © Austral Surveillance 2012, PH: 1300 130 508 10
function
3) through the "something" : do not use this function
4) through the "IRIS" : do not use this function
5)
Is used to set in IE, behind the video inside path can modify, video file format for esf, should be in our video player to play
for.
6) school: refers to the rotating Speed PTZ
7) Preset for the choice of the dots in the Point of Preset
8) Go call preset points
9) Set setting preset points
10) Delete at deleting preset
Note: this function has been for the camera PTZ effective.
3.3 other Settings, as shown in figure 3. 3 shows
Figure 3. 3
1) Talk Set to the intercom mode, two-way voice talkback when used
2) Audio The PC audio decoding the function, two-way voice the intercom open when used
3) streaming 1 Watch streaming 1 video (blue says the code word circulation are watching)
4) Stream 2 Watch streaming 2 video (blue says the code word circulation are watching, camera
factory code flow2 is closed, if need to watch, must be set parameters on)
5) Snapshot capture the current picture, default, kept in C: pan-gen directory
6) Image Size Image size player, a total of three models of switching (big. In. Small),circulation,
this function to switch the CCD, 1 million CMOS to effectively is invalid.
Preview[Safe] : need to computer hardware support, to computer hardware to accelerate, improve the quality of the
picture, the computer support hardware acceleration, unless it is very old computer. What is the status of the current
show, is what state, if the current pictures, and that is , explained the current state no hardware
acceleration; If the current picture, that is , explained the current state has already completed
the hardware acceleration
Download OCX The first to use the watch network cameras, IE to download and install, IE interface control OCX is only
found in image display
Configuration into the parameter Settings page

Document Revision V1.2, © Austral Surveillance 2012, PH: 1300 130 508 11
4.Setting Click on the figure 3. 3 "Configuration" item, enter "the Configuration" interface, the default into the "System"
Configuration page.
4.1 The System, as shown in figure 4. 1 below
Figure 4. 1
"The System" page the items of the set is introduced:
System: shows the whole of a camera about information
Device ID:shows the camera plug and play (IPNP) serial number, about IPNP, the client software instructions there are
described in detail.
Host name:The name of the camera, when networks, many cameras, can modify the camera, the name of the distinction
between, such as room 1, the room 2, etc
Ipcam Versiom:Refers to the camera to the board, at present the version number of the camera version number is 2. 2.
4. 1
Web Versiom::::Refers to the use of video cameras to watch the IE IE version number, at present this camera IE version
number is 1. 1. 4. 1

Document Revision V1.2, © Austral Surveillance 2012, PH: 1300 130 508 12
OCX Versiom: OCX is watching video images with IE important plugin
OCX Path: if was the first to use IE looked, and from the camera board will download a OCX control to the local
computer
System Time: Select time zone
Adjust: Server Time set, the default Settings, other be kept current set includes: with the current Time. Synchronize with
the PC. And Synchronize with the NTP synchronization.
Note: the camera is not like the computer hardware, no clock as motherboard battery to memory time power, it's time to
information will be lost. In order to solve this problem, divide kind of case, when the camera can networking, after the
restart, electric, automatic cameras and Internet time server, so NTP synchronous started, the display of the time, from
the NTP server to read, and there are a few seconds of the real time; If the camera is not networking, plus electric after
the restart, record is the last drop while the time, if want to and the current time synchronization, then choose and PC
time synchronization can. Every time, when the power is just like that, with a PC synchronization. For example thoroughly
solve the problem, in the new client software, system Settings-basic set of page, a function is automatic for all, connected
device synchronous this machine, the function can check time.
4.2 Audio Video sites, as shown in figure 4. 2 shows
Set the main screen, click on the "Audio Video-", enter the Video. Audio Settings interface to Video camera, can be set.
Audio
information.
Figure 4. 2
(1) in "Video", can set the camera Video information
A) "Stream Switch" inside, can Switch code word, have Stream flow Stream 1 and 2 two channels
B) in the "Target", the farther inside Bit can set the camera code Rate size
C) in the "Target", the farther inside Frame can set the camera Frame Rate
D) in "Video." inside, can set the camera Quality Settings, 1. 2. 3. 4. 5. Six altogether six options, the most clear, 3 to 6 for
medium, the most clearly. 1
E) in "Resolution" inside, can set the camera Resolution size:

Document Revision V1.2, © Austral Surveillance 2012, PH: 1300 130 508 13
The CCD camera, have QCIF/CIF / 2 CIF / 4 CIF four options, some security manufacturers say four CIF, are the same for
D1 mean.
1 million CMOS camera, CIF / 4 CIF / 1. 0 M / 2. 0 M four options.
1. 0 M is representative of the effect of 1 million, 2. 0 M represents the effect of 2 million, 1 million top 25 frames per
second, 2 million top 15 frames per second
F) Control Mode "in" the farther inside, can set the camera streaming model, there is constant bit Rate (CBR) and variable
bit Rate (VBR) in two ways. Variable bit rate (VBR) role is, when a picture of a moving object code is small, be automatic
will come down, saving abandoned network bandwidth resources.
G) in "IFrame Interval" inside, can set the camera I frame Interval, in network environment is bad, I usually choose
numerical comparison between frames, such as I frame Interval choice into 120.
H) in "Video clusters" inside, can set up Video Format (NTSC or PAL), according to the camera. Effective CCD
I) in "Stream" inside, control State 2 2 channel streaming Stream (2) of the on/off
J) VFR_State refers to, when (night) dark environment, whether to allow drop frame, have two kinds of choices
Enable: allow lower picture frame rate, to improve the brightness of the screen, this picture will be very bright, but the
night screen moving object in will have card Disable: ban reduce the picture frame rate, when the pictures will very
coherent, but the picture will not before the brightness of the light, if you buy the cameras, infrared lamp is to take the
problem, can thoroughly solved
(2) in "Audio", can set the camera Audio information
A) in "Audio Input" inside, set up front Audio Input on/off
B) In "Input" inside, set by the front of Input methods, divided into audio built-in MIC (mi) and Line (head In Line Input)
two, this option please according to the specific camera choice.
C) in "Interval Input" inside, can set up wanting the camera audio Input Gain
4.3 OSD Setting, As shown in figure 4. 3 shows

Document Revision V1.2, © Austral Surveillance 2012, PH: 1300 130 508 14
Figure 4. 3
This page can set the OSD indicates whether or not the position. Transparency. OSD. Content (except time outside the
OSD) and font size.
Left: display Position;
Alpha: OSD transparency;
Text1: OSD content;
The Font do: OSD Font Size, points big and small.
4.4 Network, As shown in figure 4. 4 shows
Figure 4. 4
1) in "IP" column after can set the camera, the IP address of the subnet mask and a default gateway, IP must and
monitor computer in the same segment,
If the network IP not familiar with it, be sure to see first client in the software of the Basic knowledge of network to
2) in "the DNS server after" column, can set up Primary DNS server and change the DNS server, generally do not set.
3) in "Port for" column:
Our camera's two Port, HTTP Port is watching the end use IE slogan, a Port is the client software
Watch for the port, the port number is 80 HTTP default, monitor the port number is 554. The two port can be modified
These parameters change will restart after camera.
4.5 IPNP Setting, As shown in figure 4. 5

Document Revision V1.2, © Austral Surveillance 2012, PH: 1300 130 508 15
Figure 4. 5
Remote monitoring to use, keep the default value can. If you want to use, as shown in the CD the client software in the
document plug and play instructions"
4.6 DDNS, As shown in figure 4. 6 shows
Figure 4. 6
1) on the WWW. 3322. Org < > or http://www.3322.org WWW. Dyndns. Org above apply for a free domain name, for
example, apply to the domain name for test. 3322. Org, domain name and password, and remember this camera support
dyndns. Org "WWW. http://www.dyndns.org > and WWW. 3322. Org < http://www.3322.org > domain name service.
2) will apply to the DDNS, User Name and Password I fill in after, click "brings a";
Do not want to save click on the "reset"; Save parameters will restart after camera.
This need not know, remote monitoring to use, if you want to use, see the client software in the camera on "how to set up
a remote access".
4.7 Motion Detecting
Mobile detection means, in monitoring pictures, and set up a or DuoGe to detect areas, such as the gate, when moving,
detection area moving object object, the cameras to take some action, such as paparazzi pictures/video to the SD card, or
and external alarm output equipment linkage.

Document Revision V1.2, © Austral Surveillance 2012, PH: 1300 130 508 16
Figure 4. 7
Set the motion detecting steps:
First open, then click Start motion detecting button, draw a or DuoGe mobile zone, then some Add button, and then some
End button, and brings a set.
Set up, when a picture of a moving object detection area, the cell will flickering. If there is no flash, open mobile detection
function of this place, cancel checked again, to open a, sometimes to pull out the camera to restart.
4.8 Alarm Setting
First introduced the related concept, alarm alarm points: alarm input and alarm output.
Alarm input can be motion detecting alarm, also can be the alarm input devices, such as smoke, door, temperature
control, infrared alarm detector, the premise is the equipment is going to give us the camera a switch quantity, followed
by the camera alarm input hardware interface.
Alarm output equipment, can be market of the mainframe above, if the equipment is going to give us the camera a switch
quantity, followed by the camera alarm output hardware interface.
The default is the alarm input, the alarm output. A few camera is two road alarm input, no alarm output.
In alarm function pages, open the alarm functions, page from each of the children, this paper introduces the function as
follows
Output port activation time length, the default time is 15 seconds, time can be modified.
Motion detecting alarm Settings:
First in figure 4. 7, set up mobile detection area.

Document Revision V1.2, © Austral Surveillance 2012, PH: 1300 130 508 17
Figure 4. 8. 1
Snapshot:
Refers to the camera to detect, detection mobile video camera to take action shot, there are four choices
None: refers to the camera to motion detecting, test do not take any action
Snapshot: refers to the camera to motion detecting, testing the pictures captured on SD card. The more detailed
introduction, reference CD FAQ folder in the SD card use documentation"
Snapshot-Send E-mail: reference document the motion detecting CD alarm Send Mail (client software)"
Snapshot-to Send FTP: reference document the CD motion detecting alarm to the FTP client software (in)"
Record:
Refers to the camera to detect, detection mobile video camera to take action, there are three choices
None: refers to the camera to motion detecting, test do not take any action
Record: refers to the camera to motion detecting, detection will video to the SD card. The more detailed introduction,
reference CD FAQ folder in the SD card use documentation"
Snapshot-to Send FTP: reference document the CD motion detecting alarm to the FTP client software (in)"
Output:
Refers to the camera to detect, detection mobile video camera and external alarm output equipment linkage, have two
kinds of choices
None: with external alarm output equipment linkage
To Port1 Output: that is the camera to motion detecting, detection will alarm signals to port 1, port 1 is also the camera
hardware interface of the above COM port and NO mouth, COM/NO take alarm Output devices, such as sound, the
mainframe. So, alarm input, output can form a linkage.
Figure 4. 8. In action, action, captured video output, the linkage several can simultaneously.
Combine Input Setting
Figure 4. 8. 2

Document Revision V1.2, © Austral Surveillance 2012, PH: 1300 130 508 18
Combine input Setting:
Input refers to the camera on the hardware interface we IN-the mouth and IN mouth, they used to pick up + alarm input
device, such as smoke, door, temperature control, infrared detector warning.
Snapshot:
Refers to the camera detection to alarm input, the camera to take action shot, there are four choices
None: refers to the camera detection to alarm input, do not take any action
Snapshot: refers to the camera detection to alarm input, pictures will be captured on SD card. The more detailed
introduction, reference CD FAQ folder in the SD card use documentation"
Snapshot-Send E-mail: reference document the motion detecting CD alarm to the FTP client software (in)"
Snapshot-to Send FTP: reference document the CD motion detecting alarm to the FTP client software (in)"
Record:
Refers to the camera detection to alarm input, video camera to take action, there are three choices
None: refers to the camera detection to alarm input, do not take any action
Record: refers to the camera detection to alarm input, the video to the SD card. The more detailed introduction, reference
CD FAQ folder in the SD card use documentation"
Record to Send FTP site: reference document the CD motion detecting alarm to the FTP client software (in)"
Alarm input:
Refers to the camera to detect, detection mobile video camera and external alarm output equipment linkage, have two
kinds of choices
None: with external alarm output equipment linkage
To Port1 Output: that is the camera to motion detecting, detection will alarm signals to port 1, port 1 is also the camera
hardware interface of the above COM port and NO mouth, COM/NO take alarm Output devices, such as sound, the
mainframe. So, alarm input, output can form a linkage.
Figure 4. 8. 2 of the action, action, captured video output, the linkage several can simultaneously.
4.9 WIFI
When using Win Vista or Win7, ensure you are using 32Bit version of IE and ensure you are running as Administrator
This is achieved by Right Clicking on IE icon and selecting ‘ Run as administrator’
If this step is being done after IE Active X controls have been reset to normal, please ensure Active X controls are
enabled, as per chapter 1.2
To configure WiFi, log into camera, select ‘Setup’ then select ‘Network’ then ‘Wifi’. Ensure Wifi is turned on and then save.
After camera saves, hit F5 to refresh. You may be prompted to download a small plugin, please allow.
Now click ‘Scan Wifi’. This will populate a list of networks within range of camera
As shown in figure 4. 9. 1, we wish to connect to CTC-41 AA network

Document Revision V1.2, © Austral Surveillance 2012, PH: 1300 130 508 19
Figure 4. 9. 1
In the diagram, the search to two wireless network, with CTC-41 AA the wireless network as an example:
Figure 4. 9. 2
The CTC-41 AA, in item 3 states 42/100, this being wireless signal strength is 42%, if is among obstacles such as wall lie
between block, the wireless signal attenuation is very severe, the proposal will be among don't have any object to lie
between block.
To use CTC-41 AA this wireless network, double click it, and complete network credentials (Encryption, wifi password etc)
Please refer to your system administrator for this information

Document Revision V1.2, © Austral Surveillance 2012, PH: 1300 130 508 20
After settings are saved, power cycle camera once (unplug power for 5 seconds, then plug back in) Your camera should
now be accessable via Wifi
Explanation:
1. If the wireless network even after you take, the Internet is still use, wireless, cable no longer use, the camera to add
electricity to the first detected after the network shall prevail.
2. Because wireless network is not stable, streaming big, the screen will delay, the proposal:
(1) use a powerful wireless router
(2) the way the biggest video camera will each code in the 1200 KBPS flow control within
(3) wireless router and the distance between the camera as close as possible, and don't have among obstacles lie
between block
4.10 video Settings
This function module to have only SD card camera effective, if you buy cameras don't take SD card, this section does not
need to understand.
Figure 4. 10. 1
According to the Schedule: can Record some time each week to video, video recording is all SD card
Record Option:
The Select Schedule Stream:
Our camera double streaming, internal network support, the use of Stream1 monitoring, Stream1 effect is good, take up

Document Revision V1.2, © Austral Surveillance 2012, PH: 1300 130 508 21
bandwidth and bigger; When remote monitoring, the network bandwidth is not enough, can use Stream2 to video,
Stream2 takes up less bandwidth.
Pack file Record vinyl:
According to the needs, their choice, the minimum 1 minute, a maximum 60 minutes a.
Figure 4. 10. 2
Cameras SD card check, if SD module has a problem, or SD card, or poor contact SD card has a problem, can't detect
system.
4.11 Camera
as shown in figure 4. 11 below
Figure 4. 11
1) Brightness: Brightness values set (range is 0 to 255, production value for 127)
2) Hue: set chromaticity (value range is 0 to 255, production value 0)
3) : set up the Contrast (value range is 0 to 255, production value for 127)

Document Revision V1.2, © Austral Surveillance 2012, PH: 1300 130 508 22
4) Saturate: set saturation (value range is 0 to 255, production value for 127)
The image of the CCD camera set only for only effective, CMOS 1 million camera brightness/colour/contrast/saturation,
the software is not adjust inside
4.12 Account, As shown in figure 4. 12 as shown
Figure 4. 12
Support level 3 user rights management, with the highest authority, can admin on camera perform all operating;
Operator can watch and video, can modify the configuration of inside, such as resolution, but there are two points can't,
one is can't add/remove users, but can modify their password, and the second is not the camera factory set back; The
user can only watch, in addition has no right
4.13 Maintenance Settings, As shown in figure 4. 13 below

Document Revision V1.2, © Austral Surveillance 2012, PH: 1300 130 508 23
Figure 4. 13
The Settings page includes four:
1) restart: restart camera
2) recovery: restore all set to factory Settings camera, except the IP
3) the default: restore all set to factory Settings camera
4) : to update the firmware update file camera software
5. IE FAQ
5.1 IE how in the switch between the Chinese and English
At present the setting of a web interface support Chinese and English, the operation is as follows: switch
The assumption that the camera IP address is 192. 168. 1. 128, Web port is 80, is in in IE browser address bar input the
following content: http://192.168.1.128/cgi-bin/language.cgi, After the show, enter the interface

Document Revision V1.2, © Austral Surveillance 2012, PH: 1300 130 508 24
Figure 5. 1
Select the corresponding language click "Apply" button after, close to open in IE, IE browser address bar input http://192.
168. 1. 128, can show the corresponding language interface.
5.2 IE can go in, but no pictures showed
The reason:
IE browser "tool" menu select "Internet options..., no Settings allowed component installation, set again, this manual
before the first chapter login to the interpretation of IE installed.
Reason 2:
IE plug-in OCX not installed success, OCX control is in IE browser, video images of the play with.
In IE monitoring menu, download and install OCX (this manual the second chapter to the interpretation of the fourth
quarter), as the chart:
5.3 IE how to video:
In IE monitoring menu, the button below can video/stop video, default, recorded in the C: pan-gen directory, this path
can be modified

Document Revision V1.2, © Austral Surveillance 2012, PH: 1300 130 508 25
If you want to watch video of words, should be in our special FilePlayer to broadcast, the FilePlayer can play, do not need
to install independent of our client software, has put of CD
5.4 IE how to use double streaming:
In the random CD, a FAQ folder, have document the IE how to use double streaming ", there is a detailed explanation
5. 5 IE how to realize two-way voice the intercom:
In the random CD, a FAQ folder, document how the two-way voice talkback ", there is a detailed explanation
5.6 How in the camera on the remote access:
In the random cd-rom, FAQ, remote access folder, a document, "how to set up the camera in remote access", there is a
detailed explanation
5.7 How to in IE on board the program to upgrade:
Usually, don't need to use this function, individual cases, would use the upgrade function, in random CD, a FAQ document
folder, have the board the program to upgrade (in IE) ", and there is explained
5.8 How to restore the camera factory Settings:
this document to the interpretation of the fourth chapter 13 quarter
5.9Night vision effect, a picture of mobile object has a point card, how to
solve?
In the video and audio, a VFR State, it will be closed. Specific explained below:

Document Revision V1.2, © Austral Surveillance 2012, PH: 1300 130 508 26
VFR State refers to, when (night) dark environment, whether to allow drop frame, have two kinds of choices
Enable: allow lower picture frame rate, to improve the brightness of the screen, this picture will be very bright, but the
night screen moving object in will have card Disable: ban reduce the picture frame rate, when the pictures will very
coherent, but the picture will not before the brightness of the light, if you buy the cameras, infrared lamp is to take the
problem, can thoroughly solved
5.10 IE language appeared after switch code, how to solve?
In IE monitoring pictures, and some right-" Encoding, select the corresponding coding length in the can, as follows:
5.11 The SD card in not?
A: first of all in IE, Configuration-" Record inside page for SD card in and see whether detection to:
If no detection, may be to hardware problems, such as SD module has a problem, or SD card, or poor contact SD card has
a problem.
If the SD can detection, but there is no video to information that is not set good, please reference reference CD FAQ

Document Revision V1.2, © Austral Surveillance 2012, PH: 1300 130 508 27
folder in the SD card use documentation"
5.12 Can’t search camera IP address?
A: there are many reasons, the camera hardware, software, customer network environment, switch, please click the
following an order to do check:
1. Confirm the camera and monitor computer in the same local area network inside.
Some monitoring site computer more, can be in a large local area network inside, a local area network (LAN) into small,
confirm the camera and monitor computer in the same small local area network inside, for the network, to division VLAN
allows the camera in the VLAN and computer in the communications between the VLAN.
2. Turn off the computer to the firewall.
3. If the camera nic data bright lights, for the following reasons:
Cable is too old, RJ45 crystal head, or exchange interface has a problem, the proposal with new cable do test;
4. If the camera lights, the network card data search less than the IP address, have the following possible
(1) the IP address of the computer is dynamic, but for DHCP get IP address is invalid.
(2) computer firewall were not concerned
(3) computer may have problems, many in just a few good computer test
(4) switch, at this time reboot network switch
(5) network card, there may be a camera lights inside some services are not completely start, must pull electricity to
restart the camera
5. Computer Settings for static IP address, use cross line the camera and computer straight, search, even if not clear what
is cross line, you can find buy computer accessories place, make a crossover cable network, if not familiar with it, please
see reading of the basic knowledge of CD network is introduced ".
If the above methods to try or not, is probably the camera hardware problems, send back overhaul.
5.13 External Housing
The external housing allows the camera to function outdoors using its existing antenna and power supply
It is importatnt to note that whilst camera is protected from rain, the power supply is not. Please ensure power supply
remains in a dry location away from rain and moisture
1. Open Housing by unscrewing 2 x scews as pictured below

Document Revision V1.2, © Austral Surveillance 2012, PH: 1300 130 508 28
2. Pull out back assembly from main housing, as pictured below
3. Using Mounting screw, attach camera to plastic mount, ensuring camera is back far enough to avoid contact with
front glass
4. Attch internal SMA flylead interface (For Wifi Antenna) and power cable
5. Connect power supply and antenna (supplied with camera)
6. Reassemble camera body ensuring housing screws are tight enough to seal the rear of the housing
7. Attach camera mount on wall using gyprock scews or masonary bolts (depending on application)
8. Attach Camera housing to camera mount and adjust view