Embed Size (px)
Citation preview
Identity Implementation GuideVersion 36.0, Spring ’16
@salesforcedocsLast updated: March 17, 2016

© Copyright 2000–2016 salesforce.com, inc. All rights reserved. Salesforce is a registered trademark of salesforce.com, inc.,as are other names and marks. Other marks appearing herein may be trademarks of their respective owners.

CONTENTS
Chapter 1: What is Salesforce Identity? . . . . . . . . . . . . . . . . . . . . . . . . . . . . . . . . . . . . . 1
Chapter 2: How to use Salesforce Identity . . . . . . . . . . . . . . . . . . . . . . . . . . . . . . . . . . 4
Chapter 3: Quick Start: Set up your own domain, add a Connected App and use theApp Launcher . . . . . . . . . . . . . . . . . . . . . . . . . . . . . . . . . . . . . . . . . . . . . . . . . . . . . . . 5
Use My Domain to create your own domain name . . . . . . . . . . . . . . . . . . . . . . . . . . . . . . . 6Create a new connected app . . . . . . . . . . . . . . . . . . . . . . . . . . . . . . . . . . . . . . . . . . . . . . 7
Step 1: Create an OAuth Application . . . . . . . . . . . . . . . . . . . . . . . . . . . . . . . . . . . . . . 7Step 2: Create a Connected Application . . . . . . . . . . . . . . . . . . . . . . . . . . . . . . . . . . . 7Step 3: Finish Your OAuth Application . . . . . . . . . . . . . . . . . . . . . . . . . . . . . . . . . . . . . 8
Launch your connected app from the Salesforce App Launcher . . . . . . . . . . . . . . . . . . . . . . . 9
Chapter 4: My Domain . . . . . . . . . . . . . . . . . . . . . . . . . . . . . . . . . . . . . . . . . . . . . . . . 11
Set Up a Domain Name . . . . . . . . . . . . . . . . . . . . . . . . . . . . . . . . . . . . . . . . . . . . . . . . . 12Define Your Domain Name . . . . . . . . . . . . . . . . . . . . . . . . . . . . . . . . . . . . . . . . . . . 12Customize Your Login Page Branding . . . . . . . . . . . . . . . . . . . . . . . . . . . . . . . . . . . . 13Add Identity Providers on a Login Page . . . . . . . . . . . . . . . . . . . . . . . . . . . . . . . . . . . 13Test and Deploy Your New Domain Name . . . . . . . . . . . . . . . . . . . . . . . . . . . . . . . . . 16Set the My Domain Login Policy . . . . . . . . . . . . . . . . . . . . . . . . . . . . . . . . . . . . . . . . 14
My Domain URL Changes . . . . . . . . . . . . . . . . . . . . . . . . . . . . . . . . . . . . . . . . . . . . . . . 15Test and Deploy Your New Domain Name . . . . . . . . . . . . . . . . . . . . . . . . . . . . . . . . . . . . 16Guidelines and Best Practices for Implementing My Domain . . . . . . . . . . . . . . . . . . . . . . . . 16Get System Performance and Maintenance Information Using My Domain . . . . . . . . . . . . . . 18
Chapter 5: Configure and Use the App Launcher . . . . . . . . . . . . . . . . . . . . . . . . . . . . 19
Enable the App Launcher with a Profile in Salesforce Classic . . . . . . . . . . . . . . . . . . . . . . . . 20Enable the App Launcher with a Permission Set in Salesforce Classic . . . . . . . . . . . . . . . . . . 21Reorder Apps . . . . . . . . . . . . . . . . . . . . . . . . . . . . . . . . . . . . . . . . . . . . . . . . . . . . . . . 22
Reordering the Force.com App Menu and App Launcher in Salesforce Classic . . . . . . . . 23Reorder the App Launcher Apps in Salesforce Lightning Experience . . . . . . . . . . . . . . . 23
Chapter 6: Set up Single Sign-on to Google Apps . . . . . . . . . . . . . . . . . . . . . . . . . . . 25
Get a Salesforce Identity Provider Certificate . . . . . . . . . . . . . . . . . . . . . . . . . . . . . . . . . . . 26Set Google Administrator Single Sign-On Options . . . . . . . . . . . . . . . . . . . . . . . . . . . . . . . 26Create a Connected App for GMail . . . . . . . . . . . . . . . . . . . . . . . . . . . . . . . . . . . . . . . . . 27
Chapter 7: Set Two-Factor Authentication Login Requirements . . . . . . . . . . . . . . . . . . 29
Connect a One-Time Password Generator App or Device for Identity Verification . . . . . . . . . . 30
Chapter 8: Customize Your Login Page with Your Own Branding . . . . . . . . . . . . . . . . 31

Chapter 9: Synchronize your Salesforce and Active Directory Users with IdentityConnect . . . . . . . . . . . . . . . . . . . . . . . . . . . . . . . . . . . . . . . . . . . . . . . . . . . . . . . . . . 32
About Identity Connect . . . . . . . . . . . . . . . . . . . . . . . . . . . . . . . . . . . . . . . . . . . . . . . . . 33Installing Identity Connect . . . . . . . . . . . . . . . . . . . . . . . . . . . . . . . . . . . . . . . . . . . . . . . 33
Chapter 10: Tutorial: Test Single Sign-On from an External Identity Provider . . . . . . . . 34
Establish a Federation ID . . . . . . . . . . . . . . . . . . . . . . . . . . . . . . . . . . . . . . . . . . . . . . . . 35Set up your identity provider . . . . . . . . . . . . . . . . . . . . . . . . . . . . . . . . . . . . . . . . . . . . . . 35Generate SAML . . . . . . . . . . . . . . . . . . . . . . . . . . . . . . . . . . . . . . . . . . . . . . . . . . . . . . 36Troubleshoot SAML assertions . . . . . . . . . . . . . . . . . . . . . . . . . . . . . . . . . . . . . . . . . . . . 37
Chapter 11: Monitor Applications and Run Reports . . . . . . . . . . . . . . . . . . . . . . . . . . . 38
Monitor Usage for Connected Apps . . . . . . . . . . . . . . . . . . . . . . . . . . . . . . . . . . . . . . . . 39Create an Identity Users Report . . . . . . . . . . . . . . . . . . . . . . . . . . . . . . . . . . . . . . . . . . . 40
Chapter 12: Use External Identities to Extend Your Organization to New Users . . . . . . 42
Chapter 13: Get More Information about Salesforce Identity, Single Sign-On andSecurity . . . . . . . . . . . . . . . . . . . . . . . . . . . . . . . . . . . . . . . . . . . . . . . . . . . . . . . . . . . 44
Index . . . . . . . . . . . . . . . . . . . . . . . . . . . . . . . . . . . . . . . . . . . . . . . . . . . . . . . . . . . . 45
Contents

CHAPTER 1 What is Salesforce Identity?
EDITIONS
Available in: SalesforceClassic
Available in: Enterprise,Performance, Unlimited,Developer, andDatabase.com Editions
Salesforce Identity connects your Salesforce organization users with external applications andservices, while providing administrative tools for monitoring, maintaining and reporting userapplications and authorization.
Note: Salesforce Identity Demo (12:16 minutes)
Take a quick tour of Salesforce Identity features.
Salesforce Identity is an Identity and Access Management (IAM) service with the following features.
• Cloud-based user directories, so user accounts and information are stored and maintained inone place, while available to other services or applications.
• Authentication services to verify users and keep granular control over user access. You can select the apps specific users can use,require two-factor authentication, and set how often individual users need to log in to maintain their session.
• Access management and authorization for third-party apps, including UI integration, so a user’s apps and services are readily available,as needed.
• Provisioning and de-provisioning of apps, so you keep the latest apps available to users, and remove apps that should not be available.
• An API for viewing and managing your deployment of Identity features.
• Reporting on the use of apps and services by your Identity users for better security.
• Salesforce Identity Connect: an on-premise Connector for Provisioning and single sign-on integration with directory services likeMicrosoft Active Directory.
To implement Salesforce Identity, use any of the following.
Security Assertion Markup Language (SAML)
Security Assertion Markup Language (SAML) is an XML-based standard that allows you to communicate authentication decisionsbetween one service and another. It underlies many Web single sign-on solutions. Salesforce supports SAML for single sign-on intoSalesforce from a corporate portal or identity provider.
OAuthOAuth is an open protocol used for single sign-on to allow secure authorization between applications. OAuth “flows” describedifferent ways of implementing OAuth for Salesforce orgs. For more information on specific flows, see Force.com REST API DeveloperGuide.
OpenID ConnectOpen ID Connect is authentication protocol, based on OAuth 2.0, for identity verification between services. OpenID Connect allowsa Salesforce organization to verify the identity of a user based on the authentication performed by another service, such as Google.
My DomainUse My Domain to define a custom Salesforce organization domain name (for example,https://companyname.my.salesforce.com). A custom domain name helps you better manage login and authenticationfor your organization, and allows you to customize the login page.
Connected AppsA connected app integrates an application with Salesforce using APIs. Connected apps use standard SAML and OAuth protocols toauthenticate, provide Single Sign-On, and provide tokens for use with Salesforce APIs. In addition to standard OAuth capabilities,connected apps allow administrators to set various security policies and have explicit control over who may use the correspondingapplications.
1

App LauncherThe App Launcher unifies the user experience of launching single sign-on apps from a Salesforce org. The App Launcher presentslogos that link to your connected apps and standard apps, all from one tab in Salesforce. Users must be assigned a profile or permissionset with “Use Identity Features” enabled and the App Launcher set to Visible to see it. Then, it appears as an app in the Force.comApp Menu.
Identity LicenseGrants users access to Identity features such as the App Launcher. To view and use the App Launcher, a user must have the “UseIdentity Features” permission.
Included with all paid user licenses in Enterprise, Performance, and Unlimited Editions. Ten free Identity user licenses are includedwith each new Developer Edition organization.
External Identity LicenseGrants Identity features such as the App Launcher and Single Sign-On to external users. These users are typically non-employees orcommunity users from outside your organization who you still want to manage and provide some access to your organization.
Included with all paid user licenses in Enterprise, Performance, and Unlimited Editions. Five free Identity user licenses are includedwith each new Developer Edition organization.
Identity Provider and Service Provider integrationAn identity provider is a trusted provider that lets you use single sign-on to access other websites. A service provider is a website thathosts applications. You can enable Salesforce as an identity provider and define one or more service providers. Your users can thenaccess other applications directly from Salesforce using single sign-on. Single sign-on can be a great help to your users: instead ofhaving to remember many passwords, they only have to remember one. Plus, the applications can be added as tabs to your Salesforceorganization, which means users don’t have to switch between programs.
Salesforce Identity ConnectIdentity Connect provides Active Directory integration with Salesforce via a service which runs on either Windows or Linux platforms.This integration includes syncing Active Directory users with either Salesforce or Identity Connect acting as the Identity ServiceProvider (IDP) for Single Sign On (SSO) Active Directory integration when logging into Salesforce.
Two-Factor AuthenticationWith two-factor authentication enabled, users are required to log in with two pieces of information, such as a username and aone-time password (OTP). Salesforce supports user-defined OTPs and OTPs generated from software or hardware devices.
For example, here’s a view of the App Launcher for a user within a Salesforce organization who has a profile or permission set enabledto open external apps and services without a separate login for each one.
2
What is Salesforce Identity?
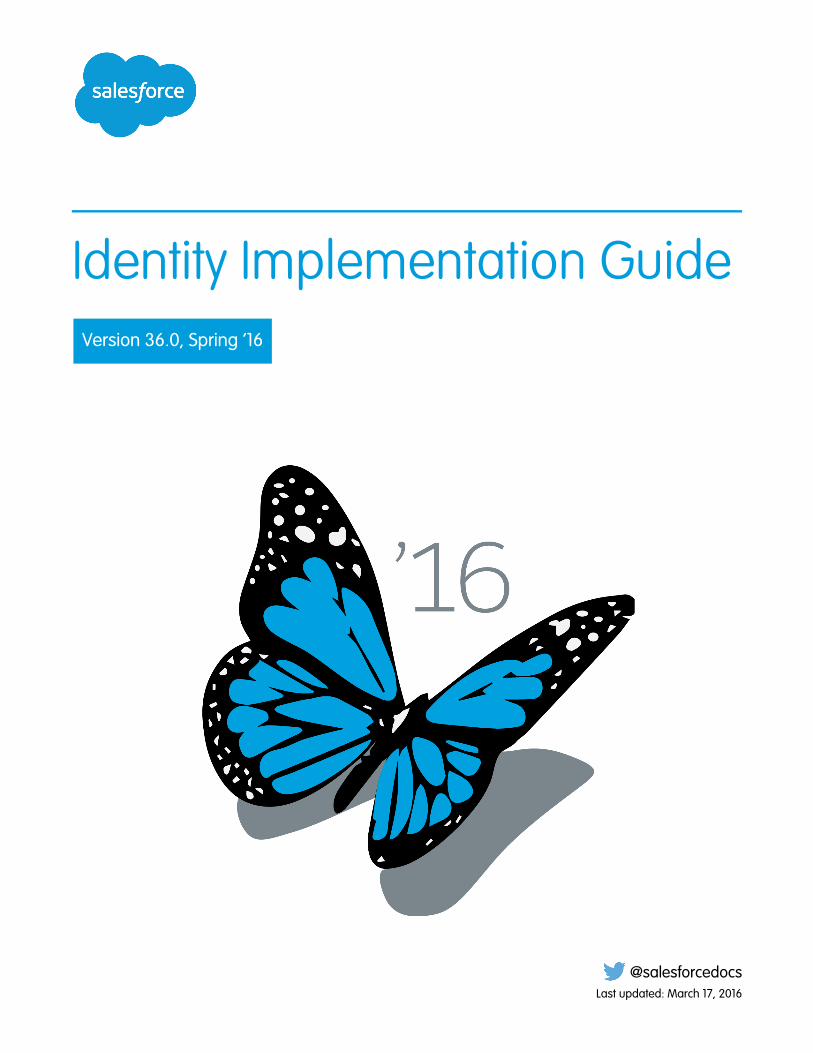
Here’s the administrator’s connected apps page that allows user assignments based on profile and permission sets for each availableapp.
For more detailed usage information, the administrator can set up and run Identity Usage reports. For more information on reporting,see Monitor Applications and Run Reports.
3
What is Salesforce Identity?
CHAPTER 2 How to use Salesforce Identity
This is a quick narrative showing how a company can combine some of the Salesforce Identity features to improve the experience oftheir employees while providing administrative control over the use of various applications.
Salesforce Identity provides single sign-on (SSO) for employees to sign in to multiple applications to get their job done. Some of thoseapplications are integrated into their Salesforce organization, and some might be third-party, external applications.
Here’s an example of how a single company, Universal Containers, might use several Salesforce Identity features to meet their needs.
Example: Universal Containers has employees that need to sign-in to multiple applications to get their job done. It needs a singlesign-on (SSO) solution, and decides to use Salesforce to do it. In order to set-up Salesforce as an SSO provider (also called the “identity provider”), Universal Containers must set up a custom domain using “My Domain” in their Salesforce organization. Withtheir own domain, Universal Containers creates and manages their own authorization settings as employees log in to that domain.
Then, Universal Containers leverages Security Assertion Markup Language (SAML) to pass authentication and authorizationinformation between their domain and other providers. Users logged into the Universal Containers custom domain are able touse external applications without having to log in again. And conversely, these users can also access the Universal Containersdomain while using approved external applications, without having to log in again (in this case, the external application is the“identity provider”). Users can have single sign-on access between any application that supports SAML standards, such as GoogleApps.
Next, Universal Containers decides they also want to enhance their own security while enabling single sign-on. They implementtwo-factor authentication to require users to enter a unique one-time code while logging in. Universal Containers also customizesthe login page, making the page more consistent with their corporate identity and easier for users logging in to see where theyare before entering authentication information.
Using the App Launcher, Universal Containers controls the apps that are available to individual users, and how frequently the userneeds to log in. They also use the App Launcher to extend single sign-on to their mobile users through a mobile browser or theChatter native mobile app.
For login and user management, they decide to integrate Active Directory with Salesforce using Identity Connect, so users in theircorporate database are added to their Salesforce organization. Users with corporate accounts can easily log in to their Salesforceorganization using their Active Directory credentials, or they can use single sign-on from their desktop.. Furthermore, changes tousers in either Active Directory or Salesforce are integrated between the two environments.
After the system is up and running, Universal Containers builds reports and dashboards to track users’ login history and applicationusage. With these reports, administrators can keep track of authorized usage, then adjust authorization as needed.
4

CHAPTER 3 Quick Start: Set up your own domain, adda Connected App and use the AppLauncher
This quick start provides a hands-on tutorial to familiarize yourself with combining several SalesforceIdentity features.
In this chapter ...
• Use My Domain tocreate your owndomain name
Important: Use a new Developer Edition (DE) organization, Winter 14 or newer. Upgraded, legacyDE organizations may not have all the required features for this quick start.
• Create a newconnected app
All you need to start using Identity features is: a custom Salesforce domain created using My Domain, aconnected app to launch from your Salesforce organization, and the App Launcher configured for theappropriate users of the allowed connected apps.• Launch your
connected app fromthe Salesforce AppLauncher
5

Use My Domain to create your own domain name
Experience personalizing your Salesforce organization domain.
While you’re learning to use My Domain, do not perform these steps in your production organization. Use a Developer Edition organization(Winter ‘14 or newer). After you deploy your new domain name, you can’t reverse it for that organization.
Note: Setting Up My Domain (5:11 minutes)
See how to use My Domain to customize your Salesforce organization URL and login.
Using My Domain, you can define a custom Salesforce domain name. A custom domain name helps you better manage login andauthentication for your organization in several key ways.
• Highlight your business identity with your unique domain URL.
• Brand your login screen and customize right-frame content.
• Block or redirect page requests that don’t use the new domain name.
• Access increased support for single sign-on. My Domain is required to use some Salesforce Identity features, such as authenticationproviders and identity providers.
• Set custom login policy and determine how users are authenticated.
• Let users select an alternate identity provider from the login page.
The following steps use the company name “universal containers” as an example. However, each My Domain must be unique, so youneed to pick a name of your own to use for this exercise.
1. From Setup, enter My Domain in the Quick Find box, then select My Domain.
2. Enter the subdomain name you want to use within the sample URL. For example, a company called Universal Containers wants touse the subdomain universalcontainers. The company’s login URL would behttps://universalcontainers.my.salesforce.com/. You can use up to 40 characters.
You can’t use these reserved words for subdomains:
• www
• salesforce
• heroku
And, you can’t start the domain name with:
• root
• status
3. Click Check Availability. If your name is already taken, choose a different one.
4. Click Terms and Conditions to review your agreement, then select the checkbox.
5. Click Register Domain.
6. You receive an email when your domain name is ready for testing. (It can take from 30 seconds to 24 hours.)
Test your domain.
1. From Setup, enter My Domain in the Quick Find box, then select My Domain.
2. Click Click Here to login.
3. See that you are redirected to your subdomain.
As you click through the UI, notice the pages all use the new subdomain.
6
Use My Domain to create your own domain nameQuick Start: Set up your own domain, add a Connected Appand use the App Launcher
Deploy your domain.
1. From Setup, enter My Domain in the Quick Find box, then select My Domain.
2. Click Deploy to Users.
Now you can edit your login policies for the new domain in My Domain Settings, or customize your login page.
Create a new connected app
Create a Heroku app that shows up as a connected app in your Salesforce organization.
A connected app integrates an application with Salesforce using APIs. Connected apps use standard SAML and OAuth protocols toauthenticate, provide Single Sign-On, and provide tokens for use with Salesforce APIs. In addition to standard OAuth capabilities,connected apps allow administrators to set various security policies and have explicit control over who may use the correspondingapplications.
In these steps, you’ll use a special Heroku app designed for use with the Security Workbook to generate a connected app you can setup in your organization.
IN THIS SECTION:
1. Step 1: Create an OAuth Application
2. Step 2: Create a Connected Application
3. Step 3: Finish Your OAuth Application
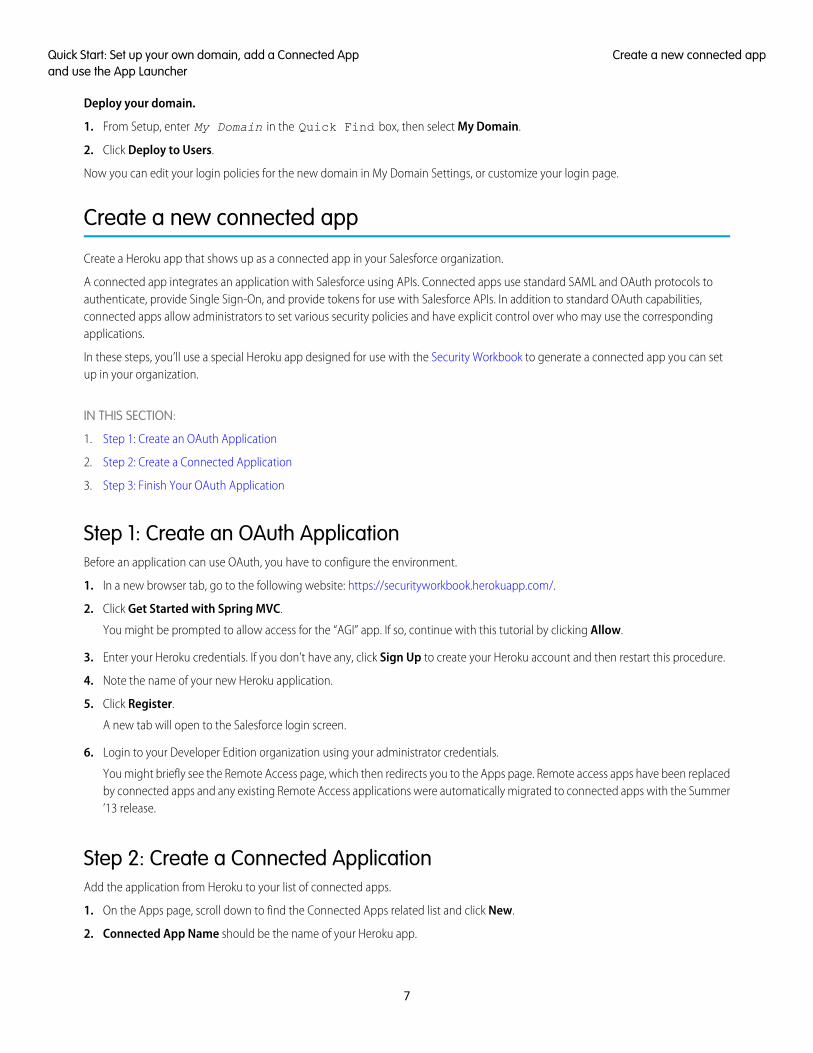
Step 1: Create an OAuth ApplicationBefore an application can use OAuth, you have to configure the environment.
1. In a new browser tab, go to the following website: https://securityworkbook.herokuapp.com/.
2. Click Get Started with Spring MVC.
You might be prompted to allow access for the “AGI” app. If so, continue with this tutorial by clicking Allow.
3. Enter your Heroku credentials. If you don’t have any, click Sign Up to create your Heroku account and then restart this procedure.
4. Note the name of your new Heroku application.
5. Click Register.
A new tab will open to the Salesforce login screen.
6. Login to your Developer Edition organization using your administrator credentials.
You might briefly see the Remote Access page, which then redirects you to the Apps page. Remote access apps have been replacedby connected apps and any existing Remote Access applications were automatically migrated to connected apps with the Summer’13 release.
Step 2: Create a Connected ApplicationAdd the application from Heroku to your list of connected apps.
1. On the Apps page, scroll down to find the Connected Apps related list and click New.
2. Connected App Name should be the name of your Heroku app.
7
Create a new connected appQuick Start: Set up your own domain, add a Connected Appand use the App Launcher
3. API Name should be the name of your Heroku app, but replace the dashes with underscore characters or remove the dashes. Herokurequires dashes for the app name, but Salesforce doesn’t allow dashes in API names.
4. Contact Email should be your administrator’s email address.
5. Select Enable OAuth Settings.
6. Callback URL should be the URL to your Heroku app including /_auth.
For example, https://arcane-crag-2451.herokuapp.com/_auth
7. For Selected OAuth Scopes, add the following.
a. Full access
b. Perform requests on your behalf at any time (refresh_token, offline_access)
8. Click Save.
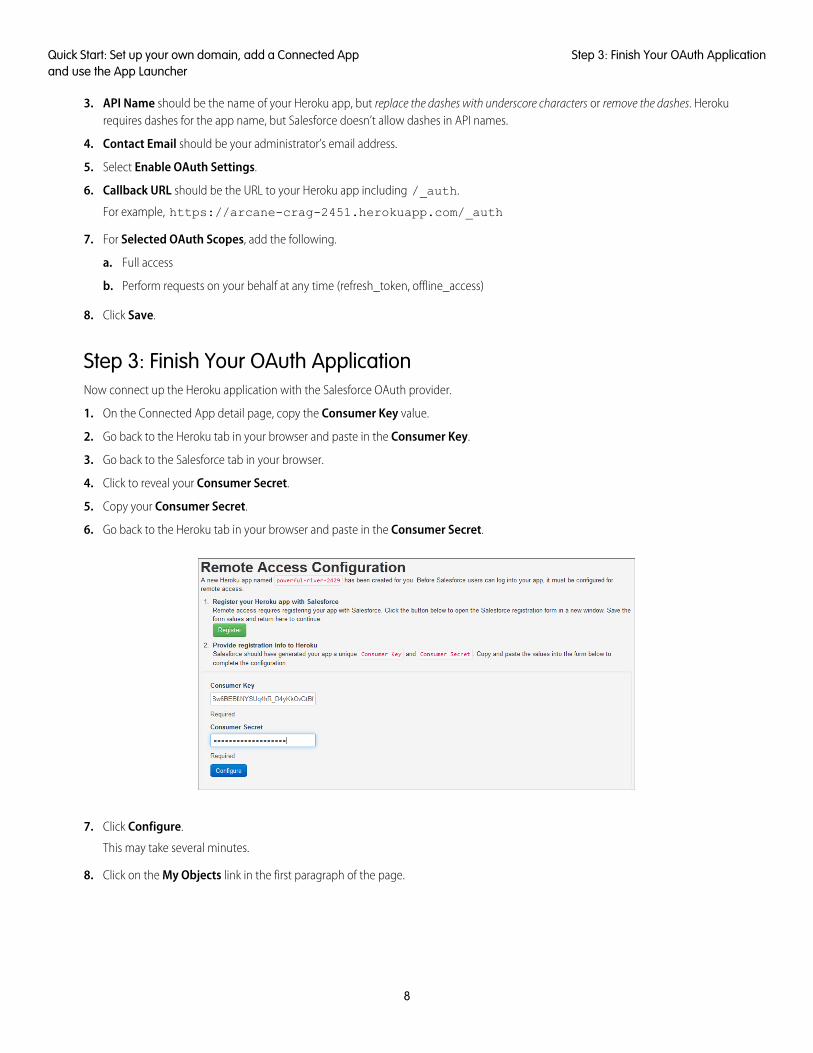
Step 3: Finish Your OAuth ApplicationNow connect up the Heroku application with the Salesforce OAuth provider.
1. On the Connected App detail page, copy the Consumer Key value.
2. Go back to the Heroku tab in your browser and paste in the Consumer Key.
3. Go back to the Salesforce tab in your browser.
4. Click to reveal your Consumer Secret.
5. Copy your Consumer Secret.
6. Go back to the Heroku tab in your browser and paste in the Consumer Secret.
7. Click Configure.
This may take several minutes.
8. Click on the My Objects link in the first paragraph of the page.
8
Step 3: Finish Your OAuth ApplicationQuick Start: Set up your own domain, add a Connected Appand use the App Launcher
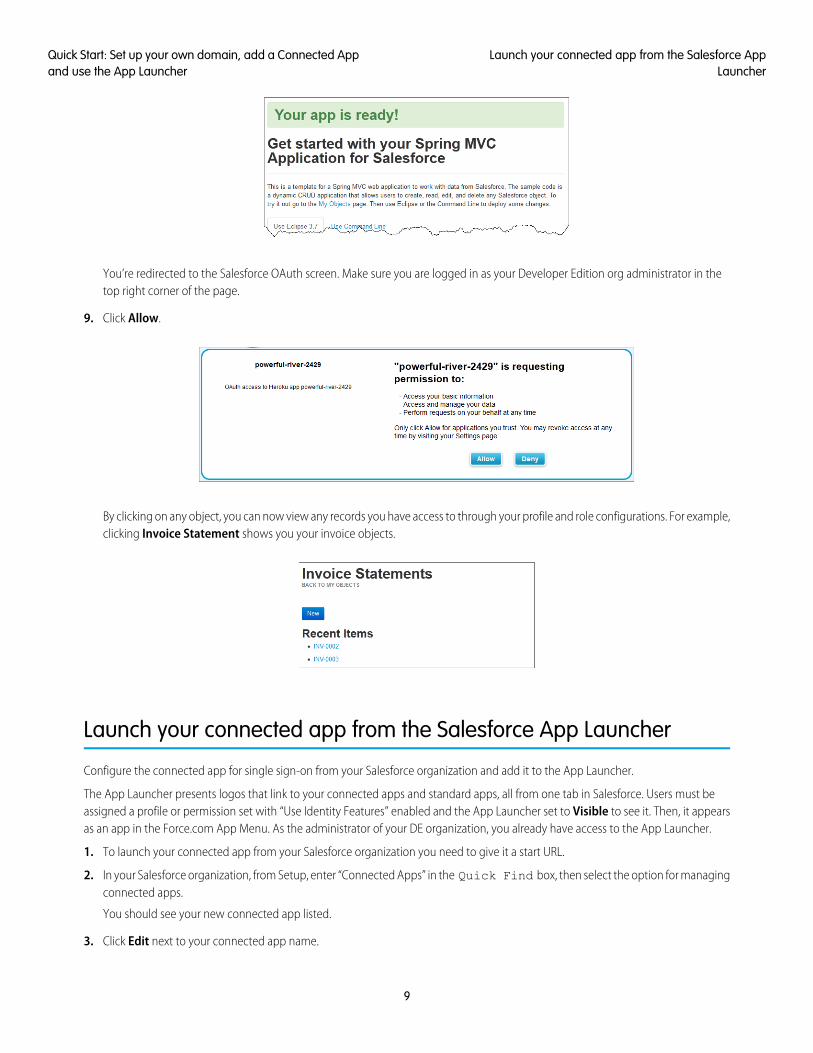
You’re redirected to the Salesforce OAuth screen. Make sure you are logged in as your Developer Edition org administrator in thetop right corner of the page.
9. Click Allow.
By clicking on any object, you can now view any records you have access to through your profile and role configurations. For example,clicking Invoice Statement shows you your invoice objects.
Launch your connected app from the Salesforce App Launcher
Configure the connected app for single sign-on from your Salesforce organization and add it to the App Launcher.
The App Launcher presents logos that link to your connected apps and standard apps, all from one tab in Salesforce. Users must beassigned a profile or permission set with “Use Identity Features” enabled and the App Launcher set to Visible to see it. Then, it appearsas an app in the Force.com App Menu. As the administrator of your DE organization, you already have access to the App Launcher.
1. To launch your connected app from your Salesforce organization you need to give it a start URL.
2. In your Salesforce organization, from Setup, enter “Connected Apps” in the Quick Find box, then select the option for managingconnected apps.
You should see your new connected app listed.
3. Click Edit next to your connected app name.
9
Launch your connected app from the Salesforce AppLauncher
Quick Start: Set up your own domain, add a Connected Appand use the App Launcher
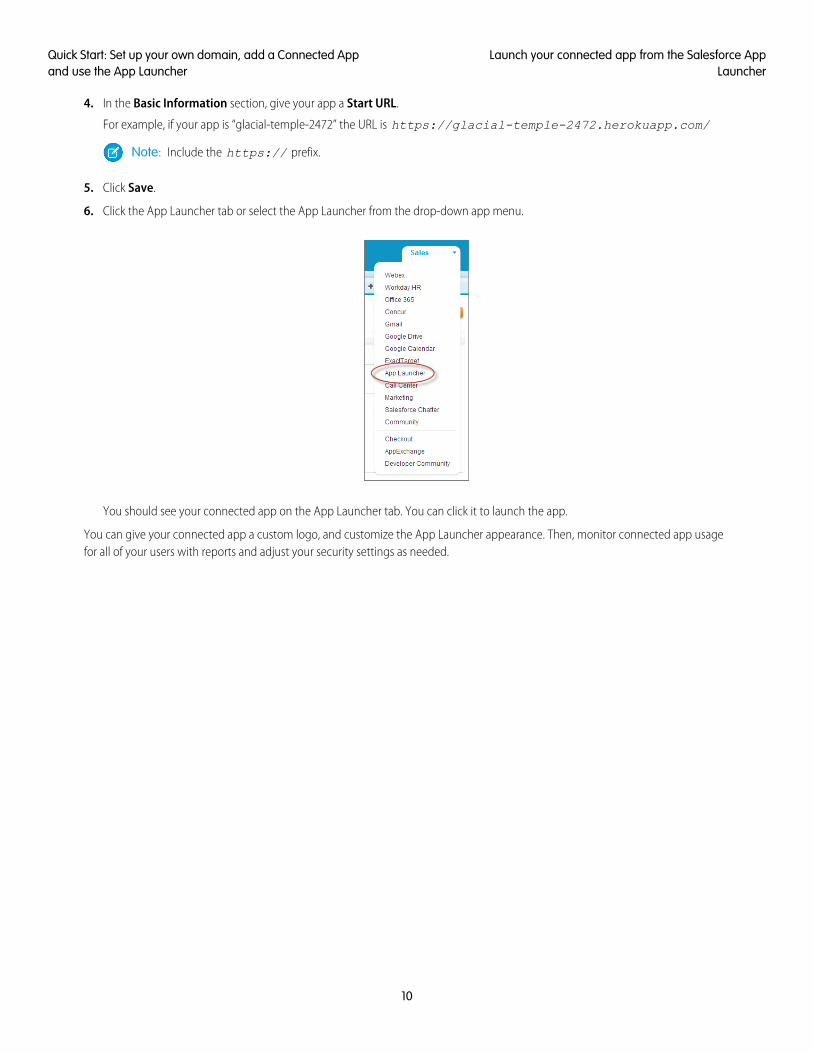
4. In the Basic Information section, give your app a Start URL.
For example, if your app is “glacial-temple-2472” the URL is https://glacial-temple-2472.herokuapp.com/
Note: Include the https:// prefix.
5. Click Save.
6. Click the App Launcher tab or select the App Launcher from the drop-down app menu.
You should see your connected app on the App Launcher tab. You can click it to launch the app.
You can give your connected app a custom logo, and customize the App Launcher appearance. Then, monitor connected app usagefor all of your users with reports and adjust your security settings as needed.
10
Launch your connected app from the Salesforce AppLauncher
Quick Start: Set up your own domain, add a Connected Appand use the App Launcher
CHAPTER 4 My Domain
EDITIONS
Available in: both SalesforceClassic and LightningExperience
Available in: Performance,Unlimited, Enterprise,Developer, Professional,and Group Editions.
Enhance access security and brand your organization’s pages byenabling your custom domain.
Using My Domain, you can define a custom Salesforce domainname. A custom domain name helps you better manage login andauthentication for your organization in several key ways.
In this chapter ...
• Set Up a DomainName
• My Domain URLChanges
• Highlight your business identity with your unique domain URL.• Test and Deploy YourNew Domain Name • Brand your login screen and customize right-frame content.
• Block or redirect page requests that don’t use the new domainname.
• Guidelines and BestPractices forImplementing MyDomain
• Access increased support for single sign-on. My Domain isrequired to use some Salesforce Identity features, such as authentication providers and identityproviders.• Get System
Performance and• Set custom login policy and determine how users are authenticated.
Maintenance• Let users select an alternate identity provider from the login page.Information Using My
Domain Watch a Demo (5:11 minutes)
You can define a custom domain name only one time. My Domain is also available for sandboxenvironments.
Note: My Domain is subject to additional Terms of Use.
Your domain name uses standard URL format, including:
• The protocol: https://
• The subdomain prefix: your brand or term
• The domain: my.salesforce.com
For example, a company called Universal Containers wants to use the subdomainuniversalcontainers. The company’s login URL would behttps://universalcontainers.my.salesforce.com/. You can use up to 40 characters.
Salesforce is automatically enabled as an identity provider when a domain is created. After your domainis deployed, you can add or change identity providers and increase security for your organization bycustomizing your domain’s login policy.
You must enable My Domain if you want to use Lightning components in Lightning component tabs,Lightning Pages, the Lightning App Builder, or standalone apps.
Important: After you deploy your new domain name, you can’t reverse it.
11

Set Up a Domain Name
EDITIONS
Available in: both SalesforceClassic and LightningExperience
Available in: Performance,Unlimited, Enterprise,Developer, Professional,and Group Editions.
USER PERMISSIONS
To set up a domain name:• “Customize Application”
Implementing your custom domain name is quick and easy.
1. Find a domain name that’s available and sign up for it.
2. Customize the logo, background color, and right-frame content on your login page.
3. Add or change the identity providers available on your login page.
4. Test your domain name and deploy it to your entire organization.
5. Set the login policy for users accessing your pages.
Define Your Domain Name
EDITIONS
Available in: both SalesforceClassic and LightningExperience
Available in: Performance,Unlimited, Enterprise,Developer, Professional,and Group Editions.
USER PERMISSIONS
To define a domain name:• “Customize Application”
Sign up for your organization’s custom domain name.
Start setting up your custom domain name by finding a domain name unique to your organizationand signing up for it.
1. From Setup, enter My Domain in the Quick Find box, then select My Domain.
2. Enter the subdomain name you want to use within the sample URL. For example, a companycalled Universal Containers wants to use the subdomain universalcontainers. Thecompany’s login URL would behttps://universalcontainers.my.salesforce.com/. You can use up to40 characters.
You can’t use these reserved words for subdomains:
• www
• salesforce
• heroku
And, you can’t start the domain name with:
• root
• status
3. Click Check Availability. If your name is already taken, choose a different one.
4. Click Terms and Conditions to review your agreement, then select the checkbox.
5. Click Register Domain.
6. You receive an email when your domain name is ready for testing. (It can take from 30 seconds to 24 hours.)
Your domain isn’t rolled out until you’ve tested and deployed it.
12
Set Up a Domain NameMy Domain

Customize Your Login Page Branding
EDITIONS
Available in: both SalesforceClassic and LightningExperience
Available in: Performance,Unlimited, Enterprise,Developer, Professional,and Group Editions.
USER PERMISSIONS
To customize a login page:• “Customize Application”
Customize the look and feel of your login page by adding a background color, logo, and right-sideiFrame content. Customizing your login page helps users recognize your page by tying it to yourcompany’s branding.
Setting Up a My Domain (5:10 minutes. Login page branding starts at 2:43.)
1. From Setup, enter My Domain in the Quick Find box, then select My Domain.
2. Under Authentication Configuration, click Edit.
3. To customize your logo, upload an image.
Images can be .jpg, .gif, or .png files up to 100 KB. Maximum image size is 250px by 125px.
4.To customize your login page background, click the or enter a valid hexadecimal colorcode.
5. Enter the URL of the file to be included in the right-side iFrame on the login page.
The content in the right-side iFrame is designed to resize to fill approximately 50% of the page.Your content must be hosted at a URL that uses SSL encryption and the https:// prefix. To buildyour own custom right-side iFrame content page using responsive web design, you can use the My Domain Sample template.
Example: https://c.salesforce.com/login-messages/promos.html
6. Optionally, select authentication services as identity providers on the login page, such as social sign-on providers like Google andFacebook. Users can then log in with accounts from those services. Configure authentication services as Auth. Providers in Setup.
7. Click Save.
Add Identity Providers on a Login Page
EDITIONS
Available in: both SalesforceClassic and LightningExperience
Available in: Performance,Unlimited, Enterprise,Developer, Professional,and Group Editions.
USER PERMISSIONS
To add identity providers ona login page:• “Customize Application”
Allow users to authenticate using alternate identity provider options right from your login page.
If you’ve enabled single sign-on and configured SAML, or set up external authentication providersas Auth. Providers in Setup, you can provide links to these alternate identity providers on yourdomain’s login page. Users are sent to the alternate identity provider’s login screen to authenticateand then are redirected back to Salesforce.
Note: Available authentication services include all providers configured as SAML singlesign-on identify providers or external authentication providers, except Janrain. Janrain can’tbe used for authentication from the login page.
1. From Setup, enter My Domain in the Quick Find box, then select My Domain.
2. Under Authentication Configuration, click Edit.
3. Select one or more already configured authentication services as an identity provider.
4. Click Save.
13
Customize Your Login Page BrandingMy Domain

Test and Deploy Your New Domain Name
EDITIONS
Available in: both SalesforceClassic and LightningExperience
Available in: Performance,Unlimited, Enterprise,Developer, Professional,and Group Editions.
USER PERMISSIONS
To set up a domain name:• “Customize Application”
After you set up your domain name, test it and then roll it out to your users.
Before deploying your domain to your users, you can log in to test your domain. Testing gives youthe chance to explore your domain name and helps you verify addresses for important pages thatyour users will need to use after your domain rolls out.
Important: After you deploy your new domain name, you can’t reverse it.
1. Test your domain login. From Setup, enter My Domain in the Quick Find box, thenselect My Domain, then click Click here to login. Or, click the URL in the email to log in toSalesforce using your new domain name.
You can customize your domain login page and add authentication services (like social sign-on)before you deploy the domain to your users. You can also test domains in sandbox environments.However, before deploying your domain, you can’t set a login policy, such as preventing usersfrom logging in at login.salesforce.com.
2. Test the new domain name by clicking tabs and links. All pages show your new domain name.
If you’ve customized your Salesforce UI with features such as custom buttons or Visualforcepages, make sure that you test custom elements thoroughly before deploying your domain name. Your customizations should notuse instance-based URLs.
3. To roll out the new domain name to your organization, from Setup, enter My Domain in the Quick Find box, then selectMy Domain and then click Deploy to Users.
When you deploy your domain, it’s activated immediately, and all users are redirected to pages with new domain addresses. You cannow set login policies in the Domain Settings section that appears after you deploy your domain.
Set the My Domain Login Policy
EDITIONS
Available in: both SalesforceClassic and LightningExperience
Available in: Performance,Unlimited, Enterprise,Developer, Professional,and Group Editions.
USER PERMISSIONS
To set login policy for adomain:• “Customize Application”
Secure your login by customizing the login policy for your domain.
Customize your login policy to add a layer of security for your organization. By default, users maylog in from a generic Salesforce login page, bypassing the login page specific to your domain. Usersare also allowed to make page requests without your domain name, such as when using oldbookmarks.
1. From Setup, enter My Domain in the Quick Find box, then select My Domain.
2. Under My Domain Settings, click Edit.
3. To turn off authentication for users who do not use your domain-specific login page, select thelogin policy. For example, this will prevent users from logging in at the generichttps://<instance>.salesforce.com/ login page, and being redirected to yourpages after login. This option enhances security by preventing login attempts by anyone whodoes not know your domain name.
4. Choose a redirect policy.
a. Choose Redirect to the same page within the domain to allow usersto continue using URLs that do not include your domain name. Choosing this option doesnot enhance security for your organization.
Note: Bookmarks do not work when the Redirect to the same page within the domain option isselected for partner portals. Manually change the existing bookmarks to point to the new domain URL by replacing the
14
Test and Deploy Your New Domain NameMy Domain
Salesforce instance name with your custom domain name. For example, replace na1.salesforce.com with<mydomain>.my.salesforce.com in the bookmark’s URL.
b. Choose Redirected with a warning to the same page within the domain to warn users that theyshould be using your domain name. After reading the warning, users will be allowed to view the page. Selecting this option fora few days or weeks can help users transition to a new domain name, but does not enhance security for your organization.
c. Choose Not redirected to require users to use your domain name when viewing your pages. This option provides thegreatest level of security.
5. Click Save.
My Domain URL Changes
EDITIONS
Available in: both SalesforceClassic and LightningExperience
Available in: Performance,Unlimited, Enterprise,Developer, Professional,and Group Editions.
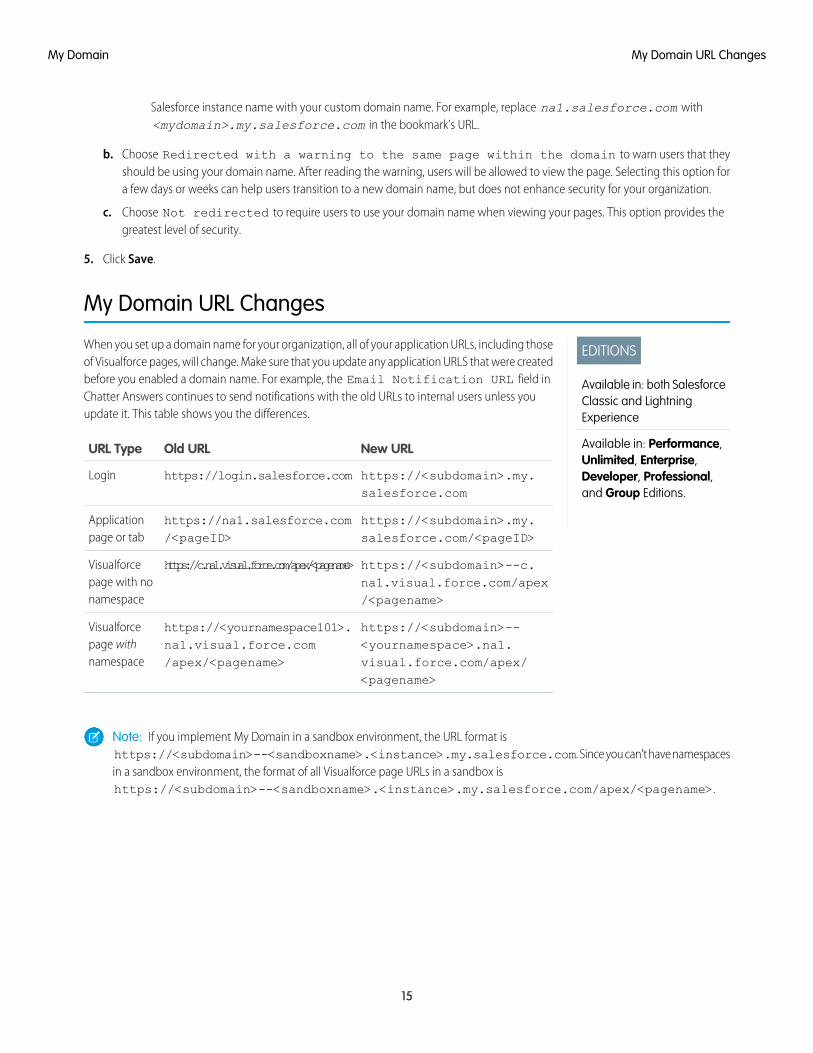
When you set up a domain name for your organization, all of your application URLs, including thoseof Visualforce pages, will change. Make sure that you update any application URLS that were createdbefore you enabled a domain name. For example, the Email Notification URL field inChatter Answers continues to send notifications with the old URLs to internal users unless youupdate it. This table shows you the differences.
New URLOld URLURL Type
https://<subdomain>.my.salesforce.com
https://login.salesforce.comLogin
https://<subdomain>.my.salesforce.com/<pageID>
https://na1.salesforce.com/<pageID>
Applicationpage or tab
https://<subdomain>--c.na1.visual.force.com/apex/<pagename>
https://c.na1.visual.force.com/apex/<pagename>Visualforcepage with nonamespace
https://<subdomain>--<yournamespace>.na1.
https://<yournamespace101>.na1.visual.force.com/apex/<pagename>
Visualforcepage withnamespace visual.force.com/apex/
<pagename>
Note: If you implement My Domain in a sandbox environment, the URL format ishttps://<subdomain>--<sandboxname>.<instance>.my.salesforce.com. Since you can't have namespacesin a sandbox environment, the format of all Visualforce page URLs in a sandbox ishttps://<subdomain>--<sandboxname>.<instance>.my.salesforce.com/apex/<pagename>.
15
My Domain URL ChangesMy Domain
Test and Deploy Your New Domain Name
EDITIONS
Available in: both SalesforceClassic and LightningExperience
Available in: Performance,Unlimited, Enterprise,Developer, Professional,and Group Editions.
USER PERMISSIONS
To set up a domain name:• “Customize Application”
After you set up your domain name, test it and then roll it out to your users.
Before deploying your domain to your users, you can log in to test your domain. Testing gives youthe chance to explore your domain name and helps you verify addresses for important pages thatyour users will need to use after your domain rolls out.
Important: After you deploy your new domain name, you can’t reverse it.
1. Test your domain login. From Setup, enter My Domain in the Quick Find box, thenselect My Domain, then click Click here to login. Or, click the URL in the email to log in toSalesforce using your new domain name.
You can customize your domain login page and add authentication services (like social sign-on)before you deploy the domain to your users. You can also test domains in sandbox environments.However, before deploying your domain, you can’t set a login policy, such as preventing usersfrom logging in at login.salesforce.com.
2. Test the new domain name by clicking tabs and links. All pages show your new domain name.
If you’ve customized your Salesforce UI with features such as custom buttons or Visualforcepages, make sure that you test custom elements thoroughly before deploying your domain name. Your customizations should notuse instance-based URLs.
3. To roll out the new domain name to your organization, from Setup, enter My Domain in the Quick Find box, then selectMy Domain and then click Deploy to Users.
When you deploy your domain, it’s activated immediately, and all users are redirected to pages with new domain addresses. You cannow set login policies in the Domain Settings section that appears after you deploy your domain.
Guidelines and Best Practices for Implementing My Domain
EDITIONS
Available in: both SalesforceClassic and LightningExperience
Available in: Performance,Unlimited, Enterprise,Developer, Professional,and Group Editions.
These tips help smooth the transition to a new domain name.
• Test in a sandbox first, because you can’t set login policies before deploying your domain. Totest these customizations, custom UI features, Visualforce pages, and application URL changes,define and deploy a domain name in a sandbox environment.
• Deploy your new domain when your organization receives minimal traffic, like during a weekend,so you can troubleshoot while traffic is low.
• If you’ve customized your Salesforce UI with features such as custom buttons or Visualforcepages, make sure that you test custom elements thoroughly before deploying your domainname. Your customizations should not use instance-based URLs.
• Make sure that you update any application URLS that were created before you enabled a domainname. For example, the Email Notification URL field in Chatter Answers continuesto send notifications with the old URLs to internal users unless you update it.
• If your domain is registered but has not yet been deployed, URLs will show My Domain URLs when you log in from the My Domainlogin page. However, links that originate from merge fields that are embedded in emails sent asynchronously, such as workflowemails, will still contain the old URLs. After your domain is deployed, those links will show the new My Domain URLs.
• Help your users get started using your new domain name by providing links to pages they use frequently, such as your login page.Let your users know if the login policy will be changed and encourage them to update their bookmarks the first time they’re redirected.
16
Test and Deploy Your New Domain NameMy Domain
• Only use Prevent login from https://login.salesforce.com if you’re concerned that users who are notaware of your custom domain might try to use it. Otherwise, leave the option available to your users as they get used to the newdomain name.
• Choose the Redirect Policy option Redirected with a warning to the same page within thedomain to give users time to update their bookmarks with the new domain name.
You can use your domain’s login policy settings to gradually phase in your domain name for your users. Redirecting users with awarning for a few days or weeks before requiring users to use the new domain name to access your pages gives them time to changetheir bookmarks.
• Bookmarks do not work when the Redirect to the same page within the domain option is selected for partnerportals. Manually change the existing bookmarks to point to the new domain URL by replacing the Salesforce instance name withyour custom domain name. For example, replace na1.salesforce.com with <mydomain>.my.salesforce.comin the bookmark’s URL.
• If you block application page requests that don’t use the new Salesforce domain name URLs, let your users know they need to eitherupdate old bookmarks or create new ones for the login page as well as any tabs or links within the application. Users will be requiredto use the new URLs immediately if you change your login redirect policy to Not Redirected.
• If you are using My Domain, you can identify which users are logging in with the new login URL and when. From Setup, enter LoginHistory in the Quick Find box, then select Login History and view the Username and Login URL columns.
• Communicate the upcoming change to your users before deploying it.
• On the login.salesforce.com page, users can click the Log in to a custom domain link to provide your custom domainname and log in. In this case, they need to know the domain name. However, you should give them a direct link to your customdomain’s login page.
You should do the following.If you have the following.
Check to see if the API client is directly referencing the serverendpoint. The API client should use the LoginResult.serverURL
API integrations into your organization
value returned by the login request, instead of using a hard codedserver URL.
After your custom domain is deployed, Salesforce returns the serverURL containing your domain. Even though the redirect policysettings have no effect on API calls (the old calls to instance URLsshould continue to work) the best practice is to use the valuereturned by Salesforce.
Replace references to the organization’s instance URL with yourcustom domain.
Email templates
Replace references to the organization’s instance URL with yourcustom domain. See How to find hard-coded references with theForce.com IDE.
Custom Visualforce pages or custom Force.com apps
Tell your users to update any bookmarks in the left navigation oftheir Chatter groups.
Chatter
Manually update the Email Notification URL.Zones for Communities (Ideas/Answers/Chatter Answers)
17
Guidelines and Best Practices for Implementing My DomainMy Domain
You should do the following.If you have the following.
To update the URL, clear the existing URL so that the field is blank.Save the page, and the system populates the field with your newMy Domain URL.
Get System Performance and Maintenance Information Using MyDomain
EDITIONS
Available in: both SalesforceClassic and LightningExperience
Available in: Performance,Unlimited, Enterprise,Developer, Professional,and Group Editions.
USER PERMISSIONS
To set up a domain name:• “Customize Application”
Salesforce customers get system performance and maintenance information fromtrust.salesforce.com.
Here's how to get that information using your new domain name.
1. Go to trust.salesforce.com where you can check the System Status.
2. To find the instance for your domain, click What instance am I using?
3. In the System Status table, look for the entry for your instance.
18
Get System Performance and Maintenance Information UsingMy Domain
My Domain

CHAPTER 5 Configure and Use the App Launcher
The App Launcher presents users with logos that link to their on-premise applications, connected apps,and Salesforce apps, all from a unified user interface. Administrators can set the default app order fortheir organizations.
In this chapter ...
• Enable the AppLauncher with a
All Lightning Experience users get the App Launcher.Profile in SalesforceClassic Salesforce Classic users need the “Use Identity Features” permission, and the App Launcher option in
their profile set to Visible. Users see only the apps they are authorized to see.• Enable the AppLauncher with a In Salesforce Classic, administrators using the System Administrator profile automatically have access to
the App Launcher. Administrators using profiles cloned from the System Administrator profile don’t.Permission Set inSalesforce Classic
Note: Setting up the App Launcher (5:39 minutes)
See how to set up, use, and manage the App Launcher.
• Reorder Apps
The App Launcher is particularly useful for managing access to connected apps, as shown in Quick Start:Set up your own domain, add a Connected App and use the App Launcher. And, you can use theAppMenuItem API for programmatic control over the apps in the App Launcher.
19

Enable the App Launcher with a Profile in Salesforce Classic
EDITIONS
Available in: SalesforceClassic
Available in: Enterprise,Performance, Unlimited,and Developer Editions
Create a profile and assign it to users, so they can access the App Launcher.
Note: These steps work in Salesforce Classic. If you see a row of tabs across the top of yourscreen, you're in Salesforce Classic. If you see a navigation bar on the left, you’re in LightningExperience.
In Salesforce Classic, administrators using the System Administrator profile automatically haveaccess to the App Launcher. Administrators using profiles cloned from the System Administratorprofile don’t.
1. From Setup, enter Profiles in the Quick Find box, then select Profiles.
2. Click New Profile.
3. Select an Existing Profile as a basis for the new profile.
For example, select Standard User.
4. Enter the name of the new profile.
For example, Standard User Identity.
5. Click Save.
6. In the detail page for the new profile, click Edit.
7. In Custom App Settings, set the App Launcher to Visible, if it isn’t already.
Under Tab Settings, verify that the App Launcher tab is set to Default On.
8. Under Administrative Permissions, select Use Identity Features.
9. Click Save.
10. From Setup, enter Users in the Quick Find box, then select Users.
11. Click Edit next to each user you want to access the App Launcher.
12. In the user’s Profile field, select the new profile that has “Use Identity Features” enabled.
For example, you might use the Standard User Identity profile.
13. Click Save.
When you log in as the selected user, the App Launcher appears in the drop-down app menu.
20
Enable the App Launcher with a Profile in Salesforce ClassicConfigure and Use the App Launcher
Enable the App Launcher with a Permission Set in Salesforce Classic
EDITIONS
Available in: SalesforceClassic
Available in: Enterprise,Performance, Unlimited,and Developer Editions
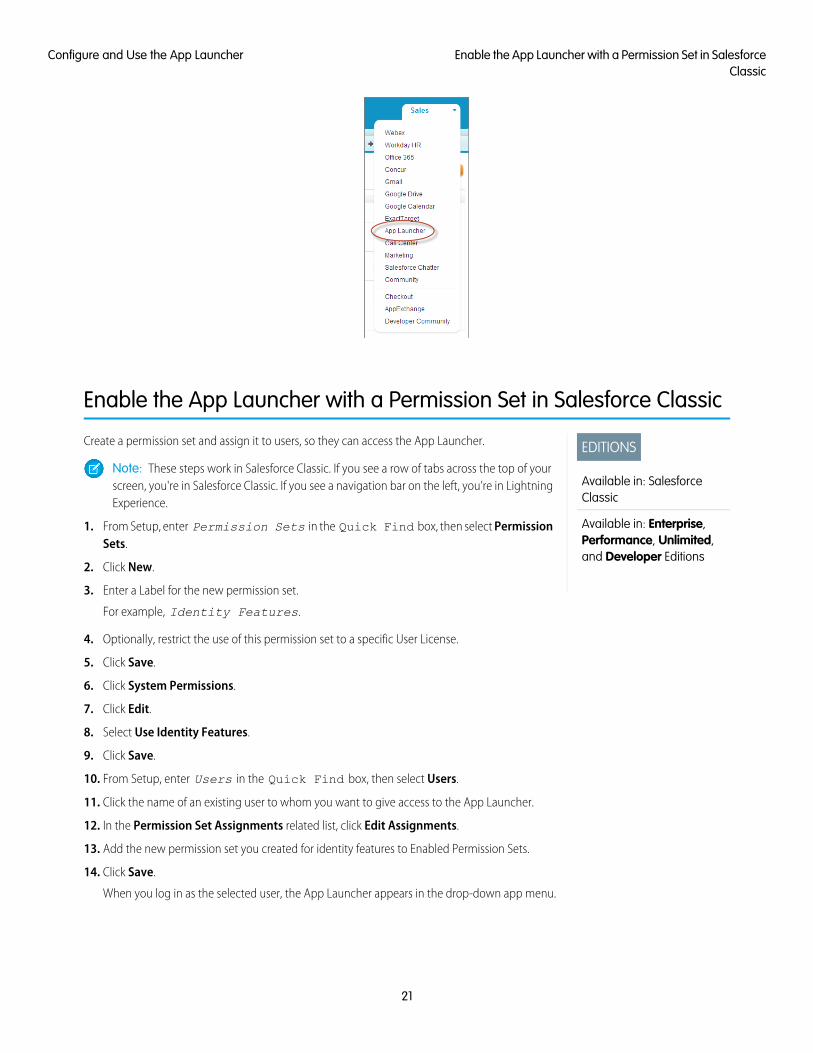
Create a permission set and assign it to users, so they can access the App Launcher.
Note: These steps work in Salesforce Classic. If you see a row of tabs across the top of yourscreen, you're in Salesforce Classic. If you see a navigation bar on the left, you’re in LightningExperience.
1. From Setup, enter Permission Sets in the Quick Find box, then select PermissionSets.
2. Click New.
3. Enter a Label for the new permission set.
For example, Identity Features.
4. Optionally, restrict the use of this permission set to a specific User License.
5. Click Save.
6. Click System Permissions.
7. Click Edit.
8. Select Use Identity Features.
9. Click Save.
10. From Setup, enter Users in the Quick Find box, then select Users.
11. Click the name of an existing user to whom you want to give access to the App Launcher.
12. In the Permission Set Assignments related list, click Edit Assignments.
13. Add the new permission set you created for identity features to Enabled Permission Sets.
14. Click Save.
When you log in as the selected user, the App Launcher appears in the drop-down app menu.
21
Enable the App Launcher with a Permission Set in SalesforceClassic
Configure and Use the App Launcher

Note: Still not seeing the App Launcher? In the profile associated with the user, select Visible for the App Launcher setting.
Reorder Apps
EDITIONS
Available in: both LightningExperience and SalesforceClassic
Available in: ContactManager, Group,Professional, Enterprise,Performance, Unlimited,and Developer Editions
Arrange the default sort order for Salesforce, custom, and connected apps in your organization.You can also hide apps from the App Launcher.
As an administrator, you control the default sort order of the apps your users see in the organization.These apps include Salesforce standard apps, such as the Salesforce Marketing app, the Call Centerapp, and any custom apps for your organization. Your organization may also use connected apps.Connected apps include productivity apps such as Gmail™ and Microsoft Office 365™, or other appsto help your users get work done.
The sort order you set for the organization is the default view for your users. Starting with theorganization’s default view, users can rearrange their apps to help them quickly get to the onesthey use most.
IN THIS SECTION:
Reordering the Force.com App Menu and App Launcher in Salesforce Classic
You can change the order in which apps appear in the Force.com app menu.
Reorder the App Launcher Apps in Salesforce Lightning Experience
You can change the organization’s default visibility and order in which apps appear in the App Launcher.
22
Reorder AppsConfigure and Use the App Launcher

Reordering the Force.com App Menu and App Launcher in SalesforceClassic
EDITIONS
Available in: SalesforceClassic
Available in: ContactManager, Group,Professional, Enterprise,Performance, Unlimited,and Developer Editions
USER PERMISSIONS
To view apps:• “View Setup and
Configuration”
To manage apps:• “Customize Application”
You can change the order in which apps appear in the Force.com app menu.
The Force.com app menu is a drop-down list that displays at the top of every application page. TheApp Launcher, if enabled, presents users with logos that link to their on-premise applications,connected apps, and Salesforce apps.
1. From Setup, do one of the following:
a. Enter Apps in the Quick Find box, then select Apps and then click Reorder.
b. Enter App Menu in the Quick Find box, then select App Menu.
2. Drag the apps in the list, as desired, to change the app order. The changes take effectimmediately.
3. Optionally, click Visible or Hidden to show or hide individual apps from the App Launcher forall users of the organization.
All the apps installed in the organization are shown for sorting. However, the apps that a user seesin the Force.com app menu, and the App Launcher, varies depending on each app’s visibility settingsand the user’s permissions. For example, an administrator can typically see more apps than astandard user. You can see all of the apps you have permission for, and that are visible to yourprofile. In the App Launcher, connected apps and service providers must have a Start URL to belisted.
Reorder the App Launcher Apps in Salesforce Lightning Experience
EDITIONS
Available in: LightningExperience
Available in: ContactManager, Group,Professional, Enterprise,Performance, Unlimited,and Developer Editions
USER PERMISSIONS
To view apps:• “View Setup and
Configuration”
To manage apps:• “Customize Application”
You can change the organization’s default visibility and order in which apps appear in the AppLauncher.
The App Launcher displays all a user’s available Salesforce apps, and any connected apps anadministrator installs for the organization. As an administrator, you can use the App Launcher toset the default sort order and visibility for the apps in your organization. Then, users can reordertheir own view within the App Launcher.
1. From Setup, do one of the following:
a. Enter Apps in the Quick Find box, then select Apps, and then click Reorder.
b. Enter App Menu in the Quick Find box, then select App Menu.
2. Drag the apps in the list, as desired, to change the app order. The changes take effectimmediately.
23
Reordering the Force.com App Menu and App Launcher inSalesforce Classic
Configure and Use the App Launcher

3. Click Visible or Hidden to show or hide individual apps from the App Launcher for all users of the organization.
All the apps installed in the organization are shown for sorting. However, the apps that a user sees in the App Launcher varies dependingon each app’s visibility settings and the user’s permissions. For example, an administrator can typically see more apps than a standarduser. You can see all the apps you have permission for, and that are visible to your profile. Connected apps and service providers musthave a Start URL to be listed.
24
Reorder the App Launcher Apps in Salesforce LightningExperience
Configure and Use the App Launcher
CHAPTER 6 Set up Single Sign-on to Google Apps
Give your Salesforce organization users single sign-on access to Google Apps, such as Google Drive,GMail, and GCal.
In this chapter ...
• Get a SalesforceIdentity ProviderCertificate
Since Google Apps uses SAML for single sign-on, you can set up your organization to launch GoogleApps from your Salesforce App Launcher without having to log in, separately, to Google. This processis similar to the one in the quick start, and can give your Salesforce organization users single sign-on
• Set GoogleAdministrator SingleSign-On Options
access to Google apps like Google Drive, GMail, and GCal. To set up Google Apps in your organization,you need:
1. A custom domain (My Domain).• Create a ConnectedApp for GMail 2. Google Apps administrator account with access to your Google Admin console.
3. A profile or permission set with “Use Identity Features” enabled.
For steps to set up your own custom domain, see Quick Start: Set up your own domain, add a ConnectedApp and use the App Launcher. For steps to set up a profile or permission set with “Use Identity Features”enabled, see Configure and Use the App Launcher.
Note: Salesforce as a SSO provider (4:14 minutes)
Learn how to use SAML and single sign-on to launch Google Apps from your Salesforce AppLauncher.
25

Get a Salesforce Identity Provider Certificate
EDITIONS
Available in: both SalesforceClassic and LightningExperience
Available in: Developer,Enterprise, Performance,Unlimited, andDatabase.com Editions
Download and save an identity provider certificate.
Follow these steps in your Salesforce organization.
1. From Setup, enter Identity Provider in the Quick Find box, then select IdentityProvider.
You get the certificate for signing SAML assertions in the Identity Provider Setup section.Optionally, you can change the self-signed certificate to a production certificate issued by asigning authority. For more information about certificates, see “Creating Certificates and KeyPairs” in the online help.
2. Click Download Certificate.
The certificate validates signatures, and you need to upload it to your Google Administratoraccount. Remember where you save it.
Set Google Administrator Single Sign-On Options
In your Google Administrator account, set the values for single sign-on.
You need to sign in as an Administrator to the Google Apps account at https://admin.google.com.
1. In your Google Administrator account, click More Controls > Security > Advanced Settings > Set up single sign-on (SSO)
2. Enter the following values.
a. Sign-in page URL: https://yourdomain.my.salesforce.com/idp/endpoint/HttpRedirect
Replace yourdomain with your custom domain name.
b. Sign-out page URL: https://yourdomain.my.salesforce.com
Replace yourdomain with your custom domain name.
c. Change password URL:https://yourdomain.my.salesforce.com/_ui/system/security/ChangePassword
Replace yourdomain with your custom domain name.
d. Verification certificate: upload the identity provider certificate file you saved in Get a Salesforce Identity Provider Certificate.
e. Select Use a domain specific issuer.
26
Get a Salesforce Identity Provider CertificateSet up Single Sign-on to Google Apps

3. Click Save changes.
Create a Connected App for GMail
EDITIONS
Available in: both SalesforceClassic and LightningExperience
Available in: Developer,Enterprise, Performance,Unlimited, andDatabase.com Editions
These steps show you how to set up a GMail connected app.
Follow these steps in your Salesforce organization.
1. From Setup, enter Apps in the Quick Find box, then select Apps.
2. In the Connected Apps section, click New.
3. In the Basic Information section, enter the following values.
a. Connected App Name: GMail.
b. Contact Email: your administrator Email address.
c. Logo Image URL: Select Choose one of our sample logos, find the logo you want, andclick on it. Then, copy the Logo URL. Paste the value back in the Logo Image URL field. Or,enter your own URL.
4. In the Web App Settings section, enter the following values.
a. Start URL: https://gmail.google.com.
b. Select Enable SAML.
c. Entity Id: Enter google.com/a/yourGoogleAppDomainName.
Replace yourGoogleAppDomainName with your actual Google domain name.
d. ACS URL: The same as Entity Id with the “https” prefix and the “acs” suffix, such ashttps://google.com/a/yourGoogleAppDomainName/acs
e. Subject Type: Select how the user is identified.
This field should contain the Google Apps Email address for the user.
Leave the other fields as is, unless you know you need to change the configuration.
27
Create a Connected App for GMailSet up Single Sign-on to Google Apps

5. Click Save.
6. From Setup, enter “Connected Apps” in the Quick Find box, then select the option for managing connected apps.
7. Click on the name of the connected app, which is “GMail” in this case.
8. Copy the IdP-Initiated Login URL value.
9. Click Edit.
10. In the Start URL field, paste the the following string the value from the IdP-Initiated Login URL field, and add the following:
The value copied from IdP-Initiated Login URL field +&RelayState=http%3A%2F%2Fmail.google.com%2Fa%2FyourGoogleAppDomainName
Replace yourGoogleAppDomainName with your actual Google domain. You should have a value similar to this one:
https://identitydemo.my.salesforce.com/idp/login?app=0sp30000000000k&RelayState=http%3A%2F%2Fmail.google.com%2Fa%2Fidentitydemo.com
11. Click Save.
Now you can add this connected app to a profile or permission set. When that profile or permission set is applied to a user, the userwill be able to use the GMail connected app. You can follow the same basic process to install other Google Apps.
28
Create a Connected App for GMailSet up Single Sign-on to Google Apps
CHAPTER 7 Set Two-Factor Authentication LoginRequirements
EDITIONS
Available in: Both SalesforceClassic and LightningExperience
Available in: ContactManager, Group,Professional, Enterprise,Performance, Unlimited,and Developer Editions
USER PERMISSIONS
To edit profiles andpermission sets:• “Manage Profiles and
Permission Sets”
As a Salesforce administrator, you can require your users to use a mobile authenticator app fortwo-factor authentication when they log in.
You can require two-factor authentication each time a user logs in with a username and passwordto Salesforce, including orgs with custom domains created using My Domain. To set the requirement,select the “Two-Factor Authentication for User Interface Logins” permission in the user profile (forcloned profiles only) or permission set.
Enhancing Security with Two-Factor Authentication
See a demonstration of Two-Factor Authentication for Salesforce, and when to use it.
Walk Through It: Secure Logins with Two-Factor Authentication
Users with the “Two-Factor Authentication for User Interface Logins” permission have to use amobile authenticator app each time they log in to Salesforce.
You can also use a profile-based policy to set a two-factor authentication requirement for usersassigned to a particular profile. Use the profile policy when you want to require two-factorauthentication for users of the following authentication methods:
• SAML for single sign-on
• Social sign-on in to Salesforce orgs or Communities
• Username and password authentication into Communities
All Salesforce user interface authentication methods, including username and password, delegated authentication, SAML single sign-on,and social sign-on through an authentication provider, are supported. In the user profile, set the Session security levelrequired at login field to High Assurance. Then set session security levels in your org’s session settings to apply the policyfor particular login methods. Also in your org’s session settings, check the session security levels to make sure that Two-FactorAuthentication is in the High Assurance column.
Warning:
If Two-Factor Authentication is in the Standard column, users get an error when they log in with a method that grants standard-levelsecurity.
IN THIS SECTION:
Connect a One-Time Password Generator App or Device for Identity Verification
You can connect a one-time password generator app, such as Salesforce Authenticator or Google Authenticator, to your account.Use a verification code generated by the app, sometimes called a “time-based one-time password,” whenever Salesforce has toverify your identity. If your administrator requires two-factor authentication for increased security when you log in, access connectedapps, or access reports or dashboards, use a code from the app. If you’re required to use two-factor authentication before you havean app connected, you’re prompted to connect one the next time you log in to Salesforce. If you don’t yet have the two-factorauthentication requirement, you can still connect the app to your account through your personal settings.
29

Connect a One-Time Password Generator App or Device for IdentityVerification
EDITIONS
Available in: Both SalesforceClassic and LightningExperience
Available in all editions
You can connect a one-time password generator app, such as Salesforce Authenticator or GoogleAuthenticator, to your account. Use a verification code generated by the app, sometimes called a“time-based one-time password,” whenever Salesforce has to verify your identity. If your administratorrequires two-factor authentication for increased security when you log in, access connected apps,or access reports or dashboards, use a code from the app. If you’re required to use two-factorauthentication before you have an app connected, you’re prompted to connect one the next timeyou log in to Salesforce. If you don’t yet have the two-factor authentication requirement, you canstill connect the app to your account through your personal settings.
1. Download the supported authenticator app for your device type. You can use any authenticator app that supports the time-basedone-time password (TOTP) algorithm ( IETF RFC 6238), such as Salesforce Authenticator for iOS, Salesforce Authenticator for Android,or Google Authenticator.
2. From your personal settings, enter Advanced User Details in the Quick Find box, then select Advanced User Details.No results? Enter Personal Information in the Quick Find box, then select Personal Information.
3. Find App Registration: One-Time Password Generator and click Connect.
4. For security purposes, you’re prompted to log in to your account.
5. Using the authenticator app on your mobile device, scan the QR code.
Alternatively, you can click I Can’t Scan the QR Code in your browser. The browser displays a security key. In the authenticator app,enter your username and the key displayed.
6. In Salesforce, enter the code generated by the authenticator app in the Verification Code field.
The authenticator app generates a new verification code periodically. Enter the current code.
7. Click Connect.
SEE ALSO:
Salesforce Help: Personalize Your Salesforce Experience
30
Connect a One-Time Password Generator App or Device forIdentity Verification
Set Two-Factor Authentication Login Requirements

CHAPTER 8 Customize Your Login Page with Your OwnBranding
EDITIONS
Available in: both SalesforceClassic and LightningExperience
Available in: Performance,Unlimited, Enterprise,Developer, Professional,and Group Editions.
Change the look and feel of your custom domain login page by adding a background color, logo,and right-side iFrame content.
Before you can change the appearance of your login page, you must set up a domain using MyDomain. For more information, see Quick Start: Set up your own domain, add a Connected Appand use the App Launcher on page 5.
A custom login page can match your company’s branding, give users extra information, and identifyyour organization.
Note: Setting Up a My Domain (5:10 minutes. Login page branding starts at 2:43.)
See how to use My Domain to customize your users’ login experience.
1. From Setup, enter My Domain in the Quick Find box, then select My Domain.
2. Under Authentication Configuration, click Edit.
3. To customize your logo, upload an image.
Images can be .jpg, .gif, or .png files up to 100 KB. Maximum image size is 250px by 125px.
4.To customize your login page background, click the or enter a valid hexadecimal color code.
5. Enter the URL of the file to be included in the right-side iFrame on the login page.
The content in the right-side iFrame is designed to resize to fill approximately 50% of the page. Your content must be hosted at aURL that uses SSL encryption and the https:// prefix. To build your own custom right-side iFrame content page using responsiveweb design, you can use the My Domain Sample template.
Example: https://c.salesforce.com/login-messages/promos.html
6. Optionally, select authentication services as identity providers on the login page, such as social sign-on providers like Google andFacebook. Users can then log in with accounts from those services. Configure authentication services as Auth. Providers in Setup.
7. Click Save.
Example: For example, you can add https://sfdclogin.herokuapp.com/news.jsp as the Right Frame URL.
31

CHAPTER 9 Synchronize your Salesforce and ActiveDirectory Users with Identity Connect
Use Identity Connect to upload and synchronize user data from Active Directory to your Salesforceorganization.
In this chapter ...
• About IdentityConnect Once installed and set up, Identity Connect provides an administration console for managing and
synchronizing users. You can set up single sign-on using Integrated Windows Authentication (IWA) and• Installing Identity
ConnectKerberos so users who sign into their desktop environment can use Salesforce without having to log in,separately.
To test Identity Connect, sign up for a Force.com trial organization. For information on the differencesbetween a Developer Edition organization and the Force.com trial organization, see this FAQ.
Example:
Note: Integrating Active Directory with Salesforce using Identity Connect (6:43 minutes)
Learn how to download and install Identity Connect to synchronize your Active Directoryusers with your Salesforce users.
32
About Identity Connect
EDITIONS
Available in: both SalesforceClassic and LightningExperience
Available for an additionalcost in: Enterprise,Performance, andUnlimited Editions.Developer Edition includes10 Identity Connectpermission set licenses.
Identity Connect provides Active Directory integration.
Identity Connect provides Active Directory integration with Salesforce via a service which runs oneither Windows or Linux platforms. This integration includes syncing Active Directory users witheither Salesforce or Identity Connect acting as the Identity Service Provider (IDP) for Single Sign On(SSO) Active Directory integration when logging into Salesforce.
Installing Identity Connect
EDITIONS
Available in: both SalesforceClassic and LightningExperience
Available for an additionalcost in: Enterprise,Performance, andUnlimited Editions.Developer Edition includes10 Identity Connectpermission set licenses.
USER PERMISSIONS
To install Identity Connect:• “Manage Users”
Your organization must have at least one Identity Connect license. To obtain Identity Connect,contact Salesforce.
The Identity Connect software will typically be installed on a server by your IT department. Eachuser does not need to install Identity Connect individually.
1. From Setup, enter Identity Connect in the Quick Find box, then select IdentityConnect.
Note: Identity Connect doesn’t appear in Setup until Salesforce adds the feature toyour organization.
2. Click the download link that corresponds to your operating system.
3. Install the software according to the Salesforce Identity Connect Implementation Guide.
33
About Identity ConnectSynchronize your Salesforce and Active Directory Users withIdentity Connect

CHAPTER 10 Tutorial: Test Single Sign-On from anExternal Identity Provider
This tutorial introduces single sign-on implementation from a third-party identity provider, and showsyou how to troubleshoot SAML assertions from that provider.
In this chapter ...
• Establish aFederation ID Salesforce also supports single sign-on from external, third-party identity providers. For single sign-on
to work, you need an identity provider and a service provider to coordinate authentication and• Set up your identity
providerauthorization information using SAML assertions. Follow these steps to test setting up single sign-onfrom an external identity provider and troubleshooting SAML assertions. At the end of this tutorial, you’llable to log in to your Salesforce org from an external app.• Generate SAML
• Troubleshoot SAMLassertions Note: Setting Up Single Sign-On (23:31 minutes)
See how to authenticate users using an external service.
34
Establish a Federation ID
For this single sign-on implementation, we’ll set a user attribute that links the user between their Salesforce organization and an externalapplication.
1. From Setup, enter Users in the Quick Find box, then select Users.
2. Click Edit next to your current user.
3. In the Single Sign On Information section, enter the Federation ID: [email protected].
For this example, we arbitrarily made up a Federation ID. The Federation ID is a unique username for each user that can be sharedacross multiple applications. Sometimes this is the employee ID for that user. The important part of the Federation ID is that it is notduplicated for more than one user within a single Salesforce organization (you can have the same Federation ID for the same userin more than one Salesforce organization).
4. Click Save.
Set up your identity provider
You’ll use Axiom, a single sign-on testing app hosted on Heroku, to go through the steps of setting up an identity provider.
Get an identity provider certificate from the Axiom app and set it up in your Salesforce organization.
Tip: Keep the Axiom app open in one browser window, and your DE organization open in another browser window so you cancut-and-paste between the two, easily.
1. In a new browser window, go to http://axiomsso.herokuapp.com.
2. Click SAML Identity Provider & Tester.
3. Click Download the Identity Provider Certificate.
The certificate validates signatures, and you need to upload it to your Salesforce organization. Remember where you save it.
4. In your Salesforce organization, from Setup, enter Single Sign-On Settings in the Quick Find box, then selectSingle Sign-On Settings.
5. Click Edit.
6. Select SAML Enabled.
7. Click Save.
8. In SAML Single Sign-On Settings, click New.
9. Enter the following values.
a. Name: Axiom Test App
b. Issuer: http://axiomsso.herokuapp.com
c. Identity Provider Certificate: Choose the file you downloaded in step 3.
d. Request Signing Certificate: Leave as the Default Certificate.
e. SAML Identity Type: Select Assertion contains the Federation ID from the User object.
f. SAML Identity Location: Select Identity is in the NameIdentifier element of the Subject statement.
g. Service Provider Initiated Request Binding: Select HTTP Redirect.
h. Entity Id: Enter your My Domain name including “https”, such ashttps://universalcontainers.my.salesforce.com
35
Establish a Federation IDTutorial: Test Single Sign-On from an External Identity Provider
10. Click Save and leave the browser page open.
Generate SAML
Axiom generates a SAML assertion to log in to your Salesforce organization with the assigned Federation ID.
Tip: Keep the Axiom app open in one browser window, and your DE organization open in another browser window so you cancut-and-paste between the two, easily.
1. Return to Axiom at http://axiomsso.herokuapp.com.
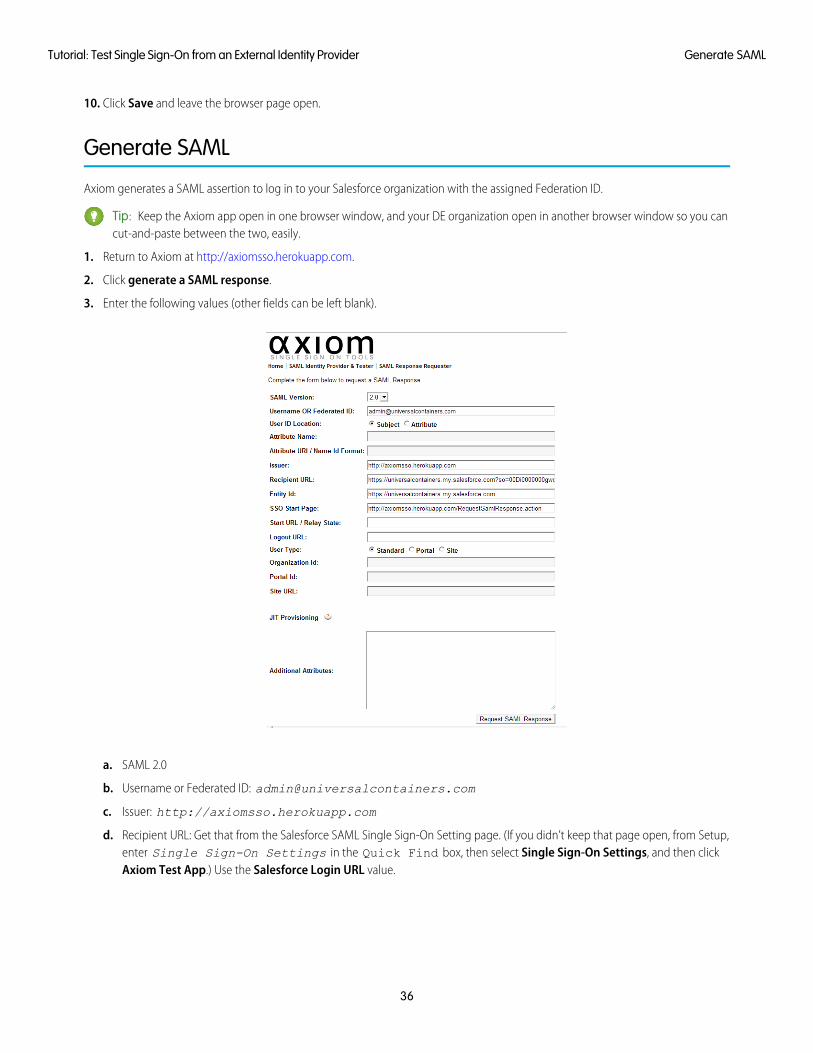
2. Click generate a SAML response.
3. Enter the following values (other fields can be left blank).
a. SAML 2.0
b. Username or Federated ID: [email protected]
c. Issuer: http://axiomsso.herokuapp.com
d. Recipient URL: Get that from the Salesforce SAML Single Sign-On Setting page. (If you didn’t keep that page open, from Setup,enter Single Sign-On Settings in the Quick Find box, then select Single Sign-On Settings, and then clickAxiom Test App.) Use the Salesforce Login URL value.
36
Generate SAMLTutorial: Test Single Sign-On from an External Identity Provider
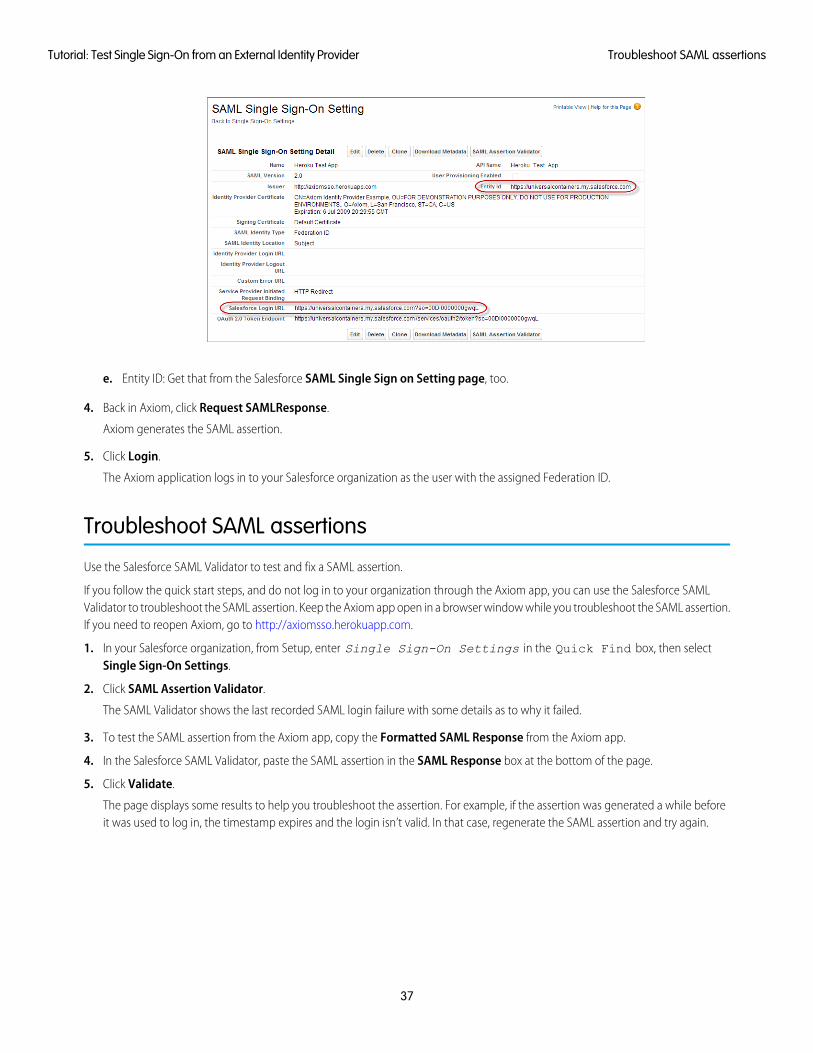
e. Entity ID: Get that from the Salesforce SAML Single Sign on Setting page, too.
4. Back in Axiom, click Request SAMLResponse.
Axiom generates the SAML assertion.
5. Click Login.
The Axiom application logs in to your Salesforce organization as the user with the assigned Federation ID.
Troubleshoot SAML assertions
Use the Salesforce SAML Validator to test and fix a SAML assertion.
If you follow the quick start steps, and do not log in to your organization through the Axiom app, you can use the Salesforce SAMLValidator to troubleshoot the SAML assertion. Keep the Axiom app open in a browser window while you troubleshoot the SAML assertion.If you need to reopen Axiom, go to http://axiomsso.herokuapp.com.
1. In your Salesforce organization, from Setup, enter Single Sign-On Settings in the Quick Find box, then selectSingle Sign-On Settings.
2. Click SAML Assertion Validator.
The SAML Validator shows the last recorded SAML login failure with some details as to why it failed.
3. To test the SAML assertion from the Axiom app, copy the Formatted SAML Response from the Axiom app.
4. In the Salesforce SAML Validator, paste the SAML assertion in the SAML Response box at the bottom of the page.
5. Click Validate.
The page displays some results to help you troubleshoot the assertion. For example, if the assertion was generated a while beforeit was used to log in, the timestamp expires and the login isn’t valid. In that case, regenerate the SAML assertion and try again.
37
Troubleshoot SAML assertionsTutorial: Test Single Sign-On from an External Identity Provider
CHAPTER 11 Monitor Applications and Run Reports
Monitor connected apps and set up reports to keep track of app usage by user, app, time, or other values.In this chapter ...Once you’ve set up connected apps for your Identity users, you can monitor the usage of connectedapps throughout your organization, find out how often the apps are used, drill-down into the app details
• Monitor Usage forConnected Apps
to make changes to the connected app settings, and block or unblock specific apps as your securityneeds change.
• Create an IdentityUsers Report
38
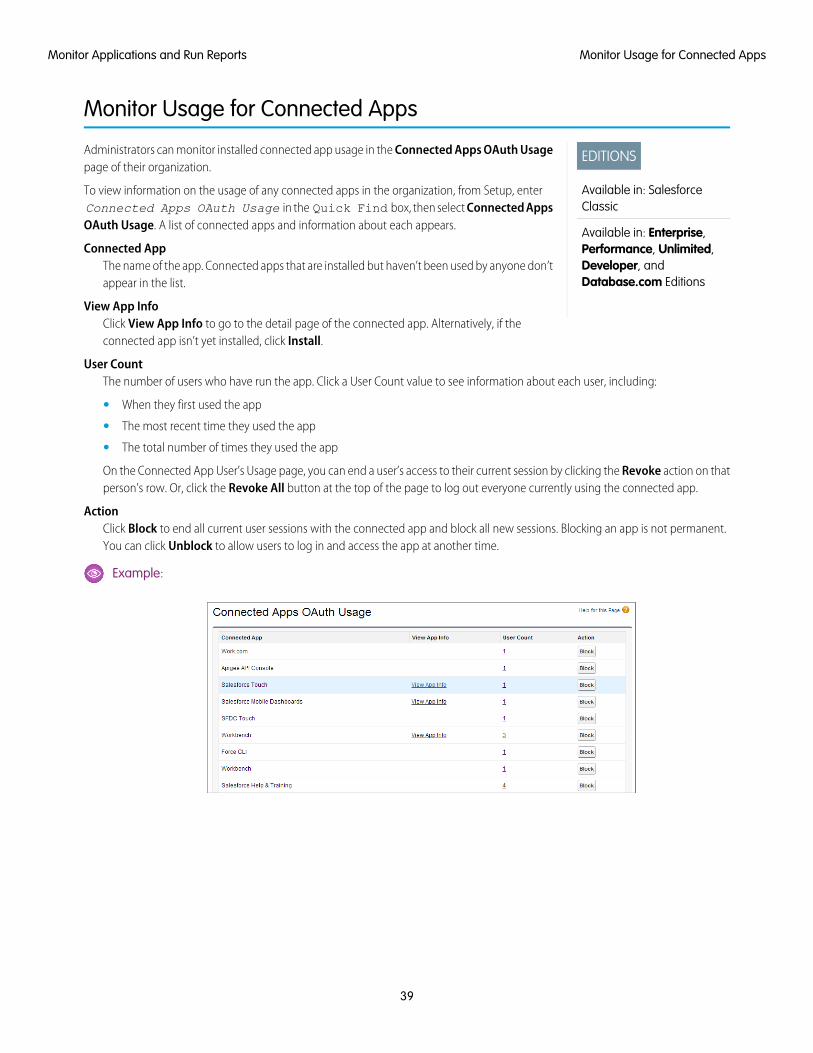
Monitor Usage for Connected Apps
EDITIONS
Available in: SalesforceClassic
Available in: Enterprise,Performance, Unlimited,Developer, andDatabase.com Editions
Administrators can monitor installed connected app usage in the Connected Apps OAuth Usagepage of their organization.
To view information on the usage of any connected apps in the organization, from Setup, enterConnected Apps OAuth Usage in the Quick Find box, then select Connected AppsOAuth Usage. A list of connected apps and information about each appears.
Connected AppThe name of the app. Connected apps that are installed but haven’t been used by anyone don’tappear in the list.
View App InfoClick View App Info to go to the detail page of the connected app. Alternatively, if theconnected app isn’t yet installed, click Install.
User CountThe number of users who have run the app. Click a User Count value to see information about each user, including:
• When they first used the app
• The most recent time they used the app
• The total number of times they used the app
On the Connected App User’s Usage page, you can end a user’s access to their current session by clicking the Revoke action on thatperson’s row. Or, click the Revoke All button at the top of the page to log out everyone currently using the connected app.
ActionClick Block to end all current user sessions with the connected app and block all new sessions. Blocking an app is not permanent.You can click Unblock to allow users to log in and access the app at another time.
Example:
39
Monitor Usage for Connected AppsMonitor Applications and Run Reports
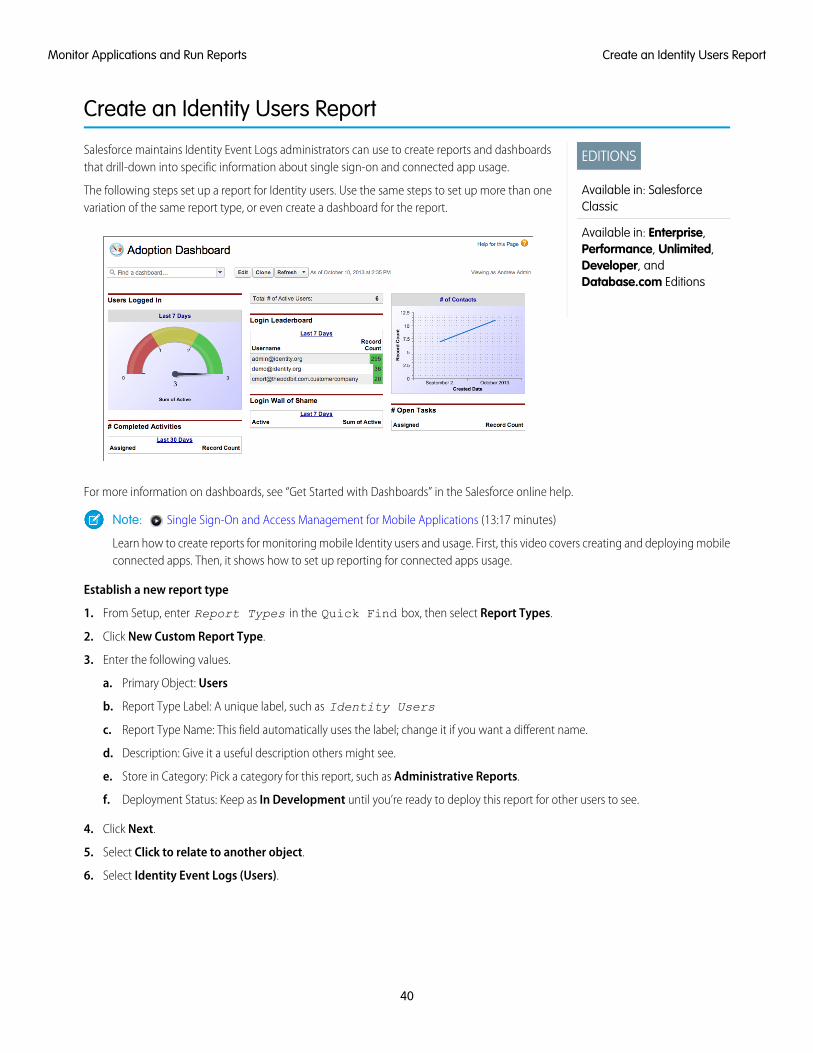
Create an Identity Users Report
EDITIONS
Available in: SalesforceClassic
Available in: Enterprise,Performance, Unlimited,Developer, andDatabase.com Editions
Salesforce maintains Identity Event Logs administrators can use to create reports and dashboardsthat drill-down into specific information about single sign-on and connected app usage.
The following steps set up a report for Identity users. Use the same steps to set up more than onevariation of the same report type, or even create a dashboard for the report.
For more information on dashboards, see “Get Started with Dashboards” in the Salesforce online help.
Note: Single Sign-On and Access Management for Mobile Applications (13:17 minutes)
Learn how to create reports for monitoring mobile Identity users and usage. First, this video covers creating and deploying mobileconnected apps. Then, it shows how to set up reporting for connected apps usage.
Establish a new report type
1. From Setup, enter Report Types in the Quick Find box, then select Report Types.
2. Click New Custom Report Type.
3. Enter the following values.
a. Primary Object: Users
b. Report Type Label: A unique label, such as Identity Users
c. Report Type Name: This field automatically uses the label; change it if you want a different name.
d. Description: Give it a useful description others might see.
e. Store in Category: Pick a category for this report, such as Administrative Reports.
f. Deployment Status: Keep as In Development until you’re ready to deploy this report for other users to see.
4. Click Next.
5. Select Click to relate to another object.
6. Select Identity Event Logs (Users).
40
Create an Identity Users ReportMonitor Applications and Run Reports
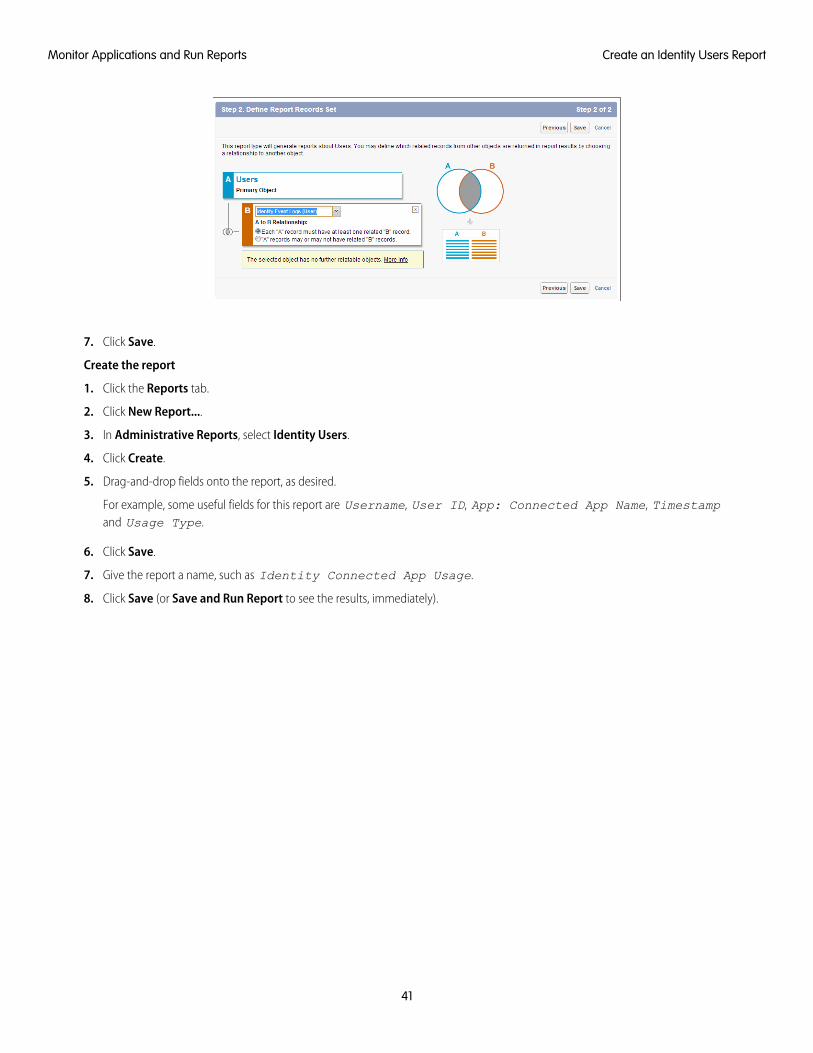
7. Click Save.
Create the report
1. Click the Reports tab.
2. Click New Report....
3. In Administrative Reports, select Identity Users.
4. Click Create.
5. Drag-and-drop fields onto the report, as desired.
For example, some useful fields for this report are Username, User ID, App: Connected App Name, Timestampand Usage Type.
6. Click Save.
7. Give the report a name, such as Identity Connected App Usage.
8. Click Save (or Save and Run Report to see the results, immediately).
41
Create an Identity Users ReportMonitor Applications and Run Reports

CHAPTER 12 Use External Identities to Extend YourOrganization to New Users
EDITIONS
Available in: SalesforceClassic
External Identity licenses areavailable in: Enterprise,Performance, Unlimited,and Developer Editions
USER PERMISSIONS
To assign and manageExternal Identity users:• “Manage Users”
To enable Communities:• “Customize Application”
External Identity is a type of Salesforce license that provides Identity and Access Managementservice for customers and partners. This license can be upgraded to Customer Community or PartnerCommunity licenses.
The External Identity license gives you the flexibility to add users to your community site withoutusing Customer Community licenses. The External Identity license adds users at a lower cost thanthe Customer Community license, but without access to community critical features like Cases orKnowledge. Store and manage these users, authenticate them through username and password,single sign-on, and social sign-on (using identities from Facebook, Google+, LinkedIn, and otherauthentication providers). Allow user self-registration for efficient provisioning of new users. Theseusers are typically consumers for your business, partners, dealers, patients, and other customers.
This table shows which features are available to users with an External Identity license and a CustomerCommunity license.
Customer CommunityExternal IdentityFeature
Read and EditRead and Edit
Accounts
Read, Create, EditRead, Create, Edit
Assets
Chatter
Read, Create, Edit
Contacts
Identity
Can create and manage theirown cases
Cases
Read only
Products
Orders
Files
Chatter Answers
Ideas
42
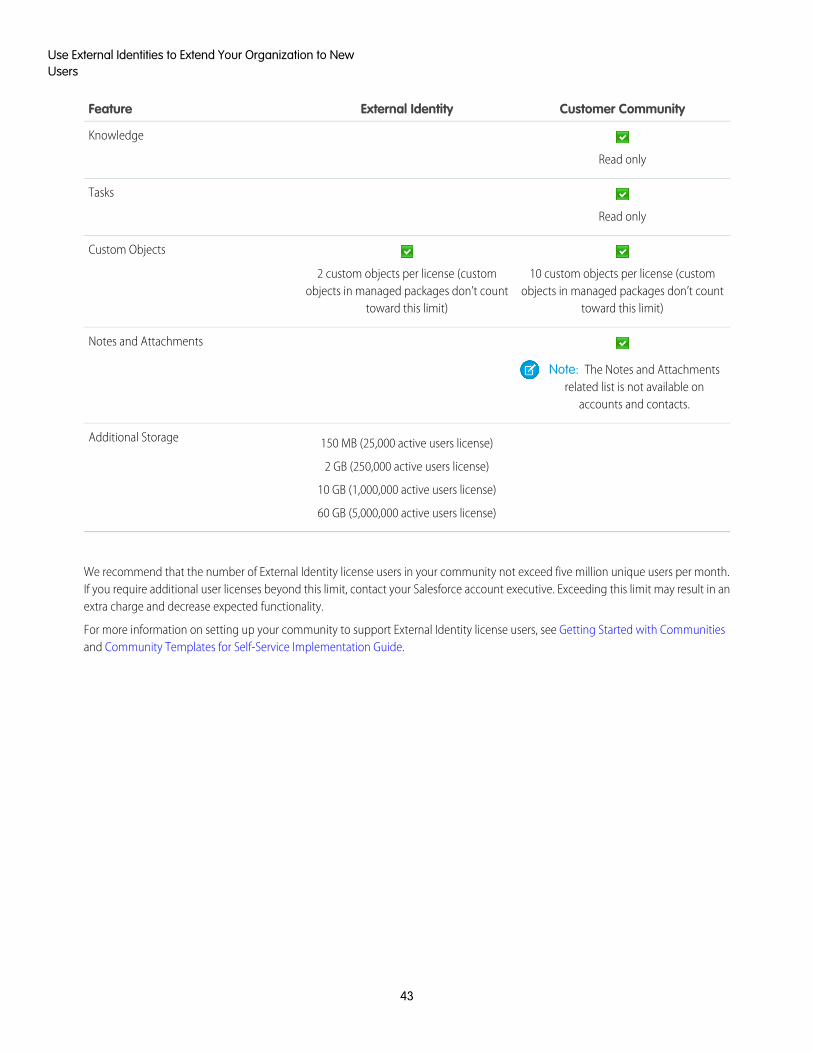
Customer CommunityExternal IdentityFeature
Read only
Knowledge
Read only
Tasks
10 custom objects per license (customobjects in managed packages don’t count
toward this limit)
2 custom objects per license (customobjects in managed packages don’t count
toward this limit)
Custom Objects
Notes and Attachments
Note: The Notes and Attachmentsrelated list is not available on
accounts and contacts.
150 MB (25,000 active users license)Additional Storage
2 GB (250,000 active users license)
10 GB (1,000,000 active users license)
60 GB (5,000,000 active users license)
We recommend that the number of External Identity license users in your community not exceed five million unique users per month.If you require additional user licenses beyond this limit, contact your Salesforce account executive. Exceeding this limit may result in anextra charge and decrease expected functionality.
For more information on setting up your community to support External Identity license users, see Getting Started with Communitiesand Community Templates for Self-Service Implementation Guide.
43
Use External Identities to Extend Your Organization to NewUsers

CHAPTER 13 Get More Information about SalesforceIdentity, Single Sign-On and Security
Links to more sources of information about Salesforce Identity.
Salesforce Identity also supports external identities for portal access, and you can enable partners and customers as Identity users. Forinformation on using external identities, see
Use the following links for other useful resources.
• Salesforce Identity Web page
• Salesforce Identity “How To” videos
• Security Single Sign-On Implementation Guide [PDF]
• Understanding Authentication in the Force.com REST API Developer Guide
• Salesforce Identity Connect User Guide
• The developer.salesforce.com Identity home page
• Salesforce Security cheatsheets
44
INDEX
AActive Directory 32–33App Launcher
configure 19permission set 21profile 20
Appsopening 22
DDomain name
define a domain name 12deploying 14, 16getting system performance information 18implementation guidelines 16login page branding 13login policy 14overview 11setup overview 12testing 14, 16URL changes 15
Eexternal identity provider 34
FForce.com app menu
reordering 23
GGoogle Apps 25Google connected app 27Google Single Sign-On 26
IIdentity
links to more information 44monitor 39overview 1
quick start5–7, 9, 35–37
App Launcher 9connected app 7Federation ID 35Generate SAML 36
Identity (continued)quick start (continued)My Domain 6Troubleshoot SAML 37
reports 38, 40scenario 4
Identity Connect 32Identity provider
adding on login page 13identity provider certificate 26
LLogin page 31, 42
MMy Domain
See: Domain name 11
PPassword
change user 29identity confirmation 29identity verification 29login verification 29two-factor authentication 29
Passwordschanging by user 30identity confirmation 30login verification 30two-factor authentication 30
permission set licenses 33
SSecurity
adding identity providers on login page 13
TTutorials 7–8
UUser setup
activate device 29activating device 30change password 29changing passwords 30
45