Embed Size (px)
Citation preview

IBM Tivoli Monitoring for Databases: Informix
User’s GuideVersion 5.1.0
SC23-4729-00
���


IBM Tivoli Monitoring for Databases: Informix
User’s GuideVersion 5.1.0
SC23-4729-00
���
NoteBefore using this information and the product it supports, read the information in Appendix G, “Notices” on page 123.
First Edition (September 2002)
This edition applies to Version 5.1.0 of IBM Tivoli Monitoring for Databases: Informix and to all subsequent releasesand modifications until otherwise indicated in new editions.
© Copyright International Business Machines Corporation 2002. All rights reserved. US Government UsersRestricted Rights – Use, duplication or disclosure restricted by GSA ADP Schedule Contract with IBM® Corp.
Contents
About this guide . . . . . . . . . . . vWho should read this guide . . . . . . . . . vWhat this guide contains . . . . . . . . . . vPublications . . . . . . . . . . . . . . vi
IBM Tivoli Monitoring for Databases: Informixlibrary . . . . . . . . . . . . . . . viPrerequisite publications . . . . . . . . . viiRelated publications . . . . . . . . . . viiAccessing softcopy publications . . . . . . viiOrdering publications . . . . . . . . . viiiProviding feedback about publications . . . . viii
Accessibility . . . . . . . . . . . . . . viiiContacting customer support . . . . . . . . ixConventions used in this book . . . . . . . . ix
Typeface conventions . . . . . . . . . . ixOperating system-dependent variables and paths ix
Chapter 1. Overview . . . . . . . . . 1Overview of extensions to the Tivoli environment . . 2Tivoli administrators. . . . . . . . . . . . 3Authorization roles . . . . . . . . . . . . 3Using the desktop or CLI . . . . . . . . . . 3Understanding IBM Tivoli Monitoring . . . . . . 3
Chapter 2. Getting startedquick-reference guide . . . . . . . . 11
Chapter 3. Setting up IBM TivoliMonitoring for Databases: Informix . . 13Starting the Tivoli environment . . . . . . . . 13Setting authorization roles . . . . . . . . . 15Specifying the managed resource types in a policyregion . . . . . . . . . . . . . . . . 16Discovering Informix instance objects. . . . . . 19Configuring Informix instance objects . . . . . 20Moving objects to IBMInformixUnmanaged policyregion . . . . . . . . . . . . . . . . 23
Chapter 4. Setting up IBM TivoliMonitoring . . . . . . . . . . . . . 25Suggested guidelines for setting up your resourcemodels . . . . . . . . . . . . . . . . 25Creating profile managers and profiles . . . . . 26Subscribing resources to profile managers . . . . 28Adding default resource models to profiles . . . . 29Distributing profiles from the desktop . . . . . 30Distributing profiles using MDist2 . . . . . . . 33Rerunning failed profile distributions. . . . . . 34
Chapter 5. Working with IBM TivoliMonitoring for Databases: Informix . . 37Editing IBMInformixServer object attributes . . . 37Viewing server properties . . . . . . . . . 39
Starting a server to online . . . . . . . . . 40Starting a server to quiescent . . . . . . . . 41Shutting down a server to offline . . . . . . . 42Stopping a server to quiescent gracefully . . . . 43Stopping a server to quiescent immediately. . . . 44
Chapter 6. Working with tasks and jobs 47Running a task . . . . . . . . . . . . . 48Customizing a task . . . . . . . . . . . . 51Creating a job . . . . . . . . . . . . . 52Running a job . . . . . . . . . . . . . 56Scheduling a job . . . . . . . . . . . . . 57
Chapter 7. Viewing resource modelresults with the IBM Tivoli Web HealthConsole . . . . . . . . . . . . . . 63Understanding resource health . . . . . . . . 63Connecting the IBM Tivoli Monitoring Web HealthConsole. . . . . . . . . . . . . . . . 64
Chapter 8. Working with resourcemodels. . . . . . . . . . . . . . . 65Overview of IBM Tivoli Monitoring . . . . . . 65Adding custom resource models to profiles. . . . 66Customizing indications . . . . . . . . . . 67Adding or removing a built-in action . . . . . . 70Editing a built-in action . . . . . . . . . . 72Specifying tasks for an event . . . . . . . . 74Sending a notice to administrators when an eventoccurs . . . . . . . . . . . . . . . . 75Customizing parameters . . . . . . . . . . 77Creating scheduling rules. . . . . . . . . . 78Customizing the scheduling monitoring period . . 80Customizing data logging information . . . . . 82Managing profiles and resource models at endpoints 85Managing IBM Tivoli monitoring gateways . . . . 86Determining which resource models are running onendpoints . . . . . . . . . . . . . . . 86
Chapter 9. Enabling IBM TivoliMonitoring for Databases: Informix forTivoli Enterprise Data Warehouse . . . 89Overview . . . . . . . . . . . . . . . 89
Control server . . . . . . . . . . . . 90Central data warehouse . . . . . . . . . 90Data marts . . . . . . . . . . . . . 90Report interface . . . . . . . . . . . . 91
Working with users and user groups . . . . . . 91About users and user groups . . . . . . . 91The Tivoli Enterprise Data Warehouseauthorization roles . . . . . . . . . . . 91
Creating an IBM Console user . . . . . . . . 92Assigning roles to a user . . . . . . . . . . 92Creating a user group . . . . . . . . . . . 93
iii
Assigning users to a user group . . . . . . . 93Assigning user groups to a data mart. . . . . . 94Managing Tivoli Enterprise Data Warehouse reports 94Running reports . . . . . . . . . . . . . 95Scheduling reports to run automatically . . . . . 96Modifying default settings for reports . . . . . 96Creating reports . . . . . . . . . . . . . 97IBM Tivoli Monitoring for Databases: Informix datamarts and reports . . . . . . . . . . . . 98
Appendix A. Authorization roles quickreference . . . . . . . . . . . . . 101
Appendix B. Setting up the TivoliEnterprise Console . . . . . . . . . 103Overview of the Tivoli Enterprise Console. . . . 103Configuring Tivoli Enterprise Console to workwith IBM Tivoli Monitoring for Databases:Informix . . . . . . . . . . . . . . . 104Viewing events in the Tivoli Enterprise Console 107Lists of event classes . . . . . . . . . . . 108
Appendix C. Integrating with TivoliBusiness Systems Manager . . . . . 109Understanding Tivoli Business Systems Manager 109
Prerequisites. . . . . . . . . . . . . . 110Integrating IBM Tivoli Monitoring for Databases:Informix with Tivoli Business Systems Manager . . 110Configuring the Tivoli Enterprise Console eventserver . . . . . . . . . . . . . . . . 111Discovering resources for Tivoli Business SystemsManager . . . . . . . . . . . . . . . 112Uninstalling IBM Tivoli Monitoring for Databases:Informix integration from Tivoli Business SystemsManager . . . . . . . . . . . . . . . 113
Appendix D. Problem determination 115
Appendix E. Messages . . . . . . . 119
Appendix F. Accessibility . . . . . . 121Using assistive technologies . . . . . . . . 121Magnifying what is displayed on the screen . . . 121Documentation in accessible formats . . . . . 121Using alternative text. . . . . . . . . . . 121
Appendix G. Notices . . . . . . . . 123Trademarks . . . . . . . . . . . . . . 125
Index . . . . . . . . . . . . . . . 127
iv IBM Tivoli Monitoring for Databases: Informix: User’s Guide

About this guide
The IBM Tivoli Monitoring for Databases: Informix User’s Guide provides informationabout setting up and working with the product. Use this guide in conjunction withthe IBM Tivoli Monitoring for Databases: Informix Reference Guide.
Who should read this guideThis guide is intended for system architects (for planning) and systemadministrators and database administrators (for implementation and operation).
Readers should be familiar with the following:v Windows NT® or UNIX® operating systemsv Tivoli softwarev Informix software
What this guide containsThis guide contains the following sections:v Chapter 1, “Overview” on page 1
Provides an overview of IBM Tivoli Monitoring for Databases: Informix features,its extensions to other Tivoli products, authorization roles, and IBM TivoliMonitoring.
v Chapter 2, “Getting started quick-reference guide” on page 11Provides an overview of the setup tasks for IBM Tivoli Monitoring forDatabases: Informix including cross-references to additional information.
v Chapter 3, “Setting up IBM Tivoli Monitoring for Databases: Informix” onpage 13Provides procedures for subscribing to notice groups, adding managed resourcetypes to a policy region, and discovering and registering databases.
v Chapter 4, “Setting up IBM Tivoli Monitoring” on page 25Provides procedures for setting up IBM Tivoli Monitoring for Databases:Informix.
v Chapter 5, “Working with IBM Tivoli Monitoring for Databases: Informix” onpage 37Provides procedures for viewing and editing database object properties, andstarting and shutting down a database.
v Chapter 6, “Working with tasks and jobs” on page 47Provides procedures for customizing the standard IBM Tivoli Monitoring forDatabases: Informix tasks and creating and scheduling jobs.
v Chapter 7, “Viewing resource model results with the IBM Tivoli Web HealthConsole” on page 63Provides information on the IBM Tivoli Monitoring Web Health Console.
v Chapter 8, “Working with resource models” on page 65Provides procedures for subscribing and distributing a monitoring collectionprofile, and determining which resource models have been distributed toInformix instances on an endpoint.
v

v Chapter 9, “Enabling IBM Tivoli Monitoring for Databases: Informix for TivoliEnterprise Data Warehouse” on page 89Provides information about setting up IBM Tivoli Monitoring for Databases,Version 5.1.0: Informix to work with Tivoli Enterprise Data Warehouse.
v Appendix A, “Authorization roles quick reference” on page 101Summarizes required authorization roles and activities and tells where to findadditional information about them in this manual.
v Appendix B, “Setting up the Tivoli Enterprise Console” on page 103Provides procedures for integrating the Tivoli Enterprise Console® with IBMTivoli Monitoring for Databases: Informix.
v Appendix C, “Integrating with Tivoli Business Systems Manager” on page 109Describes how to set up Tivoli Business Systems Manager, and how to use it tomanage Informix resources.
v Appendix D, “Problem determination” on page 115Provides information about troubleshooting and frequently asked questions forIBM Tivoli Monitoring for Databases: Informix.
v Appendix E, “Messages” on page 119Provides a list of error messages for IBM Tivoli Monitoring for Databases:Informix.
PublicationsThis section lists publications in the IBM Tivoli Monitoring for Databases: Informixlibrary and any other related documents. It also describes how to access Tivolipublications online, how to order Tivoli publications, and how to submit commentson Tivoli publications.
IBM Tivoli Monitoring for Databases: Informix libraryThe following documents are available in the IBM Tivoli Monitoring for Databases:Informix library:v IBM Tivoli Monitoring for Databases, Version 5.1.0: Informix User’s Guide,
SC23-4729-00Describes how to use IBM Tivoli Monitoring for Databases: Informix.
v IBM Tivoli Monitoring for Databases, Version 5.1.0: Informix Reference Guide,SC23-4728-00Provides detailed information about Informix resource models, tasks, andcommands.
v IBM Tivoli Monitoring for Databases, Version 5.1.0 Installation and Setup Guide,GC23-4730-00Provides instructions for installing the product and setting it up to manageInformix resources.
v IBM Tivoli Monitoring for Databases, Version 5.1.0 Release Notes, GI11-0933-00Describes product features and provides information about the latest changes tothe installation requirements and procedures. The release notes also describeknown limitations related to installation and explain how to work around eachlimitation.
v IBM Tivoli Monitoring for Databases, Version 5.1.0: Informix Limitations andWorkarounds Supplement, SC23-4787-00Provides the latest information about known product limitations andworkarounds. To ensure that the information is the latest available, this
vi IBM Tivoli Monitoring for Databases: Informix: User’s Guide

document is provided only on the Web, where it is updated on a regular basis.You can access the Limitations and Workarounds document through the IBMTivoli Monitoring for Databases: Informix link on the Tivoli Information CenterWeb site:http://www.tivoli.com/support/public/Prodman/public_manuals/td/TD_PROD_LIST.html
Prerequisite publicationsTo use the information in this book effectively, you must have some prerequisiteknowledge, which you can find in the following books:v IBM Tivoli® Management Framework User’s Guide
Provides information about profiles and profile management.v IBM Tivoli Management Framework Planning and Installation Guide
Provides information about server and hardware requirements.v IBM Tivoli Management Framework Reference Guide
Provides information about command line commands, such as the winstallcommand.
v IBM Tivoli Monitoring User’s Guide
Provides information about distributed monitoring.v IBM Tivoli Enterprise Console® User’s Guide
Provides information about using the Tivoli Enterprise Console®.v IBM Tivoli Software Installation Service (SIS) User’s Guide, Version 4.0
Provides information about using SIS to install the IBM Tivoli Monitoring forDatabases: Informix software.
Related publicationsThe following IBM Informix documents also provide useful information:v Administrator’s Guide for IBM Informix Dynamic Server
This manual is both a user guide and a reference manual to the features ofInformix Dynamic Server. It is intended to help you understand, configure, anduse your database server.
v Getting Started with IBM Informix Dynamic Server
This manual provides an overview of the Informix database server and SQL APIenvironment, summarizes important features of Informix Dynamic Server, andprovides a road map to help you use the Version 9.3 documentation set.
v IBM Informix Guide to SQL: Reference
This guide provides information on the following topics: Informix databases,data types, system catalog tables, environment variables, and the stores_demodemonstration database. It also contains a glossary.
The Tivoli Glossary includes definitions for many of the technical terms related toTivoli software. The Tivoli Glossary is available, in English only, at the followingWeb site:
http://www.tivoli.com/support/documents/glossary/termsm03.htm
Accessing softcopy publicationsThe publications for this product are available in PDF and HTML formats throughthe following media:
About this guide vii
v IBM Tivoli Monitoring for Databases: Documentation CD, LK3T-8517-00The Documentation CD contains all of the English language publications for thisproduct, except for the Web-only Limitations and Workarounds supplements. Toaccess the publications, use a Web browser to open the start.html file, which islocated in the root directory of the CD.
v IBM Tivoli Monitoring for Databases: NLS Documentation CD, LK3T-8611-00The NLS (national language support) Documentation CD contains both Englishand non-English language publications for this product, except for the Web-onlyLimitations and Workarounds supplements. To access the publications, use aWeb browser to open the start.html file, which is located in the root directory ofthe CD.
v Tivoli Information CenterIBM posts all publications for this and all other Tivoli products, as they becomeavailable and whenever they are updated, to the Tivoli Information Center Website. The Tivoli Information Center is located at the following Web address:
http://www.tivoli.com/support/public/Prodman/public_manuals/td/TD_PROD_LIST.html
Click the IBM Tivoli Monitoring for Databases: Informix link to access theproduct library.
Ordering publicationsYou can order many Tivoli publications online at the following Web site:
http://www.elink.ibmlink.ibm.com/public/applications/publications/cgibin/pbi.cgi
You can also order by telephone by calling one of these numbers:v In the United States: 800-879-2755v In Canada: 800-426-4968
See the following Web site for a list of telephone numbers in other countries:
http://www.tivoli.com/inside/store/lit_order.html
Providing feedback about publicationsIf you have comments or suggestions about Tivoli products and documentation,complete the customer feedback survey at the following Web site:
http://www.tivoli.com/support/survey/
AccessibilityAccessibility features help a user who has a physical disability, such as restrictedmobility or limited vision, to use software products successfully. With this product,you can use assistive technologies to hear and navigate the interface. You can alsouse the keyboard instead of the mouse to operate all features of the graphical userinterface. See the Accessibility Appendix in the IBM Tivoli Monitoring for Databases:Informix Reference Guide for additional information.
viii IBM Tivoli Monitoring for Databases: Informix: User’s Guide

Contacting customer supportIf you have a problem with any Tivoli product, you can contact Tivoli CustomerSupport. See the Tivoli Customer Support Handbook at the following Web site:
http://www.tivoli.com/support/handbook/
The handbook provides information about how to contact Tivoli CustomerSupport, depending on the severity of your problem, and the followinginformation:v Registration and eligibilityv Telephone numbers and e-mail addresses, depending on the country in which
you are locatedv What information you should gather before contacting support
Conventions used in this bookThis book uses several conventions for special terms and actions and operatingsystem-dependent commands and paths.
Typeface conventionsThe following typeface conventions are used in this book:
Bold Lowercase and mixed-case commands, command options, file andpath names, and flags that appear within text appear like this, inbold type. Graphical user interface elements and names of keysalso appear like this, in bold type.
Italic Variables, values you must provide, new terms, and words andphrases that are emphasized appear like this, in italic type.
Monospace Commands, command options, and flags that appear on a separateline, code examples, output, and message text appear like this, inmonospace type. Names of files and directories, text strings youmust type when they appear within text, names of Java methodsand classes, and HTML and XML tags also appear like this, inmonospace type.
Operating system-dependent variables and pathsThis book uses the UNIX convention for specifying environment variables and fordirectory notation.
When using the Windows command line, replace $variable with %variable% forenvironment variables and replace each forward slash (/) with a backslash (\) indirectory paths.
Note: If you are using the bash shell on a Windows system, you can use the UNIXconventions.
About this guide ix

x IBM Tivoli Monitoring for Databases: Informix: User’s Guide
Chapter 1. Overview
The IBM Tivoli Monitoring for Databases: Informix product complements existingtools for Informix and adds features so you can manage a large number ofInformix databases in a distributed environment. This product concentrates onthose tasks that can be defined and deployed by generic methods. It reduces thecomplexity of managing large distributed database environments and freesadministrators to concentrate on the non-generic issues associated with each of theindividual databases.
This product provides the ability to manage and monitor Informix databases byproviding extensions to Tivoli Management Framework, IBM Tivoli Monitoring,and the Tivoli Enterprise Console. It includes the resource models, which providemonitoring sources. The resource models and tasks enable you to managedistributed Informix computing resources effectively and to the granularity thatyou need.
Using the IBM Tivoli Monitoring for Databases: Informix product, you can do thefollowing:v Automate repetitive DBA tasks, such as those in the following list, which enables
you to define simple tasks once and perform them on multiple databases andinstances in a single action.– Check that server instances are online– Alert when cache hit ratios are outside of specified performance limits– Monitor diminishing logical log space and send alerts as specified– Measure the ratio of committed to rolled back transactions and send alert as
specified– Monitor the status of logical log backups and send alert as specified– Send alert on tables that do not have enough space to allocate their next
extent– Monitor the status of High availability Data Replications servers (HDR)
v Use the resource models for global Informix database availability andperformance monitoring facilities.
v Alert administrators to Informix performance problems or serious errors andfailures.
v Integrate with the Tivoli Enterprise Console to provide event correlation todetermine the severity and relationship of events. You can define rules forautomated responses, such as running a corrective task.
v Consolidate, transform, and display historical data in a variety of formats byusing the Tivoli Enterprise Data Warehouse.
v Integrate with Tivoli Business Systems Manager.
When you install the IBM Tivoli Monitoring for Databases: Informix a top-levelpolicy region named Monitoring for IBM Informix is created on your Tivolidesktop. This policy region is installed with the correct managed resources set, andwith custom policies loaded to control the targets of all IBM Tivoli Monitoring forDatabases: Informix tasks. The Monitoring for IBM Informix policy regioncontains the following policy regions and task library:
1

IBMInformixConfigured policy regionAfter you discover instances of Informix on your endpoints and configurethe IBMInformixServer objects that represent them, the objects are movedto this policy region. Objects in this policy region are ready to be used astargets for IBM Tivoli Monitoring for Databases: Informix resource modelsand tasks.
IBMInformixDiscovered policy regionThis policy region is created containing the IBMInformixDiscovery object.Use this object to discover Informix instances on your endpoints. See“Discovering Informix instance objects” on page 19 for more information.After you run discovery, temporary IBMInformixServer objects are createdin the IBMInformixDiscovered policy region for each instance of Informixfound. You can either configure these objects to be used as the targets oftasks and resource models or move them to the IBMInformixUnmanagedpolicy region. If you configure them they are moved to theIBMInformixConfigured policy region. If you move them to theIBMInformixUnmanaged policy region the instances of Informixrepresented by the temporary IBMInformixServer objects are notdiscovered if you run subsequent discovery processes.
IBMInformixUnmanaged policy regionThe IBMInformixUnmanaged policy region is used to store instances ofInformix that exist on endpoints on which IBMInformixDiscovery was run,but that you do not want to manage or monitor at this time. Objects thatare discovered and either configured or moved to theIBMInformixUnmanaged policy region are not discovered again whenIBMInformixDiscovery is run. This saves both time and resources.
IBM Informix Server Tasks task libraryThe IBM Informix Server Tasks task library contains the IBM TivoliMonitoring for Databases: Informix tasks. These tasks are used to set upthe IBM Tivoli Monitoring for Databases: Informix product and manageinstances of Informix represented by IBMInformixServer objects. See,Chapter 5, “Working with IBM Tivoli Monitoring for Databases: Informix”on page 37 for more information.
Overview of extensions to the Tivoli environmentThe IBM Tivoli Monitoring for Databases: Informix product is fully integrated intothe Tivoli environment. You should already be familiar with the concepts of theTivoli environment as outlined in the Tivoli Management Framework User’s Guide.
2 IBM Tivoli Monitoring for Databases: Informix: User’s Guide

Tivoli administratorsTivoli administrators are system or database administrators who have theauthorization to perform system or database management tasks using the TivoliManagement environment. Each administrator or group of administrators isrepresented by an icon on the Tivoli desktop.
The IBM Tivoli Monitoring for Databases: Informix product fully integrates intoTivoli security. To perform Informix administration functions, administrators musthave authorization roles for both IBM Tivoli Monitoring for Databases: Informixand Tivoli Management Framework.
Authorization rolesAuthorization roles determine the range of actions an administrator can perform.You assign roles to administrators so they can perform system or databasemanagement tasks. A role might be over the entire Tivoli management region orover a specific set of resources, such as those contained in a policy region. Super,senior, admin, and user are examples of standard authorization roles.
The IBM Tivoli Monitoring for Databases: Informix product also adds the followingauthorization roles:
IBMInformix_superThis role provides the ability to discover and configure IBMInformixServerinstances.
IBMInformix_adminThis role provides the ability to query and update a database. Anadministrator with the IBMInformix_admin role can perform all IBMTivoli Monitoring for Databases: Informix operations on an Informixdatabase.
IBMInformix_userThis role provides read-only access to a limited set of IBM TivoliMonitoring for Databases: Informix operations. An administrator with theIBMInformix_user role can only view the properties of a database.
Using the desktop or CLIIn many cases, this manual provides procedures for executing from either thedesktop or the command line interface (CLI). You may choose to use the desktopor graphical user interface (GUI) when you want to take advantage of visual inputprompting, which includes drop-down lists of options, and the defaults providedby options, such as the Display on Desktop check box. Use the command lineinterface when you want to create scripts, set tasks to respond to monitors, andrapidly enter commands.
Understanding IBM Tivoli MonitoringThis section describes the main concepts required for understanding how to set upand use resource models. IBM Tivoli Monitoring uses resource models to monitorand manage resources at distributed systems. A managed resource is a databaseobject that represents a hardware, software, or data entity that you manageaccording to policies set up in a Tivoli environment. Managed resources caninclude physical and logical disks, CPUs, memory, printers, processes, and services.
Chapter 1. Overview 3
A distributed system is the service that monitors resources, compares data frommonitored resources against configured thresholds, and runs automated responsesin a Tivoli environment.
ActionsYou can associate one or more recovery actions with a specific event. Theseactions are automatically triggered when the event occurs and, typically,are used for restoring satisfactory system service level. Each time an eventoccurs, the system provides a notification of the event, triggers a recoveryaction to restore satisfactory conditions and, if the action is successful,provides a notification that the action was performed. Actions areassociated with the execution of a CIM method or the execution of aprogram. Associate actions with indications when modifying an existingresource model using this software, or when creating a new resourcemodel with the IBM Tivoli Monitoring Workbench.
AttributesAttributes can be string or numeric values. A resource model receivesattributes when it is created. In IBM Tivoli Monitoring for Databases:Informix, you do not add, delete, or modify attributes that are in thedefault resource models. When creating a new resource model with theIBM Tivoli Monitoring Workbench, you can qualify an event by specifyingrelevant attributes according to the information you want the resourcemodel to monitor. For example, an event might indicate insufficient diskspace. When you specify attributes, such as disk name, or available diskspace, the resource model can generate a more precise indication of theproblem. For each resource model, some of the attributes are designated askeys.
Cycles When a resource model runs at an endpoint, it gathers data at regularintervals, called cycles; the duration of a cycle is the cycle time, which isdisplayed in seconds. A resource model with a cycle time of 60 secondsgathers data every 60 seconds. Each of the supplied resource models has adefault cycle time that you can modify when you define the resourcemodel. At each cycle, the resource model collects data, analyzes it,generates the events, and triggers specified actions. The data collected are asnapshot of the status of the resources specified in the resource model.
Gathering Historical Data componentThe Gathering Historical Data component uses data collected by specificIBM Tivoli Monitoring resource models to populate a database on theTivoli server where it is installed. The collected data is aggregated every 24hours and added to the Tivoli Enterprise Data Warehouse database, fromwhich it can be used in the long term analyses of system resources usingkey system metrics.
For more information about Tivoli Enterprise Data Warehouse, see thefollowing publications:v Tivoli Distributed Monitoring Warehouse Enablement Pack: Implementation
Guide
v Enabling an Application for Tivoli Enterprise™ Data Warehouse
Heartbeat functionIn addition to the monitoring processes described above, IBM TivoliMonitoring operates a heartbeat function, which monitors the basic systemstatus at endpoints attached to the gateway at which it is enabled. Eventscan be sent to the Tivoli Business Systems Manager, the Tivoli EnterpriseConsole, and the IBM Tivoli Monitoring Notice Group.
4 IBM Tivoli Monitoring for Databases: Informix: User’s Guide
Indications and eventsAn indication is generated when the state of a given resource meetsdefined criteria. By itself, an indication does not trigger any specific action.When indications are aggregated, the resource model generates an event.When you define an event, you must specify under what conditions acertain number of indications are aggregated into an event. You alsospecify whether these indications must be consecutive, or whether thesequence may be interrupted by one or more monitoring cycles that do notregister any indication. The cycles during which no indication is generatedare called holes. An event can notify that there is a problem in the resourcestate, trigger an action and, if enabled, send a notification to the TivoliEnterprise Console server or to the Tivoli Business Systems Manager.
IndicationsEach resource model generates an indication in a given cycle basedon the settings defined for it. A single occurrence of an indicationdoes not always represent a problem, however the persistence ofindications might. The resource model measures the persistence ofthe indications and aggregates them according to yourspecifications, or how you define settings for occurrences andholes. If the persistence of an indication meets the specifiednumber of occurrences, the resource model generates an event.Indications can be generated in any one of the followingcircumstances:v When a single threshold is exceeded. For example, in the
Windows® Process resource model, the Process High CPUindication is generated when the High CPU Usage threshold isexceeded (for any process that has a non-zero process ID).
v When a combination of two or more thresholds are exceeded.For example, in the Windows Logical Disk resource model aHigh Read Bytes per Second indication is generated when boththe following thresholds are exceeded:– The amount of bytes transferred per second (being written or
read) exceeds the High Bytes per Second threshold– The percentage of time that the selected disk drive spends
making read or write requests exceeds the High PercentUsage threshold.
v When a combination of other factors change. For example, in theWindows Process resource model the Process Handle Leakindication is generated when a process is losing memory. Thereis no threshold for this indication. The resource model comparesthe number of handles of the five processes with the mosthandles in consecutive cycles. If the number of handles hasincreased, the indication is generated.
Occurrences and holesOccurrences and holes record whether or not an indication occursduring the cycle for a specific resource model. An occurrence is acycle during which at least one threshold is exceeded and anindication occurs for a given resource model. A hole is a cycleduring which an indication does not occur for a given resourcemodel. A hole means none of the conditions that generate anindication were met, but it does not necessarily mean that nothresholds were exceeded.
Chapter 1. Overview 5
For example, in the Windows Logical Disk resource model a HighRead Bytes per Second indication is not created when thepercentage disk time is higher than the High Percent Usagethreshold, provided that the Low Disk Space threshold isexceeded.
EventsAn event verifies the persistence of an indication by eliminatingunrepresentative peaks and troughs for the indication. Forexample, a process that generates the Process High CPU indicationin one cycle might not threaten other processes if the high usage isnot repeated. However, an indication that persists over severalcycles is more likely to be a problem. Thus, an event defines thesignificant number of consecutive occurrences of the indication.
When you define an event, you can specify how many consecutiveholes in the sequence of consecutive occurrences are permitted.Specifying how many consecutive holes are permitted during theaccumulation of the consecutive occurrences enables you tocontinue the counting of consecutive occurrences if one or twocycles fall below the threshold.
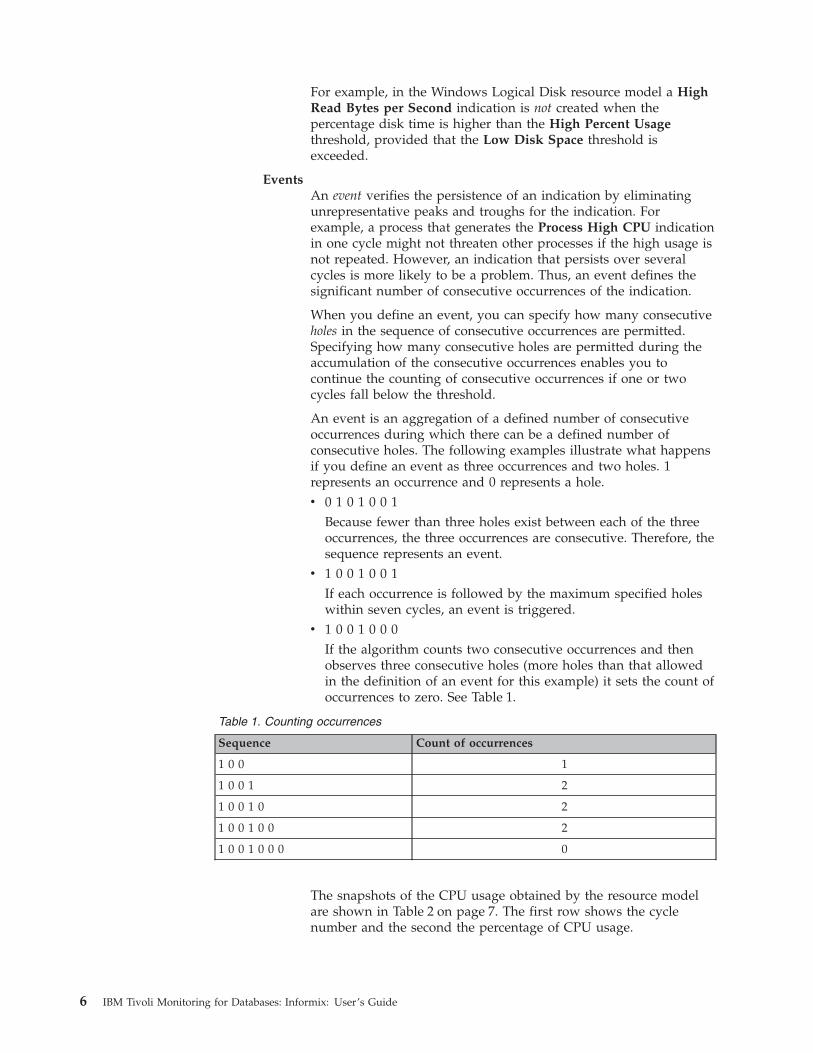
An event is an aggregation of a defined number of consecutiveoccurrences during which there can be a defined number ofconsecutive holes. The following examples illustrate what happensif you define an event as three occurrences and two holes. 1represents an occurrence and 0 represents a hole.v 0 1 0 1 0 0 1
Because fewer than three holes exist between each of the threeoccurrences, the three occurrences are consecutive. Therefore, thesequence represents an event.
v 1 0 0 1 0 0 1If each occurrence is followed by the maximum specified holeswithin seven cycles, an event is triggered.
v 1 0 0 1 0 0 0If the algorithm counts two consecutive occurrences and thenobserves three consecutive holes (more holes than that allowedin the definition of an event for this example) it sets the count ofoccurrences to zero. See Table 1.
Table 1. Counting occurrences
Sequence Count of occurrences
1 0 0 1
1 0 0 1 2
1 0 0 1 0 2
1 0 0 1 0 0 2
1 0 0 1 0 0 0 0
The snapshots of the CPU usage obtained by the resource modelare shown in Table 2 on page 7. The first row shows the cyclenumber and the second the percentage of CPU usage.
6 IBM Tivoli Monitoring for Databases: Informix: User’s Guide

Table 2. High CPU Usage percentages over 12 cycles: holes and occurrences
Cycle 1 2 3 4 5 6 7 8 9 10 11 12
CPU% 55 73 54 63 68 42 50 70 90 55 70 80
Occurrenceor hole
H O H O O H H O O H O O
Occurrencecount
0 1 1 2 3 3 0 1 2 2 3 4
Cycles that exceed the threshold are occurrences and are shown inbold type. The other cycles are holes.
For this example, an event is created for this indication if there arefour consecutive occurrences with only one hole permitted. Thefinal row in Table 2 shows the count that the resource model makesof the consecutive occurrences. The count is set to zero at the 7thcycle snapshot because the resource model has encountered twoconsecutive holes. In this example, an event is triggered in the 12thcycle. The count is then set to zero and the process continues.
While defining an event, you can also indicate if you want thesystem to notify the Tivoli Enterprise Console server, or the TivoliBusiness Systems Manager, that an event was generated. The TivoliMonitoring operator can change these selections later, when theresource model is included in a Tivoli Monitoring profile. You canalso define the degree of severity and the message that will specifythe notification of the event.
Clearing eventsA clearing event is a resource model function that, if enabled, allowsIBM Tivoli Monitoring to close an event when the circumstancesthat caused the event are no longer present. Clearing events can beprocessed by the Tivoli Enterprise Console server and by TivoliBusiness Systems Manager. Clearing events have a severity ofharmless, regardless of the severity of the original event, but havethe same event ID as the original event.
For example, a service stops and the Tivoli Enterprise Consoleserver receives an event notifying it of this problem. Until theservice restarts, the problem is still present on the endpoint, butIBM Tivoli Monitoring does not send any further eventnotifications to the Tivoli Enterprise Console server. If the ClearingEvent function is enabled, as soon as the service restarts, TivoliEnterprise Console server, thereby closing the original event. TheClearing Event itself does not normally appear on the server,because its only function is to clear the original error event.
Note: Correlated events cannot be cleared.
Monitoring of events and indicationsEvents can be sent to the Tivoli Enterprise Console server, the IBMTivoli Monitoring Web Health Console, and Tivoli BusinessSystems Manager.
Tivoli Enterprise Console ServerEvents can be viewed by a Tivoli Enterprise Console serverprovided that you have compiled and loaded the relevantBasic Recorder of Objects in C (BAROC) files on the server.
Chapter 1. Overview 7
The event contains a set of properties that can help toidentify the problem. For example, the information in theProcessHandleLeak event includes values for the following:v Current® Process IDv Number of handles allocated to the processv Name of the process
Clearing events can also be processed by the TivoliEnterprise Console server. If the default procedure is usedto enable the monitoring of events, the Tivoli EnterpriseConsole server uses the clearing event to close theassociated error event. However, if you choose not toinstall the clearing events rule incorporated in theabove-mentioned default procedure, the clearing event isdisplayed as a separate entity with the same id as theoriginal error event.
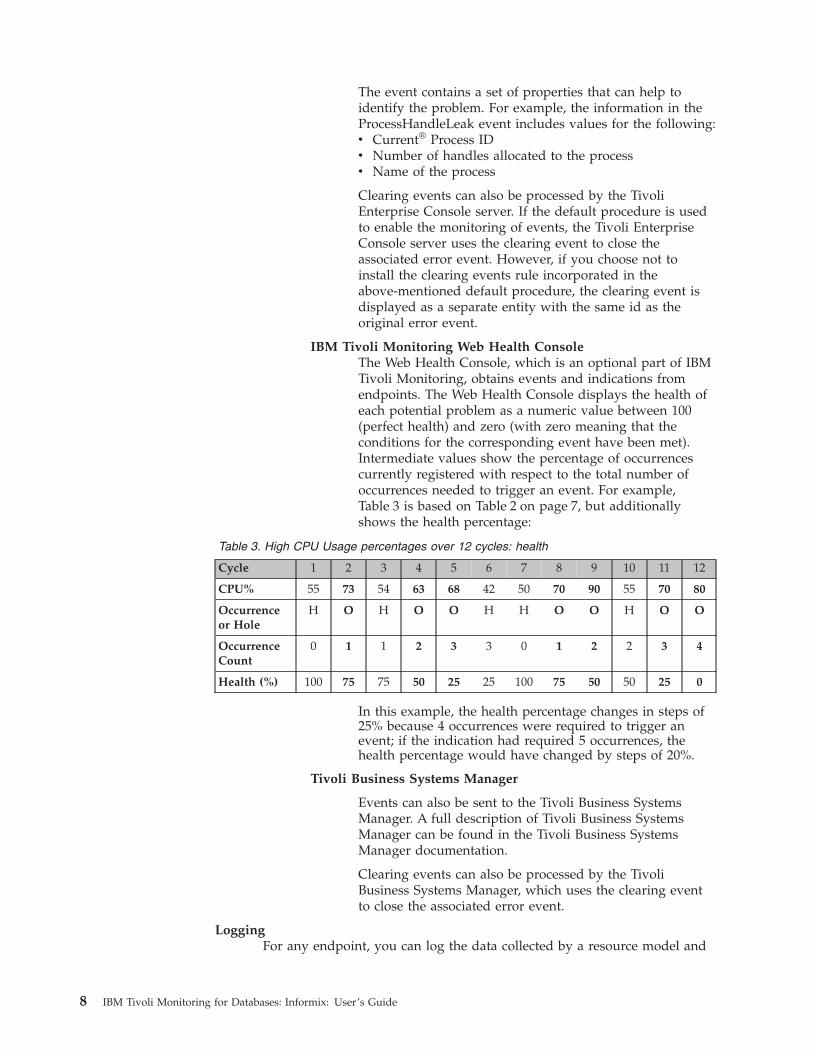
IBM Tivoli Monitoring Web Health ConsoleThe Web Health Console, which is an optional part of IBMTivoli Monitoring, obtains events and indications fromendpoints. The Web Health Console displays the health ofeach potential problem as a numeric value between 100(perfect health) and zero (with zero meaning that theconditions for the corresponding event have been met).Intermediate values show the percentage of occurrencescurrently registered with respect to the total number ofoccurrences needed to trigger an event. For example,Table 3 is based on Table 2 on page 7, but additionallyshows the health percentage:
Table 3. High CPU Usage percentages over 12 cycles: health
Cycle 1 2 3 4 5 6 7 8 9 10 11 12
CPU% 55 73 54 63 68 42 50 70 90 55 70 80
Occurrenceor Hole
H O H O O H H O O H O O
OccurrenceCount
0 1 1 2 3 3 0 1 2 2 3 4
Health (%) 100 75 75 50 25 25 100 75 50 50 25 0
In this example, the health percentage changes in steps of25% because 4 occurrences were required to trigger anevent; if the indication had required 5 occurrences, thehealth percentage would have changed by steps of 20%.
Tivoli Business Systems Manager
Events can also be sent to the Tivoli Business SystemsManager. A full description of Tivoli Business SystemsManager can be found in the Tivoli Business SystemsManager documentation.
Clearing events can also be processed by the TivoliBusiness Systems Manager, which uses the clearing eventto close the associated error event.
LoggingFor any endpoint, you can log the data collected by a resource model and
8 IBM Tivoli Monitoring for Databases: Informix: User’s Guide

write it in a local database. Then you can view it through the History Viewof the Web Health Console. You can choose to store raw or aggregateddata.
ParametersWhile thresholds can be only numeric values, parameters can be lists ofnumbers or strings. Using parameters enables you to customize yourresource model. You can define different parameters, as required. For eachparameter you can specify a value, which can be a list of numbers orstrings. This list can represent the instances you want to monitor, or a limityou do not want your resource to exceed, depending on how you use thissetting in your script. The lists will then be displayed in the TivoliMonitoring dialogs, and depending on the type of list you select in theworkbench, the lists will appear in different forms on Tivoli Monitoring.Within the workbench you can define default values and then let theoperator customize the settings in Tivoli Monitoring. You can choose oneamong the following kinds of lists when you specify the parameters:v Boolean Listv Choice Listv String Listv Numeric List
Some resource models have one or more parameters. For example, theWindows Parametric TCP/IP Ports resource model uses parameters thatcontain lists of ports and port states that you want to monitor.
ProfilesIBM Tivoli Monitoring is a profile-based application that runs in a Tivolienvironment. Different profiles can be defined containing differentselections of resource models. All aspects of existing profiles can bemodified, including the addition, deletion and customization of resourcemodels. You can distribute multiple profiles to each endpoint.
Recovery actionsFor any event, recovery actions can be run automatically, such as built-inactions (for Windows) or tasks. The actions can take positive steps toremedy the situation, or can ensure that information about the event isdistributed to the appropriate authorities or entities.
Built-in actions
Note: The indications in IBM Tivoli Monitoring for Databases,Version 5.1.0: Informix resource models do not have built-inactions.
Certain events can have one or more built-in actions predefined forthem. An action can be either the execution of a CIM class methodor the execution of a program. Both type of actions can beimplemented only through the IBM Tivoli Monitoring Workbench.For example, an event that detects the failure of a service couldhave the restart of that service as its built-in action. Thus, withoutany human intervention, IBM Tivoli Monitoring detects the failureof a service and automatically restarts it. Built-in actions aredefined by default as part of an event, but can be removed. Theyhave the same event ID as the event that they are designed tocorrect.
Tasks For each event you can select one or more tasks to be performed
Chapter 1. Overview 9

when the event is triggered. The tasks that are triggered by a IBMTivoli Monitoring event can access the event name and eventthresholds of the triggering event by accessing the environmentvariables.
Resource modelsIBM Tivoli Monitoring products provide predefined resource models thataccess specific performance data from the system at runtime. (For example,the Process resource model gathers data about processes running on thesystem.) The resource models process the data they collect using analgorithm that determines whether or not the system is performing toexpectations. You can either use a resource model’s default values to collectperformance data or customize the resource models to match specificrequirements in your environment. Distributing resource models usingdefault values enables you begin monitoring immediately to obtain usefuldata concerning your enterprise. When you become more familiar with themonitoring process and feedback, you may choose to customize theresource model information.
SchedulingIBM Tivoli Monitoring contains a scheduling feature that enables you todetermine a period within which monitoring takes place and specificscheduling rules. The monitoring period is determined by defining a fromand a to date.
The scheduling rules enable you to define time periods on specificweekdays during which monitoring takes place. Any number of rules canbe defined, allowing you to set up a complex pattern of resourcemonitoring for a profile, covering the time periods important to you.
The scheduled times are always interpreted as local times, enabling you toset up a single rule that monitors the same local time period in differenttime zones. For example, if your region covers several time zones, but youwant to monitor morning activities in each time zone, a single ruledefining the monitoring period of between 08:00 and 13:00 is interpretedlocally in each of the time zones, so that you monitor the same relativeperiod.
You should note also that all times of events or activities reported fromendpoints or gateways are also logged in the local time of the system fromwhere they originated.
ThresholdsEach resource model defines one or more thresholds. Each threshold has adefault numeric value that you can change when you define the profile.The monitoring algorithm written into the logic of the resource modeldetermines how the resource model uses a threshold. The following areexamples of how a resource model can use thresholds:v A threshold value might represent a limit that, if not met, indicates an
unsatisfactory resource state. For example, if you want the system tonotify you when disk space drops under 70%, set the threshold value to70 to generate an indication each time your disk space is less than 70%.
v Some threshold values control the scope of what the resource modelmonitors. For example, the Windows Process resource model uses theMaximum Processes threshold to limit the number processes monitoredfor the highest usage of CPU. Thus, if you set the Maximum Processesthreshold to 5, the resource model only reports on the the five highestCPU-using processes.
10 IBM Tivoli Monitoring for Databases: Informix: User’s Guide

Chapter 2. Getting started quick-reference guide
This chapter provides an overview of the setup tasks you must perform before youcan use the IBM Tivoli Monitoring for Databases: Informix product. It includescross-references to places where you can find additional information about each ofthese tasks.
The tasks can be divided into the following categories:v Setting up administrators to use the softwarev Registering a databasev Setting up the resource models and tasksv Setting up the IBM Tivoli Monitoring for Databases: Informix product to work
with the Tivoli Enterprise Console productv Setting up the IBM Tivoli Monitoring for Databases: Informix product to work
with the Tivoli Business Systems Manager productv Setting up the IBM Tivoli Monitoring for Databases: Informix product to work
with the Tivoli Enterprise Data Warehouse product
Task For more information
Setting up administratorsNote: You must assign both Tivoli and Informix authorization roles to administrators in the policy regions you wantthem to administer.
Assign each administrator the appropriateauthorization role for the procedures that theadministrator will perform.
Appendix A, “Authorization roles quick reference” on page 101,provides a list of the authorization roles required for eachprocedure.
Use the Edit Default Policies dialog in a IBM Tivoli Monitoringprofile to set the user and group IDs for the profile.
The Tivoli Management Framework User’s Guide provides informationabout how to assign authorization roles to Tivoli administrators.
Assign the IBMInformix_super role to theadministrator who will set up IBM TivoliMonitoring for Databases: Informix to work inyour environment.
Registering databases
Use the IBMInformixDiscovery object in theIBMInformixDiscovered policy region to findand register Informix databases.
“Discovering Informix instance objects” on page 19.
Configure the IBMInformixServer objectsrepresenting the instances of Informixdatabases discovered.
“Configuring Informix instance objects” on page 20.
Setting up monitoring profiles and tasks
Set up any customized tasks. “Customizing a task” on page 51.
Set up and schedule jobs from tasks. “Scheduling a job” on page 57.
Refer to the IBM Tivoli Monitoring for Databases, version 5.1.0:Informix Reference Guide for more information about tasks.
11
Task For more information
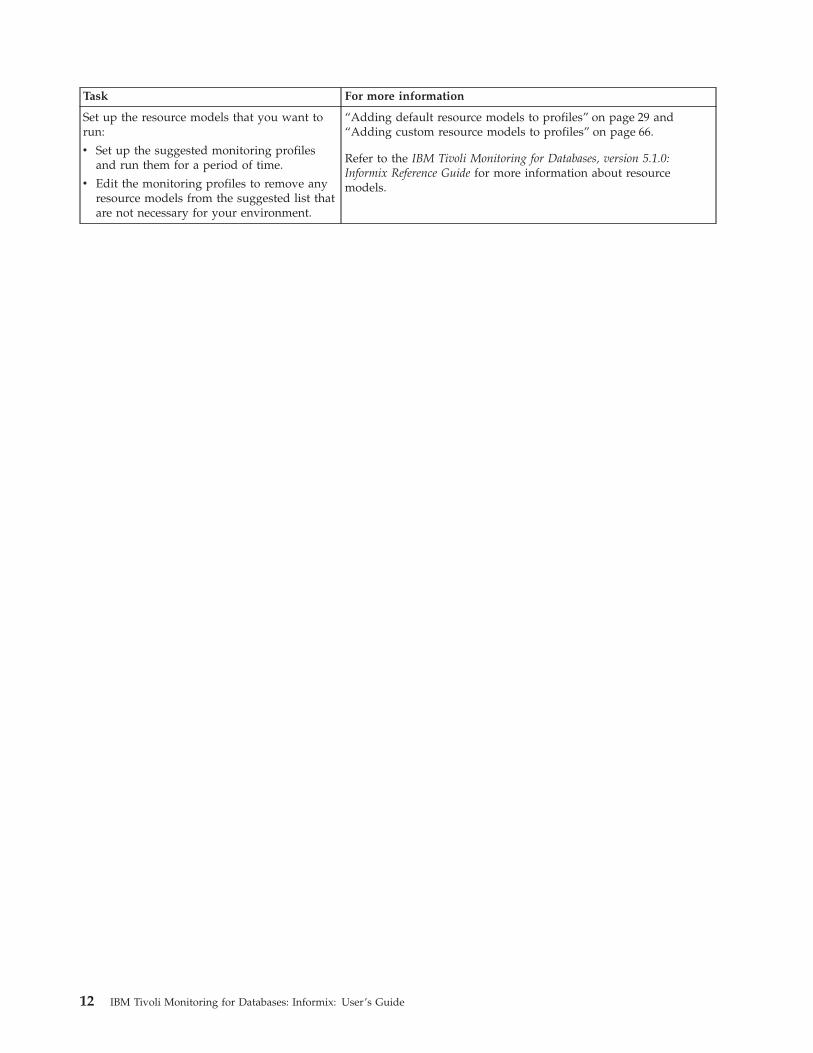
Set up the resource models that you want torun:
v Set up the suggested monitoring profilesand run them for a period of time.
v Edit the monitoring profiles to remove anyresource models from the suggested list thatare not necessary for your environment.
“Adding default resource models to profiles” on page 29 and“Adding custom resource models to profiles” on page 66.
Refer to the IBM Tivoli Monitoring for Databases, version 5.1.0:Informix Reference Guide for more information about resourcemodels.
12 IBM Tivoli Monitoring for Databases: Informix: User’s Guide
Chapter 3. Setting up IBM Tivoli Monitoring for Databases:Informix
This chapter describes the general setup procedures for IBM Tivoli Monitoring forDatabases: Informix
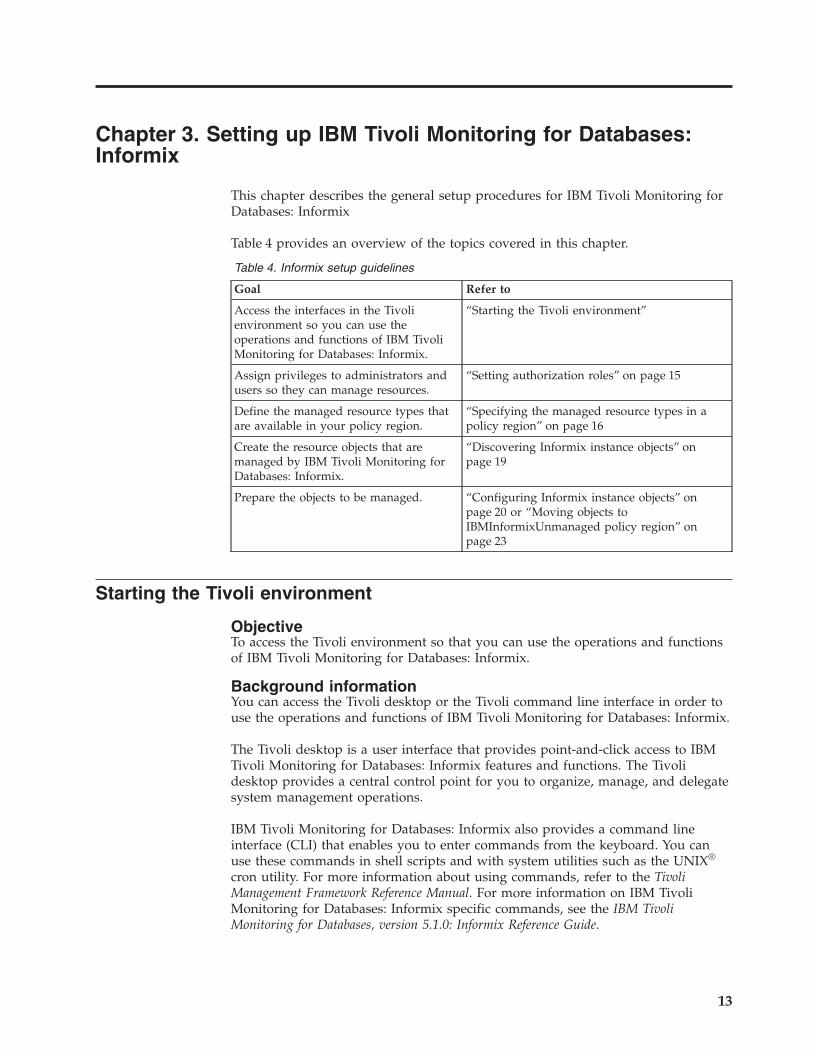
Table 4 provides an overview of the topics covered in this chapter.
Table 4. Informix setup guidelines
Goal Refer to
Access the interfaces in the Tivolienvironment so you can use theoperations and functions of IBM TivoliMonitoring for Databases: Informix.
“Starting the Tivoli environment”
Assign privileges to administrators andusers so they can manage resources.
“Setting authorization roles” on page 15
Define the managed resource types thatare available in your policy region.
“Specifying the managed resource types in apolicy region” on page 16
Create the resource objects that aremanaged by IBM Tivoli Monitoring forDatabases: Informix.
“Discovering Informix instance objects” onpage 19
Prepare the objects to be managed. “Configuring Informix instance objects” onpage 20 or “Moving objects toIBMInformixUnmanaged policy region” onpage 23
Starting the Tivoli environment
ObjectiveTo access the Tivoli environment so that you can use the operations and functionsof IBM Tivoli Monitoring for Databases: Informix.
Background informationYou can access the Tivoli desktop or the Tivoli command line interface in order touse the operations and functions of IBM Tivoli Monitoring for Databases: Informix.
The Tivoli desktop is a user interface that provides point-and-click access to IBMTivoli Monitoring for Databases: Informix features and functions. The Tivolidesktop provides a central control point for you to organize, manage, and delegatesystem management operations.
IBM Tivoli Monitoring for Databases: Informix also provides a command lineinterface (CLI) that enables you to enter commands from the keyboard. You canuse these commands in shell scripts and with system utilities such as the UNIX®
cron utility. For more information about using commands, refer to the TivoliManagement Framework Reference Manual. For more information on IBM TivoliMonitoring for Databases: Informix specific commands, see the IBM TivoliMonitoring for Databases, version 5.1.0: Informix Reference Guide.
13

Required authorization roleAll authorization roles can start the Tivoli environment. Your authorization roledetermines the actions you can perform in the Tivoli environment.
Before you beginNone.
When you finishNone.
ProcedureYou can perform this procedure from either the Tivoli command line or thedesktop.
Command Line: Use one of the following two methods to access the Tivolicommand line interface, depending on whether you use a Windows NT® or UNIXoperating system:v Windows NT
1. Log on to a Windows NT managed node or Tivoli management regionserver.
2. Select Start→Command Prompt in the Windows task bar to open thecommand prompt window.
3. Enter the following command to run the environment initialization and setupscript:sh .%SystemRoot%/system32/drivers/etc/Tivoli/setup_env
This command enables you to perform all of the IBM Tivoli Monitoring forDatabases: Informix operations.
v UNIX
1. Log on to a UNIX managed node or Tivoli management region server.2. Run the environment initialization and setup script.
– If you are using the Bourne, Korn, or bash shell, run the followingcommand:. /etc/Tivoli/setup_env.sh
– If you are using the C shell, run the following command:source /etc/Tivoli/setup_env.csh
Desktop:
1. Do one of the following to access the login screen of the Tivoli desktop:v Click Start in the Windows task bar and select Programs →Tivoli →Tivoli.
—OR—v Enter the tivoli command. See the Tivoli Management Framework, Version 3.7.1:
Reference Manual for more information on this command.2. Type the following values in the fields of the login screen:
v Host Machine specifies the Tivoli managed node, including the Tivoli serverwhere the Tivoli desktop should connect.
v Log In As specifies the login name to the managed node.v Password specifies the password for the specified login name.
3. Click OK to display the Tivoli desktop.
14 IBM Tivoli Monitoring for Databases: Informix: User’s Guide

Setting authorization roles
ObjectiveTo assign Informix administrators and users the roles they need for managingresources in IBM Tivoli Monitoring for Databases: Informix.
Background informationYou can authorize roles for the persons who use the product so that they canperform operations and access the resources that their jobs require. The followingroles are created when you install the product:v IBMInformix_super — provides the ability to discover and configure
IBMInformixServer instancesv IBMInformix_admin — provides the ability to query and update a database. An
administrator with the IBMInformix_admin role can perform all IBM TivoliMonitoring for Databases: Informix operations on an Informix database
v IBMInformix_user — provides read-only access to a limited set of IBM TivoliMonitoring for Databases: Informix operations. An administrator with theIBMInformix_user role can only view the properties of a database
A Tivoli administrator must have the required Tivoli authority and be assigned oneof these roles to successfully use this product.
Required authorization rolesenior (Tivoli)
Before you beginNone.
When you finishYou can discover objects. See “Discovering Informix instance objects” on page 19.
ProcedureYou can perform this procedure from either the Tivoli command line or thedesktop.
Command line: Use the wsetadmin command to set or change resourceauthorization roles. See the Tivoli Management Framework Reference Manual for moreinformation.
Desktop:
1. Double-click the Administrators icon to display the collection to see the iconsrepresenting the defined Tivoli administrators.
2. Right-click the existing administrator whose role you want to modify to displaythe Administrators drop-down menu.
3. Select Edit Resource Roles to display the Set Resource Roles dialog box.4. Select a resource for which you want to set the administrator’s role from the
Resources scrolling list.5. Add or remove roles for the selected resources as follows:
v Add rolesa. Select one or more roles from those shown in the Available Roles
scrolling listb. Click the left-arrow button to move the selected roles from the Available
Roles scrolling list to the Current Roles scrolling list.
Chapter 3. Setting up IBM Tivoli Monitoring for Databases: Informix 15

Additional Information: You can also double-click an entry to move itautomatically from one list to the other.
v Remove rolesa. Select one or more roles from those shown in the Current Roles scrolling
list.b. Click the right-arrow button to move the selected roles from the Current
Roles scrolling list to the Available Roles scrolling list.
You can also double-click an entry in the Current Roles scrolling list to moveit automatically to the Available Roles scrolling list.
Note: The list of roles can include others not listed here, depending on theparticular applications installed. You must click Change & Close orChange to add and remove the selected roles; the selected roles areonly temporarily moved to the Current Roles or Available Rolesscrolling lists.
6. If you are adding more than one role, click Change to add or remove theselected resource roles for the administrator as specified. The Set ResourceRoles dialog box remains displayed.
Note: You must click Change for each resource to which you assign roles.7. (Optional) Repeat steps 4 through 6 for each resource to which you want to
assign roles.8. Click Change & Close to add or remove the selected resource roles for the
administrator and return to the Administrators window.
Specifying the managed resource types in a policy region
ObjectiveTo define the managed resource types that are available in a policy region so youcan create the resource objects that are managed by the IBM Tivoli Monitoring forDatabases: Informix product.
Background informationA managed resource is any hardware or software entity that can be viewed ormanaged from the Tivoli desktop. Examples of managed resource types include:v IBMInformixServer (representation of each Informix Dynamic Server discovered)v InformixDiscovery (InformixDiscovery class is represented by the
IBMInformixDiscovery icon)v ProfileManager
A policy region is a collection of Informix resources that share one or more commonpolicies. By grouping similar resources into policy hierarchies that reflect yourorganization, you can customize IBM Tivoli Monitoring for Databases: Informix tomaintain and manage your Informix resources. For example, you can create apolicy region, North_America, that distinguishes the location, department, orgroup of resources.
Each policy region maintains a list of managed resource types that are valid forthat policy region. Before you can create an instance of a managed resource in apolicy region, you must add the managed resource type to this list. You can add orremove managed resource types at any time.
16 IBM Tivoli Monitoring for Databases: Informix: User’s Guide

When you add a managed resource type to a policy region, the software does thefollowing:v Assigns a default policy to the managed resource when you first add it to a
policy region.v Adds the managed resource type to the policy region’s Create menu so that you
can create new instances of the managed resource in the policy region.
Note: You must set the Tmw2kProfile option as a managed resource for the policyregion (if you have not already done so) so you can create IBM TivoliMonitoring profiles.
Required authorization rolesenior (Tivoli)
Before you beginNone.
When you finishNone.
ProcedureYou can perform this procedure from either the Tivoli command line or thedesktop.
Command line: Use the wgetpr and wsetpr commands to examine and changethe managed resource types in a policy region.
To assign the policy used in a policy region, enable or disable policy validation, oradd or remove a managed resource in a policy region, use the wsetpr command.The partial CLI syntax is as follows:
Adding a Managed Resource
wsetpr[–d default_pol][–v validation_pol][–E | –e]resourceregion
where:
–d default_polSpecifies the label of the default policy to be used for the managedresource.
–v validation_polSpecifies the label of the validation policy to be used for the managedresource.
–E Displays policy validation.
–e Enables policy validation.
resourceSpecifies the managed resource type.
region Specifies the label of the target policy region.
Deleting a Managed Resource
Chapter 3. Setting up IBM Tivoli Monitoring for Databases: Informix 17

wsetpr [–r] resource region
where:
–r Removes the specified resource from the policy region.
resourceSpecifies the managed resource type.
region Specifies the label of the target policy region.
Examples
The following example lists all of the managed resources in the Monitoring forIBM Informix policy region:wgetpr @PolicyRegion:Monitoring_for_IBM_InformixIBMInformixServerInformixDiscoveryProfileManagerTaskLibrary
The following example adds the TaskLibrary resource to the Engineering policyregion:wsetpr TaskLibrary @PolicyRegion:Engineering
The following example enables policy validation for the TaskLibrary resource inthe Engineering policy region. The default policy is BasicTaskLibrary and thevalidation policy is BasicTaskLibrary.wsetpr -d BasicTaskLibrary -v BasicTaskLibrary -e TaskLibrary@Engineering
For more information about these commands, see the Tivoli Management FrameworkReference Manual.
Desktop:
1. Open the Tivoli desktop.2. Double-click the policy region that contains the IBM Tivoli Monitoring for
Databases: Informix resource to display the Policy Region window.3. Click Properties to display the Properties drop-down menu.4. Click Managed Resources from the Properties drop-down menu to display the
Set Managed Resources dialog box.Additional Information: The following lists display:
Current ResourcesDisplays the current managed resource types for the policy region.
Available ResourcesDisplays the managed resource types that are available to add to thepolicy region.
5. Do one of the following to move a resource from Available to Current:v Double-click the managed resource type.
—OR—v Do the following:
a. Select a resource from the Available Resources list.b. Click the left arrow button to move your selection to the Current
Resources list.
18 IBM Tivoli Monitoring for Databases: Informix: User’s Guide
6. Optional: Remove a managed resource from the policy region by doing thefollowing:a. Choose one or more managed resources from the Current Resources list.b. Click the right arrow button to move the managed resource into the
Available Resources list.7. Click Set & Close to save the changes and return to the policy region window.
Discovering Informix instance objects
ObjectiveTo automatically create multiple IBMInformixServer instance objects on the Tivolidesktop.
Background informationDiscovery searches for Informix instances that reside on endpoints. If an Informixinstance is found that is not already being managed, a temporaryIBMInformixServer instance object is automatically created in theIBMInformixDiscovered policy region on the Tivoli desktop. An Informix instanceis an occurrence of a database server. IBMInformixDiscovery creates temporaryobjects containing as many attributes as can be automatically discovered. Beforeyou can use the instance you have to configure it by entering the attributes that arenot discovered automatically, such as the user name, password, JDBC driver, JDBCdriver location, and JDBC port number. After the instance is configured it is movedto the IBMInformixConfigured policy region and is available as a target for tasksand resource models.
Note: If you delete and then recreate an Informix instance, you must delete andrecreate the corresponding IBMInformixServer object from the IBM TivoliMonitoring for Databases: Informix product. If you delete anIBMInformixServer object, you must also unsubscribe the object from allprofile managers to which it is subscribed.
Required authorization roleIBMInformix_super
Before you beginNone
When you finishConfigure the objects you want to manage and move the others to theIBMInformixUnmanaged Policy region. See “Configuring Informix instanceobjects” on page 20 and “Moving objects to IBMInformixUnmanaged policy region”on page 23 for more information.
ProcedureYou can perform this procedure from either the Tivoli command line or thedesktop.
Command line: You can use the command line to discover Informix instanceswith the wifxdiscovery command. The CLI syntax is:
wifxdiscovery–e endpoint_label–d discovery_label
where:
Chapter 3. Setting up IBM Tivoli Monitoring for Databases: Informix 19
–e endpoint_labelSpecifies the endpoints on which to run discovery.
–d discovery_labelSpecifies the label of the discovery object being run.
Desktop:
1. Double-click the Monitoring for IBM Informix policy region to display thepolicy region window.
2. Double-click the IBMInformixDiscovered policy region to open the policyregion window.
3. Right-click on the IBMInformixDiscovery object and select Edit Endpoints todisplay the Edit Discovery Endpoints dialog.
4. Select a gateway from the Available Discovery Gateways box.5. Select the endpoints on which you want to discover Informix instances from
the Available Discovery Endpoints scrolling list.6. Click the left arrow button to move the endpoints to the Current Discovery
Endpoints scrolling list.7. Click the Change & Close button to save your changes and return to the Edit
Discovery Endpoints policy region.8. Right-click the IBMInformixDiscovery object icon and select Run Discovery to
begin the discovery process.IBMInformixDiscovery creates a temporary IBMInformixServer object for eachInformix instance discovered on the specified endpoints in theIBMInformixDiscovered policy region.
9. Perform one of the following:v Configure the Informix instance. See “Configuring Informix instance objects”.
—OR—v Move the instance to the IBMInformixUnmanaged policy region. See
“Moving objects to IBMInformixUnmanaged policy region” on page 23.
Configuring Informix instance objects
ObjectiveTo configure a temporary IBMInformixServer object so that it can be managed byIBM Tivoli Monitoring for Databases: Informix.
Background informationWhen you run IBMInformixDiscovery it creates temporary object containing asmany attributes as can be automatically discovered. The temporary object has aquestion mark (?) on the normal object icon. Before you can use the instance youhave to configure it by entering the attributes that are not discovered automatically,such as the IBM Informix user name, IBM Informix password, JDBC driver, JDBCdriver location, and JDBC port number. After the instance is configured it is movedto the IBMInformixConfigured policy region and is available as a target for taskand resource models.
Unconfigured IBMInformixServer objects can also exist in theIBMInformixUnmanaged policy region. The IBMInformixUnmanaged policyregion is used to store instances of Informix that exist on endpoints on whichIBMInformixDiscovery was run, but that you did not want to manage or monitorat the time of discovery.
20 IBM Tivoli Monitoring for Databases: Informix: User’s Guide
Required authorization roleIBMInformix_super
Before you beginRun IBMInformixDiscovery on selected endpoints to create temporaryIBMInformixServer objects for every instance of Informix not previouslydiscovered.
When you finishSubscribe the IBMInformixServer objects to profiles to start monitoring. See“Subscribing resources to profile managers” on page 28.
ProcedureYou can perform this procedure from either the Tivoli command line or thedesktop.
Command line: You can use the command line to configure IBMInformixServerobjects with the wifxconfept command. The CLI syntax is:
wifxconfept–m managed_node–u user–p password–j jdbc_port–d jdbc_driver–c jdbc_driver_location–h object_label
where:
–m managed_nodeSpecifies the name of the managed node on which the IBMInformixServerobject resides.
–u userSpecifies the name of the user accessing the IBMInformixServer databasethrough the JDBC connection.
–p passwordSpecifies the password of the user accessing the IBMInformixServerdatabase through the JDBC connection.
–j jdbc_portThe number of the port for the desired JCBC driver.
–d jdbc_driverName and location of the JDBC driver. For example:com.informix.jdbc.IfxDriver.
–c jdbc_driver_locationFull path to the ifxjdbc.jar file. For example:/data/informix/jdbc/lib/ifxjdbc.jar.
–h object_labelThe name of the Informix instance represented by the IBMInformixServerobject.
When you complete the task the object is moved to the IBMInformixConfiguredpolicy region and is no longer marked as temporary with the question mark (?) onthe icon.
Chapter 3. Setting up IBM Tivoli Monitoring for Databases: Informix 21
If you need to edit the attribute information for a configured IBMInformixServerobject, see “Editing IBMInformixServer object attributes” on page 37.
Desktop:
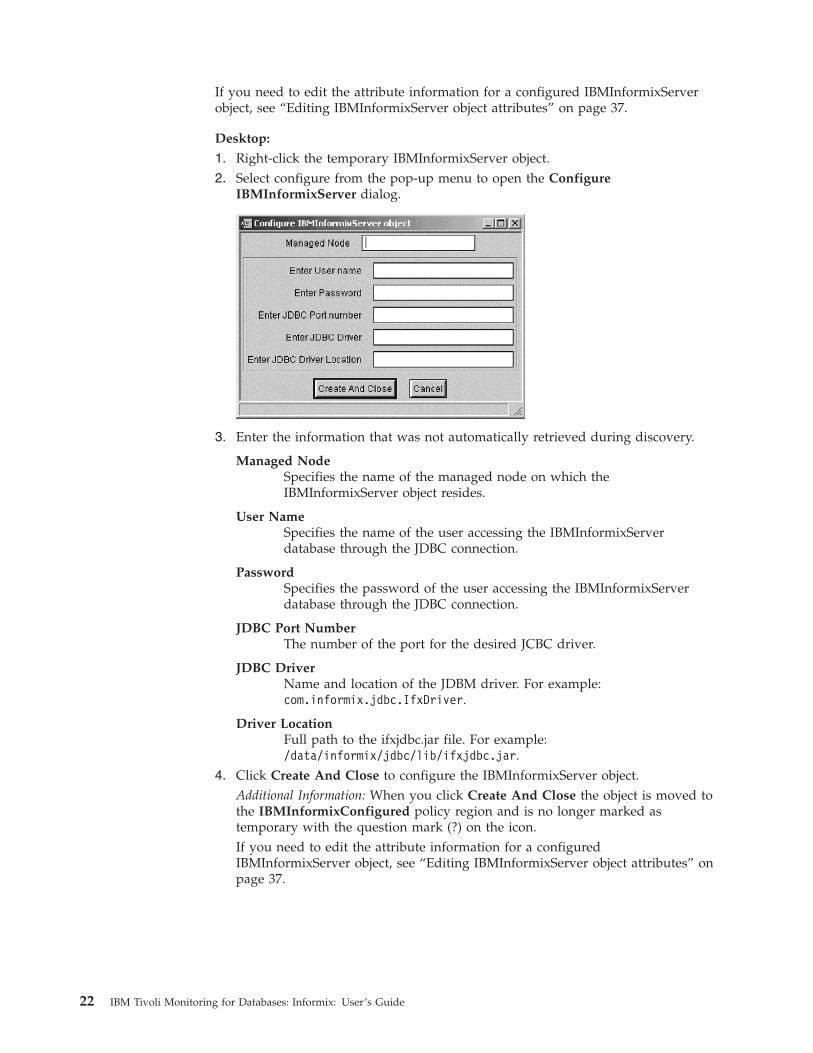
1. Right-click the temporary IBMInformixServer object.2. Select configure from the pop-up menu to open the Configure
IBMInformixServer dialog.
3. Enter the information that was not automatically retrieved during discovery.
Managed NodeSpecifies the name of the managed node on which theIBMInformixServer object resides.
User NameSpecifies the name of the user accessing the IBMInformixServerdatabase through the JDBC connection.
PasswordSpecifies the password of the user accessing the IBMInformixServerdatabase through the JDBC connection.
JDBC Port NumberThe number of the port for the desired JCBC driver.
JDBC DriverName and location of the JDBM driver. For example:com.informix.jdbc.IfxDriver.
Driver LocationFull path to the ifxjdbc.jar file. For example:/data/informix/jdbc/lib/ifxjdbc.jar.
4. Click Create And Close to configure the IBMInformixServer object.Additional Information: When you click Create And Close the object is moved tothe IBMInformixConfigured policy region and is no longer marked astemporary with the question mark (?) on the icon.If you need to edit the attribute information for a configuredIBMInformixServer object, see “Editing IBMInformixServer object attributes” onpage 37.
22 IBM Tivoli Monitoring for Databases: Informix: User’s Guide

Moving objects to IBMInformixUnmanaged policy region
ObjectiveTo move unconfigured IBMInformixServer objects to the IBMInformixUnmanagedpolicy region.
Background informationYou can move unconfigured IBMInformixServer objects to theIBMInformixUnmanaged policy region. The IBMInformixUnmanaged policyregion is used to store instances of Informix that exist on endpoints on whichIBMInformixDiscovery was run, but that you do not want to manage or monitor atthis time. Objects that are discovered and either configured or moved to theIBMInformixUnmanaged policy region are not discovered again whenIBMInformixDiscovery is run. This saves both time and resources.
Required authorization roleIBMInformix_super
Before you beginRun IBMInformixDiscovery on selected endpoints to create temporaryIBMInformixServer objects for every instance of Informix not previouslydiscovered. The temporary objects have a question mark (?) on the normal objecticon.
When you finishNone
ProcedureYou can perform this procedure from either the Tivoli command line or thedesktop.
Command line: You can use the command line to move IBMInformixServerobjects with the wmv command. The CLI syntax is:
wmv @InformixDiscoveryHBO:ObjectLabel@PolicyRegion:IBMInformixUnmanaged
where:
InformixDiscoveryHBOSpecifies the class of the temporary IBMInformixServer object beingmoved.
ObjectLabelSpecifies the name of the Informix instance represented by the temporaryIBMInformixServer object.
PolicyRegion:IBMInformixUnmanagedSpecifies the policy region into which unmanaged IBMInformixServer aremoved.
Note: On interconnected Tivoli management regions fully qualify the nameof the policy region on which the IBMInformixUnmanaged policyregion resides.
Example:
The following example shows the temporary object ol_starbug@starbug beingmoved to the IBMInformixUnmanaged policy region.
Chapter 3. Setting up IBM Tivoli Monitoring for Databases: Informix 23

wmv @InformixDiscoveryHBO:ol_starbug@starbug@PolicyRegion:IBMInformixUnmanaged
Desktop:
1. Hold the Shift key down and select the objects that you do not want tomanage at this time.
2. While depressing the Shift key drag the selected objects to theIBMInformixUnmanaged policy region.Objects that are discovered and moved to the IBMInformixUnmanaged policyregion are not discovered when IBMInformixDiscovery is run again.
24 IBM Tivoli Monitoring for Databases: Informix: User’s Guide

Chapter 4. Setting up IBM Tivoli Monitoring
This chapter describes the general setup procedures needed to use IBM TivoliMonitoring with IBM Tivoli Monitoring for Databases: Informix.
Suggested guidelines for setting up your resource modelsTable 5 provides guidelines for the order in which you set up monitoringinformation and where to find specific information on how to do so. As youbecome more familiar with IBM Tivoli Monitoring, you will discover additionalways of working with resource models that meet the needs of your environment.
Note: For additional or advanced information on IBM Tivoli Monitoring in theTivoli environment, see the IBM Tivoli Monitoring User’s Guide.
Table 5. Monitoring resources and applications guidelines
Goal See
1. Set up profile managers and profiles toorganize your resource models. This makesthe distribution of resource models moreefficient. You might need to set up multipleprofile managers and profiles within theprofile managers to meet the needs of yourenvironment.
“Creating profile managers andprofiles” on page 26
2. Subscribe Informix to the profile manager.This determines which resources receive aprofile when the profile is distributed.Profiles contain resource models to runagainst the endpoints (see Step 3).
“Subscribing resources to profilemanagers” on page 28
3. Populate each profile manager/profile withresource models for the resource that youwant to monitor. Include resource modelswith the default values or customize thedefault values to meet the needs of yourenvironment.
“Adding default resource modelsto profiles” on page 29
4. For each profile in your profile manager, dothe following:
v Specify the subscribers that you want todistribute the monitoring profile to anddistribute the profile.
v Specify the subscribers that you want todistribute the monitoring profile to whileusing MDist2.
v Determine if you must rerun any faileddistributions.
“Distributing profiles from thedesktop” on page 30
“Distributing profiles usingMDist2” on page 33
“Rerunning failed profiledistributions” on page 34
25

Table 5. Monitoring resources and applications guidelines (continued)
Goal See
5. To maintain your profiles and resourcemodels, do the following:
v Determine if you want to clear therecovery actions of an event.
v Determine if you want to reinstate therecovery actions of an event.
v Specify if you want to manage profiles andresource models after they are distributedto endpoints.
v Specify if you want to manage IBM TivoliMonitoring on gateways.
v Determine which resource models weredistributed to an endpoint.
v Determine the specific resource modelsthat are running on each endpoint.
v Use the IBM Tivoli Monitoring Web HealthConsole, Tivoli Enterprise Console, TivoliEnterprise Data Warehouse, or TivoliBusiness Systems Manager to view theinformation being monitored by yourresource models
“Adding or removing a built-inaction” on page 70
“Managing profiles and resourcemodels at endpoints” on page 85
“Managing IBM Tivoli monitoringgateways” on page 86
“Determining which resourcemodels are running on endpoints”on page 86
Creating profile managers and profiles
ObjectiveTo create profile managers and profiles so you can organize and distribute yourresource models more efficiently.
Background informationA monitoring profile is a group of defined resource models that you can distribute(download or push) to a subscribed (marked to receive) managed resource in aprofile manager.
In addition to activating default resource models, profile managers and profiles cangroup resources to enable simultaneous monitoring of multiple resources. You canhierarchically organized the profile managers. The profile manager is the top levelof the organization and contains specific profiles that contain specific resourcemodels. Instances and databases are then subscribed to the profile managers,which enable the monitoring information to be channeled to those resources.
You can create an unlimited number of profile managers, but it is recommendedthat they reflect some logical or functional grouping of database resources or thebusiness’s organizational structure. For example, profile managers could be labeledSales and Marketing, Administration and Finance, and Operations to reflect abusiness organization.
Note: Profile managers for IBM Tivoli Monitoring for Databases: Informix must bedataless to work with the product.
26 IBM Tivoli Monitoring for Databases: Informix: User’s Guide

You can create a dataless profile manager that distributes profiles without regard tothe existence of a database on its subscribers. A dataless profile managerdistributes to the system files on resources that have a profile database. However,it bypasses the profile database on these systems. Therefore, profiles are availableonly with database profile managers. A profile manager (database or dataless)cannot subscribe to a dataless profile manager. Likewise, dataless profile managerscannot distribute to other profile managers because they require profiles to bewritten to a profile database.
Required authorization roleadmin
Before you beginSet up the Tmw2kProfile managed resource types. Refer to the IBM TivoliMonitoring User’s Guide for information.
When you finishAdd resource models to the profile. See “Adding default resource models toprofiles” on page 29 or “Adding custom resource models to profiles” on page 66.
ProcedureYou can perform this procedure from either the Tivoli command line or thedesktop.
Command line:
1. Use the wcrtprfmgr command to create a profile manager. For example, tocreate a profile manager called ProfMgr2 in the TestRegion policy region, enterthe following command:wcrtprfmgr @PolicyRegion:TestRegion ProfMgr2
2. Use the wsetpm command to make the policy manager operate in datalessmode. For example, to make the profile manager ProfMgr2 dataless, enter thefollowing command:wsetpm -d @ProfileManager:ProfMgr2
where:
-d Specifies that the profile manager operates in a dataless mode.3. Use the wcrtprf command to create a profile. For example, to create a profile
called MarketingProf2 in the ProfMgr2 profile manager, enter the followingcommand:wcrtprf @ProfileManager:ProfMgr2 MarketingProfile MarketingProf2
For additional information about these commands, see the Tivoli ManagementFramework Reference Manual.
Desktop:
1. Open the Policy Region dialog box by doing the following:a. Open the Tivoli desktop.b. Double-click the policy region icon in which you want to create profile
managers and profiles to open the policy region.2. Select Create → Profile Manager to open the Create Profile Manager dialog
box.3. Type a unique name in the Name/Icon Label text box.4. Select the Dataless Endpoint Mode check box to create the profile manager in
dataless mode.
Chapter 4. Setting up IBM Tivoli Monitoring 27

5. Click the Create & Close button to close the Create Profile Manager dialogbox.Additional Information: In the following example, the policy region contains twoprofile manager icons, Manufacturing and Operations. The Manufacturingprofile manager is defined as dataless (the feathers under the Manufacturingprofile manager indicates that it is a dataless profile manager).
6. Double-click a profile manager icon to open the Profile Manager window.7. Select Create → Profile to open the Create Profile dialog box.8. Type a unique name for the profile in the Name/Icon text box.9. Select the Tmw2kProfile resource from the Type list.
10. Click the Create & Close button. An icon for the new profile is displayed inthe Profiles area of the Profile Manager window.
Subscribing resources to profile managers
ObjectiveTo add managed resources to a monitoring profile so administrators can definewhich resource to monitor.
Background informationSubscribing resources to a profile manager determines which resources receive aprofile when the profile is distributed. IBM Tivoli Monitoring uses the list ofsubscribers to determine which systems are monitored. To add a subscriber to adistributed monitoring profile, you must add the subscriber to the profile manager.
Note: Resources can also be subscribed to profiles from the IBM Tivoli MonitoringProfile dialog. See “Distributing profiles from the desktop” on page 30.
Required authorization roleadmin
Before you beginCreate a monitoring profile with monitoring sources. See “Creating profilemanagers and profiles” on page 26 for information.
When you finishDistribute the monitoring profile to the subscribed resource. See “Distributingprofiles from the desktop” on page 30 for information.
28 IBM Tivoli Monitoring for Databases: Informix: User’s Guide

ProcedureYou can perform this procedure from either the Tivoli command line or thedesktop.
Command line: Use the wsub command to add subscribers to the profilemanager. For example, to add a database called Sample@bburns as a subscriber tothe profile manager DatabaseMonitors, enter the following command:wsub @ProfileManager:DatabaseMonitors @PolicyRegionName:Sample@bburns
For additional information about these commands, see the Tivoli ManagementFramework Reference Manual
Desktop:
1. Open the Policy Region dialog box by doing the following:a. Open the Tivoli desktop.b. Double-click the policy region icon to display the policy region.
2. Double-click a profile manager icon to open the Profile Manager dialog box.3. Select Profile Manager → Subscribers to open the Subscribers dialog box.4. Select the subscribers to receive the profile distribution from the Available to
become Subscribers scrolling list.
Note: The Available to become Subscribers lists all possible subscribers,including both IBMInformixServer objects (appropriate subscriber) andendpoints (inappropriate subscriber). You can subscribe IBM TivoliMonitoring for Databases: Informix resource models to endpoints andthey are distributed with the profile taking up resource space, but theydo not run on the endpoints and an error is logged if you try to runthem. For detailed information on trace logging, see Appendix D,“Problem determination” on page 115.
5. Click the left arrow button to move the selected subscribers to the CurrentSubscribers scrolling list.
6. Click Set Subscriptions & Close to add the subscribers. Subscribers aredisplayed in the Subscribers field of the Profile Manager dialog box.
Adding default resource models to profiles
ObjectiveTo add a resource model to a profile using its default values so you can run theresource model immediately.
Background informationA resource model captures and returns information about a resource or application.You set up resource models and distribute them to IBMInformixServer instances.Each resource model monitors multiple resources. Choose the resource models toadd to a profile based on the resources you want to monitor. Adding one or moreof these resource models to a profile allows you to begin monitoring resourcesimmediately.
Put all of the resource models that you are going to distribute to the sameIBMInformixServer instance in a single profile because the distribution occurs on aper-profile basis.
Chapter 4. Setting up IBM Tivoli Monitoring 29
You can also use resource models that you have customized by customizing anexisting resource model, or adding a new one and customizing it. See, “Addingcustom resource models to profiles” on page 66 for information about customizingresource models.
Required authorization roleadmin
Before you beginv Create a profile manager and profile. See “Creating profile managers and
profiles” on page 26 for information.v Add subscribers to a profile manager. See “Subscribing resources to profile
managers” on page 28 for information.v See the IBM Tivoli Monitoring for Databases, version 5.1.0: Informix Reference Guide
for detailed information about each resource model.
When you finishDistribute the profile. See “Distributing profiles from the desktop”.
ProcedureYou can perform this procedure from either the Tivoli command line or thedesktop.
Command line: Use the wdmeditprf command to add a customized resourcemodel to a profile.
For additional information about these commands, see the Tivoli ManagementFramework Reference Manual .
Desktop:
1. Open the IBM Tivoli Monitoring Profile dialog box by doing the following:a. Open the Tivoli desktop.b. Double-click the policy region icon to open the policy region.c. Double-click the profile manager icon to open the profile manager.d. Double-click the profile icon to which you want to add a customized
resource model.2. Click Add With Defaults to open the Add Resource Models to Profile dialog
box.3. Select the resource model category from the Category drop-down list.4. Select the resource model you want from the Resource Model drop-down list.5. Click Add & Close. The resource model is added to the IBM Tivoli
Monitoring Profile.
Repeat this procedure for each resource model you want to add to the profileusing its default values.
Distributing profiles from the desktop
ObjectiveTo distribute profiles to specified subscribers.
30 IBM Tivoli Monitoring for Databases: Informix: User’s Guide

Background information
Note: IBM Tivoli Monitoring for Databases: Informix resource models can bedistributed only to IBMInformixServer instances. If you try to distribute anIBM Tivoli Monitoring for Databases: Informix resource model to anendpoint an error message is sent to the trace file and logged. For detailedinformation on trace logging, see Appendix D, “Problem determination” onpage 115.
You can distribute profiles to the following groups:
Next level of subscribersDistributes the profile only to the subscribers named in the Distribute toThese Subscribers: scrolling list of the Distribute Profile dialog box. Thisoption does not distribute to subscribers at lower levels of the hierarchy.Perform the distribution process from profile managers at more than onelevel to reach all the profile resources if a profile manager with subscribersresides at the next lower level.
All levels of subscribersDistributes the profile to all subscribers in the hierarchy. Consider thefollowing example. You have a profile in which a dataless profile manageris subscribed to a profile manager, and the dataless profile manager has asubscribed IBMInformixServer instance. If you distribute to the next levelof subscribers, the profile manager distributes the profile only to thedataless profile manager. If you distribute to all levels of subscribers, theprofile manager distributes the profile to the dataless profile manager andto the IBMInformixServer instance.
Select this option if you want to distribute a profile in which your resourceis the only subscriber.
Required authorization roleadmin
Before You Beginv Create a profile manager and profile. See “Creating profile managers and
profiles” on page 26 for information.v Add subscribers to a profile manager. See “Subscribing resources to profile
managers” on page 28 for information.v Add a resource model to a profile. See “Adding default resource models to
profiles” on page 29 and“Adding custom resource models to profiles” on page 66for information.
v See the IBM Tivoli Monitoring for Databases, version 5.1.0: Informix Reference Guidefor detailed information about each resource model.
When you finishView the output of your resource models on the IBM Tivoli Monitoring WebHealth Console, the Tivoli Business Systems Manager, or the Tivoli Enterprise DataWarehouse.
ProcedureYou can perform this procedure from the Tivoli desktop only.
Desktop:
1. Open the IBM Tivoli Monitoring Profile dialog box by doing the following:a. Open the Tivoli desktop.
Chapter 4. Setting up IBM Tivoli Monitoring 31

b. Double-click the policy region icon to open the policy region.c. Double-click the profile manager icon you want to open the Profile
Manager dialog box.d. Double-click the profile you want to distribute to open the IBM Tivoli
Monitoring Profile dialog box.2. Click Profile → Distribute. The Distribute Profile dialog box opens.3. Select one of the Distribute To options based on the following descriptions:
Next level of subscribersDistributes the profile only to the subscribers named in the Distributeto These Subscribers: scrolling list of the Distribute Profile dialog box.This selection does not distribute to subscribers at lower levels of thehierarchy. Perform the distribution process from profile managers atmore than one level to reach all the profile resources if a profilemanager with subscribers resides at the next lower level.
All levels of subscribersDistributes the profile to all subscribers in the hierarchy. Consider thefollowing example. You have a profile in which a dataless profilemanager is subscribed to a profile manager, and the dataless profilemanager has a subscribed IBMInformixServer instance. If you distributeto the next level of subscribers, the profile manager distributes theprofile only to the dataless profile manager. If you distribute to alllevels of subscribers, the profile manager distributes the profile to thedataless profile manager and to the IBMInformixServer instance.
Select this option if you want to distribute a profile in which yourresource is the only subscriber.
4. Select Make each subscriber’s profile an EXACT COPY of this profile fromthe Distribution Will options.Additional Information: This option overwrites the subscriber’s profile with anexact copy of the profile that you are distributing.
Note: Always select the Make each subscriber’s profile an EXACT COPY ofthis profile option when you distribute a profile to a IBMInformixServerobject. Do not select the Preserve modifications in subscriber’s copiesof the profile option. A Make each subscriber’s profile an EXACTCOPY of this profile pushes all profiles in a dataless profile manager tothe target, even if only one is specified.
5. Select the subscribers to receive the profile using the following steps:
Note: Make sure that each subscriber in the Distribute to These Subscribersscrolling list is either a profile manager or a IBMInformixServer instance.You can distribute IBM Tivoli Monitoring for Databases: Informixresource models to endpoints taking up resource space, but resourcemodels do not run on endpoints and an error is sent to the trace file andlogged. For detailed information on trace logging, see Appendix D,“Problem determination” on page 115.
a. Select the list of subscribers that you do not want to distribute the profile tofrom the Distribute to These Subscribers scrolling list.
b. Click the right arrow to move the subscribers to the Do Not Distribute toThese Subscribers scrolling list.
c. Select the list of subscribers that you want to distribute the profile to fromthe Do Not Distribute to These Subscribers scrolling list.
32 IBM Tivoli Monitoring for Databases: Informix: User’s Guide

d. Click the left arrow to move the subscribers to the Distribute to TheseSubscribers scrolling list.
6. Click one of the following:
Distribute & CloseDistributes the profile immediately, closes the Distribute Profile dialogbox, saves the settings you made, and returns to the IBM TivoliMonitoring Profile dialog box.
DistributeDistributes the profile immediately, saves the settings you made, andleaves the Distribute Profile dialog box open.
ScheduleSchedules the distribution of the profile with the Tivoli Scheduler. Fordetails about using the Tivoli Scheduler, refer to the Tivoli ManagementFramework User’s Guide.
Distributing profiles using MDist2
ObjectiveTo circulate copies of the monitoring profile to subscribers while using MDist2 sothat administrators and users can activate the monitoring process.
Background informationIBM Tivoli Monitoring uses Multiplexed Distribution (MDist2) to performasynchronous profile data transfers through a hierarchy of repeaters. MDist2returns a sequence of responses containing the distribution status from eachresource to the application initiating the distribution. These responses are sent backto IBM Tivoli Monitoring in a log file, on the MDist2 command line, or through theMDist2 GUI.
IBM Tivoli Monitoring uses the following MDist2 functions:
Asynchronous deliveryIBM Tivoli Monitoring submits a distribution request and immediatelyreceives a distribution identifier and confirmation that the distribution is inprogress. MDist2 uses the callback function to send the final distributionstatus for each resource when it completes each endpoint distributioninstead of waiting until all resources are distributed.
Assured deliveryAssures that distributed profiles are delivered to the resources when thereare network interruptions, computer shutdowns, or disconnections.Assured delivery tries to reestablish the connections until it is eithersuccessful or the distribution time expires. The distribution begins at thepoint where it was interrupted.
Check-point and restartAssures that an interrupted data stream resumes from the last successfulcheckpoint. You do not have to resend all the IBM Tivoli MonitoringProfile data when the distribution resumes, but only the data that was notsent when the interruption occurred.
Data depotingStores segments of the profile at a depot close to the resource so theresources can retrieve the data from the depot instead of from the sourcehost. This reduces network traffic and speeds up the distribution.
Chapter 4. Setting up IBM Tivoli Monitoring 33

Required authorization roleadmin
Before you beginv Create a profile manager and profile. See “Creating profile managers and
profiles” on page 26 for information.v Add subscribers to a profile manager. See “Subscribing resources to profile
managers” on page 28 for information.v Add a resource model to a profile. See “Adding default resource models to
profiles” on page 29 and“Adding custom resource models to profiles” on page 66for information.
v See the IBM Tivoli Monitoring for Databases, version 5.1.0: Informix Reference Guidefor detailed information about each resource model.
When you finishNone
ProcedureYou can perform this procedure from the Tivoli command line only.
Command line: Use the wdmdistrib command to distribute the profile to thesubscribers of the profile manager. For example, to distribute the default profileDBManager-DBMSMonProfile to an instance labeled inst1@bburns, enter thefollowing command:wdmdistrib @Tmw2kProfile:DBManager-DBMSMonProfile \@InstanceManager:inst1@bburns
This command updates subscriber databases and configuration files. If nosubscriber is specified, wdistrib updates all subscribers. The syntax variesdepending on the version of Tivoli management region that you installed. Refer tothe Tivoli Management Framework Reference Manual for more information about thewdistrib command.
Rerunning failed profile distributions
ObjectiveTo verify that the distribution to a resource failed so that you can rerun the faileddistribution.
Background informationWhen a distribution fails, IBM Tivoli Monitoring creates a profile manager thatcontains the subscribers that failed.
When you successfully redistribute profiles, the software deletes the profilemanager that it created for the failed distribution. A wholly or partiallyunsuccessful redistribution retains the profile manager containing only thesubscribers that were unsuccessful in the redistribution. Continue the process ofcorrecting the errors and retrying the distribution until the profile is successfullydistributed to all resources.
Required authorization roleadmin
Before you beginNone
34 IBM Tivoli Monitoring for Databases: Informix: User’s Guide

When you finishNone
ProcedureYou can perform this procedure from the Tivoli desktop only.
Desktop:
1. Open the IBM Tivoli Monitoring Profile dialog box by doing the following:a. Open the Tivoli desktop.b. Double-click the policy region icon to open the policy region.
2. Select View → Refresh from the Policy Region dialog box to see the new profilemanagers.
3. Review the new profile manager names to determine and correct the cause ofthe failure. The following profile manager names are derived from a faileddistribution:v The failed distribution creates the following profile manager name due to a
Bad_Interpreter error:OriginalProfileName_Push_Failed_Bad_Interpreter
where:
OriginalProfileNameThe name of the profile that you were distributing when the erroroccurred.
The AMW089E error message is displayed at this point, indicatingthat the resource model type is not compatible with the resourceoperating system. For example, you might have distributed aWindows resource model to a UNIX-T resource.
v The failed distribution creates the following profile manager name due toany other error:OriginalProfileName_Distribution_Failed
where:
OriginalProfileNameThe name of the profile that you were distributing when the erroroccurred.
4. Subscribe the profile managers that contain the failed resources to the profilemanager that contained the original profile. See “Subscribing resources toprofile managers” on page 28.
Note: This can be done only if the profile manager used for the originaldistribution was not dataless.
5. Distribute the original profile to the failed resources by selecting these profilemanagers as the target for the distribution. See “Distributing profiles from thedesktop” on page 30. You can also edit the profile managers to delete a resourcefrom a group of failed resources before retrying the distribution.
Chapter 4. Setting up IBM Tivoli Monitoring 35

36 IBM Tivoli Monitoring for Databases: Informix: User’s Guide
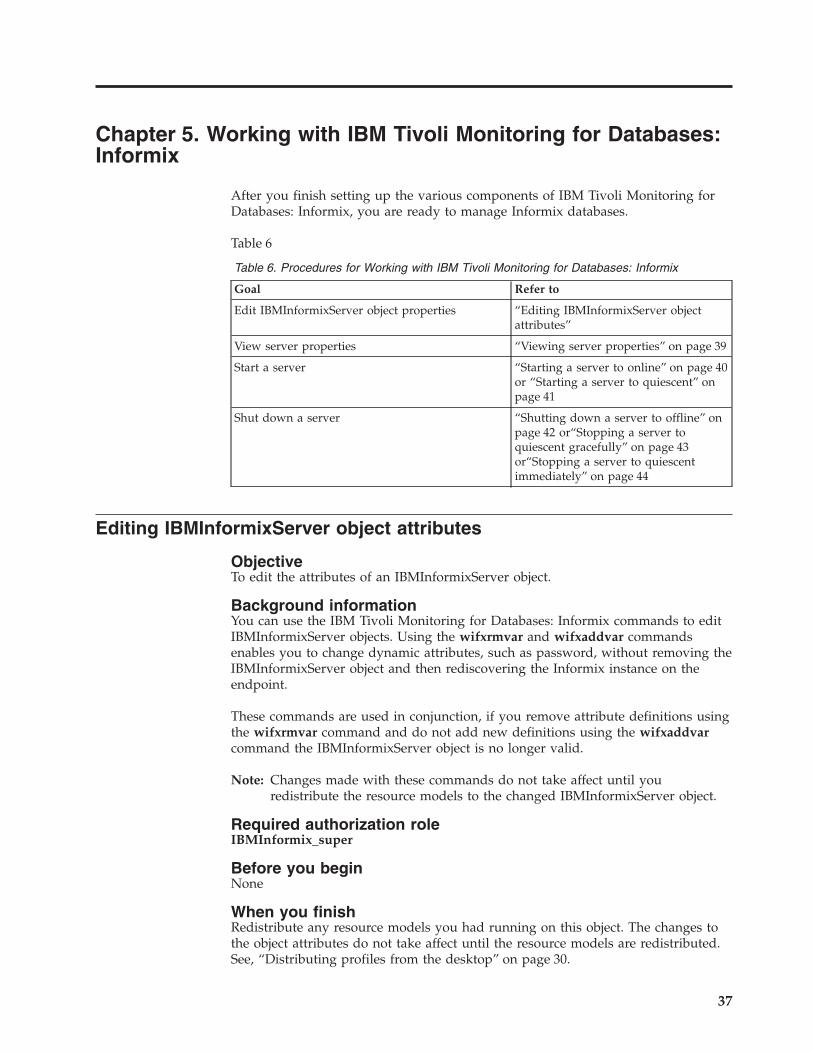
Chapter 5. Working with IBM Tivoli Monitoring for Databases:Informix
After you finish setting up the various components of IBM Tivoli Monitoring forDatabases: Informix, you are ready to manage Informix databases.
Table 6
Table 6. Procedures for Working with IBM Tivoli Monitoring for Databases: Informix
Goal Refer to
Edit IBMInformixServer object properties “Editing IBMInformixServer objectattributes”
View server properties “Viewing server properties” on page 39
Start a server “Starting a server to online” on page 40or “Starting a server to quiescent” onpage 41
Shut down a server “Shutting down a server to offline” onpage 42 or“Stopping a server toquiescent gracefully” on page 43or“Stopping a server to quiescentimmediately” on page 44
Editing IBMInformixServer object attributes
ObjectiveTo edit the attributes of an IBMInformixServer object.
Background informationYou can use the IBM Tivoli Monitoring for Databases: Informix commands to editIBMInformixServer objects. Using the wifxrmvar and wifxaddvar commandsenables you to change dynamic attributes, such as password, without removing theIBMInformixServer object and then rediscovering the Informix instance on theendpoint.
These commands are used in conjunction, if you remove attribute definitions usingthe wifxrmvar command and do not add new definitions using the wifxaddvarcommand the IBMInformixServer object is no longer valid.
Note: Changes made with these commands do not take affect until youredistribute the resource models to the changed IBMInformixServer object.
Required authorization roleIBMInformix_super
Before you beginNone
When you finishRedistribute any resource models you had running on this object. The changes tothe object attributes do not take affect until the resource models are redistributed.See, “Distributing profiles from the desktop” on page 30.
37
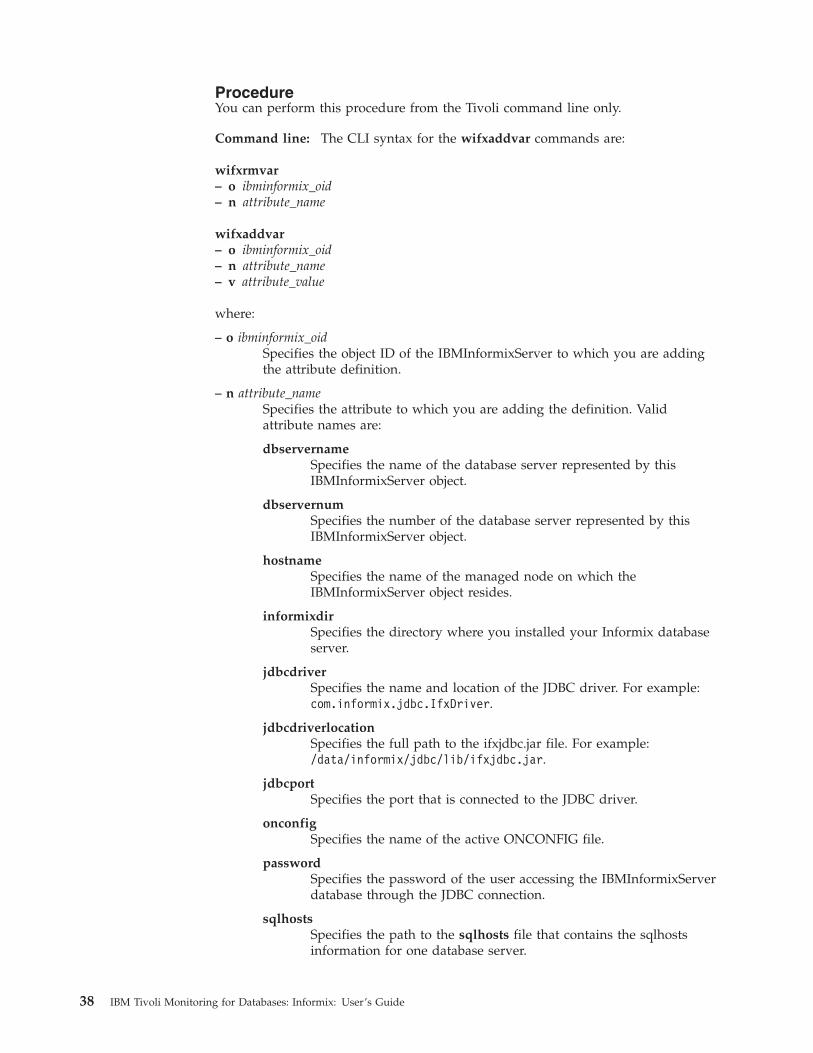
ProcedureYou can perform this procedure from the Tivoli command line only.
Command line: The CLI syntax for the wifxaddvar commands are:
wifxrmvar– o ibminformix_oid– n attribute_name
wifxaddvar– o ibminformix_oid– n attribute_name– v attribute_value
where:
– o ibminformix_oidSpecifies the object ID of the IBMInformixServer to which you are addingthe attribute definition.
– n attribute_nameSpecifies the attribute to which you are adding the definition. Validattribute names are:
dbservernameSpecifies the name of the database server represented by thisIBMInformixServer object.
dbservernumSpecifies the number of the database server represented by thisIBMInformixServer object.
hostnameSpecifies the name of the managed node on which theIBMInformixServer object resides.
informixdirSpecifies the directory where you installed your Informix databaseserver.
jdbcdriverSpecifies the name and location of the JDBC driver. For example:com.informix.jdbc.IfxDriver.
jdbcdriverlocationSpecifies the full path to the ifxjdbc.jar file. For example:/data/informix/jdbc/lib/ifxjdbc.jar.
jdbcportSpecifies the port that is connected to the JDBC driver.
onconfigSpecifies the name of the active ONCONFIG file.
passwordSpecifies the password of the user accessing the IBMInformixServerdatabase through the JDBC connection.
sqlhostsSpecifies the path to the sqlhosts file that contains the sqlhostsinformation for one database server.
38 IBM Tivoli Monitoring for Databases: Informix: User’s Guide
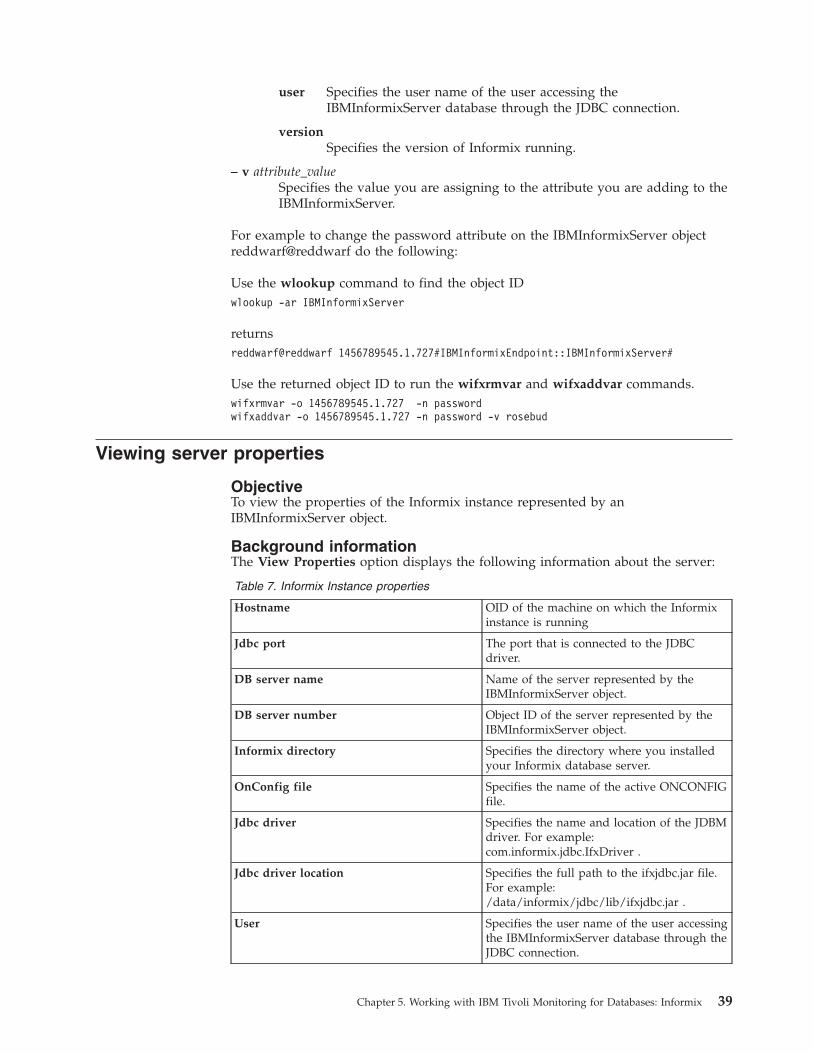
user Specifies the user name of the user accessing theIBMInformixServer database through the JDBC connection.
versionSpecifies the version of Informix running.
– v attribute_valueSpecifies the value you are assigning to the attribute you are adding to theIBMInformixServer.
For example to change the password attribute on the IBMInformixServer objectreddwarf@reddwarf do the following:
Use the wlookup command to find the object IDwlookup -ar IBMInformixServer
returnsreddwarf@reddwarf 1456789545.1.727#IBMInformixEndpoint::IBMInformixServer#
Use the returned object ID to run the wifxrmvar and wifxaddvar commands.wifxrmvar -o 1456789545.1.727 -n passwordwifxaddvar -o 1456789545.1.727 -n password -v rosebud
Viewing server properties
ObjectiveTo view the properties of the Informix instance represented by anIBMInformixServer object.
Background informationThe View Properties option displays the following information about the server:
Table 7. Informix Instance properties
Hostname OID of the machine on which the Informixinstance is running
Jdbc port The port that is connected to the JDBCdriver.
DB server name Name of the server represented by theIBMInformixServer object.
DB server number Object ID of the server represented by theIBMInformixServer object.
Informix directory Specifies the directory where you installedyour Informix database server.
OnConfig file Specifies the name of the active ONCONFIGfile.
Jdbc driver Specifies the name and location of the JDBMdriver. For example:com.informix.jdbc.IfxDriver .
Jdbc driver location Specifies the full path to the ifxjdbc.jar file.For example:/data/informix/jdbc/lib/ifxjdbc.jar .
User Specifies the user name of the user accessingthe IBMInformixServer database through theJDBC connection.
Chapter 5. Working with IBM Tivoli Monitoring for Databases: Informix 39

Table 7. Informix Instance properties (continued)
Password Specifies the password of the user accessingthe IBMInformixServer database through theJDBC connection.
Version The version of Informix being run.
Sql Hosts The SQLHOSTS registry key for thedatabase server.
Required authorization roleIBMInformix_user
Before you beginNone
When you finishNone
ProcedureYou can perform this procedure from the Tivoli desktop only.
Desktop: Use the following steps to view database properties:1. From the Tivoli desktop, double-click the policy region that contains the server.
This displays the Policy Region window.2. Right-click the server icon to display the icon’s pop-up menu.3. Select the Properties option from the pop-up menu to open the Properties
dialog.
Starting a server to online
ObjectiveTo start a server in the multi-user online state.
Background informationThis task takes the database server to the multi-user online state from theQuiescent state or the Offline state.
This task performs the equivalent of the Informix onmode -my command. See yourInformix documentation for detailed information on Informix commands.
Required authorization roleIBMInformix_admin
Before you beginNone
When you finishNone
ProcedureYou can perform this procedure from either the Tivoli command line or thedesktop.
Command line: Use the command line to start a server to online with thewruntask command. The CLI syntax is as follows:
40 IBM Tivoli Monitoring for Databases: Informix: User’s Guide
wruntask [–t TaskName] [–l LibraryName] [–h EndpointName] [–m TimeOut]
where:
–t TaskNameThe name of the task.
–l LibraryNameThe name of the library in which the task resides.
–h EndpointNameThe name of the endpoint on which to run the task.
–m TimeOutThe number of seconds this task runs without response before timing out.
For example, to do a startup to online of the server on endpoint@IBMInformixServer:Informix@vision75_11 with a 600 second timeout, use thefollowing command:wruntask-t "Start-up_to_On-Line"-l "IBM Informix Server Tasks"-h @IBMInformixServer:Informix@vision75_11-m 600
For more information about the wruntask command, refer to the Tivoli ManagementFramework Reference Manual.
Desktop:
1. Double-click the policy region to display the Policy Region window.2. Right-click the server icon.3. Select the Start Online option from the pop-up menu.
Starting a server to quiescent
ObjectiveTo start a database server in the administrative state from the Tivoli desktop.
Background informationThis task takes the database server to an administrative state from an offline state.
This task performs the equivalent of the Informix oninit -s command.
Required authorization roleIBMInformix_admin
Before you beginNone
When you finishNone
ProcedureYou can perform this procedure from either the Tivoli command line or thedesktop.
Command line: Use the command line to start a server to quiescent with thewruntask command. The CLI syntax is as follows:
Chapter 5. Working with IBM Tivoli Monitoring for Databases: Informix 41
wruntask [–t TaskName] [–l LibraryName] [–h EndpointName] [–m TimeOut]
where:
–t TaskNameThe name of the task.
–l LibraryNameThe name of the library in which the task resides.
–h EndpointNameThe name of the endpoint on which to run the task.
–m TimeOutThe number of seconds this task runs without response before timing out.
For example, to do a startup to quiescent of the server on endpoint@IBMInformixServer:Informix@vision75_11 with a 600 second timeout, use thefollowing command:wruntask-t "Start-up_to_Quiescent"-l "IBM Informix Server Tasks"-h @IBMInformixServer:Informix@vision75_11-m 600
For more information about the wruntask command, refer to the Tivoli ManagementFramework Reference Manual.
Desktop:
1. Double-click the policy region to display the Policy Region window.2. Right-click the server icon.3. Select the Start Quiescent option from the pop-up menu.
Shutting down a server to offline
ObjectiveTo shut down an Informix server to offline.
Background informationShut down the server. This task takes a database server in the Online or Quiescentstate to Offline and removes the online shared memory.
This task performs the equivalent of the Informix onmode –ky command.
Required authorization roleIBMInformix_admin
Before you beginNone
When you finishNone
ProcedureYou can perform this procedure from either the Tivoli command line or thedesktop.
Command line: Use the command line to shut down a server to off line with thewruntask command. The CLI syntax is as follows:
42 IBM Tivoli Monitoring for Databases: Informix: User’s Guide

wruntask [–t TaskName] [–l LibraryName] [–h EndpointName] [–m TimeOut]
where:
–t TaskNameThe name of the task.
–l LibraryNameThe name of the library in which the task resides.
–h EndpointNameThe name of the endpoint on which to run the task.
–m TimeOutThe number of seconds this task runs without response before timing out.
For example, to do a shut down to off line of the server on endpoint@IBMInformixServer:Informix@vision75_11 with a 600 second timeout, use thefollowing command:wruntask-t "Shutdown_to_Off-Line"-l "IBM Informix Server Tasks"-h @IBMInformixServer:Informix@vision75_11-m 600
For more information about the wruntask command, refer to the Tivoli ManagementFramework Reference Manual.
Desktop:
1. Double-click the policy region to display the Policy Region window.2. Right-click the database icon.3. Select Stop OffLine from the pop-up menu.4. Confirm the shutdown.
Stopping a server to quiescent gracefully
ObjectiveTo stop an Informix server to the quiescent state gracefully.
Background informationThis task takes the database server to the Quiescent state. This task allows anyrunning processes using the database to finish but does not allow new connectionsto the database server. When all processes finish, the database server goes into theQuiescent state and leaves the shared online memory intact.
This task is the equivalent of the Informix onmode –sy command. See yourInformix documentation for detailed information on Informix commands.
Required authorization roleIBMInformix_admin
Before you beginNone
When you finishNone
Chapter 5. Working with IBM Tivoli Monitoring for Databases: Informix 43
ProcedureYou can perform this procedure from either the Tivoli command line or thedesktop.
Command line: Use the command line to stop a server to Quiescent gracefullywith the wruntask command. The CLI syntax is as follows:
wruntask [–t TaskName] [–l LibraryName] [–h EndpointName] [–m TimeOut]
where:
–t TaskNameThe name of the task.
–l LibraryNameThe name of the library in which the task resides.
–h EndpointNameThe name of the endpoint on which to run the task.
–m TimeOutThe number of seconds this task runs without response before timing out.
For example, to do a shut down to quiescent gracefully of the server on endpoint@IBMInformixServer:Informix@vision75_11 with a 600 second timeout, use thefollowing command:wruntask-t "Stop_to_Quiescent_(Gracefully)"-l "IBM Informix Server Tasks"-h @IBMInformixServer:Informix@vision75_11-m 600
For more information about the wruntask command, refer to the Tivoli ManagementFramework Reference Manual.
Desktop:
1. Double-click the policy region to display the Policy Region window.2. Right-click the database icon.3. Select the Stop Gracefully option from the pop-up menu.4. Confirm the shutdown.
Stopping a server to quiescent immediately
ObjectiveTo stop an Informix database to the quiescent state immediately from the Tivolidesktop.
Background informationThis task takes the online database server to the Quiescent state without waitingfor running processes to finish. The current transactions are rolled back and theuser sessions are terminated.
This task is the equivalent of the Informix onmode –uy command. See yourInformix documentation for detailed information on Informix commands.
Required authorization roleIBMInformix_admin
44 IBM Tivoli Monitoring for Databases: Informix: User’s Guide

Before you beginNone
When you finishNone
ProcedureYou can perform this procedure from either the Tivoli command line or thedesktop.
Command line: Use the command line to stop a server to Quiescent immediatelywith the wruntask command. The CLI syntax is as follows:
wruntask [–t TaskName] [–l LibraryName] [–h EndpointName] [–m TimeOut]
where:
–t TaskNameThe name of the task.
–l LibraryNameThe name of the library in which the task resides.
–h EndpointNameThe name of the endpoint on which to run the task.
–m TimeOutThe number of seconds this task runs without response before timing out.
For example, to do a shut down to quiescent immediately of the server onendpoint @IBMInformixServer:Informix@vision75_11 with a 600 second timeout,use the following command:wruntask-t "Stop_to_Quiescent_(Immediately)"-l "IBM Informix Server Tasks"-h @IBMInformixServer:Informix@vision75_11-m 600
For more information about the wruntask command, refer to the Tivoli ManagementFramework Reference Manual.
Desktop: Use the following steps to stop a database to Quiescent immediately:1. From the Tivoli desktop, double-click the policy region that contains the
database. This displays the Policy Region window.2. Right-click the database icon to display the icon’s pop-up menu.3. Select the Stop Immediately option from the pop-up menu.4. Confirm the shutdown.
Chapter 5. Working with IBM Tivoli Monitoring for Databases: Informix 45

46 IBM Tivoli Monitoring for Databases: Informix: User’s Guide

Chapter 6. Working with tasks and jobs
A task is an action that must be routinely performed on selectedIBMInformixServer throughout the network. A task defines the executables to berun, the authorization role required to execute the task, and the user or groupname under which the task executes. The product provides tasks in the IBMInformix Server Tasks task library. Standard tasks run on any machine withoutconsideration of platform type. When you run tasks from the IBM Informix ServerTasks task library from the desktop, only valid targets are displayed.
A customized task is a standard task with defined arguments saved in the tasklibrary with a unique name. For example, you can customize a task to save taskoutput results to a file after each execution. Because you can customize taskarguments, the Tivoli environment does not display argument dialogs when yourun the task from the desktop. However, if you run a customized task from thecommand line, you still must specify the task arguments. Running a customizedtask requires additional information before it runs, such as the target of theexecution.
A job is a task with defined and saved arguments that can be executed many timeson specific managed resources. You can create jobs from both standard andcustomized tasks in the product task library. Like tasks, you store jobs in tasklibraries so you can reuse them. After you create a job, you can run it immediatelyusing the procedure described in “Running a job” on page 56. You also canschedule jobs to run at certain times in the Scheduler, as described in “Schedulinga job” on page 57.
Table 8 shows the options to manage tasks and jobs.
Table 8. Working with Tasks and Jobs
Goal Refer to
1. Running a task to perform a specific operation. “Running a task” on page 48
2. Defining a standard task with specific arguments tocustomize the task.
“Customizing a task” on page 51
3. Creating a job from a task so that it can be scheduled to run. “Creating a job” on page 52
4. Running a job with predefined arguments. “Running a job” on page 56
5. Scheduling jobs to run at specified times. “Scheduling a job” on page 57
The installation process installs the IBM Informix Server Tasks task library in theMonitoring for IBM Infromix policy region. We recommend that you do notremove the task library from this policy region. The task library contains defaultpolicies that affect how the task library works.
The policy region containing the task library defines task and job policies. Defaultpolicies set profile manager options and limit the execution of tasks to theappropriate targets. Validation policies control the creation and execution of tasks.
47

Running a task
ObjectivePerform a routine action on a selected managed node.
Background informationA task is an action that must be routinely performed on selected resourcesthroughout the network. A task defines the executables to be run, the authorizationrole required to execute the task, and the user or group name under which the taskis run. The product provides standard tasks in a task library. Standard tasks run onany machine without consideration of platform type.
Required authorization rolesIBMInformix_admin
Before you beginNone.
When you finishNone.
ProcedureYou can perform this procedure from either the Tivoli command line or thedesktop.
Command line: Use the wruntask command to run a task. Because not all usersuse the same task library, the documentation for the wruntask command does notprovide information for specific tasks. See the “CLI (command line interface)syntax” and “CLI example” sections in the IBM Tivoli Monitoring for Databases:Informix Reference Guide. The “CLI example” section provides an example of howto enter the wruntask command and the task arguments at the command line.
For more information about the wruntask command, see the Tivoli FrameworkManagement Reference Manual.
Desktop:
1. Open the task library window by doing the following:a. Open the Tivoli desktop.b. Double-click the policy region icon to display the policy region.c. Double-click the IBM Informix Server Tasks library icon to display the IBM
Informix Server Tasks library window.
48 IBM Tivoli Monitoring for Databases: Informix: User’s Guide
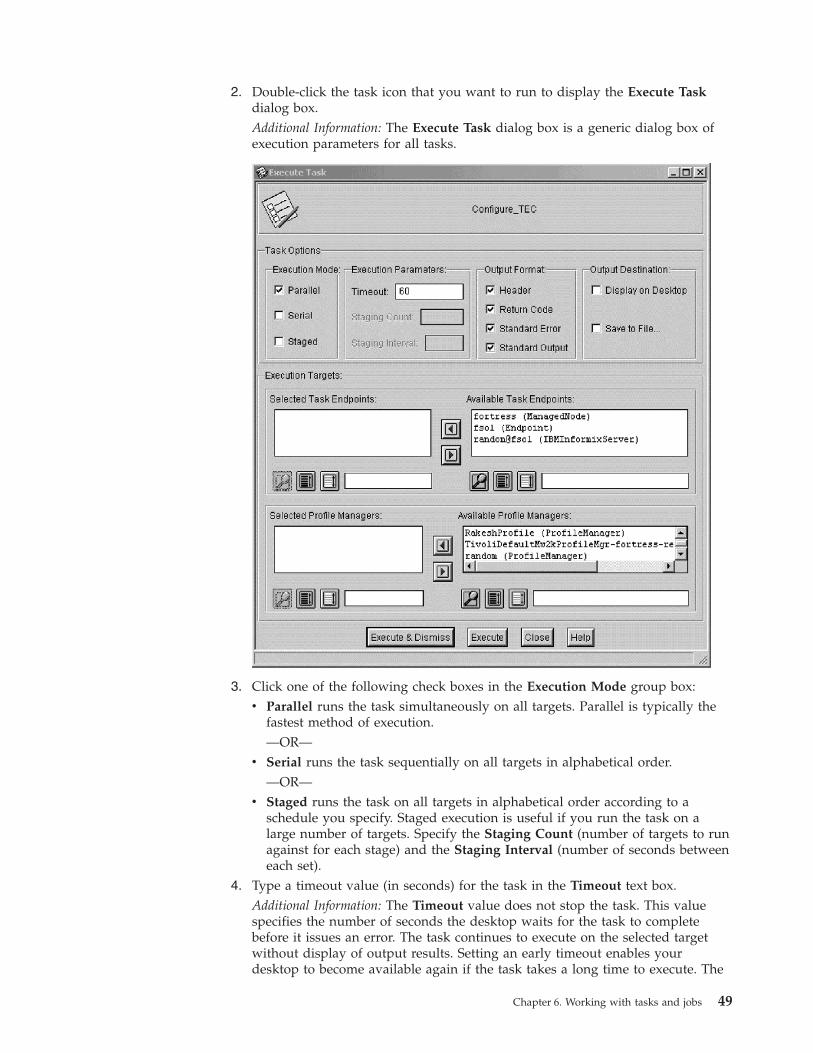
2. Double-click the task icon that you want to run to display the Execute Taskdialog box.Additional Information: The Execute Task dialog box is a generic dialog box ofexecution parameters for all tasks.
3. Click one of the following check boxes in the Execution Mode group box:v Parallel runs the task simultaneously on all targets. Parallel is typically the
fastest method of execution.—OR—
v Serial runs the task sequentially on all targets in alphabetical order.—OR—
v Staged runs the task on all targets in alphabetical order according to aschedule you specify. Staged execution is useful if you run the task on alarge number of targets. Specify the Staging Count (number of targets to runagainst for each stage) and the Staging Interval (number of seconds betweeneach set).
4. Type a timeout value (in seconds) for the task in the Timeout text box.Additional Information: The Timeout value does not stop the task. This valuespecifies the number of seconds the desktop waits for the task to completebefore it issues an error. The task continues to execute on the selected targetwithout display of output results. Setting an early timeout enables yourdesktop to become available again if the task takes a long time to execute. The
Chapter 6. Working with tasks and jobs 49
default is 60 seconds. If the task takes longer to complete than the specifiedTimeout and is running in Serial or Staged mode, the product moves on toother targets after this time expires.
5. Click one or more of the following check boxes in the Output Format groupbox to choose the output returned upon task completion:
HeaderIncludes a descriptive header for each record, such as the task nameand target.
Return CodeIncludes the programming codes produced when the task executes.
Standard ErrorIncludes all error messages encountered when the task executes.
Standard OutputIncludes all information that results from the task execution.
6. Select one of the following in the Output Destination group box to choose anoutput destination:v Click Display on Desktop to display the task output on the desktop.
Additional Information: If you choose Display on Desktop, you have anoption to save the information to a file as an option inside the output displaywindow.—OR—
v Click Save to File to save the output to a file.
To save the task output to a file, do the following:a. Click the Save to File check box in the Output Destination group box to
display the Destination for Task Output dialog box.b. Type the name of the endpoint on which to save the output in the On Host
text box.Additional Information: The endpoint must be a Tivoli client.
c. Type the absolute path name for the output file in the Output File text box.Additional Information: Example: /tmp/mytask.out
d. Click Set & Close to set your choices and return to the Execute Task dialogbox.
7. Choose the targets on which you want to run the task by doing one of thefollowing:v Run the task on specific targets by doing the following:
a. Select the targets from the Available Task Endpoints list.b. Click the left arrow button to move the selected targets to the Selected
Task Endpoints list.
—OR—v Run the task on all subscribers of the specified profile managers by doing the
following:a. Select profile managers from the Available Profile Managers list.b. Click the left arrow button to move the selected profile managers to the
Selected Profile Managers list.8. Click Execute to run the task.
—OR—
50 IBM Tivoli Monitoring for Databases: Informix: User’s Guide
a. Fill in the task argument dialog.Additional Information: For information about how to fill in the taskargument dialog, refer to the task description in the product reference guideor click Task Description to display the online help.
b. Click Set & Execute to run the task.
Customizing a task
ObjectiveTo customize one of the standard tasks in the task library so you can save definedarguments for future executions.
Background informationA customized task is a standard task with defined arguments saved in the tasklibrary with a unique name. For example, you can customize a task to save taskoutput results to a file after each execution. Because you can customize taskarguments, the Tivoli environment does not display argument dialogs when yourun the task from the desktop. However, if you run a customized task from thecommand line, you still must specify the task arguments. Running a customizedtask requires additional information before it runs, such as the target of theexecution.
Required authorization rolesadmin
Before you beginNone.
When you finishYou can run the task by following the procedure in “Running a task” on page 48.When you run a customized task, the Tivoli desktop does not display the taskargument dialog.
ProcedureYou can perform this procedure from the Tivoli desktop only.1. Open the task library window by doing the following:
a. Open the Tivoli desktop.b. Double-click the policy region icon to display the policy region.c. Double-click the product Task icon to display the task library window.
2. Double-click a task icon to display the Execute Task window for that task.Additional Information: The Execute Task window is a generic dialog box ofexecution parameters for all tasks. Complete this dialog box to run the task asdescribed in “Running a task” on page 48.
3. Click Execute to run the task.—OR—a. Fill in the task argument dialog.
Additional Information: For information about how to fill in the taskargument dialog, refer to the task description in the product reference guideor click Task Description to display the online help.
b. Click Save to display the Save Argument dialog box.Type the following information to define the customized task:1) Type a name for the task in the Name text box.
Chapter 6. Working with tasks and jobs 51
Additional Information: This name appears in the Library Contents fieldso you can view the customized tasks that are based on the parent task.
2) Type an identifier for this task.Additional Information: An identifier is the name of the task icon in theTask Library window. A customized task identifier has two parts. Thefirst part should be the standard task name (such asStart-up_to_On-Line). The second part should be descriptiveinformation that makes sense to you. For example, you could type SYS.The resulting task name would be Start-up_to_On-Line_SYS.The software generates a unique default name (such asStart-up_to_On-Line_aaa) if no identifier is entered.To enable filtering for an identifier without the standard task name, editthe tl_def_man_nodes policy method in the task library policy object.See the Tivoli Framework Management Reference Manual for moreinformation.
3) Type a description of this task in the Description text box.Additional Information: This description appears when you click TaskDescription in the task argument dialog box for this customized task.
4) Optional: Select the Show by Identifier check box to change the LibraryContents list to use the task identifier instead of the task name.
5) Optional: Click Parent Description to display information about theparent task from which you are creating a customized task.Additional Information: The task information appears under the headingDescription.
6) Click Save & Close to return to the task argument dialog box.4. Click Cancel in the task argument dialog box.5. Click Close in the Execute Task dialog to return to the Task Library window.6. Click View to display the View drop-down menu.7. Click Refresh from the View drop-down menu to display the new customized
task.
Creating a job
ObjectiveTo create a job by defining execution parameters so you can specify a targetenabling you to schedule it to run at certain times in the Scheduler.
Background informationA job is a task with defined and saved arguments that can be executed many timeson specific managed resources. You can create jobs from both standard andcustomized tasks in the product task library. Like tasks, you store jobs in tasklibraries so you can reuse them.
Required authorization rolesadmin (Tivoli)
Before you beginNone.
When you finishAfter you create a job, you can run it immediately using the procedure describedin “Running a job” on page 56. You also can schedule jobs to run at certain timesin the Scheduler, as described in “Scheduling a job” on page 57.
52 IBM Tivoli Monitoring for Databases: Informix: User’s Guide

ProcedureYou can perform this procedure from either the Tivoli command line or thedesktop.
Command line: Use the wcrtjob command to create jobs from the command line.For more information about this command, see the Tivoli Framework ManagementReference Manual. The syntax is as follows:
wcrtjob –j job_name –l library_name –t task_name –M mode [–s interval –n number]–m timeout –o output_format [–D|–d mannode_name –f file_name] [–h mannode_name][–p prof_manager_name]
where:
–j job_nameThe name of the job being created. Job names can include anyalphanumeric character, an underscore (_), a dash (–), a period (.), and aspace.
–l library_nameSpecifies the task library containing the task to be included in the job.
–t task_nameSpecifies the name of the task to include in the job.
–M modeSpecifies the mode in which the job runs. Valid options are as follows:
parallelRuns the job on all specified endpoints and any subscriberssimultaneously.
serial Runs the job on one endpoint at a time.
staged Runs the job on a set number of endpoints at specified intervals.
—m timeoutSpecifies the number of seconds that the task library waits for results to bereturned from the task. This option does not affect the execution of the job.If you are using staged mode, the timeout must be smaller than theinterval time.
—o output_formatDefines the format of the job output. The job output contains a summaryof the job on each managed node. Task execution output format isspecified with an octal number from 0 to 17. The format is constructed byadding the value of the desired output. For example, to print the task’sreturn code and standard output, enter —o 12. Output values are asfollows:
01 Prints a descriptive header for each record
02 Prints the task’s return code
04 Prints the standard error output
10 Prints the standard output
—D Displays the job output to the screen.
—d hostname and —f file nameSpecifies the host system and file name in which to save the job output.
Chapter 6. Working with tasks and jobs 53

—h task_endpointSpecifies the endpoint on which to run the job.
—p prof_manager_nameSpecifies the profile managers on which the job runs.
Desktop:
1. Access the task library window by doing the following:a. Open the Tivoli desktop.b. Double-click the policy region icon to display the policy region.c. Double-click the task library icon to display the task library window.
2. Click Create to display the Create drop-down menu.3. Click Job from the Create drop-down menu to display the Create Job dialog
box.
4. Type a descriptive job name in the Job Name text box.
54 IBM Tivoli Monitoring for Databases: Informix: User’s Guide

Additional Information: The job name identifies the icon on the desktop. Thename can include any alphanumeric character, an underscore (_), dash (–),period (.), or blank space.
5. Select the task on which the job is based from the Task Name list.6. In the Execution Mode group box, select one of the following check boxes:
ParallelRuns the task simultaneously on all targets. Parallel is typically thefastest method of execution.
—OR—
Serial Runs the task sequentially on all targets in alphabetical order.
—OR—
StagedRuns the task on all targets in alphabetical order according to aschedule you specify. Staged execution is useful if you are running thetask on a large number of targets. Complete Step 8 to specify theStaging Count (number of targets to run against per stage) and theStaging Interval (number of seconds between each set).
7. In the Execution Parameters group box, type the timeout value (in seconds)for the task in the Timeout text box.Additional Information: This value specifies the number of seconds the productwaits for the task or job to complete before it issues an error. The default is 60seconds. If the task takes longer to complete than the specified Timeout and isrunning in Serial or Staged mode, the product moves on to other targetssafter this time expires. The task continues to execute on the target, eventhough the product stopped waiting for it to end.
8. Optional: If you selected Staged in Step 6, specify the number of targets toinclude in each staged set in the Staging Count text box and the number ofseconds between each set’s startup time in the Staging Interval text box.
9. Click one or more of the following check boxes to choose the output type inthe Output Format group box:
HeaderIncludes a descriptive header for each record.
Return CodeIncludes the programming codes produced when the job executes.
Standard ErrorIncludes all error messages encountered when the job executes.
Standard OutputIncludes all information that results from the job execution.
10. Do one of the following in the Output Destination group box to choose anoutput destination:v Click Display on Desktop to display the job output on the desktop. Go to
Step 12.Additional Information: If you choose Display to Desktop, you have anoption to save the information to a file as an option inside the outputdisplay window.—OR—
v Click Save to File to save the output to a file and display the Destinationfor Task Output dialog box. Go to Step 11.
Chapter 6. Working with tasks and jobs 55

11. Do the following in the Destination for Task Output dialog box to save thejob output to a file:a. Type a Tivoli client endpoint name on which to save the output in the On
Host text box.b. Type the absolute path name for the output file in the Output File text
box.Additional Information: Example: /tmp/myjob.out
c. Click Set & Close to set your choices and return to the Create Job dialogbox.
12. Do one of the following to choose the resources on which to run the job:v Run the job on specific resource by doing the following:
a. Select the targets from the Available Task Endpoints list.b. Click the left arrow button to move the selected targets to the Selected
Task Endpoints list.–OR–
v Run the job on all subscribers of the specified profile managers by doingthe following:a. Select profile managers from the Available Profile Managers list.b. Click the left arrow button to move the selected profile managers to the
Selected Profile Managers list.13. Click Create & Close to create the job and return to the Task Library window.
Additional Information: The new job icon appears in the Task Library window.
Running a job
ObjectiveTo execute a job on specific resources immediately so you can perform amanagement operation.
Background informationBefore you can run a job, you must create it, as described in “Creating a job” onpage 52.
If you created a job from a standard task, the Tivoli desktop displays the taskargument dialog so that you can fill in any required information.
Jobs created from customized tasks run without further input because all requiredinformation is specified. (See “Customizing a task” on page 51 for informationabout how to create a customized task.)
Required authorization rolesIBMInformix_admin
Before you beginNone.
When you finishAfter you create a job, you can set it up to run on a regular schedule as describedin “Scheduling a job” on page 57.
ProcedureYou can perform this procedure from either the Tivoli command line or thedesktop.
56 IBM Tivoli Monitoring for Databases: Informix: User’s Guide
Command line: Use the wrunjob command to run jobs from the command line.For more information about this command, see the Tivoli Management FrameworkReference Manual.
Desktop:
1. Open the task library window by doing the following:a. Open the Tivoli desktop.b. Double-click the policy region icon to display the policy region.c. Double-click the task icon to display the task library window.
2. Do one of the following:v Double-click the job icon created from a customized task to begin executing
the job.–OR–
v Double-click the job icon created from a standard task. Go to Step 3.3. Type the values in the task dialog box.
Additional Information: For information about specific fields, see the taskdescription in the product reference guide or click Task Description to displaythe online help. The product runs the job and displays the output on thedesktop or sends it to a file in accordance with the job specification.
Scheduling a job
ObjectiveTo schedule jobs to occur regularly so you can routinely perform managementoperations.
Background informationThe product uses Scheduler to schedule jobs. Scheduler is a service that enablesyou to run jobs unattended. You can schedule a job to run one time or multipletimes. Scheduler notifies you by the manner you select when a job is complete. Toschedule a job, the job must exist in the task library. You create a job by followingthe procedure described in “Creating a job” on page 52.
Required authorization rolesIBMInformix_admin
Before you beginNone.
When you finishNone.
ProcedureYou can perform this procedure from either the Tivoli command line or thedesktop.
Command Line: Use the wschedjob command to schedule a job in the TaskLibrary from the command line. You can only schedule jobs that already exist inthe task library from the command line. For more information, see the TivoliManagement Framework Reference Manual.
Desktop:
1. Open the product task library window by doing the following:a. Open the Tivoli desktop.
Chapter 6. Working with tasks and jobs 57
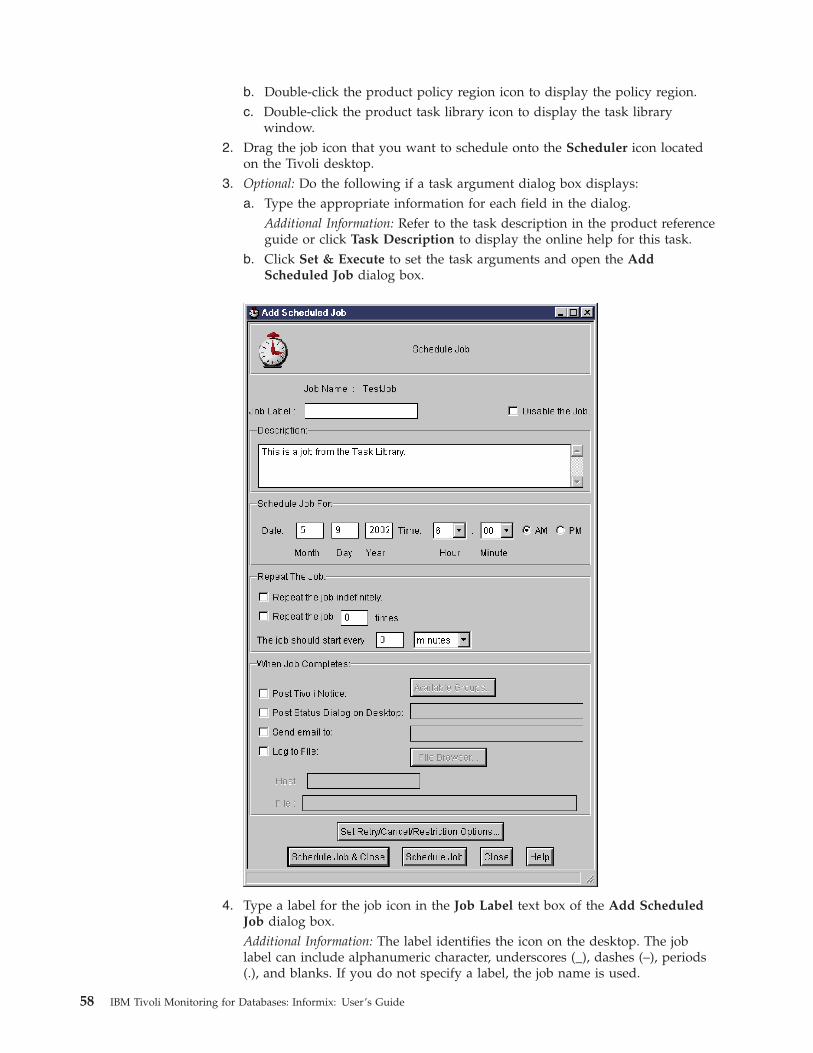
b. Double-click the product policy region icon to display the policy region.c. Double-click the product task library icon to display the task library
window.2. Drag the job icon that you want to schedule onto the Scheduler icon located
on the Tivoli desktop.3. Optional: Do the following if a task argument dialog box displays:
a. Type the appropriate information for each field in the dialog.Additional Information: Refer to the task description in the product referenceguide or click Task Description to display the online help for this task.
b. Click Set & Execute to set the task arguments and open the AddScheduled Job dialog box.
4. Type a label for the job icon in the Job Label text box of the Add ScheduledJob dialog box.Additional Information: The label identifies the icon on the desktop. The joblabel can include alphanumeric character, underscores (_), dashes (–), periods(.), and blanks. If you do not specify a label, the job name is used.
58 IBM Tivoli Monitoring for Databases: Informix: User’s Guide

5. Do one of the following:v Select the The Disable the Job check box to stop a scheduled job from
running.—OR—
v Deselect the The Disable the Job check box to continue running ascheduled job.
Additional Information: For more information on job disabling, see the TivoliEnvironment Framework User’s Guide.
6. Optional: Type a job description to uniquely identify the job in the Descriptionfield.
7. Set the date and time to begin scheduling in the Schedule Job For group box:a. Type a date in the Month, Day, and Year text boxes.b. Enter the time using the Hour and Minute drop-down lists and the AM
and PM radio buttons.8. Optional: Repeat the job by doing the following in the Repeat the Job group
box:a. Do one of the following:
v Select the Repeat the job indefinitely check box to repeat the jobindefinitely.–OR–
v Repeat the job a finite number of times by doing the following:1) Select the Repeat the job check box.2) Type the number of times you want the job to run.
b. Set the interval between start times for the job in the The job should startevery field.
9. Click any of the following check boxes in the When Job Completes group boxto send job completion notification:v Send a notice to a specific group by doing the following:
a. Click the Post Tivoli Notice check box.b. Click Available Groups to display the Available Groups dialog box.c. Select a group from the list of notice groups.d. Click Set to set your group and return to the Add Scheduled Job dialog
box.
Additional Information: You can read notices from the Tivoli desktop byclicking on the Notices icon.
v Send a notice to your desktop by doing the following:a. Click the Post Status Dialog on Desktop check box.b. Type the message you want displayed in the text box next to the check
box.v Send an email to a specified user by doing the following:
a. Click the Send e-mail to check box.b. Type the complete e-mail address in the text box next to the check box.
v Log the job completion status to a file by doing the following:a. Click the Log to File check box.b. Enter the file destination by doing one of the following:
– Type the file destination in the Host and File text boxes.
Chapter 6. Working with tasks and jobs 59

–OR–– Browse for the file destination by doing the following:
1) Click File Browser to display the File Browser dialog.2) Double-click on a host name to display the directories and files
for that host.3) Select a directory and file from the Directories and Files lists.4) Click Set File & Close to return to the Add Scheduled Job dialog
box.10. Optional: Set retry, cancel, or restriction options by doing the following:
a. Click Set Retry/Cancel/Restriction Options to display the SetRetry/Cancel Restrictions Options dialog box.
b. Choose one of the following cancel job options:v Deselect the Cancel job check box to have the Scheduler continue trying
the job indefinitely.—OR—
v Set the Scheduler to cancel a job in a specified time frame by doing thefollowing:1) Select the Cancel job check box.2) Type the time frame for the Scheduler to wait before canceling a job
that has not started.c. Click one of the following retry options:
v Click Retry the job until success to retry the job until it runssuccessfully.—OR—
v Specify the number of times a job attempts to run by doing thefollowing:1) Click the Retry the job check box.
60 IBM Tivoli Monitoring for Databases: Informix: User’s Guide

2) Type the number of attempts to start the job in the text box.3) Type the amount of time the Scheduler waits before retrying in the
The job should retry every field.d. Click any of the following check boxes in the Restrictions group box to
specify the job run times:
During the daySet the beginning and ending hour of day for the job to run.
At nightSet the beginning and ending hour of night for the job to run.
During the weekSet the beginning and ending day of the week for the job to run.
On weekendsSet the beginning and ending day of the weekend for the job torun.
e. Click Set to set the options and return to the Add Scheduled Job dialogbox.
11. Click Schedule Job & Close to schedule the job and return to the Tivolidesktop.
Chapter 6. Working with tasks and jobs 61

62 IBM Tivoli Monitoring for Databases: Informix: User’s Guide

Chapter 7. Viewing resource model results with the IBM TivoliWeb Health Console
This chapter provides an overview of the IBM Tivoli Monitoring Web HealthConsole. For complete information on installing and working with the IBM TivoliMonitoring Web Health Console see the latest version of the IBM Tivoli MonitoringUser’s Guide. The IBM Tivoli Monitoring Web Health Console runs on Netscape 6.xand Internet Explorer 6.x. You can use the IBM Tivoli Monitoring Web HealthConsole for the following purposes:v Checking, displaying, and analyzing the status and health of endpoints that
have distributed resource monitorsv Displaying an endpoint’s real-time and historical data logged to the IBM Tivoli
Monitoring databasev Viewing online and historical data on endpoints as a follow-up to specific
problemsv Starting and stopping the IBM Tivoli Monitoring engine and individual resource
models on selected endpointv Removing a profile from the selected endpoint
You can use the IBM Tivoli Monitoring Web Health Console to check, display, andanalyze the status and health of any endpoint with profiles and resource models.Status reflects the state of the endpoint displayed on the IBM Tivoli MonitoringWeb Health Console, such as running or stopped. Health is a numeric valuedetermined by resource model settings. You can also use the Web Health Consoleto work with real-time or historical data from an endpoint that is logged to theIBM Tivoli Monitoring database.
You can use the diagnostic and monitoring capabilities of the IBM TivoliMonitoring Web Health Console to perform targeted analysis of problemsassociated with individual endpoints when an event is sent to the Tivoli EnterpriseConsole. Use the online and historical data to follow up specific problems withsingle endpoints.
Understanding resource healthThe IBM Tivoli Monitoring Web Health Console obtains events and indicationsfrom endpoints. The IBM Tivoli Monitoring Web Health Console displays thehealth of each potential problem as a numeric value between 100 (perfect health)and zero (with zero meaning that the conditions for the corresponding event aremet). Intermediate values show the percentage of occurrences currently registeredwith respect to the total number of occurrences needed to trigger an event. SeeTable 9
Table 9. Health Determination Example
Cycle 1 2 3 4 5
CPU% 55 73 54 63 68
Occurrences or Holes H O H O O
Occurrence Count 0 1 1 2 3
Health % 100 75 75 50 25
63
Table 9 on page 63 displays the health percentage changes in steps of 25% because4 occurrences were required to trigger an event; if the indication required 5occurrences, the health percentage would have changed by steps of 20%. Resourcehealth is determined at the indication level and passed up to the endpoint. Thelowest health of any indication in a resource model is shown as the health of thatresource model and the lowest health of any resource model installed on anendpoint is shown as the health of that endpoint. For example, if one indication onone resource model that is installed on an endpoint has a health of zero, the healthof the endpoint is shown as zero. The required occurrences, cycle times, thresholds,and parameters for indications are defined when the resource model is created inthe IBM Tivoli Monitoring Workbench.
Connecting the IBM Tivoli Monitoring Web Health ConsoleYou can connect the IBM Tivoli Monitoring Web Health Console to any Tivolimanagement region server or managed node and configure it to monitor any or allof the endpoints that are found in that region. The IBM Tivoli Monitoring WebHealth Console does not have to be within the region itself, although it could be.To connect to the IBM Tivoli Monitoring Web Health Console you need access tothe server on which the IBM Tivoli Monitoring Web Health Console server isinstalled and the IBM Tivoli Managed Region on which you want to monitorhealth. All user management and security is handled through the IBM Tivolimanagement environment. This includes creating users and passwords as well asassigning authority.
64 IBM Tivoli Monitoring for Databases: Informix: User’s Guide

Chapter 8. Working with resource models
This chapter provides an overview of IBM Tivoli Monitoring procedures you needto follow to customize resource models.
Overview of IBM Tivoli MonitoringIBM® Tivoli® Monitoring 5.1.1 allows you deploy preconfigured best practicesresource models as well as standard and customized resource models to automatethe monitoring of essential resources. In this context, a resource is anything thataffects the operation of a computer system and includes physical and logical disks,CPUs, memory, printers, as well as the processes running, and the services, such asLanMan, the Windows event log, the UNIX syslogd (logging system daemon) andTCP/IP. This allows you to detect bottlenecks and other potential problems anddefine automatic recovery from critical situations. This ability frees systemadministrators from manually scanning extensive performance data. Themonitoring software integrates with other Tivoli Availability solutions, includingTivoli Business Systems Manager®, Tivoli Enterprise Console®, and TivoliEnterprise Data Warehouse®.
A resource model captures and returns information, such as database status orserver availability, about a resource or software application in the Tivolimanagement environment. To use a resource model, you must define anddistribute it to a resource.
Tivoli provides tools for organizing system resources on the Tivoli desktop. Aprofile manager is the top level of organization. Servers are subscribed to profilemanagers. These subscriptions provide the channel through which resource modelsare distributed to servers. A profile manager also can contains profiles, which arecontainers for application-specific information about a particular type of resource.Each profile contains one or more resource models. You can subscribe resources toa pre-defined profile manager. You can distribute individual profiles within theprofile manager to subscribers of the profile manager. You can group profilemanagers in a way that meets your needs. Profile managers can reflect functionalgrouping of resources, functional grouping of resource models, or any grouping atall. Likewise, a profile can contain any combination of resource models.
You must segregate profiles according to resources: Web servers need Web serverresource models, and database servers need database server resource models. Youcan define each resource model to include information such as how often to checkthe server resource status and what to do when certain conditions are met. Someresource models provide predefined settings and response actions, which you canadjust. Other resourced models require you to define all the settings. See the IBMTivoli Monitoring for Databases, version 5.1.0: Informix Reference Guide for adescription of individual settings.
Before running a resource model, you must subscribe the server resource to theprofile manager that contains the profile in which the resource model is stored.You can distribute the profile to the resource. By default, resource models are setup to become active when you distribute them to subscribers. You can activate anddeactivate resource models after they are distributed.
65

Adding custom resource models to profiles
ObjectiveTo specify the catagory, cycle time, and threshold values that customize a resourcemodel to meet the needs of your environment and add the resource model to aprofile.
Background informationA resource model captures and returns information about a resource or application.You set up resource models and distributed them to IBMInformixServer instance. Anumber of predefined resource models are installed with the product. To customizetheir basic settings, specify the category, cycle time, and threshold valuesappropriate for your environment. You can also edit the values of the resourcemodel indications and parameters and set scheduling and change the loggingsetting before adding the resource model. Each resource model monitors a differentresource. Choose the resource models to add to a profile based on the resourcesyou want to monitor. Adding one or more of these resource models to a profileenables you to begin monitoring resources immediately.
Put all of the resource monitors that you want to distribute to the same resource ina single profile because the distribution occurs at the individual profile level.
Note: Each resource model can have only one configuration in a profile. You canrun the same resource model with different configurations by setting up theresource model in an additional profile. In other words, multipleconfigurations of a resource model require multiple profiles.
Required authorization roleadmin
Before you beginv Create a profile manager and profile. See “Creating profile managers and
profiles” on page 26 for information.v Add subscribers to a profile manager. See “Subscribing resources to profile
managers” on page 28 for information.v See the IBM Tivoli Monitoring for Databases, version 5.1.0: Informix Reference Guide
for detailed information about each resource model.
When you finishDistribute the profile. See “Distributing profiles from the desktop” on page 30.
ProcedureYou can perform this procedure from either the Tivoli command line or thedesktop.
Command line: Use the wdmeditprf command to add a customized resourcemodel to a profile.
For additional information about these commands, see the Tivoli ManagementFramework Reference Manual
Desktop:
1. Open the IBM Tivoli Monitoring Profile dialog box by doing the following:a. Open the Tivoli desktop.b. Double-click the policy region icon to open the policy region.
66 IBM Tivoli Monitoring for Databases: Informix: User’s Guide
c. Double-click the profile manager icon to open the Profile Manager dialogbox.
d. Double-click the profile icon to which you want to add a customizedresource model.
2. Click Add to open the Add Resource Models to Profile dialog box.3. Select the resource model category from the Category drop-down list.4. Select the desired resource model from the Resource Model drop-down list.5. Set the frequency with which the resource model monitors the data in the
Cycle Time text box. Enter a time in seconds.6. Use the following steps to change any of the threshold values:
a. Select the Threshold Name that you want to change.Additional Information: The description box displays a description of thethreshold that you selected. A dialog box above the description displays thecurrently assigned threshold value. For the default threshold values see theIBM Tivoli Monitoring for Databases, version 5.1.0: Informix Reference Guide.
b. Change the currently assigned threshold value to a value appropriate toyour requirements.
c. Click Apply to set and display the new value in the Threshold Value dialogbox.
7. Optional: Click Indications or Parameters to make required modifications toindications and parameters and click Schedule to add schedule information.Additional information: If you do not perform this step, the indications andparameters use the default values shipped with the resource models. See“Customizing indications”, “Customizing parameters” on page 77, and“Customizing the scheduling monitoring period” on page 80 for information.
8. Click Add & Close to save your changes. The IBM Tivoli Monitoring Profiledialog box now shows the customized resource model.
Customizing indications
ObjectiveTo customize indication rules so that resources are monitored and events generatedin the manor most appropriate to your environment.
Background informationEach resource model triggers an indication if certain conditions defined by theresource model’s thresholds are not satisfied during the monitoring cycle. Eachresource model has predefined thresholds that meet the business needs of mostcustomers; however, you may have specific requirements for which thesethresholds are not appropriate; therefore, you can adjust these values as needed.
An event is used to verify the persistence of a given indication by eliminatingunrepresentative peaks and troughs for the indication. For example, a process thatgenerates the Process High CPU indication in one cycle is behaving perfectlynormally, and is of no threat to other processes if the high usage does not repeat.However, an indication that persists over several cycles is a problem. Thus, anevent defines the number of consecutive occurrences of the indication that aresignificant.
An occurrence refers to a cycle during which an indication occurs for a givenresource model.
Chapter 8. Working with resource models 67

A hole refers to a cycle during which an indication does not occur for a givenresource model. In other words, none of the conditions specified for the generationof any indication are met. This does not mean that none of the thresholds areexceeded.
Required authorization roleadmin
Before you beginv Create a profile manager and profile. See “Creating profile managers and
profiles” on page 26 for information.v Add subscribers to a profile manager. See “Subscribing resources to profile
managers” on page 28 for information.v Add a resource model to a profile. See “Adding default resource models to
profiles” on page 29 and“Adding custom resource models to profiles” on page 66for information.
v See the IBM Tivoli Monitoring for Databases, version 5.1.0: Informix Reference Guidefor detailed information about each resource model.
When you finishDistribute the profile to which the resource model belongs. See “Distributingprofiles from the desktop” on page 30.
Optional: Continue customizing the resource model:v Specify if you want a recovery action when a specific event occurs. See “Editing
a built-in action” on page 72v Specify if you want corrective or reporting tasks for an event. See “Specifying
tasks for an event” on page 74v Specify if you want to receive information on a specific event through a notice.
See “Sending a notice to administrators when an event occurs” on page 75v Specify if you want to customize your parameters to optimize the monitoring
process. See “Customizing parameters” on page 77v Specify if you want the monitoring of resource models to take place on specific
time periods of selected days. See “Creating scheduling rules” on page 78v Determine when the monitoring of resource models takes place. See
“Customizing the scheduling monitoring period” on page 80v Specify if you want the log data collected by a resource model written to a local
database. See “Customizing data logging information” on page 82
ProcedureYou can perform this procedure from either the Tivoli command line or thedesktop.
Command line: Use the wdmeditprf command to customize a resource model fora profile.
For more information about this command, see the IBM Tivoli Monitoring, Version5.1.0: User’s Guide.
Desktop:
1. Open the IBM Tivoli Monitoring Profile dialog box by doing the following:a. Open the Tivoli desktop.b. Double-click the policy region icon to display the policy region.
68 IBM Tivoli Monitoring for Databases: Informix: User’s Guide
c. Double-click the profile manager icon to display the profile manager.d. Double-click the profile icon in which you want to customize a resource
model.2. Select the resource model that you want to customize from the IBM Tivoli
Monitoring Profile dialog box.3. Click Edit to open the Edit Resource Model dialog.4. Click Indications. The Indications and Actions dialog box opens and displays
the indications appropriate to the selected resource model.5. Select the indication for which you want to customize the values of the event
associated with that indication.6. Apply the changes to the values that are appropriate to your requirements. See
the IBM Tivoli Monitoring for Databases, version 5.1.0: Informix ReferenceGuide for the default resource model settings. The following describes thevalues that you can customize:
Number of OccurrencesSpecifies the number of consecutive times the problem occurs beforethe software generates an indication. You can change this value tospecify the number of times a problem occurs before an indicationgenerates.
Number of HolesDetermines how many cycles that do not produce an indication canoccur between cycles that do produce an indication. This determines ifthe occurrences of an indication are consecutive. Each cycle without anindication is termed a hole. For example, an event that has a value oftwo holes means that when up to two cycles without an indicationoccur between any two cycles with an indication, the cycles with anindication are considered consecutive.
Use the value for the Number of Holes in conjunction with theNumber of Occurrences parameter and the Cycle Time to define atime window for the generation of an event. If, for example, you defineCycle Time as 300 seconds, Number of Occurrences as 5, and Numberof Holes as 2, the time that must elapse before an event occurs isbetween 1500 and 3900 seconds. The minimum elapsed time is thenumber of occurrences multiplied by the cycle time. The maximumtime window assumes that the maximum number of holes occurbetween each pair of occurrences, and is determined by the followingequation:TW=CT x (Oc + (H x (Oc - 1))
where:
TW Specifies the time window calculated
CT Specifies the cycle time
Oc Specifies the number of occurrences
H Specifies the number of holes
Send TEC EventsSelect this check box to send an event to the Tivoli Enterprise Console.You must have Tivoli Enterprise Console installed and configured.
Send to TBSM
Chapter 8. Working with resource models 69
Note: This box has no affect on IBM Tivoli Monitoring for Databases:Informix resource model behavior. IBM Tivoli Monitoring forDatabases: Informix integrates with Tivoli Business SystemsManager through Tivoli Enterprise Console rules.
7. Click Apply Changes & Close to save your changes to the indication.
Adding or removing a built-in action
Objective
Note: IBM Tivoli Monitoring for Databases, Version 5.1.0: Informix resourcemodels do not use built-in actions.
To add a built-in action so administrators and users can reinstate an event’srecovery actions or to remove a built-in action so administrators and users canclear an event’s recovery actions.
Background informationA built-in action is a recovery action for an event. The actions take positive steps toremedy the situation, or ensure distribution of information about the event to theappropriate authorities or entities.
Tivoli software has predefined actions for certain events. An action is either theexecution of a common information model (CIM) class method, or the execution ofa program. For example, an event that detects the failure of a service has therestart of that service as its built-in action. IBM Tivoli Monitoring detects thefailure of a service and automatically restarts it. Built-in actions are defined bydefault as part of an event when the resource model is created in the IBM TivoliMonitoring Workbench. See the IBM Tivoli Monitoring documentation for moreinformation.
Required authorization roleadmin
Before you beginv You must have previously removed a built-in action to activate the Built-In
button for adding a built-in action. Use this procedure to reinstate the previouslyremoved built-in action.
v Create a profile manager and profile. See “Creating profile managers andprofiles” on page 26 for information.
v Add subscribers to a profile manager. See “Subscribing resources to profilemanagers” on page 28 for information.
v Add a resource model to a profile. See “Adding default resource models toprofiles” on page 29 and“Adding custom resource models to profiles” on page 66for information.
v See the IBM Tivoli Monitoring for Databases, version 5.1.0: Informix Reference Guidefor detailed information about each resource model.
When you finishDistribute the profile to which the resource model belongs. See “Distributingprofiles from the desktop” on page 30.
Optional: Continue customizing the resource model:v Specify if you want a recovery action when a specific event occurs. See “Editing
a built-in action” on page 72
70 IBM Tivoli Monitoring for Databases: Informix: User’s Guide

v Specify if you want corrective or reporting tasks for an event. See “Specifyingtasks for an event” on page 74
v Specify if you want to receive information on a specific event through a notice.See “Sending a notice to administrators when an event occurs” on page 75
v Specify if you want to customize your parameters to optimize the monitoringprocess. See “Customizing parameters” on page 77
v Specify if you want the monitoring of resource models to take place on specifictime periods of selected days. See “Creating scheduling rules” on page 78
v Determine when the monitoring of resource models takes place. See“Customizing the scheduling monitoring period” on page 80
v Specify if you want the log data collected by a resource model written to a localdatabase. See “Customizing data logging information” on page 82
ProcedureYou can perform this procedure from either the Tivoli command line or thedesktop.
Command line: Use the wdmeditprf command to customize a resource model fora profile.
For more information about this command, see the IBM Tivoli Monitoring, Version5.1.0: User’s Guide.
Desktop:
1. Open the IBM Tivoli Monitoring Profile dialog box by doing the following:a. Open the Tivoli desktop.b. Double-click the policy region icon to display the policy region.c. Double-click the profile manager icon to display the profile manager.d. Double-click the profile icon in which you want to customize a resource
model.2. Select a resource model from the IBM Tivoli Monitoring Profile dialog box.3. Click Edit to open the Edit Resource Model dialog box.4. Click Indications. The Indications and Actions dialog box opens and displays
the indications appropriate to the selected resource model.5. Select the indication that has the associated events you want to add or remove.6. Select the action from the Action List panel of the Indications and Actions
dialog box.7. Click Remove to remove the action from the list.
— or —Click Built-in to open the Add Action dialog box.a. Select the action you want to run when an event occurs.b. Enter the number of times you want the action to perform when an
indication generates an event in the Retry field.Additional information: If you set the Retry field to zero, the productcontinually tries to perform the action until the action is successful.
c. Click one of the following buttons:
Add Adds the selected action with the values specified and keeps theAdd Action dialog box open.
Add & CloseAdds the selected action and closes the Add Action dialog box.
Chapter 8. Working with resource models 71

8.
Click one of the following buttons:
Apply ChangesSaves the changes made to the built-in actions and leaves theIndications and Actions dialog box open.
Apply Changes and CloseCloses the Indications and Actions dialog box and saves the changesmade to the built-in actions.
Editing a built-in action
Objective
Note: IBM Tivoli Monitoring for Databases, Version 5.1.0: Informix resourcemodels do not use built-in actions.
Specifies the number of times the software attempts to execute the built-in actionwhen an event is generated.
Background informationA built-in action is a recovery action for an event. The actions take positive steps toremedy the situation, or ensures distribution of information about the event to theappropriate authorities or entities.
The Tivoli software has predefined actions for certain events. An action is eitherthe execution of a common information model class method, or the execution of aprogram. For example, an event that detects the failure of a service has the restartof that service as its built-in action. IBM Tivoli Monitoring detects the failure of aservice and automatically restarts it. Built-in actions are defined by default as partof an event when the resource model is created in the IBM Tivoli MonitoringWorkbench. See the IBM Tivoli Monitoring documentation for more information.You can removing built-in actions from a resource model using the Tivoli desktop.See “Adding or removing a built-in action” on page 70.
Required authorization roleadmin
Before you beginv Create a profile manager and profile. See “Creating profile managers and
profiles” on page 26 for information.v Add subscribers to a profile manager. See “Subscribing resources to profile
managers” on page 28 for information.v Add a resource model to a profile. See “Adding default resource models to
profiles” on page 29 and“Adding custom resource models to profiles” on page 66for information.
v See the IBM Tivoli Monitoring for Databases, version 5.1.0: Informix Reference Guidefor detailed information about each resource model.
When you finishDistribute the profile to which the resource model belongs. See “Distributingprofiles from the desktop” on page 30.
Optional: Continue customizing the resource model:
72 IBM Tivoli Monitoring for Databases: Informix: User’s Guide

v Specify if you want to customize your thresholds and events to optimize themonitoring process. See “Customizing indications” on page 67
v Specify if you want corrective or reporting tasks for an event. See “Specifyingtasks for an event” on page 74
v Specify if you want to receive information on a specific event through a notice.See “Sending a notice to administrators when an event occurs” on page 75
v Specify if you want to customize your parameters to optimize the monitoringprocess. See “Customizing parameters” on page 77
v Specify if you want the monitoring of resource models to take place on specifictime periods of selected days. See “Creating scheduling rules” on page 78
v Determine when the monitoring of resource models takes place. See“Customizing the scheduling monitoring period” on page 80
v Specify if you want the log data collected by a resource model written to a localdatabase. See “Customizing data logging information” on page 82
ProcedureYou can perform this procedure from either the Tivoli command line or thedesktop.
Command line: Use the wdmeditprf command to customize a resource model fora profile.
For more information about this command, see the IBM Tivoli Monitoring, Version5.1.0: User’s Guide.
Desktop:
1. Open the IBM Tivoli Monitoring Profile dialog box by doing the following:a. Open the Tivoli desktop.b. Double-click the policy region icon to display the policy region.c. Double-click the profile manager icon to display the profile manager.d. Double-click the profile icon in which you want to customize a resource
model.2. Select a resource model from the IBM Tivoli Monitoring Profile dialog box.3. Click Edit to open the Edit Resource Model dialog box.4. Click Indications. The Indications and Actions dialog box opens and displays
the indications appropriate to the selected resource model.5. Select the indication that has the associated events you want to customize.6. Select the action to edit from the Action List panel of the Indications and
Actions dialog box.7. Click Edit to open the Edit Current Action dialog box.8. Enter the number of times you want the action to perform when an indication
generates an event in the Retry field.Additional information: If you set the Retry field to zero, the productcontinually tries to perform the action until the action is successful.
9. Click Apply next to the Retry field to apply the changes.10. Click one of the following buttons:
Close Closes the Edit Current Action dialog box and saves the original retryvalue.
Chapter 8. Working with resource models 73
Modify & CloseCloses the Edit Current Action dialog box and saves the modifiedretry value.
Specifying tasks for an event
ObjectiveTo specify a task so administrators and users can determine corrective or reportingtasks for an event.
Background informationYou can select one or more tasks to perform when an indication generates anevent. You can select one or more tasks for each event. These tasks can access theIBM Tivoli Monitoring event name and thresholds by accessing the environmentvariables.
Required authorization roleadmin
Before you beginv Create a profile manager and profile. See “Creating profile managers and
profiles” on page 26 for information.v Add subscribers to a profile manager. See “Subscribing resources to profile
managers” on page 28 for information.v Add a resource model to a profile. See “Adding default resource models to
profiles” on page 29 and“Adding custom resource models to profiles” on page 66for information.
v See the IBM Tivoli Monitoring for Databases, version 5.1.0: Informix Reference Guidefor detailed information about each resource model.
When you finishDistribute the profile to which the resource model belongs. See “Distributingprofiles from the desktop” on page 30.
Optional: Continue customizing the resource model:v Specify if you want to customize your thresholds and events to optimize the
monitoring process. See “Customizing indications” on page 67v Specify if you want a recovery action when a specific event occurs. See “Editing
a built-in action” on page 72v Specify if you want to receive information on a specific event through a notice.
See “Sending a notice to administrators when an event occurs” on page 75v Specify if you want to customize your parameters to optimize the monitoring
process. See “Customizing parameters” on page 77v Specify if you want the monitoring of resource models to take place on specific
time periods of selected days. See “Creating scheduling rules” on page 78v Determine when the monitoring of resource models takes place. See
“Customizing the scheduling monitoring period” on page 80v Specify if you want the log data collected by a resource model written to a local
database. See “Customizing data logging information” on page 82
ProcedureYou can perform this procedure from either the Tivoli command line or thedesktop.
74 IBM Tivoli Monitoring for Databases: Informix: User’s Guide

Command line: Use the wdmeditprf command to customize a resource model fora profile.
For more information about this command, see the IBM Tivoli Monitoring, Version5.1.0: User’s Guide.
Desktop:
1. Open the IBM Tivoli Monitoring Profile dialog box by doing the following:a. Open the Tivoli desktop.b. Double-click the policy region icon to display the policy region.c. Double-click the profile manager icon to display the profile manager.d. Double-click the profile icon in which you want to customize a resource
model.2. Select the resource model that you want to customize.3. Click Edit to open the Edit Resource Model dialog box.4. Click Indications. The Indications and Actions dialog box opens and displays
the indications appropriate to the selected resource model.5. Select the indication that you want to generate a task from the Indications
and Actions dialog box.6. Click the Tasks button in the Action List dialog box. The Tasks dialog box
opens.7. Double-click the appropriate task library from the scroll list of the Libraries
panel. The tasks contained in the library are displayed in the Tasks panel.8. Double-click the appropriate task in the Tasks panel.9. Specify the appropriate parameters in the Configure Task dialog box.
Additional Information: Run the wlsnotif -g command to see the availableNotice Groups.
10. Click Change & Close to add the task to the Action List panel in theIndications and Actions dialog box.
Sending a notice to administrators when an event occurs
ObjectiveTo send a notice in response to an event so administrators can take the appropriateactions or responses.
Background informationYou can select the IBM Tivoli Monitoring Utility task to send notices in response toan event.
For more information see the IBM Tivoli Monitoring User’s Guide.
Required authorization roleadmin
Before you beginv Create a profile manager and profile. See “Creating profile managers and
profiles” on page 26 for information.v Add subscribers to a profile manager. See “Subscribing resources to profile
managers” on page 28 for information.
Chapter 8. Working with resource models 75
v Add a resource model to a profile. See “Adding default resource models toprofiles” on page 29 and“Adding custom resource models to profiles” on page 66for information.
v See the IBM Tivoli Monitoring for Databases, version 5.1.0: Informix Reference Guidefor detailed information about each resource model.
When you finishDistribute the profile to which the resource model belongs. See “Distributingprofiles from the desktop” on page 30.
Optional: Continue customizing the resource model:v Specify if you want to customize your thresholds and events to optimize the
monitoring process. See “Customizing indications” on page 67v Specify if you want a recovery action when a specific event occurs. See “Editing
a built-in action” on page 72v Specify if you want corrective or reporting tasks for an event. See “Specifying
tasks for an event” on page 74v Specify if you want to customize your parameters to optimize the monitoring
process. See “Customizing parameters” on page 77v Specify if you want the monitoring of resource models to take place on specific
time periods of selected days. See “Creating scheduling rules” on page 78v Determine when the monitoring of resource models takes place. See
“Customizing the scheduling monitoring period” on page 80v Specify if you want the log data collected by a resource model written to a local
database. See “Customizing data logging information” on page 82
ProcedureYou can perform this procedure from either the Tivoli command line or thedesktop.
Command line: Use the wdmeditprf command to customize a resource model fora profile.
For more information about this command, see the IBM Tivoli Monitoring, Version5.1.0: User’s Guide.
Desktop:
1. Open the IBM Tivoli Monitoring Profile dialog box by doing the following:a. Open the Tivoli desktop.b. Double-click the policy region icon to display the policy region.c. Double-click the profile manager icon to display the profile manager.d. Double-click the profile icon in which you want to customize a resource
model.2. Select the resource model that you want to customize.3. Click Edit to open the Edit Resource Model dialog box.4. Click Indications. The Indications and Actions dialog box opens and displays
the indications appropriate to the selected resource model.5. Select the indication that you want to generate a task from the Indications
and Actions dialog box.6. Click Tasks in the Action List dialog box. The Tasks dialog box opens.
76 IBM Tivoli Monitoring for Databases: Informix: User’s Guide
7. Double-click the IBM Tivoli Monitoring Utility Tasks library in the scrolllist of the Libraries panel. The tasks contained in the IBM Tivoli MonitoringUtility Tasks library are displayed in the Tasks panel.
8. Double-click dm_mn_send_notice in the Tasks panel. The Configure Taskdialog box opens.
9. Specify the appropriate parameters in the Configure Task dialog box.Additional Information: Run the wlsnotif -g command to see the availableNotice Groups.
10. Click Change & Close to add the task to the Action List panel in theIndications and Actions dialog box.
Customizing parameters
ObjectiveTo customize the parameters of a resource model so administrators and users canoptimize the monitoring process.
Background informationSome resource models have one or more parameters. For IBM Tivoli Monitoringfor Databases: Informix each parameter is a choice list from which you can enableor disable the associated indication within the resource model. This enables you tofine tune the resource models to better fit your environment.
Note: If an indication is disabled and the resource model is distributed, theindication always appears as 100% healthy, because resource models nevergenerate events for indications that are disabled in this way.
Required authorization roleadmin
Before you beginv Create a profile manager and profile. See “Creating profile managers and
profiles” on page 26 for information.v Add subscribers to a profile manager. See “Subscribing resources to profile
managers” on page 28 for information.v Add a resource model to a profile. See “Adding default resource models to
profiles” on page 29 and“Adding custom resource models to profiles” on page 66for information.
v See the IBM Tivoli Monitoring for Databases, version 5.1.0: Informix Reference Guidefor detailed information about each resource model.
When you finishDistribute the profile to which the resource model belongs. See “Distributingprofiles from the desktop” on page 30.
Optional: Continue customizing the resource model:v Specify if you want to customize your thresholds and events to optimize the
monitoring process. See “Customizing indications” on page 67v Specify if you want a recovery action when a specific event occurs. See “Editing
a built-in action” on page 72v Specify if you want corrective or reporting tasks for an event. See “Specifying
tasks for an event” on page 74v Specify if you want to receive information on a specific event through a notice.
See “Sending a notice to administrators when an event occurs” on page 75
Chapter 8. Working with resource models 77

v Specify if you want the monitoring of resource models to take place on specifictime periods of selected days. See “Creating scheduling rules”
v Determine when the monitoring of resource models takes place. See“Customizing the scheduling monitoring period” on page 80
v Specify if you want the log data collected by a resource model written to a localdatabase. See “Customizing data logging information” on page 82
ProcedureYou can perform this procedure from either the Tivoli command line or thedesktop.
Command line: Use the wdmeditprf command to customize a resource model fora profile.
For more information about this command, see the IBM Tivoli Monitoring, Version5.1.0: User’s Guide.
Desktop:
1. Open the IBM Tivoli Monitoring Profile dialog box by doing the following:a. Open the Tivoli desktop.b. Double-click the policy region icon to display the policy region.c. Double-click the profile manager icon to display the profile manager.d. Double-click the profile icon in which you want to customize a resource
model.2. Select the resource model that you want to customize.3. Click Edit to open the Edit Resource Model dialog box.4. Click the Parameters button.5. Select a parameter from the Name drop-down list in the Parameters dialog box.6. Enable or disable the indication associated with the parameter using the choice
box.7. Click Apply Changes and Close to save your changes.
Creating scheduling rules
ObjectiveTo create schedule rules so administrators and users can determine the timeperiods on selected days when monitoring takes place.
Background informationIBM Tivoli Monitoring contains a scheduling feature that enables you to determinea period when monitoring takes place and specific scheduling rules. You candivide the overall collection period into active and inactive intervals by applyingone or more schedule rules.
The scheduling rules enable you to define time periods on specific weekdaysduring which monitoring takes place. You can define any number of rules whichallows you set up a complex pattern of resource monitoring for a profile andcovers the periods that you want to monitor. If the profile contains more than oneschedule rule, all the time intervals are respected, and rules are combined byadding together the time periods they define. For example, if you specify a rulethat requests monitoring between 8:00 and 14:00 every day and another thatrequests all-day monitoring on Fridays, the sum of the two rules gives all-daymonitoring only on Fridays, and monitoring between 8:00 and 14:00 on all other
78 IBM Tivoli Monitoring for Databases: Informix: User’s Guide
days. If the second rule instead requested monitoring from 12:00 to 18:00 onFridays, the sum of the rules would give monitoring between 8:00 and 18:00 onFridays and between 08:00 and 14:00 on all other days.
The scheduled times are always interpreted as local times, enabling you to set up asingle rule that monitors the same local time period in different time zones. Alltimes of events or activities reported from endpoints or gateways are also loggedin the local time of the system from where they originated.
The Scheduling dialog box has the following group boxes:
ScheduleSets the data collection period. By default, all resource models are set toalways collect data.
Schedule RulesManages time intervals during which the resource model is active.
Rule EditorCreates and edits schedule rules.
Required authorization roleadmin
Before you beginv Create a profile manager and profile. See “Creating profile managers and
profiles” on page 26 for information.v Add subscribers to a profile manager. See “Subscribing resources to profile
managers” on page 28 for information.v Add a resource model to a profile. See “Adding default resource models to
profiles” on page 29 and“Adding custom resource models to profiles” on page 66for information.
v See the IBM Tivoli Monitoring for Databases, version 5.1.0: Informix Reference Guidefor detailed information about each resource model.
When you finishDistribute the profile to which the resource model belongs. See “Distributingprofiles from the desktop” on page 30.
Optional: Continue customizing the resource model:v Specify if you want to customize your thresholds and events to optimize the
monitoring process. See “Customizing indications” on page 67v Specify if you want a recovery action when a specific event occurs. See “Editing
a built-in action” on page 72v Specify if you want corrective or reporting tasks for an event. See “Specifying
tasks for an event” on page 74v Specify if you want to receive information on a specific event through a notice.
See “Sending a notice to administrators when an event occurs” on page 75v Specify if you want to customize your parameters to optimize the monitoring
process. See “Customizing parameters” on page 77v Determine when the monitoring of resource models takes place. See
“Customizing the scheduling monitoring period” on page 80v Specify if you want the log data collected by a resource model written to a local
database. See “Customizing data logging information” on page 82
Chapter 8. Working with resource models 79

ProcedureYou can perform this procedure from either the Tivoli command line or thedesktop.
Command line: Use the wdmeditprf command to customize a resource model fora profile.
For more information about this command, see the IBM Tivoli Monitoring, Version5.1.0: User’s Guide.
Desktop:
1. Open the IBM Tivoli Monitoring Profile dialog box by doing the following:a. Open the Tivoli desktop.b. Double-click the policy region icon to display the policy region.c. Double-click the profile manager icon to display the profile manager.d. Double-click the profile icon in which you want to customize a resource
model.2. Select the resource model that you want to customize.3. Click Edit to open the Edit Resource Model dialog box.4. Click Schedule to open the Scheduling dialog box.5. Clear the Always check box in the Schedule panel.6. Click the New Rule button in the Schedule Rules panel.7. Type a name for the rule in the Rule Name text box of the Rule Editor panel.8. Select one or more items in the weekday list to specify the day or days on
which you want the collections active during the collection period.Additional information: Use the Shift or Ctrl key as necessary to select morethan one day from the list.
9. Set the Start Time and Stop Time for the collection activity or select the AllDay check box.Additional information: Times are always interpreted as local time where theendpoint engine runs. Setting a time interval of 08:00 to 13:00 ensures thatmonitoring takes place between those times in all time zones to which youdistribute the profile.
10. Click Set Rule. Your new rule appears in the Schedule Rules list.Additional information: To display the details of any rule, select the rule in theSchedule Rules list. Its settings are displayed in the Rule Editor group box.
11. Click Modify & Close to save your rule and close the Scheduling dialog box.
Customizing the scheduling monitoring period
ObjectiveTo customize the scheduling monitoring period of a resource model soadministrators and users can determine when monitoring takes place.
Background informationIBM Tivoli Monitoring contains a scheduling feature that enables you to determinea period when monitoring takes place and specific scheduling rules.
The scheduling rules enable you to define time periods on specific weekdaysduring which monitoring takes place. You can define any number of rules whichenables you set up a complex pattern of resource monitoring for a profile and
80 IBM Tivoli Monitoring for Databases: Informix: User’s Guide

covers the periods that you want to monitor. If a profile contains more than oneschedule rule, all the time intervals are respected, and rules are combined byadding together the time periods they define. For example, if you specify a rulethat requests monitoring between 8:00 and 14:00 every day and another thatrequests all-day monitoring on Fridays, the sum of the two rules gives all-daymonitoring only on Fridays, and monitoring between 8:00 and 14:00 on all otherdays. If the second rule instead requested monitoring from 12:00 to 18:00 onFridays, the sum of the rules would give monitoring between 8:00 and 18:00 onFridays and between 08:00 and 14:00 on all other days.
The scheduled times are always interpreted as local times, enabling you to set up asingle rule that monitors the same local time period in different time zones. Alltimes of events or activities reported from endpoints or gateways are also loggedin the local time of the system from where they originated.
The Scheduling dialog box has the following group boxes:
ScheduleSets the data collection period. By default, all resource models are set toalways collect data.
Schedule RulesManages time intervals during which the resource model is active.
Rule EditorCreates and edits schedule rules.
Required authorization roleadmin
Before you beginv Create a profile manager and profile. See “Creating profile managers and
profiles” on page 26 for information.v Add subscribers to a profile manager. See “Subscribing resources to profile
managers” on page 28 for information.v Add a resource model to a profile. See “Adding default resource models to
profiles” on page 29 and“Adding custom resource models to profiles” on page 66for information.
v Create the schedule rules. See “Creating scheduling rules” on page 78 for moredetails.
v See the IBM Tivoli Monitoring for Databases, version 5.1.0: Informix Reference Guidefor detailed information about each resource model.
When you finishDistribute the profile to which the resource model belongs. See “Distributingprofiles from the desktop” on page 30.
Optional: Continue customizing the resource model:v Specify if you want to customize your thresholds and events to optimize the
monitoring process. See “Customizing indications” on page 67v Specify if you want a recovery action when a specific event occurs. See “Editing
a built-in action” on page 72v Specify if you want corrective or reporting tasks for an event. See “Specifying
tasks for an event” on page 74v Specify if you want to receive information on a specific event through a notice.
See “Sending a notice to administrators when an event occurs” on page 75
Chapter 8. Working with resource models 81

v Specify if you want to customize your parameters to optimize the monitoringprocess. See “Customizing parameters” on page 77
v Specify if you want the monitoring of resource models to take place on specifictime periods of selected days. See “Creating scheduling rules” on page 78
v Specify if you want the log data collected by a resource model written to a localdatabase. See “Customizing data logging information”
ProcedureYou can perform this procedure from either the Tivoli command line or thedesktop.
Command line: Use the wdmeditprf command to customize a resource model fora profile.
For more information about this command, see the IBM Tivoli Monitoring, Version5.1.0: User’s Guide.
Desktop:
1. Open the IBM Tivoli Monitoring Profile dialog box by doing the following:a. Open the Tivoli desktop.b. Double-click the policy region icon to display the policy region.c. Double-click the profile manager icon to display the profile manager.d. Double-click the profile icon in which you want to customize a resource
model.2. Select the resource model that you want to customize.3. Click Edit to open the Edit Resource Model dialog box.4. Click the Schedule to open the Scheduling dialog box.5. Clear the Always check box in the Schedule panel.6. Set a Start Date and Stop Date to define the monitoring period.7. Optional: Add one or more schedule rules that determine time periods on the
selected dates that monitoring takes place.8. Click Modify & Close to save your changes.
Customizing data logging information
ObjectiveTo customize data logging information so administrators and users can log datacollected by a resource model and write it in a local database.
Background informationYou can view the log data through the IBM Tivoli Monitoring Web Health Consoleafter you write it in a local database. You can store one of the following types ofdata in the database:
Raw dataData written exactly as the resource model collects it. All the monitoredvalues are collected and copied in the database.
TEDW dataData is collected and copied in the database for later use by TivoliEnterprise Data Warehouse.
Note: The TEDW Data choice will be grayed-out unless you havepreviously installed the Tivoli Enterprise Data Warehouse Support
82 IBM Tivoli Monitoring for Databases: Informix: User’s Guide

Component. See your Tivoli Enterprise Data Warehousedocumentation for more information on the Tivoli Enterprise DataWarehouse Support Component.
Aggregated dataData collected and aggregated at fixed intervals that you define(Aggregation Period). Only the aggregated values are written in thedatabase. The aggregated data is calculated on the basis of one or more ofthe following options:v Maximumv Minimumv Average
Required authorization roleadmin
Before you beginv Create a profile manager and profile. See “Creating profile managers and
profiles” on page 26 for information.v Add subscribers to a profile manager. See “Subscribing resources to profile
managers” on page 28 for information.v Add a resource model to a profile. See “Adding default resource models to
profiles” on page 29 and“Adding custom resource models to profiles” on page 66for information.
v See the IBM Tivoli Monitoring for Databases, version 5.1.0: Informix Reference Guidefor detailed information about each resource model.
When you finishDistribute the profile to which the resource model belongs. See “Distributingprofiles from the desktop” on page 30.
Optional: Continue customizing the resource model:v Specify if you want to customize your thresholds and events to optimize the
monitoring process. See “Customizing indications” on page 67v Specify if you want a recovery action when a specific event occurs. See “Editing
a built-in action” on page 72v Specify if you want corrective or reporting tasks for an event. See “Specifying
tasks for an event” on page 74v Specify if you want to receive information on a specific event through a notice.
See “Sending a notice to administrators when an event occurs” on page 75v Specify if you want to customize your parameters to optimize the monitoring
process. See “Customizing parameters” on page 77v Specify if you want the monitoring of resource models to take place on specific
time periods of selected days. See “Creating scheduling rules” on page 78v Determine when the monitoring of resource models takes place. See
“Customizing the scheduling monitoring period” on page 80
ProcedureYou can perform this procedure from either the Tivoli command line or thedesktop.
Command line: Use the wdmeditprf command to customize a resource model fora profile.
Chapter 8. Working with resource models 83
For more information about this command, see the IBM Tivoli Monitoring, Version5.1.0: User’s Guide.
Desktop:
1. Open the IBM Tivoli Monitoring Profile dialog box by doing the following:a. Open the Tivoli desktop.b. Double-click the policy region icon to display the policy region.c. Double-click the profile manager icon to display the profile manager.d. Double-click the profile icon in which you want to customize a resource
model.2. Select the resource model that you want to customize.3. Click Edit to open the Edit Resource Model dialog box.4. Click Logging to open the Logging dialog box.5. Select the Enable Data Logging check box in the Data Logging Settings panel
to enable logging.Additional Information: This enables the data type selection and HistoricalPeriod options on the dialog.
6. Select the type of data to store from the following:
Note: The TEDW Data choice will be grayed-out unless you have previouslyinstalled the Tivoli Enterprise Data Warehouse Support Component. Seeyour Tivoli Enterprise Data Warehouse documentation for moreinformation on the Tivoli Enterprise Data Warehouse SupportComponent.
v Raw Data—OR—
v TEDW Data—OR—
v Raw Data and TEDW Data—OR—
v Aggregate Data7. Perform the following steps to specify the aggregation rule applied to the data
before it is written to the database:a. Set Hours and Minutes of the Aggregation Period to the required values.b. Select one or more of the following functions to perform on the numerical
data collected during the aggregation period before it is written to thedatabase:
MaximumCalculates and logs the peak value in each aggregation period.
MinimumCalculates and logs the lowest value in each aggregation period.
AverageCalculates and logs the average of all values in each aggregationperiod. Average is the default setting.
8. If you want to log the raw data instead of aggregate data, do the following:a. Clear the Aggregate Data check box.b. Select Raw Data.
84 IBM Tivoli Monitoring for Databases: Informix: User’s Guide

c. Optional: If Tivoli Enterprise Data Warehouse is installed, you can checkthe TEDW Data option to store the raw data for use in Tivoli EnterpriseData Warehouse.
9. Set Hours and Minutes of the Historical Period to the required values.10. Click Apply Changes and Close to save your changes and close the Logging
dialog box.
Managing profiles and resource models at endpoints
ObjectiveTo manage profiles and resource models after they are distributed to resources soadministrators and users can maintain monitoring processes on those endpoints.
Background informationNone
Required authorization roleadmin
Before you beginv Create a profile manager and profile. See “Creating profile managers and
profiles” on page 26 for information.v Add subscribers to a profile manager. See “Subscribing resources to profile
managers” on page 28 for information.v Add a resource model to a profile. See “Adding default resource models to
profiles” on page 29 and“Adding custom resource models to profiles” on page 66for information.
v Distribute the profile. See “Distributing profiles from the desktop” on page 30 forinformation.
v See the IBM Tivoli Monitoring for Databases, version 5.1.0: Informix Reference Guidefor detailed information about each resource model.
When you finishNone
ProcedureYou can perform this procedure from the Tivoli command line only.
Command line: Use the wdmcmd command to stop or restart IBM TivoliMonitoring on one or more endpoints from a gateway or server.
Use the wdmdistrib command to distribute a profile to one or more subscribers.
Use the wdmeng command to stop or start profiles or resource models atendpoints or to delete profiles at endpoints.
Use the wdmlseng command to return a list and the status of all resource modelsthat have been distributed on a specified endpoint.
Use the wdmtrceng command to set the trace parameters of the IBM TivoliMonitoring engine at the endpoint.
Refer to the IBM Tivoli Monitoring User’s Guide for more information.
Chapter 8. Working with resource models 85

Managing IBM Tivoli monitoring gateways
ObjectiveTo manage IBM Tivoli Monitoring on gateways so administrators and users canrun monitoring processes on those gateways.
Background informationNone
Required authorization roleadmin
Before you beginv Create a profile manager and profile. See “Creating profile managers and
profiles” on page 26 for information.v Add subscribers to a profile manager. See “Subscribing resources to profile
managers” on page 28 for information.v Add a resource model to a profile. See “Adding default resource models to
profiles” on page 29 and“Adding custom resource models to profiles” on page 66for information.
v Distribute the profile. See “Distributing profiles from the desktop” on page 30 forinformation.
v See the IBM Tivoli Monitoring for Databases, version 5.1.0: Informix Reference Guidefor detailed information about each resource model.
When you finishNone
ProcedureYou can perform this procedure from the Tivoli command line only.
Command line: Use the wdmmn command to stop or start selected IBM TivoliMonitoring processes on one or all gateways.
For more information about this command, see the IBM Tivoli Monitoring, Version5.1.0: User’s Guide.
Determining which resource models are running on endpoints
ObjectiveTo determine which resource models are running on an endpoint.
Background information
Note: Resource models might show false running states under the followingcircumstances:v When the database is down and the RDBMS State resource model has not
run, IBM Tivoli Monitoring shows the state of the resource model asrunning.
v When resource models are first distributed to a profile endpoint, theresource models all show running, even though they have not beenexecuted. The resource models show valid states after they are executedby the IBM Tivoli Monitoring engine.
86 IBM Tivoli Monitoring for Databases: Informix: User’s Guide
Use the Tivoli command line to determine which resource models are running onan endpoint.
Required authorization roleadmin
Before you beginv Create a profile manager and profile. See “Creating profile managers and
profiles” on page 26 for information.v Add subscribers to a profile manager. See “Subscribing resources to profile
managers” on page 28 for information.v Add a resource model to a profile. See “Adding default resource models to
profiles” on page 29 and“Adding custom resource models to profiles” on page 66for information.
v Distribute the profile. See “Distributing profiles from the desktop” on page 30 forinformation.
v See the IBM Tivoli Monitoring for Databases, version 5.1.0: Informix Reference Guidefor detailed information about each resource model.
When you finishNone
ProcedureYou can perform this procedure from the Tivoli command line only.
Command line: Use the wdmlseng command to determine which monitors arerunning on an endpoint. For example, to view the list of monitors on an endpoint,enter the following command:wdmlseng -e <endpoint>
Refer to the IBM Tivoli Monitoring User’s Guide for more information.
Chapter 8. Working with resource models 87

88 IBM Tivoli Monitoring for Databases: Informix: User’s Guide
Chapter 9. Enabling IBM Tivoli Monitoring for Databases:Informix for Tivoli Enterprise Data Warehouse
This chapter provides information on enabling IBM Tivoli Monitoring forDatabases: Informix for Tivoli Enterprise Data Warehouse.
Note: Before any data is send to the Tivoli Enterprise Data Warehouse for loggingyou must enable Tivoli Enterprise Data Warehouse logging on your resourcemodels. See, “Customizing data logging information” on page 82 for moreinformation.
OverviewTivoli Enterprise Data Warehouse enables you to access application reports fromvarious Tivoli and customer applications. The infrastructure provides a set ofextract, transform and load (ETL) utilities that you use to extract and move datafrom Tivoli application data stores to a central data warehouse database.
Tivoli Enterprise Data Warehouse provides the following capabilities:v An open architecture for storing, aggregating, and correlating historical data. In
addition to the data collected by IBM Tivoli software, Tivoli Enterprise DataWarehouse has the flexibility and extensibility to enable you to integrate yourown application data.
v Database optimizations for the efficient storage of large amounts of historicaldata and for fast access to data for analysis and report generation.
v The infrastructure and tools necessary for maintaining and viewing the collecteddata. These include the Tivoli Enterprise Data Warehouse application, IBM DB2Universal Database™ Enterprise Edition, the Data Warehouse Center, DB2®
Warehouse Manager, and a user interface for creating and viewing reports.v The ability to use your choice of data analysis tools to examine your historical
data. In addition to the report interface, you can analyze your data using otherproducts such as online analytical processing (OLAP), planning, trending,analysis, accounting, and data mining tools.
v The ability to control access to your historical data. You can keep data aboutmultiple customers and data centers in one central data warehouse, but restrictaccess so that customers can see and work with data and reports based only ontheir data and not any other customer’s data. You can also restrict an individualuser’s ability to access data.
v A zero-footprint client. Users can access Tivoli Enterprise Data Warehousereports from any system by using a Web browser. No special software isrequired on the user’s system.
v Internationalization support. Not only is the report interface localized,application programmers can localize the data stored in the central datawarehouse.
Tivoli Enterprise Data Warehouse consists of the following components:v Control serverv Central data warehousev Data martsv Report interface
89

Control serverThe control server contains the control database for Tivoli Enterprise DataWarehouse from which you manage your data warehouse.
The control server has these subcomponents:v A server that controls communication between the control server, the central
data warehouse server, the data mart server, and the report server.v The control database, which contains metadata for Tivoli Enterprise Data
Warehouse.
The control server uses the following parts of the IBM DB2 product, which youmust install manually before installing the control server. These parts are allautomatically installed when you install IBM DB2 Universal Database™ EnterpriseEdition on a Microsoft® Windows system.v DB2 Serverv The Data Warehouse Center, a component that automates data warehouse
processing. You can use the Data Warehouse Center to define the ETL processesthat move and transform data into the central data warehouse and the starschemas used by the data marts. Then, you can use the Data Warehouse Centerto schedule, maintain, and monitor these processes.
v The warehouse agent, part of DB2 Warehouse Manager.
Central data warehouseThe central data warehouse is a DB2 database that contains the historical data foryour enterprise. The system that hosts the central data warehouse is called thecentral data warehouse server. The central data warehouse component uses IBM DB2Universal Database Enterprise Edition, which you must install manually beforeinstalling the control server.
Data martsA separate DB2 database contains the data marts for your enterprise. Each datamart contains a subset of the historical data from the central data warehouse tosatisfy the analysis and reporting needs of a specific department, team, customer,or application. The system that hosts this DB2 database is called the data martserver. Although you can have many data marts, you can have only one data martserver.
The data mart component requires IBM DB2 Universal Database EnterpriseEdition, which you must install manually before installing the control server.
The warehouse pack for IBM Tivoli Monitoring for Databases: Informix createsdata marts whose structure is suitable for the report interface. They do this byproviding an extract, transform, and load (ETL) process, called a data mart ETL,that creates the data mart and loads it with data from the central data warehouse.
You can modify an existing data mart, or create new data marts that containslightly different data, to address a reporting need specific to your situation. Tomodify or create a data mart, you must be familiar with database ETL processesand with the internal representation of a data mart as star schemas in the TivoliEnterprise Data Warehouse databases. For information about this, see Enabling anApplication for Tivoli Enterprise Data Warehouse.
90 IBM Tivoli Monitoring for Databases: Informix: User’s Guide
Report interfaceThe Tivoli Enterprise Data Warehouse report interface (RPI) provides tools and agraphical user interface that other Tivoli software products use to create anddisplay reports. You can use Tivoli Enterprise Data Warehouse to customize reportsprovided with other Tivoli software and to create new reports. You also use thereport interface to control access to data marts and to the reports associated with adata mart. The system on which you install the report interface is called the reportserver.
Use the Work with Reports task group in the report interface to manage users,groups, and data marts for Tivoli Enterprise Data Warehouse or to run, create, andview Tivoli Enterprise Data Warehouse reports. The following sections describehow to do the following tasks:v Working with usersv Working with roles and groupsv Working with data martsv Working with reports
Working with users and user groupsThis section describes tasks associated with managing user groups for TivoliEnterprise Data Warehouse. It includes the following topics:v An overview of users and user groupsv Creating an IBM Console userv An overview of the Tivoli Enterprise Data Warehouse rolesv Assigning roles to a userv Creating a user groupv Assigning users to a user group
About users and user groupsYou control access to data in Tivoli Enterprise Data Warehouse data marts byspecifying which user groups (collections of users) can run the reports that accessthe data in each data mart. Each user in a user group is given access to all reportsthat access the data in the data marts to which that user group has access.
By default, Tivoli Enterprise Data Warehouse provides the TWHAdmin user group,which contains a single user: superadmin. You can customize the TWHAdmin usergroup for the needs of your enterprise.
A user can be assigned to more than one user group.
The Tivoli Enterprise Data Warehouse authorization rolesThe following Tivoli Enterprise Data Warehouse roles control access to tasks andactivities in the Work with Reports task group:v Warehouse Security Administrator
With this role, a user can create and manage groups and data marts. A user withthis role controls access to data marts by assigning users to groups and bygiving groups access to specific data marts. In effect, this role controls access tothe Tivoli Enterprise Data Warehouse data using user groups and data marts.
Chapter 9. Enabling IBM Tivoli Monitoring for Databases: Informix for Tivoli Enterprise Data Warehouse 91

v Report roles control a user’s ability to create and modify reports for the datamarts his user groups can access. Assign only one of the following roles to eachuser:– Advanced Report Author
With this role, a user can create, modify, run, and delete public and their ownpersonal reports, and save the output of reports, both public and personal.
– Report AuthorWith this role, a user can run and save the output of public reports and createand modify their own personal reports. They can run public and personalreports, and create, modify, and delete personal reports.
– Report ReaderWith this role, a user can run public reports and view the saved output ofpublic reports.
Creating an IBM Console user
ObjectiveTo create an IBM Console user.
Background informationTivoli Enterprise Data Warehouse is displayed using the IBM Console, which isalso used by other Tivoli software products. A user is given access to tasks in theIBM Console based on the roles that are assigned to that user. One user can haveroles for diverse tasks including administering IBM Console users, managing TivoliEnterprise Data Warehouse user groups and data marts, running and viewing theoutput of Tivoli Enterprise Data Warehouse reports, and performing tasksassociated with other Tivoli software products.
Required authorization rolesuper or admin
Before you beginNone.
When you finishThe Tivoli Enterprise Data Warehouse online help also guides you throughadditional tasks for managing users, such as updating or displaying the propertiesof a user and deleting a user.
ProcedureTo create an IBM Console user, complete the following steps:1. From the IBM Console, select Administer Users and then Create a User.2. Open the Task Assistant and follow the instructions provided in the online help
to create a user.
Assigning roles to a user
ObjectiveTo assign roles to a user.
Background informationNone.
Required authorization rolesuperuser
92 IBM Tivoli Monitoring for Databases: Informix: User’s Guide

Before you beginNone.
When you finishThe Tivoli Enterprise Data Warehouse online help also guides you throughadditional tasks for managing users, such as updating or displaying the propertiesof a user and deleting a user.
ProcedureTo assign a role to a user, complete the following steps:1. From the IBM Console, select Administer Users and Roles and then Manage
Users.2. From the table of users, click the context menu icon of a user and select
Properties.3. Follow the instructions in the Task Assistant about assigning roles to the user.
Creating a user group
ObjectiveTo create a user group.
Background informationNone.
Required authorization roleAdministration Authorizations
Before you beginNone.
When you finishThe Tivoli Enterprise Data Warehouse online help also guides you throughadditional tasks for managing user groups, such as updating or displaying theproperties of a user group, adding users to a user group, and deleting a usergroup.
ProcedureTo create a user group, complete the following steps:1. From the IBM console, select Work with Reports and then Manage User
Groups.2. In the Manage User Groups window, click the context menu of Root and select
Create.3. Follow the instructions in the Task Assistant about creating user groups.
Assigning users to a user group
ObjectiveTo assign users to user groups.
Background informationNone.
Required authorization roleAdministration Authorizations
Chapter 9. Enabling IBM Tivoli Monitoring for Databases: Informix for Tivoli Enterprise Data Warehouse 93
Before you beginNone.
When you finishThe Tivoli Enterprise Data Warehouse online help also guides you throughadditional tasks for managing user groups, such as updating or displaying theproperties of a user group, adding or removing users from a user group, anddeleting a user group.
ProcedureTo assign one or more users to a user group, perform the following steps:1. From the IBM Console, select Work with Reports and then Manage User
Groups.2. In the Manage User Groups window, click the context menu icon of a group
and select Properties.3. Follow the instructions in the Task Assistant about assigning users to user
groups.
Assigning user groups to a data mart
ObjectiveTo assign user groups to a data mart.
Background informationGrant access to only those user groups whose users need the data mart to performtasks.
Required authorization roleAdministration Authorizations
Before you beginNone.
When you finishThe Tivoli Enterprise Data Warehouse online help can guide you throughadditional tasks for managing user groups, such as updating or displaying theproperties of a user group, removing users from a user group, and removing datamart access from a user group.
ProcedureTo assign user groups to a data mart, complete the following steps:1. From the IBM Console, select Work with Reports and then Manage Data
Marts.2. In the Manage Data Marts window, in the Data Mart view, click the context
menu icon for the data mart that you want to change and click Properties.3. Select the User Groups tab.
Managing Tivoli Enterprise Data Warehouse reportsTivoli Enterprise Data Warehouse reports display a static view of the data in a datamart. Reports are provided by the warehouse pack for IBM Tivoli Monitoring forDatabases: Informix, along with the data marts required to collect the data used inthe report.
This section describes the following tasks:
94 IBM Tivoli Monitoring for Databases: Informix: User’s Guide

v Running a report manuallyv Automatically running reportsv Modifying default settings for report creationv Creating a report
For more information about working with reports, see the Tivoli Enterprise DataWarehouse online help.
Tivoli software products using the Tivoli Enterprise Data Warehouse can provideprepackaged reports that enable you to access specific information about yourbusiness environment. All of these reports are listed in the Manage Reports andReport Output task of the Work with Reports task group in the IBM Console. Thisincludes reports from all Tivoli software products that use the Tivoli EnterpriseData Warehouse report interface. Tivoli software products can also provide adifferent reporting interface.
A Tivoli Enterprise Data Warehouse report may use data from one or more datamarts.
If you have the appropriate role, you can also create additional reports or modifyexisting reports. Before you can create a new report or modify an existing report,you must understand the structure of the underlying warehouse data and of theoperational data that is the source of that data. For information about the structureof data in the data mart and in the central data warehouse, see Enabling anApplication for Tivoli Enterprise Data Warehouse.
For information on the specific data mart, star schema, and report mapping of IBMTivoli Monitoring for Databases: Informix, see the IBM Tivoli Monitoring forDatabases: Informix Warehouse Enablement Pack Implementation Guide located in theDocs directory of the IBM Tivoli Monitoring for Databases, version 5.1.0 InstallationCD.
For information on the specific data mart, star schema, and report mapping of IBMTivoli Monitoring for Databases: Informix, see the IBM Tivoli Monitoring forDatabases: Informix Warehouse Enablement Pack Implementation Guide located in theDocs directory of the IBM Tivoli Monitoring for Databases, Version 5.1.0: InformixInstallation CD.
Running reports
ObjectiveTo run a report using the report interface.
Background informationNone.
Required authorization roleAdvRepAuthRole, RepAuthRole, or RepReaderRole
Before you beginNone.
When you finishThe Tivoli Enterprise Data Warehouse online help can also guide you throughadditional tasks for reports, such as displaying the properties of a report anddeleting a report.
Chapter 9. Enabling IBM Tivoli Monitoring for Databases: Informix for Tivoli Enterprise Data Warehouse 95

ProcedureTo run a report using the report interface, complete the following steps:1. From the IBM Console, select Work with Reports and then Manage Reports
and Report Output.2. In the Manage Reports and Report Output window, in the Reports view, click
the context menu icon of a report and select Run.
Scheduling reports to run automatically
ObjectiveTo automatically run reports.
Background informationUsing the Tivoli Enterprise Data Warehouse report interface, you can schedule areport to run automatically when the associated data mart is updated. This ensuresthat when you examine the output of the report, it displays the most recent data inthe warehouse.
Required authorization roleAdvRepAuthRole
Before you beginNone.
When you finishThe Tivoli Enterprise Data Warehouse online help can also guide you throughadditional tasks for reports, such as modifying or displaying the properties of areport and deleting a report.
ProcedureTo schedule a report to run automatically when the associated data mart isupdated, complete the following steps:1. From the IBM Console, select Work with Reports and then Manage Reports
and Report Output.2. In the Manage Reports and Report Output window, in the Reports view, click
Reports.3. Click the context menu icon of a report and select Properties.
Modifying default settings for reports
ObjectiveTo modify default settings for report creation.
Background informationWhen you create or modify a report, you select predetermined values for the timeframe of the report. The predetermined values of Peak Hours and Weekdaysspecified under Filtering in the Time page of report properties can be modified. Dothis by modifying the information in the control database on the control server.
The default value for Peak Hours is 9:00 am through 5:00 PM, or 0900 to 1700. Thisvalue can be modified to reflect different peak hours if necessary.
The default value for Weekdays is Monday through Friday. This value can also bemodified.
96 IBM Tivoli Monitoring for Databases: Informix: User’s Guide

The RPI.TimeFilters table contains the following filters and default filter values.
Table 10. Default time filter names and values
TIME_FILTER_NAME TIME_FILTER_VALUES
Peak hours hour(meas_hour) in (9,10,11,12,13,14,15,16,17)
Weekdays dayofweek(meas_date) between 2 and 6
Required authorization roleAdvRepAuthRole
Before you beginNone.
When you finishFor additional information on the properties of the RPI.TimeFilters table, seeEnabling an Application for Tivoli Enterprise Data Warehouse.
ProcedureTo change the values displayed in the report interface, perform the following steps:1. Connect to the control database (TWH_MD).2. Use an SQL statement similar to the following to modify the values for Peak
Hours or Weekdays in the RPI.TimeFilters table. The following example sets theWeekdays filter to represent Sunday through Thursday:
Update RPI.TimeFilters set TIME_FILTER_VALUES =dayofweek(meas_date) between 1 and 5where TIME_FILTER_NAME =Weekdays
After doing this, when a user selects a Weekdays filter for a report in the reportinterface, the data returned is for Sunday through Thursday.
Note: There is no error-checking for the values inserted into the tables for PeakHours and Weekdays. Therefore, ensure that the information you insert intothe tables is correct. You can save a report that contains incorrect values forthese parameters without receiving an error message. The message is notgenerated until the report is run.
Creating reports
ObjectiveTo create a report.
Background informationYou can receive a message that the name you specified is already in use, even ifyou do not have access to the report with that name.
Required authorization roleAdvRepAuthRole or RepAuthRole
Before you beginEnsure that you use descriptive and meaningful names for the reports you create.Report names are unique across all users of Tivoli Enterprise Data Warehouse.
When you finishThe Tivoli Enterprise Data Warehouse online help also guides you throughadditional tasks for reports, such as modifying or displaying the properties of areport and deleting a report.
Chapter 9. Enabling IBM Tivoli Monitoring for Databases: Informix for Tivoli Enterprise Data Warehouse 97
Procedure1. Click Work with Reports and select Create a Report.2. Select one of the following type of reports to create: Extreme Case, Health
Check, and Summary.3. Select the data mart that contains the information from which to create the
report.4. Click OK.5. Click the General tab and enter the Name and Description for the report.6. Click the Metrics tab, and select Add to add a new metric to graph and
display the Add Metrics screen.7. Select the star schema containing the metric that you would like to graph and
to display a list of Available Metrics for the star schema.8. Check one or more of the metrics that you would like to graph.9. Click Next.
10. Select the aggregation type that you would like for each metric.11. Click Next.12. Specify the attributes to filter by, group by, or order by.
Additional information: For example, if you only want to display informationabout a specific Domino server, specify the name of the Domino server in theDomino Server Component Name Filter By field.
13. Click the Time tab, and specify the Time frame for which you would like torun the report.Additional information: You can either specify a General Time Frame, such asthe Last 7 days, or a Specific Time Interval, such as January 1, 2002 throughJanuary 31, 2002.
14. Click the Schedule tab, and select whether the report should be run when thedata mart is built.
15. Click OK.
IBM Tivoli Monitoring for Databases: Informix data marts and reportsThis section describes the prepackaged data marts, star schemas, and reports usedfor IBM Tivoli Monitoring for Databases: Informix.
IBM Tivoli Monitoring for Databases: Informix provides the CRT Informix DailyData Mart. This data mart uses the following star schemas:v CTR Informix Instance Daily Star Schemav CTR Informix Memory Segment Daily Star Schemav CTR Informix Logical Log Daily Star Schemav CTR Informix Least Recently Used Queue Daily Star Schemav CTR Informix Database Space Daily Star Schemav CTR Informix Storage Chunk Daily Star Schemav CTR Informix Virtual Processor Daily Star Schema
Four prepackaged health check reports are provided. They report data over thepast seven days. They use the CTR Informix Daily Data Mart as their data source.
Informix Health Check – 7 DaysThis health check report presents a chart of the following metrics over thepast 7 days:
98 IBM Tivoli Monitoring for Databases: Informix: User’s Guide

v Active_Transactions (average)v Transaction_Overflows (average)v Number_of_Commits (average)v Number_of_Rollbacks (average)v Percent_State_On-Line (average)
Informix Thread Activity – 7 DaysThis health check report presents a chart of the following metrics over thepast 7 days:v Number_of_Deadlocks (average)v User_Thread_Overflows (average)v System_CPU (average)v User_CPU (average)
Informix Disk Utilization – 7 DaysThis health check report presents a chart of the following metrics over thepast 7 days:v Free_Pages (average)v Pages (average)v Number_Chunks (average)v Percent_Free_Space (average)
Informix Logical Log – 7 DaysThis health check report presents a chart of the following metrics over thepast 7 days:v Logical_Log_Percent_Available (average)v Pages_Used (average)
Chapter 9. Enabling IBM Tivoli Monitoring for Databases: Informix for Tivoli Enterprise Data Warehouse 99

100 IBM Tivoli Monitoring for Databases: Informix: User’s Guide

Appendix A. Authorization roles quick reference
Each IBM Tivoli Monitoring for Databases: Informix procedure has a requiredauthorization role. The following table summarizes these activities and roles andtells you where to find additional information in this manual:
Activity Context Required role For additional information
Set authorization roles Administratorscollection
senior “Setting authorization roles” on page 15
Discover Informixinstances
Instance IBMInformix_super “Discovering Informix instance objects” onpage 19
ConfigureIBMInformixServerobjects
Instance IBMInformix_super “Configuring Informix instance objects” onpage 20
MoveIBMInformixServerobjects
Instance IBMInformix_super “Moving objects to IBMInformixUnmanagedpolicy region” on page 23
Create profile managersand profiles
Profile manager admin “Creating profile managers and profiles” onpage 26
Subscribe resources toprofile managers
Profile manager admin “Subscribing resources to profile managers”on page 28
Add default resourcemodels to profiles
Profile manager admin “Adding default resource models to profiles”on page 29
Add custom resourcemodels to profiles
Profile manager admin “Adding custom resource models to profiles”on page 66
Distribute Profiles Profile manager admin “Distributing profiles from the desktop” onpage 30
EditIBMInformixServerobject attributes
Instance IBMInformix_super “Editing IBMInformixServer object attributes”on page 37
ViewIBMInformixServerobject properties
Instance IBMInformix_user “Viewing server properties” on page 39
Start a server Database IBMInformix_admin Chapter 5, “Working with IBM TivoliMonitoring for Databases: Informix” onpage 37
Stop a server Database IBMInformix_admin Chapter 5, “Working with IBM TivoliMonitoring for Databases: Informix” onpage 37
Run a task Task library IBMInformix_super “Running a task” on page 48
Customize a task Task library admin “Customizing a task” on page 51
Create a job Task library admin “Creating a job” on page 52
Run a job Task library IBMInformix_admin “Running a job” on page 56
Schedule a job Task library IBMInformix_admin “Scheduling a job” on page 57
Customize resourcemodels
Resource model admin Chapter 8, “Working with resource models”on page 65
Configure TivoliEnterprise Console
Managed nodewhere the TivoliEnterpriseConsole isinstalled
super or senior “Configuring Tivoli Enterprise Console towork with IBM Tivoli Monitoring forDatabases: Informix” on page 104
101

Activity Context Required role For additional information
View events in theTivoli EnterpriseConsole
Event console user “Viewing events in the Tivoli EnterpriseConsole” on page 107
102 IBM Tivoli Monitoring for Databases: Informix: User’s Guide

Appendix B. Setting up the Tivoli Enterprise Console
This chapter provides information about setting up the Tivoli Enterprise Consolefor use with IBM Tivoli Monitoring for Databases: Informix. You can skip thischapter if you do not have the Tivoli Enterprise Console or do not want to haveIBM Tivoli Monitoring for Databases, Version 5.1.0: Informix send events to it youdo not need to use this information.
This appendix covers the following topics:v Overview of the Tivoli Enterprise Consolev Procedures for setting up the Tivoli Enterprise Console to receive monitoring
and task eventsv Procedures for viewing events in the Tivoli Enterprise Console consolev Lists of event classes and eventsv Procedures for setting up automated task execution in response to events
Table 11. Setting Up the Tivoli Enterprise Console Guidelines
Goal Refer to
1. Overview of how IBM Tivoli Monitoring for Databases:Informix works with the Tivoli Enterprise Console
“Overview of the Tivoli Enterprise Console”
2. Setting up the Tivoli Enterprise Console to receivemonitoring and task events
“Configuring Tivoli Enterprise Console to workwith IBM Tivoli Monitoring for Databases:Informix” on page 104
3. Viewing events in the Tivoli Enterprise Console console “Viewing events in the Tivoli Enterprise Console”on page 107
4. Listings of event classes and events “Lists of event classes” on page 108
Overview of the Tivoli Enterprise ConsoleIn distributed computing environments, it is essential to address events andconditions that can lead to problems in a timely and efficient manner. The TivoliEnterprise Console provides tools for:v Receiving events from various sourcesv Processing events using rulesv Grouping events and delegating the groups selectively to administratorsv Responding to events automaticallyv Viewing events at a console
For more information about the Tivoli Enterprise Console, refer to the TivoliEnterprise Console User’s Guide.
EventsIn the Tivoli Enterprise Console environment, an event is an object that hasbeen created using data obtained from a source that is monitored by anevent adapter. Each event is identified by a class name. Class names mayvary and are defined by their respective event adapters.
Sources of eventsThe Tivoli Enterprise Console accepts events from many sources. Typically,
103

Tivoli software is set up so that events are sent in response to changes inan application or system resource. For example, distributed monitors canbe configured to send events as well as report in other ways. Tivoli taskscan send events.
Event processingThe Tivoli Enterprise Console uses rules to process events. A rule is madeup of a set of logic statements. The rule makes decisions on what to dowith the event based on information provided in the event, such as theevent class, event name, severity, location, and description.
A rule’s logic provides one or more responses to the event. A rule can dropinsignificant events, escalate important events, create new events, orrespond to defined relationships of multiple events (event correlation). Itcan also close an old event when a new event indicates that the originalcondition is resolved.
Event groupingThe Tivoli Enterprise Console can filter events into event groups. Theseevent groups are typically organized by function but can also beconfigured by other criteria, such as location or organizational jurisdiction.
Event groups are especially useful for subdividing all the Tivoli EnterpriseConsole events into manageable chunks. Administrators can be assigned toone or more event groups.
Note: This option is not available for Tivoli Enterprise Console, Version3.7. For information on creating event groups for that version, referto the Tivoli Enterprise Console, Version 3.7, User’s Guide.
Viewing eventsThe Tivoli Enterprise Console includes a console where administrators canwatch for incoming events and respond to them. The event console is auseful tool for managing by exception. The Tivoli Enterprise Console canfilter out normal events, respond automatically to anticipated problems,and forward only those events that require human intervention.
Responses to eventsThe Tivoli Enterprise Console normally can provide automatic responses tomany common events, either by executing response programs or executingTivoli tasks. For example, you can set a response program to respond tothe event that is received when a database becomes unavailable. Thespecific response can be to inform an administrator or to attempt automaticrestarts of the database, or a combination of both.
Configuring Tivoli Enterprise Console to work with IBM TivoliMonitoring for Databases: Informix
ObjectiveTo configure Tivoli Enterprise Console so you can use Tivoli Enterprise Consolewith IBM Tivoli Monitoring for Databases: Informix.
Background informationWhen you configure Tivoli Enterprise Console for use with IBM Tivoli Monitoringfor Databases: Informix, you can have it work with events from resource models.
Resource models and Tivoli Enterprise Console
104 IBM Tivoli Monitoring for Databases: Informix: User’s Guide

Specific resource models provided by IBM Tivoli Monitoring for Databases:Informix provide the option to send events to Tivoli Enterprise Console. Forexample, the Cache Hit Ratio resource model can be configured such that when theread cache hit ratio falls below 95 percent, an event is sent to Tivoli EnterpriseConsole. In order to use this option, you must first configure Tivoli EnterpriseConsole to accept events from IBM Tivoli Monitoring for Databases: Informixresource models.
You can configure Tivoli Enterprise Console in any of the following ways:v Use the Send_TEC_Files_to_TEC and Configure_TEC tasks from the Tivoli
desktopv Use the Send_TEC_Files_to_TEC and Configure_TEC tasks from the command
line
The tasks do all of the following:v Create the specified rule base, if it does not already exist.v Copie an existing rule base into a newly created rule base, if you select the
option to do so.v Configure the rule base for the selected option(s) by importing the appropriate
class and rule set files.v Compile the rule base.v Restart the event server, if you select the option to do so.
Refer to the IBM Tivoli Monitoring for Databases, version 5.1.0: Informix ReferenceGuide for additional information about this task.
Required authorization rolesenior or super
Before you beginNone.
When you finishNone.
ProcedureYou can perform this procedure from either the Tivoli command line or thedesktop.
Command line: You can run the Send_TEC_Files_to_TEC and Configure_TECtasks from the command line. See the IBM Tivoli Monitoring for Databases, version5.1.0: Informix Reference Guide for information about these tasks.
Desktop: Use the following steps to configure Tivoli Enterprise Console byrunning the Send_TEC_Files_to_TEC and Configure_TEC tasks from the desktop.1. From the Tivoli desktop, double-click the Monitoring for IBM Informix
policy region.2. Double-click the IBM Informix Server Task icon to display the Task Library:
IBM Informix Server Task window.3. Double-click the Send_TEC_Files_to_TEC icon to display the Execute Task
dialog.4. To view the task results, do the following:
a. Change the value in the Timeout text box from 60 to 600.b. Select Display on Desktop to see the output when the task is executed.
Appendix B. Setting up the Tivoli Enterprise Console 105
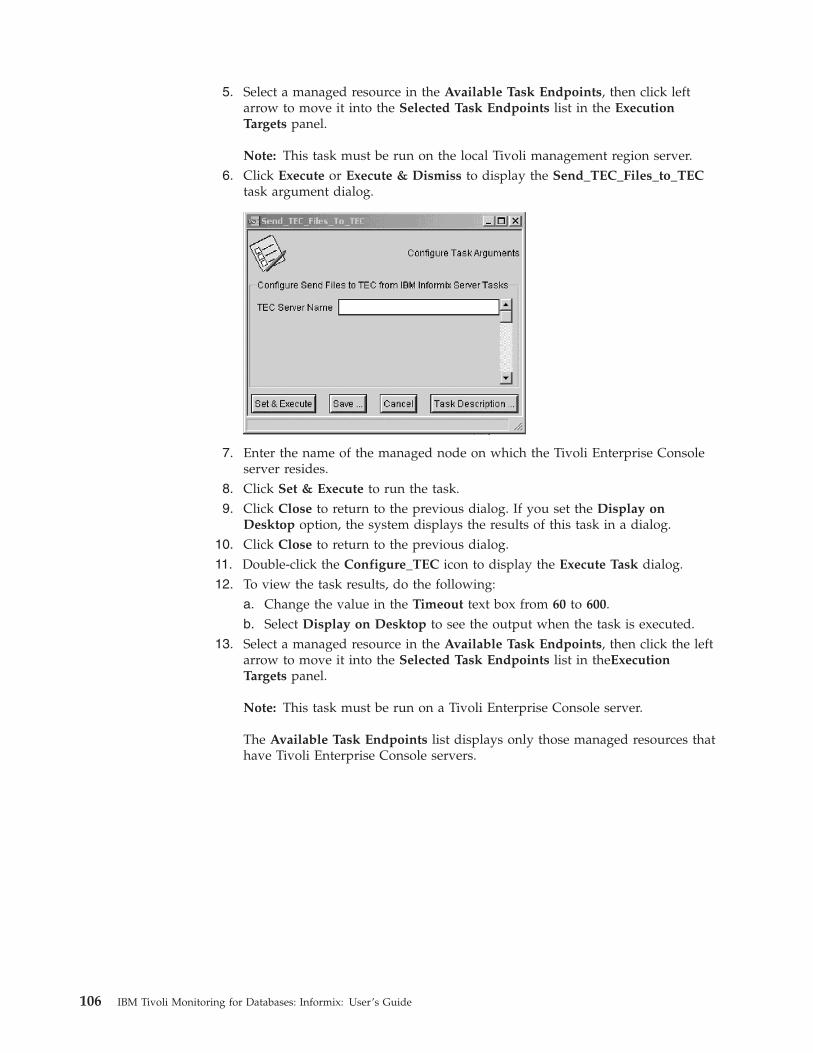
5. Select a managed resource in the Available Task Endpoints, then click leftarrow to move it into the Selected Task Endpoints list in the ExecutionTargets panel.
Note: This task must be run on the local Tivoli management region server.6. Click Execute or Execute & Dismiss to display the Send_TEC_Files_to_TEC
task argument dialog.
7. Enter the name of the managed node on which the Tivoli Enterprise Consoleserver resides.
8. Click Set & Execute to run the task.9. Click Close to return to the previous dialog. If you set the Display on
Desktop option, the system displays the results of this task in a dialog.10. Click Close to return to the previous dialog.11. Double-click the Configure_TEC icon to display the Execute Task dialog.12. To view the task results, do the following:
a. Change the value in the Timeout text box from 60 to 600.b. Select Display on Desktop to see the output when the task is executed.
13. Select a managed resource in the Available Task Endpoints, then click the leftarrow to move it into the Selected Task Endpoints list in theExecutionTargets panel.
Note: This task must be run on a Tivoli Enterprise Console server.
The Available Task Endpoints list displays only those managed resources thathave Tivoli Enterprise Console servers.
106 IBM Tivoli Monitoring for Databases: Informix: User’s Guide

14. Click Execute or Execute & Dismiss to display the Configure_TEC taskargument dialog.
15. In the dialog, specify how you want Tivoli Enterprise Console configured:v Rule Base Name: Enter the name of the rule base to configure. It can be a
new rule base to create or an existing rule base. If you specify an existingrule base, the task checks to make sure that both its class and rule set filesare defined correctly.
Note: Enter only the name; do not enter a full path. If a full path is entered,only the name portion is used.
v Rule Base Name to Copy: Specify the rule base to copy.
Note: If you specify an invalid rule base name, the task fails with amessage that the rule base is invalid. If this happens, re-run the taskwith the correct rule base name. If the name is correct but the taskfails, check the validity of the specified rule base by compiling therule base. If the compiler does not report an error, the rule base isvalid.
v Restart Event Server: Select this check box if you want the task to restartthe event server. The new rule base (or modified rule base) does not takeeffect until the event server is restarted.
Note: If you do not have the task restart the event server, you must loadthe rule base and restart the event server manually.
16. Click Set & Execute to run the task.If the Restart Event Server option is specified, this task starts the server if it isnot running, or stops and restarts it if it is currently running. If you set theDisplay on Desktop option (in step 12), the system displays the results of thistask in a dialog.
Viewing events in the Tivoli Enterprise Console
ObjectiveTo view events in Tivoli Enterprise Console so you can work with the events.
Background informationAfter you have set up the Tivoli Enterprise Console, you can view events.
Appendix B. Setting up the Tivoli Enterprise Console 107
Required authorization roleuser
Before you beginThe example used in the procedure for this topic is based on the followingassumptions:v The Tivoli Enterprise Console has been configured and it has been configured to
receive IBM Tivoli Monitoring for Databases: Informix events.v The RDBMS State resource model has been configured to send an event with a
severity level of CRITICAL to the Tivoli Enterprise Console when it detects thatthe Informix instance is unavailable.
v The RDBMS State resource model has detected this condition and has sent anevent.
When you finishNone
ProcedureYou can perform this procedure from the Tivoli command line only.
Desktop: Use the following steps to view events:1. On the command line type TEC_console to open the Tivoli Enterprise Console
Chart View.2. Click on the bar graph to display its Event Viewer. The Event Viewer contains
all of the events that were sent to the Tivoli Enterprise Console.3. To view the details of an event, do one of the following:
Double-click the desired event.—OR—Select the desired event, then click Details.The Event Group Message Viewer dialog is displayed.See the, Tivoli Enterprise Console User’s Guide for information on the EventGroup Message Veiwer dialog.
Lists of event classesFor a complete listing of event classes and thier descriptions, refer to the IBM TivoliMonitoring for Databases: Informix Reference Guide.
108 IBM Tivoli Monitoring for Databases: Informix: User’s Guide

Appendix C. Integrating with Tivoli Business SystemsManager
This chapter provides information on using Tivoli Business Systems Manager tomanage IBM Tivoli Monitoring for Databases: Informix resources and events.
Integrating IBM Tivoli Monitoring for Databases: Informix into Tivoli BusinessSystems Manager includes the following steps:
Goal Refer to
1. Install the IBM Tivoli Monitoring forDatabases: Informix integration on theTivoli Business Systems Managerserver
“Integrating IBM Tivoli Monitoring forDatabases: Informix with Tivoli BusinessSystems Manager” on page 110
2. Configure your Tivoli EnterpriseConsole event server to forward eventsto Tivoli Business Systems Manager
“Configuring the Tivoli Enterprise Consoleevent server” on page 111
3. Define the specific IBM TivoliMonitoring for Databases: Informixobjects to Tivoli Business SystemsManager using a discovery task.
“Discovering resources for Tivoli BusinessSystems Manager” on page 112
This chapter also provides a list of the IBM Tivoli Monitoring for Databases:Informix tasks that you can run from Tivoli Business Systems Manager andinformation about uninstalling the IBM Tivoli Monitoring for Databases: Informixintegration from Tivoli Business Systems Manager.
Understanding Tivoli Business Systems ManagerTivoli Business Systems Manager is a business systems management tool thatenables you to graphically monitor and control interconnected businesscomponents and operating system resources. A business resource and its resourcesare referred to as a Line of Business (LOB).
Tivoli Business Systems Manager consists of the following components:
Tivoli Business Systems Manager management serverThe Tivoli Business Systems Manager management server processes all theavailability data that is collected from various sources. Availability data is insertedin the Tivoli Business Systems Manager database, where intelligent agents providealerts on monitored objects and then broadcast those alerts to Tivoli BusinessSystems Manager workstations. The management server processes all user requeststhat originate from the workstation and includes a database server that is builtaround a Microsoft SQL Server database.
Tivoli Business Systems Manager workstationThe Tivoli Business Systems Manager workstation displays objects in customizedviews, called Line of Business Views. Objects are presented in a hierarchicalTreeView so that users can see the relationship between objects. Alerts are overlaidon the objects when the availability of the object is threatened.
109
Tivoli Event EnablementTivoli Event Enablement is installed on the Tivoli Enterprise Console event serverand enables the event server to forward events to Tivoli Business SystemsManager. Tivoli Event Enablement defines event classes and rules for handlingevents related to Tivoli Business Systems Manager.
Task serverThe Tivoli Business Systems Manager task server is installed on the TivoliEnterprise Console event server with Tivoli Event Enablement. It receives taskrequests from the Tivoli Business Systems Manager workstation, runs the tasks onthe Tivoli server on which it is installed, and returns the output to Tivoli BusinessSystems Manager.
PrerequisitesBefore you integrate IBM Tivoli Monitoring for Databases: Informix into TivoliBusiness Systems Manager, perform the following prerequisite steps:v Install the Tivoli Business Systems Manager configuration, as described in the
Tivoli Business Systems Manager Installation and Configuration Guide. You mustinstall Tivoli Business Systems Manager Version 1.5.
v Install and configure the Tivoli Event Enablement on all Tivoli EnterpriseConsole event servers that receive events that you want to forward to TivoliBusiness Systems Manager. See the Tivoli Business Systems Manager Installationand Configuration Guide for more information.
v Configure Tivoli Business Systems Manager to communicate with each TivoliEvent Enablement installed in the previous step. See the Tivoli Business SystemsManager Installation and Configuration Guide for more information.
Integrating IBM Tivoli Monitoring for Databases: Informix with TivoliBusiness Systems Manager
ObjectiveTo integrate IBM Tivoli Monitoring for Databases: Informix with Tivoli BusinessSystems Manager so you can receive IBM Tivoli Monitoring for Databases:Informix events on the Tivoli Business Systems Manager.
Background informationTo enable Tivoli Business Systems Manager to manage IBM Tivoli Monitoring forDatabases: Informix events, you must install an IBM Tivoli Monitoring forDatabases: Informix integration program on the Tivoli Business Systems Managerserver. This integration program does the following steps:v Defines the IBM Tivoli Monitoring for Databases: Informix objects in Tivoli
Business Systems Managerv Adds IBM Tivoli Monitoring for Databases: Informix tasks to the object types in
Tivoli Business Systems Managerv Defines a line of business for Informix resources
Required authorization roleYou must have administrator authority on the Tivoli Business Systems Managerserver.
Before you beginMake sure that your Tivoli Business Systems Manager environment is configuredcorrectly and that you have Tivoli Event Enablement installed on each Tivoli
110 IBM Tivoli Monitoring for Databases: Informix: User’s Guide

Enterprise Console event server that you want to forward events. For moreinformation, see the Tivoli Business Systems Manager Installation and ConfigurationGuide.
When you finishConfigure the Tivoli Enterprise Console event server to forward events to TivoliBusiness Systems Manager. See “Configuring the Tivoli Enterprise Console eventserver” for more information.
ProcedureUse the following steps to install the IBM Tivoli Monitoring for Databases:Informix integration:1. On the Tivoli Business Systems Manager server, insert the IBM Tivoli
Monitoring for Databases, version 5.1.0 installation CD and, from a commandprompt, navigate to the \TBSM directory.
2. Type install to start the installation wizard.3. Click Next on the welcome screen.4. Specify an installation location for the Tivoli Business Systems Manager
integration. The default location is C:\tivoli\informix. Click Browse to select adifferent installation location.Click Next to continue.The installation location and total installed size are displayed.
5. Click Next to continue.6. Provide the following Microsoft SQL Server information and click Next to start
the installation.
SQL ServerThe name of the SQL server with which this Tivoli Business SystemsManager server is associated
SQL UseridThe SQL user ID.
SQL PasswordThe password for the user ID defined above.
A progress bar is displayed to show the progress of the installation. Wheninstallation is complete, a message appears.
7. Click Finish to exit the installation wizard.
Configuring the Tivoli Enterprise Console event server
ObjectiveTo configure the Tivoli Enterprise Console event server to forward events to TivoliBusiness Systems Manager.
Background informationBefore Tivoli Enterprise Console event servers can forward events to TivoliBusiness Systems Manager, you must configure them to use a rule base to forwardthe events.
Required authorization roleSenior
Appendix C. Integrating with Tivoli Business Systems Manager 111

Before you beginInstall the Tivoli Event Enablement on each Tivoli Enterprise Console event serverthat you want to forward events to Tivoli Business Systems Manager. For moreinformation, see the Tivoli Business Systems Manager Installation and ConfigurationGuide for more information.
When you finishDefine your IBM Tivoli Monitoring for Databases: Informix objects to TivoliBusiness Systems Manager with the TBSM_Discovery task, as described in“Discovering resources for Tivoli Business Systems Manager”.
ProcedureUse the Configure Event Server and Send TEC Files to TEC tasks to configure (orreconfigure) each event server. If you installed the Tivoli Event Enablement on theevent server, this task recognizes that and compiles the rule base that forwardsevents to Tivoli Business Systems Manager. For information on running this task,see “Configuring Tivoli Enterprise Console to work with IBM Tivoli Monitoring forDatabases: Informix” on page 104.
Discovering resources for Tivoli Business Systems Manager
ObjectiveTo define the specific IBM Tivoli Monitoring for Databases: Informix objects toTivoli Business Systems Manager.
Background informationThe IBM Tivoli Monitoring for Databases: Informix integration that you installed inAppendix C, “Integrating with Tivoli Business Systems Manager” on page 109defined the types of objects that you want Tivoli Business Systems Manager tomanage. After you define the object types, you must define the specific objects.You can do this with the TBSM_Discovery task. This task searches a managed nodefor objects and sends a DISCOVER event to Tivoli Business Systems Manager foreach object. The TBSM_Discovery task also maintains a list of the objects that havebeen discovered and alerts Tivoli Business Systems Manager when they have beendeleted by sending Tivoli Business Systems Manager a GONE event for each objectthat no longer exists on the managed node.
Required authorization rolesuper or senior
Before you beginConfigure your Tivoli Enterprise Console event server, as described in“Configuring the Tivoli Enterprise Console event server” on page 111.
When you finishUse Tivoli Business Systems Manager to view and manage your IBM TivoliMonitoring for Databases: Informix objects. For information on using TivoliBusiness Systems Manager, see the Tivoli Business Systems Manager User’s Guide.
ProcedureYou can perform this procedure from the command line or the Tivoli desktop.
Command line: Use the wruntask command to run the TBSM_Discovery taskfrom the command line. For information on the CLI syntax for this task, see theIBM Tivoli Monitoring for Databases, version 5.1.0: Informix Reference Guide.
Desktop: Use the following steps to run this procedure as a task:
112 IBM Tivoli Monitoring for Databases: Informix: User’s Guide

1. In the IBMInformix Server Tasks task library, double-click the TBSM_Discoverytask.
2. Select the managed node on which the Tivoli Enterprise Console resides tosearch for objects and click Execute.
If the task completes successfully, you receive a list of the DISCOVER and GONEevents that were sent to Tivoli Business Systems Manager.
Uninstalling IBM Tivoli Monitoring for Databases: Informix integrationfrom Tivoli Business Systems Manager
ObjectiveTo remove the IBM Tivoli Monitoring for Databases: Informix integration fromTivoli Business Systems Manager.
Background informationUninstalling the IBM Tivoli Monitoring for Databases: Informix integrationremoves the Informix object definitions and objects from Tivoli Business SystemsManager.
Required authorization roleYou must have administrator authority on the Tivoli Business Systems Managerserver
Before you beginNot applicable
When you finishNot applicable
ProcedureUse the following steps to perform this procedure:1. On the Tivoli Business Systems Manager server, from a command prompt,
navigate to the directory where you installed the IBM Tivoli Monitoring forDatabases: Informix integration. The default directory is C:\tivoli\itmwas.
2. Type uninstall to start the uninstallation wizard.3. Click Next on the welcome screen.4. The installation location for the Tivoli Business Systems Manager integration is
displayed. Click Next to continue.5. Provide the following Microsoft SQL Server information and click Next to start
the uninstallation:
SQL ServerThe name of the SQL server with which this Tivoli Business SystemsManager server is associated
SQL UseridThe SQL user ID.
SQL PasswordThe password for the user ID defined above.
6. Click Finish to exit the installation wizard.
Appendix C. Integrating with Tivoli Business Systems Manager 113

114 IBM Tivoli Monitoring for Databases: Informix: User’s Guide

Appendix D. Problem determination
This appendix provides information about resolving problems that might occurwhen you run IBM Tivoli Monitoring for Databases: Informix.
Note: For installation and uninstallation issues, see the IBM Tivoli Monitoring forDatabases Installation and Setup Guide.
The following lists frequently asked questions regarding IBM Tivoli Monitoring forDatabases: Informix and related software.
What is Discovery?Discovery provides a convenient way of registering multiple IBM InformixDynamic Server instances on one or more endpoints in a single operation.For more information about Discovery and using it to register IBMInformix Dynamic Server instances, see “Discovering Informix instanceobjects” on page 19
Why is my resource model failing on HP-UX?A kernel parameter might be set too low if one of the following errorsappears in the trace_dmxengine.log:OutOfMemory Exception
—OR—- java.io.IOException: Too many open files caught running /bin/sh -c
Do the following to increase the appropriate kernel parameter:1. Go to your HP-UX endpoint and run the command: sam
2. Go to Kernel Configuration –>Configurable Parameters.3. Do one of the following:
For the error, OutOfMemory Exception:Increase the max_thread_proc parameter. This parameter controls themaximum number of threads allowed in each process. The default is64.—OR—for the error, - java.io.IOException: Too many open files caughtrunning /bin/sh -c:Increase the maxfiles parameter. This parameter controls the soft filelimit per process. The maximum value you can set through SAM is2048. The default is 60.
What are the port requirements for communication?There are no special firewall considerations for IBM Tivoli Monitoring forDatabases: Informix. The software depends on the framework’s ability tocommunicate with the LCF endpoint and receive upcalls. The portsrequired to be open on the LCF endpoint are local ports and have nofirewall implications.
What does ’Unable to start 150’ mean?This message appears on the IBM Tivoli Monitoring Web Health Consoleand in the output from the wdmlseng -e endpoint_name CLI. It indicatesthat an attribute required to monitor IBM Informix Dynamic Server
115

instances was not present for the resource type receiving the distributedresource model. This situation typically arises when an IBM TivoliMonitoring for Databases: Informix resource model has been distributed toan unsupported Resource Type (e.g. an Endpoint itself) or if an attributefor a configured IBMInformixServer object has been deleted. A message ofthe following form can be found in the trace_dmxengine.log on UNIXendpoints and in the Tmw2k.log on NT endpoints:Context Attribute: AttributeName missing
What does ’Unable to start 10’ mean?This message appears on the IBM Tivoli Monitoring Web Health Consoleand in the output from the wdmlseng -e endpoint_name CLI. The errorindicates the IBM Informix database is down. A level 3 error message ofthe following form can be found in the trace_dmxengine.log on UNIXendpoints and in the Tmw2k.log on NT endpoints:This RM will not collect data this cycle.
What does ’Retrying 50’ mean?This message appears on the IBM Tivoli Monitoring Web Health Consoleand in the output from the wdmlseng -e endpoint_name CLI. The errorindicates that a data provider for a resource model has generated anexception. A level 0 error message of the following form can be found inthe trace_dmxengine.log on UNIX endpoints and in the Tmw2k.log on NTendpoints:ERROR: providerClass
CollectionId= CollectionIDCIMClassName= CIMClassNameCIMPropertyName= CIMPropertyName(blank if error occurred during enumerate instances)ILTName= ITLNameCreated= DateCreatedENUM_ErrorMsg= error message from enumerate instancesENUM_ErrorCode= error code from enumerate instancesGET_ErrorMsg= error message from get property(blank if error occurred during enumerate instances)GET_ErrorCode= error code from get property(blank if error occurred during enumerate instances)
for example:ERROR: ROOT\CIMV2:IBMinformixLogicalLog
CollectionId=IBMinformixLogicalLog1496351953.1.7251030052206749CIMClassName=IBMinformixLogicalLogHelperCIMPropertyName=ILTName=com.ibm.tivoli.monitoring.informix.ilt. \ibminformixjdbc.IBMInformixJdbcCreated=Thu Aug 22 16:36:57 GMT-0500 (CDT) 2002ENUM_ErrorMsg=AMG301402W A database access error occurred opening a \connection to the database: \jdbc:informix-sqli://reddwarf:1543/sysmaster:INFORMIXSERVER=reddwarf. \The error was -951 : IX000 : Incorrect password or user \com.informix.asf.IfxASFRemoteException: ashis is not known on the \database server.
ENUM_ErrorCode=-1GET_ErrorMsg=GET_ErrorCode=0
Can I get all the trace log information in one place?Yes. Using the witmcollectsupportdata command, you can produce anXML file capturing all the various trace files in addition to other useful
116 IBM Tivoli Monitoring for Databases: Informix: User’s Guide
information such as installed Tivoli software and platform types. You canname the XML file in any way that is logical for your enviroment.
Two useful forms of the command include:itmcollectsupportdata EndPoint_OID support.xmlwitmcollectsupportdata IBMInformixServer_OID support.xml
Both commands collect all of the information into the support.xml file. Thefirst form of the command collects information about an endpoint given itsOID. The second form of the command collects information about theIBMInformixServer object specified by the OID with additional detailsunique to IBMInformixServer objects included.
Where is the trace log for IBM Tivoli Monitoring, and how do I increase thetrace logging level?
The IBM Tivoli Monitoring trace log will be found at$LCF_DATDIR/LCFNEW/AMW/logs/trace_dmxengine.log for UNIXendpoints and $LCF_DATDIR/LCFNEW/Tmw2k/Tmw2k.log for NTendpoints.
To increase the level of detail written to the trace log, you must havepreviously set trace log level to 3. To set the trace level to 3 enter thefollowing command from a Managed Node command prompt:wdmtrceng -e Endpoint_Name "" 3 -1
You must stop the IBM Tivoli Monitoring engine and restart it afterrunning this command. Enter the following two CLI commands from aManaged Node [not the endpoint] to stop and then restart the IBM TivoliMonitoring engine:wdmcmd -stop -e Endpoint_Namewdmcmd -restart -e Endpoint_Name
Where is the trace log for IBM Tivoli Monitoring for Databases: InformixILTs--IBMInformixJdbc, InformixLogfileAdapter, AlertsILT, CheckpointILT, andLogicalLogBackupILT--and how do I enable ILT trace logging?
The various ILTs all write to the same trace log found at$LCF_DATDIR/LCFNEW/AMG/logs/, named either trace1.log, trace2.logor trace3.log; where trace2.log and trace3.log are written only when theirpredecessor has reached maximum size. From that point the trace loggingrolls over from trace3.log to trace1.log, and the cycle repeats.
To enable trace logging from each ILT you must changing the value fromfalse to true on the appropriate line in the$LCF_DATDIR/LCFNEW/AMG/logs/logging.properties file:
To enable trace logging for the IBMInformixJdbc ILT, change:AMS.IBMInformixJdbcTrace.isLogging=false
toAMS.IBMInformixJdbcTrace.isLogging=true
To enable trace logging for the IBM Informix Logfile Adapter ILT, change:AMS.InformixLogfileAdapterTrace.isLogging=false
toAMS.InformixLogfileAdapterTrace.isLogging=true
To enable trace logging for the Checkpoint ILT, change:
Appendix D. Problem determination 117
AMS.CheckpointILTTrace.isLogging=false
toAMS.CheckpointILTTrace.isLogging=true
To enable trace logging for the Alerts ILT, change:AMS.AlertsILTTrace.isLogging=false
toAMS.AlertsILTTrace.isLogging=true
To enable trace logging for the Logical Log Backup ILT, change:AMS.LogicalLogBackupILTTrace.isLogging=false
toAMS.LogicalLogBackupILTTrace.isLogging=true
Note: Each line appears in the logging.properties file only after a resourcemodel using the specific ILT corresponding to the line is distributedand run on an IBMInformixServer on the endpoint.
You must stop the IBM Tivoli Monitoring engine and restart it before thesechanges take effect. Enter the following two CLI commands from aManaged Node [not the endpoint] to stop and then restart the IBM TivoliMonitoring engine:wdmcmd -stop -e Endpoint_Namewdmcmd -restart -e Endpoint_Name
Note: If you enable tracing and increase the trace level at the same timeyou only need to stop and restart the IBM Tivoli Monitoring engineonce.
118 IBM Tivoli Monitoring for Databases: Informix: User’s Guide

Appendix E. Messages
CTR1001W &1 is already Quiescent.
CTR1002I &1 is changing to Quiescentimmediately.
CTR1003E The server is not online. onstat outputfollows:
CTR1004W &1 is already offline.
CTR1005I &1 is changing to offline.
CTR1006E You can only run this task on anIBMInformixServer object.
CTR1007E The context parameter &1 was notfound.
CTR1008E &1 did not run.
CTR1009E &1 is online and cannot becomeQuiescent with a Start command.
CTR1010I &1 changed to Quiescent.
CTR1011W &1 is already online.
CTR1012I Changing &1 to online.
CTR1013E Server is not online, offline orQuiescent. onstat output follows:
CTR1014I Changing &1 to Quiescent gracefully.
CTR1015E Usage: &1 [ startq | starto | stopqg |stopqi | stopo ]
CTR1017E TBSM command &1 not found.
CTR1018I IBM Informix TBSM Discovery Task iscomplete
CTR1030E Lookup of resource type &1 failed
CTR1031I Forwarding GONE event to TBSM: &1
CTR1032I Forwarding DISCOVER event to TBSM:&1
CTR1033I No objects of type (&1) were found tosend to TBSM.
CTR1034I Copying file: (&1) to (&2)
CTR1045E No Event Server was found in this TMR
CTR1046E Creation of Rulebase (&1) Failed
CTR1047E The Rulebase copy from (&1) to (&2)Failed
CTR1048E The import of Baroc file (&1) intoRulebase (&2) Failed
CTR1049E The import of Rule file (&1) intoRulebase (&2) Failed
CTR1050E The compilation of Rulebase (&1) Failed
CTR1051E The load of Rulebase (&1) Failed
CTR1052E The EventServer could not be stopped
CTR1053E The EventServer could not be started
CTR1054I The Event Server has been configuredOK for IBM Informix
CTR1057E The import of Rule file (&1) into targetEventServer for Rulebase (&2) Failed
119

120 IBM Tivoli Monitoring for Databases: Informix: User’s Guide
Appendix F. Accessibility
Accessibility features help a user who has a physical disability, such as restrictedmobility or limited vision, to use software products successfully. The majoraccessibility features in IBM Tivoli Monitoring for Databases: Informix enable usersto:v Use assistive technologies such as screen-reader software and a digital speech
synthesizer to hear what is displayed on the screenv Operate specific or equivalent features using only the keyboardv Magnify what is displayed on the screen
In addition, the product documentation has been modified to include features toaid accessibility:v All documentation available in both HTML and convertible PDF formats to give
the maximum opportunity for users to apply screen-reader software.v All images provided with alternative text so that users of the documentation
with vision impairments can understand the contents of the images.
Using assistive technologiesAssistive technology products such as screen-readers, function with both thetext-based and graphical user interfaces found in IBM Tivoli Monitoring forDatabases: Informix. Consult the assistive technology product documentation forspecific information about using it to access command line or graphical interfaces.
Additional accessibility features might be included as part of the user interface of aparticular IBM Tivoli Monitoring for Databases: Informix component. Check withthe individual component’s documentation for any additional information aboutaccessibility.
Magnifying what is displayed on the screenIn all components of IBM Tivoli Monitoring for Databases: Informix other than theWeb Health Console, users can magnify the screens used by the product’s userinterfaces using facilities provided by the operating systems on which the productis run. For example, in a Windows environment you can change the screen settingsto a lower resolution to enlarge the font sizes of the text on the screen. Informationabout these facilities is provided in the relevant operating system documentation.
Documentation in accessible formatsAll user documentation is provided in HTML format, which can be read directlyby assistive tools such as screen readers, or in convertible PDF format. ConvertiblePDF files are those that can be converted from PDF to HTML by the Adobe PDF toHTML converter. For information about converting PDF documents to HTML, referto the Adobe book Optimizing Adobe PDF Files for Accessibility
Using alternative textAll documentation images are provided with an alternative text that can be readby assistive tools such as screen readers.
121

122 IBM Tivoli Monitoring for Databases: Informix: User’s Guide

Appendix G. Notices
This information was developed for products and services offered in the U.S.A.IBM may not offer the products, services, or features discussed in this document inother countries. Consult your local IBM representative for information on theproducts and services currently available in your area. Any reference to an IBMproduct, program, or service is not intended to state or imply that only that IBMproduct, program, or service may be used. Any functionally equivalent product,program, or service that does not infringe any IBM intellectual property right maybe used instead. However, it is the user’s responsibility to evaluate and verify theoperation of any non-IBM product, program, or service.
IBM may have patents or pending patent applications covering subject matterdescribed in this document. The furnishing of this document does not give youany license to these patents. You can send license inquiries, in writing, to:
IBM Director of Licensing
IBM Corporation
North Castle Drive
Armonk, NY 10504-1785 U.S.A.
For license inquiries regarding double-byte (DBCS) information, contact the IBMIntellectual Property Department in your country or send inquiries, in writing, to:
IBM World Trade Asia Corporation
Licensing
2-31 Roppongi 3-chome, Minato-ku
Tokyo 106, Japan
The following paragraph does not apply to the United Kingdom or any othercountry where such provisions are inconsistent with local law:
INTERNATIONAL BUSINESS MACHINES CORPORATION PROVIDES THISPUBLICATION ″AS IS″ WITHOUT WARRANTY OF ANY KIND, EITHEREXPRESS OR IMPLIED, INCLUDING, BUT NOT LIMITED TO, THE IMPLIEDWARRANTIES OF NON-INFRINGEMENT, MERCHANTABILITY OR FITNESSFOR A PARTICULAR PURPOSE.
Some states do not allow disclaimer of express or implied warranties in certaintransactions, therefore, this statement might not apply to you.
This information could include technical inaccuracies or typographical errors.Changes are periodically made to the information herein; these changes will beincorporated in new editions of the publication. IBM may make improvementsand/or changes in the product(s) and/or the program(s) described in thispublication at any time without notice.
123
Any references in this information to non-IBM Web sites are provided forconvenience only and do not in any manner serve as an endorsement of those Websites. The materials at those Web sites are not part of the materials for this IBMproduct and use of those Web sites is at your own risk.
IBM may use or distribute any of the information you supply in any way itbelieves appropriate without incurring any obligation to you.
Licensees of this program who wish to have information about it for the purposeof enabling: (i) the exchange of information between independently createdprograms and other programs (including this one) and (ii) the mutual use of theinformation which has been exchanged, should contact:
IBM Corporation
2Z4A/101
11400 Burnet Road
Austin, TX 78758 U.S.A.
Such information may be available, subject to appropriate terms and conditions,including in some cases payment of a fee.
The licensed program described in this document and all licensed materialavailable for it are provided by IBM under terms of the IBM Customer Agreement,IBM International Program License Agreement or any equivalent agreementbetween us.
Any performance data contained herein was determined in a controlledenvironment. Therefore, the results obtained in other operating environments mayvary significantly. Some measurements may have been made on development-levelsystems and there is no guarantee that these measurements will be the same ongenerally available systems. Furthermore, some measurement may have beenestimated through extrapolation. Actual results may vary. Users of this documentshould verify the applicable data for their specific environment.
Information concerning non-IBM products was obtained from the suppliers ofthose products, their published announcements or other publicly available sources.IBM has not tested those products and cannot confirm the accuracy ofperformance, compatibility or any other claims related to non-IBM products.Questions on the capabilities of non-IBM products should be addressed to thesuppliers of those products.
All statements regarding IBM’s future direction or intent are subject to change orwithdrawal without notice, and represent goals and objectives only.
This information contains examples of data and reports used in daily businessoperations. To illustrate them as completely as possible, the examples include thenames of individuals, companies, brands, and products. All of these names arefictitious and any similarity to the names and addresses used by an actual businessenterprise is entirely coincidental.
COPYRIGHT LICENSE:
124 IBM Tivoli Monitoring for Databases: Informix: User’s Guide
This information contains sample application programs in source language, whichillustrate programming techniques on various operating platforms. You may copy,modify, and distribute these sample programs in any form without payment toIBM, for the purposes of developing, using, marketing or distributing applicationprograms conforming to the application programming interface for the operatingplatform for which the sample programs are written. These examples have notbeen thoroughly tested under all conditions. IBM, therefore, cannot guarantee orimply reliability, serviceability, or function of these programs. You may copy,modify, and distribute these sample programs in any form without payment toIBM for the purposes of developing, using, marketing, or distributing applicationprograms conforming to IBM‘s application programming interfaces.
Each copy or any portion of these sample programs or any derivative work, mustinclude a copyright notice as follows:
© (your company name) (year). Portions of this code are derived from IBM Corp.Sample Programs. © Copyright IBM Corp. _enter the year or years_. All rightsreserved.
If you are viewing this information in softcopy form, the photographs and colorillustrations might not appear.
TrademarksIBM, the IBM logo, Tivoli, the Tivoli logo, AIX, DB2, IBMLink, Informix, OS/2,OS/400, Tivoli Enterprise Console, and TME are trademarks or registeredtrademarks of International Business Machines Corporation in the United States,other countries, or both.
Lotus® and Lotus Notes™ are trademarks of International Business MachinesCorporation and Lotus Development Corporation in the United States, othercountries, or both.
Microsoft and Windows NT are registered trademarks of Microsoft Corporation inthe United States, other countries, or both.
Java™ and all Java-based trademarks and logos are trademarks or registeredtrademarks of Sun Microsystems, Inc. in the United States, other countries, or both.
UNIX is a registered trademark of The Open Group in the United States and othercountries.
Other company, product, and service names may be trademarks or service marksof others.
Appendix G. Notices 125

126 IBM Tivoli Monitoring for Databases: Informix: User’s Guide
Index
Aaccessibility 121actions, recovery 9administrators
defined 3assured delivery 33asynchronous delivery 33attributes
edit IBMInformixServer object 37authorization roles
assigning of Tivoli Enterprise Data Warehouse roles 92for each procedure 101IBM Tivoli Monitoring for Databases: Informix 3IBMInformix_admin 3IBMInformix_super 3IBMInformix_user 3setting 15Tivoli 3Tivoli Enterprise Data Warehouse 91
Bbooks
feedback vionline viordering vi
built-in actionsdefined 9
Ccentral data warehouse 90check–point and restart delivery 33clearing events, concept 7commands
wcrtjob 53wcrtprf 27wcrtprfmgr 27wdistrib 34wdmcmd 85wdmdistrib 85wdmeditprf 30, 66, 68, 75, 76, 78, 80, 82, 83wdmeng 85wdmlseng 85wdmmn 86wdmtrceng 85wgetpr 17wifxaddvar 37wifxrmvar 37wlseng 87wrunjob 57wruntask 48wschedjob 57wsetadmin 15wsetpm 27wsetpr 17wsub 29
conceptsclearing events 7events (clearing) 7
configure IBMInformixServer objectabout 20command line 21desktop 22wifxconfept 21
Configure_TEC taskusing to configure the Tivoli Enterprise Console 105
control server 90conventions
highlighting ixtypeface ix
createIBM console user 92jobs 52
Customer Support ixcustomization
data logging of resource models 82indications of resource models 67parameters of resource models 77schedule rules of resource models 78sending a notice for resource models 75specifying tasks of resource models 74
customized tasks 51definition of 47
cyclesdefined 4
Ddata depoting delivery 33data logging
customizing 82defined 8
data marts 90, 94access to 91assign to Tivoli Enterprise Data Warehouse user
groups 94IBM Tivoli Monitoring for Databases: Informix data
marts 98database
shutting downdesktop 43, 44
dataless profile managersicon 28subscribers 27
DB2 databasecontaining data marts 90containing historical data 90
directory names, notation ixdiscover
about 19command line 19desktop 20Informix instances 19running 19Tivoli Business Systems Manager objects 112
distributed systemsdefined 3
distributionprofiles from the desktop 30profiles using MDist2 33
127

distribution (continued)rerun to target 34target rerun 34
Ee-mail contact viiiendpoints
dataless 27subscribing 28
environmentstart Tivoli 13
environment variables, notation ixevent monitors
defined 7Health Console 8Tivoli Business Systems Manager 8Tivoli Enterprise Console server 7
eventsdefined 6, 103Tivoli Enterprise Console 103
events (clearing), concept 7extract, transform, and load utilities
access from applications 89
Ffeedback about publications viii
Ggateaways
managing 86Gathering Historical Data Warehouse 4
Hhealth data
resource health 63heartbeat function 4highlighting
conventions ixhistorical data
access using Tivoli Enterprise Data Warehouse 89gathering 4
holes 68defined 5occurrences of 68
IIBM console
user creation 92IBM DB2
DB2 Server 90Universal Database Enterprise Edition 90
IBM Informix Server Tasks task librarydefined 2
IBM Tivoli Monitoringabout 3overview 65
IBM Tivoli Monitoring for Databases: Informixauthorization roles 3managed resources 16overview 1
IBM Tivoli Monitoring for Databases: Informix (continued)setting authorization roles 15setup 13working with 37
IBM Tivoli Monitoring for Databases: Informix data marts 98IBM Tivoli Monitoring Web Health Console 63
connect to 64IBMInformix_admin
defined 3IBMInformix_super
defined 3IBMInformix_user
defined 3IBMInformixConfigured policy region
defined 2IBMInformixDiscovered policy region
defined 2IBMInformixDiscovery
about 19IBMInformixServer object
distribution rerun 34edit attributes 37properties 39
IBMInformixServer objectsconfigure 20move 23
IBMInformixUnmanaged policy regiondefined 2
indicationscustomizing 67defined 5occurrences of 67
Jjobs
about 52creation of 52definition of 47running 56schedule of 57
Llogging (data)
defined 8
Mmanaged nodes
run tasks on 48managed resources
defined 3, 16IBM Tivoli Monitoring for Databases: Informix 16setting 16specifying in a policy region
from the CLI 17from the desktop 18
management serverTivoli Business Systems Manager 109
manualsfeedback vionline viordering vi
MDist2assured delivery function 33
128 IBM Tivoli Monitoring for Databases: Informix: User’s Guide

MDist2 (continued)asynchronous delivery function 33check-point and restart function 33data depoting delivery function 33profile distribution 33
monitoring profiles, defined 26monitors
Tivoli Business Systems Manager 8move IBMInformixServer object
about 23command line 23desktop 24
Nnotation
environment variables ixpath names ixtypeface ix
Ooccurrences 67
defined 5online publications viiordering publications viiioverview
IBM Tivoli Monitoring 65IBM Tivoli Monitoring for Databases: Informix 1
Pparameters
defined 9path names, notation ixpolicy regions
adding managed resource types tofrom the CLI 17from the desktop 18
defined 16setting managed resources 16
profile managerscreating 26creation of 34dataless 27setting up 26subscribing endpoints 28
profilesadding custom resource models to 66adding default resource models to 29creating 26defined 9distribution from the desktop 30distribution using MDist2 33managing at endpoints 85monitoring 26
propertiesview IBMInformixServer object 39view server 39
publicationsfeedback vionline viordering vi
Rrecovery actions, defined 9reource models
customization of indications 67customizing data logging 82customizing parameters 77customizing schedule rules 78sending a notice for 75specifying tasks 74
report interface 91reports
access from applications 89create 97metrics 98modify default settings 96name of 97run using the report interface 95schedule to run automatically 96Tivoli Enterprise Data Warehouse 94Tivoli Enterprise Data Warehouse, list of 98
resource health 63resource models
adding to profiles 29, 66defined 10managing at endpoints 85, 86setup 25
resourcessetting managed types 16
resources, manageddefined 3
rolessetting authorization 15
Sschedule rules
customizing 78Scheduler
about 57scheduling
defined 10Send_TEC_Files_to_TEC task
using to configure the Tivoli Enterprise Console 105server
Shutdown_to_Off-Line 42Start-up_to_On-Line 40Start-up_to_Quiescent 41Stop_to_Quiescent_(Gracefully) 43Stop_to_Quiescent_(Immediately) 44view properties 39
setupguidelines 11quick reference 11resource models 25
Shutdown_to_Off-Lineserver 42tasks 42
standard tasks 48star schemas
Tivoli Enterprise Data Warehouse, list of 98Start-up_to_On-Line
server 40tasks 40
Start-up_to_Quiescentserver 41tasks 41
Index 129
Stop_to_Quiescent_(Gracefully)server 43tasks 43
Stop_to_Quiescent_(Immediately)server 44tasks 44
subscribingendpoints 28
Ttask libraries
customization of tasks 51IBM Informix Server Tasks 47
tasksabout 48customization 51customized 47definition of 47run 48Shutdown_to_Off-Line 42standard 48Start-up_to_On-Line 40Start-up_to_Quiescent 41Stop_to_Quiescent_(Gracefully) 43Stop_to_Quiescent_(Immediately) 44Tivoli Management Framework 9
thresholdsdefined 10
Tivoli Business Systems Manageras monitor, concept 8configuring Tivoli Enterprise Console event server 111discover objects 112integrating with 109management server 109overview 109prerequisites 110Tivoli Event Enablement 110uninstall 113workstation 109
Tivoli Customer Support ixTivoli Enterprise Console
configuringoverview 104
configuring for Tivoli Business Systems Manager 111console 104event
receiving from monitors 104events 103
groups 104responses 104sources 103viewing 104
rule baseoverview 104
Tivoli Enterprise Data Warehouseassign user groups to data marts 94assign users to user groups 93assigning authorization roles 92authorization roles 91capabilities 89central data warehouse 90components 89control server 90create reports 97data marts 90, 91list of reports 98
Tivoli Enterprise Data Warehouse (continued)list of star schemas 98modify report’s default settings 96overview 89report interface 91report metrics 98report names 97reports 94run reports 95schedule reports to run automatically 96user group creation 93user groups 91users 91
Tivoli environmentstart 13
Tivoli Event EnablementTivoli Business Systems Manager 110
Tivoli Management Frameworktasks, defined 9
trace log 116troubleshooting 115TWHAdmin user group 91typeface conventions ix
Uuser groups
assign Tivoli Enterprise Data Warehouse data marts 94assign Tivoli Enterprise Data Warehouse users to 93create 93data mart access 91TWHAdmin 91
user interfacesIBM Tivoli Monitoring Web Health Console 63
usersassign Tivoli Enterprise Data Warehouse authorization
roles 92assign to Tivoli Enterprise Data Warehouse user
groups 93IBM console 92
Vvariables, notation for ix
Wwcrtjob command 53wcrtprf command 27wcrtprfmgr command 27wdmcmd command 85wdmdistrib command 34, 85wdmeditprf command 30, 66, 68, 75, 76, 78, 80, 82, 83wdmeng command 85wdmlseng command 85wdmmn command 86wdmtrceng command 85wgetpr command 17wifxaddvar
command 37wifxconfept
running 21wifxdiscovery
running 19wifxrmvar
command 37
130 IBM Tivoli Monitoring for Databases: Informix: User’s Guide

wlseng command 87wrunjob command 57wruntask command 48wschedjob command 57wsetadmin command 15wsetpm command 27wsetpr command 17wsub command 29
Index 131

132 IBM Tivoli Monitoring for Databases: Informix: User’s Guide


����
Printed in U.S.A.
SC23-4729-00