Embed Size (px)
Citation preview

IBM Systems
IBM Director
Installation and Configuration Guide
Version 5.10
���


IBM Systems
IBM Director
Installation and Configuration Guide
Version 5.10
���

Note
Before using this information and the product it supports, read the information in Appendix B,
"Notices."
Fourth Edition (October 2005)
This edition applies to version 5.10 of IBM Director and to all subsequent releases and modifications until otherwise
indicated in new editions.
© Copyright International Business Machines Corporation 1999, 2005. All rights reserved.
US Government Users Restricted Rights – Use, duplication or disclosure restricted by GSA ADP Schedule Contract
with IBM Corp.

Contents
About this book . . . . . . . . . . . v
Conventions and terminology . . . . . . . . v
Related information . . . . . . . . . . . . v
How to send your comments . . . . . . . . vii
What’s new . . . . . . . . . . . . . ix
What’s new in release 4.21 . . . . . . . . . ix
What’s new in release 4.22 . . . . . . . . . . x
What’s new in release 5.10 . . . . . . . . . xii
Chapter 1. Getting started with IBM
Director . . . . . . . . . . . . . . . 1
Introducing IBM Director . . . . . . . . . . 1
IBM Director components . . . . . . . . . . 2
IBM Director Core Services . . . . . . . . 3
IBM Director Agent . . . . . . . . . . . 4
IBM Director Console . . . . . . . . . . 4
IBM Director Server . . . . . . . . . . . 5
Concepts . . . . . . . . . . . . . . . 5
Accessibility . . . . . . . . . . . . . 5
Associations . . . . . . . . . . . . . 15
Common Information Model . . . . . . . 17
Discovery . . . . . . . . . . . . . . 20
Event management . . . . . . . . . . . 24
Groups . . . . . . . . . . . . . . . 35
Managed objects . . . . . . . . . . . . 37
Managed system . . . . . . . . . . . 38
Mass configuration profiles . . . . . . . . 40
Performance . . . . . . . . . . . . . 41
Scalable objects . . . . . . . . . . . . 44
Security . . . . . . . . . . . . . . 48
Software distribution . . . . . . . . . . 53
SNMP devices . . . . . . . . . . . . 55
Storage managed objects . . . . . . . . . 56
Service processors . . . . . . . . . . . 59
Upward integration . . . . . . . . . . . 64
User interfaces . . . . . . . . . . . . 66
z/VM Center concepts . . . . . . . . . 67
Chapter 2. Planning . . . . . . . . . 81
Requirements . . . . . . . . . . . . . . 81
Hardware requirements . . . . . . . . . 81
Network requirements . . . . . . . . . . 84
Supported operating systems . . . . . . . 86
Operating systems supported by IBM Director
tasks . . . . . . . . . . . . . . . . 92
IBM Director task support for BladeCenter
products . . . . . . . . . . . . . . 135
Supported database applications . . . . . . 137
Reviewing the environment . . . . . . . . 137
Identifying the hardware . . . . . . . . 138
Identifying local and remote subnets . . . . 138
Identifying firewalls and blocked ports . . . . 138
Preparing the physical environment . . . . . . 139
Planning to manage a BladeCenter . . . . . 139
Planning to install IBM Director . . . . . . . 142
Choosing where to install IBM Director Server 142
Selecting the IBM Director Server installation
options . . . . . . . . . . . . . . 143
Planning for Capacity Manager . . . . . . 145
Selecting the IBM Director database application 145
Planning for tiered deployment of IBM Director 147
Planning for events . . . . . . . . . . 148
Chapter 3. Installing . . . . . . . . 153
Preparing to install IBM Director . . . . . . . 153
Preparing the IBM Director database . . . . 153
Preparing to install IBM Director Server . . . 158
Preparing Level-1 managed systems . . . . . 167
Preparing Windows XP managed systems . . . 168
Preparing your System z9 or zSeries
environment for z/VM Center . . . . . . . 169
Installing IBM Director . . . . . . . . . . 182
Installing IBM Director Server . . . . . . . 182
Installing IBM Director Console . . . . . . 213
Installing Level 1: IBM Director Core Services 222
Installing Level 2: IBM Director Agent . . . . 235
Installing IBM Director extensions . . . . . 264
Changing IBM Director installation options . . 295
Upgrading from previous releases . . . . . . 298
Upgrading IBM Director Server . . . . . . 300
Upgrading IBM Director Console . . . . . . 300
Upgrading IBM Director Agent . . . . . . 301
Updating IBM Director . . . . . . . . . 308
Initially configuring IBM Director . . . . . . 308
Authorizing IBM Director users . . . . . . 309
Configuring discovery preferences . . . . . 312
Discovering systems automatically . . . . . 317
Setting up software-distribution preferences . . 318
Chapter 4. Uninstalling IBM Director 323
Uninstalling IBM Director on i5/OS . . . . . . 323
Uninstalling IBM Director Server on i5/OS . . 323
Uninstalling IBM Director Server using
DLTLICPGM . . . . . . . . . . . . 323
Uninstalling IBM Director Agent on i5/OS . . 324
Uninstalling IBM Director on Linux or AIX . . . 324
Uninstalling IBM Director on Windows . . . . . 325
Uninstalling IBM Director using the Windows
Add/Remove Programs feature . . . . . . 325
Uninstalling IBM Director using the dirunins
command . . . . . . . . . . . . . 326
Uninstalling IBM Director Agent on AIX . . . . 326
Uninstalling IBM Director Agent on NetWare . . . 327
Uninstalling IBM Director Core Services before
migrating to an earlier version of IBM Director . . 327
Chapter 5. Modifying an IBM Director
installation . . . . . . . . . . . . 329
Enabling the Wake on LAN feature . . . . . . 329
© Copyright IBM Corp. 1999, 2005 iii

Enabling the Wake on LAN feature for Linux or
AIX . . . . . . . . . . . . . . . 329
Enabling the Wake on LAN feature on Windows 329
Configuring the database on the management
server . . . . . . . . . . . . . . . . 330
Configuring the database on Linux or AIX . . 330
Configuring the database on a Windows
management server . . . . . . . . . . 331
Enabling SNMP access and trap forwarding for
Linux . . . . . . . . . . . . . . . . 331
Chapter 6. Troubleshooting . . . . . 335
Installation troubleshooting . . . . . . . . . 335
Could not detect rpm supported Linux
distribution . . . . . . . . . . . . . 335
depmod: *** Unresolved symbols in
/lib/modules/2.4.7-10smp/kernel/drivers/char/ . . . . . . . 335
Error 1722 is displayed . . . . . . . . . 336
Installing IBM Director 4.2x over IBM Director
5.10 . . . . . . . . . . . . . . . . 336
Installation package cannot be installed by
Windows Installer service . . . . . . . . 337
System Availability reports an unplanned
outage when a system is restarted . . . . . 337
Windows blue screen
IRQL_NOT_LESS_OR_EQUAL . . . . . . 338
Contacting customer support . . . . . . . . 338
Before you call . . . . . . . . . . . . 338
Using the documentation . . . . . . . . 339
Getting help and information from the World
Wide Web . . . . . . . . . . . . . 339
Software service and support . . . . . . . 339
Appendix A. Worksheets . . . . . . 341
Worksheet: Environment . . . . . . . . . 341
Worksheet: Capacity Manager space requirements 342
Worksheet: Database planning . . . . . . . . 343
Worksheet: Apache Derby database configuration 343
Worksheet: DB2 database configuration . . . . . 344
Worksheet: Oracle database configuration . . . . 344
Worksheet: PostgreSQL database configuration . . 345
Worksheet: Microsoft SQL Server database
configuration . . . . . . . . . . . . . 345
Worksheet: Installing IBM Director Server . . . . 346
Appendix B. Notices . . . . . . . . 347
Trademarks . . . . . . . . . . . . . . 348
Abbreviations, Acronyms, and
Glossary . . . . . . . . . . . . . 351
Abbreviation and acronym list . . . . . . . . 351
Glossary . . . . . . . . . . . . . . . 353
Index . . . . . . . . . . . . . . . 363
iv IBM Director Installation and Configuration Guide

About this book
This book provides information about installing and configuring IBM Director. In
addition to presenting an overview of IBM Director and its requirements, it covers
the following topics:
v Planning an IBM Director environment
v Installing IBM Director and IBM Director extensions
v Upgrading from IBM Director 4.2 or earlier to IBM Director 5.1
v Configuring IBM Director
It also includes information about IBM Director security and solving problems you
might encounter with IBM Director.
Conventions and terminology
These notices are designed to highlight key information:
Note: These notices provide important tips, guidance, or advice.
Important: These notices provide information or advice that might help you avoid
inconvenient or difficult situations.
Attention: These notices indicate possible damage to programs, devices, or data.
An attention notice appears before the instruction or situation in which damage
can occur.
Related information
This topic provides links to additional information related to IBM Director.
IBM Director resources on the World Wide Web
The following Web pages provide resources for understanding, using, and
troubleshooting IBM Director and other systems-management tools.
IBM Director information center
publib.boulder.ibm.com/infocenter/eserver/
v1r2/topic/diricinfo/fqm0_main.html
Updated periodically, the IBM Director information center contains the
most up-to-date documentation available on a wide range of topics.
IBM Director Web site on ibm.com®
www.ibm.com/servers/eserver/xseries/
systems_management/ibm_director/
The IBM Director Web site on ibm.com has links to downloads and
documentation for all currently supported versions of IBM Director.
Information on this site includes:
v IBM Director 5.10 - downloads and documentation
v IBM Director 4.22 - downloads and documentation
v IBM Director 4.22 Upward Integration Modules (UIMs) - downloads and
documentation
© Copyright IBM Corp. 1999, 2005 v

v IBM Director 4.21 - downloads and documentation
v IBM Director 4.20 - downloads and documentation
v IBM Director Hardware and Software Compatibility document - lists
supported
and IBM® xSeries® systems, as well as all supported
operating systems. It is updated every 6 to 8 weeks.
v Printable documentation for IBM Director - available in Portable
Document Format (PDF) in several languages
IBM Systems Software information center
www.ibm.com/servers/library/infocenter/
This Web page provides information about IBM Virtualization Engine™,
IBM Director, and other topics.
IBM ServerProven® page
www.ibm.com/pc/us/compat/index.html
This Web page provides information about IBM xSeries, BladeCenter®, and
IntelliStation® hardware compatibility with IBM Director.
IBM Systems Management Software: Download/Electronic Support page
www.ibm.com/servers/eserver/xseries/
systems_management/ibm_director/
Use this Web page to download IBM systems-management software,
including IBM Director. Check this Web page regularly for new IBM
Director releases and updates.
IBM Servers
www.ibm.com/servers/
This Web page on ibm.com links to information, downloads, and IBM
Director extensions such as Remote Deployment Manager, Capacity
Manager, Systems Availability and Software Distribution (Premium
Edition) for IBM servers:
v IBM BladeCenter
v IBM iSeries™
v IBM pSeries®
v IBM xSeries
v IBM zSeries®
IBM Redbooks™
www.ibm.com/redbooks/
You can download the following documents from the IBM Redbooks Web page.
You also might want to search this Web page for documents that focus on specific
IBM hardware; such documents often contain systems-management material.
Note: Be sure to note the date of publication and to determine the level of IBM
Director software to which the Redbooks publication refers.
v Creating a Report of the Tables in the IBM Director 4.1 Database (TIPS0185)
v IBM Director Security (REDP-0417-00)
v IBM eServer™ BladeCenter Systems Management with IBM Director V4.1 and Remote
Deployment Manager V4.1 (REDP-3776-00)
v Implementing Systems Management Solutions using IBM Director (SG24-6188)
v Integrating IBM Director with Enterprise Management Solutions (SG24-5388)
v Managing IBM TotalStorage® NAS with IBM Director (SG24-6830)
vi IBM Director Installation and Configuration Guide

v Monitoring Redundant Uninterruptible Power Supplies Using IBM Director
(REDP-3827-00)
Remote Supervisor Adapter
Remote Supervisor Adapter overview
www.ibm.com/support/docview.wss?uid=psg1MIGR-4UKSML
This Web page includes links to the Remote Supervisor Adapter User’s Guide
and Remote Supervisor Adapter Installation Guide.
Remote Supervisor Adapter II overview
www.ibm.com/support/docview.wss?uid=psg1MIGR-50116
This Web page includes information about the Remote Supervisor Adapter
II.
Other documents
For planning purposes, the following documents might be of interest:
v Planning and installation guide - IBM eServer BladeCenter (Type 8677)
v IBM Management Processor Command-Line Utility User’s Guide version 3.00
How to send your comments
Your feedback is important in helping to provide the most accurate and highest
quality information. If you have any comments about this book or any other IBM
Director publication, use the form for reader’s comments is provided at the back of
this publication. If the form has been removed, you may address your comments
to:
International Business Machines Corporation
Design & Information Development
Department CGFA
PO Box 12195
Research Triangle Park, NC 27709-9990
U.S.A.
About this book vii

viii IBM Director Installation and Configuration Guide

What’s new
This section describes the enhancements made to IBM Director since version 4.20.
What’s new in release 4.21
This topic provides information about new features and enhancements in IBM
Director 4.21
IBM Director 4.21 adds the following new features, functions, and enhancements:
BladeCenter management
IBM Director 4.21 contains the following enhancements:
v BladeCenter Deployment Wizard support for the BladeCenter Telco and
the Brocade Enterprise SAN Switch Module for IBM eServer BladeCenter
v Rack Manager support for the BladeCenter Telco
v Virtual Local Area Network (VLAN) configuration support for Cisco and
Intel® Gigabit Ethernet Switch Modules
v Support for managing the Intelligent Platform Management Interface
(IPMI) baseboard management controller in the IBM eServer BladeCenter
HS20, machine type 8843 server
BladeCenter switches
IBM Director 4.21 adds support for the following BladeCenter switches:
v Infiniband Switch Module
v Nortel Networks Layer 2/3 GbE Switch Module
Database
IBM Director 4.21 adds support for using PostgreSQL, version 7.4 as the
IBM Director database (SUSE LINUX Enterprise Server 9 only).
General enhancements
IBM Director 4.21 adds the following new functionality:
v Ability to launch the Web interface for service processors from IBM
Director Console
v Management Information Base (MIB) files for the IBM System Storage
DS300 and DS400
v Support for viewing blue-indicator light and firmware-level information
for xSeries servers that contain IPMI baseboard management controllers
Linux® systems
IBM Director 4.21 adds support for the following features on managed
systems running Linux:
v Alert Standard Format (ASF) 2.0 on an xSeries 306 server running a
32-bit version of Linux
v Network interface card (NIC) events
Operating systems
IBM Director 4.21 adds support for the following operating systems:
IBM Director Server and IBM Director Console
v Red Hat Enterprise Linux AS and ES, version 3.0, for Intel x86
v SUSE LINUX Enterprise Server 9 for x86
© Copyright IBM Corp. 1999, 2005 ix

IBM Director Agent
v AIX 5L™, Version 5 Release 3
v Red Hat Enterprise Linux AS and ES, version 3.0, for Intel
EM64T
v Red Hat Enterprise Linux WS, version 3.0, for Intel EM64T
v SUSE LINUX Enterprise Server 9 for AMD64 and EM64T
v SUSE LINUX Enterprise Server 9 for IBM POWER™
v SUSE LINUX Enterprise Server 9 for Itanium Processor Family
v SUSE LINUX Enterprise Server 9 for x86
ServeRAID™ hardware and software
IBM Director 4.21 adds support for the IBM ServeRAID-7k Ultra320 SCSI
controller. It also contains an updated ServeRAID Manager task, which is
based on the stand-alone version of ServeRAID Manager 7.10b.
Upward integration
IBM Director 4.21 adds the following new functionality:
v Upward integration with Microsoft® Systems Management Server (SMS)
2003
v Ability to use Secure Sockets Layer (SSL) with the upward-integration
modules for IBM Tivoli® NetView® and HP OpenView
For the most recent information about hardware or software support, see the IBM
Director Hardware and Software Compatibility document. You can download the PDF
file from the IBM Support Web page at
www.ibm.com/servers/eserver/xseries/systems_management/ibm_director/
What’s new in release 4.22
This topic provides information about new features and enhancements in IBM
Director 4.22.
IBM Director 4.22 adds the following new features, functions, and enhancements:
Alert Standard Format 2.0 on Linux systems
IBM Director 4.22 adds support for Alert Standard Format (ASF) 2.0 on the
following servers running Linux:
v xSeries 206 (32-bit operating systems only)
v xSeries 226 (32-bit and EM64T operating systems only)
Alert Standard Format on Windows® x64 systems
IBM Director 4.22 adds support for ASF on the following servers that are running
Windows x64 operating systems:
v xSeries 226
v Intellistation A-Pro
BladeCenter options
IBM Director 4.22 contains the following enhancements:
v Support for
BladeCenter LS20
v Support for the QLogic iSCSI Expansion Card
v Support for the Cisco Systems Fiber Intelligent Gigabit Ethernet Switch Module
(IGESM). This switch is also known as the Cisco Fiber IGESM.
x IBM Director Installation and Configuration Guide

v Clarification about support for installing IBM Director Server on a blade server.
IBM Director 4.22 supports installing IBM Director Server on a blade server and
using that instance of IBM Director to manage the BladeCenter unit. Previously,
if you wanted to use IBM Director to manage a BladeCenter unit, you needed to
install IBM Director Server on a non-blade server.
Refer to the IBM Director 4.22 Release Notes for more information.
IBM System Storage
IBM Director 4.22 adds support for IBM System Storage DS4000 series storage
systems. This support is provided by new storage managed objects, which are IBM
Director managed objects that represent storage-related devices.
IBM Director 4.22 also adds support for launching IBM DS4000 Storage Manager
from IBM Director Console.
Refer to the IBM Director 4.22 Release Notes for more information.
Java™ Runtime Environment (JRE)
The Java Runtime Environment (JRE), version 1.3.1, in IBM Director 4.22 has been
upgraded to service level 8.
Operating systems for IBM Director Agent
IBM Director 4.22 adds support for installing IBM Director Agent on the following
operating systems:
v Red Hat Enterprise Linux AS, ES, and WS, version 4.0, for systems with Intel
x86 processors
v Red Hat Enterprise Linux AS, ES, and WS, version 4.0, for systems with Intel
EM64T or AMD Opteron processors
v VMware GSX Server, version 3.1 and 3.2. For a list of the supported guest
operating systems, see the IBM Director Hardware and Software Compatibility
document.
v Windows Server 2003, Datacenter x64 Edition
v Windows Server 2003, Standard and Enterprise x64 Editions
v Windows XP Professional x64 Edition
Scalable systems support for xSeries 460 servers
IBM Director 4.22 adds support for scalable systems and scalable partitions
configured on xSeries 460 servers (Scalable Systems Manager 4.20 does not provide
support for this server).
Refer to the IBM Director 4.22 Release Notes for more information.
ServeRAID hardware and software
IBM Director 4.22 adds support for the IBM ServeRAID-8i Serial Attached SCSI
(SAS) RAID Controller. It also contains an updated ServeRAID Manager task,
which is based on the stand-alone version of ServeRAID Manager 8.0. This
ServeRAID Manager task can manage SAS RAID array configurations.
What’s new xi

Upward Integration Modules (UIMs)
IBM Director 4.22 adds support for Upward Integration Modules (UIMs) with HP
OpenView 7.01 on supported Windows and Linux operating systems.
For the most recent information about hardware or software support, including
operating system support that has been added to a specific version of IBM Director
after its initial release, see the IBM Director Hardware and Software Compatibility
document. You can download the PDF file from the IBM Director support Web
page at
www.ibm.com/servers/eserver/xseries/systems_management/ibm_director/.
What’s new in release 5.10
This topic provides information about new features and enhancements in IBM
Director 5.10.
Improvements to how you work in IBM Director
Enhanced user interface
IBM Director 5.10 contains the following features designed to improve
usability:
v Enhanced user interface allows more intuitive hierarchical viewing of
managed objects in a single-pane view, the ″classic″ three-pane view, or
a two-pane combination view
v New customizable details view of managed objects
v Toolbar is now customizable for users
Event Action Plan wizard
The Event Action Plan wizard now can be launched from IBM Director
Console and used to edit existing event action plans. In addition, the
wizard has been redesigned to improve usability and render it more
powerful. You can specify additional event filters, the systems to which
you want to apply the event action plan, and schedule when the event
filters are applied.
Improved accessibility
IBM Director 5.10 meets the accessibility standards for Section 508 of the
US Rehabilitation Act. The major changes to the product include the
following:
v IBM Director Console can be navigated using the keyboard only.
v IBM Director Console includes ″Accessibility Preferences″ that enable
users to customize such display attributes as color, font size, and
contrast.
v IBM Director Console implements the Java accessibility API which
supports interaction with assistive technology.
v The IBM Director documentation is delivered in a Web-based
Information Center.
New command-line interface
The dircmd command-line interface is deprecated in favor of a new
command-line interface: dircli. The dircli command-line interface supports
existing dircmd bundles, plus offers a new set of commands for
accomplishing common system-management tasks.
xii IBM Director Installation and Configuration Guide

Server Configuration Manager
New task to create or update server configuration profiles. Configuration
includes the service processors in
xSeries servers.
Software Health
New task to check for outdated firmware, drivers, and director agents on
managed objects.
Unattended installation
IBM Director Server now can be installed in unattended mode.
Web-based (Information Center) product documentation
New in version 5.10, the IBM Director information center is a
comprehensive, browser-based information system that provides easy
access to the most up-to-date product information available. Updated
periodically, the IBM Director information center contains:
v Assistance for the tasks that users must perform
v Conceptual information
v Reference for commands, extensions, icons, security, and many other
topics
v Usage scenarios for IBM Director
To find information, users can search, browse the contents, follow links
from one topic to related topics, and print the topics they want to read
offline. The IBM Director information center is available at
publib.boulder.ibm.com/infocenter/eserver/
v1r2/topic/diricinfo/fqm0_main.html.
Inventory enhancements
Inventory collection has been improved with the following new features in
IBM Director 5.10:
v Filter queries can be designed for inventory data that has not been
collected
v Enhanced tree navigation in the Inventory Query Browser
v Inventory change monitoring
v Custom collections of inventory tables
v Optional events on inventory completion or errors
v Improved control over inventory collection through additional
preferences:
– Enable/disable background inventory service
– Specify the maximum number of agents to perform inventory
collection at the same time, to control resource usage
– Specify the default collection type for the three agent levels
Upward integration enhancements
IBM Director 5.10 includes the following enhancements to the upward
integration modules (UIM):
v Support for Microsoft Operations Manager (MOM)
Support for more systems in IBM Director
SMI-S storage devices
v Support for SMI-S 1.1 compliant Storage Managed Systems, including
the IBM System Storage DS300 and DS400 devices
What’s new xiii

v Information displayed in the Hardware Status task and events for all
supported SMI-S storage devices
ServeRAID hardware and software
IBM Director 5.10 improves support for IBM ServeRAID controllers:
v Configuration Management Station on Linux
v Support for VMware ESX Server, versions 2.1, 2.5, and 2.51, Console
v Support for VMware ESX Server, versions 2.1, 2.5, and 2.51, guest
operating systems
v Support for Red Hat Enterprise Linux AS, ES, and WS, version 4.0
v Support for ServeRAID Server and Console installations on EM64T and
AMD64
v Hardware support for the IBM ServeRAID-8i controller
v Separate installation for the ServeRAID Manager extension
For complete support information, refer to the IBM ServerProven page at
www.ibm.com/pc/us/compat/index.html.
Architectural support for more systems
IBM Director 5.10 contains a significant change in the product architecture.
IBM Director Server now can manage three different types of managed
systems:
Level-0 (″agentless″) managed systems
IBM Director manages these systems through the network services
that are native to the operating system: SMB/CIFS/DCE-RPC
protocols for Windows systems, or Secure Shell (SSH) for other
systems. No IBM Director software is installed. You can perform
the following tasks on these managed systems from the IBM
Director Console:
v Collect inventory that is available from the operating system
v Install IBM Director Core Services (Level 1) or IBM Director
Agent (Level 2)
v Reboot the operating system (Windows or Linux)
v Use Remote Session task to execute command-line programs
(only if SSH is present)
v Shutdown/power-off systems (Windows)
Level-1 managed systems
IBM Director Core Services must be present. In addition to the
tasks supported by Level-0 managed systems, you can perform the
following tasks on these managed systems from the IBM Director
Console:
v Collect platform-specific inventory
v Install IBM Director Agent (promote to Level-2 managed system)
v Manage events using event action plans, event subscription, and
the event log
v Monitor hardware status
v Reboot or shutdown the managed system
v Use Remote Session task to execute command-line programs
(only if SSH is present)
v Distribute system-level update packages
xiv IBM Director Installation and Configuration Guide

Level-2 managed systems
IBM Director Agent must be installed. You can perform the full
complement of IBM Director tasks on the managed system.
Additional systems supported for IBM Director Server and IBM Director
Console installation
xSeries servers
v Red Hat Enterprise Linux AS and ES, version 4.0, for AMD64
and EM64T
v Red Hat Enterprise Linux AS and ES, version 4.0, for Intel x86
v SUSE LINUX Enterprise Server 9 for AMD64 and EM64T
v Windows Server 2003, Enterprise, Standard, and Web x64
Editions
iSeries™ servers
v AIX 5L, Version 5.3
v Red Hat Enterprise Linux AS, version 4.0, for IBM POWER
v SUSE LINUX Enterprise Server 9 for IBM POWER
System p5 and pSeries servers
v AIX 5L, Version 5.3
v Red Hat Enterprise Linux AS, version 4.0, for IBM POWER
v SUSE LINUX Enterprise Server 9 for IBM POWER
System z9 and zSeries servers
v Red Hat Enterprise Linux AS, version 4.0, for IBM System z9,
zSeries and S/390
v SUSE LINUX Enterprise Server 9 for IBM System z9, zSeries and
S/390
Additional systems supported for IBM Director Agent installation
xSeries servers and Intel-compatible systems (32-bit operating systems)
v Novell NetWare, version 6.5
v VMware ESX Server, version 2.5, with the following guest
operating systems:
– Red Hat Enterprise Linux AS, ES, and WS, version 3.0
(Update 3 required)
– SUSE LINUX Enterprise Server 8 for x86 (Service Pack 3
required)
– SUSE LINUX Enterprise Server 9 for x86
– Windows 2000, Advanced Server and Server Editions (Service
Pack 3 or later required)
– Windows Server 2003, Enterprise, Standard, and Web Editions
(Service Pack 1 required)
– Windows XP Professional Edition (Service Packs 1 and 2
required)v VMware ESX Server, version 2.51, with the following guest
operating systems:
– Red Hat Enterprise Linux AS, ES, and WS, version 3.0
(Update 4 required)
– SUSE LINUX Enterprise Server 8 for x86 (Service Pack 3
required)
– SUSE LINUX Enterprise Server 9 for x86 (Service Pack 1
required)
– Windows 2000, Advanced Server and Server Editions (Service
Pack 3 or later required)
What’s new xv

– Windows Server 2003, Enterprise, Standard, and Web Editions
(Service Pack 1 required)
– Windows XP Professional Edition (Service Packs 1 and 2
required)v Microsoft Virtual Server 2005 with the following guest operating
systems:
– Windows 2000, Advanced Server and Server Editions (Service
Pack 3 or 4 required)
– Windows Server 2003, Enterprise, Standard, and Web Editionsv Microsoft Virtual Server 2005 (Service Pack 1) with the following
guest operating systems:
– Windows 2000, Advanced Server and Server Editions (Service
Pack 3 or 4 required)
– Windows Server 2003, Enterprise, Standard, and Web Editions
– Windows Server 2003, Enterprise, Standard, and Web x64
Editions
– Windows XP Professional Edition (Service Pack 2 required)
– Windows XP Professional x64 Edition
xSeries servers and Intel-compatible systems (64-bit operating systems)
v Red Hat Enterprise Linux AS, version 4.0, for Intel Itanium
v Windows Server 2003, Datacenter, Enterprise, Standard, and Web
x64 Editions
v Windows Server 2003, Datacenter and Enterprise 64-bit Itanium
Editions
iSeries servers
v Red Hat Enterprise Linux AS, version 4.0, for IBM POWER
iSeries servers with xSeries options
iSeries server installations can use the following xSeries options:
v Integrated xSeries Server (ISX)
v xSeries servers that are attached to the iSeries servers via the
Integrated xSeries Adapter (IXA)
Using these xSeries options, you can install IBM Director Agent
and IBM Director Core Services on the following operating
systems:
v Red Hat Enterprise Linux AS and ES, version 3.0, for Intel x86
v Red Hat Enterprise Linux AS and ES, version 4.0, for Intel x86
v SUSE LINUX Enterprise Server 8 for x86
v SUSE LINUX Enterprise Server 9 for x86
v Windows 2000, Advanced Server and Server Editions
v Windows Server 2003, Enterprise, Standard, and Web Editions
Note: Whether these operating systems are supported in your
iSeries environment depends on the following criteria:
v The Integrated xSeries Server (ISX) installed in the iSeries
server
v The xSeries server that is attached to the iSeries server via
the Integrated xSeries Adapter (IXA)
v The release of i5/OS or OS/400 installed on the iSeries
server
For more information, see IBM Director Hardware and
Software Compatibility. You can download this document
xvi IBM Director Installation and Configuration Guide

from www.ibm.com/servers/eserver/xseries/
systems_management/ibm_director/.
System p5 and pSeries servers
v Red Hat Enterprise Linux AS, version 3.3, for IBM POWER
v Red Hat Enterprise Linux AS, version 4.0, for IBM POWER
System z9 and zSeries servers
v Red Hat Enterprise Linux AS, version 4.0, for IBM System z9,
zSeries and S/390
v SUSE LINUX Enterprise Server 9 for IBM System z9, zSeries and
S/390
z/VM® Center management
z/VM Center is a new extension for provisioning Linux systems on virtual
hardware that is based on real IBM System z9 and zSeries hardware and
the z/VM hypervisor. z/VM Center provides two tasks:
Virtual Server Deployment
v Create and maintain templates for virtual hardware.
v Create and maintain templates for Linux systems.
v Create and delete virtual hardware.
v Create and delete instances of the Linux operating system.
Server Complexes
v Use the templates from Virtual Server Deployment to create
virtual hardware and Linux instances on this hardware in a
single step.
v Manage configurations of Linux instances and virtual hardware.
Configuration domains include network settings, Linux
configuration scripts, disk access, and VM Resource Manager
(VMRM) performance goals.
v Apply configuration changes across multiple Linux instances.
Security enhancements
Security
IBM Director security has been improved with the following changes:
v AES support for UDP encryption
v Auditing on the server
v For new installations, security settings, including console-server SSL, are
on or selected by default
v On Windows only, group administration of privileges
v PAM authentication support on UNIX®
v User-authenticated dircli command-line interface to replace dircmd
Other enhancements
IBM Director 5.10 includes the following general enhancements:
v Apache Derby is now the default IBM Director database that is bundled with the
product. It is supported on all the operating system on which IBM Director
Server can be installed, with the exception of i5/OS.
v Changed the name of the default group ″All Systems and Devices″ to ″All
Managed Objects″; this group now has a default association, ″System
Membership,″ that associates systems with their platforms.
What’s new xvii

v Replace the timestamp on the status bar with the number of managed objects
displayed in the Group Contents pane
v Support for IBM Java Runtime Environment (JRE) 1.4.2, server release 2
v User-selected associations are persisted per group
Discontinued features in release 5.10
BladeCenter management
The BladeCenter Assistant task has been replaced with the BladeCenter
Management task.
DMI Browser
The DMI Browser task has been removed.
Management Processor Assistant task
The Management Processor Assistant task has been replaced by the new
Server Configuration Manager task.
Microsoft Management Console (MMC)
Microsoft Management Console (MMC) is no longer supported as of
release 5.10.
Server Plus Pack
The Server Plus Pack has been withdrawn; however, some of its
components are still available:
v Capacity Manager is separately available for purchase for IBM
xSeries systems
v Rack Manager is now part of the base installation of IBM Director
v System Availability is available from the IBM Web site as a separate,
installable extension
Active PCI Manager and Software Rejuvenation are not supported in
release 5.10, and if installed for a previous version of IBM Director, they
will be uninstalled when IBM Director is upgraded to version 5.10.
Web-based Access
Web-based Access has been removed from the base installation of IBM
Director. It is available from the IBM Web site as a separate, installable
extension.
xviii IBM Director Installation and Configuration Guide

Chapter 1. Getting started with IBM Director
This topic contains general and conceptual information about IBM Director.
Introducing IBM Director
This topic provides an overview of IBM Director.
IBM Director is an integrated, easy-to-use suite of tools that provide you with
comprehensive systems-management capabilities to help realize maximum system
availability and lower IT costs. Its open, industry-standard design enables
heterogeneous-hardware management and broad operating-system support,
including most Intel microprocessor-based systems and certain IBM
System p5®, iSeries, pSeries, System z9®, and zSeries servers.
IBM Director automates many of the processes that are required to manage
systems proactively, including capacity planning, asset tracking, preventive
maintenance, diagnostic monitoring, troubleshooting, and more. It has a graphical
user interface that provides easy access to both local and remote systems.
IBM Director can be used in environments with multiple operating systems and
integrated with robust workgroup and enterprise management software from IBM
(such as Tivoli software), Computer Associates, Hewlett-Packard, Microsoft, NetIQ,
and BMC Software.
IBM Director environment
IBM Director is designed to manage a complex environment that contains
numerous servers, desktop computers, workstations, mobile computers (notebook
computers), and assorted devices. IBM Director can manage up to 5000 Level-2
systems.
An IBM Director environment contains the following groups of hardware:
v One or more servers on which IBM Director Server is installed. Such servers are
called management servers.
v Servers, workstations, desktop computers, and mobile computers that are
managed by IBM Director. Such systems are called managed systems.
v Network devices, printers, or computers that have Simple Network Management
Protocol (SNMP) agents installed or embedded. Such devices are called SNMP
devices.
v Additional managed objects such as platforms and chassis. Collectively, all
managed systems, devices, and objects are referred to as managed objects.
Figure 1 on page 2 shows the hardware in an IBM Director environment.
© Copyright IBM Corp. 1999, 2005 1

IBM Director components
This topic provides information about the IBM Director components.
The IBM Director software has four components:
v IBM Director Core Services
v IBM Director Agent
v IBM Director Console
v IBM Director Server
IBM Director may also manage some systems on which no component of IBM
Director is installed. Such managed systems are referred to as Level-0 managed
systems. These systems must at a minimum support either the Secure Shell (SSH)
or Distributed Component Object Model (DCOM) protocol.
Note: When you install IBM Director Server on Microsoft Windows or Linux, IBM
Director Agent and IBM Director Console are installed automatically also.
When you install IBM Director Server on IBM i5/OS, IBM Director Agent is
installed automatically also.
Figure 2 on page 3 shows where the IBM Director software components are
installed in a basic IBM Director environment.
Figure 1. Hardware in an IBM Director environment
2 IBM Director Installation and Configuration Guide

IBM Director Core Services
IBM Director Core Services is installed on a managed system to provide
hardware-specific (Level-1) functionality for IBM Director to communicate with
and administer the managed system.
IBM Director Core Services provides a subset of IBM Director Agent functionality
that is used to communicate with and administer the managed system. Systems
(IBM servers, desktop computers, workstations, and mobile computers) that have
IBM Director Core Services (but not IBM Director Agent) installed on them are
referred to as Level-1 managed systems.
IBM Director Core Services provides management entirely through standard
protocols. This includes discovery, authentication, and management. The IBM
Director Core Services package installs an SLP service agent, an SSL-enabled
CIMOM (on Linux) or CIM mapping libraries to WMI (on Windows), an optional
ssh server, and platform-specific instrumentation.
You can perform the following tasks on a Level-1 managed system:
Figure 2. Software in an IBM Director environment
Chapter 1. Getting started with IBM Director 3

v Collect inventory.
v Promote to Level-2 management by distributing the IBM Director Agent
package.
v Manage events using event action plans, event subscription, and the event log.
v Monitor hardware status.
v Reboot or shut down the managed system.
v Run command-line programs.
v Distribute system update packages through Software Distribution
v Remote Session (requires ssh)
IBM Director Agent
IBM Director Agent is installed on a managed system to provide enhanced (Level
2) functionality for IBM Director to communicate with and administer the
managed system.
IBM Director Agent provides management data to IBM Director Server. Data can
be transferred using several network protocols, including Transmission Control
Protocol/Internet Protocol (TCP/IP), Network Basic Input/Output System
(NetBIOS), and Internetwork Package Exchange (IPX). IBM Director Server can
communicate with all systems in your network that have IBM Director Agent
installed.
IBM Director Agent features vary according to the operating system on which IBM
Director Agent is installed. For example, you can install Web-based Access only on
Windows 32-bit operating systems.
All IBM
Intel-compatible servers, IBM
JS20 blade servers, IBM
NetVista desktop computers, IBM ThinkCentre desktop computers, IBM PC
desktop computers, IBM IntelliStation workstations, IBM ThinkPad mobile
computers, IBM System Storage Network Attached Storage (NAS) products, and
IBM SurePOS™ point-of-sale systems include a license for IBM Director Agent. You
can purchase additional licenses for non-IBM systems.
IBM Director Agent is supported on systems that are running the following
operating systems:
v Microsoft Windows
v Linux (xSeries, POWER, System z9, zSeries)
v IBM AIX®
v IBM i5/OS
v Novell NetWare
Systems (IBM or non-IBM servers, desktop computers, workstations, and mobile
computers) that have IBM Director Agent installed on them are referred to as Level
2 managed systems.
The functionality of IBM Director Agent on the managed system will vary
depending on the operating system and platform.
IBM Director Console
IBM Director Console is installed on a desktop computer, workstation, or mobile
computer to provide a GUI in which the system administrator can perform tasks in
IBM Director.
4 IBM Director Installation and Configuration Guide

IBM Director Console is the GUI for IBM Director Server. Data is transferred
between IBM Director Console and IBM Director Server through TCP/IP. Using
IBM Director Console, you can conduct comprehensive systems management using
either a drop-and-drag action or a single click.
You may install IBM Director Console on as many systems as needed. IBM
Director includes an unlimited-use license for IBM Director Console. The system
on which IBM Director Console is installed is referred to as a management console.
Note: When you install IBM Director Console on a system, IBM Director Agent is
not installed automatically. To provide full management of the management
console through IBM Director, IBM Director Agent should also be installed.
IBM Director Server
IBM Director Server must be installed on the management server, and provides all
the management functionality of IBM Director.
IBM Director Server is the main component of IBM Director; it contains the
management data, the server engine, and the application logic. IBM Director Server
provides basic functions such as discovery of managed objects, persistent storage
of configuration and management data, an inventory database, event listening,
security and authentication, management console support, and administrative
tasks.
IBM Director Server stores the inventory data in a Structured Query Language
(SQL) database. You can access information that is stored in this relational database
even when the managed objects are not available.
Every IBM xSeries server and
BladeCenter unit comes with an IBM
Director Server license. You can purchase additional IBM Director Server licenses
for installation on non-IBM servers.
IBM Director Server communicates with managed objects and SNMP devices to
receive information and issue commands. If IBM Director Console is used, IBM
Director Server communicates with IBM Director Console to display network status
information and receive instructions from the system administrator.
Concepts
This section discusses concepts that will help you understand how IBM Director
works. Becoming familiar with the IBM Director components and understanding
the concepts in this section enables you to use IBM Director most effectively.
Accessibility
This topic describes the accessibility features in IBM Director.
Accessibility features help a user who has a physical disability, such as restricted
mobility or limited vision, to use software products successfully. These are the
major accessibility features in IBM Director:
v You can use screen-reader software to hear what is displayed on the screen.
v You can operate all features using the keyboard instead of the mouse.
v You can choose from a variety of high-contrast color schemes and large font
sizes in the IBM Director Console.
Chapter 1. Getting started with IBM Director 5

Keyboard shortcuts
You can use keys or key combinations to perform operations that can also be done
through mouse actions.
Keyboard shortcuts for windows, frames, panes, and icons:
You can use keys or key combinations to navigate windows, frames, panes, and
icons in the IBM Director Console interface.
Window
Action Keyboard shortcut
Activate the default button. Enter
Option pane
Action Keyboard shortcut
Navigate in or out of the option pane. Alt+F6
Hide a dialog. Esc
Active the default button (if defined). Enter
Dialog
Action Keyboard shortcut
Navigate out of the dialog. Alt+F6
Hide the dialog. Esc
Active the default button (if defined). Enter
Scroll pane
Action Keyboard shortcut
Navigate forward out of the scroll pane. Tab
Navigate backward out of the scroll pane. Shift+Tab
Move up or down. Up arrow or down arrow
Move left or right. Left arrow or right arrow.
Navigate to the beginning or end of data. Ctrl+Home or Ctrl+End
Navigate up or down one block. PgUp or PgDn
Navigate to the left or right. Ctrl+PgUp or Ctrl+PgDn
Split pane
Action Keyboard shortcut
Navigate forward out of the split pane. Tab or Ctrl+Tab
Navigate backward out of the split pane. Shift+Tab or Ctrl+Shift+Tab
Navigate between split panes. Tab or F6
Navigate to the splitter bar. F8
6 IBM Director Installation and Configuration Guide

Action Keyboard shortcut
Toggle the focus between two split bars (for windows
with three split panes).
F8
Resize the split pane vertically. Up arrow or down arrow
Resize the split pane horizontally. Left arrow or right arrow
Maximize the size of the split pane . Home
Minimize the size of the split pane. End
Notebook (tabbed pane)
Action Keyboard shortcut
Navigate into the tabbed pane. Tab
Navigate out of the tabbed pane. Ctrl+Tab
Navigate to the left or right tab. Left arrow or right arrow
Navigate to the tab above or below. Up arrow or down arrow
Navigate from the tab to the page. Enter or Ctrl+Down
Navigate from the page to the tab. Ctrl+Up
Navigate to the previous or next page. Ctrl+PgUp or Ctrl+PgDn
Frame
Action Keyboard shortcut
Display a window menu. Alt+Spacebar
Active the default button (if defined). Enter
Internal frame
Action Keyboard shortcut
Open or restore the frame. Ctrl+F5, Alt+F5, or Enter
Close the frame. Ctrl+F4 or Alt+F5
Move the frame. Ctrl+F7 or Alt+F7
Resize the frame. Ctrl+F8 or Alt+F8
Minimize the frame size. Ctrl+F9 or Alt+F9
Display a window menu. Alt+Spacebar
Active the default button (if defined). Enter
Keyboard shortcuts for the menu bar and toolbar:
You can use keys or key combinations to navigate standard controls in the IBM
Director Console interface.
Menu bar
Action Keyboard shortcut
Jump to the menu bar. Alt or F10
Chapter 1. Getting started with IBM Director 7

Action Keyboard shortcut
Navigate out of the menu bar. Esc or Alt
Navigate within the menu bar. Arrow keys
Select the next or previous menu item. Right arrow or left arrow
Activate the default or selected item. Enter
Display a menu. Use one of these keyboard
shortcuts:
v Up arrow
v Down arrow
v Enter
v Spacebar
v Alt+Character accelerator
key (if defined)
Hide a menu. Esc or Alt
Menu
Action Keyboard shortcut
Display a menu. Enter or F10
Display a submenu. Right arrow
Navigate to the next item or wrap to the top. Down arrow
Navigate to the previous item or wrap to the bottom. Up arrow
Hide the menu. Esc
Hide the submenu. Left arrow
Active the default or selected item. Enter
Menu items
Action Keyboard shortcut
Navigate in or out of a menu. Arrow keys
Activate an item. Enter, spacebar, or
Alt+Character accelerator key
(if defined)
Display a submenu. Right arrow
Hide a submenu. Left arrow or Esc
Check box menu items
Action Keyboard shortcut
Navigate in or out of the check box menu. Arrow keys
Select or clear a check box menu item. Enter
Hide a check box menu. Enter
8 IBM Director Installation and Configuration Guide
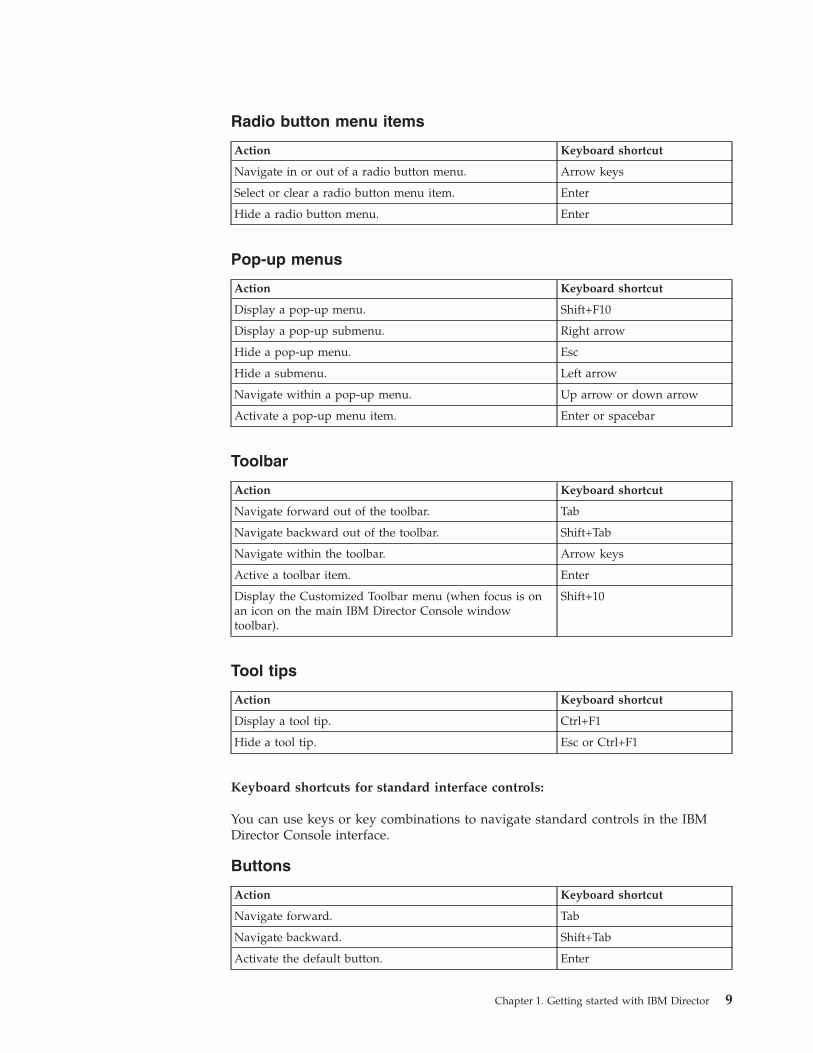
Radio button menu items
Action Keyboard shortcut
Navigate in or out of a radio button menu. Arrow keys
Select or clear a radio button menu item. Enter
Hide a radio button menu. Enter
Pop-up menus
Action Keyboard shortcut
Display a pop-up menu. Shift+F10
Display a pop-up submenu. Right arrow
Hide a pop-up menu. Esc
Hide a submenu. Left arrow
Navigate within a pop-up menu. Up arrow or down arrow
Activate a pop-up menu item. Enter or spacebar
Toolbar
Action Keyboard shortcut
Navigate forward out of the toolbar. Tab
Navigate backward out of the toolbar. Shift+Tab
Navigate within the toolbar. Arrow keys
Active a toolbar item. Enter
Display the Customized Toolbar menu (when focus is on
an icon on the main IBM Director Console window
toolbar).
Shift+10
Tool tips
Action Keyboard shortcut
Display a tool tip. Ctrl+F1
Hide a tool tip. Esc or Ctrl+F1
Keyboard shortcuts for standard interface controls:
You can use keys or key combinations to navigate standard controls in the IBM
Director Console interface.
Buttons
Action Keyboard shortcut
Navigate forward. Tab
Navigate backward. Shift+Tab
Activate the default button. Enter
Chapter 1. Getting started with IBM Director 9

Action Keyboard shortcut
Activate any button Spacebar or Alt+Character
accelerator key (if defined).
Activate Cancel or Close. Esc
Check boxes
Action Keyboard shortcut
Navigate forward. Tab
Navigate backward. Shift+Tab
Navigate within a group. Arrow keys
Select or clear a check box. Spacebar
Radio buttons
Action Keyboard shortcut
Navigate forward. Tab
Navigate backward. Shift+Tab
Navigate within a group. Arrow keys
Note: To select the radio
button, navigate to it.
Select or clear a radio button. Spacebar
Combination boxes
Action Keyboard shortcut
Navigate forward out of the combination box. Tab
Navigate backward out of the combination box. Shift+Tab
Display the drop-down list. Alt+Down arrow
Hide the drop-down list. Esc or Alt+Up arrow
Active the selected menu item. Enter
Navigate up or down the drop-down list. Alt+Up arrow or Alt+Down
arrow
Navigate to a list item without selecting it. Initial character of the list item
Move up or down the drop-down list. Up arrow or down arrow
Lists
Action Keyboard shortcut
Navigate forward out of the list. Tab
Navigate backward out of the list. Shift+Tab
Activate the selected list item. Enter
Navigate within the list. Up arrow or down arrow
Navigate to the beginning or end of the list. Ctrl+Home or Ctrl+End
Select all list items. Ctrl+A
10 IBM Director Installation and Configuration Guide

Action Keyboard shortcut
Select a single list item Spacebar
Note: Using the spacebar
clears the previous selection.
Select an additional list item. Ctrl+Spacebar
Select a range of list items. Shift+Spacebar
Extend the selection up or down one item. Shift+Up arrow or Shift+Down
arrow
Extend the selection to the top or bottom of the list. Shift+Home or Shift+End
Extend the selection up or down one block. Shift+PgUp or Shift+PgDn
Navigate up or down a block. PgUp or PgDn
Sliders
Action Keyboard shortcut
Navigate forward out of the slider. Tab
Navigate backward out of the slider. Shift+Tab
Increase the value Up arrow or right arrow.
Decrease the value Down arrow or left arrow.
Set the maximum value. Home
Set the minimum value. End
Increase the value by a set range. PgUp
Decrease the value by a set range. PgDn
Tables
Action Keyboard shortcut
Navigate forward out of the table. Ctrl+Tab
Navigate backward out of the table. Ctrl+Shift+Tab
Navigate to the next cell. Tab or right arrow
Navigate to the previous cell. Shift+Tab or left arrow
Navigate to the next row from the last column. Tab or right arrow
Navigate to the previous row from the first column. Shift+Tab or left arrow
Navigate vertically to the next or previous block. PgUp or PgDn
Navigate horizontally to the left or right one block. Ctrl+PgUp or Ctrl+PgDn
Navigate to the first or last cell in the row. Home or End
Navigate to the first or last cell in the table. Ctrl+Home or Ctrl+End
Select all cells in the table. Ctrl+A
Chapter 1. Getting started with IBM Director 11

Action Keyboard shortcut
Clear the current selection. Use one of these keyboard
shortcuts:
v Up arrow or down arrow
v Ctrl+Up arrow or
Ctrl+Down arrow
v PgUp or PgDn
v Ctrl+PgUp or Ctrl+PgUp
v Home or End
v Ctrl+Home or Ctrl+End
Extend the selection up or down one row. Shift+Up arrow or Shift+Down
arrow
Extend the selection to the right or left one column. Shift+Left arrow or Shift+Right
arrow
Extend the selection to the beginning or end of the row. Shift+Home or Shift+End
Extend the selection up or down one block. Shift+PgUp or Shift+PgDn
Extend the selection left or right one block. Ctrl+Shift+PgUp or
Ctrl+Shift+PgDn
Extend the selection to the beginning or end of the
column.
Ctrl+Shift+Home or
Ctrl+Shift+End
Edit the cell without overriding the existing text. F2
Delete the cell text before editing. Esc
Trees
Action Keyboard shortcut
Navigate forward out of the tree. Tab
Navigate backward out of the tree. Shift+Tab
Expand the entry Right arrow or Enter (if
collapsed).
Collapse the entry Left arrow or Enter (if
expanded).
Navigate up or down one entry. Up arrow or down arrow
Navigate to the first entry in the tree. Home
Navigate to the last visible entry in the tree. End
Navigate vertically up or down one block. PgUp or PgDn
Navigate to the left or right one block. Ctrl+PgUp or Ctrl+PgDn
Select all entries. Ctrl+A or Ctrl+Slash
Clear the selection. Ctrl+\
Select a single entry. Ctrl+Spacebar
Select a range of entries. Shift+Spacebar
Extend the selection up or down one block. Shift+PgUp or Shift+PgDn
Extend the selection to the top of the tree. Shift+Home
Extend the selection to the bottom of the tree. Shift+End
Keyboard shortcuts for text components:
12 IBM Director Installation and Configuration Guide

You can use keys or key combinations to navigate text components in the IBM
Director Console interface.
Text fields
Action Keyboard shortcut
Navigate into the text field Alt+Character accelerator key
(if defined).
Navigate forward out of the text field. Tab
Navigate backward out of the text field. Shift+Tab
Navigate to the previous or next character. Left arrow or right arrow
Navigate to the previous or next word. Ctrl+Left arrow or Ctrl+Right
arrow
Navigate to the beginning or end of a field. Home or End
Submit an entry. Enter
Select all text in the field. Ctrl+A
Clear the selection. Arrow keys
Extend the selection to the left or right one character. Shift+Left arrow or Shift+Right
arrow
Extend the selection to the beginning or end of the field. Shift+Home or Shift+End
Extend the selection to the next or previous word. Ctrl+Shift+Left arrow or
Ctrl+Shift+Right arrow
Copy the selected text. Ctrl+C
Cut the selected text. Ctrl+X
Paste from the clipboard. Ctrl+V
Delete the previous or next character Backspace or Delete
Text panes
Action Keyboard shortcut
Navigate into the text pane Tab or Alt+Character
accelerator key (if defined).
Navigate forward out of the text pane. Ctrl+Tab
Navigate backward out of the text pane. Ctrl+Shift+Tab
Navigate vertically up or down one block. PgUp or PgDn
Navigate up or down one line. Up arrow or down arrow
Navigate to the left or right one component or character. Left arrow or right arrow
Navigate to the beginning or end of a line. Home or End
Navigate to the previous or next word. Ctrl+Left arrow or Ctrl+Right
arrow
Navigate to the beginning or end of the text pane. Ctrl+Home or Ctrl+End
Navigate up or down one block. PgUp or PgDn
Navigate to the left or right one block. Ctrl+PgUp or Ctrl+PgDn
Navigate to the next or previous HTML link or other
focusable element.
Ctrl+T or Ctrl+Shift+T
Navigate out of a focusable element that accepts a tab. Ctrl+Tab or Ctrl+Shift+Tab
Chapter 1. Getting started with IBM Director 13

Action Keyboard shortcut
Activate a hyperlink. Ctrl+Spacebar
Extend the selection up or down one block. Shift+PgUp or Shift+PgDn
Extend the selection to the left or right one block. Ctrl+Shift+PgUp or
Ctrl+Shift+PgDn
Extend the selection up or down one line. Shift+Up arrow or Shift+Down
arrow
Extend the selection to the left or right. Shift+Left arrow or Shift+Right
arrow
Extend the selection to the beginning or end of the line. Shift+Home or Shift+End
Extend the selection to the beginning or end of the text
pane.
Ctrl+Shift+Home or
Ctrl+Shift+End
Extend the selection to the previous or next word. Ctrl+Shift+Left arrow or
Ctrl+Shift+Right arrow
Extend the selection vertically up or down one block. Shift+PgUp or Shift+PgDn
Extend the selection to the left or right one block. Ctrl+Shift+PgUp or
Ctrl+Shift+PgDn
Select all text in the text pane. Ctrl+A
Clear the selection. Arrow keys
Copy the selected text. Ctrl+C
Cut the selected text. Ctrl+X
Paste from the clipboard. Ctrl+V
Delete the previous or next component or character. Backspace or Delete
Insert a line break. Enter
Insert a tab. Tab
Configuring IBM Director Console appearance
The Appearance Preferences page enables you to customize the look of your IBM
Director Console. You can set the color for text, backgrounds, and links. You can
choose a background image and decide whether to show a shadow.
Complete the following steps to customize the background for IBM Director
Console:
1. On the IBM Director Console window, select Options → Console Preferences.
2. On the Console Preferences window, click the Appearance tab.
3. Select the text and background colors for IBM Director Console GUI
components. You can also select shadow settings and a background image.
4. Click OK.
Configuring IBM Director Console colors and fonts
The Accessibility Preferences page allows you to customize your IBM Director
Console colors and fonts.
Note:
v If you change the Accessibility Preferences while other windows are
visible, the window might not be displayed correctly after the change. If
this occurs, close and reopen the particular window to fix the problem.
14 IBM Director Installation and Configuration Guide

v Operating System changes in font, color and size can be reflected in both
the title bar and the client area of the application. IBM Director Console
settings for font size and color affect only the client area of the
application.
To customize your IBM Director Console colors and fonts, complete the following
steps:
1. On the IBM Director Console window, select Options → Console Preferences.
2. On the Console Preferences window, click Accessibility Preferences.
3. Select the color and font settings that you want.
4. Click OK.
Associations
Associations change the organization of a group of managed objects that is
displayed in the Group Contents pane.
You can apply an association type to the group that is currently displayed in the
Group Contents pane. When you apply an association, the association persists the
next time you display that group.
If the group that is currently displayed in the Group Contents pane contains
managed objects that do not apply to the selected association, those objects appear
in blue type under the “Not Associated” node.
You also can display additional information about the managed objects that are
displayed in the Group Contents pane by selecting one or more association options
from the bottom half of the Associations menu. For example, you can view
managed objects to which event action plans have been applied. If a managed
object has an event action plan applied to it, the managed object is displayed as a
tree structure that you can expand to view which event action plans have been
applied to the object.
Association type
The following associations are available:
None
System Membership
Shows the relationship between Level-0, Level-1, and Level-2 managed
systems and logical and physical platforms, with systems the top level and
the associated platforms as child nodes. This is the default association for
the All Managed Objects group.
Object Type
Shows the managed objects based on object type (such as managed
systems, SNMP devices, and chassis).
TCP/IP Addresses
Shows the managed objects based on TCP/IP address.
TCP/IP Host Names
Shows the managed objects based on TCP/IP host names.
IPX Network IDs
Shows the managed objects based on network IDs.
Chapter 1. Getting started with IBM Director 15

Domains/Workgroups
Shows the managed objects based on domains and workgroups.
Chassis Membership
Shows all the blade servers in a BladeCenter chassis. This is the default
association for the Chassis and Chassis Members group.
Cluster Membership
This is the default association for the Clusters and Cluster Members group.
Physical Platform–Remote I/O Enclosures
Shows the managed objects based on remote input/output (I/O)
enclosures.
Platform Membership
Shows the relationship between managed systems and platforms, with
platforms the top level and the associated systems as child nodes. This
association is useful if you have a single system that represents multiple
managed objects. Depending on the IBM Director task you want to
perform, the managed object that you target might differ. This is the
default association for the Platforms and Platform Members group.
Rack Membership
Shows all the managed objects in a rack. This is the default association for
the Racks with Members group.
Scalable Partitions Membership
This is the default association for the Scalable Partitions group.
Scalable Systems Membership
This is the default association for the Scalable Systems and Members
group.
TCP/IP Routers/DNS
Shows the managed objects based on TCP/IP routers or domain name
space (DNS).
Status Shows the managed objects based on status.
SNMP System Object ID
Shows the managed objects based on SNMP system object ID.
HMC Membership
This is the default association for the HMC and HMC Members group.
z/VM Server Complexes Membership
Shows all z/VM systems with their server complexes, with included Linux
guest systems. At the top level, the association shows the z/VM systems.
Under each z/VM system, it shows the server complexes. Under each
server complex, the association shows the tiers in that server complex.
Under each tier, the association shows the Linux guest systems in that tier.
The association also includes a “Free systems” node (at the second level)
for Linux guest systems in the z/VM system that are not in any server
complex.
Linux on System z9 and zSeries Platform Membership
Shows all discovered Level-0, Level-1, and Level-2 managed Linux systems
that run on a System z9 or zSeries mainframe. The association tree shows
which Linux systems run natively in a logical partition (LPAR) and which
of the other Linux systems run under which z/VM system. Linux systems
that run under an unknown z/VM system are grouped accordingly.
16 IBM Director Installation and Configuration Guide

The association also shows z/VM manageability access points. A z/VM
manageability access point is a Linux system that has been set up to enable
the z/VM Center task for a particular z/VM system. In the association
tree, z/VM manageability access points appear twice, as a Linux system
under a z/VM system and as the z/VM manageability access point for that
z/VM system.
Systems that are not below the LPAR or z/VM subtrees cannot be
associated with an LPAR or a z/VM system, possibly because they are not
Linux on System z9 and zSeries systems or because they are locked.
Default associations
The None association is the default association for most groups. This table shows
the groups that have default associations other than None:
Table 1. Default associations other than None
Group Default association
All Systems and Devices System Membership
Chassis and Chassis Members Chassis Membership
Clusters and Cluster Members Cluster Membership
HMC and HMC Members HMC Membership
Platforms and Platform Members Platform Membership
Racks with Members Rack Membership
Scalable Partition Scalable Partitions Membership
Scalable Systems and Members Scalable Systems Membership
Association options
The following association options are available:
Software Packages
Shows which software packages, if any, have been delivered to the
managed objects in the group using the Software Distribution task.
Jobs Shows all tasks, if any, that are scheduled to be run against the managed
objects in the group.
Activations
Shows all tasks, if any, that have already been run against each managed
object in the group.
Resource Monitors
Shows the resource monitors, if any, that have been applied to the
managed objects in the group.
Event Action Plans
Shows the event action plans, if any, that have been applied to the
managed objects in the group.
Common Information Model
The Common Information Model (CIM) is a language-independent programming
model that defines the properties, operations, and relationships of objects in
enterprise and Internet environments. Using the CIM, IBM Director has a single
Chapter 1. Getting started with IBM Director 17

model for communicating with these different resources. IBM Director uses the
CIM to access data on Level-1 and Level-2 managed systems.
The CIM and Web Based Enterprise Management (WBEM) are standards that are
developed by a consortium of major hardware and software vendors (including
IBM) called the Distributed Management Task Force (DMTF). The CIM provides
the framework by which a system can be managed by using common building
blocks rather than proprietary software. If a device is CIM-compliant, software that
is also CIM-compliant, such as IBM Director, can manage that device.
The infrastructure used by IBM Director for CIM instrumentation consists of the
following:
CIM Client
The CIM Client is a management application that uses CIM to manage
devices. A CIM Client can reside anywhere in the network, because it uses
HTTP to talk to CIM Object Managers and Agents.
CIM Managed Object
A CIM Managed Object is a hardware or software component that can be
managed by a management application by using CIM. When Level 2: IBM
Director Agent or Level 1: Core Services is installed on a system, the
applicable CIM software is installed and that system becomes a CIM
Managed Object.
CIM Object Manager
The CIM Object Manager (CIMOM), also known as a CIM server, is the
software entity that receives, validates, and authenticates the CIM requests
from the CIM Client. It then directs the requests to the appropriate
component or device provider.
IBM Director locates the CIMOM through discovery. When Level 1: Core Services
is installed on a system, the CIMOM registers itself to the SLP and supplies its
location, IP address, port number, and the type of service that it provides
(management.software.IBM:director-agent). When IBM Director performs an SLP
discovery, the IBM Director SLP service is identified and the system running that
service is displayed as a Level-1 managed system. With this information, IBM
Director can directly communicate with the CIMOM. Director discovers the
CIMOM on Level-2 managed system using a proprietary protocol.
Using CIM as the framework, IBM Director can perform tasks on the managed
system. As requests arrive, the CIMOM validates and authenticates each request. It
then directs the requests to the appropriate functional component of the CIMOM
or to a device provider. The provider makes calls to a device-unique programming
interface on behalf of the CIMOM to satisfy the IBM Director requests.
Shortcuts to CIM classes and methods
By creating shortcuts, or subtasks, you can bypass navigating through the class tree
to reach a specific class or method. You can define two types of shortcuts:
v A user-selected class that displays the instances, properties, and methods that are
associated with a specified class on the selected managed system.
v A user-selected method that runs on the selected managed system.
Default CIM subscriptions for IBM Director Core Services
This topic provides conceptual information about the default CIM subscriptions for
IBM Director Core Services.
18 IBM Director Installation and Configuration Guide

The Level-1 managed system event architecture is governed by the WBEM suite of
standards as implemented by the Pegasus CIM Object Manager version 2.5. This
event architecture includes indication providers, indication handlers, and indication
consumers.
Indication providers
Software modules managed by the CIMOM that monitor a resource in a
computer system and send indications when some threshold has been
exceeded for that resource.
Indication handlers
Software modules managed by the CIMOM which can export the
indication to an interested subscriber.
Indication consumers
Software modules that subscribe to the CIM indications in which they are
interested.
No indications are forwarded by the CIMOM unless there is an interested
subscriber.
Level-1 IBM Director Core Services installs the following types of indication
providers, indication handlers, and indication consumers:
v Indication providers that monitor hardware components in the managed system
and send indications when there is a problem
v An indication handler that exports indications with outstanding subscriptions
v A set of indication consumers which can subscribe or unsubscribe to the
indications
IBM Director Core Services also installs a helper service called a CIM listener. The
listener receives events sent by the indication handler and ensures they are routed
to the correct consumers.
The installation also creates a default set of subscriptions between the consumers
and the indications.
Table 2. Default subscriptions for CIM indication consumers
CIM indication consumer Default subscriptions
IBM Director events (CIM > System events) All indications of all severities after the
Level-1 managed system is discovered and
unlocked by a management server
Hardware Status task (also the IBM Director
Console Group Contents pane)
All indications of all severities except for
Lease Expiration and Warranty Expiration
Microsoft Windows Event Log (event log
event ID)
All indications of all severities
Local message window None
Microsoft System Management Server (SMS) All indications of all severities
SNMP (Tivoli NetView, HP OpenView, CA
Unicenter, Tivoli Enterprise Console®)
All indications of all severities
Microsoft Operations Manager 2005 (alerts) All indications of all severities
Tivoli Enterprise Console (native events) All indications of all severities
Chapter 1. Getting started with IBM Director 19

Additional reference information is available for IBM Director Core Services default
subscriptions, for CIM indications, and for the cimsubscribe command used to
modify subscriptions.
Discovery
This topic provides information about the IBM Director discovery process.
Discovery is the process by which IBM Director Server identifies and establishes
connections with systems and devices that it can manage. The management server
sends out a discovery request and waits for responses from managed systems. The
managed systems listen for this request and respond to the management server
that sent the request.
Before IBM Director can manage a system, that system must be discovered by IBM
Director Server. After a system or device has been discovered, an icon that
represents the object is displayed in the IBM Director Console window when the
applicable group is selected.
Note: (Windows 2000, Server Edition only) The initial discovery performed by the
management server is resource intensive. After the initial discovery is
completed, the resource utilization returns to normal.
The type of discovery method that IBM Director uses to connect with systems and
devices varies based on the type of device being discovered and the type of
network protocols used by that device.
Managed systems and devices are classified into the following three levels:
v Level 0: Any system or device without IBM Director Agent or IBM Director Core
Services installed and has SSH or DCOM/SMB running.
v Level 1: Any system with IBM CIM instrumentation installed. CIM
instrumentation can be preloaded, as it is with AIX or i5/OS, or it can be
installed using the Level 1: IBM Director Core Services package.
v Level 2: Any system with IBM Director Agent installed, including System p5 and
pSeries running AIX, IBM iSeries running IBM i5/OS, systems running Linux
32/64, systems running Windows 32/64, and Novell NetWare. This level is
limited to 5,000 licenses.
During discovery, the management server searches for Level-0, Level-1, and
Level-2 managed systems. The management server then stores addresses of those
systems to the IBM Director database. To discover managed systems, IBM Director
can either request information from the systems and devices that are accessible on
the network, or the systems and devices can be configured to send an event to IBM
Director, which will cause the management server to add that system to its
database. This capability is only available for Level-2 managed systems and
requires that the Auto-add unknown agents which contact server check box to be
selected in the Level-2 Discovery Preferences window.
Depending on the complexity of your network, and the needs of your
organization, you will need to configure the discovery process. You will need
detailed information about the layout of your network, specifically the subnet,
port, and LAN information.
The base-management server includes support for the following manageable
entities or managed objects:
20 IBM Director Installation and Configuration Guide

v System Endpoint
v Storage Devices that are optimized to support the SMI-S CIM standard for
storage devices
v Physical or logical platforms (for example a physical machine or hypervisor) that
can host an operating system
v SNMP (or generic) Devices
v Base Clusters
v Hypervisor services objects, such as the zSeries z/VM MO that create and delete
Linux for System z9 and zSeries guest operating systems
v Hardware Control Points, such as the eServer BladeCenter chassis or the Power
HMC, which are the management gateway to other physical platform objects
Level-0 and Level-1 managed systems can be added manually, much like IBM
Director Systems. To manually add any Level-0, Level-1 or Level-2 managed
system, right-click in the systems pane and select New → System. There are only
two fields, network address and system name. The system name is optional. If you
do not fill it in, the host name of the system is used. After you click OK, IBM
Director Server attempts to discover what type of system ( Level-0, Level-1, or
Level-2) is represented by the address given in the Systems window. First, it checks
for the Level-2 protocol (ports 14247 on Windows, 14248 on Linux). If the system
does not respond, it checks for the Level-1 protocol (SLP port 427). If the system
still does not respond, it checks for the Level-0 protocols (ssh port 22 or Windows
RPC ports 137-139, 145). Once the server determines the system type, it creates a
managed object. If none are detected, an error is reported.
Director supports agent-initiate and server-initiated discovery.
Agent initiated discovery
In IBM Director, agent-initiated discovery occurs when managed systems contact the
IBM Director Server rather than IBM Director Server searching for managed
systems. This is a push-based discovery.
This implementation has several advantages. An agent-initiated discovery will
always succeed as long as there is a TCP/IP connection from the management
server to the managed systems. Also, the network traffic due to discovery requests
will be negligible, compared to a server-initiated discovery.
The two available agent-initiated discovery algorithms are:
v Agent-initiated discovery using the “Add known server” entry in a unattended
install of IBM Director.
v Using the genevent command in a batch file, which sends an event to the
management server with the managed systems name and IP address.
Server initiated discovery
In IBM Director, server-initiated discovery occurs when IBM Director Server
searching the network for Level-0, Level-1, and Level-2 managed systems.
Typically, this is referred to simply as discovery. The advantage of this type of
discovery is ease of configuration. You set the discovery settings once at the
management server. IBM Director offers several ways to perform server-initiated
discovery:
v Broadcast discovery
v Multicast discovery
v Broadcast relay discovery
Chapter 1. Getting started with IBM Director 21

v Unicast discovery
v Service Location Protocol discovery
Broadcast discovery is the default discovery method. From IBM Director Console,
you can change the discovery preferences for the management server according to
your business needs and network requirements.
Broadcast discovery:
When you use broadcast discovery, the management server transmits a single
request to the entire subnetwork on which the management server is located, in an
effort to discover manageable objects on the network.
During a broadcast discovery, IBM Director Server sends out a broadcast request to
all the IP addresses that are in a specified subnet. Typically, the subnet is one
where the management server is installed, but you can also send a broadcast to
other subnets if broadcasts are not filtered by your network infrastructure. (By
default, most gateways do not permit broadcasts to pass over subnets.)
IBM Director Server broadcasts requests using each protocol supported by IBM
Director (for example, SNMP, SSH, DCOM, SLP, and IPC). You also can use
broadcast discovery on other subnets if your network gateway is configured to
permit broadcast messages. Your network might be configured to allow broadcast
messages within a subnet, but prevent them from passing over to other subnets.
The IP addresses that successfully respond to the broadcast request are saved to
IBM Director along with the applicable protocol information. IBM Director Console
displays the objects that respond to the broadcast discovery and that support one
or more of the protocols that IBM Director uses.
Note: By default, Level-0 managed systems are not discovered using broadcast
discovery. Level-0 managed systems are discovered using unicast discovery,
and an IP address range must be specified for the unicast.
Attention: Broadcast discovery consumes network resources. If IBM Director is
configured to perform broadcast discoveries frequently, your network resources
might be inefficiently used. As a best practice, contact your network administrator
to determine the best discovery method for your organization.
Multicast discovery:
In multicast discovery, the management server sends a request to a specified IP
address, called the multicast group. The multicast group that is used by IBM
Director Server by default is 224.0.1.118.
Multicast discovery is used to identify Level-1 and Level-2 managed systems. This
discovery method is useful on networks that are configured to filter broadcast
requests but not multicast requests.
One of the attributes of a multicast request is the maximum time-to-live (TTL),
which is the number of times a request is passed between subnets. After the TTL
expires, the packet is discarded.
Note: You can use multicast discovery to discover systems across multiple subnets
without configuring specific network information for each subnet. However,
some networks are configured to prevent multicast requests from passing
22 IBM Director Installation and Configuration Guide

between subnets. As a best practice, contact your network administrator to
determine the best discovery method for your organization.
Broadcast relay discovery:
In broadcast relay discovery, the management server sends a discovery request
message to a specific Level-2 managed system, instructing the managed system to
perform a discovery on the local subnet using a general broadcast. To perform the
broadcast relay discovery, the system that performs the general broadcast must
have already been discovered by IBM Director.
Broadcast relay discovery is used to identify Level-2 managed systems.
This discovery method is useful when the management server and the managed
systems belong to different subnets and the network is configured to filter
broadcast requests across those subnets.
Note: Typically, the Level-2 managed system that performs the general broadcast
discovery is on a different subnet from the management server; however, it
is not required.
When managed systems on the same subnet as the Level-2 managed system
receive the discovery request, they reply directly to the management server that
made the original request. This type of discovery generates less network traffic
than a unicast discovery and avoids many of the problems associated with
broadcast discovery when the network is configured to filter or prevent broadcasts.
You might want to consider broadcast relay discovery if you have multiple
physical locations in which managed systems reside, with lower-bandwidth
network infrastructure (such as T1 or frame relay) between these physical sites.
Unicast discovery:
In unicast discovery, the management server sends requests directly to an exact IP
address or range of IP addresses. Each address that you specify is contacted
individually.
Unicast discovery is used to discover Level-0, Level-1, and Level-2 managed
systems.
You can use this discovery method if your network filters both broadcast and
multicast requests.
The disadvantage of a unicast discovery is that an IP packet must be sent for each
individual IP address, which increases network traffic.
Service Location Protocol discovery:
In Service Location Protocol (SLP) discovery, the management server sends a
request message for the IBM Director Agent SLP service type. An SLP Service
Agent that replies to the request is identified in IBM Director Console as a Level-1
managed system.
SLP is an open-source Internet-standards track protocol that allows network
applications, such as IBM Director, to discover the location and configuration of
network services in a network. In an SLP implementation, an agent is a software
entity that processes SLP protocol messages. There are three types of SLP agents:
Chapter 1. Getting started with IBM Director 23

User Agent (UA)
The SLP User Agent is a software entity that is looking for the location of
one or more services. In an IBM Director environment, IBM Director Server
acts as the user agent when it performs an SLP discovery.
Service Agent (SA)
The SLP Service Agent is a software entity that advertises the location of
one or more services. In an IBM Director environment, Level 1: Core
Services acts as the service agent. These Level-1 managed systems can
advertise through the use of multicast messages and unicast responses to
queries.
Directory Agent (DA)
The SLP Directory Agent is a software entity that acts as a centralized
repository for service location information. If your network administrator
has configured a directory agent, you can configure IBM Director to use
the directory agent to discover service agents.
When you install Level 1: IBM Director Core Services on a system, SLP and the
IBM Director Agent SLP service type (management.software.IBM:director-agent) are
installed on that system. Common Information Model (CIM) also is installed with
Level 1: IBM Director Core Services.
SLP discovery is used to identify only Level-1 managed systems.
You can configure IBM Director to send an SLP discovery request as a unicast,
multicast, or broadcast message. Some older versions of service agents do not
support multicasting and might have to be discovered by using a broadcast.
Event management
An event is an occurrence of significance to a task, system, or managed object, such
as the completion or failure of an operation. In a system-management
environment, IBM Director Server receives events, traps, and notifications from
many sources.
These sources include, but are not limited to, the following programs and
protocols:
v IBM Director native events generated by IBM Director Agent
v CIM indications from the CIMOM that is installed as part of IBM Director Agent
and IBM Director Core Services
v Microsoft Windows event log
v Windows Management Instrumentation (WMI)
v SNMP traps through out-of-band communication
v Platform Event Traps (PET) through out-of-band communication from Alert
Standard Format (ASF)-capable systems and Intelligent Platform Management
Interface (IPMI)- capable systems
v IBM service processors notifications through out-of-band communication
When IBM Director Server receives these events or notifications, it converts them
into IBM Director events. For example, when IBM Director Server receives a CIM
indication, it converts the CIM indication into an IBM Director event of the type
CIM. When you view the Event Filter Builder tree, the CIM events are displayed
under the CIM node in the tree.
24 IBM Director Installation and Configuration Guide

Note: IBM Director can convert CIM indications into other event types, including
event types that are used by enterprise-level system-management programs,
such as SNMP events. Using these event types, IBM Director can provide
system data to the by enterprise-level system-management programs
through the IBM Director Upward Integration Modules. For more
information, see the ″CIM indications in IBM Director″ section of the IBM
Director Events Reference.
However, these SNMP events are not the same as SNMP traps that IBM
Director Server receives out-of-band (that is, not through IBM Director
Agent or IBM Director Core Services). Out-of-band SNMP traps are
generated by hardware products and other software programs. They are
displayed under the SNMP node in the Event Filter Builder tree, but
beneath a different subnode.
You can use the events in the Event Filter Builder tree when working with
managed objects. To monitor one or more events, you must create an event filter
that contains an event type from one of these sources, use the event filter as part of
an event-action plan, and then apply the event-action plan to a managed object.
Events from the Windows event log are displayed in the Windows event log tree in
the Event Type Filter Builder. Events from WMI are displayed in the Common
Information Model (CIM) tree.
Alerts and resolutions
In IBM Director, an event can be in one of the following categories: alert and
resolution. Typically, an alert is the occurrence of a problem relating to a managed
object. A resolution is the occurrence of a correction or solution to a problem.
Note: In the IBM Director product, there are tasks and features that use the word
alert in place of the word event. Also, ServeRAID Manager uses the word
notification instead of event.
Monitoring operating-system specific events
If you want to monitor Windows- or i5/OS-specific events in the IBM Director
environment, you must create an event-action plan in order for IBM Director to
process these events. The predefined active event-action plan in IBM Director, Log
All Events, does not monitor these operating-system specific events.
Managed objects running Windows or i5/OS can generate the following
operating-specific events:
Window-specific event types v Windows event log
v (Optional) A subset of the following CIM events:
– Windows event log
– Windows services
– Windows registry
i5/OS specific event types v Msgq
Even though these events are generated by their respective operating systems (or
an optional layer that is installed on the operating system), IBM Director does not
process these events unless you create an event-action plan to do so. When you
install IBM Director, it has one predefined active event-action plan: Log All Events.
However, this event-action plan does not log these Windows- or i5/OS-specific
events. You must create an event-action plan with a simple-event filter that
Chapter 1. Getting started with IBM Director 25

contains the event types for one or more of these events. Then, you must apply
this event-action plan to the managed object running Windows or i5/OS.
When IBM Director Agent starts on a managed object running Windows, the
twgescli.exe program starts, too. This program listens for IBM Director Server to
send a message to IBM Director Agent that an event-action plan has been applied
to that managed object. If the event-action plan includes a simple-event filter that
contains the event types for any of the Windows-specific events, IBM Director
appropriates these events for its own use. This is called event subscription. The
twgescli.exe program subscribes to the event types that are specified in the
event-action plan and translates the Windows-specific events into an IBM Director
event type. Then, the program forwards the events to the management server from
which the event-action plan was applied.
When IBM Director Agent starts on a managed object running i5/OS, the process
is the same with comparable code to twgescli.exe that is included in IBM Director
Agent for i5/OS.
Processing an event in IBM Director
Understanding how IBM Director processes an event can help you build and
troubleshoot event-action plans.
IBM Director completes the following steps to determine which event actions to
execute:
1. The managed object generates an event and forwards the event to all the
management servers that have discovered the managed object (except for some
events, such as those that are generated through meeting or exceeding a
resource-monitor threshold, which are sent only to the management server
where the thresholds are configured and applied).
2. IBM Director Server processes the event and determines which managed object
generated the event and which group or groups the managed object belongs to.
3. IBM Director Server determines whether any event-action plans are applied to
the managed object or to any of the groups of which the managed object is a
member.
4. If an event-action plan has been applied, IBM Director Server determines
whether any event filters match the event that was generated.
5. The management server performs any event actions for each matching event
filter.
Event-action plans
When you create an event-action plan, you attach one or more event actions to a
specified event filter. Then, you include one or more event filters in the
event-action plan. Finally, you apply that event-action plan to a system or group of
systems.
An event-action plan is composed of two types of components:
v Event filters, which specify event types and any related parameters
v Event actions, which occur in response to filtered events
You can apply an event-action plan to an individual managed object, several
managed objects, or a group of managed objects.
By creating event-action plans and applying them to specific managed objects, you
can be notified by e-mail or pager, for example, when a specified threshold is
reached or a specified event occurs. Or you can configure an event-action plan to
26 IBM Director Installation and Configuration Guide

start a program on a managed object and change a managed-object variable when
a specific event occurs. You can use process-monitor events and resource-monitor
events to build an event-action plan.
Successful implementation of event-action plans requires planning and
consideration of how you will implement them. In particular, developing and
following strict naming conventions is important, so that you can easily identify
what a specific plan does.
Modifying an existing event-action plan
You can modify an existing event-action plan, even one that is already applied to
managed objects or groups, using the Event Action Plan Builder.
If you modify an event filter or an event action that is used in an existing
event-action plan, the changes are applied automatically to any event-action plans
that use those filters or actions. If you add or delete a filter or an action that is
used in an existing event-action plan, the following warning is displayed.
Event filters
An event filter specifies an instance of one or more events that you want IBM
Director to process. IBM Director ignores any event instances that do not meet the
specifications of the event filter. Because the event filter can specify possible values
for the extended attributes that are included in an event type’s definition, an event
instance can be customized for very specific problems and occurrences. To permit
users to quickly event filters, the extended attributes include default values;
however, users can customize the extended attribute settings.
You can use an event filter to capture a single event or multiple events. The
following list includes some of the criteria that you can use to determine whether
to include an event with other events:
v All managed objects that are targeted for the filter are able to generate all events
that are included in the filter. If the managed object does not generate the event
for which the filter is defined, the filter will not be effective on that managed
object.
v The event actions that will be used to respond to the event are the same for all
targeted objects.
v The other event filter options besides the event type are common for all targeted
objects. These settings include the times the event filter is active, the severity of
the event, and other attributes.
Event-action plans can include event filters with event types that are not generated
by all managed objects. In such instances, you can apply the event-action plan to
those managed objects, but it will have no effect. For example, if an event filter is
based on a ServeRAID event and that event-action plan is applied to managed
objects that do not have a ServeRAID adapter installed, the event filter has no
events to filter, and therefore, no actions are performed. If you understand this
concept, you can create more complex event-action plans, and you can reduce the
number of event-action plans you have to build and maintain.
All currently available event types are displayed in the tree on the Event Type
page in the Event Filter Builder window. The currently installed tasks and
extensions publish their events in the Event Type tree when IBM Director Server or
IBM Director Agent or IBM Director Core Services starts.
Chapter 1. Getting started with IBM Director 27

Note: Whether the events are published when IBM Director Server or IBM
Director Agent or IBM Director Core Services starts depends on the tasks or
extensions and how they are implemented.
If you add an extension to your IBM Director installation, the extension
might publish its events either when it is added to the installation or when
the extension sends its first event. If the extension publishes when it sends
its first event, only that event is published.
Event-filter types:
IBM Director provides four types of event filters.
In the Event Action Plan Builder window, the Event Filters pane provides the
following event filters.
Event filter Description
Simple Event Simple event filters are general-purpose filters; most event filters are
this type. When you expand this tree, any customized simple event
filters that you have created are displayed. Also, the following
predefined, read-only event filters are displayed:
v All Events
v Critical Events
v Environmental Sensor Events
v Fatal Events
v Hardware Predictive Failure Events
v Harmless Events
v Minor Events
v Security Events
v Storage Events
v Unknown Events
v Warning Events
Some of these predefined filters use the severity of events to determine
which events they will allow to pass through; other filters target a
specific type of event. For example, the Critical Events filter processes
only those events that have a Critical severity. The All Events filter
processes any events that occur on any managed object, except for
Windows-specific and i5/OS-specific events. Using one of these
preconfigured event filters ensures that the correct event type or event
severity is preselected.
If you want to see what events are included in a predefined event filter,
double-click that predefined event filter in the Event Filters pane. The
“Simple Event Filter Builder” window opens, and the Event Filter
Builder notebook is displayed. Select the applicable notebook page to
view the selected event filters. For example, click the Severity tab to
view the selections for the Critical Event filter. You cannot change
predefined event filters; they are read-only. However, you can make
changes and click File → Save As to save the modified event filter with
another name.
28 IBM Director Installation and Configuration Guide

Event filter Description
Duplication Event Duplication event filters ignore duplicate events, in addition to the
options that are available in the simple event filters.
To use this filter, you must specify the number of times (Count) that the
same event is ignored during a specified time range (Interval). Then,
this filter processes the first event that meets the criteria that are
defined for this filter. Only the first event triggers the event actions that
are associated with this event filter. For the associated event actions to
be triggered again, one of the following conditions must be met:
v The value that is specified in the Count field must be exceeded.
v The time range that is specified in the Interval field must elapse.
v The value that is specified in the Count field must be exceeded by 1
(Count+1) within the time range that is specified in the Interval field.
For example, you can define a duplication event filter to filter on the
occurrence of an offline event and define a corresponding event action
to forward the event to IBM Director Server. Depending on the criteria
that you define, only the first event announcing that the system is
offline is processed, and all other instances in which an event meets the
filtering criteria are discarded until the Count value is exceeded during
the specified interval.
Exclusion Event Exclusion event filters exclude certain event types, in addition to the
simple event filter options. Using this filter, you define the criteria of
the events to exclude.
Threshold Event A threshold event filter processes an event after it has occurred a
specified number of times within a specified interval, in addition to the
simple event filter options.
An event that meets the criteria that are defined in this filter triggers
associated actions only after an event has met the criteria for the
number of times that are specified in the Count field or only after the
number of times specified in the Count field within the time range
specified in the Interval field.
For example, you can define a threshold event filter to monitor
frequently occurring heartbeat events and forward the event to IBM
Director Server only when the heartbeat event is received for the 100th
time during a specified amount of time.
Event-filter criteria:
Depending on the event-filter type, you set specific values for these types of
criteria.
Chapter 1. Getting started with IBM Director 29

Criteria Description
Event Type Use the Event Type page to specify the source or sources of the events that
are to be processed. This tree is created dynamically; and entries are added by
tasks and as new alerts are received. Entries in the tree can be expanded to
display suboption events.
Most event filters are created using only this page. It specifies the source or
sources of the events that are to be processed by this filter.
By default, the Any check box is selected, meaning that none of the events
that are listed are filtered, except for Windows-specific and i5/OS-specific
events. If you want to specify certain events on which to filter, clear the Any
check box. You can highlight more than one event by pressing the Ctrl or
Shift key.
Notes:
1. When you select a root option in the Event Type tree, all suboption events
are selected as well. For example, when you select MPA in the Simple
Event Filter Builder window, all Component, Deployment, Environmental,
and Platform suboption events are selected also.
If additional event types are published after you create the event filter, the
newly available event types are included in your event filter only if the
new event types are suboption events of an event type that you selected.
However, if you want to include a newly published event type that is not
a suboption event, you must update the event filter by selecting the new
event type.
2. The event types for BladeCenter events are displayed under MPA, except
for BladeCenter Configuration Management events, which are displayed
under Configuration Management.
Severity Use the Severity page to indicate the urgency of the events that are filtered. If
an event is received whose severity level is not included in the event filter,
the filter will not process that event. By default, the Any check box is
selected, indicating that all event severities are processed by the filter.
When you select more than one severity, they are joined together using logical
OR. The source of the event determines what severity the event is. Generally,
the severity levels have the following meanings:
Fatal The event caused a failure and must be resolved before the program
or component is restarted.
Critical The event might cause a failure and must be resolved immediately.
Minor The event is not likely to cause immediate program failure but
should be resolved.
Warning
The event is not necessarily problematic but might warrant
investigation.
Harmless
The event is for information only. Most events of this severity do not
indicate potential problems. However, offline events are categorized
as harmless, and these events can indicate potential problems.
Unknown
The application that generated the event did not assign a severity
level.
30 IBM Director Installation and Configuration Guide

Criteria Description
Day/Time Use the Day/Time page to set the filter to accept and ignore events on certain
days and at certain times of the day. By default, the Any check box is
selected, indicating that events that occur at any time are processed by the
event filter.
The time zone that applies to the specified time is the time zone in which the
management server is located. If your management console is not in the same
time zone as the management server, the difference in time zones is displayed
above the Selections pane as an aid to determining the correct time.
By default, all events are passed through all filters. This includes events that
were queued by IBM Director Agent because the link between the managed
object and the management server was unavailable. However, you can
prevent these queued events from being processed by a filter by selecting the
Block queued events check box. This option can be useful if the timing of the
event is important or if you want to avoid filtering on multiple queued events
that are sent all at once when IBM Director Server becomes accessible.
However, you can block queued events only if you filter events at a specified
time. To block queued events, you must clear the Any check box.
Category Use the Category page to specify an event filter according to the status of an
event (alert or resolution of a problem). However, not all events have
resolutions.
Sender
Name
Use the Sender Name page to specify the managed object to which the event
filter will apply. Events that are generated by all other managed objects will
be ignored. By default, the Any check box is selected, indicating that events
from all managed objects (including IBM Director Server) are processed by
the event filter.
Initially, only IBM Director Server is shown in the list. As other managed
objects generate events, such as when a threshold is exceeded, this list is
added to dynamically. If you anticipate that other managed objects will
generate events, you also can type managed-object names into the field and
click Add to add them.
Extended
Attributes
Use the Extended Attributes page to specify additional event-filter criteria
using additional keywords and keyword values that you can associate with
some categories of events, such as SNMP. This page is available only when
you clear the Any check box on the Event Type page and select certain entries
from that page.
If the Extended Attributes page is available for a specific event type but no
keywords are listed, IBM Director Server is not aware of any keywords that
can be used for filtering.
To view the extended attributes of specific event types, expand the Event Log
task in the IBM Director Console Tasks pane and select an event of that type
from the list. The extended attributes of the event, if any, are displayed at the
bottom of the Event Details pane, below the Sender Name category.
System
Variables
Use the System Variables page to further qualify the filtering criteria by
specifying a system variable. This page is available only if there are one or
more system variables. A system variable consists of a user-defined pairing of
a keyword and value that are known only to the local management server.
Note: These user-defined system variables are not associated with the system
variables of the Windows operating system.
Event Text Use the Event Text page to specify event message text to associate with the
event.
Chapter 1. Getting started with IBM Director 31

Event actions
The event action specifies the actions that you want IBM Director to take as a result
of the occurrence of an event.
Event action types
IBM Director has several predefined event action types. With the exception of Add
to Event Log, you must customize each event action type that you want to use.
Add/Remove “event” system to Static Group
Adds a managed object to or removes a managed object from a specified
static group when the managed object logs a specific event.
Add/Remove source group members to target static group
Adds all specified managed objects in a source group to a target group or
removes all specified managed objects from the target group.
Add a Message to the Console Ticker Tape
Displays a message in red type that scrolls from right to left at the bottom
of IBM Director Console.
Add to the Event Log
Adds a description of the event to the IBM Director event log.
Define a Timed Alarm to Generate an Event
Generates an event only if IBM Director does not receive an associated
event within the specified interval.
Define a Timed Alarm to Start a Program on the Server
Starts a program on the management server if IBM Director does not
receive an associated event within the specified interval.
Log to Textual Log File
Generates a text log file for the event that triggers this action.
Post a News Group (NNTP)
Sends a message to a newsgroup using the Network News Transfer
Protocol (NNTP).
Resend Modified Event
Creates or changes an event action that modifies and resends an original
event.
Send an Alphanumeric Page (via TAP)
Windows only) Sends a message to a pager using the Telocator
Alphanumeric Protocol (TAP).
Send an Event Message to a Console User
Displays a popup message on the management console of one or more
specified users.
Send an Internet (SMTP) E-mail
Sends a Simple Mail Transfer Protocol (SMTP) e-mail message.
Send an SNMP Inform to an IP host
Sends an SNMP inform request to a specified IP host.
Send an SNMP Trap to a NetView Host
Generates an SNMP trap and sends it to a specified NetView host using a
TCP/IP connection to the host. If delivery of the SNMP trap fails, a
message is posted in the history log of the managed object.
32 IBM Director Installation and Configuration Guide
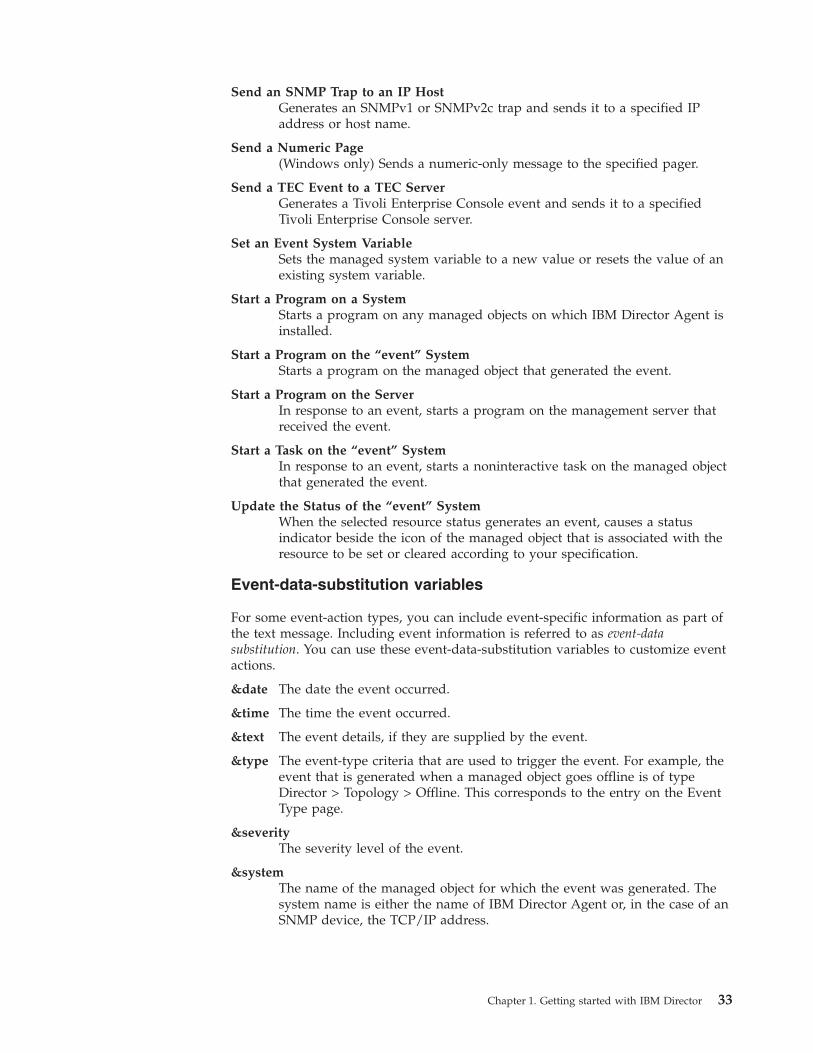
Send an SNMP Trap to an IP Host
Generates an SNMPv1 or SNMPv2c trap and sends it to a specified IP
address or host name.
Send a Numeric Page
(Windows only) Sends a numeric-only message to the specified pager.
Send a TEC Event to a TEC Server
Generates a Tivoli Enterprise Console event and sends it to a specified
Tivoli Enterprise Console server.
Set an Event System Variable
Sets the managed system variable to a new value or resets the value of an
existing system variable.
Start a Program on a System
Starts a program on any managed objects on which IBM Director Agent is
installed.
Start a Program on the “event” System
Starts a program on the managed object that generated the event.
Start a Program on the Server
In response to an event, starts a program on the management server that
received the event.
Start a Task on the “event” System
In response to an event, starts a noninteractive task on the managed object
that generated the event.
Update the Status of the “event” System
When the selected resource status generates an event, causes a status
indicator beside the icon of the managed object that is associated with the
resource to be set or cleared according to your specification.
Event-data-substitution variables
For some event-action types, you can include event-specific information as part of
the text message. Including event information is referred to as event-data
substitution. You can use these event-data-substitution variables to customize event
actions.
&date The date the event occurred.
&time The time the event occurred.
&text The event details, if they are supplied by the event.
&type The event-type criteria that are used to trigger the event. For example, the
event that is generated when a managed object goes offline is of type
Director > Topology > Offline. This corresponds to the entry on the Event
Type page.
&severity
The severity level of the event.
&system
The name of the managed object for which the event was generated. The
system name is either the name of IBM Director Agent or, in the case of an
SNMP device, the TCP/IP address.
Chapter 1. Getting started with IBM Director 33

&sender
The name of the managed object from which the event was sent. This
variable returns null if the name is unavailable.
&group
The group to which the target object belongs and is being monitored. This
variable returns null if the group is unavailable.
&category
The category of the event, either Alert or Resolution. For example, if the
managed object goes offline, the category is Alert. If the managed object
goes online, the category is Resolution.
&pgmtype
A dotted representation of the event type using internal type strings.
×tamp
The coordinated time of the event.
&rawsev
The nonlocalized string of event severity (Fatal, Critical, Minor, Warning,
Harmless, Unknown).
&rawcat
The nonlocalized string of event category (Alert, Resolution).
&corr The correlator string of the event. Related events, such as those from the
same monitor-threshold activation, will match this.
&snduid
The unique ID of the event sender.
&sysuid
The unique ID of the managed object that is associated with the event.
&prop:file_name#property_name
The value of the property string property_name from property file file_name
(relative to the IBM\Director\classes directory).
Note: For i5/OS, the absolute directory path must be used.
&sysvar:variable_name
The event system variable variable_name. This variable returns null if a
value is unavailable.
&slotid:slot_id
The value of the event detail slot with the nonlocalized ID slot_id.
&md5hash
The MD5 (message digest 5) hash code, or cyclic redundancy check (CRC),
of the event data (an event-specific unique ID).
&hashtxt
Provides a full replacement for the field with an MD5 hash code
(32-character hex code) of the event text.
&hashtxt16
Provides a full replacement for the field with a short MD5 hash code
(16-character hex code) of the event text.
&otherstring
The value of the detail slot that has a localized label that matches
otherstring. A detail slot is a record in an event detail. For example, an
event has one event detail that has an ID of key1 and a value of value1. You
34 IBM Director Installation and Configuration Guide

can use the substitution variable &soltid:key1 to obtain the value value1.
You also can use &key1 to obtain the value value1. In the description
above, otherstring is a placeholder for the user-defined event detail ID.
However, if the passed ID is not found, “Not applicable” is returned.
Message Browser
You can use the Message Browser to view events that are sent to IBM Director
Console. The Message Browser is displayed automatically whenever an alert is sent
to the management console.
You can chose to have events sent to the management console when an event
occurs by configuring an event action plan with the Send an Event Message to a
Console User event action.
The Message Browser displays all alerts, including management console ticker-tape
alerts. However, the Message Browser does not display any ticker-tape messages. A
ticker-tape message can display, for example, resource-monitor data.
Groups
IBM Director allows you to organize logical sets of managed objects into groups.
For example, a group might contain all managed systems that have Linux installed.
When you start IBM Director Console for the first time, the default groups are
displayed. This includes the All Systems and Devices group, which contains all
discovered managed objects and devices.
There are two types of groups that you can create in IBM Director:
Static groups
Static groups contains a specified set of managed systems. IBM Director
Server does not automatically update the contents of a static group. The
members of a static group are fixed unless you change them thru the IBM
Director Console or event action plan. You can also copy the members of
any dynamic group to a static group.
Dynamic groups
Dynamic groups are based on specified inventory or task criteria. You can
create a dynamic group by specifying criteria that the attributes and
properties of the managed systems must match. IBM Director
automatically adds or removes managed systems to or from the group
when their attributes and properties change, affecting their match to the
group criteria.
You also can create a dynamic group based on the types of tasks for which
the group of managed systems is enabled. You can initiate a specific task
on all members of the group with a single drag and drop operation
without having to consider whether each managed object supports that
task.
You can also create group categories to organize your groups.
When you select a group, the managed objects that are members of that group are
displayed in the Group Contents pane.
Chapter 1. Getting started with IBM Director 35

You can perform a task on all managed objects in a specific group. To perform
tasks simultaneously on multiple groups, create a new group and include managed
systems that you want from the multiple groups, or combine several separate
existing groups into one new group.
Tip: It is might be useful to consolidate all groups for which you have
administrative authority into a single category. This enables you to focus on
those managed systems that are your responsibility while removing other
managed systems and devices from your immediate attention.
Group account
A group account is a collection of user accounts. On a management server that is
running Windows, you can create a group account to manage the privileges of
multiple accounts together. By making a user account a member of a group
account, that user has the privileges and access to the tasks that are defined for
that group.
Note: You cannot manage group accounts through IBM Director on management
systems that are running Linux. The group management feature is currently
supported only on Windows.
When IBM Director Server is installed, two groups of IBM Director users are
created automatically at the operating system level: DirAdmin (diradmin in Linux)
and DirSuper (dirsuper in Linux). To create a group account you must first create a
group account for the operating system that is running on the management server.
Once the account is created that group must be made a member of either the
diradmin or dirsuper group. After a group account has been added to the
applicable IBM Director group, you can log in to IBM Director Console as an
administrator and configure that group’s privileges to IBM Director tasks and
groups. At the operating system level, you can add user accounts to the group
accounts that you create. You can manage the privileges of all the user accounts in
a group by configuring the group privileges. The changes that you make will affect
all of the users who are members of the group.
Group membership
The group to which a user account belongs provides group membership. On a
management server that is running Windows, you can create several user accounts
and make them members of the same group. The privileges that are assigned to
the group in IBM Director are also assigned to its members.
Groups that are used with scalable objects
IBM Director provides several default groups of scalable objects in the Groups
pane for easier management of these objects.
The default groups that are relevant to scalable objects are shown in table below.
Table 3. IBM Director groups that are used with scalable objects
Group name Managed objects
Logical Platforms All logical-platform objects, which includes
all scalable partitions.
Physical Platforms All physical-platform objects, which includes
all scalable nodes.
Platforms All logical platforms and physical platforms.
36 IBM Director Installation and Configuration Guide

Table 3. IBM Director groups that are used with scalable objects (continued)
Group name Managed objects
Platforms and Platform Members All logical and physical platforms and any
managed systems that result from these
platforms.
Scalable Partitions Only scalable partitions.
Scalable Systems Only scalable systems.
Scalable Systems and Members All scalable systems and all members of
those scalable systems. Members of a
scalable system include its scalable
partitions, its scalable nodes, and any remote
I/O enclosures attached to its scalable
nodes. This group also includes managed
systems that result from its scalable
partitions.
Groups used with storage managed objects
IBM Director provides several default groups of storage managed objects in the
Groups pane for easier management of these objects.
This table lists the groups that support storage managed objects.
Group name Storage managed objects
SMIS-Storage Devices Only storage managed objects that comply
with the SMI-S standard.
Storage Devices All storage managed objects, regardless of
compliance with SMI-S standards.
Managed objects
This topic describes the concepts of managed objects in IBM Director.
A managed object is a system or device that is managed by IBM Director. IBM
Director manages these types of objects:
managed system
Any computer, such as a server, desktop, workstation, or mobile computer,
that can be managed by IBM Director. In this release, managed systems are
subcategorized as follows:
Level-0 (″agentless″) managed systems
Systems that are managed through the network services that are
native to the operating system: Secure Shell (SSH) or Windows
Management Instrumentation (WMI). No IBM Director software is
installed.
Level-1 managed systems
Systems that are managed through installation of IBM Director
Core Services, which provides a subset of IBM Director Agent
functionality, including Remote Session, Power Control, Hardware
Status, Event Log, hardware-only inventory data, and distribution
of system level updates.
Level-2 managed systems
Systems that are managed through installation of IBM Director
Chapter 1. Getting started with IBM Director 37

Agent, which provides added functionality for administering the
system. The functionality of IBM Director Agent on the managed
system will vary depending on the operating system and platform.
managed device
An SNMP device (such as a network device, printer, desktop computer, or
server) that has an SNMP agent installed or embedded.
physical platform
A single physical chassis or server that has been discovered through the
use of the Service Location Protocol (SLP). A physical platform also can be
created when:
v A deployable system is discovered through an RDM scan.
v You right-click any blank space in the Group Contents pane to create the
physical platform manually.
v IBM Director Server determines that a physical platform does not exist
already for a blade server in a BladeCenter unit.
v IBM Director Server first discovers and gains access to a Level-1 or
Level-2 managed system.
v IBM Director Server gains Internet Protocol (IP) access to a Remote
Supervisor Adapter service processor. It will query the Remote
Supervisor Adapter or Remote Supervisor Adapter II service processor
for the topology of its associated ASM interconnect network, and for
each ISMP system found, a physical platform is created.
A physical platform can identify some managed systems before an
operating system or IBM Director Agent is installed.
Note: To delete a physical platform from IBM Director Console, you also
must delete any associated managed system or systems.
Scalable objects
Systems with multinode configurations, including scalable systems, nodes,
and partitions.
BladeCenter chassis
Windows cluster
Racks Racks that are created by Rack Manager.
Static partitions
Managed system
A managed system is a computer, such as a server, desktop, workstation, or mobile
computer, that can be managed by IBM Director. There are three levels that are
used to categorize managed systems.
Level 0: Agentless Systems
Level 0: Agentless Systems do not have any IBM Director software installed on
them; however, although they can still be managed by using IBM Director. Level-0
managed systems can be IBM or non-IBM servers, desktop computers,
workstations, and mobile computers.
A Level-0 managed system is a managed system that does not have IBM Director
Agent or the Common Information Model (CIM) instrumentation installed, but
does have the minimum set of protocols that are required for that system to be
38 IBM Director Installation and Configuration Guide

managed by IBM Director. To manage a system using IBM Director, that system, at
a minimum, must support the Secure Shell (SSH) or Distributed Component Object
Model (DCOM) protocol.
Level 0: Agentless Systems is supported on systems that are running the following
operating systems. For a detailed list of supported operating-system versions, see
IBM Director Installation and Configuration Guide.
v Linux
v Windows
IBM Director discovers Level-0 managed systems by verifying the IP addresses on
your network and scanning the ports of those addresses using the SSH or DCOM
protocols. The range of IP addresses that are verified is governed by the IBM
Director discovery preferences that you configure in IBM Director Console. By
default, IBM Director uses the range of addresses that are in the IP domain of the
management server.
When a Level-0 managed system is discovered, it is locked by default. You can
unlock the system by requesting access to it through IBM Director Console. If the
object that is discovered supports SSH but is not a computer system (for example,
a Remote Supervisor Adapter (RSA)), the object will be displayed in IBM Director
Console but will not support any tasks. Systems and other network devices that
support the SNMP protocol will display as SNMP Device Managed Objects in IBM
Director Console.
The attributes that are returned for a Level-0 managed system include:
v Locked
– System Name
– TCP/IP Addresses
– System State
– MAC Address
– System Presence Check Settingv Unlocked
– Computer Name
– Architecture
– OS Major Version
– OS Minor Version
– Access Denied
– Operating System
– Unique System ID
– System UUID (xSeries)
– Machine Type
– Model Number
– Serial Number
After you discover and unlock a Level-0 managed system, you can perform the
following tasks on that system:
v Collect inventory that is available from the operating system.
v Install Level 1: Core Services or Level 2: IBM Director Agent by using software
distribution.
v Restart the operating system (Linux only).
v Run command-line programs (only if SSH is present).
Chapter 1. Getting started with IBM Director 39

Level 1: IBM Director Core Services systems
Level 1: IBM Director Core Services provides managed systems with a subset of
the Level 2: IBM Director Agent functionality that is used to communicate with
and administer that system. Specifically, it provides hardware alerts and status
information that can flow to Director or 3rd party management servers.
A Level-1 managed system is any system that has Level 1: IBM Director Core
Services installed but does not have Level 2: IBM Director Agent installed. Level-1
managed systems can be IBM servers, desktop computers, workstations, and
mobile computers.
You can perform these tasks on a Level-1 managed system:
v Collect inventory.
v Install Level 2: IBM Director Agent using software distribution.
v Manage events using event action plans, event subscription, and the event log.
v Monitor hardware status.
v Restart or shutdown the managed system.
v Run command-line programs.
Level 1: IBM Director Core Services is supported on systems that are running the
following operating systems. For a detailed list of supported operating-system
versions, refer to the IBM Director Installation and Configuration Guidesee .
v Linux (xSeries, System p5 and pSeries, and System z9 and zSeries)
v Windows
Level 2: IBM Director Agent systems
Level 2: IBM Director Agent provides managed systems with the full complement
of IBM Director Agent functionality that is used to communicate with and
administer that system. The functionality of Level-2: IBM Director Agent on a
managed system varies, depending on the operating system and platform.
A Level-2 managed systems is any system that has Level 2: IBM Director Agent
installed. Level-2 managed systems can be IBM or non-IBM servers, desktop
computers, workstations, and mobile computers.
Level 2: IBM Director Agent is supported on systems that are running the
following operating systems. For a detailed list of supported operating-system
versions, refer to the IBM Director Installation and Configuration Guide.
v AIX
v i5/OS
v Linux (xSeries, System p5 and pSeries, and System z9 and zSeries)
v NetWare
v Windows
Mass configuration profiles
Using mass-configuration profiles, you can to quickly configure a group of
managed objects.
One of the advantages of IBM Director is its ability to make certain configuration
changes on multiple managed systems at once. Even in a dynamic host control
protocol (DHCP)-enabled environment, many critical servers tend to use static
addresses. Using mass-configuration profiles, you can, for example, change the IP
address that these managed systems use to locate their primary DNS server,
without having to physically visit each system.
40 IBM Director Installation and Configuration Guide

A mass-configuration profile identifies the configuration information that you want to
distribute to a managed object or group. You can create a profile for these IBM
Director tasks:
v Asset ID™
v Configure Alert Standard Format
v Configure SNMP Agent
v Network Configuration
The mass-configuration profiles are saved in the Tasks menu (and in the Tasks
pane) under the task with which they are associated. After you create a
mass-configuration profile, you then can apply that profile to a managed object or
a group.
Restriction:
v You can configure only the community name and trap destination
in a mass-configuration profile for the Configure SNMP Agent task.
You cannot configure security information.
v Specifying a community name in the profile adds the community
name as a trap destination only. For IBM Director to receive traps
sent to that community, you must manually add the community
name to the IBM Director Server.
v If you want to perform SNMP sets on managed systems, you must
manually modify the Security pane in the SNMP service properties
window, adding the correct Community Name as READ WRITE or
READ CREATE enabled on each managed system.
Performance
IBM Director provides a robust tool for monitoring and managing the performance
of your environment, called Capacity Manager.
Performance-analysis monitors
This concept describes the performance-analysis monitors.
Performance-analysis monitors are a subset of resource monitors that are
considered critical and are used to make performance recommendations. The
performance-analysis monitors are activated by default when you install Capacity
Manager.
These are the types of performance-analysis monitors:
v Processor usage
v Memory usage
v Disk usage
v Network traffic
Note: You must turn on all four types of performance-analysis monitors for a
report to display a performance-analysis recommendation.
Capacity Manager automatically discovers new disk and LAN resource monitors
and removes monitors for devices that no longer exist. Performance-analysis
monitors for Windows network adapters and physical disks are discovered when
the Windows network adapters and physical disks are added to the managed
system. If a checked network adapter or physical disk has been removed, Capacity
Chapter 1. Getting started with IBM Director 41

Manager removes the corresponding performance-analysis monitor from the
monitor list once every 24 hours or whenever the Capacity Manager Agent is
restarted.
Note: Performance analysis is available for managed systems running a Windows
or Linux operating system only.
Performance bottlenecks
This concept describes performance bottlenecks.
When you schedule Capacity Manager to check periodically for bottlenecks, or
when you select to generate a report, the performance-analysis function looks for
bottlenecks in managed-system hardware performance. When one or more
performance-analysis monitors meet or exceed their preset threshold settings and
you have selected the Generate Bottleneck events check box when you defined
the report, a bottleneck event is generated. You can adjust the threshold settings on
performance-analysis monitors, but you cannot change the default settings without
impairing the performance-analysis function.
Corresponding to each types of performance-analysis monitors are the four types
of bottlenecks:
v Processor
v Memory
v Disk
v LAN adapter
If a bottleneck is detected, two things happen:
v Each managed system with a bottleneck generates an event, and the event is
displayed in the IBM Director event log.
v A report is generated and saved in the IBM\Director\reports directory (unless
you specify another directory in the report definition).
When the performance-analysis function detects a bottleneck, it diagnoses the
problem and determines a potential solution. The performance-analysis section of
the report details the problem and recommendations.
Multiple bottlenecks can occur. For example, a disk bottleneck and a memory
bottleneck can occur concurrently. In this case, the performance-analysis algorithm
recognizes that insufficient memory can lead to disk thrashing, so the
recommendation is to add more memory and leave the disk drives unchanged.
Because systems and devices often interact in this way, each combination of
bottlenecks (that is, microprocessor, memory, disk, and LAN adapter) constitutes a
separate bottleneck with its own recommendation.
Often, when one bottleneck occurs, other bottlenecks are not evident because the
first bottleneck slows the system. A latent bottleneck is one that is not evident even
though the system has slowed down. Performance analysis reports a managed
system or device as having a latent bottleneck if a performance monitor for that
system or device exceeds the warning threshold at least 50% of the time that the
performance monitor for another system or device is constrained.
Performance-analysis reports
This concept describes the performance-analysis reports.
When you create a report, you specify a report definition. A report definition
identifies the details that you want to include in the report. You can create a
42 IBM Director Installation and Configuration Guide

customized report definition or use a predefine report definition. These predefined
report definitions are included in Capacity Manager:
v Daily report to viewer
v Hourly bottleneck events to file
v Hourly report to viewer
v Monthly report to file
v Weekly report to file
You can generate a report for immediate viewing, or you can save the report to a
file for later viewing.
Reports viewed from the Report Viewer window
The performance-analysis report consists of two sections:
Recommendations
Shows only the subset of details on which you have to act.
Details
Shows everything that was found and contains links so you can see a
graph of the performance of the monitor in question.
The managed systems with the most severe bottlenecks appear at the top of the
report list. A bottleneck that is reported in the Details section is displayed in the
Recommendations section if it meets one of these criteria:
v It occurred on the last day of the report.
v It occurred more than 25% of the time, and it occurred more than any other
bottleneck on that managed system.
v It has a high probability of occurring in the future. However, performance
analysis must have enough data to make a reliable forecast.
Reports viewed from a saved HTML file
A report that is saved in HTML contains the following sections:
Table of Contents
Contains links to the other sections.
Report Table
Presents the same monitor and managed-system data that is also available
in the Report Viewer in the Table view.
Report Information
Includes the file name, analysis start and end dates, days of the week and
hours of coverage, name of the report definition, and a list of any managed
systems that were requested but not included in the report.
Performance Analysis recommendations
Recommends remedies for the most serious bottlenecks.
Performance Analysis details
Includes information about the frequency and duration of both active and
latent bottlenecks and their remedies.
Performance forecast
This concept describes how Capacity Manager predicts future performance.
Chapter 1. Getting started with IBM Director 43

Using the Forecast function of Capacity Manager, you can review a prediction of
future performance of selected managed systems. Capacity Manager uses
forecasting in these interfaces:
v In the performance-analysis section of a report. If there are no realized
bottlenecks, Capacity Manager uses forecasting to predict, with a level of
confidence, if and when it foresees a monitor performance bottleneck.
v In a managed-system monitor performance graph. On a graph of a selected
monitor for one or more managed systems, you can click Forecast icon (
) to
see a forecast of the performance on the selected managed systems. The graph
depicts both the observed data and the forecast.
To calculate future performance, Capacity Manager applies a wavelet transform to
the monitor data before performing a least-squares linear regression . With this
transformed data, it computes a forecast line with a 95% prediction interval. The
forecast duration is equal to the duration of the observed data.
Tip: For the forecast to be valid, Capacity Manager must have a minimum of 24
days of previously collected data where the managed-system monitors have
been running at least 50% of the time.
Performance forecast graph
The forecast line describes possible future data values that are consistent with the
prediction that an actual future data value will fall within equal probability above
or below the forecast line. This line is a dashed line with an arrow at the end.
The forecast duration is equal to your data-collection period. For example, if you
have a month of collected data, the forecast will be for a month into the future.
The prediction interval is represented by the dotted lines above and below the
forecast line. The prediction interval represents the range of data values that are
located above and below the forecast line and are consistent with the prediction
that an actual future data value will fall within the interval with a probability of
95%. The width of the interval depends on the variability of the observed monitor
data: the greater the variability, the wider the prediction interval. The prediction
interval is displayed when you request a forecast of a single managed system.
Graphs of multiple managed-system forecasts do not show prediction intervals.
If you do not know how to interpret a wide prediction interval for a forecast, select
a finer resolution of your data from the Resolution drop-down list located in the
lower-right corner of the Graph pane. Your data points might have a broad
variance that is hidden by averaging that occurs when data is displayed at a
coarser resolution.
Notes:
1. The vertical bar at the beginning of the forecast data depicts the range.
2. The gap between the actual collected data and the beginning of the
predicted data serves as a separator between these two data sets.
Scalable objects
Scalable objects are IBM Director managed objects that are used with multinode
configurations of supported xSeries servers.
Scalable objects in IBM Director for xSeries 460 servers include:
44 IBM Director Installation and Configuration Guide
v Scalable nodes
v Scalable partitions
v Scalable systems
IBM Director communicates out-of-band with service processors in xSeries 460
servers to manage hardware partitions. Each hardware partition can run a single
image of the operating system and is defined as a scalable partition that consists of
one or two xSeries 460 servers. The servers that are defined in a scalable partition
have at least one SMP Expansion Module and are referred to as scalable nodes. A
scalable system consists of scalable nodes and the scalable partitions that were
created from those scalable nodes. These IBM Director managed objects are
referred to as scalable objects throughout this documentation.
Note: IBM Director performs only discovery and power operations for scalable
systems and scalable partitions that have been previously configured on
xSeries 460 servers. It does not create or configure scalable systems or
scalable partitions.
Scalable nodes
A scalable node is a server that has one or more SMP Expansion Modules. When
IBM Director discovers such a server, it creates a physical-platform managed
object. It also assigns attributes that record the number of SMP Expansion
Modules, SMP Expansion Ports, and RXE Expansion Ports on the physical chassis.
In IBM Director Console, scalable nodes are identified with the same icon that is
used for all physical platforms. To determine whether a physical platform has the
additional attributes of a scalable node, in the Group Contents pane, double-click
the icon for the physical platform. The Display System Attributes window opens
and the attributes for SMP Expansion Modules and RXE Expansion Ports are in the
list that is displayed.
The following requirements apply to multinode configurations:
v All servers in one scalable system must be of the same machine type and model,
and must have the same number of SMP Expansion Modules.
v All servers in one scalable system must have the same type of service processor
and the same firmware code level.
v The service processor of each server must be connected to an active network.
This connection is necessary so that the service processors can communicate and
perform the necessary functions for the multiple servers to merge as one
combined server or unmerge as separate servers. This connection also is required
for out-of-band communication with IBM Director.
v All servers in one scalable system must be at the same basic input/output
system (BIOS) code level.
Scalable partitions
A scalable partition contains one or more scalable nodes. Regardless of the number
of scalable nodes it contains, a scalable partition can run a single image of an
operating system.
Scalable partitions can:
v Be powered on and powered off
v Support an operating system
v Have a single, contiguous memory space and access to all associated adapters
v Identify the scalable nodes that are used by the scalable partition
Chapter 1. Getting started with IBM Director 45

v Be represented as managed systems after IBM Director Agent is installed on the
scalable partition and the scalable partition is powered on.
You can view the state of a scalable partition from IBM Director Console. To do so,
right-click the managed object for a scalable partition; then, click Open to display
general attributes for that scalable partition. The scalable partition state is
displayed under the general attribute State.
Furthermore, when you use the Status association in IBM Director Console, the
Scalable Partition Power Status folder in the Group Contents pane includes several
subcategories for scalable partition states.
Scalable systems
A scalable system is an IBM Director managed object that consists of scalable
nodes and the scalable partitions that were created from the scalable nodes in the
scalable system.
Attention: If you recable a multinode server into a different physical
configuration after it has been used with IBM Director, you must notify IBM
Director of the recabling changes by reestablishing out-of-band communication.
Groups that are used with scalable objects
IBM Director provides several default groups of scalable objects in the Groups
pane for easier management of these objects.
The default groups that are relevant to scalable objects are shown in table below.
Table 4. IBM Director groups that are used with scalable objects
Group name Managed objects
Logical Platforms All logical-platform objects, which includes
all scalable partitions.
Physical Platforms All physical-platform objects, which includes
all scalable nodes.
Platforms All logical platforms and physical platforms.
Platforms and Platform Members All logical and physical platforms and any
managed systems that result from these
platforms.
Scalable Partitions Only scalable partitions.
Scalable Systems Only scalable systems.
Scalable Systems and Members All scalable systems and all members of
those scalable systems. Members of a
scalable system include its scalable
partitions, its scalable nodes, and any remote
I/O enclosures attached to its scalable
nodes. This group also includes managed
systems that result from its scalable
partitions.
Power operations for scalable partitions
You can use IBM Director Console to power on and power off scalable partitions
on xSeries 460 servers.
46 IBM Director Installation and Configuration Guide

Power operation that are performed on managed objects that represent scalable
partitions use out-of-band communication. Power operations that are performed on
managed-system objects created from powered-on scalable partitions use in-band
communication to power off the scalable partition.
Restriction: The out-of-band power operations in IBM Director 4.22 are only for
use by xSeries 460 servers. Other supported servers (such as xSeries
455 and xSeries 445 servers) should install and use Scalable Systems
Manager (SSM) 4.20 if needed.
IBM Director Console identifies all scalable partitions with the same scalable
partition icon whether they are powered on or powered off. However, IBM
Director Console uses additional icons with the scalable-partition icon to indicate
the state of a scalable partition.
IBM Director Console uses the same icon to depict all physical platforms, including
those that are not scalable nodes and those that are not in powered-on scalable
partitions.
Discovering scalable objects
When a scalable node is unlocked, IBM Director performs additional discovery for
the xSeries 460 server.
This discovery determines whether the NVRAM of the service processor contains a
partition descriptor. If it does, IBM Director uses the partition-descriptor
information to create scalable systems and scalable partitions. The partition
descriptor in NVRAM was stored by the Web management interface for the xSeries
460 server.
IBM Director also creates the association between scalable systems and scalable
nodes, and between scalable partitions and scalable nodes. The partition descriptor
in NVRAM indicates how many scalable nodes are in a scalable system and how
many scalable nodes are in a scalable partition.
The interrogation of NVRAM to locate a partition descriptor is performed in the
background, in a manner similar to the discovery of physical platforms.
The following conventions are used to name the new scalable objects:
v The scalable system is named “Scalable System xxxx” where xxxx is the last four
characters of the scalable system UUID that is read from NVRAM.
v The scalable partition is named “Scalable Partition xxxx yyyy” where xxxx is the
last four characters of the scalable system UUID that is read from NVRAM and
yyyy is the last four characters of the scalable partition UUID that is read from
NVRAM.
Note: When more than one scalable system UUID ends with the same last four
characters, this naming convention will result in duplicate names. For this
reason, consider renaming automatically created scalable systems to avoid
confusion.
When IBM Director Server discovers that IBM Director Agent is running on the
newly started scalable partition, it creates a managed-system object to represent the
active scalable partition. You can use IBM Director to manage this managed system
as you would any other managed system. For example, by using Management
Processor Assistant (MPA), system administrators can configure, monitor, and
manage the service processors in xSeries servers. Further, IBM Director associates
Chapter 1. Getting started with IBM Director 47

the managed-system object with its scalable partition object. Use the Scalable
Partitions Membership association in IBM Director Console to view a tree structure
of scalable partitions and their associations with any managed systems.
Security
IBM Director offers several security features, including authentication and
user-administration options that enable system administrators to specify user
privileges, support for Secure Sockets Layer (SSL), and optional encryption of
interprocess communication.
Authentication
This topic provides conceptual information about authentication.
Integrated into IBM Director is a security mechanism by which a managed system
can authenticate any management server attempting to access it. Authentication
enables Level-1 and Level-2 managed system to accept commands from only an
IBM Director Server that is trusted (that is, authorized to manage it).
Authentication protects Level-1 and Level-2 managed system from access by
unauthorized management servers or rogue managed-system applications.
The IBM Director authentication process is based on two interlocking concepts:
v Digital-signature certification
v Security state of the managed system
Digital-signature certification:
This topic provides conceptual information about digital-signature certification.
IBM Director authentication is based on the Digital Signature Algorithm (DSA).
DSA is the public-key algorithm specified by the Digital Signature Standard of the
National Institute of Standards and Technology. It enables the holder of a public
key to verify the signature for a digital document that has been signed by a holder
of the corresponding private key. In an IBM Director environment, it works in the
following way:
1. IBM Director Server attempts to access IBM Director Agent. IBM Director
Server bids the public keys that correspond to the private keys it holds.
2. IBM Director Agent checks these keys. If it considers the keys to be trusted,
IBM Director Agent replies with a challenge that consists of one of the trusted
public keys and a random data block.
3. IBM Director Server generates a digital signature of the random data block
using the private key that corresponds to the public key included in the
challenge. IBM Director Server sends the signature back to IBM Director Agent.
4. IBM Director Agent uses the public key to verify that the signature is a valid
signature for the random data block. If the signature is valid, IBM Director
Agent grants access to IBM Director Server.
This digital-signature scheme has the following benefits:
v The public keys stored on the managed systems can be used only for verifying
access.
v Using a random data block for signing makes replay attacks unusable.
v Generating a private key corresponding to a given public key is
cryptographically improbable, requiring 2128 or more operations to accomplish.
48 IBM Director Installation and Configuration Guide
For Level-1 managed systems, the digital-signature certificate expires after 365
days. You can configure notification and polling settings when the certificate is
about to expire. You can also create an event action plan to notify you of an
expiring certificate.
Security states of managed systems:
This topic provides information about the security state of a managed system.
A managed system is in either an unsecured or secured state. A managed system is
unsecured when any management server can access it and perform functions on it.
A managed system is secured when only an authorized (trusted) management
server can access it.
The initial security state of IBM Director Agent depends on the underlying
operating system.
Table 5. Initial security state of IBM Director Agent
Operating system Security state
AIX Secured by default during installation of IBM Director Agent.
i5/OS Secured by default during installation of IBM Director Agent.
Linux Secured by default during installation of IBM Director Agent.
NetWare Unsecured by default. Must be secured manually or during
discovery. See Securing managed systems for more information.
Windows Can be secured during installation of IBM Director Agent.
If IBM Director Agent is not secured during installation of IBM Director Agent,
you can secure the managed system manually or during discovery.
Note: The IBM Director Agent running on a management server is secured
automatically. It has a trust relationship with only the IBM Director Server
installed on the same server.
On managed systems running Windows, the security state is determined by the
secin.ini file. If the secin.ini file is initialized as unsecured, any management server
can access the managed system and establish a trust relationship with IBM Director
Agent. IBM Director Server establishes a trust relationship by giving IBM Director
Agent a copy of its public key.
When the managed system has been secured by a management server, only that
management server, any management servers that had previously established a
trust relationship, and any future management servers that successfully request
access are able to access the managed system.
Where the security information is stored:
This topic provides information about where security information is stored.
The information needed for authentication is stored in files on both the
management server and the managed systems.
Chapter 1. Getting started with IBM Director 49

The public keys are stored in dsaxxxxx.pub files, where xxxxx is a unique identifier.
The private keys held by IBM Director Server are stored in dsaxxxxx.pvt files. For
example, the dsa23ef4.pub file contains the public key corresponding to the private
key stored in the dsa23ef4.pvt file.
On systems running Windows, the secured or unsecured state data is stored in the
secin.ini file, which is generated when you first start IBM Director Server or IBM
Director Agent. On management servers, this file is initialized as secured; on
managed systems, it is initialized as either secured or unsecured, depending on
which options were selected during the installation of IBM Director Agent.
By default, the files are located in the following directories.
Operating system Directory
AIX /opt/ibm/director/data
i5/OS /QIBM/UserData/Director/data
Linux operating systems for AMD64 and 32-bit
systems
/opt/ibm/director/data
Linux operating systems for Intel Itanium and
IBM iSeries and pSeries
/opt/ibm/director/data
NetWare d:\IBM\Director
Windows d:\Program Files\IBM\Director\Data
where d is the drive letter of the hard disk on which IBM Director is installed and
IBM Director is installed in the default location.
How the keys and sec.ini files work together:
This topic provides information about how the keys and the secin.ini files work
together.
When you first start IBM Director Server, it randomly generates a matching set of
public and private key files (dsa*.pub and dsa*.pvt files). The secin.ini file is
generated and initialized as secure.
The initial security state of a managed system depends on the following factors:
v Which operating system it is running
v Which features were selected during the installation of IBM Director Agent
Managed systems running NetWare are set to the unsecured state automatically.
For all other managed systems, the initial security state depends on which features
are selected when IBM Director Agent is installed. If either encryption or
agent/server security is selected, the managed system is set automatically to the
secured state.
While a managed system is in the unsecured state, it accepts a public key from
every management server that attempts to access it. Through this process, the
managed system establishes trust relationships with those management servers.
If a management server secures that unsecured managed system, it gives that
managed system a copy of its public key and its secin.ini file, which is initialized as
secure. After this has occurred, the managed system no longer accepts any new
50 IBM Director Installation and Configuration Guide

public keys from management servers. However, the managed system continues to
grant access to any management server whose public key is stored on the managed
system.
Key information and management:
This topic provides information about public and private keys and how to manage
them.
The public and private key files are binary files, but they contain textual data that
indicates their origin. If a dsa*.pub or dsa*.pvt file is printed using the type
command at a command prompt, the following data is displayed in the first line:
DSAKeytypeString
where:
v Keytype indicates the type of the key. “P” denotes private, and “p” denotes
public.
v String is the name of the management server that generated the key file.
For example, DSAPtest1 indicates a private key file generated by a management
server named test1, and DSAptest1 indicates the public key file generated by the
same management server.
It is very important to back up and protect the dsa*.pvt files. If they are lost, you
cannot regenerate these files.
User accounts
A user account is an account that is set up for an individual that defines that user
for IBM Director. The information that is saved to the account is full name, user
ID, password, privileges, group access, task access, pager number, and e-mail
address. From IBM Director Console, you can manage user accounts.
IBM Director user accounts are based upon the underlying operating-system
accounts. When IBM Director Server is installed, two groups of IBM Director users
are created automatically at the operating-system level: administrators and super
users. The two user groups have different levels of access to IBM Director:
Administrator group
Members of the administrator group have general access to IBM Director,
although the privileges available to the administrator group or an
individual user can be restricted by a super user.
Super-user group
Members of the super-user group can define the privileges available to the
administrator group. Also, they can create and edit individual user
accounts. The privileges available to members of the super-user group
cannot be restricted.
The following table lists the operating-system specific names of the IBM Director
user groups.
Table 6. IBM Director user groups
Operating
system Administrator group Super-user group
i5/OS QIBM_QDIR_ADMINISTRATOR QIBM_QDIR_SUPER_ADM_PRIVILEGES
Chapter 1. Getting started with IBM Director 51

Table 6. IBM Director user groups (continued)
Operating
system Administrator group Super-user group
Linux diradmin dirsuper
Windows DirAdmin DirSuper
To create a user that has access to IBM Director Server, you must first create a user
account for the operating system that is running on the management server. Once
the account is created, that user must be made a member of either the diradmin or
dirsuper group. Root users (users belonging to the root group) or members of the
Administrator group on Windows are also able to access IBM Director. After a user
account has been added to the applicable IBM Director group, you can log in to
IBM Director Console as an administrator and configure that user’s privileges to
IBM Director tasks and groups. On Windows, the IBM Director service account is
automatically assigned to the super-user group (DirSuper). In addition, all
operating-systems accounts with administrator privileges on the management
server automatically can access IBM Director Console. Users with such
operating-system accounts can access the same IBM Director privileges as members
of the DirAdmin group.
On i5/OS, the groups are not automatically populated. A user with security
administrator authority must assign users to the appropriate groups.
On Linux, the groups are not automatically populated. A user with root privileges
must assign users to the appropriate groups.
On a management server that is running Windows, you also can create additional
groups at the operating-system level and add these groups to the diradmin or
dirsuper groups. The subgroups that you add to the diradmin or dirsuper groups
can be managed in IBM Director.
Encryption
This topic provides conceptual information about encryption.
IBM Director contains a security feature that encrypts all data in interprocess
communications, except transport-layer datagrams used during discovery. This
encryption feature provides automatic key management and enables you to select
an encryption algorithm from the provided libraries:
v IBM Java Cryptography Extension (JCE)
v OpenSSL
JCE provides ciphers for all Java-based platforms, including i5/OS and Linux;
OpenSSL provides ciphers for 32-bit Windows operating systems.
Encryption is disabled by default. To encrypt data transmitted between Level-1 and
Level-2 managed systems and IBM Director Server, you must enable encryption on
both IBM Director Server and Level-1 and Level-2 managed systems.
When you install IBM Director Server, you can select one of the following
encryption algorithms:
v Advanced Encryption Standard (AES)
v Data Encryption Standard (DES)
v Triple DES
52 IBM Director Installation and Configuration Guide

IBM Director Server automatically generates a key, based on the encryption
algorithm selected. IBM Director Server stores the key in memory and presents it
to IBM Director Core Services or IBM Director Agent each time IBM Director Core
Services or IBM Director Agent is started, using the Diffie-Hellman key exchange.
This makes it unnecessary for a key to be stored on each managed system.
The following table outlines how data is transmitted between IBM Director Server
and Level-1 and Level-2 managed systems, depending on whether encryption is
enabled.
Table 7. Encryption state and data transmitted between IBM Director Server and IBM
Director Agent
IBM Director Core Services
or IBM Director Agent
(encryption enabled)
IBM Director Core Services
or IBM Director Agent
(encryption disabled)
IBM Director Server
(encryption enabled)
Encrypted Unencrypted
IBM Director Server
(encryption disabled)
No data transmission
possible
Unencrypted
Important: If two management servers have discovered each other (and they each
appear in each other’s IBM Director Console as managed nodes), and
one management server (server A) has encryption enabled, and the
other management server (server B) either has encryption disabled or
has encryption enabled now but had it disabled when it was
discovered and the communication has not ended since the discovery,
then unencrypted transmissions sent by server B to server A will
continue until the previous communication is ended. This occurs
because server A (in its role as a management server) is already
communicating with server B (in its role as managed system) in plain
text. You can delete these managed objects from each other’s console to
end the unencrypted communication, and if you run multiple
management servers that can discover each other, you can enable
encryption on both management servers before they are started or
before they can discover each other. You can also use the dircli lsmo
command to check for previous communication.
Notes:
v Encryption is not supported on managed systems running NetWare or
systems running 64-bit versions of Windows.
v Neither out-of-band communications nor communication used by
Internet tools, such as Telnet or File Transfer Protocol (FTP), are
encrypted.
v Enabling encryption imposes a performance penalty. Encrypting data
packets and exchanging encryption keys has an effect on the speed with
which IBM Director completes management operations. When either the
management server or the managed systems are restarted, keys are
regenerated and exchanged. Consequently, an unsecured managed
system might appear to be unmanageable for a period of time.
Software distribution
This topic compares two methods for distributing software.
IBM Director supports the following methods of software distribution:
Chapter 1. Getting started with IBM Director 53

v Streaming from the management server
v Using redirected distribution
Streaming from the management server
This topic describes advantages and disadvantages of distributing software by
streaming from the management server.
Software-distribution packages are copied directly from the management server to
the managed system.
This method of software distribution is resource-intensive. It can have a negative
effect on the management server performance. In addition, a package distributed
by this method requires that the target managed system have empty disk space
twice the size of the package.
For Level-2 managed systems, streaming from the management server has one
advantage, however. If a network connection is broken during the transmission,
IBM Director attempts to resume the connection from the point at which the
transmission was interrupted. If the streaming operation can be resumed,
retransmission time is saved.
Because of the ability to resume distribution, you might prefer to stream a software
package from the management server if you have an unreliable or slow network
link.
Using redirected distribution
This topic describes advantages and disadvantages of using redirected distribution
to distribute software.
Many software packages are tens or hundreds of megabytes in size. Distributing
software of this size across a large network can cause bottlenecks in network data
transmission. To avoid this problem, you can set up a universal naming convention
(UNC) or FTP share on a network server. IBM Director Server streams software
packages to the network share, where they are cached. From the share, they are
either streamed to the managed systems or, in the case of software that uses the
Microsoft Windows Installer or InstallShield as the installation utility, installed
directly from the file-distribution server.
Redirected distribution greatly reduces the software-distribution traffic in your
network. It uses fewer system resources on the management-server. In addition, if
you install InstallShield or Microsoft Windows Installer (MSI) packages directly
from the file-distribution server, redirected distribution requires less disk space on
the managed systems.
Redirected distribution has one limitation: if a redirected distribution of a software
package is interrupted (for example, if the network connection is lost), the
installation must begin all over.
File-distribution server considerations
Consider the following issues when setting up file-distribution shares:
v In a Windows environment, the file-distribution server must either be a member
of the same domain as the management server or have a trust relationship with
that domain.
54 IBM Director Installation and Configuration Guide

v The management server must have full read/write access to the share. The user
ID and password that were used to install IBM Director Server must also be
present on the file-distribution server. Otherwise, software distribution uses
streaming from the management server.
v The share must allow read access to all managed systems that you want to
access the share.
v If the file-distribution server is configured as an FTP server, you can choose to
use FTP when transferring packages from the management server to the share.
For managed systems running Windows, the home directory for the FTP login
must be the same directory as the file-distribution server. For example, if
c:\stuff\swd_share is mapped to \\server\swd_share, then c:\stuff\swd_share
must be the home directory for the FTP user ID login used on the FTP
file-distribution server configuration panel.
v You can enable null credentials to access the share so that you do not have to
specify a user ID and password for each managed system or group that needs to
access the share. To enable null credentials, you must issue the twgshare
command. This alters a registry setting on the file-distribution server, which
enables managed systems to use null credentials to access the share. To issue the
twgshare command, complete the following steps:
1. Copy the twgshare.exe file to the file-distribution server. This file is in the
\IBM\director\bin\ directory.
2. From a command prompt, type the following command:
twgshare -a sharename
where sharename is the name of the share on the file-distribution server.v If you do not want to use null credentials (which are a security risk), you must
set up an operating-system account on the file-distribution server. This account
must have read access to the share. Enter the user ID and password for this
account when you configure distribution preferences for managed systems. In
addition, the account must exist on each managed system so that IBM Director
Agent can specify this user to mount the share.
SNMP devices
IBM Director discovers SNMP devices in your network according to discovery
parameters that you can specify. The process that is used to discover SNMP
devices in your network uses lists of initial IP addresses, SNMPv1 and SNMPv2c
community names, subnet masks, and SNMPv3 profiles.
IBM Director works with SNMPv1, SNMPv2c, and SNMPv3 for all
communications and recognizes Management Information Bases (MIBs) in System
Management Information (SMI) version 1 and version 2 formats.
SNMPv1 and SNMPv2c devices and agents use community names to control their
access. A community name can be any case-sensitive text string. By default, the
community name of an SNMP device is set to public. If specific SNMP devices in
your network have unique community names to restrict access, you can specify the
correct name to gain access to a device. SNMPv3 devices and agents use profiles to
control their access.
The subnet mask enables you to further refine the scope of the discovery process,
limiting the search to certain subnets in the network. The default subnet mask is
set to the subnet of each corresponding IP address.
Chapter 1. Getting started with IBM Director 55

Using your lists of IP addresses, community names, and subnet masks, a series of
SNMP GET statements are performed against port 161 of the IP address to
determine whether the address is associated with a valid SNMP device. A valid
SNMP device for IBM Director has the following accessible values: sysName,
sysObjectID, sysLocation, sysContact, sysDescr, and sysUpTime. If the object is
determined to be a valid SNMP device, another series of SNMP GET statements
are sent to obtain information in the ipNetToMediaNetAddress table, where
additional IP addresses can be used to discover even more SNMP devices. The
search continues until no new addresses are located. Newly discovered or created
SNMP-device managed-object names default to the value of sysName. If sysName
has no value, the host name of the device is used. If no host name is assigned, the
IP address is used.
All SNMP traps that are configured with IBM Director Server as the destination are
forwarded as events to the event log. Therefore, you can view an SNMP trap using
the event log on the SNMP managed device that originated the trap. If a trap is
received that corresponds to an SNMP device that has not been discovered, IBM
Director creates the device automatically, if you selected the Auto-add unknown
agents which contact server check box on the SNMP Discovery page in the
Discovery Preferences window.
The MIB file is used to translate raw SNMP dotted decimal notation into
human-readable text. This is especially useful for SNMP devices for Level-0
managed devices, which do not have IBM Director Core Services or IBM Director
Agent installed (such as network hubs, switches, printers, and USPs). MIBs that are
placed in the data\snmp directory on the management server are compiled
automatically. You can also compile MIBs manually from the SNMP Browser
window.
Storage managed objects
IBM Director recognizes certain storage devices that comply with the Storage
Management Initiative Specification (SMI-S). This is an industry standard
developed by the Storage Networking Industry Association (SNIA). IBM Director
supports SMI-S versions 1.1 and 1.0.2.
IBM Director provides support these storage devices:
v IBM System Storage DS300
v IBM System Storage DS400
v IBM System Storage DS4000
IBM Director communicates with the storage devices through their respective
SMI-S providers. Their Service Location Protocol (SLPv2) component enables the
devices to be discovered by IBM Director, which looks for SNIA-defined SLP
service types.
IBM Director obtains information about storage devices through the SMI-S
provider’s Common Information Model Object Manager (CIMOM) component.
Communication occurs using the Distributed Management Task Force (DMTF)
standard for Web Based Enterprise Management (WBEM) as required by SNIA.
The information is organized according to the DMTF standard for the Common
Information Model (CIM) using the profiles defined by SNIA.
Note: For DS4000, the SANtricity SMI Provider from Engenio, which complies
with SMI-S version 1.1, is required. You can obtain this provider from the
56 IBM Director Installation and Configuration Guide

Engenio web site at www.engenio.com. Note that SMI providers version 1.1
are embedded in DS300 and DS400. The providers are from Adaptec.
For information on standards, see these Web sites:
SMI-S www.snia.org/smi/about
SNIA www.snia.org
DMTF
www.dmtf.org
WBEM
www.dmtf.org/standards/wbem
CIM www.dmtf.org/standards/cim
SMI-S Attributes
SMI-S attributes can include four sets of data values: Default, CIMOM, Base and
Extended.
Default attributes
SMI-S storage managed objects appear on the console immediately after being
discovered through SLPv2 as a locked object labeled by the host name (or IP
address if DNS lookup fails). When the storage managed object is locked, only the
public data surfaced through SLPv2 is available (such as a locked object that
represents the CIMOM required by the SMI-S standard). Default attributes that are
common to IBM Director managed objects are displayed. These attributes include:
SMI-S Storage Device Name
Starts as the primary host name or IP address of the CIMOM. Once
unlocked, the generated name for the device.
System Factory ID
The managed object factory that creates the objects—SMI-S Storage
Devices.
System State
State of the object. Starts as Unknown because access is required to
determine the actual online, error or offline status.
System Presence Check Setting
Polling interval in minutes for checking the status.
Secure/Unsecure supported
Specifies whether securing of the target is supported.
Access Denied
True for a locked object. This attribute goes away once the object is
unlocked.
Encryption Enabled
Specifies whether encryption to the target is enabled.
CIMOM attributes
Until the storage managed object is unlocked, the actual device and its associated
data are unavailable. The storage managed object is unlocked by obtaining access
to represent the CIMOM and the CIM schemas minded for data. The SLP provided
CIMOM attributes includes:
Chapter 1. Getting started with IBM Director 57

SMI-S Provider Service ID
The unique service id of the CIMOM. As specified in SMI-S, responses
from different IP addresses with the same Service ID value are assumed to
be the same CIMOM and are collapsed together.
Interop Namespace
The entry namespace in CIM containing the Server profile that has the
CIMOM data and list of registered profiles.
Registered Profiles Supported
The list of profiles this CIMOM claims to support.
SLP Service Names
The full service names for this CIMOM
SMI-S Provider IP Addresses
The list of one or more IP addresses for the CIMOM.
SMI-S Provider IP Port Numbers
The IP ports on this CIMOM.
Base attributes
After access is granted to the storage managed object, the full CIM data can be
obtained. This might result in the device representation going away successfully
because the entity already exists, or the object access failing or a security problem.
If access is successful, the object becomes a representation of an actual device. The
name changes based on the rules specified in the Discovery Preferences panel for
SMI-S Storage Devices. The following base attributes then appear:
Registered Profile
The profile this device represents along with the version (for example,
SNIA:Array 1.0.2).
Namespace
The namespace with the schema details about this particular profile.
Storage Server Manufacturer ID
The manufacturer of this device.
Storage Server Type and Model
Type and model string representing this device.
Storage Server Serial Number
Serial number for the device.
Endpoint Unique Name
Unique identifier (primary FC port in fibre channel).
Storage Device Type
Specifies whether this is a fibre channel or iSCSI device.
Extended attributes
Any extended attributes that are specified by the attribute extension files are
created. These may vary based on the storage managed object. For example, for an
IBM DS4000 disk array, the following attributes are displayed:
Subscriptions
Indicates whether a managed object is registered to receive state or alert
indications.
58 IBM Director Installation and Configuration Guide

Nickname
A name for the device
Controller IP Addresses
IP addresses for the controllers on the target.
External applications for storage managed objects
You can use IBM Director to start external applications for targeted storage
managed objects, including Storage Manager Client for IBM System Storage
DS4000 storage systems series.
Important: You must install Storage Manager Client on each management console
from which you intend to use it.
Before you can start Storage Manager Client from IBM Director Console on
systems running a Windows operating system, you must set the following
environment variables:
JAVA_FAStT
Defines the Java Runtime Environment (JRE) directory that is associated
with Storage Manager Client. The default directory is c:\Program
Files\Common Files\IBM_FAStT\jre\1.4.
STORAGE_MANAGER
Defines the working directory of Storage Manager Client. The default
directory is c:\Program Files\IBM_FAStT\client.
Groups used with storage managed objects
IBM Director provides several default groups of storage managed objects in the
Groups pane for easier management of these objects.
This table lists the groups that support storage managed objects.
Group name Storage managed objects
SMIS-Storage Devices Only storage managed objects that comply
with the SMI-S standard.
Storage Devices All storage managed objects, regardless of
compliance with SMI-S standards.
Service processors
Hardware-based service processors, also known as management processors, work
with hardware instrumentation and systems management software and are key to
problem notification and resolution and allow you to remotely manage your
system. In an IBM Director environment, service processors send alerts IBM
Director Server when error conditions occur in a specific managed system and are
key in helping you effectively managed your environment.
Communication with IBM Director Server
This topic provides information about the pathways on which data is transmitted
between service processors and IBM Director Server.
There are several pathways along which communication between IBM Director
Server and the service processors present in IBM Netfinity® or xSeries servers takes
place:
In-band communication
IBM Director Server communicates with IBM Director Agent; IBM Director
Chapter 1. Getting started with IBM Director 59

Agent uses a device driver to pass data to and from the service processor.
This also is called interprocess communication (IPC).
Over the local area network (LAN)
Data is transmitted between the service processor and IBM Director Server
over the LAN. This is possible if the service processor has an integrated
network interface card (NIC) or access to a NIC shared with the server.
Over the ASM interconnect
Data is passed from the service processor over an ASM interconnect
network to a second service processor. The second service processor serves
as a gateway between IBM Director Server and the first service processor.
Both of the latter types of communication are known as out-of-band communication,
because they take place independent of an operating system.
An ASM interconnect network is a group of service processors that are networked
together using the ASM interconnect feature. Connected through the RS-485 ports,
the service processors can communicate with and send alerts out-of-band to IBM
Director Server through a gateway service processor (sometimes called an ASM
interconnect gateway). An ASM interconnect network eliminates the need for
multiple modems, telephones, and LAN ports; it also permits service processors
without network interface cards to communicate out-of-band with IBM Director
Server.
Notes:
1. For IBM Director and Scalable Systems Manager (SSM) to communicate
out-of-band, the following conditions must be met:
v Service processors must maintain consistent IP addresses. You either
must assign static IP addresses or configure Dynamic Host
Configuration Protocol (DHCP) to maintain consistent IP addresses
for the service processors.
v The service processor IP addresses cannot change after IBM Director
has discovered the server.2. Only one of the following systems management applications can
communicate with a service processor at any given time:
v IBM Director Server
v IBM Management Processor Command-Line Interface (MPCLI)
In-band communication and alerts
This topic provides information about when service processors can communicate
in-band with and send alerts to IBM Director Server .
Whether a service processor can communicate in-band with IBM Director Server
depends on both the type of service processor and the operating system running
on the managed system.
Table 8. In-band communication between service processors and IBM Director Server
Primary service processor
Operating system
Linux NetWare Windows
Advanced System Management PCI Adapter
(ASM PCI Adapter)
Yes Yes Yes
Advanced System Management processor (ASM
processor)
Yes Yes Yes
60 IBM Director Installation and Configuration Guide

Table 8. In-band communication between service processors and IBM Director
Server (continued)
Primary service processor
Operating system
Linux NetWare Windows
Integrated system management processor (ISMP) Yes No Yes
IPMI baseboard management processor Yes No Yes
Remote Supervisor Adapter Yes Yes Yes
Remote Supervisor Adapter II Yes Yes1 Yes
1 Novell NetWare 6.5 only
In addition, to enable in-band communication between IBM Director Server and a
managed system that contains a service processor, both the service processor
device driver and MPA Agent must be installed on the managed system.
When in-band communication is possible, alerts are handled either by MPA Agent
or System Health Monitoring. Unless the server supports System Health
Monitoring, ISMPs in servers running Linux cannot send alerts in-band, although
in-band communication between the service processor and IBM Director Server is
possible.
The following table specifies which IBM Director Agent feature handles in-band
alerting.
Table 9. IBM Director Agent features that handle in-band alerts
Type of service processor
Operating system running on managed system
Linux NetWare Windows
ASM PCI Adapter MPA Agent MPA Agent System Health
Monitoring
ASM processor MPA Agent MPA Agent System Health
Monitoring
ISMP None or System
Health
Monitoring1
Not applicable System Health
Monitoring
IPMI baseboard management
processor
System Health
Monitoring
Not applicable System Health
Monitoring
Remote Supervisor Adapter MPA Agent or
System Health
Monitoring2
MPA Agent System Health
Monitoring
Remote Supervisor Adapter II MPA Agent or
System Health
Monitoring2
MPA Agent System Health
Monitoring
1 If System Health Monitoring is supported on the server.
2 MPA Agent handles the alerts,
unless System Health Monitoring is supported on the server.
See the IBM Director Hardware and Software Compatibility document for a list of
servers on which System Health Monitoring is supported when the server is
running Linux. This PDF file is updated every six to eight weeks. You can
download it from the IBM Director Web site at
www.ibm.com/servers/eserver/xseries/systems_management/ibm_director/.
Chapter 1. Getting started with IBM Director 61

Out-of-band communication and alerts
This topic provides information about when service processors can communicate
out-of-band with IBM Director Server. It also contains information about the
pathways on which service processors can provide out-of-band alerts to IBM
Director Server.
The type of service processor present in a server determines which paths
out-of-band communication can take. Servers that contain ISMPs can communicate
out-of-band with IBM Director Server only through a gateway service processor.
The following service processors all can serve as gateway service processors:
v ASM PCI Adapter
v ASM processor
v Remote Supervisor Adapter
v Remote Supervisor Adapter II
However, some of these service processors cannot communicate with certain other
service processors. In addition, an ASM processor can communicate with IBM
Director Server only through interprocess communication.
The following table details the possible gateway service processors and the types
of service processors located on an ASM interconnect network with which they can
communicate.
Table 10. Gateway service processors and communication with service processors on an
ASM interconnect network
Gateway
service
processor
Service processor on an ASM interconnect
ASM
processor
ASM
PCI
adapter ISMP
IPMI
baseboard
management
controller
Remote
Supervisor
Adapter
Remote
Supervisor
Adapter II
ASM PCI
adapter
Yes Yes No Not
applicable
No No
ASM
processor
Yes Yes No Not
applicable
No No
Remote
Supervisor
Adapter
Yes Yes Yes Not
applicable
Yes Yes
Remote
Supervisor
Adapter II
Yes Yes Yes Not
applicable
Yes Yes
To maximize the possibility of IBM Director Server receiving alerts from service
processors located on an ASM interconnect network, consider using a Remote
Supervisor Adapter or a Remote Supervisor Adapter II as a gateway service
processor.
Note: If you have one of the following servers attached to an RXE-100 Remote
Expansion Enclosure, you cannot use the on-board Remote Supervisor
Adapter as a gateway service processor:
v xSeries 360
v xSeries 365
v xSeries 440
v xSeries 445
62 IBM Director Installation and Configuration Guide

v xSeries 455
The Remote Supervisor Adapter is dedicated to managing the RXE-100
Remote Expansion Enclosure.
The following table contains information about the pathways available for
out-of-band alerting.
Table 11. Out-of-band alerting pathways
Type of service
processor
Pathways for out-of-band
alerting
Possible gateway service
processors
ASM PCI adapter v LAN
v Over an ASM interconnect
v ASM PCI adapter
v Remote Supervisor Adapter
v Remote Supervisor Adapter II
ASM processor v Over an ASM interconnect
v ASM PCI adapter
v Remote Supervisor Adapter
v Remote Supervisor Adapter II
ISMP v Over an ASM interconnect v Remote Supervisor Adapter
v Remote Supervisor Adapter II
IPMI baseboard
management
processor
v LAN v Not applicable
Remote Supervisor
Adapter
v LAN
v Over an ASM interconnect
v Remote Supervisor Adapter
v Remote Supervisor Adapter II
Remote Supervisor
Adapter II
v LAN
v Over an ASM interconnect
v Remote Supervisor Adapter
v Remote Supervisor Adapter II
See the documentation that came with the server for information about how to
configure your service processor and ASM interconnect to ensure that IBM Director
Server receives alerts. The IBM Redbooks publication Implementing Systems
Management Solutions Using IBM Director (SG24-6188-01) also contains information
that might be helpful.
Out-of-band alert-forwarding strategies
This topic provides information about the out-of-band alert-forwarding strategies
that are supported by xSeries service processors.
The type of service processor also determines what type of alert-forwarding
strategy is possible. The following table contains information about possible
alert-forwarding strategies.
Table 12. Out-of-band alert-forwarding strategies
Type of service processor Possible alert-forwarding strategies
ASM PCI adapter IBM Director over LAN
ASM processor IBM Director over LAN
ISMP Not applicable
IPMI baseboard management
processor
IBM Director comprehensive
Remote Supervisor Adapter IBM Director over LAN IBM Director
comprehensive
Remote Supervisor Adapter II IBM Director comprehensive
Chapter 1. Getting started with IBM Director 63

Some service processors also support SNMP as an alert-forwarding strategy.
Upward integration
Upward integration modules (UIMs) enable third-party workgroup and enterprise
systems-management products to interpret and display data that is provided by
Level-1 and Level-2 managed systems. The UIMs provide enhancements to the
systems-management products that you can use to start IBM Director Agent from
within the systems-management platform, collect inventory data, view IBM
Director event notifications, and for some UIMs, distribute IBM Director managed
system software packages.
With the UIMs, you can use your systems-management software to manage
systems installed with IBM Director Core Services or IBM Director Agent software.
You can use IBM Director Agent software to:
v Gather detailed inventory information about your systems, including operating
system, memory, network adapters, and hardware.
v Track your systems with features such as power management, event log, and
system monitor capabilities.
IBM Director Agent uses some of the latest systems-management standards,
including Common Information Model (CIM), Web-Based Enterprise Management
(WEBM) and Extensible Markup Language (XML), to provide compatibility with
your existing enterprise-management software.
IBM Director enables you to make the most of your existing enterprise
management structure by upwardly integrating with Tivoli Management
Framework, Tivoli NetView, HP OpenView, and Microsoft Systems Management
Server (SMS), and Microsoft Operations Manager (MOM).
IBM Director UIM for HP OpenView
With the IBM Director UIM for HP OpenView, you can use your
systems-management software to manage systems installed with IBM Director Core
Services or IBM Director Agent software.
When you install IBM Director UIM for HP OpenView, the following functions are
added to the HP OpenView environment:
v Event notification: Provides notification of events that occur on managed
systems on which IBM Director Agent is installed. These notifications are
delivered using SNMP traps.
v Inventory: Scans inventory using an inventory plug-in that starts a Java
application that collects the inventory from IBM Director Agent, including Asset
ID data, BIOS details, and lease information.
v Web browser launch: Provides Web browser capability from within the HP
OpenView environment so that you can display and manage real-time asset and
health information about managed systems on which IBM Director Agent is
installed.
v Discovery: Provides SNMP-based discovery of managed systems on which IBM
Director Agent is installed.
Note: You must configure the SNMP community name of the managed system.
64 IBM Director Installation and Configuration Guide

IBM Director UIM for Microsoft Operations Manager
With the IBM Director UIM for Microsoft Operations Manager, you can use your
systems-management software to manage systems installed with Level-1: IBM
Director Core Services or Level-2: IBM Director Agent software.
When you install IBM Director UIM for Microsoft Operations Manager (MOM), the
following functions are added to the Microsoft Operations Manager environment:
v Discovery: Provides discovery of Level-1 and Level-2 managed systems.
v Events: Captures events that occur on Level-1 and Level-2 managed systems.
v Alerts: Sends a notification when certain events occur on Level-1 and Level-2
managed systems.
v State: Changes the state of Level-1 and Level-2 managed systems based on event
criteria.
IBM Director UIM for Microsoft Systems Management Server
With the IBM Director UIM for Microsoft Systems Management Server (SMS), you
can use your systems-management software to manage systems installed with IBM
Director Core Services or IBM Director Agent software.
When you install IBM Director UIM for SMS, the following functions are added to
the SMS environment:
v Event notification: Provides notification of events that occur on managed
systems on which IBM Director Agent is installed. These notifications are
translated into SMS status messages.
v Collections: Adds an SMS Collection to easily identify all managed systems on
which IBM Director Agent is installed.
v Inventory: Scans inventory directly from IBM Director Agent, including Asset ID
data, BIOS details, field-replaceable unit (FRU) numbers, lease information, and
network details.
Tip:
– The inventory feature is compatible only with IBM Director Agent 4.20
or later.v Queries: Adds an SMS Query to identify all managed systems on which IBM
Director Agent is installed.
v Software distribution: Distributes an IBM Director Agent software package and
performs an unattended installation on any system in the Microsoft SMS
environment.
v Wake on LAN®: Remotely turns on managed systems on which IBM Director
Agent is installed, and are Wake-on-LAN-capable.
IBM Director UIM for Tivoli Management Framework
With the IBM Director UIM for Tivoli Management Framework, you can use your
systems-management software to manage systems installed with IBM Director Core
Services or IBM Director Agent software.
When you install IBM Director UIM for Tivoli Management Framework , the
following functions are added to the Tivoli Management Framework environment:
v Event notification: Provides notification of events (such as failing components)
occurring on IBM Director Agent systems and IBM Management Processors,
allowing IT personnel to take immediate corrective action. These notifications
can be sent as native Tivoli Enterprise Console events, SNMP traps, and
Windows event log events.
Chapter 1. Getting started with IBM Director 65

v Inventory: Collects inventory data directly from IBM Director Agent is installed
using custom MIF files, SQL scripts, and inventory queries.
v Monitors: Provides hardware status monitors for managed systems on which
IBM Director Agent is installed. This feature enhances the Tivoli Console
interface by providing a richer set of features and more comprehensive hardware
monitoring capabilities. You can monitor hardware status and various
thresholds.
v Software distribution: Enables you to build and distribute update packages for
IBM Director Agent software and perform an unattended installation of these
packages on any Tivoli endpoint running Microsoft Windows.
v Tasks: Allows you to view additional information and restart or shut down
managed systems on which IBM Director Agent is installed remotely using Wake
on LAN.
IBM Director UIM for Tivoli NetView
With the IBM Director UIM for Tivoli NetView, you can use your
systems-management software to manage systems installed with IBM Director Core
Services or IBM Director Agent software.
When you install IBM Director UIM for Tivoli NetView, the following functions are
added to the Tivoli NetView environment:
v Event notification: Provides notification of events (such as failing components)
occurring on IBM Director Agent systems and IBM Management Processors,
allowing IT personnel to take immediate corrective action. Notifications are
delivered through SNMP traps.
v Inventory: Collects the inventory data from IBM Director Agent, including Asset
ID data, BIOS details, FRU service numbers, lease information, and network
details.
v Web browser launch: Provides Web-browser capability from within the NetView
environment that allows you to view and manage real-time asset and health
information about managed systems on which IBM Director Agent is installed.
v Discovery: Automatically finds systems with the IBM Director agent installed,
using SNMP. From NetView, you can identify Director agent systems at a glance.
Note: You must configure the SNMP community name of the managed system.
User interfaces
There are three methods for managing an IBM Director environment: a graphical
user interface, called the IBM Director console, a command-line interface (dircli),
and a Web-based interface.
IBM Director Console
The IBM Director Console allows you to control and monitor managed systems
and devices from an application-based graphical user interface. You can install this
console on a desktop computer, workstation, or mobile compute that exists on the
same network as the management server.
IBM Director command-line interfaces
You can use the IBM Director the command-line interfaces to manage and monitor
the managed objects and devices.
66 IBM Director Installation and Configuration Guide

You can use the administrative command-line interface interactively using the
dircli or dircmd utilities. This administrative command-line interface is an
important primary interface into IBM Director and may be used either as an
efficient way to accomplish simple tasks directly or as an embeddable and
scriptable framework for achieving higher level goals. For security reasons,
administrative command-line interface runs only on the management server.
Note: The IBM Director dircli supports a subset of the commands that were
available previously through the deprecated dircmd utility.
To access dircli or dircmd you must log in to an management server as an IBM
Director super user. Access to dircli and interfaces is limited to IBM Director
super-users (members of the DirSuper group). By default, the connection between
the CLI client and the management server is a nonsecure TCP/IP data link. You
can use Secure Sockets Layer (SSL) to secure the data transmission.
Web-based Access
Web-based Access allows you to view managed system information, change alert
standard format (ASF) alerts, change system settings and configurations from a
Web-based graphical user interface. When you install Web-based Access on a
managed system, you can access IBM Director Agent and view real-time asset and
health information about the managed system.
Note: This feature is supported only on Windows 32-bit operating systems.
z/VM Center concepts
This topic provides information about the z/VM Center task and the z/VM
environment that z/VM Center manages.
z/VM Center uses the IBM System z9 and
zSeries virtualization
technologies, in particular z/VM, to provision System z9 and zSeries resources in
form of z/VM virtual servers. To z/VM, a z/VM virtual server is a guest virtual
machine.
A z/VM guest virtual machine consumes a portion of the processor cycles,
memory, and I/O bandwidth of the System z9 or zSeries hardware. All operating
systems that can run natively on System z9 or zSeries can also run on a z/VM
virtual server.
The z/VM Center task comprises two subtasks:
v Virtual Server Deployment
v Server Complexes
What you can do with the z/VM Center tasks
This topic explains what you can do with Virtual Server Deployment and Server
Complexes and how they relate.
You can use the z/VM Center subtasks to virtualize your System z9 or zSeries
hardware resources into z/VM virtual servers (guest virtual machines) and to
deploy Linux instances on them. You interact with z/VM through a graphical user
interface that runs on the IBM Director Console. You only have to directly work
with z/VM for setting up z/VM Center and to install and set up master Linux
instances that serve as the source for the Linux instances you deploy on your
z/VM virtual servers.
Chapter 1. Getting started with IBM Director 67

The Virtual Server Deployment and Server Complexes task complement one
another.
Virtual Server Deployment
With the Virtual Server Deployment task, you can define configurations of
guest virtual machines and save them as virtual server templates. From a
virtual server template you can then create numerous z/VM virtual servers
all with the characteristics defined in the template. You can use specially
prepared master Linux instances as sources for deploying Linux instances
on z/VM virtual servers.
With Virtual Server Deployment you can manage the characteristics of
your z/VM virtual servers.
Use the Virtual Server Deployment task to manage individual z/VM
virtual servers and operating system instances and to set up templates and
Linux guest systems to be used by Server Complexes.
Server Complexes
With the Server Complexes task you can manage configurations of Linux
guest systems. A Linux guest system is a combination of a Linux instance
and the z/VM virtual server on which the Linux instance is installed. A
server complex is a configuration profile for Linux guest systems and
includes both Linux and z/VM aspects. A server complex can define
network settings, Linux configuration scripts, disk access, and VM
Resource Manager (VMRM) performance goals.
You can automatically configure a Linux guest system by assigning it to a
server complex. You can also create a new Linux guest system within a
server complex. When creating a new Linux instance in a server complex,
you automatically create a z/VM virtual server with a Linux instance that
is configured according to the server complex. For creating a Linux guest
system, you require a virtual server template and an operating system
template that have been created by the Virtual Server Deployment task.
You can make changes to a server complex and then apply the
configuration changes to all Linux instances in the server complex.
Use Server Complexes to manage numerous Linux instances with similar
configurations.
System z9 and zSeries virtualization
This topic provides information about the zSeries virtualization technologies.
System z9 and zSeries provide two layers of virtualization:
zSeries LPAR hypervisor
is a virtualization technology built into the System z9 and zSeries
hardware. With the LPAR hypervisor, you can divide a System z9 or
zSeries mainframe into logical partitions (LPARs). Each LPAR has a
dedicated portion of the available physical memory (central storage, in
System z9 and zSeries terminology). Storage devices, I/O channels, and
processors can be shared across LPARs or dedicated to a particular LPAR.
You can use the Integrated Facility for Linux (IFL) feature of the System z9
and zSeries hardware to set up LPARs that are restricted to Linux
workloads. Such LPARs have processors that cannot run operating systems
other than Linux and z/VM.
z/VM is a System z9 and zSeries operating system that acts as virtualization
68 IBM Director Installation and Configuration Guide

software. z/VM can run in an LPAR. z/VM can virtualize all system
resources, including processors, memory, storage devices, and
communication devices.
With z/VM, you can run hundreds of operating system instances
concurrently, all on the same System z9 or zSeries hardware.
You can use a number of LPARs to concurrently run multiple instances of z/VM
while other LPARs run other mainframe operating systems. Each z/VM can run a
multitude of mainframe operating systems, including instances of z/VM itself.
z/VM basics:
This topic gives a brief introduction to z/VM and provides a reference to more
information on z/VM.
For more detailed information on z/VM, visit the z/VM 5.1 library at
ibm.com/servers/eserver/zseries/zos/bkserv/zvmpdf/zvm51.html or the
corresponding z/VM 5.2 library.
The z/VM control program
At the core of the z/VM operating system is the control program (CP). CP is a
virtualization layer between the System z9 or zSeries hardware and the z/VM
guest virtual machines. CP runs on the System z9 or zSeries machine architecture.
As illustrated in Figure 3, a guest virtual machine is a virtualized System z9 or
zSeries machine with a fraction of the actual hardware resources but with the same
machine architecture.
Any operating system or standalone program that can run natively on a System z9
or zSeries machine can also run in a guest virtual machine. To a System z9 or
zSeries operating system a guest virtual machine looks like real System z9 or
zSeries hardware. An operating system that runs in a z/VM guest virtual machine
is called a z/VM guest operating system.
A guest virtual machine runs in the context of a z/VM user ID. With this z/VM
user ID you can log on to the virtual hardware. To log on to a Linux guest
operating system you do not need the z/VM user ID. You can use your Linux user
ID and password, as usual.
Figure 3. z/VM guest virtual machines
Chapter 1. Getting started with IBM Director 69

The z/VM directory
z/VM uses the z/VM directory to keep track of its guest virtual machines. For
each guest virtual machine, there is a directory entry with a number of statements
that define its characteristics.
For example, the directory entry defines the processing power, memory size
(virtual storage, in z/VM terminology), disk access permissions and other
privileges.
The directory is well-protected from general access. There are predefined z/VM
users that are privileged to perform administrative functions. Maintaining the
directory is among the tasks that require the highest privilege level in z/VM.
Many installations use a security manager in addition to this built-in security (see
“Security manager” on page 73).
Service machines
z/VM includes a number of service machines. Service machines are guest virtual
machines that provide specific services to other guest virtual machines. For
example, there are service machines that run programs required for
communications or printing. Like all guest virtual machines, service machines are
associated with user IDs.
Table 13 shows examples of service machines that are directly relevant to z/VM
Center:
Table 13. Examples of service machines
User ID Purpose
VSMSERVE This service machine implements the z/VM systems management
API. z/VM Center uses it to interact with z/VM and its guest
virtual machines.
TCPIP This service machine runs a TCP/IP stack and defines an IP address
through which z/VM can be addressed. z/VM Center accesses
VSMSERVE through the IP address provided by TCPIP.
DIRMAINT This service machine provides an interface for maintaining the
z/VM directory. Instead of using DIRMAINT, you can use any
directory management program that provides equivalent functions
and the required interface.
DATAMOVE This service machine has privileges to perform disk copy operations.
z/VM Center uses DATAMOVE to make copies of disks it requires
for setting up new operating system instances and templates.
Note: z/VM is a highly customizable operating system. The user IDs of Table 13
are the standard user IDs for the respective service machines. These IDs can
be renamed and might be different on your installation. Your installation
might also have multiple instances of a particular service machine, each
with a different user ID.
Virtual networking
z/VM allows for a multitude of methods for communication between a guest
operating system and another guest operating system on the same z/VM, an
operating system instance elsewhere on the same System z9 or zSeries mainframe,
70 IBM Director Installation and Configuration Guide

or a networked operating system that runs on a separate hardware. For a
comprehensive description of z/VM communications refer to z/VM Connectivity,
SC24-6080.
This section briefly introduces three methods that are particularly relevant to Linux
as a guest operating system:
v Direct connections from the z/VM guest virtual machines to an Open Systems
Adapter (OSA) card
v Guest LAN
v Virtual switch
You can set up a virtual connection from each guest virtual machine to an OSA
card. The OSA card provides a connection to a LAN outside the System z9 or
zSeries mainframe. All guest virtual machines that are connected to the same OSA
card can also communicate with one another (see Figure 4). Connecting in this
context does not involve physical cables but means issuing commands that define
virtual connections.
You can also define a guest LAN. A guest LAN is a virtual LAN, emulated by
z/VM. Because a guest LAN does not use physical cables and is contained entirely
within the mainframe, it is fast and, if configured correctly, highly secure.
If you want to provide your guest virtual machines with a connection outside the
z/VM, you can include a TCP/IP router in your guest LAN (see Figure 5). The
router can be a guest virtual machine with a Linux instance as the guest operating
system or it can be a TCPIP service machine.
Figure 4. z/VM guest virtual machines directly connected to an OSA card
Figure 5. z/VM guest virtual machines connected to a guest LAN
Chapter 1. Getting started with IBM Director 71

You can also use a virtual switch to connect your guest virtual machines. Like a
guest LAN, a virtual switch does not use physical cables and can provide a fast
and highly secure connection.
To provide your guest virtual machines with a connection outside the z/VM, you
can directly connect the virtual switch to an OSA card (see Figure 6). No router is
needed in conjunction with a virtual switch.
Cloning:
This topic explains how copy and personalization techniques can be used to create
new instances of guest operating systems.
When z/VM Center creates a new instance of an operating system, it creates a
copy of an existing instance. The copy has the same characteristics as the original
but instance-specific data is personalized to make the copy a unique instance,
rather than a backup of the original. This copying in conjunction with a
personalization is called cloning.
For example, a cloned Linux instance has the same network interfaces, directory
structure, and installed programs as the original, but it has its own unique host
name and IP addresses.
Cloning in the Virtual Server Deployment task
With the Virtual Server Deployment task, you do not directly clone operating
system instances. You first use cloning to create an operating system template. You
then use cloning again to create one or more operating system instances from the
template. To create a clone of an operating system instance, you need an existing
z/VM virtual server.
Cloning in the Server Complexes task
With the Server Complexes task, you work with z/VM virtual servers that have
Linux installed on them. In single cloning operation, you directly create a z/VM
virtual server, apply an operating system image to it, and configure it according to
the target server complex properties.
For a direct cloning operation you need:
v A server complex that has been created with the Server Complexes task
v A virtual server template that has been created with the Virtual Server
Deployment task
Figure 6. z/VM guest virtual machines connected to a virtual switch
72 IBM Director Installation and Configuration Guide

v An operating system template that has been created with the Virtual Server
Deployment task
v A disk pool to provide the disk resources for the clone
Disk sharing:
Disk sharing can save disk resources.
To z/VM, the disks that a Linux guest operating system can access are minidisks.
A minidisk is a logical representation of a part or all of a Direct Access Storage
Device (DASD). If multiple operating systems that run on a z/VM require access
to the same data, you can share the minidisk where this data resides. When a
minidisk is shared, multiple operating system instances can access it.
z/VM Center typically provisions multiple operating system instances that are
based on the same master system. Because of the common base, these systems
have similar data on the respective system disks. z/VM Center allows the
operating system instances to share system disks that:
v Are identical for all operating system instances that need them
v Do not need to be written to
All operating system instances use the same physical copy of a shared minidisks
which saves disk space. z/VM ensures data integrity on shared minidisks by
restricting access by the operating system instances to read-only.
You can use minidisk sharing most effectively if you set up your master operating
systems such as to have the following data on separate minidisks:
v Read-only data
v Read-write and instance specific data
For example, when installing a master Linux you might want to design the file
system such that the /etc, /var, and /home directories and any other directories
that contain instance-specific data or data that needs to be written to are mounted
from a separate minidisk, while the /usr and other directories with fixed data are
on a minidisk that can then be shared.
Security manager:
This topic describes considerations if your z/VM installation uses a security
manager in addition to the built-in security.
z/VM resources are protected through the access permissions and privileges
defined in the z/VM directory. For example, a guest virtual machine cannot access
a disk, unless there is a specific or generic directory statement that permits this
access.
The directory source file and the facilities to make directory changes take effect are
sensitive resources for z/VM security. Accordingly, these resources are well
protected in a properly set up z/VM.
In addition to the built-in security, z/VM offers an API for security managers.
Many installations use Resource Access Control Facility (RACF®) as their security
manager.
Chapter 1. Getting started with IBM Director 73

If you are using a resource manager in conjunction with z/VM Center, you might
need to use the security manager to grant access permissions and privileges for
any objects you create with z/VM Center. z/VM Center handles the z/VM
directory for you. If your security manager requires additional permissions, you
need to define them using your security manager interfaces, outside z/VM Center.
Table 14 provides an overview of the objects that you might have to define to your
security manager.
Table 14. z/VM Center objects and required security manager definitions
z/VM Center object z/VM view of the object
Required security manager
definitions
z/VM virtual server A guest virtual machine v User ID
v Optional: Password
Operating system template A guest virtual machine that
cannot be logged on to but
owns a number of disks with
an install image, that is an
installed operating system
that is ready to be booted for
the first time
v User ID
v Optional: Disk access
Operating system instance A number of disks where an
operating system instance
resides; if there are shared
disks they are owned by the
guest virtual machine that
corresponds to an operating
system template; the
remaining disks are owned
by the guest virtual machine
on which the operating
system has been installed
v Access to network
interfaces
v Optional: Disk access
When you set up your z/VM for z/VM Center, you also create some z/VM guest
virtual machines and need to ensure that the security manager grants the required
privileges and permits access to the required disks.
Refer to your security manager documentation to find out how to grant a
particular access or privilege.
The z/VM manageability access point
The z/VM manageability access point provides a CIM based remote interface for
managing z/VM.
The Common Information Model (CIM) is a standard defined by the Distributed
Management Task Force (DMTF). The management functions provided at that
interface satisfy the CIM profile for z/VM management. Visit dmtf.org for more
information on CIM and DMTF.
In terms of z/VM, the z/VM manageability access point is a guest virtual machine
that is privileged to use the z/VM systems management API and the z/VM
directory manager interface.
In terms of IBM Director, the z/VM manageability access point is a managed object
that can be discovered by IBM Director. It is a Linux system that runs in a z/VM
guest virtual machine and has IBM Director Agent and implements the CIM profile
74 IBM Director Installation and Configuration Guide

for z/VM management (z/VM management profile). Figure 7 shows the
manageability access point in relation to z/VM.
z/VM Center uses the z/VM management profile to provision systems under
z/VM.
To interact with the z/VM manageability access point, you need z/VM Center
extension code installed on the IBM Director Console on which you are working
and on your IBM Director Server. You can then work with the z/VM Center task
on the IBM Director Console. On z/VM, the z/VM manageability access point uses
the z/VM systems API and the directory management interface to perform the
operations according to the user actions on the IBM Director Console.
The z/VM management profile is not for exclusive use by z/VM Center but is
available to any z/VM systems management application.
Virtual Server Deployment concepts
This topic introduces some of the basic concepts of the Virtual Server Deployment
task.
z/VM virtual servers and virtual server templates:
All z/VM virtual servers are guest virtual machines but not all guest virtual
machines are z/VM virtual servers.
A guest virtual machine is not a z/VM virtual server, if its z/VM directory entry
includes a NOLOG statement, that is, if it cannot be logged on.
You use a virtual server template to create a z/VM virtual server. A virtual server
template contains configuration data for creating a directory entry for the z/VM
virtual server on z/VM. The template relieves you from having to enter all details
each time you want to create a z/VM virtual server. You can maintain multiple
templates for z/VM virtual servers with different characteristics. Virtual server
templates are stored in the CIMOM data repository and are not defined in the
z/VM directory.
When creating a z/VM virtual server, the Virtual Server Deployment task uses:
v z/VM defaults. Advanced z/VM users can create their own set of defaults by
defining a prototype in the z/VM directory.
v Data from the virtual server template. If you are using a prototype, the data
from the virtual server template complements or overrides data from the
prototype.
v Data you provide when creating the z/VM virtual server. Data you provide
when creating the z/VM virtual server complements or overrides data from the
virtual server template.
Figure 7. z/VM manageability access point
Chapter 1. Getting started with IBM Director 75

Once a z/VM virtual server is in place, you can create an operating system
instance on it.
Master systems, operating system templates, and personalization:
Master systems are the sources on which Virtual Server Deployment models the
operating system instances it creates.
Virtual Server Deployment needs the following to create an operating system
instance on a z/VM virtual server:
v An operating system template with a fully configured operating system instance.
v Instance-specific data for the new operating system instance.
Virtual Server Deployment uses cloning techniques to create new operating system
instances. You first configure an operating system instance as a model for new
operating system instances. To make this operating system instance into a master
operating system instance, you install a personalization script on it.
When you create a new operating system instance with Virtual Server Deployment,
you must specify some instance-specific data. When the newly created operating
system instance is started for the first time, the personalization process reads the
provided instance-specific data and personalizes the operating system instance
accordingly.
Virtual Server Deployment does not clone new operating system instances directly
from a master operating system instance. Instead, you create an operating system
template. To z/VM, an operating system template is a guest virtual machine that
owns disks but cannot be activated. In more general terms, an operating system
template can be considered an install image.
You can activate the master operating system instance, for example, to make
software updates. You can create more than one operating system template from
the same master operating system instance.
As illustrated in Figure 8, you can create one or more operating system templates
from a master operating system instance. From each operating system template,
you can create one or more operating system instances. The master operating
system instance can be from an installation that takes place outside z/VM Center
Figure 8. Operating system creation flow
76 IBM Director Installation and Configuration Guide

or it can be one of the operating system instances that have been created from an
operating system template, within z/VM Center.
At least an initial master operating system instance must have been installed
outside z/VM Center.
Registration of operating system instances:
When you register an operating system instance, you provide configuration data
about the operating system instance to Virtual Server Deployment.
z/VM Center cannot detect data on the internal configuration of z/VM guest
operating system instances. If you have installed an operating system instance
outside z/VM Center, you need to provide configuration data about the operating
system instance to z/VM Center. This process is called registration. z/VM Center
cannot work with operating systems that have been installed outside z/VM Center,
unless you register them.
You do not need to register operating system instances that have been created from
an operating system template. z/VM Center takes the required configuration data
from the template from which they were created.
Regardless of how configuration data on a particular operating system instance has
been provided to Virtual Server Deployment—by registration or through a
template—z/VM Center cannot detect any changes you might make to that
configuration data. If you want to use an instance as a master operating system
instance, the actual operating system configuration data must match the data that
was registered or taken from an operating system template.
You re-register an operating system instance to make updates to the information
z/VM Center holds on an operating system instance.
z/VM Center supports only a single operating system instance on each z/VM
virtual server. Before you can create or register a new operating system instance,
you must first delete an existing one. De-registering an operating system instance
in Virtual Server Deployment only deletes the data Virtual Server Deployment
holds on the instance. It does not delete any data on the disks where the instance
resides. To delete an operating system instance itself and free the disks where it
resides, you can delete the z/VM virtual server on which the instance is installed.
Figure 9. Register, Re-register, and De-register
Chapter 1. Getting started with IBM Director 77

Figure 9 on page 77 summarizes the relationship between register, re-register, and
de-register.
Resource names and descriptions:
The z/VM Center graphical user interface provides fields for names and
descriptions that you can assign to objects, such as, templates, z/VM virtual
servers, disks, and ports.
z/VM Center reads most of the data on the objects from the z/VM directory. Any
descriptions and names that you assign to resources are stored in the CIMOM data
repository. As an exception, the virtual server template resides entirely in the
CIMOM data repository.
z/VM Center uses definitions from z/VM to establish the association between the
data in the CIMOM data repository and the z/VM directory. Be aware that names
and descriptions can become dissociated from the actual objects when changes are
made directly on z/VM.
Server complexes
This topic introduces some of the basic concepts related to the Server Complexes
task.
The Server Complexes task lets you control the configuration of your Linux guest
systems in an automatic fashion. Within the context of a managed z/VM, you can
create as many server complexes as you need.
You set the properties of a server complex to control various configuration aspects
of Linux guest systems. Then, when you add a Linux guest system to a server
complex, it is automatically configured according to the properties, taking care of
the required configuration in both sides—the underlying z/VM and the Linux
operating system itself.
You can also directly create a Linux guest system in a server complex. This way,
you get a new Linux guest system configured according to the server complex
properties in one action. You can also create and configure multiple Linux guest
systems this way in one action.
Before beginning to work with server complexes, you should be familiar with the
concepts described here:
Server complex:
A server complex represents a (possibly) multi-tier grouping of Linux guest
systems. It governs the creation and configuration of included Linux guest systems
by persistent properties.
The supported configuration domains are virtual networking, z/VM minidisk
attachments, VM Resource Manager performance goals, and configuration scripts.
In each configuration domain, you can define the properties separately for each
tier, or for the whole server complex.
Linux guest system:
A Linux guest system is an IBM Director managed object. This object represents a
Linux system running as a guest operating system in a z/VM virtual server.
78 IBM Director Installation and Configuration Guide

From the point of view of IBM Director, a Linux guest system is simply a managed
object that is a Linux system.
Server complex properties:
You configure the properties of a server complex, with the intention that these
properties will govern the configuration of Linux guest systems contained in that
server complex.
You can configure the properties of a server complex within four domains:
v Virtual Machine Resource Manager (VMRM) velocity goals – define the CPU
and DASD/IO velocity goals to be monitored and adjusted by the VMRM
v Virtual networking – define the virtual networking of the Linux guest systems,
based on VM guest LANs, direct OSA attachments, or VSWITCHes
v Post configuration scripts – add scripts to be run on Linux guest systems when
you add them to, or remove them from, the server complex (or tier)
v Minidisk attachments – attach minidisks up to the Linux mount point
You can set the properties for all four configuration domains or for a single one.
For example, if you are only interested in VMRM configuration, you can create
server complexes and specify their properties only for the VMRM domain.
Similarly, you can use them for networking or minidisk management.
For each configuration domain, you can specify the properties for either the whole
server complex or for each tier separately.
Inconsistencies in server complexes:
Server complex properties govern the configuration state of the Linux guest
systems contained within them. However, there are situations in which the
configuration of Linux guest systems is not consistent with the configuration
implied by the properties of the server complex containing them.
There are two kinds of situations that may cause a state of inconsistency.
Cause 1: If a user changes configuration properties directly on the managed
systems and not through the Server Complexes task functionality.
For example, a user sets the CPU velocity goal property value of a tier to 10 and
moves Linux guest systems lnx001, lnx002 (or directly creates them) into the tier.
This triggers a VMRM configuration of a workload for that tier and a
corresponding CPU velocity goal of 10. Then, the user manually edits the VMRM
configuration and changes the velocity goal to 20. This results in an inconsistency.
Cause 2: Configuration failure.
For example, a user changes a property value and applies the reconfiguration on
all the Linux guest systems in the server complex (or the tier). However, one Linux
guest system is down, so the reconfiguration can not be performed on it. The
configuration failure for that Linux guest system is ‘remembered’ according to each
configuration domain.
Chapter 1. Getting started with IBM Director 79

80 IBM Director Installation and Configuration Guide

Chapter 2. Planning
This topic contains information about planning to install IBM Director.
Requirements
This topic provides information about IBM Director product requirements.
Hardware requirements
This topic describes the minimum requirements that must be met when you install
IBM Director.
Because a system configured with the minimum requirements might perform
poorly in a production environment, consider the following suggestions:
v The microprocessor speed, memory, and disk-space minimum requirements are
in addition to whatever resources are necessary for the software already installed
on the system.
v Conduct a performance analysis to ensure that the system has sufficient capacity
to handle the additional requirements of functioning as a management server or
a management console.
Intel-compatible systems
This topic lists the minimum microprocessor speed, random access memory
(RAM), and disk space needed by the IBM Director components on
Intel-compatible systems, including iSeries servers, IntelliStation workstations,
NetVista desktop computers, IBM ThinkCentre desktop computers, ThinkPad
mobile computers, IBM System Storage Network Attached Storage (NAS) products,
and IBM SurePOS point-of-sale systems.
When reviewing the hardware requirements, consider the following information:
v The disk space listed is the minimum requirement for an installation using the
default selections.
v Requirements listed for IBM Director Server do not include the database
program hardware requirements or the increased persistent storage for managed
objects.
v The systems on which you install IBM Director Agent or IBM Director Server
must meet the Wired for Management (WfM), version 2.0, specifications.
v System Management BIOS (SMBIOS) 2.1 or later is required for all systems in an
IBM Director environment.
Table 15. Intel-compatible systems: Minimum hardware requirements
Requirements
IBM Director Core
Services IBM Director Agent IBM Director Console IBM Director Server
Microprocessor
speed
Pentium-class
processor
Pentium-class or
Itanium 2 processor
Pentium® 1.5 GHz Pentium 1.5 GHz
Memory (RAM) 128 MB 128 MB 256 MB 512 MB (minimum)
1024 MB
(recommended)
Disk space 40 MB (for Windows)
100 MB (for Linux)
110 MB (for Windows)
165 MB (for Linux)
170 MB 325 MB
© Copyright IBM Corp. 1999, 2005 81

Table 15. Intel-compatible systems: Minimum hardware requirements (continued)
Requirements
IBM Director Core
Services IBM Director Agent IBM Director Console IBM Director Server
Display Not applicable Not applicable At least 256 colors At least 256 colors
Servers running AIX
This topic lists the minimum microprocessor speed, random access memory
(RAM), and disk space needed by the IBM Director components on servers
running AIX, including iSeries and System p5 and pSeries servers, and
JS20 blade servers.
When reviewing the hardware requirements, consider the following information:
v The disk space listed is the minimum requirement for an installation using the
default selections.
v Requirements listed for IBM Director Server do not include the database
program hardware requirements or the increased persistent storage for managed
objects.
v On systems that do not provide display capability, such as the JS20 blade server,
you must export IBM Director Console using either the xhost command or SSH
tunneling. The IBM Director Console requirements apply to the receiving system.
Table 16. Servers running AIX: Minimum hardware requirements
Requirements IBM Director Agent IBM Director Console IBM Director Server
Microprocessor speed Power4 or Power5 1.5 GHz Power4 or Power5 1.5 GHz Power4 or Power5 1.5 GHz
Memory (RAM) 512 MB (minimum) 512 MB (minimum) 512 MB (minimum)
1024 MB (recommended)
Disk space 75 MB (/opt)
1 MB (/usr)
170 MB (/opt)
1
2 MB (/usr)
325 MB (/opt)
2 MB (/usr)
Display Not applicable At least 256 colors At least 256 colors
1. Includes the disk space required for IBM Director Agent.
Servers running Linux on POWER
This topic lists the minimum microprocessor speed, random access memory
(RAM), and disk space needed by the IBM Director components on servers
running Linux on POWER, including iSeries and System p5 and pSeries servers,
and
JS20 blade servers.
When reviewing the hardware requirements, consider the following information:
v The disk space listed is the minimum requirement for an installation using the
default selections.
v Requirements listed for IBM Director Server do not include the database
program hardware requirements or the increased persistent storage for managed
objects.
v On systems that do not provide display capability, such as the JS20 blade server,
you must export IBM Director Console using either the xhost command or SSH.
The IBM Director Console requirements apply to the receiving system.
82 IBM Director Installation and Configuration Guide

Table 17. Servers running Linux on POWER: Minimum hardware requirements
Requirements
IBM Director Core
Services IBM Director Agent IBM Director Console IBM Director Server
Microprocessor
speed
Power4 or Power5 1.5
GHz
Power4 or Power5 1.5
GHz
Power4 or Power5 1.5
GHz
Power4 or Power5 1.5
GHz
Memory (RAM) 128 MB (minimum) 512 MB (minimum) 512 MB (minimum) 512 MB (minimum)
1024 MB
(recommended)
Disk space 100 MB 165 MB 170 MB 325 MB
Display Not applicable Not applicable At least 256 colors At least 256 colors
iSeries servers
This topic lists the minimum commercial processing workload (CPW), storage pool
size, and disk space needed by the IBM Director components.
Table 18. iSeries servers: Minimum hardware requirements
Requirements IBM Director Agent IBM Director Server
Relative system performance 75 CPW 150 CPW
Storage pool size 350 MB 500 MB
Disk space 300 MB 500 MB
IBM System z9 and zSeries servers
This topic lists the minimum microprocessor speed, random access memory
(RAM), and disk space needed by the IBM Director components.
Table 19. Minimum hardware requirements for IBM Director on System z9 and zSeries servers
Requirement
IBM Director Server
(with or without
CIM instrumentation
for manageability
access point)
IBM Director
Console IBM Director Agent
IBM Director Agent
with CIM
instrumentation for
manageability access
point
Processor speed All processor speeds provided by IBM System z9 and zSeries servers are sufficient for IBM
Director.
Memory 1 GB 256 MB 256 MB 512 MB
Disk space 316 MB 168 MB 43-109 MB 215 MB
Display Not applicable At least 256 colors Not applicable Not applicable
Which additional resources you require for the systems you want to provision with
z/VM Center depends on the number and nature of the provisioned systems. The
requirements of the provisioned systems, including networking requirements, are
the same as if you were to set them up without z/VM Center. Refer to the z/VM
Planning information for further details.
Alert Standard Format-capable systems supported by IBM
Director 5.10
Alert Standard Format (ASF) defines remote control and alerting interfaces in an
environment that does not have an operating system, on servers with ASF-capable
network interface cards (NICs).
The following servers have ASF-capable network interface cards (NICs).
Chapter 2. Planning 83

v xSeries 206
v xSeries 226
v xSeries 235
v xSeries 255
v xSeries 306
v xSeries 335
v xSeries 345
v IntelliStation A10
v IntelliStation M20
v IntelliStation M30
v IntelliStation M40
v IntelliStation Z20
Network requirements
This section discusses supported network protocols and the ports used in an IBM
Director environment.
Network protocols
This topic lists the network protocols that can be used in an IBM Director
environment.
The following table lists the versions of network protocols that can be used in an
IBM Director environment.
Table 20. Supported versions of network protocols
Protocol Supported version
IPX IPX versions supported by NetWare and Windows
NetBIOS Native NetBIOS versions supported by Windows
TCP/IP All WinSock-compatible versions of TCP/IP version 4.0 supported
by AIX, i5/OS, Linux, NetWare, and Windows
Some network protocols are supported only for certain types of data transmissions
or on certain operating systems. The following table contains additional
information.
Table 21. Types of data transmission and supported network protocols
Type of data transmission
Operating system
running on managed
system
Supported
network
protocols
IBM Director Server ←→ IBM Director Console Not applicable TCP/IP
IBM Director Server ←→ SNMP devices Not applicable TCP/IP
IBM Director Server ←→ IBM Director Agent AIX TCP/IP
IBM Director Server ←→ IBM Director Agent i5/OS TCP/IP
IBM Director Server ←→ IBM Director Agent Linux TCP/IP
IBM Director Server ←→ IBM Director Agent NetWare IPX or TCP/IP
IBM Director Server ←→ IBM Director Agent Windows IPX, NetBIOS, or
TCP/IP
84 IBM Director Installation and Configuration Guide

Ports
This topic lists the ports used in an IBM Director environment.
The abbreviations that appear in this table are spelled out below the table.
Note: In the Connection column, the component to the left of the arrow indicates
the Initiator of the communication and the component to the right of the
arrow indicates the Listener or receiver of the communication.
For the TCP ports listed, the Initiator opens a random port in the 1024-65535
range and then connects to the Listener on the port listed in the Destination
Port column. When the Listener responds, it connects back to the random
port in the 1024-65535 range opened by the Initiator. For example, if the
entry in the Connection column is IBM Director Console → IBM Director
Server, then IBM Director Console is the Initiator and IBM Director Server is
the Listener.
Table 22. Ports used by IBM Director
Category Connection Destination port
IBM Director
interprocess
communication
IBM Director Server ←→ IBM Director Agent 14247 UDP and TCP1;
14248 TCP; 4490 IPX
(read); 4491 IPX (write)
IBM Director Console → IBM Director
Server
2033 TCP
DIRCLI client ←→ IBM Director Server 2044 TCP
DIRCMD client ←→ IBM Director Server 2034 TCP
IBM Director Console → IBM Director
Console
Any free port (for use of
BladeCenter Switch
Management launch pad)
IBM Director Console → IBM Director
Server over SSL;
DIRCLI client ←→ IBM Director Server
4066 TCP
IBM Director
Web-based
Access
Web Browser → IBM Director Agent Web
Server
411 TCP (HTTP)
Configurable at
installation1
Web Browser → IBM Director Agent Web
Server
423 TCP (HTTPS)
Configurable at
installation1
IBM Director Agent Web Server → IBM
Director Agent Web Server
8009 TCP (loopback)
CIM-XML over
HTTP2
IBM Director Server → Level-1 or Level-2
managed system, or SMI-S storage device
5988 TCP
CIM-XML over
HTTPS2
IBM Director Server → Level-1 or Level-2
managed system, or SMI-S storage device
5989 TCP
HTTP IBM Director Server → BladeCenter switch
module
80 TCP
Microsoft
Windows DCOM
IBM Director Server → Level-0 system 137 UDP; 138 UDP; 139
TCP; 445 TCP
ServeRAID
interprocess
communication
ServeRAID CIM Provider → ServeRAID
Manager
34572 TCP
Chapter 2. Planning 85

Table 22. Ports used by IBM Director (continued)
Category Connection Destination port
Service
processors
IBM Director Server ←→ service processor 6090 TCP
Service processor → IBM Director Server
(alerts)
13991 UDP
IBM Director Server → service processor
(ASF, ASF 2.0, and IPMI)
623 and 664 UDP
Service processor → IBM Director Server
(ASF, ASF 2.0, and IPMI)
Random port in the
1024-65535 range3
SLP IBM Director Server ←→ SLP service agents
or SLP directory agents
427 TCP and UDP
SNMP IBM Director Server → SNMP agent 161 TCP and UDP1
SNMP agent → IBM Director Server 162 TCP and UDP1
SSH IBM Director Server → SNMP devices
(Remote Session task)
22 TCP
IBM Director Server → Level-0 system 22 TCP
Telnet IBM Director Server → BladeCenter
management module
23 TCP
IBM Director Server → BladeCenter switch
module
23 TCP
IBM Director Server → SNMP devices
(Remote Session task)
23 TCP
Abbreviations:
v ASF = Alert Standard Format
v HTTP = Hypertext Transfer Protocol
v HTTPS = Hypertext Transfer Protocol Secure
v IPMI= Intelligent Platform Management Interface
v SLP = Service Location Protocol
v SNMP = Simple Network Management Protocol
v SSH = Secure Shell
v SSL = Secure Sockets Layer
v TCP = Transmission Control Protocol
v UDP = User Datagram Protocol
Supported operating systems
This section lists the operating systems on which IBM Director Server, IBM
Director Console, IBM Director Agent, and IBM Director Core Services are
supported.
For the most recent list of supported operating systems, see IBM Director Hardware
and Software Compatibility. You can download it from
www.ibm.com/servers/eserver/xseries/systems_management/ibm_director/.
1. (Windows XP Professional Edition with Service Pack 2 only) You must enable these ports for IBM Director to function properly.
2. The HTTP port must be turned on for the Pegasus CIMOM, regardless of whether or not HTTPS is turned on (SSL is enabled) for
any CIM-related functionality of the Level-2 agent to work.
3. You can specify a fixed port by modifying the asmDefinitions.properties file, which is in the data directory.
86 IBM Director Installation and Configuration Guide

Operating systems supported by IBM Director Server
This topic lists the operating systems on which you can install IBM Director Server.
Depending on your server model, you can install IBM Director Server on the
following operating systems.
xSeries servers
v Red Hat Enterprise Linux AS and ES, version 3.0, for Intel x86
Note: For systems that contain an AMD Opteron or Athlon64 processor, Update
5 is required.
v Red Hat Enterprise Linux AS and ES, version 4.0, for AMD64 and EM64T
v Red Hat Enterprise Linux AS and ES, version 4.0, for Intel x86
v SUSE LINUX Enterprise Server 8 for x86
v SUSE LINUX Enterprise Server 9 for AMD64 and EM64T
v SUSE LINUX Enterprise Server 9 for x86
v Windows 2000, Advanced Server and Server Editions
v Windows Server 2003, Enterprise, Standard, and Web Editions
v Windows Server 2003, Enterprise, Standard, and Web x64 Editions
iSeries servers
v AIX 5L, Version 5.3
v i5/OS, Version 5 Release 3
v Red Hat Enterprise Linux AS, version 4.0, for IBM POWER
v SUSE LINUX Enterprise Server 9 for IBM POWER
System p5 and pSeries servers
v AIX 5L, Version 5.3
v i5/OS, Version 5 Release 3
v Red Hat Enterprise Linux AS, version 4.0, for IBM POWER
v SUSE LINUX Enterprise Server 9 for IBM POWER
System z9 and zSeries servers
v Red Hat Enterprise Linux AS, version 4.0, for IBM System z9, zSeries and S/390
v SUSE LINUX Enterprise Server 9 for IBM System z9, zSeries and S/390
Operating systems supported by Level-2, Level-1, and Level-0
managed systems
This topic lists the operating systems on which you can install IBM Director Agent
and IBM Director Core Services, as well as the operating systems for which IBM
Director provides Level-0 system-management support.
Note: Unless stated otherwise, all of the listed operating systems are supported by
IBM Director Agent, IBM Director Core Services, and Level-0 system
management.
xSeries servers and Intel-compatible systems (32-bit operating
systems)
v Novell NetWare, version 6.5
Note: IBM Director does not provide Level-0 support for NetWare.
Chapter 2. Planning 87

v Red Hat Enterprise Linux AS, ES, and WS, version 3.0
Note: (Level-2 and Level-1 support only) For systems that contain an AMD
Opteron or Athlon64 processor, Update 5 is required.
v Red Hat Enterprise Linux AS, ES, and WS, version 4.0
v SUSE LINUX Enterprise Server 8 for x86
v SUSE LINUX Enterprise Server 9 for x86
v VMware ESX Server, version 2.1, with the following guest operating systems:
– Red Hat Enterprise Linux AS, ES, and WS, version 3.0
– SUSE LINUX Enterprise Server 8 for x86 (Service Pack 3 required)
– Windows 2000, Advanced Server and Server Editions (Service Pack 3 or later
required)
– Windows Server 2003, Enterprise, Standard, and Web Editions (Service Pack 1
required)v VMware ESX Server, version 2.5, with the following guest operating systems:
– Red Hat Enterprise Linux AS, ES, and WS, version 3.0 (Update 3 required)
– SUSE LINUX Enterprise Server 8 for x86 (Service Pack 3 required)
– SUSE LINUX Enterprise Server 9 for x86
– Windows 2000, Advanced Server and Server Editions (Service Pack 3 or later
required)
– Windows Server 2003, Enterprise, Standard, and Web Editions (Service Pack 1
required)
– Windows XP Professional Edition (Service Packs 1 and 2 required)v VMware ESX Server, version 2.51, with the following guest operating systems:
– Red Hat Enterprise Linux AS, ES, and WS, version 3.0 (Update 4 required)
– SUSE LINUX Enterprise Server 8 for x86 (Service Pack 3 required)
– SUSE LINUX Enterprise Server 9 for x86 (Service Pack 1 required)
– Windows 2000, Advanced Server and Server Editions (Service Pack 3 or later
required)
– Windows Server 2003, Enterprise, Standard, and Web Editions (Service Pack 1
required)
– Windows XP Professional Edition (Service Packs 1 and 2 required)v VMware GSX Server, version 3.1, with the following support:
Guest operating
systems
v Red Hat Enterprise Linux AS, ES, and WS, version 3.0 (Update 4
required)
v SUSE LINUX Enterprise Server 8 for x86 (Service Pack 3 required)
v Windows 2000, Advanced Server and Server Editions (Service Pack 3
or later required)
v Windows Server 2003, Enterprise, Standard, and Web Editions (Service
Pack 1 required)
Host operating
systems
supported on
32-bit systems
v Red Hat Enterprise Linux AS, ES, and WS, version 3.0 (Stock 2.4.21-4,
Update 2.4.21-9, 2.4.21-9.0.1, 2.4.21-15, 2.4.21-27.EL kernels required)
v SUSE LINUX Enterprise Server 8 for x86 (Stock 2.4.19, Update
2.4.21-138, 2.4.21-143, 2.4.21-215 and Patch 3 kernels required)
v Windows 2000, Advanced Server and Server Editions (Service Packs 3
or later required)
v Windows Server 2003, Enterprise, Standard, and Web Editions (Service
Pack 1 required)
Host operating
systems
supported on
64-bit systems
Windows Server 2003, Enterprise, Standard, and Web x64 Editions
(Service Pack 1 required)
88 IBM Director Installation and Configuration Guide

v VMware GSX Server, version 3.2, with the following support:
Guest operating
systems
v Red Hat Enterprise Linux AS, ES, and WS, version 3.0 (Update 3
required)
v Red Hat Enterprise Linux AS, ES, and WS, version 4.0 (Updates 1 and
2 required)
v SUSE LINUX Enterprise Server 8 for x86 (Service Pack 3 required)
v SUSE LINUX Enterprise Server 9 for x86 (Service Pack 1 required)
v Windows 2000, Advanced Server and Server Editions (Service Pack 3
or later required)
v Windows Server 2003, Enterprise, Standard, and Web Editions (Service
Pack 1 required)
v Windows XP Professional Edition (Service Packs 1 and 2 required)
Host operating
systems
supported on
32-bit systems
v Red Hat Enterprise Linux AS, ES, and WS, version 3.0 (Stock 2.4.21-4,
Update 2.4.21-9, 2.4.21-9.0.1, 2.4.21-15, 2.4.21-27.EL kernels required)
v Red Hat Enterprise Linux AS, ES, and WS, version 4.0 (Stock
2.6.9-5.EL kernel required)
v SUSE LINUX Enterprise Server 8 for x86 (Stock 2.4.19, Update
2.4.21-138, 2.4.21-143, 2.4.21-215 and Patch 3 kernels required)
v SUSE LINUX Enterprise Server 9 for x86 (Stock 2.6.5-7.97 kernel,
Service Pack 1 2.6.5-7.139 kernel required)
v Windows 2000, Advanced Server and Server Editions (Service Packs 3
or later required)
v Windows Server 2003, Enterprise, Standard, and Web Editions (Service
Pack 1 required)
Host operating
systems
supported on
64-bit systems
Windows Server 2003, Enterprise, Standard, and Web x64 Editions
(Service Pack 1 required)
v Microsoft Virtual Server 2005 with the following guest operating systems:
– Windows 2000, Advanced Server and Server Editions (Service Pack 3 or 4
required)
– Windows Server 2003, Enterprise, Standard, and Web Editionsv Microsoft Virtual Server 2005 (Service Pack 1) with the following guest operating
systems:
– Windows 2000, Advanced Server and Server Editions (Service Pack 3 or 4
required)
– Windows Server 2003, Enterprise, Standard, and Web Editions
– Windows Server 2003, Enterprise, Standard, and Web x64 Editions
– Windows XP Professional Edition (Service Pack 2 required)
– Windows XP Professional x64 Editionv Windows 2000, Advanced Server, Datacenter, Professional, and Server Editions
v Windows Server 2003, Datacenter, Enterprise, Standard, and Web Editions
v Windows XP Professional Edition
xSeries servers and Intel-compatible systems (64-bit operating
systems)
v Red Hat Enterprise Linux AS, ES, and WS, version 3.0, for AMD64 and EM64T
v Red Hat Enterprise Linux AS, version 3.0, for Intel Itanium
v Red Hat Enterprise Linux AS, ES, and WS, version 4.0, for AMD64 and EM64T
v Red Hat Enterprise Linux AS, version 4.0, for Intel Itanium
v SUSE LINUX Enterprise Server 8 for AMD64
v SUSE LINUX Enterprise Server 8 for Itanium Processor Family
v SUSE LINUX Enterprise Server 9 for AMD64 and EM64T
Chapter 2. Planning 89
v SUSE LINUX Enterprise Server 9 for Itanium Processor Family
v Windows Server 2003, Datacenter, Enterprise, Standard, and Web x64 Editions
v Windows Server 2003, Datacenter and Enterprise 64-bit Itanium Editions
v Windows XP Professional x64 Edition
iSeries servers
IBM Director provides Level-2 support for the following operating systems. Level-0
support includes Discovery, Remote Session and a limited subset of the Software
Distribution task.
v AIX 5L, Version 5.2
v AIX 5L, Version 5.3
v i5/OS, Version 5 Release 3
IBM Director provides Level-2, Level-1, and Level-0 support for the following
operating systems:
v Red Hat Enterprise Linux AS, version 3.0, for IBM POWER
v Red Hat Enterprise Linux AS, version 4.0, for IBM POWER
v SUSE LINUX Enterprise Server 8 for IBM POWER
v SUSE LINUX Enterprise Server 9 for IBM POWER
iSeries servers with xSeries options
iSeries server installations can use the following xSeries options:
v Integrated xSeries Server (ISX)
v xSeries servers that are attached to the iSeries servers via the Integrated xSeries
Adapter (IXA)
Using these xSeries options, you can install IBM Director Agent and IBM Director
Core Services on the following operating systems:
v Red Hat Enterprise Linux AS and ES, version 3.0, for Intel x86
v Red Hat Enterprise Linux AS and ES, version 4.0, for Intel x86
v SUSE LINUX Enterprise Server 8 for x86
v SUSE LINUX Enterprise Server 9 for x86
v Windows 2000, Advanced Server and Server Editions
v Windows Server 2003, Enterprise, Standard, and Web Editions
Note: Whether these operating systems are supported in your iSeries environment
depends on the following criteria:
v The Integrated xSeries Server (ISX) installed in the iSeries server
v The xSeries server that is attached to the iSeries server via the Integrated
xSeries Adapter (IXA)
v The release of i5/OS or OS/400 installed on the iSeries server
For more information, see IBM Director Hardware and Software Compatibility.
You can download this document from
www.ibm.com/servers/eserver/xseries/
systems_management/ibm_director/.
System p5 and pSeries servers
IBM Director provides Level-2 support for the following operating systems. Level-0
support is includes Discovery, Remote Session and limited subset of the Software
Distribution task.
v AIX 5L, Version 5.2
v AIX 5L, Version 5.3
90 IBM Director Installation and Configuration Guide
v i5/OS, Version 5 Release 3
IBM Director provides Level-2, Level-1, and Level-0 support for the following
operating systems:
v Red Hat Enterprise Linux AS, version 3.3, for IBM POWER
v Red Hat Enterprise Linux AS, version 4.0, for IBM POWER
v SUSE LINUX Enterprise Server 8 for IBM POWER
v SUSE LINUX Enterprise Server 9 for IBM POWER
System z9 and zSeries servers
IBM Director provides Level-2, Level-1, and Level-0 support for the following
operating systems:
v Red Hat Enterprise Linux AS, version 4.0, for IBM System z9, zSeries and S/390
v SUSE LINUX Enterprise Server 9 for IBM System z9, zSeries and S/390
Operating systems supported by IBM Director Console
This topic lists the operating systems on which you can install IBM Director
Console.
Depending on your system model, you can install IBM Director Console on the
following operating systems.
xSeries servers
v Red Hat Enterprise Linux AS and ES, version 3.0, for Intel x86
Note: For systems that contain an AMD Opteron or Athlon64 processor, Update
5 is required.
v Red Hat Enterprise Linux AS and ES, version 4.0, for AMD64 and EM64T
v Red Hat Enterprise Linux AS and ES, version 4.0, for Intel x86
v SUSE LINUX Enterprise Server 8 for x86
v SUSE LINUX Enterprise Server 9 for AMD64 and EM64T
v SUSE LINUX Enterprise Server 9 for x86
v Windows 2000, Advanced Server, Professional, and Server Editions
v Windows XP Professional Edition
v Windows Server 2003, Enterprise, Standard, and Web Editions
v Windows Server 2003, Enterprise, Standard, and Web x64 Editions
iSeries servers
v AIX 5L, Version 5.3
v Red Hat Enterprise Linux AS, version 4.0, for IBM POWER
v SUSE LINUX Enterprise Server 9 for IBM POWER
System p5 and pSeries servers
v AIX 5L, Version 5.3
v Red Hat Enterprise Linux AS, version 4.0, for IBM POWER
v SUSE LINUX Enterprise Server 9 for IBM POWER
System z9 and zSeries servers
v Red Hat Enterprise Linux AS, version 4.0, for IBM System z9, zSeries and S/390
v SUSE LINUX Enterprise Server 9 for IBM System z9, zSeries and S/390
Chapter 2. Planning 91

Operating systems supported by IBM Director tasks
This section lists the operating systems upon which IBM Director tasks are
supported.
Support for IBM Director tasks can vary depending on the following items:
v The managed object hardware
v The operating system that is installed on a managed object
v The service processor installed in the managed object
v The level of the device drivers that are installed on the managed object
Note: The device drivers that are available for a managed object depend on the
service processor and operating system that are installed on the managed
object.
For information about what hardware features are supported on IBM xSeries,
BladeCenter, or IntelliStation hardware or what operating systems are supported
on IBM xSeries, BladeCenter, or IntelliStation hardware, go to the IBM
ServerProven Web site at www.ibm.com/pc/us/compat/index.html.
Operating systems supported by Asset ID
This topic provides information about the operating systems supported by the
Asset ID task.
Management-server support
This task is supported on all operating systems supported by IBM Director Server.
Managed-object support
The following tables list the operating systems that this task supports for managed
objects. Managed objects can include IBM xSeries, iSeries, System p5 and pSeries,
and System z9 and zSeries hardware. Managed systems are a subset of managed
objects that use different levels of IBM Director support. This task can be used on
Level-2 managed systems only.
Table 23. Operating systems supported by xSeries servers and third-party Intel-based
systems
Operating system Level 2
Editions of Windows for 32-bit systems:
v Windows 2000, Advanced Server, Datacenter, Professional, and Server
Editions
v Windows XP Professional Edition
v Windows Server 2003, Datacenter, Enterprise, Standard, and Web Editions
Yes
Editions of Windows for 64-bit systems:
v Windows Server 2003, Datacenter, Enterprise, Standard, and Web x64
Editions
v Windows XP Professional x64 Edition
Yes
Windows Server 2003, Datacenter and Enterprise 64-bit Itanium Editions No
Versions of Linux for 32-bit systems:
92 IBM Director Installation and Configuration Guide

Table 23. Operating systems supported by xSeries servers and third-party Intel-based
systems (continued)
Operating system Level 2
v Red Hat Enterprise Linux AS, ES, and WS, version 3.0
v Red Hat Enterprise Linux AS, ES, and WS, version 4.0
v SUSE LINUX Enterprise Server 8 for x86
v SUSE LINUX Enterprise Server 9 for x86
v VMware ESX Server, versions 2.1, 2.5, and 2.51, Console
v VMware ESX Server, versions 2.1, 2.5, and 2.51, guest operating systems
v VMware GSX Server, versions 3.1 and 3.2, Console
v VMware GSX Server, versions 3.1 and 3.2, guest operating systems
Yes
Versions of Linux for 64-bit systems:
v Red Hat Enterprise Linux AS, ES, and WS, version 3.0, for AMD64 and
EM64T
v Red Hat Enterprise Linux AS, ES, and WS, version 4.0, for AMD64 and
EM64T
v SUSE LINUX Enterprise Server 8 for AMD64
v SUSE LINUX Enterprise Server 9 for AMD64 and EM64T
Yes
v Red Hat Enterprise Linux AS, version 3.0, for Intel Itanium
v Red Hat Enterprise Linux AS, version 4.0, for Intel Itanium
v SUSE LINUX Enterprise Server 8 for Itanium Processor Family
v SUSE LINUX Enterprise Server 9 for Itanium Processor Family
No
Other operating systems supported by xSeries servers:
Microsoft Virtual Server (guest operating system) Yes
NetWare, version 6.5 No
Table 24. Operating systems supported by iSeries servers and System p5 and pSeries
servers
Operating system Level 2
v AIX 5L, Version 5.2
v AIX 5L, Version 5.3
No
v i5/OS, Version 5 Release 3
v Red Hat Enterprise Linux AS, version 3.0, for IBM POWER
Note: System p5 and pSeries servers require Red Hat Enterprise Linux AS,
version 3.3 or later, for IBM POWER
v Red Hat Enterprise Linux AS, version 4.0, for IBM POWER
v SUSE LINUX Enterprise Server 8 for IBM POWER
v SUSE LINUX Enterprise Server 9 for IBM POWER
Yes
Table 25. Operating systems supported by System z9 and zSeries servers
Operating system Level 2
v Red Hat Enterprise Linux AS, version 4.0, for IBM System z9, zSeries and
S/390
v SUSE LINUX Enterprise Server 9 for IBM System z9, zSeries and S/390
No
Operating systems supported by Capacity Manager
This topic provides information about the operating systems supported by the
Capacity Manager task.
Chapter 2. Planning 93

Management-server support
This task is supported by IBM Director Server when installed on servers running
the following operating systems:
v Linux on xSeries
v Windows
Managed-object support
The following tables list the operating systems that this task supports for managed
objects. Managed objects can include IBM xSeries, iSeries, System p5 and pSeries,
and System z9 and zSeries hardware. Managed systems are a subset of managed
objects that use different levels of IBM Director support. This task can be used on
Level-2 managed systems only. These managed systems must be xSeries and
Netfinity servers.
Table 26. Operating systems supported by xSeries servers
Operating system Level 2
Editions of Windows for 32-bit systems:
v Windows 2000, Advanced Server, Datacenter, Professional, and Server
Editions
v Windows XP Professional Edition
v Windows Server 2003, Datacenter, Enterprise, Standard, and Web Editions
Yes
Editions of Windows for 64-bit systems:
v Windows Server 2003, Datacenter, Enterprise, Standard, and Web x64
Editions
v Windows XP Professional x64 Edition
v Windows Server 2003, Datacenter and Enterprise 64-bit Itanium Editions
No
Versions of Linux for 32-bit systems:
v Red Hat Enterprise Linux AS, ES, and WS, version 3.0
v Red Hat Enterprise Linux AS, ES, and WS, version 4.0
v SUSE LINUX Enterprise Server 8 for x86
v SUSE LINUX Enterprise Server 9 for x86
v VMware ESX Server, versions 2.1, 2.5, and 2.51, Console
v VMware ESX Server, versions 2.1, 2.5, and 2.51, guest operating systems
v VMware GSX Server, versions 3.1 and 3.2, Console
v VMware GSX Server, versions 3.1 and 3.2, guest operating systems
Yes
Versions of Linux for 64-bit systems:
v Red Hat Enterprise Linux AS, ES, and WS, version 3.0, for AMD64 and
EM64T
v Red Hat Enterprise Linux AS, ES, and WS, version 4.0, for AMD64 and
EM64T
v Red Hat Enterprise Linux AS, version 3.0, for Intel Itanium
v Red Hat Enterprise Linux AS, version 4.0, for Intel Itanium
v SUSE LINUX Enterprise Server 8 for AMD64
v SUSE LINUX Enterprise Server 8 for Itanium Processor Family
v SUSE LINUX Enterprise Server 9 for AMD64 and EM64T
v SUSE LINUX Enterprise Server 9 for Itanium Processor Family
No
Other operating systems supported by xSeries servers:
Microsoft Virtual Server (guest operating system) Yes
NetWare, version 6.5 Yes
94 IBM Director Installation and Configuration Guide

Table 27. Operating systems supported by iSeries servers and System p5 and pSeries
servers
Operating system Level 2
v AIX 5L, Version 5.2
v AIX 5L, Version 5.3
v i5/OS, Version 5 Release 3
v Red Hat Enterprise Linux AS, version 3.0, for IBM POWER
Note: System p5 and pSeries servers require Red Hat Enterprise Linux AS,
version 3.3 or later, for IBM POWER
v Red Hat Enterprise Linux AS, version 4.0, for IBM POWER
v SUSE LINUX Enterprise Server 8 for IBM POWER
v SUSE LINUX Enterprise Server 9 for IBM POWER
No
Table 28. Operating systems supported by System z9 and zSeries servers
Operating system Level 2
v Red Hat Enterprise Linux AS, version 4.0, for IBM System z9, zSeries and
S/390
v SUSE LINUX Enterprise Server 9 for IBM System z9, zSeries and S/390
No
Operating systems supported by the CIM Browser
This topic provides information about the operating systems supported by the CIM
Browser task.
Management-server support
This task is supported on all operating systems supported by IBM Director Server.
Managed-object support
The following tables list the operating systems that this task supports for managed
objects. Managed objects can include IBM xSeries, iSeries, System p5 and pSeries,
and System z9 and zSeries hardware. Managed systems are a subset of managed
objects that use different levels of IBM Director support. This task can be used on
Level-2 managed systems only.
Table 29. Operating systems supported by xSeries servers and third-party Intel-based
systems
Operating system Level 2
Editions of Windows for 32-bit systems:
v Windows 2000, Advanced Server, Datacenter, Professional, and Server
Editions
v Windows XP Professional Edition
v Windows Server 2003, Datacenter, Enterprise, Standard, and Web Editions
Yes
Editions of Windows for 64-bit systems:
v Windows Server 2003, Datacenter, Enterprise, Standard, and Web x64
Editions
v Windows XP Professional x64 Edition
Yes
Windows Server 2003, Datacenter and Enterprise 64-bit Itanium Editions No
Versions of Linux for 32-bit systems:
Chapter 2. Planning 95

Table 29. Operating systems supported by xSeries servers and third-party Intel-based
systems (continued)
Operating system Level 2
v Red Hat Enterprise Linux AS, ES, and WS, version 3.0
v Red Hat Enterprise Linux AS, ES, and WS, version 4.0
v SUSE LINUX Enterprise Server 8 for x86
v SUSE LINUX Enterprise Server 9 for x86
v VMware ESX Server, versions 2.1, 2.5, and 2.51, Console
v VMware ESX Server, versions 2.1, 2.5, and 2.51, guest operating systems
v VMware GSX Server, versions 3.1 and 3.2, Console
v VMware GSX Server, versions 3.1 and 3.2, guest operating systems
Yes
Versions of Linux for 64-bit systems:
v Red Hat Enterprise Linux AS, ES, and WS, version 3.0, for AMD64 and
EM64T
v Red Hat Enterprise Linux AS, ES, and WS, version 4.0, for AMD64 and
EM64T
v SUSE LINUX Enterprise Server 8 for AMD64
v SUSE LINUX Enterprise Server 9 for AMD64 and EM64T
Yes
v Red Hat Enterprise Linux AS, version 3.0, for Intel Itanium
v Red Hat Enterprise Linux AS, version 4.0, for Intel Itanium
v SUSE LINUX Enterprise Server 8 for Itanium Processor Family
v SUSE LINUX Enterprise Server 9 for Itanium Processor Family
No
Other operating systems supported by xSeries servers:
Microsoft Virtual Server (guest operating system) Yes
NetWare, version 6.5 No
Table 30. Operating systems supported by iSeries servers and System p5 and pSeries
servers
Operating system Level 2
v AIX 5L, Version 5.2
v AIX 5L, Version 5.3
v i5/OS, Version 5 Release 3
v Red Hat Enterprise Linux AS, version 3.0, for IBM POWER
Note: System p5 and pSeries servers require Red Hat Enterprise Linux AS,
version 3.3 or later, for IBM POWER
v Red Hat Enterprise Linux AS, version 4.0, for IBM POWER
v SUSE LINUX Enterprise Server 8 for IBM POWER
v SUSE LINUX Enterprise Server 9 for IBM POWER
Yes
Table 31. Operating systems supported by System z9 and zSeries servers
Operating system Level 2
v Red Hat Enterprise Linux AS, version 4.0, for IBM System z9, zSeries and
S/390
v SUSE LINUX Enterprise Server 9 for IBM System z9, zSeries and S/390
Yes
Operating systems supported by Configuration Manager
This topic provides information about the operating systems and the IBM Director
managed-system levels supported by the Server Configuration Manager and
BladeCenter Configuration Manager.
96 IBM Director Installation and Configuration Guide

Management-server support
This task is supported on all operating systems supported by IBM Director Server.
Managed-object support
This task does not require IBM Director Agent version 5.10 or IBM Director Core
Services version 5.10 to function. The task is a function of IBM Director Server. You
can use this task on IBM xSeries and iSeries hardware managed objects. The
operating system running on the managed object does not affect the support of this
task.
The Server Configuration Manager performs IP configuration using out-of-band
communication.
Operating systems supported by Configure Alert Standard
Format
This topic provides information about the operating systems supported by the
Configure Alert Standard Format task.
Management-server support
This task is supported on all operating systems supported by IBM Director Server.
Managed-object support
The following tables list the operating systems that this task supports for managed
objects. Managed objects can include IBM xSeries, iSeries, System p5 and pSeries,
and System z9 and zSeries hardware. Managed systems are a subset of managed
objects that use different levels of IBM Director support. This task can be used on
Level-2 managed systems only.
Table 32. Operating systems supported by xSeries servers and third-party Intel-based
systems
Operating system Level 2
Editions of Windows for 32-bit systems:
v Windows 2000, Advanced Server, Datacenter, Professional, and Server
Editions
v Windows XP Professional Edition
v Windows Server 2003, Datacenter, Enterprise, Standard, and Web Editions
Yes
Editions of Windows for 64-bit systems:
v Windows Server 2003, Datacenter, Enterprise, Standard, and Web x64
Editions
v Windows XP Professional x64 Edition
Yes
Windows Server 2003, Datacenter and Enterprise 64-bit Itanium Editions No
Versions of Linux for 32-bit systems:
v Red Hat Enterprise Linux AS, ES, and WS, version 3.0
v Red Hat Enterprise Linux AS, ES, and WS, version 4.0
v SUSE LINUX Enterprise Server 8 for x86
v SUSE LINUX Enterprise Server 9 for x86
v VMware ESX Server, versions 2.1, 2.5, and 2.51, Console
v VMware GSX Server, versions 3.1 and 3.2, Console
Yes
v VMware ESX Server, versions 2.1, 2.5, and 2.51, guest operating systems
v VMware GSX Server, versions 3.1 and 3.2, guest operating systems
No
Chapter 2. Planning 97

Table 32. Operating systems supported by xSeries servers and third-party Intel-based
systems (continued)
Operating system Level 2
Versions of Linux for 64-bit systems:
v Red Hat Enterprise Linux AS, ES, and WS, version 3.0, for AMD64 and
EM64T
v Red Hat Enterprise Linux AS, ES, and WS, version 4.0, for AMD64 and
EM64T
v SUSE LINUX Enterprise Server 8 for AMD64
v SUSE LINUX Enterprise Server 9 for AMD64 and EM64T
Yes
v Red Hat Enterprise Linux AS, version 3.0, for Intel Itanium
v Red Hat Enterprise Linux AS, version 4.0, for Intel Itanium
v SUSE LINUX Enterprise Server 8 for Itanium Processor Family
v SUSE LINUX Enterprise Server 9 for Itanium Processor Family
No
Other operating systems supported by xSeries servers:
Microsoft Virtual Server (guest operating system) No
NetWare, version 6.5 No
Table 33. Operating systems supported by iSeries servers and System p5 and pSeries
servers
Operating system Level 2
v AIX 5L, Version 5.2
v AIX 5L, Version 5.3
v i5/OS, Version 5 Release 3
v Red Hat Enterprise Linux AS, version 3.0, for IBM POWER
Note: System p5 and pSeries servers require Red Hat Enterprise Linux AS,
version 3.3 or later, for IBM POWER
v Red Hat Enterprise Linux AS, version 4.0, for IBM POWER
v SUSE LINUX Enterprise Server 8 for IBM POWER
v SUSE LINUX Enterprise Server 9 for IBM POWER
No
Table 34. Operating systems supported by System z9 and zSeries servers
Operating system Level 2
v Red Hat Enterprise Linux AS, version 4.0, for IBM System z9, zSeries and
S/390
v SUSE LINUX Enterprise Server 9 for IBM System z9, zSeries and S/390
No
Operating systems supported by Configure SNMP Agent
This topic provides information about the operating systems supported by the
Configure SNMP Agent task.
Management-server support
This task is supported on all operating systems supported by IBM Director Server.
Managed-object support
The following tables list the operating systems that this task supports for managed
objects. Managed objects can include IBM xSeries, iSeries, System p5 and pSeries,
and System z9 and zSeries hardware. Managed systems are a subset of managed
objects that use different levels of IBM Director support. This task can be used on
Level-2 managed systems only.
98 IBM Director Installation and Configuration Guide

Table 35. Operating systems supported by xSeries servers and third-party Intel-based
systems
Operating system Level 2
Editions of Windows for 32-bit systems:
v Windows 2000, Advanced Server, Datacenter, Professional, and Server
Editions
v Windows XP Professional Edition
v Windows Server 2003, Datacenter, Enterprise, Standard, and Web Editions
Yes
Editions of Windows for 64-bit systems:
Windows Server 2003, Datacenter, Enterprise, Standard, and Web x64 Editions Yes
v Windows XP Professional x64 Edition
v Windows Server 2003, Datacenter and Enterprise 64-bit Itanium Editions
No
Versions of Linux for 32-bit systems:
v Red Hat Enterprise Linux AS, ES, and WS, version 3.0
v Red Hat Enterprise Linux AS, ES, and WS, version 4.0
v SUSE LINUX Enterprise Server 8 for x86
v SUSE LINUX Enterprise Server 9 for x86
v VMware ESX Server, versions 2.1, 2.5, and 2.51, Console
v VMware ESX Server, versions 2.1, 2.5, and 2.51, guest operating systems
v VMware GSX Server, versions 3.1 and 3.2, Console
v VMware GSX Server, versions 3.1 and 3.2, guest operating systems
Yes
Versions of Linux for 64-bit systems:
v Red Hat Enterprise Linux AS, ES, and WS, version 3.0, for AMD64 and
EM64T
v Red Hat Enterprise Linux AS, ES, and WS, version 4.0, for AMD64 and
EM64T
v SUSE LINUX Enterprise Server 8 for AMD64
v SUSE LINUX Enterprise Server 9 for AMD64 and EM64T
Yes
v Red Hat Enterprise Linux AS, version 3.0, for Intel Itanium
v Red Hat Enterprise Linux AS, version 4.0, for Intel Itanium
v SUSE LINUX Enterprise Server 8 for Itanium Processor Family
v SUSE LINUX Enterprise Server 9 for Itanium Processor Family
No
Other operating systems supported by xSeries servers:
Microsoft Virtual Server (guest operating system) Yes
NetWare, version 6.5 No
Table 36. Operating systems supported by iSeries servers and System p5 and pSeries
servers
Operating system Level 2
v AIX 5L, Version 5.2
v AIX 5L, Version 5.3
v i5/OS, Version 5 Release 3
v Red Hat Enterprise Linux AS, version 3.0, for IBM POWER
Note: System p5 and pSeries servers require Red Hat Enterprise Linux AS,
version 3.3 or later, for IBM POWER
v Red Hat Enterprise Linux AS, version 4.0, for IBM POWER
v SUSE LINUX Enterprise Server 8 for IBM POWER
v SUSE LINUX Enterprise Server 9 for IBM POWER
Yes
Chapter 2. Planning 99

Table 37. Operating systems supported by System z9 and zSeries servers
Operating system Level 2
v Red Hat Enterprise Linux AS, version 4.0, for IBM System z9, zSeries and
S/390
v SUSE LINUX Enterprise Server 9 for IBM System z9, zSeries and S/390
Yes
Operating systems supported by Event Log
This topic provides information about the operating systems supported by the
Event Log task.
Management-server support
This task is supported on all operating systems supported by IBM Director Server.
Managed-object support
The following tables list the operating systems that this task supports for managed
objects. Managed objects can include IBM xSeries, iSeries, System p5 and pSeries,
and System z9 and zSeries hardware. Managed systems are a subset of managed
objects that use different levels of IBM Director support. This task can be used on
Level-1 and Level-2 managed systems.
Table 38. Operating systems supported by xSeries servers and third-party Intel-based
systems
Operating system Level 1 Level 2
Editions of Windows for 32-bit systems:
v Windows 2000, Advanced Server, Datacenter, Professional, and
Server Editions
v Windows XP Professional Edition
v Windows Server 2003, Datacenter, Enterprise, Standard, and Web
Editions
Yes Yes
Editions of Windows for 64-bit systems:
v Windows Server 2003, Datacenter, Enterprise, Standard, and Web
x64 Editions
v Windows XP Professional x64 Edition
v Windows Server 2003, Datacenter and Enterprise 64-bit Itanium
Editions
Yes Yes
Versions of Linux for 32-bit systems:
v Red Hat Enterprise Linux AS, ES, and WS, version 3.0
v Red Hat Enterprise Linux AS, ES, and WS, version 4.0
v SUSE LINUX Enterprise Server 8 for x86
v SUSE LINUX Enterprise Server 9 for x86
v VMware ESX Server, versions 2.1, 2.5, and 2.51, Console
v VMware ESX Server, versions 2.1, 2.5, and 2.51, guest operating
systems
v VMware GSX Server, versions 3.1 and 3.2, Console
v VMware GSX Server, versions 3.1 and 3.2, guest operating systems
Yes Yes
Versions of Linux for 64-bit systems:
100 IBM Director Installation and Configuration Guide

Table 38. Operating systems supported by xSeries servers and third-party Intel-based
systems (continued)
Operating system Level 1 Level 2
v Red Hat Enterprise Linux AS, ES, and WS, version 3.0, for AMD64
and EM64T
v Red Hat Enterprise Linux AS, ES, and WS, version 4.0, for AMD64
and EM64T
v Red Hat Enterprise Linux AS, version 3.0, for Intel Itanium
v Red Hat Enterprise Linux AS, version 4.0, for Intel Itanium
v SUSE LINUX Enterprise Server 8 for AMD64
v SUSE LINUX Enterprise Server 8 for Itanium Processor Family
v SUSE LINUX Enterprise Server 9 for AMD64 and EM64T
v SUSE LINUX Enterprise Server 9 for Itanium Processor Family
Yes Yes
Other operating systems supported by xSeries servers:
Microsoft Virtual Server (guest operating system) Yes Yes
NetWare, version 6.5 Yes Yes
Table 39. Operating systems supported by iSeries servers and System p5 and pSeries
servers
Operating system Level 1 Level 2
v AIX 5L, Version 5.2
v AIX 5L, Version 5.3
v i5/OS, Version 5 Release 3
v Red Hat Enterprise Linux AS, version 3.0, for IBM POWER
Note: System p5 and pSeries servers require Red Hat Enterprise
Linux AS, version 3.3 or later, for IBM POWER
v Red Hat Enterprise Linux AS, version 4.0, for IBM POWER
v SUSE LINUX Enterprise Server 8 for IBM POWER
v SUSE LINUX Enterprise Server 9 for IBM POWER
Yes Yes
Table 40. Operating systems supported by System z9 and zSeries servers
Operating system Level 1 Level 2
v Red Hat Enterprise Linux AS, version 4.0, for IBM System z9,
zSeries and S/390
v SUSE LINUX Enterprise Server 9 for IBM System z9, zSeries and
S/390
Yes Yes
Operating systems supported by External Application Launch
This topic provides information about the operating systems supported by the
External Application Launch task.
Management-server support
This task is supported by IBM Director Server when installed on servers running
the following operating systems:
v Linux
v Windows
Managed-object support
The following tables list the operating systems that this task supports for managed
objects. Managed objects can include IBM xSeries, iSeries, System p5 and pSeries,
and System z9 and zSeries hardware. Managed systems are a subset of managed
Chapter 2. Planning 101

objects that use different levels of IBM Director support. Managed-object support
for this task varies by the application that you add to the IBM Director Console
Tasks pane.
Table 41. Operating systems supported by xSeries servers and third-party Intel-based
systems
Operating system Level 2
Editions of Windows for 32-bit systems:
v Windows 2000, Advanced Server, Datacenter, Professional, and Server
Editions
v Windows XP Professional Edition
v Windows Server 2003, Datacenter, Enterprise, Standard, and Web Editions
Yes
Editions of Windows for 64-bit systems:
v Windows Server 2003, Datacenter, Enterprise, Standard, and Web x64
Editions
v Windows XP Professional x64 Edition
v Windows Server 2003, Datacenter and Enterprise 64-bit Itanium Editions
Yes
Versions of Linux for 32-bit systems:
v Red Hat Enterprise Linux AS, ES, and WS, version 3.0
v Red Hat Enterprise Linux AS, ES, and WS, version 4.0
v SUSE LINUX Enterprise Server 8 for x86
v SUSE LINUX Enterprise Server 9 for x86
v VMware ESX Server, versions 2.1, 2.5, and 2.51, Console
v VMware ESX Server, versions 2.1, 2.5, and 2.51, guest operating systems
v VMware GSX Server, versions 3.1 and 3.2, Console
v VMware GSX Server, versions 3.1 and 3.2, guest operating systems
Yes
Versions of Linux for 64-bit systems:
v Red Hat Enterprise Linux AS, ES, and WS, version 3.0, for AMD64 and
EM64T
v Red Hat Enterprise Linux AS, ES, and WS, version 4.0, for AMD64 and
EM64T
v Red Hat Enterprise Linux AS, version 3.0, for Intel Itanium
v Red Hat Enterprise Linux AS, version 4.0, for Intel Itanium
v SUSE LINUX Enterprise Server 8 for AMD64
v SUSE LINUX Enterprise Server 8 for Itanium Processor Family
v SUSE LINUX Enterprise Server 9 for AMD64 and EM64T
v SUSE LINUX Enterprise Server 9 for Itanium Processor Family
Yes
Other operating systems supported by xSeries servers:
Microsoft Virtual Server (guest operating system) Yes
NetWare, version 6.5 No
Table 42. Operating systems supported by iSeries servers and System p5 and pSeries
servers
Operating system Level 2
v AIX 5L, Version 5.2
v AIX 5L, Version 5.3
v i5/OS, Version 5 Release 3
No
v Red Hat Enterprise Linux AS, version 3.0, for IBM POWER
Note: System p5 and pSeries servers require Red Hat Enterprise Linux AS,
version 3.3 or later, for IBM POWER
v Red Hat Enterprise Linux AS, version 4.0, for IBM POWER
v SUSE LINUX Enterprise Server 8 for IBM POWER
v SUSE LINUX Enterprise Server 9 for IBM POWER
Yes
102 IBM Director Installation and Configuration Guide

Table 43. Operating systems supported by System z9 and zSeries servers
Operating system Level 2
v Red Hat Enterprise Linux AS, version 4.0, for IBM System z9, zSeries and
S/390
v SUSE LINUX Enterprise Server 9 for IBM System z9, zSeries and S/390
Yes
Operating systems supported by File Transfer
This topic provides information about the operating systems supported by the File
Transfer task.
Management-server support
This task is supported on all operating systems supported by IBM Director Server.
Managed-object support
The following tables list the operating systems that this task supports for managed
objects. Managed objects can include IBM xSeries, iSeries, System p5 and pSeries,
and System z9 and zSeries hardware. Managed systems are a subset of managed
objects that use different levels of IBM Director support. This task can be used on
Level-2 managed systems only.
Note: (VMware ESX Server and VMware GSX Server only) File systems that are
displayed for the guest operating system are limited to file systems within
its virtual disk.
Table 44. Operating systems supported by xSeries servers and third-party Intel-based
systems
Operating system Level 2
Editions of Windows for 32-bit systems:
v Windows 2000, Advanced Server, Datacenter, Professional, and Server
Editions
v Windows XP Professional Edition
v Windows Server 2003, Datacenter, Enterprise, Standard, and Web Editions
Yes
Editions of Windows for 64-bit systems:
v Windows Server 2003, Datacenter, Enterprise, Standard, and Web x64
Editions
v Windows XP Professional x64 Edition
v Windows Server 2003, Datacenter and Enterprise 64-bit Itanium Editions
Yes
Versions of Linux for 32-bit systems:
v Red Hat Enterprise Linux AS, ES, and WS, version 3.0
v Red Hat Enterprise Linux AS, ES, and WS, version 4.0
v SUSE LINUX Enterprise Server 8 for x86
v SUSE LINUX Enterprise Server 9 for x86
v VMware ESX Server, versions 2.1, 2.5, and 2.51, Console
v VMware ESX Server, versions 2.1, 2.5, and 2.51, guest operating systems
v VMware GSX Server, versions 3.1 and 3.2, Console
v VMware GSX Server, versions 3.1 and 3.2, guest operating systems
Yes
Versions of Linux for 64-bit systems:
Chapter 2. Planning 103

Table 44. Operating systems supported by xSeries servers and third-party Intel-based
systems (continued)
Operating system Level 2
v Red Hat Enterprise Linux AS, ES, and WS, version 3.0, for AMD64 and
EM64T
v Red Hat Enterprise Linux AS, ES, and WS, version 4.0, for AMD64 and
EM64T
v Red Hat Enterprise Linux AS, version 3.0, for Intel Itanium
v Red Hat Enterprise Linux AS, version 4.0, for Intel Itanium
v SUSE LINUX Enterprise Server 8 for AMD64
v SUSE LINUX Enterprise Server 8 for Itanium Processor Family
v SUSE LINUX Enterprise Server 9 for AMD64 and EM64T
v SUSE LINUX Enterprise Server 9 for Itanium Processor Family
Yes
Other operating systems supported by xSeries servers:
Microsoft Virtual Server (guest operating system) Yes
NetWare, version 6.5 Yes
Table 45. Operating systems supported by iSeries servers and System p5 and pSeries
servers
Operating system Level 2
v AIX 5L, Version 5.2
v AIX 5L, Version 5.3
v i5/OS, Version 5 Release 3
v Red Hat Enterprise Linux AS, version 3.0, for IBM POWER
Note: System p5 and pSeries servers require Red Hat Enterprise Linux AS,
version 3.3 or later, for IBM POWER
v Red Hat Enterprise Linux AS, version 4.0, for IBM POWER
v SUSE LINUX Enterprise Server 8 for IBM POWER
v SUSE LINUX Enterprise Server 9 for IBM POWER
Yes
Table 46. Operating systems supported by System z9 and zSeries servers
Operating system Level 2
v Red Hat Enterprise Linux AS, version 4.0, for IBM System z9, zSeries and
S/390
v SUSE LINUX Enterprise Server 9 for IBM System z9, zSeries and S/390
Yes
Operating systems supported by the Hardware Management
Console task
This topic provides information about the operating systems supported by the
Hardware Management Console task.
Management-server support
This task is supported on all operating systems supported by IBM Director Server.
Managed-object support
This task is supported only on an HMC managed object. The HMC is a closed
system that includes an embedded Linux distribution.
Note: You must install V5R2 or later for this task to function.
104 IBM Director Installation and Configuration Guide

Operating systems supported by Hardware Status
This topic provides information about the operating systems supported by the
Hardware Status task.
Management-server support
This task is supported on all operating systems supported by IBM Director Server.
Managed-object support
The following tables list the operating systems that this task supports for managed
objects. Managed objects can include IBM xSeries, iSeries, System p5 and pSeries,
and System z9 and zSeries hardware. Managed systems are a subset of managed
objects that use different levels of IBM Director support. This task can be used on
Level-1 and Level-2 managed systems.
Unless otherwise indicated, this task is supported (although the support might be
limited) by:
v Out-of-band notifications generated by a service processor
v CIM indications generated by IBM Director Core Services or IBM Director Agent,
Version 5.10
Table 47. Operating systems supported by xSeries servers and third-party Intel-based
systems
Operating system Level 1 Level 2
Editions of Windows for 32-bit systems:
v Windows 2000, Advanced Server, Datacenter, Professional, and
Server Editions
v Windows XP Professional Edition
v Windows Server 2003, Datacenter, Enterprise, Standard, and Web
Editions
Yes Yes
Editions of Windows for 64-bit systems:
v Windows Server 2003, Datacenter, Enterprise, Standard, and Web
x64 Editions
v Windows XP Professional x64 Edition
Yes Yes
Windows Server 2003, Datacenter and Enterprise 64-bit Itanium
Editions
No No
Versions of Linux for 32-bit systems:
v Red Hat Enterprise Linux AS, ES, and WS, version 3.0
v Red Hat Enterprise Linux AS, ES, and WS, version 4.0
v SUSE LINUX Enterprise Server 8 for x86
v SUSE LINUX Enterprise Server 9 for x86
Yes Yes1
VMware ESX Server, versions 2.1, 2.5, and 2.51, Console Yes1 Yes1
VMware ESX Server, versions 2.1, 2.5, and 2.51, guest operating
systems
Limited Limited
v VMware GSX Server, versions 3.1 and 3.2, Console
v VMware GSX Server, versions 3.1 and 3.2, guest operating systems
(For
Console)
Yes1
(For
guest)
Limited
(For
Console)
Yes1
(For
guest)
Limited
Versions of Linux for 64-bit systems:
Chapter 2. Planning 105

Table 47. Operating systems supported by xSeries servers and third-party Intel-based
systems (continued)
Operating system Level 1 Level 2
v Red Hat Enterprise Linux AS, ES, and WS, version 3.0, for AMD64
and EM64T
v Red Hat Enterprise Linux AS, ES, and WS, version 4.0, for AMD64
and EM64T
v SUSE LINUX Enterprise Server 8 for AMD64
v SUSE LINUX Enterprise Server 9 for AMD64 and EM64T
Yes Yes
1
v Red Hat Enterprise Linux AS, version 3.0, for Intel Itanium
v Red Hat Enterprise Linux AS, version 4.0, for Intel Itanium
v SUSE LINUX Enterprise Server 8 for Itanium Processor Family
v SUSE LINUX Enterprise Server 9 for Itanium Processor Family
No No
Other operating systems supported by xSeries servers:
Microsoft Virtual Server (guest operating system) Limited Limited
NetWare, version 6.5 Yes
2 Yes
3
1. Out-of-band notifications generated by a service processor or in-band events generated
by CIM (CIM support is system specific).
2. Out-of-band notifications generated by a service processor only.
3. In-band events generated by IBM Director Agent for NetWare, Version 5.1 or earlier, or
out-of-band notifications generated by a service processor.
Table 48. Operating systems supported by iSeries servers and System p5 and pSeries
servers
Operating system Level 1 Level 2
v AIX 5L, Version 5.2
v AIX 5L, Version 5.3
No No
i5/OS, Version 5 Release 3 No Yes1
v Red Hat Enterprise Linux AS, version 3.0, for IBM POWER
Note: System p5 and pSeries servers require Red Hat Enterprise
Linux AS, version 3.3 or later, for IBM POWER
v Red Hat Enterprise Linux AS, version 4.0, for IBM POWER
v SUSE LINUX Enterprise Server 8 for IBM POWER
v SUSE LINUX Enterprise Server 9 for IBM POWER
Yes1 Yes1
1. (BladeCenter JS20 only) Out-of-band notifications generated by a service processor only.
Table 49. Operating systems supported by System z9 and zSeries servers
Operating system Level 1 Level 2
v Red Hat Enterprise Linux AS, version 4.0, for IBM System z9,
zSeries and S/390
v SUSE LINUX Enterprise Server 9 for IBM System z9, zSeries and
S/390
No No
Operating systems supported by Inventory (hardware)
This topic provides information about the operating systems and the IBM Director
managed-system levels supported by the Inventory task when collecting hardware
inventory.
Management-server support
This task is supported on all operating systems supported by IBM Director Server.
106 IBM Director Installation and Configuration Guide

Managed-object support
The following tables list the operating systems that this task supports for managed
objects. Managed objects can include IBM xSeries, iSeries, System p5 and pSeries,
and System z9 and zSeries hardware. Managed systems are a subset of managed
objects that use different levels of IBM Director support. This task can be used on
Level-0, Level-1 and Level-2 managed systems. However, the inventory data
provided can vary among Level-0, Level-1 and Level-2 managed systems.
Table 50. Operating systems supported by xSeries servers and third-party Intel-based
systems
Operating system Level 0 Level 1 Level 2
Editions of Windows for 32-bit systems:
v Windows 2000, Advanced Server, Datacenter, Professional,
and Server Editions
v Windows XP Professional Edition
v Windows Server 2003, Datacenter, Enterprise, Standard, and
Web Editions
Yes Yes Yes
Editions of Windows for 64-bit systems:
v Windows Server 2003, Datacenter, Enterprise, Standard, and
Web x64 Editions
v Windows XP Professional x64 Edition
Yes Yes Yes
Windows Server 2003, Datacenter and Enterprise 64-bit Itanium
Editions
No No Yes1
Versions of Linux for 32-bit systems:
v Red Hat Enterprise Linux AS, ES, and WS, version 3.0
v Red Hat Enterprise Linux AS, ES, and WS, version 4.0
v SUSE LINUX Enterprise Server 8 for x86
v SUSE LINUX Enterprise Server 9 for x86
v VMware ESX Server, version 2.1 Console
v VMware ESX Server, version 2.1 guest operating systems
v VMware ESX Server, version 2.5 Console
v VMware ESX Server, version 2.5 guest operating systems
v VMware ESX Server, version 2.51 Console
v VMware ESX Server, version 2.51 guest operating systems
v VMware GSX Server, version 3.1 Console
v VMware GSX Server, version 3.1 guest operating systems
v VMware GSX Server, version 3.2 Console
v VMware GSX Server, version 3.2 guest operating systems
Yes Yes Yes
Versions of Linux for 64-bit systems:
v Red Hat Enterprise Linux AS, ES, and WS, version 3.0, for
AMD64 and EM64T
v Red Hat Enterprise Linux AS, ES, and WS, version 4.0, for
AMD64 and EM64T
v SUSE LINUX Enterprise Server 8 for AMD64
v SUSE LINUX Enterprise Server 9 for AMD64 and EM64T
Yes Yes Yes
v Red Hat Enterprise Linux AS, version 3.0, for Intel Itanium
v Red Hat Enterprise Linux AS, version 4.0, for Intel Itanium
v SUSE LINUX Enterprise Server 8 for Itanium Processor
Family
v SUSE LINUX Enterprise Server 9 for Itanium Processor
Family
No No Yes1
Other operating systems supported by xSeries servers:
Microsoft Virtual Server (guest operating system) Yes Yes Yes
Chapter 2. Planning 107

Table 50. Operating systems supported by xSeries servers and third-party Intel-based
systems (continued)
Operating system Level 0 Level 1 Level 2
NetWare, version 6.5 No No Yes1
1. Platform-specific data is not available for hardware inventory.
Table 51. Operating systems supported by iSeries servers and System p5 and pSeries
servers
Operating system Level 0 Level 1 Level 2
v AIX 5L, Version 5.2
v AIX 5L, Version 5.3
v i5/OS, Version 5 Release 3
No No Yes1
v Red Hat Enterprise Linux AS, version 3.0, for IBM POWER
Note: System p5 and pSeries servers require Red Hat
Enterprise Linux AS, version 3.3 or later, for IBM POWER
v Red Hat Enterprise Linux AS, version 4.0, for IBM POWER
v SUSE LINUX Enterprise Server 8 for IBM POWER
v SUSE LINUX Enterprise Server 9 for IBM POWER
Yes Yes Yes
1. Platform-specific data is not available for hardware inventory.
Table 52. Operating systems supported by System z9 and zSeries servers
Operating system Level 0 Level 1 Level 2
v Red Hat Enterprise Linux AS, version 4.0, for IBM System
z9, zSeries and S/390
v SUSE LINUX Enterprise Server 9 for IBM System z9, zSeries
and S/390
Yes Yes Yes
Operating systems supported by Inventory (software)
This topic provides information about the operating systems and the IBM Director
managed-system levels supported by the Inventory task when collecting software
inventory.
Management-server support
This task is supported on all operating systems supported by IBM Director Server.
Managed-object support
The following tables list the operating systems that this task supports for managed
objects. Managed objects can include IBM xSeries, iSeries, System p5 and pSeries,
and System z9 and zSeries hardware. Managed systems are a subset of managed
objects that use different levels of IBM Director support. This task can be used on
Level-0, Level-1 and Level-2 managed systems.
Table 53. Operating systems supported by xSeries servers and third-party Intel-based
systems
Operating system Level 0 Level 1 Level 2
Editions of Windows for 32-bit systems:
108 IBM Director Installation and Configuration Guide

Table 53. Operating systems supported by xSeries servers and third-party Intel-based
systems (continued)
Operating system Level 0 Level 1 Level 2
v Windows 2000, Advanced Server, Datacenter, Professional,
and Server Editions
v Windows XP Professional Edition
v Windows Server 2003, Datacenter, Enterprise, Standard, and
Web Editions
Yes Yes Yes
Editions of Windows for 64-bit systems:
v Windows Server 2003, Datacenter, Enterprise, Standard, and
Web x64 Editions
v Windows XP Professional x64 Edition
Yes Yes Yes
Windows Server 2003, Datacenter and Enterprise 64-bit Itanium
Editions
No No Yes
Versions of Linux for 32-bit systems:
v Red Hat Enterprise Linux AS, ES, and WS, version 3.0
v Red Hat Enterprise Linux AS, ES, and WS, version 4.0
v SUSE LINUX Enterprise Server 8 for x86
v SUSE LINUX Enterprise Server 9 for x86
v VMware ESX Server, version 2.1 Console
v VMware ESX Server, version 2.1 guest operating systems
v VMware ESX Server, version 2.5 Console
v VMware ESX Server, version 2.5 guest operating systems
v VMware ESX Server, version 2.51 Console
v VMware ESX Server, version 2.51 guest operating systems
v VMware GSX Server, version 3.1 Console
v VMware GSX Server, version 3.1 guest operating systems
v VMware GSX Server, version 3.2 Console
v VMware GSX Server, version 3.2 guest operating systems
Yes Yes Yes
Versions of Linux for 64-bit systems:
v Red Hat Enterprise Linux AS, ES, and WS, version 3.0, for
AMD64 and EM64T
v Red Hat Enterprise Linux AS, ES, and WS, version 4.0, for
AMD64 and EM64T
v SUSE LINUX Enterprise Server 8 for AMD64
v SUSE LINUX Enterprise Server 9 for AMD64 and EM64T
Yes Yes Yes
v Red Hat Enterprise Linux AS, version 3.0, for Intel Itanium
v Red Hat Enterprise Linux AS, version 4.0, for Intel Itanium
v SUSE LINUX Enterprise Server 8 for Itanium Processor
Family
v SUSE LINUX Enterprise Server 9 for Itanium Processor
Family
No No Yes
Other operating systems supported by xSeries servers:
Microsoft Virtual Server (guest operating system) Yes Yes Yes
NetWare, version 6.5 No No Yes
Table 54. Operating systems supported by iSeries servers and System p5 and pSeries
servers
Operating system Level 0 Level 1 Level 2
v AIX 5L, Version 5.2
v AIX 5L, Version 5.3
v i5/OS, Version 5 Release 3
No No No
Chapter 2. Planning 109

Table 54. Operating systems supported by iSeries servers and System p5 and pSeries
servers (continued)
Operating system Level 0 Level 1 Level 2
v Red Hat Enterprise Linux AS, version 3.0, for IBM POWER
Note: System p5 and pSeries servers require Red Hat
Enterprise Linux AS, version 3.3 or later, for IBM POWER
v Red Hat Enterprise Linux AS, version 4.0, for IBM POWER
v SUSE LINUX Enterprise Server 8 for IBM POWER
v SUSE LINUX Enterprise Server 9 for IBM POWER
Yes Yes Yes
Table 55. Operating systems supported by System z9 and zSeries servers
Operating system Level 0 Level 1 Level 2
v Red Hat Enterprise Linux AS, version 4.0, for IBM System
z9, zSeries and S/390
v SUSE LINUX Enterprise Server 9 for IBM System z9, zSeries
and S/390
Yes Yes Yes
Operating systems supported by Microsoft Cluster Browser
This topic provides information about the operating systems supported by the
Microsoft Cluster Browser task.
Management-server support
This task is supported on all operating systems supported by IBM Director Server.
Managed-object support
The following tables list the operating systems that this task supports for managed
objects. Managed objects can include IBM xSeries, iSeries, System p5 and pSeries,
and System z9 and zSeries hardware. Managed systems are a subset of managed
objects that use different levels of IBM Director support. This task can be used on
Level-2 managed systems only.
Table 56. Operating systems supported by xSeries servers and third-party Intel-based
systems
Operating system Level 2
Editions of Windows for 32-bit systems:
v Windows 2000, Advanced Server, Datacenter, and Server Editions
v Windows Server 2003, Datacenter, Enterprise, Standard, and Web Editions
Yes
v Windows 2000 Professional Edition
v Windows XP Professional Edition
No
Editions of Windows for 64-bit systems:
v Windows Server 2003, Datacenter, Enterprise, Standard, and Web x64
Editions
v Windows XP Professional x64 Edition
v Windows Server 2003, Datacenter and Enterprise 64-bit Itanium Editions
No
Versions of Linux for 32-bit systems:
110 IBM Director Installation and Configuration Guide

Table 56. Operating systems supported by xSeries servers and third-party Intel-based
systems (continued)
Operating system Level 2
v Red Hat Enterprise Linux AS, ES, and WS, version 3.0
v Red Hat Enterprise Linux AS, ES, and WS, version 4.0
v SUSE LINUX Enterprise Server 8 for x86
v SUSE LINUX Enterprise Server 9 for x86
v VMware ESX Server, versions 2.1, 2.5, and 2.51, Console
v VMware ESX Server, versions 2.1, 2.5, and 2.51, guest operating systems
v VMware GSX Server, versions 3.1 and 3.2, Console
v VMware GSX Server, versions 3.1 and 3.2, guest operating systems
No
Versions of Linux for 64-bit systems:
v Red Hat Enterprise Linux AS, ES, and WS, version 3.0, for AMD64 and
EM64T
v Red Hat Enterprise Linux AS, ES, and WS, version 4.0, for AMD64 and
EM64T
v Red Hat Enterprise Linux AS, version 3.0, for Intel Itanium
v Red Hat Enterprise Linux AS, version 4.0, for Intel Itanium
v SUSE LINUX Enterprise Server 8 for AMD64
v SUSE LINUX Enterprise Server 8 for Itanium Processor Family
v SUSE LINUX Enterprise Server 9 for AMD64 and EM64T
v SUSE LINUX Enterprise Server 9 for Itanium Processor Family
No
Other operating systems supported by xSeries servers:
Microsoft Virtual Server (guest operating system) No
NetWare, version 6.5 No
Table 57. Operating systems supported by iSeries servers and System p5 and pSeries
servers
Operating system Level 2
v AIX 5L, Version 5.2
v AIX 5L, Version 5.3
v i5/OS, Version 5 Release 3
v Red Hat Enterprise Linux AS, version 3.0, for IBM POWER
Note: System p5 and pSeries servers require Red Hat Enterprise Linux AS,
version 3.3 or later, for IBM POWER
v Red Hat Enterprise Linux AS, version 4.0, for IBM POWER
v SUSE LINUX Enterprise Server 8 for IBM POWER
v SUSE LINUX Enterprise Server 9 for IBM POWER
No
Table 58. Operating systems supported by System z9 and zSeries servers
Operating system Level 2
v Red Hat Enterprise Linux AS, version 4.0, for IBM System z9, zSeries and
S/390
v SUSE LINUX Enterprise Server 9 for IBM System z9, zSeries and S/390
No
Operating systems supported by Network Configuration
This topic provides information about the operating systems supported by the
Network Configuration task.
Management-server support
This task is supported on all operating systems supported by IBM Director Server.
Chapter 2. Planning 111

Managed-object support
The following tables list the operating systems that this task supports for managed
objects. Managed objects can include IBM xSeries, iSeries, System p5 and pSeries,
and System z9 and zSeries hardware. Managed systems are a subset of managed
objects that use different levels of IBM Director support. This task can be used on
Level-2 managed systems only.
Table 59. Operating systems supported by xSeries servers and third-party Intel-based
systems
Operating system Level 2
Editions of Windows for 32-bit systems:
v Windows 2000, Advanced Server, Datacenter, Professional, and Server
Editions
v Windows XP Professional Edition
v Windows Server 2003, Datacenter, Enterprise, Standard, and Web Editions
Yes
Editions of Windows for 64-bit systems:
v Windows Server 2003, Datacenter, Enterprise, Standard, and Web x64
Editions
v Windows XP Professional x64 Edition
Yes
Windows Server 2003, Datacenter and Enterprise 64-bit Itanium Editions No
Versions of Linux for 32-bit systems:
v Red Hat Enterprise Linux AS, ES, and WS, version 3.0
v Red Hat Enterprise Linux AS, ES, and WS, version 4.0
v SUSE LINUX Enterprise Server 8 for x86
v SUSE LINUX Enterprise Server 9 for x86
v VMware ESX Server, versions 2.1, 2.5, and 2.51, Console
v VMware ESX Server, versions 2.1, 2.5, and 2.51, guest operating systems
v VMware GSX Server, versions 3.1 and 3.2, Console
v VMware GSX Server, versions 3.1 and 3.2, guest operating systems
Yes
Versions of Linux for 64-bit systems:
v Red Hat Enterprise Linux AS, ES, and WS, version 3.0, for AMD64 and
EM64T
v Red Hat Enterprise Linux AS, ES, and WS, version 4.0, for AMD64 and
EM64T
v SUSE LINUX Enterprise Server 8 for AMD64
v SUSE LINUX Enterprise Server 9 for AMD64 and EM64T
Yes
v Red Hat Enterprise Linux AS, version 3.0, for Intel Itanium
v Red Hat Enterprise Linux AS, version 4.0, for Intel Itanium
v SUSE LINUX Enterprise Server 8 for Itanium Processor Family
v SUSE LINUX Enterprise Server 9 for Itanium Processor Family
No
Other operating systems supported by xSeries servers:
Microsoft Virtual Server (guest operating system) Yes
NetWare, version 6.5 No
112 IBM Director Installation and Configuration Guide

Table 60. Operating systems supported by iSeries servers and System p5 and pSeries
servers
Operating system Level 2
v AIX 5L, Version 5.2
v AIX 5L, Version 5.3
v Red Hat Enterprise Linux AS, version 3.0, for IBM POWER
Note: System p5 and pSeries servers require Red Hat Enterprise Linux AS,
version 3.3 or later, for IBM POWER
v Red Hat Enterprise Linux AS, version 4.0, for IBM POWER
v SUSE LINUX Enterprise Server 8 for IBM POWER
v SUSE LINUX Enterprise Server 9 for IBM POWER
No
i5/OS, Version 5 Release 3 Yes
Table 61. Operating systems supported by System z9 and zSeries servers
Operating system Level 2
v Red Hat Enterprise Linux AS, version 4.0, for IBM System z9, zSeries and
S/390
v SUSE LINUX Enterprise Server 9 for IBM System z9, zSeries and S/390
Yes
Operating systems supported by Power Management
This topic provides information about the Power Management task and the criteria
that managed systems must meet for the Power Management task to work.
The Power Management task is provided using the right-click feature on managed
objects in IBM Director Console. Power Management support is provided through
one or more of the hardware or software:
v A service processor configured for out-of-band communication
v Alert Standard Format (ASF)
v Operating system
v Wake on LAN network interface card (NIC)
Note: IBM Director Server also provides Power Management support for the
following versions of IBM Director Agent with the MPA Agent feature
installed:
v 4.22
v 4.21
v 4.20.2
v 4.20
v 4.12
v 4.11
v 4.10.2
v 4.10
For information about this support, see the IBM Director 4.20 Systems
Management Guide.
Power Management-support provided by Alert Standard Format:
Support for the Power Management task can be provided by xSeries servers that
are ASF 2.0-capable systems.
Chapter 2. Planning 113

Management-server support
This task is supported on all operating systems supported by IBM Director Server.
Managed-object support
ASF provides the Power On, Restart Now, and Power Off subtasks. The following
table lists the operating systems on which ASF 2.0-capable IBM xSeries servers
provide support for the Power Management task. To provide power-management
support, systems must meet the following criteria:
v An ASF 2.0-capable NIC must be installed in the managed system. These
systems include:
– xSeries 206
– xSeries 226
– xSeries 306
– IntelliStation M Pro (Types 6218, 6225, and 6228)
– IntelliStation Z Pro (Types 6222, 6223, and 6227)v ASF must be configured on the system for power management.
v IBM Director Core Services or IBM Director Agent, version 5.10, must be
installed on the system.
Table 62. Operating systems supported by xSeries servers and third-party Intel-based
systems
Operating system Level 2
Editions of Windows for 32-bit systems:
v Windows 2000, Advanced Server, Datacenter, Professional, and Server
Editions
v Windows XP Professional Edition
v Windows Server 2003, Datacenter, Enterprise, Standard, and Web Editions
Yes
1
Editions of Windows for 64-bit systems:
v Windows Server 2003, Datacenter, Enterprise, Standard, and Web x64
Editions
v Windows XP Professional x64 Edition
v Windows Server 2003, Datacenter and Enterprise 64-bit Itanium Editions
Yes
2
Versions of Linux for 32-bit systems:
v Red Hat Enterprise Linux AS, ES, and WS, version 3.0
v Red Hat Enterprise Linux AS, ES, and WS, version 4.0
v SUSE LINUX Enterprise Server 8 for x86
v SUSE LINUX Enterprise Server 9 for x86
v VMware ESX Server, versions 2.1, 2.5, and 2.51, Console
v VMware ESX Server, versions 2.1, 2.5, and 2.51, guest operating systems
v VMware GSX Server, versions 3.1 and 3.2, Console
v VMware GSX Server, versions 3.1 and 3.2, guest operating systems
Yes
3
Versions of Linux for 64-bit systems:
v Red Hat Enterprise Linux AS, ES, and WS, version 3.0, for AMD64 and
EM64T
v Red Hat Enterprise Linux AS, ES, and WS, version 4.0, for AMD64 and
EM64T
v Red Hat Enterprise Linux AS, version 3.0, for Intel Itanium
v Red Hat Enterprise Linux AS, version 4.0, for Intel Itanium
v SUSE LINUX Enterprise Server 8 for AMD64
v SUSE LINUX Enterprise Server 8 for Itanium Processor Family
v SUSE LINUX Enterprise Server 9 for AMD64 and EM64T
v SUSE LINUX Enterprise Server 9 for Itanium Processor Family
Yes
4
114 IBM Director Installation and Configuration Guide

Table 62. Operating systems supported by xSeries servers and third-party Intel-based
systems (continued)
Operating system Level 2
Other operating systems supported by xSeries servers:
Microsoft Virtual Server (guest operating system) Yes
1, 2
NetWare, version 6.5 No
1. Power-management support on editions of Windows for 32-bit systems is provided by
the following system models: xSeries 206, xSeries 226, xSeries 306, IntelliStation M Pro
(Types 6218, 6225, and 6228) and IntelliStation Z Pro (Types 6222, 6223, and 6227).
2. Power-management support on editions of Windows for 64-bit systems is provided by
the following system models: xSeries 226 and IntelliStation M Pro (Type 6218).
3. Power-management support on versions of Linux for 32-bit systems is provided by the
following system models: xSeries 206, xSeries 226, xSeries 306, and IntelliStation M Pro
(Type 6218).
4. Power-management support on versions of Linux for 64-bit systems is provided by the
following system models: xSeries 226 and IntelliStation M Pro (Type 6218).
Power Management-support provided by operating systems:
Support for the Power Management task can be provided by the operating system
running on Level-0, Level-1, and Level-2 managed systems.
Management-server support
This task is supported on all operating systems supported by IBM Director Server.
Managed-object support
The following tables list the operating systems that this task supports for managed
objects. Managed objects can include IBM xSeries, iSeries, System p5 and pSeries,
and System z9 and zSeries hardware. Managed systems are a subset of managed
objects that use different levels of IBM Director support.
Table 63. Operating systems supported by xSeries servers and third-party Intel-based
systems
Operating system Supported
Editions of Windows for 32-bit systems:
v Windows 2000, Advanced Server, Datacenter, Professional, and Server
Editions
v Windows XP Professional Edition
v Windows Server 2003, Datacenter, Enterprise, Standard, and Web Editions
Yes,
Restart
and
Shutdown
Editions of Windows for 64-bit systems:
v Windows Server 2003, Datacenter, Enterprise, Standard, and Web x64
Editions
v Windows XP Professional x64 Edition
v Windows Server 2003, Datacenter and Enterprise 64-bit Itanium Editions
Yes,
Restart
and
Shutdown
Versions of Linux for 32-bit systems:
Chapter 2. Planning 115

Table 63. Operating systems supported by xSeries servers and third-party Intel-based
systems (continued)
Operating system Supported
v Red Hat Enterprise Linux AS, ES, and WS, version 3.0
v Red Hat Enterprise Linux AS, ES, and WS, version 4.0
v SUSE LINUX Enterprise Server 8 for x86
v SUSE LINUX Enterprise Server 9 for x86
v VMware ESX Server, versions 2.1, 2.5, and 2.51, Console
v VMware GSX Server, versions 3.1 and 3.2, Console
Yes,
Restart
v VMware ESX Server, versions 2.1, 2.5, and 2.51, guest operating systems
v VMware GSX Server, versions 3.1 and 3.2, guest operating systems
Yes,
Restart
(for Linux)
and
Restart
and
Shutdown
(for
Windows)
Versions of Linux for 64-bit systems:
v Red Hat Enterprise Linux AS, ES, and WS, version 3.0, for AMD64 and
EM64T
v Red Hat Enterprise Linux AS, ES, and WS, version 4.0, for AMD64 and
EM64T
v Red Hat Enterprise Linux AS, version 3.0, for Intel Itanium
v Red Hat Enterprise Linux AS, version 4.0, for Intel Itanium
v SUSE LINUX Enterprise Server 8 for AMD64
v SUSE LINUX Enterprise Server 8 for Itanium Processor Family
v SUSE LINUX Enterprise Server 9 for AMD64 and EM64T
v SUSE LINUX Enterprise Server 9 for Itanium Processor Family
Yes,
Restart
Other operating systems supported by xSeries servers:
Microsoft Virtual Server (guest operating system) Yes,
Restart
and
Shutdown
NetWare, version 6.5 No
Note: (For System p5 and pSeries servers only) Power Management-support
provided only for Level-2 managed systems.
Table 64. Operating systems supported by iSeries servers and System p5 and pSeries
servers
Operating system Supported
i5/OS, Version 5 Release 3 No
1
v AIX 5L, Version 5.2
v AIX 5L, Version 5.3
v Red Hat Enterprise Linux AS, version 3.0, for IBM POWER
Note: System p5 and pSeries servers require Red Hat Enterprise Linux AS,
version 3.3 or later, for IBM POWER
v Red Hat Enterprise Linux AS, version 4.0, for IBM POWER
v SUSE LINUX Enterprise Server 8 for IBM POWER
v SUSE LINUX Enterprise Server 9 for IBM POWER
Yes,
Restart
1. Power-management support is available to Level-2 managed systems running i5/OS
and SSH. To acquire this support, discover the managed system, log in to the system,
and promote the system to a Level-2 managed system.
116 IBM Director Installation and Configuration Guide

Table 65. Operating systems supported by System z9 and zSeries servers
Operating system Supported
v Red Hat Enterprise Linux AS, version 4.0, for IBM System z9, zSeries and
S/390
v SUSE LINUX Enterprise Server 9 for IBM System z9, zSeries and S/390
Yes,
Restart
Power Management-support provided by service processors:
Support for the Power Management task can be provided by xSeries service
processors that can communicate out of band.
Management-server support
This task is supported on all operating systems supported by IBM Director Server.
Managed-object support
The following service processors in IBM xSeries servers and
blade servers
provide support for the Power Management task using out-of-band
communication:
v Remote Supervisor Adapter
v Remote Supervisor Adapter II
v IPMI baseboard management controller
These service processors provide support for the Power On, Restart Now, and
Power Off Now subtasks. Out-of-band communication does not require IBM
Director Core Services or IBM Director Agent, version 5.10. However, you must
configure the service processor to communicate with IBM Director Server. Also,
you must associate a Physical Platform managed object (PPMO) with the service
processor in IBM Director Console.
Power Management-support provided by the Wake on LAN feature:
Support for the Power Management task can be provided by xSeries servers that
have the Wake on LAN feature enabled. These servers can be Level-0, Level-1, or
Level-2 managed systems.
Management-server support
This task is supported on all operating systems supported by IBM Director Server.
Managed-object support
Wake on LAN provides the Power On subtask only. In order to use Wake on
LAN-provided power management, the following criteria must be met:
v The system must include a network interface card (NIC) that is Wake on
LAN-capable.
v The Wake on LAN feature must be enabled.
v IBM Director Server can detect the MAC address of a Level-0, Level-1, or
Level-2 managed system.
v The managed system data is included in the IBM Director inventory tables.
Chapter 2. Planning 117

v The managed system is running an operating system that supports the Wake on
LAN feature. See the following table for details.
Table 66. Operating systems supported by xSeries servers and third-party Intel-based
systems
Operating system Supported
Editions of Windows for 32-bit systems:
v Windows 2000, Advanced Server, Datacenter, Professional, and Server
Editions
v Windows XP Professional Edition
v Windows Server 2003, Datacenter, Enterprise, Standard, and Web Editions
Yes
Editions of Windows for 64-bit systems:
v Windows Server 2003, Datacenter, Enterprise, Standard, and Web x64
Editions
v Windows XP Professional x64 Edition
v Windows Server 2003, Datacenter and Enterprise 64-bit Itanium Editions
Yes
Versions of Linux for 32-bit systems:
v Red Hat Enterprise Linux AS, ES, and WS, version 3.0
v Red Hat Enterprise Linux AS, ES, and WS, version 4.0
v SUSE LINUX Enterprise Server 8 for x86
v SUSE LINUX Enterprise Server 9 for x86
v VMware ESX Server, versions 2.1, 2.5, and 2.51, Console
Yes
v VMware ESX Server, versions 2.1, 2.5, and 2.51, guest operating systems
v VMware GSX Server, versions 3.1 and 3.2, Console
v VMware GSX Server, versions 3.1 and 3.2, guest operating systems
No
Versions of Linux for 64-bit systems:
v Red Hat Enterprise Linux AS, ES, and WS, version 3.0, for AMD64 and
EM64T
v Red Hat Enterprise Linux AS, ES, and WS, version 4.0, for AMD64 and
EM64T
v Red Hat Enterprise Linux AS, version 3.0, for Intel Itanium
v Red Hat Enterprise Linux AS, version 4.0, for Intel Itanium
v SUSE LINUX Enterprise Server 8 for AMD64
v SUSE LINUX Enterprise Server 8 for Itanium Processor Family
v SUSE LINUX Enterprise Server 9 for AMD64 and EM64T
v SUSE LINUX Enterprise Server 9 for Itanium Processor Family
Yes
Other operating systems supported by xSeries servers:
Microsoft Virtual Server (guest operating system) No
NetWare, version 6.5 Yes
Operating systems supported by Process Management
This topic provides information about the operating systems supported by the
Process Management task.
Management-server support
This task is supported on all operating systems supported by IBM Director Server.
Managed-object support
The following tables list the operating systems that this task supports for managed
objects. Managed objects can include IBM xSeries, iSeries, System p5 and pSeries,
and System z9 and zSeries hardware. Managed systems are a subset of managed
118 IBM Director Installation and Configuration Guide

objects that use different levels of IBM Director support. This task can be used on
Level-2 managed systems only.
Table 67. Operating systems supported by xSeries servers and third-party Intel-based
systems
Operating system Level 2
Editions of Windows for 32-bit systems:
v Windows 2000, Advanced Server, Datacenter, Professional, and Server
Editions
v Windows XP Professional Edition
v Windows Server 2003, Datacenter, Enterprise, Standard, and Web Editions
Yes
Editions of Windows for 64-bit systems:
v Windows Server 2003, Datacenter, Enterprise, Standard, and Web x64
Editions
v Windows XP Professional x64 Edition
v Windows Server 2003, Datacenter and Enterprise 64-bit Itanium Editions
Yes
Versions of Linux for 32-bit systems:
v Red Hat Enterprise Linux AS, ES, and WS, version 3.0
v Red Hat Enterprise Linux AS, ES, and WS, version 4.0
v SUSE LINUX Enterprise Server 8 for x86
v SUSE LINUX Enterprise Server 9 for x86
v VMware ESX Server, versions 2.1, 2.5, and 2.51, Console
v VMware ESX Server, versions 2.1, 2.5, and 2.51, guest operating systems
v VMware GSX Server, versions 3.1 and 3.2, Console
v VMware GSX Server, versions 3.1 and 3.2, guest operating systems
Yes
Versions of Linux for 64-bit systems:
v Red Hat Enterprise Linux AS, ES, and WS, version 3.0, for AMD64 and
EM64T
v Red Hat Enterprise Linux AS, ES, and WS, version 4.0, for AMD64 and
EM64T
v Red Hat Enterprise Linux AS, version 3.0, for Intel Itanium
v Red Hat Enterprise Linux AS, version 4.0, for Intel Itanium
v SUSE LINUX Enterprise Server 8 for AMD64
v SUSE LINUX Enterprise Server 8 for Itanium Processor Family
v SUSE LINUX Enterprise Server 9 for AMD64 and EM64T
v SUSE LINUX Enterprise Server 9 for Itanium Processor Family
Yes
Other operating systems supported by xSeries servers:
Microsoft Virtual Server (guest operating system) Yes
NetWare, version 6.5 Yes
Table 68. Operating systems supported by iSeries servers and System p5 and pSeries
servers
Operating system Level 2
v AIX 5L, Version 5.2
v AIX 5L, Version 5.3
v i5/OS, Version 5 Release 3
v Red Hat Enterprise Linux AS, version 3.0, for IBM POWER
Note: System p5 and pSeries servers require Red Hat Enterprise Linux AS,
version 3.3 or later, for IBM POWER
v Red Hat Enterprise Linux AS, version 4.0, for IBM POWER
v SUSE LINUX Enterprise Server 8 for IBM POWER
v SUSE LINUX Enterprise Server 9 for IBM POWER
Yes
Chapter 2. Planning 119

Table 69. Operating systems supported by System z9 and zSeries servers
Operating system Level 2
v Red Hat Enterprise Linux AS, version 4.0, for IBM System z9, zSeries and
S/390
v SUSE LINUX Enterprise Server 9 for IBM System z9, zSeries and S/390
Yes
Operating systems supported by Rack Manager
This topic provides information about the operating systems supported by the
Rack Manager task.
Management-server support
This task is supported on all operating systems supported by IBM Director Server.
Managed-object support
The following tables list the operating systems that this task supports for managed
objects. Managed objects can include IBM xSeries, iSeries, System p5 and pSeries,
and System z9 and zSeries hardware. Managed systems are a subset of managed
objects that use different levels of IBM Director support. This task can be used on
Level-2 managed systems only. These systems must be xSeries and Netfinity
servers.
Table 70. Operating systems supported by xSeries servers
Operating system Level 2
Editions of Windows for 32-bit systems:
v Windows 2000, Advanced Server, Datacenter, Professional, and Server
Editions
v Windows XP Professional Edition
v Windows Server 2003, Datacenter, Enterprise, Standard, and Web Editions
Yes
Editions of Windows for 64-bit systems:
v Windows Server 2003, Datacenter, Enterprise, Standard, and Web x64
Editions
v Windows XP Professional x64 Edition
v Windows Server 2003, Datacenter and Enterprise 64-bit Itanium Editions
No
Versions of Linux for 32-bit systems:
v Red Hat Enterprise Linux AS, ES, and WS, version 3.0
v Red Hat Enterprise Linux AS, ES, and WS, version 4.0
v SUSE LINUX Enterprise Server 8 for x86
v SUSE LINUX Enterprise Server 9 for x86
v VMware ESX Server, versions 2.1, 2.5, and 2.51, Console
v VMware ESX Server, versions 2.1, 2.5, and 2.51, guest operating systems
v VMware GSX Server, versions 3.1 and 3.2, Console
v VMware GSX Server, versions 3.1 and 3.2, guest operating systems
Yes
Versions of Linux for 64-bit systems:
120 IBM Director Installation and Configuration Guide
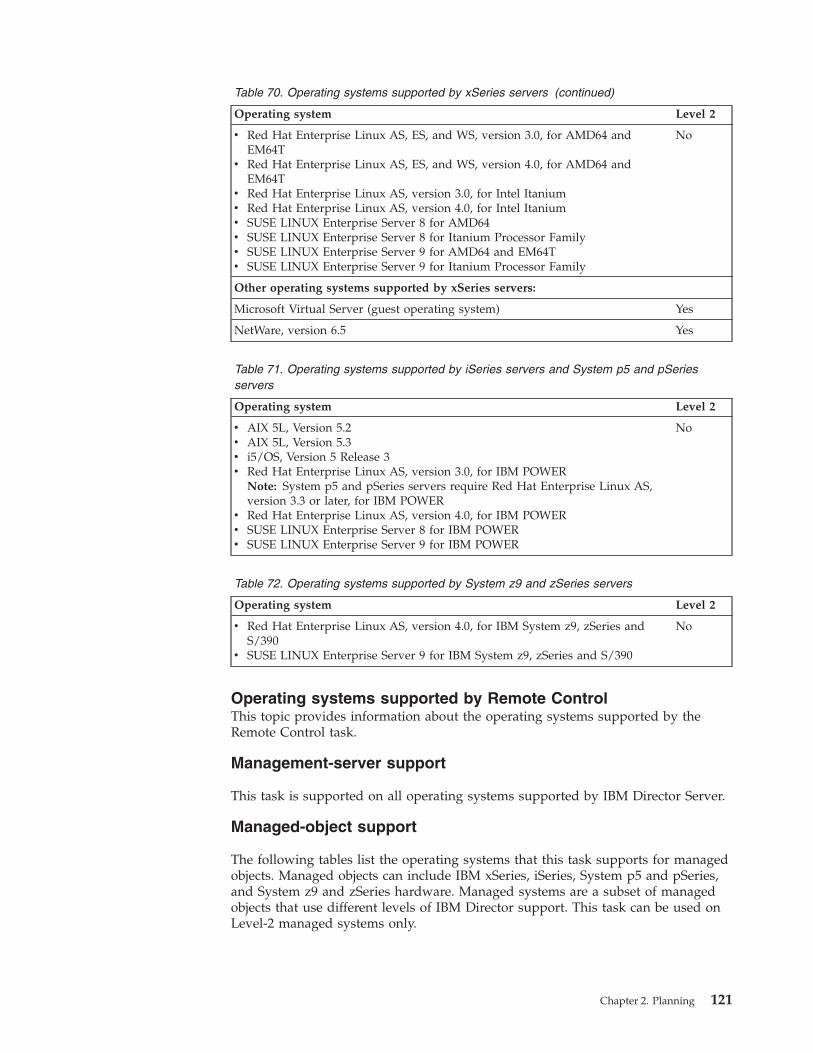
Table 70. Operating systems supported by xSeries servers (continued)
Operating system Level 2
v Red Hat Enterprise Linux AS, ES, and WS, version 3.0, for AMD64 and
EM64T
v Red Hat Enterprise Linux AS, ES, and WS, version 4.0, for AMD64 and
EM64T
v Red Hat Enterprise Linux AS, version 3.0, for Intel Itanium
v Red Hat Enterprise Linux AS, version 4.0, for Intel Itanium
v SUSE LINUX Enterprise Server 8 for AMD64
v SUSE LINUX Enterprise Server 8 for Itanium Processor Family
v SUSE LINUX Enterprise Server 9 for AMD64 and EM64T
v SUSE LINUX Enterprise Server 9 for Itanium Processor Family
No
Other operating systems supported by xSeries servers:
Microsoft Virtual Server (guest operating system) Yes
NetWare, version 6.5 Yes
Table 71. Operating systems supported by iSeries servers and System p5 and pSeries
servers
Operating system Level 2
v AIX 5L, Version 5.2
v AIX 5L, Version 5.3
v i5/OS, Version 5 Release 3
v Red Hat Enterprise Linux AS, version 3.0, for IBM POWER
Note: System p5 and pSeries servers require Red Hat Enterprise Linux AS,
version 3.3 or later, for IBM POWER
v Red Hat Enterprise Linux AS, version 4.0, for IBM POWER
v SUSE LINUX Enterprise Server 8 for IBM POWER
v SUSE LINUX Enterprise Server 9 for IBM POWER
No
Table 72. Operating systems supported by System z9 and zSeries servers
Operating system Level 2
v Red Hat Enterprise Linux AS, version 4.0, for IBM System z9, zSeries and
S/390
v SUSE LINUX Enterprise Server 9 for IBM System z9, zSeries and S/390
No
Operating systems supported by Remote Control
This topic provides information about the operating systems supported by the
Remote Control task.
Management-server support
This task is supported on all operating systems supported by IBM Director Server.
Managed-object support
The following tables list the operating systems that this task supports for managed
objects. Managed objects can include IBM xSeries, iSeries, System p5 and pSeries,
and System z9 and zSeries hardware. Managed systems are a subset of managed
objects that use different levels of IBM Director support. This task can be used on
Level-2 managed systems only.
Chapter 2. Planning 121

Table 73. Operating systems supported by xSeries servers and third-party Intel-based
systems
Operating system Level 2
Editions of Windows for 32-bit systems:
v Windows 2000, Advanced Server, Datacenter, Professional, and Server
Editions
v Windows XP Professional Edition
v Windows Server 2003, Datacenter, Enterprise, Standard, and Web Editions
Yes
Editions of Windows for 64-bit systems:
v Windows Server 2003, Datacenter, Enterprise, Standard, and Web x64
Editions
v Windows XP Professional x64 Edition
v Windows Server 2003, Datacenter and Enterprise 64-bit Itanium Editions
Yes
Versions of Linux for 32-bit systems:
v Red Hat Enterprise Linux AS, ES, and WS, version 3.0
v Red Hat Enterprise Linux AS, ES, and WS, version 4.0
v SUSE LINUX Enterprise Server 8 for x86
v SUSE LINUX Enterprise Server 9 for x86
v VMware ESX Server, versions 2.1, 2.5, and 2.51, Console
v VMware GSX Server, versions 3.1 and 3.2, Console
No
v VMware ESX Server, versions 2.1, 2.5, and 2.51, guest operating systems
v VMware GSX Server, versions 3.1 and 3.2, guest operating systems
Windows
only
Versions of Linux for 64-bit systems:
v Red Hat Enterprise Linux AS, ES, and WS, version 3.0, for AMD64 and
EM64T
v Red Hat Enterprise Linux AS, ES, and WS, version 4.0, for AMD64 and
EM64T
v Red Hat Enterprise Linux AS, version 3.0, for Intel Itanium
v Red Hat Enterprise Linux AS, version 4.0, for Intel Itanium
v SUSE LINUX Enterprise Server 8 for AMD64
v SUSE LINUX Enterprise Server 8 for Itanium Processor Family
v SUSE LINUX Enterprise Server 9 for AMD64 and EM64T
v SUSE LINUX Enterprise Server 9 for Itanium Processor Family
No
Other operating systems supported by xSeries servers:
Microsoft Virtual Server (guest operating system) Yes
NetWare, version 6.5 No
Table 74. Operating systems supported by iSeries servers and System p5 and pSeries
servers
Operating system Level 2
v AIX 5L, Version 5.2
v AIX 5L, Version 5.3
v i5/OS, Version 5 Release 3
v Red Hat Enterprise Linux AS, version 3.0, for IBM POWER
Note: System p5 and pSeries servers require Red Hat Enterprise Linux AS,
version 3.3 or later, for IBM POWER
v Red Hat Enterprise Linux AS, version 4.0, for IBM POWER
v SUSE LINUX Enterprise Server 8 for IBM POWER
v SUSE LINUX Enterprise Server 9 for IBM POWER
No
122 IBM Director Installation and Configuration Guide

Table 75. Operating systems supported by System z9 and zSeries servers
Operating system Level 2
v Red Hat Enterprise Linux AS, version 4.0, for IBM System z9, zSeries and
S/390
v SUSE LINUX Enterprise Server 9 for IBM System z9, zSeries and S/390
No
Operating systems supported by Remote Session
This topic provides information about the operating systems supported by the
Remote Session task.
Management-server support
This task is supported on all operating systems supported by IBM Director Server.
Managed-object support
The following tables list the operating systems that this task supports for managed
objects. Managed objects can include IBM xSeries, iSeries, System p5 and pSeries,
and System z9 and zSeries hardware. Managed systems are a subset of managed
objects that use different levels of IBM Director support. This task can be used on
Level-2 managed systems only.
The Remote Session task works on any SNMP device that has either Secure Shell
(SSH) or Telnet server installed and running.
Table 76. Operating systems supported by xSeries servers and third-party Intel-based
systems
Operating system Level 2
Editions of Windows for 32-bit systems:
v Windows 2000, Advanced Server, Datacenter, Professional, and Server
Editions
v Windows XP Professional Edition
v Windows Server 2003, Datacenter, Enterprise, Standard, and Web Editions
Yes
Editions of Windows for 64-bit systems:
v Windows Server 2003, Datacenter, Enterprise, Standard, and Web x64
Editions
v Windows XP Professional x64 Edition
v Windows Server 2003, Datacenter and Enterprise 64-bit Itanium Editions
Yes
Versions of Linux for 32-bit systems:
v Red Hat Enterprise Linux AS, ES, and WS, version 3.0
v Red Hat Enterprise Linux AS, ES, and WS, version 4.0
v SUSE LINUX Enterprise Server 8 for x86
v SUSE LINUX Enterprise Server 9 for x86
v VMware ESX Server, versions 2.1, 2.5, and 2.51, Console
v VMware ESX Server, versions 2.1, 2.5, and 2.51, guest operating systems
v VMware GSX Server, versions 3.1 and 3.2, Console
v VMware GSX Server, versions 3.1 and 3.2, guest operating systems
Yes
Versions of Linux for 64-bit systems:
Chapter 2. Planning 123

Table 76. Operating systems supported by xSeries servers and third-party Intel-based
systems (continued)
Operating system Level 2
v Red Hat Enterprise Linux AS, ES, and WS, version 3.0, for AMD64 and
EM64T
v Red Hat Enterprise Linux AS, ES, and WS, version 4.0, for AMD64 and
EM64T
v Red Hat Enterprise Linux AS, version 3.0, for Intel Itanium
v Red Hat Enterprise Linux AS, version 4.0, for Intel Itanium
v SUSE LINUX Enterprise Server 8 for AMD64
v SUSE LINUX Enterprise Server 8 for Itanium Processor Family
v SUSE LINUX Enterprise Server 9 for AMD64 and EM64T
v SUSE LINUX Enterprise Server 9 for Itanium Processor Family
Yes
Other operating systems supported by xSeries servers:
Microsoft Virtual Server (guest operating system) Yes
NetWare, version 6.5 Yes
Table 77. Operating systems supported by iSeries servers and System p5 and pSeries
servers
Operating system Level 2
v AIX 5L, Version 5.2
v AIX 5L, Version 5.3
v i5/OS, Version 5 Release 3
v Red Hat Enterprise Linux AS, version 3.0, for IBM POWER
Note: System p5 and pSeries servers require Red Hat Enterprise Linux AS,
version 3.3 or later, for IBM POWER
v Red Hat Enterprise Linux AS, version 4.0, for IBM POWER
v SUSE LINUX Enterprise Server 8 for IBM POWER
v SUSE LINUX Enterprise Server 9 for IBM POWER
Yes
Table 78. Operating systems supported by System z9 and zSeries servers
Operating system Level 2
v Red Hat Enterprise Linux AS, version 4.0, for IBM System z9, zSeries and
S/390
v SUSE LINUX Enterprise Server 9 for IBM System z9, zSeries and S/390
Yes
Operating systems supported by Resource Monitors
This topic provides information about the operating systems supported by the
Resource Monitors task.
Management-server support
This task is supported on all operating systems supported by IBM Director Server.
Managed-object support
The following tables list the operating systems that this task supports for managed
objects. Managed objects can include IBM xSeries, iSeries, System p5 and pSeries,
and System z9 and zSeries hardware. Managed systems are a subset of managed
objects that use different levels of IBM Director support. This task can be used on
Level-2 managed systems only.
124 IBM Director Installation and Configuration Guide
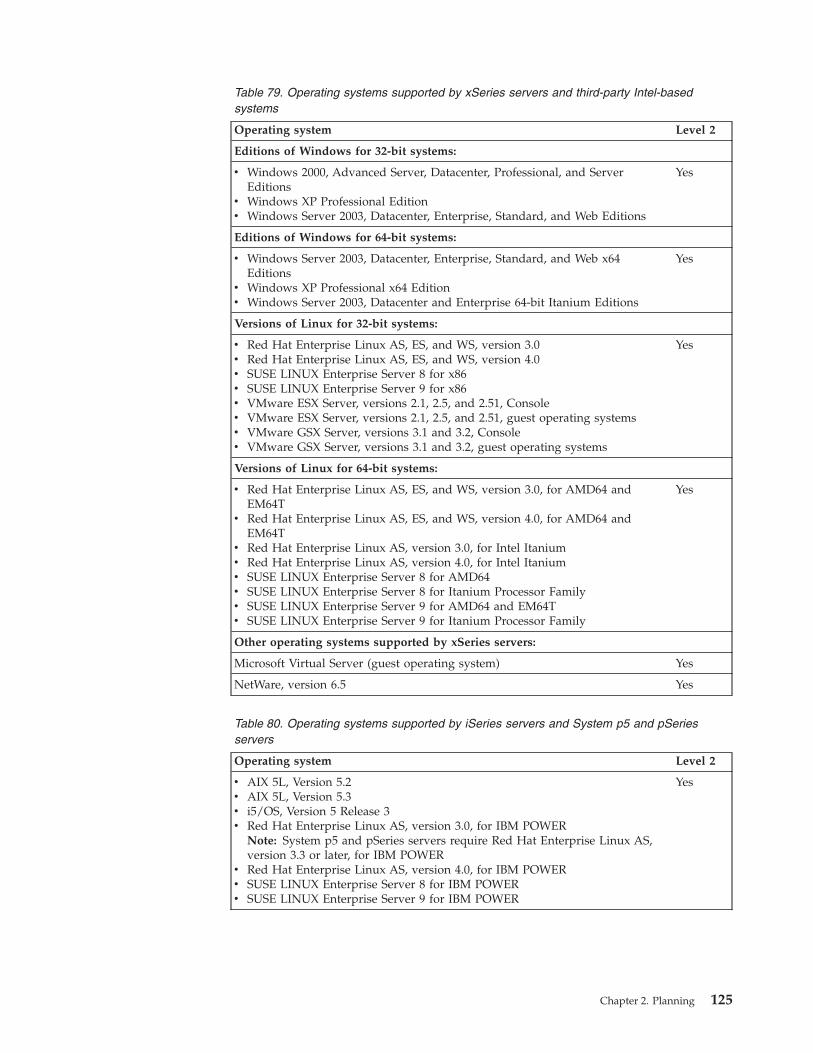
Table 79. Operating systems supported by xSeries servers and third-party Intel-based
systems
Operating system Level 2
Editions of Windows for 32-bit systems:
v Windows 2000, Advanced Server, Datacenter, Professional, and Server
Editions
v Windows XP Professional Edition
v Windows Server 2003, Datacenter, Enterprise, Standard, and Web Editions
Yes
Editions of Windows for 64-bit systems:
v Windows Server 2003, Datacenter, Enterprise, Standard, and Web x64
Editions
v Windows XP Professional x64 Edition
v Windows Server 2003, Datacenter and Enterprise 64-bit Itanium Editions
Yes
Versions of Linux for 32-bit systems:
v Red Hat Enterprise Linux AS, ES, and WS, version 3.0
v Red Hat Enterprise Linux AS, ES, and WS, version 4.0
v SUSE LINUX Enterprise Server 8 for x86
v SUSE LINUX Enterprise Server 9 for x86
v VMware ESX Server, versions 2.1, 2.5, and 2.51, Console
v VMware ESX Server, versions 2.1, 2.5, and 2.51, guest operating systems
v VMware GSX Server, versions 3.1 and 3.2, Console
v VMware GSX Server, versions 3.1 and 3.2, guest operating systems
Yes
Versions of Linux for 64-bit systems:
v Red Hat Enterprise Linux AS, ES, and WS, version 3.0, for AMD64 and
EM64T
v Red Hat Enterprise Linux AS, ES, and WS, version 4.0, for AMD64 and
EM64T
v Red Hat Enterprise Linux AS, version 3.0, for Intel Itanium
v Red Hat Enterprise Linux AS, version 4.0, for Intel Itanium
v SUSE LINUX Enterprise Server 8 for AMD64
v SUSE LINUX Enterprise Server 8 for Itanium Processor Family
v SUSE LINUX Enterprise Server 9 for AMD64 and EM64T
v SUSE LINUX Enterprise Server 9 for Itanium Processor Family
Yes
Other operating systems supported by xSeries servers:
Microsoft Virtual Server (guest operating system) Yes
NetWare, version 6.5 Yes
Table 80. Operating systems supported by iSeries servers and System p5 and pSeries
servers
Operating system Level 2
v AIX 5L, Version 5.2
v AIX 5L, Version 5.3
v i5/OS, Version 5 Release 3
v Red Hat Enterprise Linux AS, version 3.0, for IBM POWER
Note: System p5 and pSeries servers require Red Hat Enterprise Linux AS,
version 3.3 or later, for IBM POWER
v Red Hat Enterprise Linux AS, version 4.0, for IBM POWER
v SUSE LINUX Enterprise Server 8 for IBM POWER
v SUSE LINUX Enterprise Server 9 for IBM POWER
Yes
Chapter 2. Planning 125

Table 81. Operating systems supported by System z9 and zSeries servers
Operating system Level 2
v Red Hat Enterprise Linux AS, version 4.0, for IBM System z9, zSeries and
S/390
v SUSE LINUX Enterprise Server 9 for IBM System z9, zSeries and S/390
Yes
Operating systems supported by ServeRAID Manager
This topic provides information about the operating systems supported by the
ServeRAID Manager task.
Management-server support
This task is supported by IBM Director Server when installed on servers running
the following operating systems:
v Linux on xSeries
v Windows
Managed-object support
The following tables list the operating systems that this task supports for managed
objects. Managed objects can include IBM xSeries, iSeries, System p5 and pSeries,
and System z9 and zSeries hardware. Managed systems are a subset of managed
objects that use different levels of IBM Director support. This task can be used on
Level-2 managed systems only. These systems must be xSeries and Netfinity
servers.
Table 82. Operating systems supported by xSeries servers and third-party Intel-based
systems
Operating system Level 2
Editions of Windows for 32-bit systems:
v Windows 2000, Advanced Server and Server Editions
v Windows Server 2003 Standard Edition
v Windows Server 2003 Enterprise Edition
Yes
v Windows 2000 Professional Edition
v Windows 2000 Datacenter Edition
v Windows XP Professional Edition
v Windows Server 2003 Web Edition
v Windows Server 2003 Datacenter Edition
No
Editions of Windows for 64-bit systems:
v Windows Server 2003 Standard x64 Edition
v Windows Server 2003 Enterprise x64 Edition
Yes
v Windows XP Professional x64 Edition
v Windows Server 2003 Web x64 Edition
v Windows Server 2003 Datacenter x64 Edition
v Windows Server 2003, Datacenter and Enterprise 64-bit Itanium Editions
No
Versions of Linux for 32-bit systems:
v Red Hat Enterprise Linux AS, ES, and WS, version 3.0
v Red Hat Enterprise Linux AS, ES, and WS, version 4.0
v SUSE LINUX Enterprise Server 8 for x86
v SUSE LINUX Enterprise Server 9 for x86
v VMware ESX Server, versions 2.1, 2.5, and 2.51, Console
v VMware ESX Server, versions 2.1, 2.5, and 2.51, guest operating systems
Yes
126 IBM Director Installation and Configuration Guide

Table 82. Operating systems supported by xSeries servers and third-party Intel-based
systems (continued)
Operating system Level 2
v VMware GSX Server, versions 3.1 and 3.2, Console
v VMware GSX Server, versions 3.1 and 3.2, guest operating systems
No
Versions of Linux for 64-bit systems:
v Red Hat Enterprise Linux AS, ES, and WS, version 3.0, for AMD64 and
EM64T
v Red Hat Enterprise Linux AS, ES, and WS, version 4.0, for AMD64 and
EM64T
v SUSE LINUX Enterprise Server 8 for AMD64
v SUSE LINUX Enterprise Server 9 for AMD64 and EM64T
Yes
v Red Hat Enterprise Linux AS, version 3.0, for Intel Itanium
v Red Hat Enterprise Linux AS, version 4.0, for Intel Itanium
v SUSE LINUX Enterprise Server 8 for Itanium Processor Family
v SUSE LINUX Enterprise Server 9 for Itanium Processor Family
No
Other operating systems supported by xSeries servers:
Microsoft Virtual Server (guest operating system) No
NetWare, version 6.5 Yes
Table 83. Operating systems supported by iSeries servers and System p5 and pSeries
servers
Operating system Level 2
v AIX 5L, Version 5.2
v AIX 5L, Version 5.3
v i5/OS, Version 5 Release 3
v Red Hat Enterprise Linux AS, version 3.0, for IBM POWER
Note: System p5 and pSeries servers require Red Hat Enterprise Linux AS,
version 3.3 or later, for IBM POWER
v Red Hat Enterprise Linux AS, version 4.0, for IBM POWER
v SUSE LINUX Enterprise Server 8 for IBM POWER
v SUSE LINUX Enterprise Server 9 for IBM POWER
No
Table 84. Operating systems supported by System z9 and zSeries servers
Operating system Level 2
v Red Hat Enterprise Linux AS, version 4.0, for IBM System z9, zSeries and
S/390
v SUSE LINUX Enterprise Server 9 for IBM System z9, zSeries and S/390
No
Operating systems supported by SNMP Browser
This topic provides information about the operating systems supported by the
SNMP Browser task.
Management-server support
This task is supported on all operating systems supported by IBM Director Server.
Managed-object support
The following tables list the operating systems that this task supports for managed
objects. Managed objects can include IBM xSeries, iSeries, System p5 and pSeries,
Chapter 2. Planning 127

and System z9 and zSeries hardware. Managed systems are a subset of managed
objects that use different levels of IBM Director support. This task can be used on
Level-2 managed systems only.
To use the SNMP Browser task, the operating system SNMP agent must be
installed.
Table 85. Operating systems supported by xSeries servers and third-party Intel-based
systems
Operating system Level 2
Editions of Windows for 32-bit systems:
v Windows 2000, Advanced Server, Datacenter, Professional, and Server
Editions
v Windows XP Professional Edition
v Windows Server 2003, Datacenter, Enterprise, Standard, and Web Editions
Yes
Editions of Windows for 64-bit systems:
v Windows Server 2003, Datacenter, Enterprise, Standard, and Web x64
Editions
v Windows XP Professional x64 Edition
v Windows Server 2003, Datacenter and Enterprise 64-bit Itanium Editions
Yes
Versions of Linux for 32-bit systems:
v Red Hat Enterprise Linux AS, ES, and WS, version 3.0
v Red Hat Enterprise Linux AS, ES, and WS, version 4.0
v SUSE LINUX Enterprise Server 8 for x86
v SUSE LINUX Enterprise Server 9 for x86
v VMware ESX Server, versions 2.1, 2.5, and 2.51, Console
v VMware ESX Server, versions 2.1, 2.5, and 2.51, guest operating systems
v VMware GSX Server, versions 3.1 and 3.2, Console
v VMware GSX Server, versions 3.1 and 3.2, guest operating systems
Yes
Versions of Linux for 64-bit systems:
v Red Hat Enterprise Linux AS, ES, and WS, version 3.0, for AMD64 and
EM64T
v Red Hat Enterprise Linux AS, ES, and WS, version 4.0, for AMD64 and
EM64T
v Red Hat Enterprise Linux AS, version 3.0, for Intel Itanium
v Red Hat Enterprise Linux AS, version 4.0, for Intel Itanium
v SUSE LINUX Enterprise Server 8 for AMD64
v SUSE LINUX Enterprise Server 8 for Itanium Processor Family
v SUSE LINUX Enterprise Server 9 for AMD64 and EM64T
v SUSE LINUX Enterprise Server 9 for Itanium Processor Family
Yes
Other operating systems supported by xSeries servers:
Microsoft Virtual Server (guest operating system) Yes
NetWare, version 6.5 Yes
128 IBM Director Installation and Configuration Guide

Table 86. Operating systems supported by iSeries servers and System p5 and pSeries
servers
Operating system Level 2
v AIX 5L, Version 5.2
v AIX 5L, Version 5.3
v i5/OS, Version 5 Release 3
v Red Hat Enterprise Linux AS, version 3.0, for IBM POWER
Note: System p5 and pSeries servers require Red Hat Enterprise Linux AS,
version 3.3 or later, for IBM POWER
v Red Hat Enterprise Linux AS, version 4.0, for IBM POWER
v SUSE LINUX Enterprise Server 8 for IBM POWER
v SUSE LINUX Enterprise Server 9 for IBM POWER
Yes
Table 87. Operating systems supported by System z9 and zSeries servers
Operating system Level 2
v Red Hat Enterprise Linux AS, version 4.0, for IBM System z9, zSeries and
S/390
v SUSE LINUX Enterprise Server 9 for IBM System z9, zSeries and S/390
Yes
Operating systems supported by the Software Distribution
(Standard Edition)
This topic provides information about the operating systems and the IBM Director
managed-system levels supported by Software Distribution (Standard Edition).
Management-server support
This task is supported on all operating systems supported by IBM Director Server.
Managed-object support
The following tables list the operating systems that this task supports for managed
objects. Managed objects can include IBM xSeries, iSeries, System p5 and pSeries,
and System z9 and zSeries hardware. Managed systems are a subset of managed
objects that use different levels of IBM Director support. This task can be used on
Level-0, Level-1, and Level-2 managed systems.
Notes:
1. Only packages in the Solution Install format can be distributed to
Level-0 and Level-1 managed systems.
2. UpdateXpress packages can be distributed to Level-2 managed systems
only.
Table 88. Operating systems supported by xSeries servers and third-party Intel-based
systems
Operating system Level 0 Level 1 Level 2
Editions of Windows for 32-bit systems:
v Windows 2000, Advanced Server, Datacenter, Professional,
and Server Editions
v Windows XP Professional Edition
v Windows Server 2003, Datacenter, Enterprise, Standard, and
Web Editions
Yes Yes Yes
Editions of Windows for 64-bit systems:
Chapter 2. Planning 129

Table 88. Operating systems supported by xSeries servers and third-party Intel-based
systems (continued)
Operating system Level 0 Level 1 Level 2
v Windows Server 2003, Datacenter, Enterprise, Standard, and
Web x64 Editions
v Windows XP Professional x64 Edition
v Windows Server 2003, Datacenter and Enterprise 64-bit
Itanium Editions
Yes Yes Yes
Versions of Linux for 32-bit systems:
v Red Hat Enterprise Linux AS, ES, and WS, version 3.0
v Red Hat Enterprise Linux AS, ES, and WS, version 4.0
v SUSE LINUX Enterprise Server 8 for x86
v SUSE LINUX Enterprise Server 9 for x86
v VMware ESX Server, versions 2.1, 2.5, and 2.51, Console
v VMware ESX Server, versions 2.1, 2.5, and 2.51, guest
operating systems
v VMware GSX Server, versions 3.1 and 3.2, Console
v VMware GSX Server, versions 3.1 and 3.2, guest operating
systems
Yes Yes Yes
Versions of Linux for 64-bit systems:
v Red Hat Enterprise Linux AS, ES, and WS, version 3.0, for
AMD64 and EM64T
v Red Hat Enterprise Linux AS, ES, and WS, version 4.0, for
AMD64 and EM64T
v Red Hat Enterprise Linux AS, version 3.0, for Intel Itanium
v Red Hat Enterprise Linux AS, version 4.0, for Intel Itanium
v SUSE LINUX Enterprise Server 8 for AMD64
v SUSE LINUX Enterprise Server 8 for Itanium Processor
Family
v SUSE LINUX Enterprise Server 9 for AMD64 and EM64T
v SUSE LINUX Enterprise Server 9 for Itanium Processor
Family
Yes Yes Yes
Other operating systems supported by xSeries servers:
Microsoft Virtual Server (guest operating system) Yes Yes Yes
NetWare, version 6.5 No No No
Table 89. Operating systems supported by iSeries servers and System p5 and pSeries
servers
Operating system Level 0 Level 1 Level 2
i5/OS, Version 5 Release 3 No No No
v AIX 5L, Version 5.2
v AIX 5L, Version 5.3
v Red Hat Enterprise Linux AS, version 3.0, for IBM POWER
Note: System p5 and pSeries servers require Red Hat
Enterprise Linux AS, version 3.3 or later, for IBM POWER
v Red Hat Enterprise Linux AS, version 4.0, for IBM POWER
v SUSE LINUX Enterprise Server 8 for IBM POWER
v SUSE LINUX Enterprise Server 9 for IBM POWER
Yes Yes Yes
130 IBM Director Installation and Configuration Guide

Table 90. Operating systems supported by System z9 and zSeries servers
Operating system Level 0 Level 1 Level 2
v Red Hat Enterprise Linux AS, version 4.0, for IBM System
z9, zSeries and S/390
v SUSE LINUX Enterprise Server 9 for IBM System z9, zSeries
and S/390
Yes Yes Yes
Operating systems supported by the Software Distribution
(Premium Edition)
This topic provides information about the operating systems and the IBM Director
managed-system levels supported by Software Distribution (Premium Edition).
Management-server support
This task is supported on all operating systems supported by IBM Director Server.
Managed-object support
The following tables list the operating systems that this task supports for managed
objects. Managed objects can include IBM xSeries, iSeries, System p5 and pSeries,
and System z9 and zSeries hardware. Managed systems are a subset of managed
objects that use different levels of IBM Director support. This task can be used on
Level-0, Level-1, and Level-2 managed systems only.
Notes:
1. Only packages in the Solution Install format can be distributed to
Level-0 and Level-1 managed systems.
2. UpdateXpress packages can be distributed to Level-2 managed systems
only.
Table 91. Operating systems supported by xSeries servers and third-party Intel-based
systems
Operating system Level 0 Level 1 Level 2
Editions of Windows for 32-bit systems:
v Windows 2000, Advanced Server, Datacenter, Professional,
and Server Editions
v Windows XP Professional Edition
v Windows Server 2003, Datacenter, Enterprise, Standard, and
Web Editions
Yes Yes Yes
Editions of Windows for 64-bit systems:
v Windows Server 2003, Datacenter, Enterprise, Standard, and
Web x64 Editions
v Windows XP Professional x64 Edition
v Windows Server 2003, Datacenter and Enterprise 64-bit
Itanium Editions
Yes Yes Yes
Versions of Linux for 32-bit systems:
Chapter 2. Planning 131

Table 91. Operating systems supported by xSeries servers and third-party Intel-based
systems (continued)
Operating system Level 0 Level 1 Level 2
v Red Hat Enterprise Linux AS, ES, and WS, version 3.0
v Red Hat Enterprise Linux AS, ES, and WS, version 4.0
v SUSE LINUX Enterprise Server 8 for x86
v SUSE LINUX Enterprise Server 9 for x86
v VMware ESX Server, versions 2.1, 2.5, and 2.51, Console
v VMware ESX Server, versions 2.1, 2.5, and 2.51, guest
operating systems
v VMware GSX Server, versions 3.1 and 3.2, Console
v VMware GSX Server, versions 3.1 and 3.2, guest operating
systems
Yes Yes Yes
Versions of Linux for 64-bit systems:
v Red Hat Enterprise Linux AS, ES, and WS, version 3.0, for
AMD64 and EM64T
v Red Hat Enterprise Linux AS, ES, and WS, version 4.0, for
AMD64 and EM64T
v Red Hat Enterprise Linux AS, version 3.0, for Intel Itanium
v Red Hat Enterprise Linux AS, version 4.0, for Intel Itanium
v SUSE LINUX Enterprise Server 8 for AMD64
v SUSE LINUX Enterprise Server 8 for Itanium Processor
Family
v SUSE LINUX Enterprise Server 9 for AMD64 and EM64T
v SUSE LINUX Enterprise Server 9 for Itanium Processor
Family
Yes Yes Yes
Other operating systems supported by xSeries servers:
Microsoft Virtual Server (guest operating system) Yes Yes Yes
NetWare, version 6.5 No No No
Table 92. Operating systems supported by iSeries servers and System p5 and pSeries
servers
Operating system Level 0 Level 1 Level 2
i5/OS, Version 5 Release 3 No No No
v AIX 5L, Version 5.2
v AIX 5L, Version 5.3
v Red Hat Enterprise Linux AS, version 3.0, for IBM POWER
Note: System p5 and pSeries servers require Red Hat
Enterprise Linux AS, version 3.3 or later, for IBM POWER
v Red Hat Enterprise Linux AS, version 4.0, for IBM POWER
v SUSE LINUX Enterprise Server 8 for IBM POWER
v SUSE LINUX Enterprise Server 9 for IBM POWER
Yes Yes Yes
Table 93. Operating systems supported by System z9 and zSeries servers
Operating system Level 0 Level 1 Level 2
v Red Hat Enterprise Linux AS, version 4.0, for IBM System
z9, zSeries and S/390
v SUSE LINUX Enterprise Server 9 for IBM System z9, zSeries
and S/390
Yes Yes Yes
Operating systems supported by System Accounts
This topic provides information about the operating systems supported by the
System Accounts task.
132 IBM Director Installation and Configuration Guide

Management-server support
This task is supported on all operating systems supported by IBM Director Server.
Managed-object support
The following tables list the operating systems that this task supports for managed
objects. Managed objects can include IBM xSeries, iSeries, System p5 and pSeries,
and System z9 and zSeries hardware. Managed systems are a subset of managed
objects that use different levels of IBM Director support. This task can be used on
Level-2 managed systems only.
Table 94. Operating systems supported by xSeries servers and third-party Intel-based
systems
Operating system Level 2
Editions of Windows for 32-bit systems:
v Windows 2000, Advanced Server, Datacenter, Professional, and Server
Editions
v Windows XP Professional Edition
v Windows Server 2003, Datacenter, Enterprise, Standard, and Web Editions
Yes
Editions of Windows for 64-bit systems:
v Windows Server 2003, Datacenter, Enterprise, Standard, and Web x64
Editions
v Windows XP Professional x64 Edition
Yes
Windows Server 2003, Datacenter and Enterprise 64-bit Itanium Editions No
Versions of Linux for 32-bit systems:
v Red Hat Enterprise Linux AS, ES, and WS, version 3.0
v Red Hat Enterprise Linux AS, ES, and WS, version 4.0
v SUSE LINUX Enterprise Server 8 for x86
v SUSE LINUX Enterprise Server 9 for x86
v VMware ESX Server, versions 2.1, 2.5, and 2.51, Console
v VMware ESX Server, versions 2.1, 2.5, and 2.51, guest operating systems
v VMware GSX Server, versions 3.1 and 3.2, Console
v VMware GSX Server, versions 3.1 and 3.2, guest operating systems
Yes
Versions of Linux for 64-bit systems:
v Red Hat Enterprise Linux AS, ES, and WS, version 3.0, for AMD64 and
EM64T
v Red Hat Enterprise Linux AS, ES, and WS, version 4.0, for AMD64 and
EM64T
v SUSE LINUX Enterprise Server 8 for AMD64
v SUSE LINUX Enterprise Server 9 for AMD64 and EM64T
Yes
v Red Hat Enterprise Linux AS, version 3.0, for Intel Itanium
v Red Hat Enterprise Linux AS, version 4.0, for Intel Itanium
v SUSE LINUX Enterprise Server 8 for Itanium Processor Family
v SUSE LINUX Enterprise Server 9 for Itanium Processor Family
No
Other operating systems supported by xSeries servers:
Microsoft Virtual Server (guest operating system) Yes
NetWare, version 6.5 No
Chapter 2. Planning 133

Table 95. Operating systems supported by iSeries servers and System p5 and pSeries
servers
Operating system Level 2
i5/OS, Version 5 Release 3 Yes
v AIX 5L, Version 5.2
v AIX 5L, Version 5.3
v Red Hat Enterprise Linux AS, version 3.0, for IBM POWER
Note: System p5 and pSeries servers require Red Hat Enterprise Linux AS,
version 3.3 or later, for IBM POWER
v Red Hat Enterprise Linux AS, version 4.0, for IBM POWER
v SUSE LINUX Enterprise Server 8 for IBM POWER
v SUSE LINUX Enterprise Server 9 for IBM POWER
No
Table 96. Operating systems supported by System z9 and zSeries servers
Operating system Level 2
v Red Hat Enterprise Linux AS, version 4.0, for IBM System z9, zSeries and
S/390
v SUSE LINUX Enterprise Server 9 for IBM System z9, zSeries and S/390
Yes
Operating systems supported by System Availability
This topic provides information about the operating systems supported by the
System Availability task.
Management-server support
This task is supported by IBM Director Server when installed on servers running
the following operating systems:
v Linux on xSeries
v Windows
Managed-object support
The following tables list the operating systems that this task supports for managed
objects. Managed objects can include IBM xSeries, iSeries, System p5 and pSeries,
and System z9 and zSeries hardware. Managed systems are a subset of managed
objects that use different levels of IBM Director support. This task can be used on
Level-2 managed systems only. These managed systems must be xSeries and
Netfinity servers.
Table 97. Operating systems supported by xSeries servers
Operating system Level 2
Editions of Windows for 32-bit systems:
v Windows 2000, Advanced Server, Datacenter, Professional, and Server
Editions
v Windows XP Professional Edition
v Windows Server 2003, Datacenter, Enterprise, Standard, and Web Editions
Yes
Editions of Windows for 64-bit systems:
v Windows Server 2003, Datacenter, Enterprise, Standard, and Web x64
Editions
v Windows XP Professional x64 Edition
v Windows Server 2003, Datacenter and Enterprise 64-bit Itanium Editions
No
Versions of Linux for 32-bit systems:
134 IBM Director Installation and Configuration Guide

Table 97. Operating systems supported by xSeries servers (continued)
Operating system Level 2
v Red Hat Enterprise Linux AS, ES, and WS, version 3.0
v Red Hat Enterprise Linux AS, ES, and WS, version 4.0
v SUSE LINUX Enterprise Server 8 for x86
v SUSE LINUX Enterprise Server 9 for x86
v VMware ESX Server, versions 2.1, 2.5, and 2.51, Console
v VMware ESX Server, versions 2.1, 2.5, and 2.51, guest operating systems
v VMware GSX Server, versions 3.1 and 3.2, Console
v VMware GSX Server, versions 3.1 and 3.2, guest operating systems
Yes
Versions of Linux for 64-bit systems:
v Red Hat Enterprise Linux AS, ES, and WS, version 3.0, for AMD64 and
EM64T
v Red Hat Enterprise Linux AS, ES, and WS, version 4.0, for AMD64 and
EM64T
v Red Hat Enterprise Linux AS, version 3.0, for Intel Itanium
v Red Hat Enterprise Linux AS, version 4.0, for Intel Itanium
v SUSE LINUX Enterprise Server 8 for AMD64
v SUSE LINUX Enterprise Server 8 for Itanium Processor Family
v SUSE LINUX Enterprise Server 9 for AMD64 and EM64T
v SUSE LINUX Enterprise Server 9 for Itanium Processor Family
No
Other operating systems supported by xSeries servers:
Microsoft Virtual Server (guest operating system) Yes
NetWare, version 6.5 No
Table 98. Operating systems supported by iSeries servers and System p5 and pSeries
servers
Operating system Level 2
v AIX 5L, Version 5.2
v AIX 5L, Version 5.3
v i5/OS, Version 5 Release 3
v Red Hat Enterprise Linux AS, version 3.0, for IBM POWER
Note: System p5 and pSeries servers require Red Hat Enterprise Linux AS,
version 3.3 or later, for IBM POWER
v Red Hat Enterprise Linux AS, version 4.0, for IBM POWER
v SUSE LINUX Enterprise Server 8 for IBM POWER
v SUSE LINUX Enterprise Server 9 for IBM POWER
No
Table 99. Operating systems supported by System z9 and zSeries servers
Operating system Level 2
v Red Hat Enterprise Linux AS, version 4.0, for IBM System z9, zSeries and
S/390
v SUSE LINUX Enterprise Server 9 for IBM System z9, zSeries and S/390
No
IBM Director task support for BladeCenter products
This topic discusses IBM Director task support for BladeCenter products and how
it varies depending on whether it is for the BladeCenter chassis, network devices,
and blade servers.
A BladeCenter unit consists of a chassis, one or two management modules, one or
more network devices (previously called switches, up to a total of four), and one
or more blade servers (up to a total of 14, depending on the model).
Chapter 2. Planning 135

The chassis is the physical enclosure that contains the blade servers. The chassis
has one or two management modules that contain a service processor. IBM
Director discovers the chassis and gathers information from the chassis by way of
the management module. You cannot install IBM Director Agent or IBM Director
Core Services on the chassis.
The network device is an SNMP device, and IBM Director considers the network
device to be a managed device. When you view the network device in IBM
Director, it might be displayed in the RMON devices group, which is a subgroup
of the SNMP devices group.
IBM Director can gather some information from a blade server before IBM Director
Agent or IBM Director Core Services is installed on the blade server. The
information is gathered from the blade server by way of the chassis management
module. In IBM Director Console, the blade server is represented by a physical
platform managed object. However, after you install IBM Director Agent or IBM
Director Core Services on the blade server, it is a managed object, and the features
and functions that you can use on the blade server are comparable to those that
you can use on any managed object.
IBM Director tasks that you can use on your BladeCenter unit can vary, depending
on the features and options that you have installed. See the following table for a
list of IBM Director tasks and information about whether you can use a task on the
chassis, network device, or a blade server without IBM Director Agent or IBM
Director Core Services installed. Unless otherwise noted in this documentation, a
task behaves the same for blade servers as for any managed system.
Note: When IBM Director Agent or IBM Director Core Services is installed on a
blade server, the supported tasks depend on the operating system that is
installed on the blade server.
Table 100. IBM Director task support for BladeCenter products
Tasks and subtasks Chassis Network
device
Blade server without IBM Director Agent
or IBM Director Core Services installed
BladeCenter Configuration Manager Yes No Not applicable
Event Action Plans Yes Yes Yes
Hardware Status Yes No Yes
1
Inventory Yes Yes Yes
Network Device Manager (formerly
Switch Management launch pad)
Not applicable Yes Not applicable
Power Management No No Yes
Rack Manager Yes Yes No
Remote Session Not applicable Yes No
Remote Monitors No Yes No
SNMP Browser No Yes Yes
2
1. Inventory of the chassis, network device, and blade servers can be obtained through the management module.
Blade server inventory that is collected through the management module is a subset of the total inventory that is
available if IBM Director Agent or IBM Director Core Services is installed on the blade server.
2. To use the SNMP Browser task, the operating-system SNMP agent must be installed on the blade server.
136 IBM Director Installation and Configuration Guide

Supported database applications
This topic provides information about the database applications that are supported
for use with IBM Director. IBM Director Server uses an SQL database to store
inventory data for the systems in the environment.
The following tables list the database applications supported by IBM Director
Server. They also provide information about whether the database application can
be installed locally (on the management server) or remotely.
Table 101. Database applications for management servers running AIX
Database application Type of installation
Apache Derby (embedded in IBM Director Server) Local only
IBM DB2 Universal Database™ 8.1with Fix Pack 9a Local or remote
Oracle Server, versions 9.2 and 10g Local or remote
Table 102. Database applications for management servers running i5/OS
Database application Type of installation
IBM DB2 Universal Database for iSeries (part of i5/OS) Local only
Table 103. Database applications for management servers running Linux (xSeries, System
p5 and pSeries, and System z9 and zSeries)
Database application Type of installation
Apache Derby (embedded in IBM Director Server) Local only
IBM DB2 Universal Database 8.1with Fix Pack 9a Local or remote
Microsoft SQL Server 2000 with Service Pack 3a Remote only
Oracle Server, versions 9.2 and 10g Local or remote
PostgreSQL, versions 7.2., 7.3, and 7.4 Local or remote
Table 104. Database applications for management servers running Windows
Database application Type of installation
Apache Derby (embedded in IBM Director Server) Local only
IBM DB2 Universal Database 8.1, Fix Pack 9a Local or remote
Microsoft Data Engine (MSDE) 2000 (aka Microsoft SQL Server
2000 Desktop Engine) with Service Pack 3a (local use only)
Local only
Microsoft SQL Server 2000 with Service Pack 3a Local or remote
Oracle Server, versions 9.2 and 10g Local or remote
The Microsoft Jet database supported in previous releases of IBM Director
continues to be supported only for IBM Director upgrades. MS Jet is not available
as a database option for new installations.
Reviewing the environment
This topic describes how to review your environment before you install IBM
Director.
Chapter 2. Planning 137
Your network must be up and running before you install IBM Director. Complete
the following tasks to facilitate the IBM Director installation and discovery of
systems and devices:
v Determine the physical locations and network addresses of all systems and
devices in your network. Identify local and remote subnets and the network
protocols that are used.
v Determine the amount of traffic that your network can manage. If you have a
wide area network (WAN) link, use a T1 line that transmits at a speed of at least
a 1.5 megabytes per second (MBps) to ensure reliable network performance.
v Ensure that all systems and devices are correctly installed and cabled.
v Enable SNMP traps, if necessary. If you want IBM Director to poll SNMP devices
and receive their alerts, make sure that an SNMP server and an SNMP trap
service are running on the management server.
Identifying the hardware
This topic provides information about identifying the hardware in the environment
that you want to manage with IBM Director.
The type of hardware in the environment might determine how you prepare the
physical infrastructure or which features you select when you install IBM Director
Server.
Begin the planning process by identifying the hardware that you want to manage
with IBM Director and recording the information in the environment worksheet.
Your environment might include one or more of the following types of hardware:
v Desktop and mobile computers
v
BladeCenter units
v iSeries servers
v System p5 and pSeries servers
v xSeries servers
v System z9 and zSeries servers
If your environment includes xSeries servers, identify whether the servers include
ServeRAID controllers or service processors.
Identifying local and remote subnets
This topic provides information about identifying local and remote subnets.
Identify the local and remote subnets in which the systems that you want to
manage with IBM Director are located. Record this information in the “Worksheet:
Environment” on page 341. You will need this information to configure the
discovery preferences.
Identifying firewalls and blocked ports
This topic provides information about identifying firewalls and blocked ports.
Before installing IBM Director, you need to review the firewalls and blocked ports
in your installation environment.
Consider each of the following issues carefully when planning to install IBM
Director:
138 IBM Director Installation and Configuration Guide

v The SLP port (port 427) needs to be open if the installation environment is
behind a firewall.
v For the getfru command to run successfully, the managed system must have
firewall access through a standard FTP port.
v The Remote Control and Software Distribution tasks both use session support to
increase data transmission. Session support within TCP/IP causes data to flow
through a nonreserved port that is different from the one that IBM Director
typically uses for communication. Most firewalls do not allow the data to be
transmitted through this other port.
v Windows firewall can interfere with discovery of managed systems running
Windows XP.
Preparing the physical environment
Planning to manage a BladeCenter
This topic provides planning information for deploying IBM Director to manage
the blade servers in an
BladeCenter chassis.
Planning to manage a BladeCenter chassis using IBM Director
Server on a non-blade server
This topic discusses planning considerations for using IBM Director Server on a
non-blade server to manage servers in an
BladeCenter chassis, and
provides information about configuring the network for this installation.
You can install IBM Director Server on a non-blade server. With this management
server you can manage one or more BladeCenter units and the blade servers
installed in them.
1. Consider using a Dynamic Host Configuration Protocol (DHCP) server to
assign an address to the external port of the management module. When a
BladeCenter management module is first started, it searches for a DHCP server.
If a DHCP server is not found, the BladeCenter management module assigns IP
address 192.168.70.125 to the external management port. Because this static IP
address is the same for all management modules, IP address conflicts can occur
if you do not use a DHCP server and introduce multiple BladeCenter chassis
onto a network simultaneously. When you configure the BladeCenter chassis,
you assign static IP addresses to the switch module and the external and
internal ports of the management module.
2. Set up a separate management network to configure and manage your
BladeCenter chassis and blade servers. By separating the LAN segment used
for production from the LAN segment to which the BladeCenter management
module is connected, you can ensure that only authorized system
administrators can connect to the BladeCenter chassis and switch modules.
Figure 10 on page 140 shows such a network configuration.
3. If you intend to use Remote Deployment Manager (RDM), install RDM on the
management server.
4. If you plan to use a database application other than Apache Derby, consider
installing the database server on the management LAN.
5. Make sure that you have installed the latest version of the management module
firmware. To download the firmware, go to the IBM Servers Web site at
www.ibm.com/servers/.
Chapter 2. Planning 139

This network configuration ensures that applications running on the blade servers
cannot modify chassis settings, because the blade servers have no connection to
either the management module or the switch module configuration ports.
Note: Only one of the following software applications can communicate with a
BladeCenter management module at any given time:
v Cluster Systems Management (CSM)
v IBM Director Server
v IBM Management Processor Command-Line Interface (MPCLI)
Planning to manage a BladeCenter chassis using IBM Director
Server on a blade server
This topic discusses planning considerations for installing IBM Director Server on a
blade server, and provides information about configuring the network to allow this
installation.
You can install IBM Director Server on a blade server. With this management
server you can manage:
v The BladeCenter unit, including the server on which IBM Director Server is
installed.
v Other BladeCenter units.
Consider the following issues when managing the BladeCenter unit that contains
the management server:
v Enable access for authorized administrators as determined by the security policy
established for the user environment.
v Be careful when making changes to the configuration of the BladeCenter chassis
from IBM Director itself. Such changes could effectively remove the instance of
IBM Director Server from the network and halt the entire IBM Director
environment.
Figure 10. Example of BladeCenter deployment network when IBM Director Server is not
installed on a blade server
140 IBM Director Installation and Configuration Guide

Specifically, do not perform these tasks on the blade server where IBM Director
Server is installed without careful consideration:
– Using Remote Deployment Manager (RDM) to deploy software to that blade
server
– Powering off that blade server
– Changing the boot options on that blade serverv Create a network setup that enables the BladeCenter Management Module to
communicate with the management server. Otherwise IBM Director will be
unable to discover the BladeCenter chassis that contains the management server.
By default, the blade servers installed in a BladeCenter chassis cannot
communicate automatically with the BladeCenter Management Module. This
architecture is designed to prevent the blade servers from modifying the
BladeCenter chassis settings. If you install IBM Director Server on a blade server
and want to use the instance of IBM Director to manage the BladeCenter unit in
which the management server is installed, you must enable communication
between the management server and the management module.
1. Consider using a Dynamic Host Configuration Protocol (DHCP) server to
assign an address to the external port of the management module. When a
BladeCenter management module is first started, it searches for a DHCP server.
If a DHCP server is not found, the BladeCenter management module assigns IP
address 192.168.70.125 to the external management port. Because this static IP
address is the same for all management modules, IP address conflicts can occur
if you do not use a DHCP server and introduce multiple BladeCenter chassis
onto a network simultaneously. When you configure the BladeCenter chassis,
you assign static IP addresses to the switch module and the external and
internal ports of the management module.
2. Set up a separate management network to configure and manage your
BladeCenter chassis and blade servers. By separating the LAN segment used
for production from the LAN segment to which the BladeCenter management
module is connected, you can ensure that only authorized system
administrators can connect to the BladeCenter chassis and switch modules.
Figure 10 on page 140 shows such a network configuration.
3. To use an installation of IBM Director Server on a blade to manage the
BladeCenter unit in which the management server is installed, enable
communication between the Campus LAN and the Management LAN.
Figure 11 on page 142 shows such a network configuration.
4. If you intend to use Remote Deployment Manager (RDM), install RDM on the
management server.
5. If you plan to use a database application other than Apache Derby, consider
installing the database server on the management LAN.
6. Make sure that you have installed the latest version of the management module
firmware. To download the firmware, go to the IBM Servers Web site at
www.ibm.com/servers/.
Chapter 2. Planning 141

With this configuration, IBM Director Server can communicate through the
Campus LAN to the Management LAN and then onto the management module.
Note: Only one of the following software applications can communicate with a
BladeCenter management module at any given time:
v Cluster Systems Management (CSM)
v IBM Director Server
v IBM Management Processor Command-Line Interface (MPCLI)
Planning to install IBM Director
This topic provides planning information that will ensure that the installation of
IBM Director is completed successfully.
Choosing where to install IBM Director Server
This topic describes how to choose a server on which to install IBM Director
Server.
Determine the server on which you will install IBM Director Server. You might
want to install more than one instance of IBM Director Server, depending on the
following considerations:
v Consider whether you will be installing components of the Virtualization Engine
management collection. This has a few potential impacts on the IBM Director
installation:
1. Review and consider the installation requirements for the Virtualization
Engine components you will install. Some of these requirements can affect
your installation of IBM Director Server.
2. Ensure that the management server where IBM Director Server will be
installed is available to the server on which Virtualization Engine
components will be installed, and that the management server has the
required ports available.
Figure 11. Example of BladeCenter deployment network when IBM Director Server is
installed on a blade server
142 IBM Director Installation and Configuration Guide

3. Install IBM Director Server before installing Virtualization Engine
components. This allows IBM Director to be registered in the Virtualization
Engine environment when the management collection components are
installed.
Refer to the Virtualization Engine documentation for more information.
v Consider installing IBM Director Server on a blade to manage a BladeCenter
chassis.
BladeCenter chassis may be managed using IBM Director
Server installed either on a blade in the BladeCenter, or on a separate
management server. Refer to “Planning to manage a BladeCenter” on page 139
for detailed information.
v For Windows installations, do not install IBM Director Server on a domain
controller, due to the following possible consequences:
– Its high resource usage might degrade domain controller performance.
– If you install IBM Director Server on a domain controller and then demote the
domain controller, you no longer can access IBM Director Console.
– Unless the IBM Director service account has domain administrator privileges,
you cannot restart IBM Director Server.v Consider installing multiple instances of IBM Director Server. Installing IBM
Director Server on multiple management servers may be helpful in the following
situations:
– You want to manage more than 5000 systems.
– The systems that you want to manage are in several geographic locations or
are owned by multiple system administrators.
– You want to manage each BladeCenter with an installation of IBM Director
Server on a blade in the chassis.v Consider the kind of database you wish to use. You may wish to use a particular
database for IBM Director data, to facilitate data-mining activity or for other
reasons. Not all databases are supported for all IBM Director Server installation
locations. Refer to “Selecting the IBM Director database application” on page 145
for detailed information.
v Consider the extensions you wish to install, and their requirements. Some
extensions, such as Capacity Manager, can require large amounts of storage.
Select a management server—or multiple management servers—which will
allow extensions to be installed and continue functioning even if the network
grows.
Selecting the IBM Director Server installation options
This topic describes how to determine the options that you can select when you
install IBM Director Server. These options include features, encryption settings,
network settings, and file locations.
When you install IBM Director Server, you must make various choices. Use the
“Worksheet: Installing IBM Director Server” on page 346 to record the decisions
that you make as you work through this procedure. Complete the following steps:
1. Determine the optional features that you want to install. You can choose from
the following features:
IBM Director Remote Control Agent
Select this feature if you want to use the Remote Control task to
remotely control the management server.
BladeCenter Management
Select this feature if your environment includes BladeCenter units.
Chapter 2. Planning 143

Rack Manager
Select this feature if you want to use the Rack Manager task. You can
use the Rack Manager task to build a realistic, visual representation of
a rack and its components.2. Determine the location where you want to install IBM Director Server. By
default, IBM Director Server is installed in the following locations:
Operating System Location
i5/OS /qibm/proddata/director
Linux or AIX /opt/ibm/director
Windows d:\Program Files\IBM\Director
d is the drive letter of the hard disk drive.
3. Determine the IBM Director service account information. You need to provide
the following information when you install IBM Director Server:
v Computer name
v User name
v Password4. Determine whether you want to encrypt the data that is transmitted between
IBM Director Server and IBM Director Agent. If you want to encrypt the data
transmissions, you can select from the following encryption settings.
Advanced Encryption Setting (AES)
A block cipher algorithm, also known as Rijndael, used to encrypt data
transmitted between managed systems and the management server,
which employs a key of 128, 192, or 256 bits. AES was developed as a
replacement for DES.
Data Encryption Setting (DES)
A cryptographic algorithm designed to encrypt and decrypt data using
a private key.
Triple Data Encryption Setting (DES)
A block cipher algorithm that can be used to encrypt data transmitted
between managed systems and the management server. Triple DES is a
security enhancement of DES that employs three successive DES block
operations.5. Determine where software-distribution packages are located. By default,
software-distribution packages are located in the following directories:
Operating System Location
i5/OS /qibm/proddata/director/directory
Linux or AIX /opt/ibm/director/directory
Windows d:\Program Files\IBM\Director\directory
directory is one of the following strings:
v SwDistPk
v SwPkInst
IBM Director Server creates software-distribution packages in the SwDistPk
directory; when software packages are distributed to the instance of IBM
Director Agent running on the management server, these packages are placed
in the SwPkInst directory.
6. Determine the network settings:
144 IBM Director Installation and Configuration Guide

a. Will you enable all or only certain network interface cards (NICs)? If you
enable an individual NIC, IBM Director Server will receive only those data
packets that are addressed to the individual adapter.
b. Determine the network timeout setting, which is the number of seconds that
IBM Director Server waits for a response from IBM Director Agent. By
default, the network timeout setting is 15 seconds.
c. Determine whether you want to enable Wake on LAN.7. (If IBM Director Remote Control Agent is installed) Determine which remote
control options you want to enable:
v Require user authorization for system access
v Disable screen saver
v Disable background wallpaper
Planning for Capacity Manager
This topic provides planning steps for installing the Capacity Manager extension
for IBM Director.
The principal concern when planning to install Capacity Manager is the amount of
disk space required for Capacity Manager data and reports. For a network with
1000 managed systems, Capacity Manager may require about 4GB of disk space.
1. Estimate the disk space required for Capacity Manager data. Capacity Manager
data is stored internally, irrespective of the installed database for IBM Director.
Use the worksheet “Worksheet: Capacity Manager space requirements” on page
342 to estimate the disk space which will be required for Capacity Manager
data and reports.
2. If the disk space required for Capacity Manager data will be prohibitive,
consider the following options:
v Reduce the frequency of data collection.
v Reduce the number of days’ data that Capacity Manager will retain.
v Reduce the frequency of report generation.
v Plan to archive Capacity Manager data and reports to a system with
additional storage.
Use the Capacity Manager space requirements worksheet to re-calculate the
storage requirements with different parameters.
Selecting the IBM Director database application
The topic describes how to select the database application to use with IBM Director
Server.
IBM Director Server uses the database to store inventory information in a central
point. This inventory information then can be used for managing your assets.
Before you install IBM Director Server, you should decide which database you
want to use. Some installations will not require a database installed.
The Apache Derby database is embedded in IBM Director Server and is the default
database on all platforms except for i5/OS. The default database for i5/OS is IBM
DB2®.
Use the following steps to determine the appropriate database application for your
installation of IBM Director.
Chapter 2. Planning 145

Use Table 105 to determine what database(s) meet your needs. The criteria are
described following the table.
Table 105. Database selection criteria for IBM Director 5.10
Criterion No database Apache
Derby
IBM DB2 Microsoft
Data Engine
(MSDE)
2000
Microsoft
SQL Server
2000
Desktop
Engine
Microsoft
SQL Server
2000
Oracle
Server
PostgreSQL
Using
inventory
functionality
No Yes Yes Yes Yes Yes Yes Yes
Using
dynamic
groups
No Yes Yes Yes Yes Yes Yes Yes
Accessing
data with a
third-party
tool while
IBM Director
is running
No No Yes No Yes Yes Yes Yes
Large
managed
network (>
~500
managed
objects)
Yes No Yes No Yes Yes Yes Yes
Using
Capacity
Manager
No Yes4 Yes Yes4 Yes Yes Yes Yes
IBM Director
Server on
AIX
n/a Local
(default)
Local or
remote
No No No Local or
remote
No
IBM Director
Server on
i5/OS
n/a No Local
(default)
No No No No No
IBM Director
Server on
Linux
n/a Local
(default)
Local or
remote
No No Remote Local or
remote
Local or
remote
IBM Director
Server on
Windows
n/a Local
(default)
Local or
remote
Local Local Local or
remote
Local or
remote
No
The criteria from Table 105 are described more fully below:
Using inventory functionality
If you will be performing inventory tasks in IBM Director, a database of
some kind is required to store the inventory information.
Using dynamic groups
If you will be using dynamic groups in IBM Director, a database of some
kind is required to store the information.
Accessing data with a third-party tool while IBM Director is running
Database mining by other applications may or may not be useful in your
environment. If you will need to access IBM Director data such as
inventory or group information while IBM Director is running, you cannot
use Apache Derby. Instead, DB2, Oracle, or SQL Server are good choices.
4. Support may be limited for larger networks. For more information, refer to “Planning for Capacity Manager” on page 145.
146 IBM Director Installation and Configuration Guide

Large managed network (> ~500 managed objects)
If you will be managing a large network (approximately 500 managed
objects or more), Apache Derby is probably not sufficient to meet your
database needs.
local The database is installed on the management server along with IBM
Director Server. A local database server offers better ease of use, and
connectivity and security are simpler. Additionally, you have no
dependencies (for example, you would not have to contact the database
department to change the database settings), and a separate server is not
required for housing the database. On the other hand, you must plan
backup carefully, as you would have a single point of failure with the
database and application server residing on the same machine.
remote
The database is installed on a different server than the management server,
and accessed remotely by IBM Director Server. Remote databases have
several advantages, including reduced memory requirements for the
management server and the possibility of not having to purchase a
database license if you already have one on a corporate server.
Planning for tiered deployment of IBM Director
IBM Director’s tiered architecture requires system administrators to decide how to
deploy IBM Director components to manage objects.
Depending on the type of managed object and the management tasks you wish to
perform, IBM Director may be deployed to manage objects in one of three tiers:
Level 0
No IBM Director components installed; limited function. Level-0 managed
systems can be IBM or non-IBM servers, desktop computers, workstations,
and mobile computers supporting either the Secure Shell (SSH) or
Distributed Component Object Model (DCOM) protocol and running either
Windows or Linux. Level-0 managed objects may also include managed
objects supporting SSH or SNMP, such as Remote Supervisor Adapter
(RSA) or SNMP devices.
Level 1
IBM Director Core Services installed; more function than Level 0. Level-1
managed systems can be IBM servers, desktop computers, workstations,
and mobile computers running either Windows or Linux.
Level 2
IBM Director Agent installed; full management of object. Level-2 managed
systems can be IBM servers, desktop computers, workstations, and mobile
computers running one of the following operating systems:
v AIX
v i5/OS
v Linux (xSeries, System p5 and pSeries, and System z9 and zSeries)
v NetWare
v Windows
For each managed object or managed object type, decide what level of
management is required for the objects.
Chapter 2. Planning 147

Planning for events
An event is an occurrence of a predefined condition relating to a specific managed
object. There are two types of events: alert and resolution. An alert is the
occurrence of a problem relating to a managed object. A resolution is the occurrence
of a correction or solution to a problem relating to a managed object.
Note: In the IBM Director product, there are tasks and features that use the word
alert in place of the word event. Also, some tasks use the word notification
instead of event.
Sources that can generate events include, but are not limited to, the following
programs and protocols:
v IBM Director Agent
v IBM Director Core Services
v Microsoft Windows event log
v Windows Management Instrumentation (WMI)
v SNMP through out-of-band communication
v Alert Standard Format (ASF) Platform Event Traps (PET) through out-of-band
communication
v Intelligent Platform Management Interface (IPMI) Platform Event Traps (PET)
through out-of-band communication
v IBM service processors through out-of-band communication
To monitor one or more events, you must create an event filter that contains an
event type from one of these sources, use the event filter as part of an event action
plan, and then apply the event action plan to a managed object. Events from the
Windows event log are displayed in the Windows event log tree in the Event Type
Filter Builder. Events from WMI are displayed in the Common Information Model
(CIM) tree.
Successful use of event notification depends on careful planning. The following
questions should be considered:
1. Which events can be monitored on the managed object?
a. Which of these events are useful to my management strategy?
b. What configuration is required for the managed object to send event
notifications?2. How should event notifications be sent to IBM Director?
See the IBM Director Events Reference for additional information.
Planning events to be monitored
The events that you can monitor are divided into three groups. You can enable the
monitoring of these events using any one of the available user interfaces, including
IBM Director and a Web browser.
Tip: These events are not enabled by default.
v Critical alerts
– Temperature outside critical thresholds
– Voltage outside critical thresholds
– Tamper alert (server cover opened) - on some servers only
148 IBM Director Installation and Configuration Guide

– Multiple fans failure
– Power supply failure
– Hard disk drive failure
– VRM failurev Warning alerts (non-critical)
– Redundant power supply failure
– Single fan failure
– Temperature outside warning thresholds
– Voltage outside warning thresholdsv System alerts
– Operating system timeout value is exceeded
– Power off
– Power on
– Boot failure
– Server loader timeout value is exceeded
– PFA notification
– Partition configuration
If you enable the O/S timeout and server loader timeout alerts, then you also must
plan to enable those timeouts.
1. Consider how events will be sent by the managed systems to IBM Director
Server. There are generally two options:
v via telephonic modem
v over a LAN, using an IP address2. On the service processors that have Ethernet connections and modems, you
should configure those connections so alerts can be sent through them. For
Ethernet connections, configure either a static IP address or enable the use of
DHCP.
Tips:
v The RSA and RSA II support DHCP; however, the use of a static IP
address is potentially more reliable than using DHCP. A static address
will mean that the failure or inaccessibility of DNS and/or DHCP
servers will not prevent access to the service processor.
v If the RSA II is set to use DHCP but does not receive an address from
the DHCP server within two minutes, it will set its address as
192.168.70.125.
v For modem use, configure the standard modem settings (baud rate,
parity, and stop bits) plus any additional strings if necessary.
v For SNMP, enable traps and the SNMP agent, and configure the
community name and IP address.
v For SMTP, configure the SMTP server.
Planning for event action plan implementations
To plan and design an event action plan, you must determine what the goal of the
event action plan is. Consider which managed objects you intend to target with the
event action plan. You can target all managed objects, a subgroup of managed
objects, or a specific managed object.
Chapter 2. Planning 149

You can structure event filters and event actions in different ways. This section
presents some of the possible structures that you can use. Remember that many
event action plans might include each of the elements of each of the structures that
are presented.
When designing your event action plan structure, consider all the managed objects
in groups. Start by designing an event action plan that contains events that apply
to the largest number of objects. Then, create event action plans that cover the next
largest group of managed objects, and continue to group them until you reach the
individual managed-object level. When doing this, remember that each managed
object can be a member of multiple groups.
When planning an event action plan structure, consider the following issues:
v What do you want to monitor on most or all of the managed objects of the same
type as a whole? This answer determines the grouping and event filters for your
event action plans.
v How will you group your managed objects as smaller groups, according to the
additional events you want to monitor? The smaller groups are usually based on
the following criteria:
– Managed-object manufacturer, for vendor-specific events
– Function of the managed object, for services and resources specific to that
functionv What type of managed objects are you monitoring?
v What is the function of the managed object?
v What are the key monitors for the managed object?
v Are there other managed objects for which you want to use the same monitors?
Managing and monitoring systems with event action plans:
This topic provides information about events and event action plans; how to plan,
design, and build event action plan implementations; and how to work with
existing event action plans.
You can use event action plans to specify actions that occur as a result of events
that are generated by a managed object. An event action plan is composed of two
types of components:
v One or more event filters, which specify event types and any related parameters
v One or more event actions, which occur in response to filtered events
You can apply an event action plan to an individual managed object, several
managed objects, or a group of managed objects.
By creating event action plans and applying them to specific managed objects, you
can be notified by e-mail or pager, for example, when a specified threshold is
reached or a specified event occurs. You also can configure an event action plan to
start a program on a managed object and change a managed-object variable when
a specific event occurs. You can use process-monitor events and resource-monitor
events to build an event action plan.
Successful implementation of event action plans requires planning and
consideration of how you will implement them. In particular, developing and
following strict naming conventions is important, so that you can easily identify
what a specific plan does.
150 IBM Director Installation and Configuration Guide

Note: When you first start IBM Director, the Event Action Plan wizard starts. You
can use this wizard to create an event action plan.
Planning managed object grouping:
Event action plans are best implemented by grouping all of your managed objects
into both larger and smaller groups. The following criteria are examples of
groupings:
Type of managed object (servers, desktop computers, workstations, mobile
computers, and network equipment)
Each type of managed object has its own event action plans.
By manufacturer
Each managed-object manufacturer has its own event action plans. Many
organizations have managed objects from multiple manufacturers. In this
case, if manufacturer-specific event monitors are required, you might want
to have manufacturer-specific event action plans for each type of managed
object.
By function
Each function of the managed object has its own event action plans. Each
group of managed objects performing specific roles has different events to
monitor. For example, on all of your print servers, you might want to
monitor the print spoolers and printers.
By resources
Event action plans are based on specific resources. Typically, these event
action plans monitor a specific resource outside of those in the
managed-object type of event action plan. These resource event action
plans might apply to managed objects with more than one system function
but not to all managed objects of the same type.
By management technology
If you have many devices that send SNMP traps, you can design event
action plans to act on those events.
Structuring event action plans:
Determine the overall structure of your event action plans before you create them.
A little planning in advance can prevent wasted time and duplication of effort.
Consider the following examples of event action plan structures:
A structure based on the areas of responsibility of each administrator
Servers are maintained and managed by one group of personnel, and
desktop computers and mobile computers are maintained by another
group of personnel.
A structure based on administrator expertise
Some organizations have personnel that specialize in particular types of
technology. These individuals might be responsible for complete managed
objects or only certain software running on these managed objects.
A structure based on managed-object function
Servers performing different functions are managed differently.
A structure based on the type of event
Examples of some structures based on the type of event are monitoring a
specific process and monitoring for hardware events.
Chapter 2. Planning 151

A structure based on workday shifts
Because you can set up the event filters to be active during certain parts of
certain days, you can structure your event action plans and event filters
according to the shift that will be affected by the events that are occurring.
Structuring event filters:
You can use an event filter to capture a single event or multiple events. The
following list includes some of the criteria that you can use to determine whether
to include an event with other events:
v All managed objects that are targeted for the filter are able to generate all events
that are included in the filter. If the managed object does not generate the event
for which the filter is defined, the filter will not be effective on that managed
object.
v The event actions that will be used to respond to the event are the same for all
targeted objects.
v The other event filter options besides the event type are common for all targeted
objects. These settings include the times the event filter is active, the severity of
the event, and other attributes.
Event action plans can include event filters with event types that are not generated
by all managed objects. In such instances, you can apply the event action plan to
those managed objects, but it will have no effect. For example, if an event filter is
based on a ServeRAID event and that event action plan is applied to managed
objects that do not have a ServeRAID adapter installed, the event filter has no
events to filter, and therefore, no actions are performed. If you understand this
concept, you can create more complex event action plans, and you can reduce the
number of event action plans you have to build and maintain.
All currently available event types are displayed in the tree on the Event Type
page in the Event Filter Builder window. The currently installed tasks and
extensions publish their events in the Event Type tree when IBM Director Server or
IBM Director Agent starts.
Note: Whether the events are published when IBM Director Server or IBM
Director Agent starts depends on the tasks or extensions and how they are
implemented.
If you add an extension to your IBM Director installation, the extension
might publish its events either when it is added to the installation or when
the extension sends its first event. If the extension publishes when it sends
its first event, only that event is published.
152 IBM Director Installation and Configuration Guide

Chapter 3. Installing
This section provides instructions for installing IBM Director Server, IBM Director
Console, IBM Director Core Services, IBM Director Agent, and IBM Director
extensions. In addition, it contains information about how to prepare your
environment for the installation of IBM Director, instructions for upgrading IBM
Director from previous releases, and recommendations for the initial configuration
of IBM Director.
Preparing to install IBM Director
Use this section to ensure that your environment is set up properly for the
installation and use of IBM Director.
Preparing the IBM Director database
This topic describes how to prepare the SQL database that IBM Director uses to
store inventory data.
Unless you plan to use Apache Derby or IBM DB2 Universal Database for iSeries,
you must prepare the database application before configuring IBM Director Server
to use it. IBM Director can be installed before preparing the database, but you will
not be able to use database-dependent features until you configure IBM Director
Server to use a database.
The preparation required depends on the database application; it might include
one or more of the following tasks:
v Downloading and installing the applicable Java Database Connectivity (JDBC)
drivers
v Creating a database or server ID
v Configuring and starting a TCP/IP listener
v Setting the authentication mode
The database administrator should determine an appropriate size for the database
file. If IBM Director will be managing 300 - 500 systems, an initial size of 100 MB is
sufficient. A larger database might be necessary if there will be additional managed
systems or extensive inventory data.
Preparing IBM DB2
This topic describes how to prepare an IBM DB2 database for use with IBM
Director.
The IBM DB2 database can be installed on the management server. Except when
IBM Director Server is installed on i5/OS, the IBM DB2 database can optionally be
installed on a remote server from the management server. See Table 106 on page
154 for a detailed listing of IBM DB2 database installation options.
© Copyright IBM Corp. 1999, 2005 153

Table 106. IBM DB2 installation options
IBM Director
Server installed
on:
IBM DB2 database installed on:
Same server as
IBM Director
Server AIX Linux Windows
AIX local remote remote remote
i5/OS local - - -
Linux local remote remote remote
Windows local remote remote remote
Complete the following tasks before installing IBM Director Server:
1. Install IBM DB2 Universal Database 8.1 with fix pack 9a, if you have not done
so already.
Note: The DB2 client installation is not required for IBM Director release 5.10.
2. Install the DB2 Java JDBC Type 4 Universal driver on the management server.
This driver is located on the DB2 Run-time or Administration Client. Only the
Java support selection is required. The installation must use the driver
provided with Fix Pack 9a.
3. Create a user on the DB2 server for the IBM Director database.
4. Create the DB2 database, if it does not already exist. The DB2 database must be
created on the local or remote server before you configure IBM Director to use
it.
5. Grant the following runtime permissions for the user you created on the DB2
server:
v CREATE TABLE
v ALTER TABLE
v DROP TABLE
v CREATE INDEX
v ALTER INDEX
v DROP INDEX
v CREATE VIEW
v ALTER VIEW
v DROP VIEW6. If IBM Director Server will be installed on a Linux platform, perform the
following steps on the Linux management server on which IBM Director Server
will be installed:
a. Create a /etc/ibm/director/setup_env file. Add the following statement to
the file:
. /home/db2inst1/sqllib/db2profile
home/db2inst1 is the directory in which DB2 is installed. This statement sets
up the DB2 environment.
b. Set the setup_env file attributes to read-execute.7. Provide the following information to the system administrator who will install
IBM Director Server:
v TCP/IP listener port ID
v Host name of the database server
v Database name
v User ID and password
154 IBM Director Installation and Configuration Guide

Note: The IBM DB2 Information center has current information about security in
DB2.
Preparing Microsoft Data Engine and Microsoft SQL Server 2000
This topic describes how to prepare a Microsoft Data Engine (MSDE) 2000 or
Microsoft SQL Server 2000 database for use with IBM Director.
Complete the following tasks before installing IBM Director Server:
1. (Microsoft SQL Server 2000 only) Install Microsoft SQL Server 2000 Service
Pack 3a, enabling network connections and setting the security to mixed mode.
The Java Database Connectivity (JDBC) driver provided by Microsoft does not
support trusted connections; these settings enable the database to work with
the SQL Server 2000 Driver for JDBC required by IBM Director.
2. (MSDE 2000 only) Install MSDE 2000 Service Pack 3a, using the following
command-line parameters to override the default settings:
DISABLE NETWORKPROTOCOLS=0
SECURITYMODE=SQL
If SP 3a is already installed: By default, Service Pack 3a is installed with
network connections disabled and security set to
Windows authentication. Ensure that network
connections are enabled and that the
authentication mode is set to mixed mode. For
information about changing these parameters for
an existing installation, see the following
Microsoft Knowledge Base articles:
v 285097 How to Change the Default Login
Authentication Mode to SQL
v 319930 How to Connect to Microsoft Desktop
Engine
3. Install the SQL Server 2000 Driver for JDBC Service Pack 3. You can download
this driver from www.microsoft.com/sql/downloads.
4. Set the system variable CLASSPATH to include the following entries:
v sql_server_directory/lib/msbase.jar
v sql_server_directory/lib/msutil.jar
v sql_server_directory/lib/mssqlserver.jar
Replace sql_server_directory with the fully qualified path of the directory in
which the SQL Server 2000 Driver for JDBC is installed.
Note: For Linux installations, use the /etc/ibm/director/setup_env file to set
CLASSPATH.
For example:
Windows CLASSPATH=.;
c:\Microsoft SQL Server 2000 Driver for JDBC\lib\msbase.jar;
c:\Microsoft SQL Server 2000 Driver for JDBC\lib\msutil.jar;
c:\Microsoft SQL Server 2000 Driver for JDBC \lib\mssqlserver.jar
UNIX CLASSPATH=/opt/msSQLjdbc/lib/msbase.jar:
/opt/msSQLjdbc/lib/msutil.jar:
/opt/msSQLjdbc/lib/mssqlserver.jar
5. Create an SQL Server ID for use with IBM Director.
Chapter 3. Installing 155

6. Complete one of the following tasks:
Option Description
To create the database during the
installation of IBM Director
Assign the SQL Server ID Create Database
permission in the master database. When the
database is created during the IBM Director
installation, the size of the database is set to
the larger of the following sizes:
v The size of the model database
v The default database size specified in the
SQL Server configuration options
To create the database now Create the SQL Server database and give the
following runtime permissions to the SQL
Server ID that you created in step 1 on page
155:
v CREATE TABLE
v ALTER TABLE
v DROP TABLE
v CREATE INDEX
v ALTER INDEX
v DROP INDEX
v CREATE VIEW
v ALTER VIEW
v DROP VIEW
7. Provide the following information to the system administrator who will install
IBM Director Server:
v TCP/IP listener port ID
v Host name of the database server
v Database name
v User ID and password
Preparing Oracle Server
This topic describes how to prepare an Oracle Server database for use with IBM
Director.
Before preparing the Oracle Server database for use with IBM Director, ensure that
the following conditions are met:
v Oracle Server must be installed.
v IBM Director is certified to run with the Oracle Java Database Connectivity
(JDBC) thin driver for use with Java Development Kit (JDK) 1.4 only. One of the
following Oracle Java Database Connectivity (JDBC) thin drivers must be
installed:
For Oracle Server 9.2 Version 9.2.0.5
For Oracle Server 10g Version 10.1.0.2.0
You can download the Oracle JDBC thin drivers from
www.otn.oracle.com/software/content.html.
Complete the following tasks before installing IBM Director Server:
1. Make sure that the CLASSPATH statement points to the fully qualified name of
the ojdbc14.jar file that contains the Oracle JDBC thin driver.
2. Create the Oracle Server database.
156 IBM Director Installation and Configuration Guide

3. Configure and start the Oracle TCP/IP listener.
4. If IBM Director Server will be installed on a Linux platform, perform the
following steps on the Linux management server on which IBM Director Server
will be installed:
a. Create a /etc/ibm/director/setup_env file. Add the following statements to
the file:
CLASSPATH=path/ojdbc14.jar
export CLASSPATH
path is the path of the ojdbc14.jar file that contains the Oracle JDBC driver.
b. Set the setup_env file attributes to read-execute.5. Provide the following information to the system administrator who will install
IBM Director Server:
v Oracle administrator account ID and password
v Oracle system identifier (SID)
v Oracle TCP/IP listener port ID
v TCP/IP host name of the database server
Note: The Oracle administrator account ID and password are used to perform
the following tasks only:
v Create table spaces and a role (TWG_ROLE)
v Assign a user ID and password
IBM Director does not save the Oracle administrator account ID and
password.
Preparing PostgreSQL
This topic describes how to prepare a PostgreSQL database for use with IBM
Director.
v PostgreSQL must be installed.
v The Java Database Connectivity (JDBC) driver must be compatible with JDK 1.4.
v The PostgreSQL postmaster must be running with the -i flag.
Complete the following tasks before installing IBM Director Server:
1. Create a PostgreSQL server ID for use with IBM Director.
2. Complete one of the following tasks:
Option Description
To create the database during the
installation of IBM Director
Assign the PostgreSQL server ID that you
created in step 1 Create Database
permission.
Chapter 3. Installing 157

Option Description
To create the database now Create the PostgreSQL database and give the
following runtime permissions to the
PostgreSQL server ID that you created in
step 1 on page 157:
v CREATE TABLE
v ALTER TABLE
v DROP TABLE
v CREATE INDEX
v ALTER INDEX
v DROP INDEX
v CREATE VIEW
v ALTER VIEW
v DROP VIEW
3. If IBM Director Server will be installed on a Linux platform, perform the
following steps on the Linux management server on which IBM Director Server
will be installed:
a. If the PostgreSQL JDBC driver is not named postgresql.jar, create a
symbolic link for the driver. From a command prompt, type the following
command and press Enter:
ln -s realname path/postgresql.jar
v realname is the fully qualified name of the PostgreSQL JDBC driver, for
example, /opt/postgres/lib/jdbc7.1-2.jar.
v path is the path of the symbolic link, for example, /opt/postgres/lib/.b. Create a /etc/ibm/director/setup_env file. Add the following statement to
the file:
export CLASSPATH=path/postgreslq.jar
path is the path of the PostgreSQL JDBC driver, for example,
/opt/postgres/lib.
Note: If you created a symbolic link to the PostgreSQL JDBC driver, path is
the path of the symbolic link.
c. Set the setup_env file attributes to read-execute.4. Provide the system administrator who will install IBM Director Server with the
following information:
v Database name (if the PostgreSQL database was created in step 2 on page
157)
v Host name of the database server
v PostgreSQL IP listener port
v User ID and password, if necessary
Preparing to install IBM Director Server
This topic describes how to prepare your system for the installation of IBM
Director Server.
Preparing to install IBM Director on an iSeries server
This topic provides information about preparing an iSeries server for the
installation of IBM Director.
Before you install IBM Director on an iSeries server, consider the following
information:
158 IBM Director Installation and Configuration Guide

v IBM Director for i5/OS is installed using the IBM Virtualization Engine
installation wizard. When you select to install IBM Director Server, the
installation images for IBM Director Agent and IBM Director Console are also
selected to by copied to the management server by default. After the installation
of IBM Director Server is complete, you must install IBM Director Console on a
desktop computer, workstation, or mobile computer to provide a GUI to access
IBM Director Server.
v The iSeries server must be in an unrestricted state, and your user profile should
have *ALLOBJ, *SECADM, *JOBCTL, and *IOSYSCFG special authorities.
v Ensure that the following products and options are installed on the iSeries
(i5/OS V5R3) server where you plan to install IBM Director, along with the
latest cumulative PTF packages or Group PTFs. They are required to successfully
install and securely run IBM Director.
Table 107. iSeries servers: Required products and options
Products or options Order number
IBM Cryptographic Access Provider 128-bit for iSeries 5722-AC3
IBM HTTP Server for iSeries 5722-DG1
Extended Base Directory Support, Option 3 5722-SS1
Java Developer Kit 1.4, Option 6 5722-JV1
OS/400® - Qshell, Option 30 5722-SS1
OS/400 - Digital Certificate Manager, Option 34 5722-SS1
v If you plan to use Software Distribution to distribute IBM Director Agent to
Level-0 managed systems that are running i5/OS, ensure you have installed and
configured Open SSH, provided in i5/OS Utilities, *BASE and Option 1 (order
number 5733-SC1) on the managed systems. For more information about Open
SSH, see www.openssh.org.
v If you plan to use IBM Director to monitor SNMP devices in your IBM eServer
i5 or iSeries environment, ensure you have completed the necessary
configuration tasks for iSeries and SNMP devices. See the Networking topic in
the iSeries Information Center for more information.
v If you want to install IBM Director on an i5/OS logical partition that is running
AIX, see “Preparing to install IBM Director on System p5 and pSeries servers”
Preparing to install IBM Director on System p5 and pSeries
servers
This topic provides information about preparing a System p5 or pSeries server for
the installation of IBM Director.
Before you install IBM Director on a System p5 or pSeries server, consider the
following information:
v (Red Hat Enterprise Linux AS, version 4.0, for IBM POWER only) All
Components
Before installing IBM Director on a system running Red Hat Enterprise Linux
AS, version 4.0, for IBM POWER, ensure that the following RPM file is installed:
compat-libstdc++-33-3.2.3-47.3.ppc.rpm
v (AIX only) IBM Director Server and Level 2: IBM Director Agent
Ensure that the following packages are installed:
– openSSL RPM
– sysmgt.pegasus.cimserver
– sysmgt.pegasus.osbaseproviders
Chapter 3. Installing 159

For more information about installation and requirements for OpenSSL and
Pegasus, go to the pSeries and AIX Infocenter at
publib.boulder.ibm.com/infocenter/pseries/index.jsp?topic=/com.ibm.aix.doc/
aixbman/cim/ciminstall.htm.
v (Linux on POWER only) IBM Director Core Services
Ensure that the following RPM files (or later versions) are installed:
– librtas-1.2-1.ppc64.rpm
– ppc64-utils-2.5-2.ppc64.rpm
– lsvpd-0.12.7-1.ppc.rpm
You can download these RPM files from the IBM Service and productivity tools
for Linux on POWER Web site at techsupport.services.ibm.com/server/lopdiags.
Select the appropriate tab for your Linux distribution.
v (SUSE LINUX Enterprise Server 9 for IBM POWER only) Level 1: IBM
Director Core Services
Disable the Service Location Protocol daemon (SLPD) before installing IBM
Director Core Services. IBM Director Server does not discover Level-1 managed
objects that are running SLPD.
v IBM Director Console
– (AIX only) Ensure that the following packages are installed:
- sysmgt.sguide
- sysmgt.websm– (AIX only) Before installing IBM Director Console on AIX, you must install
IBM Director Agent.
– (IBM eServer BladeCenter JS20 blade servers only) To access IBM Director
Console on an IBM eServer BladeCenter JS20 blade server you need a fast
network connection to a workstation with a Virtual Network Computing
(VNC) client or an X-Windows server.
Preparing to install IBM Director on an xSeries server
This topic provides information about preparing an xSeries server for the
installation of IBM Director.
Before you install IBM Director on an xSeries server, consider the following
information:
v All components
– (Linux only) Make sure that the instance of IBM Director Agent running on
the management server will be fully functional and able to send alerts to IBM
Director Server. For the IBM Director Agent to be fully functional you might
need to install service processor device drivers or the IBM LM78 and SMBus
device drivers for Linux.
– (Linux only) Before you install IBM Director on Red Hat Enterprise Linux AS
and ES, version 3.0, make sure that the following RPM file is installed:
compat-libstdc++-7.3-2.96.122.i386.rpm
– (Linux only) Before you install IBM Director on Red Hat Enterprise Linux AS
and ES, version 4.0, make sure that the following RPM files are installed:
compat-libstdc++-296-2.96-132.7.2.i386.rpm
– (Intel Itanium systems; Linux only) Before you install IBM Director on an
64-bit Intel Itanium system running Red Hat Enterprise Linux AS, version 4.0,
for Intel Itanium, make sure that the following RPM file is installed:
compat-libstdc++-33-3.2.3-47.3.ia64.rpm
160 IBM Director Installation and Configuration Guide

– (Upgrades; Linux only) If you are upgrading from IBM Director, version 4.20
or later on SUSE LINUX Enterprise Server 9 for x86, ensure that the following
RPM is installed:
rpm-4.1.1-177.9.i586.rpm
– (Systems with IPMI Baseboard Management Controllers) The supporting IPMI
device drivers and mapping layers must be installed. IBM Director cannot
receive System Health Monitoring information if these drivers and mapping
layers are not installed. The device drivers and mapping layers for Windows,
Linux, and NetWare can be downloaded from the IBM Support Web site at
www.ibm.com/pc/support.
For eServer 325 or eServer 326 models, download and install the following
items (the exact names of the files to download are dependent upon your
operating system):
- Microsoft Windows Installer (MSI) IPMI device drivers
- IBM IPMI Library (mapping layer)
For all other xSeries systems, download and install the following items (the
exact names of the files to download are dependant upon your operating
system):
- OSA IPMI device drivers
- IBM Mapping layer software source for OSA IPMI
Important: You must install the device driver first and then install the
mapping layer.v (Linux only) IBM Director Server
Before you install IBM Director on Red Hat Enterprise Linux AS and ES, version
4.0, make sure that the following RPM file is installed:
compat-libstdc++-33-3.2.3-47.3.i386.rpm
v (Linux only)Level 1: IBM Director Core Services and Level 2: IBM Director
Agent
– If you want to use the Remote Session task on the managed system, make
sure that the package that contains telnetd daemon is installed and
configured. This is usually in the telnet_server_version.i386.RPM package,
where version is the code level of your Linux distribution.
Service-processor device drivers:
This topic lists the service-processor device drivers that must be installed before
installing IBM Director.
If you plan to install IBM Director Server or IBM Director Agent on an xSeries
server that contains one of the following service processors, make sure that the
service processor device driver has been installed:
v Advanced System Management processor
v Advanced System Management PCI Adapter
v Remote Supervisor Adapter
v Remote Supervisor Adapter II
IBM LM78 and SMBus device drivers for Linux:
This topic describes when to install the LM78 and SMBus device drivers for Linux.
If you plan to install IBM Director Server on an xSeries server running Linux, you
might need to install either or both the LM78 and SMBus device drivers for Linux.
Chapter 3. Installing 161
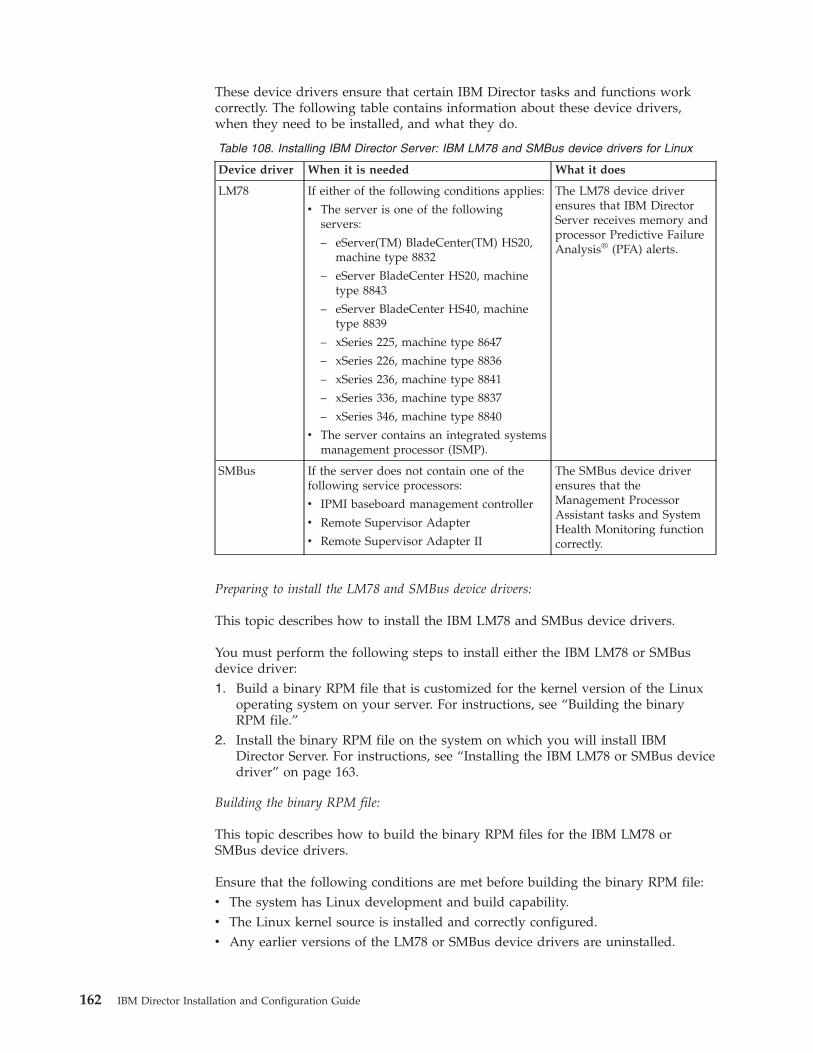
These device drivers ensure that certain IBM Director tasks and functions work
correctly. The following table contains information about these device drivers,
when they need to be installed, and what they do.
Table 108. Installing IBM Director Server: IBM LM78 and SMBus device drivers for Linux
Device driver When it is needed What it does
LM78 If either of the following conditions applies:
v The server is one of the following
servers:
– eServer(TM) BladeCenter(TM) HS20,
machine type 8832
– eServer BladeCenter HS20, machine
type 8843
– eServer BladeCenter HS40, machine
type 8839
– xSeries 225, machine type 8647
– xSeries 226, machine type 8836
– xSeries 236, machine type 8841
– xSeries 336, machine type 8837
– xSeries 346, machine type 8840
v The server contains an integrated systems
management processor (ISMP).
The LM78 device driver
ensures that IBM Director
Server receives memory and
processor Predictive Failure
Analysis® (PFA) alerts.
SMBus If the server does not contain one of the
following service processors:
v IPMI baseboard management controller
v Remote Supervisor Adapter
v Remote Supervisor Adapter II
The SMBus device driver
ensures that the
Management Processor
Assistant tasks and System
Health Monitoring function
correctly.
Preparing to install the LM78 and SMBus device drivers:
This topic describes how to install the IBM LM78 and SMBus device drivers.
You must perform the following steps to install either the IBM LM78 or SMBus
device driver:
1. Build a binary RPM file that is customized for the kernel version of the Linux
operating system on your server. For instructions, see “Building the binary
RPM file.”
2. Install the binary RPM file on the system on which you will install IBM
Director Server. For instructions, see “Installing the IBM LM78 or SMBus device
driver” on page 163.
Building the binary RPM file:
This topic describes how to build the binary RPM files for the IBM LM78 or
SMBus device drivers.
Ensure that the following conditions are met before building the binary RPM file:
v The system has Linux development and build capability.
v The Linux kernel source is installed and correctly configured.
v Any earlier versions of the LM78 or SMBus device drivers are uninstalled.
162 IBM Director Installation and Configuration Guide

You must build the binary RPM file on a system with the same kernel version and
hardware configuration as the system on which you will install IBM Director
Server. Make sure that the hardware configuration is similar in regard to the
number of processors and that any previous versions of the drivers have been
uninstalled.
Note: If you are building on Red Hat Enterprise Linux ES, version 4.0 and the
/usr/src/linux does not exist, perform the following steps:
1. From a command prompt, change to the /usr/src directory.
2. Type the following command and press Enter:
ln -s ./kernels/<version>/ ./linux
where <version> is the appropriate kernel subdirectory under
/usr/src/kernels (for example, 2.6.9-5.EL-smp-i686), which matches the
kernel the system is currently running.
Complete the following steps to build either the LM78 or SMBus device driver:
1. Copy the source file (ibmlm78-5.10-1.tgz for the LM78 driver or
ibmsmb-5.10-1.tgz for the SMBus driver) to the SOURCES directory.
2. From a command prompt, change to the SOURCES directory.
3. Type one of the following commands and press Enter:
LM78 driver SUSE LINUX Enterprise
Server 8 for x86
rpm -tb ibmlm78-5.10-1.tgz
All other supported Linux
distributions
rpmbuild -tb ibmlm78-5.10-1.tgz
SMBus
driver
SUSE LINUX Enterprise
Server 8 for x86
rpm -tb ibmsmb-5.10-1.tgz
All other supported Linux
distributions
rpmbuild -tb ibmsmb-5.10-1.tgz
Running this command creates a binary RPM file in the RPMS/architecture
directory, where architecture is one of the following strings:
v i586 (SUSE LINUX Enterprise Server 9 for x86
v i386 (all other 32-bit operating systems)
v X86_64 (64-bit operating systems)
Installing the IBM LM78 or SMBus device driver:
This topic describes how to install the IBM LM78 or SMBus device driver.
Before installing the IBM LM78 or SMBus drivers, you must build the binary RPM
file. See “Building the binary RPM file” on page 162 for more information.
You can install the binary RPM file either on the server on which it was built or on
another server that has the same Linux kernel and hardware configuration.
Complete the following steps to install either the IBM LM78 or SMBus device
driver:
1. If you built the binary RPM file on another server, complete the following
steps:
Chapter 3. Installing 163

a. Make sure that any earlier versions of the device drivers have been
uninstalled from the server where you will install version 5.10 of the device
driver and IBM Director.
b. Copy the binary RPM file to an RPMS/architecture directory, where
architecture is either i386 (for a 32-bit operating system) or X86_64 (for a
64-bit operating system).
Note: In this procedure, driver is one of the following strings:
For the IBM LM78 device driver ibmlm78
For the IBM SMBus device driver ibmsmb
2. Change to the RPMS/architecture directory.
3. From a command prompt, type the following command and press Enter:
rpm -ivh driver-5.10-1.architecture.rpm
where architecture is one of the following values:
v i386 (32-bit operating systems)
v X86_64 (64-bit operating systems)
Issuing this command performs the following tasks:
v Decompresses and untars the archive into the /usr/local/driver directory
v Copies the device driver, shared library, and all the configuration files to the
appropriate locations
v Loads and starts the device driver
Uninstalling the IBM LM78 or SMBus device driver:
This section describes how to uninstall the IBM LM78 or SMBus device drivers.
Before you install the IBM LM78 or SMBus device driver, version 5.10, you must
uninstall any previous versions of the drivers from the server.
Uninstalling the IBM LM78 or SMBus device driver, version 4.21 or later:
This topic describes how to uninstall the IBM LM78 or SMBus device driver,
version 4.21 or later.
Note: For instructions about how to uninstall the IBM LM78 or SMBUS device
driver, version 4.20 or earlier, see “Uninstalling the IBM LM78 driver,
version 4.20 or earlier” on page 165 and “Uninstalling the IBM SMBus
device driver, version 4.20 or earlier” on page 165.
To uninstall the IBM LM78 or SMBus device driver, version 4.21 or later, open a
command prompt, type the following command, and press Enter:
rpm -e driver
where driver is one of the following strings:
For the IBM LM78 device driver ibmlm78
For the IBM SMBus device driver ibmsmb
164 IBM Director Installation and Configuration Guide

Issuing this command unloads the device driver and removes all driver-related
files from the server.
Uninstalling the IBM LM78 driver, version 4.20 or earlier:
This topic describes how to uninstall versions 4.20 or earlier of the IBM LM78
driver.
Note: For instructions about how to uninstall the IBM LM78 or SMBus driver,
version 4.21 or later, see “Uninstalling the IBM LM78 or SMBus device
driver, version 4.21 or later” on page 164.
To uninstall the IBM LM78 device driver, version 4.20 or earlier, complete the
following steps:
1. To uninstall the binary RPM file, from a command prompt, type the following
command and press Enter:
rpm -e ibmlm78
2. To uninstall the source RPM file, open a command prompt, type the following
command, and press Enter:rpm -e ibmlm78-src-distribution
where distribution is one of the following strings:
For servers running Red Hat Linux or
VMware ESX Server
redhat
For servers running SUSE LINUX suse
Issuing this command unloads the device driver and removes all driver-related
files from the server.
Uninstalling the IBM SMBus device driver, version 4.20 or earlier:
This topic describes how to uninstall the IBM SMBus device driver, versions 4.20
or earlier.
Note: For instructions about how to uninstall the SMBus device driver, version
4.21 or later, see “Uninstalling the IBM LM78 or SMBus device driver,
version 4.21 or later” on page 164.
To uninstall the IBM SMBus device driver, version 4.20 or earlier, complete the
following steps:
1. To uninstall the binary RPM file, from a command prompt, type the following
command and press Enter:
rpm -e ibmsmb
2. To uninstall the source RPM file, open a command prompt, type the following
command, and press Enter:rpm -e ibmsmb-src-distribution
where distribution is one of the following strings:
For servers running Red Hat Linux or
VMware ESX Server
redhat
For servers running SUSE LINUX suse
Chapter 3. Installing 165

Issuing this command unloads the device driver and removes all driver-related
files from the server.
Preparing to install IBM Director on a System z9 or zSeries
server
This topic provides information about preparing a System z9 or zSeries server for
the installation of IBM Director.
Before you install IBM Director on a System z9 or zSeries server, consider the
following information:
v All components
– Make the installation code available to your Linux on System z9 and zSeries.
You can use the IBM Director 5.10 for Linux on System z9 and zSeries CD or the
IBM Director Support Web site as the source of the installation code.
System z9 and zSeries servers, typically, do not have directly attached
CD-ROM drives. If you are using the CD, you might have to mount the CD
on a different platform. Table 109 lists some methods of making the
installation code available.
Table 109. Making the IBM Director installation code available to Linux on System z9
and zSeries
Method How to proceed
NFS server 1. Mount the CD on an NFS server. You might already have set up
an NFS server for installing Linux.
The steps for mounting the CD depend on the platform on
which the NFS server runs. Refer to the installation information
for that platform for details.
2. Access the NFS server from your Linux on System z9 and
zSeries system.
ISO image 1. Mount the CD on the platform of your choice.
The steps for mounting the CD depend on the platform. Refer to
the installation information for that platform for details.
2. Create an ISO image. For example, if you are accessing the CD
from Linux, you can issue a command of this form:
dd if=/dev/cdrom of=./iso_file_name
where /dev/cdrom is the device node for the CD-ROM drive and
iso_file_name is the name of the ISO image.
3. Transfer the ISO image to your Linux on System z9 and zSeries,
for example, with FTP.
4. On the Linux on System z9 and zSeries system, mount the ISO
image through a loopback device:
mount -o loop iso_file_name /mnt
where iso_file_name is the name of the ISO image and /mnt the
mount point of the file system.
Web download 1. To obtain the tar file with the installation code go to the IBM
Director Support Web site at
www.ibm.com/servers/eserver/xseries/
systems_management/ibm_director/
2. Decompress the contents of the tar file to a local directory.
166 IBM Director Installation and Configuration Guide

– Ensure that the following RPMs are installed:
Table 110. Required RPMs
Red Hat
Enterprise
Linux AS,
version 4.0
31-bit compat-libstdc++-295-2.95.3-81.s390.rpm
compat-libstdc++-33-3.2.3-47.3.s390.rpm
64-bit compat-libstdc++-295-2.95.3-81.s390x.rpm
compat-libstdc++-33-3.2.3-47.3.s390x.rpm
SUSE LINUX
Enterprise
Server 9
31-bit compat-2004.7.1-1.2.s390.rpm
64-bit compat-2004.7.1-1.2.s390x.rpm
compat-32bit-9-200407011411.s390x.rpm
v Level 1: IBM Director Core Services
Make sure that SSH is available.
v Level 2: IBM Director Agent
– Make sure that SSH is available.
– Ensure that the CPINT RPM is installed.
This RPM is shipped with SUSE LINUX Enterprise Server 9.
For Red Hat Enterprise Linux AS, you can download the RPM from
linuxvm.org/Patches/. You need version 2.5.3 or later.
Note: Be aware that installing the RPM on Red Hat Linux AS might affect
any support contract you may have for the distribution.v IBM Director Console
To access IBM Director Console on Linux on System z9 and zSeries you need a
fast network connection to a workstation with a Virtual Network Computing
(VNC) client or an X-Windows server.
v If you want to use IBM Director Server on System z9 or zSeries for
heterogeneous management, you require agents for the platforms to be
managed. You can obtain these agents from the IBM Director Agents for AIX 5L,
i5/OS, Windows, Linux on xSeries, System z9, zSeries and POWER CD.
Preparing Level-1 managed systems
This topic describes procedures for preparing systems for Level-1 management
with IBM Director Core Services.
Perform the following steps on each system to be managed with IBM Director Core
Services:
1. Set the clock on the managed system to match the time of the management
server. If the managed system time is earlier than that of the management
server, the management server will be unable to unlock the managed system.
To avoid the problem of system-time mismatch, you can configure managed
systems and the management server to synchronize their clocks using a
common network time protocol (NTP) server.
2. (Level-1 managed systems with ServeRAID controllers only) In order for the
management server to receive inventory data and events information from the
system, you must install the ServeRAID Manager software that was included
with the controller.
3. The chkconfig bug fix for Red Hat Enterprise Linux AS, ES, and WS, version
3.0 must be installed on Level-1 managed systems running the following
operating systems:
v Red Hat Enterprise Linux AS, version 3.0
Chapter 3. Installing 167

v Red Hat Enterprise Linux ES, version 3.0
v Red Hat Enterprise Linux WS, version 3.0
IBM Director Server might not discover these systems if the chkconfig bug fix
is not installed.
For more information about the chkconfig bug fix and how to download it, go
to rhn.redhat.com/errata/RHBA-2005-116.html.
Preparing Windows XP managed systems
This topic describes procedures for preparing Windows XP systems for discovery
by IBM Director Server.
Typically, managed systems are first discovered using IBM Director Server. Then,
IBM Director Core Services or IBM Director Agent is installed on the managed
systems directly from IBM Director Console. However, the configuration of some
Windows XP managed systems can prevent discovery by IBM Director Server.
Perform the following steps on each Windows XP system to enable discovery by
IBM Director Server:
1. Disable Simple File Sharing. Windows XP targets must have Simple File
Sharing disabled for Level 0 discovery to work. Use the following steps to
disable Simple File Sharing on the Windows XP system to be managed:
a. Select Start → Control Panel → Folder Options.
b. In the Folder Options window, click the View tab.
c. In the View panel, scroll to the bottom of the Advanced settings list and
clear the Use simple file sharing (Recommended) check box.
d. Click OK.2. Configure Windows Firewall (Internet Connection Firewall) to allow access by
IBM Director Server. Windows XP (before Service Pack 2) includes a built-in
firewall called Internet Connection Firewall (ICF), which is disabled by default.
Windows XP Service Pack 2 includes Windows Firewall, which is enabled by
default. Either firewall will block attempted accesses by Level 0 discovery
unless the firewall is disabled or an exception is defined for the management
server on which IBM Director Server is installed.
Use the following steps to enable IBM Director Server to access the managed
system:
a. Select Start → Control Panel → Network Connections → connection. The
connection is the network connection that will be used for discovery.
Typically, this is Local Area Connection.
b. In the General tab of the connection status window, click Properties.
c. In the connection properties window, click the Advanced tab.
d. In the Advanced panel, click the firewall Settings button.
e. If the firewall is turned off, no further configuration is required. Continue to
step 3.
f. If the firewall is enabled, click the Exceptions tab.
g. In the Exceptions panel, select the File and Printer Sharing check box.
h. Click OK.
Note: The network administrator can define a group policy for this
configuration.
3. Verify that remote registry administration is enabled. Remote registry
administration must be enabled in order for Level 0 discovery to run
168 IBM Director Installation and Configuration Guide

commands and execute scripts on the managed system. The default setting for
remote registry administration on Windows XP systems is enabled. Use the
following steps to verify or change the remote registry administration setting:
a. At a command prompt, type %SystemRoot%\system32\services.msc /s and
press Enter.
b. In the list of services in the Services window, right-click the Remote
Registry service and select Properties from the menu.
c. On the General page, set the Startup type to Automatic.
d. If the Service status is not Started, click Start.
e. Click OK to apply the new settings and close the window.4. Verify the hidden administrative disk shares (such as C$, D$, etc). The default
hidden administrative disk shares (such as C$, D$, and so on) are required for
correct operation of Level 0 discovery.
Preparing your System z9 or zSeries environment for z/VM
Center
Before you can use z/VM Center, you need to perform some setup tasks on the
System z9 or zSeries mainframe.
z/VM Center will operate with z/VM 5.1 and z/VM 5.2 systems that are installed
on IBM System z9 or
zSeries hardware. There are some setup tasks that
you need to perform on each z/VM for which you want to use z/VM Center.
Some of these tasks are setup tasks for the z/VM system itself other tasks involve
setting up a special z/VM guest virtual machine, the z/VM manageability access
point. The z/VM manageability access point acts as an agent to z/VM Center and
uses the z/VM systems management API, the z/VM directory manager interface,
and the z/VM control program to perform z/VM Center tasks.
If your installation uses a security manager (for example, RACF) in addition to the
built-in z/VM security, you might have to supplement or replace the privileges
and permissions described in this section with privileges or permissions granted
through your security manager.
Setting up your z/VM for z/VM Center
The Common Information Model (CIM) profile for z/VM management requires a
directory manager product. You must set up disk pools to be used by the directory
manager. You must also set up the systems management API, and Virtual Machine
Resource Manager (VMRM).
Before you start: If you are using z/VM 5.1, you require the PTFs for APAR
VM63804.
z/VM Center restrictions:
This topic describes z/VM Center restrictions you should be aware of when
preparing z/VM for z/VM Center.
v For its provisioning tasks, z/VM Center cannot work with disk resources other
than minidisks that are made available in form of disk pools (allocation groups).
v z/VM directory displays data on guest virtual machines as it is defined in the
z/VM directory. Dynamic changes—for example, through a CP command—are
not reflected. The displayed information comprises:
Chapter 3. Installing 169

User IDs:
name, password and privilege class
Processors:
all static information
Memory:
initial size and maximum size
Minidisks:
MDISK and LINK definitions, dedicated disks are omitted
NetworkPorts:
OSA and HiperSocket, Guest LAN, VSWITCHv z/VM Center only recognizes a set of virtual OSA devices as a virtual OSA
adaptor if three dedicate statements are contiguously defined in the z/VM
directory and three consecutive device numbers are assigned.
v VLAN is not supported. You can use virtual switches. If you use z/VM Center
to create guest virtual machines that use a virtual switch, the authorizations for
using the switch are not persistent across a z/VM system restart. To assure that
the required authorizations are granted after a z/VM restart you can:
– Add the required SET VSWITCH statements to a z/VM configuration file that
is processed during IPL (for example, to SYSTEM CONFIG). You can check
$VMAPI/.vmapi/vswitch.grant as guidance on which statements to add to
SYSTEM CONFIG.
– Run $VMAPI/.vmapi/vswitch.grant your z/VM manageability access point.v z/VM Center requires that operating systems that run on a z/VM virtual server
must have network ports. You cannot register an operating system for a z/VM
virtual server that has no network ports. Accepted network port types are OSA
and HiperSocket, guest LAN, and VSWITCH.
Preparing the directory manager:
z/VM Center requires a directory manager to manage z/VM guest virtual
machines.
Before you start:
v If you are using DirMaint™ as your directory manager, you will need DirMaint
FL510 with the PTFs for APARs VM63700, VM63733, and VM63639.
v To perform this task you need access to the z/VM MAINT user ID or an
alternative user ID that is authorized to issue commands for your directory
manager.
z/VM maintains information about its guest virtual machines in the z/VM
directory. The z/VM directory contains an entry for each guest virtual machine.
Each entry consists of a set of directory statements that define the guest virtual
machine in terms of the resources and attributes that are assigned to it.
The installation and customization of a directory manager is product-dependent.
For illustration purposes, this topic describes how to set up IBM z/VM Directory
Maintenance Facility (DirMaint) for z/VM Center. DirMaint is shipped with z/VM
but you must obtain a license for using it.
If you are using DirMaint as the directory manager, complete the following steps.
If you are using another directory manager, refer to the product documentation of
your directory manager and perform equivalent steps.
170 IBM Director Installation and Configuration Guide

1. Define tagged comments. z/VM Center requires tagged comments to store
operating system information within z/VM directory records.
a. On your z/VM, establish a CMS session with your MAINT user ID or with
your alternative user ID.
b. Query the tagged comments that are already defined for your z/VM. Issue:
DIRM DEFINESTAG ? ALL
z/VM issues a number of DVHDST3404I messages. Messages that inform
you of an existing tagged comment are of the form tagname nnn, where
tagname is a unique comment name that begins with an asterisk (*) and
ends with a colon (:) and nnn is a unique number for the comment.
Example: In the following sample output, the existing tagged comments
have the names *STAGVAR1: and *STAGVAR2: and use the numbers 000
and 001:
DVHREQ2288I Your DEFINESTAG request ...
DVHDST3404I The current ...
DVHDST3404I tagname sortorder.
DVHDST3404I *STAGVAR1: 000
DVHDST3404I *STAGVAR2: 001
DVHREQ2289I Your DEFINESTAG request ...
c. Verify whether the existing tagged comments include:
v *CIMGOS01:
v *CIMIMG:d. Ensure that there are tagged comments of the form *CIMNICmm:, where
mm is a 2-digit decimal number from 01 to 99.
The number of these tagged comment variables limits the number of
network interfaces you can clone for a z/VM virtual server. Define as many
tagged comments of this form as the number of interfaces you expect to use
on any one of your z/VM virtual servers. You can define more tagged
comments as the need arises.
e. If either of the tagged comments from step 1c do not already exist or if
there are not enough tagged comments of the form *CIMNICmm:, define
them. For each missing comment, issue a command of the form:
DIRM DEFINESTAG CREATE tagname nnn
where tagname is the name of the missing comment and nnn is any 3-digit
decimal number that is unique for the tagged comment.
Example:
DIRM DEFINESTAG CREATE *CIMGOS01: 100
DIRM DEFINESTAG CREATE *CIMIMG: 101
DIRM DEFINESTAG CREATE *CIMNIC01: 102
DIRM DEFINESTAG CREATE *CIMNIC02: 103
DIRM DEFINESTAG CREATE *CIMNIC03: 104
In this example, three tagged comments of the form *CIMNICmm: have
been defined. With this setup, all z/VM virtual server that are created by
z/VM Center are limited to three network interfaces.2. Ensure that the following setting is made in your local CONFIGxx DATADVH
member for DIRMAINT:
ALLOW_ASUSER_NOPASS_FROM= VSMSERVE *
3. Optional: If you are an experienced z/VM system programmer, you might
want to define one or more z/VM virtual server prototypes.
In a prototype, you specify defaults that you can use when you create z/VM
virtual servers with z/VM Center.
Chapter 3. Installing 171

Refer to the description of the DIRM ADD command in z/VM Directory
Maintenance Facility Commands Reference, SC24-6133, for details.
4. Optional: Define additional z/VM DATAMOVE service machines for copying
disks.
A DATAMOVE server is a z/VM service machine that has the privileges to
perform disk copy operations. For disk copy operations z/VM Center requires
at least one DATAMOVE server.
Multiple DATAMOVE servers might allow you to simultaneously clone
multiple systems. For details, refer to z/VM Directory Maintenance Facility
Tailoring and Administration Guide, SC24-6024.
Create a NOLOG user ID for reserved OSA devices:
Assign OSA devices that z/VM Center is not to assign to a z/VM virtual server to
a NOLOG user ID.
When z/VM Center requires an OSA device for a z/VM virtual machine, the
z/VM manageability access point checks the z/VM directory to establish which
devices have already been assigned to other user IDs. This check does not account
for OSA devices that have been dynamically assigned to other user IDs by a class
B attach command, or that are reserved for other purposes without being explicitly
assigned in the z/VM directory. For example, the check does not account for
network devices that are defined to the TCPIP user ID in the TCPIP DTCPARMS
file. See z/VM TCP/IP Planning and Customization, 1.0 SC24-6125, for details.
For example, z/VM Center might attempt to assign an OSA device to a z/VM
virtual server if the OSA device has already been assigned to another guest virtual
machine by a script. z/VM Center might also assign OSA devices that
installation-specific policies reserve for particular guest virtual machines.
Complete these steps to assign OSA devices to a NOLOG user ID:
Create a z/VM directory entry of the following form:
USER USERID NOLOG
DEDICATE rlnm rlnm
...
DEDICATE wxyz wxyz
where USERID is the NOLOG user ID and rlnm and wxyz are device numbers you
want to prevent z/VM Center from using. Be sure to always include the complete
triplets of device numbers that correspond to an OSA device.
Example: The following z/VM directory entry prevents z/VM Center from using
device numbers 5200 through 5229 (that is, 10 specific OSA devices).
USER $DEVICE$ NOLOG
DEDICATE 5200 5200
DEDICATE 5201 5201
...
DEDICATE 5228 5228
DEDICATE 5229 5229
Result: the z/VM manageability access point finds the devices that are dedicated
to the NOLOG user ID in the z/VM directory, regards them as already belonging
to another guest virtual machine, and does not assign them to a z/VM virtual
server. Because the NOLOG user ID is never actually logged, these devices remain
free for their intended purpose.
172 IBM Director Installation and Configuration Guide

Configuring the z/VM systems management API:
z/VM Center uses the z/VM systems management API that is provided by the
VSMSERVE service machine.
VSMSERVE is essential for z/VM Center and must be operational.
For instructions on setting up the VSMSERVE server refer to z/VM Systems
Management Application Programming, SC24-6122.
Setting up the z/VM resource manager:
The Server Complexes task uses z/VM Resource Manager (VMRM) to manage
performance goals for Linux guest systems.
VMRM manages performance goals that are defined in a configuration file. The
Server Complexes task requires that this file resides in the z/VM shared file
system (SFS). You need to set up an initial configuration file. When you enter
performance goals through the Server Complexes user interface, Server Complexes
writes statements to the VMRM configuration file to represent your goals in
VMRM syntax.
For more information on VMRM, refer to z/VM Performance, SC24-6109. For more
information on the SFS refer to CMS File Pool Planning, Administration, and
Operation, SC24-6074.
You can set up VMRM easily by using the default configuration file VMRM
CONFIG VMSYS:VMRMSVM. If the default configuration file is not suitable for
your installation, you can set up a custom configuration file.
Using the default name and location for the VMRM configuration file:
By default, VMRM uses VMRM CONFIG VMSYS:VMRMSVM as the configuration
file.
Before you start: To perform this task you need access to the z/VM MAINT user
ID or an alternative user ID that is authorized to issue commands for your
directory manager.
Complete the following steps to set up VMRM using the default configuration file
name and location:
1. Add the VSMSERVE server and the administrator ID for the z/VM
manageability access point (see “Authorizing an administrator ID for the z/VM
manageability access point” on page 180) as a user of the VMSYS file pool.
From a MAINT CMS session, issue:
ENROLL USER VSMSERVE
ENROLL USER MAPAUTH
where MAPAUTH is the administrator ID.
2. Make the SFS accessible to VMRM. Add the following lines to the PROFILE
EXEC of VMRMSVM:
SET FILEPOOL VMSYS:
ACCESS VMSYS:.Z
Run the PROFILE EXEC to make the changes take effect.
Chapter 3. Installing 173

3. Create an empty VMRM configuration file, VMRM CONFIG, in the SFS
directory VMSYS:VMRMSVM.
4. In the VMRM configuration file, include the following ADMIN statement:
ADMIN MSGUSER VMRMADMN NEWCFG VMRM CONFIG VMSYS:VMRMSVM.
5. Add dummy WORKLOAD, GOAL, and MANAGE statements. The dummy
statements are not used for goal management but are required to satisfy the
configuration file syntax. Include, for example, the following lines:
WORKLOAD work1 USER dummy
GOAL goal1 VELOCITY CPU 10 DASD 10
MANAGE work1 GOAL goal1 IMPORTANCE 5
Server Complexes creates additional statements that are used for goal
management. These additional statements use the prefix “D4Z”. Do not use
dummy statements with this prefix for workload and goal names.
If you need to assure sufficient resources for one or more essential z/VM
components you can set actual VMRM goals for these components instead of
using dummy statements. Examples of essential components are TCPIP,
PORTMAP, VSMSERVE, RACFVM, DIRMAINT, or DATAMOVE. You might
already have assured sufficient resources by alternate methods, for example,
with a high share, QUICKDSP, or reserved pages.
The completed configuration file might look like this, for example:
ADMIN MSGUSER VMRMADMN NEWCFG VMRM CONFIG VMSYS:VMRMSVM.
WORKLOAD work1 USER dummy
GOAL goal1 VELOCITY CPU 10 DASD 10
MANAGE work1 GOAL goal1 IMPORTANCE 5
6. Ensure that the administrator ID of the z/VM manageability access point has
write access to the VMRM config file. As VMRMSVM issue:
grant auth vmsys:vmrmsvm. to MAPAUTH (write newwrite
grant auth vmsys:vmrmsvm. to VSMSERVE (write newwrite
grant auth * * Z to MAPAUTH (write
grant auth * * Z to VSMSERVE (write
where MAPAUTH is the administrator ID of the z/VM manageability access
point.
7. Ensure that the VMRM service machine is started automatically when z/VM is
started. Include the following lines in the PROFILE EXEC of z/VM user ID
AUTOLOG1 (AUTOLOG2 if you are using a security manager in addition to
the built-in z/VM security):
XAUTOLOG VMRMSVM
You might also want to provide an XAUTOLOG statement for VMRMADMN if
you want messages to go to VMRMADMN.
8. Optional: You can include VMRMSVM in the configuration of the TCPIP
service machine to ensure that it is automatically restarted if they fail.
For example, add VMRMSVM to the Autolog statement in the configuration file
of the TCPIP service machine:
AUTOLOG
...
VMRMSVM 0 ; VSM SERVER
ENDAUTOLOG
Refer to z/VM TCP/IP Planning and Customization, 1.0 SC24-6125, for more
details.
Using a custom name and location for the VMRM configuration file:
174 IBM Director Installation and Configuration Guide

The Server Complexes task uses z/VM Resource Manager (VMRM) to manage
performance goals for Linux guest systems.
Before you start: To perform this task you need access to the z/VM MAINT user
ID or an alternative user ID that is authorized to issue commands for your
directory manager.
Complete the following steps to use set up VMRM using the default configuration
file name and location:
1. Add the VSMSERVE server and the administrator ID for the z/VM
manageability access point (see “Authorizing an administrator ID for the
z/VM manageability access point” on page 180) as a user of the VMSYS file
pool. From a MAINT CMS session, issue:
ENROLL USER VSMSERVE
ENROLL USER MAPAUTH
where MAPAUTH is the administrator ID.
2. Make the SFS accessible to VMRM; add the following lines to the PROFILE
EXEC of VMRMSVM:
SET FILEPOOL POOL:
ACCESS POOL:DIRECTORY.MODE
where POOL is the name of the file pool you want to use, DIRECTORY is the
directory where the configuration file is to reside in the file pool, and MODE
is the uppercase letter that specifies the file mode for the file pool.
Run the PROFILE EXEC to make the changes take effect.
Example:
SET FILEPOOL MYPOOL:
ACCESS MYPOOL:MYDIR.Z
3. In the PROFILE EXEC of VMRMSVM, specify the file you want to use as the
configuration file. Include a statement of the following form:
EXEC IRMSERV NAME CONFIG MODE
where NAME is the file name of the configuration file you want to use and
MODE is the file mode.
Example:
EXEC IRMSERV MYVMRM CONFIG Z
4. Create an empty VMRM configuration file with the file name and in the SFS
directory of your choice.
5. In the VMRM configuration file, include a line with an ADMIN statement of
this form:
ADMIN MSGUSER VMRMADMN NEWCFG NAME CONFIG POOL:DIRECTORY.MODE
where the variables have the same meaning as in the examples above.
Example:
ADMIN MSGUSER VMRMADMN NEWCFG MYVMRM CONFIG MYPOOL:MYDIR.
6. Add a triplet of dummies for WORKLOAD, GOAL, and MANAGE
statements. The dummy statements are not used for goal management but are
required to satisfy the configuration file syntax. Include, for example, the
following lines:
WORKLOAD work1 USER dummy
GOAL goal1 VELOCITY CPU 10 DASD 10
MANAGE work1 GOAL goal1 IMPORTANCE 5
Chapter 3. Installing 175

Server Complexes creates additional statements that are used for goal
management. These additional statements use the prefix “D4Z”. Do not use
dummy statements with this prefix for workload and goal names.
If you need to assure sufficient resources for one or more essential z/VM
components you can set actual VMRM goals for these components instead of
using dummy statements. Examples of essential components are TCPIP,
PORTMAP, VSMSERVE, RACFVM, DIRMAINT, or DATAMOVE. You might
already have assured sufficient resources by alternate methods, for example,
with a high share, QUICKDSP, or reserved pages.
Example: The completed configuration file might look like this:
ADMIN MSGUSER VMRMADMN NEWCFG MYVMRM CONFIG MYPOOL:MYDIR.
WORKLOAD work1 USER dummy
GOAL goal1 VELOCITY CPU 10 DASD 10
MANAGE work1 GOAL goal1 IMPORTANCE 5
7. Ensure that the VMRM service machine is started automatically when z/VM
is started. Include the following lines in the PROFILE EXEC of z/VM user ID
AUTOLOG1 (AUTOLOG2 if you are using a security manager in addition to
the built-in z/VM security)::
XAUTOLOG VMRMSVM
You might also want to provide an XAUTOLOG statement for VMRMADMN
if you want messages to go to VMRMADMN.
8. On the z/VM manageability access point, ensure that the file
~root/.cimvm/properties/CimVm.properties exists. Create an empty file if it
doesn’t exist.
9. Add a line of the following form to
~root/.cimvm/properties/CimVm.properties:
VmrmConfigFile=NAME CONFIG POOL:DIRECTORY.
Example:
VmrmConfigFile=MYVMRM CONFIG MYPOOL:MYDIR.
10. Ensure that VSMSERVE and the administrator ID of the z/VM manageability
access point have write access to the VMRM config file. As VMRMSVM issue:
grant auth POOL:DIRECTORY. to MAPAUTH (write newwrite
grant auth POOL:DIRECTORY. to VSMSERVE (write newwrite
grant auth * * Z to MAPAUTH (write
grant auth * * Z to VSMSERVE (write
where MAPAUTH is the administrator ID of the z/VM manageability access
point and POOL:DIRECTORY specifies the configuration file.
11. Optional: You can include VMRMSVM in the configuration of the TCPIP
service machine to ensure that it is automatically restarted if they fail.
For example, add VMRMSVM to the Autolog statement in the configuration
file of the TCPIP service machine:
AUTOLOG
...
VMRMSVM 0 ; VSM SERVER
ENDAUTOLOG
Refer to z/VM TCP/IP Planning and Customization, 1.0 SC24-6125, for more
details.
Defining allocation groups:
Allocation groups are logical groupings of disk spaces.
176 IBM Director Installation and Configuration Guide

z/VM Center requires disk resources for maintaining templates and for creating
z/VM virtual servers and their operating systems. z/VM Center needs these disk
resources in the form of disk pools. Outside z/VM Center disk pools are known as
allocation groups.
Allocation groups are composed of regions. A region defines a single contiguous
area on a single DASD volume. An allocation group typically includes regions
from numerous disks.
To add disk space from a particular disk to an allocation group, you first define
one or more regions that cover the available disk space. You then assign the
regions to the allocation group.
Example: This example shows several 3390-9 and 3390-27 DASD volumes that
have been allocated as regions in a pool in the DirMaint EXTENT CONTROL file:
:REGIONS.
*RegionId VolSer RegStart RegEnd Dev-Type Comments
REG0 VMAU00 0001 10016 3390-09
REG1 VMAU01 0001 10016 3390-09
REG2 VMAU02 0001 32759 3390-32K
REG3 VMAU03 0001 10016 3390-09
REG4 VMAU04 0001 10016 3390-09
REG5 VMAU05 0001 32759 3390-32K
REG6 VMAU06 0001 10016 3390-09
REG7 VMAU07 0001 10016 3390-09
REG8 VMAU08 0001 32759 3390-32K
REG9 VMAU09 0001 10016 3390-09
REGA VMAU0A 0001 10016 3390-09
:END.
:GROUPS.
*GroupName RegionList
POOL0 (ALLOCATE ROTATING)
POOL0 REG0 REG1 REG2 REG3 REG4 REG5 REG6 REG7 REG8 REG9 REGA
:END.
Be sure that the volumes that to be added to a pool are formatted with CPFMTXA
before attempting to use them. Regions do not have to occupy an entire volume,
but they do have to be allocated on DASD volumes, not minidisks. Regions can be
placed on a volume beside minidisks of other users.
For more information on allocation groups refer to z/VM Directory Maintenance
Facility Tailoring and Administration Guide, SC24-6024.
Defining a custom user class:
You can optionally define a user class with the privileges required by the
administrator ID of the z/VM manageability access point.
Before you start: To perform this task you need access to the z/VM MAINT user
ID or an alternative user ID that is authorized to issue commands for your
directory manager.
A user class defines the privileges that a z/VM user ID has on the z/VM system.
A user class is represented by an uppercase letter or by one of the numbers 1 - 6.
Classes A - H are predefined by z/VM but can be modified for a particular z/VM
installation; the remaining classes are always installation-specific.
1. Establish a CMS session with your MAINT user ID or with your alternative
user ID.
Chapter 3. Installing 177

2. Identify an eligible character that is not already used for a user class. Check the
SYSTEM CONFIG file to find out which characters are free.
3. Add the following lines to the SYSTEM CONFIG file:
SET Subcmd Vswitch IBMclass B PRIVclass BX
QUERY Subcmd * IBMclass B PRIVclass BX
IND IBMclass E PRIVclass EX
QUERY Subcmd * IBMclass G PRIVclass GX
LINK IBMclass G PRIVclass GX
where X is the free character.
You have to make the changes in the SYSTEM CONFIG file active through an
IPL or dynamically. For example you can issue the following commands:
MODIFY SET Subcmd Vswitch IBMclass B PRIVclass BX
MODIFY QUERY Subcmd * IBMclass B PRIVclass BX
MODIFY IND IBMclass E PRIVclass EX
MODIFY QUERY Subcmd * IBMclass G PRIVclass GX
MODIFY LINK IBMclass G PRIVclass GX
For details, refer to CP Planning and Administration, SC24-6083.
You can now employ user classes G and X to provide the administrator ID of the
z/VM manageability access point with only the privileges that are required.
Setting up the z/VM manageability access point
The z/VM manageability access point is a z/VM guest virtual machine that
implements a CIM instrumentation for z/VM management.
In the Common Information Model (CIM), the units in which manageability
functions are implemented are called management profiles. The z/VM manageability
access point implements the z/VM management profile. IBM Director uses the
manageability access point for all interactions with z/VM. The z/VM management
profile can be used by any z/VM systems management application.
You need one z/VM manageability access point on each z/VM system on which
you want to use z/VM Center. You must not set up multiple z/VM manageability
access points on the same z/VM system.
For more information on CIM visit dmtf.org
Creating a z/VM guest virtual machine for the z/VM manageability access
point:
You must create a z/VM guest virtual machine for the z/VM manageability access
point. This topic provides the steps for creating a guest virtual machine and
describes the parameters you need for a z/VM manageability access point.
Before you start: You need access to the z/VM MAINT user ID or an alternative
user ID that is authorized to issue commands for your directory manager..
Complete the following steps to create a z/VM guest virtual machine for the
z/VM manageability access point:
1. Establish a CMS session with your MAINT user ID or with your alternative
user ID.
2. Create a CMS file of the form USERID DIRECT, where USERID is the user ID
you want to use for the guest virtual machine. “MAP” is the preferred user ID
for the z/VM manageability access point.
178 IBM Director Installation and Configuration Guide

3. In the new CMS file, specify a directory entry for the guest virtual machine and
save the file.
For example, the directory entry contains statements of this form:
USER USERID PASSWORD 512M 1G BEG
IPL BOOTDISK
SPOOLSPEC
CONDEF
OPTION LNKNOPAS LANG AMENG
DISKSPEC
where:
USERID
is your user ID for the z/VM manageability access point.
PASSWORD
is the logon password for the z/VM user ID defined in this directory
entry. The logon password is required for starting the management
access point from a 3270 terminal session unless a security manager is
used in addition to the z/VM security.
Be sure to use a password that adheres to the security policies at your
installation.
If an additional security manager, such as Resource Access Control
Facility (RACF), is used, the password defined in the resource manager
overrides the password specified in the user entry. See “Security
manager” on page 73 for more information on this issue.
512M 1G
are the minimal specifications for the initial and maximum virtual
storage sizes. The virtual storage is the main memory of the guest
virtual machine.
BEG are privilege classes that provide the z/VM manageability access point
with sufficient privileges in terms of predefined privilege classes.
Classes BEG, as predefined when z/VM is installed, assign more
privileges than required.
According to good-practice rules you should not assign more privileges
than necessary. See “Defining a custom user class” on page 177 to
define a custom privilege class that defines the minimum set of
required privileges. If you have defined a custom class X, then GX
would be correct here.
IPL BOOTDISK
specifies the disk that is to serve as the boot disk for the Linux instance
on the z/VM manageability access point, where BOOTDISK is the
device number of the boot disk.
SPOOLSPEC
adds the typical spool devices: reader, punch, and printer (RDR, PUN,
PRT).
CONDEF
can be one or more statements that define real or virtual network
connections, for example, to OSA adapters, virtual switches, or guest
LANs. At a minimum you must define a connection to the z/VM
TCP/IP stack.
See z/VM Connectivity, SC24-6080, for details about networking for
z/VM guest virtual machines.
Chapter 3. Installing 179

If you define a connection to a virtual switch, be sure to include an
additional statement that authorizes the z/VM manageability access
point to access the virtual switch.
OPTION LNKNOPAS LANG AMENG
specifies options that:
v Bypass the password authorization. This is required for automatically
running a personalization script when a Linux instance is deployed
on a z/VM virtual server.
v Specify American English to be used within the z/VM manageability
access point. This is required because the z/VM manageability access
point parses responses from z/VM control program commands.
If you are using a security manager (for example, RACF), there might
be additional authorization requirements. Refer to the documentation of
the respective security manager.
DISKSPEC
can be one or more statements that define disks. At a minimum you
must include a statement for the boot disk of the IPL statement and
any other Linux system disks.
Using MAP as the user ID, the directory entry might look like this example:
USER MAP MAPPW 512M 1G BEG
IPL 200
SPOOL 000C 2540 READER *
SPOOL 000D 2540 PUNCH A
SPOOL 000E 1403 A
NICDEF 5000 TYPE QDIO LAN SYSTEM SWITCH1
OPTION LNKNOPAS LANG AMENG
LINK MAINT 190 190 RR
LINK MAINT 19E 19E RR
MDISK 191 3390 1 10 VOL001 MR
MDISK 200 3390 AUTOG 3338 POOL1 MR
This example includes a virtual switch SWITCH1. The statement that provides
MAP with access to that switch might read:
SET VSWITCH SWITCH1 GRANT MAP
4. Add the directory entry to the z/VM directory. Issue DIRM FOR USERID ADD,
where USERID is the user ID you used in the previous steps.
Authorizing an administrator ID for the z/VM manageability access point:
You need to authorize a z/VM user ID that the z/VM manageability access point
can use to access the z/VM systems management API and for some of the
DirMaint functions.
When you use z/VM Center to work with a particular z/VM system for the first
time, you need to specify the administrator ID of the z/VM manageability access
point. The z/VM manageability access point uses this ID to perform functions of
the z/VM systems management API and of DirMaint.
Depending on the security regulations for your installation, you have the following
options:
v Specify the user ID of the z/VM manageability access point as the administrator
ID.
v Define a separate user ID for the administrator.
180 IBM Director Installation and Configuration Guide

v If the security policies at your installation permit it, you can specify MAINT as
the administrator ID. MAINT already has all required authorizations. If you use
MAINT as the administrator ID, have completed the authorization of a z/VM
user ID.
Complete the following steps to authorize a z/VM user ID other than MAINT:
1. Establish a CMS session with your MAINT user ID.
2. If the user ID you want to use as the administrator does not exist yet, create it
now.
a. Create a CMS file MAPAUTH DIRECT, where MAPAUTH is the user ID you
want to use.
b. In the file, type a directory entry. At a minimum you must provide a user
statement of this form:
USER MAPAUTH PASSWORD
where MAPAUTH is the user ID and PASSWORD is the password.
Example:
USER ADMIN SECR2ET
3. Establish a CMS session with the z/VM service machine that provides the
z/VM systems management API. This is usually the guest virtual machine with
the z/VM user ID VSMSERVE.
4. Re-IPL CMS in the service machine to stop the remote process call (RPC) server
program.
5. When prompted, enter any non-blank reply to prevent the server program from
being restarted.
6. Open the VSMSERVE AUTHLIST file with the CMS editor.
7. Add a line of the following form and save the file:
MAPAUTH ALL ALL
The user ID MAPAUTH must begin at column 1, followed by ALL in column 66
and another ALL in column 131.
This line permits MAPAUTH (at column 1)
to target any guest virtual machine (ALL at column 66)
with any command provided by the z/VM systems management API (ALL
at column 131).8. Issue commands of this form to authorize the administrator user ID for
DirMaint.:
DIRM FOR ALL AUTHFOR MAPAUTH CMDLEVEL 140A CMDSET ADGHMOPS
DIRM FOR ALL AUTHFOR MAPAUTH CMDLEVEL 150A CMDSET ADGHMOPS
where MAPAUTH is the user ID you have decided to use as the administrator
ID. ADGHMOPS are authorization classes specific to DirMaint.
Setting up communications for the z/VM manageability access point:
You must set up connections between the z/VM manageability access point and:
v The z/VM TCP/IP stack. Usually the stack runs in the TCPIP service machine.
v The IBM Director Server
Both connections, and any other connections you want to set up for the z/VM
manageability access point must use the same interface.
Chapter 3. Installing 181

Restriction: If you are using z/VM 5.1, you can use only a single network interface
for the z/VM manageability access point.
There are numerous options for setting up these connections. For a comprehensive
discussion of all possibilities see z/VM Connectivity, SC24-6080, for details.
On the Linux instance that runs on the z/VM manageability access point, ensure
that the host name is resolvable. You can make the host name resolvable by
ensuring that there is a corresponding DNS entry or an entry in /etc/hosts.
Installing IBM Director
This topic provides procedures for installing IBM Director Server, IBM Director
Console, Level 1: IBM Director Core Services, Level 2: IBM Director Agent, and
IBM Director extensions.
Installing IBM Director Server
This topic provides information about installing IBM Director Server.
Important:
v IBM Director Server and IBM Director Console must be at the same
release level. If you install IBM Director Server, version 5.10 on the
management server, you must also install IBM Director Console,
version 5.10 on any systems that you want to access the
management server. In addition, if IBM Director Console and IBM
Director Agent are installed on the same system, both software
components must be at the same release level as IBM Director
Server.
v If you are planning to install and use a database for IBM Director
other than the default database, make sure that you have installed
and configured the database application that you will use with IBM
Director before installing IBM Director Server. The default databases
are DB2 on i5/OS and Apache Derby on all other operating systems.
Installing IBM Director Server on AIX
This topic describes how to install IBM Director Server on AIX.
When you install IBM Director Server, IBM Director Console and IBM Director
Agent are installed automatically. During the installation process, you can install
several IBM Director Agent features. You also can configure a database to use with
IBM Director and change security settings.
Optional: If you choose to use a database application other than Apache Derby
with IBM Director, be sure to perform any necessary preparation steps before
configuring IBM Director to use the database. For more information, see
“Preparing the IBM Director database” on page 153.
Complete the following steps to install IBM Director Server on AIX:
1. Insert the IBM Director 5.10 for AIX 5L CD into the drive.
2. To mount the drive, type the following command and press Enter:
mount -v cdrfs -o ro /dev/cd0 /mnt
where dev/cd0 is the specific device file for the block device and mnt is the
mount point of the drive.
182 IBM Director Installation and Configuration Guide

3. To change to the directory where IBM Director Server is located, type the
following command and press Enter:
cd /mnt/director/server/aix
where mnt is the mount point of the drive.
4. If you want to customize the installation, go to step 5. If you want to accept
the default settings for the installation, type the following command and press
Enter:
./dirinstall
By default, the Apache Derby database application is installed and configured
to work with IBM Director.
Go to step 13 on page 186.
5. To customize the installation, copy the response file (dirserv.rsp) to a local
directory. Type the following command and press Enter:
cp dirserv.rsp /directory
where directory is the local directory.
6. Open an ASCII text editor and modify the installation settings in the
dirserv.rsp file. This file is fully commented.
You can specify the location of the .bff files, select the IBM Director extensions
and features that you want to install, configure a database to use with IBM
Director, and select log file options.
7. Save the modified response file with a new file name.
8. To install IBM Director Server using the response file, type the following
command and press Enter:
./dirinstall -r /directory/response.rsp
where directory is the local directory to which you copied the response file,
and response.rsp is the name of the response file as saved in step 7.
9. The selections you made in the response file determine what you do next:
Settings Result and next steps
DbmsConfigMethod parameter set to GUI;
running AIX in a graphical environment.
The ″IBM Director database configuration″
window opens. Go to step 10 on page 184.
Note: If you set the DbmsConfigMethod
parameter to GUI but are not running AIX in
a graphical environment, you must perform
the database configuration after the
installation of IBM Director Server is
complete. See “Configuring the database on
Linux or AIX” on page 330.
DbmsConfigMethod parameter set to
Rspfile; database configuration information
provided.
The database is configured silently during
the installation. Go to step 13 on page 186.
DbmsConfigMethod parameter set to
Rspfile; DbmsApplication parameter set to
noDatabase.
No database configuration is performed
during the installation. Go to step 12 on
page 185.
DbmsConfigMethod parameter set to
None.
No database configuration is performed
during the installation. Go to step 12 on
page 185.
Chapter 3. Installing 183

10. Select the database application to use with IBM Director. You have the
following options:
Apache Derby
(Option on all platforms except i5/OS) Creates and configures an
embedded Apache Derby database. The Apache Derby application is
included in the IBM Director installation.
IBM DB2 Universal Database
Configures IBM Director to use a DB2 database. IBM DB2 Universal
Database must be installed and configured on a system in your
network.
Oracle Configures IBM Director to use an Oracle database. Oracle Server
must be installed and configured on a system in your network.
Select later (database disabled)
IBM Director will be installed without a database. Tasks requiring a
database will be absent or not functional.
Important: You can configure IBM Director for use with your database
application at any point after the installation of IBM Director
Server, but you must not start the management server until it is
completed. Starting the management server before configuring
IBM Director to use a database application might result in a loss
of functionality.
11. Click Next to configure IBM Director for use with your database application.
Table 111. Database configuration
If the database
application is Complete the applicable steps
Apache Derby The ″IBM Director Apache Derby configuration″ window opens. The
values cannot be changed.
Click Next and go to step 13 on page 186.
IBM DB2 Universal
Database
The “IBM Director DB2 Universal Database configuration” window
opens.
Complete the following fields:
1. In the DB2 TCP/IP listener port field, type the number of the
port that is used by the DB2 TCP/IP listener.
2. In the Server name field, type the name of the server where DB2
is installed.
3. In the Database name field, type the name of the database.
4. In the User ID field, type a valid DB2 user ID.
5. In the Password field, type the password for the DB2 user ID.
Click Next and go to step 13 on page 186.
184 IBM Director Installation and Configuration Guide

Table 111. Database configuration (continued)
If the database
application is Complete the applicable steps
Oracle Server The “IBM Director Oracle database configuration” window opens.
Complete the following fields:
1. In the Oracle TCP/IP listener port field, type the number of the
port that is used by the Oracle TCP/IP listener.
2. In the Oracle host name field, type the TCP/IP host name of the
database server.
3. In the Oracle System Identifier (SID) field, type the Oracle
system identifier (SID).
4. In the User ID field, type a valid Oracle user ID. If it does not
exist, it is created. By default, this user ID is assigned to the IBM
Director table space.
5. In the Password and Confirm password fields, type the
password that is associated with the user ID that you typed in
step 4.
6. In the Oracle administrator account field, type a valid user ID
for the Oracle administrator account.
7. In the Oracle administrator password field, type the password
that is associated with the user ID that you typed in step 6.
Click Next. A second “IBM Director Oracle database configuration”
window opens.
Complete the following fields:
1. In the Default tablespace name field, type a table space name.
2. In the Default tablespace data file field, type the name of the
table space data file. If you do not specify the directory path, the
table space data file will be created in the Oracle Server default
directory. If you specify a directory path that is not valid, the
database configuration will fail.
3. In the Default tablespace size (MB) field, type the size of the
table space in MB.
4. In the Temporary tablespace name field, type a name for the
temporary table space.
5. In the Temporary tablespace data file field, type the name of the
temporary table space data file. If you do not specify the
directory path, the table space data file will be created in the
Oracle Server default directory. If you specify a directory path
that is not valid, the database configuration will fail.
6. In the Temporary tablespace size (MB) field, type the size of the
temporary table space in MB.
Click Next and go to step 13 on page 186.
Select later (database
disabled)
IBM Director is installed without a database configured.
To configure a database after the installation of IBM Director Server,
see “Configuring the database on Linux or AIX” on page 330.
Go to step 13 on page 186.
12. Optional: Configure IBM Director for use with a database application. For
more information, see “Configuring the database on Linux or AIX” on page
330.
Chapter 3. Installing 185

Important: You can configure IBM Director for use with your database
application at any point after the installation of IBM Director
Server, but you must not start the management server until it is
completed. Starting the management server before configuring
IBM Director to use a database application might result in a loss
of function.
13. Optional: By default, encryption using the Advanced Encryption Standard
(AES) algorithm is enabled during installation. To disable encryption or
change security settings, type the following command and press Enter:
/opt/ibm/director/bin/cfgsecurity
14. To start IBM Director Server, type the following command and press Enter:
/opt/ibm/director/bin/twgstart
15. To unmount the drive, type the following command and press Enter:
umount /mnt
where mnt is the mount point of the drive.
16. Remove the IBM Director 5.10 for AIX 5L CD from the drive.
Installing IBM Director Server using the Virtualization Engine
installation wizard
Use the Systems Edition IBM Virtualization Engine installation wizard to install
IBM Director and allow it to be integrated in a Virtualization Engine environment.
IBM Director for i5/OS is installed as part of Virtualization Engine Systems Edition
for iSeries. Before you begin installing IBM Director Server, make sure that you
have completed the planning for the installation, and that the server meets the
requirements to install IBM Director. You also must have completed the “Preparing
to install IBM Director on an iSeries server” on page 158 requirements.
Note: If you want to install Virtualization Engine console when you install IBM
Director, refer to Systems Edition for iSeries for installation instructions.
To install IBM Director Server, complete the following steps:
1. Insert the installation CD or DVD into the CD or DVD device on a Windows
system that has a network connection to the iSeries system where you plan to
install IBM Director Server. The installation wizard will start automatically.
2. On the i5/OS Sign-On page, specify the following information:
a. In the Server Name field, type the fully qualified server name on which
you want to install IBM Director Server.
b. In the User ID field, type the user ID to sign on to the system where you
are installing IBM Director Server.
c. In the Password field, type the password associated with the user ID. 3. On the Welcome page, click Next.
4. On the License Agreements page, select and read the software license
agreements. If you agree with the terms, select I accept the terms of the
license agreements and click Next. Otherwise, you will need to cancel the
installation.
5. On the Temporary Directory page, the default directory is displayed to
indicate where the installation files are copied. To select a different location for
storing log files, click Browse.
186 IBM Director Installation and Configuration Guide

6. On the Log File Destination page, the default path for the log-file destination
is displayed. The default path is /QIBM/UserData/VE2/Logs. You cannot
edit the destination directory for the log files.
7. On the Service Selection page, select IBM Director Server. It is recommended
that you also select to copy the installation images for IBM Director Agent and
IBM Director Console. The installation images that are selected to install are
copied to the /QIBM/ProdData/VE2/ManagedNodes/ directory. Click Next.
8. On the Media Copy page, click Load Next Volume to copy the required
installation files from the CD-ROM on your Windows workstation to the
iSeries system to which your computer is attached. When all of the volumes
are copied, click Next.
9. A Please Wait page opens to indicate that the installation files are being
unpacked.
10. The Selection Summary page opens to indicate the services that are selected
for installation. If you need to make changes, click Back. To continue with the
installation, click Install.
11. A page opens to indicate the installation progress for IBM Director Server.
12. On the Server Start Preference page, select either Start IBM Director or Do
not start IBM Director to indicate whether you want to start IBM Director
Server when the installation is complete. If you select Do not start IBM
Director, you can start IBM Director Server later with the twgstart command.
See the IBM Director Systems Management Guide for more information.
13. On the Readme Files page, select IBM Director to view the readme file. When
you are finished reviewing the readme, click Next.
14. A page opens that summarizes the results of the installation.
By default, encryption using Advanced Encryption Standard (AES) algorithm is
enabled during installation. To change encryption settings, use Encryption
Administration in IBM Director Console
Continue with steps to install IBM Director Agent and IBM Director Console on
the other systems in your IBM Director environment. After you have installed the
components of IBM Director, complete the required configuration steps.
Installing IBM Director Server on Linux for xSeries
This topic describes how to install IBM Director Server on a server running Linux
for xSeries.
When you install IBM Director Server, IBM Director Console and IBM Director
Agent are installed automatically. During the installation process, you can install
several IBM Director Agent features. You also can configure a database to use with
IBM Director and change security settings.
Optional: If you choose to use a database application other than Apache Derby
with IBM Director, be sure to perform any necessary preparation steps before
configuring IBM Director to use the database. For more information, see
“Preparing the IBM Director database” on page 153.
To install IBM Director Server on Linux for xSeries, complete the following steps:
1. Insert the IBM Director 5.10 for Windows and Linux on xSeries or IBM Director
5.10 for Intel and AMD-based hardware CD into the drive.
2. If the CD automounts, go to step 3 on page 188. If the CD does not
automount, type the following command and press Enter:
Chapter 3. Installing 187

mount /dev/cdrom /mnt/cdrom
where dev/cdrom is the specific device file for the block device and mnt/cdrom
is the mount point of the drive.
3. Change to the directory in which the installation script is located. Type the
following command and press Enter:
cd /mnt/cdrom/director/server/linux/i386/
where mnt/cdrom is the mount point of the drive.
4. If you want to customize the installation, go to step 5. If you want to accept
the default settings for the installation, type the following command and press
Enter:
./dirinstall
Refer to the response file to find out what the defaults are. The response file is
called dirserv.rsp and located in the same directory as the installation script.
In the response file, “1” indicates that an item is to be installed and “0”
indicates that an item is not to be installed.
If you are running Linux in a graphical environment, go to step 11 on page
189.
If you are not running Linux in a graphical environment, go to step 13 on
page 192.
5. To customize the installation, copy the response file (dirserv.rsp) to a local
directory. Type the following command and press Enter:
cp dirserv.rsp /directory
where directory is the local directory to which you copied the response file.
6. Open an ASCII text editor and modify the installation settings in the
direserv.rsp file. This file is fully commented.
You can specify the location of the RPM files, select the IBM Director
extensions and features that you want to install, configure a database to use
with IBM Director, and select log file options.
7. Save the modified response file with a new file name.
8. To install IBM Director Server using the response file, type the following
command and press Enter:
./dirinstall -r /directory/response.rsp
where directory is the local directory to which you copied the response file and
response.rsp is the name of the response file as saved in step 7.
9. Optional: Keep the response file for future use and reference.
10. The selections you made in the response file determine what you do next:
Settings Result and next steps
DbmsConfigMethod parameter set to GUI;
running Linux in a graphical environment.
The ″IBM Director database configuration″
window opens. Go to step 11 on page 189.
Note: If you set the DbmsConfigMethod
parameter to GUI but are not running Linux
in a graphical environment, you must
perform the database configuration after the
installation of IBM Director Server is
complete. See “Configuring the database on
Linux or AIX” on page 330.
188 IBM Director Installation and Configuration Guide

Settings Result and next steps
DbmsConfigMethod parameter set to
Rspfile; database configuration information
provided.
The database is configured silently during
the installation. Go to step 14 on page 192.
DbmsConfigMethod parameter set to
Rspfile; DbmsApplication parameter set to
noDatabase.
No database configuration is performed
during the installation. Go to step 13 on
page 192.
DbmsConfigMethod parameter set to
None.
No database configuration is performed
during the installation. Go to step 13 on
page 192.
11. Select the database application to use with IBM Director. You have the
following options:
Apache Derby
(Option on all platforms except i5/OS) Creates and configures an
embedded Apache Derby database. The Apache Derby application is
included in the IBM Director installation.
IBM DB2 Universal Database
Configures IBM Director to use a DB2 database. IBM DB2 Universal
Database must be installed and configured on a system in your
network.
Microsoft Data Engine (MSDE) 2000 or Microsoft SQL Server 2000
Configures IBM Director to use an MSDE or Microsoft SQL Server
database. MSDE or Microsoft SQL Server must be installed and
configured on a system in your network.
Oracle Configures IBM Director to use an Oracle database. Oracle Server
must be installed and configured on a system in your network.
PostgreSQL
Configures IBM Director to use a PostgreSQL database. PostgreSQL
must be installed and configured on a system in your network
Select later (database disabled)
IBM Director will be installed without a database. Tasks requiring a
database will be absent or not functional.
Important: You can configure IBM Director for use with your database
application at any point after the installation of IBM Director
Server, but you must not start the management server until it is
completed. Starting the management server before configuring
IBM Director to use a database application might result in a loss of
functionality.
12. Click Next to configure IBM Director for use with your database application.
Table 112. Database configuration
If the database
application is Complete the applicable steps
Apache Derby The ″IBM Director Apache Derby configuration″ window opens. The
values cannot be changed.
Click Next and go to step 14 on page 192.
Chapter 3. Installing 189

Table 112. Database configuration (continued)
If the database
application is Complete the applicable steps
IBM DB2 Universal
Database
The “IBM Director DB2 Universal Database configuration” window
opens.
Complete the following fields:
1. In the DB2 TCP/IP listener port field, type the number of the
port that is used by the DB2 TCP/IP listener.
2. In the Server name field, type the name of the server where DB2
is installed.
3. In the Database name field, type the name of the database.
4. In the User ID field, type a valid DB2 user ID.
5. In the Password field, type the password for the DB2 user ID.
Click Next and go to step 14 on page 192.
MSDE or Microsoft
SQL Server
The “IBM Director Microsoft SQL Server database configuration”
window opens.
Complete the following fields:
1. In the SQL Server TCP/IP listener port field, type the number of
the port that is used by the SQL Server TCP/IP listener.
2. In the Server name field, type the name of the server on which
SQL Server is installed.
3. In the Database name field, type the name of the database. If it
does not exist, it will be created.
4. In the User ID field, type a valid user ID for the SQL Server.
5. In the Password field, type the password for the SQL Server user
ID.
Click Next and go to step 14 on page 192.
190 IBM Director Installation and Configuration Guide

Table 112. Database configuration (continued)
If the database
application is Complete the applicable steps
Oracle Server The “IBM Director Oracle database configuration” window opens.
Complete the following fields:
1. In the Oracle TCP/IP listener port field, type the number of the
port that is used by the Oracle TCP/IP listener.
2. In the Oracle host name field, type the TCP/IP host name of the
database server.
3. In the Oracle System Identifier (SID) field, type the Oracle
system identifier (SID).
4. In the User ID field, type a valid Oracle user ID. If it does not
exist, it is created. By default, this user ID is assigned to the IBM
Director table space.
5. In the Password and Confirm password fields, type the
password that is associated with the user ID that you typed in
step 4.
6. In the Oracle administrator account field, type a valid user ID
for the Oracle administrator account.
7. In the Oracle administrator password field, type the password
that is associated with the user ID that you typed in step 6.
Click Next. A second “IBM Director Oracle database configuration”
window opens.
Complete the following fields:
1. In the Default tablespace name field, type a table space name.
2. In the Default tablespace data file field, type the name of the
table space data file. If you do not specify the directory path, the
table space data file will be created in the Oracle Server default
directory. If you specify a directory path that is not valid, the
database configuration will fail.
3. In the Default tablespace size (MB) field, type the size of the
table space in MB.
4. In the Temporary tablespace name field, type a name for the
temporary table space.
5. In the Temporary tablespace data file field, type the name of the
temporary table space data file. If you do not specify the
directory path, the table space data file will be created in the
Oracle Server default directory. If you specify a directory path
that is not valid, the database configuration will fail.
6. In the Temporary tablespace size (MB) field, type the size of the
temporary table space in MB.
Click Next and go to step 14 on page 192.
Chapter 3. Installing 191

Table 112. Database configuration (continued)
If the database
application is Complete the applicable steps
PostgreSQL The “IBM Director PostgreSQL database configuration” window
opens.
Complete the following fields:
1. In the PostgreSQL TCP/IP listener port field, type the number of
the port that is used by the PostgreSQL TCP/IP listener.
2. In the Server name field, type the name of the server where
PostgreSQL is installed.
3. In the Database name field, type the name of the database.
4. In the User ID field, type a valid PostgreSQL user ID.
5. In the Password field, type the password for the PostgreSQL user
ID.
Click Next and go to step 14.
Select later (database
disabled)
IBM Director is installed without a database configured.
To configure a database after the installation of IBM Director Server,
see “Configuring the database on Linux or AIX” on page 330.
Go to step 14.
13. Optional: Configure IBM Director for use with a database application. For
more information, see “Configuring the database on Linux or AIX” on page
330.
Important: You can configure IBM Director for use with your database
application at any point after the installation of IBM Director
Server, but you must not start the management server until it is
completed. Starting the management server before configuring
IBM Director to use a database application might result in a loss
of function.
14. Optional: By default, encryption using the Advanced Encryption Standard
(AES) algorithm is enabled during installation. To disable encryption or
change security settings, type the following command and press Enter:
/opt/ibm/director/bin/cfgsecurity
15. To start IBM Director, type the following command and press Enter:
/opt/ibm/director/bin/twgstart
16. To unmount the drive, complete the following steps:
a. Type cd / and press Enter.
b. Type the following command and press Enter:
umount /mnt/cdrom
where mnt/cdrom is the mount point of the drive.17. Remove the IBM Director 5.10 for Windows and Linux on xSeries or IBM Director
5.10 for Intel and AMD-based hardware CD from the drive.
Related tasks
“Selecting the IBM Director database application” on page 145
The topic describes how to select the database application to use with IBM
Director Server.
192 IBM Director Installation and Configuration Guide

“Preparing the IBM Director database” on page 153
This topic describes how to prepare the SQL database that IBM Director uses to
store inventory data.
“Configuring the database on a Linux or AIX management server using the
cfgdb command” on page 330
This topic describes how to configure the database after IBM Director Server is
installed using the cfgdb command.
“Configuring the database on a Linux or AIX management server using the
cfgdbcmd command” on page 331
This topic describes how to configure the database from a command line after
IBM Director Server is installed. Related reference
“Supported database applications” on page 137
This topic provides information about the database applications that are
supported for use with IBM Director. IBM Director Server uses an SQL database
to store inventory data for the systems in the environment.
Installing IBM Director Server on Linux for System z9 and
zSeries
This topic describes how to install IBM Director Server on a server running Linux
for System z9 and zSeries.
When you install IBM Director Server, IBM Director Console and IBM Director
Agent are installed automatically. During the installation process, you can install
several IBM Director Server and Agent features.
Note: The workstation being used for the installation must have an X-Windows
server or Virtual Network Computing (VNC) client.
Optional: If you choose to use a database application other than Apache Derby
with IBM Director, be sure to perform any necessary preparation steps before
configuring IBM Director to use the database. For more information, see
“Preparing the IBM Director database” on page 153.
Complete the following steps to install IBM Director Server on Linux for System z9
and zSeries:
1. Make the installation code from the IBM Director 5.10 for Linux on System z9
and zSeries CD available to your Linux system. See “Preparing to install IBM
Director on a System z9 or zSeries server” on page 166 for more information.
2. Change to the directory where the installation script is located. Type the
following command and press Enter:
cd /mnt/director/server/linux/s390/
where /mnt is the mount point of the file system on the CD or the location of
the IBM Director installation files.
3. If you want to customize the installation go to step 4 on page 194. If you want
to accept the default settings for the installation, type the following command
and press Enter:
./dirinstall
Refer to the response file to view the default. The response file is named
dirserv.rsp and located in the same directory as the installation script. In the
response file, “1” indicates that an item is to be installed and “0” indicates
that an item is not to be installed.
Chapter 3. Installing 193

Go to step 10.
4. To customize the installation, copy the response file to a local directory. Type
the following command and press Enter:
cp dirserv.rsp /directory
where directory is the local directory.
5. Open an ASCII text editor and modify the installation settings in the copy of
the dirserv.rsp file. This file is fully commented.
You can specify the location of the RPM files and select log file options.
6. Save the modified response file with a new file name.
7. To install IBM Director Server using the response file, type the following
command and press Enter:
./dirinstall -r /directory/response.rsp
where directory is the local directory to which you copied the response file and
response.rsp is the name of the response file as saved in step 6.
8. Optional: Keep the response file for future use and reference.
9. The selections you made in the response file determine what you do next:
Settings Result and next steps
DbmsConfigMethod parameter set to GUI. The ″IBM Director database configuration″
window opens. Go to step 10.
DbmsConfigMethod parameter set to
Rspfile; database configuration information
provided.
The database is configured silently during
the installation. Go to step 12 on page 197.
DbmsConfigMethod parameter set to
Rspfile; DbmsApplication parameter set to
noDatabase.
No database configuration is performed
during the installation. Go to step 11 on
page 197.
DbmsConfigMethod parameter set to
None.
No database configuration is performed
during the installation. Go to step 11 on
page 197.
10. Select the database application to use with IBM Director. You have the
following options:
Apache Derby
(Option on all platforms except i5/OS) Creates and configures an
embedded Apache Derby database. The Apache Derby application is
included in the IBM Director installation.
IBM DB2 Universal Database
Configures IBM Director to use a DB2 database. IBM DB2 Universal
Database must be installed and configured on a system in your
network.
Microsoft Data Engine (MSDE) 2000 or Microsoft SQL Server 2000
Configures IBM Director to use an MSDE or Microsoft SQL Server
database. MSDE or Microsoft SQL Server must be installed and
configured on a system in your network.
Oracle Configures IBM Director to use an Oracle database. Oracle Server
must be installed and configured on a system in your network.
PostgreSQL
Configures IBM Director to use a PostgreSQL database. PostgreSQL
must be installed and configured on a system in your network
194 IBM Director Installation and Configuration Guide

Select later (database disabled)
IBM Director will be installed without a database. Tasks requiring a
database will be absent or not functional.
Important: You can configure IBM Director for use with your database
application at any point after the installation of IBM Director
Server, but you must not start the management server until it is
completed. Starting the management server before configuring
IBM Director to use a database application might result in a loss
of functionality.Click Next to configure the IBM Director database.
Table 113. Database configuration
If the database
application is Do
Apache Derby The ″IBM Director Apache Derby configuration″ window opens. The
values cannot be changed.
Click Next and go to step 12 on page 197.
IBM DB2 Universal
Database
The “IBM Director DB2 Universal Database configuration” window
opens.
Type information in the following entry fields:
1. In the DB2 TCP/IP listener port field, type the number of the
port that is used by the DB2 TCP/IP listener.
2. In the Server name field, type the name of the server where DB2
is installed.
3. In the Database name field, type the name of the database.
4. In the User ID field, type a valid DB2 user ID.
5. In the Password field, type the password for the DB2 user ID.
Click Next and go to step 12 on page 197.
MSDE or Microsoft
SQL Server
The “IBM Director Microsoft SQL Server database configuration”
window opens.
Type information in the following entry fields:
1. In the SQL Server TCP/IP listener port field, type the number of
the port that is used by the SQL Server TCP/IP listener.
2. In the Server name field, type the name of the server where SQL
Server is installed.
3. In the Database name field, type name of the database. If it does
not exist, it will be created.
4. In the User ID field, type a valid SQL Server user ID.
5. In the Password field, type the password for the SQL Server user
ID.
Click Next and go to step 12 on page 197.
Chapter 3. Installing 195

Table 113. Database configuration (continued)
If the database
application is Do
Oracle Server The “IBM Director Oracle database configuration” window opens.
Type information in the following entry fields:
1. In the Oracle TCP/IP listener port field, type the number of the
port that is used by the Oracle TCP/IP listener.
2. In the Oracle host name field, type the TCP/IP host name of the
database server.
3. In the Oracle System Identifier (SID) field, type the Oracle
system identifier (SID).
4. In the User ID field, type a valid Oracle user ID. If it does not
exist, it is created. By default, this user ID is assigned to the IBM
Director table space.
5. In the Password and Confirm password fields, type the
password that is associated with the user ID that you typed in
step 4.
6. In the Oracle administrator account field, type a valid Oracle
administrator account user ID.
7. In the Oracle administrator password field, type the password
that is associated with the user ID that you typed in step 6.
Click Next. A second “IBM Director Oracle database configuration”
window opens.
Type information in the following entry fields:
1. In the Default tablespace name field, type a table space name.
2. In the Default tablespace data file field, type the name of the
table space data file. If you do not specify the directory path, the
table space data file will be created in the Oracle Server default
directory. If you specify a directory path that is not valid, the
database configuration will fail.
3. In the Default tablespace size (MB) field, type the size of the
table space in MB.
4. In the Temporary tablespace name field, type a name for the
temporary table space.
5. In the Temporary tablespace data file field, type the name of the
temporary table space data file. If you do not specify the
directory path, the table space data file will be created in the
Oracle Server default directory. If you specify a directory path
that is not valid, the database configuration will fail.
6. In the Temporary tablespace size (MB) field, type the size of the
temporary table space in MB.
Click Next and go to step 12 on page 197.
196 IBM Director Installation and Configuration Guide

Table 113. Database configuration (continued)
If the database
application is Do
PostgreSQL The “IBM Director PostgreSQL database configuration” window
opens.
Complete the following fields:
1. In the PostgreSQL TCP/IP listener port field, type the number of
the port that is used by the PostgreSQL TCP/IP listener.
2. In the Server name field, type the name of the server where
PostgreSQL is installed.
3. In the Database name field, type the name of the database.
4. In the User ID field, type a valid PostgreSQL user ID.
5. In the Password field, type the password for the PostgreSQL user
ID.
Click Next and go to step 12.
Select later (database
disabled)
IBM Director is installed without a database configured.
To configure a database after the installation of IBM Director Server,
see “Configuring the database on Linux or AIX” on page 330.
Go to step 12.
11. Optional: Configure IBM Director for use with a database application. For
more information, see “Configuring the database on Linux or AIX” on page
330.
Important: You can configure IBM Director for use with your database
application at any point after the installation of IBM Director
Server, but you must not start the management server until it is
completed. Starting the management server before configuring
IBM Director to use a database application might result in a loss of
function.
12. Optional: By default, encryption using the Advanced Encryption Standard
(AES) algorithm is enabled during installation. To disable encryption or
change security settings, type the following command and press Enter:
/opt/ibm/director/bin/cfgsecurity
13. To start IBM Director, type the following command and press Enter:
/opt/ibm/director/bin/twgstart
To enable SNMP Access and Trap Forwarding, install and configure Net-SNMP,
version 5.2.1. See “Enabling SNMP access and trap forwarding for Linux” on page
331.
For instructions for installing IBM Director Software Distribution (Premium
Edition) see “Installing Software Distribution on Linux” on page 281.
Related tasks
“Selecting the IBM Director database application” on page 145
The topic describes how to select the database application to use with IBM
Director Server.
“Preparing the IBM Director database” on page 153
This topic describes how to prepare the SQL database that IBM Director uses to
store inventory data.
Chapter 3. Installing 197

“Configuring the database on a Linux or AIX management server using the
cfgdb command” on page 330
This topic describes how to configure the database after IBM Director Server is
installed using the cfgdb command.
“Configuring the database on a Linux or AIX management server using the
cfgdbcmd command” on page 331
This topic describes how to configure the database from a command line after
IBM Director Server is installed. Related reference
“Supported database applications” on page 137
This topic provides information about the database applications that are
supported for use with IBM Director. IBM Director Server uses an SQL database
to store inventory data for the systems in the environment.
Installing IBM Director Server on Linux for POWER
This topic describes how to install IBM Director Server on a server running Linux
for POWER.
When you install IBM Director Server, IBM Director Console and IBM Director
Agent are installed automatically. During the installation process, you can install
several IBM Director Agent features.
Optional: If you choose to use a database application other than Apache Derby
with IBM Director, be sure to perform any necessary preparation steps before
configuring IBM Director to use the database. For more information, see
“Preparing the IBM Director database” on page 153.
Complete the following steps to install IBM Director Server on Linux for POWER:
1. Insert the IBM Director 5.10 for Linux on POWER CD into the drive.
2. If the CD automounts, go to step 3. If the CD does not automount, type the
following command and press Enter:
mount /dev/cdrom /mnt/cdrom
where dev/cdrom is the specific device file for the block device and mnt/cdrom
is the mount point of the drive.
3. Change to the directory where the installation script is located. Type the
following command and press Enter:
cd /mnt/cdrom/director/server/linux/ppc/
where mnt/cdrom is the mount point of the drive.
4. If you want to customize the installation, go to step 5. If you want to accept
the default settings for the installation, type the following command and press
Enter:
./dirinstall
By default, the Apache Derby database application is installed and configured
to work with IBM Director.
Go to step 13 on page 202.
5. To customize the installation, copy the response file (dirserv.rsp) to a local
directory. Type the following command and press Enter:
cp dirserv.rsp /directory
where directory is the local directory.
198 IBM Director Installation and Configuration Guide

6. Open an ASCII text editor and modify the installation settings in the
dirserv.rsp file. This file is fully commented.
You can specify the location of the RPM files, select the IBM Director
extensions and features that you want to install, configure a database to use
with IBM Director, and select log file options.
7. Save the modified response file with a new file name.
8. To install IBM Director Server using the response file, type the following
command and press Enter:
./dirinstall -r /directory/response.rsp
where directory is the local directory to which you copied the response file,
and response.rsp is the name of the response file as saved in step 7.
9. The selections you made in the response file determine what you do next:
Settings Result and next steps
DbmsConfigMethod parameter set to GUI;
running Linux in a graphical environment.
The ″IBM Director database configuration″
window opens. Go to step 10.
Note: If you set the DbmsConfigMethod
parameter to GUI but are not running Linux
in a graphical environment, you must
perform the database configuration after the
installation of IBM Director Server is
complete. See “Configuring the database on
Linux or AIX” on page 330.
DbmsConfigMethod parameter set to
Rspfile; database configuration information
provided.
The database is configured silently during
the installation. Go to step 13 on page 202.
DbmsConfigMethod parameter set to
Rspfile; DbmsApplication parameter set to
noDatabase.
No database configuration is performed
during the installation. Go to step 12 on
page 201.
DbmsConfigMethod parameter set to
None.
No database configuration is performed
during the installation. Go to step 12 on
page 201.
10. Select the database application to use with IBM Director. You have the
following options:
Apache Derby
(Option on all platforms except i5/OS) Creates and configures an
embedded Apache Derby database. The Apache Derby application is
included in the IBM Director installation.
IBM DB2 Universal Database
Configures IBM Director to use a DB2 database. IBM DB2 Universal
Database must be installed and configured on a system in your
network.
Oracle Configures IBM Director to use an Oracle database. Oracle Server
must be installed and configured on a system in your network.
Select later (database disabled)
IBM Director will be installed without a database. Tasks requiring a
database will be absent or not functional.
Important: You can configure IBM Director for use with your database
application at any point after the installation of IBM Director
Server, but you must not start the management server until it is
Chapter 3. Installing 199

completed. Starting the management server before configuring
IBM Director to use a database application might result in a loss
of functionality.
11. Click Next to configure IBM Director for use with your database application.
Table 114. Database configuration
If the database
application is Complete the applicable steps
Apache Derby The ″IBM Director Apache Derby configuration″ window opens. The
values cannot be changed.
Click Next and go to step 13 on page 202.
IBM DB2 Universal
Database
The “IBM Director DB2 Universal Database configuration” window
opens.
Complete the following fields:
1. In the DB2 TCP/IP listener port field, type the number of the
port that is used by the DB2 TCP/IP listener.
2. In the Server name field, type the name of the server where DB2
is installed.
3. In the Database name field, type the name of the database.
4. In the User ID field, type a valid DB2 user ID.
5. In the Password field, type the password for the DB2 user ID.
Click Next and go to step 13 on page 202.
200 IBM Director Installation and Configuration Guide

Table 114. Database configuration (continued)
If the database
application is Complete the applicable steps
Oracle Server The “IBM Director Oracle database configuration” window opens.
Complete the following fields:
1. In the Oracle TCP/IP listener port field, type the number of the
port that is used by the Oracle TCP/IP listener.
2. In the Oracle host name field, type the TCP/IP host name of the
database server.
3. In the Oracle System Identifier (SID) field, type the Oracle
system identifier (SID).
4. In the User ID field, type a valid Oracle user ID. If it does not
exist, it is created. By default, this user ID is assigned to the IBM
Director table space.
5. In the Password and Confirm password fields, type the
password that is associated with the user ID that you typed in
step 4.
6. In the Oracle administrator account field, type a valid user ID
for the Oracle administrator account.
7. In the Oracle administrator password field, type the password
that is associated with the user ID that you typed in step 6.
Click Next. A second “IBM Director Oracle database configuration”
window opens.
Complete the following fields:
1. In the Default tablespace name field, type a table space name.
2. In the Default tablespace data file field, type the name of the
table space data file. If you do not specify the directory path, the
table space data file will be created in the Oracle Server default
directory. If you specify a directory path that is not valid, the
database configuration will fail.
3. In the Default tablespace size (MB) field, type the size of the
table space in MB.
4. In the Temporary tablespace name field, type a name for the
temporary table space.
5. In the Temporary tablespace data file field, type the name of the
temporary table space data file. If you do not specify the
directory path, the table space data file will be created in the
Oracle Server default directory. If you specify a directory path
that is not valid, the database configuration will fail.
6. In the Temporary tablespace size (MB) field, type the size of the
temporary table space in MB.
Click Next and go to step 13 on page 202.
Select later (database
disabled)
IBM Director is installed without a database configured.
To configure a database after the installation of IBM Director Server,
see “Configuring the database on Linux or AIX” on page 330.
Go to step 13 on page 202.
12. Optional: Configure IBM Director for use with a database application. For
more information, see “Configuring the database on Linux or AIX” on page
330.
Chapter 3. Installing 201

Important: You can configure IBM Director for use with your database
application at any point after the installation of IBM Director
Server, but you must not start the management server until it is
completed. Starting the management server before configuring
IBM Director to use a database application might result in a loss
of function.
13. Optional: By default, encryption using the Advanced Encryption Standard
(AES) algorithm is enabled during installation. To disable encryption or
change security settings, type the following command and press Enter:
/opt/ibm/director/bin/cfgsecurity
14. To start IBM Director, type the following command and press Enter:
/opt/ibm/director/bin/twgstart
15. To unmount the drive, complete the following steps:
a. Type cd / and press Enter.
b. Type the following command and press Enter:
umount /mnt/cdrom
where mnt/cdrom is the mount point of the drive.16. Remove the IBM Director 5.10 for Linux on POWER CD from the drive.
To configure your database application for use with IBM Director, see “Configuring
the database on a Linux or AIX management server using the cfgdb command” on
page 330 or “Configuring the database on a Linux or AIX management server
using the cfgdbcmd command” on page 331.
To enable SNMP Access and Trap Forwarding, install and configure Net-SNMP,
version 5.2.1, see “Enabling SNMP access and trap forwarding for Linux” on page
331.
Installing IBM Director Server on Windows
This section describes how to install IBM Director Server on a system that is
running Windows.
When you install IBM Director Server, the InstallShield wizard also automatically
installs IBM Director Console and IBM Director Agent. During the installation
process, you can install the optional IBM Director features. You also can change
security settings.
This section provides instructions for installing IBM Director Server using the
InstallShield wizard. The wizard can be used in a standard interactive mode, or
you can perform an unattended installation using a response file to provide
answers to the questions that the wizard poses.
Note: If Microsoft Windows Installer (MSI), version 3.0 or later is not installed on
the system, it is installed during the IBM Director Server installation. If the
upgrade is necessary, the system prompts you to restart following the
installation of IBM Director Server without specifying that Microsoft
Windows Installer was installed. Unless you install using the response file
and set the RebootIfRequired parameter to N, you are prompted to restart
whether or not the IBM Director Server installation is completed
successfully.
202 IBM Director Installation and Configuration Guide

In addition, if you attempt to perform an administrative installation and
MSI has not yet been upgraded, you must change to the directory
containing the ibmsetup.exe file and run the installation program using the
following command:
ibmsetup.exe admin
This command updates MSI and runs the installation program in
administrative mode. Restart the system if prompted to do so.
Installing IBM Director Server on Windows using the InstallShield wizard:
This topic describes how to install IBM Director Server on a server running
Windows using the InstallShield wizard.
Optional: If you choose to use a database application other than Apache Derby
with IBM Director, be sure to perform any necessary preparation steps before
configuring IBM Director to use the database. For more information, see
“Preparing the IBM Director database” on page 153.
Complete the following steps to install IBM Director Server:
1. Using an account with either local or domain administrative privileges, log on
to the operating system.
2. Insert the IBM Director 5.10 for Windows and Linux on xSeries or IBM Director
5.10 for Intel and AMD-based hardware CD into the drive.
3. If the installation program starts automatically and the ″IBM Director Setup″
window opens, go to step 5. Otherwise, click Start → Run.
4. In the Open field, type the following command and press Enter:
e:\setup.exe
where e is the drive letter on your system. The installation program starts, and
the ″IBM Director Setup″ window opens.
5. Click Install IBM Director Server. The InstallShield wizard starts, and the
″Welcome to the InstallShield Wizard″ window opens.
Accessibility note: Screen readers might not process the ″IBM Director Setup″
window correctly. To start the installation wizard for IBM
Director Server using the keyboard, perform the following
steps:
a. Close the ″IBM Director Setup″ window.
b. Open Windows Explorer.
c. Browse to the director/server/windows/i386 directory
on the IBM Director 5.10 for Windows and Linux on
xSeries or IBM Director 5.10 for Intel and AMD-based
hardware CD.
d. Execute the ibmsetup.exe program. The InstallShield
wizard starts, and the ″Welcome to the InstallShield
Wizard for IBM Director Server″ window opens.
Continue to step 6. 6. Click Next. The ″License Agreement″ window opens.
7. Click I accept the terms in the license agreement; then, click Next. The
“Feature and installation directory selection” window opens.
Chapter 3. Installing 203

IBM Director Server, Level 2: IBM Director Agent, Level 1: IBM Director Core
Services, IBM Director Console, and xSeries Support and tasks are selected
automatically for installation; a hard disk drive icon
is displayed to the
left of each component. A red X
is displayed to the left of each optional
feature that is not selected by default.
8. Select the IBM Director Agent features that you want to install:
IBM Director Remote Control Agent
Enables a system administrator to perform remote desktop functions
on the management server.
BladeCenter Management Extension
Enables a system administrator to manage BladeCenter units.
Rack Manager
Enables a system administrator to use the Rack Manager task to build
a realistic, visual representation of a rack and its components.To select a feature, click the red X to the left of the feature name. A menu
opens. To select the feature, click either This feature will be installed on local
hard drive or This feature, and all subfeatures, will be installed on local
hard drive.
Figure 12. Installing IBM Director Server on Windows: “Feature and installation directory
selection” window
204 IBM Director Installation and Configuration Guide

9. Click Next. The “IBM Director service account information” window opens.
10. Provide information about the IBM Director service account:
Figure 13. Installing IBM Director Server on Windows: “Features and installation directory
selection” window
Figure 14. Installing IBM Director Server on Windows: “IBM Director service account
information” window
Chapter 3. Installing 205

a. In the Local computer name or domain field, type the computer name of
the IBM Director service account. If the service account is a domain
account, type the domain.
b. In the User name field, type the user ID for the IBM Director service
account.
c. In the Password and Confirm password fields, type the password for the
IBM Director service account.
Note: The information must correspond to a Windows account with
administrator privileges on the management server. Otherwise, the
installation will fail.
11. Click Next. The “Encryption settings” window opens.
12. By default, the Encrypt data transmissions between IBM Director Server and
IBM Director Agent check box is selected and the Advanced Encryption
Standard (AES) encryption algorithm is enabled. You can clear the check box
to disable encryption or select a different encryption algorithm.
13. Click Next. The ″Software Distribution settings″ window opens.
Figure 15. Installing IBM Director Server on Windows: “Encryption settings” window
206 IBM Director Installation and Configuration Guide

14. To select an alternative location for the creation of the software-distribution
packages, click Change and select another directory.
To select an alternative location for software-distribution packages that are
received from IBM Director Server are placed, click Change and select another
directory.
15. Click Next. The ″Ready to Install the Program″ window opens.
16. Click Install. The ″Installing IBM Director Server″ window opens. The
progress of the installation is displayed in the Status field. When the
installation is completed, the “Network driver configuration” window opens.
Figure 16. Installing IBM Director Server on Windows: “Software Distribution settings” window
Chapter 3. Installing 207

17. In the System name field, type the name that you want to be displayed in
IBM Director Console. By default, this is the NetBIOS name of the
management server.
18. Define the communication protocols to use between IBM Director Server and
IBM Director Agent.
a. In the Network drivers field, the TCPIP (all adapters) setting is enabled by
default. To enable another protocol, select the protocol and then select the
Enable driver check box.
Note: If you disable the TCPIP (all adapters) setting and enable an
individual device driver on a system with multiple network
adapters, IBM Director Server will receive only those data packets
addressed to the individual adapter.
b. In the Network timeout field, type the number of seconds that IBM
Director Server waits for a response from IBM Director Agent. By default,
this value is set to 15 seconds.
c. Select the Enable Wake on LAN check box if the network adapter
supports the Wake on LAN® feature.
Note: To determine whether your server supports the Wake on LAN
feature, see your server documentation.
d. If you chose to install the IBM Director Remote Control Agent, the
following options are available:
Figure 17. Installing IBM Director Server on Windows: “Network driver configuration” window
208 IBM Director Installation and Configuration Guide

Require user authorization for system access
Select this check box to request authorization from the local user
before controlling the management server remotely.
Disable screen saver
Select this check box to disable the screen saver on the
management server when it is controlled remotely.
Disable background wallpaper
Select this check box to disable desktop wallpaper on the
management server when it is controlled remotely. You might want
to disable the wallpaper because complicated backgrounds slow
down remote control and increase network traffic.19. Click OK. The “IBM Director database configuration” window opens.
20. Click the database application that you want to use with IBM Director. You
have the following options:
Apache Derby
Creates and configures an embedded Apache Derby database. The
Apache Derby application is included in the IBM Director installation.
IBM DB2 Universal Database
Configures a DB2 database. The DB2 Java JDBC Type 4 Universal
driver must be installed on the management server. It is installed
through the DB2 Run-time or Administration Client. Only the Java
support selection is required. IBM DB2 Universal Database must be
installed and configured on a system in your network. This is located
on the DB2 Run-time or Administration Client.
Microsoft Data Engine (MSDE) 2000 or Microsoft SQL Server 2000
Creates a Microsoft SQL Server database. Microsoft SQL Server must
be installed and configured on a system in your network.
Figure 18. Installing IBM Director Server: “IBM Director database configuration” window
Chapter 3. Installing 209

Oracle Configures an Oracle database. Oracle Server must be installed and
configured on a system in your network.
Select later (database disabled)
IBM Director will be installed without a database. Tasks requiring a
database will be absent or not functional.21. Click Next and begin configuring the IBM Director database.
If the database
application is Complete the applicable steps
Apache Derby The ″IBM Director Apache Derby configuration″ window opens. The
values cannot be changed. Click Next and go to step 22 on page 211.
IBM DB2 Universal
Database
The “IBM Director DB2 Universal Database configuration” window
opens.
Complete the following entry fields:
1. In the DB2 TCP/IP listener port field, type the number of the
port that is used by the DB2 TCP/IP listener.
2. In the Server name field, type the name of the server on which
DB2 is installed.
3. In the Database name field, type the name of the database.
4. In the User ID field, type a valid DB2 user ID.
5. In the Password field, type the password for the DB2 user ID.
Click Next.
MSDE or Microsoft
SQL Server
The “IBM Director Microsoft SQL Server database configuration”
window opens.
Type information in the following entry fields:
1. In the SQL Server TCP/IP listener port field, type the number of
the port that is used by the SQL Server TCP/IP listener.
2. In the Server name field, type the name of the server on which
SQL Server is installed.
3. In the Database name field, type the name of the database. If it
does not exist, it will be created.
4. In the User ID field, type a valid SQL Server user ID.
5. In the Password field, type the password for the SQL Server user
ID.
Click Next.
210 IBM Director Installation and Configuration Guide

If the database
application is Complete the applicable steps
Oracle Server The “IBM Director Oracle database configuration” window opens.
Type information in the following entry fields:
1. In the Oracle TCP/IP listener port field, type the number of the
port that is used by the Oracle TCP/IP listener.
2. In the Oracle host name field, type the TCP/IP host name of the
database server.
3. In the Oracle System Identifier (SID) field, type the Oracle
system identifier (SID).
4. In the User ID field, type a valid Oracle user ID. If it does not
exist, it is created. By default, this user ID is assigned to the IBM
Director table space.
5. In the Password and Confirm password fields, type the
password that is associated with the user ID that you entered in
step 4.
6. In the Oracle administrator account field, type a valid user ID
for the Oracle administrator account.
7. In the Oracle administrator password field, type the password
that is associated with the user ID that you entered in step 6.
Click Next. A second “IBM Director Oracle database configuration”
window opens.
Type information in the following entry fields:
1. In the Default tablespace name field, type a table space name.
2. In the Default tablespace data file field, type the name of the
table space data file. If you do not specify the directory path, the
table space data file will be created in the Oracle Server default
directory. If you specify a directory path that is not valid, the
database configuration will fail.
3. In the Default tablespace size (MB) field, type the size of the
table space in MB.
4. In the Temporary tablespace name field, type a name for the
temporary table space.
5. In the Temporary tablespace data file field, type the name of the
temporary table space data file. If you do not specify the
directory path, the table space data file will be created in the
Oracle Server default directory. If you specify a directory path
that is not valid, the database configuration will fail.
6. In the Temporary tablespace size (MB) field, type the size of the
temporary table space in MB.
Click Next.
Select later (database
disabled)
Go to step 22
22. Click Finish. A window opens, asking you if you want to restart the server.
23. Remove the IBM Director 5.10 for Windows and Linux on xSeries or IBM Director
5.10 for Intel and AMD-based hardware CD from the drive.
24. Click Yes to restart the server.
Performing an unattended installation of IBM Director Server on Windows:
This topic describes how to install IBM Director Server using a response file.
Chapter 3. Installing 211

You can perform an unattended installation of IBM Director Server using a
response file, which provides answers to the questions that are posed by the
InstallShield wizard. You can use this method to create a standard installation file
that can be used on many systems.
Important: The response file for IBM Director Server contains entries for a User ID
and Password to use with the IBM Director service account. The User
ID and Password must correspond to a Windows account with
administrator privileges. If you choose to include this information in
the response file, be sure to delete the file after the installation is
complete to avoid security issues.
Complete the following steps to install IBM Director Server:
1. Insert the IBM Director 5.10 for Windows and Linux on xSeries or IBM Director
5.10 for Intel and AMD-based hardware CD into the drive.
2. Copy the dirserv.rsp file to a local directory. This file is in the
director\server\windows\i386 directory on the IBM Director 5.10 for Windows
and Linux on xSeries or IBM Director 5.10 for Intel and AMD-based hardware CD.
3. Open the copy of the dirserv.rsp file in an ASCII text editor.
4. Modify and save the response file with a new file name. This file follows the
Windows initialization (INI) file format and is fully commented.
5. Open a command prompt and change to the directory that contains the IBM
Director Server installation file (ibmsetup.exe). This file is in the
director\server\windows\i386 directory on the IBM Director 5.10 CD.
6. From the command prompt, type the following command and press Enter:
ibmsetup.exe installationtype rsp="responsefile.rsp" option
where:
v installationtype is one of the following commands:
– unattended shows the progress of the installation but does not require any
user input.
– silent suppresses all output to the screen during installation.v responsefile.rsp is the path and name of the response file that you created in
step 4.
v option is one of the following optional parameters:
Table 115. Optional installation parameters
Parameter What it does
waitforme Ensures that ibmsetup.exe process will not end until the
installation of IBM Director Server is completed
debug Logs all messages that are sent by the Windows Installer log
engine, including status and information messages
log=logfilename Specifies the fully qualified name of an alternative installation
log file
verbose Enables verbose logging
7. If you set the RebootIfRequired parameter to Y in the response file, reboot the
system if prompted to do so.
8. When the installation is completed, remove the CD from the drive.
212 IBM Director Installation and Configuration Guide

Installing IBM Director Console
This topic contains instructions for installing IBM Director Console.
Note: IBM Director Server and IBM Director Console must be at the same release
level. Also, if IBM Director Console and IBM Director Agent are installed on
the same system, both software components must be at the same release
level as IBM Director Server.
Installing IBM Director Console on AIX
This topic describes how to install IBM Director Console on AIX.
Complete the following steps to install IBM Director Console on AIX.
1. To install IBM Director Console from a Web download, perform the following
steps:
a. Download the dir5.10_console_aix.tar file from the IBM Director Support
Web site at www.ibm.com/servers/eserver/xseries/
systems_management/ibm_director/.
b. Extract the contents of the dir5.10_console_aix.tar file to a local directory.
c. Change to the directory in which the installation script is located. Type the
following command and press Enter:
cd /directory/
where directory is the local directory to which you extracted the files.
d. If you want to customize the installation, go to step 1e. If you want to
accept the default settings for the installation, type the following command
and press Enter:
./dir5.10_console_aix.sh
Go to step 3 on page 214.
e. To customize the installation, copy the response file (dircon.rsp) to a local
directory. Type the following command and press Enter:
cp dircon.rsp /directory/
where directory is the local directory.
f. Open an ASCII text editor and modify the installation settings in the copy of
the dircon.rsp file. This file is fully commented. You can specify the location
of the RPM files and select log file options.
g. Save the modified response file with a new file name.
h. To install IBM Director Console using the response file, type the following
command and press Enter:
./dir5.10_console_aix.sh -r /directory/response.rsp
where directory is the local directory to which you copied the response file,
and response.rsp is the name of the response file as saved in step 1g.
Go to step 3 on page 214.2. To install IBM Director Console from the CD, perform the following steps:
a. Insert the IBM Director 5.10 for AIX 5L CD into the drive.
b. To mount the drive, type the following command and press Enter:
mount -v cdrfs -o ro /dev/cd0 /mnt
Chapter 3. Installing 213

where dev/cd0 is the specific device file for the block device, and mnt is the
mount point of the drive.
c. To change to the directory where IBM Director Console is located, type the
following command and press Enter:
cd /mnt/director/console/aix
where mnt is the mount point of the drive.
d. To install IBM Director Console, type the following command and press
Enter:
./dirinstall
Continue to step 3.3. To start IBM Director Console, type the following command and press Enter:
/opt/ibm/director/bin/twgcon
4. If you installed IBM Director Console from the CD, unmount the drive. Type
the following command and press Enter:
umount /mnt
where mnt is the mount point of the drive.
Remove the IBM Director 5.10 for AIX 5L CD from the drive.
Installing IBM Director Console on Linux for xSeries
This topic describes how to install IBM Director Console on a server running Linux
for xSeries.
Complete the following steps to install IBM Director Console on Linux for xSeries:
1. To install IBM Director Console from a Web download, perform the following
steps:
a. Download the dir5.10_console_linux.tar file from the IBM Director Support
Web site at www.ibm.com/servers/eserver/xseries/
systems_management/ibm_director/.
b. Extract the contents of the dir5.10_console_linux.tar file to a local directory.
c. Change to the directory in which the installation script is located. Type the
following command and press Enter:
cd /directory/
where directory is the local directory to which you extracted the files.
d. If you want to customize the installation, go to step 1e. If you want to
accept the default settings for the installation, type the following command
and press Enter:
./dir5.10_console_linux.sh
e. To customize the installation, copy the response file (dircon.rsp) to a local
directory. Type the following command and press Enter:
cp dircon.rsp /directory/
where directory is the local directory.
f. Open an ASCII text editor and modify the installation settings in the
dircon.rsp file. This file is fully commented. You can specify the location of
the RPM files and select log file options.
g. Save the modified response file.
214 IBM Director Installation and Configuration Guide

h. To install IBM Director Console using the response file, type the following
command and press Enter:
./dir5.10_console_linux.sh -r /directory/response.rsp
where directory is the local directory to which you copied the response file,
and response.rsp is the name of the response file.2. To install IBM Director Console from the CD, perform the following steps:
a. Insert the IBM Director 5.10 for Windows and Linux on xSeries or IBM Director
5.10 for Intel and AMD-based hardware CD into the drive.
b. If the CD automounts, go to step 2c. If the CD does not automount, type
the following command and press Enter:
mount /dev/cdrom /mnt/cdrom
where dev/cdrom is the specific device file for the block device and
mnt/cdrom is the mount point of the drive.
c. Change to the directory in which the installation script is located. Type the
following command and press Enter:
cd /mnt/cdrom/director/console/linux/i386
where mnt/cdrom is the mount point of the drive.
Go to step 2d.
d. If you want to customize the installation, go to step 2e. If you want to
accept the default settings for the installation, type the following command
and press Enter:
./dirinstall
Go to step 2i.
e. To customize the installation, copy the response file (dircon.rsp) to a local
directory. Type the following command and press Enter:
cp dircon.rsp /directory
where directory is the local directory.
f. Open an ASCII text editor and modify the installation settings in the copy of
the dircon.rsp file. This file is fully commented. You can specify the location
of the RPM files, optional items that you want to install, and select log file
options.
g. Save the modified response file with a new file name.
h. To install IBM Director Console using the modified response file, type the
following command and press Enter:
./dirinstall -r /directory/responsefile.rsp
where directory is the local directory to which you copied the response file
and responsefile.rsp is the name of the modified response file as saved in step
2g.
i. To unmount the drive, complete the following steps:
1) Type cd / and press Enter.
2) Type the following command and press Enter:
umount /mnt/cdrom
where mnt/cdrom is the mount point of the drive.
Chapter 3. Installing 215

j. Remove the IBM Director 5.10 for Windows and Linux on xSeries or IBM
Director 5.10 for Intel and AMD-based hardware CD from the drive.
Installing IBM Director Console on Linux for System z9 and
zSeries
This topic describes how to install IBM Director Console on Linux for System z9
and zSeries.
Complete the following steps to install IBM Director Console on Linux for System
z9 and zSeries:
1. Make the installation code from the IBM Director 5.10 for Linux on System z9 and
zSeries CD available to your Linux system. See “Preparing to install IBM
Director on a System z9 or zSeries server” on page 166 for more information.
2. Change to the directory in which the installation script is located. Type the
following command and press Enter:
cd /mnt/director/console/linux/s390/
where /mnt is the mount point of the file system on the CD or the location of
the IBM Director installation files.
3. If you want to customize the installation go to step 4. If you want to accept the
default settings for the installation, type the following command and press
Enter:
./dirinstall
Refer to the response file to view the default. The response file is named
dircon.rsp and located in the same directory as the installation script. In the
response file, “1” indicates that an item is to be installed and “0” indicates that
an item is not to be installed.
Go to step 9.
4. Copy the response file to a local directory. Type the following command and
press Enter:
cp dircon.rsp /directory
where directory is the local directory.
5. Open an ASCII text editor and modify the installation settings in the copy of
the dircon.rsp file. This file is fully commented.
You can specify the location of the RPM files and select log file options.
6. Save the modified response file with a new file name.
7. To install IBM Director Console, type the following command and press Enter:
./dirinstall -r /directory/response.rsp
where directory is the local directory to which you copied the response file and
response.rsp is the name of the response file as saved in step 6.
8. Optional: Keep the response file for future use and reference.
9. To start IBM Director Console start a new terminal session, type the following
command and press Enter:
/opt/ibm/director/bin/twgcon
Installing IBM Director Console on Linux for POWER
This topic describes how to install IBM Director Console on a server running Linux
for POWER.
216 IBM Director Installation and Configuration Guide

Complete the following steps to install IBM Director Console on Linux for
POWER:
1. To install IBM Director Console from a Web download, perform the following
steps:
a. Download the dir5.10_console_linppc.tar file from the IBM Director Support
Web site at www.ibm.com/servers/eserver/xseries/
systems_management/ibm_director/.
b. Extract the contents of the dir5.10_console_linppc.tar file to a local directory.
c. Change to the directory in which the installation script is located. Type the
following command and press Enter:
cd /directory/
where directory is the local directory to which you extracted the files.
d. If you want to customize the installation, go to step 1e. If you want to
accept the default settings for the installation, type the following command
and press Enter:
./dir5.10_console_linppc.sh
When the dir5.10_console_linppc.sh script finishes running, the installation
is completed.
e. To customize the installation, copy the response file (dircon.rsp) to a local
directory. Type the following command and press Enter:
cp dircon.rsp /directory/
where directory is the local directory.
f. Open an ASCII text editor and modify the installation settings in the copy of
the dircon.rsp file. This file is fully commented. You can specify the location
of the RPM files and select log file options.
g. Save the modified response file with a new file name.
h. To install IBM Director Console using the response file, type the following
command and press Enter:
./dir5.10_console_linppc.sh -r /directory/response.rsp
where directory is the local directory to which you copied the response file,
and response.rsp is the name of the response file as saved in step “Installing
IBM Director Console on Linux for POWER” on page 216.2. To install IBM Director Console from the CD, perform the following steps:
a. Insert the IBM Director 5.10 for Linux on POWER CD into the drive.
b. If the CD automounts, go to step 2c. If the CD does not automount, type
the following command and press Enter:
mount /dev/cdrom /mnt/cdrom
where dev/cdrom is the specific device file for the block device and
mnt/cdrom is the mount point of the drive.
c. Change to the directory in which the installation script is located. Type the
following command and press Enter:
cd /mnt/cdrom/director/console/linux/ppc
where mnt/cdrom is the mount point of the drive.
Go to step 2d on page 218.
Chapter 3. Installing 217

d. If you want to customize the installation, go to step 2e. If you want to
accept the default settings for the installation, type the following command
and press Enter:
./dirinstall
Go to step 2i.
e. To customize the installation, copy the response file (dircon.rsp) to a local
directory. Type the following command and press Enter:
cp dircon.rsp /directory
where directory is the local directory.
f. Open an ASCII text editor and modify the installation settings in the copy of
the dircon.rsp file. This file is fully commented. You can specify the location
of the RPM files, optional items that you want to install, and select log file
options.
g. Save the modified response file with a new name.
h. To install IBM Director Console using the modified response file, type the
following command and press Enter:
./dirinstall -r /directory/responsefile.rsp
where directory is the local directory to which you copied the response file
and responsefile.rsp is the name of the modified response file as saved in step
2g.
i. To unmount the drive, complete the following steps:
1) Type cd / and press Enter.
2) Type the following command and press Enter:
umount /mnt/cdrom
where mnt/cdrom is the mount point of the drive.j. Remove the IBM Director 5.10 for Linux on POWER CD from the drive.
Installing IBM Director Console on Windows
This section describes how to install IBM Director Console on a system that is
running Windows.
You can install IBM Director Console on any system from which you want to
remotely access IBM Director Server.
This section provides instructions for installing IBM Director Console using the
InstallShield wizard. The wizard can be used in a standard interactive mode, or
you can perform an unattended installation using a response file to provide
answers to the questions that the wizard poses.
Note: If Microsoft Windows Installer (MSI), version 3.0 or later is not installed on
the system, it is installed during the IBM Director Console installation. If the
upgrade is necessary, the system prompts you to restart following the
installation of IBM Director Console without specifying that Microsoft
Windows Installer was installed. Unless you install using the response file
and set the RebootIfRequired parameter to N, you are prompted to restart
whether or not the IBM Director Console installation is completed
successfully.
218 IBM Director Installation and Configuration Guide

In addition, if you attempt to perform an administrative installation and
MSI has not yet been upgraded, you must change to the directory
containing the ibmsetup.exe file and run the installation program using the
following command:
ibmsetup.exe admin
This command updates MSI and runs the installation program in
administrative mode. Restart the system if prompted to do so.
Installing IBM Director Console using the InstallShield wizard:
This topic describes how to install IBM Director Console on a system running
Windows using the InstallShield wizard.
Complete the following steps to install IBM Director Console on Windows:
1. To start the installation from a Web download, perform the following steps:
a. Download the dir5.10_console_windows.zip file from the IBM Director
Support Web site at www.ibm.com/servers/eserver/xseries/
systems_management/ibm_director/.
b. Extract the contents of the dir5.10_console_windows.zip file to a local
directory.
c. Locate the dir5.10_console_windows.exe file and double-click it. The
InstallShield wizard starts, and the ″Welcome to the InstallShield Wizard for
IBM Director Console″ window opens. Go to step 3 on page 220.2. To start the installation from the CD, perform the following steps:
a. Insert the IBM Director 5.10 for Windows and Linux on xSeries or IBM Director
5.10 for Intel and AMD-based hardware CD into the drive.
b. If the installation program starts automatically and the ″IBM Director Setup″
window opens, go to step 2d. Otherwise, click Start → Run.
c. In the Open field, type the following command and press Enter:
e:\setup.exe
where e is the drive letter of the drive. The installation program starts, and
the ″IBM Director Setup″ window opens.
d. Click Install IBM Director Console. The InstallShield wizard starts, and the
″Welcome to the InstallShield Wizard for IBM Director Console″ window
opens. Continue to step 3 on page 220.
Accessibility note: Screen readers might not process the ″IBM Director Setup″
window correctly. To start the installation wizard for IBM
Director Console using the keyboard, perform the following
steps:
a. Close the ″IBM Director Setup″ window.
b. Open Windows Explorer.
c. Browse to the director/console/windows/i386 directory
on the IBM Director 5.10 for Windows and Linux on xSeries
or IBM Director 5.10 for Intel and AMD-based hardware
CD.
d. Execute the ibmsetup.exe program. The InstallShield
wizard starts, and the ″Welcome to the InstallShield
Wizard for IBM Director Console″ window opens.
Continue to step 3 on page 220.
Chapter 3. Installing 219

3. Click Next. The “License Agreement” window opens.
4. Click I accept the terms in the license agreement; then, click Next. The
“Feature and installation directory selection” window opens.
IBM Director Console and the xSeries Management Extension are selected
automatically for installation; a hard disk drive icon
is displayed to the
left of each component. A red X
is displayed to the left of each of the
optional features, BladeCenter Management Extension and Rack Manager.
5. To select BladeCenter Management Extension, a feature that manages and
monitors BladeCenter systems, click the red X to the left of the feature name. A
menu opens.
Click either This feature will be installed on local hard drive or This feature,
and all subfeatures, will be installed on local hard drive.
6. To select Rack Manager, which you can use to build a realistic, visual
representation of a rack and its components, click the red X to the left of the
feature name. A menu opens.
Click either This feature will be installed on local hard drive or This feature,
and all subfeatures, will be installed on local hard drive.
7. Click Next. The ″Ready to Install the Program″ window opens.
8. Click Install. The ″Installing IBM Director Console″ window opens. The status
bar displays the progress of the installation. When the installation is completed,
the ″InstallShield Wizard Completed″ window opens.
9. Click Finish.
Performing an unattended installation of IBM Director Console on Windows:
This topic describes how to install IBM Director Console using a response file.
Figure 19. Installing IBM Director Console: “Feature and installation directory selection”
window
220 IBM Director Installation and Configuration Guide

You can perform an unattended installation of IBM Director Console using a
response file, which provides answers to the questions that are posed by the
InstallShield wizard. You can use this method to create a standard installation file
that can be employed on many systems.
Complete the following steps to install IBM Director Console:
1. To start the installation from a Web download, perform the following steps:
a. Download the dir5.10_console_windows.zip file from the IBM Director
Support Web site at www.ibm.com/servers/eserver/xseries/
systems_management/ibm_director/.
b. Extract the contents of the dir5.10_console_windows.zip file to a local
directory.
c. Locate and copy the dircon.rsp file.
d. Go to step 3.2. Insert the IBM Director 5.10 for Windows and Linux on xSeries or IBM Director
5.10 for Intel and AMD-based hardware CD into the drive.
a. If the installation program starts automatically and the ″IBM Director Setup″
window opens, close it.
b. Copy the dircon.rsp file to a local directory. This file is in the
director\console\windows\i386 directory on the IBM Director 5.10 for
Windows and Linux on xSeries or IBM Director 5.10 for Intel and AMD-based
hardware CD.
c. Go to step 3.3. Open the copy of the dircon.rsp file in an ASCII text editor.
4. Modify and save the dircon.rsp file with a new file name. This file follows the
Windows initialization (INI) file format and is fully commented.
5. Open a command prompt and change to the directory that contains the IBM
Director Console installation file (ibmsetup.exe). This file is in the
director\console\windows\i386 directory on the CD.
6. From the command prompt, type the following command and press Enter:
ibmsetup.exe installationtype rsp="responsefile.rsp" option
where:
v installationtype is one of the following commands:
– unattended shows the progress of the installation but does not require any
user input.
– silent suppresses all output to the screen during installation.v responsefile.rsp is the path and name of the response file that you saved in
step 4.
v option is one of the following optional parameters:
Table 116. Optional installation parameters
Parameter What it does
waitforme Ensures that ibmsetup.exe process will not end until the
installation of IBM Director Console is completed
debug Logs all messages that are sent by the Windows Installer log
engine, including status and information messages
log=logfilename Specifies the fully qualified name of an alternative installation
log file
verbose Enables verbose logging
Chapter 3. Installing 221

7. If you installed IBM Director Console from the CD, remove the CD from the
drive when the installation is completed.
Installing Level 1: IBM Director Core Services
This topic describes how to install Level 1: IBM Director Core Services.
Installing Level 1: IBM Director Core Services on Linux for
xSeries
This topic describes how to install IBM Director Core Services on a system that is
running Linux for xSeries.
Complete the following steps to install Level 1: IBM Director Core Services on
Linux for xSeries:
1. To start the installation from a Web download, perform the following steps:
a. Download the dir5.10_coreservices_linux.tar file from the IBM Director
Support Web site at www.ibm.com/servers/eserver/xseries/
systems_management/ibm_director/.
b. Decompress the contents of the dir5.10_coreservices_linux.tar file to a local
directory.
c. Change to the directory in which the installation script is located. Type the
following command and press Enter:
cd /directory/FILES
where directory is the local directory to which you decompressed the files.
Go to step 3.2. To start the installation from the CD, perform the following steps:
a. Insert the IBM Director 5.10 for Windows and Linux on xSeries or IBM Director
5.10 for Intel and AMD-based hardware CD into the drive.
b. If the CD automounts, go to step 2c. If the CD does not automount, type
the following command and press Enter:
mount /dev/cdrom /mnt/cdrom
where dev/cdrom is the specific device file for the block device and
mnt/cdrom is the mount point of the drive.
c. Change to the directory in which the installation script is located. Type the
following command and press Enter:
cd /mnt/cdrom/coresvcs/agent/linux/i386/FILES
where mnt/cdrom is the mount point of the drive.
Go to step 3.3. If you want to customize the installation, go to step 4. If you want to accept the
default settings for the installation, type the following command and press
Enter:
./dir5.10_coreservices_linux.sh
If you are installing from the CD, go to step 8 on page 223.
If you are installing from a Web download, the installation is completed.
4. To customize the installation, copy the response file (coresvcs.rsp) to a local
directory. Type the following command and press Enter:
cp coresvcs.rsp /directory/
222 IBM Director Installation and Configuration Guide

where directory is the local directory.
5. Open an ASCII text editor and modify the installation settings in the copy of
the coresvcs.rsp file. This file is fully commented.
You can specify the location of the RPM files and select log file options.
6. Save the modified response file with a new file name.
7. To install Level 1: IBM Director Core Services using the response file, type the
following command and press Enter:
./dir5.10_coreservices_linux.sh -r /directory/response.rsp
where directory is the local directory to which you copied the response file, and
response.rsp is the name of the response file as saved in step 6.
8. If you installed IBM Director Core Services from the CD, complete the
following steps to unmount the drive:
a. Type cd / and press Enter.
b. Type the following command and press Enter:
umount /mnt/cdrom
where mnt/cdrom is the mount point of the drive.9. Remove the IBM Director 5.10 for Windows and Linux on xSeries or IBM Director
5.10 for Intel and AMD-based hardware CD from the drive.
After IBM Director Core Services is installed, you can enable the Wake on LAN
feature.
To enable SNMP Access and Trap Forwarding, you must install and configure
Net-SNMP, version 5.2.1. For more information, see “Enabling SNMP access and
trap forwarding for Linux” on page 331.
Installing Level 1: IBM Director Core Services on Linux for
System z9 and zSeries
This topic describes how to install Level 1: IBM Director Core Services on a system
that is running Linux for System z9 and zSeries.
Complete the following steps to install Level 1: IBM Director Core Services on
Linux for System z9 and zSeries:
1. Make the installation code from the IBM Director 5.10 for Linux on System z9 and
zSeries CD available to your Linux system. See “Preparing to install IBM
Director on a System z9 or zSeries server” on page 166 for more information.
2. From a terminal session on your Linux system, change to the directory in
which the installation script is located. Type the following command and press
Enter:
cd /mnt/coresvcs/agent/linux/s390/FILES/
where /mnt is the mount point of the file system on the CD or the location of
the IBM Director installation files.
3. If you want to customize the installation go to step 4 on page 224. If you want
to accept the default settings for the installation, type the following command
and press Enter:
./csversion_agent_linz.sh
where version is a string that identifies the version.
Chapter 3. Installing 223

Refer to the response file to view the default. The response file is named
coresvcs.rsp and located in the same directory as the installation script. In the
response file, “1” indicates that an item is to be installed and “0” indicates that
an item is not to be installed.
Go to step 9.
4. To customize the installation, copy the response file to a local directory. Type
the following command and press Enter:
cp coresvcs.rsp /directory
where directory is the local directory.
5. Open an ASCII text editor and modify the installation settings in the copy of
the coresvcs.rsp file. This file is fully commented.
6. Save the modified response file with a new file name.
7. To install IBM Director Core Services using the response file, type the following
command and press Enter:
./csversion_agent_linz.sh -r /directory/response.rsp
where directory is the local directory to which you copied the response file and
response.rsp is the name of the response file as saved in step 6.
8. Optional: Keep the response file for future use and reference.
9. Optional: By default, encryption using the Advanced Encryption Standard
(AES) algorithm is enabled during installation. To disable encryption or change
security settings, type the following command and press Enter:
/opt/ibm/director/bin/cfgsecurity
To enable SNMP Access and Trap Forwarding, you must install and configure
Net-SNMP. Use the version included in your distribution.
Installing Level 1: IBM Director Core Services on Linux for
POWER
This topic describes how to install Level 1: IBM Director Core Services on a system
that is running Linux for POWER.
Complete the following steps to install Level 1: IBM Director Core Services on
Linux for POWER:
1. To start the installation from a Web download, perform the following steps:
a. Download the cs5.10_agent_linppc.tar file from the IBM Director Support
Web site at www.ibm.com/servers/eserver/xseries/
systems_management/ibm_director/.
b. Extract the contents of the cs5.10_agent_linppc.tar file to a local directory.
c. Change to the directory in which the installation script is located. Type the
following command and press Enter:
cd /directory/FILES
where directory is the local directory to which you decompressed the files.
Go to step 3 on page 225.2. To start the installation from the CD, perform the following steps:
a. Insert the IBM Director version 5.10 for Linux on POWER CD into the drive.
b. If the CD automounts, go to step 2c on page 225. If the CD does not
automount, type the following command and press Enter:
mount /dev/cdrom /mnt/cdrom
224 IBM Director Installation and Configuration Guide

where dev/cdrom is the specific device file for the block device and
mnt/cdrom is the mount point of the drive.
c. Change to the directory in which the installation script is located. Type the
following command and press Enter:
cd /mnt/cdrom/coresvcs/agent/linux/ppc/FILES
where mnt/cdrom is the mount point of the drive.
Go to step 3.3. If you want to customize the installation, go to step 4. If you want to accept the
default settings for the installation, type the following command and press
Enter:
./cs5.10_agent_linppc.sh
Go to step 8.
4. To customize the installation, copy the response file (coresvcs.rsp) to a local
directory. Type the following command and press Enter:
cp coresvcs.rsp /directory/
where directory is the local directory.
5. Open an ASCII text editor and modify the installation settings in the copy of
the coresvcs.rsp file. This file is fully commented.
You can specify the location of the RPM files and select log file options.
6. Save the modified response file with a new file name.
7. To install IBM Director Core Services using the response file, type the following
command and press Enter:
./cs5.10_agent_linppc.sh -r /directory/response.rsp
where directory is the local directory to which you copied the response file, and
response.rsp is the name of the response file as saved in step 6.
8. To unmount the media drive, complete the following steps:
a. Type cd / and press Enter.
b. Type the following command and press Enter:
umount /mnt/cdrom
where mnt/cdrom is the mount point of the media drive.9. Remove the IBM Director 5.10 for Linux on POWER CD from the drive.
To enable SNMP Access and Trap Forwarding, you must install and configure
Net-SNMP, version 5.2.1.
Installing Level 1: IBM Director Core Services on Windows
This section provides instructions for installing Level 1: IBM Director Core Services
using the InstallShield wizard.
The wizard can be used in a standard interactive mode, or you can perform an
unattended installation using a response file to provide answers to the questions
that the wizard poses.
Note: If Microsoft Windows Installer (MSI), version 3.0 or later is not installed on
the system, it is installed during the IBM Director Core Services installation.
If the upgrade is necessary, the system prompts you to restart following the
installation of IBM Director Core Services without specifying that Microsoft
Chapter 3. Installing 225

Windows Installer was installed. Unless you install using the response file
and set the RebootIfRequired parameter to N, you are prompted to restart
whether or not the IBM Director Core Services installation is completed
successfully,
In addition, if you attempt to perform an administrative installation and
MSI has not yet been upgraded, you must change to the directory
containing the dir5.10_coreservices_windows.exe file and run the installation
program using the following command:
dir5.10_coreservices_windows.exe -a admin
This command updates MSI and runs the installation program in
administrative mode. Restart the system if prompted to do so.
Installing Level 1: IBM Director Core Services on Windows using the
InstallShield wizard:
This topic describes how to install Level 1: IBM Director Core Services using the
InstallShield wizard on a system running Windows.
Complete the following steps to install Level 1: IBM Director Core Services on
Windows using the InstallShield wizard:
1. To start the installation from a Web download, perform the following steps:
a. Download the dir5.10_coreservices_windows.zip file from the IBM Director
Support Web site at www.ibm.com/servers/eserver/xseries/
systems_management/ibm_director/.
b. Extract the contents of the dir5.10_coreservices_windows.zip file to a local
directory.
c. Locate the dir5.10_coreservices_windows.exe file and double-click it. The
InstallShield wizard starts, and the ″Welcome to the InstallShield Wizard for
Core Services″ window opens. Go to step 3 on page 227.2. To start the installation from the CD, perform the following steps:
a. Insert the IBM Director 5.10 for Windows and Linux on xSeries or IBM Director
5.10 for Intel and AMD-based hardware CD into the drive.
b. If the installation program starts automatically and the ″IBM Director Setup″
window opens, go to step 2d. Otherwise, click Start → Run.
c. In the Open field, type the following command and press Enter:
e:\setup.exe
where e is the drive letter of the drive. The installation program starts, and
the ″IBM Director Setup″ window opens.
d. Click Install IBM Director Core Services. The InstallShield wizard starts,
and the ″Welcome to the InstallShield Wizard for Core Services″ window
opens. Continue to step 3 on page 227.
Accessibility note: Screen readers might not process the ″IBM Director Setup″
window correctly. To start the installation wizard for IBM
Director Core Services using the keyboard, perform the
following steps:
a. Close the ″IBM Director Setup″ window.
b. Open Windows Explorer.
226 IBM Director Installation and Configuration Guide

c. Browse to the coresvcs/agent/windows/i386/FILES
directory on the IBM Director 5.10 for Windows and Linux
on xSeries or IBM Director 5.10 for Intel and AMD-based
hardware CD.
d. Execute the dir5.10_coreservices_windows.exe program.
The InstallShield wizard starts, and the ″Welcome to the
InstallShield Wizard for Core Services″ window opens.
Continue to step 3.3. Click Next. The ″License Agreement″ window opens.
4. Click I accept the terms in the license agreement and click Next. The
″Destination Folder″ window opens.
To select an alternative location for the installation of IBM Director Core
Services, click Change and select another directory.
5. Click Next. The ″Ready to Install the Program″ window opens.
6. Click Install. The status bar displays the progress of the installation. When the
installation is completed, the ″InstallShield Wizard Completed″ window opens.
7. Click Finish.
8. If you installed IBM Director Core Services from the CD, remove the CD from
the drive.
Performing an unattended installation of Level 1: IBM Director Core Services on
Windows:
This topic describes how to perform an unattended installation of Level 1: IBM
Director Core Services on a system that is running Windows.
You can perform an unattended installation of IBM Director Core Services using a
response file, which provides answers to the questions that are posed by the
InstallShield wizard. You can use this method to create a standard installation file
that can be used on many systems.
Complete the following steps to install Level 1: IBM Director Core Services on
Windows:
1. To start the installation from a Web download, perform the following steps:
a. Download the dir5.10_coreservices_windows.zip file from the IBM Director
Support Web site at www.ibm.com/servers/eserver/xseries/
systems_management/ibm_director/.
b. Extract the contents of the dir5.10_coreservices_windows.zip file to a local
directory.
c. Locate and copy the coresvcs.rsp file. This file is in the local\FILES directory
where local is the local directory to which you extracted the contents of the
dir5.10_coreservices_windows.zip file.
d. Go to step 3.2. Insert the IBM Director 5.10 CD into the drive.
a. If the installation program starts automatically and the ″IBM Director Setup″
window opens, close it.
b. Copy the response file (coresvcs.rsp) to a local directory. This file is in the
coreservices\agent\windows\i386\FILES directory on the IBM Director 5.10
for Windows and Linux on xSeries or IBM Director 5.10 for Intel and AMD-based
hardware CD.
c. Go to step 3.3. Open the copy of the coresvcs.rsp file in an ASCII text editor.
Chapter 3. Installing 227

4. Modify and save the response file with a new file name. This file follows the
Windows INI file format and is fully commented.
5. Open a command prompt and change to the directory that contains the IBM
Director Core Services installation file (dir5.10_coreservices_windows.exe).
6. From the command prompt, type the following command (all on one line) and
press Enter:
dir5.10_coreservices_windows.exe /s /a installationtype rsp="responsefile.rsp"
option
where:
v /s is an optional parameter that suppresses all file extraction dialogs.
v installationtype is one of the following commands:
– unattended shows the progress of the installation but does not require any
user input.
– silent suppresses all output to the screen during installation.v responsefile.rsp is the path and name of the response file that you created in
step 4.
v option is one of the following optional parameters:
Table 117. Optional installation parameters
Optional parameter What it does
waitforme Ensures that dir5.10_coreservices_windows.exe process will
not end until the installation of IBM Director Core Services is
completed
debug Logs all messages that are sent by the Windows Installer log
engine, including status and information messages
log=logfilename Specifies the fully qualified name of an alternative installation
log file
verbose Enables verbose logging
7. If you set the RebootIfRequired parameter to Y in the response file, reboot the
system if prompted to do so.
8. If you installed IBM Director Core Services from the CD, remove the CD from
the drive.
Installing IBM Director Core Services using the Software
Distribution task
This topic describes how to install IBM Director Core Services using the Software
Distribution task.
You can use the IBM Director Software Distribution task to install IBM Director
Core Services on managed systems running Windows or Linux.
The following files describe IBM Director Core Services:
v dir5.10_coreservices_linux.xml
This file is located in the coresvcs/agent/linux/386/META-INF directory on the
IBM Director 5.10 for Windows and Linux on xSeries or IBM Director 5.10 for Intel
and AMD-based hardware CD.
v dir5.10_coreservices_windows.xml
This file is located in the coresvcs\agent\windows\386\META-INF directory on
the IBM Director 5.10 for Windows and Linux on xSeries or IBM Director 5.10 for
Intel and AMD-based hardware CD.
228 IBM Director Installation and Configuration Guide

v cs5.10_agent_linppc.xml
This file is located in the coresvcs/agent/linux/ppc/META-INF directory on the
IBM Director 5.10 for Linux on Power CD.
(xSeries; Windows only) The following file describes both IBM Director Core
Services and OpenSSH:
v dir5.10_coreservices-toc_windows.xml
This file is located in the coresvcs directory on the IBM Director 5.10 for Windows
and Linux on xSeries or IBM Director 5.10 for Intel and AMD-based hardware CD.
When the dir5.10_coreservices-toc_windows.xml file is imported by the IBM
Update Assistant, a software-distribution category containing both IBM Director
Core Services and OpenSSH is created, allowing them both to be installed at the
same time.
The OpenSSH package can be used to provide a secure remote interface between
a Level-1 managed system and IBM Director Server. Use the OpenSSH interface
to run the Remote Session task or the cimsubscribe utility from IBM Director
Server. The cimsubscribe utility provides a command-line interface for creating
event subscriptions.
(xSeries only) The following files describe the IBM LM78 device driver and the
IBM SMBus device driver:
v lm78driver_linux.xml
v smbdriver_linux.xml
You can download these files from the IBM Director Support Web site at
www.ibm.com/servers/eserver/xseries/systems_management/ibm_director/.
They are included in the .gz files containing the device drivers to which they
apply.
When you import the XML files into IBM Director, the IBM Update Assistant
creates software packages. Then, you can use the IBM Director Software
Distribution task to distribute the packages to the managed systems.
To install the IBM LM78 or SMBus device driver using the Software Distribution
task, you first must build the binary RPM file and copy it to the same directory as
the smbdriver_linux.xml file.
Note: If an earlier version of the IBM LM78 or SMBus device driver for Linux is
installed on the managed system, you must uninstall the device driver
before installing version 5.10 of the driver.
Related reference
“IBM LM78 and SMBus device drivers for Linux” on page 161
This topic describes when to install the LM78 and SMBus device drivers for
Linux.
Creating a software package:
This topic describes how to create a software package for installing or upgrading
IBM Director Agent or installing IBM Director Core Services.
Complete the following steps to create a software package:
Chapter 3. Installing 229

1. Locate the installation or upgrade packages. Refer to “Installing IBM Director
Core Services using the Software Distribution task” on page 228 or “Installing
IBM Director Agent using the Software Distribution task” on page 258 for
more information.
2. If you want to accept the default settings for the installation, go to step 3.
Otherwise, copy the response file (diragent.rsp for IBM Director Agent;
coresvcs.rsp for IBM Director Core Services) and open the copy in an ASCII
text editor. Modify the response file as needed; then, save the modified file
with a new file name.
3. Start IBM Director Console.
4. In the Tasks pane, double-click Software Distribution. The ″Software
Distribution Manager″ window opens.
5. If you have not installed IBM Director 5.10 Software Distribution (Premium
Edition), go to step 6. Otherwise, expand the Wizards tree.
6. Double-click IBM Update Assistant. The ″IBM Update Assistant″ window
opens.
Figure 20. Creating a software package: ″Software Distribution Manager″ window (Standard
Edition)
Figure 21. Creating a software package: Software Distribution Manager window (Premium
Edition)
230 IBM Director Installation and Configuration Guide

7. If you want to get files from the management server, click Get files from the
Director server. By default, Get files from the local system is selected.
8. To select a file, click Browse. The ″IBM Update Package/Root Directory
Location″ window opens.
9. Locate the appropriate XML file and click it. The name of the XML file is
displayed in the File Name field.
Note: Use the correct XML file for your language. The correct file for English
installations is the one without the language code. For example,
dir5.10_agent_windows.xml
Figure 22. Creating a software package: ″IBM Update Assistant″ window
Figure 23. Creating a software package: ″IBM Update Package/Root Directory Location″
window
Chapter 3. Installing 231

10. Click OK. The ″IBM Update Assistant″ window reopens.
11. Click Next. The second ″IBM Update Assistant″ window opens.
Figure 24. Creating a software package: ″IBM Update Package/Root Directory Location″
window
Figure 25. Creating a software package: ″IBM Update Assistant″ window
232 IBM Director Installation and Configuration Guide

12. To specify an alternative response file, click Browse and locate the file that
you modified in step 2 on page 230.
Note: If you do not specify an alternative response file, the package is
installed with the default settings that are specified in the installation
script.
13. Click Finish. As the package is processed, a status message is displayed at the
bottom of the window.
When the processing is completed, the software-distribution package is
displayed in the Tasks pane of IBM Director Console.
Figure 26. Creating software packages: ″IBM Update Assistant″ window
Chapter 3. Installing 233

Installing a software package:
This topic describes how to install a software package using IBM Director.
Note: The Software Distribution task copies the installation package to the client
system before starting the installation. On systems running AIX, the package
is copied to the root file system. There must be at least 60 MB of free space
available in the root file system or the task will fail.
Complete the following steps to install a software package:
1. Start IBM Director Console.
2. In the Tasks pane, expand the Software Distribution task.
3. Click the software package that you want to distribute. Then, drag it into the
Group Contents pane and drop it onto the icon that is displayed for the system
on which you want to install the software package. A window opens.
Note: To distribute software to several systems at once, you can drag the
software package into the Groups pane and drop it onto the icon for the
group. Alternatively, you can select multiple managed systems in the
Group Contents pane.
4. When prompted with Do you wish to create a scheduled job for this task
or execute immediately?, click Schedule or Execute Now. If you click Execute
Now, the software package is distributed immediately. If you click Schedule,
the ″New Scheduled Job″ window opens.
Figure 27. All Software Distribution Packages: IBM Director Agent Upgrade
234 IBM Director Installation and Configuration Guide

5. Schedule the job:
a. In the Scheduled Job field, type a unique name for the job. This name is
displayed in the Jobs pane of the Scheduler window.
b. In the Date field, type the day you want the software package to be
installed (in MM/DD/YYYY format).
c. In the Time field, type the time you want the software package to be
installed.
For more information about the Scheduler task, see the IBM Director 5.10
Systems Management Guide.
6. Click OK. The Save Job Confirmation window opens.
7. Click OK.
Installing Level 2: IBM Director Agent
This topic contains instructions for installing Level 2: IBM Director Agent.
Notes:
v The version of IBM Director Agent cannot be later than the version of
IBM Director Server running on the management system.
v If IBM Director Console and IBM Director Agent are installed on the
same system, both software components must be at the same release
level as IBM Director Server.
Installing Level 2: IBM Director Agent on AIX
This topic describes how to install IBM Director Agent on AIX.
Complete the following steps to install Level 2: IBM Director Agent on AIX:
1. To start the installation from a Web download, perform the following steps:
a. Download the dir5.10_agent_aix.tar file from the IBM Director Support
Web site at www.ibm.com/servers/eserver/xseries/
systems_management/ibm_director/.
b. Extract the contents of the dir5.10_agent_aix.tar file to a local directory.
c. Change to the directory in which the installation script is located. Type the
following command and press Enter:
cd /directory/FILES
Figure 28. Scheduling the installation of a software package: ″New Scheduled Job″ window
Chapter 3. Installing 235

where directory is the local directory to which you extracted the files.
Go to step 3. 2. To start the installation from the CD, perform the following steps:
a. Insert the IBM Director version 5.10 for AIX 5L CD into the drive.
b. If the CD automounts, go to step 2c. If the CD does not automount, type
the following command and press Enter:
mount /dev/cd0 /mnt
where dev/cd0 is the specific device file for the block device and mnt is the
mount point of the drive.
c. Change to the directory in which the installation script is located. Type the
following command and press Enter:
cd /mnt/director/agent/aix/FILES
where mnt is the mount point of the drive.
Go to step 3. 3. If you want to customize the installation, go to step If you want to accept the
default settings for the installation, type the following command and press
Enter:
./dir5.10_agent_aix.sh
Go to step 8.
4. To customize the installation, copy the response file (diragent.rsp) to a local
directory. Type the following command and press Enter:
cp diragent.rsp /directory
where directory is the local directory.
5. Open an ASCII text editor and modify the installation settings in the copy of
the diragent.rsp file. This file is fully commented. You can specify the location
of the .bff files and select log file options.
6. Save the modified response file with a new file name.
7. To install IBM Director Agent using the response file, type the following
command and press Enter:
./dir5.10_agent_aix.sh -r /directory/response.rsp
where directory is the local directory to which you copied the response file,
and response.rsp is the name of the response file as saved in step 6.
8. Optional: By default, encryption using the Advanced Encryption Standard
(AES) algorithm is enabled during installation. To disable encryption or
change security settings, type the following command and press Enter:
/opt/ibm/director/bin/cfgsecurity
9. To start IBM Director Agent, type the following command and press Enter:
/opt/ibm/director/bin/twgstart
10. If you installed IBM Director Agent from the CD, type the following
command and press Enter to unmount the drive:
umount /mnt
where mnt is the mount point of the drive. Remove the IBM Director 5.10 for
AIX 5L CD from the drive.
236 IBM Director Installation and Configuration Guide

After IBM Director Agent is installed, you can enable the Wake on LAN feature. To
determine if your server supports this feature, review the server documentation.
Installing Level 2: IBM Director Agent on i5/OS
This topic describes how to install Level 2: IBM Director Agent on i5/OS (V5R3).
You can select the appropriate method based on your environment.
Installing IBM Director Agent using the Virtualization Engine:
This topic describes how you can install IBM Director Agent using the Remote
Package Deployer, a part of the Virtualization Engine.
Before you distribute IBM Director Agent, you must have installed IBM Director
Server along with IBM Director Agent images on your management server.
Using Remote Package Deployer:
You can install IBM Director Agent, Directori5OSRPD_agentpackagedIU.xml, from
a command line using Remote Package Deployer (RPD). The default location for
this file on the management server is at
/QIBM/ProdData/VE2/ManagedNodes/Directori5OS/META-INF. With RPD you
must install IBM Director Agent to one system at a time. Refer to the instructions
in the Virtualization Engine topic, Distributing agent software without IBM
Director.
Installing IBM Director agent using RSTLICPGM:
If you do not plan to use IBM Director in a Virtualization Engine environment, you
can install IBM Director Agent on i5/OS using the Restore Licensed Program
(RSTLICPGM) command.
If you are upgrading from a previous version of IBM Director, migration of the
product will be processed during the RSTLICPGM processing.
To install IBM Director Agent using RSTLICPGM, complete the following steps:
1. On the IBM Director for i5/OS installation media, locate the
Directori5OSAgent.zip file. The ZIP file contains the SAVDA100MM.sav file.
2. Use FTP to transfer SAVDA100MM.sav into a save file on the i5/OS system
where you want to install IBM Director Agent.
3. Use RSTLICPGM to install the product. In the following example,
SAVDA100MM is the name of the save file to which SAVDA100MM.sav was
transferred.
RSTLICPGM LICPGM(5722DA1) DEV(*SAVF) SAVF(QGPL/SAVDA100MM)
Installing Level 2: IBM Director Agent on Linux for xSeries
This topic describes how to install Level 2: IBM Director Agent on a system that is
running Linux for xSeries.
Complete the following steps to install Level 2: IBM Director Agent on Linux for
xSeries:
1. To start the installation from a Web download, perform the following steps:
a. Download the dir5.10_agent_linux.tar file from the IBM Director Support
Web site at www.ibm.com/servers/eserver/xseries/
systems_management/ibm_director/.
b. Extract the contents of the dir5.10_agent_linux.tar file to a local directory.
Chapter 3. Installing 237

c. Change to the directory in which the installation script is located. Type the
following command and press Enter:
cd /directory/FILES
where directory is the local directory to which you extracted the files.
Go to step 3. 2. To start the installation from the CD, perform the following steps:
a. Insert the IBM Director 5.10 for Windows and Linux on xSeries or IBM
Director 5.10 for Intel and AMD-based hardware CD into the drive.
b. If the CD automounts, go to step 2c. If the CD does not automount, type
the following command and press Enter:
mount /dev/cdrom /mnt/cdrom
where dev/cdrom is the specific device file for the block device and
mnt/cdrom is the mount point of the drive.
c. Change to the directory in which the installation script is located. Type the
following command and press Enter:
cd /mnt/cdrom/director/agent/linux/i386/FILES
where mnt/cdrom is the mount point of the drive.
Go to step 3. 3. If you want to customize the installation, go to step 4. If you want to accept
the default settings for the installation, type the following command and press
Enter:
./dir5.10_agent_linux.sh
Go to step 8.
4. To customize the installation, copy the response file (diragent.rsp) to a local
directory. Type the following command and press Enter:
cp diragent.rsp /directory
where directory is the local directory.
5. Open an ASCII text editor and modify the installation settings in the copy of
the diragent.rsp file. This file is fully commented.
6. Save the modified response file with a new file name.
7. To install IBM Director Agent using the response file, type the following
command and press Enter:
./dir5.10_agent_linux.sh -r /directory/response.rsp
where directory is the local directory to which you copied the response file,
and response.rsp is the name of the response file as saved in step 6.
8. Optional: By default, encryption using the Advanced Encryption Standard
(AES) algorithm is enabled during installation. To disable encryption or
change security settings, type the following command and press Enter:
/opt/ibm/director/bin/cfgsecurity
9. To start IBM Director Agent, type the following command and press Enter:
/opt/ibm/director/bin/twgstart
10. If you installed IBM Director Agent from the CD, complete the following steps
to unmount the drive:
a. Type cd / and press Enter.
b. Type the following command and press Enter:
238 IBM Director Installation and Configuration Guide

umount /mnt/cdrom
where mnt/cdrom is the mount point of the CD-ROM drive. Remove the
CD from the drive.
After IBM Director Agent is installed, you can enable the Wake on LAN feature.
For more information, see “Enabling the Wake on LAN feature for Linux or AIX”
on page 329
To enable SNMP Access and Trap Forwarding, you must install and configure
Net-SNMP, version 5.2.1. For more information, see “Enabling SNMP access and
trap forwarding for Linux” on page 331.
Installing Level 2: IBM Director Agent on Linux for System z9
and zSeries
This topic describes how to install Level 2: IBM Director Agent on a system that is
running Linux for System z9 and zSeries.
Complete the following steps to install IBM Director Agent on Linux for System z9
and zSeries:
1. Make the installation code from the IBM Director 5.10 for Linux on System z9
and zSeries CD is available to your Linux system. See “Preparing to install IBM
Director on a System z9 or zSeries server” on page 166 for more information.
2. From a terminal session on your Linux system, change to the directory in
which the installation script is located. Type the following command and press
Enter:
cd /mnt/director/agent/linux/s390/FILES/
where /mnt is the mount point of the file system on the CD or the location of
the IBM Director installation files.
3. If you want to customize the installation go to step 4. If you want to accept
the default settings for the installation, type the following command and press
Enter:
./dirversion_agent_linz.sh
where version is a string that identifies the version.
Refer to the response file to view the default. The response file is named
diragent.rsp and located in the same directory as the installation script. In the
response file, “1” indicates that an item is to be installed and “0” indicates
that an item is not to be installed.
Go to step 10 on page 240.
4. To customize the installation, copy the response file to a local directory. Type
the following command and press Enter:
cp diragent.rsp /directory
where directory is the local directory.
5. Open an ASCII text editor and modify the installation settings in the copy of
the diragent.rsp file. This file is fully commented.
You can specify the location of the RPM files and select log file options.
6. Save the modified response file with a new file name.
7. To install IBM Director Agent using the response file, type the following
command and press Enter:
./dirversion_agent_linz.sh -r /directory/response.rsp
Chapter 3. Installing 239

where directory is the local directory to which you copied the response file and
response.rsp is the name of the response file as saved in step 6 on page 239.
8. Optional: Keep the response file for future use and reference.
9. Optional: By default, encryption using the Advanced Encryption Standard
(AES) algorithm is enabled during installation. To disable encryption or
change security settings, type the following command and press Enter:
/opt/ibm/director/bin/cfgsecurity
10. To start IBM Director Agent begin a new terminal session, type the following
command and press Enter:
/opt/ibm/director/bin/twgstart
To enable SNMP Access and Trap Forwarding, you must install and configure
Net-SNMP. Use the version included in your distribution.
Installing Level 2: IBM Director Agent on Linux for POWER
This topic describes how to install Level 2: IBM Director Agent on a system that is
running Linux for POWER.
Complete the following steps to install Level 2: IBM Director Agent on Linux for
POWER:
1. To start the installation from a Web download, perform the following steps:
a. Download the dir5.10_agent_linppc.tar file from the IBM Director Support
Web site at www.ibm.com/servers/eserver/xseries/
systems_management/ibm_director/.
b. Extract the contents of the dir5.10_agent_linppc.tar file to a local directory.
c. Change to the directory in which the installation script is located. Type the
following command and press Enter:
cd /directory/FILES
where directory is the local directory to which you extracted the files.
Go to step 3. 2. To start the installation from the CD, perform the following steps:
a. Insert the IBM Director version 5.10 for Linux on POWER CD into the drive.
b. If the CD automounts, go to step 2c. If the CD does not automount, type
the following command and press Enter:
mount /dev/cdrom /mnt/cdrom
where dev/cdrom is the specific device file for the block device and
mnt/cdrom is the mount point of the drive.
c. Change to the directory in which the installation script is located. Type the
following command and press Enter:
cd /mnt/cdrom/director/agent/linux/ppc/FILES
where mnt/cdrom is the mount point of the drive.
Go to step 3. 3. If you want to customize the installation, go to step 4 on page 241. If you
want to accept the default settings for the installation, type the following
command and press Enter:
./dir5.10_agent_linppc.sh
Go to step 8 on page 241.
240 IBM Director Installation and Configuration Guide

4. To customize the installation, copy the response file (diragent.rsp) to a local
directory. Type the following command and press Enter:
cp diragent.rsp /directory
where directory is the local directory.
5. Open an ASCII text editor and modify the installation settings in the copy of
the diragent.rsp file. This file is fully commented. You can specify the location
of the RPM files and select log file options.
6. Save the modified response file with a new file name.
7. To install IBM Director Agent using the response file, type the following
command and press Enter:
./dir5.10_agent_linppc.sh -r /directory/response.rsp
where directory is the local directory to which you copied the response file,
and response.rsp is the name of the response file as saved in step 6.
8. Optional: By default, encryption using the Advanced Encryption Standard
(AES) algorithm is enabled during installation. To disable encryption or
change security settings, type the following command and press Enter:
/opt/ibm/director/bin/cfgsecurity
9. To start IBM Director Agent, type the following command and press Enter:
/opt/ibm/director/bin/twgstart
10. If you installed IBM Director Agent from the CD, perform the following steps
to unmount the drive:
a. Type cd / and press Enter.
b. Type the following command and press Enter:
umount /mnt/cdrom
where mnt/cdrom is the mount point of the drive. Remove the CD from the
drive.
After IBM Director Agent is installed, you can enable the Wake on LAN feature.
For more information, see “Enabling the Wake on LAN feature for Linux or AIX”
on page 329
To enable SNMP Access and Trap Forwarding, you must install and configure
Net-SNMP, version 5.2.1. For more information, see “Enabling SNMP access and
trap forwarding for Linux” on page 331.
Installing Level 2: IBM Director Agent on Linux for Intel Itanium
(64 bit)
This topic describes how to install Level 2: IBM Director Agent on a system
running Linux for Intel Itanium (64 bit).
Complete the following steps to install Level 2: IBM Director Agent on Linux for
64-bit Intel Itanium systems:
1. Download the dir5.10_agent_linux64.tar package from the IBM Director
Support Web site at
www.ibm.com/servers/eserver/xseries/systems_management/ibm_director/.
2. Extract the dir5.10_agent_linux64.tar file to a local directory.
3. If you want to customize the installation, go to step 4 on page 242. If you want
to accept the default settings for the installation, type the following command
and press Enter:
Chapter 3. Installing 241

./dir5.10_agent_linux64.sh
Go to step 8.
4. To customize the installation, copy the response file (diragent.rsp) to a local
directory. Type the following command and press Enter:
cp diragent.rsp /directory
where directory is the local directory.
5. Open an ASCII text editor and modify the installation settings in the copy of
the diragent.rsp file. This file is fully commented.
You can specify the location of the RPM files and select log file options.
6. Save the modified response file with a new file name.
7. To install IBM Director Agent using the response file, type the following
command and press Enter:
./dir5.10_agent_linux64.sh -r /directory/response.rsp
where directory is the local directory to which you copied the response file, and
response.rsp is the name of the response file as saved in step 6.
8. To start IBM Director Agent, type the following command and press Enter:
/opt/ibm/director/bin/twgstart
After IBM Director Agent is installed, you can enable the Wake on LAN feature.
For more information, see “Enabling the Wake on LAN feature for Linux or AIX”
on page 329
To enable SNMP Access and Trap Forwarding, you must install and configure
Net-SNMP, version 5.2.1. For more information, see “Enabling SNMP access and
trap forwarding for Linux” on page 331.
Installing Level 2: IBM Director Agent on NetWare
This topic describes how to install Level 2: IBM Director Agent on NetWare.
Notes:
1. (xSeries servers only) Install the MPA Agent only if the server has one
of the following service processors installed:
v Advanced System Management processor
v Advanced System Management PCI adapter
v Remote Supervisor Adapter
v Remote Supervisor Adapter II2. To install Level 2: IBM Director Agent, you must log on to the NetWare
server from a Windows workstation running the NetWare Client for
Windows. The SYS volume must be mapped as a drive to the system
running Windows. Also, you must have administrator or supervisor
access on the NetWare server.
Complete the following steps to install Level 2: IBM Director Agent on NetWare:
1. Download the dir5.10_agent_netware.zip from the IBM Director Support Web
site at www.ibm.com/servers/eserver/xseries/
systems_management/ibm_director/.
2. Extract the contents of the dir5.10_agent_netware.zip file to the Windows
workstation running NetWare Client for Windows.
242 IBM Director Installation and Configuration Guide

3. Start Windows Explorer and open the \directory\FILES directory, where
directory is the location to which you extracted the contents of the
dir5.10_agent_netware.zip file.
4. Double-click the dir5.10_agent_netware.exe file. The InstallShield wizard
starts.
5. Click Next. The ″Installing IBM Director Agent″ window opens.
6. Click Next to accept the license agreement. The “Choose destination location”
window opens.
7. Click the drive that is mapped to the SYS volume on the server running
NetWare; then, click Next. The ″Select Components″ window opens.
Figure 29. Installing Level 2: IBM Director Agent on NetWare: “Choose destination location”
window
Chapter 3. Installing 243

IBM Director Agent is selected automatically for installation.
8. Optional: The Management Processor Assistant Agent enables communication
with service processors in IBM xSeries and Netfinity servers. To enable the
Management Processor Assistant Agent feature, select the check box.
9. Click Next. The ″Setup Status window” opens, and Level 2: IBM Director
Agent installation begins. When the installation is completed, the
“InstallShield Wizard complete” window opens.
Figure 30. Installing Level 2: IBM Director Agent on NetWare: ″Select Components″ window
244 IBM Director Installation and Configuration Guide

10. Click Finish.
11. On the server running NetWare, change to the console screen.
12. From the console, type the following command and press Enter:
Search add sys:IBM\Director
13. To define the protocols to use for communication between IBM Director Server
and IBM Director Agent, type the following command and press Enter:
twgipccf
Note: If you disable the TCPIP (all adapters) setting and enable an individual
device driver on a system with multiple network adapters, IBM
Director Agent will receive only those data packets that are addressed to
the individual adapter.
14. To start IBM Director Agent, type the following command and press Enter:
load twgipc
IBM Director Agent will start automatically whenever the server running NetWare
starts.
Installing Level 2: IBM Director Agent on 32-bit Windows
This topic provides information about installation prerequisites and instructions for
installing Level 2: IBM Director Agent using the InstallShield wizard on a system
running 32-bit Windows.
The wizard can be used in a standard interactive mode, or you can perform an
unattended installation using a response file to provide answers to the questions
that the wizard poses.
Note: If Microsoft Windows Installer (MSI), version 3.0 or later is not installed on
the system, it is installed during the IBM Director Agent installation. If the
Figure 31. Installing Level 2: IBM Director Agent on NetWare: “InstallShield Wizard complete”
window
Chapter 3. Installing 245

upgrade is necessary, the system prompts you to restart following the
installation of IBM Director Agent without specifying that Microsoft
Windows Installer was installed. Unless you install using the response file
and set the RebootIfRequired parameter to N, you are prompted to restart
whether or not the IBM Director Agent installation is completed successfully.
In addition, if you attempt to perform an administrative installation and
MSI has not yet been upgraded, you must change to the directory
containing the dir5.10_agent_windows.exe file and run the installation
program using the following command:
dir5.10_agent_windows.exe -a admin
This command updates MSI and runs the installation program in
administrative mode. Restart the system if prompted to do so.
Installing Level 2: IBM Director Agent on 32-bit Windows using the
InstallShield wizard:
This topic describes how to install Level 2: IBM Director Agent on a system that is
running 32-bit Windows using the InstallShield wizard.
Complete the following steps to install Level 2 : IBM Director Agent on 32-bit
Windows using the InstallShield wizard:
1. To start the installation from a Web download, perform the following steps:
a. Download the dir5.10_agent_windows.zip file from the IBM Director
Support Web site at www.ibm.com/servers/eserver/xseries/
systems_management/ibm_director/.
b. Extract the contents of the dir5.10_agent_windows.zip file to a local
directory.
c. Locate the dir5.10_agent_windows.exe file and double-click it. The
InstallShield wizard starts, and the ″Welcome to the InstallShield Wizard
for IBM Director Agent″ window opens. Go to step 3 on page 247. 2. To start the installation from the CD, perform the following steps:
a. Insert the IBM Director 5.10 for Windows and Linux on xSeries or IBM
Director 5.10 for Intel and AMD-based hardware CD into the drive.
b. If the installation program starts automatically and the ″IBM Director
Setup″ window opens, go to step 2d. Otherwise, click Start → Run.
c. In the Open field, type the following command and press Enter:
e:\setup.exe
where e is the drive letter of the drive. The installation program starts, and
the ″IBM Director Setup″ window opens.
d. Click Install IBM Director Agent. The InstallShield wizard starts, and the
″Welcome to the InstallShield Wizard for IBM Director Agent″ window
opens. Continue to step 3 on page 247.
Accessibility note: Screen readers might not process the ″IBM Director Setup″
window correctly. To start the installation wizard for IBM
Director Agent using the keyboard, perform the following
steps:
a. Close the ″IBM Director Setup″ window.
b. Open Windows Explorer.
246 IBM Director Installation and Configuration Guide

c. Browse to the director/agent/windows/i386/FILES
directory on the IBM Director 5.10 for Windows and
Linux on xSeries or IBM Director 5.10 for Intel and
AMD-based hardware CD.
d. Execute the dir5.10_agent_windows.exe program. The
InstallShield wizard starts, and the ″Welcome to the
InstallShield Wizard for IBM Director Agent″ window
opens. Continue to step 3. 3. Click Next. The ″License Agreement″ window opens.
4. Click I accept the terms in the license agreement and click Next. The
“Feature and installation directory selection” window opens.
Level 2: IBM Director Agent and Level 1: Core Services are selected
automatically for installation; a hard disk drive icon
is displayed to the
left of each component.
5. A red X
is displayed to the left of IBM Director Remote Control Agent,
which is optional. The IBM Director Remote Control Agent enables a system
administrator to perform remote desktop functions on the management server.
To install IBM Director Remote Control Agent, click the red X to the left of the
feature name. A menu opens. Click either This feature will be installed on
local hard drive or This feature, and all subfeatures, will be installed on
local hard drive.
6. Encrypt data transmissions between IBM Director Server and IBM Director
Agent is selected by default.
Note: If encryption is enabled, the following conditions apply:
v The managed system is automatically secured, and the Secure – IBM
Director Server must request access to manage this system check
box is unavailable.
Figure 32. Installing Level 2: IBM Director Agent on Windows: “Feature and installation
directory selection” window
Chapter 3. Installing 247

v Only management servers with encryption enabled are able to
communicate with the managed system.
To accept this setting, go to step 8. If you do not want to encrypt
transmissions between IBM Director Server and IBM Director Agent, clear the
check box and go to step 7.
7. Select the Secure – IBM Director Server must request access to manage this
system check box. This ensures that only authorized instances of IBM Director
Server can manage this system.
8. Optional: In the Add Known Server Address field, enter a comma-separated
list of IBM Director Server addresses to which IBM Director Agent should
announce itself. The format for this field is <protocol>::<address>. For example,
TCPIP::10.3.1.4, TCPIP::192.168-1.10.
9. Click Next. The “Software Distribution settings” window opens.
To select an alternative location for the storage of software-distribution
packages before they are applied to IBM Director Agent, click Change and
select another directory.
10. Click Next. The ″Ready to Install the Program″ window opens.
11. Click Install. The ″Installing IBM Director Agent″ window opens.
The status bar indicates the progress of the installation. When the installation
is completed, the “Network driver configuration” window opens.
Figure 33. Installing Level 2: IBM Director Agent on Windows: “Software Distribution settings”
window
248 IBM Director Installation and Configuration Guide

12. In the System Name field, type the name that you want to be displayed in
IBM Director Console. By default, this value is the NetBIOS name of the
managed system.
13. Define the communication protocols to use for communication between IBM
Director Server and IBM Director Agent.
a. In the Network drivers field, the TCPIP (all adapters) setting is enabled by
default. To enable another protocol, select the protocol and then select the
Enable driver check box.
Note: If you disable the TCPIP (all adapters) setting and enable an
individual device driver on a system with multiple network
adapters, IBM Director Agent will receive only those data packets
that are addressed to the individual adapter.
b. In the Network timeout field, type the number of seconds that IBM
Director Server waits for a response from IBM Director Agent. By default,
this value is set to 15 seconds.
c. Click Enable Wake on LAN if the network adapter supports the Wake on
LAN feature.
Note: To determine whether your server supports the Wake on LAN
feature, see your server documentation.14. If you chose to install the IBM Director Remote Control Agent, the following
options are available:
Figure 34. Installing Level 2: IBM Director Agent on Windows: “Network driver configuration”
window
Chapter 3. Installing 249

Require User Authorization for System Access
Select this check box to request authorization from the local user
before accessing the managed system remotely.
Disable Screen Saver
Select this check box to disable the screen saver when the managed
system is controlled remotely.
Disable Background Wallpaper
Select this check box to disable desktop wallpaper when the managed
system is controlled remotely. You might want to disable the
wallpaper because complicated backgrounds can affect the
performance of remote control and increase network traffic.15. Click OK. The status bar displays the progress of the installation. When the
installation is completed, the InstallShield Wizard Completed window opens.
16. Click Finish.
17. If you installed IBM Director Agent from the CD, remove the CD from the
drive.
18. If you are prompted to restart your system, click Yes.
Performing an unattended installation of Level 2: IBM Director Agent on 32-bit
Windows:
This topic describes how to perform an unattended installation of Level 2: IBM
Director Agent on a system that is running 32-bit Windows.
You can perform an unattended installation of Level 2: IBM Director Agent using a
response file, which provides answers to the questions that are posed by the
InstallShield wizard. You can use this method to create a standard installation file
that can be employed on many systems.
Complete the following steps to install Level 2: IBM Director Agent on 32-bit
Windows:
1. To start the installation from a Web download, perform the following steps:
a. Download the dir5.10_agent_windows.zip file from the IBM Director
Support Web site at www.ibm.com/servers/eserver/xseries/
systems_management/ibm_director/.
b. Extract the contents of the dir5.10_agent_windows.zip file to a local
directory.
c. Locate and copy the diragent.rsp file. This file is in the local\FILES directory
where local is the local directory to which you extracted the contents of the
dir5.10_agent_windows.zip file.
d. Go to step 3.2. Insert the IBM Director 5.10 for Windows and Linux on xSeries or IBM Director
5.10 for Intel and AMD-based hardware CD into the drive.
a. If the installation program starts automatically and the ″IBM Director Setup″
window opens, close it.
b. Copy the diragent.rsp file to a local directory. This file is in the
director\agent\windows\i386\FILES directory on the IBM Director 5.10 for
Windows and Linux on xSeries or IBM Director 5.10 for Intel and AMD-based
hardware CD.
c. Go to step 3.3. Open the copy of the diragent.rsp file in an ASCII text editor.
250 IBM Director Installation and Configuration Guide
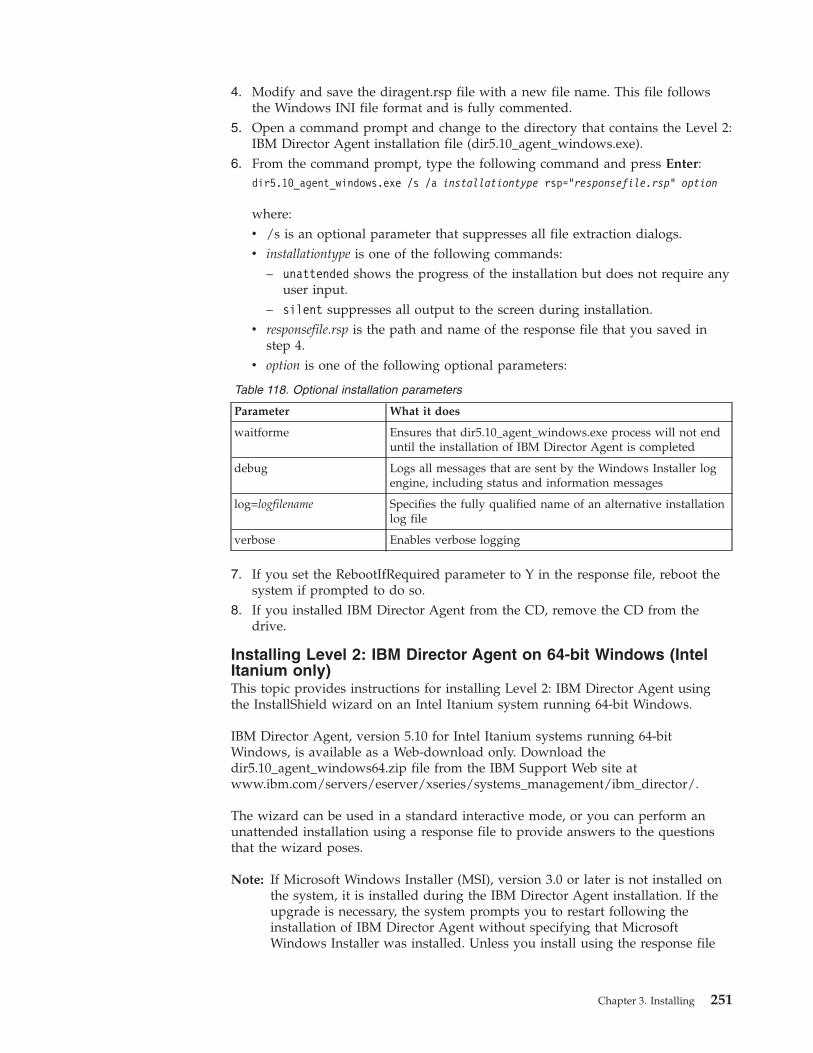
4. Modify and save the diragent.rsp file with a new file name. This file follows
the Windows INI file format and is fully commented.
5. Open a command prompt and change to the directory that contains the Level 2:
IBM Director Agent installation file (dir5.10_agent_windows.exe).
6. From the command prompt, type the following command and press Enter:
dir5.10_agent_windows.exe /s /a installationtype rsp="responsefile.rsp" option
where:
v /s is an optional parameter that suppresses all file extraction dialogs.
v installationtype is one of the following commands:
– unattended shows the progress of the installation but does not require any
user input.
– silent suppresses all output to the screen during installation.v responsefile.rsp is the path and name of the response file that you saved in
step 4.
v option is one of the following optional parameters:
Table 118. Optional installation parameters
Parameter What it does
waitforme Ensures that dir5.10_agent_windows.exe process will not end
until the installation of IBM Director Agent is completed
debug Logs all messages that are sent by the Windows Installer log
engine, including status and information messages
log=logfilename Specifies the fully qualified name of an alternative installation
log file
verbose Enables verbose logging
7. If you set the RebootIfRequired parameter to Y in the response file, reboot the
system if prompted to do so.
8. If you installed IBM Director Agent from the CD, remove the CD from the
drive.
Installing Level 2: IBM Director Agent on 64-bit Windows (Intel
Itanium only)
This topic provides instructions for installing Level 2: IBM Director Agent using
the InstallShield wizard on an Intel Itanium system running 64-bit Windows.
IBM Director Agent, version 5.10 for Intel Itanium systems running 64-bit
Windows, is available as a Web-download only. Download the
dir5.10_agent_windows64.zip file from the IBM Support Web site at
www.ibm.com/servers/eserver/xseries/systems_management/ibm_director/.
The wizard can be used in a standard interactive mode, or you can perform an
unattended installation using a response file to provide answers to the questions
that the wizard poses.
Note: If Microsoft Windows Installer (MSI), version 3.0 or later is not installed on
the system, it is installed during the IBM Director Agent installation. If the
upgrade is necessary, the system prompts you to restart following the
installation of IBM Director Agent without specifying that Microsoft
Windows Installer was installed. Unless you install using the response file
Chapter 3. Installing 251

and set the RebootIfRequired parameter to N, you are prompted to restart
whether or not the IBM Director Agent installation is completed successfully.
In addition, if you attempt to perform an administrative installation and
MSI has not yet been upgraded, you must change to the directory
containing the dir5.10_agent_windows64.exe file and run the installation
program using the following command:
dir5.10_agent_windows64.exe -a admin
This command updates MSI and runs the installation program in
administrative mode. Restart the system if prompted to do so.
Installing Level 2: IBM Director Agent on 64-bit Windows (Intel Itanium only)
using the InstallShield:
This topic describes how to install Level 2: IBM Director Agent on an Intel Itanium
system that is running 64-bit Windows using the InstallShield wizard.
Complete the following steps to install Level 2: IBM Director Agent on an Intel
Itanium system running 64-bit Windows:
1. Download the dir5.10_agent_windows64.zip file from the IBM Director
Support Web site at
www.ibm.com/servers/eserver/xseries/systems_management/ibm_director/.
2. Extract the contents of the dir5.10_agent_windows64.zip file to a local
directory.
3. Locate the dir5.10_agent_windows64.exe file. This file is in the directory\FILES
directory, where directory is the local directory to which you extracted the
contents of the dir5.10_agent_windows64.zip file.
4. Double-click the dir5.10_agent_windows64.exe file. The InstallShield wizard
starts, and the ″Welcome to the InstallShield Wizard for IBM Director Agent″
window opens.
5. Click Next. The ″License Agreement″ window opens.
6. Click I accept the terms in the license agreement and click Next. The
“Feature and installation directory selection” window opens.
252 IBM Director Installation and Configuration Guide

Level 2: IBM Director Agent is selected automatically for installation; a hard
disk drive icon
is displayed to the left of the component.
7. A red X
is displayed to the left of IBM Director Remote Control Agent,
which is optional. The IBM Director Remote Control Agent enables a system
administrator to perform remote desktop functions on the management server.
To install IBM Director Remote Control Agent, click the red X to the left of the
feature name. A menu opens. Click either This feature will be installed on
local hard drive or This feature, and all subfeatures, will be installed on
local hard drive.
8. Click Next. The “Security settings” window opens.
Figure 35. Installing Level 2: IBM Director Agent on 64-bit Windows: “Feature and installation
directory selection” window
Chapter 3. Installing 253

9. The Secure – IBM Director Server must request access to manage this
system check box is selected by default. This setting ensures that IBM Director
Server cannot manage this system until it is granted access.
10. Optional: Add a comma-separated list of IBM Director servers that you want
IBM Director Agent to announce itself to in the Add Known Server Address
field. The format for this field is <protocol>::<address>. For example,
TCPIP::10.3.1.4, TCPIP::192.168-1.10.
11. Click Next. The “Software Distribution settings” window opens.
Figure 36. Installing Level 2: IBM Director Agent on 64-bit Windows: “Security settings”
window
254 IBM Director Installation and Configuration Guide

12. To select an alternative location for the storage of software-distribution
packages before they are applied to IBM Director Agent, click Change and
select another directory.
13. Click Next. The ″Ready to Install the Program″ window opens.
14. Click Install. The ″Installing IBM Director Agent″ window opens.
The status bar indicates the progress of the installation. When the installation
is completed, the “Network driver configuration” window opens.
Figure 37. Installing Level 2: IBM Director Agent on 64-bit Windows: “Software Distribution
settings” window
Chapter 3. Installing 255

15. In the System Name field, type the name that you want to be displayed in
IBM Director Console. By default, this name is the NetBIOS name of the
managed system.
16. Define the communication protocols to use for communication between IBM
Director Server and IBM Director Agent.
a. In the Network drivers field, the TCPIP (all adapters) setting is enabled by
default. To enable another protocol, select the protocol and then select the
Enable driver check box.
Note: If you disable the TCPIP (all adapters) setting and enable an
individual device driver on a system with multiple network
adapters, IBM Director Agent will receive only those data packets
that are addressed to the individual adapter.
b. In the Network timeout field, type the number of seconds that IBM
Director Server waits for a response from IBM Director Agent. By default,
this value is set to 15 seconds.
c. Click Enable Wake on LAN if the network adapter supports the Wake on
LAN feature.
Note: To determine whether your server supports the Wake on LAN
feature, see your server documentation.17. If you chose to install the IBM Director Remote Control Agent, the following
options are available:
Figure 38. Installing Level 2: IBM Director Agent on 64-bit Windows: “Network driver
configuration” window
256 IBM Director Installation and Configuration Guide

Require User Authorization for System Access
Select this check box to request authorization from the local user
before accessing the managed system remotely.
Disable Screen Saver
Select this check box to disable the screen saver when the managed
system is controlled remotely.
Disable Background Wallpaper
Select this check box to disable desktop wallpaper when the managed
system is controlled remotely. You might want to disable the
wallpaper because complicated backgrounds can affect the
performance of remote control and increase network traffic.18. Click OK. The status bar displays the progress of the installation. When the
installation is completed, the InstallShield Wizard Completed window opens.
19. Click Finish.
20. If you are prompted to restart your system, click Yes.
Performing an unattended installation of Level 2: IBM Director Agent on 64-bit
Windows (Intel Itanium only):
This topic describes how to perform an unattended installation of Level 2: IBM
Director Agent on an Intel Itanium system that is running 64-bit Windows.
You can perform an unattended installation of Level 2: IBM Director Agent using a
response file, which provides answers to the questions that are posed by the
InstallShield wizard. You can use this method to create a standard installation file
that can be employed on many systems.
Complete the following steps to install Level 2: IBM Director Agent on an Intel
Itanium system running 64-bit Windows:
1. Download the dir5.10_agent_windows64.zip file from the IBM Director Support
Web site at www.ibm.com/servers/eserver/xseries/
systems_management/ibm_director/.
2. Extract the contents of the dir5.10_agent_windows64.zip file to a local directory.
3. Copy the diragent.rsp file.
4. Open the copy of the diragent.rsp file in an ASCII text editor and modify the
installation settings. This file follows the Windows INI file format and is fully
commented.
5. Save the copy of the diragent.rsp file with a new file name.
6. Open a command prompt and change to the directory that contains the Level 2:
IBM Director Agent installation file (dir5.10_agent_windows.exe).
7. From the command prompt, type the following command and press Enter:
dir5.10_agent_windows64.exe /s /a installationtype rsp="responsefile.rsp" option
where:
v /s is an optional parameter that suppresses all file extraction dialogs.
v installationtype is one of the following commands:
– unattended shows the progress of the installation but does not require any
user input.
– silent suppresses all output to the screen during installation.v responsefile.rsp is the path and name of the response file that you created in
step 5.
Chapter 3. Installing 257

v option is one of the following optional parameters:
Table 119. Optional installation parameters
Parameter What it does
waitforme Ensures that dir5.10_agent_windows64.exe process will not
end until the installation of IBM Director Agent is completed
debug Logs all messages that are sent by the Windows Installer log
engine, including status and information messages
log=logfilename Specifies the fully qualified name of an alternative installation
log file
verbose Enables verbose logging
8. If you set the RebootIfRequired parameter to Y in the response file, reboot the
system if prompted to do so.
Installing IBM Director Agent using the Software Distribution
task
This topic describes how to install IBM Director Agent using the Software
Distribution task.
You can use the IBM Director Software Distribution task to install IBM Director
Agent on managed systems running AIX, i5/OS, Linux, or Windows.
The following files describe IBM Director Agent:
v dir5.10_agent_aix.xml
This file is located in the director/agent/aix/META-INF directory on the IBM
Director 5.10 for AIX 5L CD.
v dir5.10_agent_linux.xml
This file is located in the director/agent/linux/i386/META-INF directory on the
IBM Director 5.10 for Windows and Linux on xSeries or IBM Director 5.10 for Intel
and AMD-based hardware CD.
v dir5.10_agent_linppc.xml
This file is located in the director/agent/linux/ppc/META-INF directory on the
IBM Director 5.10 for Linux on Power CD.
v dir5.10_agent_windows.xml
This file is located in the director\agent\windows\i386\META-INF directory on
the IBM Director 5.10 for Windows and Linux on xSeries or IBM Director 5.10 for
Intel and AMD-based hardware CD.
v Directori5OSRPD_agentpackagedIU.xml
The default location for this file on an i5/OS management server, if you have
selected to install the IBM Director Agent images, is at
/QIBM/ProdData/VE2/ManagedNodes/Directori5OS/META-INF.
If you have not installed IBM Director Server for i5/OS, this file is included on
the IBM Director Agents for AIX 5L , i5/OS, Windows, Linux on xSeries, System z9,
zSeries and POWER CD. You can access it from the \FILES\Director directory, in
the Directori5OSAgent.zip file.
The following files describe the 64-bit, Intel Itanium versions of the IBM Director
Agent:
v dir5.10_agent_linux64.xml
v dir5.10_agent_windows64.xml
258 IBM Director Installation and Configuration Guide

(xSeries only) The following files describe the IBM LM78 and IBM SMBus device
drivers:
v lm78driver_linux.xml
v smbdriver_linux.xml
You can download these files from the IBM Director Support Web site at
www.ibm.com/servers/eserver/xseries/systems_management/ibm_director/.
They are included in the .zip or .gz packages for the component or device driver to
which they apply.
When you import the XML files into IBM Director, the IBM Update Assistant
creates software packages. Then, you can use the IBM Director Software
Distribution task to distribute the packages to the managed systems.
To install the IBM LM78 or SMBus device driver using the Software Distribution
task, you first must build the binary RPM file and copy it to the same directory as
the lm78driver_linux.xml or smbdriver_linux.xml file.
Note: If an earlier version of the IBM LM78 or SMBus device driver for Linux is
installed on the managed system, you must uninstall the device driver
before installing version 5.10 of the driver.
Related reference
“IBM LM78 and SMBus device drivers for Linux” on page 161
This topic describes when to install the LM78 and SMBus device drivers for
Linux.
Creating a software package:
This topic describes how to create a software package for installing or upgrading
IBM Director Agent or installing IBM Director Core Services.
Complete the following steps to create a software package:
1. Locate the installation or upgrade packages. Refer to “Installing IBM Director
Core Services using the Software Distribution task” on page 228 or “Installing
IBM Director Agent using the Software Distribution task” on page 258 for
more information.
2. If you want to accept the default settings for the installation, go to step 3.
Otherwise, copy the response file (diragent.rsp for IBM Director Agent;
coresvcs.rsp for IBM Director Core Services) and open the copy in an ASCII
text editor. Modify the response file as needed; then, save the modified file
with a new file name.
3. Start IBM Director Console.
4. In the Tasks pane, double-click Software Distribution. The ″Software
Distribution Manager″ window opens.
Chapter 3. Installing 259

5. If you have not installed IBM Director 5.10 Software Distribution (Premium
Edition), go to step 6. Otherwise, expand the Wizards tree.
6. Double-click IBM Update Assistant. The ″IBM Update Assistant″ window
opens.
7. If you want to get files from the management server, click Get files from the
Director server. By default, Get files from the local system is selected.
Figure 39. Creating a software package: ″Software Distribution Manager″ window (Standard
Edition)
Figure 40. Creating a software package: Software Distribution Manager window (Premium
Edition)
Figure 41. Creating a software package: ″IBM Update Assistant″ window
260 IBM Director Installation and Configuration Guide

8. To select a file, click Browse. The ″IBM Update Package/Root Directory
Location″ window opens.
9. Locate the appropriate XML file and click it. The name of the XML file is
displayed in the File Name field.
Note: Use the correct XML file for your language. The correct file for English
installations is the one without the language code. For example,
dir5.10_agent_windows.xml
10. Click OK. The ″IBM Update Assistant″ window reopens.
Figure 42. Creating a software package: ″IBM Update Package/Root Directory Location″
window
Figure 43. Creating a software package: ″IBM Update Package/Root Directory Location″
window
Chapter 3. Installing 261

11. Click Next. The second ″IBM Update Assistant″ window opens.
12. To specify an alternative response file, click Browse and locate the file that
you modified in step 2 on page 259.
Note: If you do not specify an alternative response file, the package is
installed with the default settings that are specified in the installation
script.
13. Click Finish. As the package is processed, a status message is displayed at the
bottom of the window.
Figure 44. Creating a software package: ″IBM Update Assistant″ window
Figure 45. Creating software packages: ″IBM Update Assistant″ window
262 IBM Director Installation and Configuration Guide

When the processing is completed, the software-distribution package is
displayed in the Tasks pane of IBM Director Console.
Installing a software package:
This topic describes how to install a software package using IBM Director.
Note: The Software Distribution task copies the installation package to the client
system before starting the installation. On systems running AIX, the package
is copied to the root file system. There must be at least 60 MB of free space
available in the root file system or the task will fail.
Complete the following steps to install a software package:
1. Start IBM Director Console.
2. In the Tasks pane, expand the Software Distribution task.
3. Click the software package that you want to distribute. Then, drag it into the
Group Contents pane and drop it onto the icon that is displayed for the system
on which you want to install the software package. A window opens.
Note: To distribute software to several systems at once, you can drag the
software package into the Groups pane and drop it onto the icon for the
group. Alternatively, you can select multiple managed systems in the
Group Contents pane.
4. When prompted with Do you wish to create a scheduled job for this task
or execute immediately?, click Schedule or Execute Now. If you click Execute
Now, the software package is distributed immediately. If you click Schedule,
the ″New Scheduled Job″ window opens.
Figure 46. All Software Distribution Packages: IBM Director Agent Upgrade
Chapter 3. Installing 263

5. Schedule the job:
a. In the Scheduled Job field, type a unique name for the job. This name is
displayed in the Jobs pane of the Scheduler window.
b. In the Date field, type the day you want the software package to be
installed (in MM/DD/YYYY format).
c. In the Time field, type the time you want the software package to be
installed.
For more information about the Scheduler task, see the IBM Director 5.10
Systems Management Guide.
6. Click OK. The Save Job Confirmation window opens.
7. Click OK.
Installing IBM Director extensions
This topic describes procedures for installing IBM Director extensions.
Downloading extensions for IBM Director
This topic describes procedures for obtaining extensions for IBM Director on the
IBM Director Web site at ibm.com.
To obtain IBM Director extensions from the IBM Director Web site, you need a
high-speed Internet connection.
Some extensions must be purchased separately for IBM Director. The following
extensions are free and available for downloading from the IBM Director Web site:
ServeRAID Manager
Configure, monitor, and maintain ServeRAID adapters or controllers that
are installed locally or remotely on servers. You can view information that
is related to controllers, arrays, logical drives, hot-spare drives, and hard
disk drives. Also, you can view configuration settings and events and
locate defunct hard disk drives.
Figure 47. Scheduling the installation of a software package: ″New Scheduled Job″ window
264 IBM Director Installation and Configuration Guide

System Availability
Analyze the availability of a managed system or group. You can view
statistics about managed-system uptime and downtime through reports
and graphical representations.
Web-based Access
View managed system information, change alert standard format (ASF)
alerts, change system settings and configurations, and more. When you
install Web-based Access on a managed system, you can access IBM
Director Agent and view real-time asset and health information about the
managed system from a Web browser. This feature is supported only on
Windows 32-bit operating systems.
Installation instructions for the Web-based Access extension are included in
IBM Director Web-based Access Installation and User’s Guide.
z/VM Center
Provisions Linux systems on virtual hardware that is based on real System
z9 and zSeries hardware and the z/VM hypervisor.
Note: To be able to use z/VM Center, you must purchase the IBM Director
Extensions, V5.10 feature of IBM Virtualization Engine and
Infrastructure Services for Linux on System z9 and zSeries, V2.1.
The following extension is free and available for downloading from the IBM
Electronic Service Agent™ Web site (www.ibm.com/support/electronic/):
Electronic Service Agent
Monitor your xSeries servers and
BladeCenter products for
hardware errors. Hardware errors that meet certain criteria are reported to
IBM. Electronic Service Agent also administers hardware and software
inventory collections, and reports inventory changes to IBM. All
information sent to IBM is stored in a secure IBM database and used for
improved problem determination.
Installation instructions for the Electronic Service Agent extension are
included in release notes available on the Electronic Service Agent Web
site.
The following extension is free and available for downloading from the IBM
Virtual Machine Manager Web site:
Virtual Machine Manager
Manage both physical and virtual machines from a single console. With
Virtual Machine Manager (VMM), you can manage both VMware ESX
Server and Microsoft Virtual Server environments using IBM Director.
VMM also integrates VMware VirtualCenter and IBM Director for
advanced virtual machine management.
Installation instructions for the Virtual Machine Manager extension are
included in IBM Virtual Machine Manager Installation and User’s Guide,
available on the Virtual Machine Manager Web site.
Use the following procedure to download extensions for IBM Director:
Chapter 3. Installing 265

1. In a Web browser, navigate to one of the following Web sites:
Option Description
To download the Electronic
Service Agent extension
www.ibm.com/support/electronic/
To download the Virtual
Machine Manager extension
www.ibm.com/servers/eserver/xseries/
systems_management/xseries_sm/vmm.html
To download all other
extensions
www.ibm.com/servers/eserver/xseries/
systems_management/ibm_director/
2. Navigate to the desired extension on your operating system, and download the
extension files to a temporary directory.
Review any readme files that are associated with the extension, and proceed with
installation as directed.
Installing Capacity Manager
This topic describes the general procedure for installing the Capacity Manager
extension for IBM Director.
Capacity Manager may be installed on both Windows and Linux platforms.
Installing Capacity Manager is performed in several steps, each of which is
described in a topic in this section.
1. Install Capacity Manager on the management server.
Option Description
Windows server “Installing Capacity Manager on a Windows
server” on page 267
Linux server “Installing Capacity Manager on a Linux
server” on page 267
2. Optional: Install Capacity Manager user-interface components for IBM Director
Console on remote management consoles.
Option Description
Windows console “Installing Capacity Manager on a Windows
console” on page 268
Linux console “Installing Capacity Manager on a Linux
console” on page 269
Note: Capacity Manager user-interface components for IBM Director Console
are automatically installed on the management server when the Capacity
Manager server components are installed. It is not necessary or possible
to separately install Capacity Manager console components on a
management server.
3. Install Capacity Manager components for IBM Director Agent on managed
systems.
Option Description
Windows systems “Installing Capacity Manager on a managed
Windows system” on page 270
Linux systems (32-bit) “Installing Capacity Manager on a managed
32-bit Linux system” on page 271
266 IBM Director Installation and Configuration Guide

Note: Capacity Manager agent components are automatically installed on the
management server when the Capacity Manager server components are
installed. It is not necessary or possible to separately install Capacity
Manager agent components on a management server.
Installing Capacity Manager on a Windows server:
This topic describes installation procedures for Capacity Manager on a Windows
management server.
Complete the following steps to install Capacity Manager on a Windows
management server:
1. Close all applications, including any command-prompt windows.
2. Insert the IBM Director 5.10 Capacity Manager CD into the CD-ROM drive.
3. Click Start → Run.
4. In the Run dialog, type the following command in the Open field and press
Enter:
d:\capmgt\server\windows\i386\setup.exe
d represents the drive letter of the CD-ROM drive.
5. In the first panel of the IBM Director Capacity Manager Server Tool
InstallShield Wizard, click Next.
6. In the second panel of the IBM Director Capacity Manager Server Tool
InstallShield Wizard, select I accept the terms in the license agreement, and
click Next.
7. In the third panel of the IBM Director Capacity Manager Server Tool
InstallShield Wizard, click Install. A new panel displays the installation
progress.
8. When installation has completed, click Finish.
9. Remove the CD from the CD-ROM drive.
The installation process automatically stops and restarts the management server.
The IBM Director Capacity Manager Server Tool InstallShield Wizard installs the
server, console, and agent components of Capacity Manager on the management
server.
After installing the server, console, and agent components of Capacity Manager on
the management server, you need to install the console components on any other
management consoles, and the agent components on managed systems.
Installing Capacity Manager on a Linux server:
This topic describes installation procedures for Capacity Manager on a Linux
management server.
Complete the following steps to install Capacity Manager on a Linux management
server:
1. Stop IBM Director Agent. From a command prompt, type the following
command and press Enter:
/opt/ibm/director/bin/twgstop
2. Insert the IBM Director 5.10 Capacity Manager CD into the CD-ROM drive.
Chapter 3. Installing 267

3. If the CD does not automount, mount the CD-ROM drive. Type the following
command and press Enter:
mount /dev/cdrom /mnt/cdrom
For this command and others in this topic, mnt/cdrom is the mount point of the
CD-ROM drive and dev/cdrom is the specific device file for the CD-ROM block
device.
4. Change to the directory in which the installation package is located. Type the
following command and press Enter:
cd /mnt/cdrom/capmgt/server/linux/i386/
5. Type one of the following commands and press Enter:
Installation scenario Command
Performing a new
installation
rpm -ivhCapMgtServer-5.10-1.i386.rpm
Upgrading from a previous
version
rpm -Uvh --relocate
/opt/ibm/director=/opt/IBM/director
CapMgtServer-5.10-1.i386.rpm
The installation progress is displayed.
6. Restart IBM Director Agent. From a command prompt, type the following
command and press Enter:
/opt/ibm/director/bin/twgstart
7. Unmount the CD-ROM drive. Perform the following steps to unmount the
CD-ROM drive:
a. Type cd / and press Enter.
b. Type the following command and press Enter:
umount /mnt/cdrom
8. Remove the CD from the CD-ROM drive.
The IBM Director Capacity Manager Server installation process installs the server,
console, and agent components of Capacity Manager on the management server.
After installing the server, console, and agent components of Capacity Manager on
the management server, you need to install the console components on any other
management consoles, and the agent components on managed systems.
Installing Capacity Manager on a Windows console:
This topic describes installation procedures for Capacity Manager on a Windows
management console.
Capacity Manager server components should be installed on the management
server before installing the console components of Capacity Manager.
Complete the following steps to install Capacity Manager on a Windows
management console:
1. Close IBM Director Console.
2. Insert the IBM Director 5.10 Capacity Manager CD into the CD-ROM drive.
3. Click Start → Run.
4. In the Run dialog, type the following command in the Open field and press
Enter:
268 IBM Director Installation and Configuration Guide

d:\capmgt\console\windows\i386\setup.exe
d represents the drive letter of the CD-ROM drive.
5. In the first panel of the IBM Director Capacity Manager Console Tool
InstallShield Wizard, click Next.
6. In the second panel of the IBM Director Capacity Manager Console Tool
InstallShield Wizard, select I accept the terms in the license agreement, and
then click Next.
7. In the third panel of the IBM Director Capacity Manager Console Tool
InstallShield Wizard, click Install. A new panel displays the installation
progress.
8. When installation has completed, click Finish.
9. Remove the CD from the CD-ROM drive.
10. Restart IBM Director Console.
After installing the console components of Capacity Manager, you need to install
the Capacity Manager agent components on your managed systems.
Installing Capacity Manager on a Linux console:
This topic describes installation procedures for Capacity Manager on a Linux
management console.
Capacity Manager server components should be installed on the management
server before installing the console components of Capacity Manager.
Note: Capacity Manager user-interface components for IBM Director Console are
automatically installed on the management server when the Capacity
Manager server components are installed. It is not necessary or possible to
separately install Capacity Manager console components on a management
server.
Complete the following steps to install Capacity Manager on a remote Linux
console:
1. Close IBM Director Console.
2. Insert the IBM Director 5.10 Capacity Manager CD into the CD-ROM drive.
3. If the CD does not automount, mount the CD-ROM drive. Type the following
command and press Enter:
mount /dev/cdrom /mnt/cdrom
For this command and others in this topic, mnt/cdrom is the mount point of the
CD-ROM drive and dev/cdrom is the specific device file for the CD-ROM block
device.
4. Change to the directory in which the installation package is located. Type the
following command and press Enter:
cd /mnt/cdrom/capmgt/console/linux/i386/
5. Type one of the following commands and press Enter:
Installation scenario Command
Performing a new
installation
rpm -ivh CapMgtConsole-5.10-1.i386.rpm
Chapter 3. Installing 269

Installation scenario Command
Upgrading from a previous
version
rpm -Uvh --relocate
/opt/ibm/director=/opt/IBM/director
CapMgtConsole-5.10-1.i386.rpm
The installation progress is displayed.
6. Unmount the CD-ROM drive. Perform the following steps to unmount the
CD-ROM drive:
a. Type cd / and press Enter.
b. Type the following command and press Enter:
umount /mnt/cdrom
7. Remove the CD from the CD-ROM drive.
8. Restart IBM Director Console.
After installing the console components of Capacity Manager, you need to install
the Capacity Manager agent components on your managed systems.
Installing Capacity Manager on a managed Windows system:
This topic describes installation procedures for Capacity Manager on a Windows
managed system.
Capacity Manager should be installed on the management server and management
console before installing the agent components of Capacity Manager on managed
systems.
Note: An alternative installation method is to use Update Assistant and Software
Distribution. For more information, refer to the ″Creating software packages
to distribute″ section of the IBM Director Systems Management Guide.
Complete the following steps to install Capacity Manager on a Windows managed
system:
1. Insert the IBM Director 5.10 Capacity Manager CD into the CD-ROM drive.
2. Click Start → Run.
3. In the Run dialog, type the following command in the Open field and press
Enter:
d:\capmgt\agent\windows\i386\setup.exe
d represents the drive letter of the CD-ROM drive.
4. In the first panel of the IBM Director Capacity Manager Console Tool
InstallShield Wizard, click Next.
5. In the second panel of the IBM Director Capacity Manager Console Tool
InstallShield Wizard, select I accept the terms in the license agreement, and
then click Next.
6. In the third panel of the IBM Director Capacity Manager Agent Tool
InstallShield Wizard, click Install. A new panel displays the installation
progress.
7. When installation has completed, click Finish.
8. Remove the CD from the CD-ROM drive.
270 IBM Director Installation and Configuration Guide

Although you may manually stop and restart IBM Director Agent on the managed
system, it is not necessary to do so for this installation. The listener is stopped
automatically during installation and restarted when installation is complete.
Installing Capacity Manager on a managed 32-bit Linux system:
This topic describes installation procedures for Capacity Manager on a 32-bit Linux
managed system.
Capacity Manager should be installed on the management server and management
console before installing the agent components of Capacity Manager on managed
systems.
Notes:
1. Capacity Manager agent components are automatically installed on the
management server when the Capacity Manager server components are
installed. It is not necessary or possible to separately install Capacity
Manager agent components on a management server.
2. An alternative installation method is to use Update Assistant and
Software Distribution. For more information, refer to the ″Creating
software packages to distribute″ section of the IBM Director Systems
Management Guide.
Complete the following steps to install Capacity Manager on a 32-bit Linux
managed system:
1. Insert the IBM Director 5.10 Capacity Manager CD into the CD-ROM drive.
2. If the CD does not automount, mount the CD-ROM drive. Type the following
command and press Enter:
mount /dev/cdrom /mnt/cdrom
For this command and others in this topic, mnt/cdrom is the mount point of the
CD-ROM drive and dev/cdrom is the specific device file for the CD-ROM block
device.
3. Stop IBM Director Agent. From a command prompt, type the following
command and press Enter:
/opt/ibm/director/bin/twgstop
4. Change to the directory in which the installation package is located. Type the
following command and press Enter:
cd /mnt/cdrom/capmgt/agent/linux/i386/
5. Type one of the following commands and press Enter:
Installation scenario Command
Performing a new
installation
rpm -ivhCapMgtAgent-5.10-1.i386.rpm
Upgrading from a previous
version
rpm -Uvh --relocate
/opt/ibm/director=/opt/IBM/director
CapMgtAgent-5.10-1.i386.rpm
The installation progress is displayed.
6. Restart IBM Director Agent. From a command prompt, type the following
command and press Enter:
/opt/ibm/director/bin/twgstart
Chapter 3. Installing 271

7. Unmount the CD-ROM drive. Perform the following steps to unmount the
CD-ROM drive:
a. Type cd / and press Enter.
b. Type the following command and press Enter:
umount /mnt/cdrom
8. Remove the CD from the CD-ROM drive.
Installing ServeRAID Manager
This topic describes the general procedure for installing the ServeRAID Manager
extension for IBM Director 5.10.
ServeRAID Manager may be installed on both Windows and Linux platforms.
Installing ServeRAID Manager is performed in several steps, each of which is
described in a topic in this section.
1. Download the ServeRAID Manager extension.
a. In a Web browser, navigate to the following Web site:
www.ibm.com/servers/eserver/xseries/
systems_management/ibm_director/.
b. Navigate to the ServeRAID Manager extension for your operating system,
and download the extension files to a temporary directory.2. Install ServeRAID Manager on the management server.
Option Description
Windows server “Installing the ServeRAID Manager extension on a
Windows server” on page 273
Linux server “Installing the ServeRAID Manager extension on a Linux
server” on page 274
3. Optional: Install ServeRAID Manager user-interface components for IBM
Director Console on remote management consoles.
Option Description
Windows console “Installing the ServeRAID Manager extension on a
Windows console” on page 276
Linux console “Installing the ServeRAID Manager extension on a Linux
console” on page 276
Note: ServeRAID Manager user-interface components for IBM Director Console
are automatically installed on the management server when the
ServeRAID Manager server components are installed. It is not necessary
or possible to separately install ServeRAID Manager console components
on a management server.
4. Install ServeRAID Manager components for IBM Director Agent on managed
systems.
Option Description
Windows systems “Installing the ServeRAID Manager extension on a
managed Windows system” on page 277
Linux systems “Installing the ServeRAID Manager extension on a
managed Linux system” on page 278
272 IBM Director Installation and Configuration Guide

Option Description
NetWare systems “Installing the ServeRAID Manager extension on a
managed NetWare system” on page 279
Note: ServeRAID Manager agent components are automatically installed on the
management server when the ServeRAID Manager server components
are installed. It is not necessary or possible to separately install
ServeRAID Manager agent components on a management server.
Installing the ServeRAID Manager extension on a Windows server:
This topic describes the procedure for installing the ServeRAID Manager extension
for IBM Director on a Windows management server.
Complete the following steps to install ServeRAID Manager on a Windows
management server:
1. Copy the downloaded installation files to a temporary directory on the
machine on which you will be performing the installation.
2. Close all applications, including any command-prompt windows.
3. Click Start → Run.
4. In the Run dialog, type the following command in the Open field and press
Enter:
download\raid\server\windows\serveraid_5.10_server_windows.exe
download represents the location to which the ServeRAID Manager download
package was unzipped.
5. In the first panel of the ServeRAID Manager Server InstallShield Wizard, click
Next.
6. In the second panel of the ServeRAID Manager Server InstallShield Wizard,
complete the following steps:
a. Ensure that the hard disk drive icon
appears to the left of ServeRAID
Manager Server in the list box. If a different icon appears, click the icon
and select This feature, and all subfeatures, will be installed on local
hard drive from the menu.
b. Ensure that the hard disk drive icon
appears to the left of each of the
other features you wish to install. You can install the ServeRAID Manager
Agent, ServeRAID Manager Console, and IBM Management Station along
with ServeRAID Manager Server.
c. Click Next. 7. (Only if Management Station is being installed) In the next panel of the
ServeRAID Manager Server InstallShield Wizard, complete the following
steps:
a. Type the user name and password (enter twice for confirmation) for the
user for the ServeRAID Management Station service.
b. Click Next. 8. In the next panel of the ServeRAID Manager Server InstallShield Wizard, click
Install. A new panel displays the installation progress.
9. When installation has completed, click Finish.
Chapter 3. Installing 273

10. In the dialog that appears, respond to the prompt to reboot the management
server. Click Yes to reboot immediately, or click No if you will reboot the
management server yourself.
The management server must be rebooted before the ServeRAID Manager
extension will operate. After installing the server components of the ServeRAID
Manager extension, you need to install the console components.
Installing the ServeRAID Manager extension on a Linux server:
This topic describes the procedure for installing ServeRAID Manager on a Linux
management server.
Complete the following steps to install ServeRAID Manager on a Linux
management server:
1. Copy the downloaded installation files to a temporary directory on the machine
on which you will be performing the installation. The downloaded installation
files are contained in a tar file. Use the tar -x command to extract the contents
to a temporary directory.
2. Stop IBM Director. From a command prompt, type the following command and
press Enter:
/opt/ibm/director/bin/twgstop
3. Change to the directory in which the installation package is located. Type the
following command and press Enter:
cd /download/raid/server/linux/
download represents the location into which the ServeRAID Manager download
package was extracted.
4. Optional: To install the management station service on the Linux management
server, perform the following substeps.
The management station is used to administer IBM System Storage DS300 and
IBM System Storage DS400 devices. This step is only necessary if both of the
following conditions are true:
v You wish to manage IBM System Storage DS300 and IBM System Storage
DS400 devices using IBM Director
v You do not have the standalone version of ServeRAID Manager installed
If either of these conditions is not met, there is no need to install the
management station service.
Note: Although it is possible to install the management station service on a
system other than that on which IBM Director Server is installed, this is
not a recommended configuration, and is not documented here. To use
the standalone version of ServeRAID Manager, or for instructions for
installing the management station service on a different system than the
management server on which IBM Director Server is installed, refer to
the documentation and downloads available on the ServeRAID Web site
at www.ibm.com/pc/support/site.wss/MIGR-495PES.html.
a. List the directory contents. There should be several files named
serveraid-mgmt-version-build.os.i586.rpm, with version, build, and os
indicating the version number, build number, and operating system for the
package. Note the version and build numbers for the following step.
b. Type one of the following commands (substituting the actual values for
version and build) and press Enter:
274 IBM Director Installation and Configuration Guide

Installation scenario Command
Performing a new
installation on Red Hat
Enterprise Linux AS, ES, and
WS, version 3.0 (Update 3
required)
rpm -ivh serveraid-mgmt-version-build.rhel33.i586.rpm
Upgrading from a previous
version on Red Hat
Enterprise Linux AS, ES, and
WS, version 3.0 (Update 3
required)
rpm -Uvh --relocate
/opt/ibm/director=/opt/IBM/director
serveraid-mgmt-version-build.rhel33.i586.rpm
Performing a new
installation on Red Hat
Enterprise Linux AS, ES, and
WS, version 4.0
rpm -ivh serveraid-mgmt-version-build.rhel4.i586.rpm
Upgrading from a previous
version on Red Hat
Enterprise Linux AS, ES, and
WS, version 4.0
rpm -Uvh --relocate
/opt/ibm/director=/opt/IBM/director
serveraid-mgmt-version-build.rhel4.i586.rpm
Performing a new
installation on SUSE LINUX
Enterprise Server 8
rpm -ivh serveraid-mgmt-version-build.sles8.i586.rpm
Upgrading from a previous
version on SUSE LINUX
Enterprise Server 8
rpm -Uvh --relocate
/opt/ibm/director=/opt/IBM/director
serveraid-mgmt-version-build.sles8.i586.rpm
Performing a new
installation on SUSE LINUX
Enterprise Server 9
rpm -ivh serveraid-mgmt-version-build.sles9.i586.rpm
Upgrading from a previous
version on SUSE LINUX
Enterprise Server 9
rpm -Uvh --relocate
/opt/ibm/director=/opt/IBM/director
serveraid-mgmt-version-build.sles9.i586.rpm
The installation progress is displayed.
5. Type one of the following commands and press Enter:
Installation scenario Command
Performing a new
installation
rpm -ivhRAIDLxServer-5.10-1.i386.rpm
Upgrading from a previous
version
rpm -Uvh --relocate
/opt/ibm/director=/opt/IBM/director
RAIDLxServer-5.10-1.i386.rpm
The installation progress is displayed.
6. Restart IBM Director Server. From a command prompt, type the following
command and press Enter:
/opt/ibm/director/bin/twgstart
The IBM Director ServeRAID Manager Server installation process installs the
server, console, and agent components of ServeRAID Manager on the management
server.
The management server must be rebooted before the ServeRAID Manager
extension will operate. After installing the server components of the ServeRAID
Manager extension, you need to install the console components.
Chapter 3. Installing 275

Installing the ServeRAID Manager extension on a Windows console:
This topic describes the procedure for installing the ServeRAID Manager extension
on a Windows management console.
The ServeRAID Manager extension should be installed on the management server
before installing the console components of ServeRAID Manager.
Complete the following steps to install the ServeRAID Manager extension on a
Windows management console:
1. Copy the downloaded installation files to a temporary directory on the machine
on which you will be performing the installation.
2. Close IBM Director Console.
3. Click Start → Run.
4. In the Run dialog, type the following command in the Open field and press
Enter:
download\raid\console\windows\serveraid_5.10_console_windows.exe
download represents the location into which the ServeRAID Manager download
package was unzipped.
5. In the first panel of the ServeRAID Manager Console InstallShield Wizard, click
Next.
6. In the second panel of the ServeRAID Manager Console InstallShield Wizard,
complete the following steps:
a. Ensure that the hard disk drive icon
appears to the left of ServeRAID
Manager Console in the list box. If a different icon appears, click the icon
and select This feature, and all subfeatures, will be installed on local hard
drive from the menu.
b. Click Next.7. In the third panel of the ServeRAID Manager Console InstallShield Wizard,
click Install. A new panel displays the installation progress.
8. When installation has completed, click Finish.
9. Restart IBM Director Console.
After installing the console components of the extension, you need to install the
ServeRAID Manager Agent components on your managed systems.
Installing the ServeRAID Manager extension on a Linux console:
This topic describes the procedure for installing ServeRAID Manager on a Linux
management console.
The ServeRAID Manager extension should be installed on the management server
before installing the console components of ServeRAID Manager.
Note: ServeRAID Manager user-interface components for IBM Director Console are
automatically installed on the management server when the ServeRAID
Manager server components are installed. It is not necessary or possible to
separately install ServeRAID Manager console components on a
management server.
Complete the following steps to install ServeRAID Manager on a Linux console:
276 IBM Director Installation and Configuration Guide

1. Copy the downloaded installation files to a temporary directory on the machine
on which you will be performing the installation.
2. Close IBM Director Console.
3. Change to the directory in which the installation package is located. Type the
following command and press Enter:
cd /download/raid/console/linux/
download represents the location to which the ServeRAID Manager download
package was extracted.
4. Type one of the following commands and press Enter:
Installation scenario Command
Performing a new
installation
rpm -ivh RAIDLxConsole-5.10-1.i386.rpm
Upgrading from a previous
version
rpm -Uvh --relocate
/opt/ibm/director=/opt/IBM/director
RAIDLxConsole-5.10-1.i386.rpm
The installation progress is displayed.
5. Restart IBM Director Console.
6. Remove the CD from the CD-ROM drive.
After installing the console components of the extension, you need to install the
ServeRAID Manager Agent components on your managed systems.
Installing the ServeRAID Manager extension on a managed Windows system:
This topic describes the procedure for installing ServeRAID Manager on a
Windows managed system.
The following prerequisites apply to this installation:
v ServeRAID Manager should be installed on the management server and
management console before installing the agent components of ServeRAID
Manager on managed systems.
v IBM Director Agent should be installed on the managed system before installing
ServeRAID Manager.
Note: An alternative installation method is to use Update Assistant and Software
Distribution. For more information, refer to the ″Creating software packages
to distribute″ section of the IBM Director Systems Management Guide.
Complete the following steps to install ServeRAID Manager on a Windows
managed system:
1. Copy the downloaded installation files to a temporary directory on the machine
on which you will be performing the installation. The downloaded installation
files are contained in a zip file. Use the unzip command to extract the contents
to a temporary directory.
2. Click Start → Run.
3. In the Run dialog, type the following command in the Open field and press
Enter:
download\raid\agent\windows\serveraid_5.10_agent_windows.exe
Chapter 3. Installing 277

download represents the location to which the ServeRAID Manager download
package was extracted.
4. In the first panel of the ServeRAID Manager Agent InstallShield Wizard, click
Next.
5. In the second panel of the ServeRAID Manager Agent InstallShield Wizard,
complete the following steps:
a. Ensure that the hard disk drive icon
appears to the left of ServeRAID
Manager Agent in the list box. If a different icon appears, click the icon and
select This feature, and all subfeatures, will be installed on local hard
drive from the menu.
b. Click Next.6. In the third panel of the ServeRAID Manager Agent InstallShield Wizard, click
Install. A new panel displays the installation progress.
7. When installation has completed, click Finish.
8. In the dialog that appears, respond to the prompt to reboot the managed
system. Click Yes to reboot immediately, or click No if you will reboot the
managed system yourself.
You must reboot the managed system before the ServeRAID Manager Agent will
operate.
Installing the ServeRAID Manager extension on a managed Linux system:
This topic describes the procedure for installing ServeRAID Manager on a Linux
managed system.
The following prerequisites apply to this installation:
v ServeRAID Manager should be installed on the management server and
management console before installing the agent components of ServeRAID
Manager on managed systems.
v IBM Director Agent should be installed on the managed system before installing
ServeRAID Manager.
Note: An alternative installation method is to use Update Assistant and Software
Distribution. For more information, refer to the ″Creating software packages
to distribute″ section of the IBM Director Systems Management Guide.
Complete the following steps to install ServeRAID Manager on a Linux managed
system:
1. Copy the downloaded installation files to a temporary directory on the machine
on which you will be performing the installation. The downloaded installation
files are contained in a tar file. Use the tar -x command to extract the contents
to a temporary directory.
2. Change to the directory in which the installation package is located. Type the
following command and press Enter:
cd /download/raid/agent/linux/
download represents the location to which the ServeRAID Manager download
package was extracted.
278 IBM Director Installation and Configuration Guide

3. Type one of the following commands and press Enter:
Installation scenario Command
Performing a new
installation (32-bit agent)
rpm -ivhRAIDLxAg-5.10-1.i386.rpm
Performing a new
installation (64-bit agent for
Opteron or EM64T)
rpm -ivhRAIDLxAg-5.10-1.x86_64.rpm
Upgrading from a previous
version (32-bit agent)
rpm -Uvh --relocate
/opt/ibm/director=/opt/IBM/director
RAIDLxAg-5.10-1.i386.rpm
Upgrading from a previous
version (64-bit agent for
Opteron or EM64T)
rpm -Uvh --relocate
/opt/ibm/director=/opt/IBM/director
RAIDLxAg-5.10-1.x86_64.rpm
The installation progress is displayed.
You must reboot the managed system before the ServeRAID Manager Agent will
operate.
Installing the ServeRAID Manager extension on a managed NetWare system:
This topic describes the procedure for installing the ServeRAID Manager extension
on a NetWare managed system.
v The ServeRAID Manager extension should be installed on the management
server and management console before installing the agent components of the
ServeRAID Manager extension on managed systems.
v IBM Director Agent should be installed on the managed system before installing
the ServeRAID Manager extension.
Note: To install the ServeRAID Manager extension, you must log on to the
NetWare server from a Windows workstation running the NetWare Client
for Windows. The SYS volume must be mapped as a drive to the system
running Windows. Also, you must have administrator or supervisor access
on the NetWare server.
Complete the following steps on the Windows workstation running NetWare Client
for Windows to install the ServeRAID Manager extension on a NetWare managed
system:
1. Copy the downloaded installation files to a temporary directory on the
Windows workstation on which you will be performing the installation.
2. Click Start → Run.
3. In the Run dialog, type the following command in the Open field and press
Enter:
download\raid\agent\windows\serveraid_5.10_agent_netware.exe
download represents the location to which the ServeRAID Manager extension
download package was saved.
4. If prompted for the language, select a language from the dropdown list and
click OK.
5. In the first panel of the IBM ServeRAID Manager Agent 5.10 Setup Wizard,
click Next.
6. In the second panel of the IBM ServeRAID Manager Agent 5.10 Setup Wizard,
complete the following steps:
Chapter 3. Installing 279
a. Select the mapped NetWare drive on which to install ServeRAID Manager
extension Agent.
b. Click Next.7. In the third panel of the ServeRAID Manager extension Agent InstallShield
Wizard, click Install.
Note: ServeRAID Manager Agent is the only component in the list of
components to be installed, and should already be selected.
A new panel displays the installation progress.
8. When installation has completed, click Finish.
Installing Software Distribution (Premium Edition)
This topic describes procedures for installing Software Distribution (Premium
Edition) on management servers running AIX, i5/OS, Linux, and Windows.
Installing Software Distribution on AIX:
This topic describes how to install Software Distribution (Premium Edition) on an
AIX management server.
To install Software Distribution on the management server running AIX, perform
the following steps on the management server:
1. Stop IBM Director Server. From a command prompt, type the following
command and press Enter:
/opt/ibm/director/bin/twgstop
2. Insert the IBM Director 5.10 Software Distribution Premium Edition CD into the
CD-ROM drive.
3. Mount the CD-ROM drive. Perform the following steps to mount the CD-ROM
drive:
Note: For the following steps, mnt/cdrom is the mount point of the CD-ROM
drive and dev/cdrom is the specific device file for the CD-ROM block
device.
a. If the CD-ROM automounts, type the following command and press Enter:
umount /mnt/cdrom
b. Type the following command and press Enter:
mount /dev/cdrom /mnt/cdrom
4. Change to the directory in which the installation key is located. Type the
following command and press Enter:
cd /mnt/cdrom/swdist/server/aix/
5. Type the following command and press Enter:
./install
6. Remove the CD from the CD-ROM drive.
7. Restart IBM Director Server. From a command prompt, type the following
command and press Enter:
/opt/ibm/director/bin/twgstart
No further installation is required on managed systems or management consoles.
Installing Software Distribution on i5/OS:
280 IBM Director Installation and Configuration Guide

This topic describes how to install Software Distribution (Premium Edition) on an
i5/OS management server.
To install Software Distribution on the management server running i5/OS, perform
the following steps on a computer that has a drive mapped to the management
server:
1. Insert the IBM Director 5.10 Software Distribution Premium Edition CD into the
CD-ROM drive.
2. Change to the directory in which the installation package is located. The
installation package is in the /swdist/server/os400 directory on the CD-ROM.
3. Copy the contents of the /swdist/server/os400 directory on the CD-ROM to
the /qibm/proddata/director/bin/ directory on the management server.
4. Remove the CD from the CD-ROM drive.
5. Open a Qshell command prompt on the management server and type the
following commands. Press Enter after each command and wait for the
previous action to complete before entering the next command.
cd /qibm/proddata/director/bin
install
twgend
twgstart
This step installs the Software Distribution extension and shuts down and
restarts IBM Director Server.
Software Distribution is installed. No further installation is required on managed
systems or management consoles.
Installing Software Distribution on Linux:
This topic describes how to install Software Distribution (Premium Edition) on a
Linux management server.
Complete the following steps to install Software Distribution on the management
server:
1. Stop IBM Director Server. From a command prompt, type the following
command and press Enter:
/opt/ibm/director/bin/twgstop
2. Insert the IBM Director 5.10 Software Distribution Premium Edition CD into the
CD-ROM drive.
3. If the CD does not automount, mount the CD-ROM drive. Type the following
command and press Enter:
mount /dev/cdrom /mnt/cdrom
For this command and others in this topic, mnt/cdrom is the mount point of the
CD-ROM drive and dev/cdrom is the specific device file for the CD-ROM block
device.
4. Change to the directory in which the installation script is located. Type one of
the following commands and press Enter:
Option Description
Linux on POWER cd /mnt/cdrom/swdist/server/linux/ppc/
Linux on xSeries cd /mnt/cdrom/swdist/server/linux/i386/
Linux on System z9 and zSeries cd /mnt/cdrom/swdist/server/linux/s390/
Chapter 3. Installing 281

5. Type the following command and press Enter:
./install
6. Remove the CD from the CD-ROM drive.
7. Restart IBM Director Server. From a command prompt, type the following
command and press Enter:
/opt/ibm/director/bin/twgstart
No further installation is required on managed systems or management consoles.
Installing Software Distribution on Windows:
This topic describes how to install Software Distribution (Premium Edition) on a
Windows management server.
Complete the following steps to install Software Distribution on a Windows
management server:
1. Stop IBM Director Server. From a command prompt, type the following
command and press Enter:
net stop twgipc
Wait until the service stops.
2. Close all applications, including any command-prompt windows.
3. Insert the IBM Director 5.10 Software Distribution Premium Edition CD into the
CD-ROM drive.
4. Click Start → Run.
5. In the Run dialog, type the following command in the Open field and press
Enter:
d:\swdist\server\windows\i386\setup.exe
d represents the drive letter of the CD-ROM drive.
6. In the first panel of the InstallShield wizard, click Next.
7. In the second panel of the InstallShield wizard, click Yes to accept the license
agreement.
8. In the Start Copying Files panel of the InstallShield wizard, click Next.
9. In the InstallShield Wizard Completed panel, click Finish.
10. Remove the CD from the CD-ROM drive.
11. Restart IBM Director Server. From a command prompt, type the following
command and press Enter:
net start twgipc
Software Distribution is installed. No further installation is required on managed
systems or management consoles.
Installing System Availability
This topic describes the general procedure for installing the System Availability
extension for IBM Director 5.10.
System Availability may be installed on both Linux on xSeries and Windows
platforms. Installing System Availability is performed in several steps, each of
which is described in a topic in this section.
1. Download the System Availability extension.
282 IBM Director Installation and Configuration Guide

a. In a Web browser, navigate to the following Web site:
www.ibm.com/servers/eserver/xseries/
systems_management/ibm_director/.
b. Navigate to the System Availability extension for your operating system,
and download the extension files to a temporary directory.2. Install System Availability on the management server.
Option Description
Windows server “Installing System Availability on a
Windows server”
Linux server “Installing System Availability on a Linux
server” on page 284
3. Optional: Install System Availability user-interface components for IBM
Director Console on remote management consoles.
Option Description
Windows console “Installing the System Availability extension
on a Windows console” on page 284
Linux console “Installing the System Availability extension
on a Linux console” on page 285
Note: System Availability user-interface components for IBM Director Console
are automatically installed on the management server when the System
Availability server components are installed. It is not necessary or
possible to separately install System Availability console components on
a management server.
4. Install System Availability components for IBM Director Agent on managed
systems.
Option Description
Windows systems “Installing the System Availability extension
on a managed Windows system” on page
286
Linux systems “Installing the System Availability extension
on a managed Linux system” on page 287
Note: System Availability agent components are automatically installed on the
management server when the System Availability server components are
installed. It is not necessary or possible to separately install System
Availability agent components on a management server.
Installing System Availability on a Windows server:
This topic describes the procedure for installing the System Availability extension
for IBM Director on a Windows management server.
Complete the following steps to install System Availability on a Windows
management server:
1. Copy the downloaded installation files to a temporary directory on the machine
on which you will be performing the installation.
2. Close all applications, including any command-prompt windows.
Chapter 3. Installing 283

3. Click Start → Run.
4. In the Run dialog, type the following command in the Open field and press
Enter:
download\dir5.10_sysavailserver_windows.exe
download represents the location into which the download package was saved.
5. In the first panel of the System Availability Server InstallShield Wizard, click
Next.
6. In the second panel of the System Availability Server InstallShield Wizard,
select I accept the terms in the license agreement, then click Next.
7. In the third panel of the System Availability Server InstallShield Wizard, click
Install. A new panel displays the installation progress.
8. When installation has completed, click Finish.
Installing System Availability on a Linux server:
This topic describes the procedure for installing System Availability on a Linux
management server.
System Availability can only be installed on management servers running Linux for
xSeries.
Complete the following steps to install System Availability on a Linux management
server:
1. Copy the downloaded installation files to a temporary directory on the machine
on which you will be performing the installation.
2. Stop IBM Director Server. From a command prompt, type the following
command and press Enter:
/opt/ibm/director/bin/twgstop
3. Change to the directory in which the installation package is located. Type the
following command and press Enter:
cd /download/
download represents the location to which the download package was saved.
4. Type one of the following commands and press Enter:
Installation scenario Command
Performing a new
installation
rpm -ivhSysAvailServer-5.10-1.i386.rpm
Upgrading from a previous
version
rpm -Uvh --relocate
/opt/ibm/director=/opt/IBM/director
SysAvailServer-5.10-1.i386.rpm
The installation progress is displayed.
5. Restart IBM Director Server. From a command prompt, type the following
command and press Enter:
/opt/ibm/director/bin/twgstart
The IBM Director System Availability Server installation process installs the server,
console, and agent components of System Availability on the management server.
Installing the System Availability extension on a Windows console:
284 IBM Director Installation and Configuration Guide

This topic describes the procedure for installing System Availability on a Windows
management console.
System Availability should be installed on the management server before installing
the console components of System Availability.
Complete the following steps to install System Availability on a Windows
management console:
1. Copy the downloaded installation files to a temporary directory on the machine
on which you will be performing the installation.
2. Close IBM Director Console.
3. Click Start → Run.
4. In the Run dialog, type the following command in the Open field and press
Enter:
download\dir5.10_sysavailconsole_windows.exe
download represents the location to which the System Availability download
package was saved.
5. In the first panel of the System Availability Console InstallShield Wizard, click
Next.
6. In the second panel of the System Availability Console InstallShield Wizard,
select I accept the terms in the license agreement, then click Next.
7. In the third panel of the System Availability Console InstallShield Wizard, click
Install. A new panel displays the installation progress.
8. When installation has completed, click Finish.
9. Restart IBM Director Console.
After installing the console components of the extension, you need to install the
System Availability Agent components on your managed systems.
Installing the System Availability extension on a Linux console:
This topic describes installation procedures for System Availability on a Linux
management console.
System Availability should be installed on the management server before installing
the console components of System Availability.
Note: System Availability user-interface components for IBM Director Console are
automatically installed on the management server when the System
Availability server components are installed. It is not necessary or possible
to separately install System Availability console components on a
management server.
Complete the following steps to install System Availability on a Linux console:
1. Copy the downloaded installation files to a temporary directory on the machine
on which you will be performing the installation.
2. Close IBM Director Console.
3. Change to the directory in which the installation package is located. Type the
following command and press Enter:
cd /download/
Chapter 3. Installing 285

download represents the location to which the System Availability download
package was saved.
4. Type one of the following commands and press Enter:
Installation scenario Command
Performing a new
installation
rpm -ivhSysAvailConsole-5.10-1.i386.rpm
Upgrading from a previous
version
rpm -Uvh --relocate
/opt/ibm/director=/opt/IBM/director
SysAvailConsole-5.10-1.i386.rpm
The installation progress is displayed.
5. Restart IBM Director Console.
After installing the console components of the extension, you need to install the
System Availability Agent components on your managed systems.
Installing the System Availability extension on a managed Windows system:
This topic describes the procedure for installing System Availability on a Windows
managed system.
The following prerequisites apply to this installation:
v System Availability should be installed on the management server and
management console before installing the agent components of System
Availability on managed systems.
v IBM Director Agent should be installed on the managed system before installing
System Availability.
Note: An alternative installation method is to use Update Assistant and Software
Distribution. For more information, refer to the ″Creating software packages
to distribute″ section of the IBM Director Systems Management Guide.
Complete the following steps to install System Availability on a Windows managed
system:
1. Copy the downloaded installation files to a temporary directory on the machine
on which you will be performing the installation. The downloaded installation
files are contained in a zip file. Use the unzip command to extract the contents
to a temporary directory.
2. Click Start → Run.
3. In the Run dialog, type the following command in the Open field and press
Enter:
download\setup.exe
download represents the location to which the System Availability download
package was unzipped.
4. In the first panel of the System Availability Agent InstallShield Wizard, click
Next.
5. In the second panel of the System Availability Agent InstallShield Wizard, select
I accept the terms in the license agreement, then click Next.
6. In the third panel of the System Availability Agent InstallShield Wizard, click
Next. You cannot modify the installation directory; the System Availability
Agent must be installed in the same location as IBM Director Agent.
286 IBM Director Installation and Configuration Guide

7. In the fourth panel of the System Availability Agent InstallShield Wizard, click
Install. A new panel displays the installation progress.
8. When installation has completed, click Finish.
Installing the System Availability extension on a managed Linux system:
This topic describes installation procedures for System Availability on a Linux
managed system.
The following prerequisites apply to this installation:
v System Availability should be installed on the management server and
management console before installing the agent components of System
Availability on managed systems.
v IBM Director Agent should be installed on the managed system before installing
System Availability.
Notes:
1. System Availability agent components are automatically installed on the
management server when the System Availability server components
are installed. It is not necessary or possible to separately install System
Availability agent components on a management server.
2. An alternative installation method is to use Update Assistant and
Software Distribution. For more information, refer to the ″Creating
software packages to distribute″ section of the IBM Director Systems
Management Guide.
Complete the following steps to install System Availability on a Linux managed
system:
1. Copy the downloaded installation files to a temporary directory on the machine
on which you will be performing the installation. The downloaded installation
files are contained in a tar file. Use the tar -x command to extract the contents
to a temporary directory.
2. Stop IBM Director Agent. From a command prompt, type the following
command and press Enter:
/opt/ibm/director/bin/twgstop
3. Change to the directory in which the installation package is located. Type the
following command and press Enter:
cd /download/
download represents the location to which the System Availability download
package was extracted.
4. Type one of the following commands and press Enter:
Installation scenario Command
Performing a new
installation
rpm -ivhSysAvailAgent-5.10-1.i386.rpm
Upgrading from a previous
version
rpm -Uvh --relocate
/opt/ibm/director=/opt/IBM/director
SysAvailAgent-5.10-1.i386.rpm
The installation progress is displayed.
5. Restart IBM Director Agent. From a command prompt, type the following
command and press Enter:
Chapter 3. Installing 287

/opt/ibm/director/bin/twgstart
Installing z/VM Center
This topic describes the general procedure for installing the z/VM Center
extension components for IBM Director.
z/VM Center may be installed on Windows, Linux, and i5/OS platforms. Installing
z/VM Center is performed in several steps, each of which is described in a topic in
this section.
1. Install z/VM Center on the management server.
Option Description
Windows server “Installing z/VM Center on a Windows
server”
Linux server “Installing z/VM Center on a Linux server”
on page 289
AIX server “Installing z/VM Center on an AIX server”
on page 290
i5/OS server z/VM Center is installed with IBM Director
Server on i5/OS. No separate installation is
required for the extension.
Note: On Windows, Linux, and AIX, z/VM Center user-interface components
for IBM Director Console are automatically installed on the management
server when the z/VM Center server components are installed. It is not
necessary or possible to separately install z/VM Center console
components on a management server.
z/VM Center agent components are automatically installed on the
management server when the z/VM Center server components are
installed.
2. On the management server where you have installed the z/VM Center server
extension, install the license key for the Virtual Server Deployment task and for
the Server Complexes task. (See “Installing the license key for the z/VM Center
extension tasks” on page 290).
3. Optional: Install z/VM Center user-interface components for IBM Director
Console on remote management consoles.
Option Description
Windows console “Installing z/VM Center on a Windows
console” on page 291
Linux console “Installing z/VM Center”
AIX console “Installing z/VM Center on an AIX console”
on page 292
4. Install the z/VM CIM instrumentation. (See “Installing the z/VM CIM
instrumentation on the z/VM manageability access point” on page 293)
Installing z/VM Center on a Windows server:
This topic describes installation procedures for z/VM Center on a Windows
management server.
288 IBM Director Installation and Configuration Guide

IBM Director Server must be installed on the management server before installing
the z/VM Center extension.
Complete the following steps to install the z/VM Center extension on a Windows
management server:
1. Copy the downloaded installation files to a temporary directory on the machine
on which you will be performing the installation.
2. Close all applications, including any command-prompt windows.
3. Click Start → Run
4. In the Run dialog, type the following command in the Open field and press
Enter:
download\zVMCenterServerExt_version_windows.exe
download represents the location where the z/VM Center download package
was saved.
5. In the first panel of the z/VM Center extension for IBM Director Server
InstallShield Wizard, click Next.
6. In the second panel of the z/VM Center extension for IBM Director Server
InstallShield Wizard, select I accept the terms in the license agreement, then
click Next.
7. In the third panel of the z/VM Center extension for IBM Director Server
InstallShield Wizard, click Next without making any changes.
8. In the fourth panel of the z/VM Center extension for IBM Director Server
InstallShield Wizard, click Install. A new panel displays the installation
progress.
9. When installation has completed, click Finish.
Installing z/VM Center on a Linux server:
This topic describes installation procedures for z/VM Center on a Linux
management server.
IBM Director Server must be installed on the management server before installing
the z/VM Center extension.
Complete the following steps to install the z/VM Center extension on a Linux
management server:
1. Copy the downloaded installation files to a temporary directory on the machine
on which you will be performing the installation.
2. Stop IBM Director Server. From a command prompt, type the following
command and press Enter:
/opt/ibm/director/bin/twgstop
3. Change to the directory where the installation package is located.
4. Type the following command and press Enter:
rpm -ivh zVMCenterServerExt-version.noarch.rpm
version represents the version of the RPM. The installation progress is
displayed.
5. Restart IBM Director Server. From a command prompt, type the following
command and press Enter:
/opt/ibm/director/bin/twgstart
Chapter 3. Installing 289

The IBM Director z/VM Center Server installation process installs the server,
console, and agent components of z/VM Center on the management server.
After installing the server, console, and agent components of z/VM Center on the
management server, you also need to install the license key for the Virtual Server
Deployment task and the Server Complexes task on the management server, the
console components on any other management consoles, and the z/VM CIM
instrumentation on each z/VM you want to manage with IBM Director.
Installing z/VM Center on an AIX server:
This topic describes how to install z/VM Center on an AIX management server.
IBM Director Server must be installed on the management server before installing
the z/VM Center extension.
To install z/VM Center on the management server running AIX, perform the
following steps on the management server:
1. Copy the downloaded installation files to a temporary directory on the machine
on which you will be performing the installation.
2. Stop IBM Director Server. From a command prompt, type the following
command and press Enter:
/opt/ibm/director/bin/twgstop
3. Change to the directory where the installation files are located.
4. If the downloaded files do not include a .toc file, create one now. Type the
following command and press Enter:
inutoc directory
In the command directory represents the directory where the installation files
are located.
5. Type the following command and press Enter:
installp -acgNQqXY -d directory IBM.Director.zVMCenterServerExt
In the command directory represents the directory where the installation files
are located.
6. Restart IBM Director Server. From a command prompt, type the following
command and press Enter:
/opt/ibm/director/bin/twgstart
Installing the license key for the z/VM Center extension tasks:
If you want to work with the Virtual Server Deployment task or the Server
Complexes task of z/VM Center extension, you must install a license key.
Before you start:
v To obtain the license key you must purchase the IBM Director Extensions, V5.10
feature of IBM Virtualization Engine and Infrastructure Services for Linux on
System z9 and zSeries, V2.1. You receive the license key in printed form.
v You must have installed the z/VM Center extension on your IBM Director
Server.
v You need root authority to install the license key.
290 IBM Director Installation and Configuration Guide

You must install the license key on each IBM Director Server on which you plan to
use the Virtual Server Deployment task or the Server Complexes task.
As a user with administrator authority on the system on which IBM Director
Server runs, complete these steps to install the z/VM Center license key:
1. Establish a connection with or open a command prompt on the system on
which IBM Director Server runs.
2. Ensure that the file installation_directory/proddata/ZvmCenter.properties exists,
where installation_directory is the directory to which you have installed IBM
Director Server. Create an empty file if it does not exist.
3. Write a statement of the following form to
installation_directory/proddata/ZvmCenter.properties:
VSDandSC.Task.License = key
where installation_directory is the directory to which you have installed IBM
Director Server and key is the license key.
4. Restart IBM Director Server.
Installing z/VM Center on a Windows console:
This topic describes installing procedures for z/VM Center on a Windows
management console.
IBM Director Console must be installed before installing the z/VM Center
extension.
Note: z/VM Center user-interface components for IBM Director Console are
automatically installed on the management server when the z/VM Center
server components are installed. It is not necessary or possible to separately
install z/VM Center console components on a management server.
Complete the following steps to install the z/VM Center extension on a Windows
management console:
1. Copy the downloaded installation files to a temporary directory on the machine
on which you will be performing the installation.
2. Close all applications, including any command-prompt windows.
3. Click Start → Run
4. In the Run dialog, type the following command in the Open field and press
Enter:
download\zVMCenterConsoleExt_version_windows.exe
download represents the location where the z/VM Center download package
was saved and version represents the version of the download package.
5. In the first panel of the z/VM Center extension for IBM Director Console
InstallShield Wizard, click Next.
6. In the second panel of the z/VM Center extension for IBM Director Console
InstallShield Wizard, select I accept the terms in the license agreement, then
click Next.
7. In the third panel of the z/VM Center extension for IBM Director Console
InstallShield Wizard, click Next without making any changes.
8. In the fourth panel of the z/VM Center extension for IBM Director Console
InstallShield Wizard, click Install. A new panel displays the installation
progress.
Chapter 3. Installing 291

9. When installation has completed, click Finish.
Installing z/VM Center on a Linux console:
This topic describes installation procedures for z/VM Center on a Linux
management console.
IBM Director Console must be installed before installing the z/VM Center
extension.
Note: z/VM Center user-interface components for IBM Director Console are
automatically installed on the management server when the z/VM Center
server components are installed. It is not necessary or possible to separately
install z/VM Center console components on a management server.
Complete the following steps to install z/VM Center on a remote Linux console:
1. Copy the downloaded installation files to a temporary directory on the machine
on which you will be performing the installation.
2. Close IBM Director Console.
3. Change to the directory where the installation package is located.
4. Type the following command and press Enter:
rpm -ivh zVMCenterConsoleExt-version.noarch.rpm
version represents the version of the RPM. The installation progress is
displayed.
5. Restart IBM Director Console.
Installing z/VM Center on an AIX console:
This topic describes installation procedures for z/VM Center on an AIX
management console.
IBM Director Console must be installed before installing the z/VM Center
extension.
Note: z/VM Center user-interface components for IBM Director Console are
automatically installed on the management server when the z/VM Center
server components are installed. It is not necessary or possible to separately
install z/VM Center console components on a management server.
Complete the following steps to install z/VM Center on a remote AIX console:
1. Copy the downloaded installation files to a temporary directory on the machine
on which you will be performing the installation.
2. Close IBM Director Console if it is running.
3. Change to the directory where the installation files are located.
4. If the downloaded files do not include a .toc file, create one now. Type the
following command and press Enter:
inutoc directory
In the command directory represents the directory where the installation files
are located.
5. Type the following command and press Enter:
installp -acgNQqXY -d directory IBM.Director.zVMCenterConsoleExt
292 IBM Director Installation and Configuration Guide

In the command directory represents the directory where the installation files
are located.
6. Restart IBM Director Console.
Installing the z/VM CIM instrumentation on the z/VM manageability access
point:
This topic describes how to install the z/VM CIM instrumentation that you require
if you want to work with z/VM Center.
Before you start:
v You require a Linux system that runs in a z/VM guest virtual machine. Apart
from installing the z/VM CIM instrumentation, you must also set up the z/VM
guest virtual machine as described in “Setting up the z/VM manageability
access point” on page 178.
v You need to install the z/VM CIM instrumentation in a guest virtual machine on
each z/VM system on which you want to use z/VM Center. You must not
install the z/VM CIM instrumentation on multiple guest virtual machines on the
same z/VM system.
v You need a Linux system on which you have already installed IBM Director
Agent as described in “Installing Level 2: IBM Director Agent on Linux for
System z9 and zSeries” on page 239
v You require root access to the Linux system.
Complete these steps to install the z/VM CIM instrumentation that implements the
z/VM management profile:
1. Establish a Linux terminal session with user root.
2. Make the installation code from the IBM Director 5.10 for Linux on System z9
and zSeries CD available to your Linux system. See “Preparing to install IBM
Director on a System z9 or zSeries server” on page 166 for more information.
3. Ensure that CIMOM is not running; by typing this command and pressing
Enter:
/etc/init.d/dacimom stop
4. Change to the directory in which the installation script is located by typing
the following command and pressing Enter:
cd /mnt/director/agent/linux/s390/FILES/
where /mnt is the mount point of the file system on the CD or the location of
the IBM Director installation files.
5. If you want to customize the installation go to step 6. If you want to accept
the default settings for the installation, type the following command and press
Enter:
./dirversion_zvmmapagent_linz.sh
where version is a string that identifies the version.
Refer to the response file to view the defaults. The response file is named
zvmmapagent.rsp and located in the same directory as the installation script.
In the response file, “1” indicates that an item is to be installed and “0”
indicates that an item is not to be installed.
Proceed with step 11 on page 294.
6. Copy the response file to a local directory. Type the following command and
press Enter:
Chapter 3. Installing 293

cp zvmmapagent.rsp /directory
where directory is the local directory.
You can specify the location of the RPM files and select log file options.
7. Save the modified response file.
8. To install the z/VM CIM instrumentation using the response file, type the
following command and press Enter:
./dirversion_zvmmapagent_linz.sh -r /directory/zvmmapagent.rsp
where directory is the local directory to which you copied the response file.
9. Optional: Keep the response file for future use and reference.
10. Install and configure the z/VM CIM instrumentation that implements the
z/VM management profile. If it is not your present working directory, change
to the directory from which you have installed the RPM for IBM Director
Agent.
Result: The installation script installs the z/VM CIM instrumentation, assures
the required SLP service-type registration, and configures Linux to start
CIMOM automatically when Linux starts.
11. Confirm that CIMOM can be started by typing the following command and
pressing Enter:
/etc/init.d/dacimom start
12. Change the working directory by typing the following command and pressing
Enter:
cd /opt/ibm/director/cimom/bin
13. Display the operating system class by typing the following command and
pressing Enter:
./CLI -niq ei IBM_ZvmOperatingSystem
The IBM_ZvmOperatingSystem CIM class contains basic information about
the z/VM system.
Example:
./CLI -niq ei IBM_ZvmOperatingSystem
path= IBM_ZvmOperatingSystem.CreationClassName="IBM_ZvmOperatingSystem",...
//Instance of Class IBM_ZvmOperatingSystem
instance of class IBM_ZvmOperatingSystem
{
string Caption;
...
string Name = "BOEVMID1";
uint16 OSType = 39;
uint16 OperationalStatus[] = {2};
string OtherEnabledState = "";
string OtherTypeDescription = "z/VM";
string ProfileVersion = "1.1.0";
uint16 RequestedState = 5;
uint64 TotalVirtualMemorySize;
uint64 TotalVisibleMemorySize = 5368709120;
string Version = "5.1.0.402";
};
14. Ensure that the host name is resolvable. For example, issue a ping command
for the host name. You can make the host name resolvable by ensuring that
there is a corresponding DNS entry or an entry in /etc/hosts.
294 IBM Director Installation and Configuration Guide

Changing IBM Director installation options
This topic describes procedures for changing installation options after installing
IBM Director.
Changing installation options on NetWare
This topic provides procedures for modifying an IBM Director installation that is
running on NetWare.
Notes:
1. You cannot use this procedure to uninstall the MPA Agent. However,
you can use this procedure to add it to an existing IBM Director Agent
installation.
2. To modify an IBM Director Agent installation, you must log on to the
NetWare server from a Windows workstation running the NetWare
Client for Windows.
3. The SYS volume must be mapped as a drive to the system running
Windows.
4. You must have administrator or supervisor access on the NetWare
server.
Complete the following steps to add Management Processor Assistant Agent to an
existing IBM Director Agent installation:
1. Stop IBM Director Agent. From the server running NetWare, change to the
console screen. Type the following command and press Enter :
unload twgipc
2. Start Windows Explorer and open the \directory\FILES directory, where
directory is the location to which you saved the dir5.10_agent_netware.exe file.
3. Double-click the dir5.10_agent_netware.exe file. The InstallShield wizard
starts.
4. Click Next. The ″Installing IBM Director Agent″ window opens.
5. Click Next to accept the license agreement. The “Choose destination location”
window opens.
Chapter 3. Installing 295

6. Click the drive that is mapped to the SYS volume on the NetWare server;
then, click Next. The ″Select Components″ window opens.
7. Select the Management Processor Assistant Agent check box.
Figure 48. Modifying IBM Director Agent on NetWare: “Choose destination location” window
Figure 49. Modifying IBM Director Agent on NetWare: “Select Components” window
296 IBM Director Installation and Configuration Guide

8. Click Next. The ″Setup Status″ window opens, and the IBM Director Agent
installation begins. When the installation is completed, the ″InstallShield
Wizard Complete″ window opens.
9. Click Finish.
10. On the NetWare server, change to the console screen.
11. Type the following command and press Enter:
load twgipc
Changing installation options on Windows
This topic describes how to add a previously uninstalled feature to or remove a
feature from IBM Director.
Complete the following steps to add a previously uninstalled feature to or remove
a feature from IBM Director Server, IBM Director Console, or IBM Director Agent:
1. Click Start Settings > Control Panel. The Control Panel window opens.
2. Double-click Add/Remove Programs. The Add/Remove Programs window
opens.
3. Click the IBM Director software component that you want to modify; then,
click Change. The InstallShield wizard starts, and the Welcome to the
InstallShield Wizard window opens.
4. Click Next. The Program Maintenance window opens.
5. Click Modify; then, click Next.
6. Continue through the wizard, making changes as necessary.
Changing installation options on Linux
This topic describes how to add a previously uninstalled feature to or remove a
feature from IBM Director Server, IBM Director Console, or IBM Director Agent on
a system running Linux.
Figure 50. Program Maintenance window
Chapter 3. Installing 297

Installing an IBM Director feature on Linux:
This topic describes how to add a previously uninstalled feature to or remove a
feature from IBM Director on Linux.
Complete the following steps to add a previously uninstalled feature to or to
remove a feature from IBM Director Server, IBM Director Console, or Level 2: IBM
Director Agent:
1. Copy the applicable response file (*.rsp) to a local directory.
2. Open an ASCII text editor and modify the response file.
3. Save the modified response file.
4. Run the installation script for the component you want to change using the
response file.
For component-specific instructions about modifying response files and running
the installation, see the Installing section.
Uninstalling an IBM Director feature on Linux:
This topic describes how to uninstall an IBM Director feature on Linux.
Complete the following steps to remove a feature from IBM Director Server, IBM
Director Console, and IBM Director Agent:
1. Modify the diruninstall script, which is in located in the IBM Director
installation directory. By default, this script removes all detected IBM Director
components. To uninstall specific components, you must set the SmartUninstall
setting to 0 and then make the other modifications.
2. Save the modified uninstallation script.
3. To stop IBM Director Agent, from a command prompt, type the following
command and press Enter:
/opt/ibm/director/bin/twgstop
4. Run the diruninstall script. Type the following command and press Enter:
/SourceDirectory/diruninstall
where SourceDirectory is the directory to which you copied the modified
uninstallation script.
5. To start IBM Director Agent, type the following command and press Enter:
/opt/ibm/director/bin/twgstart
You also can use the standard RPM commands.
Upgrading from previous releases
This topic provides information about upgrading from previous releases of IBM
Director.
The upgrade process for all IBM Director 5.10 components begins by uninstalling
all existing IBM Director components and features and continues with the
installation of IBM Director 5.10. You can choose to install previously uninstalled
features and extensions. The database configuration you used in the previous
version is maintained.
298 IBM Director Installation and Configuration Guide

Note: You must uninstall any separately installed IBM Director extensions before
upgrading IBM Director Server, IBM Director Console, or IBM Director
Agent.
To upgrade IBM Director, follow the steps for a new installation, including any
planning and environment preparation that might be necessary.
If you are running one of the following versions of IBM Director on a supported
operating system, you can upgrade to IBM Director 5.10:
v IBM Director 4.10
v IBM Director 4.10.2
v IBM Director 4.11
v IBM Director 4.12
v IBM Director 4.20
v IBM Director 4.20.2
v IBM Director 4.21
v IBM Director 4.22
Versions of IBM Director earlier than IBM Director 4.10 are not compatible with
IBM Director 5.10. If you are running a version of IBM Director earlier than IBM
Director 4.10, you can perform one of the following operations:
v Uninstall your existing IBM Director installation and then install IBM Director
5.10.
v Upgrade your existing IBM Director installation to a version from which you can
upgrade to IBM Director 5.10. Then, upgrade to IBM Director 5.10.
Before upgrading IBM Director, consider the following information:
v (Upgrading from an installation to which a Product Engineering fix has been
applied) You must return IBM Director to the base installation state before
upgrading to version 5.10. To do this, perform one of the following tasks:
– (Windows only) Uninstall the fix using the Windows Add/Remove Programs
feature.
– (Linux only) Uninstall the fix using the following command:
rpm -e fixname
where fixname is the name of the fix to be removed.v (Linux upgrades only) Depending on the Linux distribution and the version of
IBM Director from which you are upgrading, your environment might be using
one of the following IBM Director installation directories:
– /opt/IBM/director/
– /opt/ibm/director/
Ensure that you install the upgrade in the same location as the previous
installation of IBM Director. When using instructions throughout the
documentation, use the appropriate path depending on your configuration.
v The version of IBM Director Agent cannot be later than the version of IBM
Director Server running on the management system.
v IBM Director Server and IBM Director Console must have the same release level.
If you upgrade IBM Director Server, you must upgrade IBM Director Console
also.
Chapter 3. Installing 299

v If IBM Director Console and IBM Director Agent are installed on the same
system, both software components must have the same release level as IBM
Director Server.
If version 4.22 or earlier of the IBM LM78 or SMBus device driver for Linux is
installed on a managed system, you must uninstall it and then install version 5.10
of the device driver.
Related reference
Chapter 2, “Planning,” on page 81
This topic contains information about planning to install IBM Director. Related information
“Preparing to install IBM Director” on page 153
Use this section to ensure that your environment is set up properly for the
installation and use of IBM Director.
“Installing IBM Director” on page 182
This topic provides procedures for installing IBM Director Server, IBM Director
Console, Level 1: IBM Director Core Services, Level 2: IBM Director Agent, and
IBM Director extensions.
Upgrading IBM Director Server
This topic contains instructions for upgrading IBM Director Server.
You can upgrade to IBM Director Server 5.10 from IBM Director Server, version 4.1
or later. The management server must be running one of the following operating
systems:
v i5/OS, version 5, release 3
v Red Hat Enterprise Linux AS and ES, version 3.0, for Intel x86
v SUSE LINUX Enterprise Server 8 for x86 (Service Pack 3 required)
v Windows 2000 Server and Advanced Server (Service Pack 3 required)
v Windows Server 2003, Enterprise, Standard, and Web Editions
To upgrade IBM Director Server, follow the general installation instructions for
your operating system.
Upgrading IBM Director Console
This topic contains instructions for upgrading IBM Director Console.
You can upgrade to IBM Director Console 5.10 from IBM Director Console, version
4.1 or later. The management console must be running one of the following
operating systems:
v Red Hat Enterprise Linux AS and ES, version 3.0, for Intel x86
v SUSE LINUX Enterprise Server 8 for x86 (Service Pack 3 required)
v Windows 2000 Server and Advanced Server
v Windows Server 2003, Enterprise, Standard, and Web Editions
v Windows 2000 Professional, Server, and Advanced Server Editions (Service Pack
3 required)
v Windows XP Professional Edition (Service Pack 1 recommended)
To upgrade IBM Director Console, follow the general installation instructions for
your operating system.
300 IBM Director Installation and Configuration Guide

Upgrading IBM Director Agent
This topic contains instructions for upgrading IBM Director Agent.
Notes:
v If IBM Director Console and IBM Director Agent are installed on the
same system, both software components must be at the same release
level as IBM Director Server.
v The version of IBM Director Agent cannot be later than the version of
IBM Director Server running on the management system.
v If you want to use IBM Director to manage a system running an
operating system that IBM Director 5.10 does not support, do not
upgrade IBM Director Agent. IBM Director 5.10 can manage systems
running IBM Director Agent, versions 4.10 and later.
You can upgrade to IBM Director Agent 5.10 from IBM Director Agent, version 4.1
or later. You can use either standard installation procedures or the IBM Director
Software Distribution task. The managed system must be running one of the
following operating systems:
v AIX, version 5.2
v i5/OS, version 5, release 3
v Novell NetWare, version 6.5
v Red Hat Enterprise Linux AS and ES, version 3.0, for Intel x86
v Red Hat Enterprise Linux AS, version 3.0, for AMD64
v Red Hat Enterprise Linux AS, version 3.0, for IBM POWER
v Red Hat Enterprise Linux AS and ES, version 4.0, for Intel x86
v Red Hat Enterprise Linux AS, version 4.0, for AMD64
v SUSE LINUX Enterprise Server 8 for x86
v SUSE LINUX Enterprise Server 8 for AMD64
v SUSE LINUX Enterprise Server 9 for x86
v SUSE LINUX Enterprise Server 9 for AMD64
v VMware ESX Server, version 2.1, with the following guest operating systems:
– SUSE LINUX Enterprise Server 8 for x86
– Windows 2000, Server
– Windows Advanced Server
– Windows XP Professional Edition
– Windows Server 2003, Enterprise, Standard, and Web Editionsv Windows 2000, Server
v Windows Advanced Server
v Windows XP Professional Edition
v Windows Server 2003, Enterprise, Datacenter, Standard, and Web Editions
v Windows Server 2003, Enterprise, Datacenter, Standard, and Web Editions, 64-bit
versions
To upgrade IBM Director Agent using standard installation procedures, follow the
general installation instructions for your operating system.
Chapter 3. Installing 301

Upgrading IBM Director Agent using the Software Distribution
task
This topic provides information about how to use the Software Distribution task to
upgrade IBM Director Agent.
You can use the IBM Director Software Distribution task to upgrade IBM Director
Agent on managed systems running AIX, i5/OS, Windows (32-bit and 64-bit), or
Linux (32-bit and 64-bit).
The following files describe IBM Director Agent:
v dir5.10_agent_aix.xml (located in the director\agent\aix\META-INF directory on
the IBM Director 5.10 for AIX 5L CD)
v dir5.10_agent_linux.xml (located in the director\agent\linux\i386\META-INF
directory on the IBM Director 5.10 CD)
v dir5.10_agent_windows.xml (located in the
director\agent\windows\i386\META-INF directory on the IBM Director 5.10
CD)
v Directori5OSRPD_agentpackagedIU.xml (located on the i5/OS management
server, if you have selected to install the IBM Director Agent images, in the
/QIBM/ProdData/VE2/ManagedNodes/Directori5OS/META-INF directory.
The following files describe the 64-bit, Intel Itanium versions of the IBM Director
Agent:
v dir5.10_agent_linux64.xml
v dir5.10_agent_windows64.xml
(xSeries only) The following files describe the IBM LM78 and IBM SMBus device
drivers:
v lm78driver_linux.xml
v smbdriver_linux.xml
You can download these files from the IBM Director Support Web site at
www.ibm.com/servers/eserver/xseries/systems_management/ibm_director/.
They are included in the .zip or .gz packages for the component or device driver to
which they apply.
When you import the XML files into IBM Director, the IBM Update Assistant
creates software packages. Then, you can use the IBM Director Software
Distribution task to distribute the packages to the managed systems.
To install the IBM LM78 or SMBus device driver using the Software Distribution
task, you first must build the binary RPM file and copy it to the same directory as
the smbdriver_linux.xml file.
Note: If the IBM LM78 or SMBus device driver for Linux, version 4.20 or earlier is
installed on the managed system, you must uninstall the device driver
before installing version 5.10 of the driver.
Creating a software package:
This topic describes how to create a software package for installing or upgrading
IBM Director Agent or installing IBM Director Core Services.
Complete the following steps to create a software package:
302 IBM Director Installation and Configuration Guide

1. Locate the installation or upgrade packages. Refer to “Installing IBM Director
Core Services using the Software Distribution task” on page 228 or “Installing
IBM Director Agent using the Software Distribution task” on page 258 for
more information.
2. If you want to accept the default settings for the installation, go to step 3.
Otherwise, copy the response file (diragent.rsp for IBM Director Agent;
coresvcs.rsp for IBM Director Core Services) and open the copy in an ASCII
text editor. Modify the response file as needed; then, save the modified file
with a new file name.
3. Start IBM Director Console.
4. In the Tasks pane, double-click Software Distribution. The ″Software
Distribution Manager″ window opens.
5. If you have not installed IBM Director 5.10 Software Distribution (Premium
Edition), go to step 6. Otherwise, expand the Wizards tree.
6. Double-click IBM Update Assistant. The ″IBM Update Assistant″ window
opens.
Figure 51. Creating a software package: ″Software Distribution Manager″ window (Standard
Edition)
Figure 52. Creating a software package: Software Distribution Manager window (Premium
Edition)
Chapter 3. Installing 303

7. If you want to get files from the management server, click Get files from the
Director server. By default, Get files from the local system is selected.
8. To select a file, click Browse. The ″IBM Update Package/Root Directory
Location″ window opens.
9. Locate the appropriate XML file and click it. The name of the XML file is
displayed in the File Name field.
Note: Use the correct XML file for your language. The correct file for English
installations is the one without the language code. For example,
dir5.10_agent_windows.xml
Figure 53. Creating a software package: ″IBM Update Assistant″ window
Figure 54. Creating a software package: ″IBM Update Package/Root Directory Location″
window
304 IBM Director Installation and Configuration Guide

10. Click OK. The ″IBM Update Assistant″ window reopens.
11. Click Next. The second ″IBM Update Assistant″ window opens.
Figure 55. Creating a software package: ″IBM Update Package/Root Directory Location″
window
Figure 56. Creating a software package: ″IBM Update Assistant″ window
Chapter 3. Installing 305

12. To specify an alternative response file, click Browse and locate the file that
you modified in step 2 on page 303.
Note: If you do not specify an alternative response file, the package is
installed with the default settings that are specified in the installation
script.
13. Click Finish. As the package is processed, a status message is displayed at the
bottom of the window.
When the processing is completed, the software-distribution package is
displayed in the Tasks pane of IBM Director Console.
Figure 57. Creating software packages: ″IBM Update Assistant″ window
306 IBM Director Installation and Configuration Guide

Installing a software package:
This topic describes how to install a software package using IBM Director.
Note: The Software Distribution task copies the installation package to the client
system before starting the installation. On systems running AIX, the package
is copied to the root file system. There must be at least 60 MB of free space
available in the root file system or the task will fail.
Complete the following steps to install a software package:
1. Start IBM Director Console.
2. In the Tasks pane, expand the Software Distribution task.
3. Click the software package that you want to distribute. Then, drag it into the
Group Contents pane and drop it onto the icon that is displayed for the system
on which you want to install the software package. A window opens.
Note: To distribute software to several systems at once, you can drag the
software package into the Groups pane and drop it onto the icon for the
group. Alternatively, you can select multiple managed systems in the
Group Contents pane.
4. When prompted with Do you wish to create a scheduled job for this task
or execute immediately?, click Schedule or Execute Now. If you click Execute
Now, the software package is distributed immediately. If you click Schedule,
the ″New Scheduled Job″ window opens.
Figure 58. All Software Distribution Packages: IBM Director Agent Upgrade
Chapter 3. Installing 307

5. Schedule the job:
a. In the Scheduled Job field, type a unique name for the job. This name is
displayed in the Jobs pane of the Scheduler window.
b. In the Date field, type the day you want the software package to be
installed (in MM/DD/YYYY format).
c. In the Time field, type the time you want the software package to be
installed.
For more information about the Scheduler task, see the IBM Director 5.10
Systems Management Guide.
6. Click OK. The Save Job Confirmation window opens.
7. Click OK.
Updating IBM Director
This topic provides information about updating IBM Director.
IBM might offer new releases or updates to this version of IBM Director. If you
purchased IBM Director, see the IBM
Information Center at
www.ibm.com/servers/library/infocenter/ for information about new releases.
If you received IBM Director with your IBM
BladeCenter product or
xSeries server, see your hardware documentation for information about updating
IBM Director. Also, the IBM
xSeries Subscription Services, which allows
you to receive updates automatically, is available; for more information about this
service, contact your IBM representative.
Initially configuring IBM Director
This topic describes how to set up the initial configuration of your system after
installing IBM Director.
After completing the installation of IBM Director, you should perform the
following initial configuration tasks:
v Authorize IBM Director users
Figure 59. Scheduling the installation of a software package: ″New Scheduled Job″ window
308 IBM Director Installation and Configuration Guide

To use IBM Director, a user must have an operating-system account on the
management server or the domain. You can assign and edit privileges for users
and groups, including task access and group access. By default, new users have
no privileges.
v Configure your discovery preferences
Discovery is the process by which IBM Director Server identifies and establishes
connections with systems on which IBM Director Agent is installed. The
management server sends out a discovery request and waits for responses from
managed systems. The managed systems listen for this request and respond to
the management server that sent the request.
By default, IBM Director Server automatically discovers all managed systems
that are on the same subnet as the management server. If you want to manage
systems that are on a different subnet, you must configure discovery preferences.
v Perform an automatic system discovery
The Discover Systems task allows you to discover managed objects
automatically. You can select to discover all managed objects or a particular type
of managed object.
v Configure software-distribution preferences
The Software Distribution (Standard Edition) task allows you to import
applications and data, build a software package, and distribute the package to
IBM Director managed systems.
Authorizing IBM Director users
This topic describes how to authorize IBM Director users. On Windows platforms,
you can also edit access privileges for a global group.
IBM Director Console uses the operating-system user accounts for user-logon
security. When a user logs in to IBM Director, the user ID and password
verification process used by the operating system is used to validate the user’s
authority to access IBM Director.
To use IBM Director, a user must have an operating-system account on the
management server or the domain. In addition, a user must meet one of the
following requirements, depending on the operating system running on the
management server:
For i5/OS Member of the IBM Director Administrators or IBM Director Super
Administrators group
For Linux Member of the diradmin or dirsuper group
For Windows One of the following criteria:
v Member of the DirAdmin or DirSuper group
v Administrator privileges on the management server or the domain
Users’ ability to perform tasks depends on which access privileges they have been
assigned in the IBM Director environment. A super user can configure a default set
of privileges for the administrator group. A super user also can edit user accounts
on an individual basis.
Authorizing users for i5/OS
i5/OS users must have a user profile on the management server that is running
i5/OS and be registered in a function usage group.
Chapter 3. Installing 309

To initially connect to a managed system running i5/OS, a user must also have a
user profile on the managed system. Additionally, a security administrator must
authorize these users to IBM Director Server and IBM Director Agent functions.
IBM Director running on i5/OS has a set of associated function identifiers to use
for authorizing users, configuring default users, and defining a specific user under
which jobs can run. Users must be registered in one of the following functions:
v IBM Director Administrators
v IBM Director Super Administrators
IBM Director is shipped with the user profile QCPMGTDIR. QCPMGTDIR has
*ALLOBJ special authority as well as *SECADM special authority. QCPMGTDIR is
used to start all IBM Director jobs and is the default profile under which the jobs
run. You can change the default profile from QCPMGTDIR to a user profile of
your choice for the following function IDs:
v IBM Director Agent default user
v IBM Director Server default user
v IBM Director Agent run as user
v IBM Director Server run as user
The following table describes the three function usage groups to which a user can
be authorized.
Function ID Purpose
IBM Director Administrators Perform management functions using tasks to which
they are authorized.
IBM Director Agent access Initially connect IBM Director Server to an IBM Director
Agent.
Note: By default, any user with *ALLOBJ authority has
access to this function.
IBM Director Agent default user By specifying a user profile other than the default profile,
remote commands can be performed on a managed
system using the specified user profile. No user ID and
password are required when requesting the command.
IBM Director Agent run as user By specifying a user profile other than the default profile,
jobs on the managed system are performed under this
profile. To complete all IBM Director tasks successfully,
the user profile must have *ALLOBJ authority.
IBM Director Server default user Allows a user profile to be registered as the default for
tasks such as file transfer, software distribution, and
event actions. To complete all IBM Director tasks
successfully, the user profile must have *ALLOBJ
authority.
IBM Director Server run as user By specifying a user profile other than the default profile,
jobs on the management server are performed under this
profile. To complete all IBM Director tasks successfully,
the user profile must have *ALLOBJ and *SECADM
authority.
IBM Director Super Administrators Configure a set of privileges for the administrator group,
edit user accounts on an individual basis, and use the
functions of the DIRCLI client.
Prerequisite:
To authorize users to these functions, you must have *SECADM authority.
310 IBM Director Installation and Configuration Guide

Complete the following steps to authorize users to IBM Director functions:
1. In iSeries Navigator, right-click the server and click Application
Administration.
2. On the Application Administration dialog, click the Host Applications tab.
3. Expand IBM Director for iSeries.
4. Select the function group to which you want to add users and click Customize.
Complete the instructions on the dialog to grant authority.
You can also use the Work Function Usage (WRKFCNUSG) command in the
character-based interface, WRKFCNUSG QIBM_QDIR*.
Creating user-account defaults
This topic describes how to set the default access privileges for new members of
the administrators group.
A super user can use the User Defaults Editor to set the default access privileges
for new members of the administrators group.
Complete the following steps to create user-account defaults:
1. In IBM Director Console, click Options → User Administration.
This window contains a list of all users authorized to access IBM Director.
2. In the User Administration window, click User → User Defaults.
In the User Defaults Editor window, you can set the default access privileges
for new members of the DirAdmin group.
Notes:
a. For increased security, consider providing no default access
privileges. You will have to set access levels for each user, but you
can be sure that a user will not accidentally be able to access
restricted groups or tasks.
b. You can restrict access to the Event Action Plan wizard by removing
users’ access to the Event Action Plan Builder task.
Editing an individual user’s access privileges
This topic describes how to edit an individual user’s access privileges.
Complete the following steps to edit a user’s access privileges:
1. In IBM Director Console, click Options → User Administration.
This window contains a list of all users and groups that are authorized to
access IBM Director.
2. In the User Administration window, select the user whose access privileges you
want to modify. Click Actions → User → Edit.
3. In the User Editor window, click the Privileges tab.
4. To add a privilege, click the privilege in the Available Privileges pane, and
then click Add. To remove a privilege, click the privilege in the Privileges
Granted to User pane, and then click Remove.
5. To restrict the user’s access to groups, click the Group Access tab.
6. To permit the user to access specific groups only, select the Limit user access
only to the groups listed check box. To add a group, click the group in the
Available Groups pane and click Add. To remove a group, click the group in
Chapter 3. Installing 311

the Groups User Can Access pane and click Remove. To prevent the user from
creating new groups or modifying existing groups, select the Limit user to
read-only access of groups check box.
7. To restrict the user’s access to tasks, click the Task Access tab.
8. To restrict the user to performing certain tasks only, select the Limit user access
only to the tasks listed check box. To add a task, click the task in the Available
Tasks pane and click Add. To remove a task, click the task in the Tasks User
Can Access pane and click Remove.
Note: You can restrict access to the Event Action Plan wizard by removing the
user’s access to the Event Action Plan Builder task.
9. When you have finished editing the user’s privileges, click OK.
Editing group access privileges
This topic describes how to edit access privileges for a global group on Windows
platforms.
Complete the following steps to edit privileges for a group:
1. In IBM Director Console, click Options → User Administration.
This window contains a list of all users and groups that are authorized to
access IBM Director.
2. In the User Administration window, click the Groups tab.
3. Select the group whose access privileges you want to modify. Click Actions →
Group → Edit.
4. In the Group Editor window, click the Privileges tab.
5. On the Privileges page, to add a privilege, click the privilege in the Available
Privileges pane and then click Add. To remove a privilege, click the privilege
in the Privileges Granted to User pane and then click Remove.
6. To restrict access for the group to IBM Director groups, click the Group
Access tab.
7. On the Group Access page, to permit the user to access specific groups only,
select the Limit user access only to the groups listed check box. To add a
group, click the group in the Available Groups pane and click Add. To
remove a group, click the group in the Groups User Can Access pane and
click Remove. To prevent the user from creating new groups or modifying
existing groups, select the Limit user to read-only access of groups check box.
8. To restrict access for the group to tasks, click the Task Access tab.
9. On the Task Access page, to restrict the group to performing certain tasks
only, select the Limit user access only to the tasks listed check box. To add a
task, click the task in the Available Tasks pane and click Add. To remove a
task, click the task in the Tasks User Can Access pane and click Remove.
10. When you have finished editing the privileges, click OK.
Configuring discovery preferences
This topic describes how to configure discovery preferences.
By default, IBM Director Server automatically discovers all managed systems that
are on the same subnet as the management server. If you want to manage systems
that are on a different subnet, you must configure discovery preferences.
312 IBM Director Installation and Configuration Guide

Configuring discovery preferences for Level-2 managed systems
The Level 2: IBM Director Agents page allows you to customize the discovery
parameters for Level-2 managed systems.
Complete the following steps to configure discovery preferences for Level 2: IBM
Director Agents:
1. In IBM Director Console, click Options → Discovery Preferences.
2. In the Discovery Preferences window on the Level 2: IBM Director Agents
page, configure the general discovery preferences for managed systems:
a. In the Auto-discover period (hours) field, select how often IBM Director
Server attempts to discover systems automatically. The possible range is
one to 168 hours (seven days). By default, autodiscovery is disabled.
b. In the Presence Check period (minutes) field, select how often IBM
Director Server checks the status of each managed system. A presence
check detects whether a managed system is online or offline. The possible
range is one to 240 minutes (four hours); this feature also can be disabled.
By default, a presence check is set to occur every 15 minutes.
c. Select the Automatically secure unsecured systems check box to ensure
that IBM Director Server automatically secures any unsecured managed
systems that it discovers. When this feature is enabled, IBM Director
Server prevents future management servers from managing the managed
systems without first requesting access.
d. Select the Auto-add unknown agents which contact server check box to
ensure that IBM Director Server adds objects for newly-discovered
managed systems to the Group Contents pane. This option might be useful
if you are reinstalling IBM Director Server in an existing IBM Director
environment, or if you have configured instances of IBM Director Agent to
contact IBM Director Server directly. 3. At the top of the page, click System Discovery (IP).
Note: These discovery preferences are for Level-2 managed systems only.
4. To specify that IBM Director Server issues an IP broadcast to discover
managed systems on the local subnet, on the System Discovery (IP) page,
select the Use TCP/IP general broadcasts check box. By default, this feature is
enabled.
5. To specify that IBM Director Server issues an IP broadcast to discover
managed systems on a remote subnet, complete the following steps:
a. Click Add.
b. In the Add window, click Broadcast.
c. Click Next.
d. In the Add Broadcast Address window, in the IP Address and Subnet
Mask fields, type the IP address and subnet mask.
e. Click OK. The information about the broadcast operation is displayed in
the Address Entries field. 6. To specify that IBM Director Server issues an IP multicast, complete the
following steps:
a. Select the Use TCP/IP multicasts check box.
b. In the Multicast Group field, type the address of the multicast group
address. By default, the multicast group address is set to 224.0.1.118.
Chapter 3. Installing 313

c. In the Multicast TTL fields, select the time to live for the multicast
discovery packet. The time to live is the number of times that a packet is
forwarded between subnets. By default, this is set to 32.
Note: If you modify the multicast group address, you also must modify the
multicast group address on each managed system.
7. To specify that IBM Director Server issues a broadcast relay request from a
Level-2 managed system, complete the following steps:
a. Click Add. The Add window opens.
b. Click Relay.
c. Click Next.
d. In the Add Relay Address window, in the IP Address and Subnet Mask
fields, type the IP address and subnet mask of an existing Level-2
managed system.
e. Click OK. The information about the broadcast relay operation is
displayed in the Address Entries field. 8. To specify that IBM Director Server issues a unicast, complete the following
steps:
a. Click Add.
b. In the Add window, click Unicast Address.
c. Click Next.
d. In the Unicast Address window, in the IP Address field, type the IP
address to which the packet is sent.
e. Click OK. The information about the unicast operation is displayed in the
Address Entries field. 9. To specify that IBM Director Server issues a unicast to a range of IP address,
complete the following steps:
a. Click Add.
b. In the Add window, click Unicast Range.
c. Click Next.
d. In the Add Unicast Address Range window, in the Start Address and End
Address fields, type the starting and ending IP addresses.
e. Click OK. The information about the unicast range operation is displayed
in the Address Entries field.10. If you have IPX installed on the management server, at the top of the page,
click System Discovery (IPX).
11. To specify that IBM Director Server issues an IPX broadcast to discover
managed systems on the local subnet, on the System Discovery (IPX) page,
select the Use IPX general broadcasts check box. By default, this feature is
enabled.
12. To specify that IBM Director Server issues an IPX broadcast to discover
managed systems using a specific IPX address, complete the following steps:
a. Click Add.
b. In the Add IPX address entry window, type the IPX address.
c. If you want to enable a broadcast relay, select the Enable broadcast relay
check box.
d. Click OK. The information about the broadcast operation is displayed in
the Address Entries field.
314 IBM Director Installation and Configuration Guide

Configuring discovery preferences for Level-1 managed systems
The Level 1: IBM Director Core Services Systems page allows you to customize the
discovery parameters for Level-1 managed systems.
Complete the following steps to configure discovery preferences for Level-1
managed systems:
1. In IBM Director Console, click Options → Discovery Preferences.
2. In the Discovery Preferences window on the Level 1: IBM Director Core
Services Systems page, define the discovery preferences that you want to use to
find Level-1 managed systems.
3. Click OK.
Configuring discovery preferences for Level-0 managed systems
The Level 0: Agentless Systems page allows you to customize the discovery
parameters for Level-0 managed systems.
Complete the following steps to configure discovery preferences for Level-0
managed systems:
1. In IBM Director Console, click Options → Discovery Preferences.
2. In the Discovery Preferences window on the Level 0: Agentless Systems page,
define the discovery preferences that you want to use to find Level-0 managed
systems.
3. Click OK.
Configuring discovery preferences for SNMP devices
The SNMP devices page allows you to customize the discovery parameters for
SNMP devices.
Complete the following steps to configure discovery preferences for SNMP devices:
1. In IBM Director Console, click Options → Discovery Preferences.
2. In the Discovery Preferences window on the SNMP Devices page, configure the
discovery preferences for SNMP devices.
a. In the Auto-discover period (hours) field, select the frequency with which
IBM Director Server attempts to discover SNMP devices automatically. The
possible range is one to 168 hours (seven days). By default, autodiscovery is
disabled.
b. In the Presence Check period (minutes) field, select the frequency that IBM
Director Server checks the status of each SNMP device. A presence check
detects whether an SNMP device is online or offline. The possible range is
one to 240 minutes (four hours); this feature also can be disabled. By
default, a presence check is set to occur every 15 minutes.
c. Select the Auto-add unknown agents which contact server check box to
ensure that IBM Director Server adds objects for newly-discovered SNMP
devices to the Group Contents pane.3. Configure seed addresses for SNMP discovery:
a. In the IP Address and Subnet masks group box, specify the seed addresses.
You can specify multiple IP addresses; the addresses are searched
concurrently. By default, the IP address of the management server is added
to this list. To optimize the chance of discovering all SNMP devices, be sure
to specify the IP addresses for routers and DNS servers. During the
discovery operation, IBM Director Server locates the address tables located
on the specified devices and adds those addresses to the list of addresses to
Chapter 3. Installing 315
search. The process is repeated for every new SNMP device that is
discovered from the new addresses. The discovery operation continues until
no more addresses are found.
b. In the SNMP Version field, select the SNMP version.
c. In the Community Names field, type the community names and click Add.
Continue until all community names are added. For SNMP versions 1 and
2c, be sure to order the community names appropriately.
Configuring discovery preferences for SMI-S storage devices
The SMI-S Storage Devices page allows you to customize the discovery parameters
for SMI-S storage devices.
Complete the following steps to configure discovery preferences for SMI-S storage
devices:
1. In IBM Director Console, click Options → Discovery Preferences.
2. In the Discovery Preferences window on the SMI-S Storage Devices page, select
the preferences that you want IBM Director to use.
a. In the Auto-discover period (hours) field, select the frequency with which
IBM Director Server attempts to discover SMI-S storage devices
automatically. The possible range is one to 168 hours (seven days). By
default, autodiscovery is disabled.
b. In the Presence Check period (minutes) field, select the frequency that IBM
Director Server checks the status of each SMI-S storage device. A presence
check detects whether a storage device is online or offline. The possible
range is one to 240 minutes (four hours); this feature also can be disabled.
By default, a presence check is set to occur every 15 minutes.
c. Under Service Location Protocol (SLP) Profiles, select the SLP profiles that
IBM Director Server will discover. The default is SNIA:Array.
d. Under Naming Conventions Template for SMI-S Devices, add the
parameters to include in the Template Name by selecting a parameter in
the Available Parameters column, and then clicking Add to place it in the
Selected Parameters column. To remove a parameter from the template
name, select a parameter in the Selected Parameters column, and then click
Remove. To restore the original default parameters, select the Reset to
default value check box. The default is %MANUFACTURER%
%HARDWARE_TYPE_MODEL% %HARDWARE_SERIAL_NUMBER%3. To save your selections, click OK.
Configuring discovery preferences for BladeCenter Chassis
The BladeCenter Chassis page allows you to customize the discovery parameters
for BladeCenter Chassis.
Complete the following steps to configure discovery preferences for BladeCenter
Chassis:
1. In IBM Director Console, click Options → Discovery Preferences.
2. In the Discovery Preferences window on the BladeCenter Chassis page,
configure the general preferences for discovering BladeCenter chassis:
a. In the Auto-discover period (hours) field, select the frequency with which
IBM Director Server attempts to discover BladeCenter chassis automatically.
The possible range is one to 168 hours (seven days). By default,
autodiscovery is disabled.
b. In the Presence Check period (minutes) field, select the frequency that IBM
Director Server checks the status of each BladeCenter chassis. A presence
316 IBM Director Installation and Configuration Guide

check detects whether an SNMP device is online or offline. The possible
range is one to 240 minutes (four hours); this feature also can be disabled.
By default, a presence check is set to occur every 15 minutes.3. Specify the conventions that IBM Director Server uses when you rename
BladeCenter chassis automatically. By default, this naming template is set to
IBM %CHASSIS_MACHINE_TYPE_MODEL%
%CHASSIS_SERIAL_NUMBER%.
a. Click a parameter in the Selected Parameters field; then, click Remove.
Continue until you have removed the default parameters.
b. In the Available Parameters field, click a parameter; then, click Add. The
parameter is added to the Selected Parameters list and the Naming
Template field. Continue until you have selected all the parameters that you
want to use.
To restore the renaming conventions to the default setting, select the Reset to
default value check box.
Configuring discovery preferences for physical platforms
The Physical Platforms page allows you to customize the discovery parameters for
physical platforms.
Complete the following steps to configure discovery preferences for physical
platforms:
1. In IBM Director Console, click Options → Discovery Preferences.
2. In the Discovery Preferences window on the Physical Platforms page, configure
the general preferences for discovering service processors:
a. In the Auto-discover period (hours) field, select the frequency with which
IBM Director Server attempts to discover service processors automatically.
The possible range is one to 168 hours (seven days). By default,
autodiscovery is disabled.
b. In the Presence Check period (minutes) field, select the frequency that IBM
Director Server checks the status of each service processor. A presence check
detects whether an SNMP device is online or offline. The possible range is
one to 240 minutes (four hours); this feature also can be disabled. By
default, a presence check is set to occur every 15 minutes.3. Specify the conventions that IBM Director Server uses when you rename
service processors automatically. By default, this naming template is set to IBM
%CHASSIS_MACHINE_TYPE_MODEL% %CHASSIS_SERIAL_NUMBER%.
a. Click a parameter in the Selected Parameters field; then, click Remove.
Continue until you have removed the default parameters.
b. In the Available Parameters field, click a parameter; then, click Add. The
parameter is added to the Selected Parameters list and the Naming
Template field. Continue until you have selected all the parameters that you
want to use.
To restore the renaming conventions to the default setting, select the Reset to
default value check box.
Discovering systems automatically
The Discover Systems task allows you to discover managed objects automatically.
You can select to discover all managed objects or a particular type of managed
object.
To discover systems, complete the following steps:
Chapter 3. Installing 317

1. In the IBM Director Console, click Tasks → Discover Systems.
2. Click the type of system you want to discover:
v All Managed Objects
v BladeCenter Chassis
v Level 0: Agentless Systems
v Level 1: IBM Director Core Services Systems
v Level 2: IBM Director Agents
v Physical Platforms
v SMI-S Storage Devices
v SNMP Devices
Setting up software-distribution preferences
The Server Preferences window: Software Distribution page allows you to
configure software distribution preferences such as the maximum number of
managed systems to which you want to stream software packages concurrently
and the bandwidth you want to assign to streaming software packages. You can
also specify not to stream a package if a redirected distribution fails as well as
restrict the server access check.
Complete the following steps to configure software-distribution preferences:
1. If necessary, start IBM Director Console.
2. Click Options → Server Preferences.
3. In the Server Preferences window, click the Software Distribution tab.
4. On the Software Distribution page, locate the Maximum Managed Systems
field and type the maximum number of managed systems to which IBM
Director Server can concurrently stream software packages. The default value is
three.
5. To limit the bandwidth used to stream packages, select the Enter streaming
bandwidth (kbps) for managed systems check box. In the entry field, type the
bandwidth, in kilobytes per second (KBps), that you want to use to stream
packages from either IBM Director Server or a file-distribution server to the
managed system.
Note: To specify values less than 1 KBps, type a decimal. The minimum
acceptable value is 0.25 (256 bytes per second).
6. To avoid streaming a package in the event that a redirected distribution fails,
select the Do not stream distribution if redirected distribution fails check box.
7. To prevent IBM Director Server from performing an access check of all of the
file-distribution shares, select the Restrict server access check check box.
This selection restricts the access check to only the file-distribution shares you
configure for a specific managed system or group.
8. Click OK.
Setting up file-distribution servers
This topic describes how to set up file-distribution servers.
IBM Director supports UNC-based and FTP-based file distribution. See your server
documentation for information about setting up a shared subdirectory.
Note: You do not need to install IBM Director on the file-distribution server.
See “File-distribution server considerations” on page 54 for more information.
318 IBM Director Installation and Configuration Guide

Configuring IBM Director to use a file-distribution server
This topic describes how to configure IBM Director to use a file-distribution server
to distribute software to Level-2 managed systems.
Complete the following steps to configure IBM Director Server to use a
file-distribution server:
1. Start IBM Director Console.
2. Click Options → Server Preferences.
3. In the Server Preferences window, click the File Distribution Server tab. A list
is displayed of all configured file-distribution servers.
4. Click Add.
5. In the Add Share Name window, type the name of the file-distribution server
(using UNC notation) in the Share Name field. To specify FTP as the
transport protocol, begin the share-name entry with ftp:, for example
ftp:\\ServerName\AccountName.
6. In the Maximum Disk Space field, type the maximum amount of disk space
(in MB) that can be allocated on the file-distribution server for software
distribution.
7. In the Maximum Managed Systems field, type the maximum number of
managed systems that can receive a software package at the same time.
8. To limit the bandwidth that can be used to send packages between IBM
Director Server and the file-distribution server, select the Limit bandwidth
between server and share (kbps) check box. In the entry field, type the
maximum bandwidth, in kilobytes per second (KBps), that can be used to
send packages between IBM Director and the file-distribution server.
Note: You might want to limit the bandwidth when a dedicated connection,
such as integrated services digital network (ISDN), is used for copying
the files from IBM Director Server to the share.
9. If you specified an FTP-based server in step 5, you must provide information
about the FTP server:
a. In the User ID on FTP server field, type a user ID authorized to access the
FTP server installed on the share.
b. In the Password field, type the password associated with the user ID.
c. In the Confirm password field, retype the password associated with the
user ID.
d. In the Home Directory field you can specify the directory where you want
to cache software packages. If you do not specify a directory, the packages
will be cached in the default home directory defined for the FTP user.
Note: For i5/OS, you must specify a directory, or configure the FTP server
to operate in regular mode. By specifying a directory, IBM Director
automatically changes the FTP server to operate in regular mode.10. Click OK.
If you have multiple file-distribution servers, repeat this procedure for each server.
Configuring distribution preferences for managed systems
This topic describes how to configure distribution preferences for managed
systems.
Chapter 3. Installing 319

After you configure IBM Director to use a file-distribution server, you can assign
unique policies to a managed system and groups. By default, a managed system
attempts to access all shares that have been defined to the management server. You
can configure the following software-distribution preferences for a managed
system or group:
v Restrict access to specific shares
v Specify whether software distribution occurs through streaming or redirected
distribution
v Limit the bandwidth used for software distribution
Complete the following steps to define distribution preferences:
1. If necessary, start IBM Director Console.
2. In the Group Contents pane, right-click the managed system or group.
3. Click Distribution Preferences.
4. In the Distribution Preferences window, select the method of software
distribution:
v If you want to copy packages directly from IBM Director Server to the
managed system or group, click Always stream to the Managed System(s).
v If you want to copy packages from a share to the managed system or
group, click Use File Distribution Server Shares.
Note: If a file-distribution server share cannot be located during a software
distribution when you have selected Use File Distribution Server
Shares, the default action is to stream the package from IBM Director
Server. You can prevent streaming from IBM Director Server by
selecting Do not stream if redirection fails in the Software distribution
server preferences.
5. To add a share, click Add.
6. In the Add Share Name window, in the Share Name field, select the share. If
necessary, specify a user ID and password for an account that can access the
share.
7. Click OK.
8. Repeat steps 5 through 7 until you have added all of the shares that you want
the managed system or group to access.
9. If you want to limit the shares that the managed system or group can access
to only those displayed, select the Restrict share selection to list check box.
Note: Windows only: If you select to use a file-distribution server share and
specify a user id and password with which to distribute the package,
rather than using null credentials, the Stream from File Distribution
Server check box must be selected for a distribution to complete
successfully. This applies to packages created with the IBM Update
Assistant, InstallShield Package, or Microsoft Windows Installer
Package wizards.
10. To limit the bandwidth that is used when copying packages, select the Limit
streaming bandwidth for system check box.
If you have selected Always stream to system, type a bandwidth value, in
kilobytes per second (KBps), to define the bandwidth that is used to copy
packages from IBM Director Server to the managed system or group. If a
bandwidth limitation is also set in Server Preferences for streaming from the
IBM Director Server, the lower value of the two settings is used as the
limitation parameter.
320 IBM Director Installation and Configuration Guide

If you have selected Use File Distribution Server Shares, in the entry field,
type a bandwidth value to define the bandwidth that is used to copy
packages from the file-distribution server share to the managed system or
group. If a file-distribution server share is unavailable at the time of
distribution, the package is streamed from IBM Director Server; this
bandwidth value is used to stream the package, unless a more restrictive
bandwidth value has been set in Server Preferences for Software Distribution.
Chapter 3. Installing 321

322 IBM Director Installation and Configuration Guide

Chapter 4. Uninstalling IBM Director
This topic provides procedures for uninstalling IBM Director.
You can use the following procedures to uninstall IBM Director.
Note: You can retain the configuration data when you uninstall IBM Director. This
enables you to reinstall or upgrade IBM Director and access the saved
configuration data. Should you reinstall, be sure to reinstall IBM Director in
the same location.
Uninstalling IBM Director on i5/OS
Use this information to uninstall the IBM Director components that are installed on
your i5/OS systems.
Uninstalling IBM Director Server on i5/OS
This topic describes how to uninstall IBM Director Server on i5/OS using the IBM
Virtualization Engine Uninstaller Launchpad.
Note: To uninstall IBM Director Server, you must connect to the server running
i5/OS from a system running Windows. The system running Windows must
have JRE, version 1.4 or later installed.
Complete the following steps to uninstall IBM Director Server running on i5/OS:
1. If you have not done so already, map a drive on the system running Windows
to connect to the /QIBM/ProdData/VE2 directory on the management server
that is running i5/OS.
2. On the Windows system, type X: at a command prompt and press Enter, where
X is the drive letter that you have mapped to the /QIBM/ProdData/VE2
directory.
3. When the command prompt changes to X:\>, type the following command and
press Enter to start the IBM Virtualization Engine Uninstaller Launchpad:
uninstallVEi5OS.bat
4. When the IBM Virtualization Engine Uninstaller Launchpad opens, select IBM
Director Server in the list of products to uninstall and click Uninstall.
5. When the uninstall is complete, the Messages area will display, Uninstall
completed for Director.
6. To remove IBM Director user data from the i5/OS management server, delete
the /qibm/userdata/director/ directory. You can use the following Qshell
command:
rm -rf /qibm/userdata/director/
Uninstalling IBM Director Server using DLTLICPGM
If you do not operate in an IBM Virtualization Engine environment, you can
uninstall IBM Director Server using DLTLICPGM.
© Copyright IBM Corp. 1999, 2005 323

Important: If you installed IBM Director Server using the Virtualization Engine
installation wizard, but choose to uninstall IBM Director Server using
DLTLICPGM, the configuration change will not be updated in the
Global Configuration Repository.
To uninstall IBM Director Server using DLTLICPGM, complete the following steps:
1. At an i5/OS command prompt on the system where IBM Director Server is
installed, type the following command and press Enter.
DLTLICPGM LICPGM(5722DR1)
2. To remove IBM Director user data from the i5/OS management server, delete
the /qibm/userdata/director/ directory. You can use the following Qshell
command:
rm -rf /qibm/userdata/director/
Uninstalling IBM Director Agent on i5/OS
You can uninstall IBM Director Agent using DLTLICPGM.
To uninstall IBM Director Agent using DLTLICPGM, complete the following steps:
1. At an i5/OS command prompt on the system where IBM Director Agent is
installed, type the following command and press Enter.
DLTLICPGM LICPGM(5722DA1)
2. To remove IBM Director user data from the i5/OS managed system, delete the
/qibm/userdata/director/ directory. You can use the following Qshell
command:
rm -rf /qibm/userdata/director/
Uninstalling IBM Director on Linux or AIX
This topic describes how to uninstall IBM Director from a system that is running
Linux or AIX.
Use the diruninstall script to uninstall IBM Director on Linux for System p5 and
pSeries, Linux for xSeries, Linux for System z9 and zSeries, or AIX. This script is
located in the /opt/ibm/director/bin directory. By default, this script removes all
IBM Director components. You can modify the script to remove specific
components.
v To uninstall IBM Director and all components, type the following command and
press Enter:
/opt/ibm/director/bin/diruninstall
v To uninstall specific components, perform the following steps:
1. Open the diruninstall script in an ASCII text editor and set the
SmartUninstall setting to 0.
2. Make additional modifications to the script.
3. Save the modified diruninstall script.
4. Type the following command and press Enter:
/opt/ibm/director/bin/diruninstall
Notes:
– If you are going to uninstall a specific component, you must stop the
component first.
324 IBM Director Installation and Configuration Guide

– (Linux on POWER only) If you did not install IBM Director Core
Services, you must remove IBM Director components using standard
RPM commands (by default, IBM Director Core Services is installed
when IBM Director Server or IBM Director Agent are installed).
– (AIX only) If you installed IBM Director Agent on a system that does
not have IBM Director Server installed, you must uninstall the
component using the instructions provided in “Uninstalling IBM
Director Agent on AIX” on page 326.v You also can uninstall IBM Director on Linux using standard RPM commands or
on AIX using the System Management Interface Tool (SMIT). Consider the
following information:
– Uninstall any IBM Director extensions before uninstalling IBM Director Server,
IBM Director Console, IBM Director Core Services, or IBM Director Agent.
– If an IBM Director database is configured, you must delete the tables and
remove the IBM Director database configuration. Perform this task after all
other packages are removed but before uninstalling IBM Director Server. From
a command prompt, type the following command and press Enter:
/opt/ibm/director/bin/uncfgdb
When you uninstall packages on Linux, the following files are retained to make
it possible to restore persistent data:
– /opt/ibm/director.save.1/saveddata.tar
– /etc/ibm/director/twgagent/twgagent.uid
Uninstalling IBM Director on Windows
This topic describes how to uninstall IBM Director on a system that is running
Windows.
You can uninstall IBM Director either by using the Windows Add/Remove
Programs feature or from a command-line prompt. You can use both of these
methods to uninstall IBM Director Server, IBM Director Console, IBM Director Core
Services, or IBM Director Agent.
You must uninstall any separately installed IBM Director extensions before
uninstalling IBM Director Server, IBM Director Console, or IBM Director Agent.
Uninstalling IBM Director using the Windows Add/Remove
Programs feature
This topic describes how to uninstall IBM Director using the Windows
Add/Remove Programs feature.
Complete the following steps to uninstall IBM Director:
1. Shut down all applications.
2. Click Start → Settings → Control Panel. The Control Panel window opens.
3. Double-click Add/Remove Programs. The Add/Remove Programs window
opens.
4. Click the IBM Director software component that you want to remove; then,
click Remove.
5. Follow the instructions on the screen.
Chapter 4. Uninstalling IBM Director 325

Uninstalling IBM Director using the dirunins command
This topic describes how to uninstall IBM Director using the dirunins command.
From a command-line prompt, type the following command and press Enter:
dirunins directorcomponent option
The following table contains information about the possible values for option and
directorcomponent.
Table 120. dirunins parameters
Variable Parameter What it does
option debug Logs all messages that are sent by the Windows
Installer log engine, including status and information
messages
deletedata Deletes all configuration data. This parameter must be
used in conjunction with silent or unattended
parameter. For example, dirunins agent unattended
deletedata performs an unattended uninstallation of
IBM Director Agent and deletes IBM Director
configuration data.
log=logfilename Specifies the fully qualified name of an alternative
installation log file
noreboot Suppresses any required restart
silent Suppresses all output to the screen
unattended Shows the progress of the uninstallation but does not
require any user input
verbose Enables verbose logging
directorcomponent server Uninstalls IBM Director Server and any installed IBM
Director extensions
console Uninstalls IBM Director Console and any installed
IBM Director extensions
agent Uninstalls Level 2: IBM Director Agent
coresvcs Uninstalls Level 1: IBM Director Core Services
Note: If you are uninstalling IBM Director Agent or IBM Director Core Services,
you must uninstall any installed IBM Director extensions first.
Uninstalling IBM Director Agent on AIX
This topic describes how to uninstall IBM Director Agent on AIX.
To uninstall IBM Director Agent on a system running AIX, perform the following
steps:
1. To stop IBM Director Agent, from a command prompt, type the following
command and press Enter:
/opt/ibm/director/bin/twgstop
2. Type the following command and press Enter:
installp -u -X IBM.Director.Agent.IBMDirA
3. Type the following command and press Enter:
installp -u -X IBM.Director.DirectorCimCore
326 IBM Director Installation and Configuration Guide

Uninstalling IBM Director Agent on NetWare
This topic describes how to install IBM Director Agent on NetWare.
Complete the following steps to uninstall IBM Director Agent on NetWare:
1. From the server running NetWare, change to the console screen.
2. Type the following command and press Enter:
unload twgipc
3. Type the following command and press Enter:
nwconfig
The Configuration Options screen opens.
4. Select NCF Files Options.
5. Select Edit AUTOEXEC.NCF file.
6. Remove the following lines from the autoexec.ncf file:
:********IBM Director Agent********
Search add sys:IBM\Director
load twgipc
:********IBM Director agent********
7. Save the modified autoexec.ncf file.
8. Shut down and restart the server running NetWare.
9. From a Windows workstation running the NetWare Client for Windows, map a
drive to the SYS volume and delete the IBM\Director directory.
Uninstalling IBM Director Core Services before migrating to an earlier
version of IBM Director
This topic discusses how to uninstall IBM Director Core Services and why this
procedure is important when changing your installation to a pre-5.10 version of
IBM Director.
When uninstalling IBM Director 5.10 in order to install an earlier version of IBM
Director, users must be sure to uninstall all instances of IBM Director Core
Services. On managed systems running Microsoft Windows, versions of IBM
Director previous to 5.10 cannot detect whether or not IBM Director Core Services
is installed, and will not warn users that this component of IBM Director 5.10 is
present.
Note: Installing pre-5.10 versions of IBM Director, including IBM Director Agent,
IBM Director Console, and IBM Director Server, on a system on which IBM
Director Core Services is installed has the potential to cause problems.
Before installing any pre-5.10 component of IBM Director, use the following
procedure to uninstall IBM Director Core Services.
At a command prompt, type one of the following commands and press Enter.
Operating System Command
Linux /opt/ibm/director/bin/diruninstall
Microsoft Windows dirunins coresvcs unattended deletedata
IBM Director Core Services is uninstalled.
Chapter 4. Uninstalling IBM Director 327

328 IBM Director Installation and Configuration Guide

Chapter 5. Modifying an IBM Director installation
Enabling the Wake on LAN feature
If your server supports the Wake on LAN feature, you can enable it after IBM
Director is installed. See your server documentation to determine whether or not
your server supports this feature.
Enabling the Wake on LAN feature for Linux or AIX
This topic describes how to enable the Wake on LAN feature for IBM Director
Agent.
Complete the following steps to enable Wake on LAN for IBM Director Agent:
1. To stop IBM Director Agent, from a command prompt, type the following
command and press Enter:
/opt/ibm/director/bin/twgstop
2. Open an ASCII text editor and edit the ServiceNodeLocal.properties file. This
file is in the /opt/ibm/director/data directory.
3. Modify the value of ipc.wakeonlan to read as follows:
ipc.wakeonlan=1
4. Save and close the ServiceNodeLocal.properties file.
5. To start IBM Director Agent, type the following command and press Enter:
/opt/ibm/director/bin/twgstart
Enabling the Wake on LAN feature on Windows
This topic describes how to enable Wake on LAN on a managed system running
windows.
Note: To determine whether your server supports the Wake on LAN feature, see
your server documentation.
Complete the following steps to enable Wake on LAN:
1. Click Start Settings > Control Panel. The ″Control Panel″ window opens.
2. Double-click Add/Remove Programs. The ″Add/Remove Programs″ window
opens.
3. Click the IBM Director software component that you want to modify; then,
click Change. The InstallShield wizard starts, and the ″Welcome to the
InstallShield Wizard″ window opens.
4. Click Next. The ″Program Maintenance″ window opens.
© Copyright IBM Corp. 1999, 2005 329

5. Click Modify; then, click Next.
6. Continue through the wizard until you reach the ″Network driver
configuration″ window.
7. Select the Enable Wake on LAN check box.
8. Complete the wizard.
Configuring the database on the management server
This topic describes how to configure the database after IBM Director Server is
installed.
Configuring the database on Linux or AIX
This section describes how to configure your database application for use with
IBM Director after IBM Director Server is installed. These instructions are
applicable for all Linux platforms and AIX.
Configuring the database on a Linux or AIX management server
using the cfgdb command
This topic describes how to configure the database after IBM Director Server is
installed using the cfgdb command.
Note: The cfgdb command must be used in a graphical environment. To configure
the database from a command line, see “Configuring the database on a
Linux or AIX management server using the cfgdbcmd command” on page
331.
Complete the following steps to install and configure a database after you have
installed IBM Director Server:
1. To stop IBM Director Server, from a command prompt, type the following
command and press Enter:
Figure 60. ″Program Maintenance″ window
330 IBM Director Installation and Configuration Guide

/opt/ibm/director/bin/twgstop
2. Type the following command and press Enter:
/opt/ibm/director/bin/cfgdb
3. Follow the instructions on the screen.
4. To restart IBM Director Server, type following command and press Enter:
/opt/ibm/director/bin/twgstart
Configuring the database on a Linux or AIX management server
using the cfgdbcmd command
This topic describes how to configure the database from a command line after IBM
Director Server is installed.
Complete the following steps to install and configure a database from the
command line after you have installed IBM Director Server:
1. Open the cfgdbcmd.rsp file in an ASCII text editor and modify the settings. The
cfgdbcmd.rsp file is located in the /opt/ibm/director/data directory and is
fully commented.
2. Save the modified response file with a new file name.
3. To stop IBM Director Server, from a command prompt, type the following
command and press Enter:
/opt/ibm/director/bin/twgstop
4. Type the following command and press Enter:
cfgdbcmd -rspfile response.rsp
where response.rsp is the name of the response file as saved in step 2.
5. When the configuration is completed, restart IBM Director Server. Type
following command and press Enter:
/opt/ibm/director/bin/twgstart
Configuring the database on a Windows management server
This topic describes how to configure the database after IBM Director Server is
installed.
Complete the following steps to configure a database after you have installed IBM
Director Server:
1. Stop IBM Director Server. From a command prompt, type the following
command and press Enter:
net stop twgipc
2. Type the following command and press Enter:
cfgdb
The “IBM Director database configuration” window opens.
3. Follow the instructions on the screen.
Note: For the Database Configuration window to accept Windows color settings
after installation, you must first go to the Accessibility Preferences tab in
the Console Preferences window, and select the Windows option in the
Colors field.
Enabling SNMP access and trap forwarding for Linux
This topic describes how to enable SNMP access and trap forwarding for Linux.
Chapter 5. Modifying an IBM Director installation 331

To enable SNMP access and trap forwarding on Linux, you must be running one of
the following operating systems:
v i5/OS, Version 5 Release 3
v Red Hat Linux, version 3.0
v Red Hat Linux, version 4.0
v SUSE LINUX Enterprise Server 8 for x86
v SUSE LINUX Enterprise Server 9 for x86
v Red Hat Enterprise Linux AS, version 4.0, for IBM System z9, zSeries and S/390
v SUSE LINUX Enterprise Server 9 for IBM System z9, zSeries and S/390
Note: IBM Director 5.10 supports SNMP access and trap forwarding using
NetSNMP version 5.2.1 (all releases). You must remove all NetSNMP
libraries older than version 5.2.1 from your system before completing the
steps in this task. Ensure that no net-snmp, net-snmp-libs or net-snmp-devel
rpms older than version 5.2.1 remain on your system.
Complete the following steps to enable SNMP access and trap forwarding for
managed systems running Linux:
1. Download the net-snmp-5.2.1.tar.gz file from the Net-SNMP Web site at
http://www.net-snmp.org/download.html.
Note: Net-SNMP is not supported on VMware console operating systems.
2. Build and install Net-SNMP. Refer to the INSTALL and README files included
in the net-snmp-5.2.1.tar.gz package for instructions. If you are not running an
AMD64 or EM64T distribution, go to step 4.
3. (AMD64 and EM64T distributions only) SNMP functionality on these systems
requires 32-bit versions of the NetSNMP libraries for use by the IBM Director
SNMP SubAgent. The NetSNMP Master Agent can use the native 64-bit
libraries.
You can request the 32-bit libraries from your Linux distribution provider or
compile them yourself. If you compile the libraries yourself, it is strongly
recommended that you run the configuration using the -–without-rpm
command option.
Compile the libraries in one of the following ways:
v Using 32-bit compiler flags (not tested with NetSNMP).
v Compile on a 32-bit version of the Linux distribution and then move the
libraries to your 64-bit system.Copy the 32-bit libraries to the ibm/director/cimom/lib directory or to another
location on your system library path.
Important: If you are using a 64-bit installation of the NetSNMP Master Agent,
ensure that the 32-bit libraries do not interfere with the 64-bit
libraries used by the Master Agent. You must only include one
library in the library search path.
4. Configure the Net-SNMP agent using one of the following methods:
Note: The Agent Operating mode must be set to AgentX Master Agent.
v Use the snmpconf utility to change the Agent Operating mode to AgentX
Master Agent and to configure Net-SNMP for access groups and trap
destinations.
332 IBM Director Installation and Configuration Guide

v To configure Net-SNMP manually, open the snmpd.conf file in an ASCII text
editor and locate the following section of text:
# master: Should the agent operate as a master agent or not.
# Currently, the only supported master agent type for this token
# is "agentx".
#
# arguments: (on|yes|agentx|all|off|no)
master agentx
Uncomment the master agentx string by removing the hash mark (#) if
necessary and save the modified file.5. Ensure that the LD_LIBRARY_PATH environment variables in the dacimlist
and dasnmp start-up scripts include the following path information:
v /usr/local/lib
v /opt/ibm/director/lib
v /opt/ibm/director/cimom/lib
You can configure this information in either of the following ways:
v Create a filename.sh file in the /etc/profile.d/ directory, where filename is a
name of your choice. Include the following text in the file (all on one line):
export LD_LIBRARY_PATH=$LD_LIBRARY_PATH:/usr/local/lib:/opt/ibm/director/lib:
/opt/ibm/director/cimom/lib
v Create a filename.conf file in the /etc/ld.so.conf.d/ directory, where filename is
a name of your choice. Include the following text in the file
/usr/local/lib
/opt/ibm/director/lib
/opt/ibm/director/cimom/lib
6. Ensure that the SNMPCONFPATH environment variables in the dacimlist and
dasnmp start-up scripts include the path for the location of the snmpd.conf file.
You can configure this variable by creating a filename.conf file in the
/etc/profile.d/ directory, where filename is a name of your choice. Include the
following text in the file:
export SNMPCONFPATH=$SNMPCONFPATH:/path
where path is the path for the snmpd.conf file.
Chapter 5. Modifying an IBM Director installation 333

334 IBM Director Installation and Configuration Guide

Chapter 6. Troubleshooting
Use this section to troubleshoot and resolve problems with IBM Director.
Installation troubleshooting
Use this section to troubleshoot and resolve problems with IBM Director
installation.
For additional troubleshooting information, see the IBM Director Release Notes.
Could not detect rpm supported Linux distribution
This problem only affects systems running Linux.
Problem
When installing IBM Director Core Services, IBM Director Agent, or IBM Director
Server, the following error message might be generated:
Could not detect rpm supported Linux distribution
where rpm is one of the following RPMs:
v DirectorCimCore
v xSeriesCoreServices-level1
v pSeriesCoreServices-level1
Investigation
This message occurs if you install IBM Director components on a Linux
distribution that is not supported by the DirectorCimCore, xSeriesCoreServices-level1, and pSeriesCoreServices-level1 RPMs.
To correct the problem, install a supported Linux distribution. See IBM Director
Installation and Configuration Guide.
depmod: *** Unresolved symbols in /lib/modules/2.4.7-10smp/kernel/drivers/char/
This problem only affects systems running Red Hat Linux.
Problem
If you install the IBM SMbus or LM78 device driver, a warning message similar to
the following might be recorded in the Bootmsg.log file:
depmod: *** Unresolved symbols in /lib/modules/2.4.7-10smp/kernel/drivers/
char/driver.o
where driver is either ibmsmb or ibmlm78.
© Copyright IBM Corp. 1999, 2005 335

Investigation
This warning message is generated if the Red Hat Linux kernel was compiled with
versioned symbols enabled. Ignore this message; the device driver loaded and will
operate properly.
Error 1722 is displayed
This problem affects IBM Director Server and IBM Director Console. It occurs only
on systems running Windows.
Problem
When you install IBM Director, the following message is displayed:
Error 1722. There is a problem with this Windows Installer package. A
program run as part of the setup did not finish as expected. Contact your
support personnel or package vendor.
Investigation
The monitor for a system running IBM Director Server or IBM Director Console
must support at least 256 colors.
To correct this problem, increase the display color palette to more than 256 colors,
uninstall the partial installation, and reinstall IBM Director Server.
Installing IBM Director 4.2x over IBM Director 5.10
This problem affects IBM Virtualization Engine Systems Edition for iSeries
installations.
Problem
After you have installed IBM Director 5.10 (5722-DR1 or 5722-DA1) on a system as
part of IBM Virtualization Engine Systems Edition for iSeries, you must completely
uninstall IBM Director 5.10 before installing the previous version, IBM Director
Multiplatform 4.2x (5733-VE1 option 30 or 39).
If attempted, IBM Director 5.10 is disabled and IBM Director Multiplatform 4.2x
does not work (twgstart will fail).
Investigation
To correct this problem, complete the following steps:
1. Uninstall IBM Director Multiplatform 4.2x (5733-VE1 option 30 or 39).
2. Complete the manual cleanup described in the Virtualization Engine
Information Center > eServer Software Information Center at:
http://publib.boulder.ibm.com/infocenter/eserver/v1r1/en_US/
info/veicinfo/eicarmanualuninstall.htm#eicarmanualuninstall.
3. Install only one of the following releases:
v IBM Director 5.10 (5722-DR1 or 5722-DA1)
v IBM Director Multiplatform 4.2x (5733-VE1 option 30 or 39)
336 IBM Director Installation and Configuration Guide

Installation package cannot be installed by Windows Installer
service
This problem affects systems with a version of Windows Installer (MSI) that is
earlier than version 3.0. This problem occurs only on systems running Windows
2000, Windows XP with no service packs, or Windows XP with Service Pack 1.
Problem
During a Windows Installer administrative installation, the following message is
displayed:
This installation package cannot be installed by
Windows Installer service. You must install a Windows
service pack that contains a newer version of the
Windows Installer service.
Investigation
To correct this problem and perform Windows Installer administrative installation,
complete the applicable procedure.
v If you are installing a Web-downloadable extension, type the following
command:
filename.exe -a admin
where filename is the name of the Web-downloadable extension installation file.
v If you are installing IBM Director Server, IBM Director Console, IBM Director
Agent, or IBM Director Core Services from the IBM Director CD, complete the
following steps:
1. On the IBM Director CD, change to the directory for the IBM Director
component that you want to install.
2. Type one of the following commands:
filename.exe -a admin
where filename is the name of the IBM Director component installation file.
Note: If the system that is running the administrative installation has a version of
MSI that is earlier than version 3.0, these commands update MSI on that
system. After MSI is updated and the administrative installation is
completed, a message is displayed that you must reboot the system. Be sure
to do so.
System Availability reports an unplanned outage when a
system is restarted
This problem only affects systems running Red Hat Enterprise Linux AS, versions
2.1 and 3.0.
Problem
System Availability reports an unplanned outage when a Level-2 managed system
is restarted.
Chapter 6. Troubleshooting 337

Investigation
To avoid this problem, after installing System Availability, be sure to stop and
restart IBM Director Agent before you restart the managed system.
Windows blue screen IRQL_NOT_LESS_OR_EQUAL
This problem affects IBM Director Agent. It occurs only on systems running
Windows Server 2003.
Problem
During installation of IBM Director Agent, Windows might display the following
blue screen trap:
IRQL_NOT_LESS_OR_EQUAL
Investigation
This problem is solved by a Microsoft update. See Microsoft Knowledge Base
Article 825236 for more information.
Contacting customer support
If you need help, service, or technical assistance or just want more information
about IBM products, you will find a wide variety of sources available from IBM to
assist you. This section contains information about where to go for additional
information about IBM and IBM products, what to do if you experience a problem
with your xSeries or IntelliStation system, and whom to call for service, if it is
necessary.
Before you call
Before you call, make sure that you have taken these steps to try to solve the
problem yourself:
v Check all cables to make sure that they are connected.
v Check the power switches to make sure that the system is turned on.
v Use the troubleshooting information in your system documentation, and use the
diagnostic tools that come with your system. Information about diagnostic tools
is in the Hardware Maintenance Manual and Troubleshooting Guide on the IBM
xSeries Documentation CD or in the IntelliStation Hardware Maintenance Manual at
the IBM Support Web site.
v Go to the IBM Support Web site at www.ibm.com/pc/support/ to check for
technical information, hints, tips, and new device drivers or to submit a request
for information.
You can solve many problems without outside assistance by following the
troubleshooting procedures that IBM provides in the online help or in the
publications that are provided with your system and software. The information
that comes with your system also describes the diagnostic tests that you can
perform. Most xSeries and IntelliStation systems, operating systems, and programs
come with information that contains troubleshooting procedures and explanations
of error messages and error codes. If you suspect a software problem, see the
information for the operating system or program.
338 IBM Director Installation and Configuration Guide

Using the documentation
Information about your IBM xSeries or IntelliStation system and preinstalled
software, if any, is available in the documentation that is included with your
system. That documentation includes printed books, online books, readme files,
and help files. See the troubleshooting information in your system documentation
for instructions for using the diagnostic programs. The troubleshooting information
or the diagnostic programs might tell you that you need additional or updated
device drivers or other software. IBM maintains pages on the World Wide Web
where you can get the latest technical information and download device drivers
and updates. To access these pages, go to www.ibm.com/pc/support/ and follow
the instructions. Also, you can order publications through the IBM Publications
Ordering System at
www.elink.ibmlink.ibm.com/public/applications/publications/cgibin/pbi.cgi.
Getting help and information from the World Wide Web
On the World Wide Web, the IBM Web site has up-to-date information about IBM
xSeries and IntelliStation products, services, and support. The address for IBM
xSeries information is http://www.ibm.com/eserver/xseries/. The address for IBM
IntelliStation information is http://www.ibm.com/pc/intellistation/.
You can find service information for your IBM products, including supported
options, at http://www.ibm.com/pc/support/.
Software service and support
Through IBM Support Line, you can get telephone assistance, for a fee, with usage,
configuration, and software problems with xSeries servers, IntelliStation
workstations, and appliances. For information about which products are supported
by Support Line in your country or region, go to
http://www.ibm.com/services/sl/products/.
For more information about Support Line and other IBM services, go to
http://www.ibm.com/services/, or go to http://www.ibm.com/planetwide/ for
support telephone numbers. In the U.S. and Canada, call 1-800-IBM-SERV
(1-800-426-7378).
Chapter 6. Troubleshooting 339

340 IBM Director Installation and Configuration Guide

Appendix A. Worksheets
This topic contains worksheets you can use to plan your IBM Director
environment.
Worksheet: Environment
This topic contains a worksheet that you can use to record information about the
environment that you want to manage with IBM Director.
Hardware to be managed with IBM Director
Value Description Answer
Desktop and mobile
computers
Descriptions of supported hardware, network protocols,
ports, and operating systems for management with IBM
Director are available in the following topics:
v “Hardware requirements” on page 81
v “Network requirements” on page 84
v “Supported operating systems” on page 86
Yes h No h
IBM eServer BladeCenter
units
Yes h No h
iSeries systems Yes h No h
System p5 and pSeries
systems
Yes h No h
xSeries systems Yes h No h
ServeRAID controllers on
xSeries systems
Yes h No h
Service processors on
xSeries systems
Yes h No h
SNMP devices Yes h No h
SMI-S storage devices Yes h No h
System z9 and zSeries
systems
Yes h No h
Local and remote subnets (discovery parameters)
Value Description Answer
Unicast Addresses for Level-0
discovery
IP addresses or IP-address ranges for
unicast discovery of Level-0
(″Agentless″) managed systems.
___.___.___.___ - ___.___.___.___
___.___.___.___ - ___.___.___.___
___.___.___.___ - ___.___.___.___
___.___.___.___ - ___.___.___.___
___.___.___.___ - ___.___.___.___
___.___.___.___ - ___.___.___.___
___.___.___.___ - ___.___.___.___
___.___.___.___ - ___.___.___.___
___.___.___.___ - ___.___.___.___
___.___.___.___ - ___.___.___.___
Directory agent server for Level-1
discovery
Service Location Protocol (SLP)
directory agent server for discovery
of Level-1 managed systems.
SLP scope for Level-1 discovery Service Location Protocol (SLP) scope
for discovery of Level-1 managed
systems.
© Copyright IBM Corp. 1999, 2005 341

Value Description Answer
Unicast Addresses for Level-2
discovery
IP addresses or IP-address ranges for
unicast discovery of Level-2 managed
systems.
___.___.___.___ - ___.___.___.___
___.___.___.___ - ___.___.___.___
___.___.___.___ - ___.___.___.___
___.___.___.___ - ___.___.___.___
___.___.___.___ - ___.___.___.___
___.___.___.___ - ___.___.___.___
___.___.___.___ - ___.___.___.___
___.___.___.___ - ___.___.___.___
___.___.___.___ - ___.___.___.___
___.___.___.___ - ___.___.___.___
Subnets for Level-2 discovery TCP/IP addresses and subnet masks
for broadcast and relay discovery of
Level-2 managed systems.
___.___.___.___ / ___.___.___.___
___.___.___.___ / ___.___.___.___
___.___.___.___ / ___.___.___.___
___.___.___.___ / ___.___.___.___
___.___.___.___ / ___.___.___.___
___.___.___.___ / ___.___.___.___
___.___.___.___ / ___.___.___.___
___.___.___.___ / ___.___.___.___
___.___.___.___ / ___.___.___.___
___.___.___.___ / ___.___.___.___
Multicast group for Level-2 discovery Multicast group TCP/IP address and
time-to-live value for multicast
discovery of Level-2 managed
systems.
multicast group: ___.___.___.___
time to live: _______
Subnets for discovery of SNMP
devices
TCP/IP addresses and subnet masks
for discovery of simple network
management protocol (SNMP)
devices.
___.___.___.___ / ___.___.___.___
___.___.___.___ / ___.___.___.___
___.___.___.___ / ___.___.___.___
___.___.___.___ / ___.___.___.___
___.___.___.___ / ___.___.___.___
___.___.___.___ / ___.___.___.___
___.___.___.___ / ___.___.___.___
___.___.___.___ / ___.___.___.___
___.___.___.___ / ___.___.___.___
___.___.___.___ / ___.___.___.___
Community names for discovery of
SNMP devices
Community names for discovery of
simple network management protocol
(SNMP) devices.
_________________________________
_________________________________
_________________________________
_________________________________
_________________________________
_________________________________
_________________________________
_________________________________
SLP profiles for discovery of SMI-S
storage devices
Service Location Protocol (SLP)
profiles for discovery of SMI-S
devices.
_________________________________
_________________________________
_________________________________
_________________________________
_________________________________
_________________________________
_________________________________
_________________________________
Worksheet: Capacity Manager space requirements
This topic contains a worksheet that you can use to estimate the disk space
required by Capacity Manager.
342 IBM Director Installation and Configuration Guide

Use the following worksheet to estimate the disk space required for Capacity
Manager data.
a = Number of managed systems
Real-time slt data collection
b = Data-collection frequency (in minutes)
c = Number of days to keep on the server
d = KB required: (a × c × 42.19) ÷ b
Trend slt data collection
e = Data-collection frequency (in minutes)
f = Number of days to keep on the server
g = KB required: (a × f × 42.19) ÷ e
Report generation
h = Number of daily reports generated
i = Number of hourly reports generated
j = KB required: (a × h × 16.77) + (a × i × 71.73)
Total space required
k = KB required: d + g + j
Worksheet: Database planning
This topic contains a worksheet that you can use to help plan the database for IBM
Director Server.
AIX i5/OS Linux Windows
Apache Derby local - local local
IBM DB2 local or remote local local or remote local or remote
Microsoft Data
Engine (MSDE)
2000 (aka
Microsoft SQL
Server 2000
Desktop Engine)
- - - local
Microsoft SQL
Server 2000
- - remote local or remote
Oracle Server local or remote - local or remote local or remote
PostgreSQL - - local or remote -
Selected database application
Server on which database will be installed
Server on which IBM Director will be
installed
Worksheet: Apache Derby database configuration
This topic contains a worksheet that you can use to gather required information for
configuring the database for IBM Director Server.
Appendix A. Worksheets 343

This information may be used to configure the database using the wizard during
installation, or to set options in a database-configuration response file for use with
the cfgdbcmd command.
Database configuration
attribute
Value Description
DbmsApplication Apache Derby
The selected database
application.
Worksheet: DB2 database configuration
This topic contains a worksheet that you can use to gather required information for
configuring the database for IBM Director Server.
This information may be used to configure the database using the wizard during
installation, or to set options in a database-configuration response file for use with
the cfgdbcmd command.
Database configuration
attribute
Value Description
DbmsApplication DB2
The selected database
application.
DbmsTcpIpListenerPort 50000 The TCP/IP listener port for
the database.
DbmsServerName The server name on which
the database is located.
DbmsDatabaseName The database name.
DbmsUserId The user ID for the database.
DbmsPassword The password for the
database.
Worksheet: Oracle database configuration
This topic contains a worksheet that you can use to gather required information for
configuring the database for IBM Director Server.
This information may be used to configure the database using the wizard during
installation, or to set options in a database-configuration response file for use with
the cfgdbcmd command.
Database configuration
attribute
Value Description
DbmsApplication Oracle
The selected database
application.
DbmsTcpIpListenerPort 1521 The TCP/IP listener port for
the database.
DbmsServerName The server name on which
the database is located.
DbmsDatabaseName The database name.
DbmsUserId The user ID for the database.
344 IBM Director Installation and Configuration Guide

Database configuration
attribute
Value Description
DbmsPassword The password for the
database.
DbmsAdminId The administrator user ID for
the database.
DbmsAdminPassword The administrator password
for the database.
DbmsTableName IBM_DIRECTOR_DATA_TS The table space name for the
database.
DbmsTableFile IBM_DIRECTOR_DATA_DF The table space datafile for
the database.
DbmsTableFileSize 500 The table space size.
DbmsTempTableName IBM_DIRECTOR_TEMP_TS The temporary table space
name for the database.
DbmsTempTableFile IBM_DIRECTOR_TEMP_DF The temporary table space
datafile for the database.
DbmsTempTableFileSize 50 The temporary table space
size.
Worksheet: PostgreSQL database configuration
This topic contains a worksheet that you can use to gather required information for
configuring the database for IBM Director Server.
This information may be used to configure the database using the wizard during
installation, or to set options in a database-configuration response file for use with
the cfgdbcmd command.
Database configuration
attribute
Value Description
DbmsApplication PostgreSQL
The selected database
application.
DbmsTcpIpListenerPort 5432 The TCP/IP listener port for
the database.
DbmsServerName The server name on which
the database is located.
DbmsDatabaseName The database name.
DbmsUserId The user ID for the database.
DbmsPassword The password for the
database.
Worksheet: Microsoft SQL Server database configuration
This topic contains a worksheet that you can use to gather required information for
configuring the database for IBM Director Server.
This information may be used to configure the database using the wizard during
installation, or to set options in a database-configuration response file for use with
the cfgdbcmd command.
Appendix A. Worksheets 345

Database configuration
attribute
Value Description
DbmsApplication Microsoft SQL Server
The selected database
application.
DbmsTcpIpListenerPort 1433 The TCP/IP listener port for
the database.
DbmsServerName The server name on which
the database is located.
DbmsDatabaseName The database name.
DbmsUserId The user ID for the database.
DbmsPassword The password for the
database.
Worksheet: Installing IBM Director Server
This topic contains a worksheet that you can use to record the options you will
select when you install IBM Director Server.
Optional features BladeCenter
Management
Yes h No h
Capacity Manager Yes h No h
Rack Manager Yes h No h
Remote Control
Agent
Yes h No h
Software Distribution
(Premium Edition)
Yes h No h
z/VM Center Yes h No h
Installation location
Service account
information
Computer name:
User name:
Password:
Encryption Enable encryption Yes h No h
Encryption algorithm: Advanced Encryption Setting h
Data Encryption Setting h
Triple DES h
Software-distribution
packages
Location for packages created by IBM Director Server:
Location for packages received by IBM Director Server:
Network settings Enable all NICs Yes h No h
Network timeout:
Enable Wake on LAN Yes h No h
Remote control
options
Require user
authorization for
system access
Yes h No h
Disable screen saver Yes h No h
Disable background
wallpaper
Yes h No h
346 IBM Director Installation and Configuration Guide

Appendix B. Notices
This information was developed for products and services offered in the U.S.A.
IBM may not offer the products, services, or features discussed in this document in
other countries. Consult your local IBM representative for information on the
products and services currently available in your area. Any reference to an IBM
product, program, or service is not intended to state or imply that only that IBM
product, program, or service may be used. Any functionally equivalent product,
program, or service that does not infringe any IBM intellectual property right may
be used instead. However, it is the user’s responsibility to evaluate and verify the
operation of any non-IBM product, program, or service.
IBM may have patents or pending patent applications covering subject matter
described in this document. The furnishing of this document does not grant you
any license to these patents. You can send license inquiries, in writing, to:
IBM Director of Licensing
IBM Corporation
North Castle Drive
Armonk, NY 10504-1785
U.S.A.
For license inquiries regarding double-byte (DBCS) information, contact the IBM
Intellectual Property Department in your country or send inquiries, in writing, to:
IBM World Trade Asia Corporation
Licensing
2-31 Roppongi 3-chome, Minato-ku
Tokyo 106-0032, Japan
The following paragraph does not apply to the United Kingdom or any other
country where such provisions are inconsistent with local law:
INTERNATIONAL BUSINESS MACHINES CORPORATION PROVIDES THIS
PUBLICATION ″AS IS″ WITHOUT WARRANTY OF ANY KIND, EITHER
EXPRESS OR IMPLIED, INCLUDING, BUT NOT LIMITED TO, THE IMPLIED
WARRANTIES OF NON-INFRINGEMENT, MERCHANTABILITY OR FITNESS
FOR A PARTICULAR PURPOSE. Some states do not allow disclaimer of express or
implied warranties in certain transactions, therefore, this statement may not apply
to you.
This information could include technical inaccuracies or typographical errors.
Changes are periodically made to the information herein; these changes will be
incorporated in new editions of the publication. IBM may make improvements
and/or changes in the product(s) and/or the program(s) described in this
publication at any time without notice.
Any references in this information to non-IBM Web sites are provided for
convenience only and do not in any manner serve as an endorsement of those Web
sites. The materials at those Web sites are not part of the materials for this IBM
product and use of those Web sites is at your own risk.
© Copyright IBM Corp. 1999, 2005 347
IBM may use or distribute any of the information you supply in any way it
believes appropriate without incurring any obligation to you.
Licensees of this program who wish to have information about it for the purpose
of enabling: (i) the exchange of information between independently created
programs and other programs (including this one) and (ii) the mutual use of the
information which has been exchanged, should contact:
IBM Corporation
MW9A/050
5600 Cottle Road
San Jose, CA 95193
U.S.A.
Such information may be available, subject to appropriate terms and conditions,
including in some cases, payment of a fee.
The licensed program described in this document and all licensed material
available for it are provided by IBM under terms of the IBM Customer Agreement,
IBM International Program License Agreement or any equivalent agreement
between us.
Any performance data contained herein was determined in a controlled
environment. Therefore, the results obtained in other operating environments may
vary significantly. Some measurements may have been made on development-level
systems and there is no guarantee that these measurements will be the same on
generally available systems. Furthermore, some measurements may have been
estimated through extrapolation. Actual results may vary. Users of this document
should verify the applicable data for their specific environment.
Information concerning non-IBM products was obtained from the suppliers of
those products, their published announcements or other publicly available sources.
IBM has not tested those products and cannot confirm the accuracy of
performance, compatibility or any other claims related to non-IBM products.
Questions on the capabilities of non-IBM products should be addressed to the
suppliers of those products.
This information contains examples of data and reports used in daily business
operations. To illustrate them as completely as possible, the examples include the
names of individuals, companies, brands, and products. All of these names are
fictitious and any similarity to the names and addresses used by an actual business
enterprise is entirely coincidental.
If you are viewing this information softcopy, the photographs and color
illustrations may not appear.
Trademarks
The following terms are trademarks of International Business Machines
Corporation in the United States, other countries, or both:
AIX
AIX 5L
Alert on LAN
Asset ID
348 IBM Director Installation and Configuration Guide

BladeCenter
DB2
DB2 Universal Database
DirMaint
Electronic Service Agent
Enterprise Storage Server
eServer
eServer logo
FlashCopy
HiperSockets
i5/OS
IBM
IBM logo
ibm.com
IntelliStation
iSeries
Netfinity
NetServer
NetView
OS/400
POWER
Predictive Failure Analysis
pSeries
RACF
Redbooks
ServeProven
SurePOS
System p5
System z9
Tivoli
Tivoli Enterprise
Tivoli Enterprise Console
Virtualization Engine
Wake on LAN
xSeries
z/VM
zSeries
Intel and Pentium are trademarks of Intel Corporation in the United States, other
countries, or both.
Java and all Java-based trademarks and logos are trademarks or registered
trademarks of Sun Microsystems, Inc. in the United States, other countries, or both.
Linux is a trademark of Linus Torvalds in the United States, other countries, or
both.
Appendix B. Notices 349

Microsoft, Windows, and Windows NT are trademarks of Microsoft Corporation in
the United States, other countries, or both.
Red Hat and all Red Hat-based trademarks and logos are trademarks or registered
trademarks of Red Hat, Inc., in the United States and other countries.
UNIX is a registered trademark of The Open Group in the United States and other
countries.
Other company, product, or service names may be trademarks or service marks of
others.
350 IBM Director Installation and Configuration Guide

Abbreviations, Acronyms, and Glossary
Abbreviation and acronym list
This topic lists abbreviations and acronyms used
in the IBM Director documentation.
Table 121. Abbreviations and acronyms used in IBM
Director documentation
Abbreviation or
acronym Definition
AES advanced encryption standard
APAR authorized program analysis
report
ASF Alert Standard Format
ASM Advanced System
Management
ASM PCI Adapter Advanced System
Management PCI Adapter
BIOS basic input/output system
CEC Central Electronics Complex
CIM Common Information Model
CIMOM Common Information Model
Object Manager
CP control program
CRC cyclic redundancy check
CSM IBM Cluster Systems
Management
CSV comma-separated value
DASD direct access storage device
DBCS double-byte character set
DES data encryption standard
DHCP Dynamic Host Configuration
Protocol
DIMM dual inline memory module
DMI Desktop Management
Interface
DMTF Distributed Management Task
Force
DNS Domain Name System
DSA Digital Signature Algorithm
EEPROM electrically erasable
programmable read-only
memory
FRU field-replaceable unit
Table 121. Abbreviations and acronyms used in IBM
Director documentation (continued)
Abbreviation or
acronym Definition
FTMI fault tolerant management
interface
FTP file transfer protocol
GB gigabyte
Gb gigabit
GMT Greenwich Mean Time
GUI graphical user interface
GUID globally unique identifier
HMC Hardware Management
Console
HTML hypertext markup language
IIS Microsoft Internet Information
Server
I/O input/output
IP Internet protocol
IPC interprocess communication
IPMI Intelligent Platform
Management Interface
IPX internetwork packet exchange
ISDN integrated services digital
network
ISMP integrated system
management processor
JVM Java Virtual Machine
JCE Java Cryptography Extension
JDBC Java Database Connectivity
JFC Java Foundation Classes
JRE Java Runtime Environment
KB kilobyte
Kb kilobit
kpbs kilobits per second
KVM keyboard/video/mouse
LAN local area network
LED light-emitting diode
LPAR logical partition
MAC media access control
© Copyright IBM Corp. 1999, 2005 351

Table 121. Abbreviations and acronyms used in IBM
Director documentation (continued)
Abbreviation or
acronym Definition
MB megabyte
Mb megabit
Mbps megabits per second
MD5 message digest 5
MDAC Microsoft Data Access Control
MHz megahertz
MIB Management Information
Base
MIF Management Information
Format
MMC Microsoft Management
Console
MPA Management Processor
Assistant
MPCLI Management Processor
Command-Line Interface
MSCS Microsoft Cluster Server
MST Microsoft software
transformation
NIC network interface card
NNTP Network News Transfer
Protocol
NTP network time protocol
NVRAM nonvolatile random access
memory
ODBC Open DataBase Connectivity
OID object ID
PCI peripheral component
interconnect
OSA Open Systems Adapter
PCI-X peripheral component
interconnect-extended
PDF Portable Document Format
PFA Predictive Failure Analysis®
POST power-on self-test
PTF program temporary fix
RAM random access memory
RDM Remote Deployment Manager
RPM (1) Red Hat Package Manager
(2) revolutions per minute
RSA Rivest-Shamir-Adleman
RXE Remote Expansion Enclosure
Table 121. Abbreviations and acronyms used in IBM
Director documentation (continued)
Abbreviation or
acronym Definition
SAS Serial Attached SCSI
SATA Serial ATA
SCSI Small Computer System
Interface
SFS shared file system
SHA Secure Hash Algorithm
SI Solution Install
SID (1) security identifier (2)
Oracle system identifier
SLP service location protocol
SLPD service location protocol
daemon
SMBIOS System Management BIOS
SMI System Management
Information
SMP symmetric multiprocessor
SMS Systems Management Server
SMTP Simple Mail Transfer Protocol
SMART Self-Monitoring, Analysis, and
Reporting Technology
SMI-S Storage Management
Initiative Specification
SNMP Simple Network Management
Protocol
SPB software package block
SQL Structured Query Language
SSH Secure Shell
SSL Secure Sockets Layer
TAP Telocator Alphanumeric
Protocol
TCP/IP Transmission Control
Protocol/Internet Protocol
TTL time to live
UDP User Datagram Protocol
UID unique ID
UIM upward integration module
UNC universal naming convention
USB Universal Serial Bus
UUID universal unique identifier
VPD vital product data
352 IBM Director Installation and Configuration Guide

Table 121. Abbreviations and acronyms used in IBM
Director documentation (continued)
Abbreviation or
acronym Definition
VMRM Virtual Machine Resource
Manager
VRM voltage regulator module
WAN wide area network
WfM Wired for Management
WINS Windows Internet Naming
Service
WMI Windows Management
Instrumentation
WQL Windows Management
Instrumentation Query
Language
XML extensible markup language
Glossary
This glossary includes terms and definitions from:
v The American National Dictionary for Information
Systems, ANSI X3.172-1990, copyright 1990 by
the American National Standards Institute
(ANSI). Copies may be purchased from the
American National Standards Institute, 1430
Broadway, New York, New York 10018.
Definitions are identified by the symbol (A)
after the definition.
v The Information Technology Vocabulary developed
by Subcommittee 1, Joint Technical Committee
1, of the International Organization for
Standardization and the International
Electrotechnical Committee (ISO/IEC
JTC1/SC1). Definitions of published parts of
this vocabulary are identified by the symbol (I)
after the definition; definitions taken from draft
international standards, committee drafts, and
working papers being developed by ISO/IEC
JTC1/SC1 are identified by the symbol (T) after
the definition, indicating that final agreement
has not yet been reached among the
participating National Bodies of SC1.
v The IBM Dictionary of Computing, New York:
McGraw-Hill, 1994.
v The IBM Glossary of Computing Terms, 1999.
To view other IBM glossary sources, see IBM
Terminology at www.ibm.com/ibm/terminology.
A
Advanced Encryption Setting (AES)
A block cipher algorithm, also known as
Rijndael, used to encrypt data transmitted
between managed systems and the
management server, which employs a key
of 128, 192, or 256 bits. AES was
developed as a replacement for DES.
Advanced System Management (ASM)
interconnect
A feature of IBM service processors that
enables users to connect up to 24 servers
to one service processor, thus eliminating
the need for multiple modems,
telephones, and LAN ports. It provides
such out-of-band management functions
as system power control,
service-processor event-log management,
firmware updates, alert notification, and
user profile configuration.
Advanced System Management (ASM)
interconnect network
A network of IBM servers created by
using the ASM interconnect feature. The
servers are connected through RS-485
ports. When servers containing integrated
system management processors (ISMPs)
and ASM processors are connected to an
ASM interconnect network, IBM Director
can manage them out-of-band.
Advanced System Management (ASM) PCI
adapter
An IBM service processor that is built into
the Netfinity 7000 M10 and 8500R servers.
It also was available as an option that
could be installed in a server that
contained an ASM processor. When an
ASM PCI adapter is used with an ASM
processor, the ASM PCI adapter acts as an
Ethernet gateway, while the ASM
processor retains control of the server.
When used as a gateway service
processor, the ASM PCI adapter can
communicate with other ASM PCI
adapters and ASM processors only.
Advanced System Management (ASM)
processor
A service processor built into the
mid-range Netfinity and early xSeries
servers. IBM Director can connect
out-of-band to an ASM processor located
on an ASM interconnect; an ASM PCI
adapter, a Remote Supervisor Adapter, or
Abbreviations, Acronyms, and Glossary 353

a Remote Supervisor II must serve as the
gateway service processor.
alert A message or other indication that
identifies a problem or an impending
problem.
alert forwarding
Alert forwarding can ensure that alerts
are sent, even if a managed system
experiences a catastrophic failure, such as
an operating-system failure.
alert-forwarding profile
A profile that specifies where remote
alerts for the service processor should be
sent.
alert standard format (ASF)
A specification created by the Distributed
Management Task Force (DMTF) that
defines remote-control and alerting
interfaces that can best serve a client
system in an environment that does not
have an operating system.
anonymous command execution
Execution of commands on a target
system as either system account (for
managed systems running Windows) or
root (for managed systems running
Linux). To restrict anonymous command
execution, disable this feature and always
require a user ID and password.
ASF See alert standard format.
ASM interconnect gateway
See gateway service processor.
association
(1) A way of displaying the members of a
group in a logical ordering. For example,
the Object Type association displays the
managed objects in a group in folders
based on their type. (2) A way to display
additional information about the members
of the group. For example, the Event
Action Plans association displays any
event action plans applied to the
managed objects in the group in an Event
Action Plan folder.
B
basic input/output system (BIOS)
The code that controls basic hardware
operations, such as interactions with
diskette drives, hard disk drives, and the
keyboard.
BIOS See Basic Input/Output System.
blade server
An IBM
BladeCenter server. A
high-throughput, two-way, Intel
Xeon-based server on a card that supports
symmetric multiprocessors {SMP}.
BladeCenter chassis
A BladeCenter unit that acts as an
enclosure. This 7-U modular chassis can
contain up to 14 blade servers. It enables
the individual blade servers to share
resources, such as the management,
switch, power, and blower modules.
bottleneck
A place in the system where contention
for a resource is affecting performance.
C
chassis
The metal frame in which various
electronic components are mounted.
chassis detect-and-deploy profile
A profile that IBM Director automatically
applies to all new BladeCenter chassis
when they are discovered. The profile
settings include management module
name, network protocols, and static IP
addresses. If Remote Deployment
Manager (RDM) is installed on the
management server, the chassis
detect-and-deploy profile also can include
deployment policies.
CIM See Common Information Model.
Common Information Model (CIM)
An implementation-neutral,
object-oriented schema for describing
network management information. The
Distributed Management Task Force
(DMTF) develops and maintains CIM
specifications.
component association
In the IBM Director Rack Manager task, a
function that can make a managed system
or device rack-mountable when the
inventory collection feature of IBM
Director does not recognize the managed
system or device. The function associates
the system or device with a predefined
component.
354 IBM Director Installation and Configuration Guide

D
Data Encryption Standard (DES)
A cryptographic algorithm designed to
encrypt and decrypt data using a private
key.
database server
The server on which the database
application and database used with IBM
Director Server are installed.
deployment policy
A policy that associates a specific bay in a
BladeCenter chassis with an RDM
noninteractive task. When a blade server
is added to or replaced in the bay, IBM
Director automatically runs the RDM task.
DES See Data Encryption Standard.
Desktop Management Interface (DMI)
A protocol-independent set of application
programming interfaces (APIs) that were
defined by the Distributed Management
Task Force (DMTF). These interfaces give
management application programs
standardized access to information about
hardware and software in a system.
Diffie-Hellman key exchange
A public, key-exchange algorithm that is
used for securely establishing a shared
secret over an insecure channel. During
Phase II negotiations, the Diffie-Hellman
group prevents someone who intercepts
your key from deducing future keys that
are based on the one they have.
digital signature algorithm (DSA)
A security protocol that uses a pair of
keys (one public and one private) and a
one-way encryption algorithm to provide
a robust way of authenticating users and
systems. If a public key can successfully
decrypt a digital signature, a user can be
sure that the signature was encrypted
using the private key.
discovery
The process of finding resources within
an enterprise, including finding the new
location of monitored resources that were
moved.
DMI See Desktop Management Interface.
E
enclosure
A unit that houses the components of a
storage subsystem, such as a control unit,
disk drives, and power source.
event An occurrence of significance to a task or
system, such as the completion or failure
of an operation. There are two types of
events: alert and resolution.
event action
The action that IBM Director takes in
response to a specific event or events.
event-action plan
A user-defined plan that determines how
IBM Director will manage certain events.
An event action plan comprises one or
more event filters and one or more
customized event actions.
event-data substitution variable
A variable that can be used to customize
event-specific text messages for certain
event actions.
event filter
A filter that specifies the event criteria for
an event action plan. Events must meet
the criteria specified in the event filter in
order to be processed by the event action
plan to which the filter is assigned.
extension
See IBM Director extension.
F
field-replaceable unit (FRU)
An assembly that is replaced in its
entirety when any one of its components
fails. In some cases, a FRU may contain
other FRUs.
file-distribution server
In the Software Distribution task, an
intermediate server that is used to
distribute a software package when the
redirected-distribution method is used.
forecast
A function that can provide a prediction
of future performance of a managed
system using past data collected on that
managed system.
FRU See field-replaceable unit.
G
gateway service processor
A service processor that relays alerts from
service processors on an Advanced
Abbreviations, Acronyms, and Glossary 355
System Management (ASM) interconnect
network to IBM Director Server.
group A logical set of managed objects. Groups
can be dynamic, static, or task-based.
GUID See Universal Unique Identifier.
I
IBM Director Agent
A component of IBM Director software.
When IBM Director Agent is installed on
a system, the system can be managed by
IBM Director. IBM Director Agent
transfers data to the management server
using several network protocols,
including TCP/IP, NetBIOS, and IPX.
IBM Director Console
A component of IBM Director software.
When installed on a system, it provides a
graphical user interface (GUI) for
accessing IBM Director Server. IBM
Director Console transfers data to and
from the management server using
TCP/IP.
IBM Director database
The database that contains the data stored
by IBM Director Server.
IBM Director environment
The complex, heterogeneous environment
managed by IBM Director. It includes
systems, BladeCenter chassis, software,
SNMP devices.
IBM Director extension
A tool that extends the functionality of
IBM Director. Some of the IBM Director
extensions are Capacity Manager,
ServeRAID Manager, Remote Deployment
Manager, Software Distribution.
IBM Director Server
The main component of IBM Director
software. When installed on the
management server, it provides basic
functions such as discovery of the
managed systems, persistent storage of
configuration and management data, an
inventory database, event listening,
security and authentication, management
console support, and administrative tasks.
IBM Director Server service
A service that runs automatically on the
management server, and provides the
server engine and application logic for
IBM Director.
IBM Director service account
The Windows operating-system account
associated with the IBM Director Server
service.
in-band communication
Communication that occurs through the
same channels as data transmissions. An
example of in-band communication is the
interprocess communication that occurs
between IBM Director Server, IBM
Director Agent, and IBM Director
Console.
integrated system management processor
(ISMP)
A service processor built into the some
xSeries servers. The successor to the
Advanced System Management (ASM)
processor, the ISMP does not support
in-band communication in systems
running NetWare. For IBM Director
Server to connect out-of-band to an ISMP,
the server containing the ISMP must be
installed on an ASM interconnect
network. A Remote Supervisor Adapter or
a Remote Supervisor Adapter II must
serve as the gateway service processor.
interprocess communication (IPC)
1) The process by which programs
communicate data to each other and
synchronize their activities. Semaphores,
signals, and internal message queues are
common methods of interprocess
communication. 2) A mechanism of an
operating system that allows processes to
communicate with each other within the
same computer or over a network. It also
is called in-band communication
inventory-software dictionary
A file that tracks the software installed on
managed systems in a network.
IPC See interprocess communication.
ISMP See integrated system management processor.
J
job A separately executable unit of work
defined by a user, and run by a computer.
356 IBM Director Installation and Configuration Guide

L
Level-0 managed system
An IBM or non-IBM server, desktop
computer, workstation, or mobile
computer, that can be managed by IBM
Director but does not have any IBM
Director software installed on it.
Level-1 managed system
An IBM or non-IBM server, desktop
computer, workstation, and mobile
computer that has IBM Director Core
Services installed. IBM Director uses IBM
Director Core Services to communicate
with and administer the Level-2 managed
system. IBM Director Core Services
includes the SLP instrumentation, the IBM
Director Agent SLP service type, and
Common Information Model (CIM).
Level-2 managed system
An IBM or non-IBM server, desktop
computer, workstation, or mobile
computer that has IBM Director Agent
installed. IBM Director Agent provides
managed systems with the full
complement of IBM Director Agent
function that is used to communicate with
and administer the Level-2 managed
system. The function of a Level-2
managed system varies depending on the
operating system and platform.
light path diagnostics
A technology that provides a lighted path
to failed or failing components to
expedite hardware repairs.
M
MAC address
See media access control (MAC) address.
managed group
A group of systems or objects managed
by IBM Director.
managed object
An item managed by IBM Director. In
IBM Director Console, a managed object
is represented by an icon that shows its
type (such as chassis, cluster, system, or
scalable system, for example).
managed object ID
A unique identifier for each managed
object. It is the key value used by IBM
Director database tables.
managed system
A system that is being controlled by a
given system management application, for
example, a system managed by IBM
Director.
management console
A system (server, desktop computer,
workstation, or mobile computer) on
which IBM Director Console is installed.
management module
The BladeCenter component that handles
system-management functions. It
configures the chassis and switch
modules, communicates with the blade
servers and all I/O modules, multiplexes
the keyboard/video/mouse (KVM), and
monitors critical information about the
chassis and blade servers.
management server
The server on which IBM Director Server
is installed.
media access control (MAC) address
In a local area network, the protocol that
determines which device has access to the
transmission medium at a given time.
N
nonvolatile random-access memory (NVRAM)
Random access memory (storage) that
retains its contents after the electrical
power to the machine is shut off.
notification
See alert.
NVRAM
See nonvolatile random-access memory.
O
out-of-band communication
Communication that occurs through a
modem or other asynchronous
connection, for example, service processor
alerts sent through a modem or over a
LAN. In an IBM Director environment,
such communication is independent of
the operating system and interprocess
communication (IPC).
P
partition
See scalable partition.
PCI See Peripheral Component Interconnect.
Abbreviations, Acronyms, and Glossary 357

PCI-X See Peripheral Component Interconnect-X.
Peripheral Component Interconnect (PCI)
A standard for connecting attached
devices to a computer.
Peripheral Component Interconnect-X (PCI-X)
An enhancement to the Peripheral
Component Interconnect (PCI)
architecture. PCI-X enhances the
Peripheral Component Interconnect (PCI)
standard by doubling the throughput
capability and providing additional
adapter-performance options while
maintaining backward compatibility with
PCI adapters.
PFA See Predictive Failure Analysis.
physical platform
An IBM Director managed object that
represents a single physical chassis or
server that has been discovered through
the use of the Service Location Protocol
(SLP).
plug-in
A software module, often written by a
third party, that adds function to an
existing program or application such as a
Web browser. See IBM Director extension.
POST See power-on self-test.
power-on self-test
A series of internal diagnostic tests
activated each time the system power is
turned on.
Predictive Failure Analysis (PFA)
A scheduled evaluation of system data
that detects and signals parametric
degradation that might lead to functional
failures.
private key
1) In secure communication, an
algorithmic pattern used to encrypt
messages that only the corresponding
public key can decrypt. The private key is
also used to decrypt messages that were
encrypted by the corresponding public
key. The private key is kept on the user’s
system and is protected by a password. 2)
The secret half of a cryptographic key
pair that is used with a public key
algorithm. Private keys are typically used
to digitally sign data and to decrypt data
that has been encrypted with the
corresponding public key.
public key
1) In secure communication, an
algorithmic pattern used to decrypt
messages that were encrypted by the
corresponding private key. A public key is
also used to encrypt messages that can be
decrypted only by the corresponding
private key. Users broadcast their public
keys to everyone with whom they must
exchange encrypted messages. 2) The
non-secret half of a cryptographic key
pair that is used with a public key
algorithm. Public keys are typically used
to verify digital signatures or decrypt
data that has been encrypted with the
corresponding private key.
R
redirected distribution
A method of software distribution that
uses a file-distribution server.
remote I/O enclosure
An IBM Director managed object that
represents an expansion enclosure of
Peripheral Component Interconnect-X
(PCI-X) slots, for example, an RXE-100
Remote Expansion Enclosure. The
enclosure consists of one or two
expansion kits.
Remote Supervisor Adapter
An IBM service processor. It is built into
some xSeries servers and available as an
optional adapter for use with others.
When used as a gateway service
processor, the Remote Supervisor Adapter
can communicate with all service
processors on the Advanced System
Management (ASM) interconnect.
resolution
The occurrence of a correction or solution
to a problem.
resource-monitor threshold
The point at which a resource monitor
generates an event.
RXE Expansion Port
The dedicated high-speed port used to
connect a remote I/O expansion unit,
such as the RXE-100 Remote Expansion
Enclosure, to a server.
358 IBM Director Installation and Configuration Guide

S
scalable node
A physical platform that has at least one
SMP Expansion Module. Additional
attributes are assigned to a physical
platform when it is a scalable node. These
additional attributes record the number of
SMP Expansion Modules, SMP Expansion
Ports, and RXE Expansion ports on the
physical chassis.
scalable object
An IBM Director managed object that is
used with Scalable Systems Manager.
Scalable objects include scalable nodes,
scalable systems, scalable partitions, and
remote I/O enclosures that are attached to
scalable nodes.
scalable partition
An IBM Director managed object that
defines the scalable nodes that can run a
single image of the operating system. A
scalable partition has a single, continuous
memory space and access to all associated
adapters. A scalable partition is the logical
equivalent of a physical platform. Scalable
partitions are associated with scalable
systems and comprise only the scalable
nodes from their associated scalable
systems.
scalable system
An IBM Director managed object that
consists of scalable nodes and the scalable
partitions that are composed of the
scalable nodes in the scalable system.
When a scalable system contains two or
more scalable nodes, the servers that they
represent must be interconnected through
their SMP Expansion Modules to make a
multinode configuration, for example, a
16-way xSeries 455 server made from four
scalable nodes.
Secure Sockets Layer (SSL)
A security protocol that provides
communication privacy. SSL enables
client/server applications to communicate
in a way that is designed to prevent
eavesdropping, tampering, and message
forgery.
Service Location Protocol (SLP)
In the Internet suite of protocols, a
protocol that identifies and uses network
hosts without having to designate a
specific network host name.
service processor
A generic term for Remote Supervisor
Adapters, Advanced System Management
processors, Advanced System
Management PCI adapters, and integrated
system management processors (ISMPs).
These hardware-based management
processors used in IBM Netfinity and
xSeries servers work with IBM Director to
provide hardware status and alert
notification.
SLP See Service Location Protocol.
SMBIOS
See systems management BIOS.
SMP Expansion Module
An IBM xSeries hardware option. It is a
single module that contains
microprocessors, disk cache, random
access memory, and three SMP Expansion
Port connections. Two SMP Expansion
Modules can fit in a chassis.
SNMP Access and Trap Forwarding
An IBM Director Agent feature that
enables SNMP to access managed-system
data. When installed on a managed
system, this feature enables SNMP-based
managers to poll the managed system and
receive its alerts. If System Health
Monitoring is installed on the managed
system also, hardware alerts can be
forwarded as SNMP traps.
SNMP device
A network device, printer, or computer
that has an SNMP device installed or
embedded.
SQL See Structured Query Language
SSL See Secure Sockets Layer.
static partition
A view-only scalable partition.
sticky key
An input method that enables the user to
press and release a series of keys
sequentially (for example, Ctrl+Alt+Del),
yet have the keys behave as if they were
pressed and released at the same time.
This method can be used for those who
require special-needs settings to make the
keyboard easier to use.
Abbreviations, Acronyms, and Glossary 359

Structured Query Language (SQL)
A standardized language for defining and
manipulating data in a relational
database.
switch module
The BladeCenter component that provides
network connectivity for the BladeCenter
chassis and blade servers. It also provides
interconnectivity between the
management module and blade servers.
system
The computer and its associated devices
and programs.
System Health Monitoring
An IBM Director Agent feature that
provides active monitoring of critical
system functions, including system
temperatures, voltages, and fan speeds. It
also handles in-band alert notification for
managed systems running Windows and
some managed systems running Linux.
system variable
A user-defined keyword and value pair
that can be used to test and track the
status of network resources. System
variables can be referred to wherever
event-data substitution is allowed.
systems management BIOS (SMBIOS)
A key requirement of the Wired for
Management (WfM) 2.0 specification.
SMBIOS extends the system BIOS to
support the retrieval of management data
required by the WfM specification. To run
IBM Director Agent, a system must
support SMBIOS, version 2.2 or later.
T
target system
A managed system on which an IBM
Director task is performed.
time to live (TTL)
A technique used by best-effort delivery
protocols to inhibit endlessly looping
packets. The packet is discarded if the
TTL counter reaches 0.
triple data encryption standard (DES)
A block cipher algorithm that can be used
to encrypt data transmitted between
managed systems and the management
server. Triple DES is a security
enhancement of DES that employs three
successive DES block operations.
TTL See time to live.
U
universal unique identifier (UUID)
A 128-bit character string guaranteed to
be globally unique and used to identify
components under management.
uptime
The time during which a system is
working without failure.
upward integration
The methods, processes and procedures
that enable lower-level
systems-management software, such as
IBM Director Agent, to work with
higher-level systems-management
software, such as Tivoli Enterprise™ or
Microsoft SMS.
upward integration module
Software that enables higher-level
systems-management software, such as
Tivoli Enterprise or Microsoft Systems
Manager Server (SMS), to interpret and
display data provided by IBM Director
Agent. This module also can provide
enhancements that start IBM Director
Agent from within the higher-level
systems-management console, as well as
collect IBM Director inventory data and
view IBM Director alerts.
UUID See universal unique identifier.
V
vital product data (VPD)
Information that uniquely defines the
system, hardware, software, and
microcode elements of a processing
system.
VPD See vital product data.
W
Wake on LAN
A technology that enables a user to
remotely turn on systems for off-hours
maintenance. A result of the Intel-IBM
Advanced Manageability Alliance and
part of the Wired for Management
Baseline Specification, users of this
technology can remotely turn on a server
and control it across the network, thus
360 IBM Director Installation and Configuration Guide

saving time on automated software
installations, upgrades, disk backups, and
virus scans.
walk An SNMP operation that is used to
discover all object instances of
management information implemented in
the SNMP agent that can be accessed by
the SNMP manager.
Windows Management Instrumentation (WMI)
An application programming interface
(API) in the Windows operating system
that enables devices and systems in a
network to be configured and managed.
WMI uses the Common Information
Model (CIM) to enable network
administrators to access and share
management information.
WMI See Windows Management Instrumentation.
WMI Query Language (WQL)
A subset of the Structured Query
Language with minor semantic changes to
support Windows Management
Instrumentation.
WQL See WMI Query Language.
Abbreviations, Acronyms, and Glossary 361

362 IBM Director Installation and Configuration Guide

Index
Aabbreviation list 351
accessibility 5
acronym list 351
administrator ID for z/VM manageability
access point 180
AIX installationIBM Director Agent 235
modifyingWake on LAN, enabling 329
uninstalling 326
Alert Standard Format 83
alert-forwarding strategy, service
processors 63
alertsdefinition 148
ISMP and limitations 60
MPA Agent, role of 60
out-of-band 62
System Health Monitoring, role of 60
all events filter 28
allocation group 177
Apache Derby 137
APAR 169, 170
ASF 83, 97, 113
generating events 148
Power Management 114
ASM interconnect gatewaygateway service processors 59
ISMPs, enabling communication
with 59
ASM interconnect networkdefinition 59
gateway service processor, role of 59
ASM PCI adapteralert-forwarding strategies 63
use as a gateway service
processor 59
ASM processoralert-forwarding strategies 63
Asset IDmanagement server support 92
operating systems, supported 92
associationsdefault 17
description of 15
options 17
types of 15
attributes, SMI-S 57
Bblade servers
total BladeCenter units 135
BladeCenterdocumentation v
network devices 135
products, supported tasks 135
BladeCenter Configuration Manageroperating systems, supported 97
books v
bottlenecksdescription of 42
generating events 42
latent, description of 42
types of 42
CCapacity Manager
managed systems, installing on 264
management server, installing on 203
operating systems, supported 94
performance-analysis reports 42
categoryevent filters 30
changessummary of ix
CIM 178
CIM Browser 18
management server support 95
operating systems, supported 95
CIM classshortcut, description of 18
CIM profile for z/VM management 74
CIM-class methodshortcut, description of 18
cloning 72
command-line interface 66
Common Information Model 178
Common Information Model (CIM) 18
communicationout-of-band, service processor 62
z/VM manageability access
point 181
compatibility documents v
Compatibility Documents 86
concepts 1
Configuration Manager 135
operating systems, supported 97
Configure Alert Standard Formatmanagement server support 97
operating systems, supported 97
Configure SNMP Agentmanagement server support 98
operating systems, supported 98
console extension 291, 292
control program (CP), z/VM 69
criticalevents 28
events filter 28
customer support v
Ddacimlist startup script 332
dasnmp startup script 332
Data Encryption Standard 52
databaseDB2 Universal Database
Linux installation 153
Windows installation 153
function of 5
Microsoft Data Engine 2000 155
Microsoft SQL Server 155
Oracle ServerJDBC driver 156
overview 156
planning 145
PostgreSQL 157
selecting 145
SQL Server 2000 Desktop Engine 155
databasesApache Derby 137
for management servers 137
IBM DB2 137
Microsoft Data Engine 2000 137
Microsoft SQL Server 2000 137
MS Jet 137
MSDE 2000 137
Oracle Server 137
PostgreSQL 137
supported 137
DATAMOVE, z/VM service machine 69,
170
date and timeevent filters 30
DB2 Universal DatabaseLinux installation 153
Windows installation 153
de-register 77
default associations 17
definitionsASM interconnect network 59
gateway service processor 59
in-band communication 59
interprocess communication 59
out-of-band communication 59
DES 52
descriptionresource, z/VM Center 78
design strategies, event action plan 149
device driverstroubleshooting 335
Diffie-Hellman key exchange 52
Digital Signature Algorithm 48
DirAdmin 51, 309
diragent.rsp fileupgrading IBM Director Agent using
Software Distribution 229, 259, 302
dircon.rsp filecustomizing 221
location 221
Directory Maintenance Facility 170
directory manager for z/VM 170
directory, z/VM 69
dirinstall scriptIBM Director Agent 223, 239
IBM Director Console 216
© Copyright IBM Corp. 1999, 2005 363

dirinstall script (continued)IBM Director Server 187, 193, 198
DirMaint 170
DIRMAINT, z/VM service machine 69
dirserv.rsp filecustomizing 212
location 212
DirSuper 51, 309
diruninstall script 324
diruns utility 326
disability 5
discoveryscalable objects 47
diskmonitoring usage 41
disk bottlenecks 42
disk pool, z/VM 177
disk sharing 73
display requirements 336
Distributed Management Task Force 74
DMTF 74
documentation v
domain controller 142
downloading v
compatibility documents v
hardware compatibility
information v
IBM Director code v
IBM Director publications v
Net-SNMP, version 5.2.1 332
systems-management software v
duplication event filter 28
dynamic groups 35
Eencryption
algorithms 52
enabling on managed systemAIX 235
i5/OS 237
Linux 237, 240
Windows 246
enabling on management serverLinux 187, 198
Windows 203
overview 52
performance penalty 52
enhancements ix
environment 169
ports used 85
reviewing 138
environment (illustration) 1
environmentalsensor events filter 28
error message1722 336
IRQL_NOT_LESS_OR_EQUAL 338
eServer BladeCenter HS20, machine type
8843 161
eServer(TM) BladeCenter(TM) HS20,
machine type 8832 161
eventavailability 152
definition 148
how they work 148
i5/OS-specific 28
event (continued)management 150
overview 148
processing 26
publishing 152
sources that generate 148
typesalert 148
availability 152
resolution 148
Windows-specific 28
Event Action Plan wizardaccess to, restricting 311, 312
event action plans 150
design strategies 149
example 151
filtering 30
grouping systems 151
how events work 148
naming conventions 150
overview 150
planning and designing 149
structuring 151
successful implementation 150
wizard 150
event filterscategory 30
date and time 30
duplication event filter 28
event text 30
event type 30
exclusion event filter 28
extended attributes 30
Hardware Predictive Failure
events 28
managed objects 30
severity levels 30
simple event filter 28
structuring 152
system variables 30
thresholdevent 28
event filter 28
Event Logmanagement server support 100
operating systems, supported 100
event textevent filters 30
event typeevent filters 30
eventsbottleneck 42
examplesevent action plan 151
exclusion event filter 28
extended attributesevent filters 30
extensionsinstalling z/VM Center 288
publishing events 152
External Application Launchmanagement server support 101
operating systems, supported 101
Ffatal events filter 28
File Transfermanagement server support 103
operating systems, supported 103
file-distribution serverconfiguring 319
considerations 54
setting up 318
firewall accessconfiguring 85
forecast duration 44
forecast line 44
forecastingperformance 44
Ggateway service processor, definition 59
glossary 353
groupingmanaged systems 151
groupsdescription of 35
scalable object 36, 46
types of 35
guest LAN 69
guest operating system 69
guest virtual machine 69
Hhardware
predictive failure events 28
predictive failure events filter 28
requirements 81
hardware compatibility v
Hardware Management Consolemanagement server support 104
operating systems, supported 104
hardware requirements 81, 82, 83
Hardware Statusmanagement server support 105
operating systems, supported 105
harmless events filter 28
help, IBM Director resources v
Ii5/OS 237
events 28
i5/OS installationencryption, enabling 237
IBM Director Agent, installing 237
starting 237
IBM DB2 137
IBM Directorcomponents of 1
concepts 1
getting started 1
IBM Director Console 1
overview 1
scenarios 1
updating 308
IBM Director AgentAIX, installing on
encryption, enabling 235
prerequisites 235
364 IBM Director Installation and Configuration Guide

IBM Director Agent (continued)AIX, installing on (continued)
WAKE on LAN, enabling 235
BladeCenterchassis 135
server 135
description of 40
encryption, enablingAIX 235
i5/OS 237
Linux 223, 237, 240
Windows 246
function 4
generating events 148
hardware requirements 81, 82, 83
IBM Director tasks 135
license 4
Linux, installing ondirinstall script 223, 237, 239, 240
Net-SMNP, enabling 223, 237,
239, 240
Wake on LAN, enabling 237, 240
modifying an installationNetWare 295
NetWare, installing onfeatures, selecting 242
network driver, configuring 242
network protocols 84
operating systems, supported 87
troubleshooting 335
installing 338
uninstallingLinux 324
NetWare 327
Windows 325
upgradingSoftware Distribution task,
using 302
Windows, installing onencryption, enabling 246
features, selecting 246, 252
InstallShield wizard, using 246
network driver, configuring 246,
252
securing managed system 246
security state, setting 246
software-distribution settings 246
Wake on LAN, enabling 246, 252
IBM Director Console 66, 219
display requirements 336
features, selecting 219
function 5
hardware requirements 81, 82
installing on Linux 216
installing on Windowsdircon.rsp file 221
InstallShield wizard, using 219
unattended mode, using 221
license 5
network protocols 84
overview 1
supported operating systems 91
uninstallingLinux 324
Windows 325
IBM Director Console installation 219
IBM Director Core Servicesdescription of 40
function 3
license 3
operating systems, supported 87
troubleshooting 335
IBM Director Hardware and Software
Compatibility document v
IBM Director Serverconfiguration data 323
encryption, enablingLinux 187, 198
Windows 203
function 5
hardware requirements 81, 82, 83
installing on Windowsdirserv.rsp file 212
unattended mode, using 212
license 5
Linux, installing ondatabase, configuring 187, 193,
198
network protocols 84
service processors, communication
with 59
supported operating systems 87
troubleshooting 335
installing 336
uninstallingi5/OS 323
Linux 324
Windows 325
where to install 142
Windows, installing ondatabase configuration 203
encryption settings 203
features, selecting 203
network driver, configuring 203
service account 203
Software Distribution settings 203
Wake on LAN, enabling 203
IBM eServer Information Center v
IBM systems-management softwaredownloading v
overview v
IBM Web siteseServer Information Center v
Redbooks v
ServerProven v
Support v
Systems Management Software v
xSeries Systems Management v
illustrationsIBM Director environment 1
IBM Director software components 2
in-band communication 60
definition 59
enabling 60
ISMPs, limitations 60
MPA Agent, role of 60
installation 335
troubleshooting 335
installation, troubleshooting 336
InstallShield wizardIBM Director Agent 246
IBM Director Console 219
IBM Director Server 203
interim fixes v
interprocess communication,
definition 59
Inventorymanagement server support 106, 108
operating systems, supported 106,
108
IPMI baseboard management controllergenerating events 148
ISMPalert-forwarding strategies 63
limitations on in-band
communication 60
JJDBC driver, Oracle Server 156
Kkeyboard 6
navigating a menu bar 7
navigating a toolbar 7
navigating frames 6
navigating icons 6
navigating standard controls using 9
navigating text components 13
keysfiles, location of 49
origin of, determining 51
LLAN adapter bottlenecks 42
latent bottleneck, description of 42
legal notices 347
Level 0operating systems, supported 87
Level 1 managed system 3
Level-1 managed systems 40
Level-2 managed system 4
Level-2 managed systems 40
licenseIBM Director Agent 4
IBM Director Console 5
IBM Director Core Services 3
IBM Director Server 5
license key 290
Linux installationencryption, enabling 187, 198, 237,
240
IBM Director Agent 223, 237, 239,
240
IBM Director Console 216
IBM Director Server 187, 193, 198
modifyingadding a feature 298
removing a feature 298
SNMP Access and Trap
Forwarding, enabling 332
Wake on LAN, enabling 329
starting 223, 237, 239, 240
uninstalling 324
z/VM CIM instrumentation 293
Index 365

Mmainframe 169
manageability access point 74
managed objectsdescription of 37
event filters 30
types of 37
managed systemsdefinition 1
distribution preferences,
configuring 320
forecasting performance 44
hardware requirements 81, 82, 83
securingIBM Director Agent installation,
during 246
security states 49
management console 5
definition 2
hardware requirements 81, 82
management processorgenerating events 148
Management Processor Assistant Agentmanaged system, installing on 242,
246
NetWare, installing on 242
management profiles 178
management serverDB2 database
Linux installation 153
Windows installation 153
definition 1
hardware requirements 81, 82, 83
Software Distribution, installingi5/OS 280, 281
Linux 281
Windows 282
z/VM Center, installing AIX 290
mass-configuration profiles 40
master operating system 76
memorymonitoring usage 41
Message Browserdescription of 35
MicrosoftKnowledge Base Article
825236 338
Microsoft Cluster Browsermanagement server support 110
operating systems, supported 110
Microsoft Data Engine 2000 137, 155
Microsoft SQL Server 155
Microsoft SQL Server 2000 137
minor events filter 28
modifying an IBM Director installationAIX installation
Wake on LAN, enabling 329
Linux installationadding a feature 298
removing a feature 298
SNMP Access and Trap
Forwarding, enabling 332
Wake on LAN, enabling 329
NetWare installationadding a feature 295
limitations 295
modifying an IBM Director installation
(continued)Windows installation
adding a feature 297
Program Maintenance
window 297
removing a feature 297
monitoringdisk usage 41
memory usage 41
network traffic 41
processor usage 41
MS Jet 137
MSDE 2000 137
MSItroubleshooting 337
Nname
resource, z/VM Center 78
navigating using the keyboardframes 6
icons 6
menu bar 7
panes 6
standard controls 9
text components 13
toolbar 7
windows 6
Net-SNMP, version 5.2.1 332
NetWare installationIBM Director Agent, installing 242
modifyingadding a feature 295
limitations 295
MPA Agent, when to install 242
uninstalling 327
networkmonitoring traffic 41
Network Configurationmanagement server support 111
operating systems, supported 111
network protocols 84
New Scheduled Job window 234, 263,
307
NOLOG z/VM user ID 172
notificationsdefinition 148
Ooperating system
compatibility v
master 76
support for tasks 92
supported 86
operating system templates 76
Oracle Server 137
JDBC driver 156
overview 156
out-of-band communicationdefinition 59
service processor 62
SSM 59
Pperformance
description of 41
performance monitordescription of 41
performance-analysisforecasting 44
recommendations 42
reports 42
personalization 76
PET, generating events 148
planning and designing event action
plans 149
ports 85
PostgreSQL 137
JDBC driver 157
overview 157
Power ManagementASF 114
management server support 115
operating system support 115
operating systems 113
service processor 117
Wake on LAN 117
prediction interval 44
privilege classes, z/VM 177
problem solving 335
Process Managementmanagement server support 118
operating systems, supported 118
process monitorsevent 150
processormonitoring usage 41
processor bottlenecks 42
profilesmass-configuration 40
prototypes for z/VM virtual server 170
PTF 169, 170
publications v
RRACF 73
Rack Managermanagement console, installing
on 219
management server support 120
management server, installing on 203
operating systems, supported 120
re-register 77
recommendationsperformance 42
Redbooks v
registration 77
related information v
releases, new 308
Remote Controlmanagement server support 121
operating systems, supported 121
Remote Control Agentmanaged system, installing on 246
management server, installing on 203
Remote Sessionmanagement server support 123
operating systems, supported 123
366 IBM Director Installation and Configuration Guide

Remote Supervisor Adapteralert-forwarding strategies 63
documentation v
use as an ASM interconnect
gateway 59
report definitionperformance-analysis 42
reportsperformance-analysis 42
requirements 81
hardware 81
resolutiondefinition 148
Resource Access Control Facility 73
Resource Monitorsevents 150
management server support 124
operating systems, supported 124
restrictionsz/VM Center 169
RS-485 ports 59
Sscalable nodes, description of 45
scalable objectsdescription of 44
discovering 47
groups used with 36, 46
scalable partitionspower operations 47
scalable partitions, description of 45
scalable systems 46
scenarios 1
security 312
Digital Signature Algorithm 48
encryptionalgorithms 52
performance penalty 52
events filter 28
IBM Director Agent-Server
authentication 48
key managementlocation of files 49
origin of a key, determining 51
public and private keys 49
user administrationdefault profile, creating 311
editing groupr privileges 312
editing user privileges 311
Event Action Plan wizard,
restricting access to 311
group access, restricting 311, 312
task access, restricting 311, 312
user login 309
security manager 73
security manager for z/VM 73
security states 49
Server Complexes 67
checkingconsistency 79
configuring 79
consistencychecking 79
guest system 79
inconsistencies 79
Linux guest system 79
Server Complexes (continued)properties 79
Server complexes concepts 78
setting properties 79
Server Configuration Manageroperating systems, supported 97
server extension 289
ServeRAID Managermanaged system, installing on 242,
252
management server support 126
operating systems, supported 126
service machine, z/VM 69
DATAMOVE 170
VSMSERVE 173
service packs v
service processorPower Management 117
service processors 113
alert-forwarding strategies 63
communicating with IBM Director
Serverinterprocess communication 59
over the ASM interconnect 59
over the LAN 59
communication with IBM Director
Server 59
description of 59
documentation v
generating events 148
in-band communicationMPA Agent, role of 60
operating system 60
service processor type 60
out-of-band communication 62
setup for z/VM Center 169
severity levelsevent filters 30
SFS, z/VM shared file system 173
sharing disks 73
shortcut keys 6
shortcuts 18
silent parameter 212, 221, 227, 250, 257
simple event filterdefinition 28
predefined filters 28
SMBIOS 81
SMI-S attributes 57
SMI-S storage devices 56
SNMPgenerating events 148
SNMP Access and Trap Forwardingenabling on Linux 332
SNMP Browsermanagement server support 127
SNMP devicesdefinition 1
description of 55
operating systems, supported 127
SNMP trapsenabling 138
event log 55
snmpconf utility 332
snmpd.conf file 332
software components (illustration) 2
software distributionmethods
redirected distribution 54
streaming from management
server 54
preferences, configuring 318
upgrading IBM Director Agentoverview 302
software package, installing 234,
263, 307
Software Distributionmanagement server support 129, 131
operating systems, supported 129,
131
Software Distribution (Premium Edition)installing on the management server
i5/OS 280, 281
Linux 281
Windows 282
software packagescreating 229, 259, 302
displayed in IBM Director Console
(screenshot) 229, 259, 302
Software Rejuvenationmanaged systems, installing on 264
solving problems 335
SQL Server 2000 Desktop Engine 155
SSM (Scalable Systems Manager)IP addresses 59
out-of-band communication 59
startingprograms with event action
plans 150
static groups 35
storage devices 56
storage events filter 28
structureevent action plan 151
event filters 152
subscription services 308
summary of changes ix
System Accountsmanagement server support 133
operating systems, supported 133
System Availabilitymanaged systems, installing on 264
management server support 134
operating systems, supported 134
troubleshooting 337
System Health Monitoringsupport for Linux systems 60
system variablesevent filters 30
System z9 169
systems management API, z/VM 173
Ttagged comment, z/VM directory 170
tasksevent action plans 150
management server support 92
Mass Configuration 40
operating systems, supported 92
performing on multiple groups 35
publishing events 152
TCPIP, z/VM service machine 69
Index 367

templatevirtual server 75
templatesoperating system 76
terminologyalert 148
ASM interconnect network 59
event 148
gateway service processor 59
in-band communication 59
interprocess communication 59
managed system 1
management console 2
management server 1
notification 148
out-of-band communication 59
resolution 148
SNMP device 1
threshold eventfilter 28
simple event filter 28
thresholdsevent action plans 150
trademarks 348
Triple DES 52
troubleshooting 335
IBM Director Agent 335
installing 338
IBM Director Core Services 335
IBM Director Server 335
installing 336
installation 336
LM78 device driver 335
MSI administrative installation 337
SMbus device driver 335
System Availability 337
Virtualization Engine 336
TWGshare 54
Uunattended installations
IBM Director Console 221
IBM Director Server 212
unattended parameter 212, 221, 227, 250,
257
uninstalling IBM DirectorAIX 326
configuration data, retaining 323
Linux 324
NetWare 327
Windows 325
unknown events filter 28
updates, new 308
upgradingfrom earlier versions 298
IBM Director AgentWindows 251
IBM Director ConsoleWindows 300
Software Distribution task,
using 229, 259, 302
user accountsDirAdmin and DirSuper 51
management server running
Linux 51
user accounts (continued)management server running
Windows 51
service account 51
user administration 309
default profile, creating 311
DirAdmin group 309
DirSuper group 309
editing group privileges 312
editing user privileges 311
Event Action Plan wizard, restricting
access to 311, 312
group access, restricting 311, 312
task access, restricting 311, 312
User Administration window 311
user class, custom 177
User Defaults Editor 311
user ID, z/VM 69
user interfaces, types of 66
VVirtual Server Deployment 67
virtual server template 75
virtual server, z/VM 75
virtual switch 69
Virtualization Enginetroubleshooting 336
VMRM 173
default configuration file 173
VSMSERVE, z/VM service machine 69,
173
WWake on LAN 113
enabling on AIX 235
enabling on Linux and AIX 329
enabling on WindowsIBM Director Agent,
installing 246, 252
IBM Director Server,
installing 203
Power Management 117
WAN link 138
warning events filter 28
Web siteIBM Director resources v
IBM Redbooks v
IBM ServerProven v
IBM Support v
IBM Systems Management
Software v
IBM xSeries Systems Management v
Web sitesNet-SNMP 332
Oracle Technology Network 156
Web-based Access 66
what’s new ix
windowsIBM Director Console
IBM Update Assistant 229, 259,
302
Program Maintenance 297
Windowsevent log
generating events 148
events 28
windows (IBM Director)IBM Director Agent installation
(NetWare)Choose destination location 242
InstallShield Wizard complete 242
Select Components 242
IBM Director Agent installation
(Windows) 246
Feature and destination directory
selection 246
Network driver configuration 246
Security settings 246
Software Distribution settings 246
IBM Director ConsoleAdd Share Name 319, 320
IBM Update Assistant 229, 259,
302
IBM Update Package/Root
Directory 229, 259, 302
Managed System Distribution
Preferences 320
New Scheduled Job 234, 263, 307
Server Preferences 319
Software Distribution Manager
(Premium Edition) 229, 259, 302
Software Distribution Manager
(Standard Edition) 229, 259, 302
Software Distribution
Preferences 318
User Administration 311
User Defaults Editor 311
IBM Director Console installationFeature and destination directory
selection 219
IBM Director Server installation 203
DB2 Universal Database
configuration 203
Encryption settings 203
Feature and installation directory
selection 203
IBM Director database
configuration 203
Microsoft SQL database
configuration 203
Network driver configuration 203
Oracle database configuration 203
service account information 203
Software-distribution settings 203
Windows installationencryption, enabling 203, 246
IBM Director Agent 245
IBM Director Console 218
IBM Director Server 202, 203
modifyingadding a feature 297
removing a feature 297
uninstalling 325
Windows Management Instrumentation
(WMI)generating events 148
Windows Server 2003,
troubleshooting 338
368 IBM Director Installation and Configuration Guide

Wired for Management (WfM)
specifications 81
wizardsEvent Action Plan 150
InstallShieldIBM Director Agent 246
IBM Director Console 219
IBM Director Server 203
XxSeries 225, machine type 8647 161
xSeries 226, machine type 8836 161
xSeries 236, machine type 8841 161
xSeries 336, machine type 8837 161
xSeries 346, machine type 8840 161
Zz/VM 73, 169
control program 69
directory 69
guest operating system 69
guest virtual machine 69
introduction 69
service machine 69
user ID 69
z/VM Center 290
concepts 67
console extension for AIX 292
console extension for Linux 292
console extension for Windows 291
installation of extension 288
installing on the management serverAIX 290
license key 290
resource names 78
restrictions 169
server extension for Linux 289
server extension for Windows 289
tasks 67
z/VM Center on AIX 292
z/VM Center on Linux 289, 292
z/VM Center on Windows 289, 291
z/VM CIM instrumentation 293
z/VM directory 170
z/VM Directory Maintenance
Facility 170
z/VM manageability access point 74
administrator ID 180
communications 181
setting up 178
z/VM management profile 74
z/VM Resource Manager 173
z/VM service machineDATAMOVE 170
VSMSERVE 173
z/VM shared file system 173
z/VM systems management API 173
z/VM virtual server 75
prototypes 170
zSeries 169
Index 369

370 IBM Director Installation and Configuration Guide

Readers’ Comments — We’d Like to Hear from You
IBM Systems
IBM Director
Installation and Configuration Guide
Version 5.10
Overall, how satisfied are you with the information in this book?
Very Satisfied Satisfied Neutral Dissatisfied Very
Dissatisfied
Overall satisfaction h h h h h
How satisfied are you that the information in this book is:
Very Satisfied Satisfied Neutral Dissatisfied Very
Dissatisfied
Accurate h h h h h
Complete h h h h h
Easy to find h h h h h
Easy to understand h h h h h
Well organized h h h h h
Applicable to your tasks h h h h h
Please tell us how we can improve this book:
Thank you for your responses. May we contact you? h Yes h No
When you send comments to IBM, you grant IBM a nonexclusive right to use or distribute your comments in any
way it believes appropriate without incurring any obligation to you.
Name
Address
Company or Organization
Phone No.

Readers’ Comments — We’d Like to Hear from You
����
Cut or FoldAlong Line
Cut or FoldAlong Line
Fold and Tape Please do not staple Fold and Tape
Fold and Tape Please do not staple Fold and Tape
NO POSTAGENECESSARYIF MAILED IN THEUNITED STATES
BUSINESS REPLY MAIL FIRST-CLASS MAIL PERMIT NO. 40 ARMONK, NEW YORK
POSTAGE WILL BE PAID BY ADDRESSEE
International Business Machines Corporation
Dept. CGFA
PO Box 12195
Research Triangle Park, NC 27709-9990
_ _ _ _ _ _ _ _ _ _ _ _ _ _ _ _ _ _ _ _ _ _ _ _ _ _ _ _ _ _ _ _ _ _ _ _ _ _ _ _ _ _ _ _ _ _ _ _ _ _ _ _ _ _ _ _ _ _ _ _ _ _ _ _ _ _ _ _ _ _ _ _ _ _ _ _ _ _ _ _ _ _ _ _ _ _ _ _ _
_ _ _ _ _ _ _ _ _ _ _ _ _ _ _ _ _ _ _ _ _ _ _ _ _ _ _ _ _ _ _ _ _ _ _ _ _ _ _ _ _ _ _ _ _ _ _ _ _ _ _ _ _ _ _ _ _ _ _ _ _ _ _ _ _ _ _ _ _ _ _ _ _ _ _ _ _ _ _ _ _ _ _ _ _ _ _ _ _
__
__
__
__
__
__
__
__
__
__
__
__
__
__
__
__
__
__
__
__
__
__
__
__
__
__
__
__
__
__
__
__
__
__
__
__
__
__
__
__
__
__
__
__
__
__
__
__
__
_


����
Printed in USA