Embed Size (px)
Citation preview

Podręcznik użytkownika
HP Officejet H470 Printer seriesUser Guide

HP Officejet H470 Printer seriesUser Guide

Copyright information© 2007 Copyright Hewlett-PackardDevelopment Company, L.P.Edition 1, 2/2007Reproduction, adaptation ortranslation without prior writtenpermission is prohibited, except asallowed under the copyright laws.The information contained herein issubject to change without notice.The only warranties for HP productsand services are set forth in theexpress warranty statementsaccompanying such products andservices. Nothing herein should beconstrued as constituting anadditional warranty. HP shall not beliable for technical or editorial errorsor omissions contained herein.Copyright (C) 1991-2, RSA DataSecurity, Inc. Created 1991. All rightsreserved.License to copy and use this softwareis granted provided that it is identifiedas the "RSA Data Security, Inc. MD4Message-Digest Algorithm" in allmaterial mentioning or referencingthis software or this function.License is also granted to make anduse derivative works provided thatsuch works are identified as "derivedfrom the RSA Data Security, Inc. MD4Message-Digest Algorithm" in allmaterial mentioning or referencing thederived work.RSA Data Security, Inc. makes norepresentations concerning either themerchantability of this software or thesuitability of this software for anyparticular purpose. It is provided "asis" without express or impliedwarranty of any kind.These notices must be retained in anycopies of any part of thisdocumentation and/or software.
Hewlett-Packard CompanynoticesThe information contained in thisdocument is subject to change withoutnotice.All rights reserved. Reproduction,adaptation, or translation of thismaterial is prohibited without priorwritten permission of Hewlett-Packard, except as allowed undercopyright laws.The only warranties for HP productsand services are set forth in theexpress warranty statementsaccompanying such products andservices. Nothing herein should beconstrued as constituting anadditional warranty. HP shall not be
liable for technical or editorial errorsor omissions contained herein.
AcknowledgementsWindows and Windows XP are U.S.registered trademarks of MicrosoftCorporation. Windows Vista is either aregistered trademark or trademark ofMicrosoft Corporation in the UnitedStates and/or other countries.Adobe® and Acrobat® aretrademarks of Adobe SystemsIncorporated.The Bluetooth trademarks are ownedby its proprietor and used by Hewlett-Packard Company under license.
Safety information
Always follow basic safetyprecautions when using this productto reduce risk of injury from fire orelectric shock.1. Read and understand allinstructions in the documentation thatcomes with the HP Printer.2. Use only a grounded electricaloutlet when connecting this product toa power source. If you do not knowwhether the outlet is grounded, checkwith a qualified electrician.3. Observe all warnings andinstructions marked on the product.4. Unplug this product from walloutlets before cleaning.5. Do not install or use this productnear water, or when you are wet.6. Install the product securely on astable surface.7. Install the product in a protectedlocation where no one can step on ortrip over the line cord, and the linecord cannot be damaged.8. If the product does not operatenormally, see Maintain andtroubleshoot.9. There are no user-serviceable partsinside. Refer servicing to qualifiedservice personnel.


Contents
1 Get startedFind other resources for the product .........................................................................................6Accessibility ..............................................................................................................................7Understand the device parts .....................................................................................................8
Front view ...........................................................................................................................8Back and side view .............................................................................................................9Control Panel ....................................................................................................................10Bottom view ......................................................................................................................11
Travel tips ...............................................................................................................................11
2 Install the accessoriesInstall and use the battery .......................................................................................................13
Battery safety ....................................................................................................................13Understand the battery .....................................................................................................14Charge and use the battery ..............................................................................................15
Install and use 802.11 and Bluetooth accessories ..................................................................16Install the 802.11 or Bluetooth wireless USB accessory ...................................................16802.11 and Bluetooth wireless printing .............................................................................17
About 802.11 ..............................................................................................................17About Bluetooth ..........................................................................................................18
3 Use the deviceSelect print media ...................................................................................................................19
Tips for selecting and using print media ...........................................................................19Understand specifications for supported media ................................................................21
Understand supported sizes .......................................................................................21Understand supported media types and weights ........................................................23
Set minimum margins .......................................................................................................23Load media .............................................................................................................................24Change print settings ..............................................................................................................24
To change settings from an application for current jobs (Windows) ..................................25To change default settings for all future jobs (Windows) ..................................................25To change settings (Mac OS) ...........................................................................................25
Use the HP Solution Center (Windows) ..................................................................................25Print on both sides (duplexing) ...............................................................................................26
Guidelines for printing on both sides of a page .................................................................26To perform duplexing (Windows) ......................................................................................26To perform duplexing (Mac OS) ........................................................................................ 27
Print on special and custom-sized media ...............................................................................27To print on special or custom-sized media (Windows) ......................................................27To print on special or custom-sized media (Mac OS) .......................................................27
Print borderless ......................................................................................................................28To print a borderless document (Windows) ......................................................................28To print a borderless document (Mac OS) ........................................................................29
1

Print from mobile devices .......................................................................................................29Print digital photographs ...................................................................................................29
To print with six-ink color ............................................................................................30Guidelines for printing photographs ............................................................................30To print from a PictBridge-compatible camera ............................................................31To transfer photos to your computer ...........................................................................31
Print from mobile phones ..................................................................................................31To install the Mobile Printing Application on the phone ..............................................32To print from a mobile phone ......................................................................................32
Print from Pocket PC devices ...........................................................................................32To install HP Mobile Printing for Pocket PC ................................................................33To print from Pocket PC devices ................................................................................33
Print from Palm OS devices ..............................................................................................34To install Printboy .......................................................................................................34To install a wireless card ............................................................................................34To print using standard Palm OS applications ............................................................35To choose a default printer (optional) .........................................................................35To print using Documents To Go ................................................................................35
Use memory devices ..............................................................................................................35Print from memory cards and USB Flash drives ...............................................................35
Cancel a print job ....................................................................................................................37
4 Configure and manageManage the device .................................................................................................................38
Monitor the device ............................................................................................................38Administer the device .......................................................................................................39
Use device management tools ...............................................................................................39Toolbox (Windows) ...........................................................................................................40
To open the Toolbox ...................................................................................................40Toolbox tabs ...............................................................................................................40
HP Printer Utility (Mac OS) ...............................................................................................41To open the HP Printer Utility .....................................................................................41HP Printer Utility panels ..............................................................................................42
Network Printer Setup Utility (Mac OS) .............................................................................42Toolbox software for PDAs (Pocket PC and Palm OS) .....................................................42HP Instant Support ...........................................................................................................43
Security and privacy ...................................................................................................43To gain access to HP Instant Support ........................................................................43
myPrintMileage .................................................................................................................43Understand the device information pages ..............................................................................44
Print device information pages from the control panel ......................................................44Print device information pages from the software .............................................................45
Configure the device (Windows) .............................................................................................45Direct connection ..............................................................................................................46
To install the software before connecting the device (recommended) ........................46To connect the device before installing the software ..................................................46To share the device on a locally shared network ........................................................47
Configure the device (Mac OS) ..............................................................................................47To install the software .......................................................................................................47To share the device on a locally shared network ..............................................................48
Uninstall and reinstall the software .........................................................................................48
2

802.11 wireless connection ....................................................................................................50About the wireless profile switch .......................................................................................51About 802.11 wireless network settings ............................................................................51Set up for 802.11 using factory defaults ...........................................................................52
To set up using ad hoc mode and factory defaults with a USB cable (Windowsand Mac OS) ............................................................................................................... 53To set up using ad hoc mode and factory defaults with no USB cable (Windows) .....53To set up a computer to computer (ad hoc) connection using factory defaultswith no USB cable (Mac OS) ......................................................................................54
Set up for 802.11 on existing (non-default) networks ........................................................54To set up on an existing network with a USB cable (Windows or Mac OS) ................55To set up on an existing network with no USB cable ..................................................55
Configure and use 802.11 wireless profiles ......................................................................56To configure 802.11 wireless profiles (Windows) ........................................................56To configure 802.11 wireless profiles (Mac OS) .........................................................57
Use the wireless profile switch ..........................................................................................57Reset 802.11 wireless profiles to factory defaults .............................................................58Configure multiple printers for 802.11 (Windows) .............................................................59
Bluetooth wireless connection ................................................................................................59Set up a Bluetooth wireless connection ............................................................................60Configure Bluetooth wireless settings ...............................................................................61Bluetooth wireless settings options ...................................................................................62
Bluetooth device address ...........................................................................................62Bluetooth device name ...............................................................................................62PIN code (Pass Key) ..................................................................................................63Reset device access ...................................................................................................64To reset to factory default settings ..............................................................................64To turn off Bluetooth ...................................................................................................64
Bluetooth discovery ..........................................................................................................64Bluetooth fonts ..................................................................................................................64Wireless configuration page .............................................................................................65Bonding ............................................................................................................................65Bluetooth wireless profiles ................................................................................................65
5 Maintain and troubleshootWork with print cartridges .......................................................................................................67
Replace the print cartridges ..............................................................................................67Align the print cartridges ...................................................................................................70Print with a single print cartridge .......................................................................................71Calibrate color ..................................................................................................................71Maintain the device ...........................................................................................................71
Clean the device .........................................................................................................72Clean the print cartridges ............................................................................................72
Store printing supplies ......................................................................................................75Store print cartridges ..................................................................................................75
Replace the ink service module ..............................................................................................76Troubleshooting tips and resources ........................................................................................76
Contents
3

Solve printing problems ..........................................................................................................77The device shuts down unexpectedly ...............................................................................77All device lights are on or flashing ....................................................................................78The device is not responding (nothing prints) ...................................................................78Device does not accept print cartridge ..............................................................................79Device takes a long time to print .......................................................................................79Blank or partial page printed .............................................................................................80Something on the page is missing or incorrect .................................................................80Placement of the text or graphics is wrong .......................................................................81
Poor print quality and unexpected printouts ............................................................................82General tips ......................................................................................................................82Meaningless characters print ............................................................................................83Ink is smearing .................................................................................................................84Ink is not filling the text or graphics completely .................................................................85Output is faded or dull colored ..........................................................................................85Colors are printing as black and white ..............................................................................86Wrong colors are printing ..................................................................................................86Printout shows bleeding colors .........................................................................................87Colors do not line up properly ...........................................................................................87Lines or dots are missing from text or graphics ................................................................87
Solve paper-feed problems .....................................................................................................88Media is not supported for the device ...............................................................................88Media is not picked up ......................................................................................................88Media is not coming out correctly .....................................................................................88Pages are skewing ...........................................................................................................89Multiple pages are being picked up ..................................................................................89
Troubleshoot installation issues ..............................................................................................89Hardware installation suggestions ....................................................................................89Software installation suggestions ...................................................................................... 90Problems setting up 802.11 or Bluetooth wireless communication ...................................90
Check the wireless printer accessory .........................................................................91Check the wireless settings ........................................................................................91Check the network communication .............................................................................91Check the wireless signal ...........................................................................................92
Clear jams ..............................................................................................................................93Clear a jam in the device ..................................................................................................93Tips for avoiding jams .......................................................................................................94
6 Control-panel lights referenceInterpret control-panel lights ...................................................................................................95
A HP supplies and accessoriesOrder printing supplies online ...............................................................................................101Accessories ..........................................................................................................................101Supplies ................................................................................................................................101
Print cartridges ................................................................................................................ 101HP media ........................................................................................................................102
B Support and warrantyHewlett-Packard limited warranty statement .........................................................................104Obtain electronic support ......................................................................................................105
4

Obtain HP telephone support ...............................................................................................105Before you call ................................................................................................................105Support process .............................................................................................................. 106HP support by phone ......................................................................................................106
Phone support period ...............................................................................................106Telephone support numbers .....................................................................................106Placing a call .............................................................................................................108After the phone support period .................................................................................108
Additional warranty options .............................................................................................108HP Quick Exchange Service (Japan) ..............................................................................109
Prepare the device for shipment ...........................................................................................109Remove the print cartridges before shipment .................................................................109
Pack the device ....................................................................................................................110
C Device specificationsPhysical specifications ..........................................................................................................112Product features and capacities ...........................................................................................112Processor and memory specifications ..................................................................................113System requirements ............................................................................................................113Print resolution ......................................................................................................................114Environmental specifications ................................................................................................114Electrical specifications .........................................................................................................114Acoustic emission specifications (noise levels per ISO 7779) ..............................................115Memory card specifications ..................................................................................................115
D Regulatory informationEnvironmental sustainability program ...................................................................................116
Reduction and elimination ..............................................................................................116Energy consumption .......................................................................................................116Energy Star® notice ........................................................................................................ 116Material safety data sheets .............................................................................................117Recycling ........................................................................................................................117
Product packaging ....................................................................................................117Plastics .....................................................................................................................117HP products and supplies .........................................................................................117
Disposal of waste equipment by users in private households in the European Union ....118FCC statement .....................................................................................................................119Other regulatory information .................................................................................................119
Notice to users in Korea .................................................................................................120VCCI (Class B) compliance statement for users in Japan ..............................................120Notice to users in Japan about the power cord ...............................................................120Noise emission statement for Germany ..........................................................................120RoHS notices (China only) .............................................................................................121LED indicator statement .................................................................................................121Regulatory model number ..............................................................................................121
Declaration of conformity ......................................................................................................122Index...........................................................................................................................................123
Contents
5

1 Get startedThis guide provides details about how to use the device and to resolve problems.
• Find other resources for the product• Accessibility• Understand the device parts• Travel tips
Find other resources for the product You can obtain product information and further troubleshooting resources that are notincluded in this guide from the following resources:
Resource Description Location
Readme file and release notes Provide late-breakinginformation andtroubleshooting tips.
Included on the Starter CD.
Toolbox (Microsoft®
Windows®)Provides information aboutprint cartridge health andaccess to maintenanceservices.For more information, seeToolbox (Windows).
Typically installed with thedevice software.
HP Printer Utility (Mac OS) Contains tools to configureprint settings, calibrate thedevice, clean the printcartridges, print the self-testdiagnostic page, ordersupplies online, and findsupport information from theWeb site.For more information, see HPPrinter Utility (Mac OS).
Typically installed with thedevice software.
Toolbox software for PDAs(Pocket PC and Palm OS)
Provides status andmaintenance informationabout the device. You canview ink levels and batterycharge level, understanddevice lights, align printcartridges, and also configure802.11 and Bluetoothwireless settings for wirelessprinting.
For more information, seeToolbox software for PDAs(Pocket PC and Palm OS).
Control panel Provides status, error, andwarning information aboutoperations.
For more information, seeControl-panel lights reference.
Logs and reports Provides information aboutevents that have occurred.
For more information, seeMonitor the device.
6 Get started

Resource Description Location
Self-test diagnostic page • Device information:◦ Product name◦ Model number◦ Serial number◦ Firmware version
number• Accessories installed (for
example, the duplexer)• Number of pages printed
from the trays andaccessories
• Printing supply status
For more information, seeUnderstand the deviceinformation pages.
HP Web sites Provide the latest printersoftware, and product andsupport information.
www.hp.com/supportwww.hp.com
HP telephone support Lists information to contactHP. During the warrantyperiod, this support is oftenfree of charge.
For more information, seeObtain HP telephone support.
HP photo and imagingsoftware help
Provides information aboutusing the software.
HP Solution Center (Windows) Allows you to change devicesettings, order supplies, start,and access the onscreenHelp. Depending on thedevices you have installed,the HP Solution Centerprovides additional features,such as access to the HPphoto and imaging softwareand the Fax Setup Wizard.For more information, seeUse the HP Solution Center(Windows).
Typically installed with thedevice software.
AccessibilityThe device provides a number of features that make it accessible for people withdisabilities.
VisualThe device software is accessible for users with visual impairments or low visionthrough the use of your operating system's accessibility options and features. It alsosupports most assistive technology such as screen readers, Braille readers, and voice-to-text applications. For users who are color blind, colored buttons and tabs used inthe software and on the control panel have simple text or icon labels that convey theappropriate action.
Mobility
(continued)
Accessibility 7

For users with mobility impairments, the device software functions can be executedthrough keyboard commands. The software also supports Windows accessibilityoptions such as StickyKeys, ToggleKeys, FilterKeys, and MouseKeys. The devicedoors, buttons, paper trays, and paper guides can be operated by users with limitedstrength and reach.SupportFor more details about the accessibility of this product and HP's commitment toproduct accessibility, visit HP's Web site at www.hp.com/accessibility.For accessibility information for the Mac OS, visit the Apple Web site atwww.apple.com/accessibility.
Understand the device parts• Front view• Back and side view• Control Panel• Bottom view
Front view
1 Input tray extension (not included in models for some countries/regions) – Slidesup to support legal size print media. This prevents possible media feed problems.
2 Input tray – Holds the media. Remove media and close this tray when the device is notin use.
3 Wide media paper guide – Letter, legal, and A4 are loaded flush against this guide.
Chapter 1
8 Get started
4 Media width guide – Adjusts to accommodate different media sizes. Slide to the right toaccommodate narrow media. This automatically slides the narrow media guide to the leftto ensure that media is aligned for correct print margins.
5 Narrow media guide – When you move the media width guide to the right, this guideautomatically slides to the left to accommodate narrower media.
6 Print cartridge latches – Lift these latches for easy removal and insertion of printcartridges.
7 Print cartridge cradle compartments – Holds the print cartridges.
8 Front access cover – Provides access to the print cartridges and for clearing paperjams. This cover must be closed before printing can begin.
9 Output slot – Media exits the device from here.
10 Output door – Drops open automatically when the device is turned on. Allows media toexit the device.
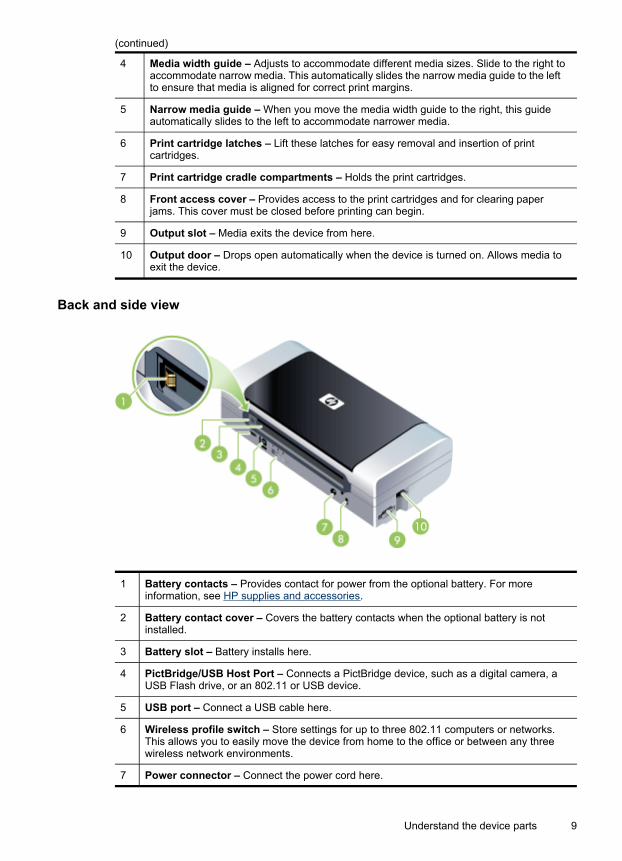
Back and side view
1 Battery contacts – Provides contact for power from the optional battery. For moreinformation, see HP supplies and accessories.
2 Battery contact cover – Covers the battery contacts when the optional battery is notinstalled.
3 Battery slot – Battery installs here.
4 PictBridge/USB Host Port – Connects a PictBridge device, such as a digital camera, aUSB Flash drive, or an 802.11 or USB device.
5 USB port – Connect a USB cable here.
6 Wireless profile switch – Store settings for up to three 802.11 computers or networks.This allows you to easily move the device from home to the office or between any threewireless network environments.
7 Power connector – Connect the power cord here.
(continued)
Understand the device parts 9

8 Security lock slot – Connect a security lock here.
9 SD, MMC slots – Accepts a Secure Digital (SD) card or Multimedia Card (MMC) forprinting digital images.
10 USB slot – Accepts 802.11 or Bluetooth wireless USB accessory.
Control Panel
1 (Cancel button) – Cancels the current print job. The time it takes to canceldepends on the size of the print job. Press this button only once to cancel a queuedprint job.
2 (Resume button) – Resumes a print job that is waiting or after temporaryinterruption (for example, when adding print media to the printer).
3 Resume light – Lights up in amber when a print job is waiting, and blinks or turns onto relay status or a need for intervention.
4 Battery charging light – Lights up in green when the battery is charging.
5 Left print cartridge light – Blinks when the left print cartridge is absent or improperlyfunctioning. Turns on solid when the ink is low or empty.
6 Right print cartridge light – Blinks when the right print cartridge is absent orimproperly functioning. Turns on solid when the ink is low or empty.
7 (Power button) – Turns the printer off or on.
8 Power light – Lights up in green when the printer is turned on using the AC adapteror a 41-100% charged battery. When powered by battery, lights up in amber whenbattery is 10-40% charged, and red when battery is below 10% charged. Blinksduring printing.
Chapter 1(continued)
10 Get started

Bottom view
1 Card holder – Holds a name card or business card.
2 Cover of replaceable ink service module – Provides access to the ink service module.(See Replace the ink service module.)
Travel tipsThe following tips will help you prepare for traveling with your device:
• If you are bringing an extra black or photo print cartridge, follow these guidelines:For a partially used black print cartridge or a partially used or full photo printcartridge, store it in the travel holder to prevent ink leakage (see Store printingsupplies). A newly opened black print cartridge will leak slightly at high altitudes(such as in airplanes). To avoid this, wait to install new black cartridges until youreach your destination. Until then, keep them in their original, taped packaging.
• You can bring the device in a carrying case. For more information, see HPsupplies and accessories. The carrying case has compartments for both yournotebook and the device. The compartments also detach if you want to carry thenotebook and device separately.
• Turn off the device using (Power button). This ensures that the print cartridgesreturn to the home position at the left side of the device and lock in place.
WARNING! To help prevent damaging the device, wait until all lights haveturned off completely before removing the battery or power cord. This processmight take approximately 16 seconds.
• Disconnect the device cable and power adapter from the device. Slide down theinput tray extension and close the input tray.
• If you are traveling to another country/region, bring the necessary plug adapterwith you.
• If you need to buy print cartridges while traveling to another country/region, seethe online help called “Traveling with your HP Mobile Printer” for regional cartridgecompatibility information. This help is available through the Toolbox (Windows), HPPrinter Utility (Mac OS), or Toolbox software for PDAs (Pocket PC and Palm OS).
Travel tips 11

• Use only the power adapter that is supplied with the device. Do not use any othervoltage transformer or converter. The power adapter can be used with AC powersources of 100 to 240 volts, 50 or 60 Hz.
• Remove the battery if you will not be using the device for more than a month.• When traveling with photo paper, pack it flat so it doesn't warp or curl. Photo paper
should be flat before printing. If the corners of the photo paper curl more than 10mm (3/8 inch), flatten the paper by putting it in the resealable storage bag, thenrolling the bag on a table edge until the paper is flat.
Chapter 1
12 Get started
2 Install the accessoriesThis chapter provides information on optional accessories such as the battery andwireless printer accessories that are included with certain device models. To orderaccessories, see Order printing supplies online.
This section contains the following topics:
• Install and use the battery• Install and use 802.11 and Bluetooth accessories
Install and use the batteryThe lithium-ion rechargeable battery comes with HP Officejet H470b and HP OfficejetH470wbt printers. It is also available for purchase as an optional accessory. For moreinformation, see HP supplies and accessories.
This section contains the following topics:• Battery safety• Understand the battery• Charge and use the battery
Battery safety• Use only the battery designed specifically for the device. For more information, see
HP supplies and accessories and Device specifications.• When discarding a battery, contact your local waste disposal provider regarding
local restrictions on the disposal or recycling of batteries. Though the lithium-ionrechargeable battery is mercury-free, it might require recycling or proper disposalat end-of-life. For more information, see Recycling.
• Battery might explode if incorrectly replaced or disposed of in fire. Do not short-circuit.
• To purchase a replacement battery, contact your local dealer or HP sales office.For more information, see HP supplies and accessories.
• To avoid risk of fire, burns, or damage to your battery, do not allow a metal objectto touch the battery contacts.
• Do not disassemble the battery. There are no serviceable parts inside.• Handle a damaged or leaking battery with extreme care. If you come in contact
with the electrolyte, wash the exposed area with soap and water. If it contacts theeye, flush the eye with water for 15 minutes and seek medical attention.
• Do not expose the battery to storage temperatures above 50°C (122°F) or below-20°C (4°F).
Install the accessories 13

Important notesTake note of the following when charging or using the battery:
• Charge the battery for 4 hours before using the battery for the first time. Forsubsequent charges, it takes approximately 2 hours to fully charge the battery.
• The battery charge light is green when the battery is charging. If it is red, thebattery might be faulty and need to be replaced.
• The Power light is green when the battery is 41-100% charged, amber when10-40% charged, and red when less than 10% charged. Charge the battery whenthe Power light turns amber. If it turns red, charge the battery as soon as possible.The battery status is also displayed on the Printer Status tab in the Toolbox(Windows) and the Power Management panel in the HP Printer Utility (Mac OS). Ifyou are using a Pocket PC or Palm OS device, you can use the Toolbox softwarefor PDAs. For more information, see Toolbox software for PDAs (Pocket PC andPalm OS).
• If your battery is running low, either plug in the AC adapter to charge it or replacethe battery with one that is charged.
• A fully charged battery can print up to approximately 450 pages, depending on thecomplexity of print jobs.
• By default, if the device is using battery power and left idle for 15 minutes, it willturn off to conserve the battery power. You can configure this feature in theToolbox (Windows), the HP Printer Utility (Mac OS), or the Toolbox software forPDAs (Pocket PC and Palm OS). For more information, see Toolbox software forPDAs (Pocket PC and Palm OS).
• Prior to long-term storage, fully charge the battery. Do not leave the battery in adischarged (empty) state for more than 6 months.
• To maximize battery life and capacity, observe the following temperature guidelines:◦ Charging: 0° to 40°C (32° to 104°F)◦ Using and storing: -20° to 50°C (-4° to 122°F)
Understand the battery
1 Battery – Supplies power to the device.
2 Battery release slider – Slides to release the battery.
Chapter 2
14 Install the accessories

Charge and use the battery
WARNING! Charge the battery for 4 hours before using the battery for the firsttime. Because the battery is normally warm while it is charging, do not charge it ina briefcase or other confined space as this might cause the battery to overheat.
NOTE: The AC adapter is normally warm to the touch when plugged into an ACoutlet.
NOTE: Wireless printing uses more battery power than wired printing. Forinformation on checking the battery charge level, see Install and use the battery.
To install the battery
NOTE: You can install the battery with the device turned on or off.
1. Slide the battery into the battery slot at an angle, until the contacts on the batteryare flush with the contacts in the battery slot. The battery contact cover slides open.
2. Push the battery into the battery slot until the battery clicks into place.3. Plug in the AC adapter and turn on the device. Allow the battery to charge for four
hours before using the battery for the first time. Subsequently, the battery chargelight is green when the battery is charging, and turns off when the battery is fullycharged.
4. After the battery is fully charged, you can use the device without connecting to theAC power supply.
Install and use the battery 15

To remove the battery1. Slide the battery release slider in the direction of the arrow.2. Remove the battery.
Install and use 802.11 and Bluetooth accessoriesSome models of the device include an 802.11 wireless or Bluetooth wireless USBaccessory.
See www.hp.com/support to learn more about supported wireless accessories.
This section contains the following topics:
• Install the 802.11 or Bluetooth wireless USB accessory• 802.11 and Bluetooth wireless printing
Install the 802.11 or Bluetooth wireless USB accessory
Insert the HP 802.11 or Bluetooth wireless USB accessory into the slot.The 802.11 accessory has one blue light. When the dongle is plugged in, the blue lightwill be on, and when there is 802.11 data communication, the light will blink.
Chapter 2
16 Install the accessories

The LED on the Bluetooth accessory provides information about its current state.
• On steady - This is the default state and means the accessory is installed and haspower.
• Rapid blinking - A sending device is discovering the Bluetooth accessory.• Blinking - The Bluetooth accessory is receiving data.
NOTE: Make sure that your Bluetooth host device and operating system aresupported by the device. For more information, visit www.hp.com/support.
802.11 and Bluetooth wireless printingThe 802.11 and Bluetooth features in this device allow you to print wirelessly. 802.11printing allows wireless printing up to 100 meters (300 feet). Bluetooth printing allowswireless printing up to 10 meters (30 feet).
For instructions on wireless printing from mobile devices, see Print from mobile devices.
NOTE: Wireless communication is available through wireless printer accessoriesthat are included with certain device models. Also, the sending device must havebuilt-in wireless capability or a wireless card installed.
NOTE: Wireless printing uses more battery power than wired printing. Forinformation on checking the battery charge level, Install and use the battery.
This section contains the following topics:
• About 802.11• About Bluetooth
About 802.11802.11 wireless technology allows you to wirelessly connect to your device by settingup “ad hoc” communication between your computer and the device. 802.11 does notrequire a direct line of sight between the sending device and the receiving device.
When you set up ad hoc communication between your computer and the device, youare creating a network of two devices. This is the recommended setup for 802.11printing to this mobile printer.
802.11 also lets you set up the device on an existing “infrastructure” network. Setting itup on an infrastructure network puts the device directly onto a local area network(LAN) using a wireless connection to an 802.11 wireless access point (WAP). Oncethe device is successfully connected to the network wirelessly, then all the computerson the same subnet can use the device.
Before setting up the device, it is recommended that you temporarily connect thedevice to the computer with a USB cable to set up the wireless connection. Once thewireless connection is established, you will remove the cable and print wirelessly. Youcan also set up the device without using a USB cable.
To set up and configure the device for 802.11 wireless printing, see 802.11 wirelessconnection.
Install and use 802.11 and Bluetooth accessories 17

About BluetoothBluetooth wireless technology allows you to wirelessly connect to your device usingradio waves in the 2.4 GHz spectrum. Bluetooth is typically used for short distances(up to 10 meters or 30 feet) and does not require a direct line of sight between thesending device and the receiving device.
Different Bluetooth profiles emulate different types of standard cable connections andhave different capabilities. For more information about Bluetooth profiles, seeConfigure Bluetooth wireless settings.When your device is directly connected to your computer (either by cable orBluetooth), it is possible to share it on a network using “printer sharing”. However, yourcomputer has to be connected to the network for others to use the device.
To set up and configure the device for Bluetooth wireless printing, see Bluetoothwireless connection.
NOTE: To configure Bluetooth settings or monitor device status (such as inklevels) using the Toolbox, you must connect the device to your computer with aUSB cable.
Chapter 2
18 Install the accessories

3 Use the deviceThis section contains the following topics:
• Select print media• Load media• Change print settings• Use the HP Solution Center (Windows)• Print on both sides (duplexing)• Print on special and custom-sized media• Print borderless• Print from mobile devices• Use memory devices• Cancel a print job
Select print mediaThe device is designed to work well with most types of office media. It is best to test avariety of print media types before buying large quantities. Use HP media for optimumprint quality. Visit the HP Web site at www.hp.com for more information about HPmedia.
This section contains the following topics:
• Tips for selecting and using print media• Understand specifications for supported media• Set minimum margins
Tips for selecting and using print mediaFor the best results, observe the following guidelines.
• Always use media that conforms to the device specifications. For moreinformation, see Understand specifications for supported media.
• Load only one type of media at a time.• On models that have an input tray extension, make sure the input tray extension is
fully extended.• Load media print-side up and aligned squarely against the alignment guides. For
more information on loading media, see Load media.• Do not overload the trays. For more information, see Understand specifications for
supported media.• To prevent jams, poor print quality, and other printing problems, avoid the following
media:◦ Multipart forms◦ Media that is damaged, curled, or wrinkled◦ Media with cutouts or perforations
Use the device 19

◦ Media that is heavily textured, embossed, or does not accept ink well◦ Media that is too lightweight or stretches easily
• Do not leave media in the input tray overnight. This might cause it to bend.• Remove each sheet of media as it prints and set aside to dry. Allowing wet media
to stack up might cause smearing.• For instructions on calibrating color, see Calibrate color.
Cards and envelopes• Avoid envelopes that have a very slick finish, self-stick adhesives, clasps, or
windows. Also avoid cards and envelopes with thick, irregular, or curled edges, orareas that are wrinkled, torn, or otherwise damaged.
• Use tightly constructed envelopes, and make sure the folds are sharply creased.• Always load envelopes into the printer with the flap facing the back of the printer
and the stamp position oriented according to the envelope icon.
Photo media• Use the Best mode to print photographs. Note that in this mode, printing takes
longer and more memory is required from your computer.• Remove each sheet as it prints and set it aside to dry. Allowing wet media to stack
up may cause smearing.• Photo paper should be flat before printing. If the corners of the photo paper curl
more than 10 mm (3/8 inch), flatten the paper by putting it in a resealable plasticbag, and roll them into a tube. Roll the sheets so the curve of the tube is in theopposite direction of the original curl of the paper. Roll the tube no smaller than a1.5 inch (4 cm) in diameter.
Chapter 3
20 Use the device

Transparencies• Insert transparencies with the rough side up and the adhesive strip pointing down.• Use the Normal mode to print transparencies. This mode provides longer drying
time and ensures that the ink dries completely before the next page is delivered tothe output tray.
• Remove each sheet as it prints and set it aside to dry. Allowing wet media to stackup may cause smearing.
Custom-sized media• Use only custom-sized media that is supported by the device.• If your application supports custom-sized media, set the media size in the
application before printing the document. If not, set the size in the print driver. Youmight need to reformat existing documents to print them correctly on custom-sizedmedia.
Understand specifications for supported mediaUse the Understand supported sizes and Understand supported media types andweights tables to determine the correct media to use with your device, and determinewhat features will work with your media.
This section contains the following topics:
• Understand supported sizes• Understand supported media types and weights
Understand supported sizes
Media size
Standard media sizes
U.S. Letter (216 x 279 mm; 8.5 x 11 inches)*
U.S. Legal (216 x 356 mm; 8.5 x 14 inches)*
A4 (210 x 297 mm; 8.3 x 11.7 inches)*
U.S. Executive (184 x 267 mm; 7.25 x 10.5 inches)*
U.S. Statement (140 x 216 mm; 5.5 x 8.5 inches)*
JIS B5 (182 by 257 mm; 7.2 by 10.1 inches)*
A5 (148 x 210 mm; 5.8 x 8.3 inches)*
8.5 x 13 inches (216 x 330 mm)
Envelopes
U.S. #10 Envelope (105 x 241 mm; 4.12 x 9.5 inches)
Monarch Envelope (98 x 191 mm; 3.88 x 7.5 inches)
A2 Envelope (111 x 146 mm; 4.37 x 5.75 inches)
DL Envelope (110 x 220 mm; 4.3 x 8.7 inches)
Select print media 21

Media size
C5 Envelope (162 x 229 mm; 6.4 x 9 inches)
C6 Envelope (114 x 162 mm; 4.5 x 6.4 inches)
Cards
Index card (76.2 x 127 mm; 3 x 5 inches)*
Index card (102 x 152 mm; 4 x 6 inches)*
Index card (127 x 203 mm; 5 x 8 inches)*
A6 card (105 x 148.5 mm; 4.13 x 5.83 inches)*
Photo media
Photo (76 x 127 mm; 3 x 5 inches)
Photo (88.9 x 127 mm; 3.5 x 5 inches)
Photo (101.6 by 152.4 mm; 4 by 6 inches)
Photo with tab (101.6 by 152.4 mm; 4 by 6 inches)
Photo (127 by 177.8 mm; 5 by 7 inches)
Photo (203.2 by 254 mm; 8 by 10 inches)
Photo 10 by 15 cm (100 by 150 mm; 4 by 6 inches)
Photo 10 by 15 cm with tab (100 by 150 mm; 4 by 6 inches)
Borderless Photo (101.6 by 152.4 mm; 4 by 6 inches)
Borderless Photo with tab (101.6 by 152.4 mm; 4 by 6 inches)
Borderless Photo 10 by 15 cm (100 by 150 mm; 3.93 x 5.9 inches)
Borderless Photo 10 by 15 cm with tab (100 by 150 mm; 3.93 x 5.9 inches)
Photo L (89 by 127 mm; 3.5 by 5 inches)
Photo 2L (178 by 127 mm; 7 by 5 inches)
Borderless Photo L (89 by 127 mm; 3.5 by 5 inches)
Borderless Photo L with tear-off tab (89 by 127 mm; 3.5 by 5 inches)
Photo media sizes between 89 by 127 mm (3.5 by 5 inches) and 216 by 279 mm (8.5 by 11inches)
Other media
L (89 by 127 mm; 3.5 by 5 inches)
2L with tab (178 by 127 mm; 5 by 7 inches)
Custom-sized media between 76.2 to 216 mm wide and 102 to 356 mm long (3 to 8.5 incheswide and 4 to 14 inches long)*
* These media sizes support manual duplex printing. For more information on duplexprinting, see Print on both sides (duplexing).
Chapter 3(continued)
22 Use the device

Understand supported media types and weights
Type Weight Capacity
Paper 64 to 90 g/m2
(16 to 24 lb bond)Up to 50 sheets of plainpaper(5 mm or 0.2 inch stacked)
Photo paper 5 to 12 mils Up to 10 sheets
Transparencies Up to 20 sheets
Labels Up to 20 sheets
Cards Up to 162 g/m2
(90 lb index)Up to 5 sheets
Envelopes 75 to 200 g/m2
(20 to 53 lb bond)Up to 5 envelopes
Set minimum marginsThe document margins must match (or exceed) these margin settings in portraitorientation.
Media (1) Leftmargin
(2) Rightmargin
(3) Topmargin
(4) Bottommargin*
A4U.S. ExecutiveU.S. StatementB5A5
3.3 mm (0.13inch)
3.3 mm (0.13inch)
3.3 mm (0.13inch)
3.3 mm (0.13inch)
U.S. LetterU.S. LegalCustom-sized media8.5 x 13 inch
6.35 mm(0.25 inch)
6.35 mm(0.25 inch)
2 mm (0.08inch)
3 mm (0.12inch)
Cards 2 mm (0.08inch)
2 mm (0.08inch)
2 mm (0.08inch)
0.5 mm (0.02inch)
Select print media 23

Media (1) Leftmargin
(2) Rightmargin
(3) Topmargin
(4) Bottommargin*
Photo media
Envelopes 3.3 mm (0.13inch)
3.3 mm (0.13inch)
14.2 mm(0.56 inch)
14.2 mm(0.56 inch)
* To achieve this margin setting on a computer running Windows, click the Advancedtab in the print driver, and select Minimize Margins.
Load mediaThis section provides instructions for loading media into the device.
To load media1. Remove all media from the input tray.2. Insert the media print-side up and align it squarely against the media paper guide.
Adjust the media width guide so it fits snugly against the sides of the media.
3. If printing on legal media, extend the input tray extension, if available on yourmodel.
4. Change any other print settings if necessary, then click OK to print.
Change print settingsYou can change print settings (such as paper size or type) from an application or theprinter driver. Changes made from an application take precedence over changes
Chapter 3(continued)
24 Use the device

made from the printer driver. However, after the application is closed, the settingsreturn to the defaults configured in the driver.
NOTE: To set print settings for all print jobs, make the changes in the printerdriver.
For more information about the features of the Windows printer driver, see theonline help for the driver. For more information about printing from a specificapplication, see the documentation that came with the application.
• To change settings from an application for current jobs (Windows)• To change default settings for all future jobs (Windows)• To change settings (Mac OS)
To change settings from an application for current jobs (Windows)1. Open the document that you want to print.2. On the File menu, click Print, and then click Setup, Properties, or Preferences.
(Specific options may vary depending on the application that you are using.)3. Change the settings that you want, and then click OK, Print, or a similar command.
To change default settings for all future jobs (Windows)1. Click Start, point to Settings, and then click Printers or Printers and Faxes.
- Or -Click Start, click Control Panel, and then double-click Printers.
2. Right-click the printer icon, and then click Properties, Document Defaults, orPrinting Preferences.
3. Change the settings that you want, and then click OK.
To change settings (Mac OS)1. On the File menu, click Page Setup.2. Change the settings that you want (such as paper size), and then click OK.3. On the File menu, click Print to open the print driver.4. Change the settings that you want (such as media type), and then click OK or Print.
Use the HP Solution Center (Windows)Use the HP Solution Center to change print settings, order supplies, and access theonscreen Help.
The features available in the HP Solution Center vary depending on the devices youhave installed. The HP Solution Center is customized to show icons that areassociated with the selected device. If the selected device is not equipped with aparticular feature, then the icon for that feature does not appear in the HP SolutionCenter.
If the HP Solution Center on your computer does not contain any icons, an error mighthave occurred during the software installation. To correct this, use the Control Panel inWindows to completely uninstall and reinstall the software.
Use the HP Solution Center (Windows) 25

Print on both sides (duplexing)You can print on both sides manually using the Windows printer software.
You can print on both sides of a sheet using a Mac by first printing the odd-numberedpages, turning the pages over, and then printing the even-numbered pages.
• Guidelines for printing on both sides of a page• To perform duplexing (Windows)• To perform duplexing (Mac OS)
Guidelines for printing on both sides of a page• Always use media that conforms to the device specifications. For more
information, see Understand specifications for supported media.• Specify duplex options in your application or in the printer driver.• Do not print on both sides of transparencies, envelopes, photo paper, glossy
media, or paper lighter than 18 lb bond (75 g/m2). Jams might occur with thesemedia types.
• Several kinds of media require a specific orientation when you print on both sidesof a page, such as letterhead, preprinted paper, and paper with watermarks andprepunched holes. When you print from a computer running Windows, the deviceprints the first side of the media first. When you print from a computer using theMac OS, the device prints the second side first. Load the media with the front sidefacing down.
To perform duplexing (Windows)1. Load the appropriate media. See Guidelines for printing on both sides of a page
and Load media.2. With a document open, on the File menu, click Print, and then click Properties.3. Click the Features tab.4. Choose Manual from the two-sided printing drop-down list.5. To automatically resize each page to match the document's onscreen layout,
ensure Preserve Layout is selected. Clearing this option might result in unwantedpage breaks.
6. Select or clear the Flip Pages Up check box to match the way you want thebinding. See the graphics in the printer driver for examples.
7. Change any other desired settings and click OK.8. Print your document.9. After the first side of the document is printed, follow the onscreen instructions and
reload the paper into the tray to complete printing.10. After reloading the paper, click Continue in the onscreen instructions to continue
the print job.
Chapter 3
26 Use the device

To perform duplexing (Mac OS)1. Load the appropriate media. For more information, see Guidelines for printing on
both sides of a page and Load media.2. With a document open, click Print on the File menu.3. From the drop-down list, select Paper Handling, click Print: Odd numbered
pages, and then press Print.4. Flip the paper over and then print the even-numbered pages.
Print on special and custom-sized mediaThis section covers the following topics:
• To print on special or custom-sized media (Windows)• To print on special or custom-sized media (Mac OS)
To print on special or custom-sized media (Windows)1. Load the appropriate media. For more information, see Load media.2. With a document open, click Print on the File menu, and then click Setup,
Properties, or Preferences.3. Click the Features tab.4. Select the media size from the Size drop-down list.
To set a custom media size:a. Select Custom from the drop-down list.b. Type a name for the new custom size.c. In the Width and Height boxes, type the dimensions, and then click Save.d. Click OK twice to close the properties or preferences dialog box. Open the
dialog box again.e. Select the new custom size.
5. To select the media type:a. Click More in the Paper Type drop-down list.b. Click the desired media type, and then click OK.
6. Select the media source from the Paper Source drop-down list.7. Change any other settings, and then click OK.8. Print your document.
To print on special or custom-sized media (Mac OS)1. Load the appropriate media. For more information, see Load media.2. On the File menu, click Page Setup.3. Select the media size.4. To set a custom media size:
a. Click Manage Custom Sizes in the Paper Size pull-down menu.b. Click New and type a name for the size in the Paper Size Name box.
Print on special and custom-sized media 27

c. In the Width and Height boxes, type the dimensions and set the margins, ifdesired.
d. Click Done or OK, and then click Save.5. On the File menu, click Page Setup, and then select the new custom size.6. Click OK.7. On the File menu, click Print.8. Open the Paper Handling panel.9. Under Destination Paper Size, click the Scale to fit paper size tab, and then
select the customized paper size.10. Change any other desired settings, and then click OK or Print.
Print borderlessBorderless printing lets you print to the edges of certain photo media types and arange of standard media sizes.
NOTE: Open the file in a software application and assign the image size. Makesure the size corresponds to the media size on which you are printing the image.
You can also gain access to this feature from the Printing Shortcuts tab. Openthe printer driver, select the Printing Shortcuts tab, and select the printingshortcut for this print job drop-down list.
• To print a borderless document (Windows)• To print a borderless document (Mac OS)
To print a borderless document (Windows)1. Load the appropriate media. For more information, see Load media.2. Open the file that you want to print.3. From the application, open the print driver:
a. Click File, and then click Print.b. Click Properties, Setup or Preferences.
4. Click the Features tab.5. Select the media size from the Size drop-down list.6. Select the Borderless check box.7. Select the media source from the Paper Source drop-down list.8. Select the media type from the Paper Type drop-down list.9. If you are printing photos, select Best from the Print Quality drop-down list.
Alternatively, select Maximum dpi, which provides up to 4800 x 1200 optimizeddpi* for optimum print quality.*Up to 4800 x 1200 optimized dpi for color printing and 1200 input dpi. This settingmight temporarily use a large amount of hard disk space (400 MB or more) and willprint more slowly.
10. Change any other print settings, and then click OK.11. Print the document.12. If you printed on photo media with a tear-off tab, remove the tab to make the
document completely borderless.
Chapter 3
28 Use the device

To print a borderless document (Mac OS)1. Load the appropriate media. For more information, see Load media.2. Open the file that you want to print.3. Click File, and then click Page Setup.4. Select the borderless media size, and then click OK.5. Click File, and then click Print.6. Open the Paper Type/Quality panel.7. Click the Paper tab, and then select the media type from the Paper type drop-
down list.8. If you are printing photos, select Best from the Quality drop-down list.
Alternatively, select Maximum dpi, which provides up to 4800 x 1200 optimizeddpi*.*Up to 4800 x 1200 optimized dpi for color printing and 1200 input dpi. This settingmight temporarily use a large amount of hard disk space (400 MB or more) and willprint more slowly.
9. Select the media source. If you are printing on thick or photo media, select themanual feed option.
10. Change any other print settings, and then click Print.11. If you printed on photo media with a tear-off tab, remove the tab to make the
document completely borderless.
Print from mobile devicesThe printer supports printing from a variety of mobile devices and memory cards, suchas:
• Cameras• Mobile phones• PDAsThis section covers the following topics:
• Print digital photographs• Print from mobile phones• Print from Pocket PC devices• Print from Palm OS devices
Print digital photographsYou can print photographs directly from a digital camera or directly from a memorycard, or you can transfer the photos from the card or camera to your computer andprint them from a software application, such as HP Photo Printing Software. Also, youcan print photos directly from a PictBridge-compatible camera.
If your digital camera uses an SD or MMC card, you can insert the card into the printerto print your photos. Your camera must support Digital Print Order Format (DPOF)version 1 or 1.1 in order to print directly from the card to the printer. DPOF files alsoautomatically print directly from a USB Flash drive that is connected to the USB port ofthe printer. For more information, see Print from memory cards and USB Flash drives.
Print from mobile devices 29

This section covers the following topics:
• To print with six-ink color• Guidelines for printing photographs• To print from a PictBridge-compatible camera• To transfer photos to your computer
To print with six-ink colorYour printer can print with six-ink color to enhance the quality of printed photographs.Print high-quality grayscale photographs by using a black print cartridge and a tri-colorprint cartridge, or by using a gray photo print cartridge and a tri-color print cartridge. Toperform six-ink color printing, a photo and a tricolor print cartridge must be installedtogether.
NOTE: You can print high-quality black-and-white photographs using a grayphoto print cartridge, combined with the tri-color print cartridge.
Guidelines for printing photographs• For the best results when printing photographs and images, choose Best mode
and select an HP photo paper in the printer driver. Best mode uses HP's uniquePhotoREt IV color-layering technology and ColorSmart III color optimizationtechnology to create realistic photo images, vivid color output, and extremely sharptext. With PhotoREt IV, a greater range of colors, lighter tones, and smoothergradations between tones can be achieved, ensuring the best photo and imageprint quality.Alternatively, select Maximum dpi, which provides up to 4800 x 1200 optimizeddpi* for optimum print quality.*Up to 4800 x 1200 optimized dpi for color printing and 1200 input dpi. This settingmight temporarily use a large amount of hard disk space (400 MB or more) and willprint more slowly. Photo cartridge, if present, further enhances the print quality.
• Remove each sheet of paper as it prints and set it aside to dry.• If the printed colors visibly shift towards yellow, cyan or magenta, or there is a
tinge of color in the gray shades, you need to calibrate the color. For moreinformation, see Calibrate color.
• If you install photo print cartridges, align the print cartridges for best possible printquality. You do not need to align the print cartridges every time you install a photoprint cartridge, only when necessary. For more information, see Align the printcartridges.
• To store a print cartridge, see Travel tips.• Always hold photo paper by the edges. Fingerprints on photo paper reduce print
quality.• Photo paper should be flat before printing. If the corners of the photo paper curl
more than 10 mm (3/8 inch), flatten the paper by putting it in a resealable plasticbag, and roll them into a tube. Roll the sheets so the curve of the tube is in theopposite direction of the original curl of the paper. Roll the tube no smaller than a1.5 inch (4 cm) in diameter.
Chapter 3
30 Use the device

To print from a PictBridge-compatible cameraThe printer supports standard PictBridge-compliant features. See your digital cameradocumentation for more information about using its PictBridge features.
1. Connect the camera to the printer with the USB cable provided with the camera.The printer and camera compare features, and the compatible features aredisplayed on the camera.
2. Navigate through the camera menus to execute the desired photo-printing features.
To transfer photos to your computer
NOTE: The printer driver lets your computer read memory cards inserted into theprinter as physical disk drives when you are connected with a USB cable. You canthen access your photo files and print them with the software of your choice.
1. Insert the memory card into the correct card slot on the printer. Make sure the sideof the card with the connecting pins or holes is placed into the printer first.
2. Press (Cancel button) to cancel direct printing from the card. If your computer isconnected to the printer with a USB cable, the card then appears as a drive inWindows Explorer or on the Mac OS desktop. You can then transfer the photo filesto another drive on the computer or open and print your photographs with thesoftware application of your choice.
Print from mobile phonesIf you have a mobile phone that supports Bluetooth and you have installed a Bluetoothwireless printer accessory in your device, you can print from your phone.
Some phones have HP’s Mobile Printing Application software installed, which canincrease the quality of the output. Visit www.hp.com/support to download thisapplication if it is available for your phone and not preinstalled. Other printingapplications might be available from your phone manufacturer that support this printer.
NOTE: HP Mobile Printing Application version 2.0 and later are supported. Youcan download the latest version from www.hp.com/support or from your phonemanufacturer’s website.
See the documentation for your phone’s printing application for information on printingitems such as:
• Images• Messages: Email, short message service (SMS), and multimedia messaging
system (MMS)• Contacts• Calendar• NotesThis sections contains the following topics:
• To install the Mobile Printing Application on the phone• To print from a mobile phone
Print from mobile devices 31

To install the Mobile Printing Application on the phoneUse the following steps to install the Mobile Printing Application on your phone, if it isnot already installed. For help using these steps, see your mobile phonedocumentation or visit the manufacturer’s support website.
1. Download the Mobile Printing Application to a computer from www.hp.com/supportor from your phone manufacturer’s website.In this example, the name of the downloaded file is print.sis.
2. Transfer the print.sis file from the computer to the phone using one of the followingmethods.• Email: Attach the print.sis file to an email, send the email to your email
address, then open the email on your phone.• Bluetooth: If your computer has Bluetooth, use your computer’s Bluetooth utility
to discover the phone, then send the print.sis file from the computer to thephone.
• Infrared: Align the phone’s infrared lens with the computer’s infrared lens. Usethe Wireless Link feature in Windows to send the print.sis file to the phone.
3. Open the print.sis file on your phone.4. Follow the onscreen instructions to install the application.5. Verify that the Mobile Printing Application has been installed by scrolling through
the phone’s main menu to find the Print icon.If you don’t see the Print icon, then repeat steps 3-5.
To print from a mobile phonePrint a file using one of the following methods, or see the documentation for yourphone’s printing application for information about printing.
• Mobile Printing Application• Bluetooth Send
NOTE: The printer ships with built-in fonts for Bluetooth printing. Certain modelsinclude Asian fonts for printing from mobile phones. The fonts included depend onthe country/region where the printer was purchased. For more information, seeDevice specifications.
Print from Pocket PC devicesCertain Pocket PC models support 802.11 and Bluetooth wireless printing. SomePocket PC devices come with wireless integrated and some require you to install aseparate wireless card in your device to enable 802.11 or Bluetooth printing.
NOTE: 802.11 and Bluetooth wireless printing are available through wirelessprinter accessories that are included with certain printer models. For a descriptionand illustration of the wireless printer accessories, see Install and use 802.11 andBluetooth accessories.
You can install HP Mobile Printing for Pocket PC to print wirelessly from your PocketPC, if it is not already preinstalled. You can find the software on the Starter CD.
Chapter 3
32 Use the device

If you are using a Pocket PC or Palm OS device, you can use the Toolbox software forPDAs to configure 802.11 and Bluetooth wireless settings for wireless printing. SeeToolbox software for PDAs (Pocket PC and Palm OS).
For printing instructions, see Print from Pocket PC devices.
For an overview of 802.11 and Bluetooth printing, see 802.11 and Bluetooth wirelessprinting.
For detailed information about setting up and configuring wireless settings for theprinter, see 802.11 wireless connection and Bluetooth wireless connection.
This section contains the following topics:
• To install HP Mobile Printing for Pocket PC• To print from Pocket PC devices
To install HP Mobile Printing for Pocket PCInstall HP Mobile Printing for Pocket PC from a desktop or notebook computer to aPocket PC, such as an HP iPAQ, through Microsoft ActiveSync.
1. Insert the Starter CD in the CD drive. The CD menu runs automatically. If the CDmenu does not start automatically, double-click the Setup icon on the Starter CD.
2. Connect the Pocket PC to the computer.If you need help connecting with ActiveSync, see the Pocket PC user’s guide.
3. Double-click the executable file you downloaded on the computer.The installer program copies the necessary files to the Pocket PC.
After HP Mobile Printing for Pocket PC is successfully installed, it appears on the Startmenu of the Pocket PC.
To print from Pocket PC devicesThe instructions in this section assume you have established a wireless connectionwith the printer using the Toolbox software for PDAs. For more information, seeToolbox software for PDAs (Pocket PC and Palm OS).
If your PDA does not have wireless integrated, then install an 802.11 or Bluetoothwireless card in your PDA according to the manufacturer’s instructions.
Use the following steps to print files from Pocket PCs. For help using these steps, seeyour PDA or wireless card documentation.
NOTE: Printing instructions for Pocket PCs vary according to the third-partyprinting application used. See the documentation that came with the third-partyprinting application for printing instructions.
To print using a wireless connection1. If using a Bluetooth connection, turn on the PDA Bluetooth radio. See your PDA or
Bluetooth wireless card documentation for instructions about turning on theBluetooth radio.
2. Insert the 802.11 or Bluetooth wireless printer accessoryy into the printer. Formore information, see Install the 802.11 or Bluetooth wireless USB accessory.
3. Tap Start, and then tap HP Mobile Printing.
Print from mobile devices 33

4. Tap the magnifying glass icon on the lower bar to see the files.5. Select the file you want to print, and then tap Print Options.6. Accept the defaults or change the print settings using the drop-down menus.7. Tap Print.
The Printing screen appears and the file will print.
NOTE: To print using an 802.11 connection, the IP address in the My Printersbox must match the IP address of the printer.
Print from Palm OS devicesYou can print from Palm OS devices using an 802.11 or Bluetooth wireless connectionand the Printboy utility. Some Palm OS devices come with wireless integrated andsome require you to install a separate wireless card in your device to enable 802.11 orBluetooth printing.
NOTE: 802.11 and Bluetooth wireless printing are available through wirelessprinter accessories that are included with certain printer models. For a descriptionand illustration of the wireless printer accessories, see Install and use 802.11 andBluetooth accessories.
The Printboy utility enhances the formatting for documents printed from standard PalmOS applications such as the Address, Memo Pad, To Do List, Date Book, and Mailoptions. It also allows you to print using Documents To Go. For more information, visitwww.hp.com/support.
Documents To Go enables you to print MS Word and MS Excel files. Find DocumentsTo Go on the CD that came with your Palm OS device or visit the DataViz website athttp://www.dataviz.com.
For an overview of 802.11 and Bluetooth printing, see 802.11 and Bluetooth wirelessprinting.
For detailed information about setting up and configuring wireless settings on theprinter, see 802.11 wireless connection and Bluetooth wireless connection.
• To install Printboy• To install a wireless card• To print using standard Palm OS applications• To choose a default printer (optional)• To print using Documents To Go
To install PrintboyFor information on downloading and installing Printboy on Windows or the Mac OS,visit www.hp.com/support.
For information on using Printboy, see the documentation that came with the software.
To install a wireless card
CAUTION: You must install the wireless card software files before inserting thecard in the Palm OS device. Otherwise, the card will not function properly.
Chapter 3
34 Use the device

If your Palm OS device does not come with wireless integrated, then install an 802.11or Bluetooth wireless card in your device according to the manufacturer’s instructions,or visit Palm’s website at http://www.palm.com.
To print using standard Palm OS applicationsFor instructions on using Printboy to print from standard Palm OS applications, see thedocumentation that came with the Printboy utility or that came with your Palm OSdevice.
If you are using a Pocket PC or Palm OS device, you can use the Toolbox software forPDAs to configure 802.11 and Bluetooth wireless settings for wireless printing. Formore information, see Toolbox software for PDAs (Pocket PC and Palm OS).
NOTE: Printing instructions for Palm OS devices vary according to the third-partyprinting application used. See the documentation that came with the third-partyprinting application for printing instructions.
To choose a default printer (optional)You can select a default printer to use for all your printing. For instructions on selectingthe HP Officejet H470 printer as the default printer, see the documentation that camewith the Printboy software.
To print using Documents To GoFor instructions on printing using Documents To Go, see the documentation that camewith the software, or visit the DataViz website at http://www.dataviz.com for moreinformation.
Use memory devicesThe following section provides information on printing from memory cards and USBFlash drives.
• Print from memory cards and USB Flash drives
Print from memory cards and USB Flash drivesIf your digital camera uses a SD card or MMC card, you can insert the card into thedevice to print your photos. Your camera must support Digital Print Order Format(DPOF) version 1 or 1.1 in order to print directly from the card to the device. See yourdigital camera documentation to see if it supports DPOF files and for additionalinstructions on printing photos.
DPOF files are files created by digital cameras. They are stored on the camera’smemory card and contain information such as which images are selected to print andhow many of each image are to be printed or saved. The printer can read a DPOF filefrom the memory card so you do not have to use the printer software to reselect theimages to print or save.
DPOF files also automatically print directly from a USB Flash drive that is connected tothe USB port of the device.
Use memory devices 35

You can also transfer photos from a memory card or a USB Flash drive onto yourcomputer’s hard disk and print them from a software application such as HP PhotoPrinting Software.
For information on loading photo paper, see Load media.
To print from a memory card1. Select the images you want to print by creating a DPOF file while the memory card
is still in your digital camera. The settings you can specify (such as number ofcopies) are specific to your camera. See your digital camera’s documentation formore information.
2. Turn on the printer.3. Load the appropriate media. For more information, see Load media.4. Configure your desired print settings:
• Windows: Open the Toolbox. Click the Printer Services tab, and then clickPrint Settings. In the dialog box, specify paper type, size, and print quality.For more information on the Windows Toolbox, see Toolbox (Windows).
• Mac OS: Open the HP Printer Utility. Click Direct Print Settings. In the dialogbox, specify paper type, size, and print quality. For more information on the HPPrinter Utility, see HP Printer Utility (Mac OS).
NOTE: If you do not have the Toolbox or HP Printer Utility installed, printa configuration page to check printer media settings for direct printing. Thisinformation will verify whether you are loading the correct media size andtype before printing. For more information, see Understand the deviceinformation pages.
5. Insert the card containing the DPOF file into the correct card slot on the printer.Make sure the side of the card with the connecting pins or holes is placed into theprinter first.
CAUTION: If you do not insert the edge with card connector into the printerfirst, you can damage the card, the printer, or both.
Chapter 3
36 Use the device

The Resume light will blink after a few seconds if there is a DPOF file on the card.6. Press (Resume button) to print the images. The printer will automatically
recognize the DPOF file on the memory card and print the images according to thespecifications you set in the file. If it is a large file, the printer might take some timeto print after you press .
CAUTION: Do not remove the memory card until the print job is completed.Otherwise the print job will be canceled.
NOTE: Printing might take several minutes, depending on print settings and thecomplexity of the image.
Cancel a print jobYou can cancel a print job using one of the following methods.
Control panel: Press (Cancel button). This clears the job that the device iscurrently processing. It does not affect jobs waiting to be processed.Windows: Double-click the printer icon that appears in the lower-right corner of thecomputer screen. Select the print job, and then press the Delete key on the keyboard.Mac OS: Double-click the printer in the Printer Setup Utility. Select the print job, clickHold, and then click Delete.
Cancel a print job 37

4 Configure and manageThis section is intended for the administrator or individual who is responsible formanaging the device. This section contains information about the following topics.
• Manage the device• Use device management tools• Understand the device information pages• Configure the device (Windows)• Configure the device (Mac OS)• Uninstall and reinstall the software• 802.11 wireless connection• Bluetooth wireless connection
Manage the deviceThe following table lists common tools that can be used to manage the device.Specific procedures might include other methods. For information about accessingand using the tools, see Use device management tools.
NOTE: Specific procedures might include other methods.
Windows• Device control panel• Printer driver• Toolbox
Mac OS• Device control panel• HP Printer Utility• Network Printer Setup Utility• Monitor the device• Administer the device
Monitor the deviceThis section provides instructions for monitoring the device.
Use this tool... to obtain the following information....
Toolbox (Windows) Print cartridge information: Click theEstimated Ink Levels tab to view the ink-level information, and then scroll to displaythe Cartridge Details button. Click theCartridge Details button to view information
38 Configure and manage

Use this tool... to obtain the following information....
about replacement ink cartridges andexpirations dates.*
HP Printer Utility (Mac OS) • Print cartridge information: Open theInformation and Support panel and clickSupplies Status.*
• Power Status: Click the Power Statusbutton.
PDA Toolbox (Pocket PC and Palm OS) Print cartridge information: Click theEstimated Ink Levels tab to view the ink-level information, and then scroll to displaythe Cartridge Details button. Click theCartridge Details button to view informationabout replacement print cartridges andexpiration dates.*
* The ink levels shown are an estimate only. Actual ink volumes may vary.
Administer the deviceThis section provides information about administering the device and modifyingsettings.
Use this tool... to do the following...
Toolbox (Windows) • Perform device maintenance tasks: Click theServices tab.
• Configure Bluetooth settings• Configure WiFi profiles
HP Printer Utility (Mac OS) • Perform device maintenance tasks: Openthe Information and Support panel, and thenclick the option for the task that you want toperform.
• Configure WiFi profiles
HP Network Setup Utility (Mac OS) Configure WiFi profiles
PDA Toolbox (Pocket PC and Palm OS) Configure WiFi profiles
Use device management toolsThe following lists common tools that can be used to manage the device.
• Toolbox (Windows)• HP Printer Utility (Mac OS)• Network Printer Setup Utility (Mac OS)• Toolbox software for PDAs (Pocket PC and Palm OS)• HP Instant Support• myPrintMileage
(continued)
Use device management tools 39
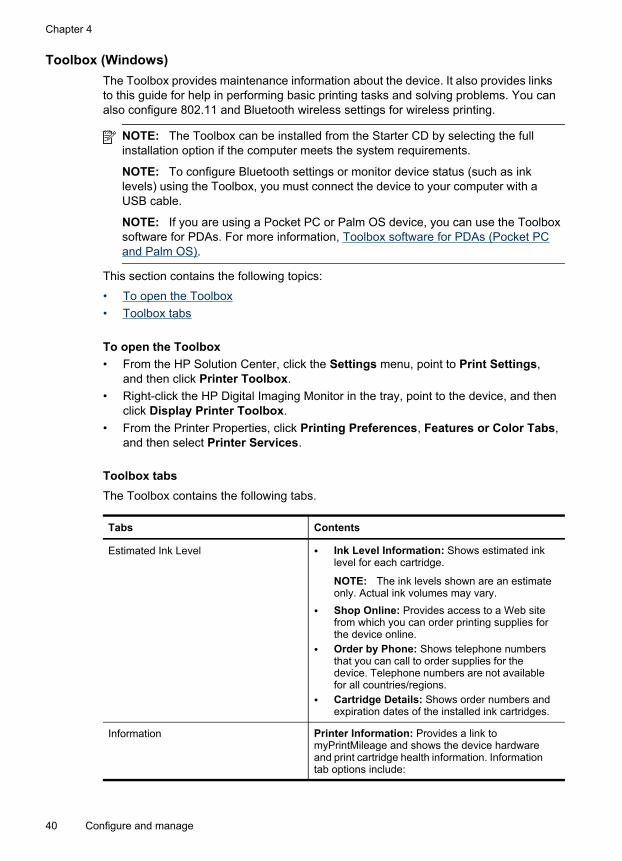
Toolbox (Windows)The Toolbox provides maintenance information about the device. It also provides linksto this guide for help in performing basic printing tasks and solving problems. You canalso configure 802.11 and Bluetooth wireless settings for wireless printing.
NOTE: The Toolbox can be installed from the Starter CD by selecting the fullinstallation option if the computer meets the system requirements.
NOTE: To configure Bluetooth settings or monitor device status (such as inklevels) using the Toolbox, you must connect the device to your computer with aUSB cable.
NOTE: If you are using a Pocket PC or Palm OS device, you can use the Toolboxsoftware for PDAs. For more information, Toolbox software for PDAs (Pocket PCand Palm OS).
This section contains the following topics:
• To open the Toolbox• Toolbox tabs
To open the Toolbox• From the HP Solution Center, click the Settings menu, point to Print Settings,
and then click Printer Toolbox.• Right-click the HP Digital Imaging Monitor in the tray, point to the device, and then
click Display Printer Toolbox.• From the Printer Properties, click Printing Preferences, Features or Color Tabs,
and then select Printer Services.
Toolbox tabsThe Toolbox contains the following tabs.
Tabs Contents
Estimated Ink Level • Ink Level Information: Shows estimated inklevel for each cartridge.
NOTE: The ink levels shown are an estimateonly. Actual ink volumes may vary.
• Shop Online: Provides access to a Web sitefrom which you can order printing supplies forthe device online.
• Order by Phone: Shows telephone numbersthat you can call to order supplies for thedevice. Telephone numbers are not availablefor all countries/regions.
• Cartridge Details: Shows order numbers andexpiration dates of the installed ink cartridges.
Information Printer Information: Provides a link tomyPrintMileage and shows the device hardwareand print cartridge health information. Informationtab options include:
Chapter 4
40 Configure and manage

Tabs Contents
• Hardware information• myPrintMileage (if installed)• HP Instant Support• Wireless strength• Traveling information• Power status
Services • Print Configuration Page: Allows you to printthe configuration page of the device. This pagecontains information about the device and thesupplies. For more information, seeUnderstand the device information pages.
• Align Print Cartridges: Guides you throughaligning the print cartridges. For moreinformation, see Align the print cartridges.
• Clean Print Cartridges: Guides you throughcleaning the print cartridges. For moreinformation, see Clean the print cartridges.
• Calibrate Color: Allows you to perform colorcalibration. For more information, see Calibratecolor.
• Print Settings: Select the default print settingsfor paper size and print quality.
• Print Network Configuration Page: View thenetwork settings for the device.
• Power Settings: Set the power time off settings.
Configure WiFi Profiles Set up a maximum of three profiles to use whenconnecting using WiFi.
NOTE: The Configure WiFi Profiles tab will notappear when the device is connecting via Bluetooth.
Configure Bluetooth Settings Set up the Bluetooth connection.
NOTE: The Configure Bluetooth Settings tab willnot appear when the device is connecting via WiFi.
HP Printer Utility (Mac OS)The HP Printer Utility contains tools to configure print settings, calibrate the device,clean the print cartridges, print the self-test diagnostic page, order supplies online, andfind Web site support information.
• To open the HP Printer Utility• HP Printer Utility panels
To open the HP Printer Utility1. From the Finder, select Computer from the Go menu.2. Select Library, and then select Printers.3. Select hp, select Utilities, and then select HP Printer Selector.4. Select the device and click Launch Utility.
(continued)
Use device management tools 41

HP Printer Utility panels
Information and Support panel• Supplies Status: Shows the information about currently installed print cartridges.• Supply Info: Shows the ink cartridge replacement options.• Device Information: Displays information about the model and serial number.
Also allows you to print the self-test diagnostic page of the device. This pagecontains information about the device and the supplies. For more information, seeUnderstand the device information pages.
• Clean: Guides you through cleaning the print cartridges. For more information, seeClean the print cartridges.
• Align: Guides you through aligning the print cartridges. For more information, seeAlign the print cartridges.
• Calibrate Color: Allows you to perform color calibration. For more information, seeCalibrate color.
• Control Panel Language: Allows you to set the language used to print reportssuch as the self-test diagnostic page.
• HP Support: Gain access to HP Web site where you can find support for thedevice, register the device, and find information about returning and recycling usedprinting supplies.
Network Printer Setup Utility (Mac OS)This tool allows you to configure network settings for the device. You can configurewireless settings such as network location name and wireless mode, and wiredsettings such as TCP/IP address, router, and subnet mask.
To open the Network Printer Setup Utility1. From the Finder, select Computer from the Go menu.2. Select Library, and then select Printers.3. Select hp, select Utilities, and then select Network Printer Setup Utility.4. Follow the onscreen instructions to configure network settings for the device.
Toolbox software for PDAs (Pocket PC and Palm OS)The Toolbox software for PDAs running Pocket PC or Palm OS allows you to viewstatus and maintenance information about the device. You can view ink levels andbattery charge level, understand device lights, align the print cartridges, and alsoconfigure 802.11 and Bluetooth wireless settings for wireless printing.
See the Toolbox software documentation for more information on using the Toolbox,or visit www.hp.com/support.
Chapter 4
42 Configure and manage

HP Instant SupportHP Instant Support is a suite of Web-based troubleshooting tools. It helps you quicklyidentify, diagnose, and resolve printing problems.
HP Instant Support provides the following information about your device:
• Easy access to troubleshooting tips: Provides tips that are customized for yourdevice.
• Resolution of specific device errors: Provides immediate access to informationthat can help you resolve errors specific to your device.
• Notification of print driver updates: Alerts you when there is an update for theprinter driver. A message appears on the HP Instant Support homepage; click thelink within the message to go directly to the download section of the HP Web site.
• Managing ink and media usage (myPrintMileage): Helps you manage andforecast device supplies usage.
This section contains the following topics:
• Security and privacy• To gain access to HP Instant Support
Security and privacyWhen you use HP Instant Support, detailed device information, such as the serialnumber, error conditions, and status, is sent to HP. HP respects your privacy andmanages this information according to the guidelines that are outlined in the HPOnline Privacy Statement (welcome.hp.com/country/us/en/privacy.html).
NOTE: To view all the data that is sent to HP, select Source (for Internet Explorerand Opera) or Page Source (for Netscape and Mozilla Firefox) from the Viewmenu in your Web browser.
To gain access to HP Instant SupportToolbox (Windows): Click the Information tab, and then click HP Instant Support.
myPrintMileagemyPrintMileage is a service that HP provides to help you track and forecast yourdevice usage and plan the purchase of supplies.
To use myPrintMileage, you must have the following:
• Internet connection• Device connected
Use device management tools 43

On the myPrintMileage Web site, you can see the print analysis, such as the amountof ink you have used, whether you use more black or color ink, and the estimatednumber of pages you can print with the remaining amount of ink.
To gain access to myPrintMileage• Toolbox (Windows): Click the Information tab, and then click myPrintMileage
and follow the onscreen instructions.• Windows taskbar: Right-click the HP Digital Imaging icon in the Windows
taskbar, choose the device you wish to view, and then click myPrintMileage.
NOTE: Do not bookmark the Web pages that are used to open myPrintMileage. Ifyou bookmark the site and connect to it by using the bookmark, the pages do notcontain the current information.
Understand the device information pagesThe device information pages contain detailed printer information, including firmwareversion number, serial number, service ID, print cartridge information, default pagesettings, and printer media settings.
The wireless configuration page contains 802.11 and Bluetooth connectivityinformation.
NOTE: The printer must not be processing any print jobs while you print theconfiguration and diagnostic pages.
If you need to call HP, it is useful to print diagnostic and configuration pages beforecalling.
Print device information pages from the control panelYou can print the following device information pages from the control panel on theprinter, without being connected to the printer.
To print a diagnostic pageHold down (Power button) and press (Resume button) four times.
To print a configuration pageHold down (Power button) and press (Cancel button) four times.Use the configuration page to view current printer settings, ink supply status, printcartridge health, and to troubleshoot printer problems.
To print a wireless configuration pageHold down (Power button), and press (Cancel button) two times, and press (Resume button) seven times.Use the wireless configuration page to view 802.11 information such as 802.11settings for different wireless profiles, and Bluetooth information such as Bluetoothdevice name.
Chapter 4
44 Configure and manage

To print a demo pageHold down (Power button) and press (Resume button) one time.You can print a demo page to verify that your device is working. However, if you wantto verify that the device is connected to the computer correctly, or that the devicesoftware is working correctly, print a test page from the General tab in the PrinterProperties dialog box (Windows) or the configuration page from the DeviceInformation panel in the HP Printer Utility (Mac OS).
Print device information pages from the softwareYou can connect to the printer to print the following device information pages from theprinter software.
To print a test page from the Toolbox (Windows)1. Open the Toolbox. For more information, see Toolbox (Windows).2. Click the Printer Services tab.3. Click Print Configuration Page.
NOTE: If you are using a Pocket PC or Palm OS device, you can use theToolbox software for PDAs. For more information, see Toolbox software forPDAs (Pocket PC and Palm OS).
To print a configuration page from the printer driver (Windows)1. Open the printer driver.2. Click Properties.3. Click the Services tab.4. Click Print Configuration Page.
To print a test page from the HP Printer Utility (Mac OS)1. Open the HP Printer Utility. See HP Printer Utility (Mac OS)2. On the Test panel, click Print Test Page.
Configure the device (Windows)You can connect the device directly to a computer, or you can share the device amongother users on a network.
NOTE: Microsoft Internet Explorer 6.0 must be installed on the computer systemto run the installation program.
Also, you must have administrator privileges to install a printer driver on Windows2000, Windows XP, Windows Server 2003, or Windows Vista.
When setting up the device, HP recommends that you connect it after you install thesoftware because the installation program is designed to provide you with the easiestsetup experience. However, if you have connected the cable first, see To connect thedevice before installing the software.
Configure the device (Windows) 45
Direct connectionYou can connect the device directly to your computer using a USB cable.
NOTE: If you install the device software and connect the device to a computerrunning Windows, you can connect additional devices to the same computer withUSB cables without reinstalling the device software.
When setting up the device, HP recommends that you connect the device after youinstall the software because the installation program is designed to provide you withthe easiest setup experience. However, if you have connected the cable first, see Toconnect the device before installing the software.
To install the software before connecting the device (recommended)1. Close any applications that are running.2. Insert the Starter CD into the CD drive. The CD menu runs automatically. If the CD
menu does not start automatically, double-click the setup icon on the Starter CD.3. On the CD menu, click the button for the connection method you want to use, and
then follow the onscreen instructions.4. When prompted, turn on the device and connect it to the computer using a USB
cable. The Found New Hardware wizard appears on the computer screen, andthe device icon is created in the Printers folder.
NOTE: You may connect the USB cable at a later time when you need to use thedevice.
You can also share the device with other computers using a simple form ofnetworking known as locally shared networking. For more information, see Toshare the device on a locally shared network.
To connect the device before installing the softwareIf you connected the device to the computer before installing the device software, theFound New Hardware wizard displays on the computer screen.
NOTE: If you turned on the device, do not turn it off or unplug the cable from thedevice while the installation program is running. If you do so, the installationprogram will not finish.
1. In the Found New Hardware dialog box that displays methods for locating theprinter driver, select the Advanced option, and then click Next.
NOTE: Do not allow the Found New Hardware wizard to perform anautomatic search for the printer driver.
2. Select the check box for specifying the driver location, and ensure that the othercheck boxes are clear.
3. Insert the Starter CD into the CD drive. If the CD menu appears, close it.4. Browse to locate the root directory on the Starter CD (for example, D), and then
click OK.5. Click Next and follow the onscreen instructions.
Chapter 4
46 Configure and manage

6. Click Finish to close the Found New Hardware wizard. The wizard automaticallystarts the installation program (this might take a short while).
7. Complete the installation process.
NOTE: You can also share the device with other computers using a simple formof networking known as locally shared networking. For more information, see Toshare the device on a locally shared network.
To share the device on a locally shared networkIn a locally shared network, the device is connected directly to the USB connector of aselected computer (known as the server) and is shared by other computers (clients).
NOTE: When sharing a directly connected device, use the computer with thenewest operating system as the server. For example, if you have a computerrunning Windows XP and another computer running an older version of Windows,use the computer running Windows XP as the server.
Use this configuration only in small groups or when usage is low. The connectedcomputer is slowed down when many users print to the device.
1. Click Start, point to Settings, and then click Printers or Printers and Faxes.- Or -Click Start, click Control Panel, and then double-click Printers.
2. Right-click the device icon, click Properties, and then click the Sharing tab.3. Click the option to share the device, and give it a share name.4. To share the device with client computers that use other versions of Windows,
click Additional Drivers to install those drivers as a convenience to the users. Youmust have the Starter CD in your CD drive.
Configure the device (Mac OS)You can use the device with a single Macintosh computer using a USB cable, or youcan share it among other users on a network.
This section contains the following topics:
• To install the software• To share the device on a locally shared network
To install the software1. Connect the device to your computer with a USB cable.2. Insert the Starter CD into the CD drive. Double-click the CD icon on the desktop,
and then double-click the setup icon. Also, you can locate the Installer folder onthe Starter CD.
3. Click Install Software and follow the onscreen instructions.4. If necessary, share the device with other Macintosh computer users.
Direct connection: Share the device with the other Macintosh computer users.For more information, see To share the device on a locally shared network.
Configure the device (Mac OS) 47
To share the device on a locally shared networkWhen you connect the device directly, you can share it with other computers using asimple form of networking known as locally shared networking. Use this configurationonly in small groups or when usage is low. The connected computer is slowed downwhen many users print to the device.Basic requirements for sharing in the Mac OS environment include the following items:
• The Macintosh computers must be communicating on the network using TCP/IP,and they must have IP addresses. (AppleTalk is not supported.)
• The device that is being shared must be connected to a built-in USB port on thehost Macintosh computer.
• Both the host Macintosh computer and the client Macintosh computers that areusing the shared device must have device sharing software installed, and thedriver or PPD for the device that is installed. (You can run the installation programto install the device sharing software and associated Help files.)
For more information about USB device sharing, see the support information on theApple Web site (www.apple.com) or the Apple Macintosh Help on the computer.
To share the device among computers running Mac OS1. Turn on printer sharing on all Macintosh computers (host and clients) that are
connected to the printer. Depending on the OS version you are using, do one ofthe following:• Mac OS 10.3: Open System Preferences, click Print & Fax, and then check
the box next to Share my printers with other computers.• Mac OS 10.4: Open System Preferences, click Print & Fax, click the Sharing
tab, check the box next to Share these printers with other computers, andthen select the printer to be shared.
2. To print from the other Macintosh computers (the clients) on the network, do thefollowing:a. Click File, and then select Page Setup in the document you want to print.b. In the drop-down menu next to Format for, select Shared Printers, and then
select your device.c. Select the Paper Size, and then click OK.d. In the document, click File, and then select Print.e. From the drop-down menu next to Printer, select Shared Printers, and then
select your device.f. Make additional settings, if necessary, and then click Print.
Uninstall and reinstall the softwareIf your installation is incomplete, or if you connected the USB cable to the computerbefore prompted by the software installation screen, you might need to uninstall andthen reinstall the software. Do not simply delete the device application files from yourcomputer. Make sure to remove them properly using the uninstall utility provided whenyou installed the software that came with the device.
Chapter 4
48 Configure and manage

There are three methods to uninstall the software on a Windows computer, and onemethod to uninstall on a Macintosh computer.
To uninstall from a Windows computer, method 11. Disconnect the device from your computer. Do not connect it to your computer until
after you have reinstalled the software.2. Press the Power button to turn off the device.3. Insert the device Starter CD into your computer's CD-ROM drive, and then start
the Setup program.4. Follow the onscreen instructions.5. If you are asked whether you would like to remove shared files, click No.
Other programs that use these files might not work properly if the files are deleted.6. Restart your computer.7. To reinstall the software, insert the device Starter CD into your computer's CD-
ROM drive, follow the onscreen instructions, and also see To install the softwarebefore connecting the device (recommended).
8. After the software is installed, connect the device to your computer.9. Press the Power button to turn the device on.
After connecting and turning on the device, you might have to wait several minutesfor all of the Plug and Play events to complete.
10. Follow the onscreen instructions.When the software installation is complete, the HP Digital Imaging Monitor iconappears in the Windows system tray.
To uninstall from a Windows computer, method 2
NOTE: Use this method if Uninstall is not available in the Windows Start menu.
1. On the Windows taskbar, click Start, select Settings, select Control Panel, andthen click Add/Remove Programs.- Or -Click Start, click Control Panel, and then double-click Programs and Features.
2. Select the device you want to uninstall, and then click Change/Remove orUninstall/Change.
3. Disconnect the device from your computer.4. Restart your computer.
NOTE: It is important that you disconnect the device before restarting yourcomputer. Do not connect the device to your computer until after you havereinstalled the software.
5. Insert the device Starter CD into your computer's CD-ROM drive and then start theSetup program.
6. Follow the onscreen instructions and also see To install the software beforeconnecting the device (recommended).
Uninstall and reinstall the software 49
To uninstall from a Windows computer, method 3
NOTE: Use this method if Uninstall is not available in the Windows Start menu.
1. Insert the device Starter CD into your computer's CD-ROM drive, and then startthe Setup program.
2. Disconnect the device from your computer.3. Select Uninstall and follow the onscreen directions.4. Restart your computer.
NOTE: It is important that you disconnect the device before restarting yourcomputer. Do not connect the device to your computer until after you havereinstalled the software.
5. Start the Setup program for the device again.6. Select Install.7. Follow the onscreen instructions and also see To install the software before
connecting the device (recommended).
To uninstall from a Macintosh computer1. Launch HP Device Manager.2. Click Information and Settings.3. Select Uninstall your HP Software from the pull-down menu.
Follow the onscreen instructions.4. After the software is uninstalled, restart your computer.5. To reinstall the software, insert the device Starter CD into your computer's CD-
ROM drive.6. On the desktop, open the CD-ROM, and then double-click HP Installer.7. Follow the onscreen instructions and also see To install the software.
802.11 wireless connectionThis section describes how to set up and configure the device for an 802.11 wirelessconnection. The recommended method for setting up this mobile device for wirelesscommunication with a single computer is using an “ad hoc” network. However, youmight want to set it up on an existing “infrastructure” network that uses a wirelessaccess point (WAP). For an overview of 802.11 wireless printing, see About 802.11.
NOTE: 802.11 printing is available through 802.11 wireless printer accessoriesthat are included with certain device models. For a description and illustration ofthe 802.11 wireless printer accessory, see Install and use 802.11 and Bluetoothaccessories. Also, the sending device must have built-in 802.11 capability or an802.11 wireless card installed.
• About the wireless profile switch• About 802.11 wireless network settings• Set up for 802.11 using factory defaults• Set up for 802.11 on existing (non-default) networks• Configure and use 802.11 wireless profiles
Chapter 4
50 Configure and manage

• Use the wireless profile switch• Reset 802.11 wireless profiles to factory defaults• Configure multiple printers for 802.11 (Windows)
About the wireless profile switchThe device includes an 802.11 wireless profile switch so you can store settings for upto three 802.11 computers or networks. This allows you to easily move the device fromhome to office or between any three wireless network environments.
When you install the printer driver from the Starter CD and select Wireless for theconnection type, the 802.11 wireless profile settings are stored in the current positionof the wireless profile switch. Once you have installed the software using a wirelessconnection, you can configure the three wireless profile settings to match the wirelessnetworks you want to use.
The wireless profile settings used by each switch position (1, 2, and 3) can beconfigured using the following tools:
• Toolbox (Windows): When the Toolbox is communicating with the device, youcan use it to configure wireless profiles.
NOTE: If you are using a Pocket PC or Palm OS device, you can use theToolbox software for PDAs. For more information, see Toolbox software forPDAs (Pocket PC and Palm OS).
• Wireless Profile Configuration Utility (Windows): You can use this tool to setup multiple printers at one time using a USB Flash drive. For more information, seeConfigure multiple printers for 802.11 (Windows).
• HP Network Setup Tool (Mac OS): This tool automatically launches duringinstallation, or you can use it later to configure 802.11 wireless profiles. For moreinformation, see HP Printer Utility (Mac OS).
For instructions on configuring 802.11 wireless profiles after software installation, seeConfigure and use 802.11 wireless profiles.
About 802.11 wireless network settingsIn order to connect to an 802.11 wireless network, you need to know the networksettings. If you do not know the settings for a network, you will need to get thisinformation from a network administrator.
You can configure the following 802.11 options for each profile:
Wireless Network Name (SSID)By default, the device looks for an ad hoc network called hpsetup. This is the wirelessnetwork name, or SSID. Your network may have a different SSID.
802.11 wireless connection 51

Communication mode:There are two communication mode options for an 802.11 connection:
• Ad hoc (recommended): On an ad hoc network, the device is set to ad hoccommunication mode and communicates directly with other wireless deviceswithout the use of a wireless access point (WAP).
• Infrastructure: On an infrastructure network, the device is set to infrastructurecommunication mode and communicates with other devices on the network,whether the devices are wired or wireless, through a WAP. WAPs commonly actas routers or gateways on small networks.
Wireless security settings• Network authentication: The device’s factory default setting is Open network. The
network does not require security for authorization or encryption.• Data encryption: Wired Equivalent Privacy (WEP) provides security by encrypting
data sent over radio waves from one wireless device to another wireless device.Devices on a WEP-enabled network use WEP keys to encode data. If yournetwork uses WEP, you must know the WEP key(s) it uses.If you set Data encryption to disabled, the device will attempt to detect andautomatically associate to open wireless network named hpsetup.All devices on the ad hoc network must:◦ Be 802.11-compatible◦ Have ad hoc as the communication mode◦ Have the same network name SSID◦ Be on the same subnet◦ Be on the same channel◦ Have the same 802.11 security settings
Set up for 802.11 using factory defaultsThe factory default wireless network settings are:
• Communication mode: ad hoc• Network name (SSID): hpsetup• Security (encryption): disabled
NOTE: On the Mac OS, an ad hoc network is referred to as a computer tocomputer network.
This section covers the following topics:
• To set up using ad hoc mode and factory defaults with a USB cable (Windows andMac OS)
• To set up using ad hoc mode and factory defaults with no USB cable (Windows)• To set up a computer to computer (ad hoc) connection using factory defaults with
no USB cable (Mac OS)
Chapter 4
52 Configure and manage

To set up using ad hoc mode and factory defaults with a USB cable (Windowsand Mac OS)You can set up your device on a wireless ad hoc network (Windows) or computer tocomputer network (Mac OS) using the default settings if you have a USB cable nearbyfor a temporary connection. Follow these steps to connect to the device using itsfactory default ad hoc network settings:
1. Close any running applications.2. Insert the Starter CD into the CD drive. The CD menu runs automatically.
If the CD menu does not start automatically, double-click the Setup icon on theStarter CD.
3. On the CD menu, click the button for the connection method you want to use.4. Follow the onscreen instructions to complete the software installation, temporarily
connecting a USB cable when prompted. Mac OS only: Complete the installationusing the HP Network Setup Tool, which launches automatically during setup.
To configure additional 802.11 wireless profiles after you have set up the device, seeConfigure and use 802.11 wireless profiles.
To set up using ad hoc mode and factory defaults with no USB cable (Windows)You can set up your device on a wireless ad hoc network using the default settingseven if you have no USB cable. Follow these steps to connect to the device using itsfactory default ad hoc network settings:
1. Open the configuration utility for your computer’s wireless network card, then dothe following:a. Create a new wireless profile with the following values:
• Communication mode: ad hoc• Network name (SSID): hpsetup• Security (encryption): disabled
b. Activate the profile.2. Wait two minutes for the device to obtain an IP address, then print a wireless
configuration page. For more information, see Print device information pages fromthe control panel.
3. On the configuration page, verify the following for the device’s network settings:• Communication mode: ad hoc• Network name (SSID): hpsetup• The IP address is not 0.0.0.0
NOTE: If one of the previous conditions is not true, then repeat the precedingsteps.
4. Close any running applications.5. Insert the Starter CD into the CD drive. The CD menu runs automatically.
If the CD menu does not start automatically, double-click the Setup icon on theStarter CD.
6. On the CD menu, click the button for the connection method you want to use.7. Follow the onscreen instructions to complete the software installation.
802.11 wireless connection 53

To configure additional 802.11 wireless profiles after you have set up the device, seeConfigure and use 802.11 wireless profiles.
To set up a computer to computer (ad hoc) connection using factory defaultswith no USB cable (Mac OS)You can set up your device on a wireless computer to computer (ad hoc) networkusing the default settings even if you have no USB cable. Follow these steps toconnect to the device using the factory default settings:
1. Print a wireless configuration page. For more information, see Print deviceinformation pages from the control panel.
2. Open the AirPort Setup Assistant, and then follow the onscreen instructions forjoining an existing wireless network. Use hpsetup as the existing network to join.
3. Insert the Starter CD into the CD drive. The CD menu runs automatically.If the CD menu does not start automatically, double-click the Setup icon on theStarter CD.
4. On the CD menu, click Install Driver.5. On the Connection Type screen, select Wireless Network, and then click Done.6. On the Welcome screen, click Continue.7. Select Wireless from the printer list drop-down menu.8. Select the device in the printer name list, and then click Continue.
If the device does not appear in the list, wait for a minute and then click Rescan.9. Enter hpsetup as the network name, and then click Apply.10. Select None for wireless security, and then click OK.11. Click Send Settings to send the settings to the device.To configure additional 802.11 wireless profiles after you have set up the device, seeConfigure and use 802.11 wireless profiles.
NOTE: The HP Officejet H470 does not support the Mac OS classic environment.
Set up for 802.11 on existing (non-default) networksIf you want to connect to an existing network with settings other than the factorydefaults (for example an infrastructure network), and are already connected wirelesslyusing the factory defaults, you can simply enter the network settings for one of thethree positions of the wireless profile switch using the Toolbox (Windows) or HPNetwork Setup Tool (Mac OS). See Configuring and using 802.11 wireless profiles.
NOTE: To use the device with any wireless connection, you must run Setup atleast once from the Starter CD and create a wireless connection. After performingone wireless setup, you can connect the device to additional wireless networks byconfiguring new wireless profiles in the wireless profile switch.
This section contains the following topics:
• To set up on an existing network with a USB cable (Windows or Mac OS)• To set up on an existing network with no USB cable
Chapter 4
54 Configure and manage

To set up on an existing network with a USB cable (Windows or Mac OS)You can set up your device on any wireless network if you have a USB cable nearbyto use for a temporary connection. Follow these steps to create a wireless connectionto the device:
1. Get all of the necessary settings for the wireless network. See About 802.11wireless network settings.
2. Close any running applications.3. Insert the Starter CD into the CD drive. The CD menu runs automatically.
On the CD menu, click the button for the connection method you want to use.4. On the CD menu, click Install (Windows) or Install Driver (Mac OS).5. Follow the onscreen instructions to complete the software installation.
a. Enter the wireless network settings in the dialogs.b. Temporarily connect a USB cable when prompted.c. Mac OS only: Complete the installation using the HP Network Setup Tool,
which launches automatically during setup.To configure additional 802.11 wireless profiles after you have set up the device, seeConfigure and use 802.11 wireless profiles.
To set up on an existing network with no USB cableThis section describes connecting to an existing network with settings other than thefactory defaults, or setting up a new ad hoc (Windows) or computer to computer (MacOS) network that does not use the factory defaults, when all of the following conditionsare true:
• You have a computer with 802.11.• You do not have a USB cable.• You have never set up the device to connect wirelessly.If all of the above are true, then you will need to do the following:
1. Set up the device with a wireless connection using the factory defaults. See Set upfor 802.11 using factory defaults.
2. Configure one of the three positions of the wireless profile switch with the desirednetwork settings using the Toolbox (Windows) or HP Network Setup Tool (MacOS). For more information, see Configure and use 802.11 wireless profiles.
802.11 wireless connection 55

Configure and use 802.11 wireless profilesThe device includes an 802.11 wireless profile switch, so you can store settings for upto three 802.11 computers or networks. This allows you to easily move the device fromhome to office or between any three wireless network environments.
You can modify these wireless profiles using the Toolbox (Windows) or the HPNetwork Setup Tool (Mac OS). For more information, see Toolbox (Windows) andNetwork Printer Setup Utility (Mac OS).
NOTE: You can modify these wireless profiles using the Toolbox (Windows) orthe HP Network Setup Tool (Mac OS). For more information, see Toolbox(Windows) and Network Printer Setup Utility (Mac OS).
After configuring a wireless profile, you can print a wireless configuration page to get alist of the profile settings and to ensure they have been properly set. For moreinformation, see Understand the device information pages.
After you have configured more than one of the wireless profiles, you can use thewireless profile switch on the device to switch between the different profiles. For moreinformation, see Use the wireless profile switch.
The Wireless Profile Configuration Utility (Windows) allows you to configure severaldevices with the same settings. For more information, see Configure multiple printersfor 802.11 (Windows).
This section contains the following topics:
• To configure 802.11 wireless profiles (Windows)• To configure 802.11 wireless profiles (Mac OS)
To configure 802.11 wireless profiles (Windows)This section assumes that the Toolbox is communicating with the device.
Chapter 4
56 Configure and manage

NOTE: To use the device with any wireless connection, you must run Setup atleast once from the Starter CD and create a wireless connection. After performingone setup to create a wireless connection, you can connect the device to additionalnetworks by configuring new wireless profiles and changing the wireless profileswitch position.
NOTE: If you can see the ink levels in the Toolbox, the Toolbox is communicatingwith the device.
1. Open the Toolbox. For more information, see Toolbox (Windows).2. Click the Configure WiFi Profiles tab.3. Select the wireless profile you wish to modify.
NOTE: A blue dot indicates the currently selected wifi profile.
4. Click Configure.5. Enter the wireless profile information for the network that you want to connect to,
and then click Finish.
To configure 802.11 wireless profiles (Mac OS)1. Select the profile to configure using the wireless profile switch on the device. For
more information, see Use the wireless profile switch.2. Double-click the Macintosh HD icon on the desktop.3. Select Library, and then select Printers.4. Select hp, select Utilities, and then select HP Network Setup Tool.5. On the Welcome screen, click Continue.6. Select Wireless from the printer list drop-down menu or USB if the device is
currently connected via a USB cable.7. Select the device in the printer name list, and then click Continue.
If the device does not appear in the list, wait for a minute and then click Rescan.8. Enter the wireless profile information, and then click Apply.9. Click Send Settings to send the settings to the device.
Use the wireless profile switchEach profile you configure in the software (1, 2, and 3) corresponds to a wirelessprofile switch position (1, 2, and 3) on the device. The “current” profile is the currentposition (1, 2, or 3) of the wireless profile switch.
NOTE: You can print a wireless configuration page to get a list of the profilesettings and to ensure they have been properly set. For more information, seeUnderstand the device information pages.
802.11 wireless connection 57

To print on a specific set profile1. Change the number on the wireless profile switch to that specific profile.
2. Change the wireless network on your computer to be in that specific profile.3. Send a print job using the installed printer driver.
After you have configured more than one of the wireless profiles, you can use thewireless profile switch on the device to switch between the different profiles.
For example, if you configured profile 1 for printing in an infrastructure environment(for example, the office) and configured profile 2 for printing in an ad hoc environment(for example, away from the office or on the road), you only have to move the switchbetween 1 and 2 to switch between those profiles.
Make sure the switch is in the appropriate position (1, 2, or 3) to match the profile youare using before sending a print job. For example, if you are on the road and hadpreviously configured switch position 2 for ad hoc wireless printing on the road, movethe switch to position 2 before sending a print job.
NOTE: After switching from one wireless profile to another, the first print job takes10 seconds or so before it starts to print.
Reset 802.11 wireless profiles to factory defaults
To reset the active profile (the current position of the wireless profile switch)▲ Hold down (Power button) and press (Cancel button) eight times.
To reset all three 802.11 wireless profiles▲ Hold down (Power button), press (Cancel button) twice, and then press
(Resume button) six times.
Chapter 4
58 Configure and manage

Configure multiple printers for 802.11 (Windows)You can use the Wireless Profile Configuration Utility to conveniently set up multipledevices for wireless connection. This utility exports the device’s wireless profilesettings to a USB Flash drive. You can then configure other devices with thesesettings by inserting the flash drive into another device’s USB host port.
NOTE: The Wireless Profile Configuration Utility is supported on the followingoperating systems: Windows 2000 and Windows XP.
To use the Wireless Profile Configuration Utility1. Insert the 802.11 wireless USB accessory into the slot.2. Connect the USB Flash drive to the other USB host port. For the location of this
port, see Back and side view.When the USB Flash drive is inserted, the 802.11 wireless USB accessory lightswill turn off. The lights will turn on again after the 802.11 settings have beenconfigured on the USB Flash drive.
3. Close any running applications.4. Insert the Starter CD into the CD drive. The CD menu runs automatically.
If the CD menu does not start automatically, double-click the Setup icon on theStarter CD.
5. On the CD menu, click Utilities, and then click Wireless Configuration Utility.6. Follow the onscreen instructions to export the device’s wireless profile settings to a
USB Flash drive and then configure the other devices by moving the USB Flashdrive to the USB host port of each device.
Bluetooth wireless connectionThis section describes how to set up and configure the device for a Bluetooth wirelessconnection. For an overview of Bluetooth, see About Bluetooth.
You can configure Bluetooth wireless settings during software installation (setup), oryou can configure settings later using the Toolbox (Windows) or HP Printer Utility (MacOS). For more information, see Bluetooth wireless settings options.
NOTE: If you are using a Pocket PC or Palm OS device, you can use the Toolboxsoftware for PDAs. For more information, see Toolbox software for PDAs (PocketPC and Palm OS).
NOTE: To configure Bluetooth settings or monitor device status (such as inklevels) using the Toolbox (Windows), you must connect the device to yourcomputer with a USB cable.
NOTE: Bluetooth printing is available through Bluetooth wireless printeraccessories that are included with certain device models. For a description andillustration of the Bluetooth wireless printer accessory, see Install and use 802.11and Bluetooth accessories. Also, the sending device must have built-in Bluetoothcapability or a Bluetooth wireless card installed.
Bluetooth wireless connection 59

This section contains the following topics:
• Set up a Bluetooth wireless connection• Configure Bluetooth wireless settings• Bluetooth wireless settings options• Bluetooth discovery• Bluetooth fonts• Wireless configuration page• Bonding• Bluetooth wireless profiles
Set up a Bluetooth wireless connectionThis section describes how to set up a Bluetooth wireless connection.
To set up a Bluetooth wireless connection (Windows)1. Save any open documents. Close any applications that are running on your
computer system.2. Place the Starter CD into the computer.
If the CD menu does not start automatically, double-click the Setup icon on theStarter CD.
3. On the CD menu, click Install Bluetooth-Connected Device.4. Follow the onscreen instructions to complete the software installation.5. Open the Bluetooth setup utility on the computer, and then establish the Bluetooth
connection between the computer and the HP device.
NOTE: The name of the Bluetooth setup utility and its features can vary,depending on the manufacturer of the Bluetooth card installed in the computer.However, this utility might be available in the Control Panel on your computeror in the tray (usually in the lower right-hand corner of the computer desktop).For more information about using the Bluetooth setup utility, see thedocumentation available with your computer.
To configure Bluetooth wireless settings after you have set up the device, seeBluetooth wireless connection.
To set up a Bluetooth wireless connection (Mac OS)1. Insert the Starter CD into the CD drive.2. Double-click the setup icon on the Starter CD, and then follow the onscreen
instructions.3. Select the HP Officejet/Officejet Pro device that you want to install. If you do not
see the HP Officejet/Officejet Pro device listed, check My device is not listed.4. Follow the instructions on the screen. When prompted, select USB from the Select
the Device Connection screen.5. In the Setup Assistant screen, click Skip Setup, and then click Skip in the
message that appears.
Chapter 4
60 Configure and manage

6. Open the Bluetooth Setup Assistant:• Mac OSX (v. 10.3): From the Finder, select Utilities from the Go menu, and
then double-click Bluetooth Setup Assistant.• Mac OSX (v. 10.4): Click System Preferences in the Dock, and from the
Hardware list, click Bluetooth. Click Devices, and then click Set Up NewDevice to open the Bluetooth Setup Assistant.
NOTE: Make sure that Bluetooth is turned on, and that the computer isDiscoverable.
7. Follow the instructions on the screen. When prompted, select Printer, and thenselect the HP device from the list, and then follow the instructions on the screen tocomplete the installation.
To configure Bluetooth wireless settings after you have set up the device, seeBluetooth wireless connection.
Configure Bluetooth wireless settingsYou can use the Toolbox (Windows), HP Printer Utility (Mac OS), or the Toolboxsoftware for PDAs (Pocket PC and Palm OS) to configure Bluetooth wireless settings.
NOTE: In order to change the device’s Bluetooth settings, you must connect thedevice to your computer with a USB cable.
To configure Bluetooth wireless settings (Windows)1. Connect the device to your computer with a USB cable.2. Insert the Bluetooth wireless USB accessory into the slot in the device. For more
information, see Install and use 802.11 and Bluetooth accessories.3. Open the Toolbox. For more information, see Toolbox (Windows).4. Click Configure Bluetooth Settings.5. Set the Bluetooth wireless options you want.
For descriptions of the Bluetooth wireless options, see Bluetooth wireless connection.6. After you have set the options you want, click Apply.7. A warning dialog box appears.8. Click OK to proceed.9. Close the Toolbox.
The printer ignores any other device that tries to establish a connection. The devicemust wait until the original connection is closed before it can establish a newconnection.
To configure Bluetooth wireless settings (Mac OS)
NOTE: Bluetooth connections are supported in Mac OS X (10.3 and later),provided Bluetooth hardware is included or installed in your computer.
1. Connect the device to your computer with a USB cable.2. Insert the Bluetooth wireless USB accessory into the slot in the device. For more
information, see Install the 802.11 or Bluetooth wireless USB accessory.
Bluetooth wireless connection 61

3. Open the HP Printer Utility. For more information, see HP Printer Utility (Mac OS).4. Select the device and click Launch Utility.5. Click the Bluetooth Settings panel.6. Set the Bluetooth wireless options you want.
For descriptions of the Bluetooth wireless options, see Bluetooth wireless settingsoptions.
7. Click Apply Now.
The printer ignores any other device that tries to establish a connection. The devicemust wait until the original connection is closed before it can establish a newconnection.
Bluetooth wireless settings options
NOTE: In order to change the device’s Bluetooth settings you must connect thedevice to your computer with a USB cable.
To see the Bluetooth-specific information for your device, print a wireless configurationpage. For more information, see Understand the device information pages.
This section contains the following topics:• Bluetooth device address• Bluetooth device name• PIN code (Pass Key)• Reset device access• To reset to factory default settings• To turn off Bluetooth
Bluetooth device addressThis is the address by which Bluetooth devices identify the device. You cannot changethe device’s Bluetooth device address.
Bluetooth device nameWhen a device discovers the device, it displays the device’s Bluetooth device name.The device ships with a default Bluetooth device name: HP Officejet H470/[serialnumber].
This option allows you to change the device’s Bluetooth device name. In order tochange the device’s name you must connect the device to your computer with a USBcable.
NOTE: Up to 60 characters can be entered and saved for the Bluetooth devicename. You can print a wireless configuration page to see the full, 60-charactername.
NOTE: The device’s Bluetooth device name appears in Bluetooth applicationsonly. In the Windows Printers folder, the device is identified as the HP OfficejetH470 series.
Chapter 4
62 Configure and manage

To change the device’s Bluetooth device name (Windows)1. Connect the device to your computer with a USB cable.2. Open the Toolbox. For more information, see Toolbox (Windows).3. Click the Configure Bluetooth Settings tab.4. Enter a new device name of up to 60 characters in the Device Name box.5. Click Apply.The device’s Bluetooth device name is changed.
To change the device’s Bluetooth device name (Mac OS)1. Connect the device to your computer with a USB cable.2. Open the HP Printer Utility. For more information, see HP Printer Utility (Mac OS).3. Click the Bluetooth Settings panel.4. Enter a new device name.5. Click Apply Now.
The device’s Bluetooth device name is changed.
PIN code (Pass Key)This option allows you to change the device’s PIN code. When the device is set toEncryption required, devices attempting to use the device are prompted for a PIN code.
In order to change the device’s PIN code, you must connect the device to yourcomputer with a USB cable.
To change the device’s PIN code (Windows)1. Connect the device to your computer with a USB cable.2. Open the Toolbox. For more information, see Toolbox (Windows).3. Click the Configure Bluetooth Settings tab.4. Click Change Passkey.
The Change PIN Code dialog box appears.5. Enter the new passkey.6. Enter the new passkey in the Confirm New Passkey box.7. Click OK.
The PIN code is changed.
To change the device’s PIN code (Mac OS)1. Connect the device to your computer with a USB cable.2. Open the HP Printer Utility. For more information, see HP Printer Utility (Mac OS).3. Click the Bluetooth Settings panel.4. Click the Change PIN Code button.
The Change PIN Code dialog box appears.5. Enter the new PIN Code. The default PIN Code is “0000” (four zeros).6. Re-enter the new PIN code.7. Click Apply Now.The PIN code is changed.
Bluetooth wireless connection 63

Reset device accessThe following steps will clear all bonded devices from the device’s memory.
To reset device access (Windows)1. Open the Toolbox. For more information, see Toolbox (Windows).2. Click the Configure Bluetooth Settings tab.3. Click the Reset Device Access button.
A warning dialog box appears.4. Click OK to close the warning dialog box.
All bonded devices are removed from the device’s memory.
To reset device access (Mac OS)1. Open the HP Printer Utility. For more information, see HP Printer Utility (Mac OS).2. Click the Bluetooth Settings panel.3. Click the Reset Device Access button.
A warning dialog box appears.4. Click OK to close the warning dialog box.All bonded devices are removed from the device’s memory.
To reset to factory default settings
NOTE: Using the following instructions will reset only the device’s Bluetoothsettings.
1. Press and hold down (Power button).2. While holding down (Power button), press (Cancel button) 4 times, then
press (Resume button) 6 times.3. Release (Power button).
To turn off Bluetooth▲ To turn off Bluetooth printing, remove the Bluetooth wireless printer accessory
from the device.
Bluetooth discoveryDiscovery is the process by which a Bluetooth-enabled device detects other Bluetooth-enabled devices that are within range.
When a device discovers the printer, it displays the printer’s Bluetooth device name.For more information, see Bluetooth device name.The method of discovery varies according to the type of Bluetooth software used.
Bluetooth fontsThe device ships with built-in fonts for Bluetooth printing. Certain models include Asianfonts for printing from mobile phones. The fonts included depend on the country/regionwhere the device was purchased. For more information, see Device specifications.
Chapter 4
64 Configure and manage

Wireless configuration pageThe wireless configuration page shows 802.11 and Bluetooth information you needwhen using the device. For more information and instructions on printing this page,see Understand the device information pages.
BondingWhen the printer and a sending device bond, they store each other’s Bluetooth deviceaddress. This allows the device to discover the printer in Private mode.
The printer can bond to up to 31 devices. If you reach this limit and want to bond to anadditional device, you must clear all the previously bonded devices from the printer’smemory. For more information, see Reset device access.
Bluetooth wireless profiles
Serial port profile (SPP)The Serial Port Profile is a wireless version of a serial port on the device that can beused with notebook computers, Pocket PC devices such as HP iPAQs, and other PDAdevices to print with Bluetooth wireless technology. The Serial Port Profile sends dataas a series of bytes and does not support bi-directional communication.
Object push profile (OPP)The Object Push Profile lets you print from devices that use the Object Exchangeprotocol (OBEX), such as mobile phones and PDAs, such as Pocket PC and Palm OSdevices. Files that can be transferred over OBEX include vCard (stores businesscards, addresses and phone numbers), vCalendar (supports event tracking and to-dolists), vMessage (supports simple messages and text), JPEG (for images), and ASCIItext for mobile phones and PDAs such as Palm OS devices.
Basic printing profile (BPP)• The Basic Printing Profile extends the capabilities of OBEX so you can better
control the printing from Bluetooth-enabled PDAs, mobile phones, and otherdevices. The Basic Printing Profile lets you set the device, the number of copies toprint, and other printing attributes, such as multiple per page sheet or handoutprinting.
• The Basic Printing Profile is flexible, allowing for “driverless” printing, so any devicethat supports the profile can print data from a device that also supports the profile.This profile is bi-directional, so it allows device status information (the progress ofthe print job, or errors such as “out of paper” or “paper jam”) to be sent back to thecomputer to be displayed.
Basic imaging profile (BIP)The Basic Imaging Profile lets you print images from a compatible digital camera orother mobile device with Bluetooth wireless technology.
Bluetooth wireless connection 65

Hardcopy cable replacement profile (HCRP)• The Hardcopy Cable Replacement Profile lets you print with the same features,
quality and speed as printing with a cable. The Hardcopy Cable ReplacementProfile provides the same basic functionality as the Serial Port Profile, with theaddition of bi-directional communication (e.g., messages such as “out of paper”,“out of ink”, and job status). It also supports all of the functions offered with HP all-in-one devices, such as printing, scanning, faxing, and copying.
• Unlike the Basic Printing Profile, the Hardcopy Cable Replacement Profile requiresyou to have the printer driver installed on the computer you are printing from, so itis primarily useful for printing from a PC.
Chapter 4
66 Configure and manage

5 Maintain and troubleshootThis section contains the following topics:
• Work with print cartridges• Replace the ink service module• Troubleshooting tips and resources• Solve printing problems• Poor print quality and unexpected printouts• Solve paper-feed problems• Troubleshoot installation issues• Clear jams
Work with print cartridgesThis section contains the following topics:
• Replace the print cartridges• Align the print cartridges• Print with a single print cartridge• Calibrate color• Maintain the device• Store printing supplies
Replace the print cartridgesYou can check the estimated ink levels from the Toolbox (Windows), the HP PrinterUtility (Mac OS), or the Toolbox software for PDAs (Pocket PC and Palm OS). Forinformation about using these tools, see Use device management tools. You can alsoprint the self-test diagnostic page to view this information (see Understand the deviceinformation pages).
NOTE: The ink levels shown are an estimate only. Actual ink volumes may vary.
After removing a cartridge from its package, install it right away. Do not remove acartridge from the device for long periods of time.
To find out which print cartridges work with your device, see Supplies.
CAUTION: To prevent clogs, ink failure, and bad electrical connections, do nottouch the print cartridge ink nozzles or copper contacts, and do not remove thecopper strips.
Maintain and troubleshoot 67

To replace the print cartridges1. Remove the new print cartridge from its package and then pull the colored tab to
remove the protective film from the cartridge.
2. With the device turned on, open the front access cover. Wait for the carriage tostop moving. This should take only a few seconds.
CAUTION: Only remove or install print cartridges when the print cartridgecarriage stops moving.
Chapter 5
68 Maintain and troubleshoot

3. Lift the print cartridge latch open and gently remove the print cartridge from itscradle compartment.
4. Insert the new print cartridge into its cradle compartment at the same angle atwhich you removed the old print cartridge. Check the symbol on the latch againstthe symbol on the print cartridge to make sure you are inserting the correct printcartridge.
Work with print cartridges 69

5. Close the print cartridge latch. If the cartridge is inserted correctly, closing the latchgently pushes the cartridge into its cradle compartment. Press the latch to makesure it is seated flat on the cartridge.
6. Close the front access cover.7. Wait for the carriage to complete the print cartridge initialization routine and return
to the home position at the left side of the device before using the device.
NOTE: Do not open the front access cover until the print cartridge initializationis complete.
Align the print cartridgesWhenever you install a new print cartridge, you should align the print cartridges for thebest possible print quality. If your printout is grainy, has stray dots, jagged edges, orthe ink is bleeding into another color, you can realign them through the Toolbox orprinter driver (Windows), the HP Printer Utility (Mac OS), or the Toolbox software forPDAs (Pocket PC and Palm OS). For information about using these tools, see Usedevice management tools.
NOTE: Load plain paper into the paper tray before aligning the print cartridges.An alignment page is printed during the alignment process.
• Toolbox (Windows): Open the Toolbox. For more information, see Toolbox(Windows). Click the Printer Services tab, and then click Align Print Cartridgesand follow the onscreen instructions.
• HP Printer Utility (Mac OS): Open the HP Printer Utility. For more information,see HP Printer Utility (Mac OS). Click Align and follow the onscreen instructions.
Chapter 5
70 Maintain and troubleshoot

Print with a single print cartridgeIf one of the print cartridges runs out of ink before you can replace it, you can still printwith a single print cartridge.
Empty cartridge Cartridges used Output
Black Prints with only the tri-color printcartridge
Color and grayscale
Tri-color Prints with only the black or photoprint cartridge
All documents will print ingrayscale
Photo Prints with only the tri-color printcartridge
Color and grayscale
NOTE: Printing with one print cartridge might be slower and the print quality mightbe affected. It is recommended to print with both print cartridges. For borderlessprinting, the tri-color print cartridge must be installed.
Calibrate colorIf you are not satisfied with the appearance of colors, you can calibrate the colorsmanually to ensure the best print quality.
NOTE: Calibrate the color only when the tri-color and photo print cartridges areinstalled together. The photo print cartridge is available for purchase as an optionalaccessory. For more information, see HP supplies and accessories.
NOTE: If you are using a Pocket PC or Palm OS device, you can calibrate thecolor using the Toolbox software for PDAs. For more information, see Toolboxsoftware for PDAs (Pocket PC and Palm OS).
Color calibration balances color tints on printed pages. It is only necessary if:
• Printed colors have visibly shifted toward yellow, cyan or magenta.• There is a color tinge in the gray shades.
Low ink levels in the print cartridges might also produce incorrect colors.• Toolbox (Windows): Open the Toolbox. For more information, see Toolbox
(Windows). Click the Printer Services tab, and then click Calibrate Color andfollow the onscreen instructions.
• HP Printer Utility (Mac OS): Open the HP Printer Utility. For more information,see HP Printer Utility (Mac OS). Click Calibrate Color and follow the onscreeninstructions.
Maintain the deviceThe device does not require scheduled maintenance, except for replacing the inkservice module. For more information, see Replace the ink service module. Youshould attempt, however, to keep the device free of dust and debris. This cleaning
Work with print cartridges 71

keeps the device in peak condition and might also make the diagnosis of problemseasier.
WARNING! Turn off the device and unplug the power cord before cleaning thedevice. If using the optional battery, turn off the device and remove the batterybefore cleaning.
This section covers the following topics:
• Clean the device• Clean the print cartridges
Clean the deviceWhen you clean the device, follow these guidelines:
• Clean the outside of the device with a soft cloth moistened with mild detergent andwater.
NOTE: Clean the device only with water or water mixed with a mild detergent.Using other cleaners or alcohol can damage the device.
• Clean the inside of the front access cover with a dry, lint-free cloth.
CAUTION: Be careful not to touch the rollers. Skin oils on the rollers cancause print quality problems.
Clean the print cartridgesIf printed characters are incomplete, or if dots or lines are missing from the printouts,you might need to clean the print cartridges. These are symptoms of clogged inknozzles, which can result from prolonged exposure to air.
NOTE: Before you clean the print cartridges, make sure the print cartridge inklevels are not low or empty. Low ink levels can also cause incomplete characters,missing lines, or dots on the printouts. Check the print cartridge lights to make surethey are not on. For more information, see Control-panel lights reference. You canalso check the status of the print cartridges from the Printer Status tab in theToolbox (Windows), HP Printer Utility (Mac OS), or Toolbox software for PDAs.Replace any low or empty print cartridges. For more information, see Replace theprint cartridges.
This section contains the following topics:
• To clean print cartridges automatically• To clean print cartridges manually
To clean print cartridges automatically
NOTE: Clean the print cartridges only when necessary. Cleaning uses ink andshortens the life of the print cartridges. There are three levels of cleaning available.After one level of cleaning, perform the next level of cleaning only if the results arenot satisfactory.
Chapter 5
72 Maintain and troubleshoot

Control panel1. Press and hold down (Power button).2. While holding down the button, do one of the following. Perform the next level of
cleaning only if results from the previous level are not satisfactory.a. For level 1 cleaning: Press (Cancel button) twice.b. For level 2 cleaning: Press (Cancel button) twice and (Resume button)
once.c. For level 3 cleaning: Press (Cancel button) twice and (Resume button)
twice.3. Release (Power button).
The device begins the cleaning process.
Toolbox (Windows)1. Open the Toolbox. For more information, see Toolbox (Windows).2. Click the Printer Services tab, click Clean Print Cartridges, and then follow the
onscreen instructions.
HP Printer Utility (Mac OS)1. Open the HP Printer Utility. For more information, see HP Printer Utility (Mac OS).2. Click Clean and follow the onscreen instructions.
To clean print cartridges manuallyPoor contact between the print cartridges and the print cartridge cradles can alsoaffect the quality of the printout. When this occurs, try cleaning the electrical contactson the print cartridges and print cartridge cradles.
NOTE: Before cleaning the print cartridges manually, remove and reinsert thecartridges to make sure they are properly inserted.
1. Remove the print cartridge from the device. For more information, see Replace theprint cartridges.
Work with print cartridges 73

2. Clean the electrical contacts on the print cartridge cradle with a dry cotton swab.
3. Carefully clean the electrical contacts on the print cartridge with a soft, dry, lint-freecloth.
CAUTION: To prevent damage to the electrical contacts, you should wipe thecontacts only once. Do not wipe the ink nozzles on the print cartridges.
4. Reinstall the print cartridges.
Chapter 5
74 Maintain and troubleshoot

Store printing suppliesThis section covers the following topics:
• Store print cartridges
Store print cartridgesThe print cartridge protector is designed to keep a print cartridge secure and prevent itfrom drying out when it is not being used. Whenever you remove a print cartridge fromthe device with the intention of using it again later, store it in the print cartridgeprotector. For example, store the black print cartridge in a print cartridge protector ifyou are removing it so you can print high-quality photos with the photo and tri-colorprint cartridges.
NOTE: If you do not have a print cartridge protector, you can order one from HPSupport. For more information, see Support and warranty. You can also use an air-tight container, such as a plastic tub. Make sure the nozzles are not touchinganything when you store the print cartridges.
To insert a print cartridge into the print cartridge protector▲ Place the print cartridge into the print cartridge protector at a slight angle and snap
it securely into place.
Work with print cartridges 75

To remove the print cartridge from the print cartridge protector▲ Press down on the top of the print cartridge protector to release the print cartridge,
then gently remove the print cartridge out of the print cartridge protector.
Replace the ink service moduleThe replaceable ink service module holds waste ink from the black print cartridge.When it is almost full, the device lights will prompt you to replace it. For moreinformation, see Control-panel lights reference.
When the ink service module is full, the device will stop printing. If you have a new inkservice module, install it immediately by following the instructions that come with it.
Otherwise, visit www.hp.com/support or see Support and warranty to get areplacement. In the meantime, remove the black print cartridge to continue printing.The device can print using only the tri-color print cartridge but the color results andprint speed will be affected. For more information, see Print with a single print cartridge.
CAUTION: Allowing the ink service module to fill completely can result in blackink spillage. Take care to avoid spilling the ink in the ink service module. Ink canpermanently stain fabric and other materials.
NOTE: If you have installed the Toolbox (Windows), you can choose to displayerror messages on your screen when there is a problem with your device. Formore information, see To share the device on a locally shared network.
Troubleshooting tips and resourcesUse the following tips and resources to resolve printing problems.
• For a paper jam, see Clear a jam in the device.• For paper-feed problems, such as the paper skew and paper pick, see Solve
paper-feed problems.• Make sure the device is in the ready state. If lights are on or blinking, see Control-
panel lights reference.• Power cord and other cables are working, and are firmly connected to the device.
Make sure the device is connected firmly to a functioning alternating current (AC)power outlet, and is turned on. For voltage requirements, see Electricalspecifications.
Chapter 5
76 Maintain and troubleshoot

• Media is loaded correctly in the tray and is not jammed in the device.• Print cartridges are properly installed in their correct slots. Press down firmly on
each one to ensure proper contact. Ensure you have removed the protective tapefrom each print cartridge.
• All covers are closed.• All packing tapes and materials are removed.• The device can print a self-test diagnostic page. For more information, see
Understand the device information pages.• The device is set as the current or default printer. For Windows, set it as the
default in the Printers folder. For the Mac OS, set it as the default in the PrinterSetup Utility. See your computer's documentation for more information.
• Pause Printing is not selected if you are using a computer running Windows.• You are not running too many programs when you are performing a task. Close
programs that you are not using or restart the computer before attempting the taskagain.
• Any necessary software, such as Printboy for Palm OS users, is installed in thehost device if using a Bluetooth connection. Make sure your Bluetooth settings arecorrect. For more information, see Bluetooth wireless settings options.
• Your wireless network settings are correct if using an 802.11 connection. For moreinformation, see 802.11 wireless connection.
• You created a DPOF file on your digital camera memory card, if you are trying toprint directly from the card. For more information, see Print from memory cardsand USB Flash drives.
Some problems can be resolved by resetting the device.
Solve printing problemsThis section contains the following topics:
• The device shuts down unexpectedly• All device lights are on or flashing• The device is not responding (nothing prints)• Device does not accept print cartridge• Device takes a long time to print• Blank or partial page printed• Something on the page is missing or incorrect• Placement of the text or graphics is wrong
The device shuts down unexpectedly
Check the power and power connections• Make sure the device is connected firmly to a functioning alternating current (AC)
power outlet. For voltage requirements, see Electrical specifications.• If you are using the battery, make sure it is properly installed.
Solve printing problems 77

All device lights are on or flashing
A non-recoverable error has occurredDisconnect all cables (such as power cord, network cable, and USB cable), removethe battery, wait about 20 seconds, press any control panel buton, and then reconnectthe cables. If the problem persists, visit the HP Web site (www.hp.com/support) for thelatest troubleshooting information, or product fixes and updates.
The device is not responding (nothing prints)
Check the print queueA print job might be stuck in the print queue. To fix, open the print queue, cancel theprinting of all documents in the queue, and then reboot the computer. After thecomputer reboots, try printing again. See your operating system help for informationon opening the print queue and canceling print jobs.
Check the device setupFor more information, see Troubleshooting tips and resources.
Check the device software installationIf the device is turned off when printing, an alert message should appear on yourcomputer screen; otherwise, the device software might not be installed correctly. Toresolve this, uninstall the software completely, and then reinstall the device software.For more information, see Uninstall and reinstall the software.
Check the cable connectionsMake sure both ends of the USB cable are secure.
Check any personal firewall software installed on the computerThe personal software firewall is a security program that protects a computer fromintrusion. However, the firewall might block communication between the computer andthe device. If there is a problem communicating with the device, try temporarilydisabling the firewall. If the problem persists, the firewall is not the source of thecommunication problem. Re-enable the firewall.If disabling the firewall allows you to communicate with the device, you might want toassign a static IP address to the device and re-enable the firewall.
Check the wireless connectionPrinting larger files using a Bluetooth wireless connection can sometimes cause theprint job to fail. Try printing a smaller file. For more information, see Problems settingup 802.11 or Bluetooth wireless communication.
Chapter 5
78 Maintain and troubleshoot

Device does not accept print cartridge
Check the print cartridge• Remove and reinstall the print cartridge.• Make sure the print cartridge is inserted into its correct slot. Make sure the
protective tape has been completely removed from the print cartridge. For moreinformation, see Replace the print cartridges.
Clean the print cartridge manuallyComplete the print cartridge cleaning procedure. For more information, see To cleanprint cartridges manually.
Turn off the device after removing the print cartridgeAfter removing the print cartridge, turn off the device, wait about 20 seconds, and turnit on again without the print cartridge installed. After the device has restarted, reinsertthe print cartridge.
Device takes a long time to print
Check the system resourcesMake sure your computer has enough resources to print the document in a reasonableamount of time. If the computer meets only the minimum system requirements,documents might take longer to print. For more information on minimum andrecommended system requirements, see System requirements. In addition, if thecomputer is too busy running other programs, documents can print more slowly.
Check the device software settingsPrint speed is slower when Best or Maximum dpi is selected as the print quality. Toincrease the print speed, select different print settings in the device driver. For moreinformation, see Change print settings.
Check for radio interferenceIf the device is connected using wireless communication and is printing slowly, thenthe radio signal might be weak. For more information, see Problems setting up 802.11or Bluetooth wireless communication.
Check the wireless connection• Printing larger files using a Bluetooth wireless connection can sometimes cause
the print job to fail. Try printing a smaller file.• After switching from one 802.11 wireless profile to another, the first print job takes
10 seconds or so before it starts to print. For more information, see Problemssetting up 802.11 or Bluetooth wireless communication.
Solve printing problems 79
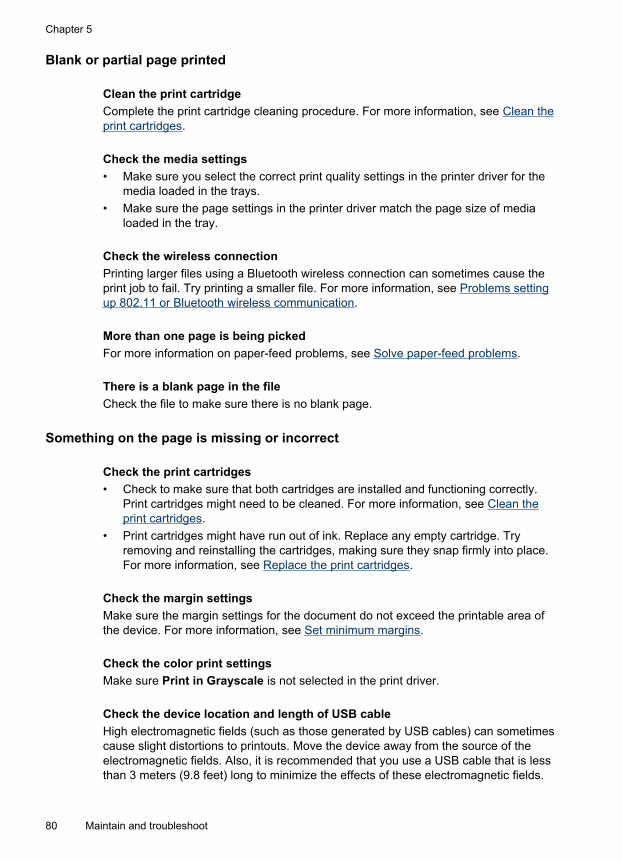
Blank or partial page printed
Clean the print cartridgeComplete the print cartridge cleaning procedure. For more information, see Clean theprint cartridges.
Check the media settings• Make sure you select the correct print quality settings in the printer driver for the
media loaded in the trays.• Make sure the page settings in the printer driver match the page size of media
loaded in the tray.
Check the wireless connectionPrinting larger files using a Bluetooth wireless connection can sometimes cause theprint job to fail. Try printing a smaller file. For more information, see Problems settingup 802.11 or Bluetooth wireless communication.
More than one page is being pickedFor more information on paper-feed problems, see Solve paper-feed problems.
There is a blank page in the fileCheck the file to make sure there is no blank page.
Something on the page is missing or incorrect
Check the print cartridges• Check to make sure that both cartridges are installed and functioning correctly.
Print cartridges might need to be cleaned. For more information, see Clean theprint cartridges.
• Print cartridges might have run out of ink. Replace any empty cartridge. Tryremoving and reinstalling the cartridges, making sure they snap firmly into place.For more information, see Replace the print cartridges.
Check the margin settingsMake sure the margin settings for the document do not exceed the printable area ofthe device. For more information, see Set minimum margins.
Check the color print settingsMake sure Print in Grayscale is not selected in the print driver.
Check the device location and length of USB cableHigh electromagnetic fields (such as those generated by USB cables) can sometimescause slight distortions to printouts. Move the device away from the source of theelectromagnetic fields. Also, it is recommended that you use a USB cable that is lessthan 3 meters (9.8 feet) long to minimize the effects of these electromagnetic fields.
Chapter 5
80 Maintain and troubleshoot

Check the PictBridge settingsIf printing using a PictBridge device, make sure the media settings in the device arecorrect or are defaulting to the current printer settings. If defaulting to the currentdevice settings, then check the Toolbox (Windows), HP Printer Utility (Mac OS), orToolbox software for PDAs (Pocket PC and Palm OS) to make sure the current devicesettings are correct.
Check the DPOF settingsIf printing a DPOF file from a memory card, make sure the DPOF file was set upcorrectly in the device that created it. Please see the documentation that came withthe device. Always load the media for portrait printing.
Check the borderless print settingsIf printing using a PictBridge device, make sure the media settings in the device arecorrect or are defaulting to the current printer settings.
Check the wireless connectionPrinting larger files using a Bluetooth wireless connection can sometimes cause theprint job to fail. Try printing a smaller file. For more information, see Problems settingup 802.11 or Bluetooth wireless communication.
Check the mobile phone fontBoxes might appear when trying to print Asian fonts from a mobile phone on devicespurchased outside Asia. Asian fonts for Bluetooth mobile phone printing are supportedby models purchased in Asia.
Placement of the text or graphics is wrong
Check how the media is loadedMake sure the media width and length guides fit snugly against the edges of the stackof media, and make sure the trays are not overloaded. For more information, see Loadmedia.
Check the media size• Content on a page might be cut off if the document size is larger than the media
that you are using.• Make sure the media size selected in the printer driver match the size of media
loaded in the tray.
Check the margin settingsIf the text or graphics are cut off at the edges of the page, make sure the marginsettings for the document do not exceed the printable area of your device. For moreinformation, see Set minimum margins.
Solve printing problems 81

Check the page-orientation settingMake sure the media size and page orientation selected in the application match thesettings in the printer driver. For more information, see Change print settings.
Check the device location and length of USB cableHigh electromagnetic fields (such as those generated by USB cables) can sometimescause slight distortions to printouts. Move the device away from the source of theelectromagnetic fields. Also, it is recommended that you use a USB cable that is lessthan 3 meters (9.8 feet) long to minimize the effects of these electromagnetic fields.
If the above solutions do not work, the problem may be caused by the inability of theapplication to interpret print settings properly. See the release notes for knownsoftware conflicts, refer to the application's documentation, or contact the softwaremanufacturer for specific help.
Poor print quality and unexpected printoutsThis section covers the following topics:
• General tips• Meaningless characters print• Ink is smearing• Ink is not filling the text or graphics completely• Output is faded or dull colored• Colors are printing as black and white• Wrong colors are printing• Printout shows bleeding colors• Colors do not line up properly• Lines or dots are missing from text or graphics
General tips
Check the print cartridges• Check to make sure that both cartridges are installed and functioning correctly.
Print cartridges might need to be cleaned. See Cleaning the print cartridges. Printcartridges might have run out of ink. Replace any empty cartridge. Try removingand reinstalling the cartridges, making sure they snap firmly into place. For moreinformation, see Replace the print cartridges.
• Whenever you install a new print cartridge, you should align the print cartridges forthe best possible print quality. If your printout is grainy, has stray dots, jaggededges, or the ink is bleeding into another color, you can realign them through theToolbox or printer driver (Windows), HP Printer Utility (Mac OS), or Toolboxsoftware for PDAs (Pocket PC and Palm OS). For more information, see Align theprint cartridges.
• Dropping or subjecting the print cartridges to impact might cause temporarymissing nozzles in the print cartridge. To resolve this problem, leave the printcartridge in the device for 2 to 24 hours.
Chapter 5
82 Maintain and troubleshoot

• Use the appropriate print cartridge for the project. For best results, use the HPblack print cartridge to print text documents and use the HP photo or gray photoprint cartridges to print color or black and white photos.
• Make sure print cartridges have not been tampered with. Refilling processes andthe use of incompatible inks can disrupt the intricate printing system and result inreduced print quality and damage to the device or print cartridge. HP does notguarantee or support refilled print cartridges. For ordering information, see HPsupplies and accessories.
Check the paper qualityThe paper might be too moist or too rough. Make sure the media meets HPspecifications, and try to print again. For more information, see Select print media.
Check the type of media loaded in the device• Make sure the tray supports the type of media you have loaded. For more
information, see Understand specifications for supported media.• Make sure you have selected the tray in the print driver that contains the media
that you want to use.
Check the rollers in the deviceThe rollers in the device might be dirty, causing lines or smudges to appear on yourprintout. Turn off the device, remove the battery, disconnect the power cord, clean theoutput rollers in the device with water on a slightly dampened lint-free cloth, and thentry to print again.
Check the device location and length of USB cableHigh electromagnetic fields (such as those generated by USB cables) can sometimescause slight distortions to printouts. Move the device away from the source of theelectromagnetic fields. Also, it is recommended that you use a USB cable that is lessthan 3 meters (9.8 feet) long to minimize the effects of these electromagnetic fields.
Check the wireless connectionPrinting larger files using a Bluetooth wireless connection can sometimes cause theprint job to fail. Try printing a smaller file. For more information, see Problems settingup 802.11 or Bluetooth wireless communication.
Meaningless characters printIf an interruption occurs to a job that is printing, the device might not recognize the restof the job.
Poor print quality and unexpected printouts 83

Cancel the print job and wait for the device to return to the ready state. If the devicedoes not return to the ready state, cancel all jobs and wait again. When the device isready, resend the job. If prompted by the computer to retry the job, click Cancel.
Check the cable connectionsIf the device and computer are connected with a USB cable, the problem may be dueto a poor cable connection.Make sure the cable connections at both ends are secure. If the problem persists, turnoff the device, disconnect the cable from the device, turn on the device withoutconnecting the cable, and delete any remaining jobs from the print spooler. When thePower light is on and not flashing, reconnect the cable.
Check the document fileThe document file may be damaged. If you can print other documents from the sameapplication, try printing a backup copy of your document, if available.
Check the mobile phone fontBoxes might appear when trying to print Asian fonts from a mobile phone on devicespurchased outside Asia. Asian fonts for Bluetooth mobile phone printing are supportedby models purchased in Asia.
Ink is smearing
Check the print settings• When you print documents that use much ink, allow more time to dry before
handling the printouts. This is especially true for transparencies. In the printerdriver, select the Best print quality, and also increase the ink drying time andreduce the ink saturation using the ink volume under the advanced features(Windows) or ink features (Mac OS). However, note that decreasing ink saturationmight give printouts a "washed-out" quality.
• Color documents that have rich, blended colors can wrinkle or smear when printedusing the Best print quality. Try using another print mode, such as Normal, toreduce ink, or use HP Premium Paper designed for printing vivid color documents.For more information, see Change print settings.
Check the media size and type• Do not allow the device to print media that is smaller than the print job. If you are
doing borderless printing, make sure the correct media size is loaded. If you areusing the incorrect size, ink smears might appear on the bottom of subsequentpages.
• Some types of media do not accept ink well. For these types of media, ink will drymore slowly and smearing may occur. For more information, see Select print media.
Check the ink service moduleRemove the ink service module and check to see if it is full. If it is not full, reinstall themodule. If it is full, replace it with a new one. For information on removing andreplacing the ink service module, see Replace the ink service module.
Chapter 5
84 Maintain and troubleshoot

Ink is not filling the text or graphics completely
Check the print cartridges• Check to make sure that both print cartridges are installed and functioning
correctly. Print cartridges might need to be cleaned. For more information, seeClean the print cartridges. Print cartridges might have run out of ink. Replace anyempty cartridge. Try removing and reinstalling the cartridges, making sure theysnap firmly into place. For more information, see Replace the print cartridges.
• Make sure print cartridges have not been tampered with. Refilling processes andthe use of incompatible inks can disrupt the intricate printing system and result inreduced print quality and damage to the device or print cartridge. HP does notguarantee or support refilled print cartridges. For ordering information, see HPsupplies and accessories.
Check the media typeSome media types are not suitable for use with the device. For more information, seeSelect print media.
Output is faded or dull colored
Check the print modeThe Draft or Fast mode in the printer driver allows you to print at a faster rate, which isgood for printing drafts. To get better results, select Normal or Best. For moreinformation, see Change print settings.
Check the paper type settingWhen printing on transparencies or other special media, select the correspondingmedia type in the print driver. For more information, see To print on special or custom-sized media (Windows).
Check the print cartridges• Check to make sure that both print cartridges are installed and functioning
correctly. Print cartridges might need to be cleaned. For more information, seeClean the print cartridges. Print cartridges might have run out of ink. Replace anyempty cartridge. Or try removing and reinstalling the cartridges, making sure theysnap firmly into place. For more information, see Replace the print cartridges.
• Make sure print cartridges have not been tampered with. Refilling processes andthe use of incompatible inks can disrupt the intricate printing system and result inreduced print quality and damage to the device or print cartridge. HP does notguarantee or support refilled print cartridges. For ordering information, see HPsupplies and accessories.
Poor print quality and unexpected printouts 85

Colors are printing as black and white
Check the print settings• Make sure Print in Grayscale is not selected in the printer driver. For information
on changing this setting, see Change print settings.• Make sure the tri-color cartridge is installed.
Check the print cartridges• Make sure the tri-color cartridge is properly installed.• Check to make sure that both print cartridges are installed and functioning
correctly. Print cartridges might need to be cleaned. For more information, seeClean the print cartridges. Print cartridges might have run out of ink. Replace anyempty cartridge. Or try removing and reinstalling the cartridges, making sure theysnap firmly into place. For more information, see Replace the print cartridges.
• Make sure print cartridges have not been tampered with. Refilling processes andthe use of incompatible inks can disrupt the intricate printing system and result inreduced print quality and damage to the device or print cartridge. HP does notguarantee or support refilled print cartridges. For ordering information, see HPsupplies and accessories.
Wrong colors are printing
Check the print settingsMake sure Print in Grayscale is not selected in the printer driver. For information onchanging this setting, see Change print settings.
Check the print cartridges• Check to make sure that both print cartridges are installed and functioning
correctly. Print cartridges might need to be cleaned. For more information, seeClean the print cartridges. Print cartridges might have run out of ink. Replace anyempty cartridge. Or try removing and reinstalling the cartridges, making sure theysnap firmly into place. For more information, see Replace the print cartridges.
• Make sure print cartridges have not been tampered with. Refilling processes andthe use of incompatible inks can disrupt the intricate printing system and result inreduced print quality and damage to the device or print cartridge. HP does notguarantee or support refilled print cartridges. For ordering information, see HPsupplies and accessories.
Chapter 5
86 Maintain and troubleshoot

Printout shows bleeding colors
Check the print cartridges• Check to make sure that both print cartridges are installed and functioning
correctly. Print cartridges might need to be cleaned. For more information, seeClean the print cartridges. Print cartridges might have run out of ink. Replace anyempty cartridge. Or try removing and reinstalling the cartridges, making sure theysnap firmly into place. For more information, see Replace the print cartridges.
• Make sure print cartridges have not been tampered with. Refilling processes andthe use of incompatible inks can disrupt the intricate printing system and result inreduced print quality and damage to the device or print cartridge. HP does notguarantee or support refilled print cartridges. For ordering information, see HPsupplies and accessories.
Check the media typeSome media types are not suitable for use with the device. For more information, seeSelect print media.
Colors do not line up properly
Check the print cartridges• Check to make sure that both print cartridges are installed and functioning
correctly. Print cartridges might need to be cleaned. For more information, seeClean the print cartridges. Print cartridges might have run out of ink. Replace anyempty cartridge. Or try removing and reinstalling the cartridges, making sure theysnap firmly into place. For more information, see Replace the print cartridges.
• Whenever you install a new print cartridge, you should align the print cartridges forthe best possible print quality. If your printout is grainy, has stray dots, jaggededges, or the ink is bleeding into another color, you can realign them through theToolbox or printer driver (Windows), HP Printer Utility (Mac OS), or Toolboxsoftware for PDAs (Pocket PC and Palm OS). For more information, see Align theprint cartridges.
• Make sure print cartridges have not been tampered with. Refilling processes andthe use of incompatible inks can disrupt the intricate printing system and result inreduced print quality and damage to the device or print cartridge. HP does notguarantee or support refilled print cartridges. For ordering information, see HPsupplies and accessories.
Check the graphics placementUse the zoom or print preview feature of your software to check for gaps in theplacement of graphics on the page.
Lines or dots are missing from text or graphics
Check the print modeTry using the Best mode in the printer driver. For more information, see Change printsettings.
Poor print quality and unexpected printouts 87

Check the print cartridges• Clean the print cartridges. For more information, see Clean the print cartridges.• Whenever you install a new print cartridge, you should align the print cartridges for
the best possible print quality. If your printout is grainy, has stray dots, jaggededges, or the ink is bleeding into another color, you can realign them through theToolbox or printer driver (Windows), HP Printer Utility (Mac OS), or Toolboxsoftware for PDAs (Pocket PC and Palm OS). For more information, see Align theprint cartridges.
• Make sure print cartridges have not been tampered with. Refilling processes andthe use of incompatible inks can disrupt the intricate printing system and result inreduced print quality and damage to the device or print cartridge. HP does notguarantee or support refilled print cartridges. For ordering information, see HPsupplies and accessories.
Solve paper-feed problemsFor information on resolving jams, see Clear a jam in the device.
This section contains the following topics:
• Media is not supported for the device• Media is not picked up• Media is not coming out correctly• Pages are skewing• Multiple pages are being picked up
Media is not supported for the deviceUse only media that is supported for the device and the tray being used. For moreinformation, see Understand specifications for supported media.
Media is not picked up• Make sure media is loaded in the tray. For more information, see Load media. Fan
the media before loading.• Make sure the paper guides are set to the correct markings in the tray for the
media size you are loading. Also make sure the guides are snug, but not tight,against the stack.
• Make sure media in the tray is not curled. Uncurl paper by bending it in theopposite direction of the curl.
• Make sure to fully extend the input tray extension if your device model has anextension.
Media is not coming out correctlyRemove excess media from the output area. If printed media stacks up outside theoutput slot, it can prevent media from properly exiting the device.
Chapter 5
88 Maintain and troubleshoot

Pages are skewing• Make sure the media loaded in the trays is aligned to the paper guides.• Load media into the device only when it is not printing.• Make sure to fully extend the input tray extension if your device model has an
extension.
Multiple pages are being picked up• Fan the media before loading.• Make sure the paper guides are set to the correct markings in the tray for the
media size you are loading. Also make sure the guides are snug, but not tight,against the stack.
• Make sure the tray is not overloaded with paper.• Use HP media for optimum performance and efficiency.
Troubleshoot installation issuesIf the following topics do not help, see Support and warranty for information about HPsupport.• Hardware installation suggestions• Software installation suggestions• Problems setting up 802.11 or Bluetooth wireless communication
Hardware installation suggestions
Check the device• Make sure that all packing tape and material have been removed from outside and
inside the device.• Make sure that the device is loaded with paper.• Make sure that no lights are on or blinking except the Power light, which should be
on. If a light other than the Power light is on or blinking, there is an error. For moreinformation, see Control-panel lights reference.
• Make sure that the device can print a self-test diagnostic page.
Check the hardware connections• Make sure that any cords and cables that you are using are in good working order.• Make sure that the power cord is connected securely to both the device and to a
working power outlet.
Check the print cartridges• Whenever you install a new print cartridge, the device aligns the print cartridges
automatically. If the alignment fails, check to make sure the cartridges are installedcorrectly, and start the print cartridge alignment. For more information, see Alignthe print cartridges.
• Make sure that all latches and covers are closed properly.
Troubleshoot installation issues 89

Software installation suggestions
Check the computer system• Make sure that your computer is running one of the supported operating systems.• Make sure that the computer meets at least the minimum system requirements.• In the Windows device manager, make sure that the USB drivers have not been
disabled.• If you are using a computer running Windows, and the computer cannot detect the
device, run the uninstallation utility (util\ccc\uninstall.bat on the Starter CD) toperform a clean uninstallation of the device driver. Restart your computer, andreinstall the device driver.
Verify installation preliminaries• Make sure to use the Starter CD that contains the correct installation software for
your operating system.• Before installing software, make sure that all other programs are closed.• If the computer does not recognize the path to the CD-ROM drive that you type,
make sure that you are specifying the correct drive letter.• If the computer cannot recognize the Starter CD in the CD-ROM drive, inspect the
Starter CD for damage. You can download the device driver from the HP Web site(www.hp.com/support).
NOTE: After correcting any problems, run the installation program again.
Problems setting up 802.11 or Bluetooth wireless communicationIf you have problems printing using an 802.11 or Bluetooth wireless connection, try thefollowing suggestions. For more information on configuring wireless settings, see802.11 wireless connection and Bluetooth wireless connection.
NOTE: To enable 802.11 wireless communication, you must complete thewireless installation by running the installer program on the Starter CD. You canset the wireless communication settings from the Toolbox (Windows) if you areconnected using a USB cable, but until you run the installer and set up the devicefor wireless communication, you cannot print using an 802.11 wireless connection.
Follow these general steps and use the information in the following sections totroubleshoot wireless connection problems:
Windows1. Check the wireless printer accessory. For more information, see Check the
wireless printer accessory.2. Check the wireless settings. For more information, see Check the wireless settings.3. Manually assign the IP address for the device in the Ports tab of the device
properties.4. PING the device. For more information, see Check the network communication.
Chapter 5
90 Maintain and troubleshoot

Mac OS1. Check the wireless printer accessory. For more information, see Check the
wireless printer accessory.2. Delete and re-add the device in the Print Center (Mac OS).3. PING the device. For more information, see Check the network communication.
Check the wireless printer accessory• Make sure the wireless printer accessory is inserted properly. For more
information, see Install the 802.11 or Bluetooth wireless USB accessory.• Make sure you inserted the wireless printer accessory before or after, and not
during, device initialization.• If the light on the wireless printer accessory is not on, do the following:
◦ Remove the wireless printer accessory.◦ Turn off the device, wait a few seconds, and then turn it back on again.◦ Reinsert the accessory when the device is in the Ready state. If there is no
response, repeat this procedure a few times. If there is still no response,contact HP. For more information, see Support and warranty.
• To see if the wireless printer accessory is working, try printing using anotherwireless device. If you still cannot print, the wireless printer accessory might befaulty. Replace the accessory if necessary.
Check the wireless settings• Make sure the wireless profile switch on the back of the device is switched to the
correct wireless profile you are using. Make sure you are using a profile that wasconfigured during installation. For more information, see 802.11 wireless connection.
• If you cannot communicate with the device after completing the softwareinstallation and removing the USB cable, then one or more of the followingwireless settings might be incorrect:◦ Network name (SSID)◦ Communication mode (infrastructure or ad hoc)◦ Channel (ad hoc networks only)◦ Security settings (such as Authentication Type and Encryption)For more information on configuring wireless settings, see 802.11 wirelessconnection and Bluetooth wireless connection.
• To configure Bluetooth settings or monitor device status (such as ink levels) usingthe Toolbox (Windows), you must connect the device to your computer with a USBcable.
Check the network communicationPING is a basic program that sends a series of packets over a network or the Internetto a specific device in order to generate a response from that device. The other device
Troubleshoot installation issues 91

responds with an acknowledgment that it received the packets. PING verifies whethera specific device on a network or the Internet exists and is connected.
To PING the device1. Print a wireless configuration page. For more information, see Understand the
device information pages.2. Using the IP address on the configuration page, PING the device to verify network
communication. In this example, the IP address is 169.254.110.107.a. Open the MS-DOS command prompt window (Windows) or Terminal (Mac OS).b. At the command prompt, type the IP address of the device, and then press
Enter (for example: ping 169.254.110.107).If the command is successful, the PING utility will return results similar to the following.The exact information returned will vary depending on your operating system.Regardless of the operating system, the results will show the IP address of the device,the round-trip time in milliseconds for each packet, the number of packets sent andreceived, and the number and percentage of how many packets got lost.
ExamplePinging 169.254.110.107 with 32 bytes of data:
Reply from 169.254.110.107: bytes=32 time<10ms TTL=128
Reply from 169.254.110.107: bytes=32 time<10ms TTL=128
Reply from 169.254.110.107: bytes=32 time<10ms TTL=128
Reply from 169.254.110.107: bytes=32 time<10ms TTL=128
If the command is unsuccessful, the PING utility will return results similar to thefollowing:
ExamplePinging 169.254.110.107 with 32 bytes of data:
Request timed out.
Request timed out.
Request timed out.
Request timed out.
Check the wireless signalWireless communication can be interrupted or unavailable if there is signalinterference, distance or signal strength problems, or if the device is not ready forsome reason.
• Make sure the device is within range of the 802.11 or Bluetooth sending device.802.11 printing allows wireless printing up to 100 meters (300 feet). Bluetoothprinting allows wireless printing up to 10 meters (30 feet).
• If a document doesn't print, there could be signal interruption. If a messageappears on the computer explaining that there is a signal problem, cancel the printjob and then resend it from the computer.
Chapter 5
92 Maintain and troubleshoot

Clear jamsOccasionally, media becomes jammed during a job. Try the following remedies beforeyou attempt to clear the jam.
• Make sure that you are printing with media that meets specifications. For moreinformation, see Select print media.
• Make sure that you are printing with media that is not wrinkled, folded, or damaged.• Make sure that the input tray is loaded correctly and is not too full. For more
information, see Load media.This section contains the following topics:
• Clear a jam in the device• Tips for avoiding jams
Clear a jam in the device
To clear a jam1. Turn off the device.2. Unplug the device from the power source.3. Remove media that is not jammed from the input tray and the output slot.
NOTE: Do not put your hands inside the input tray. Use tweezers instead andbe careful not to scratch the inside of the device.
4. Locate the media jam.5. If the media is visible from the output slot, gently pull it out from the slot. If the
media is not visible, open the front access cover and clear jammed media.
NOTE: Remove jammed media slowly and steadily to prevent media tear.
Clear jams 93

6. If the print carriage is obstructing the jam, gently push it to one side and thenremove the media.
7. If the jammed media is not visible in the print area located inside the device,remove what is visible in the input tray.
8. After you clear the jam, close the front access cover, turn on the device, and thenpress (Resume button) to continue the print job.The device will continue the print job on the next page. You will need to resend thepage or pages that were jammed in the device.
Tips for avoiding jams• Make sure that nothing is blocking the paper path.• Do not overload the trays. For more information, see Understand specifications for
supported media.• Load paper properly and when the device is not printing. For more information, see
Load media.• Do not use media that is curled or crumpled.• Always use media that conforms with specifications. For more information, see
Select print media.• Make sure media is aligned against the right side of a tray.• Make sure the media guides are adjusted snugly against the media, but do not
crinkle or bend it.
Chapter 5
94 Maintain and troubleshoot

6 Control-panel lights referenceThe control-panel lights indicate status and are useful for diagnosing printingproblems. This section contains information about the lights, what they indicate, andwhat action to take if necessary.
Interpret control-panel lights
1 (Cancel button) – Cancels the current print job. The time it takes to canceldepends on the size of the print job. Press this button only once to cancel a queuedprint job.
2 (Resume button) – Resumes a print job that is waiting or after temporaryinterruption (for example, when adding print media to the printer).
3 Resume light – Lights up in amber when a print job is waiting, and blinks or turns onto relay status or a need for intervention.
4 Battery charging light – Lights up in green when the battery is charging.
5 Left print cartridge light – Blinks when the left print cartridge is absent or improperlyfunctioning. Turns on solid when the ink is low or empty.
6 Right print cartridge light – Blinks when the right print cartridge is absent orimproperly functioning. Turns on solid when the ink is low or empty.
7 (Power button) – Turns the printer off or on.
8 Power light – Lights up in green when the printer is turned on using the AC adapteror a 41-100% charged battery. When powered by battery, lights up in amber whenbattery is 10-40% charged, and red when battery is below 10% charged. Blinksduring printing.
For more information, visit the HP Web site (www.hp.com/support) for the latesttroubleshooting information, or product fixes and updates.
Light description/Light pattern Explanation andrecommended action
Power light is green. If using AC power:Printer is turned onand idle.If using battery power:Battery is 41-100%
Control-panel lights reference 95

Light description/Light pattern Explanation andrecommended action
charged and printer isturned on and idle.No action required.
Power light is amber. Battery is 10-40%charged and printer isturned on and idle.Plug in the poweradapter to beginrecharging the battery.See Install and use thebattery.
Power light is red. Battery is less than10% charged andprinter is turned on andidle.Plug in the poweradapter to beginrecharging the battery.See Install and use thebattery.
Battery charge light is green. Battery is charging.No action required.
Battery charge light is red. Battery is faulty.Replace the battery.See HP supplies andaccessories.
Power light blinks. Printer is printing.No action required.
Power, resume, left and right print cartridge lights cycle. Printer is powering on.No action required.
Power light is green and Resume light blinks. Printer is paused eitherto wait for media todry, out of paper, orprocessing Digital PrintOrder Format (DPOF)printing.If out of paper, loadpaper. Press (Resume button) tocontinue the print job.
Chapter 6(continued)
96 Control-panel lights reference

Light description/Light pattern Explanation andrecommended action
Left print cartridge light blinks. The tri-color printcartridge needsattention.Reinstall the printcartridge and try toprint. If the errorpersists, replace thecartridge. See To cleanprint cartridgesmanually.
Right print cartridge light blinks. The right print cartridgeneeds attention.Reinstall the printcartridge and try toprint. If the errorpersists, replace thecartridge. See To cleanprint cartridgesmanually.
Right and left print cartridge lights blink. Tri-color and right printcartridges needattention.Reinstall the printcartridges and try toprint. If the errorpersists, replace thecartridges. See Toclean print cartridgesmanually.
Power light off, resume light blinks. Media jam or papermotor stall.Clear the jammedmedia. For moreinformation, see Clearjams. After clearing thejam, press (Resume button) tocontinue the print job.If no paper jam exists,press (Resumebutton). If this does notwork, try turning theprinter off and then onagain, and resend theprint job.
Power light blinks, resume light blinks. Media jam or carriagestall.Clear the jammedpaper. For moreinformation, see Clear
(continued)
Interpret control-panel lights 97

Light description/Light pattern Explanation andrecommended action
jams. After clearing thejam, press (Resume button) tocontinue the print job.If no paper jam exists,press (Resumebutton). If this does notwork, try turning theprinter off and then onagain, and resend theprint job.An unsupported USBdevice or hub isconnected to thedevice.Remove the USBdevice or hub. Formore information onsupported devices, seeMemory cardspecifications.
Power light blinks, resume light blinks, left and right print cartridgelights on.
Media jam or servicestation stall.Clear the jammedpaper. For moreinformation, see Clearjams. After clearing thejam, press (Resume button) tocontinue the print job.If no paper jam exists,press (Resumebutton). If this does notwork, try turning theprinter off and then onagain, and resend theprint job.
Resume light blinks, left and right print cartridge lights on. Media jam or pickmotor stall.Clear the jammedpaper. For moreinformation, see Clearjams. After clearing thejam, press (Resume button) tocontinue the print job.If no paper jam exists,press (Resumebutton). If this does notwork, try turning theprinter off and then on
Chapter 6(continued)
98 Control-panel lights reference

Light description/Light pattern Explanation andrecommended action
again, and resend theprint job.
Resume light blinks, left and right print cartridge lights cycle. Media jam or switchmotor stall.Clear the jammedpaper. For moreinformation, see Clearjams. After clearing thejam, press (Resume button) tocontinue the print job.If no paper jam exists,press (Resumebutton). If this does notwork, try turning theprinter off and then onagain, and resend theprint job.
Power light on, resume light blinks, right print cartridge light turns ontwice as long as off.
Ink service modulealmost full.
• If you have areplacement forthe ink servicemodule, replace itimmediately byfollowing theinstructions thatcame with it.
• Otherwise, visit:www.hp.com/support or contactCustomer Supportto get areplacement. SeeSupport andwarranty.In the meantime,you can press (Resume button)to continueprinting, but thislight error state willremain until the inkservice module isreplaced. Whenthe ink servicemodule is full, theprinter will stopprinting.
(continued)
Interpret control-panel lights 99

Light description/Light pattern Explanation andrecommended action
Power light on, resume light on, right print cartridge light turns ontwice as long as off.
Ink service module full.
• If you have areplacement forthe ink servicemodule, replace itimmediately byfollowing theinstructions thatcome with it.
• Otherwise, visit:www.hp.com/support or callCustomer Supportto get areplacement.In the meantime,you can removethe black printcartridge and printusing only the tri-color printcartridge. Thecolor results andprint speed maybe affected. SeePrint with a singleprint cartridge.
Power light, resume light, left and right print cartridge lights blink. Printer error.
Press (Resumebutton) to print theerror code.Press (Powerbutton) to reset theprinter.
Chapter 6(continued)
100 Control-panel lights reference

A HP supplies and accessoriesThis section provides information on HP supplies and accessories for the device. The informationis subject to changes, visit the HP Web site (www.hpshopping.com) for the latest updates. Youmay also make purchases through the Web site.• Order printing supplies online• Accessories• Supplies
Order printing supplies onlineBesides the HP Web site, you may order printing supplies using the following tools:• Toolbox (Windows): On the Estimated Ink Level tab, click Shop Online.• HP Printer Utility (Mac OS): Click Supplies Status from the Information and Support
panel, click the Shop for HP Supplies drop-down menu, and then choose Online.
Accessories
HP bt500 Wireless Printer Adapter with Bluetooth Technology Q6273A
HP 802.11 b/g Wireless Printer Adapter Q6274A
HP Lithium-Ion Battery CB8263A
Travel holder for black/photo print cartridge CB006A
12 V Auto Power Adapter C8257A
HP Ultra Slim AC Power Adapter C92792A
HP Battery Charger CB011A
HP Battery and Charger Kit CB012A
USB cable (2 m) C6518A
SuppliesThis section covers the following topics:• Print cartridges• HP media
Print cartridgesThe availability of print cartridges varies by country/region. The print cartridges might come indifferent sizes. To obtain a list of supported print cartridges for your device, print the self-testdiagnostic page and read the information in the print cartridge status section.You can find the print cartridge number in the following places:• On the self-test diagnostic page (see Understand the device information pages).• On the label of the print cartridge you are replacing.
HP supplies and accessories 101

• Windows: From the Toolbox, if you have bidirectional communication, click the EstimatedInk Levels tab, scroll to display the Cartridge Details button, and then click Cartridge Details.
• Mac OS: From the HP Printer Utility, click Supply Info from the Information and Supportpanel, and then click Retail Supplies Information.
NOTE: Ink from the cartridges is used in the printing process in a number of different ways,including in the initialization process, which prepares the device and cartridges for printing,and in print cartridge servicing, which keeps print nozzles clear and ink flowing smoothly. Inaddition, some residual ink is left in the cartridge after it is used. For more information seewww.hp.com/go/inkusage.
HP mediaTo order media such as HP Premium Plus Photo Paper or HP Premium Paper, go to www.hp.com.Choose your country/region, and then select Buy or Shopping.
Appendix A
102 HP supplies and accessories

B Support and warrantyThe information in Maintain and troubleshoot suggests solutions to common problems. If yourdevice is not operating correctly and those suggestions did not solve your problem, try using oneof the following support services to obtain assistance.This section contains the following topics:• Hewlett-Packard limited warranty statement• Obtain electronic support• Obtain HP telephone support• Prepare the device for shipment• Pack the device
Support and warranty 103

Hewlett-Packard limited warranty statement
Appendix B
104 Support and warranty

Obtain electronic supportTo find support and warranty information, go to the HP Web site at www.hp.com/support. Ifprompted, choose your country/region, and then click Contact HP for information on calling fortechnical support.This Web site also offers technical support, drivers, supplies, ordering information and otheroptions such as:• Access online support pages.• Send HP an e-mail message for answers to your questions.• Connect with an HP technician by using online chat.• Check for software updates.You can also obtain support from the Toolbox (Windows). The Toolbox provides easy, step-by-step solutions to common printing problems. For more information, see Toolbox (Windows).Support options and availability vary by product, country/region, and language.
Obtain HP telephone supportDuring the warranty period, you may obtain assistance from the HP Customer Care Center.This section contains the following topics:• Before you call• Support process• HP support by phone• Additional warranty options• HP Quick Exchange Service (Japan)
Before you callVisit the HP Web site (www.hp.com/support) for the latest troubleshooting information, or productfixes and updates.To assist our Customer Care Center representatives to serve you better, prepare the followinginformation if you need to call HP.1. Print the self-test diagnostic page of the device. For more information, see Understand the
device information pages. If the device does not print, get the following information ready:• Device model• Model number and serial number (check the back of the device)
2. Check the operating system that you are using, such as Windows XP.3. If the device is connected to the network, check the network operating system.4. Note how the device is connected to your system, such as through USB or network
connection.5. Obtain the version number of the printer software. (To find the version number of the printer
driver, open the printer settings or properties dialog box, and click the About tab.)6. If you have a problem printing from a particular application, note the application and version
number.
Obtain HP telephone support 105

Support process
If you have a problem, follow these steps:1. Check the documentation that came with the HP Printer.2. Visit the HP online support Web site at www.hp.com/support. HP online support is available
to all HP customers. It is the fastest source for up-to-date device information and expertassistance and includes the following features:• Fast access to qualified online support specialists• Software and driver updates for the HP Printer• Valuable HP Printer and troubleshooting information for common problems• Proactive device updates, support alerts, and HP newsgrams that are available when
you register the HP Printer3. Call HP support. Support options and availability vary by device, country/region, and language.
HP support by phoneThis section contains the following topics:• Phone support period• Telephone support numbers• Placing a call• After the phone support period
Phone support periodOne year of phone support is available in North America, Asia Pacific, and Latin America(including Mexico). To determine the duration of phone support in Europe, the Middle East, andAfrica, go to www.hp.com/support. Standard phone company charges apply.
Telephone support numbersIn many locations, HP provides toll free telephone support during the warranty period. However,some of the support numbers listed below may not be toll free.For the most current list of telephone support numbers, see www.hp.com/support.
Appendix B
106 Support and warranty

Obtain HP telephone support 107

Placing a callCall HP support while you are in front of the computer and the HP Printer. Be prepared to providethe following information:• Model number (located on the label on the front of the HP Printer)• Serial number (located on the back or bottom of the HP Printer)• Messages that appear when the situation occurs• Answers to these questions:
◦ Has this situation happened before?◦ Can you re-create it?◦ Did you add any new hardware or software to your computer at about the time that this
situation began?◦ Did anything else occur prior to this situation (such as a thunderstorm, HP Printer was
moved, etc.)?
After the phone support periodAfter the phone support period, help is available from HP at an additional cost. Help may also beavailable at the HP online support Web site: www.hp.com/support. Contact your HP dealer or callthe support phone number for your country/region to learn more about support options.
Additional warranty optionsExtended service plans are available for the HP Printer at additional costs. Go to www.hp.com/support, select your country/region and language, then explore the services and warranty area forinformation about the extended service plans.
Appendix B
108 Support and warranty

HP Quick Exchange Service (Japan)
For instructions on how to pack your device for exchange, see Pack the device.
Prepare the device for shipmentIf after contacting HP Customer Support or returning to the point of purchase, you are requestedto send the device in for service, make sure you remove and keep the following items beforereturning your device:• The print cartridges• The power cord, USB cable, memory cards, USB wireless devices, and any other cable
connected to the device• Any paper loaded in the input tray• Remove any originals you might have loaded in the device
Remove the print cartridges before shipmentBefore you return the device, make sure you remove your print cartridges.
NOTE: This information does not apply to customers in Japan.
Prepare the device for shipment 109

To remove print cartridges before shipment1. With the device turned on, open the front access cover. Wait for the carriage to stop moving.
This should take only a few seconds.
CAUTION: Only remove or install print cartridges when the print cartridge carriagestops moving.
2. Lift the print cartridge latch open and gently remove the print cartridge from its cradlecompartment.
3. Place the print cartridges in an airtight plastic container so they will not dry out, and put themaside. Do not send them with the device unless the HP customer support call agent instructsyou to.
4. Close the front access cover and wait a few minutes for the print carriage to move back to itshome position (on the left side).
5. Press the Power button to turn off the device.
Pack the deviceComplete the following steps after you have prepared the device for shipment.
Appendix B
110 Support and warranty

To pack the device1. If available, pack the device for shipment by using the original packaging materials, or use
the packaging materials that came with your replacement device.
If you do not have the original packaging materials, please use other adequate packagingmaterials. Shipping damage caused by improper packaging and/or improper transportation isnot covered under the warranty.
2. Place the return shipping label on the outside of the box.3. Include the following items in the box:
• A complete description of symptoms for service personnel (samples of print qualityproblems are helpful).
• A copy of the sales slip or other proof of purchase to establish the warranty coverageperiod.
• Your name, address, and a phone number where you can be reached during the day.
Pack the device 111

C Device specificationsFor media and media-handling specifications, see Understand specifications for supported media.• Physical specifications• Product features and capacities• Processor and memory specifications• System requirements• Print resolution• Environmental specifications• Electrical specifications• Acoustic emission specifications (noise levels per ISO 7779)• Memory card specifications
Physical specificationsSize (width x depth x height)• Device: 340.2 by 163.8 by 80.5 mm (13.4 by 6.45 by 3.15 inches)• Device with battery: 340.2 x 184.8 x 80.5 mm (13.4 x 7.28 x 3.15 inches)
Device weight (does not include printing supplies)• Device: 2.0 kg (4.2 lb)• Device with battery: 2.1 kg (4.63 lb)
Product features and capacities
Feature Capacity
Connectivity • USB Device Port: Hi-Speed USB 2.0• PictBridge/USB 1.1 Full Speed Host Port• Secure Digital (SD) card• Multimedia card (MMC)• Bluetooth 2.0 Enhanced Data Rate,
backward compatible with 1.0 (throughUSB Device Port)Bluetooth Profiles supported: HCRP,BPP, BIP, OPP, SDP
• 802.11 b/g (through USB Host Port)
Print method Drop-on-demand thermal inkjet printing
Print cartridges Two print cartridges (black, tri-color, gray, andphoto print)
Supply yields Visit www.hp.com/pageyield/ for moreinformation on estimated print cartridge yields.
Device languages HP PCL 3 enhanced
Font support 13 built-in fonts for portrait orientation.
112 Device specifications
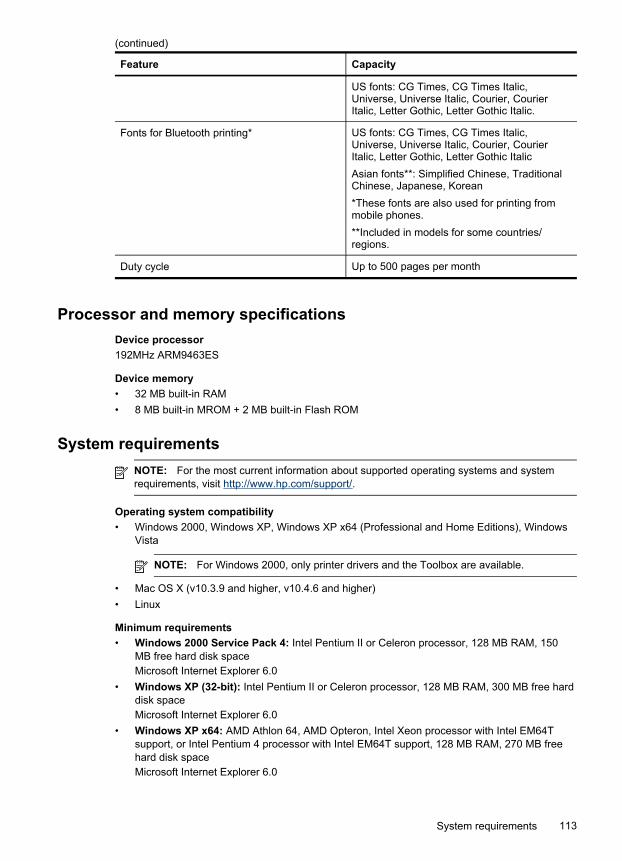
Feature Capacity
US fonts: CG Times, CG Times Italic,Universe, Universe Italic, Courier, CourierItalic, Letter Gothic, Letter Gothic Italic.
Fonts for Bluetooth printing* US fonts: CG Times, CG Times Italic,Universe, Universe Italic, Courier, CourierItalic, Letter Gothic, Letter Gothic ItalicAsian fonts**: Simplified Chinese, TraditionalChinese, Japanese, Korean*These fonts are also used for printing frommobile phones.**Included in models for some countries/regions.
Duty cycle Up to 500 pages per month
Processor and memory specificationsDevice processor192MHz ARM9463ES
Device memory• 32 MB built-in RAM• 8 MB built-in MROM + 2 MB built-in Flash ROM
System requirementsNOTE: For the most current information about supported operating systems and systemrequirements, visit http://www.hp.com/support/.
Operating system compatibility• Windows 2000, Windows XP, Windows XP x64 (Professional and Home Editions), Windows
Vista
NOTE: For Windows 2000, only printer drivers and the Toolbox are available.
• Mac OS X (v10.3.9 and higher, v10.4.6 and higher)• Linux
Minimum requirements• Windows 2000 Service Pack 4: Intel Pentium II or Celeron processor, 128 MB RAM, 150
MB free hard disk spaceMicrosoft Internet Explorer 6.0
• Windows XP (32-bit): Intel Pentium II or Celeron processor, 128 MB RAM, 300 MB free harddisk spaceMicrosoft Internet Explorer 6.0
• Windows XP x64: AMD Athlon 64, AMD Opteron, Intel Xeon processor with Intel EM64Tsupport, or Intel Pentium 4 processor with Intel EM64T support, 128 MB RAM, 270 MB freehard disk spaceMicrosoft Internet Explorer 6.0
(continued)
System requirements 113

• Windows Vista: 800 Mhz 32-bit (x86) or 64-bit (x64) processor, 512 MB RAM, 730 MB freehard disk space.Microsoft Internet Explorer 7.0
• Mac OS X (v10.3.9 and higher, v10.4.6 and higher): 400 MHz Power PC G3 (v10.3.9 andhigher, v10.4.6 and higher) or 1.83 GHz Intel Core Duo (v10.4.6 and higher), 256 MBmemory, 200 MB free hard disk spaceQuickTime 5.0 or later
• Adobe Acrobat Reader 5.0 or later
Recommended requirements• Windows 2000 Service Pack 4: Intel Pentium III or higher processor, 200 MB RAM, 150 MB
free hard disk space• Windows XP (32-bit): Intel Pentium III or higher processor, 256 MB RAM, 350 MB free hard
disk space• Windows XP x64: AMD Athlon 64, AMD Opteron, Intel Xeon processor with Intel EM64T
support, or Intel Pentium 4 processor with Intel EM64T support, 256 MB RAM, 340 MB freehard disk space
• Windows Vista: 1 GHz 32-bit (x86) or 64-bit (x64) processor, 1 GB RAM, 790 MB free harddisk space.
• Mac OS X (v10.3.9 and higher, v10.4.6 and higher): 400 MHz Power PC G4 (v10.3.9 andhigher, v10.4.6 and higher) or 1.83 GHz Intel Core Duo (v10.4.6 and higher), 256 MBmemory, 500 MB free hard disk space
Print resolutionBlackUp to 1200 dpi with pigmented black ink
ColorHP enhanced photo quality with Vivera inks (up to 4800 by 1200 dpi Optimized on HP PremiumPlus photo papers with 1200 by 1200 input dpi)
Environmental specificationsOperating environmentOperating temperature:Recommended relative humidity: 25 to 75% noncondensing◦ Recommended operating conditions: 15° to 32° C (59° to 90° F)◦ Maximum: 0° to 55° C (32° to 131° F)◦ Battery charging: 2.5° to 40° C (36.5° to 104° F)◦ Battery discharging/using: 0° to 40° C (32° to 104° F)
Storage environmentStorage temperature: -40° to 60° C (-40° to 140° F)Storage relative humidity: Up to 90% noncondensing at a temperature of 65° C (150° F)
Electrical specificationsPower supplyUniversal power adapter, external (HP part number C9279A)
Appendix C
114 Device specifications

Power requirementsInput voltage: 100 to 240 VAC (± 10%), 50 to 60 Hz (± 3Hz)Output voltage: 18.5 Vdc, 3500 mA
Power consumption34.03 watts
Acoustic emission specifications (noise levels per ISO 7779)Sound pressure (bystander position)LpAm 47 (dBA)
Sound powerLwAd 6.1 (BA)
Memory card specifications• Maximum recommended number of files on a memory card: 1,000• Maximum recommended individual file size: 12 megapixel maximum, 8 MB maximum• Maximum recommended memory card size: 2 GB (solid state only)
NOTE: Approaching any of the recommended maximums on a memory card might causethe performance of the device to be slower than expected.
Supported memory card types• Secure Digital• MultiMediaCard (MMC)
Memory card specifications 115

D Regulatory informationThis section contains the following topics:• Environmental sustainability program• FCC statement• Other regulatory information• Declaration of conformity
Environmental sustainability programHewlett-Packard is committed to providing quality products in an environmentally sound manner.HP continuously improves the design processes of its products to minimize the negative impacton the office environment and on the communities where devices are manufactured, shipped,and used. HP has also developed processes to minimize the negative impact of the disposal ofthe device at the end of its printing life.For more information about HP's environmental sustainability program, see www.hp.com/hpinfo/globalcitizenship/environment/index.html.• Reduction and elimination• Energy consumption• Energy Star® notice• Material safety data sheets• Recycling• Disposal of waste equipment by users in private households in the European Union
Reduction and eliminationPaper useThis product's two-sided (duplex) printing and N-up printing feature (which allows you to printmultiple pages of a document on one sheet of paper) can reduce paper usage and the resultingdemands on natural resources. See this guide for more information about using these features.Ink useThis product's draft mode uses less ink, which might extend the life of the cartridges. See theprint driver's online Help for more information.Ozone-depleting chemicalsOzone-depleting chemicals, such as chlorofluorocarbons (CFCs), have been eliminated from HPmanufacturing processes.
Energy consumptionThis product is designed to reduce power consumption and save natural resources withoutcompromising product performance. It has been designed to reduce total energy consumptionboth during operation and when the device is not active. Specific information on powerconsumption may be found in the printed documentation that came with the HP Printer.
Energy Star® noticeThis product is designed to reduce power consumption and save natural resources withoutcompromising product performance. It has been designed to reduce total energy consumptionboth during operation and when the device is not active. This product qualifies for ENERGY
116 Regulatory information

STAR® which is a voluntary program established to encourage the development of energy-efficient office products.
ENERGY STAR is a U.S. registered service mark of the U.S. EPA. As an ENERGY STARpartner, HP has determined that this product meets ENERGY STAR guidelines for energyefficiency.For more information on ENERGY STAR guidelines, go to the following Web site:www.energystar.gov
Material safety data sheetsMaterial safety data sheets (MSDSs) can be obtained from the following HP Web site:www.hp.com/go/msds.
RecyclingDesign for recycling has been incorporated into this device:• The number of materials has been kept to a minimum while ensuring proper functionality and
reliability.• Dissimilar materials have been designed to separate easily.• Fasteners and other connections are easy to locate, access, and remove using common tools.• High-priority parts have been designed so that they can be accessed quickly for efficient
disassembly and repair.• Product packaging• Plastics• HP products and supplies
Product packagingThe packaging materials for this device have been selected to provide maximum protection forthe least cost possible, while attempting to minimize environmental impact and facilitate recycling.The rugged design of the device assists in minimizing both packaging materials and damage rates.
PlasticsPlastic parts over 25 grams are marked according to international standards that enhance theability to identify plastics for recycling purposes at the end of product life.
HP products and suppliesHP's Planet Partners™ recycling service provides an easy way to recycle any brand of computerequipment or HP printing supplies. HP's state-of-the-art processes ensure that your unwantedhardware or HP printing supply is recycled in a way that conserves resources.For more information, see www.hp.com/recycle.
Environmental sustainability program 117

Disposal of waste equipment by users in private households in the European Union
Appendix D
118 Regulatory information

FCC statement
Other regulatory information• Notice to users in Korea• VCCI (Class B) compliance statement for users in Japan• Notice to users in Japan about the power cord• Noise emission statement for Germany• RoHS notices (China only)• LED indicator statement• Regulatory model number
Other regulatory information 119

Notice to users in Korea
VCCI (Class B) compliance statement for users in Japan
Notice to users in Japan about the power cord
Noise emission statement for Germany
Appendix D
120 Regulatory information

RoHS notices (China only)
Toxic and hazardous substance table
LED indicator statement
Regulatory model numberFor regulatory identification purposes, your product is assigned a Regulatory Model Number. TheRegulatory Model Number for your product is SNPRC-0705. The regulatory number should notbe confused with the product name (HP Officejet H470, HP Officejet H470B, HP OfficejetH470wbt, etc.) or product number (CB260A, CB027A, CB028A, etc.).
Other regulatory information 121

Declaration of conformity
Appendix D
122 Regulatory information

Index
Symbols/Numerics802.11
about 17installing USB accessory 16printing 17troubleshooting 90
Aaccessibility 7accessories
802.11 16Bluetooth 16installation 13order 101warranty 104
acoustic emissions 115administrator
settings 39after the support period 108aligning print cartridges 70
Bbattery
charging 15installing 13recycling 13removing 16safety 13
battery slot 9black and white pages
troubleshoot 86blank pages, troubleshoot
print 80Bluetooth
about 18bonding 65configuration page 65configure 61discovery 64fonts 64fonts supported 113installing USB accessory 16printing 17settings options 62setup 60troubleshooting 90
wireless connectin 59wireless profiles 65
borderless printingMac OS 29Windows 28
both sides, print on 26
Ccalibrate linefeed 71cancel
print job 37capacity
trays 23cards
guidelines 20sizes supported 22tray supporting 23
cartridges. See print cartridgeschlorofluorocarbons (CFCs) 116cleaning
print cartridges 72colors
bleeding 87faded or dull 85print black and white,
troubleshoot 86specifications 114troubleshoot 87wrong 86
configuration pageBluetooth 65
configureBluetooth 61wireless profiles 56
connectionwireless 50
connectors, locating 9control panel
illustration 95lights, understanding 95locating 8
custom-sized mediaguidelines 21print on 27sizes supported 22
customer supportelectronic 105HP Instant Support 43phone support 105warranty 108
cut-off pages, troubleshoot 81
DDeclaration of Conformity
(DOC) 122default settings
driver 24print 25
device information pagesprinting, understanding 44
digital photographsprinting 29
documentation 6Documents To Go 35dots per inch (dpi)
print 114double-sided printing 26driver
settings 24version 105warranty 104
duplexing 26duty cycle 113
Eelectrical specifications 114envelopes
guidelines 20sizes supported 21tray supporting 23
environmentalspecifications 114
environmental sustainabilityprogram 116
Ffirewalls, troubleshoot 78fonts
Bluetooth 64fonts supported 112
123

Ggraphics
ink not filling in 85missing lines or dots 87
Hhelp
HP Instant Support 43see also customer support
Hewlett-Packard Companynotices 3
HP Instant Supportabout 43accessing 43myPrintMileage 43security and privacy 43
HP Network Setup Utility (MacOS)administrator settings 39
HP Planet Partners 117HP Printer Utility (Mac OS)
administrator settings 39opening 41panels 42
HP Solution Center 25humidity specifications 114
IInformation tab, Toolbox
(Windows) 40ink cartridges
warranty 104ink smearing, troubleshoot 84install
Printboy 34wireless card 34
installationaccessories 13print cartridges 67software for Mac OS 47software for Windows 45troubleshoot 89
Jjams
clear 93media to avoid 19prevent 94
Llanguage, printer 112
lights on control panelillustration 95understanding 95
lights reference 95linefeed, calibrate 71load
media 24
MMac OS
borderless printing 29HP Printer Utility 41install software 47Network Printer Setup
Utility 42print on special, or custom-
sized media 27print settings 25sharing device 48system requirements 113uninstall software 50
maintenance 71margins
setting, specifications 23material safety data sheets
(MSDSs) 117media
borderless printing 28clear jams 93duplexing 26HP, order 102load 24print on custom-sized 27selecting 19specifications 21supported sizes 21types and weights
supported 23memory
specifications 113memory cards
printing from 35specifications 115
missing lines or dots,troubleshoot 87
missing or incorrectinformation, troubleshoot 80
MMC slot 9mobile devices
printing from 29mobile phone
printing from 31monitoring tools 38
multi-feeds, troubleshoot 89myPrintMileage
about 43accessing 44
Nnetwork
printer information 44network name
wireless 51Network Printer Setup Utility
(Mac OS) 42network settings
wireless 51networks
connector illustration 9firewalls, troubleshoot 78Mac OS setup 47sharing, Windows 47
noise information 115
Ooperating environment
specifications 114operating systems
supported 113output tray
locating 8ozone-depleting chemicals 116
Ppacking the device 110pages per month (duty
cycle) 113Palm OS
printing from 34paper. See mediapaper-feed problems,
troubleshoot 88part numbers, supplies and
accessories 101PCL 3 support 112PDA Toolbox (Pocket PC and
Palm OS)administrator settings 39
phone customer support 105phone support 106phone support period
period for support 106photo media
guidelines 20sizes supported 22
124

photographsprinting 29transferring 31
photosborderless printing 28
PictBridge 31, 81PictBridge device connection 9PING the device 92pocket PC
printing from 32ports, specifications 112power
specifications 114power input, locating 9print
cancel 37digital photographs 29double-sided 26from mobile devices 29from mobile phone 31from Palm OS 34from pocket PCs 32settings 24slow 79troubleshoot 77
print cartridgetroubleshoot 79
print cartridgesaligning 70cleaning 72lights 95order online 101part numbers 101remove 109replace 67status 38supported 112yields 112
print driverversion 105warranty 104
print qualitytroubleshoot 82
Printboyinstalling 34
printer driversettings 24version 105warranty 104
printheadswarranty 104
privacy, HP Instant Support 43processor specifications 113
profile switchwireless 51
Qquality, troubleshoot
print 82
Rreadme 6recycling 117regulatory information 116regulatory model number 121release notes 6remove print cartridges 109replace
print cartridges 67resolution
print 114
SSD card slot 9security
HP Instant Support 43security settings
wireless 52Services tab, Toolbox
(Windows) 41set up
wireless 52settings
administrator 39driver 24
setupBluetooth 60Windows 45
sharing deviceMac OS 48Windows 47
shipping the device 109skewed pages, troubleshoot 89slow print, troubleshoot 79software
installation on Mac OS 47installation on Windows 45uninstall from Mac OS 50uninstall from Windows 49warranty 104
Solution Center 25sound pressure 115specifications
acoustic emissions 115electrical 114
media 21operating environment 114physical 112processor and memory 113storage environment 114system requirements 113
speedtroubleshoot print 79
SSID 51status
supplies 38storage environment
specifications 114supplies
myPrintMileage 43order online 101status 38yields 112
support. See customer supportsupport process 106system requirements 113
Ttechnical information
memory cardspecifications 115
telephone customer support 105temperature specifications 114text
troubleshoot 81, 85, 87Toolbox (Windows)
about 40administrator settings 39Estimated Ink Level tab 40Information tab 40opening 40Services tab 41
transparencies 21travel tips 11trays
capacities 23locating 8media sizes supported 21media types and weights
supported 23paper guides illustration 8
troubleshoot802.11 90blank pages printed 80bleeding colors 87Bluetooth 90colors 85, 87
Index
125

cut-off pages, incorrect textor graphics placement 81
device shuts down 77firewalls 78HP Instant Support 43ink not filling text or
graphics 85ink smearing 84installation 89lights 95lights are on or flashing 78meaningless characters
print 83media not coming out
correctly 88media not picked up 88media not supported 88missing lines or dots 87missing or incorrect
information 80multiple pages are picked
up 89nothing prints 78paper-feed problems 88print 77print cartridge 79print quality 82skewed pages 89slow print 79tips 76wireless communication
devices 90troubleshooting resources
device information pages 44two-sided printing 26
Uuninstall software
Mac OS 50Windows 49
USB connectionport, locating 9setup Mac OS 47setup Windows 46
USB Flash drivesprinting from 35
Vvoltage specifications 114
Wwarranty 104, 108
Web sitesaccessibilty information 8Apple 48customer support 105environmental
programs 116material safety data
sheets 117order supplies and
accessories 101recycling 117supply yield data sheet 112
Windowsborderless printing 28duplexing 26HP Solution Center 25install software 45, 46print on special or custom-
sized media 27print settings 25sharing device 47system requirements 113uninstall software 49
wirelessBluetooth connection 59communication mode 52configure profiles 56connection 50network name 51network settings 51profile switch 51, 57reset profiles 58security settings 52set up 52SSID 51
wireless cardinstalling 34
wireless communication devicestroubleshooting 90
wireless profile switch 9wireless profiles
Bluetooth 65
126


Podręcznik użytkownika© 2007 Hewlett-Packard Development Company, L.P.
www.hp.com/support