Embed Size (px)
Citation preview
How to configure Access Point as Wireless Bridge
by using the Setup Wizard in CD Disk
Thanks for purchasing Edimax Wireless Access Point. We hope this instruction can help you setup the
Wireless Bridge so that your Ethernet devices can have wireless capability.
1. This instruction is for Windows computer only. After the Wireless Bridge is setup, you can connect
any Ethernet device like your Blu-Ray recorder, xBox…etc to Ethernet port on Edimax Wireless Access
Point.
2. This instruction can be applied on Edimax Wireless Access Point Series: EW-7416APn (300Mbps),
EW-7228APn (150Mbps)
3. Wireless Bridge is also known as Station Infrastructure or AP Client mode.
2011 Edimax Computer 3350 Scott Blvd., Building #15
Santa Clara, California 95054, USA Phone 408-496-1105 • Fax 408-980-1530
www.edimax.us
1
Introduction To make Access Point associate with an existing wireless router and work as wireless bridge, you need to do some extra configuration. You also need to have some basic understanding of your wireless network. You can feel free to skip step1 and step2 if you know your wifi network well. Have your computer (wireless or hard wired computer) connect to your network as usual.
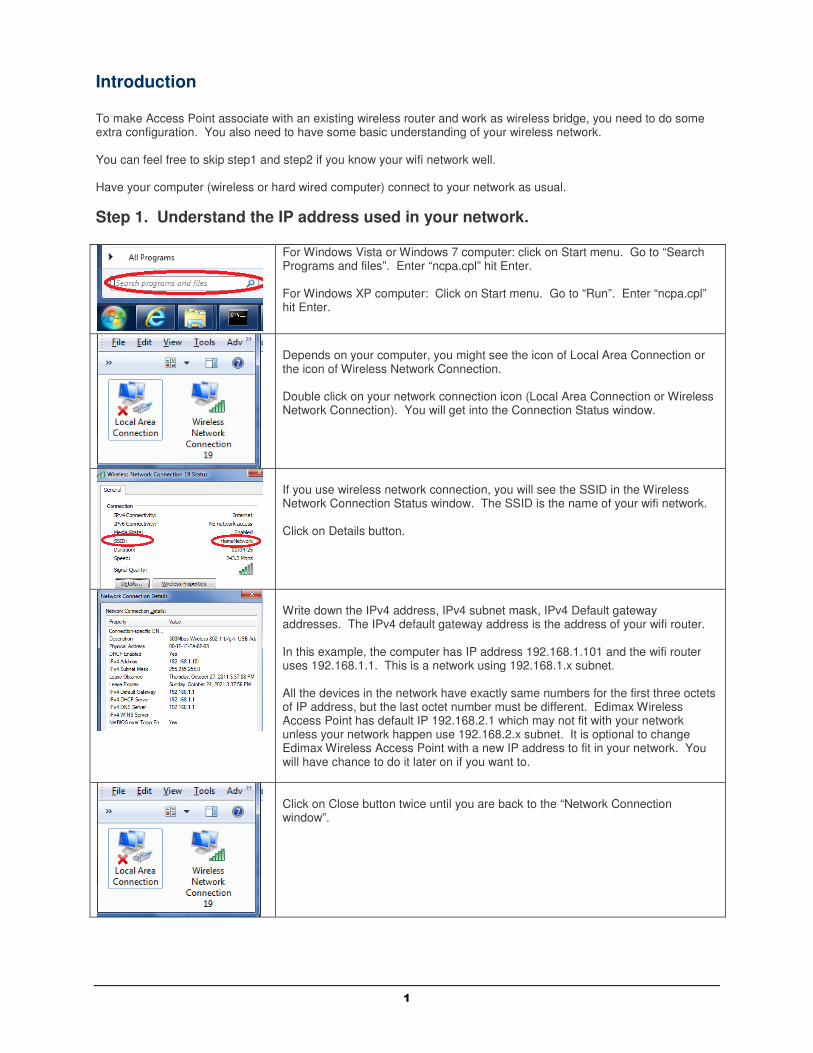
Step 1. Understand the IP address used in your network.
For Windows Vista or Windows 7 computer: click on Start menu. Go to “Search Programs and files”. Enter “ncpa.cpl” hit Enter. For Windows XP computer: Click on Start menu. Go to “Run”. Enter “ncpa.cpl” hit Enter.
Depends on your computer, you might see the icon of Local Area Connection or the icon of Wireless Network Connection. Double click on your network connection icon (Local Area Connection or Wireless Network Connection). You will get into the Connection Status window.
If you use wireless network connection, you will see the SSID in the Wireless Network Connection Status window. The SSID is the name of your wifi network. Click on Details button.
Write down the IPv4 address, IPv4 subnet mask, IPv4 Default gateway addresses. The IPv4 default gateway address is the address of your wifi router. In this example, the computer has IP address 192.168.1.101 and the wifi router uses 192.168.1.1. This is a network using 192.168.1.x subnet. All the devices in the network have exactly same numbers for the first three octets of IP address, but the last octet number must be different. Edimax Wireless Access Point has default IP 192.168.2.1 which may not fit with your network unless your network happen use 192.168.2.x subnet. It is optional to change Edimax Wireless Access Point with a new IP address to fit in your network. You will have chance to do it later on if you want to.
Click on Close button twice until you are back to the “Network Connection window”.
2
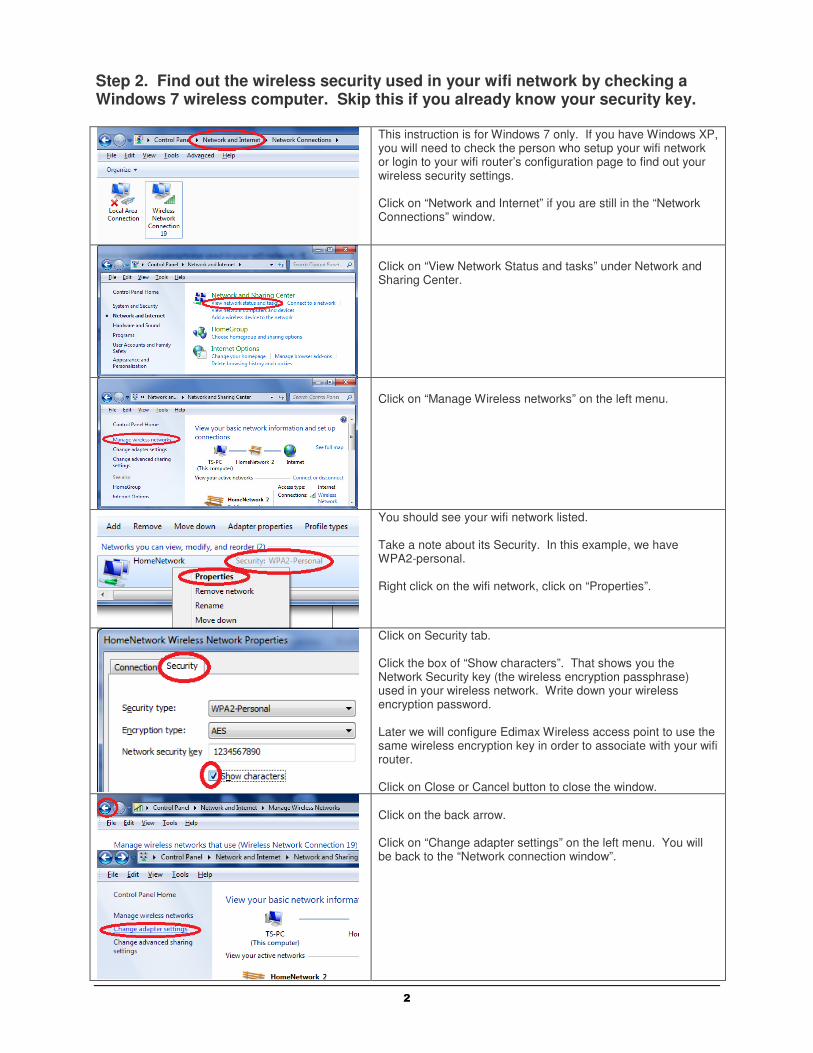
Step 2. Find out the wireless security used in your wifi network by checking a Windows 7 wireless computer. Skip this if you already know your security key.
This instruction is for Windows 7 only. If you have Windows XP, you will need to check the person who setup your wifi network or login to your wifi router’s configuration page to find out your wireless security settings. Click on “Network and Internet” if you are still in the “Network Connections” window.
Click on “View Network Status and tasks” under Network and Sharing Center.
Click on “Manage Wireless networks” on the left menu.
You should see your wifi network listed. Take a note about its Security. In this example, we have WPA2-personal. Right click on the wifi network, click on “Properties”.
Click on Security tab. Click the box of “Show characters”. That shows you the Network Security key (the wireless encryption passphrase) used in your wireless network. Write down your wireless encryption password. Later we will configure Edimax Wireless access point to use the same wireless encryption key in order to associate with your wifi router. Click on Close or Cancel button to close the window.
Click on the back arrow. Click on “Change adapter settings” on the left menu. You will be back to the “Network connection window”.
3
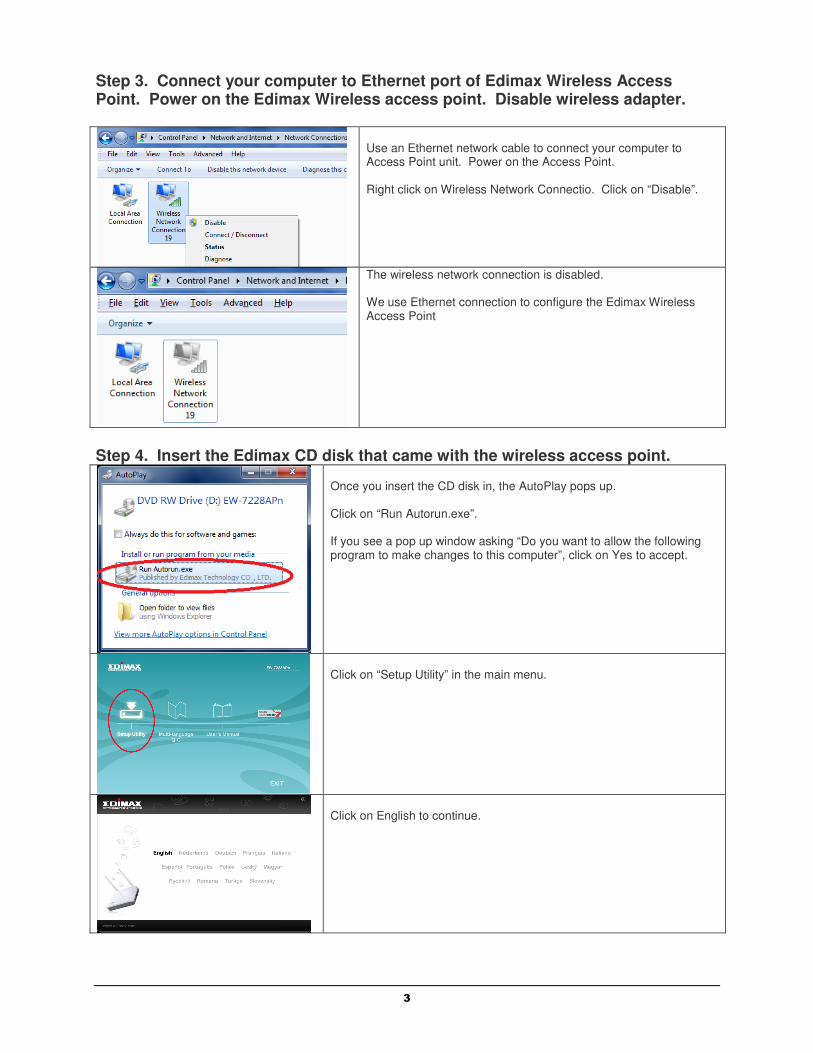
Step 3. Connect your computer to Ethernet port of Edimax Wireless Access Point. Power on the Edimax Wireless access point. Disable wireless adapter.
Use an Ethernet network cable to connect your computer to Access Point unit. Power on the Access Point. Right click on Wireless Network Connectio. Click on “Disable”.
The wireless network connection is disabled. We use Ethernet connection to configure the Edimax Wireless Access Point
Step 4. Insert the Edimax CD disk that came with the wireless access point.
Once you insert the CD disk in, the AutoPlay pops up. Click on “Run Autorun.exe”. If you see a pop up window asking “Do you want to allow the following program to make changes to this computer”, click on Yes to accept.
Click on “Setup Utility” in the main menu.
Click on English to continue.
4
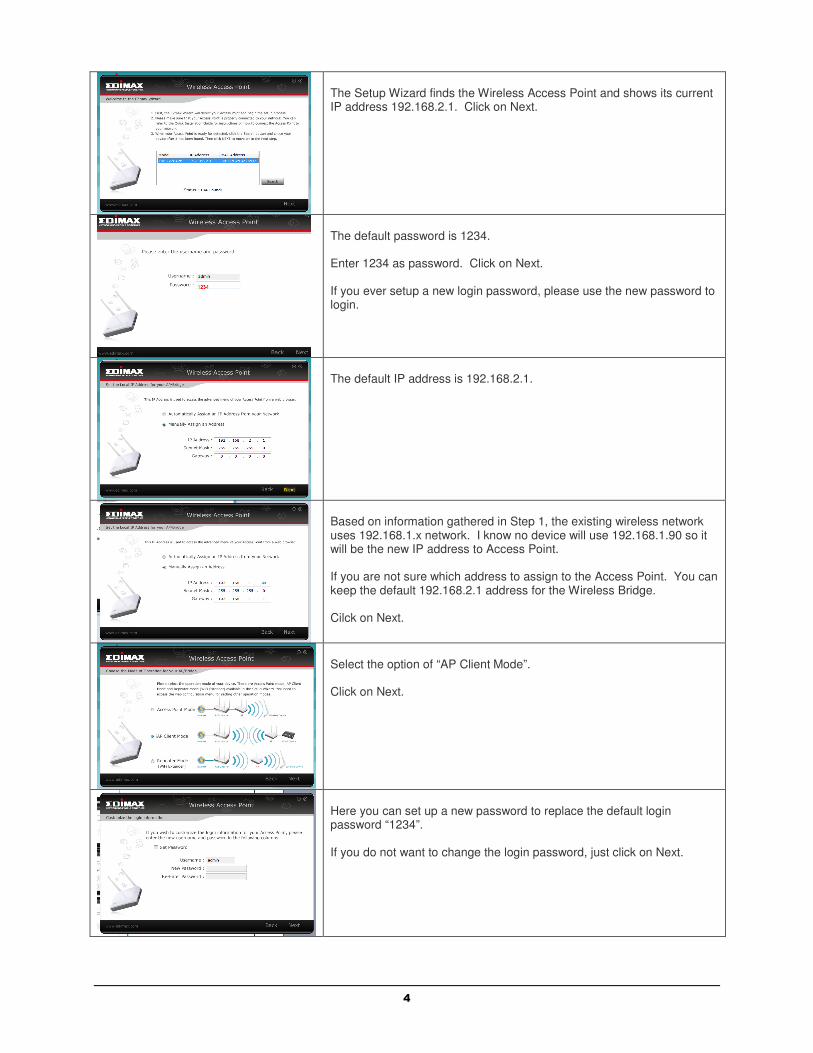
The Setup Wizard finds the Wireless Access Point and shows its current IP address 192.168.2.1. Click on Next.
The default password is 1234. Enter 1234 as password. Click on Next. If you ever setup a new login password, please use the new password to login.
The default IP address is 192.168.2.1.
Based on information gathered in Step 1, the existing wireless network uses 192.168.1.x network. I know no device will use 192.168.1.90 so it will be the new IP address to Access Point. If you are not sure which address to assign to the Access Point. You can keep the default 192.168.2.1 address for the Wireless Bridge. Cilck on Next.
Select the option of “AP Client Mode”. Click on Next.
Here you can set up a new password to replace the default login password “1234”. If you do not want to change the login password, just click on Next.

5
The program searches for available wireless networks. If it does not detect your network, you can click on “Scan” button to search. Select the correct wireless network. Click on Next.
Enter the correct wireless security passphrase key. Click on Next.
Next, it summarized of the Wireless Bridge setup. Click on Set
The Access Point is saving the setup.
Click on Finish.
Click on Exit to close the CD main menu.
6
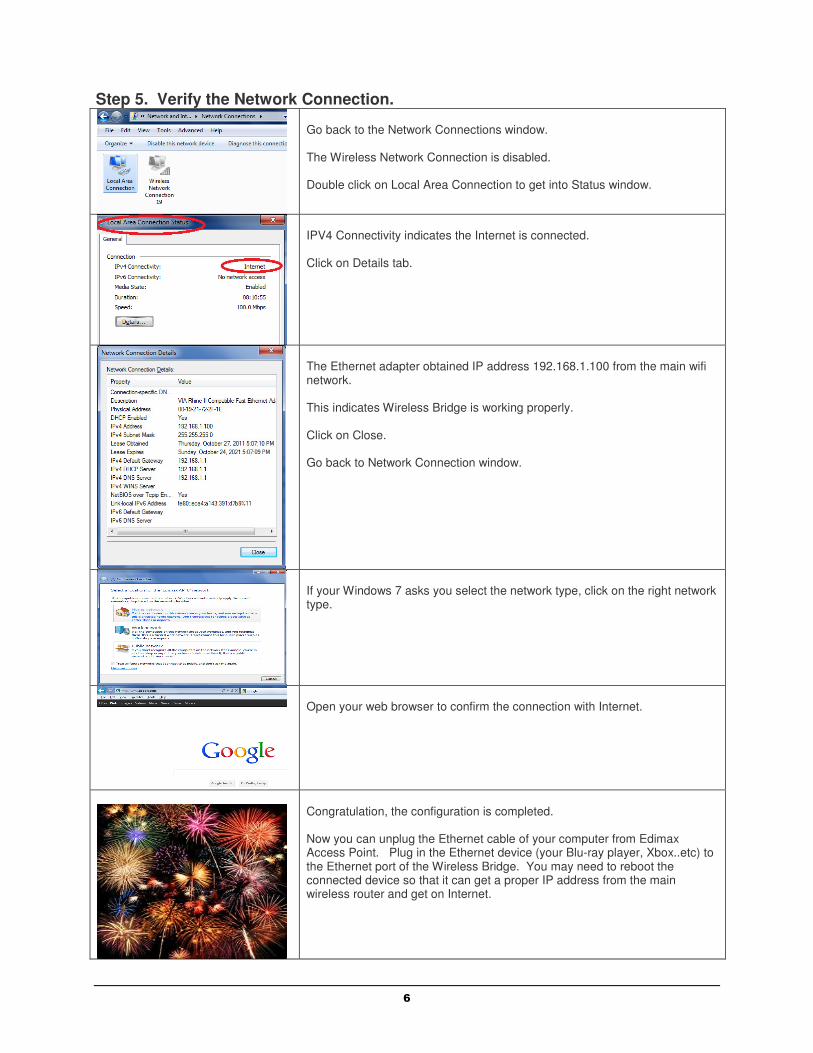
Step 5. Verify the Network Connection.
Go back to the Network Connections window. The Wireless Network Connection is disabled. Double click on Local Area Connection to get into Status window.
IPV4 Connectivity indicates the Internet is connected. Click on Details tab.
The Ethernet adapter obtained IP address 192.168.1.100 from the main wifi network. This indicates Wireless Bridge is working properly. Click on Close. Go back to Network Connection window.
If your Windows 7 asks you select the network type, click on the right network type.
Open your web browser to confirm the connection with Internet.
Congratulation, the configuration is completed. Now you can unplug the Ethernet cable of your computer from Edimax Access Point. Plug in the Ethernet device (your Blu-ray player, Xbox..etc) to the Ethernet port of the Wireless Bridge. You may need to reboot the connected device so that it can get a proper IP address from the main wireless router and get on Internet.