Embed Size (px)
DESCRIPTION
Horcm HowtoCCIHORM
Citation preview

Hitachi Data Systems Global Solution Services
HUR / HORCMConfiguration and Operations Documentation
Draft Version 4
`

Griffin HernandezSenior Technical ConsultantHitachi Data SystemsJune 29th, 2014

Table of Contents
DOCUMENT CONTROL..................................................................................................................................................6
HITACHI UNIVERSAL REPLICATOR.................................................................................................................................7OVERVIEW............................................................................................................................................................................7
Replication Configuration Process......................................................................................................................................................................7HUR LAYOUT DIAGRAM..........................................................................................................................................................8JOURNAL CREATION................................................................................................................................................................9
Create / Modify Journal...................................................................................................................................................................................10
SETTING UP COMMAND DEVICES................................................................................................................................16SOLARIS / LINUX..................................................................................................................................................................16
Configuring HORCM for non root execution (Linux with uDev)....................................................................................16Technical steps to run by hand:....................................................................................................................................16
Notable files and locations...............................................................................................................................................................................17Troubleshooting............................................................................................................................................................................................... 17File Permissions to be changed........................................................................................................................................................................17
SETUP COMMAND DEVICE ON WINDOWS.................................................................................................................................20Add all horcm instances as services..............................................................................................................................21
HITACHI DYNAMIC TIERING (HDT)...............................................................................................................................22CONFIGURATION OF A NEW POOL............................................................................................................................................22
CREATING LDEVS FOR REPLICATION............................................................................................................................26OVERVIEW..........................................................................................................................................................................26
REPLICATION STATUSES..............................................................................................................................................26OVERVIEW..........................................................................................................................................................................26
CREATING HORCM FILES.............................................................................................................................................28OVERVIEW..........................................................................................................................................................................28INTRODUCTION....................................................................................................................................................................28
A Traditional Horcm File for Replication.......................................................................................................................28Example:........................................................................................................................................................................................................... 29Explanation:..................................................................................................................................................................................................... 31
A Raidcom Only Horcm File..........................................................................................................................................32Example:........................................................................................................................................................................................................... 32Explanation:..................................................................................................................................................................................................... 32
DEFINING A PAIRING.............................................................................................................................................................33Overview......................................................................................................................................................................33HORCM Table Example................................................................................................................................................34
WORKING WITH HORCM............................................................................................................................................35RULE OF ACQUISITION...........................................................................................................................................................35INSTALLATION......................................................................................................................................................................35
*nix..............................................................................................................................................................................35Windows......................................................................................................................................................................35
HORCM COMMANDS..........................................................................................................................................................36Overview......................................................................................................................................................................36Useful Commands:.......................................................................................................................................................36
Ver: 1.0 Page 3 of 57Copyright 2013 © HDS All rights reserved.
Griffin Hernandez
Hitachi Data Systems Confidential: Authorized Use Only

inqraid.............................................................................................................................................................................................................. 36raidcom get ldev............................................................................................................................................................................................... 37pairdisplay........................................................................................................................................................................................................ 38
Replication Control Examples for all types of replication (HUR / TC / SI / TI):..............................................................39Split (Suspend) Read Only................................................................................................................................................................................ 39Split (Suspend) Read-Write..............................................................................................................................................................................39Resync (ReEstablish).........................................................................................................................................................................................39Simplex Replication (UnEstablish)....................................................................................................................................................................39Reverse Resync (Restore) - SI / TI Only............................................................................................................................................................39Creating Replication (Establish) - HUR.............................................................................................................................................................40
Explanation of Flags:....................................................................................................................................................................................40Reverse Resync (Restore) - HUR / TC...............................................................................................................................................................40Fail to Remote Site - HUR / TC - horctakeover.................................................................................................................................................41
Overview...................................................................................................................................................................................................... 41P-VOL Takeover............................................................................................................................................................................................ 41Swaptakeover..............................................................................................................................................................................................42S-VOL Takeover............................................................................................................................................................................................42
Fail to Remote Site - HUR / TC - horctakeover command................................................................................................................................42Fail to Remote Site or Perform Copyback - HUR / TC - Manual Operation...................................................................43
pairresync -swapp / -swaps..............................................................................................................................................................................43Fail to Remote Site - HUR / TC - Manual Operation - DR Scenario...............................................................................44
pairsplit -RS..................................................................................................................................................................................................... 44Finish Failover - HUR / TC - Manual Operation - DR Roll Back......................................................................................44
pairresync -swaps............................................................................................................................................................................................ 44Back out of a partial fail over - HUR / TC - Manual Operation - DR Test......................................................................45
pairsplit -RB..................................................................................................................................................................................................... 45Example Output from HDS Lab:........................................................................................................................................................................45
Creating Replication (Establish) -In System (Shadow Image)......................................................................................46Explanation of Flags:....................................................................................................................................................................................46
Creating Replication (Establish) - In System (Thin Image)..........................................................................................46Explanation of Flags:....................................................................................................................................................................................46
MONITORING SCRIPTS................................................................................................................................................47CALCULATING RPO FOR UR VIA CLI........................................................................................................................................47
Overview......................................................................................................................................................................47Process.........................................................................................................................................................................48
MONITORING JOURNAL USAGE...............................................................................................................................................48Overview......................................................................................................................................................................48
HDSF(X)......................................................................................................................................................................50OVERVIEW..........................................................................................................................................................................50AVAILABLE FUNCTIONS..........................................................................................................................................................51EXAMPLE SI RESYNC SCRIPT...................................................................................................................................................52
Ver: 1.0 Page 4 of 57Copyright 2013 © HDS All rights reserved.
Griffin Hernandez
Hitachi Data Systems Confidential: Authorized Use Only

Ver: 1.0 Page 5 of 57Copyright 2013 © HDS All rights reserved.
Griffin Hernandez
Hitachi Data Systems Confidential: Authorized Use Only

Document ControlRevision History
Version Author Reason For Issue Date
0.0 Griffin Hernandez
Initial Design
Document Distribution Copy Recipient Location / Address
1 HDS Project Office HDS Santa Clara, CA. 95054
1
Document ReferencesRef Referenced Item
1 Requirement document
Ver: 1.0 Page 6 of 57Copyright 2013 © HDS All rights reserved.
Griffin Hernandez
Hitachi Data Systems Confidential: Authorized Use Only

Hitachi Universal ReplicatorOverviewReplication Configuration Process
Ver: 1.0 Page 7 of 57Copyright 2013 © HDS All rights reserved.
Griffin Hernandez
Hitachi Data Systems Confidential: Authorized Use Only

HUR Layout Diagram
Ver: 1.0 Page 8 of 57Copyright 2013 © HDS All rights reserved.
Griffin Hernandez
Hitachi Data Systems Confidential: Authorized Use Only

Ver: 1.0 Page 9 of 57Copyright 2013 © HDS All rights reserved.
Griffin Hernandez
Hitachi Data Systems Confidential: Authorized Use Only

Journal CreationJournals are dedicated thick provisioned volumes for capturing the excess writes that cannot be immediately transferred to the remote array. Spindles used in journals must be dedicated to the journal volumes and should not be shared with any other volumes. There must be a minimum of two Raid Groups per built journal (one ldev per parity group) for proper configuration. There should be one journal per array created for every fully dedicated grouping of data to be replicated, in other words everything that cannot be left behind. From the image above there are multiple logical layers that make up replication, and both of these must be set up the same on both arrays.
The physical disks are carved into thick provisioned Ldev, the ldevs are dedicated to a journal, the journal is dedicated to replicating one or more copy groups. Copy Groups are defined as a logical grouping of ldevs participating in replication, the devices within the copy group will not have any RPO drift between the devices. Everything will occur at the same time.
When defining copy groups, determine all of the data that needs to be protected across all of the provisioned devices. Anything that cannot survive an RPO Drift needs to be in the same Copy Group. For example, if you have an SQL Database that is spread across multiple devices, then the devices should be grouped together in a “Copy Group” (also known as a Device Group), and that will be one replicated grouping.
Speaking to replicated groupings of data (not a hitachi term), any data that is striped across ldevs (disks, volumes, luns) and cannot suffer a RPO drift between different ldevs should be placed within the same consistency group.
When working with SRM, HSC or any other replication management software, all of the ldevs with data to be protected must be replicated. In SRM, you may only have one or two datastores to be replicated and the VM’s within those datastores are completely enclosed. In HSC in regards to databases, the consistency group should follow the entire database instance, all of the data, transaction, and possibly the DB Dumps LDEVs should be defined within the same group.
Ver: 1.0 Page 10 of 57Copyright 2013 © HDS All rights reserved.
Griffin Hernandez
Hitachi Data Systems Confidential: Authorized Use Only

Create / Modify Journal You can create journals or manipulate Journals using Storage Navigator -> Actions -> Remote Copy -> Universal Replication -> Journal Operation
Ver: 1.0 Page 11 of 57Copyright 2013 © HDS All rights reserved.
Griffin Hernandez
Hitachi Data Systems Confidential: Authorized Use Only

1) Enter Modify Mode.
2) Right click on the journal ID to create -> Edit Journal Volumes
Ver: 1.0 Page 12 of 57Copyright 2013 © HDS All rights reserved.
Griffin Hernandez
Hitachi Data Systems Confidential: Authorized Use Only
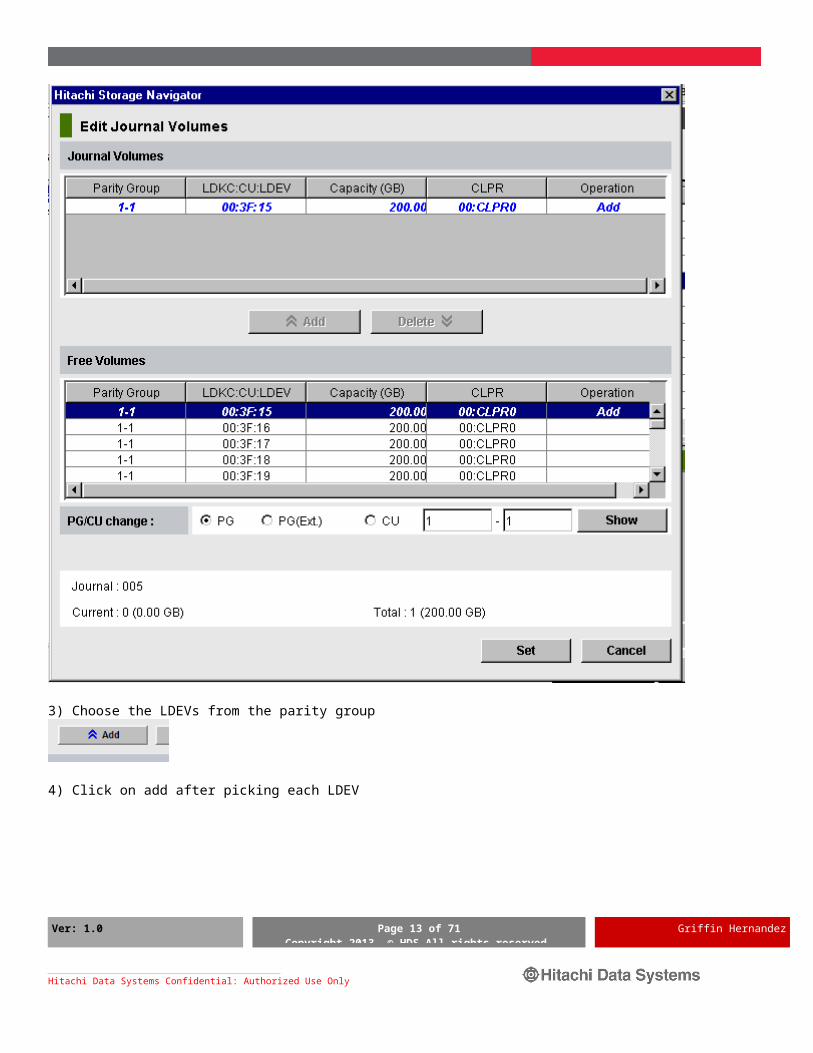
3) Choose the LDEVs from the parity group
4) Click on add after picking each LDEV
Ver: 1.0 Page 13 of 57Copyright 2013 © HDS All rights reserved.
Griffin Hernandez
Hitachi Data Systems Confidential: Authorized Use Only

5) Click on “Set” after adding all devices.
Ver: 1.0 Page 14 of 57Copyright 2013 © HDS All rights reserved.
Griffin Hernandez
Hitachi Data Systems Confidential: Authorized Use Only

6) Apply the settings and the journal will be created.
7) Right click the Journal created, then “Change JNL Option”
Ver: 1.0 Page 15 of 57Copyright 2013 © HDS All rights reserved.
Griffin Hernandez
Hitachi Data Systems Confidential: Authorized Use Only

8) Disable Inflow Control
9) Click Set.
Ver: 1.0 Page 16 of 57Copyright 2013 © HDS All rights reserved.
Griffin Hernandez
Hitachi Data Systems Confidential: Authorized Use Only

Setting up Command DevicesSolaris / LinuxThere are no configuration options that need to be set for setting up a command device for use in Linux.In Linux Systems where uDev is available, persistent binding can be done for a command device by making a new udev rule.
After creating HORCM instances, they can be automatically started with the system by adding a line to /etc/rc.d’s init file.
Also set the environment variable HORCM_EVERYCLI=1 for all users, set it in the same execution file prior to executing “horcmstart.sh” .
Configuring HORCM for non root execution (Linux with uDev)The user executing HORCM commands requires read/write access to numerous locations, most of them are within the /HORCM folder. Only the log folders need to have their permissions updated along with their owner changed. A list can be found at the end of this document.
To set permission changes across reboot using Linux 2.6 Kernels, udev rules need to be built around the devices to manipulate.
The following example will change all Command devices to be owned by user “hdsndm”.KERNEL=="sd?", ATTRS{model}=="OPEN-V-CM ", GROUP="hdsndm", OWNER="hdsndm",
MODE="0660"
This line needs to be added to a file in /etc/udev/rules.d/, the easiest method is to create a new file. Example:echo "KERNEL==\"sd?\", ATTRS{model}==\"OPEN-V-CM \", GROUP=\"hdsndm\", OWNER=\"$ hdsndm\", MODE=\"0660\"" > /etc/udev/rules.d/10-hitachi-nonroot.rules
If needing to revert, we can always delete this new file and permissions will revert next time udev is triggered.
Technical steps to run by hand:1) chown -R <user>:<usergroup> /HORCM/log*2) chown -R <user>:<usergroup> /HORCM/usr3) chown -R <user>:<usergroup> /HORCM/etc4) chown -R <user>:<usergroup> /HORCM/.uds5) find /HORCM/log* -type d -exec echo chmod u+rwx,g+rwx {} \;6) Determine the command devices using inqraid
a. ls /dev/sd* | inqraid -fgx –CLIb. chown –R <user>:<usergroup> /dev/sd____
7) Create a new udev rule if needed:a. echo "KERNEL==\"sd?\", ATTRS{model}==\"OPEN-V-CM \", GROUP=\"hdsndm\",
OWNER=\"$ hdsndm\", MODE=\"0660\"" > /etc/udev/rules.d/10-hitachi-nonroot.rules
8) Start Horcm.
Ver: 1.0 Page 17 of 57Copyright 2013 © HDS All rights reserved.
Griffin Hernandez
Hitachi Data Systems Confidential: Authorized Use Only

Notable files and locations Requirements
o inqraid Only requirement to run this is inqraid All other commands use system calls udev is not required
if using devfs you may have to set dev node permissions every reboot
Troubleshooting
1. Raidcom does not return any information but raidqry -l does:1) HORCM does not have write permissions to the /HORCM/log directory2) Example of error:
[testuser@RHEL64-2 HORCM]$ raidcom get resource -I0[testuser@RHEL64-2 HORCM]$ raidcom get port -I0[testuser@RHEL64-2 HORCM]$ raidqry -l -I0No Group Hostname HORCM_ver Uid Serial# Micro_ver Cache(MB) 1 --- RHEL64-2 01-29-03/06 0 53086 70-06-04/00 38912
3) Fix: 1. chown -R <user>:<usergroup> /HORCM/log
File Permissions to be changed
Below is a list of all of the files that require permissions / ownership change: Owner / Group Change
/dev/sdbo from root to hdsndm
/dev/sdco from root to hdsndm
/HORCM/.udso from root to hdsndm
/HORCM/usro from root to hdsndm
/HORCM/usr/varo from root to hdsndm
/HORCM/usr/bino from root to hdsndm
/HORCM/usr/bin/horcctlo from root to hdsndm
/HORCM/usr/bin/raidvchkseto from root to hdsndm
/HORCM/usr/bin/horcmshutdown.sho from root to hdsndm
/HORCM/usr/bin/raidaro from root to hdsndm
/HORCM/usr/bin/pairmono from root to hdsndm
Ver: 1.0 Page 18 of 57Copyright 2013 © HDS All rights reserved.
Griffin Hernandez
Hitachi Data Systems Confidential: Authorized Use Only

/HORCM/usr/bin/raidscano from root to hdsndm
/HORCM/usr/bin/horctakeoffo from root to hdsndm
/HORCM/usr/bin/paircurchko from root to hdsndm
/HORCM/usr/bin/pairresynco from root to hdsndm
/HORCM/usr/bin/rmsrao from root to hdsndm
/HORCM/usr/bin/rmawko from root to hdsndm
/HORCM/usr/bin/horcmstart.sho from root to hdsndm
/HORCM/usr/bin/raidvchkscano from root to hdsndm
/HORCM/usr/bin/pairvolchko from root to hdsndm
/HORCM/usr/bin/raidqryo from root to hdsndm
/HORCM/usr/bin/raidcfgo from root to hdsndm
/HORCM/usr/bin/pairsplito from root to hdsndm
/HORCM/usr/bin/raidcomo from root to hdsndm
/HORCM/usr/bin/pairsyncwaito from root to hdsndm
/HORCM/usr/bin/pairevtwaito from root to hdsndm
/HORCM/usr/bin/mkconf.sho from root to hdsndm
/HORCM/usr/bin/inqraido from root to hdsndm
/HORCM/usr/bin/raidvchkdspo from root to hdsndm
/HORCM/usr/bin/pairdisplayo from root to hdsndm
/HORCM/usr/bin/paircreateo from root to hdsndm
/HORCM/usr/bin/RMo from root to hdsndm
/HORCM/usr/bin/horctakeovero from root to hdsndm
/HORCM/usr/bin/rmsra20o from root to hdsndm
/HORCM/log0o from root to hdsndm
/HORCM/log0/tmplogo from root to hdsndm
/HORCM/log0/curlogo from root to hdsndm
/HORCM/etc
Ver: 1.0 Page 19 of 57Copyright 2013 © HDS All rights reserved.
Griffin Hernandez
Hitachi Data Systems Confidential: Authorized Use Only

o from root to hdsndm /HORCM/etc/horcm.conf
o from root to hdsndm /HORCM/etc/horcmgr
o from root to hdsndm /HORCM/etc/Raidcom_Help_Raid_RM.txt
o from root to hdsndm /HORCM/etc/Raidcom_Dic_Raid_RM_Patch.txt
o from root to hdsndm /HORCM/etc/Raidcom_Dic_Raid_RM.txt
o from root to hdsndm /HORCM/log1
o from root to hdsndm /HORCM/log1/tmplog
o from root to hdsndm /HORCM/log1/curlog
o from root to hdsndm /HORCM/log
o from root to hdsndm /HORCM/log/tmplog
o from root to hdsndm /HORCM/log/curlog
o from root to hdsndm /etc/horcm.conf
o from hdsndm to hdsndm /etc/horcm0.conf
o from hdsndm to hdsndm /HORCM
o from root to hdsndm
Permissions Change o /HORCM/log*
from 0555 to 0775o /HORCM/log*/tmplog
from 0555 to 0775o /HORCM/log*/curlog
from 0555 to 0775o /HORCM
from 0555 to 0775
Ver: 1.0 Page 20 of 57Copyright 2013 © HDS All rights reserved.
Griffin Hernandez
Hitachi Data Systems Confidential: Authorized Use Only

Setup Command Device on WindowsAdd the device to the host, initialize the device, then create a new simple volume
Command devices allow HORCM to directly communicate with the Array. HORCM files require a command device (IP or Physical) to be able to manipulate replication or configure the array.
Ver: 1.0 Page 21 of 57Copyright 2013 © HDS All rights reserved.
Griffin Hernandez
Hitachi Data Systems Confidential: Authorized Use Only

Below is a before and after of INQRAID command showing new additional LDEV added, then configured as a command device.
inqraid $Phys -fgx –CLI
Add all horcm instances as services
To add a horcm instance as a service, open an admin command prompt Go to C:\HORCM\Tool In Tool copy the horcm0_run.txt -> horcm<Instance Num>_run.txt
Open the file. Update the instance number (search for entry HORCM_INST=), then add an additional line of “set HORCM_EVERYCLI=1” below the HORCM_INST.
Save the file, then run svcexe.exe “/S=HORCM<Instance Number>” “/A=C:\HORCM\Tool\svcexe.exe”
o svcexe.exe “/S=HORCM10” “/A=C:\HORCM\Tool\svcexe.exe”
Ver: 1.0 Page 22 of 57Copyright 2013 © HDS All rights reserved.
Griffin Hernandez
Hitachi Data Systems Confidential: Authorized Use Only

Hitachi Dynamic Tiering (HDT)Configuration of a new pool
1) Select Pools from Storage Navigator, then Create pools
Ver: 1.0 Page 23 of 57Copyright 2013 © HDS All rights reserved.
Griffin Hernandez
Hitachi Data Systems Confidential: Authorized Use Only

2) The default screen
3) Select the LDEVs you want to create the pool from. Ensure that you take all of the LDEVs from a Parity group. Do not mix LDEVs between pools.
Ver: 1.0 Page 24 of 57Copyright 2013 © HDS All rights reserved.
Griffin Hernandez
Hitachi Data Systems Confidential: Authorized Use Only

1) Add the devices, then click OK
6) After hitting OK, the screen will list the number of LDEVs selected and the total capacity of the LDEVs.
Ver: 1.0 Page 25 of 57Copyright 2013 © HDS All rights reserved.
Griffin Hernandez
Hitachi Data Systems Confidential: Authorized Use Only

2) Set the pool ID (This cannot be changed later), subscription limit, thresholds, type of monitoring, and buffer space. Then click “Next”
3) Confirm the settings and hit apply.
Ver: 1.0 Page 26 of 57Copyright 2013 © HDS All rights reserved.
Griffin Hernandez
Hitachi Data Systems Confidential: Authorized Use Only

Creating LDEVs for ReplicationOverviewAll of array based replication solutions provided by Hitachi Datasystems require the following:
1. Equally sized LDEVs for Source and Target Volumesa. To ensure equal size Target Volumes, use the exact Block Count of the Source Volumeb. Different Arrays, Micro-code levels, and management software will use a different block count for LDEV
Creation.i. Always use the block size of the Source Volume when creating Target Volumesii. Paircreate will fail if the volumes are not identically sized
2. All volumes must have be in a Host groupa. If the replication Target will not be presented to any host, create a host group without a WWN and place
target volumes in that group.
Replication StatusesOverviewEach state of replication has a specific status. The statuses are uniform across all of the replication types, with certain additional ones for Disaster Recovery Software (UR / TC / TC:ED).
General PAIR
o Replication is established. Changes are being tracked updated on the Target Volume (S-VOL / R2) In Universal Replicator and TC:ED the changes may be kept in a journal if the bandwidth is not
available or if the link is severed. PSUS / SSUS
o Primary Suspend / Secondary Suspend Replication is suspended. Changes are being tracked and a differential update will be applied to
the Target Volumes (S-VOL / R2) when resynced COPY
o Shown when performing an Initial Copy OR after performing a resynco Updates are being applied
PSUE / SSUEo Primary Suspend Under Error / Secondary Suspend Under Error
An error has occurred with replication. Replication has suspended Most times a resync will return this to a “PAIR” state.
Usually a differential copy
Universal Replicator / TC SWSS
o When S-VOL paths become active due to host, path, or MCU failure, RCU automatically splits S-VOL with write enabled status (SSWS).
o SSWS is an erroneous state.
TC / TC Async / TC: ED PFUL
o If the quantity of data in sidefile cache exceeds 30% of cache storage, the internal status of the RAID storage system is PFUL, and host write I/Os receive delayed response in the range of 0.5 seconds (minimum) to 4 seconds (maximum).
Ver: 1.0 Page 27 of 57Copyright 2013 © HDS All rights reserved.
Griffin Hernandez
Hitachi Data Systems Confidential: Authorized Use Only

PFUSo If the quantity of data in sidefile cache exceeds the user-defined sidefile area (30%-70%), then host write
I/Os must wait for enough sidefile space to become available for storing the next new write data. If a copy pending timeout occurs during this waiting state, then the pair status changes from PAIR to PFUS, host write I/Os are accepted, and write data is managed by bitmap.
Additional statuses, their meanings, and information on troubleshooting can be found in the: Hitachi Command Control Interface User and Reference GuideDocument Number: MK-90RD7010
Ver: 1.0 Page 28 of 57Copyright 2013 © HDS All rights reserved.
Griffin Hernandez
Hitachi Data Systems Confidential: Authorized Use Only

Creating HORCM Files
OverviewHORCM is the Hitachi Online Replication Control Manager, it is also known as CCI, the Command Control Interface.
HORCM Files define both the connection method to an array and any replication to be controlled. A HORCM file can only control a singular array, therefore it is very important to know which instance you are working with.
Horcm Instances are labeled by number, for example, horcm0.conf is Horcm Instance 0. Inside of the horcm0.conf you define the connection to a single array. Once that is done, horcm0 will only operate for that singular array. There can be many HORCM instances pointed at the same array.
There are two types of HORCM files, one type specifically for raidcom (Hitachi Data Systems CLI configuration utility), and one for controlling replication.
An instance for raidcom will only allow array commands, though, with the addition of device groups, copy groups, and Thin Image, some In System Replication can be controlled from the raidcom program.
An instance for replication requires a partnered pair to communicate with. HORCM, when started, becomes a daemon which will listen on a specified UDP port. All replication tasks (other than DR specific) require a secondary instance to communicate with.
Traditionally replication is controlled from a HORCM file designed for replication. The replication does not happen between the hosts, HORCM instructs the array to perform replication tasks.
IntroductionA Traditional Horcm File for Replication
In a Traditional Horcm File there are four sections which need to be defined and configured in the following order1. HORCM_MON
a. Defines the IP Address to listen on, UDP Port, and timeout values2. HORCM_CMD
a. Defines the local Command Devices, or the Remote IP Address of a singular array3. HORCM_LDEV / HORCM_LDEVG / HORCM_DEV
a. Defines one or more lists of devices participating in replication4. HORCM_INST
a. The remote location of the list of devices
Ver: 1.0 Page 29 of 57Copyright 2013 © HDS All rights reserved.
Griffin Hernandez
Hitachi Data Systems Confidential: Authorized Use Only

Example:
#/************************* For HORCM_MON *************************************/
HORCM_MON#ip_address service poll(10ms) timeout(10ms)10.0.0.50 12010 6000 3000
#/************************** For HORCM_CMD ************************************/
HORCM_CMD#dev_name dev_name dev_name\\.\CMD-211033
#/************************** For HORCM_LDEV ***********************************/
HORCM_LDEV#dev_group dev_name Serial# CU:LDEV(LDEV#) MU#test1 0059_0034 211033 00:59 h1
#/************************* For HORCM_INST ************************************/
HORCM_INST#dev_group ip_address servicetest1 10.0.0.51 12011
HORCM_MONThe above text constitutes a horcm file which is deployed on host 10.0.0.50, and will listen on 10.0.0.50:12010 UDP for HORCM commands.
HORCM_CMDTells the HORCM Process which array we are controlling. It requires a valid command device pathed to the host with a valid /dev/node
HORCM_LDEVDefines that LDEV 00:59 is participating in Replication.
To control replication for this device, you would use the device group name “test1” to split, resync, and pair (suspend, re-establish, establish).“h1” states this will be HUR Replication and using Copy Slot 1 (MU#1)
Ver: 1.0 Page 30 of 57Copyright 2013 © HDS All rights reserved.
Griffin Hernandez
Hitachi Data Systems Confidential: Authorized Use Only

HORCM_INSTTells HORCM where the sister configuration file for the remote array. Note that the Device Group defined above is defined in this section as well. This is how you specify the remote array.
Ver: 1.0 Page 31 of 57Copyright 2013 © HDS All rights reserved.
Griffin Hernandez
Hitachi Data Systems Confidential: Authorized Use Only

Explanation:
#/************************* For HORCM_MON *************************************/
HORCM_MON#ip_address service poll(10ms) timeout(10ms)<Local IP> <Local Listening UDP Port> 6000 3000
#/************************** For HORCM_CMD ************************************/
HORCM_CMD#dev_name dev_name dev_name\\.\CMD-<Serial of Array to Control>
#/************************** For HORCM_LDEV ***********************************/
HORCM_LDEV#dev_group dev_name Serial# CU:LDEV(LDEV#) MU#<Replication Group Name> <Shared Unique Name> <Local Array SN> <LDEV ID> <MU>
#/************************* For HORCM_INST ************************************/
HORCM_INST#dev_group ip_address service<Replication Group Name> <Remote IP> <Remote UDP Port>
Ver: 1.0 Page 32 of 57Copyright 2013 © HDS All rights reserved.
Griffin Hernandez
Hitachi Data Systems Confidential: Authorized Use Only

A Raidcom Only Horcm FileIn a Raidcom Specific Horcm File there is one section required.
1. HORCM_CMDa. Defines the local Command Devices, or the Remote IP Address of a singular array
Example:
HORCM_CMD#dev_name dev_name dev_name\\.\CMD-211033
Explanation:
HORCM_CMD#dev_name dev_name dev_name\\.\CMD-<Serial of Array to Control>
Note: A raidcom only horcm file will only allow control of the array, as well as some in-system replication (specifically only if raidcom device groups / raidcom copy groups are employed)
Ver: 1.0 Page 33 of 57Copyright 2013 © HDS All rights reserved.
Griffin Hernandez
Hitachi Data Systems Confidential: Authorized Use Only

Defining a pairingOverview
Replication occurs between two or more LDEVs. Each direct replication (P-VOL -> S-VOL) is a pairing. Where the P-VOL is the Primary Volume (Production Volume), and the S-VOL is the Secondary Volume (DR or Snapshot Copy). HORCM Files define this pairing by using two separate HORCM Files.
Traditionally even numbered HORCM files are Production, odd numbered are Snapshot or DR (Ex: horcm0.conf is Production, horcm1.conf is DR).
Each HORCM file points at its paired HORCM file for control of replication.
Additional copies of a production volume can be defined by incrementing the MU.
The Pairing is defined in the HORCM_LDEV section of a HORCM File.
The following page is an excel table which shows two HORCM files HORCM_LDEVG section.
HORCM Table Example.
Ver: 1.0 Page 34 of 57Copyright 2013 © HDS All rights reserved.
Griffin Hernandez
Hitachi Data Systems Confidential: Authorized Use Only
Horcm1(NE1)HORCM_LDEV HORCM_LDEV#grpName DevName Serial LDEV MU #grpNamesanadmhds001d sanadm001d_002e_009A 65469 00:2e h1 sanadmhds001dsanadmhds001d sanadm001d_002F_009B 65469 00:2F h1 sanadmhds001dsanadmhds001d sanadm001d_0030_009C 65469 00:30 h1 sanadmhds001dsanadmhds001d sanadm001d_0031_009D 65469 00:31 h1 sanadmhds001dsanadmhds001d sanadm001d_0032_009E 65469 00:32 h1 sanadmhds001dsanadmhds001d sanadm001d_0033_009F 65469 00:33 h1 sanadmhds001dsanadmhds001d sanadm001d_0034_00A0 65469 00:34 h1 sanadmhds001dsanadmhds001d sanadm001d_0035_00A1 65469 00:35 h1 sanadmhds001dsanadmhds001d sanadm001d_0036_00A2 65469 00:36 h1 sanadmhds001dsanadmhds001d sanadm001d_0037_00A3 65469 00:37 h1 sanadmhds001d

The above table shows the HORCM_LDEVG comparison for two separate HORCM Files. On the left we have a set of DR LDEVs defined for HUR, on the right are the Production LDEVs which we are defining a copy from. Each section is defined on a host with a local connection to the Array participating in replication.
To control replication for this environment, the group name must be invoked.
Ver: 1.0 Page 35 of 57Copyright 2013 © HDS All rights reserved.
Griffin Hernandez
Hitachi Data Systems Confidential: Authorized Use Only

Working with HORCMRule of AcquisitionHorcm, as well as all Hitachi Software, can be downloaded using the HDS Portal located at http://portal.hds.com
The easiest way to find the HORCM CD is to use the built in search engine for “CCI”.
Installation*nix
Installation of HORCM on a Nix based box is as simple as expanding the CPIO file, placing the expanded directory under root, and then executing the “horcminstall.sh” script (now located under /HORCM).
1. Locate the correct RMHORC file for the system and architecture you are using2. Copy this to /tmp on the host3. Extract the CPIO
a. cpio -idmu < RMHORC4. Move the new directory to /
a. mv HORCM /5. Execute script to make symlinks
a. /HORCM/horcminstall.sh
Copy paste:cpio -idmu < RMHORCmv HORCM //HORCM/horcminstall.sh
WindowsWindows uses an executable for installation. Simply double click on the setup, click next a few times, and its installed.
Ver: 1.0 Page 36 of 57Copyright 2013 © HDS All rights reserved.
Griffin Hernandez
Hitachi Data Systems Confidential: Authorized Use Only

HORCM CommandsOverview
All of HORCM commands are located within its base directory. On Windows files are mixed between /HORCM/etc and /HORCM/usr/bin.On *nix platforms all of the files are located within /HORCM/usr/bin.
The “Command Control Interface Command Reference”, document id “MK-90RD7009” is a comprehensive reference guide to every command in the HORCM directory. It includes return codes, sample output, and all possible flags / arguments passed to each command.
This document is bundled on the ISO cd in the “Documents/CCI_Command_Reference” folder. The file name may change depending on versioning. As of the writing of this book it is named “rd700916.pdf”.
Useful Commands:
inqraidinqraid queries the local devices to display array information. It is equivalent to EMCs inq function, but will not
report on non-Hitachi devices. It does not require HORCM to be running to execute.Nix Examples:ls /dev/sd* | inqraid -fgx -CLIls /dev/rdsk/* | inqraid -fgx -CLI
[root@RHEL64-2 bin]# ls /dev/sd* | ./inqraid -fgx -CLIDEVICE_FILE PORT SERIAL LDEV CTG H/M/12 SSID R:Group PRODUCT_IDsda - - - - - - - Virtual disksdb CL1-A-21 53086 229 - - 0004 1:05-06 OPEN-V-CMsdc CL1-A-21 53086 228 - - 0004 A:00000 OPEN-V-CMsdd CL1-A-21 53086 22A - - 0004 1:05-06 OPEN-V-CM
a. DEVICE_FILEa. The Dev Node
b. PORTa. Array Port and Host Group Number
c. SERIALa. Array SN
d. LDEVa. LDEV ID, listed in decimal if not using “-fx” flags
e. CTGa. Consistency Group ID (If replicated)
f. H/M/12a. Replication information
i. H = Remoteii. M = In Systemiii. 12 = Child MU for in system
g. SSIDa. Subsystem ID
h. R:Groupa. Raid group info (If thick)
i. PRODUCT_IDa. scsi_id info. Device Type
i. OPEN-V (Regular provisioned Hitachi LDEV)ii. OPEN-V-CM (Command Device)
Ver: 1.0 Page 37 of 57Copyright 2013 © HDS All rights reserved.
Griffin Hernandez
Hitachi Data Systems Confidential: Authorized Use Only

raidcom get ldev“raidcom” is a utility for configuring the array, it has two distinct modes: read (get), and write (add / modify /
delete).Most “get” commands will not require a login for the array and can be executed to poll information. “raidcom get ldev” will display all of the attributes for a specified ldev on a specified array.
Example:raidcom get ldev -ldev_id 00:30 -fx -I0
[root@RHEL64-2 bin]# raidcom get ldev -ldev_id 02:29 -I0Serial# : 53086LDEV : 553SL : 0CL : 0VOL_TYPE : OPEN-V-CVS-CMVOL_Capacity(BLK) : 205440NUM_LDEV : 1LDEVs : 553NUM_PORT : 1PORTs : CL1-A-21 56 JJP-scr55u06s003F_POOLID : NONEVOL_ATTR : CMD : CVSRAID_LEVEL : RAID1RAID_TYPE : 2D+2DNUM_GROUP : 1RAID_GROUPs : 05-06DRIVE_TYPE : DKS5B-J300SSDRIVE_Capa : 571679368LDEV_NAMING : HCS_COMMAND_DEVICE_00STS : NMLOPE_TYPE : NONEOPE_RATE : 100MP# : 2SSID : 0004
Ver: 1.0 Page 38 of 57Copyright 2013 © HDS All rights reserved.
Griffin Hernandez
Hitachi Data Systems Confidential: Authorized Use Only

pairdisplay“pairdisplay” is a HORCM command which displays information pertaining to replication. Various additional flags
can show: Copy Percentage, Virtualized LDEV info, Journal Usage, and Q-Marker / Q-Count information.
Tracing the Q-Markers is an accurate way to determine RPO.
Replication Example:
pairdisplay -g oradb -IM0Group Pair Vol(L/R) (Port#,TID,LU-M), Seq#, LDEV#..P/S, Status,Fence, Seq#, P-LDEV# Moradb oradb1(L) (CL1-A, 1,0) 30053 Never, 30053 19 -oradb oradb1(R) (CL1-D, 1,0) 30053 Never, ---- 18 -
Journal / Q-Marker Example:
# pairdisplay -g VG01 -v jnlJID MU CTG JNLS AP U(%) Q-Marker Q-CNT D-SZ(BLK) Seq# Nnm LDEV#001 0 2 PJNN 4 21 43216fde 30 512345 62500 2 265002 0 2 SJNN 4 95 3459fd43 52000 512345 62538 3 270
Red:The Red Text above shows the current local and remote Journal Usage.
Blue:The Blue Text above shows the Last Q-Marker locally and remotely committed. Both will change as long as data
is updated or written to the P-VOLs.
Ver: 1.0 Page 39 of 57Copyright 2013 © HDS All rights reserved.
Griffin Hernandez
Hitachi Data Systems Confidential: Authorized Use Only

Replication Control Examples for all types of replication (HUR / TC / SI / TI):
Split (Suspend) Read Onlypairsplit -g sanadmhds001d -IH0
Needs to be executed on the host with the horcm0.conf file.
Split (Suspend) Read-Writepairsplit -g sanadmhds001d -IH0 -rw
Needs to be executed on the host with the horcm0.conf file Suspends replication and the S-VOLs on the remote array are writable
Resync (ReEstablish) pairresync -g sanadmhds001d -IH0
Needs to be executed on the host with the horcm0.conf file Performs a Differential Copy between P-Vol / S-VOL
o In the case of Thin Image, it clears the differential copy stored in the TI Pool
Simplex Replication (UnEstablish) pairsplit -g sanadmhds001d -IH0 -S
Needs to be executed on the host with the horcm0.conf file Removes all update tracking between the devices Requires a full copy for next Establish
Reverse Resync (Restore) - SI / TI Onlypairresync -g sanadmhds001d -IH0 -restore
Needs to be executed on the host with the horcm0.conf fileo Locks the P-VOL and starts a reverse differential copy process. Can be used with -f qs
Ver: 1.0 Page 40 of 57Copyright 2013 © HDS All rights reserved.
Griffin Hernandez
Hitachi Data Systems Confidential: Authorized Use Only

Creating Replication (Establish) - HURpaircreate -g sanadmhds001d -IH0 -v<L/R> -jp <Local JID> -js <Remote JID> -f async <CTG>
Needs to be executed on the host with the horcm0.conf file Starts an initial full copy
Explanation of Flags:
-v<L/R>o -vl or -vr
Vector Local, or Vector Remote VL means that the instance number defined in -IH0 will be the PRIMARY Volumes
The volumes listed in horcm1.conf will be OVERWRITTEN. VR means that the instance number defined in -IH0 will be the TARGET Volumes
The volumes listed in horcm0.conf will be OVERWRITTEN. Plain English
Local or Remote determines which volumes will be OVERWRITTEN. VL ALWAYS means the instance specified in the -I flag will be the PRIMARY volumes.
-jp <Local JID>o Local Array (in this case the array controlled by Horcm Instance 0) Journal ID Number
-js <Remote JID>o Remote Array (as defined in horcm0.conf HORCM_INST section) Journal ID Number
-f async <CTG>o “async” specifies HUR replication
“never” specifies True Copy Sync replicationo <CTG>
is the Consistency Group Number Always use the Local Journal Number.
Note: Using VR Remotely is the equivalent of running VL locally.
HUR Replication is used via the “async” command with paircreate.
Synchronous replication options for fencing are:a. data
a. In the case of a replication link down event, P-VOL access is suspended (fenced) until the MCU / RCU Paths are restored. As long as the S-VOL cannot be updated, the P-VOL is locked for writing.
b. nevera. Writes need to be committed to the DR Array before the host receives a write acknowledgement. In the
case of a replication link down event, the P-VOL remains writable.c. status
a. P-VOL access is suspended (fenced)
Reverse Resync (Restore) - HUR / TCpairresync -g sanadmhds001d -IH0 -swapp
Needs to be executed on the host with the horcm0.conf file Reverses replication, Swaps the P-VOL with the S-VOL. Secondary Site becomes Primary (HUR / TC)
Ver: 1.0 Page 41 of 57Copyright 2013 © HDS All rights reserved.
Griffin Hernandez
Hitachi Data Systems Confidential: Authorized Use Only

Fail to Remote Site - HUR / TC - horctakeover
Overview
P-VOL TakeoverThe PVOL-takeover function releases the pair state as a group, since that maintains the consistency of the secondary volume at having accepted horctakeover command when the primary volume is fenced (“data or status” and “PSUE or PDUB” state, “PSUE or PDUB” volume are contained in the group). This function allows the takeover node to use the primary volume (for example, reading and writing are enabled), on the assumption that the remote node (possessing the secondary volume) cannot be used. PVOL takeover can be specified for a paired volume or a group.For Asynchronous software: P-VOL-takeover will not be executed.
Ver: 1.0 Page 42 of 57Copyright 2013 © HDS All rights reserved.
Griffin Hernandez
Hitachi Data Systems Confidential: Authorized Use Only

SwaptakeoverWhen the P-VOL status of the remote node is PAIR and the S-VOL data is consistent, it is possible to swap the primary and secondary volumes. The swaptakeover function is used by the HA control script when a package is manually moved to an alternate data center while all hardware is operational. Swaptakeover can be specified for a paired volume or a group.The swaptakeover function internally executes the following commands to swap the primary and secondary volumes:
1. Execute suspend for swapping the local volume (S-VOL). If this step fails, swaptakeover is disabled and an error is returned.
2. Execute resync for swapping to the S-VOL (local volume). This will swap P-VOL and S-VOL, and redirect the copy direction. The result of this is:
The old P-VOL will be the new S-VOL. The old S-VOL will be the new P-VOL.And of course, this will also change the remote copy direction and it will synchronize the pair. To move back to the original state you need to repeat this procedure (where, of course P-VOL and S-VOL are the new current ones). If this step fails, swap-takeover returns at SVOL-SSUS-takeover, and the local volume (S- VOL) is maintained in SSUS(PSUS) state which allows and keeps track of write I/Os using a bitmap for the S-VOL. This special state is displayed as SSWS using the -fc option of the pairdisplay command.
The swaptakeover function does not use SMPL or No Copy mode for swapping to guarantee mirror consistence, and this is included as a function of SVOL takeover.
S-VOL TakeoverThe data consistency of the UR S-VOL is evaluated by its pair status and fence level. If successful, the SVOL takeover function returns swap takeover as the return value of the horctakeover command. If not successful, the SVOL takeover function returns SVOL-SSUS-takeover as the return value of the horctakeover command. In case of a host failure, Swap takeover is returned. In case of an ESCON/FC or P-VOL site failure, SVOL-SSUS-takeover is returned.
Plain English:Horctakeover is a decision tree that determines the best way to get volumes up and running. If both sides are
currently operational (determined by the communication of the horcm instance and MCU-RCU Paths), executing a horctakeover will subprocess the “pairresync -swaps” which will flush traffic, then swap the P-VOL and S-VOL. The Target Volumes will become production.
If there is connectivity problems, depending on the horcm instance which horctakeover is executed, either the replication will be simplexed (destroyed / unestablished), or put into a pair suspend under error mode.
Fail to Remote Site - HUR / TC - horctakeover commandhorctakeover -IH0 -g sanadmhds001d -t <RPO>
W
Ver: 1.0 Page 43 of 57Copyright 2013 © HDS All rights reserved.
Griffin Hernandez
Hitachi Data Systems Confidential: Authorized Use Only

Fail to Remote Site or Perform Copyback - HUR / TC - Manual Operationpairresync -swapp / -swaps
To make the S-VOLS production, or to overwrite the P-VOLS with the DR Copy, one needs to reverse the replication.
Unlike Shadow Image, there is not a “restore” function built into HUR / TC. To revert your production volumes to a DR copy, you need to reverse the replication twice.
P-VOL -> Normal Replication -> S-VOLVol_A1 -> Vol_A2
Vol_A1 is currently running Oracle and needs to be overwritten with data from the DR Site.
There are a few for performing a copy back:1. The data is corrupt at the Production site
1. Assumes the production array and DR array are still able to communicate2. Assumes both HORCM hosts are still operational and able to communicate
Please umount / close the application / shutdown the database prior to execution. The OS will generally cache the LDEV information and can cause corruption to the volume if the data is split and then resynced to restore normal replication.
To perform a reverse resync (copy back) and you are logged onto the Production Side (Horcm file controls the current P-VOLS), you will execute a -swapp.To perform a reverse resync (copy back) and you are logged onto the DR Side (Horcm file controls the current S-VOLS), you will execute a -swaps.
Example copy back (reverse resync) executed on the Production Side:pairresync -g sanadmhds001d -IH0 -swapp
Example copy back (reverse resync) executed on the DR Side:pairresync -g sanadmhds001d -IH0 -swaps
After execution the replication direction will change for all volumes within the consistency group. If there are multiple device groups within the consistency group, they will reverse as well.
A differential copy process will start between the new P-VOL at the DR site and S-VOLs at the production site.
The DR Site is now Write enabled. If required, databases / applications can be brought up. The DR site is now running as production.
Once the copy process is finished, normal replication direction can be restored using the appropriate pairresync swap(p/s) command.
Ver: 1.0 Page 44 of 57Copyright 2013 © HDS All rights reserved.
Griffin Hernandez
Hitachi Data Systems Confidential: Authorized Use Only

Fail to Remote Site - HUR / TC - Manual Operation - DR Scenariopairsplit -RS
To make the S-VOLS Write-Enabled in a DR Scenario, a special split operation needs to be executed.
P-VOL -> Normal Replication -> S-VOLVol_A1 -> Vol_A2
In the case where the Production array is non-viable (complete fabric failure, site failure, array failure, HORCM instance failure, etc) a protected environment will remain in “PAIR” Status. Normal HORCM commands will no longer work (excepting pairdisplay using the “-l” flag to disable attempting to connect to the remote array). In this Scenario let us assume someone has pressed the emergency power off button for the Production datacenter.
In this Scenario, the Horcm host, fabric, and array are now down. The S-VOL at the DR site will remain “PAIR” incase it is a simple link failure between sites.
Executing pairsplit, pairesync, and pairdisplay using normal flags will fail due to a communications Time Out.
Note: These must be ran from the DR Side. The side with the S-VOLs.
HORCM Commands which will work at the DR site while Prod is Down: pairdisplay -g sanadmhds001d -IH1 -l pairsplit -g sanadmhds001d -IH1 -RS
The pairsplit -RS command will tell the local array to forcibly split (suspend) replication without notifying the primary array. The S-VOL will become write enabled, and it will have a unique Replication Status of “SSWS”. The Primary Volume will remain “PAIR”.
At this point the application / database can be brought up at the DR site. Data will be in a “crash consistent” state. This is a DR Event.
During a hard poweroff state, Enterprise arrays will use their internal batteries to maintain the cache, in most cases allowing for HUR to come back up without performing a full resync.
Finish Failover - HUR / TC - Manual Operation - DR Roll Backpairresync -swaps
After performing an emergency Fail Over to the DR site, the replication is stuck in a PAIR / PSUE, SSWS state. At this point you probably have the DR site up and running, and have production applications / databases running and updating your original DR copy. Failing back to the Production Site after a failure is fairly straightforward and requires two resyncs and a split.
1) From the DR Site, initiate a copy back to Proda. pairresync -g sanadmhds001d -IH1 -swaps
2) Shut Down all applications at the DR site. In a moment the DR Site Volumes will be Read-Only. a. This ensures that data is properly flushed to the Prod site.
i. pairsplit -g sanadmhds001d -IH13) Reverse Replication Again
a. pairresync -g sanadmhds001d -IH1 -swapp
Note: First Execution is SWAPS, second is SWAPP. SWAPS is executed from the S-VOL Side to reverse replication, SWAPP from the P-VOL Side. The first execution changes the DR from an S-VOL -> P-VOL. Second Changes P-VOL -> SVOL.
Ver: 1.0 Page 45 of 57Copyright 2013 © HDS All rights reserved.
Griffin Hernandez
Hitachi Data Systems Confidential: Authorized Use Only

Back out of a partial fail over - HUR / TC - Manual Operation - DR Testpairsplit -RB
To back out of a SSWS state and re-establish replication from P-VOL to S-VOL without performing a full copy, you need to :
1. On the S-VOL side, execute a pairsplit -RB2. On the P-VOL side, resync
The PVOL Status should change as follows: PAIR -> PAIR -> PAIRThe SVOL Status should change as follows: SSWS -> PSUS -> PAIR
You can revert the S-VOL from SSWS to SSUS using the “-RB” flag, then resyncing: pairsplit -g sanadmhds001d -IH1 -RB Must be executed from DRpairresync -g sanadmhds001d -IH0 Must be executed from Prod
This will allow for DR Testing to revert back to standard replication without overwriting the P-VOL.
Example Output from HDS Lab:
Initial paired state[root@BC-013 ~]# pairdisplay -IH10 -g UR-VSP-VSP -fcxGroup PairVol(L/R) (Port#,TID, LU),Seq#,LDEV#.P/S,Status,Fence, %,P-LDEV# MUR-VSP-VSP VSP-VSP-0(L) (CL1-A1-7, 0, 0)53004 ed00.P-VOL PAIR NEVER , 100 ed00 -UR-VSP-VSP VSP-VSP-0(R) (CL1-A2-7, 0, 0)53086 ed00.S-VOL PAIR NEVER , 100 ed00 -
At DR Site, split -RS to enter SSWS (Disaster Recover Write Enable)[root@BC-013 ~]# pairsplit -IH11 -g UR-VSP-VSP -RS
[root@BC-013 ~]# pairdisplay -IH10 -g UR-VSP-VSP -fcxGroup PairVol(L/R) (Port#,TID, LU),Seq#,LDEV#.P/S,Status,Fence, %,P-LDEV# MUR-VSP-VSP VSP-VSP-0(L) (CL1-A1-7, 0, 0)53004 ed00.P-VOL PAIR NEVER , 100 ed00 -UR-VSP-VSP VSP-VSP-0(R) (CL1-A2-7, 0, 0)53086 ed00.S-VOL SSWS NEVER , 100 ed00 -
At DR Site, Change S-VOL status to PSUS (P-VOL is not overwritten)[root@BC-013 ~]# pairsplit -IH11 -g UR-VSP-VSP -RB
[root@BC-013 ~]# pairdisplay -IH10 -g UR-VSP-VSP -fcxGroup PairVol(L/R) (Port#,TID, LU),Seq#,LDEV#.P/S,Status,Fence, %,P-LDEV# MUR-VSP-VSP VSP-VSP-0(L) (CL1-A1-7, 0, 0)53004 ed00.P-VOL PAIR NEVER , 100 ed00 -UR-VSP-VSP VSP-VSP-0(R) (CL1-A2-7, 0, 0)53086 ed00.S-VOL PSUS NEVER , 100 ed00 -
At Prod Site , perform resync, overwriting the S-VOL.[root@BC-013 ~]# pairresync -IH10 -g UR-VSP-VSP
[root@BC-013 ~]# pairdisplay -IH10 -g UR-VSP-VSP -fcxGroup PairVol(L/R) (Port#,TID, LU),Seq#,LDEV#.P/S,Status,Fence, %,P-LDEV# MUR-VSP-VSP VSP-VSP-0(L) (CL1-A1-7, 0, 0)53004 ed00.P-VOL PAIR NEVER , 100 ed00 -UR-VSP-VSP VSP-VSP-0(R) (CL1-A2-7, 0, 0)53086 ed00.S-VOL PAIR NEVER , 100 ed00 -
Ver: 1.0 Page 46 of 57Copyright 2013 © HDS All rights reserved.
Griffin Hernandez
Hitachi Data Systems Confidential: Authorized Use Only

Creating Replication (Establish) -In System (Shadow Image)paircreate -g sanadmhds001d -IH0 -v<L/R>
Needs to be executed on the host with the horcm0.conf file Starts an initial full copy between two sets of LDEVS on the SAME array.
Explanation of Flags: -v<L/R>
o -vl or -vr Vector Local, or Vector Remote VL means that the instance number defined in -IH0 will be the PRIMARY Volumes
The volumes listed in horcm1.conf will be OVERWRITTEN. VR means that the instance number defined in -IH0 will be the TARGET Volumes
The volumes listed in horcm0.conf will be OVERWRITTEN. Plain English
Local or Remote determines which volumes will be OVERWRITTEN. VL ALWAYS means the instance specified in the -I flag will be the PRIMARY volumes.
vCreating Replication (Establish) - In System (Thin Image)paircreate -g sanadmhds001d -IH0 -v<L/R> -pid <TI Pool>
Needs to be executed on the host with the horcm0.conf file Starts an initial full copy between two sets of LDEVS on the SAME array.
Explanation of Flags: -v<L/R>
o -vl or -vr Vector Local, or Vector Remote VL means that the instance number defined in -IH0 will be the PRIMARY Volumes
The volumes listed in horcm1.conf will be OVERWRITTEN. VR means that the instance number defined in -IH0 will be the TARGET Volumes
The volumes listed in horcm0.conf will be OVERWRITTEN. Plain English
Local or Remote determines which volumes will be OVERWRITTEN. VL ALWAYS means the instance specified in the -I flag will be the PRIMARY volumes.
-pid o A number corresponding to the Thin Image Pool the S-VOLs should save their DELTAs (∆) in.
Note: Additional Flags are detailed in the “Command Control Interface Command Reference” Handbook included in the HORCM Binary CD. Document Number: MK-90RD7009
Ver: 1.0 Page 47 of 57Copyright 2013 © HDS All rights reserved.
Griffin Hernandez
Hitachi Data Systems Confidential: Authorized Use Only

Monitoring ScriptsCalculating RPO for UR via CLIOverview
HUR numbers each write that is sent to a replicated volume, these are known as sequence numbers or Q-Markers. Each Q-Marker (Place in line in the Queue) must be committed in the order it was commited to the source array order on the remote side.
Consistency and write order are handled at the Journal / Consistency Group level.
The FC Protocol guarantees transmission of frames in a non-erroneous state.
Ver: 1.0 Page 48 of 57Copyright 2013 © HDS All rights reserved.
Griffin Hernandez
Hitachi Data Systems Confidential: Authorized Use Only

As each write is committed to the local array, a hexadecimal number is assigned to that block of data and it is placed into queue for sending (Q-Marker).
Process
When issuing a “pairdisplay -v jnl” command the last committed Q-Marker both locally and remotely is displayed:# pairdisplay -g VG01 -v jnlJID MU CTG JNLS AP U(%) Q-Marker Q-CNT D-SZ(BLK) Seq# Nnm LDEV#001 0 2 PJNN 4 21 43216fde 30 512345 62500 2 265002 0 2 SJNN 4 95 3459fd43 52000 512345 62538 3 270
In the above sample output, the bold and underlined section is the Commited Q-Marker for the execution time.Over time (determined by bandwidth and remote array busy time) during subsequent executions the second number will catch up to 43216fde. The number is incremented for each successful transfer between the two sites.
RPO Can be calculated by multiple executions of “pairdisplay -g VG01 -v jnl” and counting the number of seconds before the secondary journals Q-Marker is greater than or equal to the original executions primary journal.
Monitoring Journal UsageOverview
Journal usage for HUR can be monitored simply by executing “pairdisplay -g VG01 -v jnl”.
# pairdisplay -g VG01 -v jnlJID MU CTG JNLS AP U(%) Q-Marker Q-CNT D-SZ(BLK) Seq# Nnm LDEV#001 0 2 PJNN 4 21 43216fde 30 512345 62500 2 265002 0 2 SJNN 4 95 3459fd43 52000 512345 62538 3 270
The Journal Usage for the Primary and Secondary Journals is displayed in bold and underlined text.Monitoring this simply requires a script with thresholds, and an alerting method.
Ver: 1.0 Page 49 of 57Copyright 2013 © HDS All rights reserved.
Griffin Hernandez
Hitachi Data Systems Confidential: Authorized Use Only

Viewing all journals on an array can be done via raidvchkscan, but there is no way to determine which copy group is using the journal then. This monitoring is solely accomplished at the journal level
# raidvchkscan –v jnl -I0JID MU CTG JNLS AP U(%) Q-Marker Q-CNT D-SZ(BLK) Seq# Nm LDEV#001 0 1 PJNN 4 21 43216fde 30 512345 62500 2 265 002 1 2 PJNF 4 95 3459fd43 52000 512345 62500 3 270 003 0 3 PJSN 4 0 - - 512345 62500 1 275 004 0 4 PJSF 4 45 1234f432 78 512345 62500 1 276 005 0 5 PJSE 0 0 - - - 512345 62500 1 277
Additionally, one could loop through all of the defined groups on an array using “raidqry -g -I0”.
# raidqry -gGNo Group RAID_type IV/H IV/M MUN/H MUN/M1 ora HTC_RAID 12 9 4 642 orb XP_RAID 12 9 4 643 orc HTC_DF 8 6 1 1
Then could for each group (ora orb orc) execute the pairdisplay command.
Ver: 1.0 Page 50 of 57Copyright 2013 © HDS All rights reserved.
Griffin Hernandez
Hitachi Data Systems Confidential: Authorized Use Only

HDSF(x)OverviewHitachi has a set of prebuilt scripts to assist with HORCM automation which are collectively known as HDS Functions.The scripts are provided in Visual Basic Scripting and Korn Shell.
The script handles wait times, multiple snapshots from a single volume, remote replication, cascading replication, remote execution of scripts to freeze, check status, and thaw applications / databases.
There is one global configuration file, and for each application / database / device group / consistency group there is a specific configuration.
The Global Configuration handles log locations, debug information, notification information, and ssh connection info; all of these values can be overwritten in the application specific configuration.
Each application specific configuration file allows configuration of remote hosts, scripts to suspend / resume writing to the P-VOL, and all of the groups that pertain to a specific application / database.
For example:
A replication environment that uses Shadow Image locally (2 copies), HUR for a DR copy (1 copy), and Thin Image remotely (3 copies) would have a total of 6 device groups associated with that single protected database / application instance.
Lets name these as follows:
Shadow Imageo SI_ORA_1o SI_ORA_2
HURo UR_ORA_1
Thin Imageo TI_ORA_1o TI_ORA_2o TI_ORA_3
Since all of these configurations pertain to the same database, they would all be entered into the same configuration file.
Example:DR_GROUP001="UR_ORA_1"
RISR_GROUP001="TI_ORA_1"RISR_GROUP002="TI_ORA_2"RISR_GROUP003="TI_ORA_3"
RISR_MU_GROUP001=0RISR_MU_GROUP002=1RISR_MU_GROUP003=2
LISR_GROUP001="SI_ORA_1"LISR_GROUP002="SI_ORA_2"
Ver: 1.0 Page 51 of 57Copyright 2013 © HDS All rights reserved.
Griffin Hernandez
Hitachi Data Systems Confidential: Authorized Use Only

Available FunctionsThe functions provided in HDSfunctions are listed below:
writeLog writeDebugLog writeERROR closeLog recoveryLog logCleanUp getEpoch getCurrentISRGroup catDebugLog getGlobalConf checkArgs getSpecificConf startLog startHORCM resyncPair createClone splitPair DBScript PairVolChk rotateISR COWCheck HURCheck remoteFunction remoteCommand remoteStartHORCM SolUnmount SolMountChk vxdgDeport SolMount vxdgImport vxdgChkState verifyVGsNotImported VMwareBackup VMwareResignatureDisks VMwareBackupRename xosfx xosfx_multidef
Ver: 1.0 Page 52 of 57Copyright 2013 © HDS All rights reserved.
Griffin Hernandez
Hitachi Data Systems Confidential: Authorized Use Only
Example SI Resync ScriptAn example script for resyncing a Shadow Image pairing would be:
#!/bin/kshAppName=”Oracle1”
./hdsfunctions.ksh $AppName startLog
./hdsfunctions.ksh $AppName startHORCM 0
./hdsfunctions.ksh $AppName rotateISR LISR
./hdsfunctions.ksh $AppName resyncPair LISR
./hdsfunctions.ksh $AppName closeLog
startLogo Logs all output of further functions
startHORCM 0o Attempts to start HORCM instance 0
rotateISR LISRo If more than one snapshot for the volume is defined in its configuration file, chooses the next one
resyncPair LISRo Performs a resync of the new copy pair.
closeLog
Additional examples can be found in the examples directory of HDSFunctions.
Ver: 1.0 Page 53 of 57Copyright 2013 © HDS All rights reserved.
Griffin Hernandez
Hitachi Data Systems Confidential: Authorized Use Only

RaidcomOverviewRaidcom is Hitachis array configuration utility. It has limited support on the USP-V/VM and AMS / HUS arrays, but is fully supported on the VSP / HUS-VM. Nix admins may have difficulty adapting to its structure as it does not follow a standard Nix command using flags and arguments. Instead it starts with two words and then the flags and arguments start.
Every raidcom execution is formed thusly: # raidcom [ command ] [ array object ] [Flags and Arguments] [Instance]
Commands determine if your raidcom execution is read only or actually modifies the array. Objects can be queried or modified.
Below are the available commands and array objects.
Available Commands Available Array Objectsadd clpr
check_ext_storage command_statusdelete copy_grp
disconnect device_grpdiscover dp_poolextend error_message
get external_grpinitialize external_storage
lock hba_wwnmap host_grp
modify journalmonitor journaltrename ldevreplace lun
reset parity_grpset path
unlock poolunmap port
rcurcu_pathresource
snap_poolsnapshot
spm_groupspm_wwn
ssid
Ver: 1.0 Page 54 of 57Copyright 2013 © HDS All rights reserved.
Griffin Hernandez
Hitachi Data Systems Confidential: Authorized Use Only

Example CommandsGet info about a specific LDEV
raidcom get ldev -ldev_id 21:01 -I0 -fx
This will print all of the applicable configuration information about LDEV 21:01. Using the -fx, LDEV information will be displayed in Hex only for the LDEV IDs displayed. No other data will be in hex.
You could also specify the LDEV_ID in decimal, or without a colon using 0x2101.
Get a set of LDEVs
raidcom get ldev -ldev_list [dp_volume | external_volume | journal | pool | parity_grp | mp_blade | defined | undefined | mapped | unmapped ] -I0 -fx
You can choose to display a list of devices with a specific attribute. Undefined LDEVs are “free” CU:LDEVs which have not yet been provisioned, Mapped LDEVs have atleast one path.
Get a list of the Ports installed on an array
raidcom get port -I0Lists all of the ports installed on the array, their WWN, and the port attribute.
Get a list of the WWNs logged into a port
raidcom get port -port [Port Name] -I0Lists all of the WWNs currently visible to the array.
Get a list of all of the Host Groups on a port
raidcom get host_grp -port [Port Name] -I0Lists all of the host groups on a specific port.
Get a list of all of the Luns in a Host Group
raidcom get lun -port [Port Name] [Host Group Name] -I0Lists all of the LDEVs assigned to a host group.
Get a list of all of the WWNs in a host group
raidcom get hba_wwn -port [Port Name] [Host Group Name] -I0Lists all of the WWNs assigned to a host group.
Ver: 1.0 Page 55 of 57Copyright 2013 © HDS All rights reserved.
Griffin Hernandez
Hitachi Data Systems Confidential: Authorized Use Only

Note: Most Add / Delete Commands are very similar. Simply changing “add” to “delete” works in many cases, there are a few exceptions though.
Add / remove a Host Group
raidcom add host_grp -port [Port Name] -host_grp_name [Host Group Name] -I0raidcom delete host_grp -port [Port Name] [Host Group Name] -I0
Adds or removes a Host Group from a port. Note, the only time you will ever use the “-host_grp_name” is when using the add host_grp command.
Add / delete a WWN to / from a host group
raidcom add hba_wwn -port [Port Name] [Host Group Name] -hba_wwn [WWN] -I0raidcom delete hba_wwn -port [Port Name] [Host Group Name] -hba_wwn [WWN] -I0
Adds or removes a WWN from a port.
Add / delete a LDEV to / from a host group
raidcom add lun -port [Port Name] [Host Group Name] -ldev_id [LDEV] -I0raidcom delete lun -port [Port Name] [Host Group Name] -ldev_id [LDEV] -I0
Adds a LDEV to a port.
Create a new LDEVraidcom add ldev -ldev_id [LDEV] -capacity [Value] -pool [PID] -I0
Creates a new LDEV. Capacity can be in blocks (blank), Terabytes (T), Gigabytes (G), Megabytes (M), Kilobytes(K), or Bytes (B).
Example: 10T = 10 terabytes, 10G = 10Gigabytes, 10000 = ten thousand blocks
There are many more options that can be changed, please refer to the command reference or to raidcom help.
Delete a LDEVraidcom delete ldev -ldev_id [LDEV] -I0
Deletes an LDEV from the array, All data on the LDEV is lost.
Ver: 1.0 Page 56 of 57Copyright 2013 © HDS All rights reserved.
Griffin Hernandez
Hitachi Data Systems Confidential: Authorized Use Only

Simple Loops (KSH / BASH)Raidcom output, being delimited by spaces (except in the case of LDEV info), is perfectly suited to be piped back into it-self for many repetitive tasks.
For example, if you wanted to get a list of every host group on every target port, you could execute:
for port in $(raidcom get port -I0 | awk '/TAR/ { print $1 }')do raidcom get host_grp -port $port -I0 | awk 'NR>1'done
To get a list of every defined WWN on the array you could take it a step further:
for port in $(raidcom get port -I0 | awk '/TAR/ { print $1 }')do for grp_id in $(raidcom get host_grp -port $port -I0 | awk 'NR>1 { print $2 }') do raidcom get hba_wwn -port ${port}-{grp_id} -I0 donedone
Change that to a “get lun” and you will now have every single LUN on the frame.
for port in $(raidcom get port -I0 | awk '/TAR/ { print $1 }')do for grp_id in $(raidcom get host_grp -port $port -I0 | awk 'NR>1 { print $2 }') do raidcom get lun -port ${port}-{grp_id} -I0 donedone
Ver: 1.0 Page 57 of 57Copyright 2013 © HDS All rights reserved.
Griffin Hernandez
Hitachi Data Systems Confidential: Authorized Use Only