Embed Size (px)
Citation preview
©2016 Copyright Kappers Fabricating, Inc. All rights reserved 1
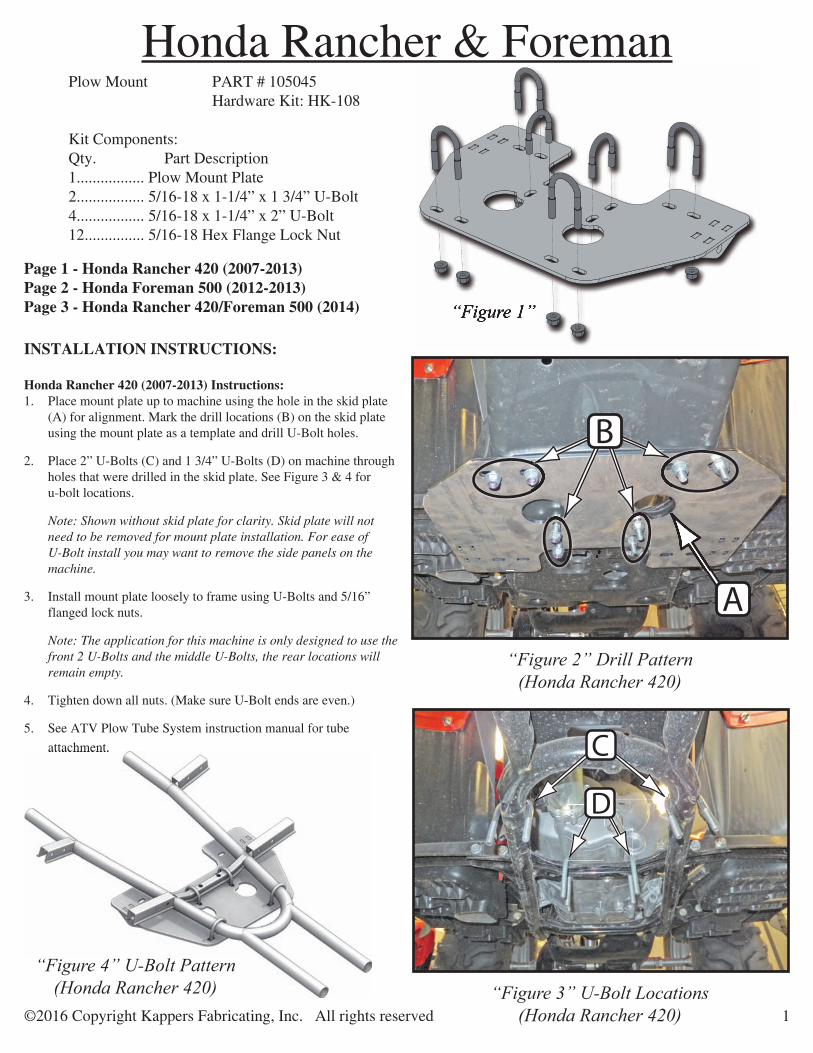
Honda Rancher & ForemanPlow Mount PART # 105045 Hardware Kit: HK-108
Kit Components:Qty. Part Description1................. Plow Mount Plate2................. 5/16-18 x 1-1/4” x 1 3/4” U-Bolt4................. 5/16-18 x 1-1/4” x 2” U-Bolt12............... 5/16-18 Hex Flange Lock Nut
C
D
“Figure 3” U-Bolt Locations(Honda Rancher 420)
“Figure 1”
INSTALLATION INSTRUCTIONS:
Honda Rancher 420 (2007-2013) Instructions:1. Place mount plate up to machine using the hole in the skid plate
(A) for alignment. Mark the drill locations (B) on the skid plate using the mount plate as a template and drill U-Bolt holes.
2. Place 2” U-Bolts (C) and 1 3/4” U-Bolts (D) on machine through holes that were drilled in the skid plate. See Figure 3 & 4 for u-bolt locations.
Note: Shown without skid plate for clarity. Skid plate will not need to be removed for mount plate installation. For ease of U-Bolt install you may want to remove the side panels on the machine.
3. Install mount plate loosely to frame using U-Bolts and 5/16” flanged lock nuts.
Note: The application for this machine is only designed to use the front 2 U-Bolts and the middle U-Bolts, the rear locations will remain empty.
4. Tighten down all nuts. (Make sure U-Bolt ends are even.)
5. See ATV Plow Tube System instruction manual for tube attachment.
“Figure 2” Drill Pattern (Honda Rancher 420)
A
B
attachment.
“Figure 4” U-Bolt Pattern (Honda Rancher 420)
“Figure 1”
Page 1 - Honda Rancher 420 (2007-2013)Page 2 - Honda Foreman 500 (2012-2013)Page 3 - Honda Rancher 420/Foreman 500 (2014)
©2016 Copyright Kappers Fabricating, Inc. All rights reserved 2
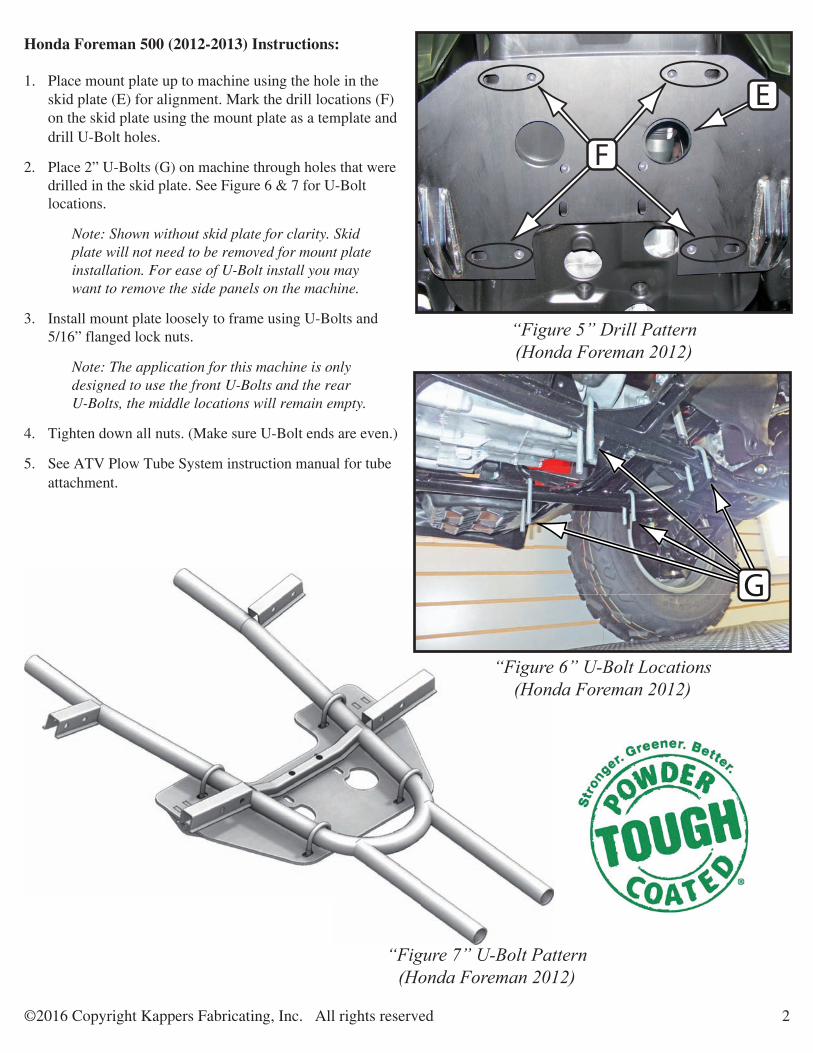
“Figure 6” U-Bolt Locations(Honda Foreman 2012)
Honda Foreman 500 (2012-2013) Instructions:
1. Place mount plate up to machine using the hole in the skid plate (E) for alignment. Mark the drill locations (F) on the skid plate using the mount plate as a template and drill U-Bolt holes.
2. Place 2” U-Bolts (G) on machine through holes that were drilled in the skid plate. See Figure 6 & 7 for U-Bolt locations.
Note: Shown without skid plate for clarity. Skid plate will not need to be removed for mount plate installation. For ease of U-Bolt install you may want to remove the side panels on the machine.
3. Install mount plate loosely to frame using U-Bolts and 5/16” flanged lock nuts.
Note: The application for this machine is only designed to use the front U-Bolts and the rear U-Bolts, the middle locations will remain empty.
4. Tighten down all nuts. (Make sure U-Bolt ends are even.)
5. See ATV Plow Tube System instruction manual for tube attachment.
“Figure 5” Drill Pattern(Honda Foreman 2012)
F
E
G
“Figure 7” U-Bolt Pattern (Honda Foreman 2012)
©2016 Copyright Kappers Fabricating, Inc. All rights reserved 3
Honda Rancher 420/Foreman 500 (2014-2015) Instructions:
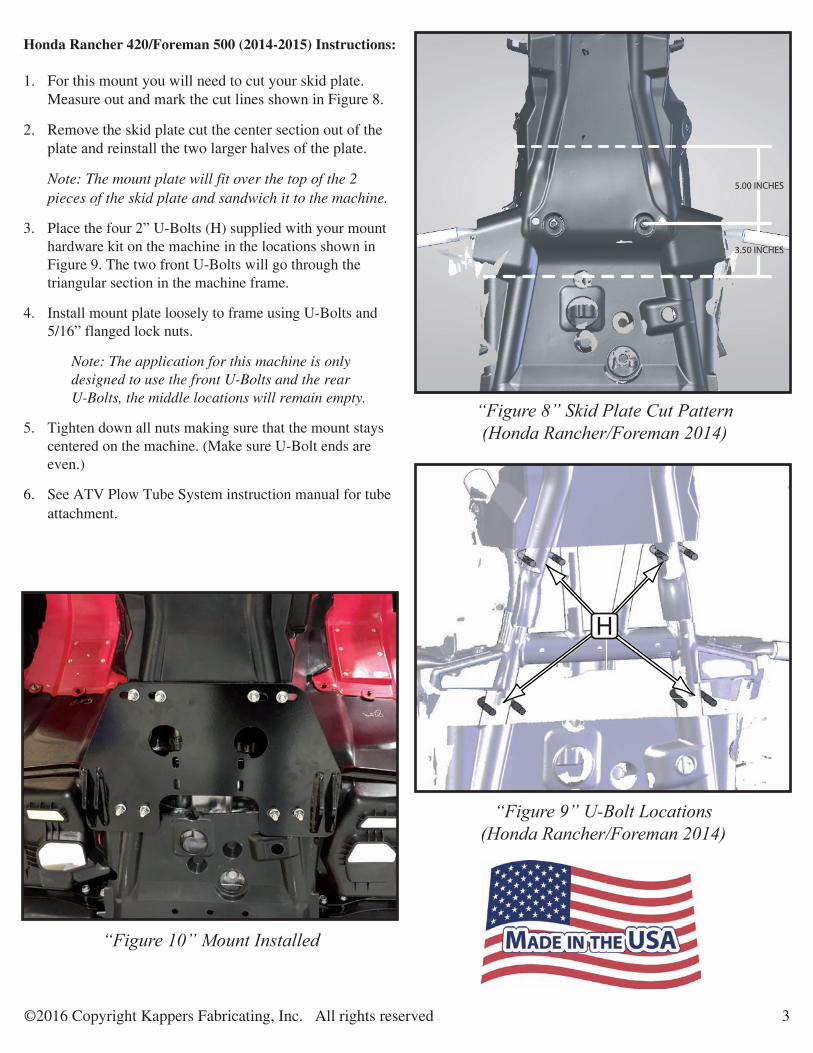
1. For this mount you will need to cut your skid plate. Measure out and mark the cut lines shown in Figure 8.
2. Remove the skid plate cut the center section out of the plate and reinstall the two larger halves of the plate.
Note: The mount plate will fit over the top of the 2 pieces of the skid plate and sandwich it to the machine.
3. Place the four 2” U-Bolts (H) supplied with your mount hardware kit on the machine in the locations shown in Figure 9. The two front U-Bolts will go through the triangular section in the machine frame.
4. Install mount plate loosely to frame using U-Bolts and 5/16” flanged lock nuts.
Note: The application for this machine is only designed to use the front U-Bolts and the rear U-Bolts, the middle locations will remain empty.
5. Tighten down all nuts making sure that the mount stays centered on the machine. (Make sure U-Bolt ends are even.)
6. See ATV Plow Tube System instruction manual for tube attachment.
“Figure 9” U-Bolt Locations(Honda Rancher/Foreman 2014)
“Figure 8” Skid Plate Cut Pattern(Honda Rancher/Foreman 2014)
5.00 INCHES
3.50 INCHES
H
“Figure 10” Mount Installed