Embed Size (px)
DESCRIPTION
Historian quick start guide
Citation preview
© 2013 Schneider Electric. All Rights Reserved
Vijeo Historian
Quick-Start Tutorial This tutorial will guide you through getting started with
Historian, providing you with a basic working knowledge
of configuration and data analysis.
Prepared by:
David Vlaming – Solution Architect
Operation and Optimisation Software Activity
© 2013 Schneider Electric. All Rights Reserved
Contents
Tutorial Outline ............................................................................................... 3
Historian Overview ........................................................................................... 4
Server Applications and Services .................................................................... 4
Client and Reporting Applications .................................................................... 5
Architecture ................................................................................................. 6
Preparing Your System .................................................................................. 7
Installation ................................................................................................. 11
Creating the Project ....................................................................................... 14
Configuring the Data Source ........................................................................... 16
Vijeo Citect Configuration - CtAPI.................................................................. 16
Vijeo Citect Configuration – Historize Setting .................................................. 17
Creating the Data Source ............................................................................. 17
Historize and Publish ...................................................................................... 20
Historizing ................................................................................................. 20
Publishing .................................................................................................. 21
Permissions and User Security ...................................................................... 21
Creating the Historian Database ...................................................................... 24
Starting the Data Service................................................................................ 26
Data Analysis ................................................................................................ 28
Process Analyst .......................................................................................... 28
Database Security for Process Analyst .............................................................. 31
Project Database ........................................................................................ 31
Historian Database ...................................................................................... 33
Using Windows Authentication ...................................................................... 34
Advanced Troubleshooting for Process Analyst .................................................. 36
Further Resources .......................................................................................... 38
Important Information ................................................................................... 39
© 2013 Schneider Electric. All Rights Reserved
Overview
Install
Create Project
Configure Data
Source
Historize & Publish
Create Database
Start Service
Data Analysis
Troubleshooting
3
Tutorial Outline
In this tutorial we will describe the steps involved in installing and
configuring Vijeo Historian. We will collect data from a Vijeo Citect
control system, and view this data using a client application.
Before getting started, we will briefly cover an overview of
Historian, where it fits in with other Schneider Electric products
and a discussion of Historian components and architecture.
As you proceed through the tutorial, take care to follow the steps
completely and in order. Tips will be provided along the way (in
the margin at right) to help you learn more about the task and
adapt the steps to different environments. You can also see
where you are in the tutorial by using the tutorial outline (bottom
of margin).
Although you can follow the tutorial using older software versions,
we will focus on using Vijeo Historian 4.40 and Vijeo Citect 7.30
on Windows 7 and Windows Server 2008 R2.
You will need to have Vijeo Citect installed and running to
complete the tutorial. We will be using the Example project
provided with Vijeo Citect, though you can use your own project if
you wish.
Important Information
People responsible for the application, implementation and use of this document
must make sure that all necessary design considerations have been taken into
account and that all laws, safety and performance requirements, regulations,
codes, and applicable standards have been obeyed to their full extent.
Schneider Electric provides the resources specified in this document. These
resources can be used to minimize engineering efforts, but the use, integration,
configuration, and validation of the system is the user’s sole responsibility. Said
user must ensure the safety of the system as a whole, including the resources
provided by Schneider Electric through procedures that the user deems
appropriate.
Further important information is contained in the Important Information
supplement section of this document on page 39 and must be read forthwith in
conjunction with the content that follows.
© 2013 Schneider Electric. All Rights Reserved
Overview
Install
Create Project
Configure Data
Source
Historize & Publish
Create Database
Start Service
Data Analysis
Troubleshooting
4
Historian Overview
Vijeo Historian helps plant and IT personnel to optimize
operational efficiency by providing powerful reporting tools that
collect, store and deliver meaningful reporting data from multiple,
disparate systems. By using the information provided by Vijeo
Historian, you can make more effective decisions toward
optimizing operational performance.
Vijeo Historian incorporates Microsoft® SQL Server® technology
to efficiently capture and store data from plant control systems
(including Vijeo Citect and any OPC DA-compatible systems).
Microsoft Reporting Services is also leveraged to deliver reporting
data, available out of the box.
Vijeo Historian also provides an industry-standard OPC HDA
interface, allowing other systems to work with Historian data.
Through this interface, Historian also works together with
Schneider Electric’s Manufacturing Execution System (MES)
offering, Ampla, to improve production efficiency and profitability.
The Vijeo Historian environment is made up of a collection of
applications and services. Next, we will describe some of these
you should know about.
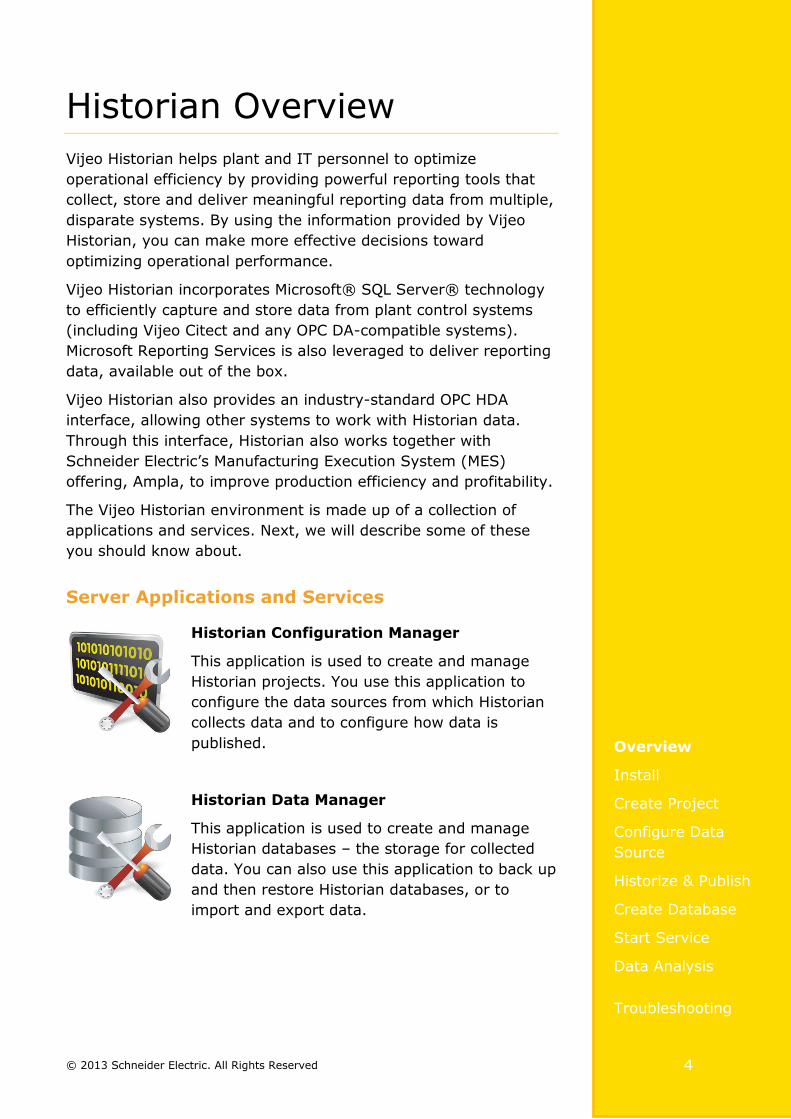
Server Applications and Services
Historian Configuration Manager
This application is used to create and manage
Historian projects. You use this application to
configure the data sources from which Historian
collects data and to configure how data is
published.
Historian Data Manager
This application is used to create and manage
Historian databases – the storage for collected
data. You can also use this application to back up
and then restore Historian databases, or to
import and export data.
© 2013 Schneider Electric. All Rights Reserved
Overview
Install
Create Project
Configure Data
Source
Historize & Publish
Create Database
Start Service
Data Analysis
Troubleshooting
5
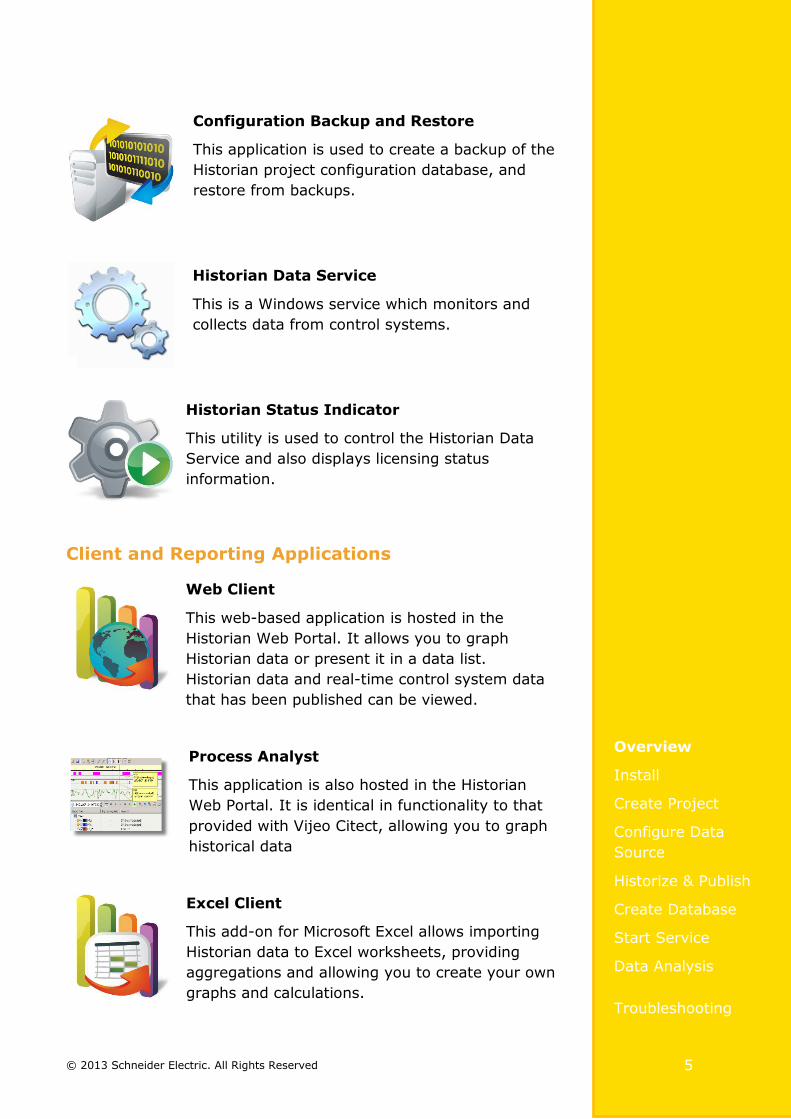
Configuration Backup and Restore
This application is used to create a backup of the
Historian project configuration database, and
restore from backups.
Historian Data Service
This is a Windows service which monitors and
collects data from control systems.
Historian Status Indicator
This utility is used to control the Historian Data
Service and also displays licensing status
information.
Client and Reporting Applications
Web Client
This web-based application is hosted in the
Historian Web Portal. It allows you to graph
Historian data or present it in a data list.
Historian data and real-time control system data
that has been published can be viewed.
Process Analyst
This application is also hosted in the Historian
Web Portal. It is identical in functionality to that
provided with Vijeo Citect, allowing you to graph
historical data
Excel Client
This add-on for Microsoft Excel allows importing
Historian data to Excel worksheets, providing
aggregations and allowing you to create your own
graphs and calculations.
© 2013 Schneider Electric. All Rights Reserved
Overview
Install
Create Project
Configure Data
Source
Historize & Publish
Create Database
Start Service
Data Analysis
Troubleshooting
6
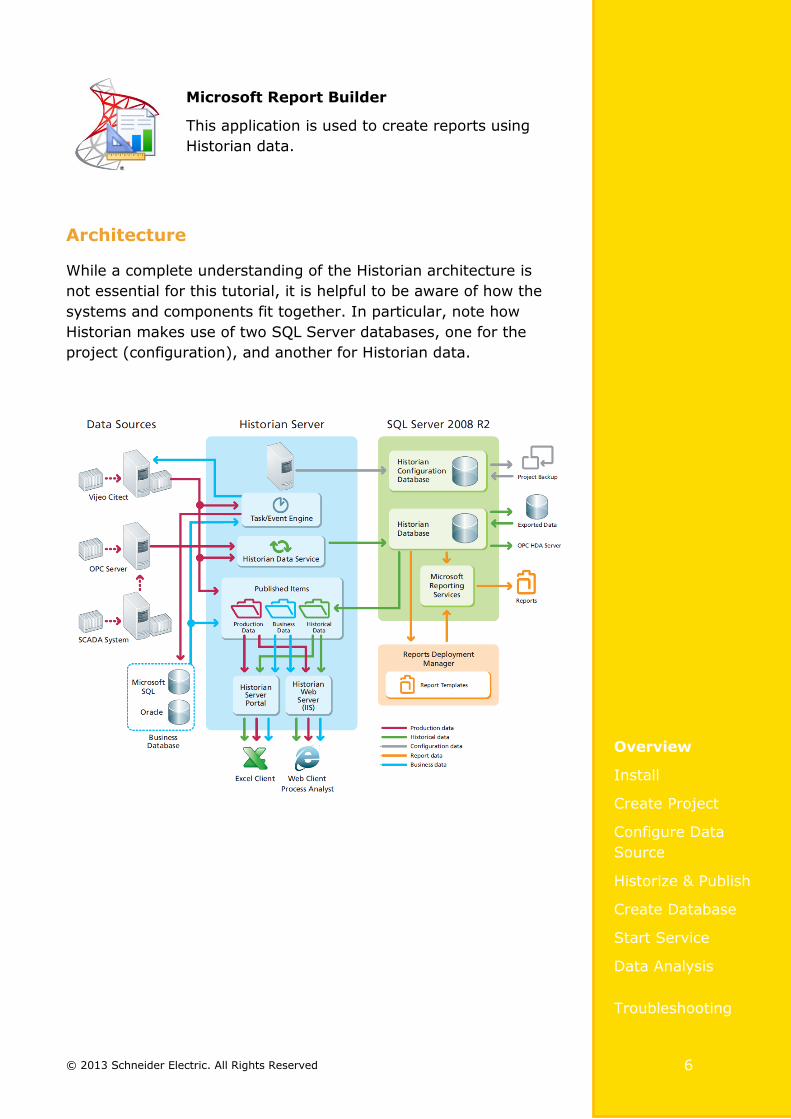
Architecture
While a complete understanding of the Historian architecture is
not essential for this tutorial, it is helpful to be aware of how the
systems and components fit together. In particular, note how
Historian makes use of two SQL Server databases, one for the
project (configuration), and another for Historian data.
Microsoft Report Builder
This application is used to create reports using
Historian data.
© 2013 Schneider Electric. All Rights Reserved
Overview
Install
Create Project
Configure Data
Source
Historize & Publish
Create Database
Start Service
Data Analysis
Troubleshooting
7
Installation
Several Vijeo Historian installation packages are available, with
each including different SQL Server language variants, and one
package without SQL Server. In this tutorial, we will use the Vijeo
Historian installation package that includes English version SQL
Server.
Preparing Your System
Before beginning installation, it is important to make sure your
environment is prepared correctly. You will need the latest service
pack and any Windows updates installed. You will also need the
correct Windows features enabled on your computer. While the
Historian installation will detect missing features based on what
you choose to install, these features need to be activated
manually.
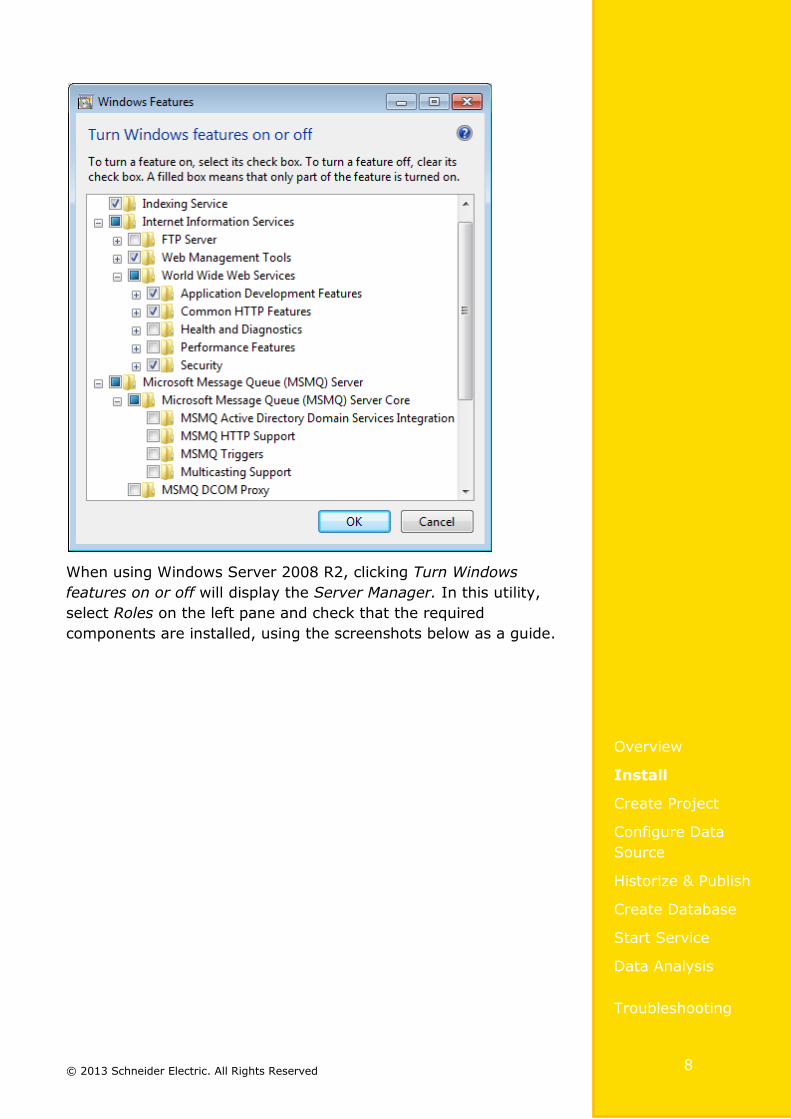
In Windows 7, features can be changed via Control
PanelPrograms and FeaturesTurn Windows features on or off.
You should include the features shown below. Note that you can
select additional features, but ensure MSMQ Active Directory
Domain Services Integration is not selected as this component
can interfere with normal Historian operation.
Note
Both 32-bit and 64-bit
installations of SQL
Server are included
with Historian. The
installation will
automatically detect
and install the correct
version for your
computer.
Tip
It is important to
make sure your
operating system is
up to date with the
latest Service Pack
and updates as some
features may not
work correctly if your
operating system files
are out of date.
© 2013 Schneider Electric. All Rights Reserved
Overview
Install
Create Project
Configure Data
Source
Historize & Publish
Create Database
Start Service
Data Analysis
Troubleshooting
8
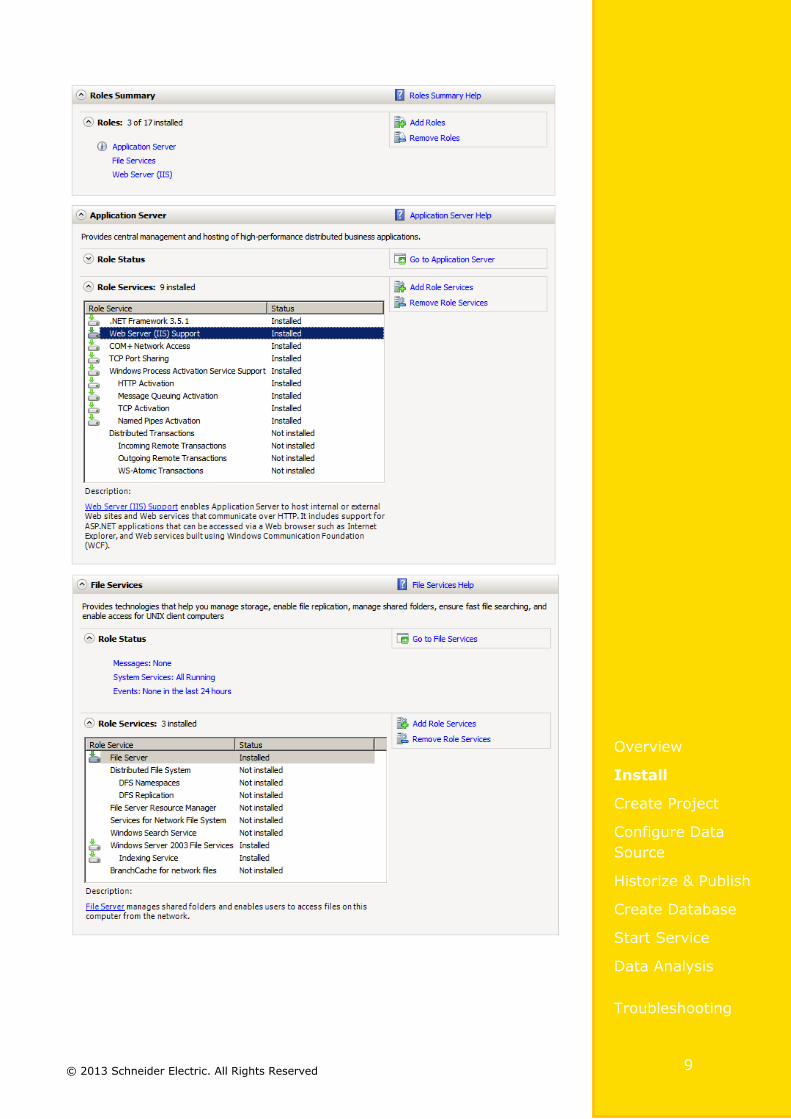
When using Windows Server 2008 R2, clicking Turn Windows
features on or off will display the Server Manager. In this utility,
select Roles on the left pane and check that the required
components are installed, using the screenshots below as a guide.
© 2013 Schneider Electric. All Rights Reserved
Overview
Install
Create Project
Configure Data
Source
Historize & Publish
Create Database
Start Service
Data Analysis
Troubleshooting
9
© 2013 Schneider Electric. All Rights Reserved
Overview
Install
Create Project
Configure Data
Source
Historize & Publish
Create Database
Start Service
Data Analysis
Troubleshooting
10
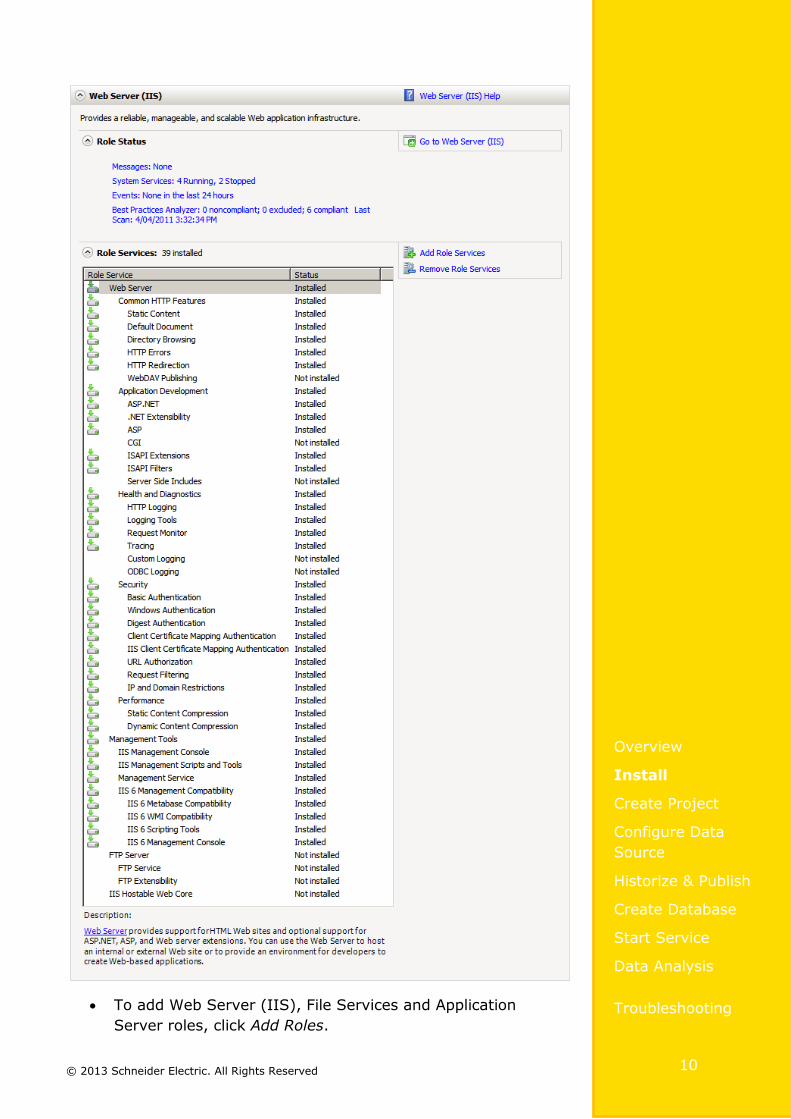
To add Web Server (IIS), File Services and Application
Server roles, click Add Roles.
© 2013 Schneider Electric. All Rights Reserved
Overview
Install
Create Project
Configure Data
Source
Historize & Publish
Create Database
Start Service
Data Analysis
Troubleshooting
11
To ensure Microsoft Message Queue components are
active, select Roles Application Server on the left pane.
To ensure the Indexing Service is active, select Roles
File Services on the left pane and ensure the Indexing
Service is installed under Role Services.
Finally, to ensure the correct Web Server (IIS) components
are active, select Roles Web Server (IIS) on the left
pane and review the Role Services.
Installation
To launch the installation, double-click the setup.exe file on the
Historian DVD, and proceed with the steps below.
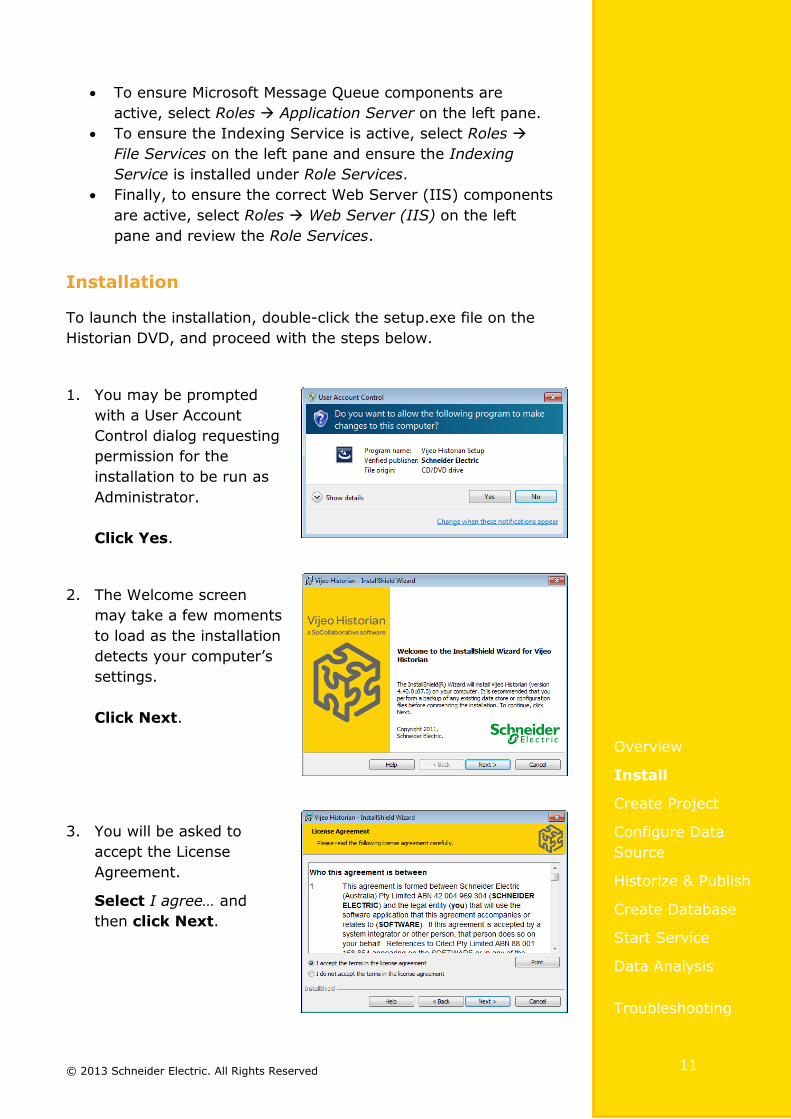
1. You may be prompted
with a User Account
Control dialog requesting
permission for the
installation to be run as
Administrator.
Click Yes.
2. The Welcome screen
may take a few moments
to load as the installation
detects your computer’s
settings.
Click Next.
3. You will be asked to
accept the License
Agreement.
Select I agree… and
then click Next.
© 2013 Schneider Electric. All Rights Reserved
Overview
Install
Create Project
Configure Data
Source
Historize & Publish
Create Database
Start Service
Data Analysis
Troubleshooting
12
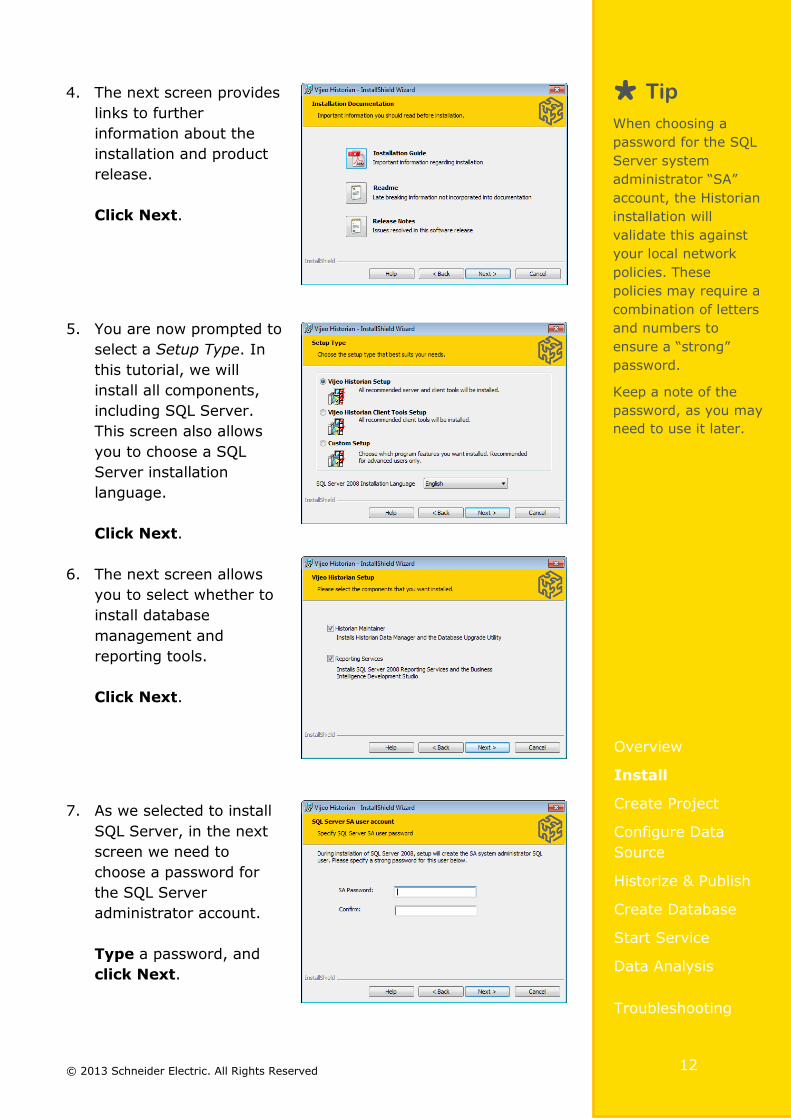
4. The next screen provides
links to further
information about the
installation and product
release.
Click Next.
5. You are now prompted to
select a Setup Type. In
this tutorial, we will
install all components,
including SQL Server.
This screen also allows
you to choose a SQL
Server installation
language.
Click Next.
6. The next screen allows
you to select whether to
install database
management and
reporting tools.
Click Next.
7. As we selected to install
SQL Server, in the next
screen we need to
choose a password for
the SQL Server
administrator account.
Type a password, and
click Next.
Tip
When choosing a
password for the SQL
Server system
administrator “SA”
account, the Historian
installation will
validate this against
your local network
policies. These
policies may require a
combination of letters
and numbers to
ensure a “strong”
password.
Keep a note of the
password, as you may
need to use it later.
© 2013 Schneider Electric. All Rights Reserved
Overview
Install
Create Project
Configure Data
Source
Historize & Publish
Create Database
Start Service
Data Analysis
Troubleshooting
13
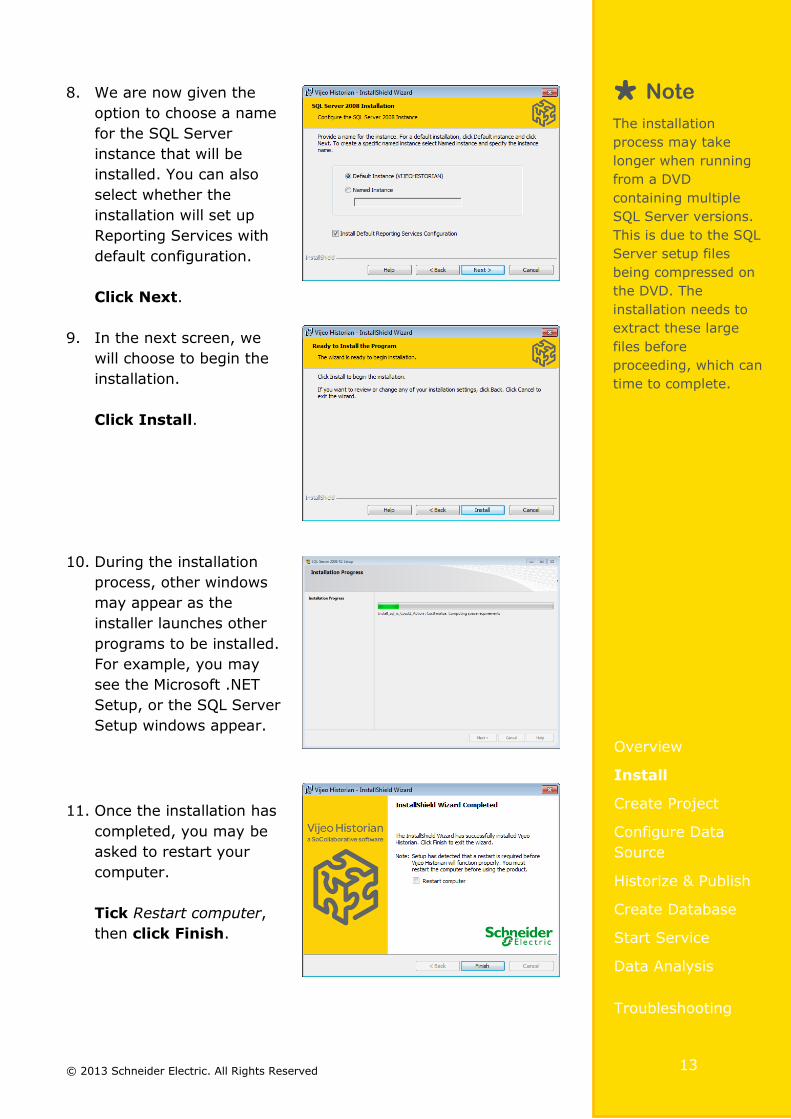
8. We are now given the
option to choose a name
for the SQL Server
instance that will be
installed. You can also
select whether the
installation will set up
Reporting Services with
default configuration.
Click Next.
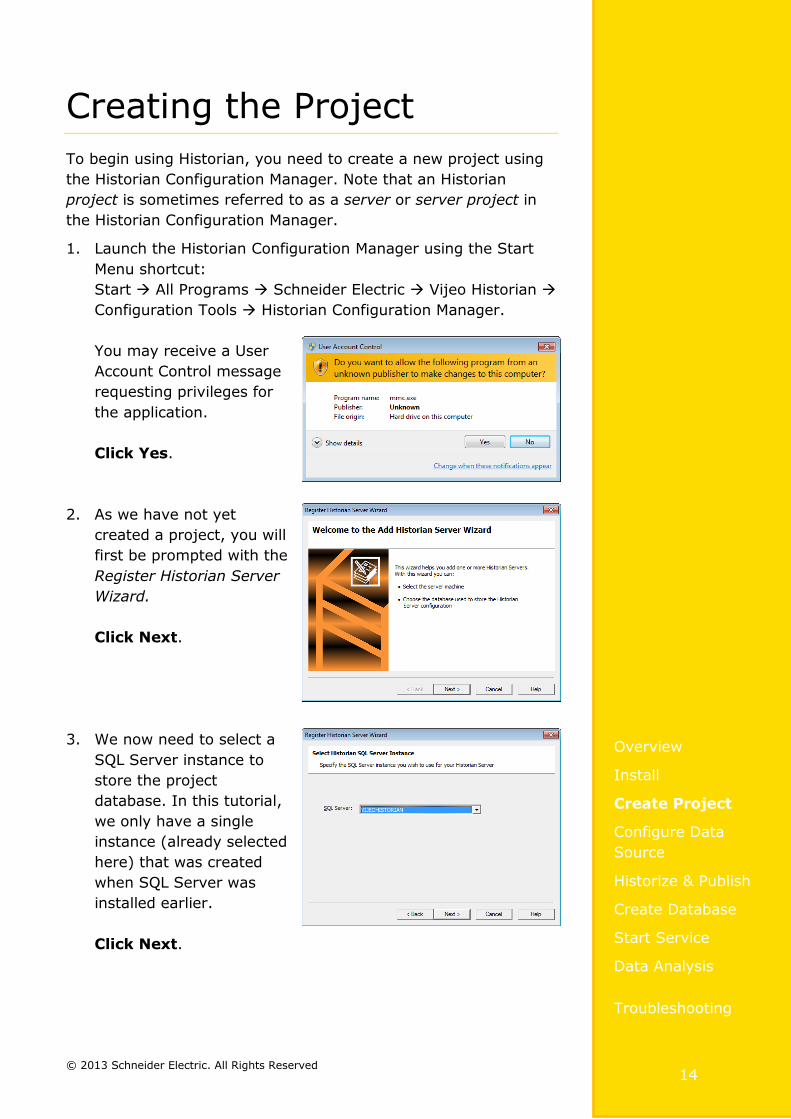
9. In the next screen, we
will choose to begin the
installation.
Click Install.
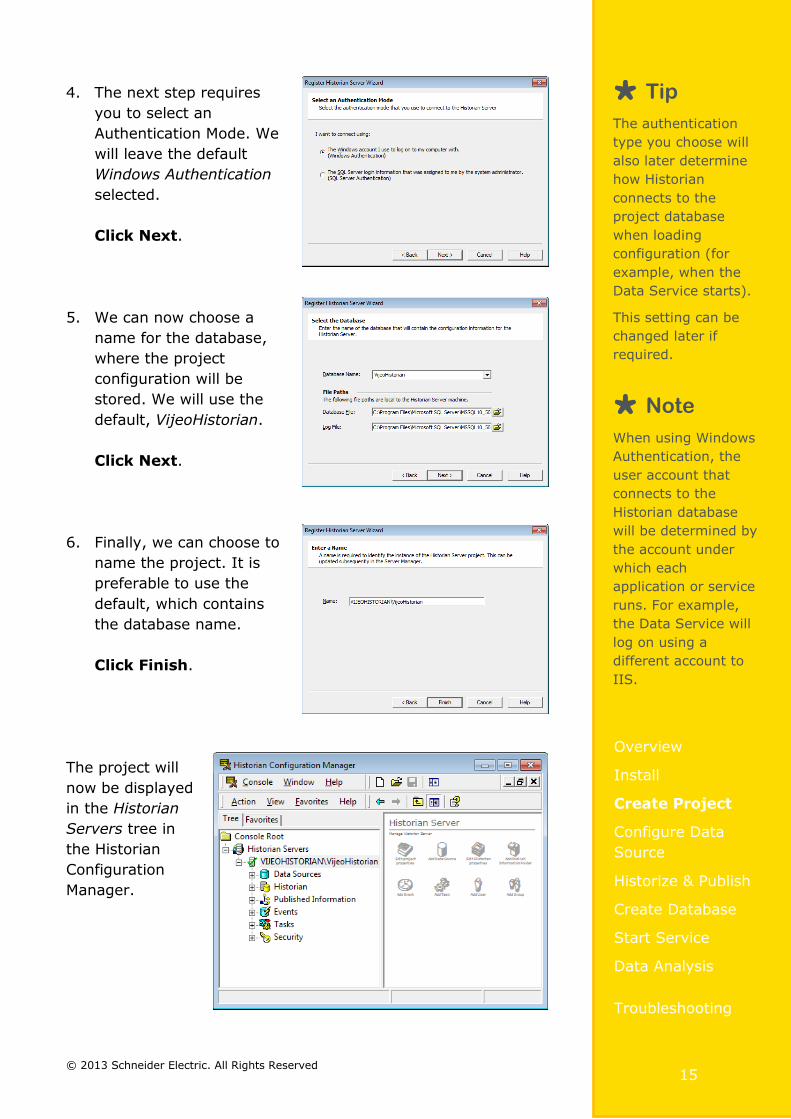
10. During the installation
process, other windows
may appear as the
installer launches other
programs to be installed.
For example, you may
see the Microsoft .NET
Setup, or the SQL Server
Setup windows appear.
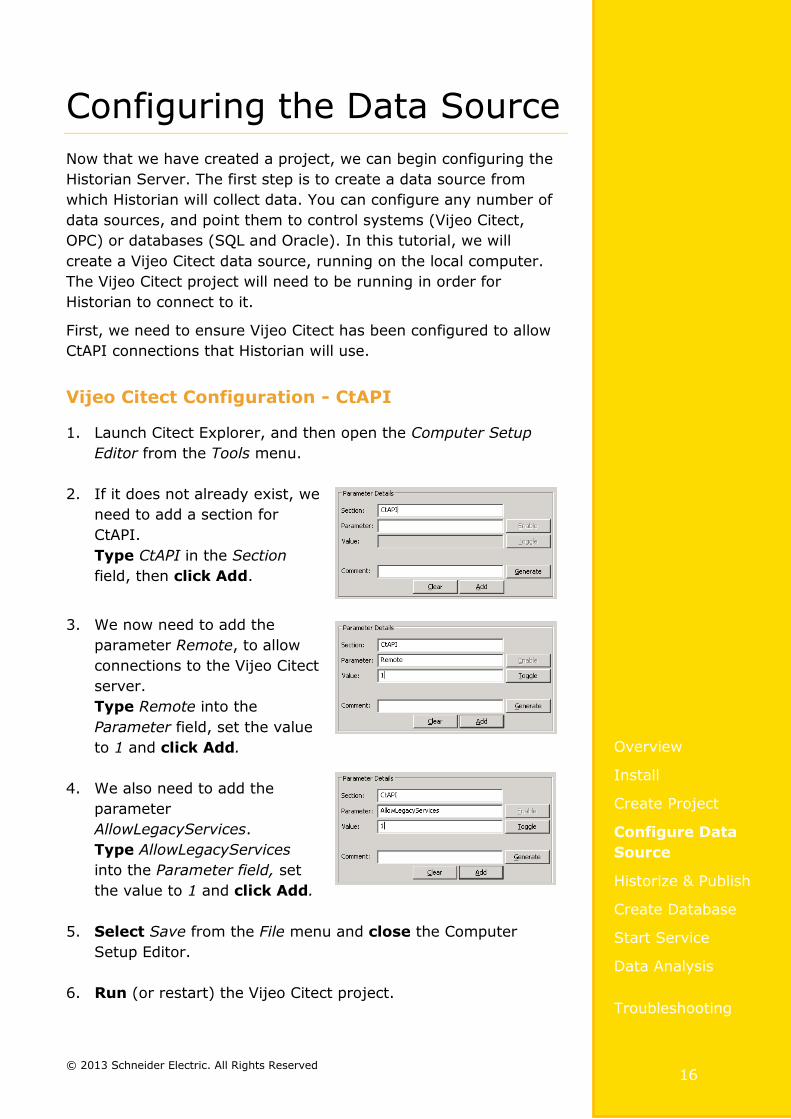
11. Once the installation has
completed, you may be
asked to restart your
computer.
Tick Restart computer,
then click Finish.
Note
The installation
process may take
longer when running
from a DVD
containing multiple
SQL Server versions.
This is due to the SQL
Server setup files
being compressed on
the DVD. The
installation needs to
extract these large
files before
proceeding, which can
time to complete.
© 2013 Schneider Electric. All Rights Reserved
Overview
Install
Create Project
Configure Data
Source
Historize & Publish
Create Database
Start Service
Data Analysis
Troubleshooting
14
Creating the Project
To begin using Historian, you need to create a new project using
the Historian Configuration Manager. Note that an Historian
project is sometimes referred to as a server or server project in
the Historian Configuration Manager.
1. Launch the Historian Configuration Manager using the Start
Menu shortcut:
Start All Programs Schneider Electric Vijeo Historian
Configuration Tools Historian Configuration Manager.
You may receive a User
Account Control message
requesting privileges for
the application.
Click Yes.
2. As we have not yet
created a project, you will
first be prompted with the
Register Historian Server
Wizard.
Click Next.
3. We now need to select a
SQL Server instance to
store the project
database. In this tutorial,
we only have a single
instance (already selected
here) that was created
when SQL Server was
installed earlier.
Click Next.
© 2013 Schneider Electric. All Rights Reserved
Overview
Install
Create Project
Configure Data
Source
Historize & Publish
Create Database
Start Service
Data Analysis
Troubleshooting
15
4. The next step requires
you to select an
Authentication Mode. We
will leave the default
Windows Authentication
selected.
Click Next.
5. We can now choose a
name for the database,
where the project
configuration will be
stored. We will use the
default, VijeoHistorian.
Click Next.
6. Finally, we can choose to
name the project. It is
preferable to use the
default, which contains
the database name.
Click Finish.
The project will
now be displayed
in the Historian
Servers tree in
the Historian
Configuration
Manager.
Tip
The authentication
type you choose will
also later determine
how Historian
connects to the
project database
when loading
configuration (for
example, when the
Data Service starts).
This setting can be
changed later if
required.
Note
When using Windows
Authentication, the
user account that
connects to the
Historian database
will be determined by
the account under
which each
application or service
runs. For example,
the Data Service will
log on using a
different account to
IIS.
© 2013 Schneider Electric. All Rights Reserved
Overview
Install
Create Project
Configure Data
Source
Historize & Publish
Create Database
Start Service
Data Analysis
Troubleshooting
16
Configuring the Data Source
Now that we have created a project, we can begin configuring the
Historian Server. The first step is to create a data source from
which Historian will collect data. You can configure any number of
data sources, and point them to control systems (Vijeo Citect,
OPC) or databases (SQL and Oracle). In this tutorial, we will
create a Vijeo Citect data source, running on the local computer.
The Vijeo Citect project will need to be running in order for
Historian to connect to it.
First, we need to ensure Vijeo Citect has been configured to allow
CtAPI connections that Historian will use.
Vijeo Citect Configuration - CtAPI
1. Launch Citect Explorer, and then open the Computer Setup
Editor from the Tools menu.
2. If it does not already exist, we
need to add a section for
CtAPI.
Type CtAPI in the Section
field, then click Add.
3. We now need to add the
parameter Remote, to allow
connections to the Vijeo Citect
server.
Type Remote into the
Parameter field, set the value
to 1 and click Add.
4. We also need to add the
parameter
AllowLegacyServices.
Type AllowLegacyServices
into the Parameter field, set
the value to 1 and click Add.
5. Select Save from the File menu and close the Computer
Setup Editor.
6. Run (or restart) the Vijeo Citect project.
© 2013 Schneider Electric. All Rights Reserved
Overview
Install
Create Project
Configure Data
Source
Historize & Publish
Create Database
Start Service
Data Analysis
Troubleshooting
17
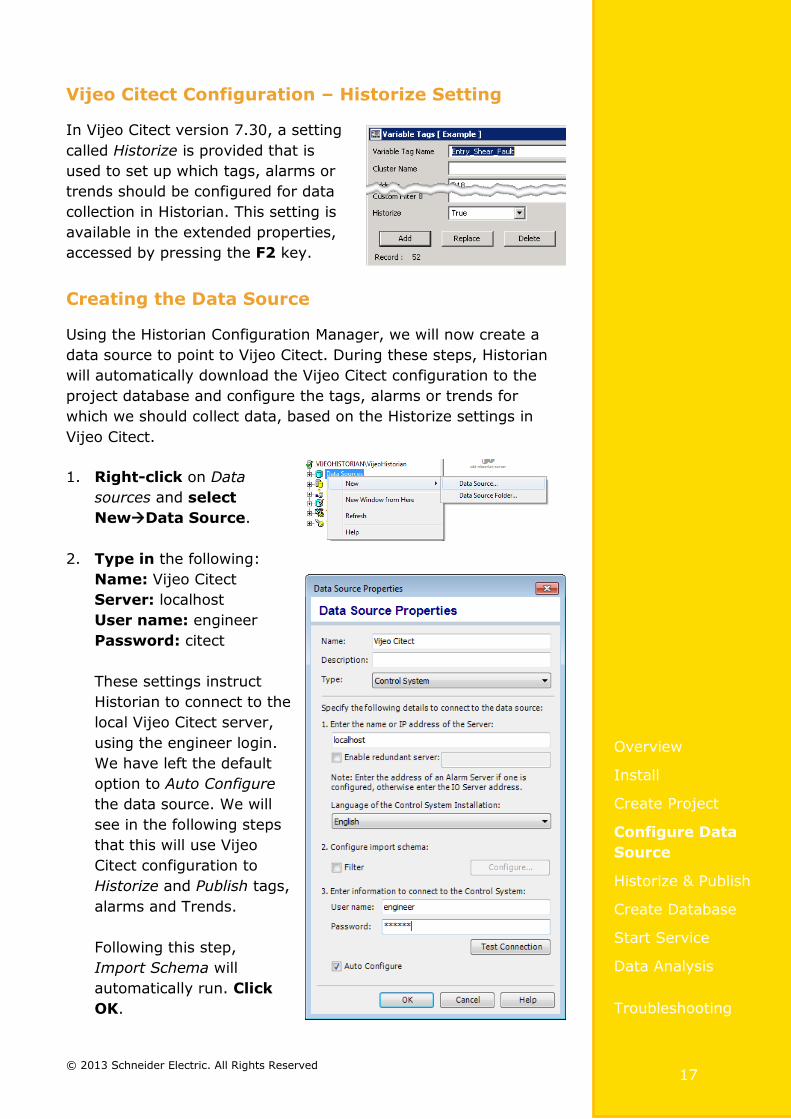
Vijeo Citect Configuration – Historize Setting
In Vijeo Citect version 7.30, a setting
called Historize is provided that is
used to set up which tags, alarms or
trends should be configured for data
collection in Historian. This setting is
available in the extended properties,
accessed by pressing the F2 key.
Creating the Data Source
Using the Historian Configuration Manager, we will now create a
data source to point to Vijeo Citect. During these steps, Historian
will automatically download the Vijeo Citect configuration to the
project database and configure the tags, alarms or trends for
which we should collect data, based on the Historize settings in
Vijeo Citect.
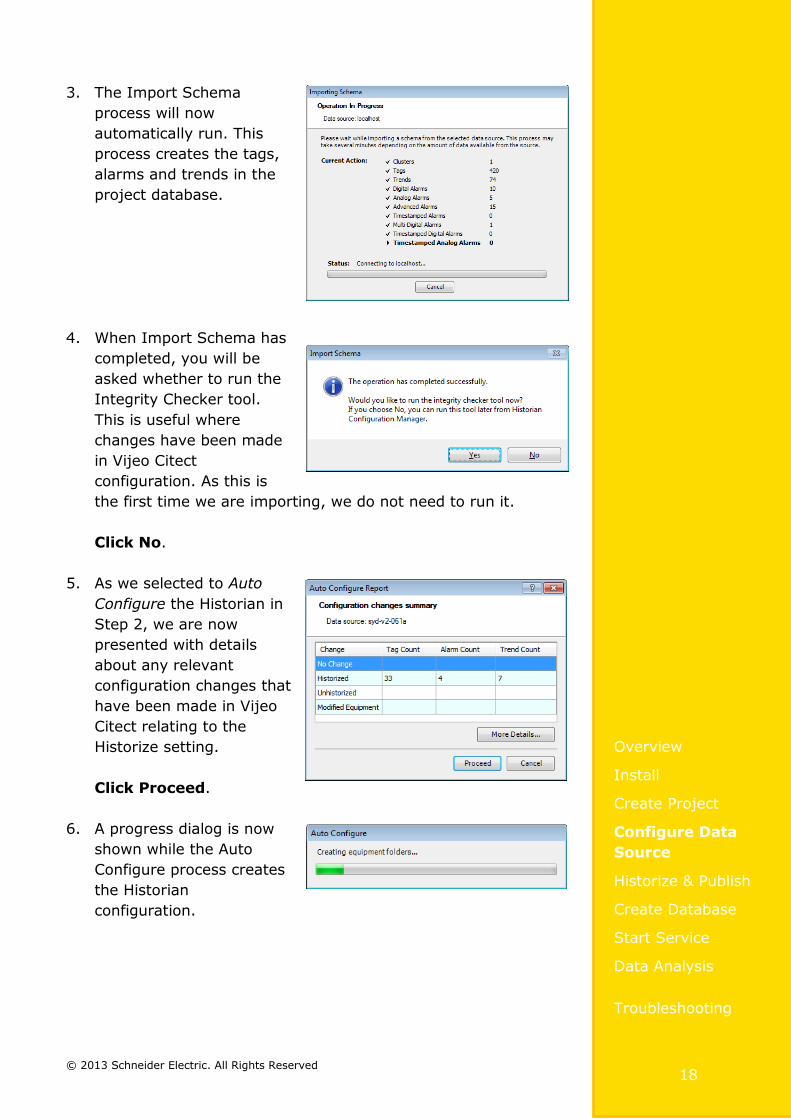
1. Right-click on Data
sources and select
NewData Source.
2. Type in the following:
Name: Vijeo Citect
Server: localhost
User name: engineer
Password: citect
These settings instruct
Historian to connect to the
local Vijeo Citect server,
using the engineer login.
We have left the default
option to Auto Configure
the data source. We will
see in the following steps
that this will use Vijeo
Citect configuration to
Historize and Publish tags,
alarms and Trends.
Following this step,
Import Schema will
automatically run. Click
OK.
© 2013 Schneider Electric. All Rights Reserved
Overview
Install
Create Project
Configure Data
Source
Historize & Publish
Create Database
Start Service
Data Analysis
Troubleshooting
18
3. The Import Schema
process will now
automatically run. This
process creates the tags,
alarms and trends in the
project database.
4. When Import Schema has
completed, you will be
asked whether to run the
Integrity Checker tool.
This is useful where
changes have been made
in Vijeo Citect
configuration. As this is
the first time we are importing, we do not need to run it.
Click No.
5. As we selected to Auto
Configure the Historian in
Step 2, we are now
presented with details
about any relevant
configuration changes that
have been made in Vijeo
Citect relating to the
Historize setting.
Click Proceed.
6. A progress dialog is now
shown while the Auto
Configure process creates
the Historian
configuration.
© 2013 Schneider Electric. All Rights Reserved
Overview
Install
Create Project
Configure Data
Source
Historize & Publish
Create Database
Start Service
Data Analysis
Troubleshooting
19
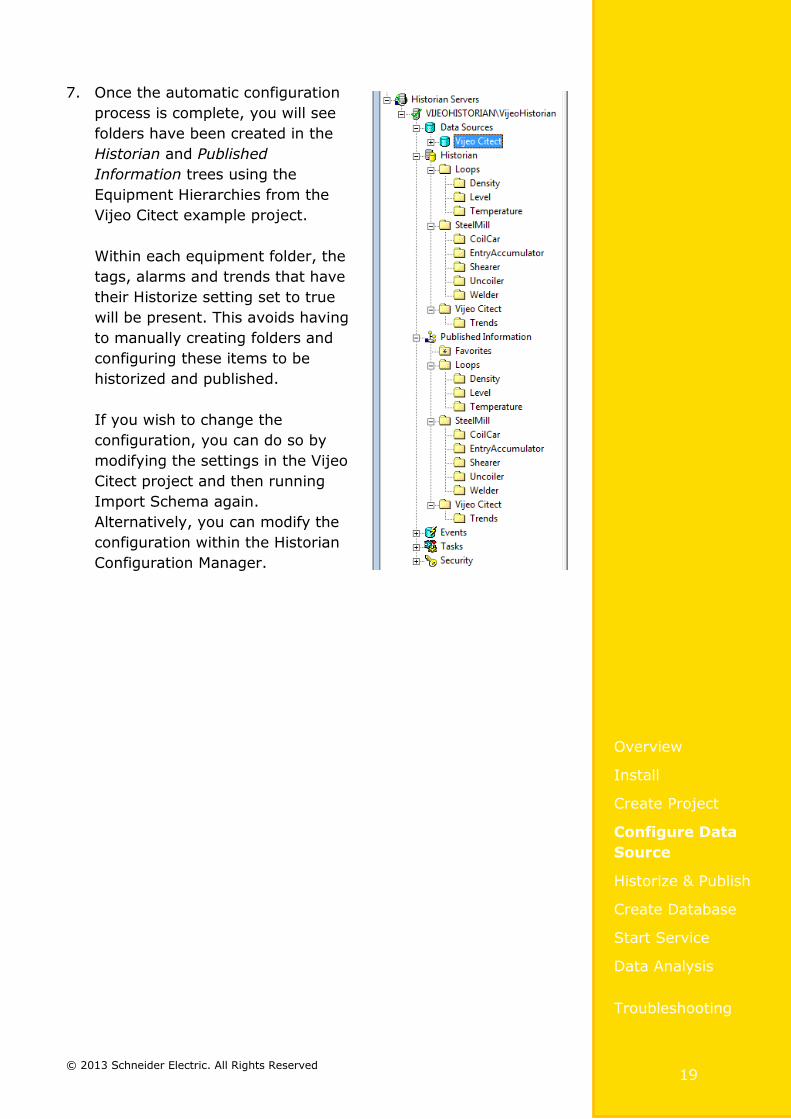
7. Once the automatic configuration
process is complete, you will see
folders have been created in the
Historian and Published
Information trees using the
Equipment Hierarchies from the
Vijeo Citect example project.
Within each equipment folder, the
tags, alarms and trends that have
their Historize setting set to true
will be present. This avoids having
to manually creating folders and
configuring these items to be
historized and published.
If you wish to change the
configuration, you can do so by
modifying the settings in the Vijeo
Citect project and then running
Import Schema again.
Alternatively, you can modify the
configuration within the Historian
Configuration Manager.
© 2013 Schneider Electric. All Rights Reserved
Overview
Install
Create Project
Configure Data
Source
Historize & Publish
Create Database
Start Service
Data Analysis
Troubleshooting
20
Historize and Publish
In the previous section, we saw that Historian will automatically
historize and publish tags, alarms and trends based on Vijeo
Citect configuration, when using Vijeo Citect 7.30 or higher. This
approach significantly simplifies the workflow of managing
Historian, though it is not the only way to configure what is
historized.
If you are not using a Vijeo Citect 7.30 or higher data source, or
you simply want to configure what is historized and published
within Historian, you can use the Historian Configuration Manager
interface to achieve this.
Regardless of data source type, we also need to set permissions
on what has been published so that users can see data when they
log in to the client applications.
Historizing
To configure Historian to collect data for a given tag, alarm or
trend, it needs to appear under the Historian item in the Historian
Configuration Manager. If you are using Vijeo Citect 7.30 with the
Example Project, the following steps are not necessary.
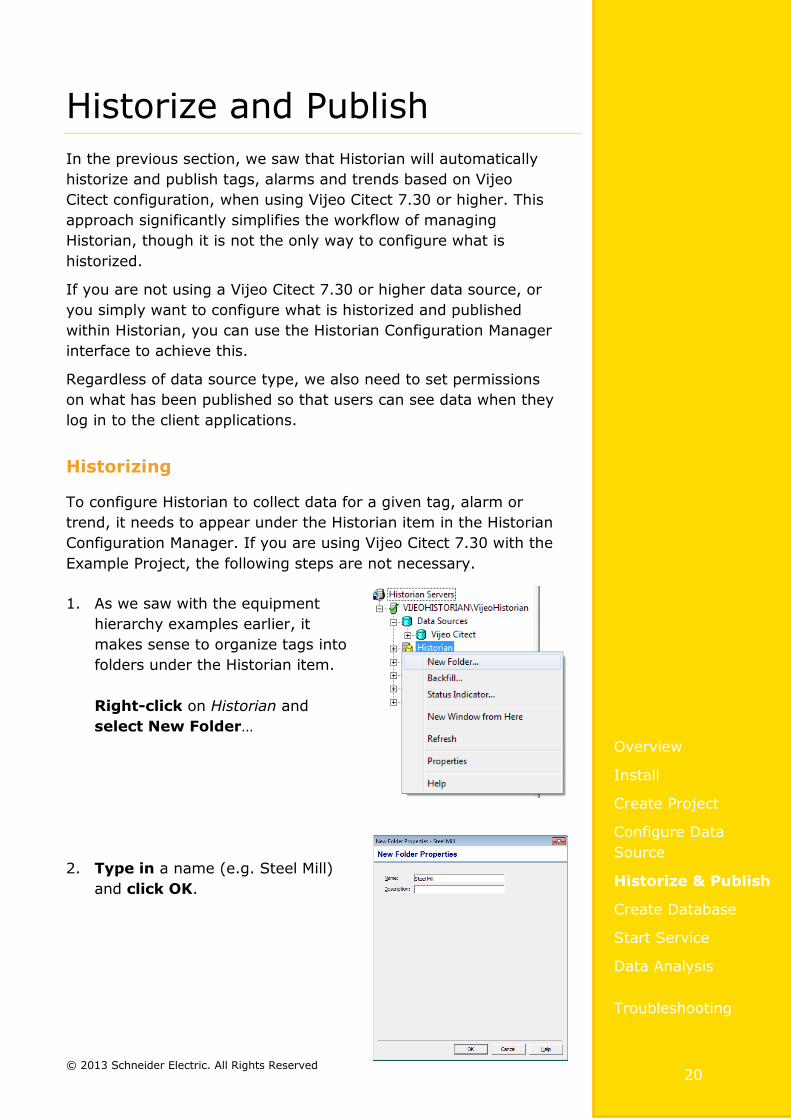
1. As we saw with the equipment
hierarchy examples earlier, it
makes sense to organize tags into
folders under the Historian item.
Right-click on Historian and
select New Folder…
2. Type in a name (e.g. Steel Mill)
and click OK.
© 2013 Schneider Electric. All Rights Reserved
Overview
Install
Create Project
Configure Data
Source
Historize & Publish
Create Database
Start Service
Data Analysis
Troubleshooting
21
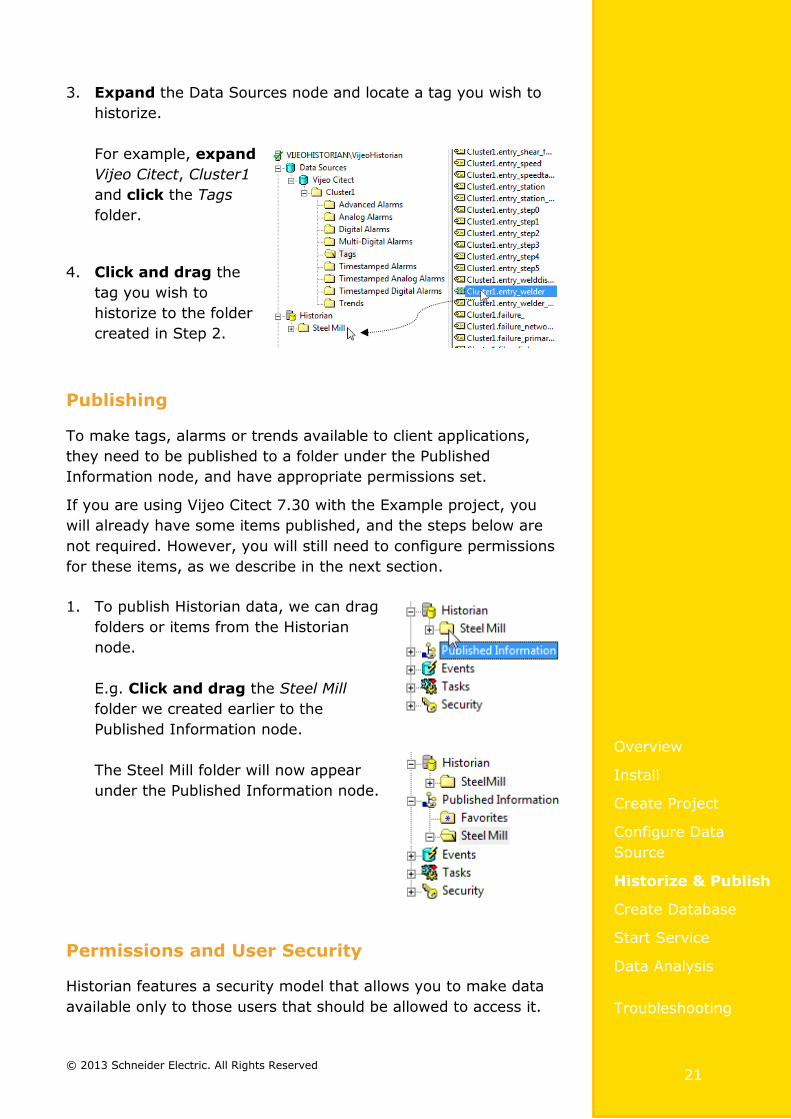
3. Expand the Data Sources node and locate a tag you wish to
historize.
For example, expand
Vijeo Citect, Cluster1
and click the Tags
folder.
4. Click and drag the
tag you wish to
historize to the folder
created in Step 2.
Publishing
To make tags, alarms or trends available to client applications,
they need to be published to a folder under the Published
Information node, and have appropriate permissions set.
If you are using Vijeo Citect 7.30 with the Example project, you
will already have some items published, and the steps below are
not required. However, you will still need to configure permissions
for these items, as we describe in the next section.
1. To publish Historian data, we can drag
folders or items from the Historian
node.
E.g. Click and drag the Steel Mill
folder we created earlier to the
Published Information node.
The Steel Mill folder will now appear
under the Published Information node.
Permissions and User Security
Historian features a security model that allows you to make data
available only to those users that should be allowed to access it.
© 2013 Schneider Electric. All Rights Reserved
Overview
Install
Create Project
Configure Data
Source
Historize & Publish
Create Database
Start Service
Data Analysis
Troubleshooting
22
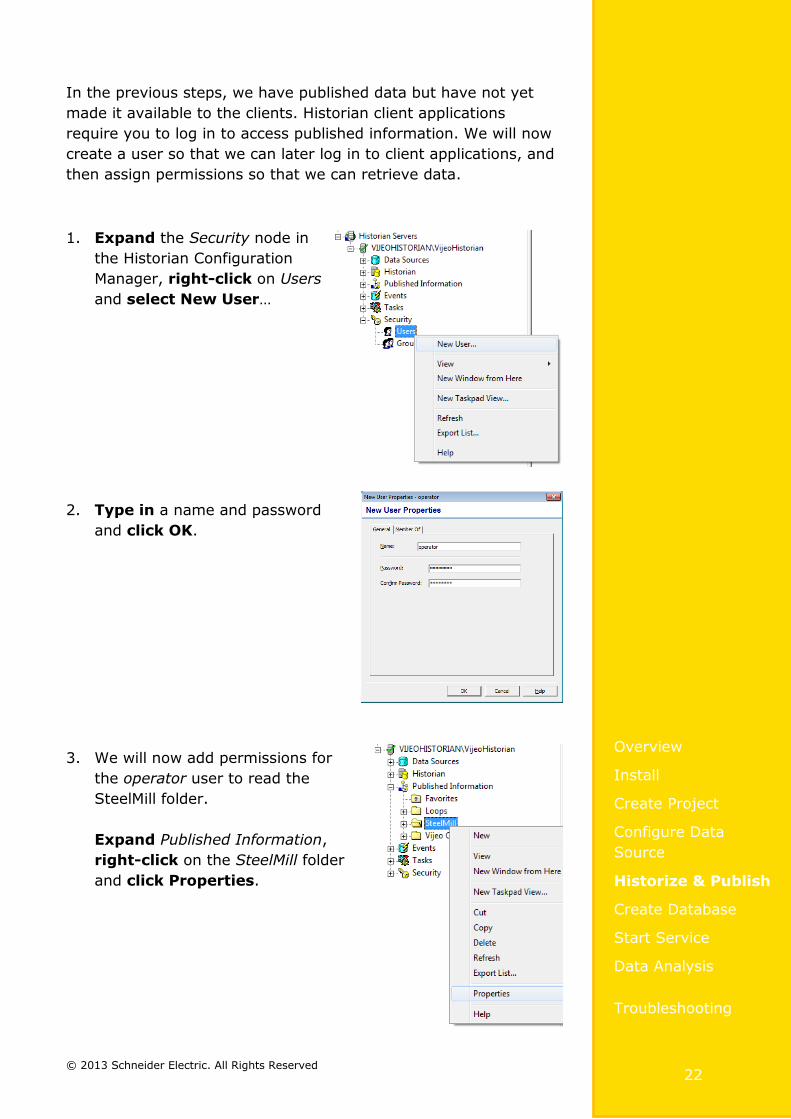
In the previous steps, we have published data but have not yet
made it available to the clients. Historian client applications
require you to log in to access published information. We will now
create a user so that we can later log in to client applications, and
then assign permissions so that we can retrieve data.
1. Expand the Security node in
the Historian Configuration
Manager, right-click on Users
and select New User…
2. Type in a name and password
and click OK.
3. We will now add permissions for
the operator user to read the
SteelMill folder.
Expand Published Information,
right-click on the SteelMill folder
and click Properties.
© 2013 Schneider Electric. All Rights Reserved
Overview
Install
Create Project
Configure Data
Source
Historize & Publish
Create Database
Start Service
Data Analysis
Troubleshooting
23
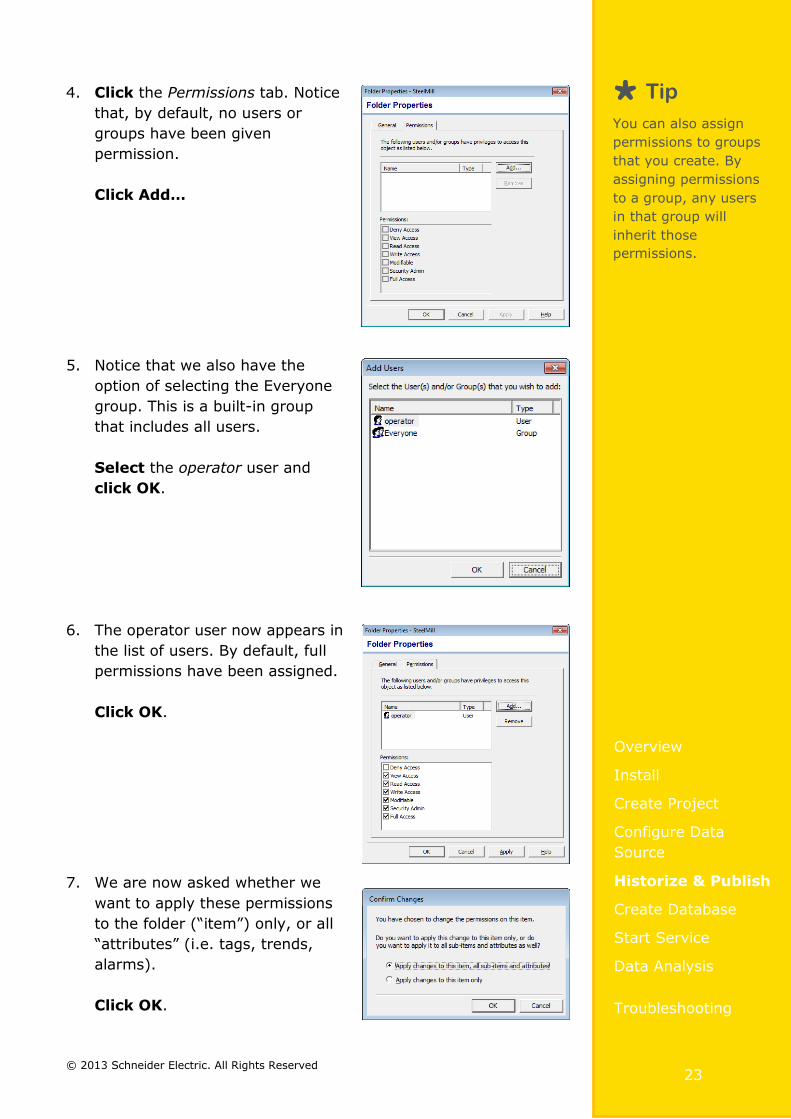
4. Click the Permissions tab. Notice
that, by default, no users or
groups have been given
permission.
Click Add…
5. Notice that we also have the
option of selecting the Everyone
group. This is a built-in group
that includes all users.
Select the operator user and
click OK.
6. The operator user now appears in
the list of users. By default, full
permissions have been assigned.
Click OK.
7. We are now asked whether we
want to apply these permissions
to the folder (“item”) only, or all
“attributes” (i.e. tags, trends,
alarms).
Click OK.
Tip
You can also assign
permissions to groups
that you create. By
assigning permissions
to a group, any users
in that group will
inherit those
permissions.
© 2013 Schneider Electric. All Rights Reserved
Overview
Install
Create Project
Configure Data
Source
Historize & Publish
Create Database
Start Service
Data Analysis
Troubleshooting
24
Creating the Historian
Database
At this point, we have configured the data source from which we will
collect data and which tags, alarms and trends are to be historized.
We now need to create a database to store the collected data.
To create a new database, we will use the Historian Data Manager.
We then need to configure this new database as the destination for
the Historian, using the Historian Configuration Manager.
1. Launch the Historian Data Manager using the Start Menu
shortcut:
Start All Programs Schneider Electric Vijeo Historian
Management Tools Historian Data Manager.
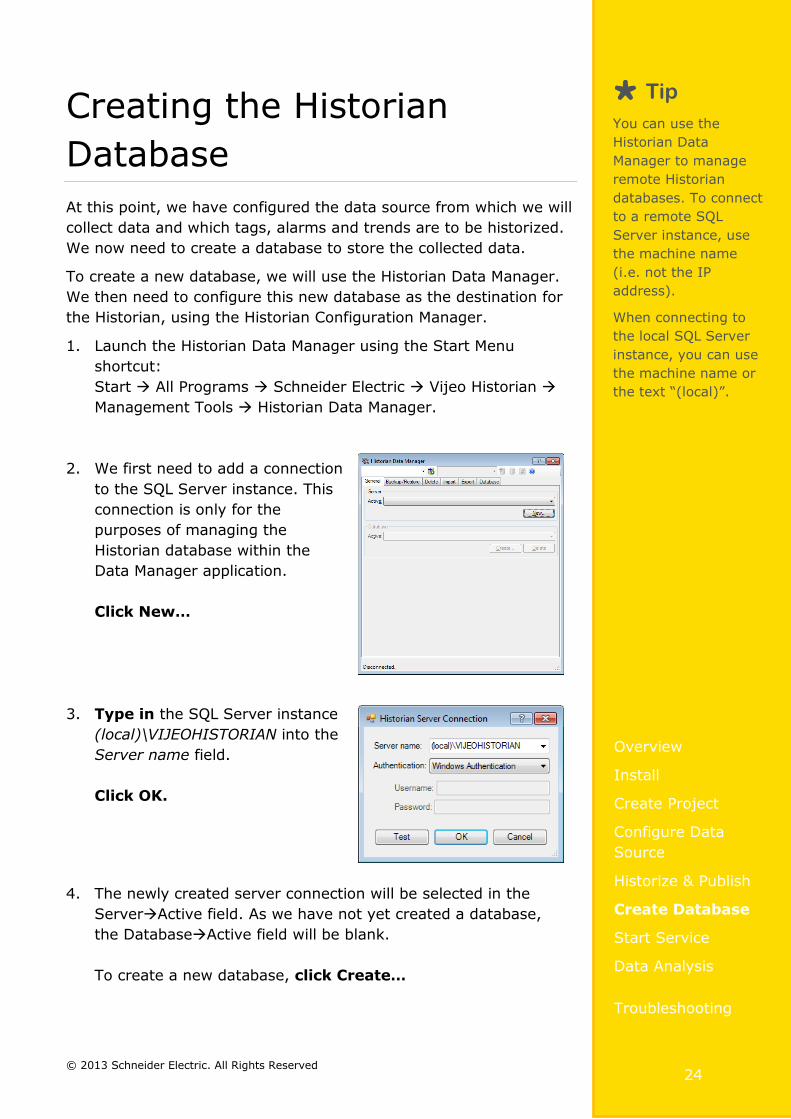
2. We first need to add a connection
to the SQL Server instance. This
connection is only for the
purposes of managing the
Historian database within the
Data Manager application.
Click New…
3. Type in the SQL Server instance
(local)\VIJEOHISTORIAN into the
Server name field.
Click OK.
4. The newly created server connection will be selected in the
ServerActive field. As we have not yet created a database,
the DatabaseActive field will be blank.
To create a new database, click Create…
Tip
You can use the
Historian Data
Manager to manage
remote Historian
databases. To connect
to a remote SQL
Server instance, use
the machine name
(i.e. not the IP
address).
When connecting to
the local SQL Server
instance, you can use
the machine name or
the text “(local)”.
© 2013 Schneider Electric. All Rights Reserved
Overview
Install
Create Project
Configure Data
Source
Historize & Publish
Create Database
Start Service
Data Analysis
Troubleshooting
25
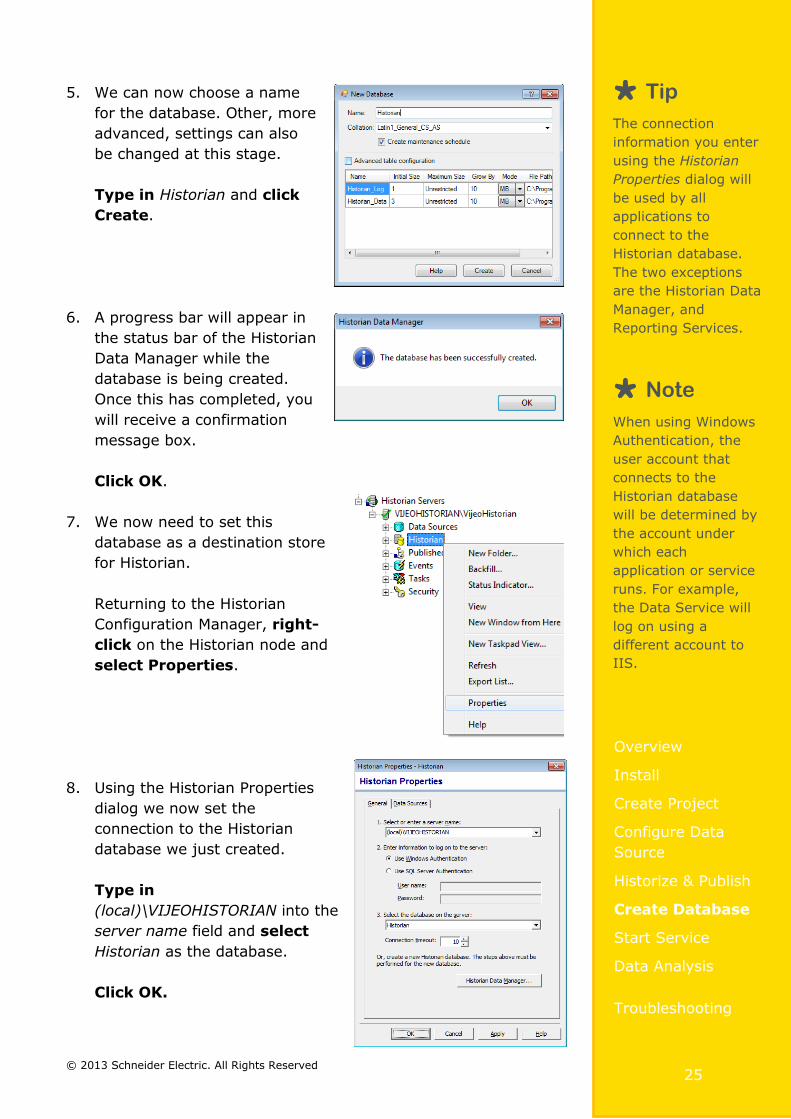
5. We can now choose a name
for the database. Other, more
advanced, settings can also
be changed at this stage.
Type in Historian and click
Create.
6. A progress bar will appear in
the status bar of the Historian
Data Manager while the
database is being created.
Once this has completed, you
will receive a confirmation
message box.
Click OK.
7. We now need to set this
database as a destination store
for Historian.
Returning to the Historian
Configuration Manager, right-
click on the Historian node and
select Properties.
8. Using the Historian Properties
dialog we now set the
connection to the Historian
database we just created.
Type in
(local)\VIJEOHISTORIAN into the
server name field and select
Historian as the database.
Click OK.
Tip
The connection
information you enter
using the Historian
Properties dialog will
be used by all
applications to
connect to the
Historian database.
The two exceptions
are the Historian Data
Manager, and
Reporting Services.
Note
When using Windows
Authentication, the
user account that
connects to the
Historian database
will be determined by
the account under
which each
application or service
runs. For example,
the Data Service will
log on using a
different account to
IIS.
© 2013 Schneider Electric. All Rights Reserved
Overview
Install
Create Project
Configure Data
Source
Historize & Publish
Create Database
Start Service
Data Analysis
Troubleshooting
26
Starting the Data Service
After following the steps in previous sections to set up Historian,
we can now start the Data Service to begin retrieving data from
our data source.
To do this, we can use the Historian Status Indicator.
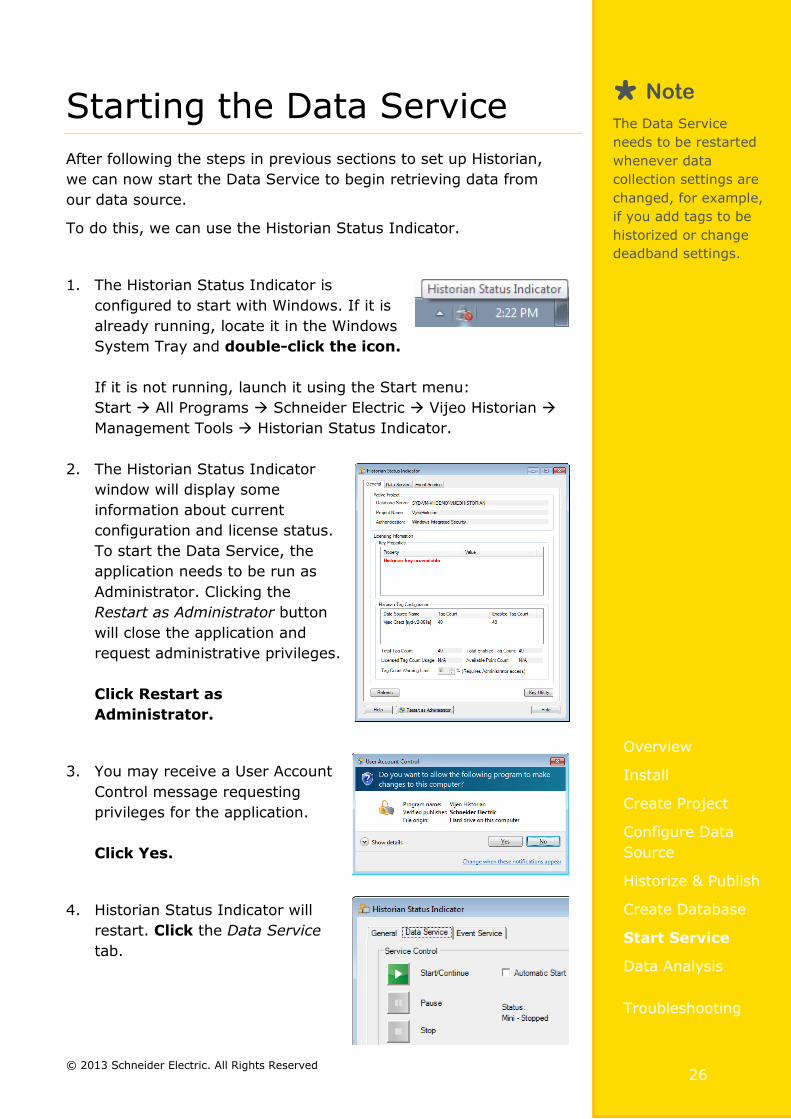
1. The Historian Status Indicator is
configured to start with Windows. If it is
already running, locate it in the Windows
System Tray and double-click the icon.
If it is not running, launch it using the Start menu:
Start All Programs Schneider Electric Vijeo Historian
Management Tools Historian Status Indicator.
2. The Historian Status Indicator
window will display some
information about current
configuration and license status.
To start the Data Service, the
application needs to be run as
Administrator. Clicking the
Restart as Administrator button
will close the application and
request administrative privileges.
Click Restart as
Administrator.
3. You may receive a User Account
Control message requesting
privileges for the application.
Click Yes.
4. Historian Status Indicator will
restart. Click the Data Service
tab.
Note
The Data Service
needs to be restarted
whenever data
collection settings are
changed, for example,
if you add tags to be
historized or change
deadband settings.
© 2013 Schneider Electric. All Rights Reserved
Overview
Install
Create Project
Configure Data
Source
Historize & Publish
Create Database
Start Service
Data Analysis
Troubleshooting
27
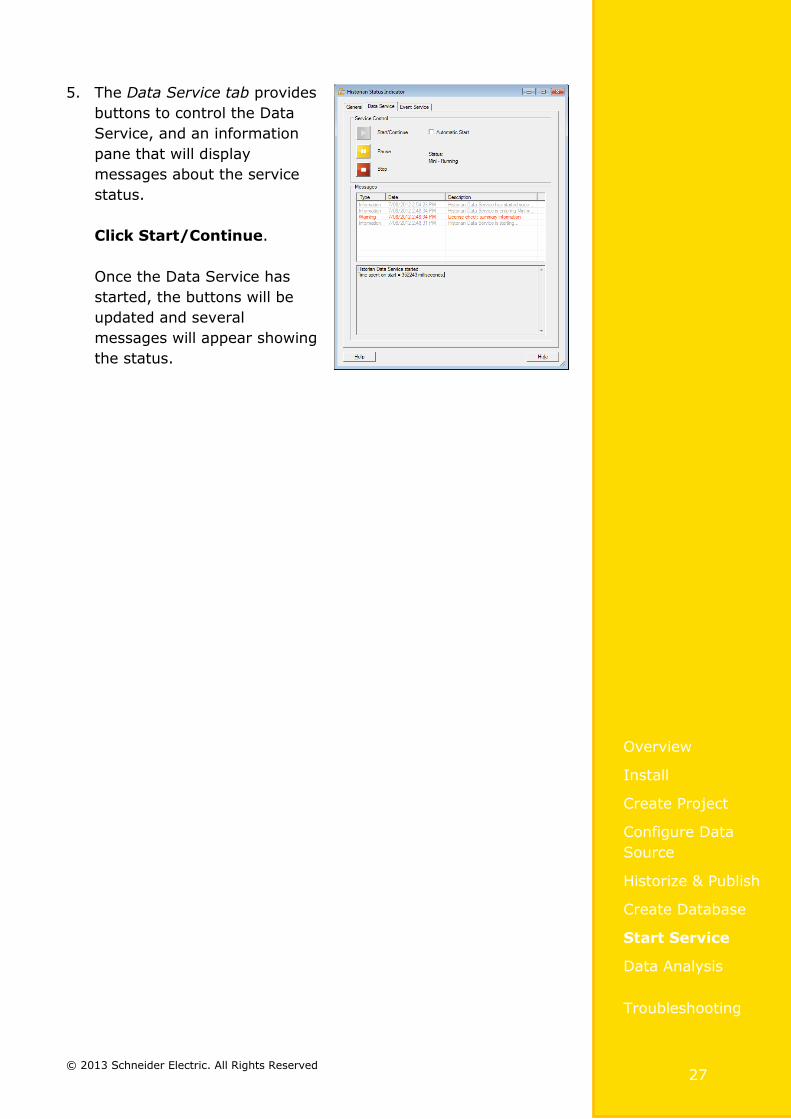
5. The Data Service tab provides
buttons to control the Data
Service, and an information
pane that will display
messages about the service
status.
Click Start/Continue.
Once the Data Service has
started, the buttons will be
updated and several
messages will appear showing
the status.

© 2013 Schneider Electric. All Rights Reserved
Overview
Install
Create Project
Configure Data
Source
Historize & Publish
Create Database
Start Service
Data Analysis
Troubleshooting
28
Data Analysis
Historian provides several client applications that allow you to
retrieve data and perform data analysis. In this tutorial, we will take
a brief look at Process Analyst.
Process Analyst
The Process Analyst is a powerful tool for analyzing data, allowing
you to retrieve and graph Historian data. It is hosted within the
Historian Web Portal, and so is accessible via the Historian Web
Client shortcut.
1. Launch the Historian Web Client using the Start Menu shortcut:
Start All Programs Schneider Electric Vijeo Historian
Clients Web Client.
2. An Internet
Explorer window
will be launched,
and will open the
Historian web
portal web page.
3. Click Log In.
4. We will now log in using
the details of the user
we created earlier in the
tutorial.
Type in operator and
the password you chose
when creating this user,
then click Login.
5. After logging in, click
Process Analyst.
Tip
The Web Client
shortcut will open the
web portal in your
default internet
browser. Historian
web client
applications are
compatible with
Internet Explorer only
– if the shortcut
opens in another
browser, you will
need to launch
Internet Explorer
using the same web
address.
© 2013 Schneider Electric. All Rights Reserved
Overview
Install
Create Project
Configure Data
Source
Historize & Publish
Create Database
Start Service
Data Analysis
Troubleshooting
29
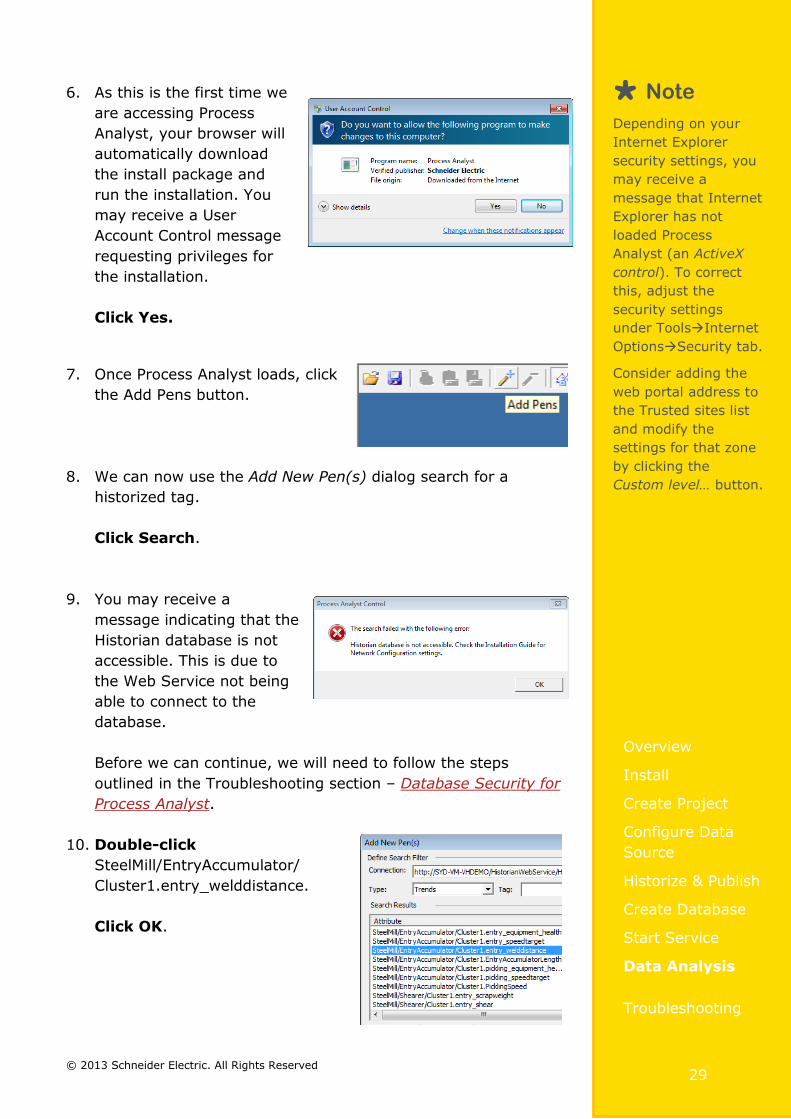
6. As this is the first time we
are accessing Process
Analyst, your browser will
automatically download
the install package and
run the installation. You
may receive a User
Account Control message
requesting privileges for
the installation.
Click Yes.
7. Once Process Analyst loads, click
the Add Pens button.
8. We can now use the Add New Pen(s) dialog search for a
historized tag.
Click Search.
9. You may receive a
message indicating that the
Historian database is not
accessible. This is due to
the Web Service not being
able to connect to the
database.
Before we can continue, we will need to follow the steps
outlined in the Troubleshooting section – Database Security for
Process Analyst.
10. Double-click
SteelMill/EntryAccumulator/
Cluster1.entry_welddistance.
Click OK.
Note
Depending on your
Internet Explorer
security settings, you
may receive a
message that Internet
Explorer has not
loaded Process
Analyst (an ActiveX
control). To correct
this, adjust the
security settings
under ToolsInternet
OptionsSecurity tab.
Consider adding the
web portal address to
the Trusted sites list
and modify the
settings for that zone
by clicking the
Custom level… button.
© 2013 Schneider Electric. All Rights Reserved
Overview
Install
Create Project
Configure Data
Source
Historize & Publish
Create Database
Start Service
Data Analysis
Troubleshooting
30
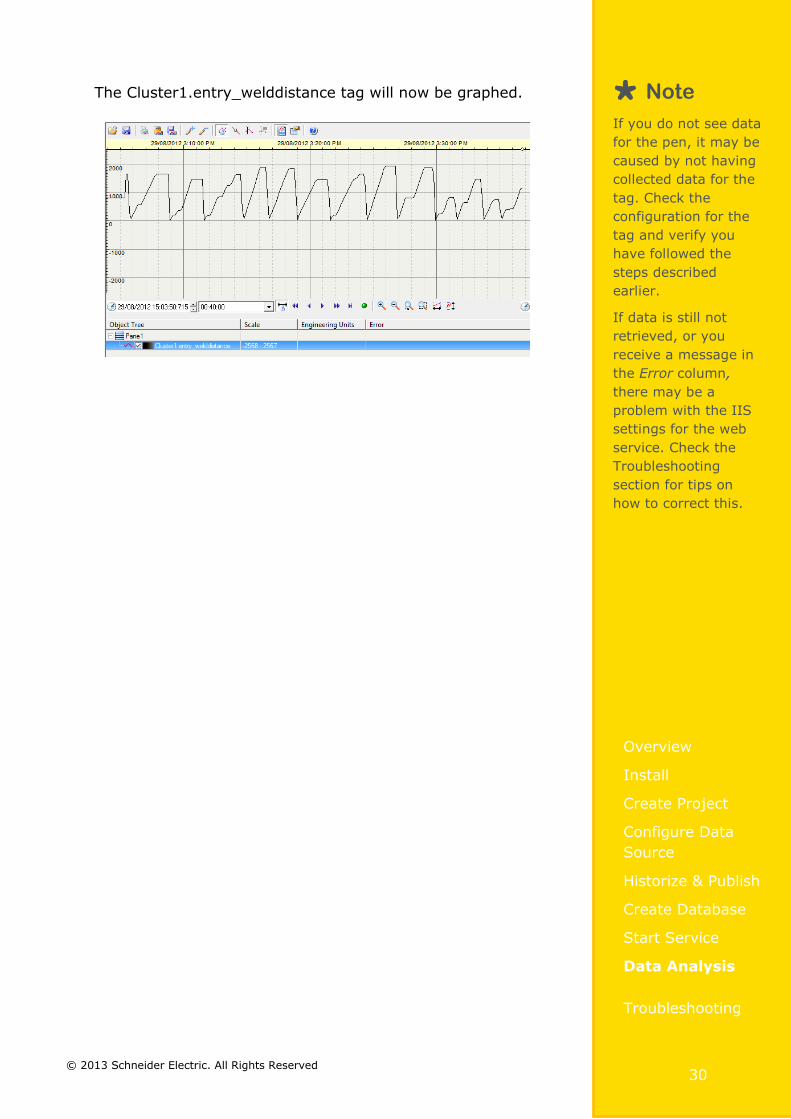
The Cluster1.entry_welddistance tag will now be graphed.
Note
If you do not see data
for the pen, it may be
caused by not having
collected data for the
tag. Check the
configuration for the
tag and verify you
have followed the
steps described
earlier.
If data is still not
retrieved, or you
receive a message in
the Error column,
there may be a
problem with the IIS
settings for the web
service. Check the
Troubleshooting
section for tips on
how to correct this.
© 2013 Schneider Electric. All Rights Reserved
Overview
Install
Create Project
Configure Data
Source
Historize & Publish
Create Database
Start Service
Data Analysis
Troubleshooting
31
Database Security for
Process Analyst
When using the Process Analyst to search for Historian items and
data, a Web Service is used to retrieve information from the
Historian server. This web service runs under a user account
configured in Windows Internet Information Services (IIS). If we
have configured database connections to use Windows
Authentication, it is this user account that accesses the Historian
databases when making a request.
By default, the user account IIS uses does not have sufficient
permission to access these databases. We need to make
configuration changes to correct this. There are several options:
Select to use SQL Server Authentication.
Change the user account in IIS to one that has access to the
databases
Add permission to the Historian databases for the user
account configured in IIS.
Create a new user for IIS to use, and add permission to the
databases for this user
Selecting to use SQL Authentication is the easiest method, though
not the most secure. Using this method, no Windows user account
will be used. In some environments this is not an option, due to
security policies – in this case, we need to choose one of the other
options. We will now look at the settings that determine this
behavior and steps to make adjustments where required.
Project Database
In order to retrieve Historian configuration, the project database
needs to be accessible. The connection information for this
database is configured when the project is created using the
Register Historian Server Wizard. It can also be changed at any
time using the Historian Server Properties dialog.
1. Launch the Historian Configuration Manager using the Start
Menu shortcut:
Start All Programs Schneider Electric Vijeo Historian
Configuration Tools Historian Configuration Manager.
© 2013 Schneider Electric. All Rights Reserved
Overview
Install
Create Project
Configure Data
Source
Historize & Publish
Create Database
Start Service
Data Analysis
Troubleshooting
32
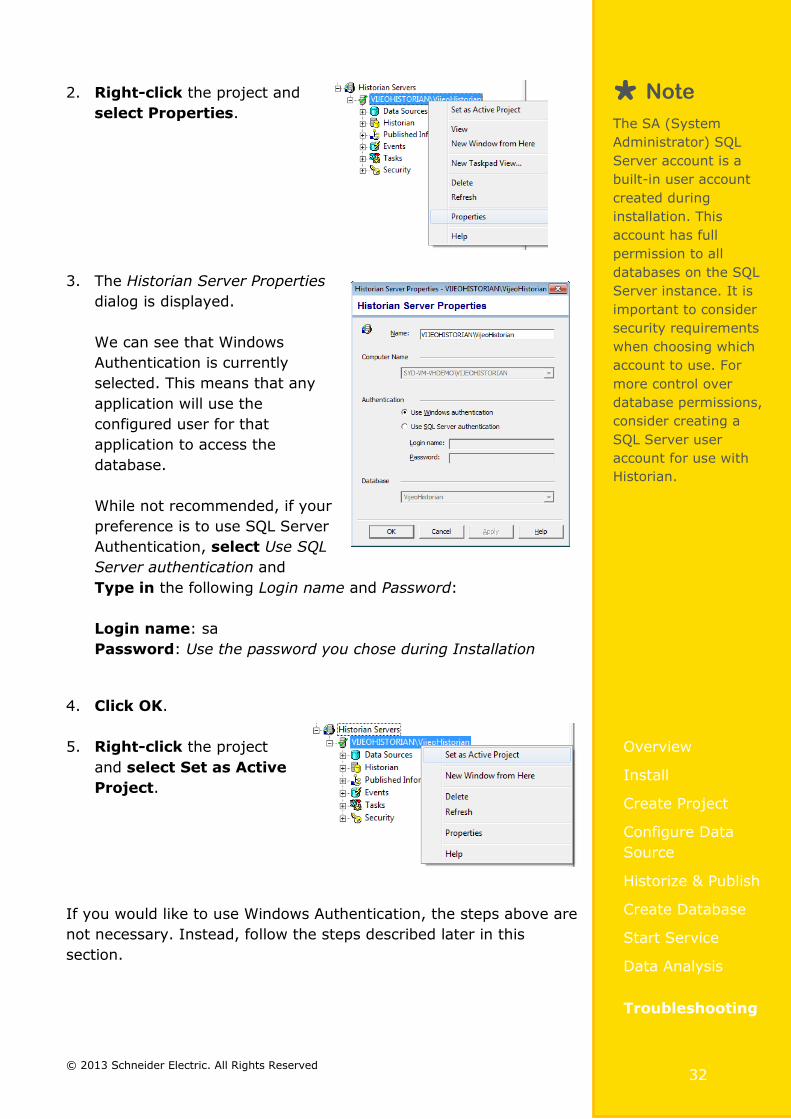
2. Right-click the project and
select Properties.
3. The Historian Server Properties
dialog is displayed.
We can see that Windows
Authentication is currently
selected. This means that any
application will use the
configured user for that
application to access the
database.
While not recommended, if your
preference is to use SQL Server
Authentication, select Use SQL
Server authentication and
Type in the following Login name and Password:
Login name: sa
Password: Use the password you chose during Installation
4. Click OK.
5. Right-click the project
and select Set as Active
Project.
If you would like to use Windows Authentication, the steps above are
not necessary. Instead, follow the steps described later in this
section.
Note
The SA (System
Administrator) SQL
Server account is a
built-in user account
created during
installation. This
account has full
permission to all
databases on the SQL
Server instance. It is
important to consider
security requirements
when choosing which
account to use. For
more control over
database permissions,
consider creating a
SQL Server user
account for use with
Historian.
© 2013 Schneider Electric. All Rights Reserved
Overview
Install
Create Project
Configure Data
Source
Historize & Publish
Create Database
Start Service
Data Analysis
Troubleshooting
33
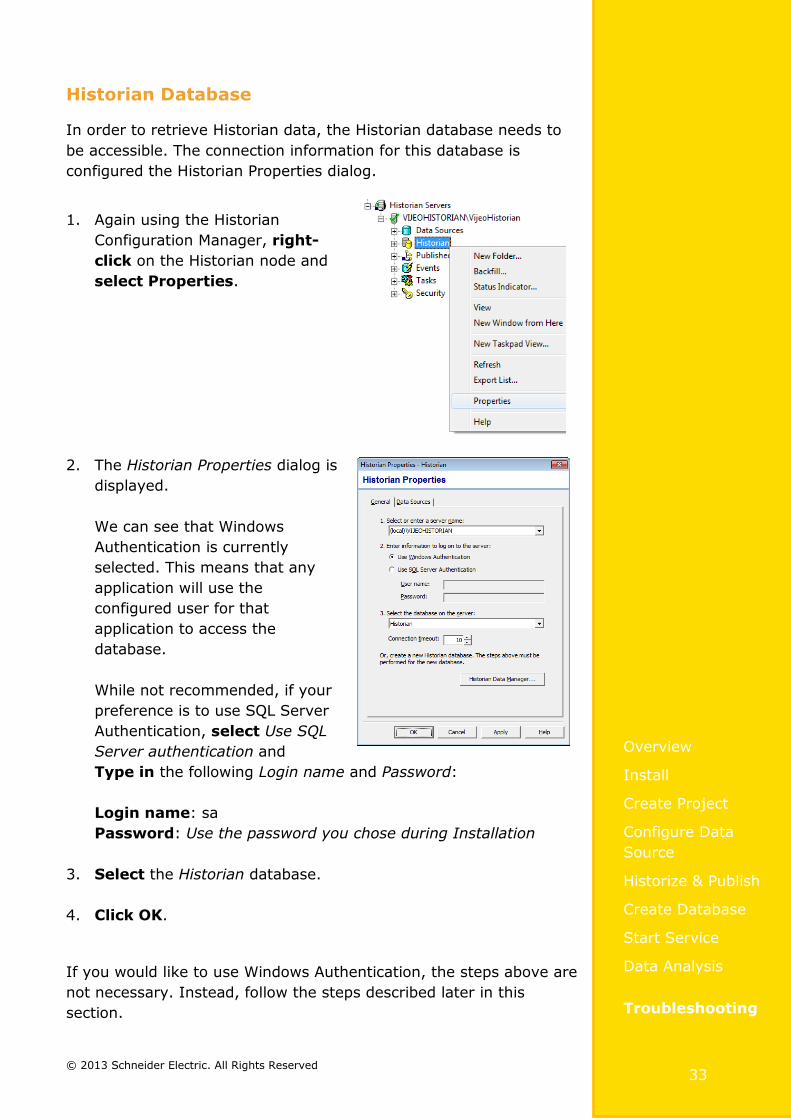
Historian Database
In order to retrieve Historian data, the Historian database needs to
be accessible. The connection information for this database is
configured the Historian Properties dialog.
1. Again using the Historian
Configuration Manager, right-
click on the Historian node and
select Properties.
2. The Historian Properties dialog is
displayed.
We can see that Windows
Authentication is currently
selected. This means that any
application will use the
configured user for that
application to access the
database.
While not recommended, if your
preference is to use SQL Server
Authentication, select Use SQL
Server authentication and
Type in the following Login name and Password:
Login name: sa
Password: Use the password you chose during Installation
3. Select the Historian database.
4. Click OK.
If you would like to use Windows Authentication, the steps above are
not necessary. Instead, follow the steps described later in this
section.

© 2013 Schneider Electric. All Rights Reserved
Overview
Install
Create Project
Configure Data
Source
Historize & Publish
Create Database
Start Service
Data Analysis
Troubleshooting
34
Using Windows Authentication
As described earlier, there are several options if choosing to use
Windows Authentication:
Changing the user account in IIS to one that has access to
the databases
o This is possible if you have already configured a
Windows user with these permissions. Note that it is
not recommended to simply change the user to one
with Administrator privileges – this has potential
security implications.
Creating a new user for IIS to use, and add permission to
the databases for this user
o This is the most secure option, as it allows you to take
control over what access the user has on your system.
Adding permission to the Historian databases for the user
account configured in IIS.
o This is the method described in the following steps.
First, we need to determine which user account requires
permission. This depends on the operating system you are using,
as well as the version of IIS.
Operating System IIS User account
Windows XP 5.1 <machine name>\ASPNET
Windows Vista &
Windows Server 2003 6.0 NT AUTHORITY\
NETWORK SERVICE
Windows 7 & Windows Server 2008
7.X IIS APPPOOL\ Classic .NET AppPool
We will use Microsoft SQL Server Management Studio to make the
required permission changes based on the table above.
1. Launch SQL Management Studio using the Start Menu
shortcut:
Start All Programs Microsoft SQL Server 2008 R2 SQL
Server Management Studio.
2. We need to log in to the server
using the Connect To Server
window. Use Windows
Authentication or choose SQL
Server Authentication, using
the sa account and password
set up during installation.
Click Connect.
© 2013 Schneider Electric. All Rights Reserved
Overview
Install
Create Project
Configure Data
Source
Historize & Publish
Create Database
Start Service
Data Analysis
Troubleshooting
35
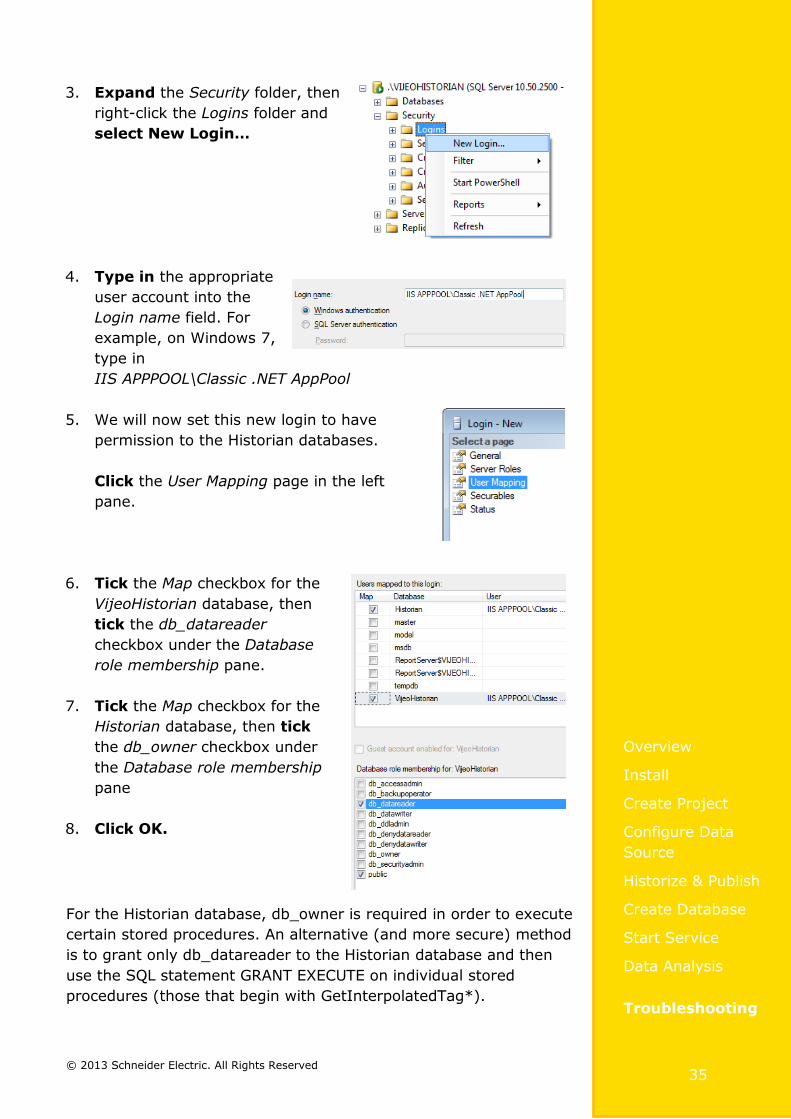
3. Expand the Security folder, then
right-click the Logins folder and
select New Login…
4. Type in the appropriate
user account into the
Login name field. For
example, on Windows 7,
type in
IIS APPPOOL\Classic .NET AppPool
5. We will now set this new login to have
permission to the Historian databases.
Click the User Mapping page in the left
pane.
6. Tick the Map checkbox for the
VijeoHistorian database, then
tick the db_datareader
checkbox under the Database
role membership pane.
7. Tick the Map checkbox for the
Historian database, then tick
the db_owner checkbox under
the Database role membership
pane
8. Click OK.
For the Historian database, db_owner is required in order to execute
certain stored procedures. An alternative (and more secure) method
is to grant only db_datareader to the Historian database and then
use the SQL statement GRANT EXECUTE on individual stored
procedures (those that begin with GetInterpolatedTag*).

© 2013 Schneider Electric. All Rights Reserved
Overview
Install
Create Project
Configure Data
Source
Historize & Publish
Create Database
Start Service
Data Analysis
Troubleshooting
36
Advanced Troubleshooting
for Process Analyst
As Process Analyst uses web service technology to retrieve data,
settings in IIS can affect this functionality. If you are not able to
view data after adding a pen in Process Analyst, you may need to
check that settings in IIS have been configured correctly.
One way to troubleshoot problems with the web service is to
navigate to the web service address using Internet Explorer. First,
you need to determine the web service address.
1. Using Process Analyst, click
the Process Analyst Control
Properties toolbar button.
2. Click the Connections tab then
double-click the Historian
connection listed in the server
list.
3. Select the Server address
text and copy to your
clipboard using the
Control-C keyboard
shortcut.
4. Click Cancel in the Modify Connection window, then click
Cancel in the Process Analyst Control Properties window.
5. Open a new browser window or tab using Internet Explorer
and paste the text into the Address bar using the Control-V
keyboard shortcut, then press Enter.
6. We will now be prompted with a
security dialog asking for login
information. Type in the user
and password used earlier (i.e.
the operator user), and then
click OK.
© 2013 Schneider Electric. All Rights Reserved
Overview
Install
Create Project
Configure Data
Source
Historize & Publish
Create Database
Start Service
Data Analysis
Troubleshooting
37
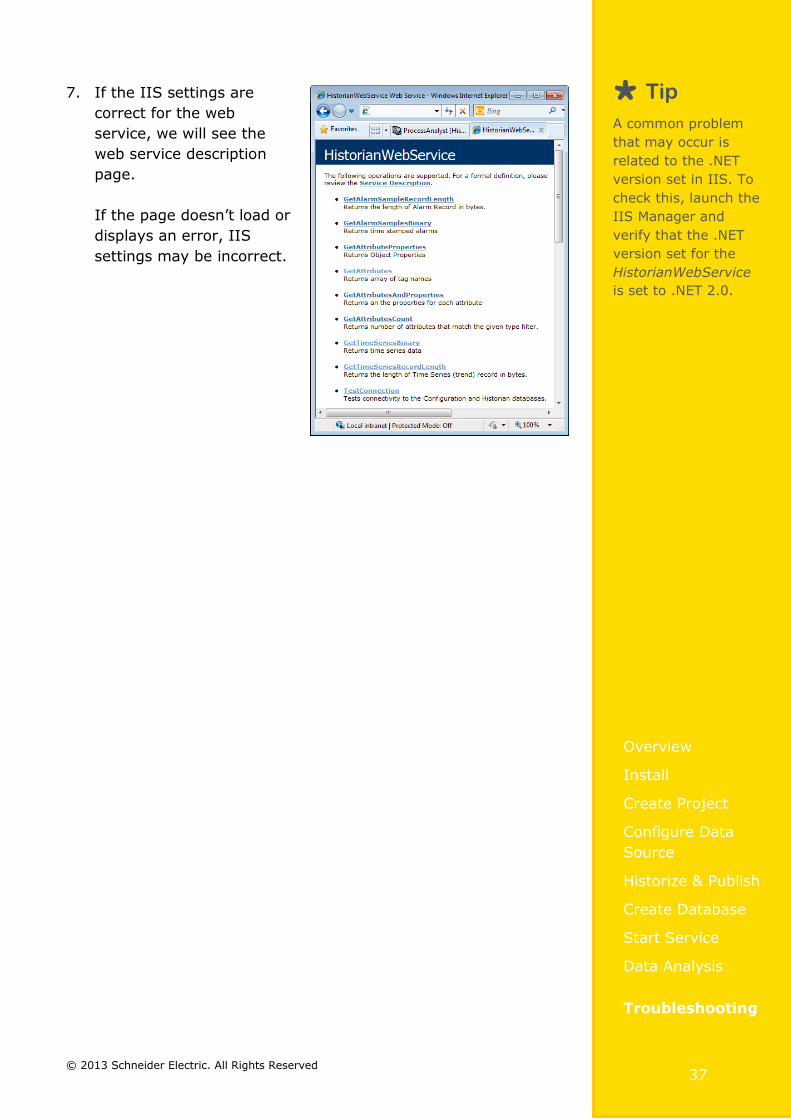
7. If the IIS settings are
correct for the web
service, we will see the
web service description
page.
If the page doesn’t load or
displays an error, IIS
settings may be incorrect.
Tip
A common problem
that may occur is
related to the .NET
version set in IIS. To
check this, launch the
IIS Manager and
verify that the .NET
version set for the
HistorianWebService
is set to .NET 2.0.
© 2013 Schneider Electric. All Rights Reserved
Overview
Install
Create Project
Configure Data
Source
Historize & Publish
Create Database
Start Service
Data Analysis
Troubleshooting
38
Further Resources
If you have trouble completing steps in this tutorial, there are a
number of resources to help you:
Help files
o To access help on any application, select Help from
the menu bar of Historian applications, the Help
button on dialog boxes or press the F1 key. The help
files are also available in the installation folder,
%ProgramFiles%\Schneider Electric\Vijeo Historian.
Product documentation
o Further documentation is available on the product
DVD.
Knowledge Base
o To access the knowledge base for Historian, visit
www.citect-kb.schneider-electric.com/ReportsKB
© 2013 Schneider Electric. All Rights Reserved
Important Information
Notice
This document is not comprehensive for any systems and does not absolve users of their
duty to uphold the safety requirements for the equipment used in their systems, or
compliance with both national or international safety laws and regulations.
This document does not replace any specific product documentation.
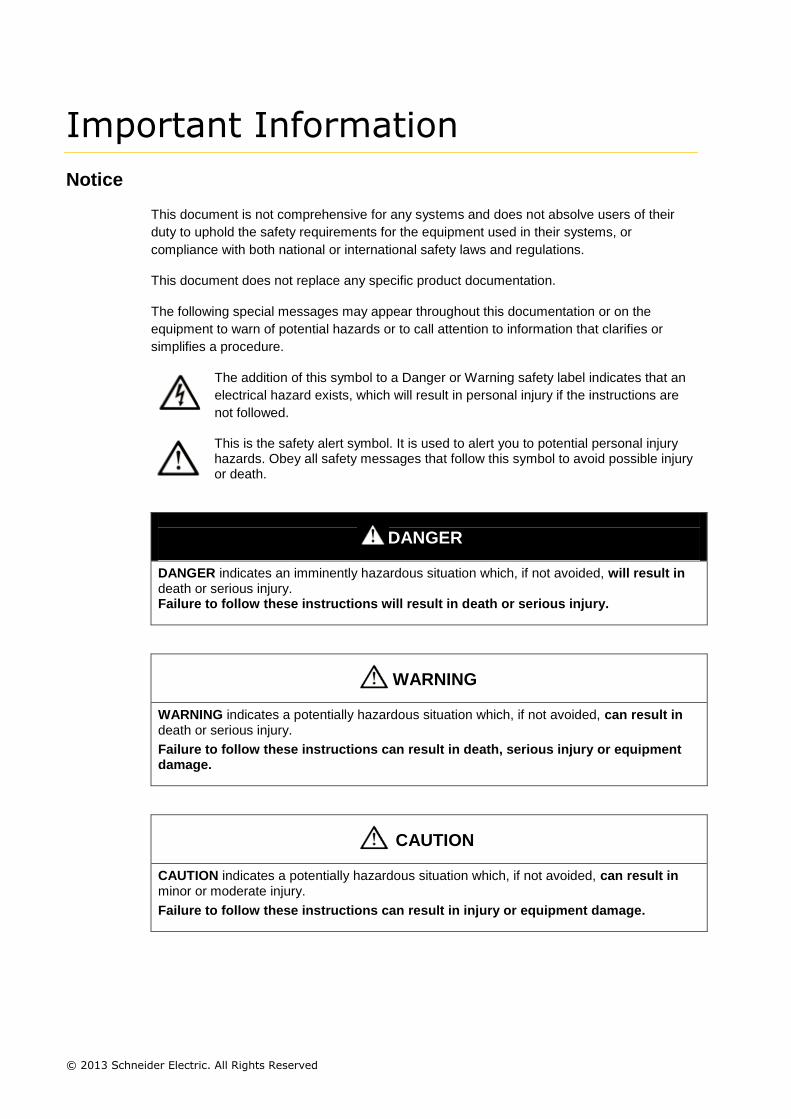
The following special messages may appear throughout this documentation or on the
equipment to warn of potential hazards or to call attention to information that clarifies or
simplifies a procedure.
The addition of this symbol to a Danger or Warning safety label indicates that an
electrical hazard exists, which will result in personal injury if the instructions are
not followed.
This is the safety alert symbol. It is used to alert you to potential personal injury hazards. Obey all safety messages that follow this symbol to avoid possible injury or death.
DANGER
DANGER indicates an imminently hazardous situation which, if not avoided, will result in death or serious injury. Failure to follow these instructions will result in death or serious injury.
WARNING
WARNING indicates a potentially hazardous situation which, if not avoided, can result in death or serious injury.
Failure to follow these instructions can result in death, serious injury or equipment damage.
CAUTION
CAUTION indicates a potentially hazardous situation which, if not avoided, can result in minor or moderate injury.
Failure to follow these instructions can result in injury or equipment damage.
© 2013 Schneider Electric. All Rights Reserved
NOTICE
NOTICE is used to address practices not related to physical injury.
Failure to follow these instructions can result in equipment damage.
Note: Electrical equipment should be installed, operated, serviced, and maintained only by
qualified personnel. No responsibility is assumed by Schneider Electric for any
consequences arising out of the use of this material.
A qualified person is one who has skills and knowledge related to the construction, operation
and installation of electrical equipment, and has received safety training to recognize and
avoid the hazards involved.
Before You Begin
Vijeo Citect is used to retrieve, collate and publish data from Supervisory Control and Data
Acquisition (SCADA) systems to manage and monitor industrial systems and processes.
Due to Vijeo Citect's central role in managing data within control systems and processes,
you must appropriately design, commission, and test your Vijeo Citect project before
implementing it in an operational setting.
WARNING
UNINTENDED EQUIPMENT OPERATION
Do not use Vijeo Citect or other SCADA software as a replacement for PLC-based control programs. SCADA software is not designed for direct, high-speed system control.
Failure to follow these instructions can result in death, serious injury or equipment damage.
WARNING
LOSS OF CONTROL
The designer of any control scheme must consider the potential failure modes of control paths and, for certain critical control functions, provide a means to achieve a safe state during and after a path failure. Examples of critical control functions are emergency stop and overtravel stop, power outage and restart.
Separate or redundant control paths must be provided for critical control functions.
System control paths may include communication links. Consideration must be given to the implications of unanticipated transmission delays or failures of the link.
Observe all accident prevention regulations and local safety guidelines1
Each implementation of a control system created using Vijeo Citect must be individually and thoroughly tested for proper operation before being placed into service.
Failure to follow these instructions can result in death, serious injury or equipment damage.
1
For additional information, refer to NEMA ICS 1.1 (latest edition) "Safety Guidelines for the
Application, Installation, and Maintenance of Solid State Control", and to NEMA ICS 7.1
© 2013 Schneider Electric. All Rights Reserved
(latest edition) "Safety Standards for Construction and Guide for Selection, Installation and
Operation of Adjustable-Speed Drive Systems" or their equivalent governing your particular
location.
CAUTION
EQUIPMENT INCOMPATIBILITY OR INOPERABLE EQUIPMENT
Read and thoroughly understand all hardware and software documentation before attempting any component substitutions.
Failure to follow these instructions can result in injury or equipment damage.
This automation equipment and related software is used to control a variety of industrial
processes. The type or model of automation equipment suitable for each application will vary
depending on factors such as the control function required, degree of protection required,
production methods, unusual conditions and government regulations etc. In some
applications more than one processor may be required when backup redundancy is needed.
Only the user can be aware of all the conditions and factors present during setup, operation
and maintenance of the solution. Therefore only the user can determine the automation
equipment and the related safeties and interlocks which can be properly used. When
selecting automation and control equipment and related software for a particular application,
the user should refer to the applicable local and national standards and regulations. The
National Safety Council’s Accident Prevention Manual also provides much useful
information.
Ensure that appropriate safeties and mechanical/electrical interlocks protection have been
installed and are operational before placing the equipment into service. All
mechanical/electrical interlocks and safeties protection must be coordinated with the related
automation equipment and software programming.
Note: Coordination of safeties and mechanical/electrical interlocks protection is outside the
scope of this document.
Start Up and Test
Following installation but before using electrical control and automation equipment for
regular operation, the system should be given a start up test by qualified personnel to verify
the correct operation of the equipment. It is important that arrangements for such a check be
made and that enough time is allowed to perform complete and satisfactory testing.
WARNING
EQUIPMENT OPERATION HAZARD
Follow all start up tests as recommended in the equipment documentation.
Store all equipment documentation for future reference.
Software testing must be done in both simulated and real environments.
Failure to follow these instructions can result in death, serious injury or equipment damage.
© 2013 Schneider Electric. All Rights Reserved
Verify that the completed system is free from all short circuits and grounds, except those
grounds installed according to local regulations (according to the National Electrical Code in
the USA, for example). If high-potential voltage testing is necessary, follow
recommendations in the equipment documentation to prevent accidental equipment
damage.
Before energizing equipment:
Remove tools, meters, and debris from equipment
Close the equipment enclosure door
Remove ground from incoming power lines
Perform all start-up tests recommended by the manufacturer
Operation and Adjustments
The following precautions are from NEMA Standards Publication ICS 7.1-1995 (English
version prevails):
Regardless of the care exercised in the design and manufacture of equipment or in the
selection and rating of components; there are hazards that can be encountered if such
equipment is improperly operated.
It is sometimes possible to misadjust the equipment and thus produce unsatisfactory or
unsafe operation. Always use the manufacturer’s instructions as a guide for functional
adjustments. Personnel who have access to these adjustments should be familiar with the
equipment manufacturer’s instructions and the machinery used with the electrical
equipment.
Only those operational adjustments actually required by the operator should be accessible to
the operator. Access to other controls should be restricted to prevent unauthorized changes
in operating characteristics.
WARNING
UNEXPECTED EQUIPMENT OPERATION
Only use software tools approved by Schneider Electric for use with this equipment.
Update your application program every time you change the physical hardware configuration.
Failure to follow these instructions can result in death, serious injury or equipment damage.
Intention
This document is intended to provide a quick introduction to Vijeo Historian. It is not intended
to replace any specific product documentation, nor any of your own design documentation.
On the contrary, it offers information additional to the product documentation on installation,
configuration and implementing the system.
The application described in this document is not a specific product in the normal
commercial sense. It describes an example of how Schneider Electric and third-party
components may be integrated to fulfill an industrial application.
© 2013 Schneider Electric. All Rights Reserved
A detailed functional description or the specifications for a specific user application is not
part of this document. Nevertheless, the document outlines some typical applications where
the system might be implemented.
The application described in this document is for illustration purpose. Your specific
application requirements may be different and will require additional and/or different
components. In this case, you will have to adapt the information provided in this document to
your particular needs. To do so, you will need to consult the specific product documentation
of the components that you are substituting in this application. Pay particular attention in
conforming to any safety information, different electrical requirements and normative
standards that would apply to your adaptation.
It should be noted that there are some major components in the application described in this
document that cannot be substituted without completely invalidating the architecture,
descriptions, instructions, wiring diagrams and compatibility between the various software
and hardware components specified herein. You must be aware of the consequences of
component substitution in the architecture described in this document as substitutions may
impair the compatibility and interoperability of software and hardware.
CAUTION
EQUIPMENT INCOMPATIBILITY OR INOPERABLE EQUIPMENT
Read and thoroughly understand all hardware and software documentation before attempting any component substitutions.
Failure to follow these instructions can result in injury or equipment damage.


