Embed Size (px)
Citation preview

GX Works2 Version 1Operating Manual(Simple Project, Function Block)
-SW1DNC-GXW2-E


A - 1
SAFETY PRECAUTIONS (Always read these instructions before using this product.)
Before using this product, thoroughly read this manual and the relevant manuals introduced in this manual
and pay careful attention to safety and handle the products properly.
The precautions given in this manual are concerned with this product. For the safety precautions of the
programmable controller system, refer to the User’s Manual for the CPU module.
In this manual, the safety precautions are ranked as " WARNING" and " CAUTION".
Note that the CAUTION level may lead to serious consequences according to the circumstances.
Always follow the precautions of both levels because they are important for personal safety.
Please save this manual to make it accessible when required and always forward it to the end user.
[Design Instructions]
[Startup/Maintenance Instructions]
WARNINGWhen data change, program change, or status control is performed from a personal computer to a running
programmable controller, create an interlock circuit outside the programmable controller to ensure that the whole
system always operates safely.
Furthermore, for the online operations performed from a personal computer to a programmable controller CPU, the
corrective actions against a communication error due to such as a cable connection fault should be predetermined as
a system.
CAUTIONThe online operations performed from a personal computer to a running programmable controller CPU (Program
change when a programmable controller CPU is RUN, operating status changes such as forced input/output
operation and RUN-STOP switching, and remote control operation) must be executed after the manual has been
carefully read and the safety has been ensured.
When changing a program while a programmable controller CPU is RUN, it may cause a program corruption in some
operating conditions. Fully understand the precautions described in GX Works2 Version 1 Operating Manual
(Common) before use.
The positioning test functions of OPR, JOG, inching or positioning data for QD75/LD75 positioning module must be
executed with the programmable controller set to STOP after the manual has been carefully read and the safety has
been ensured. Specially when executing the function on the network system, ensure the safety thoroughly since the
machinery whose operation cannot be checked by an operator may be activated. The operation failure may cause the
injury or machine damage.
WARNING
CAUTION
Indicates that incorrect handling may cause hazardous conditions, resulting in
death or severe injury.
Indicates that incorrect handling may cause hazardous conditions, resulting in
minor or moderate injury or property damage.
●
●
●

A - 2
CONDITIONS OF USE FOR THE PRODUCT
(1) Mitsubishi programmable controller ("the PRODUCT") shall be used in conditions;
i) where any problem, fault or failure occurring in the PRODUCT, if any, shall not lead to any major or
serious accident; and
ii) where the backup and fail-safe function are systematically or automatically provided outside of the
PRODUCT for the case of any problem, fault or failure occurring in the PRODUCT.
(2) The PRODUCT has been designed and manufactured for the purpose of being used in general
industries.
MITSUBISHI SHALL HAVE NO RESPONSIBILITY OR LIABILITY (INCLUDING, BUT NOT LIMITED
TO ANY AND ALL RESPONSIBILITY OR LIABILITY BASED ON CONTRACT, WARRANTY, TORT,
PRODUCT LIABILITY) FOR ANY INJURY OR DEATH TO PERSONS OR LOSS OR DAMAGE TO
PROPERTY CAUSED BY the PRODUCT THAT ARE OPERATED OR USED IN APPLICATION NOT
INTENDED OR EXCLUDED BY INSTRUCTIONS, PRECAUTIONS, OR WARNING CONTAINED IN
MITSUBISHI'S USER, INSTRUCTION AND/OR SAFETY MANUALS, TECHNICAL BULLETINS AND
GUIDELINES FOR the PRODUCT.
("Prohibited Application")
Prohibited Applications include, but not limited to, the use of the PRODUCT in;
• Nuclear Power Plants and any other power plants operated by Power companies, and/or any other
cases in which the public could be affected if any problem or fault occurs in the PRODUCT.
• Railway companies or Public service purposes, and/or any other cases in which establishment of a
special quality assurance system is required by the Purchaser or End User.
• Aircraft or Aerospace, Medical applications, Train equipment, transport equipment such as Elevator
and Escalator, Incineration and Fuel devices, Vehicles, Manned transportation, Equipment for
Recreation and Amusement, and Safety devices, handling of Nuclear or Hazardous Materials or
Chemicals, Mining and Drilling, and/or other applications where there is a significant risk of injury to
the public or property.
Notwithstanding the above, restrictions Mitsubishi may in its sole discretion, authorize use of the
PRODUCT in one or more of the Prohibited Applications, provided that the usage of the PRODUCT is
limited only for the specific applications agreed to by Mitsubishi and provided further that no special
quality assurance or fail-safe, redundant or other safety features which exceed the general
specifications of the PRODUCTs are required. For details, please contact the Mitsubishi representative
in your region.
A - 3
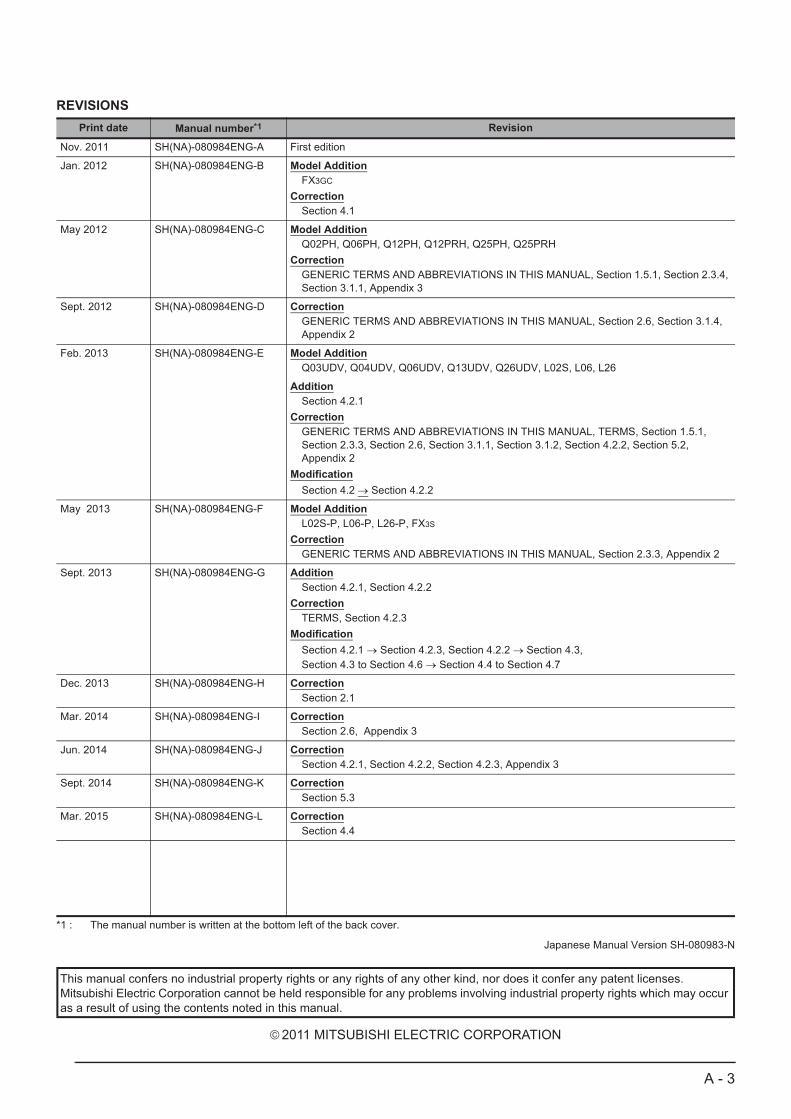
REVISIONS
Japanese Manual Version SH-080983-N
Print date Manual number*1
*1 : The manual number is written at the bottom left of the back cover.
Revision
Nov. 2011 SH(NA)-080984ENG-A First edition
Jan. 2012 SH(NA)-080984ENG-B Model AdditionFX3GC
CorrectionSection 4.1
May 2012 SH(NA)-080984ENG-C Model AdditionQ02PH, Q06PH, Q12PH, Q12PRH, Q25PH, Q25PRH
CorrectionGENERIC TERMS AND ABBREVIATIONS IN THIS MANUAL, Section 1.5.1, Section 2.3.4, Section 3.1.1, Appendix 3
Sept. 2012 SH(NA)-080984ENG-D CorrectionGENERIC TERMS AND ABBREVIATIONS IN THIS MANUAL, Section 2.6, Section 3.1.4, Appendix 2
Feb. 2013 SH(NA)-080984ENG-E Model AdditionQ03UDV, Q04UDV, Q06UDV, Q13UDV, Q26UDV, L02S, L06, L26
AdditionSection 4.2.1
CorrectionGENERIC TERMS AND ABBREVIATIONS IN THIS MANUAL, TERMS, Section 1.5.1, Section 2.3.3, Section 2.6, Section 3.1.1, Section 3.1.2, Section 4.2.2, Section 5.2, Appendix 2
Modification
Section 4.2 Section 4.2.2
May 2013 SH(NA)-080984ENG-F Model AdditionL02S-P, L06-P, L26-P, FX3S
CorrectionGENERIC TERMS AND ABBREVIATIONS IN THIS MANUAL, Section 2.3.3, Appendix 2
Sept. 2013 SH(NA)-080984ENG-G AdditionSection 4.2.1, Section 4.2.2
CorrectionTERMS, Section 4.2.3
Modification
Section 4.2.1 Section 4.2.3, Section 4.2.2 Section 4.3, Section 4.3 to Section 4.6 Section 4.4 to Section 4.7
Dec. 2013 SH(NA)-080984ENG-H CorrectionSection 2.1
Mar. 2014 SH(NA)-080984ENG-I CorrectionSection 2.6, Appendix 3
Jun. 2014 SH(NA)-080984ENG-J CorrectionSection 4.2.1, Section 4.2.2, Section 4.2.3, Appendix 3
Sept. 2014 SH(NA)-080984ENG-K CorrectionSection 5.3
Mar. 2015 SH(NA)-080984ENG-L CorrectionSection 4.4
2011 MITSUBISHI ELECTRIC CORPORATION
This manual confers no industrial property rights or any rights of any other kind, nor does it confer any patent licenses.
Mitsubishi Electric Corporation cannot be held responsible for any problems involving industrial property rights which may occur
as a result of using the contents noted in this manual.

A - 4
INTRODUCTION
Thank you for purchasing the Mitsubishi integrated FA software, MELSOFT series.Before using the product, thoroughly read this manual to develop full familiarity with the functions and performance to ensure correct use.
CONTENTS
SAFETY PRECAUTIONS . . . . . . . . . . . . . . . . . . . . . . . . . . . . . . . . . . . . . . . . . . . . . . . . . . . . . . .A - 1
CONDITIONS OF USE FOR THE PRODUCT . . . . . . . . . . . . . . . . . . . . . . . . . . . . . . . . . . . . . . .A - 2
REVISIONS. . . . . . . . . . . . . . . . . . . . . . . . . . . . . . . . . . . . . . . . . . . . . . . . . . . . . . . . . . . . . . . . . .A - 3
INTRODUCTION. . . . . . . . . . . . . . . . . . . . . . . . . . . . . . . . . . . . . . . . . . . . . . . . . . . . . . . . . . . . . .A - 4
CONTENTS . . . . . . . . . . . . . . . . . . . . . . . . . . . . . . . . . . . . . . . . . . . . . . . . . . . . . . . . . . . . . . . . .A - 4
MANUALS. . . . . . . . . . . . . . . . . . . . . . . . . . . . . . . . . . . . . . . . . . . . . . . . . . . . . . . . . . . . . . . . . . .A - 7
GENERIC TERMS AND ABBREVIATIONS IN THIS MANUAL . . . . . . . . . . . . . . . . . . . . . . . . .A - 15
TERMS . . . . . . . . . . . . . . . . . . . . . . . . . . . . . . . . . . . . . . . . . . . . . . . . . . . . . . . . . . . . . . . . . . . .A - 16
1 OVERVIEW OF FUNCTION BLOCKS
1.1 Function Blocks (FBs) 1 - 2
1.2 Features of FBs 1 - 3
1.3 Labels 1 - 4
1.4 Programming Flow with FBs 1 - 5
1.4.1 FB creation procedure . . . . . . . . . . . . . . . . . . . . . . . . . . . . . . . . . . . . . . . . . . . . . . . . . . . . . . . . . 1 - 5
1.4.2 Sequence program creation procedure using FBs. . . . . . . . . . . . . . . . . . . . . . . . . . . . . . . . . . . . 1 - 7
1.5 Overview of Screen Configuration 1 - 8
1.5.1 Main frame configuration . . . . . . . . . . . . . . . . . . . . . . . . . . . . . . . . . . . . . . . . . . . . . . . . . . . . . . . 1 - 8
1.5.2 Label setting editor. . . . . . . . . . . . . . . . . . . . . . . . . . . . . . . . . . . . . . . . . . . . . . . . . . . . . . . . . . . 1 - 10
2 CREATING FUNCTION BLOCKS
2.1 Creating Projects for FBs 2 - 2
2.2 Creating New FB Data 2 - 3
2.3 Setting Local Labels 2 - 4
2.3.1 Setting labels on Function/FB Label Setting screen . . . . . . . . . . . . . . . . . . . . . . . . . . . . . . . . . . 2 - 4
2.3.2 Classes . . . . . . . . . . . . . . . . . . . . . . . . . . . . . . . . . . . . . . . . . . . . . . . . . . . . . . . . . . . . . . . . . . . . 2 - 5
2.3.3 Data types . . . . . . . . . . . . . . . . . . . . . . . . . . . . . . . . . . . . . . . . . . . . . . . . . . . . . . . . . . . . . . . . . . 2 - 6
2.3.4 Selecting data types. . . . . . . . . . . . . . . . . . . . . . . . . . . . . . . . . . . . . . . . . . . . . . . . . . . . . . . . . . . 2 - 7
2.3.5 Assigning devices automatically . . . . . . . . . . . . . . . . . . . . . . . . . . . . . . . . . . . . . . . . . . . . . . . . . 2 - 9
2.4 Creating FB Programs 2 - 12
2.5 Converting FBs 2 - 13
2.6 Considerations when Creating FB Programs 2 - 14
A - 5
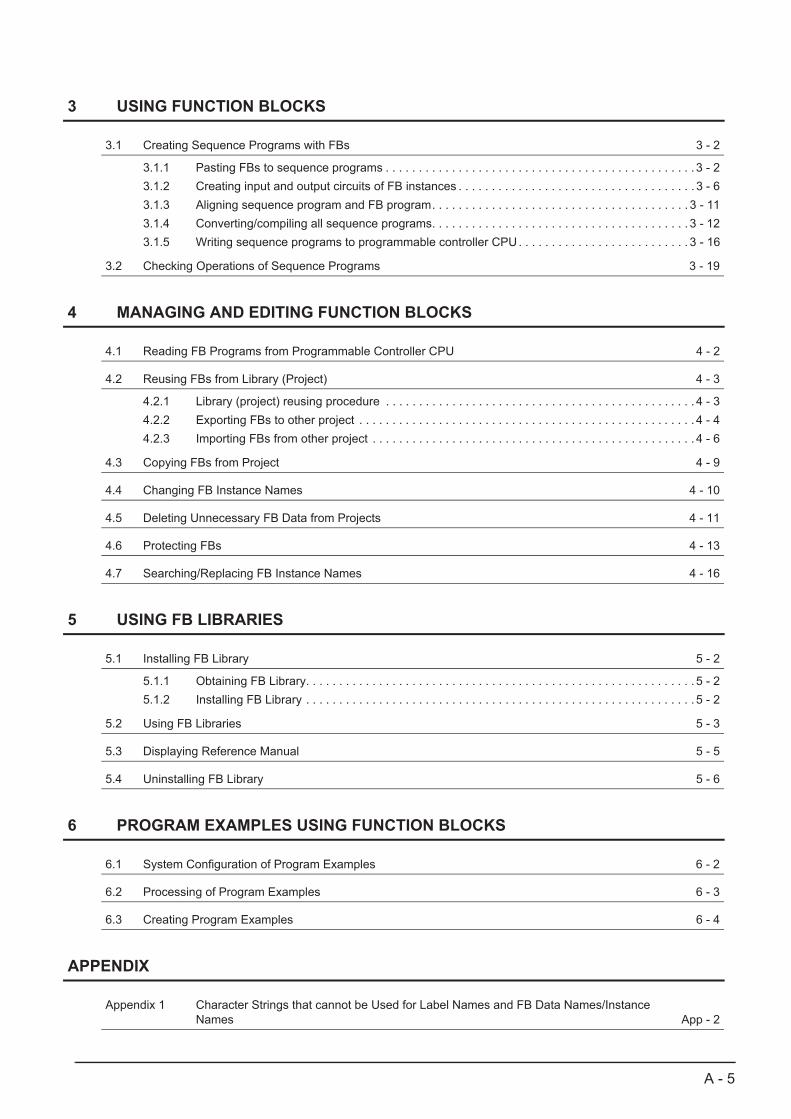
3 USING FUNCTION BLOCKS
3.1 Creating Sequence Programs with FBs 3 - 2
3.1.1 Pasting FBs to sequence programs . . . . . . . . . . . . . . . . . . . . . . . . . . . . . . . . . . . . . . . . . . . . . . . 3 - 2
3.1.2 Creating input and output circuits of FB instances . . . . . . . . . . . . . . . . . . . . . . . . . . . . . . . . . . . . 3 - 6
3.1.3 Aligning sequence program and FB program. . . . . . . . . . . . . . . . . . . . . . . . . . . . . . . . . . . . . . . 3 - 11
3.1.4 Converting/compiling all sequence programs. . . . . . . . . . . . . . . . . . . . . . . . . . . . . . . . . . . . . . . 3 - 12
3.1.5 Writing sequence programs to programmable controller CPU. . . . . . . . . . . . . . . . . . . . . . . . . . 3 - 16
3.2 Checking Operations of Sequence Programs 3 - 19
4 MANAGING AND EDITING FUNCTION BLOCKS
4.1 Reading FB Programs from Programmable Controller CPU 4 - 2
4.2 Reusing FBs from Library (Project) 4 - 3
4.2.1 Library (project) reusing procedure . . . . . . . . . . . . . . . . . . . . . . . . . . . . . . . . . . . . . . . . . . . . . . . 4 - 3
4.2.2 Exporting FBs to other project . . . . . . . . . . . . . . . . . . . . . . . . . . . . . . . . . . . . . . . . . . . . . . . . . . . 4 - 4
4.2.3 Importing FBs from other project . . . . . . . . . . . . . . . . . . . . . . . . . . . . . . . . . . . . . . . . . . . . . . . . . 4 - 6
4.3 Copying FBs from Project 4 - 9
4.4 Changing FB Instance Names 4 - 10
4.5 Deleting Unnecessary FB Data from Projects 4 - 11
4.6 Protecting FBs 4 - 13
4.7 Searching/Replacing FB Instance Names 4 - 16
5 USING FB LIBRARIES
5.1 Installing FB Library 5 - 2
5.1.1 Obtaining FB Library. . . . . . . . . . . . . . . . . . . . . . . . . . . . . . . . . . . . . . . . . . . . . . . . . . . . . . . . . . . 5 - 2
5.1.2 Installing FB Library . . . . . . . . . . . . . . . . . . . . . . . . . . . . . . . . . . . . . . . . . . . . . . . . . . . . . . . . . . . 5 - 2
5.2 Using FB Libraries 5 - 3
5.3 Displaying Reference Manual 5 - 5
5.4 Uninstalling FB Library 5 - 6
6 PROGRAM EXAMPLES USING FUNCTION BLOCKS
6.1 System Configuration of Program Examples 6 - 2
6.2 Processing of Program Examples 6 - 3
6.3 Creating Program Examples 6 - 4
APPENDIX
Appendix 1 Character Strings that cannot be Used for Label Names and FB Data Names/Instance Names App - 2

A - 6
Appendix 2 Supported CPU modules App - 5
Appendix 3 Using FBs Created with GX Developer in GX Works2 App - 6
INDEX

A - 7
■ MANUALS
Related manuals are separately issued according to the purpose of their functions in GX Works2.
● Related manuals
The manuals related to this product are shown below.Refer to the following tables when ordering required manuals.
1) Operation of GX Works2
2) Structured Programming
Manual nameManual number
(Model code)
GX Works2 Version 1 Operating Manual (Common)Explains the system configuration of GX Works2 and the functions common to Simple project and Structured project such as parameter setting, operation method for the online function.
(Sold separately)
SH-080779ENG(13JU63)
GX Works2 Version 1 Operating Manual (Simple Project)Explains methods for such as creating and monitoring programs in Simple project of GX Works2.
(Sold separately)
SH-080780ENG(13JU64)
GX Works2 Version 1 Operating Manual (Structured Project)Explains methods for such as creating and monitoring programs in Structured project of GX Works2.
(Sold separately)
SH-080781ENG(13JU65)
GX Works2 Version 1 Operating Manual (Intelligent Function Module)Explains methods of intelligent function module for such as parameter setting, monitoring programs, and predefined protocol support function in GX Works2. (Sold separately)
SH-080921ENG(13JU69)
GX Works2 Beginner's Manual (Simple Project)Explains fundamental methods for such as creating, editing, and monitoring programs in Simple project for users inexperienced with GX Works2. (Sold separately)
SH-080787ENG(13JZ22)
GX Works2 Beginner's Manual (Structured project)Explains fundamental methods for such as creating, editing, and monitoring programs in Structured project for users inexperienced with GX Works2. (Sold separately)
SH-080788ENG(13JZ23)
Manual nameManual number
(Model code)
MELSEC-Q/L/F Structured Programming Manual (Fundamentals)Explains the programming methods, types of programming languages, and other information required to create structured programs. (Sold separately)
SH-080782ENG(13JW06)
MELSEC-Q/L/F Structured Programming Manual (Common Instructions)Explains the specifications and functions of common instructions such as sequence instructions, basic instructions, and application instructions, that can be used in structured programs. (Sold separately)
SH-080783ENG(13JW07)
MELSEC-Q/L Structured Programming Manual (Application Functions)Explains the specifications and functions of application functions that can be used in structured programs. (Sold separately)
SH-080784ENG(13JW08)
MELSEC-Q/L Structured Programming Manual (Special Instructions)Explains the specifications and functions of special instructions such as module dedicated instruction, PID control instruction, and built-in I/O function dedicated instruction, that can be used in structured programs. (Sold separately)
SH-080785ENG(13JW09)
FXCPU Structured Programming Manual (Device & Common)Explains the devices and parameters provided in GX Works2 for structured programming.
(Sold separately)
JY997D26001(09R925)
FXCPU Structured Programming Manual (Basic & Applied Instruction)Explains the sequence instructions provided in GX Works2 for structured programming.
(Sold separately)
JY997D34701(09R926)
FXCPU Structured Programming Manual (Application Functions)Explains the application functions provided in GX Works2 for structured programming.
(Sold separately)
JY997D34801(09R927)

A - 8
3) Operation of iQ Works
The Operating Manuals are included on the CD-ROM of the software package in a PDF file format. Manuals in printed form are sold separately for single purchase. Order a manual by quoting the manual number (model code) listed in the table above.
Manual nameManual number
(Model code)
Let's start iQ Works Version 2Explains fundamental methods for such as managing the system using MELSOFT Navigator and using system labels for users inexperienced with GX Works2. (Sold separately)
SH-081261ENG(13JZ79)

A - 9
● Purpose of this manual
This manual explains the operations for creating sequence programs with function blocks (FB) in Simple project using the functions supported by GX Works2.Manuals for reference are listed in the following table according to their purpose.For information such as the content and number of each manual, refer to the list of 'Related manuals'.
1) Installation of GX Works2 and the USB driver
2) Operation of GX Works2
Purpose GX Works2 Installation Instructions
GX Works2 Version 1 Operating Manual
Common
Learning the operating environment and installation method
Learning a USB driver installation method
Purpose
GX Works2 Beginner's Manual
GX Works2 Version 1 Operating Manual
SimpleProject
StructuredProject
Common
Simple ProjectStructured
Project
Intelligent Function Module
Function Block
Learning all functions of GX Works2
Learning the project types and available languages in GX Works2
Learning the basic operations and operating procedures when creating a simple project for the first time
Learning the basic operations and operating procedures when creating a structured project for the first time
Learning the operations of available functions regardless of project type.
Learning the functions and operation methods for programming
Learning the operations and operating procedures when using function blocks (FBs) in Simple project
Learning data setting methods for intelligent function module
Details
Details
Outline
Outline
Details
Details
Details
Outline Details Details
Details
Details

A - 10
3) Operations in each programming languageFor details of instructions used in each programming language, refer to the section 4 and the section 5 on the following pages.
Purpose
GX Works2 Beginner's ManualGX Works2 Version 1
Operating Manual
SimpleProject
StructuredProject
SimpleProject
StructuredProject
Simple Project
LadderDiagram
Sequential Function Chart
Structured Text
Structured project
LadderDiagram
Sequential Function Chart
Structured Ladder/FBD
Structured Text
*1 : MELSAP3 and FX series SFC only
OutlineDetails
Outline
*1
Details
OutlineDetails
OutlineDetails
Outline
*1
Details
OutlineDetails
OutlineDetails

A - 11
4) Details of instructions in each programming language (for QCPU (Q mode)/LCPU)
Purpose
MELSEC-Q/L/FStructured
ProgrammingManual
MELSEC-Q/LStructured Programming
Manual
MELSEC-Q/LProgramming
Manual
MELSEC-Q/L/QnAProgramming Manual
Manualfor
moduleto be used
FundamentalsCommon
InstructionsSpecial
InstructionsApplication Functions
Common Instruction
PID ControlInstructions
SFC -
Alllanguages
Learning details of programmable controller CPU error codes, special relays, and special registers
Using Ladder Diagram
Learning the types and details of common instructions
Learning the types and details of instructions for intelligent function modules
Learning the types and details of instructions for network modules
Learning the types and details of instructions for the PID control function
UsingSequential Function Chart
Learning details of specifications, functions, and instructions of SFC (MELSAP3)
UsingStructured Ladder/FBD or Structured Text
Learning the fundamentals for creating a structured program
Learning the types and details of common instructions
Learning the types and details of instructions for intelligent function modules
Learning the types and details of instructions for network modules
Learning the types and details of instructions for the PID control function
Learning the types and details of application instructions
Details
Details
Details
Details
Details
Details
Details
Details
Outline Details
Outline Details
Outline Details
Details

A - 12
5) Details of instructions in each programming language (for FXCPU)
Purpose
MELSEC-Q/L/FStructured
ProgrammingManual
FXCPUStructured Programming
Manual
FXCPUProgramming
Manual
FundamentalsDevice & Common
SequenceInstructions
Application Functions
FX0, FX0S,FX0N, FX1, FXU, FX2C
FX1S, FX1N,FX2N, FX1NC,
FX2NC
FX3S,FX3G,FX3U,
FX3GC,FX3UC
Using LadderDiagram
Learning the types and details of basic/application instructions, descriptions of devices and parameters
Using SequentialFunction Chart
Learning details of specifications, functions, and instructions of SFC
UsingStructured Ladder/FBD or Structured Text
Learning the fundamentals for creating a structured program
Learning the descriptions of devices, parameters, and error codes
Learning the types and details of sequence instructions
Learning the types and details of application instructions
Details Details Details
Details Details Details
Details
Details
Details
Details
A - 13
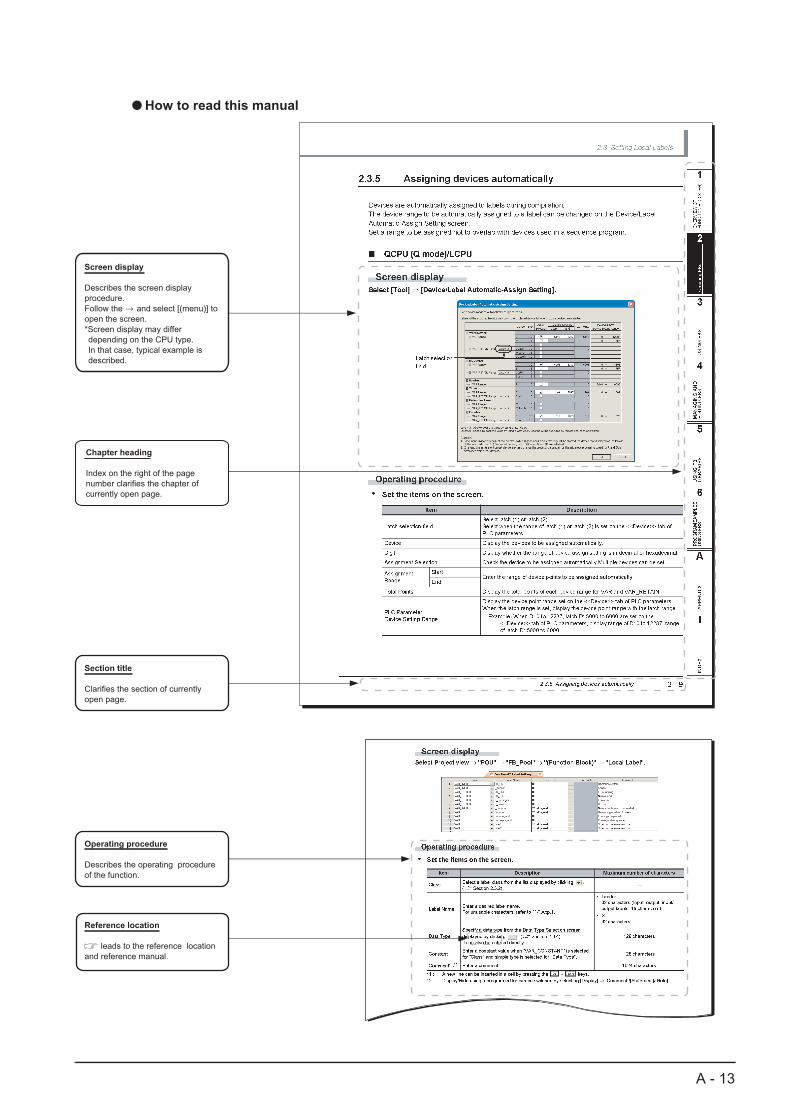
● How to read this manual
Section title
Clarifies the section of currently
open page.
Reference location
leads to the reference location
and reference manual.
Operating procedure
Describes the operating procedure
of the function.
Screen display
Describes the screen display
procedure.
Follow the and select [(menu)] to
open the screen.
*Screen display may differ
depending on the CPU type.
In that case, typical example is
described.
Chapter heading
Index on the right of the page
number clarifies the chapter of
currently open page.

A - 14
This manual also uses the following columns:
This explains notes requiring attention or useful functions relating to the information given on the same page.
● Symbols used in this manual
The following shows the symbols used in this manual with descriptions and examples.
No. Symbol Description Example
[ ] Menu name on a menu bar [Project]
Toolbar icon
(Underline) Screen name Q Parameter Setting screen
<< >> Tab name on a screen <<PLC System>>
" " Item name on a screen "Timer Limit Setting"
Button on a screen button
- Keyboard key
1
2
4
5
6
3

A - 15
■ GENERIC TERMS AND ABBREVIATIONS IN THIS MANUAL
The following are the generic terms/abbreviations of such as software packages and programmable controller CPUs used in this manual.
Generic term and abbreviation
Description
GX Works2Generic product name for SWnDNC-GXW2-E(n: version)
GX DeveloperGeneric product name for SWnD5C-GPPW-E, SWnD5C-GPPW-EA, SWnD5C-GPPW-EV, and SWnD5C-GPPW-EVA(n: version)
Personal computer Generic term for personal computers on which Windows® operates
Basic model QCPU Generic term for Q00J, Q00, and Q01
High Performancemodel QCPU
Generic term for Q02, Q02H, Q06H, Q12H, and Q25H
Process CPU Generic term for Q02PHCPU, Q06PHCPU, Q12PHCPU, and Q25PHCPU
Redundant CPU Generic term for Q12PRHCPU and Q25PRHCPU
Universal model QCPUGeneric term for Q00UJ, Q00U, Q01U, Q02U, Q03UD, Q03UDE, Q03UDV, Q04UDH, Q04UDEH, Q04UDV, Q06UDH, Q06UDEH, Q06UDV, Q10UDH, Q10UDEH, Q13UDH, Q13UDEH, Q13UDV, Q20UDH, Q20UDEH, Q26UDH, Q26UDEH, Q26UDV, Q50UDEH, and Q100UDEH
QCPU (Q mode)Generic term for Basic model QCPU, High Performance model QCPU, Process CPU, Redundant CPU, and Universal model QCPU
LCPU Generic term for L02S, L02S-P, L02, L02-P, L06, L06-P, L26, L26-P, L26-BT, and L26-PBT
FXCPUGeneric term for FX0S, FX0, FX0N, FX1, FX1S, FX1N, FX1NC, FXU, FX2C, FX2N, FX2NC, FX3S, FX3G, FX3GC, FX3U, FX3UC
SFC Generic term for MELSAP3, MELSAP-L, and FX series SFC
MELSOFT Library
Generic term for components (FB library, sample programs, drawing data) which provide easy operation of programmable controller related modules and GOTs, and various devices that are connected to themContact your local Mitsubishi representative to obtain components of MELSOFT Library.
FB Abbreviation for a function block

A - 16
■ TERMS
The following are the terms used in this manual.
Term Description
Actual deviceAn actual device assigned to label after compiling a project with labels, or a device that is not described using a label
Common instructionGeneric term for sequence instructions, basic instructions, application instructions, data link instructions, multiple CPU dedicated instructions, and multiple CPU high-speed transmission dedicated instructions
Special instructionGeneric term for module dedicated instructions, PID control instructions, socket communication function instructions, built-in I/O function instructions, and data logging function instructions
Simple ProjectGeneric term for projects created using Ladder Diagram, Sequential Function Chart, Structured Text
Without labels Generic term for projects created without selecting "Use Label" when creating new projects
With labels Generic term for projects created with selecting "Use Label" when creating new projects
Project without labels Generic term for Simple projects that do not use labels
Project with labels Generic term for Simple projects that use labels and Structured projects
Project with security Generic term for projects whose securities are set
Utilization To paste FB to a sequence program
Reuse To use FB to other project
Library (project) A project to be used as an FB library
FB instance An FB pasted to a sequence program
Global labelA label which becomes effective for all program data when multiple program data items are created in a project
Local labelA label which becomes effective only for each program dataSet for each program data.
StructureA data type which allows various device types (bit device, word device, etc.) to be stored in single aggregate (single data)
Array A data type which allows the same device type to be stored in a consecutive area

1
OV
ER
VIE
W O
F
FU
NC
TIO
N
BL
OC
KS
2
CR
EA
TIN
G
FU
NC
TIO
N
BLO
CK
S
3
US
ING
FU
NC
TIO
N
BL
OC
KS
4
MA
NA
GIN
G A
ND
E
DIT
ING
FU
NC
TIO
N
BLO
CK
S
5
US
ING
FB
LI
BR
AR
IES
6
PR
OG
RA
M
EX
AM
PLE
S U
SIN
G
FU
NC
TIO
N B
LOC
KS
A
AP
PE
ND
IX
I
IND
EX
1 - 1
1 OVERVIEW OF FUNCTION BLOCKS
This chapter explains features of FBs, overview of labels, and work flow for using FBs.
1.1 Function Blocks (FBs) 1 - 2
1.2 Features of FBs 1 - 3
1.3 Labels 1 - 4
1.4 Programming Flow with FBs 1 - 5
1.5 Overview of Screen Configuration 1 - 8

1 - 2
GX Works2
1 OVERVIEW OF FUNCTION BLOCKS
1.1 Function Blocks (FBs)
An FB is designed to convert a ladder block, which is used repeatedly in a sequence program, into a component to be utilized in a sequence program.FBs can be used in projects with labels.This manual explains FBs used in Simple projects. In the operation examples, Ladder Diagram is selected as a programming language, but Structured Text can also be selected.Note, however, that FXCPU Simple projects do not support Structured Text.
Program 1
Program 2
Program 1
Program 2
Project A
Project B
<Before use of FB>
Program 3
Program 3
Project A
Project B
<After use of FB>
FB
FB
FBUtilize
FB
Convert the
repeatedly-used
ladder block to
a component

1.2 Features of FBs
1 - 3
1
OV
ER
VIE
W O
F
FU
NC
TIO
N
BL
OC
KS
2
CR
EA
TIN
G
FU
NC
TIO
N
BLO
CK
S
3
US
ING
FU
NC
TIO
N
BL
OC
KS
4
MA
NA
GIN
G A
ND
E
DIT
ING
FU
NC
TIO
N
BLO
CK
S
5
US
ING
FB
LI
BR
AR
IES
6
PR
OG
RA
M
EX
AM
PLE
S U
SIN
G
FU
NC
TIO
N B
LOC
KS
A
AP
PE
ND
IX
I
IND
EX
1.2 Features of FBs
■ Creating programs efficiently
Converting a standard program into a component as a single block enables the program to be utilized easily. As an easy utilization for a sequence program is possible, the efficiency of creating a large-scale program is improved. In addition, converting a program into a component improves program readability and eases editing and debugging.
■ Consistency of program quality
Converting a program into a component as an FB to utilize the program allows consistency of program quality, without relying on the technological skills of the program developers. In addition, programming mistakes which may occur at the time of utilization can be prevented.
■ Reducing program creation man-hours with FB libraries
With QCPU (Q mode)/LCPU, man-hours for creating a program can be reduced using FB libraries. There are FB libraries which support various devices such as CPU modules, analog input/output modules, and counter modules. FB libraries which support partner products are also supplied.
■ Programming languages according to the intended use are selectable
In Simple projects, Ladder Diagram or Structured Text can be selected as a programming language for FBs.The optimum programming language which meets the intended use can be selected to create FBs.FXCPU Simple project supports only Ladder Diagram.

1 - 4
GX Works2
1 OVERVIEW OF FUNCTION BLOCKS
1.3 Labels
A label is a character string which represents a device.Using labels allows a program to be created without considering devices in the program.Therefore, a program with labels can be easily utilized even for a system with different module configuration.
■ Global labels and local labels
There are two types of labels, global labels and local labels.
• Global labelsGlobal labels are shared among all sequence programs in a project. A specific device can be assigned to a global label.
• Local labelsLocal labels are used only in a single sequence program.They cannot be shared even if local labels with the same name are set for multiple sequence programs.Different devices are assigned to local labels for each sequence program.
<Example of program with devices>
<Example of program with labels>

1.4 Programming Flow with FBs
1.4.1 FB creation procedure 1 - 5
1
OV
ER
VIE
W O
F
FU
NC
TIO
N
BL
OC
KS
2
CR
EA
TIN
G
FU
NC
TIO
N
BLO
CK
S
3
US
ING
FU
NC
TIO
N
BL
OC
KS
4
MA
NA
GIN
G A
ND
E
DIT
ING
FU
NC
TIO
N
BLO
CK
S
5
US
ING
FB
LI
BR
AR
IES
6
PR
OG
RA
M
EX
AM
PLE
S U
SIN
G
FU
NC
TIO
N B
LOC
KS
A
AP
PE
ND
IX
I
IND
EX
1.4 Programming Flow with FBs
This manual explains the operating procedures with examples of FBs used on QCPU (Q mode)/LCPU.For the instructions and functions which are available for FXCPU, refer to the following manuals.FXCPU user's manuals and programming manuals
1.4.1 FB creation procedure
Operating procedure
1. Creating a project for FBs
2. Creating new FB data
3. Setting local labels
4. Creating an FB program
5. Converting FBs
Procedure Reference
Create a project with labels. Section 2.1
Procedure Reference
Create new FB data. Section 2.2
Procedure Reference
Set local labels to be used for the FB program. Section 2.3
Procedure Reference
Create an FB program using labels. Section 2.4
Procedure Reference
Conversion finalizes the edited FB program content. Section 2.5

1 - 6
GX Works2
1 OVERVIEW OF FUNCTION BLOCKS
1.4.1 FB creation procedure
● Operations for created FBs
• Reading programs from programmable controller CPU (Section 4.1)
• Utilizing FBs (Section 4.2)
• Changing FB instance names (Section 4.4)
• Deleting FBs (Section 4.5)
• Protecting FBs (Section 4.6)
• Searching/replacing FB instance names and labels (Section 4.7)

1.4 Programming Flow with FBs
1.4.2 Sequence program creation procedure using FBs 1 - 7
1
OV
ER
VIE
W O
F
FU
NC
TIO
N
BL
OC
KS
2
CR
EA
TIN
G
FU
NC
TIO
N
BLO
CK
S
3
US
ING
FU
NC
TIO
N
BL
OC
KS
4
MA
NA
GIN
G A
ND
E
DIT
ING
FU
NC
TIO
N
BLO
CK
S
5
US
ING
FB
LI
BR
AR
IES
6
PR
OG
RA
M
EX
AM
PLE
S U
SIN
G
FU
NC
TIO
N B
LOC
KS
A
AP
PE
ND
IX
I
IND
EX
1.4.2 Sequence program creation procedure using FBs
Operating procedure
1. Pasting FBs
2. Creating input/output circuits of an FB instance.
3. Converting/compiling a sequence program
4. Writing a program to a programmable controller CPU
5. Checking the operation
Procedure Reference
Paste FBs to the sequence program. Section 3.1.1
Paste FBs of the FB Library to the sequence program. Chapter 5
Procedure Reference
Create input and output circuits of the FB instance. Section 3.1.2
Procedure Reference
Convert/compile the sequence program. Section 3.1.4
Procedure Reference
Write the sequence program to the programmable controller CPU. Section 3.1.5
Procedure Reference
Monitor the operation of the sequence program written to the programmable controller CPU.
Section 3.2

1 - 8
GX Works2
1 OVERVIEW OF FUNCTION BLOCKS
1.5.1 Main frame configuration
1.5 Overview of Screen Configuration
1.5.1 Main frame configuration
This section explains the screen configuration of the main frame (basic screen) of GX Works2 that is displayed when it is started up. The following is an example of a screen on which a work window and docked windows are displayed.
Screen display
Element Selection
window
Status bar
Work
window
Title bar
Toolbar
Menu bar
FB component
Navigationwindow
Sequenceprogram
FB data
Docked window
FB instance (Entity)

1.5 Overview of Screen Configuration
1.5.1 Main frame configuration 1 - 9
1
OV
ER
VIE
W O
F
FU
NC
TIO
N
BL
OC
KS
2
CR
EA
TIN
G
FU
NC
TIO
N
BLO
CK
S
3
US
ING
FU
NC
TIO
N
BL
OC
KS
4
MA
NA
GIN
G A
ND
E
DIT
ING
FU
NC
TIO
N
BLO
CK
S
5
US
ING
FB
LI
BR
AR
IES
6
PR
OG
RA
M
EX
AM
PLE
S U
SIN
G
FU
NC
TIO
N B
LOC
KS
A
AP
PE
ND
IX
I
IND
EX
Display contents
Name Description Reference
Title bar Display a project name. —
Menu bar Display menu options for executing each function. —
Toolbar Display tool buttons for executing each function.GX Works2 Version 1 Operating Manual (Simple Project)
Work windowA main screen used for operations such as programming, parameter setting, and monitoring. GX Works2 Version 1
Operating Manual (Common)
Docking window A sub screen to support operations performed on a work window.
Navigation Display contents of a project in tree format.
Element Selection Display a list of functions (such as FBs) used for programming.Section 3.1.1
FB component An FB registered as a component
Output Display compilation and check results (errors and warnings).GX Works2 Version 1 Operating Manual (Simple Project)
Cross Reference Display cross reference results.
GX Works2 Version 1 Operating Manual (Common)
Device List Display the device list.
Watch 1 to 4A screen used for monitoring and changing current device values.
Intelligent function module monitor 1 to 10
A screen used for monitoring intelligent function modules.
Find/ReplaceA screen used for searching and replacing character strings in the project.
DebugA screen used for setting the debug which uses the simulation function.
Status bar Display information about a project being edited.
Sequence program A program and local labels. —
FB data A program and local labels of FB. —
FB instance (entity) An FB pasted to a sequence program. —
1 - 10
GX Works2
1 OVERVIEW OF FUNCTION BLOCKS
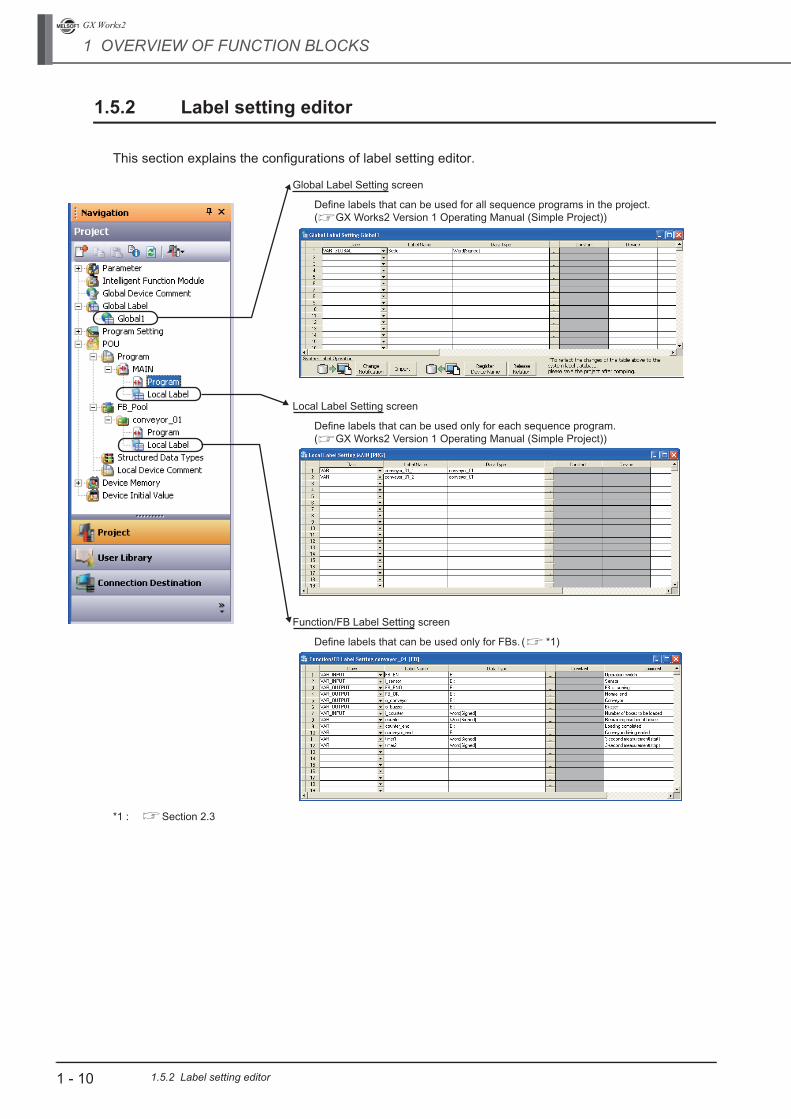
1.5.2 Label setting editor
1.5.2 Label setting editor
This section explains the configurations of label setting editor.
*1 : Section 2.3
Function/FB Label Setting screen
Define labels that can be used only for FBs. ( *1)
Local Label Setting screen
Define labels that can be used only for each sequence program.
( GX Works2 Version 1 Operating Manual (Simple Project))
Global Label Setting screen
Define labels that can be used for all sequence programs in the project.
( GX Works2 Version 1 Operating Manual (Simple Project))

1
OV
ER
VIE
W O
F
FU
NC
TIO
N
BL
OC
KS
2
CR
EA
TIN
G
FU
NC
TIO
N
BLO
CK
S
3
US
ING
FU
NC
TIO
N
BL
OC
KS
4
MA
NA
GIN
G A
ND
E
DIT
ING
FU
NC
TIO
N
BLO
CK
S
5
US
ING
FB
LI
BR
AR
IES
6
PR
OG
RA
M
EX
AM
PLE
S U
SIN
G
FU
NC
TIO
N B
LOC
KS
A
AP
PE
ND
IX
I
IND
EX
2 - 1
2 CREATING FUNCTION BLOCKS
This chapter explains how to create FBs.For the basic operations of GX Works2, refer to the following manuals.GX Works2 Version 1 Operating Manual (Common)GX Works2 Version 1 Operating Manual (Simple Project)
2.1 Creating Projects for FBs 2 - 2
2.2 Creating New FB Data 2 - 3
2.3 Setting Local Labels 2 - 4
2.4 Creating FB Programs 2 - 12
2.5 Converting FBs 2 - 13
2.6 Considerations when Creating FB Programs 2 - 14

2 - 2
GX Works2
2 CREATING FUNCTION BLOCKS
2.1 Creating Projects for FBs
This section explains how to create a project with labels for creating FBs.
Operating procedure
1. Select [Project] [New] ( ).
The New Project screen is displayed.
2. Set the items on the screen.
3. Click the button.
A new project is created.
● Existing projectsFBs can be created in an existing project with labels.For a project without labels, select [Project] [Change Project Type] to change the project to a project with labels, and create FBs.
Item Description
Series Select a programmable controller series for the project.
TypeSelect a programmable controller type (programmable controller CPU model) used for the project.
Project Type Select "Simple Project".
Use Label Select the item.
Language Select a programming language to be used.

2.2 Creating New FB Data
2 - 3
1
OV
ER
VIE
W O
F
FU
NC
TIO
N
BL
OC
KS
2
CR
EA
TIN
G
FU
NC
TIO
N
BLO
CK
S
3
US
ING
FU
NC
TIO
N
BL
OC
KS
4
MA
NA
GIN
G A
ND
E
DIT
ING
FU
NC
TIO
N
BLO
CK
S
5
US
ING
FB
LI
BR
AR
IES
6
PR
OG
RA
M
EX
AM
PLE
S U
SIN
G
FU
NC
TIO
N B
LOC
KS
A
AP
PE
ND
IX
I
IND
EX
2.2 Creating New FB Data
This section explains how to create new FB data in a project with labels.
Operating procedure
1. Select [Project] [Object] [New] ( ).
The New Data screen is displayed.
2. Set the items on the screen.
3. Click the button.
The newly created FB data is added under "FB_Pool" on the Project view, and the FB editing screen is displayed on the work window.
● Maximum number of data to be createdUp to 800 FB data including other data types such as programs can be created.
Item Description
Data Types Select "Function Block".
Data NameEnter a data name of an FB to be created with a maximum of 32 characters.For unusable characters, refer to Appendix 1.
Program Language
Select a programming language to be used.The programming languages available for FB creation in Simple projects are Ladder Diagram and Structured Text.FXCPU Simple projects support Ladder Diagram only.

2 - 4
GX Works2
2 CREATING FUNCTION BLOCKS
2.3.1 Setting labels on Function/FB Label Setting screen
2.3 Setting Local Labels
This section explains how to define labels to be used in an FB program.
2.3.1 Setting labels on Function/FB Label Setting screen
Set items such as label classes, label names, and data types.
Screen display
Select Project view "POU" "FB_Pool" "(function block)" "Local Label".
Operating procedure
• Set the items on the screen.
Item Description Maximum number of characters
Class Select a label class from the list displayed by clicking . (Section 2.3.2)
—
Label NameEnter a desired label name.For unusable characters, refer to Appendix 1.
• Ladder Diagram32 (Input, output, input/output labels: 16)
• Structured Text32
Data TypesSpecify a data type from the Data Type Selection screen
displayed by clicking . (Section 2.3.4)It can also be entered directly.
128
ConstantEnter a constant value when "VAR_CONSTANT" is selected for "Class" and simple type is selected for "Data Type".
128
Comment*1,*2 Enter a comment. 1024
*1 : A new line can be inserted into a cell by pressing the + keys.*2 : Comments on a program editor can be displayed/hidden by selecting [View] [Comment]/[Statement]/[Note].

2.3 Setting Local Labels
2.3.2 Classes 2 - 5
1
OV
ER
VIE
W O
F
FU
NC
TIO
N
BL
OC
KS
2
CR
EA
TIN
G
FU
NC
TIO
N
BLO
CK
S
3
US
ING
FU
NC
TIO
N
BL
OC
KS
4
MA
NA
GIN
G A
ND
E
DIT
ING
FU
NC
TIO
N
BLO
CK
S
5
US
ING
FB
LI
BR
AR
IES
6
PR
OG
RA
M
EX
AM
PLE
S U
SIN
G
FU
NC
TIO
N B
LOC
KS
A
AP
PE
ND
IX
I
IND
EX
● Class settingWhen an item other than the class, such as a label name and data type, is set in a blank column, "VAR" is automatically set for "Class". Change it if necessary.
● Characters that cannot be used for label namesAny of the following label names causes an error at compilation.
• A label name that includes a space.
• A label name that begins with a numeral.
• A label name which is same as the one used for devices.
For characters that cannot be used for label names, refer to Appendix 1.
● When the local label setting of an FB is changedWhen the local label setting of an FB pasted to a sequence program is changed, compile the program or all programs. The change of input/output label is applied to the sequence program to which the FB is pasted at compilation. Note that the change is not applied when the FB instance name is not registered in the global label setting or local label setting.
■ Maximum number of input/output labels
The maximum number of input/output labels which can be used in an FB program differs according to the programming language.When setting input/output labels with local label setting of FB, set within the number of the input/output labels shown in the following table.
2.3.2 Classes
A class indicates the POU applicability and the usage of label.Selectable classes differ according to the type of label setting editor.The following table shows the selectable classes on the Function/FB Label Setting screen.
Programming language of FBApplicable number of labels in an FB program
Input Output
Ladder Diagram 1 to 24*1 (Including input/output labels) 1 to 24*1 (Including input/output labels)
Structured Text 0 to 253*2 (Including input/output labels)
*1 : For input/output labels, each input label and output label is counted as one label.*2 : When pasting labels to a sequence program in Ladder Diagram, the applicable number of input/output labels is 1 to 24
(including input/output labels). Each input label and output label is counted as one label.
Class Description
VAR An internal-variable label that can be used for FB programs.
VAR_CONSTANT A constant label that can be used for FB programs.
VAR_RETAIN*1 A latch-type label that is used for FB programs.
VAR_INPUTA label that is used for an input of FB program (input label).Its value cannot be changed in an FB program.
VAR_OUTPUT A label that is used for an output of FB program (output label).
VAR_IN_OUTA label that can be used for both input and output with the same name (input/output label).Its value can be changed in an FB program.
*1 : Not supported by FXCPU.

2 - 6
GX Works2
2 CREATING FUNCTION BLOCKS
2.3.3 Data types
2.3.3 Data types
Data types of label are shown in the following table.Note that applicable data types differ according to the programming language.
: Applicable, ×: Not applicable
For value ranges and details of each data type, refer to the following manuals.
• QCPU (Q mode)/LCPUCPU user's manuals (Function Explanation, Program Fundamentals)MELSEC-Q/L Programming Manual (Common Instruction)
• FXCPUFXCPU user's manuals and programming manuals
Data typeProgramming language
Ladder Diagram Structured Text
Bit
Word [signed]
Double word [signed]
Word [unsigned]/16-bit string ×
Double word [unsigned]/32-bit string ×
Single-precision real*1
Double-precision real*2
String*3
Time ×
Timer *4 ×
Counter *4 ×
Retentive timer*5 *4 ×
Pointer *4 ×
*1 : For FXCPU, this item is supported by FX2N, FX2NC, FX3S, FX3G, FX3GC, FX3U, and FX3UC only.*2 : Supported by Universal model QCPU/LCPU only.*3 : For FXCPU, this item is supported by FX3U and FX3UC only.*4 : The data type cannot be used as input/output labels when pasting an FB to a ladder program.*5 : For FXCPU, this item is supported by FX1N, FX1NC, FX2N, FX2NC, FX3S, FX3G, FX3GC, FX3U, and FX3UC only.

2.3 Setting Local Labels
2.3.4 Selecting data types 2 - 7
1
OV
ER
VIE
W O
F
FU
NC
TIO
N
BL
OC
KS
2
CR
EA
TIN
G
FU
NC
TIO
N
BLO
CK
S
3
US
ING
FU
NC
TIO
N
BL
OC
KS
4
MA
NA
GIN
G A
ND
E
DIT
ING
FU
NC
TIO
N
BLO
CK
S
5
US
ING
FB
LI
BR
AR
IES
6
PR
OG
RA
M
EX
AM
PLE
S U
SIN
G
FU
NC
TIO
N B
LOC
KS
A
AP
PE
ND
IX
I
IND
EX
2.3.4 Selecting data types
Selecting data type.A data type can be specified by directly entering the type in text or selecting it on the Data Type Selection screen.
Operating procedure
1. Click on the data type entry field on the Function/FB Label Setting screen.
The Data Type Selection screen is displayed.
2. Select a type for "Type Class".
3. On the "Libraries" field, select the reference source such as the defined structure that is used as the data type.
4. On the "Data Type" field, select the data type, structure, or function block name.
5. Click the button when the setting is completed.
The settings are displayed on the "Data Type" column on the Function/FB Label Setting screen.
Item Description
Simple Types Specify this to select a data type from basic types such as bit and word.
Structured Data TypesSpecify this to select a data type from the defined structures.For details of structures, refer to the following manual.GX Works2 Version 1 Operating Manual (Simple Project)
Function Blocks Specify this to select a data type from the defined function blocks.
Item Description
<ALL> Browse data types, structures, and function blocks defined in the project, and all libraries.
<PROJECT>Browse data types, structures, and function blocks defined in the project. (Not displayed when "Simple Types" is selected.)
Standard LibBrowse function blocks of application functions. (Not displayed when "Simple Types" or "Structured Data Types" is selected.)

2 - 8
GX Works2
2 CREATING FUNCTION BLOCKS
2.3.4 Selecting data types
■ Setting arrays for data type
Define the data type as an array.To define a data type as an array, set the items of "Array Element" on the Data Type Selection screen.
Operation
1. Click on the data type entry field on the Function/FB Label Setting screen.The Data Type Selection screen is displayed.
2. Select "ARRAY" under "Array Element".
3. Enter the number of elements for "Element".
4. Set the data type of the array element in the same manner as setting the normal data type.
● To change the offset
To change the offset ([Array start value]..[Array end value]) to a value other than 0, edit the offset value by directly entering the array declaration in text on the Function/FB Label Setting screen.
● To change the array to a two- or three-dimensional array
When the programming language is ST, a two- or three-dimensional array can be set. Edit by directly entering the array declaration in text on the Function/FB Label Setting screen.
● A label whose class is VAR_CONSTANTAn array cannot be set for the data type. If an array is set, an error occurs at compilation.
● Offset valuesMinus values can be set for offset values.
● Using arrays in ladder programsThe labels of two- or three-dimensional array and structure array cannot be used in ladder programs.
Enter the array declaration.
Enter the array declaration.
2.3 Setting Local Labels
2.3.5 Assigning devices automatically 2 - 9
1
OV
ER
VIE
W O
F
FU
NC
TIO
N
BL
OC
KS
2
CR
EA
TIN
G
FU
NC
TIO
N
BLO
CK
S
3
US
ING
FU
NC
TIO
N
BL
OC
KS
4
MA
NA
GIN
G A
ND
E
DIT
ING
FU
NC
TIO
N
BLO
CK
S
5
US
ING
FB
LI
BR
AR
IES
6
PR
OG
RA
M
EX
AM
PLE
S U
SIN
G
FU
NC
TIO
N B
LOC
KS
A
AP
PE
ND
IX
I
IND
EX
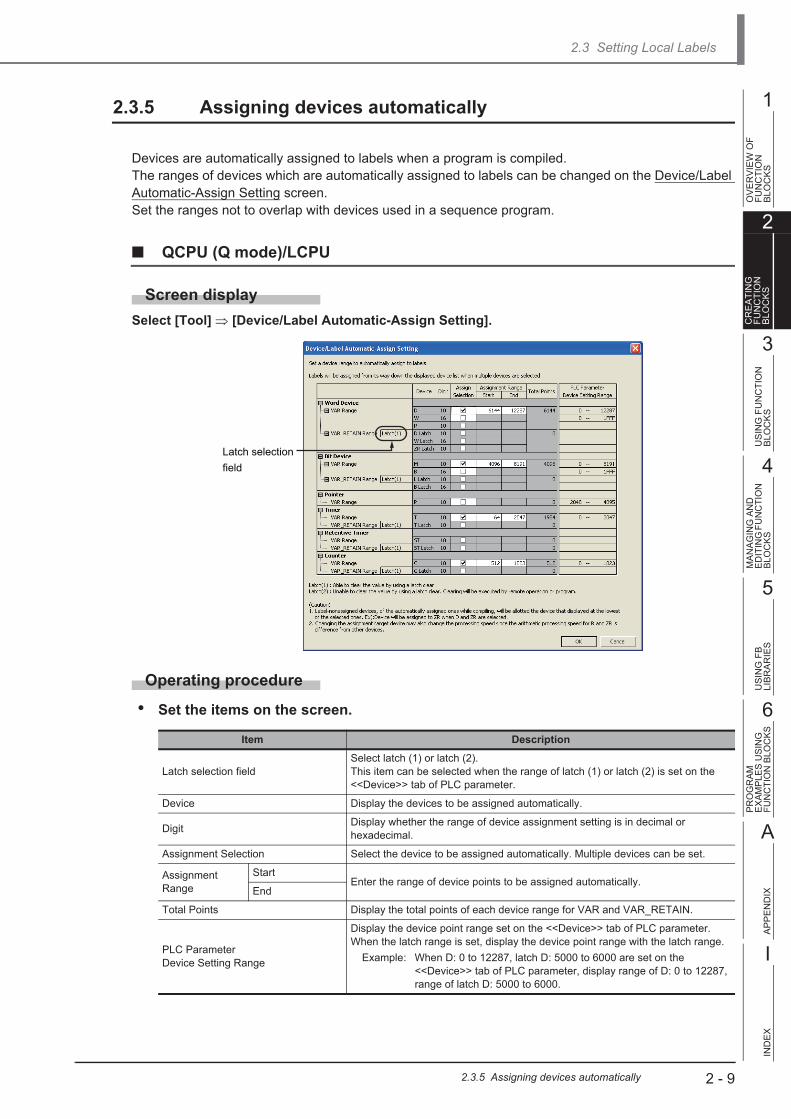
2.3.5 Assigning devices automatically
Devices are automatically assigned to labels when a program is compiled.The ranges of devices which are automatically assigned to labels can be changed on the Device/Label Automatic-Assign Setting screen.Set the ranges not to overlap with devices used in a sequence program.
■ QCPU (Q mode)/LCPU
Screen display
Select [Tool] [Device/Label Automatic-Assign Setting].
Operating procedure
• Set the items on the screen.
Latch selectionfield
Item Description
Latch selection fieldSelect latch (1) or latch (2).This item can be selected when the range of latch (1) or latch (2) is set on the <<Device>> tab of PLC parameter.
Device Display the devices to be assigned automatically.
DigitDisplay whether the range of device assignment setting is in decimal or hexadecimal.
Assignment Selection Select the device to be assigned automatically. Multiple devices can be set.
Assignment Range
StartEnter the range of device points to be assigned automatically.
End
Total Points Display the total points of each device range for VAR and VAR_RETAIN.
PLC ParameterDevice Setting Range
Display the device point range set on the <<Device>> tab of PLC parameter.When the latch range is set, display the device point range with the latch range.
Example: When D: 0 to 12287, latch D: 5000 to 6000 are set on the <<Device>> tab of PLC parameter, display range of D: 0 to 12287, range of latch D: 5000 to 6000.

2 - 10
GX Works2
2 CREATING FUNCTION BLOCKS
2.3.5 Assigning devices automatically
■ FXCPU
Screen display
Select [Tool] [Device/Label Automatic-Assign Setting].
Operating procedure
• Select the device type, and set the start and end addresses to be assigned automatically.

2.3 Setting Local Labels
2.3.5 Assigning devices automatically 2 - 11
1
OV
ER
VIE
W O
F
FU
NC
TIO
N
BL
OC
KS
2
CR
EA
TIN
G
FU
NC
TIO
N
BLO
CK
S
3
US
ING
FU
NC
TIO
N
BL
OC
KS
4
MA
NA
GIN
G A
ND
E
DIT
ING
FU
NC
TIO
N
BLO
CK
S
5
US
ING
FB
LI
BR
AR
IES
6
PR
OG
RA
M
EX
AM
PLE
S U
SIN
G
FU
NC
TIO
N B
LOC
KS
A
AP
PE
ND
IX
I
IND
EX
■ Considerations of automatically assigned devices
● Considerations when changing automatically assigned devices
All programs need to be compiled when the range of automatically assigned device is changed.Compiling all programs changes the device assignment to labels. Therefore, device values set before the program change remain on the device-assigned labels.For QCPU (Q mode)/LCPU, reset the programmable controller CPU, clear all device memories including latches, clear all file registers, then switch the programmable controller CPU to RUN for a precautionary measure.(GX Works2 Version 1 Operating Manual (Common))For the considerations for compiling all programs, refer to the following manual.(GX Works2 Version 1 Operating Manual (Simple Project))
● Assigning devices with the "Device/Label Automatic-Assign Setting" function
Assign devices to labels with the "Device/Label Automatic-Assign Setting" function when a program is compiled.(GX Works2 Version 1 Operating Manual (Simple Project))The assigned devices can be checked with the cross reference function.(GX Works2 Version 1 Operating Manual (Common))Devices within the range set on the Device/Label Automatic-Assign Setting screen cannot be used in a program.
● Considerations when the multiple types of devices are assigned automatically (QCPU (Q mode)/LCPU)
Refer to Considerations of compilation.(GX Works2 Version 1 Operating Manual (Simple Project))
● Device types and setting ranges
The types of automatically assigned devices differ by the type of CPU.The setting ranges depend on the number of device points set in PLC parameter.For details of PLC parameter, refer to the following manual.(GX Works2 Version 1 Operating Manual (Common))
● Considerations when displaying the Device/Label Automatic-Assign Setting screen
When displaying the Device/Label Automatic-Assign Setting screen, an error message may be displayed.In this case, terminate GX Works2, copy "vsflex8n.ocx" stored in the folder of GX Works2 installation
destination to "C:\WINDOWS\system32" (for Windows® XP), and restart GX Works2.

2 - 12
GX Works2
2 CREATING FUNCTION BLOCKS
2.4 Creating FB Programs
This section explains how to create an FB program using labels.Labels set on the Function/FB Label Setting screen and global labels can be used.
Operating procedure
1. Select Project view "POU" "FB_Pool" "(function block)" "Program".
The FB editing screen is displayed.
2. Create an FB program.
For the program creation method, refer to the following manual.GX Works2 Version 1 Operating Manual (Simple Project)

2.5 Converting FBs
2 - 13
1
OV
ER
VIE
W O
F
FU
NC
TIO
N
BL
OC
KS
2
CR
EA
TIN
G
FU
NC
TIO
N
BLO
CK
S
3
US
ING
FU
NC
TIO
N
BL
OC
KS
4
MA
NA
GIN
G A
ND
E
DIT
ING
FU
NC
TIO
N
BLO
CK
S
5
US
ING
FB
LI
BR
AR
IES
6
PR
OG
RA
M
EX
AM
PLE
S U
SIN
G
FU
NC
TIO
N B
LOC
KS
A
AP
PE
ND
IX
I
IND
EX
2.5 Converting FBs
For FB programs in Ladder Diagram, the edited content can be confirmed by converting the program.
Operating procedure
1. Select [Compile] [Build] ( ).
The Confirm Build Method screen is displayed.
2. Select "Convert the selected program" and click the button.
The edited content of the FB program is confirmed.

2 - 14
GX Works2
2 CREATING FUNCTION BLOCKS
2.6 Considerations when Creating FB Programs
This section explains considerations for creating FB programs.
1) Use of inline structured text in FB programsFunction blocks using inline structured text programs cannot be used in function block programs.
2) Use of actual devicesUsing labels is recommended for creating FB programs.If an FB program which uses actual devices (X10, Y10, etc.) is used at multiple locations, the program may not operate normally.In addition, if an FB program which uses actual devices for the OUT instruction is used at multiple locations, duplicated coil is resulted. Duplicated coil can be avoided with the SET/RST instruction.
3) When using master control instructionsWhen using a master control instruction in an FB program, use the MC instruction and the MCR instruction together.
4) When using FBs for a sequence program to be executed multiple times in a single scanIf an FB, which contains a rising instruction, falling instruction, or an instruction that requires multiple scans before the execution completion, is used in a sequence program to be executed multiple times in a single scan, the program may not operate normally.
Item Description
Program to be executed multiple times in a single scan
• Fixed-cycle execution type program
• Interrupt program
• Subroutine program
• FOR-NEXT instruction program
Unusable instructions for FBs which are used for above programs
Instruction which requires multiple scans before the execution completion(JP.READ/JP.WRITE instruction, SORT instruction, SP.FREAD/SP.FWRITE instruction, etc.)
Rising instruction(P instruction (such as MOVP instruction), PLS, etc.)
Falling instruction(PLF, LDF, ANDF, ORF, MEF, FCALLP, EFCALLP, etc.)

2.6 Considerations when Creating FB Programs
2 - 15
1
OV
ER
VIE
W O
F
FU
NC
TIO
N
BL
OC
KS
2
CR
EA
TIN
G
FU
NC
TIO
N
BLO
CK
S
3
US
ING
FU
NC
TIO
N
BL
OC
KS
4
MA
NA
GIN
G A
ND
E
DIT
ING
FU
NC
TIO
N
BLO
CK
S
5
US
ING
FB
LI
BR
AR
IES
6
PR
OG
RA
M
EX
AM
PLE
S U
SIN
G
FU
NC
TIO
N B
LOC
KS
A
AP
PE
ND
IX
I
IND
EX
5) When using index registers in FB programsWhen using index registers in an FB program, a save program and a restore program are required to protect the index register values.Through a method that the index register value is set to 0 when its value is temporarily saved, an operation error, which is detected by the consistency check of index modification (whether if the device number exceeds the device range), can be prevented.
Example: When the values of index registers Z1 and Z2 are temporarily saved in the FB program before the execution of the program and the saved values of the index registers are restored after execution of the program.
Save the index register values in index_reg_tmp before execution of the program.
Restore the values saved in index_reg_tmp after execution of the program to the index registers.
Set the index
register values
to "0".
Run the program.

2 - 16
GX Works2
2 CREATING FUNCTION BLOCKS
6) Specification of start I/O numbers of intelligent function modulesWhen accessing to the buffer memory or input/output signals of an intelligent function module, specify the start I/O number using an index register.Receiving the start I/O number as an input variable enables a common FB to be used without changing the start I/O numbers of the multiple intelligent function modules whose mounting positions differ.
Example 1: When accessing the input/output signals of an intelligent function moduleUsing an index register enables access to the input/output signals of a target intelligent function module.
Example 2: When accessing the buffer memory of an intelligent function module.1) Enter the start I/O number of the target intelligent function module to the index register.2) Shift the value rightward 4 bits with the SFR instruction or use the quotient of the value
divided by 16.
Specify the value of i_Start_IO_NO.
<Sequence program>
Access the input/output signal using the index register.
<FB program>
Access the buffer memory.
�
�

2.6 Considerations when Creating FB Programs
2 - 17
1
OV
ER
VIE
W O
F
FU
NC
TIO
N
BL
OC
KS
2
CR
EA
TIN
G
FU
NC
TIO
N
BLO
CK
S
3
US
ING
FU
NC
TIO
N
BL
OC
KS
4
MA
NA
GIN
G A
ND
E
DIT
ING
FU
NC
TIO
N
BLO
CK
S
5
US
ING
FB
LI
BR
AR
IES
6
PR
OG
RA
M
EX
AM
PLE
S U
SIN
G
FU
NC
TIO
N B
LOC
KS
A
AP
PE
ND
IX
I
IND
EX
7) When transferring multiple bit data to a word type labelFor a ladder program, a label does not allow digit specification (K4i_Counter, etc.)When transferring multiple bit data to a word type label, use the BSET/BRST instruction or the WOR/WAND instruction to switch ON/OFF the individual bits of the target word data.
Set 1 (ON) to the first bit of int_WordData.
Set 0 (OFF) to the fifth bit of int_WordData.
<For QCPU (Q mode)/LCPU>
Set ON to the 0th bit and the 4th bit of int_WordData with the WOR instruction.
�For the specification of the bit position, refer to the following table.
Set OFF to the 1st bit and the 5th bit of int_WordData with the WAND instruction.
� For the specification of the bit position, refer to the following table.
<For FXCPU>
Bit position(WOR instruction)
Set a bit to ON.
(WAND instruction)
Set a bit to OFF.
0th bit H0001 HFFFE
1st bit H0002 HFFFD
2nd bit H0004 HFFFB
3rd bit H0008 HFFF7
4th bit H0010 HFFEF
5th bit H0020 HFFDF
6th bit H00 40 HFFBF
7th bit H0080 HFF7F
8th bit H0100 HFEFF
9th bit H0200 HFDFF
10th bit H0400 HFBFF
11th bit H0800 HF7FF
12th bit H1000 HEFFF
13th bit H2000 HDFFF
14th bit H4000 HBFFF
15th bit H8000 H7FFF

2 - 18
GX Works2
2 CREATING FUNCTION BLOCKS
8) When handling multiple word data as an arrayInput/output labels in an FB program do not allow an array to be used.In the following method, multiple data can be imported from a sequence program to an FB program.
Example: When loading values for six points from D1000
A) Set the following three labels in the label setting of FB program. Set int_Write_Array as an array.
B) In the sequence program, save values for six points to D devices from D1000.
C) For the input of an FB instance, specify D1000.
D) Using the BMOV instruction in the FB program, transfer values for six points from the input variable (i_Write_Data) to the array (int_Write_Array).
Storage destination
of D1000
Specification of the number
of points to be imported
Transferring destination of
multiple word data
1234H
2345H
3456H
4567H
5678H
6789H
D1000
D1001
D1002
D1003
D1004
D1005
1234H
2345H
3456H
4567H
5678H
6789H
D1000(i_Write_Data)
D1001
D1002
D1003
D1004
D1005
1234H
2345H
3456H
4567H
5678H
6789H
int_Write_Array[0]
int_Write_Array[1]
int_Write_Array[2]
int_Write_Array[3]
int_Write_Array[4]
int_Write_Array[5]
Transfer 6
points with
BMOV

1
OV
ER
VIE
W O
F
FU
NC
TIO
N
BL
OC
KS
2
CR
EA
TIN
G
FU
NC
TIO
N
BLO
CK
S
3
US
ING
FU
NC
TIO
N
BL
OC
KS
4
MA
NA
GIN
G A
ND
E
DIT
ING
FU
NC
TIO
N
BLO
CK
S
5
US
ING
FB
LI
BR
AR
IES
6
PR
OG
RA
M
EX
AM
PLE
S U
SIN
G
FU
NC
TIO
N B
LOC
KS
A
AP
PE
ND
IX
I
IND
EX
3 - 1
3 USING FUNCTION BLOCKS
This chapter explains how to create a sequence program with FBs.For the basic operations and screen details of GX Works2, refer to the following manual.GX Works2 Version 1 Operating Manual (Common)
3.1 Creating Sequence Programs with FBs 3 - 2
3.2 Checking Operations of Sequence Programs 3 - 19

3 - 2
GX Works2
3 USING FUNCTION BLOCKS
3.1.1 Pasting FBs to sequence programs
3.1 Creating Sequence Programs with FBs
This section explains how to create a sequence program using FBs as components.
3.1.1 Pasting FBs to sequence programs
■ When calling an FB within a ladder program
On the pasted FB instance, label names of I/O variables and their corresponding data types are displayed.Paste FBs from the Project view of the Navigation window or from the Element Selection window to a sequence program. When the FB is pasted, an FB instance name is registered to the local label or the global label as a label.
Operating procedure
1. Select an FB from the Project view of the Navigation window and move to a desired position on the sequence program with the drag-and-drop operation.
The Input FB Instance Name screen is displayed.
2. Click to select local label or global label to register the FB instance name.
3. Change the FB instance name if necessary.
When changing the name, avoid creating the same name in the same program.

3.1 Creating Sequence Programs with FBs
3.1.1 Pasting FBs to sequence programs 3 - 3
1
OV
ER
VIE
W O
F
FU
NC
TIO
N
BL
OC
KS
2
CR
EA
TIN
G
FU
NC
TIO
N
BLO
CK
S
3
US
ING
FU
NC
TIO
N
BL
OC
KS
4
MA
NA
GIN
G A
ND
E
DIT
ING
FU
NC
TIO
N
BLO
CK
S
5
US
ING
FB
LI
BR
AR
IES
6
PR
OG
RA
M
EX
AM
PLE
S U
SIN
G
FU
NC
TIO
N B
LOC
KS
A
AP
PE
ND
IX
I
IND
EX
4. Click the button.
The FB instance is displayed on the editing screen.
● FB instance name
• FB instance names can be changed later. (Section 4.6)
• A name can be set using up to 16 characters. Alphabets are case-sensitive.
• Numeric characters cannot be used as the first character. For unusable characters, refer to Appendix 1.
● Registering FB instance names to local label or global labelWhen an FB is pasted, an FB instance name is automatically registered as a label on the setting screen of the label selected in step 2.
● Other pasting methodsFBs can also be pasted from the Element Selection window with the drag-and-drop operation. The Element Selection window is displayed by selecting [View] [Docking Window] [Element Selection].
● When the same FB is pasted repeatedlyPasting an FB to a sequence program causes the file size to be increased. Pasting the same FB to one sequence program repeatedly also causes the size increase of the sequence program according to the number of times of pasting.

3 - 4
GX Works2
3 USING FUNCTION BLOCKS
3.1.1 Pasting FBs to sequence programs
■ Display of FB instance
On the pasted FB instance, label names of I/O variables and their corresponding data types are displayed.
FB instance name
Data name
Label name
Data name
Label name
The following are the representation of data types.
B: Bit
W: Word [signed]
D: Double word [signed]
E: Single-precision real
L: Double-precision real
S: String

3.1 Creating Sequence Programs with FBs
3.1.1 Pasting FBs to sequence programs 3 - 5
1
OV
ER
VIE
W O
F
FU
NC
TIO
N
BL
OC
KS
2
CR
EA
TIN
G
FU
NC
TIO
N
BLO
CK
S
3
US
ING
FU
NC
TIO
N
BL
OC
KS
4
MA
NA
GIN
G A
ND
E
DIT
ING
FU
NC
TIO
N
BLO
CK
S
5
US
ING
FB
LI
BR
AR
IES
6
PR
OG
RA
M
EX
AM
PLE
S U
SIN
G
FU
NC
TIO
N B
LOC
KS
A
AP
PE
ND
IX
I
IND
EX
■ When calling an FB within an ST program
By entering an FB name in an ST program, the FB can be called in the same manner as pasting an FB in a ladder program.
Operating procedure
• Enter an FB label name, input variable, and output variable in the ST program.
Values must be specified for entered input variable and output variable.Note that entering of output variable can be omitted when a result of output variable is not required.
Example: When the defined FB is "TIMER"
[Details of defined FB]FB label name: FB_TIMERInput variable: Setting value 1 second, setting value 10 seconds, setting value 100 seconds, start, stopOutput variable: In operation, timer up 1, timer up 2
[Data entering example]Enter data in the ST program as shown below.
The output of the FB can be obtained by specifying the output variable name with a 'period (.)' suffixed to the FB name.Enter an instruction to obtain the output after performing the FB call.
FB_TIMER (Setting value 1 second: = X0,
Setting value 10 seconds: = X1,
Setting value 100 seconds: = X2,
Start: = X3, Stop: = X4, In operation: = Y70,
Timer up 1: = Y71, Timer up2: = Y72);
FB label name Input variableDevice that assigns a value to
an input variable
Output variable Device that assigns a value to an output variable
Y70: = FB_TIMER. In operation;

3 - 6
GX Works2
3 USING FUNCTION BLOCKS
3.1.2 Creating input and output circuits of FB instances
3.1.2 Creating input and output circuits of FB instances
Create input and output circuits of the FB instance pasted to a sequence program.
Operating procedure
1. Select [Compile] [Build].
The Confirm Build Method screen is displayed.
2. Select "Convert the selected program", and click the button.
The ladder block is converted, and lines are connected to the input labels and output labels of the FB instance.
Input circuit Output circuit

3.1 Creating Sequence Programs with FBs
3.1.2 Creating input and output circuits of FB instances 3 - 7
1
OV
ER
VIE
W O
F
FU
NC
TIO
N
BL
OC
KS
2
CR
EA
TIN
G
FU
NC
TIO
N
BLO
CK
S
3
US
ING
FU
NC
TIO
N
BL
OC
KS
4
MA
NA
GIN
G A
ND
E
DIT
ING
FU
NC
TIO
N
BLO
CK
S
5
US
ING
FB
LI
BR
AR
IES
6
PR
OG
RA
M
EX
AM
PLE
S U
SIN
G
FU
NC
TIO
N B
LOC
KS
A
AP
PE
ND
IX
I
IND
EX
3. Enter elements to the input circuit.
Enter elements in the same manner as creating normal ladder programs. Create a program meeting data type of input variable.
If the data type of input variable is not a bit type, enter the device directly on the Enter Symbol screen.
4. Enter elements to the output circuit in the same manner as the input circuit.
Edit the program other than FBs as necessary. After finishing the editing, convert/compile the program.
<Bit type>
<Other than bit type>

3 - 8
GX Works2
3 USING FUNCTION BLOCKS
3.1.2 Creating input and output circuits of FB instances
● Number of contacts that can be created in input circuit and output circuitBy setting "Display Connection of Ladder Diagram", the number of contacts occupied in input circuit or output circuit of an FB instance is determined as below.
Instructions that exceed the number of occupied contacts cannot be entered. When instructions cannot be placed by changing the number of displayed contacts, the ladder block is not displayed properly.For the setting of the number of displayed contacts, refer to the following manual.GX Works2 Version 1 Operating Manual (Simple Project)
● CommentA comment can be entered on a program.
There are four types of comments as below.
● Checking duplicated coils in the ladder programsWhen the same devices are used in the source ladder program and the target FB, even if "Check duplicated coil" is selected under "Program Editor" "Ladder/SFC" "Enter ladder" in the option setting, the duplicated coils are not detected. Check the duplicated coils in the source ladder program and the target FB by the Cross reference function. The duplicated coils can be checked by clearing the item for "Program Check" under [Tool] [Options] "Compile" "Basic Setting".
● When using labels in a sequence programWhen using labels in a sequence program, refer to the following manual.GX Works2 Version 1 Operating Manual (Simple Project)
Setting of the number of displayed contacts
Number of contacts in input circuit Number of contacts in output circuit
9 contacts 3 contacts 2 contacts + 1 coil
11 contacts 4 contacts 3 contacts + 1 coil
13 contacts 5 contacts 4 contacts + 1 coil
17 contacts 7 contacts 6 contacts + 1 coil
21 contacts 9 contacts 8 contacts + 1 coil
Type Description Reference
Device comment Enter the function of the device.GX Works2 Version 1 Operating Manual (Common)
Label comment Enter the function of the label.GX Works2 Version 1 Operating Manual (Simple Project)
Statement Enter the function of the ladder block.
Note Enter the function of the output instruction.
Statement
Device comment
Note
Label comment
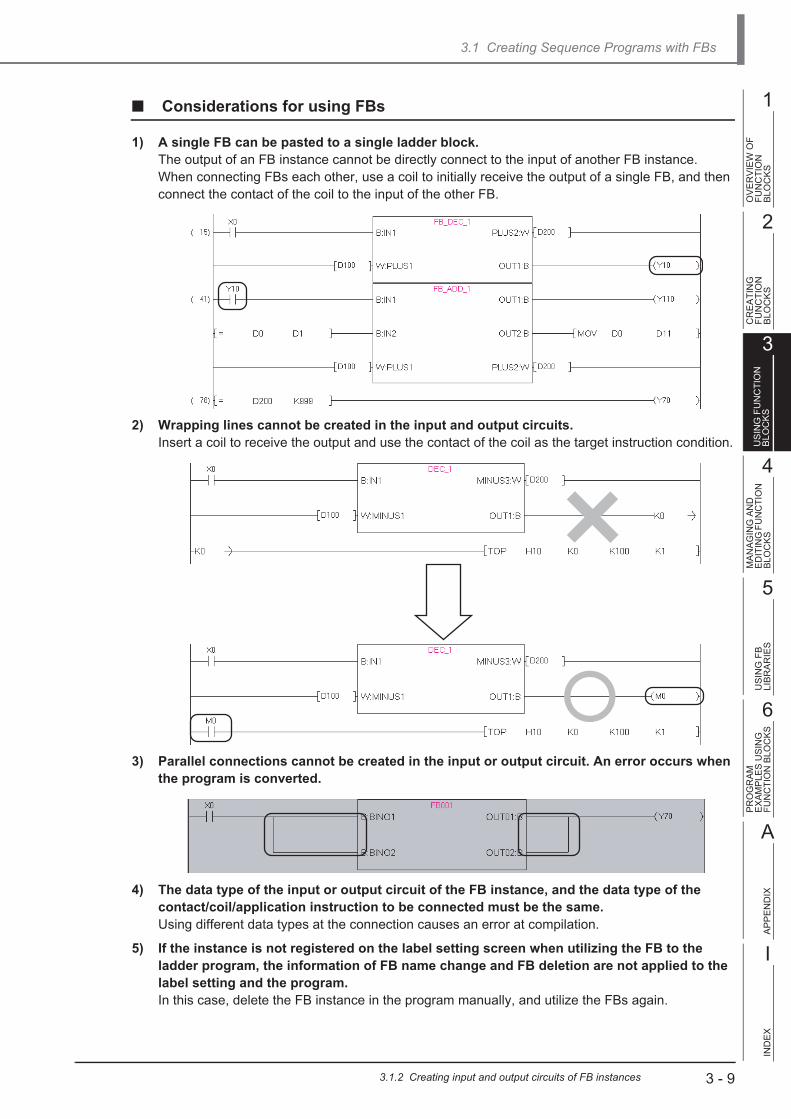
3.1 Creating Sequence Programs with FBs
3.1.2 Creating input and output circuits of FB instances 3 - 9
1
OV
ER
VIE
W O
F
FU
NC
TIO
N
BL
OC
KS
2
CR
EA
TIN
G
FU
NC
TIO
N
BLO
CK
S
3
US
ING
FU
NC
TIO
N
BL
OC
KS
4
MA
NA
GIN
G A
ND
E
DIT
ING
FU
NC
TIO
N
BLO
CK
S
5
US
ING
FB
LI
BR
AR
IES
6
PR
OG
RA
M
EX
AM
PLE
S U
SIN
G
FU
NC
TIO
N B
LOC
KS
A
AP
PE
ND
IX
I
IND
EX
■ Considerations for using FBs
1) A single FB can be pasted to a single ladder block.The output of an FB instance cannot be directly connect to the input of another FB instance.When connecting FBs each other, use a coil to initially receive the output of a single FB, and then connect the contact of the coil to the input of the other FB.
2) Wrapping lines cannot be created in the input and output circuits.Insert a coil to receive the output and use the contact of the coil as the target instruction condition.
3) Parallel connections cannot be created in the input or output circuit. An error occurs when the program is converted.
4) The data type of the input or output circuit of the FB instance, and the data type of the contact/coil/application instruction to be connected must be the same.Using different data types at the connection causes an error at compilation.
5) If the instance is not registered on the label setting screen when utilizing the FB to the ladder program, the information of FB name change and FB deletion are not applied to the label setting and the program.In this case, delete the FB instance in the program manually, and utilize the FBs again.

3 - 10
GX Works2
3 USING FUNCTION BLOCKS
3.1.2 Creating input and output circuits of FB instances
6) When the label setting of FB is changed, compile the program or all programs.The change of input/output label is applied to the utilization destination ladder program at compilation. Note that the change is not applied when the FB instance is not registered in the global label setting or local label setting.
7) Function blocks using inline structured text programs cannot be used in programs other than Ladder Diagram.
<Example of FB (before changing label setting)>
<Label setting of FB>
<Example of FB (after changing label setting)>
Execute compilation
Switch input label sequence
Delete output label OUT1
Add output label PLUS3

3.1 Creating Sequence Programs with FBs
3.1.3 Aligning sequence program and FB program 3 - 11
1
OV
ER
VIE
W O
F
FU
NC
TIO
N
BL
OC
KS
2
CR
EA
TIN
G
FU
NC
TIO
N
BLO
CK
S
3
US
ING
FU
NC
TIO
N
BL
OC
KS
4
MA
NA
GIN
G A
ND
E
DIT
ING
FU
NC
TIO
N
BLO
CK
S
5
US
ING
FB
LI
BR
AR
IES
6
PR
OG
RA
M
EX
AM
PLE
S U
SIN
G
FU
NC
TIO
N B
LOC
KS
A
AP
PE
ND
IX
I
IND
EX
3.1.3 Aligning sequence program and FB program
An alignment of a sequence program and an FB program allows a sequence program to be edited while checking the FB program.
Operating procedure
1. Move the cursor to the FB instance.
2. Select [View] [Tile FB Horizontally].
The sequence program and the FB program are displayed horizontally.
Move the cursor to the FB instance.

3 - 12
GX Works2
3 USING FUNCTION BLOCKS
3.1.4 Converting/compiling all sequence programs
● Other display methodsAn FB program can also be displayed by moving the cursor to the FB instance and performing any of the following operations.
• + +
• + + double-click
3.1.4 Converting/compiling all sequence programs
Convert/compile all sequence programs to be executed on a programmable controller CPU.
Operating procedure
1. Select [Compile] [Rebuild All] ( ).
The following message is displayed.Clear the check box if the duplicated coil check, ladder program check, and consistency (pairing) check are not performed after the compilation.
2. Click the button after reading and understanding the considerations described on the message.
All programs are converted/compiled and the result is displayed on the Output window.By double-clicking the result (errors/warnings only), the corresponding error location in the program is displayed.
Output window

3.1 Creating Sequence Programs with FBs
3.1.4 Converting/compiling all sequence programs 3 - 13
1
OV
ER
VIE
W O
F
FU
NC
TIO
N
BL
OC
KS
2
CR
EA
TIN
G
FU
NC
TIO
N
BLO
CK
S
3
US
ING
FU
NC
TIO
N
BL
OC
KS
4
MA
NA
GIN
G A
ND
E
DIT
ING
FU
NC
TIO
N
BLO
CK
S
5
US
ING
FB
LI
BR
AR
IES
6
PR
OG
RA
M
EX
AM
PLE
S U
SIN
G
FU
NC
TIO
N B
LOC
KS
A
AP
PE
ND
IX
I
IND
EX
● When a program is compiled with [Compile]Since only programs that are not compiled are subjected to compilation, time required for compilation can be reduced.For considerations of compilation, refer to the following manual.GX Works2 Version 1 Operating Manual (Simple Project)
● Program size after compilationWhen compilation is executed, the FB is applied to a program as an internal processing of a sequence program, resulting in increase of the program size.The program size can be checked on the Memory Capacity Calculation Result screen.
■ Calculating memory size (QCPU(Q mode)/LCPU)
Data size required for writing a program to a programmable controller CPU can be checked on the Memory Capacity Calculation Result screen. Excess of the capacity when writing a program to a programmable controller CPU can be prevented by checking the memory size.
Operating procedure
1. Select [Tool] [Confirm Memory Size].
The Confirm Memory Size screen is displayed.
FB
Apply the FB to the program
as an internal processing
File list

3 - 14
GX Works2
3 USING FUNCTION BLOCKS
3.1.4 Converting/compiling all sequence programs
2. Set the items on the screen.
3. Click the button.
The Memory Capacity Calculation Result screen is displayed.
The offline calculation and online calculation can be switched.For details of the Memory Capacity Calculation Result screen, refer to the following manual.GX Works2 Version 1 Operating Manual (Common)
Item Description
Target Memory/Memory Card Type
Set the memory whose size is to be calculated, and memory card type.For details of the memory card application, refer to the following manuals.QCPU User's Manual (Hardware Design, Maintenance and Inspection)MELSEC-L CPU Module User's Manual (Hardware Design, Maintenance and Inspection)
File list -
Target Select data whose size is to be calculated.
Calculation
result section
Target sectionTarget section
Sum total sectionSum total section
Memory statusMemory status
graph sectiongraph section
Target section
Sum total section
Memory status
graph section
<For online calculation>
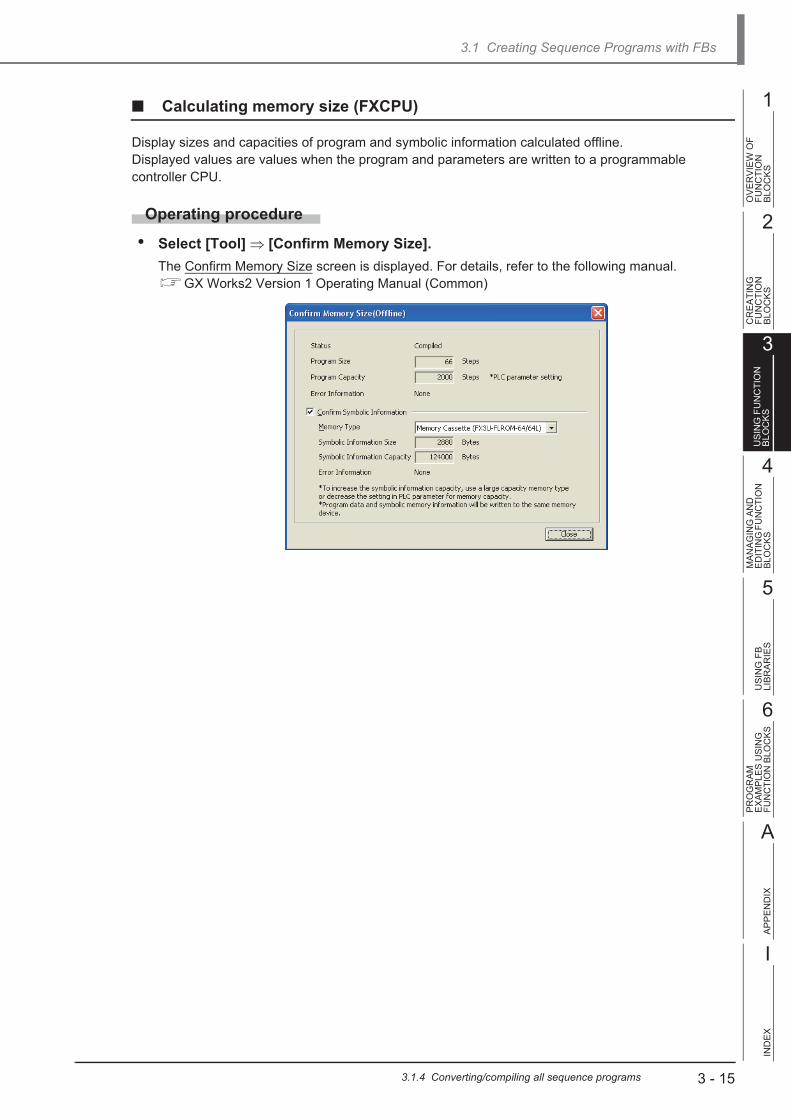
3.1 Creating Sequence Programs with FBs
3.1.4 Converting/compiling all sequence programs 3 - 15
1
OV
ER
VIE
W O
F
FU
NC
TIO
N
BL
OC
KS
2
CR
EA
TIN
G
FU
NC
TIO
N
BLO
CK
S
3
US
ING
FU
NC
TIO
N
BL
OC
KS
4
MA
NA
GIN
G A
ND
E
DIT
ING
FU
NC
TIO
N
BLO
CK
S
5
US
ING
FB
LI
BR
AR
IES
6
PR
OG
RA
M
EX
AM
PLE
S U
SIN
G
FU
NC
TIO
N B
LOC
KS
A
AP
PE
ND
IX
I
IND
EX
■ Calculating memory size (FXCPU)
Display sizes and capacities of program and symbolic information calculated offline.Displayed values are values when the program and parameters are written to a programmable controller CPU.
Operating procedure
• Select [Tool] [Confirm Memory Size].
The Confirm Memory Size screen is displayed. For details, refer to the following manual.GX Works2 Version 1 Operating Manual (Common)

3 - 16
GX Works2
3 USING FUNCTION BLOCKS
3.1.5 Writing sequence programs to programmable controller CPU
3.1.5 Writing sequence programs to programmable controller CPU
Write created data to a programmable controller CPU or a memory card.Before writing data, set a communication route of a personal computer and programmable controller CPU with the connection destination setting. In addition, set the programmable controller CPU to the STOP status.For details of connection destination setting, refer to the following manual.GX Works2 Version 1 Operating Manual (Common)
Operating procedure
1. Select [Online] [Write to PLC] ( ).
The Online Data Operation screen is displayed.

3.1 Creating Sequence Programs with FBs
3.1.5 Writing sequence programs to programmable controller CPU 3 - 17
1
OV
ER
VIE
W O
F
FU
NC
TIO
N
BL
OC
KS
2
CR
EA
TIN
G
FU
NC
TIO
N
BLO
CK
S
3
US
ING
FU
NC
TIO
N
BL
OC
KS
4
MA
NA
GIN
G A
ND
E
DIT
ING
FU
NC
TIO
N
BLO
CK
S
5
US
ING
FB
LI
BR
AR
IES
6
PR
OG
RA
M
EX
AM
PLE
S U
SIN
G
FU
NC
TIO
N B
LOC
KS
A
AP
PE
ND
IX
I
IND
EX
2. Select the target data.
Symbolic information must be selected. If symbolic information is not written, inconsistency may occur between the data on the project and the data written to the programmable controller CPU.
3. Click the button.
● Writing target for symbolic informationWhen symbolic information is selected, the memory size for the symbolic information is required.For QCPU(Q mode)/LCPU, the writing target for symbolic information can be changed to standard ROM or memory card (other than program memory or device memory), resulting that the capacity of program memory can be reserved.
● Default writing target for symbolic informationThe default writing target for symbolic information can be set for each project.Select [Tool] [Options] "Symbolic Information", and select a writing target from "Setting for Writing of Symbolic Information to PLC".
● FXCPU
• Symbolic information can be read from/write to a programmable controller CPU in a project of FX3U/FX3UC version 3.00 or later only.
• When a memory cassette to which the symbolic information has been written is used on an FXCPU other than FX3U/FX3UC version 3.00 or later, the memory cassette can be used, however, the symbolic information cannot be read from the memory cassette. When the symbolic information is written to a memory cassette on an FXCPU other than FX3U/FX3UC version 3.00 or later, the symbolic information may be corrupted.

3 - 18
GX Works2
3 USING FUNCTION BLOCKS
3.1.5 Writing sequence programs to programmable controller CPU
■ Symbolic information
The symbolic information is data that store the program configuration such as labels and FBs.To restore these data included in the symbolic information when reading a program from the programmable controller CPU, write/read the symbolic information to/from the programmable controller CPU.Data such as labels and FBs included in the symbolic information cannot be restored if only sequence programs are read.The following table shows the program data included in the symbolic information.
Item Included data
Symbolic information
Global labels
POU
Programs
Local labels
FBs
Structures

3.2 Checking Operations of Sequence Programs
3 - 19
1
OV
ER
VIE
W O
F
FU
NC
TIO
N
BL
OC
KS
2
CR
EA
TIN
G
FU
NC
TIO
N
BLO
CK
S
3
US
ING
FU
NC
TIO
N
BL
OC
KS
4
MA
NA
GIN
G A
ND
E
DIT
ING
FU
NC
TIO
N
BLO
CK
S
5
US
ING
FB
LI
BR
AR
IES
6
PR
OG
RA
M
EX
AM
PLE
S U
SIN
G
FU
NC
TIO
N B
LOC
KS
A
AP
PE
ND
IX
I
IND
EX
3.2 Checking Operations of Sequence Programs
Execute the monitoring function to check the operation of the programs written to the programmable controller CPU.FB programs can also be monitored.
Operating procedure
• Select [Online] [Monitor] [Start Monitoring] ( ).
The monitoring starts.Double-click the FB instance to monitor the FB program.
Double-click the FB instance.

3 - 20
GX Works2
3 USING FUNCTION BLOCKS
● Change Instance (Function Block) screenIf monitoring is started on an FB program when FBs are used at multiple locations in a sequence program, the Change Instance (Function Block) screen is displayed. Select an instance.The screen can also be displayed by activating the FB program's work window and selecting [Online] [Monitor] [Change Instance (Function Block)].
● Ladder editing mode with option settingWhen "Use the Switching Ladder Edit Mode (Read, Write, Monitor, Monitor (Write))" is selected in the option setting, the ladder programs cannot be edited when Start Monitoring is executed. Execute 'monitor (write mode)' to edit the programs in the monitoring status.GX Works2 Version 1 Operating Manual (Simple Project)

1
OV
ER
VIE
W O
F
FU
NC
TIO
N
BL
OC
KS
2
CR
EA
TIN
G
FU
NC
TIO
N
BLO
CK
S
3
US
ING
FU
NC
TIO
N
BL
OC
KS
4
MA
NA
GIN
G A
ND
E
DIT
ING
FU
NC
TIO
N
BLO
CK
S
5
US
ING
FB
LI
BR
AR
IES
6
PR
OG
RA
M
EX
AM
PLE
S U
SIN
G
FU
NC
TIO
N B
LOC
KS
A
AP
PE
ND
IX
I
IND
EX
4 - 1
4 MANAGING AND EDITING FUNCTION BLOCKS
This chapter explains how to manage and edit FBs.For the basic operations and screen details of GX Works2, refer to the following manual.GX Works2 Version 1 Operating Manual (Common)
4.1 Reading FB Programs from Programmable Controller CPU 4 - 2
4.2 Reusing FBs from Library (Project) 4 - 3
4.3 Copying FBs from Project 4 - 9
4.4 Changing FB Instance Names 4 - 10
4.5 Deleting Unnecessary FB Data from Projects 4 - 11
4.6 Protecting FBs 4 - 13
4.7 Searching/Replacing FB Instance Names 4 - 16

4 - 2
GX Works2
4 MANAGING AND EDITING FUNCTION BLOCKS
4.1 Reading FB Programs from Programmable Controller CPU
Read FB programs from a programmable controller CPU. When reading FB programs, read symbolic information with a project with labels using the Read from PLC function.Before reading data, set a communication route of a personal computer and programmable controller CPU with the connection destination setting. For details of connection destination setting, refer to the following manual.GX Works2 Version 1 Operating Manual (Common)
Operating procedure
1. Select [Online] [Read from PLC].
The Online Data Operation screen is displayed.
2. Select "Symbolic Information".
3. Click the button.
● FXCPUFor FXCPU projects with labels, created project data can be read from FX3U/FX3UC version 3.00 or later only.

4.2 Reusing FBs from Library (Project)
4.2.1 Library (project) reusing procedure 4 - 3
1
OV
ER
VIE
W O
F
FU
NC
TIO
N
BL
OC
KS
2
CR
EA
TIN
G
FU
NC
TIO
N
BLO
CK
S
3
US
ING
FU
NC
TIO
N
BL
OC
KS
4
MA
NA
GIN
G A
ND
E
DIT
ING
FU
NC
TIO
N
BLO
CK
S
5
US
ING
FB
LI
BR
AR
IES
6
PR
OG
RA
M
EX
AM
PLE
S U
SIN
G
FU
NC
TIO
N B
LOC
KS
A
AP
PE
ND
IX
I
IND
EX
4.2 Reusing FBs from Library (Project)
This section explains how to reuse the created FBs in another project.The created FB programs can be used as program assets in multiple projects by using the project files created in Simple project (with labels) as FB library.
4.2.1 Library (project) reusing procedure
The following shows the procedure for reusing the FBs in the created library (project) to other project.
Operating procedure
1. Creating a library (project).
2. Exporting FBs to a library (project).
3. Acquiring FBs from the library (project).
Procedure Reference
Create a Simple project (with labels).GX Works2 Version 1 Operating Manual (Common)
Name and save the project.
Close the project.
Procedure Reference
Open the project that contains FBs to be reused.GX Works2 Version 1 Operating Manual (Common)
Export FBs to the library (project). Section 4.2.2
Procedure Reference
Open the project to which FBs are to be used.GX Works2 Version 1 Operating Manual (Common)
Acquire the FBs from the library (project). Section 4.2.3

4 - 4
GX Works2
4 MANAGING AND EDITING FUNCTION BLOCKS
4.2.2 Exporting FBs to other project
4.2.2 Exporting FBs to other project
Export the FBs which are created in the project being edited to other project using the Export FB to Library (Project) screen. Global labels and structures can be exported at the same time.An FB whose PLC type is different from that of the project being edited can be exported.However, FBs created with QCPU(Q mode)/LCPU project cannot be exported to FXCPU project, and vice versa.
Operating procedure
1. Select [Project] [Library] [Export FB to Library (Project)]
The Export FB to Library (Project) screen is displayed.
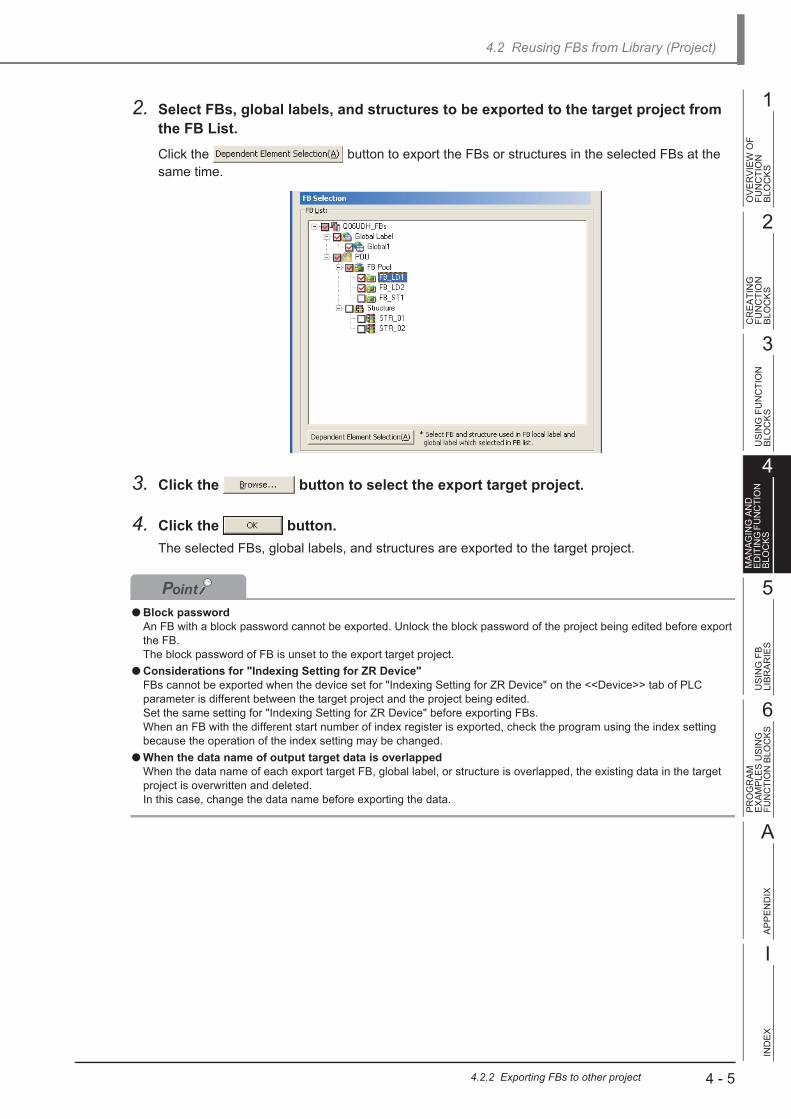
4.2 Reusing FBs from Library (Project)
4.2.2 Exporting FBs to other project 4 - 5
1
OV
ER
VIE
W O
F
FU
NC
TIO
N
BL
OC
KS
2
CR
EA
TIN
G
FU
NC
TIO
N
BLO
CK
S
3
US
ING
FU
NC
TIO
N
BL
OC
KS
4
MA
NA
GIN
G A
ND
E
DIT
ING
FU
NC
TIO
N
BLO
CK
S
5
US
ING
FB
LI
BR
AR
IES
6
PR
OG
RA
M
EX
AM
PLE
S U
SIN
G
FU
NC
TIO
N B
LOC
KS
A
AP
PE
ND
IX
I
IND
EX
2. Select FBs, global labels, and structures to be exported to the target project from the FB List.
Click the button to export the FBs or structures in the selected FBs at the same time.
3. Click the button to select the export target project.
4. Click the button.
The selected FBs, global labels, and structures are exported to the target project.
● Block passwordAn FB with a block password cannot be exported. Unlock the block password of the project being edited before export the FB.The block password of FB is unset to the export target project.
● Considerations for "Indexing Setting for ZR Device"FBs cannot be exported when the device set for "Indexing Setting for ZR Device" on the <<Device>> tab of PLC parameter is different between the target project and the project being edited.Set the same setting for "Indexing Setting for ZR Device" before exporting FBs.When an FB with the different start number of index register is exported, check the program using the index setting because the operation of the index setting may be changed.
● When the data name of output target data is overlappedWhen the data name of each export target FB, global label, or structure is overlapped, the existing data in the target project is overwritten and deleted.In this case, change the data name before exporting the data.

4 - 6
GX Works2
4 MANAGING AND EDITING FUNCTION BLOCKS
4.2.3 Importing FBs from other project
4.2.3 Importing FBs from other project
Import the FBs which are created in other project to the project being edited using the Import Library to Project screen. The global labels and the structures can be imported at the same time.An FB whose PLC type is different from that of the project being edited can be imported. However, FBs created with QCPU(Q mode)/LCPU project cannot be imported to FXCPU project, and vice versa.
Operating procedure
1. Select [Project] [Library] [Install].
The Import Library to Project screen is displayed.
2. Select "Select Library (Project)" from the "Library List" combo box.
3. Click the button, and select the other project.
4. Click the button.
When the other project is modified, click the button and update "FB List".

4.2 Reusing FBs from Library (Project)
4.2.3 Importing FBs from other project 4 - 7
1
OV
ER
VIE
W O
F
FU
NC
TIO
N
BL
OC
KS
2
CR
EA
TIN
G
FU
NC
TIO
N
BLO
CK
S
3
US
ING
FU
NC
TIO
N
BL
OC
KS
4
MA
NA
GIN
G A
ND
E
DIT
ING
FU
NC
TIO
N
BLO
CK
S
5
US
ING
FB
LI
BR
AR
IES
6
PR
OG
RA
M
EX
AM
PLE
S U
SIN
G
FU
NC
TIO
N B
LOC
KS
A
AP
PE
ND
IX
I
IND
EX
5. Select FBs, global labels, and structures to be imported to the editing project from the FB List.
Click the button to import the FBs or structures in the selected FBs at the same time.
6. Click the button.
The imported FBs, global labels, and structures are displayed on the project view.For utilizing FBs, refer to Chapter 3.
● Block passwordsAn FB with a block password cannot be imported. Delete the block password of the source project before importing the FB.
● Considerations of "Indexing Setting for ZR Device"FBs cannot be imported when the device set for "Indexing Setting for ZR Device" on the <<Device>> tab of PLC parameter is different between the source project and the project being edited.Set the same setting for "Indexing Setting for ZR Device", and import FBs.When an FB with the different start number of index register is imported, check the program using the index setting because the operation of the index setting may be changed.
● When the data name of import source data is overlappedWhen the data name of each import source FB, global label, or structure is overlapped, the existing data in the target project is overwritten and deleted.In this case, change the data name before importing the data.

4 - 8
GX Works2
4 MANAGING AND EDITING FUNCTION BLOCKS
4.2.3 Importing FBs from other project
■ Setting the conversion method for inapplicable instructions
Set the conversion method when the FBs to be added contain instructions or devices which are not applicable to the target project.
Operating procedure
1. Click the button on the Install screen.
2. Set the item on the screen.
3. Click the button.
The screen returns to the Install screen.
Item Description
Conversion Method of Invalid Instructions and Devices
Select the conversion method for the inapplicable instruction.

4.3 Copying FBs from Project
4 - 9
1
OV
ER
VIE
W O
F
FU
NC
TIO
N
BL
OC
KS
2
CR
EA
TIN
G
FU
NC
TIO
N
BLO
CK
S
3
US
ING
FU
NC
TIO
N
BL
OC
KS
4
MA
NA
GIN
G A
ND
E
DIT
ING
FU
NC
TIO
N
BLO
CK
S
5
US
ING
FB
LI
BR
AR
IES
6
PR
OG
RA
M
EX
AM
PLE
S U
SIN
G
FU
NC
TIO
N B
LOC
KS
A
AP
PE
ND
IX
I
IND
EX
4.3 Copying FBs from Project
FBs can be reused by starting another GX Works2, and copying and pasting the FBs from the source project to the target project.This section explains how to reuse FBs in an existing project.
Operating procedure
1. Open the source project.
2. Start another GX Works2, and open the target project.
If the programmable controller types differ between the two projects, match the programmable controller type. A programmable controller type can be changed by selecting [Project] [Change PLC Type].
3. Move the FB data in the source project to "FB_Pool" in the target project with the drag-and-drop operation.
● When reusing FBs created with GX Developer in GX Works2Open a project of GX Developer by selecting [Project] [Open Other Data] [Open Other Project].For considerations, refer to Appendix 3.
Target projectSource project
The FB data is copied to the project of
the sequence program, and displayed on
the Project view.

4 - 10
GX Works2
4 MANAGING AND EDITING FUNCTION BLOCKS
4.4 Changing FB Instance Names
This section explains how to change the FB instance name of an FB pasted to a ladder program.The global label or local label need to be registered/changed to the same name as the changed FB instance name.
Operating procedure
1. Move the cursor to the FB instance.
2. Select [Edit] [Edit FB Instance].
The Edit FB Instance Name screen is displayed.
3. Enter a new FB instance name, and select "Change All" or "Change Only Selection FB".
4. Click the button.
The FB instance name is changed.When "Change All" is selected, all the FB instances with the same name are changed.When "Change Only Selection FB" is selected, only the FB instance on the cursor position is changed.
5. Open the global label or local label setting screen, and register/change the label name to the same as the new FB instance name.
If the program is compiled without registering/changing the label, a compilation error occurs.
FB instance name
FB instance name after change

4.5 Deleting Unnecessary FB Data from Projects
4 - 11
1
OV
ER
VIE
W O
F
FU
NC
TIO
N
BL
OC
KS
2
CR
EA
TIN
G
FU
NC
TIO
N
BLO
CK
S
3
US
ING
FU
NC
TIO
N
BL
OC
KS
4
MA
NA
GIN
G A
ND
E
DIT
ING
FU
NC
TIO
N
BLO
CK
S
5
US
ING
FB
LI
BR
AR
IES
6
PR
OG
RA
M
EX
AM
PLE
S U
SIN
G
FU
NC
TIO
N B
LOC
KS
A
AP
PE
ND
IX
I
IND
EX
4.5 Deleting Unnecessary FB Data from Projects
This section explains how to delete FB data from a project.FB instances and FB instance names registered to the global label or local label may be deleted at the same time.
Operating procedure
1. Select an FB to be deleted on the Project view.
2. Select [Project] [Object] [Delete].
A confirmation message for deleting data is displayed.
3. Click the button.
A message for selecting the deletion method is displayed.

4 - 12
GX Works2
4 MANAGING AND EDITING FUNCTION BLOCKS
4. Select the deletion method, and click the button.
The following are the targets to be deleted.
Deletion method Deletion target
"Delete the function block and the function block in the import target program"
• FB data
• FB instance (including input circuits and output circuits)
• FB instance names registered on the label setting editor
"Delete only function block" • FB data

4.6 Protecting FBs
4 - 13
1
OV
ER
VIE
W O
F
FU
NC
TIO
N
BL
OC
KS
2
CR
EA
TIN
G
FU
NC
TIO
N
BLO
CK
S
3
US
ING
FU
NC
TIO
N
BL
OC
KS
4
MA
NA
GIN
G A
ND
E
DIT
ING
FU
NC
TIO
N
BLO
CK
S
5
US
ING
FB
LI
BR
AR
IES
6
PR
OG
RA
M
EX
AM
PLE
S U
SIN
G
FU
NC
TIO
N B
LOC
KS
A
AP
PE
ND
IX
I
IND
EX
4.6 Protecting FBs
Setting a block password protects created FB programs and disables browsing program contents. The following operations are disabled when a block password is set.
● Displaying and editing FB programs
● Editing FB local labels
● Copying data to other projects
Operating procedure
1. Select [Tool] [Block Password].
The Set Block Password screen is displayed.
2. Select an FB to be protected, and click the button.
The Change Block Password screen is displayed.

4 - 14
GX Works2
4 MANAGING AND EDITING FUNCTION BLOCKS
3. Enter a password, and click the button.
On the "Registration Status" field of the Set Block Password screen, "Unlocked" is displayed.
4. Click the button.
The protection of the FB by the block password becomes effective when the project is saved and opened once again.The lock marks are appended to the FB icons on the Project view.
● Changing block passwordsTo change a block password, simply set a new password for the POU to which a block password has already been set. However, the block password must be unlocked before changing it.

4.6 Protecting FBs
4 - 15
1
OV
ER
VIE
W O
F
FU
NC
TIO
N
BL
OC
KS
2
CR
EA
TIN
G
FU
NC
TIO
N
BLO
CK
S
3
US
ING
FU
NC
TIO
N
BL
OC
KS
4
MA
NA
GIN
G A
ND
E
DIT
ING
FU
NC
TIO
N
BLO
CK
S
5
US
ING
FB
LI
BR
AR
IES
6
PR
OG
RA
M
EX
AM
PLE
S U
SIN
G
FU
NC
TIO
N B
LOC
KS
A
AP
PE
ND
IX
I
IND
EX
■ Unlocking block passwords
Unlock the block password.Unlock of the block password is valid while the project is being opened. The lock status is restored when the project is opened again.
Operating procedure
1. Select [Tool] [Block Password].
2. Select an FB to unlock the block password, and click the button.
The Unlock Block Password screen is displayed.
3. Enter a password, and click the button.
The block password is unlocked, and "Unlocked" is displayed on the "Registration Status" field of the Set Block Password screen.
■ Deleting block passwords
Delete the block password.
Operating procedure
1. Select [Tool] [Block Password].
2. Select an FB to delete the block password, and click the button.
The following message is displayed.
3. Click the button.
The password is deleted.

4 - 16
GX Works2
4 MANAGING AND EDITING FUNCTION BLOCKS
4.7 Searching/Replacing FB Instance Names
FB instance names and labels can be searched/replaced.In this section, the search function is explained as an example.
Operating procedure
1. Select [Find/Replace] [Find String].
The Find/Replace screen is displayed.
2. Enter an FB instance name to be searched for "Find In", and click the
button or the button.
When the button is clicked, the cursor moves to the corresponding position.
When the button is clicked, the search result is displayed. By double-clicking the row in the search result, the cursor jumps to the corresponding character string.

1
OV
ER
VIE
W O
F
FU
NC
TIO
N
BL
OC
KS
2
CR
EA
TIN
G
FU
NC
TIO
N
BLO
CK
S
3
US
ING
FU
NC
TIO
N
BL
OC
KS
4
MA
NA
GIN
G A
ND
E
DIT
ING
FU
NC
TIO
N
BLO
CK
S
5
US
ING
FB
LI
BR
AR
IES
6
PR
OG
RA
M
EX
AM
PLE
S U
SIN
G
FU
NC
TIO
N B
LOC
KS
A
AP
PE
ND
IX
I
IND
EX
5 - 1
5 USING FB LIBRARIESThe FB Library is a collection of FBs and it is provided as MELSOFT Library.This chapter explains how to use the FB Library.For the overview of the FB Library, refer to the following manual.GX Works2 Version 1 Operating Manual (Common)Note that the FB Library is not supported by FXCPU.
5.1 Installing FB Library 5 - 2
5.2 Using FB Libraries 5 - 3
5.3 Displaying Reference Manual 5 - 5
5.4 Uninstalling FB Library 5 - 6

5 - 2
GX Works2
5 USING FB LIBRARIES
5.1.1 Obtaining FB Library
5.1 Installing FB Library
Install the FB Library.Log onto the personal computer to which the FB Library is to be installed as a user with Administrator privilege, and install the FB Library.
5.1.1 Obtaining FB Library
Contact your local Mitsubishi representative to obtain the FB Library.
● Compatible GX Works2 versionsInstall an FB library onto a personal computer on which GX Works2 Version 1.12N or a later is installed.Since compatible GX Works2 versions differ according to FB libraries, contact your local Mitsubishi representative for details.
5.1.2 Installing FB Library
Operating procedure
1. Decompress the installer file.
2. Double-click "setup.exe" in the decompressed folder.
The installation is executed.Install the file according to the instructions on the screen.The FB Library and a reference manual are installed in the following folder.
• When the installation path of GX Works2 is C:\Program Files\MELSOFT\GPPW2C:\Program Files\MELSOFT\GPPW2\MELSOFT\Library

5.2 Using FB Libraries
5 - 3
1
OV
ER
VIE
W O
F
FU
NC
TIO
N
BL
OC
KS
2
CR
EA
TIN
G
FU
NC
TIO
N
BLO
CK
S
3
US
ING
FU
NC
TIO
N
BL
OC
KS
4
MA
NA
GIN
G A
ND
E
DIT
ING
FU
NC
TIO
N
BLO
CK
S
5
US
ING
FB
LI
BR
AR
IES
6
PR
OG
RA
M
EX
AM
PLE
S U
SIN
G
FU
NC
TIO
N B
LOC
KS
A
AP
PE
ND
IX
I
IND
EX
5.2 Using FB Libraries
Import the installed FB libraries to a project.
Operating procedure
1. Select [Project] [Library] [Install].
The Install screen is displayed.
2. Select a library from "Library List", and click the
button.
"FB List" is updated.
3. Select FBs to be imported from "FB List".

5 - 4
GX Works2
5 USING FB LIBRARIES
4. Click the button.
The imported FB library is displayed on the Project view.For the method for utilizing FBs, refer to Chapter 3.For the method for using FB libraries and the application of labels, refer to the FB library reference manual. (Section 5.3)
● Editing FB libraries
• Since a folder which contains FB library project files is for a system use, do not change the folder name or delete the folder. If the folder name is changed or the folder is deleted, a system malfunction may occur. In addition, do not store GX Works2 project files or any other files. For a location to which FB library project files are to be stored, refer to Section 5.1.2.
• FB libraries (whose name starts with M+/P+) are read-only files. They can be deleted but cannot be edited. To edit a library, copy or paste FB library data after importing the library.
● Copying FB librariesFB library data can be copied or pasted even for projects with different programmable controller types as long as project types are identical.

5.3 Displaying Reference Manual
5 - 5
1
OV
ER
VIE
W O
F
FU
NC
TIO
N
BL
OC
KS
2
CR
EA
TIN
G
FU
NC
TIO
N
BLO
CK
S
3
US
ING
FU
NC
TIO
N
BL
OC
KS
4
MA
NA
GIN
G A
ND
E
DIT
ING
FU
NC
TIO
N
BLO
CK
S
5
US
ING
FB
LI
BR
AR
IES
6
PR
OG
RA
M
EX
AM
PLE
S U
SIN
G
FU
NC
TIO
N B
LOC
KS
A
AP
PE
ND
IX
I
IND
EX
5.3 Displaying Reference Manual
This section explains how to check the usage of the imported FB library and the application of labels.
Operating procedure
1. Select an FB from the Project view.
2. Right-click and select [Data Help] from the shortcut menu.The reference manual of the selected FB data is displayed.
● Displaying reference manual from utilized FBA reference manual can be displayed from the utilized FB of the FB library on the program.Select an FB on the project and press the key.

5 - 6
GX Works2
5 USING FB LIBRARIES
5.4 Uninstalling FB Library
This section explains how to uninstall the installed FB Library, using Windows® XP as an example.
Operating procedure
1. Select [Start] [Control Panel] [Add or Remove Programs].
2. Select "MELSOFT Library (Module Model)".
3. Click the button.
Uninstall the FB Library according to the instructions on the screen.

1
OV
ER
VIE
W O
F
FU
NC
TIO
N
BL
OC
KS
2
CR
EA
TIN
G
FU
NC
TIO
N
BLO
CK
S
3
US
ING
FU
NC
TIO
N
BL
OC
KS
4
MA
NA
GIN
G A
ND
E
DIT
ING
FU
NC
TIO
N
BLO
CK
S
5
US
ING
FB
LI
BR
AR
IES
6
PR
OG
RA
M
EX
AM
PLE
S U
SIN
G
FU
NC
TIO
N B
LOC
KS
A
AP
PE
ND
IX
I
IND
EX
6 - 1
6 PROGRAM EXAMPLES USING FUNCTION BLOCKS
This chapter explains program examples using FBs.
6.1 System Configuration of Program Examples 6 - 2
6.2 Processing of Program Examples 6 - 3
6.3 Creating Program Examples 6 - 4

6 - 2
GX Works2
6 PROGRAM EXAMPLES USING FUNCTION BLOCKS
6.1 System Configuration of Program Examples
The following shows an example of system configuration.This system controls the operations of a conveyor using a CPU module, an input module, and an output module.
� � � � �
Operation panel
Sensor
(X1)
Control panel
Conveyor Motor
Operation Buzzer
(X0) (Y1)
(Y0)
No. Category Model name Description
Base unit Q33B -
Power supply module Q62P -
CPU module Q02UCPU -
Input module QX40 Connect to the operation switch (X0) and sensor (X1).
Output module QY40P Connect to the conveyor driving relay (Y0) and buzzer (Y1).

6.2 Processing of Program Examples
6 - 3
1
OV
ER
VIE
W O
F
FU
NC
TIO
N
BL
OC
KS
2
CR
EA
TIN
G
FU
NC
TIO
N
BLO
CK
S
3
US
ING
FU
NC
TIO
N
BL
OC
KS
4
MA
NA
GIN
G A
ND
E
DIT
ING
FU
NC
TIO
N
BLO
CK
S
5
US
ING
FB
LI
BR
AR
IES
6
PR
OG
RA
M
EX
AM
PLE
S U
SIN
G
FU
NC
TIO
N B
LOC
KS
A
AP
PE
ND
IX
I
IND
EX
6.2 Processing of Program Examples
When the number of boxes to be conveyed is set, and the operation switch is pressed, the conveyor starts to operate. When conveying the set number of boxes is completed, the conveyor stops.Buzzer sound is produced for three seconds when the operation is started and stopped.
Start
The sensor (X1) detects
the conveyed boxes.
YES
NO
End
Turn the operation switch (X0) ON.
The buzzer (Y1) sounds
for 3 seconds.
Operation of the conveyor
(Y0) is started.
Has the set
number of boxes
been conveyed?
The buzzer (Y1) sounds
for 3 seconds again.
Operation of the conveyor
(Y0) is stopped.
Count the number of
conveyed boxes.

6 - 4
GX Works2
6 PROGRAM EXAMPLES USING FUNCTION BLOCKS
6.3 Creating Program Examples
This section explains how to set FB local labels, and the examples of FB program and sequence program using FBs, based on the system configuration and processing aforementioned.
■ Setting FB local labels
Set label names, classes, and data types as below.
The following is a setting example displayed on the Function/FB Label Setting screen.
Class Label name Data type Comment
VAR_INPUT FB_EN Bit Operation switch
VAR_INPUT i_sensor Bit Sensor
VAR_OUTPUT FB_ENO Bit FB is running
VAR_OUTPUT FB_OK Bit Normal end
VAR_OUTPUT o_conveyor Bit Conveyor
VAR_OUTPUT o_buzzer Bit Buzzer
VAR_INPUT i_counter Word [signed] Number of boxes to be conveyed
VAR counter Word [signed] Remaining number of boxes to be conveyed
VAR counter_end Bit conveying completed
VAR conveyor_end Bit Conveyor driving ended
VAR timer1 Word [signed] 3-second measurement (operation start)
VAR timer2 Word [signed] 3-second measurement (operation stop)

6.3 Creating Program Examples
6 - 5
1
OV
ER
VIE
W O
F
FU
NC
TIO
N
BL
OC
KS
2
CR
EA
TIN
G
FU
NC
TIO
N
BLO
CK
S
3
US
ING
FU
NC
TIO
N
BL
OC
KS
4
MA
NA
GIN
G A
ND
E
DIT
ING
FU
NC
TIO
N
BLO
CK
S
5
US
ING
FB
LI
BR
AR
IES
6
PR
OG
RA
M
EX
AM
PLE
S U
SIN
G
FU
NC
TIO
N B
LOC
KS
A
AP
PE
ND
IX
I
IND
EX
■ FB program example
Create an FB program using labels which have been set. (Chapter 2)

6 - 6
GX Works2
6 PROGRAM EXAMPLES USING FUNCTION BLOCKS
■ Sequence program example using FBs
Paste FBs to a sequence program to create the input circuit and output circuit. (Chapter 3)In the program example below, the number of boxes to be conveyed is six.
■ Sequence program example for increased number of conveyors
Converting conveyor control functions into components as FBs enables a sequence program to be easily altered when a conveyor which performs the same control is added.
Additional conveyor
Conveyor

6.3 Creating Program Examples
6 - 7
1
OV
ER
VIE
W O
F
FU
NC
TIO
N
BL
OC
KS
2
CR
EA
TIN
G
FU
NC
TIO
N
BLO
CK
S
3
US
ING
FU
NC
TIO
N
BL
OC
KS
4
MA
NA
GIN
G A
ND
E
DIT
ING
FU
NC
TIO
N
BLO
CK
S
5
US
ING
FB
LI
BR
AR
IES
6
PR
OG
RA
M
EX
AM
PLE
S U
SIN
G
FU
NC
TIO
N B
LOC
KS
A
AP
PE
ND
IX
I
IND
EX
The additional conveyor operation switch, sensor, conveyor driving relay, and buzzer are to be assigned X2, X3, Y2, and Y3 respectively.In the program sample below, the number of boxes to be conveyed with the additional conveyor is 12.

6 - 8
GX Works2
6 PROGRAM EXAMPLES USING FUNCTION BLOCKS
MEMO

1
OV
ER
VIE
W O
F
FU
NC
TIO
N
BL
OC
KS
2
CR
EA
TIN
G
FU
NC
TIO
N
BLO
CK
S
3
US
ING
FU
NC
TIO
N
BL
OC
KS
4
MA
NA
GIN
G A
ND
E
DIT
ING
FU
NC
TIO
N
BLO
CK
S
5
US
ING
FB
LI
BR
AR
IES
6
PR
OG
RA
M
EX
AM
PLE
S U
SIN
G
FU
NC
TIO
N B
LOC
KS
A
AP
PE
ND
IX
I
IND
EX
App - 1
APPENDIX
Appendix 1 Character Strings that cannot be Used for Label Names and FB Data Names/Instance Names App - 2
Appendix 2 Supported CPU modules App - 5
Appendix 3 Using FBs Created with GX Developer in GX Works2 App - 6

App - 2
GX Works2
APPENDIX
Appendix 1 Character Strings that cannot be Used for Label Names and FB Data Names/Instance Names
Character strings used for application function names, common instruction names, special instruction names, instructions, etc. are called reserved words.These reserved words cannot be used for label names, FB data names, or FB instance names. If the character string defined as a reserved word is used, an error occurs during entry or compilation.The following tables show character strings that cannot be used for FB data names, FB instance names or label names.
: Applicable, ×: Not applicable
Category Character stringFB data name/FB
instance nameLabel name
Class identifier
VAR, VAR_RETAIN, VAR_ACCESS, VAR_CONSTANT, VAR_CONSTANT_RETAIN, VAR_INPUT, VAR_INPUT_RETAIN, VAR_OUTPUT,VAR_OUTPUT_RETAIN, VAR_IN_OUT, VAR_IN_EXT, VAR_EXTERNAL, VAR_EXTERNAL_CONSTANT, VAR_EXTERNAL_CONSTANT_RETAIN, VAR_EXTERNAL_RETAIN, VAR_GLOBAL, VAR_GLOBAL_CONSTANT, VAR_GLOBAL_CONSTANT_RETAIN, VAR_GLOBAL_RETAIN
× ×
Data type
BOOL, BYTE, INT, SINT, DINT, LINT, UINT, USINT, UDINT, ULINT, WORD, DWORD, LWORD, ARRAY, REAL, LREAL, TIME, STRING, TIMER, COUNTER, RETENTIVETIMER, POINTER, Bit, Word [Unsigned]/Bit String [16-bit], Double Word [Unsigned]/Bit String [32-bit], Word [Signed], Double Word [Signed], FLOAT (Single Precision), FLOAT (Double Precision), String, Time, Timer, Counter, Retentive Timer, Pointer
× ×
Data type hierarchyANY, ANY_NUM, ANY_BIT, ANY_REAL, ANY_INT, ANY_DATE × ×
ANY_SIMPLE, ANY16, ANY32 ×
Device nameX, Y, D, M, T, B, C, F, L, P, V, Z, W, I, N, U, J, K, H, E, A, SD, SM, SW, SB, FX, FY, DX, DY, FD, TR, BL, , SG, VD, ZR, ZZ*1 ×
Character string recognized as device (Device name + Numeral)
Such as X0 × ×
ST operatorNOT, MOD × ×
(, ), - ×
IL operator
LD, LDN, ST, STN, S, S1, R, R1, AND, ANDN, OR, ORN, XOR, XORN, ADD, SUB, , MUL, DIV, GT, GE, EQ, NE, LE, LT, JMP, JMPC, JMPCN, CAL, CALC, CALCN, RET, RETC, RETCN
× ×
LDI, LDP, LDF, ANI, ANDP, ANDF, ANB, ORI, ORP, ORF, ORB, MPS, MRD, MPP, INV, MEP, MEF, EGP, EGF, OUT(H), SET, RST, PLS, PLF, FF, DELTA(P), SFT(P), MC, MCR, STOP, PAGE, NOP, NOPLF
×
Application instruction in GX Works2
Application instructions such as DMOD, PCHK, INC(P)(MELSEC-Q/L Programming Manual (Common Instructions), MELSEC-Q/L Structured Programming Manual (Common Instructions)
×
SFC instruction
SFCP, SFCPEND, BLOCK, BEND, TRANL, TRANO, TRANA, TRANC, TRANCA, TRANOA, SEND, TRANOC, TRANOCA, TRANCO, TRANCOC, STEPN, STEPD, STEPSC, STEPSE, STEPST, STEPR, STEPC, STEPG, STEPI, STEPID, STEPISC, STEPISE, STEPIST, STEPIR, TRANJ, TRANOJ, TRANOCJ, TRANCJ, TRANCOJ, TRANCOCJ
×
ST code body
RETURN, IF, THEN, ELSE, ELSIF, END_IF, CASE, OF, END_CASE, FOR, TO, BY, DO, END_FOR, WHILE, END_WHILE, REPEAT, UNTIL, END_REPEAT, EXIT, TYPE, END_TYPE, STRUCT, END_STRUCT, RETAIN, VAR_ACCESS, END_VAR, FUNCTION, END_FUNCTION, FUNCTION_BLOCK, END_FUNCTION_BLOCK, STEP, INITIAL_STEP, END_STEP, TRANSITION, END_TRANSITION, FROM, UNTILWHILE
× ×

Appendix 1 Character Strings that cannot be Used for Label Names and FB Data Names/Instance Names
App - 3
1
OV
ER
VIE
W O
F
FU
NC
TIO
N
BL
OC
KS
2
CR
EA
TIN
G
FU
NC
TIO
N
BLO
CK
S
3
US
ING
FU
NC
TIO
N
BL
OC
KS
4
MA
NA
GIN
G A
ND
E
DIT
ING
FU
NC
TIO
N
BLO
CK
S
5
US
ING
FB
LI
BR
AR
IES
6
PR
OG
RA
M
EX
AM
PLE
S U
SIN
G
FU
NC
TIO
N B
LOC
KS
A
AP
PE
ND
IX
I
IND
EX
Function name in application function
Function names in application functions such as AND_E, NOT_E ×
Function block name in application function
Function block names in application functions such as CTD, CTU ×
Symbol/, \, *, ?, <, >, |,", :, [, ], ,, =, +, %, ', ~, @, {, }, &, ^, ., tab character, ;, !, #, $, `
× ×
Date and time literal DATE, DATE_AND_TIME, DT, TIME, TIME_OF_DAY, TOD × ×
Others
ACTION, END_ACTION, CONFIGURATION, END_CONFIGURATION, CONSTANT, F_EDGE, R_EDGE, AT, PROGRAM, WITH, END_PROGRAM, TRUE, FALSE, READ_ONLY, READ_WRITE, RESOURCE, END_RESOURCE, ON, TASK, EN, ENO, BODY_CCE, BODY_FBD, BODY_IL, , BODY_LD, BODY_SFC, BODY_ST, END_BODY, END_PARAMETER_SECTION, PARAM_FILE_PATH, PARAMETER_SECTION, SINGLE, RETAIN, INTERVAL
× ×
String that starts with K1 to K8
Such as K1AAA ×
Address Such as %IX0 × ×
Statement in Ladder Diagram
;FB BLK START, ;FB START, ;FB END, ;FB BLK END,;FB IN, ;FB OUT, ;FB_NAME, ;INSTANCE_NAME, ;FB, ;INSTANCE
× ×
Common instruction Such as MOV ×
Windows® reserved wordCOM1, COM2, COM3, COM4, COM5, COM6, COM7, COM8, COM9, LPT1, LPT2, LPT3, LPT4, LPT5, LPT6, LPT7, LPT8, LPT9, AUX, CON, PRN, NUL
×
*1 : Whether to handle a device name indexed with ZZ device as a reserved word depends on the parameter setting.When Z device is specified for 32-bit index setting: Not handled as a reserved word.When ZZ device is specified for 32-bit index setting: Handled as a reserved word.
Category Character stringFB data name/FB
instance nameLabel name

App - 4
GX Works2
APPENDIX
■ Considerations for using labels
● In a function, the same name as the function cannot be used for a label.
● Inapplicable character strings differ between label names and data names such as FB data names and structure names. Therefore, if a label name which contains an FB data name or structure name is set when setting a label of instance or structure, an error may occur.
● A space cannot be used.
● A numeral cannot be used at the beginning of label name.
● A label name is not case-sensitive. An error may occur at compilation when the same label
names with different cases (example: 'AAA' and 'aaa') are declared.
● In ST programs, the same label name can be used for a global label and local label by setting the following option.Select "Use the same label name in global label and local label" under [Tool] [Options] "Compile" "Basic Setting".
● An underscore (_) cannot be used at the beginning or end of label name.Consecutive underscores (_) cannot be used for a data name or a label name.
● For Simple projects, function names and function block names in common instructions and application functions can be used.

Appendix 2 Supported CPU modules
App - 5
1
OV
ER
VIE
W O
F
FU
NC
TIO
N
BL
OC
KS
2
CR
EA
TIN
G
FU
NC
TIO
N
BLO
CK
S
3
US
ING
FU
NC
TIO
N
BL
OC
KS
4
MA
NA
GIN
G A
ND
E
DIT
ING
FU
NC
TIO
N
BLO
CK
S
5
US
ING
FB
LI
BR
AR
IES
6
PR
OG
RA
M
EX
AM
PLE
S U
SIN
G
FU
NC
TIO
N B
LOC
KS
A
AP
PE
ND
IX
I
IND
EX
Appendix 2 Supported CPU modules
The following are the programmable controller CPUs with which the FBs can be used in GX Works2.
Programmable controller series
Programmable controller type
QCPU (Q mode)
Basic model QCPU (Q00J, Q00, Q01)
High-performance model QCPU (Q02, Q02H, Q06H, Q12H, Q25H)
Process CPU (Q02PH, Q06PH, Q12PH, Q25PH)
Redundant CPU (Q12PRH, Q25PRH)
Universal model QCPU (Q00UJ, Q00U, Q01U, Q02U, Q03UD, Q03UDE, Q03UDV, Q04UDH, Q04UDEH, Q04UDV, Q06UDH, Q06UDEH, Q06UDV, Q10UDH, Q10UDEH, Q13UDH, Q13UDEH, Q13UDV, Q20UDH, Q20UDEH, Q26UDH, Q26UDEH, Q26UDV, Q50UDEH, Q100UDEH)
LCPU L02S, L02S-P, L02, L02-P, L06, L06-P, L26, L26-P, L26-BT, L26-PBT
FXCPU FX1S, FX1N, FX1NC, FX2N, FX2NC, FX3S, FX3G, FX3GC, FX3U, FX3UC

App - 6
GX Works2
APPENDIX
Appendix 3 Using FBs Created with GX Developer in GX Works2
FBs created with GX Developer can be used by selecting [Open Other Project] under [Project] [Open Other Data], and open the project in GX Works2.Note that GX Works2 and GX Developer differ in the following points.
● Character strings that cannot be used for label names
For unusable character strings with GX Developer, refer to the following manual.GX Developer Version 8 Operating Manual
● Usable instructions with ST programs
Instruction names differ between GX Developer ST and GX Works2 ST.If compilation results in an error, change the relevant part to the instruction name of GX Works2.For the ST instructions of GX Developer and GX Works2, refer to the following.GX Works2 Version 1 Operating Manual (Common)'s "ST instruction table for GX Works2 and GX Developer"Alternatively, select "Use Dedicated Instruction for GX Developer, GX IEC Developer" under [Tool] [Options] "Project" "Common Setting" "Other Project Dedicated Instruction Setting".

Appendix 3 Using FBs Created with GX Developer in GX Works2
App - 7
1
OV
ER
VIE
W O
F
FU
NC
TIO
N
BL
OC
KS
2
CR
EA
TIN
G
FU
NC
TIO
N
BLO
CK
S
3
US
ING
FU
NC
TIO
N
BL
OC
KS
4
MA
NA
GIN
G A
ND
E
DIT
ING
FU
NC
TIO
N
BLO
CK
S
5
US
ING
FB
LI
BR
AR
IES
6
PR
OG
RA
M
EX
AM
PLE
S U
SIN
G
FU
NC
TIO
N B
LOC
KS
A
AP
PE
ND
IX
I
IND
EX
● "Enable calling function block and using inline ST" in the option setting
Depending on the selection status of "Enable calling function block and using inline ST" in "Enable calling function block and using inline ST" under [Tool] [Options] "Compile" "Basic Setting", the program after compilation will differ.When the option item is unselected, the program after the compilation matches with GX Developer, therefore, calling function blocks created with Structured Text from ladder programs and calling function blocks created with Ladder Diagram from ST programs are enabled.Alternatively, when the option item is selected, calling an inline structured text and calling FBs from FB program are enabled.However, the program after the compilation will be differ from that of GX Developer. Modify the program as necessary.The differences with GX Developer are as follows:
DifferenceOperation in GX Developer and when option is not selected in
GX Works2
Operation when the option is selected in GX Works2
Correction method
Number of steps after compilation
Since a temporary variable is assigned to the argument of FB, the number of steps will be increased after compilation.
Since an input/output variable is directly assigned to the argument of FB, the number of steps after the compilation will be decreased compared to that of GX Developer.
Check the influence of scan time due to decrease the number of steps.
Input variableThe value of an input variable can be changed in FB.
The value of an input variable cannot be changed in FB.
When changing the value of an input variable in FB, substitute the value to the label whose class is VAR.
Output variable
Initial value of output variable
Initial value will be undefined value.
Initial value will be the value of device/label assigned to the argument.
When using the initial value, initialize the output variable in FB.
Connectable device
DY device can be connected. DY device cannot be connected.When output the value to DY device, modify the program.*1
*1 : Output FB to other device/label once, and then output it to DY in a rung other than the FB is used as follows:
I/O variable
Value of I/O variable
The value of input side of device/label is not changed.The operation result is returned only to device/label of the output side.
The value of input side and output side will be the same.
To make the value of device/label of input side not to be changed, modify the local label setting of the FB.*2
*2 : Use VAR_INPUT and VAR_OUTPUT instead of VAR_IN_OUT as follows:
Connectable elements
Two or more contacts or the comparison operation contact can be connected to input side.
Two or more contacts or the comparison operation contact cannot be connected to input side.
When connecting two or more contacts or comparison operation contact to FB, modify the local label settings of the FB.*3
Connection of constant
A constant can be connected to input side.
A constant cannot be connected to input side.
When connecting a constant to I/O variable, modify the local label settings of the FB.*4

App - 8
GX Works2
APPENDIX
*3 : Use VAR_INPUT and VAR_OUTPUT instead of VAR_IN_OUT as follows:
*4 : Use VAR_INPUT and VAR_OUTPUT instead of VAR_IN_OUT as follows:

1
OV
ER
VIE
W O
F
FU
NC
TIO
N
BL
OC
KS
2
CR
EA
TIN
G
FU
NC
TIO
N
BLO
CK
S
3
US
ING
FU
NC
TIO
N
BL
OC
KS
4
MA
NA
GIN
G A
ND
E
DIT
ING
FU
NC
TIO
N
BLO
CK
S
5
US
ING
FB
LI
BR
AR
IES
6
PR
OG
RA
M
EX
AM
PLE
S U
SIN
G
FU
NC
TIO
N B
LOC
KS
A
AP
PE
ND
IX
I
IND
EX
Index - 1
INDEX

Index - 2
GX Works2
INDEX
[A]
Assigning devices automatically ...................................... 2-9FXCPU .................................................................... 2-10QCPU (Q mode)/LCPU ............................................. 2-9
[B]
block password .............................................................. 4-13Deleting ................................................................... 4-15Setting ..................................................................... 4-13Unlocking ................................................................ 4-15
[C]
Calculating memory size (FXCPU) ................................ 3-15
Calculating memory size (QCPU(Q mode)/LCPU) ........ 3-13
Change Instance (Function Block) screen ..................... 3-20
Checking Operations of Sequence Programs ................ 3-19
Classes ............................................................................ 2-5
Comment ......................................................................... 3-8
Compatible CPU ..........................................................App-5
Compile .......................................................................... 3-12
Considerations of automatically assigned devices ........ 2-11
Converting ...................................................................... 2-13
Converting/compiling ..................................................... 3-12
Creating Projects for FBs ................................................. 2-2
Creating Sequence program ............................................ 3-2
[D]
Data name ........................................................ 2-3, 3-2, 3-4Character strings that cannot be used ..................App-2
Data types ........................................................................ 2-6
Device/Label Automatic-Assign Setting ........................... 2-9
Docking window ............................................................... 1-9
[E]
Element Selection window ............................................... 1-9
[F]
FB .................................................................................... 1-2Create FBs ................................................................ 2-1Creating New FB Data .............................................. 2-3Programming Flow with FBs ..................................... 1-5Protecting ................................................................ 4-13
FB component .................................................................. 1-9
FB data ............................................................................ 1-9Deleting ................................................................... 4-11
FB instance ...................................................................... 1-9Creating input and output circuits ............................. 3-6
FB instance name ............................................................ 3-2Changing ................................................................ 4-10Character strings that cannot be used ..................App-2Searching/Replacing ............................................... 4-16
FB Label Setting screen ..........................................1-10, 2-4
FB Libraries ...................................................................... 5-1
Displaying the Reference Manual ............................. 5-5Importing to a project ................................................ 5-3Installing .................................................................... 5-2Obtaining .................................................................. 5-2Uninstalling ............................................................... 5-6
FB Programs .................................................................. 2-12Aligning programs ................................................... 3-11Considerations ........................................................ 2-14Converting ............................................................... 2-13Creating .................................................................. 2-12Reading from Programmable Controller CPU ........... 4-2
FBsConsiderations for using FBs .................................... 3-9Paste ......................................................................... 3-2
FBs Created with GX Developer ..................................App-6
Function Blocks (FB)Features of FBs ........................................................ 1-3
[G]
Global labels .................................................................... 1-4
[L]
Label name ....................................................... 2-4, 3-2, 3-4
Labels ............................................................................... 1-4Character strings that cannot be used ..................App-2
Ladder editing mode ...................................................... 3-20
Local labels ...................................................................... 1-4Setting ....................................................................... 2-4
[M]
Maximum number of input/output labels .......................... 2-5
Monitor ........................................................................... 3-19
[N]
Navigation window ........................................................... 1-9
[O]
Output window ............................................................... 3-12
[P]
password ........................................................................ 4-13
Program examples ........................................................... 6-1
Program size after compilation ....................................... 3-13
[R]
Read from PLC ................................................................ 4-2
Rebuild All ...................................................................... 3-12
Reusing ............................................................................ 3-2
[S]
Selecting data types ......................................................... 2-7
Setting arrays for data type .............................................. 2-8

Index - 3
1
OV
ER
VIE
W O
F
FU
NC
TIO
N
BL
OC
KS
2
CR
EA
TIN
G
FU
NC
TIO
N
BLO
CK
S
3
US
ING
FU
NC
TIO
N
BL
OC
KS
4
MA
NA
GIN
G A
ND
E
DIT
ING
FU
NC
TIO
N
BLO
CK
S
5
US
ING
FB
LI
BR
AR
IES
6
PR
OG
RA
M
EX
AM
PLE
S U
SIN
G
FU
NC
TIO
N B
LOC
KS
A
AP
PE
ND
IX
I
IND
EX
Symbolic information ......................................................3-18Default writing target ...............................................3-17Writing target ...........................................................3-17
[U]
Utilizing .............................................................................4-9
[W]
Work window ....................................................................1-9
Write to PLC ...................................................................3-16
Writing sequence programs ...........................................3-16

Microsoft, Windows are trademarks or registered trademarks of Microsoft Corporation in the United States
and other countries.
Ethernet is a trademark or registered trademark of Xerox Corporation.
All other company names and product names used in this manual are trademarks or registered trademarks of
their respective companies.


SH(NA)-080984ENG-L(1503)KWIX
MODEL:GXW2-VER1-O-FB-E
MODEL CODE: 13JU72
Specifications subject to change without notice.
When exported from Japan, this manual does not require application to theMinistry of Economy, Trade and Industry for service transaction permission.
HEAD OFFICE : TOKYO BUILDING, 2-7-3 MARUNOUCHI, CHIYODA-KU, TOKYO 100-8310, JAPANNAGOYA WORKS : 1-14 , YADA-MINAMI 5-CHOME , HIGASHI-KU, NAGOYA , JAPAN


![· I-GX Works2 Advanced fod00144 tha 2.1.3 MELSOFT Series GX Works2 control - [Local Label Setting MAIN [PRG] ] Find\RepIace Compile View Online Debug Diagnostics](https://img.dokumen.tips/doc/110x75/5d6715f088c993ac378b9d9c/-i-gx-works2-advanced-fod00144-tha-213-melsoft-series-gx-works2-control-local.jpg)


![Conveyor System Utilizing Safety Observation Function · Conveyor System Utilizing Safety Observation Function [System Configuration] ... Engineering environment: MELSOFT MT Works2](https://img.dokumen.tips/doc/110x75/60243d5f1f8eb736204fae91/conveyor-system-utilizing-safety-observation-function-conveyor-system-utilizing.jpg)


